1-800-SAMSUNG (1-800-726-7864) Samsung Electronics America Service Division 400 Valley Road, Suite 201 Mount Arlington, NJ 07856 www.samsungusa.com Samsung Electronics Canada Inc. Samsung Customer Care 7037 Financial Drive Mississauga, Ontario L5N 6R3 www.samsung.ca BP68-00283A-02 DLPTV HL-P4663W/HL-P5063W/HL-P5663W/HL-P6163W DLPTV This device is a Class B digital apparatus. INSTRUCTION MANUAL
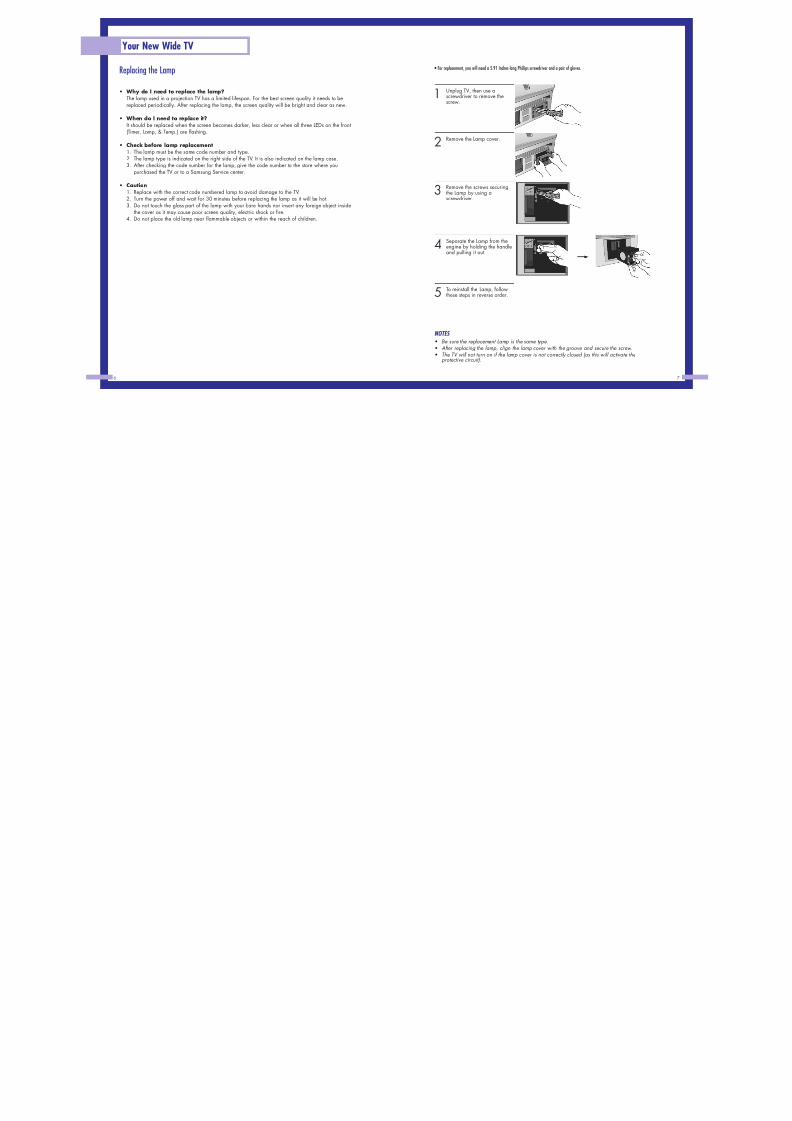
• For replacement, you will need a 5.91 Inches-long Phillips screwdriver and a pair of gloves.
Replacing the Lamp• Why do I need to replace the lamp?
The lamp used in a projection TV has a limited lifespan. For the best screen quality it needs to bereplaced periodically. After replacing the lamp, the screen quality will be bright and clear as new.
• When do I need to replace it?It should be replaced when the screen becomes darker, less clear or when all three LEDs on the front(Timer, Lamp, & Temp.) are flashing.
• Check before lamp replacement1. The lamp must be the same code number and type.2. The lamp type is indicated on the right side of the TV. It is also indicated on the lamp case.3. After checking the code number for the lamp, give the code number to the store where you
purchased the TV or to a Samsung Service center.
• Caution1. Replace with the correct code numbered lamp to avoid damage to the TV.2. Turn the power off and wait for 30 minutes before replacing the lamp as it will be hot.3. Do not touch the glass part of the lamp with your bare hands nor insert any foreign object inside
the cover as it may cause poor screen quality, electric shock or fire.4. Do not place the old lamp near flammable objects or within the reach of children.
NOTES
• Be sure the replacement Lamp is the same type.• After replacing the lamp, align the lamp cover with the groove and secure the screw.• The TV will not turn on if the lamp cover is not correctly closed (as this will activate the
protective circuit).
1 Unplug TV, then use ascrewdriver to remove thescrew.
2Remove the Lamp cover.
3 Remove the screws securingthe Lamp by using ascrewdriver.
4 Separate the Lamp from theengine by holding the handleand pulling it out.
5 To reinstall the Lamp, followthese steps in reverse order.
Side Panel ButtonsThe buttons on the right side panel control your TV’s basic features, including the on-screen menusystem. To use the more advanced features, you must use the remote control.
List of FeaturesYour TV was designed and engineered using the latest technology. It is a full-featured, high-performanceunit that exceeds industry standards. In addition, it has these special features:
• Easy-to-operate remote control• Easy-to-use on-screen menu system you can access from the side panel or remote control• Automatic timer to turn the TV on and off at any time you choose• Adjustable picture and sound settings and the ability to memorize your favorite settings• Automatic channel tuning for up to 181 channels• A special filter to reduce or eliminate reception problems• Fine tuning control for the sharpest picture possible• A built-in multi-channel sound decoder for stereo and bilingual listening• Built-in, dual channel speakers• A special sleep timer• Picture-in-Picture capability that lets you watch two channels at once• Widescreen TV with adjustable image size• Life-like clear images provided by DNle technology• MCC (My Color Control) Mode for corresponding with your color style• Color weakness Mode
Accessories
Once you have unpacked your TV, check to make sure that you have all the parts shown here. If anypiece is missing or broken, call your dealer.
Your New Wide TV
Remote Control(BP59-00048B)/
AAA Batteries(4301-000103)
Press to switch between viewing TV programs and signals from connected componePress to see the on-screen menu.
Press to lower or raise the volume and to select items when using the on-screen menu
Press to change channels and move between items on the on-screen menu.
Press to activate (or change) a particular item.
Side Panel JacksUse the right side panel jacks to connect a component that is used only occasionally (a camcorderor video game, for example).
Connect the video signal from a camcorder or video game.
Connect the audio signal from a camcorder or video game.
Connect an S-video signal from a camcorder or video game.(S-Video 3 jack and Audio L/R input 3 are used in conjunction.)
Connecting VHF and UHF AntennasIf you do not have a cable system, you will need to connect an antenna to your TV.
Antennas with 300-ohm Flat Twin LeadsIf your antenna looks like this: it has 300-ohm flat twin leads.
1Place the wires from the twinleads under the screws on the300-75 ohm adaptor (notsupplied). Use a screwdriverto tighten the screws.
2 Plug the adapter into the“ANT 1 IN” terminal on therear panel.
Antennas with 75-ohm Round LeadsIf your antenna looks like this: it is an antenna with 75-ohm round leads.
1 Plug the antenna lead into the“ANT 1 IN” terminal on therear panel.
Separate VHF and UHF AntennasIf you have two separate antennas for your TV (one VHF and one UHF), you must combine thetwo antenna signals before connecting the antennas to the TV. This procedure requires an optionalcombiner-adaptor (available at most electronics shops).
1 Connect both antennaleads to the combiner.
2 Plug the combiner into the“ANT 1 IN” terminal onthe rear panel.
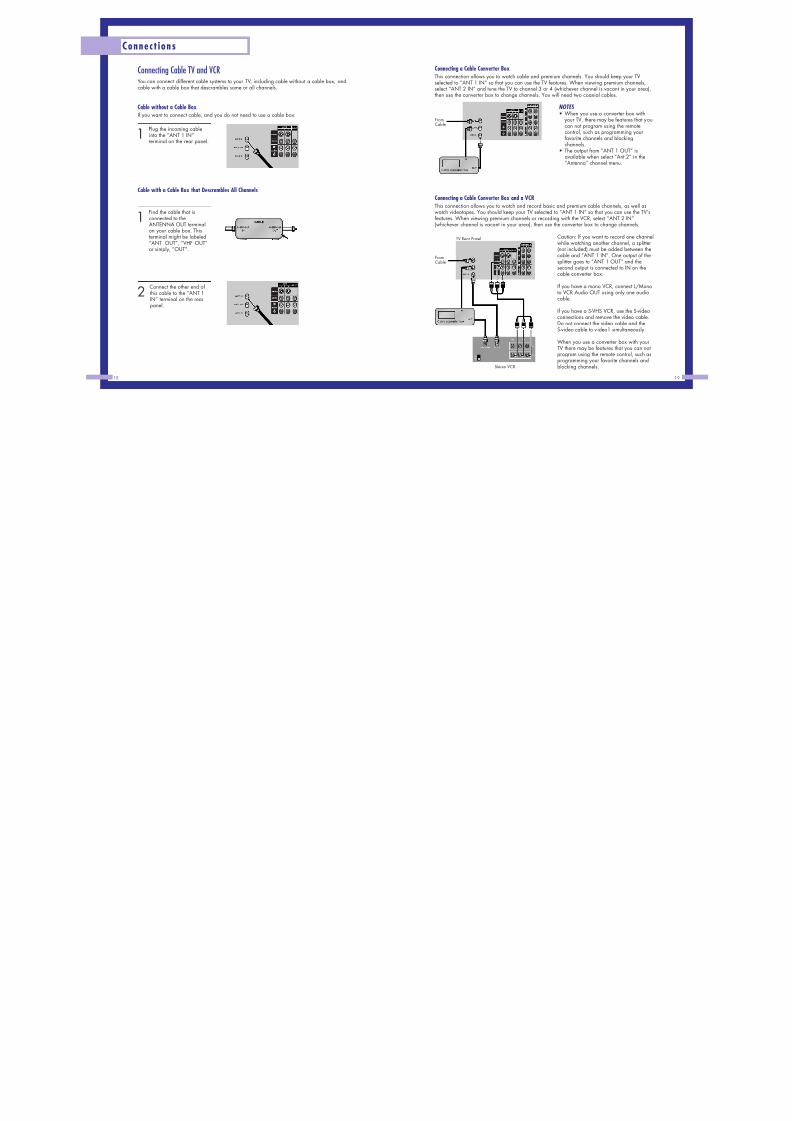
Connecting Cable TV and VCRYou can connect different cable systems to your TV, including cable without a cable box, andcable with a cable box that descrambles some or all channels.
Cable without a Cable BoxIf you want to connect cable, and you do not need to use a cable box:
1 Plug the incoming cableinto the “ANT 1 IN”terminal on the rear panel.
Cable with a Cable Box that Descrambles All Channels
1Find the cable that isconnected to theANTENNA OUT terminalon your cable box. Thisterminal might be labeled“ANT OUT”, “VHF OUT”or simply, “OUT”.
2 Connect the other end ofthis cable to the “ANT 1IN” terminal on the rearpanel.
Connecting a Cable Converter BoxThis connection allows you to watch cable and premium channels. You should keep your TVselected to “ANT 1 IN” so that you can use the TV features. When viewing premium channels,select “ANT 2 IN” and tune the TV to channel 3 or 4 (whichever channel is vacant in your area),then use the converter box to change channels. You will need two coaxial cables.
NOTES • When you use a converter box with
your TV, there may be features that youcan not program using the remotecontrol, such as programming yourfavorite channels and blockingchannels.• The output from “ANT 1 OUT” isavailable when select “Ant.2” in the“Antenna“ channel menu.
Connecting a Cable Converter Box and a VCRThis connection allows you to watch and record basic and premium cable channels, as well aswatch videotapes. You should keep your TV selected to “ANT 1 IN” so that you can use the TV’sfeatures. When viewing premium channels or recording with the VCR, select “ANT 2 IN”(whichever channel is vacant in your area), then use the converter box to change channels.
Caution: If you want to record one channelwhile watching another channel, a splitter(not included) must be added between thecable and “ANT 1 IN”. One output of thesplitter goes to “ANT 1 OUT” and thesecond output is connected to IN on thecable converter box.
If you have a mono VCR, connect L/Monoto VCR Audio OUT using only one audiocable.
If you have a S-VHS VCR, use the S-videoconnections and remove the video cable.Do not connect the video cable and theS-video cable to video1 simultaneously.
When you use a converter box with yourTV there may be features that you can notprogram using the remote control, such asprogramming your favorite channels andblocking channels.
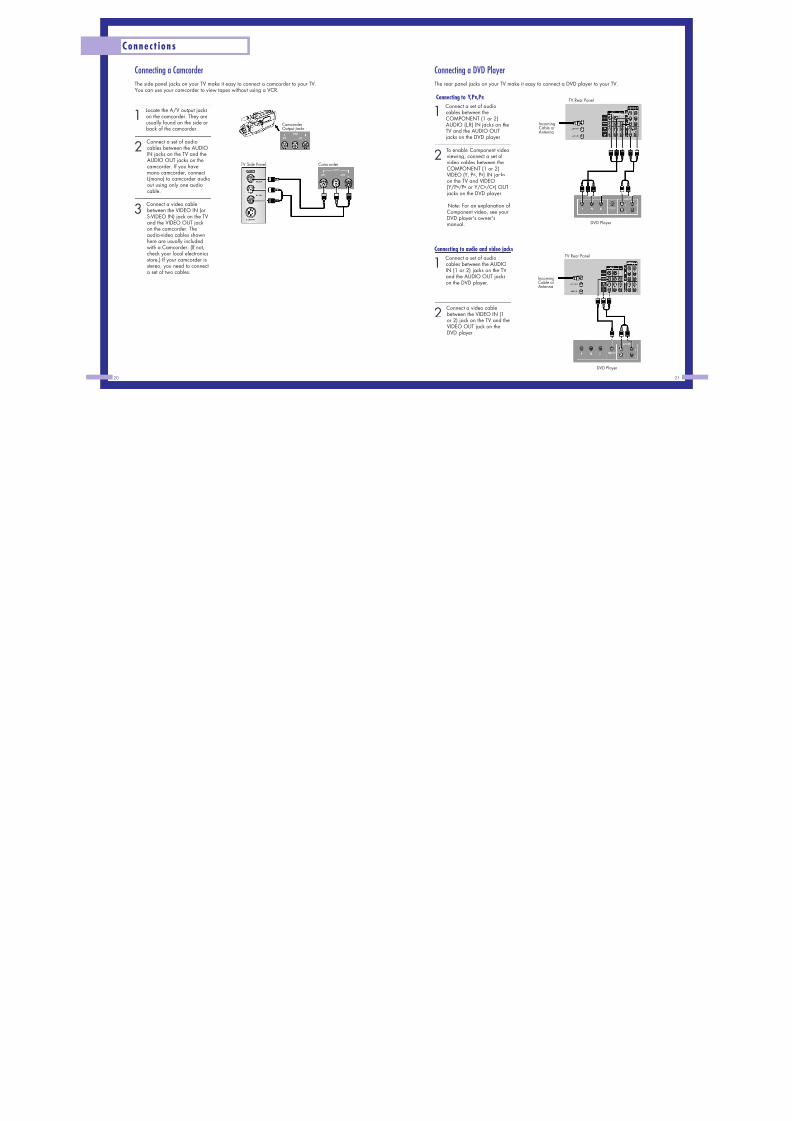
Connecting a DVD PlayerThe rear panel jacks on your TV make it easy to connect a DVD player to your TV.
Connecting to Y,PB ,PR
1 Connect a set of audiocables between theCOMPONENT (1 or 2)AUDIO (L,R) IN jacks on theTV and the AUDIO OUTjacks on the DVD player.
2 To enable Component videoviewing, connect a set ofvideo cables between theCOMPONENT (1 or 2)VIDEO (Y, PB, PR) IN jackson the TV and VIDEO(Y/PB/P R or Y/CB/C R) OUTjacks on the DVD player.
Note: For an explanation ofComponent video, see yourDVD player's owner'smanual.
Connecting to audio and video jacks
1 Connect a set of audiocables between the AUDIOIN (1 or 2) jacks on the TVand the AUDIO OUT jackson the DVD player.
2 Connect a video cablebetween the VIDEO IN (1or 2) jack on the TV and theVIDEO OUT jack on theDVD player.
Connecting a CamcorderThe side panel jacks on your TV make it easy to connect a camcorder to your TV.You can use your camcorder to view tapes without using a VCR.
1 Locate the A/V output jackson the camcorder. They areusually found on the side orback of the camcorder.
2 Connect a set of audiocables between the AUDIOIN jacks on the TV and theAUDIO OUT jacks on thecamcorder. If you havemono camcorder, connectL(mono) to camcorder audioout using only one audiocable.
3Connect a video cablebetween the VIDEO IN (orS-VIDEO IN) jack on the TVand the VIDEO OUT jackon the camcorder. Theaudio-video cables shownhere are usually includedwith a Camcorder. (If not,check your local electronicsstore.) If your camcorder isstereo, you need to connecta set of two cables.
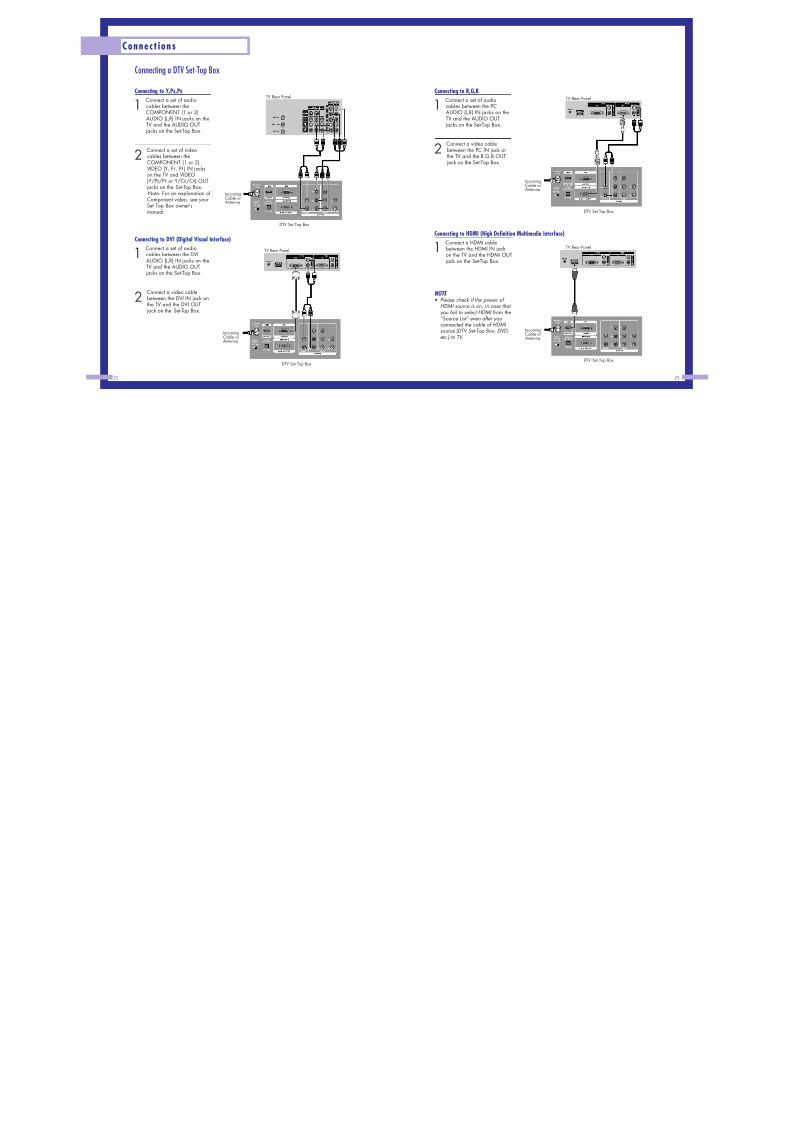
Connecting a DTV Set-Top BoxConnecting to Y,PB ,PR
1 Connect a set of audiocables between theCOMPONENT (1 or 2)AUDIO (L,R) IN jacks on theTV and the AUDIO OUTjacks on the Set-Top Box.
2 Connect a set of videocables between theCOMPONENT (1 or 2)VIDEO (Y, PB, PR) IN jackson the TV and VIDEO(Y/PB/P R or Y/CB/C R) OUTjacks on the Set-Top Box.Note: For an explanation ofComponent video, see yourSet Top Box owner'smanual.
Connecting to DVI (Digital Visual Interface)
1 Connect a set of audiocables between the DVIAUDIO (L,R) IN jacks on theTV and the AUDIO OUTjacks on the Set-Top Box.
2 Connect a video cablebetween the DVI IN jack onthe TV and the DVI OUTjack on the Set-Top Box.
Connections
22
Connecting to R,G,B
1 Connect a set of audiocables between the PCAUDIO (L,R) IN jacks on theTV and the AUDIO OUTjacks on the Set-Top Box.
2 Connect a video cablebetween the PC IN jack onthe TV and the R.G.B OUTjack on the Set-Top Box.
Connecting to HDMI (High Definition Multimedia Interface)
1 Connect a HDMI cablebetween the HDMI IN jackon the TV and the HDMI OUTjack on the Set-Top Box.
NOTE • Please check if the power of
HDMI source is on, in case that you fail to select HDMI from the “Source List” even after youconnected the cable of HDMI source (DTV Set-Top Box, DVD,etc.) to TV.
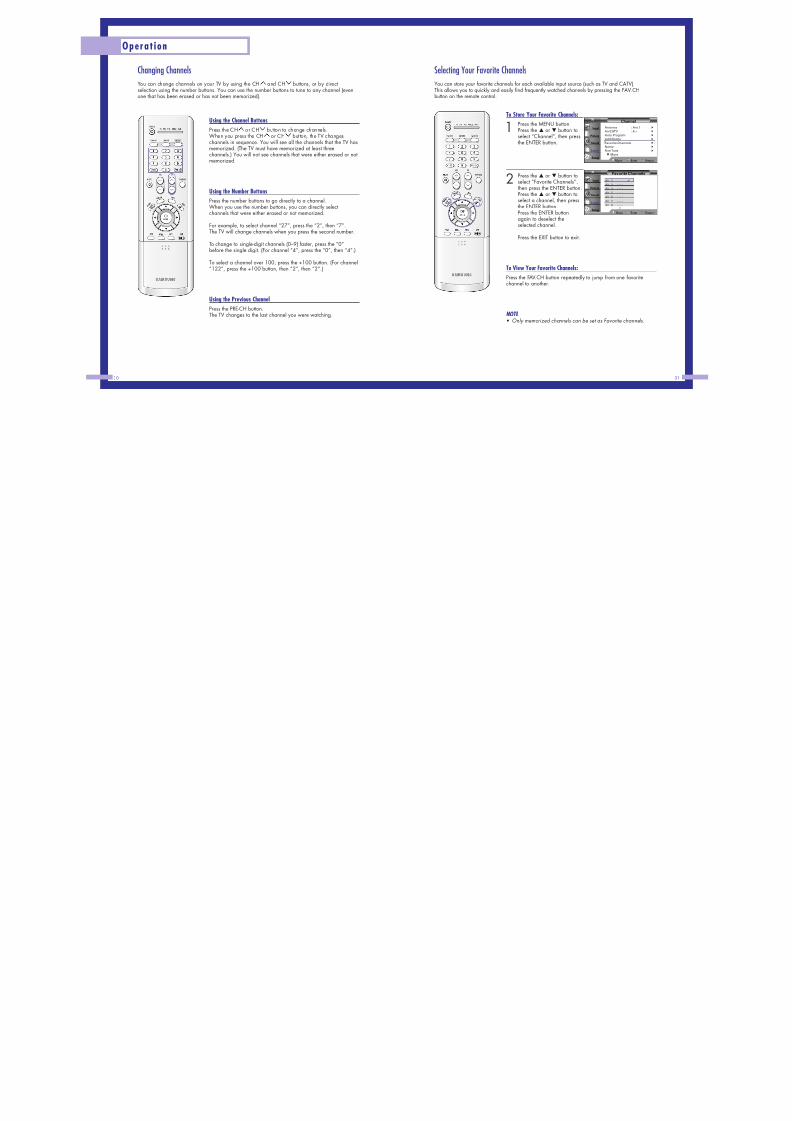
Selecting Your Favorite ChannelsYou can store your favorite channels for each available input source (such as TV and CATV).This allows you to quickly and easily find frequently watched channels by pressing the FAV.CHbutton on the remote control.
Changing ChannelsYou can change channels on your TV by using the CH and CH buttons, or by directselection using the number buttons. You can use the number buttons to tune to any channel (evenone that has been erased or has not been memorized).
30
Operation
To Store Your Favorite Channels:
1 Press the MENU button.Press the … or † button toselect “Channel”, then pressthe ENTER button.
2 Press the … or † button toselect “Favorite Channels”,then press the ENTER button.Press the … or † button toselect a channel, then pressthe ENTER button.Press the ENTER buttonagain to deselect theselected channel.
Press the EXIT button to exit.
To View Your Favorite Channels:Press the FAV.CH button repeatedly to jump from one favoritechannel to another.
NOTE • Only memorized channels can be set as Favorite channels.
ChannelAntenna : Ant.1 √
Air/CATV : Air √
Auto Program √
Add/Delete √
Favorite Channels √
Name √
Fine Tune √
▼ More
Move Enter Return
Input
Picture
Sound
Channel
Setup
Using the Channel ButtonsPress the CH or CH button to change channels.When you press the CH or CH button, the TV changeschannels in sequence. You will see all the channels that the TV hasmemorized. (The TV must have memorized at least threechannels.) You will not see channels that were either erased or notmemorized.
Using the Number ButtonsPress the number buttons to go directly to a channel.When you use the number buttons, you can directly selectchannels that were either erased or not memorized.
For example, to select channel “27”, press the “2”, then “7”.The TV will change channels when you press the second number.
To change to single-digit channels (0–9) faster, press the “0”before the single digit. (For channel “4”, press the “0”, then “4”.)
To select a channel over 100, press the +100 button. (For channel“122”, press the +100 button, then “2”, then “2”.)
Using the Previous ChannelPress the PRE-CH button.The TV changes to the last channel you were watching.
Scanning the ChannelsThe TV automatically scan all of the channels it has memorized.
Labeling the ChannelsUse this feature to assign an easy-to-remember label to any channel (i.e., “CBS”, “ESPN”,“PBS2”, CNN1”, etc.) A label consists of five fields, where each field is a letter, a number or ablank. When the INFO button is pressed, the channel label will appear next to the channelnumber.
Operation
32
1 Press the MENU button.Press the … or † button toselect “Channel”, then pressthe ENTER button.
2 Press the … or † button toselect “Scan”, then press theENTER button.The TV scans all of thechannels memorized.
Press the EXIT button to exit.
NOTE • When the “ANT 2 IN” mode is selected, the channel scan
function works on the main picture only.
Air 3
Air 4
Return
Scan
ChannelAntenna : Ant.1 √
Air/CATV : Air √
Auto Program √
Add/Delete √
Favorite Channels √
Name √
Fine Tune √
▼ More
Move Enter Return
Input
Picture
Sound
Channel
Setup
Channel▲ More
LNA : On √
Scan √
Move Enter Return
Input
Picture
Sound
Channel
Setup
1 Press the CH or CH button to tune to the channel thatwill be labeled.
2 Press the MENU button.Press the … or † button toselect “Channel”, then pressthe ENTER button.Press the … or † button toselect “Name”, then pressthe ENTER button.
3 Press the … / † / œ / √ buttonto move to the channel to beassigned to a new name,
then press the ENTER button.Press the … or † button toselect a letter, a number or ablank. (Results in thissequence: A...Z, ✽, blank,0...9, -).
4 Press the √ button to switchto the next field, which willbe selected.Select a second letter or digitpressing … or † button, asabove.Repeat the process to selectthe last two digits.When you have finished,press the ENTER button.To erase the assigned newname, select “Clear” bypressing the … / † / œ / √
button, then press the ENTERbutton.
Press the EXIT button to exit.
Name
Mo ve A dj ust R etu rn
Input
Picture
Sound
Channel
Setup
Clear
Clear
Clear
ClearClear
▼
Air 2 A
Air 3 - - - -
Air 4 - - - -
Air 5 - - - -Air 6 - - - -
▲
▼
Name
Move Enter Return
Input
Picture
Sound
Channel
Setup
Clear
Clear
Clear
Clear
Clear
▼
Air 2 CNN2
Air 3 - - - -
Air 4 - - - -
Air 5 - - - -
Air 6 - - - -
ChannelAntenna : Ant.1 √
Air/CATV : Air √
Auto Program √
Add/Delete √
Favorite Channels √
Name √
Fine Tune √
▼ More
Move Enter Return
Input
Picture
Sound
Channel
Setup
NOTE • If you add or delete
the TV channel, the labeled channels list will also be added or deleted.
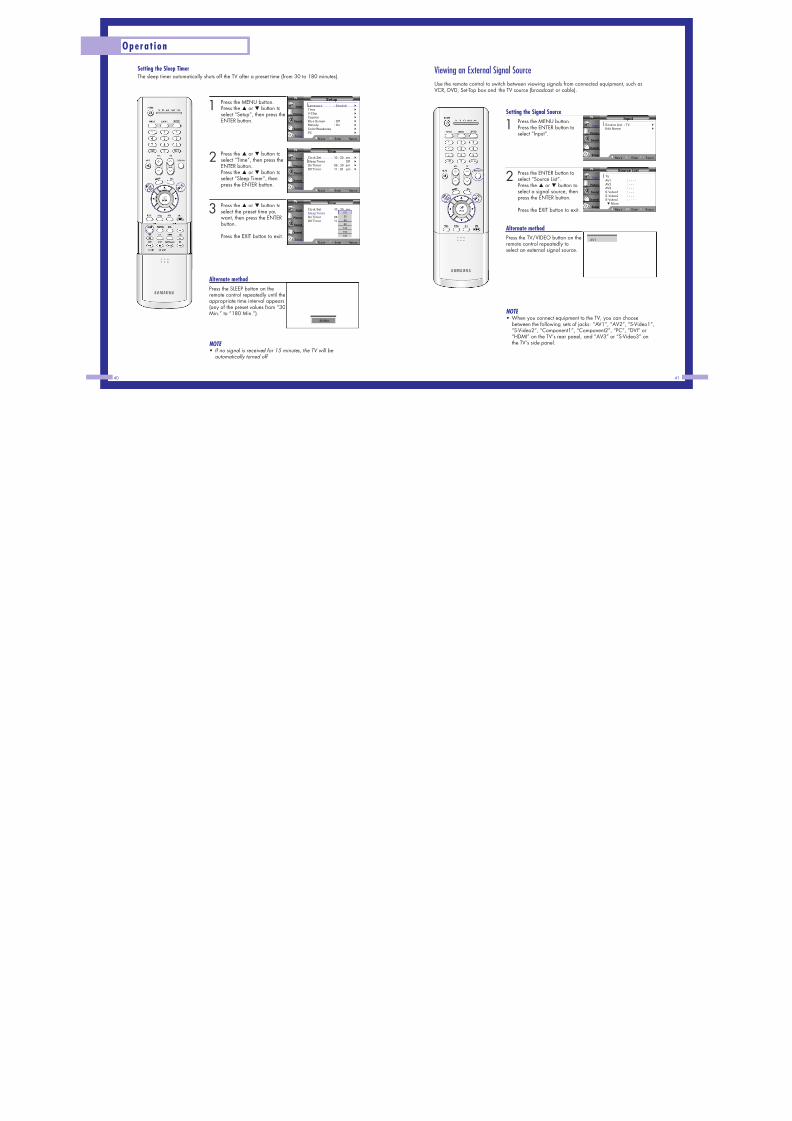
Setting the Sleep TimerThe sleep timer automatically shuts off the TV after a preset time (from 30 to 180 minutes).
40
Operation
1 Press the MENU button.Press the … or † button toselect “Setup”, then press theENTER button.
2 Press the … or † button toselect “Time”, then press theENTER button.Press the … or † button toselect “Sleep Timer”, thenpress the ENTER button.
3 Press the … or † button toselect the preset time you
want, then press the ENTERbutton.
Press the EXIT button to exit.
Alternate method
Press the SLEEP button on theremote control repeatedly until theappropriate time interval appears(any of the preset values from “30Min.” to “180 Min.”).
NOTE • If no signal is received for 15 minutes, the TV will be
automatically turned off.
SetupLanguage : English √
Time √
V-Chip √
Caption √
Blue Screen : Off √
Melody : On √
Color Weakness √
PC √
Move Enter Return
Input
Picture
Sound
Channel
Setup
TimeClock Set 10 : 30 am √
Sleep Timer Off √
On Timer 06 : 30 am √
Off Timer 11 : 30 pm √
Move Enter Return
Input
Picture
Sound
Channel
Setup
TimeClock Set 10 : 30 amSleep Timer Off
On Timer 06 : 30 amOff Timer 11 : 30 pm
Move Enter Return
Input
Picture
Sound
Channel
Setup
Off306090
120150180
30 Min.
Viewing an External Signal SourceUse the remote control to switch between viewing signals from connected equipment, such asVCR, DVD, Set-Top box and the TV source (broadcast or cable).
Setting the Signal Source
1 Press the MENU button.Press the ENTER button toselect “Input”.
2 Press the ENTER button toselect “Source List”.Press the … or † button toselect a signal source, thenpress the ENTER button.
Press the EXIT button to exit.
Alternate methodPress the TV/VIDEO button on theremote control repeatedly toselect an external signal source.
NOTE • When you connect equipment to the TV, you can choose
between the following sets of jacks: “AV1”, “AV2”, “S-Video1”,“S-Video2”, “Component1”, “Component2”, “PC”, “DVI” or“HDMI” on the TV’s rear panel, and “AV3” or “S-Video3” onthe TV’s side panel.
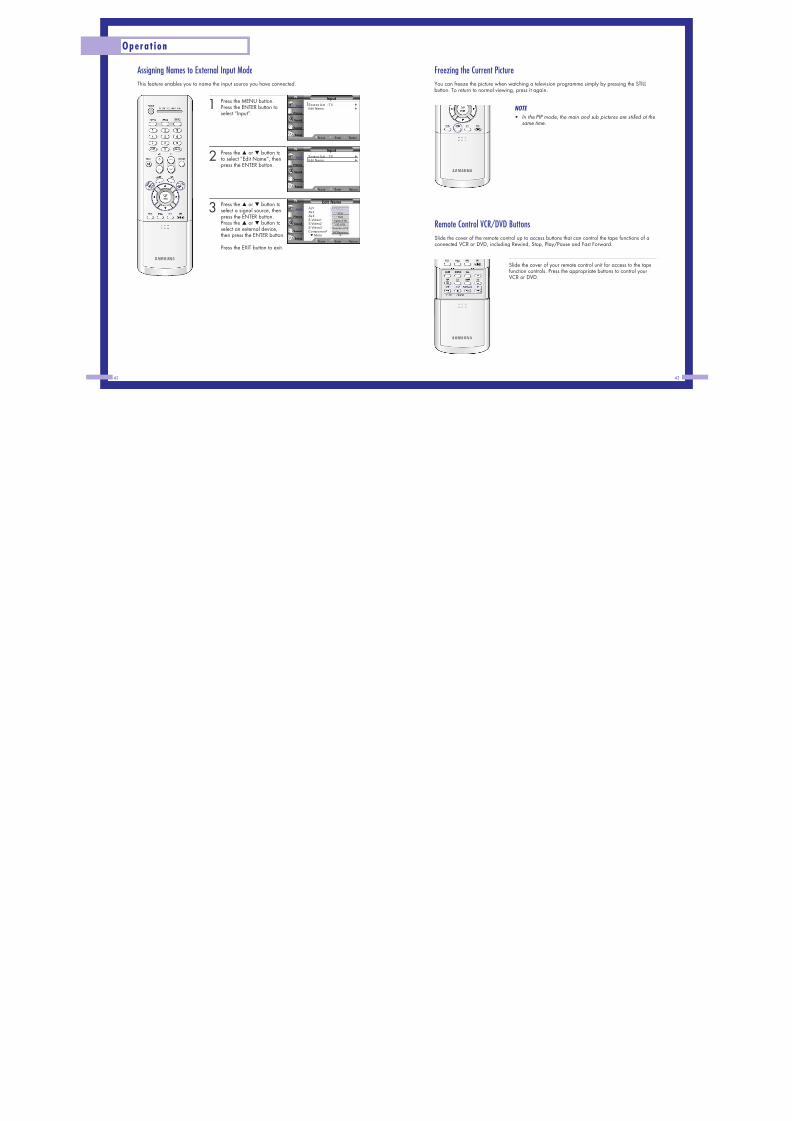
Freezing the Current PictureYou can freeze the picture when watching a television programme simply by pressing the STILLbutton. To return to normal viewing, press it again.
NOTE
• In the PIP mode, the main and sub pictures are stilled at the same time.
Remote Control VCR/DVD ButtonsSlide the cover of the remote control up to access buttons that can control the tape functions of aconnected VCR or DVD, including Rewind, Stop, Play/Pause and Fast Forward.
Slide the cover of your remote control unit for access to the tapefunction controls. Press the appropriate buttons to control yourVCR or DVD.
Customizing Your Remote ControlYour TV comes equipped with a universal remote control. In addition to controlling the TV, theuniversal remote control can also operate a VCR, Cable box, DVD and Set-Top Box made bySamsung (even if your VCR, Cable box and DVD are made by manufacturers other than Samsung).
NOTE • The remote control might not be compatible with all VCRs, DVD players and Cable boxes.
Setting Up Your Remote Control to Operate Your VCR (Cable box or
DVD player)1 Turn off your VCR (Cable box or DVD player).
2 Press the MODE button to switch the remote control to the VCR(CABLE or DVD) mode.The remote control has five modes: TV, STB, VCR, CABLE andDVD.
3 On your Samsung remote control, press the SET button.
4 Enter 3 digits of the VCR (Cable box or DVD player) code listedon next page for your brand of VCR (Cable box or DVDplayer).Make sure you enter 3 digits of the code, even if the first digit isa “0”. (If more than one code listed, try the first one.)
5 Press the POWER button. Your VCR (Cable box or DVD player)should turn on. If your VCR (Cable box or DVD player) turns on,
your remote control is now set correctly.If your VCR (Cable box or DVD player) does not turn on, repeatsteps 2, 3, and 4, but try one of the other codes listed for thebrand of your particular VCR (Cable box or DVD player).
6 Once your remote control is set up, press the MODE button anytime you want to use the remote to operate your VCR (Cablebox or DVD player).
NOTES • When your remote is in the TV mode, the VCR (or DVD player)
control buttons (REW, STOP, PLAY/PAUSE and FF) will still operate your VCR (or DVD player).
• When your remote control is in the STB, VCR, CABLE or DVD
mode, the volume buttons still control your TV’s volume.
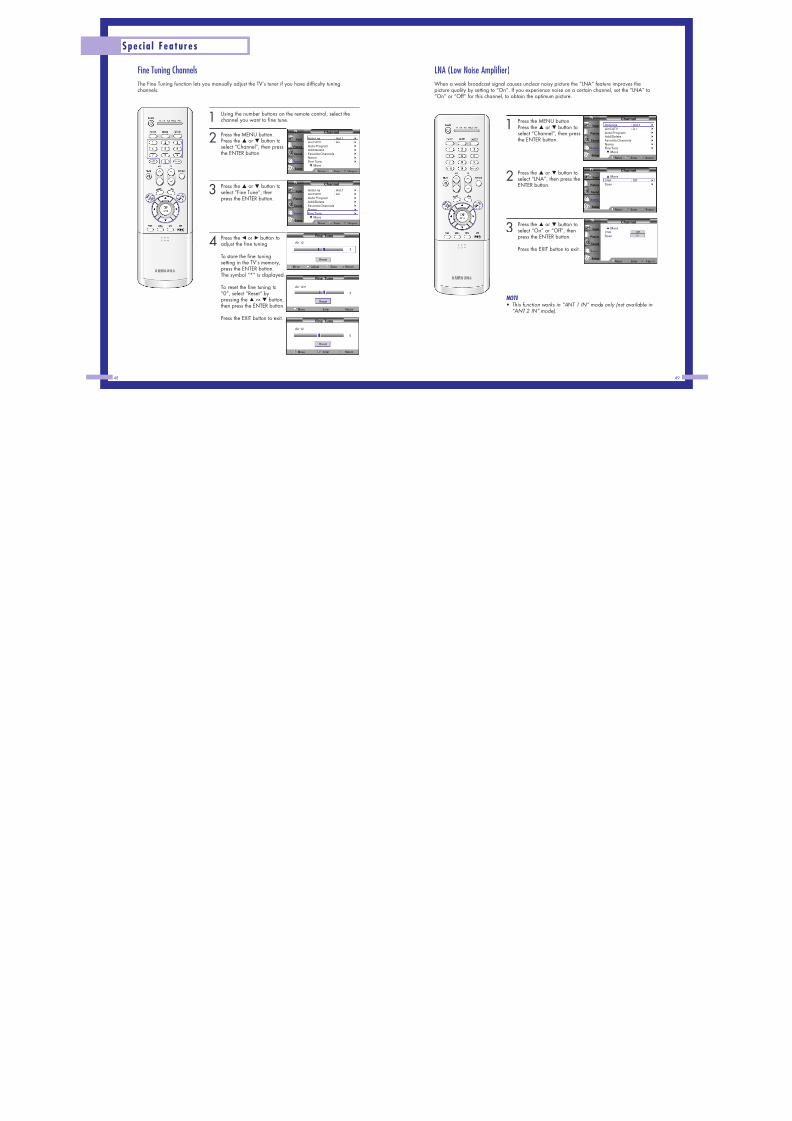
LNA (Low Noise Amplifier)When a weak broadcast signal causes unclear noisy picture the “LNA” feature improves thepicture quality by setting to “On”. If you experience noise on a certain channel, set the “LNA” to“On” or “Off” for this channel, to obtain the optimum picture.
Fine Tuning ChannelsThe Fine Tuning function lets you manually adjust the TV’s tuner if you have difficulty tuningchannels.
48
Special Features
1 Using the number buttons on the remote control, select thechannel you want to fine tune.
2 Press the MENU button.Press the … or † button toselect “Channel”, then pressthe ENTER button.
3 Press the … or † button toselect “Fine Tune”, thenpress the ENTER button.
4 Press the œ or √ button toadjust the fine tuning.
To store the fine tuningsetting in the TV’s memory,press the ENTER button.The symbol “*” is displayed.
To reset the fine tuning to“0”, select “Reset” bypressing the … or † button,then press the ENTER button.
Press the EXIT button to exit.
Channel
Antenna : Ant.1 √
Air/CATV : Air √
Auto Program√
Add/Delete √
Favorite Channels √
Name √
Fine Tune √
▼ More
Move Enter Return
Input
Picture
Sound
Channel
Setup
Channel
Antenna : Ant.1 √
Air/CATV : Air √
Auto Program √
Add/Delete √
Favorite Channels √
Name √
Fine Tune √
▼More
Move Enter Return
Input
Picture
Sound
Channel
Setup
1 Press the MENU button.Press the … or † button toselect “Channel”, then pressthe ENTER button.
2 Press the … or † button toselect “LNA”, then press theENTER button.
3 Press the … or † button toselect “On” or “Off”, thenpress the ENTER button.
Press the EXIT button to exit.
NOTE • This function works in “ANT 1 IN” mode only (not available in
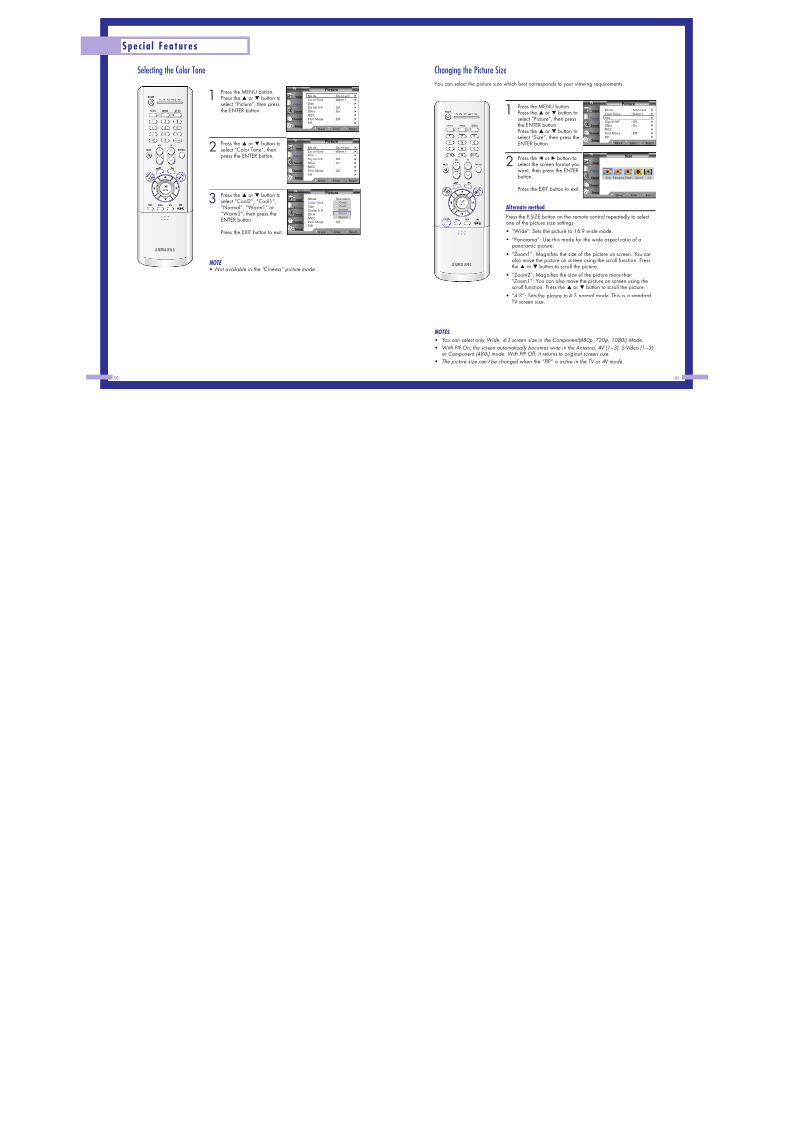
Changing the Picture SizeYou can select the picture size which best corresponds to your viewing requirements.
50
Special Features
Selecting the Color Tone
1 Press the MENU button.Press the … or † button toselect “Picture”, then pressthe ENTER button.
2Press the … or † button toselect “Color Tone”, thenpress the ENTER button.
3 Press the … or † button toselect “Cool2”, “Cool1”,“Normal”, “Warm1” or“Warm2”, then press theENTER button.
Press the EXIT button to exit.
NOTE • Not available in the “Cinema” picture mode.
Picture
Mode : StandardColor Tone : Warm1SizeDigital NR : OffDNIe : On
MCCFilm Mode : OffPIP
Move Enter Return
Input
Picture
Sound
Channel
Setup
Cool2Cool1
NormalWarm1Warm2
Picture
Mode : Standard √
Color Tone : Warm1 √
Size √
Digital NR : Off √
DNIe : On √
MCC √
Film Mode : Off √
PIP √
Move Enter Return
Input
Picture
Sound
Channel
Setup
1 Press the MENU button.Press the … or † button toselect “Picture”, then pressthe ENTER button.Press the … or † button toselect “Size”, then press theENTER button.
2 Press the œ or √ button toselect the screen format youwant, then press the ENTERbutton.
Press the EXIT button to exit.
Alternate method
Press the P.SIZE button on the remote control repeatedly to selectone of the picture size settings.• “Wide”: Sets the picture to 16:9 wide mode.• “Panorama”: Use this mode for the wide aspect ratio of a
panoramic picture.• “Zoom1”: Magnifies the size of the picture on screen. You can
also move the picture on screen using the scroll function. Pressthe … or † button to scroll the picture.
• “Zoom2”: Magnifies the size of the picture more than“Zoom1”. You can also move the picture on screen using thescroll function. Press the… or † button to scroll the picture.
• “4:3”: Sets the picture to 4:3 normal mode. This is a standardTV screen size.
NOTES
• You can select only Wide, 4:3 screen size in the Component(480p, 720p, 1080i) Mode.• With PIP On, the screen automatically becomes wide in the Antenna, AV (1~3), S-Video (1~3)
or Component (480i) mode. With PIP Off, it returns to original screen size.
• The picture size can’t be changed when the “PIP” is active in the TV or AV mode.
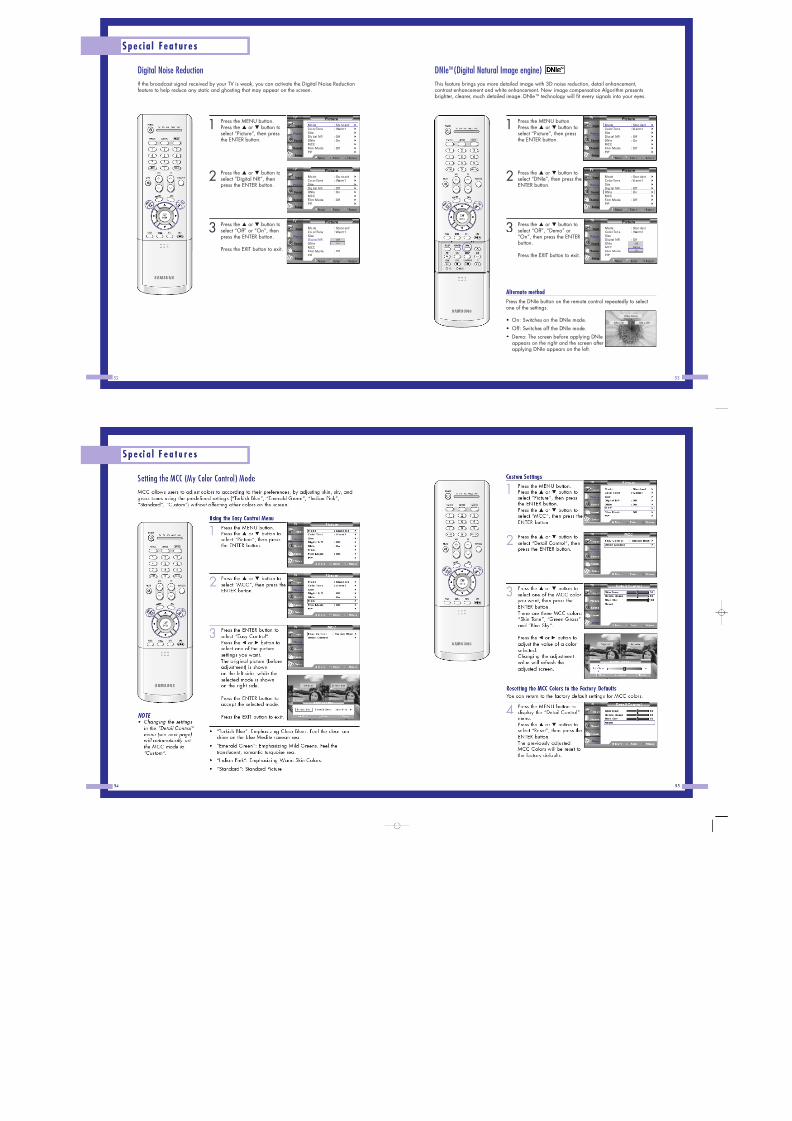
Digital Noise ReductionIf the broadcast signal received by your TV is weak, you can activate the Digital Noise Reductionfeature to help reduce any static and ghosting that may appear on the screen.
52
Special Features
DNIe TM(Digital Natural Image engine)This feature brings you more detailed image with 3D noise reduction, detail enhancement,contrast enhancement and white enhancement. New image compensation Algorithm presentsbrighter, clearer, much detailed image. DNIeTM technology will fit every signals into your eyes.
1 Press the MENU button.Press the … or † button toselect “Picture”, then pressthe ENTER button.
2 Press the … or † button toselect “Digital NR”, thenpress the ENTER button.
3 Press the … or † button toselect “Off” or “On”, thenpress the ENTER button.
Press the EXIT button to exit.
Picture
Mode : Standard √
Color Tone : Warm1 √
Size √
Digital NR : Off √
DNIe : On √
MCC √
Film Mode : Off √
PIP √
Move Enter Return
Input
Picture
Sound
Channel
Setup
Picture
Mode : Standard √
Color Tone : Warm1 √
Size √
Digital NR : Off √
DNIe : On √
MCC √
Film Mode : Off √
PIP √
Move Enter Return
Input
Picture
Sound
Channel
Setup
1 Press the MENU button.Press the … or † button toselect “Picture”, then pressthe ENTER button.
2 Press the … or † button toselect “DNIe”, then press theENTER button.
3 Press the … or † button toselect “Off”, “Demo” or“On”, then press the ENTERbutton.
Press the EXIT button to exit.
Alternate methodPress the DNIe button on the remote control repeatedly to selectone of the settings.
• On: Switches on the DNIe mode.• Off: Switches off the DNIe mode.• Demo: The screen before applying DNIe
appears on the right and the screen afterapplying DNIe appears on the left.
Picture
Mode : StandardColor Tone : Warm1SizeDigital NR : OffDNIe : OnMCCFilm Mode : OffPIP
Move Enter Return
Input
Picture
Sound
Channel
Setup
OffDemo
On
Picture
Mode : Standard √
Color Tone : Warm1 √
Size √
Digital NR : Off √
DNIe : On √
MCC √
Film Mode : Off √
PIP √
Move Enter Retur n
Input
Picture
Sound
Channel
Setup
Picture
Mode : Standard √
Color Tone : Warm1 √
Size √
Digital NR : Off √
DNIe : On √
MCC √
Film Mode : Off √
PIP √
Move Enter Retur n
Input
Picture
Sound
Channel
Setup
DNIe Demo
DNIe On DNIe Off
Picture
Mode : StandardColor Tone : Warm1SizeDigital NR : OffDNIe : OnMCCFilm Mode : OffPIP
Viewing Picture-In-PictureOne of the most best features of your TV is the Picture-In-Picture (PIP) feature. The advanced PIPsystem allows you to watch two different pictures at once, even if you don’t have a VCRconnected to your TV.
Setting the Film ModeYou can automatically sense and process film signals from all sources and adjust the picture foroptimum quality.
56
Special Features
1 Press the MENU button.Press the … or † button toselect “Picture”, then pressthe ENTER button.
2 Press the … or † button toselect “Film Mode”, thenpress the ENTER button.
3 Press the…
or†
button toselect “Off” or “On”, thenpress the ENTER button.
Press the EXIT button to exit.
NOTE
• Film mode is supported in 480i only.
Picture
Mode : Standard √
Color Tone : Warm1 √
Size √
Digital NR : Off √
DNIe : On √
MCC √
Film Mode : Off √
PIP √
Move Enter Return
Input
Picture
Sound
Channel
Setup
Picture
Mode : StandardColor Tone : Warm1SizeDigital NR : OffDNIe : OnMCCFilm Mode : OffPIP
Move Enter Return
Input
Picture
Sound
Channel
Setup
OffOn
Picture
Mode : Standard √
Color Tone : Warm1 √
Size √
Digital NR : Off √
DNIe : On √
MCC √
Film Mode : Off √
PIP √
Move Ente r Retur n
Input
Picture
Sound
Channel
Setup
Activating the PIP
1 Press the MENU button.Press the … or † button toselect “Picture”, then pressthe ENTER button.
2 Press the … or † button toselect “PIP”, then press theENTER button.
3 Press the ENTER button toselect “PIP”.Press the … or † button toselect “On”, then press theENTER button.The sub picture appears inthe corner of the screen.
Press the EXIT button to exit.
Alternate methodPress the PIP button on the remote control repeatedly to activate ordeactivate the PIP.
Picture
Mode : Standard √
Color Tone : Warm1 √
Size √
Digital NR : Off √
DNIe : On √
MCC √
Film Mode : Off √
PIP √
Move Enter Return
Input
Picture
Sound
Channel
Setup
Picture
Mode : Standard √
Color Tone : Warm1 √
Size √
Digital NR : Off √
DNIe : On √
MCC √
Film Mode : Off √
PIP √
Move Enter Return
Input
Picture
Sound
Channel
Setup
PIPPIP : OnSource : TVSwapSizePositionChannel : Air 11S ele ct So un d : Ma in
Move Enter Return
Input
Picture
Sound
Channel
Setup
OffOn
NOTES
• This feature doesn’t function when the “V-Chip” or “Caption” is active.• This feature doesn’t operate in the HDMI mode.• If you turn the TV off while watching and turn it on again, then the mode will return to normal
Swapping the Sub Picture and Main PictureSelecting an External Source
You can use PIP to view a signal from an external source, such as a VCR.
58
Special Features
1 Press the MENU button.Press the … or † button toselect “Picture”, then pressthe ENTER button.
2 Press the … or † button toselect “PIP”, then press theENTER button.
3Press the … or † button toselect “Source”, then pressthe ENTER button.If you have not connectedany equipment to the TV’sinput jacks, the signal fromthese inputs will not appear.
Press the … or † button toselect an external signal,then press the ENTER button.
Press the EXIT button to exit.
Picture
Mode : Standard √
Color Tone : Warm1 √
Size √
Digital NR : Off √
DNIe : On √
MCC √
Film Mode : Off √
PIP √
Move Enter Return
Input
Picture
Sound
Channel
Setup
NOTES
• The sub picture doesn’t support “ANT 2 IN”, “Component1”, “Component2”, “PC”, “DVI” and “ HDMI ” .
• For more information about external signals, see “Viewing an External Signal Source” (See page 41). If you select “TV”, the sub picture is the same as the main picture.
PIPPIP : OnSource : TVSwapSizePositionChannel : Air 11Se le ct So un d : Ma in
Move Enter Return
Input
Picture
Sound
Channel
Setup
TV
AV1AV2AV3
S-Video1S-Video2S-Video3
1 Press the MENU button.Press the … or † button toselect “Picture”, then pressthe ENTER button.
2 Press the … or † button toselect “PIP”, then press theENTER button.
3Press the … or † button toselect “Swap”, then pressthe ENTER button.The sub picture appears inthe main picture, and viceversa.
Press the EXIT button to exit.
Picture
Mode : Standard √
Color Tone : Warm1 √
Size √
Digital NR : Off √
DNIe : On √
MCC √
Film Mode : Off √
PIP √
Move Enter Return
Input
Picture
Sound
Channel
Setup
NOTE
• The swapping doesn’t support “ANT 2 IN”, “Component1”, “Component2”, “PC”, “DVI” and HDMI.
After you set the signal source (antenna or cable) of sub picture, it is easy to change channels.
62
Special Features
1 Press the MENU button.Press the … or † button toselect “Picture”, then pressthe ENTER button.
2 Press the … or † button toselect “PIP”, then press theENTER button.
3 Press the … or † button toselect “Channel”, then pressthe ENTER button.
Press the … or † button toselect a channel you want,then press the ENTER button.
Press the EXIT button to exit.
Alternate methodPress the CH or CH button on the remote control to changechannels of sub picture during PIP on.
Picture
Mode : Standard √
Color Tone : Warm1 √
Size √
Digital NR : Off √
DNIe : On √
MCC √
Film Mode : Off √
PIP √
Move Enter Return
Input
Picture
Sound
Channel
Setup
PIPPIP : OnSource : TVSwapSizePositionChannel : Air 11Se le ct So un d : Ma in
Mov e Enter Return
Input
Picture
Sound
Channel
Setup
▲
▼
Air 11
NOTE
• The channels of sub picture are not available when antenna is set to “ANT 2 IN”. It links to “ANT 1 IN”.
Picture
Mode : Standard √
Color Tone : Warm1 √
Size √
Digital NR : Off √
DNIe : On √
MCC √
Film Mode : Off √
PIP √
Move Enter Return
Input
Picture
Sound
Channel
Setup
Selecting the Sound Source
You can use this feature to hear sound from the main or sub picture.
1 Press the MENU button.Press the … or † button toselect “Picture”, then pressthe ENTER button.
2 Press the … or † button toselect “PIP”, then press theENTER button.
3Press the … or † button toselect “Select Sound”, thenpress the ENTER button.
Press the … or † button toselect “Main” or “Sub”,then press the ENTER button.“Main” is for the main TVpicture audio, and “Sub” isfor the sub picture (PIP)audio.
Press the EXIT button to exit.
Picture
Mode : Standard √
Color Tone : Warm1 √
Size √
Digital NR : Off √
DNIe : On √
MCC √
Film Mode : Off √
PIP √
Mov e Enter Return
Input
Picture
Sound
Channel
Setup
PIPPIP : OnSource : TVSwapSizePositionChannel : Air 11Se le ct So un d : Ma in
Auto VolumeEach broadcasting station has its own signal conditions, and it is inconvenient to adjust thevolume every time the channel is changed. “Auto Volume” automatically adjusts the volume of thedesired channel by lowering the sound output when the modulation signal is high or by raisingthe sound output when the modulation signal is low.
1 Press the MENU button.Press the … or † button toselect “Sound”, then pressthe ENTER button.
2 Press the … or † button toselect “Auto Volume”, thenpress the ENTER button.
3 Press the … or † button toselect “Off” or “On”, thenpress the ENTER button.
Press the EXIT button to exit.
Sound
Mode : StandardEqualizerSRS TSXT : OffMTS : StereoAuto Volume : OffInt erna l Mute : Off
Move Enter Return
Input
Picture
Sound
Channel
Setup
OffOn
Sound
Mode : Standard √
Equalizer √
SRS TSXT : Off √
MTS : Stereo √
Auto Volume : Off √
Int erna l Mute : Off √
Move Ente r Re turn
Input
Picture
Sound
Channel
Setup
Sound
Mode : Standard √
Equalizer √
SRS TSXT : Off √
MTS : Stereo √
Auto Volume : Off √
Int erna l Mute : Off √
Move Ente r Re turn
Input
Picture
Sound
Channel
Setup
Enjoying the Sound of External SpeakersWhen using external device such as Home Theater Systems, external speaker, or external AudioAmplifier set “Internal Mute” to “On” to produce sound which is consistent with what the pictureshows.
1 Press the MENU button.Press the … or † button toselect “Sound”, then pressthe ENTER button.
2 Press the … or † button toselect “Internal Mute”, thenpress the ENTER button.
3 Press the … or † button toselect “Off” or “On”, thenpress the ENTER button.
How to Set up Restrictions Using the “TV Parental Guidelines”
The parental restrictions can be set up using either of two methods: The “TV Parental Guidelines”or “MPAA Rating”.
1 Press the MENU button.Press the … or † button toselect “Setup”, then press theENTER button.
2 Press the … or † button toselect “V-Chip”, then pressthe ENTER button.
3Press the number buttons to
enter your current 4-digit pinnumber.(The default pin number fora new TV set is “0000”.)The “V-Chip” menu isdisplayed.
4 Press the … or † button toselect “TV ParentalGuidelines”, then press theENTER button.
Setup
Language : English √
Time √
V-Chip √
Caption √
Blue Screen : Off √
Melody : On √
Color Weakness √
PC √
Mo ve E nt er Ret urn
Input
Picture
Sound
Channel
Setup
V-Chip
0 9 Enter PIN Return
Input
Picture
Sound
Channel
Setup
Enter PIN
*
V-Chip
V-Chip Lock : On √
TV Parental Guidelines √
MPAA Rating √
Change PIN √
Mo ve E nt er Ret urn
Input
Picture
Sound
Channel
Setup
Setup
Language : English √
Time √
V-Chip √
Caption √
Blue Screen : Off √
Melody : On √
Color Weakness √
PC √
Mo ve E nt er Ret urn
Input
Picture
Sound
Channel
Setup
5 You can independently lock the TVratings. The locked TV (FCC) ratings areindicated by the symbol “ ”.Press the … / † / œ / √ buttons and theENTER button to activate the appropriaterestrictions for TV (FCC) rating system.
TV-Y : Young childrenTV-Y7 : Children 7 and overTV-G : General audienceTV-PG : Parent GuidanceTV-14 : Viewers 14 and overTV-MA : Mature Audience
Press the EXIT button to exit.
NOTES
• These categories consist of two separate groups: “TV-Y” and “TV-Y7” (youngchildren through age 7), and “TV-G” through “TV-MA” (everybody else).
• The restrictions for these two groups work independently: If a household includes very young children as well as young adults, the TV parental guidelines must be set up separately for each age group. (See page 73.)
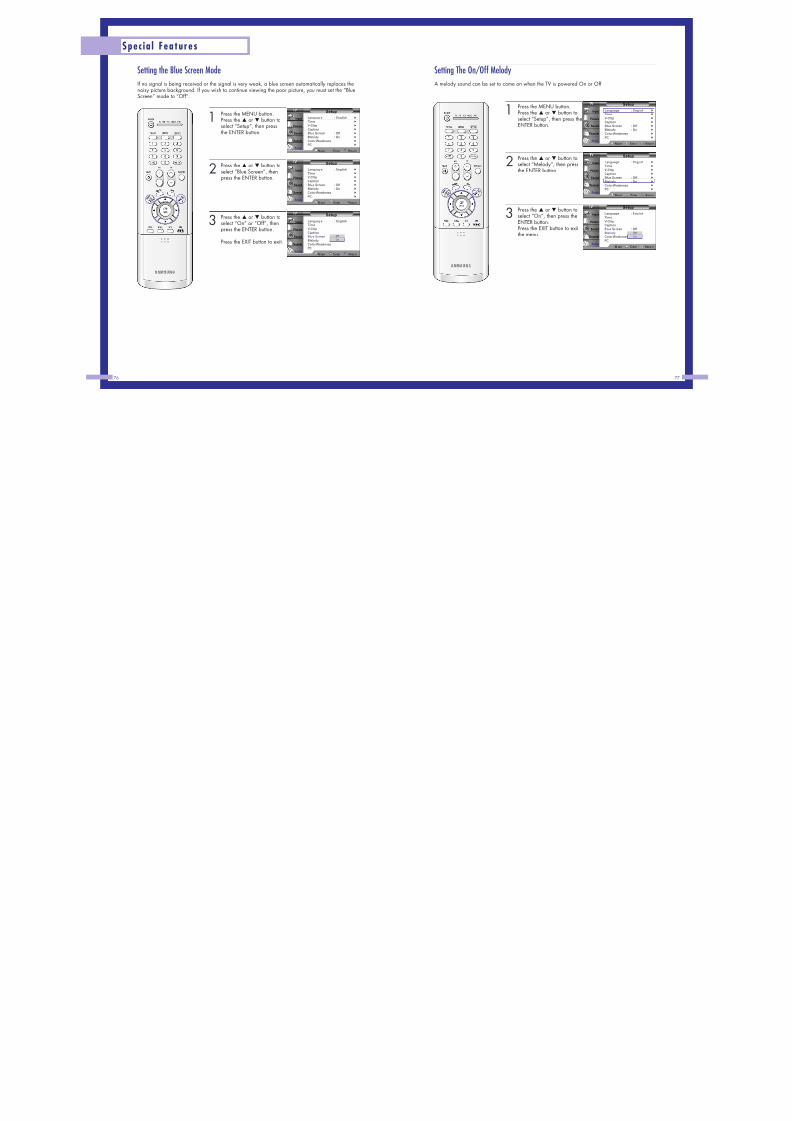
Setting the Blue Screen ModeIf no signal is being received or the signal is very weak, a blue screen automatically replaces thenoisy picture background. If you wish to continue viewing the poor picture, you must set the “BlueScreen” mode to “Off”.
Special Features
76
1 Press the MENU button.Press the … or † button toselect “Setup”, then pressthe ENTER button.
2 Press the … or † button toselect “Blue Screen”, thenpress the ENTER button.
3Press the … or † button toselect “On” or “Off”, thenpress the ENTER button.
Press the EXIT button to exit.
Setup
Language : English √
Time √
V-Chip √
Caption √
Blue Screen : Off √
Melody : On √
Color Weakness √
PC √
Move Enter Return
Input
Picture
Sound
Channel
Setup
Setup
Language : English √
Time √
V-Chip √
Caption √
Blue Screen : Off √
Melody : On √
Color Weakness √
PC √
Move Enter Return
Input
Picture
Sound
Channel
Setup
Setup
Language : EnglishTimeV-ChipCaptionBlue Screen : OffMelody : OnColor WeaknessPC
M ove En ter Retu rn
Input
Picture
Sound
Channel
Setup
OffOn
Setting The On/Off MelodyA melody sound can be set to come on when the TV is powered On or Off.
1 Press the MENU button.Press the … or † button toselect “Setup”, then press theENTER button.
2 Press the … or † button toselect “Melody”, then pressthe ENTER button.
3 Press the … or † button toselect “On”, then press theENTER button.Press the EXIT button to exitthe menu.
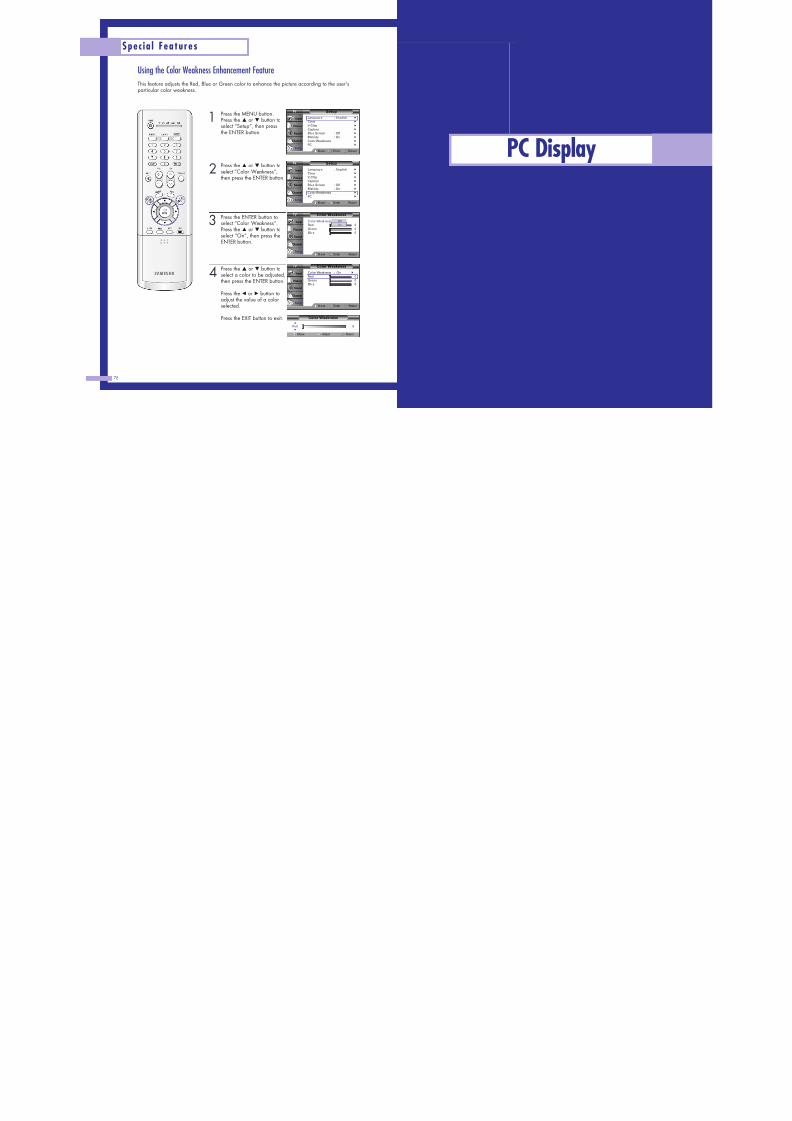
Using the Color Weakness Enhancement FeatureThis feature adjusts the Red, Blue or Green color to enhance the picture according to the user'sparticular color weakness.
78
Special Features
1 Press the MENU button.Press the … or † button toselect “Setup”, then pressthe ENTER button.
2 Press the … or † button toselect “Color Weakness”,then press the ENTER button.
3Press the ENTER button toselect “Color Weakness”.Press the … or † button toselect “On”, then press theENTER button.
4 Press the … or † button toselect a color to be adjusted,then press the ENTER button.
Press the œ or √ button toadjust the value of a colorselected.
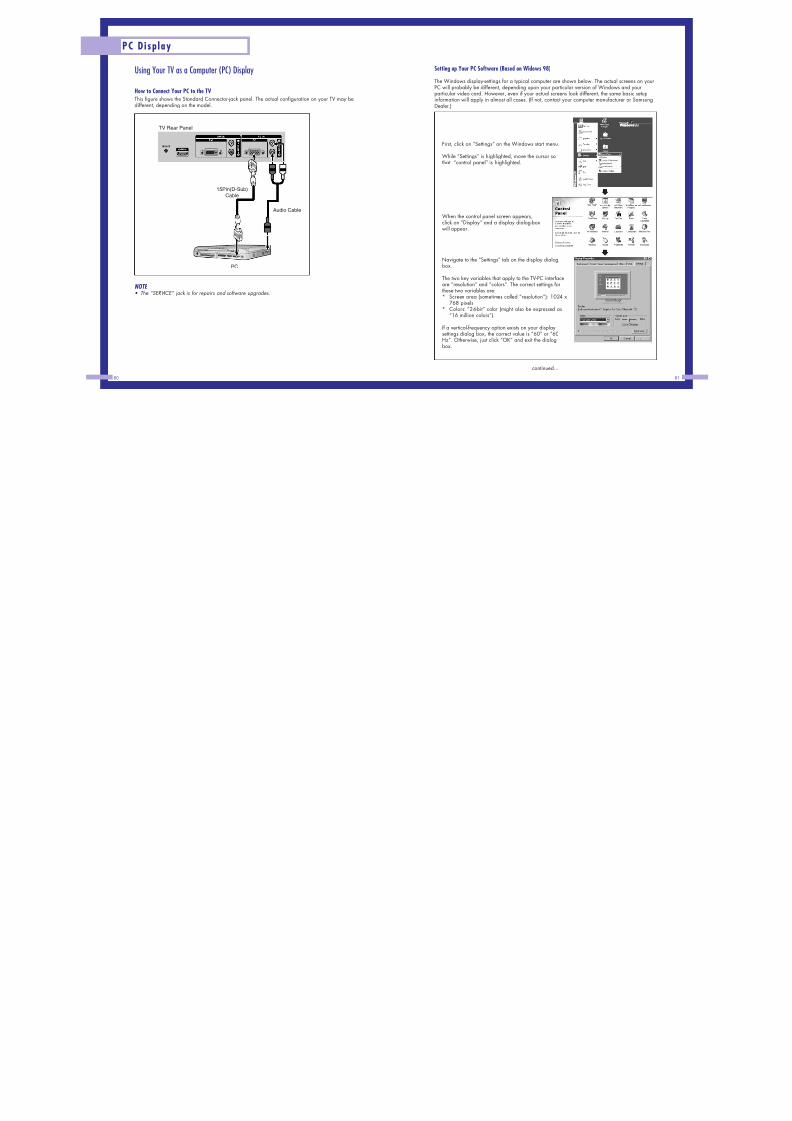
How to Connect Your PC to the TVThis figure shows the Standard Connector-jack panel. The actual configuration on your TV may bedifferent, depending on the model.
NOTE
• The “SERVICE” jack is for repairs and software upgrades.
Setting up Your PC Software (Based on Widows 98)
The Windows display-settings for a typical computer are shown below. The actual screens on yourPC will probably be different, depending upon your particular version of Windows and yourparticular video card. However, even if your actual screens look different, the same basic setupinformation will apply in almost all cases. (If not, contact your computer manufacturer or SamsungDealer.)
15Pin(D-Sub)Cable
TV Rear Panel
PC
Audio Cable
First, click on “Settings” on the Windows start menu.
While “Settings” is highlighted, move the cursor sothat “control panel” is highlighted.
Navigate to the “Settings” tab on the display dialogbox.
The two key variables that apply to the TV-PC interfaceare “resolution” and “colors”. The correct settings for
these two variables are:* Screen area (sometimes called “resolution”): 1024 x768 pixels
* Colors: “24-bit” color (might also be expressed as“16 million colors”).
If a vertical-frequency option exists on your displaysettings dialog box, the correct value is “60” or “60Hz”. Otherwise, just click “OK” and exit the dialogbox.
continued...
When the control panel screen appears,click on “Display” and a display dialog-boxwill appear.
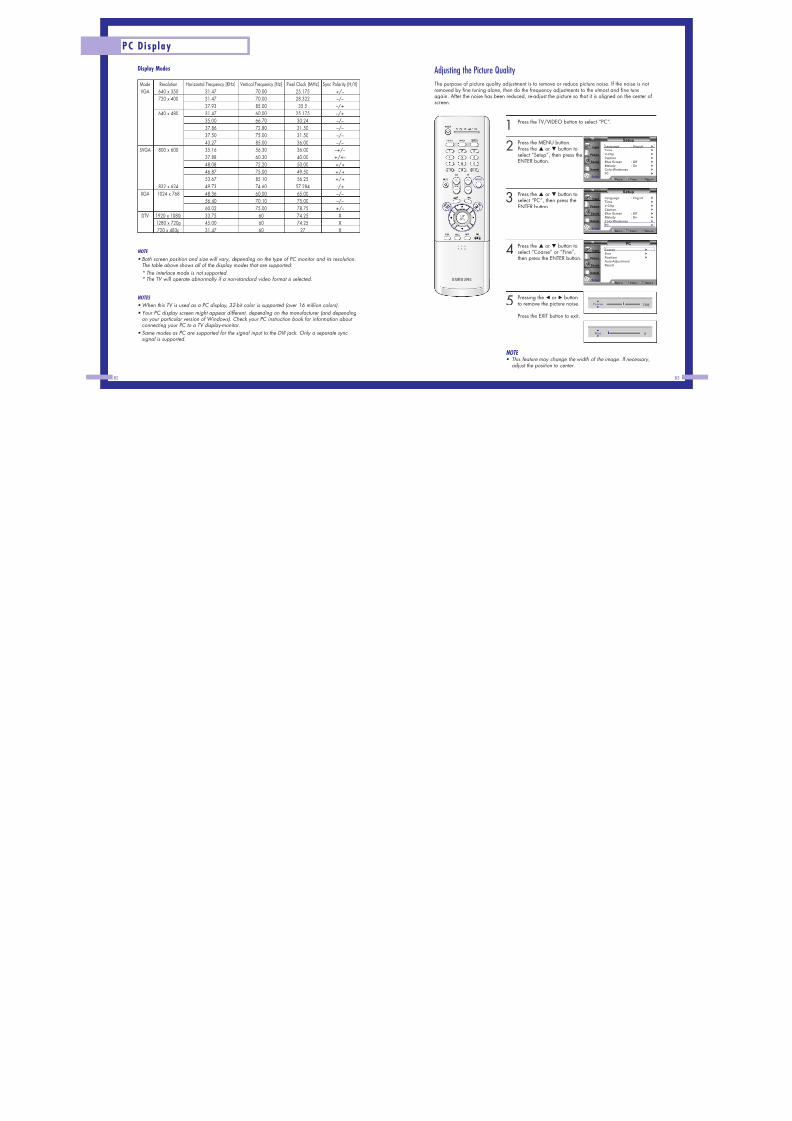
Adjusting the Picture QualityThe purpose of picture quality adjustment is to remove or reduce picture noise. If the noise is notremoved by fine tuning alone, then do the frequency adjustments to the utmost and fine tuneagain. After the noise has been reduced, re-adjust the picture so that it is aligned on the center ofscreen.
PC Display
82
NOTE
• Both screen position and size will vary, depending on the type of PC monitor and its resolution.The table above shows all of the display modes that are supported:* The interlace mode is not supported.* The TV will operate abnormally if a non-standard video format is selected.
NOTES
• When this TV is used as a PC display, 32-bit color is supported (over 16 million colors).• Your PC display screen might appear different, depending on the manufacturer (and depending
on your particular version of Windows). Check your PC instruction book for information about connecting your PC to a TV display-monitor.
• Same modes as PC are supported for the signal input to the DVI jack. Only a separate sync signal is supported.
Resolution640 x 350720 x 400
640 x 480
800 x 600
832 x 6241024 x 768
1920 x 1080i1280 x 720p720 x 483p
Horizontal Frequency [KHz]31.4731.4737.9331.4735.0037.8637.5043.27
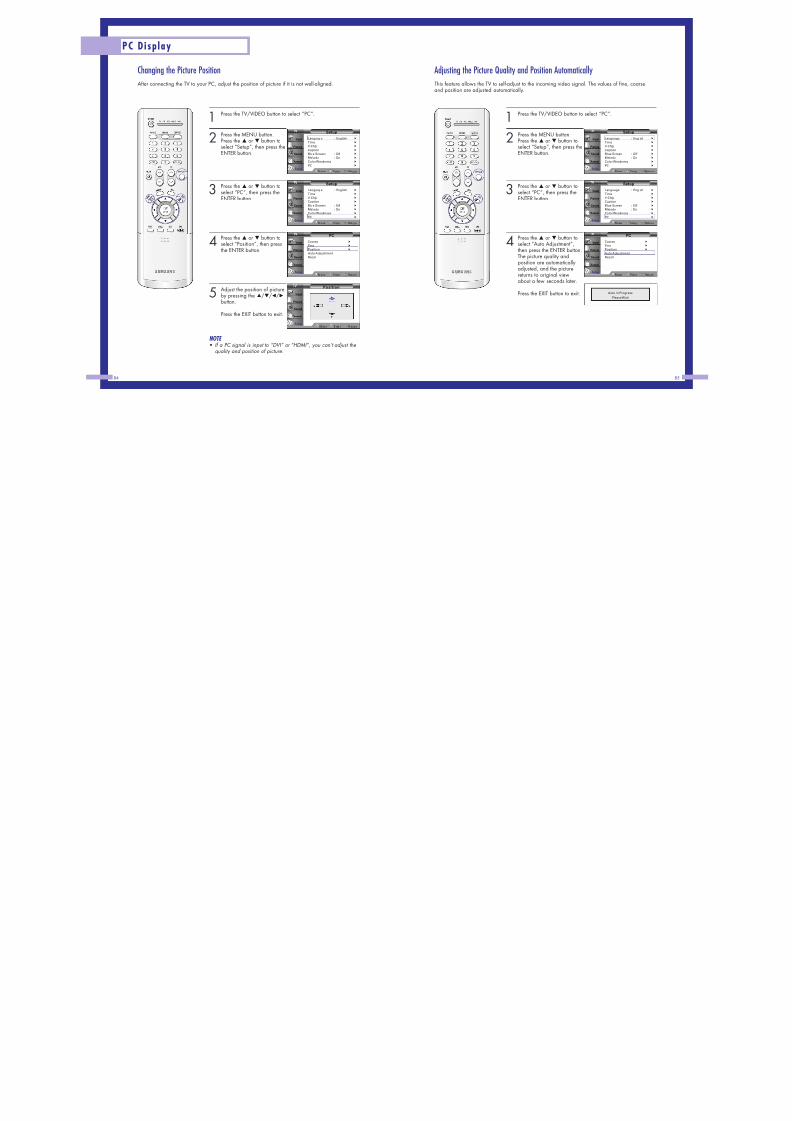
Changing the Picture PositionAfter connecting the TV to your PC, adjust the position of picture if it is not well-aligned.
84
PC Display
Adjusting the Picture Quality and Position AutomaticallyThis feature allows the TV to self-adjust to the incoming video signal. The values of fine, coarseand position are adjusted automatically.
1 Press the TV/VIDEO button to select “PC”.
2 Press the MENU button.Press the … or † button toselect “Setup”, then press theENTER button.
3 Press the … or † button toselect “PC”, then press theENTER button.
4 Press the … or † button toselect “Auto Adjustment”,then press the ENTER button.The picture quality andposition are automaticallyadjusted, and the picturereturns to original viewabout a few seconds later.
Press the EXIT button to exit. Auto in ProgressPlease Wait
PC
Coarse √
Fine √
Position √
Auto AdjustmentRecall
M ove Enter Return
Input
Picture
Sound
Channel
Setup
Setup
Language : English √
Time √
V-Chip √
Caption √
Blue Screen : Off √
Melody : On √
Color Weakness √
PC √
M ove Enter Retur n
Input
Picture
Sound
Channel
Setup
Setup
Language : English √
Time √
V-Chip √
Caption √Blue Screen : Off √
Melody : On √
Color Weakness √
PC √
M ove Enter Retur n
Input
Picture
Sound
Channel
Setup
1 Press the TV/VIDEO button to select “PC”.
2 Press the MENU button.Press the … or † button toselect “Setup”, then press theENTER button.
3 Press the … or † button toselect “PC”, then press theENTER button.
4 Press the … or † button toselect “Position”, then pressthe ENTER button.
5Adjust the position of pictureby pressing the … / † / œ / √
button.
Press the EXIT button to exit.
NOTE • If a PC signal is input to “DVI” or “HDMI”, you can’t adjust the
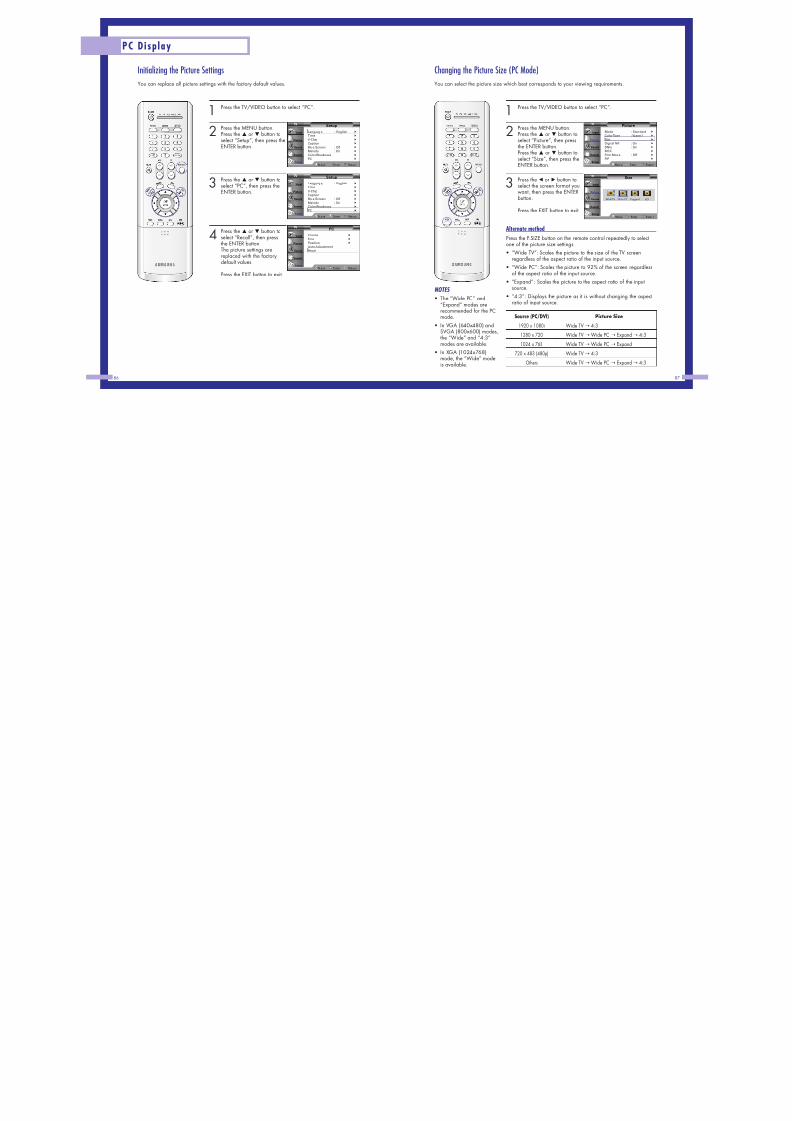
Initializing the Picture SettingsYou can replace all picture settings with the factory default values.
86
PC Display
1 Press the TV/VIDEO button to select “PC”.
2 Press the MENU button.Press the … or † button toselect “Setup”, then press theENTER button.
3 Press the … or † button toselect “PC”, then press theENTER button.
4 Press the … or † button toselect “Recall”, then pressthe ENTER button.The picture settings arereplaced with the factorydefault values.
Press the EXIT button to exit.
Setup
Language : English √
Time √
V-Chip √
Caption √
Blue Screen : Off √
Melody : On √
Color Weakness √
PC √
Move Enter Return
Input
Picture
Sound
Channel
Setup
Setup
Language : English √
Time √
V-Chip √
Caption √
Blue Screen : Off √
Melody : On √Color Weakness √
PC √
Move Enter Return
Input
Picture
Sound
Channel
Setup
PC
Coarse √
Fine √
Position √
Auto AdjustmentRecall
Move Enter Retur n
Input
Picture
Sound
Channel
Setup
Changing the Picture Size (PC Mode)You can select the picture size which best corresponds to your viewing requirements.
1 Press the TV/VIDEO button to select “PC”.
2 Press the MENU button.Press the … or † button toselect “Picture”, then pressthe ENTER button.Press the … or † button toselect “Size”, then press theENTER button.
3 Press the œ or √ button toselect the screen format youwant, then press the ENTERbutton.
Press the EXIT button to exit.
Alternate methodPress the P.SIZE button on the remote control repeatedly to selectone of the picture size settings.• “Wide TV”: Scales the picture to the size of the TV screen
regardless of the aspect ratio of the input source.• “Wide PC”: Scales the picture to 92% of the screen regardless
of the aspect ratio of the input source.• “Expand”: Scales the picture to the aspect ratio of the input
source.• “4:3”: Displays the picture as it is without changing the aspect
ratio of input source.
NOTES
• The “Wide PC” and“Expand” modes arerecommended for the PCmode.
• In VGA (640x480) andSVGA (800x600) modes,the “Wide” and “4:3”modes are available.