Difficult Airway Management Simulator Training Model MW13 ● Introduction Manufacturer’s Note ● Before You Start ● ● Before Training ● Set Includes Check points before training DOs and DON’Ts After Training ● ● Training Replacement of the Consumable Parts Instruction Manual P. 2 P. 3 P. 1 P.4 P.20 P. 5 Do not mark on the model and other components with pen nor leave printed materials contacted on surface. Ink marks on the models cannot be removed. Caution Preparation Contents Setting of DAM Setting of DAM (Degree of the mouth opening) P. 6 P. 7 P.8-P.10 P.11-P.19 Setting of DAM Setting of DAM (Tongue Edema) (Laryngospasm) (Neck flexibility)
Transcript
Difficult Airway Management SimulatorTraining Model
MW13
● IntroductionManufacturer’s Note
● Before You Start
●
●
Before Training
●
Set Includes
Check points before training
DOs and DON’Ts
After Training
●
●
Training
Replacement of the Consumable Parts
InstructionManual
P. 2
P. 3
P. 1
P.4
P.20
P. 5
Do not mark on the model and other components with pen nor leave printed materials contacted on surface.Ink marks on the models cannot be removed.
Caution
Preparation
Contents
Setting of DAM
Setting of DAM (Degree of the mouth opening)
P. 6
P. 7
P.8-P.10P.11-P.19
Setting of DAM
Setting of DAM
(Tongue Edema)
(Laryngospasm)
(Neck �exibility)
Introduction
1
Features●
・ ・
・
・
・
・
This D.A.M simulator Training Model has been developed for the training of medical and paramedical professionals only. Any other use, or any use not in accordance with the enclosed instructions, is strongly discouraged. The manufacturer cannot be held responsible for any accident or damage resulting from such use. Please use this model carefully and refrain from subjecting to any unnecessary stress or wear. Should you have any questions on this simulator, please feel free to contact our distributor in your area or KYOTO KAGAKU at any time. (Our contact address is on the back cover of this manual)
The Di�cult Airway management (D.A.M.) Simulator o�ers not only excellent reality in airway management training but also varying degrees of challenge to trainees through a combination of controllable degree of mouth opening, changeable limit of neck �exibility, and in�atable tongue. It provides wide variations of training experiences in di�cult airway management including use of diverse types of devices. Its portable design and durable structure allow training in emergency, pre-hospital, and clinical settings. This innovative simulator facilitates acquiring basic skills, improving the skills to advanced level and attaining ability to respond real-life situations.
-Robust structure and the stable base for training in various settings including those for pre-hospital scenario
DOs DON’Ts
DOs and DON’Ts
Manufacturer s note
Handle the manikin and the components with care.
Storage in a dark, cool space will help prevent the skin colours from fading.
The manikin skin may be cleaned with a wet cloth,if neccessary, using mildly soapy water or diluted detergent.
Do not let ink from pens, newspapers, this manual or other sources contact with the manikin, as they cannot be cleaned o� the manikin skin.
Never use organic solvent like paint thinner to clean the skin, as this will damage the simulator.
Even if color on its surface might be changed across the ages, this does not a�ect the quality of its performance.
’
-The optional bronchus model that allows for broncho�berscopy training
-A variety of possible airway skills that include: intubation with a laryngoscope, BVM ventilation, nasal intubation, Laryngeal mask ventilation, and use of a video laryngoscope
-The upper teeth are removable with excess force
-Anatomically correct airway structure and realistic laryngeal view
2
Set Includes
Before You Start Set includes
a. Torso body 1 b. Upper incisors 3 c. Lubricant 1
a
b
d
c
Before you start, ensure that you have all components listed below.
code name code name
Consumable parts
Optionalpart
11384-100
11392-01011392-09011392-080
11392-05011392-06011229-050
11392-040
Upper incisors (set of 10) Lung (right and left) (a set of 5)
2. Turn up the skin of the model's neck to check whether the tongue fixing part and the throat part are correctly installed.
The tongue is correctly installed
The pin is fixed to the jaw side.
Incorrect installation(* The photo is taken while the head is removed to allow to see the condition clearly.)
If the parts enclosed in the dotted circle are not correctly engaged with each other, the tongue will fall out during training.
Tongue
Caution
Check Points before Training
Check points before training
1. Open the mouth of the model to check the installation condition of the tongue.
(When the product is delivered, the tongue has already been installed on the model.)
Tongue �xing part (white)
Tongue �xing part (white)
Ensure that the tongue has not fallen out from the pin.
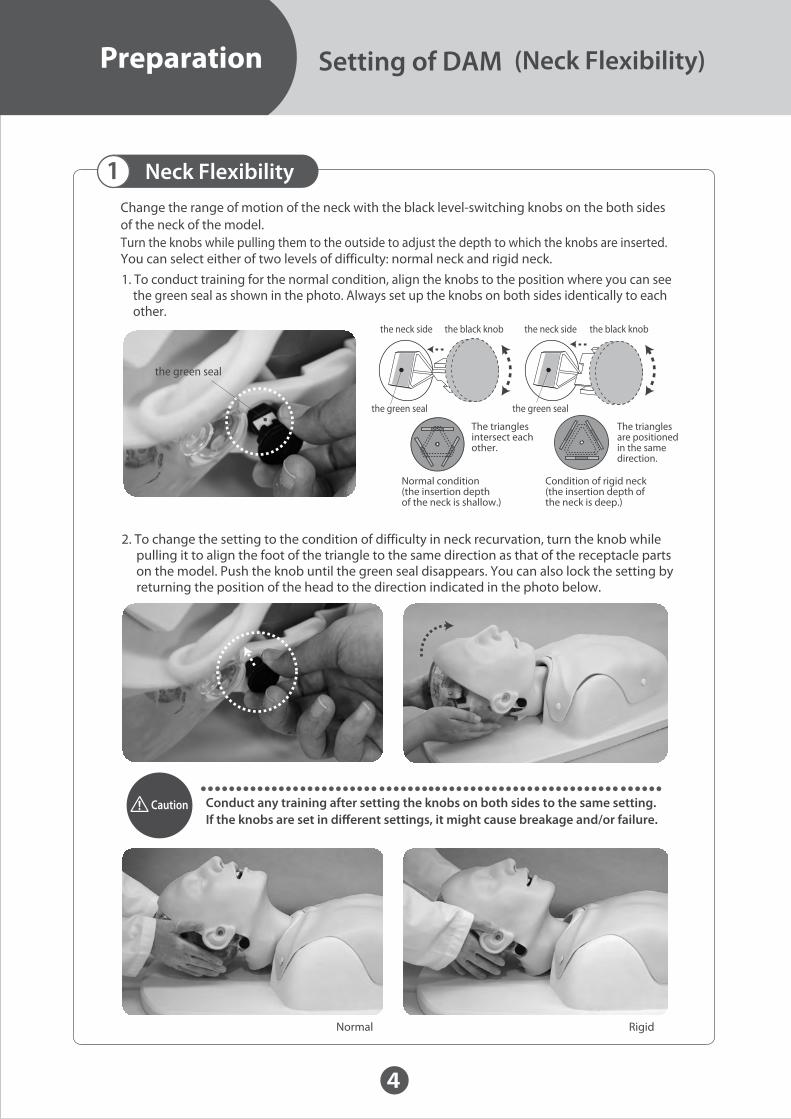
You can select either of two levels of difficulty: normal neck and rigid neck.1. To conduct training for the normal condition, align the knobs to the position where you can see the green seal as shown in the photo. Always set up the knobs on both sides identically to each other.
2. To change the setting to the condition of difficulty in neck recurvation, turn the knob while pulling it to align the foot of the triangle to the same direction as that of the receptacle parts on the model. Push the knob until the green seal disappears. You can also lock the setting by returning the position of the head to the direction indicated in the photo below.
4
1
the neck side the neck sidethe black knob the black knob
Preparation Setting of DAM
Normal Rigid
(Neck Flexibility)
Neck FlexibilityChange the range of motion of the neck with the black level-switching knobs on the both sides of the neck of the model.Turn the knobs while pulling them to the outside to adjust the depth to which the knobs are inserted.
Conduct any training after setting the knobs on both sides to the same setting.If the knobs are set in di�erent settings, it might cause breakage and/or failure.
the green seal
the green seal
Normal condition (the insertion depth of the neck is shallow.)
The triangles intersect each other.
The triangles are positioned in the same direction.
Condition of rigid neck (the insertion depth of the neck is deep.)
the green seal
Caution
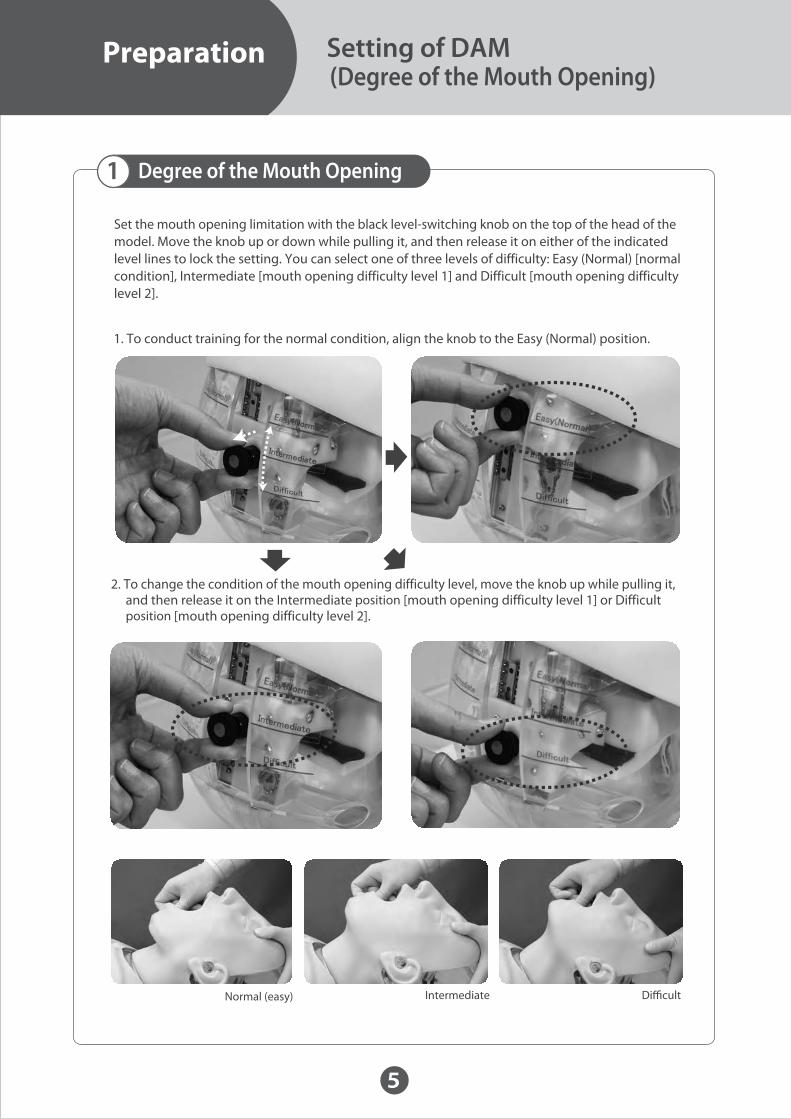
1. To conduct training for the normal condition, align the knob to the Easy (Normal) position.
2. To change the condition of the mouth opening difficulty level, move the knob up while pulling it, and then release it on the Intermediate position [mouth opening difficulty level 1] or Difficult position [mouth opening difficulty level 2].
5
1
Preparation Setting of DAM(Degree of the Mouth Opening)
Normal (easy) Intermediate Di�cult
Degree of the Mouth Opening
Set the mouth opening limitation with the black level-switching knob on the top of the head of the model. Move the knob up or down while pulling it, and then release it on either of the indicated level lines to lock the setting. You can select one of three levels of difficulty: Easy (Normal) [normal condition], Intermediate [mouth opening difficulty level 1] and Difficult [mouth opening difficulty level 2].
6
1
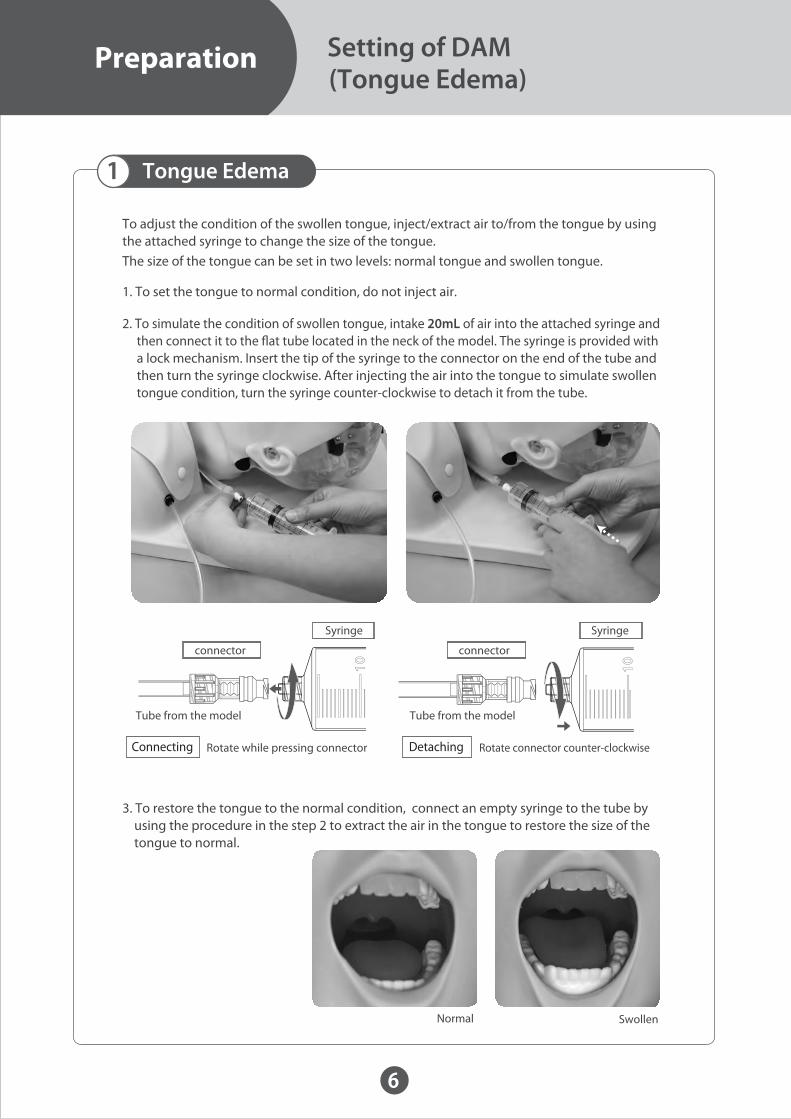
Normal Swollen
Syringe
connector
Tube from the model
Syringe
connector
Tube from the model
Rotate while pressing connector Rotate connector counter-clockwise
Preparation Setting of DAM(Tongue Edema)
Tongue Edema
To adjust the condition of the swollen tongue, inject/extract air to/from the tongue by using the attached syringe to change the size of the tongue.The size of the tongue can be set in two levels: normal tongue and swollen tongue.
1. To set the tongue to normal condition, do not inject air.
2. To simulate the condition of swollen tongue, intake 20mL of air into the attached syringe and then connect it to the �at tube located in the neck of the model. The syringe is provided with a lock mechanism. Insert the tip of the syringe to the connector on the end of the tube and then turn the syringe clockwise. After injecting the air into the tongue to simulate swollen tongue condition, turn the syringe counter-clockwise to detach it from the tube.
3. To restore the tongue to the normal condition, connect an empty syringe to the tube by using the procedure in the step 2 to extract the air in the tongue to restore the size of the tongue to normal.
Connecting Detaching
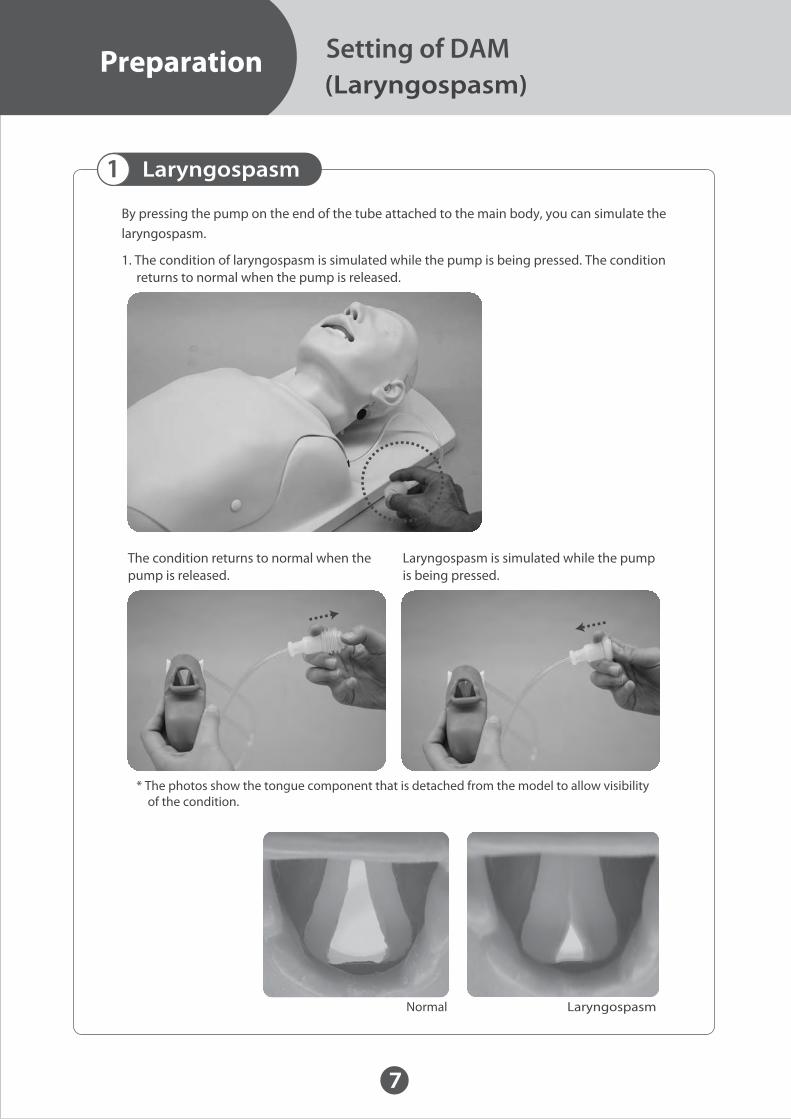
By pressing the pump on the end of the tube attached to the main body, you can simulate the laryngospasm.
The condition returns to normal when the pump is released.
* The photos show the tongue component that is detached from the model to allow visibility of the condition.
Laryngospasm is simulated while the pump is being pressed.
1. The condition of laryngospasm is simulated while the pump is being pressed. The condition returns to normal when the pump is released.
7
1
Preparation Setting of DAM
Normal
(Laryngospasm)
Laryngospasm
Laryngospasm
8
2
1
Training Training skills
Bag-Valve-Mask ventilation
Airway Opening Techniques
True-to-life articulation allows for head-tilt/chin-lift and jaw-thrust techniques.
Successful ventilation can be con�rmed by the movement of the chest.
3
4
9
Training Training skills
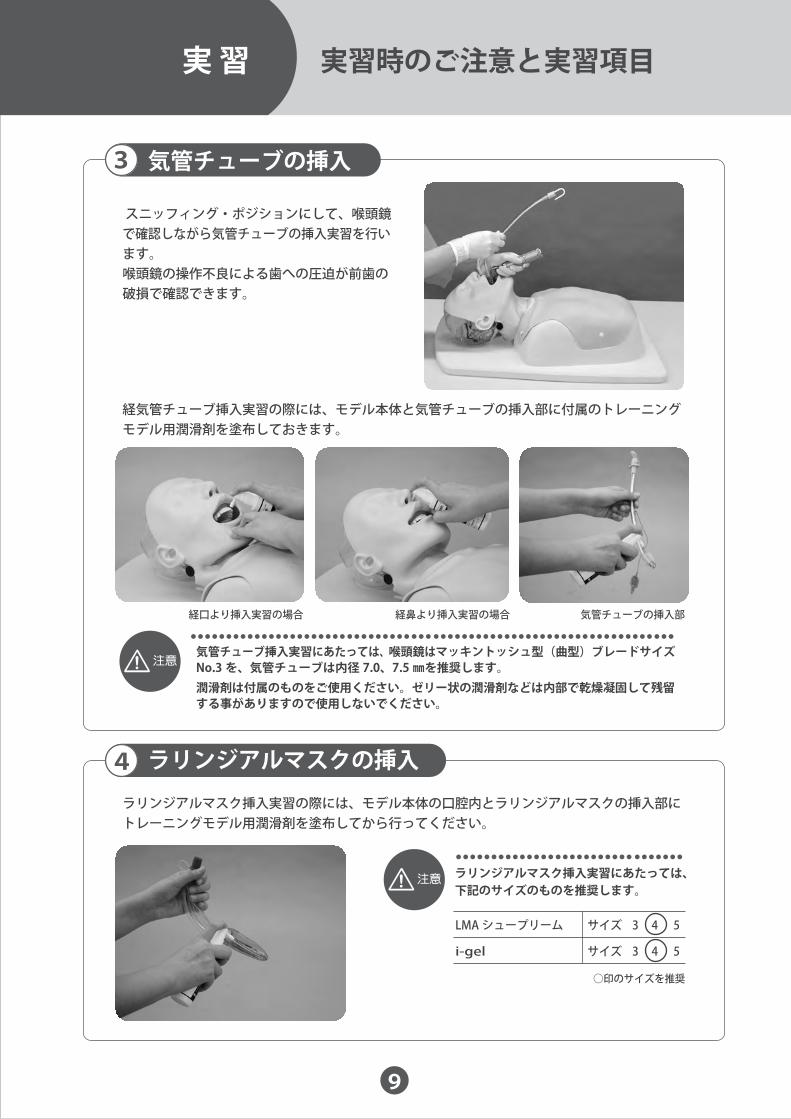
Intraoral Intubation with Laryngoscope
Setting the head at "sni�ng position", intubation with laryngoscope can be performed.
Laryngeal mask ventilation
The upper incisors are removable with excess force.
Put enough lubricant to the model before inserting the tracheal tube.For nasotracheal airway, spray the lubricant in the cavitas nasi and the tube. For oral route airway, in the mouth and the tube.
Put enough lubricant to the laryngeal mask and the oral cavity before training.
Recommended laryngeal mask:
LMA
i-gel
Recommended tools: Macintosh laryngoscope Size: No.3 Tracheal tube: 7.0, 7.5 mm (inside diameter) Use the lubricant included in the set. Others like gel type may remain in the model and become irremovable.
Caution
Caution
4
4
type size
5
7
6
10
Training Training skills
Confirmation Successful Intubation
Intubation by the Video Laryngoscope
Securing the Tracheal Tube
Put enough lubricant to the video laryngoscope and the oral cavity before training.
Do not leave the tapes on the model. If the tapes remain on the model for long time, its skin surface will become sticky with adhesive of tapes.
Caution
The placement of the tube can be con�rmed by auscultation or movement of thoracoabdominal area. (Five auscultation points are con�gured.)
Tongue
1
11
2
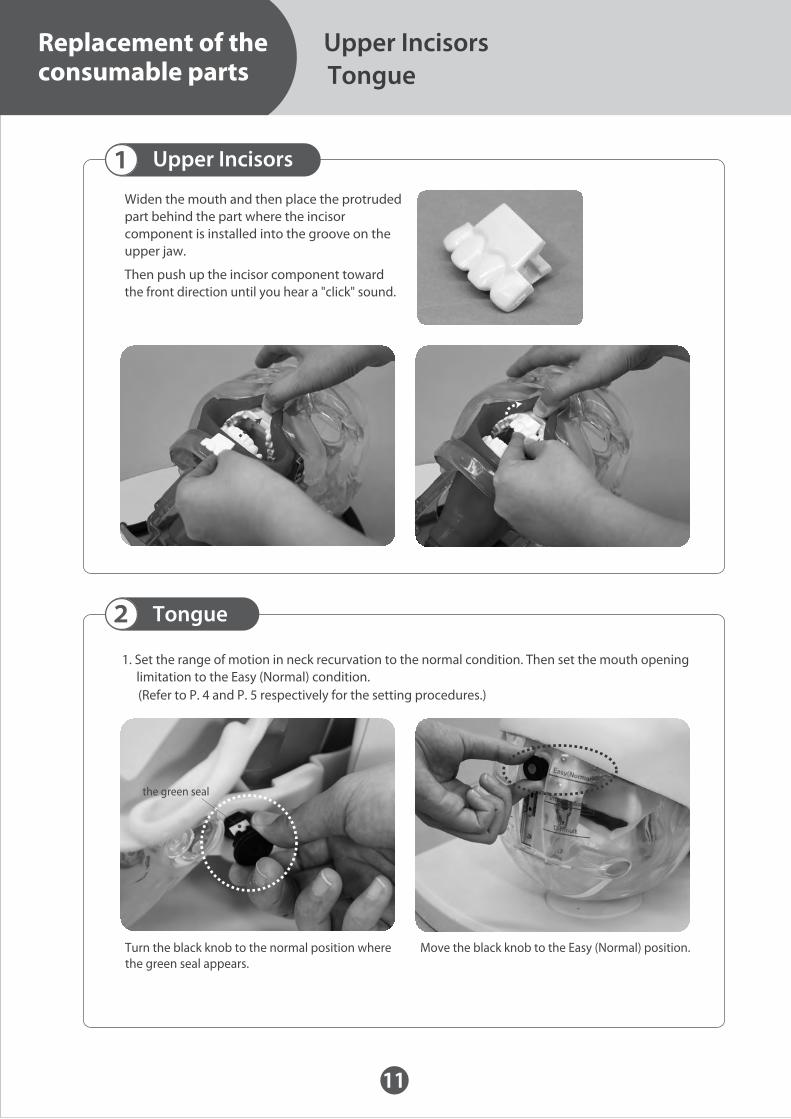
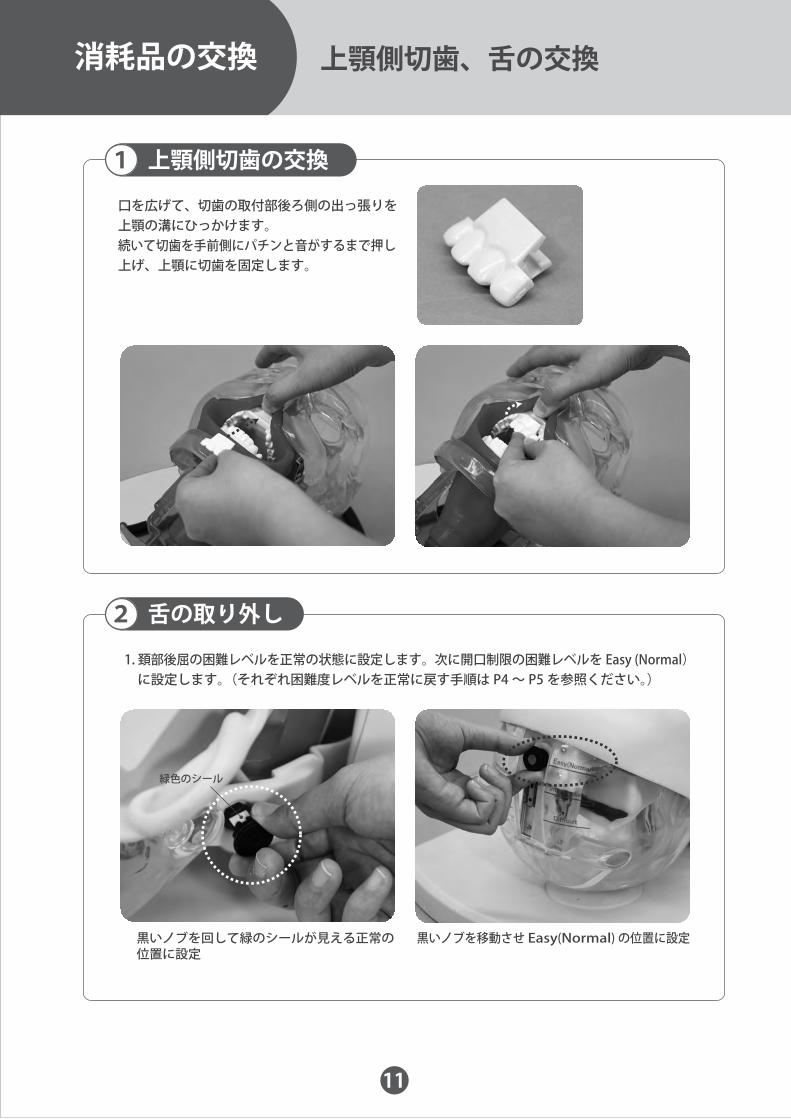
Turn the black knob to the normal position where the green seal appears.
Move the black knob to the Easy (Normal) position.
Replacement of the consumable parts
Upper Incisors
Upper IncisorsTongue
Widen the mouth and then place the protruded part behind the part where the incisor component is installed into the groove on the upper jaw.
1. Set the range of motion in neck recurvation to the normal condition. Then set the mouth opening limitation to the Easy (Normal) condition.
(Refer to P. 4 and P. 5 respectively for the setting procedures.)
Then push up the incisor component toward the front direction until you hear a "click" sound.
the green seal
2 Tongue
2. Remove the band of the back of the head and then remove the face mask from buttons at ears.
12
3. Remove the mask from the head.
5. Remove the chest cover.Lift the chest cover by pulling up the upper part of the cover, and detach the tube connected to the back of the cover from the lung bag (two points) at �rst, then from the stomach bag. The tube can be detached by pulling down it while pushing up the ring in the connector part where the tube is connected as shown in the �gure. Then remove the chest cover from the main body.
4. Remove the chest skin.
Replacement of the consumable parts Tongue
Pull out the esophagus (bronchi) tube from the stomach (lung)
Stomach (lung) bag
Connector
chest transparent cover
Esophagus (bronchi) tube
Pull out Push the ring toward the cover.
2
13
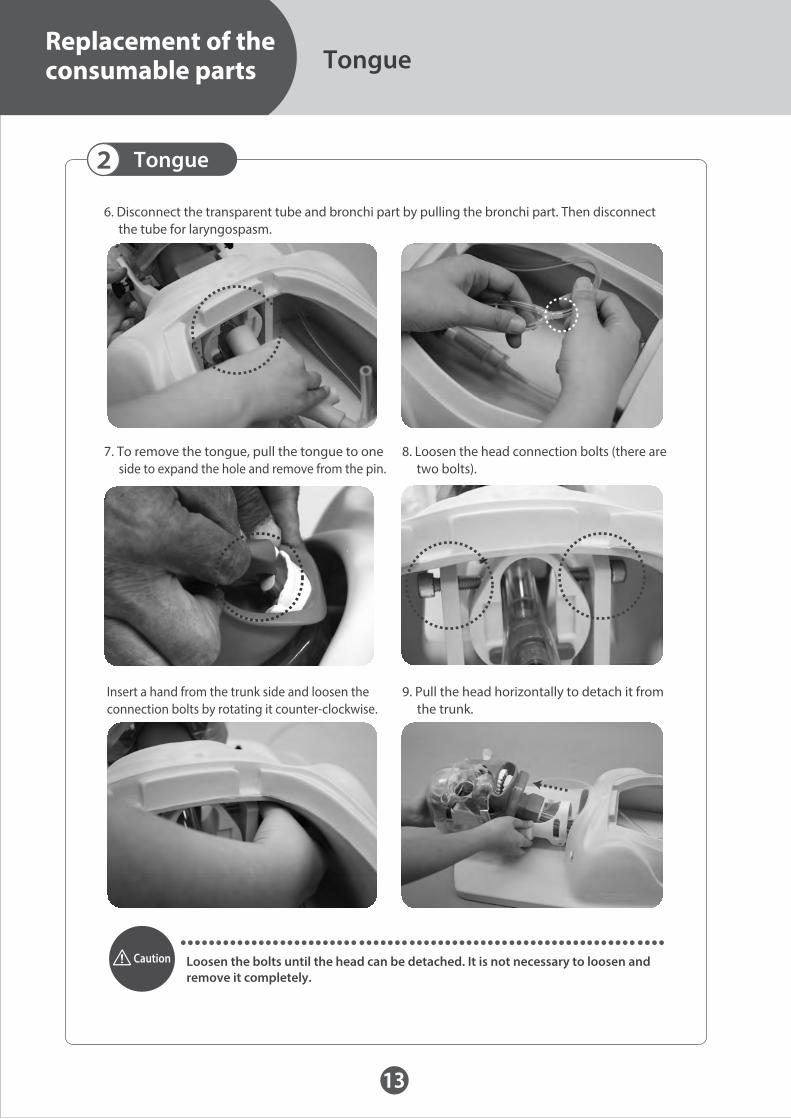
Loosen the bolts until the head can be detached. It is not necessary to loosen and remove it completely.
Tongue
Replacement of the consumable parts Tongue
6. Disconnect the transparent tube and bronchi part by pulling the bronchi part. Then disconnect the tube for laryngospasm.
7. To remove the tongue, pull the tongue to one side to expand the hole and remove from the pin.
8. Loosen the head connection bolts (there are two bolts).
9. Pull the head horizontally to detach it from the trunk.
Insert a hand from the trunk side and loosen the connection bolts by rotating it counter-clockwise.
Caution
2
14
Slowly pull out the tongue component from the throat with care. If it is pulled out forcibly, it could break.
10. Disengage the lower part of the throat from the tongue �xing part, then pull down the tongue component to detach. It becomes easy to pull out the whole tongue component when the tongue is pushed into the mouth while pulling it out.
Tongue
Replacement of the consumable parts Tongue
Transparent tube
Jugular part (red)
Bronchi
Tongue
Tongue �xing part (white)
Caution
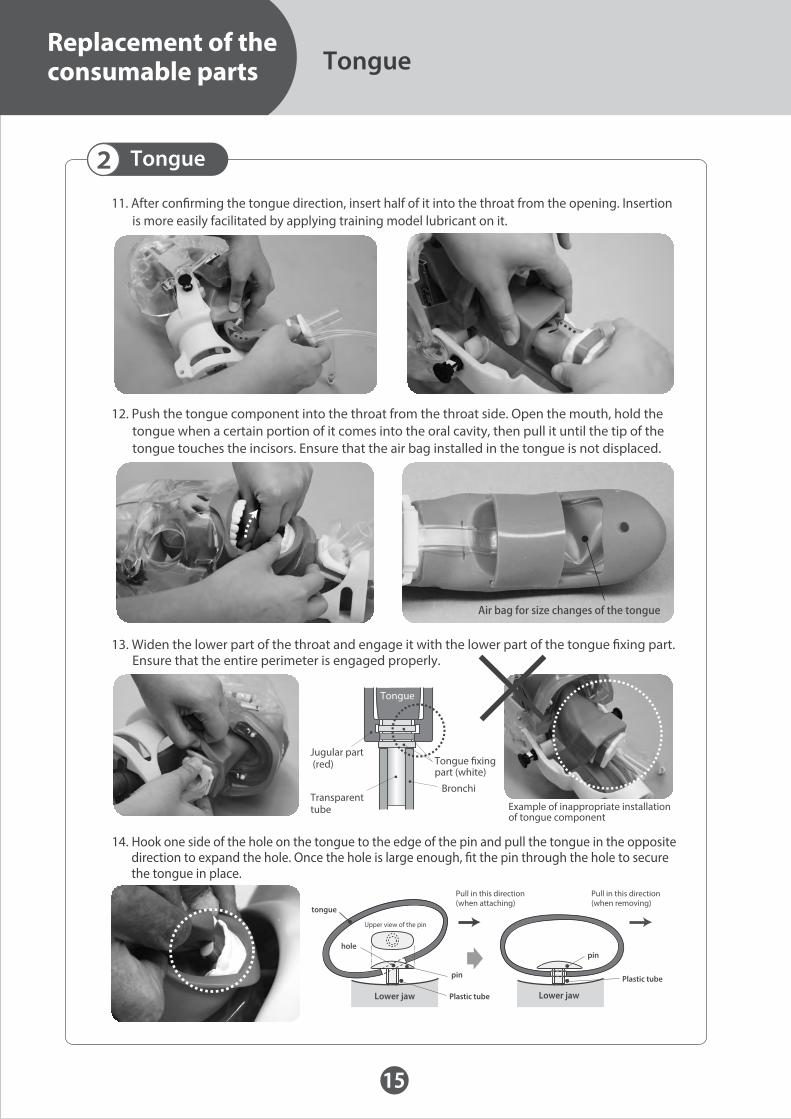
211. After con�rming the tongue direction, insert half of it into the throat from the opening. Insertion is more easily facilitated by applying training model lubricant on it.
12. Push the tongue component into the throat from the throat side. Open the mouth, hold the tongue when a certain portion of it comes into the oral cavity, then pull it until the tip of the tongue touches the incisors. Ensure that the air bag installed in the tongue is not displaced.
13. Widen the lower part of the throat and engage it with the lower part of the tongue �xing part. Ensure that the entire perimeter is engaged properly.
15
Tongue
Replacement of the consumable parts Tongue
Transparent tube
Jugular part (red)
Bronchi
Tongue �xing part (white)
Example of inappropriate installation of tongue component
Air bag for size changes of the tongue
Tongue
14. Hook one side of the hole on the tongue to the edge of the pin and pull the tongue in the opposite direction to expand the hole. Once the hole is large enough, �t the pin through the hole to secure the tongue in place.
Pull in this direction (when attaching)
Pull in this direction (when removing)
tongue
hole
pin
pin
Plastic tube
Plastic tube
Upper view of the pin
Lower jawLower jaw
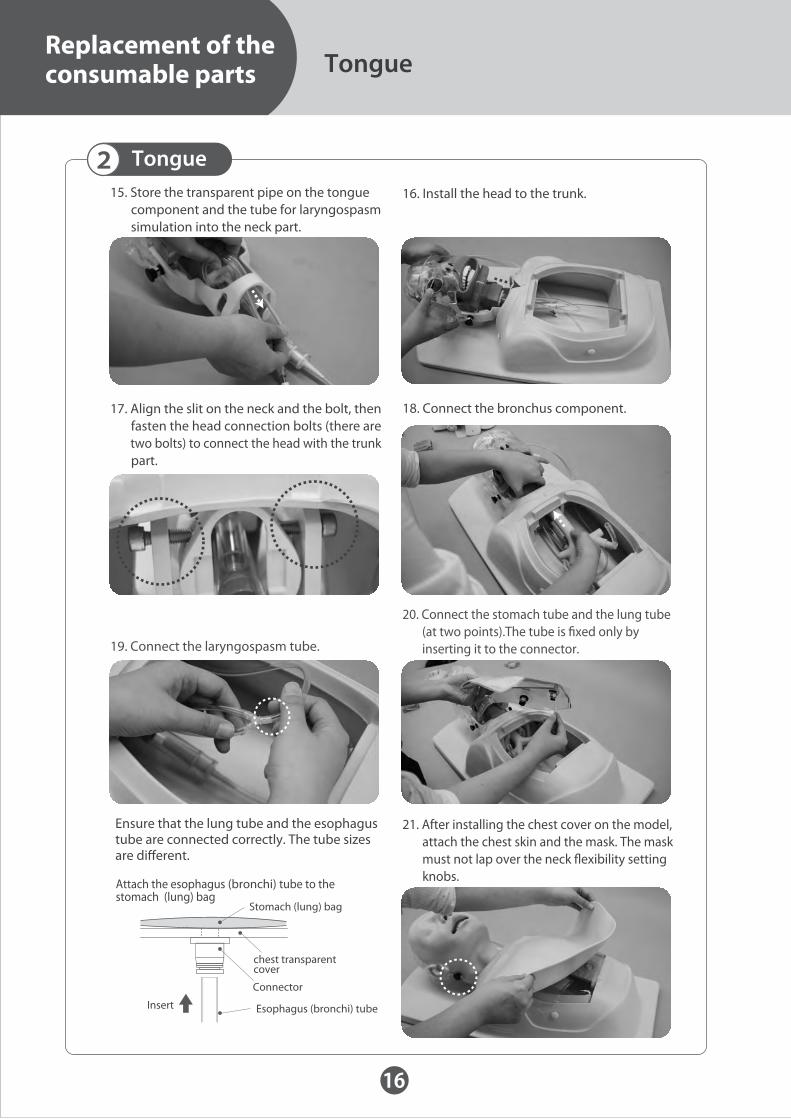
215. Store the transparent pipe on the tongue component and the tube for laryngospasm simulation into the neck part.
17. Align the slit on the neck and the bolt, then fasten the head connection bolts (there are two bolts) to connect the head with the trunk part.
16
Ensure that the lung tube and the esophagus tube are connected correctly. The tube sizesare di�erent.
Tongue
Replacement of the consumable parts Tongue
Stomach (lung) bag
Connector
chest transparent cover
Esophagus (bronchi) tube
Attach the esophagus (bronchi) tube to the stomach (lung) bag
Insert
20. Connect the stomach tube and the lung tube (at two points).The tube is �xed only by inserting it to the connector.
21. After installing the chest cover on the model, attach the chest skin and the mask. The mask must not lap over the neck �exibility setting knobs.
19. Connect the laryngospasm tube.
16. Install the head to the trunk.
18. Connect the bronchus component.
3
17
Face mask
Chest cover
4. Tilt the head, run the band attached on a side of the occipital part of the face mask behind the neck, and put it into the hole on the skin of the other side. Fit the both of the ear holes on the mask to the head of the model.
Replacement of the consumable parts Face Mask and Chest Cover
Face Mask and Chest Cover
1. Remove the band of the back of the head and then remove the face mask from buttons at ears.2. Take o� the face mask .
3. Set the new mask on the face.
1. Remove the cover from the buttons on shoulders and sides of the body.
2. Set the new cover on the chest and �x it at the buttons on shoulders and sides of the body.
4
18
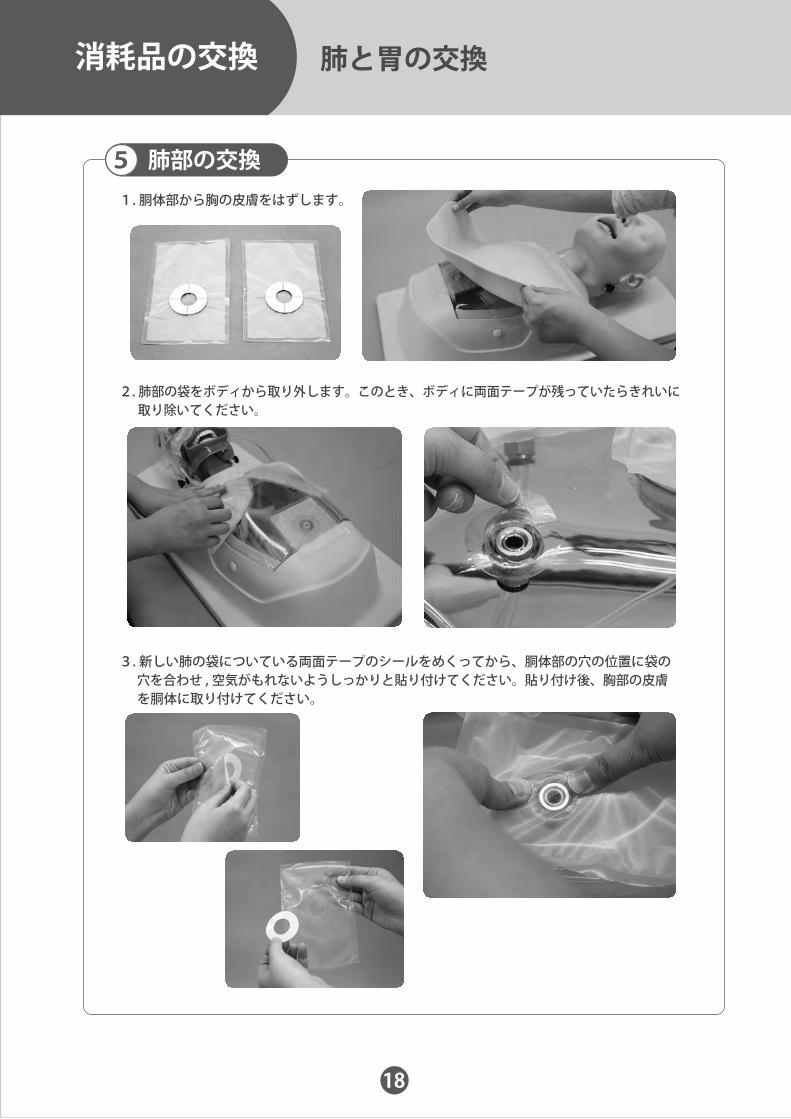
Replacement of the consumable parts Lung and Stomach Bag
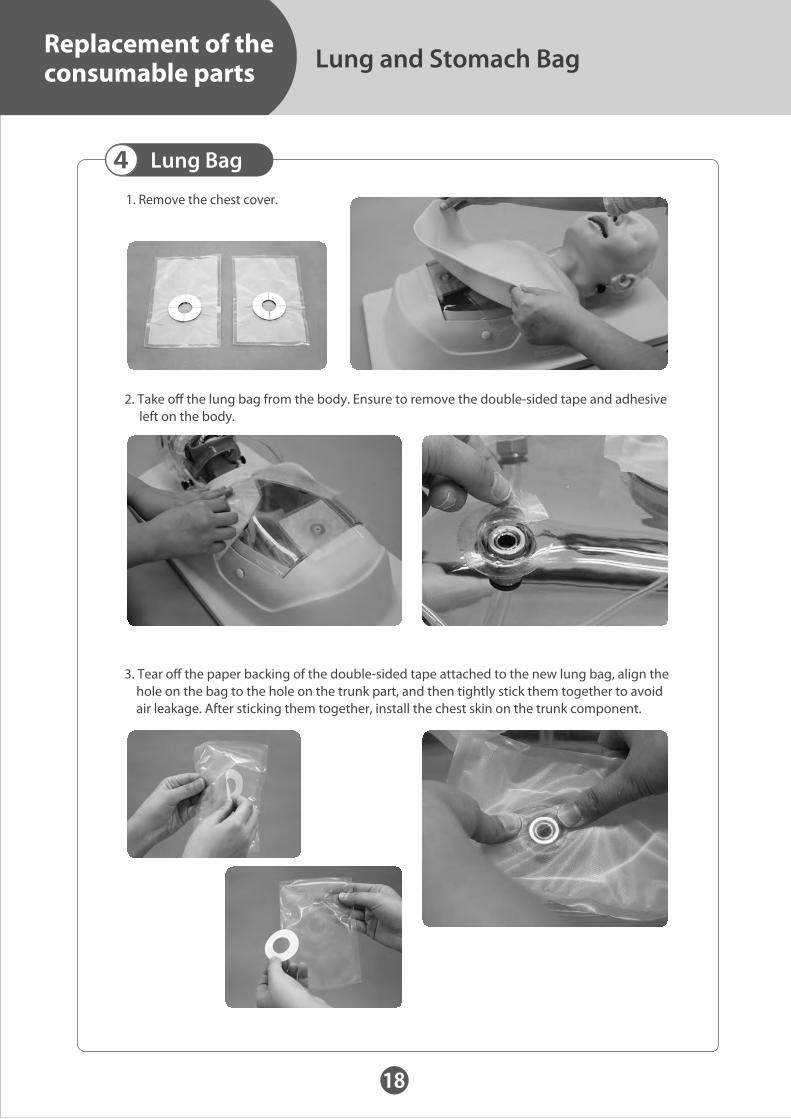
Lung Bag
1. Remove the chest cover.
2. Take o� the lung bag from the body. Ensure to remove the double-sided tape and adhesiveleft on the body.
3. Tear o� the paper backing of the double-sided tape attached to the new lung bag, align thehole on the bag to the hole on the trunk part, and then tightly stick them together to avoidair leakage. After sticking them together, install the chest skin on the trunk component.
5 Stomach Bag
19
Stick the lung bag and the stomach bag together after aligning them into the correct direction as shown in the photos above.
Replacement of the consumable parts Lung and Stomach Bag
1. Remove the chest cover.
2. Take o� the stomach bag from the body. Ensure to remove the double-sided tape and adhesive left on the body.
3. Tear o� the paper backing of the double-sided tape attached to the new lung bag, align the hole on the bag to the hole on the trunk part, and then tightly stick them together to avoid air leakage. After sticking them together, install the chest skin on the trunk component.
Caution
20
After Training
After Training
Clean and remove the lubricant on the body with water or diluted detergent. Talcum powder may be used on the face mask and chest cover and body after use to preserve suppleness of the skin and prevent it from being stained. Before storage, ensure that model is dry.
Don’t mark on the model and other components with pen or leave printed materials contacted on their surface. Ink marks on the models will be irremovable.
Caution
2018.04
The contents of the instruction manual are subject to change without prior notice.No part of this instruction manual may be reproduced or transmitted in any form without permission from the manufacturer. Please contact manufacturer for extra copies of this manual which may contain important updates and revisions. Please contact manufacturer with any discrepancies in this manual or product feedback. Your cooperation is greatly appreciated.
・For inquiries and service, please contact your distributor or KYOTO KAGAKU CO., LTD.
KyotoKagaku America Inc.USA,Canada,and South America