Introduction to creating and testing an API application in the Alma Developer Network Contents: Log into the Alma Developers Network Create an application Prepare to run the application Run the application in the developers network Run the application in Chrome Advanced REST Client See the data really updated from the API Log into the Alma Developers Network 1. Access the Alma Developers network at https://developers.exlibrisgroup.com/ Log in or create a user (Signup) if you do not already have one. Note: If you just ‘Signup’ instead of getting a username
Transcript
Introduction to creating and testing an API application in the Alma Developer Network
Contents:Log into the Alma Developers NetworkCreate an applicationPrepare to run the applicationRun the application in the developers networkRun the application in Chrome Advanced REST ClientSee the data really updated from the API
Log into the Alma Developers Network
1. Access the Alma Developers network at https://developers.exlibrisgroup.com/
Log in or create a user (Signup) if you do not already have one.
Note: If you just ‘Signup’ instead of getting a username and password from Ex Libris then you will not have most of the capabilities being shown in the rest of this document . Signing up is only for testing purposes which allow READ/GET API functions ONLY (not WRITE) and ONLY with Ex Libris' test data.
To use full API capabilities (READ and/or READ/WRITE), you will need a real user: either the administrative one Ex Libris provides for managing you specific
institution OR be invited by their institution's administrator and create your user that way.
2. See that you are logged in
Create an application
1. Click the ‘Applications’ link on the Developer Network dashboard
2. Click “Add an application” (you may need to scroll down to see this button depending on what you already have in your profile)
3. Fill in the first page as desired and click “Next Step”
4. Choose the desired API area. In this case we chose “Users”
5. Accept the ‘Terms and Conditions’ and click ‘Save’
6. See that now when you click ‘Applications’ from the dashboard the application we just made appears in the list. Note the ‘API Key’. You may want to copy it to because you will need it later to actually run this application..
7. Once the application is created you may wish to edit it and then define whether it will be ‘read’ or ‘read/write’ and whether it will apply to your sandbox or production environment. First click ‘edit’ then switch to the ‘API Management’ tab and define as desired
Prepare to run the application
1. Click the ‘Developer Network’ icon to return to the homepage
2. Under ‘Docs’ choose ‘Alma’
3. Click the ‘API Console’ link
4. Select the relevant API, Resource and Method. Below are choosing ‘GET’
5. In the ‘API Key’ section select the API we just made and click ‘Authentication’
6. The ‘Service Authentication’ window will open. Select ‘API Key’ and in the ‘Value’ field enter the API Key we saw above in step 6 of the ‘Create an application’ section
Run the application in the developers network
1. Depending on the ‘method’ (DELETE | GET | PUT) fill in the section on the page and click ‘execute request’. Below we do ‘GET for user ID YoelK613
2. The results appear, in this case it is the xml of the patron
3. We can also change method to PUT and place the xml from the GET (with modified information if desired) into the ‘Representation’ field and then the
‘Execute Request’ will update (PUT) the patron information.
Run the application in Chrome Advanced REST Client
1. Activate the Chrome Application (for example from chrome://apps)Each REST client will work slightly differently. Here we are using the ‘Advanced REST Client’
2. Get the proper URL syntax by first doing a ‘PUT’ in Alma developers network (as below). This time we will choose PUT
In the “Representation” field we have put the xml which we received from the GET command with a slight modification (to change the data)
3. After executing the PUT we switch to the ‘Query’ tab and copy the URL. The URL (selected in blue below) is from after the ‘PUT’ to before the ‘Content-Type’. When copying the URL syntax do not copy the word PUT and copy up to and not including ‘Content type’
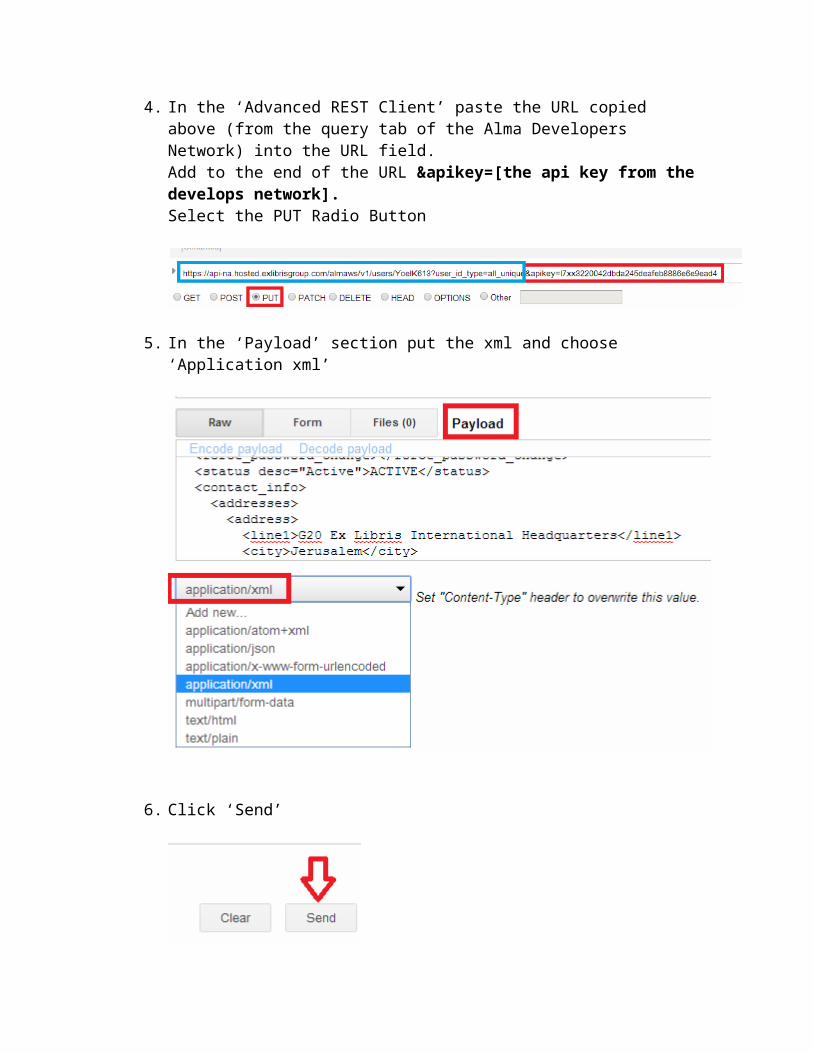
4. In the ‘Advanced REST Client’ paste the URL copied above (from the query tab of the Alma Developers Network) into the URL field. Add to the end of the URL &apikey=[the api key from the develops network]. Select the PUT Radio Button
5. In the ‘Payload’ section put the xml and choose ‘Application xml’
6. Click ‘Send’
See the data really updated from the API
1. View part of the user record in the actual Alma user interface before running the application. Here is the street address for patron YoelK613
2. Change it as follows in the ‘Advanced REST Client’