611
March 2002 30-000485-011 VERITAS NetBackup ™ DataCenter 4.5 Media Manager System Administrator’s Guide for UNIX

March 200230-000485-011
VERITAS NetBackup™ DataCenter 4.5
Media Manager System Administrator’s Guide
for UNIX
Disclaimer
The information contained in this publication is subject to change without notice. VERITAS Software Corporation makes no warranty of any kind with regard to this manual, including, but not limited to, the implied warranties of merchantability and fitness for a particular purpose. VERITAS Software Corporation shall not be liable for errors contained herein or for incidental or consequential damages in connection with the furnishing, performance, or use of this manual.
Copyright
Copyright © 1993-2002 VERITAS Software Corporation. All Rights Reserved. VERITAS, VERITAS SOFTWARE, the VERITAS logo, Business Without Interruption, VERITAS The Data Availability Company, VERITAS NetBackup, VERITAS NetBackup BusinesServer, VERITAS Remote Storage for Microsoft Exchange, VERITAS Storage Migrator, and VERITAS Storage Migrator Remote are trademarks or registered trademarks of VERITAS Software Corporation in the U.S. and/or other countries. Other product names mentioned herein may be trademarks or registered trademarks of their respective companies.
Portions of this software are derived from the RSA Data Security, Inc. MD5 Message-Digest Algorithm. Copyright 1991-92, RSA Data Security, Inc. Created 1991. All rights reserved.
VERITAS Software Corporation350 Ellis StreetMountain View, CA 94043 USAPhone 650–527–8000 Fax 650-527-2908 www.veritas.com

iii
Contents
About this Guide . . . . . . . . . . . . . . . . . . . . . . . . . . . . . . . . . . . . . . . . . . . . . . . . . . . .xxvii
Audience . . . . . . . . . . . . . . . . . . . . . . . . . . . . . . . . . . . . . . . . . . . . . . . . . . . . . . . . . . . . . . xxvii
Organization . . . . . . . . . . . . . . . . . . . . . . . . . . . . . . . . . . . . . . . . . . . . . . . . . . . . . . . . . . . xxviii
Related Documents . . . . . . . . . . . . . . . . . . . . . . . . . . . . . . . . . . . . . . . . . . . . . . . . . . . . . . xxix
Accessibility . . . . . . . . . . . . . . . . . . . . . . . . . . . . . . . . . . . . . . . . . . . . . . . . . . . . . . . . . . . . xxxi
Conventions . . . . . . . . . . . . . . . . . . . . . . . . . . . . . . . . . . . . . . . . . . . . . . . . . . . . . . . . . . . . xxxi
Type Style . . . . . . . . . . . . . . . . . . . . . . . . . . . . . . . . . . . . . . . . . . . . . . . . . . . . . . . . . . . xxxi
Notes and Cautions . . . . . . . . . . . . . . . . . . . . . . . . . . . . . . . . . . . . . . . . . . . . . . . . . . .xxxii
Key Combinations . . . . . . . . . . . . . . . . . . . . . . . . . . . . . . . . . . . . . . . . . . . . . . . . . . . .xxxii
Command Usage . . . . . . . . . . . . . . . . . . . . . . . . . . . . . . . . . . . . . . . . . . . . . . . . . . . . .xxxii
Terms . . . . . . . . . . . . . . . . . . . . . . . . . . . . . . . . . . . . . . . . . . . . . . . . . . . . . . . . . . . . . . xxxiii
Getting Help . . . . . . . . . . . . . . . . . . . . . . . . . . . . . . . . . . . . . . . . . . . . . . . . . . . . . . . . . . . xxxiii
Chapter 1. Introduction to Media Manager . . . . . . . . . . . . . . . . . . . . . . . . . . . . . . . . . .1
Administrator and User Interfaces . . . . . . . . . . . . . . . . . . . . . . . . . . . . . . . . . . . . . . . . . . . . 2
Java Administrative GUI . . . . . . . . . . . . . . . . . . . . . . . . . . . . . . . . . . . . . . . . . . . . . . . . . . 3
Starting the Administration Interface . . . . . . . . . . . . . . . . . . . . . . . . . . . . . . . . . . . . 3
Shortcut Menus . . . . . . . . . . . . . . . . . . . . . . . . . . . . . . . . . . . . . . . . . . . . . . . . . . . . . . . 5
Menu-Based Administrative Interfaces . . . . . . . . . . . . . . . . . . . . . . . . . . . . . . . . . . . . . 5
Command Line Administrative Interfaces (CLI) . . . . . . . . . . . . . . . . . . . . . . . . . . . . . . 5
The Device Configuration Wizard . . . . . . . . . . . . . . . . . . . . . . . . . . . . . . . . . . . . . . . . . . 6
The Volume Configuration Wizard . . . . . . . . . . . . . . . . . . . . . . . . . . . . . . . . . . . . . . . . . 6
Device and Media Configuration - Overview . . . . . . . . . . . . . . . . . . . . . . . . . . . . . . . . . . . 6
Using Media Manager - Overview . . . . . . . . . . . . . . . . . . . . . . . . . . . . . . . . . . . . . . . . . . . . 7
iv NetBackup DataCenter Media Manager System Administrator’s Guide for UNIX
Requesting Volumes . . . . . . . . . . . . . . . . . . . . . . . . . . . . . . . . . . . . . . . . . . . . . . . . . . . . . 7
Checking Barcodes . . . . . . . . . . . . . . . . . . . . . . . . . . . . . . . . . . . . . . . . . . . . . . . . . . . . . . 8
Volume Pools . . . . . . . . . . . . . . . . . . . . . . . . . . . . . . . . . . . . . . . . . . . . . . . . . . . . . . . . . . . 8
Security Issues . . . . . . . . . . . . . . . . . . . . . . . . . . . . . . . . . . . . . . . . . . . . . . . . . . . . . . . . . . . . . 9
Chapter 2. Configuring Storage Devices . . . . . . . . . . . . . . . . . . . . . . . . . . . . . . . . . . 11
Starting Device Management . . . . . . . . . . . . . . . . . . . . . . . . . . . . . . . . . . . . . . . . . . . . . . . 11
Using the Device Management Window . . . . . . . . . . . . . . . . . . . . . . . . . . . . . . . . . . . . . . 12
Menus and Commands . . . . . . . . . . . . . . . . . . . . . . . . . . . . . . . . . . . . . . . . . . . . . . . . . 13
Toolbars . . . . . . . . . . . . . . . . . . . . . . . . . . . . . . . . . . . . . . . . . . . . . . . . . . . . . . . . . . . . . . 14
Tree Pane . . . . . . . . . . . . . . . . . . . . . . . . . . . . . . . . . . . . . . . . . . . . . . . . . . . . . . . . . . . . . 15
Global Topology Pane . . . . . . . . . . . . . . . . . . . . . . . . . . . . . . . . . . . . . . . . . . . . . . . . . . 15
Topology Images . . . . . . . . . . . . . . . . . . . . . . . . . . . . . . . . . . . . . . . . . . . . . . . . . . . . 15
Topology Connections . . . . . . . . . . . . . . . . . . . . . . . . . . . . . . . . . . . . . . . . . . . . . . . 16
Selecting Topology Objects . . . . . . . . . . . . . . . . . . . . . . . . . . . . . . . . . . . . . . . . . . . 17
Devices Pane . . . . . . . . . . . . . . . . . . . . . . . . . . . . . . . . . . . . . . . . . . . . . . . . . . . . . . . . . . 17
Using the Drives Tab . . . . . . . . . . . . . . . . . . . . . . . . . . . . . . . . . . . . . . . . . . . . . . . . . 17
Using the Robots Tab . . . . . . . . . . . . . . . . . . . . . . . . . . . . . . . . . . . . . . . . . . . . . . . . 20
Using the Hosts Tab . . . . . . . . . . . . . . . . . . . . . . . . . . . . . . . . . . . . . . . . . . . . . . . . . 21
Shortcut Menus and Commands . . . . . . . . . . . . . . . . . . . . . . . . . . . . . . . . . . . . . . . . . . 22
Customizing the Window . . . . . . . . . . . . . . . . . . . . . . . . . . . . . . . . . . . . . . . . . . . . . . . 23
Changing the View of the Topology Pane . . . . . . . . . . . . . . . . . . . . . . . . . . . . . . . 23
Allowable Media Manager Characters . . . . . . . . . . . . . . . . . . . . . . . . . . . . . . . . . . . . . 23
Performing Initial Device Configuration . . . . . . . . . . . . . . . . . . . . . . . . . . . . . . . . . . . . . . 23
Making Device Configuration Changes . . . . . . . . . . . . . . . . . . . . . . . . . . . . . . . . . . . . . . 24
Administering Devices on Other Device Hosts . . . . . . . . . . . . . . . . . . . . . . . . . . . . . . . . 25
Remote Administration of Other UNIX Hosts . . . . . . . . . . . . . . . . . . . . . . . . . . . . . . 25
Remote Administration Example . . . . . . . . . . . . . . . . . . . . . . . . . . . . . . . . . . . . . . 25
Adding SERVER Entries in the bp.conf File . . . . . . . . . . . . . . . . . . . . . . . . . . . . . 26
Media Manager Security . . . . . . . . . . . . . . . . . . . . . . . . . . . . . . . . . . . . . . . . . . . . . . . . 26

Contents v
vmd Considerations . . . . . . . . . . . . . . . . . . . . . . . . . . . . . . . . . . . . . . . . . . . . . . . . . . 27
Example SERVER Entries . . . . . . . . . . . . . . . . . . . . . . . . . . . . . . . . . . . . . . . . . . . . . 27
Managing the Global Device Database Host . . . . . . . . . . . . . . . . . . . . . . . . . . . . . . . . . . . 28
Adding a Device Host to the Global Device Database . . . . . . . . . . . . . . . . . . . . . . . . 28
Removing a Device Host From the Global Device Database . . . . . . . . . . . . . . . . . . . 28
Synchronizing the Global Device Database . . . . . . . . . . . . . . . . . . . . . . . . . . . . . . . . . 29
Specifying a Different Host as the Global Device Database Host . . . . . . . . . . . . . . . 29
Using the Device Configuration Wizard to Configure Devices . . . . . . . . . . . . . . . . . . . 29
Wizard Limitations . . . . . . . . . . . . . . . . . . . . . . . . . . . . . . . . . . . . . . . . . . . . . . . . . . . . . 30
Drives In an SSO Configuration . . . . . . . . . . . . . . . . . . . . . . . . . . . . . . . . . . . . . . . . . . . 30
Starting the Wizard . . . . . . . . . . . . . . . . . . . . . . . . . . . . . . . . . . . . . . . . . . . . . . . . . . . . . 30
Rerunning the Wizard . . . . . . . . . . . . . . . . . . . . . . . . . . . . . . . . . . . . . . . . . . . . . . . . . . . 30
External Device Mapping Files . . . . . . . . . . . . . . . . . . . . . . . . . . . . . . . . . . . . . . . . . . . 31
Obtaining External Device Mapping Files . . . . . . . . . . . . . . . . . . . . . . . . . . . . . . . 31
Managing Partially-Configured Devices . . . . . . . . . . . . . . . . . . . . . . . . . . . . . . . . . . . . . . 31
Adding Robots . . . . . . . . . . . . . . . . . . . . . . . . . . . . . . . . . . . . . . . . . . . . . . . . . . . . . . . . . . . . 32
Dialog Box Entries for Adding and Changing Robots . . . . . . . . . . . . . . . . . . . . . . . . 33
Device Host . . . . . . . . . . . . . . . . . . . . . . . . . . . . . . . . . . . . . . . . . . . . . . . . . . . . . . . . . 33
Robot Type . . . . . . . . . . . . . . . . . . . . . . . . . . . . . . . . . . . . . . . . . . . . . . . . . . . . . . . . . 34
Robot Number . . . . . . . . . . . . . . . . . . . . . . . . . . . . . . . . . . . . . . . . . . . . . . . . . . . . . . 34
Volume Database Host . . . . . . . . . . . . . . . . . . . . . . . . . . . . . . . . . . . . . . . . . . . . . . . 35
Robot Control . . . . . . . . . . . . . . . . . . . . . . . . . . . . . . . . . . . . . . . . . . . . . . . . . . . . . . . 35
Robot is controlled locally by this device host . . . . . . . . . . . . . . . . . . . . . . . . . . . . 37
Robot control is handled by a remote host . . . . . . . . . . . . . . . . . . . . . . . . . . . . . . . 39
Robot control is attached to an NDMP host . . . . . . . . . . . . . . . . . . . . . . . . . . . . . . 40
Adding Shared Drives . . . . . . . . . . . . . . . . . . . . . . . . . . . . . . . . . . . . . . . . . . . . . . . . . . . . . . 41
Using the Device Configuration Wizard . . . . . . . . . . . . . . . . . . . . . . . . . . . . . . . . . . . 41
Using The Shared Drive Wizard . . . . . . . . . . . . . . . . . . . . . . . . . . . . . . . . . . . . . . . . . . 41
Adding Drives . . . . . . . . . . . . . . . . . . . . . . . . . . . . . . . . . . . . . . . . . . . . . . . . . . . . . . . . . . . . 41
Dialog Box Entries for Adding or Changing Drives . . . . . . . . . . . . . . . . . . . . . . . . . . 43

vi NetBackup DataCenter Media Manager System Administrator’s Guide for UNIX
Device Host Section . . . . . . . . . . . . . . . . . . . . . . . . . . . . . . . . . . . . . . . . . . . . . . . . . . 43
Drive Information Section . . . . . . . . . . . . . . . . . . . . . . . . . . . . . . . . . . . . . . . . . . . . 43
Robotic Drive Information Section . . . . . . . . . . . . . . . . . . . . . . . . . . . . . . . . . . . . . 45
Managing Robots and Drives . . . . . . . . . . . . . . . . . . . . . . . . . . . . . . . . . . . . . . . . . . . . . . . 47
Changing a Robot Configuration . . . . . . . . . . . . . . . . . . . . . . . . . . . . . . . . . . . . . . . . . 48
Changing the Configuration of a Drive . . . . . . . . . . . . . . . . . . . . . . . . . . . . . . . . . . . . 48
Changing a Non-Shared Drive to a Shared Drive . . . . . . . . . . . . . . . . . . . . . . . . . . . 49
Changing the Volume Database Host for Standalone Drives . . . . . . . . . . . . . . . . . . 49
Deleting Robots . . . . . . . . . . . . . . . . . . . . . . . . . . . . . . . . . . . . . . . . . . . . . . . . . . . . . . . . 50
Deleting Drives . . . . . . . . . . . . . . . . . . . . . . . . . . . . . . . . . . . . . . . . . . . . . . . . . . . . . . . . 50
Cleaning Tape Drives . . . . . . . . . . . . . . . . . . . . . . . . . . . . . . . . . . . . . . . . . . . . . . . . . . . 51
Robot and Drive Configuration Examples . . . . . . . . . . . . . . . . . . . . . . . . . . . . . . . . . . . . 53
Example 1: Host With One Robot . . . . . . . . . . . . . . . . . . . . . . . . . . . . . . . . . . . . . . . . . 53
Example 2: Host With Standalone Drives . . . . . . . . . . . . . . . . . . . . . . . . . . . . . . . . . . 57
Example 3: Robot and Drives Distributed Among Multiple Hosts . . . . . . . . . . . . . 60
Configuration on the Windows Host eel . . . . . . . . . . . . . . . . . . . . . . . . . . . . . . . . 61
Configuration on the Windows Host shark . . . . . . . . . . . . . . . . . . . . . . . . . . . . . . 62
Configuration on the UNIX Host whale . . . . . . . . . . . . . . . . . . . . . . . . . . . . . . . . 63
Example 4: UNIX Host With An ACS Robot . . . . . . . . . . . . . . . . . . . . . . . . . . . . . . . . 64
Example 5: UNIX Host With A TLH Robot . . . . . . . . . . . . . . . . . . . . . . . . . . . . . . . . . 67
Example 6: UNIX Host With A TLM Robot . . . . . . . . . . . . . . . . . . . . . . . . . . . . . . . . 70
Chapter 3. Managing Media . . . . . . . . . . . . . . . . . . . . . . . . . . . . . . . . . . . . . . . . . . . . . 73
Starting Media Management . . . . . . . . . . . . . . . . . . . . . . . . . . . . . . . . . . . . . . . . . . . . . . . . 73
Using the Media Management Window . . . . . . . . . . . . . . . . . . . . . . . . . . . . . . . . . . . . . . 74
Menus and Commands . . . . . . . . . . . . . . . . . . . . . . . . . . . . . . . . . . . . . . . . . . . . . . . . . 74
Toolbars . . . . . . . . . . . . . . . . . . . . . . . . . . . . . . . . . . . . . . . . . . . . . . . . . . . . . . . . . . . . . . 76
Tree Pane . . . . . . . . . . . . . . . . . . . . . . . . . . . . . . . . . . . . . . . . . . . . . . . . . . . . . . . . . . . . . 76
Volumes Pane . . . . . . . . . . . . . . . . . . . . . . . . . . . . . . . . . . . . . . . . . . . . . . . . . . . . . . . . . . 77
Managing the Volumes Pane . . . . . . . . . . . . . . . . . . . . . . . . . . . . . . . . . . . . . . . . . . 77

Contents vii
Volume Pools List . . . . . . . . . . . . . . . . . . . . . . . . . . . . . . . . . . . . . . . . . . . . . . . . . . . . 78
Volume Groups List . . . . . . . . . . . . . . . . . . . . . . . . . . . . . . . . . . . . . . . . . . . . . . . . . . 79
Robots List . . . . . . . . . . . . . . . . . . . . . . . . . . . . . . . . . . . . . . . . . . . . . . . . . . . . . . . . . . 79
Volumes List . . . . . . . . . . . . . . . . . . . . . . . . . . . . . . . . . . . . . . . . . . . . . . . . . . . . . . . . 81
Shortcut Menus and Commands . . . . . . . . . . . . . . . . . . . . . . . . . . . . . . . . . . . . . . . . . . 84
Customizing the Window . . . . . . . . . . . . . . . . . . . . . . . . . . . . . . . . . . . . . . . . . . . . . . . . 84
Showing or Hiding Columns . . . . . . . . . . . . . . . . . . . . . . . . . . . . . . . . . . . . . . . . . . 84
Allowable Media Manager Characters . . . . . . . . . . . . . . . . . . . . . . . . . . . . . . . . . . . . . 84
Administering Media on Other Hosts . . . . . . . . . . . . . . . . . . . . . . . . . . . . . . . . . . . . . . . . 85
Determining the Volume Database Host for a Device . . . . . . . . . . . . . . . . . . . . . . . . 85
Managing Media on Other Hosts . . . . . . . . . . . . . . . . . . . . . . . . . . . . . . . . . . . . . . . . . 85
Configuring Volume Pools . . . . . . . . . . . . . . . . . . . . . . . . . . . . . . . . . . . . . . . . . . . . . . . . . . 86
Adding a New Volume Pool or Scratch Volume Pool . . . . . . . . . . . . . . . . . . . . . . . . 87
Adding a Scratch Volume Pool . . . . . . . . . . . . . . . . . . . . . . . . . . . . . . . . . . . . . . . . 88
Changing the Attributes of a Volume Pool . . . . . . . . . . . . . . . . . . . . . . . . . . . . . . . . . 89
Changing a Volume Pool To a Scratch Volume Pool . . . . . . . . . . . . . . . . . . . . . . 90
Changing the Volume Pool Assignment for a Volume . . . . . . . . . . . . . . . . . . . . . . . 90
Deleting a Volume Pool . . . . . . . . . . . . . . . . . . . . . . . . . . . . . . . . . . . . . . . . . . . . . . . . . . 91
Methods Available for Injecting and Ejecting Volumes . . . . . . . . . . . . . . . . . . . . . . . . . . 92
Methods for Injecting Volumes into a Robot . . . . . . . . . . . . . . . . . . . . . . . . . . . . . . . . 92
When Adding New Volumes . . . . . . . . . . . . . . . . . . . . . . . . . . . . . . . . . . . . . . . . . . 92
When Moving Volumes . . . . . . . . . . . . . . . . . . . . . . . . . . . . . . . . . . . . . . . . . . . . . . . 93
When Performing a Volume Configuration Update Using Robot Inventory . . 93
Methods for Ejecting Volumes From a Robot . . . . . . . . . . . . . . . . . . . . . . . . . . . . . . . 94
When Moving Volumes . . . . . . . . . . . . . . . . . . . . . . . . . . . . . . . . . . . . . . . . . . . . . . . 94
Using the Eject Volumes From Robot Command . . . . . . . . . . . . . . . . . . . . . . . . . 94
Inject and Eject Functions Available by Robot Type . . . . . . . . . . . . . . . . . . . . . . . . . . 94
Adding New Volumes . . . . . . . . . . . . . . . . . . . . . . . . . . . . . . . . . . . . . . . . . . . . . . . . . . . . . 95
Methods Available for Adding Volumes . . . . . . . . . . . . . . . . . . . . . . . . . . . . . . . . . . . 95
Robotic Volumes (Volumes Located in a Robot) . . . . . . . . . . . . . . . . . . . . . . . . . . 96

viii NetBackup DataCenter Media Manager System Administrator’s Guide for UNIX
Standalone Volumes (Volumes To Be Used in Standalone Drives) . . . . . . . . . . 96
NetBackup Catalog Backup Volumes . . . . . . . . . . . . . . . . . . . . . . . . . . . . . . . . . . . 96
Notes on Labeling NetBackup Volumes . . . . . . . . . . . . . . . . . . . . . . . . . . . . . . . . 97
Adding Volumes - Using the Robot Inventory Update Option . . . . . . . . . . . . . . . . 97
Adding Volumes - Using the Actions Menu . . . . . . . . . . . . . . . . . . . . . . . . . . . . . . . . 98
Dialog Box Entries for New Volumes . . . . . . . . . . . . . . . . . . . . . . . . . . . . . . . . . . . . . 100
Media Type . . . . . . . . . . . . . . . . . . . . . . . . . . . . . . . . . . . . . . . . . . . . . . . . . . . . . . . . 100
Volume Is In a Robotic Library . . . . . . . . . . . . . . . . . . . . . . . . . . . . . . . . . . . . . . . 100
Device Host . . . . . . . . . . . . . . . . . . . . . . . . . . . . . . . . . . . . . . . . . . . . . . . . . . . . . . . . 100
Robot . . . . . . . . . . . . . . . . . . . . . . . . . . . . . . . . . . . . . . . . . . . . . . . . . . . . . . . . . . . . . 100
Number of Volumes . . . . . . . . . . . . . . . . . . . . . . . . . . . . . . . . . . . . . . . . . . . . . . . . 100
Media ID Naming Style . . . . . . . . . . . . . . . . . . . . . . . . . . . . . . . . . . . . . . . . . . . . . 101
Media ID or First Media ID . . . . . . . . . . . . . . . . . . . . . . . . . . . . . . . . . . . . . . . . . . 101
Partner ID . . . . . . . . . . . . . . . . . . . . . . . . . . . . . . . . . . . . . . . . . . . . . . . . . . . . . . . . . 101
Description . . . . . . . . . . . . . . . . . . . . . . . . . . . . . . . . . . . . . . . . . . . . . . . . . . . . . . . . 102
First Slot Number . . . . . . . . . . . . . . . . . . . . . . . . . . . . . . . . . . . . . . . . . . . . . . . . . . 102
Maximum Mounts . . . . . . . . . . . . . . . . . . . . . . . . . . . . . . . . . . . . . . . . . . . . . . . . . . 102
Maximum Cleanings . . . . . . . . . . . . . . . . . . . . . . . . . . . . . . . . . . . . . . . . . . . . . . . . 102
Volume Group . . . . . . . . . . . . . . . . . . . . . . . . . . . . . . . . . . . . . . . . . . . . . . . . . . . . . 103
Volume Pool . . . . . . . . . . . . . . . . . . . . . . . . . . . . . . . . . . . . . . . . . . . . . . . . . . . . . . . 104
Label Optical Media . . . . . . . . . . . . . . . . . . . . . . . . . . . . . . . . . . . . . . . . . . . . . . . . 104
Inject Volume Into Robot via the Media Access Port . . . . . . . . . . . . . . . . . . . . . 104
Using the Volume Configuration Wizard . . . . . . . . . . . . . . . . . . . . . . . . . . . . . . . . . . . . 104
Wizard Limitations . . . . . . . . . . . . . . . . . . . . . . . . . . . . . . . . . . . . . . . . . . . . . . . . . . . . 105
What To Expect In This Wizard . . . . . . . . . . . . . . . . . . . . . . . . . . . . . . . . . . . . . . . . . 105
Before You Start This Wizard . . . . . . . . . . . . . . . . . . . . . . . . . . . . . . . . . . . . . . . . . . . 106
To Start This Wizard . . . . . . . . . . . . . . . . . . . . . . . . . . . . . . . . . . . . . . . . . . . . . . . . . . . 106
Moving Volumes . . . . . . . . . . . . . . . . . . . . . . . . . . . . . . . . . . . . . . . . . . . . . . . . . . . . . . . . . 106
Moving Volumes - Using the Robot Inventory Update Option . . . . . . . . . . . . . . . 107
Moving Volumes - Using the Actions Menu . . . . . . . . . . . . . . . . . . . . . . . . . . . . . . . 107
Contents ix
Dialog Box Entries for Move Volumes . . . . . . . . . . . . . . . . . . . . . . . . . . . . . . . . . . . . 108
Volumes to Move . . . . . . . . . . . . . . . . . . . . . . . . . . . . . . . . . . . . . . . . . . . . . . . . . . . 108
Volume Is In a Robotic Library . . . . . . . . . . . . . . . . . . . . . . . . . . . . . . . . . . . . . . . 109
Device Host . . . . . . . . . . . . . . . . . . . . . . . . . . . . . . . . . . . . . . . . . . . . . . . . . . . . . . . . 109
Robot . . . . . . . . . . . . . . . . . . . . . . . . . . . . . . . . . . . . . . . . . . . . . . . . . . . . . . . . . . . . . 109
Volume Group . . . . . . . . . . . . . . . . . . . . . . . . . . . . . . . . . . . . . . . . . . . . . . . . . . . . . 110
First Slot Number . . . . . . . . . . . . . . . . . . . . . . . . . . . . . . . . . . . . . . . . . . . . . . . . . . . 110
Eject Volume From Robot via the Media Access Port . . . . . . . . . . . . . . . . . . . . . 111
Inject Volume Into Robot via the Media Access Port . . . . . . . . . . . . . . . . . . . . . 111
When to Delete Volumes . . . . . . . . . . . . . . . . . . . . . . . . . . . . . . . . . . . . . . . . . . . . . . . . . . 111
Deleting Volumes . . . . . . . . . . . . . . . . . . . . . . . . . . . . . . . . . . . . . . . . . . . . . . . . . . . . . . 112
Deleting a Volume Group . . . . . . . . . . . . . . . . . . . . . . . . . . . . . . . . . . . . . . . . . . . . . . . 112
Ejecting Volumes From Robots (Actions Menu Command) . . . . . . . . . . . . . . . . . . . . . 113
Deassigning Volumes . . . . . . . . . . . . . . . . . . . . . . . . . . . . . . . . . . . . . . . . . . . . . . . . . . . . . 114
Determining Which Application is Using a Volume . . . . . . . . . . . . . . . . . . . . . . . . 115
Deassigning NetBackup Volumes . . . . . . . . . . . . . . . . . . . . . . . . . . . . . . . . . . . . . . . . 115
Deassigning NetBackup Regular Backup Volumes . . . . . . . . . . . . . . . . . . . . . . 115
Deassigning NetBackup Catalog Backup Volumes . . . . . . . . . . . . . . . . . . . . . . . 116
Deassigning Storage Migrator Volumes . . . . . . . . . . . . . . . . . . . . . . . . . . . . . . . . . . . 116
Changing the Attributes for a Volume . . . . . . . . . . . . . . . . . . . . . . . . . . . . . . . . . . . . . . . 116
Dialog Box Entries for Change Volumes . . . . . . . . . . . . . . . . . . . . . . . . . . . . . . . . . . 117
Maximum Mounts . . . . . . . . . . . . . . . . . . . . . . . . . . . . . . . . . . . . . . . . . . . . . . . . . . 117
Expiration Date . . . . . . . . . . . . . . . . . . . . . . . . . . . . . . . . . . . . . . . . . . . . . . . . . . . . . 118
Description . . . . . . . . . . . . . . . . . . . . . . . . . . . . . . . . . . . . . . . . . . . . . . . . . . . . . . . . 119
Volume Pool . . . . . . . . . . . . . . . . . . . . . . . . . . . . . . . . . . . . . . . . . . . . . . . . . . . . . . . 119
Number of Cleanings Remaining . . . . . . . . . . . . . . . . . . . . . . . . . . . . . . . . . . . . . . 119
Changing the Volume Group of a Volume . . . . . . . . . . . . . . . . . . . . . . . . . . . . . . . . . . . 120
Moving A Volume Group . . . . . . . . . . . . . . . . . . . . . . . . . . . . . . . . . . . . . . . . . . . . . . . . . . 120
Replacing Volumes . . . . . . . . . . . . . . . . . . . . . . . . . . . . . . . . . . . . . . . . . . . . . . . . . . . . . . . 122
Replacing a Volume Without Reusing the Media ID . . . . . . . . . . . . . . . . . . . . . . . . 122

x NetBackup DataCenter Media Manager System Administrator’s Guide for UNIX
Replacing a Volume and Reusing the Media ID . . . . . . . . . . . . . . . . . . . . . . . . . . . . 123
Recycling Volumes . . . . . . . . . . . . . . . . . . . . . . . . . . . . . . . . . . . . . . . . . . . . . . . . . . . . . . . 123
Recycling Volumes Under the Same Media ID . . . . . . . . . . . . . . . . . . . . . . . . . . . . . 124
Recycling Volumes Under a New Media ID . . . . . . . . . . . . . . . . . . . . . . . . . . . . . . . 124
Chapter 4. Managing Media in Robots . . . . . . . . . . . . . . . . . . . . . . . . . . . . . . . . . . . 125
Robot Management Overview . . . . . . . . . . . . . . . . . . . . . . . . . . . . . . . . . . . . . . . . . . . . . 125
Robot Inventory Operations (Inventory Robot Dialog) . . . . . . . . . . . . . . . . . . . . . . 125
Checking Barcodes (Rescan/Update Barcodes Dialog) . . . . . . . . . . . . . . . . . . . . . . 127
Showing the Contents of a Robot . . . . . . . . . . . . . . . . . . . . . . . . . . . . . . . . . . . . . . . . . . . 127
Show Contents Reports for API Robots . . . . . . . . . . . . . . . . . . . . . . . . . . . . . . . . . . . 129
ACS Robots . . . . . . . . . . . . . . . . . . . . . . . . . . . . . . . . . . . . . . . . . . . . . . . . . . . . . . . . 129
TLH Robots . . . . . . . . . . . . . . . . . . . . . . . . . . . . . . . . . . . . . . . . . . . . . . . . . . . . . . . . 130
TLM Robots . . . . . . . . . . . . . . . . . . . . . . . . . . . . . . . . . . . . . . . . . . . . . . . . . . . . . . . 131
LMF Robots . . . . . . . . . . . . . . . . . . . . . . . . . . . . . . . . . . . . . . . . . . . . . . . . . . . . . . . 131
RSM Robots . . . . . . . . . . . . . . . . . . . . . . . . . . . . . . . . . . . . . . . . . . . . . . . . . . . . . . . 131
Comparing Robot Contents with the Volume Configuration . . . . . . . . . . . . . . . . . . . 131
Updating the Volume Configuration for a Robot . . . . . . . . . . . . . . . . . . . . . . . . . . . . . 135
When to Use Update Volume Configuration . . . . . . . . . . . . . . . . . . . . . . . . . . . . . . 135
When Not to Use Update Volume Configuration . . . . . . . . . . . . . . . . . . . . . . . . . . 136
To Update the Volume Configuration for a Robot . . . . . . . . . . . . . . . . . . . . . . . . . . 137
Changing the Update Options . . . . . . . . . . . . . . . . . . . . . . . . . . . . . . . . . . . . . . . . . . . 141
Update Options . . . . . . . . . . . . . . . . . . . . . . . . . . . . . . . . . . . . . . . . . . . . . . . . . . . . . . . 143
Media which have been removed from the robot should be assigned to the vol-ume group . . . . . . . . . . . . . . . . . . . . . . . . . . . . . . . . . . . . . . . . . . . . . . . . . . . . . . . . . 143
Media which have been moved into or within the robot should be assigned to the volume group . . . . . . . . . . . . . . . . . . . . . . . . . . . . . . . . . . . . . . . . . . . . . . . . . . . . . . 144
Media ID Prefix . . . . . . . . . . . . . . . . . . . . . . . . . . . . . . . . . . . . . . . . . . . . . . . . . . . . 144
Use Barcode Rules . . . . . . . . . . . . . . . . . . . . . . . . . . . . . . . . . . . . . . . . . . . . . . . . . . 146
Media Type (for robots that are not API robots) . . . . . . . . . . . . . . . . . . . . . . . . . 146
Volume Pool . . . . . . . . . . . . . . . . . . . . . . . . . . . . . . . . . . . . . . . . . . . . . . . . . . . . . . . 150

Contents xi
Label Media (local host only) . . . . . . . . . . . . . . . . . . . . . . . . . . . . . . . . . . . . . . . . . 151
Media Type Mappings (for API robots) . . . . . . . . . . . . . . . . . . . . . . . . . . . . . . . . 151
Examples of Updating a Volume Configuration . . . . . . . . . . . . . . . . . . . . . . . . . . . . 157
Example 1: Remove a volume from a robot . . . . . . . . . . . . . . . . . . . . . . . . . . . . . 157
Example 2: Add existing standalone volumes to a robot . . . . . . . . . . . . . . . . . . 159
Example 3: Move existing volumes within a robot . . . . . . . . . . . . . . . . . . . . . . . 161
Example 4: Add new volumes to a robot . . . . . . . . . . . . . . . . . . . . . . . . . . . . . . . 163
Example 5: Add cleaning tapes to a robot . . . . . . . . . . . . . . . . . . . . . . . . . . . . . . 165
Example 6: Moving existing volumes between robots . . . . . . . . . . . . . . . . . . . . 166
Example 7: Adding existing volumes when barcodes are not used . . . . . . . . . 167
Configuring Barcode Rules . . . . . . . . . . . . . . . . . . . . . . . . . . . . . . . . . . . . . . . . . . . . . . . . . 169
Adding a New Barcode Rule . . . . . . . . . . . . . . . . . . . . . . . . . . . . . . . . . . . . . . . . . . . . 170
Dialog Box Entries for Adding and Changing Barcode Rules . . . . . . . . . . . . . . . . . 171
Barcode Tag . . . . . . . . . . . . . . . . . . . . . . . . . . . . . . . . . . . . . . . . . . . . . . . . . . . . . . . . 171
Media Type . . . . . . . . . . . . . . . . . . . . . . . . . . . . . . . . . . . . . . . . . . . . . . . . . . . . . . . . 172
Volume Pool . . . . . . . . . . . . . . . . . . . . . . . . . . . . . . . . . . . . . . . . . . . . . . . . . . . . . . . 173
Maximum Mounts . . . . . . . . . . . . . . . . . . . . . . . . . . . . . . . . . . . . . . . . . . . . . . . . . . 174
Description . . . . . . . . . . . . . . . . . . . . . . . . . . . . . . . . . . . . . . . . . . . . . . . . . . . . . . . . 174
Changing a Barcode Rule . . . . . . . . . . . . . . . . . . . . . . . . . . . . . . . . . . . . . . . . . . . . . . . 174
Deleting a Barcode Rule . . . . . . . . . . . . . . . . . . . . . . . . . . . . . . . . . . . . . . . . . . . . . . . . 175
Configuring Media ID Generation Rules . . . . . . . . . . . . . . . . . . . . . . . . . . . . . . . . . . . . . 175
Adding a New Media ID Generation Rule . . . . . . . . . . . . . . . . . . . . . . . . . . . . . . . . . 176
Changing a Media ID Generation Rule . . . . . . . . . . . . . . . . . . . . . . . . . . . . . . . . . . . . 177
Deleting a Media ID Generation Rule . . . . . . . . . . . . . . . . . . . . . . . . . . . . . . . . . . . . . 178
Dialog Box Entries for Adding and Changing Media ID Generation Rules . . . . . 178
Robot Number . . . . . . . . . . . . . . . . . . . . . . . . . . . . . . . . . . . . . . . . . . . . . . . . . . . . . 178
Barcode Length . . . . . . . . . . . . . . . . . . . . . . . . . . . . . . . . . . . . . . . . . . . . . . . . . . . . . 178
Media ID Generation Rule . . . . . . . . . . . . . . . . . . . . . . . . . . . . . . . . . . . . . . . . . . . 178
Rescanning and Updating Barcodes for a Robot . . . . . . . . . . . . . . . . . . . . . . . . . . . . . . . 179
When to Use Rescan/Update . . . . . . . . . . . . . . . . . . . . . . . . . . . . . . . . . . . . . . . . . . . . 179

xii NetBackup DataCenter Media Manager System Administrator’s Guide for UNIX
When Not to Use Rescan/Update . . . . . . . . . . . . . . . . . . . . . . . . . . . . . . . . . . . . . . . 180
To Rescan/Update Barcodes . . . . . . . . . . . . . . . . . . . . . . . . . . . . . . . . . . . . . . . . . . . . 180
Chapter 5. Monitoring Storage Devices . . . . . . . . . . . . . . . . . . . . . . . . . . . . . . . . . . 181
Starting Device Monitor . . . . . . . . . . . . . . . . . . . . . . . . . . . . . . . . . . . . . . . . . . . . . . . . . . . 181
Using the Device Monitor Window . . . . . . . . . . . . . . . . . . . . . . . . . . . . . . . . . . . . . . . . . 182
Menus and Commands . . . . . . . . . . . . . . . . . . . . . . . . . . . . . . . . . . . . . . . . . . . . . . . . 183
Toolbars . . . . . . . . . . . . . . . . . . . . . . . . . . . . . . . . . . . . . . . . . . . . . . . . . . . . . . . . . . . . . 185
Drives Status Pane . . . . . . . . . . . . . . . . . . . . . . . . . . . . . . . . . . . . . . . . . . . . . . . . . . . . . 186
Pending Requests Pane . . . . . . . . . . . . . . . . . . . . . . . . . . . . . . . . . . . . . . . . . . . . . . . . . 188
Status Bar . . . . . . . . . . . . . . . . . . . . . . . . . . . . . . . . . . . . . . . . . . . . . . . . . . . . . . . . . . . . 191
Shortcut Menus and Commands . . . . . . . . . . . . . . . . . . . . . . . . . . . . . . . . . . . . . . . . . 191
Customizing the Window . . . . . . . . . . . . . . . . . . . . . . . . . . . . . . . . . . . . . . . . . . . . . . 191
Changing the Screen Display Refresh Rate . . . . . . . . . . . . . . . . . . . . . . . . . . . . . 191
Allowable Media Manager Characters . . . . . . . . . . . . . . . . . . . . . . . . . . . . . . . . . . . . 191
Controlling the Media Manager Device Daemon . . . . . . . . . . . . . . . . . . . . . . . . . . . . . 192
Administering Devices on Other Hosts . . . . . . . . . . . . . . . . . . . . . . . . . . . . . . . . . . . . . . 193
Remote Administration of UNIX Hosts . . . . . . . . . . . . . . . . . . . . . . . . . . . . . . . . . . . 194
Changing the Operating Mode of a Drive . . . . . . . . . . . . . . . . . . . . . . . . . . . . . . . . . . . . 194
Changing Mode Example . . . . . . . . . . . . . . . . . . . . . . . . . . . . . . . . . . . . . . . . . . . . . . . 194
Resetting a Drive . . . . . . . . . . . . . . . . . . . . . . . . . . . . . . . . . . . . . . . . . . . . . . . . . . . . . . . . . 195
Adding or Changing a Drive Comment . . . . . . . . . . . . . . . . . . . . . . . . . . . . . . . . . . . . . 196
Handling Pending Requests and Pending Actions . . . . . . . . . . . . . . . . . . . . . . . . . . . . 196
Pending Requests . . . . . . . . . . . . . . . . . . . . . . . . . . . . . . . . . . . . . . . . . . . . . . . . . . . . . 197
Pending Actions . . . . . . . . . . . . . . . . . . . . . . . . . . . . . . . . . . . . . . . . . . . . . . . . . . . . . . . 197
Assigning a Drive to a Pending Request . . . . . . . . . . . . . . . . . . . . . . . . . . . . . . . . . . . . . 197
Assigning a Drive Example 1 . . . . . . . . . . . . . . . . . . . . . . . . . . . . . . . . . . . . . . . . . . . 198
Assigning a Drive Example 2 . . . . . . . . . . . . . . . . . . . . . . . . . . . . . . . . . . . . . . . . . . . 199
Resolving Pending Actions . . . . . . . . . . . . . . . . . . . . . . . . . . . . . . . . . . . . . . . . . . . . . . . . 200
Resubmitting Requests . . . . . . . . . . . . . . . . . . . . . . . . . . . . . . . . . . . . . . . . . . . . . . . . . . . . 201

Contents xiii
Denying Requests . . . . . . . . . . . . . . . . . . . . . . . . . . . . . . . . . . . . . . . . . . . . . . . . . . . . . . . . 202
Shared Storage Option Summary Reports . . . . . . . . . . . . . . . . . . . . . . . . . . . . . . . . . . . . 202
Viewing SSO Summary Reports . . . . . . . . . . . . . . . . . . . . . . . . . . . . . . . . . . . . . . . . . 202
For More Information About Shared Drives (SSO) . . . . . . . . . . . . . . . . . . . . . . . . . . 203
Chapter 6. Managing Daemons . . . . . . . . . . . . . . . . . . . . . . . . . . . . . . . . . . . . . . . . .205
Overview of Media Manager Daemons . . . . . . . . . . . . . . . . . . . . . . . . . . . . . . . . . . . . . . 205
Robotic Daemons and Robotic Control Daemons . . . . . . . . . . . . . . . . . . . . . . . . . . . 205
Media Manager Device Daemon (ltid) . . . . . . . . . . . . . . . . . . . . . . . . . . . . . . . . . . . . . . . 207
Starting the Device Daemon . . . . . . . . . . . . . . . . . . . . . . . . . . . . . . . . . . . . . . . . . . . . . 207
From a Command Line . . . . . . . . . . . . . . . . . . . . . . . . . . . . . . . . . . . . . . . . . . . . . . 207
From the Java Administrative Interface . . . . . . . . . . . . . . . . . . . . . . . . . . . . . . . . 207
Stopping the Device Daemon . . . . . . . . . . . . . . . . . . . . . . . . . . . . . . . . . . . . . . . . . . . . 207
Automatic Volume Recognition Daemon (avrd) . . . . . . . . . . . . . . . . . . . . . . . . . . . . . . 208
Media Manager Volume Daemon (vmd) . . . . . . . . . . . . . . . . . . . . . . . . . . . . . . . . . . . . . 208
Robotic Daemons . . . . . . . . . . . . . . . . . . . . . . . . . . . . . . . . . . . . . . . . . . . . . . . . . . . . . . . . . 209
Starting and Stopping Robotic Daemons . . . . . . . . . . . . . . . . . . . . . . . . . . . . . . . . . . 211
Displaying Process Status using the vmps Script . . . . . . . . . . . . . . . . . . . . . . . . . . . . . . 212
Logging . . . . . . . . . . . . . . . . . . . . . . . . . . . . . . . . . . . . . . . . . . . . . . . . . . . . . . . . . . . . . . . . . 212
Chapter 7. Tape I/O Commands . . . . . . . . . . . . . . . . . . . . . . . . . . . . . . . . . . . . . . . . .213
Requesting Tapes . . . . . . . . . . . . . . . . . . . . . . . . . . . . . . . . . . . . . . . . . . . . . . . . . . . . . . . . . 213
Reading and Writing Tape Files . . . . . . . . . . . . . . . . . . . . . . . . . . . . . . . . . . . . . . . . . . . . 214
Positioning Tape Files . . . . . . . . . . . . . . . . . . . . . . . . . . . . . . . . . . . . . . . . . . . . . . . . . . 214
Rewinding Tape Files . . . . . . . . . . . . . . . . . . . . . . . . . . . . . . . . . . . . . . . . . . . . . . . . . . 215
Removing Tape Files . . . . . . . . . . . . . . . . . . . . . . . . . . . . . . . . . . . . . . . . . . . . . . . . . . . . . . 215
Using an Optical Disk . . . . . . . . . . . . . . . . . . . . . . . . . . . . . . . . . . . . . . . . . . . . . . . . . . . . . 215
External Access to Media Manager Controlled Devices . . . . . . . . . . . . . . . . . . . . . . . . 216
User Messages . . . . . . . . . . . . . . . . . . . . . . . . . . . . . . . . . . . . . . . . . . . . . . . . . . . . . . . . . . . 217
Appendix A. Media Manager Man Pages . . . . . . . . . . . . . . . . . . . . . . . . . . . . . . . . . .219

xiv NetBackup DataCenter Media Manager System Administrator’s Guide for UNIX
acsd(1M) . . . . . . . . . . . . . . . . . . . . . . . . . . . . . . . . . . . . . . . . . . . . . . . . . . . . . . . . . . . . . . . . 220
lmfd(1M) . . . . . . . . . . . . . . . . . . . . . . . . . . . . . . . . . . . . . . . . . . . . . . . . . . . . . . . . . . . . . . . . 222
ltid(1M) . . . . . . . . . . . . . . . . . . . . . . . . . . . . . . . . . . . . . . . . . . . . . . . . . . . . . . . . . . . . . . . . . 225
odld(1M) . . . . . . . . . . . . . . . . . . . . . . . . . . . . . . . . . . . . . . . . . . . . . . . . . . . . . . . . . . . . . . . . 227
tl4d(1M) . . . . . . . . . . . . . . . . . . . . . . . . . . . . . . . . . . . . . . . . . . . . . . . . . . . . . . . . . . . . . . . . 229
tl8d(1M) . . . . . . . . . . . . . . . . . . . . . . . . . . . . . . . . . . . . . . . . . . . . . . . . . . . . . . . . . . . . . . . . 231
tldd(1M) . . . . . . . . . . . . . . . . . . . . . . . . . . . . . . . . . . . . . . . . . . . . . . . . . . . . . . . . . . . . . . . . 235
tlhd(1M) . . . . . . . . . . . . . . . . . . . . . . . . . . . . . . . . . . . . . . . . . . . . . . . . . . . . . . . . . . . . . . . . 238
tlmd(1M) . . . . . . . . . . . . . . . . . . . . . . . . . . . . . . . . . . . . . . . . . . . . . . . . . . . . . . . . . . . . . . . . 241
tpautoconf(1M) . . . . . . . . . . . . . . . . . . . . . . . . . . . . . . . . . . . . . . . . . . . . . . . . . . . . . . . . . . 243
tpclean(1M) . . . . . . . . . . . . . . . . . . . . . . . . . . . . . . . . . . . . . . . . . . . . . . . . . . . . . . . . . . . . . 244
tpconfig(1M) . . . . . . . . . . . . . . . . . . . . . . . . . . . . . . . . . . . . . . . . . . . . . . . . . . . . . . . . . . . . . 247
tpformat(1M) . . . . . . . . . . . . . . . . . . . . . . . . . . . . . . . . . . . . . . . . . . . . . . . . . . . . . . . . . . . . 254
tpreq(1) . . . . . . . . . . . . . . . . . . . . . . . . . . . . . . . . . . . . . . . . . . . . . . . . . . . . . . . . . . . . . . . . . 257
tpunmount(1) . . . . . . . . . . . . . . . . . . . . . . . . . . . . . . . . . . . . . . . . . . . . . . . . . . . . . . . . . . . . 260
ts8d(1M) . . . . . . . . . . . . . . . . . . . . . . . . . . . . . . . . . . . . . . . . . . . . . . . . . . . . . . . . . . . . . . . . 261
tsdd(1M) . . . . . . . . . . . . . . . . . . . . . . . . . . . . . . . . . . . . . . . . . . . . . . . . . . . . . . . . . . . . . . . . 263
tshd(1M) . . . . . . . . . . . . . . . . . . . . . . . . . . . . . . . . . . . . . . . . . . . . . . . . . . . . . . . . . . . . . . . . 265
vmadd(1M) . . . . . . . . . . . . . . . . . . . . . . . . . . . . . . . . . . . . . . . . . . . . . . . . . . . . . . . . . . . . . . 267
vmadm(1M) . . . . . . . . . . . . . . . . . . . . . . . . . . . . . . . . . . . . . . . . . . . . . . . . . . . . . . . . . . . . . 270
vmchange(1M) . . . . . . . . . . . . . . . . . . . . . . . . . . . . . . . . . . . . . . . . . . . . . . . . . . . . . . . . . . . 271
vmcheckxxx(1M) . . . . . . . . . . . . . . . . . . . . . . . . . . . . . . . . . . . . . . . . . . . . . . . . . . . . . . . . . 277
vmd(1M) . . . . . . . . . . . . . . . . . . . . . . . . . . . . . . . . . . . . . . . . . . . . . . . . . . . . . . . . . . . . . . . . 279
vmdelete(1M) . . . . . . . . . . . . . . . . . . . . . . . . . . . . . . . . . . . . . . . . . . . . . . . . . . . . . . . . . . . . 281
vmoprcmd(1M) . . . . . . . . . . . . . . . . . . . . . . . . . . . . . . . . . . . . . . . . . . . . . . . . . . . . . . . . . . 282
vmpool(1M) . . . . . . . . . . . . . . . . . . . . . . . . . . . . . . . . . . . . . . . . . . . . . . . . . . . . . . . . . . . . . 285
vmquery(1M) . . . . . . . . . . . . . . . . . . . . . . . . . . . . . . . . . . . . . . . . . . . . . . . . . . . . . . . . . . . . 288
vmrule(1M) . . . . . . . . . . . . . . . . . . . . . . . . . . . . . . . . . . . . . . . . . . . . . . . . . . . . . . . . . . . . . 292
vmupdate(1M) . . . . . . . . . . . . . . . . . . . . . . . . . . . . . . . . . . . . . . . . . . . . . . . . . . . . . . . . . . . 294

Contents xv
Appendix B. Media Manager Reference Topics . . . . . . . . . . . . . . . . . . . . . . . . . . . .297
Robot Overview . . . . . . . . . . . . . . . . . . . . . . . . . . . . . . . . . . . . . . . . . . . . . . . . . . . . . . . . . . 297
Media Manager Robot Types . . . . . . . . . . . . . . . . . . . . . . . . . . . . . . . . . . . . . . . . . . . . 297
Media Manager Media Types . . . . . . . . . . . . . . . . . . . . . . . . . . . . . . . . . . . . . . . . . . . . 299
Robot Attributes . . . . . . . . . . . . . . . . . . . . . . . . . . . . . . . . . . . . . . . . . . . . . . . . . . . . . . . 300
Table-Driven Robotics . . . . . . . . . . . . . . . . . . . . . . . . . . . . . . . . . . . . . . . . . . . . . . . . . . 312
Robotic Test Utilities . . . . . . . . . . . . . . . . . . . . . . . . . . . . . . . . . . . . . . . . . . . . . . . . . . . 313
Correlating Device Files to Physical Drives When Adding Drives . . . . . . . . . . . . . . . 313
Correlating On Windows Hosts . . . . . . . . . . . . . . . . . . . . . . . . . . . . . . . . . . . . . . . . . . 313
Correlating On UNIX Hosts . . . . . . . . . . . . . . . . . . . . . . . . . . . . . . . . . . . . . . . . . . . . . 315
Drive Cleaning . . . . . . . . . . . . . . . . . . . . . . . . . . . . . . . . . . . . . . . . . . . . . . . . . . . . . . . . . . . 316
Frequency-Based Cleaning . . . . . . . . . . . . . . . . . . . . . . . . . . . . . . . . . . . . . . . . . . . . . . 316
On-Demand Cleaning . . . . . . . . . . . . . . . . . . . . . . . . . . . . . . . . . . . . . . . . . . . . . . . . . . 317
TapeAlert . . . . . . . . . . . . . . . . . . . . . . . . . . . . . . . . . . . . . . . . . . . . . . . . . . . . . . . . . . . . . 317
Requirements for TapeAlert and Media Manager . . . . . . . . . . . . . . . . . . . . . . . 318
TapeAlert and Media Manager . . . . . . . . . . . . . . . . . . . . . . . . . . . . . . . . . . . . . . . 318
TapeAlert and Frequency-based Cleaning . . . . . . . . . . . . . . . . . . . . . . . . . . . . . . 318
Using a Cleaning Tape . . . . . . . . . . . . . . . . . . . . . . . . . . . . . . . . . . . . . . . . . . . . . . . . . 319
Volume Pools and Volume Groups . . . . . . . . . . . . . . . . . . . . . . . . . . . . . . . . . . . . . . . . . . 319
Volume Pools . . . . . . . . . . . . . . . . . . . . . . . . . . . . . . . . . . . . . . . . . . . . . . . . . . . . . . . . . 319
Volume Groups . . . . . . . . . . . . . . . . . . . . . . . . . . . . . . . . . . . . . . . . . . . . . . . . . . . . . . . 319
Volume Pools and Groups Example . . . . . . . . . . . . . . . . . . . . . . . . . . . . . . . . . . . . . . 320
Scratch Volume Pools . . . . . . . . . . . . . . . . . . . . . . . . . . . . . . . . . . . . . . . . . . . . . . . . . . 322
Moving Volumes . . . . . . . . . . . . . . . . . . . . . . . . . . . . . . . . . . . . . . . . . . . . . . . . . . . . . . 324
Barcodes . . . . . . . . . . . . . . . . . . . . . . . . . . . . . . . . . . . . . . . . . . . . . . . . . . . . . . . . . . . . . . . . 325
Barcode Rules . . . . . . . . . . . . . . . . . . . . . . . . . . . . . . . . . . . . . . . . . . . . . . . . . . . . . . . . . 326
Media ID Generation Rules . . . . . . . . . . . . . . . . . . . . . . . . . . . . . . . . . . . . . . . . . . . . . 328
vmd Security . . . . . . . . . . . . . . . . . . . . . . . . . . . . . . . . . . . . . . . . . . . . . . . . . . . . . . . . . . . . . 329
Possible NetBackup and Media Manager Conflicts . . . . . . . . . . . . . . . . . . . . . . . . . 329
NetBackup Authentication/Authorization . . . . . . . . . . . . . . . . . . . . . . . . . . . . . . . . 329
xvi NetBackup DataCenter Media Manager System Administrator’s Guide for UNIX
Media Manager vmd Authentication/Authorization . . . . . . . . . . . . . . . . . . . . . . . 331
No vm.conf Entry Present . . . . . . . . . . . . . . . . . . . . . . . . . . . . . . . . . . . . . . . . . . . 331
vm.conf Entry Present . . . . . . . . . . . . . . . . . . . . . . . . . . . . . . . . . . . . . . . . . . . . . . . 332
Media Manager Server-Based vmd Security . . . . . . . . . . . . . . . . . . . . . . . . . . . . . . . 332
Media Manager Enhanced vmd Authorization . . . . . . . . . . . . . . . . . . . . . . . . . . . . 333
Setting up Enhanced Authorization . . . . . . . . . . . . . . . . . . . . . . . . . . . . . . . . . . . 333
How Media Manager Selects a Drive for a Robotic Mount Request . . . . . . . . . . . . . . 333
Administrators Quick Reference . . . . . . . . . . . . . . . . . . . . . . . . . . . . . . . . . . . . . . . . . . . . 334
Media Manager Commands . . . . . . . . . . . . . . . . . . . . . . . . . . . . . . . . . . . . . . . . . . . . 334
Log Files . . . . . . . . . . . . . . . . . . . . . . . . . . . . . . . . . . . . . . . . . . . . . . . . . . . . . . . . . . . . . 337
Media Manager Configuration File (vm.conf) . . . . . . . . . . . . . . . . . . . . . . . . . . . . . . . . 337
ACS Media Mapping . . . . . . . . . . . . . . . . . . . . . . . . . . . . . . . . . . . . . . . . . . . . . . . . 337
ACSSEL Listening Socket . . . . . . . . . . . . . . . . . . . . . . . . . . . . . . . . . . . . . . . . . . . . 338
ACSSSI Listening Socket . . . . . . . . . . . . . . . . . . . . . . . . . . . . . . . . . . . . . . . . . . . . . 338
ACSSSI Host Name . . . . . . . . . . . . . . . . . . . . . . . . . . . . . . . . . . . . . . . . . . . . . . . . . 338
Authorization Required . . . . . . . . . . . . . . . . . . . . . . . . . . . . . . . . . . . . . . . . . . . . . 338
AVRD Scan Delay . . . . . . . . . . . . . . . . . . . . . . . . . . . . . . . . . . . . . . . . . . . . . . . . . . 339
Client Port Range . . . . . . . . . . . . . . . . . . . . . . . . . . . . . . . . . . . . . . . . . . . . . . . . . . . 339
DAS Client Name . . . . . . . . . . . . . . . . . . . . . . . . . . . . . . . . . . . . . . . . . . . . . . . . . . 339
Days To Keep Debug Logs . . . . . . . . . . . . . . . . . . . . . . . . . . . . . . . . . . . . . . . . . . . 339
Device Host for Configuration Analyzer . . . . . . . . . . . . . . . . . . . . . . . . . . . . . . . 340
Disallow Non-NDMP Request on NDMP Drive . . . . . . . . . . . . . . . . . . . . . . . . 340
Do Not Eject Standalone Tapes . . . . . . . . . . . . . . . . . . . . . . . . . . . . . . . . . . . . . . . 340
Enable Automatic Path Remapping . . . . . . . . . . . . . . . . . . . . . . . . . . . . . . . . . . . 341
Inventory Robot Filter . . . . . . . . . . . . . . . . . . . . . . . . . . . . . . . . . . . . . . . . . . . . . . . 341
LMF Media Mapping . . . . . . . . . . . . . . . . . . . . . . . . . . . . . . . . . . . . . . . . . . . . . . . 341
Media ID Generation . . . . . . . . . . . . . . . . . . . . . . . . . . . . . . . . . . . . . . . . . . . . . . . . 342
Media ID Prefix . . . . . . . . . . . . . . . . . . . . . . . . . . . . . . . . . . . . . . . . . . . . . . . . . . . . 342
Preferred Group . . . . . . . . . . . . . . . . . . . . . . . . . . . . . . . . . . . . . . . . . . . . . . . . . . . . 343
Prevent Media Removal (TL8 Robots) . . . . . . . . . . . . . . . . . . . . . . . . . . . . . . . . . 343

Contents xvii
Random Port Numbers . . . . . . . . . . . . . . . . . . . . . . . . . . . . . . . . . . . . . . . . . . . . . . 343
Required Network Interface . . . . . . . . . . . . . . . . . . . . . . . . . . . . . . . . . . . . . . . . . . 344
Scratch Pool Configuration . . . . . . . . . . . . . . . . . . . . . . . . . . . . . . . . . . . . . . . . . . . 344
Server Entry . . . . . . . . . . . . . . . . . . . . . . . . . . . . . . . . . . . . . . . . . . . . . . . . . . . . . . . . 345
SSO DA Re-register Interval . . . . . . . . . . . . . . . . . . . . . . . . . . . . . . . . . . . . . . . . . . 345
SSO DA Retry Time . . . . . . . . . . . . . . . . . . . . . . . . . . . . . . . . . . . . . . . . . . . . . . . . . 345
SSO Host Name . . . . . . . . . . . . . . . . . . . . . . . . . . . . . . . . . . . . . . . . . . . . . . . . . . . . 345
SSO Scan Ability Factor . . . . . . . . . . . . . . . . . . . . . . . . . . . . . . . . . . . . . . . . . . . . . . 346
TLH Media Mapping . . . . . . . . . . . . . . . . . . . . . . . . . . . . . . . . . . . . . . . . . . . . . . . . 346
TLM Media Mapping . . . . . . . . . . . . . . . . . . . . . . . . . . . . . . . . . . . . . . . . . . . . . . . . 346
Verbose Message Logging . . . . . . . . . . . . . . . . . . . . . . . . . . . . . . . . . . . . . . . . . . . . 346
Example vm.conf File . . . . . . . . . . . . . . . . . . . . . . . . . . . . . . . . . . . . . . . . . . . . . . . . . . 347
Appendix C. Using tpconfig . . . . . . . . . . . . . . . . . . . . . . . . . . . . . . . . . . . . . . . . . . . .349
Terms and Concepts . . . . . . . . . . . . . . . . . . . . . . . . . . . . . . . . . . . . . . . . . . . . . . . . . . . . . . 349
Robot Number . . . . . . . . . . . . . . . . . . . . . . . . . . . . . . . . . . . . . . . . . . . . . . . . . . . . . 349
Robotic Control Path . . . . . . . . . . . . . . . . . . . . . . . . . . . . . . . . . . . . . . . . . . . . . . . . 349
Host Name . . . . . . . . . . . . . . . . . . . . . . . . . . . . . . . . . . . . . . . . . . . . . . . . . . . . . . . . . 350
No Rewind On Close Device Name . . . . . . . . . . . . . . . . . . . . . . . . . . . . . . . . . . . 350
Character Device Name . . . . . . . . . . . . . . . . . . . . . . . . . . . . . . . . . . . . . . . . . . . . . . 350
Volume Header Device Name . . . . . . . . . . . . . . . . . . . . . . . . . . . . . . . . . . . . . . . . 351
Drive Status . . . . . . . . . . . . . . . . . . . . . . . . . . . . . . . . . . . . . . . . . . . . . . . . . . . . . . . . 351
Volume Database Host Name . . . . . . . . . . . . . . . . . . . . . . . . . . . . . . . . . . . . . . . . 351
Starting the tpconfig Utility . . . . . . . . . . . . . . . . . . . . . . . . . . . . . . . . . . . . . . . . . . . . . . . . 351
Adding Robots . . . . . . . . . . . . . . . . . . . . . . . . . . . . . . . . . . . . . . . . . . . . . . . . . . . . . . . . . . . 353
Adding Drives . . . . . . . . . . . . . . . . . . . . . . . . . . . . . . . . . . . . . . . . . . . . . . . . . . . . . . . . . . . 354
Updating Robot and Drive Configurations . . . . . . . . . . . . . . . . . . . . . . . . . . . . . . . . . . . 355
Updating Robot Configurations . . . . . . . . . . . . . . . . . . . . . . . . . . . . . . . . . . . . . . . . . 355
Updating Drive Configurations . . . . . . . . . . . . . . . . . . . . . . . . . . . . . . . . . . . . . . . . . . 356
Deleting Drives and Robots . . . . . . . . . . . . . . . . . . . . . . . . . . . . . . . . . . . . . . . . . . . . . . . . 357

xviii NetBackup DataCenter Media Manager System Administrator’s Guide for UNIX
Deleting Drives . . . . . . . . . . . . . . . . . . . . . . . . . . . . . . . . . . . . . . . . . . . . . . . . . . . . . . . 357
Deleting Robots . . . . . . . . . . . . . . . . . . . . . . . . . . . . . . . . . . . . . . . . . . . . . . . . . . . . . . . 357
Specifying the Volume Database Host . . . . . . . . . . . . . . . . . . . . . . . . . . . . . . . . . . . . . . . 358
Displaying and Printing the Configuration . . . . . . . . . . . . . . . . . . . . . . . . . . . . . . . . . . 359
Appendix D. Using vmadm . . . . . . . . . . . . . . . . . . . . . . . . . . . . . . . . . . . . . . . . . . . . 361
Starting the vmadm Utility . . . . . . . . . . . . . . . . . . . . . . . . . . . . . . . . . . . . . . . . . . . . . . . . 361
Configuring Volume Pools . . . . . . . . . . . . . . . . . . . . . . . . . . . . . . . . . . . . . . . . . . . . . . . . 363
Adding Volumes for Standalone Drives . . . . . . . . . . . . . . . . . . . . . . . . . . . . . . . . . . . . . 366
Adding a Single Standalone Volume . . . . . . . . . . . . . . . . . . . . . . . . . . . . . . . . . . . . . 366
Adding a Range of Standalone Volumes . . . . . . . . . . . . . . . . . . . . . . . . . . . . . . . . . . 369
Adding Volumes to a Robot . . . . . . . . . . . . . . . . . . . . . . . . . . . . . . . . . . . . . . . . . . . . . . . 373
Auto-Populating a Robot . . . . . . . . . . . . . . . . . . . . . . . . . . . . . . . . . . . . . . . . . . . . . . . 373
Using Auto-Populate . . . . . . . . . . . . . . . . . . . . . . . . . . . . . . . . . . . . . . . . . . . . . . . . . . 374
Adding a Single Volume to a Robot (Without Auto-Populate) . . . . . . . . . . . . . . . 375
Adding a Range of Volumes to a Robot (Without Auto-Populate) . . . . . . . . . . . . 377
Displaying the Volume Configuration . . . . . . . . . . . . . . . . . . . . . . . . . . . . . . . . . . . . . . . 382
Moving Volumes . . . . . . . . . . . . . . . . . . . . . . . . . . . . . . . . . . . . . . . . . . . . . . . . . . . . . . . . . 385
Moving Volumes (With Inventory and Update) . . . . . . . . . . . . . . . . . . . . . . . . . . . 385
Moving a Single Volume (Without Inventory and Update) . . . . . . . . . . . . . . . . . . 386
Moving Multiple Volumes . . . . . . . . . . . . . . . . . . . . . . . . . . . . . . . . . . . . . . . . . . . . . . 388
Moving a Volume Group . . . . . . . . . . . . . . . . . . . . . . . . . . . . . . . . . . . . . . . . . . . . . . . 390
Deleting a Single Volume . . . . . . . . . . . . . . . . . . . . . . . . . . . . . . . . . . . . . . . . . . . . . . . . . . 392
Deleting Multiple Volumes . . . . . . . . . . . . . . . . . . . . . . . . . . . . . . . . . . . . . . . . . . . . . . . . 393
Deleting a Volume Group . . . . . . . . . . . . . . . . . . . . . . . . . . . . . . . . . . . . . . . . . . . . . . . . . 394
Changing a Volume’s Description . . . . . . . . . . . . . . . . . . . . . . . . . . . . . . . . . . . . . . . . . . 395
Changing a Volume’s Volume Pool . . . . . . . . . . . . . . . . . . . . . . . . . . . . . . . . . . . . . . . . . 395
Changing the Expiration Date for Volumes . . . . . . . . . . . . . . . . . . . . . . . . . . . . . . . . . . 396
Changing the Volume Group for Volumes . . . . . . . . . . . . . . . . . . . . . . . . . . . . . . . . . . . 397
Change Vault Name for Volumes . . . . . . . . . . . . . . . . . . . . . . . . . . . . . . . . . . . . . . . . . . . 398

Contents xix
Change Date Volumes are Sent to Vault . . . . . . . . . . . . . . . . . . . . . . . . . . . . . . . . . . . . . 399
Change Date Volumes Return from Vault . . . . . . . . . . . . . . . . . . . . . . . . . . . . . . . . . . . . 399
Change Vault Slot for Volumes . . . . . . . . . . . . . . . . . . . . . . . . . . . . . . . . . . . . . . . . . . . . . 400
Change Vault Session ID for Volumes . . . . . . . . . . . . . . . . . . . . . . . . . . . . . . . . . . . . . . . 401
Setting the Maximum Mounts for Volumes . . . . . . . . . . . . . . . . . . . . . . . . . . . . . . . . . . . 401
Changing the Cleanings Allowed for a Cleaning Tape . . . . . . . . . . . . . . . . . . . . . . . . . 402
Starting and Stopping the Media Manager Volume Daemon . . . . . . . . . . . . . . . . . . . . 402
To Start the Volume Daemon . . . . . . . . . . . . . . . . . . . . . . . . . . . . . . . . . . . . . . . . . 403
To Stop the Volume Daemon . . . . . . . . . . . . . . . . . . . . . . . . . . . . . . . . . . . . . . . . . 403
Updating Barcodes for Selected Volumes in a Robot . . . . . . . . . . . . . . . . . . . . . . . . . . . 403
Inventory and Report Robot Volume Configuration . . . . . . . . . . . . . . . . . . . . . . . . . . . 404
Inventory and Compare Robot Volume Configuration . . . . . . . . . . . . . . . . . . . . . . . . . 406
Inventory and Update Robot Volume Configuration . . . . . . . . . . . . . . . . . . . . . . . . . . 409
To Inventory and Update Robot Volume Configuration . . . . . . . . . . . . . . . . . . . . . 410
Changing Update Options . . . . . . . . . . . . . . . . . . . . . . . . . . . . . . . . . . . . . . . . . . . . . . 414
Configuring Barcode Rules . . . . . . . . . . . . . . . . . . . . . . . . . . . . . . . . . . . . . . . . . . . . . . . . . 421
Barcode Rule Sorting . . . . . . . . . . . . . . . . . . . . . . . . . . . . . . . . . . . . . . . . . . . . . . . . . . . 421
Barcode Rule Examples . . . . . . . . . . . . . . . . . . . . . . . . . . . . . . . . . . . . . . . . . . . . . . . . . 422
Barcode Rule Menu . . . . . . . . . . . . . . . . . . . . . . . . . . . . . . . . . . . . . . . . . . . . . . . . . . . . 423
Adding a Barcode Rule . . . . . . . . . . . . . . . . . . . . . . . . . . . . . . . . . . . . . . . . . . . . . . . . . 423
Changing a Barcode Rule . . . . . . . . . . . . . . . . . . . . . . . . . . . . . . . . . . . . . . . . . . . . . . . 425
Deleting a Barcode Rule . . . . . . . . . . . . . . . . . . . . . . . . . . . . . . . . . . . . . . . . . . . . . . . . 425
Listing Barcode Rules . . . . . . . . . . . . . . . . . . . . . . . . . . . . . . . . . . . . . . . . . . . . . . . . . . 425
Formatting Optical Disks . . . . . . . . . . . . . . . . . . . . . . . . . . . . . . . . . . . . . . . . . . . . . . . . . . 426
Appendix E. Robot Drive and Slot Layouts . . . . . . . . . . . . . . . . . . . . . . . . . . . . . . .427
ADIC Scalar 100 LTODELL PV-136TIBM 3583 (TLD) . . . . . . . . . . . . . . . . . . . . . . . . . . . . . . . . . . . . . . . . . . . . . . . . . . . . . . . . . . 428
ADIC Scalar 100 DLTADIC Scalar 100 SDLTIBM 7337 (TLD) . . . . . . . . . . . . . . . . . . . . . . . . . . . . . . . . . . . . . . . . . . . . . . . . . . . . . . . . . . 428

xx NetBackup DataCenter Media Manager System Administrator’s Guide for UNIX
ADIC Scalar 100 AIT (TL8) . . . . . . . . . . . . . . . . . . . . . . . . . . . . . . . . . . . . . . . . . . . . . . . . 429
ADIC Scalar 218 (TLD) . . . . . . . . . . . . . . . . . . . . . . . . . . . . . . . . . . . . . . . . . . . . . . . . . . . . 429
Exabyte 430Sony LIB-304 (TL8) . . . . . . . . . . . . . . . . . . . . . . . . . . . . . . . . . . . . . . . . . . . . . . . . . . . . . . . 430
ADIC Scalar 448/458 (TLD) . . . . . . . . . . . . . . . . . . . . . . . . . . . . . . . . . . . . . . . . . . . . . . . . 431
ADIC Scalar 1000 - DLT version (TLD) . . . . . . . . . . . . . . . . . . . . . . . . . . . . . . . . . . . . . . 432
ADIC Scalar 1000 - AIT/AIT2 (TL8) . . . . . . . . . . . . . . . . . . . . . . . . . . . . . . . . . . . . . . . . . 433
ADIC VLS DLT (TSD) . . . . . . . . . . . . . . . . . . . . . . . . . . . . . . . . . . . . . . . . . . . . . . . . . . . . . 434
ATL 2/28 DLT Library (TLD) . . . . . . . . . . . . . . . . . . . . . . . . . . . . . . . . . . . . . . . . . . . . . . 434
ATL 4/52 DLT LibraryATL 2/52 DLT LibraryCompaq TL810Compaq TL812 Compaq TL894 Sun StorEdge L1800 (TLD) . . . . . . . . . . . . . . . . . . . . . . . . . . . . . . . . . . . . . . . . . . . . . . . . . 435
ATL 6/176 DLT Library Compaq TL826Compaq TL896 (TLD) . . . . . . . . . . . . . . . . . . . . . . . . . . . . . . . . . . . . . . . . . . . . . . . . . . . . . 436
ATL 9/88 DLT Library (TLD) . . . . . . . . . . . . . . . . . . . . . . . . . . . . . . . . . . . . . . . . . . . . . . 437
ATL 3/264 (2640) DLT Library Compaq TL820Compaq TL822 Compaq TL893 (TLD) . . . . . . . . . . . . . . . . . . . . . . . . . . . . . . . . . . . . . . . . . . . . . . . . . . . . . 438
ATL P1000 Sun StorEdge L1000 (TLD) . . . . . . . . . . . . . . . . . . . . . . . . . . . . . . . . . . . . . . . . . . . . . . . . . 439
ATL M1500 M4 Data M1500 (TLD) . . . . . . . . . . . . . . . . . . . . . . . . . . . . . . . . . . . . . . . . . . . . . . . . . . . . 440
Breece Hill Q2.15IBM 7337-305 IBM 3447-105 (TLD) . . . . . . . . . . . . . . . . . . . . . . . . . . . . . . . . . . . . . . . . . . . . . . . . . . . . . . 441
Breece Hill Q4.50 (TLD) . . . . . . . . . . . . . . . . . . . . . . . . . . . . . . . . . . . . . . . . . . . . . . . . . . . 442
Breece Hill Q7 (TLD) . . . . . . . . . . . . . . . . . . . . . . . . . . . . . . . . . . . . . . . . . . . . . . . . . . . . . . 443
Breece Hill Q47 (TLD) . . . . . . . . . . . . . . . . . . . . . . . . . . . . . . . . . . . . . . . . . . . . . . . . . . . . . 444
Breece Hill Q70Breece Hill Q210 Breece Hill Q140 (TLD) . . . . . . . . . . . . . . . . . . . . . . . . . . . . . . . . . . . . . . . . . . . . . . . . . . . . 445

Contents xxi
Compaq 35/70 (TLD) . . . . . . . . . . . . . . . . . . . . . . . . . . . . . . . . . . . . . . . . . . . . . . . . . . . . . 446
Exabyte 10i, 10e, 10hExabyte 210Exabyte EZ17 (TS8) . . . . . . . . . . . . . . . . . . . . . . . . . . . . . . . . . . . . . . . . . . . . . . . . . . . . . . . 446
Exabyte 18D (TLD) . . . . . . . . . . . . . . . . . . . . . . . . . . . . . . . . . . . . . . . . . . . . . . . . . . . . . . . . 447
Exabyte 60 (TL8) . . . . . . . . . . . . . . . . . . . . . . . . . . . . . . . . . . . . . . . . . . . . . . . . . . . . . . . . . . 447
Exabyte 110L (TLD) . . . . . . . . . . . . . . . . . . . . . . . . . . . . . . . . . . . . . . . . . . . . . . . . . . . . . . . 448
Exabyte 120 (TL8) . . . . . . . . . . . . . . . . . . . . . . . . . . . . . . . . . . . . . . . . . . . . . . . . . . . . . . . . . 448
Exabyte 220ADIC Scalar AIT 220 Sun StorEdge L400 (TL8) . . . . . . . . . . . . . . . . . . . . . . . . . . . . . . . . . . . . . . . . . . . . . . . . . . 449
Exabyte 230D (TLD) . . . . . . . . . . . . . . . . . . . . . . . . . . . . . . . . . . . . . . . . . . . . . . . . . . . . . . . 449
Exabyte 440 (TL8) . . . . . . . . . . . . . . . . . . . . . . . . . . . . . . . . . . . . . . . . . . . . . . . . . . . . . . . . . 450
Exabyte 480ADIC Scalar AIT 480 (TL8) . . . . . . . . . . . . . . . . . . . . . . . . . . . . . . . . . . . . . . . . . . . . . . . . . 451
Exabyte 690D (TLD) . . . . . . . . . . . . . . . . . . . . . . . . . . . . . . . . . . . . . . . . . . . . . . . . . . . . . . . 452
Exabyte X80 (TL8) . . . . . . . . . . . . . . . . . . . . . . . . . . . . . . . . . . . . . . . . . . . . . . . . . . . . . . . . 453
Exabyte X200 (TL8) . . . . . . . . . . . . . . . . . . . . . . . . . . . . . . . . . . . . . . . . . . . . . . . . . . . . . . . 454
HP SureStore 1/9Sun StorEdge L9 (TLD) . . . . . . . . . . . . . . . . . . . . . . . . . . . . . . . . . . . . . . . . . . . . . . . . . . . . 455
IBM 3581ADIC Fastor (TLD) . . . . . . . . . . . . . . . . . . . . . . . . . . . . . . . . . . . . . . . . . . . . . . . . . . . . . . . 455
IBM 3584 (TLD) . . . . . . . . . . . . . . . . . . . . . . . . . . . . . . . . . . . . . . . . . . . . . . . . . . . . . . . . . . 456
IBM 3590 B11IBM 3590 E11 (TSH) . . . . . . . . . . . . . . . . . . . . . . . . . . . . . . . . . . . . . . . . . . . . . . . . . . . . . . . 457
IBM 7331 (TL8) . . . . . . . . . . . . . . . . . . . . . . . . . . . . . . . . . . . . . . . . . . . . . . . . . . . . . . . . . . . 457
NEC Autoloader DLT (TLD) . . . . . . . . . . . . . . . . . . . . . . . . . . . . . . . . . . . . . . . . . . . . . . . 458
Overland Data DLT Library XpressCompaq StorageWorks DLT Mini-Library (TLD) . . . . . . . . . . . . . . . . . . . . . . . . . . . . . . 459
Overland Data LXBx110 Overland Data LXBx210 Compaq TL891Compaq TL892 (TLD) . . . . . . . . . . . . . . . . . . . . . . . . . . . . . . . . . . . . . . . . . . . . . . . . . . . . . 460
Overland Data Library Pro (TL8) . . . . . . . . . . . . . . . . . . . . . . . . . . . . . . . . . . . . . . . . . . . 461
xxii NetBackup DataCenter Media Manager System Administrator’s Guide for UNIX
Overland Data NEOOverland Data LxL1u11 (TLD) . . . . . . . . . . . . . . . . . . . . . . . . . . . . . . . . . . . . . . . . . . . . . 462
Compaq Storage Works MSL 5026Compaq Storage Works MSL 5052 (TLD) . . . . . . . . . . . . . . . . . . . . . . . . . . . . . . . . . . . . 463
Qualstar 46120 (TL8) . . . . . . . . . . . . . . . . . . . . . . . . . . . . . . . . . . . . . . . . . . . . . . . . . . . . . . 464
Sony DMS (TLD) . . . . . . . . . . . . . . . . . . . . . . . . . . . . . . . . . . . . . . . . . . . . . . . . . . . . . . . . . 465
Sony DMS-B9 (TLD) . . . . . . . . . . . . . . . . . . . . . . . . . . . . . . . . . . . . . . . . . . . . . . . . . . . . . . 466
Spectra Logic 9000/20Spectra Logic 9000/40 (TL8) . . . . . . . . . . . . . . . . . . . . . . . . . . . . . . . . . . . . . . . . . . . . . . . 467
STK 9710 STK 9740HP SureStore 10/588 (A4845A) (TLD) . . . . . . . . . . . . . . . . . . . . . . . . . . . . . . . . . . . . . . . 468
STK 9714 HP SureStore E 6/100 (A4846A) (TLD) . . . . . . . . . . . . . . . . . . . . . . . . . . . . . . . . . . . . . . 469
STK 9730 STK 9738 DELL 130THP SureStore E 3/30 (A4853A) (TLD) . . . . . . . . . . . . . . . . . . . . . . . . . . . . . . . . . . . . . . . 470
STK L700Sun StorEdge L700 HP SureStore E 20/700 (A5597A) (TLD) . . . . . . . . . . . . . . . . . . . . . . . . . . . . . . . . . . . . . 471
STK L20NCR 6461 (TLD) . . . . . . . . . . . . . . . . . . . . . . . . . . . . . . . . . . . . . . . . . . . . . . . . . . . . . . . . . 472
STK L40 (TLD) . . . . . . . . . . . . . . . . . . . . . . . . . . . . . . . . . . . . . . . . . . . . . . . . . . . . . . . . . . . 473
STK L80 (TLD) . . . . . . . . . . . . . . . . . . . . . . . . . . . . . . . . . . . . . . . . . . . . . . . . . . . . . . . . . . . 473
Appendix F. Automated Cartridge System (ACS) . . . . . . . . . . . . . . . . . . . . . . . . . . 475
Media Requests . . . . . . . . . . . . . . . . . . . . . . . . . . . . . . . . . . . . . . . . . . . . . . . . . . . . . . . . . . 478
Configuring ACS Robotic Control . . . . . . . . . . . . . . . . . . . . . . . . . . . . . . . . . . . . . . . . . . 478
Configuring ACS Drives . . . . . . . . . . . . . . . . . . . . . . . . . . . . . . . . . . . . . . . . . . . . . . . . . . 478
Using the STK SN6000 . . . . . . . . . . . . . . . . . . . . . . . . . . . . . . . . . . . . . . . . . . . . . . . . . . . . 480
Should SN6000 Drives Be Configured as Shared Drives? . . . . . . . . . . . . . . . . . . . . 481
Hosts Connected To a Single Port . . . . . . . . . . . . . . . . . . . . . . . . . . . . . . . . . . . . . 481
Hosts Connected To Different Ports . . . . . . . . . . . . . . . . . . . . . . . . . . . . . . . . . . . 481

Contents xxiii
Adding ACS Volumes . . . . . . . . . . . . . . . . . . . . . . . . . . . . . . . . . . . . . . . . . . . . . . . . . . . . . 482
Removing ACS Volumes . . . . . . . . . . . . . . . . . . . . . . . . . . . . . . . . . . . . . . . . . . . . . . . . . . 482
Removing Volumes Using the STK Utility . . . . . . . . . . . . . . . . . . . . . . . . . . . . . . . . . 482
Removing Volumes Using Media Manager . . . . . . . . . . . . . . . . . . . . . . . . . . . . . . . . 483
Robot Inventory Operations . . . . . . . . . . . . . . . . . . . . . . . . . . . . . . . . . . . . . . . . . . . . . . . . 483
vm.conf Map Entries for ACS Robots . . . . . . . . . . . . . . . . . . . . . . . . . . . . . . . . . . . . . . . . 485
Advanced ACS Robot Topics . . . . . . . . . . . . . . . . . . . . . . . . . . . . . . . . . . . . . . . . . . . . . . . 487
ACS Daemon (acsd) . . . . . . . . . . . . . . . . . . . . . . . . . . . . . . . . . . . . . . . . . . . . . . . . . . . . 487
ACS Server System Interface (acsssi) . . . . . . . . . . . . . . . . . . . . . . . . . . . . . . . . . . . . . 488
Using the ACS_SSI_SOCKET Environment Variable . . . . . . . . . . . . . . . . . . . . . 489
Starting acsssi Manually . . . . . . . . . . . . . . . . . . . . . . . . . . . . . . . . . . . . . . . . . . . . . 489
Optional Environment Variables . . . . . . . . . . . . . . . . . . . . . . . . . . . . . . . . . . . . . . 489
ACS SSI Event Logger (acssel) . . . . . . . . . . . . . . . . . . . . . . . . . . . . . . . . . . . . . . . . . . . 490
Using acssel with a Different Socket Name . . . . . . . . . . . . . . . . . . . . . . . . . . . . . 490
ACS Robotic Test Utility (acstest) . . . . . . . . . . . . . . . . . . . . . . . . . . . . . . . . . . . . . . . . 492
Making ACS Robotic Configuration Changes . . . . . . . . . . . . . . . . . . . . . . . . . . . . . . 492
Multiple ACS Robots with One ACS Library Software Host . . . . . . . . . . . . . . . . . 493
Multiple ACS Robots and ACS Library Software Hosts . . . . . . . . . . . . . . . . . . . . . 493
Robotic Inventory Filtering . . . . . . . . . . . . . . . . . . . . . . . . . . . . . . . . . . . . . . . . . . . . . . 494
Appendix G. IBM Automated Tape Library (ATL) . . . . . . . . . . . . . . . . . . . . . . . . . . .497
Media Requests for a TLH Robot . . . . . . . . . . . . . . . . . . . . . . . . . . . . . . . . . . . . . . . . . . . 500
Configuring TLH Robotic Control . . . . . . . . . . . . . . . . . . . . . . . . . . . . . . . . . . . . . . . . . . 501
Robotic Control on an AIX System . . . . . . . . . . . . . . . . . . . . . . . . . . . . . . . . . . . . . . . 501
Determine the Path to the LMCP Device File . . . . . . . . . . . . . . . . . . . . . . . . . . . . 501
Verify Library Communications . . . . . . . . . . . . . . . . . . . . . . . . . . . . . . . . . . . . . . 502
Configure the Robotic Device File . . . . . . . . . . . . . . . . . . . . . . . . . . . . . . . . . . . . . 503
Robotic Control on a Non-AIX System . . . . . . . . . . . . . . . . . . . . . . . . . . . . . . . . . . . . 503
Determine the Library Name . . . . . . . . . . . . . . . . . . . . . . . . . . . . . . . . . . . . . . . . . 503
Verify Library Communications . . . . . . . . . . . . . . . . . . . . . . . . . . . . . . . . . . . . . . 504
xxiv NetBackup DataCenter Media Manager System Administrator’s Guide for UNIX
Configure the Robotic Device File . . . . . . . . . . . . . . . . . . . . . . . . . . . . . . . . . . . . . 505
Configuring Drives for TLH Robots . . . . . . . . . . . . . . . . . . . . . . . . . . . . . . . . . . . . . . . . . 505
Cleaning TLH Drives . . . . . . . . . . . . . . . . . . . . . . . . . . . . . . . . . . . . . . . . . . . . . . . . . . . . . 506
Adding TLH Volumes . . . . . . . . . . . . . . . . . . . . . . . . . . . . . . . . . . . . . . . . . . . . . . . . . . . . 507
Removing Tapes from the Robot . . . . . . . . . . . . . . . . . . . . . . . . . . . . . . . . . . . . . . . . . . . 507
Robot Inventory Operations . . . . . . . . . . . . . . . . . . . . . . . . . . . . . . . . . . . . . . . . . . . . . . . 508
Robotic Inventory Filtering . . . . . . . . . . . . . . . . . . . . . . . . . . . . . . . . . . . . . . . . . . . . . . . . 509
vm.conf Map Entries For TLH Robots . . . . . . . . . . . . . . . . . . . . . . . . . . . . . . . . . . . . . . . 510
Appendix H. ADIC Distributed AML Server (DAS) . . . . . . . . . . . . . . . . . . . . . . . . . 511
Media Requests Involving a TLM Robot . . . . . . . . . . . . . . . . . . . . . . . . . . . . . . . . . . . . . 512
Configuring TLM Robotic Control . . . . . . . . . . . . . . . . . . . . . . . . . . . . . . . . . . . . . . . . . . 513
Allocating TLM Drives to Media Manager . . . . . . . . . . . . . . . . . . . . . . . . . . . . . . . . . . . 513
Configuring the DAS Client Name . . . . . . . . . . . . . . . . . . . . . . . . . . . . . . . . . . . . . . . 513
Use DASADMIN to Allocate Drives . . . . . . . . . . . . . . . . . . . . . . . . . . . . . . . . . . . . . 514
Configuring Drives for TLM Robots . . . . . . . . . . . . . . . . . . . . . . . . . . . . . . . . . . . . . . . . 515
Configuring Shared Drives for TLM Robots . . . . . . . . . . . . . . . . . . . . . . . . . . . . . . . . . . 516
Providing Common Access to Volumes . . . . . . . . . . . . . . . . . . . . . . . . . . . . . . . . . . . . . 517
Adding TLM Volumes . . . . . . . . . . . . . . . . . . . . . . . . . . . . . . . . . . . . . . . . . . . . . . . . . . . . 517
Removing Tapes from the Robot . . . . . . . . . . . . . . . . . . . . . . . . . . . . . . . . . . . . . . . . . . . 518
Robot Inventory Operations . . . . . . . . . . . . . . . . . . . . . . . . . . . . . . . . . . . . . . . . . . . . . . . 518
vm.conf Map Entries For TLM Robots . . . . . . . . . . . . . . . . . . . . . . . . . . . . . . . . . . . . . . . 521
Appendix I. Fujitsu Library Management Facility (LMF) . . . . . . . . . . . . . . . . . . . . . 523
Media Requests Involving an LMF Robot . . . . . . . . . . . . . . . . . . . . . . . . . . . . . . . . . . . . 527
Configuring LMF Robotic Control . . . . . . . . . . . . . . . . . . . . . . . . . . . . . . . . . . . . . . . . . . 528
Determining the Library Name . . . . . . . . . . . . . . . . . . . . . . . . . . . . . . . . . . . . . . . . . . 528
Verifying Library Communications . . . . . . . . . . . . . . . . . . . . . . . . . . . . . . . . . . . . . . 529
Configuring Robotic Control . . . . . . . . . . . . . . . . . . . . . . . . . . . . . . . . . . . . . . . . . . . . 530
Configuring Drives for LMF Robots . . . . . . . . . . . . . . . . . . . . . . . . . . . . . . . . . . . . . . . . 531
Cleaning LMF Drives . . . . . . . . . . . . . . . . . . . . . . . . . . . . . . . . . . . . . . . . . . . . . . . . . . . . . 532

Contents xxv
Adding LMF Volumes . . . . . . . . . . . . . . . . . . . . . . . . . . . . . . . . . . . . . . . . . . . . . . . . . . . . . 532
Removing Tapes from the Robot . . . . . . . . . . . . . . . . . . . . . . . . . . . . . . . . . . . . . . . . . . . . 533
Robot Inventory Operations . . . . . . . . . . . . . . . . . . . . . . . . . . . . . . . . . . . . . . . . . . . . . . . . 533
Robotic Inventory Filtering . . . . . . . . . . . . . . . . . . . . . . . . . . . . . . . . . . . . . . . . . . . . . . . . 534
vm.conf Map Entries for LMF Robots . . . . . . . . . . . . . . . . . . . . . . . . . . . . . . . . . . . . . . . . 535
Glossary . . . . . . . . . . . . . . . . . . . . . . . . . . . . . . . . . . . . . . . . . . . . . . . . . . . . . . . . . . . .537
Index . . . . . . . . . . . . . . . . . . . . . . . . . . . . . . . . . . . . . . . . . . . . . . . . . . . . . . . . . . . . . . .565

xxvi NetBackup DataCenter Media Manager System Administrator’s Guide for UNIX

xxvii
About this Guide
VERITAS Media Manager is used to configure and manage media, drives, and robots for the VERITAS NetBackup DataCenter and VERITAS Storage Migrator products on a UNIX server. See the NetBackup release notes for information on the supported UNIX server platforms.
This guide describes using the NetBackup Administration Console (Java administrative interface) to manage Media Manager software and its components. See “Introduction to Media Manager” on page 1 for a description of the other Media Manager administrative interfaces that are available.
In this guide, VERITAS NetBackup DataCenter is referred to as NetBackup and VERITAS Storage Migrator is referred to as Storage Migrator.
AudienceThis guide is intended primarily for the system administrator, who most likely will want to read every chapter.
An operator should read the chapter “Monitoring Storage Devices” on page 181. A tape user, who has no responsibility for administration, may have an interest in reading the chapter “Tape I/O Commands” on page 213, which describes the user command interface and possibly the Media Manager overview in the chapter “Introduction to Media Manager” on page 1.
In this manual, various roles are defined as follows:
� A system administrator is a person with typical UNIX administrator privileges and responsibilities.
� An operator may be any user of the system; by default, root user privileges are required to use the operator interface and, to mount volumes, the operator must have physical access to the area where volumes and drives are located.
� A user is anyone with access to the commands of the system; by default, root user privileges are required to use tapes. The number of tape drives available to a user at one time is determined by the system administrator.

Organization
xxviii NetBackup DataCenter Media Manager System Administrator’s Guide for UNIX
This guide assumes you are familiar with the operating system of the platform on which Media Manager is installed and UNIX systems in general.
OrganizationThis guide contains the following chapters:
� “Introduction to Media Manager” on page 1 provides an overview of Media Manager and the administrative interfaces that are available.
� “Configuring Storage Devices” on page 11 explains how to configure Media Manager software to manage the drives and robots at your site.
� “Managing Media” on page 73 contains topics on configuring Media Manager to use the media (volumes and volume pools) that Media Manager requires to store backups.
� “Managing Media in Robots” on page 125 explains how to configure Media Manager to use and manage the media in robots (using robot inventory).
� “Monitoring Storage Devices” on page 181 discusses operator tasks, such as how to assign a drive to a tape request.
� “Managing Daemons” on page 205 explains how to start and stop the device and media management daemons and how these daemons relate to each other.
� “Tape I/O Commands” on page 213 describes the commands for requesting tape mounts, writing files, and other user-related operations.
In addition to these chapters, there are the following appendixes, a glossary of NetBackup terms and an index.
� “Media Manager Man Pages” on page 219 contains the man pages for the commands that relate to device and media management. You can also use the UNIX man command to view these commands online.
� “Media Manager Reference Topics” on page 297 provides background information on important Media Manager features and concepts.
� “Using tpconfig” on page 349 explains how to use the tpconfig utility for configuring robots and devices. tpconfig is a character-based menu utility.
� “Using vmadm” on page 361 explains how to use vmadm to define and administer media in the volume database. vmadm is a character-based menu utility.
� “Robot Drive and Slot Layouts” on page 427 contains diagrams showing the slot layout and drive locations in many of the robots supported by Media Manager.
� “Automated Cartridge System (ACS)” on page 475 explains how Media Manager works with StorageTek (STK) Automated Cartridge System robots.

About this Guide xxix
Related Documents
� “IBM Automated Tape Library (ATL)” on page 497 explains how Media Manager works with the IBM Automated Tape Library to control Tape Library Half-inch (TLH) robots, including the IBM 3494 library.
� “ADIC Distributed AML Server (DAS)” on page 511 explains how Media Manager works with the ADIC Distributed AML Server to control Tape Library Multimedia (TLM) robots, including the Grau AML Library.
� “Fujitsu Library Management Facility (LMF)” on page 523 explains how Media Manager works with robots under control of the Fujitsu Library Management Facility.
Related DocumentsNetBackup documents that will be useful are listed below. For a complete list of related documents, see the NetBackup release notes. Depending on your configuration, other documents may also be required.
� NetBackup Installation Guide for UNIX
Explains how to install NetBackup DataCenter software on UNIX-based platforms.
� NetBackup DataCenter System Administrator’s Guide for UNIX
Explains how to configure and manage NetBackup DataCenter on a UNIX system.
� NetBackup Global Data Manager System Administrator’s Guide for UNIX and Windows
Explains how to install, configure, and use Global Data Manager (GDM) for NetBackup DataCenter and BusinesServer products on UNIX and Windows-based operating systems.
� NetBackup Media Manager Device Configuration Guide for UNIX
Explains how to add device drivers and perform other system level configuration for storage devices that are supported by NetBackup DataCenter and NetBackup BusinesServer Media Manager on UNIX hosts.
� NetBackup for NDMP System Administrator’s Guide
Explains how to install, configure, and use NetBackup for NDMP to control backups on an NDMP host.
� NetBackup for EMC Fastrax System Administrator’s Guide for Solaris
Explains how to install, configure, and use NetBackup for EMC Fastrax. This product allows backup and restore of EMC Symmetrix client data using an EMC Fastrax system functioning as a third-party copy device.
� NetBackup Release Notes for UNIX and Windows

Related Documents
xxx NetBackup DataCenter Media Manager System Administrator’s Guide for UNIX
Provides important information about NetBackup DataCenter and BusinesServer products on UNIX- and Windows-based servers, such as the platforms and operating systems that are supported and operating notes that may not be in the NetBackup manuals or the online help.
� NetBackup SAN Shared Storage Option System Administrator’s Guide for UNIX and Windows
Provides information on installing and configuring the NetBackup Shared Storage Option (SSO) on UNIX and Windows-based servers. SSO is an extension to tape drive allocation and configuration for NetBackup DataCenter Media Manager.
� NetBackup Troubleshooting Guide for UNIX
Provides troubleshooting information for UNIX-based NetBackup DataCenter and BusinesServer products, including Media Manager.
� VERITAS Storage Migrator Release Notes for UNIX
Provides information, such as, the platforms and operating systems that are supported and operating notes that may not be in the Storage Migrator manuals.
� VERITAS Storage Migrator System Administrator’s Guide for UNIX
Explains how to configure and manage Storage Migrator on a UNIX server.
� NetBackup Vault 4.5 System Administrator's Guide for UNIX and Windows
Describes how to configure and use logical vaults and profiles to duplicate backups, perform catalog backups, eject media, and generate reports.
If your configuration includes Windows servers, you may also need the following manuals:
� NetBackup Installation Guide for Windows
Explains how to install NetBackup DataCenter software on Windows-based platforms.
� NetBackup DataCenter System Administrator’s Guide for Windows
Explains how to configure and manage NetBackup DataCenter on a Windows server.
� NetBackup Troubleshooting Guide for Windows
Provides troubleshooting information for Windows-based NetBackup DataCenter and BusinesServer products, including Media Manager.
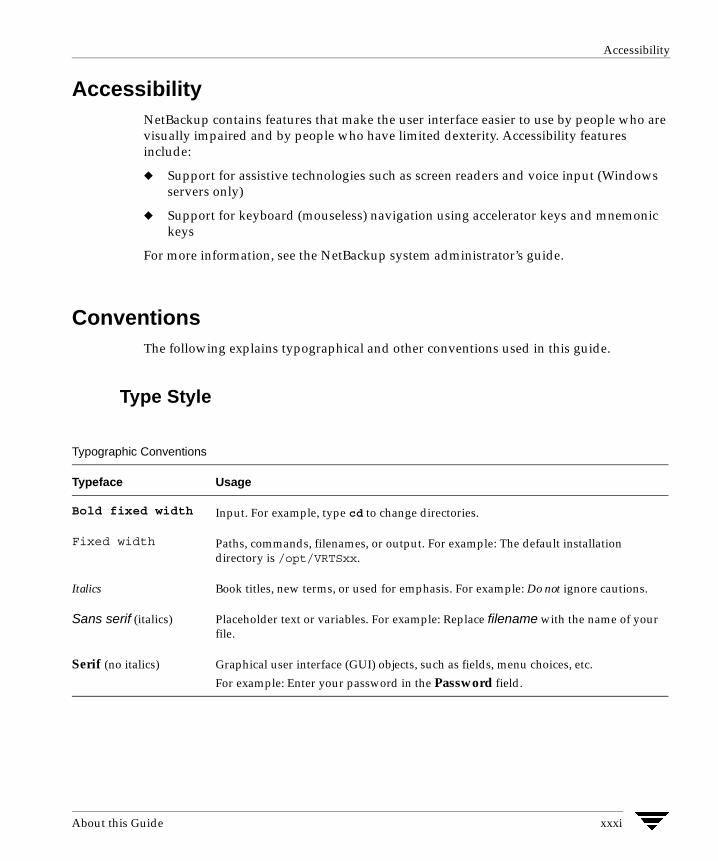
About this Guide xxxi
Accessibility
AccessibilityNetBackup contains features that make the user interface easier to use by people who are visually impaired and by people who have limited dexterity. Accessibility features include:
� Support for assistive technologies such as screen readers and voice input (Windows servers only)
� Support for keyboard (mouseless) navigation using accelerator keys and mnemonic keys
For more information, see the NetBackup system administrator’s guide.
ConventionsThe following explains typographical and other conventions used in this guide.
Type Style
Typographic Conventions
Typeface Usage
Bold fixed width Input. For example, type cd to change directories.
Fixed width Paths, commands, filenames, or output. For example: The default installation directory is /opt/VRTSxx.
Italics Book titles, new terms, or used for emphasis. For example: Do not ignore cautions.
Sans serif (italics) Placeholder text or variables. For example: Replace filename with the name of your file.
Serif (no italics) Graphical user interface (GUI) objects, such as fields, menu choices, etc.
For example: Enter your password in the Password field.

Conventions
xxxii NetBackup DataCenter Media Manager System Administrator’s Guide for UNIX
Notes and Cautions
Note This is a Note. Notes are used to call attention to information that makes using the product easier or helps in avoiding problems.
Caution This is a Caution. Cautions are used to warn about situations that could cause data loss.
Key CombinationsSome keyboard command sequences use two or more keys at the same time. For example, holding down the Ctrl key while pressing another key. Keyboard command sequences are indicated by connecting the keys with a plus sign. For example:
Press Ctrl+t
Command UsageThe following conventions are frequently used in the synopsis of command usage.
brackets [ ]
The enclosed command line component is optional.
Vertical bar or pipe (|)
Separates optional arguments from which the user can choose. For example, when a command has the following format:
command arg1|arg2
the user can use either the arg1 or arg2 variable.
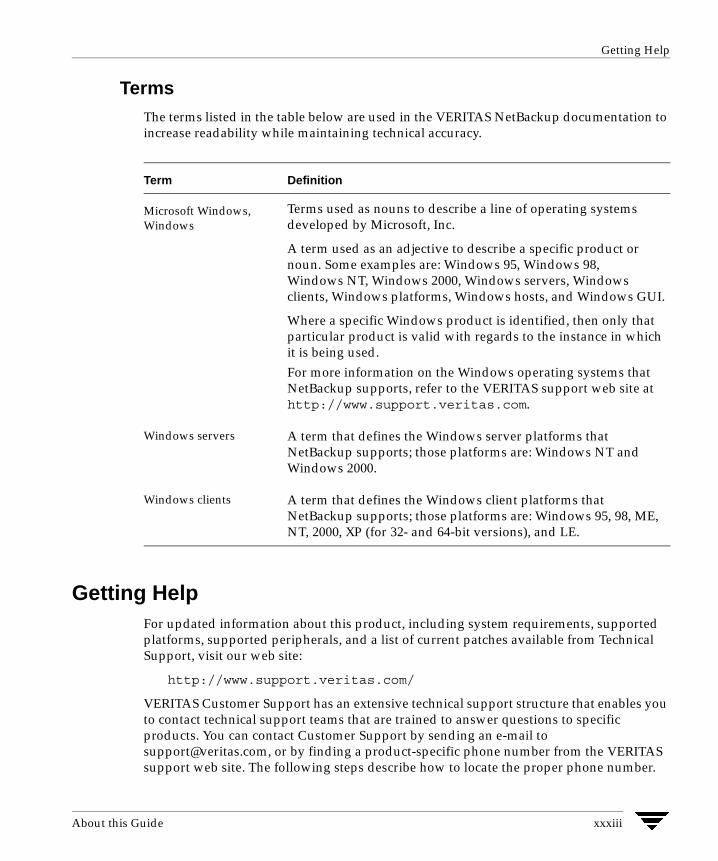
About this Guide xxxiii
Getting Help
TermsThe terms listed in the table below are used in the VERITAS NetBackup documentation to increase readability while maintaining technical accuracy.
Getting HelpFor updated information about this product, including system requirements, supported platforms, supported peripherals, and a list of current patches available from Technical Support, visit our web site:
http://www.support.veritas.com/
VERITAS Customer Support has an extensive technical support structure that enables you to contact technical support teams that are trained to answer questions to specific products. You can contact Customer Support by sending an e-mail to [email protected], or by finding a product-specific phone number from the VERITAS support web site. The following steps describe how to locate the proper phone number.
Term Definition
Microsoft Windows, Windows
Terms used as nouns to describe a line of operating systems developed by Microsoft, Inc.
A term used as an adjective to describe a specific product or noun. Some examples are: Windows 95, Windows 98, Windows NT, Windows 2000, Windows servers, Windows clients, Windows platforms, Windows hosts, and Windows GUI.
Where a specific Windows product is identified, then only that particular product is valid with regards to the instance in which it is being used. For more information on the Windows operating systems that NetBackup supports, refer to the VERITAS support web site at http://www.support.veritas.com.
Windows servers A term that defines the Windows server platforms that NetBackup supports; those platforms are: Windows NT and Windows 2000.
Windows clients A term that defines the Windows client platforms that NetBackup supports; those platforms are: Windows 95, 98, ME, NT, 2000, XP (for 32- and 64-bit versions), and LE.

Getting Help
xxxiv NetBackup DataCenter Media Manager System Administrator’s Guide for UNIX
1. Open http://www.support.veritas.com/ in your web browser.
2. Click Contact Support. The Contacting Support Product List page appears.
3. Select a product line and then a product from the lists that appear. The page will refresh with a list of technical support phone numbers that are specific to the product you just selected.

1
Introduction to Media Manager 1Media Manager is used by NetBackup and Storage Migrator to provide media and device management capabilities for tape and optical disk drives. These capabilities include the following:
� Media and device management interfaces that allow configuration of storage devices.
� Device monitor interfaces that display the current status of all defined tape devices and pending requests for volumes, allowing the operator to assign tapes or optical disks to the appropriate drives and respond to problems.
� Automatic scanning of devices for loaded media with automatic volume recognition of recorded volume labels.
Note Automatic volume recognition is the only aspect of ANSI labeled tapes that Media Manager supports. Once a tape is assigned to a request, all volumes are treated as unlabeled, and the user or application is responsible for reading or writing labels if applicable.
� Support of numerous robotic tape library and optical disk library devices that can automatically retrieve, mount, assign, unmount, and store removable volumes.
� A volume database containing location and other information about volumes that can be used to identify and retrieve volumes in the robotic devices.
� Allow any user to request and unmount a specific volume. See “Allowing Nonroot Users to Administer NetBackup” in the UNIX NetBackup system administrator’s guide.
� Ability to obtain a media inventory of a robotic device and update the associated volume database to provide efficient media tracking.
� The capacity to record media statistics. For example, the first and last time the volume was mounted, the date it was created, an expiration date, and the number of times the volume was mounted.
� Grouping volumes into volume pools for convenience and protection.
� Capability to perform automated drive cleaning, based on the TapeAlert feature or a frequency-based cleaning schedule.

Administrator and User Interfaces
2 NetBackup DataCenter Media Manager System Administrator’s Guide for UNIX
� Capability to automatically share tape drives across multiple hosts that have physical access to shared drives through appropriate hardware. This capability requires the installation of the Shared Storage Option (SSO).
Visit the VERITAS support web site for a list of the platforms and peripherals that Media Manager supports.
Caution Note: If you want to use devices with some other application and these devices are currently being controlled by Media Manger, you must do one of the following to avoid potential loss of data:
A. Use the Media Manager commands, tpreq to mount a drive and tpunmount to unmount the drive. These commands will safely get control of the device when Media Manager is finished with the device.
B. Down the drive, if the drive is in the Media Manager up state.
Administrator and User Interfaces
Note As of release 4.5, NetBackup does not include or support the xvmadm and xdevadm Motif interfaces. Attempting to configure NetBackup by using copies of these Motif interfaces from an earlier NetBackup release will corrupt your NetBackup configuration.
The following table shows the Media Manager administrative interface choices that are available. The terminology, general concepts, and results in the databases are the same, regardless of which interface you use.
See the following sections for more information on these administrative interfaces:
� “Java Administrative GUI” on page 3.
Media Manager Administrative Interfaces
Java GUI Menus CLI Wizards
Task jnbSA tpconfig vmadm
Configure Devices X X X X
Configure Media X X X X
Manage Devices X X

Chapter 1, Introduction to Media Manager 3
Administrator and User Interfaces
� “Menu-Based Administrative Interfaces” on page 5.
� “Command Line Administrative Interfaces (CLI)” on page 5.
� “The Device Configuration Wizard” on page 6.
� “The Volume Configuration Wizard” on page 6.
Note For ease of use, the wizards are recommended for device and media configuration.
Java Administrative GUIThe NetBackup Administration Console allows you to configure and manage media and devices from one main interface. This interface is supported on certain UNIX platforms.
See the NetBackup release notes for information on platform support, and configuring and using the NetBackup Administration Console on UNIX and the UNIX NetBackup system administrator’s guide for an overview of the interface.
Starting the Administration Interface
To start the NetBackup Administration Console (the Java administrative interface) enter the following:
/usr/openv/netbackup/bin/jnbSA
The NetBackup Administration Console is the starting point for administering NetBackup. The left pane of the console window has a node for each major area of NetBackup administration (including nodes for optional VERITAS products).
The right pane initially contains the NetBackup wizards that apply to each node. The figure shows the available wizards for Media Manager (the Media and Device Management node).

Administrator and User Interfaces
4 NetBackup DataCenter Media Manager System Administrator’s Guide for UNIX
The Media and Device Management node contains the Media Manager utilities. Expand Media and Device Management to view these utilities.
Clicking a node displays information related to that node in the right pane. The menus contain commands relevant to the selected node.
� Click Device Monitor. The device monitor has commands for monitoring the operation of storage devices.
“Monitoring Storage Devices” on page 171 explains how to use the Device Monitor.
� Click Media. This node has commands for managing media.
“Managing Media” on page 63 and “Managing Media in Robots” on page 117 explain how to manage your media.
� Click Devices. This node has commands for configuring and managing hosts, robots, and drives.
“Configuring Storage Devices” on page 9 explains how to configure robots and drives.
The Media and Device Management node Media and Device Management wizards

Chapter 1, Introduction to Media Manager 5
Administrator and User Interfaces
Note See the NetBackup system administrator’s guide for UNIX servers for details on the other NetBackup administration utilities and menu commands available.
Shortcut Menus
Pressing the right-mouse button while the pointer is over sections of the NetBackup Administration Console, displays shortcut menus. Different menus appear depending on where your pointer is positioned.
Menu-Based Administrative InterfacesMedia Manager has the following utilities that you can use from terminals that do not support Java capabilities. These utilities have character-based interfaces that let you choose operations from menus and prompt you for necessary information.
tpconfig
Used for device configuration. See “Using tpconfig” on page 349 for more information.
vmadm
Used for media configuration. See “Using vmadm” on page 361 for more information.
Command Line Administrative Interfaces (CLI)Media Manager has the following commands that you can use from terminals that do not support Java capabilities:
vmoprcmd
Used for device management and to perform operator functions on drives.
Users and administrators that are not using NetBackup or Storage Migrator can use the following commands to request Media Manager to mount and unmount specific volumes. “Tape I/O Commands” on page 213 explains these commands.
tpreq
Used to request and mount volumes.
tpunmount
Used to unmount volumes.
For more information about these and other commands, see “Media Manager Man Pages” on page 219.

Device and Media Configuration - Overview
6 NetBackup DataCenter Media Manager System Administrator’s Guide for UNIX
The Device Configuration WizardYou can use the Device Configuration wizard to configure robots, non-shared drives, and shared drives (drives in an SSO configuration).
This wizard is available from the right pane of the NetBackup Administration Console (click Configure Storage Devices).
The Volume Configuration WizardYou can use the Volume Configuration wizard to configure media (volumes). This wizard is available from the right pane of the NetBackup Administration Console (click Configure Volumes).
This wizard configures volumes for all supported standalone drives and robotic libraries.
Device and Media Configuration - OverviewThe following summarizes the steps for configuring storage devices and media. Complete your NetBackup configuration, as explained in the NetBackup system administrator’s guide for UNIX servers.
1. Physically attach the storage devices to the Media Manager server and perform any configuration steps specified by the device or operating system vendor. Also, see the NetBackup Media Manager device configuration guide.
2. Create the system device files for the drives and robotic control.
This is usually done during installation. Device files are created automatically on some UNIX servers. Explicit configuration of device files is required on some UNIX servers to make full use of NetBackup features. See the NetBackup Media Manager device configuration guide for information.
3. Use the Device Configuration Wizard to configure your robots, drives, and shared drives (SSO). For more information, see “Using the Device Configuration Wizard to Configure Devices” on page 29.
To configure unsupported devices, you must use the menus of the Devices node. See “Configuring Storage Devices” on page 11.
4. Use the Volume Configuration Wizard to add the media that you will be using in your storage devices. This wizard configures volumes for all supported standalone drives and robots.

Chapter 1, Introduction to Media Manager 7
Using Media Manager - Overview
When you logically add a new volume (or move volumes) in a robot that supports barcodes, a scan occurs and the Media Manager volume database is updated to reflect the contents of the robotic library.
To configure volumes for unsupported devices, use the menus of the Media node. See “Managing Media” on page 73 and “Managing Media in Robots” on page 125 for advanced robot inventory options.
Using Media Manager - OverviewWhen configuration is complete, you enable device management by starting the Media Manager device daemon (ltid). This starts the following daemons:
� Media Manager device daemon (ltid). This daemon allows Media Manager to mount volumes on the tape or optical storage devices in response to user requests.
� Media Manager volume daemon (vmd). This daemon allows Media Manager to track the location of on-line and off-line volumes and remotely manage devices.
� Automatic volume recognition daemon (avrd). If a tape or optical volume is labeled and mounted in a drive, avrd automatically reads the label. If the label matches information contained in a pending request, Media Manager assigns the drive to that request.
� Robotic daemons. If you defined any robots, ltid starts the corresponding robotic daemons.
Once these daemons are started, applications and users can request volumes.
Requesting VolumesNetBackup and Storage Migrator requests specify the volume’s media ID and device density. A request must have a file name to use as a link to the device that is assigned and the external media ID should correspond to the Media Manager media ID. When Media Manager receives a request for a volume, it searches its volume database(s) for the media ID.
If the volume is in a robot, the volume database information includes the specific robot that has the volume and the location of the volume within the robot (if applicable). Media Manager then issues a mount command to the robotic daemon controlling the robot and the volume is mounted. Control is returned to NetBackup or Storage Migrator and the media read or write operation proceeds.

Using Media Manager - Overview
8 NetBackup DataCenter Media Manager System Administrator’s Guide for UNIX
Note For standalone drives, NetBackup attempts to use the media in the drive, if the media meets the selection criteria in the request. For more information, see the standalone drive extensions in the UNIX NetBackup system administrator’s guides.
Checking BarcodesMedia Manager checks barcodes to ensure that the robot loads the correct tape, in the event that the volume database is incorrect. If the barcode on the tape does not match the barcode in the mount request, Media Manager logs an error and stops the operation. In the case of a backup or restore, NetBackup also logs an error.
If a requested volume is not in a robot, a pending request message appears in the Device Monitor. The operator must then find the volume and do one of the following:
� Check the Device Monitor to find a suitable drive, and mount the requested volume in that drive.
� Move the volume into the robot and update the volume configuration to reflect the correct location for the media, and resubmit the request.
If the volume is labeled (tape or optical platter), avrd reads the label and the drive is assigned to the request. If the volume is unlabeled, the operator manually assigns the drive to the request.
Volume PoolsMedia Manager also uses a concept called volume pools. A volume pool is a set of media that can be used only by the users that you designate when you configure the pool. You specify volume pools and assign media to them when you configure Media Manager. The Media Manager device daemon validates access to volume pools.
Whenever a new volume is required for a robotic or standalone drive, Media Manager allocates it from the volume pool requested by the application. If there are no volumes available in the requested volume pool and a scratch pool has been configured, Media Manager allocates a volume from the scratch pool.
A pool named NetBackup is created by default and, unless you specify otherwise in the policy or schedule, all NetBackup images go to media in the NetBackup pool. You can create other volume pools as desired. Other volume pools that are created by default are named None and DataStore.
See “Volume Pools and Volume Groups” on page 319 for more information.

Chapter 1, Introduction to Media Manager 9
Security Issues
Security IssuesSee “vmd Security” on page 329 for important information about security.

Security Issues
10 NetBackup DataCenter Media Manager System Administrator’s Guide for UNIX

11
Configuring Storage Devices 2The device management window provides the tools required to add, configure, and manage the devices that Media Manager uses.
This chapter explains how to attach drives and robotic libraries and configure Media Manager to use them. The topics in this chapter are listed below. If this is the first time you have configured devices, read the topics in the order they are presented.
� Starting Device Management
� Using the Device Management Window
� Performing Initial Device Configuration
� Making Device Configuration Changes
� Administering Devices on Other Device Hosts
� Managing the Global Device Database Host
� Using the Device Configuration Wizard to Configure Devices
� Managing Partially-Configured Devices
� Adding Robots
� Adding Shared Drives
� Adding Drives
� Managing Robots and Drives
� Robot and Drive Configuration Examples
Starting Device ManagementIn NetBackup Administration Console, click Media and Device Management > Devices.
The device management window appears.
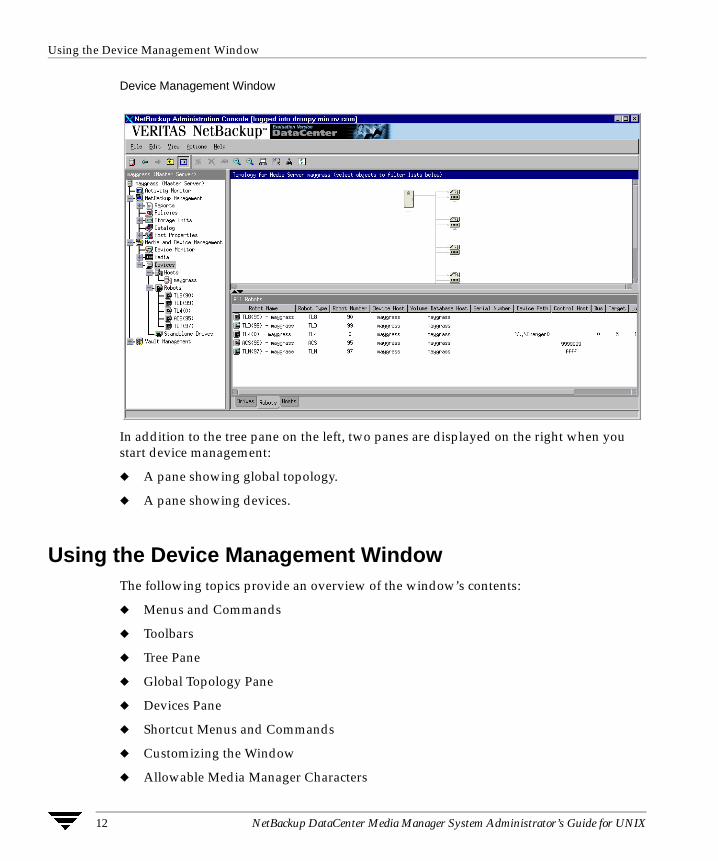
Using the Device Management Window
12 NetBackup DataCenter Media Manager System Administrator’s Guide for UNIX
Device Management Window
In addition to the tree pane on the left, two panes are displayed on the right when you start device management:
� A pane showing global topology.
� A pane showing devices.
Using the Device Management WindowThe following topics provide an overview of the window’s contents:
� Menus and Commands
� Toolbars
� Tree Pane
� Global Topology Pane
� Devices Pane
� Shortcut Menus and Commands
� Customizing the Window
� Allowable Media Manager Characters

Chapter 2, Configuring Storage Devices 13
Using the Device Management Window
Menus and CommandsThe device management window has available the menus and commands shown in the following table.
The menu items are enabled based on the items that are currently selected in the tree pane or topology pane, or which tab is selected in the devices pane. For example, if the robot tab is selected in the devices pane and a robotic library is selected in the list, Inventory Robot is enabled on the Actions menu.
Device Management Menus and Commands
Menu Commands
File Change Server - Displays a dialog box that allows you to change to a different host that is running NetBackup.
New Window from Here - Starts another instance of the NetBackup Administration Console node that was active.
Adjust Application Timezone - Displays a dialog that allows you to manage the timezone. NetBackup Console can execute in a different timezone than the timezone of the server on which it was initiated. See the NetBackup System Administrator ’s guide for UNIX for more information.
Close Window - Closes the current window.
Exit - Closes all open windows.
Edit New - Displays a dialog box to add an item of the type that is currently selected.
Change - Displays a dialog box for changing the configuration of the selected items.
Delete - Deletes selected items from the configuration.
View Contains commands for specifying your viewing preferences for the device management window, including showing and hiding the toolbar or tree, showing and hiding robots, and refreshing the display. See “Customizing the Window” on page 23.

Using the Device Management Window
14 NetBackup DataCenter Media Manager System Administrator’s Guide for UNIX
ToolbarsThe toolbar buttons of the device management window provide shortcuts for commands that are on the menus.
To show or hide the toolbar buttons:
1. In NetBackup Administration Console, click Media and Device Management > Devices.
2. Click View > Show ToolBar.
Actions New - Displays choices for adding robots, drives, or shared drives to a configuration.
Global Device Database - Displays choices for adding or removing device hosts from the global device database, or synchronizing the entries in the global device database.
See “Managing the Global Device Database Host” on page 28.
Change Standalone Volume Database Host - Displays a dialog box to change the volume database host for standalone drives.
Inventory Robot - Displays a dialog box with choices for performing an inventory of the selected robot or updating the volume configuration to match the contents of the robot.
Configure Shared Drive - Starts a wizard that guides you through the steps involved in adding a shared drive, changing a shared drive, or changing a non-shared drive to a shared drive (SSO option).
Using this wizard is not the preferred method when configuring shared drives, instead use the Device Configuration wizard (see “Using the Device Configuration Wizard to Configure Devices” on page 29).
Drive Cleaning - Displays a dialog box with choices for performing drive cleaning functions.
Stop/Restart Media Manager Device Daemon - Controls the Media Manager device daemon.
Analyze Device Configuration - Displays a dialog box for starting the configuration analyzer. This analyzer verifies that the settings in your device configuration are consistent and checks for potential problems.
Help Help Topics - Provides online help information about the NetBackup Console.
License Keys - Provides information about your active and registered license keys.
About NetBackup Administration Console - Displays program information, version number, and copyright information.
Device Management Menus and Commands (continued)
Menu Commands

Chapter 2, Configuring Storage Devices 15
Using the Device Management Window
Also see “Customizing the Window” on page 23.
Tree PaneThe tree pane for Devices contains nodes for Hosts, Robots, and Standalone Drives. You can select items in the tree pane or the Topology pane in conjunction with the tabs of the Devices pane to filter the lists that are shown in the Devices pane.
The following figure shows just the tree pane and contains an expanded view of the Devices node:
Note Selecting an item in the Tree pane (for example, a specific robot) does not enable the Robots tab in the Devices pane.
Global Topology PaneA description bar is displayed at the top of the topology pane.
The topology view shows how devices are configured to the server being administrated, by showing images of servers and devices. The topology information is taken from the Media Manager global device database and is displayed in this pane.
Topology Images
The following images may appear in the topology pane. Shared drives are a NetBackup DataCenter option.
If you select a device host, robot, or Standalone Drives, the Topology pane shows the pertinent connections highlighted and the Devices pane shows information filtered for that specific selection.
Description Topology Image

Using the Device Management Window
16 NetBackup DataCenter Media Manager System Administrator’s Guide for UNIX
Topology Connections
Connections in the topology indicate physical and logical connections of the devices, as follows:
� Media server to robotic library and drive relationships are indicated. A line attaches a robot arm to the media server that has robot control.
� Drives that are physically located in a robotic library are shown directly below the robotic library. Standalone drives are represented as individual drive objects.
� Drive to device host connections are shown only if the drive is being used for a request and the drive is in use by NetBackup. A line attaches a drive to the servers that are configured to use it. Robot to server connections and robot to volume database connections are always shown.
NetBackup media server
Robot
Robot that is partially configured
Robot media
Drive
Drive that is partially configured
Drive that is shared

Chapter 2, Configuring Storage Devices 17
Using the Device Management Window
� Media is represented as in a robotic library. A line attaches the media to the server doing media management.
� The topology also indicates robotic library to volume database host connections.
Selecting Topology Objects
Selecting an object will highlight the connecting lines from the object to all other objects to which it is connected, as follows:
� Clicking on a drive will highlight the connection to the server it is attached.
� Clicking on a shared drive will highlight connections to all servers that are configured to use the drive.
� Clicking on a server will high light connections to all robots, media, and drives that are connected or configured to the server.
Selecting objects in the topology pane is also one of the methods to filter the contents of the lists shown in the Devices pane.
Multiple objects of the same type can be selected by pressing the Ctrl key and selecting another object. If the Ctrl key is used and an object of a different type is selected, the selection is not allowed. If the Ctrl key is not used and an object is selected, the previous selection will be unselected.
Devices PaneThe lower right pane contains tabs for Drives, Robots, and Hosts. These tabs allow you to select different views of your devices. Information in the devices pane is taken from the Media Manager global device database and the local device databases.
You can use the tree pane or the topology pane in conjunction with the tabs to filter the lists shown in this pane. Selecting an item in the tree (for example, a specific robot) does not enable the Robots tab in the devices pane.
Using the Drives Tab
The drives list allows you to view detailed information about drives configured with NetBackup.
To update the drives list with more detailed information, a drive must be selected in the topology pane. You can select a drive in the topology explicitly or implicitly by selecting a robotic library. The drives list will then be updated with the objects selected in the topology.

Using the Device Management Window
18 NetBackup DataCenter Media Manager System Administrator’s Guide for UNIX
The following table describes the columns in the drives list:
Drives List
Column Description
Drive Name Contains the configured name of the drive.
If the drive is configured as a shared drive (SSO), the icon for the drive appears as a shared item.
If the icon shown for a drive contains a red arrow, the current server is not the volume database host for the drive. In this case, it is recommended to change to the correct server before adding volumes for this drive.
Device Host Contains the name of the device host where this drive is attached.
Drive Type Contains the type of drive. For example, 4MM.
If the drive is partially configured, PCD is shown. See “Managing Partially-Configured Devices” on page 31 for details.
Robot Type Specifies the type of robot that contains this drive. For example, TL4.
NONE in this column means that the drive is a standalone drive.
If the robot is partially configured, PCR is shown. See “Managing Partially-Configured Devices” on page 31 for details.
Robot Number Contains the number of the robot. If the robot type is NONE, this column is blank.
Robot Drive Number
Specifies the number of the drive in the robot. This number is only present for robot types that are not ACS, TLH, and TLM.
Vendor Drive Name
For TLH robots, this column contains the DAS drive name.
For TLH robots, this contains the IBM device name.
This column is not applicable for NetBackup BusinesServer.
ACS Contains the index (in ACS library software terms) that identifies the robot that has this drive.
This column is not applicable for NetBackup BusinesServer.
LSM Contains the ACS Library Storage Module that has this drive.
This column is not applicable for NetBackup BusinesServer.
Panel Contains the ACS robot panel where this drive is located.
This column is not applicable for NetBackup BusinesServer.

Chapter 2, Configuring Storage Devices 19
Using the Device Management Window
Drive Contains the physical number of the drive (in ACS library software terms).
This column is not applicable for NetBackup BusinesServer.
Drive Path Contains the path for the drive, for example, Tape5.
Serial Number Contains the drive serial number, if the drive reports one.
World Wide ID Contains a unique identifier that is assigned to each device. Some drives may not report this identifier.
Shared This column is used for the shared storage option (SSO) feature. Yes, means this drive is configured as a shared drive. No, means the drive is not a shared drive.
For NetBackup BusinesServer this column contains No, since this feature is not supported.
Drive Status Contains the current status of the drive.
Port Contains the SCSI port number (if the robot is connected to a Windows server).
Bus Contains the SCSI bus number (if the robot is connected to a Windows server).
Target Contains the SCSI target number (or SCSI ID) (if the robot is connected to a Windows server).
Lun Contains the SCSI logical unit number of the robot (if the robot is connected to a Windows server).
Cleaning Frequency
Contains the cleaning frequency for the drive, in hours.
Volume Header This column applies only to optical disk drives on certain UNIX hosts and specifies the volume header device path for the drive.
This column is not applicable for NetBackup BusinesServer.
Drive Comments
Contains any user comments added for the drive.
Inquiry Information
Contains device information returned from the device. This information is used to identify the device. For example, vendor ID, product ID, and product revision.
NDMP Host Contains the name of the NDMP control host.
Drives List (continued)
Column Description

Using the Device Management Window
20 NetBackup DataCenter Media Manager System Administrator’s Guide for UNIX
Using the Robots Tab
The robots list allows you to view detailed information about robots configured with NetBackup. Initially, all robots in the global device database are listed in the robot list. However, only information found in the global device database will be displayed in the list.
To update the robot list with more detailed information, a robot must be selected in the topology pane or in the tree pane. You can select a robot in the topology explicitly or implicitly by selecting a drive in the robot or the device host that the robot is connected to. The list will then be updated with the objects selected in the topology.
The following table describes the columns in the robots list:
Drive Index Drive index assigned to the drive during configuration.
Robots List
Column Description
Robot Name Contains the type and number of the robot, for example TLM(3).
If the robot is partially configured, PCR is shown. For example, PCR(3). See “Managing Partially-Configured Devices” on page 31 for details.
If the icon shown for a robot contains a red arrow, the current server is not the volume database host for the robot. In this case, it is recommended to change to the correct server before adding volumes for this device.
Device Host Contains the name of the device host where this robot is attached.
Robot Type Contains the type of robot. If the robot is partially-configured, PCR is shown. See “Media Manager Robot Types” on page 297 for a list of supported robot types.
Robot Number Number of the robot.
Volume Database Host
Contains the name of the volume database host that is used to track the volumes in this robot
Serial Number Contains the robot serial number.
Robotic Path Contains the path for the robot, for example, changer0.
Drives List (continued)
Column Description

Chapter 2, Configuring Storage Devices 21
Using the Device Management Window
Using the Hosts Tab
The hosts list allows you to view detailed information about the hosts that are referenced in your Media Manager configuration.
To update the hosts list with more detailed information, a host must be selected in the topology pane or in the tree pane. You can select a host in the topology explicitly or implicitly by selecting a robot. The hosts list will then be updated with the objects selected in the topology.
The following table describes the columns in the hosts list:
Robot Control Host
Contains the name of the host that is providing the robotic control.
Port Contains the SCSI port number (if the robot is connected to a Windows server).
Bus Contains the SCSI bus number (if the robot is connected to a Windows server).
Target Contains the SCSI target number (or SCSI ID) (if the robot is connected to a Windows server).
Lun Contains the logical unit number of the robot (if the robot is connected to a Windows server).
Inquiry Information
Contains device information returned from the device. This information is used to identify the device. For example, vendor ID, product ID, and product revision.
Hosts List
Column Description
Host Name Contains the name of the device host.
Connection Status
Contains the current NetBackup connection status for this host. This status field contains Connected, Not Connected, or the text of a possible connection error message.
Standalone Volume Database Host
Contains the name of the volume database host for all of the standalone drives controlled by this device host.
Robots List (continued)
Column Description
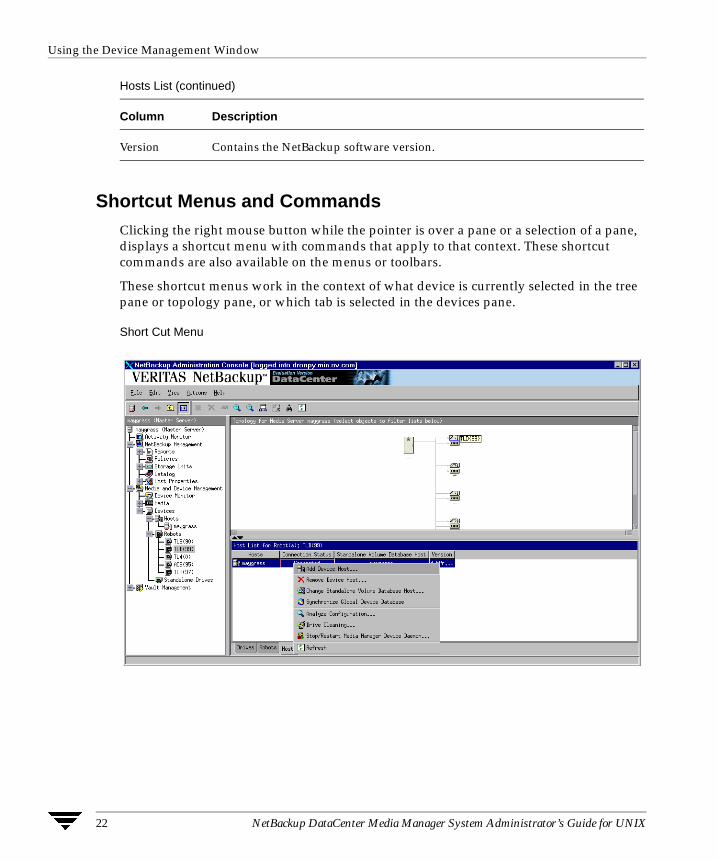
Using the Device Management Window
22 NetBackup DataCenter Media Manager System Administrator’s Guide for UNIX
Shortcut Menus and CommandsClicking the right mouse button while the pointer is over a pane or a selection of a pane, displays a shortcut menu with commands that apply to that context. These shortcut commands are also available on the menus or toolbars.
These shortcut menus work in the context of what device is currently selected in the tree pane or topology pane, or which tab is selected in the devices pane.
Short Cut Menu
Version Contains the NetBackup software version.
Hosts List (continued)
Column Description

Chapter 2, Configuring Storage Devices 23
Performing Initial Device Configuration
Customizing the Window
Changing the View of the Topology Pane
You can manage the view of the robot diagrams by right-clicking in the topology pane and selecting Expand All Robots or Collapse All Robots.
Allowable Media Manager CharactersThe following set of characters can be used in user-defined names, such as drive comments and drive names that you enter when creating these entities. These characters must be used even when specifying these items in foreign languages.
Do not use a minus as the first character or leave any spaces between characters.
� Alphabetic (A-Z a-z)
� Numeric (0-9)
� Period (.)
� Plus (+)
� Minus (-)
� Underscore (_)
Performing Initial Device Configuration
1. Physically attach the storage devices to the device host and perform any configuration steps specified by the device or operating system vendor.
Explicit configuration of device files is required on some UNIX servers to make full use of NetBackup features. See the appropriate chapter of the NetBackup Media Manager device configuration guide for your UNIX platform.
2. Create any required system device files for the drives and robotic control. This is usually done during installation. Device files are created automatically on some UNIX platforms.
See the appropriate chapter of the NetBackup Media Manager device configuration guide for your UNIX platform.
3. Add the storage devices to the Media Manager configuration. If this is the first time you have configured devices:

Making Device Configuration Changes
24 NetBackup DataCenter Media Manager System Administrator’s Guide for UNIX
a. See “Making Device Configuration Changes” on page 24.
If you are adding the device to a remote host, also see “Administering Devices on Other Device Hosts” on page 25.
b. Depending on the type of device you are adding, proceed to one of the following topics:
- “Using the Device Configuration Wizard to Configure Devices” on page 29.
- “Adding Robots” on page 32.
- “Adding Shared Drives” on page 41.
- “Adding Drives” on page 41.
Making Device Configuration ChangesThe following procedure explains how to make device configuration changes:
1. Make your device configuration changes.
If you use the Device Configuration wizard, the following step is done by the wizard.
2. Stop and restart the Media Manager device daemon (ltid) using Actions > Stop/Restart Media Manager Device Daemon.
Stopping and restarting ltid also stops and restarts the robot daemons.
In the dialog box, the arrow in the Device Host box allows you to select a device host. This dialog also shows the current status of this host.
Select a host and Stop/Restart, and OK when ready.
Note By using Apply, you can select device hosts and actions for more than one device host before clicking OK to close the dialog box.

Chapter 2, Configuring Storage Devices 25
Administering Devices on Other Device Hosts
Administering Devices on Other Device HostsBy default, you are able to manage storage devices on the server where you are running the Media Manager interface. In the following figure, the administrator is running Media Manager on host shark and managing devices on host eel.
Remote Administration of Other UNIX HostsThe name of the UNIX host that you specify in the Login box, when starting the NetBackup Administration Console, must be in the NetBackup bp.conf file on the remote UNIX host where you want to monitor devices.
Remote Administration Example
For example, you could start the administration interface from the NetBackup UNIX host (named bear) and specify the UNIX host (named shark) in the Login box.
In this example, you
� Started the interface from the host named bear.
� Are managing NetBackup, through Java application server software running on the host named shark.
� Want to manage devices on a third host, named tiger.
The bp.conf file on host tiger must include the name of the server that you logged into (shark), not the host where you first started the administration interface (bear).
Drives
Drives Drives
Media ManagerMedia Manager Media Manager
Device Database Device Database Device Database
AdministrationInterface
yakshark eel
Robots

Administering Devices on Other Device Hosts
26 NetBackup DataCenter Media Manager System Administrator’s Guide for UNIX
If you cannot connect to host tiger, add host shark to the bp.conf file on host tiger.
Adding SERVER Entries in the bp.conf File
1. Add a SERVER = host entry below any existing server entries in the /usr/openv/netbackup/bp.conf file.
2. Stop and restart the NetBackup database manager (bpdbm) and NetBackup request daemon (bprd).
See the NetBackup system administrator’s guide for UNIX for more information.
Also, the Media Manager volume daemon must be running on host tiger or Media Manager will not be able to update its configuration. This daemon is normally started when you start the Media Manager device daemon.
If you suspect that the volume daemon is not running, you should start vmd using /usr/openv/volmgr/vmd.
If you are unable to access the devices, you may need to add a SERVER entry to the vm.conf file on tiger. See “Media Manager Security” on page 26.
Media Manager SecurityFor Media Manager to access devices on another host, it may be necessary to add a SERVER entry to the vm.conf file on the remote host (or you can use the Host properties node in the NetBackup Administration Console to add an entry).
SERVER entries are used for security. Without any SERVER entries and authentication not enabled, any host can manage the devices on the host. You can add entries allowing only specific hosts to remotely access the devices.
vmd is the Media Manager volume daemon. Device configuration changes, even those made local to a server, may require vmd to be running. It is recommended that vmd be running at all times, including when changes are being made to the Media Manager device configuration.
If the vm.conf File on a Remote Host Contains Then
No SERVER entries and authentication is not enabled
Any host can manage the devices on this host. It is not necessary to make any additions to vm.conf.
SERVER entries You must add a SERVER entry for the host where you are running the NetBackup Administration Console (if it is not present).

Chapter 2, Configuring Storage Devices 27
Administering Devices on Other Device Hosts
vmd Considerations
Media Manager authentication/authorization may affect systems where NetBackup authentication/authorization has been enabled.
Connections to vmd will fail if authentication/authorization are enabled, an AUTHORIZATION_REQUIRED entry is present in vm.conf, and the caller of vmd does not have the required permission to use vmd functions.
If authentication/authorization is needed in NetBackup but not in Media Manager, you can do one of the following:
� Add SERVER entries in vm.conf.
� Have no SERVER and no AUTHORIZATION_REQUIRED entries in vm.conf.
See “vmd Security” on page 329 for more information.
Example SERVER Entries
Assume that we have three hosts, named eel, yak, and shark; and that NetBackup authentication is not enabled.
We want to centralize device management on host shark and also permit each host to manage its own devices.
� The vm.conf file on shark contains
SERVER = shark
The vm.conf file on shark does not require any additional SERVER entries, because all device management for shark will be performed from shark.
� The vm.conf file on eel contains
SERVER = eel
SERVER = shark
This allows eel to manage its own devices and also permits shark to access them.
� The vm.conf file on yak contains
SERVER = yak
SERVER = shark
This allows yak to manage its own devices and also permits shark to access them.

Managing the Global Device Database Host
28 NetBackup DataCenter Media Manager System Administrator’s Guide for UNIX
Managing the Global Device Database HostDevice discovery and auto-configuration are used by NetBackup and Media Manager. For device discovery and auto-configuration to work properly (particularly where devices are connected to many servers) a single host must serve as the repository for global device configuration information. When you install NetBackup, by default the master server is configured as the global device database host.
Also, the Devices node of the NetBackup Administration Console requires that all hosts that the node references need to be using the same global device database host. The Devices node verifies global device database consistency between any hosts that are included for device management.
If you have multiple master servers in your configuration or did not install or upgrade your master servers before the media servers, then more than one host may have been designated as the global device database host. See “Synchronizing the Global Device Database” on page 29 to correct this problem.
You should manage your media servers from the master server point of view.
Note When using the Device Configuration wizard, a global device database host conflict may be detected during device scanning. The hosts you selected to scan in the wizard do not agree on which host stores global device information.
The following topics cover the commands available to manage the global device database host:
� Adding a Device Host to the Global Device Database
� Removing a Device Host From the Global Device Database
� Synchronizing the Global Device Database
� Specifying a Different Host as the Global Device Database Host
Adding a Device Host to the Global Device DatabaseUnless you add a drive or add a robotic library, entries for each device host are not entered in the database (no host entries are present in the database).
To add a host to the global device database, select Actions > Global Device Database > Add Device Host.
Removing a Device Host From the Global Device DatabaseTo remove a host from the global device database, select Actions > Global Device Database > Remove Device Host.
Chapter 2, Configuring Storage Devices 29
Using the Device Configuration Wizard to Configure Devices
Synchronizing the Global Device DatabaseThis command updates host settings in the global device database to be consistent with the device configurations of all of the device hosts in your configuration.
Synchronizing the global device database is normally not necessary, but can be done if you are experiencing problems and have made recent configuration changes to your local device hosts that may not have been recognized.
Select Actions > Global Device Database > Synchronize Global Device Database.
Specifying a Different Host as the Global Device Database Host
See the man pages for information about using the get_gdbhost and set_gdb_host options of the tpautoconf command. This command allows you to determine the current global device database host and specify a different host as the global device database host.
tpautoconf is also used by the Device Configuration wizard to automatically discover and configure devices.
Using the Device Configuration Wizard to Configure Devices
This wizard performs better if the robotic libraries and drives that you are configuring support complete device serialization. Using this wizard is the recommended method of configuring the following devices:
� Robots.
� Drives.
� Shared drives (drives in an SSO configuration).
When using the Device Configuration wizard, a global device database host conflict may be detected during device scanning. The hosts you selected to scan in the wizard do not agree on which host stores global device information. See “Managing the Global Device Database Host” on page 28 for more information.

Using the Device Configuration Wizard to Configure Devices
30 NetBackup DataCenter Media Manager System Administrator’s Guide for UNIX
Wizard LimitationsTo scan and auto-configure a device, all of the device hosts (media servers) that you select must be running NetBackup release 3.4 or later. The scan for devices will fail on hosts that are running older release levels.
All information required for full auto-configuration may not be available on some systems. In this case, the wizard will do as much as possible with the limited device information. Later you need to manually configure the remaining devices.
If tape drives are in use or offline, they cannot be discovered.
This wizard does not support the following devices:
� ACS, LMF, or TLM robots and drives.
� Robots and drives for use with NetBackup for NDMP.
To configure these devices, see “Adding Robots” on page 32 and “Adding Drives” on page 41.
Drives In an SSO ConfigurationYou may need to use the Shared Drive wizard to configure shared drives for some robot types. See “Adding Shared Drives” on page 41.
For information on the Device Configuration wizard and the Shared Drive wizard in an SSO configuration see the NetBackup SSO system administrator’s guide.
Starting the WizardThe Device Configuration wizard is available from the list of wizards displayed in the right pane of the Media and Device Management window.
Click Media and Device Management > Configure Storage Devices.
In some cases the wizard may leave some devices partially configured. See “Managing Partially-Configured Devices” on page 31 for more information.
Rerunning the WizardRerunning the Device Configuration wizard updates the Media Manager configuration. For example, adding a new SCSI adapter may change the path to a robotic library. A similar change to the configuration may occur if you add a new drive.
The Device Configuration wizard updates the Media Manager configuration to match the new configuration.

Chapter 2, Configuring Storage Devices 31
Managing Partially-Configured Devices
External Device Mapping FilesThese text files are used by the Device Configuration wizard to automatically discover and configure new devices. External mapping files exist for robots and drives.
This means that in some cases, device discovery support for your new or upgraded devices may be accomplished without waiting for a patch from VERITAS. Support for some new devices only requires that you download an updated external mapping file when any device changes are made to your configuration.
Note These files do not indicate support for any of the devices, only the ability to recognize and automatically configure them.
Obtaining External Device Mapping Files
Visit the VERITAS support web site (http://support.veritas.com) to download the latest external device mapping files for your devices.
Refer to the supplied README file for instructions. The files that you download will be named similar to the following files: MAPPINGS_4.5_nnnnnn.TAR and MAPPINGS_4.5_nnnnnn.ZIP
Managing Partially-Configured DevicesUnder certain conditions, for example an unsupported robotic library or drive, the Device Configuration wizard may leave some devices as partially configured.
Also if you unselect a discovered device from the tree view of the wizard, will cause the device to be configured as partially configured.
Partially-configured drives are designated by PCD and partially-configured robots by PCR in the Devices window pane.
See “Using the Drives Tab” on page 17 and “Using the Robots Tab” on page 20.
If this happens it is best to ensure that you have downloaded the most recent external mapping files from the VERITAS support web site (see “External Device Mapping Files” on page 31).

Adding Robots
32 NetBackup DataCenter Media Manager System Administrator’s Guide for UNIX
Adding Robots
Note Using the Device Configuration wizard is the recommended method of configuring robots. See “Using the Device Configuration Wizard to Configure Devices” on page 29 for wizard restrictions and more information.
When adding a robotic library and drives, the best method is to add the robotic library first, as explained in this procedure and then add the drives (see “Adding Drives” on page 41).
1. Perform the steps explained in “Performing Initial Device Configuration” on page 23.
2. In the NetBackup Administration Console, click Media and Device Management > Devices.
3. Select Actions > New > Robot.
A dialog box for adding a robotic library appears. The properties that appear in this dialog box vary depending on the host platform type and robot type.

Chapter 2, Configuring Storage Devices 33
Adding Robots
4. Specify the properties for the robotic library as explained in “Dialog Box Entries for Adding and Changing Robots” on page 33.
5. Click OK.
Dialog Box Entries for Adding and Changing RobotsThe following topics describe the properties that you specify when you add a robotic library or change a robot configuration. Note that some of these properties apply only to specific robots or host platforms.
Device Host
Note This property does not apply to NetBackup BusinesServer.

Adding Robots
34 NetBackup DataCenter Media Manager System Administrator’s Guide for UNIX
Specifies the host to which you are adding the robotic library. To specify a host, click the arrow and select a host from the list.
To choose a device host that is not in the list, click the browse button (...). In the dialog box that then appears, specify the name of the host you want.
Robot Type
Specifies the type of robot that you are adding. Click the arrow and select from the list of types that Media Manager supports.
Visit the VERITAS support web site (http://www.support.veritas.com) to locate the robot type to use for specific vendors and models.
Microsoft Windows 2000 Removable Storage Manager (RSM)
If you want to use the RSM robot type, review the following important points:
� Your device host must be running Windows 2000.
� You want the Microsoft Removable Storage Manager to control the robot, rather than Media Manager.
� A robotic library configured as an RSM robot, cannot also be used as a Media Manager direct-controlled (SCSI) robot (for example, TLD).
� Shared drives cannot be configured in an RSM robot.
� For more information on configuring and using RSM robots, see the RSM appendix of the NetBackup Media Manager system administrator’s guide for Windows.
Robot Number
Specifies a unique, logical identification number for the robotic library. This number identifies the robotic library in displays (for example, TLD (21)) and also is used when adding media for the robot to the Media Manager configuration.
Important points when specifying a robot number follow:
� Robot numbers must be unique for all physically-distinct robots on all hosts in the configuration. This applies regardless of the robot type or the host that controls them. For example, if you have two robots, use different robot numbers even if they are controlled by and configured on different hosts.
� If you are adding a robot definition for a robot where the robot control is handled by a remote device host (not this device host), be sure to use the same robot number as used for that robot on all other device hosts.
Chapter 2, Configuring Storage Devices 35
Adding Robots
Also, if the robot has its robotic control and drives on different hosts (for example, as permitted by a Tape Library DLT), be certain to specify the same robot number in all references to that library. That is, use the same robot number on the hosts with the drives, as you do on the host that has the robotic control. See “Example 3: Robot and Drives Distributed Among Multiple Hosts” on page 60.
Volume Database Host
Note This property does not apply to NetBackup BusinesServer.
Specifies the name of the host where Media Manager keeps the volume configuration information about the media in the robotic library.
You can specify any host that has Media Manager installed as the volume database host, even if the host does not have any drives or robots attached. Click the arrow and select from the list of hosts listed.
Caution VERITAS recommends that you use one volume database host for all your volumes (robotic and standalone). Although it is possible to maintain separate volume databases on multiple hosts, administration is more difficult and it is not possible to merge the databases later.
“Example 3: Robot and Drives Distributed Among Multiple Hosts” on page 60, shows a configuration where the volume database is on a central host.
You will have to know the name of the volume database host when adding volumes to the robotic library.
Adding volumes is explained in “Managing Media” on page 73.
Robot Control
In the Robot control section, you specify the control for the robot. Depending on the robot type you are adding and the type of device host, various combinations of the robot control buttons are available in the dialog.
The following table provides an overview of configuring robot control, based on robot type and the device host platform type. The third column in the table indicates the robot control button that is valid for that particular robot type and platform, as follows:
� Robot is controlled locally by this device host (Local)
� Robot control is handled by a remote host (Remote)
� Robot control is attached to an NDMP host (NDMP)

Adding Robots
36 NetBackup DataCenter Media Manager System Administrator’s Guide for UNIX
For NetBackup BusinesServer, Robot control is handled by a remote host is not supported and is not available. See the NetBackup release notes or visit the VERITAS support web site for more detailed information on supported platforms and other NetBackup product limitations.
Robot Control Configuration Overview
Robot Type Valid Device Host Platform Robot ControlInformation Required for Configuration
ACS Any (except UNIX Auspex and Linux)
Remote ACSLS host
LMF UNIX Solaris Local Library name
LMF UNIX Solaris Remote Robot control host
ODL UNIX (except Linux) Local Robotic device file
RSM Windows 2000 Local Robot device
TL4, TL8, TLDTS8, TSD, TSH
UNIX Local Robotic device file
TL4, TL8, TLDTS8, TSD
Windows Local Robot device
TL8 Any (except UNIX NCR) Remote Robot control host
TLD Any Remote Robot control host
TL8, TLD, TSD WindowsUNIX AIXUNIX SolarisUNIX HP/UX
NDMP NDMP host name
Robot device
TLH UNIX AIX Local LMCP device file
TLH UNIX (except AIX and Linux) Local Library name
TLH Windows (Intel only) Local Library name
TLH Any (except Linux) Remote Robot control host
TLM Any Remote DAS server

Chapter 2, Configuring Storage Devices 37
Adding Robots
The following figure shows two hosts using two drives in a TL8 robot. This is an example of robot sharing or library sharing. The robotic control for the robot is on the host named eel. One drive in the robot is connected to eel and the other is connected to the host shark.
When you add this robot to the device configuration on eel, you select Robot is controlled locally by this device host. When you add the robot to the device configuration on shark, you select Robot control is handled by a remote host.
Robot Control Host Example
Robot is controlled locally by this device host
For this type of robot control, you have the following possibilities based on the robot type and device host platform that you selected.
Robotic Device File
When adding a robot to UNIX device hosts, specify the robotic device file path as follows. This file is used for a SCSI connection and is located in the /dev directory tree on the device host.
For Drive 2
eel shark
Control
For Drive 2
TL8 Robot (Exabyte 440)
Drive 2Drive 1TL8 Robotic Control
Remote Robot information for the TL8
Robotic Drive information for Drive 2
Local Robot information for the TL8
Robotic Drive information for Drive 1
Volume Database

Adding Robots
38 NetBackup DataCenter Media Manager System Administrator’s Guide for UNIX
1. Click ... to browse and then select a robotic device file from the list that appears in the Devices dialog box. When you click OK, your selection will be entered in the Robotic device file box.
2. If the browse operation fails to find and display all of the attached robots, click More to enter the path of the device file. Your entry will be entered in the Robotic device box.
If the device file entry does not exist, create the entry as explained in the NetBackup Media Manager device configuration guide for UNIX.
Robot Device
When adding a robot to Windows device hosts, specify the robot as follows.
For information on adding RSM robots, see the RSM appendix in the NetBackup Media Manager system administrator’s guide for Windows.
1. Click ... to browse and then select a device from the list that appears in the Devices dialog box.
Selecting a robot in the Devices dialog and clicking OK will set different values in the Robot Control text box depending on the type of Windows device host. The following table shows the settings in the first column for the type of device host listed in the second column:
2. If the browse operation fails to find and display all of the attached robots, click More to display a dialog box that allows you to specify the Port, Bus, Target, and LUN numbers, or the device name. Your entry will be set in the Robot device box.
If the browse operation fails, a dialog box appears allowing you to enter the Port, Bus, Target, and LUN numbers, or the device name. Your entry will be set in the Robot device box.
Robot Control Text Box Setting For this Type of Windows Device Host
SCSI Port, Bus, Target, and LUN numbers Windows NT hosts
SCSI Port, Bus, Target, and LUN numbers Windows 2000 hosts where a changer driver is not in control of the robot
Device name (for example, Changer1) Windows 2000 hosts where a changer driver is in control of the robot
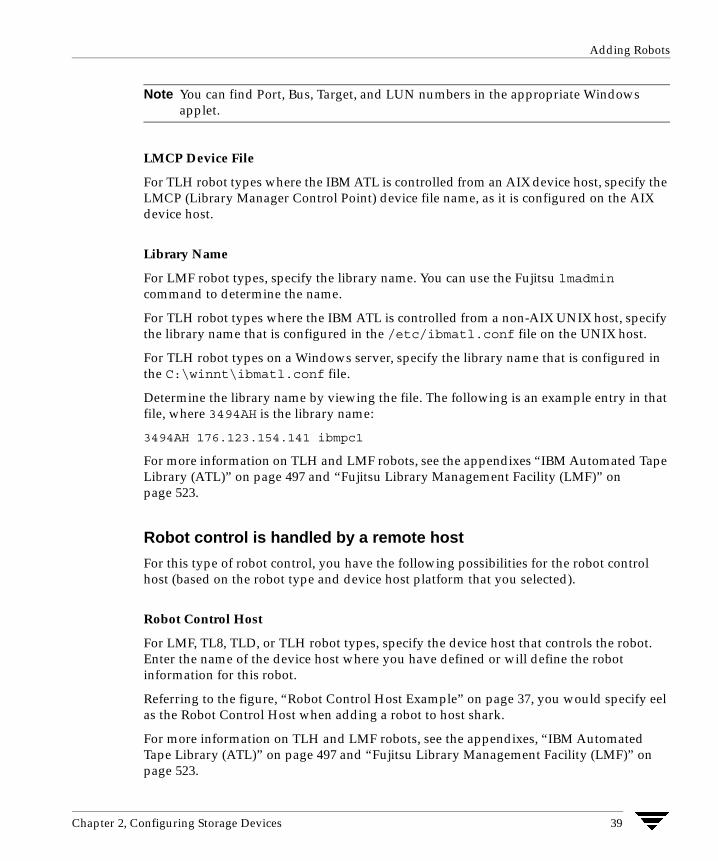
Chapter 2, Configuring Storage Devices 39
Adding Robots
Note You can find Port, Bus, Target, and LUN numbers in the appropriate Windows applet.
LMCP Device File
For TLH robot types where the IBM ATL is controlled from an AIX device host, specify the LMCP (Library Manager Control Point) device file name, as it is configured on the AIX device host.
Library Name
For LMF robot types, specify the library name. You can use the Fujitsu lmadmin command to determine the name.
For TLH robot types where the IBM ATL is controlled from a non-AIX UNIX host, specify the library name that is configured in the /etc/ibmatl.conf file on the UNIX host.
For TLH robot types on a Windows server, specify the library name that is configured in the C:\winnt\ibmatl.conf file.
Determine the library name by viewing the file. The following is an example entry in that file, where 3494AH is the library name:
3494AH 176.123.154.141 ibmpc1
For more information on TLH and LMF robots, see the appendixes “IBM Automated Tape Library (ATL)” on page 497 and “Fujitsu Library Management Facility (LMF)” on page 523.
Robot control is handled by a remote host
For this type of robot control, you have the following possibilities for the robot control host (based on the robot type and device host platform that you selected).
Robot Control Host
For LMF, TL8, TLD, or TLH robot types, specify the device host that controls the robot. Enter the name of the device host where you have defined or will define the robot information for this robot.
Referring to the figure, “Robot Control Host Example” on page 37, you would specify eel as the Robot Control Host when adding a robot to host shark.
For more information on TLH and LMF robots, see the appendixes, “IBM Automated Tape Library (ATL)” on page 497 and “Fujitsu Library Management Facility (LMF)” on page 523.

Adding Robots
40 NetBackup DataCenter Media Manager System Administrator’s Guide for UNIX
DAS Server
For TLM robot types that are controlled by an ADIC Distributed AML Server (DAS), specify the host name of the DAS server. This host is an OS/2 workstation near or within the robot cabinet, or a Windows server near the ADIC Scalar library.
For more information on TLM robots, see the appendix, “ADIC Distributed AML Server (DAS)” on page 511.
ACSLS Host
For ACS robots, specify the name of the host where the ACS library software resides (on some UNIX platforms, this host can also be a device host or volume database host).
The ACS library software component on this host can be any of the following:
� Automated Cartridge System Library Software (ACSLS)
� STK Library Station
� Storagenet 6000 Storage Domain Manager (SN6000).
This STK hardware serves as a proxy to another ACS library software component (such as, ACSLS).
Note STK LibAttach software must also be installed, if the device host that has drives under ACS control is a Windows host.
For an overview of ACS robots, see the appendix, “Automated Cartridge System (ACS)” on page 475.
Robot control is attached to an NDMP host
For this type of robot control, you specify the following:
Robot Device
Specify the robot device that is attached to the NDMP host.
Click ... to enter a robot device file in the Devices dialog.
NDMP Host Name
Enter the name of the NDMP host where the robot is attached.

Chapter 2, Configuring Storage Devices 41
Adding Shared Drives
Adding Shared DrivesThe Device Configuration wizard or the Shared Drive wizard can be used to configure drives for an SSO configuration. Either wizard guides you through the steps involved in configuring drives that will be shared among hosts.
For more information on using these wizards in a SSO configuration, see the NetBackup Shared Storage Option system administrator’s guide.
Using the Device Configuration WizardFor TL8, TLD, and TLH robot types, it is recommended to use the Device Configuration wizard to add shared drives.
See “Using the Device Configuration Wizard to Configure Devices” on page 29 for restrictions and more information.
Using The Shared Drive WizardFor ACS and TLM robot types, it is recommended to use the Shared Drive wizard to add shared drives. See the SSO system administrator’s guide for a list of restrictions.
You can start this wizard as follows:
1. In NetBackup Administration Console, click Media and Device Management > Devices.
2. Click Actions > New > Shared Drive.
Follow the prompts for the wizard.
Adding Drives
Note Using the Device Configuration wizard is the recommended method of configuring drives. See “Using the Device Configuration Wizard to Configure Devices” on page 29 for wizard restrictions and more information.
The following procedure explains how to add drives using device management menus:

Adding Drives
42 NetBackup DataCenter Media Manager System Administrator’s Guide for UNIX
1. Perform the steps necessary for the host to recognize the attached drives (see “Performing Initial Device Configuration” on page 23).
2. In NetBackup Administration Console, click Media and Device Management > Devices.
3. Select Actions > New > Drive.
The properties that appear in this dialog box vary slightly, depending on the type of host platform and robot type.
4. Specify the properties of the drive as explained in “Dialog Box Entries for Adding or Changing Drives” on page 43.
5. Click OK.
The display now shows the new drive information.
6. If the new drive was standalone, verify the volume database host setting and change it if necessary. See “Changing the Volume Database Host for Standalone Drives” on page 49.

Chapter 2, Configuring Storage Devices 43
Adding Drives
Dialog Box Entries for Adding or Changing DrivesThe following are the properties that you can specify when adding a drive or changing the properties of a drive. Some of these properties apply only to specific types of drives or host platforms.
Device Host Section
Note This property does not apply to NetBackup BusinesServer.
Specifies the host to which you are adding the drive. The host that is shown initially in the box is the device host you selected earlier in the tree pane.
If you want to specify a different host, click the arrow and select a host from the list.
If you want to specify a device host that is not in the list, click the browse button (...). In the dialog box that appears, specify the name of the host you want.
Drive Information Section
Drive Type
Specifies the type of drive that you are adding. Click the arrow and select from the list of the drive types that Media Manager supports.
See “Media Manager Media Types” on page 299 for more information.
Drive Name
Enter a name that will be used by Media Manager to identify the drive. Descriptive names are recommended and the name must be unique.
Device Name
Note Applies only to Windows servers.
The host type is displayed to the right of the Device Host box.
Enter the name of the drive as it is recognized by the Windows server. Enter the name in the box. You can find the name in the registry.
For example, if the registry shows the following display, the device name for the tape is Tape1:
Logical Unit Id 1- TapePeripheral (Tape1)

Adding Drives
44 NetBackup DataCenter Media Manager System Administrator’s Guide for UNIX
You can also get the device name for the drive from the appropriate Windows applet.
No Rewind Device
Note Applies only to UNIX servers.
Enter the no rewind device file path for the drive.
Although both no rewind and rewind device files are usually available, Media Manager requires only the no rewind on close device file.
Device files are located in the /dev directory on the UNIX host. If the device files do not exist, create them as explained in the NetBackup Media Manager device configuration guide for UNIX.
A no rewind device remains at its current position on a close operation. Usually the device file name is preceded or followed by the letter n.
If you are using NDMP drives, see the NetBackup for NDMP system administrator’s guide for configuration information.
If you are using Fastrax drives, see the NetBackup for EMC Fastrax system administrator ’s guide for configuration information.
Character Device
Note Applies only to optical disk drives on NetBackup DataCenter UNIX servers, and does not apply to NetBackup DataCenter Windows servers or NetBackup BusinesServer.
Enter the Character Device file path for the drive.
Character device files are in the /dev directory on the UNIX host. If the entries do not exist, you can create them as explained in the NetBackup Media Manager device configuration guide for UNIX. Media Manager uses character mode device files.
Volume Header Device
Note Applies only to optical disk drives on NetBackup DataCenter UNIX servers, and does not apply to NetBackup DataCenter Windows servers or NetBackup BusinesServer.
Enter the Volume Header Device path for the drive. This file is in the /dev directory on the UNIX host. If the entry does not exist, create it as explained in the NetBackup Media Manager device configuration guide for UNIX.

Chapter 2, Configuring Storage Devices 45
Adding Drives
Cleaning Frequency
If you want to setup a frequency-based cleaning schedule for the drive you are adding, set the desired number of hours between drive cleanings. When you add a drive, Media Manager starts recording the amount of time that volumes have been mounted in that drive.
If you do not specify a cleaning frequency, you can still utilize automated drive cleaning with the TapeAlert feature, provided the following conditions have been met:
� A cleaning volume has been defined in Media Manager.
� The host platform, robot type, and drive support drive cleaning.
If the drive is in a robotic library that supports drive cleaning and a cleaning cartridge is defined in that robotic library, cleaning occurs when the accumulated mount time exceeds the time you specify for cleaning frequency. The mount time is reset when the drive is cleaned.
See “Drive Cleaning” on page 316 for information on manual cleaning and cleaning tapes.
Drive Status
The default drive status is Up, meaning the drive is available. You can change the drive status using commands found on the Actions menu in Device Monitor.
When the drive status is up, the default mode is AVR (Automatic Volume Recognition) for all drives except optical drives on an HP9000-800, which are normally in OPR mode.
Drive Is In A Robotic Library
Select Drive is in a robotic library to specify that the drive is under robotic control and then enter information in the Robotic drive information section of the dialog.
Clear Drive is in a robotic library for standalone (nonrobotic) drives.
Robotic Drive Information Section
Robotic Library
This box allows you to select any currently configured robotic library that can control the drive. Click the arrow and select a robotic library from the list.

Adding Drives
46 NetBackup DataCenter Media Manager System Administrator’s Guide for UNIX
Robot Drive Number
Note Robot drive number does not apply when adding drives to the following robots:
ACS (Automated Cartridge System). See “ACS” on page 46.TLH (Tape Library Half-inch). See “TLH” on page 47.TLM (Tape Library Multimedia). See “TLM” on page 47.
Specifies the physical location within the robotic library of the drive.
Set this to the number that correlates to the location of the drive that you are adding. When adding more than one drive to a robot, you can add the physical drives in any order. For example, in a TS8 robot you can add drive 2 before drive 1.
If you assign the wrong number Media Manager does not detect it, but an error occurs when the robotic control attempts to mount media on the wrong drive. To determine the correct number, you must know which physical drive in the robot is identified by the logical device name (Windows) or device file (UNIX) that you specify in this dialog box.
See “Correlating Device Files to Physical Drives When Adding Drives” on page 313 for more information.
ACS
For drives in an Automated Cartridge System robot, click ACS to specify the physical location of the drive within the robot. A dialog box appears that allows you to enter the following information:
If you assign the wrong parameters, Media Manager does not detect it but an error eventually occurs when the robot mounts media on the wrong drive. To determine the physical location, you must know which physical drive in the robot is identified by the device files that you specified earlier. You establish this correlation during installation.
The appendix, “Automated Cartridge System (ACS)” on page 475, has further information.
For Enter
ACS Number The index (in ACS library software terms) that identifies the robot that has this drive.
LSM Number The Library Storage Module that has this drive.
Panel Number The robot panel where this drive is located.
Drive Number The physical number of the drive (in ACS library software terms).

Chapter 2, Configuring Storage Devices 47
Managing Robots and Drives
TLH
For drives in an TLH (Tape Library Half-inch) robot, click TLH to specify the IBM device name of the drive within the robot. A dialog box appears that allows you to enter the device name. If you assign the wrong IBM device name, Media Manager does not detect it but an error eventually occurs when the robot mounts media on the wrong drive.
The appendix, “IBM Automated Tape Library (ATL)” on page 497, has further information.
TLM
For drives in an TLM (Tape Library Multimedia) robot, click TLM to specify the DAS drive name of the drive within the robot. A dialog box appears that allows you to enter the drive name. If you assign the wrong drive name, Media Manager does not detect it but an error eventually occurs when the robot mounts media on the wrong drive.
The appendix, “ADIC Distributed AML Server (DAS)” on page 511, has further information.
Managing Robots and DrivesThe following topics explain how to manage your robots and drives:
� Changing a Robot Configuration
� Changing the Configuration of a Drive
� Changing a Non-Shared Drive to a Shared Drive
� Changing the Volume Database Host for Standalone Drives
� Deleting Robots
� Deleting Drives
� Cleaning Tape Drives
Rerunning the Device Configuration wizard updates the Media Manager configuration. For example, adding a new SCSI adapter may change the path to a robotic library. A similar change to the configuration may occur if you add a new drive or robotic library.
The Device Configuration wizard updates the Media Manager configuration to match the new configuration. See “Using the Device Configuration Wizard to Configure Devices” on page 29.

Managing Robots and Drives
48 NetBackup DataCenter Media Manager System Administrator’s Guide for UNIX
Changing a Robot Configuration
1. In NetBackup Administration Console, click Media and Device Management > Devices.
2. Select the Robots tab in the Devices pane.
3. Select the robotic library you want to change.
4. Select Edit > Change.
A dialog box appears, showing the current information for the selected robotic library.
5. Make the desired changes (see “Dialog Box Entries for Adding and Changing Robots” on page 33).
6. Click OK.
Changing the Configuration of a DriveTo change information for a drive, use the following procedure:
1. In NetBackup Administration Console, click Media and Device Management > Devices.
2. Select the Drives tab in the Devices pane.
3. Select the drive you want to change.
4. Select Edit > Change.
a. If the drive you selected is a shared drive, the shared drive wizard is started to guide you through the steps involved in changing the configuration of the drive. Follow the wizard prompts.
b. If the drive you selected is not a shared drive, a change drive dialog box appears showing the current information for the selected drive. Make the desired changes (see “Dialog Box Entries for Adding or Changing Drives” on page 43).
c. Click OK.

Chapter 2, Configuring Storage Devices 49
Managing Robots and Drives
Changing a Non-Shared Drive to a Shared DriveAn SSO license is required on each master and media server to configure and use a shared drive.
1. In NetBackup Administration Console, click Media and Device Management > Devices.
2. Select the Drives tab in the Devices pane.
3. Select the non-shared drive that you want to change.
4. Right-click and select Configure Shared Drive on the shortcut menu.
The shared drive wizard is started to guide you through the steps involved in changing the drive to a shared drive.
If the drive you selected is currently a shared drive, the shared drive wizard guides you through the steps involved in changing the configuration of the shared drive.
Follow the wizard prompts.
Changing the Volume Database Host for Standalone DrivesAll standalone drives on a specific host must use the same volume database. To change this host use the following procedure:
1. In NetBackup Administration Console, click Media and Device Management > Devices.
2. Select the Hosts tab in the Devices pane.
3. Select the host you want to change.
4. Select Actions > Change Standalone Volume Database Host.
A dialog box appears showing the current volume database host.

Managing Robots and Drives
50 NetBackup DataCenter Media Manager System Administrator’s Guide for UNIX
5. To change the host, enter the new host name in the text box.
You can enter the name of any host that has Media Manager installed, even if it does not have any attached drives. However, VERITAS recommends that you use a single volume database host for all your volumes (robotic and standalone). It is possible to maintain separate volume databases on multiple hosts, but administration is more difficult and it is not possible to merge the databases later.
6. Click OK.
Deleting RobotsAny drives that were configured as residing in the deleted robot are changed to standalone drives.
1. In NetBackup Administration Console, click Media and Device Management > Devices.
2. Select the Robots tab in the Devices pane.
3. Select the robotic library you want to delete.
4. Select Edit > Delete.
5. Answer the delete confirmation dialog.
Deleting Drives
1. In NetBackup Administration Console, click Media and Device Management > Devices.
2. Select the Drives tab in the Devices pane.
3. Select the drive you want to delete.
4. Select Edit > Delete.
5. Answer the delete confirmation dialog.

Chapter 2, Configuring Storage Devices 51
Managing Robots and Drives
Cleaning Tape DrivesFor drives in libraries that are under ACS, LMF, RSM, or TLH robotic control, the library software controls drive cleaning. To manage drive cleaning, use the robot vendor or operating system administrative interfaces for these robots.
See “Drive Cleaning” on page 316 for background information.
To add a cleaning tape, perform “Adding New Volumes” on page 95 and specify a cleaning tape as the media type.
To perform a drive cleaning use the following procedure:
1. In NetBackup Administration Console, click Media and Device Management > Devices.
2. Select the Drives tab in the Devices pane.
3. Select the drive you want to clean.
4. Select Actions > Drive Cleaning.
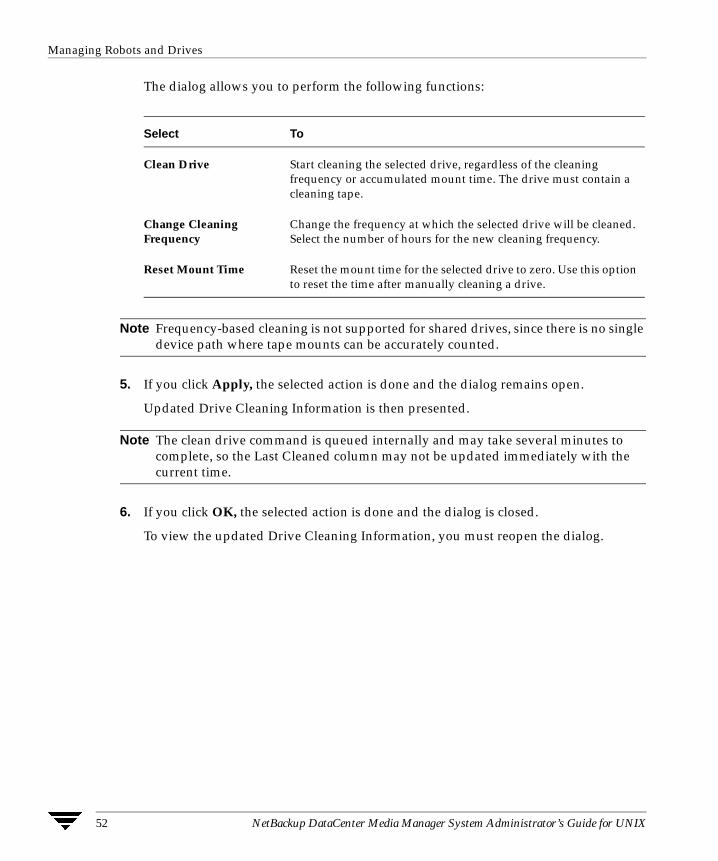
Managing Robots and Drives
52 NetBackup DataCenter Media Manager System Administrator’s Guide for UNIX
The dialog allows you to perform the following functions:
Note Frequency-based cleaning is not supported for shared drives, since there is no single device path where tape mounts can be accurately counted.
5. If you click Apply, the selected action is done and the dialog remains open.
Updated Drive Cleaning Information is then presented.
Note The clean drive command is queued internally and may take several minutes to complete, so the Last Cleaned column may not be updated immediately with the current time.
6. If you click OK, the selected action is done and the dialog is closed.
To view the updated Drive Cleaning Information, you must reopen the dialog.
Select To
Clean Drive Start cleaning the selected drive, regardless of the cleaning frequency or accumulated mount time. The drive must contain a cleaning tape.
Change Cleaning Frequency
Change the frequency at which the selected drive will be cleaned. Select the number of hours for the new cleaning frequency.
Reset Mount Time Reset the mount time for the selected drive to zero. Use this option to reset the time after manually cleaning a drive.

Chapter 2, Configuring Storage Devices 53
Robot and Drive Configuration Examples
Robot and Drive Configuration Examples
Example 1: Host With One Robot
This is a configuration with a tape stacker containing two 8mm tape drives. The robot and drives are connected to a host running Windows.
After installing Media Manager software and attaching the drives, run the Device Configuration wizard or complete the Add Robot and Add Drive dialog box entries as shown in the following tables.
Add Robot Dialog Entries
Device Host eel
Robot Type TS8 - Tape Stacker 8MM
Volume Database Host eel
Robot Number 0
Robot is controlled locally by this device host
Set (cannot be changed for this robot type)
eel Windows Server
Robotic Control Information
Volume Database
Robotic Drive Information for Drives 1 and 2
Robotic Drive 2 (8mm)
Robotic Drive 1 (8mm)
Robot Number 0
Device Name
Drive Name
Tape0
Tape1
eel_dr_1
eel_dr_2
TS8

Robot and Drive Configuration Examples
54 NetBackup DataCenter Media Manager System Administrator’s Guide for UNIX
Robot Device Selecting a robot device sets the SCSI Port, Bus, Target, and LUN numbers in the dialog for Windows NT hosts and for Windows 2000 hosts where a changer driver is not in control of the robot.
On Windows 2000 hosts where a changer driver is in control of the robot, selecting a robot device sets the changer name in the dialog.
Add Drive Dialog Entries (Tape0)
Device Host eel
Drive Type 8mm Cartridge (8mm)
Drive Name eel_dr_1
Device Name Tape0
Drive is in a Robotic Library Yes
Robotic Library TS8(0) - eel
Robot Drive Number 1
Add Drive Dialog Entries (Tape1)
Device Host eel
Drive Type 8mm Cartridge (8mm)
Drive Name eel_dr_2
Device Name Tape1
Drive is in a Robotic Library Yes
Robotic Library TS8(0) - eel
Add Robot Dialog Entries (continued)

Chapter 2, Configuring Storage Devices 55
Robot and Drive Configuration Examples
If eel was a UNIX host, you would complete the following dialog box entries. Your actual entries needed may vary from these examples.
Robot Drive Number 2
(UNIX): Add Robot Dialog Entries
Device Host eel
Robot Type TS8 - Tape Stacker 8MM
Volume Database Host eel
Robot Number 0
Robot is controlled locally by this device host
Set (cannot be changed for this robot type)
Robotic Device File /dev/sg/c0t4l0
(UNIX): Add Drive Dialog Entries (Tape0)
Device Host eel
Drive Name eel_dr_1
Drive Type 8mm Cartridge (8mm)
No Rewind Device /dev/rmt/5cbn
Cleaning Frequency 25
Drive Status UP
Drive is in a Robotic Library Yes
Robotic Library TS8(0) - eel
Robot Drive Number 1
Add Drive Dialog Entries (Tape1) (continued)

Robot and Drive Configuration Examples
56 NetBackup DataCenter Media Manager System Administrator’s Guide for UNIX
(UNIX): Add Drive Dialog Entries (Tape1)
Device Host eel
Drive Name eel_dr_2
Drive Type 8mm Cartridge (8mm)
No Rewind Device /dev/rmt/6cbn
Cleaning Frequency 25
Drive Status UP
Drive is in a Robotic Library Yes
Robotic Library TS8(0) - eel
Robot Drive Number 2

Chapter 2, Configuring Storage Devices 57
Robot and Drive Configuration Examples
Example 2: Host With Standalone Drives
This example adds three standalone drives to the device configuration for host eel shown in Example 1. As in that example, the volume database and all devices are on the same host. The following tables show the Add Drive dialog box entries for the standalone drives. Configuration information for the robot and its two drives are the same as in Example 1 and is not repeated here.
Add Drive Dialog Entries (Tape2)
Device Host eel
Drive Type 1/4” Cartridge (qscsi)
Drive Name eel_qdrv_2
Device Name Tape2
Drive is in a Robotic Library No
eel Robot Number 0
Windows Server
Robotic Drive 1 (8mm)
Robotic Drive 2 (8mm)
Robotic Drive Information for Drives 1 - 5
Device Name
Drive Name
Tape0
Tape1
eel_dr_1
eel_dr_2
TS8
Volume Database
Robotic Control Information
Drive Name
Device Name
Tape2
Tape3
Tape4 4mm Drive
eel_qdrv_3
eel_qdrv_2
eel_4mm_drv_4
qscsi Drive
qscsi Drive

Robot and Drive Configuration Examples
58 NetBackup DataCenter Media Manager System Administrator’s Guide for UNIX
If eel was a UNIX host, you would complete the following dialog box entries. Your actual entries may vary from these examples.
Add Drive Dialog Entries (Tape3)
Device Host eel
Drive Type 1/4” Cartridge (qscsi)
Drive Name eel_qdrv_3
Device Name Tape3
Drive is in a Robotic Library No
Add Drive Dialog Entries (Tape4)
Device Host eel
Drive Type 4mm Cartridge (4mm)
Drive Name eel_4mm_drv_4
Device Name Tape4
Drive is in a Robotic Library No
(UNIX): Add Drive Dialog Entries (Tape2)
Device Host eel
Drive Name eel_qdrv_2
Drive Type 1/4” Cartridge (qscsi)
No Rewind Device /dev/rmt/2cbn
Drive Status UP

Chapter 2, Configuring Storage Devices 59
Robot and Drive Configuration Examples
Drive is in a Robotic Library No
(UNIX): Add Drive Dialog Entries (Tape3)
Device Host eel
Drive Name eel_qdrv_3
Drive Type 1/4” Cartridge (qscsi)
No Rewind Device /dev/rmt/3cbn
Drive Status UP
Drive is in a Robotic Library No
(UNIX): Add Drive Dialog Entries (Tape4)
Device Host eel
Drive Name eel_4mm_drv_4
Drive Type 4mm Cartridge (4mm)
No Rewind Device /dev/rmt/4cbn
Cleaning Frequency 25
Drive Status UP
Drive is in a Robotic Library No
(UNIX): Add Drive Dialog Entries (Tape2) (continued)

Robot and Drive Configuration Examples
60 NetBackup DataCenter Media Manager System Administrator’s Guide for UNIX
Example 3: Robot and Drives Distributed Among Multiple Hosts
This is a more complex configuration than the previous examples because it involves a robot that has its robotic control on one host and its drives used by two other hosts.
After installing Media Manager software and attaching the drives, run the Device Configuration wizard or complete the Add Robot and Add Drive dialog box entries as shown in the following tables. Some things to note when examining these tables follow:
� Media for all devices is configured in a common volume database, which is located on eel.
� The Robot Number is 0 in all three cases. This is required because the three hosts refer to the same physical robot. In this case, robotic control is on host eel.
� Robot Drive Numbers correlate to the physical drive assignment within the robot.
eel
shark
whale
UNIX
Windows Server
Windows Server
Robotic Control Information
Volume Database
Robotic Drive Information for Drive 1
Robotic Drive Information for Drive 2
Robotic Drive Information for Drive 3
SCSI
SCSI
SCSI
SCSI Robot Drive 2
Robot Drive 1
Robot Drive 3
Robot Number 0
Robotic Control
Drive Name
eel_drive_1
shark_drive_2
Device Name/Path
Tape0
Tape1
/dev/nrst15 whale_drive_3
TL8
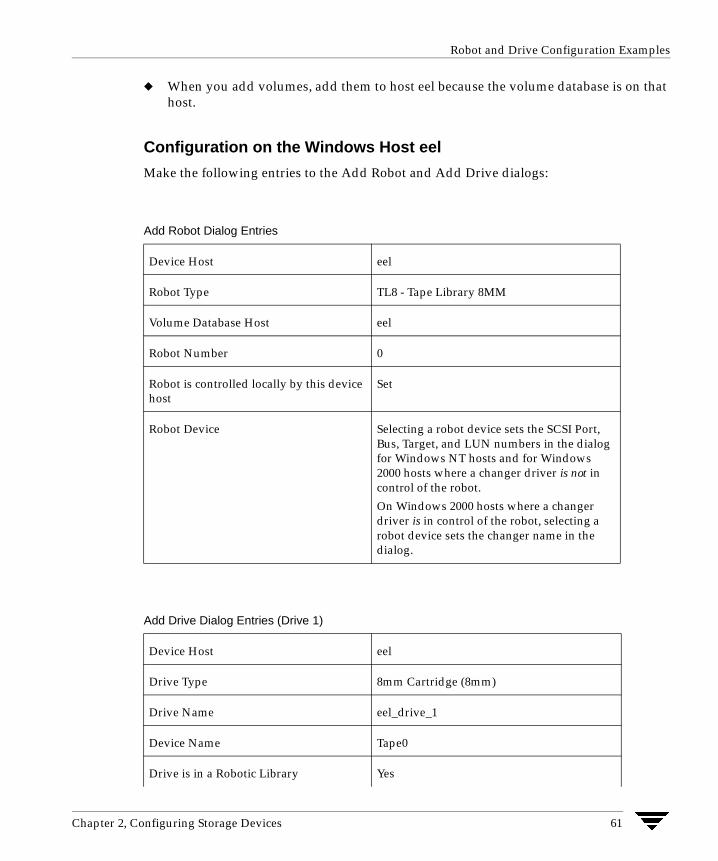
Chapter 2, Configuring Storage Devices 61
Robot and Drive Configuration Examples
� When you add volumes, add them to host eel because the volume database is on that host.
Configuration on the Windows Host eel
Make the following entries to the Add Robot and Add Drive dialogs:
Add Robot Dialog Entries
Device Host eel
Robot Type TL8 - Tape Library 8MM
Volume Database Host eel
Robot Number 0
Robot is controlled locally by this device host
Set
Robot Device Selecting a robot device sets the SCSI Port, Bus, Target, and LUN numbers in the dialog for Windows NT hosts and for Windows 2000 hosts where a changer driver is not in control of the robot.
On Windows 2000 hosts where a changer driver is in control of the robot, selecting a robot device sets the changer name in the dialog.
Add Drive Dialog Entries (Drive 1)
Device Host eel
Drive Type 8mm Cartridge (8mm)
Drive Name eel_drive_1
Device Name Tape0
Drive is in a Robotic Library Yes

Robot and Drive Configuration Examples
62 NetBackup DataCenter Media Manager System Administrator’s Guide for UNIX
Configuration on the Windows Host shark
Make the following entries in the Add Robot and Add Drive dialogs:
Robotic Library TL8(0) - eel
Robot Drive Number 1
Add Robot Dialog Entries
Device Host shark
Robot Type TL8 - Tape Library 8MM
Volume Database Host eel
Robot Number 0
Robot control is handled by a remote host
Set
Robot Control Host eel
Add Drive Dialog Entries (Drive 2)
Device Host shark
Drive Type 8mm Cartridge (8mm)
Drive Name shark_drive_2
Device Name Tape1
Drive is in a Robotic Library Yes
Robotic Library TL8(0) - eel
Robot Drive Number 2
Add Drive Dialog Entries (Drive 1) (continued)

Chapter 2, Configuring Storage Devices 63
Robot and Drive Configuration Examples
Configuration on the UNIX Host whale
Make the following entries to the Add Robot and Add Drive dialogs:
Add Robot Dialog Entries
Device Host whale
Robot Type TL8 - Tape Library 8MM
Volume Database Host eel
Robot Number 0
Robot control is handled by a remote host
Set
Robot Control Host eel
Add Drive Dialog Entries (Drive 3)
Device Host whale
Drive Name whale_drive_3
Drive Type 8mm Cartridge (8mm)
No Rewind Device /dev/nrst15
Cleaning Frequency 20
Drive Status UP
Drive is in a Robotic Library Yes
Robotic Library TL8(0) - eel
Robot Drive Number 3

Robot and Drive Configuration Examples
64 NetBackup DataCenter Media Manager System Administrator’s Guide for UNIX
Example 4: UNIX Host With An ACS Robot
This configuration uses an Automated Cartridge System (ACS) robot for storage. Host shark can be a UNIX NetBackup master server or media server. The following tables show the Add Drive and Add Robot dialog entries for host shark. Items to note when reviewing these tables follow:
� The ACSLS host (in the Add Robot dialog) is host whale, where the ACS library software resides. In this example, Automated Cartridge System Library Software (ACSLS) is installed as the ACS library software.
On some host platforms it may be possible to run Media Manager software and ACS library software on the same host, eliminating the need for two servers.
� The ACS, PANEL, LSM, and DRIVE numbers are part of the ACS library software configuration and must be obtained from the administrator of that system.
shark whale
Robotic Drive Information for Drives 0 and 1
Volume Database
acsd
SCSI
acsssi
Datalun 0
lun 1
Library Management Unit (LMU)
Drive 0
Drive 1
Panel 2 Robotics
Control Unit (CU)
Library Storage Module
Automated Cartridge System Library Software (ACSLS) Host
CA
P
(LSM 0)
(ACS 0)

Chapter 2, Configuring Storage Devices 65
Robot and Drive Configuration Examples
� Robot number and ACS number are different terms. Robot number is the robot identifier used in Media Manager. ACS number is the robot identifier in ACS library software. These numbers can be different, although they both default to zero.
� It is possible for the drives to connect through an independent Control Unit. If so, the correct Logical Unit Numbers (lun) are needed in order to find the correct tape name to use.
� The Add Robot dialog entries include an ACSLS Host entry, since communication with the ACS library software host is over the network using ACS Server System Interface (acsssi).
See the appendix, “Automated Cartridge System (ACS)” on page 475 for more information.
Add Robot Dialog Entries
Device Host shark
Robot Type ACS - Automated Cartridge System
Volume Database Host shark
Robot Number 0
Robot control is handled by a remote host
Set (cannot be changed for this robot type)
ACSLS Host whale
Add Drive Dialog Entries (Drive 0)
Device Host shark
Drive Type 1/2” Cartridge (hcart)
Drive Name shark_drive_0
Drive is in a Robotic Library Yes
Robotic Library ACS(0) - whale
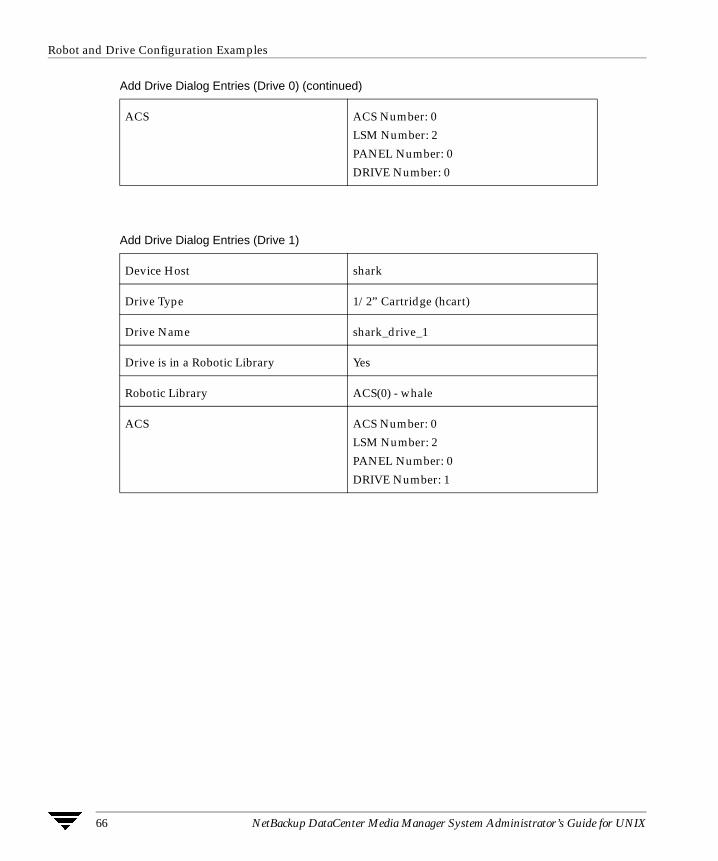
Robot and Drive Configuration Examples
66 NetBackup DataCenter Media Manager System Administrator’s Guide for UNIX
ACS ACS Number: 0
LSM Number: 2
PANEL Number: 0
DRIVE Number: 0
Add Drive Dialog Entries (Drive 1)
Device Host shark
Drive Type 1/2” Cartridge (hcart)
Drive Name shark_drive_1
Drive is in a Robotic Library Yes
Robotic Library ACS(0) - whale
ACS ACS Number: 0
LSM Number: 2
PANEL Number: 0
DRIVE Number: 1
Add Drive Dialog Entries (Drive 0) (continued)

Chapter 2, Configuring Storage Devices 67
Robot and Drive Configuration Examples
Example 5: UNIX Host With A TLH Robot
This configuration uses a TLH robot for storage. Device host shark can be a UNIX AIX, Solaris, HP-UX, IRIX, or Windows server, and can be a NetBackup master server or media server.
The following tables show the Add Drive and Add Robot dialog box entries. Some things to note when examining these tables follow:
� The robot control host is the host, shark. Note that it is also possible to have the robotic control (tlhcd) on a different host.
� The main difference between configuring a TLH robot and other robot types is the robotic device file. The robotic device file is the Library Manager Control Point (LMCP) file on AIX systems and is the library name on non-AIX systems.
In this example, shark is a UNIX AIX host, so the LMCP file is specified for the robotic device file.
If shark was a UNIX non-AIX or a Windows host, you would specify the library name (for example 3494AH).
See the appendix, “IBM Automated Tape Library (ATL)” on page 497 for more information.
shark
TLH Robot
Volume Database
Library Manager
PC
(ATL)
LMCP
SCSI
003590B1A00
Media Manager
Device Files for the physical drives
TLH_rob_drv1 TLH_rob_drv2
003590B1A01
IBM
Automated Tape Library

Robot and Drive Configuration Examples
68 NetBackup DataCenter Media Manager System Administrator’s Guide for UNIX
� The drive configuration uses the IBM device name. A cleaning frequency cannot be assigned using Media Manager.
Add Robot Dialog Entries
Device Host shark
Robot Type TLH - Tape Library Half-inch
Volume Database Host shark
Robot Number 0
Robot is controlled locally by this device host
Set
LMCP Device File /dev/lmcp0
Add Drive Dialog Entries (Drive 1)
Device Host shark
Drive Name TLH_rob_drv1
Drive Type 1/2” Cartridge (hcart)
Drive is in a Robotic Library Yes
Robotic Library TLH(0) - shark
Vendor Drive Name 003590B1A00
No Rewind Device /dev/rmt4.1
Drive Status Up
Add Drive Dialog Entries (Drive 2)
Device Host shark
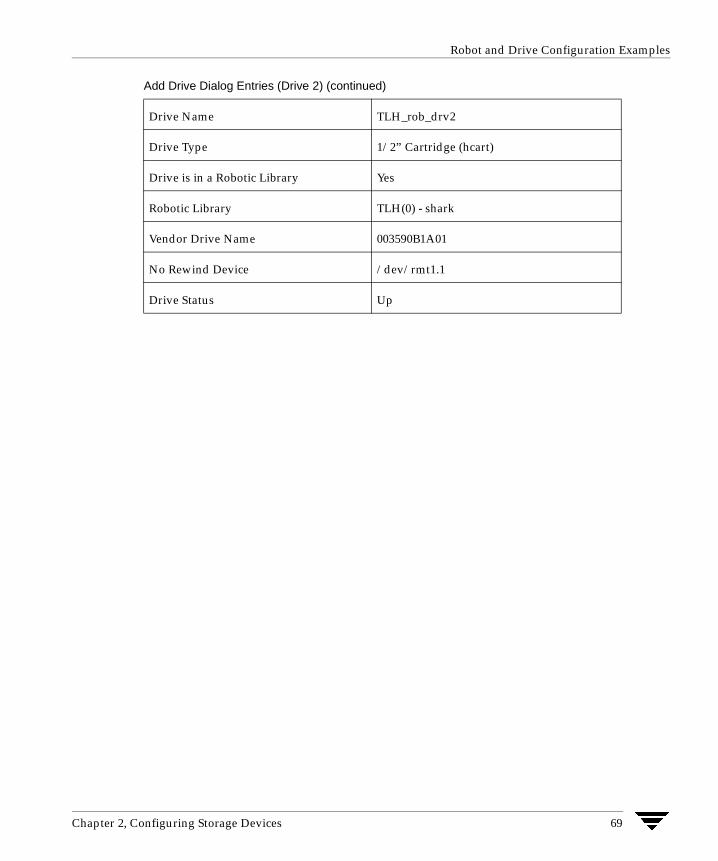
Chapter 2, Configuring Storage Devices 69
Robot and Drive Configuration Examples
Drive Name TLH_rob_drv2
Drive Type 1/2” Cartridge (hcart)
Drive is in a Robotic Library Yes
Robotic Library TLH(0) - shark
Vendor Drive Name 003590B1A01
No Rewind Device /dev/rmt1.1
Drive Status Up
Add Drive Dialog Entries (Drive 2) (continued)

Robot and Drive Configuration Examples
70 NetBackup DataCenter Media Manager System Administrator’s Guide for UNIX
Example 6: UNIX Host With A TLM Robot
This configuration uses a TLM robot for storage. In Media Manager, the device configuration for this robot is similar to the TS8 explained in “Example 1: Host With One Robot” on page 53.
However, with a TLM robot, you specify the DAS server instead of a robot control host. The DAS server may reside on an IBM OS/2 system, usually in or near the Grau cabinet, or on a Windows server (ADIC SDLC).
In this example, the DAS Server entry is dasos2_pc. It is also necessary to verify that the Distributed AML Server is configured to recognize host shark as a client and that the AML drives are allocated to shark.
See the appendix, “ADIC Distributed AML Server (DAS)” on page 511 for further information.
Add Robot Dialog Entries
Device Host shark
Robot Type TLM - Tape Library Multimedia
Volume Database Host shark
Robot Number 0
shark
dasos2_pc
TLM Robot
Media Manager
Volume Database
Device Files for the physical drives
SCSI
TLM_rob_drv1 TLM_rob_drv2
CN0 CN1
Distributed AML Server (DAS)
Archive Management Unit (OS/2)
Automated Media Library
(AML)

Chapter 2, Configuring Storage Devices 71
Robot and Drive Configuration Examples
Robot control is handled by a remote host
Set (cannot be changed for this robot type)
DAS Server dasos2_pc
Add Drive Dialog Entries (Drive 1)
Device Host shark
Drive Name TLM_rob_drv1
Drive Type 1/2” Cartridge (hcart)
Drive is in a Robotic Library Yes
Robotic Library TLM(0) - shark
Vendor Drive Name CN0
No Rewind Device /dev/rmt/rmt0h
Cleaning Frequency 25
Drive Status Up
Add Drive Dialog Entries (Drive 2)
Device Host shark
Drive Name TLM_rob_drv2
Drive Type 1/2” Cartridge (hcart)
Drive is in a Robotic Library Yes
Robotic Library TLM(0) - shark
Vendor Drive Name CN1
Add Robot Dialog Entries

Robot and Drive Configuration Examples
72 NetBackup DataCenter Media Manager System Administrator’s Guide for UNIX
No Rewind Device /dev/rmt/rmt1h
Cleaning Frequency 25
Drive Status Up
Add Drive Dialog Entries (Drive 2)

73
Managing Media 3The media management window provides the tools required to add and manage the removable media that Media Manager controls. These media are referred to as volumes.
This chapter explains how to add and manage the removable media that Media Manager controls. These media are referred to as volumes, and are assigned media IDs and other attributes that are required to track and manage them.
The chapter, “Managing Media in Robots” on page 125 explains how to manage media in robots.
If you have Backup Exec volumes to manage, see the Backup Exec tape reader option appendix of the NetBackup system administrator’s guide for Windows for more information.
Starting Media ManagementIn NetBackup Administration Console, click Media and Device Management > Media.
The media management window appears.

Using the Media Management Window
74 NetBackup DataCenter Media Manager System Administrator’s Guide for UNIX
Media Management Window
In addition to the tree pane displayed on the left, a volume pane is displayed on the right when you start media management.
Using the Media Management WindowThe following topics describe the media management window:
� Menus and Commands
� Toolbars
� Tree Pane
� Volumes Pane
� Shortcut Menus and Commands
� Customizing the Window
� Allowable Media Manager Characters
Menus and CommandsThe media management window has available the menus and commands shown in the following table.

Chapter 3, Managing Media 75
Using the Media Management Window
The menu items are enabled based on the items that are currently selected in the tree pane or volumes pane. For example, if a volume group is selected in the tree pane, Delete is enabled on the Edit menu.
Media Management Menus and Commands
Menu Commands
File Change Server - Displays a dialog box that allows you to change to a different host that is running NetBackup.
New Window from Here - Starts another instance of the NetBackup Administration Console node that was active.
Adjust Application Timezone - Displays a dialog that allows you to manage the timezone. NetBackup Console can execute in a different timezone than the timezone of the server on which it was initiated. See the NetBackup System Administrator ’s guide for UNIX for more information.
Close Window - Closes the current window.
Exit - Closes all open windows.
Edit New - Displays a dialog box to add an item of the type that is currently selected.
Change - Displays a dialog box for changing the configuration of the selected items.
Delete - Deletes selected items from the configuration.
View Contains commands for specifying your viewing preferences for the media management window, including showing and hiding the toolbar or tree, and refreshing the display. See “Customizing the Window” on page 84.
Actions New - Displays a dialog box for adding volumes or volume pools to a configuration.
Change Volume Group - Displays a dialog box for changing the volume group for selected volumes.
Move - Displays a dialog box for moving volumes.
Rescan/Update Barcodes - Rescans the barcodes in the selected robotic library and updates the barcodes for the selected volumes, as necessary.
Eject Volume(s) From Robot - Ejects selected single or multiple volumes to the robot’s media access port.
Start/Restart Media Manager Device Daemon - Controls the Media Manager device daemon.
Inventory Robot - Displays a dialog box with choices for performing an inventory of the selected robot or updating the volume configuration to match the contents of the robot.

Using the Media Management Window
76 NetBackup DataCenter Media Manager System Administrator’s Guide for UNIX
ToolbarsThe toolbar buttons of the Media window provide shortcuts for commands that are on the menus.
To show or hide the toolbar buttons:
1. In NetBackup Administration Console, click Media and Device Management > Media.
2. Click View > Show ToolBar.
Also see “Customizing the Window” on page 84.
Tree PaneThe tree pane for Media contains nodes for Volume Pools, Volume Groups, Robots, and Standalone.
The display in the Volumes pane (on the right) shows the volumes that are in the volume database on this server. If you add any volumes, they are added to this volume database.
If there are no volumes configured in the volume database, the Volumes pane will be blank. Selecting different items in the tree pane filters the lists that are shown in the Volumes pane.
Before adding volumes on the selected server, check the volume database host setting for the robot or standalone drive to verify that the volume will be added to the correct volume database. See “Administering Media on Other Hosts” on page 85.
If the icon shown for a robotic library contains a red arrow, the current server is not the volume database host for the robotic library. In this case, it is recommended to change to the correct server before adding volumes for this device.
To view or configure volumes on another server, change your connection to that host by using File > Change Server. See “Administering Media on Other Hosts” on page 85 for more information.
Help Help Topics - Provides online help information about the NetBackup Console.
License Keys - Provides information about your active and registered license keys.
About NetBackup Administration Console - Displays program information, version number, and copyright information.
Media Management Menus and Commands (continued)
Menu Commands

Chapter 3, Managing Media 77
Using the Media Management Window
The following figure shows an expanded view of the Media tree pane:
Volumes PaneThis pane lists the volumes in the volume database located on the current media server. The following tables describe the columns in the various volume lists that can be displayed.
Managing the Volumes Pane
You can view any hidden columns in the volumes pane by right-clicking in the pane and selecting Show All Columns.
All the volume groups in the volume database on the current server. If you select Volume Groups, the Volumes pane contains information for all the volumes in all groups. Selecting an individual group, displays only the volumes in that group.
All the volume pools in the volume database on the current server. If you select Volume Pools, the Volumes pane contains information for all the volumes in all pools. Selecting an individual pool, displays only the volumes in that pool.
If you select Robots, the Volumes pane contains information for all the volumes that are in all robots and in the volume database on this server. Selecting an individual robot, displays only the volumes in that robot.
If you select Standalone, the Volumes pane contains information for all the volumes that are in standalone drives (or in standalone status) and in the volume database on this server.
The current Media Manager server. You are currently connected to this host. Volumes that appear in the Volumes pane are in the volume database on this server.

Using the Media Management Window
78 NetBackup DataCenter Media Manager System Administrator’s Guide for UNIX
Volume Pools List
If you select Media > Volume Pools in the tree pane, the following list is displayed in the Volumes Pane showing information for all of the volume pools.
Volume Pools List
Column Description
Volume Pool Name of the volume pool. A volume pool defines the usage for the volume. Volumes in a pool are grouped together for use by a single application and are protected from access by other applications and users.
None is the default pool for users of applications, other than NetBackup and Storage Migrator.
NetBackup is the default pool name for NetBackup.
DataStore is the default pool name for DataStore.
HSM is the default pool name for VERITAS Storage Migrator.
Number Number assigned to the volume pool. This number is assigned by NetBackup. The following numbers are reserved:
0 is the None (default) pool.
1 is the NetBackup pool.
The DataStore pool is assigned the next available number.
User Contains the value ANY or the user ID (for example, root(0)).
Host Name of the host that is allowed to request and use the volumes in this volume pool or the value ANYHOST.
Group Identifies the UNIX user group for this volume pool or contains NONE.
Description Description for the volume pool. You create the description when you configure a volume pool.

Chapter 3, Managing Media 79
Using the Media Management Window
Volume Groups List
If you select Media > Volume Groups in the tree pane, the following list is displayed in the Volumes Pane showing information for all of the volume groups.
Robots List
If you select Media > Robots in the tree pane, the following list is displayed in the Volumes Pane showing information for all of the robots.
Volume Groups List
Column Description
Volume Group Name of the volume group. A volume group defines the volume by location and is a logical group of volumes that are at the same physical location.
Volume groups are a convenience for administrating multiple volumes. By using a volume group, you can logically move a set of volumes between a robotic library and a standalone location, or delete them by specifying the group name rather than each individual media ID.
More than one volume group can share the same location. For example, a robotic library can contain volumes from more than one volume group and there can be more than one standalone volume group. All volumes in a volume group must have a compatible media type.
Media Type Media Manager media type of the volume group.
Robot Number Number of the robot that contains this volume group. If the robot type is NONE, this column is blank.
Robot Type Type of robot that contains this volume group. NONE in this column means a standalone volume group.
Robot Control Host
This is the robot control host for the volumes in this volume group. If the robot type is NONE, this column is blank.
Volume Count Number of volumes in this volume group.
Robots List
Column Description
Robot Name Contains the name of the robot (comprised of the robot type and robot number), for example TLM(3).
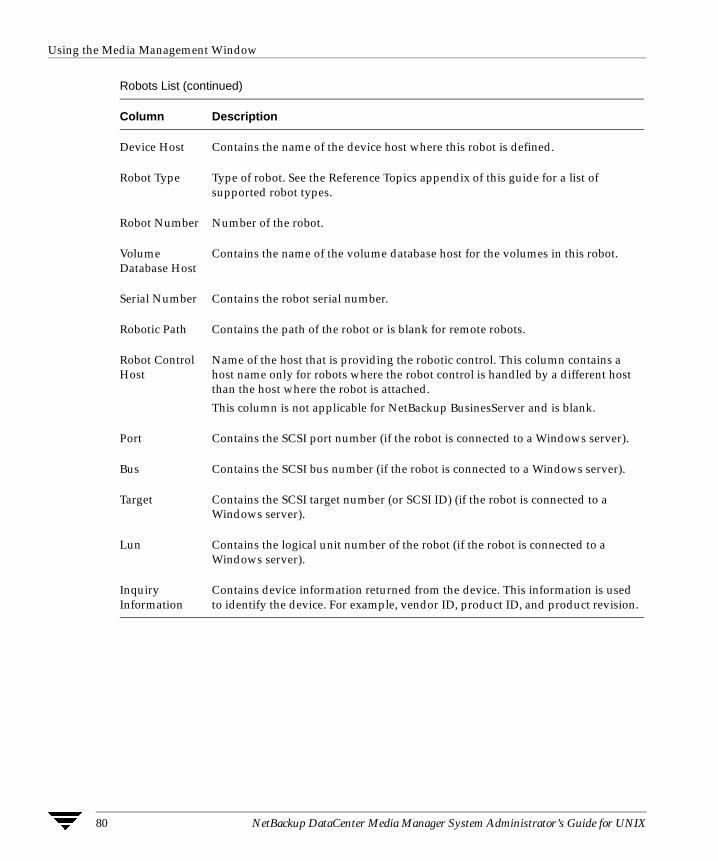
Using the Media Management Window
80 NetBackup DataCenter Media Manager System Administrator’s Guide for UNIX
Device Host Contains the name of the device host where this robot is defined.
Robot Type Type of robot. See the Reference Topics appendix of this guide for a list of supported robot types.
Robot Number Number of the robot.
Volume Database Host
Contains the name of the volume database host for the volumes in this robot.
Serial Number Contains the robot serial number.
Robotic Path Contains the path of the robot or is blank for remote robots.
Robot Control Host
Name of the host that is providing the robotic control. This column contains a host name only for robots where the robot control is handled by a different host than the host where the robot is attached.
This column is not applicable for NetBackup BusinesServer and is blank.
Port Contains the SCSI port number (if the robot is connected to a Windows server).
Bus Contains the SCSI bus number (if the robot is connected to a Windows server).
Target Contains the SCSI target number (or SCSI ID) (if the robot is connected to a Windows server).
Lun Contains the logical unit number of the robot (if the robot is connected to a Windows server).
Inquiry Information
Contains device information returned from the device. This information is used to identify the device. For example, vendor ID, product ID, and product revision.
Robots List (continued)
Column Description

Chapter 3, Managing Media 81
Using the Media Management Window
Volumes List
If you select an item under Volume Pools, Volume Groups, Robots, or Standalone in the tree pane, the volumes list is filtered based on the selected item and that information is displayed in the Volumes pane.
Volumes List
Column Description
Media ID Identifies the volume in six or less alphanumeric characters. This value is usually assumed to be the same as the external media ID and should be the same as the recorded media ID for non-scratch, labeled media.
You specify the media ID when you add volumes to Media Manager.
Barcode Uniquely identifies the barcode of a volume in 13 alphanumeric characters or less.
The barcodes for volumes in an API robot are equivalent to the volume’s identifier, as configured with the robot-vendor software.
Media Type Media type of the volume. See “Media Manager Media Types” on page 299 for a list of the supported media types.
Robot Type Type of robot that contains this volume. See “Media Manager Robot Types” on page 297 for a list of supported robot types.
NONE in this column means a standalone volume.
Robot Number Number of the robot that contains this volume. If the volume is for a standalone drive or the volume is part of a group that was moved out of a robot (with the intent of being moved back into a robot), this column is blank.
Robot Control Host
Name of the host that controls the robot that contains this volume. This host is providing the robotic control.
If this column contains NONE, there is no specific robot control host (the robot is controlled from multiple hosts).
If this column is blank, the volume is for a standalone drive.
Slot Slot in the robot that contains the volume.
This column is blank for API robots, since Media Manager does not track slot information for these robots. For these robot types, the vendor software tracks the slot information.
Volume Group Name of the volume group for this volume.

Using the Media Management Window
82 NetBackup DataCenter Media Manager System Administrator’s Guide for UNIX
Volume Pool The volume pool defines the usage for the volume. Volumes in a pool are grouped together for use by a single application and are protected from access by other applications and users.
None is the default pool name for users of applications, other than NetBackup, DataStore, and Storage Migrator.
NetBackup is the default pool name for NetBackup.
DataStore is the default pool name for DataStore.
HSM is the default pool name for Storage Migrator.
Mounts Number of times that the volume has been mounted (does not apply to cleaning media types).
Time Assigned Shows the date when the volume was assigned for use. You cannot delete a volume or change its volume pool while it is assigned to an application.
Status Applies only to volumes that are assigned to NetBackup, Storage Migrator, or Storage Migrator for Microsoft Exchange.
There is also a date in the Time Assigned column for assigned volumes.
- 0 - NetBackup
The volume is assigned to NetBackup regular backups.
- 1 - Catalog
The volume is assigned to NetBackup catalog (database) backups.
- 2 - Storage Migrator
The volume is assigned to Storage Migrator for UNIX.
- 3 - Storage Migrator
The volume is assigned to Storage Migrator for Microsoft Exchange or Storage Migrator for Windows 2000.
Side/Face Location of the volume.
If the media type is an optical disk, this column shows A or B, representing the platter side on which the volume is located.
If the media type is an 8mm tape and the robot type is TL8, this column shows the xy coordinates for the slot number.
For any other media type, this column is blank.
Volumes List (continued)
Column Description

Chapter 3, Managing Media 83
Using the Media Management Window
Partner For optical disks, this column shows the media ID of the volume on the other side of the optical platter. For all other media types, the column is blank. You define this value as Partner ID when you add the volume.
For NetBackup BusinesServer, this column is blank, since optical media is not supported
Max Mounts Number of times the volume can be mounted. If maximum mounts is reached, a message is logged to the system application log and Media Manager allows no further mounts in write mode. Further mounts in read mode are allowed.
First Mount Date and time that the volume was first mounted through Media Manager.
Last Mount Date and time that the volume was last mounted.
Expiration Date Refers to the age of the volume. If the expiration date is reached, the volume is considered too old to be reliable and Media Manager allows no further mounts in write mode. Further mounts in read mode are allowed, but a message is logged to the system application log indicating that the expiration date has been reached. If the column is blank, the volume has no expiration date.
Cleanings Remaining
For a cleaning tape, this column shows how many more times the tape can be used. To use a cleaning tape, the value in this column must be greater than zero. You can change this count by selecting the volume and using Change on the Edit menu.
Created Date and time that the volume was added.
Description Describes the media in 25 or less alphanumeric characters. You create the description when you add volumes.
Vault Name Used for the NetBackup Vault option. Contains the name of the vault where this volume is located.
Date Vaulted Used for the NetBackup Vault option. Contains the date this volume was sent to the vault.
Return Date Used for the NetBackup Vault option. Contains the date when this volume returns from the vault.
Vault Slot Used for the NetBackup Vault option. Contains the slot where this volume is stored in the vault.
Volumes List (continued)
Column Description

Using the Media Management Window
84 NetBackup DataCenter Media Manager System Administrator’s Guide for UNIX
Shortcut Menus and CommandsClicking the right mouse button while the pointer is over either pane or a selection of a pane, displays a shortcut menu with commands that apply to that context. These commands are also usually available on the menus or toolbars.
Customizing the Window
Showing or Hiding Columns
You can view all of the columns in the volumes pane by right-clicking in the pane and enabling Show All Columns.
Allowable Media Manager CharactersThe following set of characters can be used in user-defined names, such as volume groups, volume pool names, and media IDs that you enter when creating these entities. These characters must be used even when specifying these items in foreign languages.
Do not use a minus as the first character or leave any spaces between characters.
� Alphabetic (A-Z a-z)
� Numeric (0-9)
� Period (.)
� Plus (+)
� Minus (-)
� Underscore (_)
Session ID Used for the NetBackup Vault option. Contains the ID of the vault session that ejected this volume.
Volumes List (continued)
Column Description

Chapter 3, Managing Media 85
Administering Media on Other Hosts
Administering Media on Other HostsEach host that has Media Manager installed, can have a volume database. However, to simplify administration, VERITAS strongly recommends that you centralize the volume database on one host and keep the other volume databases empty. Adding volumes to multiple hosts makes administration more complicated and it is not possible to merge the databases later.
The configuration for each robotic library or set of standalone drives designates the volume database host that contains the volume information for those devices. Before adding a volume to the volume configuration, you must be managing the correct host or the volume will not be found when it is required.
To verify which host has the volume database for a device, see “Determining the Volume Database Host for a Device”.
Determining the Volume Database Host for a Device
1. In NetBackup Administration Console, click Media and Device Management > Devices.
2. For a drive in a robotic library, click the Robots tab in the Devices pane. The Volume Database Host column shows the name of the host for the volumes in this robotic library.
3. For a standalone drive, click the Hosts tab in the Devices pane. The Standalone Volume Database Host column shows the name of the host for all of the standalone drives controlled by this host.
Managing Media on Other HostsInitially, you can manage media on the server where you are running NetBackup. The name of this server is shown in the line directly above the volumes pane, for example Volumes in Media Manager spain4.
If you change from a NetBackup DataCenter server to a NetBackup BusinesServer server, the functionality available on the new server is limited to the functionality supported by NetBackup BusinesServer.
You cannot change from a NetBackup BusinesServer server to a NetBackup DataCenter server.
To change to a different server, use the following procedure:

Configuring Volume Pools
86 NetBackup DataCenter Media Manager System Administrator’s Guide for UNIX
1. In NetBackup Administration Console, click Media and Device Management > Media.
2. Click File > Change Server.
3. In the dialog box that appears, do one of the following to specify the host:
- Enter the name of the host.
- Click the arrow and select a host. The hosts in the list have a master server and media server relationship in the global device database.
Click OK.
4. The name of the new host appears above the volumes pane and the volumes pane shows the volume information for the new server.
The name of the UNIX host that you specify in the Login box, when starting the NetBackup Administration interface, must be in the bp.conf file on the remote UNIX host where you want to manage media or monitor devices.
If you encounter problems or for more information on remote administration, see the following topics:
� “Remote Administration of Other UNIX Hosts” on page 25.
� “Media Manager Security” on page 26.
Configuring Volume PoolsA volume pool identifies a logical set of volumes by usage. Associating volumes with a volume pool protects them from access by unauthorized users, groups, or applications.
With the exception of the volume pools automatically created by NetBackup, you must create a volume pool before you can add volumes to a volume pool. The following volume pools are automatically created (see “Volume Pools List” on page 78):
� Media Manager creates a pool, named NetBackup, for NetBackup use.
� NetBackup creates a pool, named DataStore, for DataStore use.
� On UNIX hosts, a pool is also created for VERITAS Storage Migrator volumes.
During initial configuration, it is easiest to create all of your volume pools first. Then as you add volumes, you can assign them to volume pools.
It is also possible to configure a scratch pool from which Media Manager can transfer volumes, when another volume pool has no volumes available.

Chapter 3, Managing Media 87
Configuring Volume Pools
For background information, see “Volume Pools” on page 319 and “Scratch Volume Pools” on page 322
The following topics explain volume pool configuration:
� Adding a New Volume Pool or Scratch Volume Pool
� Changing the Attributes of a Volume Pool
� Changing the Volume Pool Assignment for a Volume
� Deleting a Volume Pool
Adding a New Volume Pool or Scratch Volume Pool
1. In NetBackup Administration Console, click Media and Device Management > Media.
2. Click Actions > New > Volume Pool.
To add a scratch volume pool, see “Adding a Scratch Volume Pool” on page 88.
3. In the Pool name text box, enter a name for the new volume pool.
The name can be 20 characters or less, and cannot contain any spaces or special characters. See “Allowable Media Manager Characters” on page 84.
4. In the Description text box, enter a brief description for the pool.
5. To allow only a specified host to use the volumes in this pool:

Configuring Volume Pools
88 NetBackup DataCenter Media Manager System Administrator’s Guide for UNIX
a. Select Permit only the specified host to access volumes in the pool.
b. In the Host name text box, enter the name of the host that is allowed to request and use the volumes in this volume pool.
Caution VERITAS recommends that you do not specify a specific host. Allowing any host (the default) is recommended, and is required if you have NetBackup media servers controlled by a master server. Never specify the name of a client.
Adding a Scratch Volume Pool
A scratch pool is a special volume pool that you can optionally configure. If a scratch pool is configured, Media Manager moves volumes from the scratch pool to any other pools that do not have volumes available.
If you want this pool to be a scratch volume pool, do the following:
1. Specify attributes for the scratch pool as shown in the following table:
2. Add volumes to the scratch volume pool for each robotic or standalone device that may require them.
Follow the steps for adding other volumes to pools (see “Adding New Volumes” on page 95). In this case, select the pool name of the scratch pool you created as the volume pool.
For Enter
Pool Name Any name, except NetBackup or None. It is recommended to use scratchpool as the pool name.
Description It is recommended to use scratch pool in the description.
Permit only the specified host to access volumes in the pool
Do not select this check box to specify a specific host.
ANYHOST is the default host name.
Scratch Pool Select this check box.

Chapter 3, Managing Media 89
Configuring Volume Pools
Changing the Attributes of a Volume Pool
1. In NetBackup Administration Console, click Media and Device Management > Media.
2. Select the desired pool from the pools shown under Volume Pools in the tree pane.
3. Click Edit > Change.
4. In the Description text box, enter a new description for the pool.
To change this pool to a scratch volume pool, see “Changing a Volume Pool To a Scratch Volume Pool” on page 90.
5. To allow only a specified host to use the volumes in this pool:
a. Select Permit only the specified host to access volumes in the pool.
b. In the Host name text box, enter the name of the host that is allowed to request and use the volumes in this volume pool.
Caution VERITAS recommends that you do not specify a specific host. Allowing any host (the default) is recommended, and is required if you have NetBackup media servers controlled by a master server. Never specify the name of a client.

Configuring Volume Pools
90 NetBackup DataCenter Media Manager System Administrator’s Guide for UNIX
Changing a Volume Pool To a Scratch Volume Pool
A scratch pool is a special volume pool that you can optionally configure. If a scratch pool is configured, Media Manager moves volumes from the scratch pool to any other pools that do not have volumes available.
If you want to change this pool to be a scratch volume pool:
1. Specify attributes for the scratch pool as follows.
2. Add volumes to the scratch volume pool for each robotic or standalone device that may require them.
Follow the steps for adding other volumes to pools (see “Adding New Volumes” on page 95). In this case, select the name of the scratch pool as the volume pool.
Changing the Volume Pool Assignment for a VolumeVolumes are grouped in a specific volume pool. The Volume Pool column in the Volumes list shows the name of the volume pool to which the volumes belong. Change the volume pool assignment as follows:
1. In NetBackup Administration Console, click Media and Device Management > Media.
2. Select a volume or volumes from the volumes pane.
Note You are unable to change the volume pool for any assigned volumes until the application deassigns them (see “Deassigning Volumes” on page 114).
3. Click Edit > Change.
For this Attribute Your Action
Description It is recommended to enter scratch pool as the description.
Permit only the specified host to access volumes in the pool
Do not select this check box to specify a specific host.
ANYHOST is the default host name.
Scratch Pool Select this check box.

Chapter 3, Managing Media 91
Configuring Volume Pools
In the dialog box that appears, the volumes you selected are listed in the top section of the dialog.
4. In the Volume Pool section, click New Pool and click the arrow to view a list of the available volume pools.
Select a volume pool from the list.
5. Click OK.
Deleting a Volume PoolNote that you cannot delete any of the following pools:
� A volume pool that contains volumes
� Scratch pools
� The NetBackup volume pool

Methods Available for Injecting and Ejecting Volumes
92 NetBackup DataCenter Media Manager System Administrator’s Guide for UNIX
� The None volume pool
� The HSM volume pool (for VSM)
� The DataStore volume pool
Delete a volume pool as follows:
1. In NetBackup Administration Console, click Media and Device Management > Media.
2. Choose the volume pool and ensure that the volume pool is empty.
If necessary, change the volume pool name for any volumes in the pool. Or if the volumes are not needed, delete them.
3. Click Edit > Delete.
Methods Available for Injecting and Ejecting VolumesSome robotic libraries implement different functionality for their media access ports. For example, some libraries have front-panel inject and eject features that conflict with the use of the media access port in NetBackup. Other robotic libraries require front-panel interaction when using the media access port.
Read the operator manual for your robotic library to understand the media access port functionality. Libraries such as the ones noted may not be fully compatible with the inject and eject features of NetBackup if not properly handled. Other libraries may not be compatible at all.
Methods for Injecting Volumes into a RobotThe following methods are available to inject a single volume into a robotic library.
When Adding New Volumes
When specifying dialog box entries for adding new volumes, select Inject volume into robot via the media access port to inject a volume into a robotic library.
Inject volume into robot via the media access port is available only for the robot types listed in the matrix shown in “Inject and Eject Functions Available by Robot Type” on page 94.
Inject volume into robot via the media access port may be enabled for some robots that do not have media access ports, since the robot type for the robotic library only indicates that media access ports are possible.

Chapter 3, Managing Media 93
Methods Available for Injecting and Ejecting Volumes
See “Adding Volumes - Using the Actions Menu” on page 98 for complete instructions.
When Moving Volumes
When specifying dialog box entries for moving volumes, select Inject volume into robot via the media access port to inject this volume into a robotic library.
Inject volume into robot via the media access port is available only if the following are true:
� You are moving a single volume from standalone to a robotic library.
� Media Manager supports inject for the robot type involved (see “Inject and Eject Functions Available by Robot Type” on page 94).
Inject volume into robot via the media access port may be enabled for some robots that do not have media access ports, since the robot type for the robot only indicates that media access ports are possible.
See “Moving Volumes” on page 106 for complete instructions.
When Performing a Volume Configuration Update Using Robot Inventory
When performing a volume configuration update for a robot, select Empty media access port prior to update to inject a volume into a robot.
Any volumes to be injected must be in the media access port before the operation begins. If Empty media access port prior to update is selected and there are no volumes in the port, you are not prompted to place volumes in the media access port and the update operation continues.
Each volume located in the media access port is moved into the robotic library. If the robotic library has a port that can hold multiple volumes, volumes are moved to empty slots in the robotic library until the media access port is empty or all the slots are full.
After the volume or volumes have been moved, the configuration update proceeds as usual.
Empty media access port prior to update is available only for the robot types listed in the matrix shown in “Inject and Eject Functions Available by Robot Type” on page 94.
Empty media access port prior to update may be available for some robots that do not have media access ports, since these robot types only indicate that media access ports are possible.
See “Updating the Volume Configuration for a Robot” on page 135 for complete instructions.

Methods Available for Injecting and Ejecting Volumes
94 NetBackup DataCenter Media Manager System Administrator’s Guide for UNIX
Methods for Ejecting Volumes From a RobotThe following methods are available to eject single or multiple volumes.
When Moving Volumes
When specifying dialog box entries for moving volumes, select Eject volume from robot via the media access port to eject a single selected volume using the robot’s media access port.
Eject volume from robot via the media access port is available only if the following are true:
� You are moving a volume from a robotic library to standalone.
� Media Manager supports eject for the robot type involved (see “Inject and Eject Functions Available by Robot Type” on page 94).
Eject volume from robot via the media access port may be enabled for some robots that do not have media access ports, since the robot type for the robotic library only indicates that media access ports are possible.
See “Moving Volumes” on page 106 for complete instructions.
Using the Eject Volumes From Robot Command
Select Actions > Eject Volume(s) From Robot to eject one or more selected volumes from a robotic library.
Eject Volume(s) From Robot is only available for the robot types shown in the matrix in “Inject and Eject Functions Available by Robot Type” on page 94.
You cannot eject volumes that reside in multiple robots.
For the robot types shown in the 4th column of the following table, operator intervention is only required if the robotic library does not have a media access port large enough to eject all of the selected volumes. For these robot types, you are prompted to remove the media from the media access port so the eject can continue with the remaining volumes.
See “Ejecting Volumes From Robots (Actions Menu Command)” on page 113 for complete instructions.
Inject and Eject Functions Available by Robot TypeThe following matrix shows the availability of inject and eject functions provided with the Media Manager functions listed in the 1st column. The availability of the inject and eject functions listed in the column headings depends on the robot type being used. NA in a cell means not applicable.

Chapter 3, Managing Media 95
Adding New Volumes
Note For RSM robot types, the robot must be attached to a Windows 2000 server running NetBackup.
Adding New VolumesMedia Manager volumes are logical units of data storage or cleaning capability on media that have been assigned media IDs and other attributes, which are recorded in the Media Manager volume database. The attributes in the volume database include information to show the robotic location, and includes the robot host, robot type, robot number, and slot location. This type of information for the volume is referred to as residence information or residence.
When you add a new volume, there is no default expiration date.
Methods Available for Adding VolumesThe methods available to add volumes depend on how the volume will be used, as follows.
If your devices are supported by the Volume Configuration wizard, using this wizard is an easy method for adding volumes. See “Using the Volume Configuration Wizard” on page 104 for more details.
Inject / Eject Functions Available by Robot Type
Media ManagerFunction
Inject SingleVolume
Eject SingleVolume
Eject Single orMultiple Volumes
New Volumes LMF, RSM, TL8,TLD, TSH
NA NA
Move Volumes LMF, TL8, TLD, TSH LMF, TL8, TLD, TSH NA
Robot Inventory TL8, TLD, TLM NA NA
Eject Volumes NA NA ACS, TL8, TLD,TLH, TLM

Adding New Volumes
96 NetBackup DataCenter Media Manager System Administrator’s Guide for UNIX
Robotic Volumes (Volumes Located in a Robot)
� The easiest way to add robotic volumes is to use the Volume Configuration wizard. See “Using the Volume Configuration Wizard” on page 104 for more details.
� To use robot inventory to add robotic volumes, perform the Update Volume Configuration procedure. During the update, Media Manager assigns the media IDs and other attributes.
See “Adding Volumes - Using the Robot Inventory Update Option” on page 97.
� To add volumes using the menu, see “Adding Volumes - Using the Actions Menu” on page 98.
Standalone Volumes (Volumes To Be Used in Standalone Drives)
� The easiest way to add standalone volumes is to use the Volume Configuration wizard. See “Using the Volume Configuration Wizard” on page 104 for more details.
� You can also configure volumes automatically by inserting the media into a standalone drive. For an unused volume, NetBackup assigns a media ID, labels the volume, and uses it (if it needs a volume of that type for a backup). Media Manager adds the media ID (designated by NetBackup) and other attributes for the volume.
The DISABLE_STANDALONE_DRIVE_EXTENSIONS NetBackup configuration option turns off NetBackup’s automatic use of standalone volumes. See the NetBackup system administrator’s guide for UNIX for more information.
� To manually choose the media IDs, label the volume with the NetBackup bplabel command and follow the instructions in “Adding Volumes - Using the Actions Menu” on page 98.
Even if you normally use NetBackup’s assignment capabilities for standalone volumes, manually adding extra standalone volumes prevents "out of media" errors in some situations.
For example, if a volume in a standalone drive is full or unusable because of errors, NetBackup requests that Media Manager eject the volume. NetBackup then searches for another unused volume. If another appropriate volume is not defined, NetBackup exits with an error.
Labeling a volume (using the NetBackup bplabel command) and adding it prevents this problem, because Media Manager displays a mount request for that volume rather than returning an error to NetBackup.
NetBackup Catalog Backup Volumes
� Prior to using volumes for NetBackup catalog backups, you must add them. You can also use the NetBackup bplabel command to label the volume.

Chapter 3, Managing Media 97
Adding New Volumes
See “Adding Volumes - Using the Actions Menu” on page 98.
Notes on Labeling NetBackup Volumes
Labeling volumes is controlled by the application. Refer to the NetBackup DataCenter system administrator’s guide for UNIX or the Storage Migrator system administrator’s guide for more information.
NetBackup controls the labeling of its volumes and in most cases performs this operation automatically.
� If a volume in a robotic library has not been labeled, NetBackup labels it with the media ID assigned by Media Manager the first time that it uses the volumes for a backup. This is done unless those volumes
- Were last used for NetBackup catalog backups. You do not want to label the volumes unless they are no longer being used for catalog backups.
- Contain data from a recognized non-NetBackup application. The NetBackup configuration option, ALLOW_MEDIA_OVERWRITE can be set to allow the volume to be overwritten.
� If you prefer to assign specific media IDs to NetBackup volumes, label them with the NetBackup bplabel command and add them using the manual update procedure.
� NetBackup uses a default prefix of A when assigning media IDs (for example, A00001). To change this default, use the NetBackup MEDIA_ID_PREFIX configuration option.
� If the robotic library supports barcodes, by default NetBackup generates media IDs for new volumes based on the last six characters of the barcode. To change this default, you can specify and select specific characters using Media ID generation rules (see “Configuring Media ID Generation Rules” on page 175).
� An optical disk platter must be formatted, have an external media ID, and a volume label before you can use it with Media Manager. Use vmadm or vmadm with the tpformat command to add an optical disk volume. When using vmadm, you can choose the label option, thus making it unnecessary to use tpformat from the command line. See “Label Optical Media” on page 104, “Using vmadm” on page 361, or the tpformat(1M) man page for more information.
Adding Volumes - Using the Robot Inventory Update OptionTo update the volume database to match the contents of the robotic library, use the following procedure:

Adding New Volumes
98 NetBackup DataCenter Media Manager System Administrator’s Guide for UNIX
1. Insert the volume into the robotic library.
2. In NetBackup Administration Console, click Media and Device Management > Media > Robots.
3. Select the robotic library where you inserted the volume.
4. Click Actions > Inventory Robot.
5. On the Robot Inventory tab, select Perform volume configuration update.
The update includes the generation of media IDs for new volumes as follows.
If the robot
� Supports barcodes and the volumes have readable barcode labels, the update part of the operation generates media IDs for new volumes based on the last six characters of the barcodes as the default or the specific characters that you specify if you are using Media ID generation rules.
� Does not support barcodes or the volumes do not have readable barcodes, the new media IDs are based on a media ID prefix that you specify.
See “Updating the Volume Configuration for a Robot” on page 135 for more information on robot inventory and media ID generation rules.
When you use barcode rules, new volumes that are added through a barcode rule are assigned a media type, volume pool, maximum number of mounts (or maximum cleanings), and description.
Adding Volumes - Using the Actions Menu
1. If you are adding new volumes to a robotic library, insert them into the proper slots.
2. In NetBackup Administration Console, click Media and Device Management > Media.
3. Verify that you are adding volumes on the volume database host for the robotic library or a standalone device that will be using the new volumes.
See “Determining the Volume Database Host for a Device” on page 85.
4. Click Actions > New > Volumes.

Chapter 3, Managing Media 99
Adding New Volumes
5. Specify the properties for the volumes as explained in “Dialog Box Entries for New Volumes” on page 100.
Caution Be careful when specifying properties, since you cannot later change properties such as the media ID or media type. To change these properties you need to delete the volumes and add them again.
6. Click OK to execute the add. If you selected Inject volume into robot via the media access port, an inject prompt appears.
The volumes pane now shows the new volume information. If the robot has a barcode reader, Media Manager does the following:
- Adds an entry in the volume database, using the specified media ID.
- Reads the barcode of each new volume.
- Adds the barcodes as attributes in the volume database.
Note If you are making multiple additions, clicking Apply updates the configuration without closing the dialog box or refreshing the display. This allows you to add another volume by modifying the dialog box contents and then clicking Apply or OK.
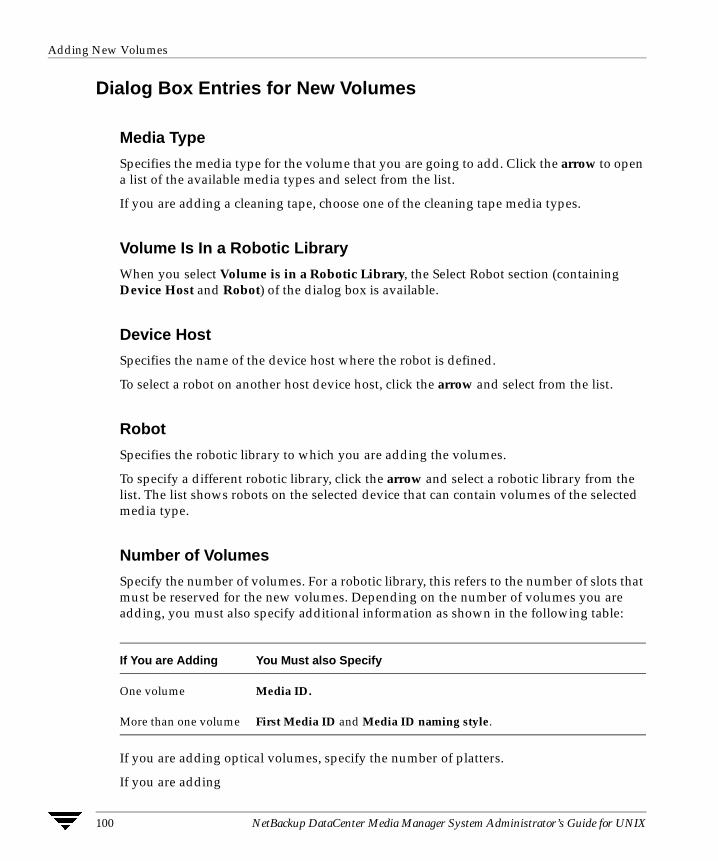
Adding New Volumes
100 NetBackup DataCenter Media Manager System Administrator’s Guide for UNIX
Dialog Box Entries for New Volumes
Media Type
Specifies the media type for the volume that you are going to add. Click the arrow to open a list of the available media types and select from the list.
If you are adding a cleaning tape, choose one of the cleaning tape media types.
Volume Is In a Robotic Library
When you select Volume is in a Robotic Library, the Select Robot section (containing Device Host and Robot) of the dialog box is available.
Device Host
Specifies the name of the device host where the robot is defined.
To select a robot on another host device host, click the arrow and select from the list.
Robot
Specifies the robotic library to which you are adding the volumes.
To specify a different robotic library, click the arrow and select a robotic library from the list. The list shows robots on the selected device that can contain volumes of the selected media type.
Number of Volumes
Specify the number of volumes. For a robotic library, this refers to the number of slots that must be reserved for the new volumes. Depending on the number of volumes you are adding, you must also specify additional information as shown in the following table:
If you are adding optical volumes, specify the number of platters.
If you are adding
If You are Adding You Must also Specify
One volume Media ID.
More than one volume First Media ID and Media ID naming style.

Chapter 3, Managing Media 101
Adding New Volumes
� One platter, you also must specify Media ID and Partner ID.
� More than one platter, you also must specify First media ID and Media ID naming style.
Media ID Naming Style
If you are adding more than one volume, click the arrow in the Media ID Naming Style box to open a list of possible combinations of alphanumeric characters and digits. Then select a style to use in creating the media IDs for this range of new volumes.
If you are adding optical volumes, there are choices for naming platters.
Note In this guide, ACS, LMF, RSM, TLH, and TLM Media Manager robot types are often grouped together and the term API robot is used to identify these robot types.
Media IDs for an API robot must always match the barcodes. This means that you must get a list of the barcodes prior to adding the volumes. You can obtain this information through a robotic inventory or from the robot vendor’s software. For API robots, Media Manager supports barcodes with six or less characters.
Media ID or First Media ID
In the text box, enter a 1 to 6-character ID for the new volume.
If you are adding one volume, Media ID is the ID for the volume.
If you are adding more than one volume, First Media ID is the ID for the first volume in the range of volumes. Use the same pattern that you chose in the Media ID Naming Style box. Media Manager names the remaining volumes by incrementing the digits.
Media IDs for an API robot must always match the barcodes. This means that you must get a list of the barcodes prior to adding the volumes. You can obtain this information through a robotic inventory or from the robot vendor’s software. For API robots, Media Manager supports barcodes with six or less characters.
Partner ID
Note This property does not apply to NetBackup BusinesServer.
If you are adding one optical volume, you can specify a 1 to 6-character ID for the partner ID. This ID is the media ID of the volume on the other side of the optical platter.

Adding New Volumes
102 NetBackup DataCenter Media Manager System Administrator’s Guide for UNIX
Description
Enter a 1 to 25 ASCII character description of the media that you are adding.
First Slot Number
Note You cannot enter slot information for volumes in an API robot. The robot vendor or the operating system software tracks the slot locations for these robot types.
For volumes in a robot, specify the first slot number to be used by the range of volumes that you are adding. Media Manager assigns the remainder of the slot numbers sequentially.
The appendix “Robot Drive and Slot Layouts” on page 427 shows the slot layout for many of the robots that Media Manager supports.
Maximum Mounts
For volumes intended for backups, specify the maximum number of times that Media Manager is able to mount the volumes. When a volume reaches this mount limit, the volume can be read, but not written.
To help determine the maximum mount limit to use, consult your vendor documentation for information on the expected life of the volume.
Note Specify the number 0 to permit an unlimited number of mounts.
Maximum Cleanings
For a cleaning tape, specify the number of cleanings that can be performed. The number must be greater than zero.
See “Drive Cleaning” on page 316 for information on manual cleaning and cleaning tapes.

Chapter 3, Managing Media 103
Adding New Volumes
Volume Group
Enter the name of the volume group for the volumes you are adding, or click the arrow to select from a list of previously configured volume groups. The following table shows the results if you leave the volume group blank:
Note Do not confuse volume groups with volume pools. Refer to “Volume Pools and Volume Groups” on page 319 for an explanation of the differences.
Rules for Assigning Volume Groups
� All volumes in a group must be the same media type.
However, a media type and its corresponding cleaning media type are allowed in the same volume group (for example, DLT and DLT_CLN).
� All volumes in a robotic library must belong to a volume group. You cannot add volumes to a robotic library without specifying a group or having Media Manager generate a name.
� The only way to clear a volume group name is to move the volume to standalone and not specify a volume group.
� More than one volume group can share the same location. For example, a robotic library can contain volumes from more than one volume group and you can have more than one standalone volume group.
� All members of a group must be in the same robotic library or be standalone. That is, Media Manager will not let you add a group (or part of a group) to a robotic library, if it already exists in another robotic library.
If You Leave the Volume Group Blank for Media Manager
Standalone volumes Does not assign a volume group.
Robotic volumes Generates a name using the robot number and type.For example, if the robot is a TS8 and has a robot number of 50, the group name will be 00_050_TS8.

Using the Volume Configuration Wizard
104 NetBackup DataCenter Media Manager System Administrator’s Guide for UNIX
Volume Pool
Click the arrow and select from the list of volume pools as follows.
Label Optical Media
Note This property does not apply to NetBackup BusinesServer.
Before using optical volumes, they must be formatted and labeled. Click the arrow to select from the list of choices. The default choice does not overwrite any old labels.
Inject Volume Into Robot via the Media Access Port
Select Inject volume into robot via the media access port to insert a single volume into the media access port, so it can be injected into the correct slot in the robot. When you select Inject volume into robot via the media access port, insert the volume in the robotic library and Media Manager will add it to its volume configuration.
See “Methods for Injecting Volumes into a Robot” on page 92 for a list of the robot types that determine when Inject volume into robot via the media access port is available and more information on using this function.
Using the Volume Configuration WizardUse the Volume Configuration wizard to do the following:
� Inventory your robots.
� Identify cleaning media in your robots.
� Add volumes for standalone drives.
Select To Make
None The volume available to any user or application (cleaning tapes must be in the None pool).
NetBackup The volume available only to NetBackup.
DataStore The volume available only to DataStore.
One of the other volume pools in the list
The volume available to a specific volume pool. Other volume pools appear only if you created them earlier as explained in “Configuring Volume Pools” on page 86.

Chapter 3, Managing Media 105
Using the Volume Configuration Wizard
� Update the Media Manager volume database.
After running this wizard to configure media, each media will have a unique media ID in the volume database that is used in NetBackup and Media Manager to track the media.
Wizard LimitationsThe Volume Configuration wizard is only available in NetBackup releases 3.4 or later.
This wizard configures volumes for standalone drives and robots, but does not support the configuring of volumes for the following devices:
� Robots that have more than one type of drive.
A robot is considered to have more than one type of drive if the media written in any one drive cannot be read and written in every other drive. This includes drives that are different versions of the same family of drives. For example, a robot with a Quantum DLT7000 drive and a Quantum DLT8000 drive is considered to have different drive types.
� API robots. API robots manage their own media.
Supported API robots on UNIX servers are ACS, LMF, TLH, or TLM Media Manager robot types.
Supported API robots on Windows servers are ACS, RSM, TLH, or TLM Media Manager robot types.
� Optical robots and optical standalone drives.
To configure volumes for these unsupported devices, see “Adding Volumes - Using the Robot Inventory Update Option” on page 97 or “Adding Volumes - Using the Actions Menu” on page 98.
What To Expect In This WizardThe following table shows the screens of the wizard and what to expect in each:
Wizard Screen What to Expect
Welcome With this wizard you can
- Inventory the volumes in a robotic library.
- Create new volumes for use in standalone drives.

Moving Volumes
106 NetBackup DataCenter Media Manager System Administrator’s Guide for UNIX
Before You Start This WizardMake sure that you have all media that you want to use in the robotic library before starting the wizard.
To Start This WizardThis wizard is available from the list of wizards displayed in the right pane of the Media and Device Management window of the NetBackup Administration Console.
Click Media and Device Management > Configure Volumes.
Moving VolumesWhen you move volumes in or out of a robotic library, you must physically and logically move the volume.
Select Device You select one of the following:
- The robotic library that you want to inventory.
- The type of standalone drive where you want to configure volumes.
Robots that have more than one type of drive are not supported.
Robot Inventory(Only if a robot was selected)
You start the inventory which updates the Media Manager volume database.
Robot Inventory(Only if a robot was selected)
You can view the results of the inventory.
Identify Cleaning Media(Only if a robot was selected)
To avoid any potential problems in the Media Manager volume database, you select the slots in the robotic library that are known to contain cleaning media.
Volumes for Standalone Drives(Only if a standalone drive was selected)
You specify the number of volumes to configure for the selected drive type. The Media Manager volume database is updated when you click Next.
Completion You can choose to go back and configure more volumes if necessary, or exit the wizard.
Wizard Screen What to Expect

Chapter 3, Managing Media 107
Moving Volumes
When moving volumes from one robotic library to another robotic library, you must move the volumes to standalone as an intermediate step, and then to the new robotic library.
For important background information, see “Moving Volumes” on page 324.
You can move volumes using one of the following methods:
� Moving Volumes - Using the Robot Inventory Update Option
� Moving Volumes - Using the Actions Menu
Moving Volumes - Using the Robot Inventory Update OptionThe robot must have a barcode reader and the volumes must have readable barcodes to use the following procedure. But you can also use this procedure to just move volumes out of a robot, even if the volumes do not have barcodes or if the robot does not have a reader.
1. Physically move the volumes to their new location.
2. Click Actions > Inventory Robot to update the volume database to agree with the contents of the robot.
See “Updating the Volume Configuration for a Robot” on page 135 for more information.
Moving Volumes - Using the Actions MenuIf you move a volume to a robotic library that has a barcode reader, Media Manager updates the media database to show the correct barcode for the volume.
When moving volumes from one robotic library to another, you must move the volumes to standalone as an intermediate step and then to the new robotic library.
1. Physically move the volumes to their new location.
2. In NetBackup Administration Console, click Media and Device Management > Media.
3. In the volumes pane, select the volumes you want to move.
4. Click Actions > Move.

Moving Volumes
108 NetBackup DataCenter Media Manager System Administrator’s Guide for UNIX
5. Specify the properties for the move as explained in “Dialog Box Entries for Move Volumes” on page 108.
Note If you are moving a single volume, the dialog box entries are set to show the current location of the volume.
6. Click OK to execute the move.
If you selected Eject volume from robot via the media access port, an eject dialog appears. See “Ejecting Volumes From Robots (Actions Menu Command)” on page 113 for more information on the eject dialogs.
Dialog Box Entries for Move Volumes
Volumes to Move
Shows the Media IDs of the volumes that you selected to move. If you selected only one side of an optical disk platter, only that side appears in the Volumes to Move box, but both sides will be moved.
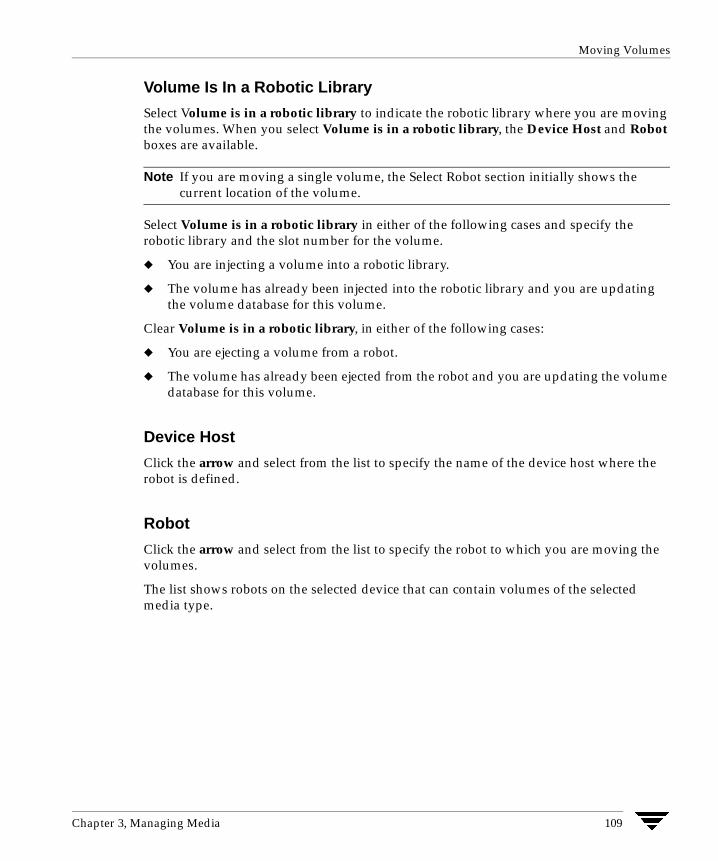
Chapter 3, Managing Media 109
Moving Volumes
Volume Is In a Robotic Library
Select Volume is in a robotic library to indicate the robotic library where you are moving the volumes. When you select Volume is in a robotic library, the Device Host and Robot boxes are available.
Note If you are moving a single volume, the Select Robot section initially shows the current location of the volume.
Select Volume is in a robotic library in either of the following cases and specify the robotic library and the slot number for the volume.
� You are injecting a volume into a robotic library.
� The volume has already been injected into the robotic library and you are updating the volume database for this volume.
Clear Volume is in a robotic library, in either of the following cases:
� You are ejecting a volume from a robot.
� The volume has already been ejected from the robot and you are updating the volume database for this volume.
Device Host
Click the arrow and select from the list to specify the name of the device host where the robot is defined.
Robot
Click the arrow and select from the list to specify the robot to which you are moving the volumes.
The list shows robots on the selected device that can contain volumes of the selected media type.

Moving Volumes
110 NetBackup DataCenter Media Manager System Administrator’s Guide for UNIX
Volume Group
Enter the name of the volume group for the volumes that you are moving, or click the arrow to select from a list of previously configured volume groups. The following table shows the results if you leave the volume group blank:
Rules for Moving Volumes Between Groups
� You must move volumes to a new volume group or to an existing volume group that has the same type of volumes as you are moving.
� All volumes in a robotic library must belong to a volume group. You cannot move volumes into a robotic library without specifying a group or having Media Manager generate a name.
� More than one volume group can share the same location. For example, a robotic library can contain volumes from more than one volume group and you can have more than one standalone volume group.
� All members of a group must be in the same robotic library or be standalone. That is, Media Manager will not let you add a group (or part of a group) to a robotic library, if it already exists in another robotic library.
First Slot Number
Note You cannot enter slot information for volumes in an API robot. The robot vendor or the operating system software tracks the slot locations for these robot types.
For volumes in a robotic library, specify the first slot number to be used in the destination robotic library.
By default, this box shows the slot number that the volume is coming from. Media Manager assigns the remainder of the slot numbers sequentially.
The appendix, “Robot Drive and Slot Layouts” on page 427 shows the slot layout for many of the robots that Media Manager supports.
If you Leave Volume Group Blank for Media Manager
Standalone volumes Does not assign a volume group.
Robotic volumes Generates a name by using the robot number and type. For example, if the robot is a TS8 and has a robot number of 50, the group name will be 00_050_TS8.

Chapter 3, Managing Media 111
When to Delete Volumes
Eject Volume From Robot via the Media Access Port
Select Eject volume from robot via the media access port to eject a single selected volume using the robot’s media access port.
See “Methods for Ejecting Volumes From a Robot” on page 94 for a list of the robot types and cases that determine when Eject volume from robot via the media access port is available and more information on using this function.
Inject Volume Into Robot via the Media Access Port
Select Inject volume into robot via the media access port to insert a single selected volume in the robot’s media access port. The robotic library will then move the volume to the correct slot.
See “Methods for Injecting Volumes into a Robot” on page 92 for a list of the robot types and cases that determine when Inject volume into robot via the media access port is available and more information on using this function.
When to Delete VolumesThere may be times when you want to delete volumes. For example, if any of the following situations apply. The volume is
� No longer used and you want to recycle it by relabeling it with a different media ID.
� Unusable because of repeated media errors.
� Past its expiration date or has too many mounts, and you want to replace it with a new volume.
� Lost and you want to clean up the volume database.
Once a volume is deleted, you can discard it or add it back under the same or a different media ID.
Before deleting and reusing or discarding a volume, ensure that it does not have any important data. NetBackup and Storage Migrator volumes have an extra safeguard against accidental deletion. Volumes assigned to either application cannot be deleted while they are still assigned. See “Deassigning Volumes” on page 114.
See “Deassigning Volumes” on page 114.

When to Delete Volumes
112 NetBackup DataCenter Media Manager System Administrator’s Guide for UNIX
Deleting Volumes
1. In NetBackup Administration Console, click Media and Device Management > Media.
2. In the volumes pane, select the volumes that you want to delete.
Note You cannot delete any assigned volumes until any application using them deassigns them (see “Deassigning Volumes” on page 114).
3. Click Edit > Delete.
A dialog box appears asking you to confirm the action.
Note If you selected only one side of a platter, the volume on other side is also deleted.
4. Remove the deleted volumes from the storage device.
Deleting a Volume Group
1. In NetBackup Administration Console, click Media and Device Management > Media.
2. In the volumes list, look at the Time Assigned column to check if any of the volumes in the group you want to delete are currently assigned.
The Time Assigned column is hidden by default. To display this column, see “Customizing the Window” on page 84.
If any of the volumes are assigned, you cannot delete the group until these volumes are deassigned by the application (see “Deassigning Volumes” on page 114). Use the “Deleting Volumes” procedure to delete individual volumes that are unassigned.
3. Select a volume group in the tree pane.
4. Click Edit > Delete.
A dialog box appears asking you to confirm the deletion.
5. Remove the deleted volumes from the storage device.

Chapter 3, Managing Media 113
Ejecting Volumes From Robots (Actions Menu Command)
Ejecting Volumes From Robots (Actions Menu Command)You can eject single or multiple volumes. See “Methods for Ejecting Volumes From a Robot” on page 94 for a list of robot types that determine when this command is available and more information on using this command.
To eject volumes, use the following procedure:
1. In NetBackup Administration Console, click Media and Device Management > Media.
2. In the volumes pane, select one or more volumes that you want to eject.
3. Click Actions > Eject Volume(s) From Robot.
4. In normal cases, the Tapes tab shows the volumes that you selected to eject and the Errors tab is empty.
The eject may not be possible because of an error. If an error occurs, the Errors tab is opened. The following two classes of errors can occur:
- For more serious errors, Eject will not be available and the error situation must be corrected (see the sample dialog that follows).
- For other errors, the Errors tab shows an explanation of the error. You may continue the eject action (select Eject) or cancel (select Cancel) depending on the type of error.

Deassigning Volumes
114 NetBackup DataCenter Media Manager System Administrator’s Guide for UNIX
5. For ACS and TLM robot types only, you must select the media access port that will be used for the eject.
6. Click Eject to execute the eject.
The robotic library may not have a media access port large enough to eject all of the selected volumes. For most robot types, you are prompted to remove the media from the media access port so the eject can continue with the remaining volumes.
Deassigning VolumesAn assigned volume is currently assigned for exclusive use by NetBackup or Storage Migrator (but not both). A volume is set to the assigned state when NetBackup or Storage Migrator first starts using it to store data. The time of the assignment appears in the Time Assigned column for the volume in the volumes pane. When a volume is assigned, you cannot delete it or change its volume pool.
A volume remains assigned until the application deassigns it. NetBackup and Storage Migrator deassign a volume only when they no longer need the data.
In the case of a NetBackup volume:
� A regular backup volume is deassigned when the retention period has expired for all the backups on the volume.
� A catalog backup volume is deassigned when you stop using it for catalog backups.

Chapter 3, Managing Media 115
Deassigning Volumes
Determining Which Application is Using a VolumeTo determine which application is using the volume, look at the Status column of the Volumes list (see “Volumes Pane” on page 77).
Deassigning NetBackup Volumes
Caution It is recommended that you do not manually deassign NetBackup volumes. If you do, be certain that the volumes do not have any important data. If you are uncertain, duplicate the images to another volume.
The procedure is different depending on whether the volume is currently being used for regular backups or for backing up the NetBackup catalogs. See the following two topics for instructions.
Deassigning NetBackup Regular Backup Volumes
NetBackup deassigns a regular backup volume when the retention periods have expired for all backups on the volume. If you do not need the data and do not want to wait for normal expiration to occur, you can expire the backup by using the bpexpdate command on the master server.
This command is located in the /usr/openv/netbackup/bin/admincmd directory and has the following format:
bpexpdate -d 0 -m media id [-host hname]
Where:
media id is the media ID to be expired.
hname is the name of the NetBackup media server that has the media ID (the server where media ID was written). Specify hname only if your configuration uses master servers and media servers.
The following example assumes there is only one NetBackup server and expires all the backups on media ID ABC001:
/usr/openv/netbackup/bin/admincmd/bpexpdate -d 0 -m ABC001
If you use this command to expire the volume, NetBackup stops tracking the backups that are on it and deassigns it. This makes the volume available to be reused, deleted, or its volume pool to be changed. You can manually expire the backups regardless of the volume’s prior state (frozen, suspended, and so on).

Changing the Attributes for a Volume
116 NetBackup DataCenter Media Manager System Administrator’s Guide for UNIX
Expiring the volume does not change anything on the volume itself. When a media is expired, however, you must use the NetBackup import feature before restoring the backups it contains (a restore is possible only if the volume has not been overwritten).
Deassigning NetBackup Catalog Backup Volumes
Volumes used for backing up the NetBackup catalogs are tracked separately from regular backup volumes. To deassign these volumes (assuming they do not contain any important data), specify None or a different media ID for catalog backups (see the NetBackup system administrator ’s guide for UNIX). Then the media is available to be reassigned or deleted; or its volume pool can be changed.
Deassigning Storage Migrator Volumes
Caution If a volume is assigned to Storage Migrator, you must wait for Storage Migrator to deassign them. Storage Migrator deassigns a volume when the images are no longer required. Attempting to manually deassign Storage Migrator volumes could result in loss of data. For more information on how Storage Migrator manages its volumes, see the Storage Migrator system administrator’s guide for UNIX.
Changing the Attributes for a Volume
1. In NetBackup Administration Console, click Media and Device Management > Media.
2. In the volumes pane, select a volume or volumes.
3. Click Edit > Change.
A dialog box appears and shows the media ID and other attributes for each selected volume.

Chapter 3, Managing Media 117
Changing the Attributes for a Volume
4. In the dialog box, change the attributes as explained in “Dialog Box Entries for Change Volumes” on page 117.
5. Click OK to apply the changes to the selected volumes.
Dialog Box Entries for Change Volumes
Maximum Mounts
Note Does not apply to cleaning tapes.

Changing the Attributes for a Volume
118 NetBackup DataCenter Media Manager System Administrator’s Guide for UNIX
Controls the number of times that the selected volumes can be mounted. The choices for this entry are as follows.
To help determine the maximum mount limit to use, consult your vendor documentation for information on the expected life of the volume.
Expiration Date
Note Expiration date does not apply to cleaning tapes. When you add a new volume, there is no default expiration date.
Changes the expiration date for the selected volumes. This date refers to the age of the volume and is the time at which the volume is considered too old to be reliable. When the expiration date has passed, a volume can still be read but will not be mounted for a write.
Do not confuse the expiration date with the retention period for the backup data on the volume. The expiration date that you can set in this dialog box refers only to the physical expiration of the volume and is independent of the backup data written on the volume.
The backup data expiration date is separately managed by the application that is using the volume. In the case of NetBackup, the expiration date for the data is set as the retention level during schedule configuration. The choices for this entry are as follows.
Select Result
Do Not Change No changes will be made to Maximum Mounts.
Unlimited Allows an unlimited number of mounts. Unlimited is the default.
Number Sets a specific limit for the number of mounts. When the limit is passed the volume can still be read, but it will not be mounted for a write. Entering 0 (the default) is the same as selecting Unlimited.
Select Result
Do Not Change No changes will be made to Expiration Date.
Never Sets the expiration date to infinity.
Number Sets a specific date and time when you want Media Manager to stop using the volumes.

Chapter 3, Managing Media 119
Changing the Attributes for a Volume
Description
Specifies the media description for the selected volumes. The choices for this entry are as follows.
Volume Pool
Note Does not apply to cleaning tapes.
Specifies the desired volume pool. The choices for this entry are as follows.
Number of Cleanings Remaining
Note Applies to cleaning tapes only.
Specifies the number of cleanings that are allowed for the cleaning tape. This number is decremented with each cleaning and when it is zero, Media Manager stops using the tape. At this point, you can change the cleaning tape or increase the number of cleanings allowed. The choices for this entry are as follows.
Select Result
Do Not Change No changes will be made to the media description.
New Description Allows you to enter a short description of how the volumes are being used.
Select Result
Do Not Change No changes will be made to Volume Pool.
New Pool Specify a volume pool. Click the arrow for a list of all previously configured volume pools.
Select Result
Do Not Change No changes will be made to Number of Cleanings Remaining.
New Count Allows you to change the number of cleanings.

Changing the Volume Group of a Volume
120 NetBackup DataCenter Media Manager System Administrator’s Guide for UNIX
Changing the Volume Group of a Volume
1. In NetBackup Administration Console, click Media and Device Management > Media.
2. In the volume list, select the volumes that you want to change the volume group.
3. Click Actions > Change Volume Group.
4. Enter a name in the New volume group name box or click the arrow to select a name from the list of volume groups.
5. Click OK.
The name change is reflected in the volume list entry for the selected volumes. If you specified a new volume group, the group appears under Volume Groups in the tree pane.
Moving A Volume GroupIn addition to moving individual volumes, you can move an entire volume group. This move can be one of the following:
� From a robotic library to standalone
� From standalone to a robotic library
1. In NetBackup Administration Console, click Media and Device Management > Media.
2. In the tree pane, select the volume group that you want to move.

Chapter 3, Managing Media 121
Moving A Volume Group
3. Click Actions > Move.
In the dialog box that appears, the current attributes of the volume group you selected are displayed. These fields cannot be changed.
4. If you are moving the volume group from a robotic library to standalone, Standalone is selected as the destination. For this type of move, fields that are not used cannot be selected.
5. If you are moving the volume group from standalone to a robotic library, Robot is selected as the destination.

Replacing Volumes
122 NetBackup DataCenter Media Manager System Administrator’s Guide for UNIX
a. Select the device host that controls the robotic library, by clicking the arrow and selecting from the list.
b. Select the destination robotic library, by clicking the arrow and selecting from the list.
6. Click OK.
7. Move the volumes physically to their new location.
Moving a volume group in Media Manager changes only their residence information in the volume database. They must also be moved physically.
Replacing VolumesIn general, you should replace volumes that are any of the following:
� Full
� Past their maximum allowable number of mounts
� Too old (past their expiration date)
� Unusable, for example, because of repeated media errors
The following are two possible procedures for replacing volumes, depending on whether you want to reuse the old media ID.
Replacing a Volume Without Reusing the Media IDUse this procedure when the volume you are replacing has unexpired images. For example, the volume may be full.
1. Move the volume to another location (see “Moving Volumes” on page 106).
If the volume is in a robotic library, you may want to take it out of the robotic library and move it to a standalone group.
2. Add a new volume or move an existing volume in as a replacement.
If you are adding a new volume, specify the same attributes as the old volume, except for media ID. See “Adding New Volumes” on page 95.
3. Physically replace the old volume, but do not delete the volume entry for that Media ID.

Chapter 3, Managing Media 123
Recycling Volumes
Replacing a Volume and Reusing the Media IDThis procedure lets you reuse the same set of media IDs, which may be convenient in some instances.
Caution Reuse a media ID only if all data on the old volume is no longer needed and you are going to recycle it later, or if the volume is damaged and you are going to discard it. Otherwise, you may encounter serious operational problems and possible loss of data.
1. Delete the volume entry and physically remove the old volume from the storage device. See “When to Delete Volumes” on page 111.
2. Physically add the new volume to the storage device.
3. Logically add the new volume to the configuration and specify the same attributes, including the media ID. See “Adding New Volumes” on page 95.
4. Set a new Expiration Date for this volume. See “Changing the Attributes for a Volume” on page 116.
5. Reset the number of mounts. Otherwise, the number continues to be incremented from the value accumulated for the old volume. You can reset the number of mounts using the following command:
/usr/openv/volmgr/bin/vmchange -m media_id -n number_of_mounts
Where:
- media_id is the media ID for which you are changing the number of mounts.
- number_of_mounts is the new number that you want for this media ID.
Recycling Volumes
Caution Recycle a volume only if all data on the volume is no longer needed, or if the volume is damaged and unusable. Otherwise, you may encounter serious operational problems and possible loss of data.

Recycling Volumes
124 NetBackup DataCenter Media Manager System Administrator’s Guide for UNIX
Recycling Volumes Under the Same Media IDReusing a NetBackup or Storage Migrator volume without changing its media ID is usually done when the last image expires. If the volume has unexpired NetBackup or Storage Migrator images, see “Deassigning Volumes” on page 114.
Recycling Volumes Under a New Media IDBefore changing the media ID and reusing a volume, be certain that it does not have any required data.
1. Physically remove the volume from the storage device.
2. If the volume is in a robotic library, move it to standalone. See “Moving Volumes” on page 106.
3. Record the number of mounts and expiration date for the volume.
4. Delete the volume entry. See “When to Delete Volumes” on page 111.
5. Add the new volume entry, and physically add the volume to the storage device. See “Adding New Volumes” on page 95.
6. Set the number of mounts to the value you recorded in step 3 by using the following command:
/usr/openv/volmgr/bin/vmchange -m media_id -n number_of_mounts
Where:
- media_id is the media ID for which you are changing the number of mounts.
- number_of_mounts is the new number that you want in the volume database for this media ID.
7. Set the expiration date to the value you recorded in step 3.

125
Managing Media in Robots 4See “Starting Media Management” on page 73 for an explanation of the Media window that you use in the procedures of this chapter.
Note ACS, LMF, RSM, TLH, and TLM Media Manager robot types are often grouped together, and the term API robot is used to identify these robot types.
If you have Backup Exec volumes to manage, see the Backup Exec tape reader option appendix of the NetBackup system administrator’s guide for Windows for more information.
Robot Management OverviewThe following topics explain the available Media Manager features for managing volumes in a robotic library.
� “Robot Inventory Operations (Inventory Robot Dialog)”
� “Checking Barcodes (Rescan/Update Barcodes Dialog)”
Robot Inventory Operations (Inventory Robot Dialog)To access the Media Manager robot inventory operations, use the following initial procedure:
1. In NetBackup Administration Console, click Media and Device Management > Media > Robots.
2. Select the robot you want to inventory.
3. Click Actions > Inventory Robot.
The following inventory operations are performed using the following tabs of the Robot Inventory dialog:
� Robot Inventory tab

Robot Management Overview
126 NetBackup DataCenter Media Manager System Administrator’s Guide for UNIX
This tab contains the following choices:
- Show contents of robot
Inventories the selected robotic library and generates a report showing which volume (media ID) is in each slot. This operation does not check or change the volume database, but is useful for determining the contents of a robot.
For detailed instructions, see “Showing the Contents of a Robot” on page 127.
- Compare robot contents with the volume configuration
Compares the contents of a robotic library with the contents of the Media Manager volume database. Regardless of the result the volume database is not changed. This is useful for determining if volumes have been physically moved within a robot.
For detailed instructions, see “Comparing Robot Contents with the Volume Configuration” on page 131.
- Preview volume configuration update
Inventories the selected robotic library and compares the results with the contents of the volume database. If there are differences, the results section shows a list of recommended changes. For example, a preview allows you to ensure that all new media have barcodes before they are added to the Media Manager volume database.
You can also specify Empty media access port prior to update to inject volumes into the robot.
After checking the results of a preview, you can perform a volume configuration update operation to update the volume database to agree with the contents of the robot.
For detailed instructions on performing a preview, see “To Update the Volume Configuration for a Robot” on page 137.
- Perform volume configuration update
Inventories the selected robotic library and compares the results with the contents of the Media Manager volume database. If there are differences, Media Manager updates the volume database to match the contents of the robot.
You can also specify Empty media access port prior to update to inject volumes into the robot.
For detailed instructions, see “Updating the Volume Configuration for a Robot” on page 135.
� Update Options tab
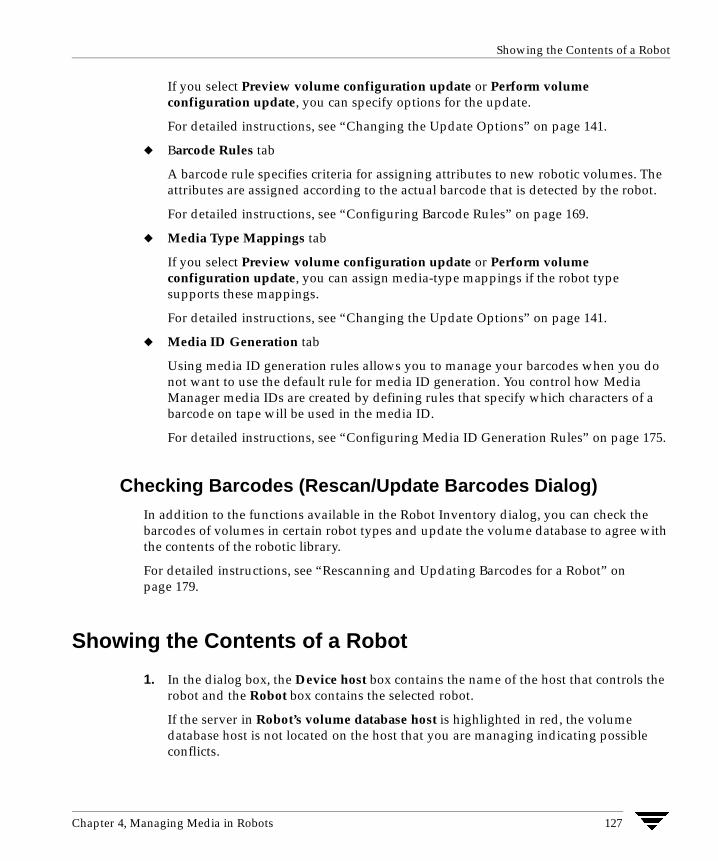
Chapter 4, Managing Media in Robots 127
Showing the Contents of a Robot
If you select Preview volume configuration update or Perform volume configuration update, you can specify options for the update.
For detailed instructions, see “Changing the Update Options” on page 141.
� Barcode Rules tab
A barcode rule specifies criteria for assigning attributes to new robotic volumes. The attributes are assigned according to the actual barcode that is detected by the robot.
For detailed instructions, see “Configuring Barcode Rules” on page 169.
� Media Type Mappings tab
If you select Preview volume configuration update or Perform volume configuration update, you can assign media-type mappings if the robot type supports these mappings.
For detailed instructions, see “Changing the Update Options” on page 141.
� Media ID Generation tab
Using media ID generation rules allows you to manage your barcodes when you do not want to use the default rule for media ID generation. You control how Media Manager media IDs are created by defining rules that specify which characters of a barcode on tape will be used in the media ID.
For detailed instructions, see “Configuring Media ID Generation Rules” on page 175.
Checking Barcodes (Rescan/Update Barcodes Dialog)In addition to the functions available in the Robot Inventory dialog, you can check the barcodes of volumes in certain robot types and update the volume database to agree with the contents of the robotic library.
For detailed instructions, see “Rescanning and Updating Barcodes for a Robot” on page 179.
Showing the Contents of a Robot
1. In the dialog box, the Device host box contains the name of the host that controls the robot and the Robot box contains the selected robot.
If the server in Robot’s volume database host is highlighted in red, the volume database host is not located on the host that you are managing indicating possible conflicts.

Showing the Contents of a Robot
128 NetBackup DataCenter Media Manager System Administrator’s Guide for UNIX
a. To select a robot on a different host, click the arrow and select a host from the list.
b. To select a different robotic library on the same host, click the arrow and select from the list of robots on that host.
2. On the Robot Inventory tab, select Show contents of robot.
To clear any previous display in the Results section, click Clear.
3. Click Start to start the inventory.
The inventory report appears in the Results section.
Show Contents Report

Chapter 4, Managing Media in Robots 129
Showing the Contents of a Robot
Note If a volume happens to be in a drive, the inventory report shows it in the slot that it came from.
For robots (other than API robots) that have a barcode reader, Media Manager obtains the barcode and includes it in the report.
See “Robot Attributes” on page 300 for information on the robots that support barcode readers. These robots can have up to eight characters in the barcodes.
See “Show Contents Reports for API Robots” for information on the reports that are generated for API robots.
Show Contents Reports for API RobotsThe following figure is an example Show Contents report for an ACS robot. The reports for other API robots are similar.
ACS Robots
Media Manager reports what it receives from ACS library software. The resulting report shows the ACS library software volume ID (in the first column), the ACS media type, and the Media Manager media type.
� The Media Manager media ID corresponds to the ACS library software volume ID.
� The report shows the mapping between the ACS library software media type and the corresponding Media Manager media type (without considering barcode rules).
See “Robot Inventory Operations” on page 483 for more information on how Media Manager reports what it receives from ACS library software.

Showing the Contents of a Robot
130 NetBackup DataCenter Media Manager System Administrator’s Guide for UNIX
Show Contents Report (ACS Robot)
TLH Robots
Media Manager reports what it receives from the Automated Tape Library (ATL) library manager. The resulting report shows the volser (volume serial number, in the first column), the ATL media type, and the Media Manager media type.
� The Media Manager media ID corresponds to the ATL volser.
� The report shows the mapping between the ATL media type and the corresponding Media Manager media type (without considering barcode rules).
See the TLH appendix, “IBM Automated Tape Library (ATL)” on page 497 for more information on how Media Manager reports what it receives from the IBM ATL library manager.

Chapter 4, Managing Media in Robots 131
Comparing Robot Contents with the Volume Configuration
TLM Robots
Media Manager reports what it receives from DAS (Distributed AML Server). The resulting report shows the volser (volume serial number, in the first column), the DAS media type, and the Media Manager media type.
� The Media Manager media ID corresponds to the DAS volser.
� The report shows the mapping between the DAS media type and the corresponding Media Manager media type (without considering barcode rules).
See the TLM appendix, “ADIC Distributed AML Server (DAS)” on page 511 for more information on how Media Manager reports what it receives from DAS.
LMF Robots
Media Manager reports what it receives from the Library Management Facility (LMF). The resulting report shows the volser (volume serial number, in the first column), the LMF media type, and the Media Manager media type.
� The Media Manager media ID corresponds to the LMF volser.
� The report shows the mapping between the LMF media type and the corresponding Media Manager media type (without considering barcode rules).
See the LMF appendix, “Fujitsu Library Management Facility (LMF)” on page 523 for more information on how Media Manager reports what it receives from LMF.
RSM Robots
Media Manager reports what it receives from the Windows 2000 Removable Storage service. The resulting report shows a list of media (by media name) obtained from the service along with their RSM and Media Manager media types.
Comparing Robot Contents with the Volume Configuration
1. In the dialog box, the Device host box contains the name of the host that controls the robotic library and the Robot box contains the selected robot.
If the server in Robot’s volume database host is highlighted in red, the volume database host is not located on the host that you are managing indicating possible conflicts.

Comparing Robot Contents with the Volume Configuration
132 NetBackup DataCenter Media Manager System Administrator’s Guide for UNIX
a. To select a robotic library on a different host, click the arrow and select a host from the list.
b. To select a different robot on the same host, click the arrow and select from the list of robots on that host.
2. On the Robot Inventory tab, select Compare robot contents with volume configuration.
To clear any previous display in the Results section, click Clear.
3. Click Start to start the compare.
Media Manager requests an inventory from the selected robotic library and compares the results with the contents of the volume database.
The Results section of the dialog box shows any discrepancies as follows:
- If the robot can read barcodes (see “Robot Attributes” on page 300), the report includes barcode information. Media Manager determines if the barcodes in the robot match those in the volume database. The following figure shows an example report.

Chapter 4, Managing Media in Robots 133
Comparing Robot Contents with the Volume Configuration
Compare Contents Report (Non-API Robot That Can Read Barcodes)
- The following figure shows an example report for an ACS robot. For ACS robots, Media Manager determines whether the media ID and media type in the Media Manager volume database matches the ACS library software database.
Reports for the other API robots are similar to an ACS robot report.
See “Robot Inventory Operations” on page 483 for more information on what Media Manager receives from ACS library software.

Comparing Robot Contents with the Volume Configuration
134 NetBackup DataCenter Media Manager System Administrator’s Guide for UNIX
Compare Contents Report (ACS Robot)
- If the robotic library cannot read barcodes, Media Manager verifies only whether the volume database correctly shows whether a slot contains a volume.
4. If the report shows that the volume database does not match the contents of the robotic library, do one of the following:
- Physically move the volume.
- Correct the condition by using Actions > Move or by updating the volume configuration as explained in “Updating the Volume Configuration for a Robot” on page 135.

Chapter 4, Managing Media in Robots 135
Updating the Volume Configuration for a Robot
Updating the Volume Configuration for a RobotThe following topics explain how to use the Update Volume Configuration feature:
� When to Use Update Volume Configuration
� When Not to Use Update Volume Configuration
� To Update the Volume Configuration for a Robot
� Changing the Update Options
� Update Options
� Examples of Updating a Volume Configuration
These topics explain how to inventory a robotic library, and optionally update the volume database to match the contents of the robotic library. In these topics, insert means the volume is placed physically in the robot without using an add or move option to update the volume database, and remove means to take a volume out of a robot without using a move or eject command.
If you have inserted new volumes, the configuration update includes creation of media IDs (based on barcodes or a prefix that you specify).
When you use barcode rules, a new volume that is added by using a barcode rule is also assigned a media type, volume pool, maximum number of mounts (or maximum number of cleanings), and description. For instructions on setting up barcode rules see “Configuring Barcode Rules” on page 169.
When to Use Update Volume ConfigurationYou can use this operation on robots that Media Manager supports, regardless of whether they can read barcodes or not. The Update Volume Configuration operation is useful for updating the volume’s configuration information that is stored in the Media Manager volume database, after performing one of the following tasks:
� Removing existing volumes from a robotic library.
The operation updates the residence information in the volume database, to show the new standalone location. You specify the volume group to use.
� Inserting new volumes into a robotic library.
If the robotic library supports barcodes and the volume has readable barcode labels, the operation creates new volume entries in the volume database with media IDs that are based on the last six characters of the barcodes as the default or the specific characters that you specify, if you are using media ID generation rules (see “Configuring Media ID Generation Rules” on page 175).

Updating the Volume Configuration for a Robot
136 NetBackup DataCenter Media Manager System Administrator’s Guide for UNIX
If the robotic library does not support barcodes or the volumes do not have readable barcodes, the new media IDs are based on a media ID prefix that you specify.
For more information, see “Adding New Volumes” on page 95.
If the robotic library supports barcodes and the volume has a readable barcode, you can use this operation in the following cases. If you are
� Inserting existing volumes into a robotic library.
The operation updates the residence information in the volume database, to show the new robotic location. This includes the robot host, robot type, robot number, and slot location. You specify the volume group to use.
� Physically moving existing volumes within a robotic library.
The operation updates the residence information in the volume database, to show the new slot location.
� Physically moving volumes between robotic and standalone.
The operation updates the residence information in the volume database, to show the new robotic or standalone location.
� Physically moving volumes from one robotic library to another.
If the volumes for the robots are in the same volume database, you must perform two separate updates as explained in “Example 6: Moving existing volumes between robots” on page 166.
These updates move the volumes to standalone, as an intermediate step, and then to the new robot. Otherwise, Media Manager is unable to update the entries and you receive an “Update failed” error.
When Not to Use Update Volume ConfigurationThe following situations require a move operation, rather than using Update Volume Configuration:
� After inserting existing volumes into a robotic library, and the volume does not have readable barcodes or the robotic library does not support barcodes.
Without barcodes, Media Manager cannot identify the volume and assigns a new media ID that uses the media ID prefix you select for the update. A volume entry for the old media ID remains in the volume database. An error may occur later, if an application attempts to use the new or old volume.
� After physically moving existing volumes that do not have readable barcodes or if the volumes are in a robot that does not support barcodes.

Chapter 4, Managing Media in Robots 137
Updating the Volume Configuration for a Robot
If you swap volumes between two different locations, Media Manager is unable to detect the change and cannot update the volume database.
If you remove a volume from a slot and place it in an empty slot, Media Manager assumes it is a new volume. Media Manager then adds a new logical volume entry with a generated media ID at its new robotic location. The volume entry for the old media ID is moved to standalone. An error may occur if an application attempts to use the volume entry with the new or old media ID. See “Example 7: Adding existing volumes when barcodes are not used” on page 167.
To Update the Volume Configuration for a Robot
Note Before adding a volume to the Media Manager volume database, you must be managing the correct server or the volume will not be found when it is requested.
1. In the dialog box, the Device host box contains the name of the host that controls the robotic library and the Robot box contains the selected robotic library.
If the server in Robot’s volume database host is highlighted in red, the volume database host is not located on the host that you are managing indicating possible conflicts.
a. To select a robotic library on a different host, click the arrow and select a host from the list.
b. To select a different robot on the same host, click the arrow and select from the list of robots on that host.
2. Check the barcode capabilities of the robotic library and the volume by performing the procedure “Comparing Robot Contents with the Volume Configuration” on page 131.
Determine if the following are true:
- The robotic library supports barcodes.
- Any new volume that was inserted has readable barcodes.
3. If the robotic library does not support barcodes or the volume does not have readable barcodes, consider the following important points:
- Save the results of the verify, as it may be useful in deciding on a media ID prefix if you use Update Options to assign a prefix later in this procedure.
- For API robots, assign media-type mappings. If you do not, default media types are used.

Updating the Volume Configuration for a Robot
138 NetBackup DataCenter Media Manager System Administrator’s Guide for UNIX
See “Media Type Mappings (for API robots)” on page 151 for instructions.
For ACS robots, media-type mappings are explained in the appendix, “Automated Cartridge System (ACS)” on page 475.
For TLH robots, media-type mappings are explained in the appendix, “IBM Automated Tape Library (ATL)” on page 497.
For TLM robots, media-type mappings are explained in the appendix, “ADIC Distributed AML Server (DAS)” on page 511.
For LMF robots, media-type mappings are explained in the appendix, “Fujitsu Library Management Facility (LMF)” on page 523.
For RSM robots, media-type mappings are explained in the appendix of the NetBackup Media Manager system administrator’s guide for Windows.
4. Create barcode rules (optional).
Barcode rules are used for updating the volume database for a volume that has been inserted into the robotic library.
See “Configuring Barcode Rules” on page 169 for more information.
5. Create media ID generation rules (optional).
Media ID generation rules allow you to manage your barcodes when you do not want to use the default rules for media ID generation. You control how Media Manager media IDs are created by defining rules that specify which characters of a barcode on tape will be used in the media ID.
See “Configuring Media ID Generation Rules” on page 175 for more information.
6. On the Robot Inventory tab, select Perform volume configuration update.
Note To preview the update without making any changes, select Preview volume configuration update.
To clear any previous display in the Results section, click Clear.
7. Select Empty media access port prior to update to move (inject) one or more volumes in the robot’s media access port into the robotic library before initiating the update.
Any volumes to be injected must be in the media access port before the operation begins. If Empty media access port prior to update is selected and there are no volumes in the port, you are not prompted to place volumes in the media access port and the update operation continues.

Chapter 4, Managing Media in Robots 139
Updating the Volume Configuration for a Robot
Check “Methods for Injecting Volumes into a Robot” on page 92 for a list of robot types that determine when Empty media access port prior to update is available and more information on using this function.
Note If you have recently ejected volumes from the robot with the eject or move volume Media Manager commands, remove the volumes from the media access ports before performing an inject with Empty media access port prior to update selected. Otherwise, if the entry and exit ports are the same, the volumes that you ejected could be injected back into the robotic library.
8. To view or change the settings for the update (or preview), click the Update Options tab. See “Changing the Update Options” on page 141 for instructions.
9. Click Start to start the update (or the preview).
The following figure shows example results for a robotic library that is not an API robot.
Note For NetBackup BusinesServer the dialog is similar, but you cannot change the device host.

Updating the Volume Configuration for a Robot
140 NetBackup DataCenter Media Manager System Administrator’s Guide for UNIX
Update Volume Configuration Report (Not an API Robot)
The following figure shows an example report for an API robot (the report is similar for other API robots).

Chapter 4, Managing Media in Robots 141
Updating the Volume Configuration for a Robot
Update Volume Configuration Report (API Robot)
Changing the Update Options
1. In the Robot Inventory dialog box, click Perform volume configuration update or Preview volume configuration update to enable the Update Options tab.
2. Click the Update Options tab.
See “To Update the Volume Configuration for a Robot” on page 137 for the complete procedure.
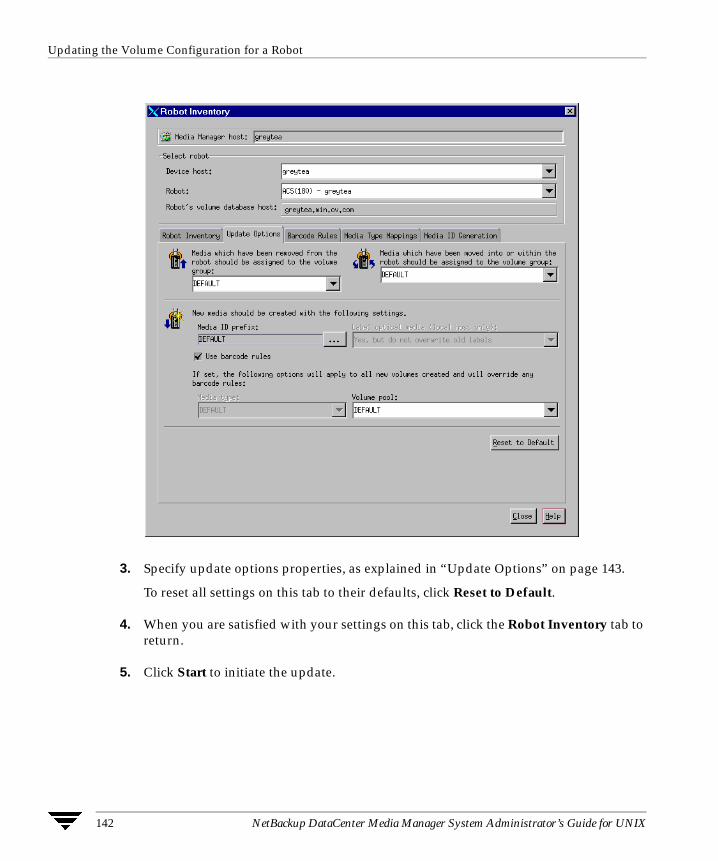
Updating the Volume Configuration for a Robot
142 NetBackup DataCenter Media Manager System Administrator’s Guide for UNIX
3. Specify update options properties, as explained in “Update Options” on page 143.
To reset all settings on this tab to their defaults, click Reset to Default.
4. When you are satisfied with your settings on this tab, click the Robot Inventory tab to return.
5. Click Start to initiate the update.

Chapter 4, Managing Media in Robots 143
Updating the Volume Configuration for a Robot
Update Options
Media which have been removed from the robot should be assigned to the volume group
If you leave the volume group at DEFAULT and there is an existing group with a compatible residence for the volume, the volume is added to that group. A compatible residence means the same robot type, robot number, robot host, and media type (DLT and DLT_CLN are considered equivalent in this regard). If a suitable volume group does not currently exist, Media Manager generates a new volume group name.
To change from DEFAULT, do one of the following:
� Enter a volume group name in the box.
� Click the arrow and select from the list of choices for the volume group. This opens a list of choices for the volume group that Media Manager can assign to volumes that you have removed from the robotic library. The list always has the following choices.
The other available volume group choices in the list depend on the Media Type selection (see “Media Type (for robots that are not API robots)” on page 146).
Select To
DEFAULT Let Media Manager choose the volume group.
AUTO-GENERATE Automatically generate a new volume group.
NO VOLUME GROUP Not assign a volume group.
If Media Type is The List Shows Existing Volume Groups that are Valid for
DEFAULT The robot’s default media type (see “Media Type When Not Using Barcode Rules” on page 147).
Not DEFAULT The specified media type.

Updating the Volume Configuration for a Robot
144 NetBackup DataCenter Media Manager System Administrator’s Guide for UNIX
Media which have been moved into or within the robot should be assigned to the volume group
If you leave the volume group at DEFAULT and there is an existing group with a compatible residence for the volume, the volume is added to that group. A compatible residence means the same robot type, robot number, robot host, and media type (DLT and DLT_CLN are considered equivalent in this regard). If a suitable volume group does not currently exist, Media Manager generates a new volume group name.
To change from DEFAULT, do one of the following:
� Enter a group name in the box.
� Click the arrow and select from the list of choices for the volume group. This opens a list of choices for the volume group that Media Manager can assign to volumes that you have moved into the robotic library. The list always has the following choices.
Note If the robotic library contains multiple media types, it is better to leave the volume group setting as DEFAULT. If you specify a volume group and volumes of different media types have been moved into or within the robotic library since the last update, the new update will fail. This is because volumes of differing media types cannot have the same volume group.
The other available volume group choices depend on the Media Type selection (see “Media Type (for robots that are not API robots)” on page 146).
Media ID Prefix
Specify a Media ID prefix, if either of the following conditions exist:
Select To
DEFAULT Let Media Manager choose the volume group.
AUTO-GENERATE Automatically generate a new volume group.
If Media Type is The List Shows Existing Volume Groups that are Valid for
DEFAULT The robot’s default media type (see “Media Type When Not Using Barcode Rules” on page 147).
Not DEFAULT The specified media type.

Chapter 4, Managing Media in Robots 145
Updating the Volume Configuration for a Robot
� The robotic library does not support barcodes.
� The volume that was inserted does not have readable barcodes.
If the robotic library supports barcodes and the volume has readable barcodes, a prefix is not required because Media Manager creates the media ID in one of the following ways. This is true whether or not a barcode rule is used.
� As the default, Media Manager assigns the last six characters of the barcode as the media ID.
� You specify specific characters for the media ID using Media ID generation rules. See “Configuring Media ID Generation Rules” on page 175.
Click ... if you want media IDs for media generated based on a specific prefix. You can then specify a media ID prefix by entering a prefix or by choosing a prefix from a list as follows.
Click Specify the media ID prefix for the current session only.
The prefix is used only for the current operation. It is not added to the vm.conf file.
Enter a new value for the prefix in the text box. You can specify a prefix having from one to five alpha-numeric characters. Media Manager assigns the remaining numeric characters. For example, if the prefix is NETB, the media IDs are: NETB00, NETB01, and so on.
Click Choose from the media ID prefix list (stored in vm.conf file).
The list will be similar to the following example list. The first two items in this example list are configured media ID prefixes. These prefixes are based on MEDIA_ID_PREFIX entries that were added to the vm.conf file on the host where you are running NetBackup administration.
NV
NETB
DEFAULT
See “Media Manager Configuration File (vm.conf)” on page 337 for an overview of the vm.conf file.
DEFAULT always appears in the selection list. If you select DEFAULT, Media Manager checks the vm.conf file for MEDIA_ID_PREFIX entries, as shown in the following table:
If the vm.conf File Media Manager
Contains prefix entries Assigns the last one as the default prefix.
Does not contain prefix entries Uses the letter A, as the default prefix.
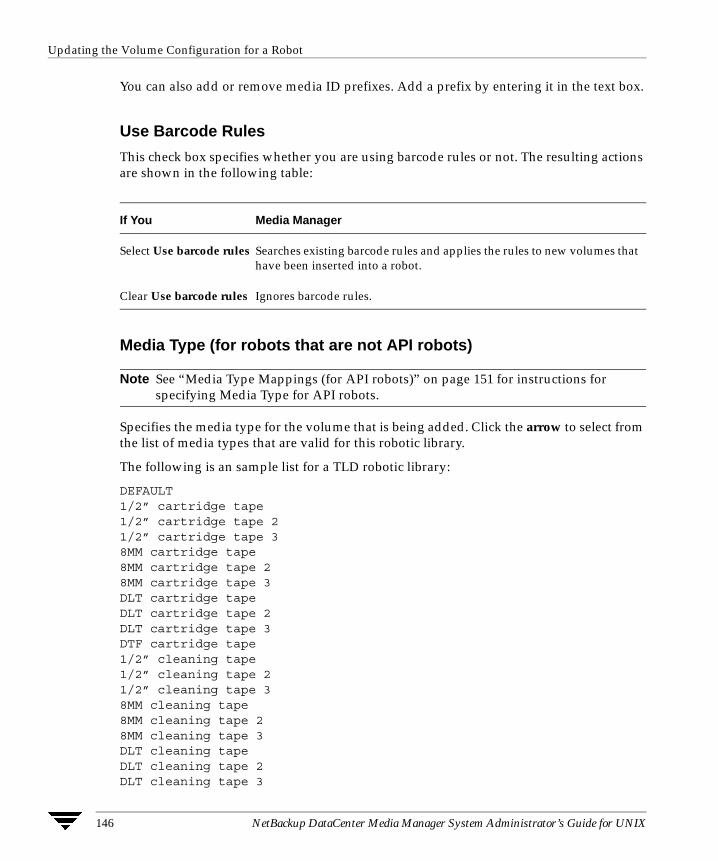
Updating the Volume Configuration for a Robot
146 NetBackup DataCenter Media Manager System Administrator’s Guide for UNIX
You can also add or remove media ID prefixes. Add a prefix by entering it in the text box.
Use Barcode Rules
This check box specifies whether you are using barcode rules or not. The resulting actions are shown in the following table:
Media Type (for robots that are not API robots)
Note See “Media Type Mappings (for API robots)” on page 151 for instructions for specifying Media Type for API robots.
Specifies the media type for the volume that is being added. Click the arrow to select from the list of media types that are valid for this robotic library.
The following is an sample list for a TLD robotic library:
DEFAULT1/2” cartridge tape1/2” cartridge tape 21/2” cartridge tape 38MM cartridge tape8MM cartridge tape 28MM cartridge tape 3DLT cartridge tapeDLT cartridge tape 2DLT cartridge tape 3DTF cartridge tape1/2” cleaning tape1/2” cleaning tape 21/2” cleaning tape 38MM cleaning tape8MM cleaning tape 28MM cleaning tape 3DLT cleaning tapeDLT cleaning tape 2DLT cleaning tape 3
If You Media Manager
Select Use barcode rules Searches existing barcode rules and applies the rules to new volumes that have been inserted into a robot.
Clear Use barcode rules Ignores barcode rules.

Chapter 4, Managing Media in Robots 147
Updating the Volume Configuration for a Robot
DTF cleaning tape
The procedure you follow to select a media type depends on whether you are using barcode rules, as follows:
Media Type When Not Using Barcode Rules
If you are not using barcode rules and you want to use the media type shown in first column of the following table, select the type as shown in the second column.
If You are See the Instructions in
Not using barcode rules “Media Type When Not Using Barcode Rules” on page 147.
Using barcode rules “Media Type When Using Barcode Rules” on page 148.
Media Type Select
The default media type DEFAULT.
If all of the drives in the robotic library (configured on this robot host) are
- The same type and at least one drive is configured on the robot control host, then Media Manager uses the media type for the drives.
- Not the same type, then Media Manager uses the default media type for the robotic library.
A media type other than the default media type
A media type from the list.
Selecting from the list is required in either of the following cases:
- The robotic library supports multiple media types and you do not want the default media type.
- Drives are not configured on the robot control host and the drives are not the default media type for the robot.

Updating the Volume Configuration for a Robot
148 NetBackup DataCenter Media Manager System Administrator’s Guide for UNIX
The following table shows the default media types for robots when drives are not configured on the robot control host:
Media Type When Using Barcode Rules
If you are using barcode rules and you want to
� Let the barcode rule determine the media type that is assigned, select DEFAULT as the media type.
Default Media Types for Robots (Not API robots)
Robot Type Default Media Type
Optical Disk Library (ODL) Rewritable optical disk
Tape Library 4MM (TL4) 4MM cartridge tape
Tape Library 8MM (TL8) 8MM cartridge tape
Also supports 8MM cartridge tape 2 and 8MM cartridge tape 3.
Tape Library DLT (TLD) DLT cartridge tape
Also supports DLT cartridge tape 2, DLT cartridge tape 3, 1/2-inch cartridge tape, 1/2-inch cartridge tape 2, 1/2-inch cartridge tape 3, 8MM cartridge tape, 8MM cartridge tape 2, 8MM cartridge tape 3, and DTF cartridge tape.
Tape Stacker 8MM (TS8) 8MM cartridge tape
Also supports 8MM cartridge tape 2 and 8MM cartridge tape 3.
Tape Stacker DLT (TSD) DLT cartridge tape
Also supports DLT cartridge tape 2 and DLT cartridge tape 3.
Tape Stacker Half-inch (TSH) 1/2-inch cartridge
Also supports 1/2-inch cartridge tape 2 and 1/2-inch cartridge tape 3.

Chapter 4, Managing Media in Robots 149
Updating the Volume Configuration for a Robot
For example, assume you want to add DLT and half-inch cartridges to a TLD robot with a single update operation. First create separate rules for DLT and half-inch cartridges and select the specific media type in the barcode rules. Then, select DEFAULT in the Update Options. Media Manager now uses the media type in the barcode rules when it does the update.
Note If you choose DEFAULT here and in the barcode rule, Media Manager assigns the default media type for the robotic library.
� Use a media type other than the default, select a media type from the list.
For example, to use the same rule to add DLT or half-inch cartridges to a TLD robot, select a specific media type in Update Options and select DEFAULT for the barcode rule media type when you add the barcode rule. Now you can perform one update for DLT and another for half-inch cartridge and use the same rule for both.
The update media type always overrides the rule. If you specify any value other than DEFAULT in Update Options, the media type for the rule must be the same type or be DEFAULT in order to obtain a match (except for cleaning media).
The following table shows the results for various combinations of update and barcode rule media types:
Update OptionsMedia Type
Barcode RuleMedia Type Rule Used
Media Type inVolume Configuration
DLT DEFAULT Yes DLT
HCART DEFAULT Yes HCART
DLT DLT Yes DLT
DLT DLT_CLN Yes DLT_CLN
DLT_CLN DLT No DLT_CLN
DLT_CLN DLT_CLN Yes DLT_CLN
DLT_CLN DEFAULT Yes DLT_CLN
DLT 8MM, 4MM, and so on No DLT
DEFAULT DEFAULT Yes DLT
DEFAULT DLT Yes DLT

Updating the Volume Configuration for a Robot
150 NetBackup DataCenter Media Manager System Administrator’s Guide for UNIX
The fourth barcode rule in the table shows Media Manager’s ability to add cleaning cartridges with regular volumes when you execute an update for a robotic library.
If the volumes that you insert include a cleaning tape, Media Manager adds the volumes correctly, if the following are true:
- The update options media type is for the regular media (DLT in this example).
- The barcode on the volume matches a barcode tag and the barcode rule media type is the cleaning media (DLT_CLN in this example).
Also see “Example 5: Add cleaning tapes to a robot” on page 165.
The sixth and seventh rules in the table illustrate how to add only a cleaning tape. In the sixth rule, you specify the cleaning media type in Update Options and in the barcode rule. In the seventh rule, you specify the cleaning media in Update Options and choose default when you configure the barcode rule.
Volume Pool
Specifies the volume pool. Click the arrow and select from the list of volume pools to which you can assign new volumes.
The list will be similar to the following example:
DEFAULTNoneNetBackupDataStorea_pool
DEFAULT DLT_CLN Yes DLT_CLN
DEFAULT 8MM, 4MM, and so on No Depends on robot type.
Update OptionsMedia Type
Barcode RuleMedia Type Rule Used
Media Type inVolume Configuration

Chapter 4, Managing Media in Robots 151
Updating the Volume Configuration for a Robot
b_pool
Label Media (local host only)
Note This option does not apply to NetBackup BusinesServer.
This option is enabled if you selected an optical robot. The media labeling will only be done if the optical robot is attached to the local host specified during the NetBackup Java login.
Note The media is labeled and is not formatted.
Media Type Mappings (for API robots)
For ACS, LMF, RSM, TLH, or TLM robot types (API robots), the Media type setting is always DEFAULT. Media Manager uses the mappings on the Media Type Mappings tab to set the media type for new volumes. This tab is available only for these robot types.
If You are Using Barcode Rules and You Want to Select
Let the barcode rule determine the volume pool that is assigned to new volumes.
DEFAULT.
Use a volume pool other than the default. That pool name in the list. The Update Options volume pool always overrides the rule.
If You are Not Using Barcode Rules and You Want to Use Select
The NetBackup volume pool for data volumes and no volume pool for cleaning tapes.
DEFAULT.
A volume pool other than the default. That pool name in the list.

Updating the Volume Configuration for a Robot
152 NetBackup DataCenter Media Manager System Administrator’s Guide for UNIX
In Media Type Mappings, map the media type specified by the robot vendor or operating system software to a corresponding Media Manager type as follows. Your mappings apply only to the current update.
1. Find the appropriate robot vendor media type in the dialog.
2. Click the arrow and select a Media Manager type from the list.
You can set the defaults that appear in Media Type Mappings by adding media mappings to the Media Manager configuration file, vm.conf, on the host where you are running NetBackup administration.
For ACS robots, adding media mapping entries is explained in “vm.conf Map Entries for ACS Robots” on page 485.
For TLH robots, adding media mapping entries is explained in “vm.conf Map Entries For TLH Robots” on page 510.
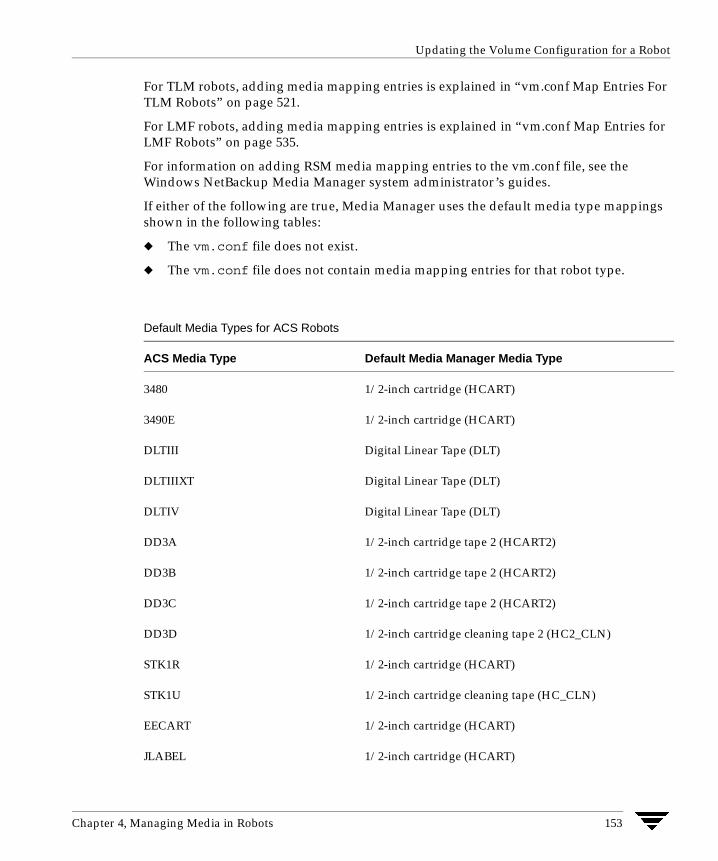
Chapter 4, Managing Media in Robots 153
Updating the Volume Configuration for a Robot
For TLM robots, adding media mapping entries is explained in “vm.conf Map Entries For TLM Robots” on page 521.
For LMF robots, adding media mapping entries is explained in “vm.conf Map Entries for LMF Robots” on page 535.
For information on adding RSM media mapping entries to the vm.conf file, see the Windows NetBackup Media Manager system administrator’s guides.
If either of the following are true, Media Manager uses the default media type mappings shown in the following tables:
� The vm.conf file does not exist.
� The vm.conf file does not contain media mapping entries for that robot type.
Default Media Types for ACS Robots
ACS Media Type Default Media Manager Media Type
3480 1/2-inch cartridge (HCART)
3490E 1/2-inch cartridge (HCART)
DLTIII Digital Linear Tape (DLT)
DLTIIIXT Digital Linear Tape (DLT)
DLTIV Digital Linear Tape (DLT)
DD3A 1/2-inch cartridge tape 2 (HCART2)
DD3B 1/2-inch cartridge tape 2 (HCART2)
DD3C 1/2-inch cartridge tape 2 (HCART2)
DD3D 1/2-inch cartridge cleaning tape 2 (HC2_CLN)
STK1R 1/2-inch cartridge (HCART)
STK1U 1/2-inch cartridge cleaning tape (HC_CLN)
EECART 1/2-inch cartridge (HCART)
JLABEL 1/2-inch cartridge (HCART)
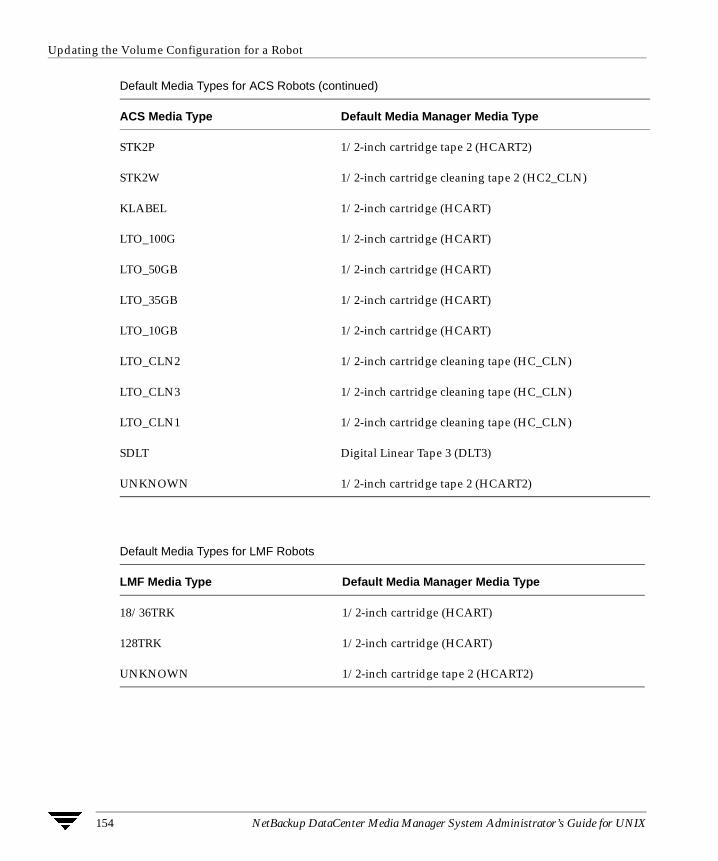
Updating the Volume Configuration for a Robot
154 NetBackup DataCenter Media Manager System Administrator’s Guide for UNIX
STK2P 1/2-inch cartridge tape 2 (HCART2)
STK2W 1/2-inch cartridge cleaning tape 2 (HC2_CLN)
KLABEL 1/2-inch cartridge (HCART)
LTO_100G 1/2-inch cartridge (HCART)
LTO_50GB 1/2-inch cartridge (HCART)
LTO_35GB 1/2-inch cartridge (HCART)
LTO_10GB 1/2-inch cartridge (HCART)
LTO_CLN2 1/2-inch cartridge cleaning tape (HC_CLN)
LTO_CLN3 1/2-inch cartridge cleaning tape (HC_CLN)
LTO_CLN1 1/2-inch cartridge cleaning tape (HC_CLN)
SDLT Digital Linear Tape 3 (DLT3)
UNKNOWN 1/2-inch cartridge tape 2 (HCART2)
Default Media Types for LMF Robots
LMF Media Type Default Media Manager Media Type
18/36TRK 1/2-inch cartridge (HCART)
128TRK 1/2-inch cartridge (HCART)
UNKNOWN 1/2-inch cartridge tape 2 (HCART2)
Default Media Types for ACS Robots (continued)
ACS Media Type Default Media Manager Media Type

Chapter 4, Managing Media in Robots 155
Updating the Volume Configuration for a Robot
Default Media Types for RSM Robots
RSM Media Type Default Media Manager Media Type
DDS_4MM 4mm cartridge (4MM)
MINI_QIC 1/4-inch cartridge (QCART)
TRAVAN 1/4-inch cartridge (QCART)
QIC 1/4-inch cartridge (QCART)
MP_8MM 8mm cartridge (8MM)
AME_8MM 8mm cartridge (8MM)
AIT1_8MM 8mm cartridge (8MM)
DLT Digital Linear Tape (DLT)
IBM_MAGSTAR_3590 1/2-inch cartridge (HCART)
IBM_MAGSTAR_MP 1/2-inch cartridge (HCART)
STK_DATA_D3 1/2-inch cartridge (HCART)
MP2_8MM 8mm cartridge (8MM)
CLEANER_CARTRIDGE 1/2-inch cartridge (HC_CLN)
STK_EAGLE 1/2-inch cartridge (HCART)
LTO_ULTRIUM 1/2-inch cartridge (HCART)
LTO_ACCELIS 1/2-inch cartridge (HCART)
UNKNOWN 1/2-inch cartridge tape 3 (HCART3)
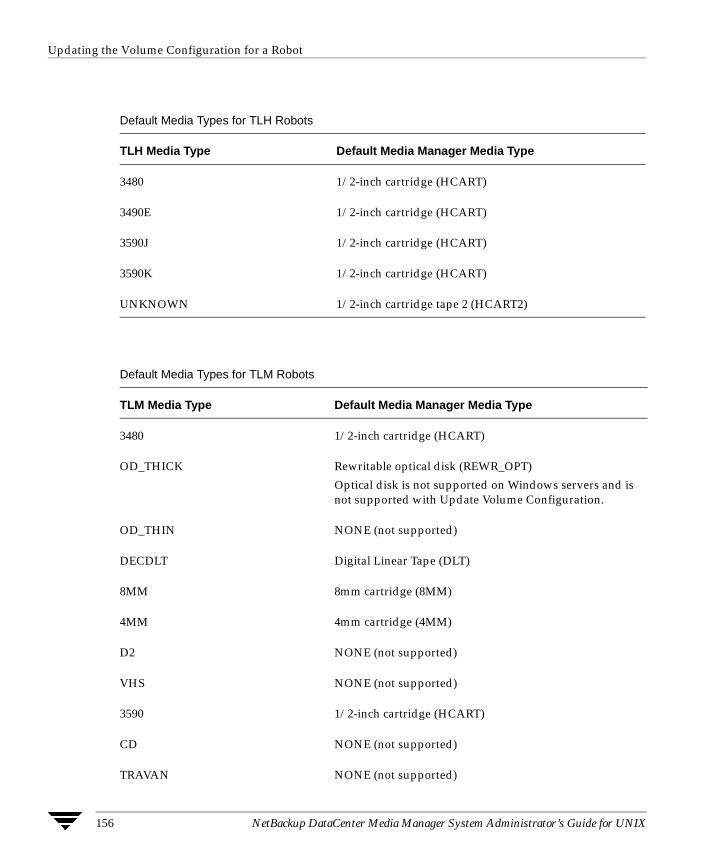
Updating the Volume Configuration for a Robot
156 NetBackup DataCenter Media Manager System Administrator’s Guide for UNIX
Default Media Types for TLH Robots
TLH Media Type Default Media Manager Media Type
3480 1/2-inch cartridge (HCART)
3490E 1/2-inch cartridge (HCART)
3590J 1/2-inch cartridge (HCART)
3590K 1/2-inch cartridge (HCART)
UNKNOWN 1/2-inch cartridge tape 2 (HCART2)
Default Media Types for TLM Robots
TLM Media Type Default Media Manager Media Type
3480 1/2-inch cartridge (HCART)
OD_THICK Rewritable optical disk (REWR_OPT)
Optical disk is not supported on Windows servers and is not supported with Update Volume Configuration.
OD_THIN NONE (not supported)
DECDLT Digital Linear Tape (DLT)
8MM 8mm cartridge (8MM)
4MM 4mm cartridge (4MM)
D2 NONE (not supported)
VHS NONE (not supported)
3590 1/2-inch cartridge (HCART)
CD NONE (not supported)
TRAVAN NONE (not supported)

Chapter 4, Managing Media in Robots 157
Updating the Volume Configuration for a Robot
Examples of Updating a Volume Configuration
Note The following examples show only the relevant dialog box and volume attributes.
Example 1: Remove a volume from a robot
The following is an example of removing a volume from a robotic library. It does not matter whether the robot supports barcodes.
DTF DTF cartridge (DTF)
BETACAM NONE (not supported)
SONY AIT 8mm cartridge (8MM)
LTO 1/2-inch cartridge (HCART)
AUDIO_TAPE NONE (not supported)
BETACAMCL NONE (not supported)
DVCM NONE (not supported)
DVCL NONE (not supported)
UNKNOWN 1/2-inch cartridge tape 2 (HCART2)
Default Media Types for TLM Robots (continued)
TLM Media Type Default Media Manager Media Type

Updating the Volume Configuration for a Robot
158 NetBackup DataCenter Media Manager System Administrator’s Guide for UNIX
1. The following are the attributes for media ID 800001.
2. Assume that you remove the volume from the robotic library, specify the following in the Update Options dialog box, and then execute the update.
3. The resulting volume attributes for media ID 800001 are as follows:
media ID 800001
media type 8MM cartridge tape
barcode TL800001
media description tl8 backup volume
volume pool NetBackup
robot type TL8 - Tape Library 8MM
volume group EXB220
max mounts allowed 0 (unlimited)
media type DEFAULT
volume group NONROB_8MM
volume pool DEFAULT
media ID 800001
media type 8MM cartridge tape
barcode TL800001
media description tl8 backup volume
volume pool NetBackup
robot type NONE - Not Robotic
volume group NONROB_8MM

Chapter 4, Managing Media in Robots 159
Updating the Volume Configuration for a Robot
The new residence information in the volume database shows a standalone location in the volume group, specified by the volume group on the Update Options dialog. The media type and volume pool remain unchanged.
The results are the same for a volume that does not have a barcode.
Example 2: Add existing standalone volumes to a robot
The following is an example of adding a standalone volume, that has a barcode, to a robotic library that supports barcodes (TL8).
Note When moving volumes from robot to robot, you must do two separate updates, as explained in “Example 6: Moving existing volumes between robots” on page 166.
1. The following are the volume attributes for media ID 800021, which has a readable barcode and already exists as a standalone volume.
2. Assume that you insert the volume into a TL8 robot, specify the following in the Update Options dialog box, and then execute the update.
max mounts allowed 0 (unlimited)
media ID 800021
media type 8MM cartridge tape
barcode TL800021
media description 8MM standalone
volume pool None
robot type None (Standalone)
volume group NONROB_8MM
max mounts allowed 0 (unlimited)
media type DEFAULT
volume group EXB220

Updating the Volume Configuration for a Robot
160 NetBackup DataCenter Media Manager System Administrator’s Guide for UNIX
The barcode rules shown in the following table exist:
3. Media Manager recognizes that the media ID exists and changes the volume database to reflect the new robotic location, rather than creating a new media ID. The resulting volume attributes for media ID 800021 are as follows:
use barcode rules YES
volume pool NetBackup
Barcode Tag Media Type Volume Pool Max Mounts/ Cleanings
Description
CLND DLT_CLN None 30 dlt cleaning
CLN8 8MM_CLN None 20 8mm cleaning
TL8 8MM NetBackup 0 tl8 backup
DLT DLT d_pool 200 dlt backup
TS 8MM None 0 8mm no pool
<NONE> DEFAULT None 0 no barcode
<DEFAULT> DEFAULT NetBackup 0 other barcodes
media ID 800021
media type 8MM cartridge tape
barcode TL800021
media description 8MM standalone
volume pool NONE
robot type TL8 - Tape Library 8MM
robot number 0
robot slot 1

Chapter 4, Managing Media in Robots 161
Updating the Volume Configuration for a Robot
Because the last six characters of the barcode match the media ID of an existing standalone volume in the configuration, the residence information in the volume database is updated to reflect the new robotic location. Since the volume is not new, barcode rules are ignored.
The only option used in the Update Options dialog box is the volume group for added or moved volumes. The media type option was not used because this example was for a single existing volume that already had a media type.
Example 3: Move existing volumes within a robot
The following is an example of moving a volume from one slot to another within the same robot. The robot supports barcodes and the volume has a readable barcode.
Caution For volumes moved within a robotic library, use Update Volume Configuration only if the robotic library supports barcodes and the volumes have readable barcodes. Otherwise, Media Manager is unable to properly recognize the move (see “When Not to Use Update Volume Configuration” on page 136 and “Example 7: Adding existing volumes when barcodes are not used” on page 167).
robot host shark
volume group EXB220
max mounts allowed 0 (unlimited)

Updating the Volume Configuration for a Robot
162 NetBackup DataCenter Media Manager System Administrator’s Guide for UNIX
1. The following are the attributes for media ID 800002, which currently resides in slot 1 of the robotic library.
2. Assume that you move the volume to empty slot 10, specify the following in the Update Options dialog box, and then execute the update.
3. The resulting volume attributes are:
media ID 800002
media type 8MM cartridge tape
barcode TL800002
media description tl8 backup
volume pool NetBackup
robot type TL8 - Tape Library 8MM
robot number 0
robot slot 1
robot host shark
volume group EXB220
max mounts allowed 0 (unlimited)
media type DEFAULT
volume group EXB220
use barcode rules NO
volume pool DEFAULT
media ID 800002
media type 8MM cartridge tape

Chapter 4, Managing Media in Robots 163
Updating the Volume Configuration for a Robot
The updated volume attributes show the new slot number, but all other information is unchanged.
Example 4: Add new volumes to a robot
The following is an example of adding new volumes with barcodes to a robot that supports barcodes. Assume the following:
� The new volume is an 8MM tape with a readable barcode of TL800002.
� There are no media generation rules defined.
� The drives in the robot all have a drive type of 8MM or there are no drives configured on the robot control host.
barcode TL800002
media description tl8 backup
volume pool NetBackup
robot type TL8 - Tape Library 8MM
robot number 0
robot slot 10
robot host shark
volume group EXB220
max mounts allowed 0 (unlimited)

Updating the Volume Configuration for a Robot
164 NetBackup DataCenter Media Manager System Administrator’s Guide for UNIX
1. You specify the following in the Update Options dialog box and execute the update.
The barcode rules shown in the following table exist:
2. The barcode on the media matches the barcode rule named TL8 and the resulting volume attributes for the new volume are as follows:
media type DEFAULT
volume group EXB2220
use barcode rules YES
volume pool DEFAULT
Barcode Tag Media Type Volume Pool Max Mounts/ Cleanings
Description
CLND DLT_CLN None 30 dlt cleaning
CLN8 8MM_CLN None 20 8mm cleaning
TL8 8MM NetBackup 0 tl8 backup
DLT DLT d_pool 200 dlt backup
TS 8MM None 0 8mm no pool
<NONE> DEFAULT None 0 no barcode
media ID 800002
media type 8MM cartridge tape
barcode TL800002
media description tl8 backup
volume pool NetBackup
robot type TL8 - Tape Library 8MM

Chapter 4, Managing Media in Robots 165
Updating the Volume Configuration for a Robot
The media ID is from the last six characters of the barcode since there are no media ID generation rules. The new residence information in the volume database, shows the robot host, robot type, robot number, slot, and host. The volume group is from the Update Options dialog. The volume pool and max mounts allowed are from the barcode rule.
If barcode rules (or barcodes) had not been used, the media description, volume pool, and max mounts allowed would be set to the following defaults:
- Media description: added by Media Manager
- Volume pool: NetBackup for data tapes or None for cleaning tapes
- Max mounts: 0 (unlimited)
Note If the robot does not support barcodes or the barcode is unreadable, you must specify a Media ID prefix (or DEFAULT) in the Update Options dialog box or Media Manager will not add new media IDs.
Example 5: Add cleaning tapes to a robot
A special case exists when adding cleaning tapes. For example, assume you are doing an update for a TLD robot.
1. The tapes you inserted include regular tapes with barcodes ranging from DLT00000 to DLT00010 and a cleaning tape with a barcode of CLN001.
The barcode rules shown in the following table exist:
robot number 0
robot slot 1
robot host shark
volume group EXB220
max mounts allowed 0 (unlimited)
Barcode Tag Media Type Volume Pool Max Mounts/ Cleanings
Description
CLN DLT_CLN None 30 dlt cleaning
DL DLT d_pool 200 dlt backup

Updating the Volume Configuration for a Robot
166 NetBackup DataCenter Media Manager System Administrator’s Guide for UNIX
2. You specify the following in the Update Options dialog box and then execute the update.
3. The barcodes on the regular tapes match the DL barcode rule and the media type of the DL barcode rule matches the Media type in the Update Options dialog box. These tapes are added as DLT.
The cleaning tape matches the CLN barcode rule and Media Manager recognizes that DLT_CLN is the cleaning tape for DLT. The cleaning tape CLN001 is added as DLT_CLN type media along with the regular volumes.
This illustrates Media Manager’s ability to add cleaning cartridges along with regular volumes when you use Update Volume Configuration.
If the volumes you insert include a cleaning tape, Media Manager adds the volumes correctly if the following are true:
- The Media type in the Update Options dialog box is the regular media (DLT in this example).
- The barcode on the volume matches a barcode tag (CLN in this example) and the media type for the barcode rule is the correct cleaning media (DLT_CLN in this example).
To add only cleaning media, specify the cleaning media type in the Update Options dialog box and in the barcode rule (DLT_CLN in this example).
Example 6: Moving existing volumes between robots
When you move volumes from one robot to another and the volumes in both robots are in the same volume database, you must perform two separate updates. These updates move the volumes to standalone, as an intermediate step, and then to the new robot.
Otherwise, Media Manager is unable to update the entries and you receive an “Update request failed” error.
<NONE> DEFAULT None 0 no barcode
media type DLT
volume group STK7430
use barcode rules YES
Barcode Tag Media Type Volume Pool Max Mounts/ Cleanings
Description

Chapter 4, Managing Media in Robots 167
Updating the Volume Configuration for a Robot
Caution This procedure assumes that robot 2 is able to read barcodes and the volume has readable barcodes. Otherwise, you will encounter the problem mentioned in “Example 7: Adding existing volumes when barcodes are not used” on page 167.
1. Remove the volume from robot 1.
Insert the volume in robot 2.
2. Perform an Update Volume Configuration on robot 1.
This updates the volume attributes to show the volume as standalone.
3. Perform an Update Volume Configuration on robot 2.
This updates the configuration to show the volume in robot 2.
Example 7: Adding existing volumes when barcodes are not used
Caution This example is NOT recommended and is shown only to illustrate the results.
The following is an example of adding an existing standalone volume to a TL4 robot. A TL4 robot supports inventory (detects media presence), but not barcodes.

Updating the Volume Configuration for a Robot
168 NetBackup DataCenter Media Manager System Administrator’s Guide for UNIX
1. The following are the attributes for media ID 400021, which already exists as a standalone volume.
2. Assume that you insert the volume into the robot, specify the following in the Update Options dialog box, and then execute the update.
3. The resulting volume attributes are:
media ID 400021
media type 4MM cartridge tape
barcode -----------
media description 4MM standalone
volume pool None
robot type NONE - Not Robotic
volume group NONROB_4MM
max mounts allowed 0 (unlimited)
media type DEFAULT
volume group 00_000_TL4
media ID prefix C4
volume pool DEFAULT
media ID C40000
media type 4MM cartridge tape
barcode -----------
media description Added by Media Manager
volume pool NetBackup

Chapter 4, Managing Media in Robots 169
Configuring Barcode Rules
It is important to note that Media Manager assigned a new media ID to the volume (C40000). This undesired result occurs if you use Update Volume Configuration to add volumes that do not have readable barcodes or if the robot does not support barcodes. Without a barcode, Media Manager cannot identify the volume and assumes it is new. The media ID C40000 is generated from the media ID prefix on the Update Options dialog.
The old media ID (400021) remains in the configuration unchanged. The information for the new media ID (C40000) shows the robotic location, including the robot host, robot type, number, slot, and host. The volume group and volume pool are according to the Update Options dialog box selections. The max mounts allowed is set to the default (0).
Configuring Barcode RulesA barcode rule specifies criteria for assigning attributes to new robotic volumes. The attributes are assigned according to the barcode that is detected by the robotic library. You choose whether to use barcode rules when you set up the update operation.
For background information, see “Barcode Rules” on page 326.
The following topics explain how to use barcode rules:
� Adding a New Barcode Rule
� Dialog Box Entries for Adding and Changing Barcode Rules
� Changing a Barcode Rule
� Deleting a Barcode Rule
robot type TL4 - Tape Library 4MM
robot number 0
robot slot 1
robot host shark
volume group 00_000_TL4
max mounts allowed 0 (unlimited)

Configuring Barcode Rules
170 NetBackup DataCenter Media Manager System Administrator’s Guide for UNIX
Adding a New Barcode Rule
1. In the Robot Inventory dialog box, click the Barcode Rules tab.
2. Click New.... A dialog box appears.
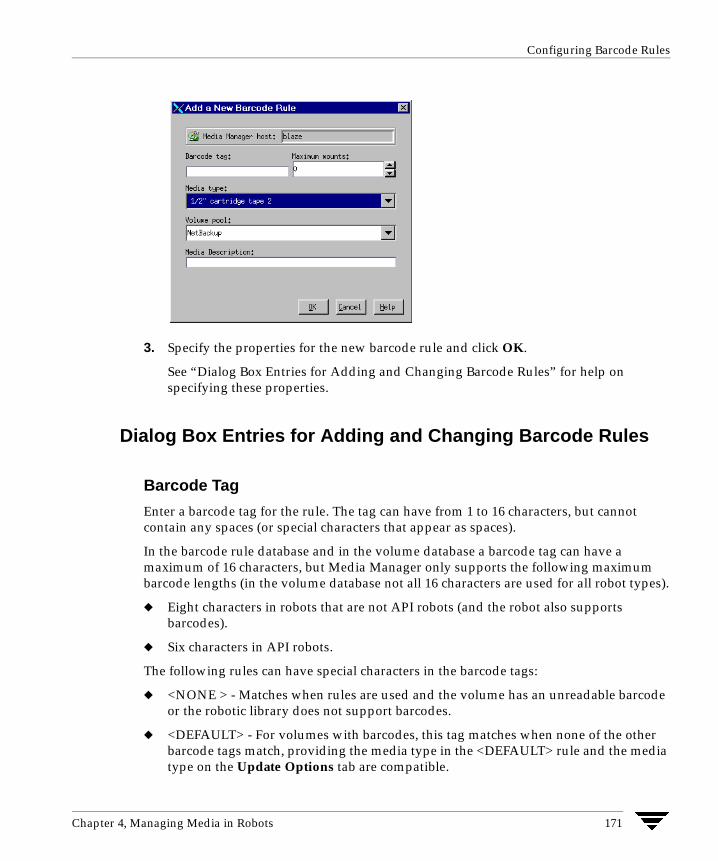
Chapter 4, Managing Media in Robots 171
Configuring Barcode Rules
3. Specify the properties for the new barcode rule and click OK.
See “Dialog Box Entries for Adding and Changing Barcode Rules” for help on specifying these properties.
Dialog Box Entries for Adding and Changing Barcode Rules
Barcode Tag
Enter a barcode tag for the rule. The tag can have from 1 to 16 characters, but cannot contain any spaces (or special characters that appear as spaces).
In the barcode rule database and in the volume database a barcode tag can have a maximum of 16 characters, but Media Manager only supports the following maximum barcode lengths (in the volume database not all 16 characters are used for all robot types).
� Eight characters in robots that are not API robots (and the robot also supports barcodes).
� Six characters in API robots.
The following rules can have special characters in the barcode tags:
� <NONE > - Matches when rules are used and the volume has an unreadable barcode or the robotic library does not support barcodes.
� <DEFAULT> - For volumes with barcodes, this tag matches when none of the other barcode tags match, providing the media type in the <DEFAULT> rule and the media type on the Update Options tab are compatible.
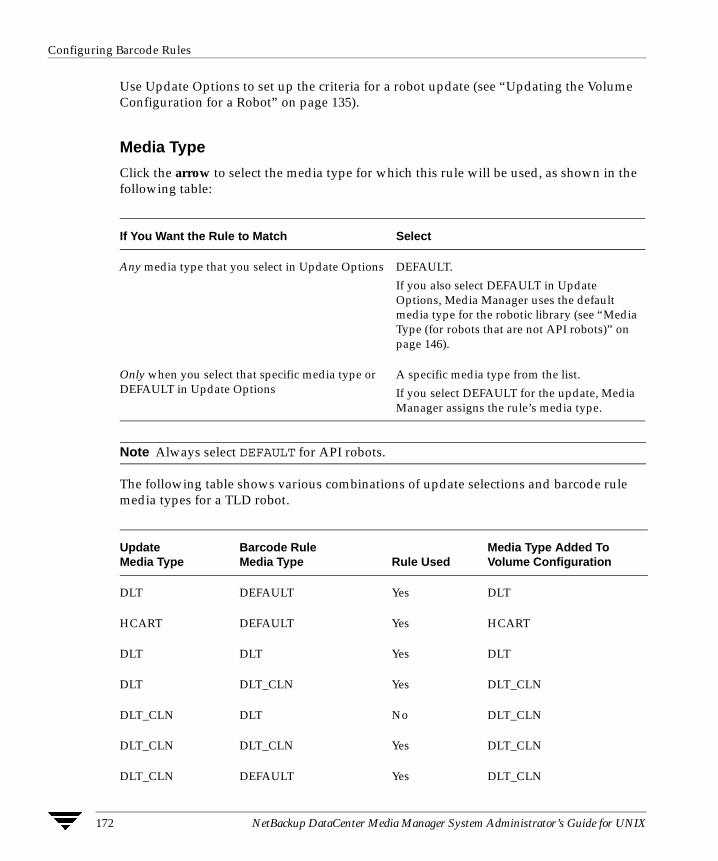
Configuring Barcode Rules
172 NetBackup DataCenter Media Manager System Administrator’s Guide for UNIX
Use Update Options to set up the criteria for a robot update (see “Updating the Volume Configuration for a Robot” on page 135).
Media Type
Click the arrow to select the media type for which this rule will be used, as shown in the following table:
Note Always select DEFAULT for API robots.
The following table shows various combinations of update selections and barcode rule media types for a TLD robot.
If You Want the Rule to Match Select
Any media type that you select in Update Options DEFAULT.
If you also select DEFAULT in Update Options, Media Manager uses the default media type for the robotic library (see “Media Type (for robots that are not API robots)” on page 146).
Only when you select that specific media type or DEFAULT in Update Options
A specific media type from the list.
If you select DEFAULT for the update, Media Manager assigns the rule’s media type.
UpdateMedia Type
Barcode RuleMedia Type Rule Used
Media Type Added ToVolume Configuration
DLT DEFAULT Yes DLT
HCART DEFAULT Yes HCART
DLT DLT Yes DLT
DLT DLT_CLN Yes DLT_CLN
DLT_CLN DLT No DLT_CLN
DLT_CLN DLT_CLN Yes DLT_CLN
DLT_CLN DEFAULT Yes DLT_CLN

Chapter 4, Managing Media in Robots 173
Configuring Barcode Rules
When setting up the update operation, a rule is not used if the media type in the rule is not compatible with the media type you select in Update Options. See “Updating the Volume Configuration for a Robot” on page 135.
For an API robot, Media Manager determines whether the media type is compatible by mapping it according to the setting in the media mappings dialog box. See “Media Type Mappings (for API robots)” on page 151 for more information.
Volume Pool
Click the arrow to select a volume pool for the volume. This is the pool that the volume will be added to, when a barcode matches the rule.
Whenever the barcode rule is used and the Update Options dialog shows
� DEFAULT for the volume pool, then the volume is assigned to the pool you specified in the barcode rule.
� A specific volume pool, then that selection overrides the pool you specified in the barcode rule.
DLT ,4MM No DLT
DEFAULT DEFAULT Yes DLT
DEFAULT DLT Yes DLT
DEFAULT DLT_CLN Yes DLT_CLN
DEFAULT HCART Yes HCART
DEFAULT 4MM No DLT (unless drives in the robot are configured on the robot control host with a different type)
UpdateMedia Type
Barcode RuleMedia Type Rule Used
Media Type Added ToVolume Configuration
Configuring Barcode Rules
174 NetBackup DataCenter Media Manager System Administrator’s Guide for UNIX
Maximum Mounts
Specify the maximum number of mounts or cleanings that are allowed for this volume, as follows:
When a barcode rule is used, Media Manager adds the number you specify to the volume database for the media ID.
Note When you specify 0 (unlimited), a cleaning tape whose barcode happens to match the rule will be assigned a 0 for Cleanings. This means it will not be used unless you subsequently change Cleanings to another value. You can avoid this situation by carefully selecting the barcodes for your cleaning media.
Description
Enter description. This can be a description of how the barcode rule will be used or any useful description determined by your site. You can enter from 1 to 25 characters.
Changing a Barcode Rule
1. In NetBackup Administration Console, click Media and Device Management > Media > Robots.
2. Select the robotic library that has the volume database where you want to change barcode rules.
3. Click Actions > Inventory Robot.
4. In the dialog box, click the Barcode Rules tab.
5. In the dialog box, select a rule that you want to change from the rules listed.
6. Click Change.
A dialog box appears.
For Select
Media other than cleaning tapes The maximum number of mounts to allow.
Cleaning tapes The number of cleanings to allow.

Chapter 4, Managing Media in Robots 175
Configuring Media ID Generation Rules
7. Specify your changes.
See “Dialog Box Entries for Adding and Changing Barcode Rules” on page 171 for help in changing the properties of the rule.
Note You cannot change the barcode tag. To change a barcode tag, you must delete the rule and then add a rule with a new tag.
Deleting a Barcode Rule
1. In NetBackup Administration Console, click Media and Device Management > Media > Robots.
2. Select the robotic library that has the volume database where you want to change barcode rules.
3. Click Actions > Inventory Robot.
4. In the dialog box, click the Barcode Rules tab.
5. In the dialog box, select the rule you want to delete from the list of rules.
6. Click Delete.
In the confirmation dialog box, confirm or cancel the delete.
Configuring Media ID Generation Rules
Note To use media ID generation rules, the robotic library must support barcodes and the robot cannot type be cannot be ACS, LMF, RSM, TLH, or TLM.
For background information see “Media ID Generation Rules” on page 328.
The following topics explain how to use media ID generation rules:
� Adding a New Media ID Generation Rule
� Changing a Media ID Generation Rule
� Deleting a Media ID Generation Rule
� Dialog Box Entries for Adding and Changing Media ID Generation Rules
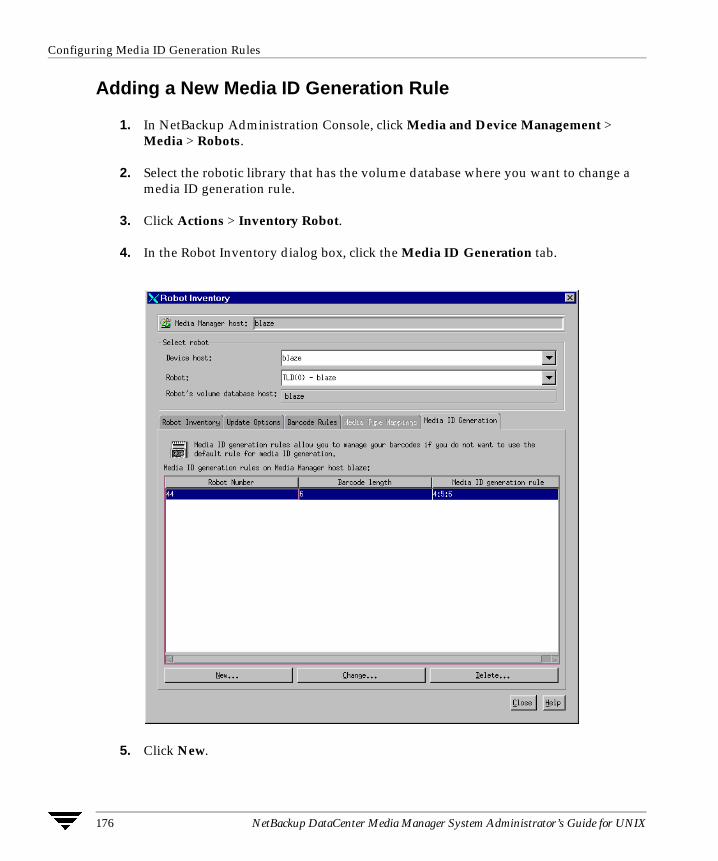
Configuring Media ID Generation Rules
176 NetBackup DataCenter Media Manager System Administrator’s Guide for UNIX
Adding a New Media ID Generation Rule
1. In NetBackup Administration Console, click Media and Device Management > Media > Robots.
2. Select the robotic library that has the volume database where you want to change a media ID generation rule.
3. Click Actions > Inventory Robot.
4. In the Robot Inventory dialog box, click the Media ID Generation tab.
5. Click New.

Chapter 4, Managing Media in Robots 177
Configuring Media ID Generation Rules
6. Specify the properties for the new media ID generation rule and click OK.
See “Dialog Box Entries for Adding and Changing Media ID Generation Rules” on page 178 for help on specifying the rule.
Changing a Media ID Generation Rule
1. In NetBackup Administration Console, click Media and Device Management > Media > Robots.
2. Select the robotic library that has the volume database where you want to change a media ID generation rule.
3. Click Actions > Inventory Robot.
4. In the dialog box, click the Media ID Generation tab.
Select a rule or rules from the list of rules.
5. Click Change.
6. In the dialog box, specify your changes for the rule. You cannot change the Robot Number or Barcode Length fields.

Configuring Media ID Generation Rules
178 NetBackup DataCenter Media Manager System Administrator’s Guide for UNIX
See “Dialog Box Entries for Adding and Changing Media ID Generation Rules” on page 178 for help in changing the rule.
Deleting a Media ID Generation Rule
1. In NetBackup Administration Console, click Media and Device Management > Media > Robots.
2. Select the robotic library that has the volume database where you want to delete media ID generation rules.
3. Click Actions > Inventory Robot.
4. In the dialog box, click the Media ID Generation tab.
Select a rule or rules from the list of rules.
5. Click Delete.
6. In the dialog box, confirm or cancel the delete action.
Dialog Box Entries for Adding and Changing Media ID Generation Rules
Robot Number
Specify a robot number where this rule will apply.
Barcode Length
Specify the length of the barcode for tapes in this robotic library and for this rule.
Media ID Generation Rule
A rule consists of a maximum of six fields that must be delimited by colons. Numbers in the fields of the rule define the positions of the characters in the barcode that are to be extracted. For example, 2 in a field extracts the second character from the barcode (numbering is from the left). The numbers can be specified in any order.

Chapter 4, Managing Media in Robots 179
Rescanning and Updating Barcodes for a Robot
Characters prefixed by # in a field result in that character being inserted in that position in the generated ID. Any alphanumeric characters that are specified must be valid for a media ID.
The following table shows some examples of rules and the resulting media IDs. You can use rules to create media IDs of many varied formats, but keep in mind that the difference in the label on the media and the generated media ID may make it difficult to keep track of your media.
Rescanning and Updating Barcodes for a RobotUse the Rescan/Update Barcodes command to check the barcodes of volumes in a robotic library and update the volume database to agree with the contents of the robotic library.
Note The Rescan/Update Barcodes command does not apply to volumes in API robot types.
“Robot Attributes” on page 300 lists the robots that support barcodes.
When to Use Rescan/UpdateUse Rescan/Update Barcodes only to fill in barcodes that are missing from the volume database.
For example, if you added a new volume to your configuration but did not physically insert the volume into the robotic library when the logical volume entry was added, the Media Manager volume database will not include the barcode. In this case, you can use this command to fill in the missing barcode, provided that the media has since been physically inserted in the robotic library.
Eight-character Tape Barcode Media ID Generation Rule
Generated Media Manager Media ID
032945L1 1:2:3:4:5:6 032945
032945L1 3:4:5:6:7 2945L
032945L1 #N:2:3:4:5:6 N32945
543106L1 #9:2:3:4 9431
543106L1 1:2:3:4:#P 5431P

Rescanning and Updating Barcodes for a Robot
180 NetBackup DataCenter Media Manager System Administrator’s Guide for UNIX
When Not to Use Rescan/UpdateDo not use this command to correct reports that show a media ID in the wrong slot. In this case, you must do one of the following:
� Logically move the volume using Actions > Move.
� Logically move the volume using Inventory Robot. See “Updating the Volume Configuration for a Robot” on page 135.
� Physically move the volume into the correct slot to agree with the volume database.
To obtain an inventory of the robotic library without updating the barcode information in the volume database, select Show Contents in the Robot Inventory dialog box.
See “Comparing Robot Contents with the Volume Configuration” on page 131 for more information.
To Rescan/Update BarcodesTo check barcodes and update the volume database:
1. In NetBackup Administration Console, click Media and Device Management > Media > Robots.
2. Select the robotic library that has the volumes that you want to check and update.
3. In the volume pane, select the volumes.
4. Click Actions > Rescan/Update Barcodes.
A dialog box appears listing the volumes you selected for the rescan operation. Select OK to continue or Cancel. If you select OK, the results of the update are displayed in the output section of the dialog.

181
Monitoring Storage Devices 5The Device Monitor provides the tools needed to manage drives and operator service requests.
This chapter explains the Device Monitor and contains the following topics:
� Starting Device Monitor
� Using the Device Monitor Window
� Controlling the Media Manager Device Daemon
� Administering Devices on Other Hosts
� Changing the Operating Mode of a Drive
� Resetting a Drive
� Adding or Changing a Drive Comment
� Handling Pending Requests and Pending Actions
� Assigning a Drive to a Pending Request
� Resolving Pending Actions
� Resubmitting Requests
� Denying Requests
� Shared Storage Option Summary Reports
Starting Device MonitorIn the NetBackup Administration Console, click Media and Device Management > Device Monitor.
The Device Monitor window appears.

Using the Device Monitor Window
182 NetBackup DataCenter Media Manager System Administrator’s Guide for UNIX
Device Monitor Window
In addition to the tree pane on the left, a pane showing drive information is displayed on the right when you start the Device Monitor:
In addition, a pane for pending requests (or pending actions) is displayed on the right if there is a pending request or pending action active.
Using the Device Monitor WindowThe following topics describe various portions of the Device Monitor window:
� Menus and Commands
� Toolbars
� Drives Status Pane
� Pending Requests Pane
� Status Bar
� Shortcut Menus and Commands
� Customizing the Window
� Allowable Media Manager Characters

Chapter 5, Monitoring Storage Devices 183
Using the Device Monitor Window
Menus and CommandsThe Device Monitor window has available the menus and commands shown in the following table.
The menu items are enabled based on what items are currently selected in the drive status or pending requests panes. For example if a drive is selected in the drive status pane, Up Drive is enabled on the Actions menu.
Device Monitor Menus and Commands
Menu Commands
File Change Server - Displays a dialog box that allows you to change to a different NetBackup media server.
New Window from Here - Starts another instance of the NetBackup Administration Console node that was active.
Adjust Application Timezone - Displays a dialog that allows you to manage the timezone. NetBackup Console can execute in a different timezone than the timezone of the server on which it was initiated. See the NetBackup System Administrator’s guide for UNIX for more information.
Close Window - Closes the current window.
Exit - Closes all open windows.
View Contains commands for specifying your viewing preferences for the Device Monitor, including showing and hiding the toolbar or tree, and refreshing the display. See “Customizing the Window” on page 191.

Using the Device Monitor Window
184 NetBackup DataCenter Media Manager System Administrator’s Guide for UNIX
Actions Note For NetBackup Datacenter SSO configurations, also see “Changing the Operating Mode of a Drive” on page 194.
Up Drive - Sets the drive to up in automatic volume recognition (AVR) mode. This is the normal and default mode for drives. In AVR mode, a robotic library automatically retrieves, mounts, unmounts, and stores volumes. Manual intervention is necessary only when a request causes an error.
For standalone drives using labeled volumes, when the volume is mounted and the tape drive is ready, Media Manager automatically reads the recorded media ID and assigns the tape drive.
For standalone drives using unlabeled volumes, you assign tape drives to requests using Actions > Assign Request.
Up Drive, Operator Control - Sets the drive to up in operator control mode (OPR). This mode is normally used only for security reasons. Do not use this mode for drives that are being used by NetBackup.
By default, all operations are similar as if in AVR mode. If standalone drive extensions have been disabled by using the DISABLE_STANDALONE_ DRIVE_EXTENSIONS entry in the NetBackup bp.conf file, all operations are similar as if in AVR mode except that labeled volumes are not automatically assigned to standalone drives. You must assign a standalone drive to a request using Actions > Assign Request.
Down Drive - Sets the selected drive to the DOWN mode, so it is not available to Media Manager. In this mode, drives are not under control of Media Manager and cannot be assigned to requests.
Reset Drive - Resets the specified drive, terminating the drive assignment and taking control away from the assigned user. For NetBackup Datacenter SSO configurations, the drive is only reset on the device host being managed. For more information, see “Resetting a Drive” on page 195.
Device Monitor Menus and Commands (continued)
Menu Commands

Chapter 5, Monitoring Storage Devices 185
Using the Device Monitor Window
ToolbarsThe toolbar buttons of the Device Monitor window provide shortcuts for commands that are on the menus.
To show or hide the toolbar buttons:
1. In NetBackup Administration Console, click Media and Device Management > Device Monitor.
2. Click View > Show ToolBar.
Actions Change Drive Comment - Displays a dialog box for changing the comment for the selected drive. For NetBackup Datacenter SSO configurations, the drive comment is changed only on the device host being managed.
Drive Details - Displays a dialog with information about the selected drive, including drive properties, drive status, and robotic library information.
Up the Drive on Every Host - For NetBackup Datacenter SSO configurations only. Displays a dialog that allows you to up the drive on all hosts that share this drive.
Down the Drive on Every Host - For NetBackup Datacenter SSO configurations only. Displays a dialog that allows you to down the drive on all hosts that share this drive.
Assign Request - Assigns a drive to a pending request.
Deny Request - Denies a pending request.
Resubmit Request - Resubmits a pending request.
This command is not applicable for NetBackup BusinesServer.
Display Pending Action - Displays information about the pending action.
Stop/Restart Media Manager Device Daemon - Controls the Media Manager device daemon.
Analyze Device Configuration - Starts the configuration analyzer wizard. The analyzer verifies that the settings in your device configuration are consistent and checks for potential problems.
View Status of Shared Drives - Displays a dialog box that allows you to display device allocation information about NetBackup Datacenter SSO configurations.
Help Help Topics - Provides online help information about the NetBackup Console.
License Keys - Provides information about your active and registered license keys.
About NetBackup Administration Console - Displays program information, version number, and copyright information.
Device Monitor Menus and Commands (continued)
Menu Commands

Using the Device Monitor Window
186 NetBackup DataCenter Media Manager System Administrator’s Guide for UNIX
Also see “Customizing the Window” on page 191.
Drives Status PaneThis pane shows the status of the drives that Media Manager controls on this server. The following table describes the columns displayed in this pane.
Drives Status Pane
Column Description
Drive Name Drive name assigned to the drive during configuration.
Drive Index Drive index assigned to the drive during configuration.
Host Name The name of the device host that has the drive.
Type Drive type. Use this column to find a drive that supports the density required by the request. The drive type to use for each density is as follows:
4mm: 4mm cartridge
8mm: 8mm cartridge
8mm2: 8mm cartridge 2
8mm3: 8mm cartridge 3
dlt: DLT cartridge
dlt2: DLT cartridge tape 2
dlt3: DLT cartridge tape 3
dtf: DTF cartridge
hcart: 1/2-inch cartridge
hcart2: 1/2-inch cartridge tape 2
hcart3: 1/2-inch cartridge tape 3
odiskwm: Optical disk-write many
odiskwo: Optical disk-write once
qscsi: 1/4-inch cartridge

Chapter 5, Monitoring Storage Devices 187
Using the Device Monitor Window
Control Control mode for the drive. Control mode can be any of the following:
- robot_designation. For drives in a robot. For example, TLD.
- DOWN-robot_designation. For drives in a robot. For example, DOWN-TLD.
- DOWN. For standalone drives only. In this mode, the drive is not available to Media Manager.
A drive can be in a DOWN mode because of problems or because it was set to that mode using Actions > Down Drive.
- PEND-robot_designation. For drives in a robot. For example, PEND-TLD.
- PEND. For standalone drives only.
If the drive reports a SCSI RESERVATION CONFLICT status, this column will show PEND. This status means that the drive is reserved when it should not be.
Several operating systems (Windows, Tru64, and HP-UX) also may report PEND if the drive reports Busy when opened. This reporting is likely caused by errors in the configuration. See the SCSI Reserve/Release section of the NetBackup Shared Storage Option guide for details.
- AVR (up in Automatic Volume Recognition mode). For standalone drives only. This is the normal operating mode.
- OPR (up in operator control mode). For standalone drives only.
If the drive is a shared drive (NetBackup DataCenter SSO option only), click Actions > Drive Details to view the drive control mode for each host that is sharing this drive.
Shared This column is used for the NetBackup Datacenter SSO feature. Yes, means this drive is configured as a shared drive. No, means the drive is not a shared drive.
For NetBackup BusinesServer this column contains the value No, since this feature is not supported.
Assigned Host This column shows the device host that currently has the drive assigned. If the selected drive is not assigned, this column is blank.
User User ID of the person or application whose request is currently assigned to this drive. If the selected drive is not assigned, this column is blank.
Media Label Shows whether a labeled or unlabeled volume is mounted on this drive. Yes, means labeled. No, means unlabeled. Labeled volumes can also be Backup Exec volumes. A dash means there is no volume mounted on the drive.
Drives Status Pane
Column Description

Using the Device Monitor Window
188 NetBackup DataCenter Media Manager System Administrator’s Guide for UNIX
Pending Requests PaneThis pane shows pending requests (or pending actions) for volumes. These usually originate from NetBackup, but can come from a user or VERITAS Storage Migrator.
This pane is not displayed until a pending request or pending action appears. After all requests have been resolved by Media Manager (automatically) or by operator intervention, the Pending Requests pane is again hidden. See “Handling Pending Requests and Pending Actions” on page 196 for more information.
The following table describes the columns that are displayed in this pane for a pending request or action.
Recorded Media ID
ID recorded on the volume mounted on this drive. This identifier is the same as the media ID and should match the external media ID. If no volume or a Backup Exec volume is mounted, this column is blank.
ExternalMedia ID
External ID of the volume mounted on this drive. This identifier should match the recorded media ID. If no volume is mounted, this column is blank.
Ready Status of the drive, indicating if it is ready to perform an operation on the loaded volume. Yes, means ready. No, means not ready.
See the vendor’s manual for the drive for instructions to make it ready, if it does not become ready automatically.
Writable Shows whether the volume currently mounted on this drive is write-enabled. Yes, in this column means the volume is write-enabled. No, means the volume is write-protected. A - in this column means there is no volume in the drive.
Request ID If this drive is assigned to a request, this column contains the ID of the request.
Last Cleaned The date that the drive was last cleaned. If the selected drive has not been cleaned, this column is blank.
Comment Comments that the administrator has added about this drive. See “Adding or Changing a Drive Comment” on page 196.
Drives Status Pane
Column Description

Chapter 5, Monitoring Storage Devices 189
Using the Device Monitor Window
Pending Requests Pane
Column Description
Host Name The name of the device host that has the pending request.
Request ID Identification number for the request or action. This is a system-assigned number that identifies the request.
NOTE: A pending action is indicated by a media icon with a hand, located to the left of the Request ID.
Recorded Media ID
Media ID of the volume requested by the user. It is the same media ID that is recorded in the volume database. The ID consists of up to six alphanumeric characters that are recorded at the beginning of the volume to identify the volume.
A volume with a recorded media ID is termed a labeled volume (that is, the volume was labeled by NetBackup or Backup Exec). Unlabeled volumes do not have recorded media IDs.
When a user requests an unlabeled volume and does not specify a recorded media ID, the external media ID appears in this column by default. This occurs because Media Manager assumes that the recorded and external media IDs are the same.
ExternalMedia ID
External media ID of the volume requested by the user. The ID consists of up to six alphanumeric characters and is usually written on an external label attached to the volume. The external media ID is not recorded on the volume and is used to identify the volume before it is inserted in a robotic library.
User User ID of the person or application making the request.

Using the Device Monitor Window
190 NetBackup DataCenter Media Manager System Administrator’s Guide for UNIX
Density Density of the volume required by the user. You must mount the volume on a drive that supports the required density.
Densities correspond to the following drive types (to find a drive of the correct type, check the drive status list.):
4mm: 4mm cartridge tape
8mm: 8mm cartridge tape
8mm2: 8mm cartridge tape 2
8mm3: 8mm cartridge tape 3
dlt: DLT cartridge tape
dlt2: DLT cartridge tape 2
dlt3: DLT cartridge tape 3
dtf: DTF cartridge
hcart: 1/2-inch cartridge tape
hcart2: 1/2-inch cartridge tape 2
hcart3: 1/2-inch cartridge tape 3
odiskwm: Optical disk-write many
odiskwo: Optical disk-write once
qscsi: 1/4-inch cartridge tape
Mode Specifies whether the volume should be write-enabled. Write in this column means you must write-enable the volume. Read means you do not have to write-enable the volume, unless specified by site policy. To write-enable a cartridge volume, move the tab off the safe position.
Time Time of day the user made the request for access.
Media Description
Describes the media in 25 or less alphanumeric characters. You create the description when you configure volumes.
Barcode Alphanumeric representation of the barcode label on the volume that was requested by the user. The barcode can contain up to 13 characters.
Volume Group Volume group to which this volume belongs. A volume group defines the volume by location and is a logical group of volumes that are at the same physical location.
Pending Requests Pane
Column Description

Chapter 5, Monitoring Storage Devices 191
Using the Device Monitor Window
Status BarThe status bar appears at the bottom of the Device Monitor window. The status bar contains any error messages.
Shortcut Menus and CommandsClicking the right mouse button while the pointer is over a pane or a selection in a pane, displays a shortcut menu with commands that apply to that context. These shortcut commands are also available on the menus or toolbars.
Customizing the Window
Changing the Screen Display Refresh Rate
The refresh rate specifies how often the Device Monitor will query the device host for new display data. Initially, screen refresh is enabled and the default rate is 60 seconds.
To change the refresh rate:
1. Click View > Options.
2. Select Refresh display every.
3. Set the desired refresh rate.
To disable screen refresh, unselect Refresh display every.
It may be necessary to scroll the Device Monitor window to see any newly arrived jobs after a refresh.
The Device Monitor saves the setting of Refresh display every when you exit.
Allowable Media Manager CharactersThe following set of characters can be used in user-defined names, such as drive comments and drive names that you enter when creating these entities. These characters must be used even when specifying these items in foreign languages.
Do not use a minus as the first character or leave any spaces between characters.
� Alphabetic (A-Z a-z)
� Numeric (0-9)
Controlling the Media Manager Device Daemon
192 NetBackup DataCenter Media Manager System Administrator’s Guide for UNIX
� Period (.)
� Plus (+)
� Minus (-)
� Underscore (_)
Controlling the Media Manager Device DaemonThe Media Manager device daemon must be running on the host being monitored or the displays in the Device Monitor panes will be blank.
If the daemon is not running when you start the Device Monitor, NetBackup prompts you so you can start it at that time. The device daemon can be managed as described in the following procedure.
Note If the device host you want to monitor is a Windows host, this procedure also controls the NetBackup Device Manager service on that Windows host.
1. In NetBackup Administration Console, click Media and Device Management > Device Monitor.
2. Click Action > Stop/Restart Media Manager Device Daemon.
3. In the dialog box that appears, enter a host name or click the arrow to select a different device host.
If the device host is known to NetBackup to be a Backup Exec server, the server does not appear in the list.
The current status field shows the status of this daemon. The dialog allows you to start, stop, or stop/restart the daemon.
4. Select the action you want to perform.
5. Click OK or Apply when done.
Note By using Apply, you can select device hosts and actions for more than one device host before clicking OK to close the dialog box.
Note You may find it useful to select Stop and click Apply, and then select Start and click Apply.

Chapter 5, Monitoring Storage Devices 193
Administering Devices on Other Hosts
Administering Devices on Other HostsInitially, you can monitor devices on the server where you are running the Device Monitor. The name of this server is shown in the line directly above the drive status pane, for example Device host: spain
If you change from a NetBackup DataCenter server to a NetBackup BusinesServer server, the functionality available on the new server is limited to the functionality supported by NetBackup BusinesServer.
You cannot change from a NetBackup BusinesServer server to a NetBackup DataCenter server.
To change to a different server, use the following procedure:
1. In NetBackup Administration Console, click Media and Device Management > Device Monitor.
2. Click the Device host: icon shown directly above the drive status pane.
You can also click File > Change Server, but if the media server you want to monitor is a Backup Exec server (and not operating in the Backup Exec tape reader mode) most NetBackup commands are not valid. In this case, using the icon is recommended.
3. In the dialog box that appears, do one of the following to specify the host to monitor:
- Enter the name of the host.
- Click the arrow and select a host. The hosts in the list have a master server and media server relationship in the global device database.
Click OK.
4. The name of the new host appears in the Device host: line and the lists in the panes show device information for the new device host.
The Media Manager device daemon must be running on the host that you are going to monitor, or the lists in the detail panes will be blank. If it is not running when you attempt to connect, a message box prompts you to start the daemon. Click Yes in this box.
If you encounter problems, see “Remote Administration of UNIX Hosts” on page 194.

Changing the Operating Mode of a Drive
194 NetBackup DataCenter Media Manager System Administrator’s Guide for UNIX
Remote Administration of UNIX HostsThe name of the UNIX host that you specify in the Login box, when starting the NetBackup Administration interface, must be in the NetBackup bp.conf file on the remote UNIX host where you want to monitor devices.
For more information on remote administration, see the following topics:
� “Remote Administration of Other UNIX Hosts” on page 25
� “Media Manager Security” on page 26
Changing the Operating Mode of a DriveIt is usually not necessary to change the operating mode of a drive. Drives are set to the UP in AVR mode (the default mode) when you add drives to your configuration, and usually can be left at that setting. Other operating mode settings are used for special purposes.
To change the mode of a drive, do the following:
1. In NetBackup Administration Console, click Media and Device Management > Device Monitor.
2. In the Drives status pane, select a drive or drives.
3. From the Actions menu, choose the command for the new operating mode you want (for example, Down Drive).
If the drive is a shared drive (SSO option), you can also use the Up the Drive on Every Host or Down the Drive on Every Host commands to up or down a shared drive on all host sharing the drive.
See the Actions menu in “Menus and Commands” on page 183 for an explanation of the operating mode commands.
Changing Mode ExampleThe following example shows the results of changing the operating mode of Drive2 from AVR to DOWN.
Note Some columns of the drive status list are not shown in this example.
The following example display shows the Drives status pane before changing the drive mode. Notice that the Control column shows AVR and the Ready column shows Yes.

Chapter 5, Monitoring Storage Devices 195
Resetting a Drive
Recorded ExternalDrive Type Control User Label MediaID MediaID Ready Writable RequestIDDrive1 qscsi OPR chg No TST401 TST401 Yes No 0Drive2 4mm AVR Yes
The following display shows the Drives status pane after using Actions > Down Drive to change the operating mode of Drive2 to DOWN. Notice that the Control column shows DOWN and the Ready column now shows No.
Recorded ExternalDrive Type Control User Label MediaID MediaID Ready Writable RequestIDDrive1 qscsi OPR chg No TST401 TST401 Yes No 0Drive2 4mm DOWN No
Resetting a Drive
Caution Do not reset an assigned drive unless directed by site policy or the system administrator. Terminating an active job can destroy user data.
The actions that result from resetting a drive, depend on the state of the drive as follows:
Use the reset capability with caution. A situation where resetting a drive might be necessary is if a system problem causes the drive to remain assigned after a job is complete. In this case, the drive cannot be used for another request and the only way to regain control of the drive is to reset it.
Note Resetting a drive does not perform any SCSI bus or SCSI device resets.
To reset a drive:
Drive State Reset Action
DOWN Media Manager attempts to unload the drive. This occurs for standalone drives, as well as drives in a robot.
UP state, not assigned to a user or application and in a ready state
Media Manager attempts to unload the drive. If the drive is not ready, no action occurs.
UP state and assigned to a user or application
Removes the tape. This takes control away from the user.

Adding or Changing a Drive Comment
196 NetBackup DataCenter Media Manager System Administrator’s Guide for UNIX
1. In NetBackup Administration Console, click Media and Device Management > Device Monitor.
2. In the Drives status pane, select a drive or drives.
3. Click Actions > Reset Drive.
4. Verify that the assignment was terminated by checking that the User and Request ID columns are empty for the drive number.
Adding or Changing a Drive Comment
1. In NetBackup Administration Console, click Media and Device Management > Device Monitor.
2. In the Drives status pane, select the drive.
3. Click Actions > Change Drive Comment.
The dialog box shows the current comment (if any).
4. Enter a comment or change the comment and click OK.
Handling Pending Requests and Pending ActionsIn the following topics, the operator is the person responsible for performing the manual intervention. A user is a person or application (for example, NetBackup) that initiates requests.
When NetBackup needs a volume to complete a tape mount, it displays a request in the Pending Requests pane. The following is an example request:
Note Some columns of the pending requests pane are not shown in this example.
Recorded ExternalRequestID User MediaID MediaID Density Mode Time Barcode Volume Group0 ldr LDR001 LDR001 4mm Write 7:22 LDR001 rack_1
See the table in “Pending Requests Pane” on page 188 for an explanation of the columns in a pending request display.

Chapter 5, Monitoring Storage Devices 197
Assigning a Drive to a Pending Request
Media Manager is able to resolve most requests automatically. For example, if the required volume is labeled and in a robotic library, Media Manager assigns the request as soon as the volume and a drive are available, and then removes the request and also the Pending Requests pane.
Pending RequestsMedia Manager sometimes needs operator assistance to complete a tape mount request. In the following cases, Media Manager is unable to automatically assign the request and the request remains in the Pending Requests pane. In any of these cases, proceed as explained in “Assigning a Drive to a Pending Request” on page 197.
� The required drive is in the Up Under Operator Control mode (OPR mode) and standalone drive extensions were disabled by using the DISABLE_STANDALONE_DRIVE_EXTENSIONS entry in the NetBackup bp.conf file.
� The volume in a drive is unlabeled (and the volume being mounted is not a known Backup Exec tape).
� NetBackup issues a write request for an unlabeled volume in a standalone drive and the standalone drive extensions were disabled.
A request for a volume that is displayed in the Pending Requests pane is sometimes called a mount request. This term means to make the volume available for reading or writing by placing it in an appropriate drive and then assigning the associated request to that drive.
Pending ActionsMedia Manager also needs operator assistance to complete a tape mount request when the request causes an error. These special requests are called pending actions.
A pending action is indicated by a media icon (the icon has hand on it depicting a manual action is required), located to the left of the Request ID column.
In these cases, the problem must be resolved before proceeding. See “Resolving Pending Actions” on page 200.
Assigning a Drive to a Pending RequestUse the following procedure to assign a drive to a pending request.

Assigning a Drive to a Pending Request
198 NetBackup DataCenter Media Manager System Administrator’s Guide for UNIX
1. In NetBackup Administration Console, click Media and Device Management > Device Monitor.
2. In the Pending Requests pane, select the request. Also, note the contents of the following columns of the request:
3. In the Drives status pane:
a. Find a drive type that matches the density for the request.
See the table in “Drives Status Pane” on page 186 for a list of the densities that each drive type supports.
b. Ensure that the drive is in the Up mode and not assigned to another request.
c. Select the drive.
4. If necessary, get the media, write-enable it, and insert it into the drive.
5. Wait for the drive to become ready, as explained in the drive equipment manual.
6. Click Actions > Assign Request.
Verify that the request disappears from the Pending Requests pane.
7. In the Drives status pane, verify that
- The assigned request ID appears in the Request ID column for the drive.
- The User column is filled in.
Assigning a Drive Example 1
Note Some columns of the drive status and pending requests panes are not shown in this example.
See the Following Column To Determine
Density The recording density that is required.
External Media ID The ID of the media that is required.
Mode Whether the volume should be write-enabled.

Chapter 5, Monitoring Storage Devices 199
Assigning a Drive to a Pending Request
In this example, a pending request is assigned to a drive using Actions > Assign Request. The following sample display shows the Pending Requests pane before assigning the request.
Recorded ExternalRequestID User MediaID MediaID Density Mode Time Barcode Volume Group2 cas CAS135 CAS135 4mm Read 7:30 CAS135 offsite
The following display shows the Drives status pane before assigning the request. Notice that Drv2 is available (the User and Request ID columns are empty) and is in OPR mode.
Recorded ExternalDrive Type Control User Label MediaID MediaID Ready Writable RequestIDDrv1 qscsi OPR rhs No TST401 TST401 Yes No 0Drv2 4mm OPR Yes
The following display shows the Drives status pane after the request is assigned to Drv2. Notice that for Drv2, the Request ID column now shows request 2 and the User column shows cas as the user.
Recorded ExternalDrive Type Control User Label MediaID MediaID Ready Writable RequestIDDrv1 qscsi OPR rhs No TST401 TST401 Yes No 0Drv2 4mm OPR cas CAS135 CAS135 Yes Yes 2
The Pending Requests pane shows that the request has been cleared.
Recorded ExternalRequestID User MediaID MediaID Density Mode Time Barcode Volume Group
Assigning a Drive Example 2This example shows how to satisfy a typical request where drives are up under Automatic Volume Recognition control (AVR mode).
Note Some columns of the drive status and pending requests panes are not shown in this example.
1. Assume that you have the following pending request. The contents of the pending request line determine how to proceed.
Recorded ExternalRequestId User MediaID MediaID Density Mode Time Barcode Volume Group4 NBU TV101 TV101 4mm Write 1:35 TV101 nonrob
The first step is to find an available tape drive. The request specifies a recording density of 4mm. This means you need a 4mm cartridge tape drive. The volume is labeled so you do not have to assign the drive using Actions > Assign Request.

Resolving Pending Actions
200 NetBackup DataCenter Media Manager System Administrator’s Guide for UNIX
2. Check the Drives status pane to see if an appropriate tape drive is available.
Recorded ExternalDrive Type Control User Label MediaID MediaID Ready Writable RequestIDDrive1 dlt AVR NoDrive2 4mm AVR No
Drive2 is a 4mm cartridge tape drive and is available, since it is not down and there is not a request number in the Request ID column. See the table in “Drives Status Pane” on page 186 for an explanation of each column in the drives status list.
3. Get the volume with the external media ID of TV101 and barcode of TV101. Depending on your site’s use of the Volume Group column, the volume group may give an indication of where the media ID is located.
4. Insert the volume into the drive. Assume that the tape drive is powered on and ready to receive the volume. Also, assume that when you insert the volume, the tape drive loads and positions it to the beginning.
5. Check the Drives status pane to verify that the drive is automatically assigned to request ID 4.
The following display shows that the assignment was successful. Drive2 is assigned to request 4, which is a request to write information on labeled volume TV101.
Recorded ExternalDrive Type Control User Label MediaID MediaID Ready Writable RequestIDDrive1 dlt AVR NoDrive2 4mm AVR NBU Yes TV101 TV101 Yes Yes 4
In this example, the drive is up in AVR mode as indicated by AVR in the Control column. This means Media Manager assigned it automatically (which it does in AVR mode, providing the recorded media ID on the volume header matches the media ID for the request).
The write operation proceeds. When complete, NetBackup or the tpunmount command requests Media Manager to release the drive and Drive2 is available for other requests.
Resolving Pending ActionsA pending action is indicated by a media icon (the icon has hand on it depicting a manual action is required), located to the left of the Request ID column.
The procedure for resolving a pending action follows:

Chapter 5, Monitoring Storage Devices 201
Resubmitting Requests
1. In NetBackup Administration Console, click Media and Device Management > Device Monitor.
2. In the Pending Requests pane, select the pending action.
3. Click Actions > Display Pending Action (or double-click on the pending action).
This opens a message box with a description of the problem and a list of possible actions to correct it. The message box also shows other information, such as user name, recorded media ID, external media IDs, and drive number.
4. Click OK after viewing the information.
5. In most cases, you can do one of the following to resolve the action:
- Correct the error condition and resubmit the request.
See “Resubmitting Requests” on page 201
- Click Actions > Deny Request to deny the request.
See “Denying Requests” on page 202.
Resubmitting RequestsThe procedure to resubmit a request follows:
1. Correct the problem identified by the pending action message.
2. In the Pending Requests pane, select the request.
3. Click Actions > Resubmit Request.
The pending action message disappears from the Pending Requests pane and the operation proceeds.
If a pending action message involves a robotic library, after correcting the problem you may need to resubmit the request that caused the message before the operation can proceed. For example, if a volume is requested after being removed from a robotic library, do the following:
1. Insert the volume in the robotic library.
2. Perform an Update Volume Configuration.
See “Updating the Volume Configuration for a Robot” on page 135 for complete instructions.

Denying Requests
202 NetBackup DataCenter Media Manager System Administrator’s Guide for UNIX
3. Resubmit the request.
Denying RequestsSome situations may require you to deny requests for service (for example, when drives are not available, you cannot find the volume, or the user is not authorized to use it). Denying a request returns an error message to the user.
1. In NetBackup Administration Console, click Media and Device Management > Device Monitor.
2. In the Pending Requests pane, select the request.
3. Click Actions > Deny Request.
The request is removed from the Pending Requests pane.
Shared Storage Option Summary ReportsThese two reports contain Media Manager information about your SSO configuration and include the following information about the drives and hosts.
Viewing SSO Summary Reports
1. In NetBackup Administration Console, click Media and Device Management > Device Monitor.
2. Click Actions > View Status of Shared Drives to display a dialog box that allows you to display these reports.
This Report Contains the Following SSO Information
Shared Drive Summary
Drive name, device allocation host, the number of registered hosts, drive reservation status, hosts reserving this drive, and the current scan host.
Device Allocation Host Summary
The device allocation host, host name of the registered host, the number of registered and reserved drives, availability status, the scan ability factor, and scanning status.
Chapter 5, Monitoring Storage Devices 203
Shared Storage Option Summary Reports
3. Select a device allocation host (or hosts) from the list and use Add >> to move it to the list of hosts that will be scanned.
4. Click OK.
The Shared Drive Summary and Device Allocation Host Summary appear in the two lower panes.
For More Information About Shared Drives (SSO)See the VERITAS NetBackup SAN Shared Storage Option Sytem Administrator’s Guide for background, installation, configuration, and verification information on shared drives.

Shared Storage Option Summary Reports
204 NetBackup DataCenter Media Manager System Administrator’s Guide for UNIX
205
Managing Daemons 6This chapter includes the following Media Manager daemon topics:
� Overview of Media Manager Daemons
� Media Manager Device Daemon (ltid)
� Automatic Volume Recognition Daemon (avrd)
� Media Manager Volume Daemon (vmd)
� Robotic Daemons
� Displaying Process Status using the vmps Script
� Logging
Overview of Media Manager DaemonsThe following daemons manage the assignment and scanning of devices:
� ltid - The Media Manager device daemon.
� avrd - The automatic volume recognition daemon.
� vmd - The Media Manager volume daemon enables remote device management and controls the volume database. This daemon informs ltid of the location of requested volumes, and tracks the number of mounts and last mount time for each volume.
Robotic Daemons and Robotic Control DaemonsA Media Manager robotic daemon (and possibly a robotic control daemon) exists for each robot that you configure on a host where Media Manager is installed.
Every host that has a drive in a robot, has a robotic daemon for that robot. The robotic daemon receives requests from the Media Manager device daemon and sends necessary information directly to the robotics or to a robotic control daemon.

Overview of Media Manager Daemons
206 NetBackup DataCenter Media Manager System Administrator’s Guide for UNIX
Robotic control daemons also exist for robot types where drives can optionally attach to hosts other than the host with direct robotic control. For example, each drive in a Tape Library DLT (TLD) robot can be attached to a different host and each host would have a tldd daemon. The robotics are controlled by a single host and only that host has the robotic control daemon, tldcd. When it is necessary to mount a tape, the robotic daemon on the host with the drive, sends control information to the robotic control daemon on the host controlling the robotics.
The following figure shows the daemons for a Tape Library DLT robot. In this figure note the following:
� Each host connects to one drive and has a robotic daemon, tldd.
� The robotic control and therefore the robotic control daemon, tldcd, is on Host A.
The Media Manager device daemons on host A and B start tldd. The tldd daemon on Host A also starts tldcd. Requests to mount tapes from host B go to tldd on Host B, which then sends the robotic command to tldcd on Host A.
Example TLD Configuration
ltid
Drive 2
Drive 1
RoboticsSCSI
SCSI
tldd
tldd
tldcd
ltid
Host A
Host BTape Library DLT
(TLD)

Chapter 6, Managing Daemons 207
Media Manager Device Daemon (ltid)
Media Manager Device Daemon (ltid)ltid is the interface between Media Manager commands and device control. ltid controls the reservation and assignment of volumes and optical disks. When a tape request is issued, ltid requests vmd to find the volume and then requests the appropriate robot to mount the volume. If necessary, ltid notifies the operator that the volume must be mounted manually.
Starting the Device DaemonStarting ltid also starts avrd, vmd, and the daemons for any robots with defined drives.
From a Command Line
Enter the following command.
/usr/openv/volmgr/bin/ltid
To start ltid and the robotic daemons in verbose mode and log debug information through syslogd, use the -v option. This option should only be used when needed for debugging, since it can use large amounts of disk space to save extra information.
From the Java Administrative Interface
1. Use Actions > Stop/Restart Media Manager Device Daemon.
2. In the dialog box, the button to the right of the Device Host box allows you to select a device host. The Current Status box shows the status of this host.
3. Select a host and the Start action, and OK when ready. This also starts the daemons for any robots that are configured.
Stopping the Device DaemonStopping ltid stops robotic daemons. vmd continues to run.
The ACS robotic processes (acsssi and acssel) also continue to run, since they are used by the ACS test facility and do not normally need to be stopped.
From the Java administrative interface, stop the device daemon before making any changes to the device configuration as follows:

Automatic Volume Recognition Daemon (avrd)
208 NetBackup DataCenter Media Manager System Administrator’s Guide for UNIX
1. Notify users and operators that the system will be unavailable.
2. Check the Pending Requests list to ensure that no tapes are currently assigned. If any tapes are assigned, you cannot stop the daemons.
3. Use Actions > Stop/Restart Media Manager Device Daemon.
4. In the dialog box, the button to the right of the Device Host box allows you to select a device host. The Current Status box shows the status of this host.
5. Select a host and the Stop action, and OK when ready.
Automatic Volume Recognition Daemon (avrd)This daemon handles automatic volume recognition and label scanning. This allows Media Manager to read labeled tape and optical disk volumes and assign the associated removable media requests to drives.
avrd is started when you start ltid and stops when you stop ltid. You do not have to start and stop it at any other times.
Media Manager Volume Daemon (vmd)When vmd receives information from ltid about a requested volume, it searches the volume database and returns the robotic location of the volume to ltid. Because vmd may be running on or servicing requests from another system, and because it is used for remote device configuration and device management, vmd continues to run even after ltid and the other daemons have been stopped.
vmd must be active to change the volume configuration.
An additional function that vmd can provide is to be the device allocator (DA) for shared drives. In this case, vmd is known as vmd/DA.
You can do either of the following when starting this daemon:
� Start ltid. This also starts vmd.
� Start only vmd, by using the following command:
/usr/openv/volmgr/bin/vmd
To stop this daemon use the following command:
/usr/openv/volmgr/bin/vmctrldbm -t

Chapter 6, Managing Daemons 209
Robotic Daemons
Robotic DaemonsThe following table lists the robotic daemons and robotic control daemons (if applicable) for each robot type. For more information about these daemons, see the appendix, “Media Manager Man Pages” on page 219.
Robotic and Robotic Control Daemons
Robot Daemon Description
Automated Cartridge System (ACS)
acsd This daemon runs on a Media Manager server and communicates mount, unmount, and robot inventory requests to the ACS server system interface process. This process communicates with the ACS library software server that controls the ACS robotics.
Library Management Facility (LMF)
lmfd
lmfcd
(UNIX hosts only)
The robotic daemon (lmfd) resides on a Media Manager server and passes mount and dismount requests to the LMF robotic control daemon (lmfcd).
lmfcd receives mount or dismount requests from lmfd or robot inventory requests through an external socket interface. This daemon must reside on a host that is running the LMF Server or the LMF Client.
Optical Disk Library (ODL)
odld (UNIX hosts only)
This daemon runs on a Media Manager server that has an Optical Disk Library. odld receives requests to mount and unmount volumes, or for robot inventory, and communicates these requests to the robotics through a SCSI interface.
Tape Library DLT (TLD)
tldd
tldcd
The robotic daemon (tldd) runs on each Media Manager server that has a drive in a Tape Library DLT. This daemon receives requests to mount and unmount volumes and sends these requests to the robotic control daemon (tldcd).
tldcd runs on the Media Manager server that has the robotic control, accepts mount, dismount, and robot inventory requests and communicates with the Tape Library DLT robotics through a SCSI interface.
Drives in the same robot may be configured on different hosts.
Tape Library 4MM (TL4)
tl4d This daemon runs on a host that has a Tape Library 4MM. tl4d receives requests to mount and unmount volumes, or for robot inventory, and communicates these requests to the robotics through a SCSI interface.

Robotic Daemons
210 NetBackup DataCenter Media Manager System Administrator’s Guide for UNIX
Tape Library 8MM (TL8)
tl8d
tl8cd
The robotic daemon (tl8d) runs on each Media Manager server that has a drive in a Tape Library 8MM. This daemon receives requests to mount and unmount volumes and sends these requests to the robotic control daemon (tl8cd).
tl8cd runs on the Media Manager server that has the robotic control, accepts mount, dismount, and robot inventory requests and communicates with the Tape Library 8MM robotics through a SCSI interface.
Drives in the same robot may be configured on different hosts.
Tape Library Half-inch (TLH)
tlhd
tlhcd
(UNIX hosts only)
The robotic daemon (tlhd) runs on each Media Manager server that has a drive in a Tape Library Half-inch. This daemon receives requests to mount and unmount volumes and sends these requests to the robotic control daemon (tlhcd).
tlhcd runs only on the Media Manager server that has the robotic control, receives mount or dismount requests from tlhd, and communicates with the IBM Automated Tape Library Software, which controls a library, such as an IBM 3494.
Tape Library Multimedia (TLM)
tlmd (UNIX hosts only)
This daemon runs on a Media Manager server and communicates mount, unmount, and robot inventory requests to the ADIC Distributed AML Server (DAS), which controls the robotics, such as a Grau Automated Media Library (AML).
Tape Stacker 8MM (TS8)
ts8d This daemon runs on a Media Manager server that has a Tape Stacker 8MM. ts8d receives requests to mount and unmount volumes, or for robot inventory, and communicates these requests to the robotics through a SCSI interface.
Tape Stacker DLT (TSD)
tsdd This daemon runs on a Media Manager server that has a Tape Stacker DLT. This daemon receives requests to mount and unmount volumes, or for robot inventory, and communicates these requests to the robotics through a SCSI interface.
Tape Stacker Half-inch (TSH)
tshd (UNIX hosts only)
This daemon runs on a Media Manager server that has a Tape Library Half-inch. tshd receives requests to mount and unmount volumes, or for robot inventory, and communicates these requests to the robotics through a SCSI interface.
Robotic and Robotic Control Daemons (continued)
Robot Daemon Description

Chapter 6, Managing Daemons 211
Robotic Daemons
Starting and Stopping Robotic DaemonsStarting ltid also starts the robotic daemons for all configured robots. Stopping ltid also stops robotic daemons.
The ACS robotic processes (acsssi and acssel) continue to run, since they are used by the ACS test facility and do not normally need to be stopped.
You can start and stop robotic daemons independently of ltid as follows. To run the daemons in verbose mode and log debug information through syslog, use the -v option on the command for the daemon, or start ltid with the -v option. This option should only be used when needed for debugging, since it can use large amounts of disk space to save the extra information.
� To start a robotic daemon use the following command:
/usr/openv/volmgr/bin/daemon_name [-v] &
For example:
/usr/openv/volmgr/bin/tldd -v &
� To stop a robotic daemon without stopping ltid, determine the process ID for the daemon using the vmps script and then use the kill command as follows.
See “Displaying Process Status using the vmps Script” on page 212” for information on using this script.
/usr/openv/volmgr/bin/vmps | grep daemon_name
kill daemon pid#
For example:
/usr/openv/volmgr/bin/vmps | grep tldd
kill 23145
� To stop robotic control daemons use the following commands:
/usr/openv/volmgr/bin/lmfcd -t
/usr/openv/volmgr/bin/tl8cd -t
/usr/openv/volmgr/bin/tldcd -t
/usr/openv/volmgr/bin/tlhcd -t
You can also stop these control daemons with the kill command as described earlier.
Once started, a robotic daemon can be in an UP or DOWN state. When a connection is made to the appropriate robot, the corresponding daemon is in the UP state and can mount or unmount tapes (or platters). If the connection cannot be made or if errors exist,

Displaying Process Status using the vmps Script
212 NetBackup DataCenter Media Manager System Administrator’s Guide for UNIX
the daemon moves to the DOWN state. Even in the DOWN state, the daemon is still running and automatically returns to the UP state when the connection is made or problems no longer exist.
Displaying Process Status using the vmps ScriptThe vmps script shows the Media Manager daemon processes that are active. You can execute this script using the following command:
/usr/openv/volmgr/bin/vmps
In the following sample display, the second column contains the process IDs for the processes.
root 303 0.0 0.2 136 264 ? S Feb 11 4:32 ltid -vroot 305 0.0 0.0 156 0 ? IW Feb 11 0:54 vmd -vroot 306 0.0 0.0 104 0 ? IW Feb 11 0:15 tl8d -vroot 307 0.0 0.0 68 56 ? S Feb 11 12:16 avrdroot 310 0.0 0.0 116 0 ? IW Feb 11 0:07 tl8cd -v
LoggingRobotic errors and network errors are logged using syslogd. See the NetBackup troubleshooting guide for UNIX for more information.

213
Tape I/O Commands 7If you are not using NetBackup or Storage Migrator, or want to troubleshoot or test Media Manager; you can manually request Media Manager to mount and unmount specific volumes by using the commands found in this chapter.
Requesting TapesThe tpreq command allows you to request a tape of a particular density and specify various options, such as the access mode. This command implicitly reserves a single drive and creates a file in the current working directory (unless a full path is specified). The file acts as a symbolic link to the tape and all subsequent access to the tape is through this file name. Users do not have to be concerned with the full path to a specific device file.
The information you supply on the tpreq command is registered for use by the Media Manager device daemon and used to validate all access requests to the tape file.
For all types of tapes, the tape is actually mounted and assigned when you enter the tpreq command.
By default, the drive assigned is one which supports DLT cartridge tapes, using the density dlt. You can use the density option on tpreq to request a drive that supports another density. See the Density field in the table in “Pending Requests Pane” on page 188 for a list of supported densities and drive types.
The density for the physical write is not selected automatically on drives. It is requested, so an operator can satisfy the correct drive. Density is determined by the /dev device name that was used when the drive was added to the Media Manager configuration or by the buttons selected on the drive itself.
A tpreq command must include a media ID and a file name. If the tape volume is associated with a volume pool (configured using Media Manager), the name of the volume pool must also be specified using the -p parameter.
The following example tpreq command reserves a tape drive and creates a symbolic tape file:
/usr/openv/volmgr/bin/tpreq -f tape1 -m jlr01 -a w -d qscsi

Reading and Writing Tape Files
214 NetBackup DataCenter Media Manager System Administrator’s Guide for UNIX
This example creates a file named tape1 in the user’s current working directory and links the file to the drive containing the tape volume having the media ID of JLR01. The access mode for the tape file is set to write and a 1/4-inch cartridge drive is assigned.
See the tpreq(1) man page in the appendix for more information.
Note When a tpreq command is executed, a call is made to the script drive_mount_notify immediately after the media has been successfully placed in a pre-selected drive. This script is located in the /volmgr/bin directory and usage information is documented within the script. This script is only called from the tpreq command for drives that are in robots and is not valid for standalone drives.
Reading and Writing Tape FilesReading or writing tape files involves copying the file from tape to disk or from disk to tape. To perform read or write operations, use one of the UNIX commands that performs input/output operations, for example tar or mt.
Positioning Tape FilesThe mt command positions tape files by skipping forward or backward according to tape marks. The following table shows the operations available on the mt command for positioning tapes and how they affect tape files.
The following example uses mt to skip forward three files on a tape:
mt -f tape1 fsf 3
mt Command Operations
Command Description
eof, weof Writes end-of-file tapemarks at the current position on the tape according to the count option on mt.
fsf, bsf Spaces forward or backward the number of tapemarks on the count option.
fsr, bsr Spaces forward and backward the number of records according to the count option on mt. bsr is only supported for the undefined record type.

Chapter 7, Tape I/O Commands 215
Removing Tape Files
Rewinding Tape FilesWhen a file is rewound, it is positioned to the beginning of information. To rewind a tape file, you can use the mt command.
The following command causes rewinding of tape file tape1. tape1 is positioned to the beginning of the tape volume associated with the file.
mt -f tape1 rewind
The count option is not used for the rewind operation. If a count is specified, it is ignored.
Removing Tape FilesWhen you have completed reading or writing tape files, use the /usr/openv/volmgr/bin/tpunmount command to end the assignment of the tape file. This command removes from the directory the tape file you created using tpreq and causes the tape volume to be removed from the tape drive. tpunmount is required for each file created by a tpreq command.
See the tpunmount(1) man page for more information.
Note When a tpunmount command is executed, call is made to the script drive_mount_notify. This script is located in the /volmgr/bin directory and usage information is documented within the script.
Using an Optical DiskAn optical disk cannot be used in the same ways that a tape can. It does have many similarities and takes advantage of the automation provided by Media Manager: it allows automatic volume recognition, and can be mounted and moved by a robot.
Optical disks work well with VERITAS storage management applications. These applications use databases to handle location information (offsets, capacity, and so forth) that would otherwise have to be done by the user. A user who is willing to keep track of such information can access an optical disk using the tape commands described in this topic.
In the following example, a user performs two tar operations to an optical disk, then lists the second tar image.
1. A rewritable optical disk is requested.
tpreq tape -m XXX01A -d odiskwm -p NetBackup

External Access to Media Manager Controlled Devices
216 NetBackup DataCenter Media Manager System Administrator’s Guide for UNIX
2. The first tar is performed, starting at the beginning of the disk.
tar -cvf - /home/arh | dd of=tape ibs=10240 obs=10240
0+473 records in
189+0 records out
3. The second tar is performed, starting at the end of the previous data. The records out information is used for the oseek parameter.
tar -cvf - /home/arh/.cshrc|dd of=tape ibs=10240 obs=10240
oseek=189
4. The disk is unmounted.
tpunmount tape
5. The optical disk is requested again.
tpreq tape -m XXX01A -d odiskwm
6. The second tar image is listed. To access the data, the user must know where it is located for the iseek parameter.
dd if=tape ibs=10240 obs=10240 iseek=189 | tar -tvf -
rw-r--r--357/110 2386 Jul 9 14:01 1992
/home/arh/.cshrc
7. The disk is unmounted.
tpunmount tape
External Access to Media Manager Controlled DevicesThe device daemon (ltid) restricts access to Media Manager controlled drives that are in an UP state by changing the permissions of the device files for those drives. The permissions are changed to 0600 when ltid starts and back to their original settings when ltid is terminated (or when a drive’s state is changed to DOWN).
Do not modify the permissions of these device files when ltid is active. To ensure reliable operation, only users that use the tpreq and tpunmount commands explained in this chapter can have access to an UP drive under ltid control.
The following example uses tpreq:
tpreq tape -m xxx -d 4mm -f /tmp/tape

Chapter 7, Tape I/O Commands 217
User Messages
/bin/tar -cvf /tmp/tape files
tpunmount /tmp/tape
Users that do not use tpreq and tpunmount to access drives that are in the UP state may encounter both access and data reliability problems. These problems occur because the Media Manager avrd daemon periodically attempts to rewind and read data from media in UP drives that are not currently assigned.
A user that is unable to use tpreq and tpunmount must do one of the following before attempting to access the drive:
� Down the drive prior to accessing it.
� Terminate ltid by executing stopltid and then restart ltid after accessing the drive.
User MessagesSee the Device Management Status Codes section of the NetBackup troubleshooting guide for errors returned from user tape commands.

User Messages
218 NetBackup DataCenter Media Manager System Administrator’s Guide for UNIX
219
Media Manager Man Pages AThis appendix describes Media Manager commands and Media Manager processes. These commands can be executed from the command line.
The remaining commands in this appendix are for device management and are started or stopped by the Media Manager device daemon (ltid) as needed.
� tpreq and tpunmount are user commands for requesting tape mounts and unmounts for configured drives.
� tpautoconf (for NetBackup DataCenter only), tpclean, tpconfig, tpformat (NetBackup DataCenter only), and vmoprcmd are administrative commands for device management.
� vmadd, vmadm, vmchange, vmcheckxxx, vmdelete, vmpool, vmquery, vmrule, and vmupdate are administrative commands for media management.
The following conventions are used in the command descriptions:
� Brackets [ ] indicate that the enclosed component of the command line is optional.
� A vertical bar (or the pipe symbol) | separates optional arguments.
For example, if a command has the following format, you can choose arg1 or arg2 (but not both):
command [arg1 | arg2]
� Italics indicate that the information is user supplied.

acsd(1M)
220 NetBackup DataCenter Media Manager System Administrator’s Guide for UNIX
acsd(1M)
NAME
acsd - Automated Cartridge System (ACS) daemon
SYNOPSIS
/usr/openv/volmgr/bin/acsd [-v]
DESCRIPTION
acsd interfaces with Media Manager to automatically mount and unmount tapes that are under Automated Cartridge System (ACS) control. It is initiated by ltid (the Media Manager device daemon), if the Media Manager device configuration shows drives in an ACS robot.
Stopping ltid stops acsd. You can start or stop acsd independently of ltid using /usr/openv/volmgr/bin/vmps or your server’s ps command to identify acsd’s process id and then entering the following commands:
kill acsd_pid
/usr/openv/volmgr/bin/acsd [-v] &
acsd performs its tasks by sending requests to the ACS Server System Interface process (acsssi) which communicates with the server that controls the Automated Cartridge System.
When the connection is established, acsd puts the ACS robot in the UP state and can mount and unmount tapes. If the connection cannot be established or Automated Cartridge System errors exist, acsd changes the robot to the DOWN state. In this state, acsd is still running and returns the robot to the UP state when the problem no longer exists.
Drives are addressed and defined in Media Manager using the following: ACS number, LSM number, Panel number, and Drive number.
Drive cleaning for ACS robots must be configured using ACS library software. Cleaning volumes cannot be defined using Media Manager. In addition, you cannot use the tpclean(1M) command for cleaning operations on drives under ACS robotic control.
The Internet service number for acsd must be in /etc/services. If you are using NIS (Network Information Service), you should place the entry in this host’s /etc/services file in the master NIS server database for services. To override the services file, create the file /usr/openv/volmgr/database/ports/acsd with a single line containing the service number for acsd. The default service number is 13702.

Appendix A, Media Manager Man Pages 221
acsd(1M)
OPTIONS
-v Logs debug information using syslogd. If you start ltid with -v, acsd also starts with -v.
ERRORS
acsd returns an error message if there is a copy of acsd running.
Media Manager logs ACS and network errors to syslogd. Log entries are also made when the state changes between UP and DOWN.
acsssi logs to a log file in the directory /usr/openv/volmgr/debug/acsssi.
SEE ALSO
ltid(1M), syslogd(8), tpconfig(1M), vmadm(1M)

lmfd(1M)
222 NetBackup DataCenter Media Manager System Administrator’s Guide for UNIX
lmfd(1M)
NAME
lmfd, lmfcd - Library Management Facility (LMF) daemon and control daemon
SYNOPSIS
/usr/openv/volmgr/bin/lmfd [-v]
/usr/openv/volmgr/bin/lmfcd [-v] [-t]
DESCRIPTION
lmfd and lmfcd interface with Media Manager to mount and unmount tape volumes in an LMF robot.
Note lmfd and lmfcd only run on Solaris platforms.
lmfd directly interfaces with ltid (the Media Manager device daemon). lmfd runs on each host with a drive connection and sends mount and unmount requests to the control daemon, lmfcd.
lmfcd communicates with the Fujitsu LMF Server, which processes all requests and control functions for the robotic library. lmfcd can be running on a different host than lmfd, depending on where the Fujitsu library control is configured (see EXAMPLES). When communication with the library is established, lmfd puts the LMF robot in the UP state and can request volume mounts and unmounts. If the library or control daemon is inaccessible, lmfd changes the robot to the DOWN state. In this state, lmfd is still running and returns the robot to the UP state if lmfcd is able to make a connection.
Note If drives are on different hosts, the robotic information must be entered in the Media Manager device configuration on all hosts and the robot number must be the same on all hosts.
lmfd and lmfcd are automatically started when ltid is started and stopped when ltid is stopped. You can stop and start lmfd independently of ltid using /usr/openv/volmgr/bin/vmps or your server’s ps command to identify the lmfd process id and then entering the following commands:
kill lmfd_pid
/usr/openv/volmgr/bin/lmfd [-v] &

Appendix A, Media Manager Man Pages 223
lmfd(1M)
lmfcd is on the host that has the robotic control and is automatically started by lmfd on that host. lmfcd is terminated when you stop ltid. The media ID for any volumes to be used in the library must be defined in the volume database before any volumes can be accessed using ltid, lmfd, and lmfcd. Both the initial volume database population and future updates can be accomplished using the Media Manager robotic inventory options.
Drives are numbered 1 through n, based on information obtained from the Fujitsu library. To map Fujitsu library drive names to the appropriate Media Manager robot drive numbers, you can use the robotic test utility, lmftest (or robtest if the robot is configured). You can also use this utility along with the Fujitsu lmdisplay command-line interface to verify library communications, status, and functionality.
Drive cleaning for LMF robotic drives must be configured through a Fujitsu administrative interface, since these operations are not made available to applications that are using the Fujitsu library. For this reason, cleaning volumes cannot be defined using Media Manager. In addition, you cannot use the tpclean(1M) command for cleaning operations on drives under LMF robotic control.
The Internet service number for lmfcd must be in /etc/services. If you are using NIS (Network Information Service), the entry found in this host’s /etc/services file should be placed in the master NIS server database for services. To override the services file, create the file /usr/openv/volmgr/database/ports/lmfcd with a single line containing the service number for lmfcd. The default service number is 13718.
OPTIONS
-v Logs debug information using syslogd. If you start ltid with -v, lmfd and lmfcd are also started with -v.
-t Terminates lmfcd.
ERRORS
lmfd and lmfcd log an error message if there is a copy of the daemon running.
Media Manager logs any LMF robotic errors to syslogd. Log entries are also made when the state changes between UP and DOWN.
EXAMPLES
In the following diagram, the drives are attached to and the robotics are controlled from a single host. ltid initiates lmfd, which initiates lmfcd. The Fujitsu LMF Server daemon must be running on Host A.
Host A LMF
__________ ___________
| | | |
| ltid | | |

lmfd(1M)
224 NetBackup DataCenter Media Manager System Administrator’s Guide for UNIX
| lmfd | | |
| lmfcd | |-----------|
| | |----| Robotics |
|----------| | |-----------|
|LMF Server|---| |--| drive 3 |
|----------| | |-----------|
| SCSI |-----|--| drive 2 |
|__________| | |-----------|
|--| drive 1 |
|___________|
In the following diagram, drives are attached to Host A and Host B. The robotics are controlled from Host A. ltid on each machine initiates lmfd. The lmfd on Host A also initiates lmfcd, since that is where the robotic control is defined. Requests to mount tapes from Host B go to lmfd on Host B, which sends the robotic command to lmfcd on Host A.
Host A LMF Host B
__________ ___________ __________
| | | | | |
| ltid | | | | ltid |
| lmfd | | | | lmfd |
| lmfcd | |-----------| | |
| | |----| Robotics | | |
|----------| | |-----------| |----------|
|LMF Server|---| | drive 3 |---------| SCSI |
|----------| |-----------| |----------|
| SCSI |--------| drive 2 | | |
|__________| | |-----------| |__________|
|--| drive 1 |
|___________|
SEE ALSO
ltid(1M), syslog(8), tpclean(1M), tpconfig(1M), vmadm(1M)

Appendix A, Media Manager Man Pages 225
ltid(1M)
ltid(1M)
NAME
ltid, stopltid - start and stop the Media Manager device daemon
SYNOPSIS
/usr/openv/volmgr/bin/ltid [-v] [-nsu] [-logmounts [minutes]] [-noverify]
/usr/openv/volmgr/bin/stopltid
DESCRIPTION
The ltid command starts the Media Manager device daemon (ltid) and Automatic Volume Recognition daemon (avrd). These daemons manage Media Manager devices. With both daemons started, an operator can initiate the operator display, observe the drive status, and control the assignment of requests to standalone drives. ltid can be placed in a system initialization script.
The Media Manager volume daemon, vmd, is also started by the ltid command. ltid also starts the appropriate robotic daemons, if robotic devices were defined in Media Manager.
The stopltid command stops ltid, avrd, and the robotic daemons.
OPTIONS
-vLogs debug information using syslogd. This is most informative when robotic devices are in use. This option starts robotic daemons and vmd in verbose mode.
-nsuIf this option is specified, tapes in standalone drives are not ejected when tpunmount is issued (though they are ejected if end of media is reached during a NetBackup backup or archive). You can override this option by specifying the -force option on tpunmount.This option can be used in a NetBackup environment where it is desirable to keep the standalone drives ready after successful backups are performed.Specifying this option is equivalent to specifying DO_NOT_EJECT_STANDALONE in the vm.conf file.

ltid(1M)
226 NetBackup DataCenter Media Manager System Administrator’s Guide for UNIX
-logmounts minutesIf this option is specified, ltid logs mount requests using syslogd. The mount requests are still posted to Media Manager displays. The mount requests are only logged after a delay of the specified number of minutes. If -logmounts is specified, the default number of minutes is 3. If -logmounts 0 is specified, ltid logs the mount request through syslogd immediately. If minutes is not zero and the mount request is satisfied before the number of minutes are up, the request is not logged through syslogd.
-noverifyIf this option is specified, ltid does not verify drive names. Normally, ltid verifies that the no rewind on close drive name has the correct minor number bits relating to no rewind, variable, berkeley-style, and so on. This option is normally not required, but may be helpful if using non-standard platform device files. If this option is specified, caution should be taken in making sure the device files are correct.
ERRORS
stopltid does not stop the daemons if any drives are assigned to users. Ensure that all users have unmounted assigned tapes before attempting to stop the daemons.
Error messages are logged using syslogd.
SEE ALSO
rc(8), syslogd(8), tpconfig(1M), vmadm(1M), tpunmount(1)
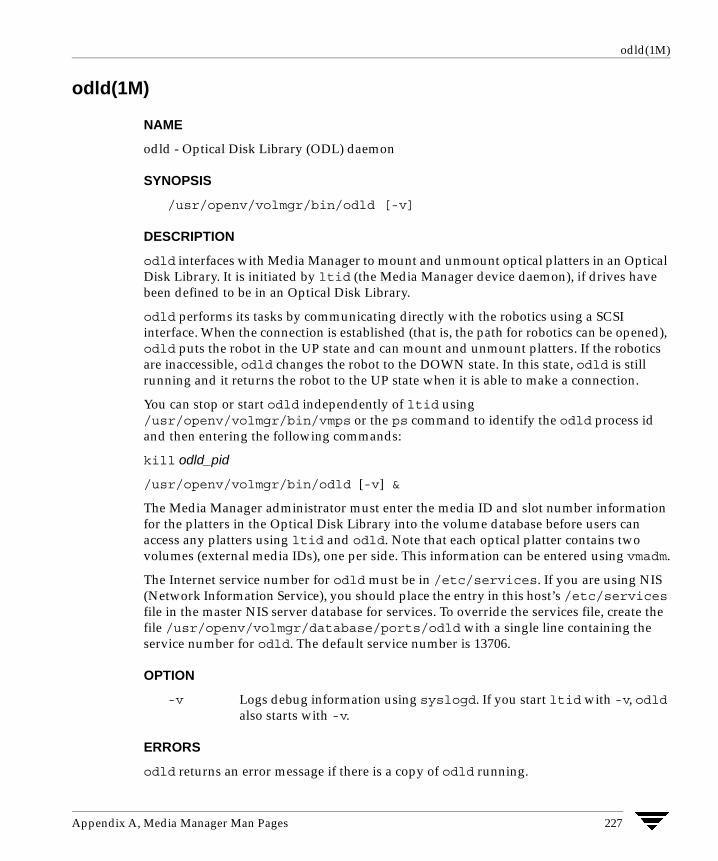
Appendix A, Media Manager Man Pages 227
odld(1M)
odld(1M)
NAME
odld - Optical Disk Library (ODL) daemon
SYNOPSIS
/usr/openv/volmgr/bin/odld [-v]
DESCRIPTION
odld interfaces with Media Manager to mount and unmount optical platters in an Optical Disk Library. It is initiated by ltid (the Media Manager device daemon), if drives have been defined to be in an Optical Disk Library.
odld performs its tasks by communicating directly with the robotics using a SCSI interface. When the connection is established (that is, the path for robotics can be opened), odld puts the robot in the UP state and can mount and unmount platters. If the robotics are inaccessible, odld changes the robot to the DOWN state. In this state, odld is still running and it returns the robot to the UP state when it is able to make a connection.
You can stop or start odld independently of ltid using /usr/openv/volmgr/bin/vmps or the ps command to identify the odld process id and then entering the following commands:
kill odld_pid
/usr/openv/volmgr/bin/odld [-v] &
The Media Manager administrator must enter the media ID and slot number information for the platters in the Optical Disk Library into the volume database before users can access any platters using ltid and odld. Note that each optical platter contains two volumes (external media IDs), one per side. This information can be entered using vmadm.
The Internet service number for odld must be in /etc/services. If you are using NIS (Network Information Service), you should place the entry in this host’s /etc/services file in the master NIS server database for services. To override the services file, create the file /usr/openv/volmgr/database/ports/odld with a single line containing the service number for odld. The default service number is 13706.
OPTION
-v Logs debug information using syslogd. If you start ltid with -v, odld also starts with -v.
ERRORS
odld returns an error message if there is a copy of odld running.

odld(1M)
228 NetBackup DataCenter Media Manager System Administrator’s Guide for UNIX
Any ODL and robotic errors are logged using syslogd. Log entries are also made when the state changes between UP and DOWN.
SEE ALSO
ltid(1M), syslogd(8), tpconfig(1M), tpformat(1M), vmadm(1M)

Appendix A, Media Manager Man Pages 229
tl4d(1M)
tl4d(1M)
NAME
tl4d - Tape Library 4MM (TL4) daemon
SYNOPSIS
/usr/openv/volmgr/bin/tl4d [-v]
DESCRIPTION
tl4d interfaces with Media Manager to mount and unmount tapes in a Tape Library 4MM (TL4) robot. It is started by ltid (the Media Manager device daemon), if the Media Manager device configuration shows drives in the robot.
Stopping ltid stops tl4d. You can stop tl4d independently of ltid using /usr/openv/volmgr/bin/vmps or your server’s ps command to identify the tl4d process ID and entering the following commands:
kill tl4d_pid
/usr/openv/volmgr/bin/tl4d [-v] &
tl4d communicates with the robotics through a SCSI interface. When the connection is established (the path for robotics can be opened), tl4d puts the TL4 robot in the UP state and can mount and unmount tapes. If the robotics are inaccessible, tl4d changes the robot to the DOWN state. In this state, tl4d is still running and returns the robot to the UP state if it is able to make a connection.
The media ID and slot number information for 4 mm tapes in a robot must be defined in the Media Manager volume database before any tapes can be accessed through ltid and tl4d.
If a cleaning volume is used, it must be defined in the volume configuration. See tpclean(1M) for information on setting the frequency for automatic drive cleaning.
The Internet service number for tl4d must be in /etc/services. If you are using NIS (Network Information Service), you should place the entry in this host’s /etc/services file in the master NIS server database for services. To override the services file, create the file /usr/openv/volmgr/database/ports/tl4d with a single line containing the service number for tl4d. The default service number is 13713.
OPTION
-v Logs debug information using syslogd. If you start ltid with -v, tl4d also starts with -v.

tl4d(1M)
230 NetBackup DataCenter Media Manager System Administrator’s Guide for UNIX
ERRORS
tl4d returns an error message if there is a copy of tl4d running.
Media Manager logs any Tape Library 4MM and robotic errors to syslogd. Log entries are also made when the state changes between UP and DOWN.
SEE ALSO
ltid(1M), syslogd(8), tpclean(1M), tpconfig(1M), vmadm(1M)

Appendix A, Media Manager Man Pages 231
tl8d(1M)
tl8d(1M)
NAME
tl8d, tl8cd - Tape Library 8MM (TL8) daemon and control daemon
SYNOPSIS
/usr/openv/volmgr/bin/tl8d [-v]
/usr/openv/volmgr/bin/tl8cd [-v] [-t] [-n]
DESCRIPTION
tl8d and tl8cd interface with Media Manager to mount and unmount volumes in a Tape Library 8MM robot.
tl8d directly interfaces with the Media Manager device daemon (ltid). A tl8d daemon runs on each host with a drive connection and sends mount and unmount requests to the control daemon (tl8cd). tl8cd communicates with the robotics through a SCSI interface.
For NetBackup DataCenter, Tape Library 8MM robotic control software permits drives in the same robot to be configured on different hosts. tl8cd may be running on a different host than tl8d, depending on where the SCSI connection resides (see EXAMPLES). When the connection is established (that is, the path for robotics can be opened), tl8d puts the TL8 robot in the UP state and can mount and unmount volumes. If the robotics are inaccessible, tl8d changes the robot to the DOWN state. In this state, tl8d is still running and returns the robot to the UP state if tl8cd is able to make a connection.
Note If drives are on different NetBackup DataCenter hosts, the robotic information must be entered in the Media Manager configuration on all machines and the robot number must be the same on all machines.
tl8d and tl8cd are automatically started when ltid is started and stopped when ltid is stopped. You can stop or start tl8d independently of ltid using /usr/openv/volmgr/bin/vmps or your server’s ps command to identify the tl8d process id and then entering the following commands:
kill tl8d_pid
/usr/openv/volmgr/bin/tl8d [-v] &
The control daemon, tl8cd, is on the host that has the robotic control and is started by tl8d on that host (see EXAMPLES).
The media ID and slot number information for volumes in a robot must be defined in the volume database before any volumes can be accessed through ltid, tl8d, and tl8cd.

tl8d(1M)
232 NetBackup DataCenter Media Manager System Administrator’s Guide for UNIX
If a cleaning volume is used, it must be defined in the volume configuration. See tpclean(1M) for information on setting the frequency for automatic drive cleaning.
If the vm.conf configuration option PREVENT_MEDIA_REMOVAL is enabled when tl8cd is active, tl8cd disables access to the volumes and media access port by issuing a command to the TL8 robot. If it is necessary to open the door of the cabinet, you must terminate tl8cd first. By default, access to the library is allowed.
The drives are logically numbered 1 through n, where n is the number of drives in the robotic library. Use one or more of the following to determine the correct robot drive numbers:
� The Device Configuration wizard (if the robotic library and drives support serialization).
� The Robot Drive and Slot Layout appendix in the NetBackup Media Manager system administrator ’s guide.
� The robotic library vendor’s documentation on drive indexing.
� The robotic test utility, or experiment by mounting media and watching the operator display.
The Internet service number for tl8cd must be in /etc/services. If you are using NIS (Network Information Service), the entry found in this host’s /etc/services file should be placed in the master NIS server database for services. To override the services file, create the file /usr/openv/volmgr/database/ports/tl8cd file with a single line containing the service number for tl8cd. The default service number is 13705.
OPTIONS
-v Logs debug information using syslogd. If you start ltid with -v, tl8d and tl8cd are also started with -v.
-t Terminates tl8cd.
-n Causes tl8cd to run with barcode checking disabled. This option is useful, if all or most of the volumes in the library do not contain barcodes, because it takes the robot a lot less time to scan volumes.Note that if the volumes contain barcodes and the -n option is selected, the barcodes are ignored.
ERRORS
tl8d and tl8cd log error messages if there is a copy of the daemon running.
Media Manager logs any Tape Library 8MM and robotic errors to syslogd. Log entries are also made when the state changes between UP and DOWN.

Appendix A, Media Manager Man Pages 233
tl8d(1M)
EXAMPLES
In the following diagram, the drives and the robotics are connected to a single host. ltid initiates tl8d, which in turn initiates tl8cd.
host A TL8 Robot
------------ -------------
| | | |
| ltid | | |
| tl8d | | |
| tl8cd | |-----------|
| | |--| Robotics |
| | | |-----------|
| | |--| drive 1 |
|----------| | |-----------|
| SCSI |------------| drive 2 |
------------ -------------
Note The following diagram applies only to NetBackup DataCenter.
In the following diagram, each host is connected to one drive in the robot and the robotics are connected to host A. ltid on each host initiates tl8d. The tl8d on host A also initiates tl8cd, since that is where the robotic control is defined. Requests to mount tapes from host B go to tl8d on host B, which sends the robotic command to tl8cd on host A.
host A TL8 Robot host B
------------ ------------- ------------
| | | | | |
| ltid | | | | ltid |
| tl8d | | | | tl8d |
| tl8cd | |-----------| | |
| | |----| Robotics | | |
| | | |-----------| |----------|
| | | | drive 1 |---------| SCSI |
|----------| | |-----------| |----------|
| SCSI |--------| drive 2 | | |
------------ ------------- ------------

tl8d(1M)
234 NetBackup DataCenter Media Manager System Administrator’s Guide for UNIX
SEE ALSO
ltid(1M), syslogd(8), tpclean(1M), tpconfig(1M), vmadm(1M)

Appendix A, Media Manager Man Pages 235
tldd(1M)
tldd(1M)
NAME
tldd, tldcd - Tape Library DLT (TLD) daemon and control daemon
SYNOPSIS
/usr/openv/volmgr/bin/tldd [-v]
/usr/openv/volmgr/bin/tldcd [-v] [-t]
DESCRIPTION
tldd and tldcd interface with Media Manager to mount and unmount volumes in a Tape Library DLT (TLD) robot.
tldd directly interfaces with ltid (the Media Manager device daemon). tldd runs on each host with a drive connection and sends mount and unmount requests to the control daemon (tldcd). tldcd communicates directly with the robotics through a SCSI interface.
For NetBackup DataCenter, TLD robotic control software permits drives in the same robot to be configured on different hosts. tldcd may be running on a different host than tldd, depending on where the interface connection resides (see EXAMPLES). When the connection is established (that is, the path for robotics can be opened), tldd puts the TLD robot in the UP state and can mount and unmount volumes. If the robotics are inaccessible, tldd changes the robot to the DOWN state. In this state, tldd is still running and returns the robot to the UP state if tldcd is able to make a connection.
Note If drives are on different NetBackup DataCenter hosts, the robotic information must be entered in the Media Manager device configuration on all machines and the robot number must be the same on all machines.
tldd and tldcd are started when ltid is started and stopped when ltid is stopped. You can stop or start tldd independently of ltid using /usr/openv/volmgr/bin/vmps or your server’s ps command to identify the tldd process ID and then entering the following commands:
kill tldd_pid
/usr/openv/volmgr/bin/tldd [-v] &
tldcd is on the host that has the robotic control and is automatically started by tldd on that host (see EXAMPLES).
The media ID and slot number information for volumes in the robot must be defined in the volume database before any volumes can be accessed through ltid, tldd, and tldcd.

tldd(1M)
236 NetBackup DataCenter Media Manager System Administrator’s Guide for UNIX
If a cleaning volume is used, it must be defined in the volume configuration. See tpclean(1M) for information on setting the frequency for automatic drive cleaning.
The drives are logically numbered 1 through n, where n is the number of drives in the robotic library. Use one or more of the following to determine the correct robot drive numbers:
� The Device Configuration wizard (if the robotic library and drives support serialization).
� The Robot Drive and Slot Layout appendix in the NetBackup Media Manager system administrator ’s guide.
� The robotic library vendor’s documentation on drive indexing.
� The robotic test utility, or experiment by mounting media and watching the operator display.
The Internet service number for tldcd must be in /etc/services. If you are using NIS (Network Information Service), the entry found in this host’s /etc/services file should be placed in the master NIS server database for services. To override the services file, create the /usr/openv/volmgr/database/ports/tldcd file with a single line containing the service number for tldcd. The default service number is 13711.
OPTIONS
-v Logs debug information using syslogd. If you start ltid with -v, tldd and tldcd are also started with -v.
-t Terminates tldcd.
ERRORS
tldd and tldcd log an error message if there is another copy of the daemon running.
Media Manager logs any Tape Library DLT and robotic errors to syslogd. Log entries are also made when the state changes between UP and DOWN.
EXAMPLES
In the following diagram, the two drives and the robotics connect to Host A. ltid initiates tldd, which in turn initiates tldcd.
Host A TLD Robot
__________ ___________
| | | |
| ltid | | |
| tldd | | |
| tldcd | |-----------|

Appendix A, Media Manager Man Pages 237
tldd(1M)
| | |--| Robotics |
| | | |-----------|
| | | | |
|----------| | |-----------|
| SCSI |-----|--| drive 2 |
|__________| | |-----------|
|--| drive 1 |
|___________|
Note The following diagram applies only to NetBackup DataCenter.
In the following diagram, each host connects to one drive and the robotics connect to host A. ltid on each machine initiates tldd. The tldd on host A also initiates tldcd, since that is where the robotic control is defined. Requests to mount tapes from host B go to tldd on host B, which sends the robotic command to tldcd on host A.
host A TLD Robot host B
__________ ___________ __________
| ltid | | | | ltid |
| tldd | | | | tldd |
| tldcd | |-----------| | |
| | |----| Robotics | | |
| | | |-----------| |----------|
| | | | drive 3 |---------| SCSI |
|----------| | |-----------| |----------|
| SCSI |---|----| drive 2 | | |
|__________| | |-----------| |__________|
|----| drive 1 |
|___________|
SEE ALSO
ltid(1M), syslog(8), tpclean(1M), tpconfig(1M), vmadm(1M)

tlhd(1M)
238 NetBackup DataCenter Media Manager System Administrator’s Guide for UNIX
tlhd(1M)
NAME
tlhd, tlhcd - Tape Library Half-inch (TLH) daemon and control daemon
SYNOPSIS
/usr/openv/volmgr/bin/tlhd [-v]
/usr/openv/volmgr/bin/tlhcd [-v] [-t]
DESCRIPTION
tlhd and tlhcd interface with Media Manager to mount and unmount tape volumes in a Tape Library Half-inch (TLH) robot.
tlhd directly interfaces with ltid (the Media Manager device daemon). tlhd runs on each host with a drive connection and sends mount and unmount requests to the control daemon, tlhcd.
tlhcd communicates with the IBM Automated Tape Library (ATL) library manager, which processes all requests and control functions for the robotic library. TLH robotic control software permits drives in the same robot to be configured on different hosts. tlhcd can be running on a different host than tlhd, depending on where the IBM library control is configured (see EXAMPLES). When communication with the library is established, tlhd puts the TLH robot in the UP state and can request volume mounts and unmounts. If the library or control daemon is inaccessible, tlhd changes the robot to the DOWN state. In this state, tlhd is still running and returns the robot to the UP state if tlhcd is able to make a connection.
Note If drives are on different hosts, the robotic information must be entered in the Media Manager device configuration on all machines and the robot number must be the same on all machines.
tlhd and tlhcd are automatically started when ltid is started and stopped when ltid is stopped. You can stop and start tlhd independently of ltid using /usr/openv/volmgr/bin/vmps or your server’s ps command to identify the tlhd process id and then entering the following commands:
kill tlhd_pid
/usr/openv/volmgr/bin/tlhd [-v] &
tlhcd is on the host that has the robotic control and is automatically started by tlhd on that host. tlhcd is terminated when you stop ltid.

Appendix A, Media Manager Man Pages 239
tlhd(1M)
The Media Manager media ID for volumes to be used in the library must be defined in the volume database before any volumes can be accessed using ltid, tlhd, and tlhcd. Both the initial volume database population and future updates can be accomplished using Media Manager robotic inventory options.
The drives are configured using IBM device names. The robotic test utility, tlhtest (or robtest if the robot is configured), can be used to determine the device names associated with the robot. You can also use this utility along with IBM’s mtlib command-line interface to verify library communications, status, and functionality.
Drive cleaning for Tape Library Half-inch robotic control must be configured through an IBM library manager console, since these operations are not made available to applications that are using the IBM library manager. For this reason, cleaning volumes cannot be defined through Media Manager. In addition, you cannot use the Media Manager utilities or the tpclean (1M) command for cleaning operations on drives under TLH robotic control.
The Internet service number for tlhcd must be in /etc/services. If you are using NIS (Network Information Service), the entry found in this host’s /etc/services file should be placed in the master NIS server database for services. To override the services file, create the file /usr/openv/volmgr/database/ports/tlhcd with a single line containing the service number for tlhcd. The default service number is 13717.
OPTIONS
-v Logs debug information using syslogd. If you start ltid with -v, tlhd and tlhcd are also started with -v.
-t Terminates tlhcd.
ERRORS
tlhd and tlhcd log an error message if there is a copy of the daemon running.
Media Manager logs any Tape Library Half-inch and robotic errors to syslogd. Log entries are also made when the state changes between UP and DOWN.
EXAMPLES
In the following examples the device hosts can be Windows NT, Windows 2000, or the following UNIX servers: AIX, HP-UX, IRIX, DYNIX/ptx, or Solaris.
In the following diagram, the drives are attached to and the robotics are controlled from a single host. ltid initiates tlhd, which in turn initiates tlhcd. The IBM library manager control-point daemon (lmcpd) must be running on Host A.
Host A TLH
__________ ___________

tlhd(1M)
240 NetBackup DataCenter Media Manager System Administrator’s Guide for UNIX
| | | |
| ltid | | |
| tlhd | | |
| tlhcd | |-----------|
| | |----| Robotics |
|----------| | |-----------|
| lmcpd |---| |--|003590B1A02|
|----------| | |-----------|
| SCSI |-----|--|003590B1A01|
|__________| | |-----------|
|--|003590B1A00|
|___________|
In the following diagram, each host is connected to at least one drive and the robotics are controlled from Host A. ltid on each machine initiates tlhd. The tlhd on Host A also initiates tlhcd, since that is where the robotic control is defined. Requests to mount tapes from Host B go to tlhd on Host B, which sends the robotic command to tlhcd on Host A.
Host A TLH Host B
__________ ___________ __________
| | | | | |
| ltid | | | | ltid |
| tlhd | | | | tlhd |
| tlhcd | |-----------| | |
| | |----| Robotics | | |
|----------| | |-----------| |----------|
| lmcpd |---| |003590B1A02|---------| SCSI |
|----------| |-----------| |----------|
| SCSI |-----|--|003590B1A01| | |
|__________| | |-----------| |__________|
|--|003590B1A00|
|___________|
SEE ALSO
ltid(1M), syslog(8), tpclean(1M), tpconfig(1M), vmadm(1M)

Appendix A, Media Manager Man Pages 241
tlmd(1M)
tlmd(1M)
NAME
tlmd - Tape Library Multimedia (TLM) daemon
SYNOPSIS
/usr/openv/volmgr/bin/tlmd [-v]
DESCRIPTION
tlmd interfaces with Media Manager to mount and unmount tapes in a Tape Library Multimedia (TLM) robot. It is initiated by ltid (the Media Manager device daemon), if drives have been defined in Media Manager to be in a Tape Library Multimedia robot.
tlmd communicates with the ADIC Distributed AML Server (DAS), which is a client/server software product designed to provide shared access to the family of ADIC Automated Media Libraries (AML). When the connection is established, tlmd puts the TLM robot in the UP state and can request inventories as well as media mounts and dismounts. If the connection cannot be established or DAS errors occur, tlmd changes the robot to the DOWN state but keeps running. In this state, tlmd keeps running and returns the robot to the UP state when the problem no longer exists.
For each TLM robot defined, tlmd connects to the DAS server that is defined by the DAS server attribute in the TLM robot entry in the Media Manager device configuration. From the perspective of DAS, tlmd is connecting as a DAS client. The host running tlmd establishes communication as the DAS client that is specified by the DAS_CLIENT entry in the Media Manager configuration file, /usr/openv/volmgr/vm.conf. If no DAS_CLIENT entry exists, the DAS client name will be the standard host name for the host that is running tlmd.
You can stop and start tlmd independently of ltid using /usr/openv/volmgr/bin/vmps or your server’s ps command to identify tlmd’s process id and then entering the following commands:
kill tlmd_pid
/usr/openv/volmgr/bin/tlmd [-v] &
The drives are configured using DAS drive names, based on information obtained from the DAS server. The robotic test utility, tlmtest (or robtest if the robot is configured), can be used to determine the drive names associated with the robot. You can also use ADIC’s DASADMIN to verify library communications, status, and functionality.

tlmd(1M)
242 NetBackup DataCenter Media Manager System Administrator’s Guide for UNIX
The Internet service number for tlmd must be in /etc/services. If you are using NIS (Network Information Service), you should place the entry in this the host’s /etc/services file in the master NIS server database for services. To override the services file, create the file /usr/openv/volmgr/database/ports/tlmd with a single line containing the service number for tlmd. The default service number is 13716.
OPTION
-v Logs debug information using syslogd. If you start ltid with -v, tlmd also starts with -v.
ERRORS
tlmd returns an error message if there is a copy of tlmd running.
Tape Library Multimedia robot and network errors are logged using syslogd. Log entries are also made when the state changes between UP and DOWN.
SEE ALSO
ltid(1M), syslogd(8), tpconfig(1M), vmadm(1M)

Appendix A, Media Manager Man Pages 243
tpautoconf(1M)
tpautoconf(1M)
NAME
tpautoconf - Manage the global device database host
SYNOPSIS
/usr/openv/volmgr/bin/tpautoconf -get_gdbhost
/usr/openv/volmgr/bin/tpautoconf -set_gdbhost host_name
DESCRIPTION
tpautoconf is normally used by the Device Configuration wizard to automatically discover and configure devices. This wizard calls tpautoconf with a different set of options.
The get and set options described here are useful only in special situations; for example, to specify a different host as the global device database host. The global device database host name is automatically defined when NetBackup is installed.
See the Configuring Storage Devices chapter of the NetBackup DataCenter Media Manager system administrator’s guide for information about managing the global device database host.
OPTIONS
-get_gdbhostReturns the name of the host where the global device database is stored.
-set_gdbhost host_nameSet the name of the host where the global device database will be stored.
EXAMPLES
The following command returns the name of the host where the global device database is stored:
tpautoconf -get_gdbhost
The following command sets the global device database host to be the host niagra:
tpautoconf -set_gdbhost niagra
SEE ALSO
tpconfig(1M)

tpclean(1M)
244 NetBackup DataCenter Media Manager System Administrator’s Guide for UNIX
tpclean(1M)
NAME
tpclean - manages tape drive cleaning
SYNOPSIS
/usr/openv/volmgr/bin/tpclean -L
/usr/openv/volmgr/bin/tpclean -C drive_name
/usr/openv/volmgr/bin/tpclean -M drive_name
/usr/openv/volmgr/bin/tpclean -F drive_name cleaning_frequency
DESCRIPTION
tpclean allows you to monitor Media Manager tape drive usage and optionally configure tape drives to be automatically cleaned (except drives in ACS, LMF, ODL, RSM, or TLH robots; or shared (SSO) drives).
Media Manager tracks the total amount of time that volumes have been mounted in the drives. You can use tpclean to specify a cleaning frequency (in hours) for a drive.
Drive cleaning occurs, if the following are true:
� The mount time exceeds the cleaning frequency.
� The drive is in a robot.
� The Media Manager volume configuration shows a cleaning tape in the robot.
The Comment field in the tpclean -L output will contain the message, NEEDS CLEANING, if the following are true. You can then manually clean the drive and reset the mount time using the -M option.
� The mount time exceeds the cleaning frequency.
� The drive is a standalone drive or does not have a cleaning tape defined.
For the -C, -M, and -F options, ltid must be running. You must also have root privileges to execute this command.
See the reference topics appendix of the Media Manager system administrator’s guide for information about the TapeAlert feature that is available with most tape drives, and other related drive cleaning topics.
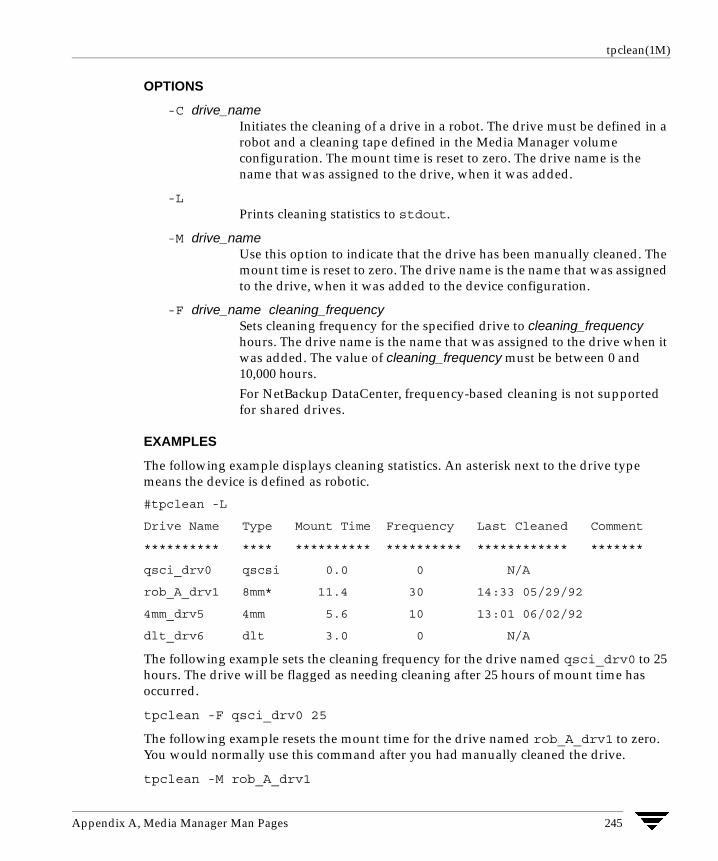
Appendix A, Media Manager Man Pages 245
tpclean(1M)
OPTIONS
-C drive_nameInitiates the cleaning of a drive in a robot. The drive must be defined in a robot and a cleaning tape defined in the Media Manager volume configuration. The mount time is reset to zero. The drive name is the name that was assigned to the drive, when it was added.
-LPrints cleaning statistics to stdout.
-M drive_nameUse this option to indicate that the drive has been manually cleaned. The mount time is reset to zero. The drive name is the name that was assigned to the drive, when it was added to the device configuration.
-F drive_name cleaning_frequencySets cleaning frequency for the specified drive to cleaning_frequency hours. The drive name is the name that was assigned to the drive when it was added. The value of cleaning_frequency must be between 0 and 10,000 hours.For NetBackup DataCenter, frequency-based cleaning is not supported for shared drives.
EXAMPLES
The following example displays cleaning statistics. An asterisk next to the drive type means the device is defined as robotic.
#tpclean -L
Drive Name Type Mount Time Frequency Last Cleaned Comment
********** **** ********** ********** ************ *******
qsci_drv0 qscsi 0.0 0 N/A
rob_A_drv1 8mm* 11.4 30 14:33 05/29/92
4mm_drv5 4mm 5.6 10 13:01 06/02/92
dlt_drv6 dlt 3.0 0 N/A
The following example sets the cleaning frequency for the drive named qsci_drv0 to 25 hours. The drive will be flagged as needing cleaning after 25 hours of mount time has occurred.
tpclean -F qsci_drv0 25
The following example resets the mount time for the drive named rob_A_drv1 to zero. You would normally use this command after you had manually cleaned the drive.
tpclean -M rob_A_drv1

tpclean(1M)
246 NetBackup DataCenter Media Manager System Administrator’s Guide for UNIX
The following example initiates the cleaning of drive rob_A_drv1. This example assumes the drive is a robotic drive, with a cleaning tape defined. The mount time is reset to zero.
You can use the -C option to force the cleaning of a drive prior to reaching cleaning_frequency. Normally, robotic drives are cleaned automatically when their mount time exceeds the cleaning frequency.
tpclean -C rob_A_drv1
Note To use a cleaning tape, the Cleanings Remaining for that tape (as shown in the volume list of the Media node in the NetBackup Administration Console or from the vmquery command) must be greater than zero. This cleaning count refers to how many more times the cleaning tape can be used. You can change this count using the Media node or the vmchange command.
SEE ALSO
ltid(1M), tpconfig(1M), vmadm(1M)

Appendix A, Media Manager Man Pages 247
tpconfig(1M)
tpconfig(1M)
NAME
tpconfig - tape configuration utility
SYNOPSIS
/usr/openv/volmgr/bin/tpconfig [-noverify]
/usr/openv/volmgr/bin/tpconfig -d
/usr/openv/volmgr/bin/tpconfig -dl
/usr/openv/volmgr/bin/tpconfig -l
/usr/openv/volmgr/bin/tpconfig -lsavdbhost
/usr/openv/volmgr/bin/tpconfig -add -drive -type drvtype -path drivepath [-vhname opticalvolhdrdrvname] [-asciiname asciidrivename] [-index drvindex] [-shared [yes|no]] [-cleanfreq hours] [-comment comment] [-drstatus [UP|DOWN]] [-robot robnum -robtype robtype] [-noverify] [-robdrnum robdrvnum | -VendorDrvName venddrvname | -ACS acsnum -LSM lsmnum -PANEL panelnum -DRIVE drivenum]
/usr/openv/volmgr/bin/tpconfig -update -drive drvindex [-type drvtype] [-path drivepath] [-vhname opticalvolhdrdrvname] [-newasciiname asciidrivename] [-shared [yes|no]] [-cleanfreq hours] [-comment comment] [-drstatus [UP|DOWN]] [-robot robnum -robtype robtype] [-noverify] [-robdrnum robdrvnum | -VendorDrvName venddrvname | -ACS acsnum -LSM lsmnum -PANEL panelnum -DRIVE drivenum]
/usr/openv/volmgr/bin/tpconfig -delete -drive drvindex
/usr/openv/volmgr/bin/tpconfig -multiple_delete -drive drvindex1:drvindex2: ... drvindexN
/usr/openv/volmgr/bin/tpconfig -add -robot robnum -robtype robtype -robpath robpath [-vdbhost volume_database_host]
/usr/openv/volmgr/bin/tpconfig -add -robot robnum -robtype robtype -cntlhost cntlhost [-vdbhost volume_database_host]
/usr/openv/volmgr/bin/tpconfig -update -robot robnum [-robtype robtype] [-robpath robpath] [-cntlhost cntlhost] [-vdbhost volume_database_host]
/usr/openv/volmgr/bin/tpconfig -delete -robot robnum

tpconfig(1M)
248 NetBackup DataCenter Media Manager System Administrator’s Guide for UNIX
/usr/openv/volmgr/bin/tpconfig -multiple_delete -robot robnum1:robnum2: ... robnumN
/usr/openv/volmgr/bin/tpconfig -savdbhost standalone_volume_database_host
DESCRIPTION
tpconfig can be used as a command line interface or menu interface to configure robots and drives for use with NetBackup.
/usr/openv/volmgr/bin/tpconfig [-noverify] starts the Media Manager Device Configuration Utility. This menu-based utility creates and modifies databases in the /usr/openv/volmgr/database directory. These databases identify the robotics and drives that are under control of ltid (the Media Manager device daemon). ltid uses these files to correlate drives in the operator’s drive status display to the device files in the /dev directory.
For example, assume that you want to configure a drive recognized by the system as an 8-mm type drive. Look in the /dev directory and locate the no rewind on close device path for an 8-mm type drive and then specify this device path for the drive. tpconfig then records the device path in the appropriate device database.
After using tpconfig to change your device configuration, use the stopltid command to stop the ltid and avrd (automatic volume recognition) daemons (if they are running). Then use the ltid command to start the daemons again. See ltid(1M) for more information.
You must be the root user to execute this utility.
OPTIONS
-lLists the current device configuration (to stdout), without volume database host names.
-dLists the current configuration information (to stdout), including volume database host names.
Note The following option is only applicable for NetBackup DataCenter.
-lsavdbhostLists the volume database host for standalone drives. This is the host where the Media Manager volume daemon maintains the volume configuration for standalone drives.

Appendix A, Media Manager Man Pages 249
tpconfig(1M)
-noverifyIf this option is specified, drive paths are not verified. Normally, tpconfig verifies that the no rewind on close drive path has the correct minor number bits that relate to no rewind, variable, Berkeley-style, and so on. This option is normally not required, but may be helpful if using non-standard platform device files. If this option is specified, caution should be taken in making sure the device files are correct.
-addAdds a drive or a robot, depending on the accompanying options.
-updateChanges the configuration information for a drive or robot. For example, you can add a drive to a robot.
-deleteDeletes a drive or robot, depending on the accompanying options.
-multiple_deleteDeletes multiple drives or robots, depending on the accompanying options.
Note The following option is only applicable for NetBackup DataCenter.
-savdbhost standalone_volume_database_hostSets the volume database host for standalone drives that attach to this specified host.
-driveUse this option with the -add option to specify that the action is for a drive.
-drive drvindexUse this option with the -update, -delete,or -multiple_delete options to specify the drive index and that the action is for a drive.
-type drvtypeSpecifies the type of drive that you are configuring.Drive type can be any of the following for NetBackup DataCenter:4mm for 4mm tape drive, 8mm for 8mm tape drive, 8mm2 for 8mm tape drive 2, 8mm3 for 8mm tape drive 3, dlt for DLT tape drive, dlt2 for DLT tape drive 2, dlt3 for DLT tape drive 3, dtf for DTF tape drive, qscsi for QIC tape drive, hcart for Half-inch cartridge drive, hcart2 for Half-inch cartridge drive 2, hcart3 for Half-inch cartridge drive 3, odiskwm for optical disk-write many drive, odiskwo for optical disk-write once drive.Drive type can be any of the following for NetBackup BusinesServer:

tpconfig(1M)
250 NetBackup DataCenter Media Manager System Administrator’s Guide for UNIX
4mm for 4mm tape drive, 8mm for 8mm tape drive, dlt for DLT tape drive, hcart for Half-inch cartridge drive, qscsi for QIC tape drive.
-path drivepathSpecifies the system name for the drive. For example, /dev/rmt/0cbn.
-comment commentAdds a comment about the drive. This field is useful for storing SCSI inquiry data so you can easily check the drive type and firmware level.
-index drvindexA drive index is a unique number that is used to identify the drive. When you add a drive you are not required to supply a drive index, since the next available drive index is used by Media Manager. Each drive on a particular host must have a unique index number.
-drstatus UP|DOWNSets the initial status of the drive to the UP or DOWN state. You can also perform this action with options in the Device Management window.
-cleanfreq hours
Note Not used with shared drives.
Specifies the number of hours between drive cleanings. When you add a drive, NetBackup starts recording the amount of time that volumes are mounted in that drive.If the drive is in a robot and a cleaning volume is defined in the robot, cleaning occurs when the accumulated mount time exceeds the time that you specify for cleaning frequency. NetBackup resets the mount time when the drive is cleaned.If the drive is standalone or if a cleaning tape is not defined, the message NEEDS CLEANING appears in the comment field of the tpclean -L output. To clean the drive, use the tpclean command.Frequency-based cleaning is not needed if TapeAlert is used.
-robot robnumA unique number that identifies the robot to NetBackup. You assign the robot number when you add the robot using the add option.Robot numbers must be unique for all robots, regardless of the robot type or the host that controls them.
-robtype robtypeSpecifies the type of robot that you are configuring and can be any of the types supported by NetBackup. Check the VERITAS support web site to determine the robot type to specify for a particular model of robotic library.

Appendix A, Media Manager Man Pages 251
tpconfig(1M)
Robot type can be any of the following for NetBackup DataCenter:acs for Automated Cartridge System, lmf for Library Management Facility, tl4 for Tape Library 4mm, tl8 for Tape Library 8mm, tld for Tape Library DLT, tlh for Tape Library Half-inch, tlm for Tape Library Multimedia, ts8 for Tape Stacker 8mm, tsd for Tape Stacker DLT, tsh for Tape Stacker Half-inch, odl for Optical Disk Library.Robot type can be any of the following for NetBackup BusinesServer:tl4 for Tape Library 4mm, tl8 for Tape Library 8mm, tld for Tape Library DLT, ts8 for Tape Stacker 8mm, tsd for Tape Stacker DLT.
-robdrnum robdrvnumSpecifies the physical location (within the robot) of the drive. If you assign the wrong number, NetBackup does not detect it, but an error eventually occurs because the robotic control attempts to mount media on the wrong drive.You can usually determine the physical location by checking the connectors to the drives or the vendor documentation.The Robot Slot and Layout appendix of the Media Manager system administrator ’s guide shows drive layouts for many of the robots that NetBackup supports.
Note The following four ACS options are not supported in NetBackup BusinesServer.
-ACS acsnum
-LSM lsmnum
-PANEL panelnum
-DRIVE drivenumThese options specify the configuration for ACS (Automated Cartridge System) robots.acsnum specifies the number for the robotic library as configured on the ACS library software host.lsmnum specifies the Library Storage Module that has this drive.panelnum specifies the robot panel where this drive is located.drivenum specifies the number of this drive.
-VendorDrvName venddrvnameSpecifies the IBM device name for a TLH robotic drive or the DAS drive name for a TLM robotic drive.
-vhname opticalvolhdrdrvnameSpecifies the volume header path for an optical drive.

tpconfig(1M)
252 NetBackup DataCenter Media Manager System Administrator’s Guide for UNIX
Note The following option is not supported in NetBackup BusinesServer.
-shared yes|noSpecify yes, if the drive you are adding or updating will be shared among hosts.
-asciiname asciidrivenameSpecifies a name for the drive. This name identifies the drive to Media Manager. If you do not specify a drive name, Media Manager generates a name.
If you are adding or updating shared drives (SSO option) on NetBackup DataCenter, make this name as descriptive as possible.
-newasciiname asciidrivenameSpecifies a new name for the drive.
Note The following option is only applicable for NetBackup DataCenter.
-cntlhost cntlhostFor a robot whose robotic control is on another host, this option specifies the host that controls the robotic library. This option applies only for LMF, TL8, TLD, and TLH, robots that can have the robotic control on another host, and for ACS and TLM robots.For an ACS robot, specify the host name where the ACS library software is installed.For a TLM robot, specify the host name where the DAS software is installed.
-robpath robpathIf the robot that you are adding or updating is a UNIX host or Windows 2000 host with the robotic control, use this option.
Note The following option is only applicable for NetBackup DataCenter.
-vdbhost volume_database_hostFor a robot, this specifies the volume database host. This is the host that will have the information about the media in the robot.
FILES
/usr/openv/volmgr/database/ltidevs
/usr/openv/volmgr/database/robotic_def
/usr/openv/volmgr/help/tpconfig* (Help files)

Appendix A, Media Manager Man Pages 253
tpconfig(1M)
SEE ALSO
ltid(1M)

tpformat(1M)
254 NetBackup DataCenter Media Manager System Administrator’s Guide for UNIX
tpformat(1M)
NAME
tpformat - formats optical disks for use by Media Manager
SYNOPSIS
/usr/openv/volmgr/bin/tpformat -m media_id [-d odiskwm | odiskwo] [-f] [-o] [-r robot_number]
DESCRIPTION
The tpformat command writes a volume label (including a media ID) on an optical disk platter. When used with the -f option, this command also formats the platter.
The volume label, a partition table required by disk drivers on most operating system platforms, contains the media ID. The recorded media ID is also kept in the volume database as the media ID. When a platter is mounted, Media Manager compares the recorded media ID to the media ID that was requested to verify that the correct platter is mounted.
You specify a media ID to be written on the disk. An external media ID is an identifier that is written on the outside of the volume so the operator can find the volume. The recorded media ID and external media ID must always be the same or the wrong volume will be mounted.
Whether it is necessary to label an optical disk with tpformat depends on the platform that has the optical disk drive as follows:
� On Sun Solaris and SGI IRIX platforms, you must use tpformat to write a system-specific volume label (that is, a partition table) and media ID on each side of a platter before you can use it with Media Manager. This action is required regardless of whether the platter has been formatted. However, if the platter is preformatted you do not have to reformat it.
� On HP HP-UX and IBM AIX systems, volume labels do not apply and it is not mandatory to use tpformat, unless you must use it to format the volume. However, labeling is still recommended so the volume will have an media ID that Media Manager can use to verify that the correct volume is mounted.
All optical disk platters must be formatted before Media Manager can use them. You can purchase preformatted platters (recommended) or format them manually with the -f option.

Appendix A, Media Manager Man Pages 255
tpformat(1M)
You must be a root user to execute tpformat and you can use it only on the server that has the optical drive. For example, you cannot use tpformat on a NetBackup master server to format media that is mounted in a drive on a NetBackup media server. In addition, the drive must be under control of Media Manager, with the device daemon (ltid) running.
This command causes a mount request to appear in the operator displays; or if the volume is in a robot and the media ID that you specify exists in the volume database, the volume is automatically mounted.
When using one of the available media management interfaces to add media to Media Manager, you can choose the label option, making it unnecessary to use tpformat.
OPTIONS
-m media_idWrites a media ID on an optical platter. You can specify up to six alpha-numeric characters for the ID. This media ID is also referred to as the recorded media ID when it is read from the platter.
-d odiskwm | odiskwoThe density (media type) that is being formatted. The default is odiskwm.odiskwm specifies rewritable (write many) media.odiskwo specifies write once (WORM) media.
Note WORM media can be formatted only once by tpformat.
-fFormats the selected disk surface. Since it takes approximately 25 minutes per surface to format, use this option only for disks not formatted at the factory.
-oYou must specify this option (overwrite) to use tpformat on a platter that has an recorded media ID (that is, the platter contains a label).
-r robot_numberVerifies that the robot number specified is configured and is a valid robot type that supports the formatting of optical volumes.
EXAMPLES
The following example writes diska as the media ID and a volume header to a rewritable optical disk:
tpformat -m diska -d odiskwm
In the following example a platter has a recorded media ID. To overwrite the current label and specify a new media ID you must specify the -o option:

tpformat(1M)
256 NetBackup DataCenter Media Manager System Administrator’s Guide for UNIX
tpformat -o -m disk1 -d odiskwm
SEE ALSO
ltid(1M), tpconfig(1M), tpreq(1), vmadm(1M)
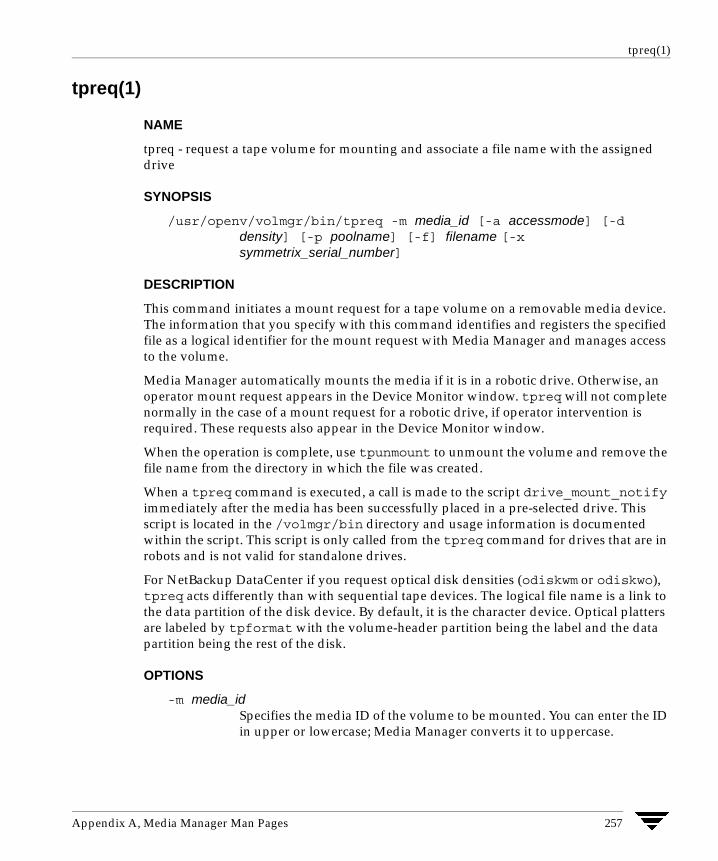
Appendix A, Media Manager Man Pages 257
tpreq(1)
tpreq(1)
NAME
tpreq - request a tape volume for mounting and associate a file name with the assigned drive
SYNOPSIS
/usr/openv/volmgr/bin/tpreq -m media_id [-a accessmode] [-d density] [-p poolname] [-f] filename [-x symmetrix_serial_number]
DESCRIPTION
This command initiates a mount request for a tape volume on a removable media device. The information that you specify with this command identifies and registers the specified file as a logical identifier for the mount request with Media Manager and manages access to the volume.
Media Manager automatically mounts the media if it is in a robotic drive. Otherwise, an operator mount request appears in the Device Monitor window. tpreq will not complete normally in the case of a mount request for a robotic drive, if operator intervention is required. These requests also appear in the Device Monitor window.
When the operation is complete, use tpunmount to unmount the volume and remove the file name from the directory in which the file was created.
When a tpreq command is executed, a call is made to the script drive_mount_notify immediately after the media has been successfully placed in a pre-selected drive. This script is located in the /volmgr/bin directory and usage information is documented within the script. This script is only called from the tpreq command for drives that are in robots and is not valid for standalone drives.
For NetBackup DataCenter if you request optical disk densities (odiskwm or odiskwo), tpreq acts differently than with sequential tape devices. The logical file name is a link to the data partition of the disk device. By default, it is the character device. Optical platters are labeled by tpformat with the volume-header partition being the label and the data partition being the rest of the disk.
OPTIONS
-m media_idSpecifies the media ID of the volume to be mounted. You can enter the ID in upper or lowercase; Media Manager converts it to uppercase.

tpreq(1)
258 NetBackup DataCenter Media Manager System Administrator’s Guide for UNIX
-a accessmodeSpecifies the access mode of the volume. Valid access modes are w and r. If the access mode is w (write), the media must be mounted with write enabled. The default is r (read), which means the media may be write protected.
-d densitySpecifies the density of the drive. This option determines the type of drive on which the tape volume is mounted. The default density is dlt.
Valid densities for NetBackup DataCenter follow:4mm for 4-mm cartridge, 8mm for 8-mm cartridge, 8mm2 for 8-mm cartridge 2, 8mm3 for 8-mm cartridge 3, dlt for DLT cartridge, dlt2 for DLT cartridge 2, dlt3 for DLT cartridge 3, dtf for DTF cartridge, hcart for 1/2 Inch cartridge, hcart2 for 1/2 Inch cartridge 2, hcart3 for 1/2 Inch cartridge 3, odiskwm for Optical disk-write many, odiskwo for Optical disk-write once, qscsi for 1/4-inch cartridge.For NetBackup DataCenter, the half-inch cartridge densities (hcart, hcart2, and hcart3) can be used to distinguish between any supported half-inch drive types. However, tape requests can only be assigned to drives of the associated media type. For example, a tape request with density hcart2 specifying a media ID with media type HCART2 will be assigned to an hcart2 drive. Likewise, a tape request with density hcart specifying an media ID with media type HCART will be assigned to an hcart drive. The same rules apply to the DLT densities (dlt, dlt2, and dlt3) and the 8MM densities (8mm, 8mm2, and 8mm3).Valid densities for NetBackup BusinesServer follow:4mm for 4-mm cartridge, 8mm for 8-mm cartridge, dlt for DLT cartridge, hcart for 1/2 Inch cartridge, qscsi for 1/4-inch cartridge.The mount request must be performed on a drive type that satisfies the density.
-p poolnameSpecifies the volume pool where the volume resides. poolname is case sensitive. The default is None.
-f filenameSpecifies the file to be associated with the volume. The file name represents a symbolic link to the drive where the volume is mounted.The file name can be a single name or a complete path. If you specify only a file name, the file is created in the current working directory. If you specify a path, the file is created in the directory named in the path. filename cannot be an existing file.Specifying -f before filename is optional.

Appendix A, Media Manager Man Pages 259
tpreq(1)
-x symmetrix_serial_numberThis option is valid only for Sun Solaris systems. Specifies the 12-digit serial number of an EMC Symmetrix storage system. This option allows the mounting of a Fastrax tape volume in a NetBackup for EMC Fastrax configuration.
SEE ALSO
tpformat(1M), tpunmount(1), vmadm(1M)

tpunmount(1)
260 NetBackup DataCenter Media Manager System Administrator’s Guide for UNIX
tpunmount(1)
NAME
tpunmount - removes a tape volume from a drive and tape file from the directory
SYNOPSIS
/usr/openv/volmgr/bin/tpunmount [-f] filename [-force]
DESCRIPTION
tpunmount removes a tape file from the directory and removes the tape volume from the drive (if the media was mounted).
Standalone drives are not unloaded (if the -force option is not specified) in the following cases:
� The ltid option, -nsu (no standalone unload) was specified.
� The DO_NOT_EJECT_STANDALONE option was specified in the vm.conf file.
When a tpunmount command is executed for drives that are not NDMP or Fastrax drives, a call is made to the script drive_unmount_notify. This script is located in the /volmgr/bin directory and usage information is documented within the script.
The tape file and the device must be closed before you can use tpunmount.
OPTIONS
-f filenameSpecifies the file associated with the media. You must specify a file name.Specifying -f before filename is optional.
-force
Ejects the volume from a standalone drive, even if the -nsu option was specified for ltid or DO_NOT_EJECT_STANDALONE was specified in the vm.conf file, at the time ltid was started.
EXAMPLE
The following command unmounts the tape volume associated with file tape1 and removes the file from the current directory:
tpunmount tape1
SEE ALSO
tpreq(1), ltid(1M)

Appendix A, Media Manager Man Pages 261
ts8d(1M)
ts8d(1M)
NAME
ts8d - Tape Stacker 8MM (TS8) daemon
SYNOPSIS
/usr/openv/volmgr/bin/ts8d [-v]
DESCRIPTION
ts8d interfaces with Media Manager to mount and unmount tapes in a Tape Stacker 8MM robot. It is initiated by ltid (the Media Manager device daemon), if the Media Manager device configuration shows drives in a Tape Stacker 8MM.
Stopping ltid stops ts8d. You can stop or start ts8d independently of ltid using the /usr/openv/volmgr/bin/vmps command or your server’s ps command to identify the ts8d process id and then entering the following commands:
kill ts8d_pid
/usr/openv/volmgr/bin/ts8d [-v] &
ts8d communicates directly with the robotics through a SCSI interface. When the connection is established (the path for robotics can be opened), ts8d puts the TS8 robot in the UP state and can mount and unmount tapes. If the robotics are inaccessible, ts8d changes the robot to the DOWN state. In this state, ts8d is still running and returns the robot to the UP state if it is able to make a connection.
The media ID and slot number information for 8mm tapes in a robot must be defined in the volume database before any tapes can be accessed through ltid and ts8d.
If a cleaning volume is used, it must be defined in the volume configuration. See tpclean(1M) for information on setting the frequency for automatic drive cleaning.
The Internet service number for ts8d must be in /etc/services. If you are using NIS (Network Information Service), you should place the entry in this host’s /etc/services file in the master NIS server database for services. To override the services file, create the file /usr/openv/volmgr/database/ports/ts8d with a single line containing the service number for ts8d. The default service number is 13709.
OPTION
-v Logs debug information using syslogd. If you start ltid with -v, ts8d also starts with -v.
ERRORS
ts8d returns an error message if there is a copy of ts8d running.

ts8d(1M)
262 NetBackup DataCenter Media Manager System Administrator’s Guide for UNIX
Media Manager logs any Tape Stacker 8MM and robotic errors to syslogd. Log entries are also made when the state changes between UP and DOWN.
SEE ALSO
ltid(1M), syslogd(8), tpclean(1M), tpconfig(1M), vmadm(1M)

Appendix A, Media Manager Man Pages 263
tsdd(1M)
tsdd(1M)
NAME
tsdd - Tape Stacker DLT (TSD) daemon
SYNOPSIS
/usr/openv/volmgr/bin/tsdd [-v]
DESCRIPTION
tsdd interfaces with Media Manager to mount and unmount tapes in Tape Stacker DLT (TSD) robots. It is initiated by ltid (the Media Manager device daemon), if the Media Manager device configuration shows drives in the Tape Stacker DLT (TSD).
Stopping ltid stops tsdd. You can stop or start tsdd independently of ltid using the /usr/openv/volmgr/bin/vmps command or your server ’s ps command to identify the process id for tsdd, and then entering the following commands:
kill tsdd_pid
/usr/openv/volmgr/bin/tsdd [-v] &
tsdd communicates directly with the robotics using a SCSI interface. When the connection is established (the path for robotics can be opened), tsdd puts the TSD robot in the UP state and can mount and unmount tapes. If the robotics are inaccessible, tsdd changes the robot to the DOWN state. In this state, tsdd is still running and returns the robot to the UP state if it is able to make a connection.
The media ID and slot number information for DLT tapes in a robot must be defined in the volume database before any tapes can be accessed through the ltid and tsdd.
If a cleaning volume is used, it must be defined in the volume configuration. See tpclean(1M) for information on setting the frequency for automatic drive cleaning.
The Internet service number for tsdd must be in /etc/services. If you are using NIS (Network Information Service), you should place the entry in this host’s /etc/services file in the master NIS server database for services. To override the services file, create the file /usr/openv/volmgr/database/ports/tsdd with a single line containing the service number for tsdd. The default service number is 13714.
OPTION
-v Logs debug information using syslogd. If you start ltid with -v, tsdd also starts with -v.
ERRORS
tsdd returns an error message if there is a copy of tsdd running.

tsdd(1M)
264 NetBackup DataCenter Media Manager System Administrator’s Guide for UNIX
Media Manager logs any Tape Stacker DLT robot and robotic errors to syslogd. Log entries are also made when the state changes between UP and DOWN.
SEE ALSO
ltid(1M), tpclean(1M), tpconfig(1M), vmadm(1M)

Appendix A, Media Manager Man Pages 265
tshd(1M)
tshd(1M)
NAME
tshd - Tape Stacker Half-inch (TSH) daemon
SYNOPSIS
/usr/openv/volmgr/bin/tshd [-v]
DESCRIPTION
tshd interfaces with Media Manager to mount and unmount tapes in Tape Stacker Half-inch (TSH) robots. It is initiated by ltid (the Media Manager device daemon), if drives have been defined in Media Manager to be in a TSH robot.
This daemon communicates directly with the robotics using a SCSI interface. When the connection is established (that is, the path for robotics can be opened), tshd puts the TSH robot in the UP state and can mount and unmount tapes. If the robotics are inaccessible, tshd changes the robot to the DOWN state. In this state, tshd is still running and it returns the robot to the UP state when it is able to make a connection.
You can stop or start tshd independently of ltid using the /usr/openv/volmgr/bin/vmps command or your server’s ps command to identify tshd’s process id and then entering the following commands:
kill tshd_pid
/usr/openv/volmgr/bin/tshd [-v] &
The media ID and slot number information for half-inch tapes in a TSH robot must be defined in the volume database before any tapes can be accessed using ltid and tshd.
A cleaning volume can also reside in the tape stacker and if so, must be defined. See tpclean(1M) for information on setting the frequency for automatic drive cleaning.
The Internet service number for tshd must be in /etc/services. If you are using NIS (Network Information Service), you should place the entry in this host’s /etc/services file in the master NIS server database for services. To override the services file, create the file /usr/openv/volmgr/database/ports/tshd with a single line containing the service number for tshd. The default service number is 13715.
OPTION
-v Logs debug information using syslogd. If you start ltid with -v, tshd also starts with -v.
ERRORS
tshd returns an error message if there is another copy of tshd running.

tshd(1M)
266 NetBackup DataCenter Media Manager System Administrator’s Guide for UNIX
Any Tape Stacker Half-inch and robotic errors are logged using syslogd. Log entries are also made when the state changes between UP and DOWN.
SEE ALSO
ltid(1M), tpclean(1M), tpconfig(1M), vmadm(1M)

Appendix A, Media Manager Man Pages 267
vmadd(1M)
vmadd(1M)
NAME
vmadd - Add volumes to the volume database
SYNOPSIS
/usr/openv/volmgr/bin/vmadd -m media_id -mt media_type [-h volume_database_host] [-verbose] [-b barcode] [-rt robot_type] [-rn robot_number] [-rh robot_host] [-rc1 rob_slot] [-rc2 rob_side] [-p pool_number] [-mm max_mounts | -n cleanings] [-op optical_partner] [-d "media_description"]
DESCRIPTION
Add volumes to the Media Manager volume database.
OPTIONS
-m media_idSpecifies the media ID of the volume to add. The media ID can be a maximum of 6 ASCII characters. For NetBackup DataCenter if you are adding an optical disk, specify the media ID for the A side of the optical platter. Media IDs for an API robot type (ACS, TLH, TLM, LMF, or RSM) must always match the barcodes.For NetBackup BusinesServer, media IDs for an RSM robot must always match the barcodes.
-mt media_typeSpecifies the media type of the volume to add. Valid media types for NetBackup DataCenter are: 4mm, 8mm, 8mm2, 8mm3, dlt, dlt2, dlt3, dtf, hcart, hcart2, hcart3, odiskwm, odiskwo, qcart, 4mm_clean, 8mm_clean, 8mm2_clean, 8mm3_clean, dlt_clean, dlt2_clean, dlt3_clean, dtf_clean, hcart_clean, hcart2_clean, hcart3_clean.Valid media types for NetBackup BusinesServer are: 4mm, 8mm, dlt, hcart, qcart, 4mm_clean, 8mm_clean, dlt_clean, hcart_clean.
Note The following option is only applicable for NetBackup DataCenter.
-h volume_database_hostName of the host with the volume database where the volume will be added. You should ensure that the host specified matches the volume database host name associated with the robot or set of standalone drives, as indicated in the device configuration. If no host is specified, the host where you execute the command is assumed.

vmadd(1M)
268 NetBackup DataCenter Media Manager System Administrator’s Guide for UNIX
-verboseSelects verbose mode.
-b barcodeSpecifies the barcode attached to the volume.
-rt robot_typeSpecifies the robot type of the robot where the volume is located.Valid robot types for NetBackup DataCenter are: none, acs, lmf, odl, rsm, tl4, tl8, tld, tlh, tlm, ts8, tsd, tsh.Valid robot types for NetBackup BusinesServer are: none, rsm, tl4, tl8, tld, ts8, tsd.
-rn robot_numberUnique, logical identification number for the robot where the volume is located.
-rh robot_hostName of the host which controls the robot, where the volume is located.
-rc1 rob_slotRobot coordinate 1 is the slot number in the robot where the volume is located.For NetBackup DataCenter, do not enter slot information for Media Manager API robot types. The robot software tracks the slot locations for these robots.For NetBackup BusinesServer, do not enter slot information for Media Manager RSM robot types. The robot software tracks the slot locations for these robots.
Note The following option is only applicable for NetBackup DataCenter.
-rc2 rob_sideRobot coordinate 2 is the platter side for optical disks (A or B).
-p pool_numberIndex of the volume pool which will contain this volume. You can use vmpool -listall to determine the index for a given pool name.
-mm max_mountsMaximum number of mounts allowed for this volume. Only used for non-cleaning media. When this limit is exceeded, the volume can be mounted for read operations only.
-n cleaningsNumber of cleanings remaining for this volume. Only used for cleaning media.

Appendix A, Media Manager Man Pages 269
vmadd(1M)
Note The following option is only applicable for NetBackup DataCenter.
-op optical_partnerIf this is an optical disk, specify the media ID of the opposite side of the optical platter.
-d "media_description"Media description of the volume. The double quote marks are required if the description contains any spaces.
EXAMPLES
The following command adds volume AJU244 in the NetBackup volume pool to the volume database on the host named llama. For NetBackup BusinesServer there is only one host (the master), so the -h option is not needed.
The volume, with a barcode of AJU244, is in slot 2 of TLD robot 1. For write operations, the volume may be mounted a maximum of 1000 times.
Note This command is usually entered on one line.
vmadd -m AJU244 -mt dlt -h llama -b AJU244 -rt tld -rn 1 -rh llama -rc1 2 -p 1 -mm 1000 -d "vmadd example"
NOTES
Only limited validation of the option parameters is done.
SEE ALSO
vmchange(1M), vmdelete(1M), vmpool(1M), vmquery(1M)

vmadm(1M)
270 NetBackup DataCenter Media Manager System Administrator’s Guide for UNIX
vmadm(1M)
NAME
vmadm - character-based media management utility
SYNOPSIS
/usr/openv/volmgr/bin/vmadm [-l] [-t]
DESCRIPTION
vmadm can be used to manage volumes and volume pools, manage barcode rules, and inventory robots controlled by the Media Manager volume daemon (vmd). Any actions performed using this utility are serviced by making requests to vmd. You must be the root user to use this utility.
This utility has a character-based user interface and can be used from any terminal. When this utility is initiated, the administrator is presented with a menu of operations that can be performed.
You can also start the tpconfig utility from vmadm.
OPTIONS
-lRequests that the Media Manager volume daemon log the current status. If vmd can handle the request; no output is visible, but log messages are written to the debug log (if the log is enabled).
-tTerminates the Media Manager volume daemon.
ERRORS
If vmd is not running, most vmadm operations fail and the following message appears:
unable to validate server: cannot connect to vmd (70)
See vmd(1M) to obtain additional debugging information should problems persist.
FILES
/usr/openv/volmgr/help/vmadm* (these are help files)
/usr/openv/volmgr/database/volDB
SEE ALSO
ltid(1M), tpconfig(1M), vmd(1M)

Appendix A, Media Manager Man Pages 271
vmchange(1M)
vmchange(1M)
NAME
vmchange - change media information in the Media Manager volume database
SYNOPSIS
Change volume group residence
/usr/openv/volmgr/bin/vmchange [-h volume_database_host] -vg_res -rt robot_type -rn robot_number -rh robot_host -v volume_group
Change volume residence
/usr/openv/volmgr/bin/vmchange [-h volume_database_host] -res -m media_id -mt media_type -rt robot_type -rn robot_number -rh robot_host -v volume_group -rc1 rob_slot [-rc2 rob_side]
Change volume expiration date
/usr/openv/volmgr/bin/vmchange [-h volume_database_host] -exp mm/dd/yy hh:mm:ss -m media_id
Change the barcode for a volume
/usr/openv/volmgr/bin/vmchange [-h volume_database_host] -barcode barcode -m media_id [-rt robot_type]
Change the media description for a volume
/usr/openv/volmgr/bin/vmchange [-h volume_database_host] -d "media_description" -m media_id
Associate this volume with a different pool
/usr/openv/volmgr/bin/vmchange [-h volume_database_host] -p pool_number -m media_id
Change a volume’s maximum mount count
/usr/openv/volmgr/bin/vmchange [-h volume_database_host] -maxmounts max_mounts -m media_id
Change a volume’s number of mounts count or cleanings
/usr/openv/volmgr/bin/vmchange [-h volume_database_host] -n num_mounts/cleanings -m media_id
Change a volume’s media type
/usr/openv/volmgr/bin/vmchange [-h volume_database_host] -new_mt media_type -m media_id
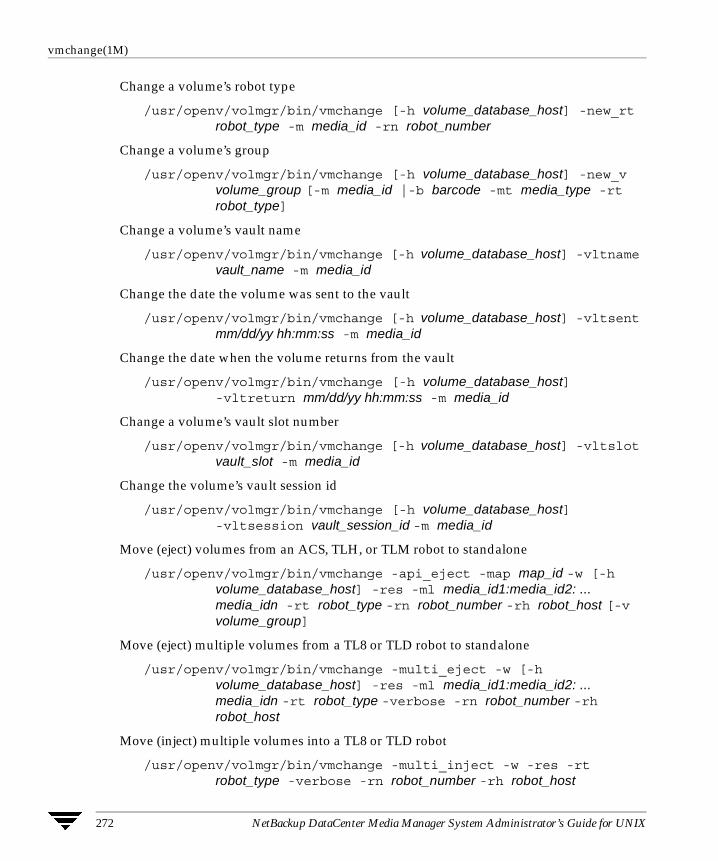
vmchange(1M)
272 NetBackup DataCenter Media Manager System Administrator’s Guide for UNIX
Change a volume’s robot type
/usr/openv/volmgr/bin/vmchange [-h volume_database_host] -new_rt robot_type -m media_id -rn robot_number
Change a volume’s group
/usr/openv/volmgr/bin/vmchange [-h volume_database_host] -new_v volume_group [-m media_id |-b barcode -mt media_type -rt robot_type]
Change a volume’s vault name
/usr/openv/volmgr/bin/vmchange [-h volume_database_host] -vltname vault_name -m media_id
Change the date the volume was sent to the vault
/usr/openv/volmgr/bin/vmchange [-h volume_database_host] -vltsent mm/dd/yy hh:mm:ss -m media_id
Change the date when the volume returns from the vault
/usr/openv/volmgr/bin/vmchange [-h volume_database_host] -vltreturn mm/dd/yy hh:mm:ss -m media_id
Change a volume’s vault slot number
/usr/openv/volmgr/bin/vmchange [-h volume_database_host] -vltslot vault_slot -m media_id
Change the volume’s vault session id
/usr/openv/volmgr/bin/vmchange [-h volume_database_host] -vltsession vault_session_id -m media_id
Move (eject) volumes from an ACS, TLH, or TLM robot to standalone
/usr/openv/volmgr/bin/vmchange -api_eject -map map_id -w [-h volume_database_host] -res -ml media_id1:media_id2: ... media_idn -rt robot_type -rn robot_number -rh robot_host [-v volume_group]
Move (eject) multiple volumes from a TL8 or TLD robot to standalone
/usr/openv/volmgr/bin/vmchange -multi_eject -w [-h volume_database_host] -res -ml media_id1:media_id2: ... media_idn -rt robot_type -verbose -rn robot_number -rh robot_host
Move (inject) multiple volumes into a TL8 or TLD robot
/usr/openv/volmgr/bin/vmchange -multi_inject -w -res -rt robot_type -verbose -rn robot_number -rh robot_host
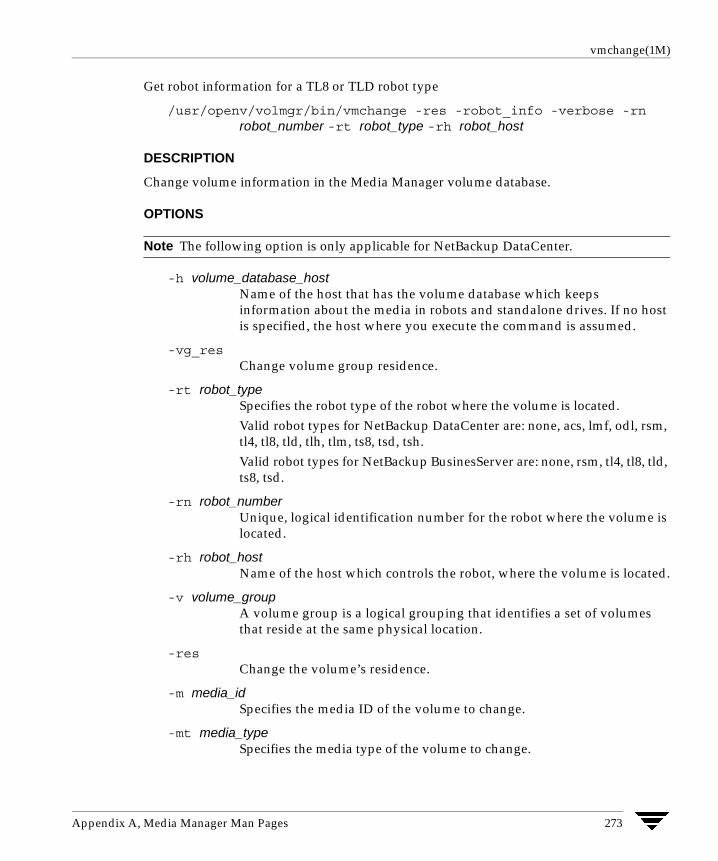
Appendix A, Media Manager Man Pages 273
vmchange(1M)
Get robot information for a TL8 or TLD robot type
/usr/openv/volmgr/bin/vmchange -res -robot_info -verbose -rn robot_number -rt robot_type -rh robot_host
DESCRIPTION
Change volume information in the Media Manager volume database.
OPTIONS
Note The following option is only applicable for NetBackup DataCenter.
-h volume_database_hostName of the host that has the volume database which keeps information about the media in robots and standalone drives. If no host is specified, the host where you execute the command is assumed.
-vg_resChange volume group residence.
-rt robot_typeSpecifies the robot type of the robot where the volume is located.Valid robot types for NetBackup DataCenter are: none, acs, lmf, odl, rsm, tl4, tl8, tld, tlh, tlm, ts8, tsd, tsh.Valid robot types for NetBackup BusinesServer are: none, rsm, tl4, tl8, tld, ts8, tsd.
-rn robot_numberUnique, logical identification number for the robot where the volume is located.
-rh robot_hostName of the host which controls the robot, where the volume is located.
-v volume_groupA volume group is a logical grouping that identifies a set of volumes that reside at the same physical location.
-resChange the volume’s residence.
-m media_idSpecifies the media ID of the volume to change.
-mt media_typeSpecifies the media type of the volume to change.

vmchange(1M)
274 NetBackup DataCenter Media Manager System Administrator’s Guide for UNIX
Valid media types for NetBackup DataCenter are: 4mm, 8mm, 8mm2, 8mm3, dlt, dlt2, dlt3, dtf, hcart, hcart2, hcart3, odiskwm, odiskwo, qcart, 4mm_clean, 8mm_clean, 8mm2_clean, 8mm3_clean, dlt_clean, dlt2_clean, dlt3_clean, dtf_clean, hcart_clean, hcart2_clean, hcart3_clean.Valid media types for NetBackup BusinesServer are: 4mm, 8mm, dlt, hcart, qcart, 4mm_clean, 8mm_clean, dlt_clean, hcart_clean.
-rc1 rob_slotRobot coordinate 1 is the slot number in the robot where the volume is located.For NetBackup DataCenter, do not enter slot information for API robot types. The robot software tracks the slot locations for these robots.For NetBackup BusinesServer, do not enter slot information for RSM robot types. The robot software tracks the slot locations for these robots.
Note The following option is only applicable for NetBackup DataCenter.
-rc2 rob_sideRobot coordinate 2 is the platter side for optical disks (A or B).
-exp mm/dd/yy hh:mm:ssExpiration date for this volume.
-barcode barcodeSpecifies the barcode attached to the volume.
-d "media_description"Media description for the volume. The double quote marks are required if the description contains any spaces.
-p pool_numberIndex of the volume pool which will contain this volume. You can get the pool index using vmpool -listall.
-maxmounts max_mountsMaximum number of mounts allowed for this volume. Only used for non-cleaning media.
-n num_mounts/cleaningsFor non-cleaning media, num_mounts is the number of times this volume has been mounted.For cleaning media, cleanings is the number of cleanings left for this cleaning tape.
-new_mt media_typeSpecifies the media type of the volume to change. See the -mt option for a list of media types.

Appendix A, Media Manager Man Pages 275
vmchange(1M)
-new_rt robot_typeSpecifies the robot type. See the -rt option for a list of robot types.
-new_v volume_groupA volume group is a logical grouping that identifies a set of volumes that reside at the same physical location.
-b barcodeSpecifies the barcode attached to the volume.
-vltname vault_nameSpecifies the name of the logical vault configured for the robot that ejected the volume.
-vltsent mm/dd/yy hh:mm:ssSpecifies the date the volume was sent offsite.
-vltreturn mm/dd/yy hh:mm:ssSpecifies the date the volume was requested for return from the vault vendor. For catalog backup volumes, this is the date that the volume will be requested for return from the vault vendor.
-vltslot vault_slotSpecifies the vault vendor’s slot number for the slot that this volume occupies.
-vltsession vault_session_idSpecifies the id of the vault session that ejected this media.
-api_ejectEject ACS, TLH, or TLM volumes from the specified robot.
-map map_idSpecifies the media access port. For ACS robot types this is the CAP ID (which has the format: ACS, LSM, CAP).
-wWait flag. This flag must be used with the eject, multiple eject, and multiple inject commands.
-verboseSelects verbose mode.
-ml media_id1:media_id2: ... media_idnSpecifies a list of media to be ejected from the robot.
-robot_infoUsed to retrieve information about a robotic library. This option is valid only for TLD and TL8 robot types
-multi_ejectUse the robotic library’s media access port to eject multiple volumes.

vmchange(1M)
276 NetBackup DataCenter Media Manager System Administrator’s Guide for UNIX
-multi_injectUse the robotic library’s media access port to inject multiple volumes.
EXAMPLES
The following command changes the expiration date of volume AJS100:
vmchange -exp 12/31/99 23:59:59 -m AJS100
The following command changes the pool (which contains volume AJS999) to pool 1 (which is the NetBackup pool):
vmchange -h dill -p 1 -m AJS999
The following command ejects volumes abc123 and abc124 from ACS robot number 700. The residences for these two volumes are changed to standalone.
vmchange -res -api_eject -w -ml abc123:abc124 -rt acs -rn 700 -rh verbena -map 0,0,0
CAUTIONS
Only limited validation of the option parameters is done.
Some robotic libraries implement different functionality for their media access ports. For example, some libraries have front-panel inject and eject features that conflict with NetBackup’s use of the media access port (for example, Spectra Logic Bullfrog). Other libraries require front-panel interaction when using the media access port (for example, Spectra Logic Gator).
Make sure you read the operator manual for your robotic library to gain an understanding of its media access port functionality. Libraries such as the ones noted may not be fully compatible with NetBackup’s inject and eject features if not properly handled. Other libraries may not be compatible at all.
SEE ALSO
vmadd(1M), vmdelete(1M), vmpool (1M), vmquery(1M)

Appendix A, Media Manager Man Pages 277
vmcheckxxx(1M)
vmcheckxxx(1M)
NAME
vmcheckxxx - Report the media contents of a robotic library
SYNOPSIS
/usr/openv/volmgr/bin/vmcheckxxx -rt robot_type -rn robot_number [-rh robot_host] [-h volume_database_host] [[-if inventory_filter_value] [-if inventory_filter_value] ...] [-full] [-list]
DESCRIPTION
Report the media contents of a robotic library and optionally compare its contents with the volume configuration.
If no options are specified, the media contents of the robot and the volume configuration are listed along with a list of any mismatches detected.
OPTIONS
-rt robot_typeSpecifies the robot type of the robot to inventory.Valid robot types for NetBackup DataCenter are: none, acs, lmf, odl, rsm, tl4, tl8, tld, tlh, tlm, ts8, tsd, tsh.Valid robot types for NetBackup BusinesServer are: none, rsm, tl4, tl8, tld, ts8, tsd.
-rn robot_numberUnique, logical identification number of the robot to inventory.
-rh robot_hostName of the host which controls the robot. If no host is specified, the host where you execute this command is assumed.
Note The following two options are only applicable for NetBackup DataCenter.
-h volume_database_hostName of the host that has the volume database which contains information about the volumes in a robot. If no host is specified, the host where you execute this command is assumed.
-if inventory_filter_valueSpecifies inventory filter values. Multiple -if options may be specified. The inventory filter value is an ACS scratch pool ID, a TLH volume category, or an LMF barcode prefix.

vmcheckxxx(1M)
278 NetBackup DataCenter Media Manager System Administrator’s Guide for UNIX
The -if and -full options cannot be specified together.
-fullSpecifies full inventory. The -full and -if options cannot be specified together.
-listLists the robot contents.
EXAMPLES
The following command lists the media contents of TLD robot 1 and the volume configuration for that robot on the host named niagra, along with a list of any mismatches that are detected:
vmcheckxxx -rt tld -rn 1 -rh niagra -h niagra
The following command lists the contents of TLH robot 2 that is connected to the host where the vmcheckxxx command was executed:
vmcheckxxx -rt tlh -rn 2 -list
NOTES
Only limited validation of the option parameters is done.
SEE ALSO
vmupdate(1M)

Appendix A, Media Manager Man Pages 279
vmd(1M)
vmd(1M)
NAME
vmd - Media Manager volume daemon
SYNOPSIS
/usr/openv/volmgr/bin/vmd [-v]
DESCRIPTION
vmd manages the volume database, responding to requests to add, change, list, or delete volumes. By maintaining the location of media, vmd allows volumes to be removed and recognized by Media Manager. vmd is used with the Media Manager device daemon (ltid) to determine the location of requested volumes and keep track of the number of mounts and last mount time. vmd is initiated by ltid, but remains running when ltid is terminated using stopltid.
ltid does not require volumes to be defined in the volume database before being used. Automatic mounting of volumes in robotic devices, however, does not take place until volumes are defined and their slot information (for non API robots on NetBackup DataCenter) is entered in the volume database.
A direct interface to the volume database is provided to easily facilitate volume database administrative activities. Graphical, menu-driven, and command line Media Manager utilities are provided.
vmd is also used for remote Media Manager device management and for managing the volume pool, barcode rules, and global device databases.
In addition, for NetBackup DataCenter, vmd is the device allocator (DA) for shared drives. vmd/DA maintains shared drive and host information, such as a list of hosts that are registered to share a drive and which host currently has the drive reserved.
Shared drive information is modified only by requests from ltid. When ltid initializes on a device host, it calls vmd/DA with a list of shared drives. vmd/DA adds these drives and the host name to its configuration, if necessary. Since ltid passes a complete list of drives each time, vmd/DA deletes references to drives for that host when a change in configuration removes them from that host’s shared drive list. This deletion occurs when ltid shuts down gracefully or after it is restarted.
The Internet service number for vmd must be in /etc/services. If you are using NIS (Network Information Service), the entry found in this host’s /etc/services file should be placed in the master NIS server database for services. To override the services file, create the file /usr/openv/volmgr/database/ports/vmd with a single line containing the service number for vmd. The default service number is 13701.

vmd(1M)
280 NetBackup DataCenter Media Manager System Administrator’s Guide for UNIX
OPTION
-v Logs detailed debug information if you create the debug/daemon directory (see ERRORS). Specify this option only if problems occur or if requested by VERITAS support.
ERRORS
vmd logs an error message using syslogd, if there is a copy of vmd running.
vmd logs an error message using syslogd, if the port that it binds to is in use. If this occurs, it may be necessary to override the services file using the mechanism described under DESCRIPTION.
To run vmd in debug mode do the following:
1. Before starting vmd, create the following directory:
/usr/openv/volmgr/debug/daemon
If vmd is running, stop and restart it after creating the directory.
2. Start vmd in verbose mode as follows or put a VERBOSE entry in vm.conf.
/usr/openv/volmgr/bin/vmd -v
3. Check the log in /usr/openv/volmgr/debug/daemon.
If problems persist, you can obtain more debug information on the requestor by creating the following directory: /usr/openv/volmgr/debug/reqlib.
One log per day is created in each debug directory. These logs continue to build until the debug directory is moved or removed, unless you specify a DAYS_TO_KEEP_LOGS entry in vm.conf. Do not remove the debug directory while vmd is running. Running vmd in debug mode should be done only when necessary.
FILES
/usr/openv/volmgr/database/volDB
/usr/openv/volmgr/database/poolDB
/usr/openv/volmgr/database/ruleDB
/usr/openv/volmgr/database/globDB
/usr/openv/volmgr/debug/daemon/*
/usr/openv/volmgr/debug/reqlib/*
SEE ALSO
ltid(1M), vmadm(1M), vmadd (1M), vmchange (1M), vmdelete (1M), vmquery (1M)

Appendix A, Media Manager Man Pages 281
vmdelete(1M)
vmdelete(1M)
NAME
vmdelete - Delete volumes from the volume database
SYNOPSIS
/usr/openv/volmgr/bin/vmdelete [-h volume_database_host] [-m media_id | -v volume_group]
DESCRIPTION
Delete volumes from the volume database.
OPTIONS
Note The following option is applicable only for NetBackup DataCenter.
-h volume_database_hostName of the host that has the volume database which contains information about the volumes in a robot. If no host is specified, the host where you execute the command is assumed.
-m media_idSpecifies the media id of the volume to delete from the volume database.
-v volume_groupSpecifies the volume group to delete. All volumes in this group are deleted from the volume database.
EXAMPLES
The following command deletes a single volume:
vmdelete -m AJS144
The following command deletes all volumes with the volume group name of DELETE_ME:
vmdelete -v DELETE_ME
NOTES
Only limited validation of the option parameters is done.
SEE ALSO
vmadd(1M), vmchange(1M), vmquery(1M)

vmoprcmd(1M)
282 NetBackup DataCenter Media Manager System Administrator’s Guide for UNIX
vmoprcmd(1M)
NAME
vmoprcmd - perform operator functions on drives
SYNOPSIS
/usr/openv/volmgr/bin/vmoprcmd [-h device_host] -down | -up | -upopr | -reset drive_index | -downbyname | -upbyname | -upoprbyname | -resetbyname drive_name | -crawlreleasebyname drive_name | -comment drive_index ["comment"] | -commentbyname drive_name ["comment"] | -assign drive_index mount_request_id | -assignbyname drive_name mount_request_id | -deny | -resubmit mount_request_id | -d [pr | ds | ad] | -help
DESCRIPTION
Perform operator functions on drives. The -h option is not required, but you must choose one and only one of the other options listed below.
OPTIONS
-h device_hostName of the device host where the drives are attached and configured. If no host option is specified, the device host where you execute the command is assumed.For NetBackup BusinesServer, the device host is the host where Media Manager is installed.
-down | -up | -upopr | -reset drive_index-down Sets the drive to the DOWN state, if it is not assigned.-up Sets the drive to UP in Automatic Volume Recognition (AVR) mode. This is the normal mode for all drives.-upopr Sets the drive to UP in Operator (OPR) mode. This mode is normally used only for security reasons. For a drive in a robot, OPR and AVR are treated identically while the robot daemon is up.-reset Resets the specified drive, terminating the drive assignment and taking control away from the assigned user.
Caution Do not reset an assigned drive unless directed by site policy or the system administrator. Terminating an active job can destroy user data.

Appendix A, Media Manager Man Pages 283
vmoprcmd(1M)
-downbyname | -upbyname | -upoprbyname | -resetbyname drive_nameThese options are similar to -down, -up, -upopr, and -reset respectively, except the drive is specified by the drive name instead of drive index.
-comment drive_index ["comment"]Add a comment for the drive. The quotes are required if your comment contains any spaces. If you do not specify comment, any existing comments for the drive are deleted.
-commentbyname drive_name ["comment"]This option is similar to the -comment option, except the drive is specified by the drive name instead of drive index.
-assign drive_index mount_request_idAssign a drive to a mount request.
-assignbyname drive_name mount_request_idThis option is similar to the -assign option, except the drive is specified by the drive name instead of drive index.
-deny | -resubmit mount_request_id-deny Denying a mount request returns an error message to the user.-resubmit Resubmit a mount request. If a pending action message involves a robot, you must correct the problem and resubmit the request that caused the message.
-d [pr | ds | ad]If none of the following optional display parameters are specified, all information is displayed.pr Display pending requests.ds Display the status of drives under control of Media Manager.ad Display additional status of drives under control of Media Manager.
-helpDisplay the usage statement for this command.
-crawlreleasebyname drive_nameThis option forces all hosts (that are registered to use the drive) to issue a SCSI release command to the drive. Issue this option on the host that is the SSO device allocator (DA host) or use the -h option to specify the DA host.
Caution Use this option after a PEND status has been seen in Device Monitor. Do not use this option during backups.

vmoprcmd(1M)
284 NetBackup DataCenter Media Manager System Administrator’s Guide for UNIX
EXAMPLES
The following command sets the drive, with a drive index of 0, to UP mode:
vmoprcmd -up 0
The following command displays the drive status of all drives:
vmoprcmd -d ds
The following command displays pending requests and the drive status of all drives on the device host named crab:
vmoprcmd -h crab
NOTES
Only limited validation of the option parameters is done.
SEE ALSO
tpconfig(1M)

Appendix A, Media Manager Man Pages 285
vmpool(1M)
vmpool(1M)
NAME
vmpool - Manage volume pools
SYNOPSIS
/usr/openv/volmgr/bin/vmpool [-h volume_database_host] -listall [-b] | -listscratch | -add pool_name "description" host uid gid | -change pool_name "description" host uid gid | -delete pool_name | -set_scratch pool_name | -unset_scratch pool_name
DESCRIPTION
Use this command to add, change, delete, or list volume pools.
The -h option is not required, but you must choose one and only one of the other seven options (for example, -listscratch).
OPTIONS
Note The following option is only applicable for NetBackup DataCenter.
-h volume_database_hostName of the host that has the volume database which keeps information about the media in a robot. If no host is specified, the host where you execute the command is assumed.
-listall [-b]List information about all volume pools. You can use the -b option to specify a brief format for volume pool information.
-listscratchList all configured scratch pools.
-add pool_name "description" host uid gidAdd a new volume pool.
-change pool_name "description" host uid gidChange an existing volume pool.
-delete pool_nameDelete a volume pool.
“description”Description of the volume pool. The double quote marks are required if the description contains any spaces.

vmpool(1M)
286 NetBackup DataCenter Media Manager System Administrator’s Guide for UNIX
hostName of the host that will be permitted to request and use volumes in this volume pool.For NetBackup DataCenter to permit only a specific host to access the volume pool, enter the name of that host. To permit any host to access the volume pool, enter ANYHOST. Using the value ANYHOST is recommended.For NetBackup BusinesServer, you can only specify the value ANYHOST.
uidSpecifies the user id of the user that is permitted to request and use volumes in the volume pool. Enter a specific user id to permit only processes running at that user id, to access the volume pool.Enter the default value, -1 (ANY), to permit any user id to access the pool.For a NetBackup or Storage Migrator (NetBackup Datacenter only) volume pool, always enter the user id for root.If you specify a specific user id and a different user id requests the pool, then Media Manager verifies the group id (see gid).
gidEnter the group id of the group that is permitted to request and use volumes in this volume pool.Enter a specific group id to permit only processes running as that group id, to access the volume pool.Enter the default value, -2 (NONE), to permit only the user id specified by uid to request or access the volume pool.
-set_scratch pool_nameIf pool_name is a previously defined volume pool, pool_name will become the scratch pool and its description will not be changed. The NetBackup, DataStore, and None volume pools cannot be changed to scratch pools.If pool_name is a new volume pool, a new pool will be created with "Scratch Pool" as the description. Only one scratch pool at a time can be defined.
-unset_scratch pool_nameUndefines pool_name as the scratch pool and defines it as a regular volume pool. The pool can be deleted using vmpool -delete pool_name.

Appendix A, Media Manager Man Pages 287
vmpool(1M)
EXAMPLES
The following command adds a new pool named MyPool on the host named llama with the default host, user id, and group id permissions:
vmpool -h llama -add MyPool "my description with spaces" ANYHOST -1 -2
The following command lists all pools configured on the host where the command is executed:
vmpool -listall -b
NOTES
Only limited validation of the option parameters is done.
uid and gid should only be used for restricting access to volumes by user or by group on UNIX hosts.

vmquery(1M)
288 NetBackup DataCenter Media Manager System Administrator’s Guide for UNIX
vmquery(1M)
NAME
vmquery - Query the volume database, or assign and unassign volumes
SYNOPSIS
/usr/openv/volmgr/bin/vmquery [-h volume_database_host, ... -h volume_database_host] [-b | -w] -a | -m media_id | -v volume_group | -rn robot_number | -rt robot_type | -mt media_type | -p pool_number | -pn pool_name | -res robot_type robot_number robot_host rob_slot rob_side | -assignbyid media_id media_type pool_number stat asg_time | -deassignbyid media_id pool_number stat
DESCRIPTION
Query the volume database for volume information. The -h, -b, and -w options are not required, but you must choose only one of the other (eleven) options.
The -b or -w option can be used in conjunction with any of the other eleven options, but the -b or -w options cannot be specified together.
OPTIONS
Note The following option is applicable only for NetBackup DataCenter.
-h volume_database_hostName of the host that has the volume database maintaining information about the volumes in a robot. If no host is specified, the host where you execute the command is assumed. Up to 100 volume database hosts can be queried.
-bSpecifies the brief output format for volume information. This option can be used in conjunction with any of the other eleven options.
-wSpecifies the wide output format for volume information. This option includes additional information not shown by the -b option and can be used in conjunction with any of the other eleven options.
-aShow all volumes.

Appendix A, Media Manager Man Pages 289
vmquery(1M)
-m media_idQuery volumes by media id. The media id is a maximum of 6 ASCII characters.
-v volume_groupQuery volumes by volume group. A volume group is a logical grouping that identifies a set of volumes that reside at the same physical location.
-rn robot_numberQuery volumes by robot number. A robot number is a unique, logical identification number for the robot where the volume is located.
-rt robot_typeQuery volumes by the type of the robot where the volume is located. Valid robot types for NetBackup DataCenter are: none, acs, lmf, odl, rsm, tl4, tl8, tld, tlh, tlm, ts8, tsd, tsh.Valid robot types for NetBackup BusinesServer are: none, rsm, tl4, tl8, tld, ts8, tsd.
-mt media_typeQuery volumes by media type. Valid media types for NetBackup DataCenter are: 4mm, 8mm, 8mm2, 8mm3, dlt, dlt2, dlt3, dtf, hcart, hcart2, hcart3, odiskwm, odiskwo, qcart, 4mm_clean, 8mm_clean, 8mm2_clean, 8mm3_clean, dlt_clean, dlt2_clean, dlt3_clean, dtf_clean, hcart_clean, hcart2_clean, hcart3_clean.Valid media types for NetBackup BusinesServer are: 4mm, 8mm, dlt, hcart, qcart, 4mm_clean, 8mm_clean, dlt_clean, hcart_clean.
-p pool_numberQuery volumes by pool number. Pool number is an index into the volume pool. You can use vmpool -listall to determine the index for a given pool name.
-pn pool_nameQuery volumes by pool name.
-res robot_type robot_number robot_host rob_slot rob_sideQuery volumes by residence.
robot_hostName of the host which controls the robot, where the volume is located.
rob_slotThis is the slot number in the robot (robot coordinate 1) where the volume resides.
rob_sideThis is the platter side (robot coordinate 2) for optical disks (A or B). If the volume is not an optical disk, specify zero for rob_side.

vmquery(1M)
290 NetBackup DataCenter Media Manager System Administrator’s Guide for UNIX
-assignbyid media_id media_type pool_number stat asg_timeAssign volume by media id, pool, and status.
statStatus applies only to volumes that are assigned to NetBackup or Storage Migrator.A status of 0 means the volume is assigned to NetBackup regular backups.A status of 1 means the volume is assigned to NetBackup catalog backups.A status of 2 means the volume is assigned to Storage Migrator (valid with NetBackup DataCenter only).A status of 3 means the volume is assigned to Storage Migrator for Microsoft Exchange or Storage Migrator for Windows 2000.
asg_timeApplies only to volumes assigned to NetBackup or Storage Migrator (NetBackup DataCenter only).asg_time is the time when the volume was assigned and is the number of seconds since 00:00:00 UTC, January 1, 1970. asg_time was originally created using the time() call.
-deassignbyid media_id pool_number statUnassign volume by media id, pool, and status.
Caution Unassigning volumes may cause inconsistencies between the application media database and the volume database, leading to possible data loss. You must use a NetBackup application interface (for example, NetBackup Console) to expire the media after unassigning volumes.
EXAMPLES
The following command lists all volume information, in brief format from the volume database on the host named llama:
vmquery -h llama -b -a
The following command assigns volume A23456, which is in pool 1 (NetBackup), and sets the status to 0 and the assign time to 12/31/98 15:50:22:
vmquery -assignbyid A23456 8mm 1 0 915141022
The following command unassigns volume A23456, which is in pool 1 (NetBackup), with a status of 0:
vmquery -deassignbyid A23456 1 0

Appendix A, Media Manager Man Pages 291
vmquery(1M)
NOTES
Only limited validation of the option parameters is done.
SEE ALSO
vmadd(1M), vmchange(1M), vmdelete(1M), vmpool(1M)

vmrule(1M)
292 NetBackup DataCenter Media Manager System Administrator’s Guide for UNIX
vmrule(1M)
NAME
vmrule - Manage barcode rules
SYNOPSIS
/usr/openv/volmgr/bin/vmrule [-h volume_database_host] -listall [-b] | -add barcode_tag media_type pool_name max_mounts “description” | -change barcode_tag media_type pool_name max_mounts “description“ | -delete barcode_tag
DESCRIPTION
Use this command to add, change, delete, or list barcode rules. The -h option is not required, but you must chose one and only one of the other four options.
OPTIONS
Note The following option is only applicable for NetBackup DataCenter.
-h volume_database_hostName of the host that has the volume database which contains information about the volumes in a robot. If no host is specified, the host where you execute the command is assumed.
-listall [-b]List information about all barcode rules. You can use the -b option to specify a brief format for the barcode rule information that is displayed.
-add barcode_tag media_type pool_name max_mounts “description”Add a new barcode rule.
-change barcode_tag media_type pool_name max_mounts “description”Change a barcode rule.
-delete barcode_tagDelete a barcode rule.
barcode_tagSpecifies the barcode prefix which will invoke the barcode rule.
media_typeSpecifies the media type of the volume, a barcode rule attribute. This affects whether the rule will be used and also affects the media type for volumes added using a robot inventory update.

Appendix A, Media Manager Man Pages 293
vmrule(1M)
Valid media types for NetBackup DataCenter are: 4mm, 8mm, 8mm2, 8mm3, dlt, dlt2, dlt3, dtf, hcart, hcart2, hcart3, odiskwm, odiskwo, qcart, 4mm_clean, 8mm_clean, 8mm2_clean, 8mm3_clean, dlt_clean, dlt2_clean, dlt3_clean, dtf_clean, hcart_clean, hcart2_clean, hcart3_clean.Valid media types for NetBackup BusinesServer are: 4mm, 8mm, dlt, hcart, qcart, 4mm_clean, 8mm_clean, dlt_clean, hcart_clean.
pool_nameSpecifies the pool to which the volumes will be added.
max_mountsMaximum number of mounts allowed for this volume (when the volume is added). This option is used only for non-cleaning media. When this limit is exceeded, the volume can only be mounted for read operations.
“description”Description of the barcode rule. The double quote marks are required if the description contains any spaces.
EXAMPLES
The following command creates a rule that defines any tape with a barcode starting with ABC is a DLT tape in the NetBackup pool. The tape can be mounted up to 100 times for writes and is given a description.
vmrule -add ABC dlt NetBackup 100 "DLT cleaning tape"
NOTES
Only limited validation of the option parameters is done.
SEE ALSO
vmupdate(1M)

vmupdate(1M)
294 NetBackup DataCenter Media Manager System Administrator’s Guide for UNIX
vmupdate(1M)
NAME
vmupdate - Inventory the media contents of a robotic library and update the volume database
SYNOPSIS
/usr/openv/volmgr/bin/vmupdate -rt robot_type -rn robot_number [-rh robot_host] [-h volume_database_host] [[-if inventory_filter_value] [-if inventory_filter_value] ...] [-full] [-recommend] [-interactive] [-involgrp volume_group] [-outvolgrp volume_group] [-mt media_type] [-p pool_name] [-use_barcode_rules] [-use_seed] [-mp media_id_prefix] [-no_sides] [-no_format_optical] [-overwrite_labels] [-empty_map]
DESCRIPTION
Inventory the media contents of a robotic library and update the volume database. If no options are specified, the volume configuration is updated to match the robot contents.
OPTIONS
-rt robot_typeSpecifies the robot type of the robot to inventory.Valid robot types for NetBackup DataCenter are: none, acs, lmf, odl, rsm, tl4, tl8, tld, tlh, tlm, ts8, tsd, tsh.Valid robot types for NetBackup BusinesServer are: none, rsm, tl4, tl8, tld, ts8, tsd.
-rn robot_numberUnique, logical identification number for the robot to inventory.
-rh robot_hostName of the host which controls the robot. If no host is specified, the host where you execute this command is assumed.
Note The following two options are only applicable for NetBackup DataCenter.
-h volume_database_hostName of the host that has the volume database which contains information about the volumes in a robot. If no host is specified, the host where you execute this command is assumed.

Appendix A, Media Manager Man Pages 295
vmupdate(1M)
-if inventory_filter_valueSpecifies inventory filter values. Multiple -if options may be specified. The inventory filter value is an ACS scratch pool ID, a TLH volume category, or an LMF barcode prefix.The -if and -full options cannot be specified together.
-fullSpecifies full inventory. The -full and -if options cannot be specified together.
-recommendLists changes required to update the volume configuration.
-interactivePrompts you before updating the volume configuration.
-involgrp volume_groupSpecifies the volume group for media moved into the robot.
-outvolgrp volume_groupSpecifies the volume group for media moved out of the robot.
-mt media_typeSpecifies the media type of the volume.Valid media types for NetBackup DataCenter are: 4mm, 8mm, 8mm2, 8mm3, dlt, dlt2, dlt3, dtf, hcart, hcart2, hcart3, odiskwm, odiskwo, qcart, 4mm_clean, 8mm_clean, 8mm2_clean, 8mm3_clean, dlt_clean, dlt2_clean, dlt3_clean, dtf_clean, hcart_clean, hcart2_clean, hcart3_clean.Valid media types for NetBackup BusinesServer are: 4mm, 8mm, dlt, hcart, qcart, 4mm_clean, 8mm_clean, dlt_clean, hcart_clean.
-p pool_nameSpecifies the name of the volume pool to which new media will be assigned.
-use_barcode_rulesSpecifies that barcode rules will be used for assigning attributes to new media.
-use_seedSpecifies automatic generation of media IDs for media with no barcodes.
-mp media_id_prefixSpecifies the prefix that is used as a seed to generate new media IDs for media with no barcodes.
-no_sidesSpecifies that any new optical media IDs will not always contain platter side A or B.

vmupdate(1M)
296 NetBackup DataCenter Media Manager System Administrator’s Guide for UNIX
-no_format_opticalSpecifies to NOT format new optical media.
-overwrite_labelsSpecifies that existing labels will be overwritten when formatting optical media.
-empty_mapSpecifies that volumes in the media access port (map) will be moved into the robot before the robot inventory is started. This option is only valid for TL8, TLD, or TLM robot types.
EXAMPLES
The following command updates the volume configuration on the host named mymaster to match the contents of TLD robot 7 connected to the host macris:
vmupdate -rt tld -rn 7 -rh macris -h mymaster
NOTES
Only limited validation of the option parameters is done.
SEE ALSO
vmcheckxxx(1M)

297
Media Manager Reference Topics BThis chapter includes the following Media Manager reference and conceptual topics:
� Robot Overview
� Correlating Device Files to Physical Drives When Adding Drives
� Drive Cleaning
� Volume Pools and Volume Groups
� Barcodes
� vmd Security
� How Media Manager Selects a Drive for a Robotic Mount Request
� Administrators Quick Reference
� Media Manager Configuration File (vm.conf)
Robot OverviewIn Media Manager, a robot is a peripheral device that contains a mechanism for the automated mounting and dismounting of media in tape or optical disk drives. A robot may also be called a robotic library, media changer, automated library, jukebox, or tape stacker. Media Manager considers any of these types of devices to be robots. Media Manager software that controls robots is referred to as robotic control software.
Media Manager Robot TypesMedia Manager classifies robots by robot type, according to one of the following:
� The physical characteristics of the robot.
Library usually refers to a larger robot, in terms of slot capacity or number of drives.
Stacker usually refers to a robot with one drive and low media capacity (6 - 12 media slots).

Robot Overview
298 NetBackup DataCenter Media Manager System Administrator’s Guide for UNIX
� The media type commonly used by that class of robots.
4 MM and 8 MM are examples of media types.
� The communication methods used by the underlying robotics (for example, SCSI-based or API robots).
ACS and LMF robots are examples of robots classified by vendor API.
Note ACS, LMF, RSM, TLH, and TLM Media Manager robot types are often grouped together and the term API robot is used to identify these robot types.
The following table lists the Media Manager robot types, with drive and slot limits for each type. Visit the VERITAS support web site (http://www.support.veritas.com) to determine which robot type applies to the model of robot that you are using.
Media Manager Robot Types
Robot Type Description Drive Limits Slot Limits
ACS Automated Cartridge System 1680 (per the ACS Library Software host)
No limit
LMF Library Management Facility 256 No limit
ODL Optical Disk Library 12 490
RSM Removable Storage Manager 256 No limit
TL4 Tape Library 4MM 2 15
TL8 Tape Library 8MM No limit 16000
TLD Tape Library DLT No limit 16000
TLH Tape Library Half-inch 256 No limit
TLM Tape Library Multimedia 250 No limit
TS8 Tape Stacker 8MM 2 21
TSD Tape Stacker DLT 1 14
TSH Tape Stacker Half-inch 1 10

Appendix B, Media Manager Reference Topics 299
Robot Overview
Media Manager Media TypesMedia Manager uses media types to differentiate tape or optical media with differing physical characteristics. Each Media Manager media type may represent a specific physical media type, for example Sony AIT media can have a Media Manager media type of 8MM, 8MM2, or 8MM3.
The following table lists the Media Manager media types:
Media Manager Media Types
Media Type Description
QCART 1/4 inch cartridge tape
HCART 1/2 inch cartridge tape
HCART2 1/2 inch cartridge tape 2
HCART3 1/2 inch cartridge tape 3
4MM 4MM cartridge tape
8MM 8MM cartridge tape
8MM2 8MM cartridge tape 2
8MM3 8MM cartridge tape 3
DLT DLT cartridge tape
DLT2 DLT cartridge tape 2
DLT3 DLT cartridge tape 3
DTF DTF cartridge tape
REWR_OPT Rewritable optical disk
WORM_OPT WORM optical disk
HC_CLN 1/2 inch cleaning tape
HC2_CLN 1/2 inch cleaning tape 2
HC3_CLN 1/2 inch cleaning tape 3

Robot Overview
300 NetBackup DataCenter Media Manager System Administrator’s Guide for UNIX
Use the 8MM2, 8MM3, DLT2, DLT3, HCART2, or HCART3 media types when you have more than one type of 8MM, DLT or 1/2 inch cartridge tape in the same robotic library and you want to differentiate between them.
For example, if a robotic library has DLT7000 and DLT4000 drives, you do not want to accidently load a tape that was written in a DLT7000 drive into a DLT4000 drive. In this case, you can specify the DLT media type for DLT7000 tapes and DLT2 for DLT4000 tapes, assuming the drive types were configured using the same convention.
Note In a robotic library, all of the volumes of a particular vendor media type must be the same Media Manager media type.
In the example that follows for a TLH robot type, the HCART2 media type is not valid. Both volumes must be HCART or both must be HCART2.
Volume TLH Media Type Media Manager Media TypeABC123 3490E HCARTABC156 3490E HCART2
Robot AttributesMedia Manager configures and controls a robot device differently depending on the robot type. The following tables list the attributes that dictate how these robot types differ.
4MM_CLN 4MM cleaning tape
8MM_CLN 8MM cleaning tape
8MM2_CLN 8MM cleaning tape 2
8MM3_CLN 8MM cleaning tape 3
DLT_CLN DLT cleaning tape
DLT2_CLN DLT cleaning tape 2
DLT3_CLN DLT cleaning tape 3
DTF_CLN DTF cleaning tape
Media Manager Media Types (continued)
Media Type Description

Appendix B, Media Manager Reference Topics 301
Robot Overview
Note See the NetBackup release notes or visit the VERITAS support web site for more detailed information on supported peripherals, platforms, and firmware levels tested.
ACS Robot Attributes
Attribute Comment
SCSI Control No
LAN Control Yes
Remote Robot Control No. Each host that has ACS drives attached has robotic control.
NDMP Support Yes
Shared Drives Support Yes
Media Type Support DLT
DLT2
DLT3
HCART
HCART2
HCART3
Barcode Support Yes. Depends on ACS library software. Barcodes are assumed to be the same as the media ID.
Drive Cleaning Support No. Drive cleaning is managed by ACS library software.
Media Access Port Support Yes, for eject only.
Media Manager Tracks Slots No
For More Information See the ACS appendix, “Automated Cartridge System (ACS)” on page 475.
Robot Examples STK 97xx
STK L180
STK L700
STK Powderhorn Silo

Robot Overview
302 NetBackup DataCenter Media Manager System Administrator’s Guide for UNIX
Host Supported Windows (requires STK LibAttach software).
UNIX (not Linux)
LMF Robot Attributes
Attribute Comment
SCSI Control No
LAN Control Yes
Remote Robot Control Yes
NDMP Support No
Shared Drives Support No
Media Type Support HCART
HCART2
HCART3
Barcode Support Yes. Depends on LMF software. Barcodes are assumed to be the same as the media ID.
Drive Cleaning Support No. Managed by the library.
Media Access Port Support Yes
Media Manager Tracks Slots No
For More Information See the LMF appendix, “Fujitsu Library Management Facility (LMF)” on page 523.
Robot Examples Fujitsu F6458
Host Supported UNIX Solaris
ACS Robot Attributes (continued)
Attribute Comment

Appendix B, Media Manager Reference Topics 303
Robot Overview
ODL Robot Attributes
Attribute Comment
SCSI Control Yes
LAN Control No
Remote Robot Control No
NDMP Support No
Shared Drives Support No
Media Type Support REWR_OPT
WORM_OPT
Barcode Support No, but the robot has inventory capability and can report whether a slot has media.
Drive Cleaning Support No
Media Access Port Support Yes
Media Manager Tracks Slots Yes
For More Information See the NetBackup DataCenter Media Manager device configuration guide for UNIX.
Robot Examples HP Optical Disk Libraries
HP SureStore Optical Libraries
Host Supported UNIX
RSM Robot Attributes
Attribute Comment
SCSI Control No
LAN Control No

Robot Overview
304 NetBackup DataCenter Media Manager System Administrator’s Guide for UNIX
Remote Robot Control No
NDMP Support No
Shared Drives Support No
Media Type Support 4MM
8MM
8MM2
8MM3
DLT
DLT2
DLT3
HCART
HCART2
HCART3
QIC
Barcode Support Yes, if the robot supports barcodes. Barcodes are assumed to be the same as the media ID.
Drive Cleaning Support No, drive cleaning is supported using the RSM utilities in Windows 2000.
Media Access Port Support Eject is supported. Inject is not supported, but the Windows 2000 RSM Inject wizard can be used.
Media Manager Tracks Slots No
For More Information See the RSM appendix in the NetBackup Media Manager system administrator’s guide for Windows.
Robot Examples Exabyte 210
Quantum DLTStor
Host Supported Windows 2000
RSM Robot Attributes (continued)
Attribute Comment

Appendix B, Media Manager Reference Topics 305
Robot Overview
TL4 Robot Attributes
Attribute Comment
SCSI Control Yes
LAN Control No
Remote Robot Control No
NDMP Support No
Shared Drives Support No
Media Type Support 4MM
Barcode Support No, but the robot has inventory capability and can report whether a slot has media.
Drive Cleaning Support Yes
Media Access Port Support No
Media Manager Tracks Slots Yes
For More Information See the NetBackup Media Manager device configuration guide for UNIX.
Robot Examples ADIC 4mm DAT Autochanger
HP DAT Autoloader
Host Supported Windows
UNIX
TL8 Robot Attributes
Attribute Comment
SCSI Control Yes
LAN Control No

Robot Overview
306 NetBackup DataCenter Media Manager System Administrator’s Guide for UNIX
Remote Robot Control Yes
NDMP Support Yes
Shared Drives Support Yes
Media Type Support 8MM
8MM2
8MM3
Barcode Support Yes
Drive Cleaning Support Yes
Media Access Port Support Yes
Media Manager Tracks Slots Yes
For More Information See the NetBackup Media Manager device configuration guide for UNIX.
Robot Examples IBM 7331
Qualstar 46120
Exabyte X200
Host Supported Windows
UNIX
TLD Robot Attributes
Attribute Comment
SCSI Control Yes
LAN Control No
Remote Robot Control Yes
NDMP Support Yes
TL8 Robot Attributes (continued)
Attribute Comment

Appendix B, Media Manager Reference Topics 307
Robot Overview
Shared Drives Support Yes
Media Type Support DLT
DLT2
DLT3
DTF
8MM
8MM2
8MM3
HCART
HCART2
HCART3
Barcode Support Yes
Drive Cleaning Support Yes
Media Access Port Support Yes
Media Manager Tracks Slots Yes
For More Information See the NetBackup Media Manager device configuration guide for UNIX.
Robot Examples ADIC Scalar 1000 DLT
ATL 7100
Breece Hill Q210
HP SureStore DLT Library
IBM 3575
Spectra Logic 9000
STK 97xx
Host Supported Windows
UNIX
TLD Robot Attributes (continued)
Attribute Comment

Robot Overview
308 NetBackup DataCenter Media Manager System Administrator’s Guide for UNIX
TLH Robot Attributes
Attribute Comment
SCSI Control No
LAN Control Yes
Remote Robot Control Yes
NDMP Support No
Shared Drives Support Yes
Media Type Support HCART
HCART2
HCART3
Barcode Support Yes. Depends on IBM ATL software. Barcodes are assumed to be the same as the media ID.
Drive Cleaning Support No. Managed by the library.
Media Access Port Support Yes
Media Manager Tracks Slots No
For More Information See the TLH appendix, “IBM Automated Tape Library (ATL)” on page 497.
Robot Examples IBM 3494
Host Supported Windows
UNIX
TLM Robot Attributes
Attribute Comment
SCSI Control No

Appendix B, Media Manager Reference Topics 309
Robot Overview
LAN Control Yes
Remote Robot Control No. Each host that has TLM drives attached has robotic control.
NDMP Support No
Shared Drives Support Yes
Media Type Support 4MM
8MM
8MM2
8MM3
DLT
DLT2
DLT3
DTF
HCART
HCART2
HCART3
REWR_OPT (HP9000-800 only)
WORM_OPT (HP9000-800 only)
Barcode Support Yes. Depends on DAS software. Barcodes are assumed to be the same as the media ID.
Drive Cleaning Support Yes
Media Access Port Support Yes
Media Manager Tracks Slots No
For More Information See the TLM appendix, “ADIC Distributed AML Server (DAS)” on page 511.
Robot Examples ADIC AML/J
ADIC AML/S
ADIC Scalar 10000
TLM Robot Attributes (continued)
Attribute Comment

Robot Overview
310 NetBackup DataCenter Media Manager System Administrator’s Guide for UNIX
Host Supported Windows
UNIX
TS8 Robot Attributes
Attribute Comment
SCSI Control Yes
LAN Control No
Remote Robot Control No
NDMP Support No
Shared Drives Support No
Media Type Support 8MM
8MM2
8MM3
Barcode Support Yes
Drive Cleaning Support Yes
Media Access Port Support No
Media Manager Tracks Slots Yes
For More Information See the NetBackup Media Manager device configuration guide for UNIX.
Robot Examples Exabyte 10x
Exabyte 210
Host Supported Windows
UNIX
TLM Robot Attributes (continued)
Attribute Comment

Appendix B, Media Manager Reference Topics 311
Robot Overview
TSD Robot Attributes
Attribute Comment
SCSI Control Yes
LAN Control No
Remote Robot Control No
NDMP Support Yes
Shared Drives Support No
Media Type Support DLT
DLT2
DLT3
Barcode Support No, but the robot has inventory capability and can report whether a slot has media.
Drive Cleaning Support Yes
Media Access Port Support No
Media Manager Tracks Slots Yes
For More Information See the NetBackup Media Manager device configuration guide for UNIX.
Robot Examples Sun StorEdge L280
Quantum DLTStor
Host Supported Windows
UNIX
TSH Robot Attributes
Attribute Comment
SCSI Control Yes

Robot Overview
312 NetBackup DataCenter Media Manager System Administrator’s Guide for UNIX
Table-Driven RoboticsTable-driven robotics provides support for some new library devices without the need to modify any robotic library control binaries. This feature uses external device mapping files for supported robots and drives.
This means that support for your new or upgraded devices may be accomplished without waiting for a patch from VERITAS. Since the external device mapping files include pertinent information relating to the operation and control of libraries, support for some new devices may only require that you download an updated external mapping file when any device changes are made to your configuration.
LAN Control No
Remote Robot Control No
NDMP Support No
Shared Drives Support No
Media Type Support HCART
HCART2
HCART3
Barcode Support No, but the robot has inventory capability and can report whether a slot has media.
Drive Cleaning Support Yes
Media Access Port Support Yes
Media Manager Tracks Slots Yes
For More Information See the NetBackup Media Manager device configuration guide for UNIX.
Robot Examples IBM 3590 B11 Autoloader
Host Supported UNIX
TSH Robot Attributes (continued)
Attribute Comment

Appendix B, Media Manager Reference Topics 313
Correlating Device Files to Physical Drives When Adding Drives
See “External Device Mapping Files” on page 31 for information on how to download the latest mapping files for your devices.
Robotic Test UtilitiesYou can use the robotic test utilities for configured robots by executing /usr/openv/volmgr/bin/robtest and selecting the desired robotic library.
From each test utility, you can obtain a list of available test commands by entering a question mark.
Use the drstat command to determine the drive addressing parameters for ACS, LMF, TLH, and TLM robot types. This command is available in the robotic test utilities for these robot types.
For most robot types, the drive addressing parameter is the robot drive number.
For ACS robot types, drives are addressed by ACS, LSM, Panel, and Drive number. For TLH robot types, drives are addressed by the IBM device name. For TLM robot types, drives are addressed by the DAS drive name.
Correlating Device Files to Physical Drives When Adding Drives
The following two topics may not be necessary, if you used the Device Configuration Wizard to configure your drives, and the drives and robotic libraries both support device serialization.
� Correlating On Windows Hosts.
� Correlating On UNIX Hosts.
If you are configuring shared drives, see the NetBackup SSO system administrator’s guide for more information.
Correlating On Windows HostsWhen selecting the drive address (for example, robot drive number) for a tape drive, match the logical device name with the drives in the physical drive layout as follows:
1. Note the SCSI target of the drive and check the Windows Tape Devices display to determine which device name (for example, Tape0) was assigned to the drive.
2. Correlate the SCSI target to the drive address using the robot’s interface panel or checking the indicators on the rear panel of the tape drive.

Correlating Device Files to Physical Drives When Adding Drives
314 NetBackup DataCenter Media Manager System Administrator’s Guide for UNIX
3. Determine the physical drive address (for example, number) by checking labels on the robot itself or by using the diagrams in the Robot Drive and Slot Layout appendix. This appendix shows the layout for many of the robots that Media Manager supports.
4. Configure the robot and then add the drives.
When you add the drives, check your notes to ensure that you are assigning the correct drive address to each device path.
5. Optionally, use the appropriate robotic test utility to verify the configuration.
a. Stop the NetBackup Device Manager service (ltid).
b. Start ltid to start the Automatic Volume Recognition process (avrd). Also start the remote robotic control process, if robotic control is not local to this host.
You must stop and restart ltid to ensure that the current device configuration has been activated.
c. Use the robotic test utility to mount a tape on a drive.
d. Use the Device Monitor to verify the tape was mounted on the correct robot drive.
For example, assume you have the following drives in a TLD robot and have the device names configured as follows:
Drive 1: Tape0
Drive 2: Tape1
Drive 3: Tape2
Also assume that in step c you requested that the tape be mounted on Drive 1. If the device name for the drive is correctly configured, the Device Monitor shows the tape mounted on Drive 1. Unload and unmount the tape from Drive 1 using the robotic test utility. It may be necessary to unload the drive with a command from another host or from the drive’s front panel, if the true data path to the drive where the tape was mounted is not on the host with direct robotic control. Repeat the test for each drive.
During your testing, if the Device Monitor shows the tape mounted on a drive other than the drive you specified in the test utility, the device name for that drive is not correctly configured. For instance, if you mounted a tape on Drive 2 and the Device Monitor shows the tape mounted on Drive 3, the device name for Drive 2 is incorrect. Replace the Drive 2 device name (Tape1) with the correct device name (Tape2) for Drive 3. You may need to use a temporary device name while making these changes. In this case, you also know that the device name for Drive 3 is incorrect. Possibly, the device names were swapped during configuration.

Appendix B, Media Manager Reference Topics 315
Correlating Device Files to Physical Drives When Adding Drives
Correlating On UNIX HostsEstablish device file to physical drive correlation during installation when you create the device files for each drive. The following is a general procedure:
1. Determine the physical location of each drive within the robotic library. This is usually shown on the connectors to the drives or in the vendor’s documentation. The Robot Drive and Slot Layout appendix shows drive locations in many of the robots that Media Manager supports.
2. Physically connect the drives to SCSI adapters in your host.
3. Record the adapter and SCSI addresses to which you connected each drive.
4. Create device files for each drive based on the SCSI addresses of the drives and adapters. Add the device file using your notes from step 3 to complete the correlation between device files and physical drive location.
5. Configure the robot and then add the drives.
When you add the drives, check your notes to ensure that you are assigning the correct drive address (for example, robot drive number) to each device path.
6. Optionally, you can use the appropriate robotic test utility to verify the configuration.
a. Stop the device daemon (ltid).
b. Start ltid to start the Automatic Volume Recognition daemon (avrd). Also start the remote robotic control daemon, if robotic control is not local to this host.
You must stop and restart ltid to ensure that the current device configuration has been activated.
c. Use the robotic test utility to mount a tape on a drive.
d. Use the Device Monitor to verify the tape was mounted on the correct robot drive.
For example, assume you have the following drives in a TLD robot and have the device paths configured as follows:
Drive 1: /dev/rmt/0cbn
Drive 2: /dev/rmt/1cbn
Drive 3: /dev/rmt/3cbn

Drive Cleaning
316 NetBackup DataCenter Media Manager System Administrator’s Guide for UNIX
Also assume that in step c you requested that the tape be mounted on Drive 1. If the device path for the drive is correctly configured, the Device Monitor shows the tape mounted on Drive 1. Unload and unmount the tape from Drive 1 using the robotic test utility. It may be necessary to unload the drive with a command from another host or from the drive’s front panel, if the true data path to the drive where the tape was mounted is not on the host with direct robotic control. Repeat the test for each drive.
During your testing, if the Device Monitor shows the tape mounted on a drive other than the drive you specified in the test utility, the device path for that drive is not correctly configured. For instance, if you mounted a tape on Drive 2 and the Device Monitor shows the tape mounted on Drive 3, the device path for Drive 2 is incorrect. Replace the Drive 2 device path (/dev/rmt/1cbn) with the correct device path (/dev/rmt/3cbn) for Drive 3. You may need to use a temporary device path while making these changes. In this case, you also know that the device path for Drive 3 is incorrect. Possibly, the device paths were swapped during configuration.
Drive CleaningFor drives in libraries that are under ACS, LMF, RSM, or TLH robotic control, the library software controls drive cleaning. To manage drive cleaning, use the robot vendor or operating system administrative interfaces for these robots.
Note Library-based cleaning is not supported by Media Manager for most robots, since robotic library and operating systems vendors have implemented this type of cleaning in many different ways.
This topic on drive cleaning covers the following areas:
� Frequency-Based Cleaning
� On-Demand Cleaning
� TapeAlert
� Using a Cleaning Tape
Frequency-Based Cleaning
Note Frequency-based cleaning is not supported for shared drives (SSO), since there is no single device path where tape mount time can be accurately counted.
When you add a drive, you can specify the number of hours (cleaning frequency) a drive will be used between drive cleanings. Media Manager updates the mount time for the drive each time a tape is unmounted. You can also change the cleaning frequency value.

Appendix B, Media Manager Reference Topics 317
Drive Cleaning
If the following conditions are met, drive cleaning occurs when the accumulated mount time exceeds the time you specified for cleaning frequency:
� The drive is in a robotic library that supports cleaning (see “Robot Attributes” on page 300).
� A cleaning tape is configured and available in Media Manager for the robotic library.
� The cleaning tape has cleanings remaining.
Media Manager cleans the drive immediately after the unmount. Drive cleaning never causes an unmount in the middle of an active backup. The mount time is reset after the drive is cleaned. The cleaning frequency value remains the same.
A cleaning can occur within a backup if you are spanning tapes. For example, if cleaning is due after the first tape is full, Media Manager cleans the drive before proceeding to the next tape.
Leaving media in a drive for extended periods does not affect cleaning frequency because Media Manager increments the mount time only when the media is actually assigned to a process.
To set, change or reset the cleaning frequency, use the tpclean command or the Drive Cleaning dialog (see “Cleaning Tape Drives” on page 51).
On-Demand CleaningIf the drive is standalone or if a cleaning tape is not defined, the message NEEDS CLEANING appears in the Comment field of the output from the tpclean -L command or the Drive Cleaning dialog box.
You can then use the tpclean command or the Drive Cleaning dialog (see “Cleaning Tape Drives” on page 51) to clean the drive and reset the accumulated mount time to zero after cleaning the drive.
You can manually clean a drive regardless of the cleaning frequency and accumulated mount time. You can clean standalone and robotic drives if a cleaning tape of the correct media type and residence for the drive has been added to the appropriate volume database.
TapeAlertReactive cleaning using TapeAlert is a function of the tape drive. If a drive supports the TapeAlert feature and TapeAlert is enabled on the drive, Media Manager polls the drive for status from TapeAlert.

Drive Cleaning
318 NetBackup DataCenter Media Manager System Administrator’s Guide for UNIX
TapeAlert allows reactive cleaning for most drive types. Not all platforms, robots, and drives, at all firmware levels, support this type of reactive cleaning. In the cases where TapeAlert is not supported on a particular drive, frequency-based cleaning may be utilized (see “Frequency-Based Cleaning” on page 316 and “TapeAlert and Frequency-based Cleaning” on page 318).
Since TapeAlert provides the same type of cleaning as library-based cleaning (also known as robotic cleaning or auto cleaning), it is recommended that you disable library-based cleaning when using TapeAlert (for most vendor’s robots).
Requirements for TapeAlert and Media Manager
To use TapeAlert with Media Manager, you need the following conditions to be met. No additional configuration is needed.
� The drive must support the TapeAlert feature and the feature must be enabled on the drive.
To determine if drives support TapeAlert, see the VERITAS support site for information on drive support for TapeAlert.
� A cleaning tape is configured and available in Media Manager for the robotic library.
� The cleaning tape has cleanings remaining.
TapeAlert and Media Manager
A drive with TapeAlert knows how many read and write errors it has encountered within a certain time period. Although these errors are recoverable, once a threshold is reached a CLEAN_NOW or CLEAN_PERIODIC flag is set by TapeAlert.
If Media Manager finds either of these flags set, it performs a cleaning at one of the following times:
� At the end of a backup or restore to the drive.
� Prior to the next backup or restore to the drive.
TapeAlert and Frequency-based Cleaning
Using TapeAlert with frequency-based cleaning ensures that a given drive will get cleaned at least every x hours, depending on the cleaning frequency value. In addition the drive may be cleaned sooner, if the CLEAN_NOW or CLEAN_PERIODIC flags are set by the drive.
Using TapeAlert without frequency-based cleaning, ensures that the tape will be cleaned only when the drive sets its CLEAN_NOW or CLEAN_PERIODIC flags.

Appendix B, Media Manager Reference Topics 319
Volume Pools and Volume Groups
Using a Cleaning TapeYou can specify the number of cleanings that are allowed for a cleaning tape. This number is decremented with each cleaning and when it is zero, Media Manager stops using the cleaning tape. At this point, you can use a new cleaning tape or increase the number of cleanings allowed. You can also change this number of cleanings at any time in Media Manager.
Volume Pools and Volume GroupsThis topic on volume pools and groups covers the following areas:
� Volume Pools
� Volume Groups
� Volume Pools and Groups Example
� Scratch Volume Pools
� Moving Volumes
Volume PoolsA volume pool is used to identify a logical set of volumes by usage. Associating volumes with a volume pool protects them from access by unauthorized users, groups, or applications. You can create volume pools for user groups or other reasons; and as you add volumes, associate them with the appropriate pool. You can also move unassigned volumes to a different pool later.
With the exception of the NetBackup and DataStore volume pools, you must create a volume pool before you can add volumes to it. By default, Media Manager creates volume pools, named NetBackup and DataStore.
During initial configuration, it is easiest to create all of your volume pools first if you want to use volume pools other than the NetBackup volume pool. Then as you add volumes, you can assign them to these volume pools.
You can also configure a scratch volume pool (see “Scratch Volume Pools” on page 322).
Volume GroupsA volume group is a logical grouping that identifies a set of volumes that reside at the same physical location. Volume groups are an administration convenience for logically moving multiple volumes (where a logical move means to change the volume attributes to show the new location). Using a volume group lets you move a set of volumes between a
Volume Pools and Volume Groups
320 NetBackup DataCenter Media Manager System Administrator’s Guide for UNIX
robotic library and a standalone location, or delete them from the configuration by specifying the group name, rather than each individual media ID. Volume groups are also convenient for tracking location, such as when a group is moved offsite.
The following are the rules for assigning volume groups:
� All volumes in a group must be the same media type.
However, a media type and its corresponding cleaning media type are allowed in the same volume group (for example, DLT and DLT_CLN).
� All volumes in a robotic library must belong to a volume group. You cannot add volumes to a robotic library without specifying a group or having Media Manager generate a name.
� The only way to clear a volume group name is to move the volume to standalone and not specify a volume group.
� More than one volume group can share the same location. For example, a robotic library can contain volumes from more than one volume group and you can have more than one standalone volume group.
� All members of a group must be in the same robotic library or be standalone. That is, Media Manager will not let you add a group (or part of a group) to a robotic library, if it already exists in another robotic library.
Do not confuse volume pools with volume groups. Remember that
� A volume pool identifies a set of volumes by usage.
� A volume group identifies a set of volumes by physical location and, like the volume pool, is specified when you add the volume. Groups are convenient for updating the configuration when moving volumes (for example from robotic to standalone).
Volume Pools and Groups ExampleThe following figure shows an example with one volume pool (NB_pool) and several volume groups. In this example, volumes can be moved between the groups in the robotic library and the groups that are offsite. All volumes, however, remain in the same pool.

Appendix B, Media Manager Reference Topics 321
Volume Pools and Volume Groups
Volume Pool With Multiple Volume Groups
In the following figure, members of the same volume pools are in different volume groups. The important thing to notice in this example is that the data intended for use by different departments are kept on separate volumes by assigning different volume pools. The volumes in a pool can be in more than one physical location and in more than one volume group.
In this example, the volumes in NB_pool_dept_1 are spread among the rob_A, standalone1, and offsite volume groups. These groups also have volumes from more than one pool (though the volumes in each group must all be the same type).
Robotic
Group 1 Group 2
Group 3 Group 4
Offsite 1
Offsite 2
StandaloneNB_pool
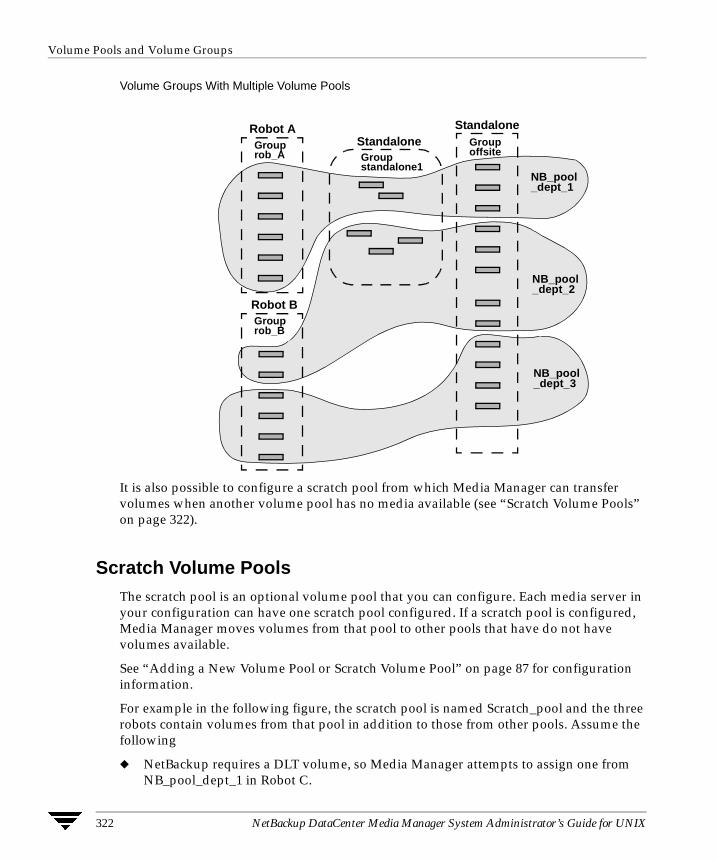
Volume Pools and Volume Groups
322 NetBackup DataCenter Media Manager System Administrator’s Guide for UNIX
Volume Groups With Multiple Volume Pools
It is also possible to configure a scratch pool from which Media Manager can transfer volumes when another volume pool has no media available (see “Scratch Volume Pools” on page 322).
Scratch Volume PoolsThe scratch pool is an optional volume pool that you can configure. Each media server in your configuration can have one scratch pool configured. If a scratch pool is configured, Media Manager moves volumes from that pool to other pools that have do not have volumes available.
See “Adding a New Volume Pool or Scratch Volume Pool” on page 87 for configuration information.
For example in the following figure, the scratch pool is named Scratch_pool and the three robots contain volumes from that pool in addition to those from other pools. Assume the following
� NetBackup requires a DLT volume, so Media Manager attempts to assign one from NB_pool_dept_1 in Robot C.
Group rob_B
Group rob_A
Group offsiteGroup
standalone1
Robot A
Robot B
NB_pool_dept_2
NB_pool_dept_1
StandaloneStandalone
NB_pool_dept_3

Appendix B, Media Manager Reference Topics 323
Volume Pools and Volume Groups
� Robot C has no unassigned volumes available in the NB_pool_dept_1 pool.
Media Manager searches the scratch pool for an unassigned DLT volume in Robot C. If there is an available volume, Media Manager moves it to NB_pool_dept_1 and assigns it to NetBackup. Otherwise, a media unavailable status is logged.
Scratch Pools
The following list contains important notes on scratch pool usage:
� If the scratch pool contains assigned volumes, these volumes remain in the scratch pool. Media Manager does not move assigned volumes to other pools as it does with unassigned volumes.
� Media Manager will not assign volumes while they are in a scratch pool. For example, if a NetBackup policy or schedule specifies the scratch pool, all requests for those volumes are denied.
� Volumes moved from a scratch pool to another pool remain in that new pool. Media Manager does not automatically move it again for any reason, but you can manually reassign it to another volume pool.
Group
rob_A
Group
rob_C
Robot A - TS8 Robot C - DLT
Robot B - TS8
Group
rob_B
NB_pool_dept_1
NB_pool_dept_2
Scratch_pool

Volume Pools and Volume Groups
324 NetBackup DataCenter Media Manager System Administrator’s Guide for UNIX
� To have Media Manager manage the allocation of your volumes to your volume pools, do one of the following:
- Create volume pools as required, but do not add any volumes to the pools.
- Create a scratch pool and add all of your volumes to it. Media Manager will move volumes to the other pools as they are required.
Moving VolumesWhen you move volumes in or out of a robotic library or from one robotic library to another, you must physically and logically move the volume (see the following figure).
� The physical part of the move is done when you insert or remove the volume. For some robot types, you can use Media Manager to physically move the volume (using Inject/Eject options).
� The logical part of the move is done when you use Media Manager to move volumes. Media Manager updates the volume database to show the volume at the new location.
Example of Moving Volumes
Common instances when you move volumes are as follows:
� Replacing full volumes in a robotic library. When a volume is full and there are no more empty slots in the robotic library, you move the full volume to standalone and configure a volume for the empty slot, or move a volume into that slot. Use the same process to replace a defective volume.
2. Move new volumeto robotic
1. Move full volumeto standalone
Example of replacing a full volume witha new volume.
Update the volume configurationReplace the full with the new
1 2
Physical Move Logical Move
full new

Appendix B, Media Manager Reference Topics 325
Barcodes
� Moving volumes from a robotic library to an offsite location or from an offsite location into a robotic library. When you move tapes to an offsite location, you move them to standalone.
� Moving volumes from one robotic library to another (for example, if a robotic library is down).
� Changing the volume group for a volume or volumes.
In one move operation, you can move a single volume, multiple volumes, or combinations of single and multiple volumes. You are limited only in that you cannot move volumes to an invalid location (for example, DLT media to an 8-mm robot).
The best approach is to keep your moves simple by selecting and moving only one type of media at a time to a single destination. For example, if you have to move 8 mm and 4 mm cartridge tapes, do it in separate moves.
BarcodesReading barcodes is a function of the robotic library hardware. When a robotic library has a barcode reader, it scans the media for barcodes and saves the results. This associates the slot number and the barcode with the media in that slot. Media Manager obtains this association from the robotic library.
VERITAS suggests that you use media with barcodes in robots that can read barcodes. Barcodes offer the following advantages:
� Automatic media ID assignment.
When you add new media to a robot, Media Manager is able to assign media IDs according to the criteria that you specify.
� More accurate tracking of volume location.
The Update Volume Configuration option can easily determine which volumes are in a robot.
� Increased performance.
Media Manager functions well whether or not barcodes are used. However, not using barcodes can adversely affect performance for some robots.
A robot that reads barcodes will perform a scan each time it moves a tape. This is normal and is done in order to store the correct barcode in memory or to verify a previously saved barcode. However, if a barcode is missing, the robot will retry the scan multiple times, degrading performance.

Barcodes
326 NetBackup DataCenter Media Manager System Administrator’s Guide for UNIX
Note Volumes in an API robot have a real or a logical barcode. This volume identifier is used as the Media Manager media ID. This volume identifier is the volume serial number in ACS, LMF, TLH, and TLM robots and must be six characters or less. For RSM robots, the last six characters of the media name are used. If these characters contain spaces, only the characters back to the first space are used.
When selecting barcodes for your volumes keep the following points in mind:
� Barcodes appear on labels that you attach to the outside of tape volumes.
Barcodes are not generally used on optical disks and Media Manager does not support barcodes for optical disk libraries (ODL robots).
� Media Manager supports barcodes with a maximum of eight characters (a maximum of six characters in API robots).
� When you buy barcode labels for use with Media Manager, always follow the robotic library vendor’s recommendations. The following are some general guidelines:
Ensure that the barcodes have the correct number of characters.
Barcodes can represent any combination of alpha and numeric characters, but different robots support different lengths of barcodes. See the vendor’s documentation to determine the requirements for a specific robot type.
Use barcodes without spaces (leading spaces, trailing spaces, or spaces between any characters). Otherwise, the robot or Media Manager can have difficulty interpreting them.
� You can match barcodes to media IDs by getting custom labels with six-character barcodes in the same series as your media IDs. For example, to match a set of media IDs from AA0000 to ZZ9999, get barcode labels in that series.
However, except for API robots, the barcode for a tape does not have to match the media ID.
� When a robotic library can contain more than one media type, a good strategy for assigning barcodes is to assign specific characters in the barcode to different media types using media ID generation rules (see “Media ID Generation Rules” on page 328). Another approach is to use barcodes to differentiate between data tapes and cleaning tapes, or between volume pools.
Barcode RulesA barcode rule specifies the criteria for assigning attributes to new robotic volumes. These attributes are assigned by Media Manager according to the barcode on the volume that is detected by the robotic library. In Media Manager, you choose whether to use barcode rules when you set up the robot inventory update operation.

Appendix B, Media Manager Reference Topics 327
Barcodes
The following table shows some example barcode rules. Rules are sorted first according to the number of characters in the barcode tag and then in the order you add them. Two exceptions are the <NONE> and <DEFAULT> rules, which are always at the end of the list.
When a robot update operation uses Media Manager barcode rules and a new barcode is detected in a slot, Media Manager searches the rules starting at the top of the list and checks for a barcode tag that matches the new barcode. If a tag matches, the media type for the rule is checked to ensure that it is compatible with the type you specified for the robot update. If the media type also matches, Media Manager uses the rule’s media type, volume pool, maximum number of mounts (or number of cleanings), and description when it assigns attributes in the volume database.
Note Media Manager will not use barcode rules for barcodes that are being used by existing volumes.
For example, assume that you select the following Update Options for a new 8-mm tape in a TS8 robot:
Media Type: 8MM
Volume Group: 00_000_TS8
Use Barcode Rules: YES
Volume Pool: DEFAULT
Example Barcode Rules
Barcode Tag Media Type Volume PoolMax Mounts/Cleanings Description
0080 8MM b_pool 55 new 008 volumes
DLT DLT d_pool 200 dlt backup
CLD DLT_CLN None 30 dlt cleaning
CLT 8MM_CLN None 20 8-mm cleaning
TS8 8MM t_pool 0 8-mm backup
TS 8MM None 0 8-mm no pool
<NONE> DEFAULT None 0 no barcode
<DEFAULT> DEFAULT NetBackup 0 other barcodes

Barcodes
328 NetBackup DataCenter Media Manager System Administrator’s Guide for UNIX
If a new tape in this robotic library has a barcode of TS800001, Media Manager uses the rule with the barcode tag of TS8 and uses the following attributes for the tape:
Media ID: 800001 (last six characters of barcode)
Volume Group: 00_000_TS8
Volume Pool: t_pool
Max Mounts: 0 (infinite)
If a new tape has a barcode of TS000001, Media Manager uses the rule with the barcode tag of TS and the attributes for the tape are:
Media ID: 000001 (last six characters of barcode)
Volume Group: 00_000_TS8
Volume Pool: None
Max Mounts: 0 (infinite)
Media ID Generation Rules
Note To use media ID generation rules, the robot must support barcodes and the robot cannot type be cannot be ACS, LMF, RSM, TLH, or TLM.
Using media ID generation rules allows you to manage your barcodes when you do not want to use the default rule for media ID generation. You control how Media Manager media IDs are created by defining rules that specify which characters of a barcode on tape will be used in the media ID. You also can specify that alphanumeric characters are to be inserted into the ID.
For example, two eight-character barcodes might be S00006L1 and 000006L1. If you do not specify media ID generation rules, Media Manager uses the right-most six characters of the barcode to create its media IDs. In this example, the same media ID for the two barcodes would be created.
Rules can be defined with respect to a robot and barcode lengths. Multiple barcode creation entries can be specified, allowing the ID generation to be specific for each robot; or for each barcode format having different numbers of characters in the barcode. This allows flexibility for multi-media.

Appendix B, Media Manager Reference Topics 329
vmd Security
vmd SecurityMedia Manager vmd security works in conjunction with NetBackup authentication/authorization security to control user access to vmd (the Media Manager volume daemon).
Media Manager vmd security consists of the following levels of security. Each successive level provides more security. These levels are explained in the following topics:
� “Media Manager vmd Authentication/Authorization” on page 331.
� “Media Manager Server-Based vmd Security” on page 332.
� “Media Manager Enhanced vmd Authorization” on page 333.
Possible NetBackup and Media Manager ConflictsMedia Manager authentication/authorization may affect systems where NetBackup authentication/authorization has been enabled.
Connections to vmd will fail if the following are all true:
� Authentication/authorization are enabled.
� An AUTHORIZATION_REQUIRED entry is present in vm.conf.
� The caller of vmd does not have the required permission to use vmd functions.
If authentication/authorization is needed in NetBackup but not in Media Manager, you can do one of the following:
� Add SERVER entries in vm.conf.
� Have no SERVER and no AUTHORIZATION_REQUIRED entries in vm.conf.
NetBackup Authentication/AuthorizationNetBackup authentication verifies NetBackup client to server access and also controls access to the services available on that host.
NetBackup authorization verifies if a NetBackup administration user has permission to use the services available on that host. Authorization provides additional security over the security provided by authentication.
The steps you use to set up security levels for your NetBackup master server apply generally to setting up security for Media Manager media servers. See the NetBackup system administrator's guide (UNIX or Windows) for more information including the following:
� Explanations of authentication and authorization.

vmd Security
330 NetBackup DataCenter Media Manager System Administrator’s Guide for UNIX
� Explanations of Enhanced Authentication.
� Explanations of Enhanced Authorization.
� Definition of the NetBackup configuration file (bp.conf).
� Definitions of the methods.txt, methods_allow.txt, and authorize.txt files.
� Information on bpauthsync(1M), vopied(1M), and vopie_util(1M)man pages.

Appendix B, Media Manager Reference Topics 331
vmd Security
Media Manager vmd Authentication/AuthorizationMedia Manager security for vmd works in conjunction with the following to control access to vmd:
� NetBackup authentication/authorization
� Media Manager server-based security
� Media Manager enhanced authorization
The following two tables provide an overview of Media Manager vmd security. Server Name, used in these matrices, refers to SERVER entries in the vm.conf file.
See “Media Manager Configuration File (vm.conf)” for more information about SERVER, AUTHORIZATION_REQUIRED, and PREFERRED_GROUP entries.
No vm.conf Entry Present
The following table describes Media Manager vmd security when there is no AUTHORIZATION_REQUIRED entry in the vm.conf file.
If Authentication is not enabled (see the fourth row in the table), the resulting security reduces to Media Manager server-based security.
vmd Security Matrix - No AUTHORIZATION_REQUIRED Entry in vm.conf
Access to vmdFunctionality?
Server Nameis in vm.conf
No Server Namesin vm.conf(or there is novm.conf File)
Server Name is Notin vm.conf (otherServer Names are)in vm.conf
Authentication Failed Denied Denied Denied
Authentication EnabledandUser is Authorized
Allowed Allowed Allowed (overridesserver-basedsecurity)
Authentication EnabledandUser is Not Authorized
Allowed (usesserver-basedsecurity)
Allowed (usesserver-basedsecurity)
Denied
Authentication Not Enabled Allowed Allowed Denied

vmd Security
332 NetBackup DataCenter Media Manager System Administrator’s Guide for UNIX
vm.conf Entry Present
The following table describes Media Manager vmd security when there is an AUTHORIZATION_REQUIRED entry in the vm.conf file.
Your level of security is dependent upon your use of the following:
� Authentication
� Authorization
� SERVER entries
Media Manager Server-Based vmd SecuritySERVER entries in vm.conf are used for server-based Media Manager vmd security. Without any SERVER entries present on a particular host and without the AUTHORIZATION_REQUIRED entry present, other hosts can access vmd on the host. You can add SERVER entries allowing only specific hosts to remotely access vmd.
If a host’s vm.conf file contains any SERVER entries, there must also be a SERVER entry for that host or it will not be able to manage its own devices.
The fourth row of the table in “No vm.conf Entry Present” on page 331 provides an overview of Media Manager server-based vmd security.
vmd Security Matrix - AUTHORIZATION_REQUIRED Entry is in vm.conf
Access to vmdFunctionality?
Server Nameis in vm.conf
No Server Namesin vm.conf
Server Name is Notin vm.conf (otherServer Names are)in vm.conf
Authentication Failed Denied Denied Denied
Authentication EnabledandUser is Authorized
Allowed Allowed Allowed (overridesserver-basedsecurity)
Authentication EnabledandUser is Not Authorized
Allowed (usesserver-basedsecurity)
Denied (disablesserver-basedsecurity)
Denied
Authentication Not Enabled Allowed Denied Denied

Appendix B, Media Manager Reference Topics 333
How Media Manager Selects a Drive for a Robotic Mount Request
Media Manager Enhanced vmd AuthorizationThe set of commands that Media Manager Enhanced Authorization allows non-root users to execute are limited to those commands that interact with vmd. Other administration commands that manipulate the Media Manager database and configuration files directly can not be used by non-root administrators through Enhanced Authorization.
The Media Manager commands that are allowed with Enhanced Authorization follow:
� vmadd
� vmchange
� vmdelete
� vmoprcmd
� vmpool
� vmquery
� vmrule
Setting up Enhanced Authorization
If you want to allow nonroot users to administer Media Manager or control user access to administer Media Manager vmd commands, use one of the following methods:
� See the Managing NetBackup chapter of the UNIX NetBackup system administrator’s guide for instructions on using the nonroot_admin script.
� See the Enhanced Authentication and Authorization chapter of the UNIX NetBackup system administrator’s guide for instructions on using enhanced authentication and authorization.
How Media Manager Selects a Drive for a Robotic Mount Request
When a mount request is issued, ltid queries vmd on the volume database host(s) for the media ID specified. If the media ID is found, vmd returns the location of the media (which robotic library and the storage slot number, if applicable).
If a drive exists that meets the following criteria, the mount request is forwarded to the appropriate robotic daemon.
� The drive is configured.
� The drive is in the robotic library that contains the media.
Administrators Quick Reference
334 NetBackup DataCenter Media Manager System Administrator’s Guide for UNIX
� The drive allows the requested media density.
The robotic daemon is managing the drives and requests for locally-attached or shared drives in the robotic library that contains the requested media. The daemon (for example, tldd) does the following:
� Determines which of the drives are currently available. Some of the things that are checked to determine drive availability follow. Is the drive
- Configured as DOWN?
- Already assigned?
- Of a compatible type?
- Reserved by another host?
� Picks the drive that was used least recently.
The time stamp used by drive selection is contained in robotic daemon memory. If the daemon is stopped and restarted, everything starts out equal again. The first drive as shown by tpconfig -d in the drive configuration will be used first, then the second, and so on. This time stamp is based on the dismount time, not the mount time.
When selecting drives among a set of drives and some of the drives are shared (SSO) and some are not, a non-shared drive is chosen first (if one is available). This is so the shared drives can be used on other hosts that are sharing the drives.
Administrators Quick ReferenceThe following tables provide a quick reference to information that you will frequently use while using Media Manager.
Media Manager CommandsSee “Media Manager Man Pages” on page 219 for detailed information on most of the commands shown in the following table.
The jnbSA command is located in the directory /usr/openv/netbackup/bin. The other commands listed are located in /usr/openv/volmgr/bin.
Commands
Command Description
Administrator Utilities

Appendix B, Media Manager Reference Topics 335
Administrators Quick Reference
jnbSA Starts the Java media and device management, and device monitor administrative interfaces.
vmadm Starts the character-based, menu driven media management utility.
tpconfig Starts the character-based, menu driven device utility for device configuration.
robtest Starts the robotic test utilities.
NOTE: This utility is not officially supported.
Starting Daemons
acsd The Automated Cartridge System robotic daemon. This daemon is started by ltid.
avrd The Automatic Volume Recognition daemon. This daemon is started by ltid.
lmfcd Starts the Library Management Facility robotic-control daemon. This daemon is started by ltid.
lmfd The Library Management Facility robotic daemon. This daemon is started by ltid.
ltid Starts the Media Manager device daemon. Starting ltid also starts the robotic, robotic control, and Media Manager volume and avrd daemons.
odld The Optical Disk Library robotic daemon. This daemon is started by ltid.
tl4d The Tape Library 4MM robotic daemon. This daemon is started by ltid.
tl8cd Starts the Tape Library 8MM robotic-control daemon. This daemon is started by ltid.
tl8d The Tape Library 8MM robotic daemon. This daemon is started by ltid.
tldcd Starts the Tape Library DLT robotic-control daemon. This daemon is started by ltid.
tldd The Tape Library DLT robotic daemon. This daemon is started by ltid.
tlhcd Starts the Tape Library Half-inch robotic-control daemon. This daemon is started by ltid.
Commands (continued)
Command Description

Administrators Quick Reference
336 NetBackup DataCenter Media Manager System Administrator’s Guide for UNIX
tlhd The Tape Library Half-inch robotic daemon. This daemon is started by ltid.
tlmd The Tape Library Multimedia daemon. This daemon is started by ltid.
ts8d The Tape Stacker 8MM robotic daemon. This daemon is started by ltid.
tsdd The Tape Stacker DLT robotic daemon. This daemon is started by ltid.
tshd The Tape Stacker Half-inch robotic daemon. This daemon is started by ltid.
vmd The Media Manager volume daemon. This daemon is started by ltid.
Stopping Daemons
kill pid Stops the process for the daemon with the specified pid (process id).
This is a system command with a path of /usr/bin/kill or /bin/kill.
lmfcd -t Stops the Library Management Facility robotic control daemon.
stopltid Stops the device, robotic, and robotic-control daemons.
tldcd -t Stops the Tape Library DLT robotic-control daemon.
tl8cd -t Stops the Tape Library 8MM robotic-control daemon.
tlhcd -t Stops the Tape Library Half-inch robotic-control daemon.
Monitoring Processes
vmps Lists the active processes.
Commands (continued)
Command Description
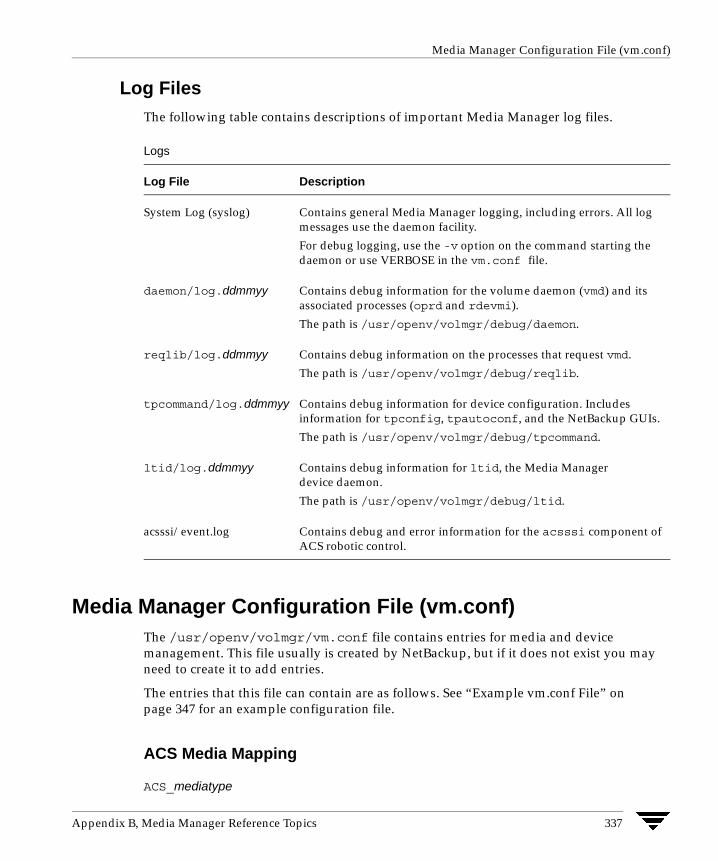
Appendix B, Media Manager Reference Topics 337
Media Manager Configuration File (vm.conf)
Log FilesThe following table contains descriptions of important Media Manager log files.
Media Manager Configuration File (vm.conf)The /usr/openv/volmgr/vm.conf file contains entries for media and device management. This file usually is created by NetBackup, but if it does not exist you may need to create it to add entries.
The entries that this file can contain are as follows. See “Example vm.conf File” on page 347 for an example configuration file.
ACS Media Mapping
ACS_mediatype
Logs
Log File Description
System Log (syslog) Contains general Media Manager logging, including errors. All log messages use the daemon facility.
For debug logging, use the -v option on the command starting the daemon or use VERBOSE in the vm.conf file.
daemon/log.ddmmyy Contains debug information for the volume daemon (vmd) and its associated processes (oprd and rdevmi).
The path is /usr/openv/volmgr/debug/daemon.
reqlib/log.ddmmyy Contains debug information on the processes that request vmd.
The path is /usr/openv/volmgr/debug/reqlib.
tpcommand/log.ddmmyy Contains debug information for device configuration. Includes information for tpconfig, tpautoconf, and the NetBackup GUIs.
The path is /usr/openv/volmgr/debug/tpcommand.
ltid/log.ddmmyy Contains debug information for ltid, the Media Manager device daemon.
The path is /usr/openv/volmgr/debug/ltid.
acsssi/event.log Contains debug and error information for the acsssi component of ACS robotic control.

Media Manager Configuration File (vm.conf)
338 NetBackup DataCenter Media Manager System Administrator’s Guide for UNIX
Maps ACS (Automated Cartridge System) media types to Media Manager media types.
For more information, see the appendix, “Automated Cartridge System (ACS)” on page 475.
ACSSEL Listening Socket
ACS_SEL_SOCKET = socket_name
By default, acssel listens on socket name 13740. You can use this entry to change the default.
For more information, see the appendix, “Automated Cartridge System (ACS)” on page 475.
ACSSSI Listening Socket
ACS_SSI_SOCKET = ACS_ library_software_host socket_name
By default, acsssi listens on unique, consecutive socket names starting with 13741. To specify socket names on a ACS library software host basis, use this entry.
For more information, see the appendix, “Automated Cartridge System (ACS)” on page 475.
ACSSSI Host Name
ACS_SSI_HOSTNAME = host
Specifies the host where RPC return packets from ACS library software are routed for ACS network communications. By default, the local host name is used.
See the appendix, “Automated Cartridge System (ACS)” on page 475 for more information.
Authorization Required
AUTHORIZATION_REQUIRED
If this entry is specified, Media Manager and NetBackup utilities must have authorization to connect to vmd; or a SERVER entry must be present in the vm.conf file. This entry is recommended for maximum security.
If this entry is not specified, Media Manager and NetBackup utilities may connect to vmd without specific authorization, except in the case when a non-matching SERVER entry is present in vm.conf.

Appendix B, Media Manager Reference Topics 339
Media Manager Configuration File (vm.conf)
AVRD Scan Delay
AVRD_SCAN_DELAY = number_of_seconds
If this entry is specified, avrd will wait number_of_seconds between normal scan cycles. You can use this entry to minimize tape mount times. Without this entry present, a mount request is delayed by an average of 7.5 seconds.
The minimum for number_of_seconds is 1. The maximum is 180. 0 is converted to 1 second. The default is 15 seconds. Using a value greater than the default will delay mount requests and the displaying of drive status information in the Device Monitor.
Caution Setting number_of_seconds to a value that allows media to be changed within one scan cycle could cause NetBackup to be unaware of a media change and cause a loss of data.
Client Port Range
CLIENT_PORT_WINDOW = start end
Specifies the range of nonreserved ports on this computer that are used for connecting to vmd on other computers.
For example the following entry permits ports from 4800 through 5000:
CLIENT_PORT_WINDOW = 4800 5000
If you specify 0 for start, the operating system determines the nonreserved port to use. If you do not specify a CLIENT_PORT_WINDOW entry, the operating system determines the nonreserved port.
DAS Client Name
DAS_CLIENT = client_name
Specifies the DAS client name that the TLM robot uses for communications with the DAS server. By default this is the host name of the Media Manager server.
See the appendix, “ADIC Distributed AML Server (DAS)” on page 511 for more information.
Days To Keep Debug Logs
DAYS_TO_KEEP_LOGS = days

Media Manager Configuration File (vm.conf)
340 NetBackup DataCenter Media Manager System Administrator’s Guide for UNIX
Specifies the number of days to keep debug logs before vmd deletes them. 0 means that the logs are not deleted. The default is 0.
Device Host for Configuration Analyzer
DEVICE_HOST = host_name
Specifies the hosts that are included in the configuration analyzer interface. These entries may be manually added. Entries are automatically added when vmd (the volume daemon) restarts, based on robot host names appearing in volume groups. These entries have no effect on the Media and Device Management interface’s host lists.
Disallow Non-NDMP Request on NDMP Drive
DISALLOW_NONNDMP_ON_NDMP_DRIVE
In NetBackup, all read types of operations (restore, the read-portion of duplicates, import, and verify) and the write-portion of duplicates are not scheduled. Therefore these operations compete for available drives.
NetBackup attempts to use an available drive based on the type of request:
� For a NDMP backup or restore request, the drive must be a NDMP drive.
� For a non-NDMP request of any kind, NetBackup always tries to find an available non-NDMP drive. But, if a non-NDMP drive is not available and a NDMP drive is available, the operation will be done using the slower NDMP drive.
If a DISALLOW_NONNDMP_ON_NDMP_DRIVE entry is specified on master or media servers, NetBackup will not assign a non-NDMP request to available NDMP drives.
Be aware when specifying this entry, that because some operations may have to wait for available non-NDMP drives to become available, the media mount timeout value may have to be increased (by using an entry in the UNIX bp.conf file or in the registry on Windows).
Do Not Eject Standalone Tapes
DO_NOT_EJECT_STANDALONE
If this entry is specified, tapes in any standalone drives will not be ejected when a backup has completed (tapes will be ejected, if end of media is reached during a backup). This entry can be used in a NetBackup environment, where it is desirable to keep a standalone drive ready after successful backups are performed.

Appendix B, Media Manager Reference Topics 341
Media Manager Configuration File (vm.conf)
Enable Automatic Path Remapping
ENABLE_AUTO_PATH_CORRECTION
Enables automatic device path remapping. With this entry when the device daemon (ltid) is started, an attempt is made to discover attached devices and automatically update the device configuration for any device paths that are incorrect in the device configuration.
New devices will not be added. Using this option will increase the amount of time it takes for ltid to restart.
This option is ignored on (Sequent) DYNIX/ptx and (NCR) MP-RAS servers.
Inventory Robot Filter
INVENTORY_FILTER = robot_type robot_number mode value1 [value2 ...]
Used for robotic inventory filtering in ACS, TLH, or LMF robot types. This entry must be added to the configuration file on the media server where you plan to do the robotic inventory.
See the appendices, “Automated Cartridge System (ACS)” on page 475, “IBM Automated Tape Library (ATL)” on page 497, or “Fujitsu Library Management Facility (LMF)” on page 523 for more information.
Note This entry is required if you are doing a robot inventory for an ACS robot and the ACS library software host is an STK Library Station.
robot_type can be ACS, TLH, or LMF.
robot_number is the number of the robot as configured in Media Manager.
mode is BY_ACS_POOL for ACS, BY_CATEGORY for TLH, or BY_PREFIX for LMF robot types.
The following are some examples:
INVENTORY_FILTER = ACS 0 BY_ACS_POOL 4 5INVENTORY_FILTER = TLH 0 BY_CATEGORY FFFA CDB0INVENTORY_FILTER = LMF 0 BY_PREFIX zzz yy
LMF Media Mapping
LMF_mediatype
Maps Fujitsu LMF media types in LMF robots to Media Manager media types.

Media Manager Configuration File (vm.conf)
342 NetBackup DataCenter Media Manager System Administrator’s Guide for UNIX
See the appendix, “Fujitsu Library Management Facility (LMF)” on page 523 for more information.
Media ID Generation
MEDIA_ID_BARCODE_CHARS = robot_num barcode_length media_ID_rule
Note To use this entry, the robot must support barcodes and the robot type cannot be ACS, LMF, RSM, TLH, or TLM.
This entry controls Media Manager media ID generation. You choose how IDs are created by defining rules that specify which characters of a barcode on tape will be used. You also can specify alphanumeric characters to be inserted in the ID.
Multiple barcode creation entries can be specified, allowing the media ID generation to be specific for each robot; or for each barcode format having different numbers of characters in the barcode. This allows flexibility for multi-media.
If MEDIA_ID_BARCODE_CHARS entries are not present or you enter an invalid entry, Media Manager uses the rightmost six characters of the barcode to create its media ID.
robot_num is the robot number.
barcode_length is the length of the barcode.
A media_ID_rule consists of a maximum of six fields delimited by colons. Numbers in the fields of the rule define the positions of the characters in the barcode that are to be extracted (numbering is from the left). For example, 2 in a field extracts the second character from the barcode. The numbers can be specified in any order.
Characters prefixed by # in a field result in that character being inserted in that position in the generated ID. Any alphanumeric characters that are specified must be valid for a media ID. You can use rules to create media IDs of many varied formats, but keep in mind that the difference in the label on the media and the generated media ID may make it difficult to manage your media. The following is an example rule and the resulting media ID:
Barcode on the tape: 032945L1Media ID rule: #N:2:3:4:5:6Generated media ID: N32945
Also see “Media ID Generation Rules” on page 328.
Media ID Prefix
MEDIA_ID_PREFIX = media_id_prefix

Appendix B, Media Manager Reference Topics 343
Media Manager Configuration File (vm.conf)
Defines the media ID prefixes to use for media without barcodes. You add the media to a robot with Update Volume Configuration option.
See “Changing the Update Options” on page 141.
Preferred Group
PREFERRED_GROUP = netgroup_name
This entry is used by all callers in Media Manager and NetBackup (other than bpgetmedia and bptm) for authentication/authorization for vmd. netgroup_name is case sensitive.
If this entry is specified, a check is made to determine if the user is in the netgroup using the innetgr() function (refer to the innetgr man page). If a PREFERRED_GROUP entry is not specified or the user is not a member of the netgroup, the local group name is obtained.
The following is an example:
PREFERRED_GROUP = nbadmins
Note Netgroups are not supported on Sequent servers.
Prevent Media Removal (TL8 Robots)
PREVENT_MEDIA_REMOVAL
Note Specifying this entry changes the default operation for TL8 robots. Without this entry present, Media Manager allows the removal of media.
If this entry is specified, TL8 robots will execute the SCSI command PREVENT MEDIUM REMOVAL. You then will not be able to open the robot's main door or gain access to the media access port while the robotic control daemon is running. You can override this action by doing one of the following:
� Use the test utility and execute allow media removal.
� Use inject/eject for access, when adding or moving volumes.
Random Port Numbers
RANDOM_PORTS = YES|NO
Specifies whether Media Manager chooses port numbers randomly or sequentially when it requires a port number for communication with Media Manager on other computers.

Media Manager Configuration File (vm.conf)
344 NetBackup DataCenter Media Manager System Administrator’s Guide for UNIX
� If RANDOM_PORTS = YES (the default), Media Manager chooses port numbers randomly from those that are free in the allowed range. For example, if the range is from 1024 through 5000, Media Manager chooses randomly from the numbers in this range.
� If RANDOM_PORTS = NO, Media Manager chooses numbers sequentially, starting with highest number that is available in the allowed range. For example, if the range is from 1024 through 5000, Media Manager chooses 5000 (assuming it is free). If 5000 is being used, port 4999 is chosen.
By default, a RANDOM_PORTS entry is not present in the Media Manager configuration file. This means that Media Manager uses the random method for selecting port numbers.
If you are specifying RANDOM_PORTS = NO in the NetBackup configuration file, you should also specify RANDOM_PORTS = NO in the Media Manager configuration file.
Required Network Interface
REQUIRED_INTERFACE = host_name
Specifies the network interface that Media Manager uses when connecting to another Media Manager server. A Media Manager server can have more than one network interface and by default, the operating system determines the one to use. To force Media Manager connections to be through a specific network interface, use this entry and specify the network host name of that interface.
In the following example, host1 is the network host name of the interface.
REQUIRED_INTERFACE = host1
Refer to the NetBackup system administrator’s guide for more information on NetBackup network configuration.
Scratch Pool Configuration
SCRATCH_POOL = pool_name
Configures the specified volume pool as the scratch pool. The scratch pool is a special volume pool from which media is moved as needed into volume pools that have no available media.
You can specify any scratch pool name, except the names: NetBackup, DataStore, or None. If the specified volume pool does not exist, Media Manager creates it and sets the host, user, group, and description for the pool to ANYHOST, root, NONE, and Scratch Pool, respectively.
If you subsequently delete the SCRATCH_POOL entry, the specified volume pool will no longer be the scratch pool.

Appendix B, Media Manager Reference Topics 345
Media Manager Configuration File (vm.conf)
See “Adding a New Volume Pool or Scratch Volume Pool” on page 87.
Server Entry
SERVER = host_name
This entry is used for security and specifies which hosts can monitor and control devices on this host. Without any SERVER entries and authentication enabled, any host can manage the devices and volumes on the local host.
For security you can add entries allowing only specific hosts to remotely access the devices. If a host’s vm.conf file contains any SERVER entries, there must also be a SERVER entry for that host or it will not be able to manage its own devices.
SSO DA Re-register Interval
SSO_DA_REREGISTER_INTERVAL = minutes
This entry is used only with the optional shared storage option (SSO) feature.
ltid on a scan host periodically re-registers its shared drives with vmd/DA to ensure that it is still providing the drive scanning function on behalf of other hosts sharing the drives. This re-registration allows conditions such as a device allocator restart to have minimal impact on use of shared drives.
5 minutes is the default for the re-registration interval. You can use this entry to tune this interval. After adding this entry, ltid must be stopped and restarted for the change to take effect.
SSO DA Retry Time
SSO_DA_RETRY_TIMEOUT = minutes
This entry is used only with the optional shared storage option (SSO) feature.
If ltid encounters problems during communications with vmd/DA, or a failure while attempting to reserve a shared drive, it delays before trying again.
3 minutes is the default for the delay. You can use this entry to tune this delay period. After adding this entry, ltid must be stopped and restarted for the change to take effect.
SSO Host Name
SSO_HOST_NAME = host_name
This entry is used only with the optional shared storage option (SSO) feature.

Media Manager Configuration File (vm.conf)
346 NetBackup DataCenter Media Manager System Administrator’s Guide for UNIX
Specifies the name used by the current host to register, reserve, and release shared drives with vmd/DA. The default is the local host name.
SSO Scan Ability Factor
SSO_SCAN_ABILITY = scan_factor
This entry is used only with the optional shared storage option (SSO) feature.
A scan ability factor ranges from 1 to 9, with a default value of 5. This factor allows the assignment of scan hosts to be prioritized, if a drive’s scan host changes. Scan hosts that have a higher scan ability factor are chosen first.
TLH Media Mapping
TLH_mediatype
Maps IBM ATL media types in Tape Library Half-inch (TLH) robots to Media Manager media types.
See the appendix, “IBM Automated Tape Library (ATL)” on page 497 for more information.
TLM Media Mapping
TLM_mediatype
Maps DAS media types in Tape Library Multimedia (TLM) robots to Media Manager media types.
See the appendix, “ADIC Distributed AML Server (DAS)” on page 511 for more information.
Verbose Message Logging
VERBOSE
Causes most Media Manager daemons to be started with verbose logging enabled.
Use this option only if problems occur or if requested by VERITAS support. After the problem is resolved, remove any debug logs that were created or add a DAYS_TO_KEEP_LOGS entry.

Appendix B, Media Manager Reference Topics 347
Media Manager Configuration File (vm.conf)
Example vm.conf FileThe following is an example of a vm.conf file, on host yak:
SERVER = yak
SERVER = whale
MEDIA_ID_PREFIX = NV
MEDIA_ID_PREFIX = NETB
ACS_3490E = HCART2
SCRATCH_POOL = ScratchPool

Media Manager Configuration File (vm.conf)
348 NetBackup DataCenter Media Manager System Administrator’s Guide for UNIX
349
Using tpconfig CThis appendix explains how to configure drives and robots using the device management configuration utility, tpconfig. This menu-driven utility creates and updates the configuration files that define drives and robots to Media Manager.
There are also other Media Manager interfaces available to configure drives and robots (see “Administrator and User Interfaces” on page 2). The terminology, general concepts, and results are the same, regardless of which interface you use.
Terms and ConceptsThe following Media Manager terms and concepts are used when configuring drives and robots.
Robot Number
A robot number is the unique, logical identification number of a robot. You assign it when you add a robot to the configuration. tpconfig prompts you to enter a number or accept the next available robot number which it displays. This number identifies the robot in displays and listings, and it follows the robotic type in parentheses, such as TL8(2). It is also used when entering the robot's media in the volume database, as described in “Managing Media” on page 73.
If you are configuring robots on multiple systems, robot numbers must be unique. If you are connecting drives from a robot, for example, drives in a Tape Library 8MM (TL8), to multiple systems; you must specify the same robot number for the robot on both systems.
Robotic Control Path
The control path to a robot is through a SCSI connection. For most robots, you or the operating system creates this path in the /dev directory when you add a robot to the configuration. When tpconfig prompts you, enter the path to the robotic control as found in the /dev directory. If the entries do not exist, see the NetBackup Media Manager device configuration guide.

Terms and Concepts
350 NetBackup DataCenter Media Manager System Administrator’s Guide for UNIX
For API robots, see the appendices in this guide for information on configuring robotic control.
The control path to a robot may be on another host. If so, enter the host name of the host instead of a path. When you define a robot that is actually controlled by another host, the robot number must be the same on both hosts.
Host Name
You must specify a host name in the following cases. When you add
� An ACS robot, enter the name of the host where the ACS Library Software resides, instead of a robotic control path.
See the ACS appendix, “Automated Cartridge System (ACS)” on page 475.
� A TLM robot, enter the DAS server host name instead of a robotic control path.
See the TLM appendix, “ADIC Distributed AML Server (DAS)” on page 511.
� An LMF, TL8, TLD, or TLH robot that has robotic control on another host, you are prompted for the host name of that host.
See also “Volume Database Host Name” on page 351.
No Rewind On Close Device Name
This device name applies to all devices, except optical disk drives. This type of device remains at its current position on a close operation.
You specify a no rewind on close device name when you add a drive. Usually the device name is preceded or followed by the letter n. If the device name entries do not exist, you must create them as explained in the NetBackup Media Manager device configuration guide.
In tpconfig displays and listings, these device names are shown under the heading DrivePath.
Character Device Name
Character device name applies only to optical disk devices. A drive used as a character device uses a complete 512-byte block each time it writes (note that some systems may use 1024 byte blocks). If less than 512 bytes are used, the remaining bytes are padded out. A character device is also referred to as a raw device. NetBackup and Storage Migrator use character mode.

Appendix C, Using tpconfig 351
Starting the tpconfig Utility
You specify a device name when you add an optical disk to the configuration. When prompted, enter the path name to the device as found in the /dev directory. If the entries do not exist, you must create them as explained in the NetBackup Media Manager device configuration guide.
In tpconfig displays and listings, the character device name appears under the heading DrivePath.
Volume Header Device Name
Note Volume headers do not apply to all systems.
The volume header device name is used internally, but still must be specified when adding an optical drive to a configuration. When prompted, enter the path name to the device as found in the /dev directory. To display the volume header device name, choose the Update or Delete option from the Drive Configuration menu.
On Solaris systems, the MAKEDEV command may have to be run first to create these entries. For more information, see the NetBackup Media Manager device configuration guide and the MAKEDEV(8) man page.
Drive Status
Drive status can be UP or DOWN, and indicates whether Media Manager considers a drive available. You specify the initial drive status when you add a drive to the configuration. You can change the status, using the Update option of the Drive Configuration menu in tpconfig or if ltid has been started, by using a Device Monitor interface or vmoprcmd.
Volume Database Host Name
The volume database host name identifies the host where the volume database is located. A volume database host name is associated with each robot and the entire set of standalone drives on a device host.
You can change or view the volume database host by using the Volume Database Host Configuration menu.
Starting the tpconfig UtilityYou can start tpconfig from the vmadm Media Management menu or with the following command from the command line. You must have root user privileges.
/usr/openv/volmgr/bin/tpconfig

Starting the tpconfig Utility
352 NetBackup DataCenter Media Manager System Administrator’s Guide for UNIX
The following menu appears:
Note If the Media Manager device daemon is running, you should stop it with the stopltid command (see “Media Manager Device Daemon (ltid)” on page 207).
� Drive Configuration opens a menu for adding, deleting, updating definitions of drives, or listing definitions of drives and robots in the drive and robot databases.
� Robot Configuration opens a menu for adding, deleting, updating definitions of robots, or listing definitions of drives and robots in the drive and robot databases.
� Volume Database Host Configuration opens a menu for updating or listing the name of the host where the volume database for a specific device resides.
� Print Configuration on the main menu and the List Configuration commands on subsequent menus allow you to display the current configuration on the screen or write it to a file.
Specifying just the -d option on the tpconfig command also writes the current configuration to stdout (the screen) without invoking the menus.
Other command options are available. Run tpconfig -help or see the tpconfig man page.
� Online help is available on the main menu and most submenus.
� Quit terminates the utility and returns you to the UNIX prompt.
You can return to the main menu from anywhere in the utility by entering Ctrl C or using the Escape key.
Device Management Configuration Utility
1) Drive Configuration2) Robot Configuration3) Volume Database Host Configuration4) Print Configuration5) Help6) Quit
Enter option:

Appendix C, Using tpconfig 353
Adding Robots
Adding RobotsWhen you configure robots and drives using tpconfig, the most efficient process is to first add the robot using the Robot Configuration menu and then add the drives using the Drive Configuration menu.
If you want to reconfigure drives configured as standalone to indicate that they are in a robot, use the Update option of the Drive Configuration menu. See “Updating Drive Configurations” on page 356.
The procedure for adding a robot follows:
1. Select the Robot Configuration menu. If any robots exist, they are displayed above this menu.
2. Select the Add option.
From the list of possible robot types displayed, select the one you want to add.
3. Enter a robot number you know is unused or accept the default number.
4. Indicate where the robotic control for the library is located as follows:
a. If robotic control is on another host, enter that host name.
For an ACS robot you must enter the name of the ACS library software host. See the appendix, “Automated Cartridge System (ACS)” on page 475.
For a TLM robot, you must enter the name of the DAS server. See the appendix, “ADIC Distributed AML Server (DAS)” on page 511.
b. If robotic control is on this host, enter the device file path or library name. The Help option on the Robot Configuration menu has examples of typical path names.
For an ACS robot you enter the name of the ACS library software host. See the appendix, “Automated Cartridge System (ACS)” on page 475.
For a TLM robot, you enter the name of the DAS server. See the appendix, “ADIC Distributed AML Server (DAS)” on page 511.
For a TLH robot, enter the LMCP Device File, if this is an AIX system. Otherwise, enter the Automated Tape Library Name. See the appendix, “IBM Automated Tape Library (ATL)” on page 497.
For a LMF robot, enter the library name rather than the path name. See the appendix, “Fujitsu Library Management Facility (LMF)” on page 523.

Adding Drives
354 NetBackup DataCenter Media Manager System Administrator’s Guide for UNIX
5. If no conflicts are detected with the new configuration, you see a message that the robot has been added.
Adding Drives
1. Select the Drive Configuration menu.
2. Select the Add option.
3. Type a drive name or use the Enter key to use the default drive name that is shown.
Specify a name, from the ASCII character set, that will be used by Media Manager to identify the drive. If you are using the shared drives option (see step 9), all hosts that are sharing the same physical drive must use the same name for the drive. Descriptive drive names are recommended.
4. From the list of possible drive types displayed, select the one you want to add.
5. Enter the no rewind on close device path as shown in the /dev directory.
If the device is an optical disk, enter the character device and volume header device file paths, from the /dev directory (volume headers are not applicable to all systems).
The Help option on the Drive Configuration menu has examples of typical path names.
6. Enter the drive status (Up or Down).
7. If a robot exists that the drive could be added to, indicate whether the drive should be added to the robot or be a standalone drive.
If there are no robots to which the drive can be added, tpconfig automatically adds the drive as a standalone drive.
If you choose to add a drive to a robot and more than one possible robot exists, enter the robot number that will control the drive.
Depending on the type of robot, you may also be prompted to add the robot drive number (see “Robot Drive Number” on page 46).
8. For a drive in an ACS robot, you are prompted for four drive identifiers. For more information on ACS robots, see the appendix “Automated Cartridge System (ACS)” on page 475.
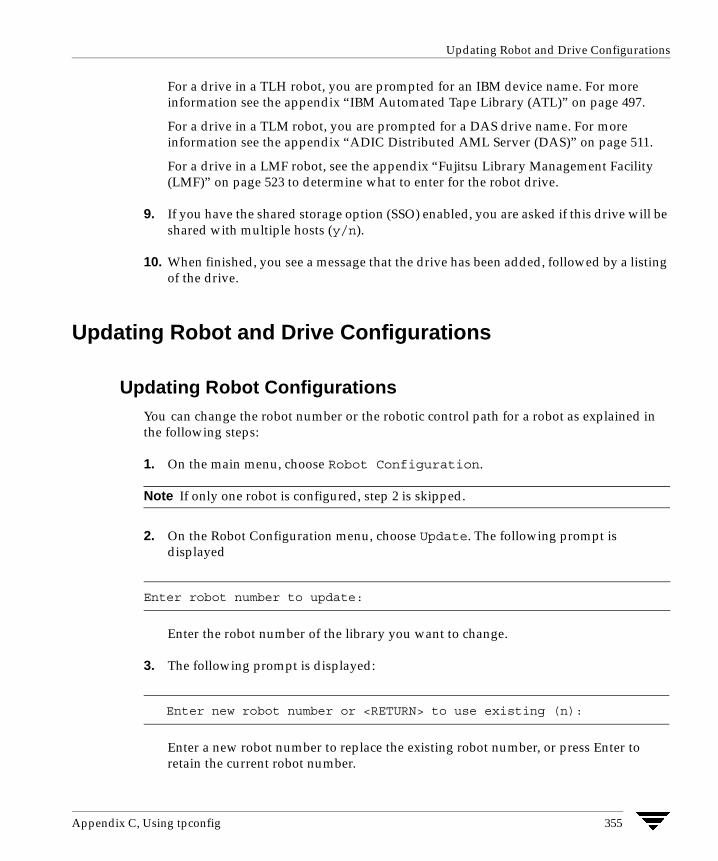
Appendix C, Using tpconfig 355
Updating Robot and Drive Configurations
For a drive in a TLH robot, you are prompted for an IBM device name. For more information see the appendix “IBM Automated Tape Library (ATL)” on page 497.
For a drive in a TLM robot, you are prompted for a DAS drive name. For more information see the appendix “ADIC Distributed AML Server (DAS)” on page 511.
For a drive in a LMF robot, see the appendix “Fujitsu Library Management Facility (LMF)” on page 523 to determine what to enter for the robot drive.
9. If you have the shared storage option (SSO) enabled, you are asked if this drive will be shared with multiple hosts (y/n).
10. When finished, you see a message that the drive has been added, followed by a listing of the drive.
Updating Robot and Drive Configurations
Updating Robot ConfigurationsYou can change the robot number or the robotic control path for a robot as explained in the following steps:
1. On the main menu, choose Robot Configuration.
Note If only one robot is configured, step 2 is skipped.
2. On the Robot Configuration menu, choose Update. The following prompt is displayed
Enter the robot number of the library you want to change.
3. The following prompt is displayed:
Enter a new robot number to replace the existing robot number, or press Enter to retain the current robot number.
Enter robot number to update:
Enter new robot number or <RETURN> to use existing (n):

Updating Robot and Drive Configurations
356 NetBackup DataCenter Media Manager System Administrator’s Guide for UNIX
4. You are prompted to enter robotic control information. The actual prompts depend on the type of robotic library you are updating.
Enter the appropriate robotic control path or host name associated with the robot.
When you are done, a message confirming that the robot has been updated is displayed.
Updating Drive ConfigurationsTo change information about a drive (for example, to add it to a robot) perform the following steps:
1. On the main menu, choose Drive Configuration.
2. On the Drive Configuration menu, choose Update.
3. Enter the name of the drive you want to update, when the following prompt is displayed:
4. The current drive information is displayed, followed by prompts to change each field. Enter a new value or use the Enter key to keep the existing value.
One of the prompts asks if you want to configure the drive in a robot and, if so, adds the drive immediately or gives you the opportunity to choose from any existing robot of the appropriate type.
5. When you have responded to all prompts, a revised Drive Information display appears, along with the following prompt:
Enter y to update the drive or n to keep the original configuration.
6. A message confirming that the drive has been updated (or not updated) is displayed.
Enter name of drive to update:
Are you sure you want to UPDATE drive name xxxxx? (y/n) n:

Appendix C, Using tpconfig 357
Deleting Drives and Robots
Deleting Drives and Robots
Deleting Drives
1. On the main menu, choose Drive Configuration.
2. On the Drive Configuration menu, choose Delete.
3. Enter the name of the drive you want to delete, when the following prompt is displayed:
4. Drive information and a prompt similar to the following are displayed:
5. Enter y to delete the drive, or n (Enter) to cancel the action.
a. If you respond with y, a message confirming the drive has been deleted is displayed.
b. If you respond with n (or Enter), pressing any key returns you to the Drive Configuration menu and the delete action is canceled.
Deleting Robots
1. On the main menu, choose Robot Configuration.
2. On the Robot Configuration menu, choose Delete.
Note If only one robot is configured, step 3 is skipped.
3. The following prompt is displayed:
Enter name of drive to delete:
Are you sure you want to DELETE drive name xxxxx? (y/n) n:
Enter robot number to delete:

Specifying the Volume Database Host
358 NetBackup DataCenter Media Manager System Administrator’s Guide for UNIX
Enter the robot number of the robot you want to delete.
4. A prompt similar to the following is displayed:
5. Enter y to delete the robot, or n (or Return) to cancel the action.
a. If you respond with y, a message confirming that the robot has been deleted is displayed.
b. If you respond with n, pressing any key returns you to the Robot Configuration menu and the delete action is canceled.
Specifying the Volume Database HostA volume database host is associated with each robot and set of standalone drives on a device host. It identifies the host where the volume database for the device is located.
By default, the volume database host name for standalone and robotic drives is the global device database.
You need to change the volume database host name, if volumes are defined on hosts other than the default hosts. This may be necessary, for example in a configuration that has been set up using no single volume database host.
VERITAS recommends that the volumes for the entire configuration be defined in one volume database. Also, shared drive (SSO) configurations require that a common volume database host is used for all hosts where a shared drive is configured.
1. On the main menu, choose Volume Database Host Configuration.
The current volume database hosts for all defined devices are displayed, along with the Volume Database Host Configuration menu and a prompt.
2. Select Update to change a host name. The following prompt is displayed:
Deleting robotic definition: TLD(0) robotic path = /dev/sg/c1t0d0s0, volume database host=vat Any drives defined on this robot will be changed to standalone drives Do you want to proceed? (y/n) n:
Enter robot number (or ’n’ for standalone drives):

Appendix C, Using tpconfig 359
Displaying and Printing the Configuration
3. Enter a robot number or n to change the host name for all standalone drives. The following prompt is displayed:
4. Enter a new name. The updated list of host names is displayed, along with the menu options and prompt.
Displaying and Printing the ConfigurationYou can display the current configuration from every menu in tpconfig by using the Print Configuration option on the main menu, or the List Configuration option on the subsequent menus.
You can print the configuration using the Print Configuration option on the main menu. When prompted, specify a file where the configuration will be written, or press Enter to display the configuration on the screen.
In addition, you can specify the -d option on the tpconfig command to write the current configuration to stdout without invoking the menus.
Enter new Volume Database Host name:

Displaying and Printing the Configuration
360 NetBackup DataCenter Media Manager System Administrator’s Guide for UNIX

361
Using vmadm DThis appendix explains how to use the media management utility (vmadm) to add, delete, or change media in the Media Manager volume configuration. This utility has a character-based interface that can be used at most terminals.
There are also other Media Manager interfaces available to configure media (see “Administrator and User Interfaces” on page 2). The terminology, general concepts, and results in the database are the same, regardless of which interface you use.
Starting the vmadm Utility
1. The Media Manager volume daemon, vmd, must be active to make any changes with vmadm. You can start vmd by entering /usr/openv/volmgr/bin/vmd at the UNIX prompt or you can use the Initiate Media Manager Volume Daemon command on the Special Actions menu. You need root privileges to start vmd.
2. To start vmadm, enter the command (requires root privileges):
/usr/openv/volmgr/bin/vmadm

Starting the vmadm Utility
362 NetBackup DataCenter Media Manager System Administrator’s Guide for UNIX
The main menu appears.
The Volume Database Host shown at the top of the main menu is the host where the volume database is located and the Media Manager volume daemon (vmd) is running.
The following list summarizes each menu command. The remaining topics in this chapter explain how to perform common operations.
a) Add Volumes
Add one or more volumes.
d) Delete Volumes
Delete one or more volumes.
m) Move Volumes
Move one or more volumes.
p) Print Information about Volumes
Print or display information about selected volumes based on criteria you provide.
c) Configure Volume Pools
Add a new volume pool, delete an existing one, change information about a volume pool, or list information about the currently defined volume pools.
s) Special Actions
Opens a menu with special actions.
u) Device Configuration Utility
Volume Database Host: shark Media Management ----------------- a) Add Volumes d) Delete Volumes m) Move Volumes p) Print Information about Volumes
c) Configure Volume Pools s) Special Actions
u) Device Configuration Utility
h) Help q) Quit ENTER CHOICE:

Appendix D, Using vmadm 363
Configuring Volume Pools
Start the tpconfig device configuration utility.
See the appendix “Using tpconfig” on page 349.
h) Help
Provides on line help.
q) Quit
Terminates the utility and returns you to the UNIX prompt. You can abort many operations by pressing the ESC key.
Configuring Volume PoolsA volume pool identifies a logical set of volumes that are associated by usage rather than physical location. For example, you can create a volume pool for each storage application you are using. Then, as you add volumes to use with an application, you can associate them with a volume pool. You can also move volumes to a different pool later. Volumes associated with a particular volume pool are grouped together and protected from access by unauthorized users, groups, or applications.
Before adding volumes to a pool, you must add the pool and configure its attributes as explained in the following topics.
Note You do not have to configure a pool for NetBackup or DataStore. Media Manager automatically reserves a pool named NetBackup that you specify when adding NetBackup volumes and a pool named DataStore when adding DataStore volumes.

Configuring Volume Pools
364 NetBackup DataCenter Media Manager System Administrator’s Guide for UNIX
When you enter c on the main menu, the following menu appears:
The following list summarizes the operations you can perform from this menu:
a) Add Pool
Defines a new volume pool. After choosing this option, you are prompted to define the following:
- Volume pool name: Name for the new volume pool. Enter a name of 20 ASCII characters or less. Names are case-sensitive, and no spaces or special characters are allowed.
- Description: Enter the description of the new volume pool (30 ASCII characters or less).
- Pool host name: Name of the host that can request and use volumes in this volume pool.
Entering a specific host name allows only that host to access the volume pool.
Using the default, ANYHOST, allows any host to access the volume pool.
Note If you have a single NetBackup server, use ANYHOST or the name of the server (not a client). If you have multiple NetBackup servers (master and media servers), always set this value to ANYHOST (the default).
- Pool user name: Login name of the user that is allowed to request and use volumes in the volume pool.
Display Mode: BRIEF Output Destination: SCREEN
Configure Volume Pools ---------------------- a) Add Pool c) Change Pool d) Delete Pool l) List Pools s) List Scratch Pools
m) Mode (brief or full) o) Output Destination (screen or file) h) Help q) Quit Menu
ENTER CHOICE:

Appendix D, Using vmadm 365
Configuring Volume Pools
Entering a specific name allows only the processes running as that user to access the volume pool. If a different user requests the pool, then Media Manager verifies the group name (see Pool group name).
Using the default, ANY, allows any user to access the pool.
For NetBackup or Storage Migrator, enter root for the pool user name.
- Pool group name: Name of the user group that can request and use volumes in this volume pool.
Entering a specific name allows any processes running as that user group to access the volume pool.
Using the default, NONE, allows only the user specified by User Name to request or access the volume pool. All other users in any groups are denied access.
- Scratch pool: Yes or No.
c) Change Pool
Changes the description, pool host name, pool user name, pool group name, or changes a pool to become the scratch pool. You are prompted for each of these items.
- Scratch pool: Yes or No.
d) Delete Pool
Deletes the volume pool and its allocated name, description, and access permissions.
l) List Pools
Lists the currently defined volume pools and their associated descriptions and permissions.
m) Mode (brief or full)
Toggles the display mode to BRIEF or FULL.
o) Output destination (screen or file)
Toggles between the output destination between SCREEN and FILE. (SCREEN is the default). If you choose to write to a file, you can define your own file name or you can use the default file, /tmp/vmadm_pool_output.
Adding Volumes for Standalone Drives
366 NetBackup DataCenter Media Manager System Administrator’s Guide for UNIX
Adding Volumes for Standalone Drives
Adding a Single Standalone Volume
1. On the main menu, choose a for Add Volumes.
2. The following prompt appears:
Enter s to add a single volume.
You are prompted for the media type with a menu similar to the following that displays the possible types:
Add Single Volume, Range of Volumes, or Auto-Populate? (s/r/a):

Appendix D, Using vmadm 367
Adding Volumes for Standalone Drives
Enter the number for the type of media you want to add.
3. If you are adding a cleaning tape, you are prompted for the number of cleanings you want available. For any other media type, the next step occurs immediately.
4. You are prompted to enter the media ID. If you selected an optical disk media type, you are prompted to enter a media ID for both side A of the platter and side B of the platter. Enter a 1 to 6 ASCII character name.
5. You are prompted for a description. Enter 1 to 25 characters of text to describe the media being added.
Adding Volumes -------------- Media Type ---------- 1) QIC - 1/4” cartridge tape 2) 1/2” cartridge tape 3) 1/2” cartridge tape 2 4) 1/2” cartridge tape 3 5) 4MM cartridge tape 6) 8MM cartridge tape 7) 8MM cartridge tape 2 8) 8MM cartridge tape 3 9) DLT cartridge tape 10 DLT cartridge tape 2 11) DLT cartridge tape 3 12) DTF cartridge tape 13) Rewritable optical disk 14) WORM optical disk 15) 1/2” cleaning tape 16) 1/2” cleaning tape 2 17) 1/2” cleaning tape 3 18) 4MM cleaning tape 19) 8MM cleaning tape 20) 8MM cleaning tape 2 21) 8MM cleaning tape 3 22) DLT cleaning tape 23) DLT cleaning tape 2 24) DLT cleaning tape 3 25) DTF cleaning tape Enter Choice [1-25]:
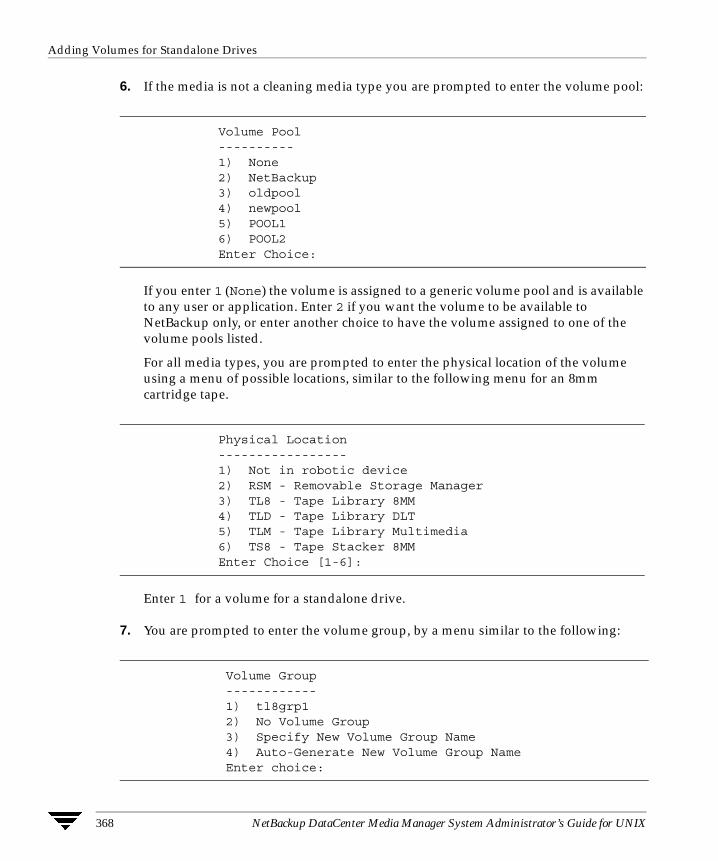
Adding Volumes for Standalone Drives
368 NetBackup DataCenter Media Manager System Administrator’s Guide for UNIX
6. If the media is not a cleaning media type you are prompted to enter the volume pool:
If you enter 1 (None) the volume is assigned to a generic volume pool and is available to any user or application. Enter 2 if you want the volume to be available to NetBackup only, or enter another choice to have the volume assigned to one of the volume pools listed.
For all media types, you are prompted to enter the physical location of the volume using a menu of possible locations, similar to the following menu for an 8mm cartridge tape.
Enter 1 for a volume for a standalone drive.
7. You are prompted to enter the volume group, by a menu similar to the following:
Volume Pool ---------- 1) None 2) NetBackup 3) oldpool 4) newpool 5) POOL1 6) POOL2 Enter Choice:
Physical Location ----------------- 1) Not in robotic device 2) RSM - Removable Storage Manager 3) TL8 - Tape Library 8MM 4) TLD - Tape Library DLT 5) TLM - Tape Library Multimedia 6) TS8 - Tape Stacker 8MM Enter Choice [1-6]:
Volume Group ------------ 1) tl8grp1 2) No Volume Group 3) Specify New Volume Group Name 4) Auto-Generate New Volume Group Name Enter choice:
Appendix D, Using vmadm 369
Adding Volumes for Standalone Drives
You may
- Choose from any existing standalone volume groups that allow this volume’s media type.
- Elect not to associate the volume with any volume group (if the option is offered).
- Enter a new name of your own choice.
- Have a name generated by vmadm, if the name of volume group is not important in this case.
8. The action taken next depends on the media type you selected.
- If you selected a tape media type, the volume is added at this point and you are returned to the main menu.
- If you selected an optical disk, you are given the option to format the platters using tpformat. (Formatting may cause an operator mount request to occur on the host.) Choosing n adds the volume immediately and you are returned to the main menu. If you choose y and the formatting does not complete, the volumes are still added.
Note All platforms and operating systems do not support 1024 byte-per-sector platters. Most support only 512 byte-per-sector sizes. Before purchasing optical disk platters, check your vendor documentation to determine the sector sizes supported by your platform and operating system. VERITAS urges you to use preformatted platters.
Adding a Range of Standalone Volumes
1. On the main menu, choose a for Add Volumes.
2. The following prompt appears:
Enter r to add a range of volumes.
3. You are prompted for the media type with a menu similar to the following that displays the possible types.
Add Single Volume, Range of Volumes, or Auto-Populate? (s/r/a):

Adding Volumes for Standalone Drives
370 NetBackup DataCenter Media Manager System Administrator’s Guide for UNIX
Enter the number for the type of media you want to add.
4. If you selected to add a range of cleaning tapes, you are prompted to enter a single number which indicates the number of cleanings you want available on each volume in the range. For any other media type, the next step occurs immediately.
5. You are prompted for a description. Enter 1 to 25 characters of text to describe the media being added. This description applies to all of the volumes in the range.
Adding Range of Volumes -------------- Media Type ---------- 1) QIC - 1/4” cartridge tape 2) 1/2” cartridge tape 3) 1/2” cartridge tape 2 4) 1/2” cartridge tape 3 5) 4MM cartridge tape 6) 8MM cartridge tape 7) 8MM cartridge tape 2 8) 8MM cartridge tape 3 9) DLT cartridge tape 10 DLT cartridge tape 2 11) DLT cartridge tape 3 12) DTF cartridge tape 13) Rewritable optical disk 14) WORM optical disk 15) 1/2” cleaning tape 16) 1/2” cleaning tape 2 17) 1/2” cleaning tape 3 18) 4MM cleaning tape 19) 8MM cleaning tape 20) 8MM cleaning tape 2 21) 8MM cleaning tape 3 22) DLT cleaning tape 23) DLT cleaning tape 2 24) DLT cleaning tape 3 25) DTF cleaning tape Enter Choice [1-25]:

Appendix D, Using vmadm 371
Adding Volumes for Standalone Drives
You are then prompted to enter the volume pool.
For a range of standalone volumes, enter 1. If you enter 1, the volumes are associated with a generic volume pool and are available to any user or application.
Enter 2 if you want the volumes to be available to NetBackup only.
Enter another choice to have the volumes assigned to one of the volume pools listed.
6. You are prompted to enter the physical location of the volumes using a menu of possible locations, similar to the following menu for an 8mm cartridge tape:
7. You are prompted to enter the volume group, by a menu similar to the following:
You may
Volume Pool ---------- 1) None 2) NetBackup 3) oldpool 4) oldpool4 5) POOL1 6) POOL2 Enter Choice:
Physical Location ----------------- 1) Not in robotic device 2) RSM - Removable Storage Manager 3) TL8 - Tape Library 8MM 4) TLD - Tape Library DLT 5) TLM - Tape Library Multimedia 6) TS8 - Tape Stacker 8MM Enter Choice [1-6]:
Volume Group ------------ 1) tl8grp1 2) No Volume Group 3) Specify New Volume Group Name 4) Auto-Generate New Volume Group Name Enter choice:

Adding Volumes for Standalone Drives
372 NetBackup DataCenter Media Manager System Administrator’s Guide for UNIX
- Choose from any existing standalone volume groups that allow this volume’s media type.
- Elect not to associate the volume with any volume group (if the option is offered).
- Enter a new name of your own choice.
- Have a name generated by vmadm, if the name of volume group is not important in this case.
8. You are prompted to enter the media ID naming mode with a menu displaying the possible modes. If you selected an optical disk media type, the display is as follows:
If you selected any device other than an optical disk media type, only options a through e are displayed.
Enter the desired naming mode. When the volumes are added, the digit field is incremented by one for each volume. (Only numbers are incremented.)
9. You are prompted for the media ID of the first volume:
If you had selected naming mode e and entered the 4-character, 2-digit ID, tape01, the media ID of the first volume added would be TAPE01, the second TAPE02, and so on.
10. You are prompted for the number of volumes to add.
Media ID Naming Mode -------------------- a) 0 characters and 6 digits b) 1 character and 5 digits c) 2 characters and 4 digits d) 3 characters and 3 digits e) 4 characters and 2 digits f) 0 characters, 5 digits, and 1 character platter-side g) 1 character, 4 digits, and 1 character platter-side h) 2 characters, 3 digits, and 1 character platter-side i) 3 characters, 2 digits, and 1 character platter-side j) 4 characters, 1 digit, and 1 character platter-side Enter Choice:
Enter Media ID for first volume -- using naming mode e:

Appendix D, Using vmadm 373
Adding Volumes to a Robot
a. If you selected an optical disk media type, the prompt is:
Each side of a platter is considered one volume. Entering the number 4, for example, causes eight volumes (four platters) to be added.
You are then given the option to format the platters being added using tpformat. Choosing n (no) adds the volumes immediately and you are returned to the main menu.
b. If you selected any media type other than optical disk, the prompt is:
11. The volumes are added to the database and you are returned to the main menu.
If any volume cannot be added (for example, if the range you specified overlaps with existing volumes), the operation aborts but volumes added before the failure remain in the database.
Adding Volumes to a Robot
Auto-Populating a RobotYou can use auto-populate for robots that support barcodes and for robots that do not support barcodes with some operational limitations (see “Robot Attributes” on page 300). The easiest way to add new media to a robot is to physically add the media and then use Media Manager’s auto-populate feature to update the volume database to agree with the contents of the robot. The database update includes automatic creation of media IDs.
If the robot supports barcodes and the volumes have readable barcode labels, auto-populate generates media IDs for new volumes based on the last six characters of the barcodes as the default or the specific characters that you specify if you are using Media ID generation rules.
When you use barcode rules, new media that is added through a barcode rule is also assigned a media type, pool name, maximum number of mounts (or cleaning count), and description (see “Configuring Barcode Rules” on page 421).
If the robot does not support barcodes or the media does not have readable barcodes, the new media IDs are based on a media ID prefix that you specify.
Enter Number of Platters (2 Volumes/Platters) in Range:
Enter Number of Volumes in Range:
Adding Volumes to a Robot
374 NetBackup DataCenter Media Manager System Administrator’s Guide for UNIX
Using Auto-PopulateThe auto-populate operation is the same as an inventory and update operation (“Inventory and Update Robot Volume Configuration” on page 409). The following procedure explains how to auto-populate a robot and refers you to the update procedure at the proper time.
1. Insert the new media into the robot.
2. Check the barcode capabilities of the robot and its media.
Before starting an auto-populate operation, perform “Inventory and Compare Robot Volume Configuration” on page 406 and check whether the following are true:
- The robot supports barcodes.
- The new media that was inserted has readable barcodes.
If either of the above statements is not true, save the results of the verify for reference, in case you assign a media ID prefix later in this procedure. You do not need a prefix if the robot supports barcodes and the media has a readable barcode.
3. Create barcode rules (optional).
Refer to “Configuring Barcode Rules” on page 421 and create any additional barcode rules that you want to use for auto-populating the database, for the media you have inserted into the robot.
4. For robot types that are not API robots, create media ID generation rules (optional).
See “Configuring Media ID Generation Rules” on page 175 for more information.
5. For API robots (ACS, LMF, RSM, TLH, or TLM robot types).
Create media type mappings for the robot as explained in step 2 under “Changing Update Options” on page 414
For ACS robots create default ACS to Media Manager media type mappings as explained in “vm.conf Map Entries for ACS Robots” on page 485.
For LMF robots create default LMF to Media Manager media type mappings as explained in “vm.conf Map Entries for LMF Robots” on page 535.
For TLH robots create default TLH to Media Manager media type mappings as explained in “vm.conf Map Entries For TLH Robots” on page 510.
For TLM robots create default TLM to Media Manager media type mappings as explained in “vm.conf Map Entries For TLM Robots” on page 521.
For RSM robots create default RSM to Media Manager media type mappings as explained in the Windows Media Manager system administrator’s guide.

Appendix D, Using vmadm 375
Adding Volumes to a Robot
6. Ensure that the appropriate control daemons are active on the robot control host.
7. On the main menu, choose a for Add Volumes.
8. Respond to the prompt with a, to use auto-populate.
This brings up a robot selection prompt for selecting the robot where you added the media.
The remaining steps are the same as for a robot inventory and update operation. Go to step 7 under “Inventory and Update Robot Volume Configuration” on page 409.
Adding a Single Volume to a Robot (Without Auto-Populate)The following procedure explains how to add a single volume to a robot using the s option, rather than Auto-Populate.
Note The first seven steps of this procedure are the same as adding a standalone volume (see “Adding a Single Standalone Volume” on page 366) and are only summarized here. Refer to that procedure.
1. On the main menu, choose a for Add Volumes.
2. Respond to the prompt with s, to add a single volume.
3. Enter the number for the type of media you want to add.
4. If you selected a cleaning tape, enter the number of cleanings you want available.
5. Enter a single media ID for tape or two media IDs for an optical disk. A media ID can contain from 1 to 6 characters.
Note Media IDs for API robots must always match the barcodes. This means that you must get a list of the barcodes prior to adding the volumes to Media Manager. You can obtain this information from the interface that is provided by the robot vendor or operating system, or you can use one of the robotic inventory options on the Special Actions menu.
6. Enter a media description (1 to 25 characters).
7. Select a volume pool.

Adding Volumes to a Robot
376 NetBackup DataCenter Media Manager System Administrator’s Guide for UNIX
8. Specify that you want the volume added to a robot. You are prompted to enter the physical location of the volume using a menu of possible locations, similar to the following menu for an 8mm cartridge tape:
Enter the number of the type of device to which you want to add a volume. If a device of the specified type does not currently exist, step 10 occurs immediately.
9. The devices of the selected type that currently have volumes in the database are displayed, along with the option to specify a new one, similar to the following:
Enter the number of the robot you want to add to, or n to specify a new robot.
10. If you enter n or the robot you chose does not exist, you are prompted for a new, unique robot number (which must match the number that will be used when you configure the robot or was used when you configured the robot) and the new robot control host (where the robotics are controlled). Otherwise, the next step occurs. (No host name is requested for an ACS or TLM robot.)
11. You are prompted for specific information about the volume and where it should go. This information varies depending on the type of robot to which the volume is being added.
- If the robot is an API robot, you do not enter slot information. Media Manager does not require slot location for those robot types because this information is tracked by the robot vendor software.
- If the robot is not an API robot, you are prompted to enter the slot number. See the appendix “Robot Drive and Slot Layouts” on page 427.
Physical Location ----------------- 1) Not in robotic device 2) RSM - Removable Storage Manager 3) TL8 - Tape Library 8MM 4) TLD - Tape Library DLT 5) TLM - Tape Library Multimedia 6) TS8 - Tape Stacker 8MM Enter Choice [1-6]:
Applicable Robot List --------------------- 22) TL8 - Tape Library 8MM (bobcat) n) New Robot Number Enter Choice:

Appendix D, Using vmadm 377
Adding Volumes to a Robot
12. You are prompted to enter the volume group by a menu similar to the following:
You may choose from any existing volume groups on the device.
13. For some robots, you are asked whether the volume should be injected using the media access port. For an ODL robot, you are asked whether the platters should be formatted.
Note This prompt occurs for robot types that support media access ports. This prompt may appear for some robots that do not have these ports, since the Media Manager robot type for the robot only indicates that media access ports are possible.
14. A reminder to insert the volume in the media access port or into the specified slot of the robot is displayed, and you are then returned to the main menu.
If you do not insert the volume now, it is still added to the database and logically associated with the robot.
If the robot is not an API robot and it has a barcode reader, the barcode is read and added to the database when you add the volume, provided you also physically insert the volume in the proper slot.
If you insert the volume later, then you must use Update/Validate Barcodes for Volumes on the Special menu at that time (see “Updating Barcodes for Selected Volumes in a Robot” on page 403).
Adding a Range of Volumes to a Robot (Without Auto-Populate)
The following procedure explains how to add a range of volumes to a robot by using the r option, rather than Auto-Populate.
Note The first six steps of this procedure are the same as adding a standalone volume (see “Adding a Range of Standalone Volumes” on page 369) and are only summarized here. Refer to that procedure.
Volume Group ------------ 1) tl8grp1 2) Specify New Volume Group Name 3) Auto-Generate New Volume Group Name Enter choice:

Adding Volumes to a Robot
378 NetBackup DataCenter Media Manager System Administrator’s Guide for UNIX
1. On the main menu, choose a for Add Volumes.
2. Respond to the prompt with r, to add a range of volumes.
3. Enter the number for the type of media you want to add.
4. If you selected a range of cleaning tapes, enter a single number that indicates the number of cleanings you want available on each volume in the range.
5. Enter a description (1 to 25 characters) that applies to all media in the range.
6. Select a volume pool.
7. Specify that you want to add the volumes to a robot. You are prompted for the physical location of the volumes using a menu of possible locations, similar to the following menu for an 8 mm cartridge tape:
Enter the number of the type of robot to which you want to add the volumes. (If a device of the specified type does not currently exist, step 8 is skipped and step 9 occurs.)
8. The devices of the selected type that currently exist in the database are displayed, along with the option to specify a new robot, similar to the following:
Enter the number of the robot you want to add to, or n to specify a new robot.
Physical Location ----------------- 1) Not in robotic device 2) RSM - Removable Storage Manager 3) TL8 - Tape Library 8MM 4) TLD - Tape Library DLT 5) TLM - Tape Library Multimedia 6) TS8 - Tape Stacker 8MM Enter Choice [1-6]:
Applicable Robot List ---------------------- 22) TL8 - Tape Library 8MM (bobcat) n) New Robot Number Enter Choice:

Appendix D, Using vmadm 379
Adding Volumes to a Robot
9. If you enter n or the robot you chose does not exist, you are prompted for a new, unique robot number and the new control host. Otherwise, the next step occurs. (No host name is requested for an ACS or TLM robot.)
10. You are prompted to enter the volume group, by a menu similar to the following:
You may choose from any existing volume groups on the device.
11. You are prompted for specific information about the volume and where it should go. This information varies depending on the type of robot to which the volume is being added.
If the robot is an API robot, you do not enter slot information. Media Manager does not require slot location for those robot types, because this information is tracked by the robot vendor software.
If the robot is not an API robot, you are prompted to enter the slot number. See the appendix “Robot Drive and Slot Layouts” on page 427.
12. At this point, the procedure is similar to adding a standalone volume. You are prompted to enter the media ID naming mode with a menu displaying the possible modes.
Note Media IDs for API robots must always match the barcodes. This means that you must get a list of the barcodes prior to adding the volumes to Media Manager. You can obtain this information from the interface that is provided by the robot vendor or operating system, or you can use one of the robotic inventory options on the Special Actions menu.
Volume Group ------------ 1) tl8grp1 2) Specify New Volume Group Name 3) Auto-Generate New Volume Group Name Enter choice:

Adding Volumes to a Robot
380 NetBackup DataCenter Media Manager System Administrator’s Guide for UNIX
If you selected an optical disk media type, the display appears as follows:
If you selected any device other than an optical disk media type, only options a through e are displayed.
Enter the desired naming mode. When the volumes are added, the digit field is incremented by one for each volume. Only numbers are incremented.
13. For all devices other than an API robot, you are prompted for the media ID of the first volume. The prompt is appropriate for the media type and is similar to one of the following:
(xxx is the slot number you entered in step 11.)
or
or
If you had selected naming mode e and entered the ID, tape01, the media ID of the first volume added would be TAPE01, the second TAPE02, and so on.
14. You are prompted for the number of volumes to add.
Media ID Naming Mode -------------------- a) 0 characters and 6 digits b) 1 character and 5 digits c) 2 characters and 4 digits d) 3 characters and 3 digits e) 4 characters and 2 digits f) 0 characters, 5 digits, and 1 character platter-side g) 1 character, 4 digits, and 1 character platter-side h) 2 characters, 3 digits, and 1 character platter-side i) 3 characters, 2 digits, and 1 character platter-side j) 4 characters, 1 digit, and 1 character platter-side Enter Choice:
Enter Media ID for slot xxx, side A -- using naming mode e:
Enter Media ID for slot xxx -- using naming mode a:
Enter 3 Character Prefix for ALL Media IDs:

Appendix D, Using vmadm 381
Adding Volumes to a Robot
a. If you selected an optical disk media type, the prompt is:
Where x and y represent the range of platters available.
For example, entering 4 causes eight volumes (four platters) to be added. You are then given the option to format the platters being added using tpformat. Choosing n (no) adds the volumes immediately and you are returned to the main menu.
b. If you selected a media type other than optical disk, the prompt is:
Where x and y represent the range of volumes available. A range is not presented, if the robot is an API robot.
15. The volumes are added to the database and you are returned to the main menu.
If any volume cannot be added (for example, if the range you specified overlaps with existing volumes), the operation aborts, but volumes added before the failure remain in the database.
If you do not insert the volume now, it is still added to the database and logically associated with the robot.
If the robot is not an API robot and it has a barcode reader, the barcode is read and added to the database when you add the volume, providing you also physically insert the volume in the proper slot. If you insert the volume later, then you must use Update/Validate Barcodes for Volumes on the Special menu at that time (see “Updating Barcodes for Selected Volumes in a Robot” on page 403).
Enter Number of Platters (2 Volumes/Platters) in Range [x-y]:
Enter Number of Volumes in Range [x-y]:

Displaying the Volume Configuration
382 NetBackup DataCenter Media Manager System Administrator’s Guide for UNIX
Displaying the Volume Configuration
1. On the vmadm menu, choose p for Print Information about Volumes. The current print criteria are displayed along with a menu which allows you to change the criteria, similar to the following example:
2. To accept the current settings, select s for Search. With the settings shown in the example, you would receive brief information about all volumes on your screen.
3. To change the print criteria, select one of the following options:
Display Filter: ALL Display Mode: BRIEF Output Destination: SCREEN
Display Options --------------- s) Search m) Mode (brief or full) o) Output Destination (screen or file) f) Filter h) Help q) Quit Menu ENTER CHOICE:
m Select m to toggle the display mode. FULL mode displays the most extensive information about each selected volume. BRIEF mode displays a subset, one line of information about each selected volume. In this mode, volumes are listed in alphabetical order by media ID. The default mode is BRIEF.
o Select o to toggle the output destination between the screen and a file of your choice. When you switch from the screen setting to a file, you are prompted for the file name. You must enter an absolute path or the enter key for the default file /tmp/vmadm_output.

Appendix D, Using vmadm 383
Displaying the Volume Configuration
4. After you change a print option, you must select s for the information to be printed or displayed. If you choose to copy the information to a file, you receive a message after you select s that output is written to the file.
vmadm uses the more utility to display information on the screen.
f Select f to change the display filter that determines which volumes are displayed. The following options are shown:
1) ALL
2) MEDIA ID
3) MEDIA TYPE
4) VOLUME GROUP
5) ROBOT NUMBER
6) ROBOT TYPE
7) VOLUME POOL
For entries 2 through 7, you are prompted to enter the appropriate value. Menus of the possibilities are provided for entries 3 through 7. The default is the last value chosen and is shown in parentheses following the prompt. Initially, information about all volumes is shown.

Displaying the Volume Configuration
384 NetBackup DataCenter Media Manager System Administrator’s Guide for UNIX
The amount of information displayed depends on the mode that you specify. FULL mode displays all available information about the selected volumes in a format similar to the following example for a single volume:
For a standalone volume, fields that do not apply (for example, robot type, robot number, and so on) are not included in the FULL mode display.
For a cleaning tape, number of mounts is replaced by cleanings left.
The status field is not displayed unless the media is assigned.
BRIEF mode displays a subset of the most pertinent information, showing one line per volume, by default in alphabetical order by media ID, similar to the example below:
media ID: MIN028 media type: 8MM cartridge tape (4) barcode: 00000018 media description: configured by GJK volume pool: POOL2 (7) robot type: TL8 - Tape Library 8MM (6) robot number: 0 robot slot: 28 (C08) robot control host: hare volume group: TL8-0 vault name: V1 vault sent date: Wed Dec 02 09:34:01 1993 vault return date: Tue Feb 17 09:34:01 1994 vault slot: 546 vault session id: 37 created: Mon Nov 29 08:39:09 1993 assigned: Tue Nov 30 20:51:28 1993 last mounted: Sun Dec 5 20:51:49 1993 first mount: Tue Nov 30 20:54:00 1993 expiration date: --- number of mounts: 6 max mounts allowed: --- status: 0x0
media media robot robot robot side/ optical # mounts/ last ID type type # slot face partner cleanings mount time--------------------------------------------------------------------------000001 DLT TLD 1 1 - - 17 06/03/1996 00:01000002 DLT TLD 1 12 - - 14 06/03/1996 00:02000022 DLT TLD 0 7 - - 1 04/18/1996 09:25

Appendix D, Using vmadm 385
Moving Volumes
Even when the same kind of information is returned, such as media type and robot type, the FULL display expands the description and is more complete. With an optical disk, for example, BRIEF mode shows a media type of REWR_OPT while FULL mode shows Rewritable optical disk.
Moving VolumesWhen you move volumes in or out of a robot, or from one robot to another, you must physically and logically move the volume. The physical part of the move is when you remove or insert the volume. The logical move changes the volume database to show the volume at the new location.
You can perform the following types of logical moves:
� Move single volumes
� Move multiple volumes
� Move volume groups
Common instances where you use the move options are:
� Replacing full volumes in a robot. When a robotic volume is full and there are no more empty slots in the robot, you move the full volume to standalone, and then configure a volume for the empty slot or move a volume into that slot. You could use a similar process to replace a defective volume.
� Moving volumes from a robot to an offsite location or from an offsite location into a robot. When you move tapes to an offsite location you move them to standalone.
� Moving volumes from one robot to another (for example, if a robot is down).
Moving Volumes (With Inventory and Update)Inventory a Robot and Update Volume Configuration on the Special Actions menu provides the easiest way to logically move media when the following are true:
� The move involves a robot that supports barcodes, see “Robot Attributes” on page 300.
� The media has readable barcodes.
See “Inventory and Update Robot Volume Configuration” on page 409 for instructions on using this option.
If the robot does not support barcodes or the barcodes are unreadable, use the move procedures explained in the following topics.
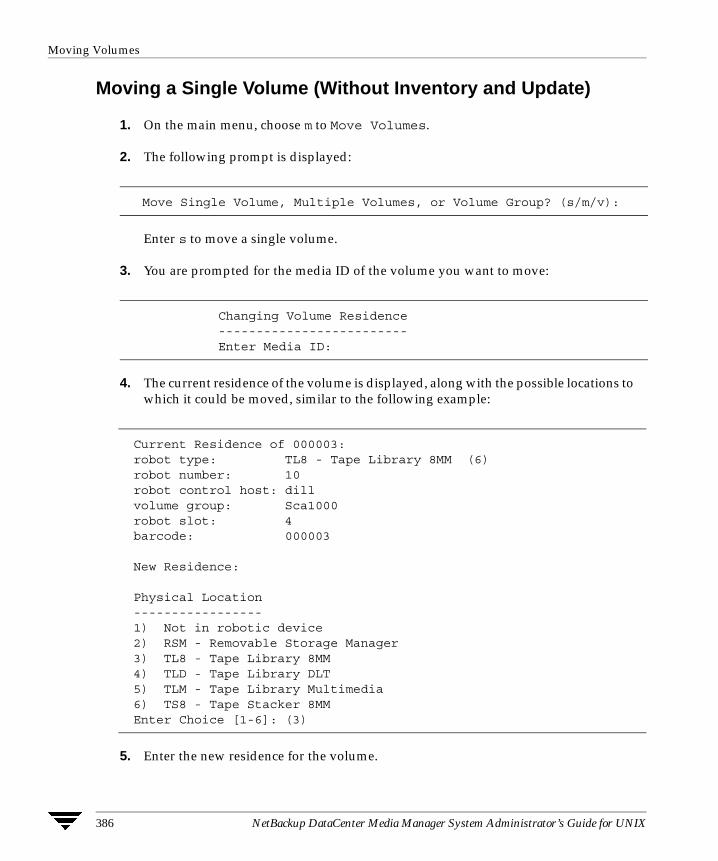
Moving Volumes
386 NetBackup DataCenter Media Manager System Administrator’s Guide for UNIX
Moving a Single Volume (Without Inventory and Update)
1. On the main menu, choose m to Move Volumes.
2. The following prompt is displayed:
Enter s to move a single volume.
3. You are prompted for the media ID of the volume you want to move:
4. The current residence of the volume is displayed, along with the possible locations to which it could be moved, similar to the following example:
5. Enter the new residence for the volume.
Move Single Volume, Multiple Volumes, or Volume Group? (s/m/v):
Changing Volume Residence ------------------------- Enter Media ID:
Current Residence of 000003: robot type: TL8 - Tape Library 8MM (6) robot number: 10 robot control host: dill volume group: Sca1000 robot slot: 4 barcode: 000003
New Residence:
Physical Location ----------------- 1) Not in robotic device 2) RSM - Removable Storage Manager 3) TL8 - Tape Library 8MM 4) TLD - Tape Library DLT 5) TLM - Tape Library Multimedia 6) TS8 - Tape Stacker 8MM Enter Choice [1-6]: (3)

Appendix D, Using vmadm 387
Moving Volumes
a. If you move a volume out of an ODL, TSH, TLD, or TL8 robot to a standalone location, you are asked whether the volume should be ejected using the media access port. This is the final step in the procedure.
Note This prompt occurs for robot types that support media access ports (and if vmadm supports the eject operation for the robot type). This prompt may be shown for some robots that do not have this support, since the robot type for the robot only indicates that media access ports are possible.
b. If you choose to move a volume into a robot, you are prompted with a menu of possible robots, similar to the following:
Enter the number of the appropriate robot. If you choose n, you are prompted to enter a new robot number and robot control host.
You are prompted for specific information about where the volume should be moved. This information varies depending on the device to which the volumes are being moved.
- If the robot is an API robot, see the next step.
- If the robot is not an API robot, you are prompted for the tape slot where the volume should be moved. See the appendix “Robot Drive and Slot Layouts” on page 427.
6. You are prompted to enter the volume group, by a menu similar to the following:
You may do one of the following:
Applicable Robot List --------------------- 10) TL8 - Tape Library 8MM (dill) 20) TL8 - Tape Library 8MM (dill) n) New Robot Number Enter choice:
Volume Group ------------ 1) tl8grp1 2) No Volume Group 3) Specify New Volume Group Name 4) Auto-Generate New Volume Group Name Enter choice:

Moving Volumes
388 NetBackup DataCenter Media Manager System Administrator’s Guide for UNIX
- Choose from any volume groups in the list.
- Elect not to associate the volume with any volume group (if the option is offered).
- Enter a new name of your own choice.
- Have a name generated by vmadm, if the name of volume group is not important in this case.
7. If you move a volume from or to robots that support media access ports (and vmadm supports that robot with eject or inject), you are asked whether the volume should be ejected and then injected using the media access port.
Moving a volume in vmadm changes only its logical residence in the volume database. It must also be moved physically, unless it is injected or ejected using the media access port.
When you move a volume to a non-API robot that has a barcode reader, Media Manager performs a Validate and Update Barcode operation on that volume.
Moving Multiple VolumesMoving multiple volumes is similar to moving single volumes, except that once you choose where you want the volumes to be moved, you are prompted to continue entering media IDs of volumes to move. You also do not have the option to eject and inject volumes using the media access port.
1. On the main menu, choose m to Move Volumes.
2. The following prompt is displayed:
Enter m to move multiple volumes.
3. You are prompted for the media ID of the first volume you want to move:
4. If you are moving a volume on an optical disk, you are reminded that moving the volume on one side of the platter also moves the volume on the other side.
Move Single Volume, Multiple Volumes, or Volume Group? (s/m/v):
Moving Volumes -------------- Enter First Media ID:

Appendix D, Using vmadm 389
Moving Volumes
The current residence of the volume is displayed, along with the possible locations to which it could be moved, similar to the following menu:
5. Enter the new residence for the volumes, which you will specify next.
6. If you move the volumes into a robot, you are prompted with a menu of possible libraries, similar to the following:
Enter the number of the appropriate robot. If you choose n, you are prompted to enter a new robot number and a new robot control host.
Current Residence for all volumes in list: robot type: TL8 - Tape Library 8MM (6) robot number: 10 robot control host: dill volume group: Sca1000 robot slot: 3 barcode: 000002
New Residence for all volumes in list:
Physical Location ----------------- 1) Not in robotic device 2) RSM - Removable Storage Manager 3) TL8 - Tape Library 8MM 4) TLD - Tape Library DLT 5) TLM - Tape Library Multimedia 6) TS8 - Tape Stacker 8MM Enter Choice [1-6]: (3)
Applicable Robot List --------------------- 10) TL8 - Tape Library 8MM (dill) 20) TL8 - Tape Library 8MM (dill) n) New Robot Number Enter choice:

Moving Volumes
390 NetBackup DataCenter Media Manager System Administrator’s Guide for UNIX
7. You are prompted to enter the volume group, by a menu similar to the following:
You may
- Choose from any volume groups in the list.
- Elect not to associate the volume with any volume group (if the option is offered).
- Enter a new name of your own choice.
- Have a name generated by vmadm, if the name of volume group is not important in this case.
8. Depending on the device, you are prompted for a media ID or to specify location information for each volume.
Note You do not enter slot information for media added to an API robot. Media Manager does not require slot location for these robot types, since this information is tracked by the operating system or the robot vendor software.
9. At this point, the volumes are moved, messages confirming the moves are displayed, and you are returned to the main menu.
Moving volumes in vmadm changes only their logical residence in the volume database. They must also be moved physically. When you move volumes to a non-API robot that has a barcode reader, Media Manager performs a Validate/Update Barcode operation on those volumes.
Moving a Volume GroupA volume group can be moved to a new robot or made standalone. All volumes must have their new slot numbers identified, as the move operation leaves slot numbers unmodified.
See “Volume Pools and Volume Groups” on page 319, for a definition of a volume group.
Volume Group ------------ 1) tl8grp1 2) No Volume Group 3) Specify New Volume Group Name 4) Auto-Generate New Volume Group Name Enter choice:

Appendix D, Using vmadm 391
Moving Volumes
Note If a volume group is moved back into a robot, every volume must be returned to its original slot.
1. On the main menu, choose m for Move Volumes.
2. The following prompt is displayed:
Enter v to move a volume group.
3. A menu of possible groups is displayed, similar to the following menu:
Enter the number of the volume group you want to move.
4. The current residence of the volume group is displayed, along with a prompt to choose the new location, similar to the following menu:
Move Single Volume, Multiple Volumes, or Volume Group? (s/m/v):
Volume Group ------------ 1) 00_025_TL8 2) 10i-1 3) 10i-2 4) axc Enter choice:
Current Residence for Volume Group 00_025_TL8: ---------------------------------------------- robot type: TL8 - Tape Library 8MM (3) robot number: 25 robot control host: bobcat
New Residence:
Physical Location ----------------- 1) Not in robotic device Enter Choice [1-1]: (1)

Deleting a Single Volume
392 NetBackup DataCenter Media Manager System Administrator’s Guide for UNIX
You can move a volume group only between a robotic location and standalone. To move a group from one robot to another, you must move the group to standalone, as an intermediate step, and then to the new robot.
If you selected a standalone volume group to move, the physical locations listed would not offer option (1), but would show the robot type to which the volumes could be moved, as in the following sample menu:
Enter the new residence for the volume group. The volumes are logically moved and you are returned to the main menu.
Moving volumes in vmadm changes only their logical residence in the volume database. They must also be moved physically.
Deleting a Single Volume
Note You cannot delete volumes that are assigned, until they are unassigned. Only NetBackup and Storage Migrator use the assigned state. See “Deassigning Volumes” on page 114 for more information..
1. On the main menu, choose d for Delete Volumes.
2. The following prompt appears:
Enter s to delete a single volume.
New Residence: Physical Location ----------------- 1) RSM - Removable Storage Manager 2) TL8 - Tape Library 8MM 3) TLD - Tape Library DLT 4) TLM - Tape Library Multimedia 5) TS8 - Tape Stacker 8MM Enter Choice [1-5]:
Delete Single Volume, Multiple Volumes, or Volume Group? (s/m/v):

Appendix D, Using vmadm 393
Deleting Multiple Volumes
3. You are then prompted for the media ID of the volume you want to delete:
If you are deleting an optical disk volume, you get the following additional warning and prompt:
(xxxxxA and xxxxxB represent the media IDs of sides A and B of the volume’s platter.)
Entering n cancels the operation. Entering y continues the operation.
4. The deletion is confirmed with a message, and you are returned to the main menu.
The volume is deleted from the database, not physically from the device.
Deleting Multiple Volumes
Note You cannot delete volumes that are assigned, until they are unassigned. Only NetBackup and Storage Migrator use the assigned state. See “Deassigning Volumes” on page 114 for more information..
1. On the main menu, choose d for Delete Volumes.
2. The following prompt appears:
Enter m to delete multiple volumes.
3. You are then prompted for the media ID of the volume you want to delete:
Deleting Volume --------------- Enter Media ID:
Deleting volume xxxxxA will also delete xxxxxB are you sure you want to delete both volumes? (y/n):
Delete Single Volume, Multiple Volumes, or Volume Group? (s/m/v):
Deleting Volumes --------------- Enter Media ID:

Deleting a Volume Group
394 NetBackup DataCenter Media Manager System Administrator’s Guide for UNIX
If you are deleting an optical disk volume, you get the following additional warning:
(xxxxxA and xxxxxB represent the media IDs of sides A and B of the volume’s platter.)
Pressing the Escape key cancels the operation. Continuing causes the volume to be deleted, when all the desired volumes have been entered. You continue to be prompted for media IDs until you press only the Enter key.
4. The volumes are deleted, messages confirm each deletion, and you are returned to the main menu.
The volumes are deleted from the database, not physically from the device.
Deleting a Volume Group
Note You cannot delete volumes that are assigned, until they are unassigned. Only NetBackup and Storage Migrator use the assigned state. See “Deassigning Volumes” on page 114 for more information..
1. On the main menu, choose d for Delete Volumes.
2. The following prompt appears:
Enter v to delete a volume group.
3. A menu of the possible volume groups is displayed, similar to the following:
Enter the number of the volume group you want to delete.
Deleting volume xxxxxA will also delete xxxxxB
Delete Single Volume, Multiple Volumes, or Volume Group? (s/m/v):
Volume Group ------------ 1) 00_025_TL8 2) 10i-1 3) 10i-2 4) cc Enter choice:

Appendix D, Using vmadm 395
Changing a Volume’s Description
4. The volumes in the specified group are deleted and you are returned to the main menu.
The volumes are deleted from the database, not physically from the device.
Changing a Volume’s Description
1. On the main menu, choose s for Special Actions.
2. Choose d for Change Media Description for Volume.
3. The following prompt appears:
Enter the media ID of the volume whose description you want to change.
4. The current media description and a prompt for the new description is displayed, similar to the following:
Enter the new description and press Enter. You are returned to the Special Actions menu.
Changing a Volume’s Volume PoolVolumes are in a specific volume pool or are associated with a generic volume pool. The volume pool row in the Print Information about Volumes FULL display mode, shows the name of the volume pool to which the volumes belong (if any).
Once associated with a pool, volumes are assigned or unassigned. Only the NetBackup and Storage Migrator applications use the assigned state. A NetBackup or Storage Migrator volume becomes assigned when it is requested by a user or an application. The time of the assignment appears in the assigned row in the Print Information about Volumes FULL display mode.
Changing Media Description for Volume ------------------------------------- Enter Media ID:
Current Media Description for 000000: test Enter Media Description (25 char max):

Changing the Expiration Date for Volumes
396 NetBackup DataCenter Media Manager System Administrator’s Guide for UNIX
A volume must be in an unassigned state before you can change its volume pool. Attempting to change its volume pool while the volume is assigned results in an error.
1. Deassign the volume if it is assigned to NetBackup (See “Deassigning Volumes” on page 114 for more information).
2. On the main menu, choose s for Special Actions.
3. Choose p for Change Volume Pool for Volumes.
4. The list of defined volume pools appears:
Enter 1, if you want the volume associated with the generic volume pool; the volume will be available to any user or application. Enter 2 if you want the volume to be available to NetBackup only; or enter another choice to have the volume associated with one of the volume pools listed.
5. You are prompted for the media ID of the volume to change. You will continue to be prompted for media IDs until you press the Enter key without typing a media ID.
Changing the volume pool for an optical disk volume also changes the volume pool for its partner volume.
Changing the Expiration Date for VolumesThe administrator can change the expiration date for any volume in the volume database. The expiration date refers to the age of the media (not the data on the media) and is the time at which the media is considered too old to be reliable.
Changing Volume Pool for Volumes ------------------------------- Volume Pool ---------- 1) None 2) NetBackup 3) oldplatters 4) newplatters 5) POOL1 6) DataStore Enter Choice:

Appendix D, Using vmadm 397
Changing the Volume Group for Volumes
When its expiration date has passed a volume can still be read, but it will not be mounted for a write access. Requesting write access to a volume whose expiration date has passed results in an error; requesting read access results in a warning being logged to the system console log.
You can set or change an expiration date for a single volume or for multiple volumes.
1. On the main menu, choose s for Special Actions.
2. Choose e for Change Expiration Date for Volumes.
At the prompt, enter 0 for no expiration date or enter a date in one of the following formats:
- mm/dd/yy hh/mm/ss
- mm/dd/yyyy hh/mm/ss
- mm/dd/yy
- mm/dd/yyyy
- mm/dd
3. You are then prompted to enter the media ID of the volume to associate with this expiration date. You will continue to be prompted for media IDs until you press the Enter key without typing a media ID.
Changing the Volume Group for Volumes
1. On the main menu, choose s for Special Actions.
2. Choose g for Change Volume Group for Volumes.
The following prompt appears:
3. Enter the media ID of the first volume you want to change and press Enter. You will continue to be prompted for media IDs until you press the Enter key without typing a media ID.
As you enter the media IDs, Media Manager validates them to ensure they have common media types and residences.
Changing Volume Group for Volumes --------------------------------- Enter Media ID:

Change Vault Name for Volumes
398 NetBackup DataCenter Media Manager System Administrator’s Guide for UNIX
4. When you exit from this prompt, a list similar to the following appears:
The list will include existing volume groups that are valid for the media you specified in step 3, (00_000_TL8 in this example), and also have options for specifying a new volume group name or having vmadm generate a new name.
If you choose to specify a new volume group name, a prompt appears allowing you to enter the name.
Change Vault Name for VolumesYou can set, clear, or change the vault name that contains the volume. This field is used by NetBackup Vault to determine what offsite location the volume is located in while offsite. You can change the vault name for a single volume or for multiple volumes, as follows:
1. On the main menu, choose s for Special Actions.
2. Choose a for Change Vault Parameters for Volumes.
3. Choose n for Change Vault Name for Volumes.
The following prompt appears:
Enter the new vault name. Entering a hyphen means that the name will be cleared.
4. You are prompted for the media IDs for which you want this vault name applied. You will continue to be prompted for media IDs until you press the Enter key without typing a media ID. If you enter the ESC key, your changes will not be applied.
Volume Group -------------- 1) 00_000_TL8 2) Specify New Volume Group Name 3) Auto-Generate New Volume Group Name Enter Choice:
Changing Vault Name for Volumes --------------------------------- (enter ’-’ to clear vault name) Enter Vault Name(25 chars max):

Appendix D, Using vmadm 399
Change Date Volumes are Sent to Vault
Change Date Volumes are Sent to VaultYou can set, clear, or change the date a volume is sent to the vault. This field is used by NetBackup Vault to record when a volume was sent to an offsite vault.
You can change this date for a single volume or for multiple volumes, as follows:
1. On the main menu, choose s for Special Actions.
2. Choose a for Change Vault Parameters for Volumes.
3. Choose s for Change Date Volumes are sent to Vault.
The following prompt appears:
Enter the new date the volume is sent offsite. Entering 0 means that the date will be cleared.
4. You are then prompted for the media IDs for which you want this date applied. You will continue to be prompted for media IDs until you press the Enter key without typing a media ID. If you enter the ESC key, your changes will not be applied.
Change Date Volumes Return from VaultYou can set, clear, or change the date a volume returns from the vault. This field is used by NetBackup Vault to record when a volume is requested to be returned from the vault. You can change this date for a single volume or for multiple volumes, as follows:
1. On the main menu, choose s for Special Actions.
2. Choose a for Change Vault Parameters for Volumes.
3. Choose r for Change Date Volumes return from Vault.
Changing Date Volume(s) Sent to Vault --------------------------------- (vault sent date of 0 means clear entry) Enter date volumes(s) sent to vault:

Change Vault Slot for Volumes
400 NetBackup DataCenter Media Manager System Administrator’s Guide for UNIX
The following prompt appears:
Enter the new date. Entering 0 means that the date will be cleared.
4. You are then prompted for the media IDs for which you want this date applied. You will continue to be prompted for media IDs until you press the Enter key without typing a media ID. If you enter the ESC key, your changes will not be applied.
Change Vault Slot for VolumesYou can set, clear, or change the slot that the volume is contained in at the vault. This field is used by NetBackup Vault to determine what slot the volume is located in while in the vault. You can change the slot for a single volume or for multiple volumes, as follows:
1. On the main menu, choose s for Special Actions.
2. Choose a for Change Vault Parameters for Volumes.
3. Choose s for Change Vault Slot for Volumes.
The following prompt appears:
Enter the new vault slot. Entering 0 means that the slot will be cleared.
4. You are then prompted for the media IDs for which you want this slot applied. You will continue to be prompted for media IDs until you press the Enter key without typing a media ID. If you enter the ESC key, your changes will not be applied.
Changing Date Volume(s) return from Vault --------------------------------- (vault return date of 0 means clear entry) Enter date volume(s) return from vault):
Setting Vault Slot for Volumes --------------------------------- Enter Vault Slot: (0)

Appendix D, Using vmadm 401
Change Vault Session ID for Volumes
Change Vault Session ID for VolumesYou can set, clear, or change the vault session ID that a volume was processed in. This field is used by NetBackup Vault to determine what session was used for a volume when it was vaulted. You can change the session ID for a single volume or for multiple volumes, as follows:
1. On the main menu, choose s for Special Actions.
2. Choose a for Change Vault Parameters for Volumes.
3. Choose i for Change Vault Session ID for Volumes.
The following prompt appears:
Enter the new session ID. Entering 0 means that the session ID will be cleared.
4. You are then prompted for the media IDs for which you want this session ID applied. You will continue to be prompted for media IDs until you press the Enter key without typing a media ID. If you enter the ESC key, your changes will not be applied.
Setting the Maximum Mounts for VolumesYou can set or change the maximum number of times a volume can be mounted. Once this number is reached, any further requests to mount the volume for a write operation result in an error. Specifying a maximum allowed mount count of 0, means there is no limit on the number of times a volume can be mounted.
To help determine the maximum mount count to use, consult your vendor documentation for information on the expected life of the media.
You can set the maximum allowed mounts for a single volume or for multiple volumes, as follows:
Note You cannot set the maximum number of mounts for a cleaning cartridge.
1. On the main menu, choose s for Special Actions.
2. Choose s for Set Maximum Allowed Mounts for Volumes.
Setting Vault Session ID for Volumes --------------------------------- Enter Vault Session ID: (0)

Changing the Cleanings Allowed for a Cleaning Tape
402 NetBackup DataCenter Media Manager System Administrator’s Guide for UNIX
A prompt is displayed for specifying a maximum mount count. Entering 0 means there is no limit to the number of times the volume can be mounted.
3. You are then prompted for the media IDs for which you want this maximum allowed mounts applied. You will continue to be prompted for media IDs until you press the Enter key without typing a media ID.
Changing the Cleanings Allowed for a Cleaning TapeWhen you added cleaning tapes, you specified a cleaning count. If you need to adjust that count, use the following procedure:
1. On the main menu, choose s for Special Actions.
2. Choose m for Modify Number of Cleanings on Cleaning Cartridge.
3. The following prompt appears:
Enter the media ID of the cleaning tape for which you want to change the cleaning count.
4. The current number of cleanings and a prompt to enter a new number for the cleaning count is displayed, similar to the following:
5. Enter a new number. The cleaning count is changed to the new number and you are returned to the Special Actions menu.
For more information about cleaning tapes, see the tpclean(1M) man page.
Starting and Stopping the Media Manager Volume DaemonThe Media Manager volume daemon, vmd, must be active to perform the operations in vmadm, even though you can start the utility without vmd running.
Changing Cleaning Count for Volume ---------------------------------- Enter Media ID:
Current Number of Cleanings for TEST:26 Enter New Number of Cleanings:

Appendix D, Using vmadm 403
Updating Barcodes for Selected Volumes in a Robot
You can start vmd by entering the following command:
/usr/openv/volmgr/bin/vmd
You can also control vmd from vmadm, as follows:
To Start the Volume Daemon
1. On the main menu, choose s for Special Actions.
2. Choose i for Initiate Media Manager Volume Daemon. This starts vmd and you are returned to the Special Actions menu.
To Stop the Volume Daemon
1. On the main menu, choose s for Special Actions.
2. Choose t for Terminate Media Manager Volume Daemon. This stops the daemon and returns you to the Special Actions menu.
Updating Barcodes for Selected Volumes in a RobotUse Update/Validate Barcode for Volumes on the Special Actions menu to check the barcodes of selected volumes in robots (that can read barcodes) and update the volume database if necessary. “Robot Attributes” on page 300 lists the robots that support barcodes.
Use this option only to fill in barcodes that are missing from the database. For example, if you logically add a new volume but do not physically insert it into the robot, the database will not include the barcode. In this case, you can use the Update/Validate Barcode option to fill in the missing barcode.
Do not use this option to correct a database entry that shows an incorrect media ID in a slot. Here, you must update the database by using a move option (see “Moving Volumes” on page 385) or the inventory and update option (see “Inventory and Update Robot Volume Configuration” on page 409).
Note You cannot use the Update/Validate Barcodes option for API robots since Media Manager does not manage location information for media in these robot types.

Inventory and Report Robot Volume Configuration
404 NetBackup DataCenter Media Manager System Administrator’s Guide for UNIX
1. Ensure that the appropriate robotic daemons are active on the robot control host. To start the daemons, see “Robotic Daemons” on page 209.
2. On the main menu, choose s for Special Actions.
3. Choose u for Update/Validate Barcode for Volumes.
The following prompt appears:
4. Enter the media ID of the first volume you want to update and press the Enter key. You will continue to be prompted for media IDs until you press the Enter key without entering a media ID.
When you press the Enter key to exit from the Enter Media ID prompt, the barcodes are updated and you are returned to the Special Actions menu.
Inventory and Report Robot Volume ConfigurationUse Inventory a Robot and Report Contents from the Special Actions menu, to inventory a selected robot and obtain a report that shows which media ID is in each slot. If the robot can read barcodes (see “Robot Attributes” on page 300) then barcode information is included in the report.
Note If a volume happens to be in a drive, the report shows it in the slot it came from.
This option does not check or change the database, but is useful for listing the contents of a robot.
1. Ensure that the appropriate control daemon is active on the host that controls the robot you are going to inventory. See “Robotic Daemons” on page 209.
2. On the main menu, choose s for Special Actions.
3. Choose c for Inventory a Robot and Report Contents.
Validating/Updating Barcodes for Volumes ---------------------------------------- Enter Media ID:

Appendix D, Using vmadm 405
Inventory and Report Robot Volume Configuration
If the volume database has entries for robotic volumes, vmadm lists the robot number, robot type, and robot control host for those robot types (except ACS and TLM robots). For example:
a. If the desired robot is not in the list, choose none of the above and go to step 4.
b. If the desired robot is in the list, enter the number corresponding to the robot (for example, enter 3 for TL8 0 on whale) and go to step 5.
c. If the desired robot is an ACS type, the menu shows a robot control host of NONE. If you choose an ACS robot, you are prompted for the Robot Control Host. At this prompt, enter the host on which the ACS daemon (acsd) is running. This can be the ACS library software host or it can be another host.
d. If the desired robot is a TLM type, the menu shows a robot control host of NONE. If you choose a TLM robot, you are prompted for the Robot Control Host. At this prompt, enter the host on which the TLM daemon (tlmd) is running. This can be the TLM library software host or it can be another host.
e. If the desired robot is a RSM type, the menu shows a robot control host of NONE. If you choose a RSM robot, you are prompted for the Robot Control Host. At this prompt, enter the host on which the RSM daemon (rsmd) is running.
f. If the volume database has no entries for robotic volumes, you are prompted to specify a robot control host on which to search the device configuration for robots.
Respond to this prompt as explained in step 4.
Robot from Volume Configuration ------------------------------- 1) TLD 2 -- breaker 2) TL4 3 -- breaker 3) TL8 0 -- whale 4) none of the above Enter choice:
Enter Robot Control Host: (whale)

Inventory and Compare Robot Volume Configuration
406 NetBackup DataCenter Media Manager System Administrator’s Guide for UNIX
4. If the device configuration has no robots or you have chosen an ACS or TLM robot or none of the above in step 3, you are prompted to select a robot control host on which to search the device configuration for robots:
a. Enter a host name and then the Enter key, or press Enter without typing a name to select the default host shown in the parentheses. Media Manager searches for robots in the device configuration on the selected host.
Note If Media Manager does not find any robots in the device configuration, vmadm displays a “robot not obtained” message.
b. If Media Manager finds robots in the device configuration, it lists their robot number, robot type, and robot host. For example:
To report the contents of a robot in the list, enter the number corresponding to the robot (for example, 1 for TLD 0 on shark) and go to step 5.
If a list appears but the desired robot is not shown, choose none of the above. In this case, vmadm shows a “robot not obtained” message and you must configure the robot before you can perform the inventory and report.
5. When you have selected a robot, vmadm displays a report that shows the contents of the robot.
For robots with a barcode reader, Media Manager obtains the barcode and includes it in the report. If the robot does not support barcodes or the media does not have a readable barcode, <none> appears in place of the barcode.
Inventory and Compare Robot Volume ConfigurationUse the Inventory a Robot and Compare with Volume Configuration on the Special Actions menu to physically inventory a robot, compare the results with the contents of the volume database, and obtain a list of recommended changes.
Enter Robot Control Host: (whale)
Robot from Device Configuration ------------------------------- 1) TLD 0 -- shark 2) TLD 1 -- shark 3) none of the above Enter choice:

Appendix D, Using vmadm 407
Inventory and Compare Robot Volume Configuration
The report shows discrepancies between the contents of the robot and the contents of the volume database. If the robot can read barcodes, then barcode information is included in the report.
This option does not change the database, but is useful for verifying whether the volume database is correct after tapes have been physically moved in the robot. If the report shows that the media in a slot does not match what is in the database, you can physically move the media or change the database using a move option (see “Moving Volumes” on page 385) or the inventory and update option (see “Inventory and Update Robot Volume Configuration” on page 409).
1. Ensure that the appropriate control daemon is active on the host that controls the robot you are going to inventory. See “Robotic Daemons” on page 209.
2. On the main menu, choose s for Special Actions.
3. Choose v for Inventory a Robot and Compare with Volume Configuration.
If the volume database has entries for robotic volumes, vmadm lists the robot number, robot type, and robot host for those robots (except ACS and TLM robots). For example:
a. If the desired robot is not in the list, choose none of the above and go to step 4.
b. If the desired robot is an ACS type, the menu shows a robot control host of NONE. If you choose an ACS robot, you are prompted for the Robot Control Host. At this prompt, enter the host on which the ACS daemon (acsd) is running. This can be the ACS library software host or it can be another host.
c. If the desired robot is a TLM type, the menu shows a robot control host of NONE. If you choose a TLM robot, you are prompted for the Robot Control Host. At this prompt, enter the host on which the TLM daemon (tlmd) is running. This can be the TLM library software host or it can be another host.
Robot from Volume Configuration ------------------------------- 1) TLD 2 -- breaker 2) TL4 3 -- breaker 3) TL8 0 -- whale 4) none of the above Enter choice:

Inventory and Compare Robot Volume Configuration
408 NetBackup DataCenter Media Manager System Administrator’s Guide for UNIX
d. If the desired robot is a RSM type, the menu shows a robot control host of NONE. If you choose a RSM robot, you are prompted for the Robot Control Host. At this prompt, enter the host on which the RSM daemon (rsmd) is running.
e. If the desired robot is in the list, enter the number corresponding to the robot (for example, enter 3 for TL8 0 on whale) and go to step 5.
f. If the volume database has no entries for robotic volumes, you are prompted to specify a robot control host on which to search the device configuration for robots.
Respond to this prompt as explained in step 4.
Note A robot does not appear in the list, if it does not have any volume entries in the volume database you are using for the compare.
4. If the volume database has no robotic volumes or you have chosen none of the above in step 3, you are prompted to select a robot control host on which to search the device configuration for robots:
a. Enter a host name and then the Enter key, or press Enter without typing a name to select the default host shown in the parentheses. Media Manager searches for robots in the device configuration on the selected host.
Note If Media Manager does not find any robots in the device configuration, vmadm shows a “robot not obtained” message.
b. If Media Manager finds robots in the device configuration, it lists their robot number, robot type, and robot host. For example:
Enter Robot Control Host: (whale)
Enter Robot Control Host: (whale)
Robot from Device Configuration ------------------------------- 1) TLD 0 -- shark 2) TLD 1 -- shark 3) none of the above Enter choice:

Appendix D, Using vmadm 409
Inventory and Update Robot Volume Configuration
To inventory and compare the volume database entries for a robot in the list, enter the number corresponding to the robot (for example, 1 for TLD 0 on shark) and go to the next step.
If a list appears but the desired robot is not shown, choose none of the above. In this case, vmadm displays a “robot not obtained” message and you must configure the robot and insert media before you can perform the inventory and update.
5. When you have selected a robot, vmadm displays a report comparing the contents of the robot with the contents of the volume database.
See “Comparing Robot Contents with the Volume Configuration” on page 131 for example reports.
For API robots (ACS, LMF, RSM, TLH, or TLM), Media Manager determines whether the media ID and media type that is stored in its own database matches the database for the robot-vendor software.
For robots that are not API robots that have a barcode reader, Media Manager determines whether the barcodes in the robot match those in the volume database. When the report shows <none>, it means that the media does not have a barcode.
For robots that cannot read barcodes, vmadm verifies only whether the volume database correctly shows whether a slot contains media.
Inventory and Update Robot Volume ConfigurationUse Inventory a Robot and Update Volume Configuration on the Special Actions menu to inventory a robot and compare the results with the contents of the volume database.
You can then optionally update the volume database to agree with what is in the robot. When you insert new media, the database update includes automatic creation of media IDs (based on barcodes or a prefix that you specify). If you use barcode rules, new media that is added through a barcode rule can also be assigned a media type, volume pool, maximum number of mounts (or number of cleanings), and description (see “Configuring Barcode Rules” on page 421).
Note insert means the media is placed physically in the robot without using an add or move option to update the database. remove means to take media out of a robot without using a move option.
See “Updating the Volume Configuration for a Robot” on page 135 for instructions on when to use and when not to use the Inventory and Update option.

Inventory and Update Robot Volume Configuration
410 NetBackup DataCenter Media Manager System Administrator’s Guide for UNIX
To Inventory and Update Robot Volume Configuration
1. Check the barcode capabilities of the robot and its media (optional).
Before doing an inventory and update, perform “Inventory and Compare Robot Volume Configuration” on page 406 and check whether the following are true:
- The robot supports barcodes.
- The new media that was inserted has readable barcodes.
If the robot does not support barcodes or the media does not have readable barcodes, save the results of the verify for reference, in case you assign a media ID prefix later in this procedure.
2. For API robot types, assign media mappings as explained in the following appendices:
- For ACS robots, see “Robot Inventory Operations” on page 483.
- For TLH robots, see “Robot Inventory Operations” on page 508.
- For TLM robots, see “Robot Inventory Operations” on page 518.
- For LMF robots, see “Robot Inventory Operations” on page 533.
- For RSM robots, see the Windows Media Manager system administrator guide.
3. For robot types that are not API robots, create media ID generation rules (optional).
See “Configuring Media ID Generation Rules” on page 175 for more information.
4. Create barcode rules (optional).
Refer to “Configuring Barcode Rules” on page 421 and create any barcode rules that you want to use for updating the database for media that has been inserted into the robot.
5. Ensure that the appropriate control daemons are active on the robot control host.
To start the daemons, see “Robotic Daemons” on page 209.
6. On the main menu, choose s for Special Actions.
7. Choose r for Inventory a Robot and Update Volume Configuration.
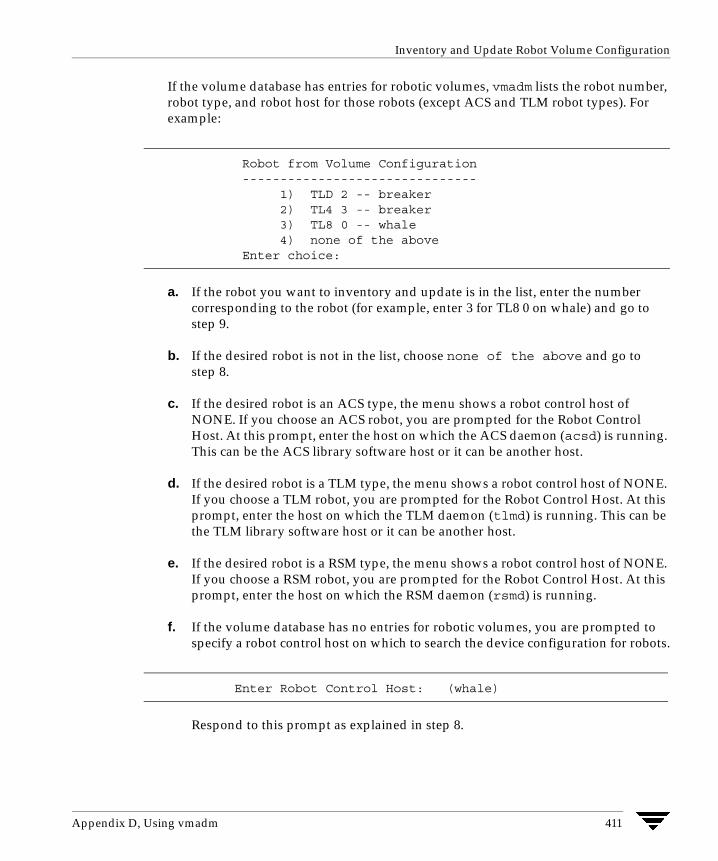
Appendix D, Using vmadm 411
Inventory and Update Robot Volume Configuration
If the volume database has entries for robotic volumes, vmadm lists the robot number, robot type, and robot host for those robots (except ACS and TLM robot types). For example:
a. If the robot you want to inventory and update is in the list, enter the number corresponding to the robot (for example, enter 3 for TL8 0 on whale) and go to step 9.
b. If the desired robot is not in the list, choose none of the above and go to step 8.
c. If the desired robot is an ACS type, the menu shows a robot control host of NONE. If you choose an ACS robot, you are prompted for the Robot Control Host. At this prompt, enter the host on which the ACS daemon (acsd) is running. This can be the ACS library software host or it can be another host.
d. If the desired robot is a TLM type, the menu shows a robot control host of NONE. If you choose a TLM robot, you are prompted for the Robot Control Host. At this prompt, enter the host on which the TLM daemon (tlmd) is running. This can be the TLM library software host or it can be another host.
e. If the desired robot is a RSM type, the menu shows a robot control host of NONE. If you choose a RSM robot, you are prompted for the Robot Control Host. At this prompt, enter the host on which the RSM daemon (rsmd) is running.
f. If the volume database has no entries for robotic volumes, you are prompted to specify a robot control host on which to search the device configuration for robots.
Respond to this prompt as explained in step 8.
Robot from Volume Configuration ------------------------------- 1) TLD 2 -- breaker 2) TL4 3 -- breaker 3) TL8 0 -- whale 4) none of the above Enter choice:
Enter Robot Control Host: (whale)

Inventory and Update Robot Volume Configuration
412 NetBackup DataCenter Media Manager System Administrator’s Guide for UNIX
Note A robot does not appear in the list if it does not have any volume entries in the volume database you are updating. This will be the case, if you configure a new robot and are adding media to it using the inventory and update option.
8. If the volume database has no robotic volumes or you have chosen none of the above in step 7, you are prompted to select a robot control host on which to search the device configuration for robots:
a. Enter a host name and then the Enter key, or press Enter without typing a name to select the default host shown in the parentheses. Media Manager searches for robots in the device configuration on the selected host.
Note If Media Manager does not find any robots in the device configuration, vmadm shows a “robot not obtained” message.
b. If Media Manager finds robots in the device configuration, it lists their robot number, robot type, and robot host. For example:
To inventory and update the volume database entries for a robot in the list, enter the number corresponding to the robot (for example, 0 for TLD 1 on shark) and go to step 9.
If a list appears but the desired robot is not shown, choose none of the above. In this case, vmadm shows a “robot not obtained” message and you must configure the robot and insert media before you can perform the inventory and update.
Enter Robot Control Host: (whale)
Robot from Device Configuration ------------------------------- 1) TLD 0 -- shark 2) TLD 1 -- shark 3) none of the above Enter choice:

Appendix D, Using vmadm 413
Inventory and Update Robot Volume Configuration
9. When you have selected a robot, the Inventory and Update Robot menu appears. For example:
Inventory a robot and update its volume database entries as follows:
a. Use the m option to toggle the update mode.
- INTERACTIVE causes vmadm to display a list of recommended changes after the inventory, and prompts you to confirm whether to proceed with updating the database.
- NOT INTERACTIVE causes vmadm to make the recommended database changes without prompting for a confirmation.
You may want to use the NOT INTERACTIVE mode after you become familiar with performing robot inventories
b. To view the current inventory and update settings or change them, choose o and refer to “Changing Update Options” on page 414”.
c. When the update options are as you want them, choose the u option to start the inventory and update operation.
See “Updating the Volume Configuration for a Robot” on page 135 for example reports.
Inventory and Update Robot: TLD (10) - whale
Update Mode: INTERACTIVE
Inventory and Update -------------------- u) Inventory Robot and Update Volume Configuration
m) Change Update Mode o) Change Update Options
h) Help q) Quit Menu
ENTER CHOICE:

Inventory and Update Robot Volume Configuration
414 NetBackup DataCenter Media Manager System Administrator’s Guide for UNIX
Changing Update OptionsWhen you choose o from the Inventory and Update Robot menu, the Update Options menu appears. The example below shows the defaults for a new installation.
These are also the defaults each time you enter the options menu, with the possible exception of the Media ID Prefix. The Media ID prefix default will be the last entry in the vm.conf file, if one exists (see step 6 below).
For most configurations, the default update options work well. You should only change the defaults if your configuration has special hardware or usage requirements.
1. Choose whether to use barcode rules when adding new media, by using the b option to toggle Use Barcode Rules between YES and NO.
Note Media Manager attempts to use barcode rules only for barcodes that are not already in the volume database.
- YES causes Media Manager to search existing barcode rules and apply them to new media that has been inserted into a robot.
- NO causes Media Manager to ignore the barcode rules.
Update Robot: TL8 (10) - whale
OPTION FOR REMOVED MEDIA ------------------------ Volume Group: DEFAULT OPTIONS FOR ADDED OR MOVED MEDIA -------------------------------- Volume Group: DEFAULT Use Barcode Rules: YES Media Type: DEFAULT Media ID Prefix: DEFAULT Volume Pool: DEFAULT
Update Options -------------- b) Use Barcode Rules r) Volume Group for REMOVED media m) Media Type a) Volume Group for ADDED or MOVED media i) Media ID Prefix p) Volume Pool
h) Help q) Quit Menu
ENTER CHOICE:
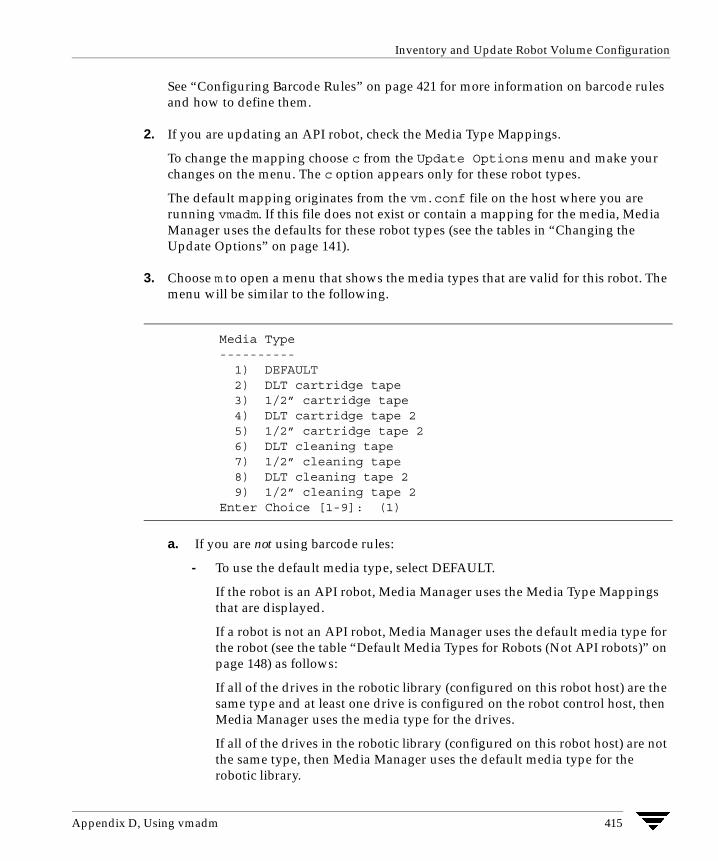
Appendix D, Using vmadm 415
Inventory and Update Robot Volume Configuration
See “Configuring Barcode Rules” on page 421 for more information on barcode rules and how to define them.
2. If you are updating an API robot, check the Media Type Mappings.
To change the mapping choose c from the Update Options menu and make your changes on the menu. The c option appears only for these robot types.
The default mapping originates from the vm.conf file on the host where you are running vmadm. If this file does not exist or contain a mapping for the media, Media Manager uses the defaults for these robot types (see the tables in “Changing the Update Options” on page 141).
3. Choose m to open a menu that shows the media types that are valid for this robot. The menu will be similar to the following.
a. If you are not using barcode rules:
- To use the default media type, select DEFAULT.
If the robot is an API robot, Media Manager uses the Media Type Mappings that are displayed.
If a robot is not an API robot, Media Manager uses the default media type for the robot (see the table “Default Media Types for Robots (Not API robots)” on page 148) as follows:
If all of the drives in the robotic library (configured on this robot host) are the same type and at least one drive is configured on the robot control host, then Media Manager uses the media type for the drives.
If all of the drives in the robotic library (configured on this robot host) are not the same type, then Media Manager uses the default media type for the robotic library.
Media Type ---------- 1) DEFAULT 2) DLT cartridge tape 3) 1/2” cartridge tape 4) DLT cartridge tape 2 5) 1/2” cartridge tape 2 6) DLT cleaning tape 7) 1/2” cleaning tape 8) DLT cleaning tape 2 9) 1/2” cleaning tape 2 Enter Choice [1-9]: (1)

Inventory and Update Robot Volume Configuration
416 NetBackup DataCenter Media Manager System Administrator’s Guide for UNIX
- To use a media type other than the default, choose one from the menu.
Selecting from the menu is required in either of the following cases:
The robotic library supports multiple media types and you do not want the default media type.
Drives are not configured on the robot control host and the drives are not the default media type for the robot.
b. If you are using barcode rules:
- Choose DEFAULT to let the barcode rule determine the media type that is assigned.
For example, assume you want to add both DLT and half-inch cartridges to a TLD robot with a single update operation. To accomplish this, first create separate rules for DLT and half-inch cartridges and select the specific media type in the barcode rules. Then, select DEFAULT from the Update Options menu. Media Manager will now use the media type in the barcode rules when it does the inventory and update.
Note If you also choose DEFAULT for the barcode rule, Media Manager assigns the default media type for the robot (see the table “Default Media Types for Robots (Not API robots)” on page 148).
- To use a media type other than the default, choose a specific type from the menu.
For example, to use the same rule to add DLT or half-inch cartridges to a TLD, choose specific media from the Update Options menu and DEFAULT for the barcode rule. Now you can perform one update for DLT and another for half-inch cartridge and use the same rule for both.
The update media type always overrides the rule. If you specify any value other than DEFAULT on the Update Options menu, the media type for the rule must be the same type or DEFAULT in order to obtain a match (except for cleaning media as explained below).
The following list shows what happens for various combinations of update and barcode rule media types.
Update Options Barcode Rule Rule Media Type in Media Type Media Type Used Volume Database ---------- ---------- ----- --------------- DLT DEFAULT Yes DLT 1/2” CART DEFAULT Yes 1/2” CART DLT DLT Yes DLT DLT DLT CLEAN Yes DLT CLEAN

Appendix D, Using vmadm 417
Inventory and Update Robot Volume Configuration
DLT CLEAN DLT No DLT CLEAN DLT CLEAN DLT CLEAN Yes DLT CLEAN DLT CLEAN DEFAULT Yes DLT CLEAN DLT (8MM, 4MM ...) No DLT DEFAULT DEFAULT Yes DLT DEFAULT DLT Yes DLT DEFAULT DLT CLEAN Yes DLT CLEAN DEFAULT 1/2” CART Yes 1/2” CART DEFAULT (4MM ...) No Robot-type dependent
- The fourth barcode rule in the list shows Media Manager’s ability to automatically add cleaning cartridges with regular media, when you execute an update for a robot.
If the media you insert includes a cleaning tape, then Media Manager automatically adds the tape correctly, if the following are true:
- The update media type is for the regular media (DLT in this example).
- The barcode on the tape matches a barcode tag and the barcode rule media type is the cleaning media (DLT CLEAN in this example).
Also see “Example 5: Add cleaning tapes to a robot” on page 165.
- The sixth and seventh rules in the list illustrate how to add only cleaning media.
In the sixth rule, you specify the cleaning media type on both the Update Options menu and in the barcode rule. In the seventh rule, you specify the cleaning media on the Update Options menu and choose default in the barcode rule.
4. Choose a to open a menu for selecting the volume group that Media Manager will assign to media that you have inserted into the robot (or moved to a new location within the robot).
The menu will be similar to the following:
The menu always has choices for:
- Specifying a new volume group name.
Volume Group ------------ 1) 00_000_TL8 2) Specify New Volume Group Name 3) Auto-Generate New Volume Group Name Enter choice:

Inventory and Update Robot Volume Configuration
418 NetBackup DataCenter Media Manager System Administrator’s Guide for UNIX
- Auto generating a new volume group (default). You can also auto generate a new volume group name by entering DEFAULT for the new volume group name.
Other choices that are available depend on the selected media type.
- If Media Type is DEFAULT, the menu shows existing volume groups that are valid for the robot’s default Media Type.
- If Media Type is other than DEFAULT, the menu shows the existing volume groups that are valid for the media type.
5. Choose r to open a menu for selecting the volume group that Media Manager will assign to media that you have removed from the robot.
The menu will be similar to the following:
The menu always has choices for:
- Specifying no volume group name.
- Specifying a new volume group name.
- Auto generating a new volume group (default). You can also auto generate a new volume group name, by entering DEFAULT for the new volume group name.
Other choices that are available depend on the selected media type.
- If Media Type is DEFAULT, the menu shows existing volume groups that are valid for the robot’s default Media Type.
- If Media Type is other than DEFAULT, the menu shows the existing volume groups that are valid for the media type.
6. Specify a value for Media ID prefix if either of the following conditions are true (see step 1 under “Inventory and Update Robot Volume Configuration” on page 409):
- The robot does not support barcodes
- The media that was inserted does not have readable barcodes.
Volume Group ------------ 1) 00_000_NON 2) No Volume Group 3) Specify New Volume Group Name 4) Auto-Generate New Volume Group Name Enter choice:

Appendix D, Using vmadm 419
Inventory and Update Robot Volume Configuration
If neither of the above conditions are true, a prefix is not required since Media Manager assigns the last six characters of the barcode or the specific characters that you specify if you are using Media ID generation rules as the media ID for media added to the robot. This applies whether or not a barcode rule is used.
To select a value for Media ID prefix, choose i from the Update Options menu to display a selection list that is similar to the following:
Choose one of the following from the list:
- If there are existing media ID prefixes, you can choose one of them from the list. The existing prefixes come from MEDIA_ID_PREFIX entries that you added to the vm.conf file on the host where you are running vmadm. For example, entries for the list above would be:
MEDIA_ID_PREFIX = NV
MEDIA_ID_PREFIX = NETB
MEDIA_ID_PREFIX = ADD
- Default Media ID Prefix
In this case, Media Manager first checks the vm.conf file for MEDIA_ID_PREFIX entries.
- If vm.conf has MEDIA_ID_PREFIX entries, then Media Manager assigns the last one as the default prefix.
- If vm.conf does not have any prefix entries, Media Manager assigns the letter A as the default prefix.
- Use No Media ID Prefix
This operation will succeed only if the robot supports barcodes and the media has readable barcodes. Otherwise, Media Manager is unable to assign new media IDs and the operation fails (with an accompanying error message).
This choice may be useful if you are using media with barcodes and want updates to fail when unreadable or missing barcodes are encountered.
Media ID Prefix ------------- 1) NV 2) NETB 3) ADD 4) Default Media ID Prefix 5) Use No Media ID Prefix 6) Specify New Media ID Prefix Enter choice:

Inventory and Update Robot Volume Configuration
420 NetBackup DataCenter Media Manager System Administrator’s Guide for UNIX
- Specify New Media ID Prefix
You can specify a new media ID prefix having from one to five alpha-numeric characters. Media Manager assigns the remaining numeric characters. For example, if the prefix is NETB, the media IDs are NETB00, NETB01, and so on.
For optical disk media, the final character reflects the platter side, unless you choose NO for Use Platter Side in Optical ID (see step 7).
Note A new media ID prefix is used only for the current operation. It is not added to vm.conf and does not appear in the Media ID prefix list the next time you use the Update Options menu.
7. If the robot is an ODL robot, choose the s option to toggle Use Platter Side in Media ID to YES or NO, depending on whether you want designate the platter-side in media IDs for optical disk media.
Note Use Platter Side in Media ID appears on the Update Options menu only if you are doing the inventory and update on an ODL robot and are using a Media ID Prefix.
The two sides of an optical disk platter are referred to as media ID partners.
- If you set Use Platter Side in Media ID to YES, one side will have a media ID of xxxxxA and the other side xxxxxB, where xxxxx is the media ID prefix and is an auto-generated number.
- If you set Use Platter Side in Media ID to NO, the platter side is not included in the media ID.
8. Choose p to change the volume pool from the default. A menu similar to the following appears:
If you are using barcode rules:
- Choose Default Volume Pool to let the barcode rule determine the volume pool that is assigned.
Volume Pool ---------- 1) None 2) NetBackup 3) a_pool 4) DataStore 5) Default Volume Pool Enter choice:

Appendix D, Using vmadm 421
Configuring Barcode Rules
- To use a volume pool other than the default, choose one from the menu.
The Update Options volume pool always overrides the rule.
If you are not using barcode rules:
- Choose Default Volume Pool to use the NetBackup volume pool for data volumes and no volume pool for cleaning tapes (the same as choosing None).
- To use a volume pool other than the default, choose one from the menu.
9. When you are satisfied with the settings, choose q to return to the Inventory and Update Robot menu.
Configuring Barcode RulesA barcode rule specifies criteria for creating volume database entries for new robotic volumes that you are adding through an auto-populate or inventory and update operation (see “Auto-Populating a Robot” on page 373 and “Inventory and Update Robot Volume Configuration” on page 409). You select whether to use barcode rules when you set up the auto-populate, or inventory and update.
The following are some example barcode rules.
Barcode Media Volume Max Mounts/ Tag Type Pool Cleanings Description ------------------------------------------------------------- 0080 8MM b_pool 55 new 008 volumes DLT DLT d_pool 200 dlt backup CLD DLT_CLN None 30 dlt cleaning CLT 8MM_CLN None 20 8mm cleaning TS8 8MM t_pool 0 8mm backup TS 8MM None 0 8mm no pool <NONE> DEFAULT None 0 no barcode <DEFAULT> DEFAULT NetBackup 0 other barcodes
Barcode Rule SortingRules are sorted, first according to the number of characters in the barcode tag (see example list above) and then in the order you add them. The two exceptions are the <NONE> and <DEFAULT> rules which are always at the end of the list.
When an inventory and update, or auto-populate operation uses barcode rules and a new barcode is detected in a slot, Media Manager searches the rules starting at the top of the list and checks for a barcode tag that matches the new barcode. If a barcode tag matches, the media type for the rule is checked to ensure that it is compatible with what you

Configuring Barcode Rules
422 NetBackup DataCenter Media Manager System Administrator’s Guide for UNIX
specified for the inventory and update. If the media type also matches, Media Manager uses the rule’s media type, volume pool, max mounts (or number of cleanings), and description to create a volume database entry for the media ID.
Note Media Manager attempts to use barcode rules only for barcodes that are not already in the volume database.
Barcode Rule ExamplesFor example, assume that during an inventory and update for a TS8 robot, you select the following update options for a new 8 mm tape (see “Inventory and Update Robot Volume Configuration” on page 409):
Media Type: 8MM
Volume Group: 00_000_TS8
Use Barcode Rules: YES
Volume Pool: DEFAULT
If a new tape in this robot has a barcode of TS800001 and there are no media generation rules defined, Media Manager uses the rule with the barcode tag named TS8 and includes the following values in the volume database entry for the tape:
Media ID: 800001 (last six characters of barcode)
Volume Group: 00_000_TS8
Volume Pool: t_pool
Max Mounts: 0 (infinite)
If a new tape has a barcode of TS000001 and there are no media generation rules defined, the rule named TS is used and volume database entry for the tape will contain:
Media ID: 000001 (last six characters of barcode)
Volume Group: 00_000_TS8
Volume Pool: None
Max Mounts: 0 (infinite)

Appendix D, Using vmadm 423
Configuring Barcode Rules
Barcode Rule MenuTo configure barcode rules, choose Configure Barcode Rules from the Special Actions menu. The following menu appears:
Adding a Barcode RuleTo add a new barcode rule, choose a from the Configure Barcode Rules menu and enter the following information at the prompts:
Barcode Tag
Enter a barcode tag for the rule. The tag can have from 1 to 16 characters and no spaces.
The only rules where you can use special characters in the barcode tags areas follows:
<NONE >
Matches when rules are used and the media has an unreadable barcode, or the robot does not support barcodes.
<DEFAULT>
For media with barcodes, this tag matches when none of the other barcode tags match, providing the media type in the <DEFAULT> rule and the media type on the Update Options menu are compatible. The Update Options menu is where you set up the criteria for an inventory and update operation (see “Inventory and Update Robot Volume Configuration” on page 409).
Display Mode: BRIEF Output Destination: SCREEN
Configure Barcode Rules ----------------------- a) Add Rule c) Change Rule d) Delete Rule l) List Rules
m) Mode (brief or full) o) Output Destination (screen or file) h) Help q) Quit Menu
ENTER CHOICE:
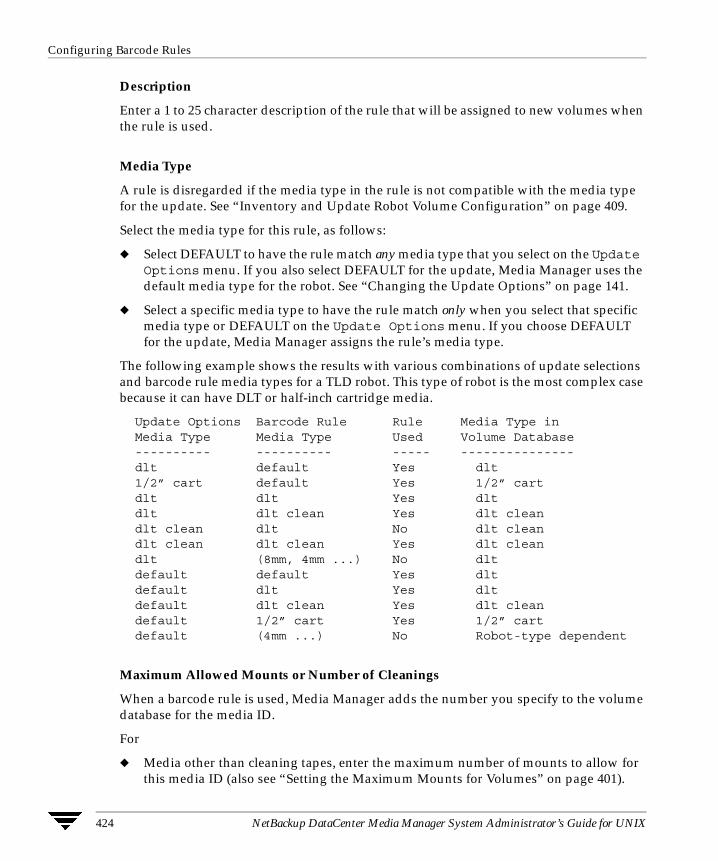
Configuring Barcode Rules
424 NetBackup DataCenter Media Manager System Administrator’s Guide for UNIX
Description
Enter a 1 to 25 character description of the rule that will be assigned to new volumes when the rule is used.
Media Type
A rule is disregarded if the media type in the rule is not compatible with the media type for the update. See “Inventory and Update Robot Volume Configuration” on page 409.
Select the media type for this rule, as follows:
� Select DEFAULT to have the rule match any media type that you select on the Update Options menu. If you also select DEFAULT for the update, Media Manager uses the default media type for the robot. See “Changing the Update Options” on page 141.
� Select a specific media type to have the rule match only when you select that specific media type or DEFAULT on the Update Options menu. If you choose DEFAULT for the update, Media Manager assigns the rule’s media type.
The following example shows the results with various combinations of update selections and barcode rule media types for a TLD robot. This type of robot is the most complex case because it can have DLT or half-inch cartridge media.
Update Options Barcode Rule Rule Media Type in Media Type Media Type Used Volume Database ---------- ---------- ----- --------------- dlt default Yes dlt 1/2” cart default Yes 1/2” cart dlt dlt Yes dlt dlt dlt clean Yes dlt clean dlt clean dlt No dlt clean dlt clean dlt clean Yes dlt clean dlt (8mm, 4mm ...) No dlt default default Yes dlt default dlt Yes dlt default dlt clean Yes dlt clean default 1/2” cart Yes 1/2” cart default (4mm ...) No Robot-type dependent
Maximum Allowed Mounts or Number of Cleanings
When a barcode rule is used, Media Manager adds the number you specify to the volume database for the media ID.
For
� Media other than cleaning tapes, enter the maximum number of mounts to allow for this media ID (also see “Setting the Maximum Mounts for Volumes” on page 401).

Appendix D, Using vmadm 425
Configuring Barcode Rules
� Cleaning tapes, enter the number of cleanings to allow (also see “Changing the Cleanings Allowed for a Cleaning Tape” on page 402).
Volume Pool
Specify a volume pool for the volume. This is the pool that the volume will be added to, when a barcode matches the rule.
Whenever the barcode rule is used, and the Update Options menu shows
� DEFAULT for the volume pool, then the volume is assigned to the pool specified in the barcode rule.
� A specific volume pool, then that selection overrides the pool specified in the barcode rule.
Changing a Barcode RuleTo change a barcode rule, choose c from the Configure Barcode Rules menu and select the desired rule from the resulting list. You are then prompted to change the description, Media Type, Maximum Allowed Mounts (or Number of Cleanings), and Volume Pool.
For Media Type, Maximum Allowed Mounts, and Number of Cleanings, the current value appears in parentheses (pressing the Enter key without typing a new value leaves the value unchanged).
Note You cannot use Change Barcode Rule to change the barcode tag. To change a barcode tag, delete the rule and then add a rule with the new tag.
Deleting a Barcode RuleTo delete a barcode rule, choose d from the Configure Barcode Rules menu and select the desired rule from the list.
Listing Barcode RulesTo list existing barcode rules, set the Display Mode and Output Destination options and then choose l (List Rules) from the Configure Barcode Rules menu.
Formatting Optical Disks
426 NetBackup DataCenter Media Manager System Administrator’s Guide for UNIX
Formatting Optical DisksBefore an optical disk platter can be used with Media Manager, a media ID (this should match the external media ID) and a volume label must be written to it. There are two ways to write this information:
� Format the platter when you add the optical disk volume using vmadm.
� Use the tpformat command.
When you use vmadm, the media ID becomes the recorded media ID. The process for using vmadm is described here. See the tpformat man page for a description of how to use that command.
Note All platforms and operating systems do not support 1024 byte-per-sector platters. Most support only 512 byte-per-sector sizes. Before purchasing optical disk platters, check your vendor documentation to determine the sector sizes supported by your platform and operating system. Also see the VERITAS support web site for information on what is supported. VERITAS urges you to use preformatted platters.
1. Perform the same steps for adding a volume, described in the preceding sections on adding single volumes or ranges of volumes.
2. The last step is a prompt similar to the following:
(xxxxxA and xxxxxB represent sides A and B of the volume’s platter.)
Enter y to proceed or n to cancel the operation.
The tpformat request is sent to the host on which vmadm is running. This action may cause a mount request that requires manual assignment by the operator. If labels already exist on the tape, you are asked if they should be overwritten.
Even if the formatting cannot be completed for some reason, the volume or volumes are still added.
Do you want to tpformat xxxxxA and xxxxxB? (y/n)

427
Robot Drive and Slot Layouts EThis appendix contains diagrams of slot layouts and drive locations in some of the more popular robots supported by Media Manager. If your robot is not included here, see the vendor’s documentation for the device.

ADIC Scalar 100 LTO DELL PV-136T IBM 3583 (TLD)
428 NetBackup DataCenter Media Manager System Administrator’s Guide for UNIX
ADIC Scalar 100 LTODELL PV-136TIBM 3583 (TLD)
The following slot mapping diagram shows a 6 drive, 24 slot model with 12 media access ports. Other robot models vary and have up to 72 slots.
ADIC Scalar 100 DLTADIC Scalar 100 SDLTIBM 7337 (TLD)
The following slot mapping diagram shows a 6 drive, 20 slot model with 10 media access ports. Other robot models vary and have up to 60 slots.
.
.
.
Front
Slot 7
Slot 24
Slot 1
Slot 6
Side
.
.
.
Mediaaccessports
Back
Drive 6
Drive 1
.
.
.
1
12
.
.
.
.
.
.
Front
Slot 6
Slot 20
Slot 1
Slot 5
Side
.
.
.
Mediaaccessports
Back
Drive 6
Drive 1
.
.
.
1
10
.
.
.

Appendix E, Robot Drive and Slot Layouts 429
ADIC Scalar 100 AIT (TL8)
ADIC Scalar 100 AIT (TL8)The following slot mapping diagram shows an 8 drive, 32 slot model with 16 media access ports. Other robot models vary and have up to 96 slots.
ADIC Scalar 218 (TLD)
Note With a barcode reader installed, the slot physically labeled as slot 1 is disabled, and physical slots 2 through 18 become known in Media Manager as slots 1 through 17. With a virtual media access port configured, physical slot 12 becomes the port and physical slots 2-11 and 13-18 become known in Media Manager as slots 1-16.
.
.
.
Front
Slot 9
Slot 32
Slot 1
Slot 8
Side
.
.
.
Mediaaccessports
Back
Drive 8
Drive 1
.
.
.
1
16
.
.
.
Drive 2 Drive 1
Slot 1 Slot 12
Slot 13 Slot 18
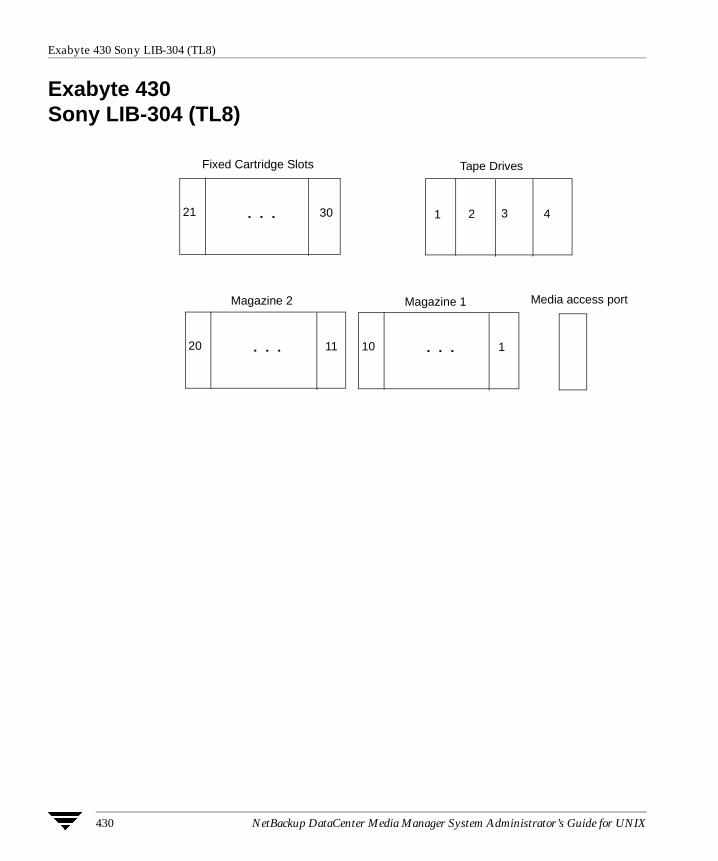
Exabyte 430 Sony LIB-304 (TL8)
430 NetBackup DataCenter Media Manager System Administrator’s Guide for UNIX
Exabyte 430Sony LIB-304 (TL8)
. . .20 11
Fixed Cartridge Slots Tape Drives
Magazine 1Magazine 2
. . .10 1
. . .21 30 1 4
Media access port
32

Appendix E, Robot Drive and Slot Layouts 431
ADIC Scalar 448/458 (TLD)
ADIC Scalar 448/458 (TLD)
Drives are installed right to left, but are numbered left to right. With a four drive configuration, the drive numbering is as follows:
Drive 2
Drive 1
Slot 37
Slot 25
Slot 13
Slot 1
Slot 48
Slot 36
Slot 24
Slot 12
Media access port
Media access port
Drive 2
Drive 1
Drive 4
Drive 3

ADIC Scalar 1000 - DLT version (TLD)
432 NetBackup DataCenter Media Manager System Administrator’s Guide for UNIX
ADIC Scalar 1000 - DLT version (TLD)
Drive 1 Drive 2
Drive 3 Drive 4
Drive 5 Drive 6
.
.
.
.
.
.
.
.
.
.
.
.
.
.
.
.
.
.
.
.
.
.
.
.
.
.
.
.
.
.
.
.
.
.
.
.
.
.
.
.
.
.
.
.
.
.
.
.
5210
43
62
53
1 75 107
84
12
1 31
42
11
20
21
30
94
85
74
63
126
117
116
158
149
148
139
127
138106
95Media access port

Appendix E, Robot Drive and Slot Layouts 433
ADIC Scalar 1000 - AIT/AIT2 (TL8)
ADIC Scalar 1000 - AIT/AIT2 (TL8)The slot mapping shown below is for a 12 drive, 237 slot model. Other robot models may vary.
Note This view of the media access ports is looking through the glass door from the front.
Drive 4
Drive 5
Drive 6
Drive 1
Drive 2
Drive 3
Drive 7
Drive 8
Drive 9
Drive 10
Drive 11
Drive 12
.
.
.
Slot 45
Slot 1
A B C D E
.
.
.
Slot 237
Slot 190
.
.
.
Slot 189
Slot 142
.
.
.
Slot 141
Slot 94
.
.
.
Slot 93
Slot 46
.
.
.
Slot 18
Slot 1
(Media Access Ports 1 through 18)

ADIC VLS DLT (TSD)
434 NetBackup DataCenter Media Manager System Administrator’s Guide for UNIX
ADIC VLS DLT (TSD)
ATL 2/28 DLT Library (TLD)
Drive 1 (the only drive)
SlotSlot
1 72 3 4 5 6
Drive 2
Drive 1
I/E slot 1
I/E slot 2
I/E slot 3
I/E slot 4
.
.
.
.
.
.
.
.
.
Slot 8
Slot 1
Slot 16
Slot 9 Slot 17
Slot 24
(Not Used) (Not Used) (Not Used)

Appendix E, Robot Drive and Slot Layouts 435
ATL 4/52 DLT Library ATL 2/52 DLT Library Compaq TL810 Compaq TL812 Compaq TL894 Sun StorEdge
ATL 4/52 DLT LibraryATL 2/52 DLT LibraryCompaq TL810Compaq TL812 Compaq TL894 Sun StorEdge L1800 (TLD)
The slot mapping shown below represents the ATL 4/52. The ATL 2/52 is similar with only two drives.
Drive 3
Drive 2
Drive 4
Drive 1
I/E slot 1
I/E slot 2
I/E slot 3
I/E slot 4
.
.
.
.
.
.
.
.
.
Slot 32
Slot 1 Slot 17 Slot 33
Slot 16 Slot 48
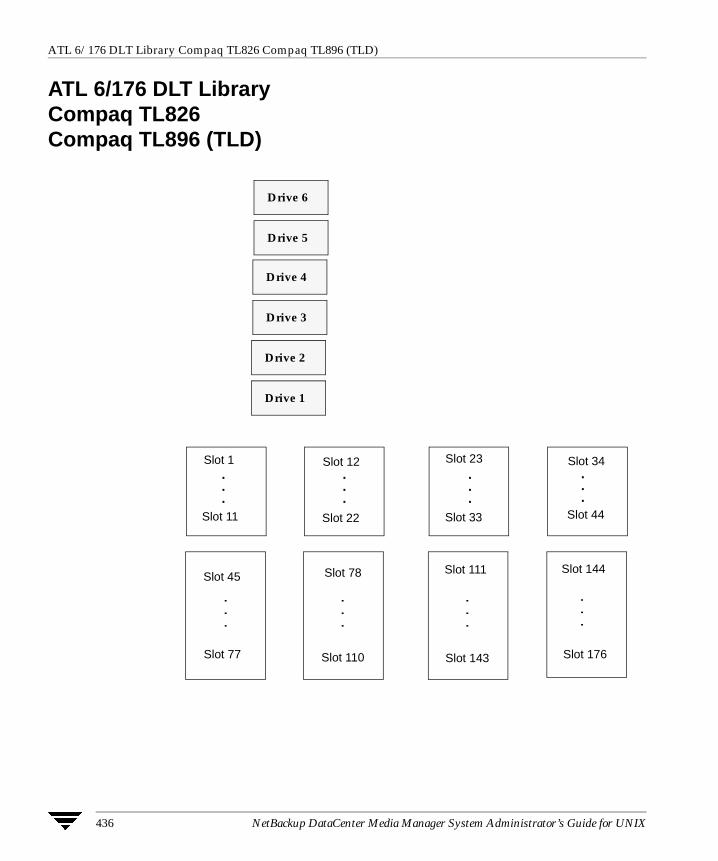
ATL 6/176 DLT Library Compaq TL826 Compaq TL896 (TLD)
436 NetBackup DataCenter Media Manager System Administrator’s Guide for UNIX
ATL 6/176 DLT Library Compaq TL826Compaq TL896 (TLD)
Drive 1
Drive 2
.
.
.
.
.
.
.
.
.
.
.
.
.
.
.
.
.
.
.
.
.
.
.
.
Drive 3
Drive 4
Drive 5
Drive 6
Slot 1
Slot 11
Slot 45
Slot 77
Slot 12
Slot 22
Slot 78
Slot 110
Slot 23
Slot 33
Slot 111
Slot 143
Slot 34
Slot 44
Slot 144
Slot 176

Appendix E, Robot Drive and Slot Layouts 437
ATL 9/88 DLT Library (TLD)
ATL 9/88 DLT Library (TLD)
Drive 6
.
.
.
.
.
.
.
.
.
.
.
.
Drive 9
Drive 5
Drive 4
Drive 3
Drive 2
Drive 7
Drive 8
Drive 1
Slot 1
Slot 22 Slot 44
Slot 23 Slot 45
Slot 66
Slot 67
Slot 88

ATL 3/264 (2640) DLT Library Compaq TL820 Compaq TL822 Compaq TL893 (TLD)
438 NetBackup DataCenter Media Manager System Administrator’s Guide for UNIX
ATL 3/264 (2640) DLT Library Compaq TL820Compaq TL822 Compaq TL893 (TLD)
Drive 2
Drive 3
Drive 1
Face-0 Face-1 Face-2 Face-3
Face-4 Face-5 Face-6 Face-7
.
.
.
.
.
.
.
.
.
.
.
.
.
.
.
.
.
.
.
.
.
.
.
.
Slot 1
Slot 33
Slot 165
Slot 133
Slot 34
Slot 66
Slot 166
Slot 198
Slot 67
Slot 99
Slot 199
Slot 231
Slot 232
Slot 264
Slot 132
Slot 100

Appendix E, Robot Drive and Slot Layouts 439
ATL P1000 Sun StorEdge L1000 (TLD)
ATL P1000 Sun StorEdge L1000 (TLD)
The slot mapping shown below apply to libraries that are configured with 25 slots. Other configurations may vary.
Slot 5
Slot 4
Slot 6
Slot 7
Slot 8
Slot 9
Slot 18
Slot 25
Slot 10
Slot 17
Slot 1
Slot 2
Slot 3
Drive 1 Drive 2
Drive 3 Drive 4
Back (Inside view of back wall from the front
Front (Inside view of front wall from the back
Media Access Port

ATL M1500 M4 Data M1500 (TLD)
440 NetBackup DataCenter Media Manager System Administrator’s Guide for UNIX
ATL M1500 M4 Data M1500 (TLD)
The slot mapping below shows a robot with two units, each unit having two removable magazines. For NetBackup BusinesServer, only a single unit is allowed and the fixed slot is 21.
Front View
Top Unit
Bottom Unit
Removable
Magazine
Removable
Magazine
Removable
Magazine
Removable
Magazine
Slot 1
Slot 10
Top Unit - (Front) Bottom Unit - (Front)
Slot 20
Slot 11
Slot 21
Slot 30
Slot 40
Slot 31
Top View of Magazines
Slot 41 Slot 42

Appendix E, Robot Drive and Slot Layouts 441
Breece Hill Q2.15 IBM 7337-305 IBM 3447-105 (TLD)
Breece Hill Q2.15IBM 7337-305 IBM 3447-105 (TLD)
Drive 1 Drive 2
(Top View)
Slot 1 Slot 10
Slot 11 Slot 15
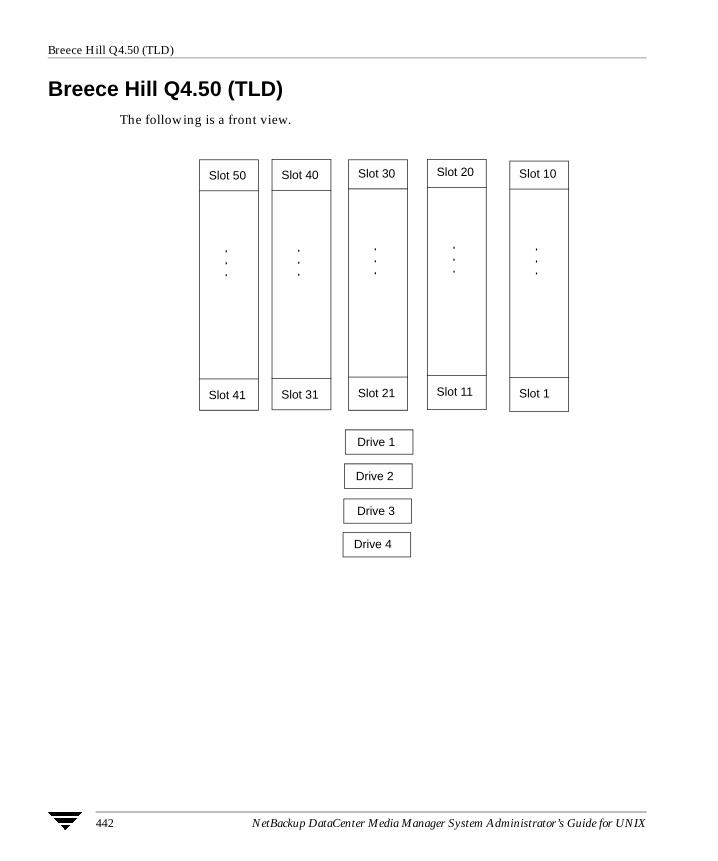
Breece Hill Q4.50 (TLD)
442 NetBackup DataCenter Media Manager System Administrator’s Guide for UNIX
Breece Hill Q4.50 (TLD)The following is a front view.
Drive 2
Drive 1
Drive 3
Drive 4
.
.
.
Slot 11
Slot 20
.
.
.
Slot 21
Slot 30
.
.
.
Slot 31
Slot 40
.
.
.
Slot 1
Slot 10
.
.
.
Slot 41
Slot 50

Appendix E, Robot Drive and Slot Layouts 443
Breece Hill Q7 (TLD)
Breece Hill Q7 (TLD)
Drive 1
Drive 2
Face 0 Face 3Face 2Face 1
.
.
.
.
.
.
.
.
.
.
.
.
Slot 8
Slot 14Slot 7
Slot 1 Slot 15
Slot 21 Slot 28
Slot 22

Breece Hill Q47 (TLD)
444 NetBackup DataCenter Media Manager System Administrator’s Guide for UNIX
Breece Hill Q47 (TLD)
Drive 1
Drive 2
Drive 3
Drive 4
Face 0 Face 3Face 2Face 1
.
.
.
.
.
.
.
.
.
.
.
.
.
.
.
.
.
.
.
.
.
.
.
.
Slot 37
Slot 14
Slot 8Slot 1
Slot 7
Slot 29
Slot 36 Slot 52
Slot 45
Slot 21
Slot 15 Slot 22
Slot 28
Slot 53
Slot 60Slot 44

Appendix E, Robot Drive and Slot Layouts 445
Breece Hill Q70 Breece Hill Q210 Breece Hill Q140 (TLD)
Breece Hill Q70Breece Hill Q210 Breece Hill Q140 (TLD)
The slot figure shown below represents the Breece Hill Q210.
Hopper1
Drive 1
Drive 2
Drive 3
Drive 4
Drive 5
Drive 6
Hopper0
Slots Slots Slots
Media Access Port
Media Access Port

Compaq 35/70 (TLD)
446 NetBackup DataCenter Media Manager System Administrator’s Guide for UNIX
Compaq 35/70 (TLD)
Exabyte 10i, 10e, 10hExabyte 210Exabyte EZ17 (TS8)
Drive 1 Drive 2
.
.
.
.
.
.
.
.
.
Slot 5
Slot 1 Slot 6
Slot 10 Slot 15
Slot 11
Drive 1
.
.
.
Drive 1
Drive 2
Drive 1
.
.
.
.
.
.
EZ17Fixed Slot 0EXB-210
EXB-10i and 10e
Slot 1
Slot 7
Slot 10
Slot 1
Slot 1
Slot 10

Appendix E, Robot Drive and Slot Layouts 447
Exabyte 18D (TLD)
Exabyte 18D (TLD)
Exabyte 60 (TL8)
Drive 1
.
.
.
Slot 1
Slot 8
Slot 1-10
Slot 11-20
Slot 21-30
Slot 31-40
Slot 41-50
Slot 51-60
A01-10
B01-10
C01-10
E01-10
F01-10
G01-10
D

Exabyte 110L (TLD)
448 NetBackup DataCenter Media Manager System Administrator’s Guide for UNIX
Exabyte 110L (TLD)
Exabyte 120 (TL8)
DriveSlot10
Slot1
Slot2
Slot3
Slot4
Slot8
Slot5
Slot9
Slot6
Front
Back
Slot7
A01-10
B01-10
C01-10
D
E01-10
F01-10
G01-10
Slot 1-10
Slot 11-20
Slot 21-30
Slot 31-40
Slot 41-50
Slot 51-60
Slot 61-70
Slot 111-116
Slot 71-80
Drive 4Drive 2 Drive 3Drive 1
Slot 81-90
Slot 91-100
Slot 101-110
B11-20
C11-20
A11-16
E11-20
F11-20
G11-20

Appendix E, Robot Drive and Slot Layouts 449
Exabyte 220 ADIC Scalar AIT 220 Sun StorEdge L400 (TL8)
Exabyte 220ADIC Scalar AIT 220 Sun StorEdge L400 (TL8)
Exabyte 230D (TLD)
Drive 1
Drive 2
Face 0 Face 1
.
.
.
.
.
.
Fixed Slot 0
Slot 11
Slot 20
Slot 1
Slot 10
Drive 2
Drive 1
Fixed slot - 0
Face-0 Face-1 Face-2 Face-3 Face-4 Face-5
.
.
.
.
.
.
.
.
.
.
.
.
.
.
.
.
.
.
Slot 5 Slot 10 Slot 15 Slot 20 Slot 25 Slot 30
Slot 1 Slot 6 Slot 11 Slot 16 Slot 21 Slot 26

Exabyte 440 (TL8)
450 NetBackup DataCenter Media Manager System Administrator’s Guide for UNIX
Exabyte 440 (TL8)
Drive 2
Drive 1
Fixed slot - 0
Drive 4
Drive 3
Face-0 Face-1 Face-2 Face-3
.
.
.
.
.
.
.
.
.
.
.
.
Slot 1
Slot 10
Slot 11
Slot 20 Slot 30 Slot 40
Slot 21 Slot 31

Appendix E, Robot Drive and Slot Layouts 451
Exabyte 480 ADIC Scalar AIT 480 (TL8)
Exabyte 480ADIC Scalar AIT 480 (TL8)
Drive 2
Drive 1
Fixed slot - 0
Drive 4
Drive 3
Face-0 Face-1 Face-2 Face-3
Face-4 Face-5 Face-6 Face-7
.
.
.
.
.
.
.
.
.
.
.
.
.
.
.
.
.
.
.
.
.
.
.
.
Slot 50 Slot 60 Slot 70 Slot 80
Slot 41 Slot 51 Slot 61 Slot 71
Slot 1
Slot 10 Slot 20 Slot 30 Slot 40
Slot 11 Slot 21 Slot 31

Exabyte 690D (TLD)
452 NetBackup DataCenter Media Manager System Administrator’s Guide for UNIX
Exabyte 690D (TLD)
Drive 3
Drive 1
Fixed slot - 0
Face-0 Face-1 Face-2 Face-3 Face-4 Face-5
.
.
.
.
.
.
.
.
.
.
.
.
.
.
.
.
.
.
Drive 5
Drive 2
Drive 4
Drive 6
.
.
.
Slot 31
Slot 45Slot 30Slot 15 Slot 60 Slot 75 Slot 90
Slot 76Slot 61Slot 46Slot 16Slot 1
1
5
Media Access Ports

Appendix E, Robot Drive and Slot Layouts 453
Exabyte X80 (TL8)
Exabyte X80 (TL8)
.
.
.
Slot 75
Slot 71
Drive 3
Drive 1
Fixed slot - 0
Face-0 Face-1 Face-2 Face-3 Face-4 Face-5
.
.
.
.
.
.
.
.
.
.
.
.
.
.
.
.
.
.
Drive 5
Drive 2
Drive 4
Drive 6
Slot 31
Slot 35Slot 25Slot 5 Slot 45 Slot 55 Slot 65
Slot 61Slot 51Slot 41Slot 21Slot 1
Drive 7 Drive 8
Face-6 Face-7
.
.
.
Slot 15
Slot 11
.
.
.
Slot 80
Slot 76
.
.
.
.
.
.
.
.
.
.
.
.
.
.
.
.
.
.
Slot 36
Slot 40Slot 30Slot 10 Slot 50 Slot 60 Slot 70
Slot 66Slot 56Slot 46Slot 26Slot 6
.
.
.
Slot 20
Slot 16

Exabyte X200 (TL8)
454 NetBackup DataCenter Media Manager System Administrator’s Guide for UNIX
Exabyte X200 (TL8)
Fixed slot - 0
Face-0 Face-1 Face-2 Face-3 Face-4 Face-5
.
.
.
Slot 6
Slot 1
Face-6 Face-7
Drive 1 Drive 2
Drive 4Drive 3
Drive 5 Drive 6
Drive 7 Drive 8
Drive 9 Drive 10
.
.
.
Slot 36
Slot 31...
Slot 66
Slot 61...
Slot 96
Slot 91...
Slot 126
Slot 121
.
.
.
Slot 156
Slot 151...
Slot 186
Slot 181...
Slot 216
Slot 211
.
.
.
Slot 12
Slot 7...
Slot 42
Slot 37...
Slot 72
Slot 67...
Slot 102
Slot 97...
Slot 132
Slot 127
.
.
.
Slot 162
Slot 157...
Slot 192
Slot 187...
Slot 222
Slot 217
.
.
.
Slot 18
Slot 13...
Slot 48
Slot 43...
Slot 78
Slot 73...
Slot 108
Slot 103...
Slot 138
Slot 133
.
.
.
Slot 168
Slot 163...
Slot 198
Slot 193...
Slot 228
Slot 223
.
.
.
Slot 24
Slot 19...
Slot 54
Slot 49...
Slot 84
Slot 79...
Slot 114
Slot 109...
Slot 144
Slot 139
.
.
.
Slot 174
Slot 169...
Slot 204
Slot 199...
Slot 234
Slot 229
.
.
.
Slot 30
Slot 25...
Slot 60
Slot 55...
Slot 90
Slot 85...
Slot 120
Slot 115...
Slot 150
Slot 145...
Slot 180
Slot 175...
Slot 210
Slot 205...
Slot 240
Slot 235

Appendix E, Robot Drive and Slot Layouts 455
HP SureStore 1/9 Sun StorEdge L9 (TLD)
HP SureStore 1/9Sun StorEdge L9 (TLD)
This is a top view of the robot.
IBM 3581ADIC Fastor (TLD)
Drive 1Slot7
Slot1
Slot2
Slot3
Slot4
Slot8
Slot5
Slot9
Slot6
.
.
.
Slot 6
Slot 7
Slot 1
Slot 5
Drive 1
BackFront

IBM 3584 (TLD)
456 NetBackup DataCenter Media Manager System Administrator’s Guide for UNIX
IBM 3584 (TLD)
Front Back
Mediaaccess ports
.
.
.
Slot 44
Slot 1
.
.
.
Slot 114
Slot 71
.
.
.
Slot 167
Slot 141 Slot 213
Slot 239
.
.
.
Slot 284
Slot 240
.
.
.
Slot 212
Slot 168
.
.
.
Slot 140
Slot 115
Drive 1
Drive 12
.
.
.
Slot 45
Slot 70
.
.
....
.
.
.
10
1

Appendix E, Robot Drive and Slot Layouts 457
IBM 3590 B11 IBM 3590 E11 (TSH)
IBM 3590 B11IBM 3590 E11 (TSH)
Note Supported only on UNIX device hosts.
IBM 7331 (TL8)
Note Supported only on UNIX device hosts.
Slot 1
Slot 10
Media
access
(One drive inside)
.
.
.
Slot 1
Slot 10...
Slot 11
Slot 20
Slot 21
Slot 22
.
.
.
Drive 2
Drive 1

NEC Autoloader DLT (TLD)
458 NetBackup DataCenter Media Manager System Administrator’s Guide for UNIX
NEC Autoloader DLT (TLD)The following diagram shows a standard model.
The following diagram shows a model with a barcode reader.
FR
ON
T
BA
CK
Magazine
Fixed Slots
Drive
.
.
.
Slot 7
Slot 1
.
.
.
Slot 10
Slot 8
FR
ON
T
BA
CK
Magazine
Fixed Slots
Drive
.
.
.
Slot 7
Slot 1
.
.
.
Slot 10
Slot 8
(Invalid Slot)
Barcode Reader

Appendix E, Robot Drive and Slot Layouts 459
Overland Data DLT Library Xpress Compaq StorageWorks DLT Mini-Library (TLD)
Overland Data DLT Library XpressCompaq StorageWorks DLT Mini-Library (TLD)
.
.
.
.
.
.
Slot 17
Slot 26
Slot 1
Slot 16
Front
Front
Expansion Module (LXG 2016)
Drive Module
Internal
Drive 1 Drive 2

Overland Data LXBx110 Overland Data LXBx210 Compaq TL891 Compaq TL892 (TLD)
460 NetBackup DataCenter Media Manager System Administrator’s Guide for UNIX
Overland Data LXBx110 Overland Data LXBx210 Compaq TL891Compaq TL892 (TLD)
.
.
.
Slot 10
Slot 1
Front
(Tape Holder)
(LXBx210 has two drives inside)
(LXBx110 has one drive inside)

Appendix E, Robot Drive and Slot Layouts 461
Overland Data Library Pro (TL8)
Overland Data Library Pro (TL8)The following is the top view.
.
.
.
Slot 19
Drive 2
Drive 1
Slot 1
Media access port
Picker

Overland Data NEO Overland Data LxL1u11 (TLD)
462 NetBackup DataCenter Media Manager System Administrator’s Guide for UNIX
Overland Data NEOOverland Data LxL1u11 (TLD)
The following diagram shows a robot with the media access port enabled.
The following diagram shows a robot with the media access port disabled and is also similar to the LxL1u11 model which only supports one drive and 11 slots.
FRONT
BACK
Drive 2
.
.
.
Slot 1
Slot 12
Drive 1
.
.
.
Slot 13
Slot 25
Media access port
FRONT
BACK
Drive 2
.
.
.
Slot 1
Slot 13
Drive 1
.
.
.
Slot 14
Slot 26

Appendix E, Robot Drive and Slot Layouts 463
Compaq Storage Works MSL 5026 Compaq Storage Works MSL 5052 (TLD)
Compaq Storage Works MSL 5026Compaq Storage Works MSL 5052 (TLD)
The following diagram shows a 5026 robot model.
The following diagram shows a 5052 robot model.
FRONT
BACK
Drive 2
.
.
.
Slot 0
Slot 11
Drive 1
.
.
.
Slot 12
Slot 24
Media access port
Drive 2
.
.
.
Slot 0
Slot 11
Drive 1
.
.
.
Slot 12
Slot 24
Media access port
TOP FRONT
Drive 4
.
.
.
Slot 25
Slot 36
Drive 3
.
.
.
Slot 37
Slot 49
Media access port
BOTTOM BACK
BOTTOM FRONT
TOP BACK

Qualstar 46120 (TL8)
464 NetBackup DataCenter Media Manager System Administrator’s Guide for UNIX
Qualstar 46120 (TL8)
Drive 1
Drive 2
Drive 3
Drive 4
Drive 5
Drive 6
Face 1 Face 6Face 5Face 4Face 3Face 2
.
.
.
.
.
.
.
.
.
.
.
.
.
.
.
.
.
.
.
.
.
.
.
.
.
.
.
.
.
.
.
.
.
.
.
.
Slot 1 Slot 21 Slot 41 Slot 61 Slot 81 Slot 101
Slot 31
Slot 10
Slot 11
Slot 30 Slot 50 Slot 70 Slot 90 Slot 110
Slot 111Slot 51 Slot 71 Slot 91
Slot 20 Slot 100Slot 40 Slot 60 Slot 80 Slot 120
Slot 125Slot 121 Slot 122 Slot 123 Slot 124 Slot 126

Appendix E, Robot Drive and Slot Layouts 465
Sony DMS (TLD)
Sony DMS (TLD)This slot diagram is for the Sony DMS-B35 with one drive configured. Other models differ.
Note Some cassettes requires two slots. For example, if a large cassette is in slot 1, slot 36 is unusable.
L
Drive n
C R
.
.
.
.
.
.
Slot 35 Slot 70
Slot 37Slot 2
Slot 1 Slot 36

Sony DMS-B9 (TLD)
466 NetBackup DataCenter Media Manager System Administrator’s Guide for UNIX
Sony DMS-B9 (TLD)
.
.
.
Slot 1
Slot 10
Drive

Appendix E, Robot Drive and Slot Layouts 467
Spectra Logic 9000/20 Spectra Logic 9000/40 (TL8)
Spectra Logic 9000/20Spectra Logic 9000/40 (TL8)
The slot figure shown below represents the 9000/40. The 9000/20 is similar with fewer slots.
Drive 1
Drive 2
Drive 3 Drive 4
Slot 1
Slot 15
Slot 16
Slot 40
Access Door

STK 9710 STK 9740 HP SureStore 10/588 (A4845A) (TLD)
468 NetBackup DataCenter Media Manager System Administrator’s Guide for UNIX
STK 9710 STK 9740HP SureStore 10/588 (A4845A) (TLD)
Drive and cell capacity are configurable. The following diagram is based on an STK 9710 configuration. Other STK library configurations may vary.
For example, STK 9740 libraries may number drives from the top down. Also 9740 drives may be installed in Panel 0, not in Panel 2.
TLD slot numbering is different than STK Cell Element numbering. To obtain the TLD slot number, add 1 to the STK Cell Element. For example, STK Cell Element 224 corresponds to TLD slot 225. Cell elements are labeled on the inside walls of the robot. See your STK documentation for more information on library cell mapping.
Drive 3Drive 2Drive 1
Drive n...
Slots Slots Slots Slots
Slots
SlotsSlotsSlotsSlots Slots
Row 0
Row 41 Row 41
Row 13
Row 0
Row 27
Row 28
Slots
Panel 0 Panel 1 Panel 2
Column Column Column
0 0 0 1 3 2 1 2 3 1 2
Media access port

Appendix E, Robot Drive and Slot Layouts 469
STK 9714 HP SureStore E 6/100 (A4846A) (TLD)
TLD drives are numbered from 1 to n. The drive number can be obtained by adding one to the STK drive index, which starts at zero.
For STK libraries under ACS control, enter the STK drive parameters (ACS, LSM, panel, and drive) directly into the device configuration.
STK 9714 HP SureStore E 6/100 (A4846A) (TLD)
Note See your STK documentation for more information on 9714 library cell mapping.
Panel 0 Panel 1 Panel 2
Drive 1
Drive n
.
.
.
Column Column Column Column Column Column
Slots Slots Slots Slots Slots
0 1 2 3 0 0
79 59 39 19
100 20 40 60 80
99
1
Row 19
Row 0 Media access port
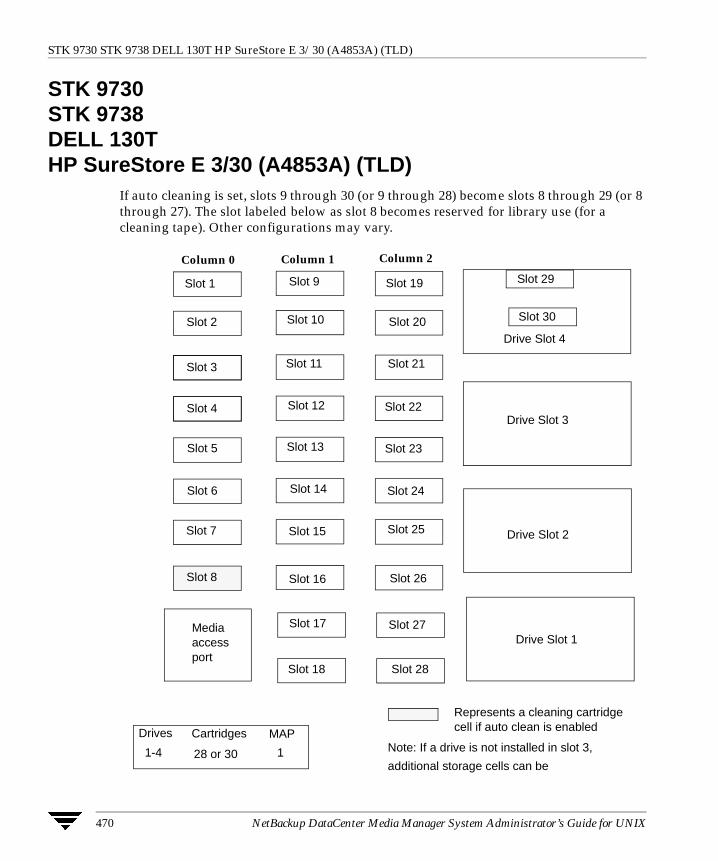
STK 9730 STK 9738 DELL 130T HP SureStore E 3/30 (A4853A) (TLD)
470 NetBackup DataCenter Media Manager System Administrator’s Guide for UNIX
STK 9730 STK 9738 DELL 130THP SureStore E 3/30 (A4853A) (TLD)
If auto cleaning is set, slots 9 through 30 (or 9 through 28) become slots 8 through 29 (or 8 through 27). The slot labeled below as slot 8 becomes reserved for library use (for a cleaning tape). Other configurations may vary.
Column 0 Column 1 Column 2
Slot 1
Slot 2
Slot 3
Slot 4
Slot 5
Slot 6
Slot 7
Slot 8
Slot 14
Slot 13
Slot 12
Slot 11
Slot 10
Slot 9
Slot 15
Slot 16
Slot 17
Slot 18
Slot 24
Slot 25
Slot 26
Slot 27
Slot 28
Slot 19
Slot 20
Slot 21
Slot 22
Slot 23
Slot 29
Slot 30
Drive Slot 4
Drive Slot 3
Drive Slot 2
Drive Slot 1Media access port
Represents a cleaning cartridge cell if auto clean is enabled
Note: If a drive is not installed in slot 3,
additional storage cells can be
Cartridges MAPDrives
1-4 128 or 30

Appendix E, Robot Drive and Slot Layouts 471
STK L700 Sun StorEdge L700 HP SureStore E 20/700 (A5597A) (TLD)
STK L700Sun StorEdge L700 HP SureStore E 20/700 (A5597A) (TLD)
Panel 0
Col 0 Col 1 Col 2 Col 3
Slots
49
90
Panel 1 Panel 2
Col 4Col 0 Col 1 Col 2 Col 3
R
E
S
E
R
V
90
102
21
20
1
40
103
114
Slots
283
324
Slots
241
282
Slots
199
240
Slots
157
198
Slots
115
156
48
37
12
1
24
13
36
25
Col 4
Drive 1 Drive 11
Drive 2 Drive 12
Drive 3 Drive 13
Drive 4 Drive 14
Drive 5 Drive 15
Drive 6 Drive 16
Drive 7 Drive 17
Drive 8 Drive 18
Drive 9 Drive 19
Drive 10 Drive 20
Slots Slots Slots Slots
Media access port A
Media access port B

STK L20 NCR 6461 (TLD)
472 NetBackup DataCenter Media Manager System Administrator’s Guide for UNIX
STK L20NCR 6461 (TLD)
If the media access port is turned on in the configuration, slot 20 becomes the media access port and is unusable for storage.
Drive 2
Drive 1
.
.
.
Slot 1
Slot 10
.
.
.
Slot 19
Slot 11
Slot 20 / Port

Appendix E, Robot Drive and Slot Layouts 473
STK L40 (TLD)
STK L40 (TLD)
STK L80 (TLD)
.
.
.
Slot 34
Drive 3
Drive 4
Drive 2
Drive 1
.
.
.
Slot 33
Slot 23
Slot 41
Media access port
Media access port
.
.
.
Slot 22
Slot 12
.
.
.
Slot 11
Slot 1
.
.
.
Slot 64
Drive 3
Drive 4
Drive 2
Drive 1
.
.
.
Slot 63
Slot 43
Slot 81
Media access ports (5)
.
.
.
Slot 42
Slot 22
.
.
.
Slot 21
Slot 1
Drive 7
Drive 8
Drive 6
Drive 5
STK L80 (TLD)
474 NetBackup DataCenter Media Manager System Administrator’s Guide for UNIX

475
Automated Cartridge System (ACS) FUnder Media Manager, robotic support for Automated Cartridge System robots is classified as ACS and these robots are considered API robots (a Media Manager grouping of robots where the robot manages its own media).
Media Manager operates differently with a StorageTek ACS robot (STK library or STK silo) than it does with most other robots. The main difference is that Media Manager does not keep slot locations for the media, since this information is provided by the ACS library software component of an ACS robot.
The ACS library software component can be any of the following STK products (see the figure “Automated Cartridge System Sample Configuration” on page 476).
� Automated Cartridge System Library Software (ACSLS)
� STK Library Station
� Storagenet 6000 Storage Domain Manager (SN6000)
This STK hardware serves as a proxy to another ACS library software component (such as, ACSLS).
Automated Cartridge System (ACS) can refer to any of the following:
� A type of Media Manager robotic control.
� The StorageTek (STK) system for robotic control.
� The highest-level component under STK’s ACS library software, which refers to a specific standalone robotic library or to multiple libraries connected with a media passthru mechanism.
The topics in this appendix
� Explain how Media Manager components handle media requests for an ACS robot.
� Cover configuration and operational differences to be aware of when using these robots.
� Explain various advanced ACS topics.

476 NetBackup DataCenter Media Manager System Administrator’s Guide for UNIX
The following figure shows a typical Automated Cartridge System configuration. The table, “Automated Cartridge System Components” on page 477, explains the major components in this configuration.
Automated Cartridge System Sample Configuration
NetBackup Master or Media Server
Data
Media Manager
SCSI SCSI
Device Drivers
Robotic Requestsusing RPC
Administrative Utility
Database
ACS Library Software
ascd IPC
acsssi
acsssi
Library ManagementUnit (LMU)
STK
Robotics
Drive
DriveControlUnit(CU)
Library StorageModule(LSM)
Driv
e
CA
P

Appendix F, Automated Cartridge System (ACS) 477
Automated Cartridge System Components
Component Description
Media Manager server Acts as a client to the ACS library software host.
The ACS robotic daemon (acsd) formulates requests for mounts, unmounts, and inventories. An API then routes these requests to the ACS Server System Interface (acsssi) using IPC communications. The requests are converted into RPC-based communications and sent to the ACS library software.
ACS library software (can be any of the following)
- Automated Cartridge System Library Software (ACSLS)
- STK Library Station
- Storagenet 6000 Storage Domain Manager (SN6000)
Receives robotic requests from Media Manager and uses the Library Management Unit to find and mount, or unmount the correct cartridge on requests involving media management.
On compatible host platforms, you may be able to configure ACS library software and Media Manager software on the same host.
Library Management Unit (LMU) Provides the interface between the ACS library software and the robot. A single LMU can control multiple ACS robots.
Library Storage Module (LSM) Contains the robot, drives, and/or media.
Control Unit (CU) The Media Manager server connects to the drives through device drivers and a Control Unit (tape controller). The Control Unit may have an interface to multiple drives. Some Control Units also allow multiple hosts to share these drives.
Most drives do not require a separate Control Unit. In these cases, the Media Manager server connects directly to the drives.
CAP Cartridge Access Port.

Media Requests
478 NetBackup DataCenter Media Manager System Administrator’s Guide for UNIX
Media RequestsA request for media in an ACS robot begins in the same manner as other media requests. The Media Manager device daemon, ltid, receives the request for a specific tape volume and drive density, and queries the Media Manager volume daemon, vmd, for the location of the media. vmd returns only the robot number and media type, since Media Manager does not manage slot information for media in an ACS robot.
ltid verifies that the requested volume’s media type and density are compatible. Next, ltid checks its internal tables (these tables are based on the device databases) to determine if there is an available drive and sends a mount request to the ACS daemon, acsd.
acsd formulates the request and uses Internal Process Communications (IPC) to send it to the ACS Server System Interface (acsssi). The request is then converted into RPC-based communications and sent to the ACS library software.
ACS library software locates the media and sends the necessary information to the Library Management Unit, which directs the robotics to mount the media in the drive. When acsssi (on the Media Manager server) receives a successful response from the ACS library software, it returns the status to acsd.
acsd waits for avrd to scan the drive. When the drive is ready, acsd sends a message to ltid that completes the mount request and enables the requesting application (for example, NetBackup) to start sending data to the drive.
Configuring ACS Robotic ControlWhen adding an ACS robot, specify the robot number, robot type, and the name of the host that contains the ACS library software. A device file is not used. The robotic control path is through the ACS library software host, and requests are handled by LibAttach (on Windows servers) or the acsssi process (on UNIX servers).
Also see “Configuring Storage Devices” on page 11 for information on configuring ACS robots.
Configuring ACS DrivesThe ACS robot uses DLT or 1/2-inch cartridge tape drives. If an ACS robot contains more than one type of DLT or 1/2-inch cartridge tape drive, you can configure an alternate drive type (see the table “Default and Allowable ACS Media Types” on page 485).

Appendix F, Automated Cartridge System (ACS) 479
Configuring ACS Drives
This means that there can be up to three different DLT and three different 1/2-inch cartridge drive types in the same robot. If you are using alternate drive types, it is important that the volumes are configured using the same alternate media type. A total of six drive types is possible, as follows: DLT, DLT2, DLT3, HCART, HCART2, and HCART3.
Use the same methods to create or identify device files for these drives as for other drives. If the drives are SCSI and connect to the robot through a control unit, you must specify the logical unit number (lun) for each drive, as they share the same SCSI ID. Refer to the system documentation for your platform and operating system for details on configuring drives and logical unit numbers. The NetBackup Media Manager device configuration guide also has information on configuring device files.
Although device file configuration is essentially the same as for other robot-controlled drives, you must include the following additional information when defining the drives in Media Manager as robotic:
� ACS number - The index, in ACS library software terms, that identifies the robot that has this drive.
� LSM number - The Library Storage Module that has this drive.
� Panel number - The panel where the drive is located.
� Drive number - The physical number of the drive in ACS library software terms.
Also see “Configuring Storage Devices” on page 11 for information on configuring ACS drives.
The following figure shows how this information is used.

Using the STK SN6000
480 NetBackup DataCenter Media Manager System Administrator’s Guide for UNIX
ACS Robot and Drive Configuration Information
Using the STK SN6000The StorageTek SN6000 provides tape drive virtualization. Logical tape drives are presented to host operating system interfaces (tape drivers), while robotic control is accomplished through the ACS API.
Some SN6000 configurations may involve a different number of logical drives compared to the number of physical drives (or equivalent resources) available for satisfying requests for drives. Also, the relationship between the number of logical drives and physical drives may change if hardware failures occur.
NetBackup scheduling, drive allocation, and drive assignment algorithms are only able to determine logical drive availability, and will attempt to fully utilize all configured and available logical drives. If the number of logical drives being utilized exceeds the number
ACS Library Software
Library ManagementUnit (LMU)
Library StorageModule(LSM)
Drive
DriveDrive
ControlUnit(CU)
SCSI ID
Robotics
SCSI ID
ACS number (0-126)
LSM number (0-23)
Panel number (0-19)
Drive number (0-19)
ACS Library Software Host
Drive
SCSI ID

Appendix F, Automated Cartridge System (ACS) 481
Using the STK SN6000
of physical drives available, a NetBackup job may be started when insufficient drive resources are available to satisfy the job. The NetBackup job will encounter a resource issue when the scheduler initiates a job resulting in an ACS tape mount request. The mount request will then be re-queued within the ACS daemon process.
Should SN6000 Drives Be Configured as Shared Drives?The answer depends on how you connect hosts to SN6000 ports. Each SN6000 port presents a distinct set of logical drives. Drives accessed from different ports have different ACS drive addresses (ACS, LSM, Panel, and Drive numbers) for each drive, as well as different serial numbers.
Hosts Connected To a Single Port
If multiple hosts are connected to a single port, the logical drives accessible through that port are shared among the hosts connected to that port. The drive address and serial number is the same for each host on that port. In this type of configuration, the drives should be configured as shared drives in the NetBackup device configuration.
You must enter the Shared Drives license key on each media server where ACS drives in the SN6000 are configured.
Hosts Connected To Different Ports
If each host is connected to a different port, each host will have its own set of logical drives and the drives should not be configured as shared drives in the NetBackup device configuration.
With this type of configuration, the SN6000 hardware is providing drive sharing and the NetBackup scheduler and robotic drive selection components are unable to avoid oversubscribing the drives. Tuning of the media mount timeout and backup policy windows may be needed to avoid backup, restore, or duplication delays, and media mount timeouts.
You must enter the Shared Drives license key on each media server where ACS drives in the SN6000 are configured.
NetBackup Tuning When Using Different Ports
Since there is a fixed limit for the number of drives that can be in use at any one time in this type of configuration, you should configure backup windows so the different NetBackup storage units tied to the same physical drives are active only at non-overlapping times. Also, raise or set the media mount timeout to infinite to prevent job failures when the job cannot get a physical drive due to all the drives being busy.

Adding ACS Volumes
482 NetBackup DataCenter Media Manager System Administrator’s Guide for UNIX
Adding ACS VolumesThe normal method for adding media is to
1. Add barcode labels and then insert the media into the robot.
Issue the ACS enter command from the STK Administrative interface (ACSSA) or use the Media Manager utility, acstest.
The Library Storage Module reads the barcode labels and passes the barcode information on to the ACS library software, which uses the barcodes for volume IDs (volume ID is the ACS term for media ID). The ACS library software also records the location of the tape within the robot.
2. Define the media to Media Manager using the ACS volume IDs as media IDs. Do one of the following to define the media:
- Update the volume configuration as explained in “Updating the Volume Configuration for a Robot” on page 135.
- Add new volumes as explained in “Adding New Volumes” on page 95.
Since the ACS volume IDs and barcodes are the same, Media Manager also has the barcodes for the media. Note that you do not enter a slot location because that information is managed by ACS library software.
3. Use Show Contents and Compare Contents with Volume Configuration from the Media and Device Management Robot Inventory dialog to verify your configuration.
Removing ACS VolumesYou can remove tapes using the STK utility or by using Media Manager.
Removing Volumes Using the STK UtilityIf you remove media from an ACS robot, for example through the Cartridge Access Port using the STK administrative utility (see the figure “Automated Cartridge System Sample Configuration” on page 476), you must logically move the media to standalone in the Media Manager volume database. To accomplish this, do one of the following:
� Update the volume configuration, as explained in “Updating the Volume Configuration for a Robot” on page 135.
� Move volumes, as explained in “Moving Volumes” on page 106.

Appendix F, Automated Cartridge System (ACS) 483
Robot Inventory Operations
If you do not do this, Media Manager will not be aware that the media is missing and may issue mount requests for it. The result is an error, such as Misplaced Tape.
It does not matter, however, if you move media from one location to another within the robot. The ACS library software will find the requested media, if its database is current.
Removing Volumes Using Media ManagerYou can remove volumes using one of the following methods. Either of these methods performs the logical move and the physical move.
� Use the vmchange command (see the Man page appendix).
� Use the NetBackup Administration Console (see “Methods for Ejecting Volumes From a Robot” on page 94).
Robot Inventory Operations
Note An INVENTORY_FILTER entry is required in the vm.conf file if you are doing a robot inventory for an ACS robot and the ACS library software host is an STK Library Station.
Media Manager considers an ACS robot as one that supports barcodes. The following sequence explains what occurs when you select an operation that requires a robotic inventory of an ACS robot:
1. Media Manager requests volume information from the ACS library software.
2. The server responds by providing a listing of the volume IDs and media types from its database. The following table is an example of the ACS information that Media Manager receives:
ACS Volume ID ACS Media Type
100011 DLTIV
200201 DD3A
202201 DD3B
203201 DD3C
300210 DD3D

Robot Inventory Operations
484 NetBackup DataCenter Media Manager System Administrator’s Guide for UNIX
3. Media Manager translates the volume IDs into media IDs and barcodes. For example in the previous table, volume ID 100011 becomes media ID 100011 and the barcode for that media ID is also 100011.
4. Media Manager maps the ACS media types into the Media Manager media types, as explained in step 5 or step 6.
5. If the operation does not require updating the volume configuration, Media Manager uses the media type defaults for ACS robots when it creates its report (see the table “Default Media Types for ACS Robots” on page 153). “Show Contents Reports for API Robots” on page 129 shows an example of this report.
6. If the operation requires updating the volume configuration, Media Manager selects the media type as follows:
a. Media Manager tries to use mappings that you have set for this update in the Media Type Mappings tab. See “Changing the Update Options” on page 141.
b. If you have not set any media type mappings, Media Manager tries to use any ACS_mediatype settings in the vm.conf file (see “vm.conf Map Entries for ACS Robots” on page 485).
412840 STK1R
412999 STK1U
521212 JLABEL
521433 STK2P
521455 STK2W
668712 KLABEL
770000 LTO_100G
770006 LTO_35GB
775500 SDLT
900100 EECART
900200 UNKNOWN
ACS Volume ID ACS Media Type
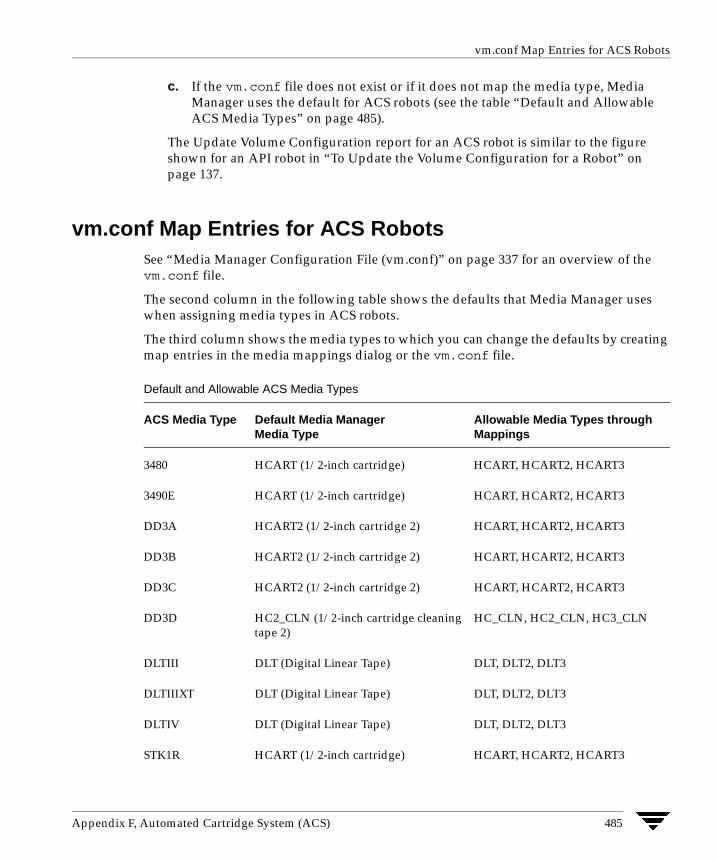
Appendix F, Automated Cartridge System (ACS) 485
vm.conf Map Entries for ACS Robots
c. If the vm.conf file does not exist or if it does not map the media type, Media Manager uses the default for ACS robots (see the table “Default and Allowable ACS Media Types” on page 485).
The Update Volume Configuration report for an ACS robot is similar to the figure shown for an API robot in “To Update the Volume Configuration for a Robot” on page 137.
vm.conf Map Entries for ACS RobotsSee “Media Manager Configuration File (vm.conf)” on page 337 for an overview of the vm.conf file.
The second column in the following table shows the defaults that Media Manager uses when assigning media types in ACS robots.
The third column shows the media types to which you can change the defaults by creating map entries in the media mappings dialog or the vm.conf file.
Default and Allowable ACS Media Types
ACS Media Type Default Media ManagerMedia Type
Allowable Media Types through Mappings
3480 HCART (1/2-inch cartridge) HCART, HCART2, HCART3
3490E HCART (1/2-inch cartridge) HCART, HCART2, HCART3
DD3A HCART2 (1/2-inch cartridge 2) HCART, HCART2, HCART3
DD3B HCART2 (1/2-inch cartridge 2) HCART, HCART2, HCART3
DD3C HCART2 (1/2-inch cartridge 2) HCART, HCART2, HCART3
DD3D HC2_CLN (1/2-inch cartridge cleaning tape 2)
HC_CLN, HC2_CLN, HC3_CLN
DLTIII DLT (Digital Linear Tape) DLT, DLT2, DLT3
DLTIIIXT DLT (Digital Linear Tape) DLT, DLT2, DLT3
DLTIV DLT (Digital Linear Tape) DLT, DLT2, DLT3
STK1R HCART (1/2-inch cartridge) HCART, HCART2, HCART3

vm.conf Map Entries for ACS Robots
486 NetBackup DataCenter Media Manager System Administrator’s Guide for UNIX
If the defaults do not provide the desired mapping, you can change the defaults by creating a /usr/openv/volmgr/vm.conf file and adding ACS_mediatype entries.
STK1U HC_CLN (1/2-inch cartridge cleaning tape)
HC_CLN, HC2_CLN, HC3_CLN
EECART HCART (1/2-inch cartridge) HCART, HCART2, HCART3
JLABEL HCART (1/2-inch cartridge) HCART, HCART2, HCART3
STK2P HCART2 (1/2-inch cartridge 2) HCART, HCART2, HCART3
STK2W HC2_CLN (1/2-inch cartridge cleaning tape 2)
HC_CLN, HC2_CLN, HC3_CLN
KLABEL HCART (1/2-inch cartridge) HCART, HCART2, HCART3
LTO_100G HCART (1/2-inch cartridge) HCART, HCART2, HCART3
LTO_50GB HCART (1/2-inch cartridge) HCART, HCART2, HCART3
LTO_35GB HCART (1/2-inch cartridge) HCART, HCART2, HCART3
LTO_10GB HCART (1/2-inch cartridge) HCART, HCART2, HCART3
LTO_CLN2 HC_CLN (1/2-inch cartridge cleaning tape)
HC_CLN, HC2_CLN, HC3_CLN
LTO_CLN3 HC_CLN (1/2-inch cartridge cleaning tape)
HC_CLN, HC2_CLN, HC3_CLN
LTO_CLN1 HC_CLN (1/2-inch cartridge cleaning tape)
HC_CLN, HC2_CLN, HC3_CLN
SDLT DLT3 (Digital Linear Tape) DLT, DLT2, DLT3
UNKNOWN
(Used for unknown ACS media types)
HCART2 (1/2-inch cartridge 2) HCART, HCART2, HCART3, HC_CLN, HC2_CLN, HC3_CLN, DLT, DLT2, DLT3, DLT_CLN, DLT2_CLN, DLT3_CLN
Default and Allowable ACS Media Types (continued)
ACS Media Type Default Media ManagerMedia Type
Allowable Media Types through Mappings

Appendix F, Automated Cartridge System (ACS) 487
Advanced ACS Robot Topics
For example, the following vm.conf entry maps the ACS media type 3490E to the HCART2 media type. Without this entry, Media Manager assigns HCART to 3480 and 3490E ACS media types.
ACS_3490E = HCART2
The following entry maps ACS DLTIV to the DLT2 media type:
ACS_DLTIV = DLT2
Without this entry, Media Manager assigns DLT to all ACS DLT media types, including DLTIV.
The third column in the table shows the media types that you can specify in ACS_mediatype entries. For example, you cannot specify either of the following entries:
ACS_DD3A = DLTACS_DD3A = HCART4
Advanced ACS Robot TopicsThe following sections cover the following advanced topics:
� ACS Daemon (acsd)
� ACS Server System Interface (acsssi)
� ACS SSI Event Logger (acssel)
� ACS Robotic Test Utility (acstest)
� Making ACS Robotic Configuration Changes
� Multiple ACS Robots with One ACS Library Software Host
� Multiple ACS Robots and ACS Library Software Hosts
� Robotic Inventory Filtering
ACS Daemon (acsd)acsd provides robotic control for mounting and dismounting volumes, and requesting inventories of volumes in a robotic library that is under the control of ACS library software. acsd interacts with and is started by ltid. You can also start acsd manually, if ltid is already running.
acsd requests SCSI tape unloads through the system’s tape driver before using the ACS API to request tape dismounts. This matches other types of Media Manager robotic control, and accommodates configurations involving SCSI multiplexors. Loaded tapes are not forcibly ejected when a dismount operation occurs.

Advanced ACS Robot Topics
488 NetBackup DataCenter Media Manager System Administrator’s Guide for UNIX
When acsd is started, it starts acsssi and acssel. When starting acsssi, acsd passes the ACS library software host name to acsssi. One copy of acsssi is started for each ACS library software host that appears in the Media Manager device configuration for the media server. If you have multiple media servers sharing drives in an ACS robot, acsssi must be active on each media server.
See “ACS Server System Interface (acsssi)” on page 488 and “ACS SSI Event Logger (acssel)” on page 490 for information about these processes.
ACS Server System Interface (acsssi)acsssi is the server system interface (SSI) for a particular ACS library software host. All RPC communications from acsd or the ACS robotic test utility intended for ACS library software are handled by acsssi.
One copy of acsssi must be running for each unique ACS library software host that is configured on a Media Manager server(s). acsd tries to start copies of acsssi for each host, but these acsssi processes fail during initialization if an acsssi process for a particular ACS library software host is already running.
In normal operations, acsssi should be started to run in the background. Log messages for acsssi are sent to acssel. acssel should be started before acsssi. See “ACS SSI Event Logger (acssel)” on page 490 for more information.
The socket name (IP port) used by acsssi can be specified in any of the following ways:
� On the command line, when starting acsssi.
� Using an environment variable (ACS_SSI_SOCKET).
� Through the default value.
Note If you configure acsssi to use a non-default socket name, the ACS daemon and ACS test utility also must be configured to use the same socket name. If this is not done, successful IPC communications cannot be established.
The ACS library software host name is passed to acsssi using the CSI_HOSTNAME environment variable.
acsssi is based on the SSI provided by STK and supports features, such as use of environment variables to affect most aspects of operational behavior. See “Optional Environment Variables” on page 489, for a list of environment variables that are supported.

Appendix F, Automated Cartridge System (ACS) 489
Advanced ACS Robot Topics
Using the ACS_SSI_SOCKET Environment Variable
By default, acsssi listens on unique, consecutive socket names starting at 13741. To specify socket names on a ACS library software host basis, you can add a configuration entry in vm.conf.
Use the following format:
ACS_SSI_SOCKET = ACS_library_software_host socket_name
The following is an example entry:
ACS_SSI_SOCKET = einstein 13750
Starting acsssi Manually
Note This is not the recommended method to start acsssi. Normally, acsd starts acsssi.
1. Start the event logger, acssel.
2. Start acsssi. The usage format is acsssi socket_name.
The CSI_HOSTNAME environment variable is required. The following is a Bourne shell example:
CSI_HOSTNAME=einstein
export CSI_HOSTNAME
/usr/openv/volmgr/bin/acsssi 13741 &
Optional Environment Variables
If you want individual acsssi processes to operate differently, you can set environment variables before the acsssi processes are started manually or from a custom-designed script.
The following are the optional environment variables:
SSI_HOSTNAME - Specifies the name of the host where ACS library software RPC return packets are routed for ACS network communications. By default, the local host name is used.
CSI_RETRY_TIMEOUT - Set this to a small positive integer. The default is 2 seconds.
CSI_RETRY_TRIES - Set this to a small positive integer. The default is 5 retries.
CSI_CONNECT_AGETIME - Set this in the range of 600 to 31536000 seconds. The default is 172800 seconds.

Advanced ACS Robot Topics
490 NetBackup DataCenter Media Manager System Administrator’s Guide for UNIX
ACS SSI Event Logger (acssel)acssel is modeled after the mini_el event logger provided by StorageTek, so its functional model differs slightly from other robotic test tools provided with Media Manager.
If ACS robots have been configured, the event logger is automatically started by acsd. Event messages are logged to the file, /usr/openv/volmgr/debug/acsssi/event.log.
Note acssel should be running for optimum ACS SSI performance, since acsssi tries to connect on the event logger’s socket for its message logging. If acsssi cannot connect to acssel, request processing from ACS library software is delayed. This leads to retries and error recovery situations. VERITAS recommends that acssel be kept running for best results.
acssel can be started automatically or manually, but only stopped using the kill command (such as is done in the NetBackup bp.kill_all utility).
The full path to the event logger is /usr/openv/volmgr/bin/acssel. The usage format is as follows:
acssel [-d] -s socket_name
where
-d d displays debug messages (by default, there are no debug messages).
socket_name is the socket name (or IP port) to listen on for messages.
Using acssel with a Different Socket Name
If there is no ACS_SEL_SOCKET entry in vm.conf, acssel listens on socket name 13740 by default. This default can be changed using one of the following methods:
Modifying the Media Manager Configuration File
1. Edit vm.conf and add an ACS_SEL_SOCKET entry.
For example:
ACS_SEL_SOCKET = 13799
2. Use /usr/openv/netbackup/bin/goodies/bp.kill_all to stop the acsd, acsssi, and acssel processes. (This script stops all NetBackup and Media Manager processes.)
3. Restart the NetBackup/Media Manager daemons.

Appendix F, Automated Cartridge System (ACS) 491
Advanced ACS Robot Topics
/usr/openv/volmgr/bin/ltid
/usr/openv/netbackup/bin/initbprd
Using Environment Variables
This method assumes there is one ACS robot configured and the SSI default socket name has not been changed with an ACS_SEL_SOCKET entry in vm.conf.
1. Use /usr/openv/netbackup/bin/goodies/bp.kill_all to stop the acsd, acsssi, and acssel processes. (This script stops all NetBackup and Media Manager processes.)
2. Set the desired socket name in an environment variable and export it.
ACS_SEL_SOCKET = 13799
export ACS_SEL_SOCKET
Note acssel also has a command line option to specify the socket name. However, since the ACS Server System Interface (acsssi) needs to know the event logger socket name, setting an environment variable is preferred.
3. Start the event logger in the background.
/usr/openv/volmgr/bin/acssel &
4. Set the ACS library software host name for acsssi in an environment variable.
CSI_HOSTNAME = einstein
export CSI_HOSTNAME
5. Start acsssi.
/usr/openv/volmgr/bin/acsssi 13741 &
6. Optionally, start acstest using robtest or by using the following command line:
/usr/openv/volmgr/bin/acstest -r einstein -s 13741
Note If you request SCSI unloads, you must also specify drive paths on the acstest command line (see “ACS Robotic Test Utility (acstest)” on page 492). This is done automatically by robtest if ACS drives have been configured.
7. Start ltid, which starts acsd. You can use the -v option for verbose message output.
/usr/openv/volmgr/bin/ltid

Advanced ACS Robot Topics
492 NetBackup DataCenter Media Manager System Administrator’s Guide for UNIX
During initialization, acsd obtains the SSI Event Logger socket name from vm.conf and sets ACS_SEL_SOCKET in the environment before starting acssel. If acsssi is started manually, it has to use (listen on) the same SSI socket that acsd is using to send data.
ACS Robotic Test Utility (acstest)acstest allows you to verify ACS communications and provides a remote system administrative interface to an ACS robot. It can also be used to query, mount, unload, and dismount volumes. In addition, acstest allows you to define, delete, and populate ACS library software scratch pools.
acstest depends on acsssi being started successfully. You can use the system command, netstat -a, to verify there is a process listening on the SSI socket. acstest attempts to communicate with ACS library software using acsssi and connects on an existing socket.
acstest should not be used while acsd is servicing requests. Communication problems may occur if acsd and acstest are making ACS requests at the same time.
The usage format follows. You can pass the socket name on the command line. Otherwise, the default socket name (13741) is used.
acstest -r ACS_library_software_host [-s socket_name] [-d drive_path ACS, LSM, panel, drive] ... [-C sub_cmd]
The following example assumes that acsssi has been started using socket name 13741:
/usr/openv/volmgr/bin/acstest -r einstein -s 13741
Making ACS Robotic Configuration ChangesAfter making any ACS robotic configuration changes, you should follow the correct steps so that acsssi can successfully communicate with acsd, acstest, and ACS library software.
Any acsssi processes must be cancelled after your changes are made and before the Media Manager device daemon, ltid, is restarted. Also in order for the acstest utility to function, acsssi for the selected robot must be running.
The easiest way to do this is to
1. Make your configuration changes.
2. Use bp.kill_all to stop all running processes.
3. Restart all processes.

Appendix F, Automated Cartridge System (ACS) 493
Advanced ACS Robot Topics
/usr/openv/volmgr/bin/ltid
/usr/openv/netbackup/bin/initbprd
Multiple ACS Robots with One ACS Library Software HostNetBackup supports configurations where a NetBackup server is connected to drives in multiple ACS robots, and these robots are controlled from a single ACS library software host. See the following example:
Inventory requests for a robot will include those volumes configured on the ACS library software host which are resident to the ACS robot (ACS 0 or ACS 1) that is designated in the drive address.
In the example, assume that drive 1 has an STK address (ACS, LSM, panel, drive) of 0,0,1,1 in the Media Manager device configuration and is under control of robot number 10 (ACS(10)). If any other drives configured under robot number 10 have a different ACS drive address (for example, 1,0,1,0) it is considered an invalid configuration.
Configurations consisting of multiple LSMs in a single ACS robot are supported if a passthru port exists.
Multiple ACS Robots and ACS Library Software HostsNetBackup supports configurations where a NetBackup server is connected to drives in multiple ACS robots and these robots are controlled from separate ACS library software hosts. See the following example:
Network Communications (RPC)
NetBackup Server
ACS(10) controls drive 1ACS(20) controls drive 2
ACS Library Software Host
Robot 1
STKACS 0
Robot 2
STKACS 1

Advanced ACS Robot Topics
494 NetBackup DataCenter Media Manager System Administrator’s Guide for UNIX
Inventory requests for a robot will include those volumes configured on the ACS library software host (in this example, Host A for Robot 1 and Host B for Robot 2) which are resident to the robot (ACS 0 for each) that is designated in the STK drive address.
In this example, assume drive 1 has an STK address (ACS, LSM, panel, drive) of 0,0,1,1 in the Media Manager device configuration and is under control of robot number 10 (ACS(10)). If any other drives configured under robot number 10 have a different ACS drive address (for example, 1,0,1,0) it is considered an invalid configuration.
Configurations consisting of multiple LSMs in a single ACS robot are supported if a passthru port exists.
Robotic Inventory FilteringIf your site has many volumes configured under ACS library software but you only want NetBackup to use a subset of them, you may be able to use inventory filtering.
Note An INVENTORY_FILTER entry is required if you are doing a robot inventory for an ACS robot and the ACS library software host is an STK Library Station.
Partial inventory functionality for ACS is accomplished by using the STK Administrative interface to create an ACS library software scratch pool or set of scratch pools. Then NetBackup can use these pools for backups, as in the following example:
1. Use the following STK Administrative interface (ACSSA) command to create a scratch pool, ID 4, with 0 to 500 as the range for the number of volumes:
ACSSA> define pool 0 500 4
NetBackup Server
ACS(10) controls drive 1ACS(20) controls drive 2
Robot 1
STKACS 0
Robot 2
STKACS 0
Network Communications (RPC)
ACS Library Software Host A
ACS Library Software Host B

Appendix F, Automated Cartridge System (ACS) 495
Advanced ACS Robot Topics
2. Use the following STK Administrative interface (ACSSA) command to define the volumes in scratch pool 4:
ACSSA> set scratch 4 600000-999999
3. On the Media Manager server where the inventory request will be initiated add an INVENTORY_FILTER entry in the vm.conf file.
INVENTORY_FILTER = ACS robot_number BY_ACS_POOLacs_scratch_pool1 [acs_scratch_pool2 ...]
where
robot_number is the number of the robot as configured in Media Manager.
acs_scratch_pool1 is the scratch pool ID as configured in ACS library software.
acs_scratch_pool2 is a second scratch pool ID (up to 10 scratch pools are allowed).
The following entry causes ACS robot number 0 to query scratch volumes from STK pool IDs 4, 5, and 6.
INVENTORY_FILTER = ACS 0 BY_ACS_POOL 4 5 6
The list of volumes returned in an ACS partial inventory includes the volumes that currently exist in the ACS scratch pool. ACS library software moves volumes out of the scratch pool after they have been mounted.
Therefore, a partial inventory also includes those volumes in the Media Manager volume database which Media Manager can validate exist in the robotic library, whether or not the volumes are in the ACS scratch pool. This complete list of volumes that exist in the robotic library is returned to prevent losing track of previously mounted volumes.

Advanced ACS Robot Topics
496 NetBackup DataCenter Media Manager System Administrator’s Guide for UNIX

497
IBM Automated Tape Library (ATL) GMedia Manager provides support for robotics under control of the IBM Automated Tape Library (ATL), including the IBM Magstar 3494 Tape Library.
Under Media Manager, robotic support for ATL robots is classified as Tape Library Half-inch (TLH) and these robots are considered API robots (the robot manages its own media). Support for these devices is different than for other types of Media Manager robotic control. This appendix provides an overview of those differences.
The following figures show two possible ATL configurations. The table, “Automated Tape Library Components” on page 500 explains the major components in these configurations.

498 NetBackup DataCenter Media Manager System Administrator’s Guide for UNIX
Robotic Control Host Communicates Directly to Robot
Inventory Requests
Media Manager
Robotic Requests
tlhd tlhcd
lmcpd
SCSI
Device Files for Physical Drives
Library Manager
(PC)
IBM Library Device Driver (AIX)
Tape Library Interface (non-AIX)
IBM Automated Tape Library
or
(ATL)
Media Manager Server
This server can be an AIX, DYNIX/ptx, HP-UX, IRIX, Windows, or Solaris server.
This server also can be a NetBackup master or media server.
003590B1A01003590B1A00

Appendix G, IBM Automated Tape Library (ATL) 499
Robotic Control and Robot Connection on Separate Hosts
MediaManager tlhd
tlhcd
Media Manager
tlhd
SCSI
SCSI
Device File for Physical Drive
Device File for Physical Drive
Inventory Requests
Robotic Requestslmcpd
Server A can be any supported server type and can be a NetBackup master or media server.
IBM Automated Tape Library
(ATL)
Library Manager
(PC)
IBM Library Device Driver (AIX)or
Media Manager Server B
Media Manager Server A
Robot Control Host
Tape Library Interface (non-AIX)
Server B can be AIX, DYNIX/ptx, HP-UX, IRIX, Windows, or Solaris; and also can be a NetBackup master or media server.
003590B1A00 003590B1A01

Media Requests for a TLH Robot
500 NetBackup DataCenter Media Manager System Administrator’s Guide for UNIX
Media Requests for a TLH RobotA request for media in a TLH robot in an IBM Automated Tape Library begins in the same manner as other media requests. The Media Manager device daemon (ltid) receives the request and queries the Media Manager volume daemon (vmd) for the location of the media. The volume daemon, in this case, returns only the robot number and type for the TLH robot, since Media Manager does not manage slot information for media in a TLH robot.
Automated Tape Library Components
Component Description
Media Manager Server This host has Media Manager software and acts as a client to the ATL through the Library Manager Control Point daemon (lmcpd). Media Manager’s device daemon, ltid, forwards mount and dismount requests to the Tape Library Half-inch daemon (tlhd).
Tape Library Half-inch daemon (tlhd)
This daemon resides on a Media Manager server and passes mount and dismount requests to the Tape Library Half-inch control daemon (tlhcd) on the robotic control host.
Tape Library Half-inch control daemon (tlhcd)
This daemon receives mount or dismount requests from tlhd, or robot inventory requests through an external socket interface. tlhcd must reside on the same system that communicates with lmcpd by using the IBM Library Device Driver interface (on AIX) or IBM Tape Library system calls (on non-AIX).
Library Manager Control Point daemon (lmcpd)
A component of IBM ATL support. This software handles all communications with the Library Manager and must be running on any system from which the Automatic Tape Library is directly controlled.
Library Manager A component of IBM ATL support that provides control of the robotics and robotic library. This is a PC that is usually located within the robot cabinet.
IBM Automated Tape Library (ATL)
An IBM name representing a physical library under automated robotic control, including the IBM Magstar 3494 Tape Library.
Appendix G, IBM Automated Tape Library (ATL) 501
Configuring TLH Robotic Control
ltid verifies that the type and density of the requested volume are compatible. Next, ltid checks its internal tables (these tables are based on the device databases) to determine if there is an available drive and sends a mount request to the TLH daemon (tlhd). This daemon passes the request to the TLH control daemon (tlhcd).
tlhcd resides on the host that has the Automatic Tape Library. This can be the same host where tlhd is running or another host. If the Media Manager server is an AIX system, the control daemon communicates with the Library Manager Control Point daemon (lmcpd) by using the Library Device Driver interface. If the Media Manager server is a non-AIX system, such as Solaris, the control daemon communicates with lmcpd through Tape Library system calls from an application library interface.
lmcpd passes the information to the Library Manager, which then locates the media and directs the TLH robotics to mount the media in the drive. When the host (where Media Manager is installed) receives a success response from the Library Manager, it allows NetBackup to start sending data to the drive.
Configuring TLH Robotic ControlWhen adding Tape Library Half-inch robotic control to Media Manager, first ensure that the IBM Automated Tape Library (that is, the IBM 3494) has been physically connected and configured.
For information on initially configuring the IBM components of the Automated Tape Library, see the IBM SCSI Tape Drive, Medium Changer, and Library Device Drivers Installation and User’s Guide (or related publications). For information on platform support for TLH robotic control, see the NetBackup release notes.
Robotic Control on an AIX SystemThe following topics explain the steps for configuring robotic control when the media server is an AIX system.
Determine the Path to the LMCP Device File
Use the Library Manager Control Point (LMCP) device file as the robotic device file in Media Manager. This file is set up when the Automated Tape Library is first configured.
Use the lsdev command (or smit) to determine the LMCP device file.
The following example uses the lsdev command:
/etc/lsdev -C | grep "Library Management"
The following is the output from this command:

Configuring TLH Robotic Control
502 NetBackup DataCenter Media Manager System Administrator’s Guide for UNIX
lmcp0 Available LAN/TTY Library Management Control Point
Verify Library Communications
After you determine the path to the LMCP device file, verify library communications through the IBM-provided mtlib interface. Resolve all errors before attempting to configure IBM 3494 support in Media Manager.
To verify communications with a specific library, specify the Library Manager Control Point device file with the mtlib command. For example, if the LMCP device path is /dev/lmcp0, the following command verifies communication with the library:
/usr/bin/mtlib -l /dev/lmcp0 -qL
The following is the output from this command:
Library Data: state..................... Automated Operational State Dual Write Disabled input stations.............1 output stations............1 input/output status........ALL input stations empty ALL output stations empty machine type...............3494 sequence number............11398 number of cells............141 available cells............129 subsystems.................2 convenience capacity.......30 accessor config............01 accessor status............Accessor available Gripper 1 available Gripper 2 available Vision system operational comp avail status..........Primary library manager installed. Primary library manager available. Primary hard drive installed. Primary hard drive available. Convenience input station installed. Convenience input station available. Convenience output station installed. Convenience output station available. avail 3490 cleaner cycles..0 avail 3590 cleaner cycles..92

Appendix G, IBM Automated Tape Library (ATL) 503
Configuring TLH Robotic Control
Configure the Robotic Device File
Configure the robotic path as explained in “Configuring Storage Devices” on page 11. When the configuration is complete you can view the robotic device information.
The following example uses tpconfig -d to view the robotic device information. In this example, the first two drives shown are standalone drives. The drive with drive index 31 is under TLH robotic control and the drive with drive index 78 is under TL4 control.
# /usr/openv/volmgr/bin/tpconfig -d
Index DriveName DrivePath Type Shared Status***** ********* ********** **** ****** ****** 5 DRIVE0 /dev/rmt4.1 hcart No DOWN 13 DRIVE2 /dev/rmt8.1 hcart No DOWN 31 DRIVE1 /dev/rmt12.1 hcart No DOWN TLH(8) IBM Device Name = 003590B1A00 78 DRIVE1 /dev/rmt11.1 4mm No UP TL4(77) Definition DRIVE=1Currently defined robotics are: TL4(77) robotic path = /dev/ovpass0, volume database host = maui TLH(8) LMCP device path = /dev/lmcp0, volume database host = mauiStandalone drive volume database host = maui
In this example, note the following line:
TLH(8) LMCP device path = /dev/lmcp0, volume database host = maui
Where /dev/lmcp0 is the path to the robotic device file and maui is the volume database host for this robot.
Robotic Control on a Non-AIX SystemThe following topics explain the steps for configuring robotic control when the media server is not an AIX UNIX system.
Determine the Library Name
Use the library name instead of the robotic device file when configuring in Media Manager. This name is set up when the Automated Tape Library is first configured (see your IBM system documentation). The library name is configured in the /etc/ibmatl.conf file and you determine the library name by viewing the file.
The following is an example entry in that file:
3494AH 176.123.154.141 ibmpc1
Where:

Configuring TLH Robotic Control
504 NetBackup DataCenter Media Manager System Administrator’s Guide for UNIX
� 3494AH is the library name.
� 176.123.154.141 is the IP address of the PC workstation that is running the Library Manager software.
� ibmpc1 is the host name of the PC workstation that is running the Library Manager software.
Verify Library Communications
After you determine the library name, verify library communications through the IBM-provided mtlib interface. Resolve all errors before attempting to configure IBM 3494 (TLH) support in Media Manager.
To verify communications with a specific library, specify the library name with the mtlib command. For example, if the library name is 3494AH, the following command verifies communications with the library:
/usr/bin/mtlib -l 3494AH -qL
The following is the output from this command:
Library Data: state......................Automated Operational State Dual Write Disabled input stations.............1output stations............1input/output status........ALL input stations empty ALL output stations emptymachine type...............3494sequence number............11398number of cells............141available cells............129subsystems.................2convenience capacity.......30accessor config............01accessor status............Accessor available Gripper 1 available Gripper 2 available Vision system operationalcomp avail status......... Primary library manager installed. Primary library manager available. Primary hard drive installed. Primary hard drive available. Convenience input station installed. Convenience input station available. Convenience output station installed. Convenience output station available.

Appendix G, IBM Automated Tape Library (ATL) 505
Configuring Drives for TLH Robots
avail 3490 cleaner cycles..0avail 3590 cleaner cycles..92
Configure the Robotic Device File
Configure the robotic path as explained in “Configuring Storage Devices” on page 11. When the configuration is complete you can view the robotic device information.
The following example uses tpconfig -d to view the robotic device information This example has one TLH drive and one TLD drive.
/usr/openv/volmgr/bin/tpconfig -d
Index DriveName DrivePath Type Shared Status***** ********* ********** **** ****** ****** 6 DRIVE2 /dev/rmt/17cbn hcart No UP TLH(0) IBM Device Name = 003590B1A00 55 DRIVE1 /dev/rmt/15cbn dlt No UP TLD(5) Definition DRIVE=1Currently defined robotics are: TLH(0) library name = 3494AH, volume database host = grozer TLD(5) robotic path = /dev/sg/c2t0l0, volume database host = grozer
Standalone drive volume database host = grozer
In this example, note the following line:
TLH(0) library name = 3494AH, volume database host = grozer
Where 3494AH is the library name and grozer is the volume database host for this robot.
Configuring Drives for TLH RobotsThe TLH robot has half-inch cartridge tape drives, usually with a SCSI interface, and you use the same methods to create or identify device files for these drives as for other drives. Refer to the system documentation for your platform and operating system for details on physically adding drives to your robots. The Media Manager device configuration guide has information on configuring device files.
See “Configuring Storage Devices” on page 11 for instructions on adding drives to your Media Manager configuration.
Caution When adding drives to Media Manager, it is important to assign the correct IBM device name to each drive. If the device name is incorrect, tape mounts or backups may fail.

Cleaning TLH Drives
506 NetBackup DataCenter Media Manager System Administrator’s Guide for UNIX
Use the Media Manager TLH test utility to determine the TLH drive designations. The following example uses tlhtest and shows which drives in the robot are under Media Manager control:
/usr/openv/volmgr/bin/tlhtest -r /dev/lmcp0
The following is the output from tlhtest (the user entered the drstat command on the third line). You would use 003590B1A00 and 003590B1A01 when adding these drives in Media Manager.
Opening /dev/lmcp0Enter tlh commands (? returns help information)drstatDrive information: device name: 003590B1A00 device number: 0x156700 device class: 0x10 - 3590 device category: 0x0000 mounted volser: <none> mounted category: 0x0000 device states: Device installed in ATL. Dev is available to ATL. ACL is installed.Drive information: device name: 003590B1A01 device number: 0x156600 device class: 0x10 - 3590 device category: 0x0000 mounted volser: <none> mounted category: 0x0000 device states: Device installed in ATL. Dev is available to ATL. ACL is installed.QUERY DEVICE DATA complete
If the robotic control is configured on a non-AIX UNIX server using the IBM Automated Tape Library support, use the library name as configured in /etc/ibmatl.conf in place of the LMCP device path on the call to tlhtest.
Cleaning TLH DrivesThe IBM ATL interface does not allow applications to request or configure drive cleaning. For this reason, you cannot assign cleaning tapes to a TLH robot in the Media Manager volume configuration. You must configure drive cleaning by using an IBM administrative interface.

Appendix G, IBM Automated Tape Library (ATL) 507
Adding TLH Volumes
Adding TLH VolumesFor TLH robots in an Automated Tape Library, the preferred method for adding volumes is as follows:
1. Add barcode labels and then insert the media into the robot using the media access port.
The Library Manager reads barcodes and classifies the media by media type. A category is assigned to each volume. Some volume categories will restrict application access to certain volumes. Volume locations are tracked by the Library Manager.
2. Define the media to Media Manager by using the ATL volume IDs as media IDs. To accomplish this, do one of the following:
- Update the volume configuration, as explained under “Updating the Volume Configuration for a Robot” on page 135.
- Add new volumes, as explained under “Adding New Volumes” on page 95.
Because the ATL volume IDs and barcodes are the same, Media Manager has the barcodes for the media. Notice that you do not enter slot location because that information is kept by the ATL software.
3. Use Show Contents and Compare Contents with Volume Configuration from the Robot Inventory dialog of the Media node to verify your configuration.
Removing Tapes from the Robot
1. Physically remove the media from the library using one of the following:
- An IBM Library Manager interface.
- The eject command in the Media Manager tlhtest utility.
- The vmchange command (see the Man page appendix).
- The NetBackup Administration Console (see “Methods for Ejecting Volumes From a Robot” on page 94).
2. If you use the vmchange command or the NetBackup Administration Console, you can skip this step.
Update the Media Manager volume database to indicate the new location of the media as being standalone. To accomplish this, do one of the following:
- Update the volume configuration, as explained in “Updating the Volume Configuration for a Robot” on page 135.

Robot Inventory Operations
508 NetBackup DataCenter Media Manager System Administrator’s Guide for UNIX
- Move volumes, as explained in “Moving Volumes” on page 106.
Otherwise, Media Manager is not aware that the media is missing and may issue mount requests for it. The result is an error such as Misplaced Tape.
It does not matter if you physically move media from one location to another within the robot. The Automated Tape Library will find the media when Media Manager requests it.
Robot Inventory OperationsMedia Manager considers a TLH robot as one that supports barcodes. The following sequence explains what occurs when you select an operation that requires a robotic inventory for a TLH robot:
1. Media Manager requests volume information from the Library Manager through the Library Manager Control Point daemon.
2. The Library Manager responds by providing a list of volume IDs and volume attributes from its database. Media Manager then filters out volume categories that cannot be used and displays a list of volumes obtained along with a translated version of the volume’s media type. The media type is based upon the attributes that were returned.
The following table shows an example of the types of information that Media Manager receives:
3. Media Manager translates the volume IDs into media IDs and barcodes. In the previous table, volume ID PFE011 becomes media ID PFE011 and the barcode for that media ID is also PFE011.
4. Media Manager maps the TLH media types to the Media Manager media types as explained in the following two steps
TLH Volume ID TLH Media Type
PFE011 3480
303123 3490E
CB5062 3590J

Appendix G, IBM Automated Tape Library (ATL) 509
Robotic Inventory Filtering
5. If this is an operation that does not require updating the volume configuration, Media Manager uses the media type defaults for TLH robots (see the table, “Default Media Types for TLH Robots” on page 156) when it creates its report.
6. If this is an operation that requires updating the volume configuration, Media Manager selects the media type as follows:
a. Media Manager tries to use mappings that you have set for this update in the Media Type Mappings tab. See “Changing the Update Options” on page 141.
b. If you have not set any media type mappings, Media Manager tries to use any TLH_mediatype settings in the vm.conf file (see “vm.conf Map Entries For TLH Robots” on page 510).
c. If the vm.conf file does not exist or it does not map the media type, Media Manager uses the default for TLH robots (see the table, “Default and Allowable TLH Media Types” on page 510).
The Update Volume Configuration report for a TLH robot is similar to the figure shown for an API robot in “To Update the Volume Configuration for a Robot” on page 137.
Robotic Inventory FilteringIf your site has many volumes configured, but you only want NetBackup to use a subset of them, you may be able to use inventory filtering.
The IBM Library Manager maintains the concept of a volume category, which can be used to classify volumes into pools, including pools by application.
On the Media Manager server where the inventory request will be initiated, you can add an INVENTORY_FILTER entry in the vm.conf file. The format for this entry follows:
INVENTORY_FILTER = robot_type robot_number filter_type value1 [value2 ...]
where
robot_type is the robot type (TLH in upper case).
robot_number is the robot number.
filter_type is the keyword (BY_CATEGORY).
value1 is a filter value of type IBM category (if filter_type = BY_CATEGORY).
value2 is a second filter value (up to 10 filter values are allowed).
For example:
INVENTORY_FILTER = TLH 0 BY_CATEGORY 0xcdb0

vm.conf Map Entries For TLH Robots
510 NetBackup DataCenter Media Manager System Administrator’s Guide for UNIX
vm.conf Map Entries For TLH RobotsSee “Media Manager Configuration File (vm.conf)” on page 337 for an overview of the vm.conf file.
The second column in the following table shows the defaults that Media Manager uses when assigning media types in TLH robots. The third column shows the media types to which you can change the defaults by creating map entries in the vm.conf file.
If the defaults do not provide the desired mapping, you can change the defaults by creating a vm.conf file and adding TLH_mediatype entries.
For example, the following vm.conf entry maps the TLH media type 3490E to the HCART2 media type. Without this entry, Media Manager assigns HCART to TLH 3490E media types.
TLH_3490E = HCART2
The third column in the table shows the media types that Media Manager allows in TLH_mediatype entries. For example, you cannot specify the following entry:
TLH_3590J = HCART4
Default and Allowable TLH Media Types
TLH Media Type Default Media ManagerMedia Type
Allowable Media Types Through Mappings
3480 HCART (1/2-inch cartridge) HCART, HCART2, HCART3
3490E HCART (1/2-inch cartridge) HCART, HCART2, HCART3
3590J HCART (1/2-inch cartridge) HCART, HCART2, HCART3
3590K HCART (1/2-inch cartridge) HCART, HCART2, HCART3
UNKNOWN
(for unknown TLH media types)
HCART2 (1/2-inch cartridge 2) HCART, HCART2, HCART3

511
ADIC Distributed AML Server (DAS) HMedia Manager provides support for robotics under control of an ADIC Distributed AML Server (DAS) and Scalar Distributed Library Controller (SDLC), including those in the ADIC Automated Media Library (AML) family.
Under Media Manager, robotic support for DAS robots is classified as Tape Library Multimedia (TLM) and these robots are considered API robots (the robot manages its own media). Support for these devices is different than for other types of Media Manager robotic control and this appendix provides an overview of those differences.
The following figure shows a possible DAS configuration. The table “Distributed AML Server Configuration” on page 512 explains the major components in this sample configuration.
Media Manager Server
Inventory RequestsMedia Manager
tlmdRobotic Requests
Device Files for Physical Drives
SCSI
Status
DN2DN1
(AML)
ArchiveManagementUnit
Distributed AMLServer (DAS)
Automated Media Library
ADIC

Media Requests Involving a TLM Robot
512 NetBackup DataCenter Media Manager System Administrator’s Guide for UNIX
Media Requests Involving a TLM RobotA request for media in a TLM robot begins in the same manner as other media requests. The Media Manager device daemon, ltid, receives the request and queries the Media Manager volume daemon, vmd, for the location of the media. The volume daemon, in this case, returns only the robot number and type TLM robot. The Media Manager volume database does not manage slot information for media in a TLM robot.
ltid verifies that the type and density of the requested volume are compatible. Next, ltid checks its internal tables (these tables are based on the device databases) to determine if there is an available drive and sends a mount request to the TLM daemon, tlmd. This daemon passes the request to the Distributed AML Server software (which resides in the Archive Management Unit).
The Distributed AML Server locates the media and directs the robotics to mount the media in the drive. When the host (where Media Manager is installed) receives a success response from the Distributed AML Server, it allows the requesting application (for example, NetBackup) to start sending data to the drive.
Distributed AML Server Configuration
Component Description
Media Manager Server A host that has Media Manager software and acts as a client to the Distributed AML Server.
Media Manager’s device daemon, ltid, forwards mount and dismount requests to the TLM daemon (tlmd).
TLM daemon (tlmd) This daemon passes mount and dismount requests to the Distributed AML Server and handles return status. tlmd also receives and handles robot inventory requests.
Archive Management Unit (AMU) A PC running the IBM OS/2 or Windows NT operating system, usually located in or near the AML cabinet. The ADIC software runs on the AMU.
Distributed AML Server (DAS)
Scalar Distributed Library Controller (SDLC)
A client/server software product that resides in the Archive Management Unit and provides shared access to the family of ADIC Automated Media Libraries (AML).
The Media Manager robotic daemon (or TLM daemon) acts as a client to the Distributed AML Server.
Automated Media Library (AML) An ADIC multimedia robotic library.

Appendix H, ADIC Distributed AML Server (DAS) 513
Configuring TLM Robotic Control
Note With TLM robotic control, the Media Manager server is actually a DAS client and sends robotic control requests to the DAS server. This relationship pertains only to the DAS client/server model and is not related in any way to the concept of NetBackup servers or clients.
Configuring TLM Robotic ControlWhen adding TLM robotic control to Media Manager, first ensure that the ADIC Automated Media Library has been physically connected and configured.
For information on initially configuring the ADIC components of the Automated Media Library, see the ADIC documentation. Pay close attention to the DAS component, which is described in the DAS installation and administration guide (an ADIC document).
For information on platform support for TLM robotic control, see the NetBackup release notes.
Allocating TLM Drives to Media ManagerBefore configuring drives in Media Manager, you must configure the DAS server to allocate the desired drives to a specific DAS client (Media Manager server). The following are some topics pertaining this configuration.
Note See the ADIC documentation for detailed instructions on configuring the DAS server.
Configuring the DAS Client NameThe DAS client name for the Media Manager server is configured in the DAS configuration file on the DAS server. It is important that this name is the same as the one being used by Media Manager and that it is a valid DAS client name.
By default, the Media Manager server uses, as its DAS client name, the host name that it obtains from the gethostname()system call. This name is usually the one that you want to use for the DAS client name in the configuration on the DAS server.
However, if this name happens to be one that is invalid for DAS clients you will have to use another name. For example, DAS 1.30C1 has a restriction on having hyphens in DAS client names. If the host name (where Media Manager is installed) happens to have a name such as dolphin-2, the DAS server will not recognize it.
Allocating TLM Drives to Media Manager
514 NetBackup DataCenter Media Manager System Administrator’s Guide for UNIX
A similar problem exists if a Media Manager server’s short host name is used as the DAS client name, but gethostname() returns the long host name.
In either of these instances, you can resolve the problem as follows:
1. Substitute a valid DAS client name on the DAS server. For example, use dolphin2.
2. Use this same name in a DAS_CLIENT entry in the /usr/openv/volmgr/vm.conf file on the Media Manager server. These entries are of the form:
DAS_CLIENT = DASclientname
Where DASclientname is the name that you want Media Manager to use as its DAS client name. In this example, this entry would be
DAS_CLIENT = dolphin2
3. Stop and start the ltid daemon to enable the TLM daemon to use the new DAS client name.
4. When the client names are correct, restart DAS with the latest version of its configuration file and then reallocate the drives to Media Manager.
Use DASADMIN to Allocate DrivesWhen the client names are correct, allocate the drives to the Media Manager server by using the DASADMIN administrative command. The DAS administrative drive allocation commands are not available from the Media Manager TLM test utility interface. You must use a DAS administrative interface on the DAS server or the DAS client administrative interface.
The following example shows how DASADMIN can be used to allocate drives, by using a DAS administrative interface:
LD_LIBRARY_PATH=/usr/local/aci/libexport LD_LIBRARY_PATHDAS_SERVER=dasos2boxexport DAS_SERVERDAS_CLIENT=grouseexport DAS_CLIENTcd /usr/local/aci/admin./dasadmin listd
The following is output from this command:
==>listd for client: successful drive: DN1 amu drive: 01 st: UP type: N sysid: client: grouse volser: cleaning 0 clean_count: 17

Appendix H, ADIC Distributed AML Server (DAS) 515
Configuring Drives for TLM Robots
drive: DN2 amu drive: 02 st: UP type: N sysid: client: mouse volser: cleaning 0 clean_count: 4./dasadmin allocd
The following is output from this command:
==> usage: dasadmin allocd drive-name UP|DOWN clientname
(First allocate it DOWN on one client, then UP on another as in the following:)
./dasadmin allocd DN2 DOWN mouse
./dasadmin allocd DN2 UP grouse
Configuring Drives for TLM RobotsThe TLM robot can have several different types of drives, usually with a SCSI interface, and you use the same methods to create device files for these drives as for other drives. If the drives are SCSI and connect to the robot through a control unit, you must specify the logical unit number (lun) for each drive, as they share the same SCSI ID.
Refer to the system documentation for your platform and operating system for details on configuring drives and logical unit numbers. The Media Manager device configuration guide also has information on configuring device files.
See “Configuring Storage Devices” on page 11 for instructions on how to add the drives to a Media Manager configuration.
Caution When adding drives to Media Manager, it is especially important to assign the correct DAS drive name to each drive. If the drive name is incorrect, tape mounts or backups may fail.
Use the Media Manager TLM test utility to determine the DAS drive designations. The following example uses tlmtest:
/usr/openv/volmgr/bin/tlmtest -r dasos2box
The following is the output from this utility (the user entered the drstat command on the third line).
Current client name is ’grouse’.Enter tlm commands (? returns help information)drstatDrive 1: name = DN1, amu_name = 01, state = UP, type = N, client = grouse, volser = , cleaning = NO, clean_count = 17Drive 2: name = DE3, amu_name = 03, state = UP, type = E, client = grouse, volser = , cleaning = NO, clean_count = 480Drive 3: name = DE4, amu_name = 04, state = UP, type = E, client = grouse, volser = , cleaning = NO, clean_count = 378

Configuring Shared Drives for TLM Robots
516 NetBackup DataCenter Media Manager System Administrator’s Guide for UNIX
DRIVE STATUS complete
This output indicates that DAS drive names DN1, DE3, and DE4 should be used. It also shows that grouse is the client name that is being used for the Media Manager server.
Configuring Shared Drives for TLM RobotsUsing TLM robots with SSO requires that the ADIC DAS server be configured to allow drives to be allocated in DAS simultaneously to all device hosts sharing the drives. DAS server version 3.01.4 or higher may be needed.
When configuring these robot types, perform steps similar to those in the following example. This example has two UNIX servers (server_1 has IP address xxx.xxx.xxx.xxx and server_2 has IP address yyy.yyy.yyy.yyy).
1. Modify the DAS server’s \ETC\CONFIG file to create a client entry with hostname set to any.
client client_name = NetBackup-shared# ip address = 000.000.000.000hostname = any
2. Place the IP addresses of the servers that will use the shared client entry in the \MPTN\ETC\HOSTS file on the DAS server.
xxx.xxx.xxx.xxx server_1yyy.yyy.yyy.yyy server_2
3. Using the DASADMIN interface, allocate the drives UP on the shared client (NetBackup-shared).
4. On each of the device hosts that are sharing the drives, create an entry in the vm.conf file with the shared DAS client name, such as the following:
DAS_CLIENT = NetBackup-shared
5. Test the DAS configuration using robtest and tlmtest, setting the client name (specify client NetBackup-shared in tlmtest) and running the drive status command, drstat.

Appendix H, ADIC Distributed AML Server (DAS) 517
Providing Common Access to Volumes
Providing Common Access to VolumesIf you use the same volume database for all Media Manager servers (recommended), each of them must have access to the same sets of volumes (volsers) in the DAS configuration. Otherwise, when you perform an update volume configuration from one of the servers, the volumes that are not configured for that server will be logically moved to a standalone residence.
As a test, you can inventory a TLM robot from each Media Manager server and compare the results. If all the inventory reports are not the same, correct the DAS configuration. Then, perform a DAS shutdown and restart.
Adding TLM VolumesThe normal method for adding media in or for a TLM robot is as follows:
1. Add barcode labels and then insert the media into the library using an insert area.
Issue the DAS insert directive from either a DAS administrative interface or from the Media Manager utility, tlmtest. You can obtain the insert area name from the DAS configuration file.
The AMU Archive Management Software reads barcodes, classifies the media by media type, and maintains storage cell locations for all media.
2. Define the media to Media Manager by using the DAS volsers as media IDs.
To accomplish this, do one of the following:
- Update the volume configuration, as explained under “Updating the Volume Configuration for a Robot” on page 135.
- Add new volumes, as explained under “Adding New Volumes” on page 95.
Because the DAS volsers and barcodes are the same, Media Manager now also has the barcodes for the media. Notice that you do not enter slot location because that information is kept by the DAS software.
3. Use Show Contents and Compare Contents with Volume Configuration from the Media and Device Management Robot Inventory dialog to verify your configuration and maintain consistency between the DAS database and the Media Manager volume configuration. That is, update the Media Manager configuration when media has moved or may have moved.

Removing Tapes from the Robot
518 NetBackup DataCenter Media Manager System Administrator’s Guide for UNIX
Removing Tapes from the Robot
1. Physically remove the media from the library using one of the following:
- A DAS administrative interface.
- The eject command in the Media Manager tlmtest utility.
- The vmchange command (see the Man page appendix).
- The NetBackup Administration Console (see “Methods for Ejecting Volumes From a Robot” on page 94).
2. If you use the vmchange command or the NetBackup Administration Console, you can skip this step.
Update the Media Manager volume database to indicate the new location of the media as being standalone. To accomplish this, do one of the following:
- Update the volume configuration, as explained in “Updating the Volume Configuration for a Robot” on page 135.
- Move volumes, as explained in “Moving Volumes” on page 106.
Otherwise, Media Manager is not aware that the media is missing and may issue mount requests for it. The result is an error such as “Misplaced Tape”.
It does not matter if you physically move media from one location to another within the robot. The DAS AMU will find the media when Media Manager requests it.
Robot Inventory OperationsMedia Manager considers a TLM robot as one that supports barcodes. The following sequence explains what occurs when you select an operation that requires a robotic inventory for a TLM robot:
1. Media Manager requests volume information from the Distributed AML Server through a DAS application library call.
2. The Distributed AML Server responds by providing a list of volume IDs and associated information from its database. Media Manager filters out volumes that are not occupied in their home cell locations or in drives, then displays a list of volumes obtained along with their media types, according to the Distributed AML Server.

Appendix H, ADIC Distributed AML Server (DAS) 519
Robot Inventory Operations
The following table indicates an example of information displayed by Media Manager:
3. Media Manager translates the volsers directly into media IDs and barcodes. In the previous table, volser A00250 becomes media ID A00250 and the barcode for that media ID is also A00250.
4. Media Manager maps the TLM (DAS) media types into the Media Manager media types as explained in the following two steps.
5. If this is an operation that does not require updating the volume configuration, Media Manager uses the media type defaults for TLM robots when it creates its report. See the table “Default Media Types for TLM Robots” on page 156.
6. If this is an operation that requires updating the volume configuration, Media Manager selects the media type as follows:
a. Media Manager tries to use mappings that you have set for this update in the Media Type Mappings tab. See “Changing the Update Options” on page 141.
b. If you have not set any media type mappings, Media Manager tries to use the TLM_mediatype settings in the vm.conf file (see “vm.conf Map Entries For TLM Robots” on page 521).
c. If the vm.conf file does not exist or if it does not map the media type, Media Manager uses the default for TLM robots (see the table “Default and Allowable TLM Media Types” on page 521).
TLM Volser TLM Media Type
A00250 3480
J03123 3590
DLT001 DECDLT
MM1200 8MM
NN0402 4MM
002455 UNKNOWN

Robot Inventory Operations
520 NetBackup DataCenter Media Manager System Administrator’s Guide for UNIX
The Update Volume Configuration report for a TLM robot is similar to the figure shown for an API robot in “To Update the Volume Configuration for a Robot” on page 137.

Appendix H, ADIC Distributed AML Server (DAS) 521
vm.conf Map Entries For TLM Robots
vm.conf Map Entries For TLM RobotsSee “Media Manager Configuration File (vm.conf)” on page 337 for an overview of the vm.conf file.
The second column in the following table shows the defaults that Media Manager uses when assigning media types in TLM robots. The third column shows the media types to which you can change the defaults by creating map entries in the vm.conf file.
Default and Allowable TLM Media Types
TLM Media Type Default Media ManagerMedia Type
Allowable Media Types Through Mappings
3480 HCART (1/2-inch cartridge) HCART, HCART2, HCART3
OD_THICK none
(OD_THICK is translated to media type REWR_OPT for robot contents reports. OD_THICK is ignored for all other robotic inventory operations)
none
OD_THIN none none
DECDLT DLT (Digital Linear Cartridge) DLT, DLT2, DLT3
8MM 8MM 8MM, 8MM2, 8MM3
4MM 4MM 4MM
D2 none none
VHS none none
3590 HCART (1/2-inch cartridge) HCART, HCART2, HCART3
CD none none
TRAVAN none none
DTF DTF DTF
BETACAM none none
AUDIO_TAPE none none

vm.conf Map Entries For TLM Robots
522 NetBackup DataCenter Media Manager System Administrator’s Guide for UNIX
If the defaults do not provide the desired mapping, you can change the defaults by creating a vm.conf file and adding TLM_mediatype entries to it.
For example, the following vm.conf entry maps the TLM media type 3480 to the HCART2 media type. Without this entry, Media Manager assigns HCART to TLM 3480 and 3590 media types.
TLM_3480 = HCART2
The third column shows the media types that Media Manager allows you to specify in TLM_mediatype entries. For example, you cannot specify the following entry. This entry is illegal because Media Manager does not permit you to map TLM 3590 to the DLT2 media type.
TLM_3590 = DLT2
BETACAMCL none none
SONY_AIT 8MM 8MM, 8MM2, 8MM3
LTO HCART (1/2-inch cartridge) HCART, HCART2, HCART3
DVCM none none
DVCL none none
UNKNOWN
(For unknown TLM media types)
HCART2 (1/2-inch cartridge 2) HCART, HCART2, HCART3, DLT, DLT2, DLT3, 8MM, 8MM2, 8MM3
Default and Allowable TLM Media Types
TLM Media Type Default Media ManagerMedia Type
Allowable Media Types Through Mappings
523
Fujitsu Library Management Facility (LMF) IMedia Manager provides support for robotics under control of the Fujitsu Library Management Facility (LMF), including the Fujitsu F6458/M2498 Magnetic Tape Library.
Under Media Manager, robotic support for Library Management Facility robots is classified as LMF and these robots are considered API robots (the robot manages its own media). Support for these devices is different than for other types of Media Manager robotic control. This appendix provides an overview of those differences.
The following figures show possible LMF configurations. In these configurations, the Media Manager servers and the server where LMF is installed (shown in the figure “Robotic Control on Host with LMF Client” on page 526) must be Sun Solaris systems.
The table “Distributed LMF Server Configuration” on page 527 defines the major components in these sample configurations.

524 NetBackup DataCenter Media Manager System Administrator’s Guide for UNIX
Robotic Control Host Connecting Directly to Robot
Media Manager Server
Media Manager
lmfd
lmfcd Inventory Requests
Robotic Requests
Device Files for Physical Drives
SCSI
LMF Server
Drive 1 Drive 2
Magnetic Tape Library

Appendix I, Fujitsu Library Management Facility (LMF) 525
Robotic Control and Robot Connection on Separate Hosts
Media Manager Server
Media Manager
lmfd
SCSI
SCSI
Device Files for Physical Drives
Device Files for Physical Drives
Drive 1 Drive 2
Inventory Requests
Robotic Requests
Media Manager Server
Media Manager
lmfd
lmfcd
LMF Server Magnetic Tape Library

526 NetBackup DataCenter Media Manager System Administrator’s Guide for UNIX
Robotic Control on Host with LMF Client
Media Manager Server
Media Manager
lmfd
lmfcd
LMF Client
LMF Server
Device Files for Physical Drives
SCSI
Inventory Requests
Robotic Requests
Magnetic Tape Library
Drive 1 Drive 2
Server
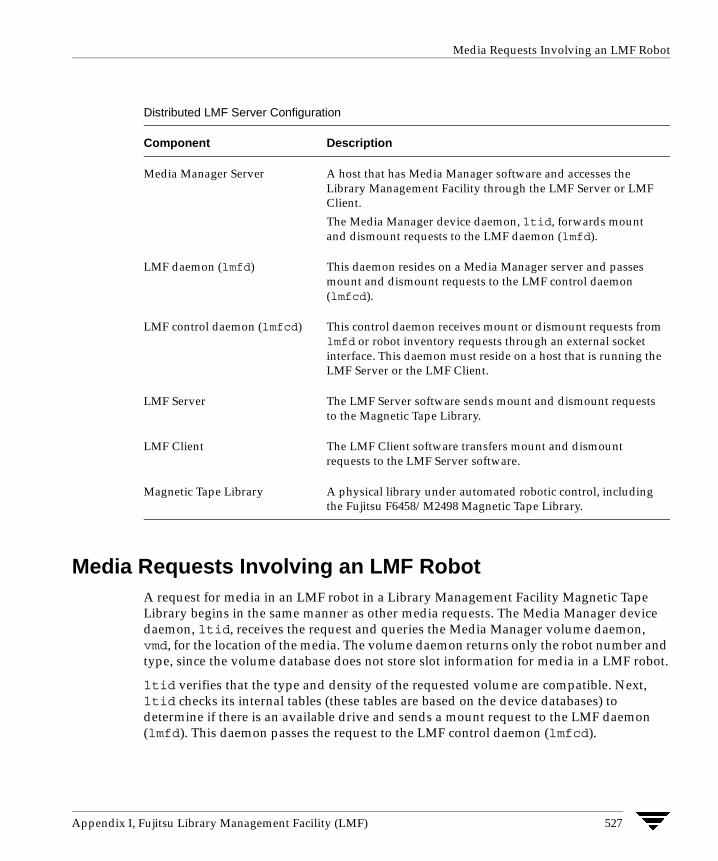
Appendix I, Fujitsu Library Management Facility (LMF) 527
Media Requests Involving an LMF Robot
Media Requests Involving an LMF RobotA request for media in an LMF robot in a Library Management Facility Magnetic Tape Library begins in the same manner as other media requests. The Media Manager device daemon, ltid, receives the request and queries the Media Manager volume daemon, vmd, for the location of the media. The volume daemon returns only the robot number and type, since the volume database does not store slot information for media in a LMF robot.
ltid verifies that the type and density of the requested volume are compatible. Next, ltid checks its internal tables (these tables are based on the device databases) to determine if there is an available drive and sends a mount request to the LMF daemon (lmfd). This daemon passes the request to the LMF control daemon (lmfcd).
Distributed LMF Server Configuration
Component Description
Media Manager Server A host that has Media Manager software and accesses the Library Management Facility through the LMF Server or LMF Client.
The Media Manager device daemon, ltid, forwards mount and dismount requests to the LMF daemon (lmfd).
LMF daemon (lmfd) This daemon resides on a Media Manager server and passes mount and dismount requests to the LMF control daemon (lmfcd).
LMF control daemon (lmfcd) This control daemon receives mount or dismount requests from lmfd or robot inventory requests through an external socket interface. This daemon must reside on a host that is running the LMF Server or the LMF Client.
LMF Server The LMF Server software sends mount and dismount requests to the Magnetic Tape Library.
LMF Client The LMF Client software transfers mount and dismount requests to the LMF Server software.
Magnetic Tape Library A physical library under automated robotic control, including the Fujitsu F6458/M2498 Magnetic Tape Library.

Configuring LMF Robotic Control
528 NetBackup DataCenter Media Manager System Administrator’s Guide for UNIX
The LMF control daemon resides on an LMF Server host or LMF Client host. This can be the host where lmfd is running or another host. The control daemon communicates with the Magnetic Tape Library through the LMF Server program interface or the LMF Client program interface.
The LMF Server passes information to the Magnetic Tape Library, which then locates the media and directs the robotics to mount the media in the drive. When the host (where Media Manager is installed) receives a successful response from the LMF Server or LMF Client, it allows the requesting application (for example, NetBackup) to start sending data to the drive.
Configuring LMF Robotic ControlThe following topics explain the steps to configure LMF robotic control.
Robotic control can be through an LMF Server or LMF Client. Some functions (inject and eject) are not available when running through an LMF Client.
The library name is used to identify the robot, when configuring robotic control in Media Manager.
Determining the Library NameThe library name is set up when the robot is configured, using the Fujitsu lmadmin command. You can also list the library name using the lmadmin -r command.
Sample output from this command follows:
Displaying all parameterssystem parameters times of load retry = 3 time of waiting for setting cartridge to entry(sec.) = 30 polling interval of DEE operation(min.) = 30 auto cleaning = enable network service name = lmf journal of volume management database = disable
library name = KOALA0 library model = F6458 library ID = 0005 special file of the accessor = /dev/ftla/0 frame setupFRAME Z FRAME DRIVE HOST NAME /CODE ADDRESS TYPE NAME LOGICAL DRIVE NAME SPECIAL FILE NAME02 00 ACCESSOR - - -02 01 CAS - - -

Appendix I, Fujitsu Library Management Facility (LMF) 529
Configuring LMF Robotic Control
21 00 WALL CELL - - -21 01 DRIVE drive#01 LIB001DRV001 /dev/rmt/3 drive#02 LIB001DRV002 /dev/rmt/141 00 - - - -41 01 - - - -
Verifying Library CommunicationsWhen you determine the library name, you can verify library communications using the following Fujitsu command. You should resolve any errors before attempting to configure Fujitsu F6458/M2498 Magnetic Tape Library (LMF) support in Media Manager.
lmdisplay -l KOALA0
Sample output from this command follows:
volume database = normaljournal of volume management database = not useLMF log file = normallibrary = KOALA0 machine type = F6458 library logical status = available ACC status = active barcode reader = normal ARC = active reserve cell #0 = cartridge not exist reserve cell #1 = cartridge not exist reserve cell #2 = cartridge not exist reserve cell #3 = cartridge not exist reserve cell #4 = cartridge not exist reserve cell #5 = cartridge not exist reserve cell #6 = cartridge not exist reserve cell #7 = cartridge not exist ACC SCSI path special file name(main) = /dev/ftla/0 logical status(main) = available CAS logical status entry = available exit = available entry status = empty entry No.1 = normal entry No.2 = normal entry No.3 = normal entry No.4 = normal

Configuring LMF Robotic Control
530 NetBackup DataCenter Media Manager System Administrator’s Guide for UNIX
entry No.5 = normal entry No.6 = normal entry No.7 = normal entry No.8 = normal entry No.9 = normal entry No.10 = normal exit status = empty exit No.1 = normal exit No.2 = normal exit No.3 = normal exit No.4 = normal exit No.5 = normal exit No.6 = normal exit No.7 = normal exit No.8 = normal exit No.9 = normal exit No.10 = normal FES status = cartridge not exist frame code = 02 frame code = 21 cleaning cartridge No.10 = use count:7 cleaning cartridge No.11 = use count:7 cleaning cartridge No.12 = use count:7 cleaning cartridge No.13 = use count:6 cleaning cartridge No.14 = not exist cleaning cartridge No.15 = not exist cleaning cartridge No.16 = not exist cleaning cartridge No.17 = not exist drive = drive#01 logical drive name = LIB001DRV001 logical status = available status = empty drive = drive#02 logical drive name = LIB001DRV002 logical status = available status = empty frame code = 41
Configuring Robotic ControlConfigure the robotic path as explained in the chapter, “Configuring Storage Devices” on page 11. When the configuration is complete you can view the robotic device information.
The following example uses tpconfig to view the robotic device information.

Appendix I, Fujitsu Library Management Facility (LMF) 531
Configuring Drives for LMF Robots
/usr/openv/volmgr/bin/tpconfig -d
Sample output from this command follows. This example does not have any drives configured yet.
Currently defined robotics are: LMF(47) library name = KOALA0, volume database host = dill
Configuring Drives for LMF RobotsThe LMF robot has half-inch cartridge drives and you use the same methods to create device files for these drives as for other drives. Refer to the system documentation for your platform and operating system for details on physically adding drives to your host. The Media Manager device configuration guide also has information on configuring device files.
See the chapter “Configuring Storage Devices” on page 11 for instructions on how to add the drives to a Media Manager configuration.
Caution When adding drives to Media Manager, it is especially important to assign the correct robot drive number to each drive. If the robot drive number is incorrect, tape mounts or backups may fail.
Use the Media Manager LMF test utility (lmftest) to determine the mapping between the Media Manager drive designations and the LMF drive designations.
The following example uses lmftest and shows which drives in the robot are under Media Management control:
/usr/openv/volmgr/bin/lmftest -r KOALA0
The following is the output from this utility (the user entered the drstat command on the fifth line). You would use drive number 1 and 2 when adding these drives in Media Manager.
Opening robotic library: KOALA0Drive=1 Name=LIB001DRV001Drive=2 Name=LIB001DRV002Enter lmf commands (? returns help information)drstatWARNING: Only changes made to the drive status during this test session are shown below.Drive 1 information: Logical drive name: LIB001DRV001 Library name: KOALA0 Special file name: /dev/rmt/3 Drive logical status: 00000000

Cleaning LMF Drives
532 NetBackup DataCenter Media Manager System Administrator’s Guide for UNIX
Drive type: 0000000e Name of loaded volume:Drive 2 information: Logical drive name: LIB001DRV002 Library name: KOALA0 Special file name: /dev/rmt/1 Drive logical status: 00000000 Drive type: 0000000e Name of loaded volume:QUERY DEVICE DATA complete
The following example uses tpconfig -d to display the configuration. Sample output from this command shows these two drives configured in Media Manager.
Index DriveName DrivePath Type Shared Status***** ********* ********** **** ****** ****** 0 DRIVE1 /dev/rmt/3cbn hcart No UP LMF(47) Definition DRIVE=1 1 DRIVE2 /dev/rmt/1cbn hcart No UP LMF(47) Definition DRIVE=2
Currently defined robotics are: LMF(47) library name = KOALA0, volume database host = dill
Cleaning LMF DrivesThe Fujitsu Library Management Facility interface does not allow applications (such as Media Manager) to request or configure drive cleaning. For this reason, you cannot assign cleaning tapes to an LMF robot in a Media Manager volume configuration.
You must configure drive cleaning using a Fujitsu administrative interface. Media Manager is designed to work with the Fujitsu LMF auto cleaning feature, whether auto cleaning is enabled or disabled.
Adding LMF VolumesFor LMF robots, the preferred method for adding media is as follows:
1. Add barcode labels and then insert the media into the robot using the media access port.
2. Define the media to Media Manager using the LMF volume IDs as media IDs. To accomplish this, do one of the following:
Appendix I, Fujitsu Library Management Facility (LMF) 533
Removing Tapes from the Robot
- Update the volume configuration, as explained under “Updating the Volume Configuration for a Robot” on page 135.
- Add new volumes, as explained under “Adding New Volumes” on page 95.
3. Use Show Contents and Compare Contents with Volume Configuration from the Media and Device Management Robot Inventory dialog to verify your configuration.
Removing Tapes from the Robot
1. Physically remove the media from the library using a Fujitsu LMF administrative interface or the eject command from the Media Manager test utility, lmftest.
2. Update the Media Manager volume database to indicate the new location of the media as being standalone. To accomplish this, do one of the following:
- Update the volume configuration, as explained under “Updating the Volume Configuration for a Robot” on page 135.
- Move volumes, as explained under “Moving Volumes” on page 106.
Otherwise, Media Manager will not be aware that the media is missing and may issue mount requests for it. The result will be an error such as Misplaced Tape.
Robot Inventory OperationsMedia Manager considers a LMF robot as one that supports barcodes. The following sequence explains what occurs when you select an operation that requires a robotic inventory for a LMF robot.
1. Media Manager requests volume information from the library through the LMF Server or LMF Client.
2. The LMF Server or Client responds by providing a list of volume IDs and volume attributes from its database. Media Manager then filters out volumes that do not belong to the specified robot or have a volume ID longer than 6 characters. Media manager displays a list of volumes along with a translated version of the volume's media type. The media type is based upon the attributes that were returned.

Robotic Inventory Filtering
534 NetBackup DataCenter Media Manager System Administrator’s Guide for UNIX
The table below is an example of LMF information displayed by Media Manager:
3. Media Manager translates the volume IDs directly into media IDs and barcodes. In the previous table, volume AJS147 becomes media ID AJS147 and the barcode for that media ID is also AJS147.
4. Media Manager maps the LMF media types into the Media Manager media types as explained in step 5 or step 6.
5. If this is an operation that does not require updating the volume configuration, Media Manager uses the media type defaults for LMF robots when it creates its report (See the table “Default and Allowable LMF Media Types” on page 535).
6. If this is an operation that requires updating the volume configuration, Media Manager selects the media type as follows:
a. Media Manager tries to use any mappings that you have set for this update in the Media Type Mappings tab. See “Changing the Update Options” on page 141.
b. If you have not set any media type mappings, Media Manager tries to use any LMF_mediatype settings in the vm.conf file (see “vm.conf Map Entries for LMF Robots” on page 535).
c. If the vm.conf file does not exist or does not map the media type, Media Manager uses the default for LMF robots (see the table “Default and Allowable LMF Media Types” on page 535).
The Update Volume Configuration report for an LMF robot is similar to the one shown for an API robot in “To Update the Volume Configuration for a Robot” on page 137.
Robotic Inventory FilteringIf your site has many volumes configured, but you only want NetBackup to use a subset of them, you may be able to use inventory filtering.
LMF Volume ID LMF Media Type
AJS147 18/36TRK
ZZ9999 128TRK

Appendix I, Fujitsu Library Management Facility (LMF) 535
vm.conf Map Entries for LMF Robots
On the Media Manager server where the inventory request will be initiated, you can add an INVENTORY_FILTER entry in the vm.conf file. The format for this entry follows:
INVENTORY_FILTER = robot_type robot_number filter_type value1 [value2 ...]
where
robot_type is the robot type (LMF in upper case).
robot_number is the robot number.
filter_type is the keyword (BY_PREFIX).
value1 is the prefix of the volume IDs you want to use.
value2 is a second volume ID prefix (up to 10 filter values are allowed).
For example:
INVENTORY_FILTER = LMF 47 BY_PREFIX AJS
vm.conf Map Entries for LMF RobotsSee “Media Manager Configuration File (vm.conf)” on page 337 for an overview of the vm.conf file.
The second column in the following table shows the defaults that Media Manager uses when assigning media types in LMF robots. The third column shows the media types to which you can change the defaults by creating map entries in the vm.conf file.
If the defaults do not provide the desired mapping, you can change the defaults by creating a vm.conf file and adding LMF_mediatype entries.
For example, the following vm.conf entry maps the LMF media type 128TRK to the HCART2 media type. Without this entry, Media Manager assigns HCART (the default) to LMF 128TRK media types.
Default and Allowable LMF Media Types
LMF Media Type Default Media ManagerMedia Type
Allowable Media Types Through Mappings
36TRK HCART (1/2-inch cartridge) HCART, HCART2, HCART3
128TRK HCART (1/2-inch cartridge) HCART, HCART2, HCART3
UNKNOWN
(for unknown LMF media types)
HCART2 (1/2-inch cartridge 2) HCART, HCART2, HCART3

vm.conf Map Entries for LMF Robots
536 NetBackup DataCenter Media Manager System Administrator’s Guide for UNIX
LMF_128TRK = HCART2
The third column shows the media types that Media Manager allows in LMF_mediatype entries. For example, you cannot specify the following mapping, since HCART4 is not an allowable LMF media type:
LMF_36TRK = HCART4

537
Glossary
access control list (ACL)
Security information associated with files on some file systems.
ACS
Automated Cartridge System. ACS can refer to any of the following:
� A type of Media Manager robotic control. This robot type is supported only by NetBackup DataCenter servers.
� The StorageTek (STK) system for robotic control.
� The highest-level component under STK’s ACS library software, which refers to a specific standalone robotic library or to multiple libraries connected with a media passthru mechanism.
active job
A job for which NetBackup is currently processing backup or restore data.
activity logs
See “debug logs.”
activity monitor
A NetBackup administration utility that displays information about NetBackup jobs and provides limited control over them.
administration client
See “remote administration console.”
administrator
A user that is granted special privileges to install, configure, and manage the operation of a system, network, or application.

538 NetBackup DataCenter Media Manager System Administrator’s Guide for UNIX
AIT
Sony Advanced Intelligent Tape, a type of tape drive or media type.
alternate-client restore
See “redirected restore (different client).”
alternate-target restore
See “redirected restore (different target).”
alternate path restore
See “redirected restore (different path).”
alternate read server
A server used to read a backup image which was originally written by a different media server. The media server specified as Alternate Read Server must have access to the media containing the backup image or images it is configured to read.
archive
A special kind of backup where NetBackup backs up the selected files, and if the backup is successful, deletes the files from the local disk. In this manual, references to backups also apply to the backup portion of archive operations except where otherwise noted.
archive bit
A file-status bit that the Microsoft based operating system sets when it writes a file, thereby indicating that the file has changed.
attributes for a policy
Configuration parameters that control the behavior of NetBackup during operations involving this policy.
autochanger
See “robotic library.”
autoloader
See “robotic library.”
automatic backup
A scheduled backup by the master server.

Glossary 539
back up
The act of copying and saving files and folders to storage media.
backup
Refers to the process of copying and saving files and directories to storage media. For example, the backup is complete. This term can also refer to the collection of data that NetBackup saves for a client during a backup or archive. For example, duplicate the backup.
Backup is two words when used as a verb. For example, back up the file.
backup, archive, and restore interface
The name of the NetBackup Microsoft Windows and Java based user interfaces for clients. On servers these interfaces can be started through the NetBackup Administration Console.
backup window
The period of time during which backups can begin.
block size
The number of bytes in each block of data written on the media during a backup.
bp
A backup, archive, and restore utility for users on NetBackup UNIX clients. It has a character-based, menu interface that can be run from terminals that do not have X Windows capabilities.
bpadm
An administrator utility that runs on NetBackup UNIX servers. It has a character-based, menu interface that can be run from terminals that do not have X Windows capabilities.
bp.conf file
A NetBackup configuration file on UNIX servers and also on UNIX, Macintosh, and OS/2 clients.
bp.ini file
NetBackup initialization file for Novell NetWare target clients.
bpcd
NetBackup Client service on Windows and the NetBackup Client daemon on UNIX.
540 NetBackup DataCenter Media Manager System Administrator’s Guide for UNIX
bprd
NetBackup Request Manager service on Windows and NetBackup Request daemon on UNIX.
cancel a job
Terminating a job and removing it from the job queue.
carousel
See “robotic library.”
catalogs
Internal NetBackup and Media Manager databases. These catalogs contain information about configuration, media, devices, status, errors, and the files and directories in the stored backup images.
CDF
Context-dependent file, which is a type of directory structure on a Hewlett-Packard system.
changer
See “robotic library.”
class
See “policy.”
client
The system with the files to back up, archive, or restore.
client-user interface
See “user interface.”
cluster
See master and media server cluster.
command lines
Commands that users can execute either from the system prompt or in scripts.
compression
The process of compacting data to enable more efficient transmission and storage.
Glossary 541
configuration
The parameters that govern the behavior of an application. This term can also refer to the manner in which a network or system is laid out or connected (for example, a network configuration).
consolidated eject
A process of ejecting media for more than one Vault session at a time. A Consolidated Eject can be performed for one or more logical vaults at one time.
consolidated report
A process of generating reports for more than one Vault session at a time. A Consolidated Report can be performed for one or more logical vaults at one time. Consolidated reports are organized by report title, not by vault.
cpio
A UNIX command that can be used for copying files to or from a cpio archive on disk or tape.
ctime
The time that a UNIX inode was changed.
cumulative-incremental backup
A backup that is scheduled by the administrator on the master server and backs up files that have changed since the last successful full backup. All files are backed up if no prior backup has been done. Also see “differential-incremental backup.”
daemon
A program on a UNIX system that runs in the background and performs some task (for example, starting other programs when they are needed). Daemons are generally referred to as services or processes on Windows server systems.
database-agent clients
Clients with additional NetBackup software that is designed to back up relational databases.
database-extension clients
See “database-agent clients.”

542 NetBackup DataCenter Media Manager System Administrator’s Guide for UNIX
debug logs
Logs that can be optionally enabled for specific NetBackup and Media Manager programs and processes and then used to investigate problems.
destination storage unit
A storage unit to which Vault sends the data from a duplication operation. If the duplicated backup images are to be vaulted, then the destination storage unit must correspond to the robotic volume group.
device delays
Delays caused by the device that are beyond the control of the storage application. An example is the time required to position tape under the read and write heads.
device host
A host (that has Media Manager installed) where a drive or robotic control is attached or is defined.
device monitor
A Media Manager administration utility that provides monitoring and manual control of Media Manager storage devices. For example, an administrator or computer room operator can use this utility to manually reset devices or set them to the UP or DOWN state.
DHCP
Dynamic host configuration protocol. This TCP/IP protocol automatically assigns temporary IP addresses to hosts when they connect to the network.
differential-incremental backup
Scheduled by the administrator on the master server and backs up files that have changed since the last successful incremental or full backup. All files are backed up if no prior backup has been done. Also see “cumulative-incremental backup.”
directory depth
The number of levels below the current directory level that the NetBackup interfaces show in their directory and file list displays.
directory tree
The hierarchical structure in which files are organized on a disk. Each directory lists the files and directories that are directly below it in the tree. On UNIX, the topmost directory is called the root directory.

Glossary 543
disaster recovery
Recovering data from backups after a disk crash or other catastrophe.
disk
Magnetic or optical disk storage media.
disk-image backup
A bit-by-bit rather than a file system backup of a disk drive on a Windows platform.
DLT
Digital-linear tape or tape drive type.
Domain Name Service (DNS)
A program that handles name translation for network communications.
drive cleaning
The use of a special cleaning tape to clean the heads on a drive.
duplicate image
A copy of a backup image.
eject
Move media out of a robotic library.
encryption
Provides additional security by encrypting backup data on the client. This capability is available only with the NetBackup Encryption option.
entry and exit ports
See “media access port.”
exclude list
A list that designates files or directories to exclude from automatic backups.
expiration (image)
The date and time when NetBackup stops tracking a backup image.

544 NetBackup DataCenter Media Manager System Administrator’s Guide for UNIX
expiration (volume)
The date and time when the physical media (tape) is considered to be no longer usable.
external media ID
This is an identifier written on a media cartridge or canister to help the operator identify the volume before inserting it into a drive or robot. For labeled media, the external media ID should be the same as the media ID recorded on the media.
EVSN
See “external media ID.”
FlashBackup
A special type of raw-partition backup that requires the NetBackup FlashBackup separately-priced option (this option is available only for NetBackup DataCenter).
flush level
Controls how often Netbackup clears its log files on a Novell NetWare or Microsoft Windows client platform.
fragment
A part of a backup or archive image. NetBackup can be configured to divide images into fragments when they exceed a certain size or span tapes.
frequency (backup)
How often NetBackup performs scheduled backups. For example, if the frequency is seven days then backups occur once a week.
FROZEN media state
If a volume is FROZEN, NetBackup keeps it indefinitely and can restore from it but not use it for further backups or archives.
full backup
A backup that copies, to a storage unit, all files and directories that are beneath a specified directory.
FULL media state
If this appears in a report or listing, it indicates the volume is FULL and cannot hold more data or be used for further backups.

Glossary 545
global attributes
NetBackup configuration attributes that affect all policies.
GDM Dashboard
The name for the Global Data Manager interface. The Dashboard enables monitoring job and drive activity on multiple master servers, as well as providing alerts to problem conditions.
GDM Managed Server
A NetBackup master server that appears as a managed master server in the left pane of the GDM Dashboard.
GDM Server
A NetBackup master server that has the Global Data Manager license activated. When logging into this host, the user can monitor the activity on multiple master servers using the GDM Dashboard interface. If the host has installed the Advanced Reporter option, the reports show information on multiple master servers.
Global Data Manager (GDM)
A separately-priced option (for UNIX servers) that provides an interface with a tree view where the administrator can view and administer multiple master servers. The server where the option is installed is called a GDM Server.
Global Device Database
A single host that serves as the repository for global device configuration information. When you install NetBackup, by default the master server is configured as the global device database host.
GNU tar
A public domain version of the UNIX tar program.
goodies directory
A directory containing programs, scripts, and other files that are not formally supported.
GUI
Graphical user interface.

546 NetBackup DataCenter Media Manager System Administrator’s Guide for UNIX
hard link
On UNIX, a hard link is a pointer to the inode for the data. On a Windows server, a hard link is a directory entry for a file. Every file can be considered to have at least one hard link. On NTFS volumes each file can have multiple hard links, and a single file can appear in many directories (or even in the same directory with different names).
heap level
A parameter for memory-heap debugging on a Novell NetWare or Windows NetBackup client.
hierarchical storage management
The process of automatically migrating selected files from a managed file system to specified migration levels on secondary storage, while maintaining transparent access to those files.
host
A computer that executes application programs.
host name
Name by which a host computer is identified by programs and other computers in the network.
HSM
See storage migrator.
image
The collection of data that NetBackup saves for an individual client during each backup or archive. The image contains all the files, directories, and catalog information associated with the backup or archive.
import
The process of recreating NetBackup records of images so the images can be restored.
include list
A list that designates files or directories to add back in from the exclude list.
incremental backup
See “cumulative-incremental backup” and “differential-incremental backup.”
Glossary 547
inject
Move media into a robotic library.
inport
See “media access port.”
inode
A UNIX data structure that defines the existence of a single file.
install_path
Directory where NetBackup and Media Manager software is installed. The default on Windows servers is C:\Program Files\VERITAS and on UNIX it is /usr/openv.
jbpSA
The Java-based NetBackup interface for performing user backups, archives, and restores.
jnbSA
The Java-based NetBackup interface for administrators.
job
A parcel of work submitted to a computer. NetBackup jobs are backups, archives, or restores.
kernel
The nucleus of an operating system.
keyword phrase
A textual description of a backup.
kill a job
See “cancel a job.”
label
Identifier of a tape or optical disk volume. A recorded label includes a media ID.
A barcode label allows a barcode scanner to be used for media tracking.
library
See “robotic library.”

548 NetBackup DataCenter Media Manager System Administrator’s Guide for UNIX
link
See “hard link” or “symbolic link.”
LMF - Library Management Facility
A Media Manager designation for a category of robot. For the specific vendor types and models in this category, see the VERITAS support web site.
This robot type is supported only by NetBackup DataCenter servers.
load
(noun) Amount of work that is being performed by a system or the level of traffic on a network. For example, network load affects performance.
(verb) Copy data to internal memory. For example, load the installation program.
(verb) Used to indicate tape drive initialization done when new media is being added.
logs
Files where a computer or application records information about its activities.
mailslot
See “media access port.”
man pages
Online documentation provided with UNIX computer systems and applications.
Master and media server cluster
A NetBackup master server and the remote media servers that it is using for additional storage. It is possible to configure clusters only with NetBackup DataCenter servers. NetBackup BusinesServer supports only a single server, the master.
Master of Masters
A NetBackup host where Global Data Manager software is installed. When logging into this host, the interface has a tree view where the administrator can view and administer multiple master servers.
master server
The NetBackup server that provides administration and control for backups and restores for all clients and servers in a master and media server cluster. NetBackup BusinesServer supports only a single server and it is the master.

Glossary 549
media
Physical magnetic tapes, optical disks, or magnetic disks where data are stored.
media access port
A slot or other opening in a robot where you can insert or remove a tape without having to access the interior of the robot. After inserting a tape, you move it to a slot by using an inject command. Prior to removing a tape, you move it to the port by using an eject command. The inject and eject commands are supported through the add and move screens in the Media Manager administration interface.
media host
NetBackup server to which the job (client) is sending the data.
media ID
An identifier that is written on a volume as part of the recorded label.
Media Manager
Software that is part of NetBackup and manages the storage devices and removable media.
Media Manager Host
Host where Media Manager is installed (may have devices attached).
media server
A NetBackup server that provides storage within a master and media server cluster. The master can also be a media server. A media server that is not the master is called a remote media server. NetBackup BusinesServer does not support remote media servers.
menu interface
A character-based interface for use on terminals that do not have graphical capabilities.
mount
Make a volume available for reading or writing.
mount point
The point where a file system on a disk logically connects to a system’s directory structure so the file system is available to users and applications.

550 NetBackup DataCenter Media Manager System Administrator’s Guide for UNIX
MPX
See “multiplexing.”
mtime
The point in time when a UNIX or NTFS file is modified.
multiplexing
The process of sending concurrent-multiple backups from one or more clients to a single storage device and interleaving those images onto the media.
multiplexed group
A set of backups that were multiplexed together in a single multiplexing session.
NDMP
Network data management protocol. NetBackup requires the NetBackup for NDMP separately-priced option to support NDMP.
NetBackup Client service
NetBackup Windows service that runs on clients and servers and listens for connections from NetBackup servers and clients in the network. When a connection is made, this service starts the necessary programs.
NetBackup configuration options
On UNIX servers and on UNIX and Macintosh, clients, these settings are made in the bp.conf file. On NetWare target and OS/2 clients, they are in the bp.ini file. On Windows servers and Windows clients, these settings are called properties and are made through the Backup, Archive, and Restore interface or the Host Properties dialog in the NetBackup Administration Console.
NetBackup databases
See catalogs.
NetBackup Database Manager service
NetBackup Windows service that runs on the master server and manages the NetBackup internal databases (called catalogs). This service must be running on the master server during all NetBackup administrative operations.

Glossary 551
NetBackup Device Manager service
The NetBackup Windows service that runs on a NetBackup server and starts the robotic control processes and controls the reservation and assignment of volumes. This service runs only if the server has devices under Media Manager control. The process is ltid.
NetBackup properties
Same as NetBackup configuration options but are called NetBackup properties on Microsoft Windows platforms.
NetBackup Request Manager service
The NetBackup Windows service that runs on the master server and starts the scheduler and receives requests from clients.
NetBackup Volume Manager service
A NetBackup Windows service that runs on a NetBackup server, allows remote administration of Media Manager, and manages volume information. The process is vmd.
NIS
Network information service.
NLM
NetWare loadable module.
NFS
Network file system.
nonrobotic
See “standalone.”
ODL
Optical disk library. This robot type is supported only by NetBackup DataCenter servers.
offsite volume group
A volume group in which media will appear after having been ejected from the robot for vaulting. When Vault ejects media it is moved from the robotic volume group to the off-site volume group.

552 NetBackup DataCenter Media Manager System Administrator’s Guide for UNIX
offsite volume pool
A volume pool that contains media that is to be ejected and vaulted. Backup images written to an off-site volume pool by an original NetBackup backup policy or by Vault’s duplication feature will be ejected and vaulted. More than one off-site volume pool can be specified for the Eject step of a Vault profile.
original backup
A backup image created by a backup job. A single backup image or all backup images created by an Inline Tape Copy (multiple copy) configuration are considered original backups. A backup image created by a duplication job is not an original backup.
outport
See “media access port.”
partitions
The logical partitions into which a magnetic disk is divided.
patch
A program that corrects a problem or adds a feature to an existing release of software.
path length
Number of characters in a pathname.
pathname
The list of directories in the path to a destination directory or file.
PC clients
NetBackup clients that have Microsoft Windows, Macintosh, or IBM OS/2 operating systems.
peername
The name by which a computer identifies itself when establishing connections to other systems.
policy
Defines the backup characteristics for a group of one or more clients that have similar backup requirements.

Glossary 553
port
A location used for transferring data in or out of a computer.
Also see “media access port.”
primary copy
The copy of an image that NetBackup uses to satisfy restores. When NetBackup duplicates an image, the original is designated as the primary copy.
privileges
The tasks or functions that a user, system, or application is authorized to perform.
profile
A vault profile is a way to save configuration settings. Specific parameters for duplication, catalog backup, eject, and report or any combination of these steps, are configured within a profile.
progress report
Log where NetBackup records events that occur during user operations.
proxy restore
A proxy restore allows the user to restore files that he has write access to, on a machine other than his desktop. The files must be in a backup of the machine to which they are being restored.
QIC
Quarter-inch-cartridge tape.
queued job
A job that has been added to the list of jobs to be performed.
raw-partition backup
Bit-by-bit backup of a partition of a disk drive on UNIX. On Windows, this is called a disk-image backup.
rbak
The program that Apollo clients use to read data from tape during a restore.

554 NetBackup DataCenter Media Manager System Administrator’s Guide for UNIX
recorded media ID
This is an identifier written as part of the label on a volume and used by Media Manager to ensure that the correct volume is mounted. The recorded media ID should match the external media ID.
redirected restore (different client)
Restoring files to your client when they were originally backed up from a different client. The administrator using the interface on the master server can direct a restore to any client (this variation is called a server directed restore).
redirected restore (different target)
On a Novell NetWare server platform running the NetBackup target version of client software, this operation restores files to a different target than the one from which they were backed up.
redirected restore (different path)
Restores files to a different directory than the one from which they were backed up.
registry
A Microsoft Windows database that has configuration information about hardware and user accounts.
remote administration console
A Windows NetBackup client that has the administration interface software installed and can be used to administer NetBackup servers.
remote media server
A media server that is not the master. Note that only NetBackup DataCenter supports remote media servers. NetBackup BusinesServer supports only a single server, the master.
residence
In Media Manager, information about the location of each volume is stored in a volume database. This residence entry contains information, such as robot number, robot host, robot type, and media type.
resource
A Novell NetWare term that refers to a data set on the target. For example, in DOS, resources are drives, directories, and files. Also see “target service.”

Glossary 555
restore
(verb) The act of restoring selected files and directories from a previous backup or archive and returning them to their original directory locations (or to a different directory).
(noun) The process of restoring selected files and directories from a previous backup and returning them to their original directory locations (or to a different directory).
retention level
An index number that corresponds to a user-defined retention period. There are 10 levels from which to choose (0 though 9) and the retention period associated with each is configurable. Also see “retention period.”
retention period
The length of time that NetBackup keeps backup and archive images. The retention period is specified on the schedule.
robotic arm
The component of a robotic library that physically selects the media (tape or optical disk).
robotic library
Refers to a robot and its accompanying software. A robotic library includes a collection of tapes or optical platters used for data storage and retrieval. For example, a Tape Library DLT (TLD) refers to a robot that has TLD robotic control.
robotic volume group
A volume group from which media will be ejected and vaulted. When Vault duplicates backups, they are duplicated to media in the robotic volume group.
root
The highest level directory in a hierarchical directory structure. In MS-DOS, the root directory on a drive is designated by a backslash (for example, the root on drive C is C:\). On UNIX, the root directory is designated by a slash (/).
Also, a UNIX user name having administration capability.
RS-232
An industry-standard interface for serial communications and sometimes used for communicating with storage peripherals.

556 NetBackup DataCenter Media Manager System Administrator’s Guide for UNIX
RSM Interface
Application in Windows 2000 used to manage Removable Storage Manager (RSM) devices.
RSM - Removable Storage Manager
A Media Manager designation for a category of robot. For the specific vendor types and models in this category, see the VERITAS support web site.
Also, a component of the Windows 2000 operating system that manages storage devices.
RVSN
See “recorded media ID.”
schedules
Controls when backups can occur in addition to other aspects of the backup, such as: the type of backup (full, incremental) and how long NetBackup retains the image.
SCSI
Small computer system interface. This is a type of parallel interface that is frequently used for communicating with storage peripherals.
server-directed restore
Using the user interface on the master server to restore files to any client. Only the administrator can perform this operation.
server independent restore
Restoring files by using a NetBackup server other than the one that was used to write the backup. This feature is available only with NetBackup DataCenter.
server list
The list of servers that a NetBackup client or server refers to when establishing or verifying connections to NetBackup servers. On a Windows server and Microsoft Windows clients, you update the list through a dialog box in the interface. On a UNIX server and UNIX and Macintosh clients, the list is in the bp.conf file. On NetWare target and OS/2 clients, the list is in the bp.ini file.
service
A program on a Windows server system that runs in the background and performs some task (for example, starting other programs when they are needed). Services are generally referred to as daemons on UNIX systems.

Glossary 557
session
An instance of NetBackup checking its schedules for backups that are due, adding them to its worklist, and attempting to complete all jobs in the worklist. For user backups and archives, a session usually consists of a single backup or archive.
Session (Vault)
A vault session consists of executing a particular profile or profiles.
shared drives
See “Shared Storage Option (SSO).”
Shared Storage Option (SSO)
A separately priced VERITAS software option that allows tape drives (standalone or in a robotic library) to be dynamically shared among multiple NetBackup and Storage Migrator servers.
This option is supported only on NetBackup DataCenter servers.
SMDR
Storage management data requestor, a Novell NetWare program that provides its services transparently to all SMS modules and lets remote and local modules communicate with one another.
SMS
Novell NetWare storage management services.
source volume group
A volume group from which Vault can select backups to duplicate. This parameter is used to restrict the list of backups from all backups that reside on media in any volume group to backups that reside on media in a single volume group. Where a volume group corresponds to a particular robot, the profile will duplicate only backups on media in that robot. The Source Volume Group is normally only specified if you have multiple robots attached to the same server, for example you want to duplicate backups that reside in robot 0 to media that reside in robot 1.
SSO
See “Shared Storage Option (SSO).”
stacker
Usually a small robotic library that contains one drive only. See “robotic library.”
558 NetBackup DataCenter Media Manager System Administrator’s Guide for UNIX
standalone
A qualifier used with drives and media to indicate they are not associated with a robot. For example, a standalone tape drive is one where you must manually find and insert tapes before using them. A standalone volume is one that is located in a standalone drive or is stored outside of a drive and designated as standalone in the volume configuration.
status code
A numerical code, usually accompanied by a troubleshooting message, that indicates the outcome of an operation.
storage migrator
Refers to the VERITAS Storage Migrator line of hierarchical storage management products for UNIX and Windows. These products make extra room on a disk by transparently moving data to other storage and then transparently retrieving the data when it is needed by a user or application.
Storage Migrator is available only for NetBackup DataCenter servers.
storage unit
Refers to a storage device where NetBackup or Storage Migrator stores files. It can be a set of drives in a robot or consist of one or more single tape drives that connect to the same host.
SUSPENDED media state
If a volume is SUSPENDED, NetBackup can restore from it but cannot use it for backups. NetBackup retains a record of the media ID until the last backup image on the volume expires.
symbolic link
On a UNIX system, this is a pointer to the name of the file that has the source data.
TapeAlert
Allows reactive cleaning for most drive types and is a function of the tape drive.
tape format
The format that an application uses to write data on a tape.
tape marks
A mark that is recorded between backup images on a tape.

Glossary 559
tape overhead
The space required for data that is not part of the backup images. For example, tape marks and catalogs of what are on the tape are considered overhead.
tape spanning
Using more than one tape to store a single backup image.
tar
Tape Archive program that NetBackup uses to extract backup images during a restore.
target
See “target service.”
target service
A Novell NetWare service that needs storage management. The SMS views all services (for example, print services, communication services, workstations) as targets.
Target Service Agent
A Target-service agent is a Novell NetWare agent that prepares the target's data for SMS during a backup and for the target during a restore.
TLD - Tape Library DLT
A Media Manager designation for a category of robot. For the specific vendor types and models in this category, see the VERITAS support web site.
TLH - Tape Library Half-inch
A Media Manager designation for a category of robot. For the specific vendor types and models in this category, see the VERITAS support web site.
This robot type is supported only by NetBackup DataCenter servers.
TLM - Tape Library Multimedia
A Media Manager designation for a category of robot. For the specific vendor types and models in this category, see the VERITAS support web site.
This robot type is supported only by NetBackup DataCenter servers.
TL4 - Tape Library 4MM
A Media Manager designation for a category of robot. For the specific vendor types and models in this category, see the VERITAS support web site.

560 NetBackup DataCenter Media Manager System Administrator’s Guide for UNIX
TL8 - Tape Library 8MM
A Media Manager designation for a category of robot. For the specific vendor types and models in this category, see the VERITAS support web site.
timeout period
The period of time that an application has allotted for an event to occur.
TIR
See “true image restore.”
tpconfig
A Media Manager administration utility for configuring devices which is started from the command line. On UNIX, it has a character-based menu interface that can be run from terminals that do not have X Windows capabilities. tpconfig also has a command line interface.
transfer rate
The rate at which computer information is transferred between a source and a destination.
transport
See “robotic arm.”
true image restore
Restores the contents of a directory to what it was at the time of any scheduled full or incremental backup. Previously deleted files are ignored.
TS8 - Tape Stacker 8MM
A Media Manager designation for a category of robot. For the specific vendor types and models in this category, see the VERITAS support web site.
TSA
See “Target Service Agent.”
TSD - Tape Stacker DLT
A Media Manager designation for a category of robot. For the specific vendor types and models in this category, see the VERITAS support web site.

Glossary 561
TSH - Tape Stacker Half-inch
A Media Manager designation for a category of robot. For the specific vendor types and models in this category, see the VERITAS support web site.
This robot type is supported only by NetBackup DataCenter servers.
unassigned media
Media that contain no valid images. A piece of unassigned media has an entry in the volumes database but no entries in the images database. Unassigned Media do not have a “time assigned” in the Media section of the GUI.
user interface
The program used to perform user backups, archives, and restores.
user operation
A backup, archive, or restore that is started by a person on a client system.
Vault
Vault is a separately-priced NetBackup option that provides offsite backup management. Vault automatically duplicates specified backup images, and automates the process of offsite media rotation (a critical component of any backup or disaster recovery strategy). Vault manages offsite storage and retrieval of media for original backups, duplicate backups, and catalog backups. Additionally, NetBackup Vault generates reports to track the location and content of each piece of media.
vault
In the context of the NetBackup Vault, a vault is logical entity associated with a particular robot that acts as a designated holding place for backups that will eventually be sent to a physical offsite vault. The term ‘vault’ is used to refer both to the process, and to the physical storage location of a set of tapes offsite.
vault process
Vaulting is the process of choosing backup images to duplicate or eject, optionally duplicating backups, ejecting duplicate or original media, storing it at an offsite location, and later returning expired media to your robot. Vaulting is an integral part of the disaster recovery process.
verbose flag
Configuration file entry that causes a higher level of detail to be written in the logs.

562 NetBackup DataCenter Media Manager System Administrator’s Guide for UNIX
verify
An operation that compares the list of files that are actually on a volume with what NetBackup has recorded as being on it. The data that is on the media is not verified.
vmadm
A Media Manager administrator utility for managing volumes. It runs on UNIX and has a character-based, menu interface that can be run from terminals.
vm.conf
A Media Manager configuration file with entries that include the servers that can manage local devices and default media ID prefixes for media that do not contain barcodes.
volume
Media Manager volumes are logical units of data storage or cleaning capability on media that have been assigned media IDs and other attributes, which are recorded in the Media Manager volume database.
volume configuration
Refers to configuration information that is stored in the Media Manager volume database.
volume database
An internal database where Media Manager keeps information about volumes. All hosts (where Media Manager is installed) have a volume database. However, the database is empty unless the host is designated as a volume database host.
volume database host
The host (where Media Manager is installed) that contains information about the volumes that Media Manager uses in a device. Because NetBackup BusinesServer supports only a single server, the volume database host is always on the same server.
volume group
A set of volumes that are configured within Media Manager to reside at the same physical location (for example, in a specific robot).
volume pool
A set of volumes that are configured within Media Manager to be used by a single application and are protected from access by other applications and users.
wakeup interval
The time interval at which NetBackup checks for backups that are due.

Glossary 563
wildcard characters
A character that can be used to represent other characters in searches.
Microsoft Windows
(noun) Describes a line of operating systems developed by Microsoft, Inc.
For more information on the Windows operating systems that NetBackup supports, refer to the VERITAS support web site at http://www.support.veritas.com.
Windows
(adjective) Used to describe a specific product or clarify a term. Some examples are: Windows 95, Windows 98, Windows NT, Windows 2000, Windows servers, Windows clients, Windows platforms, Windows hosts, and Windows GUI.
Windows servers
A term that defines the Windows server platforms that NetBackup supports; those platforms are: Windows NT and 2000.
Windows clients
A term that defines the Windows client platforms that NetBackup supports; those platforms are: Windows 95, 98, ME, NT, 2000, XP (for 32- and 64-bit versions), and LE.
Windows Display Console
A NetBackup-Java interface program that runs on Windows 2000, NT, 98, and 95 computers. Users can start this interface on their local system, connect to a UNIX system that has the NetBackup-Java software installed, and then perform any user operations that their permissions allow.
WORM media
Write-once, read-many media for optical disks. NetBackup BusinesServer does not support WORM media.
xbp
The X Windows-based backup, archive, and restore program for users on NetBackup UNIX clients.

564 NetBackup DataCenter Media Manager System Administrator’s Guide for UNIX

565
Index
Symbols/etc/ibmatl.conf file 503
AACS (see Automated Cartridge System)ACS library software component 475ACS_ vm.conf entry 337, 485ACS_SEL_SOCKET, vm.conf entry 338ACS_SSI_HOSTNAME, vm.conf entry 338ACS_SSI_SOCKET, vm.conf entry 338acsd
command 220daemon 209, 487
acssel 490acsssi 488acstest 482, 491, 492Adding
cleaning tapes 51drives 41, 354robot 32, 353shared drives 41volume pool 87, 363volumes
actions menu 98nonrobotic 366robotic 373, 375, 377update volume configuration 98
ADIC Automated Media Library (AML) 511ADIC robot slot diagram
Fastor (TLD) 455Scalar 100 AIT (TL8) 429Scalar 100 DLT (TLD) 428Scalar 100 LTO (TLD) 428Scalar 100 SDL (TLD) 428Scalar 1000 AIT/AIT2 (TL8) 433Scalar 1000 DLT (TLD) 432Scalar 218 (TLD) 429Scalar 448/458 (TLD) 431Scalar AIT 220 (TL8) 449
Scalar AIT 480 (TL8) 451VLS DLT (TSD) 434
Administrative interfacescharacter based 5Java 3
Administrator quick reference 334Allowable Media Manager characters 23Allowing nonroot users 333Alternate media types 478
defined 300example 300
AML (see Distributed AML Server)AMU (see Archive Management Unit)API robots 110, 137, 151, 326, 350, 374, 376, 379, 387, 409, 415, 475, 497, 511, 523API robots, defined 101, 125, 298Archive Management Unit (AMU) 512Assigned
time for volume 82volumes 114
Assigned hostdrive status 187
Assigning tape requests 197ATL (see Automated Tape Library)ATL robot slot diagram
2/28 DLT (TLD) 4342/52 DLT (TLD) 4353/264 DLT (TLD) 4384/52 DLT (TLD) 4356/176 DLT (TLD) 4369/88 DLT (TLD) 437M1500 (TLD) 440P1000 (TLD) 439
authentication/authorization 27, 329AUTHORIZATION_REQUIRED, vm.conf entry 338Auto cleaning 318Automated Cartridge System

566 NetBackup DataCenter Media Manager System Administrator’s Guide for UNIX
adding volumes 482barcode operations 483configuration example 64daemon, acsd 209drive information 46Library Server (ACSLS) 475, 477media requests 478removing tapes 482STK Library Station 475, 477Storagenet 6000 (SN6000) 475, 477, 480
Automated Tape Library (ATL) 500Automatic Volume Recognition
daemon 208setting 184
Auto-populate robot 373avrd daemon 208AVRD_SCAN_DELAY, vm.conf entry 339
BBackup Exec
managing volumes 73, 125Barcode
definition 81overview 325update in robot 127, 179, 403
Barcode rulesadd 170, 423change 174, 425delete 175, 425list 425overview 326
bpexpdate command 115Breece Hill robot slot diagram
Q140 (TLD) 445Q2.15 (TLD) 441Q210 (TLD) 445Q4.50 (TLD) 442Q47 (TLD) 444Q7 (TLD) 443Q70 (TLD) 445
CChanging
cleaning frequency 52cleanings allowed 119, 319drive configuration 48host
for standalone drives 49host for device monitor 193inventory update options 141
media description 119, 395robot configuration 48shared drive configuration 48, 49volume attributes 116volume expiration date 118, 396volume group 397volume group name 120volume maximum mounts 118, 401volume pool attributes 89, 363volume pool for a volume 90, 119, 395
Character device 44, 354Cleaning
count field 83drives 51, 506, 532frequency 52, 316
Cleaning tapeadding 95change cleanings allowed 119, 319, 402number of cleanings left 83set count 102wizrd 106
CLIENT_PORT_WINDOW, vm.conf entry 339Comment, drive
adding 196in drive status list 188
Compaq robot slot diagram35/70 (TLD) 446MSL 5026 (TLD) 463MSL 5052 (TLD) 463StorageWorks DLT (TLD) 459TL810 (TLD) 435TL812 (TLD) 435TL820 (TLD) 438TL822 (TLD) 438TL826 (TLD) 436TL891 (TLD) 460TL892 (TLD) 460TL893 (TLD) 438TL894 (TLD) 435TL896 (TLD) 436
Configurationdrives and robots 23, 349of media 73, 361
Configuration analyzer wizard 185Configuring
drives and robots 11examples, drives and robots 53STK SN6000 drives 481
Index 567
TLM drives 513Control mode, drive 187Control path, robotic 37, 349Control unit, ACS 477Create barcode rules 138Create media ID generation rules 138Created field 83Customize
Device Monitor window 191Devices window 23Media window 84
DDaemons
overview 205acsd 209avrd 208check with vmps 212lmfcd 209lmfd 209ltid 207odld 209robotic 211stopping robotic daemons 211tl4d 209tl8cd 210tl8d 210tldcd 209tldd 209tlhcd 210tlhd 210tlmd 210ts8d 210tsdd 210tshd 210vmd 208
DAS (see Distributed AML Server)DAS_CLIENT, vm.conf entry 339, 514DASADMIN command 514, 516DataStore volume pool 319, 363DAYS_TO_KEEP_LOGS, vm.conf entry 339Deassign volumes 114Deleting
drive 50, 51, 357robot 357volume group 112, 394volume pool 92, 365volumes 111, 392, 393
DELL robot slot diagram
130T (TLD) 470PV-136T (TLD) 428
Densityfor drive types 186for media types 190
Density field4mm 1908mm 1908mm2 1908mm3 190dlt 190dlt2 190dlt3 190dtf 190hcart 190hcart2 190hcart3 190odiskwm 190odiskwo 190qscsi 190
Denying requests 202Description field, volume list 78, 83Description, for new volume 102Device
character 44configuration analyzer 14configuration wizard 30, 41, 47, 313file permission 216no rewind 44volume header 44
Device configuration wizard 6Device file, robotic 37, 353Device host
for move volume 109for new volume 100viewing remotely 25
Device managementdaemons 205starting ltid 207stopping ltid 207
Device monitoroverview 181add drive comment 196assigning requests 197changing host 193display pending requests 196display the window 181resubmit request 201
DEVICE_HOST, vm.conf entry 340

568 NetBackup DataCenter Media Manager System Administrator’s Guide for UNIX
Devices management windowdisplaying 11menus 13toolbar 14
DISABLE_STANDALONE_DRIVE_EXTENSIONS 96DISALLOW_NONNDMP_ON_NDMP_DRIVE, vm.conf entry 340Display device configuration 359Distributed AML Server
\ETC\CONFIG file 516\MPTN\ETC\HOSTS file 516overview 511
Distributed AML Server (also see Tape Library Multimedia)DO_NOT_EJECT_STANDALONE, vm.conf entry 340Down drive, setting 184Drive
access permission 216ACS information 46, 354add (see Adding)add comment 196changing operating mode 194character device 44, 354cleaning 106cleaning frequency 45, 52control mode 187delete (see Deleting)density 186drive status 45LMF information 355monitoring use 181name 354no rewind device 44, 354reset 195, 282robot drive number 46, 354robot library, controlling drive 45robot number, controlling drive 354robotic drive 354servicing requests 196standalone 45, 354
volume database host 49TLH information 47, 355TLM information 47, 355type 43, 354types and densities 186update configuration (see Updating)virtualization 480
volume header device 44, 354Drive and slot diagrams 427Drive cleaning
for LMF robots 532for TLH robots 506manual 317Media and Device Management menu 51
Drive status listassigned host field 187comment field 188control field 187device host name 186drive index 186drive index field 186drive name 186drive name field 186external media ID field 188label field 187last cleaned field 188ready field 188recorded media ID field 188request ID field 188shared field 187type field 186user field 187write enabled field 188
drive_mount_notify script 214, 215, 257, 260drstat command 313
EEject volume from robot
for move volume 109, 111menu command 75methods available 94multiple volumes 75
Empty media access port prior to update 138, 139ENABLE_AUTO_PATH_CORRECTION, vm.conf entry 341Enhanced Authorization
allowable Media Manager commands 333setting up 333
Exabyte robot slot diagram10i,10e,10h (TS8) 446110L (TLD) 448120 (TL8) 44818D (TLD) 447
Index 569
210 (TS8) 446220 (TL8) 449230D (TLD) 449430 (TL8) 430440 (TL8) 450480 (TL8) 45160 (TL8) 447690D (TLD) 452EZ17 (TS8) 446X200 (TL8) 454X80 (TL8) 453
Expiration date, volumedefinition 83changing (see Changing)
External device mapping files 31External media ID
drive status 188pending requests 189
FFile
name on tpreq 213positioning to on tape 214
Filter, volume listby media ID 383by media type 383by robot number 383by robot type 383by volume group 383by volume pool 383display all volumes 383
First media idadd volume range 101
First mount time field 83First slot number
add volumes 102for move volumes 110
Format optical mediaprocedure 426
Frequency-based cleaning 316
GGlobal device database
tpconfig 358Global device database host
conflict 28, 29default 28
HHost
for device monitor 193for robotic control 39for standalone drives 49for volume pool 88, 89volume database 35
Host name, selectionfor volume database 351robotic control 350, 353
HP robot slot diagramSureStore 1/9 (TLD) 455SureStore 10/588 (TLD) 468SureStore E 20/700 (TLD) 471SureStore E 3/30 (TLD) 470SureStore E 6/100 (TLD) 469
IIBM Automated Tape Library 497
(also see Tape Library Half-inch)IBM Magstar 3494 497IBM robot slot diagram
3447-105 (TLD) 4413581 (TLD) 4553583 (TLD) 4283584 (TLD) 4563590 B11 (TSH) 4573590 E11 (TSH) 4577331 (TL8) 4577337 (TLD) 4287337-305 (TLD) 441
Imagesexpiring with bpexpdate 115
Inject volume into robotadd volume 104, 377for move volume 111methods available 92multiple volumes 138robot inventory 93
Insert volume 135Inventory a robot and report contents 404Inventory and compare robot contents 131, 406Inventory and update robot 409INVENTORY_FILTER, vm.conf entry 341
LLabel
field 187media tapes 97optical media 151
Last cleaned field
570 NetBackup DataCenter Media Manager System Administrator’s Guide for UNIX
drive status 188Library Management Facility
adding volumes 532cleaning drives 532configuring drives 531configuring robotic control 528daemon 209drive mapping 531removing tapes 533
Library Management Unit 477Library Manager Control Point daemon (LMCPD) 500Library sharing 37Library Storage Module 477Library-based cleaning 316, 318License keys 481LMCP device file 501LMCPD 500LMF (see Library Management Facility)LMF_ vm.conf entry 341, 535lmfcd
command 222daemon 209, 527
lmfdcommand 222daemon 209, 527
lmftest 223LMU (see Library Management Unit)Logging 212LSM (see Library Storage Module)ltid
command 225daemon 207debug logging 207, 211starting 207stopping 207
MM4 Data robot slot diagram
M1500 (TLD) 440Man pages 219Maximum mounts
add volume 102change volumes 118, 401
Mediadensity 190mount request 197recycling 124replacing 122
Media IDadd volume 101definition 81generation rules 328, 374, 410generation rules defined 178prefix for update robot 144style for new volumes 101
Media management windowdisplaying 73menus 13, 74toolbar 76
Media Manageroverview 1allowable characters 23authentication/authorization security 331configuration file 337security 26, 27server-based security 332volume daemon (see vmd)
Media pool (see Volume pool)Media type
4MM 2994MM_CLN 3008MM 2998MM_CLN 3008MM2 2998MM2_CLN 3008MM3 2998MM3_CLN 300DLT 299DLT_CLN 300DLT2 299DLT2_CLN 300DLT3 299DLT3_CLN 300DTF 299DTF_CLN 300for new volume 100for update options (ACS, LMF, TLH, TLM) 151for update options (not ACS, LMF, RSM, TLH, TLM) 146HC_CLN 299HC2_CLN 299HC3_CLN 299HCART 299HCART2 299HCART3 299

Index 571
mappings, default 153QCART 299REWR_OPT 299WORM_OPT 299
MEDIA_ID_BARCODE_CHARS, vm.conf entry 342MEDIA_ID_PREFIX, vm.conf entry 342Mode field 190Motif interfaces
support for 2Mount requests, pending 197Move volume group 120Move volumes
logical move 324methods available 107multiple volumes 385, 388overview 106, 324physical move 324single volume 385, 386update volume configuration 107volume group 390
mtlib command, IBM 502Multiple drive types 106
NNaming conventions 23NCR robot slot diagram
6461 (TLD) 472NEC robot slot diagram
Autoloader DLT (TLD) 458NetBackup
authentication 329authorization 329pool 78, 82volume pool 91, 363wizards 3
NetBackup Administration Console 3NetBackup Vault
date returned 399date sent 399session ID 401slot 400vault name 398
No rewind device 44, 354Number of mounts 82Number of volumes (or number of platters) 100
OODL (see Optical Disk Library)
odldcommand 227daemon 209
Online helptpconfig 352vmadm 363
Operating mode, drivechanging 194
Operator, definition 196Optical disk
format and label 426partner ID 83platter side 82usage 215
Optical Disk Library (ODL)daemon 209
Optical partner (see Partner ID)Optical volumes 100, 101, 104, 108Overland Data robot slot diagram
DLT Xpress (TLD) 459Library Pro (TL8) 461LXBx110 (TLD) 460LXBx210 (TLD) 460LxL1u11(TLD) 462NEO (TLD) 462
Overview ofbarcodes 325daemons 205drive cleaning 316Media Manager 1robots 297vmadm 361volume groups 319volume pools 319
PPartially-configured devices 31Partner field 83Pending requests
barcode field 190density field 190device host name 189external media ID field 189mode field 190recorded media ID field 189request ID field 189time field 190user field 189volume group field 190
572 NetBackup DataCenter Media Manager System Administrator’s Guide for UNIX
Permissions, for device access 216Platter side, definition 82Pool (see Volume pool)Positioning tape files 214PREFERRED_GROUP, vm.conf entry 343PREVENT_MEDIA_REMOVAL, vm.conf entry 343Preview volume configuration update 138, 139, 141Printing
device configuration 359volumes report 382
Processescheck with vmps 212robotic 205robotic control 206
QQualstar robot slot diagram 46120 (TL8) 464
RRANDOM_PORTS, vm.conf entry 343Reactive cleaning 317Reading tape files 214Ready status 188Recorded media ID
drive status 188pending requests 189
Recycle media 124Refresh rate, changing 191Related manuals xxixRemote device management 25Removable Storage Manager (RSM)
robot types 34Removing
tape files 215volumes 135
Replace media 122ReqId (see Request ID)Request ID field
drive status 188pending requests 189
Requestsoverview 196assigning 197denying 202display pending 196example assignment 199identification number
drive status 188
pending requests 189resubmitting 201user tape 213
REQUIRED_INTERFACE, vm.conf entry 344Reset drive 195, 282Reset mount time 52Residence
defined 95in update options 143update volume configuration 136
Retention periodexpiring backups, with bpexpdate 115
Rewinding tape files 215right-click shortcut menus 5Robot
add (see Adding)attributes 300barcode rules 169, 421barcode update 179, 403control host 39, 353delete (see Deleting)destination for move volume 109device file 37, 353device host 34drive number 46for new volume 100host, definition 81inventory 104, 126inventory and compare contents 131, 406number 34, 353process 205robotic daemons 211sharing 37show robot contents 404type 34, 353update configuration (see Updating)update volume configuration 135, 409volume database host 35, 353with more than one type of drive 105, 106
Robot drive number 354Robot number
for add drive 354for add robot 353
Robot typeACS 298LMF 298ODL 298

Index 573
RSM 298TL4 298TL8 298TLD 298TLH 298TLM 298TS8 298TSD 298TSH 298
Roboticcleaning 318control host 39control process 206device file 37drive 354library 45test utilities 313, 492
Robotic control host 350, 353Robotic control path (see Robotic device file)Robotic inventory filtering 494, 509, 534robtest 223, 239, 241, 313, 335, 491, 516
SScratch pool 365
adding 88changing to 90, 365overview 322
SCRATCH_POOL, vm.conf entry 344Scripts
drive_mount_notify 214, 215, 257, 260vmps 212
SERVER, vm.conf entry 26, 345Shared drives (see SSO)Shared drives (SSO)
configuration wizard 14, 41, 48, 49key 481
Shared drives option (see also SSO)Shared field
drive status 187Shared Storage Option (see SSO)Shortcut menus 5, 22, 84, 191Show All Columns command 77, 84Show robot contents 127, 404Side face, definition 82Silo, STK 475Slot number
add volume 102for move volumes 110
Sony robot slot diagram
DMS (TLD) 465DMS-B9 (TLD) 466LIB-304 (TL8) 430
Spectra Logic robot slot diagram9000/20 (TL8) 4679000/40 (TL8) 467
SSOconfiguration wizards 29, 41, 48, 49configuring TLM robot types 516Device Allocation Host Summary 202drive cleaning 52drive operating mode 194frequency-based drive cleaning 316Shared Drive Summary 202tpconfig 354vm.conf entries 345, 346
SSO_DA_REREGISTER_INTERVAL, vm.conf entry 345SSO_DA_RETRY_TIMEOUT, vm.conf entry 345SSO_HOST_NAME, vm.conf entry 345SSO_SCAN_ABILITY, vm.conf entry 346Standalone drive 354
add drive 45volume database host 49
Start/Stop Media Manager Device Daemon 24Status
volume 82STK robot slot diagram
9710 (TLD) 4689714 (TLD) 4699730 (TLD) 4709738 (TLD) 4709740 (TLD) 468L20 (TLD) 472L40 (TLD) 473L700 (TLD) 471L80 (TLD) 473
stopltid command 207, 225Storage devices
steps for attaching 23Sun robot slot diagram
StorEdge L1000 (TLD) 439StorEdge L1800 (TLD) 435StorEdge L400 (TL8) 449StorEdge L700 (TLD) 471StorEdge L9 (TLD) 455
syslogd 212

574 NetBackup DataCenter Media Manager System Administrator’s Guide for UNIX
TTable-driven robotics 312Tape configuration utility (see tpconfig)Tape Library (TLD)
daemon 209Tape Library 4MM (TL4)
daemon 209Tape Library 8MM (TL8)
daemon 210Tape Library Half-inch
drive information 47Tape Library Half-inch (TLH)
adding volumes 507cleaning drives 506configuration example 67configuring robotic control 501control daemon 210, 500daemon 210, 500drive mapping 506media requests 500removing tapes 507robot inventory 508vm.conf entries 510
Tape Library Multimediadrive information 47
Tape Library Multimedia (TLM)adding volumes 517allocating drives 513configuration example 70configuring drives 515configuring robotic control 513daemon 210, 512drive mapping 515inventory operations 518media requests 512overview 511removing tapes 518
Tape Stacker 8MM (TS8)daemon 210
Tape Stacker DLT (TSD)daemon 210
Tape Stacker Half-inch (TSH)daemon 210
TapeAlert 1, 45, 317Tapes and tape files
assigning requests 197density 213example of handling a request 199file name 213
labels 187mode 190positioning tape file 214reading tape files 214removing tape files 215requesting tapes 213rewinding 215time requested 190using optical disk 215volume pool assignment 213writing tape files 214
Terminating drive assignment 195Time
assigned 82field 190
TL4 (see Tape Library 4MM)tl4d
command 229daemon 209
TL8 (see Tape Library 8MM)tl8cd
command 231daemon 210
tl8dcommand 231daemon 210
TLD (see Tape Library DLT)tldcd
command 235daemon 209
tlddcommand 235daemon 209
TLH (see Tape Library Half-inch)TLH_ vm.conf entry 346, 510tlhcd
command 238daemon 210
tlhdcommand 238daemon 210
tlhtest 239TLM (see Tape Library Multimedia)TLM_ vm.conf entry 346, 521tlmd
command 241daemon 210
tlmtest 241, 515, 516, 517, 518Toolbars, viewing and customizing 76

Index 575
tpautoconf command 243tpclean command 244tpconfig
overview 349adding drive 354adding robot 353command 247deleting drive 357deleting robots 357menus 352online help 352printing device configuration 359starting 351stopping 352update drive configuration 356update robot configuration 355update volume database hostname 358
tpformatcommand 254
tpreqcommand 257requesting tapes 213
tpunmountcommand 260removing tape files 215
TS8 (see Tape Stacker 8MM)ts8d
command 261daemon 210
TSD (see Tape Stacker DLT)tsdd
command 263daemon 210
TSH (see Tape Stacker Half-inch)tshd
command 265daemon 210
Tuning NetBackup 481Type field
4mm 1868mm 1868mm2 1868mm3 186dlt 186dlt2 186dlt3 186dtf 186hcart 186hcart2 186
hcart3 186odiskwm 186odiskwo 186qscsi 186
UUp drive
standard mode (AVR) 184Update and rescan barcodes 179Update robot 409
procedure 137update options 141, 414
Update volume configurationwhen not to use 136when to use 135
Updatingbarcodes 179, 403drive configuration 356robot configuration 355volume database hostname 358
Useraccess to devices 216tape requests 213
User fielddrive status 187pending requests 189
Using Media Manager devices with other applications 2
VVERBOSE, vm.conf entry 346VERITAS Storage Migrator 7VERITAS support web site 31vm.conf file
ACS_ entries 337ACS_SEL_SOCKET entries 338ACS_SSI_HOSTNAME entries 338ACS_SSI_SOCKET entries 338adding SERVER entries 26AUTHORIZATION_REQUIRED entries 338AVRD_SCAN_DELAY entries 339CLIENT_PORT_WINDOW entries 339DAS_CLIENT entries 339, 514DAYS_TO_KEEP_LOGS entries 339DEVICE_HOST entries 340DISALLOW_NONNDMP_ON_NDMP_DRIVE entries 340DO_NOT_EJECT_STANDALONE entries 340

576 NetBackup DataCenter Media Manager System Administrator’s Guide for UNIX
ENABLE_AUTO_PATH_CORRECTION entries 341INVENTORY_FILTER entries 341LMF_ entries 341, 535MEDIA_ID_BARCODE_CHARS entries 342MEDIA_ID_PREFIX entries 342overview 337PREFERRED_GROUP entries 343PREVENT_MEDIA_REMOVAL entries 343RANDOM_PORTS entries 343REQUIRED_INTERFACE entries 344SCRATCH_POOL entries 344SERVER entries 345SSO_DA_REREGISTER_INTERVAL entries 345SSO_DA_RETRY_TIMEOUT entries 345SSO_HOST_NAME entries 345SSO_SCAN_ABILITY entries 346TLH_ entries 346, 510TLM_ entries 346, 521VERBOSE entries 346
vmadd command 267vmadm
overview 361add volume (see Adding)barcode update 403change volume’s volume pool 395changing
media description 395volume expiration date 396volume maximum mounts 401
command 270, 361deleting
multiple volumes 393single volume 392volume group 394
displaying volume configuration 382format optical disk 426inventory and report robot contents 404media configuration
changing description 395moving
volume group 390moving volumes (see Move volumes)online help 363printing volume configuration 382starting vmadm 361
stopping vmd 403verify robot contents 406verify selected robot volumes 403volume configuration
barcode rules 421update robot 409
vmchange command 271vmcheckxxx command 277vmd
command 208, 279, 402daemon 205, 208security 329starting 208
by command 208, 402using vmadm 402
stopping 208, 403vmdelete command 281vmoprcmd command 282vmpool command 285vmps script 212vmquery command 288vmrule command 292vmupdate command 294Volume configuration wizard 6, 104Volume database host
changing 358for robot 35selecting 85
Volume groupadd volume 103changing 397changing name 120definition 319deleting 112deleting (see Deleting)for move volume 110moving 120pending request field 190rules for assigning 320volumes list 79, 81
Volume header device 354Volume is in a robotic library
for move volume 109for new volume 100
Volume pooloverview 86, 319add volume 104adding 87change assignment 395

Index 577
changing attributes 89, 363changing for a volume 90configuring a scratch pool 90, 322DataStore pool 78deleting 92for update robot 150hostname 88, 89HSM pool 78in volume list 82NetBackup pool 78, 82overview 8
Volumesadding (see Adding)assigned 114barcode 81changing (see Changing)changing configuration (see Changing)cleaning count
attribute 119volumes list 83
creation time and date 83deleting (see Deleting)description for new volume 102description, changing 395first time mounted 83group (see Volume group)header device 44last time mounted 83
list 382maximum mounts allowed 102media ID column 81media ID style 101moving 106, 324moving (see Move volumes)moving actions menu 107optical disk partner 83platter side 82recycling 124replacing 122robot, host 81slot 81status 82time assigned 82volume pool (see Volume pool)
Volumes to movefor move volume 108
WWizard
device configuration 6, 30, 41, 47, 313shared drive configuration 14, 41, 48, 49volume configuration 6, 105
Write enabledfield 188tape 190
Writing tape files 214


