139
AGKSOFT ™ Documentation User Guide Volume 1

AGKSOFT ™
Documentation
User Guide
Volume
1

1
Chapter 1 – Introduction he AGKSoft Software lets you run your Gas Station/ C-Store or Liquor Store entirely without ever leaving the software. The software provides all features required to do all your accounting work as well as track your inventory. The software is based-upon an open architecture by using the standard Microsoft Access Database as well as the standard Crystal Reports reporting package. Using a standard gives you the ability to create your own reports or even do your own what if analysis
on your data.
The software runs as Back Office Software (BOS), Home Office Software (HOS) or as Point of Sale (POS).
If you are running the software as BOS, we currently support the following systems:
Gilbarco G-Site® and Passport® Dresser Wayne Nucleus® Ruby VeriFone®, Sapphire®, Topaz® and Site Controller/Commander COMDATA Smart Solutions®
The software includes the following features: Gas Sale and Gas Load (Pool Margin and Tank Inventory Tracking) Salesroom (by Amount, Count or Point of Sale) and Inventory Control Client Accounts (Account Receivable, Local Charges, Invoices and Label Printing) Expenses, Assets tracking and Car Wash Vendors Invoices with Electronic Data Invoicing (EDI) A wide variety of Portable Data Collectors to do inventory, load invoices or do price checks Lottery Scratch Tickets, Lottery Machine, Lottery Paid and Lottery Settlements Electronic and Manual Credit Cards (Track pending batches and charges) Work Order and Garage Inventory tracking for all your parts Payroll (With the ability to handle taxes for all 50 states) Multiple Checking Accounts, Electronic and Cash Accounts Short/Over and Daily Books Balance Sheet, General Ledger and Net Income Quick Books and ASCII Exports Price book Import/Export for multiple locations Consolidate multiple locations into the Home Office and much much more…
Hardware Requirements PC Hardware/Software
• Any PC or Laptop running Windows XP, Vista, Windows 7, Windows 8 or Windows 10.
• 100 GB of free disk space
• 4 GB of RAM
• To connect to a VeriFone Ruby or Gilbarco G-Site, you will need a serial port (9-pin male)
• To connect to a VeriFone Ruby Sapphire/Commander, Gilbarco Passport, Dresser Wayne Nucleus/NAMOS or COMDATA, you will need 2 network cards unless you have wireless internet.
T

2
Running AGKSoft
Look for your AGKSoft Icon on the desktop and open it.
UPC-Codes
In the United States, there are 2 types of UPC-Codes, UPC-E (short) and UPC-A (long).
In Europe and in the Middle East, EAN8 (short) and EAN13 (long) are the most common.
UPC-A is the most common UPC-Code in the U.S. and it looks something like the following:
UPC-A is 11-digits + 1 check-digit and it is stored without a check-digit in AGKSoft.
UPC-E is 7-digits + 1 check-digit, it always starts with 0 or 1, and it is common for smaller items and it looks something like the following:
UPC-E is now expanded to UPC-A on most systems.
EAN13 is the most common UPC-Code outside the U.S. and it looks something like the following:
EAN13 is entered as 12-digits complete without the check-digit (e.g. 873074512345). The check-digit in this case is “1”.
EAN8 is common for smaller items outside the U.S. and it looks something like the following:
EAN8 is entered as 8-digits complete including the check-digit. Example: 87307450. Note that the “0” is the check digit and it must be included.

3
Structure of a UPC-A number
A UPC-A number consists of four areas: (1) A 1-digit Number System (NS); (2) A 5-digit manufacturer code; (3) A 5-digits product code; (4) A 1-digit check digit.
Normally the Number System (NS) digit is printed to the left of the barcode, and the check digit to the right. The manufacturer and product codes are printed just below the barcode, separated by the guard bar.
(NS) (UPC-Code Description) 0 Regular UPC code 1 Regular UPC code 2 Weight Items 3 Drug/Health Items 4 In-store use (Make your own UPC-Codes) 5 Coupons 6 Regular UPC code 7 Regular UPC code 8 Regular UPC code (Reserved) 9 Regular UPC code (Reserved)
Number System (NS): The number system is the first digit in the UPC number to identify the type of the product. For example, if the barcode starts with digit 5, this barcode is a coupon code.
Manufacturer Code: The manufacturer code is assigned by UCC council to each manufacturer or company who distributed goods that uses UPC-A barcode.
Product Code: The product code is assigned by the manufacturer. The product code is a 5-digit number so it can
accommodate 99,999 possible products for each manufacturer.
Check Digit: The check digit is used to verify that the barcode is generated or scanned correctly. The check digit is
calculated based on the rest of the barcode digits.
UPC-A (11-digits): 0 12546 30026 1
0 is the Number System (NS) (This is typically 0, 1, 3, 6 or 7 for most C-Store items)
12546 is the manufacturer’s code
30026 is the manufacturer’s item number
1 is the check-digit
!!!DO NOT ENTER THIS DIGIT WHEN MANUALLY ENTERING UPC-A, UPC-E or EAN13 !!!
If you want to enter this UPC-Code manually, you would key in 01254630026 (11 digits) and you would leave out the check-digit.
UPC-E (7-dgits): 0 499770 4
0 is the prefix (This is typically 0)
4 is the check-digit
We can expand all UPC-E codes to UPC-A codes. The expanded version of this code is: 04900000977
If you want to enter this UPC-Code manually, you would key in 0499770 (7 digits)
Make sure you program your scanner to include the prefix and not to transmit the check-digit.

4
Chapter 2 – Quick Tour
Using the AGKSoft login window:
After you run the AGKSoft Software, you will see the Login window shown above. You need to enter a password (by default the supervisor's password is lowercase "s", the manager's password is "m", the worker's password is "w" and the garage's password is "g"). Next to "Year", you will see the current year you are working in. If you want to access another year, click the < or > arrows or simply enter the year you want to access.
If you click on the AGKSoft Logo (The Gas Attendant in brown holding the Gas Nozzle), this will prompt you "Do you want to allow AGKSoft on your PC?” By allowing AGKSoft onto your pc, you will be allowing a Support Engineer to connect to your pc remotely and guide you through training, questions or to simply set up the software in the beginning.
Under “Upload Data To”, if you click on” AGKSoft Server...” you will see the “Send files to AGKSoft ” window. You can click “Send Files” to send all your files to AGKSoft for Remote Backup or for support.
You can also click “My Server” if you want remote backup on your own server.
Under “Backup Options”, you can click “Select a new Backup Folder” to pick your backup folder. We highly recommend that you backup to a removable drive such as a USB Stick. You can also select a Network drive.
“Backup Files NOW” will perform your backup immediately. Note that the Backup happens automatically once per day to the selected backup folder. If the backup folder is not available, we will back up to your C:\AGKSoft\Backup folder automatically. Note that we do keep up-to 7 unique backups, once per day. If you look at your backup folder, you will see folders 1 to 7 inside the backup folder.
If you click on the “[…]” button, you will be exploring the backup folder in Windows Explorer.
“Restore Your Data from a previous backup...” will give you a choice of up-to 7 backups to choose from. You should always try the latest one 1st if you need to restore.
Enter your password; hit the Enter key or click OK and you will now see the AGKSoft Desktop as shown below:

5
When using the software as a Home Office you have the option of choosing which location to work on separately or choosing to work on "All Locations" at once. As seen below, we show the Home Office Cash Register Interface.
You can enter the Location Number or click on the Location Name to work on the selected location.

6
1. First Time User:
If this is the first time running the software, you will see the "First Time User" window shown below. If you happen to close it, click on the Help menu and then pick “First Timer User” to see it again.
First Time User - 1. Cash Register Interface:
Select the Cash Register you are connecting to and click the “Configure” button.
First Time User - 2. UPC-Code Options:
Expand UPC-E – Expand UPC-E to UPC-A should always be checked.
Remove check-digit – If you are not able to program your keyboard scanner to automatically remove the check-digit, check this box and we will automatically remove it.
Support EAN8 – If you get products from Europe, you may want to check this box.
Handle Weight Items – Check this box if you have a deli and sell products that you weigh. Note that the weight UPC-Codes will always start with the number 2.
First Time User - 3. Download Shift/Day Options:
Auto-Generate Daily Sheet – Auto-Generate a spreadsheet report of your Daily Batch; your Dept. Sales, Inventory, Gas Sale, Lottery and more.
Auto-Print Shift Log – Auto-Print the Shift to the default printer.
Auto-Generate Journal File – Auto-Generate a spreadsheet showing all the Tender Types (Cash, Credit, House Charge, etc.). This will also show Voids, Safe Drops, Coupons, etc.
Auto-Generate Lottery Sheet – Auto-Generate a Lottery Spreadsheet showing the Open, Sold and Closed books.

7
First Time User – Misc Options:
• Click “Gas Blending” if you sell Gas and blend it. • Click “Business Info.” to setup your Business name, address and e-mail. • Click “Taxes” to setup your Tax Rate(s). • Click “Vendors” to configure the vendors that you do business with. • Click “Employees” to create employees and assign them a password to login. • “Bank Info” is only needed if you want to use the software to print checks. • “Expenses” is used to configure all your expenses. • “ Incomes” is used to configure all your incomes. • If you have a Garage, click “Work Types” to configure all your Garage Work Types. You can also set the “Hourly rate ” for
labor under “Garage/Work Order Options” • Click “Lottery ” to configure the lottery scratch ticket UPC-Codes for the software to track. • “Assets” is used to configure all your Assets. • Money Order - Profit/Transaction – If you use the software as BOS, then you can map the "Money Order" department, we are
able to give you the profit on the department using the Profit/Transaction value by multiplying the number (e.g. $0.31) by the # of Money Orders sold.
Example: If profit/ transaction is $0.31 & you sold 50 money orders; the profit amount would be $15.50. • Charge - Finance Charge - Enter the percent that will be charged on any unpaid balance in the Client Accounts window. • Most Recent – When you open most windows such as the Gas Sale window, this limits the number of weeks to show in the
Most Recent section. • Payroll – “Do not add Tips to Final Pay” would be checked if the Tip was already paid to the employee. • Tax – Check the box you want AGKSoft to automatically update the Product Tax using the Dept. Tax. • Time Card –When checked, you can a UPC-Code to clock-in and clock-out in the Time Card window.
First Time User – Inventory Options:
• Sales Inventory – Enter/Modify the Inventory. • Gas Load – Enter/Modify any Gas Delivery. • Portable – Open the Portable Data Collector Interface. • Vendor Invoice – This window will let you Load EDI (Electronic Invoices) as well as manual invoices. • Garage Inventory – If you have a Garage, use this to maintain your Garage Inventory.

8
First Time User – Accounts Options:
• Electronic – Open your Electronic Account. • Cash – Open your Cash Account. • Checking – Open one of your Checking Accounts. • Max Check # – This is where you can limit the biggest check number to allow. • Check Type – When printing checks, you can select Intuit, Cynaptics or Blank Checks. • Mercury – This section allow you to accept credit cards using a Chip Reader as well as manually.
First Time User – Garage Options:
• Labor – You can specify your Hourly Rate that you charge for Work Orders. • Most Recent – When you open the Garage Inventory window, this limits the number of weeks to show in the Most Recent
section. • Shop Materials – When you create a work order, we can automatically add a % age for Shop Materials. • Include Unpaid Invoices – Check this box, if you want the software to not include Invoices that have no payment. This means
the Balance is the same as the Total.
First Time User – Other Options:
• Product Names – Do not change products names or change them to Mixed Case or Upper Case. • Lottery
o Auto-Print when Shift is closed – After we download a shift, we will auto-print the Lottery template. o Sort by Display # - When check, we can sort the Lottery list by Display # rather than the Lottery ID o Most Recent – Show how many weeks.

9
• Margin changes selling - When Changing Profit Margin, If this option is checked, we will change the Selling Price, otherwise we change the cost.
• Auto Load - Auto Load/Populate the Expense Lists and Income Lists when one of these windows is opened. • Round Time - Round the time to the nearest 15 minute interval. • Use List - Use List when checked, otherwise create file for Notepad. • Show Notepad - After uploading Products to your register, show Notepad with a list of changed products. • Disable Invoice Multiplier - When loading an Invoice using the Portable, disable the Case/Carton multiplier. • Update HOS Prices – Only available for Home Office - When importing from the Back Office, update the Home Office Prices. • Use Timed Messages – When we encounter an error, we typically show you an error at the bottom of your window in red.
When checked, the message will automatically go away after the selected # of seconds.
First Time User – Gas Options:
• Email Tank Readings - You can enter multiple emails separated by a semicolon (;) • Gas Price - Minimum / Maximum is used so the gas price can never be set below the Minimum or above the Maximum price.
• Convert Liters -> Gallons - should only be checked in Puerto Rico and Canada or anywhere you purchase Gas by Gallons and sell by Liters.
• TLS Tank Readings – This is the TLS IP Address for us to read directly. We do support the TLS350, TLS450 and TS550. • Fee Agent – This is used when a Gas Station gets a fixed profit for each gallon they sell. Clicking on Configure allows selecting
a different fee for each grade. • Automatic Capture TLS – When check, we will capture the TLS Readings and Delivery in the Automation. • Blending – You can set a Blending Start Date in case you changed your Tanks in the middle of the year.
First Time User – Email:
• Email Address – Configure your From/To Emails if you want AGKSoft to auto-email you or send you Text Messages. • Send Email Using – Select the Email you want to use for Sending Emails and Text Messages. • Email When – Select the various options when you want to be Emailed.

10
First Time User – Security:
• Security Settings – This allows you to setup your Manager and Worker’s security settings. • Monthly Inspection – This will get displayed automatically once every month and will show a variety of issues that need to be
addressed. • Disable File Locking - Should only be checked when using a single copy of AGKSoft non-shared. Checking this box will make
the software run faster. • Worker can’t Exit - Should be checked if you do not want someone logged-in as worker to be able to close the software. • Launch VNC – This would be checked at the Back Office if you want to easily control the Back Office from your Home Office. • Passive FTP – This can be checked or un-checked for some ISPs if the connection between the Back Office and Home Office
does not work. • Max Backups – By default we create up to 7 backups, but you can change it.

11
Creating UPC-Codes or PLUs with AGKSoft
To create PLUs and UPC-Codes click the Setup menu and pick “Products” then select “Create/Modify” . If you have the Cash Register Interface open, select “Create/Modify Products” and you will get the following window:
If you have a scanner, you can simply scan an item and make the proper selections. Please contact AGKSoft if you need a scanner.
If you do not have a scanner, make sure you enter the 1st digit shown on the UPC-Code, this is the prefix. The prefix is typically 0 or 7 for most convenient store items. Do not enter the check-digit at the end of the UPC-Code. UPC-A codes are made up of 11 digits + a check-digit. The check-digit is not used.
UPC-A Example UPC-A # To
Enter UPC-E
Example UPC-E # To
Enter
0 12546 30026 1 01254630026 0 499770 4 0499770
If you have a deli in the store and you are using AGKSoft as the POS (Point of Sale), you have the ability to create and print your own in-house bar codes. For example, if you would like to use PLU #321, you would enter “200321”. Please see the POS Options for more information.
If you don't have a scanner, you can lookup UPC-Codes by name by hitting the Enter key while in the UPC Number field in the Create/Modify Product window. When you press Enter, you will see the list of UPC-Codes as shown below.

12
In this list, you can enter part of the name to help you find the item and press ENTER when you find it. You can also sort by Description or ID by clicking on the title “Description” or “ID”. You can also type a name or a portion into the search field and click find and the software will find all names matching your criteria.
Barcode Printing with AGKSoft AGKSoft has the ability to print to barcode printers such as the Dymo Label Writers. You must install the printer and software that came with your printer before trying to print any labels. Please follow the instructions that came with your printer. Once your printer is installed please follow the steps below to print shelf labels.
How to create/print shelf labels: Open the Cash Register Interface window and click “Create/Modify Products”. You will get the window shown below.
From the Create / Modify Products window do the following:
• In the UPC Number, enter or scan the UPC of the item you would like to create the label for, validate that all information for this UPC is correct. An example would be: 4000010001
If you are creating your own In-house UPC-Code, it must start with 4 and have 10 digits after that for a total of 11 digits. Note: AGKSoft will create the check digit based upon the UPC that is entered.
When using a Dymo Label Writer, click “Print UPC” and you will get the window shown below:

13
From the “Dymo Print UPC – Code” window, do the following:
• From the combo box next to “Select Printer “choose your printer (example: Dymo Label Writer 400) • Check the “Hide Dymo Label” check box to hide the Dymo Software that came with your printer. • Choose the “# of Copies” you would like to print.
If you have chosen to use a label other then one of the Predefined Labels choose “Other” and enter the Label Filename (example: MyOwnCustomLabel.label)
Once all your selections have been made, click on “Print Label” and your label will print from your selected printer.
How to create custom labels: From the Dymo Software do the following:
Please Save all labels into “C:\AGKSoft” with the extension “.label”. 1. Choose the label size by clicking on File and New or CTRL + N. 2. Click on “Designer” on the left side. 3. Add a barcode by clicking on the barcode graphic. Once added right click on the barcode and select “Object
Settings”; you should now see the “Barcode Setting” dialog box. o Under where it says “Data” enter in a UPC (e.g. 01254630281). o For the “Symbology” select UPC A from the list. Press OK once finished. o Save the Label. o Reminder: Please save all labels into “C:\AGKSoft” with the extension “.LWL”.
• Right click again on the barcode and select “Object Properties”; you should now see the Object Properties box.
o Change the “Reference Name” from barcode to “UPCCode”. Press OK once finished.
o Save the Label.
4. Click on the “AB” to add a text object. Position it so it looks appropriate for the label size you have chosen. Enter in a description of an item (e.g. Dentyne Ice). Once satisfied right click on the description and select “Objet Properties”; you should now see the “Object Properties” dialog box.
o Change the “Reference Name” from Text to “Desc”. o Save the Label.
5. Click on the “AB” again to add another text object for the price. Position it so it looks appropriate. Enter in a price (e.g. $1.95). Once satisfied right click on the price and select “Objet Properties”; you should now see the “Object Properties” dialog box.
o Change the “Reference Name” from Text to “Price”. o Save the Label.
6. When you are ready to use this label in AGKSoft choose “Other” as your label type and enter the name you saved it as (e.g. MyCustomLabel.label) • Note: Please save all labels in C:\AGKSoft.

14
Products Setup
Click the “View Products” button in the First Time User window or click on the Setup menu and pick Products then List all Products. You will see the following "Products List" window as shown below:
ID – Is your Dept, PLU or UPC-Code. Note that since a Dept. can be the same as a PLU; we automatically add 9500, so ID 9501 is PLU 1. For PLUs larger than 500, we automatically add 95000000000000. So, PLU 500 would look like 95000000000500.
Desc – Is the Product Description.
Deleted – Tells us to no longer show this product in any list where we have a list of products. We don't recommend that you physically delete the whole line for any particular product if you no longer sell that product, instead you should mark it deleted. The reason for this is that your old saved data may point to this ID. You can also set Deleted to “True” if you want us to remove this product from your Cash Register.
Buying – This is your cost to buy this product.
Selling – This is your selling price (before tax) for this product.
Note: If you are going to use Sales Room by Amount (Sales Room by amount is when you enter in all your information by the total dollar amount and you DO NOT have a scanner), then make sure that the Selling price versus Buying price is your profit margin (Profit Margin = 1 - (Buying / Selling) * 100). Typically most departments don't have a Buying or Selling Price, since Buying and Selling will vary from product to product within the same Dept. and that is the reason why we set the Buying and Selling prices in order to calculate the Profit margin).
For example: If an item is selling for 1.00 with a buying price of .75 the profit margin is 25%, if the buying price changes to .67 the Profit Margin changes to .33% with the same selling price of $1.00.
• This is the formula we use to determine the profit margin on an item (Profit Margin = 1 - (Buying / Selling) * 100).
State Tax – Enter 5 if your state tax is 5%.
• AGKSoft support up to 3 tax rates not counting 0 as Tax Free

15
Local Tax – Leave this blank or Enter 0 if you do not have local, city or county sales tax.
Parent ID – This is the Department #
Parent Desc – This is the Department Name
Prod Code is the Product Code typically used by your Oil Company. Note: When connecting to a Gilbarco G-Site, this product code must be correct or you will not be able to upload to your G-Site.
Modified is used internally to flag every change you make.
• True = The item has changed in some way buying price, selling, description, price group, category, sub category, was loaded as part of an electronic invoice, had inventory done on it etc... This field is also used when selecting to upload Modified Products Only in the Cash Register Interface.
• False = The item has not changed; it is still in its original form. Note: The True field will revert to false once uploaded.
Discount – Enter how many cents discount you want to give (Used by the Point of Sale only)
Max Inventory and Min Inventory can be used to automatically generate orders from your vendors this can be setup in the Product Wizard.
• When the Min Inventory number (qty) is reached the software will then order up to the Max Inventory (qty) number through the Vendor Order screen if this option is chosen. Note: Taking into consideration cigarettes which always have to be ordered in qty of 10.
PriceGroup allows you to group a bunch of items together that have the same price (Example: King size candy bars selling for.89).
• If you are using a Gilbarco G-Site, Price groups have to be uploaded to the register before they can be used. To set up a Price Group select the Setup Menu, Products and then Price Group. Note: The qty of price groups that can be configured is limited to the software running on the G-Site.
Category is the Category a product or products belong to.
• Category allows you to group items together that share similar price points, manufacturers etc... And also allows for easy reporting and price changing. To setup a Category select the Setup Menu, Products and then Category. Items can then be added either through Create Modify products or in Product Wizard which can both be found in the Cash Register Interface
SubCategory is the Sub-Category a product or products belong to.
• SubCategory allows you to group items together that share similar price points, manufacturers etc... And also allows for easy reporting and price changing. You can group the same item that is in the category, this is useful with packs and cartons of cigarettes. To setup a Sub Category select the Setup Menu, Products and then Sub Category. Items can then be added either through Create Modify products or in Product Wizard which can both be found in the Cash register Interface
Buy Down is the amount of money the manufacturer pays you back.
ProductID is used for the COMDATA system only.
LinkedID is used for the Gilbarco Passport system only to automatically link a UPC or PLU to another.
UPCType tells us what type of UPC-Code it is. 0=UPC-A, 1=UPC-E, 2=EAN8, 3=EAN13, 4=PLU
OverrideID is used for the Home Office Override feature. If you are connected to your Cash register, you can modify multiple products and click on the “Send to Register” button to upload only the products you changed.
16
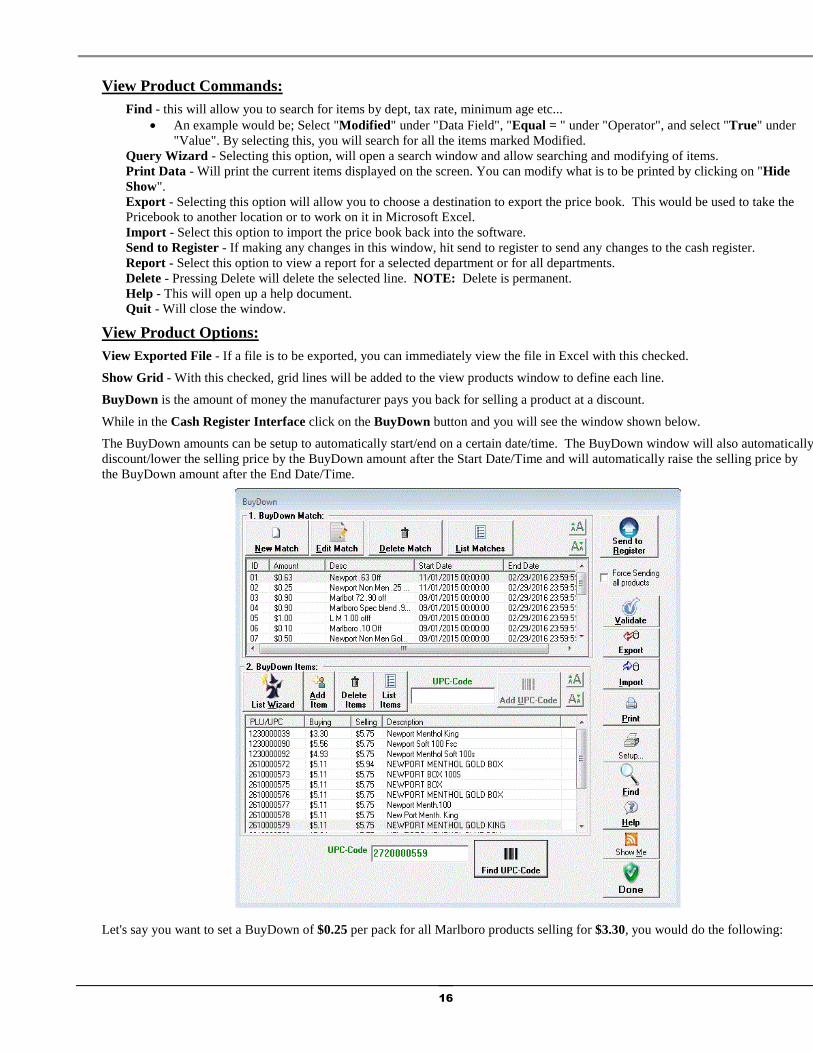
View Product Commands: Find - this will allow you to search for items by dept, tax rate, minimum age etc... • An example would be; Select "Modified " under "Data Field", "Equal = " under "Operator", and select "True" under
"Value". By selecting this, you will search for all the items marked Modified. Query Wizard - Selecting this option, will open a search window and allow searching and modifying of items. Print Data - Will print the current items displayed on the screen. You can modify what is to be printed by clicking on "Hide Show". Export - Selecting this option will allow you to choose a destination to export the price book. This would be used to take the Pricebook to another location or to work on it in Microsoft Excel. Import - Select this option to import the price book back into the software. Send to Register - If making any changes in this window, hit send to register to send any changes to the cash register. Report - Select this option to view a report for a selected department or for all departments. Delete - Pressing Delete will delete the selected line. NOTE: Delete is permanent. Help - This will open up a help document. Quit - Will close the window.
View Product Options: View Exported File - If a file is to be exported, you can immediately view the file in Excel with this checked.
Show Grid - With this checked, grid lines will be added to the view products window to define each line.
BuyDown is the amount of money the manufacturer pays you back for selling a product at a discount.
While in the Cash Register Interface click on the BuyDown button and you will see the window shown below.
The BuyDown amounts can be setup to automatically start/end on a certain date/time. The BuyDown window will also automatically discount/lower the selling price by the BuyDown amount after the Start Date/Time and will automatically raise the selling price by the BuyDown amount after the End Date/Time.
Let's say you want to set a BuyDown of $0.25 per pack for all Marlboro products selling for $3.30, you would do the following:

17
1. Click [New Match], you will prompted to enter a description, amount of the buy down and the date/time the discount will be valid. In our example above, our buy down is set to run from 12/10/2013 through 12/31/2023 and the amount of the buy down is $0.25.
2. Click [Add Item] to add the various UPC-Codes to be discounted. If you have a scanner hooked up to your PC you scan simply scan the items into this window. If you do not, click [List Wizard] to search for the items, and then add them to the list.
3. Click [Send to Register] to send the Buy Down(s) to your cash register. If the date/time matches, the price change will take effect immediately. If the date/time is set for a later time the discount will take effect the next time our Cash Register Interface Automation polls. If you have the polling set at 15 minutes, the price will change within 15 minutes of the date/time match. Please have automation running at all times to send these changes to the register on the specified day.
Home Office: When you click [Send to Register], you have the option of putting the Buy Down (s) in a Zone to send to a specific location individually or multiple locations at once.
Back Office: When we import the files from the Home Office, if the date/time match, we will upload the price change to your cash register. Please see Home Office Zones, to learn more about zones and exporting to the Back Office.
Point Of Sale: When you click [Send to Register], if the date/time match, the price change will be immediate. When the shift is closed, if the BuyDown end date/time match, the selling price will be raised by the BuyDown amount automatically.
How to use the List Wizard:
In our example above we searched for Marlboro cigarettes. We can then further search for all Marlboro packs selling for 3.30. See below to set this up.
1. Under "Select Product List by" select "Product name" choose Contains, and enter "Marl". The reason we selected "Contains Marl" instead of "Starts With" is because the description names may not all start with marl.
2. Click "Find" , all the items containing the letters "Marl" will now show.
3. Under "Limit Search To", select "Selling Price" and enter 5.29 and press "Find". Now, only the items selling for 3.30, with the letters "marl" will show.
4. If you are satisfied with your search, press "OK", and the items shown in the list will all be added to the Buy Down.

18
First Time User - Misc: Gas Blending – If you blend Gas, click the “Gas Blending” button in the First Time User window or click on the Setup menu and pick “Gas Blending” . You will see the following “Gas Blending” window as shown below:
Click Next to move to the next record or click on “Setup Blending Automatically”. You will be prompted “Are you blending Gas?” If you select yes you will be prompted “Do you blend your PLUS Grade Only?” If you select Yes you will be prompted “Enter %age of REGULAR Grade”. At this point you can enter 50, 60, 33 or whatever the blending ratio may be. • 0-Eco (Default is: 100% 0-Eco and 0% 4-Ultra) • 1-Reg (Default is: 100% 1-Reg and 0% 4-Ultra) • 2-Plus (Default is: 100% 2-Plus and 0% 4-Ultra) • 3-Super (Default is: 100% 3-Super and 0% 4-Ultra) • Etc.
Business Information:
Click on the “Business Info” button in the First Time Users window or click on the Setup menu and pick Business Info. You will see the window shown below.
What to enter… • Business Name • Street, and City, State, Zip, Phone and E-mail. • OPTIONAL: Federal ID #. • Location ID is important only if you have multiple locations and plan to use a Home Office.
Click Save to save your changes.
By entering your e-mail, the software can e-mail you changes in fuel prices.
It will also e-mail when the shift or day downloads, if the shift or day hasn't downloaded in a day, when prices are imported from an FTP server as well as much more. If you would rather receive a text message on your mobile phone pressing the TXT button will allow you to choose which mobile phone service you have and you are on your way.

19
o Enter in the number next to the carrier name that provides mobile service to you. For example, if you have mobile service through Verizon enter 7 and press OK and you will see the box shown below.
o Please enter the cell phone number you would like the software to text the information to; please be sure to include the area code as well as the cell phone number. What will appear in the Email section in the business info is [email protected] (This is for Verizon customers only) depending on which mobile carrier you have will depend on the extension that the software will automatically apply to the telephone number. Please know that the mobile carrier will apply normal text messaging rates when receiving.
Taxes Setup
Click on the Taxes button in the First Time Users window or click on the Setup menu and pick Taxes and you will get the window shown below.
Make sure you enter your State’s two-letter code under "State Information:" next to “Name” (Example: AR) and your county name next to "County" (Example: Van Buren). You should also set your State's Sales Tax and click the Save button. If you only have one tax rate, enter it under Rate 1. If you have other rates, enter them under Rates 2 and 3 (Ex: High and Lo tax).

20
If you are in Puerto Rico, enter PR.
If you are in Canada, enter your Province Initials (ON-Ontario, QU-Quebec, AA Alberta, BC-British Columbia, NB- New Brunswick, NF-New Found land, NS-Nova Scotia, YU-Yukon, NT-Northwest Territories, NU-Nunavut, and SA-Saskatchewan, PE-Prince Edward Island).
“Edit Tax” is a button you can click to adjust the Tax Table for your particular state. • Example: For Massachusetts, you would enter MA next to the State Name and therefore we will use the
configuration file MA INI, so clicking on the “Edit Tax” button will allow you to directly edit MA INI. • Note: You almost never need to edit this file if you have the Maintenance agreement with AGKSoft, where this
file is bundled with the AGKSoft Update. If you did make any changes to this file, make sure you email your changes to [email protected].
“Tax Forms” is a button you can click to research your State or any other State taxes on the Internet.
“County” is the county that you live in. This is optional for most states, except for the states where the tax varies by county like Indiana.
“Tax Rates” are the various Tax Rates your state requires and will be applied to your Depts. and UPC Codes.
“GST” is the Goods and Services Tax or Local Tax
“STDI” is the State Disability Insurance; enter the %age for your particular state.
• Note that this would be what the employee pays not the employer.
“Edit Tax Withholding” is the Federal Tax tables, which may change slightly every year.
• You almost never need to edit this file if you have the Maintenance agreement with AGKSoft, where this file is bundled with the AGKSoft Update. If you did make any changes to the file, make sure you email your changes to [email protected].
“Lottery Commission on Prizes” is the %age of the amount the Lottery Company gives you on Lottery Scratch Tickets Prizes (Winnings).
“Lottery Commission on Sales” is the %age of the amount the Lottery gives you on Gross Scratch Ticket Sales.
“Multiply by this for Overtime ” is typically 1.5, which means time and a half.
“Holiday and Vacation Overtime” is typically blank or 1, which means straight time.
“# of hours in your Payroll Period” is typically blank or 40. • Note that someone working over 40 hours will be considered overtime.
“Shop Materials %age” is a %age added to all work orders. (Total of parts+labor multiplied by the %age of shop materials)
“Labor is taxable” should be checked for states such as New York or any other state where the labor is taxable.
“Commission on Labor” should be checked if you pay your mechanic commission on his labor.
Vendors – List all Vendors.
Click on the “Vendors” button in the First Time Users window or click on the Setup menu and pick Vendors then Create/Modify.
You can use this window to add new vendors or modify existing vendors.
To create a new vendor, click “New” and enter the following:

21
Vendor Name is the company name of the vendor.
Contact would be the person who you would speak with.
Street Address, City, State, and Zip Code is the address where the vendor is located.
Phone is the Vendor’s main telephone number.
Cellular Phone is the mobile telephone number of your contact person.
Fax is the Vendor's Fax number.
Email is the Vendor’s email address. (Example: [email protected])
Default Transaction Type is the type of transaction you typically associate this Vendor with. For example, if this is a cleaning service, you would select “Expense” as the default.
Notes are any comments you wish to include about this Vendor.
When you finish, click the “Save” button to save it.
To change a vendor, do the following: Click the down arrow next to "Vendor Name", or use the left and right arrows to scroll through the vendor names, select a vendor, and make the necessary changes and click the "Save" button to save it.
To duplicate a Vendor do the following: Click the down arrow next to “Vendor Name”, or use the left and right arrows to scroll through the vendor names, select a vendor, click the “Duplicate” button, and make the necessary changes, click the “Save” button to save it.
To see all the Vendors do the following: Click the “Find” button and you will see the window shown below:
Vendors – List all Vendors.
ID is the Vendor’s Identifier • The ID number is also used when saving an invoice on the portable handheld scanner.
Desc is the name of the vendor
Vendor Code is an internal code used by vendors when you get an Electronic Invoice (EDI)
Address is the Vendor’s Street Address
Phone is the Vendor’s main telephone number
Fax is the Vendor’s Fax number
Contact would be the person who you would speak with

22
City, State, Zip is the Vendor’s address
Address 2 is the 2nd line of the Vendor’s Street Address
Phone2 is the Vendor’s or Contact’s cellular number
Email is the Vendor’s email address
Notes can be used to make comments regarding the Vendor
Employees – List all your Employees.
Click on the “Employees” button in the First Time User window or click on the Setup menu and pick Employees then Create/Modify. You can use this window to add new employees or modify existing employees.
What to enter:
Employee Name is the name of the Employee you are entering Allowances (Dependants): The number of dependants the employee claims on their taxes including themselves Hourly Pay: This is the employee’s hourly pay (How much they get paid per hour) Single or Married: Select the Employee’s marital status Password is used in the Point Of Sale software when the cashier is logging in SSN is the Employee’s Social Security Number and it is used in the Back Office for the Ruby System to identify an Employee Street, City, State, Zip Code and County is the address where the Employee lives Notes: Would be used to enter comments about an Employee Active should be selected if the employee is currently working for you otherwise it should not be selected. Commission would be selected if the employee was on commission.
• To add a new Employee, click the “New” button, and enter the Employee Name and all other needed info. And click “Save”.
• If the “New” button is grayed out (disabled) this means you are already in “New” mode and you can start entering your information.
• To change an Employee, click the down arrow next to “Employee Name”, select an Employee, and make the changes and click “Save”.

23
• To duplicate an Employee, click the down arrow next to “Employee Name” and select an Employee, click the “Duplicate” button, make the necessary changes and click “Save”.
To see all the Employees, click the “Find” button and you will see the window shown below:
ID: Employee ID number • This number is used for the Time Card to check in and out.
Name: Is the Employee’s name
Allowances: The number of dependants the Employee claims on their taxes
Status: Is the Employee's Marital Status • “M ” = Married, “S” = Single
Hourly Pay: The $ amount the Employee gets paid per hour
Reg. Hours: The typical number of hours worked per pay period
Street/City/State/Zip: The employee’s address
SSN: The employee’s Social Security Number • This is used on the Ruby VeriFone for payroll
Type: This is the default type of payment you typically pay this Employee (Example: C- Check)
Insurance: The employee’s portion of the health insurance to be deducted each pay period
IRA: This is the IRA or 401K amount the Employee elected to set aside for retirement
FedAdtlWith: Additional federal withholding tax the Employee wants to withhold
StateAdtlWith: Additional state withholding tax the Employee wants to withhold
Deleted: Indicates employee Job Status • True = Non-Active Employee (Deleted) • False = Active Employee (Not Deleted)
Notes: Would be used to enter comments about an employee
Child Support: The $ amount to be deducted each pay period
Child Support Name: Name to which the support will be paid to
IRA%: % of gross reg. pays to be withheld for IRA/401K

24
Note: If you are connected to a Ruby Cash Register, make sure the SSN field matches the Social Security field in the Employee file on your Ruby.
Bank Info . – List all your bank accounts
Select “Bank Info” from the “First Time User” window or click on Setup then Bank Info
To enter in your Bank Information choose the checking account you would like to set up by selecting 1, 2 or 3 under "Checking Account" and fill in the necessary information. Please Note the Bank Information is only important if you want to print Payroll Checks directly from the Weekly Payroll window.
Make sure you enter:
Name: This name of the institution where you do your banking
Street, City, State and Zip: This is the address where this bank is located
Routing #: These are the first series of numbers on the bottom of your checks
Account #: These are the second series of numbers on the bottom of your checks
Press save when you are finished making changes
Press Find to see all your bank info in a spreadsheet.
Press Quit closing the window.
Follow these steps for all the bank accounts you are entering. When you are finished click save and quit.
Expenses – List all your expense types.
Click on the "Expenses" button in the First Time User window or click on the Setup menu and pick Expenses.
Expenses are things like your telephone bill, Ads, Rent, etc.
What to enter:
Name: The name of the expense. Example, Electric Bill.

25
Default Price (Optional): If you always pay the same price for this expense you can enter it here
Quick Books Category: Choose a category to assign this expense type to when exporting to QuickBooks
Choose a default payment type if any from the combo box.
• To add a new Expense, click the "New" button; enter the Expense Name and all other information and click "Save".
• To change an Expense type, click the down arrow next to the “Expense Name” select an Expense, and make the necessary changes and click "Save".
• To duplicate an Expense type, click the down arrow next to “Expense Name” and select an Expense, click the “Duplicate” button, make the necessary changes and click “Save”. If you would like to see what was saved click on “Find” shown on the next page.
This window is an alternative to the Create/Modify Expenses.
To modify this list click on the Fast Forward button to go to the last record and you will see this star , click next to it under ID and enter a unique ID (e.g. 65), hit the right arrow and enter the Expense Type under “Desc” (e.g. “Electric Bill”), hit the right arrow and enter the price that you pay for this expense under “Price” which can be changed later on.
• Note that you don’t have to enter any value in the Price column. You may also enter the default type of payment enter “E” for Electronic, “C” for Checking Account 1, 2 or 3, “H” for Cash and “R” for Register and “N” for none. “N” is used for none if you are going to use the Import QIF feature found in the various Accounts.
Income - List all your income types.
Click on the "Income" button in the First Time User window or click on the Setup menu and pick Income.
What to enter:
Name: The name of the Income type.
Default Price (Optional): If you always collect the same amount you can enter that here.

26
Category: Choose a category to assign this Income type to.
• To add a new Income, click the "New" button, and enter the Income Name and all other needed information and click "Save".
• To change an Income, click the down arrow next to "Income Name", select the Income, make the changes and click "Save"
• To duplicate an Income type, click the down arrow next to the “Income Name” and select the Income, click the “Duplicate” button, make the necessary changes and click “Save”. If you would like to see what you have saved click the “Find” button.
This window is an alternative to the Create/Modify Incomes window on the previous page.
You can modify this list or click on the Fast Forward button to go to the last record and you will see this star, click next to it under ID and enter a unique ID number (e.g. 65), hit the right arrow on your keyboard and enter the Income Name under "Desc", hit the right arrow and enter the default price (OPTIONAL), then under Type would be the typical payment type.
Assets – List all your Asset types
Click on the "Assets" button in the First Time Users window or click on the Setup menu and pick Assets.
What to enter:
Name: The name of the Income type
Default Price (Optional): If you always pay the same price you can enter that here
Category: Choose a category to assign this Asset type to
• To add a new Asset, click the "New" button, and enter the Asset Name and all other needed information and click "Save".
• To change an Asset, click the down arrow next to "Asset Name", select the Asset, make the changes and click "Save"

27
• To duplicate an Asset type, click the down arrow next to "Asset Name" and select an Asset, click the "Duplicate" button, make the necessary changes and click save. If you would like to see what you have saved click the "find " button
This window is an alternative to the Create/Modify Assets window on the previous page.
You can modify this list or click on the Fast Forward button to go to the last record and you will see this star, click next to it under ID and enter a unique ID number, enter the Asset Name under “Desc”, enter the default price (OPTIONAL), under Type would be the typical payment type. Note: If the Price is positive (Larger than $0), then it is considered a Fixed Asset Cost and if the Price is negative (Less than $0), then it is considered a Fixed Asset Depreciation.
A typical example would be to enter “1” for “ID”, “Computer” for “Desc” and the Usual Method of Payment like “C” for “Check” under Type. Assets are things you would usually buy for the Station that have a value for a period of time.
You may only need to enter Assets as you need them, so if you just bought a computer, that would be considered an Asset and not an expense, because you may sell it in the future. Once you sell your Asset, you may enter the loss as an expense. Simply setup another ID (e.g. 2) and enter “Computer Depreciation” under “Desc”, enter a negative value under Price. Now you can use the Assets window on a weekly, monthly, quarterly or yearly basis.
Work type - If you have a Garage, use this to list all your work types.
Click on the “Work Types” button in the First Time Users window or click on the Setup Menu and pick Work Order then Create/Modify.
You can use this window to add new parts or modify existing parts.
To add a new part, click on the "New" button, enter the Part Number, and enter the Part Description and any other information you want. Click "Save" when you are finished.

28
To Duplicate a Work type and make a similar one, click the “Duplicate” button
What to enter:
Part Number: Enter the part number for this item (e.g. OC)
Part Description: Enter the part's description (e.g. Oil Change).
Description of Labor: Enter the description of labor to be printed on the Work Order (e.g. Oil Change, Replace Fuel Filter and Inspect Belts).
Buying Price: Enter how much this item cost you.
Selling Price: Enter the selling price before tax.
Labor Hours: The amount of time the job will take.
Month (s) Due: This is used for future scheduling and reminders. If you select "3", any work orders using this part will trigger a reminder after 3 months.
• An Oil Change would be an example of an item having the month (s) Due filled in.
Category: This is the Category # for this part.
To see what you saved click the “Find” button
This window is an alternative to the Create/Modify window on the previous page.
You can modify this list or click on the Fast Forward button to go to the last record and you will see this star, click next to it under ID and enter a unique ID number, hit the right arrow on your keyboard and enter the Work Type under “Desc”, hit the right arrow and enter the current Selling price under “Price”. The next column “Type” only applies when you buy this item for your Garage. Hours are the # of labor hours it takes you to perform this kind of work. State Tax is the Tax %age (e.g. 5) that you are required to withhold for your state when you sell such an item. Local Tax is the Tax %age that you are required to

29
withhold for your city or county when you sell such an item. Buying is your cost price when buying this item. Part Number is the item's part #. DescOfLabor is the Description which will show up on the Work Order when the Work Order is printed.
Lottery – If you sell Lottery Scratch tickets, use this to list all your scratch ticket types.
Click on the "Lottery " button in the First Time User window or click on the Setup menu and pick Lottery .
What to enter:
Name: The name of the Lottery Scratch Ticket book.
Price: The price per ticket that each ticket is sold for.
Start and End: Enter the start and end number of the book (e.g. Start=0, End=59)
UPC-Code: The UPC-code for this book. Make sure you enter the 1st digit and DO NOT ENTER the last digit
Active: By default this box is checked, when a ticket is active, it means the ticket is currently being sold. If you no longer sell this ticket, or would like to hide it, uncheck the Active checkbox.
When you are finished click "Save" and then "Send to Register". This will send all the new tickets to your register.
To see everything you have saved click the "Find" button and you will see the window shown below
This window is an alternative to the Create/Modify Lottery window above.
You can modify this list or click on the Fast Forward button to go to the last record. You will see this star, under ID and enter a unique ID number, hit the right arrow on your keyboard and enter the new Lottery Scratch Ticket’s name under “Desc”, hit the right arrow and skip “Deleted”, hit the right arrow and enter the Start and End. Start and End tells us which way you count your tickets in a book (up or down) and how many tickets are in a book. Display is optional; it is used to reorder the list of books in the Lottery Scratch Tickets window. The UPC field should be entered or scanned if you plan on tracking your lottery by ticket. After you enter all the UPC-Codes under UPC, you can click “Send to Register”.

30
Add Lottery Books – If you sell Lottery Scratch tickets, use this to add book serial numbers.
If you would like to track the sale of your books and how much money you owe the Lottery Company, use this window to add your books, and then use the Lottery Scratch Tickets window to sell them. Enter the serial numbers for your books under "Book Serial #" we will automatically enter the next serial number when the first book settles. Click on the Add button to add
the books. If you are entering a range of books like, ABC101-ABC105. Click on the next to the quit button to add the "end" serial number. If you are unsure if you entered a serial number click on "Find Books" or Report buttons, this will show you all serial numbers entered.

31
First Time User - Inventory:
Gas Load – Use this to enter your Gas purchase.
Click on the "Gas Load" button in the First Time User window or click on the Vendors menu and pick Gas Load.
Use this window to enter and track your Gas Loads as well as all the various Gas Buying prices.
• Note that by clicking on the arrows shown on the left, you can show or hide various types of Gas.
At this point, you should go outside and do a stick reading, figure out how many gallons/liters you have and enter the Volume under the Volume column.
• Note: If you live in an area that uses liters such as Puerto Rico or Canada and you want to convert the liters to gallons be sure to check the “Convert Gas Sale Liters to Gallons” in the First Time User Screen.
You should figure out what the average price that you paid and enter that under Buying Price.
Make sure you set all the Taxes properly (e.g. 0.18 is 18 cents). If you don’t know what your Gas Taxes are, enter 0 or leave the fields blank and make sure to enter the Buying Price with tax included.
For the combo-box next to “Paid from Account”, select “N-None” since you are not paying for this 1st Gas Load now.
Click Save Settings, then Save and Quit .
If you want to see what you just entered, click the Report, Find or History buttons.
32
Sales Inventory – If you don’t have a portable, use this window to enter your current inventory levels or to make inventory adjustments.
Depending on the Sales Room type that you have selected, you will get a different Inventory window. See the following table to find which you would be using.
Sales Room by Count or POS Products Inventory In/Out (Scanner Mode)
Sales Room by Amount Sales Room by Amount
Portable – This is used to load your current inventory levels from a portable scanner or Portable Data Collector (PDC). For more info. See the “Portable Data Collector” section.
Vendor Invoice – If you just opened your store, you can get an Electronic Invoice from your Vendor and load it directly into the software. For more info. See the “Vendor Invoice” section.
Garage Inventory - If you have a Garage, click the “Garage Inventory” button in the First Time Users window or click on the Station menu and pick Garage Inventory. For more info. See the “Garage Inventory” section.
First Time User - Accounts:
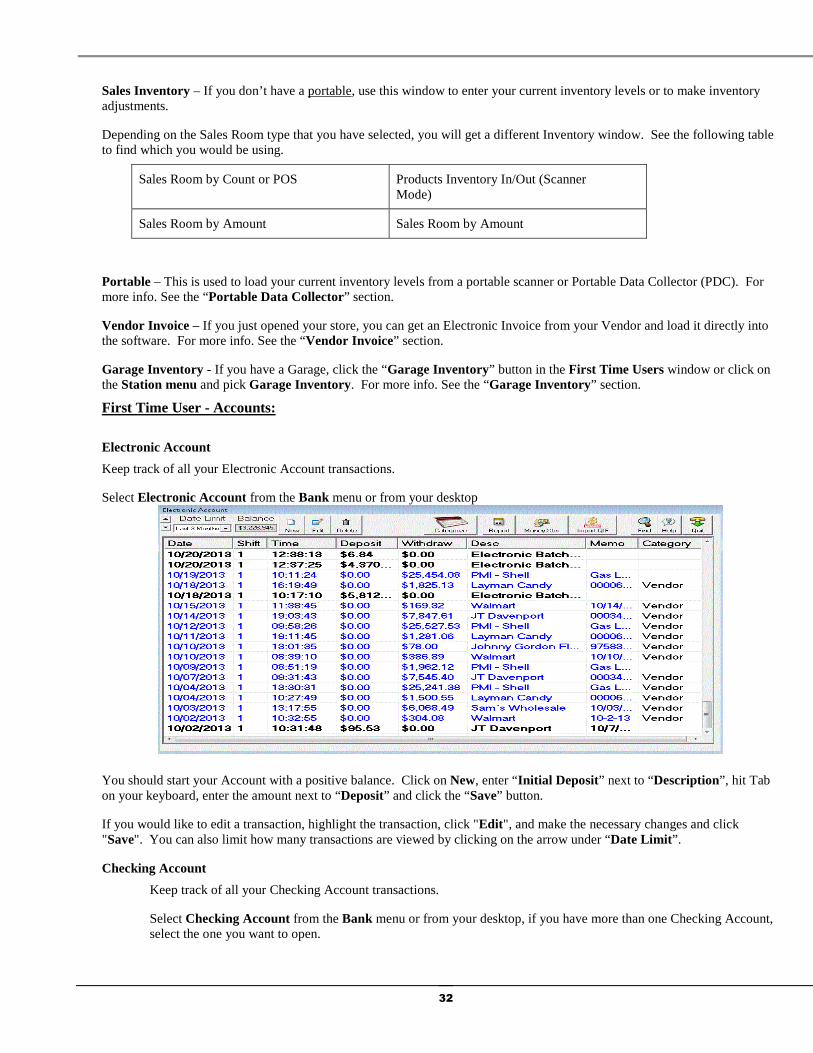
Electronic Account
Keep track of all your Electronic Account transactions.
Select Electronic Account from the Bank menu or from your desktop
You should start your Account with a positive balance. Click on New, enter “Initial Deposit” next to “Description”, hit Tab on your keyboard, enter the amount next to “Deposit” and click the “Save” button.
If you would like to edit a transaction, highlight the transaction, click "Edit ", and make the necessary changes and click "Save". You can also limit how many transactions are viewed by clicking on the arrow under “Date Limit ”.
Checking Account
Keep track of all your Checking Account transactions.
Select Checking Account from the Bank menu or from your desktop, if you have more than one Checking Account, select the one you want to open.

33
Click on New, enter “Initial Deposit” next to “Description”, hit Tab and enter the amount next to “Deposit”, check the "Paid" check box and click the “Save” button. You can limit the view where it says “Date Limit”
If you would like to edit a transaction, highlight the transaction, click "Edit ", and make the necessary changes and click "Save".
Select Check Type - Choose your check style
Click on the Setup menu and select "Check Type" .
When printing checks, we do support three types of checks Intuit , Cynaptics' LMC01 and Blank Checks.
Cash Account
Keep track of all your Cash Account transactions or you could use this to track money in a Safe.
Select Cash Account from the Bank menu or from your desktop
Click on New, enter “Initial Deposit” next to “Description”, hit Tab on your keyboard and enter the amount next to “Deposit” and click the “Save” button.
If you would like to edit a transaction, highlight the transaction, click "Edit ", and make the necessary changes and click "Save". You can limit the view where it says “Date Limit”

34
First Time User - Garage/Work Order Options:
If you have a garage, this is where you would set up the hourly rate you charge for labor. So if you charge $55.00 an hour, enter 55 in the box next to “Hourly Rate”.
First Time User - Gas:
Gas Price Min and Max is where you would enter the minimum and the maximum price you would charge for gas. So, if you wanted your minimum to be $0.25 and the maximum to be $10.00, you would enter these numbers into the boxes.
First Time User - Other Options:
Profit margin changes selling price - If this check box is checked, when you adjust your profit margin, your selling price will automatically change based on the profit margin you set.
Convert Gas Sale Liters to Gallons is only used in areas that use Liters such as Puerto Rico & Canada. So, if you live in the United States or somewhere that uses gallons then you would not check this box.
Worker Cannot Exit - With this check box checked, a worker signed in with the "w" worker password is not able to exit out of the software without the manager or supervisor password.
Limit Manager Editing - When checked the manager will no longer be able to make changes in the Short/Over as well as many other areas such as Credit Cards, Gas Sale, etc.
Round Timecard - When checked, we will round the Hours Worked to the nearest 15 minute interval.
First Time User - Delete Selected Day:
If you have been messing around or you want to redo all of what you’ve entered today, you can click on “Delete Selected Day”, which will give you the option to delete all the records for a day or a specific shift.
Note: Your Setup Information, like the list of Employee Names as well as Products Names will not be deleted.
First Time User - Delete All:
If you have been playing around entering sample data to see how to use the software and you are now ready to go live, you can click on “Delete All”, which will give you the option to delete all the records entered for the current year.
Note: Your Setup Information, like the list of Employee Names as well as Products Names will not be deleted.
Chapter 3 – Overview
What you need to do every day
When you buy Gas...
Click the "Gas Load" icon on your desktop or select Vendors from the menu and pick Gas Load (Ctrl-L). Fill out the Volume column, then the Buying Price column (without tax as shown on your Gas Load bill), then click "Save". If you are not sure of the taxes per gallon you are charged then enter the buying price with the tax included.
Note that you can simply click on "Show Latest" if the cost is the same as the last load saved, you can change the Price if it has changed. If you cannot figure out your Gas Tax, leave the Tax fields empty and enter the Buying Price with Tax.
Shell, ConocoPhillips as well as other Major Oil Companies are starting to provide Electronic Gas Invoices in the form of an XML file that can be downloaded from the Company's web-site. Click the "W" to go on your Oil Company's Web-site to download the XML file.

35
If you have such a file, save it in the "My Documents" folder or any other folder you wish, click "Load Invoice", select the XML file from the designated folder and click OK . The first time you load an XML Invoice, you will be prompted a series of questions, YOU MUST ANSWER these questions to the best of your knowledge.
If you have multiple XML files saved in a folder, you can simply select the folder rather than the file and the software will load all the XML files automatically.
If you click the "[...]" button, you will be prompted to validate the Business Name. This will insure that the XML invoice belongs to your location. We do match the Business Name you setup in First Time User to the name on the actual XML invoice.
After you click the "[...]" button, you will also be prompted to "Reset Invoice Settings". This will reset all the answers to the previous questions prompted when loading your 1st XML invoice.
When you buy Products, you have a few options...
Ask your Vendor for an Electronic Invoice (EDI file) in the ABC Record format or in the Shell ETD format. Many vendors do provide such a file. Here's a list of some of the vendors that do provide EDI files:
Amcon Distributing, Burk, BWG, Capitol Distributing, CashWa, CDH, Centry, Chamow, CONCO, Cooper, CoreMark, Doug, E B Brown, Farner Bocken, Finkle, Garber, Glidewell Distributing, GROCERY SUPPLY Company (GSC), Hackney, HH Foods, HiWay, HLA, Imperial, JPolep, JT DavenPort, Klein, LIB, Lyons, McLane, MCT Wholesale, Merchant's Grocery, Modern Distributors, Petrey, Pine State, SAINT, South Co, Stewart, Thomas & Howard , Wease Distributing and Zuma & Sons.
Once you have an EDI file, please email it to A G K S U P P O R T @ A G K S O F T. C O M for validation before you use it. You should get the file validated to make sure the vendor is sending you the proper format.
After you get the file validated, you can click on INVOICE on your desktop or you can select Vendors from the menu and pick Vendor Invoice. (Ctrl-I). For more information click on Vendors Invoice.

36
If you cannot get an EDI file, you can use the Portable Scanner to scan the merchandise you bought. For more information see Vendors Invoice.
If you go to the bank to make a deposit…
Select Checking Account from the Bank menu, click on the "New" button, enter a Description or simply click the down
arrow to the right to get a list of descriptions that you have entered in the past. Enter the Deposit or Withdraw amount. If you are writing a check, enter the check number or it will automatically get entered based on the last check # you used, click Save & then Quit.

37
If you pay Expenses (Phone Bill, Rent, etc.)
Select Expenses from the Station menu and you will see the window shown below.
Type U and click on the down arrow under Description to get a list of expenses that start with "U". The list should show "Utilities", select it and hit Tab, enter the quantity, hit Tab, enter the amount ($), hit Tab; enter an Invoice/Ref. #. Select a Vendor and then an Account. If you selected a Checking Account, you will notice a new Check # is automatically generated. You can enter another expense to pay another bill or click Save and then Quit. If you selected a Checking Account and you check the Print Check checkbox before clicking the Save button, we will automatically print the check (s).
.
38
Chapter 4 - Detailed Menus
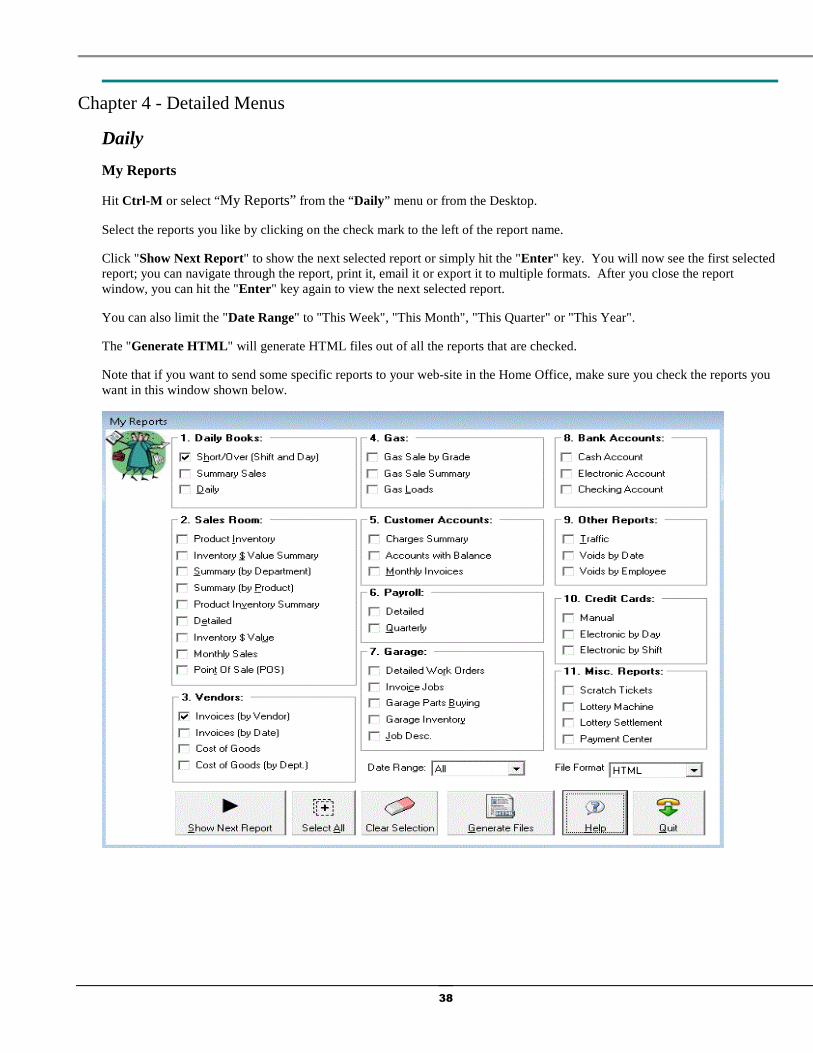
Daily
My Reports
Hit Ctrl-M or select “My Reports” from the “Daily” menu or from the Desktop.
Select the reports you like by clicking on the check mark to the left of the report name.
Click "Show Next Report" to show the next selected report or simply hit the "Enter" key. You will now see the first selected report; you can navigate through the report, print it, email it or export it to multiple formats. After you close the report window, you can hit the "Enter" key again to view the next selected report.
You can also limit the "Date Range" to "This Week", "This Month", "This Quarter" or "This Year".
The "Generate HTML" will generate HTML files out of all the reports that are checked.
Note that if you want to send some specific reports to your web-site in the Home Office, make sure you check the reports you want in this window shown below.

39
Custom Reports
Click "Custom Reports" on your desktop or select “Custom Reports” from the “Daily” menu.
(1) Select a Report Category from the list of "Main Reports Category"
(2) Select a Report from the list of "Report List"
(3) Click "Add" to add the selected report or "Add All" to add all the report to the "Selected Report List"
(4) Click "Save". You should see a prompt to enter a "Report Name", enter whatever name you would like and click OK.
Repeat steps (1) thru (4) for any other Custom Report List you want to create.
To Preview the reports, select the Report Name from the "Custom Report List", click "Load" and then "Show Next Report".
To Generate HTML files, select the "Date Range", under Format, select "HTML" and click "Generate Files".
If you want to generate PDF files, select "Printer" next to "Format" and click "Generate Files". Note that you need to setup your PDF Printer as the default printer.
40
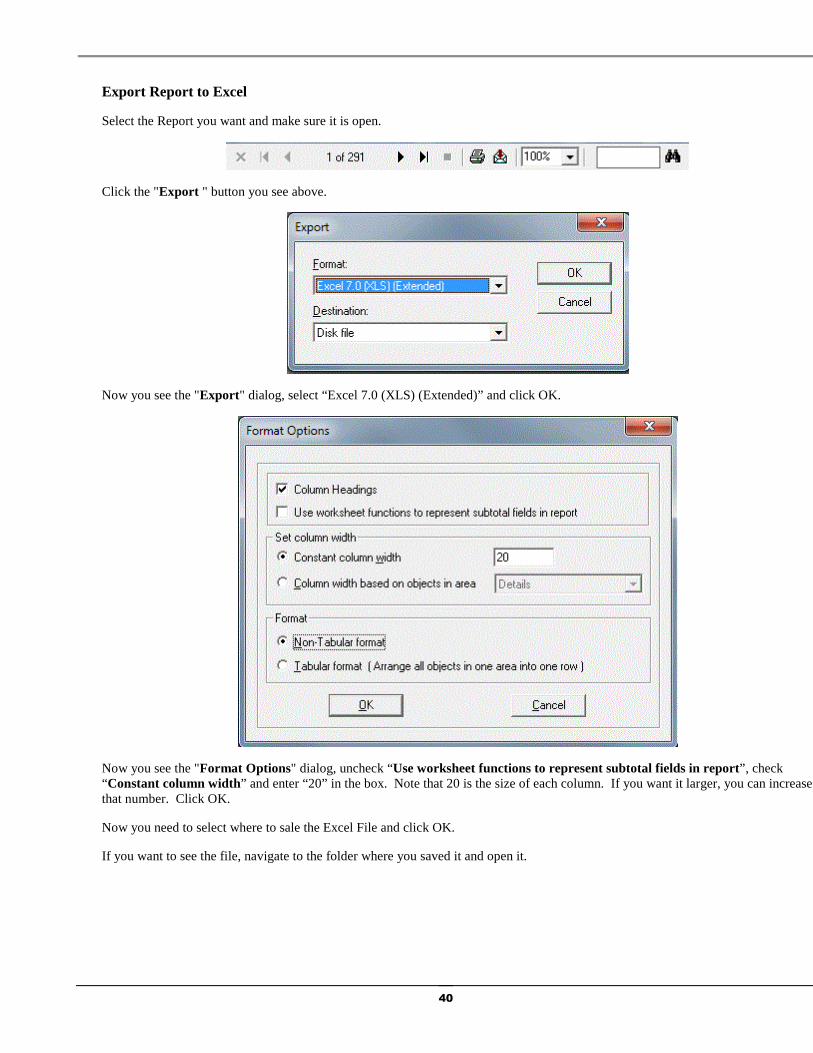
Export Report to Excel
Select the Report you want and make sure it is open.
Click the "Export " button you see above.
Now you see the "Export " dialog, select “Excel 7.0 (XLS) (Extended)” and click OK.
Now you see the "Format Options" dialog, uncheck “Use worksheet functions to represent subtotal fields in report”, check “Constant column width” and enter “20” in the box. Note that 20 is the size of each column. If you want it larger, you can increase that number. Click OK.
Now you need to select where to sale the Excel File and click OK.
If you want to see the file, navigate to the folder where you saved it and open it.

41
Cash Register Interface
The Cash Register Interface allows you the ability to connect to your Cash Register and download your Departments, PLU(s), UPC-Codes, Gas Prices and your daily Shifts. You can also program and upload new or existing Products back to the Cash Register.
On some Cash Registers, you can also upload your Gas Prices.
If this is the first time you run the Cash Register Interface, then you should click the “Setup” button.
A typical usage would be to do the following steps:
Products Download – Download your Departments, PLUs and UPC-Codes from the cash register.
Sales Download - Download your shift or day from the cash register.
Verify – Verify what was last downloaded when you last clicked on “Sales Download”.
Update Sales – Post the downloaded data into the software.
!!! WARNING !!! You should be downloading the shifts using the Automation window, but we recommend that you download the 1st shift manually to make sure everything is properly configured.
"Upload Products to Cash Register" is used to upload a bunch of products that were modified, all products, all PLUs, all UPC-Codes, All Departments or All Products in selected Departments. It also lets you upload your Price Groups on some registers that do support it.
"Product Wizard" is used to make changes to a group of products by price group, name, product code, department, UPC-Code, Selling, Buying, Category or Sub-Category.
"Department Setup" is used to program your departments and send them to the register.

42
"Change Price Groups" is used to create/modify price groups. Once you create the price group, you can assign various products that price group and change the price for the whole group in one shot.
"View Products" shows a spreadsheet with all your Departments, PLUs and UPC-Codes. Note that all IDs under 9500 are departments, all IDs 9501 to 9999 are PLUs 1 to 499, all IDs 10000 to 95000000000000 and all IDs 95000000000500 to 95000000009499 are PLUs 500 to 9499.
"Validate Products" will make sure your products are setup to be compatible with your cash register.
"Mix Match " lets you configure the Mix & Match. This is where you can setup multiple items with different UPC-Codes to be in the same promotion such as 1 for $0.59 and 2 for $1.00 without hitting any special keys.
"Create/Modify Products" will let you create new products or modify existing products. You can change the selling or buying prices as well as many other settings for the selected product.
On the Ruby
"Ruby Keys" lets you program all your Ruby Keys and have your keys map to departments, PLUs, MOP, menu, etc.
"Last Batch" is the last batch number (Shift or Day number) that was processed.
"Set Number" lets you select the Set Number to download. 2 is the latest shift or day, 3 is the previous shift or day, 4 is 2 shifts or days back, etc. Some Ruby registers are configured as a 12-shift and others are configured to be 3-shifts. If yours is configured to be 12-shifts, you can download Set Number 2, 3, 4, 5, 6, 7, 8, 9, A, B and C. Note that Set Number 1 is the currently opened shift or day and cannot be downloaded.
On the Nucleus
"Skip Batches" allows removing many batches from processing. This is useful if you want to skip a date range and start at a later date.
On the Ruby, Nucleus and Passport
"Show Available Batches" shows the shifts you already downloaded and you can pick any of them to reprocess.
"R" will let you Restore one of the latest 3 batches processed for re-processing. This is useful if you are still playing around with the configuration and you wanted to reprocess the last shift/day you downloaded.

43
Cash Register Interface Automation
Automation can do all the work for you automatically. This is important because your Cash Register may only remember a limited number of shifts and days. If automation has been off and you don't do the Download for a while, you will not be able to get the shifts you missed.
You can start the Automation by clicking on the Daily menu and selecting "Cash Register Interface" and then "Auto " or by clicking on the "Auto" button from inside the Cash Register Interface window.
The Cash Register Interface - Automation window allows you to select a "Download Interval" such as 15 minutes, 30 minutes, 1 hr, 2 hrs, 3 hrs, etc.
When performing the automation, you have the option for "Product Prices" and "Auto Restart".
If you check "Product Prices", we will download your new product prices from your Cash Register. This option is not recommended, because you should really be changing the product prices from the software and then uploading them to the register.
If you check "Auto Restart", the software will close itself down and then re-open automatically after the shift have been processed.
You can click on "Start Automation" to start the automation.
You can cancel the Automation by clicking on the "Stop Automation" button.
You can click on the View Log button to see which shift was downloaded and when.

44
To see the shifts or days that have downloaded click on the "End of Shift/SHORT OVER" icon to start the "Short/Over" window. Click "History", select OK to see all the dates/shifts that were processed. Check your Safe Drop and Total Cash & Checks to make sure they match what you actually counted, fix any discrepancies, and click "Close Shift".
Repeat the above steps for every day/shift.
Click OK. The w in the path above represents the "Worker" password, which has the least amount of access in the software. If you would rather the software automatically log-in with your password, replace the "w" with your password.
You now see the Gas Station Icon on your Desktop, click it to make sure it works.
After you test your new Shortcut, you can now Drag it to the Start menu, then to the Programs and then to Startup. Once the Shortcut is under the Startup group, it will automatically run at startup.
Please Note that the computer has to be turned on for automation to take place. So, if the computer shuts down for whatever reason make sure automation is turned back on.
Configuring Automation to Export and Import:
The Back Office has the ability to export and import information to and from the AGKSoft Home Office Software or another type of FTP Server. Please see the instructions below to configure the Automation window.
Exporting to the Home Office
Open the Automation screen from inside the Cash Register Interface screen and click on Auto and finally select the Export Options tab.
You will need a few things from the Home Office PC.
1. Home Office IP Address. (MUST be a Static IP Address)
2. Home Office user name and password to log into Windows.
3. The folder name (S) that were created using IIS.

45
Once you have all the information, the back office can be configured to Export data.
How to Export data to the Home Office:
1. Click on Auto from the Cash Register Interface screen. Select the Export Options tab.
2. Check the Data checkbox and the Include Setup and Pricebook Checkboxes (Include setup and Pricebook are mandatory for the first export to the Home Office)
3. Click on the [...] to configure the information of the Home Office.
• You will see a Select Folder dialog box, it will default to C:\AGKSoft\Export, press OK. This doesn't have to be changed.
• Enter the Home Office or other server's IP Address, press OK.
• Enter the User Name of the Home Office PC, press OK.
• Enter the Password of the Home Office PC, press OK.
• Enter the Virtual Folder Name for this location, press OK. (This is the folder name that was created using the Internet Information Service (IIS) e.g. Location1).
3. Choose the Date Range to export (If this is the first time exporting, we recommend ALL )
4. Choose freely from the other options. The Home Office information will remain the same.
• Fuel - Exports the fuel levels, and notifies you when fuel is below a certain amount.
• HTML- Exports reports in an HTML format for web page viewing.

46
• UPC Sales - Please contact AGKSoft to see if this applies to your location.
5. Click Start Automation. You will see a box with the progress of the Export until complete and then it will say "Folder changed to Location1" ( Location1 is our example, the folder name created will be displayed)
Importing Price Changes from the Home Office
How to Import Price Changes from the Home Office:
1. Click on Auto from the Cash Register Interface screen. Select the Import Options tab.
2. Check the Price Book checkbox.
3. Click on the [...] to configure the information of the Home Office.
• You will see a Select Folder dialog box, it will default to C:\AGKSoft\Import_PB, press OK. This doesn't have to be changed.
• Enter the Home Office or other server's IP Address, press OK.
• Enter the User Name of the Home Office PC, press OK.
• Enter the Password of the Home Office PC, press OK.
• Enter the Virtual Folder Name for this location, press OK. (This is the folder name that was created using the Internet Information Service (IIS) e.g. PriceChange1).
4. Choose freely from the other options. The Home Office information will remain the same.
• Use Passive Connection - Check this when importing, if the import hangs.

47
• GasInvoice.XML & CreditCardsFees.XML - Some oil companies like Shell allow you to download invoices from their site. These can be saved and exported to the Back Office.
• Data - Please contact AGKSoft to see if this applies to your location.
5. Click Start Automation. You will see a box with the progress of the Export until complete and then it will say "Folder changed to PriceChange1" ( PriceChange1 is our example, the folder name created will be displayed)
Time Card
Hit F7 or select “Time Card” from the “Daily” menu or from your Desktop.
Time Card gives you the ability to track your Employee's time when they check-in (Start working) and when they check-out (Finish working).
Before your Employees start working, they need to key in their ID, hit Enter or click on Check In/Out to Check In.
Before your Employees leave work, they need to key in their ID, hit Enter or click on Check In/Out to Check Out.
Note: Based on the Check-In and Check-Out, we can automatically figure out the # of hours the Employee worked, so when using the Payroll, we will automatically calculate the payroll based on the actual # of working hours during the week.
If you are connected to a Ruby VeriFone, make sure the Social Security Number matches the SSN in the Employee Setup. Having this set will allow us to match the Employee’s Check-in and Check-out times and will automatically load the information into the Time Card. When closing the shift/day on the Ruby, you must close the payroll period.
If you are connected to a Gilbarco G-Site, to Check-in, you can do “Paid In”, enter 1 cent, the G-Site will prompt you for a Reference # (If it does not, follow the instructions in the G-FTP Server Guide to change this option on your G-Site). The Reference # will be the same as the Employee ID. To Check-out, you can do "Paid Out", enter 1 cent, the G-Site will prompt you for a Reference # (If it does not, follow the instructions in the G-FTP Server Guide to change this option on your G-Site).
When you click the “Find” button, you get the window shown below:

48
Daily
Salesroom
Click on the “SALES ROOM” icon or “Salesroom” from the “Daily” menu or from your Desktop.
The "Daily Sales Room by Count" window allows you to track the sales of each individual item in your store.
If you are connected to your Cash Register, you simply use this window to access the Reports, not to enter any data.
Shown above is the Salesroom by count in Regular Mode, where all departments are listed under "Product Description". You can double click on any of the departments to get a report for that department.
You can get a report for any product by double clicking on it or clicking the Report button.
You can also view products in one specific department by entering the department # in the box next to "Show this Dept".
The lists of products are sorted by name unless you check the "Sort by UPC" checkbox.
If you have sales from another area of your store such as Subway or Dunkin Donuts, you can enter the "Sold Count" and "Sold Amount" and click on "Save" to save your manually entered data.
If you check the “Other mode” checkbox, you will see the window change as shown below.

49
This is what we refer to as the “Other” mode. In this “Other” mode, you work with one product at a time by entering at least the first letter under “Product Description”. You then continue hitting the down arrow to select an item. After you make your selection, you will see the Product Name, Buying and Selling Price.
When using this window in this mode, you typically download your shifts from the cash register. You can see the data by clicking on the Report button or quickly browse the records using the “Find” button. You can also make adjustments to the shift you downloaded using this method.
Note: You can also view products in one specific dept by entering the dept number in the box next to "Show this Dept".
When you click “Find” button, you get the window shown below:
Daily
Point of Sale (If you have a scanner, it is best to use this window and not to use Sales Room by Amount or by Count.
Salesroom (Point Of Sale)
Point of Sale (If you have a scanner, it is best to use this window and not to use Sales Room by Amount or by Count.)
How to setup your Software to be used as a Point of Sale (POS)?
Click on the “Help” menu and select “First Time User”
Under "Cash Register Interface" select “POS” .

50
How to setup the Point of Sale (POS) to recognize your Business name?
Click on the “Setup” menu select “Business Info.” a window with information such as Name, Street, City, State, Zip, Phone and FedID and Station ID will come up. The most important is the “Name”.
Enter your Business Name under “Name” and click Save.
Entering in an E-mail address or clicking on the TXT will allow you to e-mail or text message your client’s information about their account and or work orders with you. Configuring your e-mail address here will allow your customers to know where the e-mail is coming from. To setup the customers e-mail address, click on Client Accounts from the AGKSoft desktop, click on "New" or "Edit".
Note: When sending e-mail via AGKSoft, the e-mail has to be configured via a POP Mail Account, such as Microsoft Outlook or Outlook Express.
Optional POS Settings
• If you take Food Stamps and they are tax exempt check the “Food Stamp is Tax Exempt” check box.
• Also, by clicking the Food Stamp button in the Sales Room screen this will eliminate all sales tax from Food Stamp eligible items and allow you to enter the amount of food stamps the customer is paying with.

51
• The “Hide Gas”, “Hide Garage” and “Hide Lottery” options allow you to hide these features if you do not have them in your station.Check them to hide and un-check them to show. Click Save. If you changed these options, you need to quit the POS screen and come back in for your changes to take effect.
• If you do sell gas, you also have the option to indicate “Self Serve Only” or “Full Serve Only”, so the software will not prompt the operator to select Self-Serve or Full-Serve when selling Gas. To select “Self Serve Only” open the “Cash Register Interface Setupwindow and uncheck the “Full Service” checkbox; doing this will hide full service where ever full service is show
• If you have a deli and your scale prints out barcodes check the “Handle UPC-A Weight Items” you may also have to check the “Use 6-digits UPC-Codes”. Note: Weighted UPC codes should always start with 2.
• The “OPOS Options” should only be configured if you have configured a scale / scanner using the OPOS software.
Example:
2 07709 70190 4 $01.90 Using 6-digits Items
2 07709 70190 4 $1.90 Using 7-digits Items (default)
2 is the UPC-Code prefix that makes this UPC-Code a Weighted UPC.
2077097 or 207709 is the item # (This is the ID we will create in the Products Setup) 4 is the check digit and we ignore that.
The 1st time you scan one of these, you will see 2077097 or 207709 in the Create/Modify, you need to give it a name and assign it a price.
The price you assign is the price per pound (e.g. $1 per pound)
When you scan this item, we automatically put Quantity = 1.9, if you divide $1.90 / $1 = 1.9
So you purchased 1.9 pounds of this item at $1 per pound for a total of $1.90

52
The Worker Options Tab will allow you to configure specific actions the worker can or cannot do while logged in.
• “No Void” if checked would not allow the cashier to void sales. • “No Drawer” if checked would disable the cash drawer from opening without a sale.

53
• “Must Login” would force the cashier to enter a password to log-in. You can set this up from First Time User’s Employees button.
• “Must enter Amount Paid” forces the cashier to enter the amount being paid by the customer. • “Can Close Shift/ Exit” allows the worker to close the shift and exit if checked. • “Can Create / Edit Products” allows the worker to create new products and edit existing products if checked.
The Printing Options Tab will allow you to configure the behavior of the cash drawer, pole display and receipt printer.
• If you do not want the Receipt Printer to print and the Cash Drawer to open check the “Disable Receipt Printer & Cash Drawer”.
• If you have a pole display but do not want it to show the prices as they are being rung up check the “Disable Customer Display”.
• If you want Yes to always be the default answer to “Would you like to print a receipt” once a sale is complete check “Set Print Receipt Default to Yes”.
• To have the software prompt for a duplicate receipt check the “Prompt to Print Duplicate Receipt” checkbox. • If you do not want to ever print a receipt check the “Do not prompt to print Receipt” check box. • You can also eliminate the UPC Codes (s) from printing on the receipt by checking “Do Not print UPC-Code” • You can fill in a special message to print out on the receipts under where is says “Custom Message on Receipt Printer”
and add the stores logo or any other graphic by clicking on “Select Logo”
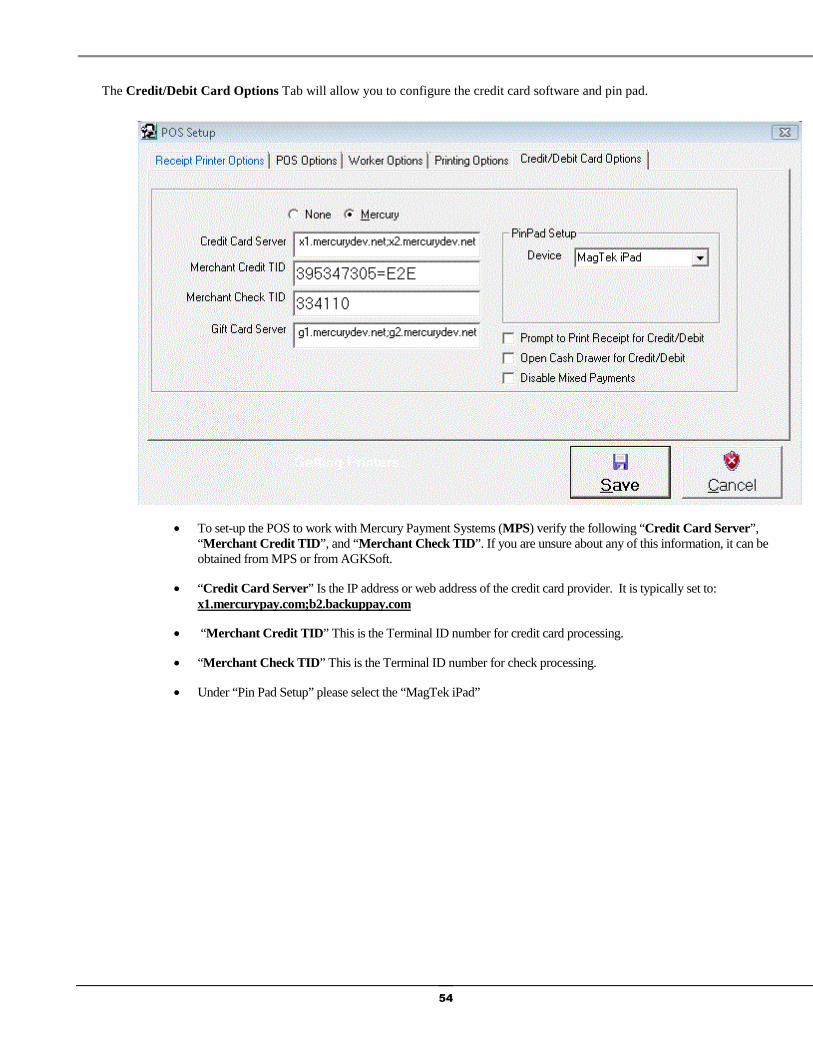
54
The Credit/Debit Card Options Tab will allow you to configure the credit card software and pin pad.
• To set-up the POS to work with Mercury Payment Systems (MPS) verify the following “Credit Card Server”, “Merchant Credit TID ”, and “Merchant Check TID”. If you are unsure about any of this information, it can be obtained from MPS or from AGKSoft.
• “Credit Card Server” Is the IP address or web address of the credit card provider. It is typically set to: x1.mercurypay.com;b2.backuppay.com
• “Merchant Credit TID ” This is the Terminal ID number for credit card processing.
• “Merchant Check TID” This is the Terminal ID number for check processing.
• Under “Pin Pad Setup” please select the “MagTek iPad”
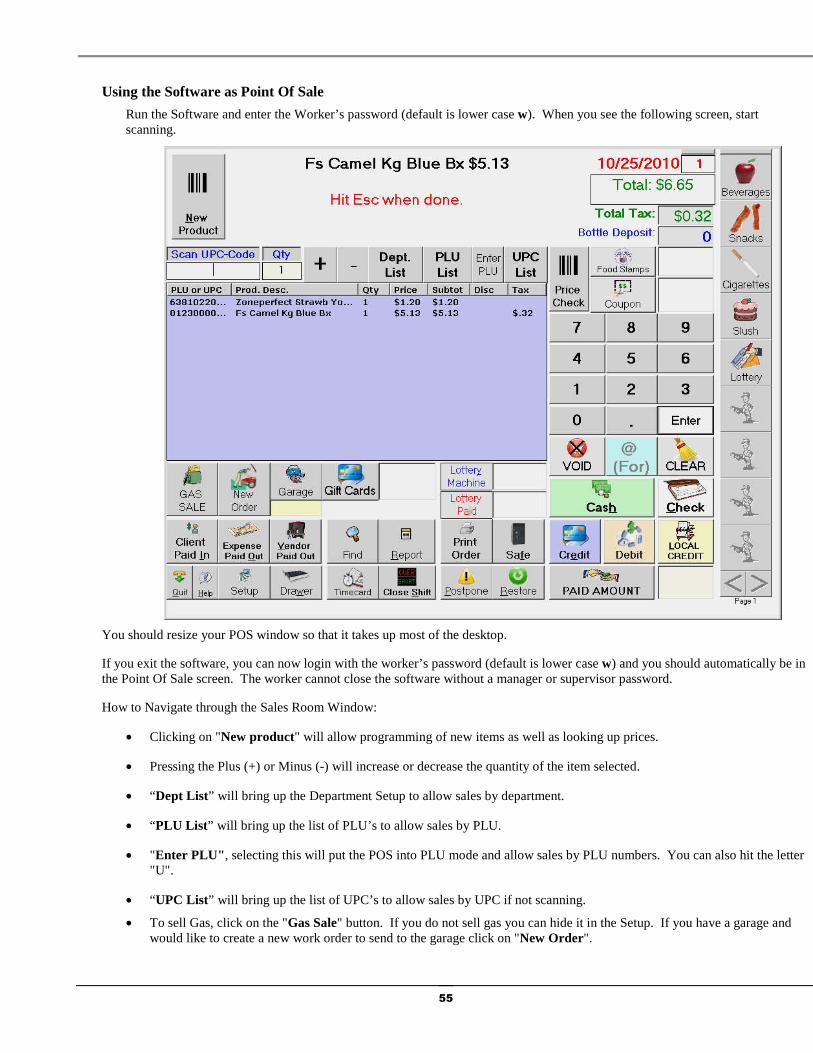
55
Using the Software as Point Of Sale
Run the Software and enter the Worker’s password (default is lower case w). When you see the following screen, start scanning.
You should resize your POS window so that it takes up most of the desktop.
If you exit the software, you can now login with the worker’s password (default is lower case w) and you should automatically be in the Point Of Sale screen. The worker cannot close the software without a manager or supervisor password.
How to Navigate through the Sales Room Window:
• Clicking on "New product" will allow programming of new items as well as looking up prices.
• Pressing the Plus (+) or Minus (-) will increase or decrease the quantity of the item selected.
• “Dept List” will bring up the Department Setup to allow sales by department.
• “PLU List ” will bring up the list of PLU’s to allow sales by PLU.
• "Enter PLU" , selecting this will put the POS into PLU mode and allow sales by PLU numbers. You can also hit the letter "U".
• “UPC List” will bring up the list of UPC’s to allow sales by UPC if not scanning.
• To sell Gas, click on the "Gas Sale" button. If you do not sell gas you can hide it in the Setup. If you have a garage and would like to create a new work order to send to the garage click on "New Order".
56
• To look up pending work orders that need to be paid click on "Garage". • If a client is "paying in" on their local credit account click on “Client Paid In” • If you pay for expenses right from your cash drawer click on “Expenses Paid Out”; you will be prompted to choose and
expense type and amount. When paying vendors directly from your cash drawer click “Vendor Paid Out”; you will be prompted to choose a vendor name and amount. “Find” will show you all saved data in the sales room in a data base form. “Report” will allow you 4 different reports to choose from. Click on “Receipt Print” to re-print a receipt from a completed sale. To perform a safe drop click on "Safe". “Setup” will allow you to configure the sales room to behave the way you like. Please see “Configuring the AGKSoft POS” in the above sections on how to configure this. “Key Help” will open a window with hints about the AGKSoft POS keyboard. Clicking on the “Timecard” will allow the employee (s) to check in and out. When you are ready to close the shift or day click the “Over Short/ Close Shift” to balance and close the shift / day. Clicking on “Drawer ” will force open the cash drawer. To "Postpone" a sale for a time and take care of other customers, click on postpone. To restore the sale click on restore. “Quit” will close the Sale Room window.
Navigating through the Tool bar Options:
Clicking on the POS menu will allow you these options
o Department – This will allow you to choose departments 1-19 and also show you which “quick key” corresponds to which department number.
o Item – This will allow you 4 options to choose from the Department list (/ or CTRL + D), UPC List (Enter), PLU List, (or CTRL + L) and Enter PLU (U or ALT + Backspace).
o Manager – This has certain functions that only the manager and supervisor can access, if logged in as a worker you will be prompted to enter in the manager or supervisor password. The manager is able to close shifts, reconcile the lottery and view reports such as the Traffic for the day, Voids reports and many others.
o Supervisor – This will open the Setup and allow configuring of the Sales Room screen and the hardware attached such as the cash drawer and pole display. Note: Only the Supervisor can access this, if logged in as a worker you will be prompted for the Supervisor password.
o Method of Payment – This is the type of payment the customer will use the pay for their merchandise. You can choose one from the list, or select one from the Sale Room screen.
o Void – Will allow a void of the All Transactions Items (X), the last item (Z), and a single item.
o Open the cash Drawer (D) – Use this to open the cash Drawer.
o Paid (D) – This will complete the sale.
o Garage (A) – This will bring focus next to the Garage button and allow you to enter the amount due.
o New Work Order – This will allow you to choose a client, enter information about their car and the issues they are having.
o Gas (G) - Choose this to sell gas or select it from the Sales Room screen.
o POS – Selecting this will put you back into selling mode.

57
o Print/History/Find- Choosing any one of these will allow you to see any saved information from previous sales.
o Change Shift (F11) – Change and close the current shift.
o Change Day (Shift + F11) – Change and close the current day.
Clicking on the Clients, Expense, and Vendors menu will allow you these options.
o Client - Paid In – Allows a client to pay in on their account.
o Expense – Paid Out – If you pay for your expenses directly from your cash drawer, you can use this option.
o Vendors – Paid out – When paying Vendors directly from your cash drawer, you can use this option.
Vendors – Order Inventory – Allows you to order from a selected vendor either by sales history or min and max inventory.
Clicking on the Lottery menu will allow you these options.
o Lottery Machine – Allows a lottery machine amount to be entered.
o Lottery Paid - When a customer wins a lottery prize use this to pay out the winnings.
o Print Scratch Tickets – Will print out the lottery form with the open numbers to validate the numbers against your numbers.
Clicking on the Misc menu will allow you these options.
o Food Stamp – This will prompt you to enter a food stamp amount.
o Safe Drop – When placing money into the safe, select this option and enter the amount.
o Postpone/Restore Sale – This will allow you to postpone a sale for a time and then select the restore sale option to bring the sale back.
o Time Card – This allows the employees to Check In before their shift and Check Out after their shift.
Clicking on the Help menu will allow you these options.
o Point of Sale – This will bring up a help document in an HTML format.
o Keyboard – This will bring up a window with keyboard shortcuts.
o Allow AGKSoft to Access your PC – This will allow a support engineer to log on-to the PC.

58
If your scanner is not working, you can hit the period (.) or click “UPC List” to get a list of all products sorted by name. You can simply type a name to go directly to that item. Typing a portion of the name and clicking find in the search field will allow the software to match any items that meet your criteria.
If you are selling a PLU item, hit the comma key, or click “PLU List ” to get a list of all PLUS sorted by name. If you know the PLU numbers, you can touch the “Enter PLU” or hit the letter “U” and type in the PLU number. You can simply type a name to go directly to that item. When using PLU #1, we automatically translate 1 into 9501 by adding 9500 to the PLU #. This is done in order to keep the ID from conflicting between the Dept., PLU and UPC-Codes.
Typing a portion of the name and clicking find in the search field will allow the software to match any items that meet your criteria.
If you are selling items by their Department number, hit / (slash) or click “Dept. List” to get a list of all Departments. You can simply type the Department # or click on one of the buttons to make your selection. Note the non-taxable departments are shown in bold. Also, the Tax Rate is shown above the Department Name next to the Dept. #. You will see the window shown below.
To finish a transaction, simply hit the Escape key on your keyboard. After hitting Esc, focus will be next to the [PAID] button. Enter the amount paid and hit the Enter key.

59
What you need to enter Special features
Dept., PLU or UPC-Code Scanning the same item twice will simply increase the Count of the previous item.
Quantity: Is the number of items you are selling. If you hit the + or - key, it will increase or decrease the Quantity you are selling
Disc: Is the discount you choose to give your customers To enter a PLU, press "U" followed by the PLU #. We adjust PLUs by 9500 to be able to differentiate them from the Dept. #, so 9501 is PLU 1
UPC-E is made up of 7 digits + 1 check-digit which we do not use
UPC-A is made up of 11 digits + 1 check-digit which we do not use

60
Daily
Amount Sales Room
If you DO NOT have a scanner connected to your cash register and you do not count the products you sell on a daily basis; then use this window.
If you DO have a scanner directly connected to your computer, it is best for you to use the "Point of Sale" window
How to use the Daily Sales Room by Amount?
At the end of the shift or day...
Start this window; enter the amounts sold for all products. When done, click on Save. To see what you saved, click on the Report or the “Find” button.
You are purchasing Products from your Vendor...
Start this window, enter the Purchased ($) amounts for all products and click on Save. To see what you saved, click on the Report or “Find” button. If you are using the Vendor Invoice window, you should not use this method.
You just finished counting your Inventory...
Start this window, enter the "Actual Inventory" amount for all products and click on Save. To see what you saved, click on the Report or the “Find” button.
Note that the above 3 steps can be combined
Products Inventory In/Out (Scanner Mode)
Hit Ctrl-U or select “Inventory ” from the “Vendors” menu or click "Inventory" on your desktop.
You can use this window to make inventory adjustments.

61
To take an Inventory by department, key in the Dept. # and press "Enter", key in the "Current Inventory " and press "Save".
To take an Inventory by UPC-Code, scan or key in the UPC and press "Enter", key in the "Current Inventory " and press "Save".
You don’t need to use this window to enter what you are buying; you can use the Invoice window.
Scan the UPC-Code or simply hit the Enter key. You will get a list of products to pick from, select the product and hit Enter. Check the Buying and Selling Prices, select the Vendor and click on Save. To see what you saved, click on the Report or “Find” button.
To check on your Inventory, click on "Quick Inventory ".
If this is the first time using this window, you need to make sure your shift is closed, count the items in your inventory and enter that number under “Add # of Products” and hit the “Save” button.
If you are simply buying new products, you can enter the # of products under “Add # of Products” and hit the “Save” button. If you are missing products and you want to remove them from your inventory, and then enter the quantity under “Remove Products” and click “Save”.
If you are tracking your inventory by department as opposed to UPC's you can check the "Use Quantity for Dept." check box and enter the quantity on hand for that particular department. If you are receiving an order form a vendor enter the amount of items under "Add # of Products", if you are simply doing inventory you can correct the value under where it says "Current Inventory" .
Daily
Gas Pumps
How to use this Window?
There are some odd cases when your register's pumps are not mapped properly and we would have to map them in this window.
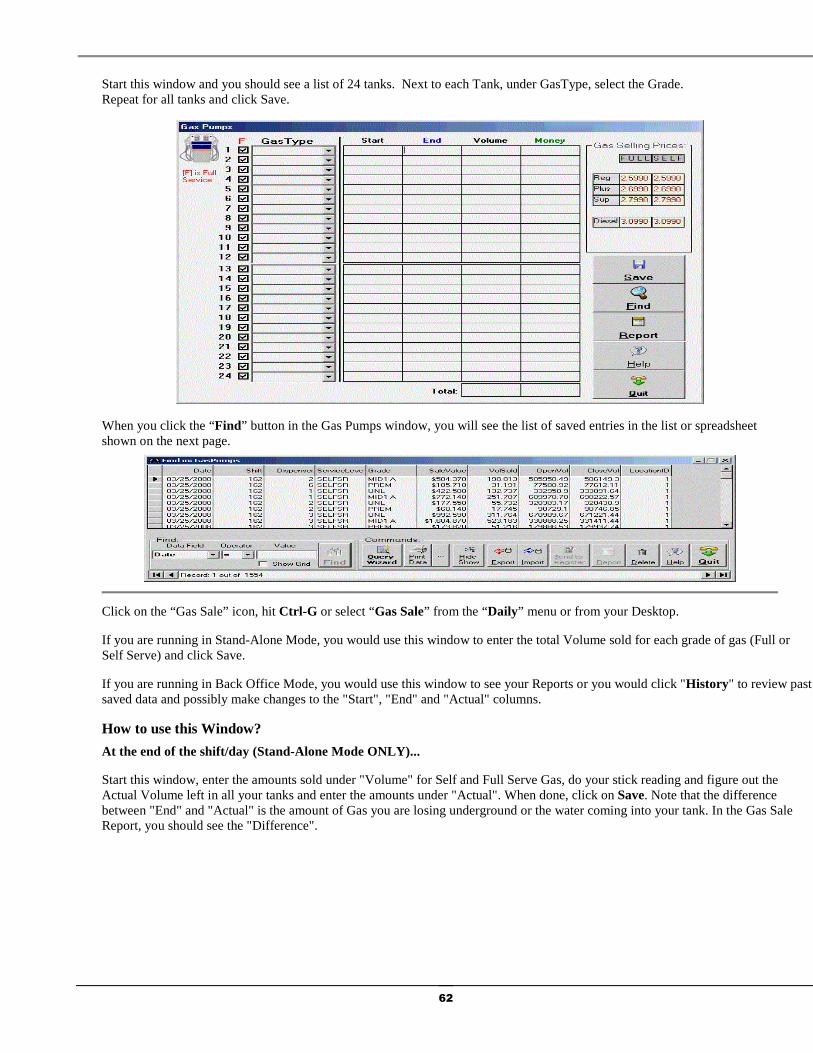
62
Start this window and you should see a list of 24 tanks. Next to each Tank, under GasType, select the Grade. Repeat for all tanks and click Save.
When you click the “Find” button in the Gas Pumps window, you will see the list of saved entries in the list or spreadsheet shown on the next page.
Click on the “Gas Sale” icon, hit Ctrl-G or select “Gas Sale” from the “Daily” menu or from your Desktop.
If you are running in Stand-Alone Mode, you would use this window to enter the total Volume sold for each grade of gas (Full or Self Serve) and click Save.
If you are running in Back Office Mode, you would use this window to see your Reports or you would click "History" to review past saved data and possibly make changes to the "Start", "End" and "Actual" columns.
How to use this Window?
At the end of the shift/day (Stand-Alone Mode ONLY)...
Start this window, enter the amounts sold under "Volume" for Self and Full Serve Gas, do your stick reading and figure out the Actual Volume left in all your tanks and enter the amounts under "Actual". When done, click on Save. Note that the difference between "End" and "Actual" is the amount of Gas you are losing underground or the water coming into your tank. In the Gas Sale Report, you should see the "Difference".

63
If running in "Stand-Alone Mode", at the end of the shift/day, you need to enter the Volume sold for Full Serve and Self Serve for all types of Gas that you sell. You should go outside, do a stick reading and enter the Actual Volume left in the Tank. Click on Save to save your data. To see what you saved, click on the “Report” or “Find” button.
Start is the Volume you started with at the beginning of the shift / day.
End is the Volume you ended with at the end of the shift / day. This is the start minus the volume sold.
Actual is what is in the ground (if your register is connected to a tank monitor this comes automatically when you download your shift). If you are not connected, you need to enter these numbers manually.
Water (in) is the amount of water that is in the tank, enter this value in Inches (if your register is connected to a tank monitor this value will come in automatically when you download your shift)
History allows you to view / edit previously saved gas sales right on the gas sale screen.
Pre-Collect, is a window that allows people in states like California to determine how much tax they have pre collected and how much tax was collected during sales and what the differences were.
Ignore errors, check this check box if you DO NOT want the software to warn you about certain errors inside the Gas Sale window.
Click the "Find" button and you will see the "Find in: Gas Sale" window below.

64
Date is the date the Gas Sale took place
Total Self Gallon is the Total Self-Serve Volume (Gallon or Liter) Sold.
Grand Total Gallon is the Grand Total Self-Serve + Full-Serve Volume (Gallon or Liter) Sold.
Total Gas Profit is the Total Gas Profit made for that date/shift.
Total Gas Money is the Total Gas Money collected for that date/shift.
Pool Margin is the # of cents per Gallon or Liter you are making for that date/shift.
Shift is the Shift # for that date.
Self Gallons 1 is the # of Gallons/Liters sold for Grade # 1 (Regular) for that date.
Self Gallons 2 is the # of Gallons/Liters sold for Grade # 2 (Plus) for that date.
Self Gallons 3 is the # of Gallons/Liters sold for Grade # 3 (Super) for that date.
Daily
Car Wash
How to use this Window?
At the end of the shift/day (Stand-Alone Mode ONLY)...
If you are running in Stand-Alone Mode, you would use this window to enter the # of cars, Profit/Car, the Money in the cash Register, the Total Refunds and Total Vacuums. Click the Save button when finished.
To see the data you saved, click the Report or “Find” button.
If you are running in Back Office Mode:
You would use this window to see your Reports or find data saved
You can also setup this window to work automatically with your Cash Register by entering the "Register PLU Mappings" as well as the "Register Tax Rates". If you configured PLU # 55 to be an Express Car Wash, you simply enter "55" or "9555" under "Register PLU Mappings" in the 1st box.
When you click the “Find” button in the Car Wash window, you will see the spreadsheet shown below.

65

66
Payment Center
Select “Payment Center” from the “Daily” menu.
Payment Center is to be used to handle various payment types such as Money Order, Western Union, etc..
To use the “Payment Center”, you must 1st setup your Payees. To do that, click “Payees” from the “First Time Users” window or click Setup, Payees and you should see the following:
You need to also open the Cash Register Interface Setup window and make sure the box next to "Pay Center" is checked.
When the fee cannot be calculated using a "percentage" or a "per transaction fee", you can create another department for the fee.
Sign Prices
Hit Ctrl-S or select “Sign Prices” from the “Daily” menu or from your Desktop.
This window is used to help you figure out how to set your selling prices outside.
Start this window, enter the PDI (Price Decrease/Increase) in cents, select Full or Self Service under "Service Type", and hit Calc to see your current Pool Margin. You may click "Increase Pool Margin" or "Decrease Pool Margin" and enter how many Cents you want to Increase or Decrease and hit Calc again. The program will give you the new Sign Prices for Outside. If you decided to go ahead and change the Sign Prices to what the program is recommending, hit Save Selling Prices to update your selling prices. Upload the new gas prices from the Cash Register Interface.

67
Service Type is the way you service your gas self/full or both. Change Pool Margin is used to increase or decrease the pool margin in cents. Search for gas prices by U.S. Zip Code is used to see what other stations surrounding the zip code entered are selling their gas for.
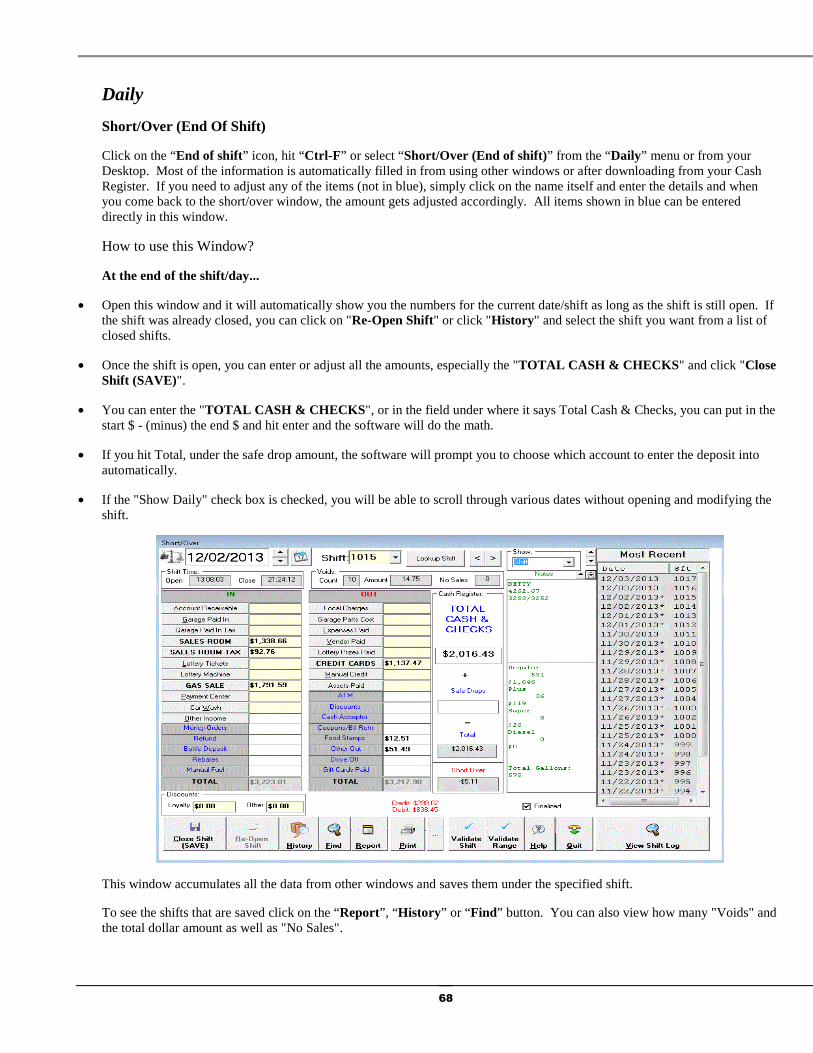
68
Daily
Short/Over (End Of Shift)
Click on the “End of shift” icon, hit “Ctrl-F ” or select “Short/Over (End of shift)” from the “Daily” menu or from your Desktop. Most of the information is automatically filled in from using other windows or after downloading from your Cash Register. If you need to adjust any of the items (not in blue), simply click on the name itself and enter the details and when you come back to the short/over window, the amount gets adjusted accordingly. All items shown in blue can be entered directly in this window.
How to use this Window?
At the end of the shift/day...
• Open this window and it will automatically show you the numbers for the current date/shift as long as the shift is still open. If the shift was already closed, you can click on "Re-Open Shift" or click "History" and select the shift you want from a list of closed shifts.
• Once the shift is open, you can enter or adjust all the amounts, especially the "TOTAL CASH & CHECKS " and click "Close Shift (SAVE)".
• You can enter the "TOTAL CASH & CHECKS ", or in the field under where it says Total Cash & Checks, you can put in the start $ - (minus) the end $ and hit enter and the software will do the math.
• If you hit Total, under the safe drop amount, the software will prompt you to choose which account to enter the deposit into automatically.
• If the "Show Daily" check box is checked, you will be able to scroll through various dates without opening and modifying the shift.
This window accumulates all the data from other windows and saves them under the specified shift.
To see the shifts that are saved click on the “Report”, “ History ” or “Find” button. You can also view how many "Voids" and the total dollar amount as well as "No Sales".

69
Clicking on Validate Shift or Validate Range will let you know if any of the original numbers were changed from what was downloaded from the register.
If you are looking for a shift that you have not closed yet, select the Date, enter the Shift # and click "Lookup Shift".
When you click “Find” button, you get the window shown below:
Daily
Closing Daily Shift (Optional)
This window is a Daily Check List to be used before closing your Daily Shift. Using this window is optional, but we recommend that you use it to quickly check your Sales Room, Gas Sale, etc. This window is designed to simply help you do all your Daily Book-keeping from one location.
How to use this Window?
At the end of the shift/day...
Start this window and click on each button in any order to make sure you have finished everything you have to do for the shift. Click on the Quit button when you finish.

70
Weekly
Payroll
Click on the “Payroll” icon, hit “Ctrl-Y ” or select “Payroll” from the “Weekly” menu or from your Desktop.
The Payroll window should be used every Week to do your Payroll. We recommend that you use this window to do your Payroll even if you are using a Payroll service.
How to use this Window?
At the end of the week...
Start this window, click on the down arrow under "Employee Name" and you will see a list of all your Employees, select one of them and you will see most fields get automatically filled in. You may adjust the # of Hours, Commission and Pay if needed. Click on the Save button to save your new entries.
To see what you saved, click on the Report, Find or History button. To modify or view existing entries click on "History"
After you save your entries, you can click the "Print Checks" button to print the Payroll Checks.
We do support three types of payroll checks Intuit , Cynaptics' LMC01, and Blank Checks. You can select which one to use by going to the “Setup” menu and selecting “Check Type”
Remember that the Taxes must be adjusted every year to accommodate the new Tax laws. If you have a maintenance agreement, you will get your taxes automatically as part of the update.
Tips Com. - This is the amount of Tips and or Commission the Employee earned per pay period
Hourly Pay- How much the Employee gets paid per hour
Reg. Hours- This is the number of hours the Employee worked for this payroll period
Holiday Hours- This is the number of Holiday hours the Employee is getting paid for
Vacation Hours- This is the amount of vacation hours the Employee is getting paid for
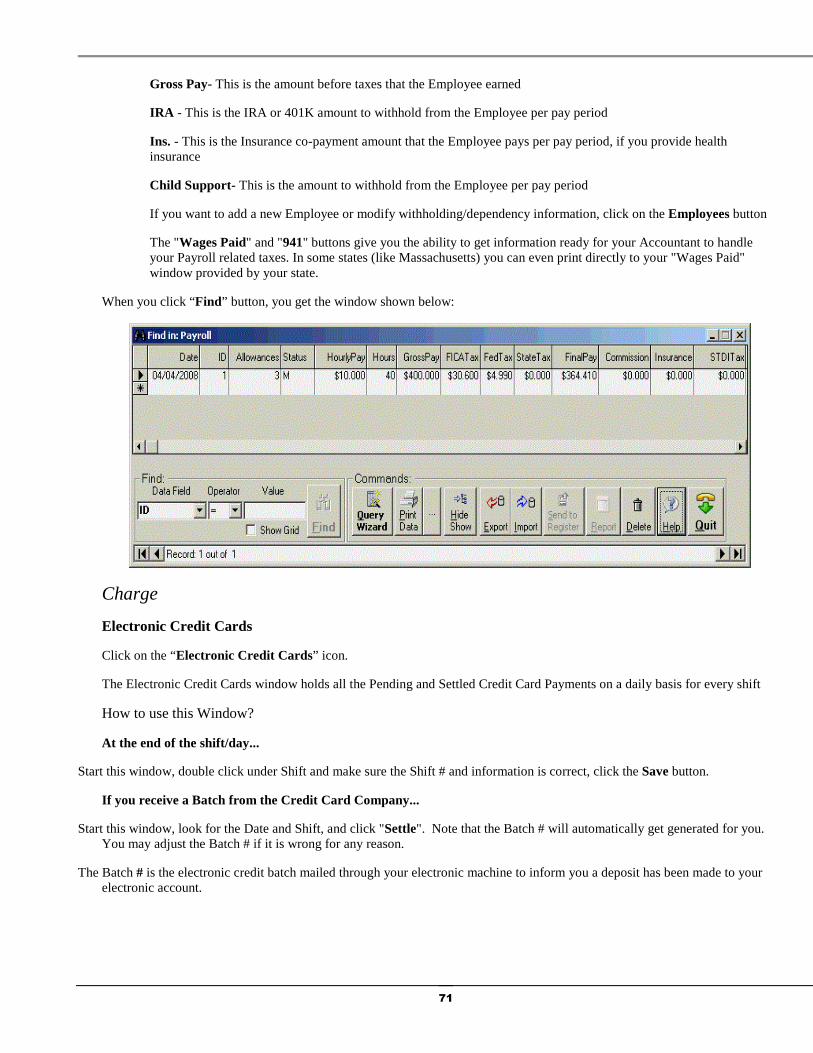
71
Gross Pay- This is the amount before taxes that the Employee earned
IRA - This is the IRA or 401K amount to withhold from the Employee per pay period
Ins. - This is the Insurance co-payment amount that the Employee pays per pay period, if you provide health insurance
Child Support- This is the amount to withhold from the Employee per pay period
If you want to add a new Employee or modify withholding/dependency information, click on the Employees button
The "Wages Paid" and "941" buttons give you the ability to get information ready for your Accountant to handle your Payroll related taxes. In some states (like Massachusetts) you can even print directly to your "Wages Paid" window provided by your state.
When you click “Find” button, you get the window shown below:
Charge
Electronic Credit Cards
Click on the “Electronic Credit Cards” icon.
The Electronic Credit Cards window holds all the Pending and Settled Credit Card Payments on a daily basis for every shift
How to use this Window?
At the end of the shift/day...
Start this window, double click under Shift and make sure the Shift # and information is correct, click the Save button.
If you receive a Batch from the Credit Card Company...
Start this window, look for the Date and Shift, and click "Settle". Note that the Batch # will automatically get generated for you. You may adjust the Batch # if it is wrong for any reason.
The Batch # is the electronic credit batch mailed through your electronic machine to inform you a deposit has been made to your electronic account.

72
If you receive your credit card statements in an XML format, like the ones provided by Shell Oil Company, you can downloaded those directly into the window by clicking on Load XML. By doing this, the software will automatically reconcile the electronic account.
You can view All, Pending or Settled batches by clicking on the arrow in the combo box under View.
New: Is used when you make a new batch manually
Edit: Allows you to modify one or multiple batches
Settle: Allows you to settle one or multiple batches
Delete: Allows you to delete one or multiple batches. Note: Delete is permanent.
Report: View daily credit card reports or shift credit card reports
Load XML: If your Oil Company such as Shell provides an XML file or text file for all the credit card batches along with the fees, click this button and select the XML file to load.
Map: This is where you enter your register mappings
Fees: This is where you enter your fees that you are being charged from the credit card companies
Create/Modify Credit Card Batch
You can use this window to add a new credit card batch or modify existing batches.

73
When you would like to make a new batch select "New" and enter in all the dollar amounts for the various types of credit cards. Click "Save". The fees adjust automatically.
List Charges- This window is an alternative to the create/modify window.
You can modify this list or click on the Fast Forward button to go to the last record and you will see this star, click next to it under DATE and enter the date, hit the right arrow on your keyboard and enter the dollar amounts for the various types of credit cards.

74
Charge
Manual Credit - Select “Manual Credit Card ” from the “Charge” menu or Shift+Ctrl+F1 .
New is used to enter new transactions
Edit is used to edit an existing transaction
Delete is used to delete a transaction. Note: Delete is permanent
Mark Paid is used to mark one or multiple transactions paid
Report is used to view transactions that were saved
Find is used to find all transactions
Create New Record - This window is used to create new transactions or modify existing transactions
To edit an existing transaction, click Edit; make the necessary changes and then click save.
If you would like to make a new record click on new and enter the following:
Date: Selected from a calendar to specify the charged date.
Card Number: Is the edit field that holds the credit card number.
Amount: Is the amount charged on the credit card.
Credit: Is the credit amount on the credit card
Exp. Date: Is the expiration date of the Credit card.
Note: Time and shift get entered automatically

75
Charge
Client Accounts
Select “Client Accounts” from the “Charge” menu or from your desktop.
This window is used for your customers that have a special account with you. You would use this window to track their charges. If your client has an e-mail address or would like to receive text messages about his or her account you can configure their account with this information. Please see C on how to do this. Please know that the mobile carrier will apply normal text messaging rates.
New is used to enter new clients (e.g. e-mail address, mobile phone number, address, etc.)
Edit is used to edit an existing client (e.g. e-mail address, mobile phone number, address, etc.)
Delete is used to delete a client along with the client's charges. Note: Delete is permanent .
List Clients is used to view all your clients
Email is used to send your client information about their accounts
Invoice is used to generate an invoice for clients with an amount due
Report is used to view daily, monthly or accounts with balances
Labels are used to print shipping labels for your clients. Note: To choose the Avery address label click the button.
Vehicles is used to add a new vehicle for a client or modify an existing one

76
Print is used print the labels
Find is used to find all clients, clients with vehicles or charges made by clients
Charges:
New is used to add a new charge
Edit is used to edit an existing charge
Delete is used to delete a charge. Note: Delete is permanent
Payment is used to apply a payment to an existing charge
Buy Gas is used if the client wants to buy gas
List Charges is used to view all the charges your clients have made
• Note: You can adjust how many charges you view by clicking the down arrow and make your selection
Create/Modify Client
You can use this window to add new customers or modify existing customers.
If you have a new client enter the following
First Name, Last Name, Company, Email, Street, City, Sate, Zip, Phone etc.
"Tax Exempt" should be checked if the client is Tax Exempt
"No Credit" should be checked if you do not allow this customer to use a house charge (Local Credit)
"Email" is the clients email and will be used if you choose to send the client information about their account. If the client prefers they can receive a text message, click on the [TXT] to configure the mobile phone carrier and cell phone number.
Select the different tabs to enter other information such as, Work Address, Notes, Discounts and Delivery info.
First Name is the client's first name
Last Name is the client's last name

77
Email is the client's email address
No Credit client is not allowed to use a credit card (House Charge or Local/Store Credit)
Amount Due is the $ amount you are collecting from this client
Due Date is when this amount is due
List Clients - This window is an alternative to the Create/Modify Clients
Client Number will allow you to change the clients account number
Name is the QuickBooks name and should match the client name that is in QuickBooks if the name already exists, if it does not match QuickBooks will make a duplicate entry.
If you would like to give a client discount, click the Discount tab:
1. To apply a discount on merchandise enter how many percent off for merchandise (example 10=10%)
2. To apply a discount on gas enter how many cents off each gallon/liter (example 5= 5cents off each gallon/liter)
Once the amount is entered, the Discount is automatically calculated based-upon the Discount used for this client.
Configuring Text Messaging
• Please select the cell phone provider that is used by the client. For example if you use Verizon enter 7 and press OK and you will see the window and shown below.
• Please enter the client’s mobile phone number staring first with the area code then finishing with the phone number (e.g. 5089954934). In the e-mail box in the Create/Modify client it will look like [email protected] (This is only for Verizon customers) the extension will change based upon the mobile carrier that is selected.
List Clients - This window is an alternative to the Create/Modify Clients window
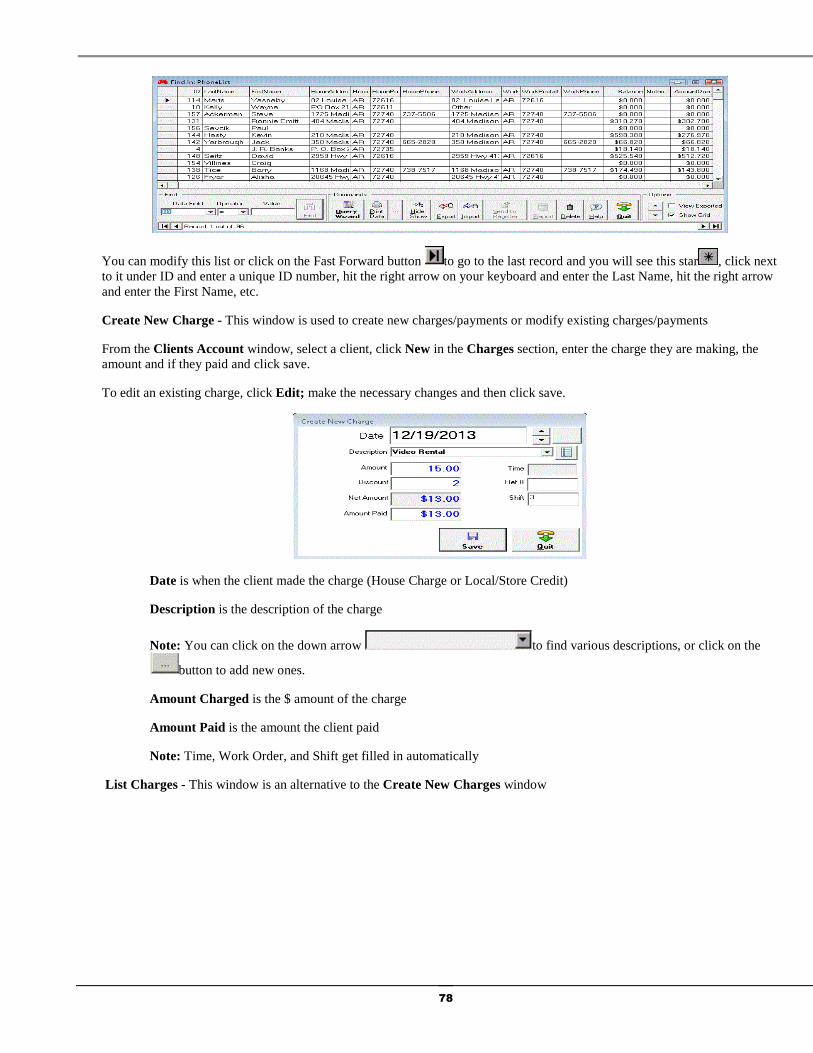
78
You can modify this list or click on the Fast Forward button to go to the last record and you will see this star, click next to it under ID and enter a unique ID number, hit the right arrow on your keyboard and enter the Last Name, hit the right arrow and enter the First Name, etc.
Create New Charge - This window is used to create new charges/payments or modify existing charges/payments
From the Clients Account window, select a client, click New in the Charges section, enter the charge they are making, the amount and if they paid and click save.
To edit an existing charge, click Edit; make the necessary changes and then click save.
Date is when the client made the charge (House Charge or Local/Store Credit)
Description is the description of the charge
Note: You can click on the down arrow to find various descriptions, or click on the
button to add new ones.
Amount Charged is the $ amount of the charge
Amount Paid is the amount the client paid
Note: Time, Work Order, and Shift get filled in automatically
List Charges - This window is an alternative to the Create New Charges window

79
You can modify this list or click on the Fast Forward button to go to the last record and you will see this star, click next to it under ID and enter a unique ID number, hit the right arrow on your keyboard and enter the date, hit the right arrow and enter the amount, etc.

80
BOS Mode
All Local (Store) Credits are automatically retrieved from your Cash Register. Client payments are also automatically entered if you entered them as "Paid In" on your Cash Register.
After downloading from the Cash Register, a new client will show up after the letter Z, The client's first name as well as the last name will both be set to the client’s ID (example: 1,1). When you see this, select it and click edit and make the necessary changes.
Stand-Alone Mode
If an existing client is charging their account, click on the client's name. Click "New" in charges, enter the description next to "Description"; enter the "Amount ", if they paid and enter how much in "Amount Paid". Click on SAVE. To see what you saved, click on the “Report” or “Find” button.
Import Clients
You can import Clients from QuickBooks or from other applications.
To import QuickBooks clients, you need to open QuickBooks, select File, Utilities, Export, and Lists to IIF Files and Select "Customers" from the list. QuickBooks will save an .IFF file which AGKSoft recognizes when importing.
To import clients from other applications, you must have a text file formatted as follows:
CUSTNO COMPANY FIRSTNAME LASTNAME STREET CITY STATE ZIP
PHONE PHONE2 FAXNUM EMAIL NOTES
This must be the 1st line in the file and these headers can be in any order as long as you have the header in there properly.
After the header, we have the actual client information. The following is an example:
1234567 AGKSOFT Jonathon Donahue 1420 main rd Tiverton RI 02878 995-
4934 995-4934 995-4934 [email protected]
Note that, you can create such a file using a spreadsheet and then save it as a "Tab-Separated Text file".
If you are creating the file in Notepad, make sure you use Tabs between columns.

81
Lotto
Select “Scratch Ticket Books” from the “Lotto ” menu, Ctrl-F3, or click on "Tickets " in lottery.
Add Lottery Books - If you sell, click the "Add Lottery Books" to see how to add books to be used in the Lottery Scratch Tickets window shown below.
Lottery Scratch Tickets
The Lottery Scratch Tickets window is used to track the sale of your scratch tickets. This window shows all the Books currently open as well as showing the total # of books available in the backroom under the Lottery Name column (Example: 565 Lucky Numbers (2) - meaning we have1 book left and 1 open).
If you live in an area that settles tickets before they're sold like Texas then check the "Settled" checkbox for each ticket and click on save doing this will force settle these books and send them into the Lottery Settlement window. You can have the software print out the lottery list automatically when the shift or day downloads by checking the "Auto-Print when Shift is closed"
.
Lottery Name: Is the book's name (click on the Setup menu and select Lottery to change the name or add new names) Clicking on any ticket name will generate a report for that ticket only.
Price: Is the selling price of the scratch ticket
What to enter
Open: Is the start of lottery tickets at the beginning of the shift or the day

82
Closed: Is the closing number at the end of the shift/day (Double click to close a book)
Prizes: Are the winnings (prizes) cashed by your clients
What is figured out Automatically
Sold: Is the difference between the closed and opened (It gives you the number of tickets sold)
Amount: Is the dollar amount sold
Total Sales: Is the total sold amounts added together for all books
Difference: Is the total sold amount minus prizes
What to select
Book Serial #: Is the lottery book serial number. In order to start selling a particular book, you must select the Book Serial #. You would use the Add Lottery Books" to add the books to the list of Book Serial #’S.
Step-by-Step
After adding some books using the "Add Lottery Books" window, you can start the Lottery Scratch Tickets window, click under the "Book Serial
#" on the down arrow and you will see the serial numbers that were added, select any one of these books and we will automatically grey out the Book Serial # combo box until the book is sold out. We will also enter the Open count. At the end of the shift/day, you can enter the Closed count, Prizes and click the Save button. If the book was sold out, then double click on the closed edit field and you will see [sold] under Closed. When you save this window, any [sold] books, will go to the Lottery Settlement window. Use the Show Me button to watch a short demo on how to use the lottery scratch tickets window.
If you have been playing around with the Lottery Scratch Tickets and you really want to start over, click on the "Clean all Tickets" button. This will remove all open books as well as all settled books.

83
Lotto
Lottery Settlement
This is the window to collect all the Saved Lotto Books to settle with the Lottery Companies. Up to 39 Books per settlement.
Select “Lottery Settlement” from the “Lotto ” menu or click on "Settle" in lottery.
How to use this Window?
When you receive the lottery settlement...
Check each box to the left of the Serial # for every book listed on the lottery settlement invoice.
Under Total Prizes, enter the amount received on the lottery settlement invoice, the rest of the amount will be saved for the next settlement. When you are finished, click Paid (Settle).
What is figured out Automatically
Book Serial #: Every lottery book sold out in the Lottery Scratch Tickets window will come automatically with the book serial number
Value ($): Is the value of the lottery book.
Total Scratch Tickets: Is the sum of all Value ($) for all the settled books.
Lottery Machine: This comes from the Lottery Machine window
Total Prizes: Is the Prizes cashed out by your clients
Prizes: Is a %age of the Total Prizes (Typically it is 1% of Total Prizes)
Commission: Is a %age of the Total Sold Tickets (Typically it is 5% of Total Lottery Sold)
Due to Lottery: Is the Total Scratch Ticket amount plus the Lottery Machine amount minus Total Prizes minus Bonus minus Commission.
Paid (Settle): Use this button every time you do the settlement, but before you press this button, double click on the Book Serial numbers that have not yet settled. When you double click it, it will clear the Value and gray the Serial # and will be saved for the next time you do your settlement. You may also modify the Lottery Machine amount that you received this time and we will automatically save the difference for next time.
Lotto
Lottery Machine (Is the window that deals with the sale of on-line lottery)
Select “Lottery Machine” from the “Lotto ” menu, or Ctrl-F5 .

84
Enter the Amount Sold, CANCELS, Coupon Used, CASHES, Prizes Cashed out, ADJUSTMENTS and click on the Save button. To see what you saved, click on the “Report” or “Find” button. Make sure your rental daily charge is set properly as well as the % commission that you make on Sales and Prizes.

85
Station
Expenses Paid Out
This window handles your daily expenses. You can use this window to pay expenses such as your Phone Bill, Electric Bill, etc.
What to select
Description: Enter the 1st letter or 2 and click on the down arrow in the Description combo box to get a list of all descriptions that start with your selection. This is a quick way to find the expense.
What to enter
QTY: This is where you would enter how many of this expense.
Amount: This is where you would enter the $ amount paid for this expense.
Invoice/Ref.: If there is an Invoice or Reference # for this expense, enter it in this column.
Vendor: This is where you would select the vendor by clicking on the down arrow in the combo box
Account: This is where you would select the payment type from the list. Click on the combo box to get a list of payment types and select one of them. Electronic payments will automatically go out of your Electronic Account, Check payments will automatically go out of your Checking Account, Cash payments will automatically go out of your Cash Account and Register payment types will go to your Short/Over window.
Check #: If your payment type is Check, the check number generated automatically
Note: If you would like to print a check make sure the "Print Check" checkbox is selected before you press Save.
Station
Income
This is the window that handles any other Income such as ATM, Money Order, etc.

86
What to select
Description: Enter the 1st letter or 2 and click on the down arrow in the Description combo box
to get a list of all descriptions that start with your selection. This is a quick way to find the income type.
What to enter
QTY: This is where you would enter how many of this item.
Amount: This is where you would enter the $ amount.
Invoice/Ref.: If there is an Invoice or Reference # for this item, enter it in this column.
Account: This is where you would select the deposit account from the list. Click on the combo box to get a list of accounts and select one of them. Electronic will automatically go into your Electronic Account, Check will automatically go into your Checking Account, Cash payments will automatically go into your Cash Account and Register will go to your Short/Over window under "Other Income"
When you click “Find” button, you get the window shown below:
Station
Garage Inventory

87
When you buy parts for the garage, use this window to enter the details for all products you buy for your garage. This window is used to track your Garage's Inventory items, so you can count the # of Fuel Filters, Tires, etc., select these names under Description (If the name is not there, click on the Setup button to add it), then enter how many you have under QTY (Quantity), enter your cost under Amount, enter an invoice number if any, select the Vendor and Account and click Save.
This Garage Inventory gives you the option to make a physical inventory of all items in your Garage and enter them in this window. Doing this is optional.
What to select
Description: Enter the 1st letter or 2 and click on the down arrow in the Description combo box to get a list of all garage parts matching descriptions that start with the 1st letter or 2 that you entered. This is a quick way to find the part.
What to enter
Qty: How many of this part you are buying
Amount: This is where you would enter the $ amount you paid for this part (Your Cost)
Invoice/Ref.: If there is an Invoice or Reference # for this part, enter it in this column.
Vendor: This is where you would select the vendor you bought the parts from
Account: This is where you would select the payment type from the list. Click on the combo box to get a list of payment types and select one of them. Electronic payment types will automatically go out of your Electronic Account, Check payments will automatically go out of your Checking Account, Cash payments will automatically go out of your Cash Account and Register payment types will go to your Short/Over window. When doing inventory select N-None as the account type where you are not paying for this item.
Check #: If your payment type is Check, this gets generated automatically
To see what you have saved click the "Find" button and you will see the window shown below:

88
Station
Work Order
Click the “Work Order ” icon, hit Ctrl-W or select “Work Order” from the “Station” menu.
The Work Order window can be used to track all the details of the work completed in your Garage and help you resolve future conflicts. This window also gives you the ability to print professional work orders for your clients. The Work Order window has the built-in ability to launch the Real-Time-Labor-Guide software and automatically fill in the Work Order based-on your selections in the Real-Time-Labor-Guide software. The Work Order window is also able to use the “All Data” database to help you estimate a work order. When “All Data” is installed on this computer, the “All Data” button will be enabled.
How to use this Window?
First, a client comes in: Start the Work Order window, click on "New" , enter the client's Name, the Car's Year & Make, the
Problem, the Phone #, etc. If you are going to enter the Address, make sure you enter it in this format: 1420 Main Rd,
Tiverton, RI 02878 Click on "Save" to save the data. You can also print a copy for the client and your mechanic.
Your mechanic finishes the work: Start the Work Order window again, enter the Work Order # and click on the "Lookup Work Order #" button or simply press enter to lookup the Work Order. Once you look up the Work Order, you can fill in the notes section. Enter the Labor amount and click on Save to save the window again. Note that the program will warn you about overwriting the previous Job Order #, you simply click on Yes. You can also enter a portion of the Phone #, a portion of the Address or a portion of any other field and hit Enter to lookup the Work Order.
The client comes back to pick up the car: Start the Work Order window again, enter the Work Order # and click on the "Lookup Work Order #" button or simply press enter to lookup the Work Order. Once you look up the Work Order, you can fill in the Paid sections; Save the window and Print a copy for the client.

89
New: Click New to create a new work order.
Save: Click Save to save your changes.
Delete: Click Delete to delete a work order.
Find: Click Find to list work orders or Work Order Parts in a spreadsheet where you can export, import and find work orders.
Email: use this to email your client information about their account. Please see Create/Modify Client on how to configure this.
Print: Click Print to print the current work order.
Print Setup: Click Print Setup to select the printer to print to, the font name and size, the top/left/bottom margins and other print options.
Duplicate: Click Duplicate to duplicate the current work order and make minor changes.
Time Card: Click Time Card to check-in and check-out as well as see the time card report.
Help: Click Help to get to this help.
Quit: Click “Quit” closing the “Work Order” window.
Lookup Work Order # : Use this button to view saved Work Orders. You can also use the arrows < or > to navigate between work orders.
Shift: This is the Shift # used to save this work order under.
Employee: This is the Mechanic's ID or number associated with this work order.
Date In: This is the date the work order was created for this vehicle.
Inspection: This is the date a Sticker Inspection is due.
Reminder: This is the date to trigger a reminder for this work order.
Pending Work Orders: This is used to list all the Work Orders that are outstanding.
Vehicle History: When working with a client, use this to view past work orders. You can also get a quick list of all work orders.

90
Scheduled Maintenance: This is used to show you a list of clients that have work to be done. For this feature to work, you need to use Parts that have the "Months Due" set to something other than ZERO. If you do not have any parts already configured, type the part # and hit Tab, you will see the "Create/Modify Work type" window. Fill in all the info. including the "Months Due" and click Save.
Paid by: This is the where you select the form of payment (Cash, Check, Credit, Local Credit, etc.)
Parts: The total amount for parts will automatically populate in this field.
Labor: The total labor will automatically populate in this field.
Shop Material: Total of parts and labor multiplied by the %age of shop materials (This %age has to be set up in Setup Taxes)
State Tax: The percent of tax from the state
Local Tax: The percent of local tax if any
Tax Exempt: Check this box if the customer is exempt from paying tax
Discount: Enter the discount you would like to give this client
Total: The total amount for the work order
Paid: How much the client paid
Balance: The balance remaining that has to be paid
When you click find in the Work Order, you get the window shown on the next page:
This is a list or a spreadsheet of all your Work Order Invoices listed in the order you want. To re-sort the order, simply click on the column header.
Station
Assets
When you buy Assets or if you already have the Assets and you want to depreciate the Assets, this is where you would enter them.

91
What to select
Description: Enter the 1st letter or 2 and click on the down arrow in the Description combo box
to get a list of all Assets matching descriptions that start with the 1st or 2nd letter that you entered. This is a quick way to find the Asset.
What to enter
Qty: This is how many of this asset you are entering
Amount: This is where you would enter the $ amount you paid for this Asset (Your Cost). You can enter a negative number to depreciate assets.
Invoice/Ref.: If there is an Invoice or Reference # for this Asset, enter it in this column.
Vendor: Choose a vendor from the combo box
Account: This is where you would select the payment type from the list. Click on the combo box to get a list of payment types and select one of them. Electronic payment types will automatically go out of your Electronic Account, Check payments will automatically go out of your Checking Account, and Cash payments will automatically go out of your Cash Account, and Register payment types will go to your Short/Over window.
Check #: If your payment type is Check, this gets generated automatically
Note that if the Amount is positive (Larger than $0), then we consider the Asset a Fixed Asset Cost and if the Amount is negative (Less than $0), then it is considered a Fixed Asset Depreciation.
For more information see the Assets Setup window.
Vendors
Products Inventory In/Out (Scanner Mode)
Hit Ctrl-U or select “UPC Inventory” from the “Vendors” menu.

92
This is for you to use when you buy products and you have a scanner directly connected to this computer or your cash register. You do not need to use this window to enter what you are buying; you can use the Vendor Invoice window.
Scan the UPC-Code or simply hit the Enter key. You will get a list of products to pick from, select the product and hit Enter. Check the Buying and Selling Prices, select the Vendor and click on Save. To see what you saved, click on the “Report” or “Find” button.
To check on your Inventory, click on "Quick Inventory " and you should see the following:
You can select a Date Range if you wish and click "Get Inventory" to generate the inventory report.
To place a Purchase Order, click on "Vendor Order" and you should see the following:

93
Select your Vendor. The "Order File Fields Configuration" only needs to be configured once per vendor.
Click "Generate Order" to generate the order. To make adjustments, click "Review Order" and to submit the order, click "Send Order".
You can also create an invoice by clicking on "Create Invoice" and load it into in the software if your vendor does not supply electronic invoices.
Vendors
Inventory
This is the Inventory window you would use when you buy products, unless you are using the Vendor Invoice window which will feed this window automatically.
Click on Show Me to watch a short demo on how to use the inventory window.
Scan the UPC-Code or simply hit the Enter key. You will get a list of products to pick from, select the product and hit Enter. Check the Buying and Selling Prices, select the Vendor and click on Save. You can also adjust the total dollar value for a

94
specific department. To see what you saved, click on the “Report” or “Find” button. To check on your Inventory, click on "Quick Inventory "
When you click “Find” button, you get the window shown below:
Vendors
Gas Load
This window is used to enter gas loads received from your Oil Company or to simply set your Gas Buying Prices.
Note: that if your Oil Company blends Gas Types, then all you have to enter are the lowest and highest Grade's Volume and Buying Price and the program will figure out the Prices for all other Gas Types automatically assuming you did setup Gas/Blending.
What to enter
Volume: Is the Volume purchased for this gas load
Buying Price: Is the cost price of each Gallon/Liter (tax price not included)
What is figured out automatically?
Buying Price + Tax: Is the price per gallon/liter plus the tax price
Previous Cost + Tax: Is the previous cost of the previous gas load

95
What to enter only once
Gas Tax: Is the Tax value that you only enter once, but can be changed anytime
Loan: Is the amount in cents per gallon/liter you are being charged by your Station Company for every Gallon/Liter you purchase.
Paid from Account: This is the method of payment you are using to pay for the Gas Load.
When you purchase Gas, enter the Volume purchased and the Buying Price before tax. Select the Method of Payment, click on Save. To see what you saved, click on the Report, History or the Find buttons.
Save Settings - If your Gas Sale window is not calculating the profit properly, it may be that you never used the Gas Load window before, so you could enter the Buying Price for all gas Types and hit the Save Settings button.
Show Latest - This will show you what you paid for the last Gas Load.
Click [W] to go on your Oil Company's web-site and download an XML Electronic Invoice. We know at least Shell and Conoco Philips are currently providing XML Invoices.
Click [Load Invoice] to load an XML Electronic Invoice automatically. You can select a single filename or a whole folder to load.
Click [...] to set a couple of options:
Compare the Location Name on the Invoice to the Business Name
Reset the Load Invoice settings
Click [History ] to see all the past saved Gas Loads. You can use this to re-load a Gas Load and resave it under another date.
Click [Save] to save a new Gas Load or a modified one.
Click [Find] to locate saved Gas Loads in a spreadsheet, which you can use to delete a Gas Load as well.
Click [Report] to view the Gas Load report.
Click [Show Latest] to show the latest saved Gas Load.
Click [Save Settings] to save all your settings.

96
Find in Gas Load
If you click on the "Find" button in the Gas Load window, you will see the following window.
You can modify this list or click on the Fast Forward button to go to the last record and you will see this star, click next to it under Date and enter the date, hit the right arrow on your keyboard and enter the Total Gallons, hit the right arrow and enter the Total Money, etc.
Vendors
Distributors/Vendors
Select “Vendors” from the “Vendor” menu or from your desktop.
This helps you track your Vendor's Invoices, what you paid so far and what you currently owe.
New is used to enter new transactions

97
Edit is used to edit an existing transaction
Delete is used to delete a transaction. Note: Delete is permanent
Report is used to view reports for all vendors or a selected vendor
Cost of Goods Report is used to view your sale value and cost value in one easy report
Find is used to find all transactions made by your vendors
If you click on "Balance", you can select to show the Balance of all vendors or simply the selected vendor.
Create New or Update Vendor Record - This window is used to create new records or edit/modify existing records.
To edit an existing transaction, click Edit; make the necessary changes and then click save.
If you would like to make a new record click on new and enter the following:
Date: You can select the Invoice Date using the supplied calendar
Description: Describes the transaction made
Amount: The amount shown on your invoice
Paid: The amount paid to the distributor
Invoice #: The invoice number on the slip
Vendor Name: When you click on the combo box , a list of Vendors will display and you may select one of them.
BOL: The Bill of Laden
Credit: The credit received from the distributor
Other Charges: Misc. charges from this transaction
Payment Type: Click on the down arrow to choose how you would like to pay this vendor
Check #: Is the check number of the Paid Amount to the selected distributor
Check the "Print Check" box if you would like to print this check before you click Save

98
Vendors
Vendor Invoice
This window handles entering a Vendor's Invoice manually as well as automatically from an Electronic Invoice (EDI) file provided to you by your vendor
If you are getting have an Electronic Invoice (EDI file) from your vendor, you can do the following:
Save the file somewhere on your hard disk, let's say C:\TEMP\INVOICE.DAT
Select the Vendor Name by clicking on the combo box . If your Vendor's Name is not in there, you
can simply type the name to automatically create the vendor or click the button to create a new vendor.
Under "File/Electronic Invoice", click "Select" and locate the file C:\TEMP\INVOICE.DAT
Click "Load Invoice" and you will see the Invoice with all the details load.
If you don't have an Electronic Invoice (EDI file), hit the Tab key and enter the Dept #, UPC-Code or PLU, hit Tab, enter the Vendor's Item # for this Item (Note that we will map this product to the Item Number, which you will see under Setup/Vendor Templates), hit Tab and enter the New Cost.
Note that we will automatically get the Old Cost. Hit Tab and enter the Quantity purchased. Note that if you purchased a Carton of cigarettes containing 10 packs enter 1 if the UPC-Code is the Carton's UPC and enter 10 if it is the Pack's UPC.
Click "Buy (+)" if you are buying this item or "Return (-)" if you are returning an item.
Repeat for all other items until you finish.
When you finish with all items, make sure the Amount is correct, enter the Credit (if any), Paid, Invoice #, select "Paid by", (if paid by check, the check number gets automatically generated) and hit the Save button.
If you purchased new items you never had before or if you changed the selling price of any items, click "Send to Register" to upload the new items or prices to your Cash Register.

99
If your Electronic Invoice uses Retail UPCs (UPC-Code of the packs), make sure "UPC is Retail" is checked.
"Remove Item" can be used to remove one of your items from the list.
"Clear Invoice" can be used to remove all items from the list.
"Delete Invoice" can be used to delete an Invoice that was already saved.
"View Old Invoices" can be used to give you a list of all previously saved Invoices. You can pick one of the Invoices from the list to reload, make changes and re-save.
"Save" can be used to save your invoice.
"Report/Print " can be used display a report of your currently displayed Invoice.
When you click the [>] on the bottom right, you will see few additional options:
Defaults - When loading an Electronic Invoice, we can automatically create products using some defaults for all new products; you can select a default Dept., Price Group and Product Code.
Pricebook Options:
Add Carton: Check this box if you want us to add the cartons to your price book. If you do not sell cartons, you should not check this option.
Prompt for selling price if item is new: If this is unchecked, we will automatically use the Vendor's Suggested Retail for all new products.
Skip Carton to Pack mapping: Check this box if you do not want the software to create a Carton to pack mapping. This is rarely ever checked.
Update Names: When we get an Electronic Invoice, we can update your product names with the names on the Invoice if this is checked.
Update Selling: When we get an Electronic Invoice, we can update your selling prices according to the Vendor's Suggested Retail Price.
Field Length
UPC-Code: This is typically 11, but in case a vendor decides to change that, you can specify what the vendor used.
Description: This is typically 25, but some vendor’s use 24.
Vendor Item #: This is typically 6, but some vendor’s use 7.
The software typically can automatically figure out these numbers, but you can override our settings if you have to.
Vendor Starter File
Load: This is used to load a Vendor Starter File, which is a special file having all the products you purchase from this vendor.
Map ONLY : When checked, it means to simply do the Vendor Mapping of the UPC-Code to the Item #.
Custom File: When checked, it means the file you are loading is not a standard file; instead it is a custom file typically a spreadsheet that was saved as a Tab-Separated .CSV file.
Auto-Fill Invoice Date - When checked, we automatically use today's date for the Invoice Date.
Zero Qty is expense - When checked, we would treat Electronic Invoices having ZERO Quantity for an item as an Expense, and otherwise it is a back order item.

100

101
Portable Data Collector
The Portable Data Collector (PDC) Interface works with various PDC devices to allow you to update your inventory or to load invoices.
The PDC is very important if your Vendor does not provide an Electronic Invoice.
Before you start using the PDC Interface, you need to install the software for your Portable.
After you install the PDC Software, click the “Setup” button and select the type of Portable you have.
Now you are ready to use the PDC Interface…
To watch a short demo on how to use the PDC Interface click on "Show Me"
The portable is always running, but the screen shuts off when not in use, so press the red button to turn the screen on.
In case the portable locks up or it simply will no longer connect to your PC, you need to Warm Start or Reboot it. To see how, click "Setup" and select "How to Reboot Portable?".
When the portable is on, click the Start menu as shown in the picture below and select "AGKSoft Inventory ". If you do not see it, see the Portable Data Collector Setup on how to install the software on your portable.
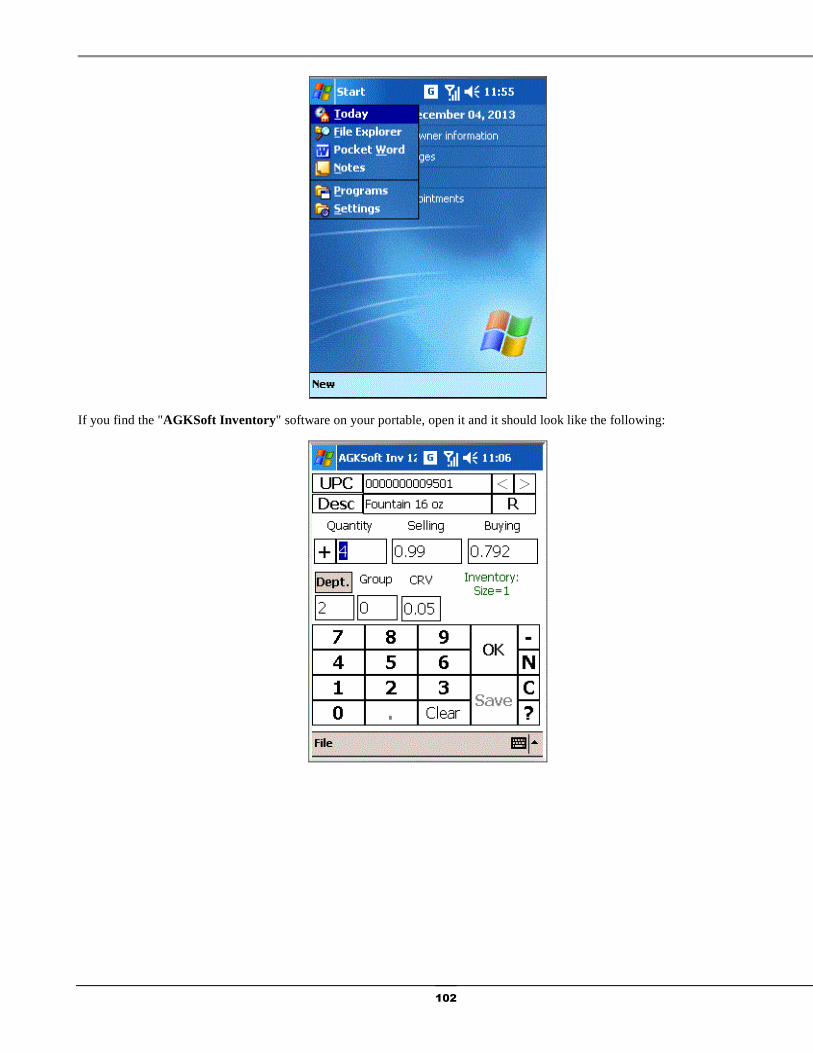
102
If you find the "AGKSoft Inventory " software on your portable, open it and it should look like the following:

103
You simply scan an item; the UPC-Code will show up next to UPC. If it does not, you portable could be defective or you are scanning a non-supported UPC-Code. Make sure you try a regular UPC-Code.
If the product you scanned is in your Pricebook already, you will see the "Desc", "Selling", "Buying", "Dept." and "Group" all get filled in with the appropriate values.
If the product you scanned is NOT in your Pricebook, you will see UNKNOWN next to "Desc". Note that "Selling", "Buying", "Dept." and "Group" all stay the same as whatever the last product you scanned. This is done on purpose to help you program many items that belong to the same Department having the same price very quickly.
When scanning your store for the 1st time, you should do one department at a time and you should scan all the products that have the same price at the same time.
!!! WARNING!!! When scanning your store, you do not need to enter the "Desc"; it is automatically entered for you when you download into AGKSoft.
After scanning a product, make sure the selling price is correct and make sure the "Dept." is ok as well, tap "OK" and repeat the process.
When finished scanning, tap "Save".
After you tap "Save", you will see the Preview window shown below. Note the Total Amount and Total Quantity and click OK to confirm.
After you click OK, you should see the following window:

104
Select "Inventory" or "Invoice". If you are scanning your store or doing your Inventory, select "Inventory" and tap "Save" again. If you are scanning an Invoice, select Invoice, select a Vendor by clicking the "Vendor Number" button and click Save.
To update your Inventory, follow the steps below:
Plug the Portable in and wait for the Synchronization process to finish.
Open AGKSoft and select “Inventory ” from the “(1) Download Type” section.
Click the “Download” button from the “(2) Download from Portable” section.
Click the “Update” button from the “(3) Post downloaded data” section.
If you want to send all the new products to your register, you can click “Send to Register” from the “(4) Upload to Cash Register” section.
To load a shipment as an Invoice, follow the steps below:
Select “Invoice” from the “(1) Download Type” section.
Click the “Download” button from the “(2) Download from Portable” section. You will see a list of Invoices if more than one was saved. Select the one you want to preview.
Click the “Update” button from the “(3) Post downloaded data” section. You will see a list of Invoices if more than one was saved. Select the one you want to Load.
If you want to send all the new products to your register, you can click “Send to Register” from the “(4) Upload to Cash Register” section.

105
Portable Data Collector Setup
The Portable Data Collector Setup allows you to select the kind of portable you are using.
Under "Model", you should select your Portable. If you happen to know you are running Pocket PC 2003 such as the Symbol PPT 88xx or MC50, you should pick "Pocket PC 2003 (PPT88xx/MC50)". If you have the MC70, select “Windows Mobile 5.0 (MC70)”.
If you do not see a folder, this means you did not make a Partnership or you setup ActiveSync not to synchronize files. Make sure you follow the instructions that came with your portable on how it should be setup.
If you have not yet installed the Microsoft ActiveSync software, click "Download ActiveSync" and follow the instructions that came with your portable.
If your portable has no software on it, click "Download Portable Software" and follow the instructions that came with your portable.
If you do not yet know how to Warm Start your portable, click "How to Reboot Portable" for more info.

106
Bank
Electronic Account
Hit "Ctrl-Shift-F11 " or Select “Electronic Account” from the “Bank” menu or from your desktop.
This is the window that deals with all electronic transactions that come automatically from the Gas Load, Lottery Settlement and the Electronic Credit Card windows.
New is used to enter new transactions
Edit is used to edit an existing transaction
Delete is used to delete a transaction. Note: Delete is permanent
Report is used to view the transactions in this account
Money Transfer use this to transfer money between accounts
Import QIF import information from your bank using the Quicken Interchange Format
Find is used to find the transaction
This Account gets updated automatically, except for deposits that you make. When you get your Bank Statement, you should go through item by item making sure all entries match the bank statement.
If you use Online-Banking with a bank or an Application such as Microsoft Money or Quicken, you can do automatic reconciliation by importing a QIF file (Quicken Interchange Format) by clicking on the "Import QIF " button. Import QIF works by looking for the Date and Amount (plus or minus 10 cents) to match and if it does match the bank, then we simply leave it alone. If the Date and Amount are not found, we simply add it automatically.
Note that you can click on the Date header once to sort Ascending and clicking again will sort Descending. You can click any other header to sort by the selected header up or down.

107
To see what you have saved click the "Find" button and you will see the window shown below:
Create New Electronic Account Record - This window is used to create new electronic account records or modify existing records. To edit an existing transaction, click Edit; make the necessary changes and then click save.
To edit an existing transaction, click Edit; make the necessary changes and then click save.
If you would like to make a new record click on new and enter the following:
Date: When the record was made
Desc: Describes the transaction made
Deposit: The dollar amount that was deposited
Withdraw: The dollar amount that was withdrawn
Memo: Use this to write any notes about this transaction
Note: Time and shift get entered automatically
Bank
Checking Account
Hit "F11" or select “Checking Account” from the “Bank” menu or from your desktop.

108
This is the window that deals with all Checking transactions. The checks are automatically entered from the Expense window, Vendors window, Payroll window, etc.
This Account gets updated automatically, except for deposits that you make. When you get your Bank Statement, you should go through item by item clicking the "Mark Paid" button.
New is used to enter new transactions
Edit is used to edit an existing transaction
Delete is used to delete a client a transaction. Note: Delete is permanent
Mark Paid is used to mark one or multiple transactions paid
Report is used to view reports for this account
Money Transfer This is used to transfer money between accounts
Import QIF import information from your bank using the Quicken Interchange Format
Find is used to find all transactions that you saved
If you use Online-Banking with an Application such as Microsoft Money or Quicken, you can do automatic reconciliation by importing a QIF (Quicken Interchange Format) file by clicking on the "Import QIF " button. Import QIF works by looking for the Check # to match and if it does match the bank, then we simply check the "Paid" check box for you for all matching records. If a check is not found, we simply add it and check the "Paid" automatically.
Note: that you can click on the Date header once to sort Ascending and clicking again will sort Descending. You can click any other header to sort by the selected header up or down.
To see what you have saved click the "Find" button and you will see the window shown below

109
Create New Transaction - This window is used to create new transactions or modify existing transactions.
To edit an existing transaction, click Edit; make the necessary changes and then click save.
If you would like to make a new record click on new and enter the following:
Date: When the transaction was made
Description: Describes the transaction made
Deposit: Is the deposit amount made
Withdraw: Is the amount withdrawn.
Check: Is the check #.
Note: Time and shift get entered automatically
If this transaction is paid select the "Paid" checkbox, and if you would like to print a check select the "Print Check" checkbox. Click Save.
If you are using the Import QIF feature, when the transactions are imported the software will mark the transactions paid automatically. Note: AGKSoft supports importing .QIF and .CSV files.
Bank
Cash Account
Hit "F12" or select “Cash Account” from the “Bank” menu or from your desktop.

110
This is the window that deals with all Cash transactions that come automatically from all other windows where you can specify a payment type.
New is used to enter new transactions
Edit is used to edit an existing transaction
Delete is used to delete a transaction. Note: Delete is permanent
Report is used to view reports for this account
Money Transfer This is used to transfer money between accounts
Import QIF import information from your bank using the Quicken Interchange Format
Find is used to find all transactions that you saved
If you use Online-Banking with an Application such as Microsoft Money or Quicken, you can do automatic reconciliation by importing a QIF (Quicken Interchange Format) file by clicking on the "Import QIF " button. Import QIF works by looking for the Check # to match and if it does match the bank, then we simply check the "Paid" check box for you for all matching records. If a check is not found, we simply add it and check the "Paid" automatically.
Note that you can click on the Date header once to sort Ascending and clicking again will sort Descending. You can click any other header to sort by the selected header up or down.
To see what you have saved click the "Find" button and you will see the window shown below on the next page.

111
Create New Transaction - This window is used to create new transactions or modify existing transactions.
If you would like to make a new record click on new and enter the following:
Date: When this transaction was made
Desc: Describes the transaction made
Deposit: Is the deposit amount made
Withdraw: Is the amount withdrawn
Memo: Use this to write any notes about this transaction
Note: Time and shift get entered automatically
Bank
Money Transfer
Hit "Ctrl-F11" or select "Money Transfer" from the "Bank" menu.
This is the window that allows you to Transfer money between all your Accounts.

112
Select the Account to Transfer from by clicking on the "From" box.
Select the Account to Transfer To by clicking on the "To" box.
Enter the Amount and then Click on the Transfer button
Create New Transaction - This window is used to create new transactions or modify existing transactions.
If you would like to make a new record click on new and enter the following:
• Date: When this transaction was made
• Desc: Describes the transaction made
• Deposit: Is the deposit amount made
• Withdraw: Is the amount withdrawn.
• Memo: Use this to write any notes about this transaction
Note: Time and shift get entered automatically
Money Transfer
Hit Ctrl-F11 or select the “Bank” menu, then “Money Transfer”
This window allows you to transfer money between all your Accounts.

113
How to use this window
Select the Account to “Transfer From”, Select the Account to “Transfer To”
Enter in the amount you would like to transfer and click “Transfer
Misc.
Export
Hit “ Shift-F5” or select “Export ” from the “Misc.” menu.
This allows you to consolidate multiple locations by exporting data from multiple locations and then importing them into the headquarter location. Simply click the Export button, select the date range and click Export.
If you want to export the Pricebook at the same time, make sure you check the "Pricebook" checkbox.
If you want to export Vendor Lists, Employee Lists, Expense Lists, etc., make sure you check the "Include Setup..." checkbox.
Salesroom data will go into salesroom.dat, Gas Sale data will go into gassale.dat, etc.
Import
Hit “ Shift-F6” or select “Import ” from the “Misc.” menu.
This is used to import data from multiple locations into the headquarter location. Select the folder to import from and click Import.

114
This will only import files exported using the "Export" feature.
Pricebook Export
Hit “ Shift-F7” or select “Price book Export” from the “Misc.” menu.
This dialog is used to export your product prices from one location in order to import the price changes to another location.
Your will be prompted for a folder name to store the files. For the departments, we create "agkdepartments.dat" and for PLUs and UPC-Codes, we create "agkpricebook.dat".
If you select "All Products", we create both files. If you select "All PLUs", then you only get the "agkpricebook.dat" file.
The files are Tab-Separated, so you can open them in Excel, make changes, re-save the file back and then use "Pricebook Import" to import your changes back.
Pricebook Import
Hit “ Shift-F8” or select “Pricebook Import” from the “Misc.” menu.

115
This dialog is used to import the exported pricebook from another location. When importing, new products will simply get created, existing products’ selling and buying prices will be updated.
If you want to completely overwrite your existing Pricebook, you need to open the Cash Register Interface, select "View Products", then "Query Wizard", select "Delete All" and click "Perform Query" before you import the pricebook.

116
QuickBooks Export
Hit “ Ctrl-F6 ” or select “QuickBooks Export” from the “Misc.” menu.
This gives you the ability to export your data to QuickBooks. You can customize the QuickBooks Transaction Type and Account where the data will be imported.
WARNING : Make sure you do not export the Lists (Departments, Clients, Vendors & Employees) more than once, QuickBooks will create duplicate records.
WARNING : Make sure you do not export the same date range more than once; QuickBooks will create duplicate sales data.
When Importing the QuickBooks file, if you get an error message such as:
The Tax field cannot be left blank, even for non-taxable customers and sales which have no taxable items, so non-taxable sales will be correct for this district.
Then do the following:
In your QuickBooks file, click Edit , Preferences. Select Sales Tax. Under "Company Preferences" select "NO" under "Do you Charge Sales Tax".

117
QuickBooks Import
Open Quick Books
Select the "File" menu, then "Utilities" , then "Export list to IIF files"
You should see the following export dialog, Select “Customer List” and “Vendor List” select ok
Save this file (example QuickBooks.IIF)
Importing your file...
Hit “ Ctrl-F7 ” or select “QuickBooks Import” from the “Misc.” menu.
Click the down arrow in the combo box to select where you saved it
Under "Select Filename" highlight the name of the file (Example: c:\quickbooks.IIF)
Click "OK"
PeachTree Synchronize
Click the "“PeachTree" icon or select “PeachTree Synchronize” from the “Misc.” menu.
Make sure PeachTree is open and your PeachTree file is open and click "Synchronize with PeachTree".
Calculator

118
This will open the "Calculator" window which will let you perform various calculations.
.
C will let you clear everything except the numbers in Memory 1, 2 & 3.
CE will simply clear the edit field (known as Readout).
Copy Result will copy the Result to the clipboard.
Copy Note will copy the Journal on the right to the clipboard.
+ is for additions, - subtraction, X is multiplication, / is for division
% will make the number a percentage, so 54 turns into 0.54
M1, M2 & M3 will let you store up-to 3 numbers in Memory.
R1, R2 & R3 will let you re-store up-to 3 numbers back from Memory.
Select Date
This will open the "Select Date" window or Calendar. If you want it to automatically open, click "Help", "Show" and select "Date".
Note that the software automatically populates all the shifts that were processed under that date, so you can simply select the shift that you want to work on from the list.

119
If you click on the list of shifts (e.g. 0002, 0003), you will get a log as follows: ------------------------------------------------------------- Found the following closed shifts for the month of: March ------------------------------------------------------------- 03/13/2008 - 0001 03/14/2008 - 0002, 0003 03/15/2008 - 0004 03/16/2008 - 0005 03/17/2008 - 0006 03/18/2008 - 0007 03/19/2008 - 0008 03/20/2008 - 0009 03/21/2008 - 0010 03/22/2008 - 0011 03/23/2008 - 0012 03/24/2008 - 0013 03/25/2008 - *** NO SHIFTS FOUND ON THIS DATE *** ... 03/31/2008 - *** NO SHIFTS FOUND ON THIS DATE ***
This will help you easily identify any missing shifts.
The bottom left shows today's date and the bottom right shows the selected date.
If you double click on a date, you will get the "Net Income" for the selected date.
Change Password
Supervisor (This user has full access to everything)
Manager (This user does not have access to change configuration or see any income related reports)
Worker (This user has limited data-entry capabilities as well as the ability to download shifts)
Garage User (This user is mainly for direct access to the Work Order and is used by the Mechanic)
Edit Configuration Files

120
Station (You should never touch this unless directed by AGKSoft)
Window Positioning (You should never touch this unless directed by AGKSoft)
Profile (You should never touch this unless directed by AGKSoft)
Other Functions
Product Names Update (This lets you automatically change your product names using ours)
The fastest way and easiest is to click "Select All", then "Use AGKSoft Names".
"Auto Correct" will only correct short names or invalid names such as UNKNOWN.
You can do multiple selections by holding the shift key and clicking with the left mouse button, and then you can click "Keep Current Name" or "Use AGKSoft Names".
ID Changer
(Change the IDs for a Vendor, Client, Department, Work type, Expense or Employee)

121
If you have the need to move Numbers in various areas, it's best to use the "ID Changer". This will not only move numbers, but it also moves any data saved with that number to the new number.
Example: Let's say Client #1 is John Doe and he happens to already have a charge for $100. If you want to move John Doe to be Client #15, this will insure that charge for $100 now goes to Client #15 and not Client #1.
Fix all Department Names
If you use the "View Products" window to change departments (ParentID) without changing the department names (Parent Desc), this function will help you fix that.
Fix Salesroom Profit
If you started using the software selling things before you enter the cost price, you may need to run this function. You will be prompted to select the following:
Select a specific department or ALL DEPARTMENTS.
Select a Date Range or select ALL Dates.
Select a Profit Formula "Standard Profit", "Percentage of Selling" or "Percentage of Buying".
Synchronize Work Orders
Print Active Form (Print the current window or form that you have open)
Diagnostics (This is for AGKSoft Support Only)

122
Income
Net Profit
Click on the “Net Profit” icon, hit “Ctrl-N ” or select “Net Profit” from the “Income” menu.
This window is used to show the Net Income as well as the Sales Profit, Gross Sales, Paid In and Paid Out. This window could also be used to show the Taxes owed, Total Gas Volume Bought and Sold, etc.
This window automatically figures out all your Sales Profit, Gross Sale, Paid Out, Paid In, Short/Over and Net Income. If you want to figure out your Net Income for a specific month, then click "Select Dates" choose which date then click "Get Results".
You can click on the "Sales Inventory" button to find out what your Sales Inventory is.
If you double click on the specific date in the Calendar, you will get this Income Statement window for that date only.
Note: If you select any of the checkboxes the profit and gross numbers will come from the End of Shift Short Over window when you close your shift. So, if you would like the sales room numbers to come into this window check the checkbox next to sales room.

123
Income
Product Information
Use this window to view all sort of valuable information about a UPC-Code, PLU or Department.
You scan the UPC-Code, enter a Dept/PLU and hit Enter or click on Get Info.
To see moving and non-moving items, you can get it by "Sold Amount" or "Sold Count". You can also select "Less" or "More" than a selected Amount or Count.
Click [Show List] to view Moving or Non-Moving Items.
Income
General Ledger
Hit "F8" or select "General Ledger" from the "Income" menu. This window allows you to print the General Ledger for the selected Date Range.

124
Select [All] and click Print to print the whole year.
Click on 1st, 2nd, 3rd or 4th Quarter to print the selected quarter.
If you do not want to print the general ledger to a printer, you can install the PDF Writer from the AGKSoft CD. Look in the Adobe\ PDF_Writer folder. Run the installer and when finished, you should see a "PDF reDirect..." print driver in your "Printers and Faxes" list. Now you can select this printer instead of the "Default" printer and you will get a PDF file to view on your screen.
The General Ledger will include the following:
Checking, Electronic & Cash Accounts, Expenses, Assets, Income, Lottery
Accounts Payable, Accounts Receivable, Credit Cards, Cost Of Fuel, Cost Of Goods
Payroll Liability, Sales Tax Payable
Income
Balance Sheet
Select “Balance Sheet" from the "Income” menu. This window shows the Balance Sheet for the Year or for a particular month.
ASSETS
Checking Accounts is the combination of all Checking Accounts 1, 2 and 3.
Electronic Account is the total Electronic Account.
Cash Account is the total Cash Account.
Accounts Receivable is the Total Amounts charged to a client account minus the Total Amounts Paid. It's the Total Balance owed by all the clients that have an Account at your location.
Sales Inventory is the total Inventory Purchased minus the total Inventory Sold based on cost value.
Gas Inventory is the total Gas Purchased minus the total Gas Sold multiplied by the latest cost.

125
Fixed Assets Cost is the total Assets purchased.
Fixed Assets Depreciation is the total of negative numbers entered into the Assets window.
LIABILITIES & EQUITY
Accounts Payable is the total amount purchased from vendors minus the total credit given minus the total payments made.
Electronic Credit Cards is the Total Amount minus Net Amount or simply the total fee owed.
Manual Credit Cards is the Total Amount charged manually that have not been paid or settled.
Payroll Liabilities is the total money owed for Payroll taxes, FICA, State, Federal and STDI taxes.
Sales Tax Payable is the total tax collected in the Salesroom and Work Orders.
Import/Export
Import and Export gives you the ability to consolidate multiple locations or work on multiple computers at the same time. The way it works is as follows:
1. You make changes on Computer A
2. Someone makes changes on Computer B
3. You Export from Computer A and Import into Computer B
4. You Export from Computer B and Import into Computer A

126
Setup
Locations - This should only be used by the Home Office Software (HOS) in order to configure all the locations you own. If you are setting up the HOS, leave the ID=0 to be "ALL LOCATIONS" and enter the 1st location # under ID (e.g. 1) and Location #1's name under "Desc". Repeat for each additional location. Your changes are automatically saved, so simply click "Quit" when you finish.
Business Info. - This is used to enter your Business Name, Address, Phone #, Federal ID and Location ID. Note that Location ID should be "1" if you only have one location. If you have multiple locations, make sure each location has a unique location ID.
Bank Info. - This is used to enter your Banking Information for up-to 3 checking accounts. The Info. includes the Bank's name, address, routing & account numbers.
Check Type - Select "Intuit", "Cynaptics" or Blank checks to use when printing checks.
Setup
Vendors
Create/Modify - Create new vendors or modify existing vendors
List All - Show a spreadsheet with all the Vendors.
Templates - Show a spreadsheet with all the mappings of Vendor Item numbers to a specific UPC-Code. Dist ID is the Vendor Number, Part Num is the Vendor's Item Number and ID is the UPC-Code.
Categories - Show a spreadsheet with all the Vendor Categories mapped to your Department Numbers. This is automatically populated when loading a custom invoice using the "Department Category" field.
Products
Departments - Show a list of departments. You can create new departments or change existing departments.
Create/Modify - Create new product or modify existing products
List All - Show a spreadsheet with all your products (ID 1 to 9500 are considered departments, ID 9501 to 9999 are PLU 1 to 499, ID 10000 to 95000000000000 are all UPC-Codes, ID 95000000000500 to 95000000009499 are PLU 500 to 9499.
Multiplier - Show a spreadsheet with all the multipliers (Carton/Case to Pack/Single relationship). ID is the Carton/Case UPC-Code, Quantity is how many units inside the Carton/Case, Content ID is the UPC-Code of the Pack/Single, and Desc is the name of the product. This is your list of multipliers, but AGKSoft comes with its own list of more than 7000 multipliers. Your list is automatically populated from the AGKSoft list, but you can change your list if you need to.
Multi-Pack Specials - Show a spreadsheet with all the Multipack Specials (Sell 1 for $0.59, but 2 for $1). ID is the UPC-Code, Quantity is the # of items for the special (e.g. 2), Price is the selling price for that Quantity (e.g. $1.00), Desc is the description of the special, Modifier is only used for the Ruby VeriFone and it should always be the same as the Quantity.
Price Groups - Show a spreadsheet with all the price groups. ID is the Group #; Desc is the Price Group name.
Categories - Show a spreadsheet with all the Categories. ID is the Category #, Desc is the Category name.
Sub-Categories - Show a spreadsheet with all the Sub-Categories. ID is the Category #, Desc is the Sub-Category name.
Work Order
Create/Modify - Create new work type or modify existing work types

127
List All - Show a spreadsheet with all your work types (ID is the work type #, Desc is the name of the work type, Type is the type of account associated with this item or simply how you pay for this item when you purchase it, Hours is the # of hours it takes to install this part, etc.
Select Disclaimer - Select the disclaimer file to be printed on the Work Order.
Edit Disclaimer - Edit the disclaimer file to be printed on the Work Order.
Employees
Create/Modify - Add new employees or change existing employees
List All - Show a spreadsheet with all your employees. (ID is the employee #, Name is the employee' name, etc.)
Expenses
Create/Modify - Add new expense types or change existing expense types
List All - Show a spreadsheet with all your expenses. (ID is the expense #, Desc is the expense's description, Price is the typical price you pay for this expense, Type is the Type of Payment you typically use to pay for this expense, Category ID is the expense QuickBooks Category # to map to when exporting to QuickBooks)
Incomes
Create/Modify - Add new Income types or change existing Income types
List All - Show a spreadsheet with all your Assets. (ID is the Income #, Desc is the Income's description, Price is the typically price you get paid for this Income, Type is the Type of Account you typically deposit this Income, Category ID is the Income QuickBooks Category # to map to when exporting to QuickBooks)
Assets
Create/Modify - Add new Asset types or change existing Asset types
List All - Show a spreadsheet with all your Assets. (ID is the Asset #, Desc is the Asset's description, Price is the typically price you pay for this Asset, Type is the Type of Payment you typically use to pay for this Asset, CategoryID is the Asset QuickBooks Category # to map to when exporting to QuickBooks)

128
Lottery
Create/Modify - Add new Lottery Scratch Ticket types or change existing Lottery Scratch Ticket types
List All - Show a spreadsheet with all your Lottery Scratch Ticket types. (ID is the Scratch Ticket #, Desc is the Scratch Ticket's description, Deleted is typically False unless you no longer sell this kind of ticket, Start is the Scratch Ticket's starting # in each book, End is the Ending Scratch Ticket #, Price is the selling price per ticket, Display is the display # or position # on your shelf, UPC is the UPC-Code used to scan and sell the ticket.
QuickBooks Categories
This is used only if you plan on exporting to QuickBooks (ID is the Category #, Desc is the Category's description, TRANS_ACCNT is the QuickBooks' Transaction Account for this Category, DISTR_ACCNT is the Distribution Account for this Category)
Fees
This is only used if you are connected to a Ruby VeriFone Cash Register (ID is the Fee #, Desc is the Fee's description)
Payees
This is used to setup the Payees to be used in the Payment Center (ID is the Payee's #, Desc is the Payee's description or Company Name, Fee is the amount you get per transaction, Percent is the %age you get)
Gas Blending
This is used only if you blend Gas such as "Plus". Typically companies blend the "Plus" grade to be 50% "Regular" and 50% "Super" or 60% "Regular" and 40% "Super". Your Cash Register Company or Installer can tell you what your blending ratio is.
Taxes
This is used to setup your State & County Names, Tax Rates, Payroll, Lottery commission and Garage Tax.
Help
Documentation (Display this document)
Cash Register Interface (Display the Cash Register Interface help document)
AGKSoft local web page (Display the AGKSoft web page from your local disk)
www.agksoft.com (Connect to the Internet and go to AGKSoft's web page on the Internet)
First Time User (This will open the First Time User window to help you start using AGKSoft)
Show (Show the following items if checked upon starting AGKSoft)
Appendix A – Most Common Reports
Here is a sample of the Short Over Report

129
This report shows you the information for shifts that are closed and saved. The information is entered in automatically from your register when you download your shifts using the software as BOS. If you are using the software as a Point of Sale (POS) then the information gets entered from the various windows that information was entered and saved in.
Here is a sample of the Sales Room Summary by Department report
This report shows how many items within that dept. were sold, the dollar amount and the profit. When viewing this report you can double click on one of the depts. to get a detailed view of the items within that dept.

130
Here is a sample of a Gas Sale report
This report shows Volume sold, pool margin and your profit. This report also shows the selling price. The "Difference" shown in red is the "Actual minus the End"

131
Here is a sample report from the Vendors Report
This report shows vendor names, how much was paid and balances if any. This report is useful to view all vendor transactions in one screen
Here is a sample report from the Checking Account
This report shows you transactions within the checking account. It shows you deposit amounts; withdraw amounts and the balance from transaction to transaction.

132
Appendix B - Report
Many windows such as the Salesroom or Gas Sale windows have a Report button. When you click on the Report button, you may be asked to select the type of report that you would like and after making your selection, you will see the following Report dialog:
The example above shows "Report (dailygas.rpt)" in the title, meaning we will be using the report file "dailygas.rpt" to show the report. If you have Crystal Report 8.5, you can open this file and modify it to suit your needs.
Typically, you would simply click the OK button or hit the Enter key to see your report on the screen.
If you don't care to see the report on the screen, you can simply click the Combo box that says "Screen" next to "Send Report to:" and select "Printer ", "File" or "Mail ".
Selecting Printer will let you directly print the report without seeing it first. Selecting File will let you send the report to various file formats, such as text files. Selecting Mail will let you directly E-mail the report to someone with an Internet E-mail address.
Note that Mail only works if you have a pop-mail account. Contact your internet service provider on how to set one up.
“Report for which quarter” lets you select a Quarter (1st, 2nd, 3rd or 4th) or you can pick "Selected Dates", which gives you the ability to select a "Date Range" by entering the "From" and "To" dates in "mm/dd/yyyy" format.
Printer lets you select another printer if you are connected to multiple printers.
Under the Printer section is a big edit field that typically shows you the formula that will be applied to the report based on your selection.
The OK button is used to accept your selections and start the report process.
If you are an advanced user, you may click on the special arrow at the bottom right to see more options as shown below:
If you are an advanced user, you may click on the special arrow at the bottom right to see more options as shown below:

133
You will now see a list of Database Field Names under "Field Name", select the one to use to limit the report information. Under Operator, you can select
Equal (=)
Not Equal (<>)
Greater or Equal (>=)
Less or Equal (<=)
Greater Than (>)
Less Than (<) or like
Under Value, you can enter a number or a description.
Example: If you wanted a report of all your Department 1 sales select the following:
Under Field Name select “{SalesRoom.ParentID}”
Under Operator select "="
Under Value enter "1" and click the "Select" button.
Now you should see “{SalesRoom.ParentID} = 1” in the formulas box. Click the OK button to see the report. If you wanted to limit the report for selling to a range of dates, you would select the dates first and then use the "And" button rather than "Select".

134
Appendix C - Finding Information
Simple Find
This is a simple spreadsheet; it shows you a quick list of all records that you saved.
You can simply click on any cell and modify the value, but we highly recommend that you be careful doing it, since your Short/Over will not accurately reflects the changes you are making. If you simply want to delete a line, click on the 1st cell in the
line, like the Date Cell, then click on the black arrow that you see on the left to highlight the whole row, and then hit the delete key on your keyboard.
You can sort this spreadsheet in either Ascending or Descending order of any column by simply clicking on the Column header, in the case shown above, you can click on the "Date" header to sort by Date, you can also click on any other header to sort by the selected header.
Operators
• = (Equal)
• <> (Not Equal)
• >= (Greater or Equal)
• <= (Less or Equal)
• > (Greater than)
• < (Less than)
• Like (This is useful to match names that start with or end with something).
Note that you can use a star "*" before and after to match all.

135
Product Wizard
This window gives you the ability to change the Buying Price, Selling Price, Department, Price Group, Product Code, Min and Max Inventory for many products matching a Product Name, Price Group or Product Code. You can change the selling price for the whole group with a single click.
Example: Let's say you want to change all the "Marlboro" that is currently selling for $3.79 to $3.89.
Select the following:
Under “Select Product List by:” select "Product Name", enter "MARL".
Under "Limit Search to:" select "Selling Price" = and enter "3.79",
Click the FIND button.
You will now see a list of all products matching the criteria you specified.
Under "Change Field", select "Selling"
Under "New Value" enter “3.89”
Click "Change".
When you are satisfied, click "Save Changes" and then "Send to Register" to update the prices on your Cash Register.
If you are using a Gilbarco G-Site, you will see "Building Item Info"; wait for the message to go away before you attempt to add any new products.
If you are using a Ruby VeriFone Super System, you need to Log-off and Log back in to see the changes.
Price Group

136
This window displays Price Groups that have been created. New Price Groups can also be created here by assigning an Id and description. Price Groups are a convenient way of grouping like prices that can be updated by simply making one entry. An example: short term sale on all 8oz soda regardless of the brand.
Query Wizard
You can access the Query Wizard from Simple Find
In the “Select Action” section, you can select one of three kinds of Actions to perform on your data:

137
1. Change
In the “Which” section, you need to select the “Data Field” you want to change. In the example shown, we wanted to set the Buying Price to 70% of the Selling Price, so we selected “Buying”.
We want to apply the following formula:
Buying = Selling * 0.70 or Set Buying To Selling * 0.70
We need to set the “1st Criteria”, so we select the Top radio button (This is used to select a field.), so we select “Selling” from the combo-box.
Now we select the “*” from the “Operator” combo-box.
In the “2nd Criteria”, we select the bottom radio button (This is used to enter a constant number), and we type 0.7 in the edit field.
In the “Where” section, you need to select the “Data Field”. In our case we want to limit the change to only Department #1; to do that, we select “ParentID” under “Data Field”.
Now we select the “=” from the “Operator” combo-box.
In the “Value” edit field, we type “1” (Department #1).
Now we can click the “Perform Query” button to execute the query.
2. Find
In the “Where” section, you need to select the “Data Field”. In our case we want to find Department #18; to do that, we select “ParentID” under “Data Field”.
Now we select the “=” from the “Operator” combo-box.
In the “Value” edit field, we type “18” (Department #18).
Now we can click the “Perform Query” button to execute the query.
3. Delete

138
In the “Where” section, you need to select the “Data Field”. In our case we want to delete all items that belong to Department #18; to do that, we select “ParentID” under “Data Field”.
Now we select the “=” from the “Operator” combo-box.
In the “Value” edit field, we type “18” (Department #18).
Now we can click the “Perform Query” button to execute the query.


