21
NanoPC User’s Manual
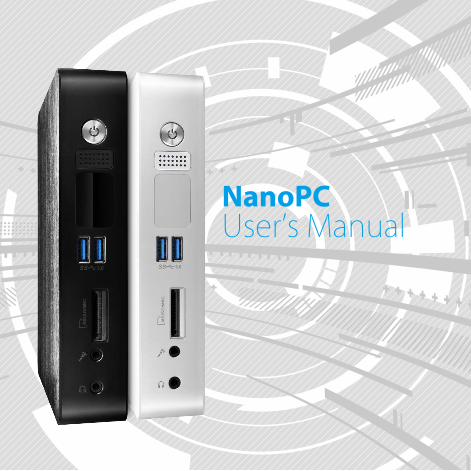
NanoPC User’s Manual

Before using this product, please read the below safety notice carefully, this will help toextend the product’s lifecycle, and work normally.
■ WhenNanoPCisworking,pleasemakesureitsventilationsystemisworking.■ Thepoweradapterisdissipatingheatduringnormaluse,pleasebesurenottocover itandkeepitawayfromyourbodytopreventdiscomfortorinjurybyheatexposure.■ Pleaseusethepoweradapterthatcomeswiththeproduct’spackage,wrongpower adaptermaydamageyourdevice.■ MakesurealltheperipheralsareproperlyconnectedbeforeusingNanoPC.■ Thisproductshouldonlybeusedinanenvironmentwithambienttemperatures between0°Cand40°C.■ Alwaysshutdownthecomputerbeforeinstallingoruninstallingtheperipheralwhich does not support hot plug. ■ Disconnectallperipheralsbeforeservicingordisassemblingthisequipment.■ Pleasedonotdisassemblethisproductbyyourself,anydisassemblynotapproved bytheoriginalmanufacturermayresultinmalfunction,andvoidwarranty.■ Riskofexplosionifbatteryisreplacedbyanincorrecttype,pleasedisposeofused batteries according to the instructions.
CAUT
ION
Safety Notice:Trademark: Alltrademarksarethepropertyoftheirrespectiveowners.
Version: User’sManualV1.0forNanoPC.
Symbol description:
Note: ReferstoimportantinformationthatcanhelpyoutouseNanoPCbetter,and tellsyouhowtoavoidproblems.
Caution: Indicatingapotentialriskofhardwaredamageorphysicalinjurymayexist.
WEEE: The use of this symbol indicates that this product may not be treated as household
waste.Byensuringthisproductisdisposedofcorrectly,youwillhelppreventpotentialnegativeconsequencesfortheenvironmentandhumanhealth,whichcouldotherwisebe caused by inappropriate waste handling of this product. For more detailed informa-tionaboutrecyclingofthisproduct,pleasecontactyourlocalcityoffice,yourhouse-holdwastedisposalserviceortheshopwhereyoupurchasedthisproduct.
©Allrightsreserved.Alltradenamesareregisteredtrademarksofrespectivemanufacturerslisted.
Allimagesareforreferenceonly,pleaserefertothephysicalproductforspecificfeatures.
CAUT
ION

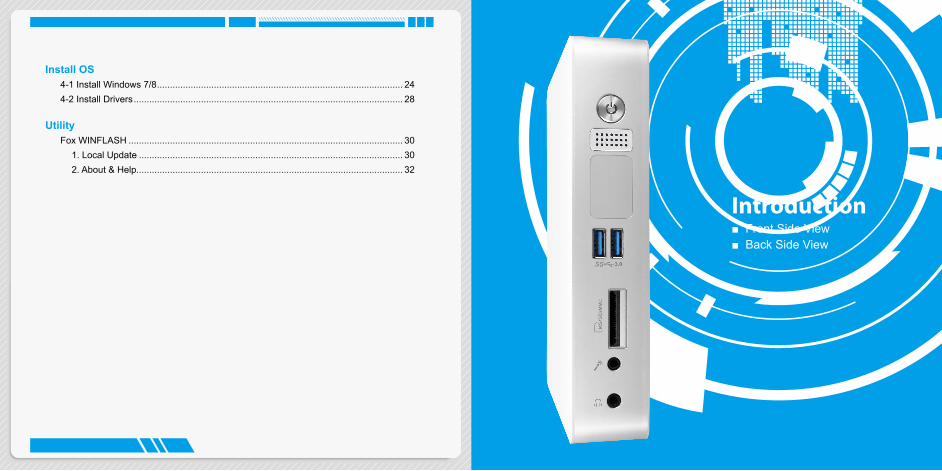
Introduction1-1FrontSideView ...................................................................................................... 21-2BackSideView ....................................................................................................... 4
Placement and connecting2-1PlacementofNanoPC ........................................................................................... 7
Erectedonthedesk.................................................................................................. 7InstallingtoDisplay................................................................................................... 7
2-2ConnectionofNanoPC ........................................................................................ 10Connectdisplay ...................................................................................................... 10ConnectUSBdevices............................................................................................. 11Connectnetworkcable ........................................................................................... 11Connectpowercord ............................................................................................... 12
BIOS SetupEnterBIOSSetup ....................................................................................................... 14Main ............................................................................................................................ 15Advanced .................................................................................................................... 16Boot ............................................................................................................................ 18Security ....................................................................................................................... 20Save&Exit ................................................................................................................. 21
TABLE OF CONTENTSPackage Contents
NanoPC SeatBase VESAMount
PowerAdapter PowerCord EasyGuide
USBFlashDiskScrewsandMiniPCIeHalfCardSupportBracket
DVI-VGAAdapter
WeDONOTguaranteeitisincompliancewiththeSafetyCertificatesifyouaddonanextensioncabletoNanoPCUSBFlashDiskinthepackage.
Install OS4-1InstallWindows7/8 ............................................................................................... 244-2InstallDrivers ........................................................................................................ 28
UtilityFoxWINFLASH .......................................................................................................... 30
1.LocalUpdate ...................................................................................................... 302.About&Help....................................................................................................... 32
■FrontSideView■BackSideView
Introduction

2 3
INTRODUCTION INTRODUCTION
1 PowerbuttonwithPowerindicatorLEDPresstoturnyourNanoPConoroff,theLEDcanindicateyoursystemstates.
2 Speaker
3 USB3.0portThisUSBportsupportstheUSB3.0/2.0/1.0specification.UsethisportforUSBdevicessuchaskeyboard,mouse,USBprinter,USBflashdrivesandharddiskdrives,etc.YouneedtoinstalltheUSB3.0driverinNanoPCUSBDiskbeforeusingit.
4 Multi-FunctioncardreaderThismemorycardreadersupportsSD/SDHC/MS/MSPro/MMCmemorycardsusedindeviceslikedigitalcameras,mobilephones,Mediaplayersand so on.
5 Microphone/SPDIFinportConnectstoamicrophoneorplaybackdeviceswithopticalconnectors(3.5mmjack).SPDIFfunctionrequiresadditionaladapterandadaptercable.
6 HeadphoneConnectstoaheadphone.
7 Kensington lock AttachaKensingtonsecuritysystemoracompatiblesecuritylocktosecureyourNanoPCinplace.
1-1 Front Side View
1
2
3
4
5
6
7

4 5
INTRODUCTION INTRODUCTION
1 USB2.0portThisUSBportsupportstheUSB2.0/1.0specification.UsethisportforUSBdevicessuchaskeyboard,mouse,USBprinter,USBflashdrivesandharddiskdrives,etc.
2 DVI DVIportConnectmonitororTVthatusesDVIconnectortothisport.ByusingtheDVItoVGAadapterthatcomeswithyourproduct,youcanalsoconnectaVGA-compatibledevicessuchasamonitororprojector.
3 HDMI HDMIportTheHDMI(High-DefinitionMultimediaInterface)portsupportsFull-HDdisplaydevices.ConnectmonitororTVthatusesHDMIconnectortothisport.
4 RJ-45LANportSupports10/100/1000Mb/sEthernetnetwork.ConnectnetworkcabletoaccessInternet.
5 Lineout/SPDIFoutportConnectstopoweredanalogspeakersorrecordingdeviceswithopticalconnectors(3.5mmjack).SPDIFfunctionrequiresadditionaladapterandadaptercable.
6 PowerinputportConnectpowercordthatcomewithyourproduct.
1-2 Back Side View
1
2
3
4
5
6

7
PLACEMENTANDCONNECTING
2-1 Placement of NanoPC
Erected on the desk
1.PlaceyourNanoPCintothegrooveoftheSeatBase.
Installing to Display
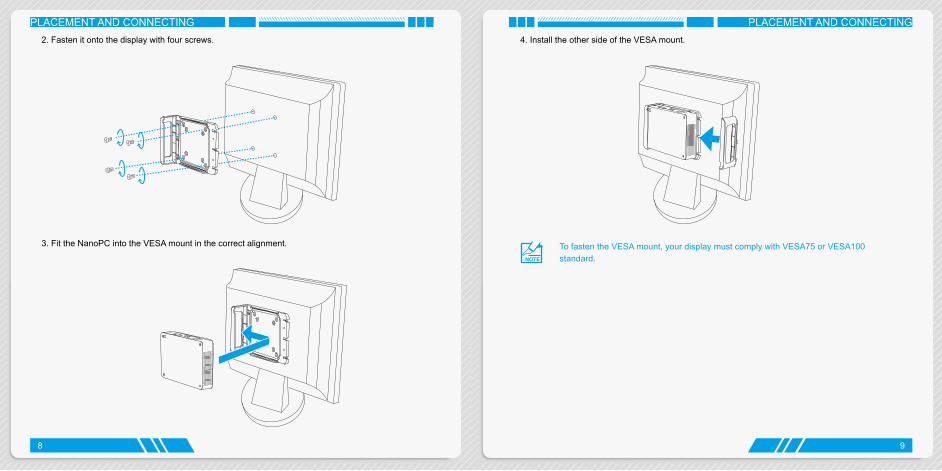
1.AssembleonesideoftheVESAmount.
Placement and
connecting■PlacementofNanoPC■ConnectionofNanoPC
8 9
PLACEMENTANDCONNECTING PLACEMENTANDCONNECTING 4.InstalltheothersideoftheVESAmount. 2. Fasten it onto the display with four screws.
3.FittheNanoPCintotheVESAmountinthecorrectalignment. TofastentheVESAmount,yourdisplaymustcomplywithVESA75orVESA100standard.

10 11
PLACEMENTANDCONNECTING PLACEMENTANDCONNECTING
2-2 Connection of NanoPC
Connect display ConnectadisplayorTVthathasHDMIportorDVI/VGAporttoyourNanoPC. YoucanconnectaVGAdisplaytotheDVIportbyusingtheDVI-VGAadapter.
Connect USB devices
ConnectUSBdevicestotheUSBports,forexample,mouse,keyboarddevices. TherearetwoUSB3.0portsonthefrontsideofyourNanoPC,youneedtoinstalltheUSB3.0driver inNanoPCUSBdiskbeforeusingthem.
Connect network cable ConnectoneendofanetworkcabletotheRJ-45LANport,andtheotherendtoahubor switch.
■ PleaseusethecustomizedDVI-VGAAdapterthatcomeswithyourNanoPCtogeta higherresolutiononyourVGAdisplay.■ YoucouldhaveaccesstodisplayadjustmentforsomeHDTVorHDdisplay connectedviaHDMIportbyusingthescalingfunctionin“AMDVISIONEngine Center”,autility,whichisavailableaftertheinstallationofAMDChipsetDriver.And youcaninitiatethisutilitybyfirstright-clickingonDesktopandselectingit,then furtherchoosing“ScalingOptions(DigitalFlat-Panel)”in“MyDigitalFlat-Panels”.

12
PLACEMENTANDCONNECTINGConnect power cord
ConnectthepoweradaptertothepowerinputportoftheNanoPC,andthenpressthepowerbuttonto start it.
Thepoweradapterisdissipatingheatduringnormaluse,pleasedonotcoveritandkeepitawayfromyourbodytopreventinjuryfromheatexposure.CA
UTIO
N
1
2
3
■EnterBIOSSetup■Main■Advanced■Boot■Security■Save&Exit
BIOS Setup
14 15
BIOSSETUP BIOSSETUP
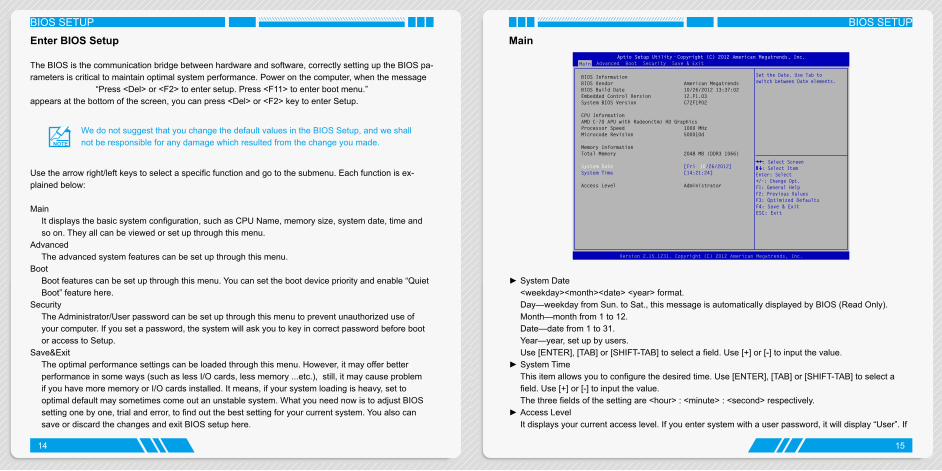
Main
Version 2.15.1231. Copyright (C) 2012 American Megatrends, Inc.
Aptio Setup Utility - Copyright (C) 2012 American Megatrends, Inc. Main Advanced Boot Security Save & Exit
BIOS Information BIOS Vendor American Megatrends BIOS Build Date 10/26/2012 13:37:02 Embedded Control Version 12.F1.03 System BIOS Version C72F1P02 CPU Information AMD C-70 APU with Radeon(tm) HD Graphics Processor Speed 1000 MHz Microcode Revision 500010d
Memory Information Total Memory 2048 MB (DDR3 1066) System Date [Fri 10/26/2012] System Time [14:21:24]
Access Level Administrator
→ ←: Select Screen ↑ ↓: Select ItemEnter: Select+/-: Change Opt.F1: General HelpF2: Previous Values F3: Optimized DefaultsF4: Save & ExitESC: Exit
Set the Date. Use Tab to switch between Date elements.
Main
►SystemDate <weekday><month><date> <year> format. Day—weekdayfromSun.toSat.,thismessageisautomaticallydisplayedbyBIOS(ReadOnly). Month—monthfrom1to12. Date—datefrom1to31. Year—year,setupbyusers. Use[ENTER],[TAB]or[SHIFT-TAB]toselectafield.Use[+]or[-]toinputthevalue.►SystemTime Thisitemallowsyoutoconfigurethedesiredtime.Use[ENTER],[TAB]or[SHIFT-TAB]toselecta field.Use[+]or[-]toinputthevalue. Thethreefieldsofthesettingare<hour>:<minute>:<second>respectively.►AccessLevel Itdisplaysyourcurrentaccesslevel.Ifyouentersystemwithauserpassword,itwilldisplay“User”.If
Enter BIOS Setup
TheBIOSisthecommunicationbridgebetweenhardwareandsoftware,correctlysettinguptheBIOSpa-rametersiscriticaltomaintainoptimalsystemperformance.Poweronthecomputer,whenthemessage
“Press<Del>or<F2>toentersetup.Press<F11>toenterbootmenu.”appearsatthebottomofthescreen,youcanpress<Del>or<F2>keytoenterSetup.
Usethearrowright/leftkeystoselectaspecificfunctionandgotothesubmenu.Eachfunctionisex-plainedbelow:
Main Itdisplaysthebasicsystemconfiguration,suchasCPUName,memorysize,systemdate,timeand soon.Theyallcanbeviewedorsetupthroughthismenu.Advanced Theadvancedsystemfeaturescanbesetupthroughthismenu.Boot Bootfeaturescanbesetupthroughthismenu.Youcansetthebootdevicepriorityandenable“Quiet Boot”featurehere.Security TheAdministrator/Userpasswordcanbesetupthroughthismenutopreventunauthorizeduseof yourcomputer.Ifyousetapassword,thesystemwillaskyoutokeyincorrectpasswordbeforeboot oraccesstoSetup.Save&Exit Theoptimalperformancesettingscanbeloadedthroughthismenu.However,itmayofferbetter performanceinsomeways(suchaslessI/Ocards,lessmemory...etc.),still,itmaycauseproblem ifyouhavemorememoryorI/Ocardsinstalled.Itmeans,ifyoursystemloadingisheavy,setto optimaldefaultmaysometimescomeoutanunstablesystem.WhatyouneednowistoadjustBIOS settingonebyone,trialanderror,tofindoutthebestsettingforyourcurrentsystem.Youalsocan saveordiscardthechangesandexitBIOSsetuphere.
WedonotsuggestthatyouchangethedefaultvaluesintheBIOSSetup,andweshallnot be responsible for any damage which resulted from the change you made.

16 17
BIOSSETUP BIOSSETUP no password is set or you enter system with administrator password, this item will display “Administrator”.
Advanced
Version 2.15.1231. Copyright (C) 2012 American Megatrends, Inc.
Aptio Setup Utility - Copyright (C) 2012 American Megatrends, Inc. Main Advanced Boot Security Save & Exit
SATA Mode [AHCI Mode] Deep Sleep Support [Enabled] USB 2.0 Port S3 Wakeup [Enabled] LAN / USB 3.0 Port S3 Wakeup [Enabled] Restore on AC Power Loss [Last State] Supporting C6 power state [Disabled] Integrated GPU UMA Frame Buffer [Auto]
→ ←: Select Screen ↑ ↓: Select ItemEnter: Select+/-: Change Opt.F1: General HelpF2: Previous Values F3: Optimized DefaultsF4: Save & ExitESC: Exit
Select the SATA Mode
Option:(1) IDE Mode(2) AHCI Mode
Advanced
►SATAMode ThisitemisusedtosettheoperationmodeofyourSATAports. [IDEMode]-ThisconfigurestheSATAportstosupportIDEmode. [AHCIMode]-TheAdvancedHostControllerInterface(AHCI)specificationdescribestheregister levelinterfaceforaHostControllerforSerialATA.Thespecificationincludesadescriptionofthe hardware/softwareinterfacebetweensystemsoftwareandthehostcontrollerhardware.AHCI providesmoreadvancedfeaturesincludingSATAfeatures,butsomeSATAdrivesmaynotsupport AHCI,unlesstheyarelabeledwithAHCIsupportinitsspecification. IfyourmotherboardsupportingAHCI,andyouhaveaSATAdevice,whichalsosupportsAHCI,then
youcanselectIDEoptiontohavefairperformance,oryoucanselectAHCItogetitsbest performance.
AHCImodeisnotavailableunderWindowsXP,pleaseselectIDEmode.
►DeepSleepSupport ThisitemisusedtoenableordisableDeepSleepSupportfunction.Whenenteringdeepsleep modesystem(S4/S5)onlycanwakeupfrompowerbutton.►USB2.0PortS3Wakeup Thisitemisusedtoenable/disabletheUSB2.0device(s)togenerateawakeupfromS3state.►LAN/USB3.0PortS3Wakeup Thisitemisusedtoenable/disabletheLAN/USB3.0device(s)togenerateawakeupfromS3state.►RestoreonACPowerLoss ThisitemisusedtosetwhichstatethePCwilltakewithwhenitresumesafteranACpowerloss.►SupportingC6Powerstate ThisitemisusedtoenableordisablethesupportingC6powerstate.►IntegratedGPUUMAFrameBuffer Allocatessystemmemoryforuseasvideomemorytoensurethemostefficientuseofavailable resourcesformaximum2D/3Dgraphicsperformance. ThisisamemoryallocationmethodadditiontotheUnifiedMemoryArchitecture(UMA)concept, whereinastaticamountofpage-lockedgraphicsmemoryisallocatedduringdriverinitialization.This fixedamountofmemorywillprovidetheuserwithaguaranteedgraphicsmemoryatalltimes,andwill nolongerbeavailabletotheOS.

18 19
BIOSSETUP BIOSSETUP
Boot
Version 2.15.1231. Copyright (C) 2012 American Megatrends, Inc.
Aptio Setup Utility - Copyright (C) 2012 American Megatrends, Inc. Main Advanced Boot Security Save & Exit
Boot Configuration Bootup NumLock State [On] Quiet Boot [Disabled] Fast Boot [Enabled] Lanch CSM [Enabled] Lanch LAN OpROM policy [Do not launch] Built-in EFI Shell Support [Disabled]
Boot Option Priorities
→ ←: Select Screen ↑ ↓: Select ItemEnter: Select+/-: Change Opt.F1: General HelpF2: Previous Values F3: Optimized DefaultsF4: Save & ExitESC: Exit
Select the keyboard NumLockstate
Boot
►BootupNumlockState ThisitemdefinesifthekeyboardNumLockkeyisactivewhenyoursystemisstarted.Theavailable settingsare:On(default)andOff.►QuietBoot Thisitemisusedtoenable/disablethequietboot. [Disabled]:DisplaysthenormalPOSTmessages. [Enabled]:DisplaysOEMcustomerlogoinsteadofPOSTmessages.►FastBoot WhileEnabled,thisoptionallowsBIOStoskipcertaintestswhilebooting,thiswillshortenthetime needed to boot the system.►LaunchCSM ThisitemcontrolsifCSMwillbelaunched.►LaunchLANOpROMpolicy ThisitemcontrolstheexecutionofUEFIandLegacyPXEOpROM.
►Built-inEFIShellSupport Thisitemisusedtocontrolwhetherthe“Built-inEFIShell”appearsintheBootOption. Youcansetthe“Built-inEFIShell”optionbootpriorityin“BootOptionPriorities”listingwhenthisitem issetto[Enabled].►BootOptionPriorities These items are used to set the system boot order.

20 21
BIOSSETUP BIOSSETUPSecurity
Version 2.15.1231. Copyright (C) 2012 American Megatrends, Inc.
Aptio Setup Utility - Copyright (C) 2012 American Megatrends, Inc. Main Advanced Boot Security Save & Exit
Password Description
If ONLY the Administrator's paeeword is set, then this only limits access to Setup and is only asked for when entering Setup. If ONLY the user's password is set, then this is a power on password and must be entered to boot or enter Setup. In Setup the user will have Administrator right. The password length must be in the following range: Minimum length 4 maximum length 20
Administrator Password User Password
→ ←: Select Screen ↑ ↓: Select ItemEnter: Select+/-: Change Opt.F1: General HelpF2: Previous Values F3: Optimized DefaultsF4: Save & ExitESC: Exit
Set Administrator Password
Security
►AdministratorPassword This item is used to install or change administrator password. Afteryouinputadministratorpassword,itthenwillaskyoutoconfirmthepassword.►UserPassword This item is used to install or change user password.
Save & Exit
Version 2.15.1231. Copyright (C) 2012 American Megatrends, Inc.
Aptio Setup Utility - Copyright (C) 2012 American Megatrends, Inc. Main Advanced Boot Security Save & Exit
Save Changes and Exit Discard Changes and Exit Save Changes and Reset Discard Changed and Reset
Save Option Save Changes Discard Changes
Restore Defaults Save as User Defaults Restore User Defaults
Boot Override
→ ←: Select Screen ↑ ↓: Select ItemEnter: Select+/-: Change Opt.F1: General HelpF2: Previous Values F3: Optimized DefaultsF4: Save & ExitESC: Exit
Set Administrator Password
Save & Exit
►SaveChangesandExit Ifyouselectthisoptionandpress<Enter>,amessagewillbedisplayedinthescreen. Select[Yes]tosaveyourchangesandexit,select[No]or<ESC>toreturntothemainmenu.►DiscardChangesandExit Ifyouselectthisoptionandpress<Enter>,amessagewillbedisplayedinthescreen. Select[Yes]toexitsetuputilitywithoutsavingyourmodifications,select[No]or<ESC>toreturnto the main menu.►SaveChangesandReset Ifyouselectthisoptionandpress<Enter>,amessagewillbedisplayedinthescreen. Select[Yes]tosaveyourchangesandresetcomputer,select[No]or<ESC>toreturntothemain menu.►DiscardChangesandReset Ifyouselectthisoptionandpress<Enter>,amessagewillbedisplayedinthescreen.

22
BIOSSETUP
■InstallWindows7/8■InstallDrivers
Install OS
Select[Yes]toexitsetuputilityandresetcomputerwithoutsavingyourmodifications,select[No]or <ESC>toreturntothemainmenu.►SaveChanges Ifyouselectthisoptionandpress<Enter>,amessagewillbedisplayedinthecenterofthescreen. Select[Yes]tosaveyourchanges,select[No]or<ESC>toreturntothemainmenu.►DiscardChanges Ifyouselectthisoptionandpress<Enter>,amessagewillbedisplayedinthecenterofthescreen. Select[Yes]todiscardyourmodifications,select[No]or<ESC>toreturntothemainmenu.►RestoreDefaults Optimaldefaultsarethebestsettingsofthismotherboard. AlwaysloadtheOptimaldefaultsafterupdatingtheBIOSorafterclearingtheCMOSvalues. SelectthisoptionandpressEnter,itwillpopoutadialogueboxtoletyouloadthedefaults.Select <Yes>andthenpress<Enter>toloadthedefaults.Select<No>andpress<Enter>,itwillnotload. Bythisdefault,BIOShavesettheoptimalperformanceparametersofsystemtoimprovetheperformances of system components. But if the optimal performance parameters to be set cannot be supported by yourhardwaredevices(forexample,toomanyexpansioncardswereinstalled),thesystemmightfail to work.►SaveasUserDefaults Ifyouselectthisoptionandpress<Enter>,amessagewillbedisplayedinthescreen. Select[Yes]tosavethechangesdonesofarasuserdefaults,select[No]or<ESC>toreturntothe main menu.►RestoreUserDefaults Ifyouselectthisoptionandpress<Enter>,amessagewillbedisplayedinthescreen. Select[Yes]torestore/loadtheuserdefaultstoallthesetupoptions,select[No]or<ESC>toreturnto the main menu.►BootOverride BIOSautodetectthepresenceofconnecteddevices,selectthedeviceyouwanttobootfromand press<Enter>,thenthesystemwilldirectlybootfromtheselecteddevices.

24 25
INSTALLOS INSTALLOSWhatkindsofhardwareandsoftwareyouneedhere:1.Windows7/8InstallUSBDisk/USBDVD-ROMdriveandWindows7/8InstallCD(Otherpurchase)2. NanoPCUSBFlashDisk(Inthispackage)
Windows7(32-bit/64-bit)andWindows8(32-bit)can’tbeinstalledwhen“LaunchCSM”issetto“Disabled”intheBIOSsetup.
4-1 Install Windows 7/8
1. ConnecttheWindows7/8InstallUSBDisk(orUSBDVD-ROMdrive)tooneUSBportofNanoPC.2. Presspoweronbuttontoturnonyourcomputer.3. PuttheWindows7/8InstallCDintotheUSBDVD-ROMdriveifyouusetheUSBDVD-ROMdrive.4. ComputerwillchoosethebootdevicebyBIOSdefaultandstartloadingthefilesforinstallingtheOS.
5. Whentheinstallationwindowspopup,settherelateditemsandclick“Next”tocontinue,thenclick “Installnow”buttontostartthesetup.6. Whenthelicensetermsappear,chooseacceptandclick“Next”tocontinue.7. Itwillthenaskyoutoselecttheinstallationtype.Click“Custom(advanced)”toinstallanewcopyof Windows.
8. Thesetupwillthedisplaytheharddiskpartitions(160GB,inthisexample)ofyoursystem.Ifthere wereothersystems(suchasLinux)installedpreviously,youneedselectthemandclick“Driveoptions (advanced)”todeletethem.Whenallpartitionsareclean,setupwilldisplaythebiggestsizeofyour harddrive.
Pleasepress<Del>or<F2>keytoenterBIOSSetupifyouwanttochangethefirstbootdeviceforinstallingtheOS.

26 27
INSTALLOS INSTALLOS9. Intheharddisksizescreen,youcanclickthe“new”buttontocreatepartitionsasyouneed. Inthisexamplewearecreatinga70GBpartitiontoinstallWindows.Makeyourmodificationsand click“Apply”.
ToensurethatallWindowsfeaturesworkcorrectly,Windowsmightcreateadditionalpartitionsfor systemfiles.Soyouwillseea100MBpartitionreservedbysystemafteryoucreateapartition.Select the70GBpartitionandclick“Next”tocontinue.
10.ThesetupprogramwillthenstarttoinstallWindows7/8onyourharddisk.Duringtheinstallation, yourcomputerwillrestartseveraltimes.

28
INSTALLOS11.Whentheinstallationiscomplete,setupwillprepareyourcomputerforit’sfirstuse.Youcanthen follow the steps to select system settings, create an account, set a password...etc, until the whole process is completed.
4-2 Install Drivers
1. WhentheWindows7/8iscompletelyinstalled,youhavetoinstallthenecessarydriversbeforeusing theNanoPC.ConnecttheNanoPCUSBFlashDisktoyoursystem.2. Waitingforafewseconds,themainmenuwillbedisplayedonthescreen.
3. Usetheseoptionstoinstallallthedriversforyoursystem.Youmustclick"AMDChipsetDriver"to installitfirst.Afterthat,youcanclick”OneClickSetup”andthenchoosetheitemsyouwanttoinstall, oryoucanclickoneachindividualdrivertoinstallitmanually.4. Afterinstallingallthedrivers,youneedtorestartyourNanoPC,thenyoucanstartusingit.
■FoxWINFLASHUtility

30 31
UTILITY UTILITY
Fox WINFLASH
FoxWINFLASHisausefulutilitytobackupandupdateyoursystemBIOS.
SupportingOperatingSystems:■ WindowsXP(32-bit/64-bit)■ Windows7(32-bit/64-bit)■ Windows8(32-bit/64-bit)
1. Local Update1-1LocalUpdate-BIOSInformation ThispageletsyouknowyoursystemBIOSinformation.
Note:BIOSSize32Mb=32Mbit=4MByte BIOSSize16Mb=16Mbit=2MBytePleaserefertothephysicalmotherboardfordetails.
Toolbar
ShowcurrentBIOSinformation
MinimumExit
1-2LocalUpdate-BackupBIOS ThispagecanbackupyoursystemBIOS.Youcanclick“BackupBIOS”,andkeyinafilename,then click“Save”tofinishthebackupoperation.Theextensionofthisbackupfileis“.ROM”forAMIBIOS. Makesureyoucanrememberthefilenametogetherwiththedirectorywhichitisstored,prevented thatyoumayneedthemtorecoveryourBIOSlater.
1-3LocalUpdate-UpdateBIOS ThispagehelpsyoutoupdateyourBIOSfromalocalfile.Afterclick“UpdateBIOS”,Analert messagewillbedisplayedtoensureifyoureallywanttocontinue,click“Yes”toconfirm.Asetup wizardwillguideyoutoloadalocalBIOSfiletofinishtheoperation.Youmustrememberfromwhich directorytoloadyournewBIOSfile(withanextensionof“.ROM”forAMIBIOS)beforethesetup wizardstarts.
KeyinaBIOSnameClicktoSave

32
UTILITY
2. About & Help ThispageshowssomeinformationaboutFoxWINFLASH.
Statement: Thisdevicecomplieswithpart15oftheFCCRules.Operationissubjecttothefollowingtwo conditions:(1)Thisdevicemaynotcauseharmfulinterference,and(2)thisdevicemustacceptany interferencereceived,includinginterferencethatmaycauseundesiredoperation.
Warning:FEDERAL COMMUNICATIONS COMMISSION INTERFERENCE STATEMENT ThisequipmenthasbeentestedandfoundtocomplywiththelimitsforaClassBdigitaldevice, pursuanttopart15oftheFCCRules.Theselimitsaredesignedtoprovidereasonableprotection againstharmfulinterferenceinaresidentialinstallation.Thisequipmentgenerates,usesandcan radiateradiofrequencyenergyand,ifnotinstalledandusedinaccordancewiththeinstructions,may causeharmfulinterferencetoradiocommunications.However,thereisnoguaranteethatinterference willnotoccurinaparticularinstallation.Ifthisequipmentdoescauseharmfulinterferencetoradioor televisionreception,whichcanbedeterminedbyturningtheequipmentoffandon,theuseris encouragedtotrytocorrecttheinterferencebyoneormoreofthefollowingmeasures: ▪Reorientorrelocatethereceivingantenna. ▪Increasetheseparationbetweentheequipmentandreceiver. ▪Connecttheequipmentintoanoutletonacircuitdifferentfromthattowhichthereceiveris connected. ▪Consultthedealeroranexperiencedradio/TVtechnicianforhelp.
Caution: Anychangesormodificationsnotexpresslyapprovedbythegranteeofthisdevicecouldvoidthe user’sauthoritytooperatetheequipment.
RF exposure warning: Thisequipmentmustbeinstalledandoperatedinaccordancewithprovidedinstructionsandthe antenna(s)usedforthistransmittermustbeinstalledtoprovideaseparationdistanceofatleast 20cmfromallpersonsandmustnotbeco-locatedoroperatinginconjunctionwithanyotherantenna ortransmitter.End-usersandinstallersmustbeprovidewithantennainstallationinstructionsand transmitteroperatingconditionsforsatisfyingRFexposurecompliance.

Warning statement for Europe: Also,putinthemanualwhichdirectivetofulfilandalsowhichcountriestoselltheproduct. Exampleofatexttotellwhichdirectivehasbeenfulfilled: Hereby,Foxconn,declaresthatthisAT-5000Seriesisincompliancewiththeessentialrequirements andotherrelevantprovisionsofDirective1999/5/EC.”


