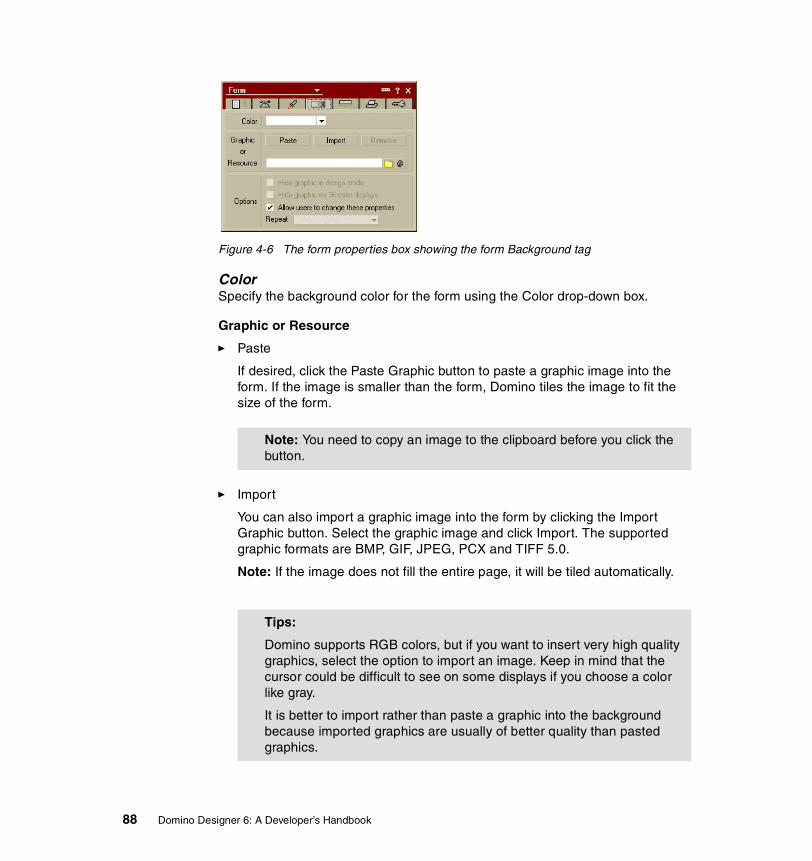
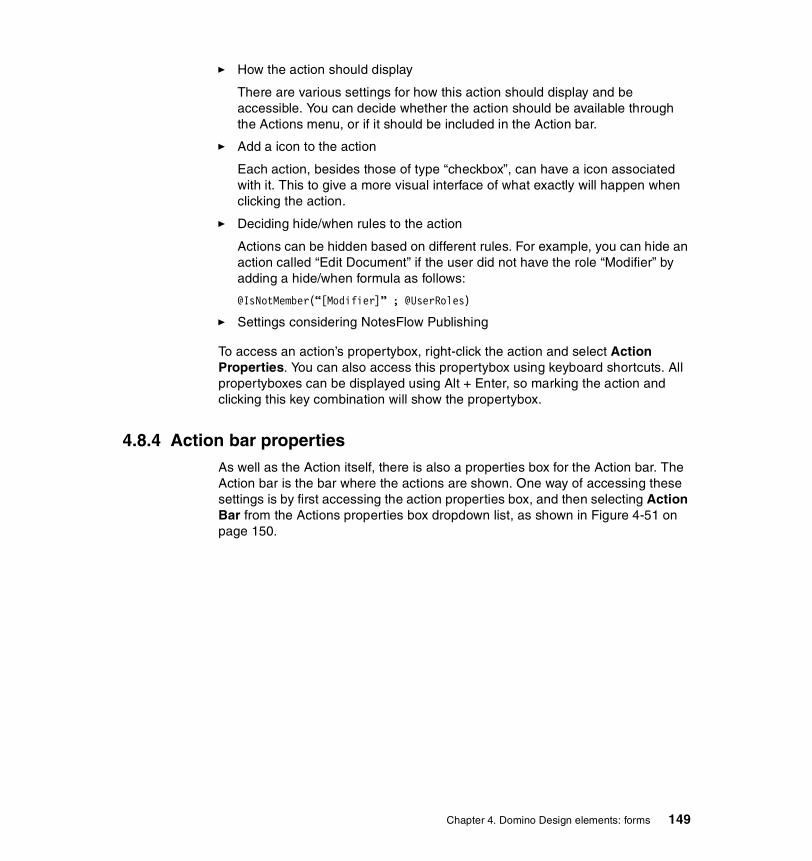
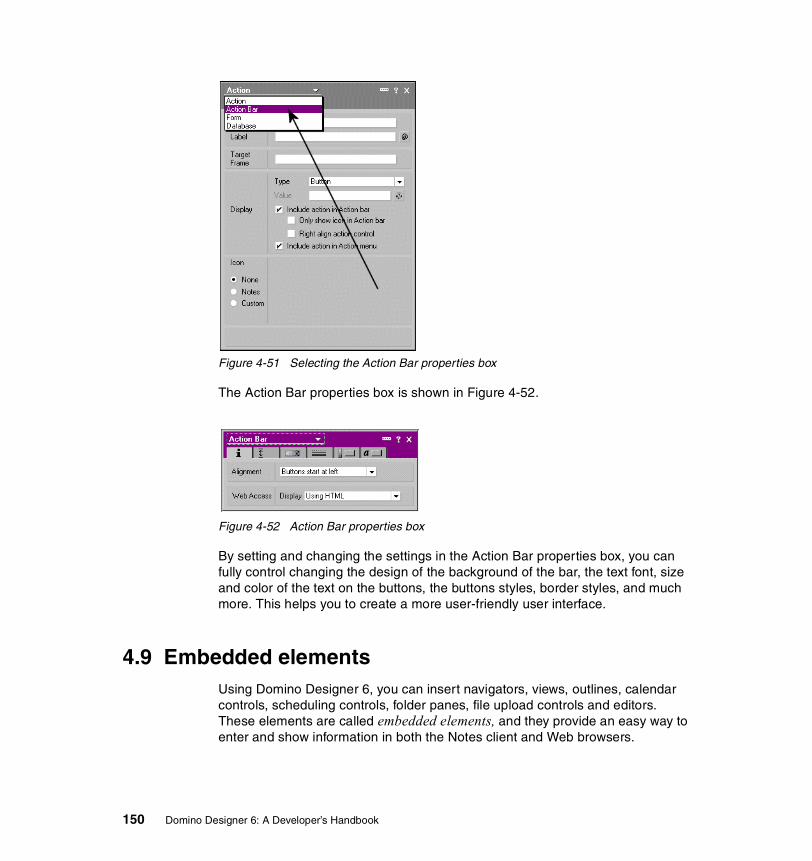
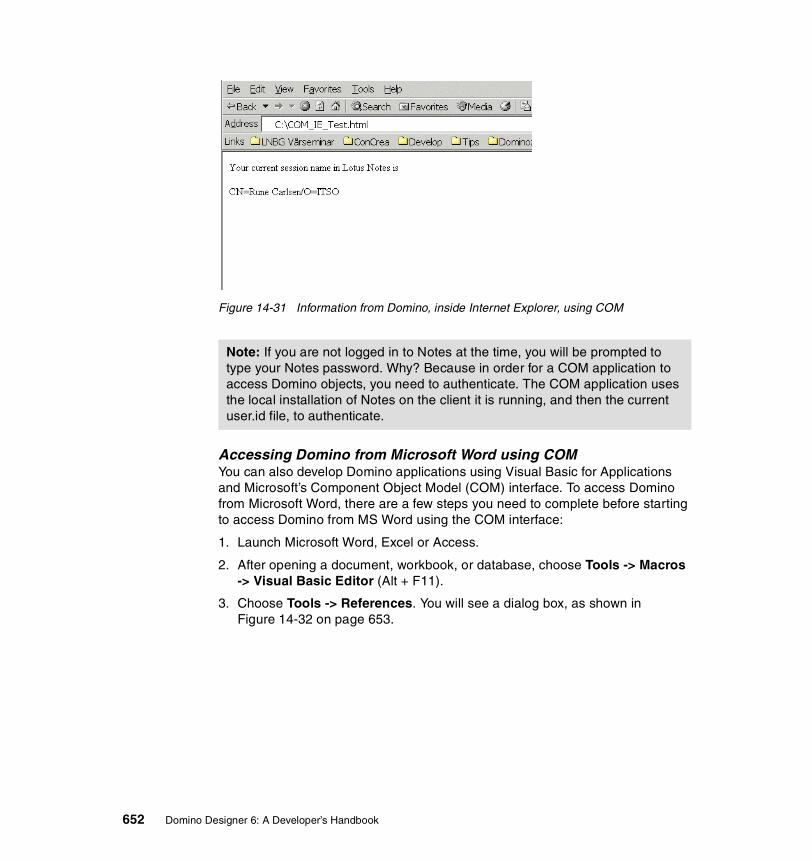
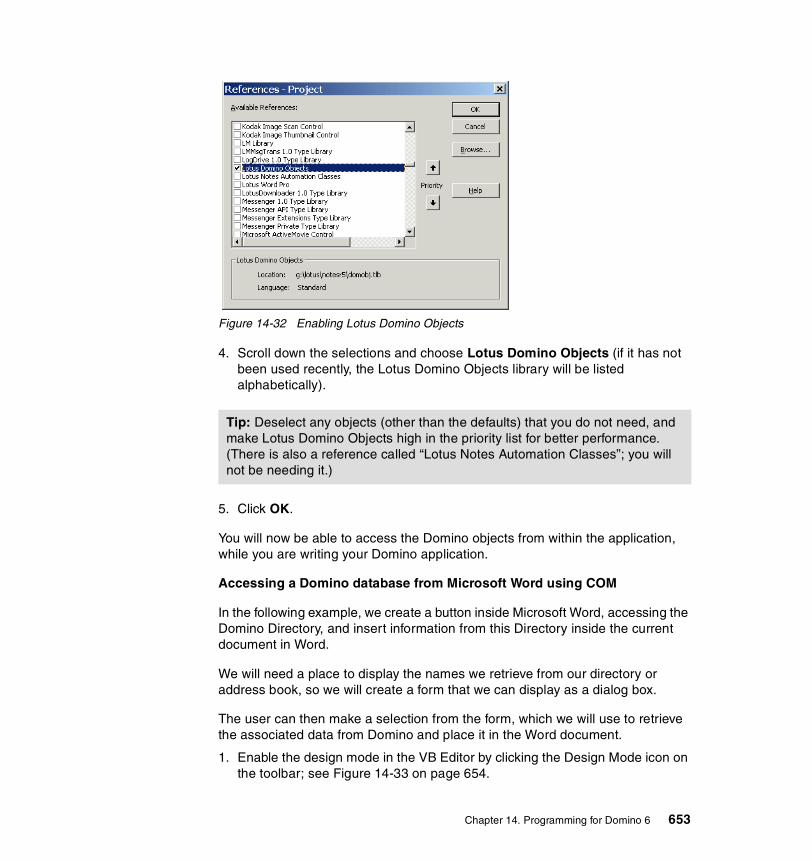
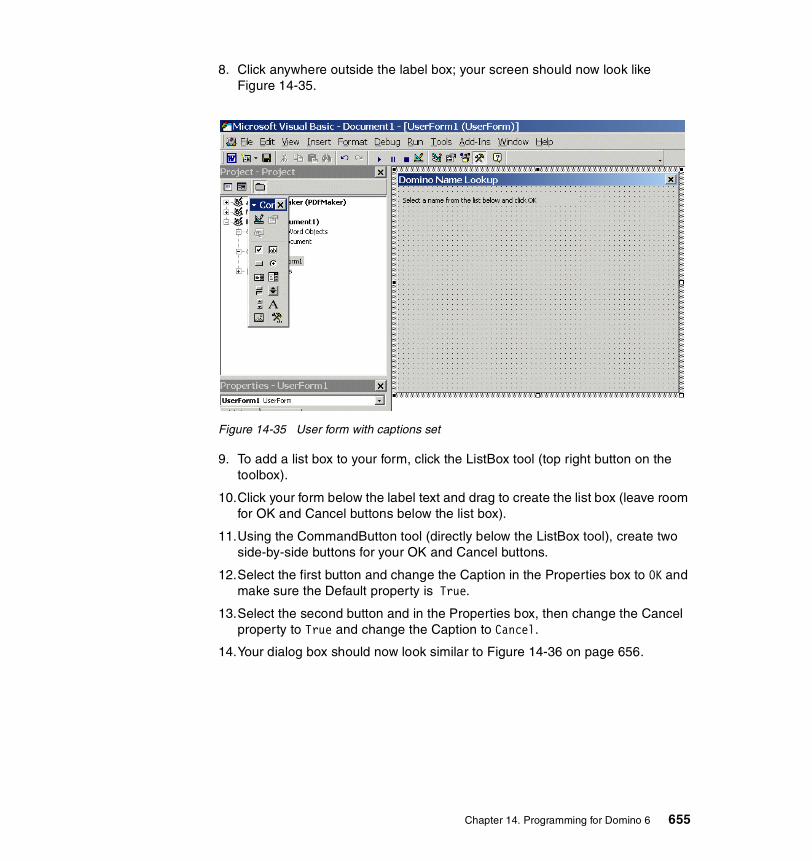
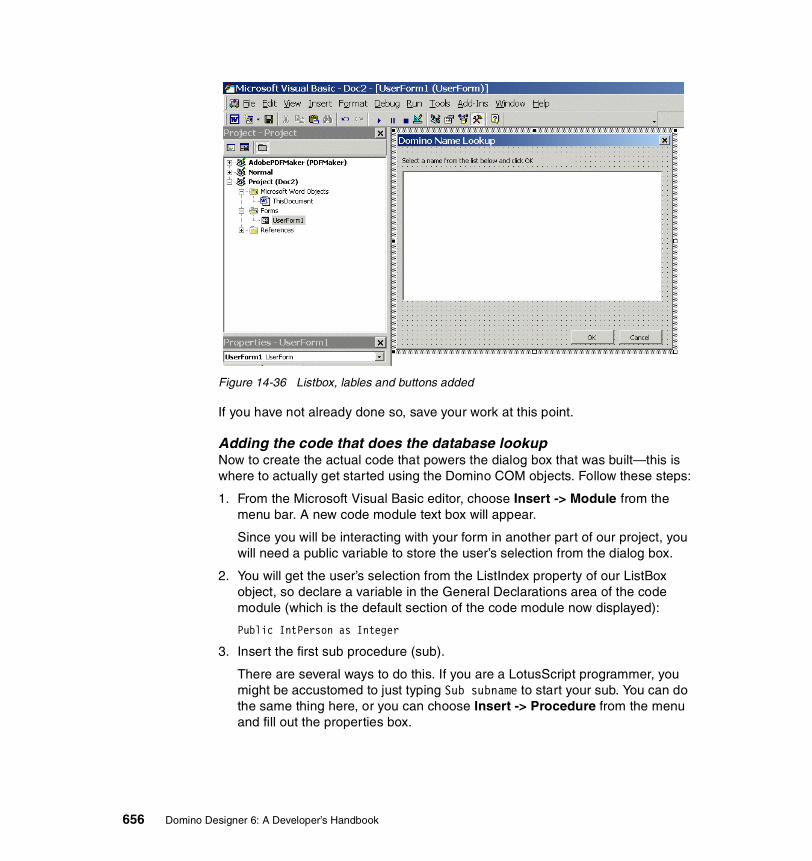
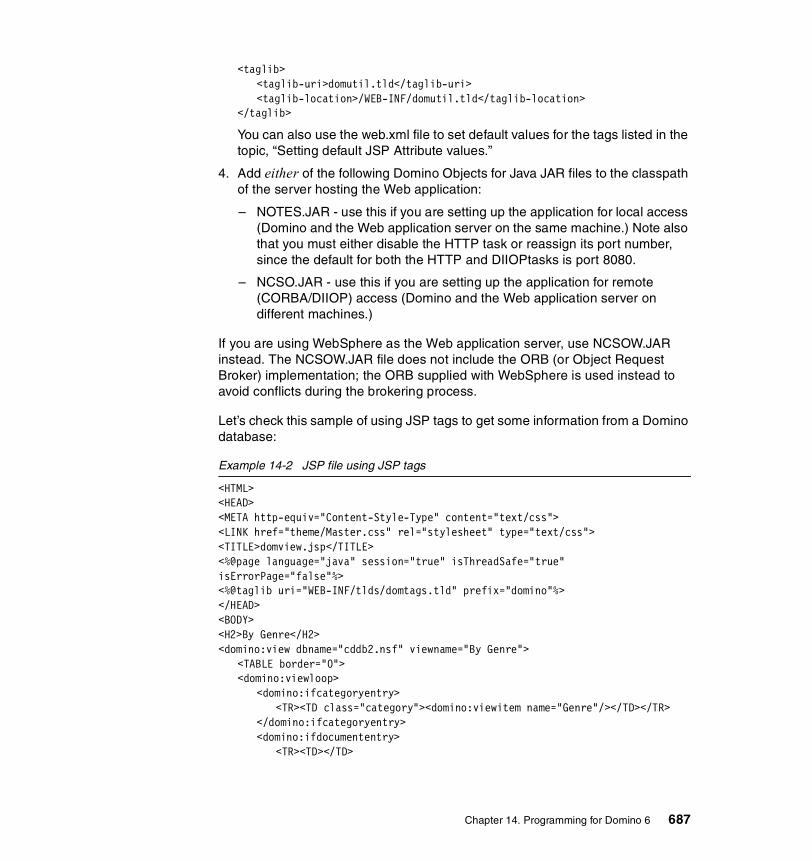
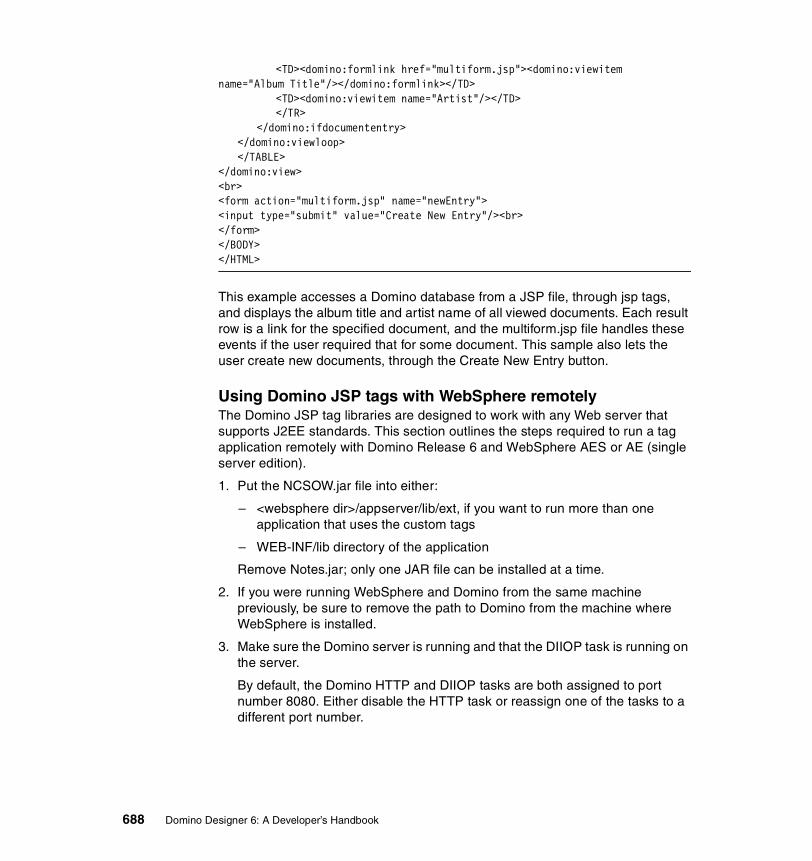
ibm.com/redbooks Domino Designer 6: A Developer’s Handbook Tommi Tulisalo Rune Carlsen Andre Guirard Pekka Hartikainen Grant McCarthy Gustavo Pecly Develop applications for Notes, Web and Mobile clients Programming with Domino Designer 6 New features of Domino 6
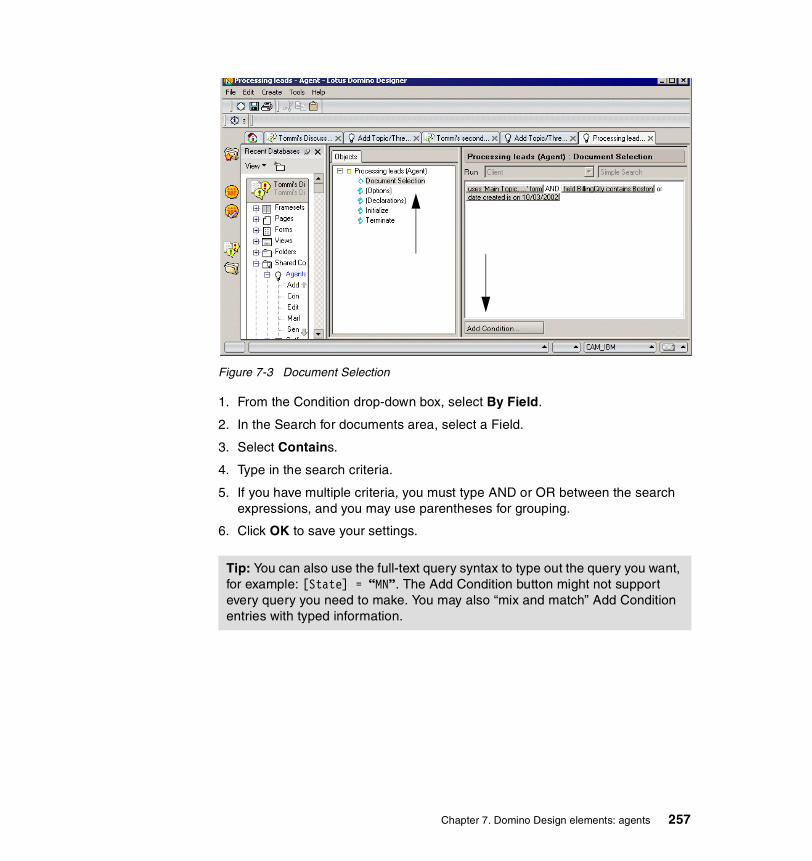
Transcript
ibm.com/redbooks
Domino Designer 6:A Developer’s Handbook
Tommi TulisaloRune Carlsen
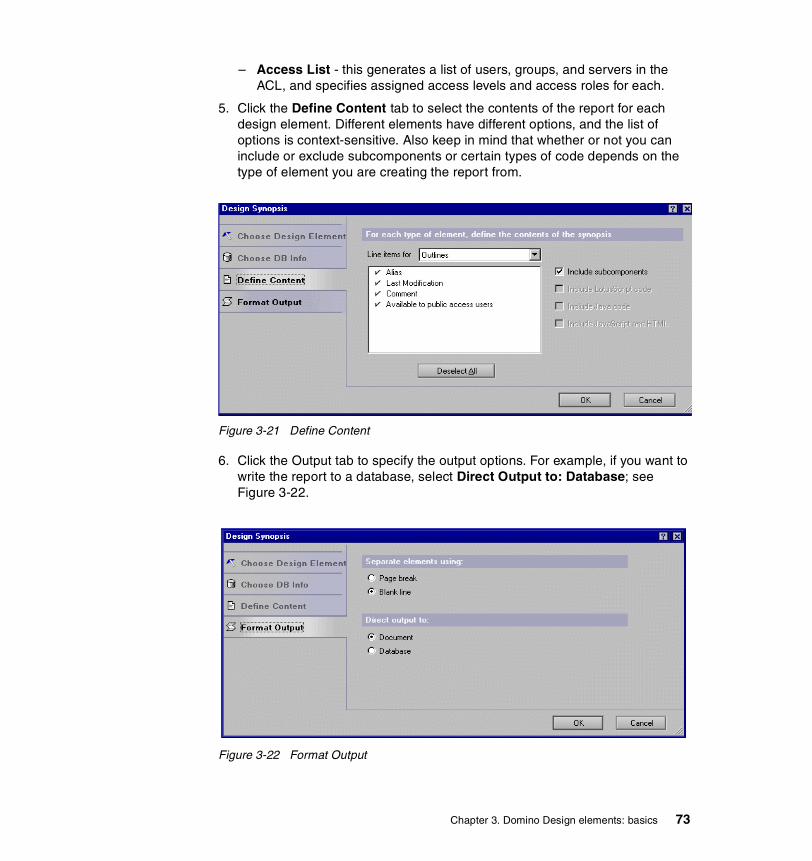
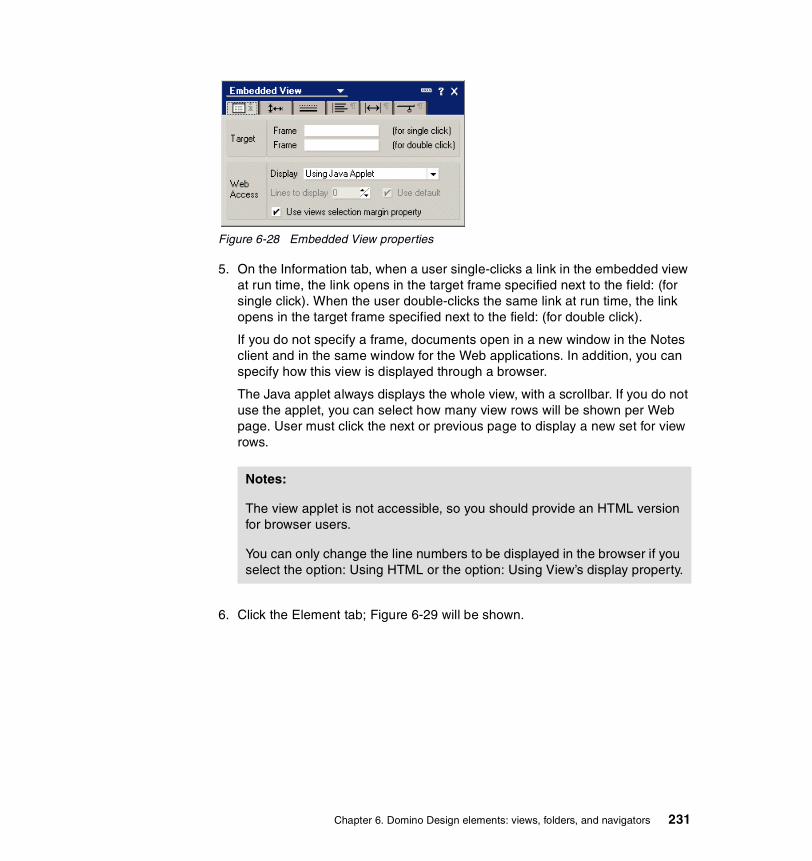
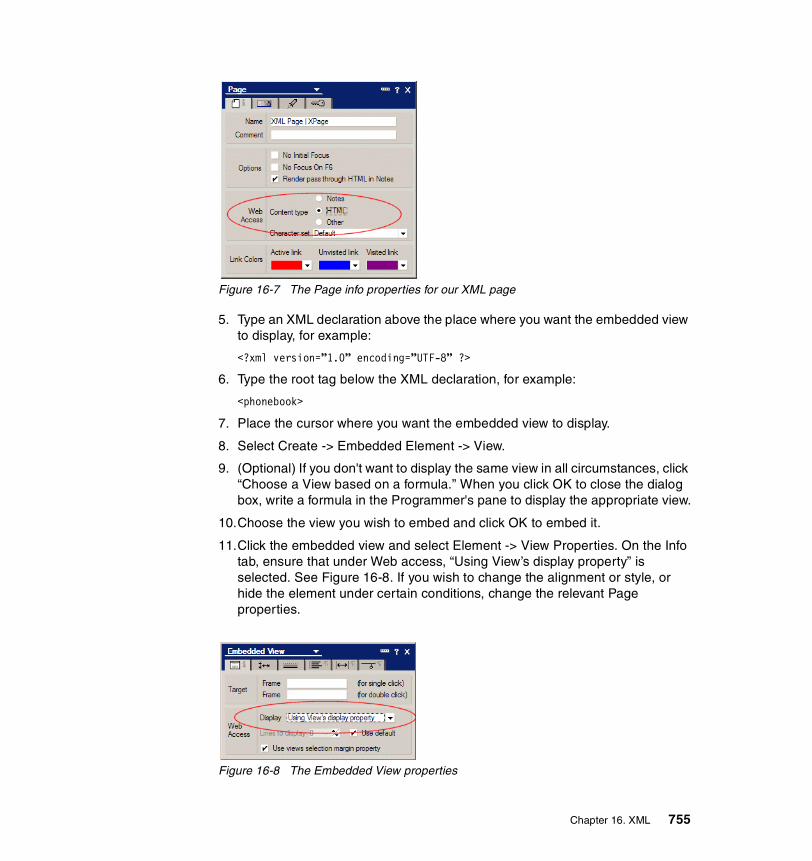
Andre GuirardPekka Hartikainen
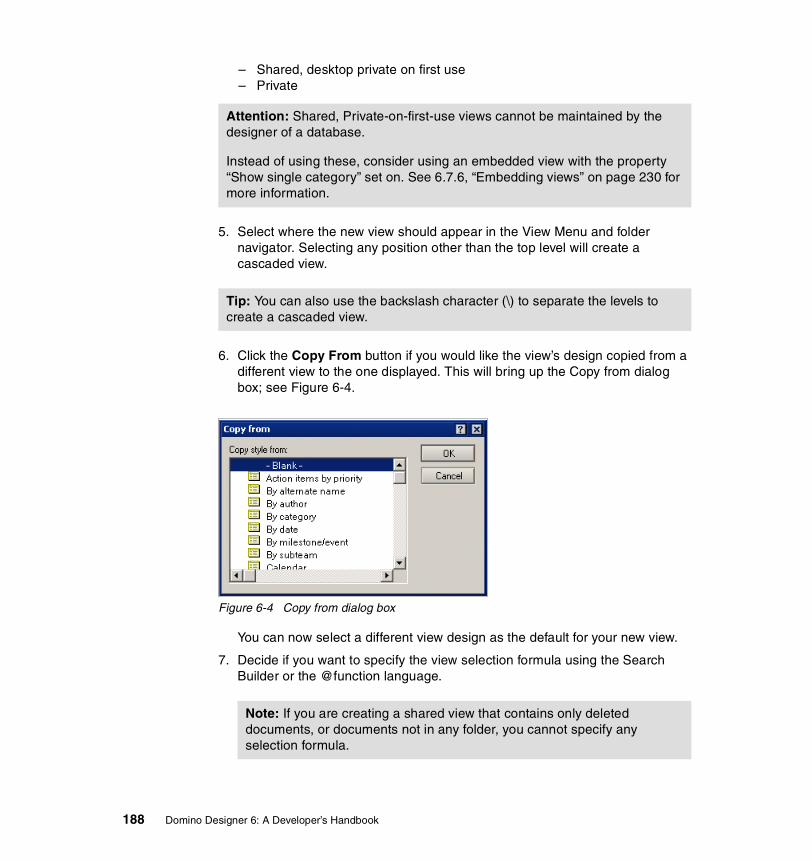
Grant McCarthyGustavo Pecly
Develop applications for Notes, Web and Mobile clients
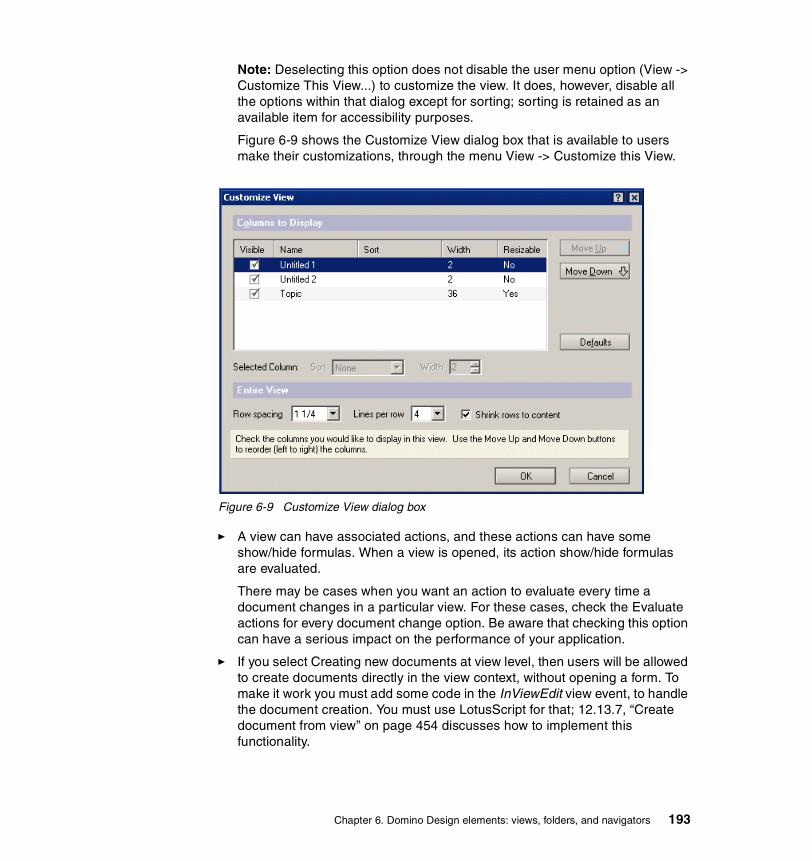
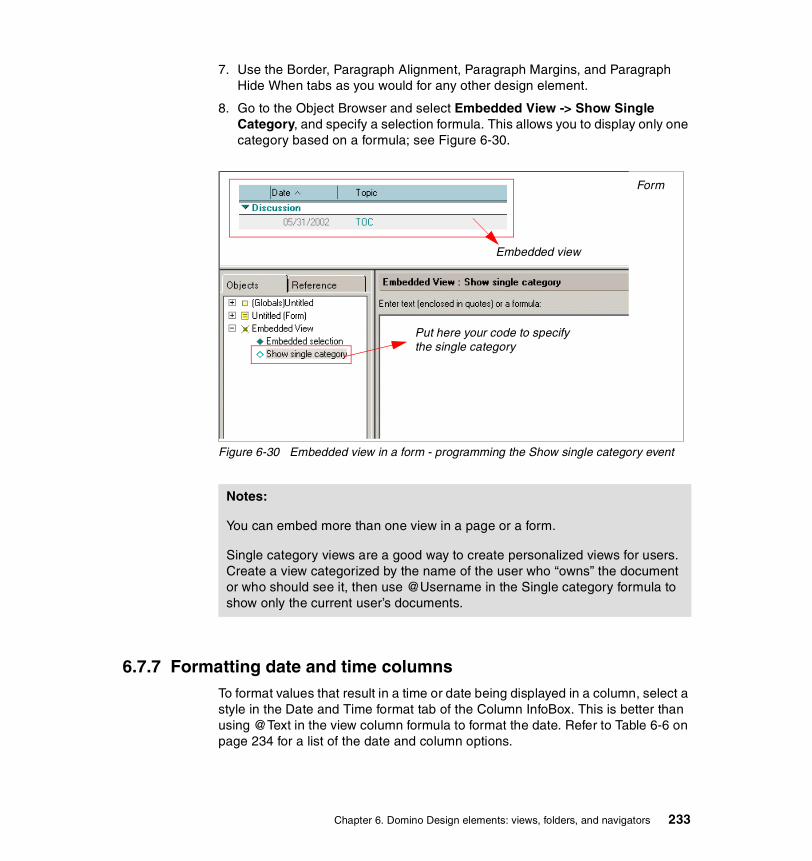
13.4 Using outline control to hide part of an Domino application . . . . . . . . . 51813.5 Using directory links to control access to a Domino application . . . . . . 51913.6 Controlling access to views and forms . . . . . . . . . . . . . . . . . . . . . . . . . 520
This information was developed for products and services offered in the U.S.A.
IBM may not offer the products, services, or features discussed in this document in other countries. Consult your local IBM representative for information on the products and services currently available in your area. Any reference to an IBM product, program, or service is not intended to state or imply that only that IBM product, program, or service may be used. Any functionally equivalent product, program, or service that does not infringe any IBM intellectual property right may be used instead. However, it is the user's responsibility to evaluate and verify the operation of any non-IBM product, program, or service.
IBM may have patents or pending patent applications covering subject matter described in this document. The furnishing of this document does not give you any license to these patents. You can send license inquiries, in writing, to: IBM Director of Licensing, IBM Corporation, North Castle Drive Armonk, NY 10504-1785 U.S.A.
The following paragraph does not apply to the United Kingdom or any other country where such provisions are inconsistent with local law: INTERNATIONAL BUSINESS MACHINES CORPORATION PROVIDES THIS PUBLICATION "AS IS" WITHOUT WARRANTY OF ANY KIND, EITHER EXPRESS OR IMPLIED, INCLUDING, BUT NOT LIMITED TO, THE IMPLIED WARRANTIES OF NON-INFRINGEMENT, MERCHANTABILITY OR FITNESS FOR A PARTICULAR PURPOSE. Some states do not allow disclaimer of express or implied warranties in certain transactions, therefore, this statement may not apply to you.
This information could include technical inaccuracies or typographical errors. Changes are periodically made to the information herein; these changes will be incorporated in new editions of the publication. IBM may make improvements and/or changes in the product(s) and/or the program(s) described in this publication at any time without notice.
Any references in this information to non-IBM Web sites are provided for convenience only and do not in any manner serve as an endorsement of those Web sites. The materials at those Web sites are not part of the materials for this IBM product and use of those Web sites is at your own risk.
IBM may use or distribute any of the information you supply in any way it believes appropriate without incurring any obligation to you.
Information concerning non-IBM products was obtained from the suppliers of those products, their published announcements or other publicly available sources. IBM has not tested those products and cannot confirm the accuracy of performance, compatibility or any other claims related to non-IBM products. Questions on the capabilities of non-IBM products should be addressed to the suppliers of those products.
This information contains examples of data and reports used in daily business operations. To illustrate them as completely as possible, the examples include the names of individuals, companies, brands, and products. All of these names are fictitious and any similarity to the names and addresses used by an actual business enterprise is entirely coincidental.
COPYRIGHT LICENSE: This information contains sample application programs in source language, which illustrates programming techniques on various operating platforms. You may copy, modify, and distribute these sample programs in any form without payment to IBM, for the purposes of developing, using, marketing or distributing application programs conforming to the application programming interface for the operating platform for which the sample programs are written. These examples have not been thoroughly tested under all conditions. IBM, therefore, cannot guarantee or imply reliability, serviceability, or function of these programs. You may copy, modify, and distribute these sample programs in any form without payment to IBM for the purposes of developing, using, marketing, or distributing application programs conforming to IBM's application programming interfaces.
TrademarksThe following terms are trademarks of the International Business Machines Corporation in the United States, other countries, or both:
CICS®DB2®Everyplace™IBM®IMS™
Informix®iSeries™MQSeries®Perform™Redbooks(logo)™
SP™Tivoli®VisualAge®WebSphere®
The following terms are trademarks of International Business Machines Corporation and Lotus Development Corporation in the United States, other countries, or both:
The following terms are trademarks of other companies:
ActionMedia, LANDesk, MMX, Pentium and ProShare are trademarks of Intel Corporation in the United States, other countries, or both.
Microsoft, Windows, Windows NT, and the Windows logo are trademarks of Microsoft Corporation in the United States, other countries, or both.
Java and all Java-based trademarks and logos are trademarks or registered trademarks of Sun Microsystems, Inc. in the United States, other countries, or both.
C-bus is a trademark of Corollary, Inc. in the United States, other countries, or both.
UNIX is a registered trademark of The Open Group in the United States and other countries.
SET, SET Secure Electronic Transaction, and the SET Logo are trademarks owned by SET Secure Electronic Transaction LLC.
Other company, product, and service names may be trademarks or service marks of others.
xviii Domino Designer 6: A Developer’s Handbook
Preface
In this IBM Redbook, we describe how to develop applications with IBM LotusDomino Designer 6. With Domino Designer, you are able to create applications hosted by a Domino server. These applications can be used by different clients, such as Notes clients, Web browsers or mobile devices.
We introduce, and show in detail, how you can use all the design elements of Domino Designer, such as forms, pages, views, agents, outlines, resources and framesets. Those readers who are familiar with developing applications using Release 5 of Lotus Domino may want to start at Chapter 12, which introduces the new features in Domino 6.0, and continue from there.
In the chapters toward the end of the book, we discuss different programming languages, @functions, LotusScript, JavaScript, and Java, that can be used in Domino. We describe in detail how to manipulate rich text objects by programming, as well as XML, in Domino.
This redbook was written for technical specialists, developers and programmers, customers, IBM Business Partners, and the IBM and Lotus community who need technical understanding of how to develop applications using IBM Lotus Domino Designer 6.0.
The team that wrote this redbookThis redbook was produced by a team of specialists from around the world working at the International Technical Support Organization, Cambridge Center.
Tommi Tulisalo is a project leader for the International Technical Support Organization at Cambridge, Massachusetts. He manages projects whose objective is to produce Redbooks on all areas of Lotus Software products. Before joining the ITSO in 2001, he was an IT Architect for IBM Global Services in Finland, designing solutions for customers, often based on Lotus software.
Rune Carlsen is a Senior Consultant for ConCrea as, which is a Norwegian company owned by IBM. He specializes in Notes/Domino/Web application development as well as system administration, and provides technical support for customers and their system environments. As a Certified Lotus Instructor, Rune also teaches classes, lectures for corporate customers through Lotus Authorized Education Centers, and often speaks at seminars. He is a Lotus Certified administrator and developer for Notes/Domino R4, R5 and 6 at the Principal
level. He is also the author and the developer of http://www.dominozone.net, a non-commercial resource site for the Notes/Domino community.
Andre Guirard is a product developer and consultant on the IBM Lotus Software Enterprise Integration team. He has worked with Notes since version 3.0, and with other information technologies for some time before that. He has lectured on Lotes Notes development, and authored several articles on that subject. Andre can be reached at [email protected].
Pekka Hartikainen is an IT Specialist with IBM Finland, currently working on a team that develops Domino- and WebSphere-based applications for IBM customers. He specializes in the development of Web applications based on Domino. Since joining IBM Global Services in 1998, he has been involved in developing several business applications, such as browser-based extranet solutions.
Grant McCarthy is an Advisory IT Specialist with IBM South Africa. He has developed a number of Domino applications for IBM, including the IBM SA On-line Procedures Manual, for which he was the team leader. He was also selected to participate in the WebAhead Partnership Program, and spent three months working with the WebAhead team in the USA, whose mission is to accelerate advanced Internet technology inside IBM. He worked on the Franklin project, an XML-based content management prototype that is currently being used by ibm.com.
Gustavo Pecly is an IT Director at Cyberlynxx Ltda., an IBM Premier Business Partner in Rio de Janeiro, Brazil. He specializes in e-business applications development and enterprise integration systems. He has worked with IBM/Lotus technologies for more than five years, developing solutions for several industry areas that range from simple Domino applications to e-business and intranets that integrate back-end systems (ERP systems, RDBMS, Transaction systems). Gustavo is a Certified Lotus Professional at the Principal level in Application Development, and a Certified Lotus Instructor. His e-mail address is [email protected].
A number of people provided support and guidance to this project, in particular Gary Devendorf, Senior Product Manager for Application Development at Lotus Sofware, and Alan Lepofsky, Offerings Manager for “Grow with Lotus” at Lotus Software, who contributed numerous samples used throughout the book.
Thanks also to the authors of the IBM Redbook Lotus Domino R5: A Developer’s Handbook, SG24-5331-01: Fiona Collins, David Morrison, Søren Peter Nielsen, Sami Serpola, and Reinhard Strobl. We have utilized the material of that redbook throughout this book.
In addition, we would like to thank to following people:
xx Domino Designer 6: A Developer’s Handbook
Brian Benz, Benz Technologies
Richard Berube, IBM Westford Lab
Roy Bowen, Lotus Software
Kimilee Gile, IBM Westford Lab
Jan Kenney, IBM Westford Lab
Timothy Kounadis, Lotus Software
George LanglaisI, IBM Westford Lab
Steve Nikopoulos, IBM Westford Lab
Jim Verdibello, IBM Westford Lab
Wai-Ki Yip, IBM Westford Lab
Alison Chandler, ITSO Poughkeepsie
William Tworek, ITSO, Cambridge
ITSO Poughkeepsie Editing Team
Become a published authorJoin us for a two- to six-week residency program! Help write an IBM Redbook dealing with specific products or solutions, while getting hands-on experience with leading-edge technologies. You'll team with IBM technical professionals, Business Partners and/or customers.
Your efforts will help increase product acceptance and customer satisfaction. As a bonus, you'll develop a network of contacts in IBM development labs, and increase your productivity and marketability.
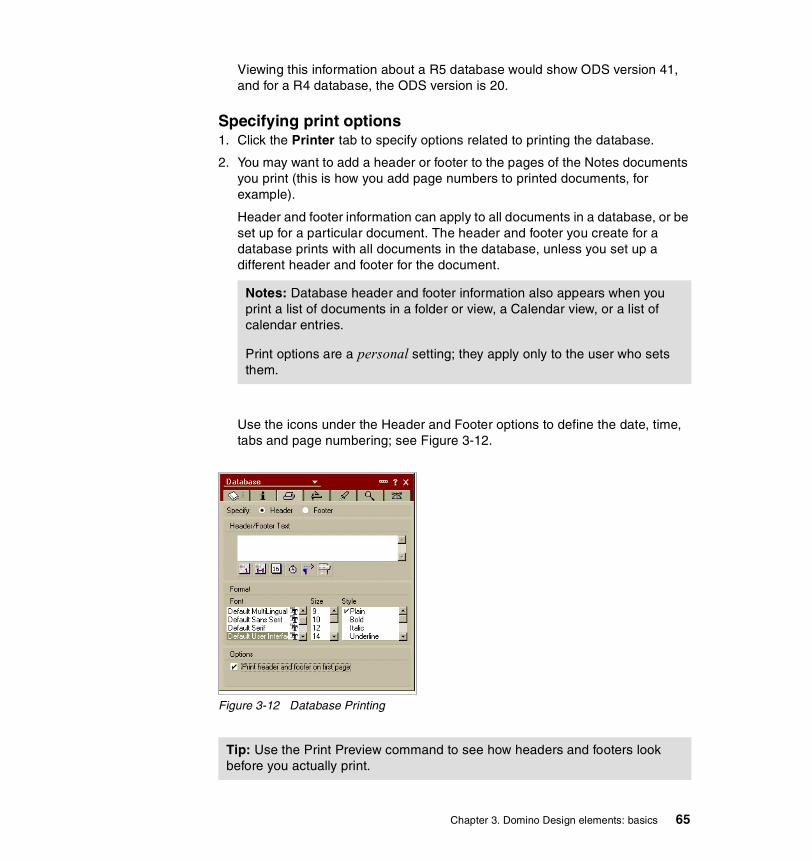
Find out more about the residency program, browse the residency index, and apply online at:
ibm.com/redbooks/residencies.html
Comments welcomeYour comments are important to us!
The Domino Server family is an integrated messaging and Web application software platform for companies that need to improve customer responsiveness and streamline their business processes.
Domino 6, the only solution built on an open, unified architecture, is trusted by the world’s leading companies to deliver secure communication, collaboration, and business applications.
In this chapter, we describe the Domino 6 Server Family, the services that Domino 6 offers, and the clients for Domino 6.
1.1 Domino 6 ServerThe Domino 6 Server is offered in different packages in order to allow customers to pick the functionality that meets their current requirements, and extend that functionality as their requirements change. In the following sections, we briefly describe the three Domino 6 Servers.
1.1.1 Domino Messaging ServerDomino Messaging Server is used for messaging, and for calendar & scheduling. It has prebuilt e-mail and collaborative applications including discussions, teamrooms, and personal journals. Domino Messaging combines support for the latest Internet mail standards with the advanced messaging capabilities and enterprise-scale reliability and performance of Lotus Domino.
Note: Domino Messaging Server is used for messaging only. Customers who want to deploy their own applications on the Domino server should consider Domino Enterprise Server or Domino Utility Server.
1.1.2 Domino Enterprise ServerDomino Enterprise Server supports the same e-mail and collaborative applications as Messaging Server, plus the custom applications created by customers or business partners. It also includes clustering capabilities for high-availability implementations.
This is the Domino server to use if your company uses Domino for messaging, and you want to deploy custom applications.
1.1.3 Domino Utility ServerDomino Utility Server is the new member of the Domino Server family. It does not entitle the user of e-mail (specifically, individual user mailboxes), but does include the custom application entitlement. It includes the clustering capabilities for high-availability implementations. Utility Server imposes no CAL requirements; in other words, any user of any software can access the server.
This is the Domino server to use if your company does not use Domino for messaging, but you want to deploy custom applications.
1.1.4 Services offered by Domino ServersLotus Domino Servers offer a wide range of services. In this section, we briefly describe the most important ones.
2 Domino Designer 6: A Developer’s Handbook
Object StoreDocuments in a Domino database can contain any number of objects and data types, including text, rich text, numerical data, structured data, images, graphics, sound, video, file attachments, embedded objects, and Java™ and ActiveX applets. A built-in Full text search engine makes it easy to index and search documents. The object store also lets your Domino applications dynamically present information based on variables such as user identity, user preferences, user input, and time.
DirectoryA single directory manages all resource directory information for server and network configuration, application management, and security. Domino includes user account synchronization between Windows NT/Windows 2000 and Domino, and is Light Weight Directory Access Protocol (LDAP)-compliant. The directory is the foundation for easily managing and securing your Internet and intranet applications.
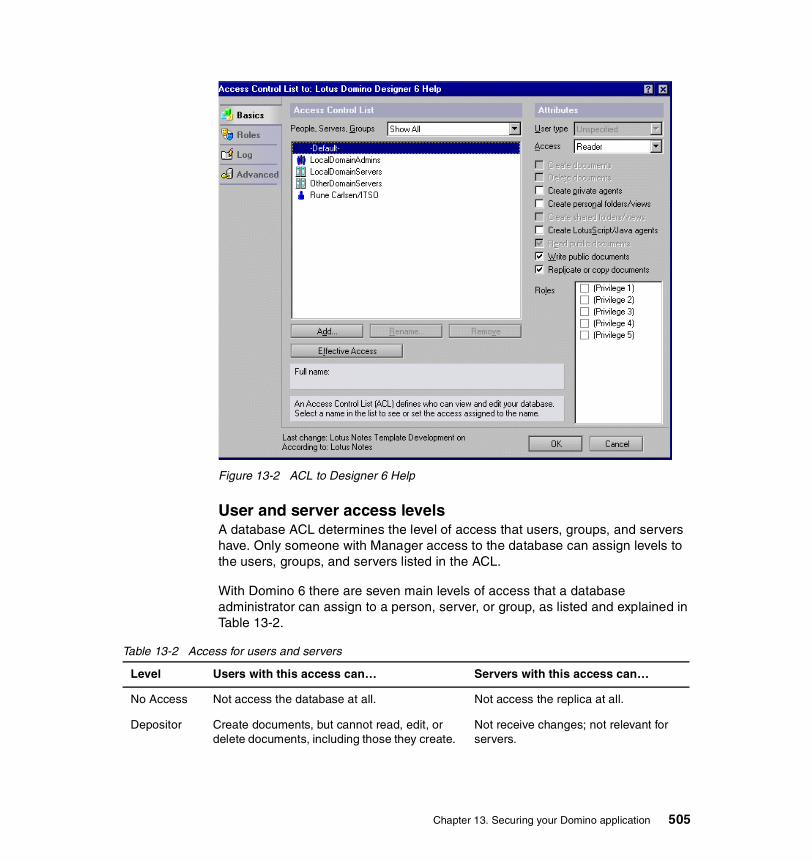
SecurityThe Domino security model provides user authentication, digital signatures, flexible access control, and encryption. Domino security enables you to extend your intranet applications to customers and business partners. Refer to Chapter 13, “Securing your Domino application” on page 499 for more information.
Replication Bi-directional replication automatically distributes and synchronizes information and applications across geographically dispersed sites. Replication makes your business applications available to users around your company or around the world, regardless of time or location.
MessagingAn advanced client/server messaging system with built-in calendaring and scheduling enables individuals and groups to send and share information easily. Message transfer agents (MTAs) seamlessly extend the system to Simple Mail Transfer Protocol (SMTP)/Multipurpose Internet Mail Extension (MIME), x.400, and cc:Mail™ messaging environments. The Domino messaging service provides a single server supporting a variety of mail clients: Post Office Protocol V3 (POP3), Internet Message Access Protocol V4 (IMAP4), Message Application Programming Interface (MAPI), and Lotus Notes clients.
Chapter 1. What is Lotus Notes/Domino 3
Web serverLotus Domino provides an integrated Web application server that can both host Web sites that a Web browser, Notes clients, and mobile clients can access, and serve pages that are stored in the file system or in a Domino database.
When a Web browser requests a page in a Domino database, Domino translates the document into HTML. When a Web browser requests a page in an HTML file, Domino reads the file directly from the file system. Then the Web server uses the HTTP protocol to transfer the information to the Web browser.
WorkflowA workflow engine distributes, routes, and tracks documents according to a process defined in your applications. Workflow enables you to coordinate and streamline critical business activities across an organization, and with customers, partners, and suppliers.
Agents Agents enable you to automate frequently performed processes, eliminating tedious administration tasks and speeding your business applications. Agents can be triggered by time or events in a business application. Agents can be run on Domino servers or Lotus Notes clients.
Development EnvironmentDomino Designer is general-purpose client software featuring an integrated development environment (IDE) that provides easy access to all features of the Domino server. In this redbook, we focus on the features and functions of Domino Designer, as well as the Domino Object Model.
Domino Object ModelDomino offers a unified model for accessing its objects through back-end classes, whether you use LotusScript® or Java. This allows you to switch programming languages without having to learn new ways to program for Domino. Refer to 14.2, “The Domino Object Model” on page 565, for more information on the Domino Object Model.
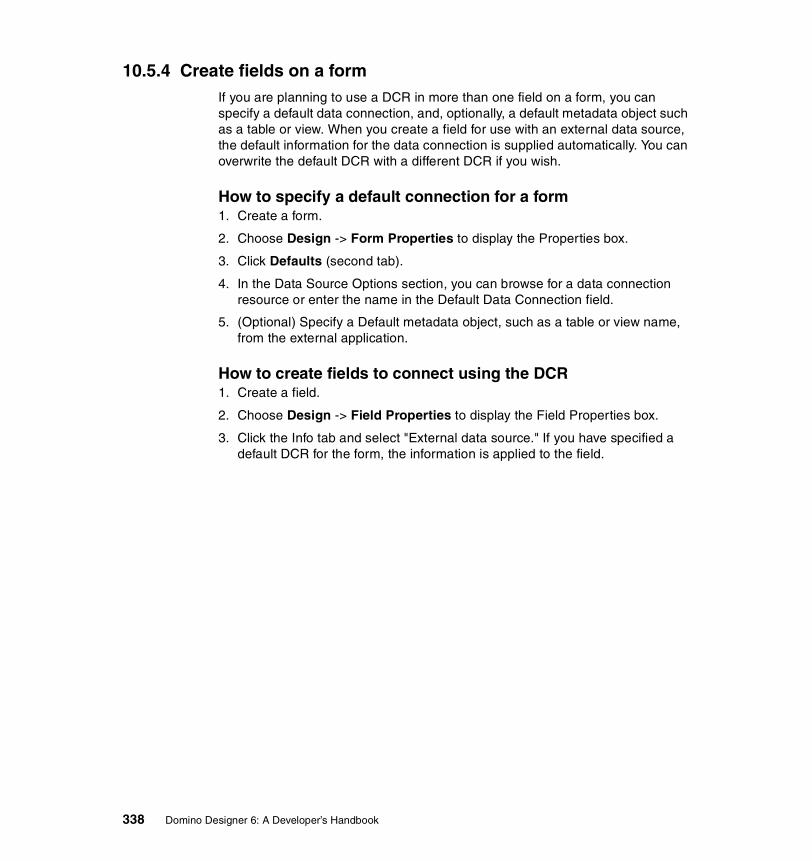
Live integration with enterprise dataDECS, or Domino Enterprise Connection Services, is part of the Domino Server. It is a Lotus-developed technology, first shipped with NotesPump™ 2.5, that supplies an easy-to-use, forms-based interface to achieve deep, integrated connectivity to external data from Domino applications. This allows developers to map fields in forms directly to fields in relational database tables, without storing any data within the Domino database.
4 Domino Designer 6: A Developer’s Handbook
Scalability and reliabilityDomino Enterprise Server enables you to cluster up to six Domino servers to provide both scalability and failover protection, in order to maximize the availability of your groupware and messaging applications. Real-time replication technology keeps the clustered servers synchronized.
Note: A Domino server is not the same as a file server. A file server provides access to shared resources such as printers and applications, and also manages network activity. Domino is an application-level server process that provides services necessary for the effective management of communications and applications.
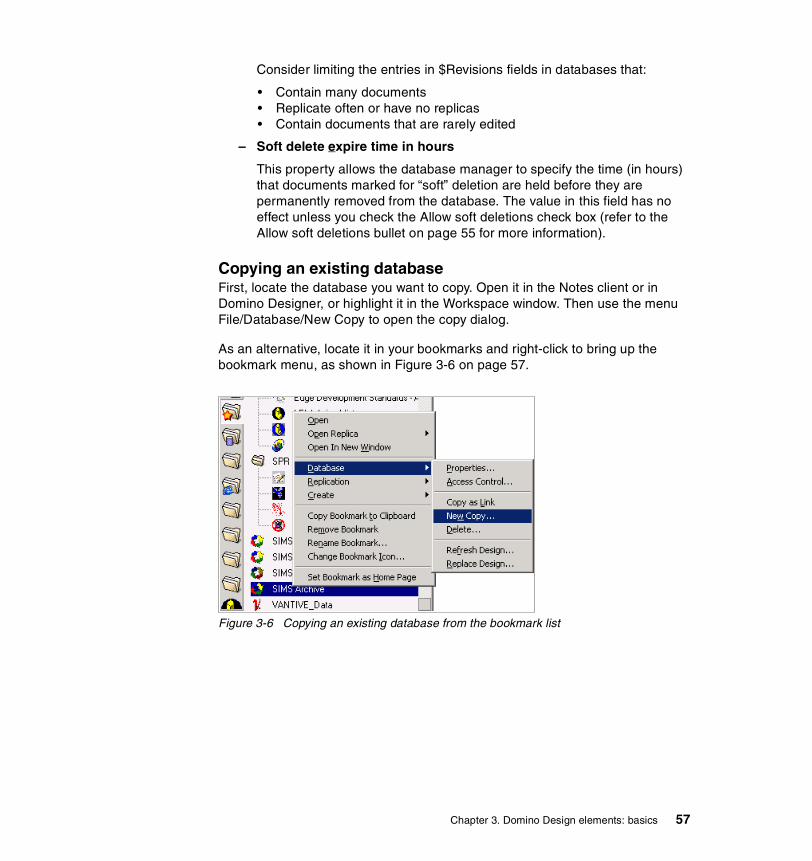
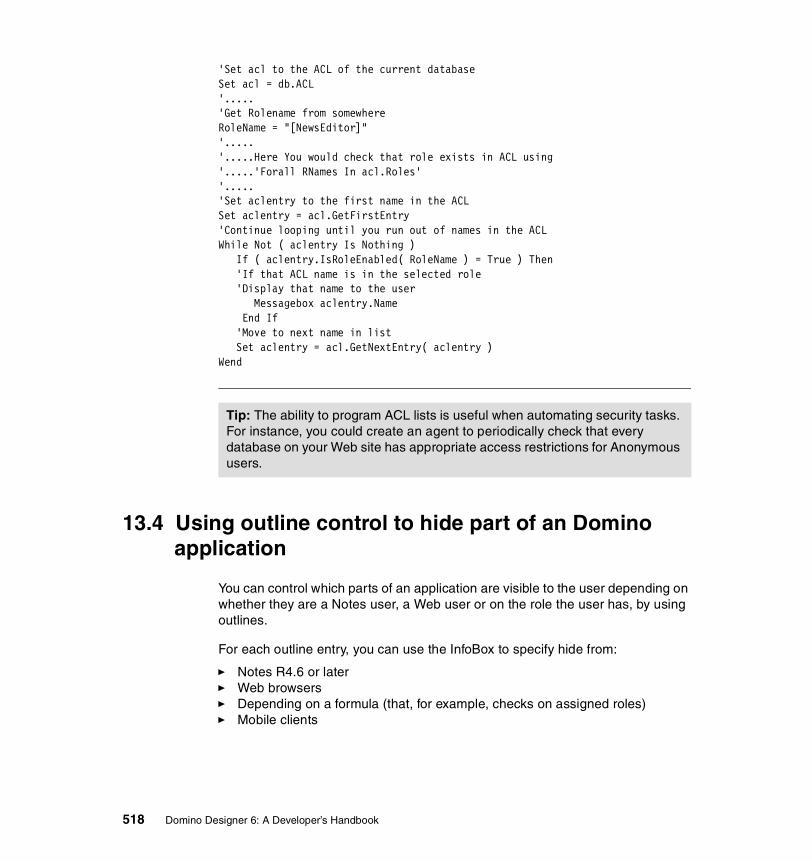
1.2 Clients for Domino 6As with the previous release of Lotus Domino, Domino 6 continues to focus on its “ease of use” approach. Therefore it has numerous clients available to use, each one designed to meet specific needs:
� Lotus Notes 6 client
� Domino Designer 6: the developer’s client
� Domino Administrator 6: the system administrator’s client
� Mobile clients (PDAs, Internet-enabled cellular phones)
� iNotes Web Access
� iNotes for Microsoft Outlook
� Other POP/IMAP clients
Most of the functionality in Lotus Domino can also be accessed from Web browsers. The Lotus Domino server includes a Web administration client. In the following section we give a brief overview of the clients.
1.2.1 Lotus Notes 6Lotus Notes is the leading integrated e-mail and collaborative software for the Internet. Notes 6 offers an even more open, Web-like, customizable environment than was available in Notes R5. You can use Notes to send and receive Internet mail, schedule appointments, browse the Web, contribute to Internet newsgroups, and take advantage of the Welcome page for tracking all your important daily information. You can also use Notes 6 to create databases and browse existing Notes databases, as well to access Notes applications.
Chapter 1. What is Lotus Notes/Domino 5
Following are some of the highlights of features that contribute to improving Notes' ease of use:
Welcome PageNotes R5 introduced the Welcome Page, which provides instant, customizable access to the things that are most important to you—mail, calendar, to do list, Web pages, whatever you want. For Notes 6, the default Welcome Page has been redesigned to increase ease of use and make more of the features accessible to you. New features include:
� Enhanced Welcome Page options and a new wizard that make it even easier to customize and personalize your Welcome Page
� A Tip of the Day that shows handy information about using the Notes client
� Increased content types, such as Notes database views and access to directories on the file system
� On framed Welcome Pages, a “switcher” for dynamic switching of frame content (for example, switching from your Inbox to your calendar within the same frame)
� Welcome Page action buttons, for example, to create a new mail memo or calendar entry
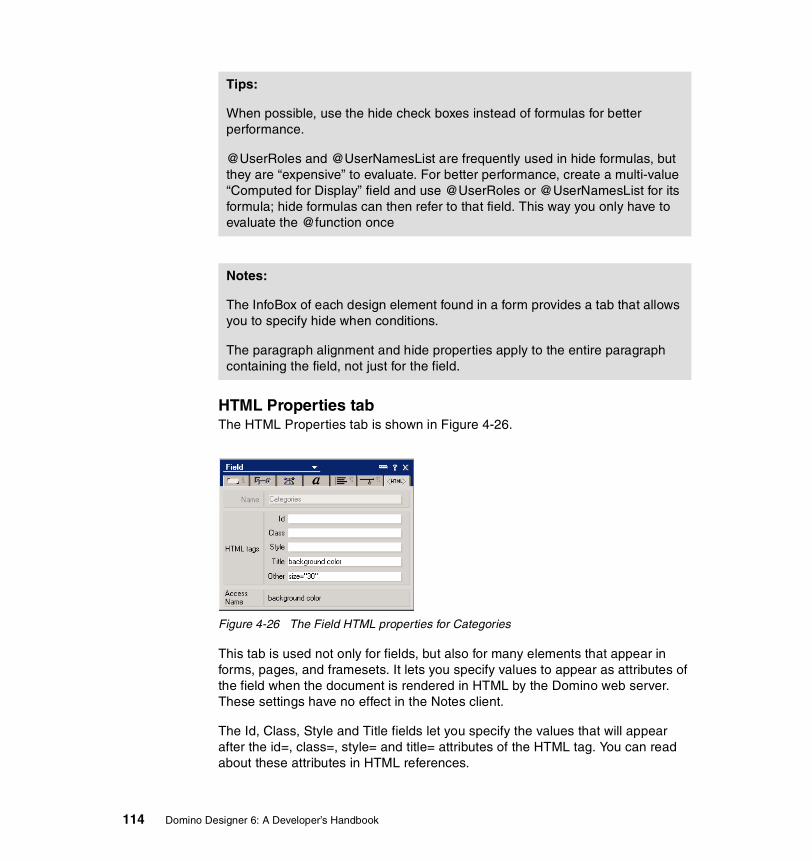
� A Preview Pane, similar to regular Notes databases
� The Launch Pad, for quick access to applications, everyday tasks, Notes links, and Web links
� Quick Notes, on the right-hand side of the screen, which allow you to create mail, contacts, journal entries, and reminders without having to open the respective databases
BookmarksBookmarks let you create links that point to Notes elements (for example: views, databases, and documents) or to Internet sites (for example: Web pages, newsgroups, and ftp sites). To create a bookmark, all you need to do is to drag a document link or window tab to the Bookmark bar. Bookmarks in Notes 6 now also fully support drag-and-drop, which means that you can bookmark items from the file system, including Microsoft Word documents and presentation files, as well as system folders.
Other Notes 6 enhancements include a Startup folder and a History folder.
The Startup folder allows you to bookmark databases, Web pages, even other programs that you would want to launch when you start your Notes client.
6 Domino Designer 6: A Developer’s Handbook
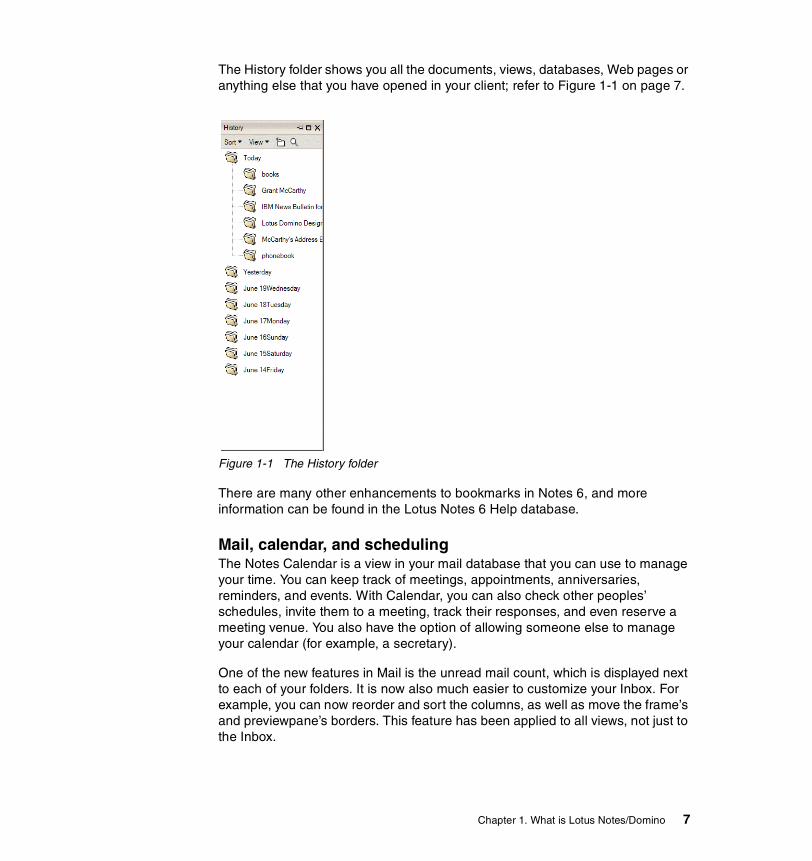
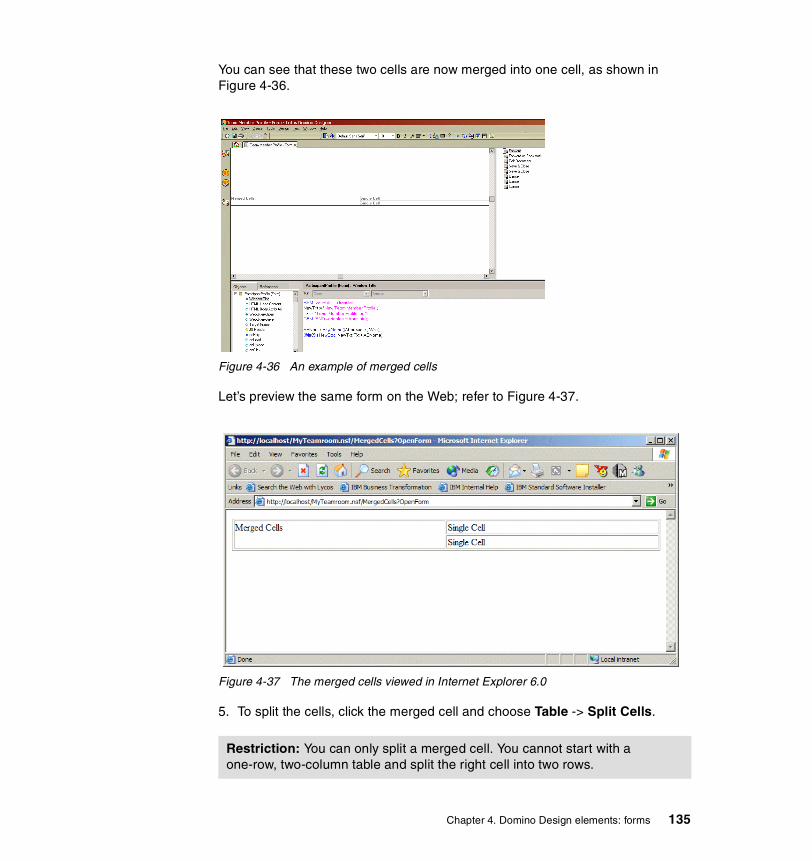
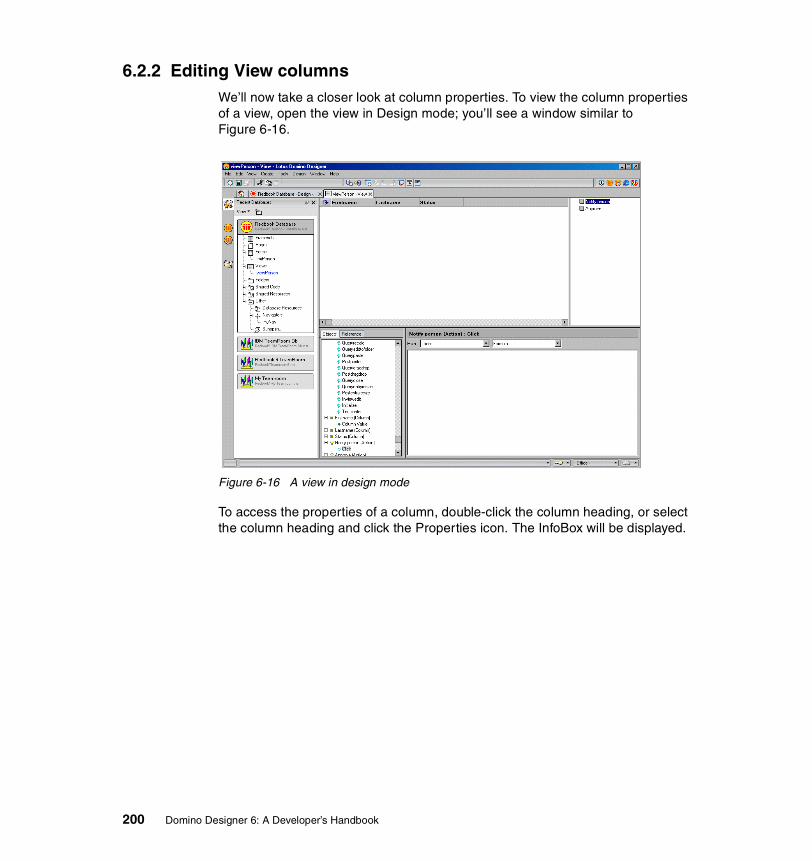
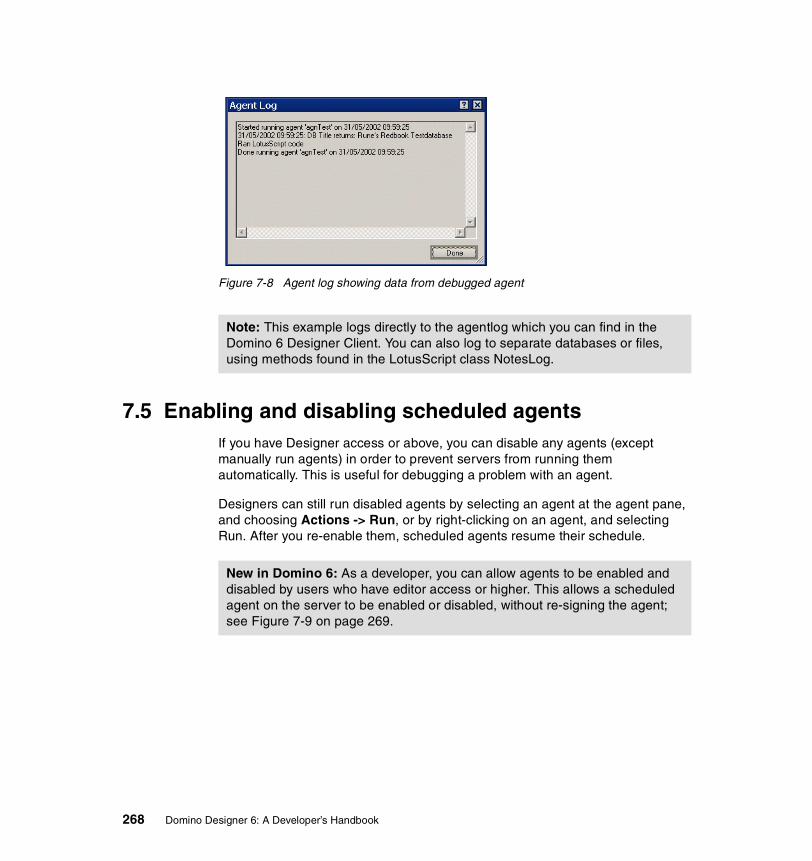
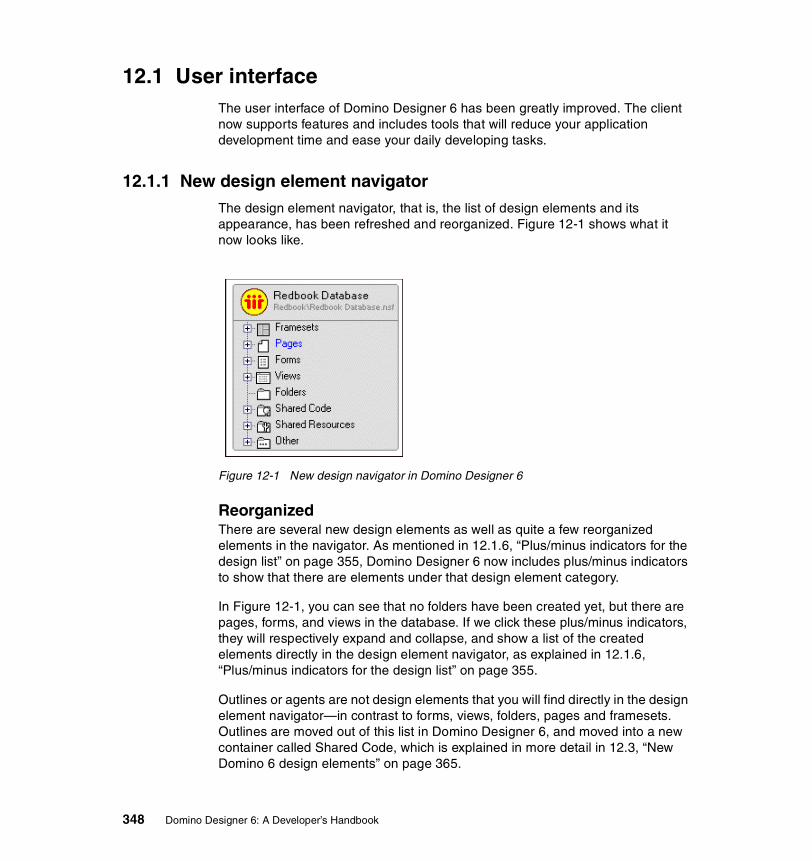
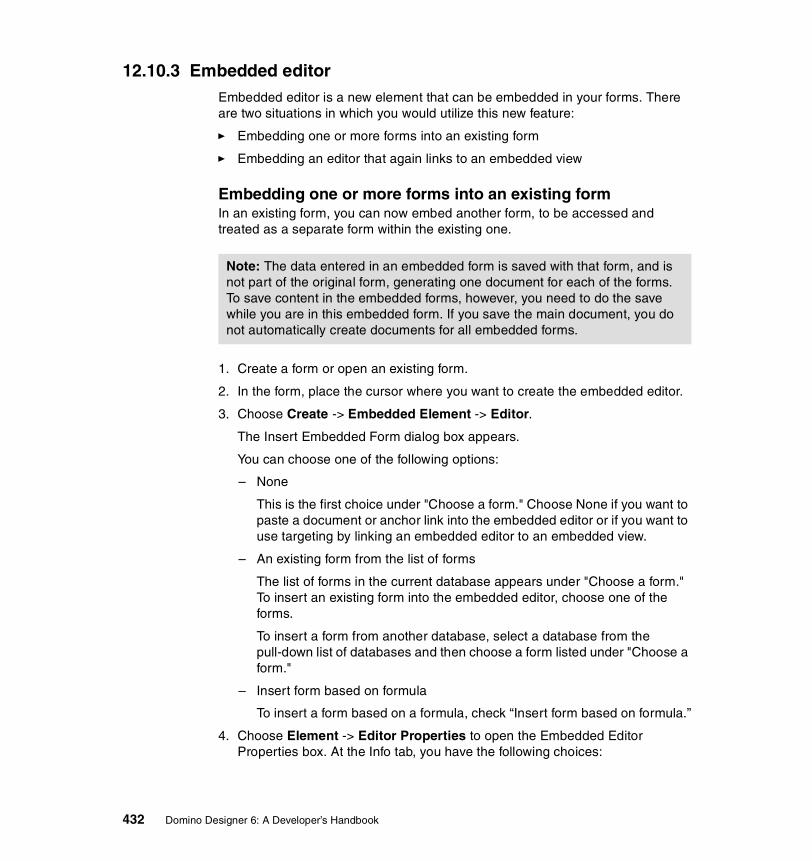
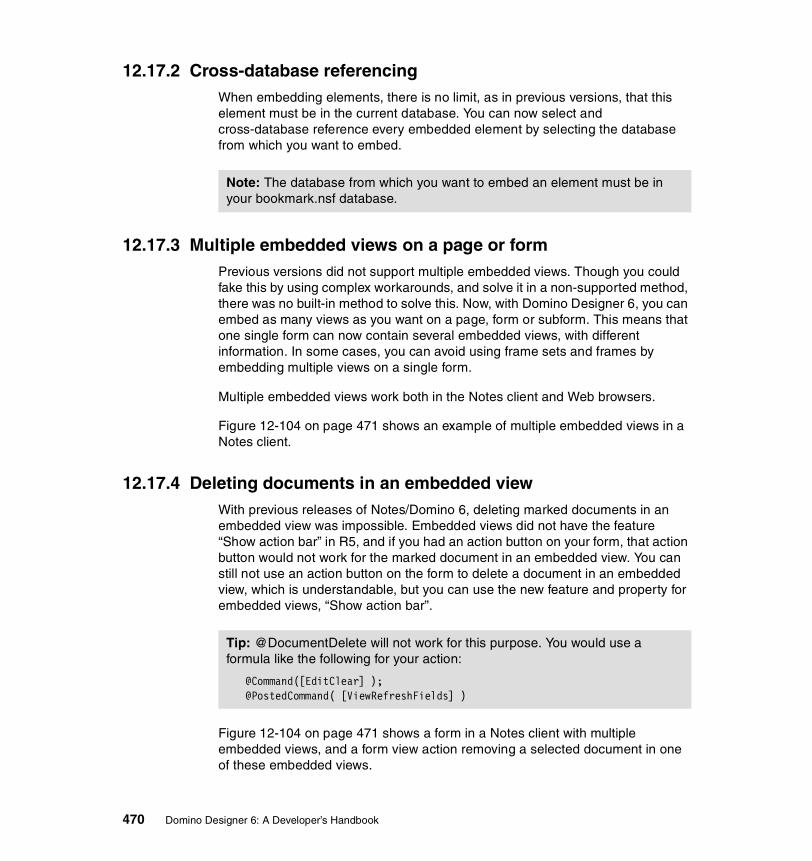
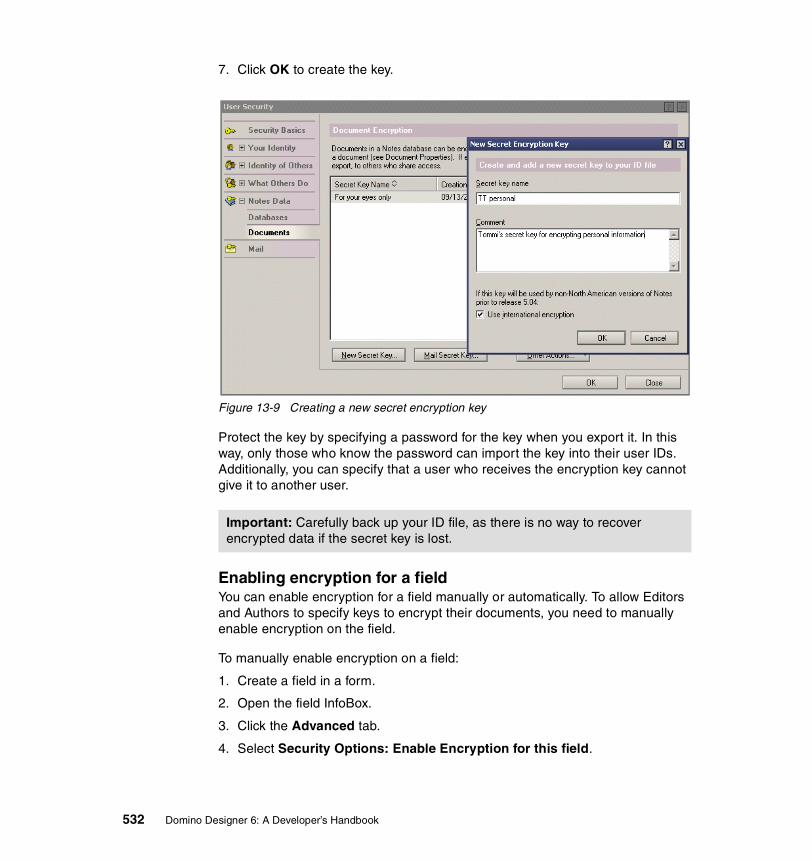
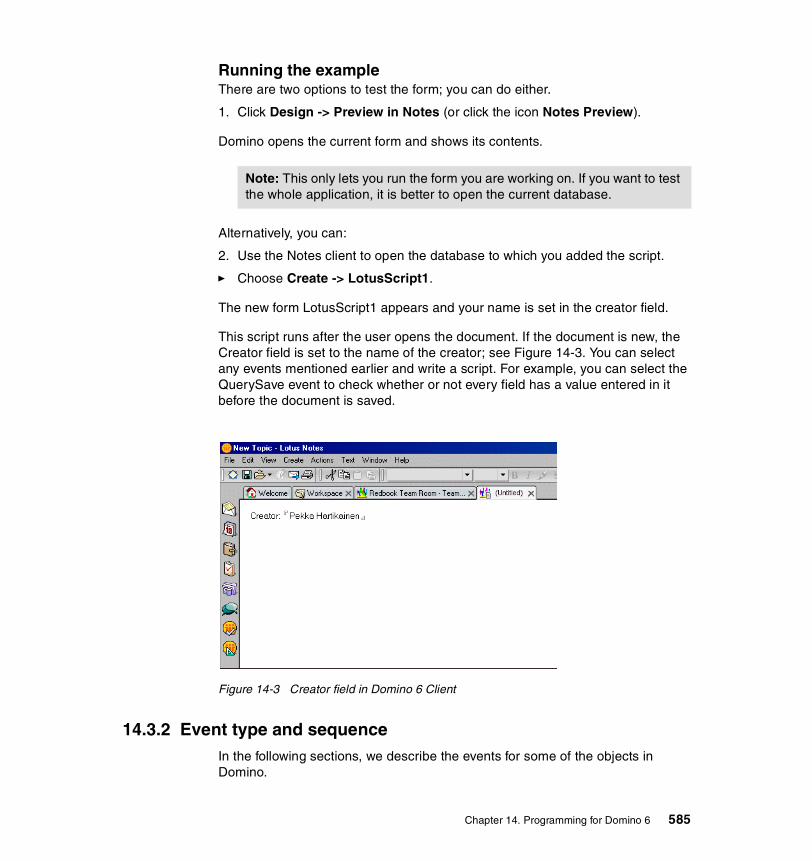
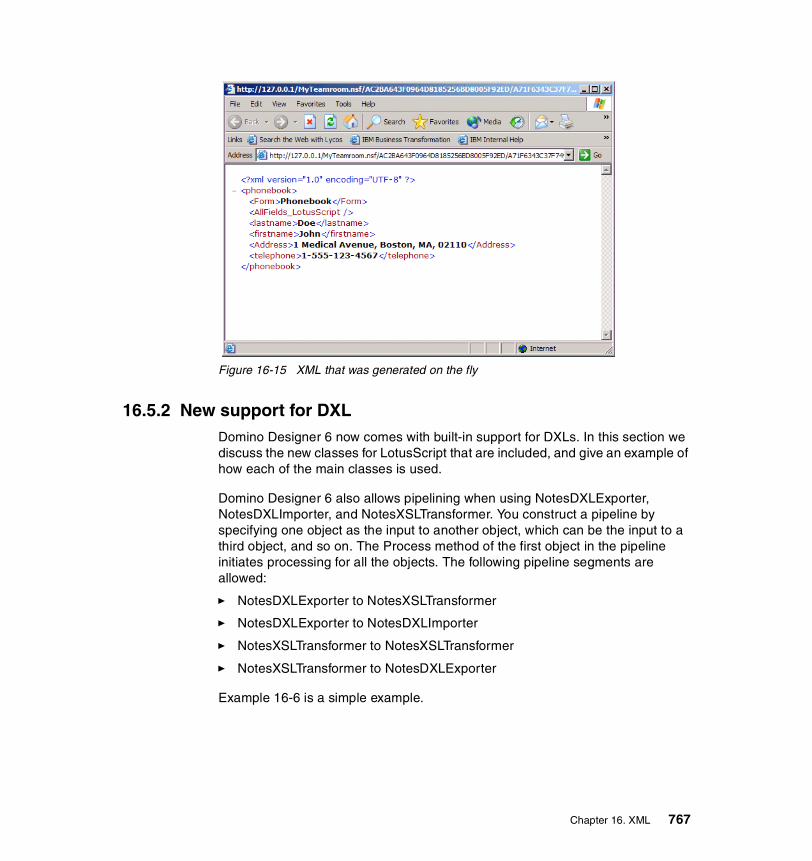
The History folder shows you all the documents, views, databases, Web pages or anything else that you have opened in your client; refer to Figure 1-1 on page 7.
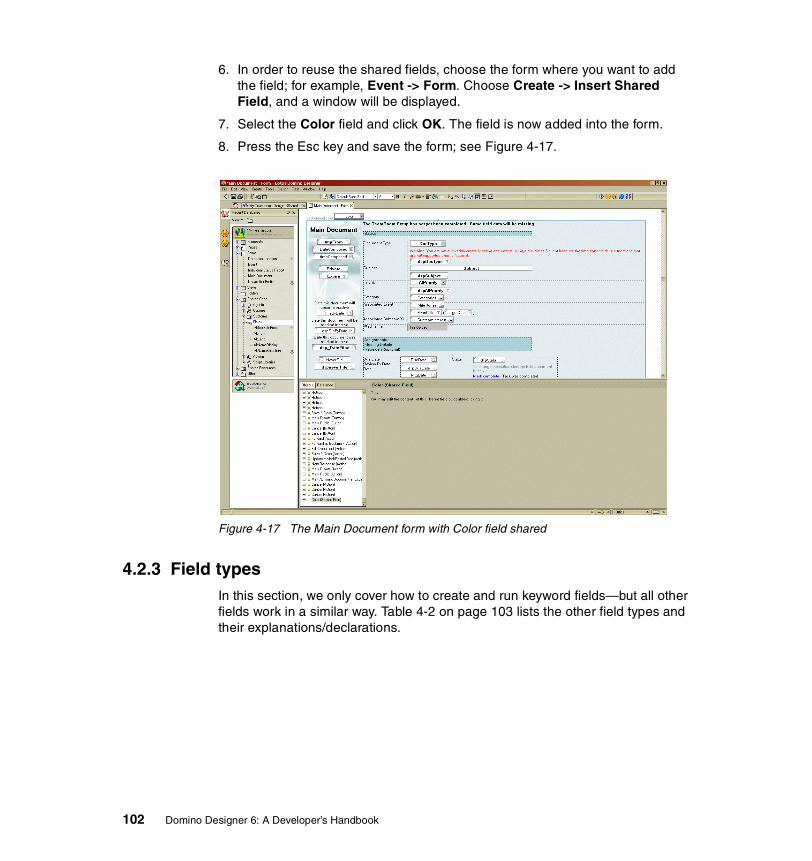
Figure 1-1 The History folder
There are many other enhancements to bookmarks in Notes 6, and more information can be found in the Lotus Notes 6 Help database.
Mail, calendar, and schedulingThe Notes Calendar is a view in your mail database that you can use to manage your time. You can keep track of meetings, appointments, anniversaries, reminders, and events. With Calendar, you can also check other peoples’ schedules, invite them to a meeting, track their responses, and even reserve a meeting venue. You also have the option of allowing someone else to manage your calendar (for example, a secretary).
One of the new features in Mail is the unread mail count, which is displayed next to each of your folders. It is now also much easier to customize your Inbox. For example, you can now reorder and sort the columns, as well as move the frame’s and previewpane’s borders. This feature has been applied to all views, not just to the Inbox.
Chapter 1. What is Lotus Notes/Domino 7
Another useful feature is the Auto Inbox Refresh, which checks for new e-mail and automatically refreshes the Inbox. For details about all the new features in Mail, consult the Notes 6 online help.
Calendar views are now presented in a tabbed format to make it easier to switch between daily, weekly and monthly calendars. The calendar entry form has been redesigned to include more tools on one form. All entries in the calendar are now color-coded, so that it must simpler to distinguish between a meeting, an appointment and a reminder. Here are examples of other features included in Notes 6:
� iCalendar (Internet-standard calendaring and scheduling) and vCard (electronic business card) support
� Several new day, week, and month views
� Many new printing options, including the ability to print to a Notes document
� New formatting options for views: Summarize (for all views) and Show Time Slots (for week and month views)
� Clickable month and year in the date chooser, so you can quickly change either the month, the year, or both
� A scroll bar at the bottom of the screen to quickly move to other dates in the view you're in
Document lockingNotes 6 includes a powerful new collaboration tool; you now have the ability to lock and unlock documents. When this feature is enabled on a database, users with at least Author access are able to lock documents on any replica, preventing others with the same access from modifying the document, even if they are working on a different replica. Even managers of a database cannot edit a locked document (although they are able to unlock documents). Database designers can enable this feature in the Database properties box.
1.2.2 Domino Designer 6Domino Designer 6 is used to create Domino applications. We focus on Domino Designer 6 in this redbook; Chapter 2 is dedicated to an overview of Domino Designer 6, and in other chapters we examine the various design elements and describe in detail how to program with Domino Designer.
1.2.3 Domino Administrator 6The Domino Administrator is a powerful tool that allows you to perform all your administrator tasks from one easy-to-use interface. Domino Administrator’s
8 Domino Designer 6: A Developer’s Handbook
integrated interface allows you to manage users, files, and servers. This is all possible without the need to switch tools. The Domino Administrator is task-based. It has different tabs representing the logical grouping of administrator tasks. Domino 6 includes a number of administration features that give you powerful, centralized control over Domino, and reduces your administrative tasks.
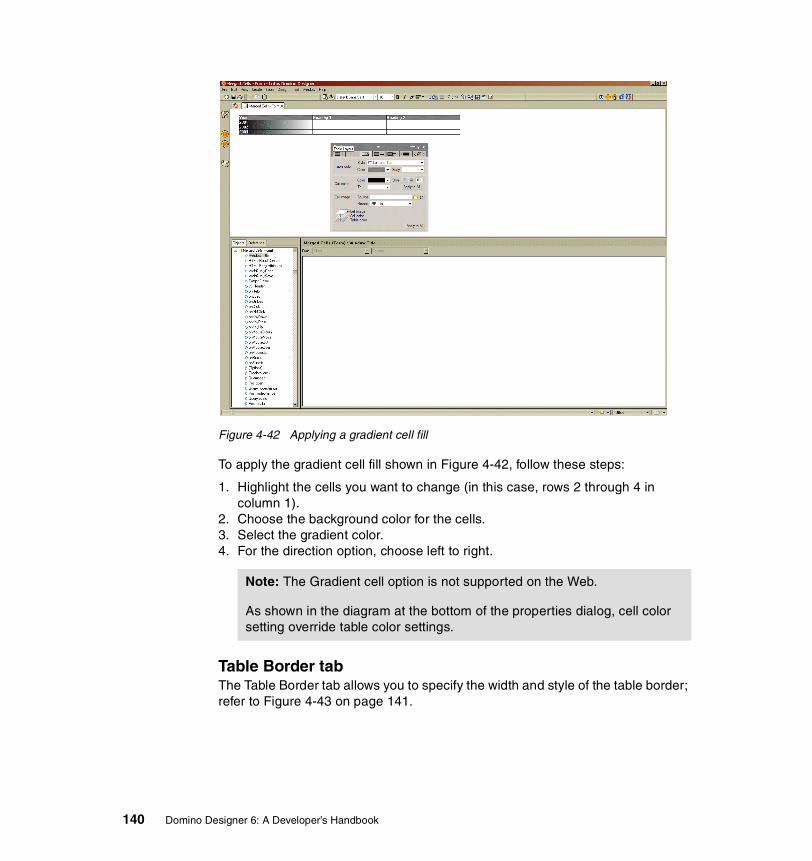
Some of these powerful features include:
� Policy-based management
� Automatic client upgrades with Smart Upgrade
� Roaming user support
� Delegated server administration
� ASP administration
� Deployment of corporate Welcome pages
� Client version reporting
� Console innovations and improvements
� Statistics monitoring and analysis
For more details about the features found in Domino Administrator 6, see the online help.
Domino Administrator 6 is not a standalone client, but can be optionally installed when installing Notes 6 or Domino Server 6. As a developer, you will need Domino Administrator for certain tasks, such as signing a database. Using the Java-based Web Administrator client is an alternative to Domino Administrator client. The Web Administrator client is new to Domino 6.
1.2.4 Mobile clientsLotus Notes is the leader in mobility solutions. Lotus Mobile Notes is currently part of another Lotus Offering called Domino Everyplace. Mobile Notes, together with Domino Everyplace, offers you access to your e-mail, calendars, directories and Domino-based applications from wireless devices such as PDAs and Internet-enabled phones.
Mobile Notes offers a familiar menu structure, along with unified access to the Notes inbox from multiple clients. It comes with a menu that you can personalize and customize, along with convenient Notes features, views, and reply options that allow you to work productively while on the go. A feature designed for the mobile user to view full or brief memos makes it more convenient and easier to view only the data that's needed. For more detailed information about using
Chapter 1. What is Lotus Notes/Domino 9
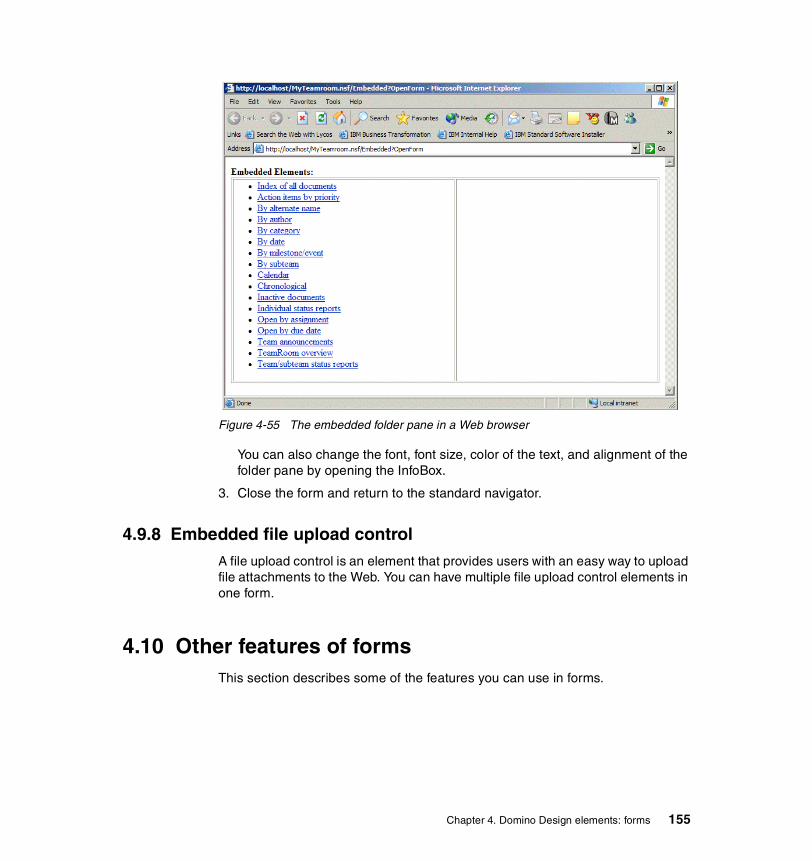
Domino with mobile clients, see the IBM Redbook Lotus Mobile and Wireless Solutions, SG24-6525.
1.2.5 iNotesiNotes delivers powerful Domino messaging, collaboration, and e-business capabilities to Web browser users. Plus, iNotes extends reliable, scalable, secure Domino messaging services to standards-based client and Microsoft Outlook users. iNotes provides centralized management and deployment—and unmatched offline support. iNotes includes:
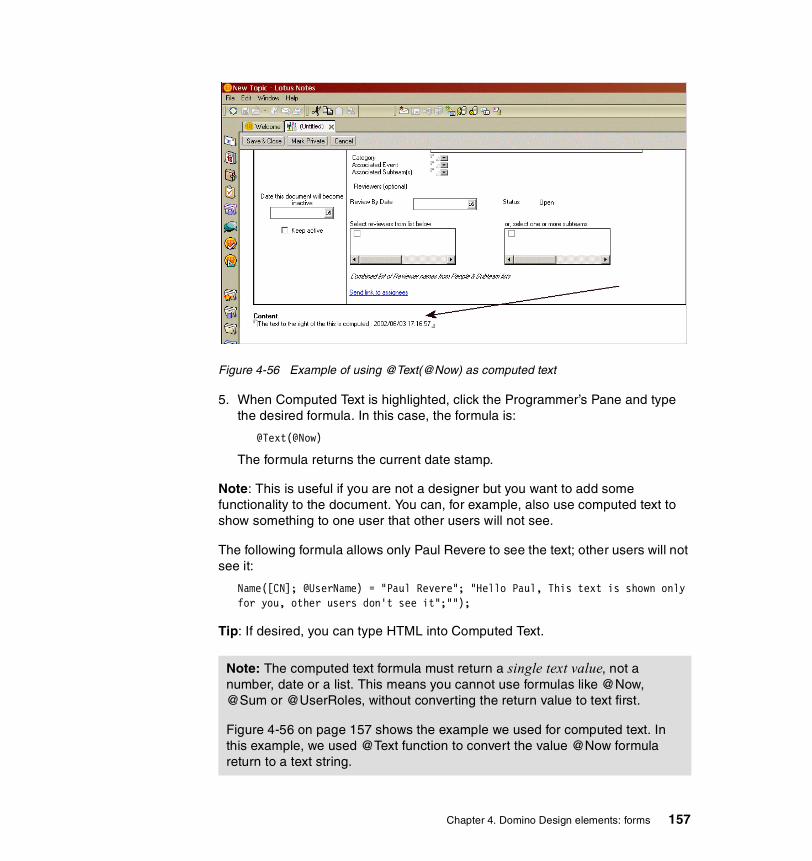
� iNotes Web Access
� iNotes Access for Microsoft Outlook
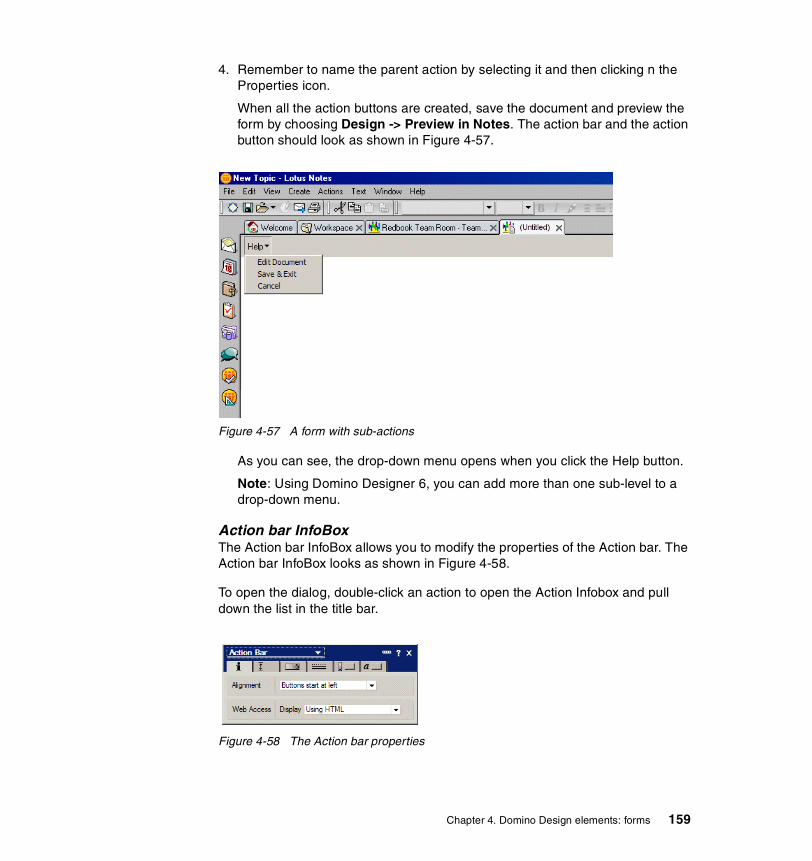
iNotes Web AccessiNotes Web Access provides users with browser-based access to Notes Mail, and to Notes Calendar and Scheduling features. iNotes Web Access users can send and receive mail, view their calendars, invite people to meetings, create to do lists, keep a notebook, and work offline. However, users cannot access Domino databases other than their mail file.
After being set up for iNotes Web Access, a user can use both the standard Notes Client and a Web browser to access their mail files. Because both the Notes Client and iNotes Web Access operate on the same underlying user mail file, read and unread marks remain up to date, regardless of which Client the user uses to read the mail. Users can also synchronize information in their Personal Address Book with information in their contact list in iNotes Web Access.
Other features include:
� Drag-and-drop to folders� Calendar and Scheduling improvements � Lock down welcome page� Rich text enhancements � New UI refresh
iNotes Access for Microsoft OutlookThis product simply allows you to connect to your Notes mail file through the Microsoft Outlook client. The Microsoft Outlook user experience is unchanged with iNotes Access for Outlook; users simply work with their mail, calendar, and task data on Domino instead of Microsoft Exchange.
Familiar Microsoft Outlook features are supported, including rich text, folders, and integration with Microsoft Office applications. You can now take advantage of
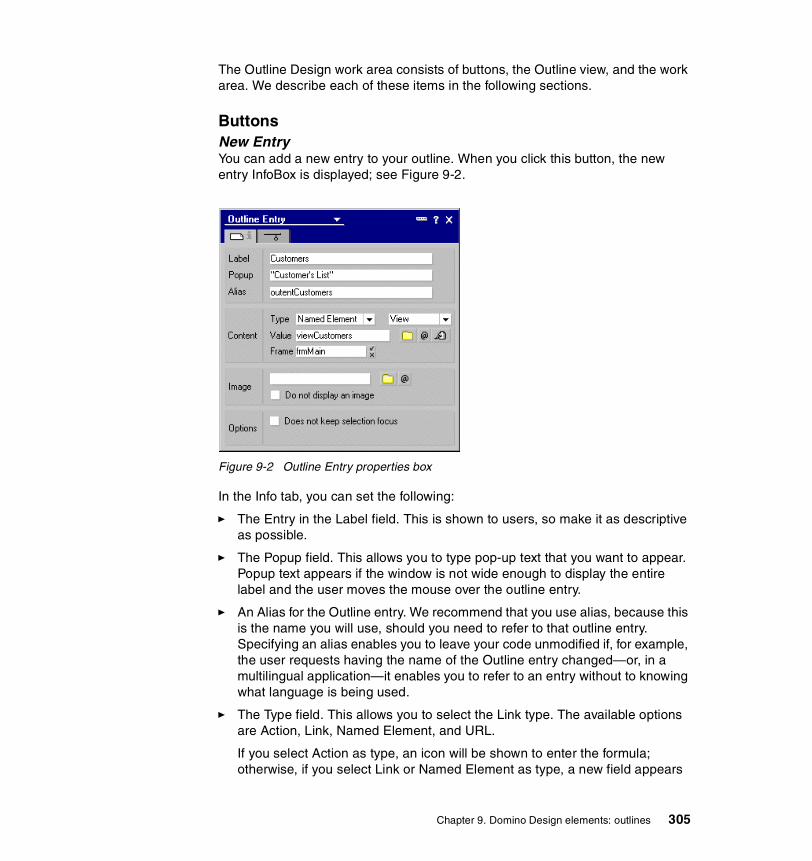
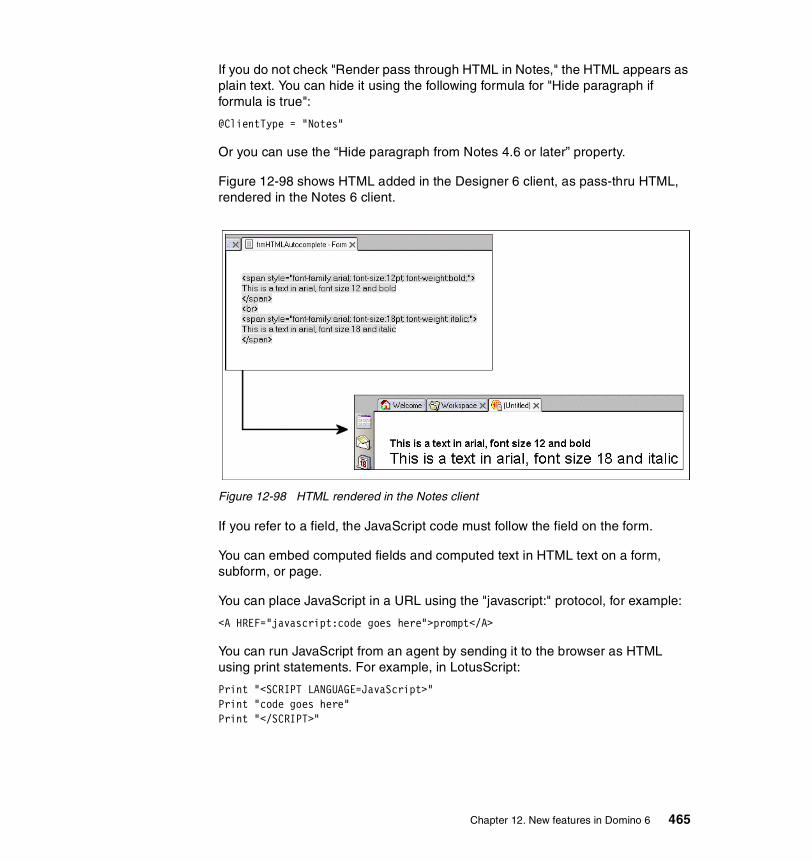
10 Domino Designer 6: A Developer’s Handbook
the reliable and scalable Domino Messaging environment and all the valuable features it has to offer.
Other POP3/IMAP clientsiNotes 6 caters for most, if not all, Internet messaging standards. This means that you can access your e-mail using a third-party standards-based client.
Chapter 1. What is Lotus Notes/Domino 11
12 Domino Designer 6: A Developer’s Handbook
Chapter 2. Lotus Domino Designer
The Domino server and Domino Designer provide a world-class development platform for applications, whether the applications will be accessed by Notes clients, Web browsers or mobile devices. In this chapter, we take a closer look at Domino Designer.
2.1 OverviewDomino enables you to build applications which facilitate the flow of information between your organization’s enterprise systems and front-end business processes.
The Domino development environment offers you application services such as workflow, directory, messaging, and security which can be used to create high value business solutions.
The Domino Designer is an open application development environment that is intuitive and offers a high degree of developer productivity.
In release 6, Notes and Web development experiences have been integrated, bringing native Web technologies to the Notes environment and extending native Domino Technologies to the Web environment. With Domino Designer, you write your application once to run in both a Web browser and the Notes client. In addition, you can write applications in JavaScript which will support both the Notes client and the Web browser.
Domino Designer gives you the ability to build international applications with Domino Global WorkBench™ which contains a comprehensive set of tools to easily create, synchronize, and manage multilingual Domino applications.
2.2 Working in Domino DesignerThis section gives you an overview of the user interface of Domino Designer. As in Lotus Notes client, the workspace in Domino Designer is made up of several pages where the Domino databases are displayed as icons. Databases are also accessible through bookmarks, which could be located inside bookmark folders, on the bookmark bar, or even inside documents.
One of the features of the Programmer’s Pane is its sensitivity to context. You are very often just one mouse-click away from the action you want to perform.
2.2.1 Launching Domino DesignerIn order to start application development, you need to open a separate, client, Domino Designer.
14 Domino Designer 6: A Developer’s Handbook
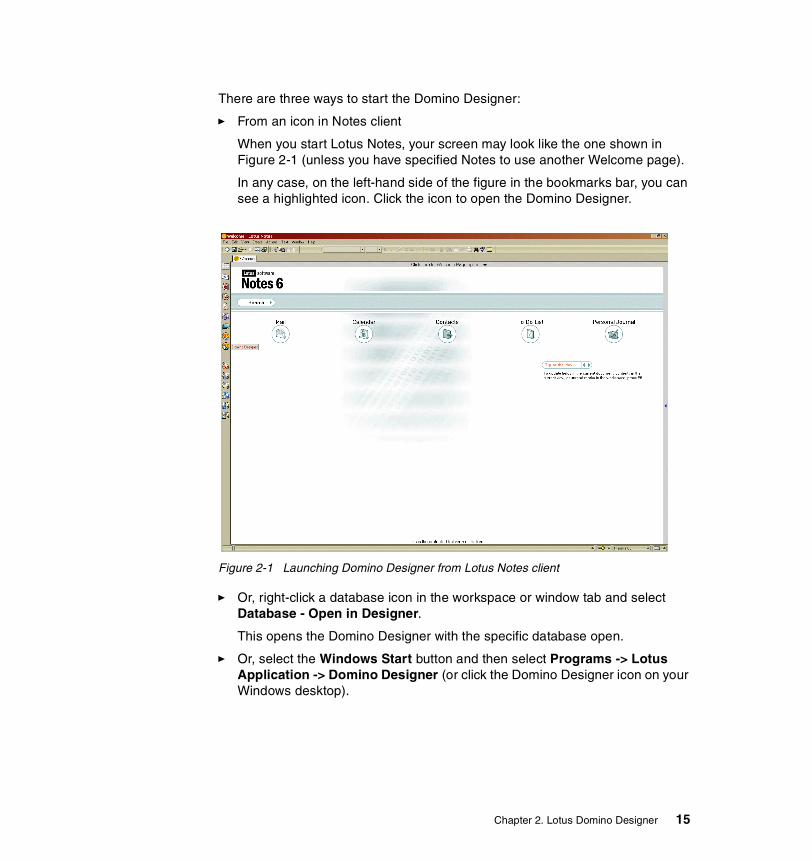
There are three ways to start the Domino Designer:
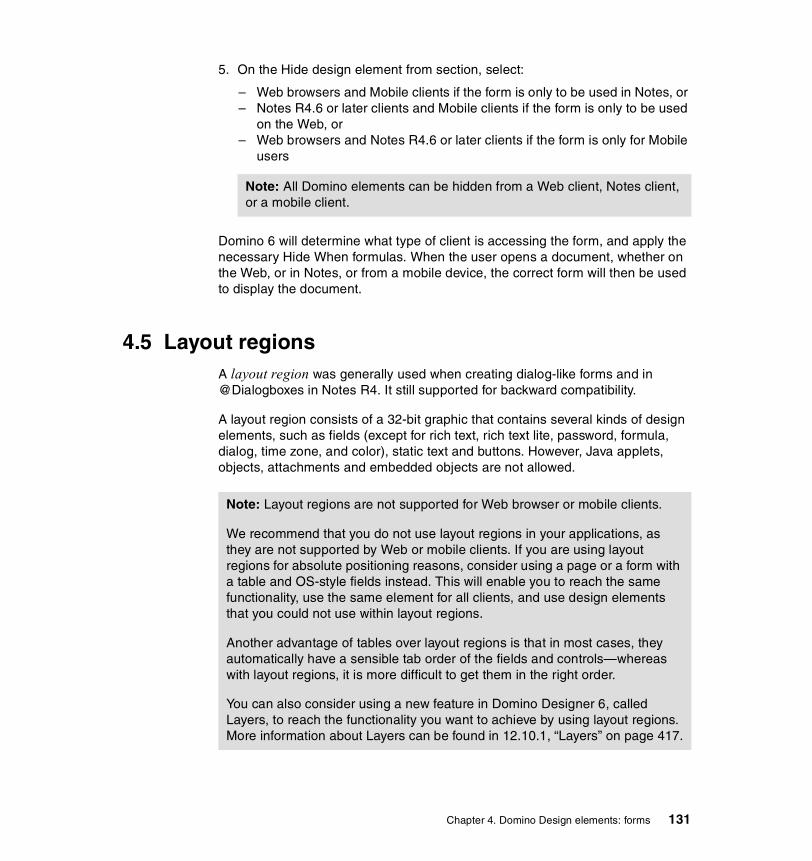
� From an icon in Notes client
When you start Lotus Notes, your screen may look like the one shown in Figure 2-1 (unless you have specified Notes to use another Welcome page).
In any case, on the left-hand side of the figure in the bookmarks bar, you can see a highlighted icon. Click the icon to open the Domino Designer.
Figure 2-1 Launching Domino Designer from Lotus Notes client
� Or, right-click a database icon in the workspace or window tab and select Database - Open in Designer.
This opens the Domino Designer with the specific database open.
� Or, select the Windows Start button and then select Programs -> Lotus Application -> Domino Designer (or click the Domino Designer icon on your Windows desktop).
Chapter 2. Lotus Domino Designer 15
2.2.2 The Domino Designer clientWhen the Domino Designer is opened, it will show you a Welcome Page. The functionality of the Welcome Page in Designer is similar to the page in the Notes client. The default Welcome Page has links to most obvious tasks you would perform with Designer, such as creating a new database or opening an existing one; the page is shown in Figure 2-2.
This page provides you an option to customize the page content. You can change the content that is shown in the page by selecting one of the values of the Show me field, which is illustrated in Figure 2-2.
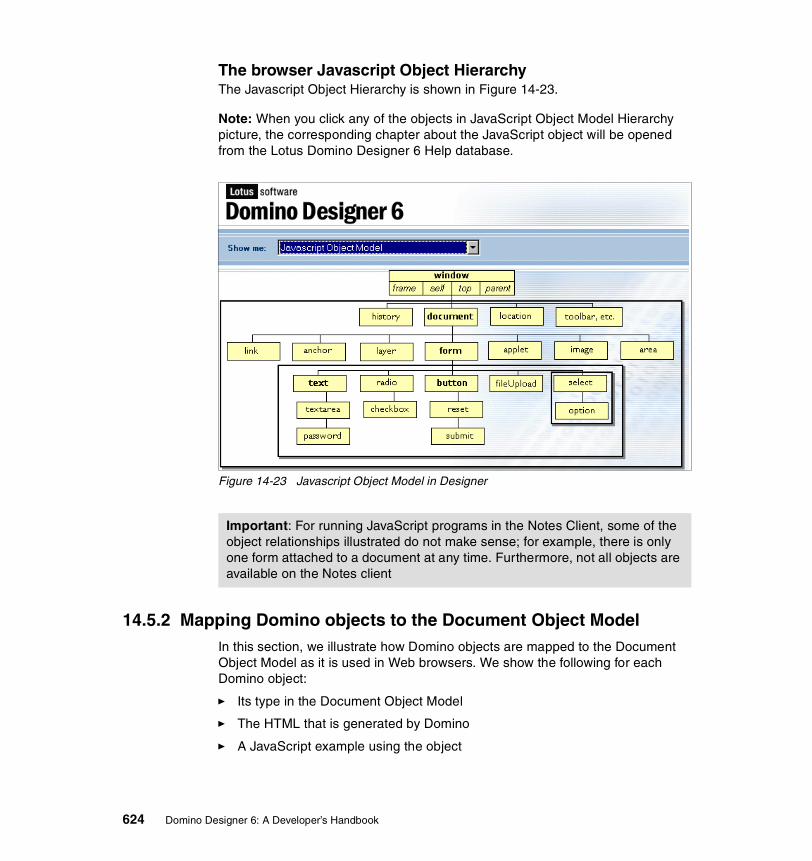
There are four options that you can choose in the Show me field:
� Quick links for common tasks (the default option)
� Domino Objects for LotusScript and OLE
� Domino Objects for DXL Support
� JavaScript Object Model
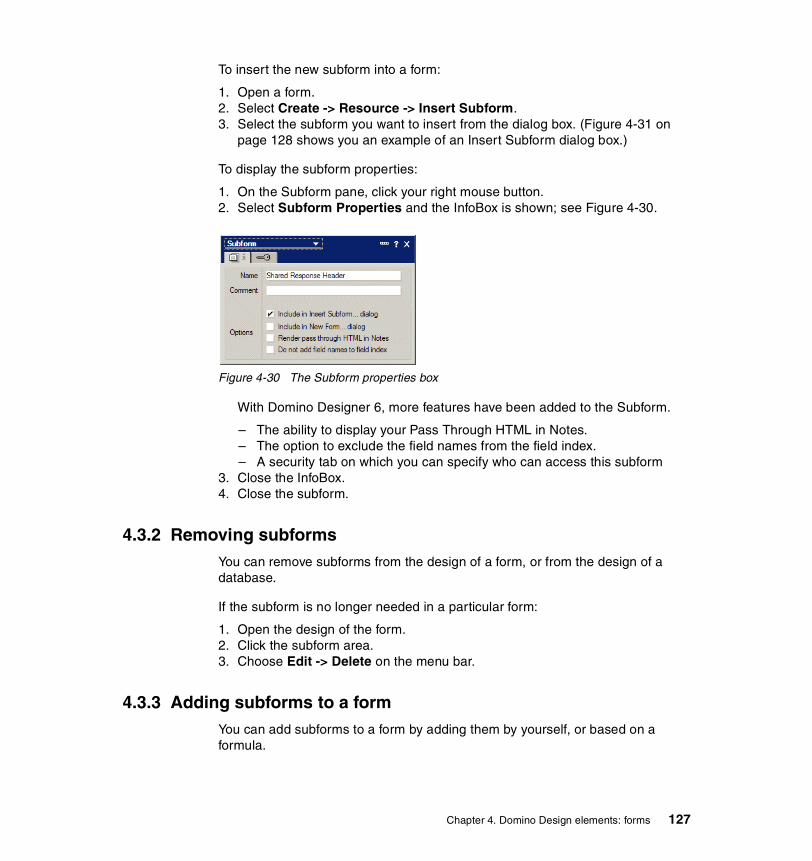
The first option shows the default page with common tasks, and each other selection will change the page to show the object model of the language you selected on the field.
Figure 2-2 Customizing the Welcome Page in Designer
16 Domino Designer 6: A Developer’s Handbook
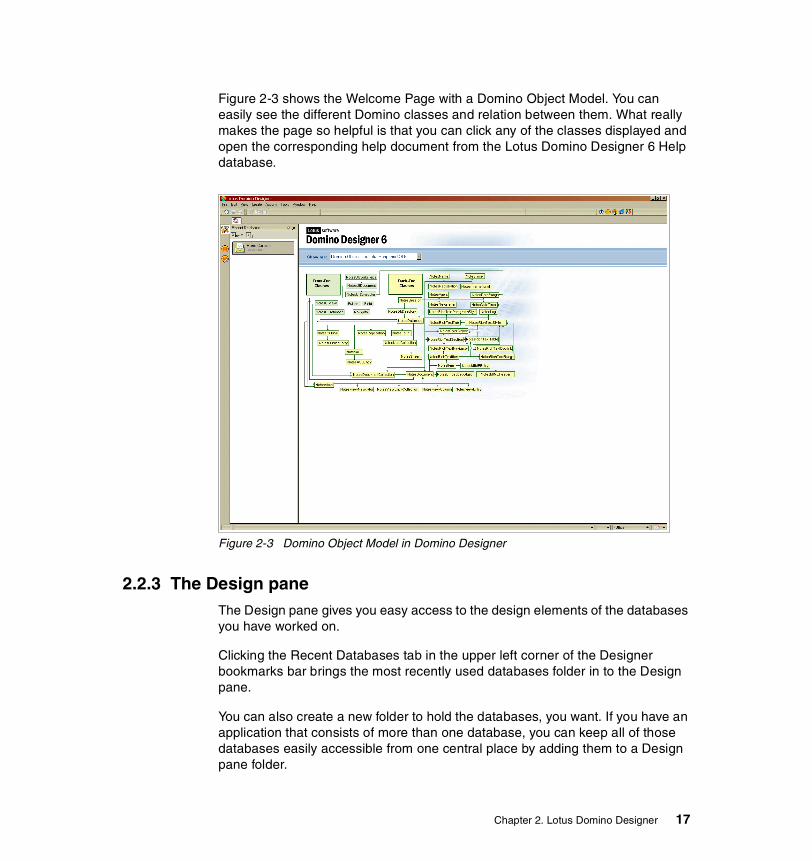
Figure 2-3 shows the Welcome Page with a Domino Object Model. You can easily see the different Domino classes and relation between them. What really makes the page so helpful is that you can click any of the classes displayed and open the corresponding help document from the Lotus Domino Designer 6 Help database.
Figure 2-3 Domino Object Model in Domino Designer
2.2.3 The Design paneThe Design pane gives you easy access to the design elements of the databases you have worked on.
Clicking the Recent Databases tab in the upper left corner of the Designer bookmarks bar brings the most recently used databases folder in to the Design pane.
You can also create a new folder to hold the databases, you want. If you have an application that consists of more than one database, you can keep all of those databases easily accessible from one central place by adding them to a Design pane folder.
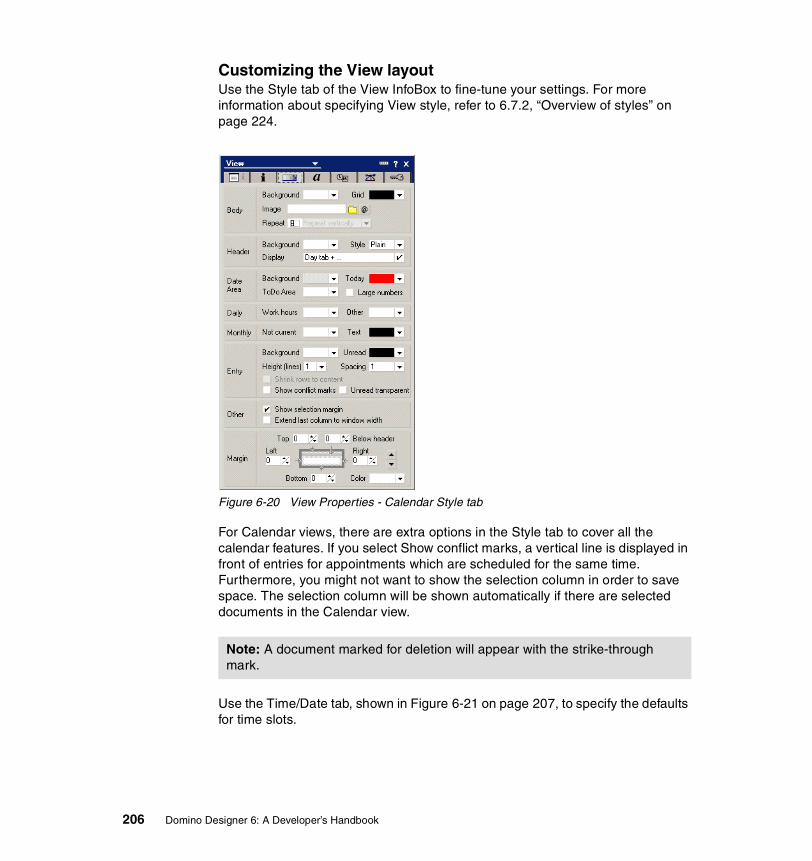
Chapter 2. Lotus Domino Designer 17
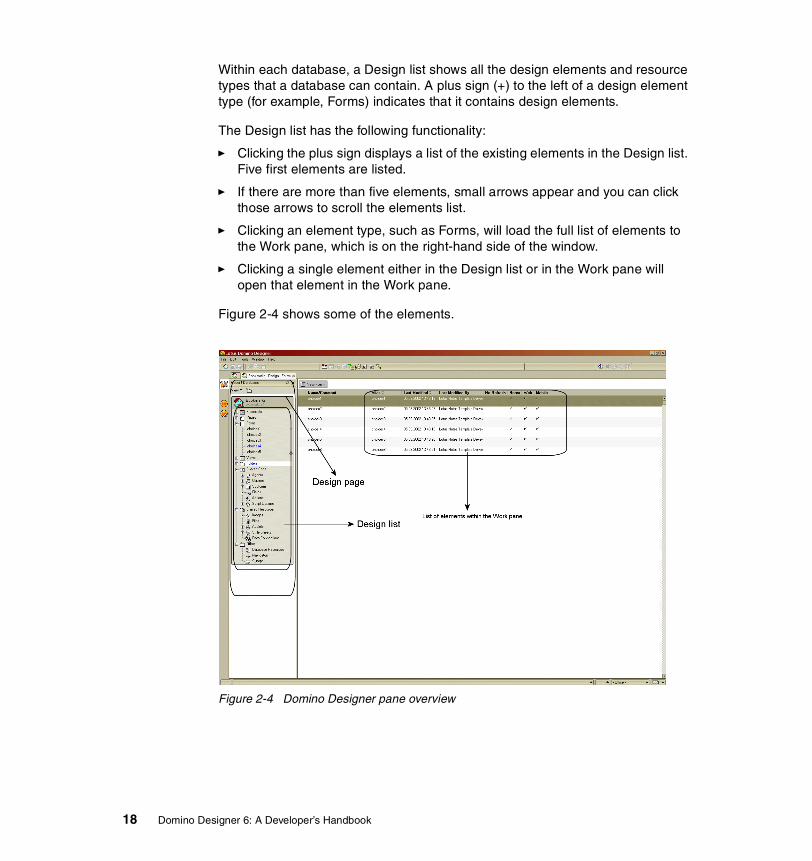
Within each database, a Design list shows all the design elements and resource types that a database can contain. A plus sign (+) to the left of a design element type (for example, Forms) indicates that it contains design elements.
The Design list has the following functionality:
� Clicking the plus sign displays a list of the existing elements in the Design list. Five first elements are listed.
� If there are more than five elements, small arrows appear and you can click those arrows to scroll the elements list.
� Clicking an element type, such as Forms, will load the full list of elements to the Work pane, which is on the right-hand side of the window.
� Clicking a single element either in the Design list or in the Work pane will open that element in the Work pane.
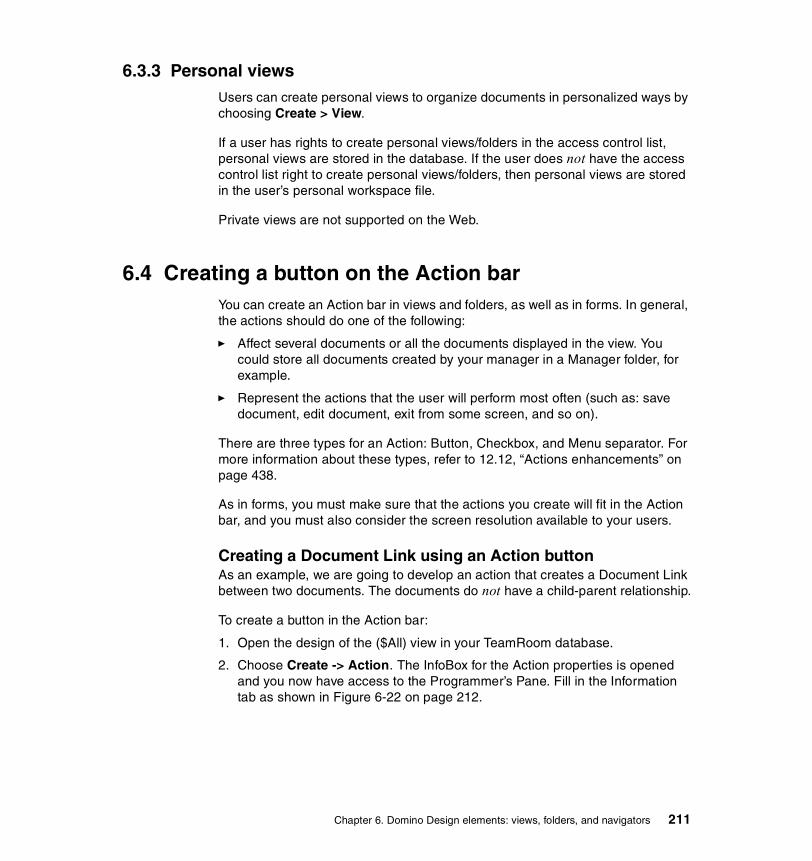
Figure 2-4 shows some of the elements.
Figure 2-4 Domino Designer pane overview
18 Domino Designer 6: A Developer’s Handbook
Following are some of the enhancements made to the Design pane in Domino Designer 6:
� The elements list of the database you are working with has a lighter background than other databases, which makes it easy to see where you are.
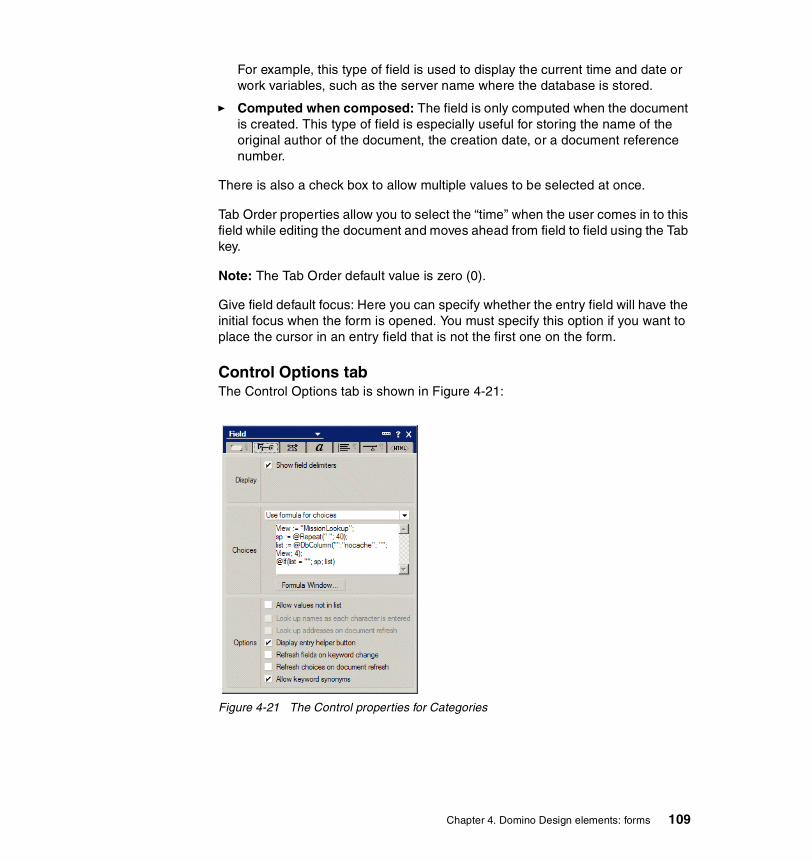
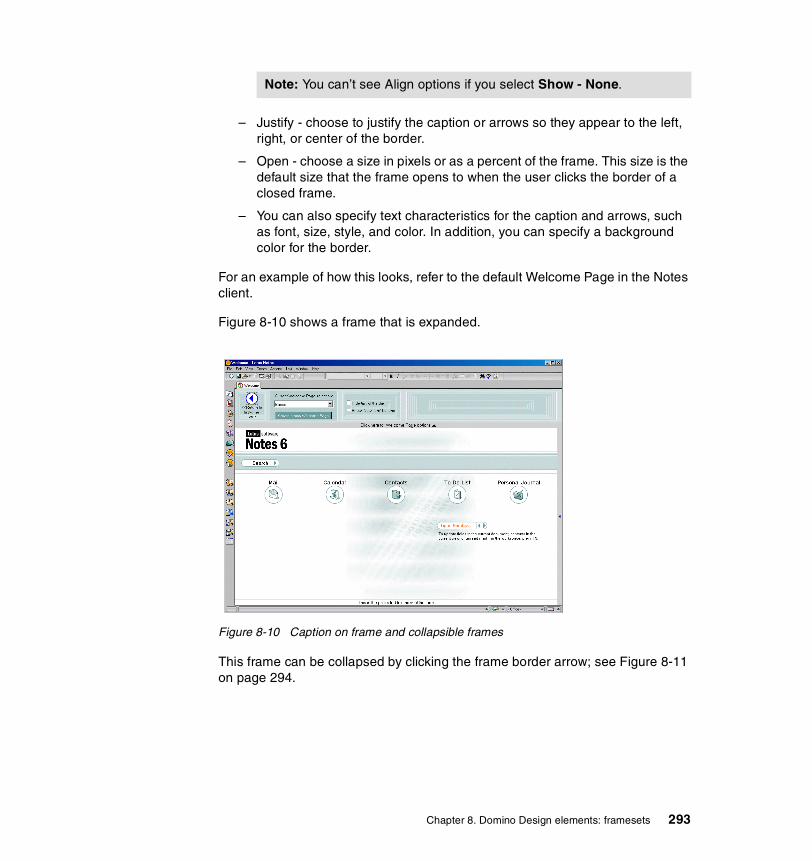
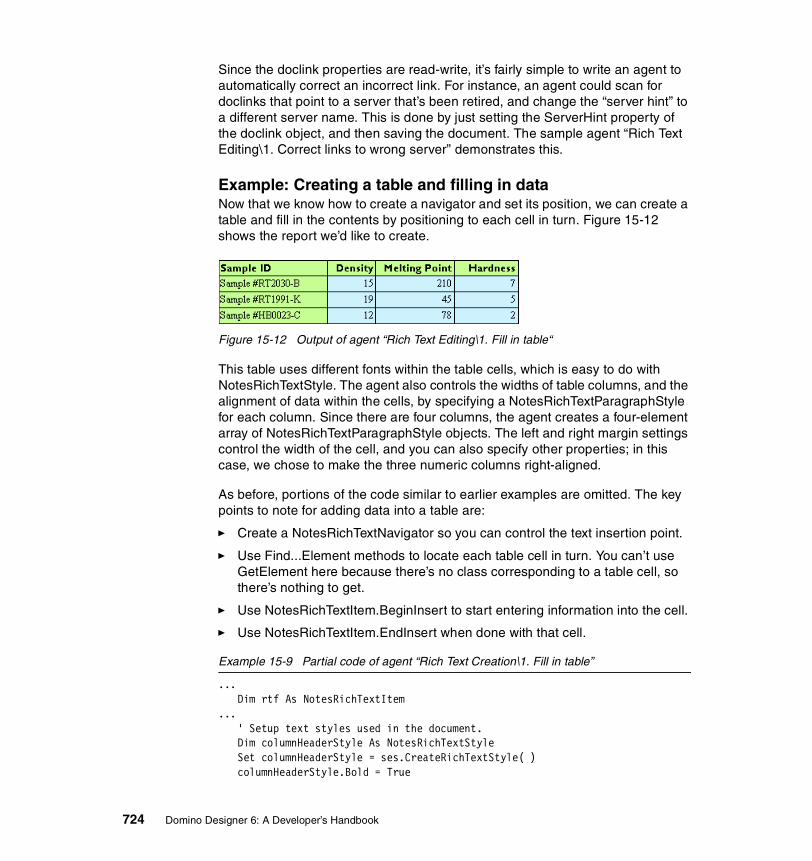
� The Design list is reorganized. Some of the design elements now are grouped in Shared Code and Shared Resource.
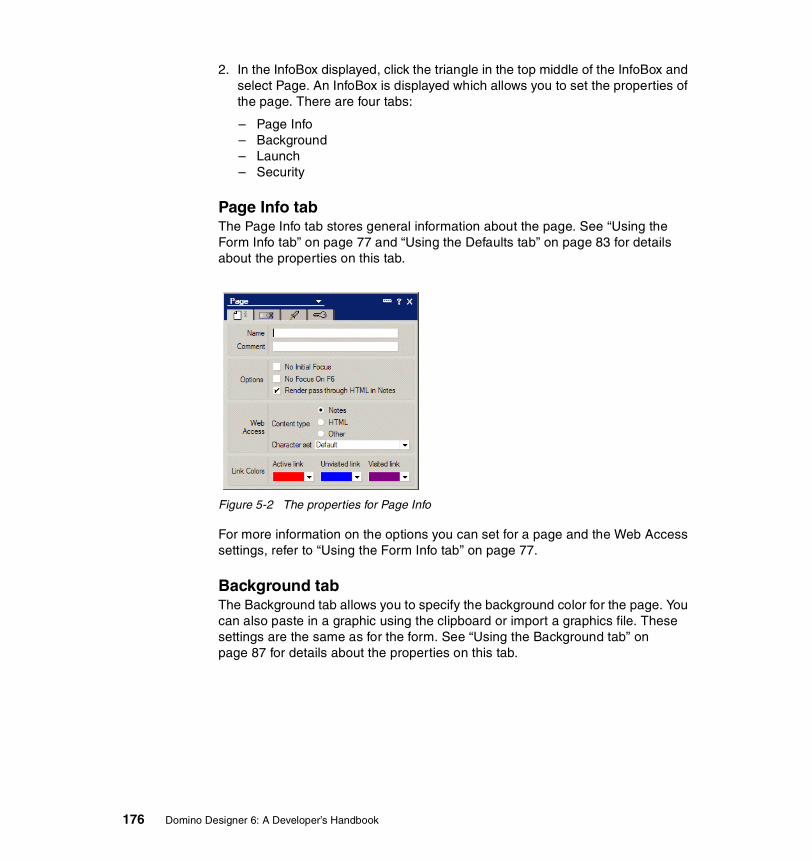
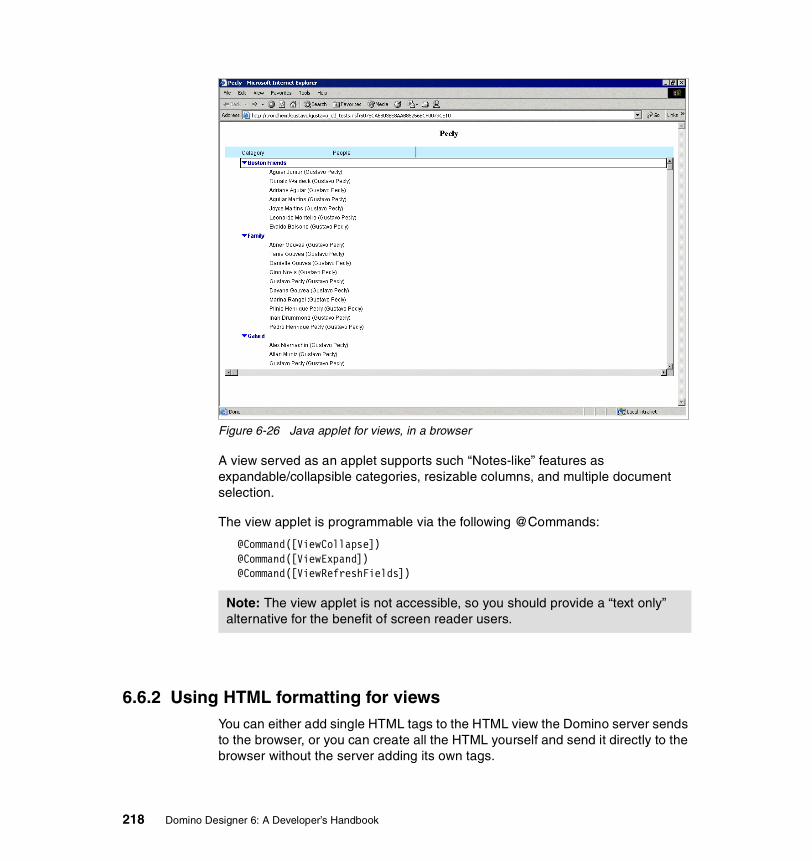
� There are new Object Containers, such as Files, Style Sheets, and Data Connections.
� There are new Library Types, such as JavaScript Libraries and Java Libraries.
We cover all these new features in Chapter 12, “New features in Domino 6” on page 347.
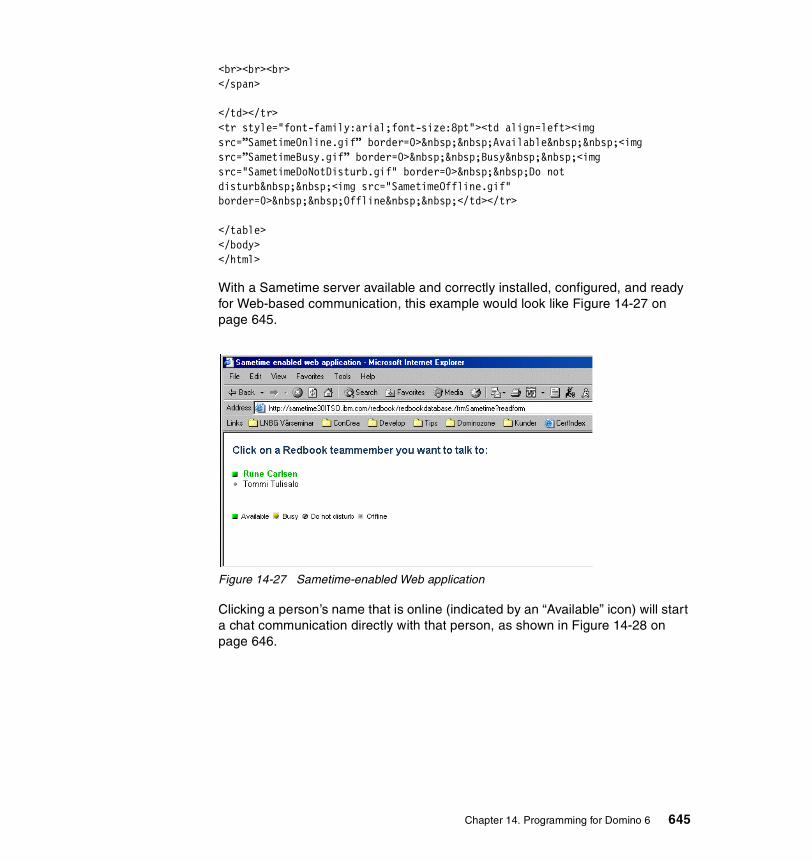
From here, you can easily go to any of the design elements of an already listed database in the area called the Work pane by simply clicking it.
Clicking the push-pin in the upper right corner of the Databases list fixes the list to the screen and stops it from automatically hiding. Clicking the push-pin a second time will cause the site database list to disappear when you click the programmer's pane.
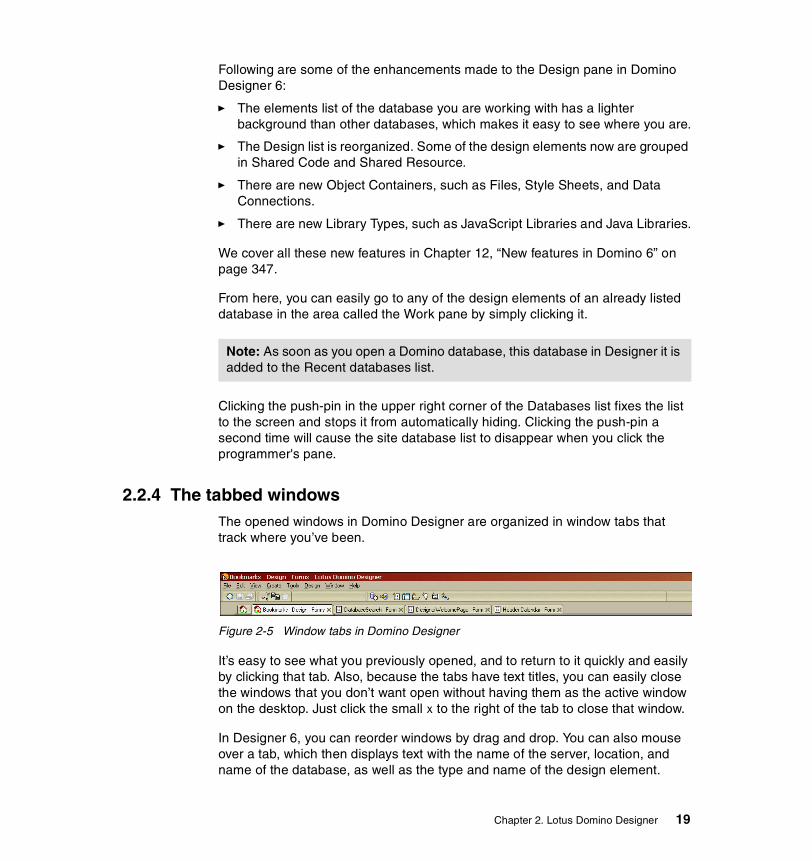
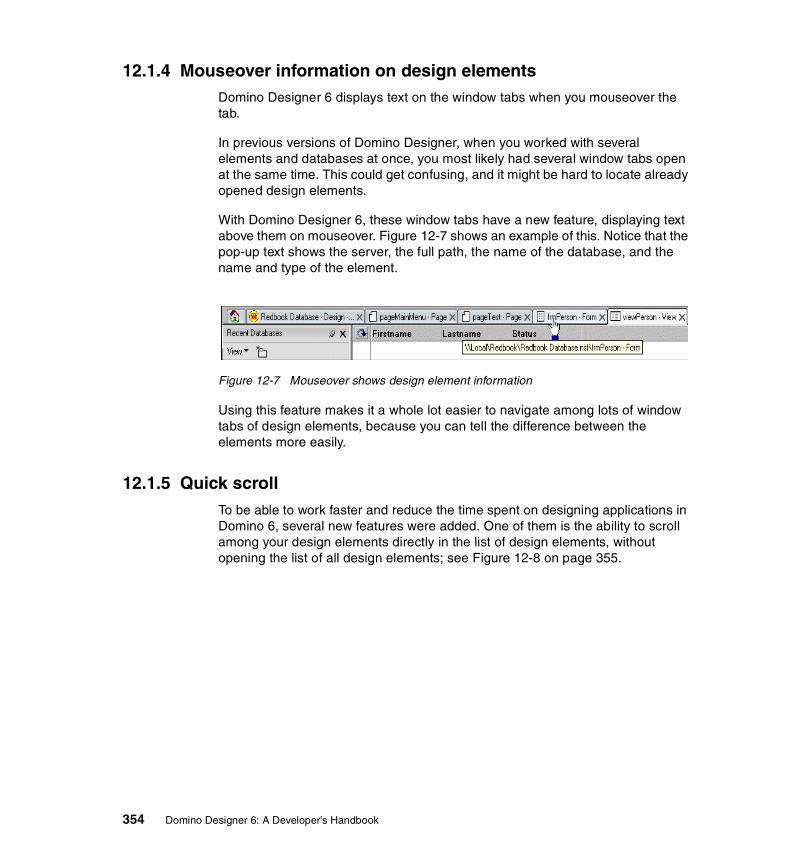
2.2.4 The tabbed windowsThe opened windows in Domino Designer are organized in window tabs that track where you’ve been.
Figure 2-5 Window tabs in Domino Designer
It’s easy to see what you previously opened, and to return to it quickly and easily by clicking that tab. Also, because the tabs have text titles, you can easily close the windows that you don’t want open without having them as the active window on the desktop. Just click the small x to the right of the tab to close that window.
In Designer 6, you can reorder windows by drag and drop. You can also mouse over a tab, which then displays text with the name of the server, location, and name of the database, as well as the type and name of the design element.
Note: As soon as you open a Domino database, this database in Designer it is added to the Recent databases list.
Chapter 2. Lotus Domino Designer 19
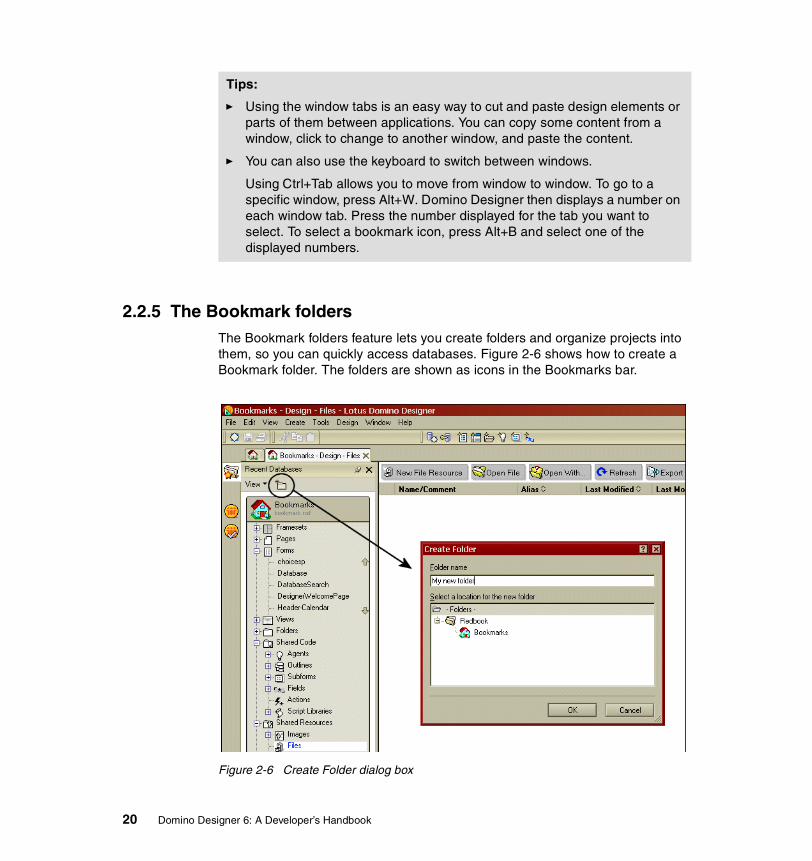
2.2.5 The Bookmark foldersThe Bookmark folders feature lets you create folders and organize projects into them, so you can quickly access databases. Figure 2-6 shows how to create a Bookmark folder. The folders are shown as icons in the Bookmarks bar.
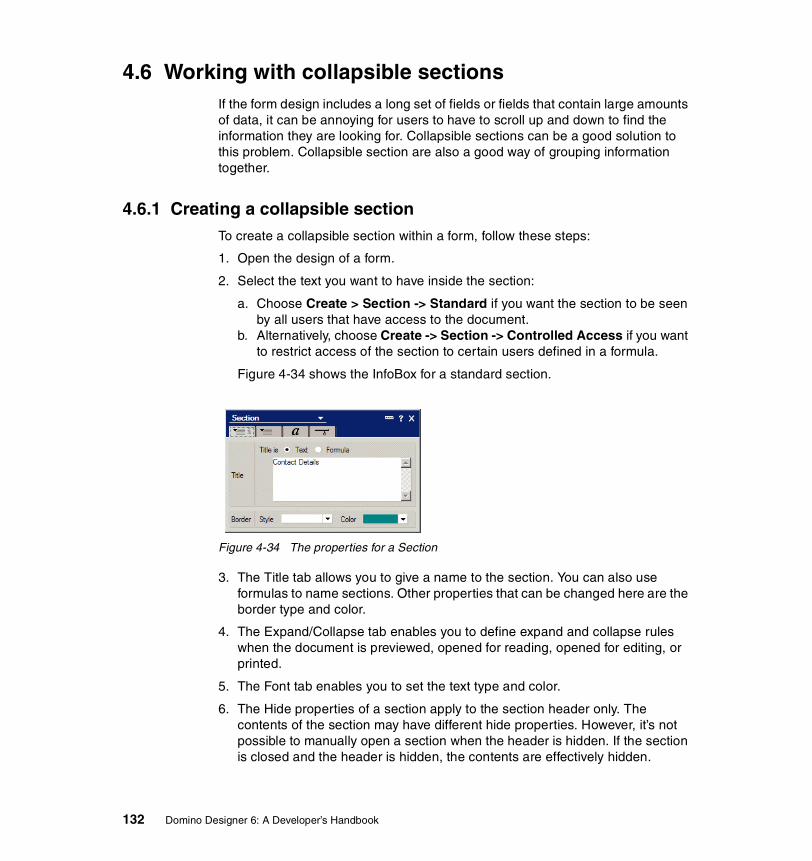
Figure 2-6 Create Folder dialog box
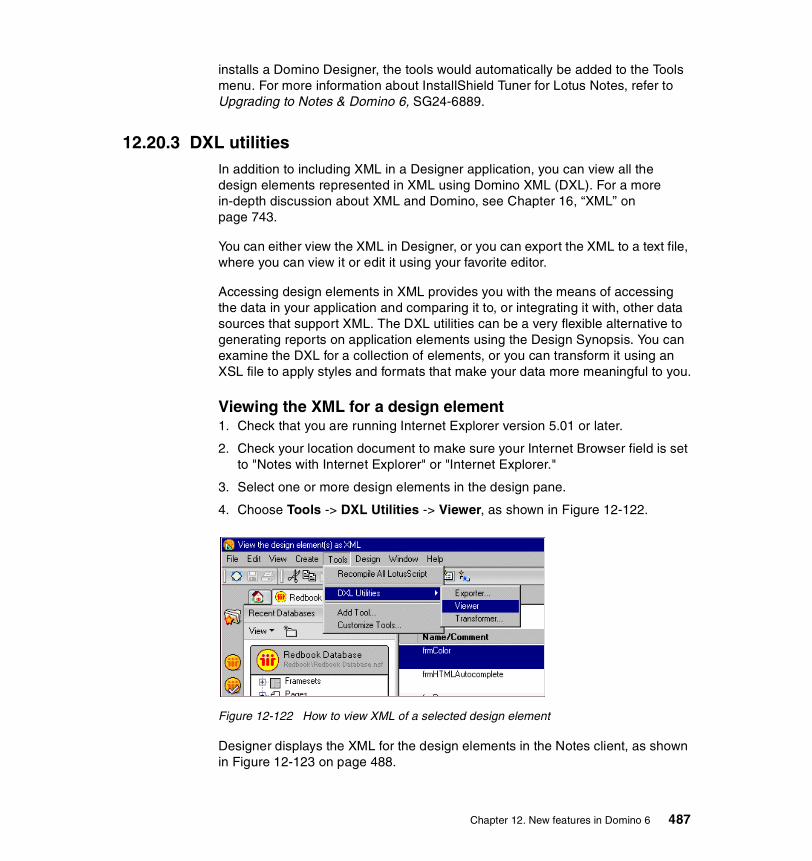
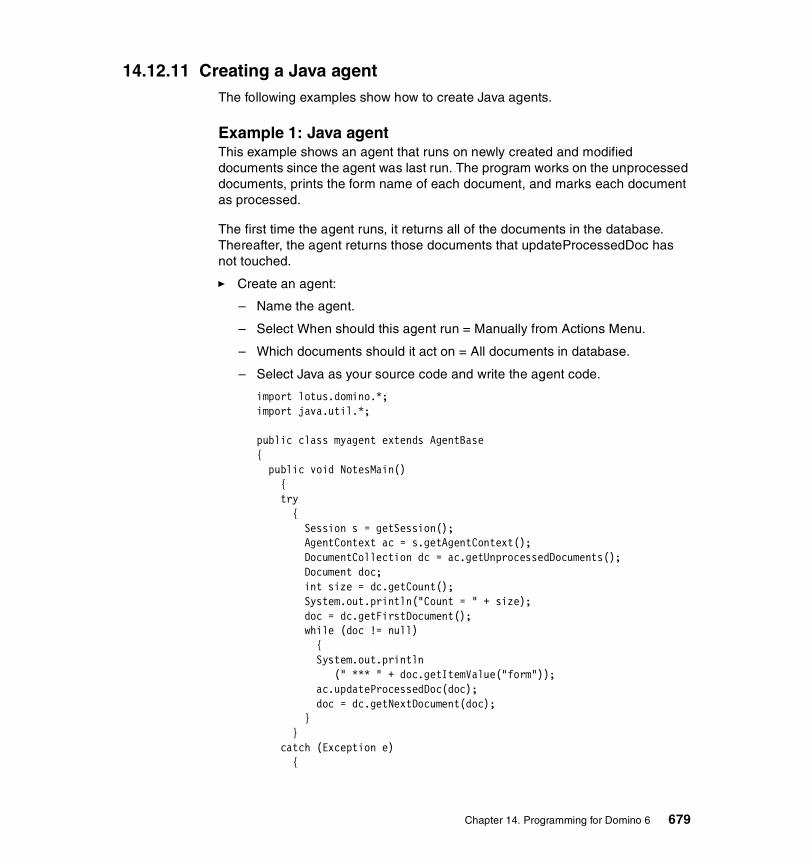
Tips:
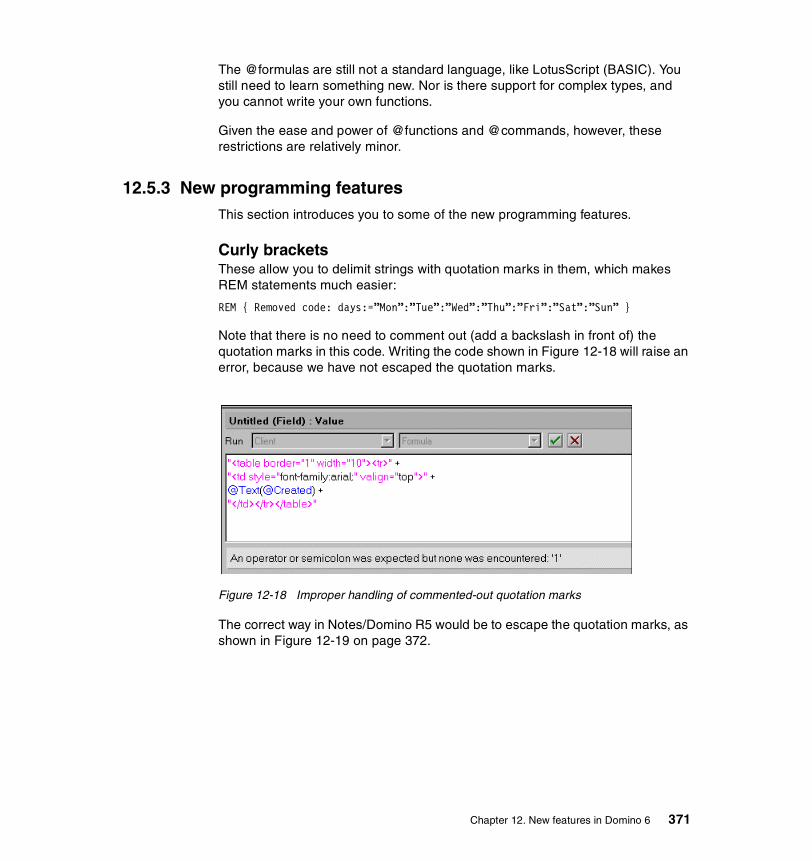
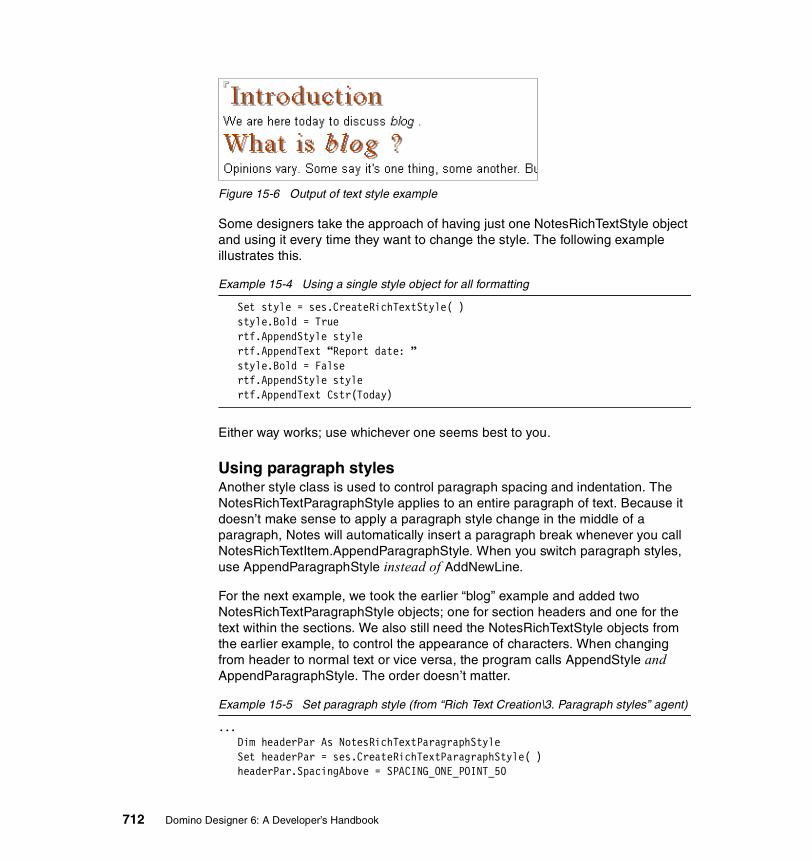
� Using the window tabs is an easy way to cut and paste design elements or parts of them between applications. You can copy some content from a window, click to change to another window, and paste the content.
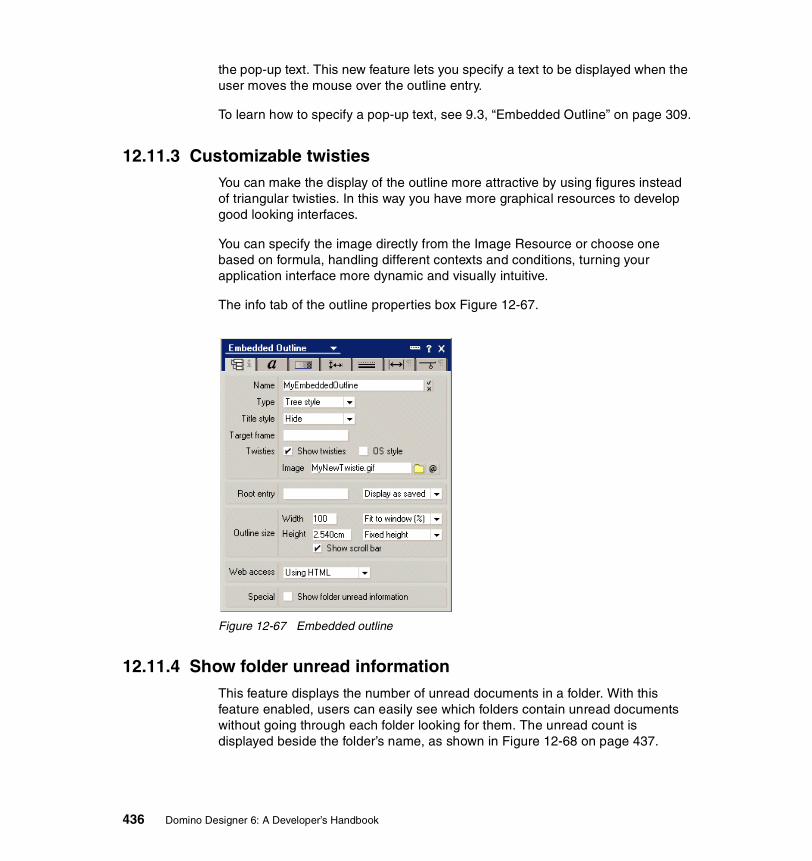
� You can also use the keyboard to switch between windows.
Using Ctrl+Tab allows you to move from window to window. To go to a specific window, press Alt+W. Domino Designer then displays a number on each window tab. Press the number displayed for the tab you want to select. To select a bookmark icon, press Alt+B and select one of the displayed numbers.
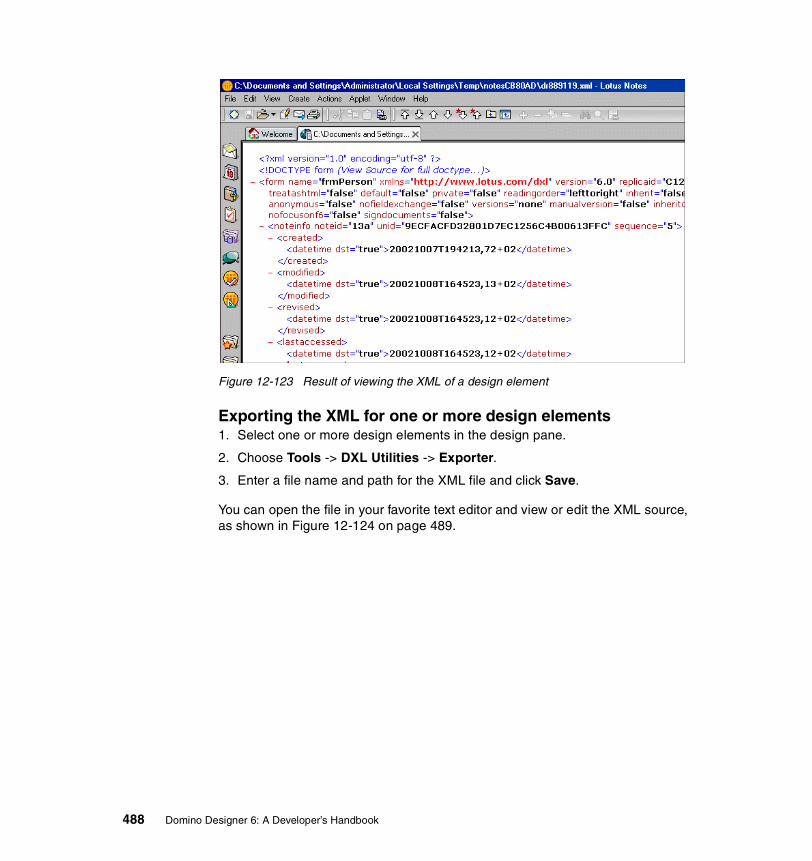
20 Domino Designer 6: A Developer’s Handbook
You can also drag and drop database bookmarks into folders.
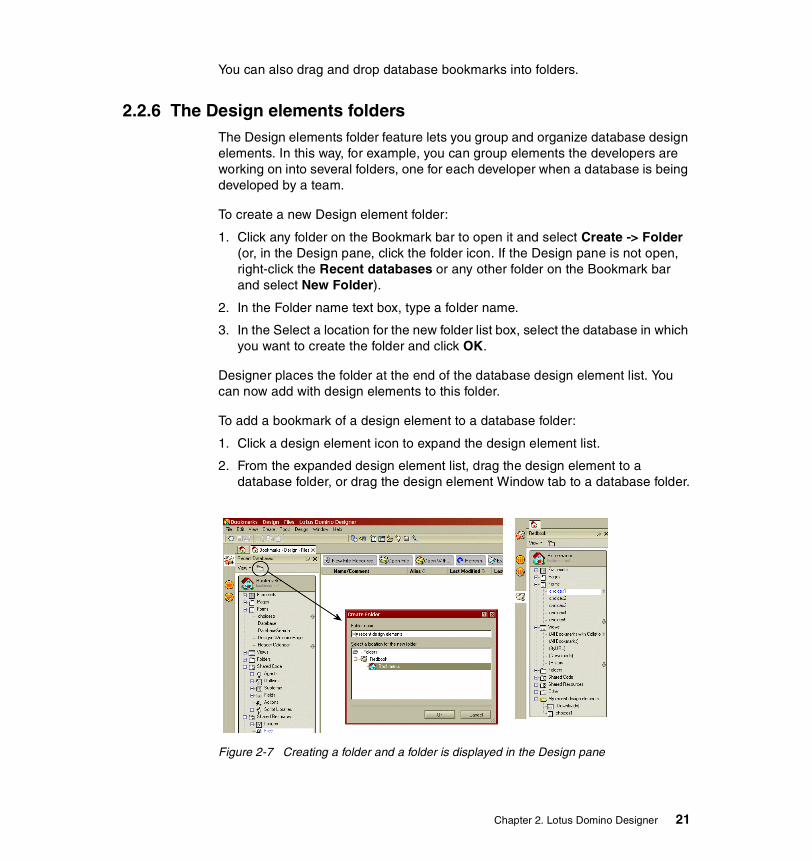
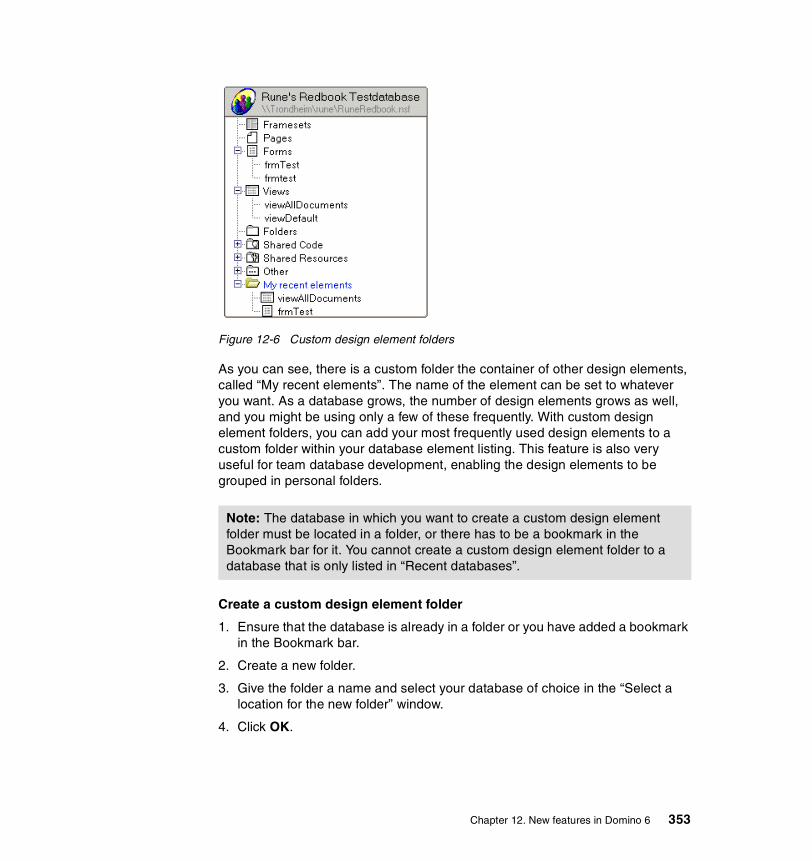
2.2.6 The Design elements foldersThe Design elements folder feature lets you group and organize database design elements. In this way, for example, you can group elements the developers are working on into several folders, one for each developer when a database is being developed by a team.
To create a new Design element folder:
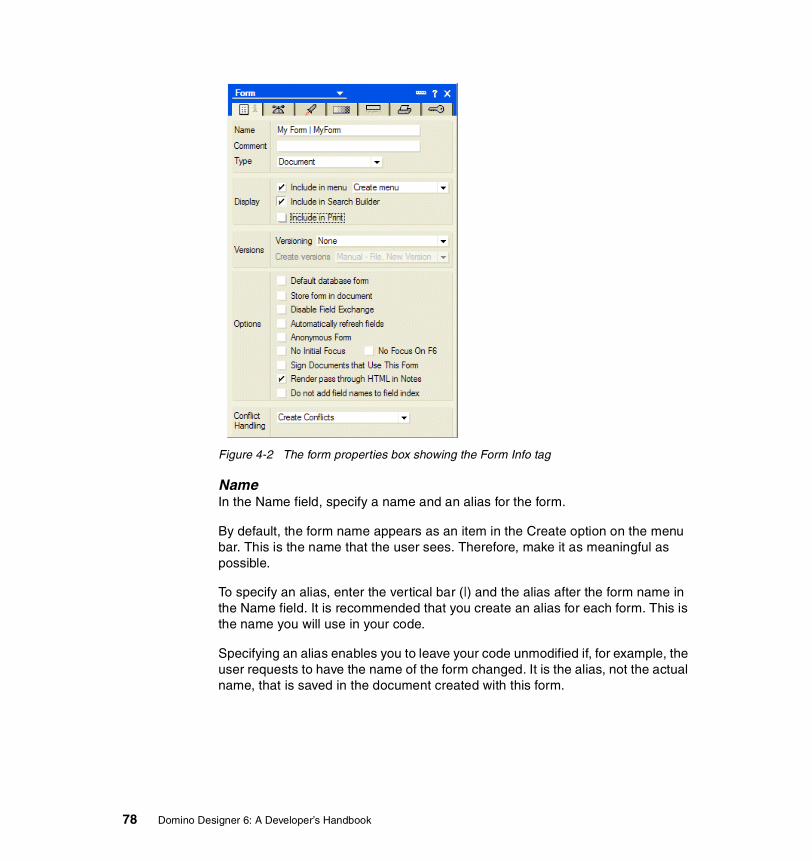
1. Click any folder on the Bookmark bar to open it and select Create -> Folder (or, in the Design pane, click the folder icon. If the Design pane is not open, right-click the Recent databases or any other folder on the Bookmark bar and select New Folder).
2. In the Folder name text box, type a folder name.
3. In the Select a location for the new folder list box, select the database in which you want to create the folder and click OK.
Designer places the folder at the end of the database design element list. You can now add with design elements to this folder.
To add a bookmark of a design element to a database folder:
1. Click a design element icon to expand the design element list.
2. From the expanded design element list, drag the design element to a database folder, or drag the design element Window tab to a database folder.
Figure 2-7 Creating a folder and a folder is displayed in the Design pane
Chapter 2. Lotus Domino Designer 21
2.2.7 The Properties dialogThe Properties dialog, also called InfoBox, is your most important tool for controlling the behavior of design elements.
Every design element has at least two dialogs that display and set its properties.
1. Properties for the Design Document.
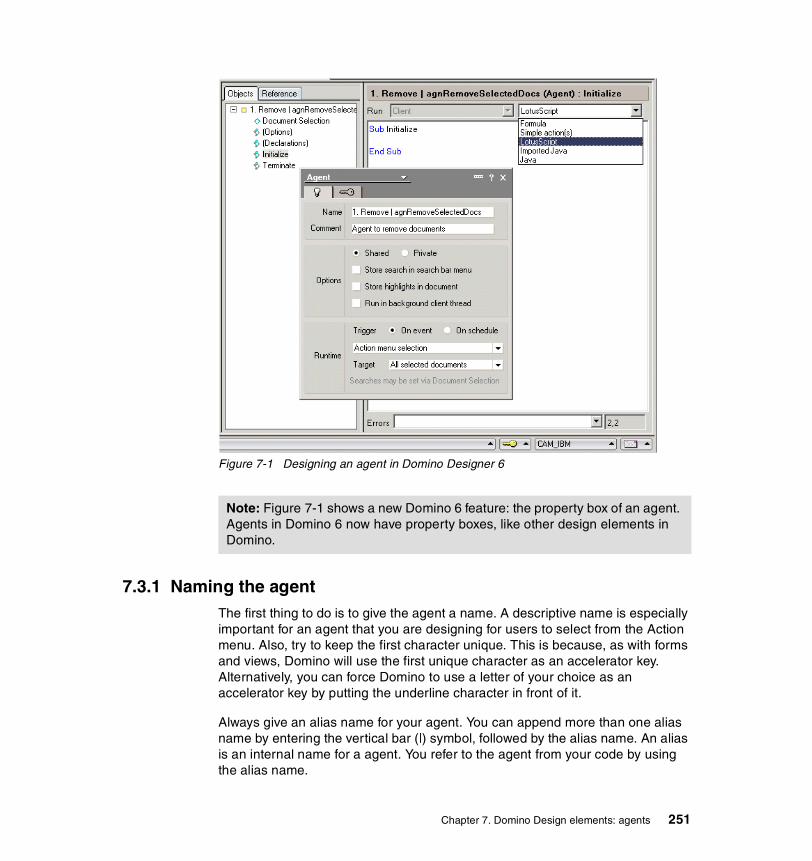
This displays properties that are common to all design elements, whether they are views, forms, pages, or something else. An example of a property would be hiding a design element from a Web browser.
2. Each design element also has a dialog giving properties specific to the type of design element (Form properties if the design element is a form, etcetera). Some design elements have additional properties dialogs for objects contained within them, such as Field properties for a field on a form.
To open a properties dialog at any time, press Alt+Enter. This will open a dialog appropriate to the context (for example, if a view column is selected, you’ll see the view column properties).
The dialog contains a drop-down list of all the properties dialogs available at that point (for example, if view Column properties are displayed, you can pull down to select View or Database properties instead).
While the properties box is selected as the active window, pressing F1 or clicking on the question mark icon will open a window with help information related to that element.
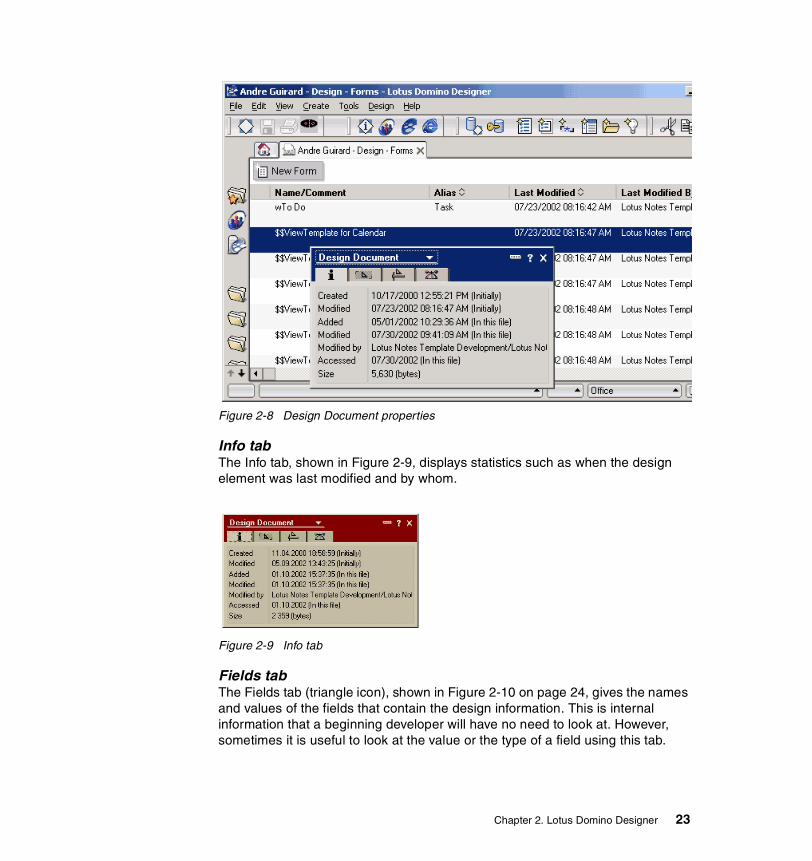
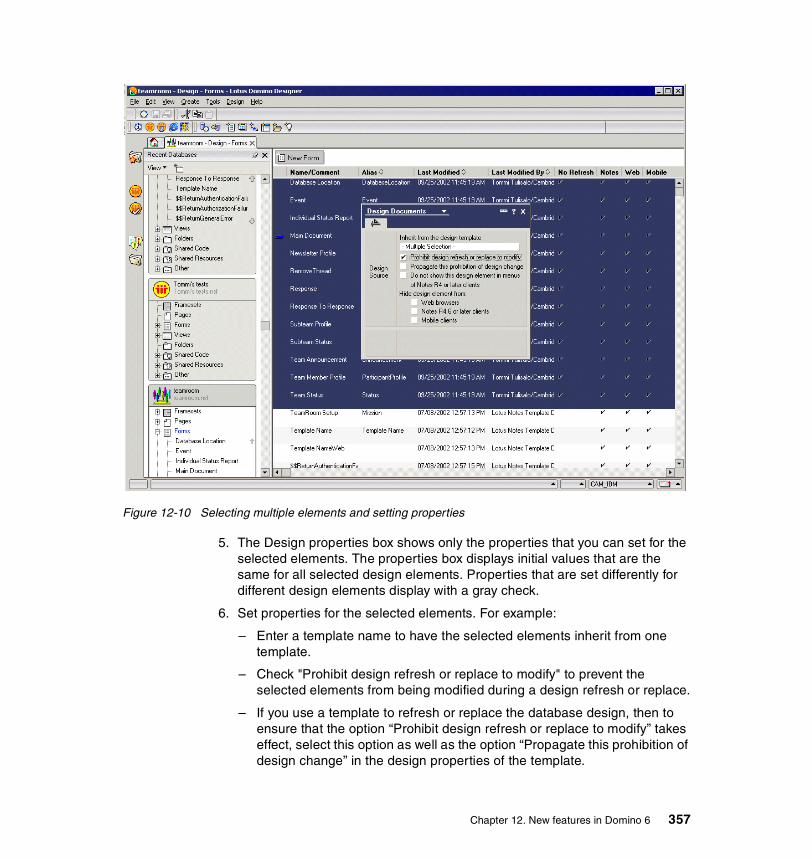
Design Document Properties dialogThe Design Document properties are only available from the work pane when a list of design elements is displayed there, as shown in Figure 2-8 on page 23.
Like the document properties dialog in the Notes client, the properties of the highlighted design element are displayed (in this case, for a form). The dialog has four tabs, as shown in the figure.
22 Domino Designer 6: A Developer’s Handbook
Figure 2-8 Design Document properties
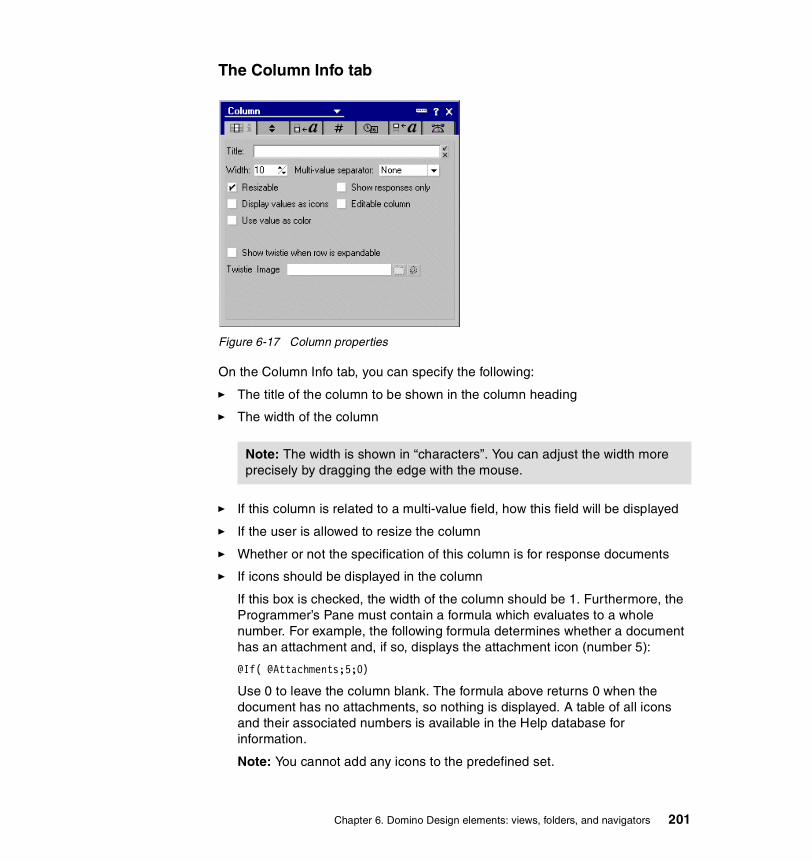
Info tabThe Info tab, shown in Figure 2-9, displays statistics such as when the design element was last modified and by whom.
Figure 2-9 Info tab
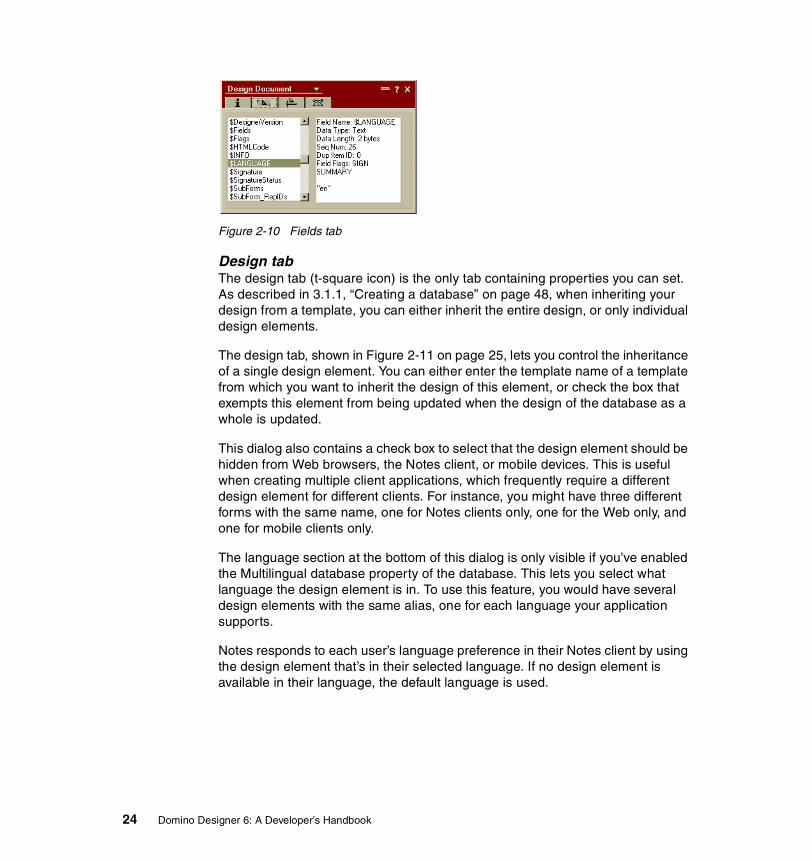
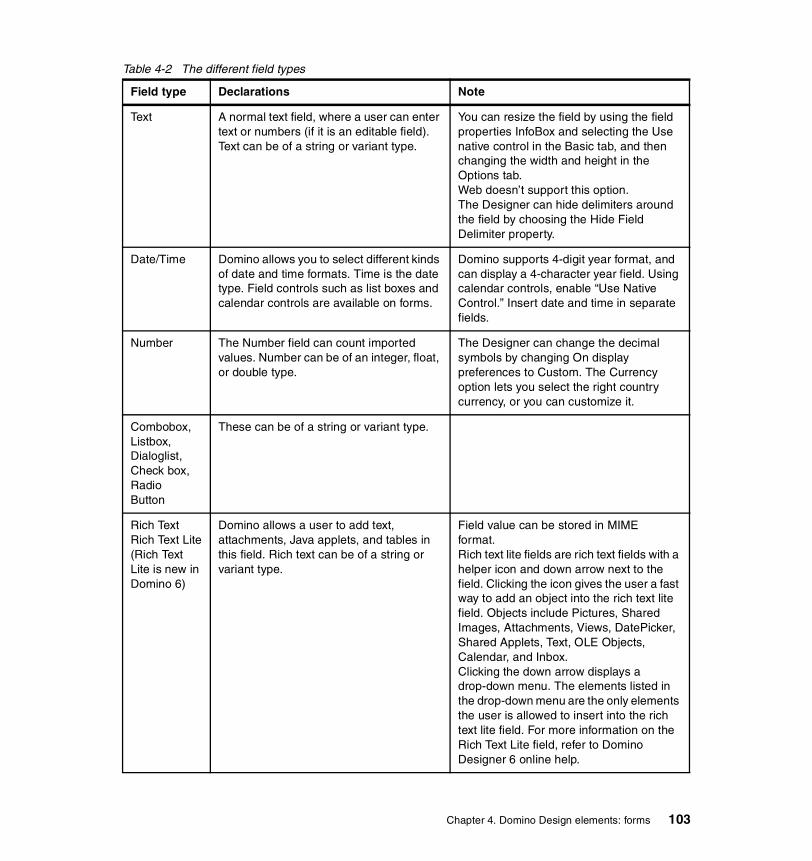
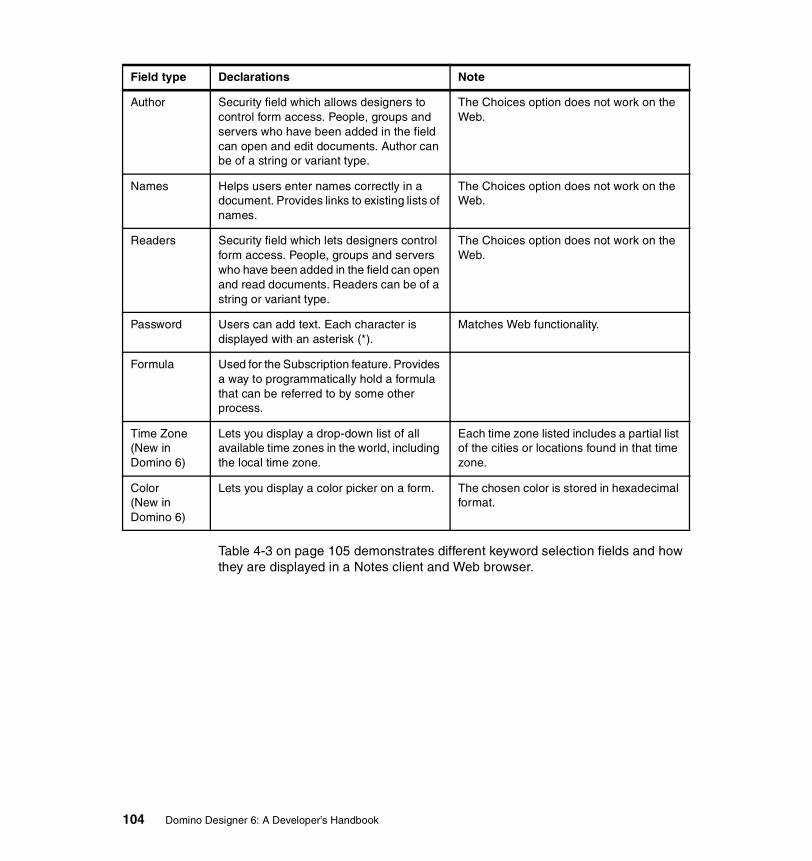
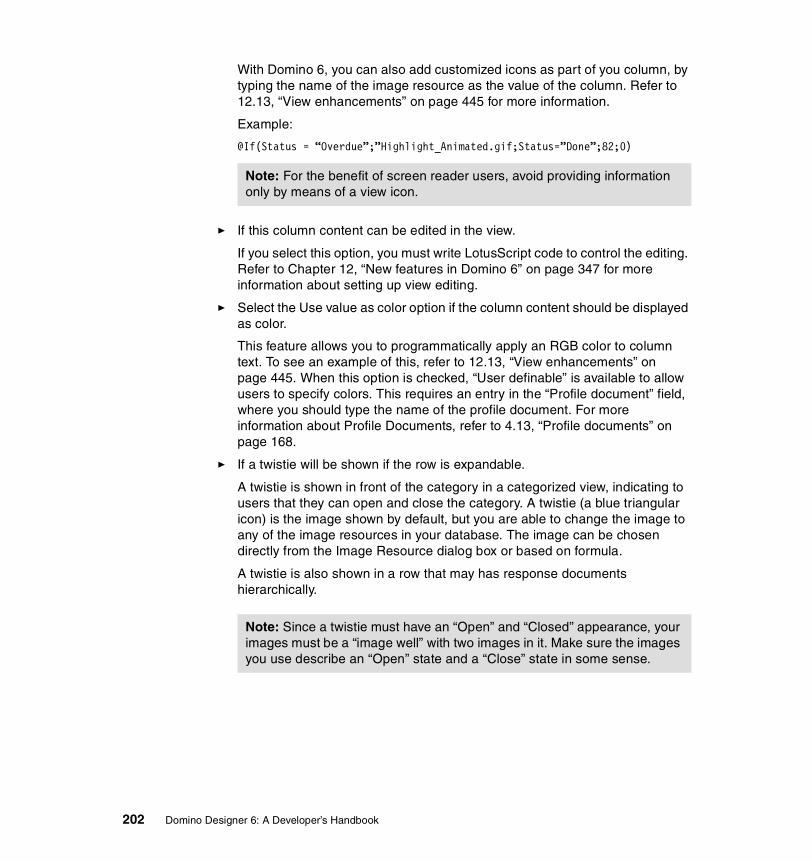
Fields tabThe Fields tab (triangle icon), shown in Figure 2-10 on page 24, gives the names and values of the fields that contain the design information. This is internal information that a beginning developer will have no need to look at. However, sometimes it is useful to look at the value or the type of a field using this tab.
Chapter 2. Lotus Domino Designer 23
Figure 2-10 Fields tab
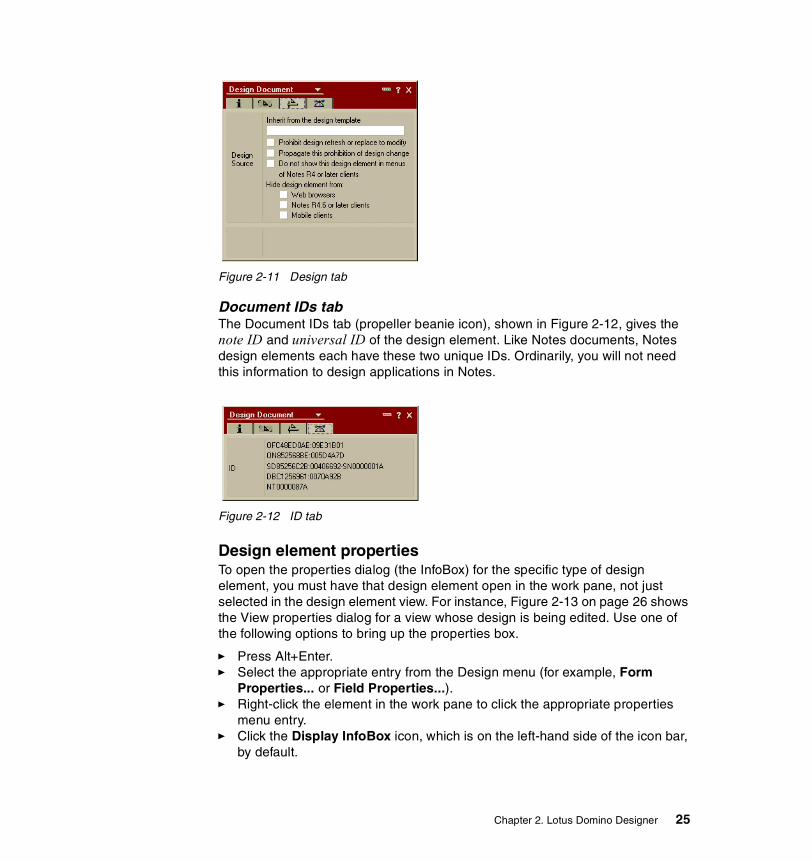
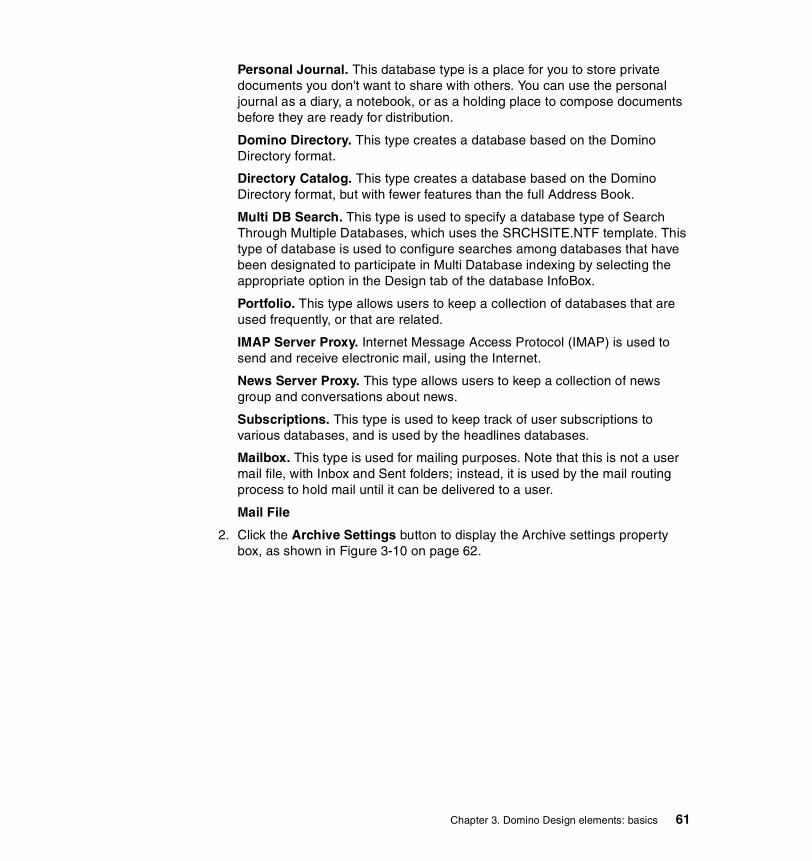
Design tabThe design tab (t-square icon) is the only tab containing properties you can set. As described in 3.1.1, “Creating a database” on page 48, when inheriting your design from a template, you can either inherit the entire design, or only individual design elements.
The design tab, shown in Figure 2-11 on page 25, lets you control the inheritance of a single design element. You can either enter the template name of a template from which you want to inherit the design of this element, or check the box that exempts this element from being updated when the design of the database as a whole is updated.
This dialog also contains a check box to select that the design element should be hidden from Web browsers, the Notes client, or mobile devices. This is useful when creating multiple client applications, which frequently require a different design element for different clients. For instance, you might have three different forms with the same name, one for Notes clients only, one for the Web only, and one for mobile clients only.
The language section at the bottom of this dialog is only visible if you’ve enabled the Multilingual database property of the database. This lets you select what language the design element is in. To use this feature, you would have several design elements with the same alias, one for each language your application supports.
Notes responds to each user’s language preference in their Notes client by using the design element that’s in their selected language. If no design element is available in their language, the default language is used.
24 Domino Designer 6: A Developer’s Handbook
Figure 2-11 Design tab
Document IDs tabThe Document IDs tab (propeller beanie icon), shown in Figure 2-12, gives the note ID and universal ID of the design element. Like Notes documents, Notes design elements each have these two unique IDs. Ordinarily, you will not need this information to design applications in Notes.
Figure 2-12 ID tab
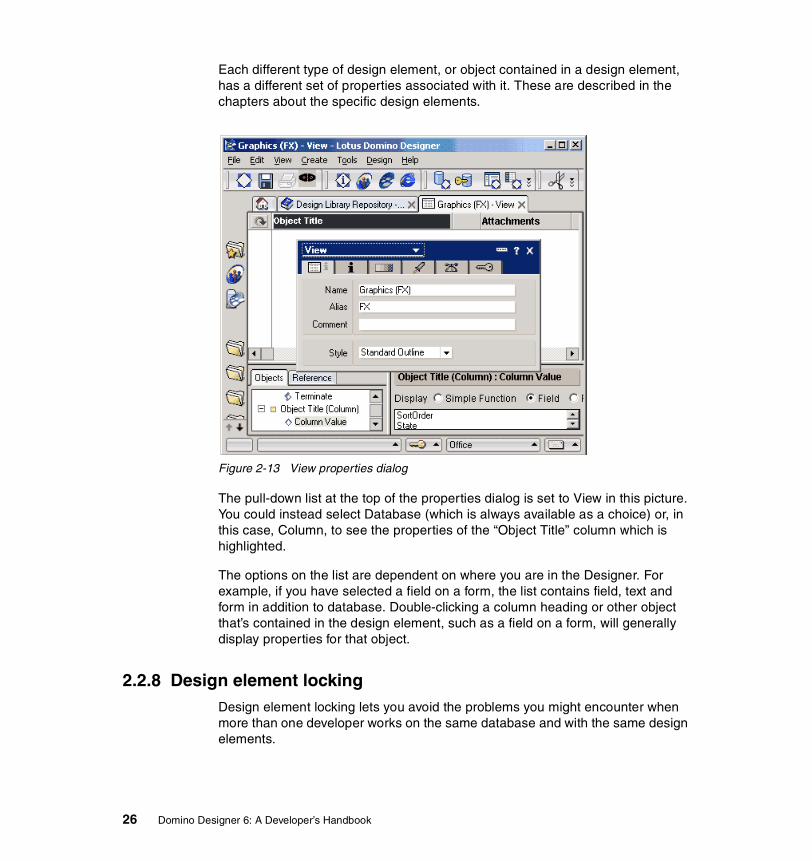
Design element propertiesTo open the properties dialog (the InfoBox) for the specific type of design element, you must have that design element open in the work pane, not just selected in the design element view. For instance, Figure 2-13 on page 26 shows the View properties dialog for a view whose design is being edited. Use one of the following options to bring up the properties box.
� Press Alt+Enter.� Select the appropriate entry from the Design menu (for example, Form
Properties... or Field Properties...).� Right-click the element in the work pane to click the appropriate properties
menu entry.� Click the Display InfoBox icon, which is on the left-hand side of the icon bar,
by default.
Chapter 2. Lotus Domino Designer 25
Each different type of design element, or object contained in a design element, has a different set of properties associated with it. These are described in the chapters about the specific design elements.
Figure 2-13 View properties dialog
The pull-down list at the top of the properties dialog is set to View in this picture. You could instead select Database (which is always available as a choice) or, in this case, Column, to see the properties of the “Object Title” column which is highlighted.
The options on the list are dependent on where you are in the Designer. For example, if you have selected a field on a form, the list contains field, text and form in addition to database. Double-clicking a column heading or other object that’s contained in the design element, such as a field on a form, will generally display properties for that object.
2.2.8 Design element lockingDesign element locking lets you avoid the problems you might encounter when more than one developer works on the same database and with the same design elements.
26 Domino Designer 6: A Developer’s Handbook
There are two type of locking you can specify:
� Explicit lock� Temporary lock
Explicit lockIf you work on a team and want to ensure that other designers cannot modify design elements that you are working with, you can explicitly lock them. When you have finished working with the design elements and want to release them so that others can modify them, you can unlock them.
Temporary lockA design element that is not explicitly locked is always temporarily locked while it is being edited. If another developer tries to open the same design element, a message is displayed telling the developer that the element is already open. After the designer has finished editing the design element, the temporary lock is released.
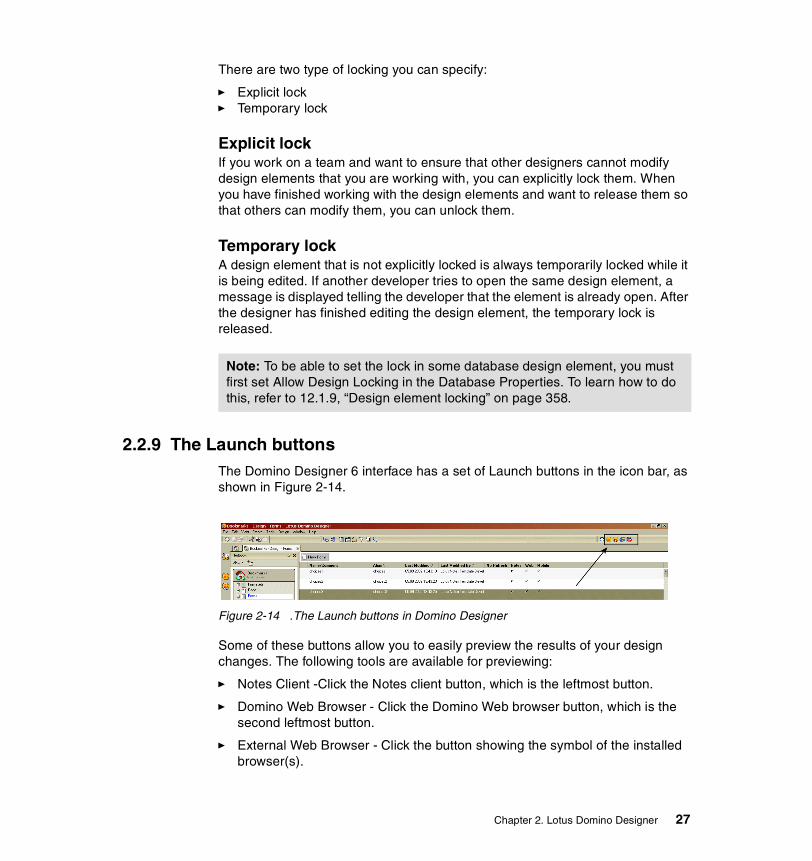
2.2.9 The Launch buttonsThe Domino Designer 6 interface has a set of Launch buttons in the icon bar, as shown in Figure 2-14.
Figure 2-14 .The Launch buttons in Domino Designer
Some of these buttons allow you to easily preview the results of your design changes. The following tools are available for previewing:
� Notes Client -Click the Notes client button, which is the leftmost button.
� Domino Web Browser - Click the Domino Web browser button, which is the second leftmost button.
� External Web Browser - Click the button showing the symbol of the installed browser(s).
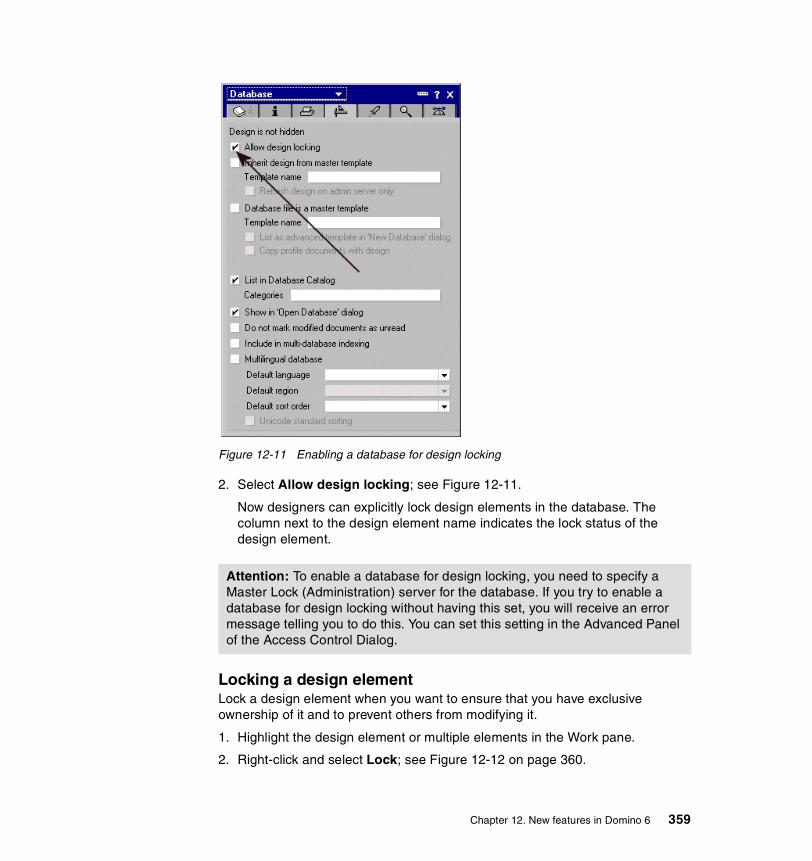
Note: To be able to set the lock in some database design element, you must first set Allow Design Locking in the Database Properties. To learn how to do this, refer to 12.1.9, “Design element locking” on page 358.
Chapter 2. Lotus Domino Designer 27
The button displayed to the left of the preview tools buttons (refer to Figure 2-14) will launch the InfoBox for the selected design element.
2.2.10 The Programmer’s PaneThe Programmer’s Pane is made up of two parts:
� Info list� Script area
In the info list you can select one of two views:
� Objects view� Reference view
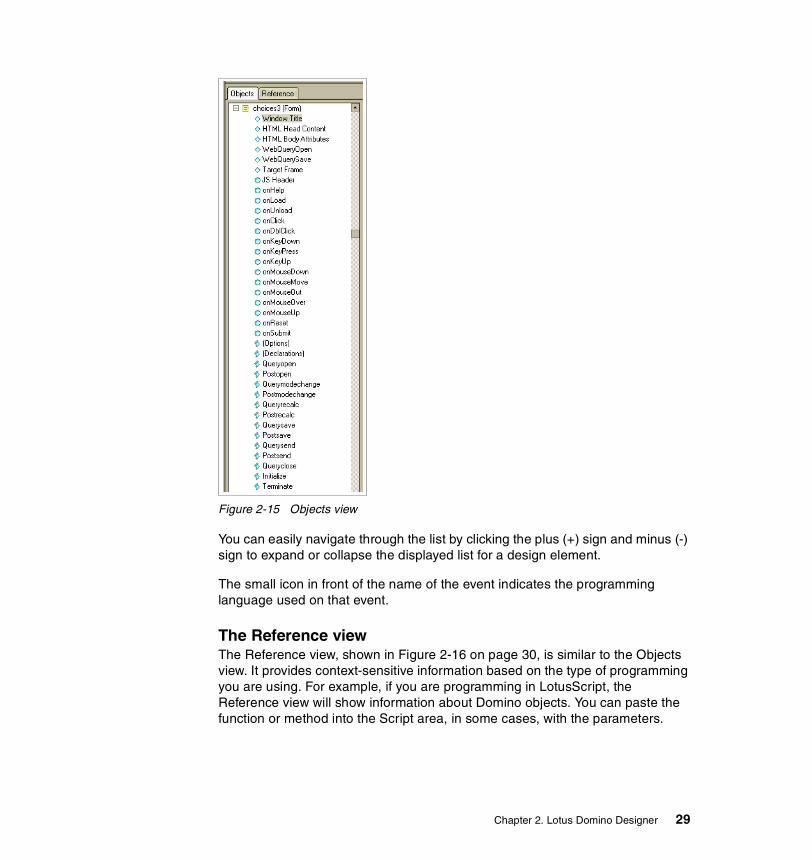
The Objects viewThe Objects view gives you immediate access to any design element in your application and its associated events and attributes.
An icon identifies the language supported by each element event. Domino Designer provides different programmable events to handle both Lotus Notes client and Web browsers events. When an event icon is an empty figure, it means the event doesn’t have any programming code. When an event icon is a full figure, it means the event does have some programming code; see Figure 2-15 on page 29.
When an event is chosen by the developer, the Programmer’s Pane will reflect these event, showing the appropriate language and supported clients.
Note: The symbol shown for the external Web browser depends on the installed browser. For example, if you have two browsers installed, you will see two buttons for the external browsers.
28 Domino Designer 6: A Developer’s Handbook
Figure 2-15 Objects view
You can easily navigate through the list by clicking the plus (+) sign and minus (-) sign to expand or collapse the displayed list for a design element.
The small icon in front of the name of the event indicates the programming language used on that event.
The Reference viewThe Reference view, shown in Figure 2-16 on page 30, is similar to the Objects view. It provides context-sensitive information based on the type of programming you are using. For example, if you are programming in LotusScript, the Reference view will show information about Domino objects. You can paste the function or method into the Script area, in some cases, with the parameters.
Chapter 2. Lotus Domino Designer 29
Figure 2-16 The Reference view
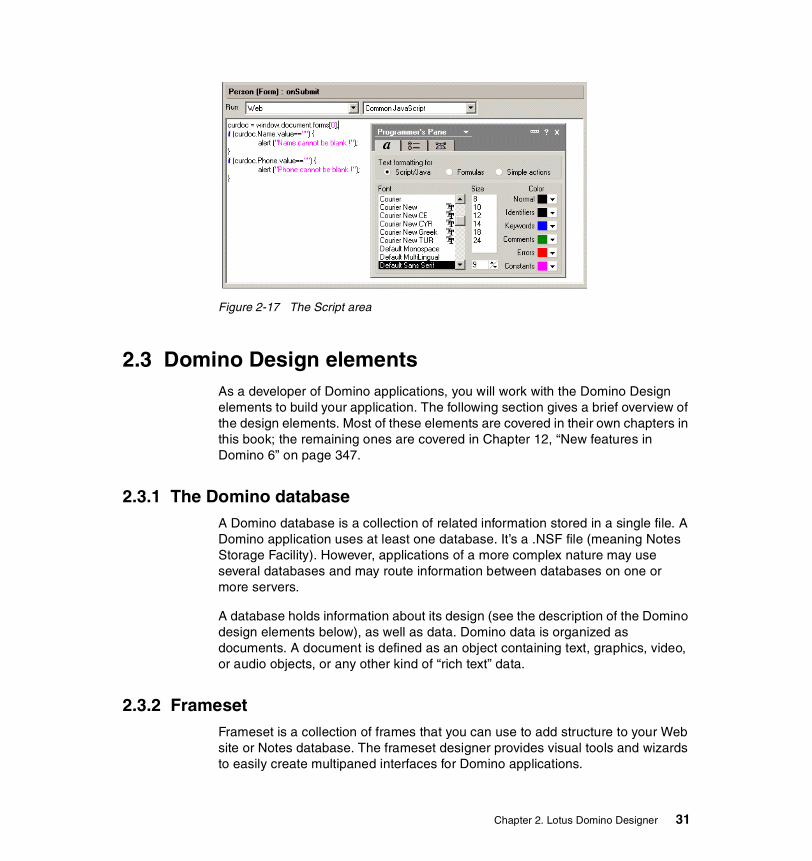
The Script areaDepending on the selection you make in the Objects view, the appropriate input window is presented in the Script area, as shown in Figure 2-17 on page 31. Using the Design Pane property box, you can adjust the settings to your needs (for example, to change the text formatting for identifiers, keywords, and comments).
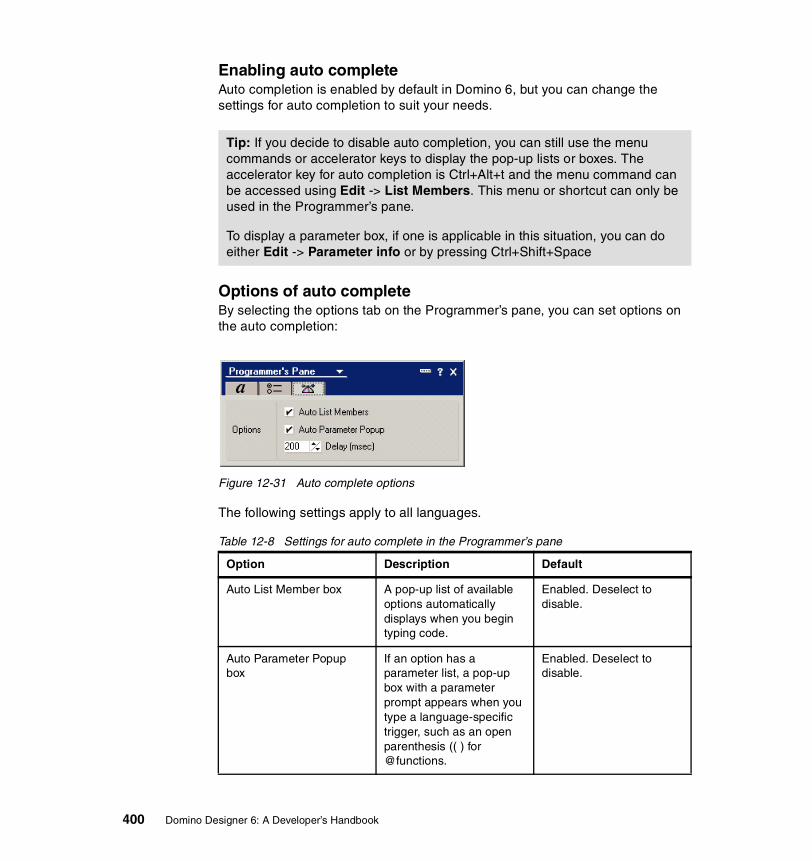
Domino 6 has also a new feature, auto complete, which will look up and paste the syntax elements directly into the Script area as you start to enter your code. See 12.7, “Auto complete” on page 399, for information on enabling and using this feature.
Note: Use the Reference view as a quick way to get programming help.
30 Domino Designer 6: A Developer’s Handbook
Figure 2-17 The Script area
2.3 Domino Design elementsAs a developer of Domino applications, you will work with the Domino Design elements to build your application. The following section gives a brief overview of the design elements. Most of these elements are covered in their own chapters in this book; the remaining ones are covered in Chapter 12, “New features in Domino 6” on page 347.
2.3.1 The Domino databaseA Domino database is a collection of related information stored in a single file. A Domino application uses at least one database. It’s a .NSF file (meaning Notes Storage Facility). However, applications of a more complex nature may use several databases and may route information between databases on one or more servers.
A database holds information about its design (see the description of the Domino design elements below), as well as data. Domino data is organized as documents. A document is defined as an object containing text, graphics, video, or audio objects, or any other kind of “rich text” data.
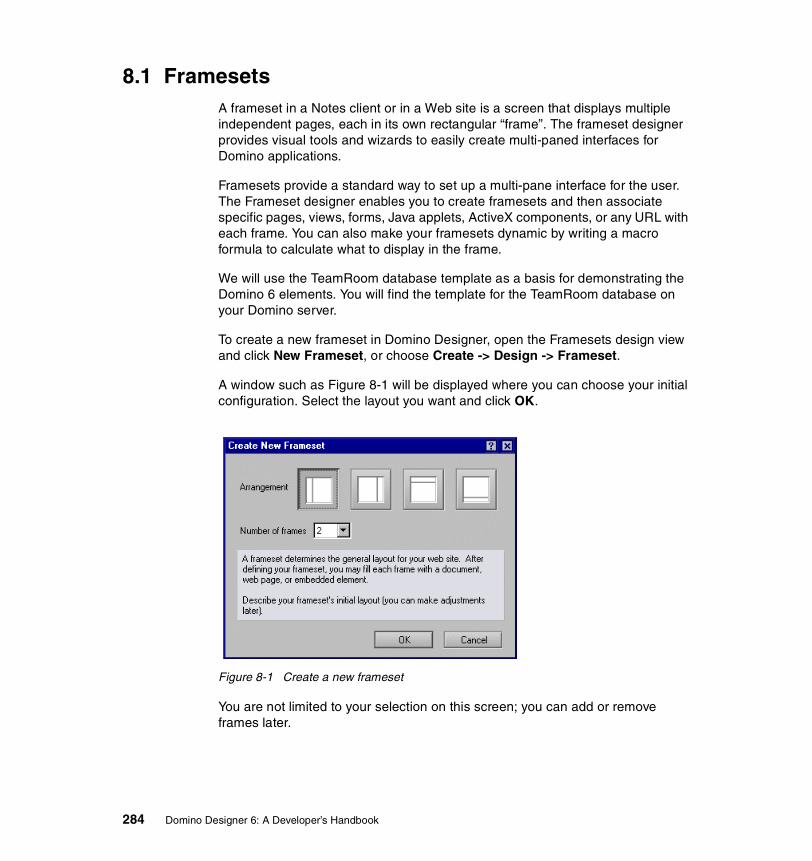
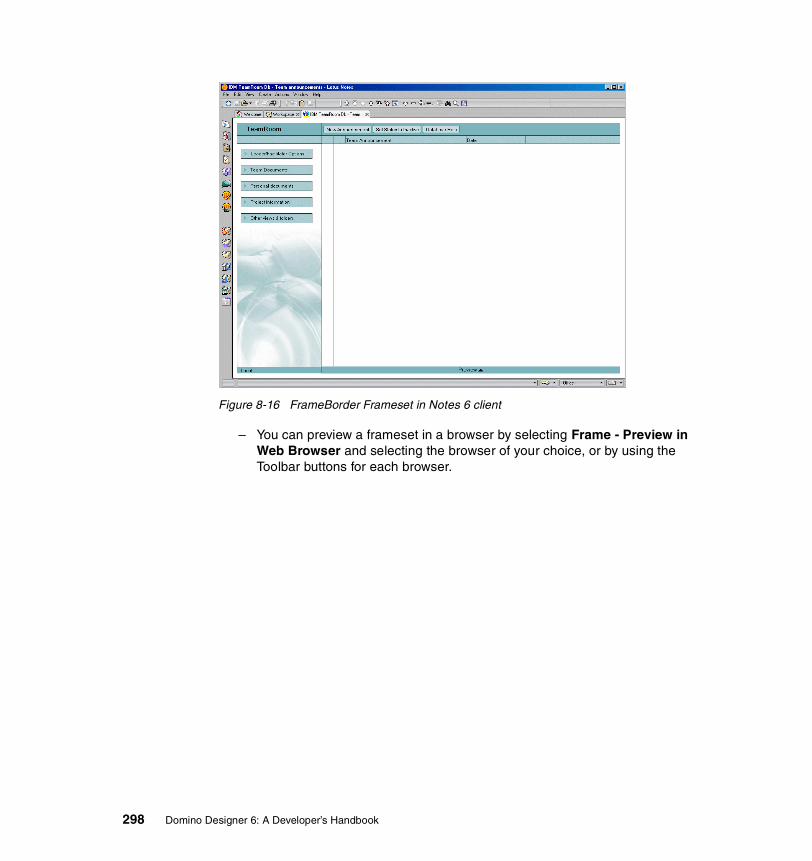
2.3.2 FramesetFrameset is a collection of frames that you can use to add structure to your Web site or Notes database. The frameset designer provides visual tools and wizards to easily create multipaned interfaces for Domino applications.
Chapter 2. Lotus Domino Designer 31
Framesets provide a standard way to set up a multipane interface for the user. The Frameset designer enables you to create framesets and then associate specific pages, views, forms, Java applets, ActiveX components, or any URL with each frame.
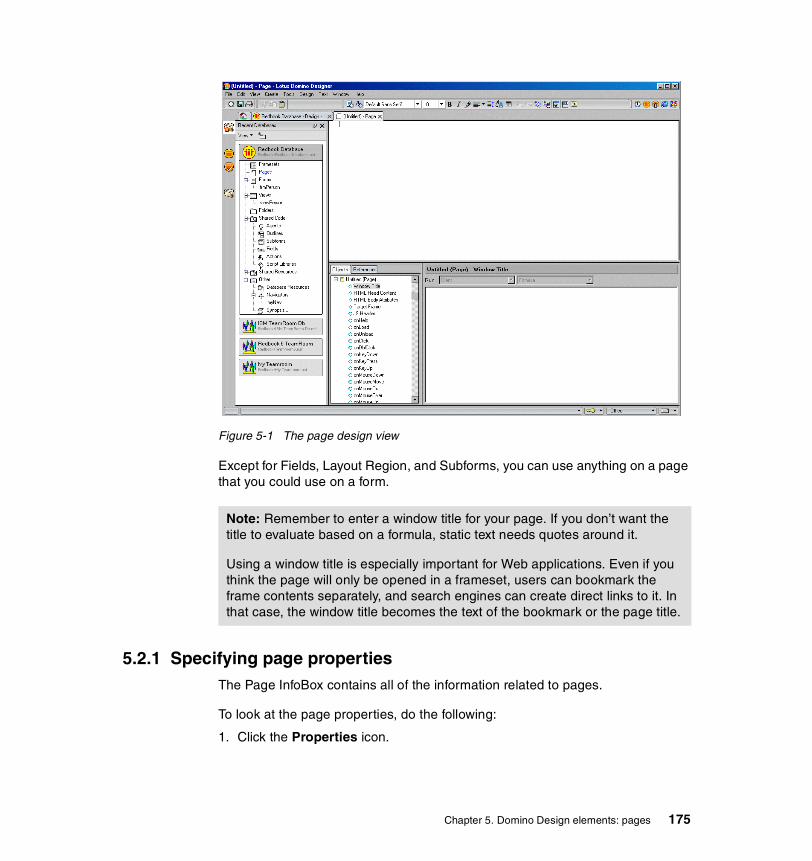
2.3.3 PagesA page is a design element that displays information to users. It is similar to a form except that it does not contain fields or subforms. Using the Page designer, you can create or import HTML Web pages. Page designer is a WYSIWYG HTML authoring tool that provides support for a broad range of browser technologies including HTML 4, image file formats, Java applets, ActiveX components, and multimedia objects. You can create or edit HTML in the Page designer by using the WYSIWYG editor, by writing HTML source code, or by mixing both in a single page.
The Page designer provides you with a much improved level of control over the layout of your Web pages. You no longer have to work directly in HTML to create sophisticated page design and layout (although working directly in HTML is still an option).
2.3.4 FormsA form is a framework for entering and viewing information in a database. A Notes database contains documents created from one or more forms. A form can contain:
� Fields that store data.
� Text that labels fields or gives instructions.
� Subforms that store a collection of form elements that you want to use on more than one form.
� Layout regions that combine graphics and fields in a way that affords greater design flexibility.
� Graphics that make forms easier to understand.
� Tables that summarize or organize information.
� Objects (OLE, Subscriptions, Notes/FX™ fields), file attachments, URLs, and links that extend the reach of Notes documents. For more information on these features, refer to the Domino Designer 6 Help database.
� Actions and buttons that perform functions automatically.
� Background color and graphics that enhance the look of a document.
� Embbeded Elements to include other design elements in a form.
32 Domino Designer 6: A Developer’s Handbook
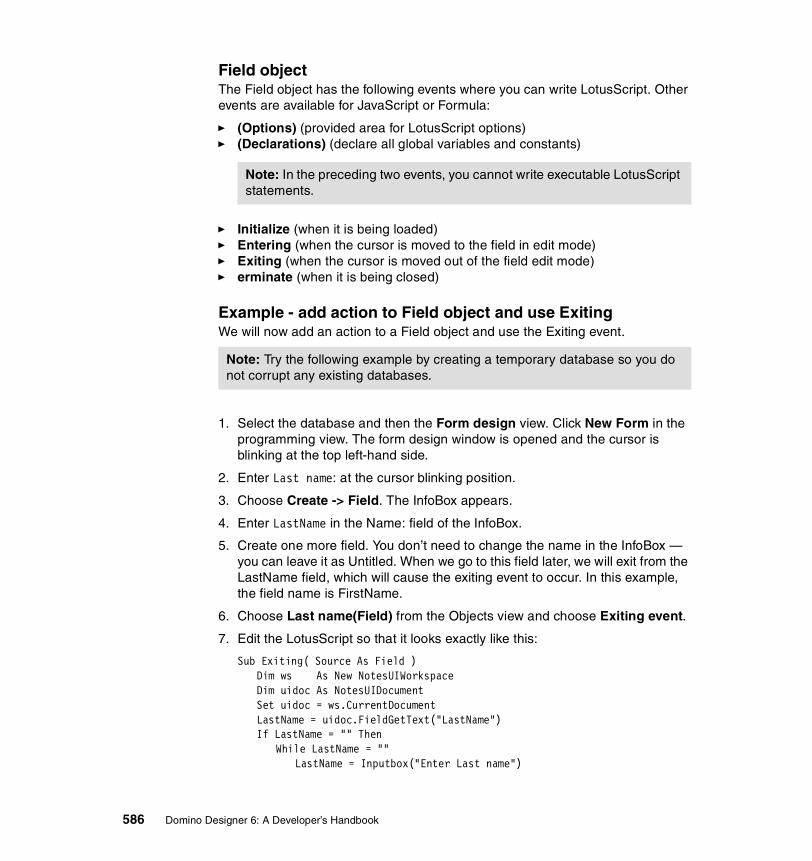
FieldsFields are the individual elements on a form that store data. Fields determine what data a single document can contain when the document is created with that form. Each field in a document stores a particular kind of data, such as text, numbers, dates, or user names. Often users can enter and edit field values, but sometimes data is filled in or changed automatically.
The contents of a field can be displayed in documents and views, or can be retrieved for use in formulas. A field can be defined for use on a single form, or can be defined to be shared among multiple forms in a database.
2.3.5 ViewsA view is a list of documents in a database. Depending on the selection criteria, you can display all documents of a database, or a subset. The documents may be grouped or sorted based on their contents. Usually, the most important information contained in a document is shown in a view, too.
2.3.6 FoldersFolders are structurally similar to a view. They list documents, but folders do not have a selection criteria; rather, the user decides on which documents are stored in folders. Folders can be private or shared.
2.3.7 Shared codeIn the following sections we introduce the Domino code and design elements that can be shared among databases.
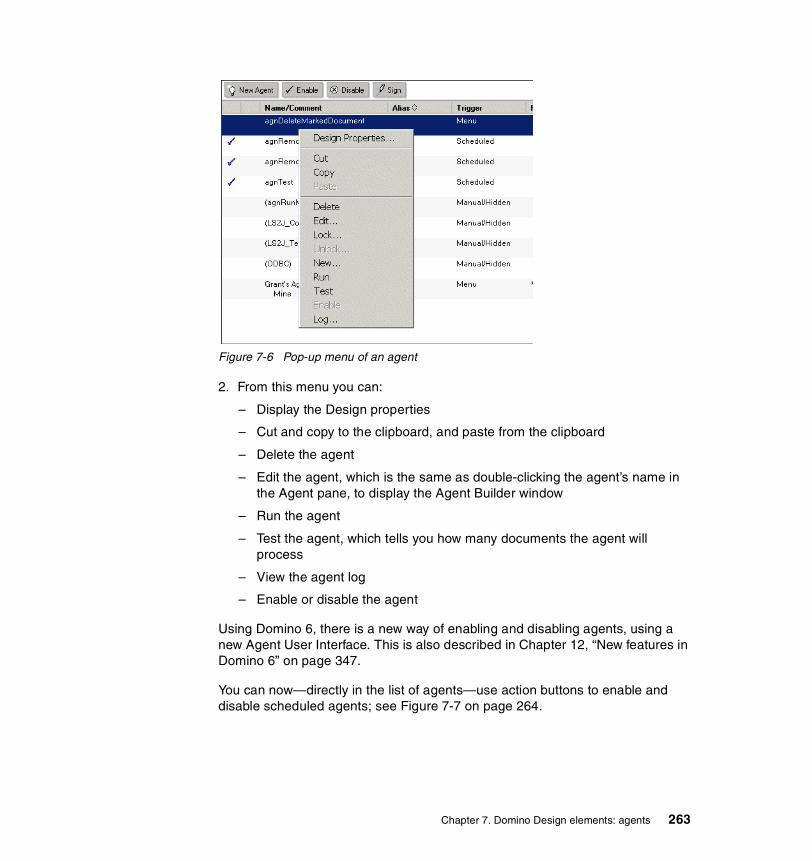
AgentsAgents allow you to automate many tasks within Domino. They are standalone programs that perform a specific task in a database for the user, for example, filing documents, changing field values, sending mail messages, deleting documents, or performing more powerful actions, such as interacting with external applications.
Agents can also be set to run unattended on the server, either on a schedule or when certain events occur.
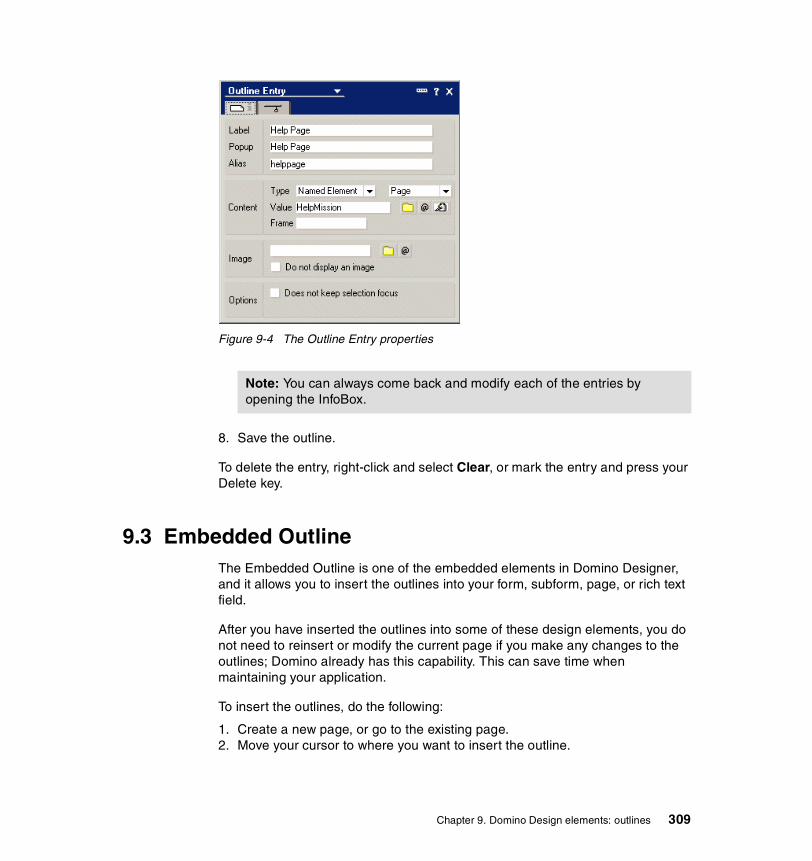
OutlinesOutlines, like image maps and navigators, provide a way for users to navigate an application. Unlike image maps or navigators, outlines let you maintain a navigational structure in only one place. As your site or application changes, you
Chapter 2. Lotus Domino Designer 33
make only one change in the source outline. Each navigational structure that uses that outline source is dynamically updated.
You can create an outline that lets users navigate to the views and folders in your database, perform actions, or link to other elements or URLs outside of your application. You can create an outline that navigates through your entire application or site, or through part of it.
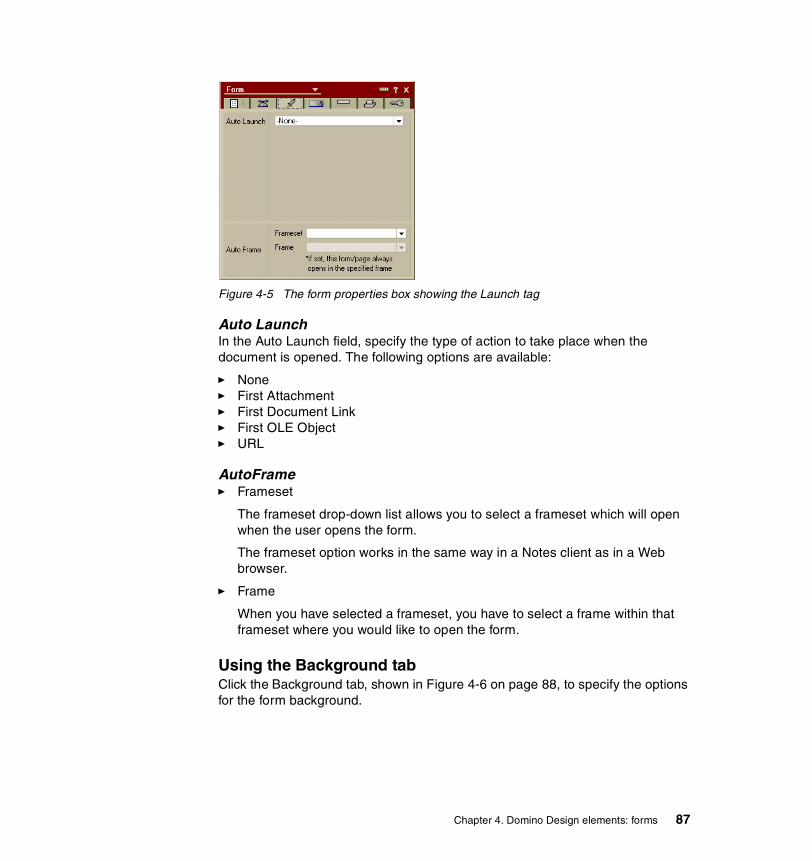
Once you create the source outline, you embed it on a page or form to create an outline control. This displays it to users as a site map or navigational structure. Users can click the outline entries to take them where you want them to go.
SubformsA subform is a horizontal slice of a form that you can use in more than one form. For example, you might create a corporate letterhead in a subform, and then use the subform on a variety of business forms. Subforms can contain the same elements as a regular form. Subforms can be loaded on a form based on a formula.
Shared fieldsShared fields behave like fields, but may be used in different forms. If you change the properties of a shared field, the changes are promoted to all occurrences of this field.
ActionsAction buttons provide one-click shortcuts for routine tasks, and substitutes for menu choices. For example, they might allow users to compose, print, delete, or categorize documents, or to give Web users who don’t have access to the Notes menus a way to click to edit, save, or close documents.
Actions can be shared and used on views, subforms and forms.
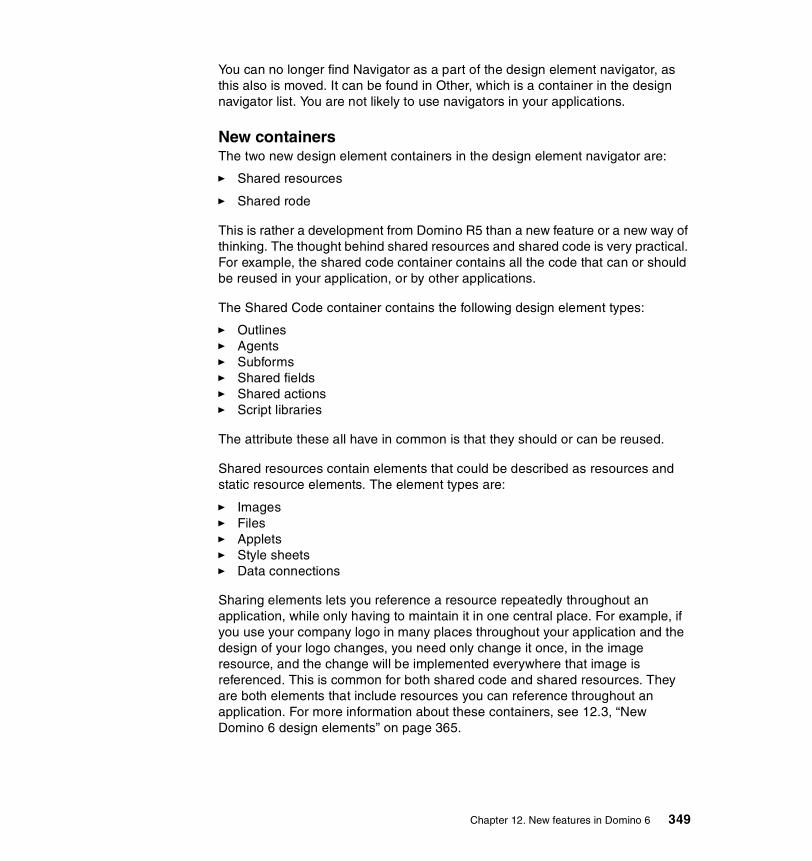
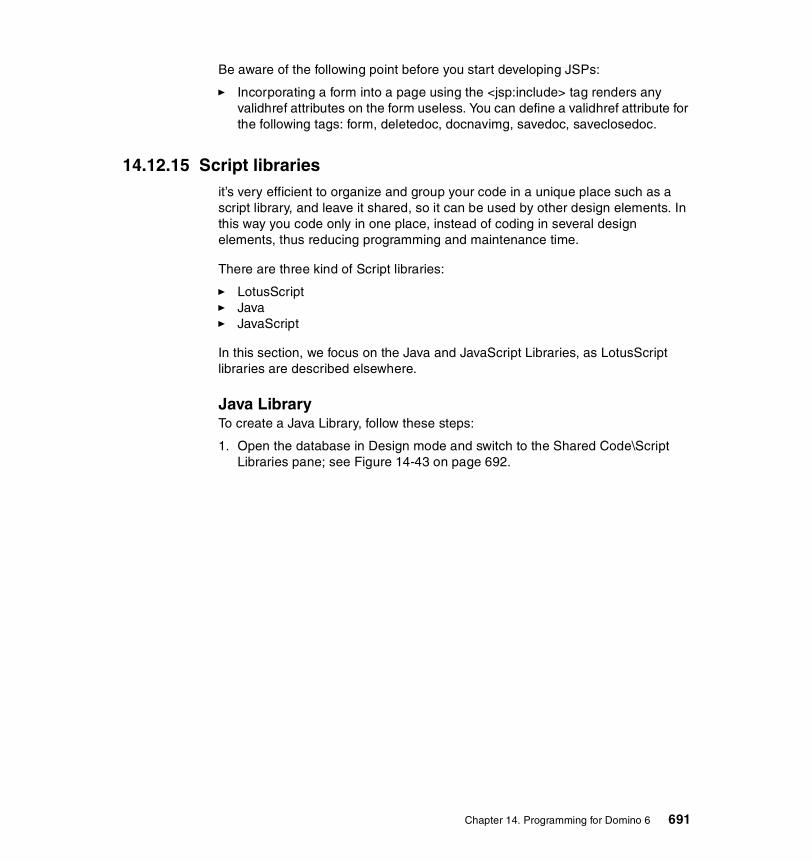
Script librariesA script library is a central place for storing code to be shared. See 2.4.4, “LotusScript, JavaScript and Java libraries” on page 37, “New library type” on page 350 and 12.3.2, “Shared Code” on page 367, for more detailed information about script libraries and what’s new about them in Domino 6.
2.3.8 Shared resourcesShared resources contain design elements that can be shared among databases.
34 Domino Designer 6: A Developer’s Handbook
ImagesYou can import any image file to your databases, and then use them throughout your applications.
FilesYou can import any file to your databases, and then use them throughout the applications. An example of a file to be imported could be an HTML file.
AppletsJava applets are mostly used for providing the user an advanced user interface. They are often used by Web browsers, but you can use applets for the Notes client, including the applet in a form, document or page. Use your favorite Java programming environment to create the applet, and you can then make the applet available for your applications by importing it as a shared resource
Data connectionsThe data connection resource is a design element where you can define a connection from a Domino database to a relational database.
Style sheetsStyle sheets give you the ability to control many aspects of your interface layout, including headers, links, text, fonts, styles, color, and margins. Create the style sheet with your favorite editor, import it as a shared resource in Domino Designer, and it will then be available for use throughout the databases.
2.3.9 Other
Design SynopsisDesign Synopsis is a tool to generate a detailed report on a specific database. It covers every component of the application. It can be used, for example, for a archive proposal (to track database design versions, and to find specific information inside some design element).
You can set which information you want in the report and what kind of output you want, as well. This output is customizable and can be displayed in a single document or in a database to be used at a later time.
NavigatorsNavigators are graphics where you can include programmed areas, or hotspots, that are used for navigation. Hotspots usually direct the user to another part of the database or Web site.
Chapter 2. Lotus Domino Designer 35
IconYou can create an icon for your database to visually represent the purpose of the database. This icon is shown, together with the bookmark, on the Bookmarks bar, workspace and—when you have the database open—on a Window tab. You can create the icon in your favorite graphics editor and paste it into the Designer, or create the icon in the Designer. The size of the icon is 32*32 pixels.
About This Database and Using This Database documentsThese two special documents are meant to be used for providing information for the user about the database.
The About This Database document is used to describe the purpose of a database, as well as the target audience of the database. You can specify the About document to open automatically when a user opens the database.
The Using This Database document is used to give an overview of the database, as well as instructions on how to use the database. It is also useful for providing instructions and descriptions about forms and views in the database.
To display these documents, choose Help - About This Database, or Help - Using This Database.
2.4 New elements of Domino Designer 6There are many enhancements in Domino Designer 6 which both maintain its place as an integrated, high level, rapid software development platform for the Notes client and Web browser, and make it an increasingly useful tool for developing applications that target other clients, such as PDAs and Internet-enabled phones, as Domino itself has evolved into a universal enterprise application server.
In this section, we briefly describe some new elements of Domino Designer 6. In Chapter 12, “New features in Domino 6” on page 347, we provide detailed explanations of all the new features.
2.4.1 Cascading style sheet (CSS)Cascading style sheet (CSS) give you the ability to control many aspects of your interface layout, including headers, links, text, fonts, styles, color, and margins. You can browse your local file system for a CSS, turn it into a shared resource, and then insert it into a page, form, or subform.
36 Domino Designer 6: A Developer’s Handbook
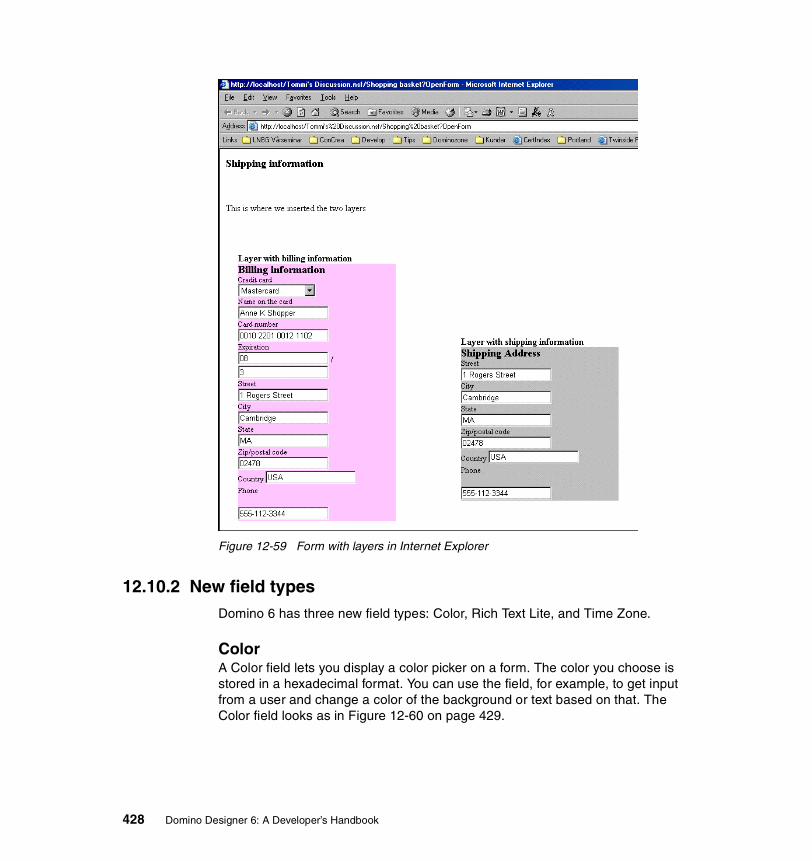
2.4.2 LayersA layer is not a design element you can create on a database level; you create it inside a page, form of subform. Layers let you position overlapping blocks of content on a page, form, or subform. Layers give you design flexibility because you can control the placement, size, and content of information. You can create and stack multiple layers beneath and above one another. Transparent layers reveal layers underneath; opaque layers conceal layers underneath.
The content of a layer depends on whether you create a layer on a page or a form. When you create a layer on a page, a layer can contain the same elements that a page can contain; for example, you can add text and graphics, and so on. When you create a layer on a form, a layer can contain the same elements that a form can contain; for example, you can add text and graphics, as well as controlled-access sections, fields, and subforms.
2.4.3 Shared code and shared resourcesEach database can contain its own library of shared code and shared resources, and you can access shared elements in other databases. Sharing elements lets you reference a resource repeatedly throughout an application, while only having to maintain in one standard place. For example, if you use your company logo in many places throughout your application and the design of your logo changes, you need only change it once, in the image resource, and the change will be implemented everywhere that image is referenced.
With shared code and resources, you could also make a database that is central storage for certain type of element or elements. Then you can just reference the elements from other database. An example of such a database could be an Image Resources Bank database.
2.4.4 LotusScript, JavaScript and Java librariesA script library is a place for storing code that can be shared in the current application using LotusScript, JavaScript, and Java—or in other applications using JavaScript and Java. Using script libraries allows you to maintain code in one place.
2.4.5 Data connectionsData connection resource (DCR) is new to Domino 6. DCR is a design element where you can define a connection from Domino database to a relational database. This functionality is also available via DECS.
Chapter 2. Lotus Domino Designer 37
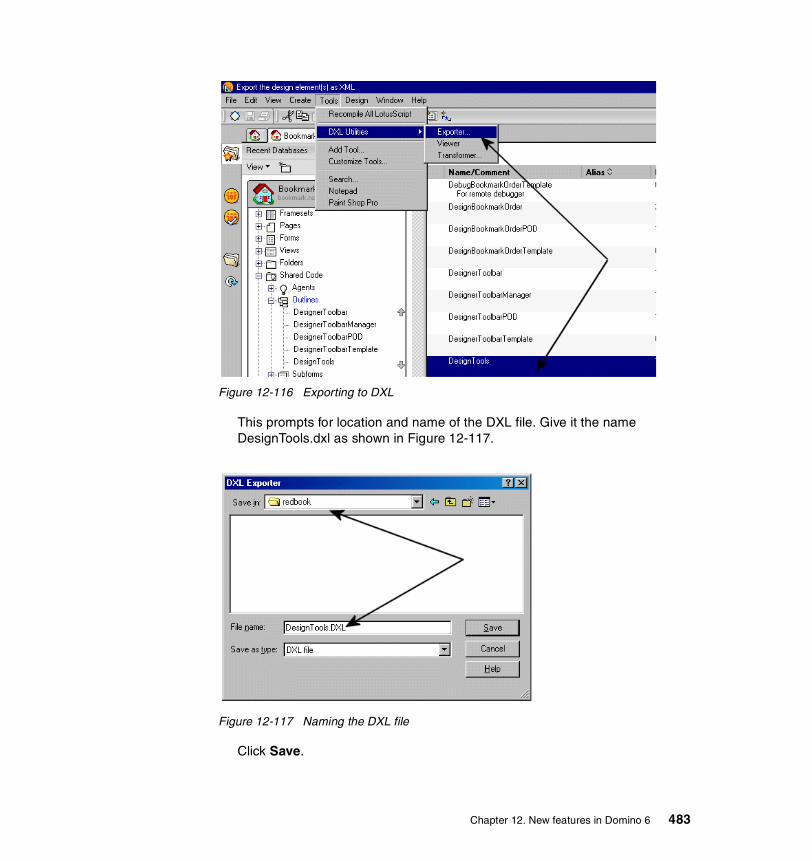
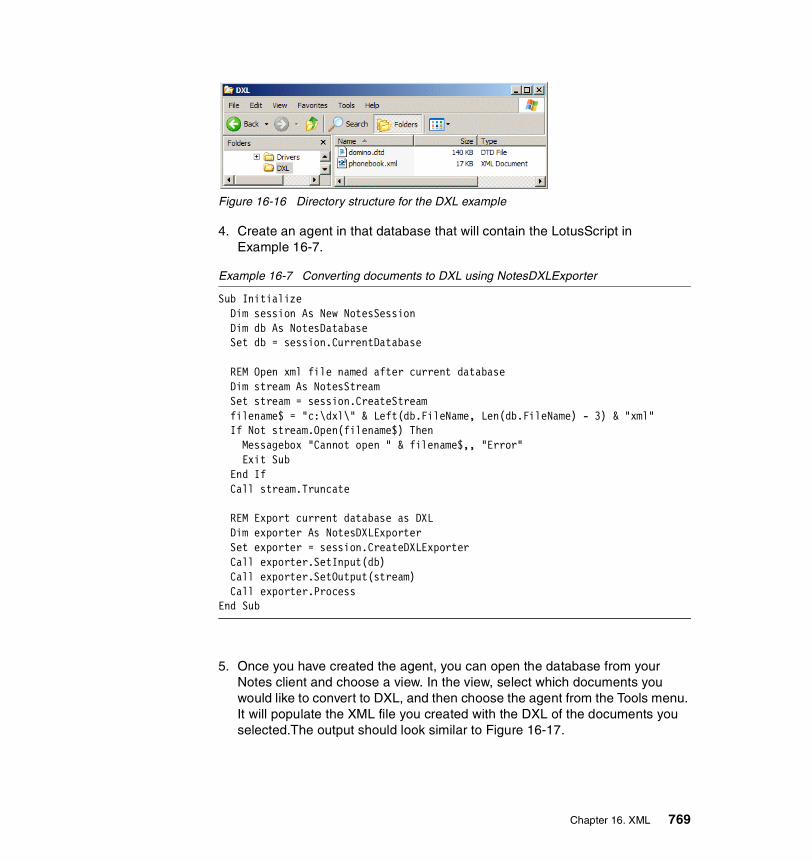
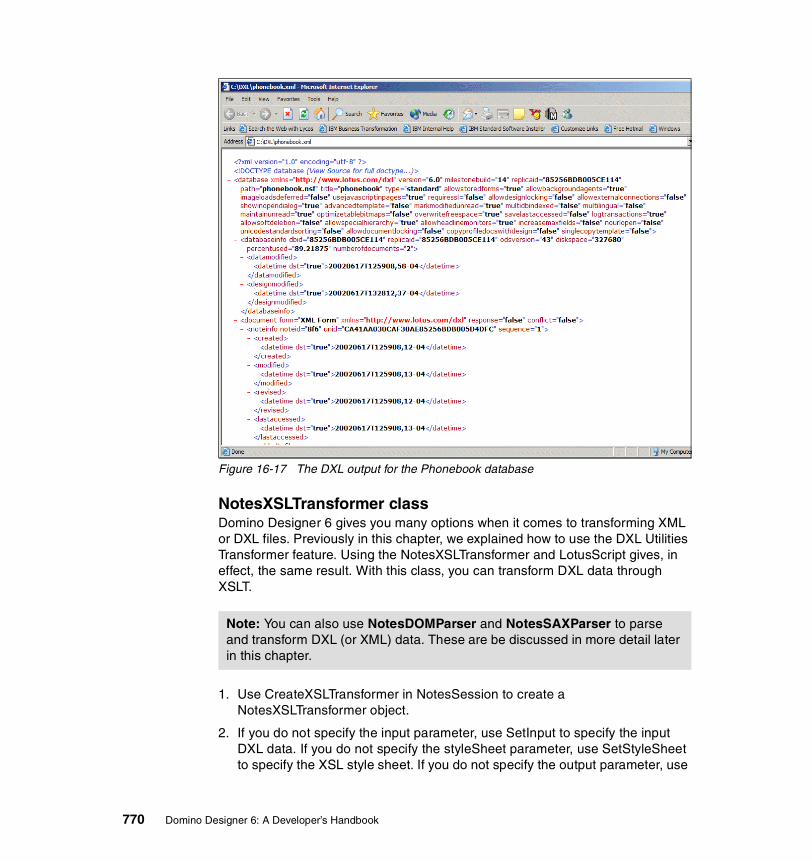
2.4.6 DXL utilitiesThe XML representation of Domino data is known as DXL. DXL describes Domino-specific data and design elements such as embedded views, forms, and documents. As XML becomes the standard basis for exchanging information, DXL provides a basis for importing and exporting XML representations of data to and from a Domino application.
With DXL utilities, you can view and export your Domino design elements. You can also transform to another format using the Transformer utility and a XSL style sheet file. XSL file contains the formatting for the XML data.
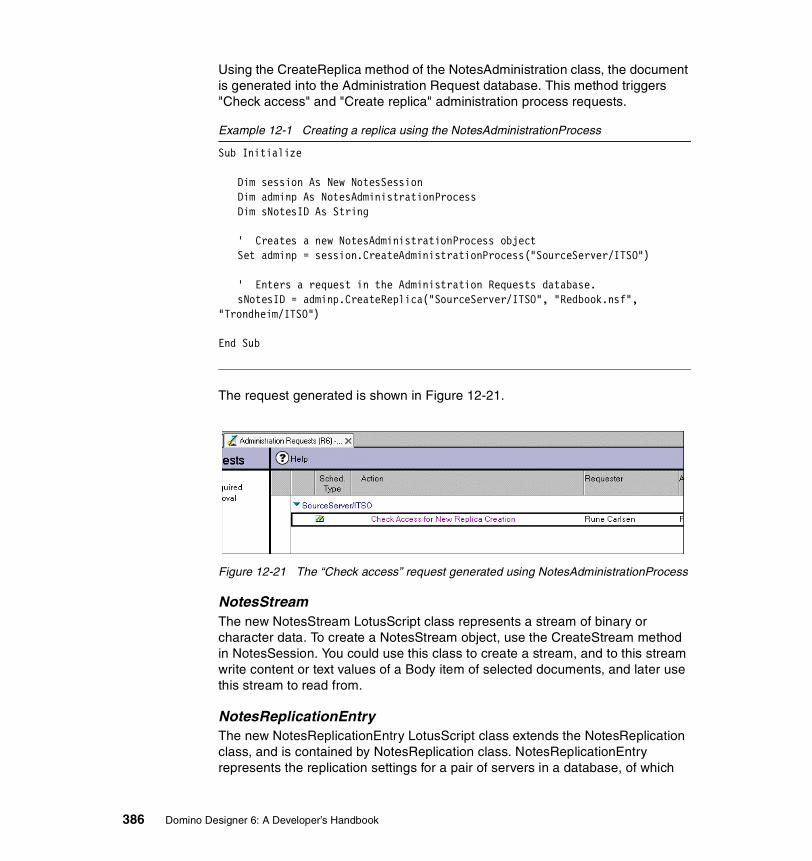
2.4.7 JSP custom tag librariesWith JSP technology, developers can create Web pages that have dynamic content. This is a quick and efficient way to incorporate complex Java programming into your pages. JSP tag libraries contain JSP tags, which are similar HTML tags except that, instead of describing how to present the content, contain a reference to a Java class.
JSP Custom Tag Libraries that ship with Domino lets you access Domino objects from Web pages. This means that someone without expert Java or Domino programming could easily add a tag to a Web page which could, for example, display a Domino view for the end user.
2.5 Industry Standards supportEnvironments for developing e-business applications must support the “standard” Web programming and scripting languages including Java, JavaScript, CSS, Servlets, HTML and XML. Domino Designer provides support of these Web standards.
Within the Designer Programmer’s Pane, you have new choices of languages for writing and compiling code. Java is available for creating Domino agents and Script Libraries, which are server-side applications that are initiated based upon events or schedules. Designer supports JavaScript in conjunction with a subset of the Document Object Model, a standard drafted by the World Wide Web Consortium (W3C).
In addition, you can code in HTML directly in the Page designer and Forms designer, format the interface with CSS, exchange external data with XML, provide dynamic information with JSP Tags and run Servlets in a compliance mode with the J2EE Internet application development standard.
38 Domino Designer 6: A Developer’s Handbook
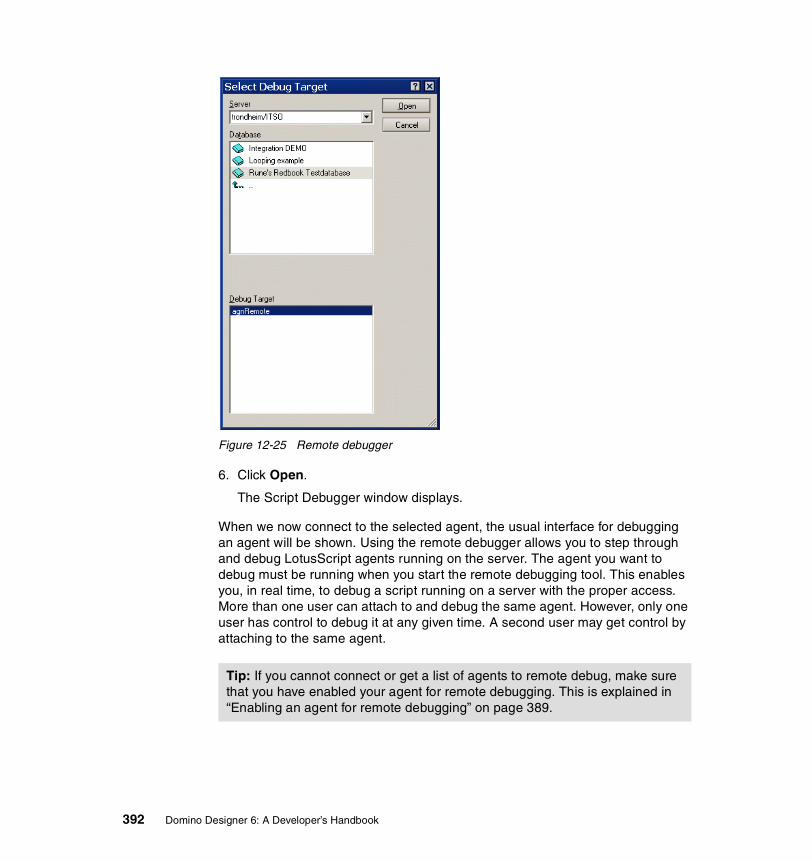
Domino Designer also supports CORBA/IIOP for creating distributed applications. With Domino CORBA objects, you can write Java applications and Java applets that remotely access Domino services and data. Through the support of industry standards in the Domino Web application server and in Domino Designer, you are able to lower your cost of ownership and application maintenance by leveraging your existing developer skills.
2.6 Multi-client applications supportOne benefit of Domino Designer is that you are able to develop a single application that runs in the Notes client, Web browsers, and mobile clients. The Designer now supports the latest Web standards including HTML 4.01, JavaScript 1.3, XML, JSP Tags, and Java. In addition, some Domino design elements are available as Java applets. This provides functionality, previously available only in Notes clients, to Web browsers. Furthermore, the CORBA/IIOP distributed object technology is supported in Domino, providing an alternative to Notes Remote Procedure Call (RPC) for communicating between clients and the server.
2.7 Multilingual applications supportWith Domino Global WorkBench, you can create multilingual Web sites right out of the box. The strengths of Domino Global WorkBench reside in better enabling and serving multilingual multinational corporations and Web site developers who are implementing and rolling out Domino-based multilingual applications for use on the World Wide Web or on a Notes Network. Domino Global WorkBench turns Domino servers into an intelligent language server for the Web.
Domino Global WorkBench lets you localize the Web infrastructure, define the initial sets of languages supported in the Web site, and define the high level of synchronization between forms and pages across languages. By allowing you to localize all user-visible elements of an application, including field labels, buttons, bitmaps, and dialog boxes, as well as actual content, an application can be optimized for each individual user who can select their language of choice at run time.
You can create the design of a Web site in more than one language with Domino Global WorkBench by resourcing/localizing Notes design elements and objects stored in the Notes object store environment, and the development languages including HTML, LotusScript, or JavaScript. Domino Global WorkBench facilitates review and approval of localized documents through workflow process
Chapter 2. Lotus Domino Designer 39
and ensures accurate linking and synchronizing of pages available in different languages, enabling content to appear simultaneously to all users worldwide.
2.8 Easy access to enterprise data and applicationsIncorporating back-end data into everyday business processes maximizes the value of Domino applications. Domino applications provide core technologies for the security and control of business processes, forms routing, and approvals management. With new enterprise integration technologies, Domino applications are now able to incorporate traditionally difficult to reach data into those applications, becoming a key component of managed business processes.
Domino includes the ability to create Web applications that contain connectors to relational databases (for example, DB/2 and Oracle), Enterprise Resource Planning systems (for example, SAP/R3), and transaction systems (for example, CICS, IBM MQSeries, and IMS). You can accomplish this either programmatically or with visual tools to native database drivers.
Domino Enterprise Connection Services (DECS) offers developers a visual tool and high performance server environment used to create Web applications that provide live, native access to enterprise data and applications. The visual tool presents an application wizard and online documentation to assist you to define external data source connections—DB2, Oracle, Sybase, text-based files, EDA/SQL, SAP/R3 and ODBC—and fields within the Domino application that will be automatically updated with external connector data.
New Domino classes for enterprise data access will be available in LotusScript and Java, such as NotesStream/lotus.domino.Stream and NotesMIMEHeader/lotus.domino.MIMEHeader, respectively LotusScript class and Java class. These classes enable you to customize applications to incorporate information from relational databases, transaction systems, and ERP applications from Domino according to your business needs.
The Domino driver for JDBC, providing standard JDBC access to data in Domino databases, is also available. Using this driver, you can write Java applets and applications that use JDBC to access information in Domino databases.
Domino Connectors are modules that provide native connectivity to external sources such as relational database, ERP, or transaction systems. These connectors can be accessed through the forms-based development tool in DECS, or through the new Domino object classes using LotusScript or Java languages.
40 Domino Designer 6: A Developer’s Handbook
Data Connection Resources (DCR) is a new feature in Designer 6 that allows you to handle DECS functionality directly in Designer, allowing you to link some Notes fields with external database fields. DCRs are reusable in an application and can be shared across applications; see “Data connections” on page 366 for more information.
Lotus Enterprise Integrator (LEI), which is available separately, extends DECS functionality beyond real-time data sources to include support for high volume data transfer and synchronization. LEI provides visual tools to manage integration between data sources without programming, including the capability to initiate event-driven or scheduled high volume data transfers between Domino applications and relational databases and other enterprise applications. LEI also supports programmatic data transfers via LotusScript and Java Classes.
The LEI release 6 is an important release of LEI and is closely coupled with the release of Domino 6. There have been ongoing improvements in “classic” LEI, most of which are available in the last release of LEI 3.2. The exciting part is the new Virtual Activities, which have long been talked about as virtual views. There are three of them: Virtual Fields (“classic” RealTime), Virtual Documents, and Virtual Agents. Back on the “classic” side, there are significant changes in the user interface, particularly for Replication Activities, that make them easier use.
2.9 Developing for mixed releases of clientsIn this section we describe what you need to consider when you are developing an application which will be used with different releases of Notes clients, for example with Notes R4.6, Notes R5, and Notes 6.
After upgrading a server to Lotus Domino 6, you can upgrade the databases on that server to the Domino 6 database format and design (template). These two steps—upgrading database format and upgrading database design—are independent of each other. Because database format does not replicate, you can leave the design of a database based on a Domino 4.6 or Domino 5 template, and upgrade the database format on that server to the Domino 6 format.
If you decide to upgrade the database design to use Domino 6 templates and features, be aware that Notes 4.6 and Notes 5 clients cannot use Notes/Domino 6 features. Some Domino 6 features and templates require that a database use the Domino 6 database format.
Note: When using the Domino Designer 6 client to create applications, you should know who your clients are. Notes/Domino 6 have several new features and upgrades, explained in Chapter 12, “New features in Domino 6” on page 347. If you use these new features, and your client are still on a version
Chapter 2. Lotus Domino Designer 41
prior to Notes/Domino 6 (for example, R5), then part of your application will not work properly, because their client does not support your features.
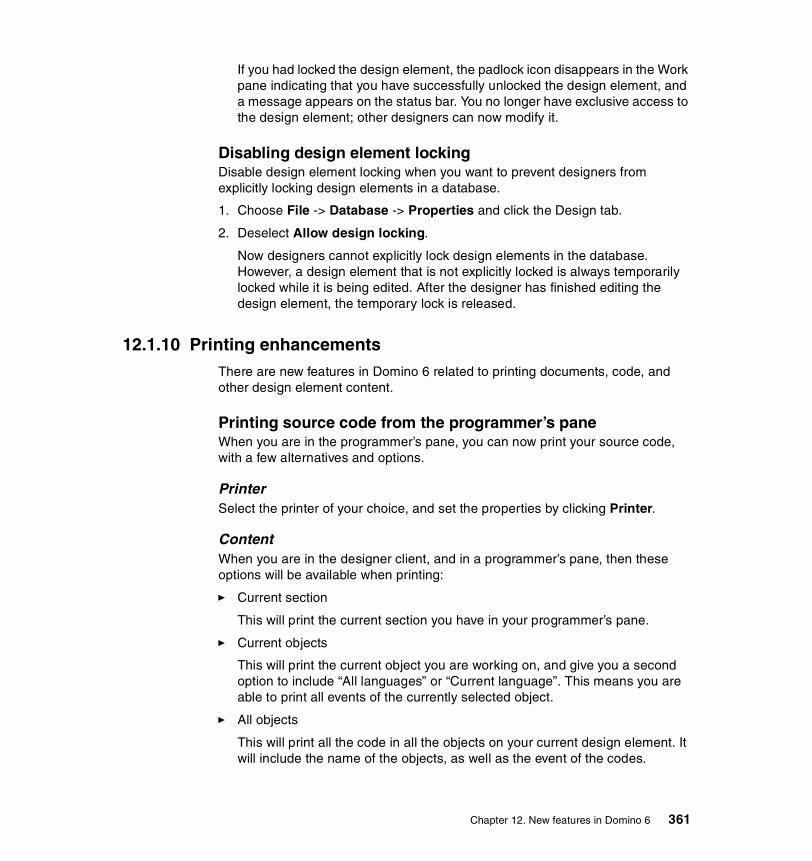
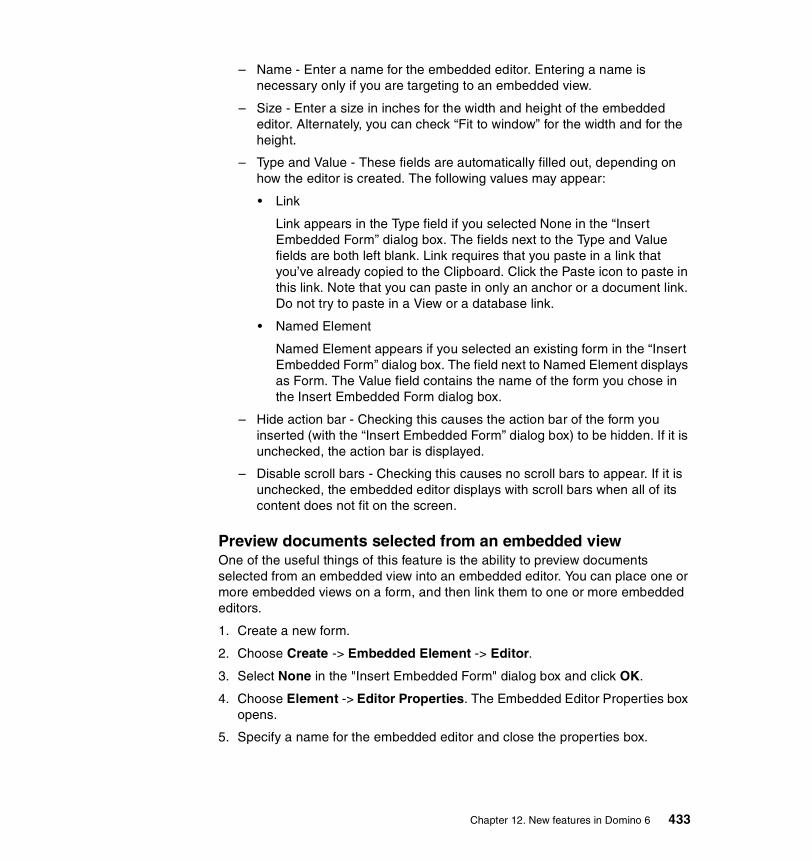
2.9.1 On-Disk StructureOn-Disk Structure (ODS) is the way data is written to disk storage. Every major release of Notes\Domino has included significant architectural changes to the database structure. These changes to the ODS provide you with significant benefits (new features) with very low risk.
Table 2-1 lists the ODS versions related to Domino releases.
Table 2-1 ODS version on different Domino releases
If your clients use releases of Notes before Notes/Domino 6, and the Notes/Domino 6 application with ODS 43 is located on a Domino 6 server, then R4/R5 clients should have no problem accessing this database on the Domino 6 Server. If the user replicates this database locally onto their R4/R5 client, the local replica will automatically be converted to earlier version. The ODS version does not replicate.
Upgrading the database to the new ODS is simple: you compact the database on a Domino 6 server or Notes 6 client and the database ODS will be upgraded. In addition, when you create a new replica, a new database or a new database copy, the new database will have the new ODS version.
If, however, you don’t want to have the database in Domino 6 ODS version for some reason, you can revert the database to an earlier ODS version. However,
Attention: We recommend that you develop the applications with a Domino Designer version that is on the same level as the oldest client version you have to support. If you are unable to do that, then at a minimum you should test your application with that client version thoroughly.
Your Domino server should be on the same release version as your Designer. Some of the functionality of your application might not work as desired if the server is on a release prior to the Designer.
Domino release level On-Disk Structure level Server output version
Notes R3.x 17 V3
Notes/Domino R4.x 20 V4
Notes/Domino R5.x 41 V5
Notes/Domino 6 43 V6
42 Domino Designer 6: A Developer’s Handbook
by doing this you lose some of the new database features, such as LZ1 compression (the new enhanced compression method) or view logging. Some of the new features, such as document locking, will still be available. If some of the new database features are obligatory for you, experiment to see if those are still available after the ODS has been reverted.
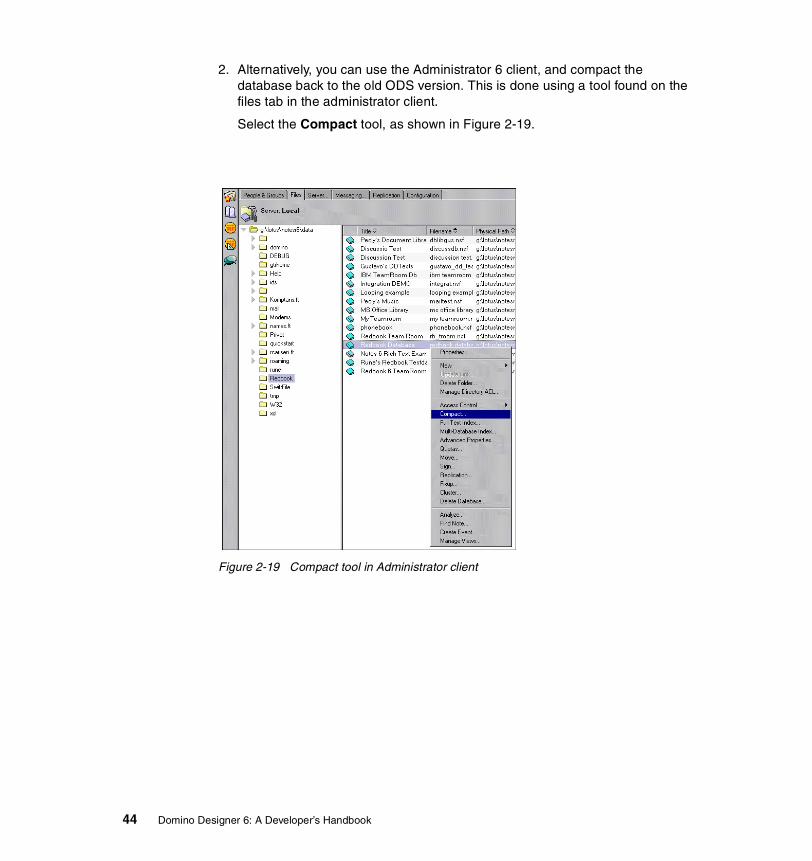
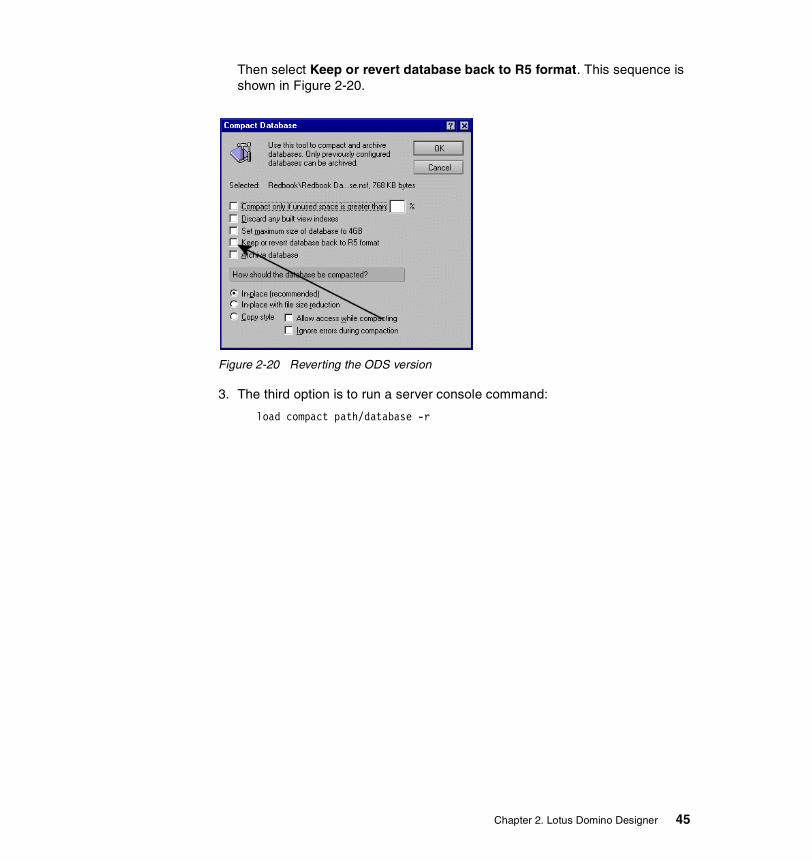
To revert the ODS version back to the R5 format, you have three options:
1. Create a new copy of the database (using the Notes client), and use the extension .ns5 for the database; see Figure 2-18.
To force the ODS version to remain on R5 level, you can specify .ns5 as the database extension when you create the database, The extension will only affect the ODS and make it stay at ODS version 41 (R5); it will not affect the new Domino 6 features (for example, new elements) you are using. So the features used will still be unavailable for earlier versions of Notes, but they are available for Notes 6 clients.
Figure 2-18 New copy with extension .ns5
Note: Changing the file extension on the operating system level does not convert the ODS of the database.
Chapter 2. Lotus Domino Designer 43
2. Alternatively, you can use the Administrator 6 client, and compact the database back to the old ODS version. This is done using a tool found on the files tab in the administrator client.
Select the Compact tool, as shown in Figure 2-19.
Figure 2-19 Compact tool in Administrator client
44 Domino Designer 6: A Developer’s Handbook
Then select Keep or revert database back to R5 format. This sequence is shown in Figure 2-20.
Figure 2-20 Reverting the ODS version
3. The third option is to run a server console command:
load compact path/database -r
Chapter 2. Lotus Domino Designer 45
46 Domino Designer 6: A Developer’s Handbook
Chapter 3. Domino Design elements: basics
In this chapter, we describe how to create and manage Domino databases. We include a glossary of Domino Design terms that application developers need to understand when creating a Domino application.
3.1 Domino databasesThe term “Domino database” refers to both Domino and Web databases. What makes it a “Web” database is the viewing mechanism—a Web browser instead of a Notes client, and the fact that it resides on a Domino server running the HTTP server task.
Traditional Web sites consist of different kinds of pages and associated compound elements, which are organized in hierarchical directory structures. When an HTTP request is issued to display a page, a new HTML coded file is opened.
With Domino, the Web site is structured through Notes databases designed in the Notes object store format. When an HTTP request is issued to display a page, a Notes element is opened through a Universal Resource Locator (URL) command and Domino translates it for viewing as a Web page.
3.1.1 Creating a databaseThere are several different ways to create a database. You can:
� Use an existing template� Use an existing database� Create a new database
Once the database is created, you can modify most of the settings by using the Database InfoBox. We cover these options in 3.1.2, “Changing the database properties” on page 59.
Using an existing templateDomino 6 provides a series of written applications that can be used or customized for your own needs. Although there are many types of popular application templates, they are mainly designed to reveal the underlying technology and development capabilities within Domino 6. Their main intent is not to be “out-of-the-box” applications.
If your application is identical, or similar to, an existing template provided with Domino, the most convenient way to create a new database is to use that template as your starting point. Most of the design work has already been done for you. The design elements of the individual templates can easily be copied and pasted into your custom applications.
48 Domino Designer 6: A Developer’s Handbook
Following are some of the most useful application templates shipped with Domino 6:
� Discussion - this is a discussion database for both Notes and Web clients, where users can create new discussion topics and others can reply to them. The discussion database template is also often used to create a Classified Ads database.
� Doc Library - this is a document library for both Notes and Web clients, which can be used to store all kind documentation, instructions, manuals or technical details. It is often used to create a database containing Human Resource information, travel guidelines, or equipment information. The template also contains Document Review Cycle functionality, which allows moving the document from user to user for reviews.
� Lotus SmartSuite Library - this is a document library template with Lotus SmartSuite integration. Users can create documents using one of the SmartSuite products, like 1-2-3, WordPro, or Freelance Graphics and the files are saved inside the Domino database.
� Microsoft Office Library - this is a document library template with Microsoft Office integration. Users can create documents using one of the MS Office products, like Word or Excel, and the files are saved inside the Domino database.
� TeamRoom - this is a very useful application for enabling communication and sharing database among the team. Users can utilize the rich set of functionality the application has, such as discussion, creating and sharing documents, creating meeting minutes, assigning action items and team calendar.
Listing available templatesTo see the list of available templates, follow these steps:
1. Choose File -> Database -> New. The list box on the New Database dialog box lists several templates.
2. Click the Show advanced templates check box. The list box at the bottom of the list displays additional templates. The templates listed are stored on your local workstation.
3. Select any template.
4. Click the About button to display the database Help document. It summarizes what the database can be used for.
Tip: The shortcut is Ctrl+N.
Chapter 3. Domino Design elements: basics 49
To see additional templates stored on a server, select the server you want to access from the Template server drop-down list.
Creating the databaseFollow these steps to create the database:
1. Decide if the database will reside on your local workstation or on a server.
2. In the Title field, specify a meaningful title.
3. In the File Name field, specify a file name for the database. You can also take the file name that Domino provides automatically based on the database title.
Figure 3-1 shows an example of a completed New Database dialog box.
Figure 3-1 Creating a new database
4. You can encrypt local databases to protect confidential data. This is useful if users have laptops that will be taken out of their business locations.
To specify encryption, click Encryption. Specify the appropriate level of encryption.
Note: The extension for a database file is .NSF (for Notes Storage Facility). The extension for a database template file is .NTF (for Notes Template Facility).
50 Domino Designer 6: A Developer’s Handbook
Figure 3-2 shows an example of a new Encryption setting.
Figure 3-2 New database Encryption setting
Only the user shown in the Encryption window has access to the local database after it is encrypted.
You should set the size limit only if you are developing an application for use with Lotus Notes and Domino 4.x, or if you will be on a Domino 4.x server. The maximum size for database in Domino R4 was 4 GB. In Domino 6, the size of the database is only limited to what your operating system can support, up to 64 GB.
Note: The size button that was visible in earlier releases of Domino is now hidden if the file extension is .nsf. If you change the file extension to .nsf4, the size button will become visible again, as shown in Figure 3-3 on page 52.
Note: Although others can’t access the encrypted database locally, they can still access the database if it is on a server. This also applies to Web users.
If you would like to deny access to other users, use the Access Control List.
Chapter 3. Domino Design elements: basics 51
Figure 3-3 Size limit button visible
Clicking this button allows you to set the size limit of the new database; see Figure 3-4.
Figure 3-4 Size limit for new databases
If you want to set a size limit to a database in Domino 6, use the Set size quota feature with Domino Administration Client (see the Lotus Domino Administrator 6 Help for more information).
5. If you want your new database design to stay synchronized with the design template, check the option “Inherit future design changes” in the New Database dialog box.
Note: “Inherit future design changes” is shaded until you select a template from which your database should inherit design changes.
52 Domino Designer 6: A Developer’s Handbook
6. For advanced options, click Advanced. Figure 3-5 shows the dialog box that will be displayed.
Figure 3-5 Advanced Database Options dialog box
Let’s take a closer look at each option:
– Don't maintain unread marks
Maintaining unread marks in a database slows performance. For some databases, such as the Domino Directory or the Domino log file, unread marks are not useful. However, in many applications, such as discussion databases and document libraries, the unread marks are essential functionality to the application. Your decision regarding this property should be based on what your database is used for.
If you do not need to track read and unread documents, consider disabling unread marks in the database to improve performance.
– Document Table bitmap optimization
Notes refers to tables of document information to determine which documents appear in an updated view. Selecting this property associates tables with the forms used by documents in each table.
During a view update, Notes searches only tables whose views contain forms used by documents in that view. While there is a slight performance cost to maintaining this association, this setting significantly speeds
Chapter 3. Domino Design elements: basics 53
updates of small views in large databases. To enable optimization using the table-form association, select this property.
When you change this setting, compact the database to enable it. Make sure your system has sufficient disk space, as this compact makes a temporary copy of the database. (You can also use the load compact command with the -F or -f switch to enable or disable bitmap optimization.)
– Don't overwrite Free space
To prevent unauthorized users from accessing data, Notes overwrites deleted data in databases, which can reduce database performance. In some situations, this security feature is not necessary, such as when:
• The database is physically secure (for example, on a password-protected server in a locked room).
• Space in the database is quickly reallocated (for example, in system databases such as MAIL.BOX).
• Security is not an issue (for example, in an employee discussion database).
• The database is encrypted.
– Maintain Last Accessed Property
Domino databases store the date when a document was last modified or read. By default, the database records only changes to documents—not reads.
If you select this property, the database records reads of a document, as well as changes to the document.
Tip: Document Table bitmap optimization will not improve performance unless the server can tell, based on the view selection formula, which forms are candidates for inclusion in a view. The view selection formula must begin with the test of the form name; for example, use this format:
SELECT Form = “Report” & Category = “Done”
Do not use this format:
SELECT Category = “Done” & Form = “Report”
Note: Legal requirements for document retention in your company may be a consideration in whether you select this property. If you do not overwrite free space, it may be possible to retrieve deleted information from the database.
54 Domino Designer 6: A Developer’s Handbook
If you set the database to delete documents based on intervals without activity (such as, 10 days without being read or modified), then you should select this property—with the understanding that this may negatively impact database performance.
Otherwise, leave the property deselected for best performance.
– Disable transaction Logging
When disabled, this property turns off logging of all transactions for all Domino API functions. It also turns off full database integrity and replacement of Database Fixup on system restart with high speed transaction roll forward/rollback from transaction logs, along with support for backup and recovery APIs.
Note: Consult your Domino administrator prior turning on or off the transaction logging on any databases.
– Allow soft deletions
This property allows deleted documents to remain in the database and not be permanently removed for a set number of hours. The hours are set by the database manager in the Advanced tab of the Database Properties box. After the specified time period, the document is permanently deleted from the database.
This feature is very useful for administrators to use with databases where regular users have deletion rights. Often users delete documents by accident or without enough consideration, and usually notice this within a couple of hours from the deletion. As an administrator, you can restore those documents, if they have not been permanently deleted.
If important documents are deleted, but the user does not realize it until several days after the deletion, you can always restore those documents from the backups.
– Don't Support specialized response hierarchy
Documents store information about their parent and response documents, which is used only by the @functions @AllChildren and @AllDescendants. In databases that do not use these @functions in views, select this property to improve database performance.
Note: You can still have responses with this option selected, but the @functions do not work.
– Don't allow headline Monitoring
Users can set up their headlines to search databases automatically for items of interest. If many users do this, database performance can be slow. To prevent a database from being monitored, select this property.
Chapter 3. Domino Design elements: basics 55
– Allow more fields in database
This option allows a database to contain up to 23,000 field names. For a database without this option selected, all field names when concatenated cannot exceed 64 kilobytes, which results in a database limit of approximately 3,000 fields.
– Use LZ1 compression for attachments
This is a new feature in Domino 6. With Domino 6, you can compress attachments using the Lempel-Zev class 1 (LZ1) adaptive algorithm instead of the Huffman algorithm, which was the compression method used in earlier releases of Domino.
Because LZ1 compression can save you a considerable amount of disk space, it is favored over the Huffman method. Be aware, however, that if you are working in an environment that uses different versions of client and server software and you choose this property, the attachments are automatically recompressed on the server using the Huffman algorithm. This recompression of attachments can add significant extra time to the process.
– Limit entries in $UpdatedBy fields
A document stores the name of the user or server that made each change to it in the $UpdatedBy field. This edit history requires disk space and slows both view updates and replication.
If you do not need to maintain a complete edit history, then specify the number of changes that the $UpdatedBy field tracks by using this setting. Once the $UpdatedBy field reaches this limit, the next edit causes the oldest entry to be removed from the $UpdatedBy list.
The default value is 0, which means that the number of entries is limited to 500.
Consider limiting the entries in the $UpdatedBy field in databases if there is no need to record who has edited documents over time. (The reasons cited in the following item are also valid considerations for limiting the number entries of this field.)
– Limit entries in $Revisions fields
A document stores the date and time of each change saved to it in the $Revisions field. Domino servers use this field to resolve replication or save conflicts. The $Revisions field stores up to 500 entries by default.
If you do not need to track changes this closely, specify the number of changes that the $Revisions field tracks by using this setting. Once the $Revisions field reaches this limit, the next edit causes the oldest entry to be removed from the $Revisions list.
56 Domino Designer 6: A Developer’s Handbook
Consider limiting the entries in $Revisions fields in databases that:
• Contain many documents• Replicate often or have no replicas• Contain documents that are rarely edited
– Soft delete expire time in hours
This property allows the database manager to specify the time (in hours) that documents marked for “soft” deletion are held before they are permanently removed from the database. The value in this field has no effect unless you check the Allow soft deletions check box (refer to the Allow soft deletions bullet on page 55 for more information).
Copying an existing databaseFirst, locate the database you want to copy. Open it in the Notes client or in Domino Designer, or highlight it in the Workspace window. Then use the menu File/Database/New Copy to open the copy dialog.
As an alternative, locate it in your bookmarks and right-click to bring up the bookmark menu, as shown in Figure 3-6 on page 57.
Figure 3-6 Copying an existing database from the bookmark list
Chapter 3. Domino Design elements: basics 57
Once the Copy Database dialog is open, proceed as follows:
1. Select Local as the server name if you want to store the database on your local workstation. Select a server name if you want to store the database on a server.
2. Enter a title for the database.
3. Type a file name with the extension .NSF for the new database.
4. Select Database Design Only if you do not want to copy the documents that are stored in the database.
5. Deselect Access Control List, because it could prevent you from modifying the database design in the future.
Figure 3-7 shows an example of the Copy Database dialog box.
Figure 3-7 Copy Database
Tips:
Generally, you will want to customize the design of databases you copy. To do this, the database design must not be hidden. Check the Design tab of the database properties to find out whether the design is hidden. If so, try to get the original template from which the database was created.
The shortcut to open an existing database is: CTRL+O.
Note: Unless you deselect Access Control List, the access that you have to the copy of the database will be the same as the access you have to the original database.
58 Domino Designer 6: A Developer’s Handbook
6. To encrypt the database, click Encryption and select the appropriate encryption level. (This is desirable if the database will be stored locally, especially if the database contains confidential data, or if your users have laptops that they use in public environments.)
7. Click OK to start the copy operation.
Creating a new databaseIf the template or existing databases do not meet your requirements, you can create a completely new database. This means that you will have to create all the design elements, such as forms, pages, views, and fields.
However, you can always copy existing elements from other databases and paste them into the new database by using this method:
1. Choose File -> Database -> New.
2. Type a title in the Title field.
3. From the list of available databases displayed at the bottom of the window, choose the -Blank- option.
4. Click OK. The new database will be added to your bookmarks.
5. Select the database that you just created, click the right mouse button, and select Open in Designer.
Domino Designer and your newly created database will be opened, and you will be ready to start the design of the database.
3.1.2 Changing the database propertiesOne strength of Domino is the fact that it is sensitive to context. You are often just one mouse-click away from the properties of the object you are working on: outlines, fields, embedded elements, Java applets, buttons, forms, attachments, and databases.
Opening the database InfoBoxTo display the database InfoBox:
1. Display the database pop-up menu by clicking the right mouse button.
2. Select Database Properties; see Figure 3-8 on page 60.
Tip: The shortcut is Alt+Enter. You can also click the Properties icon to display the database properties InfoBox. If the toolbar bar is not visible, select File -> Preferences -> Toolbar Preferences and go to the Toolbar tab, and then set the Universal toolbar to: visible.
Chapter 3. Domino Design elements: basics 59
Figure 3-8 Properties
Specifying the database type, replication, and encryptionThe Basics tab contains information about the database, such as its title, location, database name, the database type, the replication settings, and replication history; see Figure 3-9.
Figure 3-9 Database properties
1. To set the Database type, you can select one of the following values:
Standard. This type is used most of the time. Unless you have a specific reason for specifying the database as something else (such as, the database is a Domino Directory), the database type should be standard.
Library. This type is generally created from the Database library template. It’s used to record and store information about the databases located on a Domino server or on a workstation, which provides an easy way for users to browse the list of databases available to them.
60 Domino Designer 6: A Developer’s Handbook
Personal Journal. This database type is a place for you to store private documents you don't want to share with others. You can use the personal journal as a diary, a notebook, or as a holding place to compose documents before they are ready for distribution.
Domino Directory. This type creates a database based on the Domino Directory format.
Directory Catalog. This type creates a database based on the Domino Directory format, but with fewer features than the full Address Book.
Multi DB Search. This type is used to specify a database type of Search Through Multiple Databases, which uses the SRCHSITE.NTF template. This type of database is used to configure searches among databases that have been designated to participate in Multi Database indexing by selecting the appropriate option in the Design tab of the database InfoBox.
Portfolio. This type allows users to keep a collection of databases that are used frequently, or that are related.
IMAP Server Proxy. Internet Message Access Protocol (IMAP) is used to send and receive electronic mail, using the Internet.
News Server Proxy. This type allows users to keep a collection of news group and conversations about news.
Subscriptions. This type is used to keep track of user subscriptions to various databases, and is used by the headlines databases.
Mailbox. This type is used for mailing purposes. Note that this is not a user mail file, with Inbox and Sent folders; instead, it is used by the mail routing process to hold mail until it can be delivered to a user.
Mail File
2. Click the Archive Settings button to display the Archive settings property box, as shown in Figure 3-10 on page 62.
Chapter 3. Domino Design elements: basics 61
Figure 3-10 Archive settings
This option enables you to determine when documents are deleted, and where archives of those documents are stored. You can set more specific settings for archiving (such as creating archiving scenarios where documents are archived based on when they were created, for example).
You can also set up scheduled archiving.
3. Click Encryption to display a window that enables you to specify encryption for the local version of the database.
4. Web Access: Use JavaScript when generating pages. This option allows the Domino server to use JavaScript to generate Web pages. For example, by selecting this option, you can use multiple buttons on the form.
Some of the @Commands require this option to be set in order to work. An example would be @Command([ViewRefreshFiels]), which causes all the field formulas to recalculate.
5. Web Access: Require SSL connection. This option forces users to log in to the database using Secure Sockets Layer (SSL). SSL securely encrypts the traffic between client and server. Without SSL, the traffic between the Web browser and the Domino server could possible be cached or compromised.
6. Web Access: Don't allow URL open. As you design an application which users will access with a browser, you may want to restrict browser users from using URL commands that would open forms and views in your application.
62 Domino Designer 6: A Developer’s Handbook
For example, you can design your application so that a servlet that uses forms or views will only use the forms and views using URL commands.
However, if you set this property, it will be impossible for browser users to manipulate these application components using Domino URL commands.
7. Disable background agents for this database. This property can be used to disable all scheduled agents in a database for debugging or troubleshooting issues. (Note: Generally, you do not set this option on a production database.)
8. Allow use of stored forms in this database. This setting applies only when using Notes client to view databases. When a form is stored with a document, all the user interface elements and information about how to use them is stored with every document that is created with the form. Because of this, your database could grow substantially.
Previously, this option was required to store information entered into OLE objects embedded on the forms. However, with Domino 6, the OLE object is always stored as part of the document, not the form, so the main reason for using stored forms is gone.
The benefit of storing the form on a document is that you could send or copy/paste a document to a database, and that database does not have to contain the forms to show the documents. Also, storing the form with the document might be useful if you have an application with different versions of design—and the old documents should use the design and UI that was current when the document was created.
Note: Keep in mind, however, that allowing stored forms causes a potential security risk; someone could write malicious code and store it in the document. When the document is opened, the code could run and do damage.
9. Display images after loading. Properly setting database properties can improve the performance of an active database. Setting database performance properties on many databases—or on one, large, active database—can also improve server performance. In addition, some of these property settings also help reduce the size of databases.
10.Allow document locking. When you set this property, users with Author access or higher can lock documents in that database. Locking a document prevents editing and replication conflicts by ensuring that the document lock owner has exclusive access to modify the document; others with the same
Note: Users also can specify “Load images: On request” in the Advanced section of a Location document, in order to display images only when users click them. For more information, refer to Lotus Notes 6 Help.
Chapter 3. Domino Design elements: basics 63
access cannot modify a locked document at the same time—even if they are working on a different replica on the same LAN. Managers of a database cannot edit a locked document. However, Managers can unlock documents that are locked.
11.Allow connections to external databases using DCRs. In order to establish a connection to an external data source, you must first enable external connections for the database. Once that database property is set, you can then use your data connection resource (DCR) in a form to exchange data with an external database. For more information about DCRs, refer to Chapter 10, “Domino design elements: shared resources” on page 317.
Displaying general database information1. Click the Information tab to display general information about the database,
such as its size and the number of documents stored.
Figure 3-11 shows the Information tab of the property box.
Figure 3-11 Database Information
2. Click User Detail to display information related to user activity.
3. This page also tells you the ODS, or On Disk Structure, version. ODS version tells you the version of the database, ODS version 43 means that the database is made with Domino 6 or newer.
Note: You may want to disable this property while you are designing an application, and enable it when you are ready to deploy your application.
You must also disable this option when you import existing records from an external database into your application.
64 Domino Designer 6: A Developer’s Handbook
Viewing this information about a R5 database would show ODS version 41, and for a R4 database, the ODS version is 20.
Specifying print options1. Click the Printer tab to specify options related to printing the database.
2. You may want to add a header or footer to the pages of the Notes documents you print (this is how you add page numbers to printed documents, for example).
Header and footer information can apply to all documents in a database, or be set up for a particular document. The header and footer you create for a database prints with all documents in the database, unless you set up a different header and footer for the document.
Use the icons under the Header and Footer options to define the date, time, tabs and page numbering; see Figure 3-12.
Figure 3-12 Database Printing
Notes: Database header and footer information also appears when you print a list of documents in a folder or view, a Calendar view, or a list of calendar entries.
Print options are a personal setting; they apply only to the user who sets them.
Tip: Use the Print Preview command to see how headers and footers look before you actually print.
Chapter 3. Domino Design elements: basics 65
3. You can also select the font, size, and style.
Specifying Database Design properties1. Click the Design tab to display or specify information concerning the design
of the database.
The example displayed in the Figure 3-13 on page 67 shows that the design of this database is not hidden. The design of a database can be hidden when creating the database, or replacing or refreshing the database design from a template.
2. If you select Inherit design from template, the database automatically inherits all the changes made to the template if the template this database is based on is modified in the future.
3. You can enable the Design locking feature in the database. First, you must specify an Administration (Master lock) server for the database; this is done using the Advanced tab of the ACL dialog box.
4. If the database you are creating is a template, check the “Database is a master template” check box and specify a name for the template.
5. If appropriate, select that the new template is listed as an advanced template. This indicates that the template should only be used by Domino developers or administrators, and that it is only visible as an available template when the advanced check box is checked when creating a new database.
6. Deselect “List in Database Catalog and Show” in the Open Database dialog if the database is located on a server, contains sensitive data, and you do not want users to be able to see its name.
Note: Printing properties do not take effect if you are printing from the Web.
Note: The DESIGN task on the server updates databases when their design templates change. This generally happens nightly; however, the task can be disabled by an administrator.
You can also refresh a design using File -> Database -> Refresh Design while in the database.
Note: This is not a security feature, since there are other ways to find databases on the server. To keep the contents secure, use the database ACL and encrypt local replicas.
66 Domino Designer 6: A Developer’s Handbook
7. If you want the index to be included in Multi Database Search Database site queries, then select Include in multi database indexing.
8. Enable Multilingual database if your database will be used by multinational organizations across time zones, languages, and cultures; see Figure 3-13.
– Select the Default language for this database.– Select the Default region for this database.– Select the Default sort order for this database.
Using this option lets you create multiple versions of each design element, one for each language your application supports. The Notes client will choose the appropriate element that matches the language the user has set.
Figure 3-13 Database Design
Specifying Launch options1. Click the Launch tab to define what users will see when they first open the
database. The dialog box displays differently, depending on your choice of actions in the On Database Open drop-down list; see Figure 3-14 on page 68.
Chapter 3. Domino Design elements: basics 67
Figure 3-14 Database Launch
2. Select an option from the On Database Open drop-down list; see Figure 3-15.
Figure 3-15 Drop-down list
A wide variety of options is possible, for example:
– If you select Open designated Frameset, then you need to select the frameset that you want to be opened. All available framesets are listed in the drop-down box.
– If you select Open designated Navigator options, another drop-down list is displayed, where you can select the kind of navigator that you want to open. You can choose folders, standard navigator or page. Choosing standard navigator or page will display a third drop-down list, where you can select the actual navigators or pages to be used; see Figure 3-16 on page 69.
68 Domino Designer 6: A Developer’s Handbook
Figure 3-16 Open designated Navigator
– Select Open designated Navigator in its own window if you want the navigator to be displayed in a full screen. You would typically choose this option if the navigator or page consists of a large map or a workflow sketch.
3. You can specify the properties of the preview pane by clicking Preview Pane Default.... You will be presented with a number of choices. Click the most appropriate property for the user; see Figure 3-17.
Figure 3-17 Preview pane properties
Note: This is the default value that is used when the user opens the database for the first time. Users can override this choice and Notes will remember their preference when they open the database again.
However, this option does not take effect on the Web, because Web users do not have the preview pane.
Chapter 3. Domino Design elements: basics 69
4. Select an option from the On Web Open drop-down list for Web users opening the database. A wide variety of options are possible.
Specifying Full-Text indexing1. Click the Full-Text tab to create, update, or delete a full-text index, which
allows for fast retrieval of documents.
2. Select the update frequency as required; see Figure 3-18.
Figure 3-18 Create Full-Text Index
Specifying Advanced options The Advanced tab allows you to enable or disable advanced database options, many of which affect the performance of the database. For more detail about advanced options, refer to the explanations listed under item 6 on page 53.
Note: You generally do want to full-text index your databases, since this makes it much faster for users to find information by searching for keywords in the text. Agents that use full-text selection criteria also execute faster if there is an index.
70 Domino Designer 6: A Developer’s Handbook
3.2 Using Design SynopsisDesign Synopsis gives you a single location where you can browse or search all of the components and code logic of a database. It provides you with an output of important information about every component of the application, for documentation or archival purposes. You may customize the output to your needs and display it as a single document, or put it into a database to be used at a later time.
The Design Synopsis dialog box allows you to generate a detailed report on a particular database. In Domino 6, the user interface of the dialog box has been enhanced to make it easier to use.
To create a design synopsis:
1. Select the database for which you want a report.
2. Choose File -> Database -> Design Synopsis. (Or you can open Designer and select the database for which you want a report, and then click Other -> Design Synopsis).
3. Select the design elements (forms, views, shared fields, agents, and so on) that you want in your report. For each design element type you choose, select the individual elements that you want in your report.
The Add button lets you select the elements of a design and add them one at a time to your report. The Add All button selects all the elements of a particular design element. The Type drop-down list also includes an -All- option, which lists all elements in your database.
Restriction: For databases with large amounts of design elements, such as your mail file, Design Synopsis may fail with an error message.
For these cases, you can try creating a separate synopsis for views and forms—or use the Format output tab to select a database for the output.
Chapter 3. Domino Design elements: basics 71
Figure 3-19 Choose Design element
4. Click the Choose DB Info tab to select the database information that you want in the report; see Figure 3-20.
Figure 3-20 Choose DB Info
The following selections can be made:
– General Information - this provides information such as the database title, location, and categories.
– Space Usage - this calculates the file size, the number of documents, and the space used by the database.
– Replication - this provides information about the replication settings for the database.
72 Domino Designer 6: A Developer’s Handbook
– Access List - this generates a list of users, groups, and servers in the ACL, and specifies assigned access levels and access roles for each.
5. Click the Define Content tab to select the contents of the report for each design element. Different elements have different options, and the list of options is context-sensitive. Also keep in mind that whether or not you can include or exclude subcomponents or certain types of code depends on the type of element you are creating the report from.
Figure 3-21 Define Content
6. Click the Output tab to specify the output options. For example, if you want to write the report to a database, select Direct Output to: Database; see Figure 3-22.
Figure 3-22 Format Output
Chapter 3. Domino Design elements: basics 73
7. Click OK to generate the report; see Figure 3-23 on page 74.
Figure 3-23 Database Information
3.3 SummaryThis chapter explains some of the basics related to creating Domino databases, and also provides a glossary of some of the most commonly used design elements in Domino.
We walked through different database settings available on different tabs on the InfoBox of databases. We also illustrated how to use Design Synopsis, which enables you to easily see an overview of the design elements in your database.
Note: For more information about Design Synopsis and its new features in Domino 6, refer to 12.2, “Design Synopsis” on page 363.
74 Domino Designer 6: A Developer’s Handbook
Chapter 4. Domino Design elements: forms
In this chapter, we describe Domino forms and explain what they are and how to design and modify them. We also discuss the basic design elements used when creating a Domino database.
In addition, we show you how to display different information to the Web and Notes, as well as to users with mobile clients such as PDAs and Internet-enabled phones.
4.1 FormsThis section will guide you through Domino forms; it describes what they are and explains the different types of forms, and discusses how to create, design, and modify them. This section also examines the design elements of the form, such as fields, tables, images, embedded elements, layout regions, and computed text. We make use of the MyTeamRoom database, which we created from the TeamRoom template as a basis for demonstrating the Domino 6 elements. You will find the template for the TeamRoom database on your Domino server.
The form is the skeleton provided to users to enable them to enter data, either by typing or by simply clicking various buttons or hotspots. There is usually at least one form in a database, although a typical business application will have many forms, each targeted to the type of information that the user wants to save in the database.
The form contains all the design elements; fields to store the user’s information, static text, buttons, sections, images, and subforms that help the user to enter the data into the database.
To create a new form, go to Form Designer and click New Form, or choose Create -> Design -> Form. Alternatively, you can copy and paste a form from the Design Form pane and then customize the form to your needs.
4.1.1 Specifying form propertiesThe Form InfoBox contains all of the information related to forms. To look at the form properties, do the following:
1. Go to the Form Designer.
2. To create a form, click New Form and the new form is displayed; see Figure 4-1 on page 77.
3. Click the Properties icon.
4. An InfoBox will be displayed which allows you to set the properties of the form. It consists of seven tabs:
– Form Info– Defaults– Launch– Form Background– Header– Printing– Security
76 Domino Designer 6: A Developer’s Handbook
Figure 4-1 To create a form, click New Form
Using the Form Info tabThe Form Info tab stores general information about the form; see Figure 4-2 on page 78. In the section following the figure, we explain the details of each selection you can make.
Chapter 4. Domino Design elements: forms 77
Figure 4-2 The form properties box showing the Form Info tag
NameIn the Name field, specify a name and an alias for the form.
By default, the form name appears as an item in the Create option on the menu bar. This is the name that the user sees. Therefore, make it as meaningful as possible.
To specify an alias, enter the vertical bar (|) and the alias after the form name in the Name field. It is recommended that you create an alias for each form. This is the name you will use in your code.
Specifying an alias enables you to leave your code unmodified if, for example, the user requests to have the name of the form changed. It is the alias, not the actual name, that is saved in the document created with this form.
78 Domino Designer 6: A Developer’s Handbook
Try to keep the first character unique, because Domino will use the first unique character as a keyboard shortcut under Windows.
CommentIn the Comment field, you can enter remarks for the benefit of developers who maintain the form.
TypeSpecify the form type in this field; there are several types to choose from:
� The form we’re creating in the example shown in Figure 4-2 on page 78 is a Document type, which means that it is a main document.
� A Response type means that it is linked to a main document of type Document. A Response document cannot exist without a parent.
� A Response to Response type adds a third level to the document hierarchy. It can be created as a response to any of these three types of document.
Note: The alias should uniquely identify the form. It should be different from every other form, page and subform name and alias.
The exception is for multilingual applications, where you deliberately use the same alias in multiple forms to show the same document with a different form for different languages.
Note: You also can add the underline character (_) to define a keyboard shortcut.
Example: _Document
The D is now the keyboard shortcut character
To put the form in a submenu under the Create menu item, use the backslash character (\) in the form name; for example: “Requests\Work orders” to create a “Request” submenu.
Note: If you want to have a multiple-level hierarchy, as in a discussion database, it is not necessary to define separate Response and Response to Response forms; only the Response to Response form is needed.
Chapter 4. Domino Design elements: forms 79
Display� Include in menu
If you want to include the form in the Create option on the menu bar, you have two options:
– If there are only a small number of forms, they can be displayed directly in the Create Menu list. Up to nine forms can be listed in the Create option.
Otherwise, use the “\” character to organize them into submenus as described above. If the list gets too long, you can use Create - Other to get the complete list of forms.
– If there are many different forms, it is best to use the Create - Other dialog. You could add the most commonly used forms to the Create Menu list, and then put the least used forms under the Create - Other dialog option.
� Search Builder
Select the Search Builder check box to add the Response form to the list of forms that users can use to enter field values for a full-text search.
� Include in Print
Select the Include in Print check box when you want to enable contact printing for this form. Contact printing, such as label printing, is a special type of printing where the form is used for printing multiple documents. See the document “Designing a form for contact printing” in the Lotus Domino Designer 6 help database for further discussion and design guidelines for contact printing.
VersioningIn the Versioning field, specify whether or not you want version control. The following options are available:
� None
� New versions become responses
Use this when the original version is the most important. The original document is listed first in a view.
� Prior versions become responses
Use this when the new version is the most important. The latest version is listed first in a view.
� New versions become siblings
Note: Create options are not applicable to Web users, because Web users do not have the Create menu.
80 Domino Designer 6: A Developer’s Handbook
Use this when all versions have equal importance. The original document is listed first in a view. All successive versions follow as additional main documents, without introducing the risk of replication or save conflicts.
� Create versions
If you decided to work with versioning, there are two create version options:
– Manual-File, New Version creates a new version of the document when the user chooses File - Save as New Version.
– Automatic-File, Save creates a new version of the document each time the user saves the document.
Options� Default database form
Domino uses a default form to open documents whenever their associated form has been dropped from the database design. You should select the Default database form option for the main form of the database.
� Store Form in Document
Leave the Store Form in Document check box deselected.
You should only store the form in the document if, for example, a user that has no access to the database receives a document and has no access to the design of the form used to create the document. For Web users, this option is supported in read mode, but do not use it for documents that need to be created or edited on the Web.
Previously, this option was required to store information entered into OLE objects embedded on the forms. However, with Domino 6, the OLE object is always stored as part of the document, not the form, so the main reason for using stored forms is gone.
� Disable Field Exchange
The Disable Field Exchange check box, which is normally left deselected to enable data exchange with Notes/FX-compliant applications, is not supported on the Web.
� Automatically refresh fields
With the option Automatically refresh fields selected, Domino recalculates fields automatically whenever a field value changes. It is not supported on the Web. In most cases, it is better to use Refresh fields on keyword change,
Note: Selecting the Store Form in Document option greatly increases the amount of disk storage required to store each document based on that form.
Chapter 4. Domino Design elements: forms 81
which is a property of a keyword field, such as dialog list, radio button. That is also supported on the Web.
� Anonymous Form
Select the Anonymous Form check box if you want authors or editors to anonymously enter documents into the database based on this form.
Use of Anonymous forms is appropriate for employee comment databases, surveys, and suggestion boxes, where users may prefer anonymity.
� No Initial Focus/No Focus On F6
You can change the focus of a form, as follows:
– No Initial Focus - this lets you choose to have no initial focus on the form.
– No Focus On F6 - this lets you disable the F6 and Shift+F6 keys. These keys usually give focus to a frame. Use for forms and pages that contain no controls or fields or links; this saves time for users of screen readers, as they do not have to navigate through frames containing information they can’t use.
� Sign Documents that Use This Form
As the developer, you can choose whether you want all documents that are created using this form to be signed electronically by selecting the Sign Documents that Use This Form option. This enhances the security of the application.
� Render pass through HTML in Notes
By choosing the Render pass through HTML in Notes option, the pass-through HTML code entered in the form is also rendered in the Notes client, not just in the Web browser.
� Do not add field names to field index
Select the Do not add field names to field index option if you want to prevent the field names on this form from appearing in the field index. The field index
Notes:
Documents created with an anonymous form do not contain the $UpdatedBy field, but have an $Anonymous field with a value of 1. You need to ensure that the author’s or editor’s name does not appear in any other field of the form.
Also, in databases that use anonymous forms, you should turn off usage history tracking in the database properties. This ensures that the author cannot be deduced by comparing the creation time and the usage log.
82 Domino Designer 6: A Developer’s Handbook
is used on certain lists, for example when adding Simple Actions that manipulate or use fields. You can save some memory by checking this option on.
This is a good choice for forms that are never saved as documents, such as $$ViewTemplate forms. Details about using $$ViewTemplate forms can be found in 6.7.6, “Embedding views” on page 230
� Conflict Handling
At the Conflict Handling section of the Form Info tab, choose one of the following options for the form:
– Create Conflicts - This creates conflicts so that a replication conflict appears as a response document to the main document.
– Merge Conflicts - If a replication conflict occurs, the conflicting documents are merged into a single document by combining the edits of those documents field by field. However, if two users edit the same field in the same document, Notes saves one document as a main document and the other document as a response document marked as a replication conflict.
– Do Not Create Conflicts - No merge occurs. Domino simply chooses one document over another. The other document is lost.
Using the Defaults tabThe Defaults tab lets you specify details regarding the usage of the form; see Figure 4-3 on page 84.
Tip: Merge Conflicts is a good choice for many forms, and many companies routinely turn on this option on all forms. It is not appropriate to use the option with strict data validation requirements, where the validity of one field may depend on the value on another field.
Chapter 4. Domino Design elements: forms 83
Figure 4-3 The form properties box showing the defaults tag
The Defaults Tab is divided into five sections, which we discuss in detail as follows:
On Create� Formulas inherit values from selected document
When this option is selected, Domino copies the values of the fields in the parent document to the document or response document that is being created. The inherit does not work automatically, unless you specify the field name of the parent document in the field’s default value event. Domino supports this feature for rich text fields, as well as other field types.
� Inherit entire selected document into rich text field
When selected, this option defines how the fields of the parent document are displayed in the response document. To inherit the parent document, a Web browser user must open an existing document before creating the new
Note: Inheritance from selected documents is supported on the Web, and as with Notes, it works only between documents that reside in the same database.
84 Domino Designer 6: A Developer’s Handbook
document. To enable Web users to create a new document from an open document, you must provide a form action.
On Open� Automatically enable Edit Mode
When selected, this option opens the document in edit mode from either a Notes client or a Web browser.
� Show Context Pane
When selected, this option displays the parent document to end users in the Preview Pane of the Notes client.
On Close� Present mail send dialog
When selected, this option causes the Mail Send dialog box to appear so that the users have the option of mailing, saving, signing, or encrypting a document.
On Web Access
� Content type
Choose the type of content by selecting Notes, HTML, or Other. If you select HTML, Domino passes all data on the form directly to the browser. If you select Other, you will need to specify what the content type is. This could be any type of your choice.
� Generate HTML for all fields allows the developer to use hidden fields for programming in Web applications.
Use the three color selections (Active line, Unvisited link, Visited link) to determine how links will be displayed in a Web browser.
Note: You must also have certain fields on the form for this to work. The only mandatory field for this feature to work is SendTo, but you also need a couple of other fields to form the e-mail message. Refer to document “Reserved fields that control mailing options” in the Domino Designer 6 Help for more information.
Note: These options, which are new with Domino 6, allow you to specify, among other things, the type of content on your form. This will enable you to program and control the content of your form without Domino adding Domino-specific tags or other information on your forms.
Chapter 4. Domino Design elements: forms 85
Data Source OptionsData Connection Resources (DCRs) bring the technology of Domino Enterprise Connector Services (DECS) into Designer so that you can define a connection to an external data source, such as a relational database, and use the connection to link the fields in a form to fields in the external source. DCRs are reusable in an application and can be shared across applications. Using DCR technology, you can access data in enterprise systems; Figure 4-4 shows the Data Source Options properties.
� Browse
If you have already created data connection resources in the database, you can browse for data resources to use on the form. If you do not have a data connection resource set up, this section is greyed out.
a. Click the Browse button in the Data Source Options section.
A Browse External Data Sources dialog box appears, with a list of data connections resources already created in the database.
b. Default data connection
Select a data connection resource and click OK. The resource populates the Default data connection field on the Defaults tab of the Form Properties box. The Default metadata object can be a backend database table, a view, or a procedure.
c. Default metadata object
Once the user starts to create fields on the form using an external data resource, the default metadata object can be changed.
Figure 4-4 The Data Source Options properties
Using the Launch tabThe Launch tab, as shown in Figure 4-5 on page 87, enables you to specify what happens when the document is opened. It gives you the ability to automatically activate OLE objects and attachments when the document that contains them is opened, or to automatically follow a doclink or URL link instead of opening the document.
Note: The Auto Launch feature is not available for Web users.
86 Domino Designer 6: A Developer’s Handbook
Figure 4-5 The form properties box showing the Launch tag
Auto LaunchIn the Auto Launch field, specify the type of action to take place when the document is opened. The following options are available:
� None� First Attachment� First Document Link� First OLE Object� URL
AutoFrame� Frameset
The frameset drop-down list allows you to select a frameset which will open when the user opens the form.
The frameset option works in the same way in a Notes client as in a Web browser.
� Frame
When you have selected a frameset, you have to select a frame within that frameset where you would like to open the form.
Using the Background tabClick the Background tab, shown in Figure 4-6 on page 88, to specify the options for the form background.
Chapter 4. Domino Design elements: forms 87
Figure 4-6 The form properties box showing the form Background tag
ColorSpecify the background color for the form using the Color drop-down box.
Graphic or Resource
� Paste
If desired, click the Paste Graphic button to paste a graphic image into the form. If the image is smaller than the form, Domino tiles the image to fit the size of the form.
� Import
You can also import a graphic image into the form by clicking the Import Graphic button. Select the graphic image and click Import. The supported graphic formats are BMP, GIF, JPEG, PCX and TIFF 5.0.
Note: If the image does not fill the entire page, it will be tiled automatically.
Note: You need to copy an image to the clipboard before you click the button.
Tips:
Domino supports RGB colors, but if you want to insert very high quality graphics, select the option to import an image. Keep in mind that the cursor could be difficult to see on some displays if you choose a color like gray.
It is better to import rather than paste a graphic into the background because imported graphics are usually of better quality than pasted graphics.
88 Domino Designer 6: A Developer’s Handbook
� Allow users to change these properties
By selecting this option, users can change the background properties of a document that uses this form.
Using the Header and Footer tabHeaders work only in a Notes client. If you select to use a header on the form, you are able to have part of the form in a separate frame. For example, a mail document has the header above the body of the document. This header always stays in place when the content of the body is scrolled.
Note that where the header ends and the other part of the form begins is defined by where your cursor is on the form when you select the Add a header to form property.
On the Web, Domino produces a table with the header information rather than a separate frame.
Figure 4-7 An example of a form with a Header
Chapter 4. Domino Design elements: forms 89
Figure 4-8 The form properties box showing the Header tag
Headers can contain any element that a form can contain. The only caveat is that a table cannot be the first element in a header—it must be preceded by a text object, even if the text object is blank (for example, an empty line would be sufficient, with the table placed on the following line).
Using the Print tabClick the Print tab to specify the options that relate to printing a document based on the form; see Figure 4-9. Use the icons listed under the Header and Footer option buttons to define the date and time, tabs, and page numbering. You can also select the font, size, and style.
Figure 4-9 The form properties box showing the Print tag
Note: The printing properties set here do not take effect if you are printing from the Web.
90 Domino Designer 6: A Developer’s Handbook
Using the Security tabUse the Security tab to define which users or user groups are authorized to use the form.
Figure 4-10 The form properties box showing the Security tag
� All readers and above
Deselect the All readers and above check box. This activates the blue person button to the right of the list. Click the button. A window is displayed that allows you to select the users and groups from the different address books to which you have access.
� Who can create documents with this form
Here you specify who can create documents with this form.
The default is All authors and above. If required, deselect the check box, and click the blue person button to the right of the list. A window is displayed that allows you to select individual users and groups.
Tip: For professional-looking applications, you should always define a print header and footer for every form that might be printed from the Notes client.
Tip: Assign access to forms using Role names rather that groups or individual user names. This makes your design more reusable and easier to administer.
Chapter 4. Domino Design elements: forms 91
� Disable printing/forwarding/copying to clipboard
If required, select Disable printing/forwarding/copying to clipboard. This makes it more difficult for users to distribute the documents created with this form to other users. It is recommended that you limit this option to confidential data.
Note: Selecting this option does not prevent the user from using other software to copy data.
� Available to Public Access users
Select this option, if required. This allows users with No access or Depositor access to see specific documents and forms, without giving them reader access to the entire database.
4.1.2 Giving the form a window titleTo give your application a professional look, always define a window title formula. The title will appear on the Notes title bar when a document is created or edited, based on the form in Notes and on the browser title bar when a document is created or edited in browser.
Following is an example of a window title that can be used from either a Notes client or a Web browser:
@If(@IsNewDoc;"New Document";"Document: " + Subject + " created by " + DocCreatedBy)
Subject is a field of the form, where the document author type is the subject of the document. DocCreatedBy is a field of type Computed when composed on the form, with the formula @Name([CN];@UserName). @Name([CN];@UserName) returns the common name part of a user name.
If the document is a new document (@IsNewDoc), the title is set to New Document. If the document already exists in the database, the title is set to Document: Subject created by Username.
4.1.3 Form eventsTable 4-3 on page 105 lists all form events in Domino 6.
92 Domino Designer 6: A Developer’s Handbook
Table 4-1 Form events in Domino 6
Events Language Description Notes Web
Window Title Formula Calculates text to display in the title bar of the document window.
Yes Yes
HTML Head Content
Formula Contains HTML tags to add to the <HEAD> tag, in addition to those generated automatically by Domino server.
No Yes
HTML Body Attributes
Formula Contains additional attributes of the HTML <BODY> tag.
No Yes
WebQueryOpen Formula Runs an agent before a Web document displays. The formula must use the following syntax: @Command([ToolsRunMacro]; “agentname”).Tip: You can also enter different types of formulas here without calling an agent.
No Yes
WebQuerySave Formula Runs an agent after a form is submitted from the Web. Must use the syntax: @Command([ToolsRunMacro]; “agentname”). Tip: You can also enter different types of formulas here without calling an agent.
No Yes
Target Frame Formula The frame pages, views and forms will open if no default frameset has been specified in the hotspot action properties
Yes Yes
JS Header JavaScript You can put JavaScript functions in here.Note: In Domino 6, you can enter separate content for Notes clients and Web browserTip: It is more efficient to use JavaScript libraries than long scripts here.
Yes Yes
onClick JavaScript Runs when an object is selected. Yes Yes
OnDblClick JavaScript Runs when an object is selected with a double-click.
Yes No
onHelp - Client FormulaLotusScriptJavaScript
Opens a specified page in Help; opens a page if the user chooses Help or presses F1.
Yes No
onHelp - Web JavaScript Runs when help is selected. No Yes
onKeyDown JavaScript Runs when a key is pressed. No Yes
Chapter 4. Domino Design elements: forms 93
onKeyPress JavaScript Runs when a key is pressed. No Yes
onKeyUp JavaScript Runs when a key is released. No Yes
onLoad - Client FormulaJavaScriptLotusScript
Runs when document is finished loading. Yes No
onLoad - Web JavaScript Runs when document is finished loading. No Yes
onMouseDown JavaScript Runs when a mouse button is pressed. No Yes
onMouseMove JavaScript Runs when the mouse is moved. No Yes
onMouseOut JavaScript Runs when the mouse is moved out of an object.
No Yes
onMouseOver JavaScript Runs when the mouse is moved over an object.
No Yes
onMouseUp JavaScript Runs when a mouse button is released. No Yes
onReset JavaScript Runs when document is reset by button. Triggers the form.reset.action.
No Yes
onSubmit - Client(New for LotusScript)
FormulaJavaScriptLotusScript
Runs when document is submitted. Yes No
onSubmit - Web JavaScript Runs when document is submitted. No Yes
onUnload - Client(New for LotusScript)
FormulaJavaScriptLotusScript
Runs when a document is exited. Yes No
onUnload - Web JavaScript Runs when a document is exited. No Yes
(Options) LotusScript Applies to all scriptable objects and provides an area for statements (Use, Option, Const, Def).
Yes No
(Declarations) LotusScript Applies to all scriptable objects and provides an area where all global variables are declared.
Yes No
Queryopen LotusScript Runs before a document is opened. Yes No
Postopen LotusScript Note: Use is discouraged. Use onLoad - Client instead.
Yes No
Events Language Description Notes Web
94 Domino Designer 6: A Developer’s Handbook
4.2 Creating a fieldIn this section we describe how to create a field in a form, and how to change the properties of the field.
We will add a combobox field in the form. This field will demonstrate how to use keyword fields on the Web. The combobox field will allow you to choose one keyword.
1. To begin, create a new TeamRoom database as described 3.1.1, “Creating a database” on page 48.
2. Open the Main Document form listed in the View pane.
3. Type the static text: Background Color; refer to Figure 4-14, “The TeamRoom database in Notes 6” on page 98.
4. Next to the static text, create the field Color. To do so, select Create - Field.
Querymodechange LotusScript Runs before a document is changed to Read or Edit mode.
Yes No
Postmodechange LotusScript Runs after the user changes the document to Read or Edit mode.
Yes No
Postrecalc LotusScript Runs after a document is refreshed (and values are recalculated).
Yes No
QuerySave LotusScript Note: Use is discouraged. Use onSubmit - Client instead.
Yes No
PostSave LotusScript Runs after the document has been saved. Yes No
Queryclose LotusScript Note: Use is discouraged. Use onUnload instead.
Yes No
Initialize LotusScript Runs when a document is being loaded. Yes No
Terminate LotusScript Runs after the document is closed. Yes No
Events Language Description Notes Web
Note: Whether an event is supported on the Web or not depends on which browser is used. Refer to Domino 6 Designer help section “Table of supported JavaScript objects for automated components” for more information on which browser supports which events.
Chapter 4. Domino Design elements: forms 95
Tip: You can also display a pop-up menu by clicking the right mouse button and selecting Create Field.
5. On the InfoBox for Field, type a name for the field (for example: Color). The new name is now also shown in the Objects view.
6. In the Type field, choose Combobox.
7. In the field next to Type, keep Editable.
8. Enter 1 in the Position in tab order field. This positions the cursor in this field when the document is opened.
Figure 4-11 The field properties for the example
9. Switch to the next tab.
10.In the Choices field, keep Enter choices (one per line).
11.In the Choices list box, type: yellow, green and blue. Separate the values by pressing Enter.
12.In the Programmer’s Pane, leave the Default Value empty. The form and fields InfoBox should look as shown in Figure 4-12 on page 97.
Note: Remember to change the Frameset field in the forms InfoBox launch tab to -Blank-.
96 Domino Designer 6: A Developer’s Handbook
Figure 4-12 The Main document form of the Teamroom database opened in Designer
13.Make sure that no check boxes are selected on the Paragraph Hide When tab.
Figure 4-13 The Paragraph Hide When properties for the example
14.Save the modified form by pressing the Esc key, and confirm that you want to save the form.
15.Close the information box that is displayed.
Chapter 4. Domino Design elements: forms 97
4.2.1 Performing a test runTo test your modification from a Notes client, follow these steps:
1. Open a Notes Client and open the Teamroom database.
2. Once the database is open, choose Create -> Main Document.
3. In the document, you will see that there is now an additional field; see Figure 4-14:
Figure 4-14 The TeamRoom database in Notes 6
4. Select a color for the background and type a document title in the Subject box.
5. On the Action bar, click Save & Close.
Tip: You can preview the form in the Notes client by selecting Design -> Preview in Notes... when the form is open in the Designer or when the form is selected on the forms list. Or you can click the Notes preview icon in the icon bar to preview the form.
98 Domino Designer 6: A Developer’s Handbook
To see the document, select the By Date view and the document will appear in the list of documents.
To test your modifications from a Web browser interface, you can use the Preview in Web browser option in Notes, which will enable you to preview your form without creating a document.
To do this, choose Design -> Preview in Web browser. If your database is on a Domino Server, Notes will then use the browser specified in your location document to preview the form. If your database is on a local machine, Notes will start the Local Web Preview Process.
In the following example, Server name is the current server where the database is located, Teamroom.nsf is the database name, and Main+Document?OpenForm opens the new document so that you can edit it.
3. You should see the new field in your browser; see Figure 4-15 on page 100.
Chapter 4. Domino Design elements: forms 99
Figure 4-15 The form with the new field, previewed in a browser
4. Type in the Document title and choose the color for the background.
5. After you have completed the form, click Save & Close.
Earlier we created a Color field to enable the user to change the background color of the form. We will now make some further updates to the form to add new functions:
1. From the Domino Designer 6, choose the Forms Design view.
2. Double-click the Main Document form in the View pane to open it.
3. Click the Color field.
4. Select the onChange event from the Objects view.
The onChange event is a method which occurs when the value in the field is changed. The object document represents the current Web page, and it has a property bgcolor, which is the background color of the page.
this.form.Color.selectedIndex
100 Domino Designer 6: A Developer’s Handbook
This returns an integer specifying the option selected in the field. Now that we know which option is selected, we can use it to return a text string with:
6. After you have entered the code, the design should look as shown in Figure 4-16:
Figure 4-16 The Programmer’s Pane showing the JavaScript
7. Preview the form in your browser.
8. When you select the value in the Color field, the background color of the page should change.
4.2.2 Sharing and reusing a fieldYou can only reuse fields in the database where the field has been defined as a shared field.
1. From Domino Designer 6, choose the Forms Design view. The list of forms is displayed in the view pane.
2. Double-click the Main Document form. The form is displayed.
3. Go to the Color field, created in the previous exercise, and select Design -> Share this field.
4. Domino will automatically copy that field to the Resources -> Shared Field -> View pane, where all database shared fields are stored.
5. Save and close the form and open a new form.
Important: Unlike HTML and LotusScript, JavaScript is case-sensitive.
Note: While the Notes client also can execute JavaScript code, not all dynamic HTML features are supported.
Chapter 4. Domino Design elements: forms 101
6. In order to reuse the shared fields, choose the form where you want to add the field; for example, Event -> Form. Choose Create -> Insert Shared Field, and a window will be displayed.
7. Select the Color field and click OK. The field is now added into the form.
8. Press the Esc key and save the form; see Figure 4-17.
Figure 4-17 The Main Document form with Color field shared
4.2.3 Field typesIn this section, we only cover how to create and run keyword fields—but all other fields work in a similar way. Table 4-2 on page 103 lists the other field types and their explanations/declarations.
102 Domino Designer 6: A Developer’s Handbook
Table 4-2 The different field types
Field type Declarations Note
Text A normal text field, where a user can enter text or numbers (if it is an editable field). Text can be of a string or variant type.
You can resize the field by using the field properties InfoBox and selecting the Use native control in the Basic tab, and then changing the width and height in the Options tab. Web doesn’t support this option. The Designer can hide delimiters around the field by choosing the Hide Field Delimiter property.
Date/Time Domino allows you to select different kinds of date and time formats. Time is the date type. Field controls such as list boxes and calendar controls are available on forms.
Domino supports 4-digit year format, and can display a 4-character year field. Using calendar controls, enable “Use Native Control.” Insert date and time in separate fields.
Number The Number field can count imported values. Number can be of an integer, float, or double type.
The Designer can change the decimal symbols by changing On display preferences to Custom. The Currency option lets you select the right country currency, or you can customize it.
Combobox,Listbox,Dialoglist,Check box,RadioButton
These can be of a string or variant type.
Rich TextRich Text Lite(Rich Text Lite is new in Domino 6)
Domino allows a user to add text, attachments, Java applets, and tables in this field. Rich text can be of a string or variant type.
Field value can be stored in MIMEformat.Rich text lite fields are rich text fields with a helper icon and down arrow next to the field. Clicking the icon gives the user a fast way to add an object into the rich text lite field. Objects include Pictures, Shared Images, Attachments, Views, DatePicker, Shared Applets, Text, OLE Objects, Calendar, and Inbox. Clicking the down arrow displays a drop-down menu. The elements listed in the drop-down menu are the only elements the user is allowed to insert into the rich text lite field. For more information on the Rich Text Lite field, refer to Domino Designer 6 online help.
Chapter 4. Domino Design elements: forms 103
Table 4-3 on page 105 demonstrates different keyword selection fields and how they are displayed in a Notes client and Web browser.
Author Security field which allows designers to control form access. People, groups and servers who have been added in the field can open and edit documents. Author can be of a string or variant type.
The Choices option does not work on the Web.
Names Helps users enter names correctly in a document. Provides links to existing lists of names.
The Choices option does not work on the Web.
Readers Security field which lets designers control form access. People, groups and servers who have been added in the field can open and read documents. Readers can be of a string or variant type.
The Choices option does not work on the Web.
Password Users can add text. Each character is displayed with an asterisk (*).
Matches Web functionality.
Formula Used for the Subscription feature. Provides a way to programmatically hold a formula that can be referred to by some other process.
Time Zone(New in Domino 6)
Lets you display a drop-down list of all available time zones in the world, including the local time zone.
Each time zone listed includes a partial list of the cities or locations found in that time zone.
Color(New in Domino 6)
Lets you display a color picker on a form. The chosen color is stored in hexadecimal format.
Field type Declarations Note
104 Domino Designer 6: A Developer’s Handbook
Table 4-3 How keyword selections are displayed
Rich Text Field (RTF) appletThis is a good option to use when you want to give Web users opportunities to write different styles of text. This feature allows you to use italics, bold, color—and most of the features you would find on a word processor—on a Web page.
Keyword Notes Client Web Browser (IE 6.0)
Dialog list
Check box
Radio Button
ListboxNote: Width and height do not work on the Web. It formats to the width of the longest string.
ComboboxNote: Width and height do not work on the Web. It formats to the width of the longest string.
Note: Choosing frame type has no effect on the Web.
Chapter 4. Domino Design elements: forms 105
One example of where this field is very useful is in a feedback form. After the user has submitted feedback, Domino saves the document in the database. Using the RTF applet, Domino also saves the text format and style, which means that the text is stored in exactly the same format and style as when the user entered it. Let’s see how this option works.
1. Open the Main Document form.
2. Go to the Body field and open the field’s InfoBox. You can see that the field is RichText type and that the Use Applet In The Browser option is enabled.
3. When you run the form in Notes, it looks like an ordinary RichText field. But when you run the form in a Web browser, it should look as shown in Figure 4-18:
Figure 4-18 The RTF applet in Internet Explorer 6
4. After the user has submitted the document, if you look at the document using a Notes client, it should look as shown in Figure 4-19 on page 107:
106 Domino Designer 6: A Developer’s Handbook
Figure 4-19 The document viewed in Notes
As you can see, the field contents are stored exactly as the user entered them.
4.2.4 Field propertiesNow that you have created a field, we are going to look at some of the properties of fields contained in the document form.
Let’s first take a look at the Categories Field. We will look at the keyword field and explain the differences between this field type and other field types.
1. From the Domino Designer 6, choose the Forms Design view.
Chapter 4. Domino Design elements: forms 107
2. Double-click the Main Document form in the view pane to open it. Double-click the Categories field. The Field InfoBox is displayed and it looks ash shown in Figure 4-20:
Figure 4-20 The Field Info properties for Categories
The Field Info tabOn the Field Info tab, Domino displays the field format. This field is of type Editable Dialog list field.
There are several different ways of displaying the list of keywords from which users can make their selections. In our example, formula is used to calculate the list of available values by looking up the values from a view column in the same database, a View variable is given the “MissionLookup” view name (which is later used in @DBColumn), and an @DbColumn formula checks all the documents in the current database for categories and retrieves them for display in a keyword list.
The Field Info tab also shows how the data is actually put into the field. The following types of field are available:
� Editable: The user enters the data, or the data is created when the user selects a button performing a formula or script written by the developer.
� Computed: The field is computed each time the document is created, edited and saved.
� Computed for display: The field is computed each time the document is opened in browse or edit mode. The contents of the field are only visible while the document is open. It is not saved into the database and is not visible in a view.
108 Domino Designer 6: A Developer’s Handbook
For example, this type of field is used to display the current time and date or work variables, such as the server name where the database is stored.
� Computed when composed: The field is only computed when the document is created. This type of field is especially useful for storing the name of the original author of the document, the creation date, or a document reference number.
There is also a check box to allow multiple values to be selected at once.
Tab Order properties allow you to select the “time” when the user comes in to this field while editing the document and moves ahead from field to field using the Tab key.
Note: The Tab Order default value is zero (0).
Give field default focus: Here you can specify whether the entry field will have the initial focus when the form is opened. You must specify this option if you want to place the cursor in an entry field that is not the first one on the form.
Control Options tabThe Control Options tab is shown in Figure 4-21:
Figure 4-21 The Control properties for Categories
Chapter 4. Domino Design elements: forms 109
There are a number of check boxes, as follows:
� Show field delimiters. This shows the field delimiters of the field.
� Allow values not in list. By choosing this option, you give the user a chance to enter a value which is not on the list.
Note: This feature is not available for Web users.
� Display entry helper. This displays the small grey down arrow in the bottom right-hand corner of the field to tell the user that there are multiple options to select from.
Note: This feature is not available for Web users.
� Refresh fields on keyword change. This will force the document to refresh its fields if the value in the field is changed. This option should be used sparingly because if you have a form containing a large number of fields, it takes some time to recalculate all the formulas, which can often result in users experiencing a lengthy wait.
� Refresh choices on document refresh. This option is used to refresh the values in the field (usually based on a formula) if the document is refreshed.
Note: This is not applicable for Web browsers, because choices are always refreshed on page refresh.
Note: The content of the Control Options tab, as with some other tabs, varies based on the field type. For example for a text field, the Show field delimiters is the only visible option.
110 Domino Designer 6: A Developer’s Handbook
Advanced tabThe Advanced tab is shown in Figure 4-22.
Figure 4-22 The Advanced properties for Categories
This tab enables you to specify:
� Help Description: information is shown at the bottom of the Notes client screen. Screen reader programs for the visually impaired also may speak this text; although this is not a required field, it’s good practice to always supply a value here.
Note: Field help is not available for Web users. If you require field help in a browser application, you could use the JavaScript onFocus event to update either the message area of the browser window or a separate field.
� Field Hint: text that assists the user to fill in the field. This text disappears when the user moves the cursor into the field, and is not saved with the document.
Note: This is a new feature with Domino 6
� Multi-value separators. You can define what characters define a multi-value in a field. Most common is to use a comma. You can also define what is used to display the separate values.
� Security options: for example, Enable Encryption for this field.
Note: All security options are not available for Web users.
Fonts tabThe Fonts tab of the InfoBox lets you specify fonts and colors for the field data; it is shown in Figure 4-23 on page 112.
Chapter 4. Domino Design elements: forms 111
Figure 4-23 The Font properties for Categories
Paragraph Alignment tabThe Alignment tab sllows you to specify the alignment of the paragraph containing the field. You should use this option, for example, if you define a field to be used as the title.
If you choose to align it in the center of the form, it will stay in the center irrespective of the screen resolution used. The Alignment tab is shown in Figure 4-24.
Figure 4-24 The Paragraph Alignment properties for Categories
Restriction: Web browsers pay no attention to font attributes when a document is in edit mode.
112 Domino Designer 6: A Developer’s Handbook
Paragraph Hide When tabThe Hide When tab is shown in Figure 4-25.
Figure 4-25 The Paragraph Hide When properties for Categories
Example: You can use a formula to restrict a field so that only one group of people can see it:
� Create a Friend group in the server’s Public Address Book.
� Select the Hide paragraph if formula is true option and add the following formula in the formula window:
!(@IsMember(“Friends”; @UserNamesList))
The @IsMember() formula checks if the Friends group is one of the values in the list returned by @UserNamesList.
Note: The exclamation point character (!) is the logical not operator. Many developers find it easier to write a show when formula rather than a hide when, and then use !( ) to reverse the test, as we have done here.
The @UserNamesList formula returns a text list of the current user’s name and all their groups and roles. If the user has been added to the group named Friends, they can see the field and database.
Several check boxes are available to hide the paragraph on predefined conditions. You can also specify other conditions using an @function.
Chapter 4. Domino Design elements: forms 113
HTML Properties tabThe HTML Properties tab is shown in Figure 4-26.
Figure 4-26 The Field HTML properties for Categories
This tab is used not only for fields, but also for many elements that appear in forms, pages, and framesets. It lets you specify values to appear as attributes of the field when the document is rendered in HTML by the Domino web server. These settings have no effect in the Notes client.
The Id, Class, Style and Title fields let you specify the values that will appear after the id=, class=, style= and title= attributes of the HTML tag. You can read about these attributes in HTML references.
Tips:
When possible, use the hide check boxes instead of formulas for better performance.
@UserRoles and @UserNamesList are frequently used in hide formulas, but they are “expensive” to evaluate. For better performance, create a multi-value “Computed for Display” field and use @UserRoles or @UserNamesList for its formula; hide formulas can then refer to that field. This way you only have to evaluate the @function once
Notes:
The InfoBox of each design element found in a form provides a tab that allows you to specify hide when conditions.
The paragraph alignment and hide properties apply to the entire paragraph containing the field, not just for the field.
114 Domino Designer 6: A Developer’s Handbook
Note: The values you enter in these fields should not contain quotes; Domino will insert those.
The Other field lets you enter any additional HTML attributes you want to insert into the tag for the field. In this case, you supply the entire attribute, including any quotes required, as shown in the example.
4.2.5 Special fieldsThis section describes the use of some of the special fields.
The $$Return FieldThe $$Return field is used for creating messages that will be displayed after the user has submitted a document on the Web. The field should be of type “Computed for display”, whose value formula contains the HTML you want to display or the URL you want to go to after the form is accepted. (Without the $$Return field, Domino responds with the default response: Form processed.) To customize this response message, you can include HTML code as part of the formula for the $$Return field.
You can also use a $$Return field to run a custom Common Gateway Interface (CGI) program immediately after the user submits the form and Domino has created the document. For example, you can run a CGI program that uses the Notes API to further process the input data. The Web client displays the output of the CGI program to the user.
To run a CGI program, include the URL to the CGI program file and enclose it in square brackets [ ]. Note that you can pass arguments (for example, values from fields in the form) to the CGI program, as part of the URL.
Returning to another pageYou can display another Web page to the user, once a form has been processed, instead of sending the default message. The following example displays the Lotus home page, but you can, for instance, direct the user to the main view of the database instead:
“[http://www.lotus.com]”
The preceding is the formula you would use for the field. You may either use one set of square brackets, as shown above, or two sets, as shown below:
Tip: Screen reader programs for the visually impaired speak the text you supply in the Title HTML attribute. We definitely suggest you enter a value here, even if this is for use in the Notes client.
Chapter 4. Domino Design elements: forms 115
“[[http://www.lotus.com]]”
These variations do slightly different things:
� If you use single square brackets, the Domino server sends the URL to the Web browser, and the browser goes to that URL.
� If you use double square brackets, however, the Domino server does not send the URL to the browser. Instead, it fetches the page itself and sends the HTML to the browser, under the “CreateDocument” or “SaveDocument” URL used to submit the document.
In cases where the $$Return URL is on the same Domino server, it makes sense to use double square brackets in order to save the extra “round trip” of the browser requesting the new URL and the server sending the page. If you know what page the browser will request, you can send the page instead of forcing the browser to make that request.
Adding a link to another Web pageIn the response message, you can include links to other Web pages. In the following example, an HTML page will be created with a link to the Lotus home page. The user will see a blank screen with a link to the specified Web page once the form has been processed:
“<a href=”http://www.lotus.com”>Lotus</a>”
Adding links is useful if, for example, you want to provide the user with a choice of Web pages to visit once a form has been processed.
Personalized messagesYou can create a personalized message for the user who submits a form. For example, the following $$Return formula returns the response: Thank you for your document and appends the user’s name. <h2> </h2> is an HTML tag and means that text between those tags is a second level header. <hr> creates a horizontal rule.
Note: One disadvantage of double brackets is that the URL used to submit the form remains the current URL. If users refresh the page, they will be asked whether to resubmit the document.
Tip: If the HTML of your post-submit page is at all complex, you may find it easier to create a page design element and return the URL to that page instead. Pages can contain computed text, so you can still include username or other variable info. You also need to worry less about HTML syntax, as you can use familiar elements to form the page with Domino Designer.
116 Domino Designer 6: A Developer’s Handbook
"<h2>Thank you for your document, "+@Name([CN];@UserName) +"! </h2><hr>"
Note: In order for the @Name function to work, you need to authenticate with the Domino server when first opening the database; otherwise, you will be classified as an Anonymous user of the application.
$$Return example from TeamRoom templateThe TeamRoom template has a rather complex $$Return field, but going through the code gives you some good examples of how you could use this field. The $$Return field is a shared field and you can open the field by going to the Shared Code - Fields design view and double-clicking the field.
You can use the REM command to add a comment for the formula. For example:
REM “This $$Return field returns HTML as a result of the successful form submittal.”;REM;
First, simple strings are assigned to variables to make it easier to write and to read formulas:
REM “Variables to translate”;PrevDoc := “Open the page you just submitted”;Another := “Create Another: “;TRreturn := “Return to the TeamRoom”;Done := “Done”;Subteam := “Subteam Profile”;Participant := “Participant Profile”;Event := “Event Profile”;MainTopic := “TeamRoom topic”;Mission := “Mission Page”;Response := “Response”;IntProfile := “Interest Profile”;ArcProfile := “Archive Profile”;TeamStatus := “Team Status”;SubteamStatus := “Subteam Status”;
The formula takes the current user name and adds that and the “Thank You, ” text into the ThankPerson variable:
ThankPerson := "Thank you, " + @Name([CN]; @UserName);ThankYou := ThankPerson + ". The following page has been successfully submitted: ";REM "End variables to translate";REM "Get the name of this database.";
The following formula gets the name of the current database and replaces any spaces with the plus (+) character and replaces any backslash characters with
Chapter 4. Domino Design elements: forms 117
the forward slash character (/). @DbName is a function that returns the name of the current Domino server and the name and the path of the database. @Subset with the -1 parameter returns just the database name and path:
DB := @ReplaceSubstring(@ReplaceSubstring(@Subset(@DbName; -1); " "; "+"); "\\"; "/");
We get the value from the webButtonPressed field:
FIELD webButtonPressed := webButtonPressed;
As part of the “Thank you” screen, we want to display the document title. The field containing the text is different for each form, and the shared field is used by every form. So, we test which form was just saved and copy the title from the appropriate field for that form.
As the $$Return field is a shared field in this database, the formula first determines which form was used:
The bkgd variable contains a background color (#ffffff = white):
bkgd := "<body bgcolor=\"" + "#ffffff" + "\"+ >";
We then concatenate the variables into two text strings:
REM "Assemble the HTML to be returned";OkMsg := bkgd + Thanks + existingdoclink + LinkTRReturn;CancelMsg := mkgd + Thanks + LinkDoneButton + Another + LinkCRParticipant + LinkCRSubteam + LinkCREvent;
Finally, an @If formula checks which of the two strings should be returned as a response to the user:
REM "Because the Part Profile, Subteam, and Event are created in a smaller window, we\'re using a different msg. when they\'re new docs.";@If(webNewDoc = "1"; CancelMsg;OKMsg )
Note: You can also use the onSubmit event in the form to control the forms submit process. To use the onSubmit event, you will need to use JavaScript.
Other special fieldsTable 4-4 lists other special fields.
Table 4-4 Reserved fields for general use
Field name Use
$VersionOpt Controls version tracking for documents.
FolderOptions Puts new documents in folders.
SecretEncryptionKeys Encrypts documents with secret, rather than public, encryption keys.
HTML Passes HTML directly to the browser.
Chapter 4. Domino Design elements: forms 119
There are still other reserved fields used in more specialized applications; for detailed information about those fields, refer to the Domino Designer 6 online help.
4.2.6 Field eventsField events are functions that can be implemented using formulas, LotusScript, or JavaScript.
Table 4-5 lists all the Fields events.
Table 4-5 Field events
$$HTMLHead Passes HTML information to be hosted within the <HEAD> tag for a document. The passed information might be meta data (using a <META ...> tag) or JavaScript code (using a <SCRIPT ...> tag) or CSS information (using a <STYLE ...> tag).
Field name Use
Events Language Description Notes Web
Default value Formula When the document is loaded the contents of the Default Value event are displayed.
Yes Yes
Input translations Formula Can be used to modify the data entered by the user, to trim blanks, and to change users’ names into uppercase or propercase.
Yes Yes
Input validation Formula Tests whether the field contains a legal value; this formula, evaluated when the user tries to save the document, returns a value that either indicates success, or contains a message to display to the user.
Yes Yes
HTML Attributes Formula Allows you to add extra HTML attributes to the field tag that Domino generates.
No Yes
120 Domino Designer 6: A Developer’s Handbook
onBlur - Client(New for LotusScript)
JavaScriptLotusScript
Runs when user exits the field. Yes No
onBlur - Web JavaScript Runs when user exits the field. No Yes
onChange JavaScript Runs when the field value changes.
No Yes
onClick JavaScript Runs when field is clicked. No Yes
onDblClick JavaScript Runs when field is double-clicked.
No Yes
onFocus - Client(New for LotusScript)
JavaScriptLotusScript
Runs when user gives input focus to the field.
Yes No
onFocus - Web JavaScript Runs when user gives input focus to the field.
No Yes
onKeyDown JavaScript Runs when a key is pressed down.
No Yes
onKeyPress JavaScript Runs when a key is pressed. No Yes
onKeyUp JavaScript Runs when a key is released. No Yes
onMouseDown JavaScript Runs when a mouse button is pressed.
No Yes
onMouseMove JavaScript Runs when the mouse is moved.
No Yes
onMouseOut JavaScript Runs when the mouse is moved out of an object.
No Yes
onMouseOver JavaScript Runs when the mouse is moved over an object.
No Yes
onMouseUp JavaScript Runs when a mouse button is released.
No Yes
onSelect JavaScript Runs when a user selects text in a text field.
No Yes
(Options) LotusScript Applies to all scriptable objects and provides an area for state- ments (Use, option, Const, Def).
Yes No
Chapter 4. Domino Design elements: forms 121
Note: The onFocus event is not triggered if the field gets the initial focus when a document is opened.
4.2.7 Examples using different field types and eventsThis example shows a simple example of the use of fields and their values; Figure 4-27 shows the form in Designer 6.
Figure 4-27 Fields in Designer 6
The form uses four fields:
� Quote - a text field, computed for display
� FirstName - an editable text field
� Time - a computed date/time field
� DateCreated - a computed when composed date/time field
(Declarations) LotusScript Applies to all scriptable objects and provides an area where all global variables are declared.
Yes No
Entering LotusScript Note: Use is discouraged. Use onFocus - Client instead.
Yes No
Exiting LotusScript Note: Use is discouraged. Use onBlur - Client instead.
Yes No
Initialize LotusScript When field is being loaded (user clicks the button, for example).
Yes No
Terminate LotusScript When field is being closed. Yes No
122 Domino Designer 6: A Developer’s Handbook
Figure 4-28 shows what this form looks like in the Notes 6 client.
Figure 4-28 Fields in Notes 6
In the Notes 6 client, the fields have different values, based on the formulas and settings we set for these fields in the Designer:
� Quote - a computed for display field.
For this example, it has a computed value getting a random quote for each time this form is opened or refreshed:
The code does a lookup in a view containing all “quotes” registered in the database. It performs an error-check to ensure that no error is returned to the end user. If there are any quotes found in the view, the formula returns a random quote, using a random function and getting this value from the array/list of quotes returned from the lookup.
The value of the field “Quote” is not saved with the document, since this is a computed for display type of field.
Tip: Depending on the type of the field, each field has its own look in the Designer client. Each field has an icon representing the field type, to avoid the need to open the property box of each field to check the field type.
As you can see in Figure 4-27 on page 122, the Time and DateCreated field have a icon representing a calendar, which again indicates that it is a “Date/Time” field. The Quote and FirstName field has a “T”-icon, which indicates that it is a “Text” field.
Chapter 4. Domino Design elements: forms 123
� FirstName - an editable field, with no default value.
The text “Please enter your first name here” shown in Figure 4-28 on page 123 is not the default value of the field. This is a new feature of Domino 6 called “Field Hint”, which describes what a user should enter to this field.
As the user moves the cursor inside this field, the field hint is erased. “Field Hints” are not saved with the document. For more information about field hints, refer to 12.14.1, “Field hints” on page 461.
The field has a “Input Validation” formula:
@If(@ThisValue = "" ; @Failure("You need to enter your first name") ; @Success)
If no value is entered in the FirstName field, end users will receive an error telling them to enter a value in the field.
The field FirstName also has an “Input Translation” formula, as follows:
@ProperCase(@ThisValue)
The “Input Translation” will ensure that the first letter of every word in the FirstName field always will be a propercase.
� Time - a computed field that is evaluated for each time the document is opened, refreshed, and saved.
The code in the field is:
@Now
The field will show current date and time, and the value will be saved to the document.
� DateCreated - a computed when composed field that is only calculated once, when the document is created.
The code in the field is:
@Date(@Created)
The field will show the date when the document was created, and the value will be saved to the document.
Note: @ThisValue and the array subscript operator (as in tmpQuote[random]) are new features of Domino 6, and are explained in detail in Chapter 12, “New features in Domino 6” on page 347.
124 Domino Designer 6: A Developer’s Handbook
4.3 Sharing design elements with subforms Subforms provide a way to avoid duplicating the design of section of a form. With subforms, you can ease the development effort because you can maintain a group of elements in one place, and use the same subform in many forms.
All design elements that are added to forms can also be used in subforms. These include:
� Static text and pictures� Fields, whatever their type and format� Hotspots as buttons or links� Tables� Action Bar� Java applets� Embedded elements� Another subform
When you modify an existing subform, the changes are immediately reflected in all the forms that use the modified subform.
Note: You can insert subforms into a table or even into another subform.
A subform is provided with the TeamRoom template. You can work with its design in one of the following ways:
� From Domino Designer 6, select the Shared Code -> Subforms design view. The list of subforms is displayed in the view pane. Double-click the Shared Response Header subform. This subform is used to share hidden fields which are common to both Response and Response To Response forms. The Subform Builder window is displayed.
� Alternatively, you can open the subform directly from the form. To do this, open any form that contains the subform (Response or Response To Response). Once the form is open, double-click the subform part of the form. The Subform design element is displayed on its own window.
Tip: You might have to scroll through the form to see the subform part. As Figure 4-29 on page 126 shows, the Subform Builder window is identical to the Form Builder window.
Chapter 4. Domino Design elements: forms 125
Figure 4-29 The Subform design view
It contains the following areas:
� The form in the design pane.
� The actions linked to the subform in the action pane. When a form and a subform are displayed, the action bars of both the form and the subform are shown.
� The field definition in the Programmer’s Pane. In subforms, as in forms, @functions, LotusScript and JavaScript can be used.
4.3.1 Creating a new subformTo create a new subform into the database, do the following.
1. From Domino Designer 6, select the Shared Code -> Subforms design view. 2. Click New Subform; a new subform is created.3. Design the subform content.4. Close the subform, give it a meaningful name, and save it.
Note: The subform does not contain all the events that a form has, such as the Window title, onSubmit, onReset, HTML Head Attributes, HTML Body Attributes, WebQueryOpen, or WebQuerySave, because the subform is always linked to a form and the form already contains those events.
126 Domino Designer 6: A Developer’s Handbook
To insert the new subform into a form:
1. Open a form.2. Select Create -> Resource -> Insert Subform.3. Select the subform you want to insert from the dialog box. (Figure 4-31 on
page 128 shows you an example of an Insert Subform dialog box.)
To display the subform properties:
1. On the Subform pane, click your right mouse button.2. Select Subform Properties and the InfoBox is shown; see Figure 4-30.
Figure 4-30 The Subform properties box
With Domino Designer 6, more features have been added to the Subform.
– The ability to display your Pass Through HTML in Notes.– The option to exclude the field names from the field index.– A security tab on which you can specify who can access this subform
3. Close the InfoBox.4. Close the subform.
4.3.2 Removing subforms You can remove subforms from the design of a form, or from the design of a database.
If the subform is no longer needed in a particular form:
1. Open the design of the form.2. Click the subform area.3. Choose Edit -> Delete on the menu bar.
4.3.3 Adding subforms to a formYou can add subforms to a form by adding them by yourself, or based on a formula.
Chapter 4. Domino Design elements: forms 127
1. First, create some subforms (at least two).2. When your subforms are ready, open the Main Topic form.3. Create a subform by choosing Create -> Resource -> Insert Subform.
A dialog box is displayed (shown in Figure 4-31).4. Select the subform you want to add and click OK.
You can use computed subforms to show different elements to different users. Which subform is loaded is based on a formula, so you can load different subforms for different groups. You can also use different subforms for Web users than for Notes users. To add a subform by a formula, select Insert Subform based on formula.
Figure 4-31 The Insert Subform dialog box
Figure 4-32 on page 129 shows a computed subform created on the form.
Note: In Domino Designer 6, you now have the ability to access Shared Code from other databases. In other words, you can insert a subform from a different database.
One example of this could be a standard header for all the forms in your databases, containing for example the company name of logo and some other consistent information.
128 Domino Designer 6: A Developer’s Handbook
Figure 4-32 A form with a computed subform
You have to specify a formula in the Programmer’s Pane. The formula returns a text string which is the name of the subform to be loaded.
Looking at a computed subformTo look at a completed subform, follow these steps:
1. You should still be in the document form.
2. Click the computed subform once.
3. Add the following formula in the Computed(subform) - Default Value - Events Programming pane:
@If(@ClientType="Notes";"NotesSub";"WebSub")
@ClientType is a formula that determines whether the user is using a Notes client or a Web client. The result of the preceding formula is a text string, NotesSub or WebSub. If the user is using a Web client, the WebSub subform is loaded. If the user is using a Notes client, the formula returns the string NotesSub and the NotesSub subform is loaded.
Note: If the formula returns an empty string, no subform is loaded.
Using a computed subform is a good way to show some elements only to one type of client, or to users who have different roles. For example, one user can read information or provide content to the Web site, while another user may have the authority to approve information for the Web.
Chapter 4. Domino Design elements: forms 129
4.4 Displaying a different form to Web, Notes, and mobile users
Perhaps the easiest way to show different things to different users is to use different forms. This is most useful when the information you want to show to Web users, Notes users, and mobile users differs considerably, or where Web or mobile browsers do not support the features used in your forms.
To use different forms for Web users, Notes client users, and mobile users, follow these steps:
1. You need to create three forms: one for Web users, one for Notes users, and one for mobile users.
2. Make sure that all three forms have the same alias part of the name, which follows the vertical bar (|); this way, the same value is saved in the Form field.
3. The names of the forms can also be the same, but it’s much more useful to give them different meaningful names. In this way, you can easily determine if the form is for use by Web users, Notes users, or mobile users. For example, you could name them as Main Document (Web), Main Document (Notes), and Main Document (Mobile).
Note: Even if the names of the forms will be the same, you can tell them apart in the design view by looking at Web, Notes, and Mobile columns on the right.
4. After creating the three forms, you need to make them available only for Web users, Notes users, or mobile users.
From the standard navigator, choose Design, then Forms. The list of forms is displayed. Click the form and click the Properties icon. The InfoBox is displayed. Go to the Design tab, as shown in Figure 4-33.
Figure 4-33 The Design Properties for the My Document form
130 Domino Designer 6: A Developer’s Handbook
5. On the Hide design element from section, select:
– Web browsers and Mobile clients if the form is only to be used in Notes, or – Notes R4.6 or later clients and Mobile clients if the form is only to be used
on the Web, or – Web browsers and Notes R4.6 or later clients if the form is only for Mobile
users
Domino 6 will determine what type of client is accessing the form, and apply the necessary Hide When formulas. When the user opens a document, whether on the Web, or in Notes, or from a mobile device, the correct form will then be used to display the document.
4.5 Layout regionsA layout region was generally used when creating dialog-like forms and in @Dialogboxes in Notes R4. It still supported for backward compatibility.
A layout region consists of a 32-bit graphic that contains several kinds of design elements, such as fields (except for rich text, rich text lite, password, formula, dialog, time zone, and color), static text and buttons. However, Java applets, objects, attachments and embedded objects are not allowed.
Note: All Domino elements can be hidden from a Web client, Notes client, or a mobile client.
Note: Layout regions are not supported for Web browser or mobile clients.
We recommend that you do not use layout regions in your applications, as they are not supported by Web or mobile clients. If you are using layout regions for absolute positioning reasons, consider using a page or a form with a table and OS-style fields instead. This will enable you to reach the same functionality, use the same element for all clients, and use design elements that you could not use within layout regions.
Another advantage of tables over layout regions is that in most cases, they automatically have a sensible tab order of the fields and controls—whereas with layout regions, it is more difficult to get them in the right order.
You can also consider using a new feature in Domino Designer 6, called Layers, to reach the functionality you want to achieve by using layout regions. More information about Layers can be found in 12.10.1, “Layers” on page 417.
Chapter 4. Domino Design elements: forms 131
4.6 Working with collapsible sectionsIf the form design includes a long set of fields or fields that contain large amounts of data, it can be annoying for users to have to scroll up and down to find the information they are looking for. Collapsible sections can be a good solution to this problem. Collapsible section are also a good way of grouping information together.
4.6.1 Creating a collapsible sectionTo create a collapsible section within a form, follow these steps:
1. Open the design of a form.
2. Select the text you want to have inside the section:
a. Choose Create > Section -> Standard if you want the section to be seen by all users that have access to the document.
b. Alternatively, choose Create -> Section -> Controlled Access if you want to restrict access of the section to certain users defined in a formula.
Figure 4-34 shows the InfoBox for a standard section.
Figure 4-34 The properties for a Section
3. The Title tab allows you to give a name to the section. You can also use formulas to name sections. Other properties that can be changed here are the border type and color.
4. The Expand/Collapse tab enables you to define expand and collapse rules when the document is previewed, opened for reading, opened for editing, or printed.
5. The Font tab enables you to set the text type and color.
6. The Hide properties of a section apply to the section header only. The contents of the section may have different hide properties. However, it’s not possible to manually open a section when the header is hidden. If the section is closed and the header is hidden, the contents are effectively hidden.
132 Domino Designer 6: A Developer’s Handbook
4.7 Using tablesTables are used for positioning and aligning elements on a page or form. With Domino 6, you can include fields, graphics, buttons, subforms, hotspots, objects, sections, nested tables, attachments, Java Applets, and embedded elements inside a Domino table.
For basic information about tables and how to create them, see the document “Creating tables” in the Lotus Notes 6 Help database.
4.7.1 Creating tables within tablesDomino 6 supports nested tables (up to four levels deep). This is useful for developing tabbed tables both for Notes client users and for Web sites when you want to be sure that fields and graphics are aligned correctly.
To create a nested table, follow these steps:
1. Select the table and position the cursor within the cell where you want to create a nested table.
2. Choose Create -> Table.3. Specify the number of rows in the Rows field.4. Specify the number of columns in the Columns field.
The nested table is then created inside the table; refer to Figure 4-35 on page 134.
Chapter 4. Domino Design elements: forms 133
Figure 4-35 A nested table
To use this nested table on the Web, highlight the whole table and choose Text -> Pass Thru HTML. This causes Domino to translate the whole table into HTML, so that the nested table will be displayed correctly on the Web.
4.7.2 Merging and splitting cellsTable cells can also be merged into one cell. The following example demonstrates how to create a table of four cells and then merge two of them into one:
1. Create a blank form by selecting Create -> Design -> Form from the Domino Designer 6 client.
2. Create a table with two rows and two columns.3. Highlight the two leftmost cells.4. Choose Table -> Merge Cells.
Note: When you are using tables on the Web, you must insert information in all the cells (even if it is only a dot); otherwise, the empty cells will not be displayed.
134 Domino Designer 6: A Developer’s Handbook
You can see that these two cells are now merged into one cell, as shown in Figure 4-36.
Figure 4-36 An example of merged cells
Let’s preview the same form on the Web; refer to Figure 4-37.
Figure 4-37 The merged cells viewed in Internet Explorer 6.0
5. To split the cells, click the merged cell and choose Table -> Split Cells.
Restriction: You can only split a merged cell. You cannot start with a one-row, two-column table and split the right cell into two rows.
Chapter 4. Domino Design elements: forms 135
4.7.3 Table propertiesThere are seven available tab options where you can modify tables, as described in the following sections.
Table Layout tabThe Table Layout tab is shown in Figure 4-38.
Figure 4-38 The Table Layout tab
1. The Width option allows you to specify how the table appears to the user. There are three different ways to show the table:
– Fit to window: The table uses the same width definitions as the current window.
– Fit with margins: The table size changes when the user changes the window size. Fit with margins shows all the table cells at the same time so users don’t have to use the horizontal scroll bar.
– Fixed: The designer can manually determine the size of the table. The table width does not change if the user changes the window size.
2. If Fixed is selected, then you can select the table’s alignment. Options are left, center, and right of the window.
Notes:
All of these options are supported on the Web.
The cell width can never be reduced to less than the widest element in that column.
136 Domino Designer 6: A Developer’s Handbook
3. Cell width: allows you to set the width of the cell. You may find it helpful to set the table to “Fixed” temporarily, so that you can type column widths without the table adjusting all columns to fit.
4. The Space Between Columns and Space Between Rows options allow you to specify the distance between the cells or rows.
Cell Border tabThe Cell Border tab is shown in Figure 4-39.
Figure 4-39 The Cell Border tab
� Cell Border Style allows you to select the style of the cell borders. Available options are Solid, Ridge, and Groove. Web browsers support only Ridge style or no borders.
� Color allows you to select the color of the border lines for the whole table. Not supported on the Web.
� The thickness of the borders can be set from 0 to 10. You can set all the borders of selected cells to 0 (= no border) or to 1 by clicking one of the buttons at the bottom of the screen. If you have selected more than one cell, you can outline them by clicking the button at the bottom right of the section.
The Notes client lets you individually adjust the thickness of each cell wall. However, HTML lets you specify one border thickness that is used for the entire table.
Table/Cell Background tabThe Table/Cell Background tab is shown in Figure 4-40 on page 138.
Note: For the Web, there are only two options for borders: on or off. This is determined by the borders of the top left cell.
Chapter 4. Domino Design elements: forms 137
Figure 4-40 The Table/Cell Background tab
1. In the Colors tab, you can choose the background color of the cell. To have the same background color for the whole table, click Apply to All.
2. The Table Style option allows you to select different types of styles for the table. The style, in this case, refers to the pattern used to color in table cells with one or two colors you select. The available options are:
– None– Solid– Alternating rows– Alternating columns– Left and top– Left– Right and top– Right– Top
Figure 4-41 on page 139 shows an example for table style — Left and Top.
138 Domino Designer 6: A Developer’s Handbook
Figure 4-41 An example of the Left and Top style
The Style options give you the opportunity to use a particular color effect in the cells; refer to Figure 4-42 on page 140.
Chapter 4. Domino Design elements: forms 139
Figure 4-42 Applying a gradient cell fill
To apply the gradient cell fill shown in Figure 4-42, follow these steps:
1. Highlight the cells you want to change (in this case, rows 2 through 4 in column 1).
2. Choose the background color for the cells.3. Select the gradient color.4. For the direction option, choose left to right.
Table Border tabThe Table Border tab allows you to specify the width and style of the table border; refer to Figure 4-43 on page 141.
Note: The Gradient cell option is not supported on the Web.
As shown in the diagram at the bottom of the properties dialog, cell color setting override table color settings.
140 Domino Designer 6: A Developer’s Handbook
Figure 4-43 The Table Border tab
The Drop Shadow option shows a shadow around the table.
Margins tabThe Margins tab enables you to specify the left and right margins for the table. This is the distance the outside edge of the table is intended to be from the edges of the page. You can use either the percent sign (%) or inches. The Margins tab is shown in Figure 4-44.
Figure 4-44 The Table Margins tab
The R4 Spacing option converts the whole table into the R4 form. (It is unlikely you will want to use this; it is provided for compatibility with Notes version 4 applications.)
Table Rows tabThe Table Rows tab allows you to change the table display style between standard, tabbed, and other styles.
Note: The Drop Shadow option is not supported on the Web.
Note: The Margins option is not supported on the Web.
Chapter 4. Domino Design elements: forms 141
Figure 4-45 The Table Rows tab
Select the Show only one row at a time option. You can use many different kinds of features.
Figure 4-45 on page 142 shows a small table that we will use to demonstrate how the collapsible features work.
Note: Some collapsible features do not work on the Web.
142 Domino Designer 6: A Developer’s Handbook
Figure 4-46 The table example to demonstrate collapsible features
Figure 4-46 shows the table that we set up in order to demonstrate the different table display options that we have available.
� There is one large table, which contains five rows and two columns.
� In the second cell of each of the first four rows there is a nested table.
– The first and second nested tables each contain two rows and two columns.
– The third nested table contains three rows and two columns. – The final nested table in the fourth row contains one row and two columns.
Table 4-6 on page 144 shows further examples of these features. (Note that all table rows in the main table are displayed to users such that they only see one row at a time.)
Chapter 4. Domino Design elements: forms 143
Table 4-6 Which row to display examples
Option Description
Users pick rows via tabs.
Note: You can type the Tab label and caption, as well as set the Font properties for the label and caption.
User picks rows via captions.
Note: You can type the Tab label and caption, as well as set the Font properties for the label and caption.
Switch rows every (n)milliseconds — Advance on Click.
Note: You also have the option of using one of eight effects to display the rows.
This option allows you to display a single row from the main table that the user can cycle through to the next by clicking the table with the mouse.
Switch rows every (n)milliseconds — Once when opened.
Note: You also have the option of using one of eight effects to display the rows
Domino runs (displays the rows one after another) the table once when the form is loaded. Interval option is allowed.
Switch rows every (n)milliseconds — Cycle once on Click.
Note: You also have the option of using one of eight effects to display the rows
This is similar to the Once when opened option, but is activated when the user clicks the first row.
144 Domino Designer 6: A Developer’s Handbook
Table Programming tabThe Table Programming tab gives you an opportunity to specify options for your table; refer to Figure 4-47. Available options are Name/ID, Class, Style, and Title. Apart from the Name/ID field, which is used in controlling the table programmatically, HTML options only take effect on the Web.
Figure 4-47 The Table Programming tab
Switch rows every (n)milliseconds — Continually.
Note: You also have the option of using one of eight effects to display the rows.
This is similar to the Once when opened option, but cycles through each row in the table continuously.
Switch rows programatically. Allows you to display a single row based on the value stored in special field $table-name where table-name is the value that you give your table in the Programming tab of the Table in Name/ID field (for example MyTable; see Figure 4-17 on page 102).
The value required in this field is the name of the tab or the row number (field must be a number type and rows start from zero) you need to have displayed.
Note: This tab is similar to the generic HTML properties, but the table and the selected cell each have their own properties.
Chapter 4. Domino Design elements: forms 145
4.8 ActionsActions are used to provide a user interface for users. By clicking a button or selecting an action from the Actions menu, Notes client users can perform certain tasks. An Actions menu is not available for Web users, but button-type actions are.
Actions help you automate tasks in an application. This can speed up repetitive tasks like routing documents, updating document information, performing calculations, checking for errors or basically nearly anything that can be done using LotusScript or @formulas. Users click a button, hotspot, or pick from the Action menu to execute the action.
Examples of typical actions:
� Changing the document to edit mode� Create a new document� Create a response document� Saving a document� Changing a value of a computed field on a form� Forwarding a document
Actions can both be shared and unshared. (Normally, we don’t use the term “unshared” actions; we just speak of these as “Actions”.)
You can create an unshared action in a view, folder, form, page, or subform to provide one-click shortcuts for routine tasks in a view or document. Actions become part of a design element's design and are not stored with individual documents.
You can also create a shared action in a database that can be used in multiple views, folders, pages, forms, and subforms. Shared actions are stored as shared resources in the database. If you make changes to a shared action, then all forms, views, pages or subforms that use this shared action will automatically be updated with the new/changed code.
Important: As mentioned, Web users do not have an Actions menu, nor can they use many of the shortcuts. Therefore, it is essential that you provide them with the ability to perform the necessary tasks by providing them with action buttons.
Tip: You should to provide basic functionality for users with buttons, even though some of the functionality could be achieved through other means (such as using a menu action or shortcuts), because buttons provide a more user-friendly user interface.
146 Domino Designer 6: A Developer’s Handbook
To build an action, you can use any of the following:
� Simple actions that you select from a list
� Formulas
� LotusScript
� JavaScript
� Common JavaScript
When you work with forms, views, pages or subforms, then the way to add, change, or view your actions is the same. If you open one of these design elements, you can view your actions by dragging the right-most corner in the Designer 6 client to the left, as shown in Figure 4-48.
Figure 4-48 Displaying the actions
Another way to view the action bar is by using the path View -> Action Pane, as shown in Figure 4-49.
Figure 4-49 Displaying actions using the menu
4.8.1 Creating an actionTo create an action, right-click in the action pane and select Create Action, as shown in Figure 4-50 on page 148.
Chapter 4. Domino Design elements: forms 147
Figure 4-50 Creating an action
You can create an unshared action by using the path Create -> Action -> Action.
4.8.2 Removing an actionTo delete an unshared action, mark the action in the action pane and press the Delete key. Confirm the deletion by responding yes when you are asked whether you want to delete the action from the database.
4.8.3 Action propertiesUse the different tabs in the action’s properties box to set:
� The name of the action
This is the name of the action, which is shown on the button for the end user. If “label” is used, “label” is used as the visual name of the button for the end user.
� The label of the action
To create more user-friendly actions, labels can be set on actions. This is a new feature of Domino 6. A label can programmatically be set to evaluate the visual name/text on the button based on different values, such as @username or values in fields on the document.
� The target frame of the action
This is used to set the target frame where the action should be performed.
� Type of action
In Domino 6, we have both “Button” and “Checkbox” as action types. The default is “Button”. For more information about the Checkbox type of action, refer to 12.12.4, “Checkbox action” on page 439.
Note: Checkbox-type actions are not supported on the Web. They behave like regular actions.
148 Domino Designer 6: A Developer’s Handbook
� How the action should display
There are various settings for how this action should display and be accessible. You can decide whether the action should be available through the Actions menu, or if it should be included in the Action bar.
� Add a icon to the action
Each action, besides those of type “checkbox”, can have a icon associated with it. This to give a more visual interface of what exactly will happen when clicking the action.
� Deciding hide/when rules to the action
Actions can be hidden based on different rules. For example, you can hide an action called “Edit Document” if the user did not have the role “Modifier” by adding a hide/when formula as follows:
@IsNotMember(“[Modifier]” ; @UserRoles)
� Settings considering NotesFlow Publishing
To access an action’s propertybox, right-click the action and select Action Properties. You can also access this propertybox using keyboard shortcuts. All propertyboxes can be displayed using Alt + Enter, so marking the action and clicking this key combination will show the propertybox.
4.8.4 Action bar propertiesAs well as the Action itself, there is also a properties box for the Action bar. The Action bar is the bar where the actions are shown. One way of accessing these settings is by first accessing the action properties box, and then selecting Action Bar from the Actions properties box dropdown list, as shown in Figure 4-51 on page 150.
Chapter 4. Domino Design elements: forms 149
Figure 4-51 Selecting the Action Bar properties box
The Action Bar properties box is shown in Figure 4-52.
Figure 4-52 Action Bar properties box
By setting and changing the settings in the Action Bar properties box, you can fully control changing the design of the background of the bar, the text font, size and color of the text on the buttons, the buttons styles, border styles, and much more. This helps you to create a more user-friendly user interface.
4.9 Embedded elementsUsing Domino Designer 6, you can insert navigators, views, outlines, calendar controls, scheduling controls, folder panes, file upload controls and editors. These elements are called embedded elements, and they provide an easy way to enter and show information in both the Notes client and Web browsers.
150 Domino Designer 6: A Developer’s Handbook
The Notes client cannot use Embedded Folder Panes or Embedded File Upload Controls; only Web users can. Web users cannot use Date Picker.
4.9.1 Embedded editorsThis is a new feature that comes in Domino Designer 6. You can now embed an editor into a form. This functions like an IFRAME on a Web page.
There are mainly two situations in which you would use this new feature:
� Embedding one or more forms into an existing form
� Embedding an editor which again links to an embedded view
For more information about this feature, refer to 12.17, “Embedded element enhancements” on page 469.
4.9.2 Embedded navigatorsAn embedded navigator is an element that provides you with an easy way to show a Notes navigator. You can have multiple navigators in one form. To insert an embedded navigator into your form, follow these steps:
1. From Domino Designer 6, open the MyTeamRoom database.
2. Choose the Forms design view and create a new form by pressing the New -> Form button in the Form view pane.
3. Create a table containing one row and two columns.
4. Go to the first cell in the table and choose Create -> Embedded Element -> Navigator and choose TeamRoom navigator in the dialog box.
5. The TeamRoom navigator is now inserted into the table, and you can see in the Programmer’s Pane that the TeamRoom navigator is highlighted.
6. Try to change the embedded navigator by choosing another navigator in the Programmer’s Pane to see what happens. As you will see, the navigator changes in your design pane when you select another navigator.
7. You can also embed a navigator based on a formula.
Note: You can also use these embedded elements in any page and they will work as they do in a form.
Note: This type of application can also be done with a frameset design element, where the view is in one frame and the selected document in another frame.
Chapter 4. Domino Design elements: forms 151
4.9.3 Embedded date pickerAn embedded date picker is an element which shows the calendar view of the current month (default) and allows the user to browse other months.
Usually you would use a embedded date picker in a frameset and set the target frame of the embedded date picker to a frame containing a calendar view. Clicking a date in a date picker would result the calendar view to change to that date.
This feature is not supported on the Web.
4.9.4 Embedded outline controlYou can insert an embedded outline control in your form to give more flexibility to your programming of the navigation pane than navigators provide. Navigators appear essentially as static image maps. If you need more flexible and programmable navigation, Outline control can be a good option. For more information on this, read the document “Embedding an outline” in the Domino Designer 6 Help database, and refer to 9.3, “Embedded Outline” on page 309.
4.9.5 Embedded viewAn embedded view is an element that provides you with an easy way to show a Domino view for Notes or Web users inside a page or a form. For example, the Expand and Collapse options work fine, and it is not necessary for browsers to reload the site repeatedly, which can be slow. With Domino 6, you can insert more than one view in a form, subform, or page.
To create a new embedded view, follow these steps:
1. Go to an empty area of a form (for example, Team Member Profile Form) and choose Create -> Embedded Element -> View.
2. A dialog box is displayed. Choose By Category and then OK.
3. The embedded view is inserted into the table and you can see a list of views in the Programmer’s Pane.
4. By clicking with the right mouse button and selecting Embedded View, you can display the Embedded Views InfoBox, as shown in Figure 4-53 on page 153.
152 Domino Designer 6: A Developer’s Handbook
Figure 4-53 The Embedded View properties
– The Basic tab allows you to specify whether you want to use the view Java applet when looking at this form through a browser, and if not, lets you override the default number of lines to display as configured in the Domino server configuration. It also has the option for you to specify the target of your view when clicked once or when it encounters a double click.You select which frame to open the view in. This is a new option in Domino Designer 6.
– You can choose the color of the background and the size of the view in the Elements tab.
– The Fonts tab of the InfoBox lets you specify fonts and colors for the Embedded View.
– The Alignment tab lets you specify the alignment of the view.
– The Page Break tab allows you to control the pagination of the view.
– The Hide When tab allows you to set when to display and hide the view.
4.9.6 Embedded group scheduling controlThe group scheduling control is similar to the one found in the mail template, and allows you to view the diaries/schedules of multiple people at the same time.
4.9.7 Embedded folder paneAn embedded folder pane is an element that provides you with an easy way to display a list of Notes views on the Web. You can have only one embedded folder pane within one form.
Tip: The view Java applet is not accessible for users with screen readers. We suggest you provide an alternate text-only page.
Chapter 4. Domino Design elements: forms 153
1. Open the form that you created earlier and delete the embedded navigator element.
2. In the same place, choose Create -> Embedded Element -> Folder Pane. After embedding the folder pane element form, the layout will look as shown in Figure 4-54.
Figure 4-54 An embedded folder pane
You can view the form in your Web browser by opening the database from the Web and typing the following address in the location field:
where server name is the name of your server, database name is the database name, and Form Name is the name of the form that you want to open.
154 Domino Designer 6: A Developer’s Handbook
Figure 4-55 The embedded folder pane in a Web browser
You can also change the font, font size, color of the text, and alignment of the folder pane by opening the InfoBox.
3. Close the form and return to the standard navigator.
4.9.8 Embedded file upload controlA file upload control is an element that provides users with an easy way to upload file attachments to the Web. You can have multiple file upload control elements in one form.
4.10 Other features of formsThis section describes some of the features you can use in forms.
Chapter 4. Domino Design elements: forms 155
4.10.1 Horizontal rulesTo create a horizontal rule, do the following:
1. From the standard navigator choose Design -> Forms. A list of forms is displayed.
2. Open the Main Topic form.3. Click the form where you want to create a horizontal rule.4. Choose Create -> Horizontal Rule.5. A horizontal rule is created on the form. You can change the settings of the
horizontal rule from the Infobox.6. By default, the rule is set to fit to window. You can set the height and color,
and either fit the width to the window or specify a width.
Note: Domino displays the horizontal rule for Web applications using the HR tag.
4.10.2 Computed textComputed text can be used to create text, on the form or in a rich text-type field on a document, based on Notes @formulas. Creating computed text is similar to creating text fields that are computed for display.
Computed text is not stored in the document, and it is computed every time the document is opened, reloaded or refreshed.
Authors who do not have designer privileges can create personalized Web pages using computed text. To create computed text in an existing field, do the following:
1. From the Notes client, open the TeamRoom database and create a new document by choosing Create -> Main Document.
2. Go to the Content field.3. Choose Create -> Computed Text.4. Computed Text is created on the field.
156 Domino Designer 6: A Developer’s Handbook
Figure 4-56 Example of using @Text(@Now) as computed text
5. When Computed Text is highlighted, click the Programmer’s Pane and type the desired formula. In this case, the formula is:
@Text(@Now)
The formula returns the current date stamp.
Note: This is useful if you are not a designer but you want to add some functionality to the document. You can, for example, also use computed text to show something to one user that other users will not see.
The following formula allows only Paul Revere to see the text; other users will not see it:
Name([CN]; @UserName) = "Paul Revere"; "Hello Paul, This text is shown only for you, other users don't see it";"");
Tip: If desired, you can type HTML into Computed Text.
Note: The computed text formula must return a single text value, not a number, date or a list. This means you cannot use formulas like @Now, @Sum or @UserRoles, without converting the return value to text first.
Figure 4-56 on page 157 shows the example we used for computed text. In this example, we used @Text function to convert the value @Now formula return to a text string.
Chapter 4. Domino Design elements: forms 157
4.10.3 Buttons, Action bar buttons, and hotspotsNote menus are not available to Web users. Therefore, you must provide alternatives to perform these functions. Use actions in all your views and forms, or buttons and hotspots on forms.
To create multiple buttons that are displayed in a Web browser, perform the following steps:
1. The browser must support JavaScript.
2. Select the database property Web Access: Use JavaScript When Generating Pages. If this property is not set, Domino recognizes only the first button in a document and treats it, by default, as a Submit button that closes and saves the document. If there are no buttons in the form, Domino places a Submit button at the bottom of the form.
Guidelines for using button formulasNotice the following guidelines and restrictions:
� On the Web Action bar, buttons and hotspots support only a subset of the available actions.
� You should create only one Submit button per form. You can customize this button, even if you haven’t selected the database property Web Access: Use JavaScript when generating pages.
� Formulas on buttons are run when the user clicks the button.
Tip: If your browser doesn’t support JavaScript and you don’t want any buttons on the form, then enter the following HTML code on the bottom of the form: </form>. Remember to mark text as Pass-Thru HTML and hide it from Notes users.
ActionsAction Drop-down menuThe application developer can create a drop-down menu on an action bar. The following example creates an action button with three sub-actions:
1. From the menu, select Create -> Action -> Action with Sub Action.
2. When the Actions properties box is shown, type in the name of the first sub-action.
3. To add further sub-actions, select Create -> Action -> Action while the top-level action is selected.
Tip: To add more top level actions you may need to press “-” to collapse the list.
158 Domino Designer 6: A Developer’s Handbook
4. Remember to name the parent action by selecting it and then clicking n the Properties icon.
When all the action buttons are created, save the document and preview the form by choosing Design -> Preview in Notes. The action bar and the action button should look as shown in Figure 4-57.
Figure 4-57 A form with sub-actions
As you can see, the drop-down menu opens when you click the Help button.
Note: Using Domino Designer 6, you can add more than one sub-level to a drop-down menu.
Action bar InfoBox The Action bar InfoBox allows you to modify the properties of the Action bar. The Action bar InfoBox looks as shown in Figure 4-58.
To open the dialog, double-click an action to open the Action Infobox and pull down the list in the title bar.
Figure 4-58 The Action bar properties
Chapter 4. Domino Design elements: forms 159
The Action bar InfoBox consists of six tabs:
1. Action Bar Info
On this tab you can specify:
– The alignment of the buttons.– Whether to use HTML or the Java applet when viewing this page via a
browser.
2. Action Bar Size
Select one or more of the following:
– Bar height - choose one of the following:• Default - automatically determines the appropriate height for the action
bar. • Exs - specify the size of the action bar in exs. An ex is equal to the size
of the lower case of the font that you have chosen. • Fixed - specify an absolute bar height in pixels.
– Font, Size, and Style - if you selected Exs, specify the font, the size of the font, and the style of the font (for example, bold or italic) for the items in the Action Bar.
This setting does not affect the text on the action buttons, only the height of an “Ex” for purposes of determining the button height.
3. Action Bar Background
This allows you to change the following:
– Color - specify a color for the background of the action bar. – Image - you can also choose to use an image for the background. To use
an image, click the folder icon and select the name of a shared image resource that you have created and stored in the database as a Resource, or click @ and specify a formula (or set of formulas).
– Options - lets you choose how to present the background image. For example, you can center it, tile it, repeat the image vertically, and so on.
4. Action Bar Border
This contains the settings for the bar’s border
– Border style and color - choose the style and color of the action bar border. For example, you can choose a solid line border or a border with a ridge or no border at all.
– Border effects - lets you choose to have a drop shadow border and set its width in pixels.
– You can also set the thickness of the border (as well as the thickness of the outside and inside border, if applicable).
160 Domino Designer 6: A Developer’s Handbook
5. Button Properties
This tab allows you to modify the properties of buttons.
– Button Size - lets you set the height, the width, and the margin for all the buttons on the action bar. If you choose Fixed size, you can specify the size in pixels. • If you choose default for the height, for the width, or for the margin, its
size is automatically set. Note that if you have images that are much taller than the font, you should not choose a default height, but should specify a fixed height.
– Button Options:• Display border - controls when the button border displays. You can
choose to display the button border On Mouse Over, Always, or Never.• Align text - choose whether to have button text aligned center, left, or
right.• Internal margins - set the margins within the button in pixels.• Always show drop-down - checking this causes the drop-down
character (down caret) to display inside the Action button. If this is not checked, the drop-down character displays only on mouse over.
– Button Background - lets you either select a color for the button background or use an image for the background. To use an image, click the folder icon and select the name of a shared image resource that you have created and stored in the database as a Resource, or click @ and specify a formula (or set of formulas). • Note that using an image is not supported on the Web.
6. Button Font
This tab allows you to modify the font size and text style on the of the buttons. This controls the actual button font. The font size and style on the action bar size tab is only used for determining the button height.
4.11 Images within formsThere are several ways to add images to your Web pages:
� Copy images through clipboard� Import pictures� By using Image Resource
Note: It is possible to create Shared Actions in a database that can be used in multiple views, folders, pages, forms, and subforms. Shared actions are stored as shared resources in the database.
Chapter 4. Domino Design elements: forms 161
4.11.1 Copying images 1. Copy your desired image to the clipboard.2. Open the form in Design mode.3. Click the form where you want to place the image.4. Choose Edit -> Paste.
Figure 4-59 Example of a form with an image pasted into it
4.11.2 Importing pictures1. Open the form in Design mode.2. Click the form where you want to place the image.3. Choose Create -> Picture.4. Select the type of file, click the file to import and click OK.
4.11.3 Using Image ResourceAttaching your image files as image resources into your database is the recommended way of storing and using the images you want to use in your application. Images are stored in a central place inside the application, and they
Tip: Often the quality of the image is better when the picture is imported rather than pasted.
162 Domino Designer 6: A Developer’s Handbook
can be replicated together with the application. Note that you can use images from databases other than the current databases. This means you could have a central repository for your image resources, thus allowing you to mange your images in a single place.
1. Create a new image resource by opening the Shared Resources -> Images view.
2. Click the New Image Resource button, select the type of image file, and then click the file to import. Click OK.
3. Go to the form and move the cursor to the place where you want to place the image resource.
4. Choose Create -> Image Resource and select the image for Insert Image Resource box. You can also choose images from other databases. If you do, the other database needs to be available to users who use that form.
Figure 4-60 The Insert Image Resource dialog box
4.11.4 Alternate textAdding alternate text to graphical hotspots allows Web users with text-only Web browsers to see text on the form where the graphic should be. Users with Web browsers that support graphics will see the alternate text while the Web browser is loading the graphic. Screen reader programs speak this text for the benefits of those who cannot see the image.
Note: Image Resource also supports animated images.
Chapter 4. Domino Design elements: forms 163
To add alternate text:
1. Select the graphic and choose Picture -> Properties.2. In the Alternate Text box, enter the text to describe the graphic.
4.12 Using CGI variablesCommon Gateway Interface (CGI) is a standard for interfacing external applications with HTTP servers. When a Web user saves a document or opens an existing document, the Domino Web server uses CGI variables to collect information about the user, including the user’s name, the browser, and the user’s Internet Protocol (IP) address.
To capture this information in a Web application, you have two options:
� Create fields with the same names as CGI variables.
� Use LotusScript agents.
4.12.1 Table of CGI variables supported by DominoTable 4-7 lists all the Common Gateway Interface (CGI) variables that are supported by Domino.
Domino captures the following CGI variables through a field or a LotusScript agent. You can also capture any CGI variable preceded by HTTP or HTTPS. For example, cookies are sent to the server by the browser as HTTP_Cookie.
Table 4-7 Table of CGI variables with new variables in bold
Tip: It is important to provide alternate text for all non-trivial images, especially for the benefit of visually impaired.
However, do not add alternate text for spacers, bullets, or other elements that only decorate and do not add information, as this just clutters the screen and wastes the time of screen reader users.
CGI variable Returns
Auth_Type If the server supports user authentication and the script is protected, this is the protocol-specific authentication method used to validate the user.
Content_Type For queries that have attached information, such as HTTP POST and PUT, this is the content type of the data.
164 Domino Designer 6: A Developer’s Handbook
Content_Length The length of the specified content as given by the client.
Gateway_Interface The version of the CGI spec with which the server complies.
HTTP_Accept The MIME types that the client accepts, as specified by HTTP headers.
HTTP_Accept_language The languages that the client accepts, as specified by HTTP headers.
HTTP_Referer The URL of the page the user used to get here.
HTTPS Indicates if SSL mode is enabled for the server.
HTTPS_CLIENT_CERT_COMMON_NAME
The common name on the x.509 certificate.
HTTPS_CLIENT_CERT_ISSUER_COMMON_NAME
The issuer of the x.509 certificate.
HTTPS_KEYSIZE The session key during an SSL session. For example, 40-bit, 128-bit.
HTTP_User_Agent The browser that the client is using to send the request.
Path_Info The extra path information (from the server’s root HMTL directory), as given by the client. In other words, scripts can be accessed by their virtual path name, followed by extra information that is sent as PATH_INFO.
Path_Info_Decoded Returns the same as Path_Info, but decodes the string. For example, if a URL references a view name that contains characters that are not allowed a URL, the name is encoded. This CGI variable decodes the string. Path_Info_Decoded is available to Domino applications only.
Path_Translated The server provides a translated version of PATH_INFO, which takes the path and does any virtual-to-physical mapping to it.
Query_String The information that follows the question mark (?) in the URL that referenced this script.
Chapter 4. Domino Design elements: forms 165
For more information about CGI, see:
http://hoohoo.ncsa.uiuc.edu/cgi/env.html
Query_String_Decoded Returns the same as Query_String, but decodes the string. For example, if a URL references a view name that contains characters that are not allowed in a URL, the name is encoded. This CGI variable decodes that string. Path_Info_Decoded is available to Domino applications only.
Remote_Addr The IP address of the remote host making the request.
Remote_Host The name of the host making the request.
Remote_Ident This variable will be set to the remote user name retrieved from the server. Use this variable only for logging.
Remote_User Authentication method that returns the authenticated user name.
Request_Content Supported only for agents. Contains the data sent with an HTTP POST request. The data is usually “URLencoded”, consisting of name=value pairs concatenated by ampersands; for example, FirstName=John&LastName=Doe.
Request_Method The method used to make the request. For HTTP, this is “GET,” “HEAD,” “POST,” and so on.
Script_Name A virtual path to the script being executed, used for self-referencing URLs.
Server_Name The server’s host name, DNS alias, or IP address as it would appear in self-referencing URLs.
Server_Protocol The name and revision of the information protocol accompanying this request.
Server_Port The port to which the request was sent.
Server_Software The name and version of the information server software running the CGI program.
Server_URL_Gateway_Interface
The version of the CGI spec with which the server complies.
166 Domino Designer 6: A Developer’s Handbook
4.12.2 Using a field to capture CGI variablesWhen a field has the same name as a CGI variable, Domino copies the field value from the CGI environment and places it in the field. There are two things to note:
� You do not have to specify a formula if the field is editable.
� Make the field hidden when previewed for editing and opened for editing.
For example, you can create a field named HTTP_USER_AGENT. This field captures information about which browser the user is using. You can use this field to see if the user’s browser supports features in your application.
The general format of HTTP_USER_AGENT variable is software/version library/version. The 11 leftmost characters basically tell you the browser version. You can evaluate this in formulas and display different things based on that. For example:
@Left(HTTP_USER_AGENT;11)="Mozilla 3.0";"Netscape Navigator"; @Left(HTTP_USER_AGENT;11)="MSIE 2.0";"Microsoft Internet Explorer";"")
Some of the values returned by HTTP_USER_AGENT are listed in Table 4-8.
Table 4-8 The returned values for some browsers, using HTTP_USER_AGENT
4.12.3 Using a LotusScript agent to capture CGI variablesYou can use the DocumentContext property of the NotesSession class to capture CGI variables. The property returns a Notes document that contains all CGI variables that are applicable to the session. You can use these values to collect or process information for the current session.
The following example demonstrates how to access CGI variables:
Dim session As New NotesSessionDim doc As NotesDocumentDim CGIValue As StringSet doc = session.DocumentContextCGIValue = doc.HTTP_USER_AGENT(0)
Returned value Browser
MSIE Microsoft Internet Explorer 4 or later
Mozilla 3.x Netscape Navigator 3.x
Mozilla 4.x Netscape Navigator 4.x
Mozilla 5.x Netscape Navigator 6.x
Chapter 4. Domino Design elements: forms 167
The CGIValue string now has information about a user’s browser.
Tip: When submitting a document, CGI variables are calculated twice: once when the form is displayed to the user in the browser, and again when the submit button is clicked and the form is posted back to the server.
There are occasions when you need to capture the state of a CGI variable when the form is first displayed by the Web browser, for example, when using the HTTP_Referer field to capture the URL the user has just come from so that you can take them directly back to that point.
In this case, you need to create a second field on the form that computes the value of the CGI variable: make the field hidden to the HTML form by using the HTML tag’s <TYPE=HIDDEN>.
4.13 Profile documentsProfile forms are useful for collecting user-specific or database-specific values. These values are stored in documents that are called profile documents. The difference between documents and profile documents is the way they are displayed and how items are accessed. Only one profile document per form can exist for each user of a database. Or, only one profile document can exist for a database, if that form is available to all users.
Profile documents allow for quick data retrieval, because they are cached while the database that stores them is open. Profile documents are like other database documents except they are somewhat invisible.
Users create profile documents through an action button or agent you design that uses LotusScript or the formula language.
A database can have a single profile document or multiple profile documents that match a key you specify—for example, an @UserName key that creates one profile document for each user of a database, or a key that specifies a different profile document for each day of the week.
Whether you use one profile document for a database, or use multiple profile documents, depends on your design needs. Use multiple profile documents for more customizable settings, such as user preferences. A user must have at least
Note: Profile documents do not display in views and are not included in a document count for the database. This goes both for the database property document count, and the count method for the LotusScript class, NotesDocumentCollection.
168 Domino Designer 6: A Developer’s Handbook
ability to create documents in the access control list (ACL) of a database to create a profile document that is available to all users.
You can use any form to create a profile document. After creating the form, you create a button, action, or agent for the application that uses either @Command([EditProfile]) in a formula or NotesUIWorkspace.EditProfile or NotesDatabase.GetProfileDocument in a LotusScript program to create or retrieve a document. In each case, Notes looks for a profile document with the form name you specify, and creates a profile document if one does not already exist.
4.13.1 Creating a profile formFollow these steps to create a profile form for profile documents in your database:
1. Create a form with fields to hold the values you want to store in profile documents.
2. Choose Design -> Form Properties and deselect: Include in Menu.
3. Save the form.
4. Create a button, action, or agent that uses either the LotusScript NotesDatabase.GetProfileDocument method or NotesUIWorkspace.EditProfile, or the Formula language @Command EditProfile to create or access the document.
4.13.2 Creating and retrieving profile documents using LotusScriptYou can create and retrieve profile documents using the GetProfileDocument method in the NotesDocument class. Example 4-1 on page 170 shows the use of GetProfileDocument.
Note: The form should not be available for users in the “Create”-menu on the client. This is to ensure that no one can create regular documents with the form.
Tip: When using profile documents in Domino Web applications, the Domino server process caches the profile. It does not notice changes made in the Notes client or scheduled agents.
Chapter 4. Domino Design elements: forms 169
Example 4-1 Creating a profile document using LotusScript
Dim session As New NotesSessionDim db As NotesDatabaseDim docProfile as NotesDocument
Set db = session.CurrentDatabaseSet docProfile = db.GetProfileDocument("Interest Profile", _session.UserName)
The first parameter (“Interest profile”) is the “profilename”, which is a string. This is the name or an alias of the profile document. The second parameter (session.UserName) is optional, and should be the user name (key) attached to the profile document. The return value of this example, docProfile, will return the profile document created or retrieved that matches the given name.
You can create or edit a profile document using @Command([EditProfile]), @Command([EditProfileDocument]) or @SetProfileField. Use the SetProfileField and GetProfileField commands to set and retrieve field values from a profile document. A SetProfileField command also creates a profile document if none exists.
If you prefer scripts to formulas, use LotusScript routines to create and edit profile documents. The EditProfile method of the NotesUIWorkspace class produces the same result as the @Command([EditProfile]) command used in a formula.
To set or retrieve field values for a profile document with a script, use the GetProfileDocument method to get a handle to the document. You can then retrieve values from the document or set new ones, just as you would with any document.
Use the IsProfile property for the NotesDocument class to determine if a NotesDocument object is a profile document. Use the NameOfProfile property to retrieve the name of the profile document.
Example 4-2 on page 171 shows an example on how you can create, retrieve and modify a profile document. If the profile document (docProfile) is not found, it is created. It then checks for a value on this document (Company field). If this field is not set, then it is updated, and saved with the new value. If it is already set, nothing more is done.
Important: You cannot delete a profile document using an @command or @function. Use LotusScript if you must delete a profile document.
170 Domino Designer 6: A Developer’s Handbook
Example 4-2 Creating/retrieving/modifying profile documents
Sub Initialize
Dim session As New NotesSessionDim db As NotesDatabaseDim docProfile As NotesDocumentDim sAuthor As StringDim itemCompany As NotesItem
Set db = session.CurrentDatabaseSet docProfile = db.GetProfileDocument("Profiles", session.UserName)Set itemCompany = docProfile.GetFirstItem("Company")If itemCompany Is Nothing Then
4.14 New features in Domino Designer 6One of the new features is that you can create layers. Layers let you position overlapping blocks of content on a page, form, or subform. Layers give you design flexibility because you can control the placement, size, and content of information. You can create and stack multiple layers beneath and above one another. Transparent layers reveal layers underneath; opaque layers conceal layers underneath.
Another feature is the ability to embed an editor into the form; this subject is covered briefly in 4.9.1, “Embedded editors” on page 151.
Finally, the embedded scheduler allows you to design a form or subform that displays the schedules of users. For example, you can create a form for users to schedule department meetings. Embedding a scheduler on the form lets users check everyone's schedules before planning the meeting time. Also, within the embedded scheduler, users can click a person's name to open that person's calendar view (provided the user has been given access in the person's mail preferences). You can program the calendar to open in a separate frame, or in its own window.
These features are explained in greater detail in Chapter 12, “New features in Domino 6” on page 347.
Chapter 4. Domino Design elements: forms 171
4.15 SummaryThis chapter explained the main features and functions available to the application developer when creating forms in a Notes application. It outlined some of the areas that application developers need to consider when developing applications for use by Notes clients, Web browsers, and mobile clients. New features that are included in Domino Designer 6 were also highlighted.
172 Domino Designer 6: A Developer’s Handbook
Chapter 5. Domino Design elements: pages
In this chapter, we describe the page design element. We explain the basics of when and how to use pages in a database, and provides an example. We also mention the new features that have been added in Domino Designer 6.
5.1 What is a pageA page in Domino Designer 6 is a design element that is used to display information. Unlike a form that collects information, pages are designed to present information to the user. For this reason, you cannot create any fields or subforms on a page. However, you can have text, graphics, or an embedded control (such as an outline) on a page.
Pages provide application developers with a greatly improved level of control over the layout of Web pages on Domino sites. Application developers not familiar with traditional Notes development, but with experience designing Web pages, now have a WYSIWYG HTML authoring tool that provides support for a broad range of browser technologies including HTML 4, image file formats, Java applets, Active X components, and multimedia objects.
Pages are best used for static information, or as containers for other elements. You might use a page as the opening screen of your application, or as the “thank you” screen after a user submits a document (for more information about thank you screens, see “The $$Return Field” on page 115), or as a “view template” to provide the background and surrounding graphics in which a Notes view appears.
5.2 Creating a new pageYou can create a new page by choosing Create > Design -> Page or by clicking the New Page button in the Design Page View pane; the new page is shown in Figure 5-1 on page 175:
174 Domino Designer 6: A Developer’s Handbook
Figure 5-1 The page design view
Except for Fields, Layout Region, and Subforms, you can use anything on a page that you could use on a form.
5.2.1 Specifying page propertiesThe Page InfoBox contains all of the information related to pages.
To look at the page properties, do the following:
1. Click the Properties icon.
Note: Remember to enter a window title for your page. If you don’t want the title to evaluate based on a formula, static text needs quotes around it.
Using a window title is especially important for Web applications. Even if you think the page will only be opened in a frameset, users can bookmark the frame contents separately, and search engines can create direct links to it. In that case, the window title becomes the text of the bookmark or the page title.
Chapter 5. Domino Design elements: pages 175
2. In the InfoBox displayed, click the triangle in the top middle of the InfoBox and select Page. An InfoBox is displayed which allows you to set the properties of the page. There are four tabs:
– Page Info– Background– Launch– Security
Page Info tabThe Page Info tab stores general information about the page. See “Using the Form Info tab” on page 77 and “Using the Defaults tab” on page 83 for details about the properties on this tab.
Figure 5-2 The properties for Page Info
For more information on the options you can set for a page and the Web Access settings, refer to “Using the Form Info tab” on page 77.
Background tabThe Background tab allows you to specify the background color for the page. You can also paste in a graphic using the clipboard or import a graphics file. These settings are the same as for the form. See “Using the Background tab” on page 87 for details about the properties on this tab.
176 Domino Designer 6: A Developer’s Handbook
Figure 5-3 The properties for Background
Launch tabThe Launch tab specifies what happens when the page is loading. See “Using the Launch tab” on page 86 for details about the properties on this tab.
Figure 5-4 The properties for Launch
Tip: When developing for the Web, you might occasionally need the database to launch directly to a form. This is not an option of the launch properties of a database.
However, you can program a page with the use of meta tags and “HTML Head Content” to redirect to a form. Setting a database to launch such a page will then actually launch the form.
Chapter 5. Domino Design elements: pages 177
Security tabOn this tab you specify whether this page is available to Public Access users. Refer to “Using the Security tab” on page 91 for details about the properties on this tab.
Figure 5-5 The properties for Security
Most security screens let you specify a list of users who have access to the design element.
Note: This option is not available for pages, because they are unlikely to include any secrets. If the page contains any information from other design elements, the security of those design elements is still in effect. For instance, if a user does not have access to a given view, the user will be unable to see the view contents by looking at a page that includes that view as an embedded element.
5.3 Page eventsPage events are just like form events, except that the NotesUIDocument object in the script events contains no field items, and the events for saving and submitting are not supported because there are no fields to submit. For more information about events, see Chapter 4, “Domino Design elements: forms” on page 75.
5.4 Using pagesPages can be used any time you are displaying information to the user. Pages can contain:
� Layers� Text� Computed text� Tables� Graphics� Applets� Embedded objects such as views� Links
Pages often work in conjunction with framesets to display graphics, site navigation, or applets. They are also in previous versions of Domino (before
178 Domino Designer 6: A Developer’s Handbook
Domino 6), and are often used to hold JavaScripts and Cascading style sheets. However, with Domino 6, it is recommended that you use Shared Resources and Shared Code instead.
In the following example, we look at existing pages in the TeamRoom database to see how the pages are used in that application, as follows:
1. Create a new database, using the TeamRoom template, and call it MyTeamRoom.
2. Open this database in Design mode.
3. Go to the Pages design collections. The view pane shows all of the pages in the database.
4. Open the TeamRoom Outline page by double-clicking it in the view pane. The page should look like Figure 5-6.
Figure 5-6 The Team Outline page design view
5. To see what you can add to the page, click Create; refer to Figure 5-7 on page 180.
Chapter 5. Domino Design elements: pages 179
Figure 5-7 The Create menu for pages
5.4.1 Launching pagesThere are many options for launching pages, such as the following:
� Inserting the page into a frameset
Select the frame where you want to put the page, and then click the right mouse button and select Frame Properties. Select the Named Element in Type option, and from the Kind options, select Page. You can also create links to pages from outlines and hotspots, using a similar dialog.
Note: You can also select a page from another database.
� Using existing framesets
Open the Pages InfoBox and select the Launch tab. Select the Frameset option and choose the framesets where you want to insert the page. Select Frame options and select the page or form that you want to replace.
� Linking to the page via URL
In cases where you can’t use the Named Element selection to create a link to your page, you can specify its location in Web applications by its URL.
The URL of a page is the URL for the database, followed by “/pagename?OpenPage”; see the following example:
http://www.mycompany.com/main.nsf/Intro?OpenPage
180 Domino Designer 6: A Developer’s Handbook
� When database is opened
Open the database InfoBox and select the Launch tab. Choose Open Designed Navigator in the On Database Open dialog list. Next, select the page from the Type of Navigator dialog list and select the current page name in the next field.
Note: In the On Web Open options, select the Use Notes Launch option if you want to open that page for Web users as well as Notes client users.
5.5 New features in Domino Designer 6With Domino Designer 6, you can select Style Sheets as a resource. Cascading style sheets (CSS) gives you the ability to control many aspects of your page layout, including headers, links, text, fonts, styles, color, and margins. You can browse your local file system for a CSS, turn it into a shared resource, and then insert it into a page, form, or subform.
Another feature is that you can create layers. Layers let you position overlapping blocks of content on a page, form, or subform. Layers give you design flexibility because you can control the placement, size, and content of information. You can create and stack multiple layers beneath and above one another. Transparent layers reveal layers underneath; opaque layers conceal layers underneath.
The third new feature for pages is the ability to insert an existing JavaScript library into your page. A JavaScript library is a place for storing and sharing common JavaScript programs and code.
These features are explained in greater detail in Chapter 12, “New features in Domino 6” on page 347.
5.6 SummaryThis chapter explained the main features and functions available to the application developer when creating pages in a Notes application. It differentiated between forms and pages. We described how to create a page and what design elements are available to use in a page. We also examined some of the new features that are available in Domino Designer 6.
Tip: If you need to write a formula to calculate the URL from elsewhere in the same application, use the @WebBDbName macro function to avoid hardcoding the database path.
Chapter 5. Domino Design elements: pages 181
182 Domino Designer 6: A Developer’s Handbook
Chapter 6. Domino Design elements: views, folders, and navigators
In this chapter, we describe the view, folder and navigator design elements. We explain how to create and modify them, and how to control the information that they display.
6.1 Design elements definedIn the following sections we explain view, folders and navigator design elements.
6.1.1 What is a viewA view lists the documents stored in a Domino database and can be thought of as a “table of contents” of a database. Each row listed in a view represents data taken from a single document. Each column represents a field or a combination of fields taken from that document; see Figure 6-1 on page 185.
All Domino databases have at least one view, but most of them have more. A view can display all the documents in the database, or it can display a subset of the documents. Documents can be viewed by categories, such as creation date or author. Views can present documents sorted on different fields (for example, sorted by topic or by creation data).
Every view has a view selection formula, which is a rule used to decide which documents will be displayed in that view. The view might contain all documents in the database, or only those that use a particular form, or only those created within a month, or any other rule you set.
184 Domino Designer 6: A Developer’s Handbook
Figure 6-1 View sample
6.1.2 What is a folderFolders enable you to store and manage related documents, without putting them into a category. Folders are also convenient because you can drag documents to them. A folder looks and behaves like a view.
The main difference between a folder and a view is that a folder does not have a selection formula. It is up to the user to decide which documents are to be stored in a folder. This can also done programmatically.
6.1.3 What is an outlineOutlines, like imagemaps and navigators, provide a way for users to navigate an application. Unlike imagemaps or navigators, outlines let you maintain a navigational structure in only one place. As your site or application changes, you make only one change in the source outline. Each navigational structure that uses that outline source is dynamically updated.
You can create an outline that lets users navigate to the views and folders in your database, perform actions, or link to other elements or URLs outside of your
Chapter 6. Domino Design elements: views, folders, and navigators 185
application. You can create an outline that navigates through your entire application or site or through part of it.
6.1.4 What is a navigatorA database navigator is a graphical interface which allows the user to easily access views, Domino data, or other applications. Navigators can include graphic buttons or hotspots, which are programmed areas that a user clicks to execute an action.
Navigators are supported for backward compatibility, but you should consider using outlines or a combination of frameset and pages instead of navigators. Both of them offer more rich functionality than a navigator.
Figure 6-2 shows a navigator.
Figure 6-2 Navigator sample
186 Domino Designer 6: A Developer’s Handbook
6.2 Creating viewsThere are several ways to create a new view. You can build a view from scratch, or base it on an existing view in the same database.
Alternatively, if a useful view exists in a database other than the one you are working in, you may want to copy this view over to your database and customize it to your needs.
Creating a new viewTo create a new view:
1. Open the database in Design mode and switch to the View pane.
2. Click the New View button. (You may also choose Create -> View from the action bar.) The Create View dialog box is displayed; see Figure 6-3.
Figure 6-3 Creating a new view
3. Change the view name from Untitled to a meaningful name of your choice. You also should provide a view alias at this time by entering the vertical bar (|), followed by the alias name after the view name.
4. Select the view type from the pull-down list. The following options are available:
– Shared– Shared, contains documents not in any folder– Shared, contains deleted documents– Shared, private on first use
Chapter 6. Domino Design elements: views, folders, and navigators 187
– Shared, desktop private on first use– Private
5. Select where the new view should appear in the View Menu and folder navigator. Selecting any position other than the top level will create a cascaded view.
6. Click the Copy From button if you would like the view’s design copied from a different view to the one displayed. This will bring up the Copy from dialog box; see Figure 6-4.
Figure 6-4 Copy from dialog box
You can now select a different view design as the default for your new view.
7. Decide if you want to specify the view selection formula using the Search Builder or the @function language.
Attention: Shared, Private-on-first-use views cannot be maintained by the designer of a database.
Instead of using these, consider using an embedded view with the property “Show single category” set on. See 6.7.6, “Embedding views” on page 230 for more information.
Tip: You can also use the backslash character (\) to separate the levels to create a cascaded view.
Note: If you are creating a shared view that contains only deleted documents, or documents not in any folder, you cannot specify any selection formula.
188 Domino Designer 6: A Developer’s Handbook
8. To use Search Builder, click the Add Condition button. This brings up the Search Builder dialog box; see Figure 6-5 on page 189.
Figure 6-5 Search Builder
9. Build your selection criteria and click the OK button.
10.When using the @function language, the layout of the dialog box changes; see Figure 6-6.
Figure 6-6 Creation view - Properties box
11.Click the Fields & Functions button if you want to see a list of all the fields defined in the database and all the available @functions, along with their Help documents.
Note: The layout and entry fields in this dialog box change, depending on the condition you choose.
Chapter 6. Domino Design elements: views, folders, and navigators 189
12.If you click the Save and Customize button, the Design window of the new view is displayed so that you can start your customization immediately. Otherwise, click the OK button.
Copying an existing viewYou can copy an existing view in two ways: by using Copy and Paste, or Drag and Drop.
To Copy and Paste:
1. Open the database in Designer, and switch to the Views design view.
2. In the View pane, select the view you want to copy.
3. Choose Edit -> Copy to copy the view to the clipboard.
4. Open the database in Design mode where you want the view to be copied.
5. Click the View pane, then choose Edit -> Paste to copy the contents of the clipboard. This creates the new view.
6.2.1 Working with view propertiesTo display the View InfoBox:
1. Open the view in Design mode.
2. Click the Properties icon to display the InfoBox. It contains six tabs.
Info tab� you must specify the name of the view. Including backslashes (\) in the name
will cascade the views in the View menu (for example: Marketing\Lotus Domino).
Tip: You can double-click to copy the field names and @functions from this list into the formula window.
Tip: Clicking the Formula Window button opens an formula input window, where it is easier to enter more complex formulas.
Tip: Instead of choosing Edit -> Copy and Edit -> Paste from the Action bar, you may want to use the keyboard shortcuts.
190 Domino Designer 6: A Developer’s Handbook
� Specify an alias. This is the name you will use in your code if you need to refer to the view. The advantage of using an alias is that if the name of the view has to be changed, you need not change your code each time the view name is mentioned.
� Specify a comment. The comment entry field is optional, but useful for maintenance purposes.
� Choose a style. You can display the documents in a view as a calendar instead of a table. For example, a Calendar view can display a date, a meeting or appointment time, a duration, and optional text describing the entry.
To display a view as a calendar, the first column must be a Time/Date field. For more information on creating a Calendar view, see 6.2.3, “Creating Calendar views” on page 205.
Options tabThe Options tab is shown in Figure 6-7.
Figure 6-7 View Properties - Options tab
Note: If you set the name of the view to the reserved word ($All), Domino will display this view with the name All Documents in the View menu.
With the exception of the reserved names, ($All), ($Inbox), ($Trash), and ($Sent), enclosing a view in parentheses means that the view is hidden and is used solely for programming purposes. The user will not see it in the list of views
Chapter 6. Domino Design elements: views, folders, and navigators 191
� If you select Default when database is first opened, this view open the first time. The setting has no effect unless database launch properties are set to “Restore as last viewed”.
Figure 6-8 Default view mark
� If you select Default design for new folders and views, this view will be used as the template when the user creates folders or adds new views to the database.
� If you select Collapse all when database is first opened, the view will only show the headings for categorized documents. This only applies when the view is opened for the first time.
� If you select Show response documents in a hierarchy, the view will show all response documents indented under their parent documents.
� If the Show in View menu check box is not selected, the view will be hidden from the View menu in the action bar. It will still be shown in the folder navigator.
� If you select Allow customizations, then users will be allowed to customize a view in a variety of ways, including resizing and reordering columns.
Changes that users make are maintained when they close and reopen the view. Because of this, designers will no longer have to “tweak” the view design and either try to satisfy all users with one design, or create several almost identical views with different sorting. Instead, the user can change the order and the visibility of all view columns.
If you do not want users to customize a view, then do not select this option on the Info tab.
Note: There can only be one view in a database having the attribute of being the default view. In the View pane, such a view is marked with a dark blue arrow
Note: The view selection formula still needs to select response documents.
192 Domino Designer 6: A Developer’s Handbook
Note: Deselecting this option does not disable the user menu option (View -> Customize This View...) to customize the view. It does, however, disable all the options within that dialog except for sorting; sorting is retained as an available item for accessibility purposes.
Figure 6-9 shows the Customize View dialog box that is available to users make their customizations, through the menu View -> Customize this View.
Figure 6-9 Customize View dialog box
� A view can have associated actions, and these actions can have some show/hide formulas. When a view is opened, its action show/hide formulas are evaluated.
There may be cases when you want an action to evaluate every time a document changes in a particular view. For these cases, check the Evaluate actions for every document change option. Be aware that checking this option can have a serious impact on the performance of your application.
� If you select Creating new documents at view level, then users will be allowed to create documents directly in the view context, without opening a form. To make it work you must add some code in the InViewEdit view event, to handle the document creation. You must use LotusScript for that; 12.13.7, “Create document from view” on page 454 discusses how to implement this functionality.
Chapter 6. Domino Design elements: views, folders, and navigators 193
Figure 6-10 Creating document from view
� You may specify what happens when the view is opened. For example, you can set the selection bar of the view to go to the bottom row.
� You may specify what happens when the documents are changed and the view needs to be refreshed. Generally, you’ll want to display an indicator to let users know that a view needs to be refreshed instead of refreshing automatically (as this can have negative impact on the performance of your server).
Tip: To keep your application accessible, make sure this is not the only way to create documents.
Add some code here to handle the document creation
View display
View Programmer’s pane
194 Domino Designer 6: A Developer’s Handbook
The Style tabThe Style tab is shown in Figure 6-11.
Figure 6-11 View Properties - Style Tab
Choose a background color for your view. If you also select an Alternate color, rows will alternate between two colors.
You might instead select one of your Image resources and display that behind the view text. The Repeat option lets you select whether the image will be displayed once, tiled or stretched to fit the available space. Refer to 4.11.3, “Using Image Resource” on page 162 for information about how to use Image resources.
Figure 6-12 shows a view with background image; let’s go into more detail on this.
Figure 6-12 View with background image
� Specify a grid to enhance the view display; you can do so by selecting the style and color.
Chapter 6. Domino Design elements: views, folders, and navigators 195
� You can choose to have up to five lines of text for the column headings, so that long column titles can wrap multiple files. In addition, you can specify which style and color you can use for it.
� As far as rows are concerned, you can also have up to nine lines for each document, to enable you to store a large description. If you select Check box Shrink rows to content, this will eliminate all blank lines for documents that do not require the extra space.
� The Don't show empty categories option suppresses the display of categories with no documents. Select this option if there are documents with a Reader field which may hide these documents from the user at runtime.
If that is the case and there is no document to be displayed for a specific category, the category will also not be displayed to the user.(Without this option checked on, part of the content might be compromised despite use of reader fields.) Refer to 6.7.4, “Using categories in views” on page 228 for more information.
Use this option if you want to hide the existence of the categories from users who do not have access to the documents in it.
� The Colorize view icons option colors the pre-defined Domino view icons to match the header color.
� Color options let you set colors and style for unread documents and for column totals. Red is used in applications that are shipped with Domino for unread documents.
� You can set other options, such as Show/Hide the selection margin, margin border (a line between the margin and the view), and extend last column to window width.
� A new feature in Designer is view margins. You can set it in pixels (1 to 100.) and choose the appropriate color. This draws a rectangular border around the whole view.
Note: Selecting the Don’t show empty categories option is likely to have a negative impact on your Domino server.
Tip: If you allow users access to create views on the server, they can still see the category values by creating a view that shows categories.
Note: Extend last column will only make the column wider, never narrower. It is generally good idea to use this option if the column is left-aligned.
196 Domino Designer 6: A Developer’s Handbook
Refer to Figure 6-10 on page 194 to see how some of these options are used.
The Launch tabYou can set a specific Frameset and Frame that must be used to display the view; see Figure 6-13. Note that this feature for views and folders works only on the Web. Refer to “Using the Launch tab” on page 86 for more information about Launch options.
Figure 6-13 View Properties - Launch tab
The Advanced tabThe Advanced tab provides information on the following topics:
� The index used to build the view; when it should be refreshed and discarded, and Restrict initial index build to designer or manage.
Note: A view index is similar to an index in a relational database. It remembers what documents are in the view and how they are sorted. This saves time when opening the view, since Domino must only look at documents that were modified since the last time the view was opened, to add or remove them from the index.
This is not the same as a full-text index that supports keyword searching.
These advanced options are not often used. The default view indexing behavior is best for most applications.
Chapter 6. Domino Design elements: views, folders, and navigators 197
Figure 6-14 View Properties - Advanced tab
� How users will be notified about documents that were added or modified since they last opened the view; refer to 6.7.3, “Identifying unread documents” on page 227 for more information.
� Whether unique keys are built in the view for ODBC.
� How this view is displayed when viewed with a Web browser (whether in HTML format or like an Java applet), and if the view documents can be selected.
Note: The difference between HTML format and Java applet is that with Java applet, the Web application interface is very similar to a Lotus Notes client. Whereas with HTML, you have the flexibility of the HTML language to format the view the way you wish.
� Include view updates in the transaction log; this is a new feature in release 6.
Transaction logging captures all the changes made to a database and writes them to a transaction log. The logged transactions are then written to a dedicated disk in sequential order to be committed into the Domino database later. Transaction logs can then be used for backups and backup recovery, to recover from a media failure or system crash.
Attention: The view applet is not accessible for screen reader users, so you should provide an HTML alternative.
198 Domino Designer 6: A Developer’s Handbook
By including view updates in the transaction log, you can avoid most of the view rebuilds. This can save a significant amount of time after a server restart. However, including view updates in the transaction logging can seriously impact your server’s performance. View logging should be turned on only for complex system views such as $Users view in the Domino Directory.
For more information about Transaction Logging, see Lotus Domino Administrator 6 Help.
The Security tabIn the following example, the view can be used by all users that have access to the database. If you want to restrict its use to only some users or groups of users, deselect the check box and add the users or groups that will be granted specific access.
Figure 6-15 View Properties - Security Tab
You may also select the Available to Public Access Users option if you wish to enable this view or folder for users with public access read or write privileges in the access control list for this database.
3. Close the InfoBox.
Attention: Consult your Domino server administrator before turning this option on for any view.
Chapter 6. Domino Design elements: views, folders, and navigators 199
6.2.2 Editing View columnsWe’ll now take a closer look at column properties. To view the column properties of a view, open the view in Design mode; you’ll see a window similar to Figure 6-16.
Figure 6-16 A view in design mode
To access the properties of a column, double-click the column heading, or select the column heading and click the Properties icon. The InfoBox will be displayed.
200 Domino Designer 6: A Developer’s Handbook
The Column Info tab
Figure 6-17 Column properties
On the Column Info tab, you can specify the following:
� The title of the column to be shown in the column heading
� The width of the column
� If this column is related to a multi-value field, how this field will be displayed
� If the user is allowed to resize the column
� Whether or not the specification of this column is for response documents
� If icons should be displayed in the column
If this box is checked, the width of the column should be 1. Furthermore, the Programmer’s Pane must contain a formula which evaluates to a whole number. For example, the following formula determines whether a document has an attachment and, if so, displays the attachment icon (number 5):
@If( @Attachments;5;0)
Use 0 to leave the column blank. The formula above returns 0 when the document has no attachments, so nothing is displayed. A table of all icons and their associated numbers is available in the Help database for information.
Note: You cannot add any icons to the predefined set.
Note: The width is shown in “characters”. You can adjust the width more precisely by dragging the edge with the mouse.
Chapter 6. Domino Design elements: views, folders, and navigators 201
With Domino 6, you can also add customized icons as part of you column, by typing the name of the image resource as the value of the column. Refer to 12.13, “View enhancements” on page 445 for more information.
� If this column content can be edited in the view.
If you select this option, you must write LotusScript code to control the editing. Refer to Chapter 12, “New features in Domino 6” on page 347 for more information about setting up view editing.
� Select the Use value as color option if the column content should be displayed as color.
This feature allows you to programmatically apply an RGB color to column text. To see an example of this, refer to 12.13, “View enhancements” on page 445. When this option is checked, “User definable” is available to allow users to specify colors. This requires an entry in the “Profile document” field, where you should type the name of the profile document. For more information about Profile Documents, refer to 4.13, “Profile documents” on page 168.
� If a twistie will be shown if the row is expandable.
A twistie is shown in front of the category in a categorized view, indicating to users that they can open and close the category. A twistie (a blue triangular icon) is the image shown by default, but you are able to change the image to any of the image resources in your database. The image can be chosen directly from the Image Resource dialog box or based on formula.
A twistie is also shown in a row that may has response documents hierarchically.
Note: For the benefit of screen reader users, avoid providing information only by means of a view icon.
Note: Since a twistie must have an “Open” and “Closed” appearance, your images must be a “image well” with two images in it. Make sure the images you use describe an “Open” state and a “Close” state in some sense.
202 Domino Designer 6: A Developer’s Handbook
The Sorting tab
Figure 6-18 Sorting a view
On this tab, you can specify whether or not the documents displayed in the view should be sorted based on the values in this column, and if so, what the rules are for sorting. You do this by making the following selections:
� Select None, Ascending, or Descending as the sorting rule.
� Specify Standard or Categorized as the sorting type.
� Specify sorting rules for case and accent sensitivity.
� Choose options for multiple values and categories.
If selected, then the Show multiple values as separate entries option tells Notes to display the same entry multiple times in the view, if the field displayed in this column contains multiple values.
� The Categorized is flat option is greyed out unless the view is categorized. If selected, the category heading and the first document in the category are combined into a single row. This saves screen space.
� Select if you want the user to be able to alter the sort order by clicking the column heading.
� Select a value from the Totals pull-down menu if you would like to display some statistics in the view. You can, for example, summarize values in a column, show averages, or show percentage info.
Tip: Using the Click on column header to sort option allows the user to specify a secondary sort column, as well.
Chapter 6. Domino Design elements: views, folders, and navigators 203
The Font and Style tab� The Font tab lets you set the font and color used when displaying information
in this column.
� Use the Number tab to specify the display format of numbers in this column.
� Use the Time tab if you are going to display date/time values in this column.
� The Title tab allows you to set the font and color of the column title.
The Advanced tab
Figure 6-19 Advanced settings
On the Advanced tab, you can specify the following:
� The name of the column for programmatic use
You can also use this name to refer to the column in other columns of the same view.
If you specify the column to show a field, the name of the field will be used for this value, by default. If you specify a formula or a simple formula, a numeric value, preceded by a dollar sign ($), will be used for the Name of the column.
You are able to change the Name of the column to whatever you want. However, be cautious if you change the name, because if you have referred to the programmatic name of the column in your code, changing the name will break the code.
If you change the programmatic name of the column and then change the type of what is shown in the column, for example from field to formula, the name will be overwritten.
204 Domino Designer 6: A Developer’s Handbook
Designer will not check if the same name was used more than for a column.
You will need the programmatic name for the column to program the InViewEdit event that allows users to edit documents from the view.
� The conditions to hide the column.
A check box is available to hide the column in any condition. You can also specify other conditions using an @function.
� Use the Advanced tab to force the values in this column to be used as document links when this view is displayed in a Web browser.
6.2.3 Creating Calendar viewsThere are rules that you must follow in order to create a Calendar view. You start the creation like any other view described, but on the View Info tab of the InfoBox you specify Calendar as the style. This tells Domino to display the documents in this view using the Calendar Outline.
Defining columnsYou must define the first two columns as described here in order for the view to function properly:
� The first column must be sorted and has to contain a Time/Date value or a list of Time/Date values. Also, make sure that the Show Multiple Values as Separate Entries option is selected in the Sorting tab of the InfoBox for this column. This causes documents containing a Time/Date value list to be displayed on more than one day in the calendar which you can use, for example, for repetitive events.
The column may contain dates only, or dates with times, or a mix of the two.
Make this column hidden.
� The value for the second column must evaluate to a duration in minutes, for example (EndDateTime - StartDateTime)/60. If the duration is not relevant for your view, or for the documents being displayed, set the value to zero.
Make this column hidden.
Note: The hide a column in any condition feature has been relocated to the Advanced tab (in previous releases, it was located at the Column Info tab).
Note: Column headers are not displayed in Calendar views.
Chapter 6. Domino Design elements: views, folders, and navigators 205
Customizing the View layoutUse the Style tab of the View InfoBox to fine-tune your settings. For more information about specifying View style, refer to 6.7.2, “Overview of styles” on page 224.
Figure 6-20 View Properties - Calendar Style tab
For Calendar views, there are extra options in the Style tab to cover all the calendar features. If you select Show conflict marks, a vertical line is displayed in front of entries for appointments which are scheduled for the same time. Furthermore, you might not want to show the selection column in order to save space. The selection column will be shown automatically if there are selected documents in the Calendar view.
Use the Time/Date tab, shown in Figure 6-21 on page 207, to specify the defaults for time slots.
Note: A document marked for deletion will appear with the strike-through mark.
206 Domino Designer 6: A Developer’s Handbook
Figure 6-21 Time/Date tab
A time slot display lists the time of day, along the left edge of the cell, with intervals you specify here. In this example, 8 AM, 9 AM...through 6 PM are displayed for each day. Appointments that occur at a particular time are displayed in the appropriate position.
You may want to build your own columns for displaying the start and end time of appointments.
Enhancing the functionality of a Calendar viewTo allow the user to easily add entries in the Calendar view, consider associating the following LotusScript samples with your view. They allow users to add an appointment by double-clicking in the Date/Time area.
Tip: If you do add start and end time columns, include the entire start date and time, but use time formatting options of the column to display only hours and minutes. This allows Notes to adjust for the user’s local time zone.
If you do not do it this way, users in different time zones may see the same time displayed (for example, they might all see “10:00 AM”) even though the event is not at 10:00 AM in their time zone.
Note: The example assumes that the variables ws and ClickedDate are already declared. You must change the commands parameters for your application requirements.
Chapter 6. Domino Design elements: views, folders, and navigators 207
1. Add the following to the Regiondoubleclick event of the view:
Set ws = New NotesUIWorkspaceIf source.CalendarDateTime<>"" Then Call ws.ComposeDocument("", "", "Appointment")End If
This code detects when the user double-clicks in a calendar cell and creates an “Appointment” document (if you do not want to use the name “Appointment”, substitute another name).
You could also add code to this event to fill in a field or fields on the new document with the date and time the user clicked on, or you could do it on the form itself, as described in the next step.
2. Add this LotusScript code to the QueryOpen event of the Appointment form:
Set ws = New NotesUIWorkspaceClickedDate = ws.CurrentCalendarDateTimews.CurrentDocument.Document.ReplaceItemValue(“StartDateTime”, ClickedDate)
ClickedDate is a global variable that is used to set the start date of the new appointment as default.
6.2.4 View summaryFollowing is a checklist of the most important things to consider when creating a view.
Checking View design� Is there a default view for the database?
� Is there a view that is displayed by date?
If not, you may want to add one.
� Do all views appear correctly on the View menu? Are the appropriate keyboard shortcuts used? Do the views appear in the correct order?
If not, verify the names and the Show in view menu selection in the View InfoBox.
Tip: You may consider numbering your views to arrange the views in the order you like them to be. This also helps Helpdesk members to identify the view when receiving a telephone call from a user.
208 Domino Designer 6: A Developer’s Handbook
� Is the information in the view easy to read?
If the view appears cluttered or the columns are too close together, reset the column width and alignment.
� Are all the documents that should be in the view displayed, or are too many documents displayed?
If the view is not displaying the correct documents, check the view selection formula.
� Are response documents indented?
If they are not and you want to indent responses, select Show response documents in a hierarchy on the Options tab of the View InfoBox, and create a column for responses.
� If the view is used for programming purposes, make sure that it is a hidden view.
� Check workstation compatibility. Are all fonts used in this view available (or approximated) on all workstations? Are column widths sufficient for all workstations, or too wide for some?
� If needed, does the view have a read access list?
To create a read access list, select the Security tab in the View InfoBox.
� Keep the view simple, especially if it is designed for Web access. Removing unused columns will provide ease of use and improve performance.
Checking columns� Is the information in each column correct?
If not, verify the formulas in the column definitions.
� Is each column displaying all the information that is contained in it?
If not, you may need to adjust the column width and/or the font used to display the column, or set the view properties to allow multiple lines per row, so it will wrap.
� Are the contents of columns aligned properly?
For example, numbers should be right-aligned; text should be left-aligned or centered. Verify the alignment for each column.
� Are documents in the right order?
If not, make sure that you sort on the correct columns, and that you choose the correct sort order (ascending or descending).
If the document sort is out of order, check that the column formula returns a value of the type it appears to be, for example that number columns have number values, not text.
Chapter 6. Domino Design elements: views, folders, and navigators 209
6.3 Shared views and private viewsViews can be either shared views (that is, available to many users), or personal views (that is, used by one person). You designate the view type when you create it, and you cannot change it later.
6.3.1 Shared viewsShared views are available to any user with at least Reader access to the database. Most views that you design for databases are shared views. Only users with Designer or Manager access can create shared views. Users with editor access can create personal views or folders, when the database manager has selected Create personal Folders/Views for them in the access control list.
6.3.2 Shared, Personal-on-first-use viewsShared, Personal-on-first-use views are a convenient way to distribute customized personal views to multiple users. You usually create this type of view by using @UserName to customize the display for each user.
After a user creates a Shared-to-personal view, the user’s copy of the view no longer inherits design changes. For example, if the developer adds a column to the view, anyone already using a personal version of the view will not see the new column. To obtain design changes, users must delete their personal versions of the view and open the Shared-to-personal view again.
Shared-to-personal views are stored in the database as long as they are shared. After the first use, Domino uses the Create Personal Folders/Views option to determine where to store the view.
If you want the shared-to-private view to be stored in a user's desktop.dsk file rather than in the database, choose Shared, desktop private on first use as the View Type when you create the view.
Note: Shared-to-personal views are not a security measure, because they do not protect data. If you create a Shared-to-personal view that omits certain documents, a user can still create a personal view that includes them.
Tip: Embedded “Show single category” views can often be used instead of Shared, Personal-on-first-use views. They are more efficient and easier to maintain. See 6.7.6, “Embedding views” on page 230 for more details about embedded views.
210 Domino Designer 6: A Developer’s Handbook
6.3.3 Personal views Users can create personal views to organize documents in personalized ways by choosing Create > View.
If a user has rights to create personal views/folders in the access control list, personal views are stored in the database. If the user does not have the access control list right to create personal views/folders, then personal views are stored in the user’s personal workspace file.
Private views are not supported on the Web.
6.4 Creating a button on the Action barYou can create an Action bar in views and folders, as well as in forms. In general, the actions should do one of the following:
� Affect several documents or all the documents displayed in the view. You could store all documents created by your manager in a Manager folder, for example.
� Represent the actions that the user will perform most often (such as: save document, edit document, exit from some screen, and so on).
There are three types for an Action: Button, Checkbox, and Menu separator. For more information about these types, refer to 12.12, “Actions enhancements” on page 438.
As in forms, you must make sure that the actions you create will fit in the Action bar, and you must also consider the screen resolution available to your users.
Creating a Document Link using an Action buttonAs an example, we are going to develop an action that creates a Document Link between two documents. The documents do not have a child-parent relationship.
To create a button in the Action bar:
1. Open the design of the ($All) view in your TeamRoom database.
2. Choose Create -> Action. The InfoBox for the Action properties is opened and you now have access to the Programmer’s Pane. Fill in the Information tab as shown in Figure 6-22 on page 212.
Chapter 6. Domino Design elements: views, folders, and navigators 211
Figure 6-22 Create doclink view action in Designer
3. Put the following @function statements into the Programmer’s Pane:
A doclink to the document selected from the view is copied to the clipboard:
@PostedCommand([EditMakeDocLink]);
The form Document is created:
@PostedCommand([Compose]; ""; "Document");
The macro goes to the field Body:
@PostedCommand([EditGotoField]; "Body");
It pastes the doclink into the RichText field:
@PostedCommand([EditPaste]);
It then positions the cursor back at the top entry field:
@PostedCommand([EditTop])
212 Domino Designer 6: A Developer’s Handbook
Testing the formulaTo test the formula:
1. Select the All Documents view.
2. Click one of the documents to highlight it.
3. Click the Link Documents button on the Action bar. The document is opened for creation, the doclink is pasted, and the cursor is positioned in the first entry field.
4. Double-click the doclink to open the document that was selected in the view.
The results are shown in Figure 6-23.
Figure 6-23 The document is created; has doclink to other document
Properties of Actions and the Action barActions and Action bars have properties that you can display by selecting the action in the Action pane of the view or folder design window.
These properties are identical to the ones found in the Form Action bar.
6.5 Working with views as a developerAs an application developer, you may have additional requirements for a view in a database than a regular user. Therefore, you will probably build “administrative” views in order to be able to keep an eye on columns that are hidden to regular users, for example, create an All Documents view, or a view showing replication
Tip: When you use a field name in a view action formula, it refers to that field in the currently highlighted document. To get information from the highlighted document in a LotusScript view action, use the CaretNoteID property of the NotesUIView class to find out which document that is.
Chapter 6. Domino Design elements: views, folders, and navigators 213
and save conflicts (using the $Conflicts field). These views are also a great help for administrators when the database is used in the production environment.
While you are testing your application, you will probably need to inspect field values that are hidden on the form. By using the following method, you can inspect a form’s fields and their values without creating special views. To do so, look at the properties of a document:
1. Select any one of the documents displayed.
2. Click the Properties icon.
3. Click the Fields tab to see the list of fields for that document, as well as their values.
Figure 6-24 Document Properties
When files are attached to a document, a field called $FILE exists. Scroll down the right listbox to see the file information. Here you can see the file name and size and the platform on which it was created. There are also other keywords, such as $Revision, $Links, $UpdatedBy, $Conflicts, and $Anonymous.
Tip: Users can see hidden views by holding Ctrl+Shift while selecting View/GoTo, or holding down the Ctrl+Shift keys and double-clicking the database icon. Hiding a view is not a security measure, but simply a design option.
Note: As you can see, all the reserved fields start with a dollar sign ($). Notice also that the data type of each field is shown; this is a good way to detect fields that are supposed to be date/time or numeric values, but which actually contain text values. It also lets you see whether a supposed Readers or Authors field actually is being used for access control. Refer to the description of the NotesItem class in the Lotus Domino Designer 6 Help for details.
214 Domino Designer 6: A Developer’s Handbook
The field replication mechanism allows for a faster transfer of information across servers, or between the servers and workstations. An indicator is attached to each field in all documents: Seq Num (or sequence number).
If you have a replica of a server database, compare the values of the sequence number for fields of a replicated document. If their values are different, this means that the field containing the lower value will be modified at the next replication.
6.6 Views and the WebDomino dynamically creates Web pages from the views in a database, including URL links to the documents in the view. Using a Web browser, a user can navigate, expand, and collapse the view in much the same way as they can from a Notes client.
6.6.1 Using the default displayWhen a browser is used, the view is split into pages with 30 view rows per page. This is to avoid having a view containing hundreds of documents presented as one page with all the documents. Limiting the lines per page in this way improves performance and makes navigation of the database more manageable.
When Domino generates the HTML page for a view, it maintains the column and row format of standard Domino views. There are, however, a number of differences that you need to be aware of and take into consideration when you develop applications for the Web.
Tip: To detect often-modified fields, look for high sequence numbers. If designing for peak performance, you may want to minimize the sizes of these fields—or try to change them less often.
Note: The default of 30 view rows per page can be changed in the HTTP section of your server document; this affects all the views of the databases on that server. To modify this by view level, change this in the properties on an embedded view.
Chapter 6. Domino Design elements: views, folders, and navigators 215
Figure 6-25 shows an example of a categorized view as seen through a Web browser.
Figure 6-25 Categorized view
Notice that there is no outline of available views on the left. Domino does not include a view outline by default on Web pages. , Domino also ignores any menu actions not supported on the Web.
Also note that there is no selection column unless you specify this in the view option. To learn more about selection columns, refer to 6.7.2, “Overview of styles” on page 224.
Tip: To improve Web performance (and performance on any other view for that matter), avoid time-sensitive column formulas with @functions such as @Now, @Created, @Modified, and so on.
Since the Domino Web server generates Web views as HTML pages on the fly, time-sensitive formulas recalculate every time a Web user works in the view (for example, when they open, scroll, or expand the view). Instead, create a field in the form for that formula and refer to the field in your view.
216 Domino Designer 6: A Developer’s Handbook
As you can see, Domino has automatically created a Web navigation bar at the top of the screen and, although not shown in Figure 6-25 on page 216, in the end of the page. This navigation bar contains buttons that users click to Expand, Collapse, Scroll, and Search the view.
On the Web, users open documents by clicking a document link column rather than clicking anywhere in the row, as you do in the Notes client. The application designer can specify which column(s) should include a URL link to the document. By default, it is the first non-categorized column.
Domino displays the width of a column in a view as the length of the longest entry in the column, regardless of what the column width is set to in the Column InfoBox.
To avoid having long columns pushed to the right of the display, use the Style tab in the View InfoBox and specify a number greater than 1 in the Lines Per Heading setting. This causes the lines to wrap on the Web. If you specify 1, the lines will not wrap. The same guidelines apply to column headings.
You also can use the Java applet option in the view properties. It allows you to display a view in a more Domino-like outline. You activate this applet by selecting the Use Applet in Browser option on the Advanced tab of the View InfoBox.
Tip: To force a column to be limited to a certain width when viewed from the Web, use a column formula to retrieve the field value, for example:
@Left(FieldName;50)
This formula will set the widest width of the column to 50 characters.
Chapter 6. Domino Design elements: views, folders, and navigators 217
Figure 6-26 Java applet for views, in a browser
A view served as an applet supports such “Notes-like” features as expandable/collapsible categories, resizable columns, and multiple document selection.
The view applet is programmable via the following @Commands:
6.6.2 Using HTML formatting for viewsYou can either add single HTML tags to the HTML view the Domino server sends to the browser, or you can create all the HTML yourself and send it directly to the browser without the server adding its own tags.
Note: The view applet is not accessible, so you should provide a “text only” alternative for the benefit of screen reader users.
218 Domino Designer 6: A Developer’s Handbook
Enhancing the view display using HTMLYou can also add HTML coding to the view in order to enhance the display on the Web.
HTML embedded in views is a browser-only feature. If you embed HTML in a view, the view is accessible by a Notes client, but the client interface will be unattractive (because of the exposed HTML tags). Although you can see the HTML tags from the Notes client, the features that the HTML coding provides (such as linking) are not available to Notes clients.
In this case, you can use hide-when attributes for the column (to handle when the user is accessing the application from a Notes client or a Web browser) and display the appropriate layout.
Unlike forms and documents, there is no pass-thru HTML option in the design interface. To write HTML in views, you need to include the HTML code in square brackets ([ ]). Domino treats everything between the square brackets as pass-thru HTML.
Following are examples of how you might want to use HTML in views, and in the following section, we explain how to implement several of these examples.
� Insert a blank .GIF file between two columns in order to get a little more space between the columns on the Web
� Add a horizontal ruler spanning the entire view for each document category
� Add a couple of icons and a URL link to the Home Page in the column headers
� Include an HTML statement in the formula for a column to display a blinking text string if it is a newly created document
� Include a URL in a few documents, and jump directly to the URL from the view
Treating the view contents as HTMLYou can tell Domino to disregard all formatting and column alignment and just send the text that is in the view columns. That text will have to include any necessary HTML, since the server will not add any.
Note: Domino is actually looking for “[<“ to start the pass-thru and “>]” to end it, but the < and > are part of the HTML.
Chapter 6. Domino Design elements: views, folders, and navigators 219
In a Notes client, the view displays normally. On the Web, the view uses the HTML formatting attributes that you specify in the column formula. You must include HTML that defines all formatting and document linking for the view, as follows:
1. Open the view in Design mode and choose Design -> View Properties.
2. Click the Advanced tab and select For Web Access: Treat view contents as HTML.
3. Create a column.
4. In the design pane, click Formula and enter the HTML code in the edit window.
Adding a space between columnsTo add space between columns, follow these steps:
1. Create a new column between two columns, and set the column width to one (1). Deselect the option Show values in this column as links (if not already done).
2. Select Formula in the Programmer’s Pane and insert the following HTML code, including the quotation marks (this is a text string):
Note: The “ecblank.gif” icon comes with Domino. It is located in the icons subdirectory on the Domino server.
Adding HTML and icons to column headersYou can use the column Title field in the column properties box to add graphics and pass-thru HTML to your column headings. The only limitation is that you can only fit 64 characters into the column title.
1. Open the InfoBox of a column for which the resorting property has been turned on, and in the Title field, add the following line (no quotation marks):
Sort [<img src =/icons/vwicn108.gif>]
This will add a small green arrow to identify where to click to sort the column on the Web. Browser users might not be familiar with the little triangle if they are not familiar with the Notes client.
Important: Always use img tags with alt, height, and width parameters—the alt tag is provided for the benefit of screen reader users, and specifying height and width will prevent screens from “jumping” as they are loaded (when you specify the height and width, the HTML page will have the correct space for the image when it is loaded).
220 Domino Designer 6: A Developer’s Handbook
2. Open the InfoBox for any other column. In the Title field, enter the following:
This will add an icon with a DocLink to the home page from the column header.
Click the Title tab and select Right Alignment.
Adding HTML to column formulas1. Select a categorized column. In the Programmer’s Pane, click the Formula
button and enter the following formula for the column:
Categories + "[<hr>]"
This will display the value of the Categories field and then add a horizontal rule. Notice that the plus (+) sign is used to append values.
2. Add a column and enter the following formula:
@If(@Now>@Adjust(@Created;0;0;7;0;0;0);"";"[<blink><font color=\"Red\"><b> New </b></font></blink>]")
The formula checks to see if the document was created within the last week and if so, it will display a blinking “New” text string.
Creating URL links at view levelYou can add HTML to the document fields displayed in the view columns in the same way. By adding a URL address to a document, you can display URL links in a view, enabling users to jump directly from the view level to a URL.
1. Create a new document and include the following in a field that will be displayed in the view, such as the Document title:
[<A HREF=http://www.ibm.com>]IBM Corp.[</A>]
2. Save your document and create a new one. Enter the following URL:
Using @Now in a column formula will degrade performance. Consider using a schedule agent to flag new documents instead.
The HTML blink tag is not supported on all browsers.
Note: You could also calculate the HTML in the view, which is useful if you want to use the same document, but different views, for Web browsers and Notes clients.
Chapter 6. Domino Design elements: views, folders, and navigators 221
3. Save your document.
Both documents take you directly to their respective Web sites.
Domino view properties not supported on the WebTable 6-1 lists and explains view and folder features you should avoid using in a Web application.
Table 6-1 Views and folders to avoid using in Web applications
Table 6-2 lists and explains column features you should avoid using in a Web application.
Table 6-2 Column features to avoid using in Web applications
Views and folders Reason
Options properties This feature is not supported using HTML in a Web browser.
Show in View menu Web applications do not have a View menu. To exclude a view from the folders navigator, use the Design - Design InfoBox to hide the view from Web users, or surround the view name in parentheses, for example: (HiddenView).
On Open: Go To… options This feature is not supported using HTML in a Web browser.
On Refresh options This feature is not supported using HTML in a Web browser.
These features are not supported using HTML in a Web browser.
Advanced propertiesRefresh index optionsDiscard index options
These features are not supported using HTML in a Web browser.Views can be re-indexed at a Domino server.
Columns Reason
Column Info properties Most of the features on this tab are not supported using HTML in a Web browser; for example, Title is used on Web, as well as Show responses only,.
Show twistie when row is expandable
Triangles are always shown.
222 Domino Designer 6: A Developer’s Handbook
6.7 Hints and tips on designing viewsIn this section we provide hints and tips that you may find useful when designing or changing views.
6.7.1 Naming viewsThe name that you choose for a view is visible to Notes client users in the View menu, to Web users in the Views list, and in the Folders pane (unless the view is hidden). The name is case-sensitive and can be any combination of characters, including letters, numbers, spaces, and punctuation. The full name, including all alias names, can be up to 64 characters.
Naming tipsViews appear in alphabetical order in menus and lists. To force names to appear in a different order, you should number or letter them. This also enables help desk staff to easily identify a view.
When possible, assign a name that indicates how the view sorts documents (for example, By Company Name or All by Category), or specifies which documents it includes (for example, New Customers).
Use consistent names across databases to make it easier for users to recognize views.
Alias namesAn alias is an internal name for a view. Usually you use this alias for programming purposes, for example, in @DbColumn formulas. Aliases follow the same naming rules as view names.
You can append more than one alias name by entering the vertical bar (|) symbol, followed by the alias name. Always keep the original alias as the rightmost name.
View name | Alias1 | Alias2
Changing a view nameYou can edit the view name in the View InfoBox when the view is open in Design mode. If you have designed your view properly, used an alias, and referred to the view by using only the alias name in your code, there is no need to retain the old view name. However, if you have referred to the name of the view in your code, then copy and paste the previous name into the Alias box to the left of any other aliases, using the vertical bar (|) as the separator.
Chapter 6. Domino Design elements: views, folders, and navigators 223
For example, suppose a movie database contains a view named By Screening Date. The name of this view is going to be changed to By Premiere Date. Here is how the name will look after it has been changed:
By Premiere Date | By Screening Date | DateView
Hidden viewsWhen you surround a name with parentheses, for example (All), the view does not appear to Notes client users in the Domino view menu, or to Web users or Notes client users in the Folders pane.
Cascading viewsTo avoid overwhelming users with long lists, or if you have related views that should be grouped together, you can arrange them in a hierarchy so that a group of related menu items is organized under one item in the navigator pane. A user clicks on the higher-level name to display the cascaded list.
If you do not want to specify a cascading view when you create the view, enter the name you want to appear on the Create menu, followed by a backslash (\), followed by the view name. For example, the Personal Address Book template has two views related to servers:
Server\CertificatesServer\Connections
6.7.2 Overview of stylesTable 6-3 gives an overview of one of the most important view settings - view styles.
Table 6-3 View styles
Tip: If you are unsure about whether you have used the view name in your code, you can use the Design Synopsis tool to generate a report of all of your design elements and search the report to see if such references exist. Then it is easy to correct those references to refer to the alias name.
View styles Description Comments
Color: Body Determines the background color for the view.
White, light blue, and yellow are good choices.
Image: Body Determines the image used in the view background.
Light images should be used.
224 Domino Designer 6: A Developer’s Handbook
Table 6-4 gives an overview of one of the most important view settings - row styles.
Table 6-4 Row styles
Margins Displays margins in the view. Use “Color” to set a color for the view margin. Useful for offsetting a view with a contrasting background color.
Collapse all when database is first opened
Displays the top level category in categorized views, or the main documents in a hierarchical responses view. Users click the category to see individual documents within the category.
Useful for large views with many categories or topics. Not applicable to Calendar views.
Row styles Description Comments
Lines per row (1-9) Determines how many lines a row can contain.
“Shrink rows to content” and “Color: Alternate rows” are useful accompaniments to multi-line rows.
Color: Unread rows Determines the color for unread documents.
Red is used for unread documents in template designs.
Color: Alternate rows Determines the color that alternates with the background color to highlight every other row.
Useful for multi-line rows. Not applicable to Calendar views.
Color: Icons Determines if the column icons should be colorized.
It colors the predefined Domino view icons to match the header color.
Show selection margin Shows the document selection margin. Deselect for cleaner-looking rows.
If you deselect “Show selection margin,” users can still select documents by pressing and holding Shift as they click document names. The selection margin appears temporarily while documents are selected, and hides again when all documents are deselected.
Shrink rows to content Keeps gaps from appearing below rows that are shorter than the number of lines per row you select.
Chapter 6. Domino Design elements: views, folders, and navigators 225
Table 6-3 gives an overview of one of the most important view settings - column styles.
Table 6-5 Column styles
Row spacing (Single, 1-1/4, 1-1/2, 1-3/4, Double)
Determines how much space there is between rows.
More space makes each row easier to read. Less space condenses the view contents to make them useful for reports or Web users.
Show twistie when row is expandable
Shows a green triangle or a image next to a column that displays categories or response documents.
Not applicable to Calendar views.
Extend last column to window width
Fills out the last column to avoid empty space in the view.
Column styles Description Comments
Column width Determines how many characters fit in one row of a column.
(Optional) Select “Resizable” to allow users to change the width as needed.With the view in Design mode, you can also click the column and drag the column divider line to the width you want.
Text style and color: Column title
Determines the font, size, color, and alignment of an individual column title at the top of the view.
Use the “Apply to All” button to change the text style for all titles in the view.
Text style and color: Column values
Determines the font, size, color, and alignment of values that display in this column.
Use the “Apply to All” button to change the text style for all columns that display text in the view.
Color content Determines the column content is a color.
Supply RGB coordinates.
Hide column The column title and values do not display to users. It depends on the formula specified in the hide-when formula in the column properties.
Useful for columns used for sorting that contain values users don’t need to see. This is not a security feature.
Multi-value separator For any documents that display multiple values in the column, separates each value with punctuation or a new line.
Useful for making columns more readable if they contain several values (usually generated by a multi-value field).
Show column headings (Beveled, Simple)
Shows a bar at the top of the view with column titles with either a beveled or flat look.
Beveled-background is gray.Simple-background matches view color.
226 Domino Designer 6: A Developer’s Handbook
6.7.3 Identifying unread documentsTo help users find new or modified documents, display the unread marks (asterisks) next to unread documents in the view. A set of unread marks are maintained for each user, so even if one person has read a particular document, the asterisk still appears for other users who have not yet read that document.
Choosing a style for unread marksThese options are set as a Design property for a view. Open the Advanced tab of the View InfoBox and select an “Unread marks” option. You can display unread marks as:
� Standard (compute in hierarchy)
Displays asterisks for unread Main documents and Response documents, and for any collapsed categories containing unread Main or Response documents.
� Unread documents only
Displays asterisks only for unread Main or Response documents. Unread marks do not appear next to collapsed categories. This choice displays the view faster than the standard display, and is a good compromise between showing unread marks at every level, and not showing them at all.
Choosing the option None omits unread marks. Users can still navigate to the next unread document by using SmartIcons.
Choosing a color for unread marksTo change the color of unread documents in the view from the default color red, click the Style tab and select another color for Unread rows. In Domino 6 there are some new features that let you choose if you want display the unread row in a bold format or transparent (for transparent, only an asterisk is displayed in the selection margin; don’t change the row color setting).
Disabling unread marks for unread documentsIf the unread status of modified documents is unimportant to users—or if the database resides on a server that users don’t access directly—then turn off unread tracking for all documents in a database to conserve disk processing time. Click the Design tab of the Database InfoBox and select Do not mark
Lines per heading (1- 5) Determines how many lines a column title can wrap.
Useful for long column titles or instructions placed in a column title.
Color: Column totals Determines the color of the totals for any columns that contain totals.
Chapter 6. Domino Design elements: views, folders, and navigators 227
modified documents as unread. This setting affects all views in the database. Users see only new documents as unread; modified documents do not appear as unread.
Disabling unread marks entirelyThe Advanced tab of the database properties provides the “Do not record unread marks.” If you select this option, no documents will be marked as unread.
6.7.4 Using categories in viewsA view that displays categories enables users to find related documents. A categorized view is neat and easy to scan. Users can collapse the categories to display only the category names and then expand categories individually, or expand the whole view.
To categorize a view, create a column to display categories and then select the option type Categorized on the Sorting tab of the column InfoBox. A categorized column groups documents with matching values, and converts the value to a category name. The column is usually one that appears on the left side of the view. You may have multiple categorized columns in a view.
Setting the following options is recommended:
� Style the column text with a different color and in boldface to make categories stand out.
� Select the Column Info property Show twisties when row is expandable, to display a green triangle or an image that users click in order to see categorized documents.
� Select the Options view property Collapse all when database is first opened, to show only the category names when users open the view for the first time.
On subsequent occasions, a category may be open to highlight the current document from the last time the view was opened.
Tip: Turning on this option saves space and makes your application faster. Consider always using this option unless there is a real need to show the unread marks.
228 Domino Designer 6: A Developer’s Handbook
6.7.5 Presenting views to usersSeveral options in the view and database InfoBoxes determine the initial display of a view.
Opening to a particular row in a viewTo highlight a particular row when a user opens the view, select one of the following On Open options on the Options tab of the View InfoBox:
� Go to last opened document (the default choice)� Go to top row� Go to bottom row
If you want to jump to a specific document, you can write code in the view’s PostOpen event.
Collapsing a view to show only categoriesIf you have a view that displays categories, you can show the view in collapsed form every time users open it by selecting Collapse all when database is first opened on the Options tab of the View InfoBox. You must also select Go to top or Go to bottom row.
Displaying the last-used viewIf you select Restore as last viewed by user (one of the On Database Open choices on the Launch tab of the Database InfoBox), then Notes client users see the default view the first time they open a database, and afterwards they see the last view they opened. This option is not available for views opened by Web browser users.
Tips:
If the column formula of a categorized column returns multiple values, the document will appear multiple times in the view in each of the categories in the multi-value list. Overuse of this feature can slow your application.
The backslash (\) symbol in a category name creates a subcategory; for example, “Animals\Dogs” creates a top-level category Animals and a subcategory Dogs.
Chapter 6. Domino Design elements: views, folders, and navigators 229
6.7.6 Embedding viewsEmbedded views are the standard way to display a view to browser users. The Domino server’s default of a view is rarely good enough for a professional application. To redefine its appearance, you can create a form called $$ViewTemplate for XXX, where XXX is the alias name of the view. This form will be displayed when the view is opened from a Web browser, allowing you to add custom controls, decorations, and so on. Refer to the Lotus Domino Designer 6 Help database for more details about view template forms.
To embed a view on a form or a page, do the following:
1. Open the form in Design mode.
2. Select Create -> Embedded Element -> View. The window shown in Figure 6-27 is displayed.
Figure 6-27 Insert Embedded View window
Select a view from the list (you can also choose a view from other databases), or select Choose a View based on formula (if you want to have a dynamic selection).
3. Click OK and the view will appear on your form.
4. Click the Properties icon to bring up the InfoBox.
230 Domino Designer 6: A Developer’s Handbook
Figure 6-28 Embedded View properties
5. On the Information tab, when a user single-clicks a link in the embedded view at run time, the link opens in the target frame specified next to the field: (for single click). When the user double-clicks the same link at run time, the link opens in the target frame specified next to the field: (for double click).
If you do not specify a frame, documents open in a new window in the Notes client and in the same window for the Web applications. In addition, you can specify how this view is displayed through a browser.
The Java applet always displays the whole view, with a scrollbar. If you do not use the applet, you can select how many view rows will be shown per Web page. User must click the next or previous page to display a new set for view rows.
6. Click the Element tab; Figure 6-29 will be shown.
Notes:
The view applet is not accessible, so you should provide an HTML version for browser users.
You can only change the line numbers to be displayed in the browser if you select the option: Using HTML or the option: Using View’s display property.
Chapter 6. Domino Design elements: views, folders, and navigators 231
Figure 6-29 Embedded View properties
– Use the Percentage selection to refine your selection. (Otherwise, provide a width value for the view.)
– Specify the height of the view.
– Check the Disable scrollbars option, if it is not to be available to the user.
– Check the Show header option, to show column names for the view.
– Check the Selection tracks mouse movement option if you want to move a selection box over documents as you mouse-over them.
Note: If this option is checked, then the Show selection margin option cannot be checked. Also, this option is not available when a view is set to allow users to edit document from the view.
– Check the Transparent background option, to overlay the view contents on the page or form background.
– Check the Show entries as Web links option, to display each view entry as a clickable link.
– Check the Show Action Bar option, to display the Action bar for the view.
– Check the Show selection margin, to add white space around the view.
Note: If this option is checked, then the Selection tracks mouse movement option cannot be checked.
– Check the Show Only Current Thread option, to display the parent and response documents associated with the current document. This is useful in a threaded discussion database.
232 Domino Designer 6: A Developer’s Handbook
7. Use the Border, Paragraph Alignment, Paragraph Margins, and Paragraph Hide When tabs as you would for any other design element.
8. Go to the Object Browser and select Embedded View -> Show Single Category, and specify a selection formula. This allows you to display only one category based on a formula; see Figure 6-30.
Figure 6-30 Embedded view in a form - programming the Show single category event
6.7.7 Formatting date and time columnsTo format values that result in a time or date being displayed in a column, select a style in the Date and Time format tab of the Column InfoBox. This is better than using @Text in the view column formula to format the date. Refer to Table 6-6 on page 234 for a list of the date and column options.
Notes:
You can embed more than one view in a page or a form.
Single category views are a good way to create personalized views for users. Create a view categorized by the name of the user who “owns” the document or who should see it, then use @Username in the Single category formula to show only the current user’s documents.
Embedded view
Put here your code to specifythe single category
Form
Chapter 6. Domino Design elements: views, folders, and navigators 233
Table 6-6 Date and column options
� You can use the operating system date/time settings, or you can customize it for your convenience.
� Show “today” when appropriate show values resulting in the current date with the word “Today”. Values resulting in the previous day display “Yesterday”;
Note: This information applies to columns whose formula displays a date-time value (for example, @Created). Often applications contain dates stored in text fields; Notes doesn’t recognize these as date values, so if you display them in view columns, the setting on this tab do not apply.
It is undesirable to store date-time value in text format. Different computers format dates differently, which could result in inconsistent values in your database.
Option name Selections
On Display User settingCustom
Display Date: Show AllOnly month, day and yearOnly weekday, month and dayOnly month and yearOnly month and dayOnly yearOnly monthOnly dayOnly weekday
Display Date: Special
Show “today” when appropriateAlways show 4-digit yearShow 4-digit year for 21st centuryShow year only if not this year
Display Date: Calendar
GregorianHijri
Display Time: Show AllHours, minutes and secondsHours and minutesHours only
Display Time: Time zone
Adjust time to local zoneAlways show time zoneShow only if zone not local
234 Domino Designer 6: A Developer’s Handbook
otherwise, for the day after, it displays “Tomorrow“. All other values display the date.
� If you have an international date format set in your operating system, these choices change to suit the national convention (for example, from month/day to day/mont).
� If you have an international time format set in your operating system, these choices change (for example, from 02:30 to 14:30).
� You have three choices for time zone displays:
– “Adjust time to local zone” displays the time relative to the time zone of the reader. A document created at 3:00 P.M. in New York that is read by a user in Los Angeles adjusts to Pacific Standard Time; the creation time is displayed as “12:00 PM.”
– “Always show time zone” displays the time zone where the document was, for example, created. With this option, the creator’s time zone is always shown. If a document is created in New York at 3:00 P.M., a user in Los Angeles sees the creation time as “3:00 PM EST.” A user in New York also sees the creation time as “3:00 PM EST.”
– “Show only if zone not local” displays the time zone where the document was, for example, created only when the document is read by someone in a different time zone. A document created in New York at 3:00 P.M. displays to all users in the U.S. Eastern standard time zone as “3:00 PM.” Users in all other time zones see the creation date as “3:00 PM EST.”
6.7.8 Formatting numbers in columnsTo format values that result in a number being displayed in the column, select a style on the Number tab of the Column InfoBox. The following selections are available:
� General
Formatting displays numbers as they are entered; zeroes to the right of the decimal point are suppressed (for example, 6.00 displays as 6).
� Fixed
Formatting displays numbers with a fixed number of decimal places (for example, 6 displays as 6.00).
� Scientific
Formatting displays numbers using exponential notation (for example, 10,000 displays as 1.00E+04).
Chapter 6. Domino Design elements: views, folders, and navigators 235
� Currency
Formatting displays values with a currency symbol and two digits after the decimal symbol (for example, $15.00). The currency symbol and thousands separator that appear are based on settings in your operating system.
The following formatting options also apply:
� For any formatting type other than General, select a number from 1 to 15 from the Decimal Places list.
� Select Percentage (value * 100)% to display values as percentages (for example, to display .10 as 10%).
� Select Parentheses on Negative Numbers to display negative numbers enclosed in parentheses (for example, (5) instead of -5).
� Select Punctuated at thousands to display large numbers with the thousands separator (for example, 1,000 in English, or 1.000 in French).
6.7.9 Indenting Response documentsIndenting Response documents beneath Main documents is useful when readers want to see the progression of a discussion. You can display 32 levels of responses, with each level indented three spaces under its parent document.
Such a view requires that:
� Response forms are available to users with the types Response and Response-to-Response.
� The Show Response documents in a hierarchy option is selected on the Options tab of the View InfoBox, and the document selection formula uses SELECT @All, or contains a formula that allows response documents to be included, such as:
SELECT Form = “Action Item” | @AllDescendants
� The view has a responses-only column.
� The responses column is created immediately to the left of the column under which responses are to be indented. Leave its title blank, make its width 1, and select Show Responses only on the Information tab of the Column
Note: As with dates, these settings do not apply to text fields that contain numeric values, only to Number fields.
Note: Even if you have no Response form, replication and save conflict documents are responses to the original document.
236 Domino Designer 6: A Developer’s Handbook
InfoBox. Enter a column formula that displays information about the response documents shown in the column, such as their authors or creation dates.
6.7.10 Sorting documents in viewsEvery view needs a sorting method that organizes documents in a way that makes sense to users. For example, a By Date view sorts documents by their creation dates, and a By Author view sorts documents by author names. To achieve this effect, designate at least one column as a sorting column. You can then define it as a user-sorted column, an auto-sorted column, or both.
Views that display categories often use sorting methods to sort the category names into alphabetical order. If the sort column displays values from a multiple-value list, select Show multiple values as separate entries to show each value as a separate row. If you do not select this option, multiple values display as one entry and are sorted by the first value.
Ascending and descending orderColumns sort documents in either ascending or descending order:
� Ascending order sorts in increasing order (1 precedes 2, A precedes B, earlier dates precede later dates). For example, to display documents from the oldest to the newest, create a Date column that uses the Creation Date as its value and sorts documents in Ascending order.
� Descending order sorts in decreasing order (2 precedes 1, B precedes A, later dates precede earlier dates). For example, to display documents from the newest to the oldest, create a Date column that uses Creation Date as its value and sorts documents in Descending order.
Auto-sorted columnsTo set up a sorting style in advance, select the option Sort: Ascending or Sort: Descending on the Sorting tab of the Column InfoBox. The sorting column is usually the one that appears on the leftmost side of the view.
User-sorted columnsUsers see a triangle next to a column title where values can be re-sorted. Users click the column and choose a sorting method to see the documents in the order that they choose.
Note: On a response document row, columns to the right of the “Responses only” column are not displayed. The responses only column occupies the rest of the line.
Chapter 6. Domino Design elements: views, folders, and navigators 237
To set up a user-sorted column, select the Click column header option to sort on the Sorting tab of the Column InfoBox. Next, select Ascending (or Descending order), or select Both to allow users to cycle between ascending sort order, descending sort order, and no sort order for the column.
Multiple sorting columnsTo create multiple levels of sorting, designate more than one column as a sorting column. For example, if a primary sorting column sorts entries by date, a secondary sorting column might sort entries by author. Then all documents created by one person on a particular date are grouped together.
Using an auto-sorted column as a secondary sorting columnTo add a secondary sorting column, add a column to the right of the first sorting column and then choose Sort: Ascending or Sort: Descending. Documents and responses are sorted, then sub-sorted, in column order from left to right.
Designating a secondary sorting column for a user-sorted column
User-sorted columns override the sorting built into auto-sorted primary and secondary columns. If the view has a user-sorted column and you want to include secondary sorting, you can associate it with a secondary sorting column. In the Column InfoBox for a user-sorted column, click Secondary Sort Column and choose the secondary sort column and its sorting order.
Character sorting rulesSorting rules are governed by these options:
Case-sensitive and accent-sensitive sorting rules for Release 5 and greater differ from sorting rules in previous releases in the following ways:
� Both case-sensitive sorting and accent-sensitive sorting are turned off by default (in previous releases, they were on by default).
� Case-sensitive sorting sorts lowercase letters before uppercase letters (for example, ab sorts before Aa).
� Accent-sensitive sorting sorts accented characters after non-accented characters (for example, ab sorts before äa).
Note: Allowing users to re-sort a view by different columns is convenient for users, saves space and improves performance of your application compared to having a separate view for each way you want to sort. Consider turning on this option for most of the columns in your views.
238 Domino Designer 6: A Developer’s Handbook
Overriding alphabetical sorting with a hidden columnThe sorting column does not need to be visible. Sometimes you may want to use a hidden column that selects documents according to criteria that you specify in a formula as your sorting column. For example, a Service Request form contains a Priority field, which uses the following keywords list:
� Urgent� High� Medium� Low
You want the By Priority view to sort documents by the value in the Priority field, but you do not want them to appear in ordinary alphabetical order (High, Low, Medium, Urgent). You want users to see Urgent-priority documents at the top of the view, High-priority documents next, and so on.
To do this, create a column that has the following characteristics:
� Is hidden� Has no title� Is one character wide� Uses this formula:
Add a column to the right of the hidden column that:
� Is not hidden� Has the title “Priority”� Is 10 characters wide� Displays the value of the Priority field
6.8 Designing a folderFolders have the same design elements as views. You design folders in much the same way as views, using the Create - Design - Folder command.
The difference between folders and views is that views always have a document selection formula that collects and displays documents automatically, while folders remain empty until users or programs add documents to the folder.
Note: Web users cannot drag documents into folders.
Chapter 6. Domino Design elements: views, folders, and navigators 239
When you create a folder, its design is automatically based on the design of the default view of the current database. You can choose to base the folders design on a different existing view, or to design the folders from scratch.
You can keep a folder personal, or share it with other users of a database. No one else can read or delete your personal folders. To create personal folders in a database, you must have at least Reader access to the database. To create shared folders in a database, you must have at least Editor access, and the option Create shared folders/views must be enabled for you.
When you create a personal folder, Domino stores it in one of two places:
1. If the Manager of the database has allowed it, your folder is stored in the database, allowing you to use the folder at different workstations.
2. If the Manager has not given you the option to create personal folders in the database, Domino stores your folder in your desktop file.
6.9 Managing access to views and foldersIf you only want certain users to see a view or folder, you can create a Read access list. Users who are excluded from the access list will no longer see the view or folder on the View menu or in the View element list in Domino Designer.
Note that a view or folder Read access list is not a true security measure. Users can create private views or folders that display the documents shown in your restricted view, unless the documents are otherwise protected. For greater security, use a Read access list for a form.
You can add users to the Read access list for a view or folder as long as they already have at least Reader access in the database access control list.
6.9.1 Creating a Read access list1. Open the view or folder in Design mode.
Note: To see whether a database allows you to store personal folders in it, select the database, choose File > Database -> Access Control, select your name, and see whether the Create personal folders/views option is enabled.
Note: If a folder is stored in your desktop file, you can use the folder only from your workstation, and you cannot use Full text search in the folder.
240 Domino Designer 6: A Developer’s Handbook
2. Open the InfoBox.
3. Click the Key icon (Security tab).
4. Deselect: All Readers and Above.
5. Click each user, group, server, or access role that you want to include. A checkmark appears next to each selected name.
6. Click the Person icon to add person or group names from a Personal Address Book or the Domino Directory.
7. To remove a name from the list, click the name again to remove the checkmark.
8. Check the option Available to public access users, if you want documents in this view or folder available to users with public access Read or Write privileges in the access control list for this database.
9. Save the view or folder.
Note: You must provide server access to views that are Read-restricted when a database must be replicated.
6.9.2 Creating a Write access listTo allow only certain users to add documents to or remove from a folder, create a Write access list for the folder. You can add users to the Write access list for a folder as long as they already have at least Author access in the database access control list. To grant access to users, do the following:
1. Open the InfoBox.
2. Click the Key icon (Security tab).
3. In the section labeled Contents can be updated by:, deselect the option: All authors and above.
4. Click each user, group, server, or access role that you want to include. A checkmark appears next to each selected name.
5. Click the Person icon to add person or group names from a Personal Address Book or the Domino Directory.
Important: Do not create a Read access list for the default view of a database.
Tip: Use role names, not groups or individual usernames, to control access to views. This makes it possible for a non-designer to change who has access by updating the database ACL.
Chapter 6. Domino Design elements: views, folders, and navigators 241
6. To remove a name from the list, click the name again to remove the checkmark.
7. Save the folder.
6.10 Using navigatorsA database navigator allows the user to easily access views, Domino data, or other applications. It is like a roadmap that guides the user through the application using a graphical interface. Most navigators include graphic buttons or hotspots, which are programmed areas a user clicks to execute an action. A hotspot can be text, graphics, or a combination thereof. Refer to Figure 6-2 on page 186 for an example of a navigator.
6.10.1 Navigator objectsYou create a navigator by combining objects. These might include a background graphic for display only, and some combination of graphic buttons and text objects. To create navigator objects, import or paste objects from another application, or use the drawing tools that are supplied by Domino. The drawing tools include hotspot tools that you use to define a clickable area in a navigator.
6.10.2 Navigator actionsA navigator action determines what happens when users click an object. You can add actions to all navigator objects except the graphic background.
Domino Designer provides the following Simple Actions that you can attach to navigators:
� Open another navigator.� Open a view.� Serve as an alias for a folder.
Clicking the object displays the contents of the designated folder in the view pane. Dragging and dropping a document to the folder object adds the document to the actual folder.
Note: Web users cannot drag documents into folders.
Note: You might also consider using framesets, pages and outlines, as they offer more flexibility when creating applications for both Notes clients and Web browsers. To learn more about framesets, refer to Chapter 8, “Domino Design elements: framesets” on page 283.
242 Domino Designer 6: A Developer’s Handbook
� Open a database, view, or document link.� Open a URL.
In addition, a navigator can perform the following functions:
� It can run an @function formula. � It can run a LotusScript program.
6.10.3 Creating a navigatorIn the following section, we describe how to create a simple navigator by creating a graphic background and adding a button. The button will have an action associated with it.
You can add a navigator to your database in one of three ways:
� Copy an existing navigator from the same database.� Copy an existing navigator from another database.� Create a new navigator.
Whichever way you choose, you need Designer access or higher to the database. In our example, a navigator will be created from scratch.
To create a navigator, do the following:
1. Open the database where you want to create the navigator in Design mode.2. Go to the navigator pane.3. Click the New Navigator button. This will bring up the Programmer’s Pane for
navigators.
Creating a backgroundThere are two options for creating a background image:
� Copy any available graphic image to the clipboard and use Create -> Graphic Background to paste the graphic in as the background.
� Use the File - Import dialog box to import a graphic as a background to your navigator
Note: You can have only one graphic background for each navigator. It always has its top left corner at the top left corner of the window, so design the graphic with this in mind.
Chapter 6. Domino Design elements: views, folders, and navigators 243
Creating a graphic buttonCreating a button is done in the same way as creating a background:
1. Use cut and paste or the Import dialog box to build the graphic button.
2. Move the button to the desired position by dragging it.
3. Choose Design -> Object Properties to display the InfoBox.
4. Select Lock size and position.
5. Click the Highlight tab. The highlight is a rectangular border that appears around the control. You can choose the color, width and when it appears.
6. Select Highlight when touched and Highlight when clicked.
7. Close the InfoBox.
6.10.4 Adding an action to a navigator objectIt is very easy to add a simple action to a navigation object. For example, if you want to add an action that opens a view, follow these steps:
1. Select a graphic button or create a hotspot.
2. In the bottom pane, select Simple action(s).
3. From the Action drop-down list, choose Open a View or Folder.
4. From the drop-down list next to the Action drop-down list, choose a view.
5. Save your changes.
6.10.5 Adding an action using @Functions or LotusScriptIf you require a more complicated action to be added to a graphic object, you can create the action by using an @function or a LotusScript program. You do this in the same way as for Simple Actions, except that you select the Formula or LotusScript option button in the bottom pane.
Tips:
Whenever possible, use the File - Import method to create a background, because this gives better color fidelity when the graphic is displayed.
To remove a graphic background, choose Design -> Remove Graphic Background.
244 Domino Designer 6: A Developer’s Handbook
6.10.6 Displaying navigator when a database is openedTo display a navigator when a database is opened, follow these steps:
1. Open the database InfoBox.
2. Click the Launch tab.
3. To display the navigator in the navigation pane, choose Open designated navigator under On Database Open. (To display the navigator in a full-screen window, select Open designated navigator in its own window.)
4. From the Navigator drop-down list, select the navigator that you want displayed in the view.
5. Close the InfoBox.
When the database is opened, the navigator should launch.
6.11 New features in Domino 6There are several new features and enhancements with views in Domino 6, including the following:
� Column colors� Context-sensitive actions� Customized column icons� Background images/grids� Customized twisties� User customizations� Create document from view� Edit document in view
Refer to 12.13, “View enhancements” on page 445 for more information about the new features and enhancements with Domino 6.
6.12 SummaryViews are the entry point to the data stored in a database. When users open a view, a list of documents in the database is displayed, each row presenting
Note: Make sure that Click is selected in the Event area. This ensures that the LotusScript program is run when the user clicks the object
Chapter 6. Domino Design elements: views, folders, and navigators 245
pieces of information from a document. As such, views give users a logical and organized overview of information available in Domino databases.
The dynamic nature of views allows application developers to design highly flexible entries for databases and Web sites, based on user requirements or access levels.
246 Domino Designer 6: A Developer’s Handbook
Chapter 7. Domino Design elements: agents
In this chapter, we explain and describe Domino agents: what they are, what they do, where to use them, and how to create them. We also cover Web agents, WebQueryOpen and WebQuerySave, and how to make agents available for Web users.
In addition, we explain how to write agents using LotusScript, how to access CGI variables, and what access you need in order to run an agent.
Finally, we briefly mention some new features in Domino 6. For detailed information about these features, refer to Chapter 12, “New features in Domino 6” on page 347.
7.1 About Domino agentsAgents allow you to automate many tasks within Domino. They are standalone programs that can perform a specific task in a database for the user (for example, filing documents, changing field values, sending mail messages, deleting documents) or that can perform more powerful actions (such as interacting with external applications). Agents are the most flexible type of automation because they can be run by users or in the background, and they are not tied to a specific view or form.
Agents can either be private (that is, created by the user and used only by the user), or shared (that is, created by a designer and used by anybody who has sufficient access to the application). Both private and shared agents are design elements stored in the database for which they are created. They can be run manually by the user, or run automatically when certain events occur (such as mail arriving or documents being changed or added to the database), or scheduled to run at certain intervals. They can contain Notes Simple Actions, @function formulas, or a LotusScript or Java program.
The agents are part of a new design container in Domino 6 called “Shared Code”. This is where all agents, private and shared, are located.
7.2 Access to create Domino agentsTable 7-1 lists the options in the database access control list (ACL) that affect agents.
Table 7-1 Access to create agents
Type of agent Access needed
Shared agent To create a shared agent, a user must have Designer access or higher in the ACL.
Personal non-LotusScript agent To create a personal non-LotusScript agent that is stored in a shared database, a user must be assigned the Create personal Agents privilege.
Shared LotusScript or Java agent To create a shared LotusScript or Java agent, a user must be assigned the Create LotusScript Agents option in the Access Control List, and the user must also be assigned the Create Personal Agents authority.
248 Domino Designer 6: A Developer’s Handbook
In the Access Control List (ACL) for the database, there is an option to Create Personal Agents. Since personal agents on server databases take up server disk space and processing time, the database manager may deselect this option to prevent users from creating personal agents in the database.
When agents run, they automatically check the identity of a Domino user against any server document or ACL restrictions. Manually run agents run with the identity of the Domino user; scheduled agents run with the identity of the person who created or last modified the agent.
It is important to draw a distinction between agents run on the user’s workstation and agents run on the server. Server agents include those run on a schedule (for example, hourly) or when an event occurs (for example, when a document is created), as well as those executing in a Domino Web application (WebQueryOpen, WebQuerySave and those run with an OpenAgent URL). To avoid chaos, rules govern what agents that run on the server are allowed to do, as discussed in the following section.
7.2.1 Restricted and unrestricted agents, methods and operationsIn the server document of the Domino Directory, you can determine who can run unrestricted and/or restricted agents on that server. Using unrestricted agents, users have full access to the server’s system.
Certain functions will not work for users with restricted access. Be aware, however, that this does not apply on the Web—Web users can run any agent, as long as the agent is not hidden from Web users.
Notes:
A Domino administrator can also specify restrictions in the server document to prevent users from running agents on a server. Users denied this server access cannot create personal agents to execute on the server, regardless of the ACL setting of the database.
Agents run using the Domino “OpenAgent” URL command may be set to run with either the invoker’s or the author’s privilege.
Note: In Domino 6, the Run unrestricted agents field has been changed to Run unrestricted methods and operations. This is basically the same thing, and includes users that can run all kinds of agents without restrictions.
Chapter 7. Domino Design elements: agents 249
LotusScript and Java include operations that have full access to the server’s system and can manipulate system time, file I/O, and operating system commands. Users or groups with unrestricted access can run an agent that includes any of these operations in the LotusScript and Java components. Users or groups with restricted access can include most operations. The only restricted commands are those that allow access to the server’s system.
Users with restricted access have limited access to the system. For example, they cannot run LotusScript or Java agents that manipulate system time, file I/O, and operating system commands.
7.3 Creating an agentThere are several ways to create an agent:
1. Create a new agent
Open the database in Design mode, go to the Shared Code section, click Agents, and then click New Agent.
2. Copy an existing agent
Open the database you want to copy from in Design mode, and use cut and paste.
If you choose to create an agent using the first method, the Agent property box shown in Figure 7-1 on page 251 is displayed.
Notes:
Server id and Lotus Notes Template Development id will always have the right to run unrestricted LotusScript/Java agents.
Agent restrictions do not apply to code that runs on the user’s workstation (for example, from the Actions menu). Those agents are limited only by the user’s level of access to the database and its documents.
250 Domino Designer 6: A Developer’s Handbook
Figure 7-1 Designing an agent in Domino Designer 6
7.3.1 Naming the agentThe first thing to do is to give the agent a name. A descriptive name is especially important for an agent that you are designing for users to select from the Action menu. Also, try to keep the first character unique. This is because, as with forms and views, Domino will use the first unique character as an accelerator key. Alternatively, you can force Domino to use a letter of your choice as an accelerator key by putting the underline character in front of it.
Always give an alias name for your agent. You can append more than one alias name by entering the vertical bar (|) symbol, followed by the alias name. An alias is an internal name for a agent. You refer to the agent from your code by using the alias name.
Note: Figure 7-1 shows a new Domino 6 feature: the property box of an agent. Agents in Domino 6 now have property boxes, like other design elements in Domino.
Chapter 7. Domino Design elements: agents 251
The names you give to manually run agents appear as choices in the Actions menu on the Notes client. To ensure useful and sensible naming of your agents, following are some agent naming tips:
� Choices on the action menu appear in alphabetical order. To force names to appear in a different order you can number or letter your agents.
� Use consistent names across databases in order to enable users to recognize identical agents.
� Use aliases to give your agents another name, or synonym. Using an alias, you can change or translate the name that users see without disabling code that references the original name.
� Use a backslash (\) to list an agent under a submenu of the Actions men (for example, “Reports\Sales report”).
Click Shared/Personal to determine whether the agent may be used by other users.
To make the agent available for public access, click the “key” tab and check the “Allow public access users to view and run this agent” checkbox. Creating these kinds of agents, enabled for public access, allows users with No Access or Depositor access to view and use any manually run agents.
Tip: When selecting to run from action menu, consider that a user can run an agent from anywhere in the application—and the agent must behave appropriately even when run from a place you didn’t intend it to run from. Therefore, you might instead consider selecting “Run from Agent list”.
Tip: To add an alias, add a vertical bar (|) symbol and the alias name to the right of the original name. Always keep the original name as the leftmost name.
Figure 7-1 on page 251 shows an agent with a original name of “agnRemoveSelectedDocs” with an alias of “1. Remove”.
Note: The ability to toggle between Shared/Personal is a new Domino 6 feature, and enables developers to change this setting during first time creation, and also later on.
252 Domino Designer 6: A Developer’s Handbook
7.3.2 Scheduling the agentTo decide when agents should run, you choose when it should be triggered.
On event options� Action menu selection
This is the only choice that allows users to see the agent in the Actions menu. As previously mentioned, keep in mind that the user can run the agent from anywhere in the application. The agent must also behave appropriately when it is run from a place you didn’t intend it to ran from.
� Agent list selection
Use this option when you do not want to the agent to show up in the Actions menu. If the agent is called by another agent (the main agent), the document selection is ignored. The main agent always determines the document selection (“Target” listbox). Also use this option to hide the agent for the end users.
� Before new mail arrives
This option refers to processing mail before it is deposited in the mail databases (for example, to move incoming mail to a folder). With this option, the agent runs before the message is listed in the database. Therefore, be careful what other options you choose. For example, do not use the Mark Documents Read simple action, because documents will always be marked unread when they are listed in the database.
Note: “Allow public access” does not let users exceed their normal access to other parts of the database. For instance, an agent run by a “Depositor” user will not be able to look up information in a view unless that view is also public access.
Tip: Since the agent runs before the message is listed in the database, you cannot get a handle on the NotesDocument. To get a handle on the document itself, you need to use “DocumentContext”, which is a property in the NotesSession class, using LotusScript.
If you want to accomplish the same with the use of Java, you need an extra step, and go via the “AgentContext” class in Java and use the DocumentContext through the getDocumentContext.
Note: This option is limited to one agent per database.
Chapter 7. Domino Design elements: agents 253
� After new mail arrives
This option refers to processing incoming mail: to respond to it, forward it, modify it, delete it, or file it. Interactive functions and functions that read or modify data external to the current document are ignored when documents are mailed into the database (for example: @DbColumn, @DbCommand, @DbLookup, @MailSend, @Prompt, @Command, or @PostedCommand are all ignored).
� After documents are created or modified
This option refers to workflow tasks where a task is performed based on new or changed documents. This trigger is actually a scheduled agent handled by the Agent Manager, and can execute either on the local Notes client or on a server.
When you select After documents are created or modified, an Edit settings button appears. If you click the button, the Schedule dialog box appears. Here you can set a start and end date for the agent, tell the agent not to run on weekends, and either choose a server for the agent to run on or choose the local Notes client. You can also specify that the server is chosen when the agent is enabled. The delay time using this agent varies between 5 to 30 minutes, depending on the server load.
� When documents are pasted
This option refers to documents that are pasted into the database and need to be modified as they are being pasted. Note that this event requires action by the user and does not happen in the background. Paste-activated agents cannot use the @Command or @PostedCommand.
Tip: This option can be used multiple times within the same database.
Note: Each time this agent runs, it processes all documents created or modified since it last ran—even if it has been inactive for a while because of not being run on weekends, for instance.
Note: To prevent documents being pasted, use the new QueryPaste event of the NotesUIView class. A “when documents have been pasted” agent runs too late to prevent the paste. It can delete the new documents, but only if the user who pastes has access to delete.
254 Domino Designer 6: A Developer’s Handbook
On schedule options:� More than once a day� Daily� Weekly� Monthly� Never
Use the On schedule trigger to schedule agents to run at regular intervals. When you select On schedule, you get a new button called Schedule, that brings up a dialog box to schedule the specific run time, as shown in Figure 7-2.
Figure 7-2 Scheduling an agent
To set up an interval-scheduled agent:
� Specify Run Once Every in a range between 5 minutes and 11 hours 55 minutes.
� Specify the start and end time of each day.
� Specify the start and end date for the agent to run, and whether it should run on weekends or not.
� Specify the server on which the agent is to run.
The following options are available:
– Running the agent on the original server
To run the agent on the same server where you create the agent, leave the default setting in the Run box.
Chapter 7. Domino Design elements: agents 255
– Running the agent on another server
To run the agent on another server, select a server in the Run list box or enter a server name.
– Running the agent from any server
If you cannot specify a server in advance, select -Any Server- as the server name in the Run box. This wildcard entry allows any server to run the agent. However, be aware that choosing this may result in replication conflicts if several servers run the same agent and change the same documents.
– Allowing users to choose which server runs the agent
If you select Choose When Agent is Enabled, users are prompted to select a server when they enable the agent. This is useful for distributing agents in ready-to-use applications.
7.3.3 Selecting documents to be processedThis selection is set depending on the option selected for scheduling the agent. For example, if the agent is scheduled to run if new mail has arrived, this option is set to Newly Received Mail Documents, and it cannot be changed.
You can further narrow down which documents are processed by specifying a “document selection”. For example, if you want to process only documents which have a field value of a specific value, click document selection in the agent window, and then add condition; see Figure 7-3 on page 257.
Tip: If the agent is modifying data in a database, it should run just once on one server. The changed data is then replicated to the other replicas of the database.
Tip: Test your selection criteria by entering it in the search bar of a view, to see whether it selects the right documents.
Note: An agent that uses document selection criteria will run much faster if the database is full-text indexed.
256 Domino Designer 6: A Developer’s Handbook
Figure 7-3 Document Selection
1. From the Condition drop-down box, select By Field.
2. In the Search for documents area, select a Field.
3. Select Contains.
4. Type in the search criteria.
5. If you have multiple criteria, you must type AND or OR between the search expressions, and you may use parentheses for grouping.
6. Click OK to save your settings.
Tip: You can also use the full-text query syntax to type out the query you want, for example: [State] = “MN”. The Add Condition button might not support every query you need to make. You may also “mix and match” Add Condition entries with typed information.
Chapter 7. Domino Design elements: agents 257
Figure 7-4 Adding conditions to agents
Table 7-2 lists which document options are allowed with which run options.
Table 7-2 Run options and document options for agents
Note: Document selection is new in Domino 6, and replaces the search expression field and Add search button in earlier versions.
Run options Document options
Action menu selection All documents in database.All new and modified documents since last run.All unread documents in view.All documents in view.All selected documents.None.
Agent list selection All documents in database.All new and modified documents since last run.All unread documents in view.All documents in view.Selected documents.Run once.
Before new mail arrives Each incoming mail document.
258 Domino Designer 6: A Developer’s Handbook
7.3.4 Specifying what an agent should doThere are five ways of specifying what an agent should do: Simple Actions, formulas, LotusScript, imported Java, and Java. Select which one you will use with the language pull-down at the top of the Programmer’s Pane.
Simple ActionsThese are predefined actions that allow you to define a sequence of actions without requiring any programming knowledge. They are ideal for the end user who wishes to automate some routine tasks. (Simple Actions are rarely used by programmers as they lack the power of the other choices.)
The Simple Actions available are:
� Copy to Database� Copy to Folder� Delete from Database� Mark Document Read� Mark Document Unread� Modify Field� Modify Fields by Form� Move to Folder� Remove from Folder� Reply to Sender� Run Agent� Send Document� Send Mail Message� Send Newsletter Summary� Run @Function Formula
After new mail has arrived Newly received mail documents.
After documents are created or modified
All new and modified documents.
On schedule- More than once a day
All documents in database.All new and modified documents.
On schedule- daily, weekly, monthly, never
All documents in database.All new and modified documents.
Note: You can combine Simple Actions in one agent to build more complex functions.
Chapter 7. Domino Design elements: agents 259
FormulasFormulas can use the full range of @functions available with Domino. You can write an @function formula that runs by itself or with a simple action. You cannot combine an @function formula with a LotusScript program.1
� To write a standalone formula, click Formula in the design pane and type the formula in the panel.
� To combine a formula with a simple action, click Simple action(s) and then click Add Action. Choose @Function formula from the Action list and type the formula in the editing window.
How many times the formula executes depends on the document options. A “Run Once” agent will execute its formula just one time. Otherwise, formula-based agents operate on each of the documents in turn and run the complete formula on a document before proceeding to the next document. The documents are not processed in any particular order.
A SELECT statement in the formula further limits the search. If you do not include a SELECT statement in the formula, Domino appends a SELECT @All statement. Except for SELECT @All, a SELECT statement must be the first statement in the formula to be effective.
For example, if you want to forward documents only if they do not have attachments, do the following:
1. In the Agent Builder window, click the Formula option.
2. Enter the following formula in the Programmer’s Pane:
LotusScriptAgents can also be written in LotusScript, as follows:
1. In the Agent Builder window, select LotusScript as programming language.
2. Enter the LotusScript code in the Programmer’s Pane.
Attention: Simple Actions refer to the displayed name of design elements. Therefore, changing the name of such an element will cause the agent not to work.
1 The Evaluate statement in LotusScript lets you get the value of an @Function expression from within your LotusScript agent, and the Search methods let you specify a macro selection expression.
260 Domino Designer 6: A Developer’s Handbook
Script-based agents run once and must therefore process all documents selected. You supply the search criteria and the processing order through the language constructs. Search criteria applied through the agent interface are effective only through the UnprocessedDocuments property of the NotesDatabase class. This property contains all documents not yet processed by the agent, or the result of the search specified to the agent builder, depending upon how you create the agent.
Imported JavaTo attach a Java program to an agent, first write the program in a Java development environment, like WebSphere Studio Application Developer. In Domino Designer, click Imported Java and then click Import Class Files to import the files into the agent.
JavaAgents can also be written in Java, as follows:
1. In the Agent Builder window, select Java as programming language.
2. Enter the Java code in the Programmer’s Pane.
Notice that some of the code is appended to the Programmer’s Pane automatically; see Figure 7-5 on page 262. You get, automatically, handles to Session and AgentContext objects. This is very useful, as you will need these objects in your agent code.
Note: Control is always passed to the agent using the Initialize event, so this is where your program should begin.
Chapter 7. Domino Design elements: agents 261
Figure 7-5 A new Java agent
Just like LotusScript agents (and unlike macro agents), Java agents do not automatically repeat when run on a collection of documents. To process the documents selected by its selection criteria, the agent must use getUnprocessedDocuments of the class AgentContext to fetch the set of documents, and will usually contain a loop to fetch and process each document from that collection. Alternatively, it could use a method of NotesDocumentCollection that acts on all the documents at once, such as stampAll or putAllInFolder.
Java agents can also be set to run on no documents, and any agent is free to obtain documents from other sources and perform any operations on them.
7.3.5 Displaying the pop-up menu of an agent1. To display the pop-up menu of the agent, click with the right mouse button on
the agent listed in the agents pane. The agent pop-up menu is shown in Figure 7-6 on page 263.
262 Domino Designer 6: A Developer’s Handbook
Figure 7-6 Pop-up menu of an agent
2. From this menu you can:
– Display the Design properties
– Cut and copy to the clipboard, and paste from the clipboard
– Delete the agent
– Edit the agent, which is the same as double-clicking the agent’s name in the Agent pane, to display the Agent Builder window
– Run the agent
– Test the agent, which tells you how many documents the agent will process
– View the agent log
– Enable or disable the agent
Using Domino 6, there is a new way of enabling and disabling agents, using a new Agent User Interface. This is also described in Chapter 12, “New features in Domino 6” on page 347.
You can now—directly in the list of agents—use action buttons to enable and disable scheduled agents; see Figure 7-7 on page 264.
Chapter 7. Domino Design elements: agents 263
Figure 7-7 Enabling, disabling, and signing agents
7.3.6 Signing an agentA server agent will run with the access given to the signer of the agent. To sign a agent in Domino 6, you have the following options:
� Sign the database
An administrator can sign either the whole database or design elements selectively with a administrative ID file, or another ID file using the Domino Administration client. The database and all its design elements will be signed with this ID file, and the agent will run with the access given to this ID.
� Edit and re-save the agent
To sign just a single agent, open the agent and then save it. This will sign the agent with the current user’s ID file.
� Sign the agent
With Domino 6, you can now sign a single or multiple agent at once, using a action button in the agent list or from the menu that you can bring up by right-clicking the agent on agents list.
Figure 7-7 shows the new buttons as part of the list of agents in the Designer. Pressing this button will sign the marked agent(s) with the current user ID file.
Agents that are run by a user will run with the access of that user. For these agents, signatures are not an issue as far as determining the access rights of the agent, except that—as with all Notes code, and depending on the user’s Execution Control List—the agent may not be able to run or perform certain operations unless signed with the recognized ID.
264 Domino Designer 6: A Developer’s Handbook
7.4 Testing an agentIt is important that you, as a developer, test an agent before copying that agent to a production server. Having a test environment is valuable for testing and developing agents.
7.4.1 Testing an agent during developmentYou can quickly test an agent by simulating a run without affecting documents.
1. Select the database and go to the Shared Code and Agent pane.
2. Select the agent and choose Agent -> Test, or right-click on the agent and choose Test.
3. Read the Test Run Agent Log, which describes how many documents would be processed and what action would be taken if the agent were actually run.
7.4.2 Testing an agent before copying it to a live databaseFor agents that have multiple steps or complex tasks, split the process into several smaller tasks and create an agent for each. Test and fix each smaller agent first. When everything is working correctly, combine the agents into one and then test the agent again.
1. Choose File -> Database -> New Copy to make a test copy of the database with documents. For all agents except those that act on mailed documents, the test copy can be local.
2. If the agent works on mailed documents, the test database must be on a server, and a Mail-in Database document must exist in the Domino Directory. Mail a few documents to the test database.
3. If you do not need to run the agent from a view, select the database and go to the Shared Code and Agent pane, select the agent you’re testing, and choose Agent -> Run; otherwise, open the database, select the view, and choose Actions -> <Agent Name>.
4. Make any required changes to the agent to fix any problems that the test run shows. If necessary, create a new copy of the database to run the agent again.
5. When the test shows no problems, copy the tested agent to the live database.
7.4.3 Checking the Agent LogEvery time an agent runs, it writes a report that includes when it ran, how many documents it ran on, and what actions it took on those documents. Each new run
Chapter 7. Domino Design elements: agents 265
of the agent writes over the previous log report. Domino stores the Agent Log with the database.
To view the most recent Agent Log:
1. Select the agent whose log you want to check and choose Agent -> Log.
2. Click OK to close the Log window.
If there is no Log (because the agent has never run), you will see the following message: This agent has never been run before.
7.4.4 Debugging agentsTo debug your agents, you can use the debugging features of Domino Designer. However, it is sometimes difficult to debug agents on your workstation when these agents are expected to run on a server (background agents) or on the Web. Use one of the following techniques to debug such agents:
� Include MESSAGEBOX statements to print out statements.
MESSAGEBOX statements in your LotusScript agent will write directly to the server console, and for that reason, also to the server log.nsf file. This method is convenient, but can clutter the server log if you have many statements or run the agent repeatedly. To handle this, you either need your own testing server, or you need permission to populate a server log with debugging information.
� Use the NotesLog class to write out your statements.
� Use On Error statements to trap any errors that occur during execution. In your error trap code, use AgentLog or Messagebox to write error information including line number. Note that On error statements do not slow your agent down, so you can leave this in your production code to help you track down any problems that occur after the application is rolled out.
� With Domino 6, there is a new debugging feature called Remote debugger, which enables you to connect to a running agent on the server and debug it. You can also invite other persons to debug it at the same time. This subject is covered in detail in 12.6.2, “Remote debugger” on page 387.
Note: LotusScript agents will only report how many documents matched their search criteria, not how many were actually modified. Use the methods NotesLog class to log messages into the log.
266 Domino Designer 6: A Developer’s Handbook
Example debugging agents using MESSAGEBOX
Dim session As New NotesSession Dim db As NotesDatabaseOn Error Goto trapSet db = session.currentdatabaseMessagebox “Debugging to console and log.nsf : “ & db.title
...trap:
Messagebox “Error “ & Err & “ in Initialize, line “ & Erl & “: “ & ErrorExit Sub
The preceding messagebox will be included in the server log.nsf file. If there’s any error event, the error details, including line number, will be recorded in the log file as well.
Example debugging agents using AgentLog class
Dim session as New NotesSessionDim db as NotesDatabaseDim agentLog As New NotesLog("Agent log")
Call agentLog.OpenAgentLogSet db = session.currentdatabaseCall agentLog.LogAction( "DB Title returns: " & db.title)Call agentLog.Close
Tip: If you modularize your LotusScript code (which is a useful idea), you can get a stack trace in case of error by trapping errors in each sub or function and adding line number information to the error message. At the top of each module, add the following line:
On Error Goto trap
At the end, add the following (where subname is the module name):
Exit Sub ‘ or Function...trap:
Error Err, Error & “/subname:” & Erl
Optionally, you can add values of important variables at the end, also. As the error gets passed up the stack, each function adds its name and line number. The error trap in the Initialize sub can record the error in the log, along with its value of Erl, so that you can see not only where the error happened, but how the code got to that point.
Chapter 7. Domino Design elements: agents 267
Figure 7-8 Agent log showing data from debugged agent
7.5 Enabling and disabling scheduled agentsIf you have Designer access or above, you can disable any agents (except manually run agents) in order to prevent servers from running them automatically. This is useful for debugging a problem with an agent.
Designers can still run disabled agents by selecting an agent at the agent pane, and choosing Actions -> Run, or by right-clicking on an agent, and selecting Run. After you re-enable them, scheduled agents resume their schedule.
Note: This example logs directly to the agentlog which you can find in the Domino 6 Designer Client. You can also log to separate databases or files, using methods found in the LotusScript class NotesLog.
New in Domino 6: As a developer, you can allow agents to be enabled and disabled by users who have editor access or higher. This allows a scheduled agent on the server to be enabled or disabled, without re-signing the agent; see Figure 7-9 on page 269.
268 Domino Designer 6: A Developer’s Handbook
Figure 7-9 User activation
7.5.1 To disable and enable individual agents1. Select the database and go to the Shared Code and Agent pane.
2. Click the enabled agent and choose Disable from the new Domino 6 user interface (action buttons in the list of agents). Icons will toggle and show what state the agent is in; see Figure 7-10.
To enable a disabled agent, click the agent and choose the Enable button.
Figure 7-10 Enable and disable agents
Tip: If the Allow user activation box is checked and someone enables the agent, the agent is not re-signed. If this box is not checked and someone (with Designer access or above) enables the agent, the agent is re-signed.
Chapter 7. Domino Design elements: agents 269
7.5.2 To disable all automated agents in a databaseDisabling all agents is useful for debugging a problem with an agent running on a server.
1. Select the database and choose File -> Database -> Properties.
2. Click Disable background agents for this database.
Figure 7-11 Disable all automated agents in a database
7.6 Troubleshooting agentsThe Agent Manager runs background agents—scheduled, mail-activated, and change-activated agents—according to the schedules that you specify in the agent manager section of the server document in the Domino Directory. If an agent is not executing correctly, or if you are experiencing performance difficulties, there are a number of areas that you can examine to correct problems, as described in the following sections.
7.6.1 Agent is not runningFor this problem, check the access for the agent to make sure that the agent can run on all specified databases. For example, if you design an agent to copy documents from database A to database B, but you don’t have access to database B, the agent will not be able to execute the task. To check for access problems, view the Agent Log after the agent runs, or use other debugging methods to capture what is going wrong.
270 Domino Designer 6: A Developer’s Handbook
Make sure that the agent is completing its task. If the task exceeds the amount of time allotted in the Max LotusScript/Java execution time setting in the server document, the Agent Manager terminates the agent before the task is complete. Increase the allotted time for execution, or rewrite the agent as several smaller agents.
Also, make sure that the signer of the database or the agent itself has execution rights and access to perform and run the agent on the server, as well as access to all the involved methods and actions taking place.
7.6.2 Agent Manager is not workingFor this problem, make sure that the Agent Manager is scheduled to run when agents are scheduled. In the Agent Manager section of a server document in the Domino Directory, make sure the Start time and End time parameters are set for Daytime and Nighttime to cover the hours when agents are scheduled to run. Adjust these parameters as necessary.
7.6.3 Agents are running slowlyFor this problem, check to see if you have too many agents competing for server resources. Reschedule agents for the nighttime hours, when system demand is lower.
Alternatively, allocate additional system resources to the Agent Manager by increasing the Max concurrent agents setting and the % of polling period setting in the Agent Manager section of the server document. (Be aware, however, that shifting resources to the Agent Manager might slow down other server processes.)
Listed here are some of the reasons why agents might be slow:
� The database is not full-text indexed.
� Agents iterate through all documents to find a few to act on, instead of using selection criteria.
� You are using GetNthDocument instead of GetFirstDocument and GetNextDocument.
� Agents should use NotesView. AutoUpdate to prevent view re-indexing each time a document is modified.
7.6.4 Agent will not run on a particular serverFor this problem, examine the Agent Manager section of the server document in the Domino Directory to make sure that the user who created the agent has
Chapter 7. Domino Design elements: agents 271
access to run the agent on the server. Also, check the access control list for the server to make sure that the user who creates an agent has access to the server. An agent inherits access rights from its creator, so an agent cannot run on a server to which the creator does not have access.
If the agent cannot access information on another server, check the other server’s trust setting on the server document.
7.6.5 Debugging with NOTES.INI settingsIf you are unable to determine why your agent is not running by using these procedures, you can turn on the debugging flag for the Agent Manager in the NOTES.INI file on the server. To do this, add the following line to the server NOTES.INI:
Debug_AMgr = flag
Flag can be one, or a combination, of those listed in Table 7-3.
Table 7-3 Debug flags
The output is written to the server console log and the Notes Log.
Additionally, you can turn on agent execution logging. To do this, add the following line to NOTES.INI. (You can also do this in the server configuration document in the Domino Directory.)
Log_AgentManager = value
Flag Output
c Show output agent control parameters
e Information about Agent Manager events
l Agent loading reports
m Agent memory warnings
r Agent execution reports
s Information about Agent Manager scheduling
v Verbose mode, showing information about agent loading, scheduling, and queues
* All of the above information (same as turning on all the flags)
Important: Be aware that debugging affects server performance.
272 Domino Designer 6: A Developer’s Handbook
The list of values is shown in Table 7-4.
Table 7-4 Values for Log_AgentManager parameter
This setting gives you only a subset of information compared to what the Debug_AMgr generates, but it has less of an impact on the performance of the server.
7.6.6 Debugging at the server consoleUse the following server commands to troubleshoot the Agent Manager; in the following sections, we describe their use in more detail.
Tell amgr scheduleIssuing this command on the server console shows the Agent Manager schedule of all agents scheduled to run for the current day. Use it to see if your agent is waiting in one of the Agent Manager queues.
There are three queues:
� A queue for agents that are eligible to run (E)
� A queue for agents that are scheduled to run (S)
When the time they are scheduled to run arrives, they are moved into the Eligible to run queue.
� A queue for event-triggered agents waiting for their event to occur (V)
Event-triggered agents (new mail and document creation/modification agents) are queued in the Event queue until an event they are waiting for occurs. When the event occurs, the agents move into the Scheduled queue and then into the Eligible to run queue.
Here is an example:
E S 09:33 AM Today agent_a TEST.NSFS S 09:54 AM Today agent_b TEST.NSFV U agent_c TEST.NSF
Value Output
0 No logging
1 Show partial and complete success
2 Show complete success
Chapter 7. Domino Design elements: agents 273
In this example, the first column contains the Agent Manager queue type. The second column contains the agent trigger type (S means the agent is scheduled, M represents a new mail-triggered agent, and U represents a new/updated document-triggered agent). The following columns show the time that the agent is scheduled to run, the name of the agent, and the database name.
Tell amgr statusUse this command to show a snapshot of Agent Manager status. It provides information about all settings in effect.
Tell amgr debugUse this command to set or change Agent Manager debug settings. You need to use the same debug values as shown above for the Debug_AMgr setting in the NOTES.INI file.
7.7 Agents and the WebAgents are also used in the Web environment to perform several functions. In this section, we will concentrate on agents that can be activated by a user on a Web browser.
As an application developer, you will most likely create two sets of agents in order to perform the same operations from both a Notes client and from a Web browser. The main reason for this is the difference in the way in which an application interacts with the user in the two environments.
In Domino, the applications can interact with users by using message boxes or by prompting information (for example, to change the values in the fields of the currently open document).
On the Web, however, the only way to show information to users without using JavaScript is by using HTML to create Web pages. If you want to change the current document on the Web, you can only do it before the document is loaded, using the WebQueryOpen event, or before it is saved, using the WebQuerySave event.
Agents for Web users are most often written using LotusScript or Java, since Simple Actions are not available on the Web and @formulas do not allow you to return information to users.
Note: It will take up to a minute for an agent to appear in a queue, or to move from one queue to another.
274 Domino Designer 6: A Developer’s Handbook
Note: Remember, agents cannot run in a browser. They can be activated from a browser, but they run on the Domino server containing the agent.
7.7.1 The Document Context of a Web agent and CGI variablesWhenever a LotusScript agent is run from the Web, the NotesSession.DocumentContext property returns a NotesDocument containing information about the Web session, as well as access to all items in the document. This document contains the values of all CGI variables associated with the browser session and with the agent call.
If an agent is called in connection with a Web form event (WebQueryOpen or WebQuerySave), DocumentContext gives the document being opened or saved. The CGI variables are also supplied in this document (even though they might not appear on the form).
Common Gateway Interface (CGI) is a standard for interfacing external applications with HTTP servers. When a Web user saves a document, opens an existing document, or runs an agent using an “?OpenAgent” URL, the Domino Web server uses CGI variables to collect information about the user, including the user’s name, the browser, and the user’s Internet Protocol (IP) address.
The following example demonstrates how to access CGI variables:
Dim session As New NotesSessionDim context As NotesDocumentDim CGIValue As String
To create an instance of the DocumentContext:
Set context = session.DocumentContext
Once you have access to this object, you can access every CGI variable and store it in a LotusScript variable; for example:
CGIValue = context.HTTP_USER_AGENT(0)
CGIValue (string) now has information about the user’s browser.
Following are some examples:
� To determine Web identity:
Set webUserName = context.remote_user(0)
� To read the arguments passed, that is, the string followed by the ampersand (&) that ends some URLs:
Set args = context.query_String(0)
Chapter 7. Domino Design elements: agents 275
7.7.2 Agent outputThe Domino server captures the output stream of an agent and uses that as the Web page returned by the agent. In the case of a LotusScript agent, the output stream is anything output with a Print statement.2
There are three types of values the agent might choose to print:
� The actual information to be displayed on the browser (an HTML Web page, generally)
� A URL that the browser should redirect to, in [square brackets]
� A URL that should serve as the new page contents, in [[double square brackets]]
When redirecting to a URL, it’s generally preferable for performance reasons to use the double brackets, since this saves one “round trip” between the browser and server. This is the preferred option when possible.
If your agent prints anything that does not start with square brackets, the output is assumed to be HTML code. Domino will automatically add an HTML header to the page. If you prefer to write your own HTML header, or if your output is not HTML, you must supply a header line that tells the content type of the page. For instance, if you’re printing HTML information, your first print statement should be:
Print "Content-Type:text/html"
If your output begins with a Content Type line, Domino will send the rest of your output exactly as is. You may specify other content types using the standard type codes recognized by browsers, so it’s possible for agents to output PDF files, GIF images, and so on.
7.7.3 Running multiple instances of an agentBy default, all agents run serially from the Web, one after the other. This can cause a performance bottleneck on heavily used sites or sites with slow agents. When Domino is being used as a Web server, you can add the following line to the NOTES.INI file on the Domino server:
DominoAsynchronizeAgents=1
2 Messagebox output goes to the server log database, log.nsf.
Tip: Rather than use an agent to generate a Web page on the fly, it is generally easier and more efficient to create a page (or form) that displays the desired output, and redirect the browser to that page.
276 Domino Designer 6: A Developer’s Handbook
This allows an agent to be run by more than one person at the same time. By default, the Domino server only runs one copy of an agent at a time and queues other requests.
Agent designers will need to make sure their agents are thread-safe. Currently, there is no way to selectively serialize an agent.
7.7.4 WebQueryOpen and WebQuerySave agentsThere are two special events in all Domino forms: WebQueryOpen and WebQuerySave.
WebQueryOpen eventA WebQueryOpen event runs the agent before Domino converts a document to HTML and sends it to the browser. Domino ignores any output produced by the agent in this context.
Examples for using this agent include performing large computations that are not possible with @commands, or collecting statistics about who opened documents and when.
WebQuerySave eventA WebQuerySave event runs the agent after field validations and before Domino saves the document in the database. The agent can run any operations with document data or modify the document.
An example of a WebQuerySave agent could be an agent that creates another document in the Notes database but does not save the current document.
To perform error checking, field validation, and other processing before Web users open or save documents, create a shared agent that runs manually.
Important: Be sure to implement this with caution. There have been problems registered using this setting in combination with Domino.Doc and other situations.
This NOTES.INI setting will make all Web-triggered agents run asynchronously; however, before using this setting, you must consider what all the agents on the Web site are doing so they do not run over each other and cause data corruption.
Data corruption could be caused by two or more invocations of the same agent attempting to modify the same document at the same time. This could produce unpredictable results.
Chapter 7. Domino Design elements: agents 277
You can then write a formula that uses @Command([ToolsRunMacro]) to run the agent and attach it to the WebQueryOpen or WebQuerySave form events. This simulates the LotusScript QueryOpen and QuerySave form events that are not supported on the Web.
The best place to do validations in a Web application is normally with JavaScript code on the form. Since JavaScript executes in the browser, without the need to submit the form to the server, it executes much faster and reduces server load.
However, certain validations have to be done on the server because they depend on information that’s only available on the server (for example, a test to see that the document title is unique in the database). If a WebQuerySave is used for validation, a LotusScript agent can use Print to display an error message and set the document’s SaveOptions field to zero (“0”) to prevent it from being saved.
7.7.5 Using the @URLOpen command to call agentsThe @URLOpen function allows you to reference an agent within a formula. You can associate such a formula with a button to invoke agents from a Web browser. These agents run when the user clicks the button. Following is an example @URLOpen formula to run an agent named UpdateEntries:
7.8 Using agents (advanced topics)Agents are very useful if you need to change the design of a database. They can help you to keep the data in the database consistent with the design. For example, you can use an agent to update all documents that are affected by a form change. Usually you will create a private agent which selects the documents affected by the form changes and run it manually.
Tips:
It’s inefficient to write an WebQuerySave agent just for the purpose of displaying a Thank you page when a form is submitted. Instead, use the $$Return field on the form to give the URL of a page that displays the message you want.
Macro formulas in form fields or in the WebQueryOpen and WebQuerySave events are more efficient than agents. Since formula language now supports looping, you can do more than you might think about without writing agents.
278 Domino Designer 6: A Developer’s Handbook
The following is a list of examples of where agents can be very useful after changes are made to the design of a database:
Editing and resaving documentsTo save the step of editing and resaving documents manually, create an agent that uses the following formula:
@Command([ToolsRefreshAllDocs])
Adding a fieldIf you create a new field, insert the new field into existing documents by creating an agent that uses the following formula:
FIELD New_field_name := value;
where New_field_name is the name of the field, and value is the value you want the field in these documents to have. The value can be the field default value, a formula that calculates the value, or a null value (“”) that inserts the field into the documents, but does not give them any initial value.
Removing field data from all documentsIf you delete a field, existing documents continue to store the obsolete field and its values. This unnecessary storage can affect disk space. To remove the obsolete field, create an agent that uses the following formula:
FIELD Field_name := @DeleteField;
After you run the agent, compact the database to reduce its actual file size.
Renaming a fieldIf you rename a field, existing documents continue to refer to the old field name. To update documents to refer to the new name, create an agent that uses the following formula:
FIELD New_field_name := Old_field_name;FIELD Old_field_name := @DeleteField;
where New_field_name is the new name for the field, and Old_field_name is the original name for the field.
Note: This will not succeed with fields assigned by LotusScript event code on the form.
Note: For removing rich text fields, don’t use this technique; LotusScript will give you better results.
Chapter 7. Domino Design elements: agents 279
Reassigning documents to another formIf users attempt to open documents created with a form that has since been deleted, they see a message indicating that the form cannot be found. To prevent users from seeing this message, use these agent options to reassign existing documents to another form:
1. Under Which document(s) should it act on, select All Documents in Database and click Add Search.
2. Select By Form Used, select the name of the obsolete form, and click OK.
3. In the design pane, click Formula and enter:
FIELD Form := "Reassigned_form_name";
where Reassigned_form_name is the name of the form that the documents should use.
Removing the stored form from documentsSelecting the form property Store Form in Documents is useful for mail-enabled applications in which users need to see a document and don’t have the original form stored in their mail databases.
This form property is permanently attached to all documents created with the form. To remove the stored form, remove all internal fields connected with that form by creating an agent that uses the following formula:
This formula removes all internal fields attached to the documents where Old_form_name is the name of the form used to create the documents. The last line creates a FORM field where New_form_name is the form that will display the documents in the future.
After you run the agent, compact the database to reduce its actual file size.
7.9 New features in Domino 6The new features of agents in Domino 6 are covered in Chapter 12, “New features in Domino 6” on page 347.
280 Domino Designer 6: A Developer’s Handbook
The following features of agents are detailed there:
� New agent user interface
� “Run on behalf of”
� User activation
� Converting shared and private agents
� Remote debugging of server agents
� Ability for server agent to access information on other servers
7.10 SummaryAgents allow you to automate many tasks within Domino. They can operate in the background to perform routine tasks automatically, and in the foreground when called by the user. They can easily be created without programming knowledge by using Simple Actions, but very complex algorithms can also be implemented using LotusScript or Java.
On the Web, you can also use agents to perform operations before a document is opened or before it is saved. In addition, you are also able to access CGI variables to capture information about the user.
Chapter 7. Domino Design elements: agents 281
282 Domino Designer 6: A Developer’s Handbook
Chapter 8. Domino Design elements: framesets
In this chapter, we describe what Domino framesets are, and how to design and modify them. We discuss the basic design elements used when creating a Domino database. We also explain how to show different information to Web users and Notes users
8.1 FramesetsA frameset in a Notes client or in a Web site is a screen that displays multiple independent pages, each in its own rectangular “frame”. The frameset designer provides visual tools and wizards to easily create multi-paned interfaces for Domino applications.
Framesets provide a standard way to set up a multi-pane interface for the user. The Frameset designer enables you to create framesets and then associate specific pages, views, forms, Java applets, ActiveX components, or any URL with each frame. You can also make your framesets dynamic by writing a macro formula to calculate what to display in the frame.
We will use the TeamRoom database template as a basis for demonstrating the Domino 6 elements. You will find the template for the TeamRoom database on your Domino server.
To create a new frameset in Domino Designer, open the Framesets design view and click New Frameset, or choose Create -> Design -> Frameset.
A window such as Figure 8-1 will be displayed where you can choose your initial configuration. Select the layout you want and click OK.
Figure 8-1 Create a new frameset
You are not limited to your selection on this screen; you can add or remove frames later.
284 Domino Designer 6: A Developer’s Handbook
8.1.1 Specifying frameset propertiesThe Frameset InfoBox contains all the information related to framesets. To view the frameset properties while you have a frameset open in Designer, use Frame/Frameset Properties.
In the InfoBox, click the triangle in the middle of the InfoBox title and select Frameset. An InfoBox will be displayed which allows you to set the properties of the frameset. It contains two tabs:
� Basic� HTML
Using the Framesets Basic tabThe Frameset Info tab stores general information about the frameset; see Figure 8-2.
Figure 8-2 Frameset properties
1. In the Name field, specify the “display name” of the frame.
2. In the Alias field, provide an alias for the frameset. An alias is an internal name for the frameset. Use the alias if you need to refer to the frameset in your program code. This lets you change the display name without breaking your code.
3. The text in the Comment field is information for developers.
4. In the Title field, enter a macro formula that will be the window title of the frameset. Generally this will be a constant string (in quotes), but you can use most of the @Functions in the Notes macro language, as shown in the example in Figure 8-3 on page 286.
Chapter 8. Domino Design elements: framesets 285
Figure 8-3 Computed title in Designer client
This would give a more personal look to the application; see Figure 8-4.
l
Figure 8-4 Computed title in Notes client
Using the HTML tab
The HTML tab is the same for frames as it is for various form elements, for consistency. However, the Class and Style attributes do not apply to frames, so there is no reason to fill them in.
8.1.2 Specifying frame propertiesFrameset is a collection of frames and now we’ll show how to modify these frames. The Frame Info Tab stores general information about the frame.
Tip: Although Title is not a required field, supplying a title makes for a more user-friendly application. The user cannot tell which tab is which if they all say “(Untitled)”. This information is also shown on the window title when accessed with a Web browser or Notes client.
286 Domino Designer 6: A Developer’s Handbook
1. In the InfoBox (property box), click the triangle in the middle of the InfoBox title and select Frame. An InfoBox will be displayed which allows you to set the properties of the frame. It consists of five tabs:
– Info– Frame size– Frame Border– Advanced– Additional HTML
Using the Frame Info tab1. In the name field, you specify the frame name. This is the name you would
use to target other links (for example, when you click a link in frame A, the new page is displayed in frame B). This field contains the name you will use to tell the link which frame to open in.
2. In the Type field, you specify what you want the frame to display initially when the frameset is opened. You can select three different types:
– Link
Link requires that you paste in a link that you've already copied to the Clipboard. Click the Paste icon to paste in the link. There are three kinds of links you can paste in from the Clipboard: View, Document, or Anchor.
– Named Element
A named element is a design element that you have already created and named. A named element can be a page, form, frameset, view, folder, or navigator.
When you click Named element, then a new icon called Browse will be available in the info tab of the frame property; see Figure 8-5 on page 288.
Note: Database links are not supported in framesets.
Chapter 8. Domino Design elements: framesets 287
Figure 8-5 Browse named elements
When you click this, a window will be displayed allowing you to navigate and easily select the named element you want to link to; see Figure 8-6.
Figure 8-6 Locate object window
The choices you have to verify are:
i. Kind of object
Choose the named type of element.
ii. Database
Choose from which database you want to pick this element.
i. Element name
Choose the element itself.
288 Domino Designer 6: A Developer’s Handbook
Instead of selecting a specific design element, type, and database, you also have the option to calculate these when the frameset is opened. Click the button with the at (@) symbol; this will open a formula editing window, as shown in Figure 8-7. This is useful when you need to display different information depending on the user’s identity, roles, or preferences.
Figure 8-7 Frame formulas to display different screens depending on user roles
– To put a Web page into a frame, choose URL and enter the full URL specification (for example, http://www.ibm.com/redbooks). You can also paste in a URL or use a formula that evaluates to a URL.
When you click a link in a Web page (in the Notes client or in a Web browser), the link may open within the same Web page or in a new window, depending on the setting for that Web page.
Note: The database formula must return the file path of the database in the form server!!pathname (for example, Trondheim!!mail2\rcarlsen.nsf). For local databases, use only the pathname.
Tip: The URL must include the initial “http://” or “https://”. You may also specify a Notes URL, beginning with “Notes://”. For examples of Notes URLs, explore the design of the framesets in your bookmark.nsf database.
Chapter 8. Domino Design elements: framesets 289
3. Default target for links in frame
Enter the target frame for links activated within the current frame.
Using the Frame size tabFigure 8-8 shows the Frame size tab. On this tab, you can manually adjust both the width and height of the frame.
Figure 8-8 Frame size
1. Switch to the size tab of the InfoBox.
The following options are available:
– Relative - This means that you specify the width and height relative to the frames in this set. For example, if you have two frames and set the width for the first one to 1 and the second to 2, the second frame will be twice as wide as the first.
– Pixel - With this selection you provide an absolute value measured in pixels.
– Percent - This option allows you to specify the width and height values as a percentage of the window.
You can also resize the frames by dragging their edges with a mouse.
2. Scrolling
If you choose On, this forces a scroll bar for the frame; if you choose Off, then no scroll bar will appear. If you choose Auto, the scroll bar appears if it is needed. The default is Auto.
3. Allow Resizing
If you choose Yes, you allow users in the Notes client or Web browser to change the height and width of frames by dragging their borders. If you choose No, then users cannot drag borders to resize the frame.
290 Domino Designer 6: A Developer’s Handbook
4. Set Initial Focus
Checking this box causes the focus to be on this frame when the frameset is launched in the Notes client. If this property is enabled for more than one frame in a frameset, the first frame found is enabled.
If this property is enabled on a frame that either has no content or has content that cannot be found, there is no frame focus.
Using the Frame border tabFigure 8-9 shows the Frame border tab.
Figure 8-9 Frame border
The following options are available:
1. 3-D border
This displays three-dimensional borders between the current frame and its adjacent frames.
Note: When a user drags a frame border, they are really resizing more than one frame—one gets larger, while another gets smaller. To let the user resize a frame, all the frames involved must allow resizing.
Chapter 8. Domino Design elements: framesets 291
1. Apply to all frames
This adds or removes three-dimensional borders between all frames in the frameset
2. Border style
– Border width (in pixels) - the default is 7 pixels. Checking Default means that the frame displays according to the user's browser settings. Each browser renders design elements differently, so be sure to preview your work in each browser if you are choosing this setting.
– Border color - choose a color from the drop-down color chart. Click the system (monitor) icon at the top of the color chart to get the default color. Click the wheel icon at the top of the color chart to create a custom color.
3. Border caption
You can use a caption for frames and turn it collapsible. In this way, you can label the frames and allow wide navigation between the collapsible frames, thereby providing more information in the same screen area and displaying it at your convenience.
– Caption Formula - enter a formula that translates to a caption that appears in the border.
– Show - you can choose None, Caption only, Arrows only, or Both:
• None - shows the default border with no caption or arrows.• Caption only - displays a caption in the border.• Arrows only - displays an arrow in the border. This arrow lets you open
and close the frame.• Both - displays both a caption and an arrow in the border.
– Align - note the following:
• For a caption, choose to align so that the caption appears inside the top or bottom border of the frame.
• For an arrow, choose to align so the arrow appears at the top, bottom, left, or right border of the frame.
• For both a caption and an arrow, you can align top or bottom. Note that the border appears only where the caption or arrows appear. For example, if you choose Top, then the border displays on the top only.
Notes:
This is a new feature in Domino 6. Refer to 12.19.1, “Collapsible and captionable frames” on page 475 for more information.
This feature is only supported in the Notes client.
292 Domino Designer 6: A Developer’s Handbook
– Justify - choose to justify the caption or arrows so they appear to the left, right, or center of the border.
– Open - choose a size in pixels or as a percent of the frame. This size is the default size that the frame opens to when the user clicks the border of a closed frame.
– You can also specify text characteristics for the caption and arrows, such as font, size, style, and color. In addition, you can specify a background color for the border.
For an example of how this looks, refer to the default Welcome Page in the Notes client.
Figure 8-10 shows a frame that is expanded.
Figure 8-10 Caption on frame and collapsible frames
This frame can be collapsed by clicking the frame border arrow; see Figure 8-11 on page 294.
Note: You can’t see Align options if you select Show - None.
Chapter 8. Domino Design elements: framesets 293
Figure 8-11 Frame Border tab
Figure 8-12 on page 295 illustrates the relationship between Designer settings and the output.
294 Domino Designer 6: A Developer’s Handbook
Figure 8-12 The relationships between Designer settings and output
Using the Frame Advanced tabFigure 8-13 shows the Frame Advanced tab.
Figure 8-13 Frame Advanced
The following options are available:
1. Frame Spacing
The default is minimal space between frames. You specify spacing between frames in pixels.
Chapter 8. Domino Design elements: framesets 295
Checking Default means that the frame displays according to the user's browser settings. Each browser renders design elements differently, so be sure to preview your work in each browser if you choose this setting.
2. Margin Height and Margin Width
The default is minimal space between the frame border and the frame content. You specify height and width in pixels.
Checking Default means that the frame displays according to the user's browser settings. Each browser renders design elements differently, so be sure to preview your work in each browser if you choose this setting.
Using the Frame HTML tab1. The HTML tab has the same fields as the HTML tab of framesets.
8.2 Changing the layout of a framesetYou can change the layout of a frameset whenever there is a need to do so. Simply select the frame that you want to alter and select the desired action.
By using the buttons shown in Figure 8-14, you can add, delete and alter the contents of the frame. You can then size the frame by dragging its border, or by specifying a precise size in the Properties box, as previously described.
Figure 8-14 Frame buttons
Note: This property is not supported in the Notes client.
Note: This property is not supported in the Notes client.
Tip: Most screen reader software will speak the title text of the frame to let the user know what frame they’re in. To make your application accessible, you should fill in this field.
To learn more about designing accessible applications, see:
http://www-3.ibm.com/able/accessr5.html
296 Domino Designer 6: A Developer’s Handbook
When you are designing frames and framesets, the View menu contains the following commands:
� Refresh all
This refreshes the content of each frame with changes you have made since opening the frameset.
� Show Frame Content
Once you have populated the frames, you can use this menu option to view either the actual content of the frame, or a short description of the frame content. For example, instead of an actual Web page appearing in a frame, the frame contains text such as:
Content type: URL
Content value: http://www.ibm.com/
Now we can change some of the layout in the framesets. We use BorderFrame Frameset in the TeamRoom database, as shown in Figure 8-15.
1. Open Designer - Framesets - BorderFrame.
Figure 8-15 BorderFrame in Designer
– You can preview the frameset in the Notes client by selecting Frame - Preview in Notes, or by using the Toolbar button Notes Preview; see Figure 8-16 on page 298.
Chapter 8. Domino Design elements: framesets 297
Figure 8-16 FrameBorder Frameset in Notes 6 client
– You can preview a frameset in a browser by selecting Frame - Preview in Web Browser and selecting the browser of your choice, or by using the Toolbar buttons for each browser.
298 Domino Designer 6: A Developer’s Handbook
Figure 8-17 BorderFrame in Web browser
2. Now you can create a new frame in the frameset. In Designer, select the frame you want split.
– Click the Split into Row button; now you have the new frame.
– Open Frame Properties. Add your frame information (in this example, we will use a Web page):
• Content Type - URL• Content Value - http://www.ibm.com/redbooks
Figure 8-18 on page 300 shows the frameset after the split.
Chapter 8. Domino Design elements: framesets 299
Figure 8-18 Frameset after splitting a frame in Designer client
– You can preview the new frameset in the Notes client by selecting Frame - Preview in Notes, or by using the Toolbar button Preview Notes; see Figure 8-19 on page 301.
300 Domino Designer 6: A Developer’s Handbook
Figure 8-19 Notes client
– You can preview the new frameset in a browser by selecting Frame - Preview in Web Browser and selecting the browser of your choice, or use the Toolbar button for your preferred browser; see Figure 8-20 on page 302.
Tip: One frame of a frameset may contain another frameset that you design separately. This can be useful, for instance, if you don’t want the same border width on all frames.
Chapter 8. Domino Design elements: framesets 301
Figure 8-20 Web browser
8.3 New features in Domino Designer 6� Collapsible
� Captionable
These features are covered in this chapter, as well as in Chapter 12, “New features in Domino 6” on page 347.
8.4 SummaryThis chapter explains the main features available to application developers when creating framesets in a Notes/Domino application.
302 Domino Designer 6: A Developer’s Handbook
Chapter 9. Domino Design elements: outlines
In this chapter, we explain the use of the outline element.
Outlines, like imagemaps and navigators, provide a way for users to navigate an application. However, unlike imagemaps or navigators, outlines let you maintain a navigational structure in only one place. As your site (or application) changes, you make only one change—in the source outline. Each navigational structure that uses that outline source will be dynamically updated.
9.1 Outline DesignerYou can create an outline that lets users navigate to the views and folders in your database, perform actions, or link to other elements or URLs outside of your application. You can create an outline that navigates through your entire application or site, or through part of it.
Once you create the source outline, you embed it on a page or form to create an outline control. This displays it to users as a site map or navigational structure. Users can click the outline entries to take them where you want them to go.
With an outline, you can create a logical structure just once and then use it in multiple places, specifying the appearance at the place you use it. For instance, the same outline might be displayed on your home page in a vertical configuration—or, in other pages—horizontally, across the top.
When you create a new outline, the work area looks as shown in Figure 9-1.
Figure 9-1 The Outline work pane
304 Domino Designer 6: A Developer’s Handbook
The Outline Design work area consists of buttons, the Outline view, and the work area. We describe each of these items in the following sections.
ButtonsNew EntryYou can add a new entry to your outline. When you click this button, the new entry InfoBox is displayed; see Figure 9-2.
Figure 9-2 Outline Entry properties box
In the Info tab, you can set the following:
� The Entry in the Label field. This is shown to users, so make it as descriptive as possible.
� The Popup field. This allows you to type pop-up text that you want to appear. Popup text appears if the window is not wide enough to display the entire label and the user moves the mouse over the outline entry.
� An Alias for the Outline entry. We recommend that you use alias, because this is the name you will use, should you need to refer to that outline entry. Specifying an alias enables you to leave your code unmodified if, for example, the user requests having the name of the Outline entry changed—or, in a multilingual application—it enables you to refer to an entry without to knowing what language is being used.
� The Type field. This allows you to select the Link type. The available options are Action, Link, Named Element, and URL.
If you select Action as type, an icon will be shown to enter the formula; otherwise, if you select Link or Named Element as type, a new field appears
Chapter 9. Domino Design elements: outlines 305
that allows you to specify in more detail what you are linking (page, form, database, and so on). This field gives you a combobox where all the available elements are shown.
� The Value field. This is only used for online entries of the URL type. In this field you type the URL address for this entry (or you can use a formula to compute it dynamically).
� The target frame in which to display the link. This setting is optional. If supplied, it overrides the default target specified for the frame containing the outline.
� The Image value. This indicates which icon to display to the user, to the left of the label value. Images are stored in the Image Resources part of a database.
� If you select Does not keep selection focus, then after a user clicks an entry, the entry will not remain selected. Instead, the previously selected entry will retain the focus.
� If you select Read only, users will only be able to read the outline entry (they will not be able to edit it).
In the Hide When tab, you can programmatically set the Hide When conditions for the outline entry.
Save OutlineThis saves the outlines.
Use OutlineThis creates a page and then displays a dialog list where you can select the current outlines.
Generate Default Outline This creates a default outline. This outline will be based on the folders and views in the current database.
Note: In Designer 6, you can now specify the content of an Outline Entry based on a formula. This is a really useful feature, because you can handle different situations in the application while providing the user with the appropriate information and application resources.
Tip: It is generally quicker to create a default outline first and then modify it, rather than creating an outline by adding one entry at a time—but it all depends on the number of entries you want in your outline.
306 Domino Designer 6: A Developer’s Handbook
Indent Entry This enables you to indent the outlines. Outlines with indented entries can be expanded and collapsed to drill down into long lists.
Outdent Entry This enables you to outdent the entries.
Outline Pane This is the place where you can modify your outlines by dragging and dropping the entries from one place to another. You can also change the entry settings and options by opening the Entry InfoBox.
Programmer’s PaneThis contains the Entries Events, so that you can dynamically generate their values at runtime. The available events are:
� Label - You can name your Entry.
� Source - The element name specified in the outline entry.
� Frame - The frame name that should open.
� Image - The image from the Image Resource that you are using in front of the entry.
� Hide When - This defines when the entry is displayed. @Userroles is often used in the hide formulas. Use of individual user or group names is not recommended, for ease of maintenance.
9.2 Creating a new outlineWe now create a new entry that is linked to the page called WelcomePage in the TeamRoom database. To create a new outline, follow these steps:
1. Open a database in Design mode.
2. Go to the Outline design view and click the New Outline button.
3. Click the Generate Default Outline button to generate a default outline, including all views and folders inside the current database. The outline might look as shown in Figure 9-3 on page 308.
6. Link the page by selecting Named Element in the Type field, selecting Page in the Kind field, and adding the page name, HelpMission, in the Value field.
7. When you have inserted all of the required information, the entry InfoBox should look similar to Figure 9-4 on page 309.
308 Domino Designer 6: A Developer’s Handbook
Figure 9-4 The Outline Entry properties
8. Save the outline.
To delete the entry, right-click and select Clear, or mark the entry and press your Delete key.
9.3 Embedded OutlineThe Embedded Outline is one of the embedded elements in Domino Designer, and it allows you to insert the outlines into your form, subform, page, or rich text field.
After you have inserted the outlines into some of these design elements, you do not need to reinsert or modify the current page if you make any changes to the outlines; Domino already has this capability. This can save time when maintaining your application.
To insert the outlines, do the following:
1. Create a new page, or go to the existing page.2. Move your cursor to where you want to insert the outline.
Note: You can always come back and modify each of the entries by opening the InfoBox.
Chapter 9. Domino Design elements: outlines 309
3. Choose Create -> Embedded Element -> Outline to insert the outline into the page.
4. Choose an outline in the list, or insert an outline based on a formula; see Figure 9-5.
Figure 9-5 Embedded Outline in a page
Embedded Outline InfoBoxThe InfoBox is shown in Figure 9-6 on page 311.
Note: You can also insert the outline into a table or nested table; this gives you more control over how the outline should look.
You can have tables with captions that show different outlines when the different captions are clicked; this gives you both a more dynamic outline—and enables you to have much more information and navigation in a small area (captionable tables do not take up much place, so by adding outlines inside these tables, you can have several, large navigation structures in a rather small area).
310 Domino Designer 6: A Developer’s Handbook
Figure 9-6 Embedded Outline properties box
Let’s see what outline entries look like in different clients when you change their appearance. Following are some of the features that you can control from this InfoBox.
Info tabUsing the Info tab, you can identify your outlines by name. Furthermore, you can set the following:
� Type - Tree or Flat. This setting allows you to decide whether or not to show the hierarchy of the Outline. Tree style shows all of the outline entries in the hierarchy, while Flat shows only one level at a time. Use the Flat style selection in conjunction with the Title style setting.
If you choose Flat Style, you have the option of displaying the outline vertically or horizontally. Display horizontally displays entries to fit the window across, instead of down.
� Title style - Hide or Simple. These settings work in conjunction with the Type: Flat Style setting. In a Flat style outline, Simple style lets users navigate back up to prior levels by displaying the parent of the current level in a flat outline.
Hide style does not display any hierarchy, so once users go down a level in the outline, they cannot navigate back up.
� Target frame - Specify the frame where you want the links in the outline to be opened.
Chapter 9. Domino Design elements: outlines 311
� Twisties - To display a triangle that users click to see outline entries, check Show twisties. You can specify an twistie image. Click the folder icon to select a shared image resource. (Optional) Click the @ button to use a formula to control the image display.
� Root entry - Defining a root entry will show the children of the specified entry only. This can be used as a way to restrict users' access to elements in your site or database.
Specify a root by using the alias of the parent entry. For example, if a parent entry has an alias of “Main”, then enter: Main in the Root entry box and only that entry's children will display in the outline initially. If the specified entry does not have any children, then nothing will display in the outline.
If you want to give users a way to navigate back up the hierarchy from the root entry's children, enable Simple as the Title style for either a Tree or Flat outline. If you want to limit users' access to those children entries only, set the root, and do not enable a Title style.
� Outline size
Width
– To specify the width of an embedded outline as a percentage of the parent window, choose Fit to window (%).
– To specify the width in inches of an embedded outline, choose Fixed (Size).
– To allow automatic sizing of an outline based on its content (for example, the number of entries and whether or not the entries are expanded or collapsed), choose Fit to content.
– To specify the width as approximately the specified number of characters based on the average character width of the specified font, choose Fixed (Chars).
Height
– To specify the height in inches of an embedded outline, choose Fixed (Size).
– To allow automatic sizing of an outline based on its content (for example, the number of entries and whether or not the entries are expanded or collapsed), choose Fit to content.
– To allow automatic sizing of the height of an outline based on the size of the window that the outline is displayed in regardless of its content, choose Fit to window.
312 Domino Designer 6: A Developer’s Handbook
Show scroll bar
– To display a scroll bar if the embedded outline entries do not fit on the screen, check Show scroll bar.
� Web access - select HTML or a Java applet to display an embedded outline to Web users.
Figure 9-7 Embedded outline style samples
Font tabThis tab allows you to specify the font type, style, color, and size for the Top-level font and the Sub-level font.
Background tabThis tab allows you to specify a color or an image to the background of the Top-level font and Sub-level font of the outline.
Layout tabThis tab enables you to customize the spacing and alignment of the outline entries, images, and background. The Layout tab is shown in Figure 9-8 on page 314.
Note: The Outline Java applet is not accessible for visually impaired users using screen reader software. You should provide a page that displays the outline in HTML as an alternative for screen reader users.
Flat style and Tree style and Tree style and Title style simpleTitle style hideTitle style hide
Chapter 9. Domino Design elements: outlines 313
Figure 9-8 Layout tab
Each setting has its picture showing what you are changing. There are three main settings to set:
� Entry
– Which is the entry itself, not the content of the outline entry.
You can adjust the settings for height and offset.
� Entry label
– Which is the entry content, the exact label of the outline entry.
You can adjust the settings for offset, as well as set the alignment of the outline entry.
� Entry image
– Which is the entry image, if the outline entry has this property turned on.
You can adjust the settings for offset, as well as set the alignment of the outline entry.
Hide When tabUse this tab to specify the conditions to hide the embedded outline. You can explicitly hide for some clients (Lotus Notes, web browsers, mobile), or use a formula to do it.
Tip: Notice the Top-Level Layout button, as well as the Set All to Same button. You can have different settings for the different levels of your outline entries.
Top-Level can have one “offset setting” set, while Sub-Levels can have others. If you want to apply the same setting for all levels, click the Set All to Same button.
314 Domino Designer 6: A Developer’s Handbook
Let’s check the final results of an embedded outline in a page, both in the Lotus Notes client and in the Web browser. This page, shown in Figure 9-7, is in a frameset.
Figure 9-9 Embedded Outline in a page, displayed in a frameset
In this chapter, we describe “shared resources”, which are new in Domino 6; what they are, and when and how to use them. In summary, these elements are:
� Images
� Files
� Applets
� Style Sheets
� Data Connections
Shared resources help you control and manage your applications more easily because you can store them within resources and then share these elements, rather than copy and paste the images or applets into several different locations.
Before reading this chapter, you should be familiar with the functions described in Chapter 4, “Domino Design elements: forms” on page 75, where we describe how to create and use various elements in a form. Also see 12.3.1, “Shared Resources” on page 365 for more information about shared resources.
10.1 ImagesThe image resource allows you to store all of the images that you are using in your database. This is a very useful feature because the database can now contain all the pictures that it needs and you don’t need to worry about sending all the images along with an application when you send it to another server, for example.
Use an image resource in preference to pasting or importing an image onto several forms or pages. This saves space, improves performance by letting the client cache the image, and eases maintenance if you need to change it by having the picture stored in just one place.
Creating an image resourceTo create an image resource:
1. Open the database in Design mode.
2. From the shared resources design, click New Image Resource in the view pane.
3. Select your image, and click Open.
When the image is inserted in the view pane, it should look like Figure 10-1.
Figure 10-1 New image resource added to Shared Resources
4. You can specify your image by opening the property box of the added image resource, and entering the alias name and comments for that image.
Open an image resource1. In the shared image resources work pane, highlight the image that you want
to open.
Note: Domino 6 supports .GIF, .JPEG, and .BMP graphics files.
318 Domino Designer 6: A Developer’s Handbook
2. To allow Designer to select the application for opening the image resource, click Open File.
Or:
To select the application for opening the image resource, click Open With.
3. You can now edit the file.
Refresh an image resourceWhen you have edited an image resource, you most probably want to save the updates to the database as well. An image resource that has been edited but not yet refreshed is identified in two places:
� In the shared images work pane, the file name is preceded by a refresh icon.
� In the shared image properties box, the “Needs refresh” check box is selected.
To refresh a shared image resource, perform these three steps:
1. In the shared images work pane, highlight the image resource that you have edited.
2. Click Refresh.
3. In the Open dialog box, select the updated file name and click Open.
The file resource is now refreshed. The refresh icon disappears from the files work pane and the "Needs refresh" check box in the File Resource properties box is cleared.
Adding the image to your formNext, place the image that you have created onto the form.
1. In the database design, go to the Forms design view.
2. Click New Forms in the view pane or select an already existing form to add the image resource to.
3. Go to Create - Image Resources in the Main menu or go to Create - Insert Resource.
Tip: The edited image must still be open in the program where you edited the image to complete the refresh.
In some contexts, you need a set of related images. For instance, a button graphic might need a normal, mouse-over and clicked state, or an icon may need to appear in three different sizes. To support these uses, image resources let you define an “image well” in the properties box of the image resource. You can specify that your graphic actually contains multiple images across or down, and how many. Depending on how the image is used, Notes displays only the portion that applies to the current situation.
Creating a horizontal image resource set1. In a graphics program, copy and modify an image to create a series of images
in different states. All of the images must be the same size.
2. In a single GIF, BMP, or JPG file, line up the images horizontally and separate them with a one-pixel-wide well or line.
3. Create an image resource from the graphic file, as described in “Creating an image resource” on page 318.
4. Double-click the image resource in the list of image resources in the Work pane.
5. On the Basics tab of the Image Resource Properties box, enter the number of images across in “Images across”. This is shown in Figure 10-2 on page 321.
Note: “Create - Insert Resource” is a new Domino 6 feature that lets you choose among all the shared resources available, not only shared images. Independent of which method you use, you can now use another new feature in Domino 6 that enables you to insert shared resources from any database available, not only from the current database.
Tip: You can preview the form by choosing Design - Preview in Notes or using the toolbar icon for previewing in the Notes client.
320 Domino Designer 6: A Developer’s Handbook
Figure 10-2 Image resource - horizontal set
The number of images corresponds to the number of states you are using. The four images map to the four states as follows:
Table 10-1 Image Resource set
Figure 10-2 is taken from the bookmark.nsf database. It is used on the Welcome page when you select and do a mouse-over on the mail icon for opening your mail file.
You can also create a vertical image resource set, similar to the horizontal set. The same rules apply, but they have different targets for using them.
When to use horizontal and vertical image resource setsUse a horizontal image set to create an image that appears to change depending on its state. For example, when a user passes the mouse over an image, you
Images across State Position
1 Normal image First position
2 Mouse-over image Second position
3 Selected image Third position
4 Mouse-down image Fourth position
Tip: The order of the states is predetermined and cannot be changed. However, if you want to take advantage of only two of the states—for example, if you want to use a different image in the normal state (the first position) only—copy the second image two or three times so that the different image is in the first position.
might want it to appear to light up. To effect this, create a second image in the set and adjust the background color of the graphic. You may also want the image to appear to get darker as the user clicks on it, and dimmer once it has been clicked.
Use a vertical image set for icons you are adding to the bookmark bar on the Notes, Designer, and Administration client. The bookmark bar can display small, medium, or large icons provided that the image resources for those icons are part of a vertical image set. A vertical image set includes an icon in three different sizes. To set the size for icons on the bookmark bar, users choose File -> User Preferences. At the "Bookmark icon size" setting on the Basics page, they can choose Small, Medium, or Large.
For more information on how to create a vertical image resource set, refer to the Lotus Domino Designer 6 Help database.
10.2 FilesDesigner allows you to share non-NSF files within and across databases. This capability gives you greater flexibility in designing your application. For example, you might need to reference a shared company logo that is a GIF file, or all applications in your company might share a Welcome page that is an HTML file, created by and maintained in another tool by a non-Notes developer. Other uses might be scripting files, such as JSP or CGI.
An example is described in “Example of the use of files as shared resources” on page 324.
Create a shared file resource1. On the Design pane, click Shared Resources.
2. Click Files. The files work pane opens.
3. Click New File Resource.
4. Select the file or files you want to share.
5. Choose Resource -> Resource Properties to see the properties of the file.
Note: This feature is new in Domino 6.
322 Domino Designer 6: A Developer’s Handbook
Using the file resourceThe file resource—just like images, stylesheets and JavaScript—can be included on a form/subform or a page. This is done by using Create -> Resource -> Insert Resource on the element where you want to include it, and choosing the Resource of your choice. This is similar to how we include other shared resources.
Open a shared file resource1. In the files work pane, highlight the file resource that you want to open.
2. To allow Designer to select the application to open the file resource, click Open File.
Or:
To select the application for opening the file resource, click Open With.
3. You can now edit the file.
Refresh a shared file resourceWhen you have edited a file resource, you most probably want to save the updates to the database as well. A file resource that has been edited but not yet refreshed is identified in two places:
� In the files work pane, the file name is preceded by a refresh icon.
� In the File Resource properties box, the “Needs refresh” check box is selected
To refresh a file resource, perform these three steps:
1. In the files work pane, highlight the file resource that you have edited.
2. Click Refresh.
3. In the Open dialog box, select the updated file name and click Open.
The file resource is now refreshed. The refresh icon disappears from the files work pane and the "Needs refresh" check box in the File Resource properties box is cleared.
Note: There is a checkbox named “Needs refresh”. This might be confusing. It is not a checkbox that you should check. It just tells you that the original file has been edited, and that your shared resource needs to be refreshed. This can be done using Refresh in the Files view.
Note: You can refresh a file resource even if Domino Designer does not think it needs it.
Exporting shared file resourcesUsing the new Domino 6 feature and action button in the shared file resource view, you can easily export your resources, as follows:
1. Select the resource to be exported.
2. Click Export.
3. Select a directory to export the resource to, as well as a file name.
4. Click Save.
Example of the use of files as shared resourcesIn this example, we include an HTML file on a form, and this file is the only content on the form.
We insert an HTML file named External HTML File.html in the Files of Shared Resources. This will look as in Figure 10-3.
Figure 10-3 HTML file as Shared Resource
The content of this HTML file is shown in Example 10-1.
Example 10-1 The HTML file content
<html><head><title>This is an external html file</title>
Tip: If a shared resource is preceded by a refresh icon, and you don’t want to refresh it, or remove the refresh icon, just uncheck the “Needs refresh” check box from the property box of the shared resource.
324 Domino Designer 6: A Developer’s Handbook
</head>
<body>This is the content of the html file</body>
</html>
So, how can we use this shared resource? One example would be to include this HTML file on a form and let it be the content of the form.
1. Open the form where you want the HTML file included in the Designer client.
2. Place the cursor where you want the resource to be included
3. Go to Create Resource - Insert Resource or right-click with your mouse, and select Insert Resource.
4. Select the Resource type HTML Files.
5. Choose the HTML file External HTML File.html and click OK.
6. You will have an icon on your form indicating that a File resource has been inserted, as shown in Figure 10-4.
Figure 10-4 HTML file inserted in a form
If we now preview this form on the Web, the content of the HTML file will be the content of what we see on the Web. This is shown in Figure 10-5 on page 326.
Figure 10-5 Form with an HTML file shown in a browser
Let’s take a look at the source code for this Web page, shown in Figure 10-6 on page 327.
326 Domino Designer 6: A Developer’s Handbook
Figure 10-6 Source of the form with HTML file
As we can see in Figure 10-6, Domino generates a lot of HTML code and tags. The HTML file that was inserted into the form is not the only content of the form.
If you want the HTML file to be the only content of the form, without Domino-generated code, make sure you switch on the form property “Content type: HTML” shown in Figure 10-7 on page 328.
This tells Domino that it should not generate Domino-specific HTML data, but treat the form as pure HTML.
When previewing the same form for the Web now, it will look the same, as shown in Figure 10-5 on page 326, but the source is different, as shown in Figure 10-8 on page 329.
328 Domino Designer 6: A Developer’s Handbook
Figure 10-8 New source with content type HTML
Taking the example one step furtherSo why would we want to include an HTML file as the content, or part of the content, on a form or similar design element? Well, there might be several reasons. One situation could be that you still have a lot of HTML files that you would like to use, but you would like to use them as part of your existing forms and pages. Using the above example lets you include HTML files as part of a larger form, and have several HTML files create a Web page. And you can also include other kinds of information on this form/page/subform using other design elements. This could be an embedded view, lookups, and other Domino Designer elements and technologies.
And, with a WebDAV-enabled Domino 6 server, you can also let other people maintain these HTML files, from other application development tools, and save them directly into the .nsf file on the Domino server. For more information on WebDAV, refer to 12.22, “WebDav” on page 490.
10.3 AppletsJava applets that you are using in many places can be added to a shared resource. Then, if you make any changes to the applet later, you only need to
Important: If you preview the form with the ?Openform parameter, you will get the message Error 500 - HTTP Web Server: Application Exception - Documents treated as HTML cannot be edited. Change your URL to use ?Readform instead.
copy the revised applet into one place, and applications that use the applet will then have access to it.
10.4 Style sheetsCSS or cascading style sheets give you the ability to control many aspects of your page layout, including headers, links, text, fonts, styles, color, and margins. You can browse your local file system for a CSS, turn it into a shared resource, and then insert it into a page, form, or subform.
For more information about cascading style sheets, visit W3.org’s site at:
http://www.w3.org/Style/CSS/.
Create a new style sheet resource1. Expand Shared Resources in the Design pane.
2. Select Style Sheets from the list of resources; see Figure 10-9 on page 331.
3. Click New Style Sheet Resource. The Browse dialog box opens. Only files with a CSS extension appear.
4. Find and select the cascading style sheet you want to use.
5. Click Open to add the style sheet to the list of style sheet resources. The Style Sheet Resource Properties box opens, so you can change the name or other properties of the style sheet.
Note: This feature is new in Domino 6.
330 Domino Designer 6: A Developer’s Handbook
Figure 10-9 Style Sheets design element
Insert a style sheet resource into a page, form, or subform1. Open a page, form, or subform.
2. Place the cursor where you want to add the style sheet.
3. Choose Create -> Insert Resource. The Insert Resource dialog box appears; see Figure 10-10 on page 332 and Figure 10-11 on page 332.
Figure 10-10 Inserting a Style sheet into a form directly
Figure 10-11 Choosing the resource to insert
4. Select the database containing the style sheet. The default is the current database.
332 Domino Designer 6: A Developer’s Handbook
5. Because a form can have several resources, like JavaScript and HTML files, you need to select what type of resource to insert. Select Style Sheets.
6. In the Available resources section, highlight the style sheet resource to add.
7. Click OK.
Figure 10-12 Style sheet inserted
8. (Optional) To view the name of the inserted style sheet resource or to change to another style sheet resource, choose Style Sheet -> Style Sheet Properties. The Style Sheet Properties box appears with the name of the style sheet resource. To select a different style sheet resource, click the Locate Object folder.
The use of style sheets on forms and pages does not work directly in pass-through HTML code. Style sheet resources apply styles directly to some Notes elements, and these elements are well documented in Lotus Domino Designer 6 Help; see “Creating style sheets as shared resources” for details.
Notes elements that support style sheet resources are
� Document� Paragraph� List item� Layer� Table� Table cell� Image
Fields do not directly support style sheet resources. Field content will inherit styles for an inheritable property. For Web browsers, these style sheets will apply as usual.
Tip: You can also insert the style sheet resource directly into the HTML Head Content of your form. Select HTML Head Content, right-click in the programmer’s pane, and select Insert Resource. Notice that the dialog box is context sensitive. Select the style sheet resource to be included, and click OK.
Opening and editing style sheet resourcesYou can open and edit style sheet resources just as you open and edit shared file resources:
� Select the style sheet resource to be opened and click Open, or optionally Open with to select which program to open the resource with.
When you have edited a style sheet resource, you most probably want to save the updates to the database as well. A file resource that has been edited but not yet refreshed is identified in two places:
� In the files work pane, the file name is preceded by a refresh icon.
� In the File Resource properties box, the “Needs refresh” check box is selected.
To refresh a style sheet resource, follow these three steps:
1. In the style sheets work pane, highlight the file resource that you have edited.
2. Click Refresh.
3. In the Open dialog box, select the updated file name (it is preceded by a tilde (~)), and click Open.
The style sheet resource is now refreshed. The refresh icon disappears from the work pane and the "Needs refresh" check box in the style sheet resource properties box is cleared.
Export style sheet resourcesUsing the new Domino 6 feature and action button in the shared style sheet resource view, you can easily export your resources:
1. Select the resource to be exported.
2. Click Export.
3. Select a directory to export the resource to, as well as a file name.
4. Click Save.
Note: This gives you the choice to use your favorite style sheet editor when editing cascading style sheets.
334 Domino Designer 6: A Developer’s Handbook
10.5 Data connections
Many of the enhancements in Domino Designer 6 extend the properties-box paradigm to make functions easier and more intuitive. One of the most powerful is the creation of a Data Connector and linked fields that connect a form to an external database. This brings a new ease to integrating Domino and relational data sources.
Data Connection Resources (DCRs) bring the technology of Domino Enterprise Connector Services (DECS) into Designer so that you can define a connection to an external data source, such as a relational database, and use the connection to link the fields in a form to fields in the external source. DCRs are reusable in an application and can be shared across applications. You can use DCR technology to access data in enterprise systems and then take advantage of the power of a Domino application to replicate, share, secure, and manage the data.
To create an external connection, you first need to install the DECS server software on your Domino server. The client software for the application you are connecting to (such as DB2 or ODBC) must also be installed on the Domino server. You can develop an application locally, but you will be unable to browse the external metadata when designing your application.
To establish a connection with external resources, follow the steps described in the topics that follow.
10.5.1 Create a data source resourceBefore you can create and use a Data Connection Resource, you must first create a data source server reference to the external application that is using a data source that is defined on the server. For example, to create a data source for a Microsoft Access database on a Windows NT server, you would use the Windows System Tools utility to specify the Microsoft Access table as a data source and ODBC as the data driver to use for data exchange.
If you do not have access to the server on which the external database resides, work with your system administrator or database manager to make sure the data source is defined.
10.5.2 Create the DCRA Data Connection Resource (DCR) is a reusable connection between a Domino application and a non-Domino database. You must have a defined data source on the server before you can create a DCR.
Creating the Data Connection Resource1. Launch Domino Designer.
2. In the Design pane, select Shared Resources -> Data Connections. Any existing data connections display in the Work pane on the right.
3. Click New Data Connection at the top of the Work pane. The Data Connection Properties box appears.
4. Enter a name for the connection resource.
5. (Optional) Enter an alias to use in place of the name.
6. (Optional) Enter a comment describing the connection.
7. Select the class of application you are connecting to, that is, the type of database.
8. Select the type of connection. Certain databases, such as DB2 and Oracle, have native drivers that are listed as an available type of connection. If a specific driver is not available, choose a generic one, such as ODBC or OLE DB. For example, to access an MS Access database, choose OLE DB as the connection type.
9. Enter the username and password you use to access the system you are connecting to.
10.Enter the name of the data source that maps to the external application you plan to access.
11.(Sybase only) Enter the name of the server on which the database resides, and the catalog name.
12.Select the type of object to connect to: table, view, or procedure.
13.Enter the User ID for the owner of the table or view. The owner is the creator of the database you are connecting to. The owner must supply you with the correct owner ID, which is typically in the format ownername.tablename. In the case of a procedure, also enter the procedure name for any of the document events that will trigger the procedure.
14.Enter the name of the table, view, or procedure. You can click Browse Metadata to browse the external database for the name of the table, view, or procedure.
15.(Optional) Click Options to customize the settings for the DCR.
336 Domino Designer 6: A Developer’s Handbook
10.5.3 Set a database propertyIn order to establish a connection to an external data source, you must first enable external connections for the database. Once that database property is set, you can then use your DCR in a form to exchange data with an external database; see Figure 10-13.
1. Open the database where you plan to use a data connection and choose File -> Database -> Properties.
2. Click Database Basics.
3. Select Allow connections to external databases using DCRs. This property is disabled until you have created at least one DCR in the database.
Figure 10-13 Setting the database property
4. Close and reopen the database to enable the property.
Note: You may want to disable this while you are designing an application, and enable it when you are ready to deploy your application.
10.5.4 Create fields on a formIf you are planning to use a DCR in more than one field on a form, you can specify a default data connection, and, optionally, a default metadata object such as a table or view. When you create a field for use with an external data source, the default information for the data connection is supplied automatically. You can overwrite the default DCR with a different DCR if you wish.
How to specify a default connection for a form1. Create a form.
2. Choose Design -> Form Properties to display the Properties box.
3. Click Defaults (second tab).
4. In the Data Source Options section, you can browse for a data connection resource or enter the name in the Default Data Connection field.
5. (Optional) Specify a Default metadata object, such as a table or view name, from the external application.
How to create fields to connect using the DCR1. Create a field.
2. Choose Design -> Field Properties to display the Field Properties box.
3. Click the Info tab and select "External data source." If you have specified a default DCR for the form, the information is applied to the field.
338 Domino Designer 6: A Developer’s Handbook
Figure 10-14 New Domino 6 field properties for data connection
4. In the Data Source Options section (Figure 10-14), browse for, or enter, the name for the metadata object and the corresponding external field. The type of field in the metadata (for example, text or integer) is indicated by an icon.
6. Select Key field if this field corresponds to a field in the external application. Every data connection requires a key field—the key field is the link between the form and the backend database or application. Note that key fields are always stored locally as well as on the backend.
7. (Optional)If you want data from fields other than the key field stored locally, mark each of these fields as a Data field and select the Store locally option. For these fields, data will be stored in the Domino database as well as in the backend database. Changes you make in the Domino database are pushed back to the backend database. If the backend changes, you can manually refresh the Domino database by pressing F9 with the document open or by closing and opening the document.
Important: Note that if you are developing an application locally, you will not be able to browse external metadata.
340 Domino Designer 6: A Developer’s Handbook
Chapter 11. Developing for multiple clients
When you develop in Notes/Domino, it is important to be aware that most features you develop for the Notes client are directly available and compatible for Web browsers. You don't need to double your work by coding twice the code.
It is, of course, a very common thing to customize certain design elements for the Web, and for that reason develop and use programming languages for the Web. This chapter is a “best practices” guide for developers developing for multiple clients, with tips and suggestions of what to consider when developing in such environments.
11.1 Plan your application This is a situation where a little planning goes a long way. Before you start coding, you should first define your audience and think about how the application should work for both Notes and Web users. Regardless of how simple the application is, you don't want to waste time porting a feature that wasn't worth porting to begin with.
11.1.1 Security settingsKeep in mind that the ACL is not the only way to control access to a database, when accessing it from the Web. The Basics section of the ACL lists the access levels for individual users, groups, and servers. In addition, the Advanced section specifies the maximum level of access allowed from the Web in the "Maximum Internet name & password access" field, which overrides individual levels set in the ACL. The LotusScript actions in your application may require Manager or Designer access that is not allowed from the Web—meaning that sometimes not all applications are appropriate for Web access.
Some features, such as encryption, are not available for Web or mobile users. This means that you have to plan your application accordingly. For example, you cannot utilize encryption as a means to secure the data using a Web browser. On the other hand, data encrypted with Notes is also safe from Web and mobile users.
11.1.2 Consider the use of graphicsWhen designing for the Web, people tend to think of graphics. However, if performance is an issue, you might want to sacrifice the fancy graphics in favor of better performance. There are several techniques, both using DHTML and CSS, that can replace a lot of plain graphic elements, which again will increase your application’s performance. Though there are caching features on the Domino server to handle the use of graphics and make them faster to access, keep this in mind: graphics might not be the most important thing in your application. The key, in most cases, is the utility value.
Also keep in mind that when using graphics, you should use the shared resources, and not paste graphics directly into a form. This saves space, improves performance by letting the client cache the image, and eases maintenance by having the picture stored in just one place should you need to change it.
342 Lotus Domino 6 Application Development
11.1.3 Examine your LotusScript codeIdeally, you should try to share as much code as possible. Then, if you need to modify the code in the future, you'll be able to make the changes all in one place. (It will also help you keep the size of your application down.) Only the backend classes are supported on the Web, so avoid using UI classes on your LotusScript code and if you do use them, make a separate script library for Notes to access frontend classes.
11.2 Designing the applicationThis section offers some guidelines about designing an application that will be used by different clients.
11.2.1 Same or different forms for the Web and NotesSince Web browsers and the Notes client are not identical in their capabilities, you may often need to create different UI elements for the two clients. It might be easier initially to design two separate forms, but that means that if you change one form, the other form may also need to change, for consistency, so maintenance is complicated. The situation is further complicated if your application is multilingual, since you then can multiply those two forms by the number of languages you plan to support. It's generally worth expending a little effort and try to make one form work for both clients. Creative use of hide properties and subforms, and careful selection of programming languages, can make this easier.
The fact that JavaScript works in both clients means that it makes sense to write input translation and validation in JavaScript as opposed to LotusScript or macro language. Macro language field formulas work, but the Web browser doesn't know macro language, so it has to submit the form to the server for evaluation. Since JavaScript executes locally, it gives better performance—plus, it's easy to place the cursor in the offending field, whereas with macro language validations the user must view the message and then use the browser Back function to return to the form.
If you do use separate Notes and Web forms, avoid duplicating business logic by using JavaScript libraries that you can include both on the Web version and the Notes version of the form (see “New library type” on page 350). Each form can contain multiple script libraries, so if you are writing a multilingual application, you can have a separate "message text" JavaScript library for each language, and a single library of business logic that refers to the messages defined in the "message text" library.
Chapter 11. Developing for multiple clients 343
11.2.2 Choosing fields Most of the fields work similarly for Notes and Web browsers. However, there are differences. For example, there is no concept of dialog box fields on the Web. You should use other types of multiple selection fields, such as check box or dialog list, instead. Some of the field properties do not work on the Web either, as when you want to allow a user to enter new values for a selection field. You have to provide a way for Web users to do that.
11.2.3 Choosing actionsRemember, when developing applications for browsers, they do not have access to the Notes menu commands. They will not have the chance of forwarding a document, for example. To Web-enable all buttons in a database as well as certain @commands, select the database property "Web access: Use JavaScript when generating pages." Without this property set, Domino recognizes only the first button in a document and treats it by default as a Submit button that closes and saves the document. Be aware that when you select this Use JavaScript property, Domino displays all buttons, actions, and hotspots—even those that contain @commands and @functions that are not supported for Web applications. These functions are executed by submitting the form to the server, which calculates the resulting Web page.
11.2.4 How to deal with the Notes viewsAlthough your Notes views will appear OK on the Web, you will lose the attractive, three-paned layout of the Notes interface. You can translate this layout to the Web by using the Frameset design element, or by embedding outlines, views and other elements on a form or page.
However, another option is that you can embed views, folders, or navigators on a form to create a "frame" effect that helps Web users navigate through your application. The way this works is that you create a form called "$$ViewTemplate for ViewName." Then, when a user tries to open the view called ViewName, Domino displays the view template instead. If you don't use a $$ViewTemplate form, you may not get the desired display of the view.
11.2.5 Need of miscellaneous formsOne final area to consider when designing forms is that Web users don't have access to standard Notes dialogs, such as error dialogs or help dialogs. The new $$Return pages allow you to design customized pages for returning errors to Web users. You should also consider the use of the $$ReturnAuthenticationFailure form to display an error message to Web users
344 Lotus Domino 6 Application Development
when there is an authentication failure and the $$ReturnDocumentDeleted form to display sensible error messages to users when the document deletion has been successful. Use $$ReturnGeneralError to display an informative page instead of the default error page when an error occurs.
11.2.6 Designing the agentsAs with any Notes or Web application, agents do most of the work. The number of agents in your application should not affect performance. Obviously, adding a WebQueryOpen agent to a form will certainly make it take longer to open the document (because Domino must run the agent prior to opening the document). The key is to make the agent perform a few key tasks, and if you need to do complex processing, use a background agent. In some cases, you might be able to use existing code in a PostOpen event of a form directly in a WebQueryOpen agent, so the work is minimized. When doing this, make sure that you have the correct document context for the Web agent.
More specifically, you can get to the existing backend document from a WebQueryOpen or WebQuerySave agent, or by using @Command([ToolsRunMacro]) from a document action by using the NotesSession DocumentContext property. However, if you are executing a Web agent from a hotspot on the form via @URLOpen, you don't have access to the fields on the document (other than CGI fields such as remote_user). Generally, you should use @URLOpen when you need to pass an argument to the agent or when you are deleting the current document. The way to get the real backend document from the @URLOpen context is to pass the UNID of the document as an argument to the agent, as shown in the following call:
set note = session.documentcontextOriginalUNID = Mid(note.Query_String(0), Instr(note.Query_String(0), "&UNID=")+6, 32)
11.2.7 Be aware of multiple lookupsYou usually don't think about multiple lookups when developing in a pure Notes/Domino environment with only Notes clients. Including multiple lookups in your application may slow it down. Be aware of using lookups like the following:
Lookups take time, and might slow your application accessing it from a Web browser. Often it is very convenient to use subforms, because you benefit dividing the code into "sections", which makes maintenance easier. Complex applications, with multiple computed lookups, should be used with care. Also make sure that you check your lookups for errors. If a lookup fails, make sure you return something to the client or tell the lookup to continue, with an empty result set.
11.2.8 Developing for PDA and mobile clientsLotus is the market leader in providing messaging, personal information management, and collaborative applications in the enterprise. These provide a full range of mobile and wireless solutions for Domino as part of the strategy to provide users with the most robust and pervasive messaging and collaborative environment. To enable your applications for PDA and mobile clients, refer to the redbook Lotus Mobile and Wireless Solutions.
11.3 Take advantage of Domino 6Domino 6 comes with a lot of new features, and you should be aware of these.
For example, while we usually used pages or forms for JavaScript repositories, or maybe added them directly to the JS header of a form, we can now add our JavaScripts to the new script library for JavaScript. Then we can add these libraries directly on to a form or inside the JS header of the form.
These JavaScripts can now be rendered and run in the Notes client, as well. For example, this allows us to have one set of field validation, only using JavaScript, instead of both JavaScript and @formulas, if desirable. In other words, "write once—use in many clients".
Another benefit one should consider is the use of another shared resource: cascading style sheets. These can also be rendered and used in Notes clients as well as Web browsers, and are included and handled in the same way the JavaScript resource is. You can now include it directly on a form, as a shared resource, and use that resource for multiple clients.
11.4 ConclusionSuch a “best practice” guide could have been a redbook itself, but this should help you get started. Because each application is unique, you may have additional issues when you begin Web-enabling your application.
346 Lotus Domino 6 Application Development
Chapter 12. New features in Domino 6
This chapter describes the new features in Lotus Domino 6 and Domino Designer 6. Domino 6 contains several new features for administrators, application developers and end users. This chapter focuses on the new features provided to the application developer.
We also offer some tips and tricks based on experience developing in Domino 6.
The purpose of many of the new features in Domino Designer 6 is to reduce the time spent on developing a Domino 6 application.
With Domino Designer 6 you can build applications for use with Lotus Notes clients, Web browsers, and Mobile clients.
12.1 User interfaceThe user interface of Domino Designer 6 has been greatly improved. The client now supports features and includes tools that will reduce your application development time and ease your daily developing tasks.
12.1.1 New design element navigatorThe design element navigator, that is, the list of design elements and its appearance, has been refreshed and reorganized. Figure 12-1 shows what it now looks like.
Figure 12-1 New design navigator in Domino Designer 6
ReorganizedThere are several new design elements as well as quite a few reorganized elements in the navigator. As mentioned in 12.1.6, “Plus/minus indicators for the design list” on page 355, Domino Designer 6 now includes plus/minus indicators to show that there are elements under that design element category.
In Figure 12-1, you can see that no folders have been created yet, but there are pages, forms, and views in the database. If we click these plus/minus indicators, they will respectively expand and collapse, and show a list of the created elements directly in the design element navigator, as explained in 12.1.6, “Plus/minus indicators for the design list” on page 355.
Outlines or agents are not design elements that you will find directly in the design element navigator—in contrast to forms, views, folders, pages and framesets. Outlines are moved out of this list in Domino Designer 6, and moved into a new container called Shared Code, which is explained in more detail in 12.3, “New Domino 6 design elements” on page 365.
348 Domino Designer 6: A Developer’s Handbook
You can no longer find Navigator as a part of the design element navigator, as this also is moved. It can be found in Other, which is a container in the design navigator list. You are not likely to use navigators in your applications.
New containersThe two new design element containers in the design element navigator are:
� Shared resources
� Shared rode
This is rather a development from Domino R5 than a new feature or a new way of thinking. The thought behind shared resources and shared code is very practical. For example, the shared code container contains all the code that can or should be reused in your application, or by other applications.
The Shared Code container contains the following design element types:
The attribute these all have in common is that they should or can be reused.
Shared resources contain elements that could be described as resources and static resource elements. The element types are:
� Images� Files� Applets� Style sheets� Data connections
Sharing elements lets you reference a resource repeatedly throughout an application, while only having to maintain it in one central place. For example, if you use your company logo in many places throughout your application and the design of your logo changes, you need only change it once, in the image resource, and the change will be implemented everywhere that image is referenced. This is common for both shared code and shared resources. They are both elements that include resources you can reference throughout an application. For more information about these containers, see 12.3, “New Domino 6 design elements” on page 365.
Chapter 12. New features in Domino 6 349
New library typeThere is one new Script library available in Domino Designer 6: JavaScript.
You can now create and select which library you want to add directly from the design work pane, by clicking your choice; see Figure 12-2.
Figure 12-2 Script libraries in Domino Designer 6
Insert a JavaScript library into a page, form or subform1. Open a page, form, or subform.
2. Place the cursor where you want to add the JavaScript.
4. Select the database containing the JavaScript. The default is the current database.
5. Select JavaScript libraries as the resource type.
6. In the Available resources section, highlight the JavaScript to add.
7. Click OK.
Note: There are now three script libraries in Domino 6: LotusScript, JavaScript, and Java Libraries. All of these have their own action button in the Script libraries design element view.
Tip: You can also insert the JavaScript directly into the JS Header of your form. Select JS Header, right-click in the programmer’s pane, and select Insert Resource. Notice that the dialog box is context sensitive. Select the JavaScript to be included, and click OK.
350 Domino Designer 6: A Developer’s Handbook
12.1.2 BookmarksUsing bookmarks and folders allows you the flexibility to organize your work according to your needs, and to easily reorganize your work as your design progresses.
There are several new features and enhancements to bookmark folders in Domino Designer 6 that make it easier to bookmark both applications and databases, create folders, manage bookmarks, and even copy single design elements into folders (covered in 12.1.3, “Custom design element folders” on page 352).
Bookmarking an applicationYou can now add your favorite applications or other files, such as HTML pages, text files, or image files, directly on your Bookmark bar. Figure 12-3 shows how Microsoft Internet Explorer has been added to the Bookmark bar so that it can be easily launched from there.
Figure 12-3 Application as a bookmark
To create a bookmark to an application on the bookmark bar, drag an application shortcut from your desktop or Windows Explorer directly to the bookmark bar. You can also add the bookmark inside a folder by dropping the icon on top of the folder.
Create a bookmark folderThe process of creating a folder in the Domino 6 Designer Client has been changed. Click the icon for a new folder, as shown in Figure 12-4 on page 352.
Chapter 12. New features in Domino 6 351
Figure 12-4 Creating a new folder
When using this new feature, you can also decide where this new folder should be located, within your already existing folders; see Figure 12-5.
Figure 12-5 Location of a new folder
Organize the bookmarksYou can drag and drop your bookmarks into the folders you want. This feature applies to drag and drop from the task bar and from folder to folder.
12.1.3 Custom design element foldersTo make it even more rapid and easy to access and create database elements in Domino 6, there is a new feature for grouping and managing design elements from custom design element folders; see Figure 12-6 on page 353.
352 Domino Designer 6: A Developer’s Handbook
Figure 12-6 Custom design element folders
As you can see, there is a custom folder the container of other design elements, called “My recent elements”. The name of the element can be set to whatever you want. As a database grows, the number of design elements grows as well, and you might be using only a few of these frequently. With custom design element folders, you can add your most frequently used design elements to a custom folder within your database element listing. This feature is also very useful for team database development, enabling the design elements to be grouped in personal folders.
Create a custom design element folder
1. Ensure that the database is already in a folder or you have added a bookmark in the Bookmark bar.
2. Create a new folder.
3. Give the folder a name and select your database of choice in the “Select a location for the new folder” window.
4. Click OK.
Note: The database in which you want to create a custom design element folder must be located in a folder, or there has to be a bookmark in the Bookmark bar for it. You cannot create a custom design element folder to a database that is only listed in “Recent databases”.
Chapter 12. New features in Domino 6 353
12.1.4 Mouseover information on design elementsDomino Designer 6 displays text on the window tabs when you mouseover the tab.
In previous versions of Domino Designer, when you worked with several elements and databases at once, you most likely had several window tabs open at the same time. This could get confusing, and it might be hard to locate already opened design elements.
With Domino Designer 6, these window tabs have a new feature, displaying text above them on mouseover. Figure 12-7 shows an example of this. Notice that the pop-up text shows the server, the full path, the name of the database, and the name and type of the element.
Figure 12-7 Mouseover shows design element information
Using this feature makes it a whole lot easier to navigate among lots of window tabs of design elements, because you can tell the difference between the elements more easily.
12.1.5 Quick scrollTo be able to work faster and reduce the time spent on designing applications in Domino 6, several new features were added. One of them is the ability to scroll among your design elements directly in the list of design elements, without opening the list of all design elements; see Figure 12-8 on page 355.
354 Domino Designer 6: A Developer’s Handbook
Figure 12-8 Quick scroll
12.1.6 Plus/minus indicators for the design listThere is now a new feature as part of the design element list: plus and minus indicators. Clicking the plus sign expands the list of elements, and if the number of elements exceeds 5, it also enables the quick scroll. Clicking the minus sign collapses the elements list; see Figure 12-9.
Figure 12-9 Plus/minus indicators for design elements
Note: The arrows are only shown when the number of elements in the specific design element exceeds 5. The first 5 are directly accessible.
Chapter 12. New features in Domino 6 355
12.1.7 New features in design element viewsIn Domino Designer 6, all the design element views have been changed. You will now get quite a bit more information displayed directly in the designer, which makes it all both faster and easier to work with. You can, among all other properties, now see which of your design elements, let us say forms, that should prohibit design refresh or replace to modify. You will also see if a design element has been hidden or made available for different clients directly in these views. The views can also be sorted in different columns, as well as resized.
Some of the design element views also have action bars, which enable a developer to take action directly on design elements in the design views. This is covered in detail in 12.8, “Agent enhancements” on page 404.
12.1.8 Modifying properties for multiple elementsTo save time, you can select multiple design elements and set their common design properties at the same time. For example, you might want to prevent all of the forms in your application from inheriting changes from a template, or hide a collection of views from Web users or Mobile users. See Figure 12-10 on page 357.
1. Select a bookmarked database or open a database in Designer.
2. In the Design pane, click the name of a design element (for example, Forms). The names of all the design elements of the specified type appear in the Work pane.
3. In the Work pane, select the name of a design element that you want to modify, then hold down the Shift key and select other continuous elements you want to modify, or hold down the Ctrl key and select the elements you want to modify.
4. Choose Design -> Design Properties or click the Display Infobox icon on the toolbar in the upper right corner of the Design pane.
Note: Design element types with no plus or minus indicators have no elements inside. In Figure 12-9 on page 355, no framesets or folders have been created in the database, while there are several forms, views and pages.
356 Domino Designer 6: A Developer’s Handbook
Figure 12-10 Selecting multiple elements and setting properties
5. The Design properties box shows only the properties that you can set for the selected elements. The properties box displays initial values that are the same for all selected design elements. Properties that are set differently for different design elements display with a gray check.
6. Set properties for the selected elements. For example:
– Enter a template name to have the selected elements inherit from one template.
– Check "Prohibit design refresh or replace to modify" to prevent the selected elements from being modified during a design refresh or replace.
– If you use a template to refresh or replace the database design, then to ensure that the option “Prohibit design refresh or replace to modify” takes effect, select this option as well as the option “Propagate this prohibition of design change” in the design properties of the template.
Chapter 12. New features in Domino 6 357
– Hide the design elements from Web browsers, Notes clients, or Mobile users.
12.1.9 Design element lockingDesign element locking is a new feature designed to help teams work on a single database. If you work on a team and want to ensure that other designers cannot modify design elements that you are working with, you can explicitly lock them. When you have finished working with the design elements and want to release them so that others can modify them, unlock them.
Before you can start locking design elements, you have to enable this on your specific database.
Enabling design element lockingEnable design element locking when you want to give designers the ability to lock and unlock any of the design elements in a database.
1. Choose File -> Database -> Properties and click the Design tab.
Important:
� A design element that is not explicitly locked is always temporarily locked while it is being edited. After the designer has finished editing it, the temporary lock is released. Locking the element replicates to other servers and also stays locked until it is manually unlocked.
� Shared Actions are contained in one design note. Therefore, when you lock a Shared Action, you lock all Shared Actions. Likewise, when you unlock a Shared Action, you unlock all Shared Actions.
Note: You need to specify a Master lock server for the database before setting the design locking on. This is done by setting the Administration server for the database, which you can set up on the Advanced properties tab of the Access control list of your database.
358 Domino Designer 6: A Developer’s Handbook
Figure 12-11 Enabling a database for design locking
2. Select Allow design locking; see Figure 12-11.
Now designers can explicitly lock design elements in the database. The column next to the design element name indicates the lock status of the design element.
Locking a design elementLock a design element when you want to ensure that you have exclusive ownership of it and to prevent others from modifying it.
1. Highlight the design element or multiple elements in the Work pane.
2. Right-click and select Lock; see Figure 12-12 on page 360.
Attention: To enable a database for design locking, you need to specify a Master Lock (Administration) server for the database. If you try to enable a database for design locking without having this set, you will receive an error message telling you to do this. You can set this setting in the Advanced Panel of the Access Control Dialog.
Chapter 12. New features in Domino 6 359
Figure 12-12 Locking a design element
If the design element was unlocked, a padlock icon appears in the Work pane indicating that you have successfully locked the design element, and a message appears on the status bar. You now have exclusive access to the design element; other designers cannot modify it.
If someone else has locked the design element, a lock-and-key icon appears in the Work pane. If you try to open a locked element, you will not be able to save your modifications.
Unlocking a design elementUnlock a design element when you have finished making changes to it and want to allow others to be able to modify it. You can only unlock design elements that you have locked. Designers with Manager access to the database can unlock any design element.
1. Highlight the design element or elements in the Work pane.
2. Right-click and select Unlock.
Attention: If you work locally or offline and attempt to lock a design element, Designer displays the message Master lock database cannot be reached and asks if you want to proceed with locking the design element. If you click Yes to proceed, the database applies a provisional lock to the design element. When you connect again and replicate, the database attempts to convert the provisional lock to a true lock. If it is successful, the database saves the edits that you made to the design element. If it is unsuccessful, the database sends you mail containing the edits that the database could not save; you must apply them manually to the design element.
360 Domino Designer 6: A Developer’s Handbook
If you had locked the design element, the padlock icon disappears in the Work pane indicating that you have successfully unlocked the design element, and a message appears on the status bar. You no longer have exclusive access to the design element; other designers can now modify it.
Disabling design element lockingDisable design element locking when you want to prevent designers from explicitly locking design elements in a database.
1. Choose File -> Database -> Properties and click the Design tab.
2. Deselect Allow design locking.
Now designers cannot explicitly lock design elements in the database. However, a design element that is not explicitly locked is always temporarily locked while it is being edited. After the designer has finished editing the design element, the temporary lock is released.
12.1.10 Printing enhancementsThere are new features in Domino 6 related to printing documents, code, and other design element content.
Printing source code from the programmer’s paneWhen you are in the programmer’s pane, you can now print your source code, with a few alternatives and options.
PrinterSelect the printer of your choice, and set the properties by clicking Printer.
ContentWhen you are in the designer client, and in a programmer’s pane, then these options will be available when printing:
� Current section
This will print the current section you have in your programmer’s pane.
� Current objects
This will print the current object you are working on, and give you a second option to include “All languages” or “Current language”. This means you are able to print all events of the currently selected object.
� All objects
This will print all the code in all the objects on your current design element. It will include the name of the objects, as well as the event of the codes.
Chapter 12. New features in Domino 6 361
Figure 12-13 Printing code from programmer’s pane
12.1.11 ShadingDomino Designer 6 Client now uses shading to make it easier for you as a developer to figure out which database the design element you are currently working on belongs to; see Figure 12-14 on page 363.
Note: These settings and options are context sensitive. If you try to print something from your Notes 6 Client, there will be new options available for the end user as well. Among these is the possibility to select individual frames when printing, and printing embedded views.
362 Domino Designer 6: A Developer’s Handbook
Figure 12-14 Use of shading to indicate active database
As we can see in Figure 12-14, the active database in the folder (or recent databases) is shaded. If the background of a database is not shaded, then that is the active database you are currently working in. A shaded background indicates an inactive database.
12.2 Design SynopsisThe basics of this function are covered in 3.2, “Using Design Synopsis” on page 71.
In Designer 6, there are some new features in Design Synopsis:
1. Hide-When
The Hide-When conditions are supported in Design Synopsis.
2. Customized reports
This is not really part of the Design Synopsis tool functionality; it is another tool that can be used to produce a synopsis-like output. The biggest benefit of
Chapter 12. New features in Domino 6 363
it is that you can create customized reports using the DXL Transformer utility. This tool adds to the familiar Design Synopsis function. It allows you to output all of your database design or selected elements and transform them by applying a style sheet, and then either send the output to your display or write it to an HTML file.
To open the DXL Transformer utility, select Tools -> DXL Utilities -> Transformer. In this way you can choose the elements to display, the style sheet you want to apply, and the output format you want. It is shown in Figure 12-15.
Figure 12-15 DXL Transformer
In this example, several forms were selected from the left column of the DXL Transformer, and an XSL style sheet named AllLSinForm.xsl, which extracts any LotusScript code in the forms. When the extracted code is formatted in HTML by a cascading style sheet, the results look like those in Figure 12-16 on page 365.
364 Domino Designer 6: A Developer’s Handbook
Figure 12-16 Extracted code formatted in HTML
The flexibility of Transformer will make it easy for you to extract, archive, and reuse your code in ways that haven't been possible before with Design Synopsis.
12.3 New Domino 6 design elementsDomino Designer 6 includes several new design elements. Some of these are already mentioned earlier in the book, but mostly as a reference to this section.
12.3.1 Shared ResourcesShared Resources is one of the new design elements in Domino 6, although some of the elements that can be shared existed in prior releases. Sharing elements lets you reference a resource repeatedly throughout an application, while only having to maintain it in one standard place. Shared Resources includes the following elements:
� Images� Files� Applets
Chapter 12. New features in Domino 6 365
� Style Sheets� Data Connections
Among these, the following are new design elements:
� Files� Style Sheets� Data Connections
FilesDesigner allows you to share non-NSF files within and across databases. This capability gives you greater flexibility in designing your application. For example, you might need to reference a shared company logo that is a GIF file, or all applications in your company might share a welcome page that is an HTML file, created by and maintained in another tool by a non-Notes developer.
For more information about files, and how to create a file resource, refer to 10.2, “Files” on page 322.
Style sheetsCascading style sheets (CSS) give you the ability to control many aspects of your page layout, including headers, links, text, fonts, styles, color, and margins. You can browse your local file system for a CSS, turn it into a shared resource, and then insert it into a page, form, or subform.
For more information about style sheets, how to create them and insert them in your application, refer to 10.4, “Style sheets” on page 330.
Data connectionsMany of the enhancements in Domino Designer 6 extend the properties-box paradigm to make functions easier and more intuitive. One of the most powerful is the creation of a Data Connector and linked fields that connect a form to an external database. This brings a new ease to integrating Domino and relational data sources.
Data Connection Resources (DCRs) bring the technology of Domino Enterprise Connector Services (DECS) into Designer so that you as a developer can define a connection to an external data source, such as a relational database, and use the connection to link the fields in a form to fields in the external source. DCRs are reusable in an application and can be shared across applications. You can use DCR technology to access data in enterprise systems and then take advantage of the power of a Domino application to replicate, share, secure, and manage the data.
366 Domino Designer 6: A Developer’s Handbook
To create an external connection, you first need to install the DECS server software on your Domino server. The client software for the application you are connecting to (such as DB2 or ODBC) must also be installed on the Domino server. You can develop an application locally, but you will be unable to browse the external metadata when designing your application.
For more information about data connections, how to create them and include them in your applications, refer to 10.5, “Data connections” on page 335.
12.3.2 Shared CodeShared Code is a new design element in the design element navigator. It is a container for other design elements, which is considered code-related, that can easily be referenced and reused repeatedly throughout an application, while only having to maintain it in one standard place.
The shared code container now includes these design elements:
None of these design elements in the new container is new to Domino Designer 6. For more information on each single element, refer to their respective chapters.
12.4 The event modelThere are fundamental changes in the event model, making it easier and more efficient to program in Domino.
Note: The Script Libraries container has a new type of library that can be added, JavaScript Libraries, which works like other script libraries. In previous versions, you have one script library from where you selected which kind of code it should include (Java or LotusScript). Now there are three possible libraries to be added to the Script Libraries container: LotusScript, Java and JavaScript.
Chapter 12. New features in Domino 6 367
12.4.1 Targeting your codeDomino Designer 6 distinguishes between Notes clients and Web browser events, enabling you to easily write different code for Notes clients and Web browsers. The client events permit LotusScript, and in some cases Formula and Simple actions in addition to JavaScript.
Figure 12-17 shows how you select which client the selected event should run on.
Figure 12-17 New event model
12.4.2 Removed eventsThe event HelpRequest, which could be found on pages and forms in earlier releases, is removed in Domino 6. Use the onHelp event instead.
12.4.3 New preferred eventsIn Domino 6, there are new events that should replace events from previous versions.
Table 12-1 New preferred events
Old event Preferred event
Entering onFocus
Exiting onBlur
PostOpen onLoad for Form and Page
QueryClose onUnload for Form and Page
QuerySave onSubmit for Form
368 Domino Designer 6: A Developer’s Handbook
12.4.4 New eventsThere are several new events in Domino 6. These are shown in Table 12-2.
Table 12-2 New events in Domino 6
Note: The old events still work, but it is recommended and preferred that the new events be used, because these are available both for Notes clients and Web browsers.
Event Run Language Object Trigger
onBlur Client JavaScriptLotusScript
Field Object is deselected.
onChange Client JavaScriptLotusScript
Field Contents of object change.
onFocus Client JavaScriptLotusScript
Field Object is selected.
onHelp Client FormulaLotusScriptJavaScript
Form Page
Occurs after the user chooses Help or presses F1.
PostEntryResize
Client FormulaLotusScript
FolderView
After a drag operation in a calendar folder or view.
PostSend Client FormulaJavaScriptLotusScript
FormSubform
After object is sent.
QueryEntryResize
Client LotusScriptFormula
FolderView
Before a drag operation in a calendar folder or view.
QueryRecalc Client FormulaJavaScriptLotusScript
FormPageSubform
Before object is refreshed (and values are recalculated).
onSubmit(new for LotusScript)
Client FormulaJavaScriptLotusScript
FormPage
Before object is saved.
Chapter 12. New features in Domino 6 369
12.5 @functions and @commandsThe @formulas have been enhanced with Domino 6. There are several new functions, commands and formulas. This section covers the new @formulas available in Domino 6, and highlights some of the most useful new functions.
12.5.1 Why use themWhy should you still use @functions and @commands? Well, the answer is quite simple: they are easy and fast to use. They have been here since Notes 1.0 and it is the core processing language. The @formulas and @commands execute very fast and are upward compatible. In many cases they can be used where you cannot use other programming languages, as in field, column, and Hide-When formulas.
12.5.2 LimitationsThere are still some issues with the @formulas, and maybe the most often mentioned one is the lack of a debugger.
onUnload Client FormulaLotusScriptJavaScript
FormPage
Before object is unloaded.
onFocus(new for LotusScript)
Client LotusScriptJavaScript
Field Object is selected.
QuerySend Client FormulaJavaScriptLotusScript
FormSubform
Before object is sent.
Tip: InViewEdit will be covered in 12.13.8, “Editing a document in a view” on page 456.
Event Run Language Object Trigger
Tip: With Domino 6, there is a new @function called @Statusbar, which will help you debug your code. It works like the Print method in LotusScript, and prints to the status bar of your Notes/Designer client. It is not a complete debugging feature, but it will help you print out values during your formula code execution.
370 Domino Designer 6: A Developer’s Handbook
The @formulas are still not a standard language, like LotusScript (BASIC). You still need to learn something new. Nor is there support for complex types, and you cannot write your own functions.
Given the ease and power of @functions and @commands, however, these restrictions are relatively minor.
12.5.3 New programming featuresThis section introduces you to some of the new programming features.
Curly bracketsThese allow you to delimit strings with quotation marks in them, which makes REM statements much easier:
REM { Removed code: days:=”Mon”:”Tue”:”Wed”:”Thu”:”Fri”:”Sat”:”Sun” }
Note that there is no need to comment out (add a backslash in front of) the quotation marks in this code. Writing the code shown in Figure 12-18 will raise an error, because we have not escaped the quotation marks.
Figure 12-18 Improper handling of commented-out quotation marks
The correct way in Notes/Domino R5 would be to escape the quotation marks, as shown in Figure 12-19 on page 372.
Chapter 12. New features in Domino 6 371
Figure 12-19 Proper handling of commented-out quotation marks
With Notes/Domino 6, this can be done more easily by using curly brackets, as shown in Figure 12-20.
Figure 12-20 Using the curly brackets
Array subscript operatorYou can now use a list subscript operator ([ ]) to return one element of a list. A subscript consists of a numeric value in brackets. The numeric value can be a constant, variable, or expression. Decimals are truncated to integers. A subscript follows the list name. The following example uses a variable subscript to iterate through a list:
n := 1;@While(n <= @Elements(Categories);@Prompt([OK]; "Category " + @Text(n); Categories[n]);n := n + 1)
Tip: The Categories field containing the list must be located above or to the left of the field containing this code or the formula returns an Array index out of bounds error.
372 Domino Designer 6: A Developer’s Handbook
This example uses @While and looping, which also is a new feature of Domino Designer 6. Refer to 12.5.5, “Looping” on page 382 for more information about this feature.
Using this subscript operator to return one element of a list reduces the need for @Subset. In previous versions, this was more complex and complicated, especially if you had to pick a middle value in an array.
Using Domino Designer 6, it would look like this:
dbFileName := @DbName[2]
The first element of a list is subscript [1]. A subscript that is less than [1] or that is greater than the number of elements in the list also returns the Array index out of bounds error.
Assignment statementsThere is a new way to assign statements with Domino Designer 6: you don’t need to declare variables anymore. @Set and @Setfield are more or less redundant. We can now assign multiple times to the same variable and nest assignments in the functions:
@If(Firstname = “Rune” ; FIELD x := “Rune” ; y := “Carlsen”);
We can also nest our assignments in an operation. The following example assigns "randi" to the variable name as well as the value "RANDI" to the nameUpper variable:
nameUpper := @UpperCase(name := “randi”);
You can now also use the FIELD reserved word with a nested assignment:
FIELD CityUpper := @UpperCase(FIELD City := "London" )
12.5.4 New and enhanced @formulas and @commandsIn this section we cover all the @formulas and @commands that are new or enhanced in Domino 6.
New @functionsThis is the complete list of new @functions in Domino 6. See “Some examples with new @functions” on page 379 for examples.
Chapter 12. New features in Domino 6 373
Table 12-3 New @functions in Domino 6
@function Comments
@AttachmentModifiedTimes Returns the date on which the file attached to the current document was last modified.
@BusinessDays Returns the number of business days in one or more date ranges.
@CheckFormulaSyntax Reports compile errors, not runtime errors. A runtime error is generated, for example, if a function has an insufficient number of arguments.
@Compare Compares the alphabetic order of the elements in two lists pair-wise.
@ConfigFile Returns the file path for the initialization file for Lotus Notes (NOTES.INI).
@Count Calculates the number of text, number, or time-date values in a list. This function always returns a number to indicate the number of entries in the list.This function is similar to @Elements, except that it returns the number 1 instead of 0, when the value it is evaluating is not a list or is a null string.
@DocLock Locks, unlocks, returns the locked status of the current document, or indicates if a database has document locking enabled.
@DocOmittedLength Returns the approximate number of bytes a truncated document lost during replication.
@DoWhile Executes one or more statements iteratively while a condition remains true. Checks the condition after executing the statements.
@Eval At runtime, compiles and runs each element in a text expression as a formula. Returns the result of the last formula expression in the list or an error if an error is generated by any of the formula expressions in the list.
@FileDir Returns the directory portion of a path name, that is, the path name minus the file name.
@FloatEq @FloatEq is helpful in dealing with the inexactness of floating point operations.
374 Domino Designer 6: A Developer’s Handbook
@For Executes one or more statements iteratively while a condition remains true. Executes an initialization statement. Checks the condition before executing the statements and executes an increment statement after executing the statements.
@GetAddressBooks Returns a list of the address books associated with a client (if the current database is local) or server.
@GetCurrentTimeZone Returns the current operating system's time zone settings in canonical time zone format.
@GetField Returns the value of a specified field. @GetField, @ThisName and @ThisValue provide a means to write portable code. Instead of specifying field names in formulas, use these @functions to write code that can be copied as is from one formula to another.
@GetFocusTable Returns the name, current row, or current column of the table that is in focus.
@GetHTTPHeader In a Web application, returns the value of an HTTP request-header field that the browser client sends to the server. @GetHTTPHeader is useful in formulas that run in the context of a browser.The Notes client always returns null for this formula.
@GetViewInfo Returns a view attribute.There are 3 attributes to get, CalendarViewFormat, ColumnValue and IsCalViewTimeSlotOn.
@HashPassword Encodes a string.
@IfError Returns a null string ("") or the value of an alternative statement if a statement returns an error.
@IsNull Tests for a null value. This function is useful for checking for empty fields before using them in other functions in which they might generate errors.
@IsVirtualizedDirectory Indicates whether virtualized directories are enabled for the current server.
@LDAPServer Returns the URL and port number of the LDAP listener in the current domain.
@Nothing In an @Transform formula, returns no list element (reducing the return list by one element). In any other context, returns null.See @Transform for more info.
@function Comments
Chapter 12. New features in Domino 6 375
@OrgDir In a Service Provider (xSP) environment, returns the name of the subdirectory for the company with which the currently authenticated user is registered. Lotus Notes/Domino retrieves this information from the organization's certifier document.
@ReplicaID Returns the replica ID of the current database.
@SetHTTPHeaders In a Web application, sets the value of an HTTP response-header field, which is passed from the server to the client.
@ServerAccess Checks if a specified user has a specified administrative access level to a server.
@ServerName Returns the name of the server containing the current database. When the database is local, returns the user name.
@SetViewInfo In Standard Outline views, filters a view to display only documents from a specified category. In Calendar views, filters a view to display only document that contain a specified string in a specified column.
@Statusbar Writes a message or messages to the status bar. Similar to the Print method in LotusScript - used for debugging.
@Sort Sorts a list based on keywords as parameters.
@ThisName Returns the name of the current field. Very useful in validation formulas
@ThisValue Returns the value of the current field. Very useful in validation formulas and portable code.
@TimeMerge Builds a time-date value from separate date, time, and time zone values.
@TimeToTextInZone Converts a time-date value to a text string, incorporating time zone information.
@TimeZoneToText Converts a canonical time zone value to a human-readable text string.
@ToNumber Converts a value with a data type of text or number to a number value.
@ToNumber Converts a value with a data type of text or time to a date-time value.
@function Comments
376 Domino Designer 6: A Developer’s Handbook
Enhanced @functionsSeveral @functions have been enhanced in Domino 6. Following is the complete list.
Table 12-4 Enhanced @functions
@ToTime Converts a value with a data type of text or time to a date-time value.
@Transform Applies a formula to each element of a list and returns the results in a list.
@UpdateFormulaContext Updates the context of a formula to the Notes client window currently being accessed by the code. For example, if the code accesses a new form called "Response" by using @Command([Compose]:"Response", @UpdateFormulaContext switches the context of the formula to this new form. Any subsequent functions in the code execute in the context of the Response document, not the current document.
@UrlDecode Decodes a URL string into regular text.
@UrlEncode Encodes a string into a URL-safe format.
@UrlQueryString In a Web application, returns the current URL command and parameters, or the value of one of the parameters.
@VerifyPassword Compares two passwords. Use this function to verify which password format, @Password or @HashPassword, was used to encode a password field.
@WebDbName Returns the name of the current database encoded for URL inclusion.
@While Executes one or more statements iteratively while a condition remains true. Checks the condition before executing the statements.
Enhanced @function Comment
@DialogBox Has a new keyword [OkCancelAtBottom].
@function Comments
Chapter 12. New features in Domino 6 377
@DbColumn(Domino data source)
Allows “ReCache” in the first parameter to refresh the cache where ““ (cache) is specified in a previous lookup to the same data source.
@DbColumn(ODBC data source)
Allows “ReCache” in the first parameter to refresh the cache where ““ (cache) is specified in a previous lookup to the same data source.
@DbCommand(Domino data source)
Enables you to list folders and display next or previous groups of documents in a view. This function works in Web applications only.
@DbCommand(ODBC data source)
Allows “ReCache” in the first parameter to refresh the cache where ““ (cache) is specified in a previous lookup to the same data source.
@DbLookup(Domino data source
Allows the keywords [FailSilent], [PartialMatch], and [ReturnDocumentUniqueID] as a new parameter.
@DbLookup(Domino data sources)
Allows “ReCache” in the first parameter to refresh the cache where ““ (cache) is specified in a previous lookup to the same data source.
@DbLookup(ODBC data sources)
Allows “ReCache” in the first parameter to refresh the cache where ““ (cache) is specified in a previous lookup to the same data source.
@Explode Takes a fourth parameter that permits the suppression of newlines as separators. Not previously documented is the fact that newlines are treated as separators regardless of the specification of the second parameter.
@Max With one parameter returns the largest number in a list.
@Min With one parameter returns the smallest number in a list.
@Name Has new keywords that convert a name from Domino to LDAP format and vice-versa.
@Now Takes parameters that allow the time-date to be based on the server containing the current database or specified servers.
@SetDocField Can now be used to set the value of a field in the current document.
@Text Can now convert rich text.
Enhanced @function Comment
378 Domino Designer 6: A Developer’s Handbook
Some examples with new @functionsTo emphasize the use and strength of some of the new @functions, and as a guidance for using them, this section shows how you can use the new @functions.
Field validation using Domino 6
Field validation on several fields on a form, is much easier in Domino 6, using @ThisField and @ThisValue. Instead of, as earlier, hard coding a name of a field in a validation formula, you know use these functions to make them more dynamic:
@If(@ThisValue = ““ ; @Failure ; @Success)
@IfError
Returns a null string ("") or the value of an alternative statement if a statement returns an error. This function can easily replace @If(@IsError(...)) by using @IfError instead.
Example: A keyword lookup formula that checks for errors:
This is a great new feature for debugging using @functions. Earlier, we usually used message boxes to check values during a long code, now we can write values of variables during the code, directly to the status bar, as we do in LotusScript, using the Print method.
As this code runs, the status bar is updated before the prompt box is. The example uses a list subscript operation to get the server name. Refer to 12.5.3, “New programming features” on page 371.
@UserAccess Accepts keyword parameters that can return the user's database access level or test for specific user privileges for a database.
Enhanced @function Comment
Chapter 12. New features in Domino 6 379
@Servername
Instead of using @subset and @dbname to get the server name, we can now use @servername instead. It returns the name of the server containing the current database. If the database is local, it returns the user name.
The following example displays a server name that reads the format “CN=Trondheim/O=Lotus”:
@Prompt([OK] ; “Servername” ; @Servername)
The following example displays a server name that reads the format “Trondheim”.
New duplicating @commandsThe following new @commands duplicate the functionality of existing @commands, except that they execute as soon as they are encountered in a formula. The @commands they duplicate execute only after all @functions present in the formula have been executed.
Table 12-5 List of new, but duplicating, @commands in Domino 6
Note: If the database is located locally, @servername returns the username of the person running the @formula.
@command Duplicates:
Clear EditClear
CloseWindow FileCloseWindow
DatabaseDelete FileDatabaseDelete
EditProfileDocument EditProfile
ExitNotes FileExit
FolderDocuments Folder
NavNext NavigateNext
NavNextMain NavigateNextMain
NavNextSelected NavigateNextSelected
380 Domino Designer 6: A Developer’s Handbook
New @commandsThese @commands are new with Domino 6, and do not duplicate any existing commands.
Table 12-6 New @commands in Domino 6
Enhanced @commandsThese @commands have been enhanced in Domino 6.
Table 12-7 Enhanced @commands in Domino 6
NavNextUnread NavigateNextUnread
NavPrev NavigatePrev
NavPrevMain NavigatePrevMain
NavPrevSelected NavigatePrevSelected
NavPrevUnread NavigatePrevUnread
RefreshWindow ReloadWindow
RunAgent ToolsRunMacro
RunScheduledAgents ToolsRunBackgroundMacros
SwitchForm ViewSwitchForm
SwitchView ViewChange
@command Comments
ComposeWithReference Creates a response document containing a reference to the main document.
EditQuoteSelection Makes selected text look like an Internet-style reply.
EditRestoreDocument Restores a soft deleted document to the view or folder it was deleted from.
RefreshFrame Refreshes a specified frame in a frameset.
@command Comments
MailAddress
ReplicatorReplicateHigh Does not require the Replicator page to be open.
ReplicatorReplicateNext Does not require the Replicator page to be open.
@command Duplicates:
Chapter 12. New features in Domino 6 381
12.5.5 LoopingYou can now do looping in Domino Designer 6, using @formulas. @DoWhile, @While, and @For let you execute statements iteratively (in a loop), depending on whether a condition is True or False. @For initializes, changes, and tests the condition as part of the @function, and is best used for processing a range of numbers such as list subscripts. @While and @DoWhile test the condition; typically you initialize the condition before the @While or @DoWhile statement, and change the condition with one of the @While or @DoWhile statements. @While tests the condition before executing its statements, and @DoWhile tests after.
If you are looping through a field containing a list, be sure the “Allow multiple values” check box is selected in the Field Properties box for the list field.
ReplicatorReplicateSelected Does not require the Replicator page to be open.
ReplicatorReplicateWithServer Does not require the Replicator page to be open.
ReplicatorSendMail Does not require the Replicator page to be open.
ReplicatorSendReceiveMail Does not require the Replicator page to be open.
ReplicatorStart Does not require the Replicator page to be open.
ReplicatorStop Does not require the Replicator page to be open.
WindowCascade Resizes all open Notes/Domino windows to less than 50% of their maximum window size and layers them in a cascading stack.
WindowNext Maximizes the Notes window whose taskbar button is to the right of the current window's taskbar button or, if the windows are cascaded, moves the next window in the stack to the top of the stack.
WindowTile Resizes all open Notes/Domino windows to display them all at once. The open windows are tiled across the screen until they fill the background.
@command Comments
Note: All of the following examples perform the same operation. Depending on your preference and your code and what it should do besides looping, choose the best solution for your script.
The first parameter initializes the variable n to 1 and executes once. The second parameter tests whether n is less than or equal to the number of elements in Categories. The third parameter increments n. The fourth parameter is a statement that executes as long as the test remains True.
Using this code will prompt for every value in the Categories multivalue field.
The use of @While
n := 1;@While(n <= @Elements(Categories);@Prompt([OK]; "Category " + @Text(n); Categories[n]);n := n + 1)
Using this code will prompt for every value in the Categories multivalue field.
The use of @DoWhile
@DoWhile tests at the bottom of the loop instead of at the top, like @While. The statements will always execute at least once.
Using this code will prompt for every value in the Categories multivalue field.
12.5.6 Other enhancementsThere are other enhancements that should be noted, as well:
� The 64 K limit is gone in event codes.
� Buttons formulas do not need the main statement.
Chapter 12. New features in Domino 6 383
12.6 LotusScriptIn Domino 6, there are several new enhancements to LotusScript. This section only covers the most important and significant changes, as there are a huge number of new methods, properties, and classes. This section covers:
� New classes� The remote debugger� Recompile all� Language enhancements
12.6.1 New classesThe new LotusScript classes in Domino 6 are:
Use of the new classesMost of these new LotusScript classes are designed to interface with XML data in some way. They support a full set of generalized XML processing functions. In addition, Domino has a Notes-specific DTD, which is used to represent Notes database and document information. Domino has its own XML format called DXL (Domino XML Language). DXL represents all designer elements in a XML format that conforms to the Domino DTD. The main classes that handle DXL data are NotesDXLImporter, NotesDXLExporter, NotesXSLTransformer, NotesDOMParser, and NotesSAXParser. These classes are covered in greater detail in Chapter 16, “XML” on page 743.
In addition to XML-related classes, a couple of classes were added to allow better manipulation of rich text. See in-depth discussion about rich text programming and the new rich text classes in Chapter 15, “Rich text programming” on page 697.
NotesAdministrationProcessThis is a new LotusScript class with Domino 6 that represents the administration process on a Domino server. In earlier releases of Notes/Domino, there was no way to generate an administration request. This is now possible using the new class.
Example 12-1 on page 386 shows an example of creating an administration request for creating a replica of the database Redbook.nsf onto the server Trondheim/ITSO, from the source server SourceServer/ITSO.
Using the method CreateAdministrationProcess of the NotesSession class, we specified the name of the server containing the Administration Requests database (admin4.nsf). An empty string means the local computer. The server must contain a replica of the Certification Log database. You must have access privileges to the Domino Directory on the server for Administration Process requests that use it. You need author access to the Administration Requests database to be able to create requests.
Tip: Even though it was not possible to generate administration requests in earlier releases, you could always manipulate and generate documents directly in the admin4.nsf database. This required that you really knew what you were doing, and knew all the required fields to set on creation.
Chapter 12. New features in Domino 6 385
Using the CreateReplica method of the NotesAdministration class, the document is generated into the Administration Request database. This method triggers "Check access" and "Create replica" administration process requests.
Example 12-1 Creating a replica using the NotesAdministrationProcess
Sub Initialize
Dim session As New NotesSessionDim adminp As NotesAdministrationProcessDim sNotesID As String
' Creates a new NotesAdministrationProcess objectSet adminp = session.CreateAdministrationProcess("SourceServer/ITSO")
' Enters a request in the Administration Requests database.sNotesID = adminp.CreateReplica("SourceServer/ITSO", "Redbook.nsf",
"Trondheim/ITSO")
End Sub
The request generated is shown in Figure 12-21.
Figure 12-21 The “Check access” request generated using NotesAdministrationProcess
NotesStreamThe new NotesStream LotusScript class represents a stream of binary or character data. To create a NotesStream object, use the CreateStream method in NotesSession. You could use this class to create a stream, and to this stream write content or text values of a Body item of selected documents, and later use this stream to read from.
NotesReplicationEntryThe new NotesReplicationEntry LotusScript class extends the NotesReplication class, and is contained by NotesReplication class. NotesReplicationEntry represents the replication settings for a pair of servers in a database, of which
386 Domino Designer 6: A Developer’s Handbook
one is the source and the other is the destination. By using the GetEntry method in the NotesReplication class, you can create or get a NotesReplicationEntry object.
NotesColorObjectThe new NotesColorObject LotusScript class represents a color as defined in Domino. Domino defines colors numbered 0 through 240, as reflected in the read-write property NotesColor. Each Domino color maps to RGB (red, green, and blue) values in the range 0-255 and HSL (hue, saturation, and luminance) values in the range 0-240, as reflected in the remaining, read-only properties. NotesColor can be used as the value for the following properties:
NotesColor in NotesRichTextStyleBackgroundColor in NotesViewFontColor and HeaderFontColor in NotesViewColumn
12.6.2 Remote debuggerIn Domino 6 you can debug any LotusScript agents or script libraries currently running on the server remotely. You can use the remote debugger to step through and debug LotusScript agents running on the server. The agent you want to debug must be running when you start the remote debugging tool. This enables you, in real time, to debug a script running on a server with the proper access.
More than one user can attach to and debug the same agent. However, only one user has control to debug it at any given time. A second user may get control by attaching to the same agent. This capability is useful, for instance, if you want help from a coworker in debugging an agent. You can ask the coworker to attach to and debug the server agent and that coworker can do so without having to be in the same physical location.
There are several things that must be configured to take advantage of the remote debugger feature. Both the server and the agent itself must be enabled and configured. The reason for this is security. You don't want someone to come in through the remote debugger and change the value of your script or to find out information through the debugger. Ensure that you configure both your agents and servers correctly for this feature to be enabled.
Tip: If you attempt to continue debugging the server agent after your coworker has attached to and begun to debug it, you will get the error Another user has attached to the agent and taken control. Please try to reconnect for further debugging.
Chapter 12. New features in Domino 6 387
Enabling the server for remote debugging1. Before starting the server, add the following value to the ServerTasks= list in
the server's notes.ini file:
Rdebug
If the server is already running, to begin the remote debugging task, either:
– Restart the server (after having added rdebug to the ServerTasks list in the notes.ini file)
– Or enter load rdebug at the server console.
2. Click Server Tasks on the server document, and then select Remote Debugger Manager and change the value of the “Allow remote debugging of this server” to “Enabled”. See Figure 12-22. You must have administrative access to the server to edit this field.
Figure 12-22 Enabling remote debugging on the server
3. You can also set the limit for running the rdebug task on the server in the “Turnoff Server Debug after” setting.
4. Enter a time interval in the “Agent Wait at Start Time” field if you want to force the agent to pause before running, giving you time to attach the remote debugger to the target agent.
5. Check the Ports -> Internet Ports -> Remote Debug Manager tab to ensure that the TCP/IP port status property is set to Enabled. Also, if you are thinking of enabling remote debugging over the Internet or between servers with firewalls, make sure that the port number set is open for traffic.
6. Make sure you are listed on the server's Security tab as having permission to run agents.
Tip: If you set this value to -1, the task can run forever.
388 Domino Designer 6: A Developer’s Handbook
Enabling an agent for remote debuggingTo enable an agent for remote debugging, follow these steps:
1. On the Security tab of the Agent Properties box (Figure 12-23), select Allow remote debugging.
Figure 12-23 Allow remote debugging
2. On the Basics tab of the Agent Properties box, click Schedule.
The Agent Schedule dialog box displays (Figure 12-24 on page 390).
3. Click Schedule and select the server from the “Run on” list box.
Chapter 12. New features in Domino 6 389
Figure 12-24 Run on server
4. In the Programming pane, add either of the following code snippets to the beginning of the Initialize event code in the agent:
Print "AgentName is about to start running****************"Sleep(30)
This prints a message to the server console when the agent is preparing to run and delays its execution for thirty seconds, giving you time to open the remote debugger and select the agent as a target.
Or add the following line at the start of your agent:
Stop
If you set the “Agent Wait at Start Time” property in the server document to Yes, then when Domino encounters the Stop statement it waits for the time indicated in the time-out value defined in the server document, again giving you time to open the remote debugger and select the agent as a target.
This does not mean that to stop equals to sleep. If the remote debugger is not on, stop is ignored. Sleep however, will always sleep regardless whether the remote debugger is there or not. Also, if the remote debugger is attached, stop behaves like a break point. Sleep will just sleep and continue unless the user does something to stop it. The stop statement is ignored when the agent isn’t in debug mode.
390 Domino Designer 6: A Developer’s Handbook
Starting the remote debuggerTo run a specific agent you want to debug, do one of the following:
� Increase the run frequency of the agent by clicking Schedule on the Basics tab of the Agent Properties box. In the Agent Schedule dialog box, change the hour value of “Run agent every” to zero and the minutes value to 5 or less.
� Enter the following command on the server console:
tell amgr run databaseName.nsf 'agentName'
This tells the agent manager to start the agent named agentname in the database databaseName.nsf.
1. While the agent you want to debug is running on the server, choose File -> Tools -> Remote Debugger from the menu.
This starts the Lotus Notes Server Agent Debugger window.
2. Select File -> Select Debug Target from the menu.
The Select Debug Target dialog box displays.
3. Choose the server that is running the agent from the Server list box and click Open.
A list of the databases on the server displays.
4. Select the database that contains the agent and click Open.
If the agent you want to debug is currently running, it appears in the Debug Target box; see Figure 12-25 on page 392.
5. Select the agent you want to debug from the list of agents currently running on the database.
Tip: Use the Sleep() function in your agent to override the setting set in the server document, or if the field “Agent Wait at Start Time” in the server document is not set.
Tip: The run parameter for “tell amgr” is a new console command of Domino 6, and will run the agent specified. Notice that you use a quote (‘) to enclose the agent name.
Chapter 12. New features in Domino 6 391
Figure 12-25 Remote debugger
6. Click Open.
The Script Debugger window displays.
When we now connect to the selected agent, the usual interface for debugging an agent will be shown. Using the remote debugger allows you to step through and debug LotusScript agents running on the server. The agent you want to debug must be running when you start the remote debugging tool. This enables you, in real time, to debug a script running on a server with the proper access. More than one user can attach to and debug the same agent. However, only one user has control to debug it at any given time. A second user may get control by attaching to the same agent.
Tip: If you cannot connect or get a list of agents to remote debug, make sure that you have enabled your agent for remote debugging. This is explained in “Enabling an agent for remote debugging” on page 389.
392 Domino Designer 6: A Developer’s Handbook
12.6.3 Recompile allIn Lotus Notes/Domino, script compilation takes place in two phases:
� A partial compilation occurs as you enter the script. Syntax and other per-line errors are reported at this time.
� A complete compilation occurs when you save the script. All remaining compile-time errors are reported at this time.
If you attempt to save a script with compilation errors, you are given a choice of editing the script again or exiting without saving your changes.
With Domino 6, the new feature “Recompile all” will help you recompile all your LotusScripts in the current database. This can be very useful when you have performed changes in a script library that might affect all your other LotusScripts.
Recompile All LotusScript is a menu tool, available through your Tools menu.
As a general rule, the code that calls a script library should have been compiled more recently than the library. This ensures that all the caller’s references to functions and global variables in the library are correct. This menu function determines which code calls which script libraries and recompiles everything in the right order, from the bottom up.
Recompile All LotusScript compiles all design documents in the database, but does not modify design elements with script errors. If any errors are found during the recompilation, Domino Designer 6 will display a list of all these elements (Figure 12-26 on page 394).
Note: If you choose to exit, all changes are lost!
Chapter 12. New features in Domino 6 393
Figure 12-26 Recompile All LotusScript showing elements with errors
If no errors are found, you should see the information displayed in Figure 12-27.
Figure 12-27 Recompile all LotusScript run successfully
394 Domino Designer 6: A Developer’s Handbook
12.6.4 LotusScript to Java (LS2J)LotusScript to Java is a new LSX, enabling you to use your LotusScript to:
� Instantiate Java Objects
� Call Java Object Methods
� Read and write to Java Object Properties
Using LotusScript and LS2J, you can access Java classes, giving you a powerful cross-platform extension to LotusScript. Developers can access Java in LotusScript programs as a set of predefined LotusScript objects. This set of objects allows LotusScript to use already created Java classes that are available in script libraries or found using the classpath.
As mentioned, you can instantiate any Java class, using classes available in Jar files on the classpath, or classes available in your Domino Designer Java Library. Using the Designer library will also enable replication of these libraries.
By taking advantage of LS2J, you can use extensive API, which is beyond the capabilities of LotusScript.
Enabling a LS2J connection To enable the LS2J connection, the following tasks have to be performed.
� Initialize Java Virtual Machine (JVM).
� Establish a JVM connection (JavaSession).
Note: LSXs are Lotus libraries, like DLLs, that provide external data and system access to the Domino LotusScript environment.
Note: Domino Designer Java Library is a Script Library available in the Designer client.
Chapter 12. New features in Domino 6 395
� Find the desired class (JavaClass).
� Get the desired object (JavaObject).
� Access the object’s methods and properties.
Let us create an example that takes us through all these steps, and create a simple LS2J agent:
1. Initialize Java Virtual Machine (JVM).
The first thing to do is to initialize the JVM, which loads the JavaSession. In LotusScript code, include the following code:
uselsx “*javacon”
2. Establish a JVM connection (JavaSession).
The JavaSession represents a JVM connection, and is the starting point for accessing Java objects. Example:
Dim jsession as New JavaSession
3. Find the desired class (JavaClass).
JavaClass represents a Java class, and can be included with the following code:
Dim jclass as JavaClassset jclass = jsession.GetClass(“java/net/InetAddress”)
4. Get the desired object.
You can get the object you want by creating a new one, calling a static method or accessing static properties in Java. Example:
Dim localhost as JavaObjectset localhost = jclass.getLocalHost()
5. Access the object’s methods and properties.
You can only access public fields and methods, and dot notation usually suffices:
msgbox “Name: “ & localhost.getHostName()
Using the following code, which calls Java from LotusScript, should enable you to access information on your computer—not possible using LotusScript alone:
Option Publicuselsx"*javacon"Sub InitializeDim jsession As JavaSessionDim jclass As JavaClassDim localHost As JavaObjectSet jsession = New JavaSessionSet jclass = jsession.GetClass("java/net/InetAddress")
396 Domino Designer 6: A Developer’s Handbook
Set localHost = jclass.getLocalHost()Msgbox "Name: " & localHost.getHostName() & chr(13) & "Address: " & localHost.getHostAddress()End Sub
Running this example should give msgboxes like the one shown in Figure 12-28.
Figure 12-28 Calling Java from LotusScript
LS2J limitationsBe aware of some limitations in using LS2J:
� You may not delete a Variant containing a JavaClass object.
� There are some data type limitations. Refer to the Domino Designer 6 Help Database for more information.
� LotusScript property or method names are not case sensitive, but Java property and method names are. If two Java properties are the same except for their case, use the GetProperty and GetValue or SetValue methods to access the correct property. Java methods may also be overloaded; that is, they may differ only by parameter type. If two Java methods are the same except for their case, or their parameter type, use the GetMethod and Invoke methods to access the correct method. Java method calls are limited to 12 parameters.
� LotusScript can access all Java values and classes; however, there is no mechanism for Java to access LotusScript objects directly.
12.6.5 Automatically add Option DeclareMany programmers’ customary practice when developing for Domino is the use of “Option Declare” or “Option Explicit”. Leaving this out is a huge source of
Tip: For more information on using LS2J and how to invoke methods in Java, refer to the Lotus Domino Designer 6 Help database.
Chapter 12. New features in Domino 6 397
errors, and for that reason there is a new feature in Domino 6 that enables you to set this to be included as default.
When Option Declare is enabled, this forces the developer to declare all the variables that are used in that module. If you try to use variables without declaring them first, the compiler gives you an error.
The option can be set by enabling Automatically add “Option Declare”, which is a property of the programmer’s pane:
Figure 12-29 Automatically add Option Declare
12.6.6 Language enhancementsAs mentioned earlier in this section, LotusScript has been enhanced a lot, so refer to the Lotus Domino Designer 6 Help database for the complete list and the accompanying information. Here are a few of these new functions:
� Implode or Join
Resembles the @Implode function. Concatenates all members of an array of strings and returns a string. Elements of the array are separated by a delimiter, if provided, or the space character (“ ").
Example 12-2 The implode function
Sub Initialize
Dim array(2) As String
Tip: Setting and enabling properties on the Programmer’s pane affects your Domino Designer 6 Client in general, not just for the active database. It means that every new object will have the Option Declare by default on its (Options) event.
Note that Option Declare is not added to existing objects, only the ones you create after setting the option on.
This code creates a string that concatenates all array values, with a delimiter of “&”. The result of the agent would look like this:
Figure 12-30 Result from an implode
� Replace
Resembles the @ReplaceSubstring function. Replaces specific words or phrases in a string with new words or phrases that you specify.
� Split
Resembles the @Explode function. Returns an array of strings that are the substrings of the specified string.
� StrToken
Resembles the @Word function. Returns a specified word from a text string.
12.7 Auto completeAuto complete is a feature that will both speed up the development and help get the right formatting done more easily. It will look up and paste the syntax elements directly into the Programmer’s pane, as you start to enter your code. This code can be LotusScript, @formula, or HTML. The auto completion uses type-ahead functionality to let you quickly find and select the options you want and need.
Chapter 12. New features in Domino 6 399
Enabling auto completeAuto completion is enabled by default in Domino 6, but you can change the settings for auto completion to suit your needs.
Options of auto completeBy selecting the options tab on the Programmer’s pane, you can set options on the auto completion:
Figure 12-31 Auto complete options
The following settings apply to all languages.
Table 12-8 Settings for auto complete in the Programmer’s pane
Tip: If you decide to disable auto completion, you can still use the menu commands or accelerator keys to display the pop-up lists or boxes. The accelerator key for auto completion is Ctrl+Alt+t and the menu command can be accessed using Edit -> List Members. This menu or shortcut can only be used in the Programmer’s pane.
To display a parameter box, if one is applicable in this situation, you can do either Edit -> Parameter info or by pressing Ctrl+Shift+Space
Option Description Default
Auto List Member box A pop-up list of available options automatically displays when you begin typing code.
Enabled. Deselect to disable.
Auto Parameter Popup box
If an option has a parameter list, a pop-up box with a parameter prompt appears when you type a language-specific trigger, such as an open parenthesis (( ) for @functions.
Enabled. Deselect to disable.
400 Domino Designer 6: A Developer’s Handbook
12.7.1 LotusScript and auto completeWhen you add LotusScript in the Programmer’s pane, follow these simple conventions to use auto completion:
1. When declaring an object using the Dim statement, enter the word “As” followed by a space to trigger the pop-up list of available classes, as in this example:
Dim doc As[SPACE]
2. From the pop-up list, you can either type ahead to select the class you need, or scroll through the list and select it. Press Enter to paste the class into the Script area and close the list; see Figure 12-32.
Figure 12-32 Auto complete when declaring an object in LotusScript
3. To see a list of available properties and methods for a class, enter a period (.) after an object name.
Delay box The value is the amount of time to wait between a trigger keystroke and another keystroke before a pop-up list displays. If you type a second keystroke before the time has elapsed, the pop-up list does not appear. The value is in milliseconds.
200 milliseconds.
Option Description Default
Chapter 12. New features in Domino 6 401
4. From the pop-up list, you can either type ahead to select the element you need, or scroll through the list and select it. Press Enter to paste the element into the Script area and close the list; see Figure 12-33.
Figure 12-33 Auto complete of methods on the current object using LotusScript
5. If a method has a parameter list, type an open parenthesis (( ) to display a pop-up box with the parameter list. The syntax of the first parameter appears in bold.
6. Type a comma (,) after each parameter. The syntax of the next parameter in the string appears bold.
Figure 12-34 Type-ahead of parameters on methods using LotusScript
7. Type a closing parenthesis ()) or press Esc to close the pop-up box.
402 Domino Designer 6: A Developer’s Handbook
12.7.2 HTML and auto completeHTML auto completion is now available for HTML pass-through code in forms and pages. To enable and take advantage of this feature for HTML, we need to use another new feature called HTML Pane. This is covered in 12.9, “HTML” on page 412.
12.7.3 Formulas and auto completeAs with LotusScript and HTML, @formulas also support type ahead and auto completion. In the Programmer's pane, follow these conventions to use auto completion:
1. Both @function and @command auto complete are triggered by pressing the at (@) symbol. A pop-up list of available @functions and @commands appears.
2. From the pop-up list, you can either type ahead to select the function or command you need, or scroll through the list and select it. Press Enter to paste the function/command into the Script area.
Figure 12-35 Auto complete for @formulas, functions and commands
3. If the function has a parameter list, type an opening parenthesis (() to display a pop-up box with the parameter prompt. The syntax of the first parameter appears in bold.
Type a semicolon (;) after each parameter. The syntax of the next parameter in the string appears bold.
Type a closing parenthesis ()) or press Esc to close the pop-up box.
Chapter 12. New features in Domino 6 403
Or:
If the command has a parameter list, type a semicolon (;) to display a pop-up box with the parameter list. The syntax of the first parameter appears in bold.
Type a semicolon (;) after each parameter. The syntax of the next parameter in the string appears bold.
Type a closing parenthesis ()) or press Esc to close the pop-up box.
12.8 Agent enhancementsThe agent architecture has been changed in Lotus Notes/Domino 6, and there are several new security paradigms. While these change the complex and underlying aspects, there are also some other new features.
For more information about agents, refer to Chapter 7, “Domino Design elements: agents” on page 247.
12.8.1 New user interfaceThere are three new user interface features:
� New agent builder
The new agent builder is now a property box and makes all previous choices, all well as new ones, easily accessible and consistent with other design elements in Domino Designer. Most of these properties and settings are available in previous versions as well, but not as part of an agent builder in a property box; see Figure 12-36 on page 405.
404 Domino Designer 6: A Developer’s Handbook
Figure 12-36 New user interface
� All personal agents are now visible to any Manager.
As manager of a database, you can now see all agents created by users as private agents in the database (Figure 12-37).
Figure 12-37 Personal agents visible to any manager in an agent list
� Enabling and disabling agents.
You can now, directly in the list of agents, use action buttons to enable and disable scheduled agents (Figure 12-38 on page 406).
Note: If you, as manager of a database, re-sign this agent by opening it and saving it, or by signing it with the sign feature of the Designer 6 Client, be aware that the agent will remain personal, but it is now the database manager’s personal agent. It will disappear from the list of personal agents from the user who created the agent in the first place.
Chapter 12. New features in Domino 6 405
Figure 12-38 Enabling and disabling agents
12.8.2 Agent restriction listThe agent restriction list for the current server has been expanded. Agent restrictions are usually an area that your Domino Administrator takes care of. However, it is very important for you, the developer, to understand how the restrictions work. The restrictions in Domino 6 have a more granular structure. They apply to all kinds of agents (LotusScript, Java, Simple actions, Formula). These are the new agent restriction lists:
� Unrestricted
Lists who can run and have all rights to perform all agent operations, including all programmable languages and interfaces.
� OnBehalf of anyone
Lists who can and have the rights to create and sign agents that can run on behalf of someone else, as a scheduled agent.
� OnBehalf of invoker
Lists who can and have the rights to create agents that will be executed on behalf of the invoker.
� Script libraries
Lists who have the rights to sign script libraries.
406 Domino Designer 6: A Developer’s Handbook
Figure 12-39 Security settings in the server document
12.8.3 Access remote serversWith Domino 6, it is possible to access remote servers with your agents. The remote server’s server document needs to have the server you are using listed in the Trusted servers field (Figure 12-40). By having a server name in this field the server assumes that the trusted server has authenticated the user.
Figure 12-40 Remote access
Note: These are all settings in the server document and are usually maintained by the Domino server administrator.
Chapter 12. New features in Domino 6 407
Explanation:
� Remote server B must fully trust server A.
This is a new setting in the server document, which must be enabled by the Domino administrator. It is a field called “Trusted servers” and the server trusts that the servers listed in the fields have been authenticated (Figure 12-41).
Figure 12-41 Trusted servers in server document, security section
12.8.4 Run on behalf ofLets you specify on whose authority this agent can run. Note that restricted signers can run agents only under the same authority as their own (that is, the restricted signers enter only their own name or else the agent returns an error at runtime). This gives you the possibility to have users who are allowed to sign agents that will be executed on anyone else's behalf or on behalf of the invoker.
12.8.5 Script librariesIn previous versions of Lotus Notes/Domino, all code in a script library runs under the agent signer and authority. Now, you can control who is allowed to sign script libraries.
When running an agent now, which include a script library, it will enforce a check if the signer of the agent has rights to access and run the script library. This check will not run, however, if:
� The field “Sign script libraries to run on behalf of someone else” is blank. You will find this field in the Security tab of the server document in your Domino directory.
Note: This defaults to anyone for backwards compatibility.
408 Domino Designer 6: A Developer’s Handbook
� Agent and script library signers are the same.
� The script library signer is Lotus Notes Template Developers.
� The script library signer is the server on which the agent is running.
� The script library signer is unrestricted.
12.8.6 User activationIn previous versions, only designers as determined in the ACL can enable and disable agents in a database. That is not the case in Domino 6 any more. You can now allow non-designers to enable agents.
The ideal thing would be to give mail users only editor access to their mail file. In version prior to Notes 6 this led to problems with “out of office” functionality, since the users needed designer access to enable these agents as well as rights to run LotusScript agents.
In Notes 6, users with editor access can activate agents, if that is allowed, using the new property “Allow user activation” for the agent. The editor can only enable and disable the agent, not sign the agent.
How to configure user activationThese are requirements for user activation to take place:
� “OnBehalf” is set to a user who is an editor.
� The “Allow user activation” property enabled.
� The agent is signed by an “Unrestricted” or “OnBehalf of anyone” signer.
Now, a user can activate an agent with only editor access, and the user is not listed in the “Run Restricted agents” field.
Important: In order to have access to sign and run the script libraries, the script library signer has to do both of the following:
� Appear in the “Sign script libraries to run on behalf of someone else” field.
� Appear in one of the fields that gives the signer unrestricted access (“Sign agents to run on behalf of someone else” or “Run unrestricted methods and operations”).
Tip: In the Notes versions before 6, when enabling an agent, you also signed it, and you had to have designer access. In Notes 6, when the “Allow user activation” is enabled, the user will not sign it with editor access, just run it. However, if the user is a designer, it will be signed and run.
Chapter 12. New features in Domino 6 409
12.8.7 Agent securityBeginning with Domino Designer 6, you can set up basic security for an agent by using the Security tab of the Agent Properties box. This tab contains the options listed in Table 12-9.
Table 12-9 Agent security in Domino 6
12.8.8 Converting shared and private agentsOne major enhancement considering agents is that they can now be converted to shared or private, or vice versa, independent of their previous state.
Option Description
Run as Web user When enabled, the agent is run with the effective user rights of the Web user.
Run OnBehalf of Lets you specify on whose authority this agent can run. Note that restricted signers can run agents only under the same authority as their own (that is, the restricted signers enter only their own name or else the agent returns an error at runtime). Unrestricted signers can run agents on behalf of anyone. Whoever you specify in this field has to be included in the ACL of any database being accessed.
Allow remote debugging Checking this enables the agent to be debugged through a remote debugger. Only LotusScript can be remotely debugged; however, you can monitor the execution of agents written in Java.
Restricted operations Lets users who have unrestricted rights specify whether the agent should run in restricted or unrestricted mode. This option has no effect on users with restricted rights.
Allow user activation Checking this box allows users with ACL editor access or higher to enable agents. This allows a scheduled agent on the server to be enabled or disabled without resigning the agent.
Default access for viewing and running this agent
The default level for viewing and running the agent is "All readers and above." You can deselect this field and choose who you want to have default access for viewing and running the agent.
Allow public access users to view and run this agent
Lets users who have public access to documents in a database view and run the agent.
410 Domino Designer 6: A Developer’s Handbook
Converting agents can be performed using the agent’s property box (Figure 12-42).
Figure 12-42 Converting private and shared agents
12.8.9 New console commandsThere are a few new console commands that handle agents. These are:
� load amgr -h
Gives you a help index for the agent manager.
� tell amgr run “database name” ‘agent name’
Runs an agent in a separate thread.
� tell amgr cancel “database name” ‘agent name’
Aborts an agent currently running on the server.
� show agents [-v] “database name”
Shows all agents in a database, and with the verbose format, also script libraries, with additional information; Figure 12-43 on page 412.
Chapter 12. New features in Domino 6 411
Figure 12-43 Agent information using “show agents”
12.9 HTMLLotus Notes/Domino has supported HTML and pass-through HTML for ages, and now in Domino 6 there are new features for editing and rendering HTML.
12.9.1 Enabling the HTML PaneWith Domino Designer 6 you can add a new pane into the Designer client—the HTML Pane. To enable this new pane, you need to have some HTML on your form/page. Without HTML, there is no point having an HTML Pane available, so this new menu and feature element is context sensitive.
1. Type some HTML code in your form.
2. Make this code pass-through HTML.
To make your code pass-through HTML, mark your code/text and choose Text-Pass-Thru HTML from the menus. Your text/code will now be shaded as shown in Figure 12-44 on page 413.
Note: Context sensitive means that elements are available only from where they should be available. For the HTML Pane, this means that you will not be able to enable this pane unless you are in a form or page, and that you in fact are currently inside a pass-through HTML text.
412 Domino Designer 6: A Developer’s Handbook
Figure 12-44 Pass-through HTML in a form
3. Place your cursor somewhere in the HTML code.
4. Choose View -> HTML Pane.
This gives you a new pane directly in your Domino Designer 6 (Figure 12-45).
Figure 12-45 HTML Pane
Chapter 12. New features in Domino 6 413
This is the new HTML Pane. The lower part of the window (similar to the Programmer’s pane), is where you will add and remove your HTML code. The upper part of the window is a preview of what your code would look like viewed through a browser or even a Notes client. Since it is not a live preview window, you will need to click Refresh in the upper left corner whenever you’ve made some changes to the HTML and want to view the result.
5. To go back to your regular form, choose View -> HTML Pane, to deselect your HTML Pane.
12.9.2 Adding code using the HTML PaneWhen you have completed the steps described in 12.9.1, “Enabling the HTML Pane” on page 412, you are ready to add some more code on your form. This section explains the HTML Pane’s capabilities and features.
With the HTML Pane available, you can edit and change the code of your choice in the pane. All your code is added back to the form when saving and leaving this pane.
The HTML Pane supports type-ahead coding. If you want Domino Designer 6 to help you and propose and give you type-ahead of the tags and properties available, make sure this is enabled, as described in “Enabling auto complete” on page 400. This is enabled by default.
As you can see in Figure 12-46 and Figure 12-47 on page 415, HTML type-ahead is supported for both tags and properties:
Figure 12-46 Type-ahead for HTML tags
414 Domino Designer 6: A Developer’s Handbook
Figure 12-47 Type-ahead for HTML properties
So, after adding some code and switching back to the normal form look, you might have something like Figure 12-48.
Figure 12-48 HTML example built with HTML Pane
The example in Figure 12-48 shows simple HTML code, with some <span> tags and some <table> tags. Previewing this on a Web browser would look like what Figure 12-49 on page 416 shows.
Chapter 12. New features in Domino 6 415
Figure 12-49 HTML in a Web browser
Now, with Domino 6, you can also preview the HTML code directly in your Notes 6 client. This new feature also applies when including style sheets and other elements common to HTML. This allows you to use Domino Designer 6 to develop code that is available and can be rendered in multiple clients (Figure 12-50).
Figure 12-50 HTML in a Notes 6 client
In this example, we added styles to the text directly using the “style” tag.
416 Domino Designer 6: A Developer’s Handbook
Using style sheets on form and pagesThe use of style sheets on forms and pages does not work directly in pass-through HTML code. Style Sheet Resources apply styles directly to some Notes elements, and these elements are well documented in the Lotus Domino Designer 6 Help. Notes elements that support Style Sheet Resources are the document, paragraph, list item, layer, table, table cell, and image. Fields do not directly support Style Sheet Resources. Field contents inherit styles for an inheritable property. For Web clients, however, these style sheets apply as usual.
12.10 New UI elementsThere are a couple of new UI elements that the designer can utilize in Domino Designer 6. This section explains and describes these elements and how to use them.
12.10.1 LayersYou can now control and position overlapping blocks of content on a page, form, or subform. With layers you can control your placement, size, and content of information. These layers can both be transparent and opaque, so a stack of layers can in fact reveal layers underneath and hide others.
The content of a layer depends on where you add the layer. If you create it on a form, then you can add text and graphics, controlled-access sections, fields, and subforms. These are elements that normally can be added to a form. If the layer is created on a page, this layer can only contain the same elements that a page can contain, like text and graphics.
Once a layer is created, you can change the following properties of the layer:
� Position� HTML properties� Background color and image
Creating a layerFollow these steps to create a layer on your form, page, or subform:
1. Open/create a form, page, or subform.
Chapter 12. New features in Domino 6 417
2. Choose Create -> Layer.
You now get a layer, which is a rectangular element with borders and a Layer Anchor icon in the top left corner; see Figure 12-51.
Figure 12-51 New layer
Positioning the layerIf you need to, you can change the position of a layer in several dimensions by changing its properties, as follows:
1. Select the layer.
2. Choose Layer -> Layer Properties and click the Positioning tab.
3. Choose a position and position value, as described in Table 12-10.
Table 12-10 Positioning a layer
Layer position Description Default value
Top Specifies the location of the top edge of the layer.
"Auto" aligns the top of the layer vertically with its original location (insertion point).
418 Domino Designer 6: A Developer’s Handbook
A layer with a higher Z-Index value (for example, layer A) is located closer to the user; that is, it is stacked in front of a layer with a lower Z-Index value (for example, layer B). If the layers overlap and layer A is opaque, the contents of layer A obscure the contents of layer B. In addition, the contents of layer B cannot be clicked or selected, even if layer A is transparent.
A negative Z-Index is placed behind the parent element's contents (so that it cannot be clicked or selected); a positive Z-Index (>=0) is placed in front of the parent element's contents (and prevents overlapped parent element (form, page, or another layer, for example) content from being clicked or selected)
Left Specifies the location of the left edge of the layer. For example, a value of 96 units indicates that the left side of the layer is located 96 units from the left edge of the parent element.
"Auto" aligns the left edge horizontally with its original location (insertion point).
Width Specifies the width of the layer, a value based on the location of its right edge relative to its left edge.
One-third of the width of the window or the parent element, whichever applies.
Height Specifies the height of the layer, a value based on the location of its bottom edge relative to the top edge.
One-third of the height of the window or the parent element, whichever applies.
Z-Index Specifies the stacking order of the layer; that is, how close to or far from the front of the parent element the layer is located.
0; that is, in front of the parent element.
Tip: You can also position the layer by dragging and dropping it anywhere in the page or form. This is often much easier than trying to experiment with the positioning values.
You can also select multiple layers and move them simultaneously. To select a layer hold Shift down and click on the layers and move them. You can also select multiple layers by selecting a layer and then selecting Layer -> Select -> All siblings or All children.
Layer position Description Default value
Chapter 12. New features in Domino 6 419
Setting HTML propertiesThe layer element is supported for use in Web browsers as well, and if you are designing an application for the Web and are using HTML 4.0, the HTML tab lets you apply some attributes to layers.
Follow these steps to set your HTML properties:
1. Select a layer.
2. Choose Layer -> Layer Properties and click the HTML tab.
3. Specify HTML attributes, as described in Table 12-11.
Table 12-11 HTML properties for the layer element
Hiding a layerYou can hide your layers if you want, and there are basically two ways to hide a layer, depending on the situation:
� Using Hide-When
� For the current session only
You can hide your layers by using the Hide-When properties of the paragraph containing the layer anchor, just like any other elements. Hide-When is described in “Paragraph Hide When tab” on page 113.
Note: Do not include quotation marks when you enter the attributes in the various HTML tab fields, except in the Other field.
Tag Description
ID The ID attribute. This is the name of the layer object.
Class Use the Class attribute to apply a CSS class for a defined object.
Style Use the Style attribute to apply a specific CSS style to an object using inline CSS.
Title Generally use the Title attribute in Explorer 4.x and later to provide the user with a tip or prompt.
Other Use the Other attribute for additional HTML tag attributes, which must be written as pure HTML code.
Note: If a layer anchor is contained in a collapsed section or in a row that is not currently visible, of a tabbed table, the layer and its contents are not visible until the collapsed section is expanded or until the row is current.
420 Domino Designer 6: A Developer’s Handbook
If you want to hide the layers for the current session only, then use the Layer Tree dialog box:
1. Open a page or form and create one or more layers.
2. Choose Design -> Layer Tree. The Layer Tree dialog box appears listing all the layers (and their hierarchies) on the page or form.
3. Select a layer. Click Hide/Show to hide or show the layer while you edit the form or page in Designer.
4. To hide all layers for the current session, click Hide All. To show all layers for the current session, click Show All.
5. Click Close.
Example of using layersEarlier in this chapter, we created a layer, shown in Figure 12-52.
Figure 12-52 A single layer on a form
We then resized the first layer and inserted another layer to the right of it; see Figure 12-53 on page 422.
Tip: You can easily set many of the settings of a layer to be the same as those of some other layer. Select both layers and set desired properties.
Chapter 12. New features in Domino 6 421
Figure 12-53 Two layers
Now let’s add some information in these two layers, using tables, text and fields; see Figure 12-54 on page 423.
422 Domino Designer 6: A Developer’s Handbook
Figure 12-54 Layers with content
If we now preview this form with layers in the Notes 6 client; see Figure 12-55 on page 424.
Chapter 12. New features in Domino 6 423
Figure 12-55 Layers in Notes 6 client
If you want to reorder these layers, and change their location on the screen, this is easily done, since layers are fully movable and controllable and can be placed anywhere, as shown in Figure 12-56 on page 425.
424 Domino Designer 6: A Developer’s Handbook
Figure 12-56 Overlapping layers
After completing the move and customization of the placement of the layers, as shown in Figure 12-57 on page 426, it will look as for the Notes 6 client.
Chapter 12. New features in Domino 6 425
Figure 12-57 Changed places in Domino Designer 6
426 Domino Designer 6: A Developer’s Handbook
Figure 12-58 Changed places in Notes 6 client
Web supportThe layer element is supported for use in Web browsers as well, and if you are designing an application for the Web and are using HTML 4.0, the HTML tab lets you apply some attributes to layers, as explained in “Setting HTML properties” on page 420.
Figure 12-59 on page 428 shows the same form with layers (after some further repositioning) in Internet Explorer.
Chapter 12. New features in Domino 6 427
Figure 12-59 Form with layers in Internet Explorer
12.10.2 New field typesDomino 6 has three new field types: Color, Rich Text Lite, and Time Zone.
ColorA Color field lets you display a color picker on a form. The color you choose is stored in a hexadecimal format. You can use the field, for example, to get input from a user and change a color of the background or text based on that. The Color field looks as in Figure 12-60 on page 429.
428 Domino Designer 6: A Developer’s Handbook
Figure 12-60 Color field
Rich Text LiteWhen you need to collect, store and display formatted text in a field, embedded or attached objects and elements, you have a new option in addition to the Rich Text fields: Rich Text Lite fields.
Rich Text Lite fields are Rich Text fields with a helper icon and down arrow next to the field. Clicking the icon gives the user a fast way to add text, an object, or an element into the Rich Text Lite field. Clicking the down arrow displays a drop-down menu. The elements listed in the drop-down menu are the only elements the user is allowed to insert into the Rich Text Lite field. Any attempt to paste a non-allowed element into this field causes an error message. This is a good way to limit the input from the end user, and restrict what can be added in Rich Text fields.
You can select or deselect one or more of the following object types (the object types selected have a check next to them):
Creating a Rich Text Lite fieldTo add a Rich Text Lite field to a form, select Rich Text Lite from the field type list on the Field Info tab of the Field Properties box (Figure 12-61).
Figure 12-61 Designing and limiting inputs to the field
At the Control tab of the Field Properties box, check the object types you want to add to the drop-down menu that appears when the user clicks the down arrow.
Figure 12-62 shows how Rich Text Lite would look to the end user in Notes.
Figure 12-62 Rich Text Lite, to an end user
Note: If you select only one of these object types, no down arrow appears because there is no need to change types.
430 Domino Designer 6: A Developer’s Handbook
After a user has selected to show an Inbox, the document looks as shown in Figure 12-63.
Figure 12-63 Rich Text Lite, with an inbox inserted
Time zoneA time zone field lets you display a drop-down list of all available time zones in the world, including the local time zone. Each time zone listed includes a partial list of the cities or locations found in that time zone; see Figure 12-64.
Figure 12-64 The Time Zone field
Chapter 12. New features in Domino 6 431
12.10.3 Embedded editorEmbedded editor is a new element that can be embedded in your forms. There are two situations in which you would utilize this new feature:
� Embedding one or more forms into an existing form
� Embedding an editor that again links to an embedded view
Embedding one or more forms into an existing formIn an existing form, you can now embed another form, to be accessed and treated as a separate form within the existing one.
1. Create a form or open an existing form.
2. In the form, place the cursor where you want to create the embedded editor.
3. Choose Create -> Embedded Element -> Editor.
The Insert Embedded Form dialog box appears.
You can choose one of the following options:
– None
This is the first choice under "Choose a form." Choose None if you want to paste a document or anchor link into the embedded editor or if you want to use targeting by linking an embedded editor to an embedded view.
– An existing form from the list of forms
The list of forms in the current database appears under "Choose a form." To insert an existing form into the embedded editor, choose one of the forms.
To insert a form from another database, select a database from the pull-down list of databases and then choose a form listed under "Choose a form."
– Insert form based on formula
To insert a form based on a formula, check “Insert form based on formula.”
4. Choose Element -> Editor Properties to open the Embedded Editor Properties box. At the Info tab, you have the following choices:
Note: The data entered in an embedded form is saved with that form, and is not part of the original form, generating one document for each of the forms. To save content in the embedded forms, however, you need to do the save while you are in this embedded form. If you save the main document, you do not automatically create documents for all embedded forms.
432 Domino Designer 6: A Developer’s Handbook
– Name - Enter a name for the embedded editor. Entering a name is necessary only if you are targeting to an embedded view.
– Size - Enter a size in inches for the width and height of the embedded editor. Alternately, you can check “Fit to window” for the width and for the height.
– Type and Value - These fields are automatically filled out, depending on how the editor is created. The following values may appear:
• Link
Link appears in the Type field if you selected None in the “Insert Embedded Form” dialog box. The fields next to the Type and Value fields are both left blank. Link requires that you paste in a link that you’ve already copied to the Clipboard. Click the Paste icon to paste in this link. Note that you can paste in only an anchor or a document link. Do not try to paste in a View or a database link.
• Named Element
Named Element appears if you selected an existing form in the “Insert Embedded Form” dialog box. The field next to Named Element displays as Form. The Value field contains the name of the form you chose in the Insert Embedded Form dialog box.
– Hide action bar - Checking this causes the action bar of the form you inserted (with the “Insert Embedded Form” dialog box) to be hidden. If it is unchecked, the action bar is displayed.
– Disable scroll bars - Checking this causes no scroll bars to appear. If it is unchecked, the embedded editor displays with scroll bars when all of its content does not fit on the screen.
Preview documents selected from an embedded viewOne of the useful things of this feature is the ability to preview documents selected from an embedded view into an embedded editor. You can place one or more embedded views on a form, and then link them to one or more embedded editors.
1. Create a new form.
2. Choose Create -> Embedded Element -> Editor.
3. Select None in the "Insert Embedded Form" dialog box and click OK.
4. Choose Element -> Editor Properties. The Embedded Editor Properties box opens.
5. Specify a name for the embedded editor and close the properties box.
Chapter 12. New features in Domino 6 433
6. Choose Create -> Embedded Element -> View. The “Insert Embedded View” properties box appears.
7. Choose a view and click OK.
8. Choose Element -> View Properties. The Embedded View Properties box opens.
9. In the Target Frame (for single click) field, enter the name of the Embedded Editor that you want to link to. Close the properties box.
10.Save and close the new form.
11.Create a new document with the form.
12.Highlight a document in the embedded view. The document loads in the embedded editor. You can now edit that document in the embedded editor. You can then switch to another document in the embedded view and continue editing.
Figure 12-65 shows the end-user view of this.
Figure 12-65 Previewing selected documents
434 Domino Designer 6: A Developer’s Handbook
12.11 Outline enhancementsThere are some new ways and features to handle outlines in Domino 6. This chapter covers some of these enhancements.
12.11.1 Computed outlinesIn Designer 6 it is possible to embed an Outline in a page, form, subform or Rich Text Field based on formula (Figure 12-66). In this way you can offer a dynamic navigation context to the user based on some condition. For example, you could show different outlines for internal or external users, or based on access rights to the database.
Figure 12-66 Embedding an outline based on a formula
To learn how to embed an Outline in another Design element, see 9.3, “Embedded Outline” on page 309.
12.11.2 Pop-up textIn some cases you need to specify a label for the Outline entry and there is a window size limitation for the label that you want to use. In this case, you can use
Tip: Combining the above with the Domino 6 feature InViewEdit, which enables the end-user to edit documents directly in a view, makes the feature even more useful, reducing the need for multiple open windows.
Chapter 12. New features in Domino 6 435
the pop-up text. This new feature lets you specify a text to be displayed when the user moves the mouse over the outline entry.
To learn how to specify a pop-up text, see 9.3, “Embedded Outline” on page 309.
12.11.3 Customizable twistiesYou can make the display of the outline more attractive by using figures instead of triangular twisties. In this way you have more graphical resources to develop good looking interfaces.
You can specify the image directly from the Image Resource or choose one based on formula, handling different contexts and conditions, turning your application interface more dynamic and visually intuitive.
The info tab of the outline properties box Figure 12-67.
Figure 12-67 Embedded outline
12.11.4 Show folder unread informationThis feature displays the number of unread documents in a folder. With this feature enabled, users can easily see which folders contain unread documents without going through each folder looking for them. The unread count is displayed beside the folder’s name, as shown in Figure 12-68 on page 437.
436 Domino Designer 6: A Developer’s Handbook
Figure 12-68 Unread information for a folder
To enable this, you need to set a property on the embedded outline; see Figure 12-69.
Figure 12-69 Enabling unread information for an embedded outline
Chapter 12. New features in Domino 6 437
12.12 Actions enhancementsThere are a lot of new features for actions in Domino Designer 6, and this chapter covers most of these enhancements.
12.12.1 General changes� System actions are no longer default-added to action bars.
System actions are six prebuilt actions related to document handling. Each of them runs a system command such as forward, edit or send document. You cannot modify what the system commands do. System actions are included in the action menu, but not in the action bar by default. You can change this in the properties, action by action.
System commands must now be inserted if needed, using Create -> Action -> Insert System Actions, as shown in Figure 12-70.
Figure 12-70 Including system actions
� Easier handling and maintenance of actions.
You can easily drag and drop actions in the action list, to move them around, and reorder them.
12.12.2 Computed labelsComputed labels are now possible. These let you, for example, personalize action bars and actions, or compute them in ways that meet your needs:
438 Domino Designer 6: A Developer’s Handbook
Figure 12-71 Computed labels
To make a computed label as described in Figure 12-71, add the following formula to the computed label window:
@Name([CN] ; @UserName) + ", click here to save the document"
12.12.3 Menu separatorThere is a new type of action, the menu separator, that enables and makes it easier to add separators in your application’s action bars. This action type adds a separator to the resulting drop-down list, when using “Action with sub action”.
Figure 12-72 Menu separator
The line that separates the actions in the drop-down list is the menu separator action. You select this type of action as you design your action in the action pane.
12.12.4 Checkbox actionThere is a new type of action, the checkbox, that lets you show the state of an item (checked or unchecked). If you choose checkbox, you can enter a value in
Chapter 12. New features in Domino 6 439
the Value field (for example, a formula that evaluates to true or false). You can also highlight the Click event in the Objects list of the Programmer's pane to enter a Click value. If you want the action bar's state (checkbox) to be re-evaluated when a different document becomes current, make sure to check the “Evaluate actions for every document change” option in the Options tab of the Views Properties box.
Example of using the checkbox actionTo understand the complete relation of this example, refer to 14.9, “Sametime connectivity” on page 641 for information about Sametime connectivity, and see 14.9.3, “Power of Sametime” on page 641.
The example in this chapter shows how you can Sametime-enable a Web application by adding instant messaging capabilities. Clicking on a listed person on a Web page gives you the possibility to chat directly with the listed person, using Sametime functionality in a Web browser.
This example uses a list of hard-coded and predefined users that should be available on the Web page. The more optimal solution would be to have a more dynamic and end-user selective solution, letting the end user select whether he or she should be available or not.
This solution could be achieved by clicking a button that runs a background agent, and maybe returns a message box, prompting the status of the person.
An even better solution would be if the user could actually see the state of this setting directly, without having to click a button to run some agent that will give this status as part of a prompt. This can be achieved by using a checkbox action.
Let’s see how this can be implemented.
Assumptions� The name of the Web application database is SametimeWebApp.nsf.
� A view of all users registered in this database, with their status, is called lupSametimePeopleStatus.
Target� An action button in the mail file that changes the state of the person’s status
� An action button that shows the state of the status in the Web application
SolutionFirst, add an action button in the ($Inbox) folder in the mail file, and set this action button to the checkbox type, as shown in Figure 12-73 on page 441.
440 Domino Designer 6: A Developer’s Handbook
Figure 12-73 Checkbox action added
This adds a checkbox action to the Inbox folder of the mail file, as shown in Figure 12-74.
Figure 12-74 Checkbox in the Inbox
Clicking this action should now change the status field in another database (SametimeWebApp.nsf), for the current user. It should also be checked if the status is Online, and unchecked if the status is Offline. This will easily let the users select their status, and visually show whether they are Online or Offline in the Web application database.
Chapter 12. New features in Domino 6 441
This checkbox is checked if the value of the action is evaluated as True, and unchecked if the value is evaluated as False. Clicking Value in the action properties box, let us specify formula for the checkbox action. By adding the code in Example 12-3, the formula will evaluate as True if the field SametimeStatus has the value Online, and as False if the value is Offline or the field has any other value.
To complete this task, the only thing remaining is to change the SametimeStatus field in the Web application database when clicking the checkbox action. To achieve this, we added the code in Example 12-4, in the click event of the checkbox action button.
Example 12-4 Click event of the checkbox action
Sub Click(Source As Button)
Dim session As New NotesSessionDim dbThis As NotesDatabaseDim db As NotesDatabaseDim view As NotesViewDim doc As NotesDocumentDim namUsername As NotesNameDim sUsername As String
Set dbThis = session.CurrentDatabaseSet namUsername = New NotesName(session.username)sUsername = namUsername.Canonical
Set db = session.GetDatabase(dbThis.Server, "SametimeWebApp.nsf")If Not db Is Nothing Then
Set view = db.GetView("lupSametimePeopleStatus") If Not view Is Nothing Then
Set doc = view.GetDocumentByKey(sUsername, True)
Note: The view in @DbLookup has two columns. The first one contains the user name, the second the status.
442 Domino Designer 6: A Developer’s Handbook
If Not doc Is Nothing ThenIf doc.SametimeStatus(0) = "Online" Then
Example 12-4 on page 442 uses the username as the key for finding the correct document in the SametimeWebApp.nsf database.
If the user is offline in the Web application database upon opening his mail file, then the checkbox is not checked, as shown in Figure 12-75.
Figure 12-75 Unchecked, not online
By clicking the action, the click event is performed, and the action button is re-evaluated and is now checked, because the status in the Web application database has been changed to Online. You can see this in Figure 12-76 on page 444.
Note: This example supposes that the SametimeWebApp.nsf database is on the same server as the mail file. This is not a requirement.
Chapter 12. New features in Domino 6 443
Figure 12-76 Checked, online
12.12.5 Sub actionsThere is a new feature called “Create Action with Sub Action”, which allows you to create cascaded actions with sublevels of actions:
Figure 12-77 Action pane with sub actions
As you can see in Figure 12-77, the look and interface of the action pane is changed as well.
How to create Action with Sub ActionThere are two ways to create Action with Sub Action:
� Choose Create Action with Sub Action from the menu.
Or:
� Inside your action pane, right-click and select Create Action with Sub Action.
Note: This example is based on changes in the inbox folder of a mail file. Customizing the mail file is not recommended. The purpose of the example is to highlight the strength of the checkbox action that lets you show the state of an item.
444 Domino Designer 6: A Developer’s Handbook
12.12.6 Other features and enhancementsThere are several new features with actions and action bars, and without going into more detail, here are some of them:
� Hide actions for mobile clients
� Bar height on action bars
� Border styles on action bars
� Border effects on action bars
12.13 View enhancementsMany improvements and new features have been made for views. This section highlights some of these.
12.13.1 Column colorsIn Designer 6 you can set colors to be displayed in view columns. With this enhancement you can represent information visually with colors. You can do this in two ways:
� By specifying the color, RGB based, directly in the Programmer’s pane for the column.
� By pointing the color settings to a profile document.
Example of column colorsIn Notes client applications, you can set a column's background color and text color programmatically by selecting the “Use value as color” option on the Info tab of the Column Properties box and then supplying RGB coordinates in the Programmer's pane as the value for the column. To be able to set the color of a column, you need to enable the column option “Use value as color” as shown in Figure 12-78 on page 446.
Tip: You can now create actions and actions with sub actions by right-clicking in the action pane.
Chapter 12. New features in Domino 6 445
Figure 12-78 Enabling column color
If you specify one set of coordinates (three numbers separated by colons), this defines the color of the text. If you specify two sets of coordinates (six numbers separated by colons), the first set of coordinates defines the background color for the column, and the second set of coordinates specifies the text color.
To add text and background colors, we apply a column value of that column. But the problem then is, how do we also show some content on that column? The trick here is that all the columns to the right of the column where you specify the colors, will appear in the colors you defined. Hide the column where you define the colors, because showing those color coordinates to users makes no sense.
If you want just one column to be colored, then you have to put a hidden color column to the left and right of the colored column. In the color column on the right, you should switch back to the normal colors.
Let’s see how this would be done. Let’s start with a plain view, with four columns, and no colors, as shown in Figure 12-79.
Figure 12-79 A plain view with no colors, in Domino Designer
What we want to achieve is to have different columns in a separate background and text colors as follows:
� The first column will remain as the default, black text on white background.
� The second column will have black background with white text.
446 Domino Designer 6: A Developer’s Handbook
� The third column will have a light grey background with red text.
� The last column should have the normal background again.
� Each column should also have content data as well. To do all this, we need to add some code for each column.
For the first column, there should be no code, since it should have the default colors. So we only add a column value of the content we would like. For this example, let’s use Firstname, which is a field in our example documents.
For the second column, we also need to add some code. What we could do, is to add the RBG code as the value of this column, but this wouldn’t give us the possibility to also add some real content to the column, like Lastname. We add a hidden column to the left of the second column with the “Use value as color” option turned on, and add the RBG code in this column. The column value of the “Black background” column would be the field Lastname. This is shown in Figure 12-80.
Figure 12-80 Adding a hidden column with the RGB code
Adding this column adds color to the hidden column as well as all the columns to the right of it. In the Notes 6 client, this would look as in Figure 12-80.
Chapter 12. New features in Domino 6 447
Figure 12-81 Column colors
As we can see in Figure 12-81, the second column, titled “Black background”, is colored with black background and white text. But so are all the columns to the right of this column.
Now we want to add a different color in the third column, titled “Light grey background/red text”. But we would also like to have the value of the field Status in this column. Because of that, we need another hidden column before the “Light grey background/red text” column, with the “Use value as color” option turned on. In that column we set the new RGB code, and for the “Light grey background/red text” column, we add the Status as the column value. This is shown in Figure 12-82.
Figure 12-82 Another hidden column with RGB code
448 Domino Designer 6: A Developer’s Handbook
The view would now look like Figure 12-83 in the Notes 6 client (colors may not be clear in black/grey printout, but you should be able to see the contrasts).
Figure 12-83 Column colors in the Notes 6 client
And, finally, we want the last column, “Back to normal”, to have the regular colors, as in the first column, and with the text “This is absolute normal” as the column content. To do this, we once again add a hidden column with the “Use value as color” option turned on; see Figure 12-84.
Figure 12-84 Another hidden column
And after adding a column value for the last column to “This is absolutely normal”, our example would look like Figure 12-85 on page 450 in the Notes 6 client.
Chapter 12. New features in Domino 6 449
Figure 12-85 Final result of column colors
12.13.2 Context-sensitive actionsTo provide an intuitive and attractive application, you can use context-sensitive actions. In order to use them, you must set Hide-When conditions for those actions. Notes always evaluates the Hide-When conditions when the view is opened and you can set the option “Evaluate actions for every document change” in the view’s properties box to evaluate the Hide-When conditions each time a document changes.
Figure 12-86 Context-sensitive actions
ExampleConsider an example where you have a database that handles orders, and the database has a view showing orders with different statuses. Then, you can control an action button to be hidden if the marked document has a certain value. For example, if the view contains both approved and pending orders, and you select an “approved” document, then the action button for “Approve order” should not be visible.
450 Domino Designer 6: A Developer’s Handbook
In Figure 12-87 we have four documents. For the marked document, Terje Weiseth, you have an action button available: Approve.
Figure 12-87 Evaluate actions I
If you select another person, Rune Carlsen, this action button is no longer available, because it is hidden based on the value of the field Status (it is already approved). This can be seen in Figure 12-88.
Figure 12-88 Evaluate actions II
To enable your application for this feature, follow these steps:
� Check the “Evaluate actions for every document change” on the view property for the view you want this feature. See Figure 12-86 on page 450.
� Add a Hide-When formula for the action in the selected view, for example:
Status = “Approved”
12.13.3 Customized iconsIn Designer 6 you can choose your own images to be displayed as icons in a view column. These images must be in the Image Resources. You can still use the standard icons, of course.
Caution: Be aware that checking this option can have a serious impact on the performance of your application.
Chapter 12. New features in Domino 6 451
To set a customized image for an icon in a view column, select the “Display values as icons” option in the Column properties box. Then, in the programmer’s pane of this column, point to an image in the Image Resource; see Figure 12-89.
Figure 12-89 Customized icons in columns
12.13.4 Background images/gridsTo develop a pleasing and user-friendly application you can specify an image to be the background of a view. You can do this by choosing an image from the Image Resources dialog box or specifying a formula for displaying an image based on a certain condition. The formula is evaluated when the view first displays.
Another enhancement in Designer 6 is that you can set a grid style for the view. This adds borders for your rows and columns, making it easier to read the views, especially if they have a large amount of data; see Figure 12-90 on page 453.
Note: Choose an image with appropriate size and colors that fits well in a view. An image resource can be a GIF, BMP, or JPEG graphic. The recommended size for a column icon is .2 inches wide and .18 inches high.
452 Domino Designer 6: A Developer’s Handbook
Figure 12-90 Grids in a view
The grids can be defined as part of the view property, and have several styles as well. Choose the one that suits your needs.
To learn how to use a background image or to set the grids in a view, see Chapter 6, “Domino Design elements: views, folders, and navigators” on page 183.
12.13.5 Customize twistiesIn Designer 6 you can customize the twistie images. Twisties are very useful in views, more specifically in categorized columns and documents with response documents.
In the previous releases of Lotus Notes, just the standard triangular was available as the twisties image. Now in Designer 6, You can do it by choosing an image from the Image Resources dialog box or specifying a formula for displaying an image based on a certain condition. The formula evaluates when the view first displays.
To learn how to define a twistie image see Chapter 6, “Domino Design elements: views, folders, and navigators” on page 183
12.13.6 User customizationsIn Designer 6, the user, by default, can customize a view in a variety of ways, including resizing and reordering columns or setting color options. Changes users make are maintained when they close and reopen the view. It’s a great enhancement because the application developer can create a view for different audiences, avoiding creation of several views to satisfy all the audience interface needs.
Chapter 12. New features in Domino 6 453
To set this feature, select “Allows customization options” in the views properties box.
For more information about View customization, see Chapter 6, “Domino Design elements: views, folders, and navigators” on page 183.
12.13.7 Create document from viewThis feature lets the users create documents directly from the view, without opening a new window. The users fill the fields in through the view columns. In this context, the columns appear in edit mode. To set this feature, do the following:
1. Select the “Create new documents at view level” option in the View’s properties box.
2. Select “Editable column” in the Column’s properties box for the columns where you want the user to enter data.
3. Add code to the view’s InViewEdit event to handle the document creation and validation entries. You can program this event only with LotusScript.
Example 12-5 shows a sample of programming the view’s InViewEdit event to create a document. In this sample database, there is a form with two fields: Firstname and LastName. In the view we just allow the user to fill the Firstname field.
Example 12-5 Create a document from a view
Sub Inviewedit(Source As Notesuiview, Requesttype As Integer, Colprogname As Variant, Columnvalue As Variant, Continue As Variant)
The InViewEdit event runs several times, depending on the request that is being performed.
� Query
This is when the user enters an editable view column entry.
� Validate
This is when the user exits an editable view column entry.
� Save
This is after validation of one or more view column entries in an existing document.
In the view, use Ctrl-Click here to add a new document in the bottom of the view to create a document.
An editable column appears in which to enter data. Fill this in and press Enter, or click outside of the editable field to finalize the procedure.
A new document is created in the database; see Figure 12-92 on page 459.
Note: In the previous sample the code just handles the document creation.
Chapter 12. New features in Domino 6 455
Figure 12-91 Create a document from view
12.13.8 Editing a document in a viewYou can enable Notes users to edit fields of an existing document directly in a view. The big advantage of this feature is that the document itself does not need to be opened—editing takes place directly in the view. This is especially beneficial for documents where users make only minor changes to few fields and therefore can avoid opening the document in a separate window.
For in-view editing, there is a new event for a view, called InViewEdit, and the developers have to enable the column to have this feature, “Editable column”. To enable a view for this option, follow these steps:
1. Select “Editable column” in the Column’s properties box for the columns where you want the user to enter data.
2. Add code to the view’s InViewEdit event to handle the document creation and validation entries. You code this event only with LotusScript.
In this new event, we have to add some code that will make sure that the update happens, and that validation takes place. Example 12-6 on page 457 shows an
456 Domino Designer 6: A Developer’s Handbook
InViewEdit LotusScript that enables InViewEdit to take place, accept all user inputs, and update the document.
Example 12-6 Editing a document in a view
Sub Inviewedit(Source As Notesuiview, Requesttype As Integer, Colprogname As Variant, Columnvalue As Variant, Continue As Variant)
The InViewEdit event runs several times, depending on the request that is being performed:
� Query
This is when the user enters an editable view column entry.
� Validate
This is when the user exits an editable view column entry.
� Save
This is after validation of one or more view column entries in an existing document.
1. Before we edit the document, no events are influenced.
2. We click the document and column value we want to edit. This request is a Query. This request then checks whether the marked document has the field to be edited. If so, it sets a value of the field to a constant. If not, it exits the sub.
3. Then, the next request is Validate, which validates the content. We have set it to accept all inputs.
4. The next request is the Save request, which actually updates the document by replacing the current value in the field with the new value and saves it.
These sequences are shown in Figure 12-92 on page 459.
Tip: CaretNoteID is a new property with Domino 6 that is the Note ID of the currently highlighted (that is, at the caret location) document in a view.
458 Domino Designer 6: A Developer’s Handbook
Figure 12-92 InViewEdit
This is one example of how you can enable your views for InViewEdit events. You can add validation and other routines as well. Refer to the Domino Designer 6 Help database for more information.
12.13.9 Hide columns on-the-flyAnother improvement in Designer 6 is the feature to hide view columns on-the-fly. It means you can develop a view to serve different audiences, displaying different columns for different users. The feature works both for Notes clients and Web browser users.
To learn how to set Hide-When options for columns, see Chapter 6, “Domino Design elements: views, folders, and navigators” on page 183.
Attention: The InViewEdit event is only supported in the Notes client.
Note: Hide-When formulas are not a security measure. Users can still get information by viewing the document properties. Use this feature as a method for controlling the display of information in a view.
Because the ability to selectively hide a column based on a formula is new in Designer 6, columns hidden in this way will display in earlier releases of the client unless you also check the option Hide in Notes R5 or before.
Chapter 12. New features in Domino 6 459
12.13.10 Creating views programmaticallyLotusScript enables you to programmatically add, customize, and delete views. In Designer 6 there is a new method in the NotesDatabase class, CreateView, where you can programmatically create a view, modify the properties of the view and even delete a view. In this way you can create views and set their attributes, such as columns, with LotusScript.
Example 12-7 Creating a view programmatically
Sub Initialize
Dim session As New NotesSession Dim db As NotesDatabase Dim view As NotesView Dim viewCol As NotesViewColumn
Set db = session.CurrentDatabase Set view = db.CreateView("viewMyNewViewName", |SELECT Form = "myForm"| )Set viewCol = view.CreateColumn(1, "Firstname", "Firstname")viewCol.HeaderAlignment = VC_ALIGN_RIGHTviewCol.HeaderFontStyle = VC_FONT_BOLD
End Sub
Explanation Example 12-7 creates a view programmatically with the use of the new method in the NotesDatabase class, CreateView, and sets some properties of the new column using the NotesViewColumn class. The CreateView method contains several possible parameters, though we only used the first two in our example:
� viewName
This is the name of the new view. It defaults to “untitled” and is created even though the name duplicates an existing view.
� selectionFormula
This is the selection formula you want to set for the view to determine which documents are shown in the view. It defaults to Select @All, if none is specified.
� formatNotesView
You don’t necessarily have to create the new view from scratch. Use this property to specify an existing view, from which the new view is copied. If the existing view has many of the attributes you need in your view, you can save a lot of coding and execution time by using it.
460 Domino Designer 6: A Developer’s Handbook
� isProhibitDesignRefresh
Specify False to allow the view design to be refreshed. The default is True, which prohibits the view design from being refreshed.
To set properties of the created view, use the NotesViewColumn class, which includes several properties that can be “get” and “set”, as shown in Example 12-7 on page 460.
12.14 Field enhancementsWe can now give field hints in Notes 6, as well as quite a few other good field enhancements. This section covers the main enhancements with fields in Domino 6.
12.14.1 Field hintsTo create even more user-friendly user interfaces in Domino 6 applications, we can now include field hints. These are explanations of each field in the application. They are set as part of the field property, and show up as text in the field. They disappear when the user enters the field; see Figure 12-93.
Figure 12-93 Field hints
12.14.2 Size optionsThere are some new size options for fields, regarding the size of the field, shown in Table 12-12 on page 462.
Chapter 12. New features in Domino 6 461
Table 12-12 New size options
12.14.3 Alignment options“Align control’s baseline with paragraph’s” is a new property setting for a field, shown in Figure 12-94.
Figure 12-94 Align control’s baseline
Property Choose one
Width Fixed (Size) - this lets you set a fixed width in inches
Fit to window - fits the field to the window as the percentage you set.
Fixed (Characters) - this lets you set a fixed width in characters.
Height Fixed - this lets you set a fixed height in inches.
Dynamic - this increases the size of the entry box dynamically up to 3 lines. If an entry is longer than 3 lines, scroll bars display automatically.
Proportional - this sets the height proportionally to the width.
462 Domino Designer 6: A Developer’s Handbook
If you check “Align control's baseline with paragraph's,” the baseline of the characters in the field is aligned with the baseline of the characters in the paragraph containing the field. This setting is especially useful if you have no border around the field. The text in the borderless field will be on the same baseline as the text in the paragraph containing the field.
Figure 12-95 Align control’s baseline with paragraph’s field property
Figure 12-95 shows an example of the use of this property. Take a look at the two lines with the text Static text.... The lines are identical, except that the text in the fields is aligned differently. The field on the first line has the “Align control’s baseline with paragraph’s” property set on; the second line doesn’t.
12.14.4 Border stylesWhen we use “Native OS Style” for fields, we now have new border styles to choose from; see Figure 12-96.
Figure 12-96 Native OS Style now have border styles
Chapter 12. New features in Domino 6 463
12.15 Form enhancementsFor basic information about forms, see Chapter 4, “Domino Design elements: forms” on page 75.
12.15.1 Render pass-through HTML in NotesDesigner 6 has a tool for both Notes clients and Web application development, which provides a new feature that enables Notes clients to evaluate HTML placed in forms, subforms and pages. In this way it is easier for developers to make their applications portable for both Notes clients and the Web without a lot of workarounds to support several clients.
To allow Notes clients to process HTML, check “Render pass through HTML in Notes” in the Form, Subform or Page Properties box.
Figure 12-97 Form Properties box
464 Domino Designer 6: A Developer’s Handbook
If you do not check "Render pass through HTML in Notes," the HTML appears as plain text. You can hide it using the following formula for "Hide paragraph if formula is true":
@ClientType = "Notes"
Or you can use the “Hide paragraph from Notes 4.6 or later” property.
Figure 12-98 shows HTML added in the Designer 6 client, as pass-thru HTML, rendered in the Notes 6 client.
Figure 12-98 HTML rendered in the Notes client
If you refer to a field, the JavaScript code must follow the field on the form.
You can embed computed fields and computed text in HTML text on a form, subform, or page.
You can place JavaScript in a URL using the "javascript:" protocol, for example:
<A HREF="javascript:code goes here">prompt</A>
You can run JavaScript from an agent by sending it to the browser as HTML using print statements. For example, in LotusScript:
To run a Domino agent from JavaScript, set the href property of the location object to the URL for opening the agent. The URL can be relative to the current host. For example:
12.16 Paragraph enhancementsParagraphs have been enhanced and several new features have been added. Among them is a language tagging feature. This chapter covers the most relevant new features and enhancements in paragraphs.
12.16.1 Language taggingBeyond Designer, there are a lot of new features for Notes Client 6 as well. One of them is that you can mark some text of your document to a specific language.
One of the advantages of associating a language to a selection of text is for spell checking. When you perform a spell check in the document, Notes knows to use the correct dictionary based on the language tag set for the text. You must, of course, have the language dictionaries installed to use this feature.
Figure 12-99 shows how to set a language tag for some selected text in a document.
Figure 12-99 Language tagging
Note: The default language for text is Untagged. The spell checker uses your default dictionary to spell check Untagged text. If you want the spell checker to skip particular words in a document, mark the words as Unknown.
466 Domino Designer 6: A Developer’s Handbook
12.16.2 Paragraph bordersThere is a new feature for text paragraphs in Designer 6. In the Text Properties Box, an extra tab was added for paragraphs: the Paragraph Border tab. Table 12-13 shows the properties you can set.
Table 12-13 Borders for paragraphs
Figure 12-100 Text Properties Box - Paragraph borders
12.16.3 New section stylesA good way to organize information in documents is by creating sections to group related information, turning the application more intuitive and user-friendly, and with an unpopulated interface. There are two types of section:
� Standard
� Controlled Access
You can restrict the users who can read and edit the content of the section. You can also, programmatically, change these access control options.
You can use sections in forms, subforms, pages, and documents.
In Designer 6, there are four new border styles, shown in Figure 12-101 on page 468.
Feature What you can set
Border style Border style and color
Border effects Border drop shadow and width
Inside/Thickness/Outside Border thickness for all borders (top, bottom, left, right)
Chapter 12. New features in Domino 6 467
Figure 12-101 Section - new border styles
To set the section border style, follow these steps:
1. Right-click the section name, then click Section Properties.
2. The Section Properties Box appears; see Figure 12-102 on page 469.
Closed Sections
Opened Sections
468 Domino Designer 6: A Developer’s Handbook
Figure 12-102 Section - Properties Box
3. Choose the appropriate border style and its color.
12.17 Embedded element enhancementsThis section highlights some of the enhancements made to the elements you can embed on a page, form or subform.
12.17.1 Improved action bar support and enhanced stylingYou can now control the style and how the embedded element should behave, to a considerably greater extent than in previous releases. Several of the embedded elements have improved property boxes and enhanced styling options. Among them are the embedded views and embedded scheduler property boxes; see Figure 12-103.
Figure 12-103 Enhanced styling and control of embedded elements
Chapter 12. New features in Domino 6 469
12.17.2 Cross-database referencingWhen embedding elements, there is no limit, as in previous versions, that this element must be in the current database. You can now select and cross-database reference every embedded element by selecting the database from which you want to embed.
12.17.3 Multiple embedded views on a page or formPrevious versions did not support multiple embedded views. Though you could fake this by using complex workarounds, and solve it in a non-supported method, there was no built-in method to solve this. Now, with Domino Designer 6, you can embed as many views as you want on a page, form or subform. This means that one single form can now contain several embedded views, with different information. In some cases, you can avoid using frame sets and frames by embedding multiple views on a single form.
Multiple embedded views work both in the Notes client and Web browsers.
Figure 12-104 on page 471 shows an example of multiple embedded views in a Notes client.
12.17.4 Deleting documents in an embedded viewWith previous releases of Notes/Domino 6, deleting marked documents in an embedded view was impossible. Embedded views did not have the feature “Show action bar” in R5, and if you had an action button on your form, that action button would not work for the marked document in an embedded view. You can still not use an action button on the form to delete a document in an embedded view, which is understandable, but you can use the new feature and property for embedded views, “Show action bar”.
Figure 12-104 on page 471 shows a form in a Notes client with multiple embedded views, and a form view action removing a selected document in one of these embedded views.
Note: The database from which you want to embed an element must be in your bookmark.nsf database.
Tip: @DocumentDelete will not work for this purpose. You would use a formula like the following for your action:
Figure 12-104 Deleting a document from an embedded view
12.18 Table enhancementsTables have been enhanced and several new features for tables have been added in Domino 6.
12.18.1 Autosize width to contentNow you can set autosize for the column width. In this way, Notes automatically adjusts a column width based on its content. To set this feature, do the following:
� Select a cell or a range of cells, then click Table -> Autosize.
Or:
� Right-click the cell. In the list that appears, select Autosize.
Chapter 12. New features in Domino 6 471
12.18.2 New optionsA new enhancement was implemented for tabbed tables to make the display more flexible and customizable.
Tabs on all sidesNow you can choose where you want to position the table tabs. It can be in the top, bottom, right or left. You set this in the Table Properties Box; see Figure 12-105.
Figure 12-105 Table properties with new settings
With this new feature, you can provide tabbed tables in different layouts. Refer to Figure 12-106 on page 473.
472 Domino Designer 6: A Developer’s Handbook
Figure 12-106 New tabbed tables
Equally sized tabsYou can also set equal sizes for the tabs’ size. Lotus Notes automatically adjusts the size of the tabs based on the longest tab label.
12.18.3 Caption styleA table that has collapsible sections is called a table with row captions. Row captions look like maximize and minimize buttons for windows, and are used to expand and collapse rows. Captions allow you to hide information in one row, but display information in another.
Figure 12-107 shows an example of a table with three rows (Caption 1, 2, and 3) and two columns, with the first captioned row expanded.
Figure 12-107 Table caption sample
Tab on top
Tab on right
Tab on left
Tab on bottom
Chapter 12. New features in Domino 6 473
To give your table caption capabilities, set the “Users pick row via caption” option and label the appropriated captions in the table properties box. See Figure 12-108.
Figure 12-108 New feature for tables
474 Domino Designer 6: A Developer’s Handbook
12.19 Frameset enhancementsFramesets and frames have several new features in Domino 6. This section covers the main areas.
12.19.1 Collapsible and captionable framesIn Designer 6 you can now use a caption for frames and turn them collapsible. In this way, you can label the frames and allow wide navigation between the collapsible frames, providing more information in the same screen area, displaying it as you like; see Figure 12-109. This feature works only for the Notes 6 client.
Figure 12-109 Collapsed and expanded frames
The settings to provide such a frameset, with collapsed and expanded frames, are controlled and set by properties of the actual frame, as shown in Figure 12-110 on page 476.
Chapter 12. New features in Domino 6 475
Figure 12-110 Frame properties to set to enable collapsible frames
The following explanations apply:
� The border caption
This text can be evaluated by a formula or be hard-coded. This caption is optional and is used to explain to the end users what will happen if they click the text or the arrow. Using the formula to evaluate this gives it all a more personalized look.
� Show
You can choose None, Caption only, Arrows only, or Both. None shows the default border with no caption or arrows. “Caption only” displays a caption in the border. “Arrows only” displays an arrow in the border. This arrow lets you open and close the frame. Both displays have a caption and an arrow in the border.
� Align
For a caption, choose to align so that the caption appears inside the top or bottom border of the frame. For an arrow, choose to align so the arrow appears at the top, bottom, left, or right border of the frame. For both a caption and an arrow, you can align top or bottom. Note that the border appears only where the caption or arrows appear. For example, if you choose Top, then the border displays at the top only.
476 Domino Designer 6: A Developer’s Handbook
� Justify
Choose to justify the caption or arrows so they appear to the left, right, or center of the border.
� Open
Choose a size in pixels or as a percent of the frame. This size is the default size that the frame opens to when the user clicks on the border of a closed frame.
You can also specify text characteristics for the caption and arrows, such as font, size, style, and color. In addition, you can specify a background color for the border.
12.20 Tools menuWith Domino Designer 6, there is a new menu element called Tools. This is a fully customizable and context-sensitive feature, which allows you to include menu items that launch other applications or your own custom formulas. For example, you might want to include a menu item to launch your favorite image editor while you are in the list of images, or you might want to add a formula that you can launch at any time which automates your design process.
To ensure that this list of tools will not be overly complex and difficult to follow, you can specify when you want the tool to be available. You might need some tools for every phase of your design work, and other tools for use with very specific design activities, such as designing a page or a frameset. In this way, you can personalize your application development process throughout your Designer desktop, and have a fully context-sensitive tools menu.
12.20.1 Add a toolTo add a tool to Domino, do the following:
1. Select Tools -> Add Tool; see Figure 12-111 on page 478.
Note: To enable this feature, your frame must have the property “Allow resizing” set to Yes. This setting is found in the property box of the frame, on the second tab.
Chapter 12. New features in Domino 6 477
Figure 12-111 Adding a new tool
2. Enter the name of the tool (Figure 12-112).
Figure 12-112 Setting tool preferences
3. Do one of the following:
– Select Run program to have a menu item launch a tool from within Designer. Enter the path for the executable file or browse to select the executable.
Tip: To make the tool accessible to users with physical disabilities, or for convenience, specify a keyboard accelerator key for the tool name by putting an underscore (_) before the letter you wish to use as the accelerator key.
478 Domino Designer 6: A Developer’s Handbook
– Select Run formula to launch a tool using an @command formula.
4. In the Tool Location section, specify one or more contexts when the tool should be available. That is, if you do not want the tool to always be available, choose the design elements where you might use the tool in your design work. For example, if you select Form Design, the tool will be available during form design; if you select Form List, the tool will be available from the tool menu when you are in the list of forms.
5. Click OK.
6. The name of the tool appears on the Tools menu for the contexts. That is, if you specified that the tool should always be available, it will always be on the Tools menu. If you specified the tool should only be available for page design, it will only display when a page has focus in the work pane.
12.20.2 Customize your toolsAfter you have added tools to the Tools menu, you can edit the tool names or their associated formulas, delete one or more tools, organize tools into submenu groupings, or change the context for a tool.
To add a submenu for tools1. Select Tools -> Customize Tools.
2. Select a design context and click Add Submenu to add a submenu for that context.
3. Enter a name for the submenu and click OK.
Figure 12-113 A new tool available with accelerator key
Chapter 12. New features in Domino 6 479
4. Use drag and drop or the Copy and Paste buttons to move tools to the submenu.
To move a tool to another design context1. Select Tools -> Customize Tools. Click the arrow next to a design context to
display the tools associated with that context.
2. Select one or more tools.
3. Drag and drop the tools to a new context.
To copy, paste, or delete a tool1. Select Tools -> Customize Tools. A dialog box displays the list of design
contexts.
2. Click the arrow next to a context name to display the tools associated with a design context.
3. Select the tool name.
4. Click Copy to copy the tool to the clipboard.
5. Select the design context where you want to place the tool and click Paste.
6. Select a tool and click Cut to remove the tool from its original context.
To edit a tool1. Select Tools - Customize Tools.
2. Click the arrow next to the name of a design context to display tools associated with that design context.
3. Select the tool name and click Edit. You can edit the name of the tool and/or the formula that it executes. Note that if you choose to run an executable program from the menu, the action is represented as an @command([Execute]) formula. You can change the name of the executable file or customize the formula.
4. Click OK to confirm your changes.
Tip: To make the submenu accessible to users with physical disabilities, or for convenience, specify a keyboard accelerator key for the submenu name by putting an underscore (_) before the letter you wish to use as the accelerator key.
480 Domino Designer 6: A Developer’s Handbook
Distributing tools using the DXL LotusScript classesThe Tools menu is a personal setting that is part of the Domino Designer installation. Tools need to be added by each designer on their Domino Designer client.
It is also possible to distribute a set of tools for a group of developers. You might want all of your developers or a group of developers to have the following tools, among others:
� Paint Shop Pro
� Notepad
� @Command([ToolsRefreshAllDocs])
When you add a tool in your Designer 6 client, these tools are added to an outline in the personal bookmark.nsf database. This outline is called DesignTools, as shown in Figure 12-114.
Figure 12-114 Outline for tools
Added tools will be part of this outline, as outline entries, as shown in Figure 12-115 on page 482.
Chapter 12. New features in Domino 6 481
Figure 12-115 Outline entries for tools
So, how can we use this knowledge to create a more dynamic distribution of these tools to a set of developers? By adding some knowledge about DXL. All design elements in Domino can be represented in XML, or, more precisely, in DXL (Domino XML). Exporting the DesignTools outline to a DXL file, and creating an agent that imports this DXL file back into a bookmark.nsf database, adds a new dimension to the process of dynamically adding design elements to databases.
Let’s see how we can do this:
1. Exporting the Design Tools outline to DXL
Select the DesignTools in the bookmark.nsf database, using Designer 6 Client, and select Tools -> DXL Utilities -> Exporter from the menu, as shown in Figure 12-116 on page 483.
Note: If you add a tool for a program, for example Paint Shop Pro, you do not install the program, but assume that it is available from the location you specify. So by distributing tools to programs, you assume that your developers have installed the programs on the same directories as the original client from where the DXL file was created.
482 Domino Designer 6: A Developer’s Handbook
Figure 12-116 Exporting to DXL
This prompts for location and name of the DXL file. Give it the name DesignTools.dxl as shown in Figure 12-117.
Figure 12-117 Naming the DXL file
Click Save.
Chapter 12. New features in Domino 6 483
2. To show how this example works, let’s remove the tools that are available in the Domino Designer 6 Client. Use the Customize Tools feature found in the Tools menu line. In Figure 12-118 we select the tools to be removed, and click Cut to remove them.
Figure 12-118 Removing tools
After removing these tools, no tools are available in the Designer 6 Client, as shown in Figure 12-119.
l
Figure 12-119 No tools available
3. Importing tools into the Designer Client.
By using the new DXL LotusScript classes, we can now import design elements into any database. Because bookmark.nsf is the database holding the DesignTools outline, which again is the outline that contains the tools available in the Designer Client, this is the database that should have the DXL file imported. Example 12-8 on page 485 shows a script that imports the specified DXL file into the local bookmark.nsf. For this example, let’s create an agent in a database with this code.
484 Domino Designer 6: A Developer’s Handbook
Example 12-8 Importing a DXL file into a database
Sub Initialize
' ## Set the directory constant to reflect your settingsConst sDir = "h:\redbook\"Const sFileName = "DesignTools.dxl"
Dim session As New NotesSessionDim db As NotesDatabaseDim dbTarget As NotesDatabaseDim stream As NotesStreamDim importer As NotesDXLImporter
Set db = session.CurrentDatabaseSet dbTarget = New NotesDatabase("", "bookmark.nsf")
' Open the DXL file(s)Set stream = session.CreateStreamIf Not stream.Open(sDir & sFilename) Then
Print "Could not open: " & sFilenameExit Sub
End If
' Check the content of the DXL fileIf stream.Bytes = 0 Then
Print "File did not exist or was empty: " & sFilenameExit Sub
End If
' Import the DXL into the target databaseSet importer = session.CreateDXLImporter(stream, dbTarget)importer.ReplicaRequiredForReplaceOrUpdate = Falseimporter.DesignImportOption = DXLIMPORTOPTION_REPLACE_ELSE_CREATECall importer.Process
End Sub
Right-clicking the agent in the Designer 6 Client, as shown in Figure 12-120 on page 486, imports the DXL file specified in the agent.
Note: The agent uses a constant for the directory of the location of the DXL file. In the above example, this constant, sDir, is set to h:\redbook\. Make sure you change this to the directory you saved the DXL file in.
Chapter 12. New features in Domino 6 485
Figure 12-120 Running the agent/script
4. The Tools menu now has the imported DXL file, and the available tools, as shown in Figure 12-121.
Figure 12-121 Tools imported using DXL
There is no built-in method to dynamically distribute tools in the Designer Client, but with the new DXL classes and methods you can accomplish this. This example could be extended by putting the DXL file on a shared directory or distributing it otherwise, and importing it in the background without any user interference. This could easily be done by adding a script like Example 12-8 on page 485as part of the PostOpen event of the mail file, or other possible solutions.
You could also use the InstallShield Tuner for Lotus Notes to customize the Domino Designer Client installation package. You could include the customized bookmarks.nsf database with the installation package, and when a new user
486 Domino Designer 6: A Developer’s Handbook
installs a Domino Designer, the tools would automatically be added to the Tools menu. For more information about InstallShield Tuner for Lotus Notes, refer to Upgrading to Notes & Domino 6, SG24-6889.
12.20.3 DXL utilitiesIn addition to including XML in a Designer application, you can view all the design elements represented in XML using Domino XML (DXL). For a more in-depth discussion about XML and Domino, see Chapter 16, “XML” on page 743.
You can either view the XML in Designer, or you can export the XML to a text file, where you can view it or edit it using your favorite editor.
Accessing design elements in XML provides you with the means of accessing the data in your application and comparing it to, or integrating it with, other data sources that support XML. The DXL utilities can be a very flexible alternative to generating reports on application elements using the Design Synopsis. You can examine the DXL for a collection of elements, or you can transform it using an XSL file to apply styles and formats that make your data more meaningful to you.
Viewing the XML for a design element1. Check that you are running Internet Explorer version 5.01 or later.
2. Check your location document to make sure your Internet Browser field is set to "Notes with Internet Explorer" or "Internet Explorer."
3. Select one or more design elements in the design pane.
4. Choose Tools -> DXL Utilities -> Viewer, as shown in Figure 12-122.
Figure 12-122 How to view XML of a selected design element
Designer displays the XML for the design elements in the Notes client, as shown in Figure 12-123 on page 488.
Chapter 12. New features in Domino 6 487
Figure 12-123 Result of viewing the XML of a design element
Exporting the XML for one or more design elements1. Select one or more design elements in the design pane.
2. Choose Tools -> DXL Utilities -> Exporter.
3. Enter a file name and path for the XML file and click Save.
You can open the file in your favorite text editor and view or edit the XML source, as shown in Figure 12-124 on page 489.
488 Domino Designer 6: A Developer’s Handbook
Figure 12-124 XML being edited in Notepad
Transforming XML for one or more design elements using XSL1. Select one or more design elements in the design pane.
2. Choose Tools -> DXL Utilities -> Transformer.
3. Select the name of an XSL file to use for transforming the XML.
4. Choose a type of output. Either select screen for a screen display, or specify an output file name.
For more information about XML and its features in Domino 6, refer to Chapter 16, “XML” on page 743.
Note: To re-import your changes back to the design element in your application, use the LotusScript class NotesDXLImporter. See Chapter 16, “XML” on page 743 for more information on XML and Domino.
Note: XSL is an extensible stylesheet language (XSL) that describes how to transform XML into HTML or into another version of XML. Designer ships with some sample XSL files that you can select or you can browse the file system to select another XSL file.
Chapter 12. New features in Domino 6 489
12.21 URL enhancementsThere are a couple of new URL commands in Domino 6 and some enhancements. This section covers these updates.
12.21.1 New and enhanced URL commands� OpenImageResource
This new URL command allows you to open any graphic resource in an application. If you have a image called Image1, then you could access it as follows:
This URL command is enhanced in Domino 6, and should be used to access view data in XML form without appearance attributes such as fonts, list separators, date formats, HTML settings, view templates and frame redirections.
12.22 WebDavAs you are developing an application, you may want to supplement the tools provided with Designer with tools of your own choice. For example, you may have a favorite graphics editor you use to design images for your application, or you may have a favorite HTML editor that you want to use to design pages. You launch and use third-party tools from within Designer using the new feature Tools. Now, with WebDav, you can save your changes directly back into the database. This feature is for certain design elements only.
Web Distributed Authoring and Versioning (WebDav) is a new feature that allows you or others on your team to edit and manage parts of a database on remote Web servers. This enables designers with proper access to a database to open files from a WebDav client (such as Internet Explorer or other third-party development tools), edit these files, and save them back to the database. By making Designer 6 WebDav compliant, the methods with which you display data you store in a Domino database are extended.
490 Domino Designer 6: A Developer’s Handbook
For example, you may build a page using a favorite HTML editor. Using Windows Explorer, you can drag that page into an NSF file for inclusion in a Domino application. Similarly, an application designer collaborating on a project might open an HTML page using Internet Explorer 5.x, edit the page, and then place the page back into the database. WebDAV technology gives you much greater flexibility in the development process as you can use third-party tools and contribute to application design from remote Web servers.
The following resources can be accessed with a WebDav client:
Enabling WebDavYour server, or your databases, are not enabled by default for WebDav clients. There are a few steps to be completed to make your applications and server WebDav enabled.
WebDAV must be enabled on the Domino server. Check with your system administrator to make sure WebDAV is enabled in the Web Site document, which can be found under the Internet Sites view in the Domino Directory. On the configuration tab select Enable WebDAV in the Allowed Methods field. Note that the HTTP server requires refreshing before the change takes effect.
As a developer, these are the steps to be completed to enable your application for WebDav clients:
1. Set the ACL
– Provide the user with either Designer or Manager access in the database Access Control List (ACL). The user also must have both "Create documents" and "Delete documents" privileges enabled in the database ACL.
– On the Advanced tab of the database ACL, set the "The maximum Internet name & password" field to either Designer or Manager access.
2. Enable design locking for your application. Refer to 12.1.9, “Design element locking” on page 358.
3. Disable proxies
– If the WebDAV client used to access the database is on a Domino server, then disable the proxy for access to that particular server. For example, if you are using either MS Windows Explorer or Internet Explorer 5 (IE5) as a WebDAV client, do the following:
Chapter 12. New features in Domino 6 491
• Open Microsoft IE5, go to Tools -> Internet Options -> Connections tab.
• Click LAN settings.
• Click Advanced.
• In the Exceptions edit box, enter the name of the Domino WebDAV server, such as: trondheim.lotus.com.
4. Disable session authentication
Check with your server administrator to make sure sessions authentication is disabled on the Domino Web server. This setting is found in the server document’s “Internet Protocols - Domino Web Engine” settings.
5. Start the Web server (http-task) on your Domino server. For more information, see the Domino Administration 6 Help database.
System requirementsDomino’s implementation of WebDav in Domino 6 is only supported on Windows NT and Windows 2000, and at the time of writing, the only WebDav-enabled clients that work with WebDav on a Domino server are:
� Microsoft Internet Explorer 5.0x or 6.0
� Windows Explorer on Windows 98, Windows NT4, Windows 2000 or Windows XP
� Macromedia’s Dreamweaver 4.01
� Microsoft Word 2000
Accessing your WebDav-enabled applicationSince Microsoft uses Web Folders to represent their WebDav client, you start off with creating a connection from the client to the specified Domino server. Using Windows 2000, this can be done by creating a “Network Place”; see Figure 12-125 on page 493.
Tip: Microsoft uses the term Web Folders to represent their WebDAV client application. Refer to Microsoft's documentation for how to use Web Folders. At the time of writing, the document at this URL tells you more about Web Folders:
Clicking this option gives you the new dialog box shown in Figure 12-126.
Figure 12-126 Adding the URL of the WebDav server and database
To identify the database you want to connect to, use URLs and append $files to the end of the path to indicate to the WebDav server that this is a WebDav request. For example, to open the database on server trondheim.lotus.com named rune\runeredbook.nsf as a Web folder from Windows Explorer, enter the path as follows:
If Windows can find the WebDav server and identify the database, the dialog box shown in Figure 12-127 on page 494 completes your installation.
Chapter 12. New features in Domino 6 493
Figure 12-127 Successfully completed adding a WebDav network place
Once you have mapped a database to a WebDAV client, you can use the interface of the WebDAV client to browse the database and select elements within the database to open.
Once you have established a connection to a Domino database using a WebDAV client, you can open a resource, edit it, and save it back to the database. Or you can add an element that you have created using a third-party editor to the database.
Example of editing elements using WebDavFigure 12-128 on page 495 assumes that WebDav is configured and enabled on your Domino server and that the installation of a network place has been accomplished.
The file explorer on your computer can be set up to show the content of your WebDav-enabled Domino server; see Figure 12-128 on page 495.
Caution: WebDAV clients do not maintain operating system attributes, such as a read-only state. For example, if you create an HTML page and flag it as being a read-only file in Windows, the page will not be flagged as read-only if you add it to a database and view it from Designer.
494 Domino Designer 6: A Developer’s Handbook
Figure 12-128 Explorer showing content of WebDav server
Figure 12-128 shows the content of a WebDav-enabled Domino server, and the three elements that are available. These are Shared Resources of three types:
� Images (Ch4_forminfobox.gif)
� Files (install.log)
� Style Sheets (myStyleSheet.css)
These files can now be opened as any other file, within a supported WebDav client. If you prefer to edit style sheets in Microsoft Word 2000, open the application, edit it as preferred and save it. It will be saved directly back into the Domino application or database, and will update the design element.
Figure 12-129 on page 496 shows these elements in Domino 6 Designer.
Chapter 12. New features in Domino 6 495
Figure 12-129 Elements available for WebDav clients in Domino Designer 6
Important: If the design element has been “locked”, you will not be able to save and update. You will receive an error message, depending on the application you are using.
496 Domino Designer 6: A Developer’s Handbook
12.23 SummaryDomino 6 contains thousands of new features; covering them all would be too much for this book, and is not its purpose. This chapter covered the most important new features that an application developer using the Designer 6 Client should be aware of and utilize.
Chapter 12. New features in Domino 6 497
498 Domino Designer 6: A Developer’s Handbook
Chapter 13. Securing your Domino application
As a database designer, you can control who has access to an application you create at every level in the application. Domino provides a variety of security mechanisms to enable you to do this. In this chapter, we help you understand how these mechanisms fit together to secure your application.
13.1 OverviewThe designer of an application, together with the system administrator of the system, should define security for an application. Choices made by developers and administrators may have impact on system performance.
Even though user authentication and creation are normally administrative tasks, we will briefly discuss them here, as these tasks may have an impact on defining security for different types of clients and users in your application.
You may also have to integrate with, or even develop, a user registration application for Web users.
For a detailed description of Domino’s system security and authentication features, refer to the redbook Lotus Notes and Domino R5.0 Security Infrastructure Revealed, SG24-5341.
This chapter will help you decide how to:
� Set up and manage an access control list (ACL)
� Create roles to manage access for groups of users
� Restrict access to database elements
� Control document access
� Develop a plan that provides the required security for your data and appropriate access for each user
� Utilize new Domino 6 security features
500 Domino Designer 6: A Developer’s Handbook
13.2 Controlling access to Domino dataThere are a number of ways to control access to Domino data, and there are a number of ways to approach this access as well. You can secure certain design elements and information so that users cannot access them at all, or you can alternatively hide certain fields and information from the user. In this instance, the information is still accessible to the experienced user, but is hidden from the casual user. This is more a usability issue than a security feature.
By using both the database access control list (ACL) and the encryption features provided by Domino, you can achieve true security for your application. Creating view access lists, hiding design elements, and using such features as computed subforms, Hide-When features, and collapsible sections allow you to hinder access and are good usability features, but they are not true security features.
13.2.1 Overview of Domino Security architectureThe Domino environment is made up of several components, all of which can be secured. If access is allowed to:
� The network, then server tests are applied.
� The server, then database tests are applied.
� The database, then design factors are tested.
� Documents, encryption and access to individual documents may prevent access to certain documents and fields.
Figure 13-1 on page 502 illustrates the places in the database structure where access tests are applied. These are the elements you will be concerned with in securing your application at the database level.
Chapter 13. Securing your Domino application 501
Figure 13-1 Where access tests are applied
Design elements for controlling accessSetting up the ACL establishes who has access to the database as a whole. You can further restrict access to database elements by using the following Domino design elements:
� Access lists for documents, forms, and views
� User roles in the ACL
� Authors and Readers fields in a document
� Hide-when capabilities for fields, actions, sections and outlines
� Controlled access sections
Note: Underlying all this is the identification of the user, based on their ID file and encryption keys for their HTTP login.
502 Domino Designer 6: A Developer’s Handbook
To control user access to Domino data, consider the following situations:
Table 13-1 Security requirements and solutions
Security Requirement Solution
Allow anonymous users access to your site.
Create an Anonymous entry in the database ACL. See “Anonymous Access to Databases” in this chapter.
Define server authentication at the user level for Web users.
Create Web users and passwords in the Domino Directory. See also, “Planning for Web user access” on page 551 in this chapter.
Restrict access to database elements to specific users.
Create access lists for documents, forms, and views, and consider creating user roles in the ACL. Start with “Using the Access Control List to Control Access to an Application” in this chapter.
Control Web user access to parts of your site.
Add a group containing the names of registered Web users to the ACL. Choose which databases can be accessed by Web users and what level of access to provide for each database.Authenticate any Web client accessing a Domino server, database, view, or document.
Restrict access to specific documents. Create Authors and Readers fields on the form, or create a document access list.
Control display of database elements within forms.
Use hide-when capabilities for fields, actions, and sections, or create a controlled-access section.
Secure field information. Apply encryption techniques.
Display different information for Web browser, Notes client and Mobile client users.
For example: Use @ClientType to enable a computed subform, hide elements based on @ClientType, use different forms for different clients.
Provide an extra layer of security. Add encryption to HTTP transactions by activating Secure Sockets Layer (SSL) at the server. (See the Domino Administrator’s Help for more information on SSL.)
Chapter 13. Securing your Domino application 503
13.3 Using the Access Control List to control access Every database includes an Access Control List (ACL) that Domino uses to determine the level of access that users and servers have to that database. When a user opens a database, Domino classifies the user into an access level that determines privileges. The access level for a user or server may vary in different databases.
The access level assigned to a user determines the tasks that the user can perform in the database. The access level assigned to a server determines what information the server can replicate within a particular database.
Only someone with Manager access can create or modify the ACL of a database located on a server. The Designer and Manager of the database can coordinate to create one or more roles to refine access to particular views, forms, sections, or fields of a database.
This section covers:
� Displaying the ACL
� User and server access levels
Displaying the ACLThe access control list of a database lists all the servers, groups, and users who have access to the database.
To display the access control list of a database:
Choose File -> Database -> Access Control and the panel in Figure 13-2 on page 505 will be displayed.
504 Domino Designer 6: A Developer’s Handbook
Figure 13-2 ACL to Designer 6 Help
User and server access levels A database ACL determines the level of access that users, groups, and servers have. Only someone with Manager access to the database can assign levels to the users, groups, and servers listed in the ACL.
With Domino 6 there are seven main levels of access that a database administrator can assign to a person, server, or group, as listed and explained in Table 13-2.
Table 13-2 Access for users and servers
Level Users with this access can… Servers with this access can…
No Access Not access the database at all. Not access the replica at all.
Depositor Create documents, but cannot read, edit, or delete documents, including those they create.
Not receive changes; not relevant for servers.
Chapter 13. Securing your Domino application 505
Server access levels are often the cause of databases failing to replicate as expected. Keep the following points in mind:
� Servers not specified in the ACL have the access level that is assigned to the -Default- group.
� Listing a server with Manager access in the ACL lets people know which server has Manager access.
� To allow a replica to receive changes made by people with Author access, assign the server Editor access or higher in the replica ACL.
13.3.1 Setting up and refining the ACLWhen you set up the access control list, you can refine the access for users in several ways, beyond simply specifying an access level:
� Select User Type to specify Users, Groups, and Servers
When you enter users in the ACL, you can specify whether they are users, groups, or servers.
� Access Options
Assigning access options allows you to further refine user access.
Reader Read documents, but cannot create, edit, or delete them.
Pull changes from the replica but not send changes to it.
Author Create and read documents, but can only edit their own documents if they are listed in an Authors field on that document.
Replicate new documents.
Editor Create, read, and edit all documents unless there are restrictions on specific documents.
Replicate all documents.
Designer Have Editor access to documents, except where restrictions exist for specific documents, and they can modify the database design, but they cannot delete the database or modify the ACL.
Replicate design changes as well as all documents, but not ACL changes.
Manager Perform all operations on the database, including modifying ACLs and deleting the database.
Replicate all changes to the database and the ACL.
Note: Any server with reader access or above can receive any kind of change by replication. The list in Table 13-2 on page 505 refers to the ability to send changes via replication.
506 Domino Designer 6: A Developer’s Handbook
� User Roles
Roles allow you to define responsibilities in the application and refine access rights to database elements.
Users, groups and serversA group is a list of users and/or servers that have something in common. Using a group helps simplify many administration tasks. For example:
� A group of users can be given access to a database in the ACL.
� A group of servers can be designated as permitted to replicate with a database.
� A group of users can be denied access to a resource.
There are two default server groups in the ACL:
� LocalDomainServers are servers in the local domain.
� OtherDomainServers are servers in other domains. These are usually servers in other companies with whom users in your company need to communicate. This type of access needs to be specified and configured by the system administrator as well.
User typesThe ability to specify user types lets you clearly indicate whether a name is that of a person, server, or group. Table 13-3 lists descriptions of the available user types.
Table 13-3 User types
Note: Groups you specify in the ACL must be listed in the Domino Directory. Groups defined in users’ personal address book do not work for any kind of access control.
User type Assign for this type of user Allows you to . . .
Person An individual user; this includes a user on a server workstation.
Control access for an individual user.
Server A single server; this includes a server console, and server workstation.
Prevent someone from accessing the database from a Notes workstation using the server ID.
Server Group A group of servers. Identify a group of servers that will host replicas of the database.
Chapter 13. Securing your Domino application 507
Assigning user types for additional securityAssigning user types can provide additional security. Specifying names in the ACL as a person, server, or server group prevents someone from later creating a group in the Domino Directory with the same name as a person in the ACL, as well as adding his or her name to it to access the database through the group name.
Access optionsWhen you add users and groups you can specify individual options that further refine user access. For each ACL entry, you can specify slightly different options, as listed and explained in Table 13-4.
Table 13-4 Access options
Person Group A group of individual users. Grant the same access to all users in a group without listing each user name in the access control list.
Mixed Group A group of servers and individual users.
Grant the same access to a group of users and servers.
Unspecified In the Advanced Access Control List window, click Lookup User Types for “Unspecified Users.” Notes looks up an unspecified user type in the Domino Directory.
If you leave type as Unspecified Domino will not check whether the access is given to a user or a server.
Important: Be aware of the “Unspecified” User Type. Setting a ACL entry to “Unspecified” is not a recommended setting in the long term. The server hosting the database will not check whether the “Unspecified” user is a server or a user, and server IDs usually don’t have a password set. This means that you in fact can use a server id from a client machine to access the database.
In the Advanced Access Control List window, click Lookup User Types for “Unspecified Users.” Notes looks up an unspecified user type in the Domino Directory.
Enable this option… To allow… This option is assigned by default to…
Create documents Authors to create documents. Managers, Designers, Editors, and Depositors
Delete documents Managers, Designers, Editors, and Authors to delete documents. Authors can delete only documents they created.
No one
508 Domino Designer 6: A Developer’s Handbook
*Enabling users to read and write public documents lets you give users with No Access or Depositor access the ability to access specific forms, views, and documents without giving them Reader or Author access in the database. Public documents are useful for calendar applications in which one user might delegate the ability to read or create appointments on his or her behalf to another user.
** New with Lotus Notes/Domino 6
You can specify the availability of a database element for public access at the bottom of the Security tab in its Infobox.
Documents created with a form where public access is enabled will have the field $PublicAccess with a value of 1 added by Domino.
Anonymous access to databases You can handle anonymous users in one of the following ways:
� Define an anonymous entry in the ACL and specifically define access privileges for anonymous users.
� Allow anonymous users the same access as the Default entry in the ACL.
Create personal agents Designers, Editors, Authors, or Readers to create personal agents.
Managers
Create private folders/views
Editors, Authors, and Readers to create personal folders and views in a database on a server.
Managers and Designers
Create shared folders/views
Editors to create shared folders and views. Managers and Designers
Create LotusScript/ Java agents
Readers, Authors, Editors, and Designers to create LotusScript and Java agents.
Managers
Read public documents* Users to read documents created with forms, and use views and folders, designated as “available for public access user.”
Readers and above
Write public documents* Users to create and modify documents with forms designated as “available for public access user.”
Authors and above
Replicate or copy documents **
Users to create copies or local replicas of the database.
Everyone
Chapter 13. Securing your Domino application 509
If you allow anonymous access to a server, you can still control access to databases. To control database access for anonymous users, follow these steps:
1. Add a user with the name Anonymous in the Add User dialog box of the ACL.
2. Click OK.
3. In the Access drop-down box, select one of the following:
– No Access, to prevent access by anonymous users. This means that when a Web user tries to use the database, the user will be prompted to login.
– Reader, to allow access to an information database.
– Author, to allow access to an interactive database.
Important: If the database ACL does not contain an Anonymous entry, all anonymous users receive the Default access.
To protect the databases from unregistered users, you can establish the Default as No Access. If Default access needs to be higher, create an Anonymous entry in the database ACL and grant it No Access.
When granting access to unauthenticated Web clients, you will want to grant anonymous users the least access that still allows them to use the database effectively. For example, you might grant anonymous users:
� Reader access, for an information database
� Author access, for an interactive database
Differentiating default and anonymous access If Anonymous is not listed in the ACL, Domino grants the user access based on the default database access level. This may be a higher access level than you want for anonymous users.
Access level definitions:
� Default: a user not specified in the ACL
� Anonymous: a user without a valid Notes ID for that organization
Effective accessEffective access is a new feature in Domino 6 that lets you find the correct and effective access for a user, group or server. This is helpful when you have people
Tip: Any application that will be deployed on the Web should have an Anonymous entry in the ACL. Assign No access to Anonymous entry unless you want to let users access the database without authenticating them first.
510 Domino Designer 6: A Developer’s Handbook
in multiple groups in the same ACL, as well as if they are listed explicitly in the ACL.
By using this new feature, the Notes client will check by doing a lookup in the Domino Directory, expanding the group members of the groups in the ACL, and comparing and building an internal list to decide what the effective access is for a specific user.
Figure 13-3 Effective Access in ACL
Clicking Effective Access, shown in Figure 13-3, gives you a new dialog box, where you can specify who you want to check the access for. The result of this check for Rune Carlsen/ITSO is shown in Figure 13-4 on page 512.
Chapter 13. Securing your Domino application 511
Figure 13-4 Result of Effective Access
Rune Carlsen/ITSO is listed in the ACL both explicit, with Manager access, and as a member of the group Trondheim, with Reader access. Rune’s effective access will be Manager, since there is no level of “No access” for Rune, and because he will get the highest level of access given.
The box on the right side shows why Rune Carlsen/ITSO gains this level of access. It is because he is explicitly added in the ACL. If Rune had been given No Access in the ACL, and the group Trondheim had been given Reader access, then this box would have looked as shown in Figure 13-5 on page 513.
512 Domino Designer 6: A Developer’s Handbook
Figure 13-5 Effective access with No Access
As you can see in Figure 13-5, Rune gets a level of No Access, even though the group Trondheim has Reader access to the database. It is also indicated to the right that the reason for the level of No Access is the entry in the ACL, which is Rune Carlsen/ITSO.
13.3.2 Roles in the ACLWhen a group you want to add to the ACL does not exist in the Domino Directory, you may want to create a special group or role for users of the database. The use of roles allows you to define responsibilities in the application and further define access to database elements.
Note: As you can see in Figure 13-5, Rune is also given Full Access Administrator rights. People listed in the Full Access Administrator field of the server document can override any security settings of the database. Full Access Administrator can also see all the documents in the database, regardless of the use of readers fields on those documents.
Chapter 13. Securing your Domino application 513
What a Role isA role is a subset of the ACL that is controlled by the database manager. A role can be used almost anywhere that a group or user name can be used, except for things like e-mail addressing or to control access to design elements.
Users and groups are assigned roles to refine access to particular views, forms, sections, or fields of a database. Instead of assigning access to a design element to users and groups, you assign access to the role.
Some advantages of using roles are:
� They provide a flexible method of restricting document access to a specific set of users.
� They provide group control if you do not have the authority to create groups in the Domino Directory, or if you want to create groups just for the database.
� They make it easier for you to modify access when users leave or new users join.
� They separate the design of your database from the names of the individuals and groups who use it, allowing the design to be reused more easily. (For example, if you move the application from one organization to another, you can simply assign roles to appropriate users and groups in the ACL instead of creating new groups in the Domino Directory and assigning users to them or making any changes to your application design.)
To use a role in an application, assign roles to users and groups in the ACL. Include the role in access lists, just as you do with users and groups (or actually instead of adding specific users and groups).
Note, however, that roles cannot extend the access level given in the ACL. Consider an exemplary database where a user has Reader access to a database in the ACL. The database ACL also contains a role, which is called ModifyDocs, in the ACL, which basically enables a user to modify specific documents created with a specific form. The user will not be able to modify them, even though given the role. To modify documents, the user would need at least need author access to the database.
Adding roles to the ACLTo add roles to an ACL, follow these steps:
1. Open the database ACL.
2. Click Roles in the Contents pane; see Figure 13-6 on page 515.
514 Domino Designer 6: A Developer’s Handbook
Figure 13-6 Adding a role
3. Click Add. The Add Role dialog box appears (Figure 13-7).
Figure 13-7 Adding a role
4. Enter a role name (the maximum length is 15 characters) and click OK. The role name appears in brackets in the Role list, so do not use brackets in the name.
Assigning roles to users or groupsTo assign a role to a user:
1. Open the database ACL.
2. Select the user or group name in the list of people, servers, and groups.
Note: You need Manager access to the database to add or modify a role.
Chapter 13. Securing your Domino application 515
3. Click one or more role names in the Roles list.
4. Confirm roles by highlighting a user. A check mark appears next to the user role or roles.
13.3.3 Enforce Consistent ACLYou can ensure that the ACL of a database remains the same on all replicas. You do this by selecting the advanced access control list option Enforce a consistent Access Control List across all replicas of this database. Selecting this option ensures not only that the ACL remains consistent across server replicas, but also that the ACL is enforced on replicas of the database made on workstations or laptops. If you do not select this option, users have Manager access to local replicas of server databases, which allows them to make changes to their access levels on the server replica, although they can’t replicate such changes back to the server.
Enforcing a consistent access control list as it applies to ACLs on workstation or laptop replicas is not a security feature. Data in the local replica is not secure unless you physically secure the workstation or laptop, or you encrypt the database using the local security feature. Also, a Domino add-in program can bypass an ACL enforced on local workstations.
Therefore, be careful when turning on this option, because if you accidentally omit the rights to access the database, it cannot be bypassed by accessing the database locally. You should make sure you have Manager access to the database prior turning on this option.
People listed in the Full Access Administrator field of the server can override any security settings of the database, including Enforce Consistent ACL. Full Access Administrator can also see all the documents in the database, regardless of the use of readers fields on those documents.
Note: A user who has access to a database through more than one ACL entry (e.g. is a member in multiple groups listed in the ACL), is a member of a role if that role is enabled for any of those ACL entries.
Tip: Selecting this option lets you tell whether a user is a member of a role or group when they are using a local replica.
516 Domino Designer 6: A Developer’s Handbook
13.3.4 Maximum Internet Name and Password accessWhen working with advanced ACL options, you can also specify a maximum access level for users that have been authenticated with the Internet name and password setting (browser users). This setting overrides individual settings in the ACL. No browser user can get higher access than specified for Maximum Internet Name and Password access.
Check this setting to increase the security of your Web applications, guaranteeing that Web browser users cannot damage your database should they manage to guess the HTTP password of someone with access to your database.
13.3.5 Changing the ACL programmaticallyYou can change the ACL programmatically by using these Domino classes.
The classes in the Domino Object Model to use when working with the ACL are:
� NotesACL� NotesACLEntry
Refer to the descriptions of the classes in the Domino Designer documentation for detailed descriptions of the possibilities.
Example 13-1 illustrates how to obtain all entries in the ACL that are associated with a given role.
Example 13-1 Obtain all entries in the ACL associated with a given role
'Declare Variable session as a new Notes sessionDim session As New NotesSession'Declare db as a Notes DatabaseDim db As NotesDatabase'Declare acl as the Notes Database ACLDim acl As NotesACL'Declare aclentry as ACL Entry typeDim aclentry As NotesACLEntry'Declare RoleName as type StringDim RoleName As String'Set db to the currently selected databaseSet db = session.CurrentDatabase
Important: To keep the ACL the same across all server replicas of a database, you must select this setting on a replica whose server has Manager access to the other replicas; otherwise, replication will fail because the server has inadequate access to replicate the ACL.
Chapter 13. Securing your Domino application 517
'Set acl to the ACL of the current databaseSet acl = db.ACL'.....'Get Rolename from somewhereRoleName = "[NewsEditor]"'.....'.....Here You would check that role exists in ACL using '.....'Forall RNames In acl.Roles''.....'Set aclentry to the first name in the ACLSet aclentry = acl.GetFirstEntry'Continue looping until you run out of names in the ACLWhile Not ( aclentry Is Nothing ) If ( aclentry.IsRoleEnabled( RoleName ) = True ) Then 'If that ACL name is in the selected role 'Display that name to the user Messagebox aclentry.Name End If 'Move to next name in list Set aclentry = acl.GetNextEntry( aclentry )Wend
13.4 Using outline control to hide part of an Domino application
You can control which parts of an application are visible to the user depending on whether they are a Notes user, a Web user or on the role the user has, by using outlines.
For each outline entry, you can use the InfoBox to specify hide from:
� Notes R4.6 or later� Web browsers� Depending on a formula (that, for example, checks on assigned roles)� Mobile clients
Tip: The ability to program ACL lists is useful when automating security tasks. For instance, you could create an agent to periodically check that every database on your Web site has appropriate access restrictions for Anonymous users.
518 Domino Designer 6: A Developer’s Handbook
13.5 Using directory links to control access to a Domino application
The system administrator can control access to all databases in a given directory by creating a directory link file. A directory link file must be named in the format XXX.dir, where XXX is the name that will appear as a directory in the user’s Open Database dialog.
The file is a flat text file where the first line holds the path to the actual directory holding the databases, and the following lines hold the names of the people and groups that are allowed to access that directory.
ExampleA directory link file called projecta.dir has the following content:
This means that the databases the Notes user can see in the projecta directory are physically stored on the server in the d:\projects\projecta directory. Access to this directory through Domino is allowed only to people in one of the groups ProjectAMembers and #Admin and the person Rune Carlsen/ITSO.
System administrators don’t usually do this manually, as described, but instead use the Domino Administrator Client and create this Directory Link using a GUI. This task can be performed using the Files tab and the Tools available under Folder.
Notes: Using this method only controls which navigational aid the user is offered. The underlying objects must also be secured if the user should not be allowed access to them. For example, if you have a view that only Notes users should see, then you can hide it from Web users in the outline, but you must also limit Read access for the view; otherwise, Web users can access the view by specifying its exact URL.
Some types of outline entries will automatically hide themselves if the current user does not have access to the entity they link to. Use the hide attributes if you discover that entries are showing up inappropriately.
Chapter 13. Securing your Domino application 519
13.6 Controlling access to views and formsTo control which views each user has access to when the user opens the database, create a View read access list. The list can contain any users, groups, servers, and roles that are in the ACL for the database.
Creating a View access listTo create a view read access list:
1. Open the view in Design mode.
2. Select Design -> B to open the InfoBox for the view.
3. Click the Security tab (key icon).
4. Deselect the option “All readers and above” (the default). The list in the window displays the contents of the ACL (Figure 13-8).
Figure 13-8 View access list
5. Click one or more of the users, groups, servers, and roles that you want to have access to the view. A check mark appears next to the names you select.
Note: The system administrator can control whether Web browsers are allowed to access databases using directory links through the NOTES.INI variable A value of zero (0) will allow Web browsers to access directory links, while a value of one (1) prevents it.
The group name for administrators, #Admin, starts with the pound symbol (#). This is to make it one of the last entries in a sorted list. When a user brings up an address dialog from the Domino Directory, the list will not be cluttered with system groups if they are named so they appear last in the list.
520 Domino Designer 6: A Developer’s Handbook
6. Click the blue person button to add names, roles and groups to the list from the Address books that you have access to, and make sure that they are added to the ACL.
To deny access to the view, deselect by clicking the name to remove the check mark.
13.6.1 Controlling access to formsYou can control access to a form in several ways:
1. Exclude the form from the Create menu and make it available to a select set of users with a View action button.
2. Create a form access list that specifies who can create documents with the form.
3. Create a form for Public Access users with Read or Create rights in the ACL.
Making a form available to a list of usersThis method has two parts:
� Exclude the form from the Create menu.
� Create a View action button that is available to a select set of users.
To prevent a form from appearing on the Create menu:
1. Open the form in Design mode.
2. Select Design -> Form Properties to open the InfoBox for the form.
3. On the Information tab, deselect the Include in: Menu option.
To create the action button:
1. Open a view that displays the form in Design mode.
2. Create a view action using the formula @Command([Compose];"formname").
3. Open the Action InfoBox and click the Hide tab.
Important: Remember that denying access to a view does not deny access to the content and data in those views. A user can still create a personal view and get access to the data by using selection formulas.
Tip: Your application will be more flexible and easier to maintain if you use only roles to control access to design elements, not groups or individual names.
Chapter 13. Securing your Domino application 521
4. Enter a formula to hide the view from everyone except the users and groups you specify. (Using roles instead of individual user or group names is recommended for easier application maintenance.) An example of such a formula is !@IsMember( "[NewsEditor]"; @UserRoles ) This formula hides the form from everyone except users who have a NewsEditor role.
Using a form access listForm access lists further refine the access level set in ACL and allow only those on the list to access the form or documents created with the form.
� A form Create access list allows only those on the list to create documents using the form.
� A form read access list allows only those on the list to read documents created with the form.
To create a form Create access list:
1. Open the form in Design mode.
2. Select Design -> Form Properties to open the InfoBox for the form.
3. Click the Security tab (key icon).
4. In the Who can create documents with this form section, deselect All Authors and Above (the default).
The list in the window displays the contents of the ACL.
5. Click one or more of the users, groups, servers, and roles that you want to have the ability to create documents with the form. A check mark appears next to the names you select.
6. Click the blue person button to add names, roles, and groups to the list from the Address books that you have access to, and check to see that they are added to the ACL before you make the database available to users.
To deny access to the form, deselect by clicking the name to remove the check mark.
Note: This is not a true security measure, as users might gain access to the form in other ways.
Note: A user without access to a restricted form may still be able to create documents that look like they have been created with that form by using an agent or by pasting a document from another database.
522 Domino Designer 6: A Developer’s Handbook
Creating a form for Public Access usersA public access list works with the database ACL to expand user access to specific views, forms, and documents. Creating forms and views enabled for public access allows you to provide users with No Access or Depositor access with the ability to view specific documents, forms, and folders without giving them Reader access to the entire database. Users who have this access level in the database ACL will see only documents, folders, and views specified as available for public access in the form/folder/view InfoBox.
Public documents are useful for calendar applications where users might delegate the ability to read or create appointments on their behalf to another user.
To create a form for public access and let Public Access users create documents with the form, do the following:
1. Choose Design -> Form Properties.
2. Click the Security tab.
3. Select Available to Public Access users.
To let Public Access users read documents created with the document, do the following:
1. Create a field and open its InfoBox.
2. In the Name field, enter $PublicAccess.
3. In the Type field, select Text and Computed when Composed.
4. In the Design pane, enter 1 as the default value for the field and click the green button to accept the value.
5. To hide this field from users, select the Hide tab and specify hide-when conditions in the Field InfoBox.
6. Save the form.
Tip: Use roles in the form access lists to ease the maintenance of your application.
Note: The views the Public users will use must also be marked for Public Access. This is done using the View InfoBox.
Chapter 13. Securing your Domino application 523
13.6.2 Preventing printing, forwarding, and copying of documentsYou can discourage users from printing, forwarding, or copying documents created with a form. This feature helps to prevent accidental distribution of confidential information, but it is not a true security feature since the settings can be manipulated with the appropriate Design and Document access rights or circumvented by using a screen capture program. To set this option, do the following:
1. Open the form in Design mode.
2. Choose Design -> Form Properties.
3. Click the Security tab (the key icon).
4. Select Disable printing/forwarding/copying to clipboard.
5. Close and save the form.
13.7 Controlling access to documentsIndividual documents can contain sensitive information. Domino security provides several mechanisms that can restrict access to a document. You can control both Read and Editor access to documents, as follows:
� Restrict Read access to documents:
– Create a Read access list for all documents created with a form.
– Use a Readers field.
� Restrict Editor access to documents:
– To those named in the Authors field.
– Use a Controlled Access section.
Read accessIf you want to control read access at the document level, you can do it for all documents created with a specific form or you can do it for each document. In the following sections, we describe:
� Controlling Read access to documents based on the form used to create them
� Controlling Read access to individual documents using a Readers field
Note: Turning this option on only affects documents created after the option was set on. It doesn’t affect existing documents.
524 Domino Designer 6: A Developer’s Handbook
Read access list for a form A read access list for a form refines the ACL by allowing only those named in the list to read documents created with the form. See “Using a form access list” on page 522 for detailed steps.
Readers fieldA Readers field is a field data type that restricts readership for the document to those users and servers that are listed in the field. There are two ways to create a Readers field in a document:
� The Designer places a field with the Readers Data Type on a form.
� The Author or an Editor of the document opens the document properties and sets the Read access in the Security tab. This automatically creates a $Readers field in the document. The value of the field is the form read access list.
� Each document that users create with the form contains the $Readers field list of readers. If there is no read access list for the form, the documents do not have a $Readers field.
Readers fields have the following characteristics:
� They are an excellent means of restricting replication, as only the documents for which a user is listed in the Readers field will be replicated.
� If a document contains multiple Readers fields, all entries from all Readers fields have read access to the document.
� They restrict reader access to individual documents only; access to each document depends on the contents of its Readers field.
� Editable Readers fields allow authors and editors to enter names of authorized readers.
� If all Readers fields have a null value, anyone with reader access can access the document.
Note: The Author or an Editor of a document can change the read access list of a document from the document InfoBox by changing the selection in the read access list of the Security tab.
Chapter 13. Securing your Domino application 525
Creating a Readers field To create a Readers field:
1. Add a field to a form.
2. Select Readers as the field data type.
3. Specify readers by using one of the following methods:
– Enter user names, roles, or groups directly.
– Use a formula to compute user names, roles, or groups.
– Make the field editable so Authors and Editors can select and change readers.
13.7.1 Editor accessEditor access to a form can be controlled by Authors fields.
Authors field An Authors field is a Notes reserved field that lets you give users Editor access to their documents when they have Author access to the database.
An Authors field:
� Works only in a database located on a server, or on a local replica when the Enforce a Consistent ACL option has been selected.
� Refines the ACL, but does not change it.
To allow users with Author access to edit existing documents, including documents they create, you must include them in the documents’ Authors field.
Users with Editor access can edit a document even if they are not in the Authors field. (Use Readers fields to prevent users with Editor access from reading the document, since if Editors cannot read the document, they cannot edit it.)
Attention: If you allow users to enter names of authorized readers, you should also have a separate, hidden, computed Readers field that contains a role for servers that should replicate the document.
We recommend that you add a role for replicating servers to a Readers field, and then assign the relevant servers to that role in the ACL. Without that role in a Readers field, the document will not be replicated.
This can also be solved using Authors fields, to be described in 13.6.1, “Controlling access to forms” on page 521.
526 Domino Designer 6: A Developer’s Handbook
Users with No Access, Depositor access or Reader access cannot edit the document even if they are listed in the Authors field.
If you add only one Authors field to a document and it contains a null value, then only an Editor or above can edit the document.
Creating an Authors field To create an Authors field:
1. Add a field to the form.
2. Select Authors as the field data type.
3. Specify the authors by using one of the following methods:
– Entering user names, roles, or groups.
– Using a formula to compute user names, roles, or groups. Use role name names to ease the administration of your application. Also, consider adding @Username function, to allow access to the current user to edit the document again later.
– Making the field editable so that users with author or editor authority can select and change authors themselves.
13.7.2 Combining Readers and Authors fields Use Table 13-5 as a quick reference to determine how Readers and Authors fields can protect your document.
Assume that Rune Carlsen and Grant McCarthy both have Author access in the ACL and that there is no form Read access list.
Table 13-5 Combination of Readers and Authors fields
Note: You cannot, as an author, edit your own documents automatically. To edit your own documents in a database, the form from which the document was created needs to have an Authors field with your name.
Authors fields do not overrule the ACL. You cannot edit a document, even though you are part of an Authors field, if you do not have Author access in the ACL.
Readers field Authors field Who can read Who can edit
None None Everyone with ACL Reader access
Everyone with ACL Editor access and above
Chapter 13. Securing your Domino application 527
When programming with the Domino classes, you cannot use the extended class method to assign values for Readers and Authors fields as you can when working in the formula language. Suppose that you have a Readers field in your document called DocumentReaders, and that you want to assign the value Rune Carlsen/ITSO to this document. Using the formula language, you can do as follows:
FIELD DocumentReaders := "Rune Carlsen/ITSO"
You might also expect to be able to do it in a similar way using the Domino classes by treating the item name DocumentReaders as a property of a NotesDocument object (assigned to the variable doc in this example):
...doc.DocumentReaders = "Rune Carlsen/ITSO"...
However, this method will not work because it changes the type of the DocumentReaders field to Text type (instead of Readers type), thereby removing the read protection from the document. When working with Readers and Authors fields in the Domino classes, you must use the NotesItem class as follows:
...Dim newValues( 1 To 2 ) As StringnewValues( 1 ) = "Rune Carlsen/ITSO"newValues( 2 ) = "[ReplicServers]"
None Grant McCarthy Everyone with ACL Reader access or above and Grant McCarthy
Grant McCarthy and everyone with ACL Editor access and above
Rune Carlsen None Rune Carlsen No one
Rune Carlsen Grant McCarthy Rune Carlsen and Grant McCarthy
Grant McCarthy
Note: Do not hardcode group or people names in Readers and Authors fields, as this makes maintenance harder. Using roles instead allows the database manager to assign the desired access to different groups and people by assigning the right role to them in the ACL.
Note: This example assumes that the field exists in the document. If you are creating a new field, use LotusScript instead, as you are not able to set the type of the field to Readers with formulas. For more information about front-end and back-end coding, refer to 14.2.5, “Understanding front-end classes and back-end classes” on page 577.
528 Domino Designer 6: A Developer’s Handbook
Dim authorsItem As New NotesItem(doc, "DocumentReaders", _newValues, READERS)...
As you can see, the role [ReplicServers] was also added to the Readers field in the last example. Documents protected by Readers fields should always include read access to a role that can be assigned in the ACL to the servers that need to replicate the database. Another way to solve this is by using a role, for example [Admin], and assigning the role to the LocalDomainServers group.
Field Editor access security optionIn a database where some users have Editor access while others only have Author access, you can combine the use of Authors fields with the individual field security option “Must have at least Editor access to use”. Thus, even though you are giving users with Author rights in the ACL access to a document, by using an Authors field you can hinder them in editing certain fields by using the Must have at least Editor access to use field security option.
13.7.3 Controlled access sectionsIn addition to having the same properties as the standard access, controlled access sections also have a separate list of allowable editors. To users with Editor access, fields behave as normal editable fields. To users who are not listed as Editors of the section, the fields are read-only.
In addition to limiting Editor access to the fields within a section, sections also provide a means of attaching multiple signatures to a document (up to one signature per section). This is a useful feature for workflow-type applications.
When programming a controlled section access formula, it must evaluate to a name or list of names, groups, or roles. Roles are preferred for ease of maintenance. A null return value will give general access.
Note: The preceding example assumes that the field does not already exist. If you have an existing field and you want to change its value, do so as you would normally, but do not use AppendItemValue; it creates a new item with a duplicate name, and the new item doesn't have the Readers attribute.
Tip: Be sure to test readers/authors security with a user ID that should not have access to view or edit the documents.
Chapter 13. Securing your Domino application 529
13.7.4 Use of Hide-When formulasYou can control whether an action button, a paragraph or a cell in a table is to be shown to a user by a hide-when formula. Select the object that you want to hide and display its InfoBox. Click the Hide When tab and select Hide Object if Formula is True. Then enter a formula for when the selected object should be hidden.
See the Using @UserRoles section later in this chapter for examples of hide-when formulas.
13.7.5 Using encryption for field securityEncryption allows you to secure information at the field level. You can encrypt the contents of any field so that only users who have the secret encryption key can access the message or field.
Note the following:
� Users who need to create and save documents with a form must have at least one of the secret encryption keys you selected in the default secret keys list.
� Users who need to read the encrypted fields must also have at least one of the secret keys used to encrypt the fields.
Note: Sections are not to be used as a security feature. An access-controlled section does not physically protect data, because a user can modify the section through a different form. To make a section truly secure, encrypted fields must be used within the section.
Sections should be used when documents require multiple signatures validating the Composer or Editor of the data.
Important: Hide-when formulas are not a true security feature on the Notes client, as all hidden fields in a document can be seen through the document property. It is also not secure for a Web client if Generate HTML for all fields is selected in the Form Properties box.
Note: Web browser users have no way of using encryption, because the secret key is held in the Notes ID. This also means that there is no way that a Web browser user can access encrypted data.
530 Domino Designer 6: A Developer’s Handbook
How encryption works for fields Encryption prevents unauthorized access to critical data in selected fields, and is enabled using encryption keys. The system administrator distributes the encryption keys to authorized users when deploying the application by mailing the key or giving it to users in a file. When users receive an encryption key, they must merge it with their user ID files. By having this encryption key merged in the personal ID file, a user will be able to access the encrypted data.
Encryption methods You need to choose an encryption method and design for it. There are three ways you can apply encryption:
Automatically You can design a form to automatically encrypt all encryptable fields whenever someone saves a document composed with that form.
Manually Authors and Editors can encrypt the document by selecting an encryption key in the document InfoBox.
Manually or automaticallyYou can create a field that generates a list of encryption keys from which the Author or Editor can choose a key, or you create a field that contains a formula that chooses the key.
Creating a secret encryption key A document can be encrypted only if it contains at least one field designated as encryptable.
To encrypt a document:
1. Create a secret encryption key.
2. Enable encryption for a field.
To create an encryption key:
1. Choose File -> Security -> User Security.
2. On the left side of the dialog box, click the Notes data tab and then Documents. You see a document encryption dialog.
3. Click New Secret Key to create a new key; see Figure 13-9 on page 532.
4. Enter a name that describes the purpose of the key.
5. (Optional) Enter a comment. Include the names of the database, forms, and fields that use the encryption key in case you need the information later.
6. If there are users using non-North American versions of Notes prior to version 5.0.4. and they are going to use the key, click Use International Encryption.
Chapter 13. Securing your Domino application 531
7. Click OK to create the key.
Figure 13-9 Creating a new secret encryption key
Protect the key by specifying a password for the key when you export it. In this way, only those who know the password can import the key into their user IDs. Additionally, you can specify that a user who receives the encryption key cannot give it to another user.
Enabling encryption for a fieldYou can enable encryption for a field manually or automatically. To allow Editors and Authors to specify keys to encrypt their documents, you need to manually enable encryption on the field.
To manually enable encryption on a field:
1. Create a field in a form.
2. Open the field InfoBox.
3. Click the Advanced tab.
4. Select Security Options: Enable Encryption for this field.
Important: Carefully back up your ID file, as there is no way to recover encrypted data if the secret key is lost.
532 Domino Designer 6: A Developer’s Handbook
The Editor or Author must then specify which encryption key to use on the Key tab on the InfoBox for the document.
To enable automatic field encryption:
1. In the form InfoBox, click the Key tab.
2. From the Default Encryption Keys list, select one or more encryption keys in your ID. If you select more than one encryption key, all the encryptable fields will be encrypted with all the keys.
13.8 Authentication on the WebThis section discusses different authentication methods for Web clients and secure connections between a Web client and Domino server.
13.8.1 HTTP Basic AuthenticationThe communications protocol used by the World Wide Web is the Hypertext Transfer Protocol (HTTP). HTTP includes a simple user ID and password- based authentication scheme known as Basic Authentication. The implementation of basic authentication is server-specific, but in general all servers use it for two purposes:
� As a mechanism to identify which user is accessing the server
� To limit users to accessing specific pages (identified as Uniform Resource Locators, or URLs).
How Basic Authentication worksBasic Authentication uses a challenge mechanism to prompt users to authenticate themselves. The user ID and password block is constructed by creating a string of the form: userID:password, and then encoding it, using the base64 algorithm.
You may wonder why you are not repeatedly prompted for a password every time you access a new restricted page. The reason is that the browser caches the user ID, password, server name, and realm name in memory. In fact, most
Notes: Encrypted fields do not show up in a view, nor would you want them to, since they would not be no longer private. The server, when calculates the view index, doesn’t have the key to decrypt them.
You cannot access encrypted data from an agent, if the signer of the agent has the key. The key is in the ID file, and is not part of a signature.
Chapter 13. Securing your Domino application 533
browsers go one stage further than this and send a user ID and password for any URL that is likely to need it.
Is Basic Authentication secureThere are two obvious loopholes in HTTP Basic Authentication:
� The user ID and password are included in the packet header, which means that they can be captured by anyone with a network sniffer or trace tool at any place in the session path.
� The user ID and password are cached in the browser, so if you leave the machine unattended, anyone can use your ID to access restricted information.
The user ID and password are not encrypted when they are placed in the packet header, but instead are encoded with base64. Base64 is an algorithm that forms part of the Multipurpose Internet Mail Extensions (MIME) protocol. It is a mechanism that turns any bit stream into printable ASCII characters. (It is described in RFC1521.) In fact, the objective of base64 is not to mask data at all, but to provide a method of sending binary data through a mail gateway that can only handle character data.
The result of this is that by capturing the Authorization: Basic header from an HTTP request, an attacker can easily extract the user ID and password.
How serious is this exposure? Within a corporate network, it may not be a big problem. In fact, base64 offers protection of user IDs and passwords that is superior to many older protocols that send them as clear text.
On the Internet, however, it is a different story: there you have to assume that someone, somewhere, is tracing everything you send. Clearly HTTP Basic Authentication should not be used as the sole method of protection for any critical resource.
You can make basic authentication more secure by providing an encrypted connection for it to operate in. SSL is a valuable example of a protocol that encapsulates HTTP data in this way.
13.8.2 Session-based authenticationSession-based name-and-password authentication includes additional functionality that is not available with basic name-and-password authentication. A session is the time during which a Web client is actively logged onto a server with a cookie. To specify settings that enable and control session authentication, you edit the Web site document or the Server document, depending on your configuration.
534 Domino Designer 6: A Developer’s Handbook
Furthermore, you have two selections for enabling session-based authentication:
� Single server� Multi-server
The single server option causes the server to generate a cookie that is honored only by the server that generated it, while the multi-server option generates a cookie that allows single sign-on with any server that shares the Web SSO configuration document.
To use session-based authentication, Web clients must use a browser that supports cookies. Domino uses cookies to track user sessions.
13.8.3 Secure Sockets Layer (SSL)The SSL protocol was originally created by Netscape Inc., but now it is implemented in World Wide Web browsers and servers from many vendors. SSL makes use of a number of cryptographic techniques, such as public key and symmetric key encryption, digital signatures and public key certificates. SSL has two main objectives:
1. To ensure confidentiality, by encrypting the data that a client and server send.
2. To provide authentication of the session partners, using RSA public key methods. Most current implementations only require the server to be authenticated in this way, although the protocol does allow for client authentication.
There are two parts to SSL: The handshake, in which the session partners introduce themselves and negotiate session characteristics, and the record protocol, in which the session data is exchanged in an encrypted form.
SSL and certifying authoritiesAuthentication in SSL depends on the client being able to trust the server’s public key certificate. A certificate links the description of the owner of a key pair to the public part of the key. The validity of a certificate is guaranteed by the fact that it is signed by some trusted third party, the certifying authority (CA).
But how does a certifying authority become trusted? In the case of an SSL-capable browser, the certificates of trusted authorities are kept in a key database, sometimes called a key ring file. The list of top-level authorities, for example VeriSign, is pre-installed when you get the browser.
This approach has the benefit of being very simple to set up; a browser can authenticate any server that obtains a public key certificate from one of the CAs in the list, without any configuration or communication with the CA required.
Chapter 13. Securing your Domino application 535
SSL Client AuthenticationBoth client and server use digital signatures to identify themselves and those signatures use public keys that are validated by the existence of a shared hierarchy of certificate authorities. You may think that SSL could apply a similar approach to allow Web browsers to authenticate themselves, simply by having the client implement a mirror image of the server authentication process. In fact, this is exactly what the SSL protocol specifies, by adding to the handshake a server challenge that the client must encrypt using its private key.
Unfortunately life is not that simple. Notes can support a symmetrical authentication scheme because you have control over the CA hierarchy and therefore you can ensure a region of shared trust. On the Web, however, you do not have that luxury. The monolithic certification scheme used by servers is not flexible enough to support the large number of certificates that client authentication would require.
13.8.4 Domino and SSLDomino Release 4.5 added support for Domino to obtain a certificate from an external certificate authority to provide for Domino server authentication and session encryption (SSL V2).
The Domino 4.6 server added support for Internet client authentication (SSL V3), using client certificates obtained from an external certificate authority. The client certificate had to be registered in the user’s person record in the Domino Name and Address book. Domino 4.6 also added support for Domino to be a certificate authority to issue X.509 certificates for servers (although the Domino CA could not yet issue client certificates).
The X509 certificate is a standard certificate format for the Internet. Certificates verify the user’s identity and bind the public key to the user’s name. X.509 certificates are used on the Internet/intranet for authentication and encrypted sessions (SSL), and encrypted mail and digital signatures (S/MIME).
Domino Release 5.0 added SSL 3 Client Authentication and the ability to create X509 certificates that can be issued to Notes clients, which is the same in Domino 6.
Previous Notes clients used their own internal certificates (similar concept to X.509, but different format) and did not support X.509 certificates. The Notes 6 client have the ability to request a certificate from any certificate authority, including a Domino certificate authority, and store the X.509 certificate in the Notes ID file. To obtain an X.509 certificate from a Domino CA, Notes users will use the Domino CA Web site (CA application) just as a browser user does today. The X.509 certificate can be used for encryption and digital signatures between
536 Domino Designer 6: A Developer’s Handbook
Notes clients and Internet clients using S/MIME and for access to secure Web sites using SSL.
13.8.5 When to use Internet securityThere are three methods of Internet security that can be used, Basic Authentication, SSL Server Authentication, and SSL Client Authentication with X509 certificates. Table 13-6 describes when, typically, to use each of these levels of security in your applications.
Table 13-6 Internet security levels and use
13.8.6 Defining Web usersYou may register new Web users from scratch, or let existing Notes users have access to the Domino Web server. To create a new Web user follow these steps:
1. Open the Domino Directory and select the Person view.
2. Select Add Person to display the Person document.
3. Enter the required information. The User Name and Internet Password fields are the only fields used for Domino Web authentication. The other fields are optional with the exception of the Last Name field, a required field without which the form cannot be saved.
4. Figure 13-10 on page 538 shows a Person document being created.
Security feature When to use it
Basic Authentication In a closed network application such as a company intranet where the level of risk from outside attack is low.
SSL Server Authentication
In an Internet application where the risk of outside attack is greater and you wish to protect the information and data on your Web server to a greater extent.
SSL Client Authentication with X509 certificates
When security is at a premium and you are exposed to potential attacks from the Internet.
Chapter 13. Securing your Domino application 537
Figure 13-10 A Person document being created
For more information on Internet Security, see the IBM Redbook Lotus Notes and Domino R5.0 Security Infrastructure Revealed, SG24-5341.
13.9 Programming considerationsDomino provides several @functions that help you control application behavior based on the user, or on the client type. We discuss the following functions:
� @UserRoles: returns a list of roles for the current user.
� @UserName: returns the user name or server name.
� @ClientType: returns a text string to differentiate Notes and Web clients.
� @UserNamesList: returns a text list containing the current user name, any group names, and any roles.
This information is also available from LotusScript, but these are mostly used in formula context, especially in hide formulas.
13.9.1 Using @UserRoles Use @UserRoles in formulas to either:
� Determine what to do for a particular set of users, without needing to hard code user names in the code.
538 Domino Designer 6: A Developer’s Handbook
� Direct one set of users to one page, and another set of users to another page when the user clicks a button.
The @UserRoles function has no arguments:
@UserRoles
It returns a text list whose value is the role or roles of the current user. Figure 13-11 shows an example of the values returned by @UserRoles. You can add code to perform an action based on the returned value.
Examples To display an action only to people in the NewsEditor role, enter the following hide-when formula for the action:
!@IsMember( "[NewsEditor]"; @UserRoles )
Or:
@IsNotMember( "[NewsEditor]"; @UserRoles )
Figure 13-11 Example of the results of @UserRoles and @UserNamesList functions
Note: @UserRoles only works on a server-based database unless the Enforce a Consistent ACL option is selected in the Advanced section of the ACL settings.
Chapter 13. Securing your Domino application 539
13.9.2 Using @UserName @UserName returns the current user name. Using @UserName allows you to make the current user name available to formulas. You can use it to:
� Restrict the Edit action in documents created with a particular form based on whether @UserName is equal to the author of the document
� Hide portions of documents in hide-when formulas based on the user name
Example The following view selection formula selects only documents created by the current user to display in a private view:
SELECT @UserName=Author
@UserName has been extended to take a new parameter, index, which returns the user name, alternate user name, or server name indicated by the parameter.
13.9.3 Using @ClientType @ClientType returns a text string to differentiate Notes and Web clients. Use @ClientType in formulas for which the outcome is different depending on client type.
Example Used in a computed subform formula, the following formula inserts the subform WebHead if the form is to be displayed on the Web, and the subform NotesHead if the form is to be displayed on a Notes client:
@If(@ClientType = "Web"; "WebHead"; "NotesHead")
13.9.4 Using @UserNameList@UserNamesList returns a text list containing the current user name, any group names and any roles. It also works on local databases when the Enforce Consistent ACL option is selected. It returns “” for a local database where Enforce is not in effect.
Attention: You should never use @Username as part of your view selection formula or in a view column formula, unless the view is Private on First Use. A workaround could be to create a categorized view based on a field where you save the author of the document. Then you can embed this view on a form and use @Username in the “Show single category” option.
540 Domino Designer 6: A Developer’s Handbook
@UserNamesList will allow you to combine the functionality of @UserRoles and @UserName and, in addition, the group information for the user. Figure 13-11 on page 539 shows an example of the values returned by @UserNamesList.
13.9.5 Password fieldYou can create a Password field that displays only asterisks when a value is entered into the field. This field allows users to enter a password in privacy.
13.9.6 Controlling if users paste documents into the databaseYou must also consider whether users should be allowed to paste documents into your application database. If this is not controlled, users may be able to compose a document in another database in a way not allowed in your application and then paste the document into your application database.
To control the pasting of documents, use the QueryPaste event of the view. Using this event, you can make sure the documents to be pasted meet your criteria.
13.9.7 Hiding the design of a databaseThe developer can protect the design of a database by hiding it. However, hiding the design of a database will not hide the data in that database.
Consider carefully before hiding the design of a database. It may be more difficult for the system administrator to maintain while it is deployed. For example if you hide the design of a database, the Agents view is also hidden and the system administrator cannot enable or disable server agents unless you have added action buttons or similar functions.
Note: Unlike @UserRoles, this function does not append “$$WebClient” to the list. This is because @ClientType is now available for this purpose, so @UserRoles overloading is no longer necessary.
Important: However, you must either make sure that the password is passed on and not saved in the document, or protect it in the document by using a Readers field or an encrypted field to avoid other users seeing the password through the InfoBox for the document.
Chapter 13. Securing your Domino application 541
13.10 Other security options and considerationsIn the following sections, we discuss other security options and considerations to keep in mind.
13.10.1 Using signatures for securityDomino checks the signatures in design elements for two reasons:
� To allow execution of the application in the Notes client.
Signers allowed to execute in the Notes client are listed in the client Execution Control List (ECL).
� To allow execution of server-based agents in the application.
Signers allowed to execute agents on the server are listed in the Security (Agent Restrictions) section of the server document in the Domino Directory.
To make management of Execution Control Lists and the Security section of the server document easier, it is recommended that you create a common ID for your development organization that is used to sign all deliverables before handing them over to the System Administrator for deployment. Then ensure that this ID is trusted in all users ECL and is part of the Administrative ECL.
The following sections will explain:
� Execution Control Lists
� Server-based security for agents, Java and JavaScript
� Signing a database
� Signing an applet
Execution Control ListsExecution Control Lists (ECL) have stemmed from the concern that a Notes user does not have much control over what a Notes application is doing to their document, database, or system.
ECLs are a means by which the Notes user can now specify what level of access an executing formula or LotusScript program created by another person can have to their system.
By default, no scripts or formulas, whether signed or unsigned, can execute on your workstation without displaying a warning message.
542 Domino Designer 6: A Developer’s Handbook
ECLs are stored on a user’s workstation. To work with ECLs choose File - Security - User Security. Click the “What others do”. The ECL of the user’s workstation is now shown:
Figure 13-12 Execution Control List
The dialog is split into two parts. Below the “What others do” there are three options. One for “Using Workstation”, another one for “Using Applets” and another one for “Using JavaScript”.
Depending on your choice among these options, your choices changes for the settings of your ECL. Common for them all, is that you add, rename, remove and manage what the different signatures can perform on the current workstation. Based on the developers’ signatures, you can set the level of access these signatures should have on your workstation.
For example, suppose you are trying to create a document from a design that has been signed by the ID Rune Carlsen/ITSO. You have specified in your ECL list that you do not want to give this ID access to your environment variables.
When you open up the document and the program tries to perform an @Environment command, a dialog box will appear telling you that the system is trying to access an environment variable when it does not have the authority to do so. If you want to allow the command to continue you can do so. You can either allow it to run this one time only, or you have the ability to change the ECL
Note: This is a new way to access the ECL with Lotus Notes 6.
Chapter 13. Securing your Domino application 543
permanently to give Rune Carlsen/ITSO the ability to access any of your environment variables in the future.
Central maintenance of the ECLWhen new Notes clients are installed, a default ECL is pulled from the server. The system administrator also has the option of not allowing users to modify their ECL. The system administrator should set an administrative ECL before installing and configuring clients in his environment. If this is not done, there are various ways to update the client’s ECL with a new administrative ECL.
� If the system administrator updates the default ECL, the new settings can be distributed to existing clients by mailing them a memo that includes a button that executes the function @RefreshECL and asks them to refresh their ECL.
� Another possibility is to add the same @RefreshECL function in the PostOpen event of the mail template, so all users will refresh the ECL as they open their mail file.
� The third and best way is by using the new Domino 6 Administration tools, Security Policy Settings documents. They allow you to apply security settings for all your users or group of users, and define how ECL maintenance should be performed.
Refer to Lotus Domino Administrator 6 Help for more information on how to configure and implement this.
A complete list of LotusScript and @functions that are affected by the ECL can be found in the Notes Help database.
Agent, Java and JavaScript security on the serverThe system administrator can decide the access rights for agents and code utilizing the Domino Object Model based on the ID that the agent/code is signed with.
In the Security part of the server document, there are entries for specifying:
� Agent Restrictions: options to specify who can:
– Run personal agents
– Run restricted LotusScript/Java agents
– Run unrestricted LotusScript/Java agents
� NOI Restrictions: options to specify who can:
Note: By default, every template that comes from Lotus is signed by Lotus Notes Template Development, which is given full access to your system.
544 Domino Designer 6: A Developer’s Handbook
– Run restricted Java/JavaScript
– Run unrestricted Java/JavaScript
Here the system administrator can enter specific IDs; for example:
Domino Development/IBM
Access can be given to a whole organization; for example:
*/IBM
You can read more about the different levels of restrictions for agents and the Domino object interface in the Domino Administration Help.
Signing a databaseYou can sign templates and databases developed by your organization so that you can then add the associated name to the Administration ECL, as follows:
1. Launch the Domino Administrator client. One way to do this is through the menu; choose File -> Tools -> Server Administration.
2. If the ID you want to use to sign is not the current one, switch to the correct ID.
3. Click the Files tab.
4. Select the server that stores the databases or templates that you want to sign.
5. Select the databases or templates that you want to sign by highlighting them in the list box.
6. In the Tools pane, expand the list under Database.
7. Click Sign. A dialog is displayed.
8. Select which elements to sign. To sign every design element in a database or template, select Sign “All Design Documents”.
9. Click Sign. A dialog box shows the number of databases processed and the number of errors that occurred (if any). See the log file for details.
10.Click OK.
13.10.2 Access control for HTML and other filesDomino extends its access control to files in the file system. This is particularly useful for HTML and other types of files used in Web sites. When using the Domino native HTTP stack, you will be able to configure access control lists for files (HTML, GIFs, etc.) in the file system. This gives you complete security and access control for your Domino Web sites, no matter how they are built or where their assets are stored.
Chapter 13. Securing your Domino application 545
File system protection does not apply to CGI scripts, servlets, or agents that access files on the system. The scripts, servlets, and agents have full access to any files accessed. File system protection does apply, however, to files that access other files (for example, HTML files that open image files). If a user has access to the HTML file, but does not have access to the JPEG file that the HTML file uses, Domino does not display the JPEG file when the user opens the HTML file.
A File Protection document needs to be created for each directory that contains files that you want to protect. The directory is relative to the HTML directory, set in the Server document or, if you have virtual servers, set in the Virtual Server document. Create the document as follows:
1. Open the Domino Directory.
2. In the Server/Servers view, highlight the Server document for the server on which you want to protect files.
3. Choose Actions -> Create File Protection, fill out the fields described in Table 13-7, and save the document.
Table 13-7 File protections
Tab Field Value
Basics Applies to If you have virtual servers on this machine, select whether you want this setting to apply to all virtual servers on this machine, or only to the virtual server you specify.
IP Address If you select Virtual Server, enter the IP address of the server to which the file protection applies.
Path Path This is the drive or directory that you want to restrict. The path is relative to the HTML directory specified in the Server document or, if you have virtual servers, the Virtual Server document. If you want to restrict access to specific files, enter the name of the file or use the wildcard characters * or ? to specify a group of files.
546 Domino Designer 6: A Developer’s Handbook
4. Create a File Protection document for every path that you want to restrict on the server.
5. At the server console, type tell http restart to refresh the file protection settings.
6. To display the File Protection document, open the Server\Web Configurations view. Notes displays the File Protection document as a response to the Server document.
13.10.3 APIs for customized authentication, encryption, and signingDomino offers APIs for:
� Authentication of Domino users by another system
This is part of the Domino Web Server API.
� Authentication of users for other applications
Customizable authentication through domino Web server APIBy using an API provided with Domino (DSAPI), you can create your own authentication schemes for Domino that can leverage external directories or security systems. This interface provides you with greater flexibility in integrating Domino into your existing environment and building “single-sign on” log in capabilities. Refer to the Domino documentation and release notes for more information.
Common Data Security Architecture (CDSA)Domino provides a common, multivendor interface for managing various security services, including a standards-based interface to Domino security for application developers. This interface exposes Domino encryption, signing, authentication, and other elements to application developers. CDSA makes the
Access Control
Current access control list
The users who can access the files you specified and the type of access they are allowed.To add users to this list, click Set/Modify Access Control List. Select a user name from the Public Address Book in the Name field and select Read-Execute, Author, or Full access. Read-Execute lets the user open files and start programs in the directory. Author lets the user create new files in the directory in addition to the Read-Execute privileges. Full access lets the user delete files in the directory in addition to the Author privileges.If users connect to the server using Anonymous access, enter Anonymous in the Name field and assign the appropriate access.
Chapter 13. Securing your Domino application 547
process of adding security to Domino applications easier and provides for interoperability between different applications that use security. Refer to the Domino documentation for more information.
13.10.4 Backup and restoreBackup and restore is also part of securing your application.
You need to work with your system administrator on how to implement backup and restore of application data during production. In larger organizations, there will often be a standard mechanism for these important processes.
During development, it is also important that you secure your work against loss through user or system error by making a backup of your development databases on a regular basis.
By enabling transaction logging in each application you may be able to improve your backup capabilities with rollback to an earlier state of the application that’s more current than the last full backup. However, enabling transaction logging may impact server performance and require more disks. Work with your Domino server administrators to develop a backup plan.
13.11 Developing a plan for securing your applicationSecuring a Domino application is a joint effort. The database designer must work closely with the system administrator and the database manager to successfully design, create and deploy a secure application.
Depending on the enterprise, the database designer, the database manager, and the system administrator may be one person or three separate people. The system administrator often takes over the responsibility of database Manager when the database is launched.
Table 13-8 provides a guideline for the tasks that are the normal responsibility of each participant in an application.
Table 13-8 Planning security
Database designer Database manager System administrator
Design a security scenario.Design the access control list (ACL). Implement Design tools for security.Implement Design changes.Implement the ACL.
Implement the ACL.Update the ACL.
Set up and authorize users and groups. Update the Domino Directory.Manage the server. Propagate replication.Manage user issues.
548 Domino Designer 6: A Developer’s Handbook
Database manager and system administrator Securing servers and controlling access to a domain is usually the responsibility of the server administrator. In addition, in a production environment, it will be the system administrator who is assigned the role of database manager in the ACL for purposes of setting up and maintaining the ACL. The database manager should receive the following kinds of information from the designer:
� A list of users, groups, and roles in each database
� A comprehensive security plan for each database, so that it can be maintained on the server
� All changes that are made in user and group access
� Updates to access levels and restrictions
Database designerWhile the designer must design the security plan for the application, it is usually the system administrator who has responsibility for implementing and maintaining the security plan. Therefore, it is essential that you work out your plan carefully, so that you can document it for the database manager. Designers need to do the following:
� Work with the server administrator while designing the application so that access levels and replication can be set up properly.
� Let the server administrator know whether there are any applications that require anonymous access.
� Determine which users and groups have access to which parts of the application.
� Decide what roles need to be added to the ACL for each database in the application.
� Document design changes for the server administrator so that they can replicate appropriately.
Note: All users and groups must be listed in the Domino Directory before they can be added to the access control list in a database.
13.11.1 Key design issues Before setting up the ACL for an application, you need to create an access scenario. Use the following questions to create the scenario:
� Who is responsible for setting up and maintaining the ACL?
Chapter 13. Securing your Domino application 549
The system administrator usually has overall responsibility for the ACL, and the designer would document the security mechanisms to be used for the administrator.
� Which users need what kind of access?
The designer needs to inform the system administrator about which access levels to set for users, servers and groups and the sets of privileges controlled by the roles in the ACL.
� Can you determine groups of users who need the same kind of access?
The system administrator must ensure that the groups are listed in the Domino Directory before adding them to the ACL.
� Is there a hub server responsible for replication?
If so, you should set up replication so that changes are added to the hub replica, then the hub adds the changes to other servers.
� Will this application be deployed on the Web?
If so, it is advisable to always have an Anonymous entry for Web users so that you can specify exactly what Web users can do without registering.
Note: The backup and restore of application data is part of securing the application. You also need to consider this during the design of your application.
Server access Server documents in the Domino Directory contain restrictions that are used to control access to a server. The database access control list refines these restrictions, but cannot override them.
Servers in the database ACL If there are replicas of a database, add server names and server groups to the ACL. Server access levels affect what information can be exchanged between the replica databases.
It is important to understand which design changes replicate and which do not, and how the database ACL and other replication settings affect the distribution of design changes:
� Servers need to have Editor access at minimum, so that they can replicate data changes.
� Servers must have Designer access to replicate design changes.
Important: You cannot use server lists to control access by Web clients. The clients are not authenticated until they try to access a database.
550 Domino Designer 6: A Developer’s Handbook
If you share your database via replication with outside agency, it may be appropriate to grant their servers a more limited level of access so they can’t damage your application by accident.
Planning for Web user accessUsers are granted access to the Domino Web server through basic authentication; the standard for Web security that is based on a challenge/response protocol.
The Web user can be challenged upon initial access to the Web site if restricted, or upon request to open any database that is restricted by the default entry in the ACL of No Access, or an Anonymous entry in the ACL of No Access.
All Web users have access to any database on the server that has a default access of Reader. If the database is restricted, a Web user must be listed in the Domino Directory with an HTTP password.
You can define additional access privileges and refine the ACLs for an authenticated user for a database, document, and so on.
Controlling Web access to Domino data To set up Web access to your Domino data, do the following:
� Authenticate any Web client accessing a Domino server, database view, or document.
� Define server authentication at the user level by creating Web users and passwords.
� Choose which databases can be accessed by Web users and what level of access to provide for each database. It is good practice to create a separate database for the home page and use ACL restrictions to control access to all other databases.
� Determine how to handle anonymous users.
� Optionally, add encryption to HTTP transactions by activating Secure Sockets Layer (SSL) at the server.
Planning for anonymous users You can control the level of access to a database for users who are not recognized by the system. These include Web users and Notes users who do not share a certificate in common with the server. Such users are considered anonymous users.
Chapter 13. Securing your Domino application 551
Anonymous access to servers Before anonymous users can be granted access to a database from their Notes client, they must be allowed server access. In the security section of the server document, the Administrator defines the security settings in the following ways:
� If the Compare Notes Public Keys Against Those Stored in the Address Book option is:
– Yes, then the Notes user must have an entry in the Domino Directory to access the server.
– No, then the Notes user does not have to exist in the Domino Directory to access the server.
� If the Allow Anonymous Notes Connections option is:
– Yes, then all Notes users in the world can access the server.– No, then only Notes users who have a certificate in common with the
server can access the server.
13.11.2 Distinguishing true security featuresAs you probably have gathered from reading this chapter, it is important to distinguish between true security features and features that are used to control the User Interface of the application and may only appear to control access. Use tTable 13-9 to distinguish between the security abilities of the different database elements.
Table 13-9 True security features
Note: Web users can connect to the server anonymously, unless this has been denied in the server document. In case Web browser users can access the server anonymously, you must use database and file restrictions to lock them out.
Is this a true security feature
In Notes… On the Web…
ACL Yes Yes
Public Access to documents
Yes Yes
Reader Access Lists and Readers fields
Yes Yes
552 Domino Designer 6: A Developer’s Handbook
13.12 New security features in Domino 6Lotus Notes/Domino 6 has a few new security features for system administrators and application developers. In this section we cover those that are mainly of interest to application developers of Domino 6 databases.
Extended access control listAn extended access control list (xACL) is an optional directory access-control feature available for a directory created from the PUBNAMES.NTF template—a Domino Directory or an Extended Directory Catalog. Use an extended ACL to
Author name fields Yes, for users that have Author access in the ACL. However, users with Editor access will be able to edit the document even without being in the Reader list.
Yes, as in Notes
Field Encryption Yes Not applicable
Signing Yes, verifies ownership. Not applicable
Controlled Access Sections
No, users can modify the section through a different form, but combined with signing the section non-authorized updates can be discovered.
No. Given the document ID, a Web user can get around the control in a section (this is not for the casual Web user, however).
View restrictions No, users may create private views and will be able to see all document content that isn’t protected by Readers fields or encrypted fields.
Yes
Form restrictions No, users can always see field content through the Document Properties dialog box.
It depends: No, when “Generate HTML for all fields” is selected.Yes, when “Generate HTML for all fields” is deselected.
Hide-when formulas No, users can always see field content through the Document Properties dialog box.
It depends: No, when “Generate HTML for all fields” is chosen.Yes, when “Generate HTML for all fields” is deselected.
Prevent Copying and Forwarding
No No (not applicable)
Chapter 13. Securing your Domino application 553
apply restrictions to a user's overall database access granted through the database ACL.
Although the security provided by the Readers and Authors fields is similar to that provided by an extended ACL, Readers and Authors field restrictions apply to all fields associated with a specific form—whereas you can use an extended ACL to restrict access at the field level. Since you must create Readers and Authors fields separately on each form that requires them, they can be time consuming to set up and to track. With this feature, however, you can apply and manage extended ACL restrictions through one interface and for multiple forms at once.
You manage an extended ACL using dialog boxes accessible from the database Access Control List dialog box.
Full Access AdministratorA Full Access Administrator is a new super-user access level, which is defined on a server level, in the server document. The people listed here will get the same rights as administrators, as well as manager access, to all databases on the server, regardless of the ACL on the database. A Full Access Administrator can override any setting of a database, including Enforce Consistent ACL across all replicas, and can access all documents in the database regardless of the use of Readers fields.
For more information on Full Access Administrator, refer to the Lotus Domino 6 Administrator Help database.
Effective accessThe “effective” access a person, server, or group has to documents in a database is not always apparent. For example, if there are two groups with different levels of access to documents, and someone is a member of both groups, you may wonder what access the person actually has. Now, however, using Lotus Notes/Domino 6, you can determine a person's effective access to the documents, as follows:
� Select a database and choose File -> Database -> Access Control.
� Click Effective Access.
� From the Effective Access dialog box, select the name of the person, server, or group whose effective access you want to determine and then press Enter or click Calculate Access.
Note: If you enable an ACL for Extended Access, the ACL history is cleared. The new history gives you far more entries than the 20-line limit. It also includes more details about Extended Access changes.
554 Domino Designer 6: A Developer’s Handbook
� “Database Access is derived from” in the top left of the dialog box shows the selected name's effective database access, as determined by the database ACL.
The checked boxes on the lower left of the dialog box indicate the access rights for the selected name.
The Groups and Roles boxes on the right of the dialog box show all the individual and group name entries and roles that could potentially control the selected name's access to the selected document scope. If the person, server, or group is not in the ACL, the Groups box displays the group used to determine the effective access.
� After you review the effective access for the selected name, click Done.
New agent security paradigmThe agent architecture and security paradigm has been changed in Domino 6, as follows:
� Access remote servers
With Domino 6, it is possible to access remote servers with your agents. The remote server’s server document needs to have the server you are using listed in the Trusted servers field. By having a server name in this field, the server assumes that the trusted server has authenticated the user.
� Save agents
It is now possible to agents to manipulate and save other agents on the server. With this new feature, your agents are able to enable and disable other agents on the server.
� Allowing editor-level users to run LotusScript and Java agents
A database designer is able to allow users with editor-level access to activate agents.
� Setting rights on individual agent level
An agent signer with unrestricted rights is able to select which level of rights does the agent operate in. By doing this, it is possible to restrict unrestricted signer rights on agent-by-agent basis. There are three levels for this setting:
– Do not allow restricted operations
Limits the agent to running in restricted mode. The agent will not be allowed to perform file input/output or signing but will be allowed to do regular LotusScript or Java operations.
– Allow restricted operations
Makes the agent run in unrestricted mode. File input/output and signing are allowed.
Chapter 13. Securing your Domino application 555
– Allow restricted operations with full administration rights
Allows the agent to perform all operations. The agent can also perform functions that require administrative rights.
Refer to the Lotus Domino Administrator 6 Help and Lotus Domino Designer 6 Help databases for full details on the new security features and how to use them.
13.13 SummaryIn this chapter we discussed the various levels of security available to Domino server administrators and application developers to secure information within a Domino database. We also discussed how Domino implements standard Internet-based security protocols and how these can be used, and reviewed the new Domino 6 agent security features.
Note: When the agent is created, the default setting is “Do not allow restricted operations”, which is the safest setting. If you want to perform restricted operations in the agent, you need to set the setting to one of the other options.
556 Domino Designer 6: A Developer’s Handbook
Chapter 14. Programming for Domino 6
In this chapter, we cover the methods available for programming in Domino. We briefly discuss Simple Actions and the Formula language, but our primary focus is on the LotusScript and JavaScript languages. The chapter explains how, when, and where you can use the different programming methods.
For information on the new formulas and LotusScript functions, refer to Chapter 12, “New features in Domino 6” on page 347.
14.1 Programming for Domino 6The following section explains the differences between the existing integral programming interfaces to Domino: Simple Actions, LotusScript, Java, Javascript, XML, and the Formula language. It gives a brief overview of Simple Actions, and it compares LotusScript, @functions, and JavaScript. The examples are written in LotusScript and JavaScript, which are two of the programming languages you can use to develop your applications.
14.1.1 Choosing a programming languageDomino offers four built-in languages that are appropriate for different situations: macro, LotusScript, JavaScript, and Java.
Generally, the best language to use is the one that accomplishes the task with the least programming. While there are differences in performance, usually these differences are minor compared to the cost of developers' time in creating and maintaining the application.
Macro language is best suited for:
� Operations on the current open document
� Action buttons that use basic commands (for example, FileSave)
� Agents that make simple changes to many documents in a single database
On some cases using the macro language is the only option, for example in hide-when, view column, view selection formulas.
LotusScript is the usual best choice for any task you can't do easily with macro language. It works both in the “front end” and “back end”, can be used to access other Notes databases or non-Notes data sources. In short, it's a full-featured programming language.
The disadvantages of LotusScript are:
� Unlike macro language, LotusScript does not automatically know its context or automatically loop through multiple documents; you have to program that logic.
� It does not work in Web and mobile applications (except as discussed in Chapter 7, “Domino Design elements: agents” on page 247).
� Unlike macro language, its native types are not ideally suited to dealing with Notes field data. For instance, as shown in the front-end/back-end section, dealing with dates can be tricky. You must use special classes for some data, and handle with arrays for multi-values.
558 Domino Designer 6: A Developer’s Handbook
JavaScript is the tool of choice for programming on Web forms, particularly for form validations. Since it is the only one of these languages that Web browsers know how to execute, it can be used to create Web forms with built-in intelligence. By writing code that executes in the browser, you save a round trip of submitting the form back to the server, the server doing calculations, and sending the modified page back.
Of course, JavaScript is only suitable when all the necessary information is available locally. For instance, you cannot use it to tell whether a document title entered on the Web form is unique in the database.
Since the Notes client also can execute most JavaScript, use it to write validation code for dual-client applications also. The same form can use the same code to check for correct data entry in Notes and on the Web.
Java is a good alternative to LotusScript for agents that access the Notes back-end classes. Use it if you are more comfortable with Java than with BASIC. Also, you can add functionality to your Notes forms and pages by embedding Java applets in them. These applets can also access Domino data, either locally or by remote calls from a Web browser, using class libraries supplied by IBM.
14.1.2 Simple ActionsSimple Actions are predefined actions that allow you to define a sequence of actions without requiring any programming knowledge. They are ideal for the end user who wishes to automate some routine tasks
Use Simple Actions with shared and unshared actions, buttons, action hotspots, picture hotspots, and agents. To access a list of Simple Actions, select Simple Actions from the Run pull-down list and click Add Action.
The Simple Actions available are:
� Copy to database
This copies the selected document to the database you specify. You can copy and paste selected documents within the same database or to another database on the same server or another server. They are marked as read in the target database.
� Copy to folder
This copies the selected document to the folder you specify. You must create new folders before you can select them. Copying a document from one folder to another does not remove the document from the source folder. A duplicate
Note: Web applications do not support Simple Actions.
Chapter 14. Programming for Domino 6 559
of the document is not created; instead, the document is displayed in a new place.
� Delete from database
This deletes the selected documents from the database. If there are replicas of this database on other servers, documents deleted in this database are also deleted in the replicas unless the option “Do not send deletions made in this replica to other replicas” is selected in your database replication settings (choose File -> Replication > Settings and click Send to see what the settings are).
� Mark document read
This marks selected documents as read. Use this action to mark an unread document as read without opening it or for reverting a document that was modified back to its read status because it doesn’t actually need to be read again(for example, if it has been modified by an agent).
� Mark document unread
This marks selected documents as unread. Use this action for flagging a document that users want to read again. Modify field
� Modify fields by form
This replaces or appends a single field value with a new text value you specify. This action replaces only text values for documents in Edit mode. To replace a value with something other than text, use an @function formula or LotusScript program. This action can modify the value of a hidden field, if you can specify the field’s name.
� Move to folder
This moves the highlighted document in a view or folder to a different folder. This action removes the document from the source folder and adds it to the specified folder. The document is not deleted from the database.
Note: Do not use this option with an agent that is processing documents with “Before New Mail Arrives.”
Note: The Append Value option does not work for rich text, number, time fields, or for fields that are not available within documents already saved in the database. Also, Append Value is not available if a database does not contain any documents (for example, a database template).
560 Domino Designer 6: A Developer’s Handbook
� Remove from folder
This moves the highlighted document in a view or folder to a different folder. This action removes the document from the source folder and adds it to the specified folder. The document is not deleted from the database.
� Reply to sender
This sends a reply to a mail memo automatically. Replies are not sent to a mail memo that was generated by an agent. The Body field accepts only plain text. It does not accept styled text, graphics, or attachments.
� Run agent
This allows you to chain agents together with other agents or combine LotusScript programs, @function formulas, and Java in one agent. The agent to be run must already exist in the database.
The documents that additional agents process are determined by the first agent. All subsequent agents use the same documents, regardless of their own settings. The first agent completes its search and actions first and then passes that information to the second agent.
For example, Agent A searches for all documents with the word “blue,” replaces “blue” with “red,” and then runs Agent B. Agent B launches its own search queries and actions only on the documents that Agent A processed.
� Send document
This mails the current document to the recipients designated in the document’s SendTo field. This action works like the @MailSend function.
To predict the recipient, the document must have a SendTo field. If it does not have a SendTo field, then Notes uses the contents of the internal $UpdatedBy field as the recipient. If the document also contains the CopyTo or BlindCopyTo fields, it is routed to those recipients at the same time.
If the document contains the DeliveryPriority, DeliveryReport, or ReturnReceipt fields, they control the delivery priority, generation of a delivery report, and generation of a return receipt. If the document does not contain these fields, they default to normal priority, no delivery report, and no return receipt, respectively.
� Send mail message
This mails the selected document as a whole document or as a link. The Body field accepts only plain text. It does not accept styled text, graphics, or attachments.
� Send newsletter summary This searches a database for documents matching conditions you specify, then sends a summary document with links to the individual documents.
Chapter 14. Programming for Domino 6 561
The summary information includes items such as a one-line description of the Date, Author, and Title columns.
The “Gather at least” option does not apply to sending a document summary from a view or folder with an action because the action can act on only the highlighted document, and “Gather at least” acts on multiple documents.
� @Function Formula
This adds a customized @function formula.
14.1.3 Formula languageFormulas are expressions that have program-like attribute; for example, you can assign values to variables and use a limited control logic. The formula language interface to Lotus Domino Designer is through calls to @functions and @commands.
A formula consists of one or more statements that are executed in order. Depending on the object associated with the formula and other criteria, the formula may execute once, or it may execute multiple times on selected documents (one execution per document). Formulas, as part of Domino 6, now have language elements for loop iteration.
Agent formulas execute multiple times on selected documents, giving the effect of conditional, iterative execution. Data can be processed in lists, giving the same effect.
All @functions evaluate to a value and can be placed in a formula anywhere a value of that type can be placed. When the formula executes, the value of the formula takes the place of the formula. Some formulas also have side-effects, that is, they cause actions to occur (for example, @Prompt causes a message box to appear).
Most @functions can be used in formulas for any Notes object, but some @functions are restricted in their applicability.
@Commands are special @functions that perform immediate actions in the user interface. Most @commands mimic menu commands.
Note: Simple Actions only cover basic functions. To implement more complex functions, consider using @formulas or a programming language, such as LotusScript or JavaScript.
562 Domino Designer 6: A Developer’s Handbook
For example, the following formula, if executed from a button, puts the current document in Edit mode and moves the insertion point down twice:
You can use @commands in formulas for toolbar buttons, agents that do not specify target documents, events, button hotspots, and action hotspots. However, you cannot use @commands in a formula that does not interact with the user. These include replication, form, selection, column, hide action, window title, section title, section access, insert subform, hidden paragraph, default value, input translation, input validation, computed value, and keyword field formulas, and agents other than those that specify no target documents.
You also cannot use most @commands in Web applications, since @commands are based on the Notes workstation user interface. About 30 @commands are supported, but some behave differently. Refer to the Lotus Domino Designer 6 Help database for a overview of programming Domino for Web applications.
Domino 6 has many new @functions; you can find information about those @functions in 12.5, “@functions and @commands” on page 370.
14.1.4 LotusScriptLotusScript offers the application developer the wide variety of features expected of a modern, fully object-oriented programming language. Its interface to Domino is through predefined object classes. Domino oversees the compilation and loading of user scripts and automatically includes the Domino object class definitions. This allows you to code your programs in an efficient way.
Furthermore, the hierarchy of the Domino object classes represents the flow of control you follow in the user interface if you step down from a database icon to a view, and further on to a document, and to a specific field within this document. For example, if you are coding in LotusScript, you will start with the UIWorkspace class and go down to the UIDocument class which represents the currently open document. Once you have set this object variable, you have access to the fields of the document.
The same principle applies if you are working with the back-end classes of Domino, which represent the objects you might wish to work with that are not in the user interface. You will start at the NotesSession class and go down through the NotesDatabase class to the NotesDocument class. The front-end and back-end classes are described in the section about Domino Object Models.
Chapter 14. Programming for Domino 6 563
Here is a short summary of the benefits offered by LotusScript:
� Superset of BASIC
Since LotusScript is a superset of the BASIC language, it is easy to learn, especially for Visual Basic users. You can write sophisticated scripts by using conditions, branches, subroutines, while loops, and others.
� Cross-platform
LotusScript is a multi-platform scripting language. You can create just one application, which can be used on any supported platform.
� Object-oriented
Domino objects are available to LotusScript. You can write scripts to access and manipulate these objects. The scripts are event-driven, such as by an action, clicking the object or button, opening a document, or opening a view. You can also create your own classes, and organize your code using an object model.
� Included in Lotus applications
Since LotusScript is supported by all the Lotus products, these products are able to access Domino objects using a Domino-supplied LotusScript extension. Another advantage is that you only need to learn one language to become proficient in writing scripts in other Lotus products.
� OLE/COM support
Domino can be the perfect container for SmartSuite documents and other OLE-enabled applications, such as Microsoft Office. You can use external OLE automation objects by scripting them, such as 1-2-3 worksheet objects.
Domino registers itself as an OLE2 automation server, supporting both a COM and an OLE interface. External applications can use these objects in scripts to create and reference them. LotusScript is able to combine all the parts and provide the means for controlling and manipulating objects.
The initial Domino 6.0 release does not include COM server capability, but this is planned for later releases.
� Coexistence with Notes @functions
Lotus continues to support @functions. LotusScript can work with them.
� Integrated development environment
The Domino 6 Integrated Development Environment (IDE) provides an easy-to-use interface to create, edit, and debug scripts, and to browse variables and properties of the Domino Object Model. This allows you to write more complex scripts in Domino.
564 Domino Designer 6: A Developer’s Handbook
� Extendable through LSXs
You may extend LotusScript by writing your own classes, which are called LotusScript eXtensions (LSXs) in C or C++, as a Dynamic Link Library (DLL). Creating your own LSXs allows you to expose custom functionality to LotusScript developers in precisely the same way as Domino functionality is exposed. You might use this, for example, if you have customer processing logic, such as a proprietary pricing process, that you wanted to make available to Domino developers.
� Connecting to external databases
You can connect your application to use another database (for example, DB2) by using the LS:DO. The benefit is that you can use the existing database so that data is stored in only one place.
� LS2J is the interface that allows data to transfer from the Java data type to the LotusScript data type, and allows LotusScript to execute Java object methods. LS2J allows LotusScript to create Java objects as if they are native to the LotusScript environment.
This set of LotusScript objects is implemented by way of a LotusScript Extension. You can use this LSX in any existing LotusScript implementation, standalone or embedded in another application, such as Enterprise System Builder (ESB), Lotus SmartSuite, or Lotus Notes.
LS2J enforces Java security as follows:
– Only public methods and fields are available.
– LS2J has the same access rights as a Java program which does not contain a package statement.
14.2 The Domino Object ModelNow we take a look at the Domino Object Model (DOM). Using this model, you have access to Domino databases and application services. The Domino Object Model is mapped to a set of object-oriented classes available for building applications. You can access the Domino Object Model from a broad range of languages, including Java, LotusScript, and Visual Basic. In Domino 6, the classes have also been exposed as XML objects to enable the creation of distributed applications. For more highly customized applications, you can directly access Domino services using the C++ APIs.
If you are going to write your own application, you can use the objects, methods and properties defined in this model to work with Domino objects (for example, databases, views, and forms). Normally, you use the properties of an object to get information about the object; for example, you use the ReplicaID property of
Chapter 14. Programming for Domino 6 565
the database object to query the ReplicaID of a database. On the other hand, you use methods to perform actions on an object; for example, the CreateDocument method of the database object creates a document in a given database.
Conceptually, there are two types of objects:
� Front-end user interface (UI) objects
� Back-end (server) objects
14.2.1 Domino front-end user interface (UI) objectsFront-end UI objects are used to manipulate the current user interface. They are typically used for programming events, and give you access to the Domino object that the user is currently working on. The following front-end UI objects are available:
� NotesUIWorkSpace represents the current Notes workspace window.
� NotesUIDatabase represents the currently used database.
� NotesUIView represents the currently used view.
� NotesUIDocument represents the document that is currently open.
� NotesUIScheduler, represents an embedded scheduler in a document.
The following objects have only events associated with them:
� Button represents a button.
� Field represents a field.
� Navigator represents a navigator.
� NotesTimer is a programmable timer you can set to execute an event routine at specified intervals.
14.2.2 Domino back-end objectsDomino back-end objects are used for manipulating Domino data. They do not support any event or user interface interaction.
Nevertheless, you can combine back-end objects with front-end objects in UI scripts. For example, the NotesUIDocument object has a property called Document which provides access to the underlying document.
566 Domino Designer 6: A Developer’s Handbook
The following back-end objects exist:
� NotesSession
This represents the Domino environment of the current script, providing access to environment variables, Domino directories, information about the current user, and information about the current Domino platform and release number.
� NotesDbDirectory
This represents the Domino databases on a specific server or local machine.
� NotesDatabase
This represents a Domino database.
� NotesACL
This represents the access control list (ACL) of a database.
� NotesACLEntry
This represents a single entry in an access control list. An entry may be for a person, a group, or a server.
� NotesAdministrationProcess
This represents the Administration Process. This class is new with Release 6.
� NotesAgent
This represents an agent.
� NotesView
This represents a view or folder of a database, and provides access to documents within it.
� NotesViewColumn
This represents a column in a view or folder.
� NotesDocumentCollection
This represents a collection of documents from a database, selected according to specific criteria.
� NotesDocument
This represents a document in a database.
� NotesDOMAttributeNode
This represents an attribute in a NotesDOMElementNode object. This class is new with Release 6.
Chapter 14. Programming for Domino 6 567
� NotesDOMCDATASectionNode
This represents a CDATA section in the XML data source. This class is new with Release 6.
� NotesDOMCharacterDataNode
This represents character data in a DOC node. This class is new with Release 6.
� NotesDOMCommentNode
This represents a comment in the XML. This class is new with Release 6.
� NotesDOMDocumentFragmentNode
This represents a document fragment in the XML. This class is new with Release 6.
� NotesDOMDocumentNode
This represents the entire XML document. This class is new with Release 6.
� NotesDOMDocumentTypeNode
This represents a document type node. This class is new with Release 6.
� NotesDOMElementNode
This represents an element in the XML document. This class is new with Release 6.
� NotesDOMEntityNode
This represents an entity in the XML document. This class is new with Release 6.
� NotesDOMEntityReferenceNode
This represents an entity reference in the XML document. This class is new with Release 6.
� NotesDOMNode
A base class representing a single node in a DOM tree. This class is new with Release 6.
� NotesDOMNodeList
This represents a list of the child nodes of an element node. This class is new with Release 6.
� NotesDOMNotationNode
This represents a notation declared in the DTD. This class is new with Release 6.
568 Domino Designer 6: A Developer’s Handbook
� NotesDOMParser
This processes XML into a standard DOC tree stucture. This class is new with Release 6.
� NotesDOMProcessingInstructionNode
This represents a processing instruction. This class is new with Release 6.
� NotesDOMTextNode
This represents the textual content of an element or attribute. This class is new with Release 6.
� NotesDOMXMLDeclNodeNode
This represents the version of XML being used. This class is new with Release 6.
� NotesDXLExporter
This represent sthe conversion of Domino data to DXL (Domino XML) data. This class is new with Release 6.
� NotesDXLImporter
This represents the conversion of Domino data to DXL (Domino XML) data. This class is new with Release 6.
� NotesItem
This represents a piece of data in a document. All items in a document are accessible through LotusScript, regardless of what form is used to display the document in the user interface.
� NotesRichTextItem
This represents an item of type rich text.
� NotesRichTextStyle
This represents the rich text field attributes.
� NotesEmbeddedObject
This represents embedded objects, linked objects, and file attachments.
� NotesDateTime
This represents a date and time.It provides a means of translating between the LotusScript date-time format and the Notes format.
� NotesDateRange
This contains a range of NotesDateTime. An object of type NotesDateTime represents a given date and time.
Chapter 14. Programming for Domino 6 569
� NotesLog
This enables you to record actions and errors that take place during a scripts execution. You can record actions and errors in a Notes database, a mail memo, or a file (for scripts that run locally).
� NotesMIMEEntity
This represents a NotesItem of type MIME. This class is new with Release 6.
� NotesMIMEHeader
This represents a MIME header. This class is new with Release 6.
� NotesNewsLetter
This represents a document that contains information from, or doclinks to, several other documents. All of the NotesItem properties and methods can also be used on a NotesRichTextItem.
� NotesNoteCollection
This represents a summary document thet contains information from, or links to, several other documents. This class is new with Release 6.
� NotesForm
This represents a form in a Notes database.
� NotesInternational
This object contains properties that provide information about the international settings (for example, date format) of the environment in which Domino is running.
� NotesName
The properties of this object contain information about a Domino user name.
� NotesTimer
Objects represent a timer in Domino.
� NotesRegistration
This represents the creation or administration of an ID file.
� NotesOutline
This represents the Notes Outline attributes.
� NotesOutlineEntry
This represents an entry in a Notes Outline.
� NotesReplication
This represents the replication settings of a database.
570 Domino Designer 6: A Developer’s Handbook
� NotesReplicationEntry
This represents the replication setting for a pair of servers in a database. This class is new with Release 6.
� NotesRichTextDocLink
This represents a doclink in a rich text item. This class is new with Release 6.
� NotesRichTextNavigator
This represents a means of navigator in a rich text item. This class is new with Release 6.
� NotesRichTextParagraphStyle
This represents RichText paragraph attributes.
� NotesRichTextRange
This represents elements in a rich text item. This class is new with Release 6.
� NotesRichTextSection
This represents a collabsible section in a rich text item. This class is new with Release 6.
� NotesRichTextTab
This represents RichText tab attributes.
� NotesRichTextTable
This represents a table in a rich text itemsection in a rich text item. This class is new with Release 6.
� NotesSAXAttributeList
This represents the attributes of an element. This class is new with Release 6.
� NotesSAXExeption
This represents information about errors that occur during SAX parsing. This class is new with Release 6.
� NotesSAXParser
This represents XML as a series of events using a SAX parser. This class is new with Release 6.
� NotesViewEntry
This represents a view entry. A view entry represents a row in a view.
� NotesViewEntryCollection
This represents a collection of view entries, selected according to specific criteria.
Chapter 14. Programming for Domino 6 571
� NotesViewNavigator
This represents a view navigator. A view navigator provides access to all, or a subset of, the entries in a view.
� NotesColorObject
This represents a color.
� NotesXMLProcessor
This contains the properties and methods common to all DXL processes. This class is new with Release 6.
� NotesXSLTransformer
This represents the transformation of DXL (Domino XML) through XSLT. This class is new with Release 6.
14.2.3 Object hierarchyThere is a hierarchical relationship for Domino objects. Higher hierarchical objects contain the lower ones. Figure 14-1 on page 573 shows an example of the hierarchical relationship between a few of the Domino objects.
572 Domino Designer 6: A Developer’s Handbook
Figure 14-1 Object hierarchy
Each object has defined members, properties and methods. Using these members, you can access other objects. The relationship of containment and access means that the higher object has the property or the method to access the lower one.
For example, you can see all the views when you open the database. This means that the opened database (object) in the workspace includes the views (object). Furthermore, you can see the documents when you select one of the views. This means that your selected view (object) contains the documents (object).
This hierarchy is important when using Domino objects. NotesSession is the top level object in the Domino Object Model. You can work your way to any Domino object if you start from NotesSession.
14.2.4 Using Domino objects from LotusScriptIn this section, we look at examples of code that use objects in LotusScript.
Chapter 14. Programming for Domino 6 573
Example 1: Getting the text of the subject fieldDim session As New NotesSessionDim db As NotesDatabaseDim view As NotesViewDim doc As NotesDocumentDim item As NotesItemSet db = session.CurrentDatabaseSet view = db.GetView( "Main View" )Set doc = view.GetFirstDocumentSet item = doc.GetFirstItem( "Subject" )Messagebox "Subject of first document in Main View is: " + item.Text ‘ or item.Values(0)
First, we declare the variable session as types of NotesSession object, and New is used to create an instance of that object.
We declare the variables:
� db as type of NotesDatabase � view as type of NotesView � doc as type of NotesDocument � item as type of NotesItem
To get the text of the subject field, we need to follow the hierarchical path from the top to the lower one. In this example, we go from NotesSession object to NotesItem object:
We initialize the variable db with the property CurrentDatabase of the higher level object. We set the object variable view using the GetView method, giving it the name of a view.
The next statements are the same as before: we use the methods GetFirstDocument method to give us the first document from the view, and GetFirstItem to get the subject field from the document. Then we get a handle on the textvalue of the item by printing this to the client using the “Print”-method.
The NotesItem object contains other information about the field besides the value, such as the last modified timestamp of the field. If all you want is the value, you can get it using NotesDocument.GetItemValue method, so you don't need to declare a NotesItem variable.
You can also use the syntax doc.fieldname, which is equivalent to doc.GetItemValue("fieldname"). However, this is slightly less efficient.
574 Domino Designer 6: A Developer’s Handbook
Notice the difference between the Text property of an item, and its Values, which are always returned as an array. Even if the field contains just a single value, its value is returned as an array with one element.
If the field contains numeric or date values, the array elements will be Double or Date/time variants, respectively. A common programming error is to treat the field value as a scalar, for example:
Print "Subject is: " + doc.Subject ' "type mismatch" error on this line.
This results in an error because of the attempt to concatenate a string with an array.
Example 2: Disabling a role for a personDim session As New NotesSessionDim db As NotesDatabaseDim acl As NotesACLDim entry As NotesACLEntrySet db = session.CurrentDatabaseSet acl = db.ACLSet entry = acl.GetEntry("Kari Koski")If Not (entry Is Nothing) Then ' The ACL entry does exist. Call entry.DisableRole("Auditor") Call acl.SaveEnd If
To access the personal access control list (ACL) data for a database, you need to follow the hierarchical path from the top class to the lower one. This example steps from the NotesSession object to the NotesACLEntry object:
The object that you would like to manipulate has methods or properties to handle its own data. The first seven lines of this example are similar to Example 1. The tenth line uses the DisableRole method of the NotesACLEntry object to disable the role [Auditor] for “Kari Koski”.
Example 3: Getting the subject field of all documentsDim db As New NotesDatabase("Server","db.nsf")Dim dc As NotesDocumentCollectionDim doc As NotesDocumentDim item As NotesItemDim subject As StringSet dc = db.AllDocumentsSet doc = dc.GetFirstDocument()
While Not(doc Is Nothing)
Chapter 14. Programming for Domino 6 575
Set item = doc.GetFirstItem("Subject")subject = item.textSet doc = dc.GetNextDocument(doc)
Wend
The earlier two examples start at the NotesSession object, but to access an existing database when you know its server and file name, you can get the database object directly as shown in the first line.
This illustrates a unique feature of writing Notes applications in LotusScript, as opposed to the formula language: you can access any database from within a script, and perform any function upon it.
The following sequence is the same as in the earlier examples. The NotesDatabase object contains the NotesDocumentCollection object, which contains NotesDocument:
We use the AllDocuments property of the NotesDatabase object to get all the documents in the database. Next, we use the GetFirstDocument method of the NotesDocumentCollection object to get the first document in a collection.
We then use the GetNextDocument method of the NotesDocumentCollection object to get the document immediately following the earlier document in a collection. If a document does not exist in a collection, the GetNextDocument method returns Nothing.
Example 4: Obtaining a value from a open documentDim ws As New notesUIWorkspace ' the user's current screenDim uidoc As NotesUIDocumentDim doc As NotesDocumentDim subj As VariantSet uidoc = ws.CurrentDocument ' the form displayed on the current screen.Set doc = uidoc.Document ' the document whose values are displayed in the form.subj = doc.GetItemValue("Subject")' subj now contains a one-element array.Print "Subject: " + subj(0)
Tip: GetNthDocument can also be used to loop through the douments in a collection, but in most cases GetFirstDocument and GetNextDocument are much faster.
576 Domino Designer 6: A Developer’s Handbook
This example obtains a value in the current open document by going to the back-end document and reading information from it. First it gets a handle on the current displayed document on the screen; this is done using the “currentdocument” property of the NotesUIWorkspace.
Then it gets a handle on the back-end version of this document by using the “Document” property of the NotesUIDocument. For more information and understanding of the frond-end and back-end classes, refer to 14.2.5, “Understanding front-end classes and back-end classes” on page 577.
14.2.5 Understanding front-end classes and back-end classesFront-end classes are a hierarchy that begins with the NotesUIWorkspace class, and that includes NotesUIDatabase, NotesUIView, NotesUIDocument and NotesUIScheduler. The UI in the names of these classes indicate their function; they deal with the user interface (whatever the user is seeing on their screen at that moment). These classes can only be used when there is a UI context available; for instance, you cannot use them in a server agent because with a server agent, there is no user and no screen display.
Back-end classes deal with information that is stored in the Notes database, which the user may or may not be viewing at the time. This hierarchy begins with NotesSession; it is pictured, in part, in Figure 14-1 on page 573. These classes may be used in server agents because they do not assume a user and a screen.
There is an interface between front and back end. The front-end classes contain properties that allow you access to the back-end object corresponding to the user's current display.
For instance, if the user is viewing a document, you can use NotesUIWorkspace.CurrentDocument to obtain the NotesUIDocument object that represents the current window. Then, use NotesUIDocument.Document to get the NotesDocument object that represents the document that the current window displays.
The Domino back-end data modelTo understand how to work with documents in the back end, you must know how Domino stores information in those documents.
A document, in Domino, is a container of “items”. The document also has header information that is not stored in items, such as its creation date.
Each item has a name, value, and other properties. Notes reserves some item names for its own use, and you may not (or should not) modify these. These
Chapter 14. Programming for Domino 6 577
items have names that begin with “$” (for example, $UpdatedBy, which contains a list of names of users who have modified the record).
Apart from this system information, the association of items to documents is entirely arbitrary. When working with a document in the back end, you may create any number of items with any names and datatypes you like, subject only to some limits on how much “summary” information may be stored in one document.
In particular, it is not necessary that the item names match the names of fields on a form. When working with a NotesDocument object, the design of the form is totally irrelevant to what you can and cannot do. There need not even be a form; it is quite possible to create a document entirely on the back end, assign values to some items, and save it, without specifying what form would be used to edit the document.
If they do happen to match a field on a form, the datatype of an item need not match the datatype the field has on any form. For instance, you might have a numeric field named “Total” on a form, but this does not prevent you from storing a string in a NotesDocument item named “Total” if you choose—even if the document was originally created using that same form.
That's in theory—in practice, of course, there is generally quite a strong connection between fields on a form and items stored in a document. While you could write a program to change the Total field in all your documents from a number to a text string, it would generally be undesirable to do so.
Actually, the main reason you need to know about this is to avoid creating such inconsistencies accidentally! All too often, developers write back-end code that implicitly assumes that the form will reformat the values they supply. In fact, this will not happen unless the user is editing the document at the time.
Following are examples of this kind of error:
� doc.PublishedDate = publish$ ' - the string is stored as a string, not converted to a date.
� doc.Readers = "[Admin]" ' - creates a plain text field, not a Readers field.� doc.SendTo = "Ralph Jones, Sally Pigeon" ' - the comma-delimited string is
not converted to a multi-value field.� doc.Authors = "Blind Lemon Jefferson/Blues Zone" ' - creates a plain text
field, not an Authors field; also, the name is not stored in canonical form.
Example 14-1 on page 579 shows the corrected code.
578 Domino Designer 6: A Developer’s Handbook
Example 14-1 Manipulating fields in a document with LotusScript
Dim pubDate As NotesDateTime(publish$)Set doc.PublishedDate = pubDate
Dim recipients(0 to 1)recipients(0) = "Ralph Jones"recipients(1) = "Sally Pigeon"doc.SendTo = recipientsDim author = New NotesName("Blind Lemon Jefferson/Blues Zone")
doc.Authors = author.Canonicaldoc.GetFirstItem("Authors").IsAuthors = Truedoc.Form = "PublicationRecord" ' when you create a document in the back end, you must add the Form item if you want it associated with a form (and you usually will!)
Notice that the corrected code is a lot longer than the original erroneous code; that's because it is doing more work. The business of conversion to the correct type, reformatting names, splitting delimited strings into multi-values, and flagging items as Readers or Authors fields, is taken care of automatically when the user edits a document using a form; the Notes client uses definitions of the fields on the form to decide what values should be manipulated in what way to get the document to match the form.
The lazy way to get Notes to do all this work for you is to call the NotesDocument.ComputeWithForm method. This would have fixed all the problems in the preceding code sample. It also, optionally, evaluates field validation formulas, so that you can make sure the document contains only legal values.
The disadvantage is that ComputeWithForm has poor performance compared to writing it yourself. In addition, it does not execute any JavaScript or LotusScript code in the form events, so the results may not be the same as editing the document.
Working with documents in the front eEndSo what happens, exactly, when you open a document in the Notes client? First, Notes decides what form to use to view the document with. There are a few factors affecting this (such as whether the view has a form formula), but in general, the form used will be the one whose name or alias appears in the Form
Chapter 14. Programming for Domino 6 579
item of the document. In the preceding example, the PublicationRecord form would be used.
Think of the form as a “window” on the document. The form contains fields; if the document contains an item with the same name as the field, its value will be displayed there. If the document contains items whose names do not match any on the form, those values are not displayed—but they are still part of the document, so you can use them in the LotusScript back-end objects and in macro code.
The same document might later be viewed with a different form. For an example of this, open a calendar entry in your Notes calendar (choose one that has a description at the end) and select the menu View/Switch Form.... and then select Memo in the dialog. You'll see the same document, but viewed “through the window” of a different form.
The Memo form and the Calendar Entry form both have a Subject and Body field, so you can still see the meeting description that is stored there. But the memo form does not have a field to display the meeting type, location, or start time, so that information is not visible, although it is still stored in the document.
When you recalculate or save a document you are editing, Notes uses the fields and formulas of the form that is open on screen to update the values of the items in the document. Every item whose name matches the name of a field on the form is set to the appropriate datatype, turned into a list if the field is designated as multivalued, and changed to canonical form if the field is of Names, Readers or Authors type. Fields that do not appear on the form are not affected by this, unless there are formulas or event code on the form that changes their values.
The NotesUIDocument properties and methods concern themselves with what users see on the screen. The NotesDocument item values are what will actually be stored in the database when the document is saved. The difference can be most easily shown by keyword fields. Refer to 4.2.3, “Field types” on page 102 for a description of keyword fields; it shows how to specify a different value to be displayed on the screen versus stored in the document.
For example, suppose this is the list of keyword choices for the field RushDelivery:
� Yes|1� No|0
The user will see the choices Yes and No when editing the document, but the value 1 or 0 will actually be stored in the document.
580 Domino Designer 6: A Developer’s Handbook
Therefore, if Yes is selected currently, the following piece of code will output the text : Yes ---> 1. This represents two different ways of looking at the same field.
Dim ws As New NotesUIWorkspaceDim uidoc As NotesUIDocumentDim doc As NotesDocumentSet uidoc = ws.CurrentDocumentSet doc = uidoc.DocumentPrint uidoc.FieldGetText("RushDelivery") + " ---> " + doc.RushDelivery(0)
All field values that you can obtain through the NotesUIDocument are text, regardless of the type of the field. These are the actual characters that are in the field at the moment.
If you refer to the field through the NotesDocument item, you will get a value of the type specified for that field—number, date, or whatever (or to be precise, an array of such values), assuming it was possible to convert the value to the correct type.
Refer to the Notes help for NotesUIDocument.AutoReload property for a discussion of when changes to the back-end document appear on the screen. Also note that rich text fields are handled in a special way, as described in detail in Chapter 15, “Rich text programming” on page 697.
14.2.6 Using Domino objects from JavaYou can also access the Domino back-end objects from Java. This allows you to write parts of your application in Java. The Java program runs on the machine where Domino is installed. For example, Java agents can be written that will manipulate Domino objects
Java agent This example shows an agent that runs on newly created and modified documents since the agent was last run. The program works on the unprocessed documents, prints the form name of each document, and marks each document as processed. The first time the agent runs, the agent returns all of the
Notes:
The Java classes are not a port of the LotusScript classes to Java. Actually the same C++ code is executed, only the syntax of the interface is different.
LotusScript and Java are about equal in terms of performance. Use the one that best suits your application, or you’re that more comfortable with.
Chapter 14. Programming for Domino 6 581
documents in the database. Thereafter, the agent returns those documents that updateProcessedDoc has not touched.
� Create an agent:
– Name the agent.
– Select When should this agent run = Manually from Actions Menu.
– Which documents should it act on = All documents in database.
– Select Java as your source code and write the agent code.
import lotus.domino.*;import java.util.*;
public class myagent extends AgentBase{ public void NotesMain() { try { Session s = getSession(); AgentContext ac = s.getAgentContext(); DocumentCollection dc = ac.getUnprocessedDocuments(); Document doc; int size = dc.getCount(); System.out.println("Count = " + size); doc = dc.getFirstDocument(); while (doc != null) { System.out.println (" *** " + doc.getItemValue("form")); ac.updateProcessedDoc(doc); doc = dc.getNextDocument(doc); } } catch (Exception e) { e.printStackTrace(); } }}
Save it.
14.2.7 Using LS to access Java objects and methodsIn Domino 6, you can use LotusScript to access Java object and methods. For more information on this, refer to 12.6.4, “LotusScript to Java (LS2J)” on page 395.
582 Domino Designer 6: A Developer’s Handbook
14.3 Programming with LotusScriptWhen you program in Domino, you write your LotusScript code to affect Domino objects. Your code is executed by the occurrence of an event to the objects (such as clicking a button, opening a document, closing a document, or entering data in a field). Using the Objects view, you can easily see the events that are available for an object.
For example, you can write a very simple script for an object such as a button, as follows:
Sub Click( Source As Button )MessageBox( "I'm learning LotusScript!" )
End Sub
This script just shows a message box when you click the button.
14.3.1 The Event modelEach programmable object in Domino has a list of associated events that it responds to; for example, a button responds to an event called “Click” that is executed when the user clicks the button.
Another example of this is the “postopen” event of the form, which is triggered when a user displays a document on their screen. The postopen event occurs once all data has been loaded from the back-end database into the form, and just before it is displayed to the user.
In the following section, we show how to use the postopen event.
Example - using the OnLoad eventThis example adds an action to the Form (document) object and uses the OnLoad event.
1. After you have created a blank database, open it in Design mode.
2. Select the form design view and click New Form. The new form is displayed.
3. At the cursor blinking position, enter: CREATOR.
4. Choose Create -> Field. The InfoBox used to set the properties of a field appears; see Figure 14-2 on page 584.
Note: Try the following example by creating a temporary database based on the Blank template, so as not to corrupt any existing databases.
Chapter 14. Programming for Domino 6 583
Figure 14-2 Creator field in Domino Designer
5. Enter: Creator in the Name: field of the InfoBox and close the box.
6. Go to the Untitled (Form) in the Objects view.
7. Choose the OnLoadevent.
8. Edit the LotusScript so that it looks exactly like the following:
Sub Onload(Source As Notesuidocument)Dim session As New NotesSessionIf source.EditMode Then Call source.FieldSetText("Creator", session.CommonUserName)End If
End Sub
9. Choose File -> Save.
10.Enter: LotusScript1 as the form name and click OK.
Note: In Domino R5, you could use PostOpen event, but PostOpen event use is discouraged in Domino 6. Use onLoad- Client instead.
584 Domino Designer 6: A Developer’s Handbook
Running the exampleThere are two options to test the form; you can do either.
1. Click Design -> Preview in Notes (or click the icon Notes Preview).
Domino opens the current form and shows its contents.
Alternatively, you can:
2. Use the Notes client to open the database to which you added the script.
� Choose Create -> LotusScript1.
The new form LotusScript1 appears and your name is set in the creator field.
This script runs after the user opens the document. If the document is new, the Creator field is set to the name of the creator; see Figure 14-3. You can select any events mentioned earlier and write a script. For example, you can select the QuerySave event to check whether or not every field has a value entered in it before the document is saved.
Figure 14-3 Creator field in Domino 6 Client
14.3.2 Event type and sequenceIn the following sections, we describe the events for some of the objects in Domino.
Note: This only lets you run the form you are working on. If you want to test the whole application, it is better to open the current database.
Chapter 14. Programming for Domino 6 585
Field objectThe Field object has the following events where you can write LotusScript. Other events are available for JavaScript or Formula:
� (Options) (provided area for LotusScript options)� (Declarations) (declare all global variables and constants)
� Initialize (when it is being loaded)� Entering (when the cursor is moved to the field in edit mode)� Exiting (when the cursor is moved out of the field edit mode)� erminate (when it is being closed)
Example - add action to Field object and use ExitingWe will now add an action to a Field object and use the Exiting event.
1. Select the database and then the Form design view. Click New Form in the programming view. The form design window is opened and the cursor is blinking at the top left-hand side.
2. Enter Last name: at the cursor blinking position.
3. Choose Create -> Field. The InfoBox appears.
4. Enter LastName in the Name: field of the InfoBox.
5. Create one more field. You don’t need to change the name in the InfoBox — you can leave it as Untitled. When we go to this field later, we will exit from the LastName field, which will cause the exiting event to occur. In this example, the field name is FirstName.
6. Choose Last name(Field) from the Objects view and choose Exiting event.
7. Edit the LotusScript so that it looks exactly like this:
Sub Exiting( Source As Field )Dim ws As New NotesUIWorkspaceDim uidoc As NotesUIDocumentSet uidoc = ws.CurrentDocumentLastName = uidoc.FieldGetText("LastName")If LastName = "" Then
While LastName = ""LastName = Inputbox("Enter Last name")
Note: In the preceding two events, you cannot write executable LotusScript statements.
Note: Try the following example by creating a temporary database so you do not corrupt any existing databases.
586 Domino Designer 6: A Developer’s Handbook
WendCall uidoc.FieldSetText("LastName", LastName)
End IfEnd Sub
Figure 14-4 Example LotusSript2
8. Choose File -> Save. Enter LotusScript2 as the form name and click OK.
Running the example 1. Select the database to which you added the script.
2. Choose Create - LotusScript2. The new form LotusScript2 appears.
3. Select the second field without entering any data. A message box appears which asks you to enter Last name.
This script runs when the user exits from the Last name field. The script makes sure that the user enters a last name.
Chapter 14. Programming for Domino 6 587
Button objectThe Button object has the following events:
� (Options) (provided area for LotusScript options)� (Declarations) (declare all global variables)
� Initialize (when the form is being loaded)� Click (when it is selected)� ObjectExecute (see the following note)
� Terminate (when the form is being closed)
Example - add action to Button object and use ClickWe will now add an action to a Button object and use the Click event.
1. Select the database and then the Form design view and click New Form. The form design window is opened and the cursor is blinking at the top left-hand side.
2. Enter CHARACTER: at the cursor blinking position.
3. Choose Create -> Field. The InfoBox appears.
4. Enter Character in the Name field in InfoBox.
5. Set the cursor position just to the right side of the Character field.
6. Choose Create -> Hotspot -> Button. A button is placed on the form, and the InfoBox for the button appears.
7. Inside the InfoBox, enter Clear in the Button label.
Note: In the preceding two events, you cannot write executable LotusScript statements.
Note: The ObjectExecute event is primarily used in external applications, and should not be used in the Notes environment.
Note: Try the following example by creating a temporary database so as not to corrupt any existing databases.
588 Domino Designer 6: A Developer’s Handbook
Figure 14-5 LotusScript 3
8. Choose Clear (Button) from the Objects view.
9. Edit the sub so that it looks exactly like this:
Sub Click(Source As Button ) Dim ws As New NotesUIWorkspace Dim uidoc As NotesUIDocument Set uidoc = ws.CurrentDocument If ( uidoc.FieldGetText( "Character" ) <> "" ) Then Call uidoc.FieldClear("Character") End IfEnd Sub
10.Choose File -> Save. You are asked to specify a form name for the new form.
11.Enter LotusScript3 as the form name and click OK.
Chapter 14. Programming for Domino 6 589
Running the example1. Select Design - Preview in Notes. The new form LotusScript3 appears.
2. Enter some characters in the field, then click Clear. The characters you entered are cleared.
14.3.3 Action objectThe Action object has the following events:
� (Options) (provided area for LotusScript options)
� (Declarations) (declare all global variables)
� Initialize (when it is being loaded)
� Click (when it is selected)
� ObjectExecute (see the following note)
� Terminate (when it is being closed)
14.3.4 Using LotusScript in Web applicationsDomino also allows you to run your LotusScript code in Web applications, but there are a few limitations. Usually you use LotusScript to develop agents which you will call from the WebQueryOpen and WebQueryClose events.
Note: LotusScript agents can only run on the Domino server, not within the Web browser.
14.3.5 How scripts and formulas are executedIf your application contains a combination of LotusScript and the formula language, it is useful to know the order in which the events and formulas in a form are executed.
Note: In the preceding two events, you cannot write executable LotusScript statements.
Note: The ObjectExecute event is primarily used in external applications, and should not be used in the Notes environment.
590 Domino Designer 6: A Developer’s Handbook
The following example lists the order in which LotusScript events and Domino formulas in a single forms design are executed, during a number of activities. The list was generated by embedding message box commands or @prompt formulas into all the possible events and formulas on a test form containing different field types.
The test form does not include all the possible field types or evaluation combinations. By studying the results in this example, however, you will be able to understand the order of execution in the forms of your own application.
The test form contains five fields from top to bottom, in the following order:
� Subject - Editable/Text Field - (with Default Value, Input Translation and Input Validation Formulas).
� From - Computed When Composed/ Authors Name Field - (with Value Formula).
� Counter - Computed/Number Field - (with Value Formula).
� DisplayNum - Computed For Display/Number Field - (with Value Formula).
� Body - Editable/RTF Field - (with Default Value Formula).
In Table 14-1 through Table 14-9 on page 594, we list different activities (such as composing a document, saving a document and so on), and the order in which LotusScript events and Domino formulas are executed for each activity.
Table 14-1 Composing a document
Object Formula or Event
Form Initialize Event
Form Window Title
Form Query Open Event/WebQuery Open Event
Subject Field Default Value Formula
Subject Field Initialize Event
From Field Value Formula
From Field Initialize Event
Counter Field Value Formula
Counter Field Initialize Event
DisplayNum Field Value Formula
DisplayNum Field Initialize Event
Chapter 14. Programming for Domino 6 591
Table 14-2 Saving a Document Using @Command([FileSave]) or File - Save
Table 14-3 Closing the Window using @Command([FileCloseWindow]) or File - Close
Table 14-4 Reopening the Document in Read Mode
Body Field Value Formula
Body Field Initialize Event
Subject Field Entering Event
Form PostOpen Event
Object Formula or Event
Form QuerySave Event
Subject Field Input Translation Formula
Counter Field Value Formula
DisplayNum Field Value Formula
Subject Field Input Validation Formula
Object Formula or Event
Form QueryClose Event / WebQuery Close Event
Form Terminate Event
Subject Field Terminate Event
From Field Terminate Event
Counter Field Terminate Event
DisplayNum Field Terminate Event
Subject Field Terminate Event
Object Formula or Event
Form Initialize Event
Form Window Title Formula
592 Domino Designer 6: A Developer’s Handbook
Table 14-5 Toggling from Read Mode to Edit Mode with Document Open
Table 14-6 Toggling from Edit Mode to Read Mode with Document Open (No Changes)
Table 14-7 Toggling from Edit Mode to Read Mode with Document Open (Saving Changes)
Form Query Open Event / WebQuery Open Event
Subject Field Initialize Event
From Field Initialize Event
Counter Field Initialize Event
DisplayNum Field Value Formula
DisplayNum Field Initialize Event
Body Field Initialize Event
Form PostOpen Event
Object Formula or Event
Form QueryModeChange Event
Subject Field Entering Event (depends on cursor)
Form PostModeChange Event
Object Formula or Event
Form QueryModeChange Event
Form PostModeChange Event
Object Formula or Event
Form QueryModeChange Event
Same sequence as for saving a document
Form PostModeChange Event
Form QueryClose Event / WebQueryClose Event
Chapter 14. Programming for Domino 6 593
Table 14-8 Moving Cursor From One Editable Field to Another
Table 14-9 Refreshing Fields While in Edit Mode (F9)
Sequence of events in a complex exampleFigure 14-16 on page 615 illustrates the sequence of events in a form which contains a subform.
Same sequence as for closing a document
Same sequence as for reopening a document in read mode
Object Formula or Event
First field Exiting Event
Second field Entering Event
Object Formula or Event
Subject Field Input Translation formula
Counter Field Value Formula
DisplayNum Field Value Formula
Subject Field Input Validation Formula
Form PostRecalc Event
594 Domino Designer 6: A Developer’s Handbook
Figure 14-6 Sequence of events
Following is the sequence of events when the document is opened:
1. Initialize of Globals
2. Initialize of Form
3. Queryopen of Form
4. Initialize of Field1 (contained in Form)
5. Initialize of Subform
6. Queryopen of Subform
7. Initialize of Field2 (contained in Subform)
8. Entering of Field1
9. Postopen of Form
10.Postopen of Subform
Chapter 14. Programming for Domino 6 595
Following is the sequence of events when the document is closed:
1. Queryclose Form
2. Queryclose Subform
3. Terminate Form
4. Terminate Field1
5. Terminate Subform
6. Terminate Field2
7. Terminate Globals
14.4 LotusScript programming tips and considerationsThe following section will give you some help in structuring your LotusScript code for event programming within Domino.
14.4.1 General suggestionsDo any or all of the following to improve your scripts:
� Declare all variables in the global definitions for an object and use the Option Public statement. Next, instantiate the variables in the PostOpen event or in a subroutine that you can call from either the QueryOpen event (for an existing document), or the PostOpen event (for a new document). Your variables will be easier to find and maintain, and you’ll be able to use them in any script for the object.
� It is recommended that you use Option Explicit or Option Declare to make certain that you have declared all variables used in your application. Domino 6 has a new feature to ensure that this always is included; refer to 12.6.5, “Automatically add Option Declare” on page 397.
� Store subroutines and functions in the global definitions for a form or navigator. Then you can use the subroutines or functions with any object on the form or navigator.
� To reuse a segment of script in multiple scripts, put the segment into a function or subroutine or use script libraries (refer to 14.4.4, “Using script libraries” on page 600 for more information on script libraries).
� Avoid too many nested levels of parenthesis in a single statement.
� Modularize your code so that each subroutine or function accomplished a single task that you can describe in a few words. Modules should not be overly long - 40 lines is getting long.
596 Domino Designer 6: A Developer’s Handbook
� To debug a script that runs on a shared field, insert the field into a temporary form so that you’ll have a place from which to run the debugger.
For complete information on LotusScript, see the online Lotus Notes Help information or the Programmer’s Guide.
14.4.2 Use consistent variable namesThe Domino templates use a set of standard variable names, as shown in Table 14-10. For example, in the Domino templates, the variable note always refers to the current back-end document.
Table 14-10 Standard variable names
Class name Object variable
Comments
NotesSession session
NotesDatabase db
NotesView view
NotesViewColumn column
NotesDocument note Refers to the data associated with the current document.
parent The parent of the current document.
child A child of the current document.
profile A profile document from which you are retrieving processing parameters.
NotesItem item
NotesRichTextItem rtitem
NotesEmbeddedObject embobj
NotesDocumentCollection documents
responses Use if you are working within one collection of responses to the current document.
children An alternative to using the variable name responses. Use if you’re using child as the NotesDocument object variable.
Chapter 14. Programming for Domino 6 597
Using these names in your own scripts makes them easy to read and understand, keeps them consistent, helps you maintain them more easily, and may help to share the code with other developers.
Consider using all lowercase letters for object variables, and a combination of lowercase and uppercase (for example, VariableName) for other variables.
When passing values to a subroutine or function, use the same variable names in the called routine as in the calling routine. For example, don’t call something StatusNumber in one and StatNo in the other. Consistent naming ensures that others can easily read and understand the script.
Note: This approach should not, however, be used as a general rule. If a module does its job of making some code generally available from different locations, it is likely that it will not be called with the same arguments from each, so the parameters cannot match all of the arguments. The parameter names should contribute to the understanding of that module (for example, use “sourceDoc” and “destDoc”, instead of necessarily trying to match the names of the calling arguments).
14.4.3 Reserved fieldsThere are reserved fields in Domino that you can use to automatically add functionality that you would otherwise need to program yourself.
NotesDateTime date1, date2, …
Consider using for comparing dates.
NotesAcl acl
NotesAclEntry aclentry
NotesAgent agent
NotesDbDirectory dbdir
NotesLog log
NotesUiWorkSpace ws
NotesUiDocument source Already an argument to the form events — using this name keeps your scripts consistent.
uidoc To use, set uidoc = source in PostOpen. Then you can use this object variable in field and action scripts in the form.
598 Domino Designer 6: A Developer’s Handbook
Table 14-11 lists all the reserved fields for mailing documents.
Table 14-11 Reserved fields for mailing documents
Table 14-12 lists all reserved fields for general use.
Table 14-12 Reserved fields for general use
ExampleWhen a document with its contents changed is being closed, a dialog box is presented to the user, asking whether the changes should be saved or not.
Reserved field name Description
MailOptions Gives users the option of mailing a document.
Sign Sign creator’s name to prevent tampering.
SaveOptions Controls whether documents are saved when closed.
Encrypt Encrypts mail.
SendTo Sends mail to users listed in field.
CopyTo Sends copy to users listed in field.
BlindCopyTo Send blind copy to users which are listed in field.
DeliveryPriority Delivers mail high, medium, or low priority.
DeliveryReport Returns a report when mail is delivered to recipient.
ReturnReceipt Returns a receipt when recipient reads mail.
MailFormat Routes mail via cc:Mail.
Note: The mail fields items, from SendTo to the bottom of the list, have special meaning only if the document is actually mailed—the mere presence of a SendTo field does not cause mail to be sent.
Reserved field name Description
Categories Categorizes documents.
$VersionOpt Controls version tracking for documents.
FolderOptions Puts new documents in folders.
SecretEncryptionKeys Encrypts documents with secret, rather than public, encryption keys.
Chapter 14. Programming for Domino 6 599
Setting SaveOptions to “0” before closing the document prevents the dialog from being displayed. Thus, the document is closed with all changes discarded.
14.4.4 Using script librariesA script library is a place where you can store code segments that you want to use from other scriptable objects. You may code options, declarations, an initialize subroutine, a terminate subroutine, and user scripts.
To create a new Script Library, choose the Shared Code - Script Library design view in Domino Designer and click New LotusScript Library. The new LotusScript Library is created.
You can write the code inside the initialize and terminate subroutine, or you can create your own subroutines. This code is not usually routines itself, but you define additional functionality and call these from outside the library.
To create your own subroutines, write a statement such as Function or Sub outside of an existing script. The editor automatically creates a new script and transfers your code there.
Figure 14-7 shows the Discussion Routines script library in the Discussion database, which contains GetDbPath and InstatiateObjects subroutines.
Figure 14-7 Discussion Routines script library
To incorporate a script library into a scriptable object, enter a Use statement in the (Options) script for the object or for the (Globals) object.
600 Domino Designer 6: A Developer’s Handbook
You can see how script libraries are used in the TeamRoom database by opening the SendReminder agent:
Use "DiscussionRoutines"
The name is not case-sensitive and should not contain spaces. Specify the name as a character literal or named constant.
Figure 14-8 shows how the SendReminder agent (ReminderDoneMsg subroutine) uses the GetDBPath routine of the DiscussionRoutines script library:
Figure 14-8 Calling the script library in the agent
The code in the (Options), (Declarations), Initialize, and Terminate scripts of the library becomes available as though it were in the current object’s corresponding scripts. User scripts in the library become available as though they were in the current object.
Tip: When doing object-oriented coding, a script library is a great place to define a class or set of related classes. Class definitions go into the (Declarations) section.
Chapter 14. Programming for Domino 6 601
14.4.5 Using the Template databaseWhen you are developing a Domino application, you usually use much of the same code that you have used before for performing standard procedures. Many different applications contain the same procedures (for example, removing extra spaces in a field, creating a chart in the field, and so on).
For this reason, it is very useful to use the Template databases to store the most commonly used LotusScript, Java Script and Java code, actions and buttons, and other functions. This is better than using cut and paste because if you need to change the code (for example, to add new LotusScript code to manipulate a field), then you only need to add the code in one place, and the updated code will be used in each application that references it.
Figure 14-9 illustrates this process diagramatically.
Figure 14-9 Template database
Let’s discuss this diagram in more detail:
1. The Template database contains commonly used code, actions, shared fields, and so on. Sub ExtraSpaces is a Script Library code segment that removes all extra spaces in the current field.
602 Domino Designer 6: A Developer’s Handbook
2. The ExtraSpaces class is used in three databases, and it is copied to each database.
3. The ExtraSpaces Script Library is now stored in each database.
Updating the ExtraSpaces subroutineWhen you want to update elements or code segments, you only need to make changes in the Template databases. For our example, you need to add code into the ExtraSpaces Script Library.
1. Open the Template database and go to the ExtraSpaces code segment.
2. Make the required changes and save the ExtraSpaces Script Library.
3. If you have selected the Inherit options, and Database1, Database2, and Database3 are on the same server as the Template database, then Domino automatically runs the inherit program.
The server will refresh the databases overnight. (You can also run the refresh commands manually by selecting the database that you want to refresh and then selecting File -> Database -> Refresh Design).
4. After the refresh, then Database1, Database2, and Database3 will have the new updated version of the ExtraSpaces Script Library.
14.4.6 Catching errors at compile timeSpecifying Option Declare or Option Explicit in the (Options) event of the object forces you to declare variables explicitly. With this option in effect, any undeclared variables will be flagged during compile time. This is useful if you design large applications, and it avoids having to search for typing errors.
14.4.7 Improving form performanceA form that performs well is one that Domino can calculate quickly for display, so that documents created with the form are more likely to open quickly.
To improve form performance, do any or all of the following:
� Avoid overusing hide-when formulas on forms. Each formula that Domino must calculate when opening a form slows the application down.
Note: When you use the copy and paste options, Domino automatically asks if you want to inherit the changes from the Template database when the ExtraSpaces Script Library changes.
Chapter 14. Programming for Domino 6 603
Before you use a hide-when formula, try using a computed subform or a hide-when condition, such as “Hide when editing” or “Hide when reading.”
� If you must use hide-when formulas to hide buttons on an Action bar, use @Command([RefreshHideFormulas]) or the LotusScript RefreshHideFormulas method in the NotesUIDocument in the action formulas or scripts to force calculation of the hide-when formulas.
This closely correlates the appearance of different buttons with users’ button clicks, and allows each calculation to occur only when needed. In other words, if you only recalculate hide formulas, use this instead of a general refresh.
� If a form has keyword fields (for example, in a layout region), and you want formulas to calculate based on changes in those fields (for example, hide-when formulas that progressively disclose items in the layout region) select the “Refresh fields on keyword change” field option instead of the “Auto refresh fields” form option.
Domino performs more calculations when “Auto refresh fields” is enabled; for example, it refreshes all formulas every time a user moves between fields, instead of just when values in keyword fields change.
� Remove infrequently used items from a form (for example, redesign your application to display infrequently used items in a dialog box).
� Consider limiting, or eliminating entirely, the use of shared fields or subforms on any form that must open quickly.
� Minimize the number of fields per form, because each field is calculated when a document is opened, refreshed, or saved.
� Consider putting field formulas into form events rather than into the fields themselves, so that you can more easily control which formulas are calculated at each event. Avoid using hidden fields for processing events (unless required).
� Avoid using too many DbLookups in your keyword fields. Avoid using @UserRoles multiple times, or @Dbfunctions and @UserNameList.
If your application was created in Release 3.x, it may include forms with hidden fields containing formulas that process a document when it is opened or saved. To improve the performance of the application, convert the formulas to LotusScript, and use the PostOpen and QuerySave form events.
Tip: For consecutive multiple paragraphs that use the same hide/when formula, calculate the formula just onc, for efficiency.
604 Domino Designer 6: A Developer’s Handbook
14.4.8 When to use formulas and LotusScriptGenerally speaking, the best language to use is one that accomplishes a task with the least programming. While there are differences in performance that may affect your choice of programming language, in most cases such differences are minor compared to the cost of developer’s time in creating and maintaining the application.
From this standpoint, macro language is ideally suited most operations on the current document. Since the document context is assumed, you do not have to write code to locate the current document, and @functions automatically handle the Notes native data types (for instance, to work with a date value, you do not need a special NotesDateTime object). Macro language is also a good choice for making simple changes to existing documents in a single database.
Use LotusScript for more complex document changes, for tasks involving changes to multiple databases, for creating new documents from scratch, or, broadly speaking, if you can’t find a way to do what you want with macro language.
In general, formulas are best used for working within the object that the user is currently processing (for example, to return a default value to a field or to determine selection criteria for a view). Scripts are best used for accessing existing objects (for example, to change a value in one document based on values in other documents). Scripts provide capabilities that formulas do not, such as the ability to manipulate RichText fields. However, formulas provide better performance in some situations, and may be more convenient for simple applications.
When you’re ready to use both, deciding whether to use LotusScript or the Domino formula language for a given task usually depends on the complexity of the task. Consider these questions when making your decision:
Do you need to process a quantity of data?A formula that “touches” many databases or documents using @functions must rely on the Notes user interface to access each document, whereas LotusScript accesses the documents more efficiently and quickly.
For example, LotusScript is a good tool for creating an agent that scans all the databases on your workspace and returns information such as size of database, percent used, number of documents, and so on. LotusScript is also a good tool for running a full-text search on multiple documents and performing an action with the results of the search.
Chapter 14. Programming for Domino 6 605
Are you using Domino object model front-end or back-end classes?Domino object model (front-end classes) use the same Domino code as their equivalent @commands, so LotusScript will not perform better than the formula language when you use these classes. The database (back-end) classes, however, use different code, and perform more quickly than the equivalent @functions.
For example, avoid using the front-end class NotesUIDocument to perform many field updates. The back-end class NotesDocument is much faster, and allows you to assign data types (including rich text) and to add new (hidden) fields. The front-end class allows you to update only fields that already exist on the form, and it allows you to insert only text in the field, as @Command([EditInsertText]) does.
In addition, front-end classes will not work in scheduled agents run by a server; they work only in agents run from a user’s workstation (for example, from the menu).
Do you need to manipulate the currently selected object?Use the formula language, instead of LotusScript.
Do you need to program buttons on an Action bar?Consider using the formula language instead of LotusScript. Button actions are usually simple and perform tasks usually accomplished directly through the Notes user interface, such as saving or closing a document.
Do you need to return the default value to a field?Use the formula language, instead of LotusScript.
Do you need to return the title of a window?Use the formula language, instead of LotusScript.
Do you need to control a work flow process from a form?LotusScript works best for controlling workflow with form events (especially the QuerySave or onSubmit event, which is preferred in Domino 6) because it can handle the more complex tasks you may want to accomplish, such as looping and setting multiple variables.
For example, you can require a user to fill out fields on a form in a predetermined order by manipulating enter and exit field events, or you can prevent a user from opening, saving, or editing a form until certain conditions are met.
Are you including too many @functions in one formula?If a formula includes many @functions in sequence, try changing the formula to LotusScript. However, formulas that need only a single @function, such as
606 Domino Designer 6: A Developer’s Handbook
@Command[FilePrint], are more efficient and perform better than scripts that do the same thing.
14.4.9 Using Evaluate to combine LotusScript and formulas
Use the Evaluate function in LotusScript to combine pieces of formula language with LotusScript. This allows you to make your scripts leaner wherever @functions do something in fewer lines than LotusScript does. Keep in mind that including formulas in scripts may make the scripts easier to write, but will not necessarily improve performance.
You can use Evaluate to include any @functions except the ones that directly interact with the Notes user interface (such as @Prompt, @DialogBox, @PickList, and @Command). Several particularly useful @functions to combine with LotusScript are:
� @Name, which lets you manipulate hierarchical names� @Replace, which pulls a value from a text list without requiring the looping
that LotusScript would demand� @Unique, which removes duplicates from a text list� @Subset, which reads the list from left to right
You can also combine LotusScript and formulas in an application by using them in different parts of the same form.
The Evaluate function in LotusScriptThe Evaluate function executes a LotusScript formula.
Syntax:
Evaluate(macro [, object])
Elements:
� macro
(Mandatory) This is a string expression specifying the text of the Notes macro, in the syntax that Domino recognizes. Refer to Domino documentation for the correct syntax of the macro.
� object
Note: If the macro text is in a constant or string literal, Domino needs to do only initial processing of the macro once at compile time, while variable strings incur that processing each time the Evaluate function is called.
Chapter 14. Programming for Domino 6 607
(Optional) This is a NotesDocument that provides the context for evaluation of the formula. If the formula uses a field name, it is referring to the field in this document. Other Lotus products that support LotusScript (for example, 1-2-3) use a different object type here.
Example:
result = Evaluate("@Sum(Numlist)", doc)
or
Const NotesMacro$ = "@Sum(NumList)" result = Evaluate(NotesMacro$, doc)
Return valueThe Evaluate function returns a Variant array. The datatype of the array elements depends on the type of the formula return value. If the return value is a list, each array element contains one list value. If the formula returns a single value, the array will contain that value at element 0.
Sample codeThis script runs when the user exits from the Subject field and changes the characters to proper case:
Sub Exiting (Source As Field)Dim ws As New NotesUIWorkspaceDim uidoc As NotesUIDocumentDim doc As NotesDocumentDim eval As VariantSet uidoc = ws.CurrentDocumentSet doc = uidoc.Documenteval = Evaluate( "@ProperCase(Subject))", doc)Call doc.ReplaceItemValue("Subject", eval)
End Sub
In this example, we use the Evaluate function to get @ProperCase carried out. Parameters to the Evaluate function are the string containing the @function and the field name, as well as the object that contains the field.
Note: If the formula returns an error result, this is returned as a scalar value; not an array. Use IsArray to detect this, or use @IsError in the formula to prevent returning an error result.
608 Domino Designer 6: A Developer’s Handbook
14.4.10 Making field value changes effectiveYou can use the Refresh method of the NotesUIDocument class to make changes effective on a document that is in edit mode. (This has the same effect as using View/Refresh on the Lotus Notes user interface.)
When you modify ReplaceItemValue or remove RemoveItem fields in a document in your LotusScript program, you need to use the Reload method of the NotesUIDocument class to make the changes effective in the Lotus Notes user interface. The following statements are examples to show the Reload method.
Postopen(Source As Notesuidocument) note.RemoveItem("Action") note.RemoveItem("SaveOptions") note.ReplaceItemValue("Action","Approve") source.Reload .....
source.AutoReload = False
Figure 14-10 Field value change
14.4.11 Using validation formulas and QuerySave/onSubmitIf you are using Input Translation and Input Validation formulas along with QuerySave (or onSubmit), be sure to do a refresh (source.Refresh) at the
Tip: Since in the above example, the variable uidoc is only used to get the object of the next lower class, you may also write Set doc=ws.CurrentDocument.Document to initialize variable doc.
Note: You usually add the following statement at the initialization stage of your program to improve performance, as it prevents the screen from refreshing each time you update a field. Remember to manually invoke the Reload method in your programs when you use this statement.
Chapter 14. Programming for Domino 6 609
beginning of the script for the QuerySave event. Why? Because the QuerySave (or onSubmit) event occurs before Notes refreshes the document when saving.
Figure 14-11 shows the field FirstName with a field validation formula.
Figure 14-11 Field translation
You want QuerySave (or onSubmit) to have the properly validated data to process (for example, you do not want QuerySave (or onSubmit) to process an empty field, because a validation formula that would have flagged the field as empty has not yet run).
Refer to Figure 14-15 on page 612; if this code was run—with the field translation shown in Figure 14-11—it would end up in a messagebox, as shown in Figure 14-12.
Figure 14-12 onSubmit messagebox - without translated data
As we can see, the messagebox, or the onSubmit event code, does not have the translated data, because the code checks exactly what is in the NotesUIDocument at runtime.
610 Domino Designer 6: A Developer’s Handbook
The NotesUIDocument and the field FirstName has not been refreshed, and will still be in lowercase, even though the uppercase function in the Input Translation has run.
To get around this, we need to change the code in the onSubmit (QuerySave) event, as shown in Figure 14-13.
Figure 14-13 Refreshing the NotesUIDocument before running rest of code
By using the Refresh method of the NotesUIDocument, the rest of the code will now work on translated data. It will reflect that the field value in fact has been translated by the Input Translation formula; the result is shown in Figure 14-14.
Figure 14-14 NotesUIDocument is refreshed - shows accurate data
Chapter 14. Programming for Domino 6 611
Figure 14-15 onSubmit on the form
14.4.12 Error handlingIdeally, you would not need to write anything to handle run-time errors; however, some errors may occur at run-time, such as running out of disk space or dividing by zero, causing the script to stop unexpectedly. To avoid this situation, you can include error-handling procedures in your script.
Using On Error and Resume statementsBy using On Error and Resume statements in your script, you can handle run-time errors that may occur. These statements are built-in functions provided by LotusScript.
The script needs the following steps to handle the error:
1. Trap the error using an On Error statement and specify where to go to handle the error.
For example, if the error occurs, you can go to the label ERRORPROC:
Dim x As Integer, y As Integer, z As Integer x = 3 y = 0 On Error GoTo ERRORPROC z = x/y Exit SubERRORPROC:
2. Script the error-handling process. For example, at the ERRORPROC: label:
612 Domino Designer 6: A Developer’s Handbook
ERRORPROC: MessageBox("Divide error") y = CInt( InputBox("Enter new number") )
3. Complete the error-handling process by using a Resume statement to go back to the statement where the error occurred:
Dim x As Integer, y As Integer, z As Integer x = 3 y = 0 On Error GoTo ERRORPROC z = x/y Exit SubERRORPROC: MessageBox("Divide error") y = CInt( InputBox("Enter new number") ) Resume
Creating an error handler for debuggingIt is useful to have an error handler to help debug your programs, as the LotusScript debugger ends when errors occur. To prevent this from happening, you can create an error handler like this:
Be aware of the “Resume Next” statement, and how it works. “Resume Next” specifies that program execution continues with the next statement after the statement that generates the error. This might cause loops if not handled with care and caution. Make sure that your error handler handles and avoids possible loops.
While you are writing scripts, you will often find errors that require fixing. Domino recognizes two kinds of LotusScript errors: compile errors and run-time errors. Let’s discuss these in more detail.
Note: If you include the constant definition file (%Include “LSCONST.LSS”, you can use constant symbols (MB_OK, MB_ICONINFORMATION and so on), instead of values 0 and 64 in the Message box statement.
Chapter 14. Programming for Domino 6 613
Compile errorsCompilation of your script takes place when you save it. Since Domino will not allow you to save a script with compile errors, if compile errors are reported, then the script will not be saved. Therefore, you will need to correct all compile errors first.
Run-time errorsA run-time error is an error that cannot be detected during compilation. Run-time errors are found while Domino is running the script, causing the program to stop. The script may have the correct syntax, but certain operations may not be allowed; for example, as the following run-time error shows, division by zero is not allowed:
Dim x As IntegerDim y As IntegerDim z As Integerx = 5y = 0z = x / y
During execution of this code, LotusScript will stop and issue an error message because dividing 5 by 0 is not a valid operation.
Logical errorsThere is yet another error type, which is a logical error. With logical errors, you may be able to run your script without errors, but the result is not as intended.
The Debugger helps you to detect run-time errors and logical errors.
14.4.13 Enabling the DebuggerIt is easy to enable debug mode. Before running your script, do the following:
1. Choose File -> Tools >- Debug LotusScript.
2. To check if the Debugger is enabled, choose File -> Tools. If the Debugger is on, a checkmark will show next to the menu option; refer to Figure 14-16 on page 615.
614 Domino Designer 6: A Developer’s Handbook
Figure 14-16 Starting the LotusScript Debugger
If you click the Debug LotusScript menu again, debug mode is disabled.
If the Debugger is enabled when you start running any LotusScript, the Debugger is launched and the script stops at the first line; see Figure 14-17 on page 616.
Chapter 14. Programming for Domino 6 615
Figure 14-17 LotusScript Debugger
In this example, the script is in interrupt mode.
Debug modeWhen you run a script in debug mode, the script shows one of three states:
� When a script is interrupted at a breakpoint, the Debugger has control.
� When a script is stepping, control passes to the script and then back to the Debugger after a single statement in the script is performed.
� When a script is continuing, it runs uninterrupted until a breakpoint or the end of the code is reached, or until a Stop statement is encountered or an unhandled error event occurs.
Interrupt modeWhile the script is in interrupt mode, you can do one of the following:
� Inspect the script.� Inspect the value of variables and properties.� Control which is the next statement that will be performed.� Inspect other defined objects, events and the scripts related to them.
616 Domino Designer 6: A Developer’s Handbook
You can control which statement is the next to be performed in interrupt mode by clicking the following options:
� Continue - to continue until a break point is reached
� Step Into - to perform the current statement and step to the next statement
� Step Over - to perform the current statement and step to the next statement, stepping over the subprogram if the current statement calls a subprogram
� Step Exit - to continue executing the current subprogram and stop in the subprogram that called it at the line following the call
Making breakpointsIf you find a run-time or logical error, inspect your script and make breakpoints at the statement (or around it) where you suspect the error is occurring. You can then run your script, and it will stop at the breakpoint. In interrupt mode, you can inspect the value of important variables and properties.
One-step executionDuring one-step execution, only the current statement is performed before the code is stopped. You can then inspect the values of variables or properties before and after performing the statement.
Variable inspection1. Click the Variables tab in the bottom pane to access the variables window.
The variables defined for the procedure appear in a three-column display, showing the name, data type, and value of each variable.
2. To view array or type members, click the plus sign (+) to the left of the variable name.
Using the Debugger - a simple exampleHere we illustrate the use of the Debugger on the database we used earlier as an example for the PostOpen event. Follow these steps:
2. Open the database and create a new document. The Debugger window will be displayed; see Figure 14-18 on page 618. The execution of the script stops at the first statement.
Chapter 14. Programming for Domino 6 617
Figure 14-18 Debugger window
The script added to the form object has been launched by the Postopen event, and the execution stops at the marked sentence.
Now, go through the debugger.
3. Double-click or click the statement Call Source.FieldSetText.… and press F9 in the upper pane. This creates a breakpoint.
4. Click the Variables tab. In this pane, you can see the values of your variables.
5. Click the + symbol next to Source in the bottom pane. You can see the properties of the Source instance, which is of type NotesUIDocument. This class represents the document that is currently open in the Notes workspace.
6. You can see that the variable session does not yet have values.
7. Click the Continue action button.
Figure 14-19 Stop in breakpoint
8. The script runs and stops at the breakpoint that you made, as shown in Figure 14-19. The session variable now has a value.
Note: For objects containing a data structure, the values of the data items are also shown on the top level.
618 Domino Designer 6: A Developer’s Handbook
9. Click Continue to run the script to its end. This will then close the Debugger.
This very simple example shows how easy it is to control the execution flow of the program, and to inspect variables.
Enabling the Debugger LotusScript Server agentDomino 6 has a new, remote Debugger for debugging the LotusScript Server agent. With it, you can debug any agents or script libraries currently running on the server remotely. You can use the remote Debugger to step through and debug LotusScript agents running on the server.
To enable debug mode for this new function:
� Choose File -> Tools -> Debug LotusScript Server Agent
The agent you want to debug must be running at the time that you start the remote debugging tool. This enables you to, in real time, debug a script running on a server with the proper access.
More information on the remote Debugger, refer to 12.6.2, “Remote debugger” on page 387.
14.4.14 Tracing programs without a debuggerThere are several ways to trace programs without a debugger, though you will need to add some statements into the programs to use them. For example, you can use the PRINT and MESSAGEBOX statements to look at variables in your programs.
PRINT statementThe Print statement displays constant values, and the contents of variables, on the status line at the bottom of the Notes interface:
Print "Sending Notification"
The result of this statement is shown in Figure 14-20.
Figure 14-20 Print “Sending Notification”
Note: For variables of simple types, you can change their values while the Debugger is paused. Click the variable in the variables tab, and type a new value in the field below.
Chapter 14. Programming for Domino 6 619
When you click the status line, you will see the message list box shown in Figure 14-21, which contains the Print message history.
Figure 14-21 Print message history messagebox
To clear the status line, simply issue the Print statement with no arguments. This clears the status line. However, you can still click the cleared area to display the message box.
You can also see the messages created by the Print statement by clicking the Output button when using the Lotus Notes debugger; see Figure 14-22.
Figure 14-22 Output message in Lotus Notes Debugger
Messagebox statementThe Messagebox statement displays a dialog box with buttons to show messages, as shown in the following example (note that the vertical bar (|) is the string delimiter for multi-line strings):
620 Domino Designer 6: A Developer’s Handbook
%INCLUDE "LSCONST.LSS"Dim twoLiner As StringtwoLiner = |This messageis on two lines|MessageBox twoLiner, MB_OKCANCEL, "Demo"
14.5 Using JavaScriptWith Domino 6, you can use JavaScript to write applications that will support both the Notes client and the Web browser. All events associated with an object are programmable by using JavaScript, LotusScript or even simple @functions, and can be easily accessed within the Programmer’s Pane.
JavaScript allows you to handle events such as onLoad (for a Web page), onClick (for an input button on form), onChange, onBlur, onFocus (for input fields), and so on. You can use these events to trigger JavaScript functions that can also perform some complex operations.
In a Web browser, JavaScript functions can access all elements on a Web page (like input fields), as well as properties and methods that control the status and the behavior of the Web browser window itself.
Adding JavaScript to Domino forms and fields is particularly useful, as it allows you to create forms with a more dynamic behavior—without adding workload to the Domino server. For example, with JavaScript, field values can be validated locally on the browser, instead of on the Domino server, after submitting.
14.5.1 Using JavaScript in Domino Design elementsTo use JavaScript in your application, add JavaScript code to events as you do with LotusScript. Table 14-13 on page 622 lists some of the supported JavaScript events for forms and page.
Tip: Server agents write their Print and Messagebox output to the server log (log.nsf, “Misc events” view) and to the server console. This is also very handy for debugging!
Chapter 14. Programming for Domino 6 621
Table 14-13 Some supported JavaScript events for forms/pages
Note: Domino supports the standard JavaScript object model. For information on the JavaScript object model, see the following sites:
Browser implementation of the object model depends upon the browser. The Notes client implements the object model, with some exceptions.
For information on the Notes implementation, see the Domino 6 Client Document Object Model:
http://www-10.lotus.com/ldd/doc
Notes Form event handlers Description
onLoad Similar to PostOpen event.
onUnLoad Before document is closed.
onSubmit Window event, before Document saved.
onReset Window event, before Document reset.
onBlur When the forms loses focus.
onClick An object on a form is clicked.
onDblClick The user double-clicks a form element or a link.
onFocus The form receives focus.
onHelp Triggered when the user presses the F1-Help key.
onKeyDown The user presses a key down.
onKeyPress The user presses or holds down a key.
onKeyUp The user releases a key.
onMouseDown The user presses a mouse button down.
onMouseMove The user moves the cursor.
onMouseOut The cursor leaves the form or page.
onMouseOver The cursor moves over the form or page.
onMouseUp The user releases a mouse button.
622 Domino Designer 6: A Developer’s Handbook
For form elements (for example, fields), you can provide JavaScript for the events listed in Table 14-14.
Table 14-14 Supported JavaScript events - fields
If you want to add JavaScript code for other Window events that are not handled by the Notes client, you can do this in the HTML Body Attributes object for the form. Likewise, if you want to add an event for a form element, you can do it in the HTML Body Attributes Field event.
Code in pass-thru HTML and the HTML body attributes fields are passed to the browser, but ignored in the Notes client.
Note: JavaScript must be enabled in the User Preferences in order to be executed by the client.
Notes Form element event handlers
Description
onFocus Entering the object.
onBlur Exiting the object.
onChange When object is changed.
onClick When object is selected.
Attention: If you enter JavaScript code into a formula, keep the following rules in mind:
1. Within the text string that you are going to put in the formula, every double quote (“), single quote (‘), and backslash (\) must be preceded by a backslash (\). For example:
<a href="http://www.ibm.com"> IBM </a>
must become:
<a href=\"http://www.ibm.com\"> IBM </a>
2. The same text string must be included between two double quotes before pasting it into the formula. For example:
"<a href=\"http://www.ibm.com\"> IBM </a>"
Chapter 14. Programming for Domino 6 623
The browser Javascript Object HierarchyThe Javascript Object Hierarchy is shown in Figure 14-23.
Note: When you click any of the objects in JavaScript Object Model Hierarchy picture, the corresponding chapter about the JavaScript object will be opened from the Lotus Domino Designer 6 Help database.
Figure 14-23 Javascript Object Model in Designer
14.5.2 Mapping Domino objects to the Document Object ModelIn this section, we illustrate how Domino objects are mapped to the Document Object Model as it is used in Web browsers. We show the following for each Domino object:
� Its type in the Document Object Model
� The HTML that is generated by Domino
� A JavaScript example using the object
Important: For running JavaScript programs in the Notes Client, some of the object relationships illustrated do not make sense; for example, there is only one form attached to a document at any time. Furthermore, not all objects are available on the Notes client
624 Domino Designer 6: A Developer’s Handbook
Text field
Date/Time field
Number field
Rich Text field
DOM type Text
HTML <INPUT TYPE="text" NAME=... ...>
Example document.forms[0].textField.value = "default";
DOM type Text
HTML <INPUT TYPE="text" NAME=... ...>
Example document.forms[0].dateField.value = "1999/01/01";
DOM type Text
HTML <INPUT TYPE="text" NAME=... ...>
Example document.forms[0].counter.value = parseInt(document.forms[0]. counter.value) + 1;
DOM type TextArea or applet
HTML <TEXTAREA NAME=... ...> or <APPLET NAME=... ...>
Example If the Rich Text field is shipped to a browser as HTML, or is used within the Notes Client, the field is treated as a TextArea.The value of a TextArea is a unicode string. To clear out a field named "richText": document.forms[0].richText.value = ""; If the Rich Text field is shipped to a browser as an applet, the <APPLET> tag is used. To set a field named "richText" to be "Please don't!": document.applets.richText.setText("text/html", "Please <B>don't!</B>");
Chapter 14. Programming for Domino 6 625
Authors/Names/Readers field
Password
Hidden field
Formula field
DOM type Text
HTML <INPUT TYPE="text" NAME=... ...>
Example In Notes, extra “helper” buttons will appear to aid in inputting a value. These helper buttons are not accessible to JavaScript.
DOM type Password
HTML <INPUT TYPE="password" NAME=... ...>
Example var passwd = document.forms[0].passwordField.value;
DOM type Any field, regardless of type
HTML <INPUT TYPE="hidden" NAME=... ...>
Example document.forms[0].textField.value = "default";
Note: Hidden fields are only sent to the browser if the form property “Generate HTML for all fields” is selected.
DOM type Text
HTML <INPUT TYPE="text" NAME=... ...>
Example document.forms[0].formulaField.value = "Select @All"
626 Domino Designer 6: A Developer’s Handbook
Dialog List, Listbox, Combobox field
Checkbox field
DOM type Select
HTML <SELECT><OPTION ...> ... </SELECT>
Example In Notes, extra “helper” buttons will appear to aid in inputting a value. These helper buttons aren't accessible to JavaScript. To find out which keyword has been selected from a (single valued) keyword list associated with a field named "Grade":var list = document.forms[0].Grade;alert(list.options[list.selectedIndex].text);
Note: If keyword synonym is used, value is the synonym, while text is the display text.
DOM type Checkbox
HTML <INPUT TYPE="checkbox" NAME=... ...>
Example To show each choice selected in a field named "checkboxField":var boxes = document.forms[0].checkboxField;for (var i = 0; i < boxes.length; i++) { var box = boxes[i]; if (box.checked) alert(box.value + " is checked");}
Note: If keyword synonym is used, value is the synonym, while text is the display text.
Chapter 14. Programming for Domino 6 627
Radio Button field
Action
Computed text
DOM type Radio
HTML <INPUT TYPE="radio" NAME=... ...>
Example To display which radio button from the field "radioField" is checked:var result = "--no result--";var buttons = document.forms[0].radioField;for (var i = 0; i < buttons.length; i++) { var button = buttons[i]; if (button.checked) { result = button.value; break; }}alert(result);
Note: If keyword synonym is used, value is the synonym, while text is the display text.
DOM type Link
HTML <A NAME=... onClick=... ...>
Example If an Action bar is emitted as an applet to a Web browser, the actions are inaccessible to JavaScript. To programmatically fire the first action on a page: document.links[0].click();
DOM type Span
HTML <SPAN ID=...> ... </SPAN>
Example Accessed as a “Span” in a browser, but is inaccessible within Notes. To change the value of computed text field named "cText": document.all.cText.innerHTML = "new value";
628 Domino Designer 6: A Developer’s Handbook
Link hotspot
Text pop-up hotspot
Button hotspot
Formula pop-up hotspot
DOM type Link
HTML <A HREF=... NAME=...>
Example To change where a link named “launch” will link to, if clicked: document.links.launch.href = "http://www.lotus.com";
DOM type not accessible
HTML inline text
Example n/a
DOM type Button
HTML <INPUT TYPE="button" NAME=... ...>
Example To change the label of a button named “pushMe”: document.forms[0].pushMe.value = "Go ahead. Push me!";
DOM type not accessible
HTML inline text
Example n/a
Chapter 14. Programming for Domino 6 629
Action hotspot
Picture, Image Resource
Picture, Image Resource Hotspot
Java applet
DOM type Link
HTML <A HREF=... NAME=... onClick=...>
Example To programmatically perform the action (as determined by the onClick handler) behind the first hotspot on a page: document.links[0].click();
DOM type Image
HTML <IMG NAME=... ...>
Example To change the image associated with a picture named “effects”: document.images.effects.src = "/db.nsf/RollOver?OpenImageResource";
DOM type Area
HTML <AREA NAME=... ...>
Example To programmatically leap to the link associated with a hotspot named “hotSpot”: document.images.hotSpot.click();
DOM type Applet
HTML <APPLET NAME=... ...>
Example To call a public method named “setDate” of an applet named “DatePicker”: document.applets.DatePicker.setDate(...supply parameters...);
630 Domino Designer 6: A Developer’s Handbook
Form
14.5.3 Examples of adding JavaScript to formsThis section lists examples of JavaScript.
Using a JavaScript LibraryFor information on how to include a Javascript on a form/page/subform, refer to Chapter 12, “New features in Domino 6” on page 347.
The following section contains examples of using JavaScript in forms and fields. Each of the following examples illustrates effects that you can implement using JavaScript.
Example Domino's concept of a form maps onto both a Window and a Form in the DOM world. The onSubmit and onReset handlers are accessed through the Form DOM object. All other handlers are hung on the BODY tag in HTML and accessed via the Window DOM object. To programmatically submit a form from a button named “submitButton”, add the following code to submitButton's onClick handler: this.form.submit();
Note: In a browser, when a document is rendered in read mode, all fields are generated as inline text and are inaccessible. In Notes, fields in read mode are accessed exactly as they would be in edit mode: document.forms[0].fieldName. Though you are free to change their values, these new values are not stored in the back-end document.
Furthermore, in a browser, computed fields are generated as inline text and are generally inaccessible.
Chapter 14. Programming for Domino 6 631
Example 1: Auto-Refresh, Field Validation, and Help fieldsThe form in Figure 14-24 on page 632 allows a user to insert a percentage value in one of the two fields, and the other field is then computed as a complementary percentage. For example, if a user inserts 70 in A, the user will see 30 appearing in B immediately after changing the focus.
If a number greater than 100 is entered, a JavaScript alert message is displayed. Also, when the user puts the mouse inside a field, a help message is displayed on the bottom bar of the Web browser.
To create this form, do the following:
1. Create two Numeric Editable fields, PercentA and PercentB.
window.status='Insert Percentage A and look to Percentage B'
The onBlur event is triggered each time the focus is moved from a field. Here, it is used to trigger the validation and auto-refresh “procedure” (if()...else block) and to set the message bar to blank (window.status= “”).
Fields accessed in these procedures are those on the Web form; therefore, you cannot access hidden or computed Domino fields using JavaScript, because these are not fields on the Web page.
Figure 14-24 Percentage A + B = 100%
Note: All validation operations are performed locally, without calling any server tasks.
632 Domino Designer 6: A Developer’s Handbook
The onFocus event occurs when a user enters an input field, and here it is used to set the status bar message in order to use it as a help field.
window.status='Insert Percentage B and look to Percentage A'
This JavaScript code mirrors that of step 2, and it does not need further explanation.
An alternative to onBlur is to use onChange as a triggering event for the validation. This event occurs only when the value of a field is different from the previous value.
In the same way, you can call a procedure defined in the header of the form that refreshes fields on that form.
Example 2: setting field valuesThe field in Figure 14-25 can be reset to today’s date, by clicking the button. Though this example is very simple, it illustrates a function which could be very useful— having a button that resets all the fields on a form to their original values. Again, this action is performed without calling the server. This works in the Web and Notes client.
Note: There are many solutions for the problem solved by this example. Another possible solution is to store a unique JavaScript function for the validation of the entire form in the header of the Web page, instead of doing the validation inside each field, and then to call it using the following syntax, for an event such as onChange or onBlur:
onBlur="validateForm()"
Chapter 14. Programming for Domino 6 633
Figure 14-25 Setting the default value
To create this sample, do the following:
1. Create a button on the form and add the following to the onClick event:
The action behind the button assigns the value of the DefaultDate field to the Date field.
2. Create an Editable Date field and call it “Date”.
3. Create an Editable Date field and call it “DefaultDate”, and put in its default formula: @Today.
4. In HTML Attributes of DefaultDate, type:
"TYPE=\"Hidden\""
Example 3: using JavaScript with Keyword fieldsIn this example, the input field is completed automatically when the user selects a value from a list. Since the selected field is separated by the keyword list, the user may also introduce a value that is not on the list.
Figure 14-26 Choose country from the list
To create this sample, do the following:
1. Create Choices as a keyword field. In the onChange event, insert:
Important: This field will not appear on the Web but it is defined on the Web form, so it does exist on the browser. If you use the Domino hide-when formulas instead of TYPE=“Hidden”, the field would not be sent to the browser, so the sample would not work.
634 Domino Designer 6: A Developer’s Handbook
The onChange event triggers the assignment of the selected value to the field named Country. SelectedIndex is the number of the selected item of the list.
2. Create Country as an Editable Text field.
Example 4: changing an image on Mouse-Over or Mouse-OutThe image displayed on the screen can be changed when the mouse floats in and out of it. The following example alternates two different logos, depending on the position of the mouse pointer.
To create this sample, do the following:
1. Create a form and put the following JavaScript in a Javascript library, and include it in the JS Header of the form:
The JavaScript will be inside the header of the Web page, so that all objects of this JavaScript are allocated before other elements on the Web page.
– logoIBM and logoLotus are the definitions of two images.
– logoIBM.src and logoLotus.src store the URL of the images. You will need to replace their values with the URL of your sample images.
– showLogo() is a function that replaces the content of the “Banner” image with that of one of the two defined above; the selection of the image depends on the value of logoName, which is a parameter (a string) passed to the function.
2. Add the following HTML code to the form, using pass-thru HTML style:
Note: This only works in a browser, as Domino does not support the onMouseOver or onMouseOut events on the Notes client.
Chapter 14. Programming for Domino 6 635
Entrevision.gif"></a>
Explanation:� onMouseOver is the event that triggers the function call
showLogo(‘logoIBM’).
� onMouseOut is the event that triggers the function call showLogo(‘logoLotus’).
� “Banner” is the name of the image that is replaced each time the mouse enters or exits its area.
Example 5: updating frames using JavaScriptThis short sample can be used when you need to change the content of two frames at the same time.
1. Add the following Javascript to the JS Header of the form, or create a Javascript library for it, and include it in the JS Header:
function changeFramesContent(URL1,URL2){ top.Frame1.location=URL1; top.Frame2.location=URL2;}
We have named the two frames Frame1 and Frame2.
2. Create a new button to update the frames, and in the onClick event add the following:
changeFramesContent(URL1,URL2);
14.6 LiveConnect - JavaScript access to Domino classes
The LiveConnect technology allows JavaScript to initiate applet communication within browsers, and is also implemented in the Notes client.
LiveConnect is a proprietary Netscape Technology (since 3.0), and is also implemented within Internet Explorer. It allows applet-script (IE - partial support), script-applet (IE - partial support) and applet-applet communication, but this is not fully supported in the two browser environments.
636 Domino Designer 6: A Developer’s Handbook
14.6.1 Accessing an applet from JavaScriptConsider the following applet:
JavaScript can access an applet via the applet name or applets array in the JavaScript document object:
� document.applets.Hi
� document.applets[0] or document.applets[“Hi”]
On accessing the applet, JavaScript can also access the Java public methods/properties of the applet:
� document.applets.Hi.methodname
� document.applets.Hi.variable
Obvious advantages include repainting applets with new data at runtime, without roundtrips to the server via submits.
14.6.2 Accessing Java/CORBA applets via LiveConnectConsider the current Notes Client Programmability model. The Domino Object Model (DOM) is accessed by LotusScript in the event handlers. On the Web, the scripting language is JavaScript, which has no interface to the Domino Object Model (DOM). Java has an interface to the DOM, but the API’s are remote. This is where you can utilize a CORBA applet.
A CORBA-enabled applet can access a remote Domino Session object and, in combination with LiveConnect, make this property available to JavaScript via a public property or method. An HTML page can now have a persistent session with the Domino server via JavaScript and utilize the DOM, without the need to submit the page to the server for each transaction.
ExampleThe following example illustrates how LiveConnect can be used in the Notes client. It has been taken from the Lotus Domino Toolkit for Java/CORBA 2.0.
The Rich Text field on the document contains a 1-pixel square embedded applet. The applet code is minimal:
import lotus.domino.*;public class PinpointApplet extends lotus.domino.AppletBase {
public void notesAppletInit(){
setLayout(null);
Chapter 14. Programming for Domino 6 637
setSize(1,1);}
}
The important thing is that the applet extends the AppletBase class. This class implements the method AppletBase.openSession(), which we will use to get a Domino session object.
The Rich Text field on the document also has a button that, when clicked, locates the applet, passes the openSession() method to it and then accesses the Domino Object Model through JavaScript. You can see all the JavaScript code for that button.
// Sample JavaScript code accessing back-end data via Java// Retrieves the first or second database in the DBDirectory{
// Once session is obtained, we can utilize any class // in the Domino Object Model. Can also
// use document.applets[0].openSession(user, pwd);var s = document.applets[0].openSession();if ( s == null ) {window.defaultStatus = "Unable to connect to server";}// Update a field on the formdocument.forms[0].Platform.value = s.getPlatform();var dir = s.getDbDirectory("");// Use introspection to retrieve static constants
// such as lotus.domino.DbDirectory.DATABASEvar dirclass = dir.getClass();var dbcode = dirclass.getField("DATABASE").getInt(null);var db = dir.getFirstDatabase(dbcode);// For fun, switch between first and second DB each time
// button is clickedif ( document.forms[0].DatabaseTitle.value == db.getTitle() ) {
db = dir.getNextDatabase();}db.open();document.forms[0].DatabaseTitle.value = db.getTitle();var server = db.getServer();if ( server == "" ) server = "Local";document.forms[0].DatabasePath.value = db.getFilePath() + " on " +
server}
Once JavaScript has retrieved the session object reference, it can utilize the full Domino Object Model in the JavaScript code.
In the preceding code, the JavaScript code uses the Session object to access the following data, which is placed into the respective fields on the form.
638 Domino Designer 6: A Developer’s Handbook
� Platform of the Domino server
� Title of the first or second database on the Domino Server
� File path of the first or second database on the Domino Server
From a performance perspective, the applet initially takes a small amount of time to load from the server. Once it is loaded and initialized, however, access to the remote session object is fast.
The applet and the button with the JavaScript code can be placed in the form design, so that every document created automatically contains them. The applet can be in a hidden paragraph, as users do not need to see it.
It is advisable to place complex code into a public method within the applet to correctly handle Java Exception conditions.
This method could also be used for hiding JavaScript implementation code as Java inside an applet.
If the form had many applets, the one session reference could be shared among the applets via the InfoBus technology.
14.7 The API for Domino and Notes
The C and C++ API for Domino and Notes allows you to write a program that processes data in a Domino database, or moves data in and out of Domino. The API accesses the Domino database layer, much as the Domino Object Model itself accesses it. You can also use the API to access the server software, the Tools menu in the workstation software, and the File Types list in the File Export dialog box.
Note: Because Domino 6 supports a CORBA/IIOP architecture, you are also able to run API programs through the Web. In this case, the client uses the server APIs. For more information about CORBA/IIOP architecture, refer to the Lotus Domino Release 5.0: A Developer's Handbook, SG24-5331.
You can write an API program to do the following:
� Extract external data, reformat it, and store it in the Domino database.
For example, you can retrieve information from SQL records.
� Extract Domino data, reformat it, and store it in an external application.
Note: Remote access via CORBA must be enabled on the server by an administrator in order to use Domino data in applets.
Chapter 14. Programming for Domino 6 639
For example, you can retrieve Notes workflow status data into a word processor or executive information management (EIS) system.
� Add commands to the File - Tools menu.
For example, when a user chooses your new command, Domino can launch your program and pass user context information to it, such as which view is active, whether the user is editing a document, and which field contains the cursor. Your program can compute new values and enter them into Domino fields.
� Implement server add-in tasks.
For example, you can implement a task that takes conditional actions beyond Notes background macro capabilities. A server add-in task functions as a daemon. It has no user interface and runs in the background like other server tasks.
� Create a custom file export format.
For example, when a user selects your new file type in the Notes File Export dialog box, Domino launches your program and exports data to it.
For more information about the API products, refer to the documentation found at Lotus Developer Domain, Documentation Library pages:
http://www.lotus.com/ldd/doc
14.8 XMLNotes 6 contains programming tools to let you generate and parse any XML data. The classes that were previously available by downloading the Lotus XML Toolkit, have been added to the main product and are now a standard part of LotusScript (and Java). Chapter 16, “XML” on page 743, discusses the XML capabilities in detail.
Briefly, the LotusScript classes include:
� XML processors NotesDOMParser and NotesSAXParser, which implement the two standard models for processing any XML data.
� Helper class NotesStream, which represents an input to or output from an XML processor (among other uses).
In addition, there are classes to support DXL, the Domino-specific XML Document Type Definition. DXL is used to represent and process information about Notes documents, databases and design elements. These classes include the following:
� NotesXSLTransformer transforms DXL through XSLT.
640 Domino Designer 6: A Developer’s Handbook
� NotesDXLExporter and NotesDXLImporter convert Domino data to and from DXL.
� NotesNoteCollection lets you select parts of a Notes database to pass to a NotesDXLExporter.
Versions of all of these classes are also available in Java.
14.9 Sametime connectivityThis section briefly covers basic information about Sametime and Sametime connectivity. For more information, refer to the IBM Redbook Lotus Sametime Application Development Guide, SG24-5651, and to the other Sametime-related redbooks listed in “Related publications” on page 799.
14.9.1 What is SametimeLotus Sametime is the product that delivers a network-based, real-time communication and collaboration solution to today's global business. A pivotal component to achieve the Lotus ideal of collaboration, Sametime establishes a virtual office environment where workers can easily locate and communicate with colleagues, customers, suppliers, and others.
14.9.2 What can Sametime doSametime meets the need for workers to connect and communicate instantly on issues that are critical to business success. Sametime fulfills this need by establishing an online community and providing these key user capabilities:
� Awareness� Conversation� Object sharing
14.9.3 Power of SametimeThe unique power of Sametime is its ability to move between asynchronous and real-time communications while adding value to the user's experience. Let's look at a business scenario where Sametime demonstrates this power.
Suppose you receive an urgent e-mail from a customer with a serious software support issue. You must provide an immediate and accurate solution to this issue or lose the customer account. Using e-mail, you could exchange endless messages with an internal expert seeking answers to the issue. The downtime
Chapter 14. Programming for Domino 6 641
between messages could grow into hours, leaving the customer even more dissatisfied.
Using Sametime installed in a Domino environment, you could get much faster results than with e-mail. First, with awareness you can quickly locate an internal expert knowledgeable about the customer issue and determine if that person is available for discussion. Seeing that the customer available, you send an instant message asking him a few direct questions.
During the chat session, you decide to invite another internal expert to help with the issue. This conference chat leads to a discussion about a document stored in the Customer Service database.
Using Sametime's instant meeting feature, you access that Notes database, open the document, and share it with the experts online. In real-time, the group reviews the document. Based on the online review, necessary document changes are made.
You save the document and repost it to the Customer Service database. In minutes you have created a document that accurately addresses the customer's specific needs. You can now forward that document to the customer or discuss it in a phone conversation.
14.9.4 Sametime-enabling Domino applicationsDomino applications can be enabled for Sametime, thus taking the power and strength of what Sametime delivers into the application itself. This can be to support a chat service and instant messaging within an application, or you might enable the application to find out if a specific user is online.
Another use would be to check who is within a Domino application at the same time as you are, and to be able to contact that person. This means that you can have a team database where you and others might be in the same section, for example, on the same Web page. Sametime lets you “see” each other as online there, and you can send an instant message right from that indicator, and start a meeting session, if desired.
To enable your Domino Web applications for Sametime, refer to the IBM Redbooks Lotus Sametime Application Development Guide, SG24-5651 and Working with the Sametime Client Toolkits, SG24-6666.
The Sametime Links 3.0 Toolkit is available from Lotus Web site:
Example - Sametime-enabled applicationThe following example builds on the Sametime 3.0 server and the Sametime Links 3.0 Toolkit functionality. It will create a very simple Web page with links to persons online on a Sametime 3.0 server. By clicking the names of these people, you are available to chat directly to them, using the Web-based chat client.
Sametime-enabling a Web application with the new Sametime Links 3.0 Toolkit is easy, and well documented in the Toolkit.
Preparing the page for the addition of Sametime links1. Include the necessary files by adding the following HTML code to the Head
The codebase is the URL of the directory where the Sametime Links runtime package is installed (http://<sametimeserver>/sametime/stlinks, where <sametimeserver> is your Sametime server host name).
2. Add the code that puts the hidden Sametime Links Java™ applet on the page. This code can be put anywhere in the HTML code for your page because the applet itself is placed on a hidden, zero-size HTML layer.
Note the following in the writeSTLinksApplet call:
� The loginName argument is the login name of the user.
� The key argument is the password or the token. Sametime Links provides three methods for logging in to a Sametime community: log in by password; log in as anonymous; log in by token.
� The isByToken argument is true if you use a token to authenticate, and false if you use a password. The default is false.
Adding the Sametime linkOnce you have prepared the page for adding Sametime Links, you add a Sametime link anywhere in the HTML text by typing the following:
� The userName argument is the unique user name. To ensure uniqueness, use the canonical name, or the distinguished name if you are using an LDAP directory.
Note: The Sametime server 2.5 cannot resolve distinguished names. Therefore, if you are using Sametime server 2.5 with LDAP, use the user’s common name.
� The displayName argument is the display name of the user. This name is displayed as the text of the link.
� The bResolve argument is true if the Sametime server has to resolve the user name. False indicates that the user name is already resolved.
� The options argument is a string of semicolon-delimited display options. Each element in the list has the format “option:value.” The options allow you to change the rendering and the behavior of the Sametime link. For example, by specifying “text:yes;icon:no” you create a Sametime link without a status icon. For more information of writeSametimeLink, check out the Sametime 3.0 Toolkit.
<table border=0 width=770><tr><td><span style="font-family:arial; font-size:12pt; font-weight:bold;color:#123456;">Click on a Redbook teammember you want to talk to:</span><br><br>
With a Sametime server available and correctly installed, configured, and ready for Web-based communication, this example would look like Figure 14-27 on page 645.
Figure 14-27 Sametime-enabled Web application
Clicking a person’s name that is online (indicated by an “Available” icon) will start a chat communication directly with that person, as shown in Figure 14-28 on page 646.
Chapter 14. Programming for Domino 6 645
Figure 14-28 Sametime chat on Web
This example only describes a basic example of live chat with a predefined set of users, hardcoded in the HTML file. This can be more dynamic, depending on how you prefer to program it.
There is also a set of other things to do on Web, such “changing status links”, “place-based awareness”, “place counter” and other useful features. Refer to the Sametime 3.0 Toolkit and the Sametime Redbooks for more detailed information.
14.10 Integration with Microsoft technologiesThis section provides information and a brief overview of Microsoft integration using the Component Object Modem (COM), and gives both simple and advanced code examples on how to access the Domino objects using COM.
646 Domino Designer 6: A Developer’s Handbook
Developers have had access to the Domino Object Model (DOM) through OLE Automation since Notes R4.0. There are two main reasons why COM support is needed, as well:
� OLE Automation requires Notes to be running.
You cannot use Domino services through OLE Automation without having the Notes client launched in the foreground.
� OLE Automation only allows late binding.
By using COM, you can choose between early and late binding. Early binding gives better performance and stability during application execution.
On the other hand, if you want to use the Notes client to handle the user interface or parts of it in your application, you must use OLE Automation. You cannot control the Notes user interface via COM.
For more information about COM and Domino, refer to the IBM Redbook, COM Together - with Domino, SG24-5670.
14.10.1 What is COMCOM, or the Component Object Model, is an open software component specification developed by Microsoft. It allows objects to expose their functionality to other applications. COM defines a specification for developing reusable binary components across multiple software languages and platforms.
COM components can be written and called by any language that can call functions through pointers, including C, C++, Delphi, and Basic, just to name a few. Because of this flexibility, COM components can be built by different software vendors and incorporated in endless combinations to create applications and systems.
Tip: The difference between early binding and late binding is like the difference between speed and flexibility; note the following:
� In early (compile-time) binding, the object definitions are available. They can be typed correctly and syntax checking can be performed.
� In late (run-time) binding, objects are generic during development. There is an overhead when casting an object to its correct type during run time, and there is also the danger of syntax errors.
Note: The initial 6.0 release, unlike Notes 5.x, lacks COM server capability. This will be restored in a later release. Notes can still act as an COM client.
Chapter 14. Programming for Domino 6 647
COM is one of the basic building blocks in newer Windows technology, including OLE services. You could say that OLE is a standard for one software calling another software.
The COM specification provides:
� Rules for component-to-component interaction� A mechanism for publishing available functions to other components� Automatic use tracking to allow components to unload themselves when no
When it comes to COM components, they also offer an interface to applications. The mechanism to make this interface available to other software objects is covered by the COM standard. It is up to the COM component developer, though, to decide what the actual interface should look like.
The decision of what properties and services (methods) to make available from the outside is an important one. Applications using the COM component will depend on having these methods available throughout the components’ lifetime.
The developer can change the internal mechanisms of a COM component, but the applications using that COM component should never need to know. They should continue working exactly as they always have because the interface to the component did not change.
New interfaces can be added to the component, so long as the old ones still continue to function in the same manner. This provides an upgrade path without causing obsolescence to those components relying on the older interface. If a developer wanted to take advantage of the new interface, they could do so, but they would not have to do in order for their applications to continue functioning.
This is a very simple overview of COM. There are many other aspects and important things to be aware of, which this section will not cover. For additional information, refer to Lotus Noted/Domino Help databases and to:
http://www.microsoft.com/com
14.10.2 COM support in DominoIn order to use the COM classes for Domino with Microsoft Office or any other COM-supported application, you must have at least one of the following installed on the machine where the code will be running:
� Domino Designer 5.0.2b or later� Domino Server 5.0.2b or later
648 Domino Designer 6: A Developer’s Handbook
� Notes Client 5.0.2b or later
For Microsoft Office, you will need Microsoft Office 97 or later. During development, you will need to enable the reference to the Domino Objects library in the Visual Basic Editor.
Domino Object ModelThe Domino Object Model gives you as a developer access to a wide range of services (such as object store, directory, security, replication, messaging, workflow, automation through agents, and more) in a consistent way.
Through a wide range of Domino objects, methods and properties, you can use all those services from COM-enabled languages like Visual Basic, VB for applications, VBScript, C++, and LotusScript, as well as from Java™ and other languages that can use Common Object Request Broker Architecture/Internet Inter-ORB Protocol (CORBA/IIOP).
Note: If you have upgraded Notes or Domino from an earlier release using the incremental upgrade installer, you may have to enable the COM support manually.
Do this by selecting Run on the Windows Start menu and then executing the following command (substituting c:\lotus\notes with the path where your Notes Domino files are installed):
regsvr32 c:\lotus\notes\nlsxbe.dll
Tip: “COM support” means that anyone with basic programming skills, such as from using BASIC, C, or C++, could write a program that accesses Domino objects.
Note: CORBA is an architecture and specification for creating, distributing, and managing distributed program objects in a network. IIOP (or Internet Inter-ORB Protocol) is a protocol that makes it possible for distributed programs written in different programming languages to communicate over the Internet.
IIOP is a critical part of a strategic industry standard, CORBA. Using CORBA's IIOP and related protocols, a company can write programs that will be able to communicate with their own or other company's existing or future programs wherever they are located and without having to understand anything about the program other than its service and a name.
Chapter 14. Programming for Domino 6 649
The Lotus Domino object COM components can be thought of as black box access to Domino, as illustrated in Figure 14-29.
Figure 14-29 Accessing Domino through Domino objects using COM
The actual mechanism for accessing Domino is hidden from the application developer, who relies fully on the interface provided by Lotus. Knowing this interface will be your key to success in utilizing the features of Domino, such as creating workflow applications and creating document archives with integrated security, as well as all the other functions that Domino is famous for providing.
Developers familiar with the Domino Object Model used when programming LotusScript against Domino will recognize most of the interface classes in the COM interface.
Accessing Domino with COMYou can access Domino using any COM-enabled application.
For the following examples, we use Microsoft software (such as Microsoft Internet Explorer, Excel and Word) to indicate how you can integrate your existing Microsoft-based applications with Lotus Notes/Domino using COM.
Note: A “COM-enabled application”, in relation to Domino, is an application that accesses the Domino Object Model using the COM interface.
650 Domino Designer 6: A Developer’s Handbook
Accessing Domino with Microsoft Internet Explorer using COMThe following example illustrates how we can use VBScript to access Domino via the COM interface, using Microsoft Internet Explorer:
<HTML><HEAD><TITLE>Access Domino via COM using IE</TITLE><SCRIPT LANGUAGE="VBScript">Sub test
Dim sessionSet session = CreateObject("Lotus.NotesSession")session.Initializedocument.write("Your current session name in Lotus Notes is<br><br>")document.write(session.username)
End Sub</SCRIPT></HEAD><BODY onLoad="test"></BODY></HTML>
When running this example, and depending on your settings in Microsoft Internet Explorer, you may see the dialog box shown in Figure 14-30 appear.
Figure 14-30 Internet Explorer warning
If this dialog box appears, click Yes; this example code will do no harm. (This warning most likely appears as a result of security settings in your Microsoft Internet Explorer; from the application, you are trying to connect and access other applications, in this case, through a COM interface.)
You should now see a screen similar to Figure 14-31 on page 652.
Chapter 14. Programming for Domino 6 651
Figure 14-31 Information from Domino, inside Internet Explorer, using COM
Accessing Domino from Microsoft Word using COMYou can also develop Domino applications using Visual Basic for Applications and Microsoft’s Component Object Model (COM) interface. To access Domino from Microsoft Word, there are a few steps you need to complete before starting to access Domino from MS Word using the COM interface:
1. Launch Microsoft Word, Excel or Access.
2. After opening a document, workbook, or database, choose Tools -> Macros -> Visual Basic Editor (Alt + F11).
3. Choose Tools -> References. You will see a dialog box, as shown in Figure 14-32 on page 653.
Note: If you are not logged in to Notes at the time, you will be prompted to type your Notes password. Why? Because in order for a COM application to access Domino objects, you need to authenticate. The COM application uses the local installation of Notes on the client it is running, and then the current user.id file, to authenticate.
652 Domino Designer 6: A Developer’s Handbook
Figure 14-32 Enabling Lotus Domino Objects
4. Scroll down the selections and choose Lotus Domino Objects (if it has not been used recently, the Lotus Domino Objects library will be listed alphabetically).
5. Click OK.
You will now be able to access the Domino objects from within the application, while you are writing your Domino application.
Accessing a Domino database from Microsoft Word using COM
In the following example, we create a button inside Microsoft Word, accessing the Domino Directory, and insert information from this Directory inside the current document in Word.
We will need a place to display the names we retrieve from our directory or address book, so we will create a form that we can display as a dialog box.
The user can then make a selection from the form, which we will use to retrieve the associated data from Domino and place it in the Word document.
1. Enable the design mode in the VB Editor by clicking the Design Mode icon on the toolbar; see Figure 14-33 on page 654.
Tip: Deselect any objects (other than the defaults) that you do not need, and make Lotus Domino Objects high in the priority list for better performance. (There is also a reference called “Lotus Notes Automation Classes”; you will not be needing it.)
Chapter 14. Programming for Domino 6 653
Figure 14-33 Buttons to click on the vb editor
2. Insert a new user form by clicking the Insert User Form button on the toolbar.
3. Your screen should now look similar to Figure 14-34.
Figure 14-34 User form added
4. In the properties box on the left side of your screen, change the caption to read: Domino Name Lookup.
5. Click back on the form itself to make the form toolbox reappear, then select the label tool (second from the left, top row).
6. Click your form with the label tool and drag to create a label where we will place instructions for the dialog box.
7. Click inside the label and edit the text to read:
Select a name from the list below and click OK:
654 Domino Designer 6: A Developer’s Handbook
8. Click anywhere outside the label box; your screen should now look like Figure 14-35.
Figure 14-35 User form with captions set
9. To add a list box to your form, click the ListBox tool (top right button on the toolbox).
10.Click your form below the label text and drag to create the list box (leave room for OK and Cancel buttons below the list box).
11.Using the CommandButton tool (directly below the ListBox tool), create two side-by-side buttons for your OK and Cancel buttons.
12.Select the first button and change the Caption in the Properties box to OK and make sure the Default property is True.
13.Select the second button and in the Properties box, then change the Cancel property to True and change the Caption to Cancel.
14.Your dialog box should now look similar to Figure 14-36 on page 656.
Chapter 14. Programming for Domino 6 655
Figure 14-36 Listbox, lables and buttons added
If you have not already done so, save your work at this point.
Adding the code that does the database lookupNow to create the actual code that powers the dialog box that was built—this is where to actually get started using the Domino COM objects. Follow these steps:
1. From the Microsoft Visual Basic editor, choose Insert -> Module from the menu bar. A new code module text box will appear.
Since you will be interacting with your form in another part of our project, you will need a public variable to store the user’s selection from the dialog box.
2. You will get the user’s selection from the ListIndex property of our ListBox object, so declare a variable in the General Declarations area of the code module (which is the default section of the code module now displayed):
Public IntPerson as Integer
3. Insert the first sub procedure (sub).
There are several ways to do this. If you are a LotusScript programmer, you might be accustomed to just typing Sub subname to start your sub. You can do the same thing here, or you can choose Insert -> Procedure from the menu and fill out the properties box.
656 Domino Designer 6: A Developer’s Handbook
Whichever method you choose is fine, in this case. Call your procedure PopulateList so it will match our example, then press OK if you used the dialog box, or simply press Enter if you typed it in the code module text box.
4. Declare the variables for this sub, as follows:
Dim DomSession As New NotesSessionDim DomDir As NotesDatabaseDim DomContacts As NotesViewDim DomDoc As NotesDocumentDim StrName As StringDim doc As Document ’this will be our reference to the’Word documentDim myRange As RangeDim DomSession As NotesSessionSet DomSession = CreateObject(“Lotus.NotesSession”)
Access to Domino objects must always start with the creation of a NotesSession as shown above.
DomDir will hold your Name and Address Book. DomContacts will hold the reference to the People view you will be using for populating your list box and document. DomDoc will be the reference to the Domino document (record) we are currently accessing.
StrName is a regular VB String, where you will store the composite name that you piece together from the FirstName, MiddleInitial, and LastName fields in our Domino document. The variable doc will be used to reference the current Word document. The variable myRange will represent the current insertion range in your Word document.
1. To initialize the Domino (Notes) Session:
DomSession.Initialize
2. A session to Domino is now set up, and the next thing is to access the objects of Domino which you want to access, as follows:
At this point, you have access and a handle on the first document in the “Contacts” view.
3. Add and populate each document into the list box by using a While loop:
While Not (DomDoc Is Nothing)StrName = DomDoc.GetItemValue(“LastName”)(0) & “, ” & _DomDoc.GetItemValue(“FirstName”)(0) & “ ” & _DomDoc.GetItemValue(“MiddleInitial”)(0)UserForm1.ListBox1.AddItem (StrName)
Chapter 14. Programming for Domino 6 657
Set DomDoc = DomContacts.GetNextDocument(DomDoc)Wend
You are only retrieving certain items of the domino objects and document, which is the FirstName, LastName and MiddleInitial, and adding these to the list box using AddItem.
4. Once the list box has been populated, you can show it to users so they can make their selection:
UserForm1.Show
5. Once the user has responded to the dialog box, you will be returned here and will continue execution by first checking to see if the user canceled the dialog box. You can do this by inspecting IntPerson to see if it has been set to the value of -1 by the Cancel (CommandButton2) click event. If the user did Cancel, you can exit the sub:
If IntPerson = -1 Then ’User pressed Cancel (CommandButton2)Exit Sub
End If
6. If you get past the Cancel check, you can retrieve the document corresponding to the name the user selected from the list box, which populates IntPerson with the number of the selection.
Using that value as an index, you can use the GetNthDocument method of the NotesView, DomContacts, to retrieve a reference to the document:
Set DomDoc = DomContacts.GetNthDocument(IntPerson)
7. Once you have the reference, you can again use the GetItemValue method of DomDoc to get all the components of the full name, and store the formatted result in StrName for later inclusion in your document. Since not all records will include a middle initial, check to see if there is one before including it:
8. Now you are ready to start inserting information into your document. Word allows you to set a “range” for insertion using x,y coordinates which correspond to the row and character position where you want to start your range. The coordinates 0,0 correspond with the first position in the document.
Set myRange = ActiveDocument.Range(0, 0)With myRange
Adding code to the OK and Cancel command buttonsThe easiest way to add code to the command buttons is to switch back to the form itself.
1. Use the Window menu in the VB Editor and switch back to the window that contains UserForm1 (UserForm). Double-click the OK button; this will position you in the UserForm1 Code module in the click event for the OK command button. Add the following code:
If ListBox1.ListIndex = -1 ThenMsgBox (“You didn’t make a selection, please select a name and click OK to proceed, or Cancel to quit.”)ElseIntPerson = ListBox1.ListIndex + 1Unload UserForm1End If
2. Switch back to UserForm1 (UserForm), double-click the Cancel button, and insert the following code in the click event of that command button:
IntPerson = -1Unload UserForm1
Setting IntPerson to -1 will be the signal to your calling module that the user canceled. Again, unload the form here, because it is no longer needed. Now you just need to add a toolbar and button to give the user a way to easily access your lookup macro.
Save the document as a Word templateIn order to add a toolbar in the next step, you will need to specify a template where you’ll store the new toolbar. While you could store the toolbar in the default template Normal.dot, create instead a new template just for the example, using the following steps:
1. Switch back to the Word document window by selecting it on the Windows toolbar.
2. From the menu, choose File -> Save As. In the Save As dialog box, scroll down and choose Document Template (*.dot) from the drop-down list box.
3. Name it Domino Name Lookup.dot.
Add the toolbar1. Choose Tools -> Customize from the menu and click the Toolbars tab.
Chapter 14. Programming for Domino 6 659
2. Click New. Name your toolbar Domino Name Lookup. The template should default to the one you just saved, Domino Name Lookup.dot.
3. Click OK. A small toolbar will appear on your screen.
4. To add your macro to it, click the Commands tab on the Customize dialog box.
5. Select Macros from the Categories list box.
6. Drag the Project1.Module1.PopulateList Macro to the toolbar on the right and drop it.
7. Right-click the toolbar text and choose Name. Name it: Insert Name from Domino.
8. Close the Customize dialog box, save your form, and you’re done!
Try your codeNow you can choose File -> New, choose your Domino Name Lookup template, and you’re ready to use your new macro to look up Domino names and addresses to add to your document. Figure 14-37 shows what a new document based on the template should look like.
Figure 14-37 New document based on the new template
660 Domino Designer 6: A Developer’s Handbook
Click the Insert Name from Domino button and your screen should display a dialog box showing content from a Domino database (you might be prompted for your Notes password first).
After selecting a name, your document should look similar to Figure 14-38.
Figure 14-38 Information from Domino inserted into MS Word document
Accessing Domino with Microsoft Excel using COMYou can just as easily integrate and access Domino objects by using Microsoft Excel.
Note: Depending on how you saved your new toolbar and template, the new button might be visible as a floating window as well. Drag this to your toolbar and make it part of the other icons, if desired.
Important: Remember to access Domino objects using VBA, or Visual Basic for Applications, you need to enable the “Lotus Domino Objects” for your project (found in the reference settings). This is described in “Accessing Domino from Microsoft Word using COM” on page 652.
Chapter 14. Programming for Domino 6 661
Accessing Domino from Excel is done using buttons in a spreadsheet or from icons in the toolbar. In this section, we present several examples of how you can access Domino and integrate the two applications.
All of the following examples are based on running macros initiated from a button in a spreadsheet. We create macros in MS Excel in a similar way to creating them in MS Word. The examples will mainly show you the code and explain what the examples will do for the end user.
Getting the current usernameLet’s start off rather simple and show how, from Microsoft Excel, you can get the current username from the logged-in user in Lotus Notes/Domino:
1. Create a new spreadsheet in Excel.
2. Create a button somewhere in your spreadsheet.
3. Add this code to the button:
Sub GetNotesUsername()Dim session As New NotesSessionSet session = CreateObject("Lotus.NotesSession")session.InitializeMsgBox session.UserName
End Sub
Clicking a button in MS Excel with this code should give you something like Figure 14-39.
Figure 14-39 Accessing Notes from Excel - receiving the current username
Sending an e-mail through Domino from MS ExcelThis example, through a button in Microsoft Excel, creates an e-mail to be sent and created in the current user’s mailfile, with an attachment of the current Excel spreadsheet, using the COM interface.
Sub SendSheetByMail()‘ ** First we declare our variablesDim session As New NotesSessionDim dbdir As NotesDbDirectoryDim db As NotesDatabaseDim doc As NotesDocumentDim rtitem As NotesRichTextItem
662 Domino Designer 6: A Developer’s Handbook
‘ ** Then we initialize the Notes session and get the‘ ** database (mailfile) and create a new document in itsession.Initialize ("")Set dbdir = session.GetDbDirectory("")Set db = dbdir.OpenMailDatabaseSet doc = db.CreateDocument
‘ ** Then we set the correct values in the ‘ ** sendto and subject field, and create a richtextiten‘ where our attachment will be addedCall doc.ReplaceItemValue("SendTo", session.UserName)Call doc.ReplaceItemValue("Subject", "Mail from MS Excel")Set rtitem = doc.CreateRichTextItem("Body")
‘ ** then we get a handle on the current active spreadsheet‘ ** by firstsaving it, and adding the name of the file‘ ** to a variable and then attaching this file to the ‘ ** richtextitem in the maildocument created earlier.‘ ** Finaly we send the document.ActiveWorkbook.SaveMyAttachment = ActiveWorkbook.FullNameCall rtitem.EmbedObject(EMBED_ATTACHMENT, "", MyAttachment)Call doc.Save(True, False)Call doc.Send(False)MsgBox "This spreadsheet has been mailed to " & session.CommonUserNameSet s = Nothing
End Sub
Sending an e-mail through Domino with MS Excel contentThis example, through a button in Microsoft Excel, creates an e-mail to be sent and created in the current user’s mailfile, with content from the current spreadsheet, using the COM interface:
Sub SendEmailWithContent()Dim session As New NotesSessionDim dbdir As NotesDbDirectoryDim db As NotesDatabaseDim doc As NotesDocumentsession.Initialize
Set dbdir = session.GetDbDirectory("")Set db = dbdir.OpenMailDatabaseSet doc = db.CreateDocument
Note: By setting the session to “nothing”, you free up the memory used to run this routine.
Chapter 14. Programming for Domino 6 663
‘ ** Mycell is the cell with the data we want to catch and sendMycell = Sheet1.Cells(14, 5)Status = "Data from spreadsheet as of: " & Date & " " & Time & "
Content is $" & Mycell & " ."Call doc.ReplaceItemValue("SendTo", session.UserName)Call doc.ReplaceItemValue("Subject", "Excel message")Call doc.ReplaceItemValue("Body", Status)Call doc.Save(True, False)Call doc.Send(False)‘ ** the following line just selects a cellRange("E7").Select‘ ** the following line adds todays date into this cellActiveCell.FormulaR1C1 = DateMsgBox "A document has been created and sent: " & Date & " " & Time &
Chr(10) & "containing the value in Cell E14 [ " & Mycell & " ]"‘ ** this line select the cell with the date we earlier addedRange("E7").Select‘ ** and clears the content of the cellSelection.ClearContentsSet session = Nothing
End Sub
Accessing MS applications from Notes/Domino using COMYou can access any COM-enabled application using Lotus Notes/Domino. For the following examples, we use Microsoft Excel to indicate how you can integrate your existing Lotus Notes/Domino applications using COM.
Creating a Microsoft Excel spreadsheet with Domino dataThis example creates a Microsoft Excel spreadsheet with content and data from the current notes document. It also creates a chart based on the data transferred. This example can be included as part of an action on a form, with the content that should be produced in Excel:
Sub Click(Source As Button)On Error ErrOLECantCreate Goto errh On Error 207 Goto errh
Dim xlApp As Variant ' Declare variable to hold the reference.Dim ButtonHide As StringDim workspace As New NotesUIWorkspaceDim uidoc As NotesUIDocumentSet uidoc = workspace.CurrentDocument
‘ ** here we create a object for Excel - mind that this might be‘ ** different for different versions of Excel.Set xlApp = CreateObject("excel.application")xlApp.Workbooks.AddxlApp.Visible = True
664 Domino Designer 6: A Developer’s Handbook
‘ ** In the following loop, we add text to excel, from the current‘ ** NotesUIDocument with the content of the Keyword and Count fieldsFor i = 2 To 23
‘ ** These next lines, will based on the data just added to the cells, ‘ ** create a chart and set the location, axis labels and shape‘ ** of the chart.
End SubAdd the following code in the Terminate event of the code:Sub Terminate
On Error Resume NextxlApp.DisplayAlerts = FalsexlApp.Quit ' use the Quit method to closeSet xlApp = Nothing ' release the reference.
Chapter 14. Programming for Domino 6 665
End Sub
This example will create and add data to a spreadsheet in Excel, and create a chart based on the content of the data in the cells; see Figure 14-40.
Figure 14-40 Excel chart created from Notes/Domino
14.10.3 New features in Domino 6There are no new enhancements in COM in Domino 6; none of the new classes, methods, or properties added for LotusScript are available in COM in Domino version 6.0. Check subsequent maintenance releases of Domino 6 to see if COM support for the features is added. However, access via OLE Automation is possible.
666 Domino Designer 6: A Developer’s Handbook
14.11 WebSphere integrationIn this section, we provide introductory information about WebSphere integration with Domino.
14.11.1 What is WebSphereWebSphere is infrastructure software for dynamic e-business, delivering a proven, secure, and reliable software portfolio.
Providing comprehensive e-business leadership, WebSphere evolves to meet the demands of companies faced with challenging business environments such as the need for increasing operations efficiencies, strengthening customer loyalty, and integrating disparate systems.
Leading customers toward dynamic e-business means WebSphere provides answers to these challenging business environments. WebSphere is the only e-business platform that can provide everything you need to build, deploy and integrate your e-business, including Foundation & Tools, Reach & User Experience, Business Integration and Transaction Servers & Tools.
Together, these facets of the WebSphere software platform close the gap between business strategy and information technology, allowing you to create and operate a dynamic e-business.
14.11.2 Domino and WebSphere definedLotus Domino and IBM WebSphere are premier applications servers that address different parts of the market. Domino is the leading collaborative application server. WebSphere is a definitive Java Web Application Server (WAS), and thus it excels in tasks that require massive scalability, transaction support, and pure Java development model.
As premier application servers, both platforms support a wide range tasks. They enable skilled developers to develop powerful and versatile applications. It is possible, for example, to create rich applications in Domino 6 that rely almost exclusively on back-end data systems.
Similarly, it is possible in WebSphere to create content-intensive applications based on dynamic documents. Examples exist of these application types, and in many cases, the reason for creating them this way is as simple as having the software or skills in place.
Real opportunity comes from utilizing tools in a way that leverages their fundamental strengths; it is simply quicker, easier, and more robust to do it that
Chapter 14. Programming for Domino 6 667
way. When you use most tool combinations, it is often simpler to force the applications to fit one or the other of the tools exclusively, than to invest energy and time in the integration work required to make them work in harmony.
Perhaps the best way understand the differences, and leverage the best capabilities of each, is to examine the strengths of Domino 6 and WebSphere. Table 14-15 highlights same essential attributes Domino and WebSphere.
Table 14-15 Attributes of Domino and WebSphere
For more information about how to use Domino and WebSphere together, refer to the IBM Redbook Domino and WebSphere Together, SG24-5955.
Tip: Understanding these fundamental design points answers the basic question: “When do I use what in an application?
Primary attribute Domino WebSphere
Application type Collaborative Integrating or Trasactive
Content type Document Data
Object type Form, View, Database Servlet, JavaBean, Java Server Page (JSP), Enterprise JavaBean (EJB)
Architecture Integrated object model Java components
Scalability Large Massive
Skills required Moderate High
Development model(s) BASIC, COM/COM+, Java Java (J2EE)
Protocol supported HTTP, IIOP, SMTP, NNTP,IMAP/POP3, NRPC, etc.
HTTP, IIOP
Clients supported Notes, Browsers Browsers
Application tools Domino Designer WebSphere Studio, VisualAge of Java
668 Domino Designer 6: A Developer’s Handbook
14.12 JavaJava is one of the most important and more commonly used programming language. It is cross-platform and based on the power of networks. Domino offers you the option to write your applications in Java. Domino 6 and later supports Java programs written in JDK 1.3 and JSDK 2.0.
None of the new classes, methods, or properties added for LotusScript are available for Java in Domino 6.0 version. Check subsequent maintenance releases of Domino 6 to see if Java support for the features is added.
14.12.1 About Java Domino classesJava Notes classes are created by modifying some of the LotusScript Extension (LSX) architecture to include a Java “adapter” to compose the new Java Domino classes. The Java Domino classes have similar functions to some of the LotusScript Domino back-end objects.
You can use these classes from any Java program, either within the Notes Designer environment or outside of it, as long as Notes 6 is installed on the machine. Internally, Java Notes classes execute the same C++ code as the LotusScript Domino back-end objects, only the language syntax is different.
A Java program is generally made up of a number of files. You must designate one as the Base Class, which is the starting point for the Java program. For efficiency, typically for improving applet download speeds, you can bundle all of the class files and additional resources (for example GIF files) into a single compressed Java Archive file. The imported Java files can be of the following types:
� Class - *.class� Archive - *.jar
For example, when you write a Java agent program, the class you write must extend the class AgentBase. The code you want to execute when the agent runs is in the NotesMain() method.
To work with Java in Domino you need the Lotus Domino Toolkit for Java/CORBA 2.1. To download the toolkit:
http://www.lotus.com/ldd
14.12.2 Java coding conventionsThere are conventions you should follow to write a Java program, as described in the following sections.
Chapter 14. Programming for Domino 6 669
ClassesThe names of the Java classes are similar to the LotusScript classes, except that they begin with the lotus.domino prefix. Table 14-16 illustrates how some of the Java Domino classes correspond to LotusScript objects:
Table 14-16 Java classes and corresponding LotusScript objects
Note: The lotus.domino package has the same content as the Release 5 lotus.notes package plus new classes, methods, and other enhancements. The Release 5 lotus.notes package continues to be supported for backwards compatibility only. It does not contain the new classes, methods, and other enhancements.
By convention, start your own classes with the first character as upper case.
MethodsMethod names are written with the first character being lower case (for example, getFirstDocument). Of course, there are exceptions (such as FTSearch).
PropertiesTo access properties in Java, you also have to use methods. In Java, properties are implemented through methods, known as accessors, which use the following naming conventions:
� The name of a method used to get the value of a non-boolean property is the name of the property prefixed with “get”.
Java class LotusScript object
lotus.domino.Session NotesSession
lotus.domino.DbDirectory NotesDbDirectory
lotus.domino.Database NotesDatabase
lotus.domino.View NotesView
lotus.domino.Document NotesDocument
lotus.domino.Item NotesItem
lotus.domino.RichTextItem NotesRichTextItem
lotus.domino.Stream NotesStream
lotus.domino.MIMEHeader NotesMIMEHeader
Important: Java is case-sensitive; using the wrong case causes an error.
670 Domino Designer 6: A Developer’s Handbook
� The name of a method used to set the value of a property is the name of the property prefixed with “set”.
� The name of a method used to get the value of a boolean property is the name of the property prefixed with “is”.
Parameters and return valuesParameter and return values differ from LotusScript as needed to match the different data types in Java.
Object Containment HierarchyIn Java, you cannot create lotus.domino objects using the “new” modifier. All lotus.domino objects must be created with lotus.domino methods emanating from the root Session object.
14.12.3 Agents, applets and applicationsJava programs can take one of several forms, each with its own characteristics. The differences between these forms are summarized here.
Java agents complement the familiar LotusScript agents and, to a large degree, they can be used interchangeably when dealing with back-end operations. Reasons for choosing Java over LotusScript include existing programmer knowledge, multi-threading, a more fully featured language, extensibility through (non-visual) beans, and so on.
Applets allow a Notes developer to create a richer GUI environment for the end user. Applets will be dynamically downloaded from the server and executed on the client’s machine, and will work with either Web browsers or Notes clients.
The functions of applets can vary widely, from simple news tickers to complex database front-ends. Java applets are subject to the Java Sandbox security model, which prevents unauthorized applets from accessing sensitive machine resources and from performing certain operations. By default, applets will not have access to the Notes back-end classes. If this is required, then CORBA is needed.
Java applications differ from applets in that they are not dynamically loaded from the server; they are similar to traditional executables in this respect. However, Java applications typically run outside the Java “Sandbox” security model and can thus access machine and network resources denied to an applet. A Java application can be loosely regarded as analogous to a standalone application which accesses the Notes object model (for example, a C or Visual Basic program). By default, applets and applications will not have access to the Notes back-end classes. If this is required, then CORBA is needed.
Chapter 14. Programming for Domino 6 671
The model for Java agents differs from Java applets in a number of ways:
� Java agents are written explicitly for Domino. Applets are often designed be served up by any Web servers.
� Java agents behave in the same way as LotusScript agents, but Java applets behave like Java applets in any Web-authoring environment.
� Java agents only run within a Domino-supplied Java runtime environment, while Java applets run in both Domino-supplied Java runtimes and browser-supplied runtimes.
� Java agents are structured in the same way as Java applications (not as applets). They run within a Domino-supplied context as opposed to applets whose context is provided in part by the browser and in part by the codebase parameter specified as part of the applet tag.
For agents, CodeBase and DocBase are not meaningful ways of getting hold of additional classes. Instead, as with other Java applications, classes and resources are located within jar files and the class path.
� Java agents can access Domino databases directly by using the Java Domino classes. Applets can only access Domino objects within Notes using URLs. (Note that nothing precludes a Java agent from using URLs to access Domino objects in Notes.)
Agents do not have a UI (and consequently do not use resources as much as applets). Java Agents run in a relaxed security environment like Java applications do. You can wrap an application or agent in a SecurityLoader; typically this would be used in a tightly controlled secure environment when running a semi-trusted application. This feature is being built into JDK1.2, but can be achieved in 1.1x.
14.12.4 Adding CORBACommon Object Request Broker Architecture (CORBA) is an open standard defined by the Object Management Group (OMG). CORBA serves as middleware for a distributed computing environment whereby clients can invoke methods on remote APIs residing on other computers. CORBA uses Internet Inter-ORB Protocol (IIOP) for communication over a TCP/IP network.
CORBA/IIOP support enables Domino developers to create applets that can be downloaded to the client and can be remotely invoked in Domino services (for example, to initiate a workflow process).
In addition, CORBA/ IIOP enables information to be processed efficiently over networks within an open standards-based framework and to distribute work effectively between clients and servers, ultimately lowering the cost of ownership.
672 Domino Designer 6: A Developer’s Handbook
14.12.5 Benefits of using CORBASome advantages to using CORBA are:
� You can use Domino Object Model (DOM) back-end classes to support CORBA.
� The client does not have to deal with issues such as networking or security.
� CORBA allows many different clients to use the same objects (not copies of the objects). The latest version of the object is always used.
� Client applications can be in different languages from the Server Objects.
� Java ORBs and Stubs can be downloaded to the client at runtime, which means:
– Users do not have to install the application on the client before running it.– Clients are always working on the most current version of the application.– Network computers are supported as clients, as the application is
removed when the computer is turned off.
14.12.6 How and when to use CORBACORBA support can be easily added to Java applets and applications to extend their reach into the Domino back end. In order to utilize CORBA, you must make small changes to your server and Java programs.
A Java program using CORBA has the following requirements:
ServerThe server tasks HTTP and DIIOP must be running. Ensure that the notes.ini file contains the following line:
ServerTasks=<any other tasks>,http,diiop
To enable an applet for CORBA, import your applet into a form and select the appropriate properties from the applet InfoBox. (For performance reasons, when a CORBA-enabled applet is loading in the Notes client, all calls are transparently made to the Notes DLLs, rather than the Java classes.)
14.12.7 Compiling and running a Java programThe package lotus.domino, which comes with Domino 6.0, supports local and remote calls to the Notes object interface. This package contains the same classes and methods as the lotus.notes package shipped with Domino R5, plus new classes, new methods, and other enhancements.
Chapter 14. Programming for Domino 6 673
Note: The Domino R5 lotus.notes package is supported for backward-compatibility only.
A Java program using the Domino classes has the following requirements:
ServerThe server tasks HTTP and DIIOP must be running. Ensure that the notes.ini file contains the following line:
ServerTasks=<any other tasks>,http,diiop
DesignerEnsure that the NOTES.INI file contains the following line:
ALLOW_NOTES_PACKAGE_APPLETS=1
Include NCSO.jar and Notes.jar in your CLASSPATH environment, for example:
set CLASSPATH=<other>;<domino>\java\NCSO.jar;<domino>\Notes.jar
Notes.jar contains the high-level lotus.domino package, the lotus.domino.local package for local calls, and the old lotus.notes package. NCSO.jar contains the high-level lotus.domino package and the lotus.domino.corba package for remote calls. Strictly speaking, you do not need NCSO.jar if you are not compiling remote calls, and you do not need Notes.jar if you are not compiling local calls or old calls.
Your class code must import the high-level lotus.domino package:
import lotus.domino.*
14.12.8 Runtime requirements� A machine running a Java application that makes local Notes calls must
contain Domino 6.0 (Client, Designer, or Server) and must include Notes.jar in the CLASSPATH.
� A machine running a Java application that makes remote Notes calls need not contain Domino 6.0, but must contain NCSO.jar and must include NCSO.jar in the CLASSPATH.
� A machine running a Domino 6.0 agent that makes Notes (Java) calls must include Notes.jar in the CLASSPATH.
Note: A machine running an applet that makes Notes calls needs no Domino software or CLASSPATH assignments.
674 Domino Designer 6: A Developer’s Handbook
� The server must be running when remote calls are made.
14.12.9 Remote calls to lotus.domino packageIn order for a Java application to have remote runtime access to lotus.domino, you must create a Session with the NotesFactory method createSession (String IOR, String user, String pwd).
The IOR, or initial object reference, parameter is required to access a Domino server remotely. It is a string contained in the file diiop_ior.txt in the notes directory of the Domino server. The NotesFactory method getIOR(String host) returns the IOR for a given host. Use the createSessionWithIOR methods if you have another mechanism for getting the IOR.
The second and third parameters must be a user name and Internet password in the Domino directory on the server being accessed. If empty strings are specified, anonymous access must be permitted by the server.
The application must not use the NotesThread method. NotesThread is for local access only.
This example demonstrates an application using remote calls:
import lotus.domino.*; // replaces old lotus.notes packagepublic class platform3 implements Runnable{ String host=null, IOR=null, user="", pwd=""; public static void main(String argv[]) { if(argv.length<1) { System.out.println("Supply Notes server name"); return; } platform3 t = new platform3(argv); Thread nt = new Thread((Runnable)t); nt.start(); }
public platform3(String argv[]) { host = argv[0]; if(argv.length >= 2) user = argv[1]; if(argv.length >= 3) pwd = argv[2]; }
Chapter 14. Programming for Domino 6 675
public void run() { try { IOR = NotesFactory.getIOR(host); Session s = NotesFactory.createSession(IOR,user,pwd); String p = s.getPlatform(); System.out.println("Platform = " + p); } catch (Exception e) { e.printStackTrace(); } }}
14.12.10 Applet calls to lotus.domino packageAn applet intended for run-time access of lotus.domino extends AppletBase and puts its functional code in the methods notesAppletInit(), notesAppletStart(), and notesAppletStop().
You do not have to distinguish between local and remote access. AppletBase will make local calls if the applet is running on a machine with Domino installed, and remote calls otherwise. Domino will automatically supply the IOR.
Here is an example of an applet:
import lotus.domino.*;public class platformApplet extends AppletBase{ java.awt.TextArea ta; public void notesAppletInit() { setLayout(null); setSize(100,100); ta = new java.awt.TextArea(); ta.setBounds(0,0,98,98); add(ta); ta.setEditable(false); setVisible(true); } public void notesAppletStart() { Session s;
676 Domino Designer 6: A Developer’s Handbook
try { // Can also do openSession(user, pwd) s = this.openSession(); if (s == null) { //not able to make the connection, warn user ta.append("Unable to create a session with the server"); return; } String p = s.getPlatform(); ta.append("Platform = " + p); } catch(Exception e) { e.printStackTrace(); } finally { // this.closeSession(s); } }}
Setting security options for Java appletsYou can now set security options for applets to prevent unauthorized access to your Notes file system or to Notes Java classes. You create an execution control list that identifies what people and groups you trust with access to your Notes system.
When an applet runs on your workstation, Notes checks for execution rights of the person or group that signed the applet. If an applet is signed by a person or group without the correct authorization, Notes alerts you to the illegal operation. You can abort the operation and not run the applet, or trust the signer of the applet one time, or automatically add the signer to the execution control list.
Note that this security model only applies to applets running on the Notes client. Applications running on a Web browser must follow the security model set by the browser.
To set applet security:
1. Choose File -> Security -> User Security.
2. Click What Others Do and then either Using Workstation, Using Applets, or Using JavaScript.
3. (Optional) To add an item to the “When n is signed by” list, click Add, enter the name of the person or organizational certifier, for example /Acme (click
Chapter 14. Programming for Domino 6 677
the person icon to choose a name from your Personal Address Book), then click OK. You can then decide access for that item.
4. (Optional) To edit an item in the “When n is signed by” list, select the item, click Rename to edit the item or enter a new name (or click Remove to delete an item from the list), then click OK.
5. Select the person or organizational certifier whose access you want to specify.
6. Enable the types of access you want this person or organizational certifier to have.
Note: The implementation of this applet security system removes the restriction on using Notes classes in Java applets.
Using the NotesThread ClassA standalone program must use the lotus.domino.NotesThread class, which extends Java.lang.Thread. You can either extend NotesThread, or implement the run-able interface.
If you extend NotesThread, the entry point to the functional code must be public void runNotes(). If you implement run-able, the entry point must be public void run().
Note the following points:
� A Domino or Domino agent program must extend the lotus.notes.AgentBase class, which extends lotus.domino.NotesThread. The class that contains the agent code must be public. The entry point to the functional code must be public void NotesMain().
� The lotus.domoino.Session class is the root of the Notes back-end object containment hierarchy.
– For standalone programs, use one of the NotesFactory.createSession methods to create a Session object.
– For agents, use the AgentBase method getSession().
� System.exit must not be used to terminate a program using the NotesThread class (and by extension the AgentBase class). In an agent, System.exit throws SecurityException. In a standalone program, System.exit may cause corruption problems.
� For foreground agents, System.out and System.err output goes to the Java debug console. For locally scheduled agents, System.out and System.err output goes to the Domino log.
678 Domino Designer 6: A Developer’s Handbook
14.12.11 Creating a Java agentThe following examples show how to create Java agents.
Example 1: Java agent This example shows an agent that runs on newly created and modified documents since the agent was last run. The program works on the unprocessed documents, prints the form name of each document, and marks each document as processed.
The first time the agent runs, it returns all of the documents in the database. Thereafter, the agent returns those documents that updateProcessedDoc has not touched.
� Create an agent:
– Name the agent.
– Select When should this agent run = Manually from Actions Menu.
– Which documents should it act on = All documents in database.
– Select Java as your source code and write the agent code.
import lotus.domino.*;import java.util.*;
public class myagent extends AgentBase{ public void NotesMain() { try { Session s = getSession(); AgentContext ac = s.getAgentContext(); DocumentCollection dc = ac.getUnprocessedDocuments(); Document doc; int size = dc.getCount(); System.out.println("Count = " + size); doc = dc.getFirstDocument(); while (doc != null) { System.out.println (" *** " + doc.getItemValue("form")); ac.updateProcessedDoc(doc); doc = dc.getNextDocument(doc); } } catch (Exception e) {
Chapter 14. Programming for Domino 6 679
e.printStackTrace(); } }}
– Save it.
Example 2: using Java Notes classes This sample Java program is from Lotus Technology Learning Center. The Java code is commented to help you understand how the Java Notes class is implemented.
This program creates an instance of NotesThread, a class which extends the Java Thread class. It allows Notes to properly initialize and terminate per thread in a convenient way for the programmer.
This sample program does the follow things:
1. Creates a new Notes session.2. Opens a database (in this case, the local Address Book).3. Accesses the People view.4. Searches the People view for the entered name.5. Accesses the document that matches the search criteria.6. Pulls the Spouse field out of the document.7. Prints the Spouse field in a message output.
Running this sample1. Add a person John Smith and his spouse Mary Smith into the local Address
Book. John Smith will be used as a parameter to the command to run the Java program.
2. Write the following code into a Java program(.java) and set your PATH and CLASSPATH, for example, as follows:
class abe implements Runnable{public String g_name;
// if you run the class from the command line...public static void main(String argv[])throws Exception{// print out a message, then exit, no args providedif (argv == null || argv.length == 0) System.out.println("Usage: java abe <user name>");
else { // create new instance of abe abe t = new abe(); // store name to look up in the instance t.g_name = argv[0]; // make sure the Notes lsx is loaded NotesThread.load(true); // create a thread instance for running abe, start it NotesThread nt = new NotesThread((Runnable)t); // start the thread, call our runNotes() nt.start();
Chapter 14. Programming for Domino 6 681
}}
// this would get called if we ran it from java.lang.Thread // insteadpublic void run(){runNotes();}
public void runNotes() { int i; try { System.out.println("Creating Notes session..."); Session s = NotesFactory.createSession(); // show off, print the current user's name System.out.println("User name = " + s.getUserName());
// get db instance for the name and address db Database db = s.getDatabase("","names.nsf"); // find the "People" view View view = db.getView("People"); // search for the name provided view.FTSearch(g_name); // for now, ignore multiple matches Document doc = view.getFirstDocument(); // look up contents of the "spouse" field String name = doc.getItemValueString("Spouse"); System.out.println("Spouse of " + g_name + " is " + name); // also print out the date the document was created System.out.println("Date created: " + doc.getCreated()); } catch (Exception e) { e.printStackTrace(); } }}
682 Domino Designer 6: A Developer’s Handbook
14.12.12 Java Database Connectivity (DBC)The Domino driver for Java Database Connectivity (JDBC), providing standard JDBC access to data in Domino databases, is also available from the Lotus Web site:
http://www.lotus.com
By using this driver, you can write Java applets and applications that use JDBC to access information in Domino databases. JDBC classes ship with Domino in the java.sql classes. These classes may be used when writing Java agents to access relational data via standard JDBC drivers.
14.12.13 ServletsJava servlets, as their name suggests, only run on the server. A servlet is invoked by a client request and will respond directly to the client.
Typically, a servlet will be used to provide a high performance link to a back-end system and format the results back to the client as a HTML document. However, servlets are not restricted to serving just HTTP requests, and may in fact converse directly with any suitable client application (usually an applet)— a loose analogy can be drawn to the ability in Domino to invoke an agent directly from a HTTP request (myagent?openagent¶m1=value1).
Creating a servletTo create a servlet, you need a Java compiler and the servlet API. You can obtain both from Sun Microsystem's Web site:
http://java.sun.com
Download the Java Development Kit (JDK), which includes the compiler and other basic tools, and the Java Servlet Development Kit (JSDK), which includes the servlet API specification, the servlet .JAR file (jsdk.jar), and example servlets. The Sun site also provides links to other servlet resources on the Web.
You can also write servlets using any popular Java development environment, such as IBM Visual Age for Java. As a convenience, a copy of jsdk.jar is included in the Domino server and Designer installation kits. It is identical to the file supplied in Sun's JSDK.
Sun periodically updates the JDK and JSDK. Lotus Domino Designer Release 6 supports JDK 1.3 and JSDK 2.0. Domino quarterly maintenance releases (QMRs) often incorporate Sun's upgrades, so check QMR Release Notes to verify the supported JDK and JSDK versions.
Chapter 14. Programming for Domino 6 683
You can create a servlet that accesses Domino through the Common Object Request Broker Architecture (CORBA) interface. If the servlet accesses Domino through the CORBA interface, it can specify a Domino user name and Internet password. Domino security applies to all CORBA operations.
You can control who can access the servlet by using file protection documents in the Domino Directory.
Calling a servletYou can invoke directly by a URL. Domino recognizes two types of servlet URLs:
1. A servlet specified by its name (for example: http://acme.com/servlet/SQLDatabaseQuery?month=june).
2. A file extension that the Domino administrator has mapped to a servlet (for example: http://acme.com/sqlquery.esp?month=june).
A servlet is loaded once, and it stays loaded until the HTTP server task is shut down or restarted. This gives servlets a significant performance advantage over agents or CGI programs.
However, this also means that the servlet classes can be accessed from many requests simultaneously, so you must make sure that the servlet code is thread-safe.
14.12.14 Java Server Page (JSP)A JSP is a dynamic HTML Web page that contains code that executes application logic to generate on-demand content. The HTML page is created at the time it is requested.
JSP pages are compiled into servlets; the code they contain is processed by the server, and the result is displayed back for the Web client. For more information on JSPs, see the Sun Microsystems Web site:
http://java.sun.com/products/jsp/
JSP language structureJSP technology provides a flexible structure since it supports custom tags, thus making this standard more extensible and improving its usability. Its structure separates the roles of graphic designers and programmers. Based on Java technology, JSP is also portable, so you can “write once, run everywhere”.
684 Domino Designer 6: A Developer’s Handbook
Figure 14-41 JSP code sample
Figure 14-41 illustrates JSP syntax in a simple sample, where we can highlight the following parts:
JSP tagsYou can now retrieve Domino data from an NSF database for use in a JSP tag. Designer 6 includes custom tag libraries that you can include in your Web site directory files. The power of a JSP page is in the tags that it contains. JSP tags are similar to HTML tags, except they contain a reference to Java implementation classes rather than to instructions on how to display the tag body. This section defines how to use tag libraries.
A JSP tag library is a collection of custom JSP tags. The library defines declarative, modular functionality that can be reused by any JSP page. The tags are defined in XML format in a text file known as the Tag Library Descriptor file or TLD.
In the TLD, the tag definitions tell the JSP parser how to interpret each tag, its attributes, and its body content. By grouping the tags into one library file, they can be shared by several JSPs.
The advantage of using Domino JSP tag libraries is that they enable Web page authors who are not Java experts, or who are not versed in handling back-end Domino objects, to incorporate complex, server-side Domino data manipulation into their pages through easy-to-use tags.
There are two Domino JSP tag libraries, as shown in the following table. Both comply to the JSP 1.1 and Java Servlet 2.2 specifications developed by Sun Microsystems.
You can download the JSP 1.1 specification from:
http://java.sun.com/products/jsp/download.html
You can download the Java Servlet 2.2 specification from:
Using Domino JSP tags with a Web application serverThe Domino JSP tag libraries are designed to let you build applications that can run on any J2EE-compliant Web application server.
To use the tags in a Web application:
1. Copy the domtags.jar file, which is located in the Notes/Data/domino/java directory, to the WEB-INF\lib directory for the Web application.
2. Copy the domtags.tld and domutil.tld files, which are also located in the Notes/Data/java directory, to the WEB-INF directory for the Web application.
3. In the web.xml file for your application, define the following tag library XML tags:
You can also use the web.xml file to set default values for the tags listed in the topic, “Setting default JSP Attribute values.”
4. Add either of the following Domino Objects for Java JAR files to the classpath of the server hosting the Web application:
– NOTES.JAR - use this if you are setting up the application for local access (Domino and the Web application server on the same machine.) Note also that you must either disable the HTTP task or reassign its port number, since the default for both the HTTP and DIIOPtasks is port 8080.
– NCSO.JAR - use this if you are setting up the application for remote (CORBA/DIIOP) access (Domino and the Web application server on different machines.)
If you are using WebSphere as the Web application server, use NCSOW.JAR instead. The NCSOW.JAR file does not include the ORB (or Object Request Broker) implementation; the ORB supplied with WebSphere is used instead to avoid conflicts during the brokering process.
Let’s check this sample of using JSP tags to get some information from a Domino database:
</domino:view><br><form action="multiform.jsp" name="newEntry"><input type="submit" value="Create New Entry"/><br></form></BODY></HTML>
This example accesses a Domino database from a JSP file, through jsp tags, and displays the album title and artist name of all viewed documents. Each result row is a link for the specified document, and the multiform.jsp file handles these events if the user required that for some document. This sample also lets the user create new documents, through the Create New Entry button.
Using Domino JSP tags with WebSphere remotelyThe Domino JSP tag libraries are designed to work with any Web server that supports J2EE standards. This section outlines the steps required to run a tag application remotely with Domino Release 6 and WebSphere AES or AE (single server edition).
1. Put the NCSOW.jar file into either:
– <websphere dir>/appserver/lib/ext, if you want to run more than one application that uses the custom tags
– WEB-INF/lib directory of the application
Remove Notes.jar; only one JAR file can be installed at a time.
2. If you were running WebSphere and Domino from the same machine previously, be sure to remove the path to Domino from the machine where WebSphere is installed.
3. Make sure the Domino server is running and that the DIIOP task is running on the server.
By default, the Domino HTTP and DIIOP tasks are both assigned to port number 8080. Either disable the HTTP task or reassign one of the tasks to a different port number.
688 Domino Designer 6: A Developer’s Handbook
4. Define the remote host for the tags by either:
– Adding a value for the host attribute to any tags in the application that have a host attribute (these include the session, db, form, document, view the dbselect, mailto, and runagent tags).
– Updating the web.xml file for the application to include a <context-param> tag that specifies values for the lotus.domino.default.host and lotus.domino.preset.host attributes, as follows:
You assign and maintain the connection to a single host (that you define in the host attribute) for the life of a session.
Note: Do not use *webuser as the value for the default or preset user attributes. Specifying *webuser as the value for the user attribute should only be used with container-based authentication and single sign-on. WebSphere AES does not support container-based authentication nor single sign-on with Domino.
Incorporating the tag library in a JSPA JSP author tells the Java parser where to find the Tag Library Descriptor file using a taglib directive. The following taglib directives, when included in a JSP page, indicate that tag libraries exist and where they are located:
This code tells the JSP engine how to parse a page before it compiles it into a servlet. Note that the taglib directives have the following two parameters:
1. uri - this specifies the name and location of the TLD file.
This can be either an absolute or relative URL that refers to the TLD.
2. prefix - this indicates the namespace to assign to the library.
You then use this namespace in front of the tag names of tag elements defined in the TLD. The default namespaces for the domtags.tld and domutil.tld libraries are domino and util, respectively. Using the defaults, you would refer to the session tag as domino:session and the switch tag as util:switch.
Incorporating individual JSP tags in a pageJSP tags are defined in the TLD using the Extensible Markup Language (XML) format. Each tag element includes a set of attributes within its opening and closing tags. The tag element represents a Domino object; its attributes further
Chapter 14. Programming for Domino 6 689
define the object by qualifying what information it should share about itself with the JSP page.
To include a tag, follow these steps:
1. In the HTML editor, after the page directives and opening <HTML> and <BODY> tags, enter the opening angle bracket of a tag(<), followed by the namespace for the TLD containing the custom tag you want to specify (domino or util), a colon(:), then the tag name; for example:
<domino:view
2. Enter any attribute values you want to set for the tag by entering the attribute name, followed by the equals (=) sign, then the value you want to set for the attribute, surrounded by quotation marks. For example, to specify the viewname and max attributes, enter:
<domino:view viewname="View Title" max="10"
Some tags attributes are required. For example, specifying a value for the name attribute of a form tag is mandatory. See the documentation provided here to determine which attribute values must be supplied for an individual tag.
3. To close the tag:
– If other tags are included in the context of this tag, close the opening tag with a closing angle bracket only (>). This indicates that this tag element contains other elements. After you have added the tags contained within a tag element to the page, you enter a closing tag for the element(</domino:viewloop>).
This containment hierarchy of the tags helps to define the context structure of the data. For example, to display a Domino view element on a JSP, you use the viewloop tag. The viewloop tag contains one or more viewitem tags within it. (Refer to the following example for the format used to incorporate the viewloop tag.)
– If no other tags are included in the context of this tag, close the tag with a slash, then a closing angle bracket (/>). This indicates that the tag element contains no other elements. (Refer to the following example for the format used to incorporate the viewitem tag.)
JSP limitsNote the following known limit to JavaServer Pages:
� The size of a Java byte stream cannot exceed 64 K.
690 Domino Designer 6: A Developer’s Handbook
Be aware of the following point before you start developing JSPs:
� Incorporating a form into a page using the <jsp:include> tag renders any validhref attributes on the form useless. You can define a validhref attribute for the following tags: form, deletedoc, docnavimg, savedoc, saveclosedoc.
14.12.15 Script librariesit’s very efficient to organize and group your code in a unique place such as a script library, and leave it shared, so it can be used by other design elements. In this way you code only in one place, instead of coding in several design elements, thus reducing programming and maintenance time.
There are three kind of Script libraries:
� LotusScript� Java� JavaScript
In this section, we focus on the Java and JavaScript Libraries, as LotusScript libraries are described elsewhere.
Java LibraryTo create a Java Library, follow these steps:
1. Open the database in Design mode and switch to the Shared Code\Script Libraries pane; see Figure 14-43 on page 692.
Chapter 14. Programming for Domino 6 691
Figure 14-42 Script libraries
2. Click New Java Library. (You may also choose Create -> Design -> Script Library -> Java Library from the Action bar.) Figure 14-43 will be shown.
Figure 14-43 Java script library
3. Enter your code and save the library.
692 Domino Designer 6: A Developer’s Handbook
To include a Java library in a Domino Java agent, do the following:
1. Open your agent in design mode
2. Click Edit Project (this is shown at the bottom of the Programmer’s Pane in Figure 14-43 on page 692).
3. The dialog box shown in Figure 14-44 is displayed.
Figure 14-44 Organize Java Agent Files dialog box
4. In the Browse field, select Local File System if you want to specify some file in the File System, or select Shared Java Libraries. The last one displays a list with the Java libraries for you to choose.
5. Select the options required, click Add/Replace File(s), and then click OK.
JavaScript libraryTo create a JavaScript Library, follow these steps:
1. Open the database in Design mode and switch to the Shared Code\Script Libraries pane; see Figure 14-45 on page 694.
2. Click the New JavaScript Library button. (You may also choose Create -> Design -> Script Library -> JavaScript Library from the Action bar). Figure 14-45 on page 694 will be shown.
Chapter 14. Programming for Domino 6 693
Figure 14-45 JavaScript script library
3. Enter your code and save the library.
You can include a JavaScript library in some design elements such as Forms, Subforms and Pages. To do that, follow these steps:
1. Open a page, form, or subform in Designer.
2. Choose Create -> Insert Resource.
3. Highlight “JavaScript libraries” and select an available JavaScript library, and then click OK. Figure 14-46 on page 695 will be shown.
694 Domino Designer 6: A Developer’s Handbook
Figure 14-46 Inserting a shared resource - javascript
This can both be added directly on the form, and as part of the “JS Header” of the form, page or subform.
14.13 SummaryIn this chapter, we covered some basic methods for programming the Domino Object Model using LotusScript, JavaScript and Java, as well as for using COM to integrate with Microsoft applications. We also covered accessing Domino applications from JSP pages.
Chapter 14. Programming for Domino 6 695
696 Domino Designer 6: A Developer’s Handbook
Chapter 15. Rich text programming
In this chapter, we describe how to copy, create, analyze, and manipulate rich text in Notes documents.
Notes and Domino 6.0 contains lots of new functionality to give you more visibility and control of information in rich text fields than was possible in previous versions. This chapter has several examples of the practical use of these new capabilities. All the examples presented here are available in a sample database, Notes6RichText.nsf, which is available for download on the Redbooks Web site. See Appendix B, “Additional material” on page 797 for instructions on how to obtain it.
15.1 What is rich textRich text fields can contain free-form, “word processor” style information, including images, file attachments, OLE objects, font and color changes, tables, buttons, doc links and URL links, and so forth. If you need something other than plain text, use a rich text field.
For “regular” fields, the font, color, text size, paragraph indentation and spacing, tab stops, and hide settings are controlled by the form that contains the field. This formatting information is not stored in the document. If you edit the design of the form, and change the font for a field, when you open a document created with the previous version of the form, the field will appear in the new font.
But rich text fields don’t work that way; with them, the formatting information is stored in the document, as part of the rich text. The form establishes the default formatting for the field, but the user can change these settings as they edit a document, for parts or all of the text. This can happen inadvertently, for instance if they copy and paste text from another Notes document. When they save the document, their formatting is saved too. If you use Domino Designer to change the form, it won’t affect the way rich text looks in existing documents.1
The text in a rich text field is stored in one or more paragraphs. Paragraphs are delimited by a paragraph break (pressing the Enter key, if you’re typing). It’s possible to have a line break within a paragraph either because the text wrapped or because the user entered a line break (Shift+Enter). When text is contained within a table or section, it’s still composed of paragraphs. A table cell or section may contain more than one paragraph.
Figure 15-1 Use View / Show / Hidden Characters to see paragraph end markers
It’s helpful to think of rich text as a series of objects, which may include tables, links, sections, and a great many other things. Text is also treated as an object; a sequence of consecutive characters that are in the same paragraph and use the
1 Actually, depending how the user edited the text, a change on the form may affect the first paragraph of the rich text in an existing document.
Tip: Don’t hide a rich text field by setting its hide attributes on the form. Rich text has its own hide attributes, which override those on the form. Lotus technote 179788 gives workarounds.
698 Domino Designer 6: A Developer’s Handbook
same style is referred to as a text run. Functions that let you work with rich text tend to treat this sequence of characters as a unit. For instance, if you search the rich text for a string, you’ll only find the string if all of its characters are in the same text run.2
15.2 Summary versus non-summary fieldsTo save time and space when compiling view indexes and replicating documents, Notes designates certain fields as summary fields. Only summary fields can be used in views, and the replication settings dialog lets you opt to replicate only summary information to your local replica.
In general, all non-rich text fields are summary fields, and vice versa. This is how Notes creates the fields by default. You can change this default one document at a time using an agent and the NotesItem.IsSummary property. If rich text is flagged as a summary field, you can use @Abstract to display some of its contents in a view. However, doing so is likely to impair performance of your application. A more useful application of the IsSummary property is to set a non rich text field to be non-summary, if you know it’ll frequently contain a lot of text and you don’t need it in views.
15.3 Rich text and the Notes APIsWith the possibility of images inside of tables inside of merged table cells inside of sections, the structures used to represent rich text are necessarily complex. The tools for working with rich text are correspondingly complex. A detailed discussion of this topic is beyond the scope of this guide; however, the Notes C and C++ APIs, which you can download from the Lotus Web site, contain documentation of the “CD Record” structure of rich text and example programs for reading and creating rich text values.
You can do much more with rich text using the APIs, the C API in particular, than you can with LotusScript, Java, or macro language. Some examples of things you would need to use the API for are the following tasks:
� Work with images in a rich text field
2 However, it’s possible to strip out the formatting and get just the plain text of the field, so that you can search the text without text runs being an issue.
Restriction: A paragraph of rich text is limited to 64K bytes. Since characters are stored using a multi-byte character set, this will be much less than 64K characters. Notes will break up too-long paragraphs into multiple paragraphs.
Chapter 15. Rich text programming 699
� Create tables with:
– Merged cells
– Cells with background color or image that differs from the table background color
– Hidden borders
– Timing properties (cycle through rows and so forth)
� Add or delete table columns
� Add formula buttons, text pop-ups, URL links, action hotspots, embedded elements, or computed text
� Use bulleted or numbered lists
� Adjust hide properties and formulas
� Set attributes of a collapsing section to make it automatically open or close depending on the edit mode
� Create a form and add fields to the form and formulas to the fields (the body of a form is a rich text value)
There are workarounds for some of this. For instance, you can create the rich text you want using the Notes user interface, then your program can copy and modify it as required. This is a great way to create reports in Notes, as the examples in this chapter show. However, you can’t directly program any and all rich text without using the API.
15.4 New rich text capabilities in Notes 6With Notes 6, you can get much more detailed information about the contents of a rich text field than was previously possible. You can change properties of existing elements (for example, change the background color of a table), and edit or delete information in the middle of an existing rich text value.
In Notes R5 you could create rich text only by adding to the end—you could not insert in the middle or delete anything that was already there. You could select fonts, colors, indentation, line spacing, and tab stops; add text, line breaks, paragraph breaks, doclinks, file attachments, and OLE objects. When reading rich text, you could get the text from the field, or scan it for file attachments or OLE objects.
With Notes 6, you can also create tables and collapsing sections. You can scan the rich text for the most common elements—text, paragraphs, font changes, style changes, links, tables, sections, and attachments. You can find out
700 Domino Designer 6: A Developer’s Handbook
information about these elements—for instance, what font is being used or how many rows are in a table.
These capabilities are available in LotusScript using several new classes in the Domino object model. They are described in detail in later sections, along with the previously existing functionality. The new capabilities are not available in Java or COM/OLE2 in the initial Notes 6 release; they may be added in a point release.
Another new feature that will be helpful in many applications is the Rich Text Lite field type. While a standard rich text field lets the user add any kind of information they like, in many applications it’s undesirable to allow that much freedom. If there’s a field where you just mean to have the user attach a single file, or add a photo, or some other specific thing, you can restrict their input to just that and nothing else. Refer to the online help file for details about this feature.
15.5 Rich text in macro languageMacro language has no datatypes for handling complex data such as appears in a rich text field. You can’t tell, for instance, whether the rich text contains a table. But you can copy out the text and work with that, or copy a rich text value from one document to another without knowing what’s in it. You can also get information about file attachments, though it’s not possible to tell whether a file is attached to a particular rich text field or to the document.3
Anything more complex requires using LotusScript or Java. But the simple functions available through macro language do have their uses.
15.5.1 Macro language functions to handle rich textSeveral macro expressions can be used to refer to rich text values. Macro language lacks operators for manipulating the values—you can’t concatenate two rich text values together, for instance. However, you can copy rich text fields from one document to another or get their text. The expressions you can use to work with rich text values include:
� @Abstract: This function produces a compacted, truncated, and abbreviated version of the text in a rich text field. Various arguments let you select the maximum length and the degree of compaction and abbreviation desired. @Abstract is handy when you need to use the rich text in a situation that calls for brevity. For instance, you might use it in an agent to forward e-mail to a pager or cell phone.
3 An attachment is attached to the document, as opposed to a rich text field, if it’s added from a Domino Web form using the file upload control. This is sometimes called a “V2 style” attachment.
Chapter 15. Rich text programming 701
@Abstract is also useful if you must summarize rich text information for display in a view column. Recall, however, that rich text by default is a non-summary field, so view formulas cannot read its value. The recommended way to deal with this, is to create a Computed field on the form that uses @Abstract to create the rich text synopsis as the document is saved.
� @Text: New in Notes 6.0, the @Text function returns the complete text of a rich text field (compare to @Abstract, which abbreviates words and reduces the size of the text to a number of characters you specify). In earlier versions, @Text could not get information from a rich text field. As with @Abstract, you can’t use this capability in a view column or selection formula, but it’s useful for agents and occasionally for form fields.
� @GetDocField and @GetField can retrieve a rich text value, which you can then assign to a different field.
� @GetProfileField: If you create a profile form that contains a rich text field, you can use @GetProfileField to retrieve that value, just as you could any other field type. Read more about profile documents in 4.13, “Profile documents” on page 168. This is mainly useful in providing a default value for a rich text field.
� @DbLookup: If given the name of a rich text field as the final argument, this function lets you retrieve a rich text value using a view key. This is mainly useful in providing a default value for a rich text field.
� @Attachments, @AttachmentNames, @AttachmentLengths, and @AttachmentModifiedTimes let you retrieve information about file attachments and embedded objects, which are generally in a rich text field. One OLE object will appear to be several attachments, according to these functions. These functions do work in a view.
You can also refer to a rich text field by name, if it’s in the current document, and use a FIELD statement to copy the value:
FIELD Comment := LongDescription; REM “Create a copy of LongDescription RTF”;
A word of caution about using rich text in macro language. Depending what’s in the rich text item, if you copy it from place to place using macro language, you
Note: If you use @Text on too large a field you will get a “User defined error.” @Abstract does not have this problem.
Restriction: You can’t copy file attachments, embedded objects, and fonts (other than the Notes default fonts) using macro language. LotusScript does not have this problem in version 6.
702 Domino Designer 6: A Developer’s Handbook
may not get all of it. File attachments and OLE objects, while they are displayed as part of the rich text, are actually stored in a separate item named $FILE. If you copy the rich text, you’ll copy the icon of an attachment, but not the actual file. Likewise, using fonts other than the Notes default fonts requires storing some data in a separate item called $Fonts; this will not copy over along with the rich text that uses the fonts, so the copy of the rich text will use a Notes default font instead.
15.5.2 Working with rich text in edit modeIf you refer to a rich text item—either by name, or using @Text or @Abstract—in a document in edit mode, the information you get won’t reflect recent changes the user has made in the field. Instead, you’ll get the value the field had when the document was opened. Unlike with other field types, Notes normally doesn’t “notice” the user’s edits until they try to save the document. This has to do with the “front-end/back-end” distinction discussed in 14.2, “The Domino Object Model” on page 565.
You can force Notes to process the user’s edits by calling the LotusScript method NotesUIDocument.Refresh(True). This refreshes all the fields, the same as F9 or View/Refresh, and in addition updates the rich text values into the “back end” document. There is no corresponding macro language function; a normal refresh, for example using @Command([ViewRefreshFields]), will not update rich text.
Notes doesn’t let rich text changes move the other way, meaning you can’t make changes on the “back end” of a document in edit mode and make the user’s document display those changes. However, the various [Edit...] @Commands let you change the contents of the editing field directly.
15.5.3 Example application: default value for rich text fieldAlthough a rich text field allows the entry of free-form information, in practice, many applications want users to enter information in a particular format: it might be a table that needs to be filled in, or a preferred outline structure for a document. You can design the desired structure onto the form, but this makes the application inflexible. If you want to assist users instead of trying to control them, you can fill in the field with starting information that they can then modify.
To do this, create a profile form and add a rich text field to the form. Refer to 4.13, “Profile documents” on page 168 for a complete explanation of profile
Chapter 15. Rich text programming 703
documents. We have named our profile form “MasterProfile”—our own choice, not a reserved word.
Figure 15-2 MasterProfile form in Domino Designer
Edit the profile document and add the starting field contents. As mentioned previously, non-default fonts, file attachments, and OLE objects won’t work here; you can’t copy them when you copy the field that contains them. To prevent this, in our sample database, we’ve added a validation to the Querysave event of the MasterProfile form to check for these types of data and prevent the user from saving them.
Figure 15-3 Profile document being edited to provide default rich text value
704 Domino Designer 6: A Developer’s Handbook
In the rich text field on the Document form, use @GetProfileField in the Default Value formula to read the rich text field from the profile document.
Figure 15-4 Document form in Domino Designer
Now, when a user composes this document, the rich text field will automatically be filled in with whatever rich text you’ve entered in the profile document.
If you don’t care for profile documents, you can store the default value in a regular Notes document and use @DbLookup in your default formula instead of @GetProfileField. Profile documents give better performance.
15.6 Working with rich text in LotusScript and JavaMost of the new rich text functionality is available through new classes and methods of the Domino Object Model.
Certain “front-end” functions (see discussion about “front-end/back-end” in 14.2, “The Domino Object Model” on page 565) are available only when working on documents in edit mode, using the NotesUIDocument class. Since there is no equivalent Java class, these functions aren’t available in Java. In addition, the rich text classes, methods, and properties that are new in Notes 6 are not available in Java in the 6.0 release. We expect these functions to be available in a point release.
In this section, we discuss the LotusScript implementation of the classes only. For those functions which are also implemented in Java, the method names and operation are generally the same.
15.6.1 The LotusScript rich text classesTable 15-1 on page 706 shows the classes available for working with rich text in the back end, which means starting with a NotesDocument object as opposed to a NotesUIDocument.
Chapter 15. Rich text programming 705
Table 15-1 LotusScript classes for handling rich text
15.6.2 Creating and appending to rich textTo create a new rich text value from scratch, or to add to an existing one, start with a NotesDocument object. To create a new rich text item, use NotesDocument.CreateRichTextItem. To work on an existing one, use NotesDocument.FindFirstItem to locate it. If you’re not sure whether the field already exists, use both methods, as shown in the code sample.
Example 15-1 Locating or creating a rich text item to append to
...Dim rtf As Variant‘ We think it's a NotesRichTextItem, but in case it's not, this avoids a‘ type mismatch.
Class name (*=new in Notes 6) Represents
NotesRichTextItem The entire contents of a rich text field.
NotesEmbeddedObject An OLE object or file attachment within the rich text. Note: These objects can also be associated with the document, for example, if an attachment is added via Domino file upload control.
NotesRichTextDocLink * A doc link, view link or database link, with either an icon or link text. LotusScript doesn’t contain a way to work with URL links.
NotesRichTextParagraphStyle The settings you can make on a paragraph: indentation, line spacing, tab stops.
NotesRichTextTab A single tab stop, including position and alignment. Contained in NotesRichTextParagraphStyle.
NotesRichTextStyle The settings you can make on text: font, size, color, effects, and so forth.
NotesRichTextTable * A table.
NotesRichTextSection * A collapsing section.
NotesRichTextNavigator * A position within the rich text; you can think of it as a “cursor” where you can insert or edit items.
NotesRichTextRange * A consecutive subset of the rich text contents. You can think of it as a “selected area.”
NotesColorObject * A color, which can be specified using 256 levels of red, green and blue, or hue, lightness, and saturation.
706 Domino Designer 6: A Developer’s Handbook
Set rtf = doc.GetFirstItem(“Comment”)If rtf Is Nothing Then ‘ the item doesn’t already exist; create it.
Set rtf = doc.CreateRichTextItem(“Comment”)End If
...
We’ve defined the variable rtf as a Variant here, even though we know that it will contain a NotesRichTextItem object, so that we can use it with GetFirstItem. If the field is not a rich text field, Set rtf =... line would result in a type mismatch error at runtime. Refer to the online help of GetFirstItem for details.
Once you have the NotesRichTextItem object, you can use the methods of NotesRichTextItem to add text and elements, and set the properties of those elements. The code is easy to understand, but you’re limited to those properties defined in the various objects.
If you need to create rich text with some attributes not provided by the classes, the easiest way is to have the rich text elsewhere, load it into your program, and append it to the item in progress. Refer to “Adding rich text copied from elsewhere” on page 714 for details.
In the meantime, here’s what you can do using just method calls, starting with the simplest techniques and moving forward to more and fancier rich text constructions.
Adding simple textThe most straightforward operation when appending to rich text is to add some text to the end of the field. The following methods of NotesRichTextItem are used for this:
� AppendText to add text.
� AddNewLine to start a new line or paragraph.
� AddTab to insert a Tab character.
� AddPageBreak to start a new page.
The only point about these methods that’s even slightly tricky is with AddNewLine, specifically the distinction between adding a line break (the default) and a paragraph break. This corresponds to using Shift+Enter versus just Enter when entering rich text manually.
If you’re not using any hanging indents or paragraph spacing, you’re not going to notice the difference between a line break and a paragraph break when you view your output. However, you should still pay attention to which one you’re using, because you can only store 64K bytes of text in a single paragraph, and each
Chapter 15. Rich text programming 707
character requires multiple bytes. If you don’t start a new paragraph occasionally yourself, Notes will start one for you, and you might not like where it chooses to do so.
The sample database contains an agent, “Rich Text Creation\1. Simple text”, which demonstrates the uses of these methods. The code is in Example 15-2.
Example 15-2 Partial code of “Rich Text Creation\1. Simple text” agent
...Dim doc As New NotesDocument(db) ' create a new document in memory.Call doc.ReplaceItemValue("Form", "Document")Call doc.ReplaceItemValue("Subject", "Simple rich text")Dim rtf As NotesRichTextItemSet rtf = New NotesRichTextItem(doc, "Body")Call rtf.AppendText("Here’s a new rich text field with just plain text.")Call rtf.AddNewline(1, True)Call rtf.AppendText("The beginning of a new paragraph. Now a line break.")Call rtf.AddNewline(1, False)Call rtf.AppendText("In edit mode, put the cursor on this line and press” _
& ” F8. The line above also changes.")Call rtf.AddNewline(1, True)Call rtf.AppendText("A tab:")Call rtf.AddTab(1)Call rtf.AppendText("and more text, then a page break.")Call rtf.AddPageBreak( )Call rtf.AppendText("That's all, folks!")
' make Notes complete cached rich text changes.Call rtf.Update( )Dim ws As New NotesUIWorkspaceCall ws.EditDocument(True, doc)
Figure 15-5 Output of “Rich Text Creation\1. Simple text” agent
In this case, the document we’re creating the rich text item in doesn’t exist on disk. The agent creates it in memory and doesn’t save it. It assigns fields and uses NotesUIWorkspace.EditDocument to open the document in edit mode. Note the use of the NotesRichTextItem.Update method (new in Notes 6). For efficiency, Notes caches rich text changes; before calling EditDocument, you must force it to complete any cached updates, or your rich text changes will not
708 Domino Designer 6: A Developer’s Handbook
be visible on screen. You can flush the cache either with Update, or by saving the document (NotesDocument.Save), or with NotesDocument.ComputeWithForm. Update is most efficient.4
The call to EditDocument opens the document on screen for the user to edit. You can do this even though the document has never been saved; the effect is the same as if you’d composed a new document and filled in fields for the user.
EditDocument can also be used to open the document in read-only mode, even if the document has never been saved. This is useful for displaying a report, where you don’t want to let the user edit the report.
Using text stylesNow let’s see how to control the appearance of the characters in your text. To do this you need another class, NotesRichTextStyle. This class contains settings for all the text attributes, collected together into one tidy package. It was done this way because you often make character style changes in groups—you don’t just want italic, you want bold italic 16 point Times Roman, and you want to use that same combination of attributes several times. NotesRichTextStyle lets you store all the properties together in a single variable and apply them all at once.
However, if you prefer to change just one text attribute at a time, you can do that also. If you assign just a few properties of the style object, when you apply that style, only those text properties will change. Say you want to turn italics on or off when you like, while keeping the font, size, or color of the text as they are. You could define two styles: one that adds italics to whatever style is currently in effect, and one that turns off italics.
The next example demonstrates both approaches with four style objects:
� header, used to format a section header line in a report
� normal, used for the lines within a section
� italicOn and italicOff to turn italics on and off
These four names are just what we chose to call the object variables—they’re not keywords. You have to use the NotesRichTextStyle properties to define what they mean.
Portions of the code are omitted from Example 15-3 since they are similar to the previous example. Also, if you compare this to the previous example, you’ll notice that here we chose to omit the keyword Call and the parenthesis around the arguments. This has no effect on how the program runs; for an explanation of the
4 None of these three methods will push back-end rich text changes into a document that’s already open in edit mode.
Chapter 15. Rich text programming 709
Call keyword refer to the document “Call statement” in Domino Designer 6 Help database.
Example 15-3 Partial code of “Rich Text Creation\2. Text styles” agent
...Dim italicOn As NotesRichTextStyleSet italicOn = ses.CreateRichTextStyle( )italicOn.Italic = True
Dim italicOff As NotesRichTextStyleSet italicOff = ses.CreateRichTextStyle( )italicOff.Italic = False
Dim header As NotesRichTextStyleSet header = ses.CreateRichTextStyle( )Dim color As NotesColorObjectSet color = ses.CreateColorObject' find standard Notes color closest to desired color.Call color.SetRGB(153, 51, 0) ' dark reddish brown.header.Notescolor = color.NotesColorheader.Effects = EFFECTS_SHADOWheader.Fontsize = 20' use the Times New Roman font for headings.header.NotesFont = rtf.GetNotesFont("Times New Roman", True)
Dim normal As NotesRichTextStyleSet normal = ses.CreateRichTextStyle( )normal.Bold = Falsenormal.Italic = Falsenormal.NotesFont = FONT_HELV
‘ Don’t need GetNotesFont for the default fonts...normal.Notescolor = COLOR_BLACKnormal.FontSize = 10normal.Effects = EFFECTS_NONE
rtf.AppendStyle headerrtf.AppendText "Introduction"rtf.AddNewline 1, Truertf.AppendStyle normalrtf.AppendText "We are here today to discuss "rtf.AppendStyle italicOnrtf.AppendText "blog"rtf.AppendStyle italicOffrtf.AppendText "."rtf.AddNewline 1, Truertf.AppendStyle headerrtf.AppendText "What is "rtf.AppendStyle italicOn
710 Domino Designer 6: A Developer’s Handbook
rtf.AppendText "blog"rtf.AppendStyle italicOffrtf.AppendText "?"rtf.AddNewline 1, Truertf.AppendStyle normalrtf.AppendText "Opinions vary. Some say it's one thing, some another. “ _& “But everybody agrees it's tasty..."
...
To set the color of text, use the NotesRichTextStyle.NotesColor property. You cannot use any color you like; you must choose from among 241 standard colors (numbered from 0 to 240) in the Notes palette.
To help you choose among the available colors, LotusScript gives you names for the 16 “system” colors. For instance, in the example we use COLOR_BLACK to set the text color to black; COLOR_BLACK has value 0. You can find a table of these constants in the Domino Designer help database (look up NotesColorObject in the index).
If you don’t want one of the 16 system colors, the NotesColorObject class can help you choose the palette color that’s closest to what you want. As we did in this example, you can create a NotesColorObject variable, provide the desired values for red, green, and blue levels, and use the NotesColor property to find the number of the palette color that’s closest to that. You can also use the NotesColorObject class to set the exact RGB color for table backgrounds and section bars.
When selecting a font for your text, you also must specify a number. You can select the system “default” fonts by using the constant FONT_HELV for Default Sans Serif, FONT_ROMAN for Default Serif, or FONT_COURIER for Default Monospace.5 If you want to use a specific font instead, you must use NotesRichTextItem.GetNotesFont to request that font be assigned a number code. You can then use that number code to use that font. In this example, we used GetNotesFont to ask that the “Times New Roman” font be given a number. This number will only work for the document it’s requested in. If you write an agent that processes multiple documents and creates rich text in each, you’ll need to call GetNotesFont for each document.
5 It’s a little confusing that the constant names don’t match the font names very well. In Notes 4 they matched, and the old constants were retained for backward compatibility.
Chapter 15. Rich text programming 711
Figure 15-6 Output of text style example
Some designers take the approach of having just one NotesRichTextStyle object and using it every time they want to change the style. The following example illustrates this.
Example 15-4 Using a single style object for all formatting
Either way works; use whichever one seems best to you.
Using paragraph stylesAnother style class is used to control paragraph spacing and indentation. The NotesRichTextParagraphStyle applies to an entire paragraph of text. Because it doesn’t make sense to apply a paragraph style change in the middle of a paragraph, Notes will automatically insert a paragraph break whenever you call NotesRichTextItem.AppendParagraphStyle. When you switch paragraph styles, use AppendParagraphStyle instead of AddNewLine.
For the next example, we took the earlier “blog” example and added two NotesRichTextParagraphStyle objects; one for section headers and one for the text within the sections. We also still need the NotesRichTextStyle objects from the earlier example, to control the appearance of characters. When changing from header to normal text or vice versa, the program calls AppendStyle and AppendParagraphStyle. The order doesn’t matter.
Example 15-5 Set paragraph style (from “Rich Text Creation\3. Paragraph styles” agent)
...Dim headerPar As NotesRichTextParagraphStyleSet headerPar = ses.CreateRichTextParagraphStyle( )headerPar.SpacingAbove = SPACING_ONE_POINT_50
712 Domino Designer 6: A Developer’s Handbook
Dim normalPar As NotesRichTextParagraphStyleSet normalPar = ses.CreateRichTextParagraphStyle( )normalPar.LeftMargin = RULER_ONE_INCH * 1.5
' indent normal paragraphs an extra half inch.normalPar.FirstLineLeftMargin = RULER_ONE_INCH * 1.5
rtf.AppendStyle headerrtf.AppendParagraphStyle headerParrtf.AppendText "Introduction"rtf.AppendParagraphStyle normalParrtf.AppendStyle normalrtf.AppendText "We are here today to discuss "
...
With this you could produce a nicely formatted report. Using the NotesRichTextParagraphStyle.SetTab method, you could also set tab stops and use these to line up columns of text.
Figure 15-7 Output of paragraph style example
Adding doclinksTo insert a link to a Notes document, view, or database, use NotesRichTextItem.AppendDocLink. You can make the link display as an icon, or as text that you specify.
There’s no way to programmatically create a URL link, popup text, or other hotspot.
For an example of adding a doclink to your rich text output, refer to , “Example: Scan for invalid doclinks” on page 720.
Adding sectionsNew in Notes 6, you can programmatically add a collapsing section to your rich text. There are two calls you must make for each section: NotesRichTextItem.BeginSection and NotesRichTextItem.EndSection. Any other
Chapter 15. Rich text programming 713
thing you add in between these two calls becomes the contents of the section. As the example shows, it’s even possible to nest sections inside other sections.
Example 15-6 Partial code of “Rich Text Creation\4. Nested sections” agent
rtf.AppendText "Example of nested section creation"rtf.BeginSection "Dogs", headerrtf.AppendText "Here's what Science knows about dogs. There are two types."rtf.BeginSection "Big Dogs", headerrtf.AppendText "Big dogs are usually friendly."rtf.EndSection ' end of "Big Dogs"rtf.BeginSection "Yippy Dogs", headerrtf.AppendText "Little yippy dogs are aggressive and annoying."rtf.EndSection ' end of "Yippy Dogs"rtf.EndSection ' end of containing section "Dogs"rtf.AppendText "Some text to follow the section."
...
Figure 15-8 Output of section creation example.
There’s no way to specify the indentation of the section header, as you might want to do when nesting sections. However, you can use a NotesRichTextParagraphStyle to indent the text inside a section (we didn’t do that in this example).
Adding rich text copied from elsewhereIf you’ve been following along with the examples, it may have occurred to you that it’s a lot easier to create rich text that looks exactly the way you want it to by typing it in a Notes client, instead of writing a lot of code.
714 Domino Designer 6: A Developer’s Handbook
There is a way to fetch rich text from a document or form and append it to the end of the rich text you’re building. This functionality is available in Notes R5 and later.
If the rich text can be the same each time you use it, use a field in a profile document or other document. Use NotesDocument.GetFirstItem to get the rich text value from the profile, then NotesRichTextItem.AppendRTItem to add it to another rich text field in a document you’re working on. This might be a good way to create a static report header, for instance.
If you need to have variable data inside the rich text, design a form that looks like what you want and place fields at the points where you want to add variable data. Figure 15-9 shows a form designed to serve as one row in a sales report. To make use of it:
� Create a new NotesDocument object in memory. This document will never be saved to disk; it’s just to help you in creating the rich text you want. This is your “row document;” it should not be the same document as the one containing the rich text field you’re writing.
� Assign values to the fields that appear on the “row form.”
� Use NotesDocument.RenderToRTItem to take a “snapshot” of the row and append it to your rich text under construction.
Figure 15-9 Form used in generating a report row
The following example demonstrates both techniques; it reads static information from a profile document for a report header,6 and it uses the form in Figure 15-9 repeatedly, once for each row of the report, to fill in the report data. As before, code similar to previous examples is left out.
Example 15-7 Partial code of “Rich Text Creation\5 . Sales report” agent.
' read report header field from profile document.Dim profile As NotesDocumentDim headerFromProfile As Variant ' rich text itemSet profile = db.GetProfileDocument("MasterProfile")Set headerFromProfile = profile.GetFirstItem("SalesReportHeader")' Insert the static report header into the RTF.rtf.AppendRTItem headerFromProfile
6 The term “header” here refers to a banner appearing just once, at the beginning of the report. Print headers, which appear on every page of a printout, are a property of the form, not part of the rich text of the document.
Chapter 15. Rich text programming 715
Dim rowDoc As notesdocumentSet rowDoc = db.CreateDocument( )' temporary "row document" holds data from one report row at a time.rowDoc.ReplaceItemValue "Form", "SalesReportRow"
...For i = 0 To Ubound(reportrows)
...' Fill in a temporary "row document" with one row's worth of data.rowDoc.ReplaceItemValue "RegionName", rowArray(0)rowDoc.ReplaceItemValue "Sales", Clng(rowArray(1))rowDoc.ReplaceItemValue "Profitability", Clng(rowArray(2))rowDoc.ReplaceItemValue "Integrity", rowArray(3)rowDoc.ReplaceItemValue "Genius", Cdbl(rowArray(4))' Take a "snapshot" of the row document -- the rich text' representing what it would look like on screen if it were opened.' Add that snapshot to the end of the report.rowDoc.RenderToRTItem rtf
Next
Figure 15-10 Sales report output screen
This technique gives you a great deal of control over the appearance of your rich text. A side benefit to using this approach, besides having to write less code, is that it lets a user without Domino Designer edit the profile document to customize the appearance of the report header. Using advanced techniques described in the following sections, you can also avoid the use of a “row form” and have the format of a report row also set in the profile document.
Restriction: This technique may not be appropriate for very long reports, as Notes will have trouble displaying a document with more than 1000 tables in it.
716 Domino Designer 6: A Developer’s Handbook
Adding a tableTo add a table to a rich text item, use NotesRichTextItem.AppendTable. This lets you specify:
� The number of rows and columns (you can add or remove rows later).
� Optionally, an array of tab labels—one for each row—in case you want to make a tabbed table.
� A left indent setting for the table as a whole.
� Optionally, an array of paragraph styles, one for each column. The left and right margin settings on these control the cell widths to create a fixed-width table.
There are some things missing here. There’s no way to select the thickness and style of cell borders, nor to merge cells, to name a couple. You can select the cell background colors to a limited extent (we’ll see how later). This function is intended for a very basic style of table, something you might use to create a report of data in columns. If you need to get fancy, refer to the previous section for a discussion of creating your table using the Notes or Designer UI and copying it into your rich text.
Adding a table is a good start, but in most cases you’ll also need to add data into the table cells. That requires a shift from what we’ve been doing, since the new information is no longer being added at the end of the rich text value. To create a table and fill in values, we’ll have to reposition the cursor from its default position at the end of the rich text, to elsewhere within the rich text, so new elements are added somewhere other than at the end. This brings us to our next topic.
15.6.3 Navigating and inserting into rich textAll the functionality discussed in this section is new in Notes 6. Notes 5 doesn’t have any way to insert or revise rich text—only append it. This section shows you how to locate text and other elements within an existing rich text field, delete them, change their properties, or insert text or other elements before, after, or inside them.
To find elements within the rich text, use two new classes:
� NotesRichTextNavigator lets you position to a particular place in the field and search for elements of specified types. Think of it as a bookmark or cursor that keeps track of a spot in the rich text for you. Among other things,
Restriction: Tables in Notes are limited to 255 rows. If you need more rows, you will need to create additional tables.
Chapter 15. Rich text programming 717
you can use it to set the point in the field where things you add will be inserted.
� NotesRichTextRange represents a consecutive subset of the rich text. Think of it as a “highlighted” area in the rich text, which you can treat as a group. For instance, you can delete everything in the range, or set all of it to a new font, in a single operation. This object also lets you read text from the “selected” area, and find and replace strings.
While it’s helpful to think of the navigator as a sort of insertion cursor and a range as a selection, there’s one important difference: you can have more than one navigator and more than one range at the same time in the same piece of rich text, all at different positions within the field.
Once you have a navigator, you can use it to scan for “elements” that appear in the rich text. You can get information about the elements you find—and change their attributes—by using one of the classes that describes a particular type of element:
� NotesRichTextDoclink describes a document, view, or database link. Its attributes include the server, view ID, and document ID that the link is to, a comment, and the text the user clicks to activate the link.
� NotesRichTextSection describes a collapsing section in the rich text. Using this object you can read and set the section title, header style (font, color, etcetera), and bar color.
� NotesRichTextTable describes a table. You can read and set the background color, an alternate color, and tab labels (for a tabbed table). You can choose among several patterns for the background and alternate color (alternating rows, alternating columns, top row one color and the rest of the table another color, and so forth). You can read the number of rows and columns, and add and delete rows.
� NotesEmbeddedObject represents an OLE object or file attachment.7 You can read the OLE object properties and set some of them, and with file attachments you can detach them to disk. Unlike the other elements listed, you can access these directly from the NotesRichTextItem using the EmbeddedObjects property. The others can only be located through a navigator. You should use a navigator for embedded objects if you need to locate them in relation to other elements in the rich text, for instance if you want to make sure that an embedded object is the first thing in the field.
Elements not listed above cannot be processed with LotusScript. There are no classes for images, text pop-ups, URL links, or hotspot buttons, to name just a few. If you need to work with them, you’ll have to either use the API or do XML
7 The NotesEmbeddedElement class ia available in Notes 5.0. The new Notes 6 functionality is the ability to locate it with a NotesRichTextNavigator.
718 Domino Designer 6: A Developer’s Handbook
export and import. However, if you don’t need to locate these elements in the rich text or read their properties, but just want to create rich text that includes them, you have other choices, as described in “Adding rich text copied from elsewhere” on page 714 and “Example: Using Import to add a table” on page 737.
Finding an element with a navigatorTo locate something you’re interested in within a rich text item—be it text, a table, or whatever—you first need a NotesRichTextNavigator. Use the NotesRichTextItem.CreateNavigator method to get one. A navigator is like a cursor: it points somewhere within the rich text. Using its methods, you can tell it where you want to point, or get information about the element it’s pointing to.
Table 15-2 Methods of the NotesRichTextNavigator class (new in version 6.0)
Method name Description
FindFirstElement Moves the current position to the first element of a specified type in a rich text item. The type can be one of the four elements listed previously (doclink, section, table, or OLE/attachment), plus you can search for paragraphs, table cells, or “text runs” (sequences of characters that share the same character style).
FindLastElement Moves the current position to the last element of a specified type in a rich text item.
FindNextElement Moves the current position to the next element of a specified type after the current position.
FindNthElement Given a counter n, sets the position to the nth occurrence of the specified type.
FindFirstString Searches for the first occurrence of a string, and positions the navigator to the beginning of the string.
FindNextString Searches for the next occurrence of a string, starting at the current position, and repositions the navigator to the beginning of that string.
GetElement Returns the element at the current position. The navigator must be positioned on one of the four element object types. The function returns an object of the appropriate type.
GetFirstElement Returns the first element of a specified type. This combines the functions of FindFirstElement and GetElement. The type specified must be one of the four element object types.
GetLastElement Same as FindLastElement plus GetElement.
GetNextElement Same as FindNextElement plus GetElement.
Chapter 15. Rich text programming 719
Use GetFirstElement and GetNextElement to loop through all the rich text elements of a particular type. GetLastElement is most useful for backing up to insert elements into a table that you just added to the end of the rich text. The other methods are useful for positioning the endpoints of a NotesRichTextRange.
Using the navigator, you can get complete information about the four object element types, and using those objects you can change the properties of those rich text elements. You need the NotesRichTextRange to read text and text styles, or find and replace text. This is covered in a later section.
Example: Scan for invalid doclinksA website manager wants to be able to regularly scan a Domino database on her website for doclinks that are either broken (meaning they point to something that no longer exists), or point to servers or databases that Web browser users don’t have access to. The report lists all documents that have problem links, includes a doclink to each document, and lists which links have a problem and what the problem is.
Figure 15-11 Output of Agent “Rich Text Analysis / 1. Check for broken links”
GetNthElement Same as FindNthElement plus GetElement.
SetPosition Sets the current position to point to a specified element, which must be one of the four object element types.
SetPositionAtEnd Sets the current position at the end of a specified element in a rich text item. The element must be one of the four element object types.
SetCharOffset Moves the current position forward or backward a specified number of characters.
Clone Creates another NotesRichTextNavigator object with the same position as the current one. This is different from just copying the reference using “Set nav2 = nav1”; the cloned copy is a new object, not just another reference to the same object. The clone can be changed to point to a different location from the original.
Method name Description
720 Domino Designer 6: A Developer’s Handbook
The sample output shows that the second and third link in one document are incorrect, as is the first link in another document. If you run this agent, you’ll get different results because you don’t have access to the same servers, so all links will appear to be broken.
Example 15-8 shows how to use a NotesRichTextNavigator to find doclinks in the document rich text, and the NotesRichTextDoclink class to get information about the objects. As before, portions of this code that are the same as previous examples are left out. The code is modular, with two utility functions, FindDatabase and LinkIsValid, defined at the end.
Example 15-8 Agent “Rich Text Analysis / 1. Check for broken links”
...Dim illegalCount As LongreportTitle = "Invalid Doclink Report for " & Format(Now, "Long Date")reportBody.AppendText reportTitleDim allowedDBIDs, allowedServers
' The MasterProfile profile document contains a list of' database IDs of databases to which users are allowed to link,' and a list of servers that may appear in the server hint. Use' these to check each link to determine whether it's legal.Set profile = db.GetProfileDocument("MasterProfile")allowedDBIDs = profile.GetItemValue("AllowedDBIDs")allowedServers = profile.GetItemValue("AllowedServers")
Set col = db.UnprocessedDocuments ' = all docs that use the Document form.Set doc = col.GetFirstDocument( )Do Until doc Is Nothing
' A link is considered illegal if the server it points to is not in our' list of servers, or if the database replica ID isn't in the' allowed list, or if the element it points to no longer exists.Set body = doc.GetFirstItem("Body")Dim firstNotice As Boolean, message As String, linkCount As LongfirstNotice = TruelinkCount = 0Set rtnav = body.CreateNavigator( )Set link = rtnav.GetFirstElement(RTELEM_TYPE_DOCLINK)Do Until link Is Nothing
linkCount = linkCount + 1message = ""Set link = rtnav.GetElement( )If Not LinkIsValid(link) Then
message = ", link is broken"End If
' Even if link is broken, still check that it’s a legal server & DB.If Isnull(Arraygetindex(allowedServers, link.ServerHint)) Then
Chapter 15. Rich text programming 721
' disallowed serverDim tmpName As New NotesName(link.ServerHint)message=message & {, illegal server "} & tmpName.Abbreviated & {"}
End IfIf Isnull(Arraygetindex(allowedDBIDs, link.DBReplicaID)) Then
message=message & {, illegal database "} & link.DBReplicaID & {"}Dim targetDb As NotesDatabaseSet targetDb = findDatabase(link)If Not targetDb Is Nothing Then
' first message about doc -- doublespace and give link to doc.reportBody.AddNewline 2, TruereportBody.AppendDocLink doc, doc.Subject(0)firstNotice = FalseillegalCount = illegalCount + 1
Else' there's already a message about the same doc -- singlespace.reportBody.AddNewline 1, True
End IfSet link = rtnav.GetNextElement(RTELEM_TYPE_DOCLINK)
LoopSet doc = col.GetNextDocument(doc)
Loop
' finish report by telling how many documents had errors.reportBody.AddNewline 2, TruereportBody.AppendText illegalCount & _
" documents contained invalid doclinks."...Function LinkIsValid(link As NotesRichTextDoclink) As Boolean
' Given a doclink object, this function uses the properties of the' doclink to find the database, view or document that the doclink' points to. Return True if the element is found, else False.Dim targetDB As NotesDatabaseSet targetDB = FindDatabase(link)If targetDB Is Nothing Then' database was not found.
LinkIsValid = FalseElse
' found the database. Does the include view and document information?Dim targetDoc As NotesDocument
722 Domino Designer 6: A Developer’s Handbook
LinkIsValid = True ' until we know it's not.
' if the link points to a view, make sure the view exists' (note: even if the link is to a document, it will mention the' view the document is in and we'll make sure the view's there).On Error Goto noGoodIf link.ViewUnID <> "00000000000000000000000000000000" Then
Set targetDoc = targetdb.GetDocumentByUNID(link.ViewUnID)' will cause an error event if the doc doesn't exist.
End If
If link.DocUnID <> "00000000000000000000000000000000" ThenSet targetDoc = targetDB.GetDocumentByUNID(link.DocUnID)
End IfEnd IfExit Function
noGood:' error trying to follow a doclink -- link is broken.LinkIsValid = FalseExit Function
End Function
Function FindDatabase(link As NotesRichTextDoclink) As NotesDatabase' Given a doclink, find the database it points to.' If no such database, return Nothing.Static databasesById List As notesdatabase' a cache of databases sorted by ID, to not look up the same one twice.
Dim key As Stringkey = link.ServerHint + ":" + link.DBReplicaIDIf Iselement(databasesById(key)) Then
Set FindDatabase = databasesById(key)Else
Dim targetDB As New NotesDatabase("", "")If targetDB.OpenByReplicaID(link.ServerHint, link.DBReplicaID) Then
Set FindDatabase = targetDBElse
Set FindDatabase = NothingEnd IfSet databasesById(key) = FindDatabase
End IfEnd Function
The list of valid servers and database replica IDs is stored in a profile document for ease of maintenance—the database manager can change the list without using Domino Designer.
Chapter 15. Rich text programming 723
Since the doclink properties are read-write, it’s fairly simple to write an agent to automatically correct an incorrect link. For instance, an agent could scan for doclinks that point to a server that’s been retired, and change the “server hint” to a different server name. This is done by just setting the ServerHint property of the doclink object, and then saving the document. The sample agent “Rich Text Editing\1. Correct links to wrong server” demonstrates this.
Example: Creating a table and filling in dataNow that we know how to create a navigator and set its position, we can create a table and fill in the contents by positioning to each cell in turn. Figure 15-12 shows the report we’d like to create.
Figure 15-12 Output of agent “Rich Text Editing\1. Fill in table“
This table uses different fonts within the table cells, which is easy to do with NotesRichTextStyle. The agent also controls the widths of table columns, and the alignment of data within the cells, by specifying a NotesRichTextParagraphStyle for each column. Since there are four columns, the agent creates a four-element array of NotesRichTextParagraphStyle objects. The left and right margin settings control the width of the cell, and you can also specify other properties; in this case, we chose to make the three numeric columns right-aligned.
As before, portions of the code similar to earlier examples are omitted. The key points to note for adding data into a table are:
� Create a NotesRichTextNavigator so you can control the text insertion point.
� Use Find...Element methods to locate each table cell in turn. You can’t use GetElement here because there’s no class corresponding to a table cell, so there’s nothing to get.
� Use NotesRichTextItem.BeginInsert to start entering information into the cell.
� Use NotesRichTextItem.EndInsert when done with that cell.
Example 15-9 Partial code of agent “Rich Text Creation\1. Fill in table”
...Dim rtf As NotesRichTextItem
...' Setup text styles used in the document.Dim columnHeaderStyle As NotesRichTextStyleSet columnHeaderStyle = ses.CreateRichTextStyle( )columnHeaderStyle.Bold = True
Dim dataStyle As NotesRichTextStyleSet dataStyle = ses.CreateRichTextStyle( )dataStyle.Bold = FalsedataStyle.Fontsize = 10dataStyle.NotesFont = FONT_ROMAN
' Define an array of paragraph styles, which will' set the width and alignment of each table column.Dim i As IntegerDim columnStyles(0 To 3) As NotesRichTextParagraphStyleFor i = 0 To 3
Set columnStyles(i) = ses.CreateRichTextParagraphStylecolumnStyles(i).LeftMargin = 0 ' position relative to cell border.columnStyles(i).FirstLineLeftMargin = 0
Dim headerColor As NotesColorObjectDim dataColor As NotesColorObjectSet headerColor = ses.CreateColorObjectCall headerColor.SetRGB(198,255,148) Set dataColor = ses.CreateColorObjectCall dataColor.SetRGB(207,243,255)
' fetch the fake data to use in the report....
' create an empty table, 1+the number of data rows, 4 columns,' of fixed widths defined in the columnStyles array.Call rtf.AppendTable( 2 + Ubound(sampleData), 4, , , columnStyles)
' create navigator to position the text insertion point within table cells.Dim nav As NotesRichTextNavigatorSet nav = rtf.CreateNavigator( )
' Get an object describing the table.Dim table As NotesRichTextTablenav.FindLastElement RTELEM_TYPE_TABLESet table = nav.GetElement
Chapter 15. Rich text programming 725
' Set table to use different color for the top and left column.table.Style = TABLESTYLE_LEFTTOPtable.SetColor headerColortable.SetAlternateColor dataColor
rtf.AppendStyle columnHeaderStyle ' this will be in effect until changed.nav.FindNextElement RTELEM_TYPE_TABLECELLrtf.BeginInsert navrtf.AppendText "Sample ID"rtf.EndInsertnav.FindNextElement ' defaults to last thing searched forrtf.BeginInsert nav rtf.AppendText "Density"rtf.EndInsertnav.FindNextElementrtf.BeginInsert navrtf.AppendText "Melting Point"rtf.EndInsertnav.FindNextElementrtf.BeginInsert nav rtf.AppendText "Hardness"rtf.EndInsert
' Next, place the data into the cells.Dim columnrtf.AppendStyle dataStyleFor i = 0 To Ubound(sampleData)
In an earlier example, we used a NotesColorObject to find out what Notes system color was closest to a desired color. Here, we’re using NotesColorObject to set the table background colors. Unlike with text, we do not have to choose a color from the Notes palette; the table background colors are the exact RGB values we specified.
There’s not a way to select cells and merge them, as you can in the Notes UI. However, you can “nest” a table inside of a table cell. Once you call BeginInsert, you can insert anything, including another table, in the cell. Or, you could copy the table from a profile document, as shown in the previous example “Adding rich text copied from elsewhere” on page 714, and add rows to make it the size you
726 Domino Designer 6: A Developer’s Handbook
want. The sample agent “Rich Text Creation\2. Fill in copied table” demonstrates this approach (we won’t describe it in greater detail here).
Example: File attachment size limitConsider the case where a database administrator wants to limit the size of file attachments on the Document form to 200K bytes, wants to limit attachments to a maximum of one per document, and wants to prohibit any OLE objects. The user will get an error when trying to save the document if they break these rules.
Unlike previous examples, this is not done with an agent, but with the form Querysave event. If not for the OLE object test, it could be done by using @AttachmentLengths in a field’s Input Validation formula.8 Using LotusScript lets us check for OLE objects, and put the cursor in the rich text field if there’s a problem with an attachment.
Figure 15-13 Output of Querysave to test file attachment size
The NotesRichTextItem.EmbeddedObjects property returns an array listing all attachments, OLE objects, and OLE links. The elements of this array are NotesEmbeddedObject objects. This functionality is available in Notes R5 also.
Example 15-10 Querysave code on Document form.
Sub Querysave(Source As Notesuidocument, Continue As Variant)On Error Goto trapSource.Refresh True ' update rich text items in memory.Dim doc As NotesDocumentDim body As VariantDim nav As NotesRichTextNavigatorSet doc = Source.DocumentSet body = doc.GetFirstItem("Body")
' The next statement will cause an error if there are no attachments.' That's OK because we trap the error and exit, allowing the save.Forall object In body.EmbeddedObjects
8 Not in the Body field, however, since rich text fields don’t have validation formulas; you would have to put it in a different field.
Chapter 15. Rich text programming 727
If object.Type <> EMBED_ATTACHMENT ThenMsgbox "No OLE objects allowed.", 0, "Validation Failure"Continue = False
Elseif object.FileSize > 200000 ThenMsgbox "File attachment may not exceed 200KB.", 0, _
"Validation Failure"Continue = False
End IfEnd ForallIf Ubound(body.EmbeddedObjects) > 0 Then
Msgbox "Only one attachment per document, please.", 0, _"Validation Failure"
Continue = FalseEnd If
If Not Continue Then' put the cursor in the rich text field if it's not already there.If Source.CurrentField <> "Body" Then Source.GotoField "Body"
End IfExit Sub
trap: ' if validation error; Notes already printed a message, so exit.' if there are no attachments, saving is OK, so exit.Exit Sub
End Sub
Instead of the EmbeddedObjects property, you could use a NotesRichTextNavigator to loop through all the embedded objects and attachments. This is what we did with doclinks in the previous section. However, when working with OLE objects and attachments, using EmbeddedObjects is generally simpler.
You have to use the NotesRichTextNavigator to locate attachments if you care about the position of the attachment relative to other parts of the rich text. For instance, if you wanted to test whether an attachment was inside of a table cell, you would use a NotesRichTextRange and NotesRichTextNavigator to search the table for it.
15.6.4 Using a NotesRichTextRange to read text or limit a searchThe NotesRichTextNavigator class is useful for finding “things” within the rich text—tables, sections, attachments, and doclinks. But, to read or modify text and text styles in the document, you need a NotesRichTextRange object. Create a NotesRichTextRange using the NotesItem.CreateRichTextRange method. The following tables list the methods and properties of the range object.
728 Domino Designer 6: A Developer’s Handbook
Table 15-3 Properties of the NotesRichTextRange class (new in version 6.0)
Table 15-4 Methods of the NotesRichTextRange class (new in version 6.0)
Property Description
TypeInteger
A numeric code indicating the type of object that’s at the beginning of the range. Type returns 0 (unknown) for the “default” range (the entire field). You can’t use this to tell what’s the first thing in the field.
StyleNotesRichTextStyle
A description of how the first text in the range is formatted.
TextRunString
The text at the beginning of the range, up to the first text style change or paragraph break.
TextParagraphString
The text at the beginning of the range, up to the first paragraph break.
NavigatorNotesRichTextNavigator
A navigator that’s restricted to the range begin and end points. This is useful in narrowing the scope of a search to less than the entire field.
Method name Description
Clone Make a copy of the range; returns a new NotesRichTextRange which you can assign to another variable. This is different from merely copying the variable with an “=” assignment; a copy made with Clone can have different begin and end points than the original, whereas “=” just makes another reference to the same object.
FindAndReplace Search for text and replace it with other text. Flags let you select case and accent sensitivity, and “replace one” versus “replace all”.
Remove Deletes everything in the range.
Reset Restores the range to its default start and end points (the entire rich text item).
SetBegin Set the beginning point of the range to an element or navigator.
SetEnd Set the end point of the range to just before a given element or navigator.
SetStyle Change the text style of everything in the range. There’s not a way to change the paragraph style of existing text.
Chapter 15. Rich text programming 729
You don’t need a range to just test whether the rich text contains a particular word. For that, use NotesRichTextItem.GetFormattedText and search for the word you want. You also don’t need it to insert new data within the rich text, as we saw in “Example: Creating a table and filling in data” on page 724.
You do need to use a range to remove or change existing text, or to read text from a particular location within the field.
For instance, suppose you want to find a word and replace it with a different word, but only if it appears in a table. Use a navigator to locate the beginning of the table (using FindFirstElement or FindNextElement method, for instance). Use SetBegin to make that the beginning of the range. Use the navigator to locate the end of the table (SetPositionAtEnd). Use SetEnd to make that the end of the range. Then use FindAndReplace to swap one word for another.
When you use NotesRichTextItem.CreateRange to create a new range, or when you “reset” the range with the Reset method, the range refers to the entire rich text item. However, this range doesn’t behave quite the same as a range whose begin and end points have been specified using SetBegin and SetEnd. The Type property is 0 (“range not explicitly defined”). There’s no way to get the first element in such a range; you can only get the first element of a type that you specify; the first text, first table, etcetera. Without any idea what’s in the field, you cannot process the contents of the entire field from front to end.
Example: Search and replace textThe agent “Rich Text Editing\3 - Find and Replace Text” asks the user to enter a search string and a replacement string, and select whether the search is case-, accent-, or pitch-sensitive. (Pitch marks are used with some Asian languages to indicate vocal tone.)
Figure 15-14 Dialog from “Rich Text Editing\3 - Find and Replace Text” agent
730 Domino Designer 6: A Developer’s Handbook
The agent changes all occurrences of the search string to the replacement string in the Body field of the selected documents.
Example 15-11 Agent “Rich Text Editing\3.Find and Replace Text“
...Dim ses As New NotesSessionDim ws As New NotesUIWorkspaceDim db As NotesDatabaseDim dialogdoc As notesdocumentDim searchFor As String, replaceWith As String, flags As LongDim result As Integer, count As IntegerDim col As NotesDocumentCollectionDim doc As NotesDocumentDim body As NotesRichTextItemDim range As NotesRichTextRange
Set db = ses.CurrentDatabaseSet dialogdoc = db.CreateDocument( )
' Display a dialog for user to enter search string and replacement string.result = ws.DialogBox("FindAndReplace", True, True, False, False, False, _
False, "Search and Replace Selected Docs", dialogDoc, True)
If result Then ' user pressed OK in the dialog.searchFor = dialogDoc.GetItemValue("SearchString")(0)replaceWith = dialogDoc.GetItemValue("ReplaceString")(0)flags = dialogDoc.GetItemValue("Flags")(0) Or RT_REPL_ALL' RT_REPL_ALL replaces all; default replaces only first occurrence.Set col = db.UnprocessedDocumentsSet doc = col.GetFirstDocumentDo Until doc Is Nothing
Set body = GetRichTextField(doc, "Body")Set range = body.CreateRangecount = range.FindAndReplace(searchFor, replaceWith, flags)If count <> 0 Then
' a replacement was made.doc.Save False, False, False
End IfSet doc = col.GetNextDocument(doc)
LoopEnd If
Example: Change text style of certain paragraphsConsider a manual that has been stored as documents in a Notes database, and now the content manager wants to find all the paragraphs that begin with “Note:” and italicize them.
Chapter 15. Rich text programming 731
The agent to accomplish this task (“Rich Text Editing\4. Highlight Note Paragraphs”) uses a NotesRichTextNavigator to scan the rich text field paragraph by paragraph, finding those that begin with “Note:”. When one is found, the agent creates a range that includes only that paragraph. It then uses SetStyle on the range to change the text to italics (leaving its other attributes unchanged).
Example 15-12 Partial code of “Rich Text Editing\4. Highlight Note Paragraphs” agent
Dim italicsOn As NotesRichTextStyleSet italicsOn = ses.CreateRichTextStyleitalicsOn.Italic = True
...Set body = doc.GetFirstItem("Body")found = FalseSet range = body.CreateRangeSet nav = body.CreateNavigatorSet nextPar = nav.Cloneflag = nav.FindFirstElement(RTELEM_TYPE_TEXTPARAGRAPH)While flag
range.SetBegin navnextPar.SetPosition navflag = nextPar.FindNextElement(RTELEM_TYPE_TEXTPARAGRAPH)If Left(range.TextParagraph, 5) = "Note:" Then
found = TrueIf Not flag Then
' this is the last paragraph. Let our range go to the end.Set range = body.CreateRangerange.SetBegin nav
Else' Not the last paragraph. Set range to end at next paragraph.range.SetEnd nextPar
End Ifrange.SetStyle italicsOn
End Ifnav.SetPosition nextPar
Wend
If found Then doc.Save False, False, False...
15.6.5 Working with rich text in edit modeAs already noted, the classes in the previous sections work only in the back end. If a document is open in edit mode, you can’t use these classes to fill in the document’s rich text because there’s no way to make Notes recognize that the back end rich text has changed and update it in the front end.
732 Domino Designer 6: A Developer’s Handbook
Actually, there is one way: you can save the document, close it, make your changes, and re-open the document in edit mode. You generally don’t want to do this because the user might have made changes they’re not ready to save, or left a required field blank.
You can read information in edit mode using the back-end classes. To do this, you have to first tell Notes to “refresh” the rich text fields using NotesUIDocument.Refresh(True). Refer to “Example: File attachment size limit” on page 727 for an example of this. This also has drawbacks. Refreshing a document may make other fields change because their formulas are recalculated, and also it will evaluate validation formulas and display validation messages—for instance, that the user has left a required field blank—even though they’re not trying to save the document. You can get around this by carefully writing your validation formulas so that they only report an error when the user is trying to save a document. For example, the following input validation tests whether a field is blank, but doesn’t cause a failure if the document is only being recalculated. The input validation formula is for a text field on a form, not for a rich text field. You cannot write an input validation formula for a rich text field.
Example 15-13 Input Validation formula that only reports errors during save
@If(@IsDocBeingSaved & @ThisValue = ““;@Failure(“You must enter a value for Rate of Plummet.”);@Success
)
So what can you do in the front end to update rich text in a document the user is editing? The NotesUIDocument class provides several methods that will help with this; shown in Table 15-5. This is not a complete list of NotesUIDocument methods—only those that have some use in working with rich text are shown. None of these methods are new in version 6.0.
Table 15-5 Methods of NotesUIDocument (partial list)
Method name Description
Clear Erase the contents of the current field.
Copy Copy the current selection to the clipboard.
CreateObject Create an OLE object of a specified type.
Cut Cut the current selection to the clipboard.
DeselectAll Deselect the current selection.
FieldAppendText Add text to the end of a specified field.
Chapter 15. Rich text programming 733
FieldClear Erase the contents of a specified field.
FieldContains Test whether a specified field contains a certain string.
FieldGetText Return the text that’s in a specified field.
FieldSetText Replace a field’s contents with text you provide. This is not especially good with a rich text field because you don’t get to format the text at all, and you overwrite any formatting, tables, or other objects that were there before.
FindString Find the next occurrence of a string you provide, and makes that the current selection.
GetObject If the rich text field contains an OLE object, this returns a handle to the object. You can use this handle to send OLE commands to the object. (Windows only)
GetSelectedText Returns the text in the selected area.
GotoBottom Moves the cursor to the bottom of the form. This is one way to move the cursor to the end of your rich text field, if it’s the last thing on the form.
GotoField Move the cursor into a specified field. The cursor ends up at the beginning of the field.
Import Does the same thing as File / Import in the menu. You can specify the type of file and filename to import. The new information is inserted at the current cursor position.There’s a long list of files types you can choose from, but the following are especially useful for rich text:� HTML File� GIF Image� JPEG Image� Other Image formats, which are used less often
InsertText Add text at the current cursor position.
Paste Paste from clipboard.
Refresh Used with an argument of True, this method copies updated rich text information from the “front end” and makes it available on the “back end”.
SelectAll Selects the entire contents of the current field. This will cause an error if the field is empty, which you can trap with an On Error statement.
Method name Description
734 Domino Designer 6: A Developer’s Handbook
Of special importance are the Import, Copy, and Paste methods. These methods let you create complex rich text information elsewhere and insert it into the rich text field in the document being edited. The other methods only let you add or change text. The following examples address this.
In addition to the LotusScript methods identified in the table, there are several macro commands and functions that are useful in working with rich text on the front end. Many of them are just macro versions of the LotusScript methods. However, here are some commands that do things for which there is no corresponding LotusScript:
� @Command( [EditInsertFileAttachment] )� @Command( [EditInsertPageBreak] ) � @Command( [EditInsertPopup] ) Note: You can’t supply the text of the
pop-up; the user is prompted to enter it with a dialog.� @Command( [EditInsertTable] ) Note: You can’t specify the size of the
table; the user is prompted.� @Command( [EditLeft] ; count )� @Command( [EditRight] ; count )� @Command( [EditUp] ; count )� @Command( [EditDown] ; count )� @Command( [TextBold] )� @Command( [TextItalic] )� @Command( [TextUnderline] ) � @Command( [TextBullet] ; onOff ) makes a bullet list� @Command( [TextNumbers] ; onOff ) makes a numbered list� @Command( [TextCycleSpacing] )� @Command( [TextAlign...] ) Center, Left, Right, Full, None� @Command( [TextOutdent] )� @Command( [TextSetFontColor] ; [ color ] )� @Command( [TextSetFontFace] ; typeface ) � @Command( [TextSetFontSize]; size )� @Command( [TextEnlargeFont] ) � @Command( [TextReduceFont] ) � @Command( [TextSpacing...] ) Single, Double, OneAndAHalf� @Command( [TextNormal] ) � @FontList Provides a list of fonts available on the Notes client. You can use
this function in LotusScript with an Evaluate statement.
Using these @Commands, you can write macro code that generates almost anything you want in terms of formatted text. If you can get an empty table in your rich text, you can also use the cursor movement commands (EditLeft and the rest) to place the cursor inside the table cells, then use the other @Commands to add your text.
Chapter 15. Rich text programming 735
Example: Using Import to add an imageThe NotesUIDocument.Import method accepts two string arguments: the file type and file path. The “Add Picture” action on the Document form places the cursor in the rich text field and imports a “gif” image.
It’s easy to import a file if you already have the file. The challenge in using the Import method is how to get the file. In this case, we created an “Image Library” view and documents in the sample database. Each document in this view contains a file attachment, which must be a GIF or JPEG file. When the user asks to add an image to their document, they get to choose from the image titles displayed in the view.
The LotusScript code then has to extract the selected image file to the user’s local hard disk. There’s no way to directly grab an attachment and place it into the document the user is editing; to do anything with it, you have to first store it to disk.
Once it’s detached into a local file, the code uses Import to insert it at the current position within the rich text. It then calls “Kill” to delete the file from disk.
Except for Import, there’s no way to add an image to a rich text field unless the image was already in a rich text field waiting to be copied, or on a form that you can convert to rich text using RenderToRTItem.
Example 15-14 Code for “Import picture” action
Dim ses As New NotesSessionDim ws As New NotesUIWorkspaceDim db As NotesDatabaseDim profile As NotesDocumentDim tmppath$Dim rtf As Variant ' NotesRichTextItemDim uidoc As NotesUIDocument
Set uidoc = ws.CurrentDocumentIf uidoc.CurrentField <> "Body" Then
Msgbox "You must place the cursor in a rich text field first.", 0, _"Import picture"Exit Sub
End If
' Locate profile document containing the image to import,' and the RTF that contains the file attachment.Set db = ses.CurrentDatabaseSet profile = db.GetProfileDocument("MasterProfile")Set rtf = profile.GetFirstItem("ImageAttachment")If rtf Is Nothing Then
Msgbox "Error: profile document is not initialized.", 0, "Import picture"
736 Domino Designer 6: A Developer’s Handbook
Elseif Not Isarray(rtf.EmbeddedObjects) ThenMsgbox "Error: profile document is not initialized.", 0, "Import picture"
Else' There's at least one file attachment in the field.Dim attach As NotesEmbeddedObjectSet attach = rtf.EmbeddedObjects(0)' Make up a filename in the user's temp directory.tmppath = Environ("Temp") & {\} & attach.Source' Save the file attachment to temp disk file.Call attach.ExtractFile(tmppath)' Gring it into the document being edited.If Lcase(Right$(attach.Source, 4)) = ".gif" Then
Call uidoc.Import("GIF Image", tmppath)Else
Call uidoc.Import("JPEG Image", tmppath)End If' the temp file is no longer needed; delete it.Kill tmppath
End If
Example: Using Import to add a tableIn the previous example, Import was used to bring in an existing file—we just copied it from where it was stored as a file attachment.
When you import HTML into rich text, you may sometimes have the same situation. For instance, the Notes mail application uses Import to add your HTML signature file to the end of your e-mail message, if you’ve enabled this function.
However, it’s often useful to create your own HTML. LotusScript has commands to create and write to files, so you can write code to construct the HTML you need when you need it. You write the HTML to a file, and then import the file to create the rich text you want.
To try the example, use Create/Squeegee Report in the sample database. This form uses Import to display a table of randomly generated data. The table headings are buttons that you can click to re-sort the table according to the data in that column.
Except for Import, there’s no way to add a button to a rich text field unless the button was already in a rich text field or on a form somewhere waiting to be copied. By importing HTML, you can create JavaScript buttons; the Notes client can execute JavaScript code. As in the case of this form, if you can’t do what you want to do using just JavaScript, the JavaScript can “click” a macro code or LotusScript button on the form.
Chapter 15. Rich text programming 737
A more in-depth treatment of this technique can be found in “Rich Text Programmability for Notes R5 Applications” published in The View magazine, May/June 2000 issue.
Example: Using Copy and Paste to add rich textAs we’ve seen in several examples in the preceding sections, you can use the methods of NotesRichTextItem, NotesRichTextNavigator and NotesRichTextRange to create some rich text in the back end. You can then use the EditDocument method and a form such as the Report form to display that rich text to the user. However, there’s not a LotusScript command to display the back-end rich text you create in a document that’s already open in edit mode.
What you can do, however, is use the clipboard to copy information from a report and paste it into your document. The “Insert Sales Report” action in the Document form uses macro language @PostedCommand9 to run an agent that generates the desired output in a new window. The action then selects the contents of the report window, copies to clipboard, closes the report window, and then pastes the output into the rich text field (it assumes the cursor is already in the field).
Example 15-15 Code for “Insert Sales Report” action
There is a disadvantage to this technique: it wipes out whatever was in the clipboard before.
15.7 Using rich text from other apps via COM/OLENotes has a COM API and an OLE API, which means that other Microsoft Windows applications can call Notes functions to make Notes find documents, write documents, open new windows, and so on.
Refer to the Domino Designer help for general information about programming Notes using COM and OLE. For the purposes of working with rich text, the COM API is the same as the LotusScript classes, with one important exception: the
9 We use @PostedCommand instead of @Command to make the agent run before the other commands execute.
738 Domino Designer 6: A Developer’s Handbook
new functionality of Notes 6 will not be available via COM in the initial 6.0 release. This functionality might be available in a future release of Notes 6.
The OLE interface does implement the new rich text functions, however. In the following Visual Basic example, we use OLE automation to locate the user’s mail file, create a new memo, fill in the fields, add a rich text body that includes a tabbed table with more tables nested inside it, and open the memo for the user to edit on-screen and send if they choose.
Figure 15-15 Output of OLE memo example
Example 15-16 Visual Basic code of OLE memo example
Sub NotesMailExample()Dim notesOLE As ObjectDim maildb As Object ' NotesDatabaseDim memo As Object ' NotesDocumentDim body As Object ' NotesRichTextItemDim tabTable As Object ' NotesRichTextTableDim nav As Object ' NotesRichTextNavigator
On Error GoTo trapSet notesOLE = CreateObject("Notes.NotesSession")
Chapter 15. Rich text programming 739
' Lotus.NotesSession if we want to use COM.
Set maildb = notesOLE.GetDatabase("", "", False)maildb.OpenMail ' locate the user’s mail database.Set memo = maildb.createDocument()memo.ReplaceItemValue "Form", "Memo"memo.ReplaceItemValue "Subject", "Tournament Score Report: " & Format(Date,
"Long Date")memo.ReplaceItemValue "BlindCopyTo", "Scores Mailing List"Set body = memo.CreateRichTextItem("Body")body.AppendText "Here are your up to the minute tournament scores!"Dim games(0 To 3) As Stringgames(0) = "Chess"games(1) = "Checkers"games(2) = "Mahjongg"games(3) = "Jacks"' Create a tabbed table with the above as the tabs.Call body.AppendTable(4, 1, games)body.UpdateSet nav = body.CreateNavigator()nav.FindFirstElement 1 ' tableDim i%, k%, n%For i = 1 To 4
' find the next row of the tabbed table.nav.FindNextElement 7 ' table cellbody.BeginInsert nav ' insert text inside the table cell.body.AppendText games(i - 1) & " Scores:"' add a table inside the tabbed table.body.AppendTable 4, 4body.EndInsertnav.FindLastElement 1 ' table we just inserted.For k = 1 To 4
For n = 1 To 4nav.FindNextElement 7 ' table cellbody.BeginInsert navbody.AppendText "row " & k & " col " & nbody.EndInsert
NextNext' Nav position is in the last cell of the inner table.' FindNext table cell at top of loop will position to' next cell of containing tabbed table.
Next
Dim ws As ObjectSet ws = CreateObject("Notes.NotesUIWorkspace")body.Update' open memo for user editing.ws.editdocument True, memo, False
740 Domino Designer 6: A Developer’s Handbook
' bring new Notes window to foreground.AppActivate "Tournament Score Report"
finish:
Set body = NothingSet nav = NothingSet tabTable = NothingSet memo = NothingSet maildb = NothingSet ws = NothingSet ses = NothingExit Sub
In this case, we chose to open the document on-screen. It’s also possible to create memos and other documents totally in the back end and send or save them using the NotesDocument methods, without the user ever seeing them.
Chapter 15. Rich text programming 741
742 Domino Designer 6: A Developer’s Handbook
Chapter 16. XML
In this chapter, we describe what XML is, and how Domino Designer 6 supports XML. We also look at the ways in which you can use DXL utilities, LotusScript, and Java to handle XML in Domino applications.
The purpose of this chapter is to introduce the new features available in Domino Designer 6 relating to XML. It will not, however, cover programming for XML in great detail. The IBM Redbook XML Powered by Domino - How to use XML with Lotus Domino, SG24-6207, presents the topic in great detail, and includes numerous examples in LotusScript and Java.
16.1 What is XMLXML stands for eXtensible Markup Language. It is similar to HTML, but unlike HTML, which uses tags to display data, XML uses tags to describe data. In HTML, all the tags are predefined, such as <HTML>,<HEAD> and <TABLE>. XML allows you to define your own tags and your own document structure. Here is a simple example:
Example 16-1 A phonebook entry in XML
<phonebook><contact><lastname>Doe</lastname><firstname>John</firstname><address>1 Medical Street, Boston, MA, 02110</address><telephone>1-555-123-4567</telephone></contact></phonebook>
There are some important differences between HTML and XML. These differences are listed in Table 16-1. For XML, these are also known as rules.
Table 16-1 Major differences between HTML and XML
HTML XML
Tags are not case sensitive. Elements names (tags) are case sensitive.
In some cases, the end tag is not required. For example: <P>
A start tag and an end tag must be present. For example: <P>...</P>
A tag without a slash suffices for an empty element. For example: <BR>
Empty elements require a slash before the right bracket. For example: <BR/>
Attribute values do not need to be in quotes. For example: <FONT SIZE=12>
All attribute values must be in quotes. For example: <FONT SIZE=”12”>
White space is mostly discarded when formatting content in a browser.
White space is preserved as part of the content, unless explicitly told not to.
Tags are allowed to overlap. For example: <B>some <i>text</B></i>
Elements are not allowed to overlap. For example: <B>some <i>text</i></B>
Isolated markup characters may be used. For example: <formula>x > y</formula>
Isolated markup characters may not be used. For example:<formula> x > y</formula>
744 Domino Designer 6: A Developer’s Handbook
The rules for XML need to be strictly adhered to if you wish to generate well-formed XML. A well-formed XML document is one that satisfies all the XML rules, and is able to be read by an XML parser. This ensures that all XML data follows a strict standard, and is particularly useful when integrating XML data from a different application.
XML documents can be created with or without a document type definition (DTD). Without a DTD, XML processors can still determine whether a document is well-formed syntactically. However, if you make use of a DTD, it is possible to determine whether the XML document is valid or not.
A valid XML document is one that has elements that conform to a specification, which it obtains from a DTD. A DTD defines the data structure of each XML document. It defines the names of elements and attributes, the tree structure of the data, the number of elements, and any rules related to the data structure. We usually use DTDs when we exchange data with other systems. This ensures a consistency between two different sets of data, and allows for an easier interpretation of the data.
One of the main benefits of XML is that it can be used as a universal data format. This means that we can exchange information between systems over intranets and the internet, making use of browsers and Java.
XSL and XSLTXML itself only describes the structure of the data. When you open an XML file, the data itself is presented to you in plain text. It would be much more useful if you could manipulate the data and change the format of its presentation. There is an XML-based language available that allows you to change the presentation of XML and display it in various media (for example, a Web page). It is called XSL (eXtensible Stylesheet Language). Included in XSL is XSLT (XSL Transformation). XSLT is the engine that you use to do the actual transformation from XML to a more presentable format.
Figure 16-1 The way XML is transformed into HTML
We can also make use of other tools to manipulate the data. XML parsers provide application programming interfaces (APIs) to work with XML data. The most common APIs are DOM and SAX.
Chapter 16. XML 745
DOM APIThe Document Object Model (DOM) is an API that is used to access XML files. DOM is particularly useful when it comes to handling XML because it breaks down the XML data and represents it as a tree object model. The root element of the XML data forms the root node of the tree. The remaining elements are linked to the root, or to each other as other nodes, according to their relationship with one another. This creates a hierarchy which is easy to navigate through.
SAX APISimple API for XML (SAX) is another API that can be used when working with XML files. SAX does not create a document tree; it is event driven. Each element of the XML triggers certain events, and passes these to the event handler. SAX_StartDocument, SAX_EndDocument, SAX_StartElement, and SAX_EndElement are examples for events generated by an XML file.
16.2 XML and DominoDomino is already a superb environment for data integration. Notes and Domino have a very similar architecture to that of XML. They both have separate data and presentation parts. For example, Domino stores data in structured documents, separate from its presentation. It retrieves a form, and the structure within a form, to display the document to you, with the form structure used as the presentation part.
Lotus has developed an XML language for representing Domino data. It is called Domino XML Language (DXL). This language contains a set of elements (tags) and attributes to describe Notes documents, views, rich text, and any other elements that can be stored in a .nsf file. DXL allows you to describe both data and design elements.
Domino Designer 6 includes some powerful tools for handling XML. These are known as DXL Utilities. The three tools are:
� Exporter - Converts any Domino Design Element into DXL.
� Viewer - Domino will display the element to you in the DXL format.
� Transformer - Transformer allows you to output all of your database design or selected elements, transform them by applying a style sheet, and either send the output to your display screen or write it to an HTML file.
These tools are available from the Tools -> DXL Utilities menu.
746 Domino Designer 6: A Developer’s Handbook
For programmers, Domino Designer 6 has included new LotusScript classes that can be used when working with DXL. They are:
� NotesDXLExporter class� NotesDXLImporter class� NotesXSLTransformer class� NotesDOMParser class� NotesSAXParser class� NotesDOMAttributeNode class � NotesDOMCDATASectionNode class � NotesDOMCharacterDataNode� NotesDOMCommentNode class � NotesDOMDocumentFragmentNode class � NotesDOMDocumentTypeNode class � NotesDOMDocumentNode class � NotesDOMElementNode class � NotesDOMEntityNode class � NotesDOMEntityReferenceNode class � NotesDOMNamedNodeMap class � NotesDOMNode class � NotesDOMNodeList class � NotesDOMNotationNode class � NotesDOMProcessingInstructionNode class � NotesDOMTextNode class � NotesDOMXMLDeclNode class � NotesNoteCollection class� NotesSAXAttributeList class � NotesSAXException class � NotesStream class � NotesXMLProcessor class
Important: To make use of the DXL utilities, you ,ust be +running Internet Explorer 5.01 or later. Check your location document to make sure your Internet Browser field is set to “Notes with Internet Explorer” or “Internet Explorer.”
Chapter 16. XML 747
Figure 16-2 Domino objects for DXL support
Most of the existing LotusScript classes have also been enhanced with new methods which assist in working with XML objects. These new classes are explained in detail, with examples, later on in this chapter.
You would most likely use DXL in one of three ways:
1. To export XML data from Domino databases into other applications or databases
2. To modify data in a Domino database by exporting DXL, making changes, and then reimporting the data back into Domino
3. To import XML data from external databases or applications into Domino databases
Lotus Domino Designer includes the LotusXSL processor in the product so you can parse and transform XML data without a separate download.
To create and process Domino data expressed as DXL, use:
� NotesDXLExporter to generate DXL
� NotesDXLImporter to process DXL data
Use industry-standard tools to:
� Transform DXL data through XSLT with the NotesXSLTransformer class
748 Domino Designer 6: A Developer’s Handbook
� Parse XML data into a standard DOM tree structure with the NotesDOMParser class
� Parse XML data as a series of events with the NotesSAXParser class
The XML Processor class is a base class that contains the properties and methods common to all XML processing classes.
Use these “helper” classes to:
� Stream XML to or from a memory buffer or file with the NotesStream class.
� Build subsets of notes to export with the NotesNoteCollection class in conjunction with NotesDXLExporter.
16.3 Basic XML use in Domino DesignerDomino, by nature, is an excellent tool for storing documents of structured and unstructured information; the security, directory, and application development features found in Domino make it a very effective tool for storing and generating XML.
There are some very simple ways of developing Domino elements that display XML. However, as with most simple methods, there are certain disadvantages to using them. The main disadvantage is inflexibility, since your XML will be hard coded into your forms, views, or pages. This would be relatively difficult to change.
16.3.1 XML for forms, views, or pages
FormsA relatively easy method of transforming Domino data to XML is to create a form that contains fields you want to convert to XML data, then add tags on either side of the field that will be interpreted as XML.
Chapter 16. XML 749
Figure 16-3 A simple form containing XML tags
Figure 16-4 The settings required for forms containing XML
Note: In order for the form to be recognized as XML in your browser, the form’s Default property - Content type must be set to HTML, and the “Render pass through HTML in Notes” option on the Form info tab must be selected. Otherwise the form will be rendered incorrectly! Figure 16-4 shows the pertinent settings.
750 Domino Designer 6: A Developer’s Handbook
The main disadvantage of using this method is the future inflexibility and maintenance that you would be faced with. Since the XML elements are hard-coded and directly associated with field names on the form, changing the field name on the form or associating a field with another XML element becomes confusing and difficult, especially if you're using a large number of forms to generate XML.
A more flexible solution is to build agents that run on a regular schedule or when a form is opened via the form WebQueryOpen event to generate XML on the fly. While this requires more work on the front-end, the agents themselves can provide automatic XML generation tools based on form data. These agents can be written in LotusScript or Java, as seen in examples later on in this chapter.
Views and pagesThere are occasions when we must be able to represent many documents in XML. In Domino there are many ways to generate representations of multiple documents. The easiest way is to create a view that contains the documents that you want to generate as XML. Once the view is created, there are several ways to create XML data out of the view columns. We examine these ways in this section.
The easiest way to convert your view into XML is to use the built-in ?ReadViewEntries URL command. This requires no programming. This option however, is the least flexible, and will only be meaningful if an XML parser is used to receive the data. Parsers are described in more detail later on in this chapter.
To use this command, simply type the following in your Web browser:
For more information on the use of these commands, as well as several examples, refer to the Domino Designer online help.
Another method of producing XML using a view, is to map the XML tags to the columns in the view. Once you have created a view and mapped the XML tags to it, you embed the view into a page. A view embedded into a page maintains the same functionality on the Web as a view in a Notes client application, and allows you to control the size and appearance of the view display. For views displaying XML, the page contains the XML declaration and root element.
To map XML to a view, do the following:
1. Create a view and open it.
2. Select Edit -> Properties to open the View Properties box.
3. Click the Advanced tab.
4. In the Web Access section, select “Treat view contents as HTML.” Domino generates HTML for the contents of a view if this property is not selected. In addition, the content of a view that is embedded into a page is not visible if this property is not selected. The correct setting is shown in Figure 16-6.
Figure 16-6 The Advanced properties for a view
5. Click “View Selection” on the Objects tab and add a selection formula to define which documents will be included in the view. For our example, documents are selected for the view using the following formula:
SELECT @All
Chapter 16. XML 753
6. Click “Form Formula” on the Objects tab and enter a formula that selects your template form.
SELECT Form = "XML"
7. Add columns to the view.
8. Click the first column of the view.
9. Enter a formula for Column Value in the Script area using the following syntax:
"<PARENT><CHILD>"+fieldname+"<\CHILD>"
Our example looked like this:
"<contact><lastname>"+lastname+"</lastname>"
If you have more than one element for any column, add a semicolon (;) at the end of the first column formula and add the column formula for the next element below it.
10.Click the second column and type a column formula into the Script area using the following syntax:
"<CHILD>"+fieldname+"<\CHILD>"
For example:
"<firstname>"+firstname+"</firstname>"
11.Repeat Step 10 for each XML element except the last one.
12.For the last child element, use the following syntax:
"<LASTCHILD>"+fieldname+"<\LASTCHILD></PARENT>"
For example:
"<telephone>"+telephone+"</telephone></contact>"
Once you have set up your view, you have to create a page into which you will embed the view.
1. Open or create a page.
2. Select Design -> Page Properties.
3. Click the Page Info tab.
4. In Web Access, select “Treat page contents as HTML,” and close the Page properties box. See Figure 16-7.
754 Domino Designer 6: A Developer’s Handbook
Figure 16-7 The Page info properties for our XML page
5. Type an XML declaration above the place where you want the embedded view to display, for example:
<?xml version=”1.0” encoding=”UTF-8” ?>
6. Type the root tag below the XML declaration, for example:
<phonebook>
7. Place the cursor where you want the embedded view to display.
8. Select Create -> Embedded Element -> View.
9. (Optional) If you don't want to display the same view in all circumstances, click “Choose a View based on a formula.” When you click OK to close the dialog box, write a formula in the Programmer's pane to display the appropriate view.
10.Choose the view you wish to embed and click OK to embed it.
11.Click the embedded view and select Element -> View Properties. On the Info tab, ensure that under Web access, “Using View’s display property” is selected. See Figure 16-8. If you wish to change the alignment or style, or hide the element under certain conditions, change the relevant Page properties.
Figure 16-8 The Embedded View properties
Chapter 16. XML 755
12.Type a close root tag below the view, for example:
</phonebook>
Once these steps have been followed, your view in Internet Explorer should look like the screen shown in Figure 16-9.
Figure 16-9 The page displaying XML from a view
Style sheetsSince the XML file only describes the data, we need to apply a stylesheet to display the data in a more meaningful format. In Domino, we can use either XSL or CSS (Cascading Style Sheets) to transform the data. Example 16-2 is an example of an XSL stylesheet.
Example 16-2 A simple XSL stylesheet
<?xml version="1.0"?>
<!--This line is for IE only--><xsl:stylesheet xmlns:xsl="http://www.w3.org/TR/WD-xsl">
Note: A second contact has been added to the example to better illustrate the view.
756 Domino Designer 6: A Developer’s Handbook
<!--root node--><xsl:template match="/" >
<!--This line sets the table border to 3 pixels, inset, black--><TABLE STYLE="border:3px inset black">
<!--The first row of the table. The font of the text in this row is set 10 point, boldface, Verdana, and the background color of the row to light grey.--><TR STYLE="font-size:10pt; background-color: lightgrey; font-family:Verdana; font-weight:bold">
<!--This is the text that will appear in the first cell of the first row of the table. All of the cells in this row will have the attributes defined in the line above.--><TD>Last Name</TD>
<!--This is the text that will appear in the second cell of the first row of the table--><TD>First Name</TD>
<!--This is the text that will appear in the third cell of the first row of the table.--><TD>Address</TD>
<!--This is the text that will appear in the fourth cell of the first row of the table.--> <TD>Telephone</TD>
<!--The end of the first row in the table.--></TR>
<!--This line applies the defined style to the data in each child element contained by the root element <phonebook> and the parent element <contact>, then puts it in the table in order by part name. Note that order-by is not the field name, but the XML tag that is associated with the field.--><xsl:for-each select="phonebook/contact">
<!--The second row and subsequent rows of the table. The font is set to Verdana, 10 point. The cell padding is set to 0 pixels and 6 pixels.--> <TR STYLE="font-family:Verdana; font-size:10pt; padding:0px 6px">
<!--The data contained by the <lastname> tag will be placed in the first column.--><TD><xsl:value-of select="lastname" /></TD>
<!--The data contained by the <firstname> tag will be placed in the second column.--> <TD><xsl:value-of select="firstname" /></TD>
Chapter 16. XML 757
<!--The data contained by the <address> tag will be placed in the third column.--><TD><xsl:value-of select="address" /></TD>
<!--The data contained by the <telephone> tag will be placed in the fourth column.--><TD><xsl:value-of select="telephone" /></TD>
<!--This line ends each row of the table. Note that a third row, fourth row, and so on will be created until all of the data has been rendered.--></TR>
</xsl:for-each>
</TABLE>
</xsl:template>
</xsl:stylesheet>
To use an XSL stylesheet in a Domino application:
1. Create a new page.
2. Choose Design -> Page Properties.
3. Enter a name with the extension XSL in the Name field, for example:
phonebookentries.xsl
4. Ensure that under Web Access, Content type is set to HTML.
5. Write your own stylesheet, or copy the phonebookentries code in Example 16-2 into the XML Example database.
6. Save the page with an XSL extension.
7. Create a LotusScript or JavaScript agent to access the XML and apply the stylesheet programmatically.
Applying a stylesheet using JavaScriptIn order to access the XSL we created, we use LotusScript or JavaScript. The next example shows how to access the XSL stylesheet to access XML with client-side JavaScript:
1. Create a new page.
2. Choose Design -> Page Properties.
758 Domino Designer 6: A Developer’s Handbook
3. Type JavaScriptXML in the Name field.
4. Click the Page Info tab and verify that "Web Access: Content type: HTML" is not selected.
5. Type the following division tags on the page where you want your data to display:
<div id="HTMLresults"></div>
6. Highlight the <div id="HTMLresults"></div> tags and click Text -> Pass-Thru HTML. The tags will appear with a grey background indicating that they are marked as pass-thru HTML.
7. Optionally, add HTML Head Content.
8. Click JSHeader and type or paste the JavaScript in Example 16-3 into the Script area.
Example 16-3 JavaScript example to access XML in Domino
var HTMLresults;var source;var style;
//Defines loadXML() as a function.function loadXML() {
//Creates a new ActiveXObject called source which is the //Microsoft.XMLDOM parser.source = new ActiveXObject("Microsoft.XMLDOM");
//Creates a new ActiveXObject called style which is the//Microsoft.XMLDOM parser that is installed with IE 5.5. //This object will be used to apply the stylesheet to the XML.style = new ActiveXObject("Microsoft.XMLDOM");
source.async = false;style.async = false;
//Sets the validateOnParse property to false.source.validateOnParse = false;
//Loads the GetParts page into the parser using //the openPage URL command. source.load("http://localhost/phonebook.nsf/Xpage?openPage");
Note: HTMLresults is an attribute that is used in the JSHeader object described below.
Chapter 16. XML 759
//Loads the phonebookentries.xsl stylesheet into the //parser using the openPage URL command.style.load("http://localhost/phonebook.nsf/phonebookentries.xsl?OpenPage");
//Error handler. If there is an error, call the //showError() function. if(source.parseError.errorCode != 0) {showError();}//If there is no error, call the doTransform() function.doTransform();}
//Defines doTransform() as a function.function doTransform() {
//If the getReadyState() function returns true, //then transform the node using the //stylesheet and put the results inside the tags with //the HTMLresults attribute.if (getReadyState()){
resulting = source.transformNode(style);document.all.item("HTMLresults").innerHTML = resulting;}//If the getReadyState() function doesn't return //true, then refresh.self.refresh;}
9. In the OnLoad event, type or paste the following JavaScript:
//Calls the loadXML() function when the page is //loaded into the browser.loadXML();
10.Save the page.
11.Choose Design -> Preview In Web Browser -> Internet Explorer.
The XSL file should have transformed your XML data to look like Figure 16-10.
Figure 16-10 XML data transformed by the XSL stylesheet
16.4 XML tools (DXL Utilities)Domino Designer 6 now has an easy way to work with XML in your applications. The DXL Utilities are available from the Tools menu in Designer. Using these tools, you can simply choose the elements you wish to export, view, or transform with only a few clicks of your mouse. Domino then handles the elements according to your selection.
Note: You are able to preview this page directly in Internet Explorer 5.5 because the XML in the GetParts page is being accessed programmatically via JavaScript.
Chapter 16. XML 761
16.4.1 ExporterPossibly the easiest way to transform a Domino Designer element into DXL is to use the Export utility. To use this, you need to have Domino Designer 6 open.
1. Select one or more design elements in the design pane.
2. Choose Tools -> DXL Utilities -> Exporter. The dialog box in Figure 16-11 is displayed.
Figure 16-11 DXL Exporter dialog box
3. Enter a file name and path for the XML file and click Save. You can save you file either as an XML file or as a DXL file.
You can now go to the file that was created and edit or view the contents with any text editor.
16.4.2 ViewerThe Viewer allows you to see any element that you select in the DXL format.To view the Design elements as DXL, do the following:
1. Check your location document to make sure your Internet Browser field is set to “Notes with Internet Explorer” or “Internet Explorer.”
2. Select one or more design element in the design pane.
3. Choose Tools -> DXL Utilities -> Viewer.
Note: Using these features requires Internet Explorer version 5.01 or later.
762 Domino Designer 6: A Developer’s Handbook
The DXL will be displayed in your Notes client or in Internet Explorer, depending on your Notes browser setting.
16.4.3 TransformerThe Transformer utility allows you to take an existing DXL file and transform it using an XSL file. This gives you the ability to apply styles and formats to customize the data so that it will be more meaningful to you.
Before you can transform your DXL, you will need to have an XSL file available which contains the tags that make up a design element.
1. Select one or more design elements in the design pane.
2. Choose Tools -> DXL Utilities -> Transformer.
3. Select the name of an XSL file to use for transforming the XML.
Designer ships with some sample XSL files that you can select, or you can browse the file system to select another XSL file.
4. Choose a type of output. Either select screen for a screen display, or specify an output file name.
Figure 16-12 The DXL Transformer dialog box
16.5 XML and LotusScriptAs we mentioned earlier, one of the biggest disadvantages of hard-coding XML in Domino is its inflexibility. However, we can get the same results
Chapter 16. XML 763
programmatically. Agents can be set to run on a schedule, based on an event, or in response to a URL command. This kind of flexibility is necessary to create automated XML applications.
16.5.1 LotusScript agentsExample 16-4 is an agent that retrieves each document in a view called XML, creates XML from the content, and prints the output when opened in a browser.
Example 16-4 LotusScript that converts a view to XML
Dim s As New NotesSessionDim db As NotesDatabaseDim doc As NotesDocumentDim view As NotesView
Set db = s.currentDatabaseSet view = db.GetView( "XML" )Set doc = view.GetFirstDocument
Print "Content-type: text/xml"'Prevents Domino from sending default headers.Print "<phonebook>"'phonebook is the root element of the XML document.
While Not ( doc Is Nothing )'Loop as long as there are document objects available. Print "<contact>" 'Send the parent element for each book document. Print "<lastname>"+doc.lastname(0)+"</lastname>" Print "<firstname>"+doc.firstname(0)+"</firstname>" Print "<address>"+doc.address(0)+"</address>" Print "<telephone>"+doc.telephone(0)+"</telephone>" Print "</contact>" 'Close the contact element tag. Set doc = view.GetNextDocument( doc ) 'Get the next document in the view.WendPrint "</phonebook>"'Closes the root element.
The results of running the LotusScript in Example 16-4 are displayed in Figure 16-13.
764 Domino Designer 6: A Developer’s Handbook
Figure 16-13 Using a LotusScript agent to display XML from a view
There are times when it would be preferable to generate your XML tags on the fly. This means that to add a new element to a form or remove an existing element from a form, the developer would only have to add or delete a field. The agent in Example 16-5 will take the form, and automatically generate XML tags for each field on the form.
Example 16-5 An agent that creates XML tags on the fly
Sub InitializeDim session As NotesSessionSet session = New NotesSessionDim doc As NotesDocumentSet doc = session.DocumentContextAllFields_LotusScript=""Forall i In doc.ItemsIf ( Instr( i.name, "$" ) = 0 ) ThenAllFields_LotusScript = AllFields_LotusScript + "<" + i.name+">"+i.text + "</" + i.name+">"+Chr(13)End IfEnd Foralldoc.AllFields_LotusScript=AllFields_LotusScriptEnd Sub
This agent also removes the $ character from any field names since this character is not allowed in XML element names.
Chapter 16. XML 765
You are also required to hide the actual fields from the Web, and the declaration and root element should be hidden from Notes.
Figure 16-14 The form and settings required to generate XML correctly
Calling this agent from the WebQueryOpen event for your form, you should get the results shown in Figure 16-15 when the document is opened via your browser.
Note: Remember to have the form’s content type set to HTML.See Figure 16-4 on page 750.
This should be hidden from Notes R4.6 or later.
This must be hidden from Web browsers.
Ensure that you hide the relevant fields from the different clients.
766 Domino Designer 6: A Developer’s Handbook
Figure 16-15 XML that was generated on the fly
16.5.2 New support for DXLDomino Designer 6 now comes with built-in support for DXLs. In this section we discuss the new classes for LotusScript that are included, and give an example of how each of the main classes is used.
Domino Designer 6 also allows pipelining when using NotesDXLExporter, NotesDXLImporter, and NotesXSLTransformer. You construct a pipeline by specifying one object as the input to another object, which can be the input to a third object, and so on. The Process method of the first object in the pipeline initiates processing for all the objects. The following pipeline segments are allowed:
� NotesDXLExporter to NotesXSLTransformer
� NotesDXLExporter to NotesDXLImporter
� NotesXSLTransformer to NotesXSLTransformer
� NotesXSLTransformer to NotesDXLExporter
Example 16-6 is a simple example.
Chapter 16. XML 767
Example 16-6 A pipelining example
Set exporter = session.CreateDXLExporter(inputDoc) 1
Set importer = session.CreateDXLImporter(exporter) 2
exporter.Process 3
1 The XML “pipe” feature makes it unnecessary to specify the SAX parser as theoutput object here.2 Specifying the exporter as the input to the SAX parser makes the SAX parserthe output of the exporter.3 This initiates both the export and the SAX-parsing operations.
NotesDXLExporter classConverting a Designer element to DXL programmatically is much easier now using the new NotesDXLExporter class for LotusScript. This class is used in the following way:
1. Use CreateDXLExporter in NotesSession to create a NotesDXLExporter object.
2. If you do not specify the input parameter, use SetInput to specify the input Domino data. If you do not specify the output parameter, use SetOutput to specify the output DXL data. You can also use these methods to override the CreateDXLExporter parameters.
3. Finally, call Process to initiate a conversion.
The following example creates an agent that is accessible via the Notes client that will convert any select documents to DXL. This can be especially useful if you need to convert numerous documents at once. In order for this example to work correctly, a couple of steps need to taken beforehand:
1. Create a directory on your C:\ drive called DXL (you may also change the filename$ value in the agent’s code to reflect a different directory).
2. Create an empty text file with the name your_database.xml. For example, we created phonebook.xml.This can be done using NotePad or any other text editor.
3. Copy the Domino DTD file (called domino.dtd) from your Notes directory to the C:\DXL directory (or whatever you chose to call your directory).
768 Domino Designer 6: A Developer’s Handbook
Figure 16-16 Directory structure for the DXL example
4. Create an agent in that database that will contain the LotusScript in Example 16-7.
Example 16-7 Converting documents to DXL using NotesDXLExporter
Sub Initialize Dim session As New NotesSession Dim db As NotesDatabase Set db = session.CurrentDatabase REM Open xml file named after current database Dim stream As NotesStream Set stream = session.CreateStream filename$ = "c:\dxl\" & Left(db.FileName, Len(db.FileName) - 3) & "xml" If Not stream.Open(filename$) Then Messagebox "Cannot open " & filename$,, "Error" Exit Sub End If Call stream.Truncate REM Export current database as DXL Dim exporter As NotesDXLExporter Set exporter = session.CreateDXLExporter Call exporter.SetInput(db) Call exporter.SetOutput(stream) Call exporter.ProcessEnd Sub
5. Once you have created the agent, you can open the database from your Notes client and choose a view. In the view, select which documents you would like to convert to DXL, and then choose the agent from the Tools menu. It will populate the XML file you created with the DXL of the documents you selected.The output should look similar to Figure 16-17.
Chapter 16. XML 769
Figure 16-17 The DXL output for the Phonebook database
NotesXSLTransformer classDomino Designer 6 gives you many options when it comes to transforming XML or DXL files. Previously in this chapter, we explained how to use the DXL Utilities Transformer feature. Using the NotesXSLTransformer and LotusScript gives, in effect, the same result. With this class, you can transform DXL data through XSLT.
1. Use CreateXSLTransformer in NotesSession to create a NotesXSLTransformer object.
2. If you do not specify the input parameter, use SetInput to specify the input DXL data. If you do not specify the styleSheet parameter, use SetStyleSheet to specify the XSL style sheet. If you do not specify the output parameter, use
Note: You can also use NotesDOMParser and NotesSAXParser to parse and transform DXL (or XML) data. These are be discussed in more detail later in this chapter.
770 Domino Designer 6: A Developer’s Handbook
SetOutput to specify the output DXL data. You can also use these methods to override the CreateXSLTransformer parameters.
3. Call Process to initiate the conversion.
NotesDOMParser classUsing the DOM API, you can access any individual node of the tree. Domino Designer 6 has the NotesDOMParser class, which you use to access and manipulate the nodes in a XML file.
1. Use CreateDOMParser in NotesSession to create a NotesDOMParser object.
2. If you do not specify the input parameter, use SetInput to specify the input XML data. If you do not specify the output parameter, use SetOutput to specify the output XML data. You can also use these methods to override the CreateDOMParser parameters.
3. Call Process to parse the input XML into a DOM tree and raise the PostDOMParse event.
The following example demonstrates how to use this class to parse an XML file, examine the nodes, and create a report displaying all the nodes contained in the XML file.
Example 16-8 An example of how the NotesDOMParser class is used
(Declarations)Dim domParser As NotesDOMParserDim LF As StringSub Initialize Dim session As NotesSession Dim db As NotesDatabase Dim inputStream As NotesStream, outputStream As NotesStream Dim docNode As NotesDOMDocumentNode Dim origXML As String, outputFile As String origXML = "c:\dxl\xmldom.xml" outputFile = "c:\dxl\DOMtree.txt" Dim header As String header = "Walk Tree agent" LF = Chr(13)+Chr(10) On Error Goto errh Set session = New NotesSession Set db = session.CurrentDatabase 'create the output file Set outputStream =session.CreateStream
Chapter 16. XML 771
outputStream.Open (outputFile) outputStream.Truncate 'write report title outputStream.WriteText ("DOM Parser Report - " ) outputStream.WriteText (header+LF) 'open the XML file Set inputStream = session.CreateStream inputStream.Open (origXML) If inputStream.Bytes = 0 Then outputStream.WriteText (origXML+" is empty"+LF) Goto results End If 'create DOM parser and process Set domParser=session.CreateDOMParser(inputStream, outputStream) domParser.Process 'get the document node Set docNode = domParser.Document Call walkTree(docNode) results: Call outputStream.Close Exit Suberrh: outputStream.WriteText ("errh: "+Cstr(Err)+": "+Error+LF) Resume resultsEnd SubSub walkTree ( node As notesdomnode) Dim child As notesdomnode Dim elt As notesdomnode Dim attrs As notesdomnamednodemap Dim a As notesdomattributenode Dim piNode As Notesdomprocessinginstructionnode LF = Chr(13)+Chr(10) If Not node.IsNull Then Select Case node.NodeType Case DOMNODETYPE_DOCUMENT_NODE: ' If it is a Document node domParser.Output( "Document node: "+node.Nodename ) Set child = node.FirstChild ' Get the first node Dim numChildNodes As Integer numChildNodes = node.NumberOfChildNodes domParser.Output(" has "+Cstr(numChildNodes)+" Child Nodes"+LF) While numChildNodes > 0
772 Domino Designer 6: A Developer’s Handbook
Set child = child.NextSibling ' Get next node numChildNodes = numChildNodes - 1 Call walkTree(child) Wend Case DOMNODETYPE_DOCUMENTTYPE_NODE: ' It is a <!DOCTYPE> tag domParser.Output("Document Type node: "+ node.NodeName+LF) Case DOMNODETYPE_TEXT_NODE: ' Plain text node domParser.Output("Text node: "+node.NodeValue+LF) Case DOMNODETYPE_ELEMENT_NODE: ' Most nodes are Elements domParser.Output("Element node: "+node.NodeName ) Set elt = node Dim numAttributes As Integer, numChildren As Integer numAttributes = elt.attributes.numberofentries domParser.Output(" has "+Cstr(numAttributes)+" Attributes"+LF) Set attrs = elt.Attributes ' Get attributes Dim i As Integer For i = 1 To numAttributes ' Loop through them Set a = attrs.GetItem(i) ' Print attr. name & value domParser.Output("Attribute "+a.NodeName+": "+a.NodeValue+LF) Next numChildren = elt.NumberOfChildNodes Set child = elt.FirstChild ' Get child While numChildren > 0 Call walkTree(child) Set child = child.NextSibling ' Get next child numChildren = numChildren - 1 Wend domParser.Output( elt.nodeName+LF) Case DOMNODETYPE_COMMENT_NODE: ' Comments domParser.Output("Comment node: "+node.NodeValue+LF) Case DOMNODETYPE_PROCESSINGINSTRUCTION_NODE: ' Handle PI nodes Set piNode = node domParser.Output("Processing Instruction node: " ) domParser.Output(" with Target "+piNode.Target+_ " and Data "+piNode.Data+LF) Case DOMNODETYPE_CDATASECTION_NODE: ' CDATA sections domParser.Output("CDATA Section node: "+node.NodeName) domParser.Output(" has value of "+node.NodeValue+LF)
Chapter 16. XML 773
Case DOMNODETYPE_ENTITYREFERENCE_NODE: ' Handle entities domParser.Output("Entity Reference node: "+node.NodeName+LF) Case Else: domParser.Output("Ignoring node: "+Cstr(node.NodeType)+LF) End Select 'node.NodeType End If 'Not node.IsNullEnd Sub
Figure 16-18 shows the text file that was generated by our agent, using the NotesDOMParser class.
Figure 16-18 The output from the NotesDOMParser example
NotesSAXParser classThe NotesSAXParser class is used as follows:
1. Use CreateSAXParser in NotesSession to create a NotesSAXParser object.
774 Domino Designer 6: A Developer’s Handbook
2. If you do not specify the input parameter, use SetInput to specify the input XML data. If you do not specify the output parameter, use SetOutput to specify the output XML data. You can also use these methods to override the CreateSAXParser parameters.
3. Call Process to initiate the data conversion process by triggering a series of event handlers.
In Example 16-9, we read an XML file and display each event in a message box. Errors and warnings are written to a file.
For this example, we have used the two entries in the phonebook.nsf database, created an XML file called phonebookentries.xml, and copied it to the C:\dxl directory.
Example 16-9 The NotesSAXParser class
(Options)%INCLUDE "lsconst.lss"
Sub Initialize Dim session As New NotesSession Dim saxParser As NotesSAXParser Dim xml_in As NotesStream filename$ = "c:\dxl\phonebookentries.xml" ' open input file Set xml_in=session.CreateStream If Not xml_in.Open(filename$) Then Messagebox "Cannot open " & filename$,, "XML file error" Exit Sub End If If xml_in.Bytes = 0 Then Messagebox filename$ & " is empty",, "XML file error" Exit Sub End If Dim xml_out As NotesStream filename$ = "c:\dxl\saxparser.txt" ' create output file Set xml_out=session.CreateStream If Not xml_out.Open(filename$) Then Messagebox "Cannot create " & filename$,, "TXT file error" Exit Sub End If xml_out.Truncate Set saxParser=session.CreateSAXParser(xml_in, xml_out) On Event SAX_Characters From saxParser Call SAXCharacters
Chapter 16. XML 775
On Event SAX_EndDocument From saxParser Call SAXEndDocument On Event SAX_EndElement From saxParser Call SAXEndElement On Event SAX_Error From saxParser Call SAXError On Event SAX_FatalError From saxParser Call SAXFatalError On Event SAX_IgnorableWhitespace From saxParser _Call SAXIgnorableWhitespace On Event SAX_NotationDecl From saxParser Call SAXNotationDecl On Event SAX_ProcessingInstruction From saxParser _Call SAXProcessingInstruction On Event SAX_StartDocument From saxParser Call SAXStartDocument On Event SAX_StartElement From saxParser Call SAXStartElement On Event SAX_UnparsedEntityDecl From saxParser Call SAXUnparsedEntityDecl On Event SAX_Warning From saxParser Call SAXWarning saxParser.Process ' initiate parsing End Sub
Sub SAXStartDocument (Source As Notessaxparser) Messagebox "Start reading Document", MB_ICONINFORMATIONEnd Sub
Sub SAXEndDocument (Source As Notessaxparser) Messagebox "End of Document", MB_ICONINFORMATIONEnd Sub
Sub SAXCharacters (Source As Notessaxparser, Byval Characters As String, _Count As Long) Messagebox "Characters found", MB_ICONINFORMATION Source.Output (Characters)End Sub
Sub SAXEndElement (Source As Notessaxparser, Byval ElementName As String) Messagebox "End of Element", MB_ICONINFORMATIONEnd Sub
Sub SAXError (Source As Notessaxparser, Exception As NotesSaxException ) Messagebox "Error - "+Exception.Message, MB_ICONINFORMATION Source.Output ("Error - "+Exception.Message)End Sub
Sub SAXFatalError (Source As Notessaxparser, Exception As NotesSaxException) Messagebox "FatalError - "+Exception.Message, MB_ICONINFORMATION Source.Output ("FatalError - "+Exception.Message)End Sub
Sub SAXIgnorableWhitespace (Source As Notessaxparser,_Byval characters As String, Count As Long) Messagebox "Ignorable Whitespace found", MB_ICONINFORMATION
776 Domino Designer 6: A Developer’s Handbook
End Sub
Sub SAXNotationDecl (Source As Notessaxparser,_Byval NotationName As String, Byval publicid As String,_Byval systemid As String) Messagebox "Notation Declaration found", MB_ICONINFORMATIONEnd Sub
Sub SAXProcessingInstruction (Source As Notessaxparser,_Byval target As String, Byval PIData As String) Messagebox "Processing Instruction found", MB_ICONINFORMATIONEnd Sub
Sub SAXStartElement (Source As Notessaxparser,_Byval elementname As String, Attributes As NotesSaxAttributeList) Dim i As Integer Messagebox "Start reading Element name = "+elementname, MB_ICONINFORMATION If Attributes.Length > 0 Then Dim attrname As String For i = 1 To Attributes.Length attrname = Attributes.GetName(i) ' test GetValue and GetType args two ways _ ' - by attribute name and by attribute index Messagebox "Attribute "+attrname+" = "_ +Attributes.GetValue(attrname)+",_ type = "+Attributes.GetType(attrname), MB_ICONINFORMATION Messagebox "Attribute "+attrname+" = "+Attributes.GetValue(i)+",_ type = "+Attributes.GetType(i), MB_ICONINFORMATION Source.Output("Attribute "+attrname+_ " = "+Attributes.GetValue(attrname)+",_ type = "+Attributes.GetType(attrname)) Next End IfEnd Sub
Sub SAXUnParsedEntityDecl (Source As Notessaxparser,_Byval Entityname As String, Byval publicid As String,_Byval systemid As String, Byval notationname As String) Messagebox "Unparsed Entity Declaration found", MB_ICONINFORMATIONEnd Sub
Sub SAXWarning (Source As Notessaxparser, Exception As NotesSaxException) Messagebox "Warning - "+Exception.Message, MB_ICONINFORMATION Source.Output("Warning - "+Exception.Message)End Sub
Chapter 16. XML 777
Figure 16-19 shows one of the message boxes that was generated by running Example 16-9.
Figure 16-19 A message box displayed during the example
NotesDXLImporter classThis class allows you to import any DXL file into a Domino database. Once imported, you will see the new element that was imported in the database design.
In this instance, you can use CreateDXLImporter in NotesSession to create a NotesDXLImporter object. If you do not specify the input parameter, use SetInput to specify the input DXL data. If you do not specify the output parameter, use SetOutput to specify the output Domino data. You can also use these methods to override the CreateDXLImporter parameters.
Use ACLImportOption, DesignImportOption, and DocumentImportOption to indicate whether you want to create additional elements in the output database from the incoming DXL, ignore incoming elements, replace existing elements, or update existing elements.
Call Process to initiate a conversion.
Example 16-10 is an agent that was created to import a DXL file from the file system into an existing database.
You need to have the following in place if this example is to work:
� A DXL file generated from an element in your existing database (using the Tools -> DXL Utilities -> Exporter in Designer). Name this file your_database.dxl and saved in the C:\DXL directory (you may also change the filename$ value in the agent’s code to reflect a different directory). For example:
C:\DXL\phonebook.dxl
� An existing database in your Notes\Data directory that does not already contain the element that you wish to import. For example:
newphonebook.nsf
We run this agent from the source database.
778 Domino Designer 6: A Developer’s Handbook
Example 16-10 NotesDXLImporter example
Sub InitializeDim session As New NotesSessionDim db As NotesDatabaseDim dbCopy As NotesDatabaseSet db = session.CurrentDatabasefilename$ = Left(db.FileName, Len(db.FileName) - 4)
REM Open dxl file named after current databaseDim stream As NotesStreamSet stream = session.CreateStreamIf Not stream.Open("c:\dxl\" & filename$ & ".dxl") Then
Messagebox "Cannot open " & filename$,, "Error"Exit Sub
End IfIf stream.Bytes = 0 Then
Messagebox "File did not exist or was empty",, filename$Exit Sub
End If
REM Create new database named current database + "Copy"Set dbCopy = New NotesDatabase("", "")Call dbCopy.Open("","new" & filename$ )
REM Import DXL into new databaseDim importer As NotesDXLImporterSet importer = session.CreateDXLImporter(stream, dbCopy)Call importer.Process
End Sub
Once this agent is run, it will have created the Design element that you previously exported into your existing database in your Data directory called newyour_database.nsf (for example: phonebookCopy.nsf). You should be able to open the new database and see the imported element.
16.6 XML and JavaJava is probably the most common language used outside of Domino to exploit XML. This is mainly because of the powerful classes that have been provided to Java developers that allow them to manipulate XML in many different ways. Domino Designer 6 now includes the XML4J parser and LotusXSL processor, which allows you to parse and transform XML data.
Chapter 16. XML 779
Table 16-2 Back-end Java classes provided by Domino
Another Java class, the XSLTResultTarget class, is a wrapper class in the com.lotus.xsl package that contains the result of a transformation made using the LotusXSL processor. An instance of this class serves as a container for the XSLT Result tree.
With the generateXML, parseXML, and transformXML methods, you have the same functionality as you do when you use LotusScript.
generateXMLYou can use a Java agent to generate XML for you from a Domino document. Using the generateXML method, you can generate an XML representation of a document to the Writer. Following is an example of code using generateXML to convert a Notes document to XML.
Example 16-11 Java code to convert a Notes document to XML
//The XmlWriter class writes data as XML to a java.io.Writer object.
// This class handles the low-level tasks of writing character data properly// as XML, including Domino datetimes and Domino documents.
transformXMLThis method transforms the data from an input source according to a specified stylesheet.
Chapter 16. XML 781
The next example uses the transformXML method to take XML data and convert it to a text file, which is written to your hard drive.
First, you need to create a form. This form will store the XML data as well as the XSL stylesheet. Use Figure 16-20 to assist you in creating your form.
Figure 16-20 The XMLTransform form that converts XML to text
The form consists of 3 text fields and an action button. Name the fields:
� rawXML� XSLStylesheet� TransResult
Next, create an agent called JavaXSLconverter. In the agent properties, in the Runtime section, select “Agent list selection” from the drop-down list. Ensure that the Trigger is set to “On event”. This agent uses the Java code in Example 16-12.
Example 16-12 Java code for the JavaXSLConverter agent
import lotus.domino.*;import java.io.*;import org.xml.sax.*;public class TransformPrimer extends AgentBase {
public void NotesMain() {try {
Session s = getSession();AgentContext ac = s.getAgentContext();Database db = ac.getCurrentDatabase();
782 Domino Designer 6: A Developer’s Handbook
Document doc = ac.getDocumentContext();// assign object variables to the fields that have the XML and XSLT code in them
//create an inputsource out of the value from the XSLT fieldString sc = doc.getItemValueString("XSLStylesheet");InputSource style = xslItem.getInputSource();
// create a File Writer, transform the xml and write it to the following file.FileWriter fw = new FileWriter("C:\\DXL\\javaoutput.txt");XSLTResultTarget result = new XSLTResultTarget(fw);xmlItem.transformXML(style, result);
// create a StringWriter and write the same results to the results field in the current document
style = new InputSource(new StringReader(sc));StringWriter rw = new StringWriter();result = new XSLTResultTarget(rw);xmlItem.transformXML(style, result);doc.replaceItemValue("TransResult" , rw.toString() );doc.save(true,true);} catch(Exception e) {e.printStackTrace();}
}}
On your XSLTranform form, add an action and label it “Transform XML”. Then add the following formula to your Transform XML button:
@Command([ToolsRunMacro];"(JavaXSLConverter)");@Command([FileCloseWindow]);@Prompt([Ok];"Transformation Complete";"The Transformation is complete.Review text file or Document contents")
Any documents you create using this form will contain both the XML data and the stylesheet. To demonstrate the XML transformation, create a new XMLTransform document. In the rawXML field, add the following XML file:
Now click the Transform XML button. Once the Java agent has run, the form will close and the output will be written to C:\DXL\Javaoutput.txt. The text file should look like Figure 16-21.
Figure 16-21 The text output from the Java agent
parseXMLTo convert XML data into a format that can be processed, you will need to send the data to a parser. There are two APIs that will do this for you: the DOM API and the SAX API.
The following example shows how to use the parseXML method of the RichTextItem class to parse the XML and return an instance of a w3 document in the form of a Document Object Model (DOM) tree.
Again, you will need to create a form that will contain the XML.
Note: It is possible to create a Java agent that can download an XML file (for example, daily stock prices) on a scheduled basis, that will populate a field on a form. This field can be parsed at a later stage.
784 Domino Designer 6: A Developer’s Handbook
Create a form that contains a rich text field to contain your XML data. It should resemble the form in Figure 16-22.
Figure 16-22 The form required to parse XML
Next, create a Java agent called ParseXML. In the agent properties, in the Runtime section, select “Agent list selection” from the drop-down list. Ensure that the Trigger is set to “On event”. This agent uses the code shown in Example 16-13.
System.out.println("Node Name is:" + n.getNodeName());System.out.println("Node Value is: " + n.getNodeValue());System.out.println("Node Value is: " + n.getNodeType());System.out.println("This node has child nodes: " +
n.hasChildNodes());}
}} catch(Exception e) {e.printStackTrace();}
}}
After you have saved your agent, create a button on your xmldata form. This button will perform a simple action, which is “Run agent”. Select (ParseXML) from the drop-down list of available agents. Save the form and then open it in your Notes client. Use the XML data from the previous example and paste it in the XMLDATA field. Save the document and select File -> Tools -> Show Java Debug Console. Click the Parse XML button and the DOM should be displayed in the Java Console.
16.7 SummaryIn this chapter we introduced XML. We described how we transform XML into different formats that are more meaningful to us. Next, we explained how Domino supports the XML technology. We defined what DXL is and introduced the new LotusScript classes that are provided with Domino Designer 6. Domino can handle XML data both basically (directly in forms, pages, and views) as well as programmatically, using LotusScript or Java. It is possible to export Domino data into a XML format. We can also transform existing XML data in Domino into different formats using stylesheets. Finally we saw how to import a DXL file into a Domino database as a new design element.
786 Domino Designer 6: A Developer’s Handbook
Chapter 17. Web services in Domino
In this chapter, we briefly discuss what a Web service is and how it relates to Domino 6.
For a more detailed look at Web services and how to develop Web service applications, see Domino Web Service Application Development for iSeries, SG24-6862, and the following Lotus and IBM Web services Web sites:
17.1 What is a Web serviceA Web service can be defined as an application that has exposed an API, in order to integrate itself with other applications. Its main function is to provide process-to-process interaction, without the need for a user interface. This means that you can invoke this application remotely, by interfacing with the API. Applications that invoke this service are known as clients. XML lies at the core of Web services, and provides a common language for describing Remote Procedure Calls, Web services, and Web service directories.
The phrase “Web service” can sometimes be misleading, as it implies the use of a Web browser. However, this is not always the case. There are many different ways of invoking the Web service: an HTTP request or an e-mail from another application are just a few examples.
One of the most common ways to invoke a Web service is by sending an HTTP Get request to the API. Accessing the API via the Internet has many advantages:
� The API can be accessed by any client worldwide that has the address of the Web service.
� A change in the Web service application needs to be made only at the source.
� Web services can be written in any language and on any platform, as long as those Web services are accessible according to the Web services standards.
To enable interoperability, the Web services platform must provide a standard system that will interface with systems that are using different platforms and/or programming languages. A Web service platform needs to describe the Web service and provide the information other applications need in order to invoke this Web service.
The main technologies that make up the Web services platform are:
� XML - This is the basic format for representing data on the Web services platform.
� SOAP - (Simple Object Access Protocol) - The remote procedure call (RPC) facility for Web services. SOAP is a transport protocol that transports methods using HTTP POST requests. The response returned is an XML document.
� WDSL - Web Service Description Language is an XML-based grammar for describing Web services, their functions, parameters, and return values.
� UDDI - (Universal Description, Discovery, and Integration) is an XML-based directory, which represents a technical specification for publishing and finding businesses and Web services.
788 Domino Designer 6: A Developer’s Handbook
Figure 17-1 A simple Web service application
17.2 Web services and DominoDomino 6 is an ideal application for either hosting or using Web services. Since Web services are comprised mainly of XML data, Domino 6 is especially capable of exploiting Web services. This is due to the fact that Domino 6 now has many more LotusScript classes that are designed to work specifically with XML. For more information about these new LotusScript classes, see Chapter 16, “XML” on page 743.
There are also tools available that provide additional support for Web services in Domino. They are:
� SOAPConnect for LotusScript - This contains a LotusScript library that allows you use and host Web services.
� MS SOAP toolkit - This toolkit is provided by Microsoft and allows Domino to either use or host a Web service on a Windows platform.
� .NET (“Dot Net”) - A collection of tools from Microsoft that let you both use and host a Web service. This set of tools is accessed from Lotus Notes/Domino through the Common Object Model (COM) interface. For more information on the COM interface, see 14.10, “Integration with Microsoft technologies” on page 646.
Web Service Client, for example: a browser
Search (UDDI)
Publish (WSDL)
Requests and responses (SOAP)
Web Service Host or Application
Chapter 17. Web services in Domino 789
790 Domino Designer 6: A Developer’s Handbook
Appendix A. Domino and connectivity
In this appendix, we introduce and list some of the connectivity tools and techniques available for Domino, such as OLE, LSX toolkit, ODBC, JDBC, NotesSQL, DECS, LEI.
For most of these tools and techniques, we recommend that you to refer to the IBM Redbook Lotus Domino R5.0: A Developer's Handbook, SG24-5331, which contains an in-depth discussion about connecting to other sources.
CORBA/IIOPDomino uses an architecture called Common Object Request Broker Architecture (CORBA). This is an open standard defined by the Object Management Group (OMG). CORBA serves as middleware for a distributed computing environment whereby remote clients can invoke methods on remote APIs residing on other computers. CORBA uses Internet Inter-ORB Protocol (IIOP) for communication over a TCP/IP network. CORBA/IIOP support enables Domino developers to create applets that can be downloaded to the client and can be remotely invoked in Domino services, for example, to initiate a workflow process. In addition, CORBA/IIOP enables information to be processed efficiently over networks within an open standards-based framework and to distribute work effectively between clients and servers, ultimately lowering the cost of ownership.
See the Domino R5 developers handbook for more details; for Domino 6 there are mainly minor improvements and bug fixes.
OLE AutomationOLE (Object Linking Embedding) is a feature of Windows and is also supported on the Macintosh. The OLE object model is used by developers to expose the objects of one product to another. OLE Automation is an OLE service for integrating applications. Two key elements of OLE Automation are the OLE Automation Server and OLE Automation Controller or Client. OLE Automation Servers expose applications' functionality as objects to other applications. These objects have properties (data) and methods (functions). OLE Automation Controllers can control objects in OLE Automation Servers through their properties and methods. Simply put, OLE Automation is the process in which an OLE Automation Controller sends instructions to an OLE Automation Server. You can call upon an OLE Automation Server object's code to perform a variety of tasks that you do not want to, or cannot, perform in your own code.
Domino can act both as an OLE Automation Server providing functionality to other applications, and as an OLE Automation Controller where a Domino application integrates with functionality offered by an external OLE Automation Server application (for example, a spreadsheet).
Changes from the support in R5 are mainly bug fixes.
LSX Toolkit/Lotus Custom Object ToolkitAn LSX (Lotus Software eXtension) is a dynamic library of objects (or classes) written in the C++ programming language. You can use these objects from languages and language interfaces like Java, CORBA, OLE, and LotusScript.
792 Domino Designer 6: A Developer’s Handbook
You can treat LSX objects just like any other Domino objects. For example, you can create new objects from their classes, invoke methods, and get their properties.
The source programming language of LSX is C++, which enables you to use APIs of some other applications. After an LSX is loaded by Domino, the LSX registers its C++ class definitions as corresponding LotusScript classes. This means an LSX extends the functionality of LotusScript running in Domino because it enables any Domino application to connect to resources and functionality of external applications.
An LSX is the same as an LCO, since the LSX Toolkit name was changed from the Lotus Custom Object Toolkit.
For Domino 6, there are mainly minor bugs that have been fixed.
DECSDomino Enterprise Connectivity Services (DECS) is a Domino server task that allows application developers to link their Lotus Domino databases to relational databases and access data from them in real time. DECS works by capturing certain Lotus Domino database events on the server, such as opening a form and triggering a predefined action on the relational database. DECS is a visual tool and high performance server environment you can use to create Web applications that provide live, native access to enterprise data and applications. The visual tool includes an application wizard and online Help to assist you to define external data source connections—for example, DB2, Oracle, Sybase, File directory, EDA/SQL, or ODBC—and fields within your application that automatically contain external connector data.
Beyond the support already included in R5, Domino 6 includes mainly bug fixes.
Lotus Enterprise IntegratorLotus Enterprise Integrator (LEI), a module previously called Lotus NotesPump, extends DECS functionality beyond real-time data sources to include support for high volume data transfer and synchronization. Lotus Enterprise Integrator provides visual tools to manage integration between data sources without
Note: In Domino 6, some of the functionality provided by DECS is available directly in the Domino Designer. To learn more about this see 10.5, “Data connections” on page 335, which describes how to use the new data connection resources to connect to a relational database from your Domino application.
Appendix A. Domino and connectivity 793
programming, including the capability to initiate event-driven or scheduled high volume data transfers between Domino applications and relational databases and other enterprise applications. This programming API is available for both LEI and DECS.
For more information on Lotus Enterprise Integrator, see the Lotus Web site at:
http://www.lotus.com/dominoei
NotesSQLNotesSQL is an ODBC (Open Database Connectivity) driver for Notes and Domino. It allows ODBC-enabled data reporting tools, database tools, and application development tools to read, report, and update information that is stored in Domino databases (.nsf files). With NotesSQL, end users and application developers can integrate Domino data with their applications using tools such as Crystal Decisions Crystal Reports, Microsoft Visual Basic, Access, Brio, and Lotus Approach. Even Internet application development tools that support ODBC can access Domino data. IT professionals can enable their existing ODBC-enabled applications to access data stored in a Domino database.
A Domino database is not relational, but with NotesSQL a Domino database looks like a relational data source to an OBDC-enabled tool. This allows relational database management systems (RDBMS) such as Oracle or DB2 to issue SQL (Structured Query Language) statements to Domino.
For more information on NotesSQL in Domino, refer to the Domino R5 developer's handbook and the Lotus/IBM website. These resources cover when to use NotesSQL, requirements, installation, examples, latest versions, configuration and other meaningful information.
ODBCThe Open Database Connectivity (ODBC) standard is a set of functions developed by Microsoft to access Relational Database Management Systems (RDBMS) like Oracle, DB/2, Informix, and others. There are two software components required to use ODBC:
� ODBC Driver Manager is a set of APIs in the ODBC dynamic link library. Those APIs are called by client programs like LS:DO, NotesSQL, and so on, in order to access an RDBMS via ODBC.
Note: Lotus Enterprise Integrator version is a new release of the LEI and has many new features and enhanced functionality.
794 Domino Designer 6: A Developer’s Handbook
� RDBMS ODBC driver is the driver for specific RDBMSs like NotesSQL, DB2, Oracle, and so forth. The ODBC driver allows you to issue any SQL statements in Data Definition Language (DDL), Data Control Language (DCL), and Data Manipulation Language (DML) using SQLExecute or SQLExecDirect with the ODBC API. In addition, other ODBC Drivers enable you to get information about columns attributes, index, privileges of column, drivers, foreign keys of tables, and other RDBMS entities.
When you develop a Notes/Domino application, you often need to implement data integration between Notes and other data resources, such as RDBMS, spreadsheet data, and ASCII delimited text files. If you need to do this using ODBC, these are your possibilities:
� LS:DO (LotusScript:Data Object)
This is a LotusScript Extension (LSX) which provides additional LotusScript classes for accessing other data resources via ODBC.
� DBLookup, @DBColumn using ODBC
These are @functions for ODBC data access. The functions @DBLookup and @DBColumn are frequently used to access Notes databases, as well as ODBC-compliant databases.
For more information about the use of these database access facilities, refer to the Domino R5 developer's guide.
JDBCJDBC is an object interface that allows Java applications and applets to retrieve and manipulate data in database management systems using SQL. The interface allows a single application to connect to many different types of databases through a standard protocol. JDBC handles details for such tasks as connecting to a database, fetching query results, committing or rolling back transactions, and converting SQL types to and from Java program variables. JDBC is implemented as a driver manager with multiple drivers. Each driver links the application to a specific type of database.
JDBC was first introduced in the Java Development Kit (JDK) 1.1 from Sun Microsystems. The JDBC classes and interfaces are part of the java.sql package. The major components of JDBC are the JDBC driver manager and the underlying drivers. JDBC uses the driver manager to handle finding and loading a driver. A JDBC data source consists of the data the user application wants to access and its associated parameters. Each JDBC driver processes JDBC method invocations, sends SQL statements to a specific data source, and returns results to the application.
Appendix A. Domino and connectivity 795
JDBC drivers generally fit into one of four types:
1. The JDBC-ODBC bridge provides JDBC access via ODBC drivers. NotesSQL (the Domino/Notes ODBC driver) may be used with the JDBC-ODBC bridge.
2. A native-API, partly-Java driver converts JDBC calls into calls on the client API for the DBMS in question. This style of driver requires that some binary code be loaded on the client machine. Domino Driver for JDBC is a Type 2 driver.
3. A net-protocol, all-Java driver translates JDBC calls into a DBMS-independent net protocol which is then translated to a DBMS protocol by a server. This net server middleware is able to connect its all-Java clients to many different databases. This is the most flexible Java alternative.
4. A native-protocol, all-Java driver converts JDBC calls into the network protocol used by DBMSs directly. This allows a direct call from the client machine to the DBMS server and is a practical solution for Internet access.
For more information about the use of JDBC, refer to the redbook Lotus Domino R5.0: A Developer's Handbook, SG24-5331.
Note: From a functionality and SQL syntax viewpoint, the JDBC driver for Domino is the same as NotesSQL.
Note: You can now use methods that support JDBC 2.0 in the Domino Java agents because the JVM in Domino 6 has been updated to version 1.3.
796 Domino Designer 6: A Developer’s Handbook
Appendix B. Additional material
This redbook refers to additional material that can be downloaded from the Internet as described below.
Locating the Web materialThe Web material associated with this redbook is available in softcopy on the Internet from the IBM Redbooks Web server. Point your Web browser to:
ftp://www.redbooks.ibm.com/redbooks/SG246854
Alternatively, you can go to the IBM Redbooks Web site at:
ibm.com/redbooks
Select the Additional materials and open the directory that corresponds with the redbook form number, SG246854.
Using the Web materialThe additional Web material that accompanies this redbook includes the following files:
File name DescriptionNotes6RichText.zip Zipped Notes6RichText.nsf database, containing samples
used in Chapter 15, “Rich text programming” on page 697.
System requirements for downloading the Web materialThe following system configuration is recommended:
Hard disk space: 10 MB mininumOperating System: Any, which is supported for Notes & Domino 6
How to use the Web materialCreate a subdirectory (folder) on your workstation, and unzip the contents of the Web material zip file into this folder. Then copy the Notes6RichText.nsf Domino database into your Notes/Domino data directory, for example c:\notes\data on your local workstation or on your Domino Server.
798 Domino Designer 6: A Developer’s Handbook
Related publications
The publications listed in this section are considered particularly suitable for a more detailed discussion of the topics covered in this redbook.
IBM RedbooksFor information on ordering these publications, see “How to get IBM Redbooks” on page 800.
� Upgrading to Notes and Domino 6, SG24-6889
� Lotus Domino Release 5.0: A Developer's Handbook, SG24-5331
� Domino and WebSphere Together Second Edition, SG24-5955
� Lotus Domino R5.0 Enterprise Integration: Architecture and Products, SG24-5593
� COM Together - with Domino, SG24-5670
� Lotus Mobile and Wireless Solutions, SG24-6525
� XML Powered by Domino How to use XML with Lotus Domino, SG24-6207
� Lotus Notes and Domino R5.0 Security Infrastructure Revealed, SG24-5341
� Performance Considerations for Domino Applications, SG24-5602
� Working with the Sametime Client Toolkits, SG24-6666
� Working with the Sametime Community Server Toolkit , SG24-6667
� Lotus Sametime Application Development Guide, SG24-5651
Other resourcesThese publications and resources are also relevant as further information sources:
� Tamura, Randall A. and Tamura, Randy Domino 5 Web Programming with XML, Java, and JavaScript. Que, 2000, ISBN 0789722755
� LotusScriptors Plain Simple Guide to the Lotus Notes C++ API. Lee Powell, UK, 2002, ISBN 0954315901
� Flanagan, David JAVA in a Nutshell. O’Reilly & Associates, UK, 2002, ISBN 119900040X
A guide to enable Web pages and applications with Sametime awareness and real-time collaboration.
� Lotus Developer Domain
http://www.lotus.com/ldd
The Lotus Web site for developers. Includes discussion forums, technical journal, articles, interviews, sample applications, documentation, downloads and more.
� Dominozone
http://www.dominozone.net
A non-profit Web site for developers interested in Domino. Includes discussion forums, articles, interviews, sample applications, downloads.
� IBM developerWorks
http://www-106.ibm.com/developerworks/
IBM Web site for developers. Includes discussion forums, articles, tutorials, online courses, sample code and applications, downloads. The site contains technology zones, such as Java, XML and Web services, as well as product domains for WebSphere, Tivoli, DB2, Lotus and others. Be sure to subscribe to the weekly newsletters!
How to get IBM RedbooksYou can order hardcopy Redbooks, as well as view, download, or search for Redbooks at the following Web site:
800 Domino Designer 6: A Developer’s Handbook800 Domino Designer 6: A Developer’s Handbook
ibm.com/redbooks
You can also download additional materials (code samples or diskette/CD-ROM images) from that site.
IBM Redbooks collectionsRedbooks are also available on CD-ROMs. Click the CD-ROMs button on the Redbooks Web site for information about all the CD-ROMs offered, as well as updates and formats.
802 Domino Designer 6: A Developer’s Handbook802 Domino Designer 6: A Developer’s Handbook
Index
Symbols$$Return field 115
link to Web pages 116$$Return field example 117$$ReturnAuthenticationFailure 344$$ReturnDocumentDeleted 345$$ReturnGeneralError 345$$ViewTemplate form 344$Anonymous 82, 214$Conflicts 214$Links 214$Revisions 56, 214$UpdatedBy field 56, 82, 214($All) view name 191($Inbox) view name 191($Sent) view name 191($Trash) view name 191(Declarations) 94
Aabsolute positioning 417access control 91, 104, 178, 240, 248, 501
@ClientType 540@UserName 540@UserNameList 540@UserRoles 538Authors Field 526Combining Readers and Authors Fields 527controlled access sections 529Documents 524ECL 542files 545for HTML and Other Files 545Forms 521hide when formulas 530hiding the design of a database 541HTML files 545password field 541Pasting Documents into Database 541programming considerations 538Using Encryption for Field Security 530using signatures for security 542Web access 551workstation security 542
Access Control List 58example 575settings for creating agents 249
access list for views and folders 240accessibility 115, 194, 202, 218, 220, 286, 313, 478Accessing external data sources 40accessing resources with WebDAV clients 491accessing XSL 758ACL 58
displaying 504effective access 510, 554Enforce Consistent ACL 516groups 507manager 506Maximum Internet Name and Password Access 517modifying 506no access 505public documents 509roles 513servers 507setting up 506User and Server Access Levels 505user types 507users 507xACL 553
action bar 159, 469background 160buttons 158properties 160size 160
action bars 211action object 590actions 146, 158
adding to navigators 244automating tasks 146checkbox 440computed labels 438context sensitive 450creating 147hiding based on field values 450in Actions menu 148in navigators 242menu separator 439name 148removing 148shared 146sub actions 444system actions 438type 148typical 146
administration process 385adminp 385Advanced database options 53advanced templates 49, 66agent log 265Agent Manager 271AgentBase class 669
AgentContext class 262agents 4, 248
access control 248, 410access to operating system 250accessing remote servers 407acting on mail 253acting on modified documents 254acting on new documents 254acting on pasted documents 254alias name 251allow remote debugging 410background 63, 248, 590background, disabling 63builder 404capturing CGI variables 275changing documents 279changing type of 410creating 250debugging 266debugging examples 267debugging, Notes.ini 272debugging, server console 273designing for multiple clients 345disabling 263, 268, 405disabling all background agents 270enabling 263, 268, 405enabling by users 268execution rights 271for Web applications 249formulas 260imported Java 261Java 261, 581log 263, 265LotusScript 260maximum execution time 271naming 251output 276outputting files 276personal 248, 252private 410redirecting 276remote debugging 266removing data from documents 279renaming a field 279restricted 249restricted operations 410restrictions 250, 406rights to create 248run by a user 264
804 Domino Designer 6: A Developer’s Handbook
run options 258running 263running an agent on different servers 255running as a Web user 410running multiple instances 276running on behalf of someone else 406running programmatically 278scheduled 255scheduled, disabling 268scheduled, enabling 268scheduling 253security 406, 410, 555selecting documents 256server-based 542serving a new page 276shared 248, 252, 410signing 263–264, 405Simple Actions 259simple actions 259slow 271testing 263, 265triggered by programs 253triggering 253triggers 258troubleshooting 270unrestricted 249user activated 409user activation 268user triggered 253Web 274, 345WebQueryClose 590WebQueryOpen 249, 274, 277, 590WebQuerySave 249, 274, 277
aliasof form 78
aligningparagraph 112tables 136
AllDocuments property 576Allowing connections to external databases 64Allowing headline monitoring 55Alt + W 20alternate text
hotspots 163anonymous access 509, 552anonymous form 82API 699
for Notes 639applets
adding CORBA 673calls to lotus.domino package 676DIIOP 673rich text field 105
Creating a database 48creating a new outline 307creating a replica of a database 386creating a view 460Creating documents 32creating documents at view level 193creating documents from view 454CSS 36, 330, 342Ctrl - Tab 20CurrentDatabase property 574custom design element folders 352custom JSP tags 685Customized Authentication, Encryption, Signing
APIs 547customizing twisties 453
806 Domino Designer 6: A Developer’s Handbook
Ddata 566Data Connection Resource
creating 336data connection resources 41, 86, 335
data source 335data source options 339default connection 338enabling 337key field 340type 336
Data connections 40Database 31, 47
$Revisions field 56$UpdatedBy field 56advanced options 53allow soft deletions 55allowing headline monitoring 55allowing more fields in the database 56compacting 64copying 57creating new 48, 50, 59design information 71design, inherit 66Directory Catalog 61Domino Directory 61encryption 50hidden design 58information 64Last Accessed property 54Multi DB Search 61ODS 64properties 59replica ID 64size 64specialized response hierarchy 55templates 48title 50type 60usage details 64using a template 48
database 49Database Catalog 66Database icon 36Database information 35Database version 42databases
database manager 549enabling data connections 337
hiding the design 541use JavaScript when generating pages 344
Date Pickerembedded 152
Date/Time values in views 233DB2 335DCR
See Data Connection Resourcesdebug mode 616debugger 613
enabling 614debugging 266, 613
remote 387debugging agents 266DECS 4, 40, 335default form 81default outline 306default value
for fields 120default view 192delimiting strings 371Design Document 22design element locking 26, 66, 358
design elements 31absolute positioning 131, 133hiding 530information 354locking 358–359modifying properties 356not allowed in layout regions 131script libraries 631, 691supported in frames 287supported in pages 175, 178supported in subforms 125supported in tables 133unlocking 360
creating 71creating the report 72customized reports 363DXL utilities 363specifying content 73using database for output 72
Design synopsis tool 224Design upgrade 41determining access level 510Developing for multiple clients 24DHTML 342DIIOP 673Directory 3directory links 519DisableRole method 575disabling agents 268disabling all background agents 270Disabling background agents 63disabling design element locking 361disabling the debugger 615distributing tools 481Document ID 25Document locking 8, 63document retrieval 70DocumentContext 253, 275Documents
archiving 62documents
access control 524authors fields 526changing associated form 280creating from view 454creating with a form 578creating without a form 578editor access 526form used 580read access 524read access list 525readers fields 524–525sorting in views 237stored in the database 577viewing with different forms 580
Dominoaccessing WebSphere 667clients 5
clustering 5connecting to databases 4database 3features 5Object Model 4reliability 5replication 3scalability 5Server 2services 2Web application server 4
Domino Administrator 8features 8
Domino Application Server 2Domino Connectors 40Domino Database 31Domino database 47Domino design elements 31Domino Designer 14
adding tools 477auto complete 400basics 14bookmark folders 20custom design element folders 352customizing the welcome page 16Data Connection Resources 41design element locking 358design element navigator 348design element views 356design elements 31Design elements folder 21Design list 17, 19Design pane 17design pane 17developing for mixed releases of clients 41embedded elements 150enabling applications with Sametime 642expanding element lists 355hiding a design element 24InfoBox 22inheriting the design 24launch buttons 27launching 14layers 37, 131layout 284, 417LotusXSL processor 748multilingual application 24new elements 36organizing applications 351
Domino Enterprise Connector Services 335Domino Enterprise Server 2Domino Global WorkBench 39Domino Mail Server 2Domino Object Model 4, 565Domino objects
events 586Domino security architecture 501Domino Server Family 1Domino Server Services 2Domino Web Server API 547DominoAsynchronizeAgents 276Don't show empty categories 196Downgrading the database ODS version 42DSAPI 547DXL 38, 385, 481
See Execution Control Listediting a document in a view 456functions
@Command( 169effective access 510, 554
embeddedDate Picker 152file upload control 155folder pane 153navigators 151outline 309outline control 152scheduling control 153view 152
embedded elements 150date picker 152editor 432embedded editor 151file upload control 155folder pane 153group scheduling control 153navigator 151outline control 152referring from another database 470view 152
examplesaccessing a field 575accessing an ACLEntry 575Click event 583, 588Evaluate function 608Exiting event 586Messagebox statement 620Postopen event 583Print statement 619
Execution Control List 264, 542maintaining 544
Exiting eventexample 586for fields 122
Explicit lock 26exporting files 324extended access control list 553Extending Notes with other products
Notes API 639
FField class 566field events 120field object 586field validation 379fields 33
$$Return 115(Declarations) 122(Options) 121aligning with baseline 462allow values not in list 110authors 104, 526Color 104color 428colors 111computed 108, 122
810 Domino Designer 6: A Developer’s Handbook
computed for display 108, 122computed when composed 109, 122connecting to external data source 338creating 95data types, stored 578date/time 103, 123default value 120deleting 279editable 108, 122enabling encryption 532Entering event 122examples of using 122excluding from field index 127Exiting event 122field hint 111, 124field hints 461fonts 111giving a name 96help 111help information 111hide delimiters 110hide-when 97, 113HTML attributes 120Initialize event 122input translation 120, 124input validation 120, 124keyword lists 103–104manipulating with LotusScript 578multi-value separator 111names 104native OS style 463new types 428not supported on Web 344number 103onBlur event 121onChange event 121onClick event 121onFocus event 121onKeyDown event 121onKeyPress event 121onKeyUp event 121onMouseDown event 121onMouseMove event 121onMouseOut event 121onMouseOver event 121onMouseUp event 121onSelect event 121OS style 131password 104, 541
properties 107readers 104, 525refresh on keyword change 110refreshing choices 110renaming 279reserved 214, 598rich text 103rich text lite 429security 111shared 101showing in views 699sizing 461special 115, 120specifying properties 96summary vs. non-summary 699tab order 109Terminate event 122text 103, 123time zone 104, 431types 102
footer 65forcing to declare variables 397forms 32, 76
$$ReturnAuthenticationFailure 344$$ReturnDocumentDeleted 345$$ReturnGeneralError 345$$ViewTemplate 344$Anonymous field 82
Index 811
$UpdatedBy field 82access control 520alias 78alias name 130anonymous form 82assigning to documents 580auto launch 87automatically enabling edit mode 85background color 88background properties 88computed text 156converting data to XML 749Create dialog 80Create menu 80creating 76, 284creating a header 89customized error messages 344Data Connection Resources 86default data connection 338default form 81disable printing, forwarding and copying to clip-board 92elements 76embedding forms 432embedding views 152entering data into a database 76events 92focus 82frameset option 87generate HTML for all fields 85header and footer 89hiding 130hierarchical structure 79horizontal rule 156HTML in Notes client 464HTML type of content 327importing graphics 88inherit entire document 84inherit values 84inserting embedded editor 432keyboard shortcut 79layers 171, 417limiting access 91multilingual applications 79multiple views 470naming 78previewing 98printing properties 90profile 168
profile, creating 169properties 76providing comments 79public access users 523refresh fields automatically 81Render pass through HTML in Notes 82render pass through HTML in Notes 464replication conflicts 83response 79response to response 79save conflicts 83sections 467security 91select for display 130settings required for XML 751sharing elements 125signing documents 82special forms 344store form in document 81stored 63title 92type of content 85using different for each client 343using resources 319version control 80versioning 80
formulas 590hide-when 603
formulas, looping 382formulas, using in agents 260frames
adding a Web page 289adding an object 288borders 291elements 287naming 287scrolling 290sizing 290
frameset 31for forms 87
framesetsbasics tab 285displaying views in 344layout 296naming 285previewing 297properties 285–286sizing 290window title 285
812 Domino Designer 6: A Developer’s Handbook
front-end classes 566, 577, 606full access administrators 513Full text search engine 3Full-text index 70full-text index 70, 256full-text search 70functions 370, 562, 596
Ggenerate HTML for all fields 85generateXML method 780GetFirstDocument method 574, 576GetFirstItem method 574GetNextDocument method 576getUnprocessedDocuments 262GetView method 574grouping design elements 353, 417
Hheader 65header and footer 89help 36
field hint 111, 124for fields 111
Hidden design 58hide when formulas 530hide-when formulas 603hiding
views 191Hiding a design element 24hiding design elements 131hiding paragraphs 113horizontal rules 156hotspots 158
alternate text 163HTML 412
adding code using HTML Pane 414auto complete 403HTML body attributes 93HTML head attributes 93HTML pane 412in Notes client 464–465pass-thru HTML 412properties 114rendering pass through HTML in Notes 127
HTML attributes for body field 120HTML body attributes 93HTML content 327HTML files 322, 325HTML head attributes 93HTML header 276HTTP Basic Authentication 533
IIDE 564image resources 161
Index 813
refreshing 319images 161
as a shared resources 318creating 318guidelines 342image wells 320replacing with other techniques 342supported formats 318
importing graphicsinto forms 88
importing pictures 162Improving performance 53–54, 56indexing, full-text 70Info List 28InfoBox 22Information about document usage 54inherit entire document 84Inherit future design changes 52inherit values 84Inheriting the design 24Initialize event 95
for fields 122iNotes Access for Microsoft Outlook 10iNotes Web Access 10input from Web in rich text 105input translation 609input translation for fields 120input validation 609input validation for fields 120instant messaging 641Integrated Development Environment 564Internet Authentication
When to Use Internet Security 537Interoperability 41InViewEdit 455InViewEdit event 193iterating 382
JJava 4, 253, 261, 274, 581, 669
accessing from LotusScript 582adding CORBA support to applets 673agents 671applets 671applications 671calling from LotusScript 395CORBA 672differences between agents and applets 672
JSP 684Notes class implementation 669servlets 683using in agents 261XML 779
adding elements 423creating 417example 421hiding 420HTML properties 420Layer Tree 421on the Web 427overlapping 425positioning 418, 424size 419stacking order 419Z-Index 419
accessing a field 576accessing Java objects 395auto complete 401back-end 577benefits of 564connecting to Java 565cross-platform 564declaring variables 574DocumentContext property 275front-end 577functions 596initializing variables 574looping 576LS2J 565onLoad 94onUnload 94performance 596programming tips 596subroutines 596using Domino objects 573using front-end classes 577using in agents 260using in navigators 244using methods 574working with arrays 398XML 763
LotusScript to Java 395LS2J 582
accessing methods 396enabling 395finding a class 396getting an object 396JVM 396limitations 397making a connection 396
LSX 565LZ1 compression 56
Mmargins
tables 141maximum Internet name & password access 342Merging conflict documents 83Messagebox statement 620Messaging 3Mixed releases of clients 41Mobile clients 9modifying properties for multiple elements 356
Index 815
mouseover 354Multilingual applications 24, 39, 67Multilingual database 67multi-pane interface 284Multiple clients 39multiple views on a page or form 470multi-value separator
for fields 111
Nnaming
a form 78an agent 251
naming views 223navigating 304Navigator class 566navigators 35, 242
actions 242description 186elements to be used instead of 242embedded 151objects 242
nested tables 133creating 133
new @commands 381new @functions 373New Database dialog box 50new features 347New Features of Domino Designer 36new LotusScript classes 384new users 537Not 505Notes
Notes URL 289Notes/FX 81NotesACL class 517, 567NotesACLEntry class 517, 567, 575NotesAdministrationProcess class 385NotesAgent class 567NotesColorObject class 387, 706, 726
to set rich text color 711NotesDatabase class 261, 460, 563, 567, 576NotesDateRange class 569NotesDateTime class 569NotesDbDirectory class 567NotesDocument class 563, 567, 576NotesDocumentCollection class 262, 567, 576NotesDOMParser class 385, 771NotesDXLExporter class 385NotesDXLImporter class 385, 778NotesEmbeddedObject class 569, 706, 718NotesFactory method 675NotesForm class 570NotesInternational class 570NotesItem class 569NotesLog class 266, 570NotesMain method 669NotesMIMEHeader class 40NotesName class 570NotesNewsLetter class 570NotesOutline 570NotesOutlineEntry 570NotesRegistration 570NotesReplication 570NotesReplicationEntry class 386NotesRichTextDocLink class 706, 718NotesRichTextItem class 569, 706NotesRichTextNavigator class 706, 717NotesRichTextParagraphStyle 571NotesRichTextParagraphStyle class 706, 712NotesRichTextRange class 706, 718, 728NotesRichTextSection class 706, 718NotesRichTextStyle class 706, 709NotesRichTextTab class 571, 706NotesRichTextTable class 706, 718NotesSAXParser class 385, 774NotesSession class 253, 275, 563, 567, 574–575NotesStream class 40, 386NotesThread Class 678
NotesTimer class 570NotesUIDatabase class 566NotesUIDocument class 566NotesUIView class 254, 566NotesUIWorkSpace class 566NotesView class 567NotesViewColumn class 567NotesViewEntry 571NotesViewEntryCollection 571NotesViewNavigator 572NotesXSLTransformer class 385, 770Nothing, special value 576NSF file 31NTF file 48, 602numbers in views 235
@commands 562@functions 562accessing Domino objects 565accessing field values 581accessing items 578accessing stored data 577ACL 517back-end classes 566choosing a language 558COM 646creating views 460different languages 558Domino Object Model 565errors 603for Web 563forcing to declare variables 596formula language 562Java 581JavaScript 343LotusScript 563open documents 580rich text fields 581run-time errors 612Simple Actions 559
QQueryclose event 95Querymodechange event 95Queryopen event 94QueryOpen form event 278QueryPaste event 254QuerySave event 95QuerySave form event 278
RR4 41, 51R5 41Read Access List
Form 525ReadViewEntries 490recompile all 393recompiling code 393Redbooks Web site 800
Contact us xxiiredirecting 519Reference View 29Refresh design 66refresh fields automatically
in forms 81Refresh method 609registering users 537Relational databases 40relational databases, connecting to 335Reload method 609remote debugger 387, 619remote debugging
allowing 388connecting to an agent 392
Index 819
enabling an agent 389enabling on the server 388enabling TCP/IP port 388permission to run agents 388remote debugger manager 388security 388starting 391turning of automatically 388
render pass through HTML in Notes 82Replication 3replication conflicts 213Requiring SSL connection 62reserved fields 214reserved names
for views 191response documents
indenting in views 192, 236Response forms 79response message to Web users 115response messages 278Response to Response 79response to response
forms 79restore 548restricted agents 249Resume statement 613returning to another page 115returning user groups 540returning user name 540returning user roles 538, 540Rich text 697
@functions 701AddNewLine method 707AddPageBreak method 707AddTab method 707appending 706AppendRTItem method 715AppendTable method 717AppendText method 707copying to a document 714creating 706default value 703defined 698doclinks 713, 720file attachments 727File attachments, copying 703front-end vs. back-end 703, 705, 732GetFirstItem and 707GetNotesFont method 711
hide attributes 698import an image 736locating inside rich text 719Notes C and C++ APIs 699paragraph size limit 699paragraph styles 712search and replace 730sections 713table, background colors 726tables, filling in data 724text styles 709
rich text fieldapplet 105
Roles 91roles 241, 513, 539
adding 514assigning to users 515defined 514on local replicas 516restricting access 514
run-time errors 612–613
SSametime 440, 641
enabling applications 643integration example 643
Sametime enabling applications 642Sametime link 643save conflicts 213SaveOptions 278scheduled agents 255scheduling control
embedded 153Script Area 30Script libraries 34, 37script libraries 600
access control 91, 104, 199, 248, 501–502Access Control List 58access control list 501, 504access levels 505
820 Domino Designer 6: A Developer’s Handbook
access to forms 520access to public documents 509access to views 520ACL 58, 501–502, 504agents 544, 555anonymous access 503, 509, 552authentication 533, 535certificate authority 535controlling document pasteing 541customizing authentication 547design issues 549determining access level 510directory links 519effective access 554encrypting connection 535encryption 51, 530File Protection document. 546for fields 111form access list 522forms 91full access administrators 513, 516hiding elements 518Java 544JavaScript 544maximum Internet name and password access 517overriding 513overview 501password 533plan 548preventing printing, forwarding and copying 524Public Access users 92roles 91, 513, 549server-based agents 542session-based authentication 534signing 82SSL 62stored forms 63true security features 552user name 533using outlines 518view access list 520Web user access 551workstation 542
server console 273, 411Server tasks
design 66servlets 683
invoking 684
running in Domino 684setting
window title 93Setting a size limit for a database 52setting field values 373Setting properties 22Setup information 168shared agents 410Shared Code 33, 37, 367
accessing with WebDAV clients 491applets 34, 329creating a new image 318data connections 34, 335, 366design elements 349files 34, 322horizontal image sets 321images 34, 161, 318, 342inserting on a form 320inserting on a page 320opening 318style sheets 34, 330, 366vertical image sets 321
shared views 187, 210Sharing code 37sharing design elements 125, 349sharing files 322sharing program code 349sharing resources 349Signatures 542Signing a Database 545signing a database 264signing an agent 264Simple Actions
examples 559simple actions, using in agents 259Size limit 51–52sizing framesets 290Soft deletions 55specifying content language 466
Index 821
SSLSee Secure Sockets Layer
stampAll 262Standards 38starting the remote debugger 391store form in document 81stored form, removing 280Stored forms 63, 81storing
documents in databases 577Storing data 32Storing the form on a document 63style sheet resources 330
creating 330editing 334exporting 334inserting into a form 331inserting into a page 331opening 334pass-through HTML 417refreshing 334supported Notes elements 333using on forms and pages 417
subforms 125available elements 125computed 127creating 125–126properties 127removing 127Web 346
agents 345CGI 115defining users 537entering rich text 105events 368features not available 342images 342LotusScript 590personalized message 116providing user interface 344response message 115–116subforms 346user interface 284using agents 274using dedicated forms 343validating data 278view navigation 218views 344
Web Administration 8Web application server 667Web server 4Web service
defined 788Domino 789invoking 788UDDI 788WSDL 788XML 788
Web services 787Web site
multilingual 39WebDAV 329, 490
accessing resources 492clients 491
824 Domino Designer 6: A Developer’s Handbook
design locking 491disable session authentication 492editing elements 494enabling 491enabling databases 491enabling on a server 491system requirements 492Web server 492Web Site document 491
customizing 16Domino objects 16JavaScript Object Model 16Recent Databases tab 17
what is new in Domino 6 347Window Tabs 19window title 93Work pane 19Workflow 4workflow 254working with open documents 580WSDL 788WYSIWYG 174
XXLS 489XML 38, 364, 385, 744
compared to HTML 744creating programmatically 764defined 744describing the presentation 745describing the structure of the data 745document type definition 745DOM API 746Domino objects for DXL 748DXL 746exporting data 748exporting for elements 488for design elements 487importing data 748in Domino 746
Java 779LotusScript 763modifying data in Domino database 748presenting data 746SAX API 746showing view data 490style sheets 756transforming 489, 745using a XSL stylesheet in Domino 758using in Domino Designer 749XSL 745XSLT 745
XML tools 761XSL 364
Index 825
826 Domino Designer 6: A Developer’s Handbook
(1.5” spine)1.5”<->
1.998”789 <
->1051 pages
Domino Designer 6:
A Developer’s Handbook
®
SG24-6854-00 ISBN 073842658X
INTERNATIONAL TECHNICALSUPPORTORGANIZATION
BUILDING TECHNICALINFORMATION BASED ONPRACTICAL EXPERIENCE
IBM Redbooks are developed by the IBM International Technical Support Organization. Experts from IBM, Customers and Partners from around the world create timely technical information based on realistic scenarios. Specific recommendations are provided to help you implement IT solutions more effectively in your environment.
For more information:ibm.com/redbooks
Domino Designer 6:A Developer’s Handbook
Develop applications for Notes, Web and Mobile clients
Programming with Domino Designer 6
New features of Domino 6
In this IBM Redbook, we describe how to develop applications with IBM Lotus Domino Designer 6. With Domino Designer, you are able to create applications hosted by a Domino server. These applications can be used by different clients, such as Notes clients, Web browsers or mobile devices.
We introduce, and show in detail, how you can use all the design elements of Domino Designer, such as forms, pages, views, agents, outlines, resources and framesets. Readers who are familiar with developing applications using Release 5 of Lotus Domino may want to start at Chapter 12, which introduces the new features in Domino 6.0, and continue from there.
In the chapters towards the end of the book, we discuss different programming languages, @functions, LotusScript, JavaScript, and Java, that can be used in Domino. We describe in detail how to manipulate rich text objects by programming, as well as XML, in Domino.
This redbook was written for technical specialists, developers and programmers, customers, IBM Business Partners, and the IBM and Lotus community who need technical understanding of how to develop applications using IBM Lotus Domino Designer 6.0.