24
1 DON’T I JUST PUSH THE BUTTONS AND BLOW? (A Band Director’s Guide to Woodwind Pitch) Jessica Tippett Practical Application 2 MUSI 5398 American Band College at Sam Houston State University
1
DON’T I JUST PUSH THE BUTTONS AND BLOW?
(A Band Director’s Guide to Woodwind Pitch)
Jessica Tippett Practical Application 2
MUSI 5398 American Band College at Sam Houston State University
2
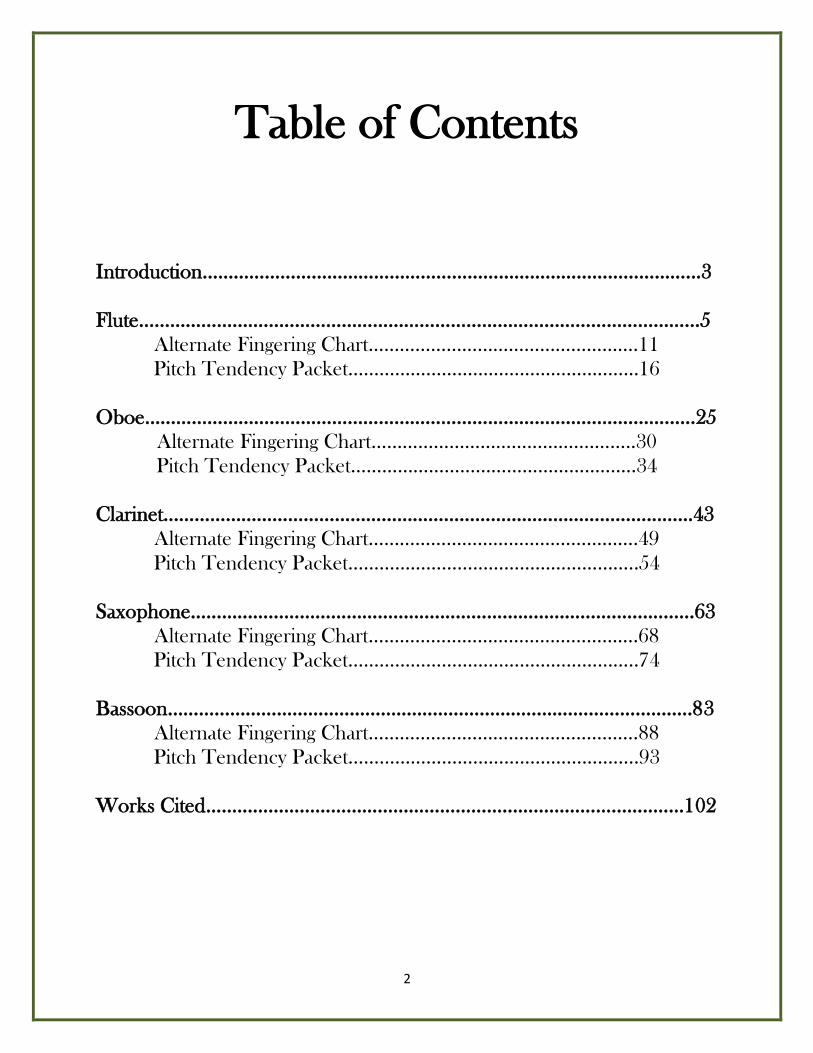
Table of Contents
Introduction…………………………………………………………………………………...3 Flute………………………………………………………………………………………………5
Alternate Fingering Chart…………………………………………….11 Pitch Tendency Packet…………………………………………..……16
Oboe………………………………………………………………………………….…………25
Alternate Fingering Chart…………………………………….……..30 Pitch Tendency Packet…………………………………………..…..34
Clarinet………………………………………………………………………………….....….43
Alternate Fingering Chart…………………………………………….49 Pitch Tendency Packet………………………………………………..54
Saxophone………………………………………………………………………….…………63
Alternate Fingering Chart…………………………………………….68 Pitch Tendency Packet………………………………………………..74
Bassoon………………………………………………………………………………………..83
Alternate Fingering Chart…………………………………………….88 Pitch Tendency Packet…………………………………………….….93
Works Cited…………………………………………………………………………..……102

3
Have you ever been in this situation?
A portion of band rehearsal has just been spent tuning each and every member of the woodwind section on a concert B-flat. Now that each instrument has been properly adjusted, the band is ready to make the first sounds. The students bring their instruments up to playing position, take a deep breath, and play the first few notes of the piece and…
…the most horrendous sound is heard from the woodwind section!
“How can this be?!” the director and students ask themselves. “We just spent twenty minutes making sure each instrument was in tune!”
The director stops in frustration and proceeds to tune each and every woodwind instrument again, but this time not using a concert B-flat as the tuning note. Instead, the director asks each student to play the first note of the piece individually as he glances at the electronic tuner to see if students are still in tune. Sadly, none of them are. As the director turns to Sally, the first chair flute player, to have her play her first note of the piece, she looks up angelically at the director.
“But my concert B-flat is already in tune,” Sally states, innocently. “Once that’s in tune, don’t I just push the buttons and blow?”
*** Unfortunately for Sally, playing a woodwind instrument in tune is not as easy as pushing buttons and blowing. Bad intonation problems are the result of not understanding the tendencies of an instrument and have a negative effect on the band’s sound. Don’t I Just Push the Buttons and Blow? (A Band Directors Guide to Woodwind Pitch) provides directors with the necessary information to teach their woodwind players how to fix their intonation problems. Most intonation problems for woodwinds are caused by things the players are doing.
This book provides in-depth information about the pitch tendencies for each instrument and ways to improve intonation in the woodwind section. Each instrument is discussed and information is provided in three sections:
The first section provides basic information about each instrument including what causes bad intonation. Solutions to intonation problems controlled by the student are also discussed.
The next section contains a reproducible alternate fingering chart created to help make out of tune notes sound more in tune.
Finally, a reproducible student-friendly Pitch Tendency Packet provides information about intonation.
This book is not designed to be read cover-to-cover but instead used as an as-needed reference for the band room.
Alternate Fingering Section Each instrument has alternate fingerings that will help improve intonation. The selection for each note is based off of the pitch tendencies specific to that instrument. Not every note considered out of tune will be included because sometimes the best adjustment to pitch is done by the student. These alternate fingerings should not be taught until they understand how to make adjustments using the standard fingerings. These fingerings will not be helpful to every student, but they provide another option for solving pitch problems.
Pitch Tendency Packet
Intonation is a very individual process and probably is the most frustrating thing about playing a woodwind instrument. The purpose of the Pitch Tendency Packets is to get students to discover what their individual intonation problems are and what they can

4
do to play more in tune. Each Pitch Tendency Packet includes information explaining the science of intonation, how it is heard, what determines flat and sharp, and suggestions for memorizing pitch tendencies. A how-to guide for an electronic tuner is included as well.
The Pitch Tendency Chart included in each packet covers the range of the instrument. Depending on the level of the student, certain notes may need to be left out. Students will need an electronic tuner and somebody to help them fill out the chart, whether it is the director, a parent, or another student. This chart should be filled out at least twice a year because students’ pitch tendencies may change as they advance.
Once the student has completed the Pitch Tendency Chart, the student should consult the Quick Fixes page to learn ways to improve intonation. They should experiment with each suggestion to find what makes them sound the most in tune.
The Results… It is well worth the time and effort to engage students in the tuning process. They will feel a sense of ownership with their playing and will feel obligated to play in tune with their best tone all the time. Students will start to actively listen to what they are playing and make adjustments to their intonation without even thinking about it. Not only will the efforts of individual players improve, but the overall intonation of the band will get better!
5
Flute

6
Sound Production Many believe that sound on the flute
is created by blowing air into the head joint. The initial noise of the flute is actually produced at the edge of the aperture hole while the body of the flute turns air vibrating at the aperture hole into musical sound. The head joint carries the air from the edge of the aperture hole to the body of the flute. The sound that vibrates at the edge of the aperture hole, called the edge tone, is similar to lips buzzing on a brass instrument. As air is blown at the edge of the aperture hole, it does not flow smoothly around or past the edge. Rather, it becomes quite turbulent. The air moves side to side, creating small whirlpools of air above and below the edge of the tone hole. The effect heard without the body of the flute is a high-pitched whistle, much like what happens when wind whistles through a crack in a door.1
Figure 1: A demonstration of what air is doing when it reacts with the edge of the aperture hole.
When the edge tone separates, the downward air travels down the body of the flute. As the air reaches the end of the flute, it reacts with low-pressure air that is already in the flute from the atmosphere. The low-pressure wave combines with the air from the player to make high-pressure air. This air is forced back up the instrument to react with the air coming from the player. The entire process takes a very short amount of time. 1 (Jakeways, 2011)
Every time the air moves up and down the flute, they increase in power forcing the air to oscillate in and out of the first open hole, or tone hole.2 The oscillating air creates a powerful sound wave heard to the human ear as a flute sound. How far the air travels back and forth through the flute depends on the location of the first open tone hole. Air exits the flute through the opening whether it is located at the top or bottom of the flute. The player opens and closes tone holes by pushing and releasing keys to control how far air travels up and down the flute. A tone hole that opens near the head joint will create a smaller area for the air to vibrate, forcing faster vibrations. Those faster vibrations will be heard by the ear as high pitches. Conversely, the first open tone hole near the foot joint will release air that is vibrating slower because of the large space it has to move through. In this case, a lower pitch will be heard.3
Figure 2: A flute with some tone holes open.
Natural Tendencies The flute’s natural overtone series break the octaves down in the following way:
The first octave occupies the fundamental.
The second octave occupies the second partial.
The third octave occupies a combination of the second and third partials.
When a flute player over-blows a note or lifts the first finger, the fundamental frequency of a note is eliminated and the second partial is heard. Air is forced to vibrate at the second partial’s frequency creating a sound eight
2 (Jakeways, 2011) 3 (Shepard)
7
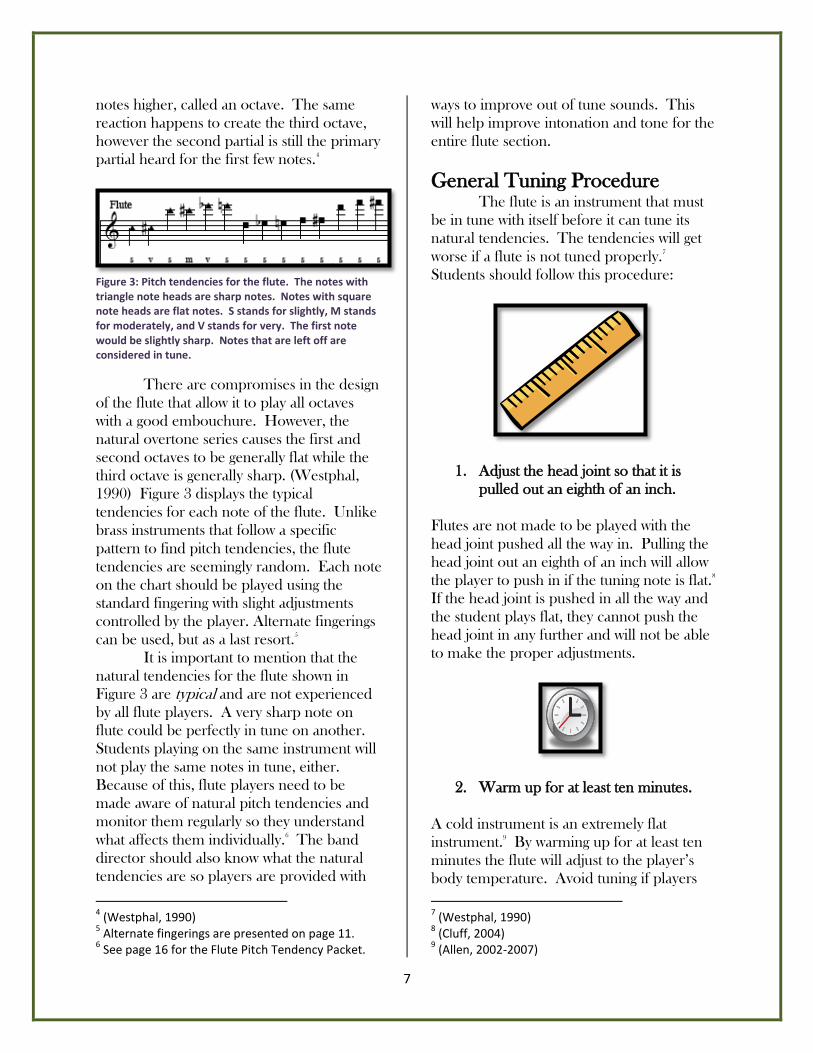
notes higher, called an octave. The same reaction happens to create the third octave, however the second partial is still the primary partial heard for the first few notes.4
Figure 3: Pitch tendencies for the flute. The notes with triangle note heads are sharp notes. Notes with square note heads are flat notes. S stands for slightly, M stands for moderately, and V stands for very. The first note would be slightly sharp. Notes that are left off are considered in tune.
There are compromises in the design of the flute that allow it to play all octaves with a good embouchure. However, the natural overtone series causes the first and second octaves to be generally flat while the third octave is generally sharp. (Westphal, 1990) Figure 3 displays the typical tendencies for each note of the flute. Unlike brass instruments that follow a specific pattern to find pitch tendencies, the flute tendencies are seemingly random. Each note on the chart should be played using the standard fingering with slight adjustments controlled by the player. Alternate fingerings can be used, but as a last resort.5 It is important to mention that the natural tendencies for the flute shown in Figure 3 are typical and are not experienced by all flute players. A very sharp note on flute could be perfectly in tune on another. Students playing on the same instrument will not play the same notes in tune, either. Because of this, flute players need to be made aware of natural pitch tendencies and monitor them regularly so they understand what affects them individually.6 The band director should also know what the natural tendencies are so players are provided with
4 (Westphal, 1990) 5 Alternate fingerings are presented on page 11. 6 See page 16 for the Flute Pitch Tendency Packet.
ways to improve out of tune sounds. This will help improve intonation and tone for the entire flute section.
General Tuning Procedure The flute is an instrument that must be in tune with itself before it can tune its natural tendencies. The tendencies will get worse if a flute is not tuned properly.7 Students should follow this procedure:
1. Adjust the head joint so that it is pulled out an eighth of an inch.
Flutes are not made to be played with the head joint pushed all the way in. Pulling the head joint out an eighth of an inch will allow the player to push in if the tuning note is flat.8 If the head joint is pushed in all the way and the student plays flat, they cannot push the head joint in any further and will not be able to make the proper adjustments.
2. Warm up for at least ten minutes.
A cold instrument is an extremely flat instrument.9 By warming up for at least ten minutes the flute will adjust to the player’s body temperature. Avoid tuning if players 7 (Westphal, 1990) 8 (Cluff, 2004) 9 (Allen, 2002-2007)
8
have been sitting in rehearsal for a short amount of time because the instrument will adapt to the temperature of the room.
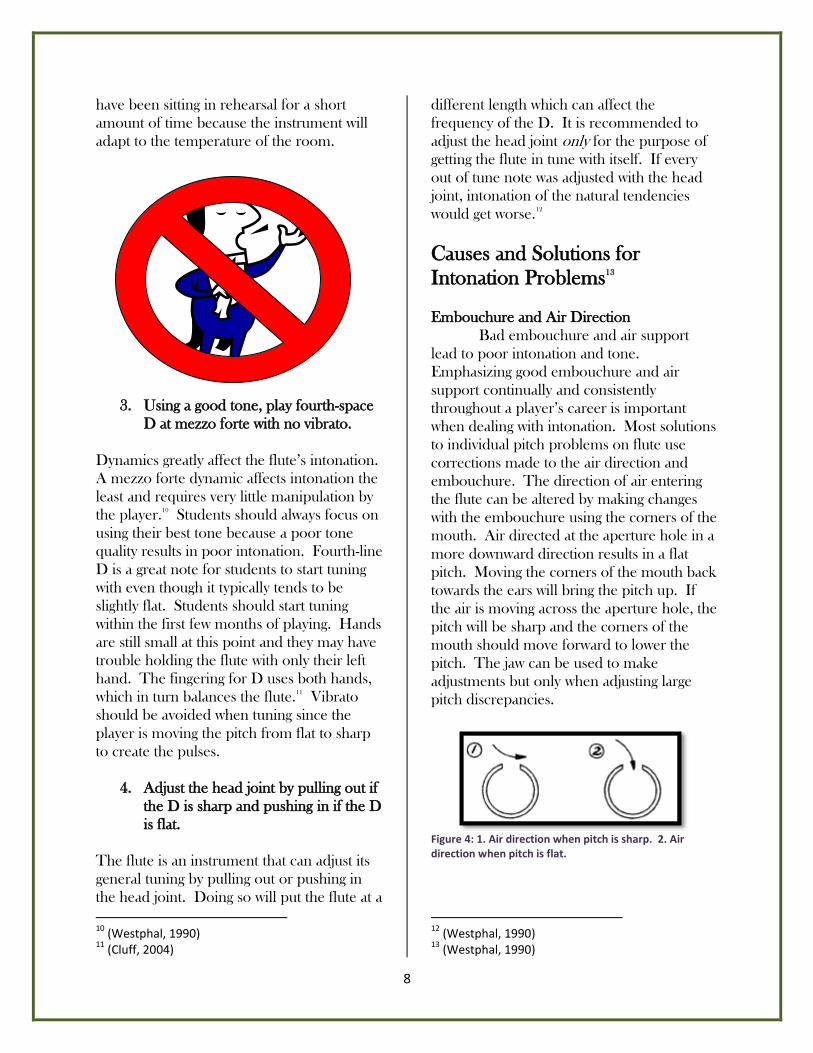
3. Using a good tone, play fourth-space D at mezzo forte with no vibrato.
Dynamics greatly affect the flute’s intonation. A mezzo forte dynamic affects intonation the least and requires very little manipulation by the player.10 Students should always focus on using their best tone because a poor tone quality results in poor intonation. Fourth-line D is a great note for students to start tuning with even though it typically tends to be slightly flat. Students should start tuning within the first few months of playing. Hands are still small at this point and they may have trouble holding the flute with only their left hand. The fingering for D uses both hands, which in turn balances the flute.11 Vibrato should be avoided when tuning since the player is moving the pitch from flat to sharp to create the pulses.
4. Adjust the head joint by pulling out if the D is sharp and pushing in if the D is flat.
The flute is an instrument that can adjust its general tuning by pulling out or pushing in the head joint. Doing so will put the flute at a 10 (Westphal, 1990) 11 (Cluff, 2004)
different length which can affect the frequency of the D. It is recommended to adjust the head joint only for the purpose of getting the flute in tune with itself. If every out of tune note was adjusted with the head joint, intonation of the natural tendencies would get worse.12
Causes and Solutions for Intonation Problems13 Embouchure and Air Direction Bad embouchure and air support lead to poor intonation and tone. Emphasizing good embouchure and air support continually and consistently throughout a player’s career is important when dealing with intonation. Most solutions to individual pitch problems on flute use corrections made to the air direction and embouchure. The direction of air entering the flute can be altered by making changes with the embouchure using the corners of the mouth. Air directed at the aperture hole in a more downward direction results in a flat pitch. Moving the corners of the mouth back towards the ears will bring the pitch up. If the air is moving across the aperture hole, the pitch will be sharp and the corners of the mouth should move forward to lower the pitch. The jaw can be used to make adjustments but only when adjusting large pitch discrepancies.
Figure 4: 1. Air direction when pitch is sharp. 2. Air direction when pitch is flat.
12 (Westphal, 1990) 13 (Westphal, 1990)

9
Dynamics The speed of air striking the aperture
hole controls dynamics. Faster air creates a louder tone but also a sharper pitch. As a flute gets louder, the direction of the air goes more across the aperture hole than in it also making the pitch sharper. To adjust, the air will need to be directed downward by moving the corners of the lips back towards the ears. When the flute gets softer, the pitch gets flatter because air is directed more into the aperture hole than across it. Pushing the corners of the lip forward will help raise the pitch. As a note gets louder or softer, the pitch will gradually change and so should the direction of air. Students should get used to making these adjustments by practicing long tones that crescendo and decrescendo while checking pitch with an electronic tuner. Playing Position If a player slouches while playing, breath support is reduced and air speed entering the flute cannot be controlled making intonation flat. Also, playing the flute at an angle that does not follow the line of the lips will force the air to hit the aperture hole at an angle and bring out the natural tendencies of the flute. Both problems can be prevented by always encouraging students to sit with the correct posture so the flute can be held at the correct angle.
Figure 5: Flute lip plate.
Lip Plate Placement Overall pitch, intonation, and tone
quality can be affected by the placement of the lip plate. When checking intonation, the first thing to look at is the location of the lip plate. If it is placed too low on the lip, the pitch will be flat; if the plate is too high, the
pitch will be sharp. The lip plate should always be placed just above the edge of the lower lip. Mechanical Factors Teaching students to regularly monitor the condition of keys, pads, and rods on their flute will not only keep the instrument in good playing condition, but also will help intonation. All keys should open and close at the same height. Unadjusted keys will affect intonation the most if they are the first open key of a fingering. A key that is too close to the tone hole will flatten the pitch, but a key that is too open will raise the pitch. Keys that do not seal completely around the tone hole will interfere with response and also cause notes to sound sharp. Make sure adjustments screws on each finger key are allowing keys to seal properly. The plug in the end of the head joint can affect intonation even though it should never be regularly adjusted for tuning. The sole purpose of the plug is to close the head joint, which is done so by a cork shaped much like the cork from a wine bottle. The cork must be exactly 17.3 millimeters from the center of the aperture hole and it needs to be checked daily. If it is not at 17.3 millimeters, the player will be consistently out of tune regardless of the adjustments made.14
Figure 6: A cork that is set at 17.3 mm.
To access the cork, a cap is attached to the head joint. To verify the distance, insert the bottom of the cleaning rod into the head joint until it touches the cork. The etched line found at the bottom of the 14 (Cluff, 2004)

10
cleaning rod should be in the exact center of the aperture hole. Unscrew the cap and push the plug into place by applying pressure to the cap if the line is closer to the top of the head joint. The player will be flat on the general tuning note even after multiple adjustments to the head joint are made. If the line is closer to the body of the flute making the player sharp, unscrew the cap and gently tap the cleaning rod with a rawhide mallet until the line returns to the center. The cap should always be tightened by the fingers to the point that it securely stays in place. Students should be warned that the plug should be kept in place at all times and not unscrew the cap.

11
Alternate Fingering Chart
(Flute)

12
Purpose of Alternate Fingerings Alternate fingerings are used
primarily for technical ease on the flute. However, there are fingerings that can be used to improve intonation for some notes. Using alternate fingerings to adjust the pitch of a note should be used as a “last resort” method. Students should be taught how to make intonation adjustments with the embouchure and direction of air using standard fingerings before alternate fingerings are taught. Not all of the fingerings included in this chart include every note on the Pitch Tendency Chart15 nor will they be useful to every player. Some of the fingerings will be out of tune to a greater or lesser degree for some player.
How to Read the Alternate Fingering Chart
The first column shows the note the alternate fingering affects.
The second column shows the typical tendency of the note.
The third column shows the alternate fingering.
The fourth column explains how the alternate fingering will improve the intonation of that note.
The pitch tendency symbols used in this fingering chart will explain the typical tendency of a note.
shows that a note is slightly flat.
shows that the note is slightly sharp.
15 See page 23 for the Flute Pitch Tendency Chart.
shows that the note is moderately sharp.
shows that the note is very sharp. Most fingerings in this chart are actually slight deviations from the standard fingering. If a key is used in the standard fingering, it will be colored in black.
When a key is not typically used in the standard fingering, it will be colored in yellow. There are instances where eliminating one key from the standard fingering will improve intonation. The eliminated key will have a red X placed over it.
Examples of Alternate Fingerings Flute players typically will make
fingering adjustments by closing one or more tone holes to adjust pitch. An example of this is with third-space C-sharp, normally played as:
Sb
S#
M#
V#

13
This note tends to be very sharp. By adding fingers four, five, and six, this very sharp note will lower in pitch:16 Flute players can also eliminate the use of a key. An example of this is the alternate fingering for E:
Using a different key altogether can also help improve pitch. An example of this is the alternate fingering for F-sharp:
Whether or not this fingering chart will be distributed to students is at the discretion of the director because students may mistake alternate fingerings for the standard ones. Also, this chart would not be appropriate for students who are in the first couple years of their playing career. These students need to learn the basics of flute playing and how to make intonation adjustments with their embouchure and air direction. As stated earlier, this chart is to be used as a last resort.
16 (Flute Fingerings, 2008)

14
Note Tendency Fingering How It Helps
Adding fingers 5 and 6 will help to lower this slightly sharp note.
Adding 4, 5, and 6 will help to lower this very sharp note.
Eliminating the use of the Eb key will raise the pitch of this slightly flat note.
Adding finger 6 will raise this slightly flat note.
Using finger 5 instead of finger 6 will raise this slightly flat note.
Adding finger 6 will help to lower this slightly sharp note.
Adding fingers 4, 5, and 6 will help lower this moderately sharp note.
To lower this very sharp note, use the 4th-space Eb fingering and over blow.
Eliminating the Eb key will lower this slightly sharp note.
Adding finger 6 will raise this slightly flat note.
S#
V#
Sb
Sb
Sb
S#
M#
V#
S#
Sb

15
Using finger 5 instead of finger 6 will raise this slightly flat note.
(Flute Fingerings, 2008) (The Woodwind Fingering Guide, 1998-2005)
Sb

16
Pitch Tendency Packet (Flute)
17
Name___________________ Date___________________
Materials needed: 1. Instrument 2. Pencil 3. Electronic Tuner 4. Someone to help you (either a friend, parent, or band director)
Knowing the tendency of each note is important! Playing the general tuning note and making a physical adjustment is not enough to play in tune. Each note on your instrument will play flat, sharp, or in tune. The purpose of the Pitch Tendency Packet is to teach you what notes are in tune and out of tune on your instrument. Once you discover what the out of tune notes are, you can manipulate the notes to play in tune by making small adjustments when you are playing.
This packet will help you develop an individualized plan for tuning. As you discover which notes need special attention, it is your responsibility as a musician to figure out how you can play the note in tune. The tricky thing about this process is what gets you to play in tune may not work for your stand partner! Things like dynamics, reeds, embouchure, and even the brand of instrument can cause one person to play a note in tune while another plays the same note out of tune.
The last page of this packet will provide you with some tricks of the trade that
you can experiment with those tricks to improve those out of tune notes. You will notice that once you start focusing on making those out of tune notes sound in tune, your tone will improve and your musician’s instincts will start to anticipate intonation problems before they happen.

18
What is intonation?17 A musical pitch you hear is actually a
sound wave going through your instrument. The sound wave can travel at different speeds, or frequencies, depending on what finger combinations you are using. More fingers usually means a lower pitch and a slower sound wave, but adding playing the note at a higher octave will make the sound wave move faster. Frequency is measured in cycles per second, or Hertz (hz). One cycle per second is equal to one Hertz. Musicians have a standard frequency that we agree will make us sound the most in tune. That frequency is measured at 440 hz. Anything higher or lower than that will not agree with the musicians’ or the audience’s ears.
An example of sounds at different frequencies.
A Case of the “Wah’s”18 If two musicians are playing the same note at exactly the same time, they’re playing in tune, right? Not really. Have you ever heard two musicians play the same note at the exact same time, but instead it sounds like “wah-wah-wah”? This means the musicians have a case of the “wah’s”, a disease that cause musicians to play out of tune!
17 (Pitch (music)) 18 (Hein, 1981)
You are actually hearing the
musicians play out of tune with each other. Each note’s sound wave is moving at a slightly different frequency, making the sound waves clash. Both notes are fighting so much to be the main note heard that they are cancelling each other out!
One of the musicians should make an effort to get rid of the “wah’s” by making adjustments to the way they are playing their instrument or by physically adjusting something on their instrument. If the musician makes the right adjustment, the “wah’s” will start to disappear and the note will be in tune. However if the wrong adjustment is made, the “wah’s” will move faster.
Flat vs. Sharp19 Musicians think of intonation as a vertical concept. The straight line below represents In Tune Musician, a musician who always plays in tune.
19 (Pitch (music))
IN TUNE

19
Now, another musician will play the same note along with In Tune Musician. Finally, a third musician will play the same note with the other musicians. Even though all three musicians were playing the same note, Musicians 2 and 3 were playing their notes at different frequencies.
Musician 2’s note was played at a slightly higher frequency than In Tune Musician. Even though the both musicians were playing the same note, Musician 2’s note sounds a little higher than In Tune Musician’s. When notes vibrate at a slightly higher frequency than 440 hz, they are considered sharp. Musician 2 will have to lower his frequency so he can play at the same frequency as In Tune Musician.
What about Musician 3? Well, his note was played at a slower frequency than In Tune Musician’s. He sounds a little lower because his note vibrates slightly slower than 440 hz. When notes vibrate at slightly slower frequencies, they are considered flat. Musician 3 will have to raise his frequency so he can play in tune with the others.
How to Improve Intonation Intonation will not get better by itself; it is something that will constantly need to adjust no matter your musical experience. Professional musicians struggle with intonation issues even with all the experience they have. Constant practice and reinforcement will help you understand intonation. Here are some suggestions to help you improve your intonation: Fill out the Pitch Tendency Chart. The chart will tell you what notes are the notes you need to focus on. As you advance in your playing, your pitch tendencies may change. Continue to fill the chart out every four to six months to see if there are any changes. Practice making the adjustments! Remember, it is your responsibility as a member of the ensemble to play in tune. If you do nothing to improve intonation, nothing will get better. Your brain will train itself to make the adjustment automatically once you’ve found what works and practice making those adjustments every time you see the note. If you focus on improving only five
IN TUNE MUSICIAN
MU
SICIAN
2
IN TUNE MUSICIAN
MU
SICIAN
2 M
USICIA
N 3
IN TUNE MUSICIAN
MUSICIAN 2
MUSICIAN 2
IN TUNE MUSICIAN
MUSICIAN 3

20
notes a week in your practice time, you will see huge improvements in your playing. Use a friend, an electronic tuner, or a tuning CD to help train your ear. If your ear doesn’t know what bad intonation sounds like, then you will always play out of tune. Here are some ways to help train your ear:
Have a friend help you by having them play each note as the In Tune Musician. If you have the “wah’s”, then you need to adjust to cure yourself. Have them play again and see if you adjusted correctly. Remember, if the “wah’s” get better, you made the correct adjustment!
An electronic tuner will give you a visual measurement of how flat or sharp you are. Play a note you’re your eyes closed and guess if it’s flat or sharp. Electronic tuners are usually around $25 and can be purchased at any music store or website. Korg brand tuners are the most common.
Some electronic tuners also have a function where they can produce pitches so you can check for the “wah’s”. This is a great function to use if you are by practicing by yourself.
“The Tuning CD” is available for download on iTunes and can be purchased online. It is a CD containing all the notes of the chromatic scale that you can play along with to check the “wah’s”.
Memorize your pitch tendencies. You can do this by creating flashcards or writing the tendencies in your music.
The Results… Poor intonation doesn’t fix itself and is not pleasant to listen to. If you focus and stay consistent in your efforts to improve your intonation, you will also hear improvement in your tone quality. It will start to become second nature to you and you will begin to adjust your pitch without even thinking about it.

21
Electronic Tuner How-to Guide
1. Turn your tuner on by pushing the on/off button. 2. Check the upper left-hand corner to see if your tuner is calibrated to 440 hz. If it is not,
push either the calibration up button or the calibration down button until you see 440 on the screen.
3. Set the tuner on your stand so the screen is facing you. Make sure the microphone (indicated by the word “mic”) is not covered up.
4. Play a note to move the needle. The concert pitch letter name of the note you are playing will be shown in the upper right-hand corner of the screen.
5. If you are… …flat, the needle will move to the left and the light next to the flat sign will light up. …in tune, the needle will stand straight up and the green light will light up. …sharp, the needle will move to the right and the light next to the sharp sign will light up.
6. If your tuner has the option and wish to have the tuner produce a sound while you are playing, hit the sound button on the tuner. Hitting the sound button again will turn off the sound.
7. Turn your tuner off by pushing the on/off button when you are finished using it.
The meter on a tuner measures pitches in cents. In tune notes are measured at zero cents, which makes the needle stand straight up. As a note gets progressively flatter, the needle will move to the left measuring the note in negative cents. When a note gets increasingly sharper, the needle will move to the right measuring the note in positive cents.

22
Completing Your Pitch Tendency Chart
*Make sure you have someone to help you complete this!* 1. Fill out the top portion of the guide as completely as you can. Ask your band director for
help if you have questions about the brand of your instrument or reed. 2. Warm up for at least ten minutes to allow your instrument to adjust to your body
temperature. 3. Turn the electronic tuner on and get your instrument in tune with itself using the following
procedure:
4. Give the tuner and your Pitch Tendency Chart to your partner so they can fill it out while you play.
5. It is best to start at concert B-flat and work your way down and then start again at concert B-flat and work your way to the top to get the most accurate reading. Have your partner tell you what note to play. Play the note and have your partner write down what your pitch tendency is based on the chart below.
Pitch Tendency Category Cents Slightly flat (Sb) -1 to -10 cents
Moderately flat (Mb) -11 to -25 cents Very flat -25 cents to -50 cents
Slightly sharp (S#) +1 to +10 cents Moderately sharp (M#) +11 to +25 cents
Very sharp (V#) +25 cents to +50 cents
6. Once you have completed the chart, return it to your director. A copy will be made for their files and your completed chart will be returned to you.
7. Using the Quick Fixes for Flute chart and an electronic tuner, find the tricks for each note that will make them in tune. Make a note of what works and use those tricks each and every time you play.
1. Adjust the head joint so it is pulled out an eighth of an inch.
2. Using a good tone, play D at a mezzo forte volume with no vibrato.
3. Adjust the head joint by pulling out if the note was sharp or pushing in if the note was flat.
4. Continue this process if your first attempt was not in tune.


24
If the note sounds sharp….
Use a mirror to see if the lip plate is placed too high. It should be placed right above the edge of your lip.
Move the corners of your mouth towards your ears to direct the air stream into the aperture hole.
If the music is written at forte or louder, you will need to move the corners of your mouth towards your ears to direct the air stream into the aperture hole.
Check to see if any of keys on your flute are too open. Let your band director fix any keys that are out of line.
If the note sounds flat….
Use a mirror to see if the lip plate is placed too low. It should be placed right above the edge of your lip.
Make sure you are sitting up nice and tall, holding the flute in the proper playing position
Move the corners of your mouth forward to direct the air steam across the aperture hole.
If the music is written at piano or softer, you will need to move the corners of your mouth forward to direct the air stream across the aperture hole.
Check to see if any keys on your flute are too close to the tone hole. Let your band director fix any keys that are out of line.


