AdvantEdge User Manual Version Date 2.3.4 06/03/2018 Latest Changes: Added ‘Total Minutes’ unit (p157) Added new date mnemonics (p12) Added sections for Unique Reach and Incremental Reach (p44) Click on page number to view.
Transcript
AdvantEdge
User Manual
Version Date
2.3.4 06/03/2018
Latest Changes:
Added ‘Total Minutes’ unit (p157) Added new date mnemonics (p12) Added sections for Unique Reach and Incremental
From version 2.0 we will update the manual whenever we release a new AdvantEdge feature sheet. You can download the latest version of this manual at any time from www.grouptechedge.com/manual/adedgeusermanual.zip
Please consider the environment before printing this manual. An electronic version has the benefit of being much easier to search and navigate than a paper version, and due to the continual development of AdvantEdge this manual is updated on a regular basis.
This manual is provided with book marks corresponding to the table of contents. Open the side panel in your PDF viewer and use Bookmarks to quickly navigate through the document. You can also use ‘Find’ feature in your PDF viewer to search for specific terms.
If you would like to receive feature sheets highlighting new developments in AdvantEdge please email [email protected] to be added to the mailing list. We also welcome your comments or suggestions.
1.5 Index targets 33 1.6 Universe – activity and platform targets 34
Show Users 35 Show Only [Country Name] 36 Show alpha sorted 37 Create System Universe/Add User Universe (Universe section only) 37 Difference between ‘Universe’ and ‘Platform’ 38
Filtering by Period and Channels 79 5.2 User defined brand groups 79 5.3 Schedules 80 5.4 Spot “Type…” 81 5.5 Analysis settings (Spot) 82
R&F 82 Titles 82 AI 82 Collapse 82 Crosstab Only 82 Spot Dropout 83
6 PROGRAMME MODULE 85 6.1 Selecting Programmes 85
Filtering by Period and Channels 86 6.2 User defined programme groups 86 6.3 Schedules 87 6.4 Programme “Type…” 88 6.5 Analysis settings (Programme) 89
R&F 89 Share 89 Share of Channel Group: 90 Include Benchmark: 90 Include Contribution to Share 91 ADH Target Share/Profile Base: 92 Include Rating by Channel: 92 Include Share by Channel: 92 Include Average Age: 93 Include Peak Time: 93 Include Lead In/Lead Out: 93 AI: 95 This displays appreciation by programme or on average. This option only applies in countries that have appreciation in the data set. 95 Daily Reach/Cover 95 Titles by Channel 97
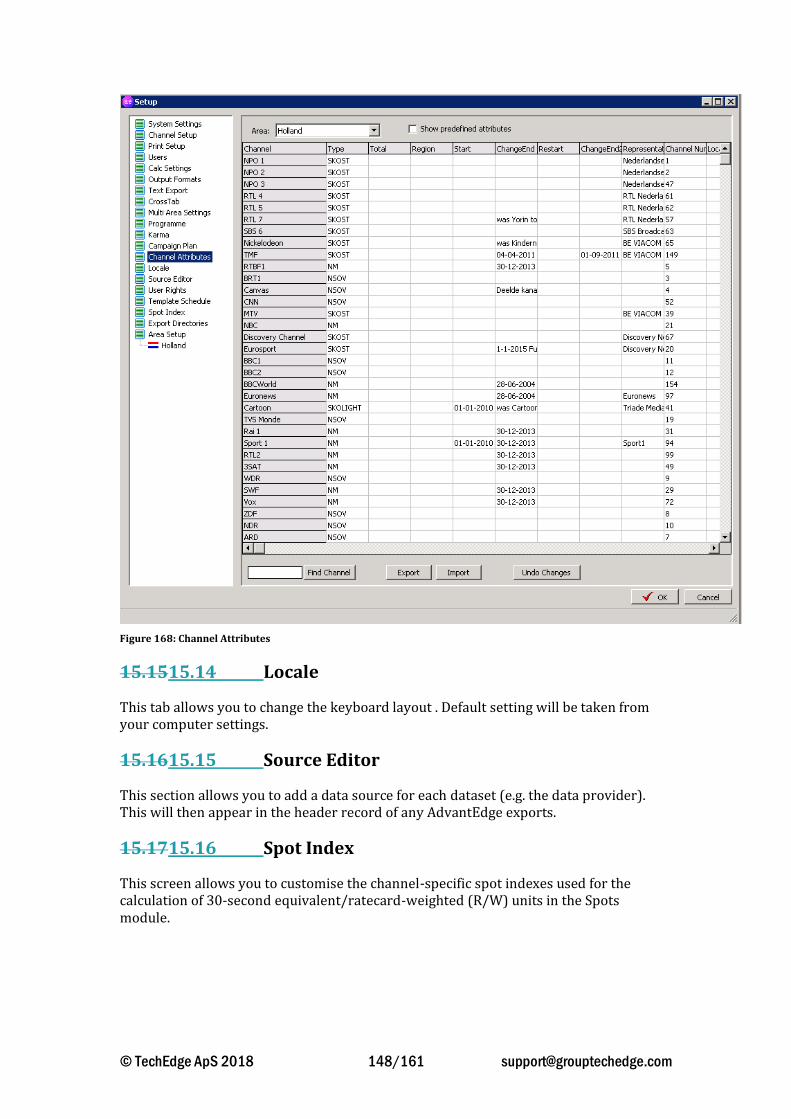
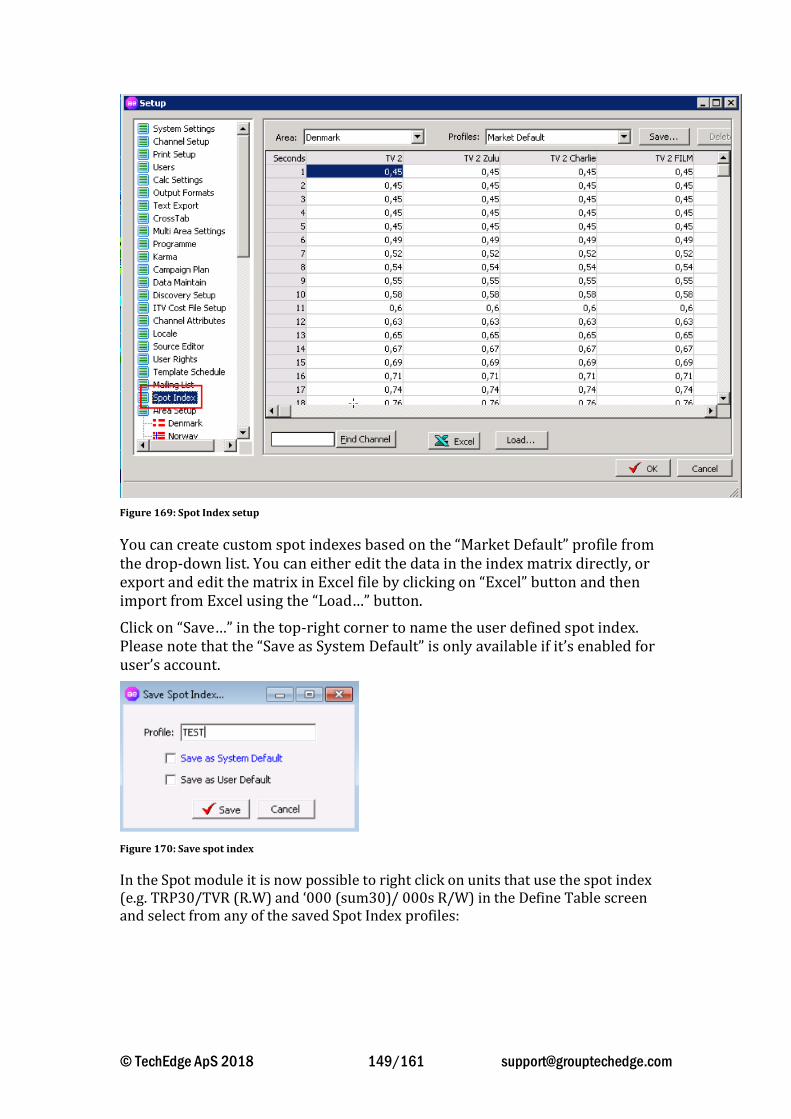
15.9 Multi area settings 146 15.10 Programme 147 15.11 Karma 147 15.12 Campaign Plan 147 15.13 Channel Attributes 147 15.14 Locale 148 15.15 Source Editor 148 15.16 Spot Index 148 15.17 Export Directories 150 15.18 Area setup 150
16 DATA AVAILABILITY 152
17 FREQUENTLY ASKED QUESTIONS 153 17.1 Difference between Daily Reach and R&F 153 17.2 Difference between ATV and ATS 153 17.3 Difference between Net and Gross ratings for a programme 153 17.4 Difference between OTS and AvgFreq 153
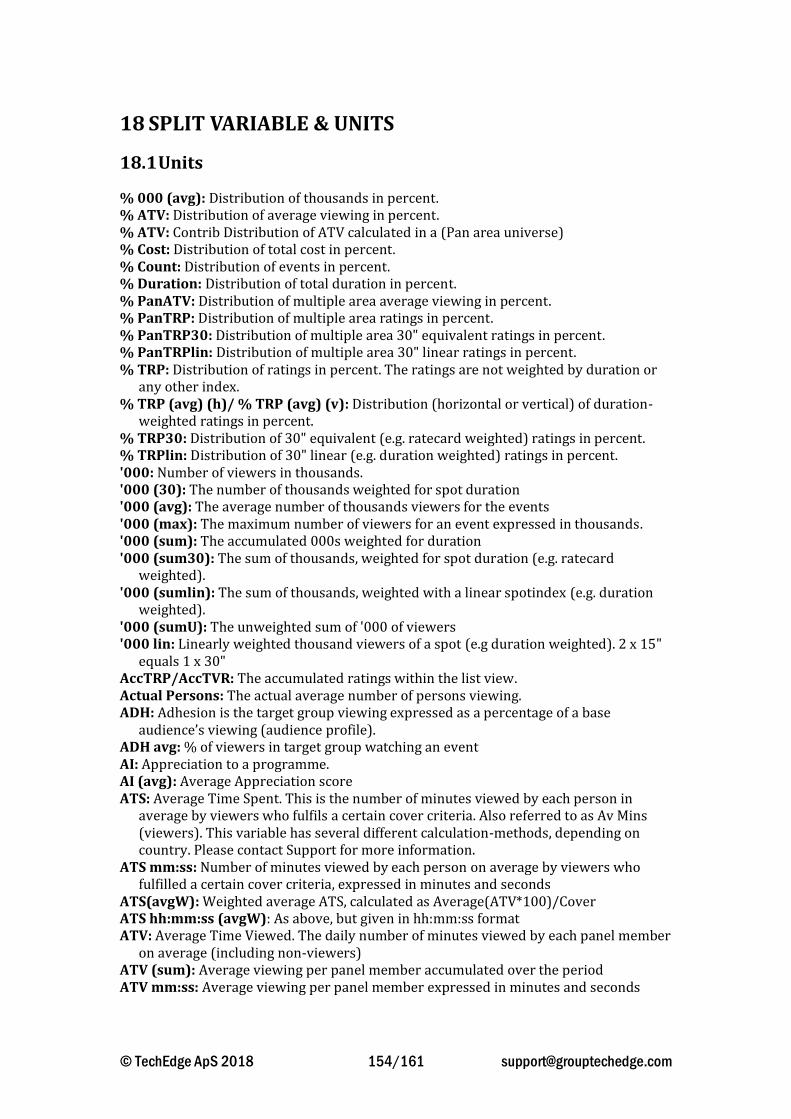
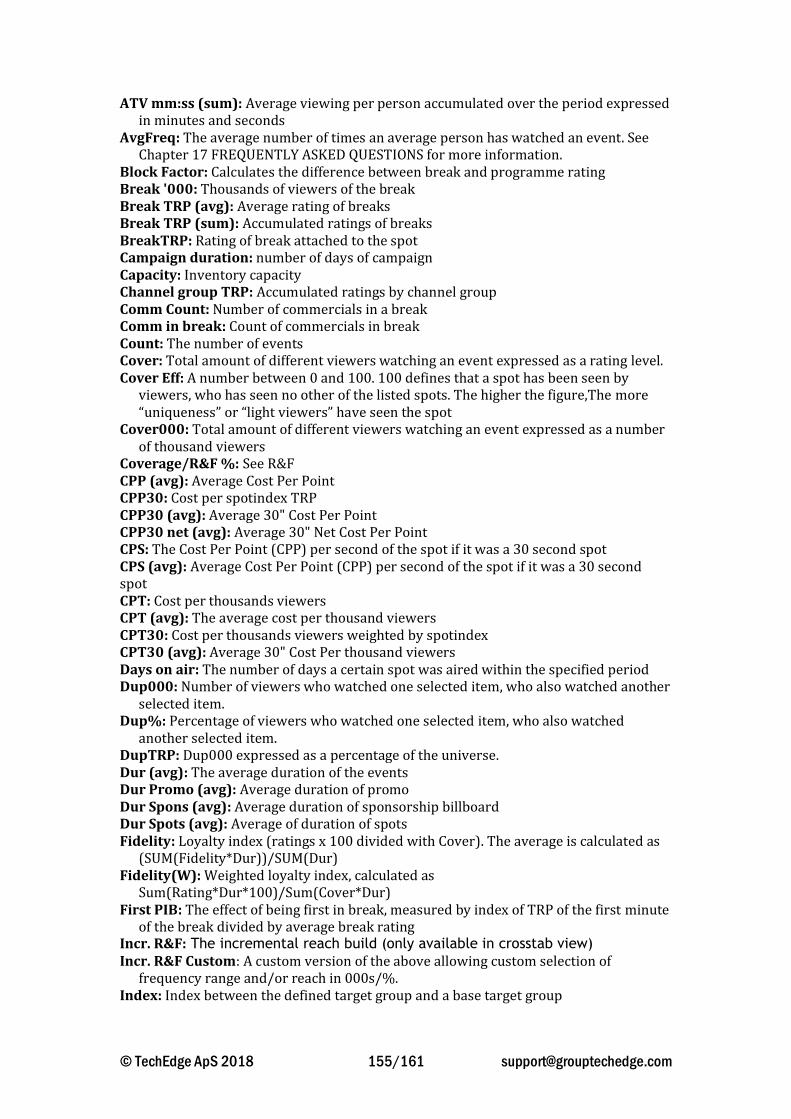
18 SPLIT VARIABLE & UNITS 154 18.1 Units 154 18.2 Split variables 157
In most analysis modules in AdvantEdge, the main options for setting up a query (selecting channels, targets etc.) are identical. Here we cover the main setup options that apply across various analysis modules. For setup options specific to one analysis module please refer to the individual chapter referring to that particular analysis module. Figure 1 shows the main setup options for creating a query:
Figure 1: Query Setup
1 = Area Picker (see page 9) 2 = Period Picker (see page 10) 3 = Daypart Picker (see page 13) 4 = Target Picker (see page 19) 5 = Index Target (see page 33) 6 = Universe selection (see page 34) 7 = Channel Picker (see page 38 8 = Analyse Options (see page 42)
Each of these functions is explained in more detail below.
The [Areas…] button allows you to select the reporting areas(s) you wish to base your analysis on.
Figure 2: Selecting reporting area(s)
In some countries, the [Areas…] button allows you to select reporting areas within the country. These are usually based on geographic areas (e.g. London within the UK) or household reception type (e.g. Cable and Satellite Homes). Please note that not all countries are divided in this way. Where applicable, clicking on the [Areas…] button will show the reporting areas available for selection. Click on an area to select it for analysis, or hold down control to select multiple reporting areas. In the example below, the ITV London reporting area has been selected.
In multi-territory installations, the [Areas…] button is also used to select which country(s) you wish to include in your analysis.
Figure 3: Selecting countries in multi-country installations
Click on the [World] button to bring up a list of countries, and select the country you wish to run analysis on (see Figure 3). By holding down the control key it is possible to select multiple countries
1.2 Selecting Date Periods
There are two ways of selecting the date period you want to analyse in AdvantEdge: using the period picker, or by typing in mnemonic codes.
Period Picker
Press the [Period] button to open the period picker dialogue box. On the left hand side you can change the period resolution between years, months, quarters, weeks and days. Highlight the period you wish to analyse and press the right arrow to select it.
Figure 4: The period picker
It is possible to deselect certain weekdays by pressing the box [mon-sun] located beneath Day on the left hand side of the period picker. By deselecting weekdays only the remaining weekdays will be included in the period (for example, Mon-Fri).
The period picker can be used to select multiple periods, and the periods can be overlapping if required. Once a period has been selected using the right-hand arrow, you can highlight it in the right hand pane and right-click to rename the period if desired.
Once your period(s) have been selected, you can press the [Save] button to save them under a user name for future use if required.
If the period picker is in Day view, some additional information is also displayed. An asterisk (*) next to a date shows that this is the last date for which official consolidated programme data is available. Days marked in blue indicates part-consolidated data.
Figure 5 - Selecting specific weekdays
Date Mnemonic Codes
It is possible to enter the period you wish to analyse by using mnemonic codes. This is especially useful when working with report templates as it allows the use of relative periods – i.e. a regular weekly report can be set up so that it always runs on the last full week of data, without the user having to manually change the date period.
Fixed periods can be typed into the period text-box using the following formats:
Table 1: Mnemonic codes for fixed date periods
Mnemonic Code Description Example Period Selected Ddmmyy Specific date 230810 23rd August 2010 ddmmyy-ddmmyy
Date range 270610-210810 27th June to 21st August 2010
Yy Calendar year 10 2010 yym# Specific month 10m7 July 2010 Yyww Specific week 1028 Week 28 in 2010 yy ddd Year and specific week day 10 mon Mondays in 2010 yyQq Specific quarter 15q1 First quarter of 2015 yyww-yyww fri Week to week specific day 10m3-10m6 fri Friday in March-June 2010 YYmMMwp Select months based on full
weeks (Mon-Sun). 15m1wp Weeks 1-5 (29/12/14 –
01/02/15). YYQxwp Select quarters based on full
weeks (Mon-Sun). 16Q2wp Weeks 14-26 (04/04/16 –
03/07/16) YYwp Select years based on full
weeks (Mon-Sun). 15wp Weeks 1-53 (29/12/14-
03/01/16) The following mnemonic codes are for US: yyWUww Week US definition 15wu08 US week 8 in 2015 yyBMmm Month using US broadcast
month 14bm8 August 2014 US broadcast
month yyBQq Quarter using US broadcast
month definition to define the quarter
14bq2 2nd quarter of 2014 defined by US broadcast month
yyBY Year using US broadcast 13by 2013 as defined using US
Mnemonic Code Description Example Period Selected month definition to define the year
broadcast month.
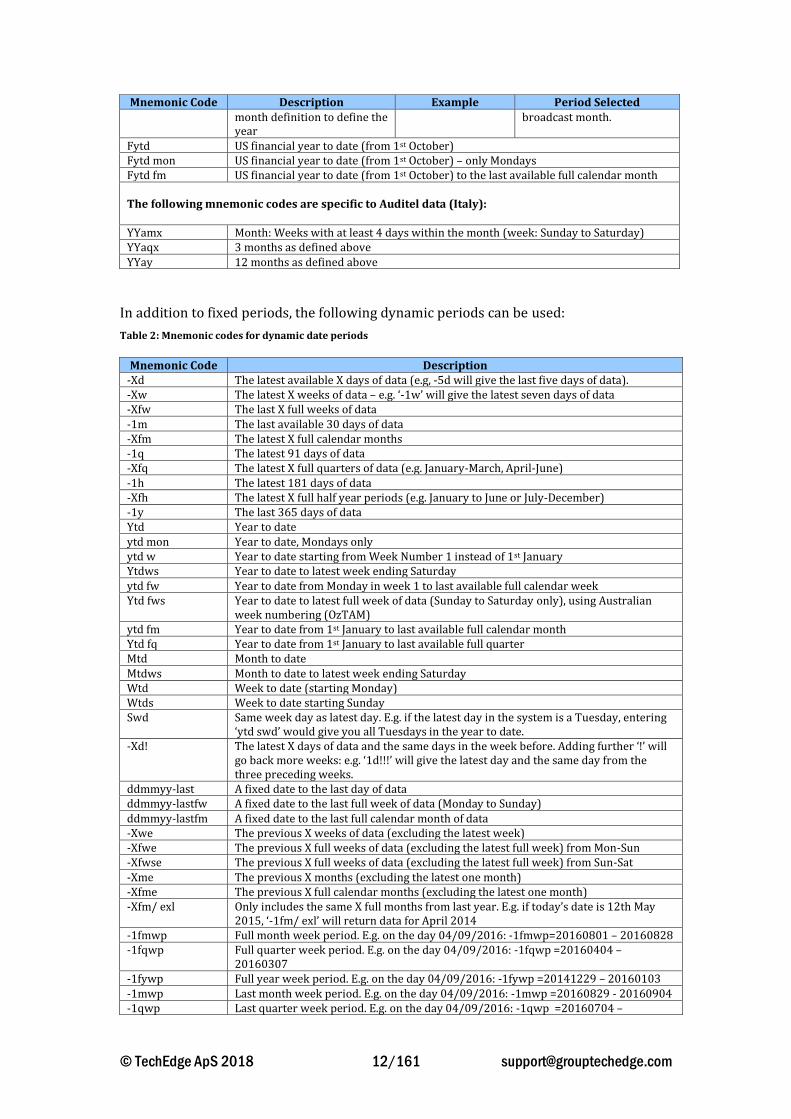
Fytd US financial year to date (from 1st October) Fytd mon US financial year to date (from 1st October) – only Mondays Fytd fm US financial year to date (from 1st October) to the last available full calendar month The following mnemonic codes are specific to Auditel data (Italy): YYamx Month: Weeks with at least 4 days within the month (week: Sunday to Saturday) YYaqx 3 months as defined above YYay 12 months as defined above
In addition to fixed periods, the following dynamic periods can be used:
Table 2: Mnemonic codes for dynamic date periods
Mnemonic Code Description -Xd The latest available X days of data (e.g, -5d will give the last five days of data). -Xw The latest X weeks of data – e.g. ‘-1w’ will give the latest seven days of data -Xfw The last X full weeks of data -1m The last available 30 days of data -Xfm The latest X full calendar months -1q The latest 91 days of data -Xfq The latest X full quarters of data (e.g. January-March, April-June) -1h The latest 181 days of data -Xfh The latest X full half year periods (e.g. January to June or July-December) -1y The last 365 days of data Ytd Year to date ytd mon Year to date, Mondays only ytd w Year to date starting from Week Number 1 instead of 1st January Ytdws Year to date to latest week ending Saturday ytd fw Year to date from Monday in week 1 to last available full calendar week Ytd fws Year to date to latest full week of data (Sunday to Saturday only), using Australian
week numbering (OzTAM) ytd fm Year to date from 1st January to last available full calendar month Ytd fq Year to date from 1st January to last available full quarter Mtd Month to date Mtdws Month to date to latest week ending Saturday Wtd Week to date (starting Monday) Wtds Week to date starting Sunday Swd Same week day as latest day. E.g. if the latest day in the system is a Tuesday, entering
‘ytd swd’ would give you all Tuesdays in the year to date. -Xd! The latest X days of data and the same days in the week before. Adding further ‘!’ will
go back more weeks: e.g. ‘1d!!!’ will give the latest day and the same day from the three preceding weeks.
ddmmyy-last A fixed date to the last day of data ddmmyy-lastfw A fixed date to the last full week of data (Monday to Sunday) ddmmyy-lastfm A fixed date to the last full calendar month of data -Xwe The previous X weeks of data (excluding the latest week) -Xfwe The previous X full weeks of data (excluding the latest full week) from Mon-Sun -Xfwse The previous X full weeks of data (excluding the latest full week) from Sun-Sat -Xme The previous X months (excluding the latest one month) -Xfme The previous X full calendar months (excluding the latest one month) -Xfm/ exl Only includes the same X full months from last year. E.g. if today’s date is 12th May
2015, ‘-1fm/ exl’ will return data for April 2014 -1fmwp Full month week period. E.g. on the day 04/09/2016: -1fmwp=20160801 – 20160828 -1fqwp Full quarter week period. E.g. on the day 04/09/2016: -1fqwp =20160404 –
20160307 -1fywp Full year week period. E.g. on the day 04/09/2016: -1fywp =20141229 – 20160103 -1mwp Last month week period. E.g. on the day 04/09/2016: -1mwp =20160829 - 20160904 -1qwp Last quarter week period. E.g. on the day 04/09/2016: -1qwp =20160704 –
-1ywp Last year week period. E.g. on the day 04/09/2016: -1ywp =20160104 - 20160904 -1fhyWP Last full half-year week period (Jan-Jun week period or Jul-Dec week period), e.g.
on date 26/10/2016 this would select the period 04/01/2016 to 03/07/2016.
-1hyWP Last half-year week period (Jan-Jun week period or Jul-Dec week period), e.g. on the 26/10/2016 this would select the period 04/07/2016 to 25/10/2016
-sfwX Minus single full week. E.g. ‘-sfw5’ will give you the full week (Mon-Sun) five weeks ago
-sfwsX As above, but weeks start on Sunday -sfw[x-y] A range version of the above. E.g. ‘-sfw[4-2]’ will give you the full weeks from 4 weeks
ago to 2 weeks ago -sfsws[x-y] As above, but weeks start on Sunday -sfmX The full month X months ago -sfm[X-Y] A range version of the above, e.g. ‘sfm[4-2]’ reverts full months from 4 up to 2 months
ago The following mnemonic codes are for Auditel data: -Xaw The last X Auditel weeks, e.g. ‘-3aw’ -xfaw The last X full Auditel weeks, e.g. ‘-3faw’ will give the last 3 full Auditel weeks -Xam The last X Audietel months -Xfam The last X full Audietel months -Xaq The last X Auditel quarters -Xfaq The last X full Auditel quarters
Note that to get the full period of a date segment you enter an ‘f’ in the code. For example, -1w will give the last seven days of data, whilst -1fw will give the last full week of data from Monday-Sunday.
By entering a forward slash ( / ) after any of the above codes you will get the same period in the year before, enabling fast year-on-year comparisons. Multiple / will give you multiple years.
You can also amend mnemonic codes to ensure that only consolidated viewing data is used. There are three codes for this:
CV = Consolidated Viewing
CP= Consolidated Programs
CVA= Consolidated Viewing Australia (used for some countries such as Australia where consolidated data always arrives exactly 7 days after the overnight data).
For example, -14d cv which will give you the last 14 days of consolidated viewing data, whilst -14d cp will give you the latest 14 days of consolidated program data.
You can select multiple periods by entering several mnemonic codes directly into the Period input-box and separating the codes by commas.
1.3 Dayparts
Daypart selection
Dayparts can be selected post-analysis in the Crosstab except for in the Time and Share of Viewing modules. For example, it is possible to run a Programme query without entering any daypart information in the setup, and then split programmes by daypart in the Crosstab when viewing the results.
Previously saved dayparts are selected by clicking on the [Daypart…] button and transferring a daypart from the left column to the right column. This can be done by double-clicking on a daypart, or by marking a daypart and using the blue arrows in the middle.
It is possible to select several dayparts for one analysis. The order of the chosen dayparts can be moved up and down using the blue arrows in the top right corner.
In the example above, the group ‘AE Dayparts’ has been selected, thereby selecting the four individual segments contained in this group (see Figure 6).
It is also possible to expand the group to view its constituent segments, and then select one or more of these segments individually. In Figure 7 the 1200-1659 segment has been selected from within the ‘AE Dayparts’ group:
It is possible to filter the daypart user groups to only show a subset of users. Click on the [Filter] button in the bottom right corner and put a tick next to the user groups you wish to see, and then click in ‘Enable Filter’ before pressing [OK] (see Figure 8). The list will then show only the selected users. Please note that you can toggle between filtered/unfiltered view by pressing [Filter] and ticking/de-ticking ‘Enable Filter’.
It is possible to type in a daypart range(s) in the Daypart box using the format hhmm-hhmm. In Figure 9 two daypart ranges have been entered, 0700-0859 and 0900-1159, separated by a comma. Please note that 0859 is actually 08:59:59, so if the daypart is meant to end on the hour this should be used instead of 0900.
Quick dayparts can also be made by clicking the ‘Daypart…’ button in Figure 10, and then clicking on the ‘Time’ button in the top right hand corner.
Figure 10: Creating quick dayparts
This will bring up a dialogue box in which to enter your daypart. Multiple dayparts can be added by pressing the ‘Time’ button again.
Creating advanced dayparts
To create a new daypart click on the ‘Daypart…’ button, and then click the ‘Create…’ button at the bottom left of the window in Figure 10. The menu has three main options: Quick Daypart, Advanced Daypart or Intervals.
Quick daypart Type in time(s) for the dayparts you wish to analyse. When you have created your daypart(s), press ‘Save as’ and name your daypart group.
Advanced dayparts Advanced dayparts allows you to name dayparts (e.g. Breakfast, Daytime etc.) and add them to a certain group.
First of all type the name of a folder in the ‘Title’ dialogue box, and click the ‘Add’ button to the right of this to create the folder. You will notice that the ‘To group’ drop-down menu automatically changes to the name of the folder you have just created. You can now change the start and end time and click the second ‘Add’ button to create a daypart in the group.
Figure 12: Advanced dayparts example
It is possible to create multiple groups by typing a new name in the ‘Title’ dialogue box and clicking ‘Add’ again. Use the ‘To group’ drop-down menu to select which group a new daypart should be added to. It is also possible to add multiple dayparts into the same group. In the example above, three daypart groups have been created.
When using Advanced Dayparts, it is also possible to make dayparts that only apply to specific channels and/or days of the week. To select the weekdays a daypart should apply to click on the ‘Weekdays’ button. When you now create a daypart in the ‘Advanced daypart’ section, it will only be applied to the days of the week selected here. The ‘Channel’ button works in the same way. For example, you can use the Weekday button to created two different peaktime definitions (one for weekdays, one for weekends), or use the Channel button to create different peaktime definitions for different channels.
Interval dayparts
This option allows you to split a time segment into its constituent intervals. You can select whether dayparts created here are added to individual groups, or added in to an existing group. Type in the desired interval duration (e.g. 10 min,
15 min), and the time period to be covered (e.g. 1800-2259). When you press ‘Add’, the daypart will be split into the interval you specified.
As with Advanced Dayparts, you can use the ‘Weekdays’ and ‘Channels’ buttons when using Intervals to make dayparts that only apply to specific weekdays and/or channels.
1.4 Targets
Selecting Targets
Click on the ‘Targets…’ button to open the Target Picker. The left hand side of this window shows any targets already created by users on your system – double-click on a user name to display the list of targets stored under it. For the UK, there is also a ‘Standard Targets’ folder containing a predefined list of key targets.
Once you have found the target(s) you would like to use in your analysis, highlight them in the left-hand window and either double-click on them or use the right arrow button to select them.
One exception is targets that have been created based on viewing behaviour rather than demographic information (see Dynamic Targets on page 114). To select dynamic targets, first of all you must change the selection from ‘Standard’ to ‘Dynamic’ using the radio buttons at the top of the Target Picker. These targets can then be selected in the same way as standard targets.
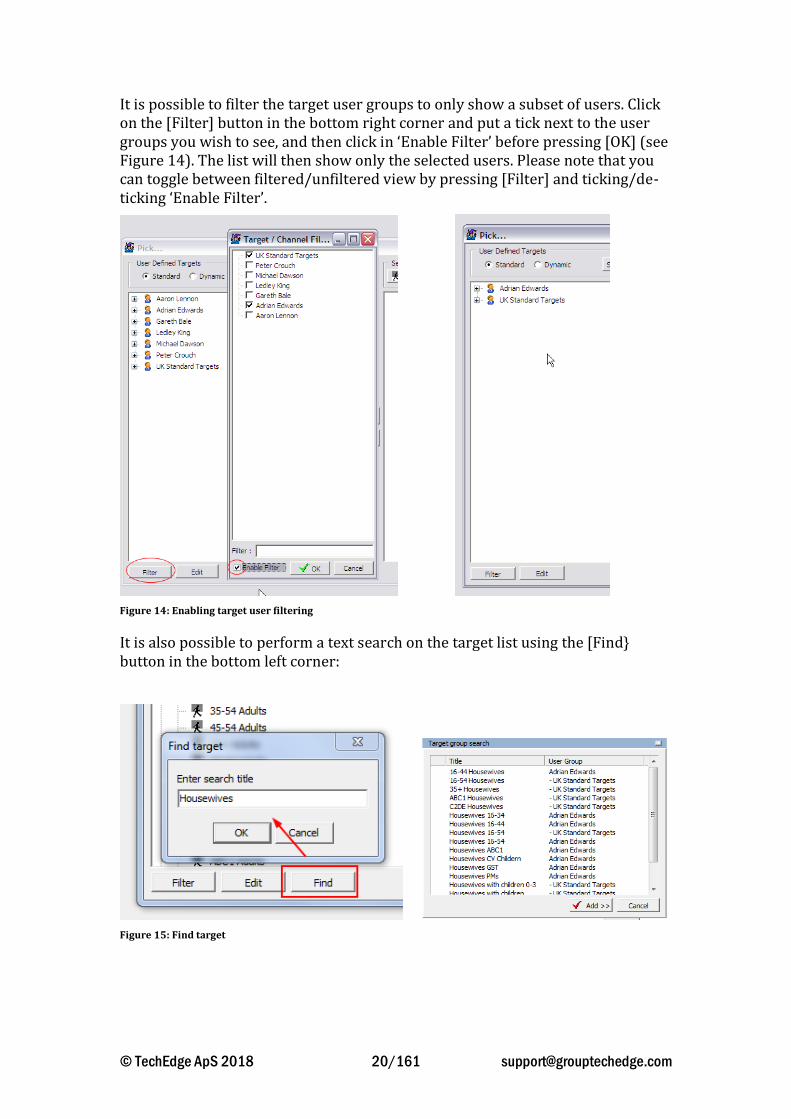
It is possible to filter the target user groups to only show a subset of users. Click on the [Filter] button in the bottom right corner and put a tick next to the user groups you wish to see, and then click in ‘Enable Filter’ before pressing [OK] (see Figure 14). The list will then show only the selected users. Please note that you can toggle between filtered/unfiltered view by pressing [Filter] and ticking/de-ticking ‘Enable Filter’.
Figure 14: Enabling target user filtering
It is also possible to perform a text search on the target list using the [Find} button in the bottom left corner:
If the target you wish to use in your analysis has not already been defined in your system, use the ‘Create Target’ button at the top-right of the Target Picker to enter the Create Target view.
Figure 16: Create Target window
On the left hand side of the Create Target window you will see all the demographic information available. This information varies by country, and for those users with multi-country installations you can also select which country you wish to create a target in by expanding the relevant country flag. The ‘Filter’ tickbox at the top left of the screen allows you to filter the list to only show demographic variables for the selected country and/or date range.
Click on a ‘+’ sign next to a level of demographic information to see the dimensions available, and select the relevant dimension(s) by either double-clicking or by using the right arrow in the middle of the window.
As you start to build your target by selecting demographic dimensions, the sample size and universe information displayed in the top-right corner of the Create Target window automatically update. Please note that the universe figure is given in 000s. By clicking on the date you can change the period to which the sample and universe size relates. The demographic information used in a panel may change over time, meaning that some demographics may only be used in certain date ranges. Where this is the case it is usually indicated by a date range in brackets next to the demographic name.
Once you are happy with the target you have created, press the ‘Pick’ button at the bottom-right of the Create Target window to use the target in a query without saving it, or press ‘Save As’ and give your target a name to save it for future use. In the future it can then be selected by expanding the relevant user name in the Target Picker (see section on selecting targets above).
Segments can be used to create more complex targets, and logic statements can then be used to determine the relationship between the segments and between statements within the same segment. Create a new segment using the ‘Add to segment’ dropdown at the top of the Target Picker. The next demographic selection will then be added to the new segment.
Figure 17: Adding target segments
In the example above I have created a target of Males who are either in the AB social class OR working full time. By right-clicking on a logic statement you can change it, selecting between AND, OR and XOR (NOT OR).
Target Profiler
Clicking the [Profile] button in the ‘Create Target’ window or right-clicking a target in the target picker and selecting ‘Profile’ will open up the Target Profiler:
By default the profile will be based on the latest viewing day if it is a Standard target, or the sample date used for the target creation if it is a Dynamic target. The profile date can be changed manually using the [Period] button in the top right corner.
Select demographics or saved target folders from the left-hand side and double-click or use the arrow button to add them to the profile. You can set a default list of demographics to be included in the profile by highlighting them in the left-hand window, right-clicking and selecting the ‘Run selected on startup’ option:
Figure 19: Select default demographics for profiler
The information is also displayed graphically. It is possible to choose between several graphical outputs: Bar chart, line chart, compass chart or radar chart.
The data can also be displayed accumulated by selecting the ‘% Acc’ radio button or as an Index by selecting the ‘Index button’. Legends and data labels can be added by pressing [mark] and [%].
All graphs can be saved or copied to Excel, Word or PowerPoint by pressing [Save] or [Copy]. By right clicking on the chart it is possible to Edit, Copy, Print and save as well as move the image by dragging it with the cursor.
Multi Target Profiler
It is possible to profile multiple targets at the same time to compare them. First of all hold down [Ctrl] on your keyboard and click on the targets you wish to profile. You can then right click and select the [Multi Profile…] option:
Figure 20: Selecting targets for Multi Profile
This will bring up the profile screen with a separate column for each of the selected targets. As with the standard target profile, you can select from the available demographics in the list on the left-hand side and double-click or user the arrows button in the middle of the screen to add them to the profile:
An Index Target column is also included in the profile for easy reference. The index target can be changed using the [Index] button in the top left corner.
By default the profile will be based on the latest viewing day (regardless of whether the selected targets are ‘Standard’ or ‘Dynamic’). The sample date used for the profile can be changed manually using the [Period] button in the top right corner.
Auto Created Targets
The [Auto Create Targets] option automatically creates a number of targets by breaking down an existing target into its constituent parts. For example, if the base target selected is Men 16-34, by selecting [Auto Created Targets you will create 19 new targets (Men aged 16, Men aged 17 etc.). The amount of new targets that can be created on the basis of any target depends on the available demographic levels in the target group.
To auto-create targets, select a base target from the Target Picker and right-click, then select ‘Auto Create Targets’ from the menu.
The [Sample] button is situated in the bottom-left corner of the Create Target window. This button allows you to switch between a sample and universe based on People or Households. To create a Households target, begin creating a target as normal and then press the [Sample] button to change to a Households sample.
Figure 23: Sample menu
After switching to Households sample, the sample and universe information displayed will relate to number of households rather than number of people.
In countries which use Guest Factoring (such as the UK), the Sample menu also allows you to include or exclude panel members and guest viewers from the ratings calculation.
TV-Set information differs from country to country. In most cases it is possible to filter on location of TV sets (living room, bedroom etc.). In the UK and many other markets, it is also possible to filter on a number of other TV set attributes, such as reception platform, HD capability, PVR presence, Timeshift etc.
Clicking on the [TV Set] button in the bottom-left corner of the Create Target window opens the TV Sets menu. From here you can click to activate ‘Specific TV Set’, and select/deselect sets using the dimensions available. In the example below, only TV sets situated in the main living room have been selected:
Figure 24: TV Sets menu
TV Sets information acts as a filter on viewing e.g. in the example above, only viewing that took place on TV sets located in a main living room would be counted in any analysis. TV Set information has no effect on sample or universe size.
Co-Viewing
Co-viewing (also referred to as mutual viewing) works as a filter, allowing you to analyse viewing of a target that occurred when they watched with other people in a defined target group present (or, conversely, when they were watching without anyone in the defined adjoining target group present).
For example, if you choose Women as the main target group and children as an adjoining target group you will get ratings for women that have watched together with children. All other viewing has been filtered out, and the ratings will NOT contain any children viewing.
To create a co-viewing target, first of all open the Create Target window and create your base target as normal (e.g. Women in the example above). Next click the co-view button at the bottom left of the Create Target window to open the Co-View window.
Tick the box next to ‘People watching together in household’ to activate co-viewing, and click on the target icon next to ‘Adjoining target group’ to select the adjoining target (e.g. in the above example this would be children). By default co-viewing will only be counted where it takes place on the same TV set. By deselecting this option it is possible to look at co-viewing taking place in the same household on different sets.
The default setting for co-viewing is 2+, which counts all co-viewing where the main target is present with at least one person in the adjoining target group. By changing this figures to 1 you will get solo viewing (e.g. the main target was watching with none of the adjoining target present).
For example, if the main target is Individuals and the adjoining target is also Individuals and ‘People watching together in household’ is set to ‘1’ it will return viewing only where panel members were watching alone:
If the adjoining target group was changed to ‘Children’ in the above example it would return all viewing where the main target was watching without any Children present.
As co-viewing is acting as a filter on viewing, it has no effect on sample and universe.
When creating targets in AdvantEdge, it is now possible to specify a custom interval for time-shifted viewing. This allows you to see how much time-shift viewing occurs within the specified time interval.
To use the new feature, got to the ‘Create Target’ screen and build your target as normal, then click on the [TS Int.] button at the bottom of the screen. In the ‘Time shift interval…’ dialogue box, put a tick next to ‘enabled’ and type in your interval range:
Figure 27: TS Interval
In the above example the interval range is set as ‘0-60’. This will give all viewing that occurs within an hour of transmission, including live viewing. Click ‘OK’ and then save target as normal.
You can of course create multiple targets in this way to see how time-shift viewing accumulates in the hours and days following transmission, e.g. 0-0 (live viewing and playback in same minute as live), 1-60mins, 61-120mins etc. The maximum interval is 9,840mins. In the example below has consecutive TS Interval targets based on Individuals 4+ from 0-9,840 minutes. The sum of all these TS Interval targets will equal the Individuals 4+ audience:
It is possible to create target consisting of sex and age by simply writing in the demography string:
16+ - People of the age of 16 and over
19-50 - People of the age between 19 and 50
W20-44 - Women between the ages of 20 and44
M15+ - Men of the age of 15 and over
When choosing multiple target groups separate by comma.
These mnemonic codes can be particularly useful in multi-country installations when running data across multiple territories simultaneously. For example, typing in 3+ will give you All Individuals in all countries (even those where demographics start at age 4).
In addition, there are a number of UK-specific mnemonic codes:
I = Individuals 4+ A = Adults 16-99 Men = Men 16-99 Wom = Women 16-99 CH = Children 4-15
HW = Housewives 16-99
Grouping targets together
It is possible to create groups of targets – for example, you can group all targets you use to produce a standard demographic profile.
From the Target Picker window, press [Edit] and choose [Create group] from the menu:
In the resulting Groups menu, select the targets you wish to add to the group by double-clicking them in the left-hand window or using the right arrow:
Figure 30: Adding targets to a group
Once you have added all targets to the group, click [Save] and give the group a name. Note that target within the group are only shortcuts to the actual targets. These shortcuts are indicated by a blue triangle in the top right hand corner. It is possible to delete the target shortcut within a group without deleting the original target.
When creating targets it is possible to save them directly into a target group by typing a group name into the ‘Group’ field to create a new group or by selecting an existing group from the drop-down menu:
The target will be saved under the User name, and a link will be added to the selected group:
1.5 Index targets
The [Index] button allows you to choose a base target on which to compare the target group results against. Setting an index target makes an Index unit available once you have you run your analysis – this is the TVR of any targets you have selected indexed against the TVR of the index target.
To select an index unit, click on the [Index…] button. You can highlight an Index Target from the list and click [OK] to select, or click on [Edit…] to add a new Index Target to the list. There are four options under [Edit…]: ‘Create New’ will open the Create Target window for you to build a new target and add it to the list; ‘Target Picker’ will open the Target Picker and allow you to select predefined targets to the list of Index targets; ‘Edit’ and ‘Delete’ allow you to modify or remove existing entries in the list of Index targets.
Press [Clear] to remove the Index Target, or [Dynamic] to select an Index Target based on viewing behaviour (see section on Dynamic Targets on page 114).
1.6 Universe – activity and platform targets
In the universe section it is possible to filter viewing by household reception capability, viewing activity and TV-set information using user-defined presets. Selections made here modify all targets selected for the query, saving the need to create lots of targets from scratch.
For example, you may want to run an audience profile on 16-34s, 34-54s and 55+ age groups in Digital Terrestrial homes and split the ratings between Live viewing and Playback viewing. Using the Universe section it is possible to run this analysis using standard age targets instead of creating six custom targets:
In this instance the standard age targets have been entered, and ‘DTT Only’ has been selected in the Universe list. This restricts the analysis to DTT Only households. Two items have then been selected from the Activity list: Live, and Timeshift Days 1-7. In the resulting output, all data will be based on DTT only homes and ratings will be given separately for Live viewing and Timeshift viewing:
Figure 34: Output using Universes selection
The Universe list is always displayed whenever you press the [Universes…] button. Activity and Platform fields can be toggled on/off using the tick boxes at the bottom of the window.
It is possible to define a new Universe, Activity or Platform and add it to the relevant list. This can be done by right-clicking in the relevant section. A list of all relevant options will then be displayed from which to create your new item.
These options available differ slightly between the Universe window and the Activity/Platform windows:
Figure 35: Right-click menu for Universe section (left) and Activity/Platform sections (right)
Show Users
This option will show Universe/Activity/Platform items stored by the name of the user that created the item (same as the Target Picker):
Figure 36: 'Show Users' activated in Activity window
Note that in the ‘Universe’ list you may also see ‘System Universe’ and ‘Universe Archive listed’ as users – please see below for more information.
Show Only [Country Name]
For installations with multiple datasets, this option allows you to show only those Universe/Activity/Platform items that have been defined in the currently selected dataset.
In the example below, Hungary has been selected as the Reporting Area, and under the ‘AE’ user we can see two universes – one based on Hungarian data, the other on Spanish data:
By selecting the ‘Show only Hungary’ option the Universe list will be filtered to show only items that have been defined in the Hungary dataset:
This option will apply alphanumerical sorting to the items in the list.
Create System Universe/Add User Universe (Universe section only)
When adding new items to the Universe list you can choose from two different options. ‘Create System Universe’ will open the universe creation window, allowing you to create new universes. These will automatically be stored under a ‘System Universe’ user, and are identifiable by a ‘globe’ icon next to them in the Universe list. When User Rights are enabled in an installation the user rights password will be required to create a new System Universe, meaning that only administrators can add new items.
The second option is to ‘Add User Universe’. Any user can do this without needing the user rights password. Selecting this option will open the Target Picker, from where you can select existing target(s) to be added to the Universe list (including dynamic targets if required) or create a new target that will be added to both the target list and the universe list. Universes created in this way are stored by user name, and are identifiable in the Universe list by a target icon next to the name.
Please note the difference between Universe and Platform. Items in the Universe list are based on household reception capability taken from household demographics. Platform information is taken from TV set information. Selecting DSat households in the Universe list will give viewing in all homes with DSat reception capability, but this could include viewing that took place on other platforms if there are households with multiple reception types. Selecting DSat in the Platforms list will only give viewing that took place using the DSat platform –viewing on other platforms will not be counted.
‘View Setup’ of Activity/Platform
This feature allows you to see how a saved Activity or Platform has been defined and is useful for installations with User Rights enabled where you are only able to edit items that you created yourself. By right-clicking and selecting “View Setup…” you can see the composition of items that other users have created:
1.7 Channel selection
Quick selection
It is possible to select a channel by clicking directly on the name in the channel list. Multiple channels can be selecting by holding down the Control button on your keyboard. The ‘Select All’ button will select all available channels.
Figure 38: Quick channel selection
Channel picker
Clicking on the [Channels] button opens up the “Channel Picker” screen. The cursor will automatically be in the ‘Filter’ input box at the bottom of the screen. Here you can type in characters to filter the channel list - in the example below ‘ITV’ has been entered in the Filter box, so the channel list only displays channels that include these characters:
By clicking on ‘Any’ to the right of the Filter box, it is possible to select only channels that start with the inputted characters. Channels that have been selected at least once are represented by a light blue colour in the main channel list. By clicking on the tabs Name or Area column headings you can sort the channel list by these parameters.
The folder icon in the top right of the Channel Picker window creates a folder or subfolder for channel groups. Once you have created and named a folder, you can highlight it in the right-hand window and add channels to the folder using the channel picker. In the example below, a folder has been created that contains all BBC channels:
By default all channels within a folder will be displayed as one entity in the output, with the folder’s name as the reported entity. However, it is still possible to split outputs by the individual channels within the folder by adding the ‘Channel’ dimension in Crosstab Layout.
You can save a selection of channels using the [Save as Group] button in the top-right corner of the Channel Picker. To recall a previously saved group, switch the mode using the [User defined groups] tick-box in the top-left corner. To edit a previously saved group, right click on the group name and choose [Edit]. It is possible to filter the channel user groups to only show a subset of users by clicking on the [Filter] button in the bottom right corner and putting a tick next to the user(s) you wish to see, and then clicking ‘Enable Filter’ and pressing [OK]. The list will then show only the selected users.
The [Options…] button in the bottom right corner of the channel picker allows you to search for channel names [Find], create folders [New folder], and clear all selected channels [Clear].
Channel list views
Channel list views are user-made channel lists where only a relevant selection of channels is displayed. For example, you can set up a list view containing only sports channels or only channels operated by a particular broadcaster.
List views can be accessed from two places: by clicking on the [View] button on the main screen, or using the dropdown menu in the top-right corner of the Channel Picker:
Figure 41: Channel list views
The ‘Default’ option always includes all available channels in the country(s) selected. [Edit view list…] brings up the ‘Edit Channel View’ window:
From here you can delete channel views by highlighting them and clicking on the trash can icon, edit an existing channel view by highlighting a channel view and pressing the [Edit] button, or create a new channel view by pressing the [Add] button. Please note that channel views can contain folder groups if required (see page 39). It is also possible to reorder the list of channel views using the blue up/down arrows.
A channel view can be selected as a User (applied only o the current user) or System (applied to all users) default, meaning it will be selected by default on start-up. To do this click on ‘Edit view list…’, right-click on the required channel view and select either User or System default. Text will appear next to the channel view to indicate that is an active default:
Figure 43: Setting a Default channel view
Please note that if User Rights are enabled for your AdvantEdge installation an administrator password will be required before you can set a default System channel view, since this change effects all users.
The last row of the query setup screen allows you to include additional units in your query. Basic audience units such as 000s and TVR are always available, while other units such as Reach and Frequency and Share must be enabled in this section before you run a query. The units available in the Analyse section will vary by analysis module – details on units and options specific to one analysis module will be dealt with in the relevant chapters of this manual. In this section we will look at options available in the Time module.
Figure 44: Analyse Options
R&F:
Ticking on ‘R&F’ adds Reach and Frequency units to your query. This calculates the number of unique viewers for a series of events, and the number of times they have watched these events. Depending on the analysis module, including R&F will make the following unites available:
Click on the red arrow to the right of the ‘R&F’ button to change the reach conditions. Here you can choose how many minutes a panel member has to view before being counted in Reach, and whether or not these minutes have to continuous (i.e. in one session). It is also possible to override the default sample date.
Figure 45: Setting reach conditions
Once you have activated R&F, a number of additional units will be available in the output:
R&F: This gives Reach in % for some predefined frequency levels. These default frequency levels can be changed in the ‘Calc Settings’ tab under Setup (see page 137).
Figure 46 - R&F custom template
R&F Custom: This allows you to specify the frequency levels you wish to show reach for, and also select whether you would like to look at Reach in %, in 000s, or both. Upon selecting this unit, an R&F custom template window will open (see Figure 46):
In the Frequency Levels window, type in the frequencies you wish to display. These can be cumulative (e.g. 3+ will give the reach for those watching 3 or more items), exact (e.g 3 will give the reach for those watching exactly 3 items) or ranges (e.g. 1-3 will give the reach for those watching between 1 and 3 items). The ‘Frequency unit’ dropdown allows you to select between Reach in %, in 000s, or include both. Clicking on [Save} allows you to name the template, and this can be retrieved in future by using the ‘Pick…’ dropdown menu.
Ave Freq / OTS: Depending on your installation, you will also have a unit called Ave. Freq (average frequency) and/or or a unit called OTS (Opportunity to See). Please see page 153 for a description of these units.
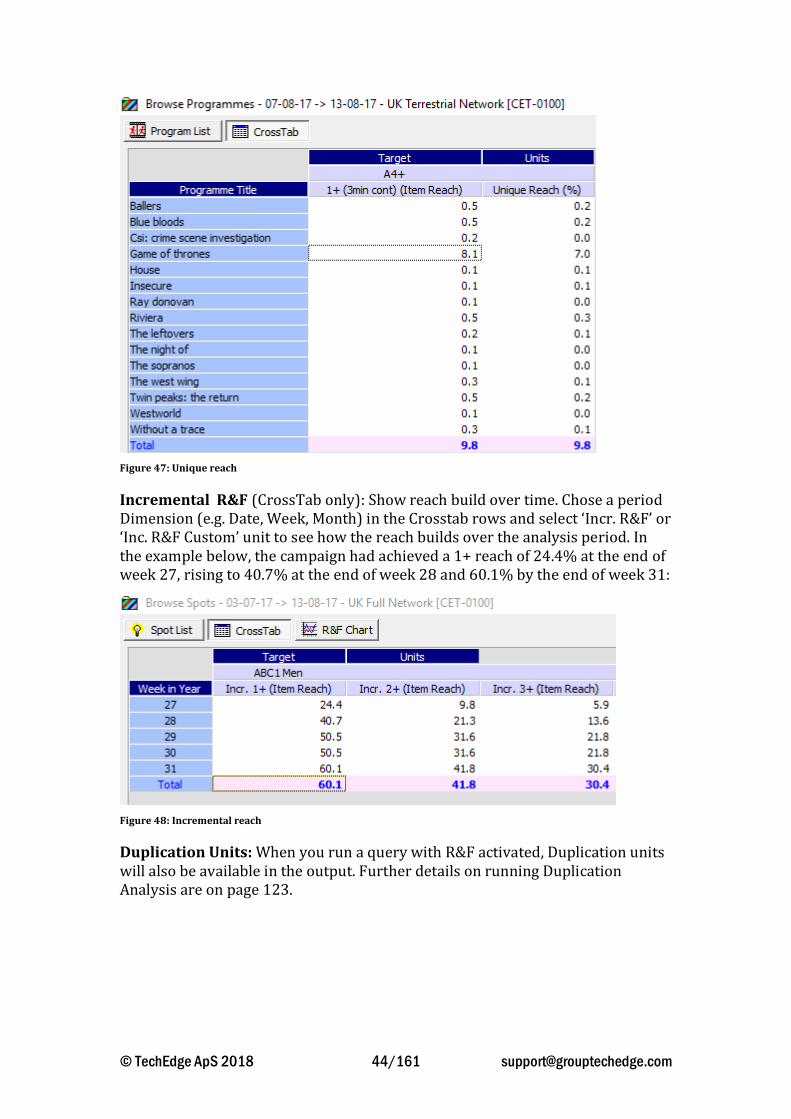
Unique Reach: This shows the amount of unique reach each item has added to the overall reach. For example, in Figure 47 the total 1+ reach across all programmes was 9.8% (e.g., 9.8% of the target audience had watched at least 3 consecutive minutes of one or more programmes). ‘Game of Thrones’ has a total 1+ reach of 8.1% (e.g., 8.1% of the target audience had watched at least 3 consecutive minutes of ‘Game of Thrones’) and a Unique Reach of 7% (the people that had seen ‘Game of Thrones’ but none of the other programmes). If ‘Game of Thrones’ was removed from the analysis the total reach would therefore drop to 2.8%.
Incremental R&F (CrossTab only): Show reach build over time. Chose a period Dimension (e.g. Date, Week, Month) in the Crosstab rows and select ‘Incr. R&F’ or ‘Inc. R&F Custom’ unit to see how the reach builds over the analysis period. In the example below, the campaign had achieved a 1+ reach of 24.4% at the end of week 27, rising to 40.7% at the end of week 28 and 60.1% by the end of week 31:
Figure 48: Incremental reach
Duplication Units: When you run a query with R&F activated, Duplication units will also be available in the output. Further details on running Duplication Analysis are on page 123.
Ticking on ‘Share’ makes a Share of viewing unit available in the output. Clicking the red triangle to the right of the Share button brings up a menu of further options:
Figure 49: Share menu
Share of Channel Group: By default the Share figure will be based on Total TV viewing, also referred to as People Using Television (PUT). By selecting ‘Share of Channel Group’, it is possible to change the Share base to a selection of channels. When this option is selected the Channel Picker window opens, and from here you select which channels are to be selected for the Share base. For example, this can be used to track one channel’s contribution to a portfolio of channels.
ADH Target Share/Profile Base: Selecting this option brings up a list of targets from which you can select a base audience to profile your selected target(s) against. For example, if the targets selected for the query are 16-34, 35-54 and 55+ and the base target is set as Adults, you would see what proportion of Adults viewing came from the three age bands. Activating this feature adds an additional unit to the output called ‘Profile’ or ‘ADH (avg)’ depending on your installation.
Include TS Share: Calculates the time-shift viewing as a percentage of the total consolidated viewing. E.g. if total consolidated viewing in 3+ = 110 and Live viewing in 3+ = 98, then TS Share for the target 3+ live = 98*100/110= 89.1. This variable is only implemented in Dutch and US data.
Include TS Daily Share: Calculates the different types viewing activity as a percentage of the total time-shifted viewing. E.g.: How much does Vosdal contribute to the total time-shifted viewing. This variable is only implemented in Dutch and US data.
Include Average Age: Selecting this feature adds two additional units to the output – Average Age and Median Age. This is adjusted for the minutes viewed (viewing consumption) and the weight of the panel members, and is computed for the specific target audience(s) selected in your query. For example, including Average Age with a target of 16-34s would give you the average age of viewers who were aged between 16 and 34. The median age is calculated as the age where the accumulated viewing reaches the 50% mark.
Include Peak Time: This feature can be used in Time and Programme modules and enables you to quickly find out the highest rating minute within a programme/daypart or series of programmes.
This will add three new units to your output:
Peak Min. 000: for each programme/daypart the max audience in 000s during the programme/daypart
Peak Min. TVR: for each programme/daypart the max TVR during the programme/daypart
Peak Min. Time: for each programme/daypart the time of the maximum rating during the programme/timeband
Please note that this feature is not available when running US data.
For example: What is the highest rating the programme ‘EastEnders’ has achieved this year?
Run a Programme query on ‘EastEnders’ year to date with the ‘Include Peak Time’ option activated.
In the Programme List view, add the ‘Peak Min 000/TVR/Time’ unit(s) to the output.
Sort the ‘Peak Min. 000’ or ‘Peak Min. TVR’ column descending to see the highest rating achieved by EastEnders in the year to date, and when this peak minute occurred:
Figure 50: Peak Time in list view
Alternatively the same result can be obtained from the CrossTab screen. However,
when using these units in CrossTab please remember to split the data by Date to see
the absolute highest-rating minute, otherwise you will see the minute of the day
with the highest average rating across all transmissions:
Include only active channels (Time module only): Please note that this feature is not available by default and must be enabled for an AdvantEdge installation before it can be used. If you do not have this feature available and would like it to be added to your AdvantEdge install please email [email protected]
The purpose of this feature is to exclude dates form the period of channel, based on the active period as displayed in the channel picker.
Figure 52: Active channel period
This active period is defined by the presence of viewing on the channel. The “From” data is the first date where we have viewing on the channel in AdvantEdge, and the “To” date is the last date where we have viewing.
When the ‘Include only active channels’ option is activated, then dates outside of the selected channel’s Active period are not included in average calculations in the Time module. This is equivalent to deleting the records for the inactive dates from the list view.
Daily Reach (also referred to as Cover) calculates the total number of viewers who came into contact with an individual event. This could be a day, time segment, or programme. This differs to R&F, which is used to calculate the number of unique viewers across a SERIES of events and the number of times they have watched these events.
As each individual member can only be included once in the calculation, the actual weight of the panel members is used for the specific day which they were watching.
Ticking on the red arrow to the right of the button allows you to change the viewing criteria (Reach Setup) or choose to include some additional units in your analysis:
Figure 53: Daily Reach/Cover menu
By default, activating Daily Reach adds three additional units to an output: Daily Reach (000s), Daily Reach (%), and Av. Mins (viewers). This latter unit is also referred to as ATS (Average Time Spent), and is the average number of minutes watched by viewers (people who fulfilled the Reach criteria) in the target group. This variable has several different calculation-methods depending on country - please contact Support for more information.
This should not be confused with Av. Mins (all), also referred to as ATV (Average Time Viewed), which is the average minutes watched by ALL people in the target group (including non-viewers).
In addition, the following units can be activated via the Daily Reach menu:
Include Persistence: Selecting this option makes three additional units available in the output: Pers (TVR), Pers (000s) and Pers (%). These show how many (or what proportion) of viewers went from one item to the next. For example, selecting Pers% unit in a programme list will show you what percentage of viewers who saw one programme went on to watch the following programme in the list. Persistence is always between adjacent items in the list view, so by running a query on one programme title it is possible to look at persistence between multiple transmissions of the same programme. Once persistence has been activated, the ‘Setup Main…’ and ‘Setup Following…’ options in the Daily Reach menu can be used to define the reach criteria used.
Include Inheritance: Selecting this option makes three additional units available in the output: Inher (TVR), Inher (000s) and Inher (%). These show
how many (or what proportion) of viewers to an item had also watched the previous item. Inheritance is always between adjacent items in the list view, so by running a query on one programme title it is possible to look at inheritance between multiple transmissions of the same programme. Once inheritance has been activated, the ‘Setup Main…’ and ‘Setup Previous…’ options in the Daily Reach menu can be used to define the reach criteria used for viewing to the main item and the preceding item.
Include Avg. Session Length: This option is available in both Time and Programme modules. Selecting this option adds two extra units to your output: Avg. Session Length and Avg. Number of Sessions. Session length is defined as a single continuous viewing session on a single channel. In other words, it is how long the viewer stays tuned to a channel before switching off/over. Each viewing session has to meet the daily reach/cover criteria to be included. E.g. if this is set to 15-min continuous reach and a viewer watched three sessions in a day of 5min, 30min and 60min, then the first session would be discounted as it does not meet the reach criteria. The Average Number of Sessions would be 2 and the Average Session Length would be 45mins. Average Session Length should not be confused with ATS (Average Time Spent). ATS is the average number of minutes viewed by viewers (people who actually watched the channel/ programme) in the target group, but the viewing does not have to be continuous (this variable has several different calculation-methods depending on country- please contact Support for more information). Average Session Length is the average number of continuous minutes viewed by viewers (people who actually watched the channel/programme) in the target group per viewing session.
1.9 Save Template
You can save a report template prior to running the report by clicking on the [Save] button on the query setup screen:
Each analysis has a minimum of two outputs: crosstab and list view. List view gives a detailed list of all items – for example, in a Programme analysis the list view will display ratings for each individual transmission. The crosstab works off the available data in the list view to produce a summary table, just like a pivot table in Microsoft Excel.
2.1 Crosstab View
After running a query, you will be presented with the crosstab view. Here you create a summary of the data. In the example below, I have run all programmes on a channel for a month in the Programme module. I have then set the crosstab to show me the average ratings by programme title and day of week:
Figure 55: Crosstab view
The [Define table] button at the bottom left allows you to split and sort the data on columns and rows, and select the units to display:
All available “dimensions” or split variables are displayed in a list on the left hand side of the Define Table window. Select dimensions by dragging and dropping them into either the Rows or Columns panes to the right. Units are selected from the unit lists on the right side – use the tick boxes to toggle units on/off. The following selection would give the output seen in Figure 55:
Figure 57 - Setting up the crosstab
Ordering units and attributes in the Crosstab
By select a unit in the Units pane and dragging it to another position in the list, you can change the order of the units in the output. Likewise you can drag and drop dimensions in the Rows/Columns panes to reorder the data.
Crosstab Options
Clicking on the [Options] button on the Define Table window opens the Crosstab Options window:
Use the Sub Total section to toggle sub totals on/off for columns/rows, and decide where these should be displayed.
When using subtotals, by default AdvantEdge displays a subtotal for each unique combination of variables in the split:
Figure 59: Sub totals in crosstab
It is possible to reduce the number of totals by activating “Hide Single Totals” in the Crosstab Options menu. The crosstab will now only display totals when the split results in more than one record:
The Layout section allows you to decide what should be displayed in empty cells, and gives you the option to populate all columns and rows in the table. This makes the table ‘row rich’ and can be very useful when carrying out further analysis in programmes such as Excel. The example below shows the same output, but ‘Populate All Columns/Rows’ has been switched on for the second table:
The final section of the Crosstab Options menu allows you to save the selection as the default for the module, or save the sort order as the default.
Right-button menu in Crosstab
Right clicking on any cell in the crosstab gives you the following options:
Detail - Displays the detailed information behind the cell in a list view. For example, if the cell is displaying the average rating for a programme title across a number of transmissions, the Detail option will list each individual transmission. See page 55.
Mark - Marks the specific data behind the cell. Items marked using the crosstab will also be marked in the list view. Marking can be used to create custom groups. In the example below I wish to report Coronation Street and Emmerdale as one item in the crosstab. I select two cells and right-click, then select ‘Mark’. I can now remove Programme Title from the crosstab rows, and see the average ratings for the marked items (Coronation Street and Emmerdale) and all unmarked items.
Unmark - Unmark specific data Sort column - Sort data in the column ascending. Sort column descend - Sort data in the column ascending. Revert to default Crosstab… Clear the selected layout and revert to the default. Freeze row titles – for tables that extend beyond one screen, this option freezes row titles so they are always visible when scrolling down. Copy table - Copy the entire data table to the clipboard. Copy Cell Item - Copy a single cell to the clipboard. Select All – Select all cells. Delete - Deletes selected data. Delete unselected - Deletes all unselected data Create dynamic target group - creates dynamic target group out of the selected data. See chapter 10 page 114.
Crosstab – Detail View
Double-clicking on a cell in the crosstab view in Programme or Spots modules will bring up a list of all individuals items that make up that cell. For example, if the cell showed the average audience for Coronation Street in a week, double-clicking on the cell would bring up a list of all Coronation Street transmissions from that week. The Detail View can be sorted by clicking on column headings.
Crosstab Filter
The Filter option has three modes: List Filter (see page 58), Crosstab Content filter and Crosstab Filter:
The ‘CrossTab Content’ filter applies filters to the contents of the crosstab cells. In the example below, a Crosstab Content filter has been applied on top five averages 000s. The items in the crosstab are now based on top five transmissions (based on average 000s) by Programme Title (e.g. 194.2 in the first row is the average 000s across the five highest-rating transmission of ‘Anglia Weather’):
Figure 64: Crosstab Content filter
The Crosstab filter applies filters directly on the result of the crosstab. It regards the records in the crosstab table as simple records. For example, a Crosstab filter on the top 10 average ratings will reduce the records in the crosstab to show only the 10 records with the highest average ratings:
The list view can be customised by adding or removing information from columns, and selecting from available units. Press the [Columns] button and select parameters by dragging and dropping Attributes from the top left pane into the top right pane, or reverse the process to remove columns. Choose the units to be displayed from those available by dragging and dropping from the bottom left pane to the ‘Units’ section in the right-hand pane. The settings can be saved as the default for the analysis module using the “Default” check box at the bottom of the window.
Figure 66: Customising list view output
You can sort information in the list view by clicking on column headings. Hold down the Shift key to sort on multiple parameters.
Right-button menu in List View
Right clicking on an item or selection of items in the list view gives you the following options:
Mark/Toggle - Mark up programmes by using this option, or by highlighting items in the list view and pressing the spacebar. You can edit the title assigned to the marked items by pressing [Edit title…] button in the top right hand corner. The crosstab view will now split the results by marked and unmarked segments (see section on using Split View on page 58).
Copy item - Copy the highlighted item(s) to the clipboard. Column headings will also be included.
Copy all - Copy all items from the list view to the clipboard. Column headings will also be included.
Delete - Delete the highlighted item(s). Deleting items from the list view also removes them from the crosstab view, and all data in the crosstab view will update to reflect the deletions. This can be useful in many situations. For example, when looking at a programme transmission list you may decide to delete some items that were repeats showings, and the figures in the crosstab will then be based on the ratings for the remaining first-run transmissions. ‘Deleted lines’ text will appear in blue at the bottom of the screen to show that items have been deleted.
Delete unselected - Delete all items apart from those highlighted.
Save as schedule - Save the selected items as a user-defined schedule that can be recalled for use in other queries. This option is not available in the Time module. See the Programme and Spots chapters for more information.
Create dynamic target group - Creates a dynamic target group based on the selected data (see Dynamic Targets on page 117).
Look up min. by min - Creates a minute-by-minute output for the selected programme using the Time module. This option is only available in the Programme module.
Sorting list contents
Clicking on a column header will sort the entire table according to the values in that column. Multiple columns can be included in the sorting by clicking their respective headers while holding down the [Shift] key. Clicking a column again will toggle the sorting order for that particular column between ascending and descending. A column can be excluded from the sorting by clicking its header while holding down the Ctrl key. The sort order can be reset to its default by clicking the “Reset sort order”-button located above the table.
List Filter
The List filter allows you to filter on multiple units simultaneously – for example, “show the top 20 highest rating programmes among 16-34s with an Index over 150”.
The [Filter] option now has three modes: List Filter (e.g. Program List or Spot List depending on module), Crosstab Content Filter and Crosstab Filter. ‘List Filter’ works with programme/spot list views. The filter is applied to all items in the programme or spot list. Please note that after applying ‘List filter’, the figures in the Crosstab view are based on the filtered items. Activate the filter by clicking on the [Filter] button and select ‘List Filter’:
It is possible to filter on all the units selected in the list view. Select the unit by clicking on the blue variable name. The filter defaults to show ‘Top’ items: click on ‘Top’ to change this:
Top: Display the top X ranked items
Bottom: Display the bottom X ranked items
Greater than: Display items with a value greater than X
Less than: Display items with a value less than Y
Between: Display items with a value between X and Y
The List filter also gives the option to filter by all the split variables in the list view. Select the option by clicking on the blue link to the right of ‘By’ (the default values is ‘none’). For example, this can be used to display top 10 programmes by channel when multiple channels have been selected for the run:
The ‘Unique’ dropdown can be used to filter the data so that only one program per unique split-variable is shown. For example, in the screenshot above there are four instances of ‘EastEnders’ on BBC1. By selecting ‘Main Title’ in the Unique dropdown, only the highest-ranked occurrence will be displayed:
Where multiple targets have been included in the run, the ‘Target’ dropdown allows you to select a target for the filter to be based on. By choosing ‘All Targets’, AdvantEdge will display the result for each target in the same screen.
It is possible to combine multiple filters using the [Advance Filter] button, and then click [Add Filter] to add additional filter(s). Use the blue arrows to the right of each filter line to change the order the filters are applied, and use the ‘And’/’Or’ radio buttons in the Criteria section to decide whether results should match all filters (And) or one or more filters (Or). In the example below it has been set to show the Top 10 items by channel for all items that achieved an Index greater than 50:
Figure 70: Advanced filter
2.3 Split view
By entering the List View and pressing the [Split view] button in the top right hand corner you can see both List View and Crosstab outputs simultaneously. This can be particularly useful when using features such as Mark or Delete in the List View (see page 57) as it allows you to see the changes reflected in the crosstab information in real-time.
The [Universe] button in the bottom left corner of the Crosstab or List View screens opens a new window displaying the universe and sample size for all targets included in the report.
Universe: The universe selected for the report (by default this will be ‘Nat’ for National).
Target: The target name.
Period: The period defined in the report. By default the sample/universe will be calculated as ‘Period average’ over the whole period selected for the report (called “All”). It is possible to split the information by date, week, month or year using the drop down menu at the bottom left of the screen.
Population: The target as a percent of the total population, filtered by the universe chosen for the report. In the example above, 15+ accounts for 82.4% of the total universe in Ireland.
National Pen: The target filtered by the general universe, as a percent of the target with no filter. In the example above this shows us that Adults 15+ in Sky homes account for 48% of the total Adults 15+ universe: (1,641,424/3,422,001) * 100 = 48).
UniSize: The size of the universe for each target, filtered by the general universe chosen for the report
Sample: The number of panel members in the target, filtered by the general universe chosen for the report
Guests: The number of guest viewers included in the target, filtered by the general universe chosen for the report
2.5 R&F chart
This output is only available in the Spot module when ‘R&F’ is ticked in the Analyse options. The chart displays the reach and frequency build-up during a campaign.
Figure 73: R&F Chart
The dropdown menu at the top-left of the R&F chart window allows you to toggle between actual spot build-up or an average build (smoothing the line). The [Frequency] button allows you to select the frequency levels to be displayed on the chart. If multiple targets have been selected for the query, the Target dropdown allows you to change the target on the chart.
2.6 Graphs
By double clicking on data in the List View or in the detail view from the crosstab a chart view is created. The chart view offers 5 different displays:
Figure 74: Graph views Minute-by-minute view a d Distribution by duration
Figure 75 - Distribution by accumulated duration Distribution by sample
All graphs can be copied to the clipboard or saved to an Excel.
2.7 Exporting Data
In both List View and Crosstab View, pressing the [Export] button at the bottom of the screen will open the Export menu. Here you can chose whether or not to include header information (date, time, sample and universe size), and whether to include the Crosstab View, the List View, or both. When running a query with multiple targets, ticking on the ‘One Target per Sheet’ option will create an Excel workbook with multiple sheets, with each target appearing on a separate sheet (please note this feature cannot be used with Text or CSV file formats).
Data can be exported in one of four file formats using the drop-down menu in the top right of the dialogue box: the most recent Excel format (.xlsx), the 2003 Excel format (.xls), Commas Separated Values (.csv) file or text format (.txt).
The title of the export file can be edited in the textbox. By default it is set to modulename_yyyymmdd_hhmmss, e.g. Spots_20150911_135507.xlsx. If you would prefer not to have a unique export filename this option can be turned off by clicking on the “Export settings…” link in the left-hand-side of the dialogue box. The Text Output setup menu will open, and from here you can choose to untick the “Unique filename” box. If this should be the default setting for all sessions for the same user the “Save as User Default” in the setup menu should also be ticked.
The file save path will be the default path set in the Export Directories tab of the [Setup] menu – see page 150 for details of changing this. Click the [Browse] button if you wish to export to a different directory. The sub-menu will show the last x number of directories used (configurable in the Export Directories setup) together with a ‘<New>’ option to select a new path.
Provided the ‘Launch Editor’ option is ticked, the data will open in the default editor for that file type (usually Excel if ‘Excel Format’ or CSV are selected or Notepad if ‘Text Format’ is selected) upon pressing the ‘Save’ button. If this option is deselected, pressing ‘Save’ will save the data in the selected format.
2.8 Saving Query Templates
Press the [Save] button on any output view to save a copy of the query template. This will save the query setup used to generate the report, and also save any changes made to the List or Crosstab view.
After pressing the [Save] button you can enter a title for the report. Reports will automatically be saved under your user name, and in a group named after the analysis module the report was created in (e.g. Programmes, Time, Spots etc.). It is possible to choose other options using the drop-down menus, or type a new User or Group name into the box.
Pressing the [Export] button on the Save screen allows you to select the export parameters for the report (see Exporting Data above) and set a save location for the report. The report template can then be reloaded from the Report Manager (see page 68).
The Report Manager can be accessed by clicking on the [Report] button at the bottom of the AdvantEdge window.
Figure 78: Report Manager
Any saved report templates will be listed by user and grouped in folders (by default the folder names are taken from the Analysis module). Double-click on a user and folder to see the report templates saved within it. In most installations, each user has access to reports saved by other users within the same installation.
Filter by User
It is possible to filter the report user groups to only show a subset of users. Click on the [Filter] button in the bottom right corner and put a tick next to the user groups you wish to see, and then click in ‘Enable Filter’ before pressing [OK] (see Figure 8). The list will then only show the report templates saved by the selected user(s). Please note that you can toggle between filtered/unfiltered view by pressing [Filter] and ticking/de-ticking ‘Enable Filter’.
It is possible to search reports by title by typing into the ‘Filter’ text box. This will filter the displayed reports to show only those report titles/folder titles that contain the inputted text. By default this will search across reports created in any module. This can be restricted to searching for reports created in specific modules using the dropdown list.
Double-clicking a report title will rerun the report – alternatively, click the [Run] button under the report list. Clicking the [Edit] button will open the query setup screen, allowing you to change parameters before running the report. Clicking the [Excel] button will run the report and automatically open the output in Excel.
Right-clicking on a report title gives the following options:
Run Other Parameters – This option allows you to change the Period, Targets and/or Universe parameters for the report. For example, I want to run a report called ‘Top 20’ for June, July and August 2012 against Adults. The original report was saved with Individuals as the target and July 2012 entered as a period. If I right-click on the report and select ‘Run Other Paramers’, I can enter my new period and target:
Figure 82: Run other parameters
Run periods can be entered using mnemonic codes (see page 11) or by using the period picker. If multiple periods are entered, the ‘Separate Report by Group’ option will generate a separate report for each period entered.
After changing parameters it is possible to either run the report without saving changed using the [Run] button, or save the changes to the report template using the [Save…] button (please note this will overwrite your existing report).
Excel – This will run the report and export the output to Excel.
Export Settings – This allows you to change the export parameters and select a save location and a file format.
Click the [Browse] button to select an export directory. The sub-menu will show the last x number of directories used (configurable in the Export Directories setup) together with a ‘Browse…’ option to select a new path. The dropdown menu can be used to select the desired file format (.xlsx, .xls, .txt or .csv).
The ‘Include Header’ option allows you to toggle header information on or off. The next two options allow you to export either the List view, Crosstab view or both.
If ‘One target pr sheet’ is selected, data for each target included in the report will be exported to separate tabs in an Excel file. Please note that this option can only be used in conjunction with the Excel file format.
By ticking ‘Specific output formats’ you can specify what output formats are used for the report (see Output Formats on Page 143 for more details). These output formats are then saved with the report template and will override user defaults, meaning that any user will see the same output format when running the template (regardless of their own user settings).
Figure 84: Setting specific output formats
Use as default template – This option will use the report as a template each time you open AdvantEdge. For example, the period, targets and channels selected in the report will automatically be entered in AdvantEdge on startup. Once toggled on, right-click and select ‘Do not use as default template’ to reset.
3.2 Batch Runs
It is possible to run multiple reports at the same time (‘batch runs’) by holding down Control on your keyboard and highlighting multiple report titles in the Report Manager. This is particularly useful when reports have been set up using dynamic date range mnemonic codes (for example, -1fw, -1fm) as it is possible to run ‘regular’ reports in this way without changing date periods in the query setup.
It is possible to create batch runs that export the data directly to an Excel file and saves these files on your computer or network storage. First of all right-click each individual report title and select ‘Export settings’ to choose a save location:
Once each report has a save location set, highlight all reports and press the [Excel] button to start the batch run. Each report will be processed in turn, and all export files will be output to the specified location(s).
If all the required reports are saved in the same folder, it is also possible to start a batch run by right-clicking on the folder name and selecting one of the options (Run Group, Run Group Period or Excel Group).
The air browser gives a quick overview of yesterday’s viewing on a selection of channels. The settings can be customised to fit specific needs. Press [Chart…] in the bottom left corner to activate the setup box.
Figure 88: Air Browse setup menu
In the setup menu you can choose which channels to include on the chart, which target(s) to include, and what unit should be displayed (TVR, 000s, Share or Index). Units are changed using the dropdown menu in the top left corner. You can also select to display a specific daypart by deselecting the ‘all day’ tick-box and typing in the daypart.
Add channels by pressing [add channel…] and selecting the channels from the dialogue box. Remove channel(s) by highlighting it and press the “trash can”. The order of the channels can be changed by highlighting a channel and using the up/down arrows.
You can select the information to be displayed for each channel using the tick-boxes to the right of the channel name:
Colour – Change the line colour for the channel by clicking on this box and selecting the new colour.
TVR - If TVR is not selected the channels viewing will not be shown Average - A dotted line will mark the average curve. See section ‘Average curve’ Titles – Will overlay the top programme titles on the chart provided the ‘Show
top titles’ option is selected. Typology - Will show pre-defined typologies chosen under the section setup Breaks - Will mark breaks on the chart provided this information is available in
the programme data.
Setup
The set up box allows you to change:
Target - Select the target group. Index - Set the index target group. Universe - Set universe and/or viewing activity (e.g. live viewing) or viewing
platform. Typology - Select whether the graph should display a particular programme or
type of programme (i.e. News or Sport). Note that the information available here will depend on the dataset being used – UK ‘overnight’ data does not include genre coding.
Share base – by default the share base will be Total TV, but here you can define a group of channels to use as the basis for share calculations.
Colour by channel - In the typology box it is possible to predefine the colour of the typology, by marking the “colour by channel” it will automatically get the same colour as the graph displaying the channel
Titles
Show top - Select the number of top programmes to be displayed. By channel - Select this to give top programmes by channel rather than overall. Show Cursor - When the cursor function is enabled it connects the x- and y-axis
and displays the time and ratings. The cursor will move along the graph that is closest to its position.
Programme titles – works in conjunction with the cursor to show programme titles on each channel at the selected time.
Program filter - Under the program filter you have the option to choose which information you wish to be displayed in the title panel and on the viewing graph. Depending on the underlying data, you can choose between programme, break, promo, sponsorship, off air, other information to be displayed.
Average curve
This adds extra lines to the chart showing average ratings for the channel(s) over a defined period. There are four options:
Avg: most recent - enter the number of days. The function is connected to Days and weekday.
Period – Select a period in the pop-up calendar Days - Is connected to ‘Avg: Most recent’ Weekday - This box will always show the same weekday as the latest day of data.
This way the graph will always use the same day of week in creating averages None - If activated no average curve will appear
User Default
After adjusting the settings select the ‘User default’ button at the bottom of the Air Browse setup window to save them. In future AdvantEdge will start with your using settings applied.
Black Dialogue Box (top left corner)
This box displays top-line data for Total TV and each selected channel. Press setup to customize it or Grid to go directly to the Programme Grid which will display the set up chosen for the air browser.
Figure 89: Air Browse dialogue box
By clicking on [Setup] you can change the following options:
Total TV report: Select the unit(s) to be displayed for Total TV from Av. Mins (all), TVR or Daily Reach.
Channel/Group: The data can be viewed as individual channels (default) or grouped together in station groups.
Value by channel: select the unit to be displayed in the dialogue box for individual channels.
Program title information: Program title information refers to the ‘top programme’ boxes that are overlaid on the chart. Here you can change the unit(s) displayed in these boxes.
Time: By default the summary information in the dialogue box will match the daypart selected for the chart. You can change this by deselecting ‘Same as chart’ and entering a daypart.
User Default: After adjusting the settings to fit your specific needs press user default to save them.
The dialogue box size can be adjusted by dragging horizontally and vertically on the sides, and the box can be moved by grabbing it with the cursor and moving it with the mouse.
Note that by right clicking anywhere on the Air Browser window you will get the following options:
Show key figures - will show black dialogue box. Show program figures - will display a box with programme title information. Colours - allows you to change background, fonts etc. Colours (detailed) & layout - allows you to edit the colours and the layout for the
Air Browser, view data values, and set export and print settings. Copy chart - copies the chart to the clipboard. Save chart to file - saves the chart as a file. Print chart. Zoom full page - expand the air browser to fit screen.
By pressing on the country flag at the bottom of the screen you can choose different a reporting area and switch between countries in multi-country installations. The calendar box next to the flag can be used to pick a different date to display data for, while the +/- buttons will move the date forward/back by one day.
Press the [Brands…] button to open up the Brand Picker menu:
Figure 90: Pick Brand menu
Use the ‘Create’ tab to find particular brands or advertisers. The list of parameters available varies by country, but typically includes fields such as Advertiser, Agency, and some brand categories. Click on a parameter on the left hand side to search within that parameter.
The [Find] button at the bottom of the brand picker window allows you to search within the selected parameter. For example, to find the advertiser ‘Coca Cola’ I would select ‘Advertiser’ in the list of parameters, click on [Find] and do a search for all advertisers with ‘Coca Cola’ in the name:
The Pick Brand menu also allows you to drill up or down between the various parameters, making it easy to look for competing brands and advertisers. For example, if I right click on the advertiser ‘Panasonic’ and then select ‘Mid category from the menu, I can drill down under ‘Panasonic’ to see all the categories in which this advertiser was active. I could then select one of these categories to run spots data for all advertisers in this category in order to compare Panasonic against its competitors in this category.
Figure 92: Using the spot parameter hierarchy
Filtering by Period and Channels
The [Period] button at the bottom of the Brand Picker window allows you to filter the information displayed to show only those parameters that were active on specified channels in a specified period. Clicking on the [Period] button gives three options:
A pre-defined period based on the period entered for your run. For example, if your run is set up using the ‘-1fm’ mnemonic code, then this predefined period will also be ‘-1fm’.
Period…, where you can select channel(s) and period and filter the information displayed in the Brand Picker so it based only on spots broadcast on this combination of channels and period.
All Spots, which removes all filters.
5.2 User defined brand groups
After selecting a brand or group of brands using the Brand Picker, you can click on the [Save As] button at the bottom of that window to save your selection for future use. You will be asked to enter a title and select the user group to save it under, and the selection can then be recalled at a later date using the ‘Brand’ tab:
It is possible to create groups of brands by pressing the [Groups] button at the bottom of this screen. This will give you the option to create new group, edit an existing group or delete a group. If you choose ‘Create Group’, you can select entries from your user-defined brand list to add to the new group. If more than one user defined brand is chosen and there are overlapping brands in the categories, it is possible to make sure these brands are not calculated twice by ticking on the [Single Brand] option.
5.3 Schedules
This feature allows you to create your own schedules from selected spots in the spot list/crosstab view. These can be used for “what if” scenarios, and multiple schedules can be combined.
Create schedules by marking up spots in the Spot List or crosstab, right click and select ‘Save as Schedule’:
Schedules can be recalled from the ‘Schedule’ tab in the Brand Picker. By highlighting multiple schedules and right-clicking or clicking the [Merge] button at the button of the window you can merge two or more schedules together:
Figure 95: Merging spots schedules
You can then save the merged schedules as a new item in the list.
Schedules can also be created manually or imported from Excel. By pressing [Create] in the Schedules list menu (see Figure 95) the column format that the system needs will be displayed.
5.4 Spot “Type…”
The [Spot Type] button allows you to select or de-select which spot classes you wish to include in your analysis:
Figure 96: Selecting spot type
Not all datasets are classified with different spot types, and this will vary by country.
Adds Reach & Frequency to the analysis. When R&F is “ticked” clicking on the red arrow you can select to include unique reach by spots and change the R&F default. When R&F is calculated a R&F chart is also displayed in the output (see page 64).
Titles
Clicking on ‘Titles’ makes the following additional attributes available in the output: Programme Before, Programme After, Genre Before and Genre After.
AI
Appreciation. This option is only applicable to countries that have appreciation in the data set. AI values for Spots are taken from the surrounding programme.
Collapse
This option collapses top/tail (twin/tandem) spots for R&F calculation. When collapse is activated R&F will only be calculated on the first spot if 2 spots for the same advertiser and product appear in the same break. The duration of the spot will be the combined duration, and a “split” variable can be displayed in the spot list view. Collapsing spots results in a lower frequency tail.
Crosstab Only
Running large Spots queries can be particularly memory-intensive due to the high volume of data. The Spots module therefore allows you to run off summary figures in ‘Crosstab Only’ mode, without creating the detailed spot list. Once you tick the ‘Crosstab Only’ option, a hyperlink will appear. Clicking this takes you to the Crosstab screen:
From here you can set up the crosstab in the same way as you would post-analysis, creating a summary of the data. When you run the query, only this data will be output – there will be no List View, and you cannot make changes to the crosstab view. However, queries will run significantly faster using ‘Crosstab Only’.
Spot Dropout
Selecting this option makes a ‘Spot Dropout’ unit available in the output, giving a measure of viewer retention during advertising breaks. By default this is the TVR for each individual spot indexed against the programme rating in the minute before the break1. An index of 100 would mean that the spot had the same rating as the programme immediately before the break, whilst an index of 75 would mean that the rating for the spots was 25% less than the rating for the programmes.
The settings for calculating Spot Dropout can be changed under ‘Calc Settings’ in the main setup menu (see Figure 99). Here you can specify the number of minutes before/after the first/last spot in the break that will be included in the index base.
1 In cases where both spot rating and benchmark rating are zero, no dropout figure will be shown and the data point will not be included in any averages.
Press the [Prog…] button to open up the Programme Picker menu:
Figure 100: Pick Programme menu
Use the ‘Create’ tab to find particular programmes. The list of parameters available varies by country, but typically includes fields such as Programme Title and genre classifications. Click on a parameter on the left hand side to search within that parameter.
The [Find] button at the bottom of the brand picker window allows you to search within the selected parameter. For example, to find the programme ‘Spooks’ I would select ‘Main Title’ in the list of parameters, click on [Find] and do a search for all titles that contain ‘Spooks’.
This would display all programme that contain the word ‘Spooks’, from which I can select the exact title(s) I am interested in.
Alternatively I could use the [Title Filter] button to search for Spooks. Instead of searching the title list and selecting specific title(s), this option allows you to do a more general search on a term. For example, I could choose to include all programmes that contain the word ‘Spooks’ in my output, or only those that start with ‘Spooks’.
Figure 102: Title Filter
Filtering by Period and Channels
The [Period] button at the bottom of the Programme Picker window allows you to filter the information displayed to show only those parameters that were active on specified channels in a specified period. Clicking on the [Period] button gives three options:
A pre-defined period based on the period entered for your run. For example, if your run is set up using the ‘-1fm’ mnemonic code, then this predefined period will also be ‘-1fm’.
Period…, where you can select channel(s) and period and filter the information displayed in the Programme Picker so it based only on programmes broadcast on this combination of channels and period.
All Progs, which removes all filters.
6.2 User defined programme groups
After selecting a programme or group of programmes using the Programme Picker, you can click on the [Save As] button at the bottom of that window to save your selection for future use. You will be asked to enter a title and select the user group to save it under, and the selection can then be recalled at a later date using the ‘Programmes’ tab:
It is possible to create groups of programmes by pressing the [Groups] button at the bottom of this screen. This will give you the option to create a new group, edit an existing group or delete a group. If you choose ‘Create Group’, you can select entries from your user-defined programme list to add to the new group.
6.3 Schedules
This feature allows you to create your own programme schedules from selected transmissions in the programme list/crosstab view. These can be used for “what if” scenarios, and multiple schedules can be merged into one schedule.
Create schedules by marking up transmissions in the Programme List or CrossTab views, right click and select ‘Save as Schedule’. Schedules can also be created manually or imported from Excel.
Schedules can be recalled from the ‘Schedule’ tab in the Programme Picker. By highlighting multiple schedules and right-clicking or clicking the [Merge] button at the button at the bottom of the window you can merge two or more schedules together:
Figure 105: Programme schedules
You can then save the merged schedules as a new item in the list.
6.4 Programme “Type…”
The [Type…] button allows you to select or de-select which classes of airtime you wish to include in your analysis:
Figure 106: Selecting programme type
The airtime types contained in programme logs varies by country – not all types will be valid in all countries.
The ‘Breaks (all)’ type will return all commercial breaks (provided this information is included in the Programme logs for the market). ‘Breaks (selected
programmes)’ works in conjunction with any programme filters you have set, and just returns the breaks positioned in and around the selected programmes.
The Type button also allows you to change the calculation methodology for programmes that contain commercial breaks. You can choose whether to report the net ratings (e.g. based only on programme minutes, with breaks taken out) or gross ratings (e.g. based on programme start and end time and including centre breaks), or report on individual programme parts. Again, the availability of this varies from country to country and is dependent on breaks being marked in programme logs.
Using the type button, it is also possible to filter out programmes with less than a set number of transmissions. After ticking the ‘Minimum transmission’ box you will be asked to enter a number for minimum transmissions:
Figure 107: Minimum number of transmissions
By default the minimum number of transmissions will be calculated across all selected channels. By ticking on the ‘Unique by channel’ option this can be changed so that the minimum number of transmissions is applied on a per-channel basis.
6.5 Analysis settings (Programme)
R&F Adds Reach and Frequency units to the analysis. The R&F criteria can be changed by pressing the red arrow which appears when R%F has been activated (see page 42). Activating R&F also makes duplication units available for selection in the Programme crosstab (see page 123).
Share
When this option is ticked, a Share unit will be available in the output – by default this will be based on Total TV viewing (also referred to as PUT – People Using Television).
Click on the red triangle to the right of ‘Share’ to activate other share-based measures:
By default the Share figure will be based on People Using Television (PUT), also referred to as ‘Total TV’ (TTV). By selecting ‘Share of Channel Group’, it is possible to change the Share base to a selection of channels. When this option is selected the Channel Picker window opens, and from here you select which channels are to be selected for the Share base – for example, to calculate a programme’s share based only on commercial channels.
Include Benchmark:
The ‘Include Benchmark’ option enables you to quickly compare a programme’s performance against the average performance for the same channel/timeslot over a user-defined period. Benchmarks can be based on rolling or fixed periods.
When selecting the ‘Rolling Period’ option you will be prompted to enter the number of weeks you would like the benchmark to be calculated across. This function uses weekday matching, so for example by inputting 12 weeks for the benchmark calculation and running data for a Monday, the benchmark will be calculated over the previous 12 Mondays.
When using Fixed Period a date range can be entered using the Period Picker or you may type a mnemonic code directly into the text box.
A benchmark 000s and TVR is then calculated for each item in the Programme list, based on the average 000s/TVR for the programme’s timeslot on the channel averaged over the last X weeks. If Share has been included as a unit in the run then a benchmark share will also be calculated.
Up to 5 additional units are then available in the Programme List and/or Crosstab views:
Figure 110: Benchmark units
Benchmark TRP Index: This is the programme rating (TRP/TVR) indexed against the average rating for the timeslot on the same channel averaged over the past X weeks.
Benchmark Share Index: As above, but using Share figures instead of ratings. This unit is only available when Share has been included in the run.
Benchmark TRP: The average rating for the programme’s timeslot averaged over the past X weeks.
Benchmark 000: The average audience (000s) for the programme’s timeslot averaged over the past X weeks.
Benchmark Share: The average Share for the programme’s timeslot averaged over the past X weeks.
Include Contribution to Share:
This calculates a single programme’s contribution to the overall share of a period.
Selecting this option brings up a list of targets from which you can select a base audience to profile your selected target(s) against. For example, if the targets selected for the query are 16-34, 35-54 and 55+ and the base target is set as Adults, you would see what proportion of Adults viewing came from the three age bands. Activating this feature adds an additional unit to the output called ‘Profile’ or ‘ADH (avg)’ depending on your installation.
Note that the Profile/ADH (avg) unit is only available in the CrossTab and Detail View if you have selected a base audience before running the report.
Include Rating by Channel:
Selecting this option automatically opens the channel picker, from where you can select a set of competitor channels. Once you have done this, you will be able to see the ratings for the selected channels against the programme slots from the channel(s) in your query. In the example below, I have run a programme analysis for the Sky One channel, but selected two other channels (E4 and ITV2) under ‘Include Rating by Channel’:
Figure 111: Include Ratings by Channel
Two new units are available in the Programme List: TVR by Channel and ’000 by Channel. In the example above I have selected ‘000 by channel, so against each programme on Sky1 and I can see what the average audience was on ITV2 and E4 in the same slot.
As above, but the unit available will be Share by Channel. Please note that both options (Rating by Channel and Share by Channel) can be run together if required.
Include Average Age:
Selecting this option will add two additional metrics to your output: Average Age and Median Age.
Include Peak Time:
This feature enables you to quickly find out the highest rating minute within a programme or series of programmes.
Selecting this option will add three new units to your output:
Peak 000: the maximum audience in 000s during the programme
Peak TVR: the maximum TVR during the programme
Peak Time: the time of the maximum rating during the programme
Please note this feature is not available when running US data.
Include Lead In/Lead Out:
This calculates how much a programme’s rating and share is higher/lower than the surrounding minutes.
To set up the benchmark parameters, click on [Setup] from the AdvantEdge home screen and then select the ‘Calc Settings’ tab. In the ‘Prog Lead In/Lead Out’ section you can specify how many minutes before and/or after the programme should be used to create the benchmark:
To activate the new metrics in the Programme module, first activate Share in the Analyse options, click on the red triangle to the right of Share and select Rating, Share and/or TRP in the ‘Include Lead In/Lead Out’ section:
Figure 113: Activating lead in/lead out
In the report you can now select the following variables in List or Crosstab view:
'000 after (X min) This is the calculated average ‘000, X minutes after the programme ended
'000 before (X min) This is the calculated average ‘000, X minutes before the programme started
Dropout (before X: , after X: ) This is the calculated dropout index, calculated as: Program rating (000)*100 / average('000 after (X min); '000 before (X min))
Share dropout:
Share after (X min) This is the calculated share, X minutes after the programme ended
Share before (X min) This is the calculated share, X minutes before the programme started
Dropout (Share) (before: X, after: X)
This is the calculated dropout index, calculated as: Program share*100 / average(Share after (X min); Share before (X min)))
TRP dropout:
TRP after (X min) This is the calculated TVR, X minutes after the programme ended
TRP before (X min) This is the calculated TVR, X minutes before the programme started
Dropout (TR) (before: X, after: X)
This is the calculated dropout index, calculated as: Program TRP / average(TRP after (X min); TRP before (X min)))
AI:
This displays appreciation by programme or on average. This option only applies in countries that have appreciation in the data set.
Daily Reach/Cover
Daily Reach (also referred to as Cover) calculates the total number of viewers who came into contact with an individual transmission. This differs to R&F, which is used to calculate the number of unique viewers across a SERIES of transmissions and the average number of transmissions they have watched. As each individual member can only be included once in the calculation, the actual weight of the panel members is usually used for the specific day which they were watching.
Ticking on the red arrow to the right of the button allows you to change the viewing criteria (Reach Setup) or choose to include some additional units in your analysis:
Figure 114: Daily Reach/Cover menu
By default, activating Daily Reach adds three additional units to an output: Daily Reach (000s), Daily Reach (%), and Av. Mins (viewers). This latter unit is also referred to as ATS (Average Time Spent), and is the average number of minutes watched by viewers (people who fulfilled the Reach criteria) in the target group. This variable has several different calculation-methods, depending on country. Please contact Support for more information. This unit should not be confused with Av. Mins (all), also referred to as ATV (Average Time Viewed), which is the average minutes watched by ALL people in the target group (including non-viewers).
In addition, the following units can be activated via the Daily Reach menu:
Include Persistence:
Selecting this option makes three additional units available in the output: Pers (TVR), Pers (000s) and Pers (%). These show how many (or what proportion) of viewers went from one programme to the next. Persistence is always between adjacent items in the list view, so by running a query on one programme title it is possible to look at persistence between multiple transmissions of the same programme (e.g. to track viewer retention across a series). Once persistence has been activated, the ‘Setup Main…’ and ‘Setup Following…’ options in the Daily Reach menu can be used to define the reach criteria used.
Include Inheritance:
Selecting this option makes three additional units available in the output: Inher (TVR), Inher (000s) and Inher (%). These show how many (or what proportion) of viewers to a programme had also watched the previous programme. Inheritance is always between adjacent items in the list view, so by running a query on one programme title it is possible to look at inheritance between multiple transmissions of the same programme. Once inheritance has been activated, the ‘Setup Main…’ and ‘Setup Previous…’ options in the Daily Reach menu can be used to define the reach criteria used for viewing to the main item and the preceding item.
Selecting this option adds two extra units to your output: Avg. Session Length and Avg. Number of Sessions. Session length is defined as a single continuous viewing session on a single channel. In other words, it is how long the viewer stays tuned to a channel before switching off/over. Each viewing session has to meet the daily reach/cover criteria to be included. E.g. if this is set to 15-min continuous reach and a viewer watched three sessions in a day of 5min, 30min and 60min, then the first session would be discounted as it does not meet the reach criteria. The Average Number of Sessions would be 2 and the Average Session Length would be 45mins.
Average Session Length should not be confused with ATS (Average Time Spent). ATS is the average number of minutes viewed by viewers (people who actually watched the channel/ programme) in the target group, but the viewing does not have to be continuous. This variable has several different calculation-methods, depending on country - please contact Support for more information. Average Session Length is the average number of continuous minutes viewed by viewers (people who actually watched the channel/programme) in the target group per viewing session.
Titles by Channel This option allows you to include programme title information for a range of competitor channels, so you can easily see what other shows a programme was scheduled against.
Click on the ‘Titles by Channel’ tick box, and then click on the red triangle to the right of this and select ‘Pick Channels…] from the menu. This will open the channel picker, allowing you to select the channels for which you wish to view programme title information:
Figure 115: Titles by Channel
When you run the query, you can now select ‘Title by Channel…’ attributes in the Programme List view to see which programme was being shown on the selected channels:
The Programme Grid module is most often used to look at one day of viewing across multiple channels, or one channel across multiple days. Although it is possible to run multiple channels over multiple dates, it does become harder to work with the output.
The module produces a grid output with time bands running vertically and channels/days across the columns. Programme titles are then marked in the grid in the relevant slot:
Figure 117: Programme Grid output
This module is particularly useful for analysing and understanding specific events such as a new programme launch, since it makes a variety of analysis types instantly available through the Analysis menu.
The resolution of the Programme Grid can be changed using the dropdown menu in the top-left corner – select between 5, 10, 15, 30 and 60-minute resolutions. The resolution can also be changed by right-clicking on the time axis, and here it is also possible to change the start and end time of the displayed grid.
It is possible to see more information about a single programme in the Programme Grid. Just right-click on the programme and choose ‘Program Information’:
The detail view will display selected information for the chosen program. It is possible to right-click and copy the data into Excel etc. If you click on the ‘Columns’ button, it is possible to choose the information needed in the usual Cross Tab format and to save the selection as default.
When Duplication is selected in the Analysis menu, clicking on a programme in the grid will fix those viewers as a dynamic target. It is then possible to see the percentage of this target that watched any other programme in the grid. In the example below, Channel 4’s Ramsay’s Best Restaurant has been selected, and by hovering over Masterchef: The Professionals on BBC2 we can see that 27% of viewers who watched some of Ramsay’s Best Restaurant also watched some of Masterchef: The Professionals:
Figure 120: Duplication in Programme Grid
Click on ‘…’ next to Duplication to set the reach criteria that must be met to define a viewer.
Duplication can be used across days and channels. To see the duplication of several programs in a group use the cursor to select the programs while pressing Ctrl.
Persistence
Selecting Persistence shows percentage of viewers for each programme who went on to watch the next programme in the schedule. Unlike Duplication it is not necessary to select a base programme since persistence is always between adjacent programmes in the schedule. For example, in Figure 121we can see that 49% of CSI Miami viewers on Five at 2100hrs went on to watch CSI New York at 2200hrs:
Click on ‘…’ next to Persistence to set the reach criteria used to determine viewers.
Inheritance
Inheritance is the percentage of viewers on a given program who had also watched the programme immediately before it. This works on the same principle as Persistence (see above), but where Persistence shows the % of viewers who went on to the next item in the schedule Inheritance shows the % that had seen the previous item.
TVR
This option colour-codes each programme in the grid based on its TVR. Programmes with a higher TVR appear darker red.
Index
Selecting this option opens the Target Picker, from where you can select a base audience. The TVR of the report target is then indexed against the TVR of the base target and the index figure is displayed on each programme in the grid. Colour-coding is also used to highlight the programmes with the highest index.
Adhesion
This displays an audience profile, e.g. what percentage the report target represents of the programme’s total audience. By default the index base is set to Individuals. This can be changed by selecting a different index target using the [Index…] button on the report definition screen before running the report.
Gross Migration
This displays the overall increase/decrease in viewers for each programme in the grid. The calculation used is:
Gross Migration = Sum(migration to the program) - Sum(migration away from the program).
This option should only be run with a Live activity selected.
This feature creates benchmarks based on slot averages for each programme in the grid and colour-codes each programme depending on its index against benchmark. In the example below, we can instantly see that programmes on BBC2 were performing above–average from 1600-2030hrs:
The settings can be edited by pressing “…” next to Traffic Light:
Figure 123: Traffic Light Options
Reference period is the period over which the benchmark ratings are calculated. There are four options for the reference period:
1. Relative period (e.g. last 4 weeks, last 12 week). 2. The same week in the previous year (year-on-year comparison). 3. A fixed period (e.g. a specific month). 4. A relative reference period in the previous year. Selecting this option allows you
to select the number of days/weeks around the report date to use in the reference period.
Traffic Light Interval is calculated by: (Programme TRP / Traffic Light Reference) * 100. E.g: Traffic Light Interval 65 means that the programme rating is 35% lower than the reference period rating, whilst Traffic Light Interval 115 means that the programme rating is 15% higher than the reference period rating.
By default, the Traffic Light Interval is set to show three categories - red (if <80), orange (between 80-120,) and green (if >120). This can be edited in the bottom section of the Traffic Light Options window (see Figure 1230). You can change the number of categories displayed by entering a value in the ‘Number of Lights’ textbox, and select which of the categories should be the middle range using the ‘Index of Neutral’ textbox.
In the bottom-left corner of the Traffic Light Options window is a ‘Save as Default’ button. This will save all selected options as the default for any future Programme Grid runs.
The bottom part of the Analysis menu has options for analysis based on time intervals:
Switching
After activating the Switching radio button, drag the cursor over the part of a schedule you want to look at. This will automatically create a dynamic target based on viewing to this segment, and give a visual representation of the audience flow of these viewers across the day. This option should only be run when a Live activity is selected.
Time Slot Winner
This highlights the highest-rating channel in each interval in the report. Clicking on the link to the right of the text gives the following additional options:
Choose between Minute-by minute (will calculate the time slot winner minute by minute) or Time Block (this will calculate the time slot winner based on the resolution of the Program Grid)
Base Channel makes it possible to select what channel the calculation should be against. Selecting a channel will compare the rating of the channels in the grid against this single competing channel
TVR
This option looks at the highest rating interval in the report, and then colour-codes each interval based on a scale working backwards from this. Higher-rating intervals will appear in darker red highlighting.
Migration
This option shows the flow of viewers entering and leaving a target channel. The target channel can be changed by clicking on the channel name at the top of the report. This option should only be run with a Live activity selected.
Once you activate Migration, a horizontal red line will appear across the Programme Grid. Use the cursor to move the line up/down the schedule, and the Migration box will show the audience flow in that minute. The migration figures will be split by all channels selected in the report, and will also show figures for On/Off (e.g. viewers entering or leaving the channel by switching the television on or off) and an ‘All’ category which shows the total number of viewers entering/leaving the channel.
The Main Menu in the Programme Grid allows you to change the information displayed in the Programme Grid.
Figure 125: Programme Grid Main Menu
Add Column: Prog
This option allows you to add another channel to the report. Select the channel to add using the [Channel] button under Setup. You can also choose which target you want to display for this channel, and select the units you wish to display under ‘Fields’. By ticking on ‘Apply to all channels’ you can apply the selection to all channels in the report, whilst the [Save as Default] button will set the current selection as the default for future runs. Units can be reordered using the up/down arrows in the Fields section.
This enables you to a graphical column to the report, charting audience level for a specified channel. Select the channel to display using the [Channel] button under Setup, and select the unit the chart will display using the radio buttons under ‘Chart’.
Figure 127: Add Graph
Add Column: Numeric
This option will display key figures for each interval in the chart – the resolution will depend on the resolution set in the top-left corner of the Programme Grid (5, 10, 15, 30 or 60-minute). Select the channel using the [Channel] button under
Migration displays the viewing behaviour between channels. Analysis can be performed minute by minute on a single day, or as an average over a period where the time band resolution can be from 1 second to 60 minutes. Please note that in some markets (including the UK) the minimum resolution available in the ratings data is 1 minute. The output displays how many viewers are leaving and entering the primary station. This module should only be run when a Live activity is selected.
Figure 128: Migration module
When selecting aggregate resolutions (e.g. base resolution of the data is 1 minute, and selected report resolution is 15 min) all figures are either the sum or the average of the minutes within that daypart (depending on unit). For example, if the resolution was 15 minutes and the time was 18:00, then:
The displayed “Entering” figure is the sum of the Entering figures for the individual minutes between 18:00-18:14.
The figure for “Leaving” is the sum of the Leaving figures for the individual minutes between 18:00-18:14.
The tables below show Migration calculated with a 5 min resolution and a 1 min resolution. Cells highlighted in yellow are the average of the individual minute values, whilst cells highlighted in green are the sum of the individual minutes:
The primary station can be changed using the dropdown menu in the top left corner. Each station in the query will appear as a separate column, together with ‘TV On/Off’ (the number that were non-viewers before/after) and ‘Any Station’. The latter displays the migration to all channels, including those not selected in the query.
The [Columns…] button allows you to select how the information is displayed. In the example above I have selected to show the minute audience in thousands (‘000 (U/W)) and the total number of switches that occurred across all stations in that minute (Zaps). I have also selected to see the number of people entering the primary channel (ITV1 in this example), the number of people leaving the channel, and the net gain/loss. These columns can be ticked on/off – for example, you may wish to only display the Net figures.
A ‘Retention’ column can also be added to the report. This shows the number of viewers in that timeslot who were also watching in the previous timeslot.
The columns menu also allows you to select the unit to be displayed in the ‘Entering’ and ‘Leaving’ sections of the Migration report (‘000s, TVR, or Sample Size) and toggle colour coding on or off (red = increase, blue = decrease) to visually highlight areas of high gain/loss.
8.2 Migration Summary
The summary section displays the migration average for the selected period. This option should only be run with a Live activity selected.
By selecting “Net summary” in the columns section the net gain/loss is displayed.
In the example above BBC1 is losing 407,300 viewers on average to BBC2. The summary section also displays the average viewing statement – e.g. how long does the average viewer stay tuned before they switch away? In the above example, the average viewing session on ITV1 lasts 27 minutes 6 seconds.
Switching describes the viewing pattern of a specific dynamic target group. The Switching module “locks” the viewers selected and displays where they came from and where they went. The module should only be run with a Live activity selected.
Figure 131: Switching module - Rating view
The output displays a simple minute by minute rating by channel (the resolution can be set from 1 minute to 60 minute), and on the right hand side the programme titles for each channel are shown. Use the cursor to mark up the cell(s) you wish your viewing behaviour to be based on and then press [Switching] in the top left corner.
In the [Switching] section, only the viewers that were marked up are displayed. In the example above, a dynamic target has been created on viewers watching Five at 17:54. We can then see where these viewers came from in the preceding minutes, and where they went.
As viewing data includes guest viewing and dynamic target groups by definition do not, the number of ‘000 viewers can be greater than the universe size of the dynamic target group.
Dynamic target groups are defined by viewing behaviour rather than demographic information - e.g. “all viewers of Coronation Street last week” rather than “Adults ABC1”. It is possible to create a dynamic target groups based on viewing to spots, breaks, programmes, days, weeks, months, years or any combination of these.
It is possible to create dynamic target groups from either the List view or the Crosstab view. In the Crosstab, right-click on a cell to create a dynamic target based on all viewers behind that cell (e.g. in the example below the dynamic target will be based only on people who viewed on Tuesday). In the List view, dynamic targets can be created by double-clicking on a line of data.
Figure 133: Creating a dynamic target in CrossTab
10.2 Heavy – Medium – Light
The ‘Heavy-Medium-Light’ tab allows you to define dynamic target groups based on viewing levels. By default the dynamic target uses a middle day sample.
The first option allows you to select from four preset viewer groups (Heavy viewers, Medium viewers, Light viewers or User defined) using a dropdown menu. The categories are based on percentage of viewing. The input windows beneath the dropdown menu can be used to change the range, and the ‘disc’ icon can be used to save definitions if desired. As changes are made, the sample and universe sizes will update.
The next option allows you to create a target of non-viewers (e.g. all viewers who have NOT seen the item(s).
The first ‘Viewers Watching’ option allows you to define viewership in terms of minutes viewed (e.g. viewers who watched from 5 minutes, or viewers who watched between 10-15 minutes), or by % of the total duration.
The second ‘Viewers Watching’ button allows you to define viewers in relation to the average time viewed. For example, by choosing “at least” 110% of average duration, you are selecting the viewers watched at least 10% more than the average time viewed.
Please be aware that this type of dynamic target does not use Continuous Reach criteria, and that it is based on accumulated viewing across the whole period.
10.3 Reach & Frequency
The Reach & Frequency dynamic target option is only available if reach and frequency has been included in the original analysis run. The default sample day used (e.g. Middle Day, First Day etc.) for the creation of dynamic targets based on R&F depends is inherited from the reach calculation rules in the dataset that the target is being created from.
The Reach criteria be taken from the analysis settings – e.g. if reach criteria was defined as 3-minute continuous in the analysis settings, this criteria will be aplied when creating a dynamic target. Here you can create a dynamic target based on accumulated frequency (e.g. viewers who watched 3+ items), or frequnecy ranges (e.g. viewers who watched between 3 and 5 items) or create a group of non-viewers who did not meet the Reach criteria.
The bar chart displays the % of sample by accumulated Reach (e.g. 1+ items, 2+ items etc.) or by discrete reach groups (e.g. 1 item, 2 items etc.).
10.4 Segments
This feature is available in the Time and Programme modules provided Reach and Frequency was included in the analysis, and makes it possible to instantly categorise viewers into four segments based on their viewing behaviour. These segments are defined by the number of times they have viewed, and their viewing duration. Viewing and viewing duration are calculated without using the member weights, only counting the panel members and their viewing. The four segments can be saved as dynamic targets and used for in-depth analysis or profiling.
AdvantEdge creates a scatter diagram with four segments. The x-axis show the number of times a panel member has viewed, and the y-axis shows the average number of minutes viewed per event (programme/timeband etc). By default AdvantEdge will automatically calculate the average frequency level (four in the above example) and calculate the average amount of viewing per event (22 minutes in this case), and plot these using red lines over the scatter graph to illustrate each segment. The definition of each segment can be manually amended by typing over the values in the ‘Frequency level’ or ‘Avg minute per watched event’ boxes.
Beneath the input boxes, each segments’ share of the viewing, sample size and universe is displayed. These are colour-coded to match the segments displayed on the graph. Assuming the frequency and viewing levels have been left at the default setting (average values across all viewers) then the segments are defined as follow:
Segment A is viewers who watched a below-average number of events, but watched for an above-average number of minutes each time they did view (e.g. ‘occasional viewers’.)
Segment B comprises the viewers who see an above-average number of events, and also watch for a long time. They can be identified as high-volume loyal viewers (e.g. ‘gold viewers’).
Segment C illustrates the light viewers who watch only a few items and watch for only a few minutes (e.g. ‘flickers’)
Segment D illustrates the viewers who watch an above-average number of events, but don’t watch as many minutes per episode (e.g. ‘silver viewers’).
From within the segment analysis you can profile each segment individually. You can also rename the default segment names by clicking on the hyperlink. By selecting the save button, the system will automatically save all four segments using the name given for each individual segment name.
10.5 Saving a dynamic target group
Dynamic target groups can be saved as any other target groups. These targets will be stored under [Dynamic] in the Target Picker (see page 19).
10.6 Fractiles
When saving a dynamic target, it is possible to divide the target into further equal size groups or ‘fractiles’:
Figure 137: Creating fractile groups
Fractiles are activated using the tick-box at the bottom-left corner of the Save menu. The default value is 4, but this can be changed using the [Number of groups] button. The Fractiles window will show the viewing duration (mins) and sample size for each group. Each fractile will then be saved as a separate dynamic target – for example, the above settings would give four dynamic targets (Sky One HV Nov (00-025), Sky One HV Nov (25-50), Sky One HV Nov (50-75), Sky One HV Nov (75-100)).
By marking two or more dynamic targets in the Target Picker and right-clicking on them it is possible to combine targets by selecting ‘Combine dynamic targets…’ from the pop-up menu. This will open the following window:
Figure 138: Combine dynamic targets
There are four modes to select from:
Add: adds the two targets together. Subtracts: Subtracts the second target’s viewers from the first target. Blue
arrows in the top-right corner allow you to change the order. Common: Finds the common viewers between the target groups. Exclusive OR: For two targets this finds the unique viewers in each target and
combines them into one target group. For three targets it finds the unique viewers in each target + common viewers among the target groups and combines them into one target group:
Figure 139: 'Exclusive OR' for two target groups (left) and three target groups (right)
Once you are happy with your selection click ‘Save’ to save the target as a new Dynamic Target.
10.8 Analysing on individual panel members
By right-clicking on a dynamic target group and pressing [Edit] each panel member’s number is displayed individually.
From this section it is possible to separate the group into individual targets using the ‘Create as separate targets’ tick box at the bottom of the window (be warned, this may result in creating a large volume of targets!). The panel member numbers can also be exported to Excel using the [Copy] button.
10.9 Profiler
Since dynamic targets are based on viewing behaviour rather than demography, the Target Profiler can be particularly useful when working with this type of target. Each dynamic target screen has a ‘Profile’ button allowing you to instantly generate a demographic profile of your dynamic target. For more details please see the section on the Target Profiler on page 22
This feature only applies to clients who subscribe to Kantar Media TGR Surveys in the UK or an equivalent survey in another market .
A survey target is constructed based on dimensions from 3rd-party survey respondents rather than the Television Audience Measurement (TAM) panel members. This information is then ‘fused’ onto the TAM panel. For example, in the UK the TGR survey is fused onto the BARB panel by Kantar Media.
To create a Survey Target, open the Target Picker and click on the [Edit] button in the bottom left corner, then select ‘Create survey target’ from the menu (see Figure 141).
Click on a country flag to show the available surveys for that territory, and then click on the ‘+’ next to a survey date to show the list of survey questions, and then click on the ‘+’ next to a question to bring up a list of all answers in the bottom section of the window. Answers are selected by putting a check in the box next to the answer(s) you want. The ‘Add to segments’ feature can be used to create more complex targets – see page 22 for more details.
Survey targets can be combined with demographic information from the standard TAM data using the ‘User Universe’ function — see ‘Universe – activity and platform targets’ on page 34 for more information on using Universe.
The [Find] button in the top-left corner can be used to do a text search on survey dimensions.
Please note that each survey covers a specific period as indicated in the folder name. As these surveys used a fixed sample date the sample size will decrease markedly outside of this period, so you should always try to use the correct survey for the period you are running. When creating a survey target the sample size and universe displayed will automatically relate to the middle of the survey period.
This feature is available in the Time and Programme modules in the crosstab output, and it requires R&F to be selected in the Analyse options. In the crosstab view, press the [Define Table] button to select duplication units (Duplication 000, Duplication TVR and Duplication %) from the Units list. Other units cannot be displayed in the crosstab at the same time as Duplication units, so selecting Duplication units will automatically remove other units from the crosstab.
Figure 143: Selecting Duplication units
In Figure 144 I have selected ‘Duplication %’ as a unit in the Programme module. Each item is automatically given a number in the crosstab, and these numbers are then used to find the duplication figure in the corresponding column. In the example below, we can see that 27.5% of viewers to Scrubs also watched item no. 7 (The Inbetweeners). Conversely, 13.2% of The Inbetweeners viewers had also watched Scrubs (item no. 4).
Figure 144: Duplication in crosstab
The Duplication figures are based on reach criteria. If the Reach definition is set as 3-minutes consecutive viewing, a viewer would have to watch 3 consecutive minutes of both programmes to count towards the duplication audience.
Persistence and Inheritance analysis are available in both the Time and Program modules. Transmission here refers to either a programme or time band.
Activating Persistence/Inheritance
To activate the feature click the red arrow on the right of “Daily Reach” and click on Include Persistence and/or Include Inheritance:
Figure 145: Activating Persistence/Inheritance
Once activated, the ‘Setup Main…’ and ‘Setup Following/Previous’ options will be activated in the same menu. These can be used to define the reach criteria for the main programme and the programme before/after - thresholds are defined in the same way as for R&F (see page Figure 45).
Persistence/Inheritance Output
The following units will be activated in the list view and crosstab:
Persistence:
Pers %: For a transmission, the percentage of the audience in the (main) transmission who also saw the following transmission. “Following” is defined strictly relative as the following transmission within the extracted schedule. For example, if all programmes on a channel are output in the Programme module, Persistence will always relate to the next programme in the schedule. If the Programme Picker is used to restrict the analysis to transmissions of Coronation Street, persistence will be calculated based on the next transmission of Coronation Street.
Pers (TVR): For a transmission, the audience in TVR’s of this transmission who also saw the following transmission.
Pers ‘000: For a transmission, the audience in ‘000 of this transmission who also saw the following transmission.
Inheritance:
Inher %: For a transmission, the percentage of the audience in the (main) transmission who also saw the previous transmission. “Previous” is defined strictly relative as the preceding transmission in the extracted schedule. “Following” is defined strictly relative as the following transmission within the extracted schedule. For example, if all programmes on a channel are output in the Programme module, Inheritance will always relate to the programme
immediately before it in the schedule. If the Programme Picker is used to restrict the analysis to transmissions of Coronation Street, persistence will be calculated based on the previous transmission of Coronation Street.
Inher (TVR): For a transmission, the audience in TVR’s of this transmission who also saw the previous transmission.
Inher ‘000: For a transmission, the audience in ‘000 of this transmission who also saw the previous transmission.
In the example below, I can see that 28% of the audience to Film: The Long Ships went on to watch Mastermind, while 100% of the Mastermind audience stayed on the channel for Escape to the Country:
Figure 146: Persistence output in Programme List view
Karma is a scenario simulator that operates on empiric data. Working on actual spots makes the simulation realistic, and it is possible for the planner/TV buyer to transform the scenarios into real campaigns. Another feature which separates Karma from other optimizers is the ability to change prices according to share allocation, which are the most sensitive parameters in optimizing.
13.1 Mode Options
Spot Mode: choose if ratings should be calculated based on Spot (default), break or programme ratings
Simulate Mode: There are three different options for simulating campaigns in Karma - by cost, by ratings, or by number of spots:
Figure 147: Selecting simulation type
When simulating by cost you are required to enter a budget goal, when simulating by ratings it is a TVR goal, and when simulating by count the goal is a number of insertions.
13.2 Setup Options
As Karma is fully integrated within AdvantEdge, the channel, period, and target pickers are identical to the one used in AdvantEdge analysis modules.
Area: Select a reporting area to run the analysis on.
Channels: Select the channel(s) you wish to place spots on.
Period: Choose a period that matches the campaign you wish to buy, both in terms of season and campaign period.
Target: Choose the target for the campaign. If more than one target is entered the simulation will be based on the first target, and index delivery will be calculated and displayed in the cover guide for subsequent targets.
Universe: Select a Universe for the simulations (default is ‘National’).
Natural Delivery Constraints: Press this button if you wish your campaign to be based on natural delivery.
This calculates TVR Linear share of impact (in other words the natural delivery of all spot ratings by channel and daypart) and automatically fills in channel/daypart constraints. When applied to a channel that has no spotlog in Advantedge, Karma simulates a 3 minutes break on the channel every 20 minutes and calculates the fictive TVRs accordingly.
13.3 Simulation Options
Choose the number of iterations you want for the simulation. The default is set to 100 which should be sufficient to generate statistically robust results, but this can be lowered when running large campaigns or raised when running smaller campaigns where the standard error rate on 100 iterations is too large.
13.4 Constraints
Entering Constraints
Unless ‘Natural Delivery’ has been activated (see above), constraints must be entered before the analysis can be run. Enter the main window and apply the desired % split in both the Channel Share and Daypart Share sections (the figures must sum to 100). Daypart splits can be applied by clicking on the ‘Daypart’ hyperlink beneath the channel name and then either selecting the require daypart(s) from the list or by creating a new daypart (see the Dayparts section on page 13).
Figure 148: Entering constraints
When simulating by cost you must also fill in the cost template. The default option sets one cost for all dayparts - by clicking a Daypart link you can specify a price per daypart.
Click on the ‘Cost…’ hyperlink to choose a cost structure (see Figure 149). There are three options:
CPP (Cost per Point) CPT (Cost per Thousand) Ratecard Discount. When choosing this option you must enter the discount level.
If the discount level at a specific daypart is a surcharge enter a “-“in front of the surcharge.Take care using the rate card discount. It can only be used when spot prices are available in the data set. If some spots have a 0 cost it can result in wrong Karma estimations.
Figure 149: Cost template
Running multiple scenarios
If you want to run multiple scenarios press the [Add] button at the top of the screen. This will add a copy of the first scenario. The constraints for the new scenario can then be changed. The [Add] function will always copy the previous scenario. If you want to copy another scenario go to [clone] under [Add] and select a scenario to clone. After defining the setup press [Run] to generate the analysis.
13.5 Output
The Karma output is displayed by Reach on the Y-axis and cost/ratings on the X-axis (depending on whether the simulation is made as a cost or a ratings simulation). Each scenario is given a colour, and each campaign is marked by a dot. The curve describes the average of the campaigns.
The cursor displays the reach level by TVR across the curve. To change the campaign connected to the cursor, mark the campaign number in the “Title” box (top left hand corner). By clicking on the ‘Freq’ link at the bottom of the title box you can select to display figures for a different frequency level.
To zoom in on a particular area of the chart simply mark the area with the cursor and it automatically zooms in. To exit zoom reverse the movement.
It is possible to create an Excel report of the used spots for the simulation by pressing the [Report] button in the bottom left corner of the screen.
The [Cover Guide] button displays the delivery of the scenario by different ratings levels. The layout option allows you to define frequency levels, the maximum level of ratings, and the intervals. When selecting two or more target groups two new tables will be added. The first table is the ratings and reach in the primary target. The second table is the ratings in the primary target with the equivalent ratings and reach in the secondary target. The third table is the equivalent ratings and reach in the secondary target, but this table will show how many equivalent ratings were produced in total. In the example below the scenario generates 160 ratings in the main target (16-34 Adults), and 204 ratings in the secondary target (Men):
The Benchmark module is used to benchmark campaigns and categories against each other to establish at what level advertisers and brands are operating at. It allows you to analyse large amounts of data in a graphical environment.
14.1 Flights
The system splits spots by product and separates them into individual campaigns by 7 days of separation.
Clicking on a ‘+’ on the right hand side of the screen will ‘drill down’ into the data, splitting the flight by other dimensions (e.g. Brand, Advertiser, Product Category etc.). The order of dimensions can be changed using the [Order] button in the top left of the screen:
Groups are used to group the data into separate segments and colour code it accordingly. The colours will be used in both the R&F analysis and the campaign section. Groups… and auto grouping is available is all 3 sections; Flights, R&F analysis and Campaigns. Click on the [Groups..] button at the bottom of the screen to open the Groups menu.
Figure 154: The Auto Group
The [Auto Group] button allows you to easily group campaigns by target affinity and channel group. When selecting the Affinity option, adding targets to the analysis automatically calculates the affinity compared to the index target and allocates the campaign to the target group in which it delivers the highest index.
When using the Channel Group option, you can select the channel(s) and select the number of groups (group count). Alternatively the campaigns can be split into evenly large groups by using the [percentile]. The percentage will naturally vary but the number of campaigns will be evenly split in to the selected groups.
The system automatically colour codes the campaigns so it is easy to see the channel share by campaign.
The [Layout] button allows you to select the information to display on the flight bars. The ‘Bar Coloring’ section allows you to apply colour-coding to the bars to reflect the
intensity of the activity in a given period (darker = more intense), and select what unit this colour coding should be based on.
Figure 155: Layout menu
Campaign
The [Campaign] button allows you to change the days of separation. By default a new flight bar is created if a campaign is inactive for 7 or more days. This can be changed to ‘Weekly’, ‘Monthly’ or ‘Days of Separation’ where you can enter the desired number of days that should separate campaigns. The separation period can also be set by right-clicking on a flight bar.
You can delete a specific flight bar from the report by selecting it and pressing the [Campaign] button, then selecting the ‘Delete’ option. Multiple flight bars can be selected and deleted by holding down the Ctrl key. If multiple flights have been selected, they can also be joined together using the ‘Join’ option.
The R&F section displays the data by ratings (x-axis) and reach (Y-axis). The data can be split by Groups, targets, frequencies, dayparts, or channel groups. For each section the data can be viewed by at different frequency levels, target groups and groups.
Figure 158: R&F analysis
The ‘Cursor’ radio buttons allow you to choose between ‘selection’ and ‘zoom’, depending on which functionality you wish to use the cursor for. When set to ‘selection’,
The groups are identical to those in the flight chart. Use cursor [selection] to select which campaigns to group.
Groups allows you to see average delivery by groups (by agency in the example).
R&F by different targets, if multiple targets have been defined.
The layout section in R&F allows you to select which information to display in the hint
box. Here you can edit the colours and curve width and select which curve fitting model to use. (The default curve fitting model is Adbudg).
Karma analysis in Benchmark Karma allows you to run a simulation of random spots with an identical channel split and user defined dayparts in order to compare the delivery of a campaign to an average delivery of a certain channel/daypart split.
Campaign In the campaign section the data is displayed in a tabular format. Attributes and units can be added from the columns… section.
Benchmark reports Reports breaks down the data in a pre-defined format in Excel. An option box allows you to select what information you wish to include in the report.
The summary can be defined by each individual spot classification. The report exports the flight chart, R&F analysis and campaigns section as a bit map file so it easily can be copied to a presentation. The rest of the data is displayed in individual sheets broken down by summary section.
The [Setup] button is located in the bottom right hand corner of the main AdvantEdge screen, and allows you to change the system setup defaults.
There are up to 15 different setup sections in the system. Depending on the setting, it may be possible to save the selection as either a System Default or a User Default. Saving a System Default applies the change to the whole installation (e.g. other users will also see this change), while ‘Save as user default’ will only apply the change to your specific user profile.
15.1 System settings
Figure 159: System Settings
Sample Size Demography
The Sample Size Demography section allows you to specify the minimum sample size for:
Select if the channel list should be displayed in alphabetical order or in the standard order from data set. You can also change the behaviour of the ‘Select all’ button to only select channels native to the reporting area.
It is possible to toggle the default setting for newly-created channel groups from ‘Fixed Channel Groups’ (newly created channel groups will be fixed, as they always were) to ‘Linked Channel Groups’ (when newly created channel groups are used in a report the list of channels in the report will be updated automatically when changes are made to the channel group). Please note that this is a System Default and the change will be applied to all users. By default the initial settings is ‘Fixed Channel Groups’.
This section allows you to customise print settings. You can change print margins, customise header/footers and change the default paper size.
15.4 Users
The Users section allows you to specify user access rights. Here you can select whether each user sees folders created by other users, and whether user has full access or read-only access to other user’s folders. A User Rights password is required to toggle user rights on/off.
This changes the default frequency ranges displayed for the R&F unit.
PIB – “Place in Block” Semantics
This changes the semantics used to classify spots with a commercial break. You chose how many spots should be separately classified at the start/end of a break (all other spots will be labelled “Middle”). Changes here will be reflected when using any PIB dimensions in the Spots module.
Daypart Semantics
By default a programme’s start time must fall within a specified daypart to be assigned to that daypart. This section allows you to select different criteria for assigning programmes to dayparts.
Spot/Break Dropout
This setting relates to the ‘Spot Dropout’ unit available in the Spots and Break module. By default this unit indexes spot rating in spot module
and break rating in break module against the programme minute in the minute preceding the break, but this can be changes to index against an average rating based on the selected number of minutes before and/or after the break.
Prog Lead In/Lead Out
Determines the minutes used for programme lead in/out analysis. See page 94.
15.6 Output Formats
This defines the number of decimal places included for each unit type. Please note that ‘Ratings – avg Impacts’ also changes the 000s (avg.) unit. If you have a report open in AdvantEdge, any changes made here will be reflected in the open report without the need to rerun the report.
Figure 164: Output Formats
If ‘Show 000s as Individuals’ is ticked on, the audience figures will be displayed as actuals instead of 000s (e.g. ‘3,500’ instead of ‘3.5’).
If ‘Show Share as [0.0, 1.0] is ticked on the share figures will be divided by 100, so they can be formatted as percentages in Microsoft Excel. E.g. by default a share
of 8.7% will be displayed as ‘8.7’ in the output. With this option enabled it will be displayed as ‘0.087’.
It is also possible to change the decimal separator and thousand separator as well as date and time formats used on screen, and adjust column alignment.
It is possible to add grid lines to the List view in AdvantEdge. To activate this feature set a value in ‘Grid shading %’ (the higher the value, the darker the grid lines appear):
Figure 165: Show gridlines
15.7 Text Export
This section allows you to change the decimal and thousand separators and select date and time formats for saved files, exportations and for data copied to the clipboard. It is also possible to change the encoding of text exports between Unicode (default), ANSI and UTF-8 using the ‘Text Export Encoding’ dropdown menu.
The Programme List view includes colour-code classifications for different airtime types and different programme calculations (e.g. Net programmes excluding commercials, gross programmes including commercials etc). In this setup box the defaults colours can be changes.
Window Setup
By default, clicking ‘Edit’ from the CrossTab view will close the CrossTab window. Deselecting this option will result in CrossTab windows remaining open after clicking ‘Edit’.
Output
The ‘Convert to upper case’ option will capitalise programme titles in the list and CrossTab view, regardless of the case used by the local ratings provider.
For multi country installations this screen gives the option to control the behaviour of area handling.
Figure 167: Multi Area Settings
Module Defaults keeps the same area when switching between modules.
Start Up Area allows you to start AdvantEdge in the last previously used area. If selected this overrides ‘Module Defaults’.
Default Area Order allows you to change the default order areas are listed in the Area Picker. This can be saved as User Default (applied only to your login) or System Default (applied to all users).
Codepage allows you to choose which set of characters will be used and save a specific preference. The default will use your computer’s setting and you will have to change this if you need to read other character sets. “Use as user default” will keep the setting until you unmark the check-box.
This screen allows you to change the default logic statement used in the Programme Picker between ‘OR’ and ‘AND’.
15.1215.11 Karma
These settings apply to the Karma planning module. Here you can choose the airtime categories used in Karma under [Spot Class], and select a default brand or category. It is also possible to define the maximum number of spots that can be used within a single break.
15.1315.12 Campaign Plan
15.1415.13 Channel Attributes
This screen allows you to enter your own Channel Attributes that can then be displayed next to the channel in the Channel Picker or selected as dimensions in the List or CrossTab views. Up to 10 fields can be used per channel. In the example below, a custom channel genre classification has been applied to channels in the Local CA1 field:
The Global Channel Attributes are set by TechEdge and can only be changed by us.
This tab allows you to change the keyboard layout . Default setting will be taken from your computer settings.
15.1615.15 Source Editor
This section allows you to add a data source for each dataset (e.g. the data provider). This will then appear in the header record of any AdvantEdge exports.
15.1715.16 Spot Index
This screen allows you to customise the channel-specific spot indexes used for the calculation of 30-second equivalent/ratecard-weighted (R/W) units in the Spots module.
You can create custom spot indexes based on the “Market Default” profile from the drop-down list. You can either edit the data in the index matrix directly, or export and edit the matrix in Excel file by clicking on “Excel” button and then import from Excel using the “Load…” button.
Click on “Save…” in the top-right corner to name the user defined spot index. Please note that the “Save as System Default” is only available if it’s enabled for user’s account.
Figure 170: Save spot index
In the Spot module it is now possible to right click on units that use the spot index (e.g. TRP30/TVR (R.W) and ‘000 (sum30)/ 000s R/W) in the Define Table screen and select from any of the saved Spot Index profiles:
If a system default profile is not defined the profile name will be added next to the units to indicate which profile is being used in the report (except for Market Default profile). If a system default profile is defined the profile name will be added next the units to indicate which profile is being used in the report (except for System Default profile).
15.1815.17 Export Directories
Figure 172: Export directories
This section allows you to save a Default Directory to be used for file exports. On this tab you may also define the number of desired export directories (default is 4 with a maximum of 100 directories).
15.1915.18 Area setup
In multi territory installations, each country will have its own Area Setup page accessible by clicking on the corresponding country flag. This contains configurable settings unique to each data set. Be extremely careful when making changes in Area Setup as the default values for each country have been set in order to calculate to the recognised market standard.
The [Data] button located in the bottom right hand corner of the main window gives an overview of what data is available by:
Type Area Period Days
Depending on the installation, there can be up to 5 different types of data:
Viewing data Spots data Programme data Promo data Appreciation data
If all data is up to date then the [Data Update] button in the bottom left corner will be greyed out. If newer data is available then this button will be activated and the respective dataset(s) will be highlighted in red:
Figure 174: Update data
You can now click on the ‘Update Data’ button and select ‘Yes’ at the prompt to restart AdvantEdge and update the available data.
Daily Reach is used to calculate the accumulated number of viewers for a single event. An event can be a day, time segment, programme, series of programmes etc. As each individual member can only be included once in the calculation, the weight assigned to the day of the event of the panel members is usually used for the specific day which they were watching.
R&F is used to calculate the number of unique viewers to a SERIES of events and the number of times they have watched these events. This is typically used for an advertising campaign or a series of programmes.
As R&F is calculating both Reach and Frequency a sample day (often the middle day in the date range) is used to determine the panel member’s weight.
17.2 Difference between ATV and ATS
ATV = Average Time Viewed. This is the number of minutes viewed by all people in the target group, including non-viewers. This is also known as ‘Avg. Minutes (all)’. ATS = Average Time Spent. The average time viewed for the viewers who actually saw the item. This is based on a reach criteria - for example 3 minutes continuous viewing. This is also called ‘Avg. Minutes (viewers)’. To calculate ATS [Cover] must be activated in the Analyse section. This variable has several different calculation-methods depending on country - please contact Support for more information.
17.3 Difference between Net and Gross ratings for a programme
Gross ratings are calculated including commercial breaks, while Net ratings are calculated based on the actual minutes of the programme (excluding breaks). For programmes that do not include breaks Net and Gross ratings will be identical. Net, Gross and individual programmes are colour coded and identified as an attribute both in the list view and crosstab (see page 145).
17.4 Difference between OTS and AvgFreq
The difference between OTS (Opportunity to See) and AvgFreq (Average Frequency) is the TVR used in the calculation.
OTS uses the standard TVR, calculated from the daily panel in the survey. It does not takes into account the difference between the sample used in calculation of the reach, and the panel-sample used for calculating TVR.
AvgFreq uses sum of Cover for each program/day/spot to calculate the TVR. The sample used is the daily reach-sample.
% 000 (avg): Distribution of thousands in percent. % ATV: Distribution of average viewing in percent. % ATV: Contrib Distribution of ATV calculated in a (Pan area universe) % Cost: Distribution of total cost in percent. % Count: Distribution of events in percent. % Duration: Distribution of total duration in percent. % PanATV: Distribution of multiple area average viewing in percent. % PanTRP: Distribution of multiple area ratings in percent. % PanTRP30: Distribution of multiple area 30" equivalent ratings in percent. % PanTRPlin: Distribution of multiple area 30" linear ratings in percent. % TRP: Distribution of ratings in percent. The ratings are not weighted by duration or
any other index. % TRP (avg) (h)/ % TRP (avg) (v): Distribution (horizontal or vertical) of duration-
weighted ratings in percent. % TRP30: Distribution of 30" equivalent (e.g. ratecard weighted) ratings in percent. % TRPlin: Distribution of 30" linear (e.g. duration weighted) ratings in percent. '000: Number of viewers in thousands. '000 (30): The number of thousands weighted for spot duration '000 (avg): The average number of thousands viewers for the events '000 (max): The maximum number of viewers for an event expressed in thousands. '000 (sum): The accumulated 000s weighted for duration '000 (sum30): The sum of thousands, weighted for spot duration (e.g. ratecard
weighted). '000 (sumlin): The sum of thousands, weighted with a linear spotindex (e.g. duration
weighted). '000 (sumU): The unweighted sum of '000 of viewers '000 lin: Linearly weighted thousand viewers of a spot (e.g duration weighted). 2 x 15"
equals 1 x 30" AccTRP/AccTVR: The accumulated ratings within the list view. Actual Persons: The actual average number of persons viewing. ADH: Adhesion is the target group viewing expressed as a percentage of a base
audience’s viewing (audience profile). ADH avg: % of viewers in target group watching an event AI: Appreciation to a programme. AI (avg): Average Appreciation score ATS: Average Time Spent. This is the number of minutes viewed by each person in
average by viewers who fulfils a certain cover criteria. Also referred to as Av Mins (viewers). This variable has several different calculation-methods, depending on country. Please contact Support for more information.
ATS mm:ss: Number of minutes viewed by each person on average by viewers who fulfilled a certain cover criteria, expressed in minutes and seconds
ATS(avgW): Weighted average ATS, calculated as Average(ATV*100)/Cover ATS hh:mm:ss (avgW): As above, but given in hh:mm:ss format ATV: Average Time Viewed. The daily number of minutes viewed by each panel member
on average (including non-viewers) ATV (sum): Average viewing per panel member accumulated over the period ATV mm:ss: Average viewing per panel member expressed in minutes and seconds
ATV mm:ss (sum): Average viewing per person accumulated over the period expressed in minutes and seconds
AvgFreq: The average number of times an average person has watched an event. See Chapter 17 FREQUENTLY ASKED QUESTIONS for more information.
Block Factor: Calculates the difference between break and programme rating Break '000: Thousands of viewers of the break Break TRP (avg): Average rating of breaks Break TRP (sum): Accumulated ratings of breaks BreakTRP: Rating of break attached to the spot Campaign duration: number of days of campaign Capacity: Inventory capacity Channel group TRP: Accumulated ratings by channel group Comm Count: Number of commercials in a break Comm in break: Count of commercials in break Count: The number of events Cover: Total amount of different viewers watching an event expressed as a rating level. Cover Eff: A number between 0 and 100. 100 defines that a spot has been seen by
viewers, who has seen no other of the listed spots. The higher the figure,The more “uniqueness” or “light viewers” have seen the spot
Cover000: Total amount of different viewers watching an event expressed as a number of thousand viewers
Coverage/R&F %: See R&F CPP (avg): Average Cost Per Point CPP30: Cost per spotindex TRP CPP30 (avg): Average 30" Cost Per Point CPP30 net (avg): Average 30" Net Cost Per Point CPS: The Cost Per Point (CPP) per second of the spot if it was a 30 second spot CPS (avg): Average Cost Per Point (CPP) per second of the spot if it was a 30 second spot CPT: Cost per thousands viewers CPT (avg): The average cost per thousand viewers CPT30: Cost per thousands viewers weighted by spotindex CPT30 (avg): Average 30" Cost Per thousand viewers Days on air: The number of days a certain spot was aired within the specified period Dup000: Number of viewers who watched one selected item, who also watched another
selected item. Dup%: Percentage of viewers who watched one selected item, who also watched
another selected item. DupTRP: Dup000 expressed as a percentage of the universe. Dur (avg): The average duration of the events Dur Promo (avg): Average duration of promo Dur Spons (avg): Average duration of sponsorship billboard Dur Spots (avg): Average of duration of spots Fidelity: Loyalty index (ratings x 100 divided with Cover). The average is calculated as
(SUM(Fidelity*Dur))/SUM(Dur) Fidelity(W): Weighted loyalty index, calculated as
Sum(Rating*Dur*100)/Sum(Cover*Dur) First PIB: The effect of being first in break, measured by index of TRP of the first minute
of the break divided by average break rating Incr. R&F: The incremental reach build (only available in crosstab view)
Incr. R&F Custom: A custom version of the above allowing custom selection of frequency range and/or reach in 000s/%.
Index: Index between the defined target group and a base target group
Index U: Index between the defined target group and a base target group based on TVR (avgU)
Index Share: Share in targetgroup / share in Index target group Last PIB: The effect of being last in break, measured by index of TRP of the last minute
of the break divided by average break rating Monthly Reach % (Time module): Average monthly reach in % calculated across the
months in the selected period. If the period includes part of a month (e.g. 10 days from a month) it will still include these days in the average Monthly Reach, based on the reach across the 10 available days.
Monthly Reach 000s (Time module): Average monthly reach in 000s calculated across the months in the selected period. If the period includes part of a month (e.g. 10 days from a month) it will still include these days in the average Monthly Reach, based on the reach across the 10 available days.
OTS: Opportunity to see / Avg. Frequency. See Chapter 17 FREQUENTLY ASKED QUESTIONS for more information.
Pan000: Pan area thousand of viewers PanATV: Pan area Average Time Viewed PanATV mm:ss: Pan area Average Time Viewed expressed in minute and seconds PanConsumption: ATV calculated in a Pan area universe PanCPP: Pan area Cost Per Point PanCPT: Pan area Cost Per Thousand PanR&F: Pan area Reach & Frequency PanR&F000: Pan area reach & Frequency in thousand of viewers PanRchFrq cust...: Customized reach & frequency for pan area PanTRP: Pan area ratings PanTRP (avg): Average Pan area ratings PanTRP30: 30" pan area ratings PanTRPlin: Linear ratings for pan area Peak 000: for each programme the max of 000 during the programme/timeband Peak TRP: for each programme the max of TRP during the programme/timeband Peak Time: for each programme the time of the max rating during the programme/timeband PIB rel %: % distribution of PIB rel PIB rel TRP: Ratings by PIN rel Prog TRP (avg): Average Program ratings of which spot or break is attached to Prog TRP (sum): Sum of program ratings of which spot or break is attached to ProgTRP: Program Trp of which spot or break is attached to PUT: People using Television expressed as a rating PUT Level: People using Television expressed as a rating PUT000: People using Television expressed in thousands of viewers R&F: Reach & Frequency distribution as a % of universe. This can be defined to specify
the frequency levels desired. e.g. ‘5+ (3 min cont) (%)’ is showing the percentage of the target group who watched for at least 3 consecutive minutes on at least 5 occassions.
R&F000: Reach & Frequency measured in number of thousands instead of in % of target RchFrq Custom...: Using this variable, the user can select exactly the frequency levels
he/she wants displayed and choose between ratings and '000 Retention (Migration module): The number of viewers in that timeslot who were also
watching in the previous timeslot. Share: Share of viewing in the time period of the event Share By Channel: Displays the share for other channels on program level. Only
applicable in the detail list for programs. Share of PUT: The share of viewing compared to all viewing Share Relative: The share of viewing between selected channels
Spot Count (avg): Average number of spots Total Minutes: The total ‘viewer minutes’ in 000s, e.g. audience in 000s multiplied by
duration. TRP: Target Rating Points in the target group defined TRP (avgU): The unweighted number of ratings. Regardless of the duration of the
events, the ratings are added together. Normally only used in break analysis TRP (avgW): Ratings weighted for duration TRP (max): Max rating of event within a cell. Used for top program ranking TRP Sum: Accumulated ratings TRP30: Ratings adjusted for spotindex (2x15” spots > 1x30”) TRPlin: Ratings adjusted for duration (2x15” spots equal 1x30”) Unique: How many truly unique viewers, the spot attached – i.e. the percentage of the
target group, who has only seen this particular spot out of the whole spotlist Weekly Reach % (Time module): Average weekly reach in % calculated across the
weeks in the selected period. If the period includes part of a week (e.g. 5 days from a week) it will still include these days in the average Weekly Reach, based on the reach across the 5 available days.
Weekly Reach 000s (Time module): Average weekly reach in 000s calculated across the weeks in the selected period. If the period includes part of a week (e.g. 5 days from a week) it will still include these days in the average Weekly Reach, based on the reach across the 5 available days.
Zaps (Migration module): The total number of switches that occurred across all stations in that time-band, excluding people turning TV on and TV off. This option should only be run with a Live activity selected.
18.2 Split variables
1+ diff: The added reach to the total result by each spot Ad Producer: Ad production company Advertiser: Advertiser name Advertiser/2: Advertiser name - sub level After: Subject: Categorization of subject after event
After: Subject/2: Categorization of subject after event, sub categories After: Subject/3: Categorization of subject after event, sub categories After: Subject/4: Categorization of subject after event, sub categories
Agency: Name of advertising or media agency Agency/2: Name of advertising or media agency — sub level Air Type: Classification of broadcast type All Count: Count of all events within a break (commercials, sponsorships and promos) Area: The country or region in which the analysis is done Before: Subject: Categorization of subject before event.
Before: Subject/2: Categorization of subject before event. Sub category Before: Subject/3: Categorization of subject before event. Sub category Before: Subject/4: Categorization of subject before event. Sub category
Bid: Auctioned price of the event Block Code: Break code number used to identify price of spots in the break Brand Group: If a group of brand definitions is defined under “brand” when the analysis
is set up, each selection can be split using this variable Break Class: Break class classification Break Code: Break identification code Break Cost: Cost of break Break id: Break identification code Break Origin: If the break was derived from the spotlog or the programme log
Break Title: Title of break Break: Subject: Categorization of subject of programme in relation to break. Break: Subject/2: Categorization of subject of programme in relation to break. Sub
categories Break: Subject/3: Categorization of subject of programme in relation to break. Sub
categories Break: Subject/4: Categorization of subject of programme in relation to break. Sub
categories Broadcast Type: Event classification Campaign No: Campaign identification number Campaign Title: Campaign Title Category: Category Category Code: Category Code Channel: Selected channels in analysis setup Channel group %: Per cent distribution of channel groups Channel Group ...: The defined group of channels Channel Origin: The country the channels originally is broadcasted from. For example
“V8” is a Dutch channel Channels: Split data by channels Concern: Name of concern that owns advertiser Concern Code: Concern Code Concern/2: Name of concern that owns advertiser - sub level Contract Number: The campaign the spot belongs to Cost: Cost of event Cost 30sec: Cost weighted by spot index Cost Class: The cost code of a spot (used to identify price) Cost Local: Cost in local currency Cross Promotion: Flag if promo is for programme on another channel Date: Splits data by date Daypart: Daypart library Daypart %: Ratings distributed by dayparts Daypart ...: Selection of daypart post analysis Daypart TRP: Ratings by daypart Distributor: Distributor Dur min: Duration in minutes Dur Promos: Duration of promo Dur sec: Duration of event in seconds Dur Spons: Duration of sponsorship billboard Dur Spots: Duration of spot Duration: Duration of event Duration sec: Duration of event in seconds End date: End date of campaign Episode: Episode number Estim TRP: Estimated rating Event ID: Event ID Expected GRP: Estimated rating Extended Title: Full title Film Code: Specific spot version code Film Code: Additional film code title Film Code/2: Additional film code title level 2 Film Title: Film description First date: First date of campaign First/last period: First and late date of campaign - user defined separation of days Gross Cost: Official rate card cost (from data provider)
Halfyear (wk27-53): Splits year into two periods week 1-25 and 26-53 Hour: Splits data into one hour intervals Internal ID: Broadcasters internal ID number Inv Index: 1/index Inv Index U: 1/index unweighted for duration Level: Program level number used to define sub programs within a program Main Title: Main titel of program Manufacturer: (Advertiser) Mid Category: Middle spot categorization by product type Month: Splits data by month Month in Year: Displays the month in year Movie Title: Title of movie Net cost: The actual cost including discount levels Number in prog: Number of breaks within the programme Orig Title: Original title of event PIB (real) rel: Position in break, categorized in 1st, 2nd, 3rd excluding promo, spons
etc. PIB count: Number of spots in break PIB pos: Actual position in break PIB rel: Position in break, categorized in 1st, 2nd, 3rd middle, 2nd last and last Platforms: Broadcast platform Premium: Premium price for a break Product: Product name Product Code: Product Code Product/2: Product description level 2 Product/3: Product description level 3 Production company: Name of production company Prog '000: Thousand viewers of program Prog After: Programme after event Prog After/extended: Extended programme title attached to the spot or break Prog Before: The programme name after the event Prog Campaign: Identifies the program in which the spot was connected to Prog Class: Program classification, program, break, other etc. Prog Class Type: Program classification, program, break, other etc. Prog Group: User defined groups of programmes Prog Type: Programme classification (programmes, breaks, promos etc) Prog Type/2: Programme classification (programmes, breaks, promos etc). Level 2 Promo Count: Number of promos Promo Group: User defined groups of promos Promo Name: Name of promo Promo Target: Target group for promo Promo Type: Type of promo (Generic, Coming soon etc) Promos in break: Count of promos in break Quarter: Quarter of year Quarter Hour: 15 minute intervals Region: Reporting area Reporting Area: Broadcast areas Segment Number: Identifies the chronology of individual parts of a program Sold: Signifies if a spot was sold in the broadcast region Spons Count: Number of sponsorships in break Spons in break: Count of sponsorships in break Sponsor: sponsorship billboards Sponsor Count: sponsorship billboards count Spot Class: Type of spot (for example sponsorship and commercial)
Spot Count: Number of posts Spot ID: Spot identification code Spot Type: Classification of spot type (Commercial, sponsorship, promo etc) SpotIB count: As PIB count but only for actual commercials SpotIB pos: As PIB position but only for actual commercials SpotIB rel: As PIB relative but only for actual commercials Spots in break: Count of spots in break Start date: Start date of campaign STI code: classification of STI codes Sub Category: Lowest spot category Sub Product: Sub product Sub Title: Sub title Tail: Signifies a spot as a tail spot Tape Code/1: Internal number of the transmission Tape Code/2: Internal number of the transmission level2 Tape Code/3: Internal number of the transmission level3 Target: Split data by selected target groups Time: The start time of the event Title: Event title To: The end time of the event Top Category: Highest spot categorization by product type Type: Broadcast: Premiere, repeat etc., 1 sub category
Type: Broadcast/2: Sub category of Broadcast Type: Common: Categorization of broadcast categories, 2 sub categories
Type: Common/2: Sub category of Type: Common Type: Common/3: Sub category of Type: Common
Type: Format: Categorization of format, 3 subcategories Type: Format/2: Subcategory of Type: Format Type: Format/3: Subcategory of Type: Format Type: Format/4: Subcategory of Type: Format
Type: Frequency: Categorization of frequency, 3 subcategories Type: Frequency/2: Subcategory of Type: Frequency Type: Frequency/3: Subcategory of Type: Frequency Type: Frequency/4: Subcategory of Type: Frequency
Type: Language: Language spoken in the program, 1 subcategory Type: Language/2: Subcategory of Type: Language
Type: Origin: Categorization of production origin, 2 sub categories Type: Origin/2: Sub category of Type: Origin Type: Origin/3: Sub category of Type: Origin
Type: Prod Area: Categorization of production country, 3 sub categories Type: Prod Area/2: Sub category of Type: Prod Area Type: Prod Area/3: Sub category of Type: Prod Area Type: Prod Area/4: Sub category of Type: Prod Area
Type: Producer: Categorization of production department, 2 sub categories Type: Producer/2: Sub category of Type: Producer Type: Producer/3: Sub category of Type: Producer
Type: Production Year: Year of production Type: Purpose: Purpose of broadcast Type: Subject: Categorization of subject, 3 sub categories
Type: Subject/2: Sub category of: Type: Subject Type: Subject/3: Sub category of: Type: Subject Type: Subject/4: Sub category of: Type: Subject
Type: Subject Area: Categorization of area for subject, 3 sub categories Type: Subject Area/2: Sub category of Type: Subject Area
Type: Subject Area/3: Sub category of Type: Subject Area Type: Subject Area/4: Sub category of Type: Subject Area
Type: Suggested: Suggested placement of the programme in the schedule Type: Suggested/2: Sub category of Type: Suggested Type: Suggested/3: Sub category of Type: Suggested Type: Suggested/4: Sub category of Type: Suggested
Type: Target: Categorization of target groups for programme, 2 sub categories Type: Target/2: Sub category of Type: Target Type: Target/3: Sub category of Type: Target
Type: Transmission: Categorization of type of transmission, 1 sub category Type: Transmission/2: Sub category of Type: Transmission
Universe: The universe defined in the analysis User Markup: Variable containing user marked items from list view. Video Clip: Identifies if a video clip can be viewed of the spot or programme Week in Year: Identifies week no. Week sun-sat: Splits information in week from Sunday to Saturday Weekday: Displays data by weekday (mon-sun) Weekday/weekend: Separates data in weekdays and weekends Weeks: Separates data into weeks Year: Year of event Year (wk1-53): Week calendar. Week 52,53 and week 1 can be in overlapping years