DR4000 Setup Guide for Backup Exec 2010 R3 v1.0 DR4000 Setup Guide for Symantec Backup Exec 2010 R3 This Dell Whitepaper shows how to provision DR4000 v1.0 with Microsoft Windows Server 2008 R2 & Symantec Backup Exec 2010 R3 John Bassett SMB Marketing
Transcript
DR4000 Setup Guide for Backup Exec 2010 R3 v1.0
DR4000 Setup Guide for
Symantec Backup Exec 2010 R3
This Dell Whitepaper shows how to provision DR4000 v1.0 with Microsoft Windows Server 2008 R2 & Symantec Backup Exec 2010 R3
John Bassett
SMB Marketing
DR4000 Setup Guide for Backup Exec 2010 R3 v1.0
This document is for informational purposes only and may contain typographical errors and technical
inaccuracies. The content is provided as is, without express or implied warranties of any kind.
typography or photography. Dell, the Dell logo, and PowerEdge are trademarks of Dell Inc. Intel and
Xeon are registered trademarks of Intel Corporation in the U.S. and other countries. Microsoft, Windows
and Windows Server are either trademarks or registered trademarks of Microsoft Corporation in the
United States and/or other countries. Other trademarks and trade names may be used in this document
to refer to either the entities claiming the marks and names or their products. Dell disclaims proprietary
interest in the marks and names of others.
DR4000 Setup Guide for Backup Exec 2010 R3 v1.0
Executive summary
In this paper, we demonstrate how to setup a DR4000 with Backup Exec 2010 R3 provisioned as a
backup to disk target. This paper is a quick reference guide and does not include all DR4000 deployment
best practices. Reference the DR4000 owner’s manual other DMA best practices whitepapers for
additional information. Note that your DR4000 build version and other screen shots may vary slightly
depending on the version of the DR4000 OS.
Getting Started
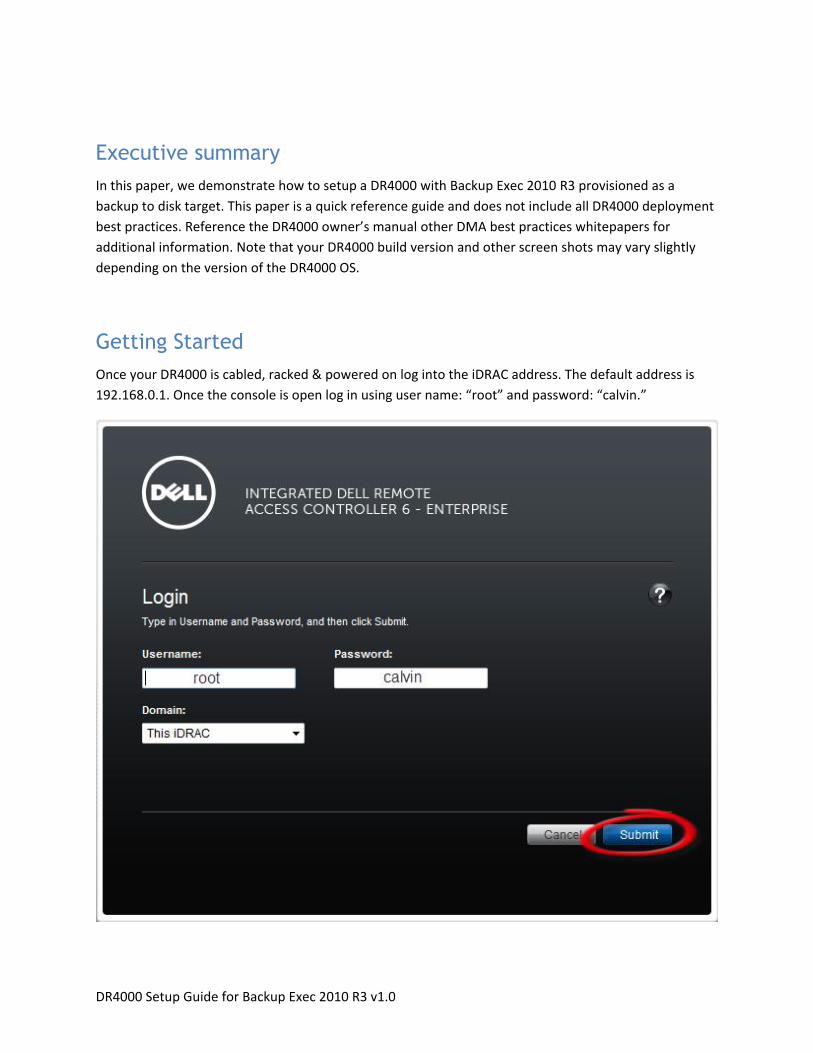
Once your DR4000 is cabled, racked & powered on log into the iDRAC address. The default address is
192.168.0.1. Once the console is open log in using user name: “root” and password: “calvin.”
DR4000 Setup Guide for Backup Exec 2010 R3 v1.0
Next, launch the Virtual console.
DR4000 Setup Guide for Backup Exec 2010 R3 v1.0
Initializing the DR4000
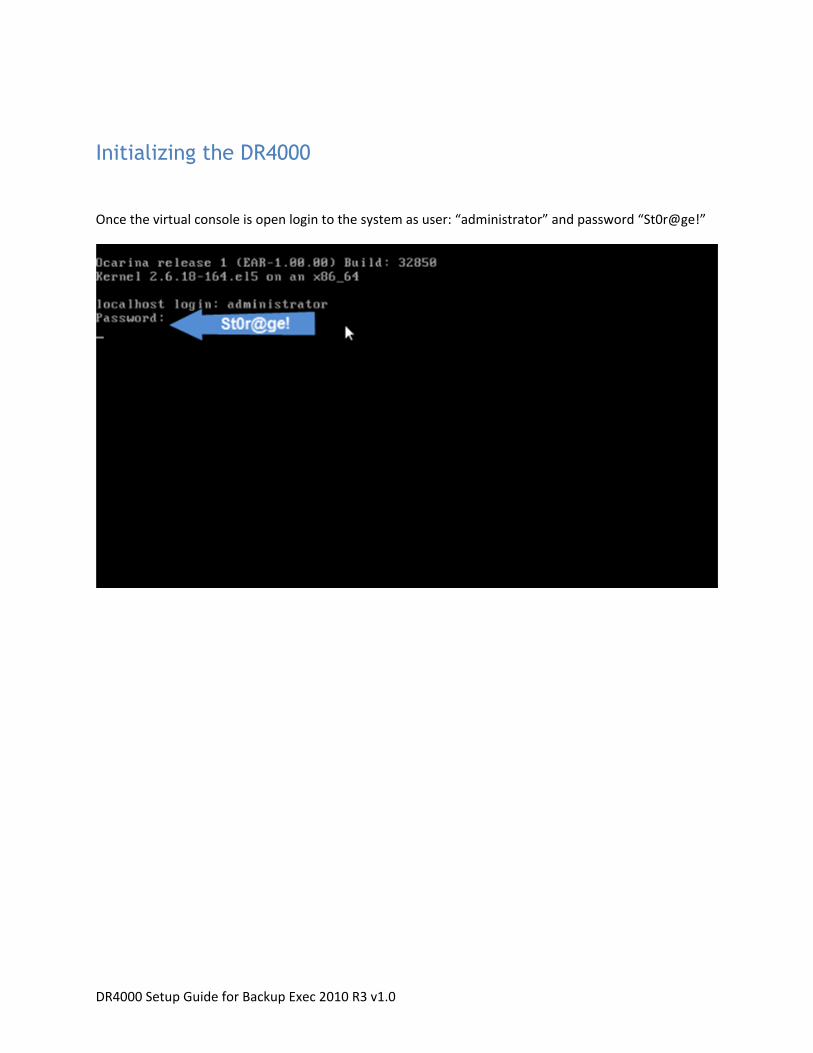
Once the virtual console is open login to the system as user: “administrator” and password “St0r@ge!”
DR4000 Setup Guide for Backup Exec 2010 R3 v1.0
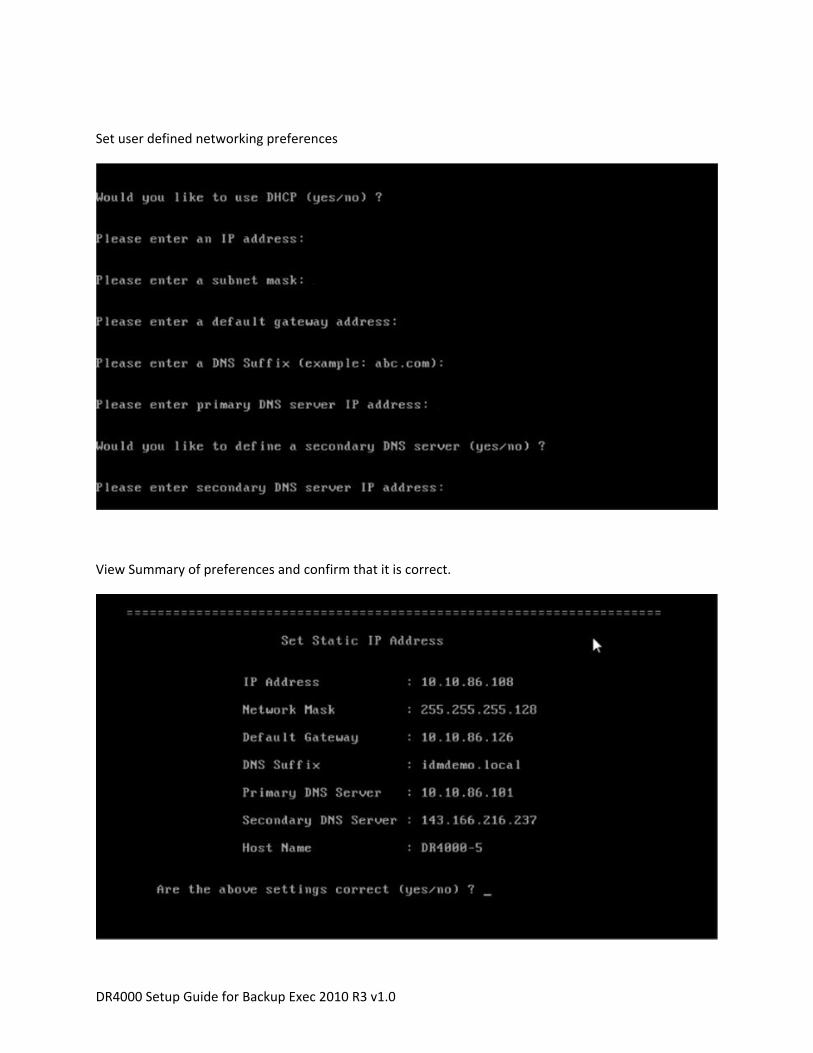
Set user defined networking preferences
View Summary of preferences and confirm that it is correct.
DR4000 Setup Guide for Backup Exec 2010 R3 v1.0
Log into the DR4000 GUI
Enter the user defined IP address into your browser. Login as “administrator” and use password
“St0r@ge!”
DR4000 Setup Guide for Backup Exec 2010 R3 v1.0
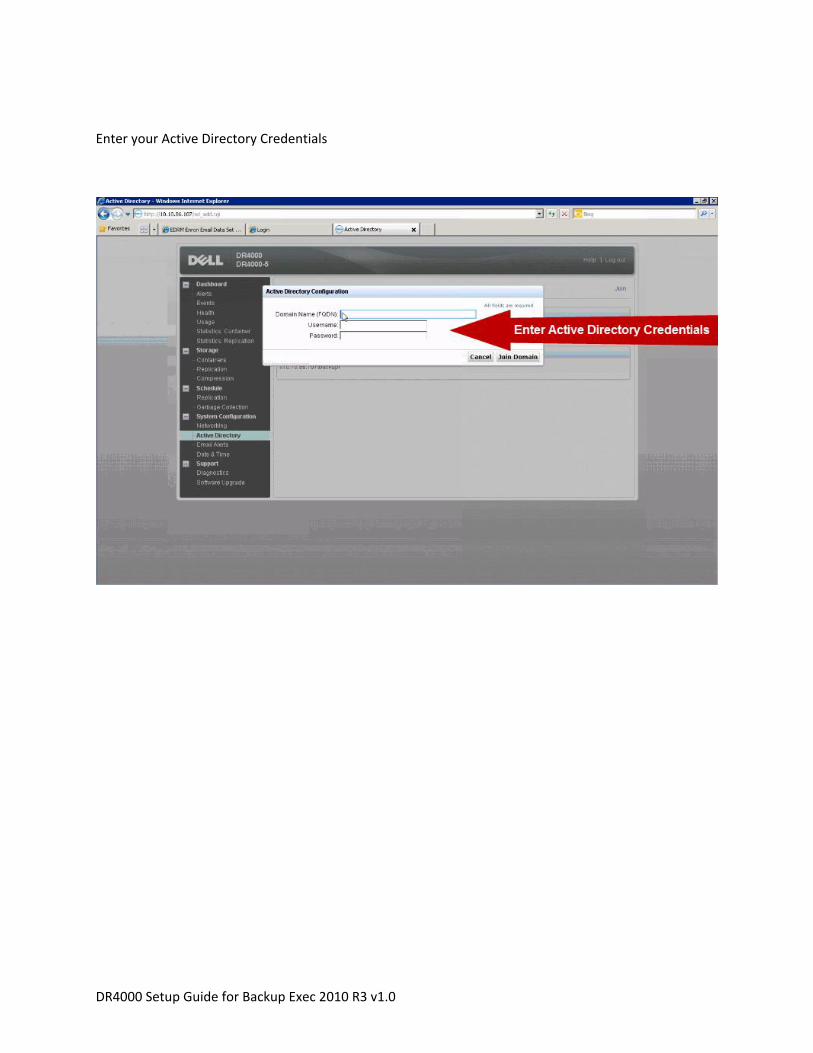
Join DR4000 to Active Directory
Select the “Active Directory” in the Dashboard tree of the left hand side.
Note: if you do not want to add DR4000 to Active Directory reference the Owner’s manual for guest login
instructions.
DR4000 Setup Guide for Backup Exec 2010 R3 v1.0
Enter your Active Directory Credentials
DR4000 Setup Guide for Backup Exec 2010 R3 v1.0
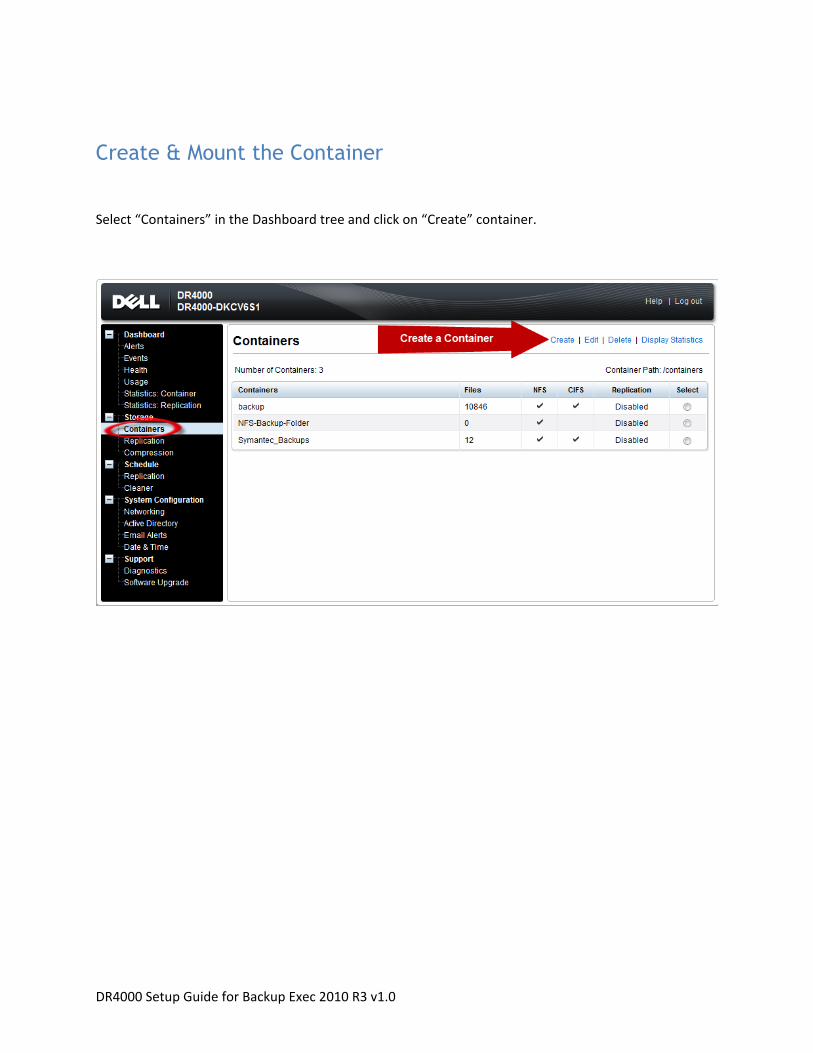
Create & Mount the Container
Select “Containers” in the Dashboard tree and click on “Create” container.
DR4000 Setup Guide for Backup Exec 2010 R3 v1.0
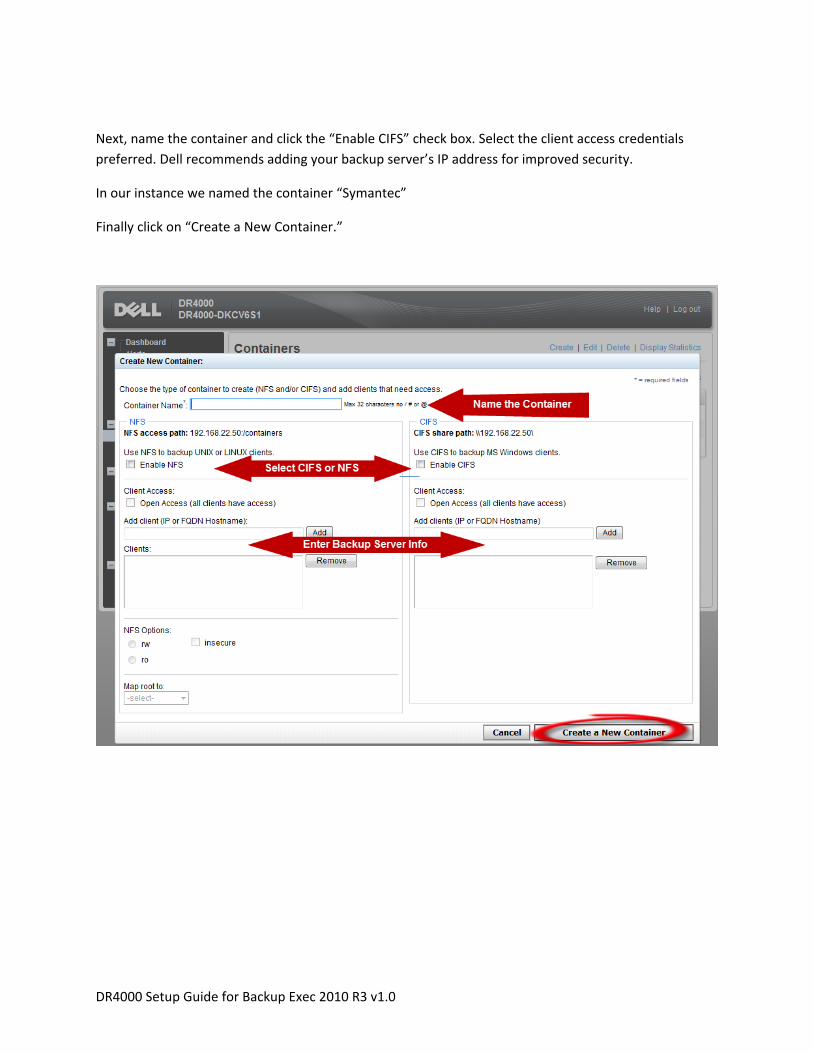
Next, name the container and click the “Enable CIFS” check box. Select the client access credentials
preferred. Dell recommends adding your backup server’s IP address for improved security.
In our instance we named the container “Symantec”
Finally click on “Create a New Container.”
DR4000 Setup Guide for Backup Exec 2010 R3 v1.0
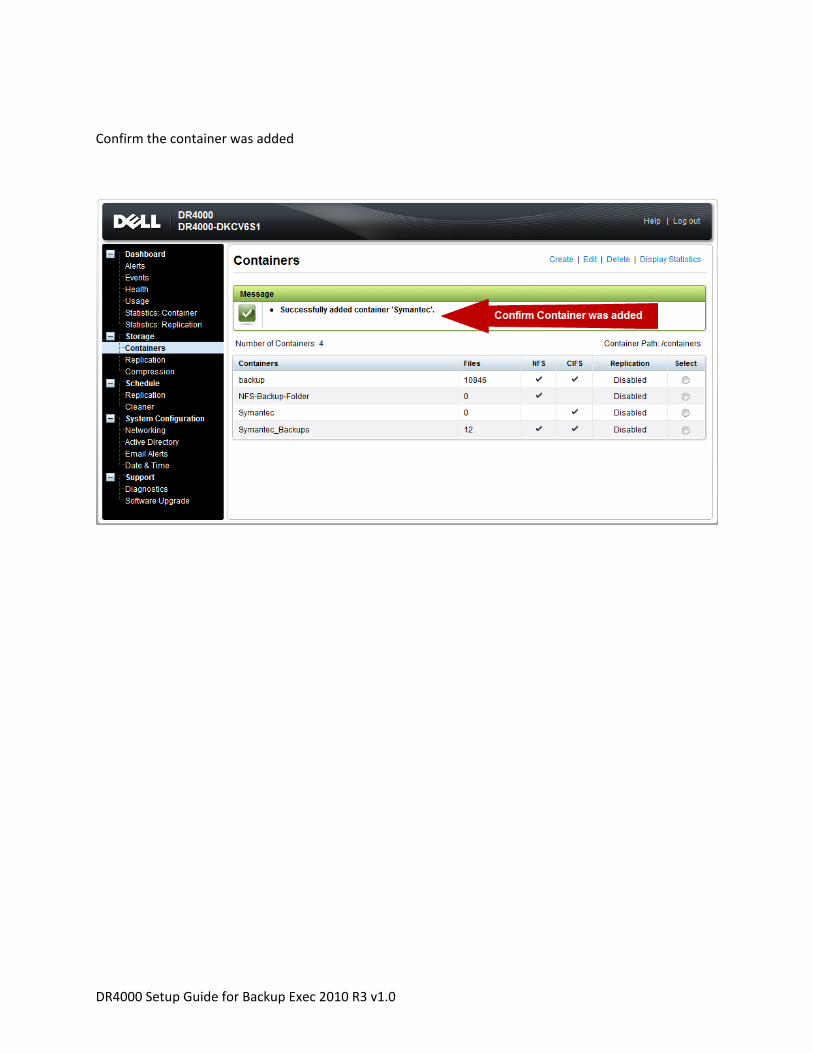
Confirm the container was added
DR4000 Setup Guide for Backup Exec 2010 R3 v1.0
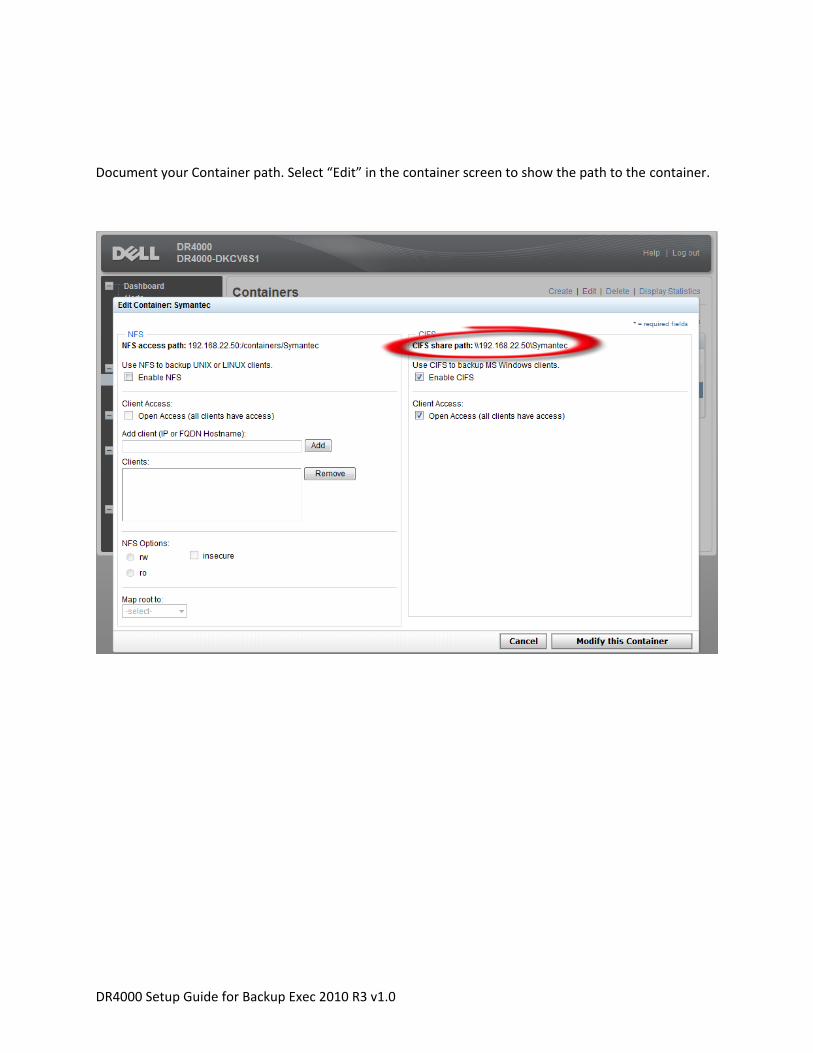
Document your Container path. Select “Edit” in the container screen to show the path to the container.
DR4000 Setup Guide for Backup Exec 2010 R3 v1.0
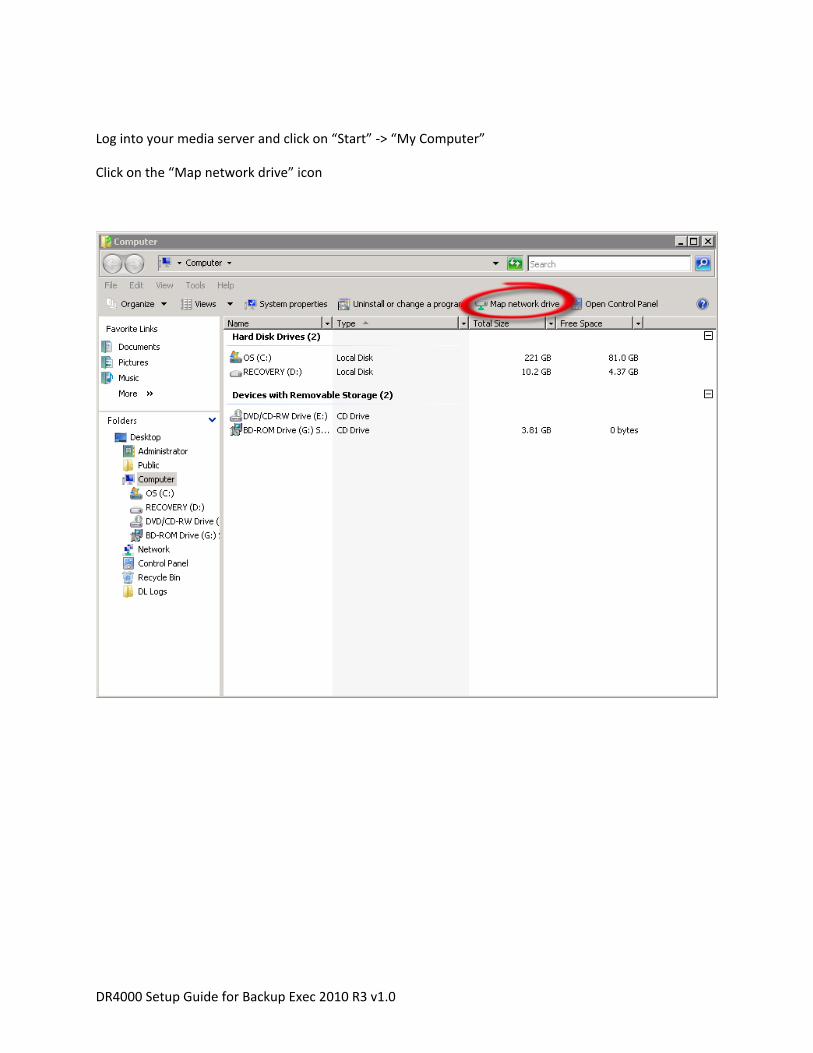
Log into your media server and click on “Start” -> “My Computer”
Click on the “Map network drive” icon
DR4000 Setup Guide for Backup Exec 2010 R3 v1.0
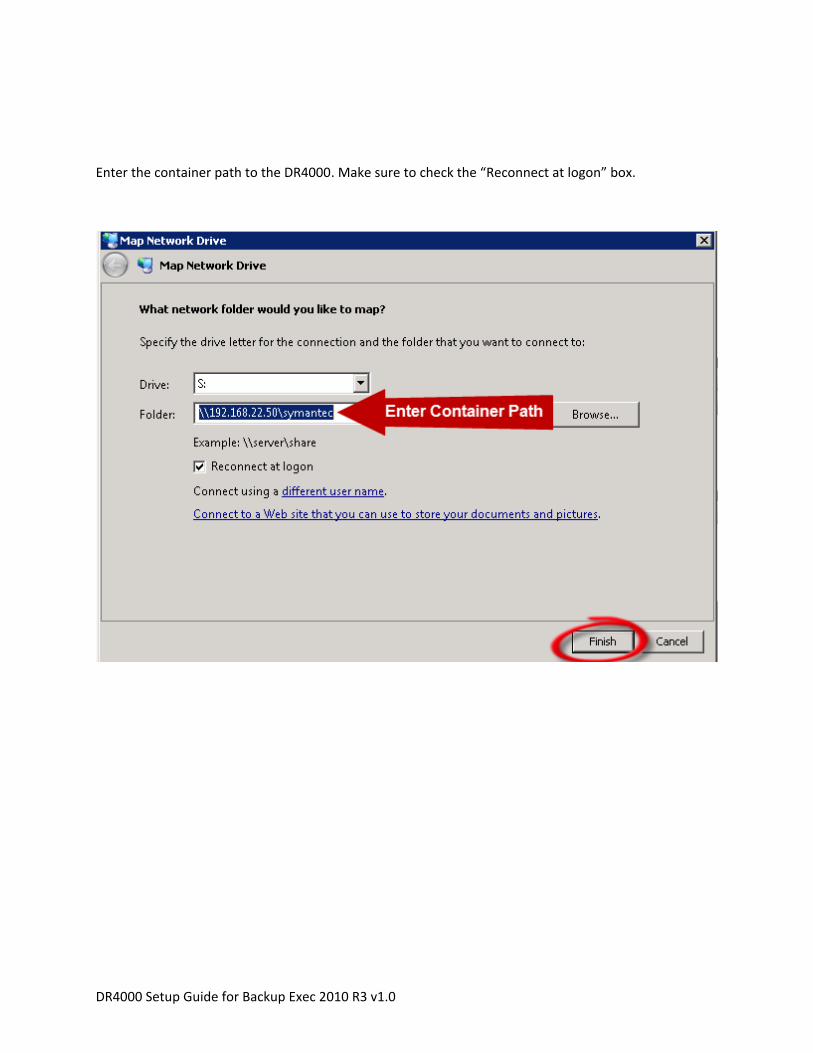
Enter the container path to the DR4000. Make sure to check the “Reconnect at logon” box.
DR4000 Setup Guide for Backup Exec 2010 R3 v1.0
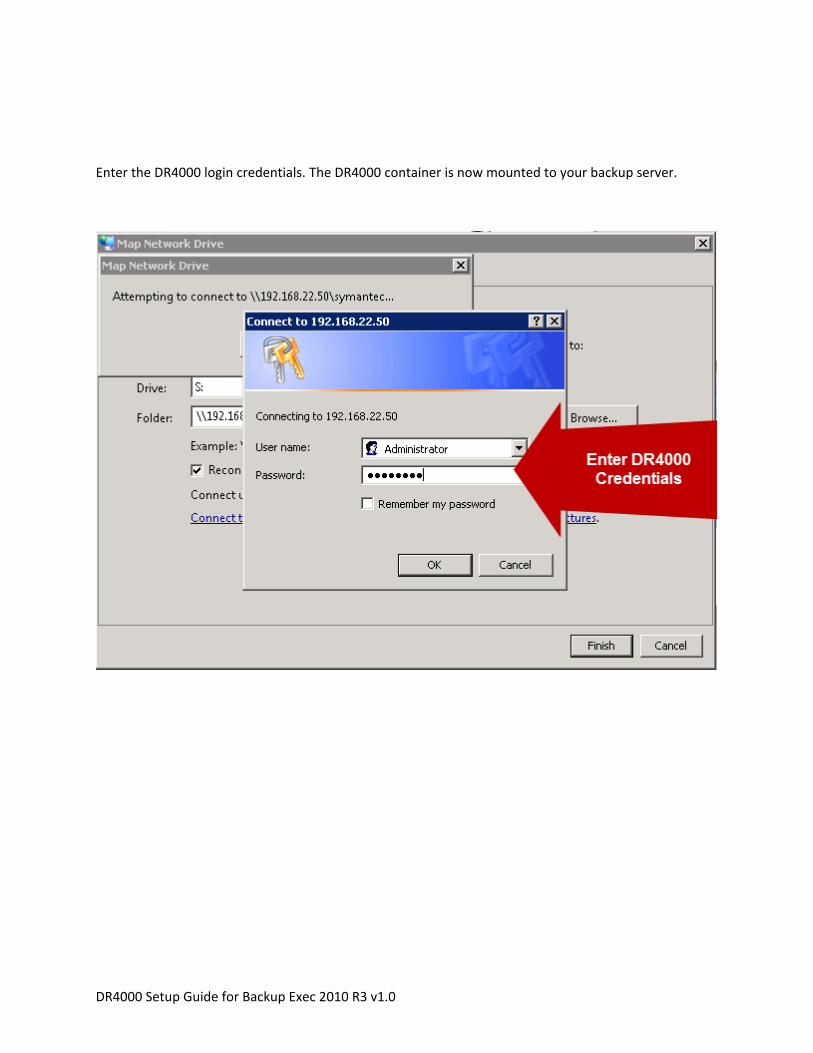
Enter the DR4000 login credentials. The DR4000 container is now mounted to your backup server.
DR4000 Setup Guide for Backup Exec 2010 R3 v1.0
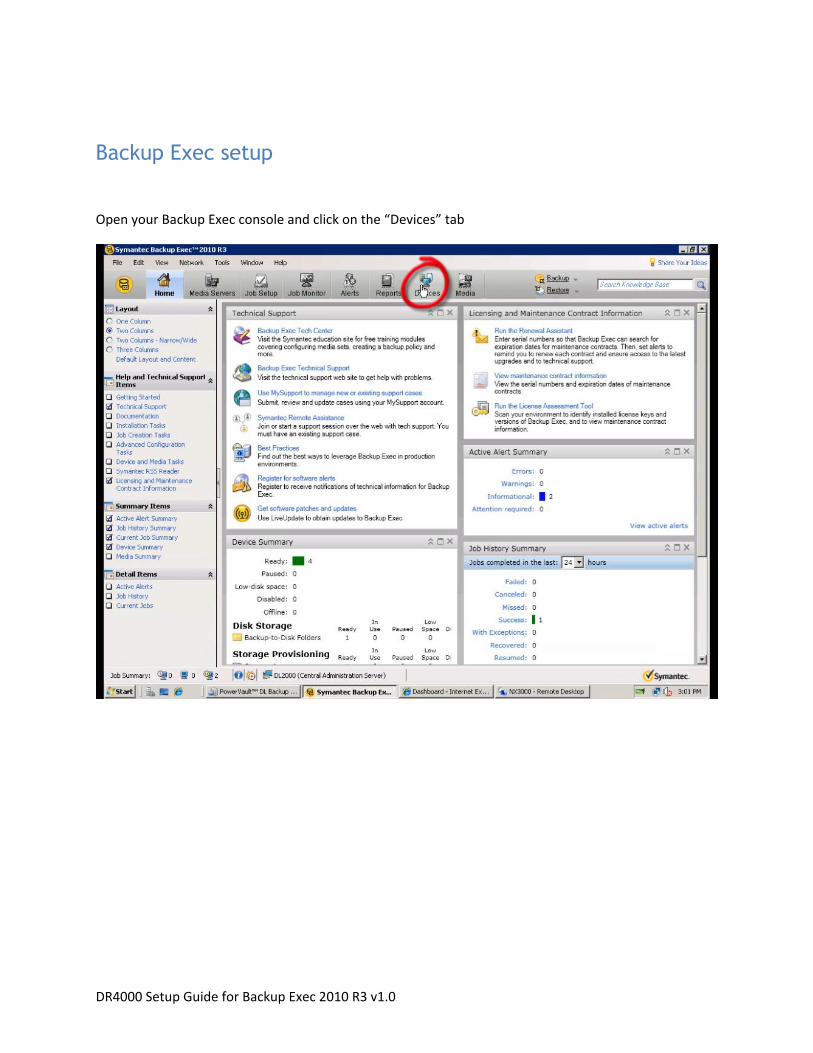
Backup Exec setup
Open your Backup Exec console and click on the “Devices” tab
DR4000 Setup Guide for Backup Exec 2010 R3 v1.0
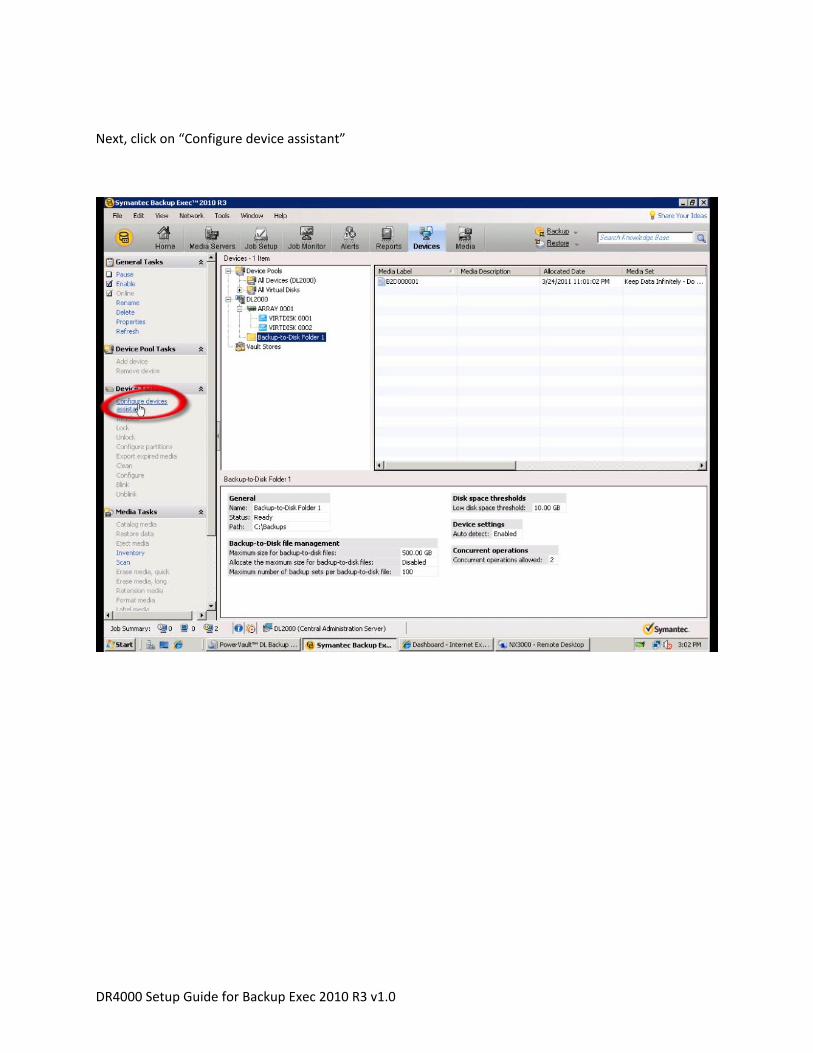
Next, click on “Configure device assistant”
DR4000 Setup Guide for Backup Exec 2010 R3 v1.0
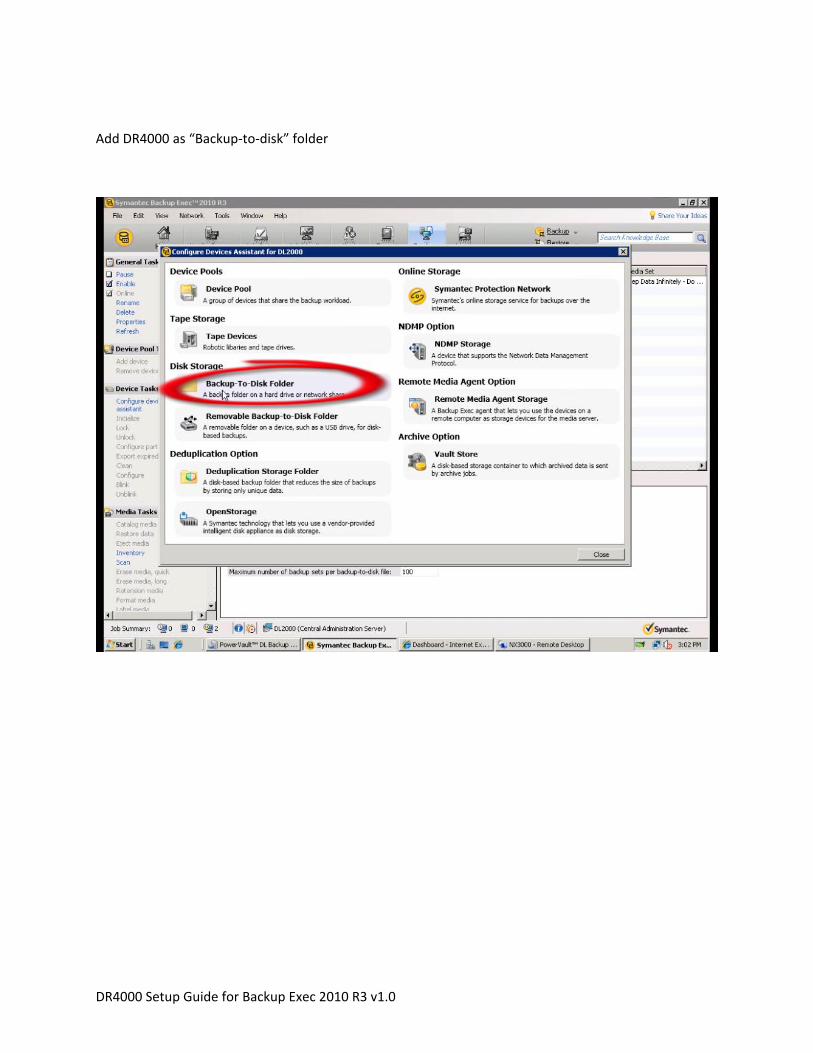
Add DR4000 as “Backup-to-disk” folder
DR4000 Setup Guide for Backup Exec 2010 R3 v1.0
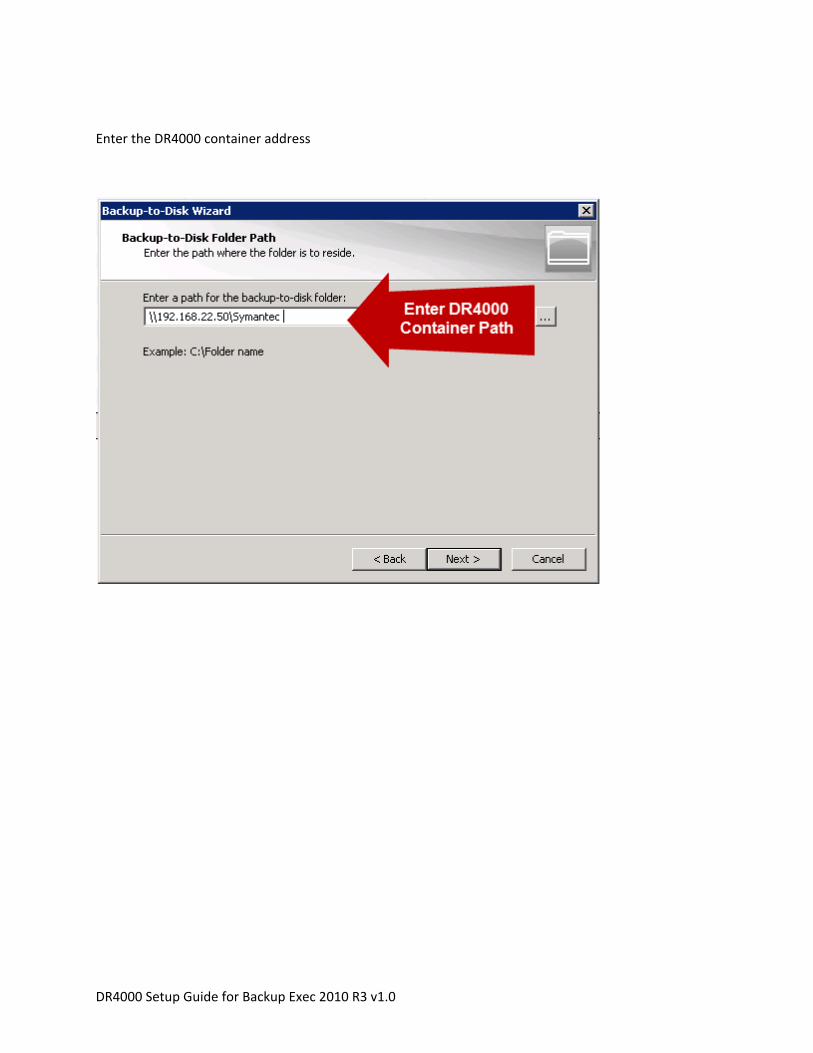
Enter the DR4000 container address
DR4000 Setup Guide for Backup Exec 2010 R3 v1.0
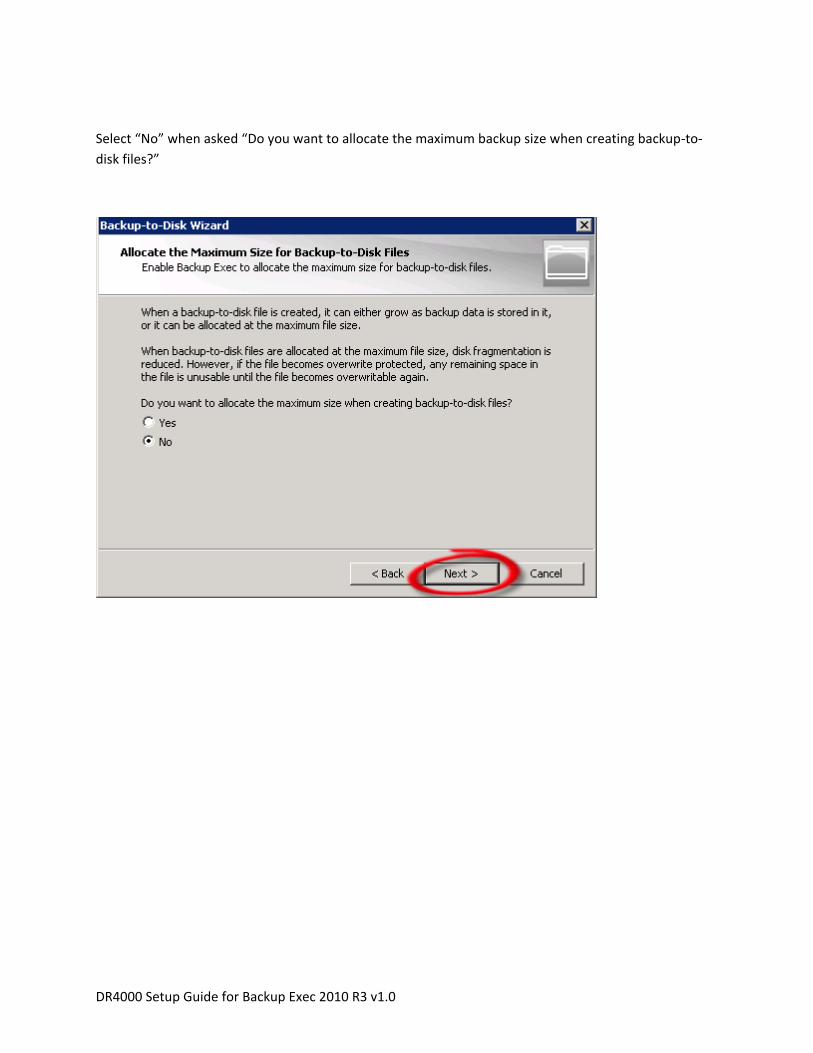
Select “No” when asked “Do you want to allocate the maximum backup size when creating backup-to-
disk files?”
DR4000 Setup Guide for Backup Exec 2010 R3 v1.0
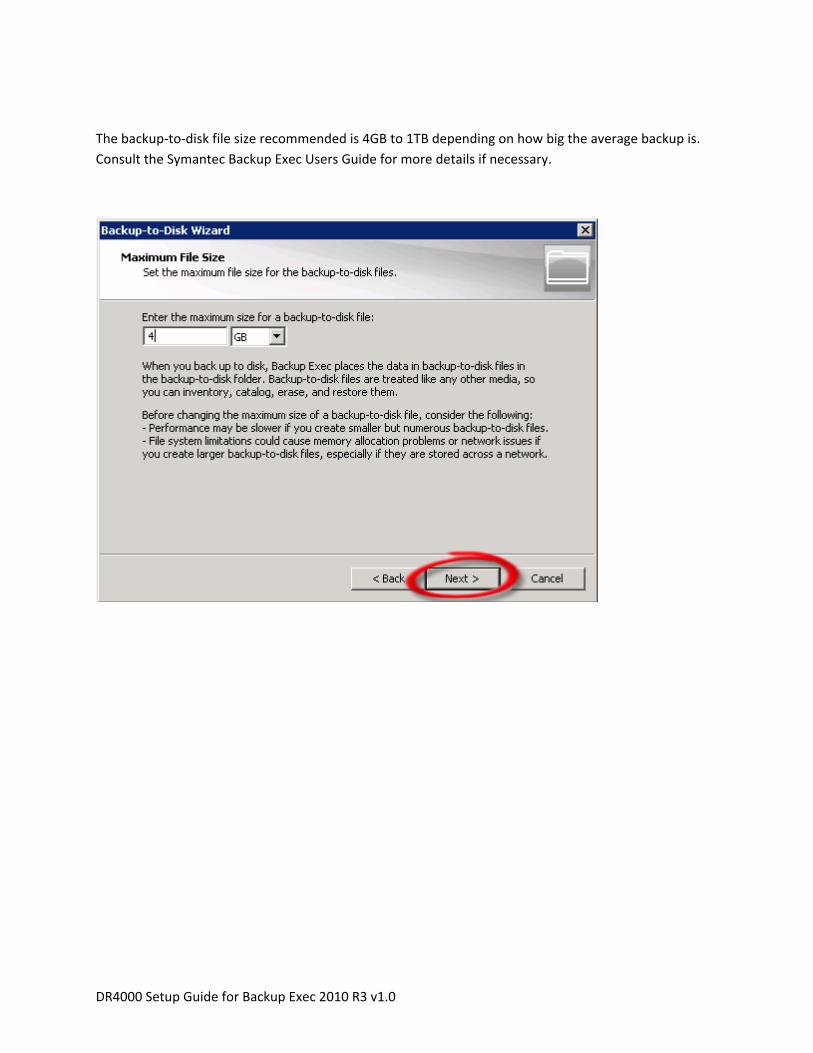
The backup-to-disk file size recommended is 4GB to 1TB depending on how big the average backup is.
Consult the Symantec Backup Exec Users Guide for more details if necessary.
DR4000 Setup Guide for Backup Exec 2010 R3 v1.0
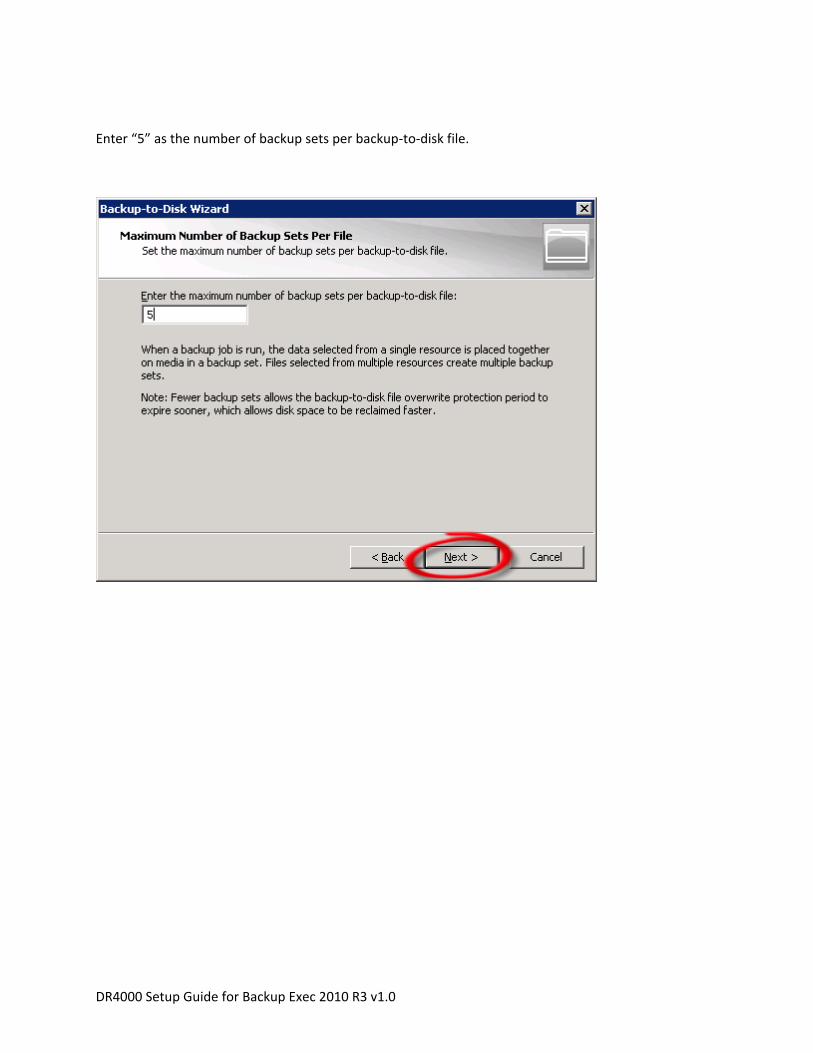
Enter “5” as the number of backup sets per backup-to-disk file.
DR4000 Setup Guide for Backup Exec 2010 R3 v1.0
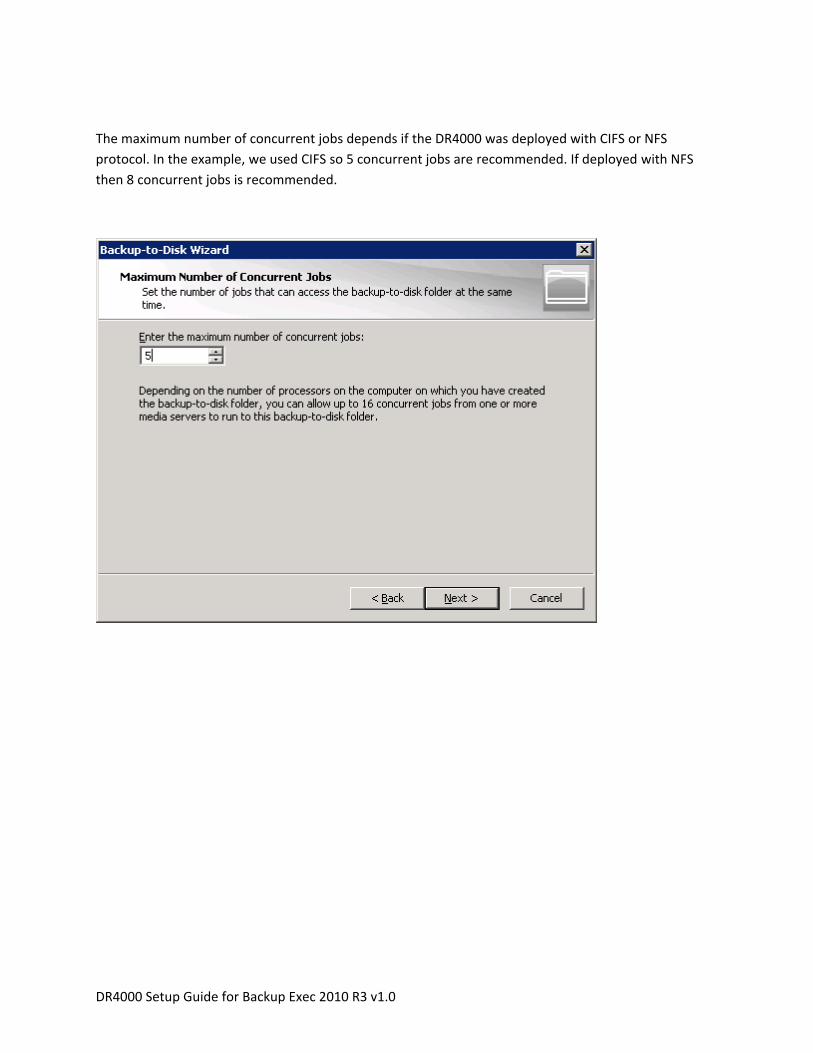
The maximum number of concurrent jobs depends if the DR4000 was deployed with CIFS or NFS
protocol. In the example, we used CIFS so 5 concurrent jobs are recommended. If deployed with NFS
then 8 concurrent jobs is recommended.
DR4000 Setup Guide for Backup Exec 2010 R3 v1.0
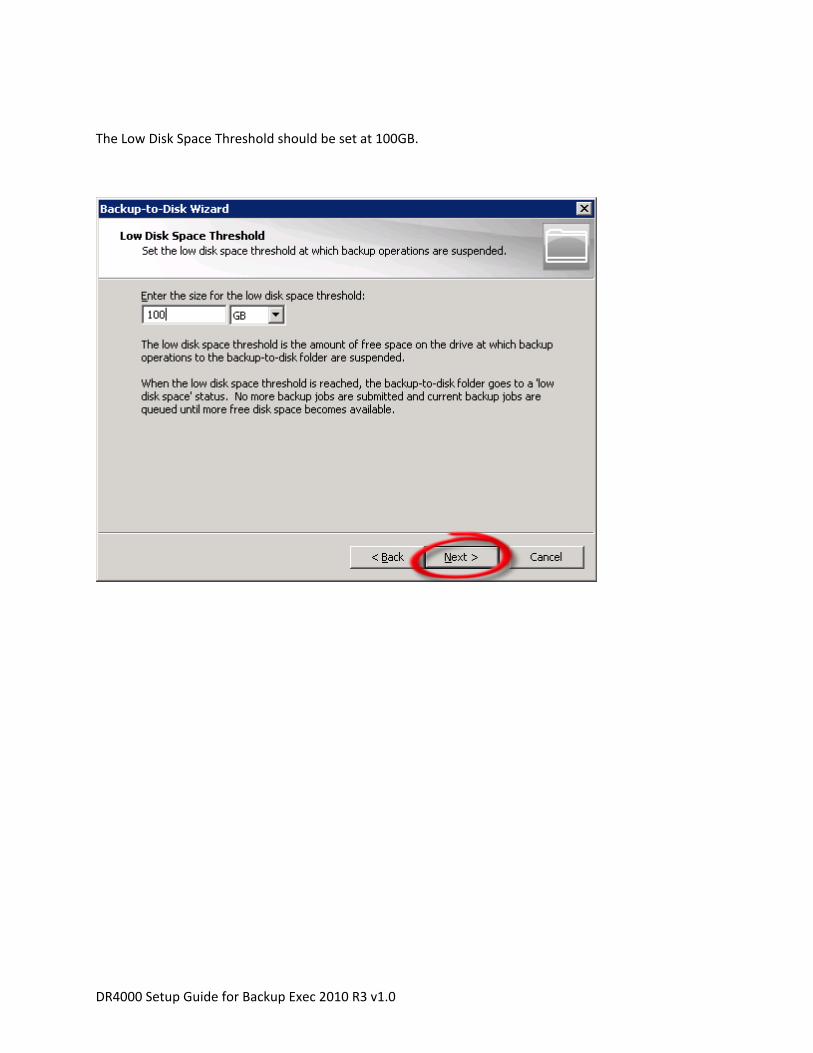
The Low Disk Space Threshold should be set at 100GB.
DR4000 Setup Guide for Backup Exec 2010 R3 v1.0
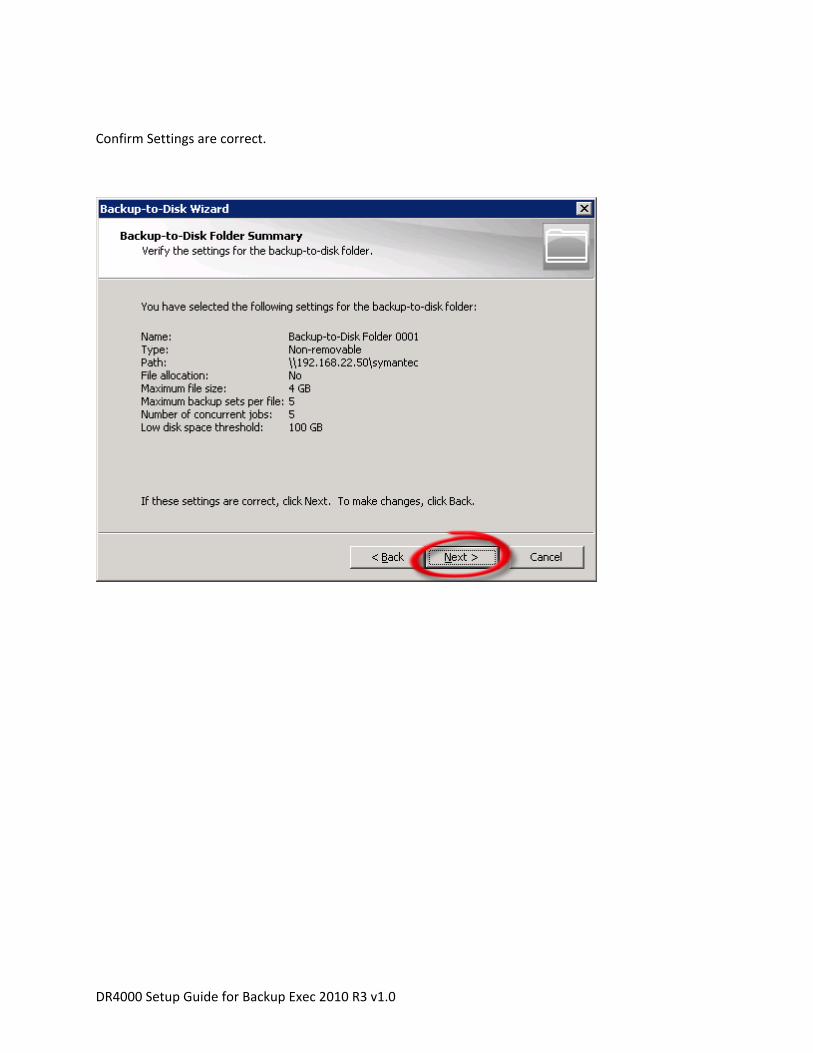
Confirm Settings are correct.
DR4000 Setup Guide for Backup Exec 2010 R3 v1.0
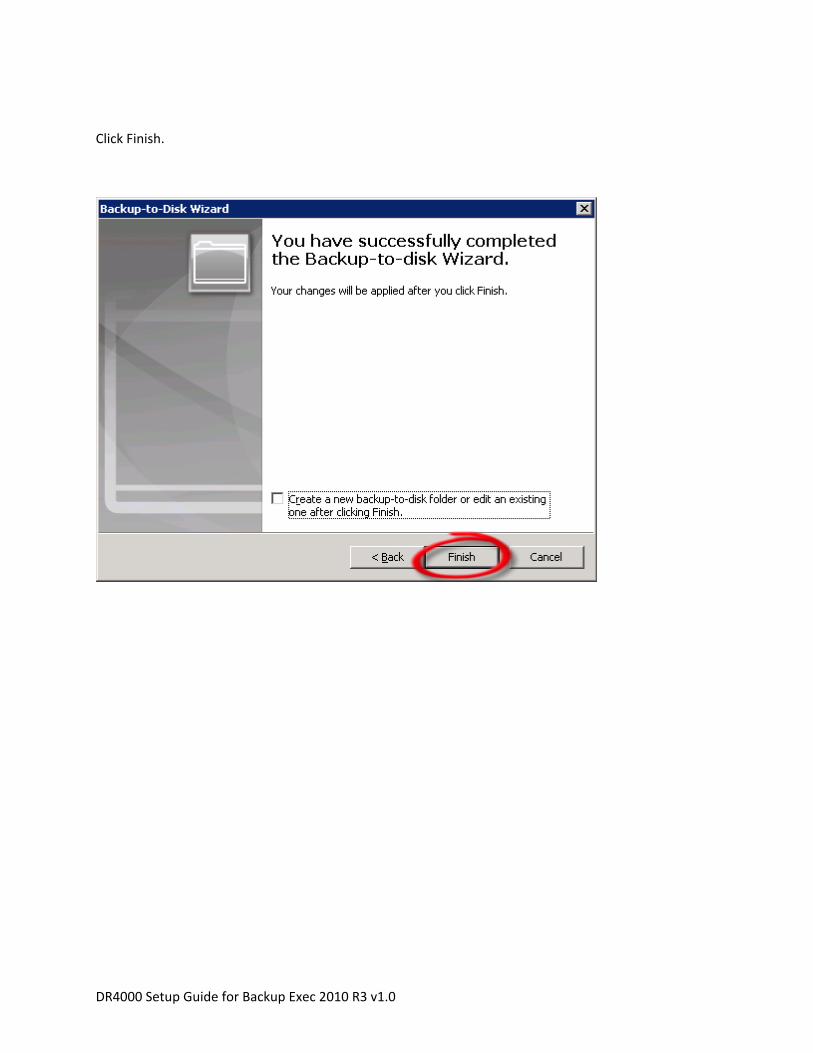
Click Finish.
DR4000 Setup Guide for Backup Exec 2010 R3 v1.0
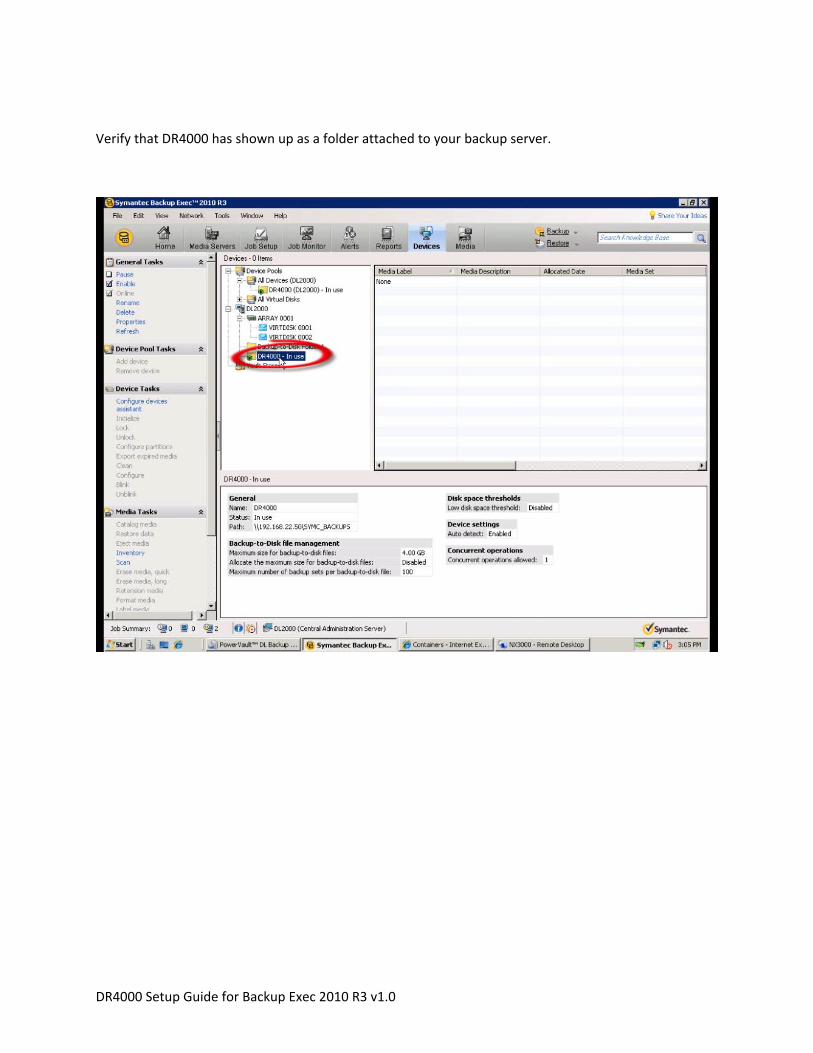
Verify that DR4000 has shown up as a folder attached to your backup server.
DR4000 Setup Guide for Backup Exec 2010 R3 v1.0
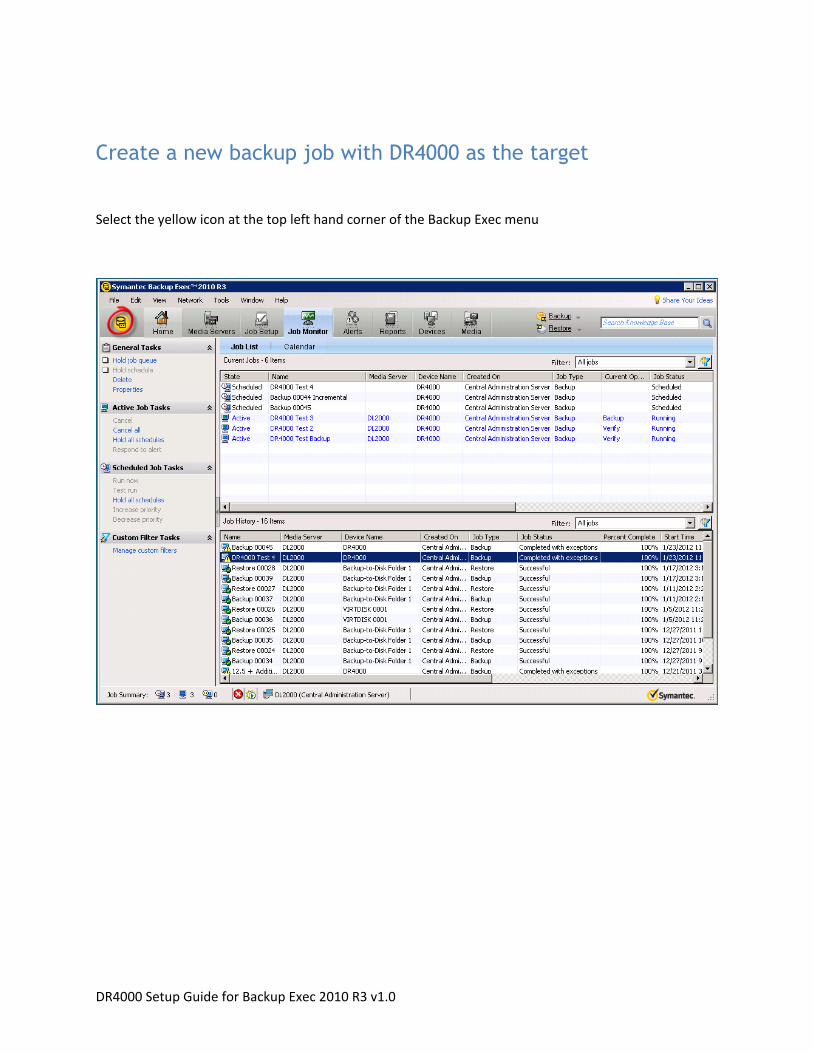
Create a new backup job with DR4000 as the target
Select the yellow icon at the top left hand corner of the Backup Exec menu
DR4000 Setup Guide for Backup Exec 2010 R3 v1.0
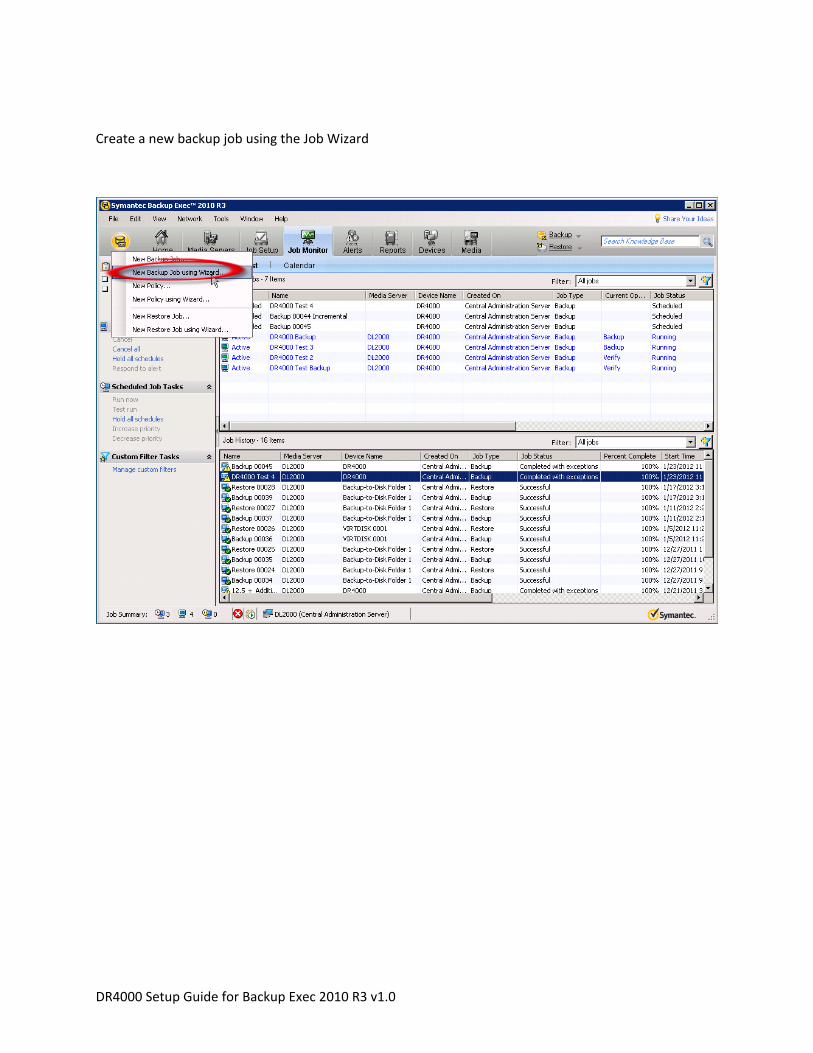
Create a new backup job using the Job Wizard
DR4000 Setup Guide for Backup Exec 2010 R3 v1.0
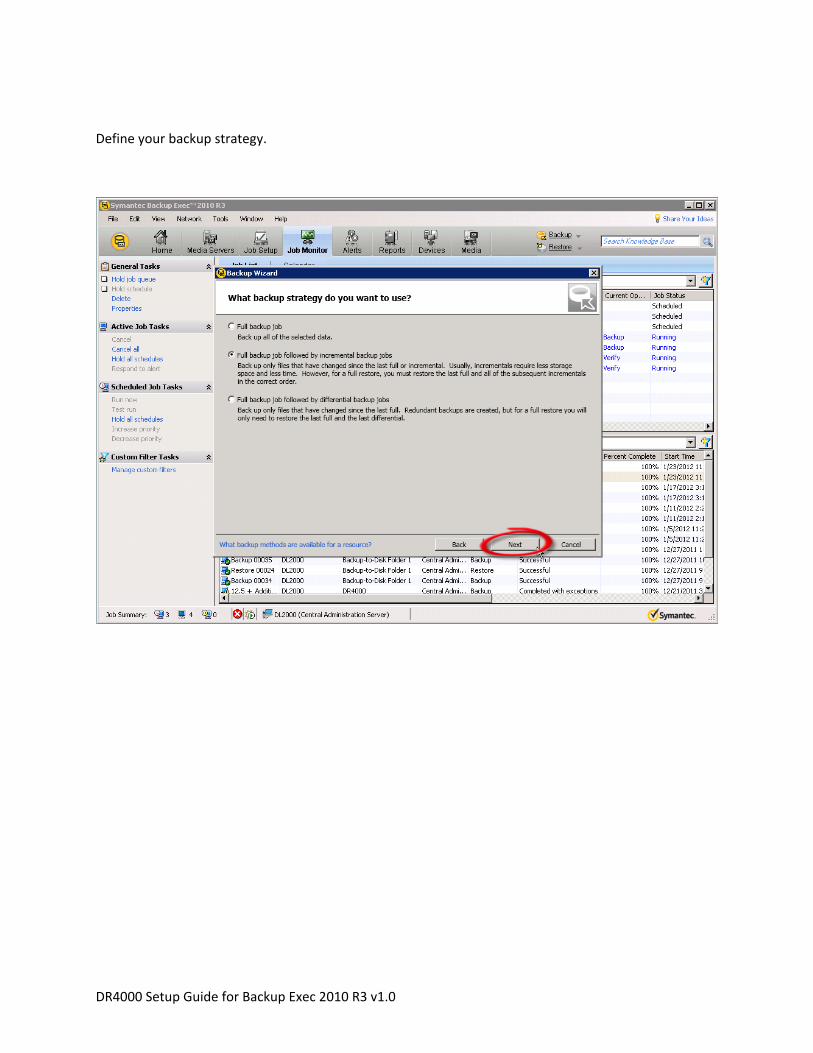
Define your backup strategy.
DR4000 Setup Guide for Backup Exec 2010 R3 v1.0
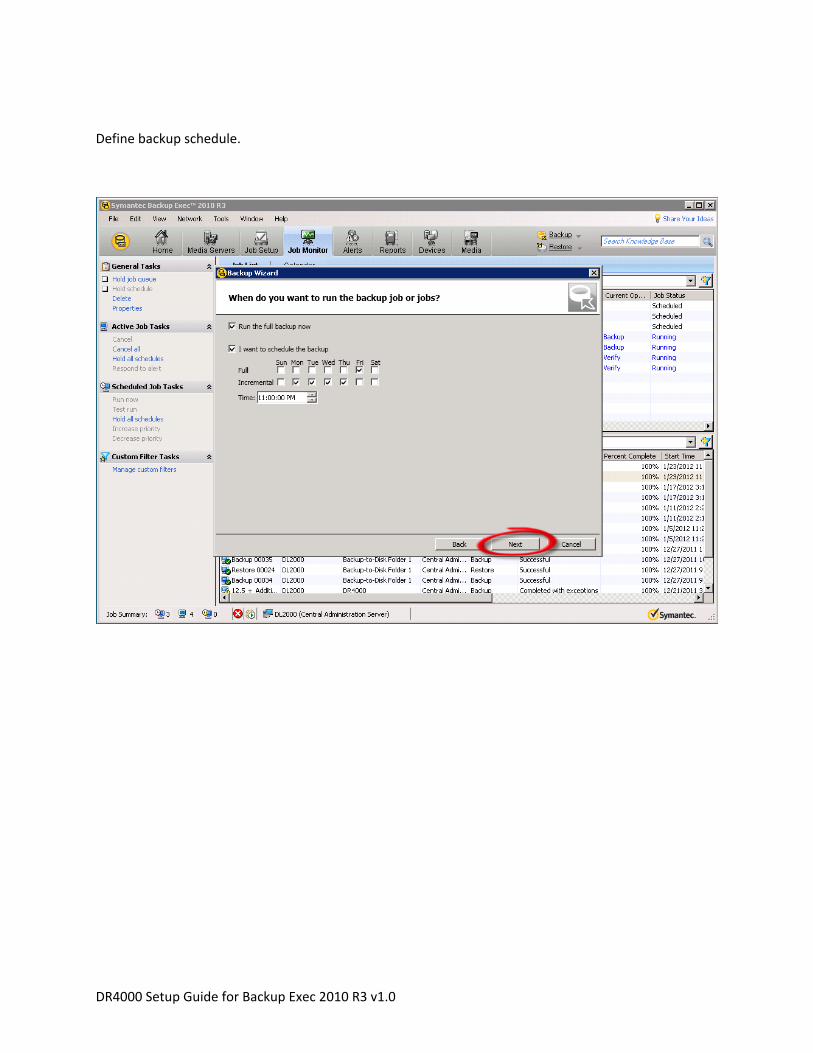
Define backup schedule.
DR4000 Setup Guide for Backup Exec 2010 R3 v1.0
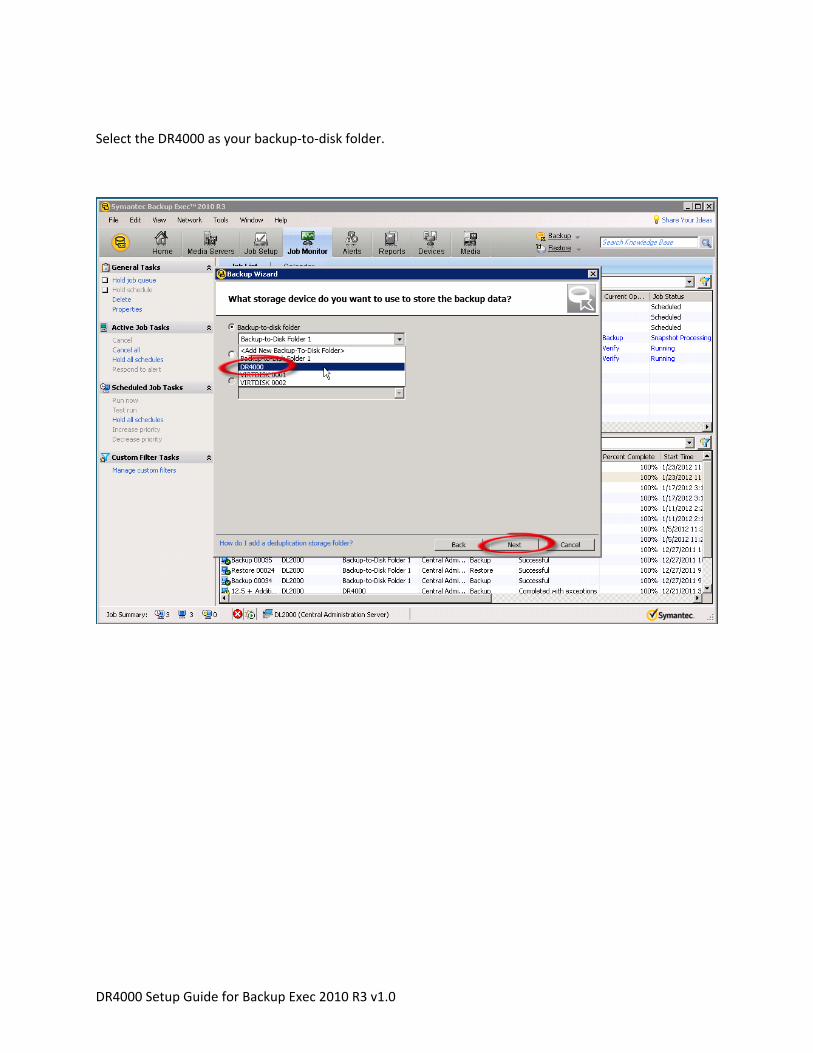
Select the DR4000 as your backup-to-disk folder.
DR4000 Setup Guide for Backup Exec 2010 R3 v1.0
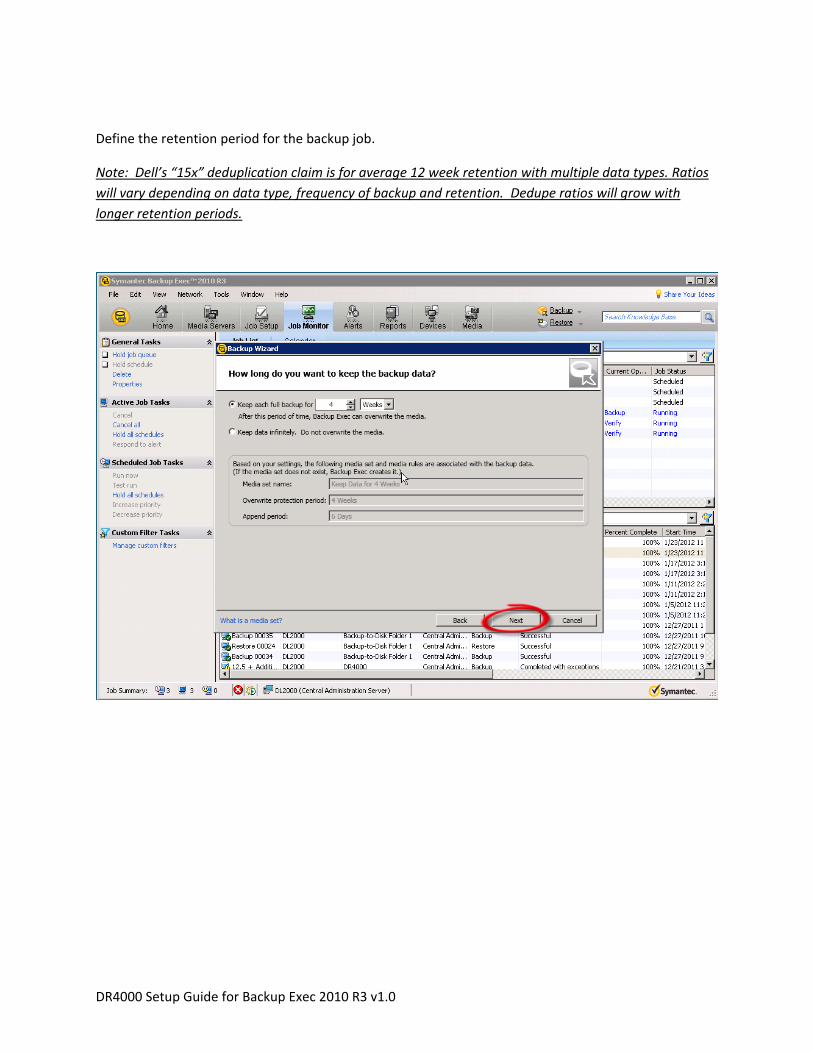
Define the retention period for the backup job.
Note: Dell’s “15x” deduplication claim is for average 12 week retention with multiple data types. Ratios
will vary depending on data type, frequency of backup and retention. Dedupe ratios will grow with
longer retention periods.
DR4000 Setup Guide for Backup Exec 2010 R3 v1.0
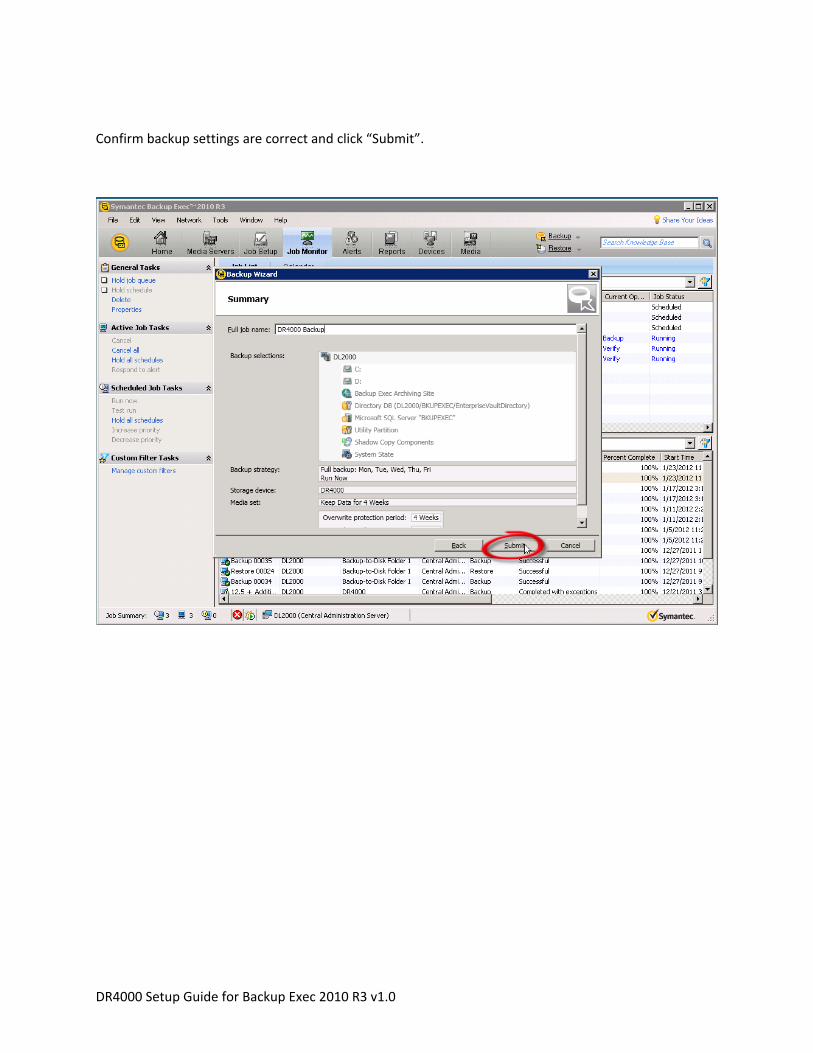
Confirm backup settings are correct and click “Submit”.
DR4000 Setup Guide for Backup Exec 2010 R3 v1.0
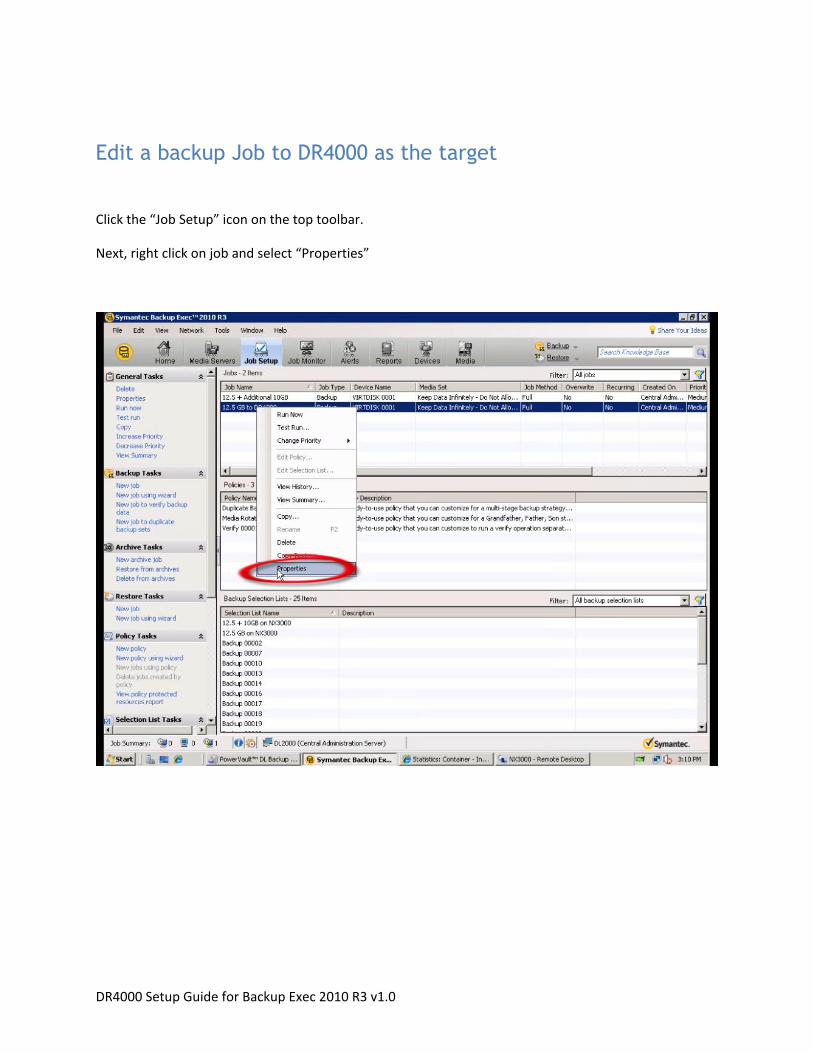
Edit a backup Job to DR4000 as the target
Click the “Job Setup” icon on the top toolbar.
Next, right click on job and select “Properties”
DR4000 Setup Guide for Backup Exec 2010 R3 v1.0
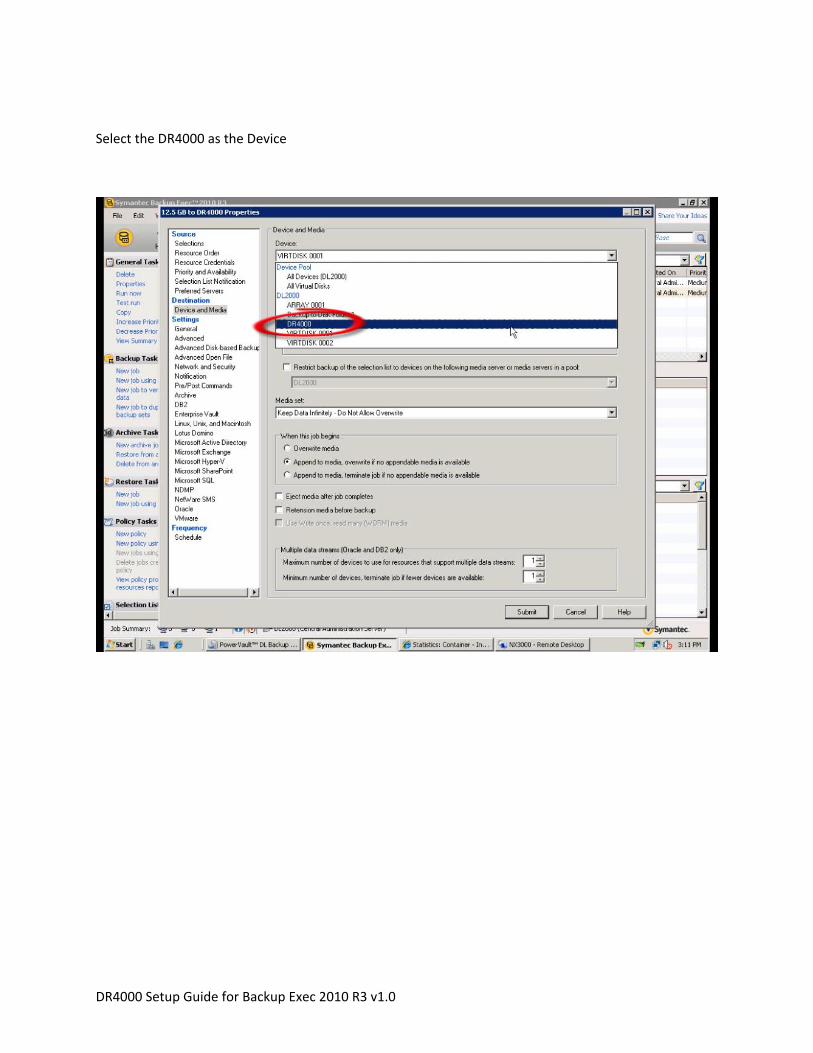
Select the DR4000 as the Device
DR4000 Setup Guide for Backup Exec 2010 R3 v1.0
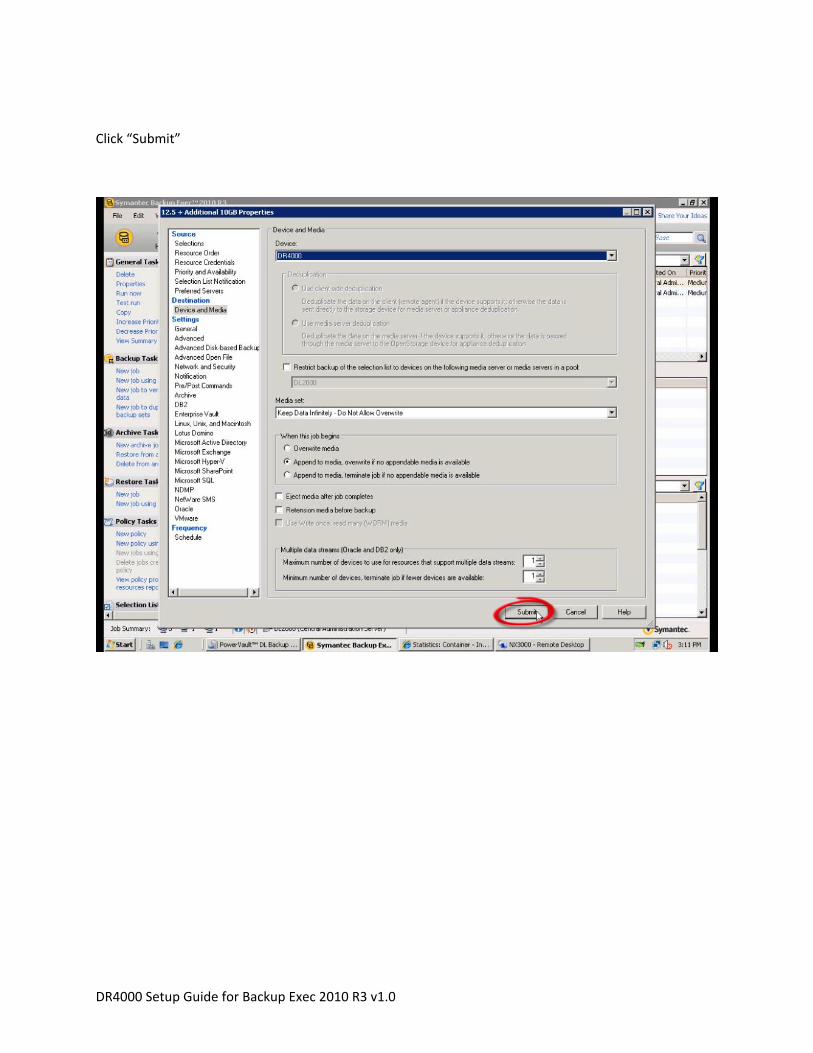
Click “Submit”
DR4000 Setup Guide for Backup Exec 2010 R3 v1.0
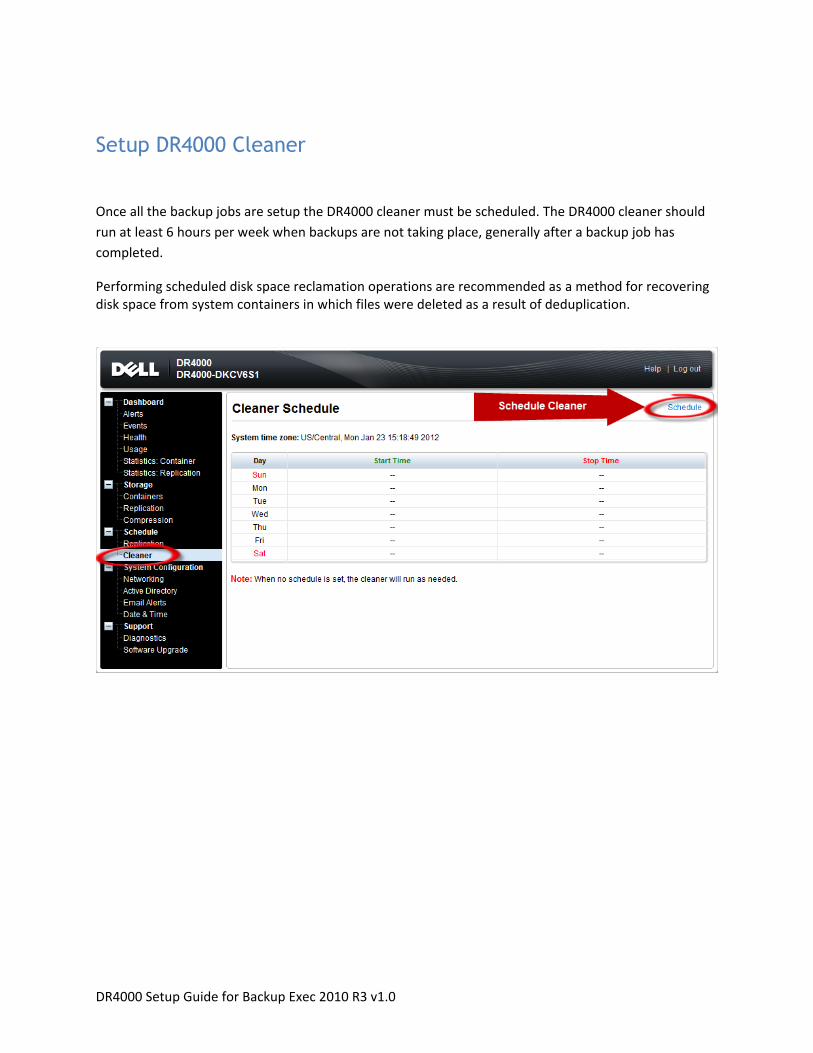
Setup DR4000 Cleaner
Once all the backup jobs are setup the DR4000 cleaner must be scheduled. The DR4000 cleaner should
run at least 6 hours per week when backups are not taking place, generally after a backup job has
completed.
Performing scheduled disk space reclamation operations are recommended as a method for recovering disk space from system containers in which files were deleted as a result of deduplication.
DR4000 Setup Guide for Backup Exec 2010 R3 v1.0
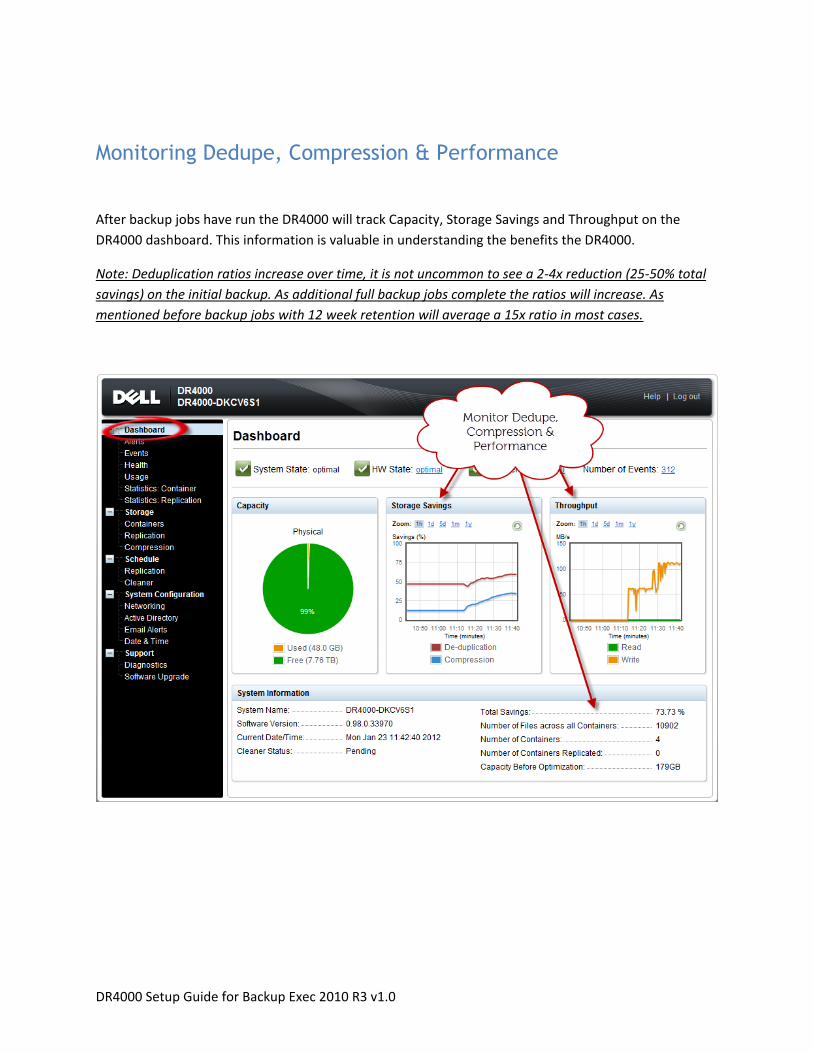
Monitoring Dedupe, Compression & Performance
After backup jobs have run the DR4000 will track Capacity, Storage Savings and Throughput on the
DR4000 dashboard. This information is valuable in understanding the benefits the DR4000.
Note: Deduplication ratios increase over time, it is not uncommon to see a 2-4x reduction (25-50% total
savings) on the initial backup. As additional full backup jobs complete the ratios will increase. As
mentioned before backup jobs with 12 week retention will average a 15x ratio in most cases.