64
1 | Page DREAMWEAVER CS6 Step by step Jelinek Zoran
| Date post: | 17-Jul-2015 |
| Category: |
Education |
| Upload: | zoran-jelinek |
| View: | 209 times |
| Download: | 2 times |

1 | P a g e
DREAMWEAVER CS6 Step by step
Jelinek Zoran
2 | P a g e
When you finish this course, you will know how to:
- open a Web document
-create a root folder, and set up the host server
- use one of the layouts, or to work with a template
- create site by templates that can be downloaded from
Internet
- learn the basics of HTML and Java script language
- format the text on the page
- edit an image and insert it on the page
-work with multimedia content
- create links
- validate a site
- publish a website on the Web
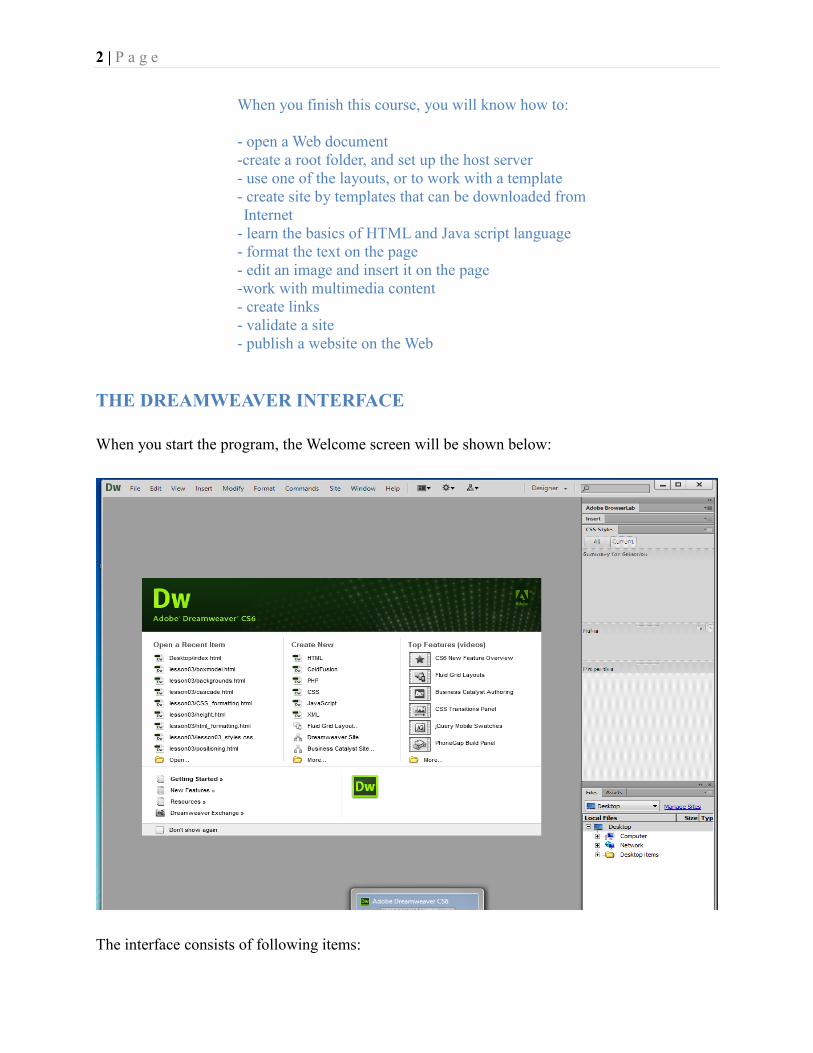
THE DREAMWEAVER INTERFACE
When you start the program, the Welcome screen will be shown below:
The interface consists of following items:
3 | P a g e
-The menu bar
-The application toolbar
-The document toolbar
-The status bar
-The panel bar
-The workspace
THE MENU BAR
The menu bar contains few buttons: file, edit, view, modify, format, commands, site, windows
and help (look up the content of each item).
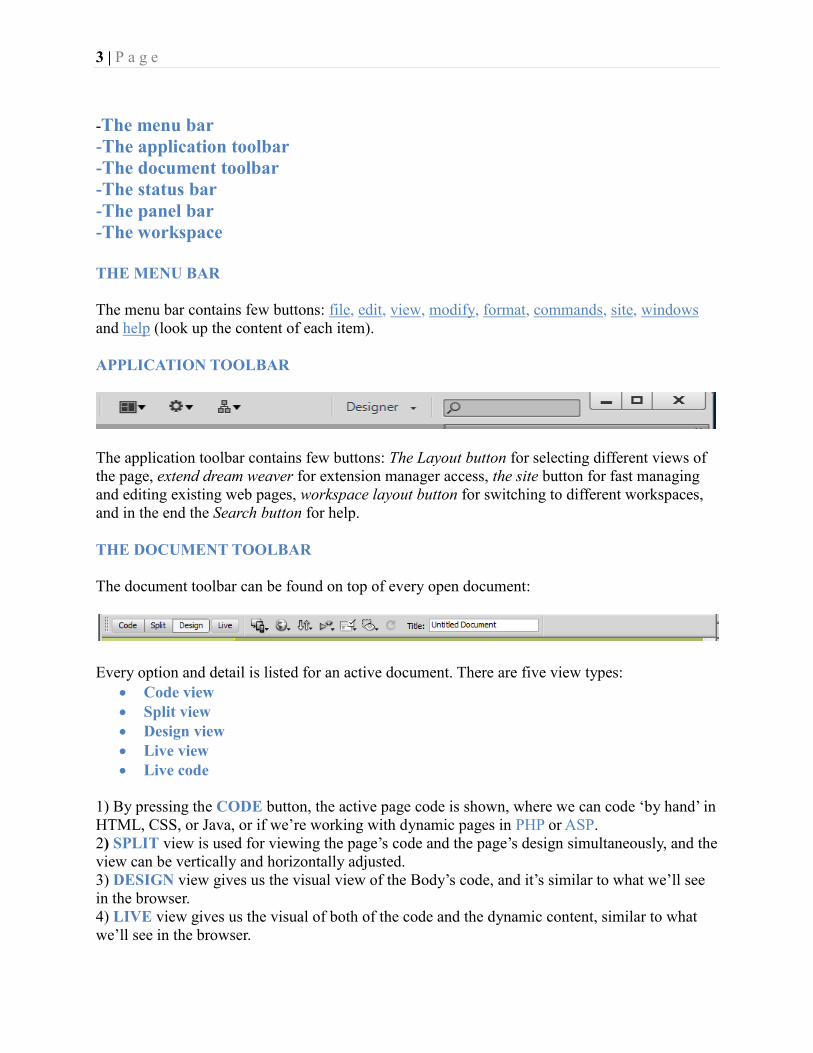
APPLICATION TOOLBAR
The application toolbar contains few buttons: The Layout button for selecting different views of
the page, extend dream weaver for extension manager access, the site button for fast managing
and editing existing web pages, workspace layout button for switching to different workspaces,
and in the end the Search button for help.
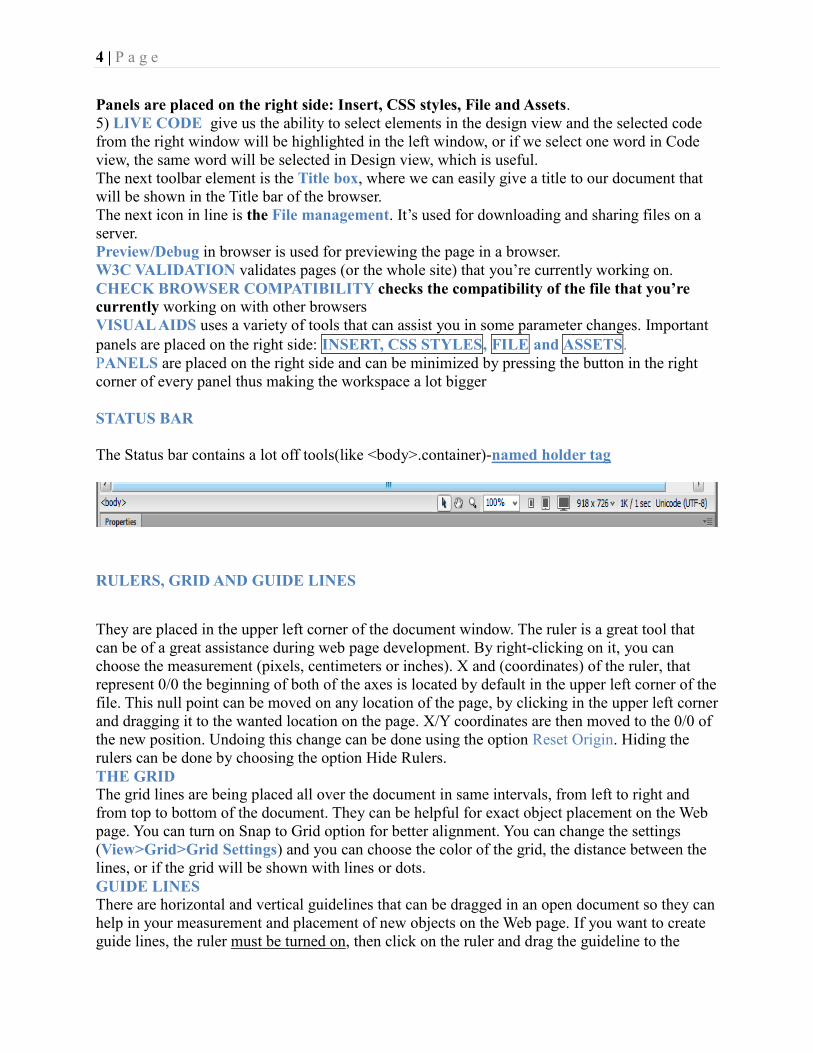
THE DOCUMENT TOOLBAR
The document toolbar can be found on top of every open document:
Every option and detail is listed for an active document. There are five view types:
Code view
Split view
Design view
Live view
Live code
1) By pressing the CODE button, the active page code is shown, where we can code „by hand‟ in
HTML, CSS, or Java, or if we‟re working with dynamic pages in PHP or ASP.
2) SPLIT view is used for viewing the page‟s code and the page‟s design simultaneously, and the
view can be vertically and horizontally adjusted.
3) DESIGN view gives us the visual view of the Body‟s code, and it‟s similar to what we‟ll see
in the browser.
4) LIVE view gives us the visual of both of the code and the dynamic content, similar to what
we‟ll see in the browser.
4 | P a g e
Panels are placed on the right side: Insert, CSS styles, File and Assets.
5) LIVE CODE give us the ability to select elements in the design view and the selected code
from the right window will be highlighted in the left window, or if we select one word in Code
view, the same word will be selected in Design view, which is useful.
The next toolbar element is the Title box, where we can easily give a title to our document that
will be shown in the Title bar of the browser.
The next icon in line is the File management. It‟s used for downloading and sharing files on a
server.
Preview/Debug in browser is used for previewing the page in a browser.
W3C VALIDATION validates pages (or the whole site) that you‟re currently working on.
CHECK BROWSER COMPATIBILITY checks the compatibility of the file that you’re
currently working on with other browsers VISUAL AIDS uses a variety of tools that can assist you in some parameter changes. Important
panels are placed on the right side: INSERT, CSS STYLES, FILE and ASSETS.
PANELS are placed on the right side and can be minimized by pressing the button in the right
corner of every panel thus making the workspace a lot bigger
STATUS BAR
The Status bar contains a lot off tools(like <body>.container)-named holder tag
RULERS, GRID AND GUIDE LINES
They are placed in the upper left corner of the document window. The ruler is a great tool that
can be of a great assistance during web page development. By right-clicking on it, you can
choose the measurement (pixels, centimeters or inches). X and (coordinates) of the ruler, that
represent 0/0 the beginning of both of the axes is located by default in the upper left corner of the
file. This null point can be moved on any location of the page, by clicking in the upper left corner
and dragging it to the wanted location on the page. X/Y coordinates are then moved to the 0/0 of
the new position. Undoing this change can be done using the option Reset Origin. Hiding the
rulers can be done by choosing the option Hide Rulers.
THE GRID
The grid lines are being placed all over the document in same intervals, from left to right and
from top to bottom of the document. They can be helpful for exact object placement on the Web
page. You can turn on Snap to Grid option for better alignment. You can change the settings
(View>Grid>Grid Settings) and you can choose the color of the grid, the distance between the
lines, or if the grid will be shown with lines or dots.
GUIDE LINES
There are horizontal and vertical guidelines that can be dragged in an open document so they can
help in your measurement and placement of new objects on the Web page. If you want to create
guide lines, the ruler must be turned on, then click on the ruler and drag the guideline to the
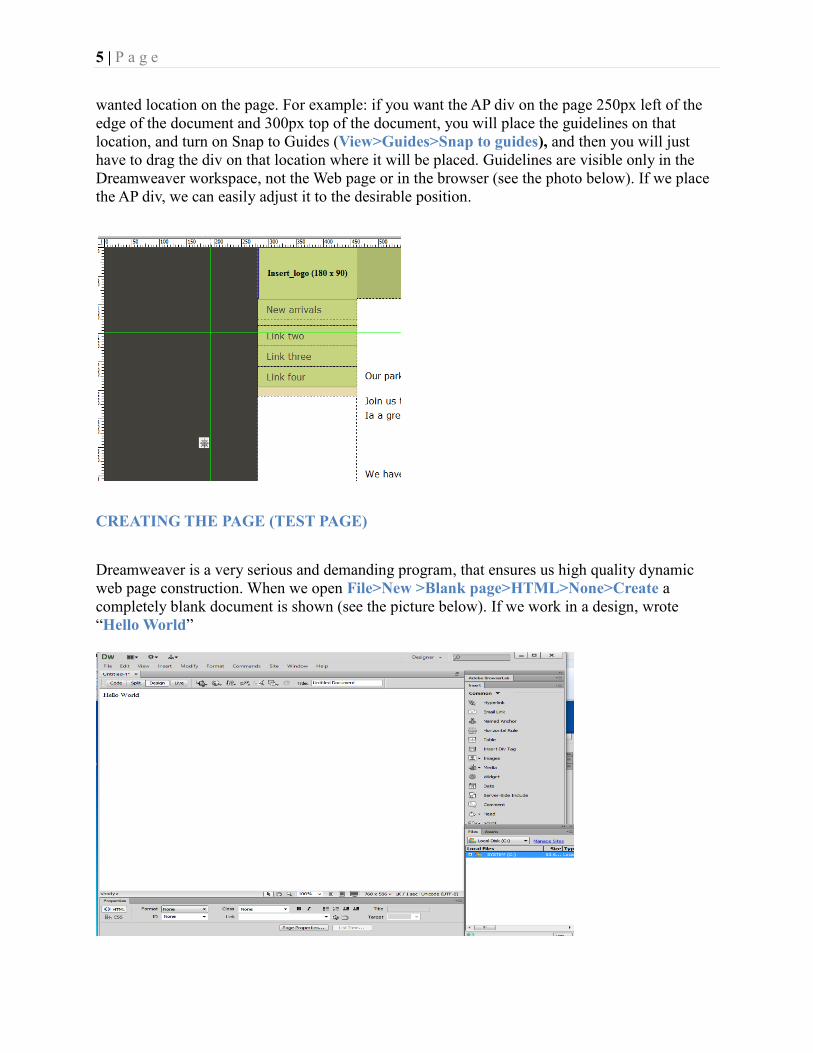
5 | P a g e
wanted location on the page. For example: if you want the AP div on the page 250px left of the
edge of the document and 300px top of the document, you will place the guidelines on that
location, and turn on Snap to Guides (View>Guides>Snap to guides), and then you will just
have to drag the div on that location where it will be placed. Guidelines are visible only in the
Dreamweaver workspace, not the Web page or in the browser (see the photo below). If we place
the AP div, we can easily adjust it to the desirable position.
CREATING THE PAGE (TEST PAGE)
Dreamweaver is a very serious and demanding program, that ensures us high quality dynamic
web page construction. When we open File>New >Blank page>HTML>None>Create a
completely blank document is shown (see the picture below). If we work in a design, wrote
“Hello World”
6 | P a g e
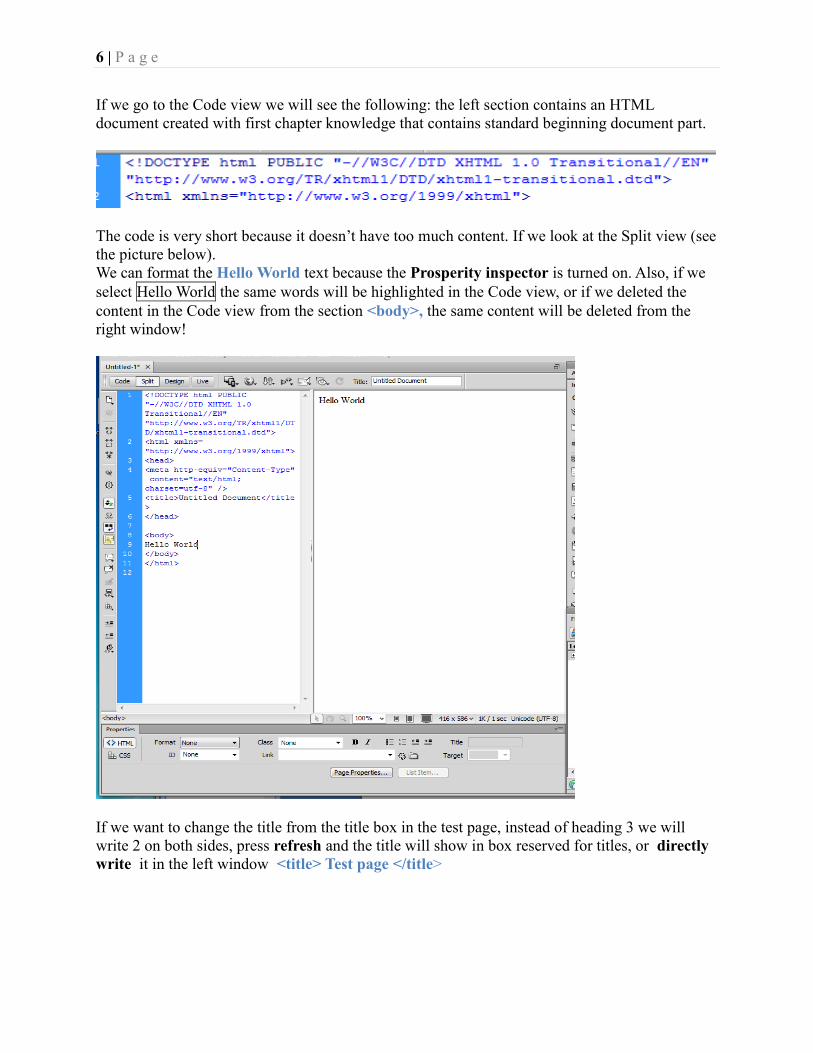
If we go to the Code view we will see the following: the left section contains an HTML
document created with first chapter knowledge that contains standard beginning document part.
The code is very short because it doesn‟t have too much content. If we look at the Split view (see
the picture below).
We can format the Hello World text because the Prosperity inspector is turned on. Also, if we
select Hello World the same words will be highlighted in the Code view, or if we deleted the
content in the Code view from the section <body>, the same content will be deleted from the
right window!
If we want to change the title from the title box in the test page, instead of heading 3 we will
write 2 on both sides, press refresh and the title will show in box reserved for titles, or directly
write it in the left window <title> Test page </title>

7 | P a g e
We can view and save the test page, but we won‟t because it‟s just a page for testing.
CREATING A WEB SITE
For creating the site you need to determine the root folder and subfolders. The web site
content should be placed within the folder. We‟ll create the folder on the desktop and call them
Spring park. We click on Site <Manage Site> New and choose the path to the local Root folder
as shown below select the path to the local root folder as shown below in Set up for Spring Park.
Type the site name that will never appear anywhere, for example the name of the client, and with
the option browse, we will got to the folder Spring Park, which we originally created , and where all the content should be contained. In that folder we will create a folder for images, a
folder for CSS documents and later, the subfolders that we need. This is the first step towards
making a web page. The name that we have given the site, will appear in the Files panel

8 | P a g e
Before the creation of the main design, it is necessary to sketch the desire page layout:
THE FIRST PAGE DESIGN
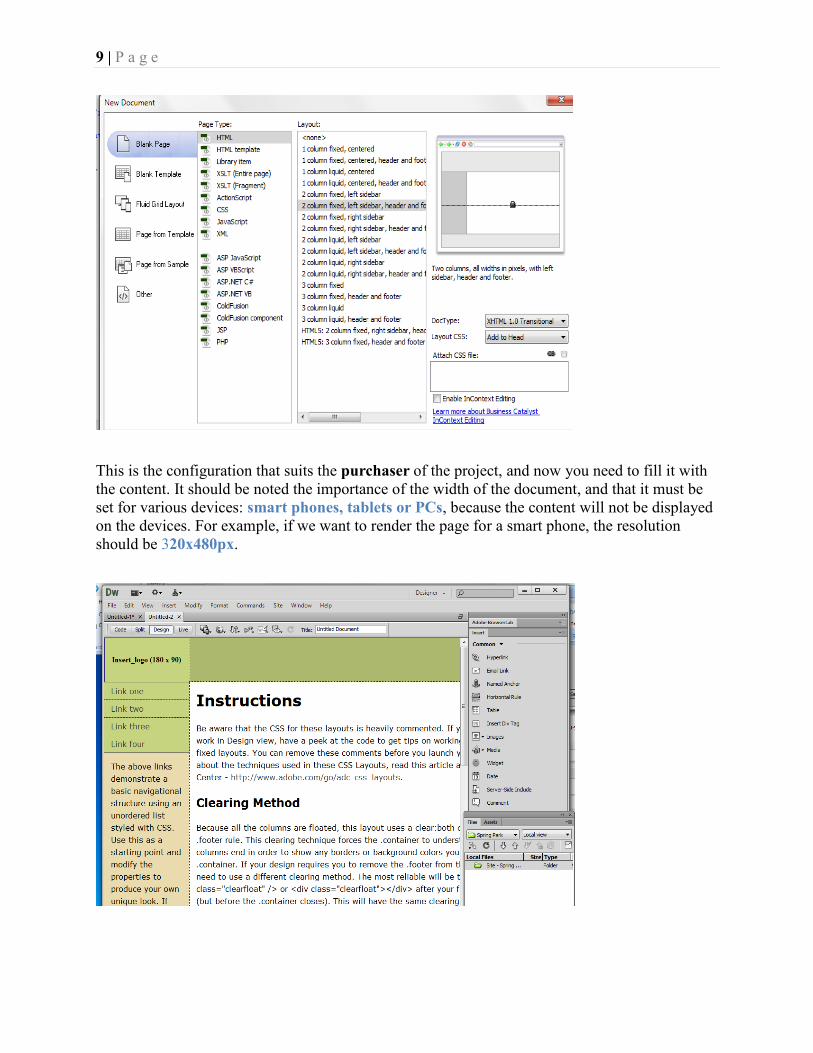
The first page design respecting the client‟s wishes. Choose a blank page, from File<New and
from layout 2 columns, header and footer and the left sidebar. Click Create
9 | P a g e
This is the configuration that suits the purchaser of the project, and now you need to fill it with
the content. It should be noted the importance of the width of the document, and that it must be
set for various devices: smart phones, tablets or PCs, because the content will not be displayed
on the devices. For example, if we want to render the page for a smart phone, the resolution
should be 320x480px.

10 | P a g e
These settings can be found from the Start bar on the right side, where clicking on the icon
Phone, tablet or PC gets us the look and size of the page in pixels.
Change the word instruction to Welcome to spring Park. Open the split view and select the
whole paragraph between <p> content </p> deleted it and on the same place in Code view
change the text to: “Our park is a great location for family day out”.
11 | P a g e
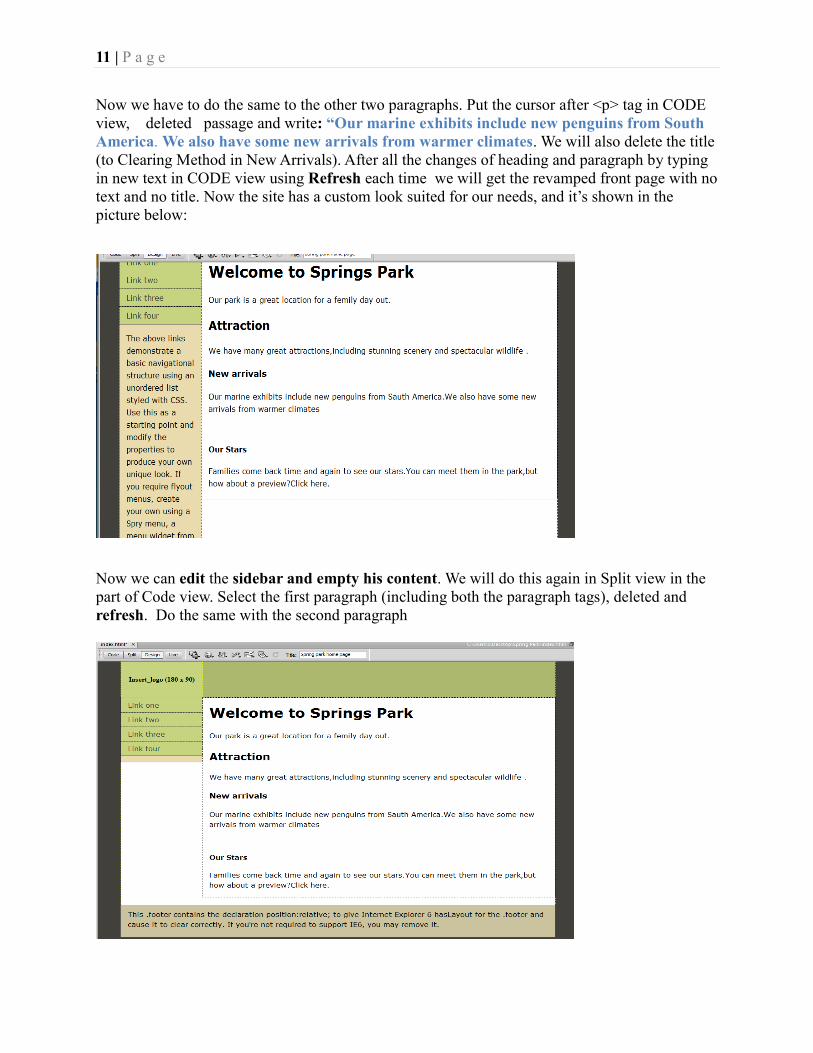
Now we have to do the same to the other two paragraphs. Put the cursor after <p> tag in CODE
view, deleted passage and write: “Our marine exhibits include new penguins from South
America. We also have some new arrivals from warmer climates. We will also delete the title
(to Clearing Method in New Arrivals). After all the changes of heading and paragraph by typing
in new text in CODE view using Refresh each time we will get the revamped front page with no
text and no title. Now the site has a custom look suited for our needs, and it‟s shown in the
picture below:
Now we can edit the sidebar and empty his content. We will do this again in Split view in the
part of Code view. Select the first paragraph (including both the paragraph tags), deleted and
refresh. Do the same with the second paragraph
12 | P a g e
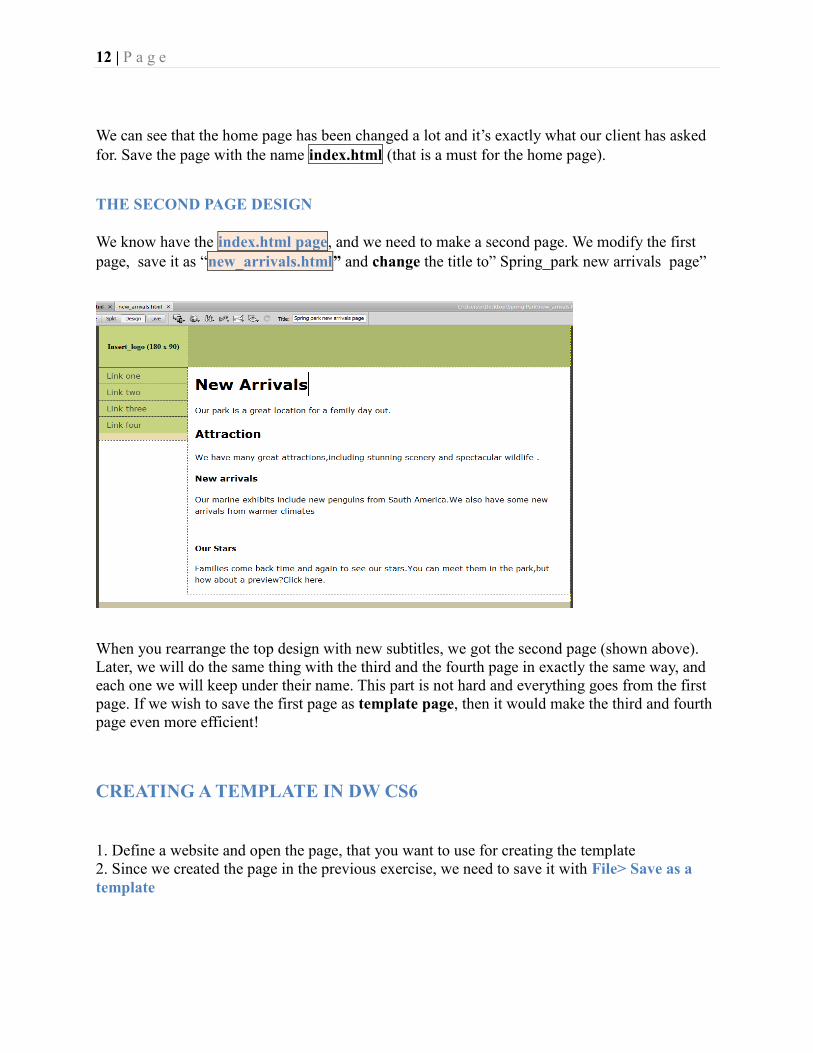
We can see that the home page has been changed a lot and it‟s exactly what our client has asked
for. Save the page with the name index.html (that is a must for the home page).
THE SECOND PAGE DESIGN
We know have the index.html page, and we need to make a second page. We modify the first
page, save it as “new_arrivals.html” and change the title to” Spring_park new arrivals page”
When you rearrange the top design with new subtitles, we got the second page (shown above).
Later, we will do the same thing with the third and the fourth page in exactly the same way, and
each one we will keep under their name. This part is not hard and everything goes from the first
page. If we wish to save the first page as template page, then it would make the third and fourth
page even more efficient!
CREATING A TEMPLATE IN DW CS6
1. Define a website and open the page, that you want to use for creating the template
2. Since we created the page in the previous exercise, we need to save it with File> Save as a
template

13 | P a g e
3. A small window will pop up in which we chose Spring Park site on which we can apply this
template, and give the name of the template Template1.
4. Create a stable region by going to the menu and choosing Insert> Template object> Editable
region
These regions are frameworks for content that is unique to each page on which the template is
applied.
5. A small window will open (picture above) in which you have to enter the name of the region.
The same thing should be done with the rest of the parts of the created page. Every part should
be assigned with a different name.
6. Now, open the page you want to apply the template .
7. Choose>Modify> Template> Apply template to Page. Select the template you want to apply
to this page and press the Select key.
8. In the Inconsistent Region Names window choose a template and click Use to all.
9. Click OK.
All that will change later in the use of templates for creating a page must be in a variable field,
including hyperlinks. If you make a hyperlink in the template, use directory or point to file tool
located on the Property panel to find the hyperlink.
You must not enter the hyperlink directly into the appropriate field on the Properties
panel, because then the hyperlink will not work! Dreamweaver automatically forms a path
when you use one of these two methods. Save the file in the end.
Changing the patterns of variable fields can be disabled. From the Modify menu, select
Templates, and then Remove Template Markup. The contour will disappear indicating the
area as a variable and it‟s locked and cannot be changed in pages made this template. Templates
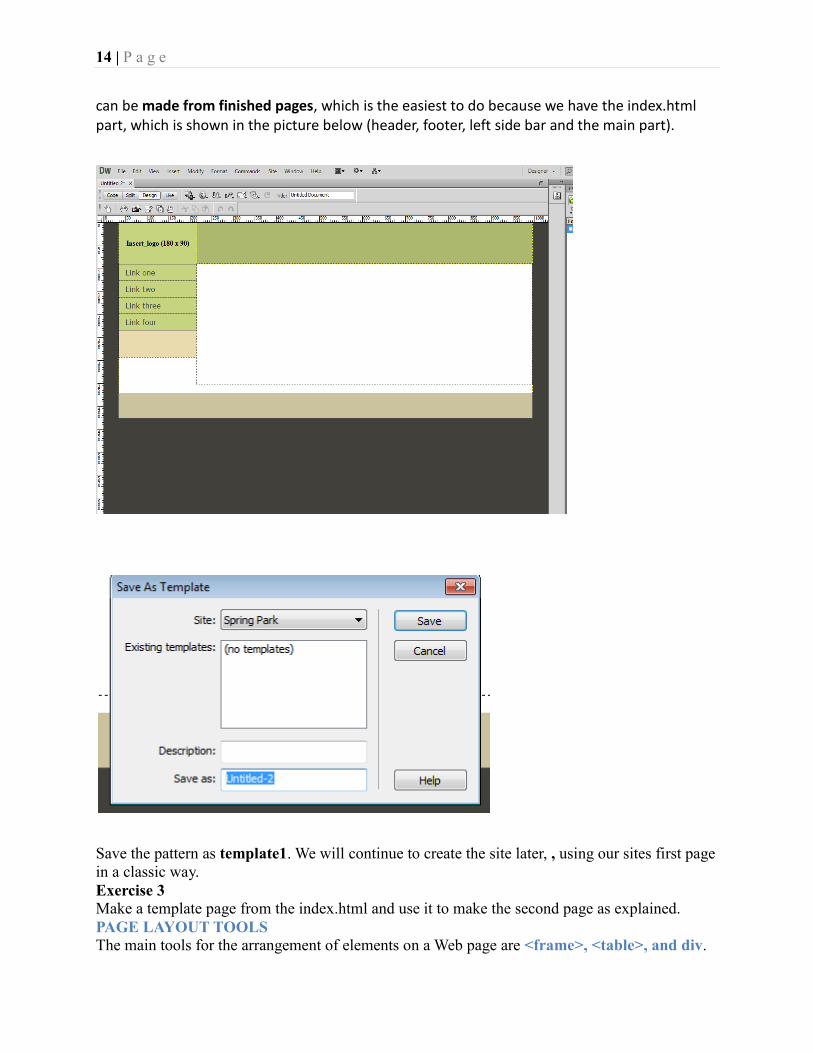
14 | P a g e
can be made from finished pages, which is the easiest to do because we have the index.html part, which is shown in the picture below (header, footer, left side bar and the main part).
Save the pattern as template1. We will continue to create the site later, , using our sites first page
in a classic way.
Exercise 3
Make a template page from the index.html and use it to make the second page as explained.
PAGE LAYOUT TOOLS
The main tools for the arrangement of elements on a Web page are <frame>, <table>, and div.
15 | P a g e
Frames is now very controversial, and most experts no longer use them. One of the main reasons
is because search engines like Google, Yahoo and others have a problem with these sites because
they cannot see them, or send visitors to on an inappropriate captioned page.
Tables are less in use today, the reasons are as follows: when browsers read the table, they must
Read it twice before they can display its content, first time to load the structure of the table
and a second time to determine the content of the page. While you load other web pages on the
same site, the procedure repeats. Tables are not displayed on the screen, part by part, it will be
displayed when the entire table is loaded.
Layers are elements of the HTML language with which cascade styles modern, accessible
and usable element layouts on the page are made.
1. CSS generally requires less code than tables
2. The whole CSS code in an external file, which once loaded, cashes on the user's computer
3. The order in which each element will be loaded, can be controlled via CSS- it ,is important
that the content should be loaded first, and then the elements of the slower loading speed
(pictures, sounds, videos)
HOW TO CREATE LINKS
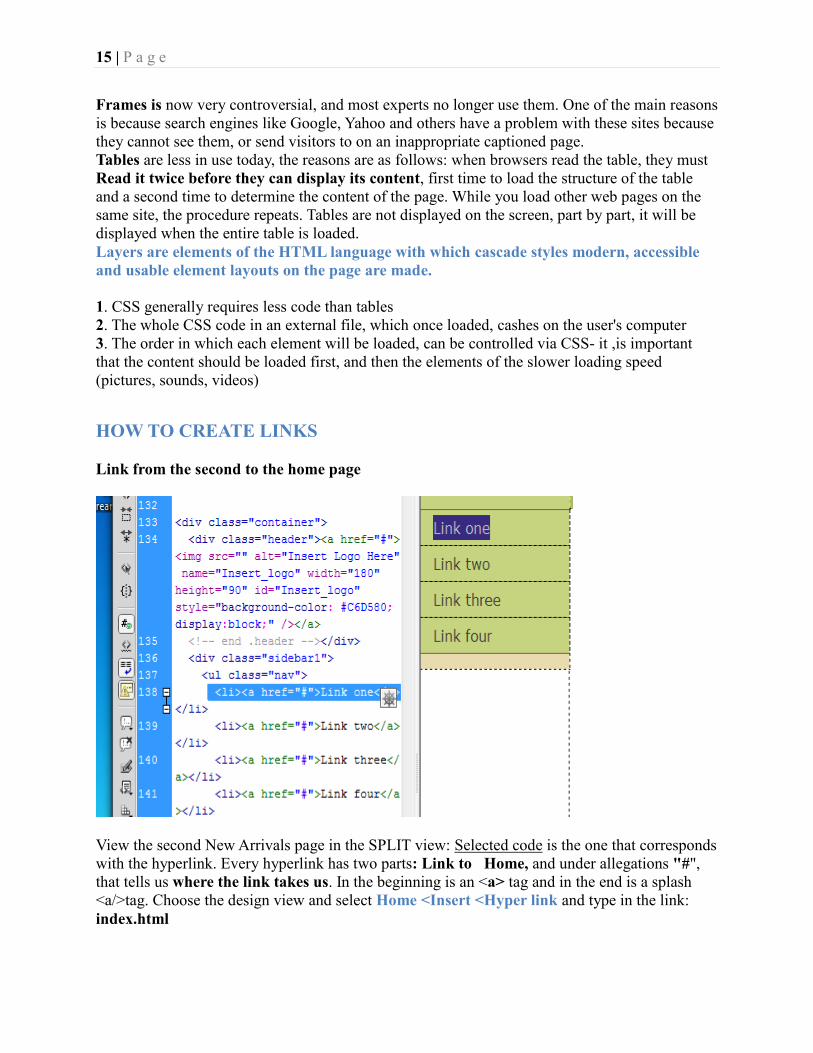
Link from the second to the home page
View the second New Arrivals page in the SPLIT view: Selected code is the one that corresponds
with the hyperlink. Every hyperlink has two parts: Link to Home, and under allegations "#",
that tells us where the link takes us. In the beginning is an <a> tag and in the end is a splash
<a/>tag. Choose the design view and select Home <Insert <Hyper link and type in the link:
index.html
16 | P a g e
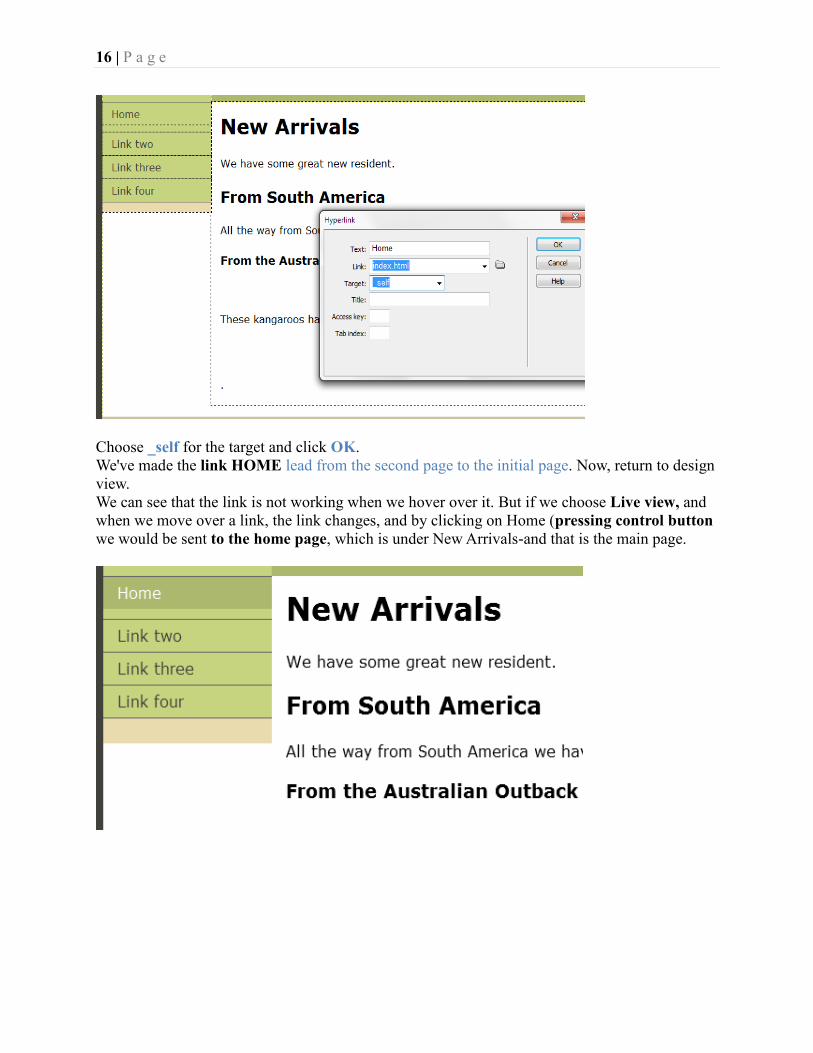
Choose _self for the target and click OK.
We've made the link HOME lead from the second page to the initial page. Now, return to design
view.
We can see that the link is not working when we hover over it. But if we choose Live view, and
when we move over a link, the link changes, and by clicking on Home (pressing control button
we would be sent to the home page, which is under New Arrivals-and that is the main page.

17 | P a g e
If you open the page in a browser the link will become active and will switch us to first page. It‟s
clear that the arrangement of the links include: Home, New Arrivals, Opening Times,
Admission Prices, as will be done using Java script and Spray menu. So far we have only tried
to connect the sides with relative links in relation to the document and the root folder.
Link from the home page to the second page We will now create a Link that leads to the second page from the main page.
Select the link 1 on the second page and enter New Arrivals in the field,
click on browse next of the link, find the path and enter new_arrivals.html,
enter self for the target and click OK in the end. If we choose the
split view the link will work, if we press Control and Click(on the link)
If we open the page in the browser, the link will become active ,and it
will take us to the first page. It's clear that the link layout will be:
Home; New Arrivals; Opening times; Admission prices, which we will do later,
18 | P a g e
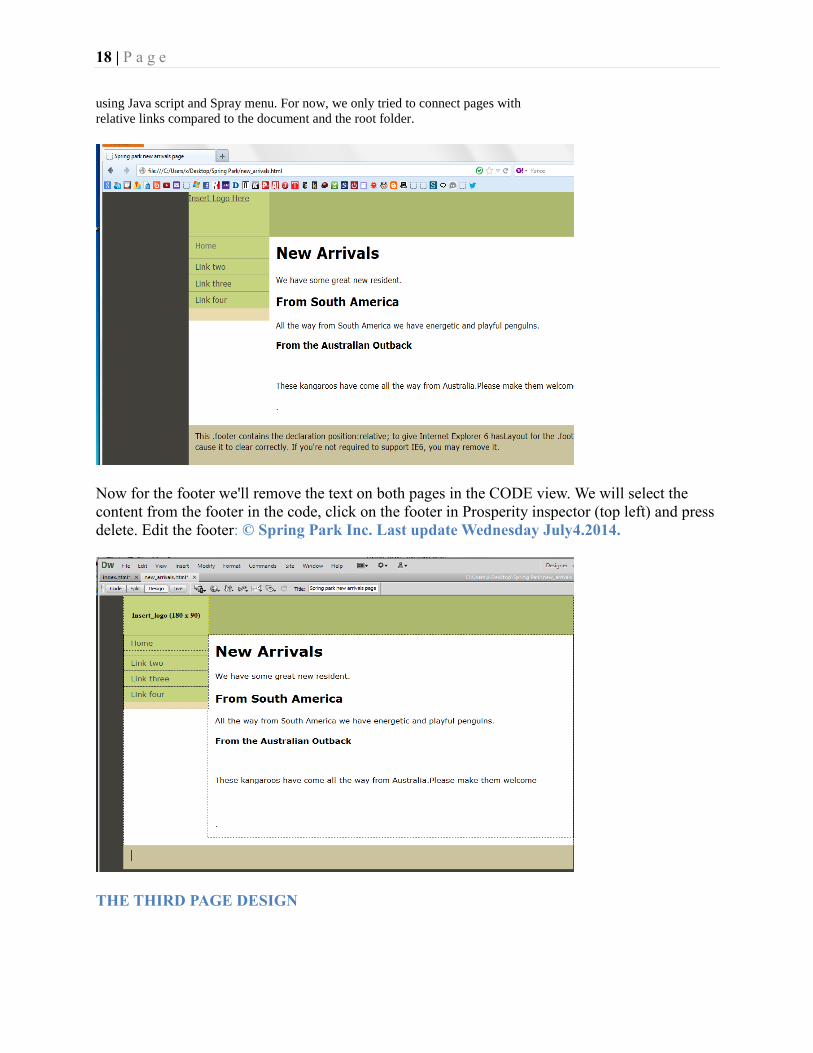
using Java script and Spray menu. For now, we only tried to connect pages with
relative links compared to the document and the root folder.
Now for the footer we'll remove the text on both pages in the CODE view. We will select the
content from the footer in the code, click on the footer in Prosperity inspector (top left) and press
delete. Edit the footer: © Spring Park Inc. Last update Wednesday July4.2014.
THE THIRD PAGE DESIGN
19 | P a g e
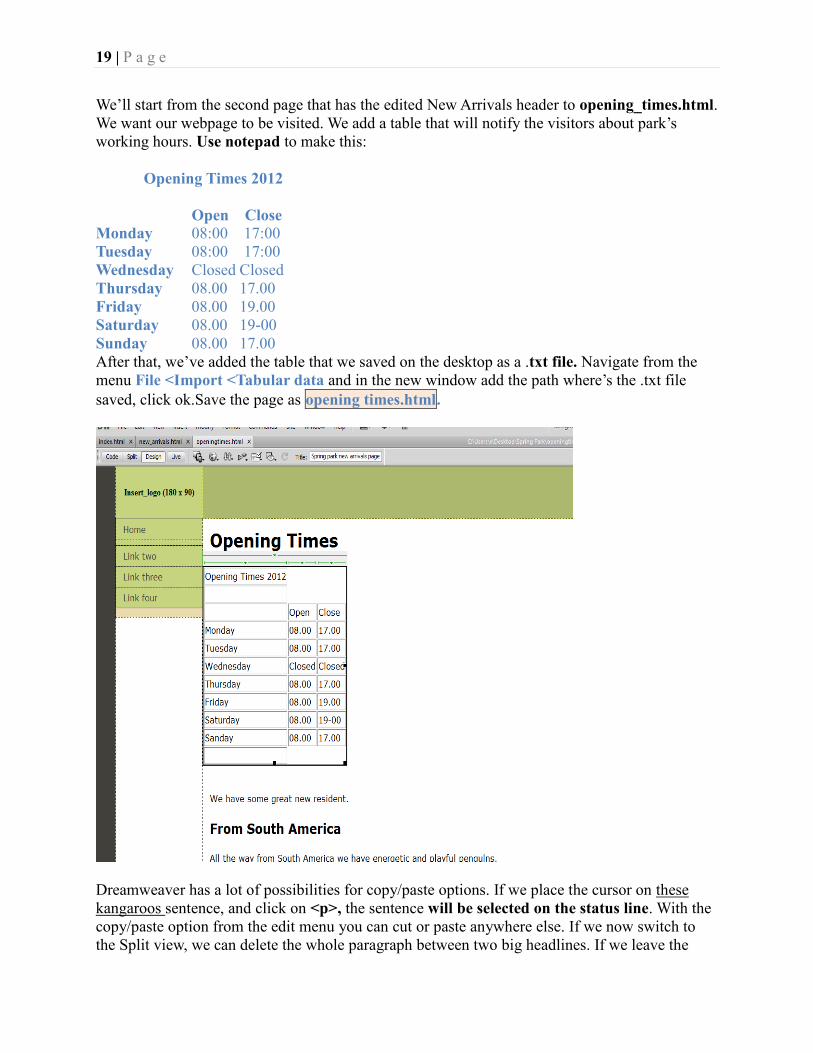
We‟ll start from the second page that has the edited New Arrivals header to opening_times.html.
We want our webpage to be visited. We add a table that will notify the visitors about park‟s
working hours. Use notepad to make this:
Opening Times 2012
Open Close
Monday 08:00 17:00
Tuesday 08:00 17:00
Wednesday Closed Closed
Thursday 08.00 17.00
Friday 08.00 19.00
Saturday 08.00 19-00
Sunday 08.00 17.00
After that, we‟ve added the table that we saved on the desktop as a .txt file. Navigate from the
menu File <Import <Tabular data and in the new window add the path where‟s the .txt file
saved, click ok.Save the page as opening times.html.
Dreamweaver has a lot of possibilities for copy/paste options. If we place the cursor on these
kangaroos sentence, and click on <p>, the sentence will be selected on the status line. With the
copy/paste option from the edit menu you can cut or paste anywhere else. If we now switch to
the Split view, we can delete the whole paragraph between two big headlines. If we leave the

20 | P a g e
code   for the new line, the blinker remains between two lines, because the code keeps the
line spacing options. On the other hand, if we delete everything, we will get this look:
If we place the cursor, for example, in front of the word these and we hold Shift, the whole text
till the end will be selected. One word is selected with a single click, and the whole sentence with
a triple click.
LINK off absolute paths
We can make a link on the webpage, and directly from that link go to some URL address, for
example Wikipedia (this is an absolute path). On the main page, select the word here and enter
the hyperlink
Click OK after you fill in the needed parameters. The word here becomes the hyper link that
leads us to Wikipedia website.

21 | P a g e
In the following presentation we‟ll modify the link in comparison to the previous page
procedure. On Opening times page select the second link, click insert and we‟ll get a dialog
window. In the first we write in New Arrivals, in the second field, we chose the
new_arrivals.html page. The Target Field has several options: blank will open a new page in the
web browser. self will open a page on the same page in the browser. Choose blank (opens a new
tab). title field is noted in the text that will appear when the mouse is moved over the link.
Enter Click to see our latest new arrivals. And for the key, enter K, and click OK.

22 | P a g e
THE FOURTH PAGE DESIGN
Treated as the third side, starting from the second page do the necessary corrections because we
do not use the template, save it with Save as admission _ price.html, and adjust the footer. This
will remain after corrections:
Notice we have not done all links.About Spay menu links- in the text following!

23 | P a g e
NAME ANCHORS
If we write on the New Arrivals page the text Find out all about kangaroos on Wikipedia by
clicking here. Click on the start of that line, and Insert> Name Anchor. At the beginning of the
line will appear a character named anchor, i.e. we link directly to the end of the page to the
anchor
Add a new line to the page: To find out about kangaroos, see here. We will make a link from the
word here to the name anchor.
If you click on OK, go to the LIVE VIEW and click on here, you will be transferred to the end of
the page, because we‟ve set the named anchor there. We can remove the link by selecting
Modify< Remove link. For checking links use Site <Check Link Side wide ,where we on the
extra panel see if there are deleted links, how many external links there is, etc.
24 | P a g e
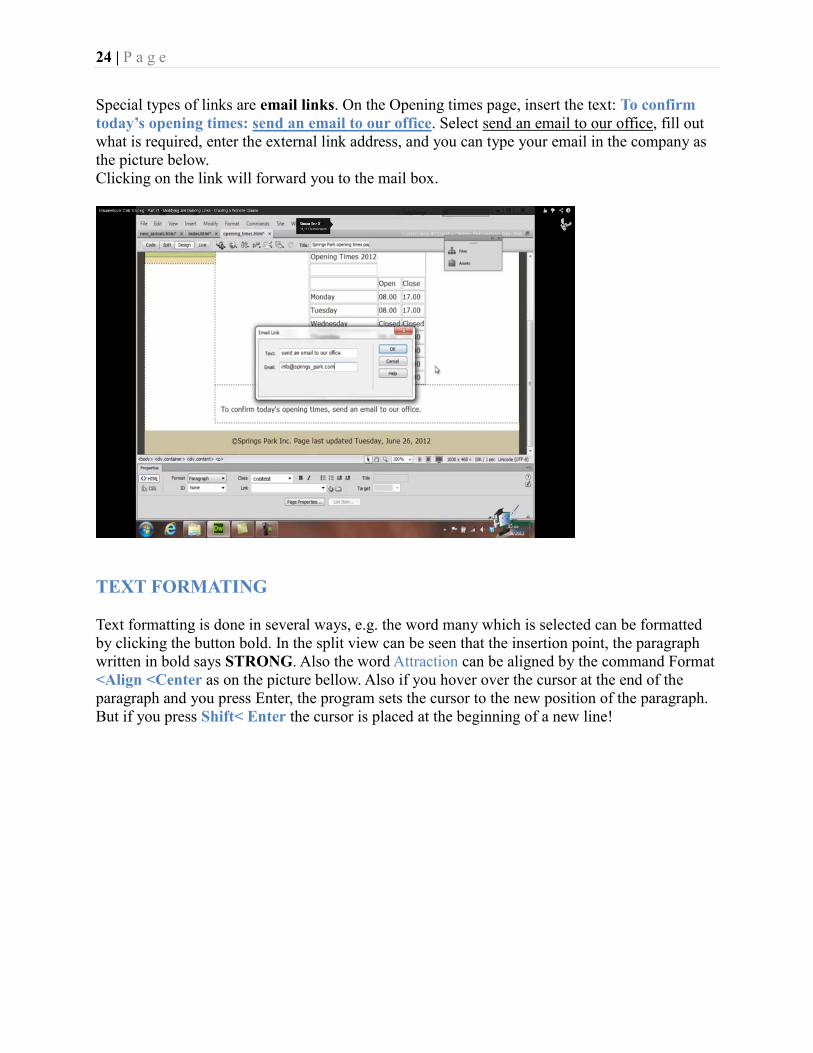
Special types of links are email links. On the Opening times page, insert the text: To confirm
today’s opening times: send an email to our office. Select send an email to our office, fill out
what is required, enter the external link address, and you can type your email in the company as
the picture below.
Clicking on the link will forward you to the mail box.
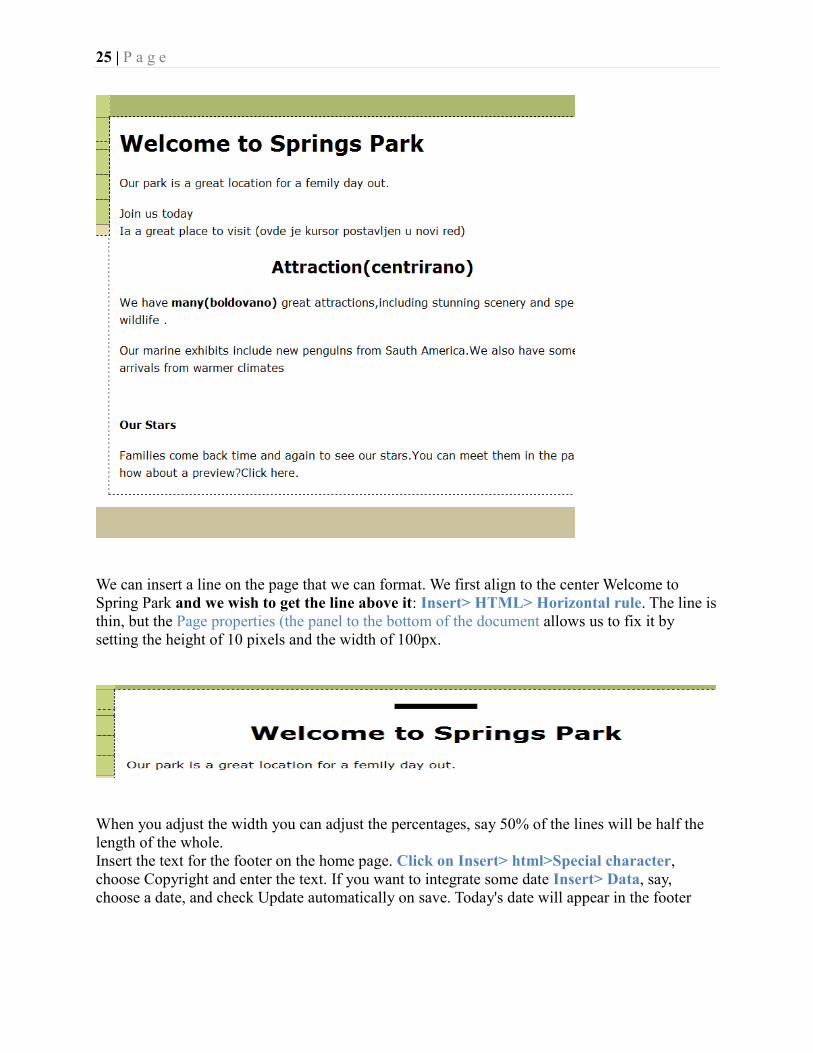
TEXT FORMATING
Text formatting is done in several ways, e.g. the word many which is selected can be formatted
by clicking the button bold. In the split view can be seen that the insertion point, the paragraph
written in bold says STRONG. Also the word Attraction can be aligned by the command Format
<Align <Center as on the picture bellow. Also if you hover over the cursor at the end of the
paragraph and you press Enter, the program sets the cursor to the new position of the paragraph.
But if you press Shift< Enter the cursor is placed at the beginning of a new line!
25 | P a g e
We can insert a line on the page that we can format. We first align to the center Welcome to
Spring Park and we wish to get the line above it: Insert> HTML> Horizontal rule. The line is
thin, but the Page properties (the panel to the bottom of the document allows us to fix it by
setting the height of 10 pixels and the width of 100px.
When you adjust the width you can adjust the percentages, say 50% of the lines will be half the
length of the whole.
Insert the text for the footer on the home page. Click on Insert> html>Special character,
choose Copyright and enter the text. If you want to integrate some date Insert> Data, say,
choose a date, and check Update automatically on save. Today's date will appear in the footer
26 | P a g e
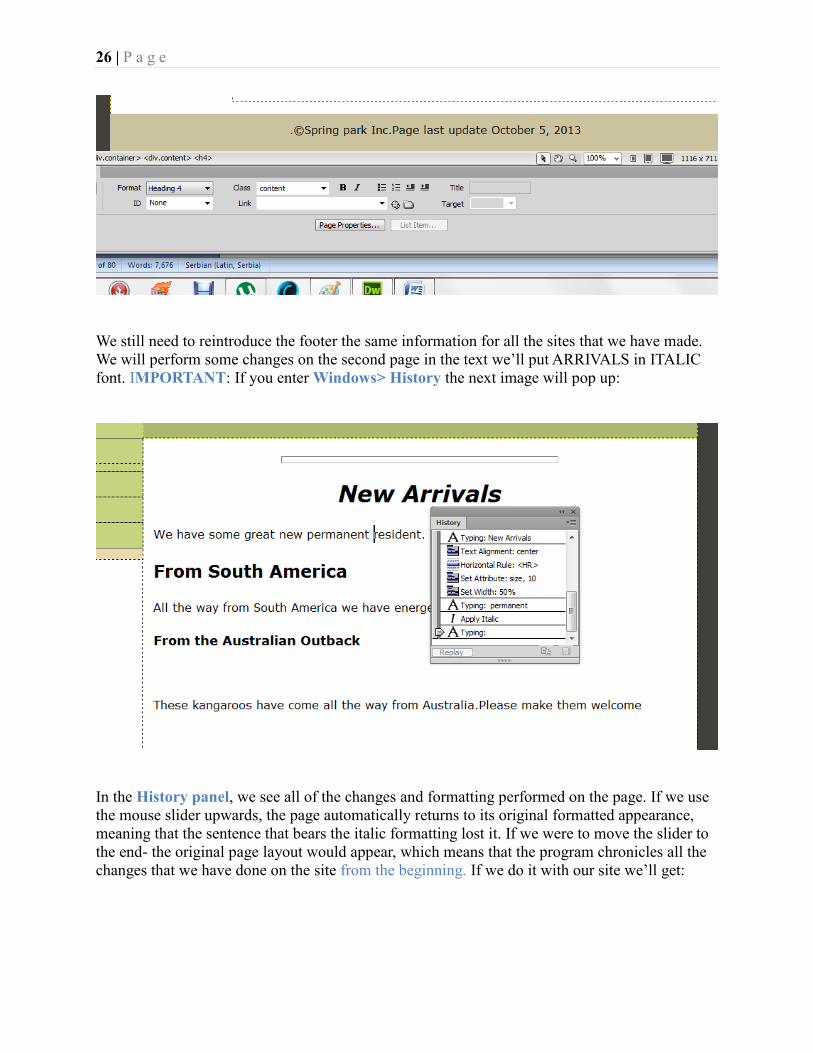
We still need to reintroduce the footer the same information for all the sites that we have made.
We will perform some changes on the second page in the text we‟ll put ARRIVALS in ITALIC
font. IMPORTANT: If you enter Windows> History the next image will pop up:
In the History panel, we see all of the changes and formatting performed on the page. If we use
the mouse slider upwards, the page automatically returns to its original formatted appearance,
meaning that the sentence that bears the italic formatting lost it. If we were to move the slider to
the end- the original page layout would appear, which means that the program chronicles all the
changes that we have done on the site from the beginning. If we do it with our site we‟ll get:
27 | P a g e
:
Also, to restore the typed text or words we use UNDO typing and REDO backspace.
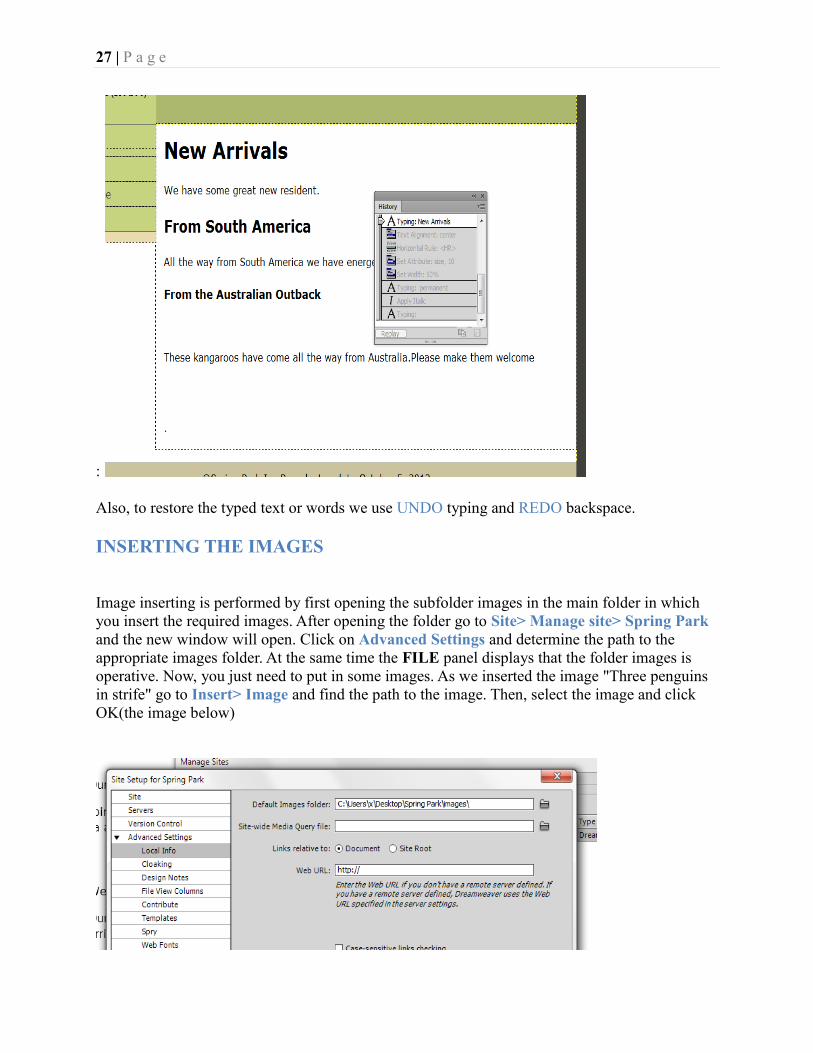
INSERTING THE IMAGES
Image inserting is performed by first opening the subfolder images in the main folder in which
you insert the required images. After opening the folder go to Site> Manage site> Spring Park
and the new window will open. Click on Advanced Settings and determine the path to the
appropriate images folder. At the same time the FILE panel displays that the folder images is
operative. Now, you just need to put in some images. As we inserted the image "Three penguins
in strife" go to Insert> Image and find the path to the image. Then, select the image and click
OK(the image below)
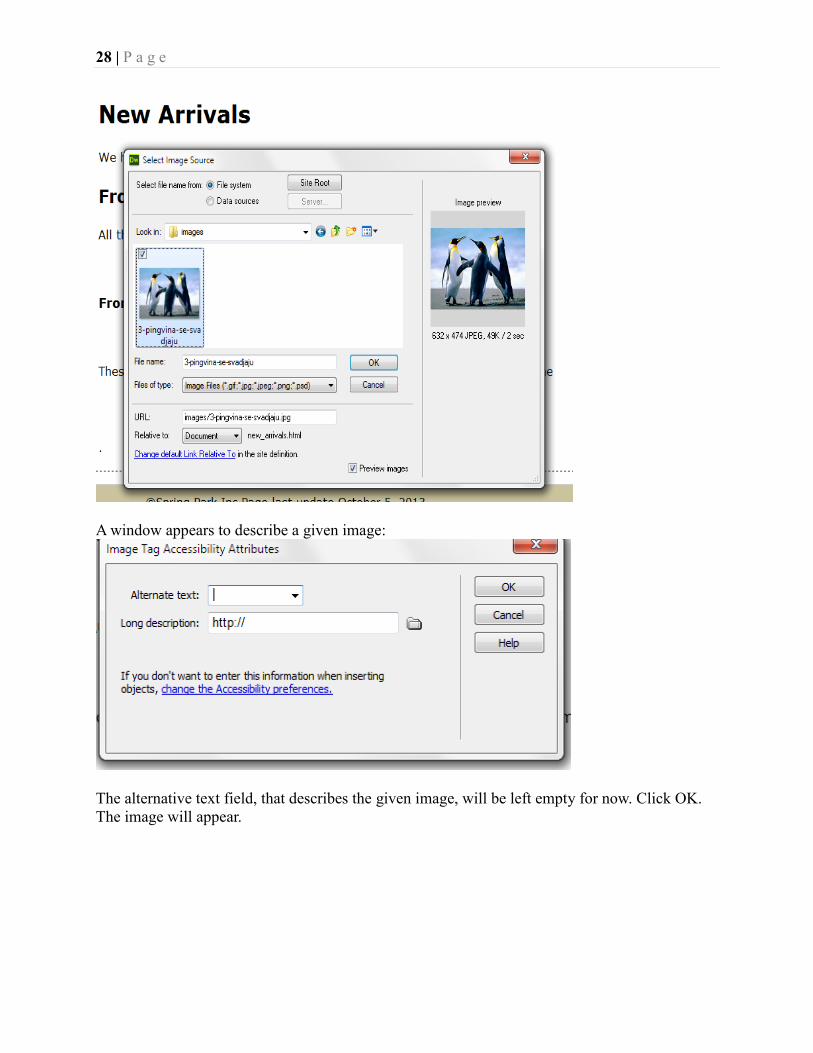
28 | P a g e
A window appears to describe a given image:
The alternative text field, that describes the given image, will be left empty for now. Click OK.
The image will appear.
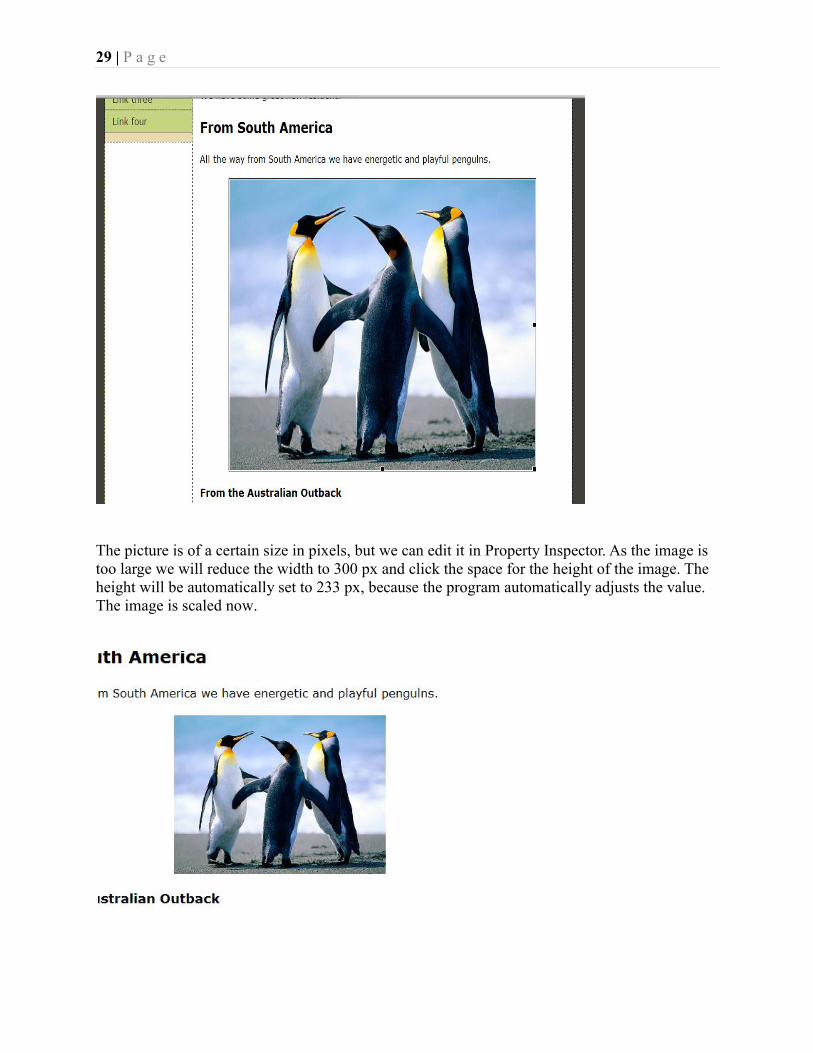
29 | P a g e
The picture is of a certain size in pixels, but we can edit it in Property Inspector. As the image is
too large we will reduce the width to 300 px and click the space for the height of the image. The
height will be automatically set to 233 px, because the program automatically adjusts the value.
The image is scaled now.

30 | P a g e
We can crop the image in the program by choosing Modify> Image> Crop
The image has a picture frame now and we can choose the image size if we need it, or part of the
image. The image can be stretched out after reduction, but the resolution will be bad. The image
can be edited using another program, for example using MS Paint Modify> Image> Edit width
The image can be further edited (contrast, sharpness, opacity etc.)
You can also editing an image from Dreamweaver by Modify> Image> Optimize (sharpen or
contrast.)
IMAGE FORMATS
GIF Graphic interchange format. This abbreviated format supports 8-bit images with up to
256 colours. They are used for drawings, black and white images. GIF supports transparency,
where one or more colors are set to be transparent and you can see them through web colors
below it. Format GIF is considered a lossless format, meaning that the image is displayed in the
browser and it will be the same quality, as when it was made.
JPEG stands for Joint Photographic Expert. Format is designed for 24-bit images and a
million colours. JPEG format must compress and has a loss of quality, which means that the
compression has to sacrifice the image quality in order to reduce the size of the file. This is a
standard format for the Internet. Image in this format does not support transparency.
PNG abbreviated Portable Network Graphic is the successor of GIF format. Unlike the GIF
that has improved compression and text storage. The advantage is that this format allows images

31 | P a g e
with millions of colors and provides transparency of the background. A disadvantage is that no
picture is shown in old browsers, before version 4.0. Format shows the same image quality in
Windows systems and Mac systems. Programs Adobe Fireworks and Adobe Flash for basic
format used PNG format, where transparency is fully supported
Let's look at how the page will look like on different devices, which allows the function
multiscreen
Phone (320*300px)
Tablet (768*300px)
Desktop (1126*276px
If we press the Viewport Size button for the phone and change the width to 400 px , we'll see that
the view for the phone is a lot better, because we can see both rulers.
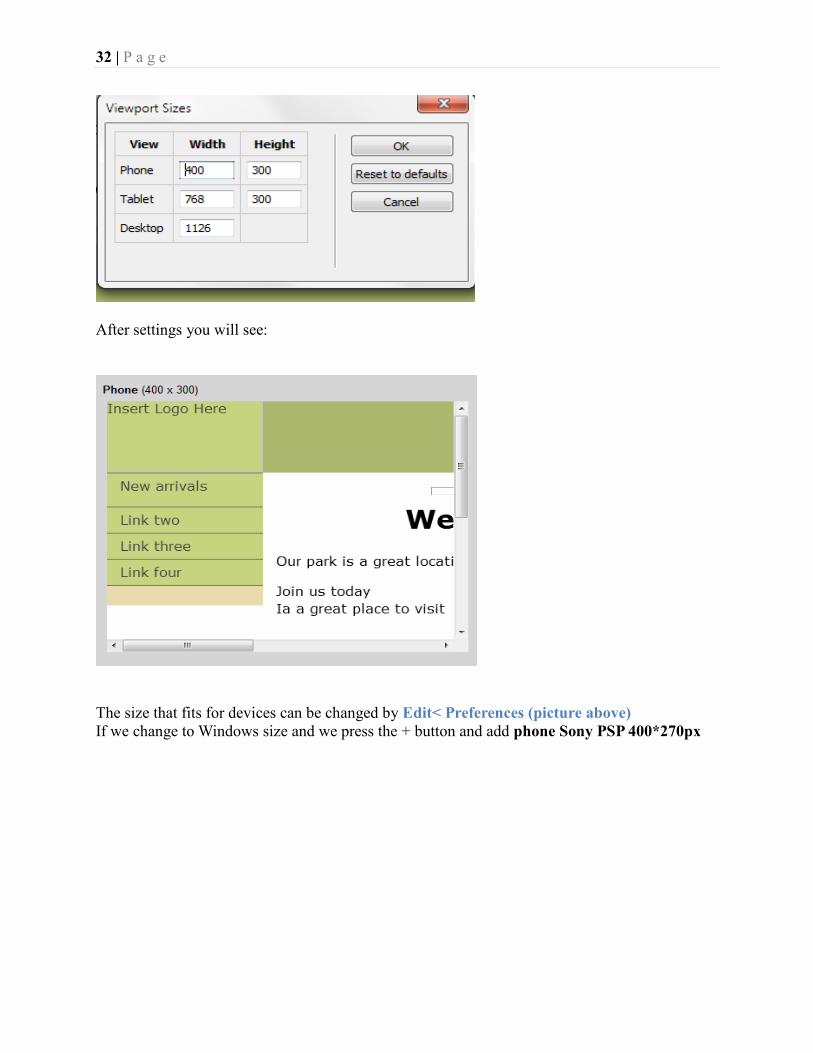
32 | P a g e
After settings you will see:
The size that fits for devices can be changed by Edit< Preferences (picture above)
If we change to Windows size and we press the + button and add phone Sony PSP 400*270px

33 | P a g e
After pressing OK the Sony device view will be shown in the card Preferences!
HOW TO CREATE TABLES
CSS table is inserted by Insert> Table. Press OK when you set all of the parameters.

34 | P a g e
We insert after that, the data directly in the table as we do with first row (admissions prices).
There are two modes
1. Standard Mode
2. Expanded Mode
The row is selected just like in Excel, by clicking on left side row the column is selected by
clicking on the column on the upper side. A new column is inserted by marking the column in
front of the one you want to insert the new column right clicking, and then choosing Insert<
Column We can see that the column is inserted from the left side of the selected column. The
table is deleted by selecting it and pressing delete. To undo do function choose Edit< Undo. This
table is the table we will use on the Admission prices page.
35 | P a g e
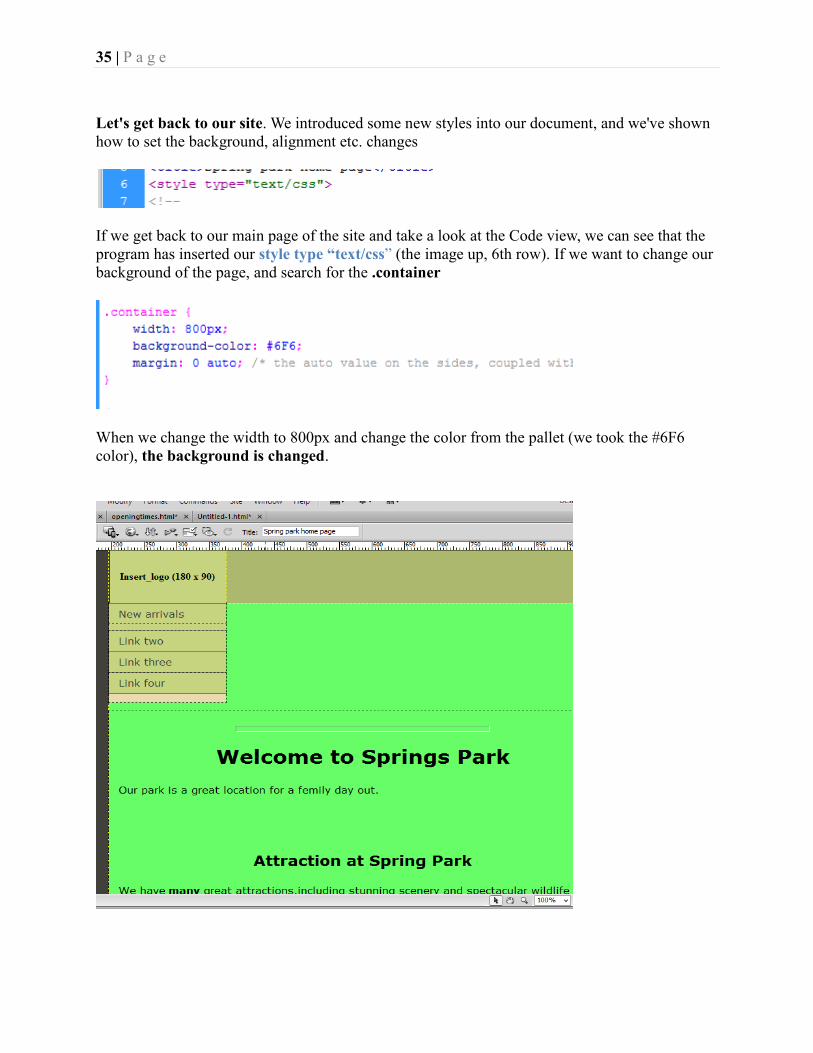
Let's get back to our site. We introduced some new styles into our document, and we've shown
how to set the background, alignment etc. changes
If we get back to our main page of the site and take a look at the Code view, we can see that the
program has inserted our style type “text/css” (the image up, 6th row). If we want to change our
background of the page, and search for the .container
When we change the width to 800px and change the color from the pallet (we took the #6F6
color), the background is changed.
36 | P a g e
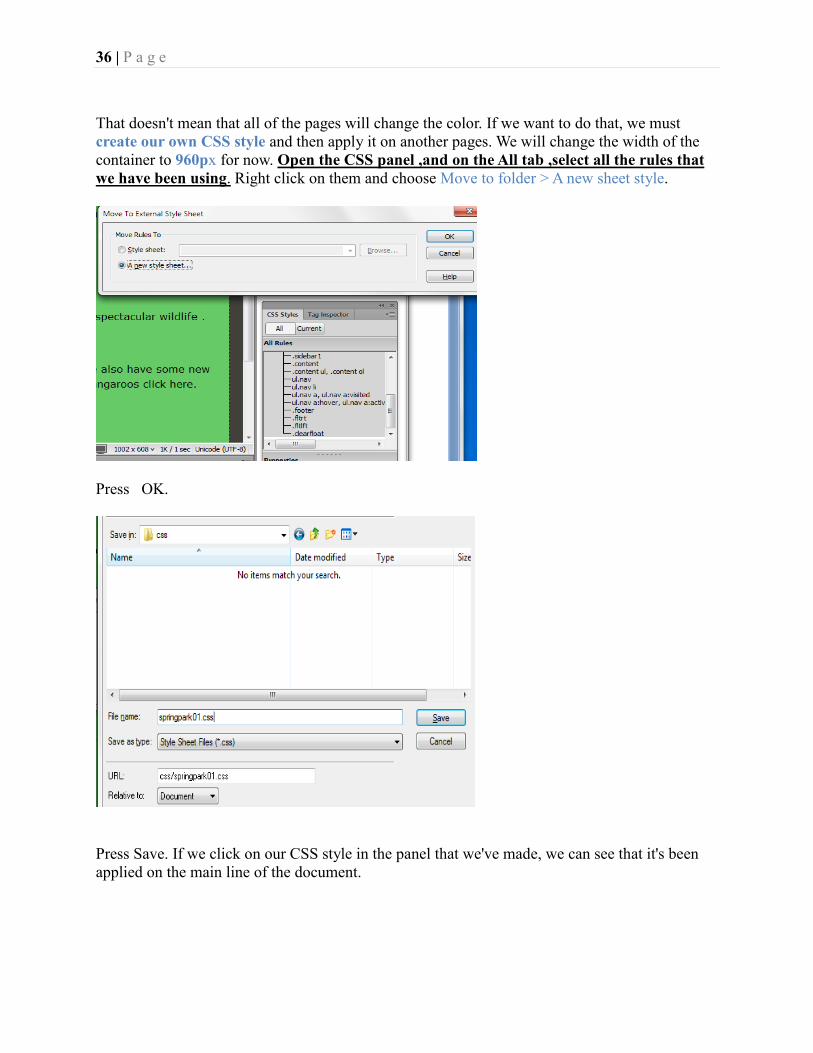
That doesn't mean that all of the pages will change the color. If we want to do that, we must
create our own CSS style and then apply it on another pages. We will change the width of the
container to 960px for now. Open the CSS panel ,and on the All tab ,select all the rules that
we have been using. Right click on them and choose Move to folder > A new sheet style.
Press OK.
Press Save. If we click on our CSS style in the panel that we've made, we can see that it's been
applied on the main line of the document.
37 | P a g e
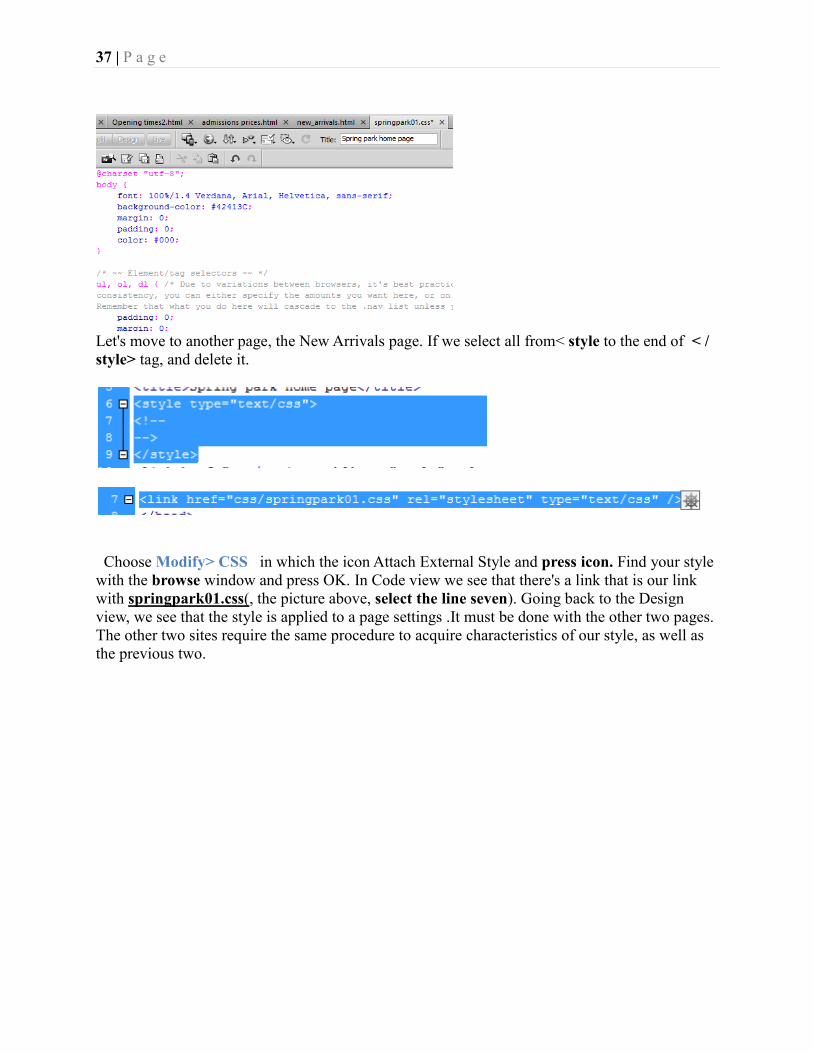
Let's move to another page, the New Arrivals page. If we select all from< style to the end of < /
style> tag, and delete it.
Choose Modify> CSS in which the icon Attach External Style and press icon. Find your style
with the browse window and press OK. In Code view we see that there's a link that is our link
with springpark01.css(, the picture above, select the line seven). Going back to the Design
view, we see that the style is applied to a page settings .It must be done with the other two pages.
The other two sites require the same procedure to acquire characteristics of our style, as well as
the previous two.
38 | P a g e
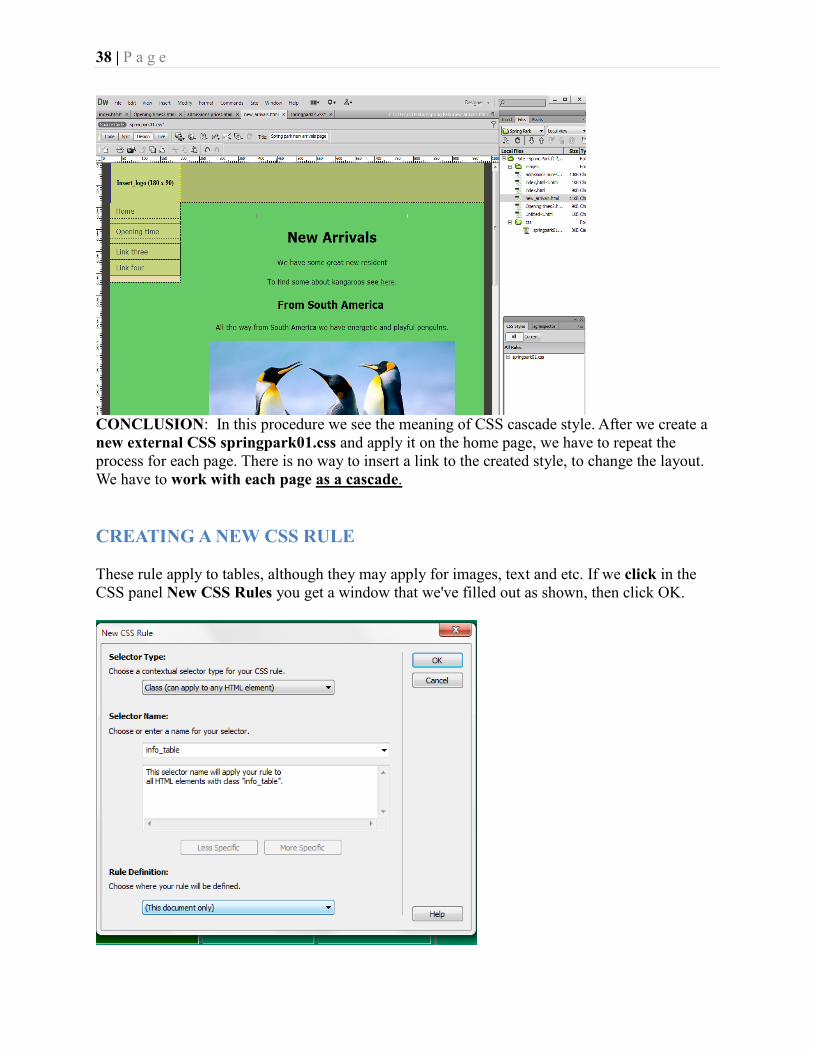
CONCLUSION: In this procedure we see the meaning of CSS cascade style. After we create a
new external CSS springpark01.css and apply it on the home page, we have to repeat the
process for each page. There is no way to insert a link to the created style, to change the layout.
We have to work with each page as a cascade.
CREATING A NEW CSS RULE
These rule apply to tables, although they may apply for images, text and etc. If we click in the
CSS panel New CSS Rules you get a window that we've filled out as shown, then click OK.
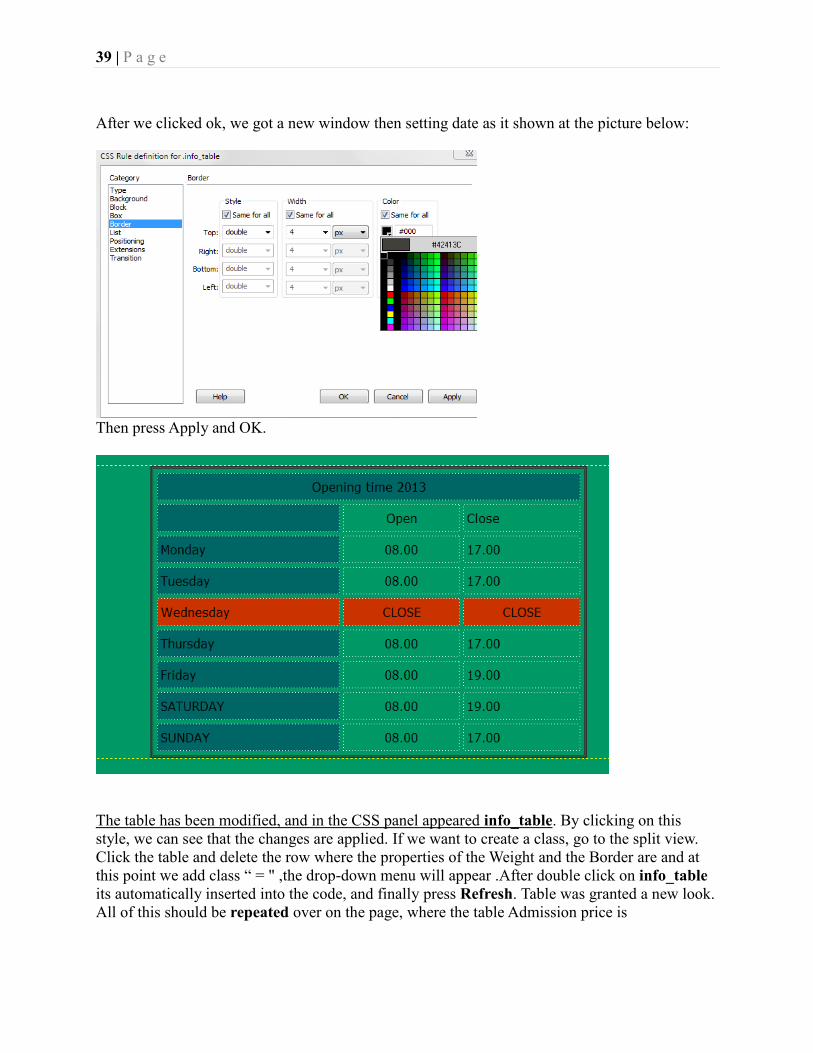
39 | P a g e
After we clicked ok, we got a new window then setting date as it shown at the picture below:
Then press Apply and OK.
The table has been modified, and in the CSS panel appeared info_table. By clicking on this
style, we can see that the changes are applied. If we want to create a class, go to the split view.
Click the table and delete the row where the properties of the Weight and the Border are and at
this point we add class “ = " ,the drop-down menu will appear .After double click on info_table
its automatically inserted into the code, and finally press Refresh. Table was granted a new look.
All of this should be repeated over on the page, where the table Admission price is
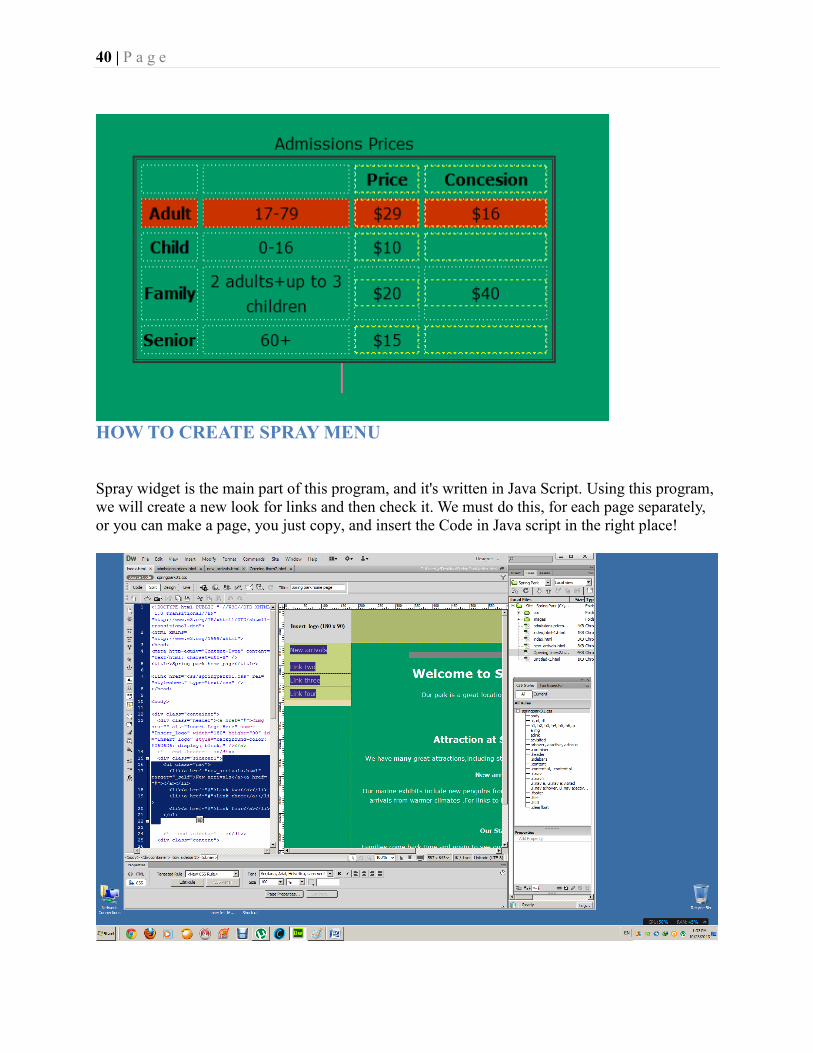
40 | P a g e
HOW TO CREATE SPRAY MENU
Spray widget is the main part of this program, and it's written in Java Script. Using this program,
we will create a new look for links and then check it. We must do this, for each page separately,
or you can make a page, you just copy, and insert the Code in Java script in the right place!

41 | P a g e
First, delete selected ,after go to Insert> Spray> Spray bar
First, you have to open a new folder, double click on the Spring park main folder in the CSS
panel, and create a new folder Spray Assets, and now you need to save this folder to: Manage
Site> Edit> Advance settings> Spray find the folder path Save> Done.
We can see that the Spray menu bar show up in the CSS panel.
The new menu of the links on the page showed up, and boxes in the Prosperity bar, where we can
add a new link, or delete some with navigation. Links that have an arrow on the right show that
you can add a sub-link to them. The look of the Prosperity bar in which we edited the new link is
these. Item 1, 2, 3 is we can removed with a (-) and we add new sub-links with a plus(+).
42 | P a g e
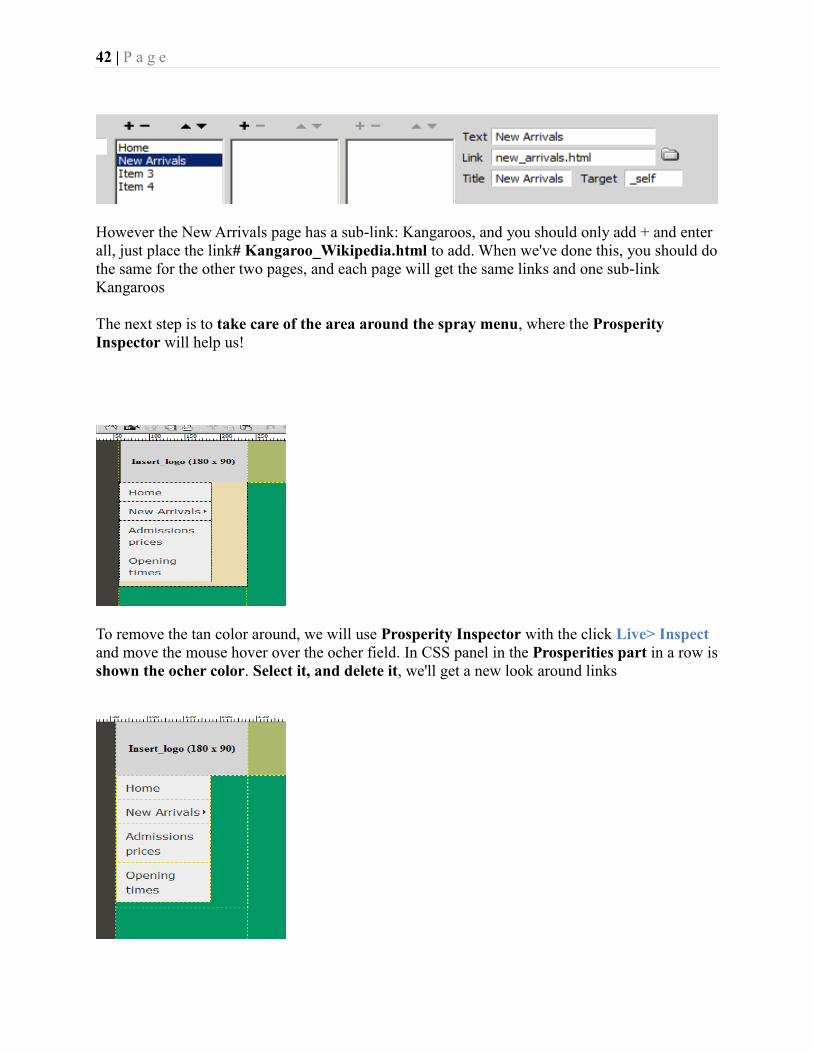
However the New Arrivals page has a sub-link: Kangaroos, and you should only add + and enter
all, just place the link# Kangaroo_Wikipedia.html to add. When we've done this, you should do
the same for the other two pages, and each page will get the same links and one sub-link
Kangaroos
The next step is to take care of the area around the spray menu, where the Prosperity
Inspector will help us!
To remove the tan color around, we will use Prosperity Inspector with the click Live> Inspect
and move the mouse hover over the ocher field. In CSS panel in the Prosperities part in a row is
shown the ocher color. Select it, and delete it, we'll get a new look around links
43 | P a g e
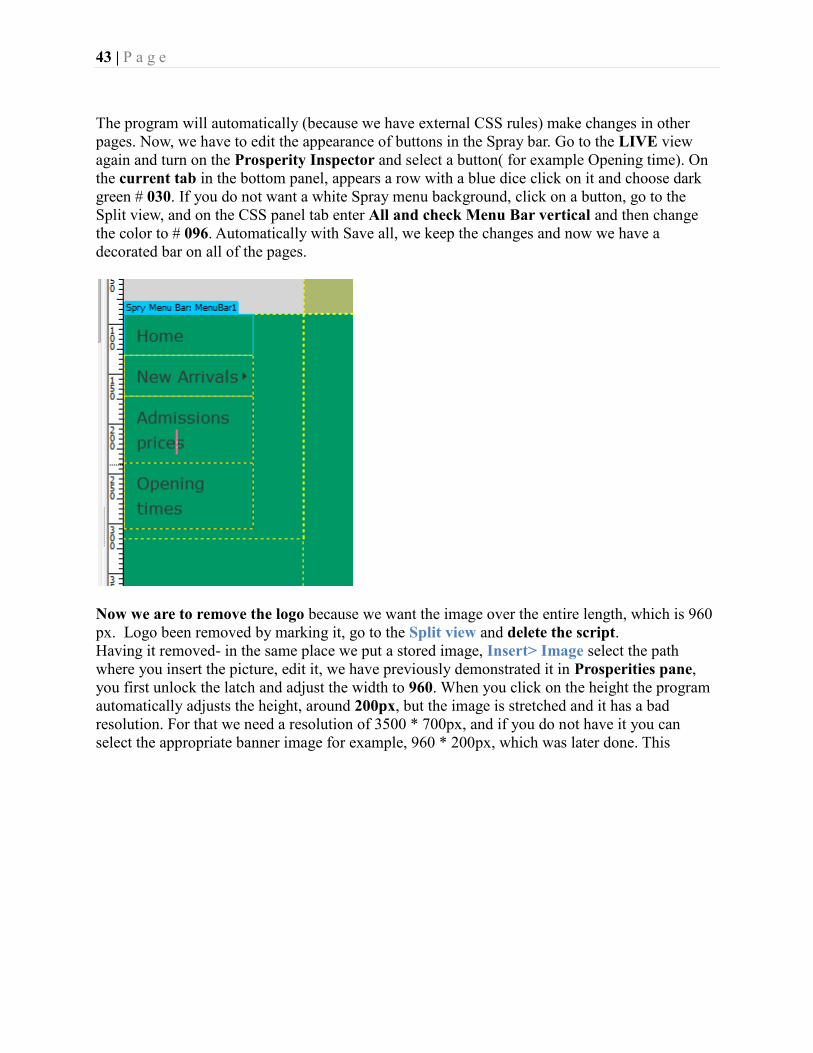
The program will automatically (because we have external CSS rules) make changes in other
pages. Now, we have to edit the appearance of buttons in the Spray bar. Go to the LIVE view
again and turn on the Prosperity Inspector and select a button( for example Opening time). On
the current tab in the bottom panel, appears a row with a blue dice click on it and choose dark
green # 030. If you do not want a white Spray menu background, click on a button, go to the
Split view, and on the CSS panel tab enter All and check Menu Bar vertical and then change
the color to # 096. Automatically with Save all, we keep the changes and now we have a
decorated bar on all of the pages.
Now we are to remove the logo because we want the image over the entire length, which is 960
px. Logo been removed by marking it, go to the Split view and delete the script.
Having it removed- in the same place we put a stored image, Insert> Image select the path
where you insert the picture, edit it, we have previously demonstrated it in Prosperities pane,
you first unlock the latch and adjust the width to 960. When you click on the height the program
automatically adjusts the height, around 200px, but the image is stretched and it has a bad
resolution. For that we need a resolution of 3500 * 700px, and if you do not have it you can
select the appropriate banner image for example, 960 * 200px, which was later done. This

44 | P a g e
picture is temporary because it does not look good, so we will later change it.
To remove the logo it is important to select it, and be sure to click on the<a> tag in the tag
holder. When you click on the tag, and the cursor is set on the exact spot of the source code from
where we deleted the script! Same applies to other tags, although we can do it manually as well.
You can always use Edit> Undo function if you make a mistake, or use HISTORY PANEL,
which was discussed earlier.
LINK CHECK AND VALIDATION
To check the links go to Windows> Results> Link Checker. A new billboard will show up at
the bottom where there are more options.If you click on the link checker and then press the little
green arrow in the top left, we get the links which are on the page „break“
We see that the home page is a link that leads to the New Arrivals, and from it on the Wikipedia,
by pressing the link at the page. When you click on broken links the folder will appear where you
need to define a new path, and the problem is the solved. Repeat this for each page.
Checking links is very important, because when uploading on the site server, the biggest problem
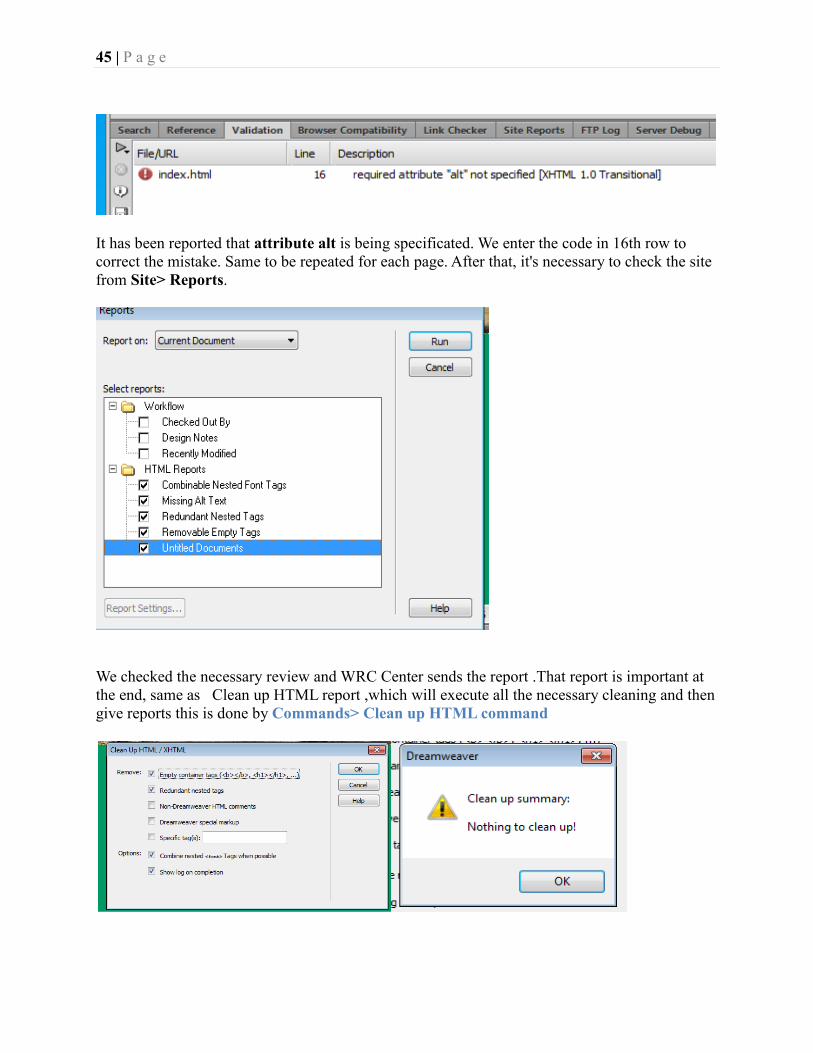
is link not working! The next step is validation. If we click on the next Validation button, and
then click the green arrow on the top right corner-there will appear all the mistakes previously
made. Mistakes should be corrected on the each page. In our case there is a problem in the 16th
row in the code.
45 | P a g e
It has been reported that attribute alt is being specificated. We enter the code in 16th row to
correct the mistake. Same to be repeated for each page. After that, it's necessary to check the site
from Site> Reports.
We checked the necessary review and WRC Center sends the report .That report is important at
the end, same as Clean up HTML report ,which will execute all the necessary cleaning and then
give reports this is done by Commands> Clean up HTML command
46 | P a g e
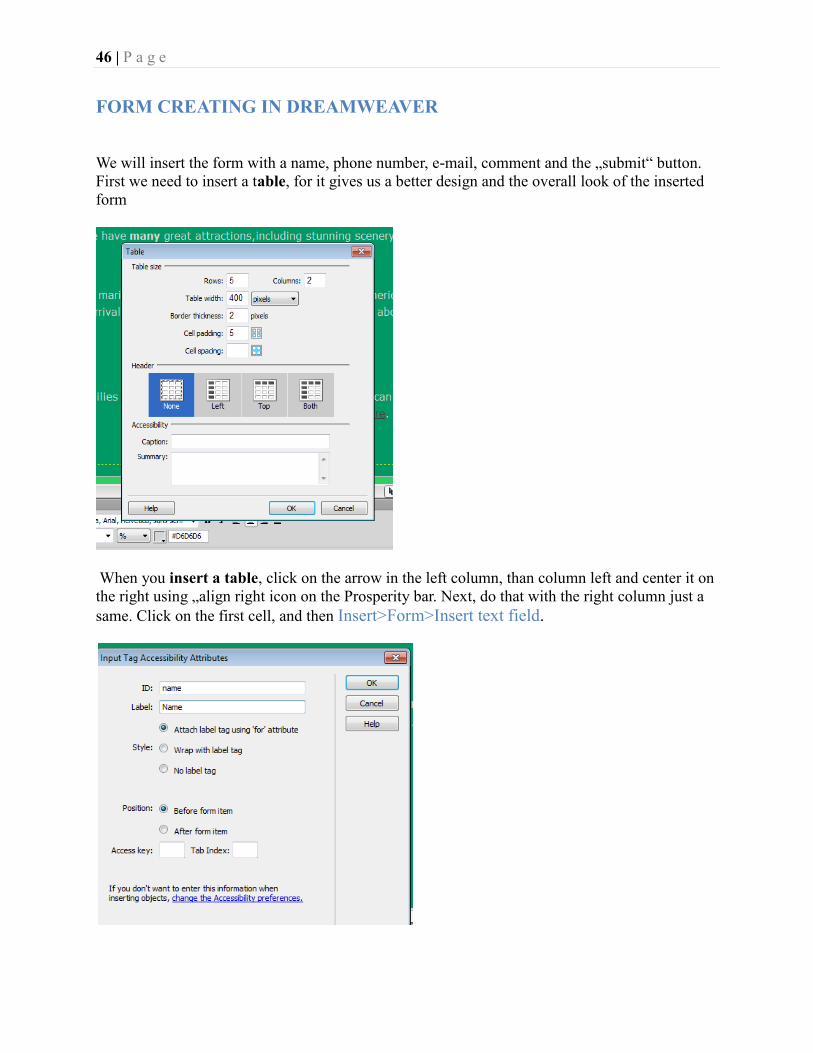
FORM CREATING IN DREAMWEAVER
We will insert the form with a name, phone number, e-mail, comment and the „submit“ button.
First we need to insert a table, for it gives us a better design and the overall look of the inserted
form
When you insert a table, click on the arrow in the left column, than column left and center it on
the right using „align right icon on the Prosperity bar. Next, do that with the right column just a
same. Click on the first cell, and then Insert>Form>Insert text field.
47 | P a g e
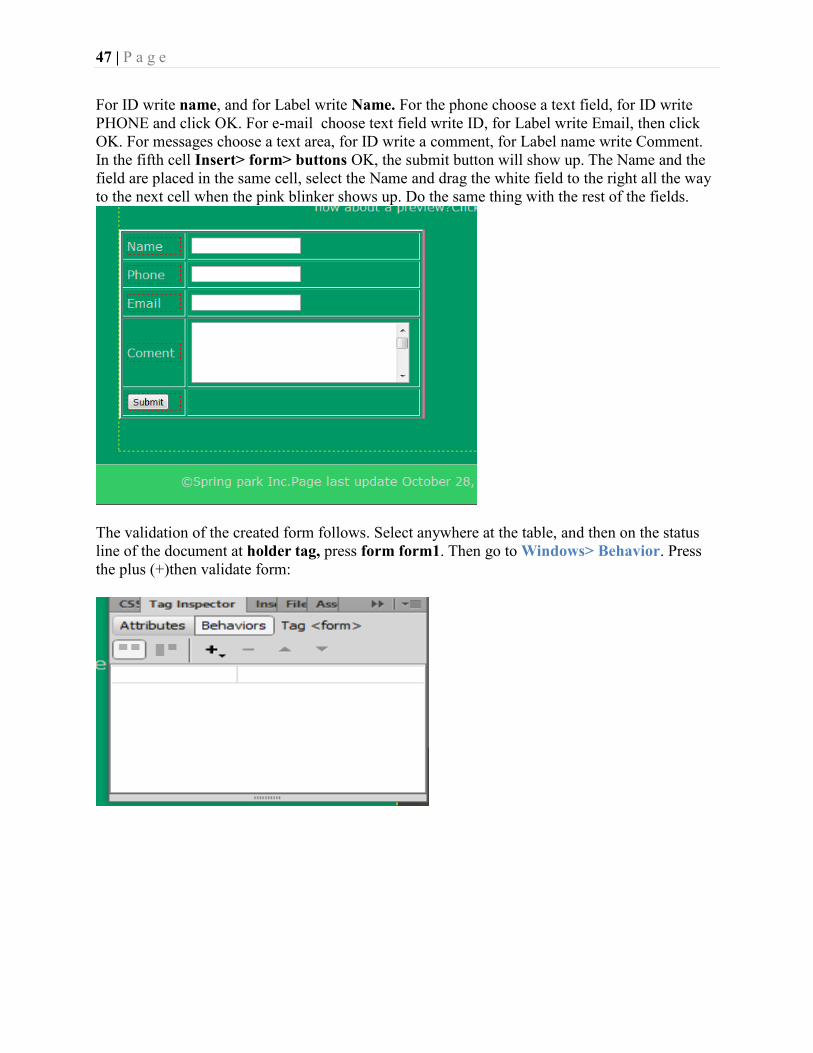
For ID write name, and for Label write Name. For the phone choose a text field, for ID write
PHONE and click OK. For e-mail choose text field write ID, for Label write Email, then click
OK. For messages choose a text area, for ID write a comment, for Label name write Comment.
In the fifth cell Insert> form> buttons OK, the submit button will show up. The Name and the
field are placed in the same cell, select the Name and drag the white field to the right all the way
to the next cell when the pink blinker shows up. Do the same thing with the rest of the fields.
The validation of the created form follows. Select anywhere at the table, and then on the status
line of the document at holder tag, press form form1. Then go to Windows> Behavior. Press
the plus (+)then validate form:

48 | P a g e
Now, confirm required for everything:
Name-write anything
Phone-write anything
Email- email address
Comment- anything
Go to your browser to see if the form works. If you don't fill in all of the fields, you will get the
message what's required, and when you press Submit all of the fields will be deleted, and they
will be ready for new insertion. It is important to accentuate that you can find already done forms
in the Internet, all you have to do is to paste them in Code view on a spot you want.
MULTIMEDIA INSERTING
Dreamweaver easily imports Flash files, music and video files, and the program it self
harmonizes the attributes that determine how these files will be displayed on the Web pages.
There are several types of Flash files that can be imported on the page:
1. Flash files or Flash movies with the .FLA extension
2. Files with the .SWF extension. This is a compressed version of the .FLA file that can be
viewed in DW and that can work in web browsers.
3. Files with the .FLV (flash video file) extension contain encoded audio and video information
that allow the Flash player to play them.
1. INSERTING A FLASH MOVIE
Before you insert the Flash file in DW you must first create files with ,SWF extension in some
program, for example, I use the program Free Video to Flash converter. Add a MP4 file for
example, and press Convert. Program edits the file with the .SWF or .FLV extension, save the
video file and later you can insert it in DW.
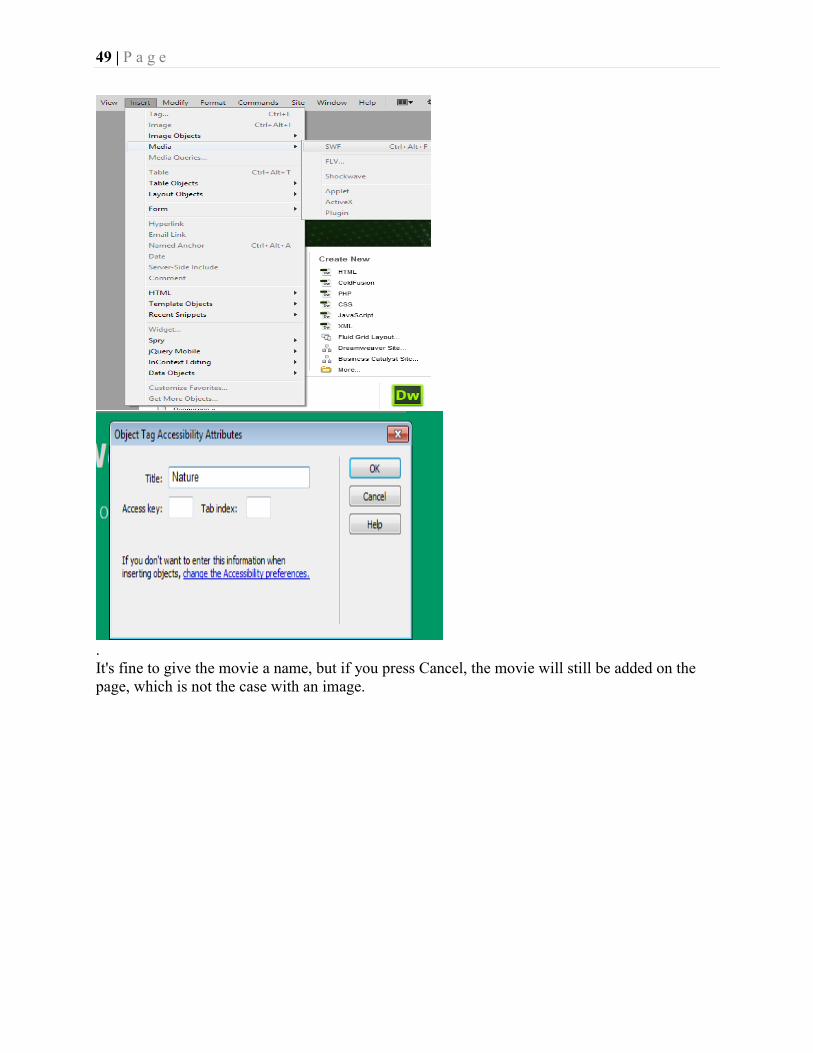
To insert a .SWF file in DW, position the cursor where you want to insert the file, and then click
Insert> Media> SWF
49 | P a g e
.
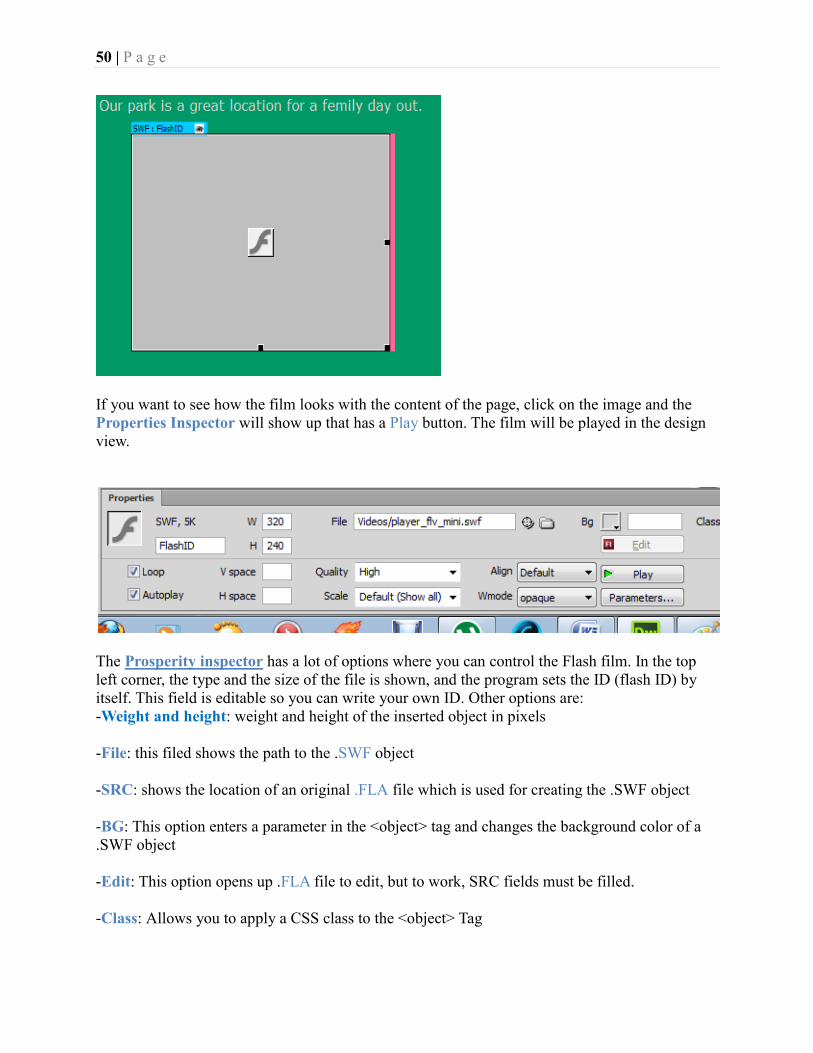
It's fine to give the movie a name, but if you press Cancel, the movie will still be added on the
page, which is not the case with an image.
50 | P a g e
If you want to see how the film looks with the content of the page, click on the image and the
Properties Inspector will show up that has a Play button. The film will be played in the design
view.
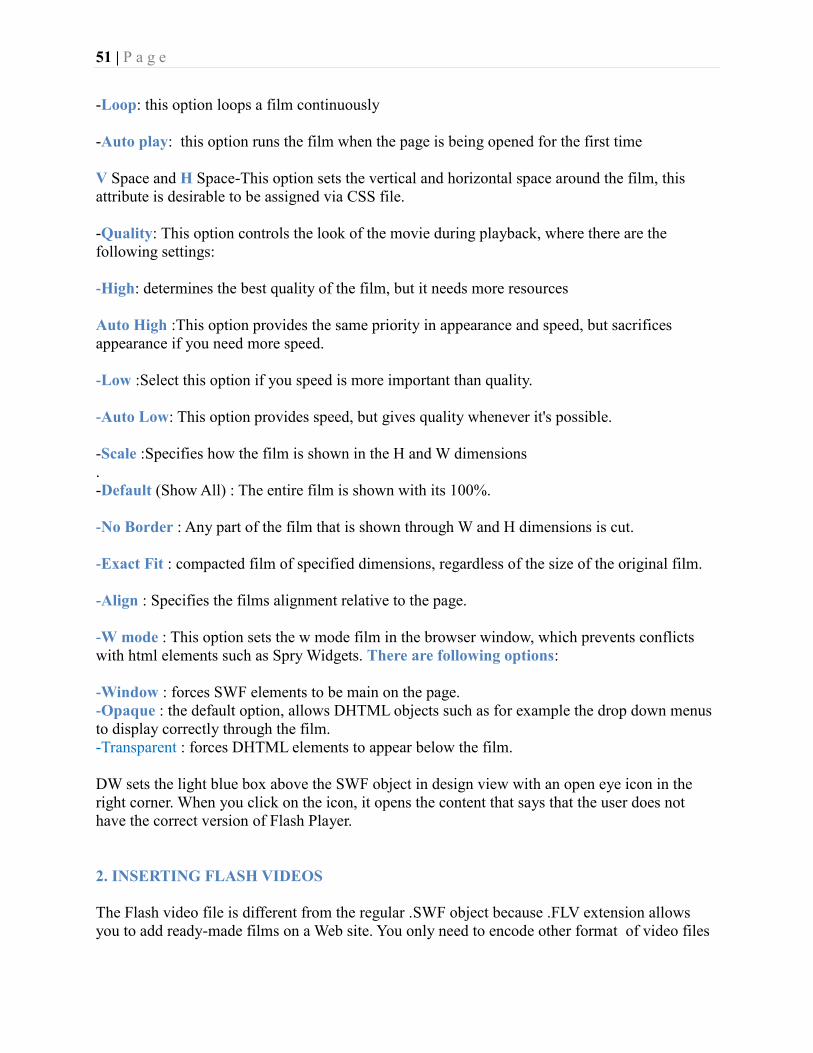
The Prosperity inspector has a lot of options where you can control the Flash film. In the top
left corner, the type and the size of the file is shown, and the program sets the ID (flash ID) by
itself. This field is editable so you can write your own ID. Other options are:
-Weight and height: weight and height of the inserted object in pixels
-File: this filed shows the path to the .SWF object
-SRC: shows the location of an original .FLA file which is used for creating the .SWF object
-BG: This option enters a parameter in the <object> tag and changes the background color of a
.SWF object
-Edit: This option opens up .FLA file to edit, but to work, SRC fields must be filled.
-Class: Allows you to apply a CSS class to the <object> Tag
51 | P a g e
-Loop: this option loops a film continuously
-Auto play: this option runs the film when the page is being opened for the first time
V Space and H Space-This option sets the vertical and horizontal space around the film, this
attribute is desirable to be assigned via CSS file.
-Quality: This option controls the look of the movie during playback, where there are the
following settings:
-High: determines the best quality of the film, but it needs more resources
Auto High :This option provides the same priority in appearance and speed, but sacrifices
appearance if you need more speed.
-Low :Select this option if you speed is more important than quality.
-Auto Low: This option provides speed, but gives quality whenever it's possible.
-Scale :Specifies how the film is shown in the H and W dimensions
.
-Default (Show All) : The entire film is shown with its 100%.
-No Border : Any part of the film that is shown through W and H dimensions is cut.
-Exact Fit : compacted film of specified dimensions, regardless of the size of the original film.
-Align : Specifies the films alignment relative to the page.
-W mode : This option sets the w mode film in the browser window, which prevents conflicts
with html elements such as Spry Widgets. There are following options:
-Window : forces SWF elements to be main on the page.
-Opaque : the default option, allows DHTML objects such as for example the drop down menus
to display correctly through the film.
-Transparent : forces DHTML elements to appear below the film.
DW sets the light blue box above the SWF object in design view with an open eye icon in the
right corner. When you click on the icon, it opens the content that says that the user does not
have the correct version of Flash Player.
2. INSERTING FLASH VIDEOS
The Flash video file is different from the regular .SWF object because .FLV extension allows
you to add ready-made films on a Web site. You only need to encode other format of video files
52 | P a g e
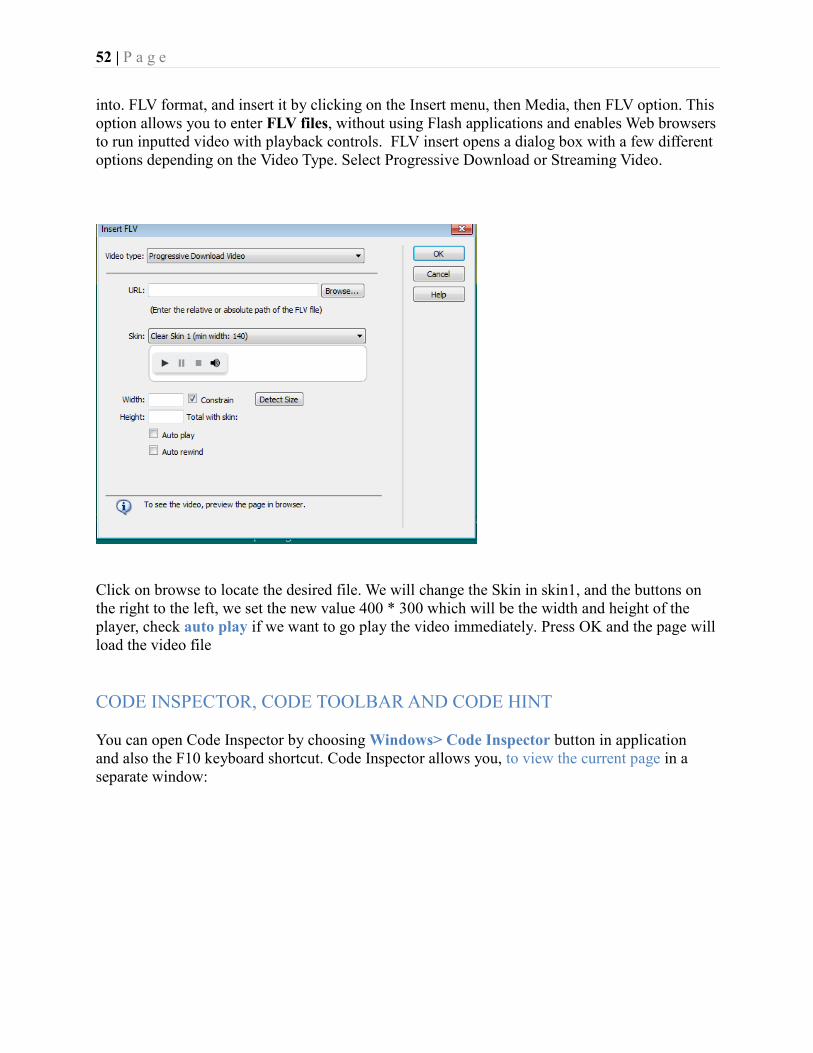
into. FLV format, and insert it by clicking on the Insert menu, then Media, then FLV option. This
option allows you to enter FLV files, without using Flash applications and enables Web browsers
to run inputted video with playback controls. FLV insert opens a dialog box with a few different
options depending on the Video Type. Select Progressive Download or Streaming Video.
Click on browse to locate the desired file. We will change the Skin in skin1, and the buttons on
the right to the left, we set the new value 400 * 300 which will be the width and height of the
player, check auto play if we want to go play the video immediately. Press OK and the page will
load the video file
CODE INSPECTOR, CODE TOOLBAR AND CODE HINT
You can open Code Inspector by choosing Windows> Code Inspector button in application
and also the F10 keyboard shortcut. Code Inspector allows you, to view the current page in a
separate window:
53 | P a g e
.
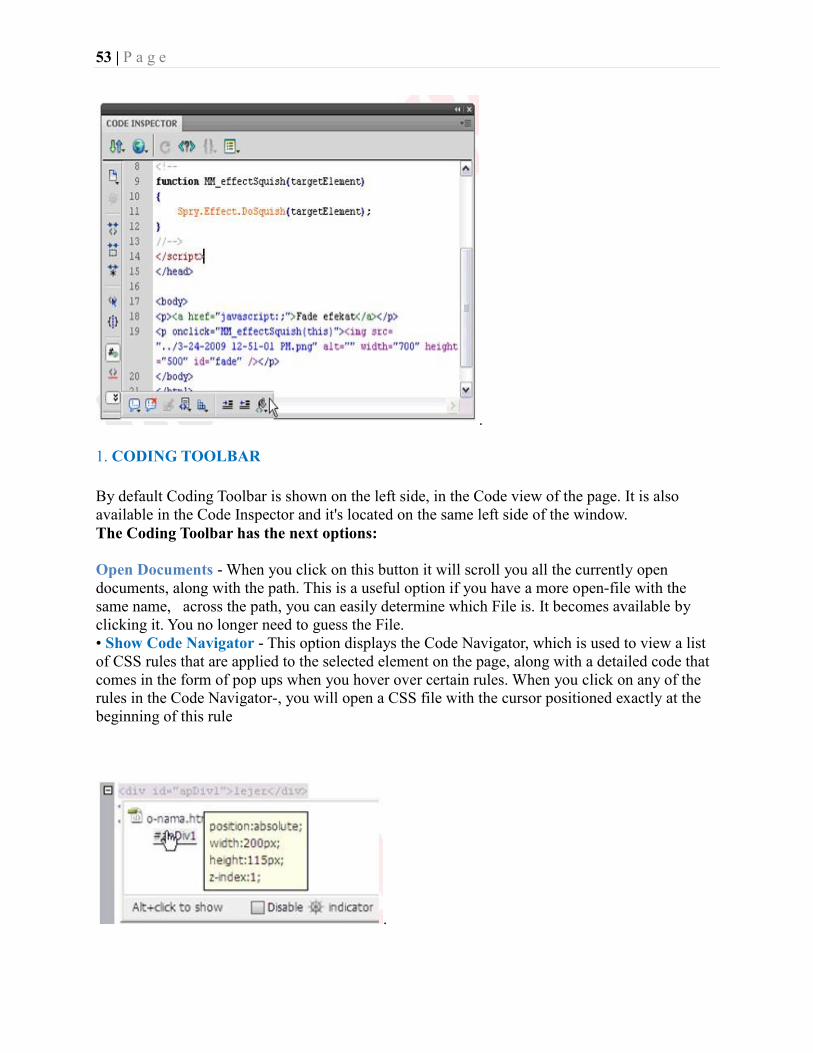
1. CODING TOOLBAR By default Coding Toolbar is shown on the left side, in the Code view of the page. It is also
available in the Code Inspector and it's located on the same left side of the window.
The Coding Toolbar has the next options:
Open Documents - When you click on this button it will scroll you all the currently open
documents, along with the path. This is a useful option if you have a more open-file with the
same name, across the path, you can easily determine which File is. It becomes available by
clicking it. You no longer need to guess the File.
• Show Code Navigator - This option displays the Code Navigator, which is used to view a list
of CSS rules that are applied to the selected element on the page, along with a detailed code that
comes in the form of pop ups when you hover over certain rules. When you click on any of the
rules in the Code Navigator-, you will open a CSS file with the cursor positioned exactly at the
beginning of this rule
.
54 | P a g e
Collapse Full Tag - This option selects a block of code which is currently your cursor and
collapses all the code that's in it.
Collapse Selection - This option collapses the selected code.
Expand All - Click this option to expand all collapsed sections.
Select Parent Tag - This option selects the Parent tag currently selected element, or
elements wherever the cursor is currently located.
Balance Braces - This option selects all the code that is inside the parentheses, braces and angle
brackets.
Line Numbers - This option enables / disables the display of the number of lines in Code view.
Highlight Invalid Code - Dreamweaver highlights in yellow incorrectly nested Tag's. This
button enables / disables the yellow color in the Code view. Default one option is OFF.
Syntax Error Alerts - This option displays the errors in Java Script code in a yellow bar at the
top of the document window. This button enables / disables this option.
Apply Comment Tag - This option allows you to input different types Comment Tag's in the
current line or selection.
Remove Comment Tag - Use this option to remove the entered comments in the current line or
selection.
Wrap Tag - This option provides a quick way to apply a tag around the current selection.
Recent Snippets - This shows all used Snippet from Snippets panel.
Move or Convert CSS - This option allows you to quickly switch CSS rules in CSS File.
Indent Code - This option moves the open Tag element to the right. Tab button has the same
function.
Out dent Code - This option moves the open Tag element to the left (Shift + Tab)
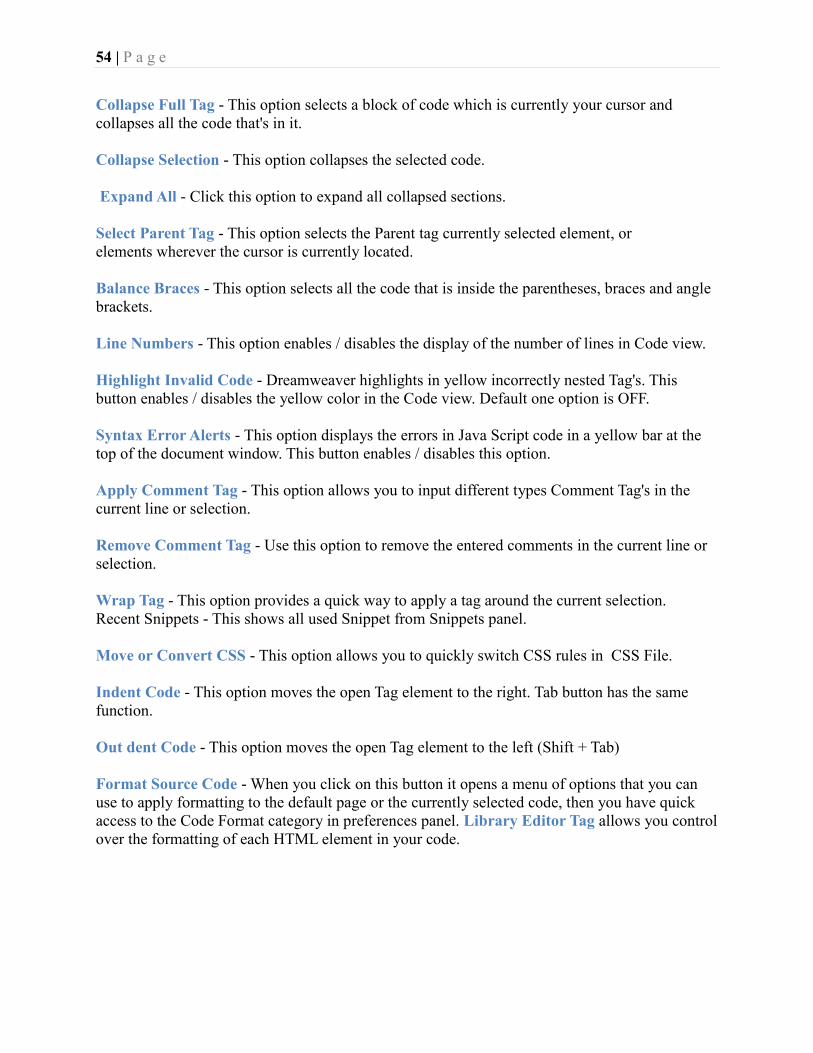
Format Source Code - When you click on this button it opens a menu of options that you can
use to apply formatting to the default page or the currently selected code, then you have quick
access to the Code Format category in preferences panel. Library Editor Tag allows you control
over the formatting of each HTML element in your code.
55 | P a g e
2. CODE HINT
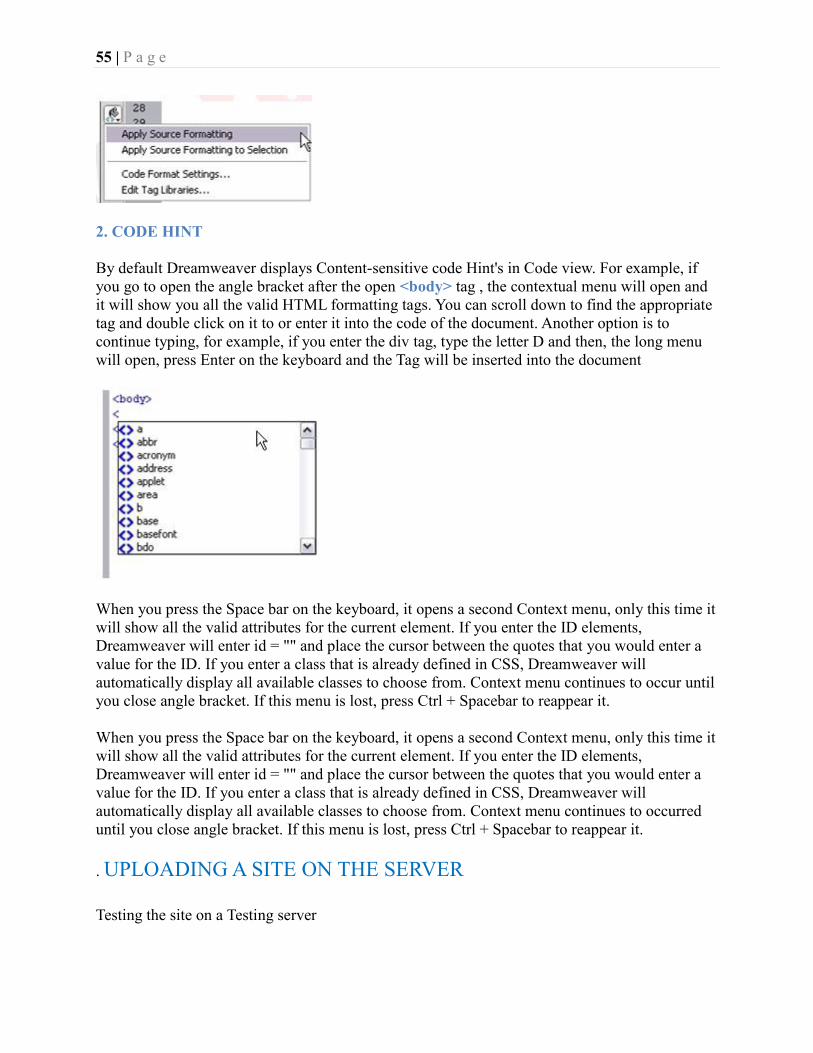
By default Dreamweaver displays Content-sensitive code Hint's in Code view. For example, if
you go to open the angle bracket after the open <body> tag , the contextual menu will open and
it will show you all the valid HTML formatting tags. You can scroll down to find the appropriate
tag and double click on it to or enter it into the code of the document. Another option is to
continue typing, for example, if you enter the div tag, type the letter D and then, the long menu
will open, press Enter on the keyboard and the Tag will be inserted into the document
When you press the Space bar on the keyboard, it opens a second Context menu, only this time it
will show all the valid attributes for the current element. If you enter the ID elements,
Dreamweaver will enter id = "" and place the cursor between the quotes that you would enter a
value for the ID. If you enter a class that is already defined in CSS, Dreamweaver will
automatically display all available classes to choose from. Context menu continues to occur until
you close angle bracket. If this menu is lost, press Ctrl + Spacebar to reappear it.
When you press the Space bar on the keyboard, it opens a second Context menu, only this time it
will show all the valid attributes for the current element. If you enter the ID elements,
Dreamweaver will enter id = "" and place the cursor between the quotes that you would enter a
value for the ID. If you enter a class that is already defined in CSS, Dreamweaver will
automatically display all available classes to choose from. Context menu continues to occurred
until you close angle bracket. If this menu is lost, press Ctrl + Spacebar to reappear it.
. UPLOADING A SITE ON THE SERVER
Testing the site on a Testing server

56 | P a g e
View the file panel in the program. We see all the pages and all the files that we created during
the making of this site. In fact, this is a local copy of these files, and they are located on our
computer. To publish our website these copies should be copied to the server.
We have two options, to copy them on the Testing server and check the site, or to copy them on
the Remote server.
We need to check and configure the site on the testing server before we upload them

57 | P a g e
To go to a remote server, go Site> Manage Site> Advanced settings. Configure the local server
on the tab e.g. 'Navidad', whereby we chose the local network and chose the path to the Root
folder of Springs_Park the name of our site.
58 | P a g e
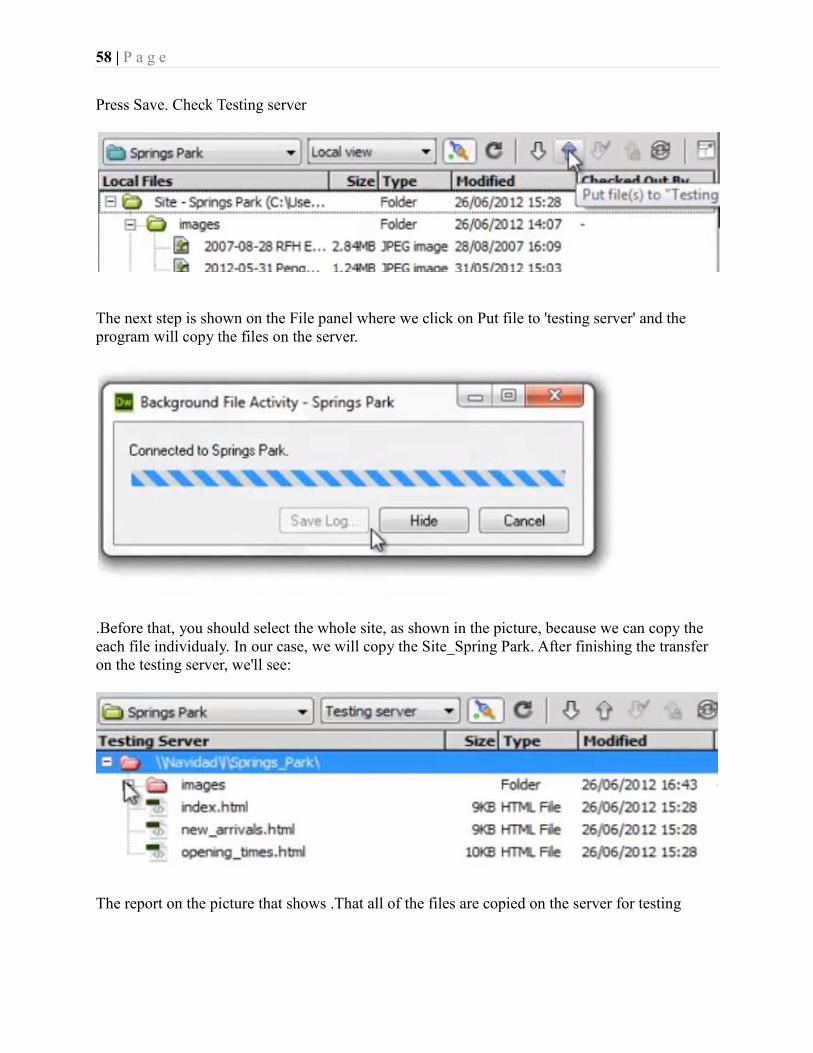
Press Save. Check Testing server
The next step is shown on the File panel where we click on Put file to 'testing server' and the
program will copy the files on the server.
.Before that, you should select the whole site, as shown in the picture, because we can copy the
each file individualy. In our case, we will copy the Site_Spring Park. After finishing the transfer
on the testing server, we'll see:
The report on the picture that shows .That all of the files are copied on the server for testing

59 | P a g e
. If we open the IE browser and type in the address shown on the picture, the Home page will be
open, Welcome to Spring Park (this is the old look of the site, because the testing was done
earlier)
Checking the site on a remote server
To set the files to the remote server you should now set the Site Set up Spring _Park tab.Go to
Site> Manage site> Server> Ad server. You need to enter the data, which provides web hosting
as you previously bought a domain and paid for it. Free hosting can be found on the Internet, as
it was done in this case. Now, the necessary date is entered, as shown in the next picture:
60 | P a g e
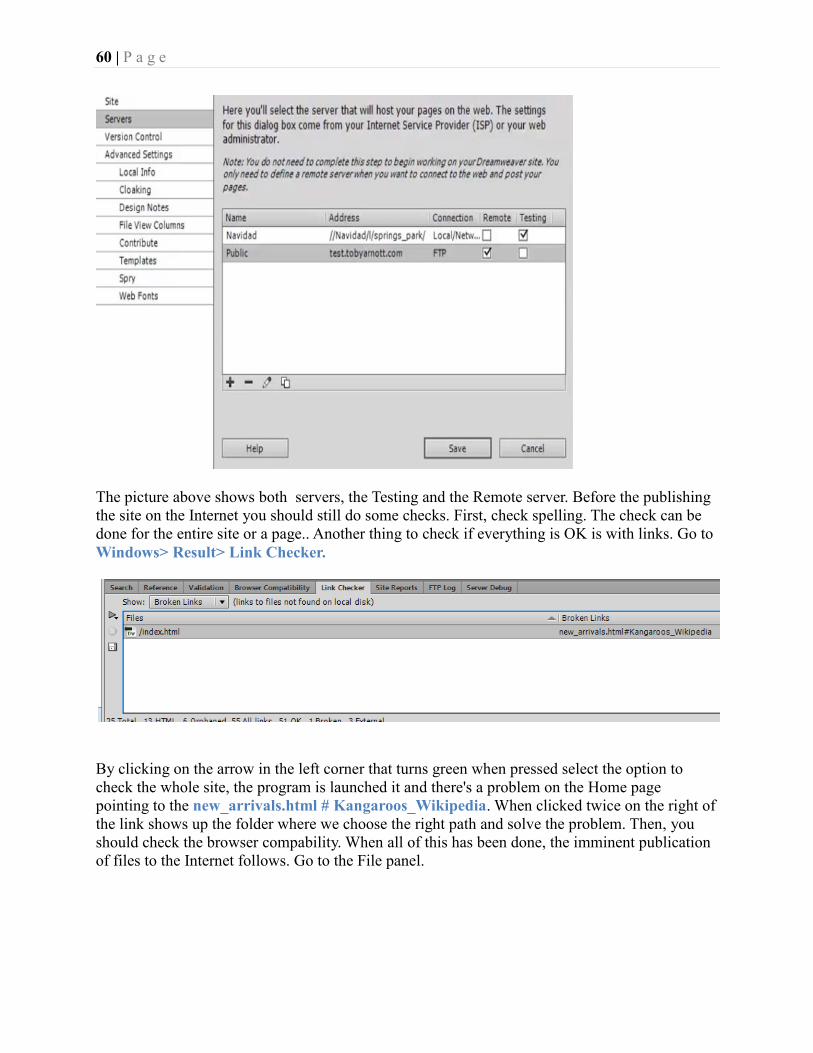
The picture above shows both servers, the Testing and the Remote server. Before the publishing
the site on the Internet you should still do some checks. First, check spelling. The check can be
done for the entire site or a page.. Another thing to check if everything is OK is with links. Go to
Windows> Result> Link Checker.
By clicking on the arrow in the left corner that turns green when pressed select the option to
check the whole site, the program is launched it and there's a problem on the Home page
pointing to the new_arrivals.html # Kangaroos_Wikipedia. When clicked twice on the right of
the link shows up the folder where we choose the right path and solve the problem. Then, you
should check the browser compability. When all of this has been done, the imminent publication
of files to the Internet follows. Go to the File panel.
61 | P a g e
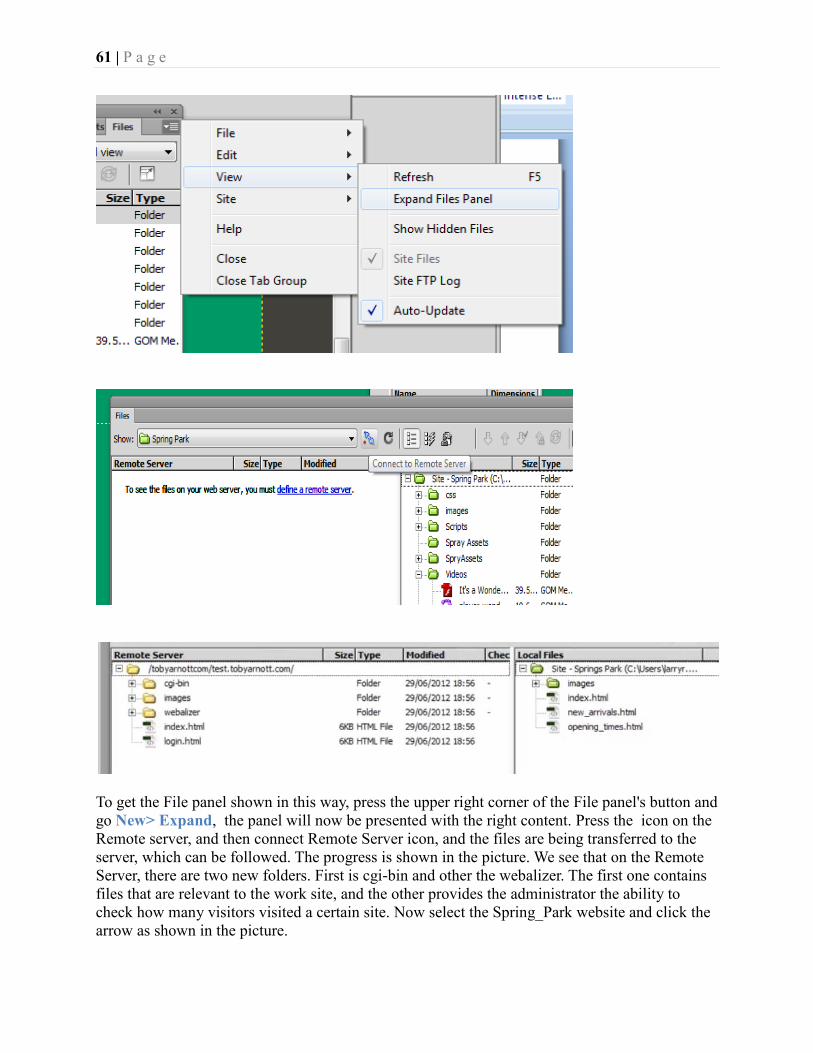
To get the File panel shown in this way, press the upper right corner of the File panel's button and
go New> Expand, the panel will now be presented with the right content. Press the icon on the
Remote server, and then connect Remote Server icon, and the files are being transferred to the
server, which can be followed. The progress is shown in the picture. We see that on the Remote
Server, there are two new folders. First is cgi-bin and other the webalizer. The first one contains
files that are relevant to the work site, and the other provides the administrator the ability to
check how many visitors visited a certain site. Now select the Spring_Park website and click the
arrow as shown in the picture.

62 | P a g e
After some time, the files are uploaded on the Remote server, and now it's the time to see how it
looks like on the internet. This is the look from the begining of the course.
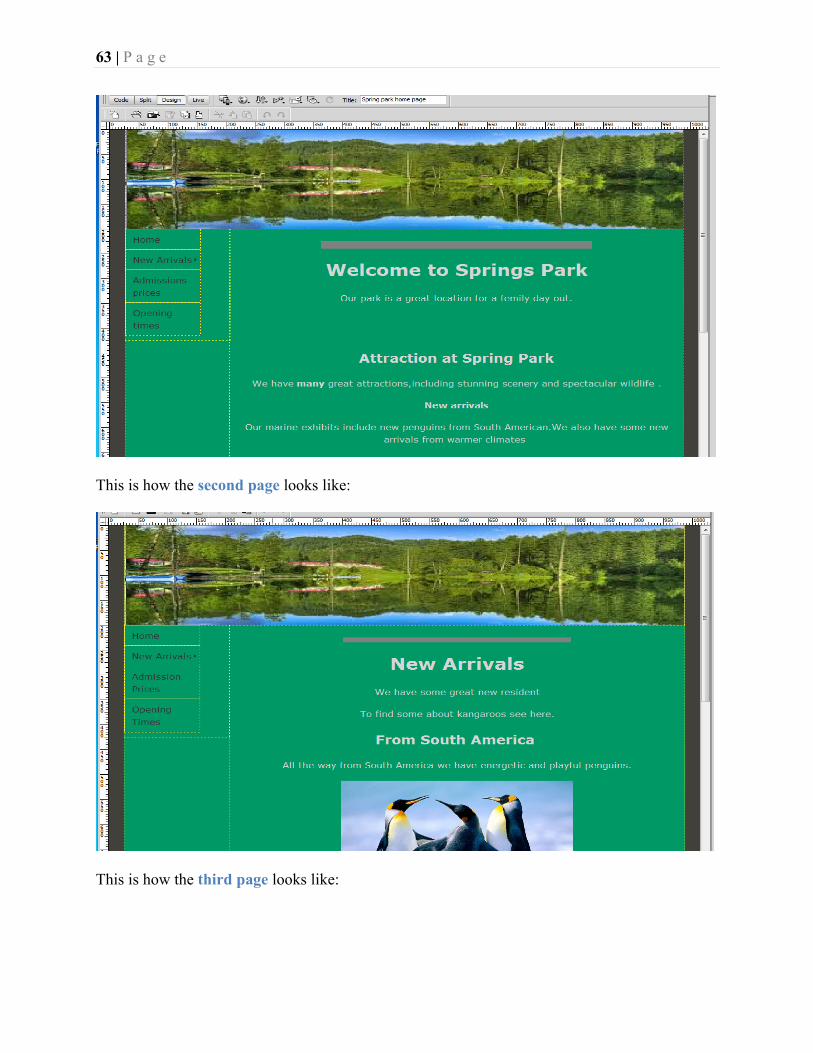
This is how our home page looks like,and we should check all the links in all of the browsers.
63 | P a g e
This is how the second page looks like:
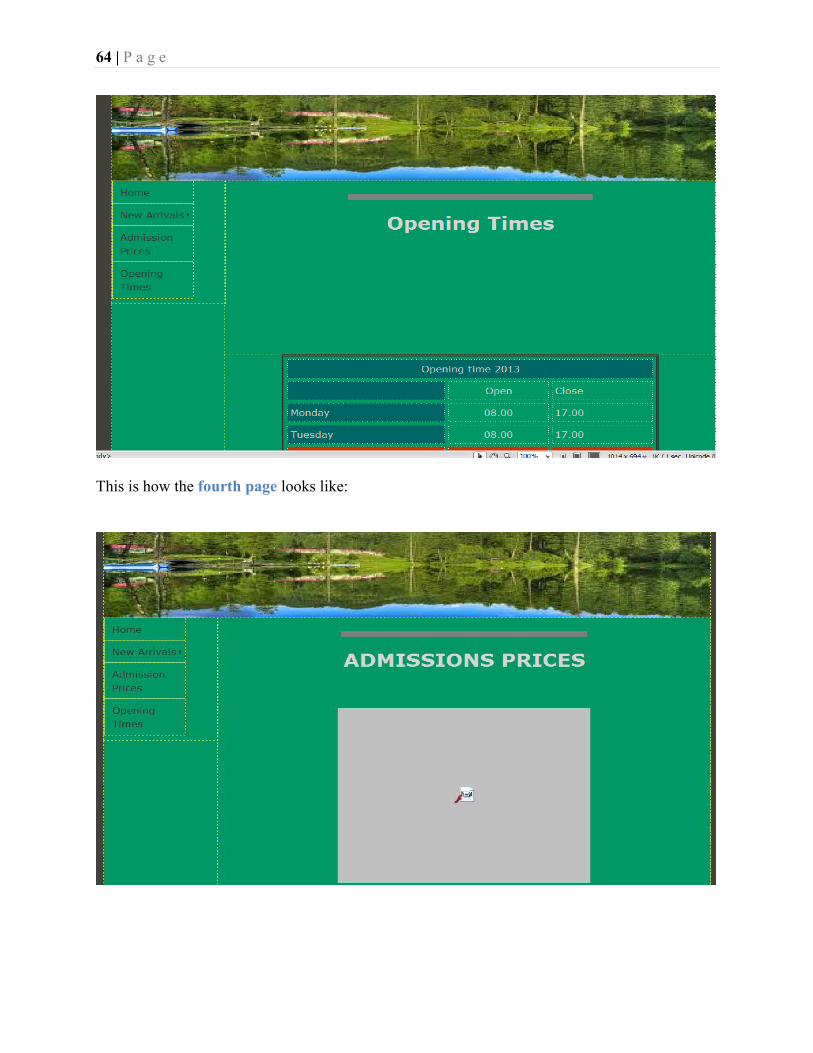
This is how the third page looks like:
64 | P a g e
This is how the fourth page looks like:


