28
DRILLS PACKET jccstl.org
DRILLS PACKET
jccstl.org
Basketball Drills for all agesFor additional information besides what is provided here please go to www.coachesclipboard.net
Ball Handling Fundamentals and Drills
These are the drills:Do each one about 30 to 60 seconds and then move to the next one. With all of these drills, try to keep your eyes forward, without looking at the ball. Start all practices with these drills or similar ones to get hands warmed up and loose.
Finger Grabs:Hold the ball with the fingertips, squeezing it while rotating it back and forth from hand to hand. The ball should not touch the palms of the hands.
Slaps:Pound or slap the ball hard from hand to hand
Tipping:Tip the ball back and forth from one hand to the next, starting with your hands straight up over your head. Then gradually move the ball down, while continuing to tip it back and forth. Go down to your chest, then your waist, knees, and ankles, and then back up again. Keep your elbows straight.
Circles:Put your feet together and make circles around both legs. Then circle around the back. And then circle around the head. Then combine them and move the ball in circles around your head, then down your body, down around your knees, and then around your ankles (“candy cane”). Then come back up again. Be sure to use your fingertips, not the palms.
Around Each Leg and Figure Eights:Put one leg forward and move the ball in a circular motion around the leg. Then do the other leg. Finally, spread your legs out wide with the ball in front of you. Move the ball around through your legs in a figure-of-eight motion. Keep your eyes forward and don’t let the ball hit the floor. After 30 seconds, reverse the direction.
Drops:Put the ball between your feet and grab it with both hands. Start with the left hand behind your left leg and your right hand in front of your right leg. Drop the ball and let it bounce once. Quickly, move your left hand in front of your left leg and your right hand behind your right leg, and catch the ball as it bounces up. Drop it again and switch your hands back to the original position (left behind, right in front) and catch it. Repeat this motion continuously. For a more difficult varia-tion, try catching the ball before it actually hits the floor!
Toss Up and Catch Behind:Here’s a fun drill the players like. Toss the ball up over your head. Reverse pivot and catch the ball behind your back.
Crab Walk:Walk, bent over up the floor and put the ball between the legs, back and forth as you go. The ball is brought over the front of the thigh, then through the legs and then behind the opposite thigh and around and over the thigh.
JCC Youth Basketball Drills 2010 • 1 • www.jccstl.comjccstl.org
Dribbling Stationary Skills
Up and DownsStart by dribbling the ball in front of you so that the ball reaches your waist high. Gradually, bounce the ball harder and harder until you are dribbling the ball as high as you can without jumping. Then gradually dribble the ball lower and lower until you are on one knee, finishing as close to the floor as possible. Pound the ball quickly to keep it going. Then do it with the other hand.
KillsDribble the ball waist high, then suddenly “kill” it by dribbling it as low as you can, hold this for a few seconds, then bring it back up to waist high. Do this several times with each hand.
Circle DribblesThis drill is similar to “Circles” except now the ball is dribbled. Dribble around your left leg then your right. Next, using both hands, dribble around both legs which should be together. Next, kneel down on one knee and dribble around your body and under your leg. After that, switch knees and continue. Then, while on your knees, dribble around your body, using both hands.
Figure EightThis drill is similar to the ball-handling figure eights drill except now the ball is dribbled through your legs in a figure-of-eight motion. Use both hands and be sure to look up while doing this drill.
Back and Forth Under the LegsGet crouched over with your right knee and leg forward. V-dribble the ball behind the extended leg. Repeat behind the other leg.
Crossover DribblesDribble with your right hand. Bounce the ball once on the right side, then cross the ball over in front of you by bouncing it to the left. The left hand now bounces it on the left once, and then crossover back to the right, where the right takes over again. Repeat this procedure.
V-Dribble in FrontStart with the right hand and dribble once on the right side. Then dribble the ball in front you, as if you were going to cross over to the left side. Instead of getting it with your left hand, roll your right hand over the top of the ball, and bring it back to the right. Keep dribbling like this: right then cross over V-dribble. Repeat with the left hand.
Side V-DribbleNow do the v-dribble on the side. Do both left and right hands. Also try some of the 2-ball drills. There are demonstrations of all these drills in the video clips library. See the one and two-ball dribbling drills, and ball-handling drills.
JCC Youth Basketball Drills 2010 • 2 • www.jccstl.comjccstl.org
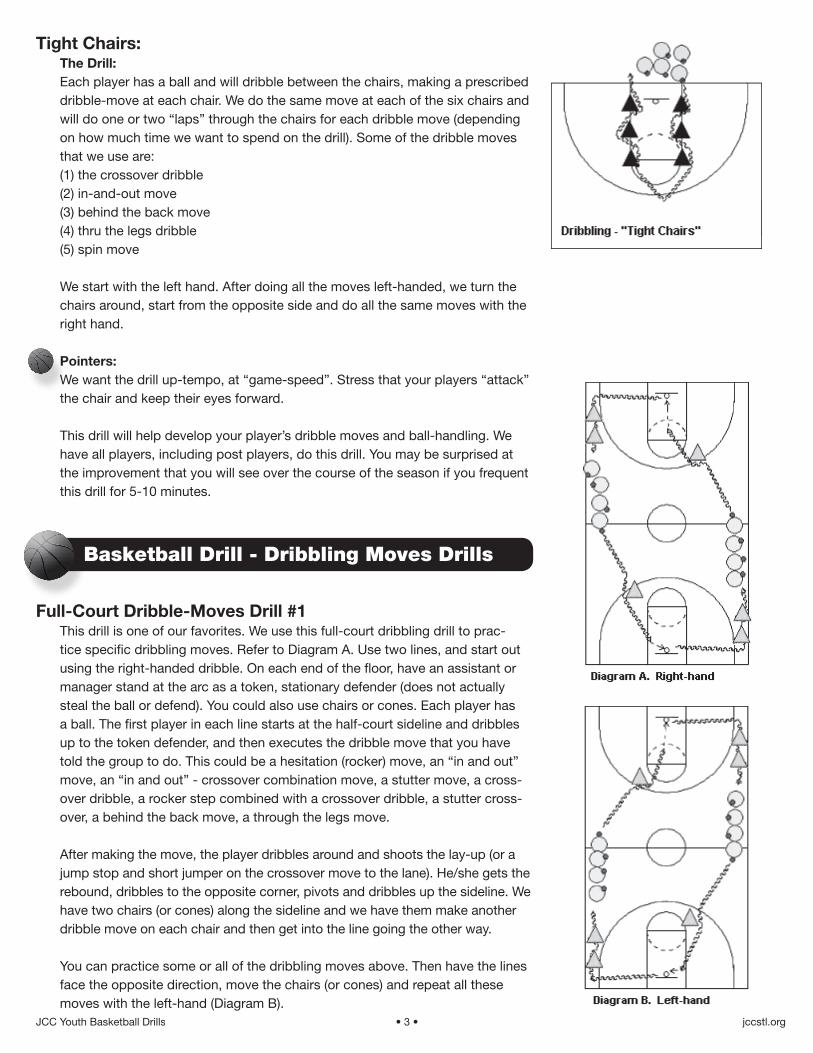
Tight Chairs:The Drill:Each player has a ball and will dribble between the chairs, making a prescribed dribble-move at each chair. We do the same move at each of the six chairs and will do one or two “laps” through the chairs for each dribble move (depending on how much time we want to spend on the drill). Some of the dribble moves that we use are:(1) the crossover dribble(2) in-and-out move(3) behind the back move(4) thru the legs dribble(5) spin move
We start with the left hand. After doing all the moves left-handed, we turn the chairs around, start from the opposite side and do all the same moves with the right hand.
Pointers:We want the drill up-tempo, at “game-speed”. Stress that your players “attack” the chair and keep their eyes forward.
This drill will help develop your player’s dribble moves and ball-handling. We have all players, including post players, do this drill. You may be surprised at the improvement that you will see over the course of the season if you frequent this drill for 5-10 minutes.
4Start with the right hand and dribble once on the right side. Then dribble the ball in front you, as if you were going to cross over to the left side. Instead of getting it with your left hand, roll your right hand over the top of the ball, and bring it back to the right. Keep dribbling like this: right then cross over V-dribble. Repeat with the left hand.
Side V-Dribble Now do the v-dribble on the side. Do both left and right hands.Also try some of the 2-ball drills. There are demonstrations of all these drills in the video clips library. See the one and two-ball dribbling drills, and ball-handling drills.
Tight Chairs:The Drill: Each player has a ball and will dribble between the chairs, making a prescribed dribble-move at each chair. We do the same move at each of the six chairs and will do one or two "laps" through the chairs for each dribble move (depending on how much time we want to spend on the drill). Some of the dribble moves that we use are: (1) the crossover dribble (2) in-and-out move (3) behind the back move (4) thru the legs dribble (5) spin move
We start with the left hand. After doing all the moves left-handed, we turn the chairs around, start from the opposite side and do all the same moves with the right hand.
Pointers: We want the drill up-tempo, at "game-speed". Stress that your players "attack" the chair and keep their eyes forward.
This drill will help develop your player's dribble moves and ball-handling. We have all players, including post players, do this drill. You may be surprised at the improvement that you will see over the course of the season if you frequent this drill for 5-10 minutes.
Basketball Drill - Dribbling Moves Drills
Full-Court Dribble-Moves Drill #1 This drill is one of our favorites. We use this full-court dribbling drill to practice specific dribbling moves. Refer to Diagram A. Use two lines, and start out using the right-handed dribble. On each end of the floor, have an assistant or manager stand at the arc as a token, stationary defender (does not actually steal the ball or defend). You could also use chairs or cones. Each player has a ball. The first player in each line starts at the half-court sideline and dribbles up to thetoken defender, and then executes the dribble move that you have told the group to do. This could be a hesitation (rocker) move, an "in and out" move, an "in and out" - crossover combination move, a stutter move, a crossover dribble, a rocker step combined with a crossover dribble, a stutter cross-over, a behind the back move, a through the legs move
After making the move, the player dribbles around and shoots the lay-up (or a jump stop and short jumper on the crossover move to the lane). He/she gets the rebound, dribbles to the opposite corner, pivots and dribbles up the sideline. We have two chairs (or cones) along the sideline and we have them make another dribble move on each chair and then get into the line going the other way.
You can practice some or all of the dribbling moves above. Then have the lines face the opposite direction, move the chairs (or cones) and repeat all these moves with the left-hand (Diagram B).
Basketball Drill - Dribbling Moves Drills
Full-Court Dribble-Moves Drill #1This drill is one of our favorites. We use this full-court dribbling drill to prac-tice specific dribbling moves. Refer to Diagram A. Use two lines, and start out using the right-handed dribble. On each end of the floor, have an assistant or manager stand at the arc as a token, stationary defender (does not actually steal the ball or defend). You could also use chairs or cones. Each player has a ball. The first player in each line starts at the half-court sideline and dribbles up to the token defender, and then executes the dribble move that you have told the group to do. This could be a hesitation (rocker) move, an “in and out” move, an “in and out” - crossover combination move, a stutter move, a cross-over dribble, a rocker step combined with a crossover dribble, a stutter cross-over, a behind the back move, a through the legs move.
After making the move, the player dribbles around and shoots the lay-up (or a jump stop and short jumper on the crossover move to the lane). He/she gets the rebound, dribbles to the opposite corner, pivots and dribbles up the sideline. We have two chairs (or cones) along the sideline and we have them make another dribble move on each chair and then get into the line going the other way.
You can practice some or all of the dribbling moves above. Then have the lines face the opposite direction, move the chairs (or cones) and repeat all these moves with the left-hand (Diagram B).
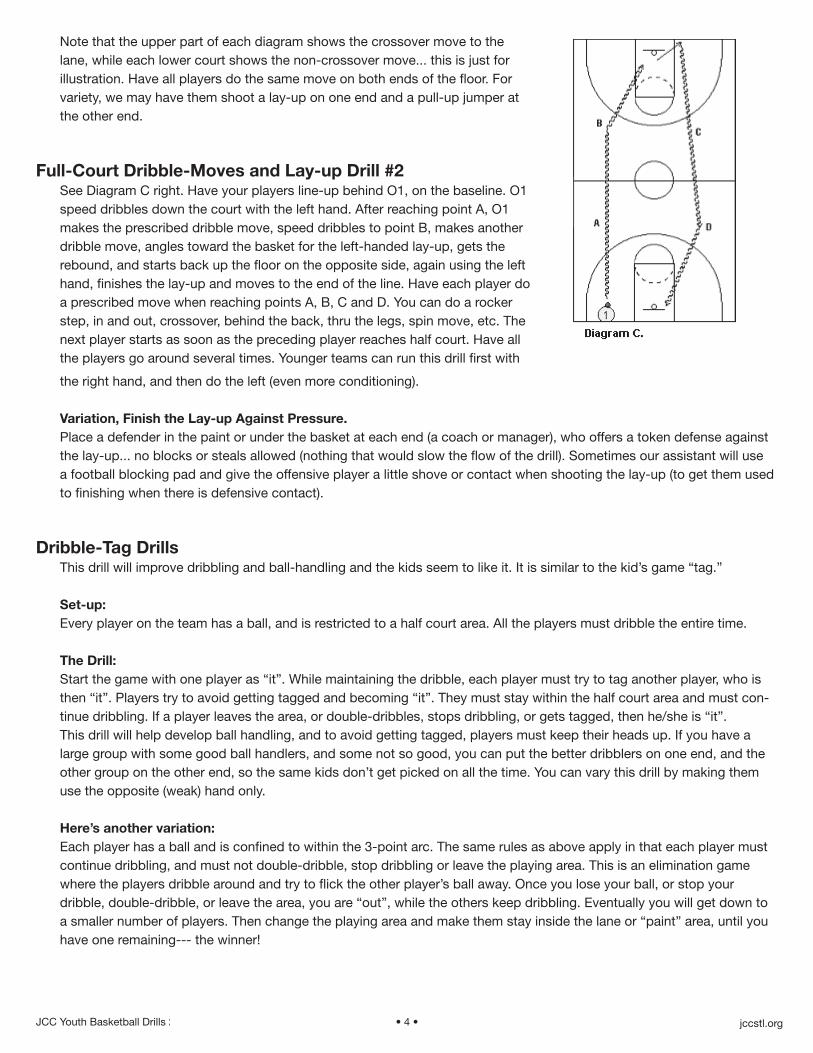
5Note that the upper part of each diagram shows the crossover move to the lane, while each lower court shows the non-crossover move... this is just for illustration. Have all players do the same move on both ends of the floor. For variety, we may have them shoot a lay-up on one end and a pull-up jumper at the other end.
Full-Court Dribble-Moves and Lay-up Drill #2 See Diagram C above. Have your players line-up behind O1, on the baseline. O1 speed dribbles down the court with the left hand. After reaching point A, O1 makes the prescribed dribble move, speed dribbles to point B, makes another dribble move, angles toward the basket for the left-handed lay-up, gets the rebound, and starts back up the floor on the opposite side, again using the left hand, finishes the lay-up and moves to the end of the line. Have each player do a prescribed move when reaching points A, B, C and D. You can do a rocker step, in and out, crossover, behind the back, thru the legs, spin move, etc. The next player starts as soon as the preceding player reaches half court. Have all the players go around several times. Younger teams can run this drill first with the right hand, and then do the left (even more conditioning).
Variation, Finish the Lay-up Against Pressure. Place a defender in the paint or under the basket at each end (a coach or manager), who offers a token defense against the lay-up... no blocks or steals allowed (nothing that would slow the flow of the drill). Sometimes our assistant will use a football blocking pad and give the offensive player a little shove or contact when shooting the lay-up (to get them used to finishing when there is defensive contact).
Dribble-Tag Drills This drill will improve dribbling and ball-handling and the kids seem to like it. It is similar to the kid's game "tag."
Set-up:Every player on the team has a ball, and is restricted to a half court area. All the players must dribble the entire time.
JCC Youth Basketball Drills 2010 • 3 • www.jccstl.comjccstl.org
5Note that the upper part of each diagram shows the crossover move to the lane, while each lower court shows the non-crossover move... this is just for illustration. Have all players do the same move on both ends of the floor. For variety, we may have them shoot a lay-up on one end and a pull-up jumper at the other end.
Full-Court Dribble-Moves and Lay-up Drill #2 See Diagram C above. Have your players line-up behind O1, on the baseline. O1 speed dribbles down the court with the left hand. After reaching point A, O1 makes the prescribed dribble move, speed dribbles to point B, makes another dribble move, angles toward the basket for the left-handed lay-up, gets the rebound, and starts back up the floor on the opposite side, again using the left hand, finishes the lay-up and moves to the end of the line. Have each player do a prescribed move when reaching points A, B, C and D. You can do a rocker step, in and out, crossover, behind the back, thru the legs, spin move, etc. The next player starts as soon as the preceding player reaches half court. Have all the players go around several times. Younger teams can run this drill first with the right hand, and then do the left (even more conditioning).
Variation, Finish the Lay-up Against Pressure. Place a defender in the paint or under the basket at each end (a coach or manager), who offers a token defense against the lay-up... no blocks or steals allowed (nothing that would slow the flow of the drill). Sometimes our assistant will use a football blocking pad and give the offensive player a little shove or contact when shooting the lay-up (to get them used to finishing when there is defensive contact).
Dribble-Tag Drills This drill will improve dribbling and ball-handling and the kids seem to like it. It is similar to the kid's game "tag."
Set-up:Every player on the team has a ball, and is restricted to a half court area. All the players must dribble the entire time.
Note that the upper part of each diagram shows the crossover move to the lane, while each lower court shows the non-crossover move... this is just for illustration. Have all players do the same move on both ends of the floor. For variety, we may have them shoot a lay-up on one end and a pull-up jumper at the other end.
Full-Court Dribble-Moves and Lay-up Drill #2
See Diagram C right. Have your players line-up behind O1, on the baseline. O1 speed dribbles down the court with the left hand. After reaching point A, O1 makes the prescribed dribble move, speed dribbles to point B, makes another dribble move, angles toward the basket for the left-handed lay-up, gets the rebound, and starts back up the floor on the opposite side, again using the left hand, finishes the lay-up and moves to the end of the line. Have each player do a prescribed move when reaching points A, B, C and D. You can do a rocker step, in and out, crossover, behind the back, thru the legs, spin move, etc. The next player starts as soon as the preceding player reaches half court. Have all the players go around several times. Younger teams can run this drill first with
the right hand, and then do the left (even more conditioning).
Variation, Finish the Lay-up Against Pressure.Place a defender in the paint or under the basket at each end (a coach or manager), who offers a token defense against the lay-up... no blocks or steals allowed (nothing that would slow the flow of the drill). Sometimes our assistant will use a football blocking pad and give the offensive player a little shove or contact when shooting the lay-up (to get them used to finishing when there is defensive contact).
Dribble-Tag DrillsThis drill will improve dribbling and ball-handling and the kids seem to like it. It is similar to the kid’s game “tag.”
Set-up:Every player on the team has a ball, and is restricted to a half court area. All the players must dribble the entire time.
The Drill:Start the game with one player as “it”. While maintaining the dribble, each player must try to tag another player, who is then “it”. Players try to avoid getting tagged and becoming “it”. They must stay within the half court area and must con-tinue dribbling. If a player leaves the area, or double-dribbles, stops dribbling, or gets tagged, then he/she is “it”. This drill will help develop ball handling, and to avoid getting tagged, players must keep their heads up. If you have a large group with some good ball handlers, and some not so good, you can put the better dribblers on one end, and the other group on the other end, so the same kids don’t get picked on all the time. You can vary this drill by making them use the opposite (weak) hand only.
Here’s another variation:Each player has a ball and is confined to within the 3-point arc. The same rules as above apply in that each player must continue dribbling, and must not double-dribble, stop dribbling or leave the playing area. This is an elimination game where the players dribble around and try to flick the other player’s ball away. Once you lose your ball, or stop your dribble, double-dribble, or leave the area, you are “out”, while the others keep dribbling. Eventually you will get down to a smaller number of players. Then change the playing area and make them stay inside the lane or “paint” area, until you have one remaining--- the winner!
JCC Youth Basketball Drills 2010 • 4 • www.jccstl.comjccstl.org
Passing Drills
Basketball Drills - Fast-Break, Full-Court Passing Drills -- 2-on-0, 2-on-1, 2-on-2These full-court, fast-break drills emphasize passing and receiving on the move and finishing the break with a lay-up, or finishing in a 2-on-1 or 2-on-2 situation. We run through all the sets of drills below, starting with the 2-on-0 drills, and then progressing into the 2-on-1 and finally the 2-on-2 drills. Run all these drills in about 10 minutes, and them almost every practice.
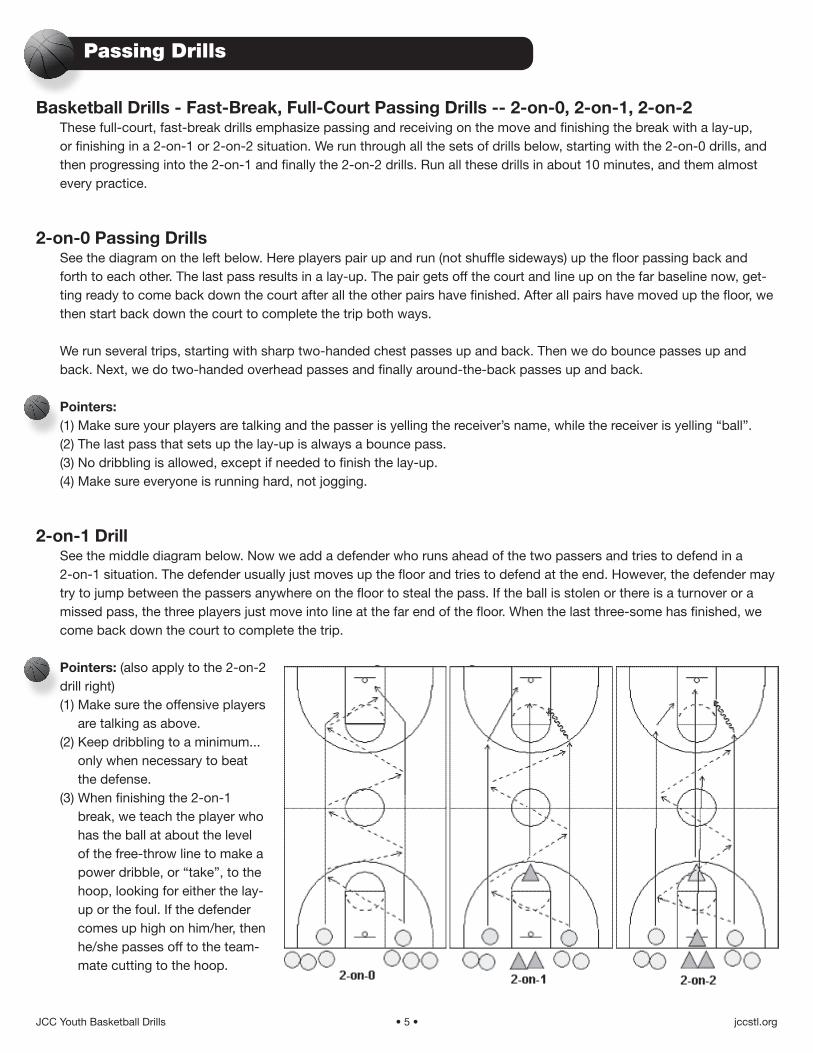
2-on-0 Passing DrillsSee the diagram on the left below. Here players pair up and run (not shuffle sideways) up the floor passing back and forth to each other. The last pass results in a lay-up. The pair gets off the court and line up on the far baseline now, get-ting ready to come back down the court after all the other pairs have finished. After all pairs have moved up the floor, we then start back down the court to complete the trip both ways.
We run several trips, starting with sharp two-handed chest passes up and back. Then we do bounce passes up and back. Next, we do two-handed overhead passes and finally around-the-back passes up and back.
Pointers:(1) Make sure your players are talking and the passer is yelling the receiver’s name, while the receiver is yelling “ball”.(2) The last pass that sets up the lay-up is always a bounce pass.(3) No dribbling is allowed, except if needed to finish the lay-up.(4) Make sure everyone is running hard, not jogging.
2-on-1 DrillSee the middle diagram below. Now we add a defender who runs ahead of the two passers and tries to defend in a 2-on-1 situation. The defender usually just moves up the floor and tries to defend at the end. However, the defender may try to jump between the passers anywhere on the floor to steal the pass. If the ball is stolen or there is a turnover or a missed pass, the three players just move into line at the far end of the floor. When the last three-some has finished, we come back down the court to complete the trip.
Pointers: (also apply to the 2-on-2 drill right)(1) Make sure the offensive players
are talking as above.(2) Keep dribbling to a minimum...
only when necessary to beat the defense.
(3) When finishing the 2-on-1 break, we teach the player who has the ball at about the level of the free-throw line to make a power dribble, or “take”, to the hoop, looking for either the lay-up or the foul. If the defender comes up high on him/her, then he/she passes off to the team-mate cutting to the hoop.
7See the middle diagram below. Now we add a defender who runs ahead of the two passers and tries to defend in a 2-on-1 situation. The defender usually just moves up the floor and tries to defend at the end. However, the defender may try to jump between the passers anywhere on the floor to steal the pass. If the ball is stolen or there is a turnover or a missed pass, the three players just move into line at the far end of the floor. When the last three-some has finished, we come back down the court to complete the trip.
Pointers: (also apply to the 2-on-2 drill below) (1) Make sure the offensive players are talking as above. (2) Keep dribbling to a minimum... only when necessary to beat the defense. (3) When finishing the 2-on-1 break, we teach the player who has the ball at about the level of the free-throw line to make a power dribble, or "take", to the hoop, looking for either the lay-up or the foul. If the defender comes up high on him/her, then he/she passes off to the teammate cutting to the hoop.
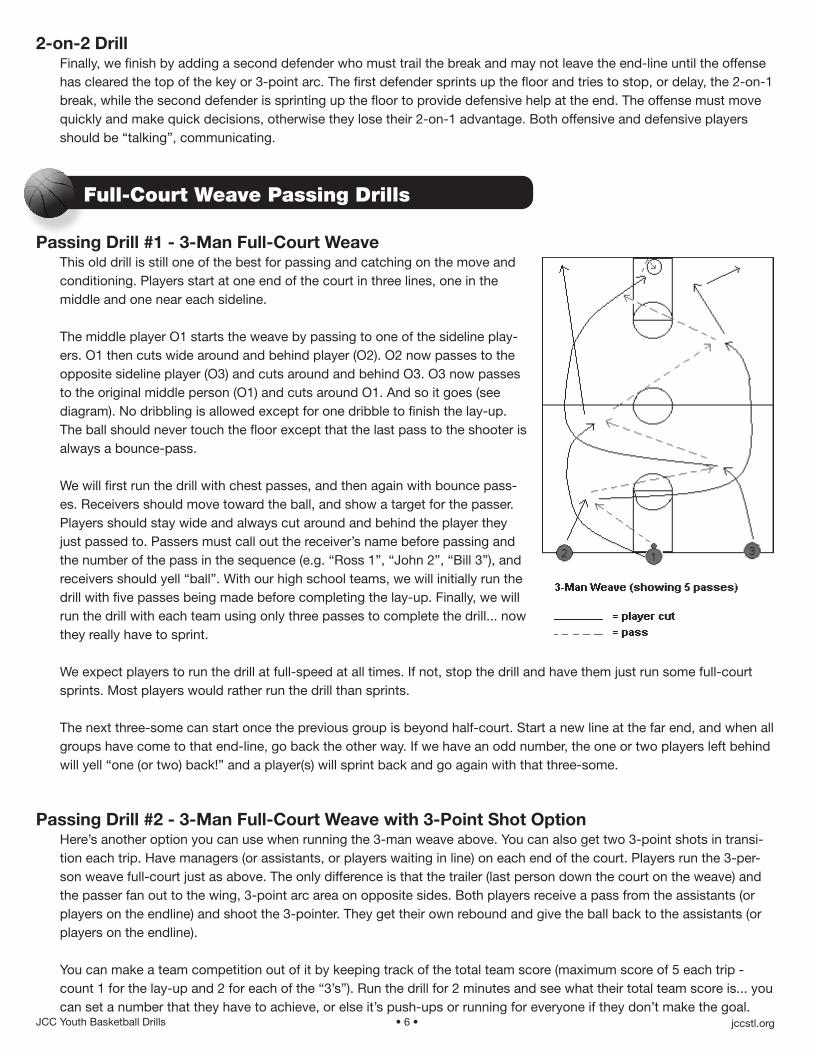
2-on-2 Drill Finally, we finish by adding a second defender who must trail the break and may not leave the end-line until the offense has cleared the top of the key or 3-point arc. The first defender sprints up the floor and tries to stop, or delay, the 2-on-1 break, while the second defender is sprinting up the floor to provide defensive help at the end. The offense must move quickly and make quick decisions, otherwise they lose their 2-on-1 advantage. Both offensive and defensive players should be "talking", communicating.
Full-Court Weave Passing Drills
Passing Drill #1 - 3-Man Full-Court Weave This old drill is still one of the best for passing and catching on the move and conditioning. Players start at one end of the court in three lines, one in the middle and one near each sideline.
JCC Youth Basketball Drills 2010 • 5 • www.jccstl.comjccstl.org
2-on-2 DrillFinally, we finish by adding a second defender who must trail the break and may not leave the end-line until the offense has cleared the top of the key or 3-point arc. The first defender sprints up the floor and tries to stop, or delay, the 2-on-1 break, while the second defender is sprinting up the floor to provide defensive help at the end. The offense must move quickly and make quick decisions, otherwise they lose their 2-on-1 advantage. Both offensive and defensive players should be “talking”, communicating.
8
The middle player O1 starts the weave by passing to one of the sideline players. O1 then cuts wide around and behind player (O2). O2 now passes to the opposite sideline player (O3) and cuts around and behind O3. O3 now passes to the original middle person (O1) and cuts around O1. And so it goes (see diagram). No dribbling is allowed except for one dribble to finish the lay-up. The ball should never touch the floor except that the last pass to the shooter is always a bounce-pass.
We will first run the drill with chest passes, and then again with bounce passes. Receivers should move toward the ball, and show a target for the passer. Players should stay wide and always cut around and behind the player they just passed to. Passers must call out the receiver's name before passing and the number of the pass in the sequence (e.g. "Ross 1", "John 2", "Bill 3"), and receivers should yell "ball". With our high school teams, we will initially run the drill with five passes being made before completing the lay-up. Finally, we will run the drill with each team using only three passes to complete the drill... now they really have to sprint.
We expect players to run the drill at full-speed at all times. If not, stop the drill and have them just run some full-court sprints. Most players would rather run the drill than sprints.
The next three-some can start once the previous group is beyond half-court. Start a new line at the far end, and when all groups have come to that end-line, go back the other way. If we have an odd number, the one or two players left behind will yell "one (or two) back!" and a player(s) will sprint back and go again with that three-some.
Passing Drill #2 - 3-Man Full-Court Weave with 3-Point Shot OptionHere's another option you can use when running the 3-man weave above. You can also get two 3-point shots in transition each trip. Have managers (or assistants, or players waiting in line) on each end of the court. Players run the 3-person weave full-court just as above. The only difference is that the trailer (last person down the court on the weave) and the passer fan out to the wing, 3-point arc area on opposite sides. Both players receive a pass from the assistants (or players on the endline) and shoot the 3-pointer. They get their own rebound and give the ball back to the assistants (or players on the endline).
You can make a team competition out of it by keeping track of the total team score (maximum score of 5 each trip - count 1 for the lay-up and 2 for each of the "3's"). Run the drill for 2 minutes and see what their total team score is... you can set a number that they have to achieve, or else it's push-ups or running for everyone if they don't make the goal.
Full-Court Weave Passing Drills
Passing Drill #1 - 3-Man Full-Court WeaveThis old drill is still one of the best for passing and catching on the move and conditioning. Players start at one end of the court in three lines, one in the middle and one near each sideline.
The middle player O1 starts the weave by passing to one of the sideline play-ers. O1 then cuts wide around and behind player (O2). O2 now passes to the opposite sideline player (O3) and cuts around and behind O3. O3 now passes to the original middle person (O1) and cuts around O1. And so it goes (see diagram). No dribbling is allowed except for one dribble to finish the lay-up. The ball should never touch the floor except that the last pass to the shooter is always a bounce-pass.
We will first run the drill with chest passes, and then again with bounce pass-es. Receivers should move toward the ball, and show a target for the passer. Players should stay wide and always cut around and behind the player they just passed to. Passers must call out the receiver’s name before passing and the number of the pass in the sequence (e.g. “Ross 1”, “John 2”, “Bill 3”), and receivers should yell “ball”. With our high school teams, we will initially run the drill with five passes being made before completing the lay-up. Finally, we will run the drill with each team using only three passes to complete the drill... now they really have to sprint.
We expect players to run the drill at full-speed at all times. If not, stop the drill and have them just run some full-court sprints. Most players would rather run the drill than sprints.
The next three-some can start once the previous group is beyond half-court. Start a new line at the far end, and when all groups have come to that end-line, go back the other way. If we have an odd number, the one or two players left behind will yell “one (or two) back!” and a player(s) will sprint back and go again with that three-some.
Passing Drill #2 - 3-Man Full-Court Weave with 3-Point Shot OptionHere’s another option you can use when running the 3-man weave above. You can also get two 3-point shots in transi-tion each trip. Have managers (or assistants, or players waiting in line) on each end of the court. Players run the 3-per-son weave full-court just as above. The only difference is that the trailer (last person down the court on the weave) and the passer fan out to the wing, 3-point arc area on opposite sides. Both players receive a pass from the assistants (or players on the endline) and shoot the 3-pointer. They get their own rebound and give the ball back to the assistants (or players on the endline).
You can make a team competition out of it by keeping track of the total team score (maximum score of 5 each trip - count 1 for the lay-up and 2 for each of the “3’s”). Run the drill for 2 minutes and see what their total team score is... you can set a number that they have to achieve, or else it’s push-ups or running for everyone if they don’t make the goal.
JCC Youth Basketball Drills 2010 • 6 • www.jccstl.comjccstl.org
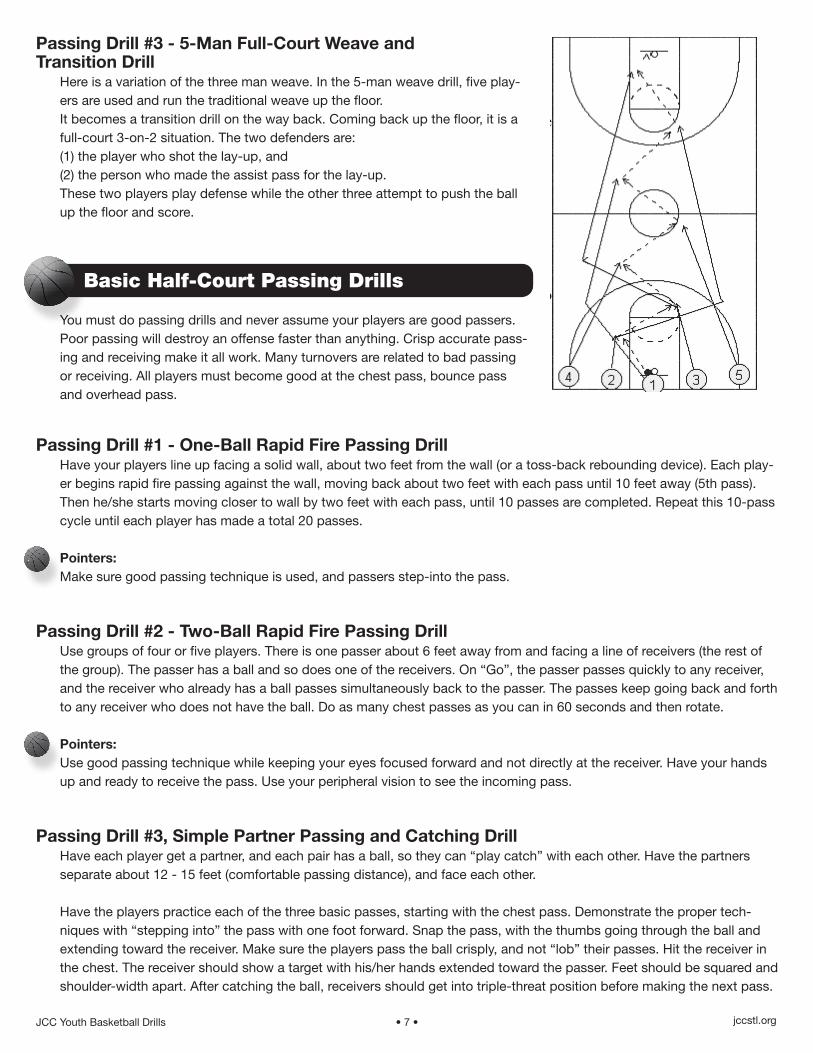
Passing Drill #3 - 5-Man Full-Court Weave and Transition Drill
Here is a variation of the three man weave. In the 5-man weave drill, five play-ers are used and run the traditional weave up the floor.It becomes a transition drill on the way back. Coming back up the floor, it is a full-court 3-on-2 situation. The two defenders are:(1) the player who shot the lay-up, and(2) the person who made the assist pass for the lay-up.These two players play defense while the other three attempt to push the ball up the floor and score.
9
Passing Drill #3 - 5-Man Full-Court Weave and Transition Drill Here is a variation of the three man weave. In the 5-man weave drill, five players are used and run the traditional weave up the floor.
It becomes a transition drill on the way back. Coming back up the floor, it is a full-court 3-on-2 situation. The two defenders are:(1) the player who shot the lay-up, and (2) the person who made the assist pass for the lay-up.
These two players play defense while the other three attempt to push the ball up the floor and score.
Basic Half-Court Passing Drills You must do passing drills and never assume your players are good passers. Poor passing will destroy an offense faster than anything. Crisp accurate passing and receiving make it all work. Many turnovers are related to bad passing or receiving. All players must become good at the chest pass, bounce pass and overhead pass.
Passing Drill #1 - One-Ball Rapid Fire Passing Drill Have your players line up facing a solid wall, about two feet from the wall (or a toss-back rebounding device). Each player begins rapid fire passing against the wall, moving back about two feet with each pass until 10 feet away (5th pass). Then he/she starts moving closer to wall by two feet with each pass, until 10 passes are completed. Repeat this 10-pass cycle until each player has made a total 20 passes.
Pointers:Make sure good passing technique is used, and passers step-into the pass.
Passing Drill #2 - Two-Ball Rapid Fire Passing Drill Use groups of four or five players. There is one passer about 6 feet away from and facing a line of receivers (the rest of the group). The passer has a ball and so does one of the receivers. On "Go", the passer passes quickly to any receiver, and the receiver who already has a ball passes simultaneously back to the passer. The passes keep going back and forth to any receiver who does not have the ball. Do as many chest passes as you can in 60 seconds and then rotate.
Pointers:Use good passing technique while keeping your eyes focused forward and not directly at the receiver. Have your hands up and ready to receive the pass. Use your peripheral vision to see the incoming pass.
Passing Drill #3, Simple Partner Passing and Catching Drill
Basic Half-Court Passing Drills
You must do passing drills and never assume your players are good passers. Poor passing will destroy an offense faster than anything. Crisp accurate pass-ing and receiving make it all work. Many turnovers are related to bad passing or receiving. All players must become good at the chest pass, bounce pass and overhead pass.
Passing Drill #1 - One-Ball Rapid Fire Passing DrillHave your players line up facing a solid wall, about two feet from the wall (or a toss-back rebounding device). Each play-er begins rapid fire passing against the wall, moving back about two feet with each pass until 10 feet away (5th pass). Then he/she starts moving closer to wall by two feet with each pass, until 10 passes are completed. Repeat this 10-pass cycle until each player has made a total 20 passes.
Pointers:Make sure good passing technique is used, and passers step-into the pass.
Passing Drill #2 - Two-Ball Rapid Fire Passing DrillUse groups of four or five players. There is one passer about 6 feet away from and facing a line of receivers (the rest of the group). The passer has a ball and so does one of the receivers. On “Go”, the passer passes quickly to any receiver, and the receiver who already has a ball passes simultaneously back to the passer. The passes keep going back and forth to any receiver who does not have the ball. Do as many chest passes as you can in 60 seconds and then rotate.
Pointers:Use good passing technique while keeping your eyes focused forward and not directly at the receiver. Have your hands up and ready to receive the pass. Use your peripheral vision to see the incoming pass.
Passing Drill #3, Simple Partner Passing and Catching DrillHave each player get a partner, and each pair has a ball, so they can “play catch” with each other. Have the partners separate about 12 - 15 feet (comfortable passing distance), and face each other.
Have the players practice each of the three basic passes, starting with the chest pass. Demonstrate the proper tech-niques with “stepping into” the pass with one foot forward. Snap the pass, with the thumbs going through the ball and extending toward the receiver. Make sure the players pass the ball crisply, and not “lob” their passes. Hit the receiver in the chest. The receiver should show a target with his/her hands extended toward the passer. Feet should be squared and shoulder-width apart. After catching the ball, receivers should get into triple-threat position before making the next pass.
JCC Youth Basketball Drills 2010 • 7 • www.jccstl.comjccstl.org
Next, work on bounce passes. Again, passers should start from triple-threat position. The ball should hit the ground about three-quarters from the receiver and bounce right to his chest. Make sure passers are passing the ball with their hands waist to chest high - not over the head (we do not believe in an overhead bounce pass).
Next, work on the two-handed overhead pass or outlet pass. Have the partners move a little farther apart, so that you are working on a longer pass. Players should snap their passes with some arc, but be sure that they are not lobbing their passes too high. The arc should be just enough to get over the extended hands of a defender, but not so high that the pass “floats”. This pass can be thrown hard, and is effective as the outlet pass after a rebound, to start the fast break. It is also good for throwing over zone defenses (“skip passes”). To simulate the outlet pass, after receiving the ball, have the passer turn his back to the receiver, then simulate pulling the ball in, pivot, and make the overhead pass.
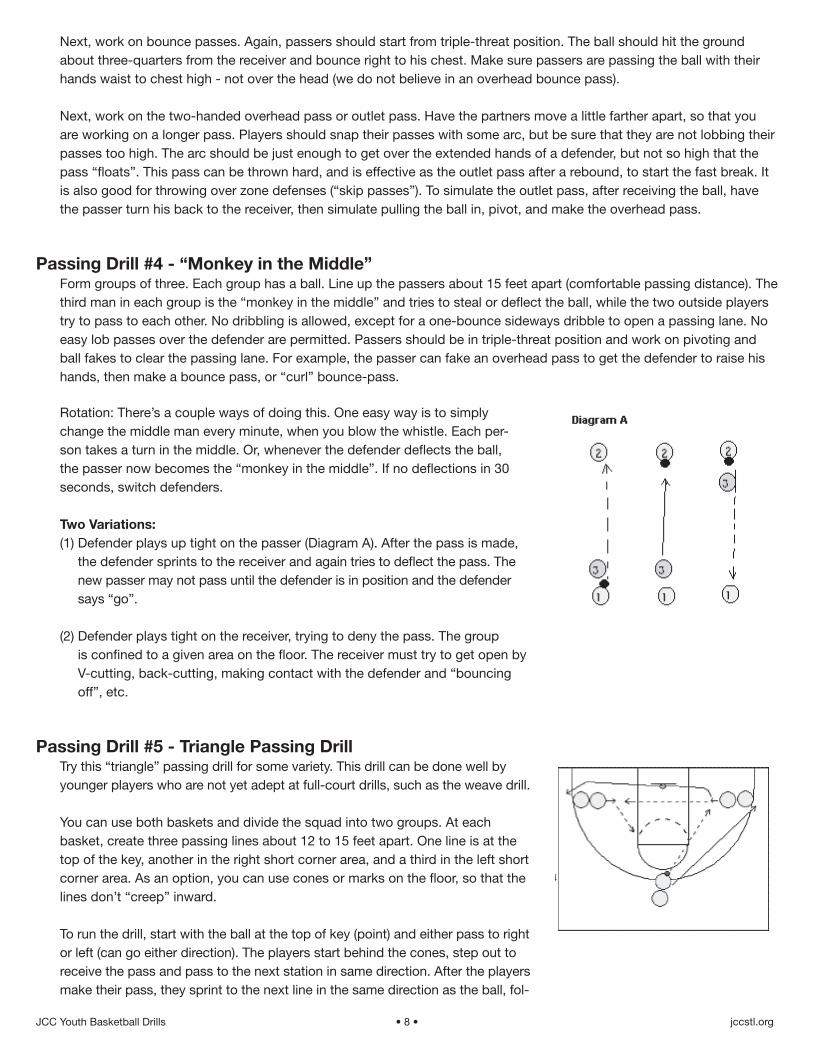
Passing Drill #4 - “Monkey in the Middle”Form groups of three. Each group has a ball. Line up the passers about 15 feet apart (comfortable passing distance). The third man in each group is the “monkey in the middle” and tries to steal or deflect the ball, while the two outside players try to pass to each other. No dribbling is allowed, except for a one-bounce sideways dribble to open a passing lane. No easy lob passes over the defender are permitted. Passers should be in triple-threat position and work on pivoting and ball fakes to clear the passing lane. For example, the passer can fake an overhead pass to get the defender to raise his hands, then make a bounce pass, or “curl” bounce-pass.
10Have each player get a partner, and each pair has a ball, so they can "play catch" with each other. Have the partners separate about 12 - 15 feet (comfortable passing distance), and face each other.
Have the players practice each of the three basic passes, starting with the chest pass. Demonstrate the proper techniques with "stepping into" the pass with one foot forward. Snap the pass, with the thumbs going through the ball and extending toward the receiver. Make sure the players pass the ball crisply, and not "lob" their passes. Hit the receiver in the chest. The receiver should show a target with his/her hands extended toward the passer. Feet should be squared and shoulder-width apart. After catching the ball, receivers should get into triple-threat position before making the next pass.
Next, work on bounce passes. Again, passers should start from triple-threat position. The ball should hit the ground about three-quarters from the receiver and bounce right to his chest. Make sure passers are passing the ball with their hands waist to chest high - not over the head (we do not believe in an overhead bounce pass).
Next, work on the two-handed overhead pass or outlet pass. Have the partners move a little farther apart, so that you are working on a longer pass. Players should snap their passes with some arc, but be sure that they are not lobbing their passes too high. The arc should be just enough to get over the extended hands of a defender, but not so high that the pass "floats". This pass can be thrown hard, and is effective as the outlet pass after a rebound, to start the fast break. It isalso good for throwing over zone defenses ("skip passes"). To simulate the outlet pass, after receiving the ball, have the passer turn his back to the receiver, then simulate pulling the ball in, pivot, and make the overhead pass.
Passing Drill #4 - "Monkey in the Middle" Form groups of three. Each group has a ball. Line up the passers about 15 feet apart (comfortable passing distance). The third man in each group is the "monkey in the middle" and tries to steal or deflect the ball, while the two outside players try to pass to each other. No dribbling is allowed, except for a one-bounce sideways dribble to open a passing lane. No easy lob passes over the defender are permitted. Passers should be in triple-threat position and work on pivoting and ball fakes to clear the passing lane. For example, the passer can fake an overhead pass to get the defender to raise his hands, then make a bounce pass, or "curl" bounce-pass.
Rotation: There's a couple ways of doing this. One easy way is to simply change the middle man every minute, when you blow the whistle. Each person takes a turn in the middle. Or, whenever the defender deflects the ball, the passer now becomes the "monkey in the middle". If no deflections in 30 seconds, switch defenders.
Two Variations:(1) Defender plays up tight on the passer (Diagram A). After the pass is made, the defender sprints to the receiver and again tries to deflect the pass. The new passer may not pass until the defender is in position and the defender says "go".
(2) Defender plays tight on the receiver, trying to deny the pass. The group is confined to a given area on the floor. The receiver must try to get open by V-cutting, back-cutting, making contact with the defender and "bouncing off", etc.
Passing Drill #5 - Triangle Passing Drill Try this "triangle" passing drill for some variety. This drill can be done well by younger players who are not yet adept at full-court drills, such as the weave drill.
You can use both baskets and divide the squad into two groups. At each basket, create three passing lines about 12 to 15 feet apart. One line is at the top of the key, another in the right short corner area, and a third in the left short corner area.As an option, you can use cones or marks on the floor, so that the lines don't "creep" inward.
11
To run the drill, start with the ball at the top of key (point) and either pass to right or left (can go either direction). The players start behind the cones, step out to receive the pass and pass to the next station in same direction. After the players make their pass, they sprint to the next line in the same direction as the ball, following their pass - no walking. After a few sequences, change direction and also alternate between chest passes, bounce passes, and overhead passing.
This drill goes quickly and keeps them moving, providing a lot of touches in a short amount of time.
Pointers:Make sure correct passing techniques are used, that the players "step out" to meet the pass, and that the players receive the ball and place it in triple threat position.
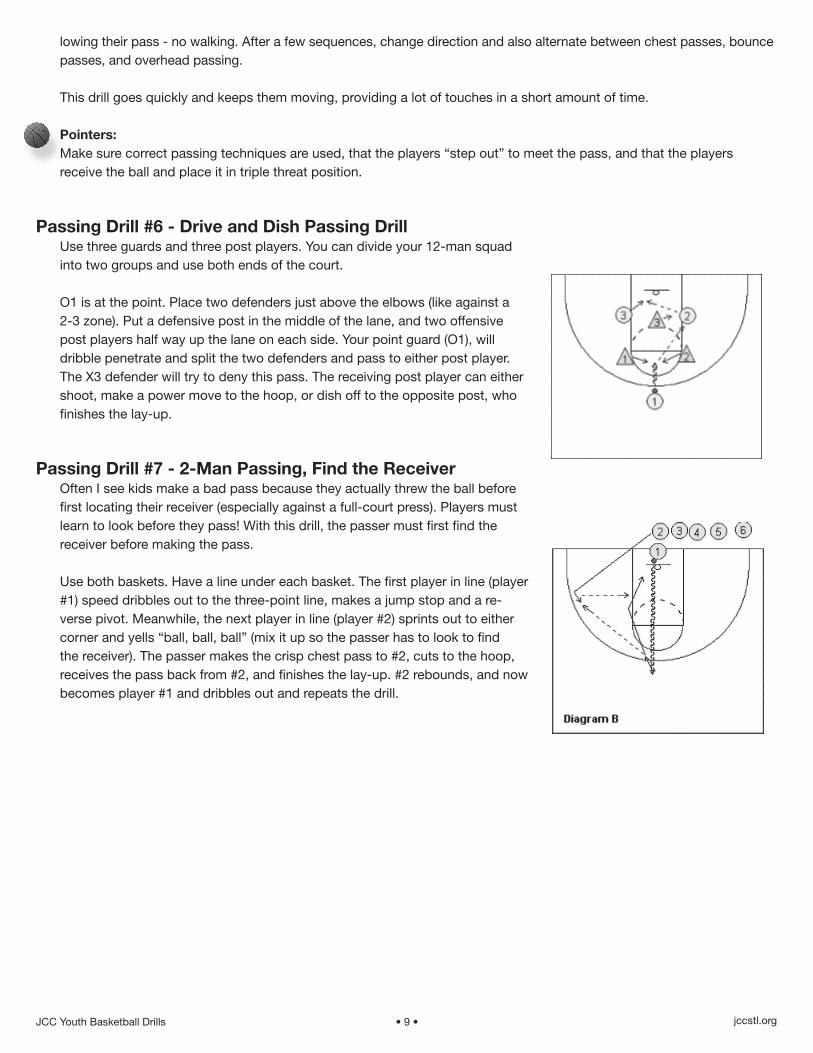
Passing Drill #6 - Drive and Dish Passing Drill Use three guards and three post players. You can divide your 12-man squad into two groups and use both ends of the court.
O1 is at the point. Place two defenders just above the elbows (like against a 2-3 zone). Put a defensive post in the middle of the lane, and two offensive post players half way up the lane on each side. Your point guard (O1), will dribble penetrate and split the two defenders and pass to either post player. The X3 defender will try to deny this pass. The receiving post player can either shoot, make a power move to the hoop, or dish off to the opposite post, who finishes the lay-up.
Passing Drill #7 - 2-Man Passing, Find the Receiver Often I see kids make a bad pass because they actually threw the ball before first locating their receiver (especially against a full-court press). Players must learn to look before they pass! With this drill, the passer must first find the receiver before making the pass.
Use both baskets. Have a line under each basket. The first player in line (player #1) speed dribbles out to the three-point line, makes a jump stop and a reverse pivot. Meanwhile, the next player in line (player #2) sprints out to either corner and yells "ball, ball, ball" (mix it up so the passer has to look to find the receiver). The passer makes the crisp chest pass to #2, cuts to the hoop, receives the pass back from #2, and
Rotation: There’s a couple ways of doing this. One easy way is to simply change the middle man every minute, when you blow the whistle. Each per-son takes a turn in the middle. Or, whenever the defender deflects the ball, the passer now becomes the “monkey in the middle”. If no deflections in 30 seconds, switch defenders.
Two Variations:(1) Defender plays up tight on the passer (Diagram A). After the pass is made,
the defender sprints to the receiver and again tries to deflect the pass. The new passer may not pass until the defender is in position and the defender says “go”.
(2) Defender plays tight on the receiver, trying to deny the pass. The group is confined to a given area on the floor. The receiver must try to get open by V-cutting, back-cutting, making contact with the defender and “bouncing off”, etc.
Passing Drill #5 - Triangle Passing DrillTry this “triangle” passing drill for some variety. This drill can be done well by younger players who are not yet adept at full-court drills, such as the weave drill.
You can use both baskets and divide the squad into two groups. At each basket, create three passing lines about 12 to 15 feet apart. One line is at the top of the key, another in the right short corner area, and a third in the left short corner area. As an option, you can use cones or marks on the floor, so that the lines don’t “creep” inward.
To run the drill, start with the ball at the top of key (point) and either pass to right or left (can go either direction). The players start behind the cones, step out to receive the pass and pass to the next station in same direction. After the players make their pass, they sprint to the next line in the same direction as the ball, fol-
JCC Youth Basketball Drills 2010 • 8 • www.jccstl.comjccstl.org
lowing their pass - no walking. After a few sequences, change direction and also alternate between chest passes, bounce passes, and overhead passing.
This drill goes quickly and keeps them moving, providing a lot of touches in a short amount of time.
Pointers:Make sure correct passing techniques are used, that the players “step out” to meet the pass, and that the players receive the ball and place it in triple threat position.
Passing Drill #6 - Drive and Dish Passing DrillUse three guards and three post players. You can divide your 12-man squad into two groups and use both ends of the court.
O1 is at the point. Place two defenders just above the elbows (like against a 2-3 zone). Put a defensive post in the middle of the lane, and two offensive post players half way up the lane on each side. Your point guard (O1), will dribble penetrate and split the two defenders and pass to either post player. The X3 defender will try to deny this pass. The receiving post player can either shoot, make a power move to the hoop, or dish off to the opposite post, who finishes the lay-up.
Passing Drill #7 - 2-Man Passing, Find the ReceiverOften I see kids make a bad pass because they actually threw the ball before first locating their receiver (especially against a full-court press). Players must learn to look before they pass! With this drill, the passer must first find the receiver before making the pass.
Use both baskets. Have a line under each basket. The first player in line (player #1) speed dribbles out to the three-point line, makes a jump stop and a re-verse pivot. Meanwhile, the next player in line (player #2) sprints out to either corner and yells “ball, ball, ball” (mix it up so the passer has to look to find the receiver). The passer makes the crisp chest pass to #2, cuts to the hoop, receives the pass back from #2, and finishes the lay-up. #2 rebounds, and now becomes player #1 and dribbles out and repeats the drill.
11
To run the drill, start with the ball at the top of key (point) and either pass to right or left (can go either direction). The players start behind the cones, step out to receive the pass and pass to the next station in same direction. After the players make their pass, they sprint to the next line in the same direction as the ball, following their pass - no walking. After a few sequences, change direction and also alternate between chest passes, bounce passes, and overhead passing.
This drill goes quickly and keeps them moving, providing a lot of touches in a short amount of time.
Pointers:Make sure correct passing techniques are used, that the players "step out" to meet the pass, and that the players receive the ball and place it in triple threat position.
Passing Drill #6 - Drive and Dish Passing Drill Use three guards and three post players. You can divide your 12-man squad into two groups and use both ends of the court.
O1 is at the point. Place two defenders just above the elbows (like against a 2-3 zone). Put a defensive post in the middle of the lane, and two offensive post players half way up the lane on each side. Your point guard (O1), will dribble penetrate and split the two defenders and pass to either post player. The X3 defender will try to deny this pass. The receiving post player can either shoot, make a power move to the hoop, or dish off to the opposite post, who finishes the lay-up.
Passing Drill #7 - 2-Man Passing, Find the Receiver Often I see kids make a bad pass because they actually threw the ball before first locating their receiver (especially against a full-court press). Players must learn to look before they pass! With this drill, the passer must first find the receiver before making the pass.
Use both baskets. Have a line under each basket. The first player in line (player #1) speed dribbles out to the three-point line, makes a jump stop and a reverse pivot. Meanwhile, the next player in line (player #2) sprints out to either corner and yells "ball, ball, ball" (mix it up so the passer has to look to find the receiver). The passer makes the crisp chest pass to #2, cuts to the hoop, receives the pass back from #2, and
JCC Youth Basketball Drills 2010 • 9 • www.jccstl.comjccstl.org
Team Shooting Drills
Here are several team shooting drills that we like. We rotate these drills from practice to practice, trying to avoid boredom from the same old drill.
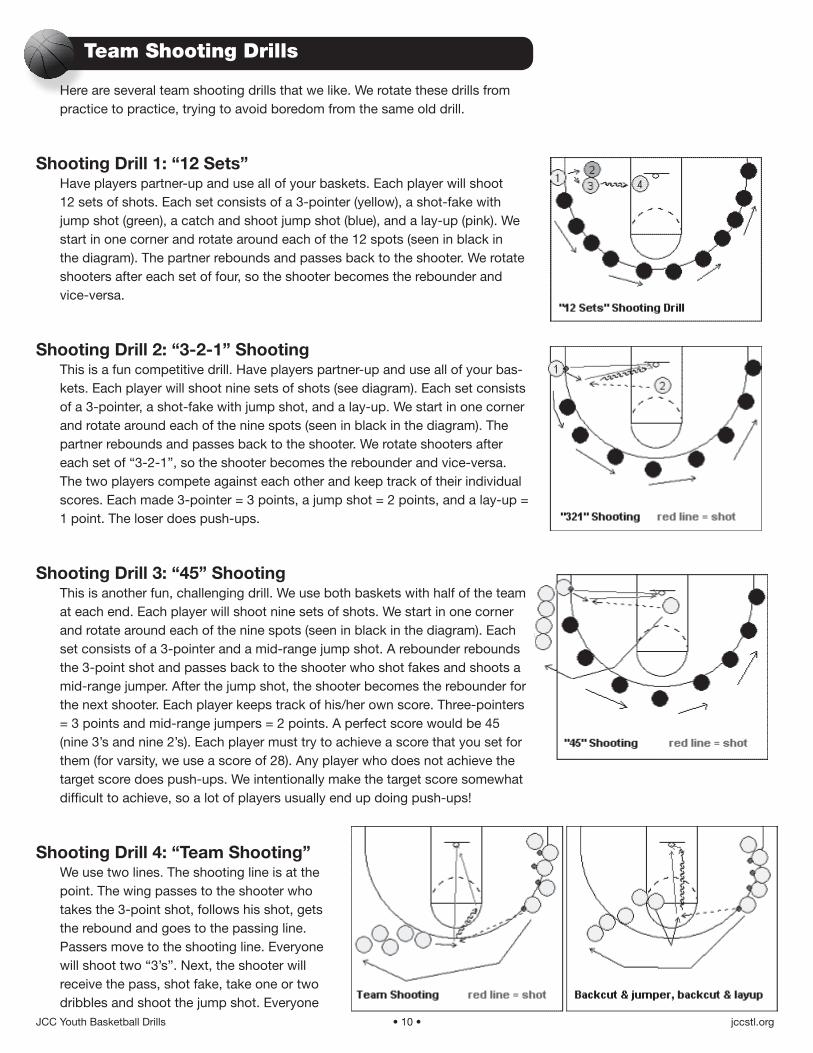
Shooting Drill 1: “12 Sets”Have players partner-up and use all of your baskets. Each player will shoot 12 sets of shots. Each set consists of a 3-pointer (yellow), a shot-fake with jump shot (green), a catch and shoot jump shot (blue), and a lay-up (pink). We start in one corner and rotate around each of the 12 spots (seen in black in the diagram). The partner rebounds and passes back to the shooter. We rotate shooters after each set of four, so the shooter becomes the rebounder and vice-versa.
Shooting Drill 2: “3-2-1” ShootingThis is a fun competitive drill. Have players partner-up and use all of your bas-kets. Each player will shoot nine sets of shots (see diagram). Each set consists of a 3-pointer, a shot-fake with jump shot, and a lay-up. We start in one corner and rotate around each of the nine spots (seen in black in the diagram). The partner rebounds and passes back to the shooter. We rotate shooters after each set of “3-2-1”, so the shooter becomes the rebounder and vice-versa. The two players compete against each other and keep track of their individual scores. Each made 3-pointer = 3 points, a jump shot = 2 points, and a lay-up = 1 point. The loser does push-ups.
Shooting Drill 3: “45” ShootingThis is another fun, challenging drill. We use both baskets with half of the team at each end. Each player will shoot nine sets of shots. We start in one corner and rotate around each of the nine spots (seen in black in the diagram). Each set consists of a 3-pointer and a mid-range jump shot. A rebounder rebounds the 3-point shot and passes back to the shooter who shot fakes and shoots a mid-range jumper. After the jump shot, the shooter becomes the rebounder for the next shooter. Each player keeps track of his/her own score. Three-pointers = 3 points and mid-range jumpers = 2 points. A perfect score would be 45 (nine 3’s and nine 2’s). Each player must try to achieve a score that you set for them (for varsity, we use a score of 28). Any player who does not achieve the target score does push-ups. We intentionally make the target score somewhat difficult to achieve, so a lot of players usually end up doing push-ups!
Shooting Drill 4: “Team Shooting”We use two lines. The shooting line is at the point. The wing passes to the shooter who takes the 3-point shot, follows his shot, gets the rebound and goes to the passing line. Passers move to the shooting line. Everyone will shoot two “3’s”. Next, the shooter will receive the pass, shot fake, take one or two dribbles and shoot the jump shot. Everyone
12finishes the lay-up. #2 rebounds, and now becomes player #1 and dribbles out and repeats the drill.
Team Shooting Drills Here are several team shooting drills that we like. We rotate these drills from practice to practice, trying to avoid boredom from the same old drill.
Shooting Drill 1: "12 Sets" Have players partner-up and use all of your baskets. Each player will shoot 12 sets of shots. Each set consists of a 3-pointer (yellow), a shot-fake with jump shot (green), a catch and shoot jump shot (blue), and a lay-up (pink). We start in one corner and rotate around each of the 12 spots (seen in black in the diagram). The partner rebounds and passes back to the shooter. We rotate shooters after each set of four, so the shooter becomes the rebounder and vice-versa.
Shooting Drill 2: "3-2-1" Shooting This is a fun competitive drill. Have players partner-up and use all of your baskets. Each player will shoot nine sets of shots (see diagram). Each set consists of a 3-pointer, a shot-fake with jump shot, and a lay-up. We start in one corner and rotate around each of the nine spots (seen in black in the diagram). The partner rebounds and passes back to the shooter. We rotate shooters after each set of "3-2-1", so the shooter becomes the rebounder and vice-versa. The two players compete against each other and keep track of their individual scores. Each made 3-pointer = 3 points, a jump shot = 2 points, and a lay-up = 1 point. The loser does push-ups.
Shooting Drill 3: "45" Shooting This is another fun, challenging drill. We use both baskets with half ofthe team at each end. Each player will shoot nine sets of shots. We start in one corner and rotate around each of the nine spots (seen in black in the diagram). Each set consists of a 3-pointer and a mid-range jump shot. A rebounder rebounds the 3-point shot and passes back to the shooter who shot fakes and shoots a mid-range jumper. After the jump shot, the shooter becomes the rebounder for the next shooter. Each player keeps track of his/her own score. Three-pointers = 3 points and mid-range jumpers = 2 points. A perfect score would be 45 (nine 3's and nine 2's). Each player must try to achieve a score that you set for them (for varsity, we use a score of 28). Any player who does not achieve the target score does push-ups. We intentionally make the target score somewhat difficult to achieve, so a lot of players usually end up doing push-ups!
13
Shooting Drill 4: "Team Shooting" We use two lines. The shooting line is at the point. The wing passes to the shooter who takes the 3-point shot, follows his shot, gets the rebound and goes to the passing line. Passers move to the shooting line. Everyone will shoot two "3's". Next, the shooter will receive the pass, shot fake, take one or two dribbles and shoot the jump shot. Everyone shoots two jumpers. Next, our shooter will start at the free-throw line, cut outside and then back-cut to receive the pass for a pull-up jump shot. Everyone does two of these. Next, the shooter again starts at the free-throw line, cuts outside, back-cuts, receives the pass and dribbles in for the lay-up. After completing this rotation, we will move the passing line to the left wing and repeat all the same shots with the pass coming from the left wing.
Shooting Drill 5: "Boimer Shooting" This is probably our favorite shooting drill and the kids love this drill. Use all the baskets. Split up into groups of three. Each group must make twelve baskets at each of five shot categories. The first group that finishes wins, and all other do push-ups. Each group must make twelve lay-ups, then twelve shots from the block-elbow areas, then twelve medium range jump shots, then twelve 3-pointers and finally twelve shot-fake, one dribble jump shots.
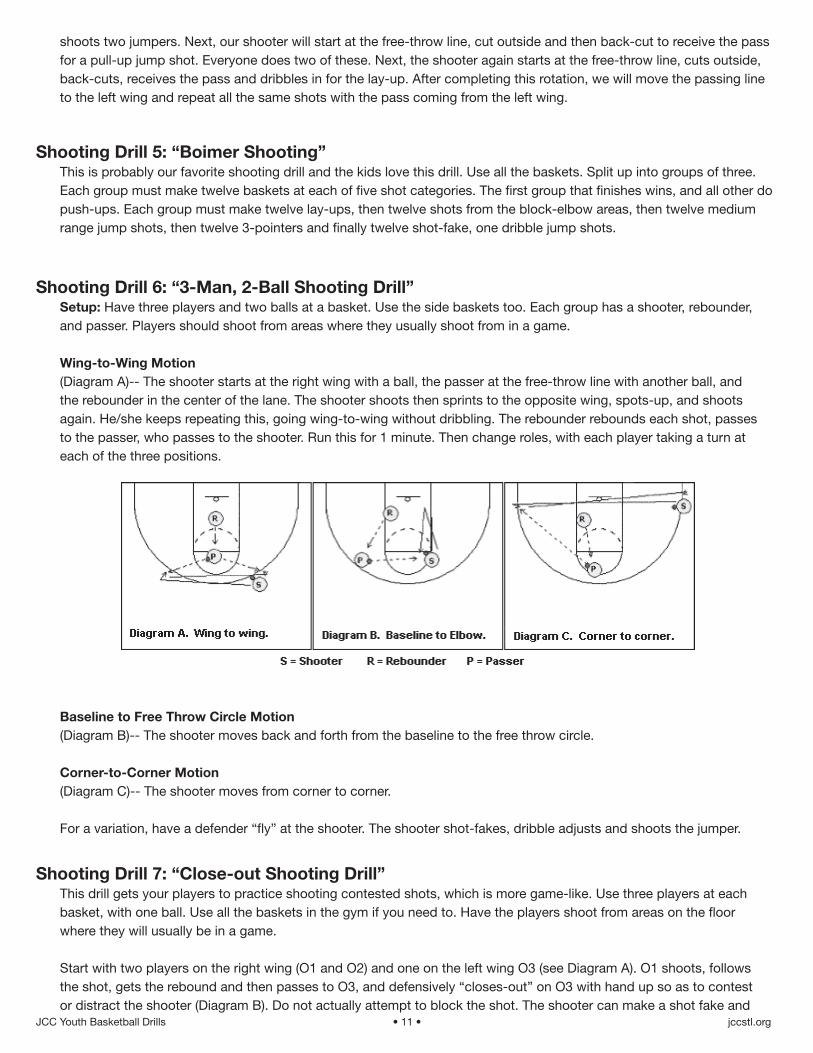
Shooting Drill 6: "3-Man, 2-Ball Shooting Drill" Setup: Have three players and two balls at a basket. Use the side baskets too. Each group has a shooter, rebounder, and passer. Players should shoot from areas where they usually shoot from in a game.
Wing-to-Wing Motion (Diagram A)-- The shooter starts at the right wing with a ball, the passer at the free-throw line with another ball, and the rebounder in the center of the lane. The shooter shoots then sprints to the opposite wing, spots-up, and shoots again. He/she keeps repeating this, going wing-to-wing without dribbling. The rebounder rebounds each shot, passes to the passer, who passes to the shooter. Run this for 1 minute. Then change roles, with each player taking a turn at each of the three positions.
12finishes the lay-up. #2 rebounds, and now becomes player #1 and dribbles out and repeats the drill.
Team Shooting Drills Here are several team shooting drills that we like. We rotate these drills from practice to practice, trying to avoid boredom from the same old drill.
Shooting Drill 1: "12 Sets" Have players partner-up and use all of your baskets. Each player will shoot 12 sets of shots. Each set consists of a 3-pointer (yellow), a shot-fake with jump shot (green), a catch and shoot jump shot (blue), and a lay-up (pink). We start in one corner and rotate around each of the 12 spots (seen in black in the diagram). The partner rebounds and passes back to the shooter. We rotate shooters after each set of four, so the shooter becomes the rebounder and vice-versa.
Shooting Drill 2: "3-2-1" Shooting This is a fun competitive drill. Have players partner-up and use all of your baskets. Each player will shoot nine sets of shots (see diagram). Each set consists of a 3-pointer, a shot-fake with jump shot, and a lay-up. We start in one corner and rotate around each of the nine spots (seen in black in the diagram). The partner rebounds and passes back to the shooter. We rotate shooters after each set of "3-2-1", so the shooter becomes the rebounder and vice-versa. The two players compete against each other and keep track of their individual scores. Each made 3-pointer = 3 points, a jump shot = 2 points, and a lay-up = 1 point. The loser does push-ups.
Shooting Drill 3: "45" Shooting This is another fun, challenging drill. We use both baskets with half ofthe team at each end. Each player will shoot nine sets of shots. We start in one corner and rotate around each of the nine spots (seen in black in the diagram). Each set consists of a 3-pointer and a mid-range jump shot. A rebounder rebounds the 3-point shot and passes back to the shooter who shot fakes and shoots a mid-range jumper. After the jump shot, the shooter becomes the rebounder for the next shooter. Each player keeps track of his/her own score. Three-pointers = 3 points and mid-range jumpers = 2 points. A perfect score would be 45 (nine 3's and nine 2's). Each player must try to achieve a score that you set for them (for varsity, we use a score of 28). Any player who does not achieve the target score does push-ups. We intentionally make the target score somewhat difficult to achieve, so a lot of players usually end up doing push-ups!
JCC Youth Basketball Drills 2010 • 10 • www.jccstl.comjccstl.org
Shooting Drill 6: “3-Man, 2-Ball Shooting Drill”Setup: Have three players and two balls at a basket. Use the side baskets too. Each group has a shooter, rebounder, and passer. Players should shoot from areas where they usually shoot from in a game.
Wing-to-Wing Motion(Diagram A)-- The shooter starts at the right wing with a ball, the passer at the free-throw line with another ball, and the rebounder in the center of the lane. The shooter shoots then sprints to the opposite wing, spots-up, and shoots again. He/she keeps repeating this, going wing-to-wing without dribbling. The rebounder rebounds each shot, passes to the passer, who passes to the shooter. Run this for 1 minute. Then change roles, with each player taking a turn at each of the three positions.
Baseline to Free Throw Circle Motion(Diagram B)-- The shooter moves back and forth from the baseline to the free throw circle.
Corner-to-Corner Motion(Diagram C)-- The shooter moves from corner to corner.
For a variation, have a defender “fly” at the shooter. The shooter shot-fakes, dribble adjusts and shoots the jumper.
Shooting Drill 7: “Close-out Shooting Drill”This drill gets your players to practice shooting contested shots, which is more game-like. Use three players at each basket, with one ball. Use all the baskets in the gym if you need to. Have the players shoot from areas on the floor where they will usually be in a game.
Start with two players on the right wing (O1 and O2) and one on the left wing O3 (see Diagram A). O1 shoots, follows the shot, gets the rebound and then passes to O3, and defensively “closes-out” on O3 with hand up so as to contest or distract the shooter (Diagram B). Do not actually attempt to block the shot. The shooter can make a shot fake and
shoots two jumpers. Next, our shooter will start at the free-throw line, cut outside and then back-cut to receive the pass for a pull-up jump shot. Everyone does two of these. Next, the shooter again starts at the free-throw line, cuts outside, back-cuts, receives the pass and dribbles in for the lay-up. After completing this rotation, we will move the passing line to the left wing and repeat all the same shots with the pass coming from the left wing.
Shooting Drill 5: “Boimer Shooting”This is probably our favorite shooting drill and the kids love this drill. Use all the baskets. Split up into groups of three. Each group must make twelve baskets at each of five shot categories. The first group that finishes wins, and all other do push-ups. Each group must make twelve lay-ups, then twelve shots from the block-elbow areas, then twelve medium range jump shots, then twelve 3-pointers and finally twelve shot-fake, one dribble jump shots.
13
Shooting Drill 4: "Team Shooting" We use two lines. The shooting line is at the point. The wing passes to the shooter who takes the 3-point shot, follows his shot, gets the rebound and goes to the passing line. Passers move to the shooting line. Everyone will shoot two "3's". Next, the shooter will receive the pass, shot fake, take one or two dribbles and shoot the jump shot. Everyone shoots two jumpers. Next, our shooter will start at the free-throw line, cut outside and then back-cut to receive the pass for a pull-up jump shot. Everyone does two of these. Next, the shooter again starts at the free-throw line, cuts outside, back-cuts, receives the pass and dribbles in for the lay-up. After completing this rotation, we will move the passing line to the left wing and repeat all the same shots with the pass coming from the left wing.
Shooting Drill 5: "Boimer Shooting" This is probably our favorite shooting drill and the kids love this drill. Use all the baskets. Split up into groups of three. Each group must make twelve baskets at each of five shot categories. The first group that finishes wins, and all other do push-ups. Each group must make twelve lay-ups, then twelve shots from the block-elbow areas, then twelve medium range jump shots, then twelve 3-pointers and finally twelve shot-fake, one dribble jump shots.
Shooting Drill 6: "3-Man, 2-Ball Shooting Drill" Setup: Have three players and two balls at a basket. Use the side baskets too. Each group has a shooter, rebounder, and passer. Players should shoot from areas where they usually shoot from in a game.
Wing-to-Wing Motion (Diagram A)-- The shooter starts at the right wing with a ball, the passer at the free-throw line with another ball, and the rebounder in the center of the lane. The shooter shoots then sprints to the opposite wing, spots-up, and shoots again. He/she keeps repeating this, going wing-to-wing without dribbling. The rebounder rebounds each shot, passes to the passer, who passes to the shooter. Run this for 1 minute. Then change roles, with each player taking a turn at each of the three positions.
JCC Youth Basketball Drills 2010 • 11 • www.jccstl.comjccstl.org
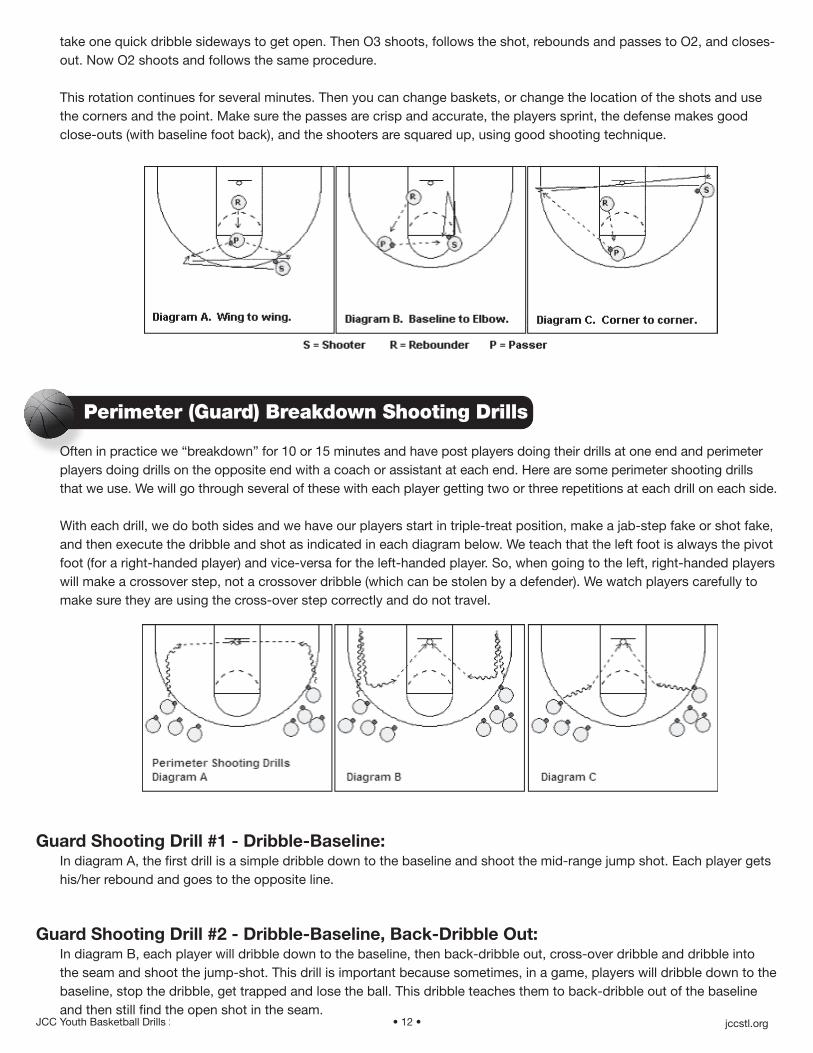
take one quick dribble sideways to get open. Then O3 shoots, follows the shot, rebounds and passes to O2, and closes-out. Now O2 shoots and follows the same procedure.
This rotation continues for several minutes. Then you can change baskets, or change the location of the shots and use the corners and the point. Make sure the passes are crisp and accurate, the players sprint, the defense makes good close-outs (with baseline foot back), and the shooters are squared up, using good shooting technique.
Perimeter (Guard) Breakdown Shooting Drills
Often in practice we “breakdown” for 10 or 15 minutes and have post players doing their drills at one end and perimeter players doing drills on the opposite end with a coach or assistant at each end. Here are some perimeter shooting drills that we use. We will go through several of these with each player getting two or three repetitions at each drill on each side.
With each drill, we do both sides and we have our players start in triple-treat position, make a jab-step fake or shot fake, and then execute the dribble and shot as indicated in each diagram below. We teach that the left foot is always the pivot foot (for a right-handed player) and vice-versa for the left-handed player. So, when going to the left, right-handed players will make a crossover step, not a crossover dribble (which can be stolen by a defender). We watch players carefully to make sure they are using the cross-over step correctly and do not travel.
Guard Shooting Drill #1 - Dribble-Baseline:In diagram A, the first drill is a simple dribble down to the baseline and shoot the mid-range jump shot. Each player gets his/her rebound and goes to the opposite line.
Guard Shooting Drill #2 - Dribble-Baseline, Back-Dribble Out:In diagram B, each player will dribble down to the baseline, then back-dribble out, cross-over dribble and dribble into the seam and shoot the jump-shot. This drill is important because sometimes, in a game, players will dribble down to the baseline, stop the dribble, get trapped and lose the ball. This dribble teaches them to back-dribble out of the baseline and then still find the open shot in the seam.
13
Shooting Drill 4: "Team Shooting" We use two lines. The shooting line is at the point. The wing passes to the shooter who takes the 3-point shot, follows his shot, gets the rebound and goes to the passing line. Passers move to the shooting line. Everyone will shoot two "3's". Next, the shooter will receive the pass, shot fake, take one or two dribbles and shoot the jump shot. Everyone shoots two jumpers. Next, our shooter will start at the free-throw line, cut outside and then back-cut to receive the pass for a pull-up jump shot. Everyone does two of these. Next, the shooter again starts at the free-throw line, cuts outside, back-cuts, receives the pass and dribbles in for the lay-up. After completing this rotation, we will move the passing line to the left wing and repeat all the same shots with the pass coming from the left wing.
Shooting Drill 5: "Boimer Shooting" This is probably our favorite shooting drill and the kids love this drill. Use all the baskets. Split up into groups of three. Each group must make twelve baskets at each of five shot categories. The first group that finishes wins, and all other do push-ups. Each group must make twelve lay-ups, then twelve shots from the block-elbow areas, then twelve medium range jump shots, then twelve 3-pointers and finally twelve shot-fake, one dribble jump shots.
Shooting Drill 6: "3-Man, 2-Ball Shooting Drill" Setup: Have three players and two balls at a basket. Use the side baskets too. Each group has a shooter, rebounder, and passer. Players should shoot from areas where they usually shoot from in a game.
Wing-to-Wing Motion (Diagram A)-- The shooter starts at the right wing with a ball, the passer at the free-throw line with another ball, and the rebounder in the center of the lane. The shooter shoots then sprints to the opposite wing, spots-up, and shoots again. He/she keeps repeating this, going wing-to-wing without dribbling. The rebounder rebounds each shot, passes to the passer, who passes to the shooter. Run this for 1 minute. Then change roles, with each player taking a turn at each of the three positions.
15
Guard Shooting Drill #1 - Dribble-Baseline: In diagram A, the first drill is a simple dribble down to the baseline and shoot the mid-range jump shot. Each player gets his/her rebound and goes to the opposite line.
Guard Shooting Drill #2 - Dribble-Baseline, Back-Dribble Out:In diagram B, each player will dribble down to the baseline, then back-dribble out, cross-over dribble and dribble into the seam and shoot the jump-shot. This drill is important because sometimes, in a game, players will dribble down to the baseline, stop the dribble, get trapped and lose the ball. This dribble teaches them to back-dribble out of the baseline and then still find the open shot in the seam.
Guard Shooting Drill #3 - In the Seam: In diagram C, it's a simple dribble move into the seam with the pull-up jump shot. For right-handed players in the right line, this will be a crossover step.
Guard Shooting Drill #4 - Corner, In the Seam: In diagram D, we start with all players in the corner (use both sides). Again, it's triple-threat position, a shot fake or jab-step, and a dribble into the seam between the corner and wing for a mid-range jump shot (like in diagram B).
Guard Shooting Drill #5 - Wing, V-Cut, Lay-up: In diagram E, we again use both sides, and pass from the point to the wing. The wing makes a V-cut, catches the pass in triple-threat position, makes a shot-fake and dribble-drives for a lay-up.
Guard Shooting Drill #6 - Wing, V-Cut, Jump Shot:
JCC Youth Basketball Drills 2010 • 12 • www.jccstl.comjccstl.org
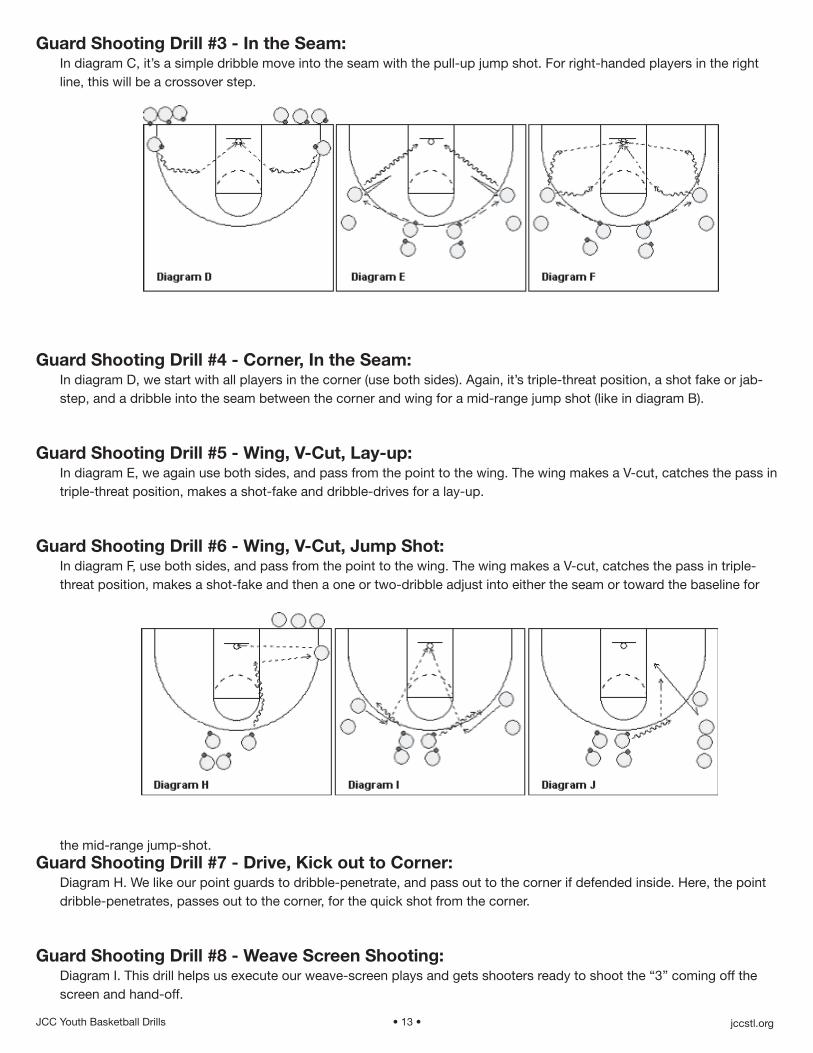
Guard Shooting Drill #3 - In the Seam:In diagram C, it’s a simple dribble move into the seam with the pull-up jump shot. For right-handed players in the right line, this will be a crossover step.
Guard Shooting Drill #4 - Corner, In the Seam:In diagram D, we start with all players in the corner (use both sides). Again, it’s triple-threat position, a shot fake or jab-step, and a dribble into the seam between the corner and wing for a mid-range jump shot (like in diagram B).
Guard Shooting Drill #5 - Wing, V-Cut, Lay-up:In diagram E, we again use both sides, and pass from the point to the wing. The wing makes a V-cut, catches the pass in triple-threat position, makes a shot-fake and dribble-drives for a lay-up.
Guard Shooting Drill #6 - Wing, V-Cut, Jump Shot:In diagram F, use both sides, and pass from the point to the wing. The wing makes a V-cut, catches the pass in triple-threat position, makes a shot-fake and then a one or two-dribble adjust into either the seam or toward the baseline for
the mid-range jump-shot.Guard Shooting Drill #7 - Drive, Kick out to Corner:
Diagram H. We like our point guards to dribble-penetrate, and pass out to the corner if defended inside. Here, the point dribble-penetrates, passes out to the corner, for the quick shot from the corner.
Guard Shooting Drill #8 - Weave Screen Shooting:Diagram I. This drill helps us execute our weave-screen plays and gets shooters ready to shoot the “3” coming off the screen and hand-off.
15
Guard Shooting Drill #1 - Dribble-Baseline: In diagram A, the first drill is a simple dribble down to the baseline and shoot the mid-range jump shot. Each player gets his/her rebound and goes to the opposite line.
Guard Shooting Drill #2 - Dribble-Baseline, Back-Dribble Out:In diagram B, each player will dribble down to the baseline, then back-dribble out, cross-over dribble and dribble into the seam and shoot the jump-shot. This drill is important because sometimes, in a game, players will dribble down to the baseline, stop the dribble, get trapped and lose the ball. This dribble teaches them to back-dribble out of the baseline and then still find the open shot in the seam.
Guard Shooting Drill #3 - In the Seam: In diagram C, it's a simple dribble move into the seam with the pull-up jump shot. For right-handed players in the right line, this will be a crossover step.
Guard Shooting Drill #4 - Corner, In the Seam: In diagram D, we start with all players in the corner (use both sides). Again, it's triple-threat position, a shot fake or jab-step, and a dribble into the seam between the corner and wing for a mid-range jump shot (like in diagram B).
Guard Shooting Drill #5 - Wing, V-Cut, Lay-up: In diagram E, we again use both sides, and pass from the point to the wing. The wing makes a V-cut, catches the pass in triple-threat position, makes a shot-fake and dribble-drives for a lay-up.
Guard Shooting Drill #6 - Wing, V-Cut, Jump Shot:
16In diagram F, use both sides, and pass from the point to the wing. The wing makes a V-cut, catches the pass in triple-threat position, makes a shot-fake and then a one or two-dribble adjust into either the seam or toward the baseline for the mid-range jump-shot.
Guard Shooting Drill #7 - Drive, Kick out to Corner: Diagram H. We like our point guards to dribble-penetrate, and pass out to the corner if defended inside. Here, the point dribble-penetrates, passes out to the corner, for the quick shot from the corner.
Guard Shooting Drill #8 - Weave Screen Shooting: Diagram I. This drill helps us execute our weave-screen plays and gets shooters ready to shoot the "3" coming off the screen and hand-off.
Guard Shooting Drill #9 - Dribble at, Back-cut: Diagram J. This drill enforces our rule, "if someone is dribbling at you, back-cut" (except in a called weave-screen play). The point dribbles toward the wing. The wing moves out higher, holds a fist up (a signal for a back-cut), and then back-cuts quickly, all the way to the hoop. The point guard should make the pass early. It's important that whenever a player back-cuts, the back-cut must go all the way to the hoop. In a game, if the cutter stops short and the point guard makes the pass, it's a turnover.
Guard Shooting Drill #10 - Feed Post and Slide to Corner: We don't want our perimeter players standing still. When our wing players (O2 and O3) feed the low post, we want them to slide to the corner. Oftentimes, the wing defender will momentarily drop down toward the post, turns his/her head, and momentarily loses sight of our wing. We have our wing slide to the corner. This is an easy pass back out of the post and is often open for the 3-point shot from the corner. Similarly, if the ball is passed from the low post back out to the point, then our wing must slide back up.
JCC Youth Basketball Drills 2010 • 13 • www.jccstl.comjccstl.org
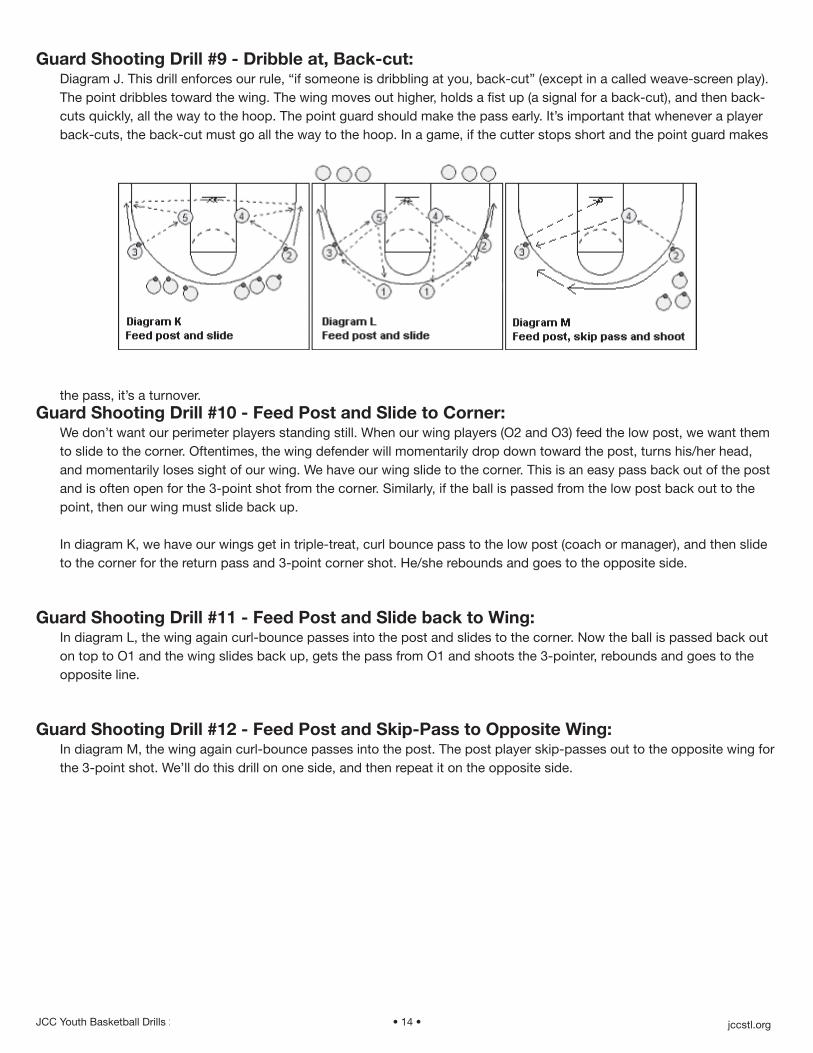
Guard Shooting Drill #9 - Dribble at, Back-cut:Diagram J. This drill enforces our rule, “if someone is dribbling at you, back-cut” (except in a called weave-screen play). The point dribbles toward the wing. The wing moves out higher, holds a fist up (a signal for a back-cut), and then back-cuts quickly, all the way to the hoop. The point guard should make the pass early. It’s important that whenever a player back-cuts, the back-cut must go all the way to the hoop. In a game, if the cutter stops short and the point guard makes
the pass, it’s a turnover.Guard Shooting Drill #10 - Feed Post and Slide to Corner:
We don’t want our perimeter players standing still. When our wing players (O2 and O3) feed the low post, we want them to slide to the corner. Oftentimes, the wing defender will momentarily drop down toward the post, turns his/her head, and momentarily loses sight of our wing. We have our wing slide to the corner. This is an easy pass back out of the post and is often open for the 3-point shot from the corner. Similarly, if the ball is passed from the low post back out to the point, then our wing must slide back up.
In diagram K, we have our wings get in triple-treat, curl bounce pass to the low post (coach or manager), and then slide to the corner for the return pass and 3-point corner shot. He/she rebounds and goes to the opposite side.
Guard Shooting Drill #11 - Feed Post and Slide back to Wing:In diagram L, the wing again curl-bounce passes into the post and slides to the corner. Now the ball is passed back out on top to O1 and the wing slides back up, gets the pass from O1 and shoots the 3-pointer, rebounds and goes to the opposite line.
Guard Shooting Drill #12 - Feed Post and Skip-Pass to Opposite Wing:In diagram M, the wing again curl-bounce passes into the post. The post player skip-passes out to the opposite wing for the 3-point shot. We’ll do this drill on one side, and then repeat it on the opposite side.
16In diagram F, use both sides, and pass from the point to the wing. The wing makes a V-cut, catches the pass in triple-threat position, makes a shot-fake and then a one or two-dribble adjust into either the seam or toward the baseline for the mid-range jump-shot.
Guard Shooting Drill #7 - Drive, Kick out to Corner: Diagram H. We like our point guards to dribble-penetrate, and pass out to the corner if defended inside. Here, the point dribble-penetrates, passes out to the corner, for the quick shot from the corner.
Guard Shooting Drill #8 - Weave Screen Shooting: Diagram I. This drill helps us execute our weave-screen plays and gets shooters ready to shoot the "3" coming off the screen and hand-off.
Guard Shooting Drill #9 - Dribble at, Back-cut: Diagram J. This drill enforces our rule, "if someone is dribbling at you, back-cut" (except in a called weave-screen play). The point dribbles toward the wing. The wing moves out higher, holds a fist up (a signal for a back-cut), and then back-cuts quickly, all the way to the hoop. The point guard should make the pass early. It's important that whenever a player back-cuts, the back-cut must go all the way to the hoop. In a game, if the cutter stops short and the point guard makes the pass, it's a turnover.
Guard Shooting Drill #10 - Feed Post and Slide to Corner: We don't want our perimeter players standing still. When our wing players (O2 and O3) feed the low post, we want them to slide to the corner. Oftentimes, the wing defender will momentarily drop down toward the post, turns his/her head, and momentarily loses sight of our wing. We have our wing slide to the corner. This is an easy pass back out of the post and is often open for the 3-point shot from the corner. Similarly, if the ball is passed from the low post back out to the point, then our wing must slide back up.
JCC Youth Basketball Drills 2010 • 14 • www.jccstl.comjccstl.org
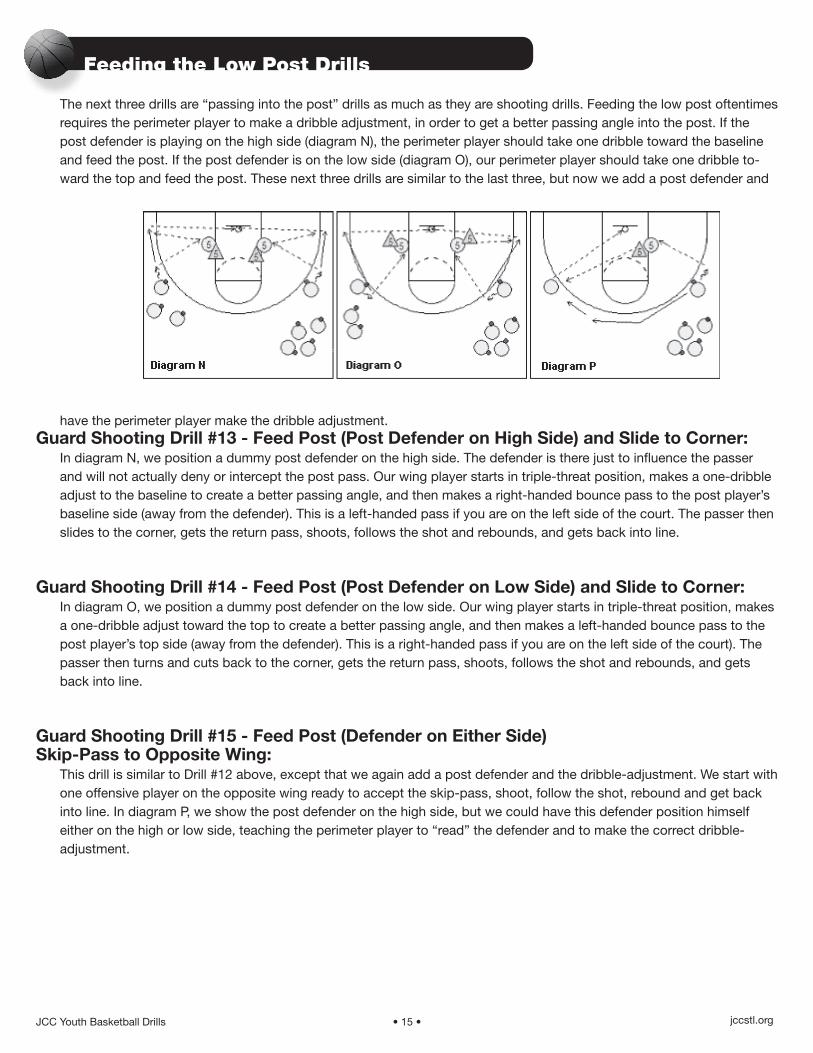
Feeding the Low Post Drills
The next three drills are “passing into the post” drills as much as they are shooting drills. Feeding the low post oftentimes requires the perimeter player to make a dribble adjustment, in order to get a better passing angle into the post. If the post defender is playing on the high side (diagram N), the perimeter player should take one dribble toward the baseline and feed the post. If the post defender is on the low side (diagram O), our perimeter player should take one dribble to-ward the top and feed the post. These next three drills are similar to the last three, but now we add a post defender and
have the perimeter player make the dribble adjustment. Guard Shooting Drill #13 - Feed Post (Post Defender on High Side) and Slide to Corner:
In diagram N, we position a dummy post defender on the high side. The defender is there just to influence the passer and will not actually deny or intercept the post pass. Our wing player starts in triple-threat position, makes a one-dribble adjust to the baseline to create a better passing angle, and then makes a right-handed bounce pass to the post player’s baseline side (away from the defender). This is a left-handed pass if you are on the left side of the court. The passer then slides to the corner, gets the return pass, shoots, follows the shot and rebounds, and gets back into line.
Guard Shooting Drill #14 - Feed Post (Post Defender on Low Side) and Slide to Corner:In diagram O, we position a dummy post defender on the low side. Our wing player starts in triple-threat position, makes a one-dribble adjust toward the top to create a better passing angle, and then makes a left-handed bounce pass to the post player’s top side (away from the defender). This is a right-handed pass if you are on the left side of the court). The passer then turns and cuts back to the corner, gets the return pass, shoots, follows the shot and rebounds, and gets back into line.
Guard Shooting Drill #15 - Feed Post (Defender on Either Side) Skip-Pass to Opposite Wing:
This drill is similar to Drill #12 above, except that we again add a post defender and the dribble-adjustment. We start with one offensive player on the opposite wing ready to accept the skip-pass, shoot, follow the shot, rebound and get back into line. In diagram P, we show the post defender on the high side, but we could have this defender position himself either on the high or low side, teaching the perimeter player to “read” the defender and to make the correct dribble-adjustment.
17In diagram K, we have our wings get in triple-treat, curl bounce pass to the low post (coach or manager), and then slide to the corner for the return pass and 3-point corner shot. He/she rebounds and goes to the opposite side.
Guard Shooting Drill #11 - Feed Post and Slide back to Wing: In diagram L, the wing again curl-bounce passes into the post and slides to the corner. Now the ball is passed back out on top to O1 and the wing slides back up, gets the pass from O1 and shoots the 3-pointer, rebounds and goes to the opposite line.
Guard Shooting Drill #12 - Feed Post and Skip-Pass to Opposite Wing: In diagram M, the wing again curl-bounce passes into the post. The post player skip-passes out to the opposite wing for the 3-point shot. We'll do this drill on one side, and then repeat it on the opposite side.
Feeding the Low Post Drills The next three drills are "passing into the post" drills as much as they are shooting drills. Feeding the low post oftentimes requires the perimeter player to make a dribble adjustment, in order to get a better passing angle into the post. If the post defender is playing on the high side (diagram N), the perimeter player should take one dribble toward the baseline and feed the post. If the post defender is on the low side (diagram O), our perimeter player should take one dribble toward the top and feed the post. These next three drills are similar to the last three, but now we add a post defender and have the perimeter player make the dribble adjustment.
Guard Shooting Drill #13 - Feed Post (Post Defender on High Side) and Slide to Corner: In diagram N, we position a dummy post defender on the high side. The defender is there just to influence the passer and will not actually deny or intercept the post pass. Our wing player starts in triple-threat position, makes a one-dribble adjust to the baseline to create a better passing angle, and then makes a right-handed bounce pass to the post player's baseline side (away from the defender). This is a left-handed pass if you are on the left side of the court. The passer then slides to the corner, gets the return pass, shoots, follows the shot and rebounds, and gets back into line.
Guard Shooting Drill #14 - Feed Post (Post Defender on Low Side) and Slide to Corner: In diagram O, we position a dummy post defender on the low side. Our wing player starts in triple-threat position, makes a one-dribble adjust toward the top to create a better passing angle, and then makes a left-handed bounce pass to the post player's top side (away from the defender). This is a right-handed pass if you are on the left side of the court).
JCC Youth Basketball Drills 2010 • 15 • www.jccstl.comjccstl.org
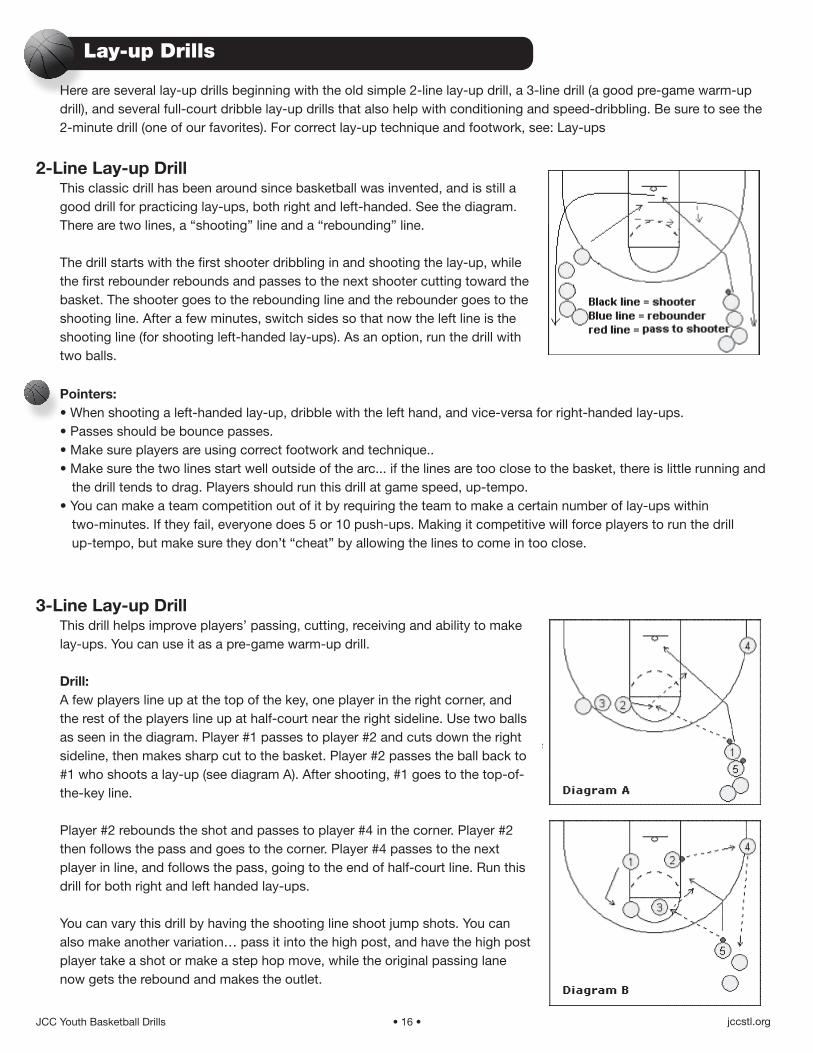
Lay-up Drills
Here are several lay-up drills beginning with the old simple 2-line lay-up drill, a 3-line drill (a good pre-game warm-up drill), and several full-court dribble lay-up drills that also help with conditioning and speed-dribbling. Be sure to see the 2-minute drill (one of our favorites). For correct lay-up technique and footwork, see: Lay-ups
2-Line Lay-up DrillThis classic drill has been around since basketball was invented, and is still a good drill for practicing lay-ups, both right and left-handed. See the diagram. There are two lines, a “shooting” line and a “rebounding” line.
The drill starts with the first shooter dribbling in and shooting the lay-up, while the first rebounder rebounds and passes to the next shooter cutting toward the basket. The shooter goes to the rebounding line and the rebounder goes to the shooting line. After a few minutes, switch sides so that now the left line is the shooting line (for shooting left-handed lay-ups). As an option, run the drill with two balls.
18The passer then turns and cuts back to the corner, gets the return pass, shoots, follows the shot and rebounds, and gets back into line.
Guard Shooting Drill #15 - Feed Post (Defender on Either Side) Skip-Pass to Opposite Wing: This drill is similar to Drill #12 above, except that we again add a post defender and the dribble-adjustment. We start with one offensive player on the opposite wing ready to accept the skip-pass, shoot, follow the shot, rebound and get back into line. In diagram P, we show the post defender on the high side, but we could have this defender position himself either on the high or low side, teaching the perimeter player to "read" the defender and to make the correct dribble-adjustment.
Lay-up Drills
Here are several lay-up drills beginning with the old simple 2-line lay-up drill, a 3-line drill (a good pre-game warm-up drill), and several full-court dribble lay-up drills that also help with conditioning and speed-dribbling. Be sure to see the 2-minute drill (one of our favorites). For correct lay-up technique and footwork, see: Lay-ups
2-Line Lay-up Drill This classic drill has been around since basketball was invented, and is still a good drill for practicing lay-ups, both right and left-handed. See the diagram. There are two lines, a "shooting" line and a "rebounding" line.
The drill starts with the first shooter dribbling in and shooting the lay-up, while the first rebounder rebounds and passes to the next shooter cutting toward the basket. The shooter goes to the rebounding line and the rebounder goes to the shooting line. After a few minutes, switch sides so that now the left line is the shooting line (for shooting left-handed lay-ups). As an option, run the drill with two balls.
Pointers:
• When shooting a left-handed lay-up, dribble with the left hand, and vice-versa for right-handed lay-ups.
• Passes should be bounce passes.
• Make sure players are using correct footwork and technique..
• Make sure the two lines start well outside of the arc... if the lines are too close to the basket, there is little running and the drill tends to drag. Players should run this drill at game speed, up-tempo.
• You can make a team competition out of it by requiring the team to make a certain number of lay-ups within two-minutes. If they fail, everyone does 5 or 10 push-ups. Making it competitive will force players to run the drill up-tempo, but make sure they don't "cheat" by allowing the lines to come in too close.
19
3-Line Lay-up Drill This drill helps improve players' passing, cutting, receiving and ability to make lay-ups. You can use it as a pre-game warm-up drill.
Drill:A few players line up at the top of the key, one player in the right corner, and the rest of the players line up at half-court near the right sideline. Use two balls as seen in the diagram. Player #1 passes to player #2 and cuts down the right sideline, then makes sharp cut to the basket. Player #2 passes the ball back to #1 who shoots a lay-up (see diagram A). After shooting, #1 goes to the top-of-the-key line.
Player #2 rebounds the shot and passes to player #4 in the corner. Player #2 then follows the pass and goes to the corner. Player #4 passes to the next player in line, and follows the pass, going to the end of half-court line. Run this drill for both right and left handed lay-ups.
You can vary this drill by having the shooting line shoot jump shots. You can also make another variation… pass it into the high post, and have the high post player take a shot or make a step hop move, while the original passing lane now gets the rebound and makes the outlet.
2-Minute Full-Court Left-Hand Lay-up DrillThis is a favorite drill that we often run at the end of practice. It helps us with our left-handed lay-ups, left-handed dribble and conditioning. It is a competitive drill where the team has to make a certain number of left-handed lay-ups within 2 minutes. We use 75 for high school boys varsity and 65 for girls varsity. If they fail to make the goal, they run or do push-ups.
Drill:Half of the players are on each end of the court with the first two players in each line having a ball. On "Go!" the first two players from each end start the left-handed speed dribble and shoot the left-handed lay-up. The next player on that end gets the rebound and speed dribbles up the other side. Players must speed dribble quickly and make most of their lay-ups to achieve the goal.
If the team fails to make the goal, they run or do push-ups. If we have had a good practice with good effort, we give them a "second chance" by allowing everyone a chance to make a half-court shot. If just one player makes it, nobody has to run and instead they should celebrate as a team mobbing the shooter with lots of "high-5's" ... it's a fun thing and a good way to end practice on a positive note.
Of course, you could run this drill with right-handed lay-ups as well, especially for younger teams and make the goal easier to achieve.
Free-Throw Shooting Drills
Free-Throw Shooting Drill #1. "1-and-1"
Pointers:• When shooting a left-handed lay-up, dribble with the left hand, and vice-versa for right-handed lay-ups. • Passes should be bounce passes. • Make sure players are using correct footwork and technique.. • Make sure the two lines start well outside of the arc... if the lines are too close to the basket, there is little running and
the drill tends to drag. Players should run this drill at game speed, up-tempo. • You can make a team competition out of it by requiring the team to make a certain number of lay-ups within
two-minutes. If they fail, everyone does 5 or 10 push-ups. Making it competitive will force players to run the drill up-tempo, but make sure they don’t “cheat” by allowing the lines to come in too close.
3-Line Lay-up DrillThis drill helps improve players’ passing, cutting, receiving and ability to make lay-ups. You can use it as a pre-game warm-up drill.
Drill:A few players line up at the top of the key, one player in the right corner, and the rest of the players line up at half-court near the right sideline. Use two balls as seen in the diagram. Player #1 passes to player #2 and cuts down the right sideline, then makes sharp cut to the basket. Player #2 passes the ball back to #1 who shoots a lay-up (see diagram A). After shooting, #1 goes to the top-of-the-key line.
Player #2 rebounds the shot and passes to player #4 in the corner. Player #2 then follows the pass and goes to the corner. Player #4 passes to the next player in line, and follows the pass, going to the end of half-court line. Run this drill for both right and left handed lay-ups.
You can vary this drill by having the shooting line shoot jump shots. You can also make another variation… pass it into the high post, and have the high post player take a shot or make a step hop move, while the original passing lane now gets the rebound and makes the outlet.
JCC Youth Basketball Drills 2010 • 16 • www.jccstl.comjccstl.org
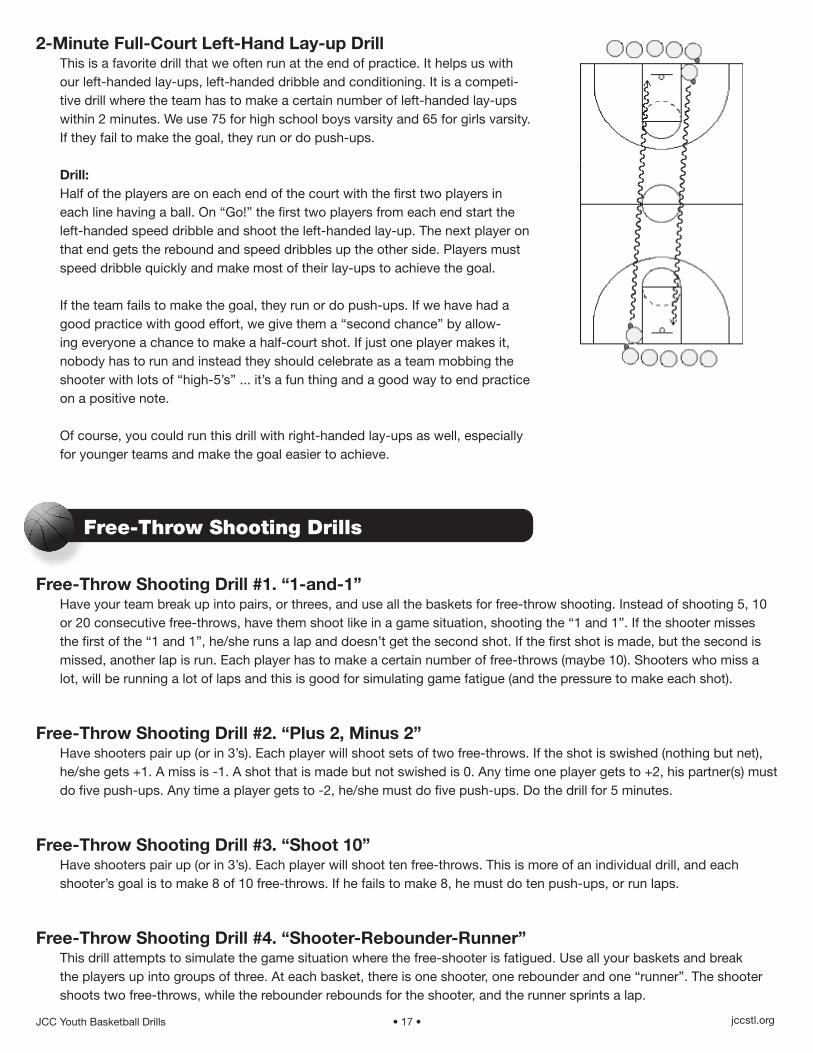
19
3-Line Lay-up Drill This drill helps improve players' passing, cutting, receiving and ability to make lay-ups. You can use it as a pre-game warm-up drill.
Drill:A few players line up at the top of the key, one player in the right corner, and the rest of the players line up at half-court near the right sideline. Use two balls as seen in the diagram. Player #1 passes to player #2 and cuts down the right sideline, then makes sharp cut to the basket. Player #2 passes the ball back to #1 who shoots a lay-up (see diagram A). After shooting, #1 goes to the top-of-the-key line.
Player #2 rebounds the shot and passes to player #4 in the corner. Player #2 then follows the pass and goes to the corner. Player #4 passes to the next player in line, and follows the pass, going to the end of half-court line. Run this drill for both right and left handed lay-ups.
You can vary this drill by having the shooting line shoot jump shots. You can also make another variation… pass it into the high post, and have the high post player take a shot or make a step hop move, while the original passing lane now gets the rebound and makes the outlet.
2-Minute Full-Court Left-Hand Lay-up DrillThis is a favorite drill that we often run at the end of practice. It helps us with our left-handed lay-ups, left-handed dribble and conditioning. It is a competitive drill where the team has to make a certain number of left-handed lay-ups within 2 minutes. We use 75 for high school boys varsity and 65 for girls varsity. If they fail to make the goal, they run or do push-ups.
Drill:Half of the players are on each end of the court with the first two players in each line having a ball. On "Go!" the first two players from each end start the left-handed speed dribble and shoot the left-handed lay-up. The next player on that end gets the rebound and speed dribbles up the other side. Players must speed dribble quickly and make most of their lay-ups to achieve the goal.
If the team fails to make the goal, they run or do push-ups. If we have had a good practice with good effort, we give them a "second chance" by allowing everyone a chance to make a half-court shot. If just one player makes it, nobody has to run and instead they should celebrate as a team mobbing the shooter with lots of "high-5's" ... it's a fun thing and a good way to end practice on a positive note.
Of course, you could run this drill with right-handed lay-ups as well, especially for younger teams and make the goal easier to achieve.
Free-Throw Shooting Drills
Free-Throw Shooting Drill #1. "1-and-1"
2-Minute Full-Court Left-Hand Lay-up DrillThis is a favorite drill that we often run at the end of practice. It helps us with our left-handed lay-ups, left-handed dribble and conditioning. It is a competi-tive drill where the team has to make a certain number of left-handed lay-ups within 2 minutes. We use 75 for high school boys varsity and 65 for girls varsity. If they fail to make the goal, they run or do push-ups.
Drill:Half of the players are on each end of the court with the first two players in each line having a ball. On “Go!” the first two players from each end start the left-handed speed dribble and shoot the left-handed lay-up. The next player on that end gets the rebound and speed dribbles up the other side. Players must speed dribble quickly and make most of their lay-ups to achieve the goal.
If the team fails to make the goal, they run or do push-ups. If we have had a good practice with good effort, we give them a “second chance” by allow-ing everyone a chance to make a half-court shot. If just one player makes it, nobody has to run and instead they should celebrate as a team mobbing the shooter with lots of “high-5’s” ... it’s a fun thing and a good way to end practice on a positive note.
Of course, you could run this drill with right-handed lay-ups as well, especially for younger teams and make the goal easier to achieve.
Free-Throw Shooting Drills
Free-Throw Shooting Drill #1. “1-and-1”Have your team break up into pairs, or threes, and use all the baskets for free-throw shooting. Instead of shooting 5, 10 or 20 consecutive free-throws, have them shoot like in a game situation, shooting the “1 and 1”. If the shooter misses the first of the “1 and 1”, he/she runs a lap and doesn’t get the second shot. If the first shot is made, but the second is missed, another lap is run. Each player has to make a certain number of free-throws (maybe 10). Shooters who miss a lot, will be running a lot of laps and this is good for simulating game fatigue (and the pressure to make each shot).
Free-Throw Shooting Drill #2. “Plus 2, Minus 2”Have shooters pair up (or in 3’s). Each player will shoot sets of two free-throws. If the shot is swished (nothing but net), he/she gets +1. A miss is -1. A shot that is made but not swished is 0. Any time one player gets to +2, his partner(s) must do five push-ups. Any time a player gets to -2, he/she must do five push-ups. Do the drill for 5 minutes.
Free-Throw Shooting Drill #3. “Shoot 10”Have shooters pair up (or in 3’s). Each player will shoot ten free-throws. This is more of an individual drill, and each shooter’s goal is to make 8 of 10 free-throws. If he fails to make 8, he must do ten push-ups, or run laps.
Free-Throw Shooting Drill #4. “Shooter-Rebounder-Runner”This drill attempts to simulate the game situation where the free-shooter is fatigued. Use all your baskets and break the players up into groups of three. At each basket, there is one shooter, one rebounder and one “runner”. The shooter shoots two free-throws, while the rebounder rebounds for the shooter, and the runner sprints a lap.
JCC Youth Basketball Drills 2010 • 17 • www.jccstl.comjccstl.org
After shooting the two free-throws, the shooter now becomes the rebounder, the rebounder becomes the runner, and the runner (who is now tired from running) becomes the shooter of the next two shots. Continue this rotation.
You can continue running this drill for a specified time period, or until each player has shot a specified number of free-throws (say 20).
Free-Throw Shooting Drill #5. “team competition”Do this drill at the end of practice when players are tired. We want to simulate a game situation. Use both ends of the court, half of the team on one basket, the other half on the other basket. Tell the kids we are pretending the game is tied at 50-50. Then first player in each line will shoot the first of a 1 and 1 free throw. If the first is made, then the player shoots the bonus. If the other team misses the first shot, they may not shoot again until the other team has completed the bonus shot. Keep track of the score with each free throw. Then the next player in each line does the 1 and 1, and so forth. The first team to say 60 is the winner. If there is time, play the best 2 out of 3 games. The losers have to run. A player from the losing team who made all her free throws can be rewarded by not having to run.
Note: make sure each player gets to shoot...the above example is for 5 players on each team. If you only have four on each team, make the starting score 52 - 52 and the winning score 60, so each player gets to shoot. If you have 12 play-ers, use 48 - 48 as the starting score, etc.
Free-Throw Shooting Drill #6. “6 In-A-Row”This drill puts some pressure on the shooter. Use all of your baskets and have two or three players at each basket. Set a time limit of 5 minutes. Each player must make 6 consecutive shots in that time span. Players who do not succeed will run or do push-ups at the end. Each shooter gets two shots to start with. If the first is missed, he/she gets another at-tempt. If the second is missed, another player becomes the shooter. If a shot is made, he/she keeps shooting until either 6 consecutive free-throws are made, or until he/she misses. If a shot is missed, his/her score resets back to zero, and another player becomes the shooter. Once a shooter completes 6 in-a-row, he/she is finished and helps rebound and encourage others. If a basket becomes empty (both shooters are finished), other shooters may use that hoop. For varsity boys, we make it 8 in-a-row.
Free-Throw Shooting Drill #7. “Guts Free-Throws”This is another drill that puts pressure on your shooters and tries to prepare them for the fan distractions that occur in a game. Have all of your players line up along the endline on one end of the floor. Starting out, have the first player in the line step forward to the free-throw line while teammates stay along the endline. He/she must shoot two free-throws. Coaches, assistants will yell and try to distract the shooter. Here is the pressure... each time a shot is missed, the entire team runs one full-court lap. If the shooter misses the first shot, everyone runs and he/she must return and shoot the second one... another miss and everyone runs. Go thru the entire line so that each player shoots two. This is a tough drill, both for the pressure and the conditioning.
Basketball Fundamentals - the Jump Stop
The jump stop is helpful offensive footwork that can be used at the end of a dribble, or to receive a pass and be in triple threat position. At the end of a speed dribble, young players will often stop, fall forward from their momentum, and get a traveling call. Ending the speed dribble with a jump stop will prevent the traveling violation. The jump stop is executed by the player, who is on the run, taking one small step and then landing on both feet simultaneously in proper balance (not leaning forward). When receiving a pass with a jump stop, either foot can be used as the pivot foot. This is especially helpful for the low post player.
There is often confusion on what is or is not traveling and when do you still have a pivot allowable after a jump stop. I have quoted the rules below. My interpretation is this... it depends on whether you already have possession of the ball or not (as in receiving a pass), and whether or not you have already used up the one-step that you are entitled to. When receiving a pass with a jump-stop, you can pivot after the jump-stop and either foot can become the pivot foot. This is
JCC Youth Basketball Drills 2010 • 18 • www.jccstl.comjccstl.org
especially helpful for post players. A perimeter player can catch the ball with a jump-stop, and the pivot into triple-threat position if necessary and use the non-pivot foot for executing jab-step fakes or a drive step.
Now let’s take a player who already has possession of the ball on the outside. He/she makes a dribble move into the lane, picks up the dribble, takes one step, and then lands a two-footed jump-stop. So far, so good. But after landing the jump-stop, he/she cannot move either foot and has no pivot foot since the one step was already used up prior to the jump-stop. He/she could jump upward, but must either shoot or pass the ball before either foot touches the floor again.
The following is taken from the National Federation of State High Schools web-site in regard to this rule.
“The traveling rule has not changed. What has changed is the common use of the jump stop as an offensive move. Officials and coaches are having difficulty determining the difference between a legal and illegal move. The key to making this determination properly is first finding the pivot foot. Then, if the player moves a foot or the feet in any direction in excess of prescribed limits while holding the ball, a traveling violation has oc-curred. The limits follow:
1. A player who catches the ball with both feet on the floor may pivot, using either foot. When one foot is lifted, the other is the pivot foot.
2. A player who catches the ball while moving or dribbling may stop and establish a pivot foot as follows:a. If both feet are off the floor and the player lands;
(1) Simultaneously on both feet, either foot may be the pivot.(2) On one foot followed by the other, the first foot to touch is the pivot.(3) On one foot, the player may jump off that foot and simultaneously land on both.
Neither foot can be a pivot in this case.b. If one foot is on the floor;
(1) It is the pivot when the other foot touches in a step.(2) The player may jump off that foot and simultaneously land on both.
Neither foot can be a pivot in this case.3. After coming to a stop and establishing a pivot foot:
a. The pivot foot may be lifted, but not returned to the floor, before the ball is released on a pass or try for goal;
b. If the player jumps, neither foot may be returned to the floor before the ball is released on a pass or try for goal;
c. The pivot foot may not be lifted, before the ball is released, to start a dribble.4. After coming to a stop when neither foot can be a pivot:
a. One or both feet may be lifted, but may not be returned to the floor, before the ball is released on a pass or try for goal;
b. Neither foot may be lifted, before the ball is released, to start a dribble.”
Jump Stop Drill #1Here is a drill for teaching the jump stop. First demonstrate the jump stop to your players. Have all the players lineup on the end-line, with adequate spacing. Start this drill at slow speed initially. Have the players jog down the floor slowly. When you blow your whistle, they come to a jump stop. Yell “go” and they start again. Every-time you blow the whistle, they jump stop. Do this back and forth, up and down the court. When they look like they are getting the hang of it, have them sprint and do the drill. Then give everyone a ball, and dribble slowly down the floor, doing jump stops. Eventually work up to the speed dribble and jump stop.
JCC Youth Basketball Drills 2010 • 19 • www.jccstl.comjccstl.org
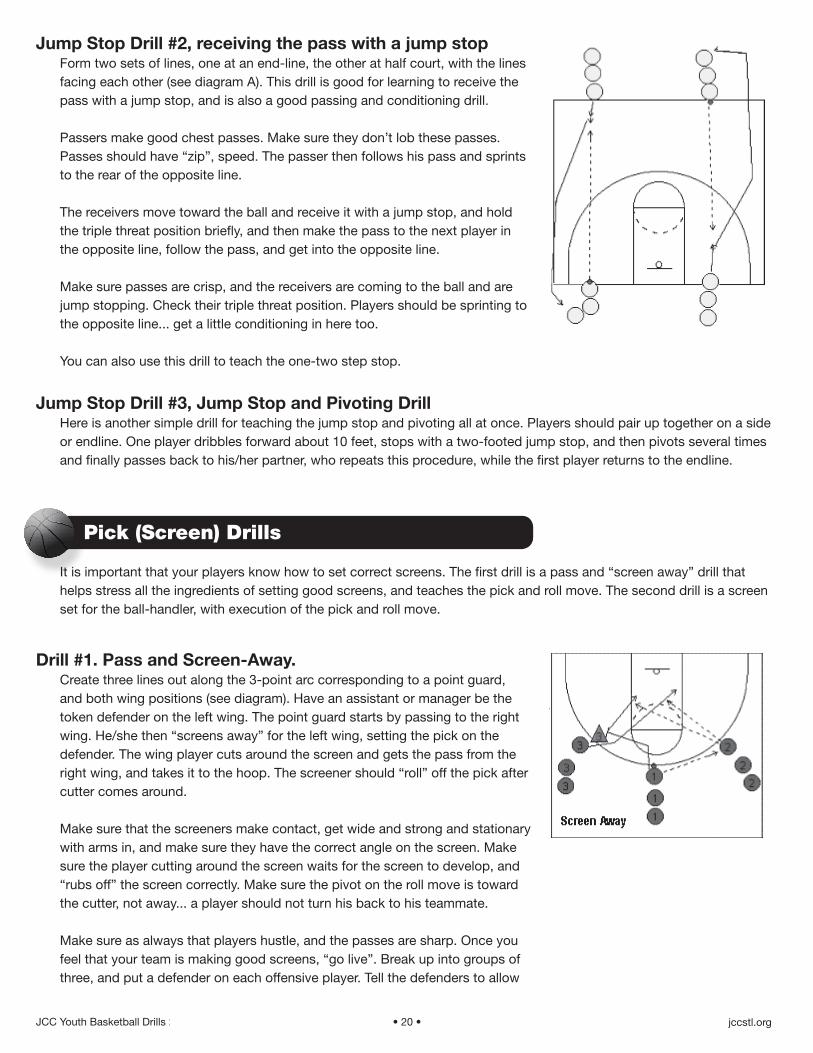
Jump Stop Drill #2, receiving the pass with a jump stopForm two sets of lines, one at an end-line, the other at half court, with the lines facing each other (see diagram A). This drill is good for learning to receive the pass with a jump stop, and is also a good passing and conditioning drill.
Passers make good chest passes. Make sure they don’t lob these passes. Passes should have “zip”, speed. The passer then follows his pass and sprints to the rear of the opposite line.
The receivers move toward the ball and receive it with a jump stop, and hold the triple threat position briefly, and then make the pass to the next player in the opposite line, follow the pass, and get into the opposite line.
Make sure passes are crisp, and the receivers are coming to the ball and are jump stopping. Check their triple threat position. Players should be sprinting to the opposite line... get a little conditioning in here too.
You can also use this drill to teach the one-two step stop.
223. After coming to a stop and establishing a pivot foot: a. The pivot foot may be lifted, but not returned to the floor, before the ball is released on a pass or try for goal;
b. If the player jumps, neither foot may be returned to the floor before the ball is released on a pass or try for goal;
c. The pivot foot may not be lifted, before the ball is released, to start a dribble.
4. After coming to a stop when neither foot can be a pivot: a. One or both feet may be lifted, but may not be returned to the floor, before the ball is released on a pass or try for goal; b. Neither foot may be lifted, before the ball is released, to start a dribble."
Jump Stop Drill #1 Here is a drill for teaching the jump stop. First demonstrate the jump stop to your players. Have all the players lineup on the end-line, with adequate spacing. Start this drill at slow speed initially. Have the players jog down the floor slowly. When you blow your whistle, they come to a jump stop. Yell "go" and they start again. Every-time you blow the whistle, they jump stop. Do this back and forth, up and down the court. When they look like they are getting the hang of it, have them sprint and do the drill. Then give everyone a ball, and dribble slowly down the floor, doing jump stops. Eventually work up to the speed dribble and jump stop.
Jump Stop Drill #2, receiving the pass with a jump stop Form two sets of lines, one at an end-line, the other at half court, with the lines facing each other (see diagram A). This drill is good for learning to receive the pass with a jump stop, and is also a good passing and conditioning drill.
Passers make good chest passes. Make sure they don't lob these passes. Passes should have "zip", speed. The passer then follows his pass and sprints to the rear of the opposite line.
The receivers move toward the ball and receive it with a jump stop, and hold the triple threat position briefly, and then make the pass to the next player in the opposite line, follow the pass, and get into the opposite line.
Make sure passes are crisp, and the receivers are coming to the ball and are jump stopping. Check their triple threat position. Players should be sprinting to the opposite line... get a little conditioning in here too. You can also use this drill to teach the one-two step stop.
Jump Stop Drill #3, Jump Stop and Pivoting Drill Here is another simple drill for teaching the jump stop and pivoting all at once. Players should pair up together on a side or endline. One player dribbles forward about 10 feet, stops with a two-footed jump stop, and then pivots several times and finally passes back to his/her partner, who repeats this procedure, while the first player returns to the endline.
Pick (Screen) Drills It is important that your players know how to set correct screens. The first drill is a pass and "screen away" drill that helps stress all the ingredients of setting good screens, and teaches the pick and roll move. The second drill is a screen set for the ball-handler, with execution of the pick and roll move.
23
Drill #1. Pass and Screen-Away. Create three lines out along the 3-point arc corresponding to a point guard, and both wing positions (see diagram). Have an assistant or manager be the token defender on the left wing. The point guard starts by passing to the right wing. He/she then "screens away" for the left wing, setting the pick on the defender. The wing player cuts around the screen and gets the pass from the right wing, and takes it to the hoop. The screener should "roll" off the pick after cutter comes around.
Make sure that the screeners make contact, get wide and strong and stationary with arms in, and make sure they have the correct angle on the screen. Make sure the player cutting around the screen waits for the screen to develop, and "rubs off" the screen correctly. Make sure the pivot on the roll move is toward the cutter, not away... a player should not turn his back to his teammate.
Make sure as always that players hustle, and the passes are sharp. Once you feel that your team is making good screens, "go live". Break up into groups of three, and put a defender on each offensive player. Tell the defenders to allow the first pass to the right wing, but then play tough "D". You can now also teach your defense how to fight through, and slide behind a screen, and how to call a "switch" on defense. You can also start with a pass to the left wing, and screen right, or let the point guard go either way.
Look at the diagrams below for common screening errors.
Drill #2. On-Ball Front Screen with Pick and Roll. O1 and O2 have defenders on them. O2 sets a front screen for O1 (Diagram A). O1 dribbles around the screen, "brushing off" the screener. If the defense does not switch, O1 takes it in for the lay-up (Diagram B), and O2 will roll as the trailer for the rebound.
Now see Diagram C for the next option. If the defenders switch the screen, O2 (after screening and pinning the defender) should "roll" to the hoop, and expect the bounce pass from O1.
Jump Stop Drill #3, Jump Stop and Pivoting DrillHere is another simple drill for teaching the jump stop and pivoting all at once. Players should pair up together on a side or endline. One player dribbles forward about 10 feet, stops with a two-footed jump stop, and then pivots several times and finally passes back to his/her partner, who repeats this procedure, while the first player returns to the endline.
Pick (Screen) Drills
It is important that your players know how to set correct screens. The first drill is a pass and “screen away” drill that helps stress all the ingredients of setting good screens, and teaches the pick and roll move. The second drill is a screen set for the ball-handler, with execution of the pick and roll move.
Drill #1. Pass and Screen-Away.Create three lines out along the 3-point arc corresponding to a point guard, and both wing positions (see diagram). Have an assistant or manager be the token defender on the left wing. The point guard starts by passing to the right wing. He/she then “screens away” for the left wing, setting the pick on the defender. The wing player cuts around the screen and gets the pass from the right wing, and takes it to the hoop. The screener should “roll” off the pick after cutter comes around.
Make sure that the screeners make contact, get wide and strong and stationary with arms in, and make sure they have the correct angle on the screen. Make sure the player cutting around the screen waits for the screen to develop, and “rubs off” the screen correctly. Make sure the pivot on the roll move is toward the cutter, not away... a player should not turn his back to his teammate.
Make sure as always that players hustle, and the passes are sharp. Once you feel that your team is making good screens, “go live”. Break up into groups of three, and put a defender on each offensive player. Tell the defenders to allow
JCC Youth Basketball Drills 2010 • 20 • www.jccstl.comjccstl.org
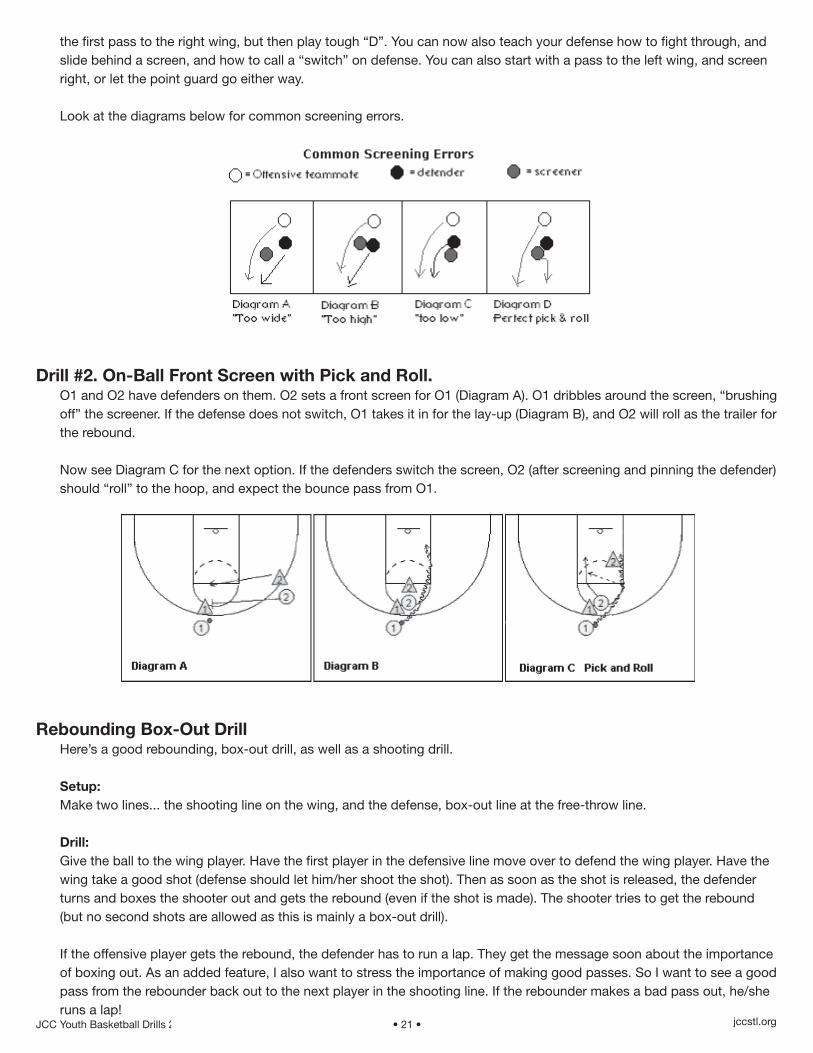
the first pass to the right wing, but then play tough “D”. You can now also teach your defense how to fight through, and slide behind a screen, and how to call a “switch” on defense. You can also start with a pass to the left wing, and screen right, or let the point guard go either way.
Look at the diagrams below for common screening errors.
Drill #2. On-Ball Front Screen with Pick and Roll.
O1 and O2 have defenders on them. O2 sets a front screen for O1 (Diagram A). O1 dribbles around the screen, “brushing off” the screener. If the defense does not switch, O1 takes it in for the lay-up (Diagram B), and O2 will roll as the trailer for the rebound.
Now see Diagram C for the next option. If the defenders switch the screen, O2 (after screening and pinning the defender) should “roll” to the hoop, and expect the bounce pass from O1.
Rebounding Box-Out DrillHere’s a good rebounding, box-out drill, as well as a shooting drill.
Setup:Make two lines... the shooting line on the wing, and the defense, box-out line at the free-throw line.
Drill:Give the ball to the wing player. Have the first player in the defensive line move over to defend the wing player. Have the wing take a good shot (defense should let him/her shoot the shot). Then as soon as the shot is released, the defender turns and boxes the shooter out and gets the rebound (even if the shot is made). The shooter tries to get the rebound (but no second shots are allowed as this is mainly a box-out drill).
If the offensive player gets the rebound, the defender has to run a lap. They get the message soon about the importance of boxing out. As an added feature, I also want to stress the importance of making good passes. So I want to see a good pass from the rebounder back out to the next player in the shooting line. If the rebounder makes a bad pass out, he/she runs a lap!
23
Drill #1. Pass and Screen-Away. Create three lines out along the 3-point arc corresponding to a point guard, and both wing positions (see diagram). Have an assistant or manager be the token defender on the left wing. The point guard starts by passing to the right wing. He/she then "screens away" for the left wing, setting the pick on the defender. The wing player cuts around the screen and gets the pass from the right wing, and takes it to the hoop. The screener should "roll" off the pick after cutter comes around.
Make sure that the screeners make contact, get wide and strong and stationary with arms in, and make sure they have the correct angle on the screen. Make sure the player cutting around the screen waits for the screen to develop, and "rubs off" the screen correctly. Make sure the pivot on the roll move is toward the cutter, not away... a player should not turn his back to his teammate.
Make sure as always that players hustle, and the passes are sharp. Once you feel that your team is making good screens, "go live". Break up into groups of three, and put a defender on each offensive player. Tell the defenders to allow the first pass to the right wing, but then play tough "D". You can now also teach your defense how to fight through, and slide behind a screen, and how to call a "switch" on defense. You can also start with a pass to the left wing, and screen right, or let the point guard go either way.
Look at the diagrams below for common screening errors.
Drill #2. On-Ball Front Screen with Pick and Roll. O1 and O2 have defenders on them. O2 sets a front screen for O1 (Diagram A). O1 dribbles around the screen, "brushing off" the screener. If the defense does not switch, O1 takes it in for the lay-up (Diagram B), and O2 will roll as the trailer for the rebound.
Now see Diagram C for the next option. If the defenders switch the screen, O2 (after screening and pinning the defender) should "roll" to the hoop, and expect the bounce pass from O1.
JCC Youth Basketball Drills 2010 • 21 • www.jccstl.comjccstl.org
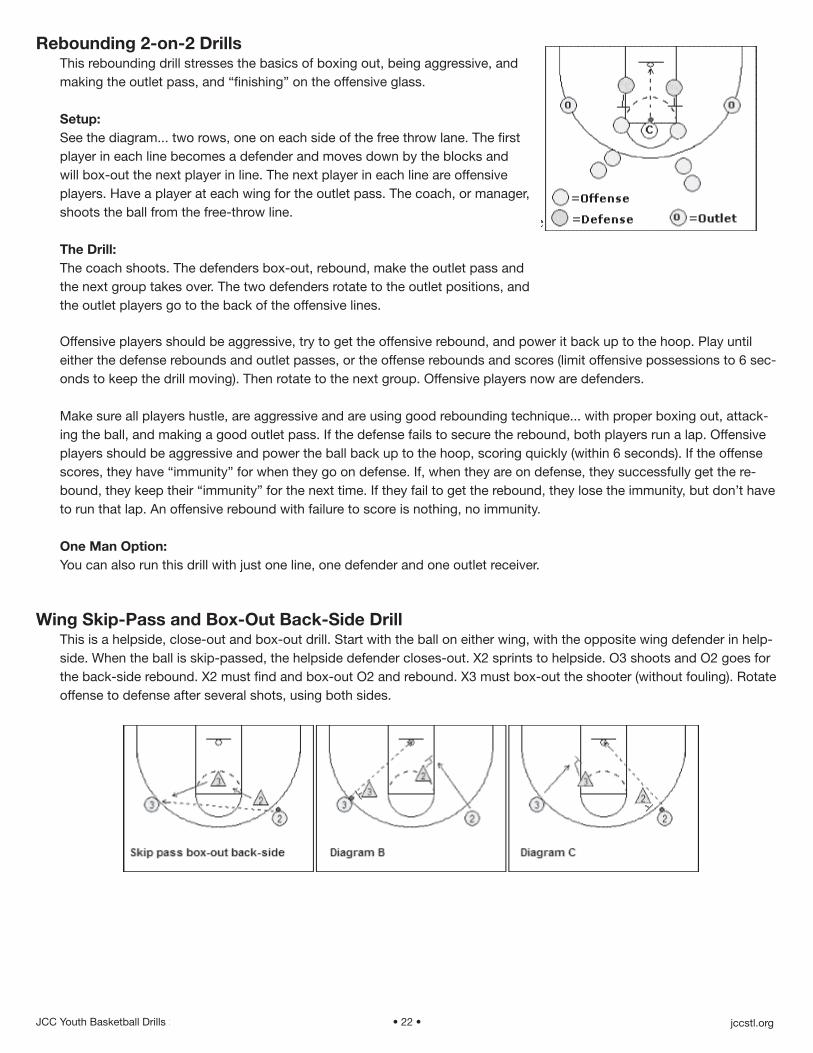
Rebounding 2-on-2 DrillsThis rebounding drill stresses the basics of boxing out, being aggressive, and making the outlet pass, and “finishing” on the offensive glass.
Setup: See the diagram... two rows, one on each side of the free throw lane. The first player in each line becomes a defender and moves down by the blocks and will box-out the next player in line. The next player in each line are offensive players. Have a player at each wing for the outlet pass. The coach, or manager, shoots the ball from the free-throw line.
The Drill:The coach shoots. The defenders box-out, rebound, make the outlet pass and the next group takes over. The two defenders rotate to the outlet positions, and the outlet players go to the back of the offensive lines.
24
Rebounding Box-Out Drill Here's a good rebounding, box-out drill, as well as a shooting drill.
Setup:Make two lines... the shooting line on the wing, and the defense, box-out line at the free-throw line.
Drill:Give the ball to the wing player. Have the first player in the defensive line move over to defend the wing player. Have the wing take a good shot (defense should let him/her shoot the shot). Then as soon as the shot is released, the defender turns and boxes the shooter out and gets the rebound (even if the shot is made). The shooter tries to get the rebound (but no second shots are allowed as this is mainly a box-out drill).
If the offensive player gets the rebound, the defender has to run a lap. They get the message soon about the importance of boxing out.
As an added feature, I also want to stress the importance of making good passes. So I want to see a good pass from the rebounder back out to the next player in the shooting line. If the rebounder makes a bad pass out, he/she runs a lap!
Rebounding 2-on-2 Drills This rebounding drill stresses the basics of boxing out, being aggressive, and making the outlet pass, and "finishing" on the offensive glass.
Setup: See the diagram... two rows, one on each side of the free throw lane. The first player in each line becomes a defender and moves down by the blocks and will box-out the next player in line. The next player in each line are offensive players. Have a player at each wing for the outlet pass. The coach, or manager, shoots the ball from the free-throw line.
The Drill:The coach shoots. The defenders box-out, rebound, make the outlet pass and the next group takes over. The two defenders rotate to the outlet positions, and the outlet players go to the back of the offensive lines.
Offensive players should be aggressive, try to get the offensive rebound, and power it back up to the hoop. Play until either the defense rebounds and outlet passes, or the offense rebounds and scores (limit offensive possessions to 6 seconds to keep the drill moving). Then rotate to the next group. Offensive players now are defenders.
Make sure all players hustle, are aggressive and are using good rebounding technique... with proper boxing out, attacking the ball, and making a good outlet pass. If the defense fails to secure the rebound, both players run a lap. Offensive players should be aggressive and power the ball back up to the hoop, scoring quickly (within 6 seconds). If the offense scores, they
Offensive players should be aggressive, try to get the offensive rebound, and power it back up to the hoop. Play until either the defense rebounds and outlet passes, or the offense rebounds and scores (limit offensive possessions to 6 sec-onds to keep the drill moving). Then rotate to the next group. Offensive players now are defenders.
Make sure all players hustle, are aggressive and are using good rebounding technique... with proper boxing out, attack-ing the ball, and making a good outlet pass. If the defense fails to secure the rebound, both players run a lap. Offensive players should be aggressive and power the ball back up to the hoop, scoring quickly (within 6 seconds). If the offense scores, they have “immunity” for when they go on defense. If, when they are on defense, they successfully get the re-bound, they keep their “immunity” for the next time. If they fail to get the rebound, they lose the immunity, but don’t have to run that lap. An offensive rebound with failure to score is nothing, no immunity.
One Man Option:You can also run this drill with just one line, one defender and one outlet receiver.
Wing Skip-Pass and Box-Out Back-Side DrillThis is a helpside, close-out and box-out drill. Start with the ball on either wing, with the opposite wing defender in help-side. When the ball is skip-passed, the helpside defender closes-out. X2 sprints to helpside. O3 shoots and O2 goes for the back-side rebound. X2 must find and box-out O2 and rebound. X3 must box-out the shooter (without fouling). Rotate offense to defense after several shots, using both sides.
25have "immunity" for when they go on defense. If, when they are on defense, they successfully get the rebound, they keep their "immunity" for the next time. If they fail to get the rebound, they lose the immunity, but don't have to run that lap. An offensive rebound with failure to score is nothing, no immunity. One Man Option:You can also run this drill with just one line, one defender and one outlet receiver.
Wing Skip-Pass and Box-Out Back-Side Drill This is a helpside, close-out and box-out drill. Start with the ball on either wing, with the opposite wing defender in helpside. When the ball is skip-passed, the helpside defender closes-out. X2 sprints to helpside. O3 shoots and O2 goes for the back-side rebound. X2 must find and box-out O2 and rebound. X3 must box-out the shooter (without fouling). Rotate offense to defense after several shots, using both sides.
Hustle Drills
Hustle Drill #1 This is a good drill for emphasizing hustle and going for loose balls. It also works one-on-one offensive skills, man-to-man defensive skills, and rebounding. A "laid back" player can actually be taught to hustle, and get after the ball and the opponent.
Setup:Refer to the diagram. Divide the team into two groups. They will be competing against each other, so even out the speed and talent. Line each team up along a sideline. Each player is given a number, 1, 2, 3, etc (see diagram). Try to align your post players into the 1 and 2 spots, and the guards further out (3 - 5). Have the players get down on their knees, or all fours, facing away from the floor. Have a coach or manager check to make sure they don't peek! If they cheat, the other team gets a point. Starting the Drill:The coach places the ball somewhere on the floor, equidistant from each team. You could place it out high, or even down in the paint. Coach then yells a number 1 through 5. The player from each team whose number he calls runs out and gets the loose ball. The player, who gets the ball, then takes it to the hoop and tries to score, while the other player defends. Keep playing until the offense scores, or the defense gets the ball. Award one point for getting the loose ball, and another point for the scores. Play to 10. Losers run!
JCC Youth Basketball Drills 2010 • 22 • www.jccstl.comjccstl.org
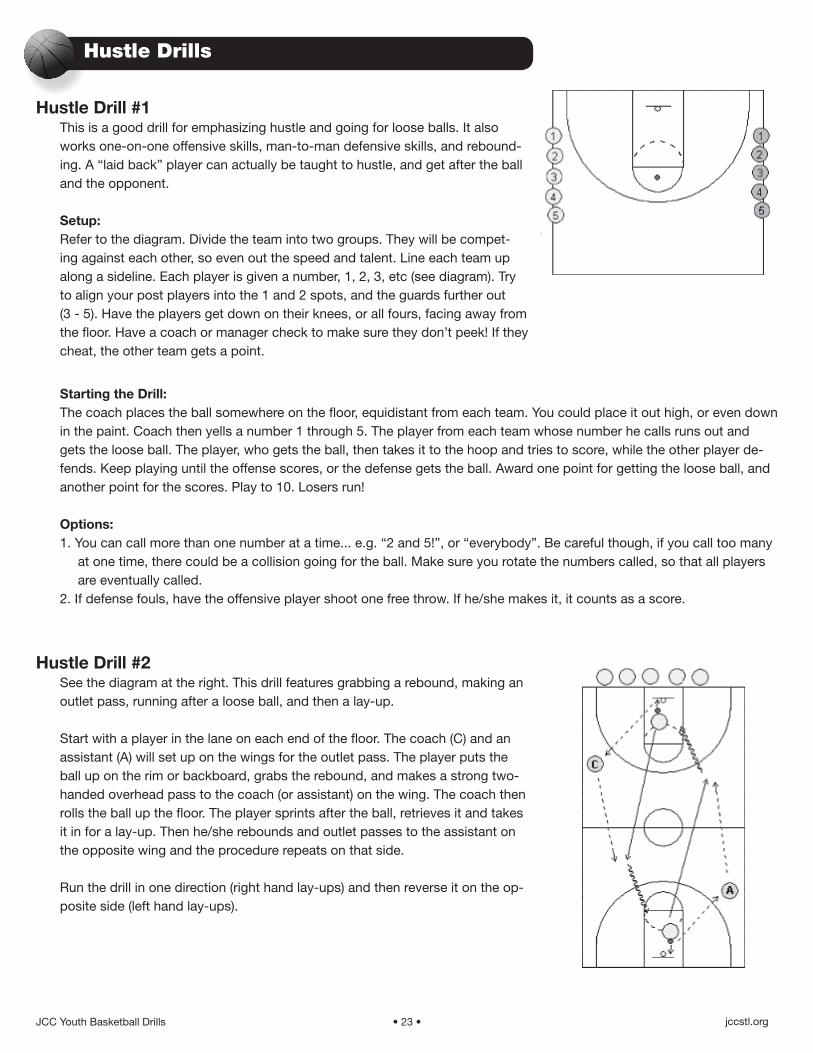
Hustle Drills
Hustle Drill #1This is a good drill for emphasizing hustle and going for loose balls. It also works one-on-one offensive skills, man-to-man defensive skills, and rebound-ing. A “laid back” player can actually be taught to hustle, and get after the ball and the opponent.
Setup: Refer to the diagram. Divide the team into two groups. They will be compet-ing against each other, so even out the speed and talent. Line each team up along a sideline. Each player is given a number, 1, 2, 3, etc (see diagram). Try to align your post players into the 1 and 2 spots, and the guards further out (3 - 5). Have the players get down on their knees, or all fours, facing away from the floor. Have a coach or manager check to make sure they don’t peek! If they cheat, the other team gets a point.
25have "immunity" for when they go on defense. If, when they are on defense, they successfully get the rebound, they keep their "immunity" for the next time. If they fail to get the rebound, they lose the immunity, but don't have to run that lap. An offensive rebound with failure to score is nothing, no immunity. One Man Option:You can also run this drill with just one line, one defender and one outlet receiver.
Wing Skip-Pass and Box-Out Back-Side Drill This is a helpside, close-out and box-out drill. Start with the ball on either wing, with the opposite wing defender in helpside. When the ball is skip-passed, the helpside defender closes-out. X2 sprints to helpside. O3 shoots and O2 goes for the back-side rebound. X2 must find and box-out O2 and rebound. X3 must box-out the shooter (without fouling). Rotate offense to defense after several shots, using both sides.
Hustle Drills
Hustle Drill #1 This is a good drill for emphasizing hustle and going for loose balls. It also works one-on-one offensive skills, man-to-man defensive skills, and rebounding. A "laid back" player can actually be taught to hustle, and get after the ball and the opponent.
Setup:Refer to the diagram. Divide the team into two groups. They will be competing against each other, so even out the speed and talent. Line each team up along a sideline. Each player is given a number, 1, 2, 3, etc (see diagram). Try to align your post players into the 1 and 2 spots, and the guards further out (3 - 5). Have the players get down on their knees, or all fours, facing away from the floor. Have a coach or manager check to make sure they don't peek! If they cheat, the other team gets a point. Starting the Drill:The coach places the ball somewhere on the floor, equidistant from each team. You could place it out high, or even down in the paint. Coach then yells a number 1 through 5. The player from each team whose number he calls runs out and gets the loose ball. The player, who gets the ball, then takes it to the hoop and tries to score, while the other player defends. Keep playing until the offense scores, or the defense gets the ball. Award one point for getting the loose ball, and another point for the scores. Play to 10. Losers run!
Starting the Drill: The coach places the ball somewhere on the floor, equidistant from each team. You could place it out high, or even down in the paint. Coach then yells a number 1 through 5. The player from each team whose number he calls runs out and gets the loose ball. The player, who gets the ball, then takes it to the hoop and tries to score, while the other player de-fends. Keep playing until the offense scores, or the defense gets the ball. Award one point for getting the loose ball, and another point for the scores. Play to 10. Losers run!
Options: 1. You can call more than one number at a time... e.g. “2 and 5!”, or “everybody”. Be careful though, if you call too many
at one time, there could be a collision going for the ball. Make sure you rotate the numbers called, so that all players are eventually called.
2. If defense fouls, have the offensive player shoot one free throw. If he/she makes it, it counts as a score.
Hustle Drill #2See the diagram at the right. This drill features grabbing a rebound, making an outlet pass, running after a loose ball, and then a lay-up.
Start with a player in the lane on each end of the floor. The coach (C) and an assistant (A) will set up on the wings for the outlet pass. The player puts the ball up on the rim or backboard, grabs the rebound, and makes a strong two-handed overhead pass to the coach (or assistant) on the wing. The coach then rolls the ball up the floor. The player sprints after the ball, retrieves it and takes it in for a lay-up. Then he/she rebounds and outlet passes to the assistant on the opposite wing and the procedure repeats on that side.
Run the drill in one direction (right hand lay-ups) and then reverse it on the op-posite side (left hand lay-ups).
26
Options:1. You can call more than one number at a time... e.g. "2 and 5!", or "everybody". Be careful though, if you call too many at one time, there could be a collision going for the ball. Make sure you rotate the numbers called, so that all players are eventually called. 2. If defense fouls, have the offensive player shoot one free throw. If he/she makes it, it counts as a score.
Hustle Drill #2 See the diagram at the right. This drill features grabbing a rebound, making an outlet pass, running after a loose ball, and then a lay-up.
Start with a player in the lane on each end of the floor. The coach (C) and an assistant (A) will set up on the wings for the outlet pass. The player puts the ball up on the rim or backboard, grabs the rebound, and makes a strong two-handed overhead pass to the coach (or assistant) on the wing. The coach then rolls the ball up the floor. The player sprints after the ball, retrieves it and takes it in for a lay-up. Then he/she rebounds and outlet passes to the assistant on the opposite wing and the procedure repeats on that side.
Run the drill in one direction (right hand lay-ups) and then reverse it on the opposite side (left hand lay-ups).
<>
JCC Youth Basketball Drills 2010 • 23 • www.jccstl.comjccstl.org
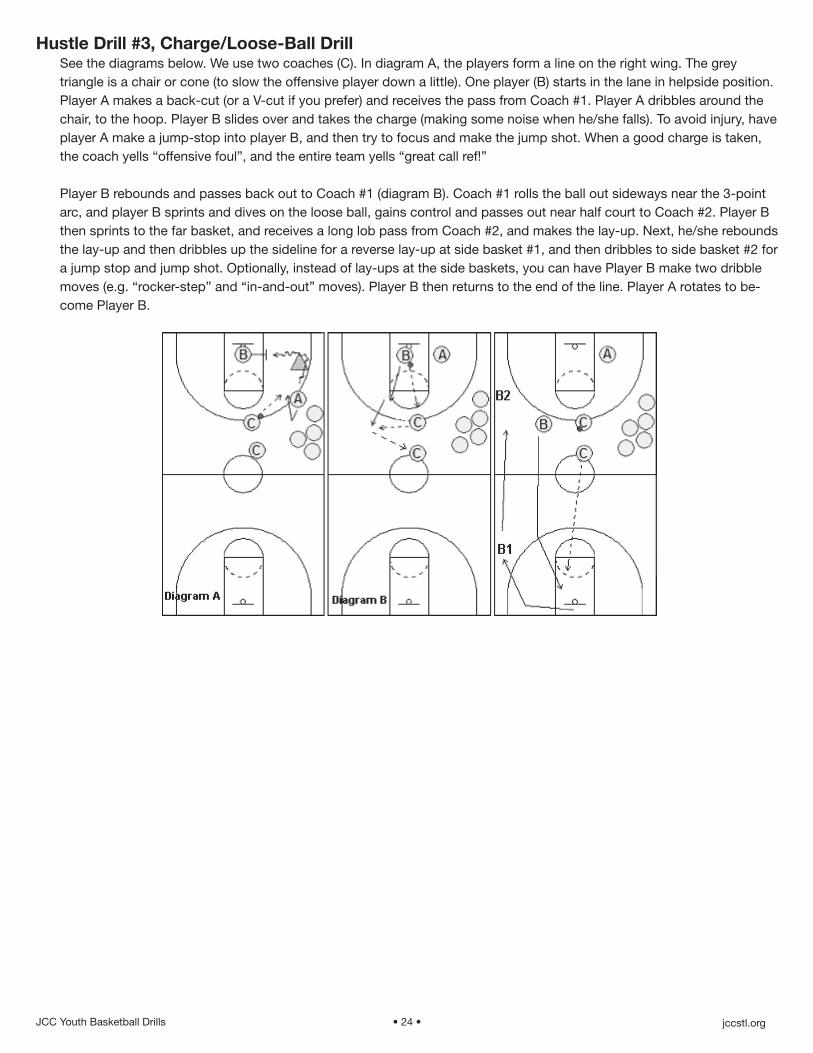
Hustle Drill #3, Charge/Loose-Ball DrillSee the diagrams below. We use two coaches (C). In diagram A, the players form a line on the right wing. The grey triangle is a chair or cone (to slow the offensive player down a little). One player (B) starts in the lane in helpside position. Player A makes a back-cut (or a V-cut if you prefer) and receives the pass from Coach #1. Player A dribbles around the chair, to the hoop. Player B slides over and takes the charge (making some noise when he/she falls). To avoid injury, have player A make a jump-stop into player B, and then try to focus and make the jump shot. When a good charge is taken, the coach yells “offensive foul”, and the entire team yells “great call ref!”
Player B rebounds and passes back out to Coach #1 (diagram B). Coach #1 rolls the ball out sideways near the 3-point arc, and player B sprints and dives on the loose ball, gains control and passes out near half court to Coach #2. Player B then sprints to the far basket, and receives a long lob pass from Coach #2, and makes the lay-up. Next, he/she rebounds the lay-up and then dribbles up the sideline for a reverse lay-up at side basket #1, and then dribbles to side basket #2 for a jump stop and jump shot. Optionally, instead of lay-ups at the side baskets, you can have Player B make two dribble moves (e.g. “rocker-step” and “in-and-out” moves). Player B then returns to the end of the line. Player A rotates to be-come Player B.
27
Hustle Drill #3, Charge/Loose-Ball Drill See the diagrams below. We use two coaches (C). In diagram A, the players form a line on the right wing. The grey triangle is a chair or cone (to slow the offensive player down a little). One player (B) starts in the lane in helpside position. Player A makes a back-cut (or a V-cut if you prefer) and receives the pass from Coach #1. Player A dribbles around the chair, to the hoop. Player B slides over and takes the charge (making some noise when he/she falls). To avoid injury, have player A make a jump-stop into player B, and then try to focus and make the jump shot. When a good charge is taken, the coach yells "offensive foul", and the entire team yells "great call ref!"
Player B rebounds and passes back out to Coach #1 (diagram B). Coach #1 rolls the ball out sideways near the 3-point arc, and player B sprints and dives on the loose ball, gains control and passes out near half court to Coach #2. Player B then sprints to the far basket, and receives a long lob pass from Coach #2, and makes the lay-up. Next, he/she rebounds the lay-up and then dribbles up the sideline for a reverse lay-up at side basket #1, and then dribbles to side basket #2 for a jump stop and jump shot. Optionally, instead of lay-ups at the side baskets, you can have Player B make two dribble moves (e.g. "rocker-step" and "in-and-out" moves). Player B then returns to the end of the line. Player A rotates to become Player B.
JCC Youth Basketball Drills 2010 • 24 • www.jccstl.comjccstl.org

JCC Youth Basketball Drills 2010 • 25 • www.jccstl.com
NOTES:
jccstl.org
JCC Youth Basketball Drills 2010 • 26 • www.jccstl.com
NOTES:
jccstl.org

JCC Youth Basketball Drills 2010 • 27 • www.jccstl.com
NOTES:
jccstl.org


![[INSERT SUBHEADING]...Basketball Skills and Drills 6:00-7:30 PM Mondays Starting Oct 14th $115 Member $145 Participant The YMCA basketball skills and drills class is designed to develop](https://static.documents.pub/doc/80x56/5e83b95344b90352297799ec/insert-subheading-basketball-skills-and-drills-600-730-pm-mondays-starting.jpg)


