31
Test Preparation Guide Certification Workshop Adult Development

Test Preparation Guide
Certification WorkshopAdult Development
Copyright © 2010
Professional Tennis Registry
All rights reserved.
Reproduction in whole or in part is not permitted without written consent of Professional Tennis Registry.
CONTENTSWelcome 1
Serve
Outline for Group Lesson 2
Errors & Corrections 3
Forehand
Outline for Group Lesson 4
Errors & Corrections 5
Backhand
Outline for Group Lesson 6
Errors & Corrections 7
Volley Progressions 8
Tactical Priorities of the Serve 9
Spin Serve Progressions 9
Overhead Progressions 11
Drop Shot Progressions 11
Forehand Approach Shot (Slice) Progressions 12
Backhand Approach Shot (Slice) Progressions 13
Topspin Lob Progressions 14
Half Volley Progressions 15
Instant Tennis Progressions 16
10 Minute Warm Up 18
Grips 20
Glossary of Terms 21
General Teaching Considerations 22
Written Test Preparation 23
Sample Test Questions 24

PTR ADULT DEVELOPMENT CERTIFICATION WORKSHOP TEST PREPARATION GUIDE 1
The Certification Workshop - Adult Development - is a presentation and an explanation
of a fundamentally sound method of teaching tennis to beginning players. Upon com-
pletion of the workshop, you should have a good foundation for instructing tennis. If
you are taking the certification exam at the conclusion of the workshop, the material
presented will greatly increase your ability to perform well on the test.
The primary emphasis of the workshop will be on the teaching of the serve, forehand
and backhand to a group of students. The progressions used in the teaching of the
other specialty shots will also be demonstrated. Many terms used in the teaching of
tennis will be incorporated into the workshop by your workshop leader. Pay close
attention to the organization of the lesson, its division into three distinct parts, the use
of corrective techniques, the importance of safety and the purpose of demonstrations.
There is a tremendous amount of information to be presented during the workshop,
and it is important for your workshop leader to keep the day moving. Please feel free
however, to direct questions to your workshop leader during pauses or breaks in the
activities. PTR workshop leaders are experienced teachers and coaches, and have
been trained specifically to conduct the workshop.
Finally, remember that the other attendees in the workshop are likely to be from con-
siderably different backgrounds and are attending for many different reasons.
Participants often include full time teaching professionals, high school coaches, camp
counselors, college coaches, recreational instructors, retired teachers, or possibly just
interested parents of junior players.
Teaching tennis is a skill to be developed throughout a lifetime. It is important to
always continue to improve ourselves as well as our students, to learn from mistakes
and to actively pursue more knowledge to become a better instructor.
Enjoy the workshop experience and best of luck to those of you who will be taking the
certification exam.
Dan Santorum
PTR CEO & Executive Director
Welcome to PTR
Adult Development
Certification Workshop

2 PTR ADULT DEVELOPMENT CERTIFICATION WORKSHOP TEST PREPARATION GUIDE
SERVE - Outline for Group Lesson
Introduction
• Greet students & learn names
• Briefly describe lesson/goal of lesson
• Have students demonstrate their serves
• Give positive comment & identify ONE error (stroke evaluation)
• Demonstrate serve (2-3 times)
Part 1 - Teaching the Stroke
1. Line up students on baseline and demonstrate components with students shadowing
a. Stance
b. Grip
c. Pronation
d. (Drop behind back) swing up on edge
e. (Drop behind back) swing up with pronation
f. Weight transfer
---Move students to net ---
g. Point of Contact*
h. Add follow through*
i. Add backswing (broken serve)*
j. Rhythm - no toss
k. Rhythm - with toss and catch
l. Complete serve*
2. Students demonstrate serves (half-court or closer)
* indicates a step where the ball is struck
Part 2 - Individual Help
1. Organize for Individual Help
a. Line students up halfway between service line and net
b. Instructor works individually with a student on end
c. Instructor rotates students until all receive individual help
2. Attention must be paid to all students using names and feedback
continuously
3. Students demonstrate serves (half-court or closer)
Part 3 - Practice
1. Organize for Practice
a. Have students line up five or six balls from the net to the baseline
b. All students begin with ball closest to net
c. Demonstrate and explain practice procedure (hitting up on ball)
2. Students progressively serve balls moving from net to the baseline
3. Have balls available for students who miss their serves into the net
4. Assemble students in deuce alley near service line and demo the tactical
priorities
5. Students demonstrate serves (half-court or closer)

PTR ADULT DEVELOPMENT CERTIFICATION WORKSHOP TEST PREPARATION GUIDE 3
Errors & Corrections
Additional errors and corrections are included in the PTR Preparation for Certification DVD or
PTR Instructor’s Manual.
Error Correction
Front foot slides forward Place an object (ball, racquet) in front of the front
Before contact (foot fault) foot.
Incorrect grip/changes in grip Place a pencil between the index knuckle and the
racquet (pencil rests at 45-degrees).
Loss of balance Have student serve with feet together facing forward.
Improper point of contact Rarely teach how to toss the ball. Always stress
point of contact.
Tap the ball at the point of contact at the fence.
Elbow drops Have student toss the ball up and rebound off the
top of the elbow.
Muscling the ball Serve holding the racquet with two fingers.
No hip rotation Belly button facing the net.
Back heel off the ground.
Knees dip before toss Have the student serve with legs locked.
Have the student serve with one knee on the ground.
Pushing the ball forward Tap the ball against the fence. The tip of the racquet
(no pronation) will meet the fence first.
Quick toss Leave tossing arm in the air for two counts after
releasing the ball.
Quick backswing Imagine you are taking racquet back under water.
Wrap up
• Instructor brings students together in a group
• Review individual errors in a positive manner
• Give practice suggestions to students
• Provide incentive to return for future lessons
• Thank the students

4 PTR ADULT DEVELOPMENT CERTIFICATION WORKSHOP TEST PREPARATION GUIDE
FOREHAND - Outline for Group Lesson
Introduction
• Greet students & learn names
• Briefly describe lesson/goal of lesson
• Have students demonstrate their forehands
• Give positive comment & identify ONE error (stroke evaluation)
• Demonstrate forehand (2-3 times)
Part I - Teaching the Stroke
1. Line up students on baseline and demonstrate components with students shadowing
a. stance
b. grip
c. turn & pivot (shoulder turn)
d. racquet back & down
e. adjusting steps
f. point of contact
g. follow through
2. Students moved to net and learn/practice self-start
3. Stroke progressions introduced
a. hit from point of contact
b. hit from backswing position
c. hit from shoulder turn position
4. Students demonstrate forehands (half-court)
Part 2 - Individual Help
1. Organize for Individual Help
a. One student becomes ‘assistant coach’ (feeder) and feeds to two students
b. Instructor works individually with one student on same error identified in
Introduction
2. Instructor rotates (clockwise) students until all receive individual help
3. Attention must be paid to all students using names and feedback continuously
4. Students demonstrate forehands (half-court)
Part 3 - Practice
1. Organize for Practice (emphasis on footwork and point of contact)
a. Position students in two lines of two for point of contact practice. Instructor
alternates feeds to each line and students rotate positions.
b. Pair up students across from each other for rally practice. Instructor moves
about court with comments and using students’ names.
2. Students demonstrate forehands (half-court)

PTR ADULT DEVELOPMENT CERTIFICATION WORKSHOP TEST PREPARATION GUIDE 5
Wrap up
• Instructor brings students together in a group
• Review individual errors in a positive manner
• Give practice suggestions to students
• Provide incentive to return for future lessons
• Thank the students
Errors & Corrections
Additional errors and corrections are included in the PTR Preparation for Certification DVD or
PTR Instructor’s Manual.
Error Correction
Improper point of contact Have student catch the ball at the point of contact
on the strings.
Wristy at point of contact Hold racquet halfway. May also place ball between
racquet and forearm.
Slicing the ball Have student touch the racquet to the ground
(cannot hit topspin) before swinging forward.
Short follow through Have student catch the racquet with the left hand.
Steps in with wrong foot Step on a coin or foot pedal.
Hits off back foot From behind the student, throw the ball out in front.
Wrist break on backswing The student stands beside the net with the body
(excessive backswing) on one side of the net and the racquet on the other.
The net will make sure that there is no excessive
backswing.
Scoops or parallel backswing Swinging over, then under racquet. Have student
leave dominant hand on racquet longer.
Have the student trace your racquet frame with
theirs.
Not enough shoulder turn on Have student leave non-dominant hand on racquet
backswing longer.
Put a racquet in both hands. Keep them together
during the shoulder turn.
Leading with elbow Have student place ball under upper arm between
arm and body. Ball should not drop out until
racquet swings forward.

6 PTR ADULT DEVELOPMENT CERTIFICATION WORKSHOP TEST PREPARATION GUIDE
BACKHAND - Outline for Group Lesson
Introduction
• Greet students & learn names
• Briefly describe lesson/goal of lesson
• Have students demonstrate their backhands
• Give positive comment & identify ONE error (stroke evaluation)
• Demonstrate backhand (2-3 times with reference to two-handed backhand as well)
Part 1 - Teaching the stroke - Basic progressions
1. Line up students on baseline and demonstrate components with students shadowing
a. stance
b. grip
c. turn & pivot (shoulder turn)
d. racquet back & down
e. adjusting steps
f. point of contact
g. follow through
2. Students moved to net and learn/practice self-start
3. Stroke progressions introduced
a. hit from point of contact
b. hit from backswing position
c. hit from shoulder turn position
4. Students demonstrate backhands (half-court)
Part 2 - Individual Help
1. Organize for Individual Help
a. One student becomes ‘assistant coach’ (feeder) and feeds to two students
b. Instructor works individually with one student on same error identified in
Introduction
2. Instructor rotates (counterclockwise) students until all receive individual help
3. Attention must be paid to all students using names and feedback continuously
4. Students demonstrate backhands (half-court)
Part 3 - Practice
1. Organize for Practice (emphasis on footwork and point of contact)
a. Position students in two lines of two for point of contact practice. Instructor
alternates feeds to each line and students rotate positions.
b. Pair up students across from each other for rally practice. Instructor moves
about court with comments and using students’ names.
2. Students demonstrate backhands (half-court)

PTR ADULT DEVELOPMENT CERTIFICATION WORKSHOP TEST PREPARATION GUIDE 7
Wrap up
• Instructor brings students together in a group
• Review individual errors in a positive manner
• Give practice suggestions to students
• Provide incentive to return for future lessons
• Thank the students
Errors & Corrections
Additional errors and corrections are included in the PTR Preparation for Certification DVD or
PTR Instructor’s Manual.
Error (One-handed) Correction
Incorrect grip Place pencil between forefinger and grip.
Leading with elbow Sandwich a ball against the body, under the arm
above the elbow.
Wrist break on backswing Stand student beside the net with body on one side
and racquet on the other. Net will prevent
excessive backswing.
Excessive hip and shoulder Hold a ball hopper with non-playing hand.
rotation
Hits off back foot Student steps on a coin placed in front of him/her.
Feed the student short balls
Improper point of contact Toss the student a few balls and ask him/her to stop
at the point of contact.
Racquet rolls on follow through Have the student stand with back to fence, stopping
follow through.
Have the student stop at the point of contact and
then add the follow through.
Error (Two-handed) Correction
Left hand (wrist) covers ball Push against instructor’s racquet through swing
(follow through).
Racquet too far back on backswing Use net as a barrier to prevent extreme backswing.
8 PTR ADULT DEVELOPMENT CERTIFICATION WORKSHOP TEST PREPARATION GUIDE
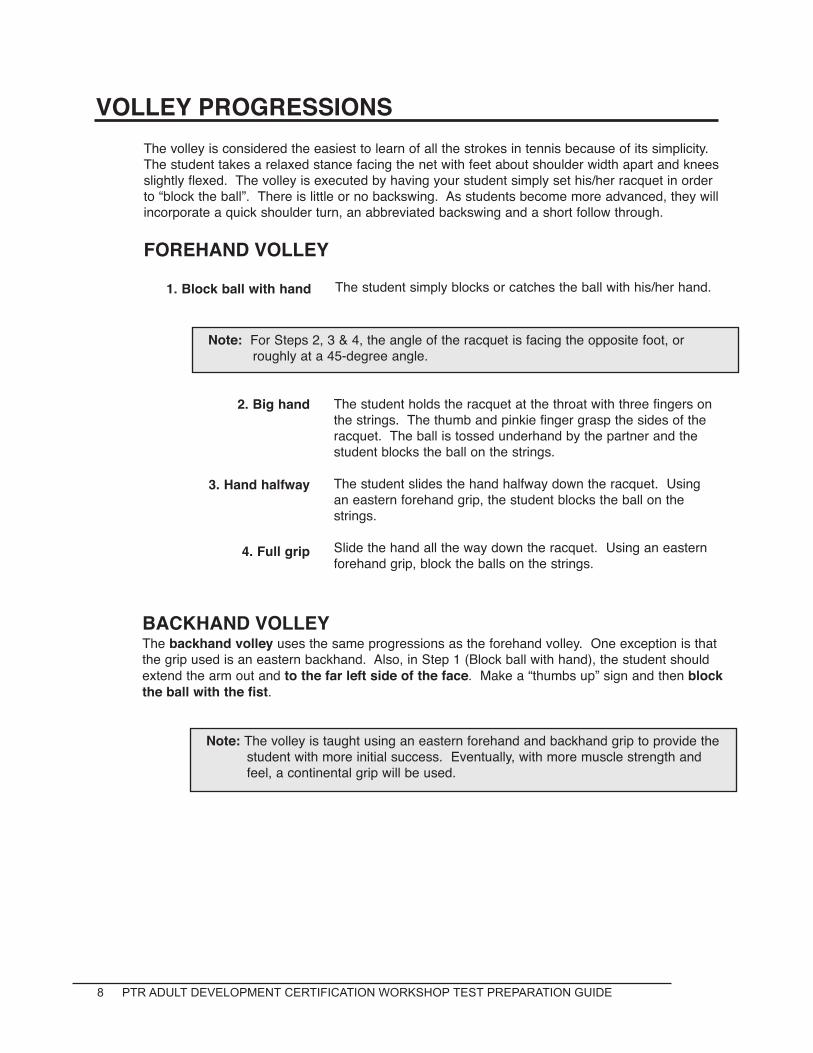
VOLLEY PROGRESSIONS
The volley is considered the easiest to learn of all the strokes in tennis because of its simplicity.
The student takes a relaxed stance facing the net with feet about shoulder width apart and knees
slightly flexed. The volley is executed by having your student simply set his/her racquet in order
to “block the ball”. There is little or no backswing. As students become more advanced, they will
incorporate a quick shoulder turn, an abbreviated backswing and a short follow through.
FOREHAND VOLLEY
Note: For Steps 2, 3 & 4, the angle of the racquet is facing the opposite foot, or
roughly at a 45-degree angle.
BACKHAND VOLLEYThe backhand volley uses the same progressions as the forehand volley. One exception is that
the grip used is an eastern backhand. Also, in Step 1 (Block ball with hand), the student should
extend the arm out and to the far left side of the face. Make a “thumbs up” sign and then block
the ball with the fist.
Note: The volley is taught using an eastern forehand and backhand grip to provide the
student with more initial success. Eventually, with more muscle strength and
feel, a continental grip will be used.
1. Block ball with hand The student simply blocks or catches the ball with his/her hand.
2. Big hand
3. Hand halfway
4. Full grip
The student holds the racquet at the throat with three fingers on
the strings. The thumb and pinkie finger grasp the sides of the
racquet. The ball is tossed underhand by the partner and the
student blocks the ball on the strings.
The student slides the hand halfway down the racquet. Using
an eastern forehand grip, the student blocks the ball on the
strings.
Slide the hand all the way down the racquet. Using an eastern
forehand grip, block the balls on the strings.

PTR ADULT DEVELOPMENT CERTIFICATION WORKSHOP TEST PREPARATION GUIDE 9
TACTICAL PRIORITIES OF THE SERVE
Discuss the tactical priorities of the serve. This is an excellent context for introducing the spin
serve. You should be able to proficiently demonstrate the five tactical priorities of the serve, which
include the topspin serve. Tactical priorities for the serve are:
1. Consistency: Get the ball in the correct service court.
2. Placement or Direction: Serve to the forehand or backhand side, or
down the middle.
3. Depth: Being able to hit the ball deep or short.
4. Spin: Slice or topspin.
5. Power: A ball hit with velocity.
Most people don’t follow these tactical priorities. Instead, they try to hit the ball as hard as they can,
with minimal control. To ensure that your students develop a controlled serve, ask them to serve the
ball slowly over the net so it will bounce twice before crossing the baseline. As the stroke becomes
more fluid and relaxed, the racquet head speed will naturally increase. This will prepare the player
to learn slice and spin. When discussing spin, show your students where slice is most effective
(wide - where it pulls your opponent off the court; or into the body - where it jams your opponent).
SPIN SERVE PROGRESSIONS
The spin serve is a stroke that should be taught to people of intermediate and advanced levels.
Only players who can generate reasonable racquet head speed can benefit from a spin or slice
serve.
Organize your students in a semi-circle. Grip the racquet halfway up the handle, so they have
more control.
Note: The students will keep a half grip until the final progression.
Explain the motion of the racquet by using the example of a clock face. For a flat serve, the point
of contact would be in the center, or where the hands meet on a clock face. On the slice serve,
the racquet travels in a direction toward 3 o’clock. For the spin serve, the racquet travels from
7 o’clock toward 1 o’clock. Students will practice each step after your demonstration.
Show your students how to bypass the ball at 6 o’clock. The
racquet moves back and forth (right to left, toward the body)
underneath the ball to produce underspin. This exercise should
be done with the ball staying on the racquet. After a few
bypasses, let the ball drop to the ground and look at the spin
that is produced. Have the students practice this step.
Bring the students close to the net. Rest the racquet behind
your shoulder and demonstrate the following. With a short toss,
no higher than your chest, bypass the ball at 6 o’clock. You
should contact the ball at waist level. The ball will travel over
the net with underspin.
1. Creating spin
2. Demo spin
10 PTR ADULT DEVELOPMENT CERTIFICATION WORKSHOP TEST PREPARATION GUIDE
Note: Remind the students not to “cup” the ball or try to “come around the ball”.
Everyone should still be holding the racquet halfway up the shaft. Most
importantly, it is a short, abbreviated stroke with no follow through.
From the slice motion, we move to topspin. Rest the racquet
behind your shoulder and move the racquet from 7 o’clock to a
1 o’clock position. The follow through is abbreviated, with the
racquet handle finishing on the outside of the forearm. By correctly
hitting up on the ball, you will create some topspin. Only the
forearm rotates as the wrist rolls with the butt of the racquet.
The next progression is to demonstrate following through behind
your back. At the finish, the back of your hand should be resting on
the small of your back. This will produce greater topspin on the ball.
Caution: Steps 5 & 6 should be done at 1/2 pace - slow motion, because they are
not natural motions. Students who have injured shoulders or elbows may
skip these steps.
3. Demo slice
4. Demo topspin
5. Demo
follow through
To show slice, rest the racquet behind your shoulder and swing
the racquet up, bypassing the ball at 3 o’clock. The racquet
moves to the ball at a 45-degree angle. There is no follow through.
The next step is to start with the racquet and ball together and use
a rhythmic backswing and ball toss. (Remember we still have not
moved the grip to the end of the handle.) Again, complete the
stroke by slowly finishing behind the back.
As a next step, demonstrate the topspin serve with a normal follow
through (on the left side of the body).
Finally, have your students hold the racquet full length and move
to the outside of the fence or backdrop. Stand at arm’s length away
from the fence or backdrop and slowly serve over the barrier.
Note: Pronation of the forearm is used in flat, slice and topspin serves. However,
pronation naturally occurs at different times for each type of serve.
Safety Tip: Do not serve in front of a fence pole or any solid object where the ball
might ricochet.
6. Add backswing
7. Normal follow through
8. Emphasize
hitting up

PTR ADULT DEVELOPMENT CERTIFICATION WORKSHOP TEST PREPARATION GUIDE 11
OVERHEAD PROGRESSIONS
From the baseline, one player feeds a high lob. His/her partner
stands sideways in a serve stance, racquet on shoulder and left
hand extended toward the sky. Player adjusts feet and positions
himself to be able to catch the ball, after the bounce, in his left hand
above the head.
Player now catches the ball after the bounce, makes a serve toss
and hits the ball over the net. Player should make a complete
follow through.
Player now adjusts feet to be able to play an overhead without
catching the ball. Left hand is still extended toward the descending
ball. Player acts as if to prepare to catch the ball, but instead
plays the overhead.
Same as Step 3, except player now hits overhead out of the air.
Demonstrate the overhead and each progression. Separate your students into pairs and go
through the following progressions.
1. Ball catch
2. Ball catch, serve
3. No catch, overhead
with bounce
DROP SHOT PROGRESSIONS
Both you and your partner move back to the service line. Have your
partner feed you some volleys. Get the feel of gently blocking the
ball over the net.
The partner feeds a “baby serve” (racquet on the shoulder and
gently reach up and contact the ball - no follow through) and player
hits a drop shot (block) where the highest point of the ball’s
trajectory (apex) is on the player’s side of the net.
The drop shot is very similar to the volley in that the ball is blocked in order to play the stroke. There
are a number of ways to hit a drop shot. Most of the pros tend to use a very relaxed wrist or they
use extreme underspin. This, however, takes a great amount of skill and timing. The simplest way
to hit a drop shot is to block the ball on the rise. A drop shot is most effective when it is played from
inside the service line.
Demonstrate the drop shot and each progression. Then separate your students into pairs and, using
eastern grips, do the following progressions.
Note: The backhand drop shot uses the same progressions as the forehand. It is
biomechanically easier to hit than the forehand because you lead with your
hitting shoulder, which is out in front.
1. Volley
2. Drop shot
4. Overhead without
bounce

12 PTR ADULT DEVELOPMENT CERTIFICATION WORKSHOP TEST PREPARATION GUIDE
FOREHAND APPROACH SHOT (SLICE) PROGRESSIONS
Both students are at the service line. The hitter tosses the ball in
front and steps with the right foot a split second before contacting
the ball. The hitter then steps with the left foot.
With both students at the service line, the feeder drop-feeds a
ball to the hitter. The hitter pushes off the right foot a split second
before contacting the ball. The hitter then steps with the left foot.
Repeat Step 2. After hitting the stroke, continue to the net and
use a split step.
To make the stroke more dynamic, the hitter goes back to the
baseline and hits the forehand approach shot off of a short feed.
The hitter continues toward the net, split steps and blocks a volley.
Demonstrate the slice approach shot and show how it differs from the usual groundstroke. The ball
is hit as the player is moving to the net. This is called “dynamic balance”. The ball is hit with a
semi-open stance off the right foot, while the player is in stride. Most players have greater success
using a continental grip. A continental grip opens the face of the racquet, thus making the slice
easier. Separate into pairs and do the following progressions.
Note: On the follow through, the racquet face points toward the direction of the ball.
1. Toss, step right, hit,
step left
2. Feed, step right, hit,
step left
3. Add more footwork
4. Dynamic
approach shot
PTR ADULT DEVELOPMENT CERTIFICATION WORKSHOP TEST PREPARATION GUIDE 13
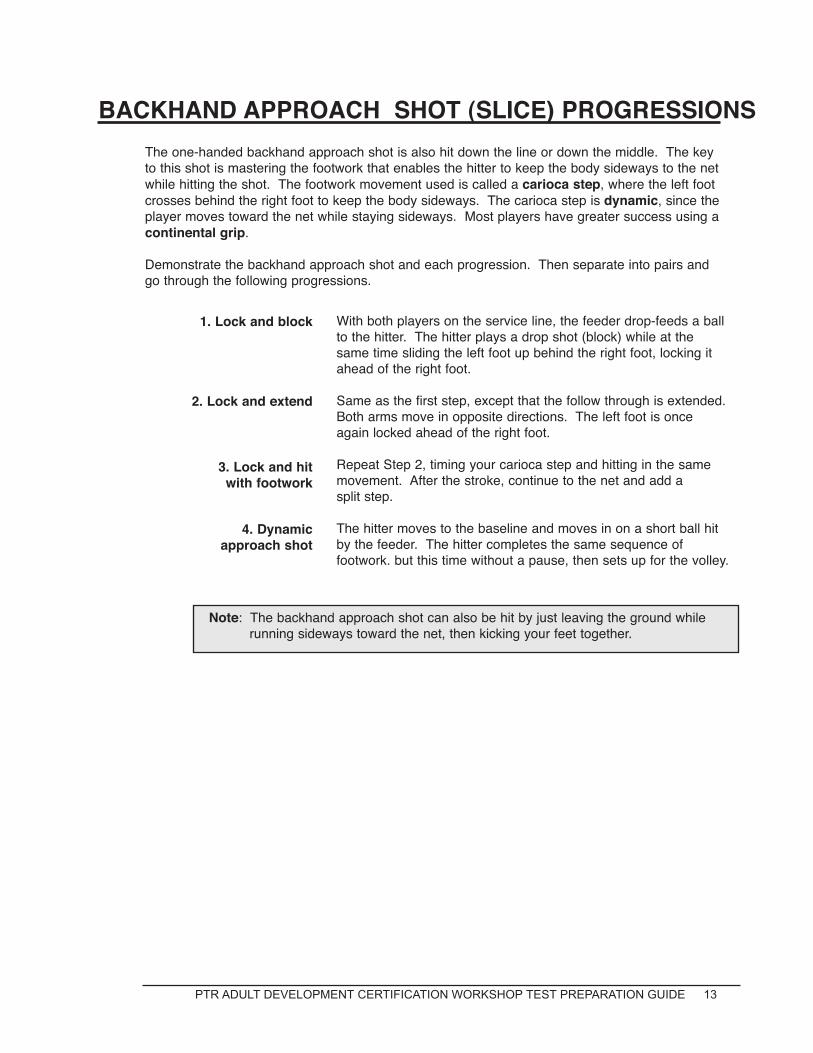
BACKHAND APPROACH SHOT (SLICE) PROGRESSIONS
With both players on the service line, the feeder drop-feeds a ball
to the hitter. The hitter plays a drop shot (block) while at the
same time sliding the left foot up behind the right foot, locking it
ahead of the right foot.
Same as the first step, except that the follow through is extended.
Both arms move in opposite directions. The left foot is once
again locked ahead of the right foot.
Repeat Step 2, timing your carioca step and hitting in the same
movement. After the stroke, continue to the net and add a
split step.
The hitter moves to the baseline and moves in on a short ball hit
by the feeder. The hitter completes the same sequence of
footwork. but this time without a pause, then sets up for the volley.
The one-handed backhand approach shot is also hit down the line or down the middle. The key
to this shot is mastering the footwork that enables the hitter to keep the body sideways to the net
while hitting the shot. The footwork movement used is called a carioca step, where the left foot
crosses behind the right foot to keep the body sideways. The carioca step is dynamic, since the
player moves toward the net while staying sideways. Most players have greater success using a
continental grip.
Demonstrate the backhand approach shot and each progression. Then separate into pairs and
go through the following progressions.
Note: The backhand approach shot can also be hit by just leaving the ground while
running sideways toward the net, then kicking your feet together.
1. Lock and block
2. Lock and extend
3. Lock and hit
with footwork
4. Dynamic
approach shot

14 PTR ADULT DEVELOPMENT CERTIFICATION WORKSHOP TEST PREPARATION GUIDE
TOPSPIN LOB PROGRESSIONS
The ball is sandwiched between the net cord and the racquet.
The student lifts the racquet straight up and over the right
shoulder to produce excessive spin on the ball as the racquet
travels sharply upward. The hitter’s partner retrieves the ball
and places it back on the net for another attempt.
The hitter takes three steps back. With the racquet head on
edge and placed lower than the height of the net, the hitter
drops the ball and swiftly swings straight up and over the right
shoulder. This will put a heavy spin on the ball.
The hitter moves back to the service line. The partner stays
at the net with his/her racquet held up in the sky to show the
necessary clearance for the topspin lob. The hitter turns
sideways and opens up the racquet face to 45-degrees.
The hitter drops the ball and takes a semi-circular backswing,
then hits through the ball with a slightly open racquet face - just
out in front of the left leg. The follow through over the right
shoulder imparts heavy topspin. The ball should clear the
partner’s racquet and land behind the imaginary line halfway
between the service and baselines.
The partner volley-feeds a ball to the hitter and immediately
extends his/her racquet up in the air. The hitter adjusts the feet
and, with a semi-circular backswing, hits up and through the
ball. The ball should clear the partner’s racquet and land
behind the imaginary line between the service and baselines.
At this point, the feeders and hitters switch.
The topspin lob has become a very popular shot in recent years. When executed properly, it
leaves an opponent virtually helpless. However, since the topspin lob is not a particularly easy
shot to hit, it is taught to individuals with intermediate and advanced skill levels.
Demonstrate the forehand topspin lob and each progression. Then separate into pairs and do
the following progressions.
1. Sandwich
the ball
2. Spin on edge
3. Open
racquet face
4. Hit off
partner’s feed
PTR ADULT DEVELOPMENT CERTIFICATION WORKSHOP TEST PREPARATION GUIDE 15
HALF VOLLEY PROGRESSIONS
In the half volley, the player contacts the ball immediately after it bounces. As a result, the half
volley is mostly a neutral or defensive shot. As in the approach shot, the half volley is typically
placed down the line or down the middle and deep, in a effort to cut down an opponent’s angles
for a passing shot. One of the keys to this shot is bending at the knees rather than at the waist,
to get down to the ball. As in the topspin lob and other speciality shots, the half volley is a more
advanced stroke and should be taught to players who have developed a reasonable amount of
ball skill.
FOREHAND HALF VOLLEYDemonstrate the half volley and the following progressions. The grip used is an eastern
forehand. Then separate into pairs and go through the following progressions. Instruct players
to use a half volley feed to their partners for each progression.
With both students on the service line, the partner feeds a ball
directly at the hitter’s feet.
The hitter bends at the knees and either catches the ball or blocks
the ball with his/her hand immediately after the ball bounces.
With both students on the service line, the partner feeds a ball
directly at the hitter’s feet.
The hitter bends at the knees and blocks the ball with the racquet on
edge near the ground. The timing is a one-two beat, bounce-block.
The ball is fed at the hitter’s feet and the hitter contacts the ball in
front of the left leg. The face of the racquet follows through in the
direction of the ball.
BACKHAND HALF VOLLEYThe backhand half volley uses the same progressions as the forehand half volley. The one
exception is that the grip used is an eastern backhand. Also, the backhand half volley is hit with
a “rising socket”. This is where the shoulder socket lifts up as the arm moves forward through
the ball. The butt of the racquet points to the right fence. This movement is different from the
backhand drive which utilizes a “rotating socket”. The rising socket makes it easier to hit the
ball down the line as well as to “pick up” the ball on the rise.
1. Bounce/block
with hand
2. Bounce/block
with racquet
3. Bounce/extend
16 PTR ADULT DEVELOPMENT CERTIFICATION WORKSHOP TEST PREPARATION GUIDE
INSTANT TENNIS PROGRESSIONS
Partners hold the racquet like a frying pan and each gently bounces
the ball off the strings. First toward the sky and then alternating
hitting up with ball bouncing off the ground.
Partners now share one ball, alternating bouncing the ball off the
strings. Ball bounces between hits.
Partners place one ball on the ground as a target. They now
alternate bouncing the ball up off the strings, trying to have the
ball hit the target ball.
Two target balls are now placed on the court. One on the singles
sideline and the other directly across on the doubles sideline.
Players stand directly across from each other, move forward and
press their racquets together for a forehand. This will cause the
player to hold an eastern forehand grip. Partners back up and
now gently rally, aiming for their partner’s target ball.
Partners now move across the net from one another, placing the
target two or three feet from the net. Players press racquets
together before beginning to reinforce the proper grip. They must
now rally over the net attempting to hit their partner’s target ball.
Players now rally without target balls, trying to hit 10 or more
consecutive hits.
One player now comes close to the net holding his hand out like a
policeman stopping traffic. His partner gently bounce-hits to the
partner’s hand. Player bumps the ball back and they attempt to
keep a rally going.
Net player holds the racquet at the throat as s/he volleys.
Net player holds the racquet halfway down the handle.
Net player now holds the racquet at the grip (full length)
Repeat progressions 7-10 with partners reversing roles.
One player comes close to the net holding his thumb and
fist out to the left side of the body. The partner gently bounce-hits to
his thumb. Player attempts to touch the ball with thumb or knuckles.
Instant Tennis is a great way to introduce basic ball control skills and strokes to beginning students.
In just a few minutes, students can be hitting the ball in a rally situation or playing a game. The first
six progressions can be utilized to give complete beginners the ability to self-start the ball and begin
a rally. Students work with a partner during Instant Tennis. The progressions are as follows:
1. Ball bounce
2. Partner sharing
3. Single target ball
4. Double target ball
5. Targets over net
6. Remove targets
7. Forehand volley
(hand)
8. At throat (big hand)
9. Halfway
10. Full length
11. Switch roles
12. Backhand volley
(thumb)

PTR ADULT DEVELOPMENT CERTIFICATION WORKSHOP TEST PREPARATION GUIDE 17
Player holds racquet with thumb behind strings. Partner
bounce-feeds the ball and they attempt to keep the ball in play.
Player moves hand halfway down handle, still with thumb behind.
Partner plays mini-groundstrokes while player hits backhand volleys.
Net player holds the racquet at the grip (full length).
Repeat progressions 12-15 with partners reversing roles.
With the same backhand grip, net player backs up from the net
and bumps easy backhand drives while the partner plays easy
forehands.
Players now switch roles.
One player comes to the net and extends his racquet toward the
sky with the edge facing the net. Partner gently bounce-feeds a lob
and player attempts to touch the ball to the edge.
Without changing the grip, player turns the hand forward so the ball
will strike the strings.
Player drops the racquet behind the back and then reaches up to
touch the ball at contact point.
Player now turns sideways in a serve stance and extends the left
hand toward the sky. Player now reaches to contact the ball from
this position.
Repeat progressions 19-22 with partners reversing roles.
Each player now steps back three to four meters from the net.
Players alternating hitting gentle serves (stopping at point of
contact) to each other.
Now one player serves a ball and the two players rally in the
service boxes. Players switch after an error.
13. Big thumb
16. Switch roles
18. Switch roles
19. Serve
21. Back scratch
22. Serve stance
14. Thumb halfway
15. Full length
17. Backhand
groundstrokes
20. Contact point
23. Switch roles
24. Self toss
25. Mini-court play
18 PTR ADULT DEVELOPMENT CERTIFICATION WORKSHOP TEST PREPARATION GUIDE
10 MINUTE WARM UP
Typically, most tennis players proceed to the baseline to begin their warm up. Unfortunately, this
leads to may unnecessary injuries. Over hitting or reaching for a wide ball can cause injury if
your body is not limber. This is especially true as we grow older.
The 10 Minute Warm Up is designed for two players. It consists of five progressions that
emphasize control and sound biomechanics. Properly done, the 10 Minute Warm Up will get
your body loose and give you better focus for your upcoming match.
The players should concentrate on keeping one ball in play. However, if the ball goes to the
wrong side of the intended hitter, the player should let it go and continue with another ball.
There are two roles for each progression. For this explanation, they will be referred to as
“Player A” and “Player B”.
The players assume their roles for the first progression for one minute, then they reverse roles.
After the second minute (the end of the first progression), the players start the second
progression. Continue in this manner until both players have completed all five progressions.
Safety Tip: If there are four or more students on a court, there is a tendency for the
students to move closer together. Give constant reminders to your
students to stay separated with the end players staying near their
respective alleys.
Player positions Player A goes to the service line. Player B is directly opposite
Player A, three steps from the net.
Note: As the coach, constantly remind players hitting the groundstrokes to move their
feet and hit from the point of contact. There is little or no backswing in the
groundstrokes or volleys since this leads to more power and lack of control.
The volleyer concentrates on simply blocking the ball back to the groundstroker
and using proper technique.

PTR ADULT DEVELOPMENT CERTIFICATION WORKSHOP TEST PREPARATION GUIDE 19
Note: The forehand is the preferred stroke for the person hitting groundstrokes. Since
the forehand is usually easier to control, the students are more likely to sustain
the rallies.
First progression
Forehand volleys
1st minute - Player A hits groundstroke to Player B’s
forehand volley.
2nd minute - Player B hits groundstrokes to Player A’s
forehand volley.
3rd minute - Player A hits groundstrokes to Player B’s
backhand volley.
4th minute - Player B hits groundstrokes to Player A’s
backhand volley.
5th minute - Player A hits groundstrokes to Player B’s
forehand and then backhand volley.
6th minute - Player B hits groundstrokes to Player A’s
forehand and then backhand volley.
7th minute - Player A hits lob to Player B. Player B hits
a “baby overhead”.
8th minute - Player B hits lob to Player A. Player A hits
a “baby overhead”.
9th & 10th minute -
Combination: Player A hits to Player B’s
forehand volley, then backhand volley and
then feeds a lob to Player B’s baby
overhead.
Switch positions for the 10th minute.
These steps should be followed in order.
Second progression
Backhand volleys
Third progression
Alternate volleys
Fourth progression
Baby overhead
Fifth progression
3 ball combination

20 PTR ADULT DEVELOPMENT CERTIFICATION WORKSHOP TEST PREPARATION GUIDE
Grips are listed as you move clockwise around the grip
• Extreme Eastern Backhand (sometimes called western backhand)
This grip places the index finger knuckle on the left top side bevel (8) of the racquet,
and in some cases the knuckle may even be as far over as the left side bevel (7).
This grip can generate a great amount of topspin and is helpful when playing high
bouncing balls.
• Eastern Backhand
This grip places the index finger knuckle on the top bevel (1) of the racquet which
generally centers the palm on top of the racquet.
• Continental
For this grip, the index finger knuckle is located on the top right side bevel (2).
Typically used for serving and volleys.
• Eastern Forehand
The classic “shake hands” grip. The player’s palm is generally against the right side
bevel of the grip. The index finger knuckle is also resting on the right side bevel (3).
• Semi-western
This grip places the index finger knuckle on the bottom right side bevel (4). This grip
allows players to generate much more topspin than the eastern forehand.
• Western
The index finger knuckle is located on the bottom bevel (5) of the racquet. Players
using this grip can generate a great amount of topspin and often prefer clay courts.
GRIPS
12
3
45
6
7
8

PTR ADULT DEVELOPMENT CERTIFICATION WORKSHOP TEST PREPARATION GUIDE 21
GLOSSARY OF TERMS
biomechanics The study of the mechanics of the body, especially the forces exerted by
muscles and gravity.
bypass The motion of the racquet as it moves against the ball to create spin.
carioca step The crossing of the left foot behind the right foot as the player makes a
backhand approach shot.
closed stance The stance that occurs when the player steps across with the foot opposite the
side where the ball will be hit.
dynamic balance Body control as the player moves to hit the ball.
hot seat The location of the returner’s partner in doubles. Near the “T” to protect the
middle of the court.
open stance The stance that occurs when the player steps toward the sideline with the foot
on the same side as where the ball will be hit.
paralysis by Refers to a player receiving too much information about a skill. This information
analysis overload prevents them from executing the skill (shot).
poaching In doubles, a player who is at the net and moves across to intercept the
opponent’s return.
pronation The rotation of the forearm from the right to the left. An inward rotation of the
hand to a palm-down position.
rising socket The shoulder motion exhibited when playing a backhand half volley or an
extreme low-to-high topspin backhand groundstroke.
rotating socket The shoulder motion exhibited when playing a classic backhand groundstroke.
shadow Imitating the stroke from a visual representation.
split step The hesitation movement of a player as s/he squares off toward the net in
preparation of the opponent’s shot.
square stance The stance that occurs when the player is perfectly sideways to the net
(90-degrees)
static balance Body control when the player is in a stationary position.
wrong footed Player is moving in the direction opposite of where the ball is being hit.
22 PTR ADULT DEVELOPMENT CERTIFICATION WORKSHOP TEST PREPARATION GUIDE
GENERAL TEACHING CONSIDERATIONS
Here are a few general comments from PTR Founder Dennis Van der Meer that will help you
become a great instructor. You should review these suggestions in preparation for the
certification test.
• Keep group lessons moving. Don’t spend extra time with a slower learner in the beginning
of the lesson. Wait for the opportunity to work with them in the Individual Help portion. It’s
important to keep everyone in lockstep so the lesson doesn’t lose momentum, and worse
yet, lose some of your students’ attention.
• Make frequent comments to everyone in the lesson. Use the students’ names to
personalize your comments and bring attention to their individual needs.
• Vary the tone and volume of your voice. It’s important to interject excitement and energy
into the learning of the game. Your voice and attitude will relay your enjoyment of the game
and keep your student returning.
• Corrective techniques are easier to administer in the Individual Help portion of the lesson.
But remember to keep your eyes moving as the instructor. You have to see and attend to
everyone!
• There is nothing more important than the safety of your students. Be sure to position the
ball hopper correctly and be aware of the spacing between your students at all times.
• As an instructor, your stroke demonstrations need to be controlled and absent of any
idiosyncratic movements. You do not need to demonstrate any stroke at a fast playing
speed for a beginning student. Be aware of your own playing limitations.
• Stay away from detailed descriptions of a stroke’s movement. Most will learn much faster
from a more “show and tell” method. Too much information may paralyze your students,
and you will lose their attention.
• Sometimes students who have played for many years have developed inefficient
mechanics, yet they still maintain a good deal of success and are comfortable with their
play. It is most important to get their cooperation before making any substantial change to
their game. And it is always easier for students to accept an addition to their game rather
than a change.
• Give frequent feedback to your students, always finding the opportunity to be positive and
motivating. For slower learners, look for small improvements to praise. Too much criticism
can defeat a student’s desire to continue playing.

PTR ADULT DEVELOPMENT CERTIFICATION WORKSHOP TEST PREPARATION GUIDE 23
WRITTEN TEST PREPARATION
The Written Test is divided into eight sections. You should be knowledgeable with the items
listed below for each section as well as the other information included in this Test Preparation Guide.
Your workshop will include discussions of many of these topics and issues.
Tennis Teaching Terms and GripsStatic balanced stroke
Dynamic balanced stroke
Bypass
Shadow
Poaching
Open stance
Closed stance
Square stance
Rising socket
Rotating socket
Paralysis by analysis
Pronation
Carioca step
Wrong footed
Biomechanics
Split step
Hot seat
Technique RecognitionIn this section you must identify the basic grips
and types of spin by observing several
photographs.
Stroke & Lesson ProgressionsServe (12 in proper order)
Forehand
Backhand
Spin serve (8 in proper order)
Order of major components of the group lesson
Instant tennis
Specialty shots
10 minute warm up
Teaching & the Group LessonBall hopper positioning during lesson
Three progression of groundstroke lesson
Use of positive comments and “two” voices
Instructor positioning in Individual Help
Ball feeding for teaching the half volley and
drop shot
Emphasis in practice portion of lesson
Components of the Introduction
Dealing with slow learners during the lesson
Components of a proper demonstration
Concerns when changing a student’s mechanics
Graduated length method
Corrective Techniques
Consult the PTR Preparation for Certification DVD,
PTR Instructor’s Manual, or this Test Preparation
Guide for examples of errors and corrective tech-
niques. Your workshop leader will demonstrate
several on the court, but you should be aware of
all the errors and corrections provided in these
publications.
Grips & Basic StrategyEastern forehand
Eastern backhand
Continental
Semi-western
Western
Extreme eastern backhand
Grip advantages and disadvantages
Grips and generating spins
Basic singles and doubles strategy
Tactical priorities of the serve
General Tennis KnowledgeMajor grand slam tournaments
Court surfaces and their characteristics
Effect of string tension
Davis Cup
Federation Cup
Grand Slam
ATP and WTA Tours
International Tennis Federation (ITF)
Rules, Scoring & CompetitionThorough knowledge of tennis scoring
Thorough knowledge of tennis rules
Basic court dimensions and net height
12 point tie-break procedure
Calculating matches in a tournament
Calculating matches in a round robin
Rules of wheelchair tennis
The rules of tennis are available online through
many tennis federations and organizations,
including www.usta.com

24 PTR ADULT DEVELOPMENT CERTIFICATION WORKSHOP TEST PREPARATION GUIDE
SAMPLE TEST QUESTIONS
1. In Part 1 - Teaching the Stroke of the forehand lesson, put (number) the following steps in the
correct order as they are presented to the student:
_____ grip
_____ adjusting steps
_____ point of contact
__1__ stance
_____ turn & pivot (shoulder turn)
_____ follow through
_____ racquet back & down
(Hint: Know all the progressions of all the strokes and specialty shots.)
2. The score of a tennis match is 6-1, 4-5, 30-40. What is the minimum number of points that
had to be played to get to this score?
A. 81
B. 76
C. 69
D. 64
3. Mark and Jayne are playing Steve and Cindy. Mark serves the first game of the match and
Steve the second game. The score is 6-5 in the first set. Who will be serving the 12th
game?
A. Jane
B. Mark
C. Cindy
D. Steve
4. A match score stands at 6-3, 4-6, 3-3. How many times have the opponents changed sides?
A. 11
B. 12
C. 13
D. 14
5. During the Individual Help portion of the group lesson, all of the following apply except:
A. rotate the students so they all have an opportunity to work with the professional
B. use two distinct voices; one for the group, and one for the individual
C. spend the majority of the available time with the weakest player
D. place the ball hopper in a safe position
6. Rank the following forehand grips in the order of their general ability to produce topspin
(less topspin to more; 1 to 4):
______ eastern forehand
______ western
______ continental
______ semi-western
Answers - 1. 2, 5, 6, 1, 3, 7, 4 • 2. C • 3. C • 4. C • 5. C • 6. 2, 4, 1, 3

Notes:


Professional Tennis Registry
PO Box 4739, Hilton Head Island, SC 29938 USA
843-785-7244 or 800-421-6289
[email protected] • www.ptrtennis.org


