26
Dual Trunk Survivability - Mediatrix SBC in the LAN Registering to the Service Provider For Sentinel and Mediatrix 3000 units v. 42.1.857 2018-05-16
Dual Trunk Survivability - Mediatrix SBC inthe LAN Registering to the Service Provider
For Sentinel and Mediatrix 3000 units
v. 42.1.857
2018-05-16
Table of Contents
media5corp.com
Table of Contents
Information to Know Before Starting 3
Dual Trunk Survivability 6
Getting Started 6
Logging on to the Mediatrix Unit Web Interface 7
Configuring the Uplink Network Interface 8
Configuring the Default Gateway to a Static IP Address 9
Configuring the Domain Name Server (DNS) 10
Configuring the SNTP Server 11
Configuring the uplink_s Signaling Interface 12
Configuring the uplink_m Media Interface 13
Configuring the Office NAT/FW 14
Configuring the wan_ip_trunk_ca Call Agent 14
Configuring the secondary_ip_trunk_ca Call Agent 16
Configuring the lan_ip_pbx_ca Call Agent 17
Configuring a Registration Agent 18
Importing Rulesets 19
Associating Call Agent Rulesets to a Call Agent 20
Associating Routing Rulesets to Your Configuration 22
Configuring the IP PBX 23
Configuring Your Main Office Phones 23
Available Documentation 24
Copyright Notice 25

Dual Trunk Survivability - Mediatrix SBC in the LAN Registering to the Service Provider 3
media5corp.com
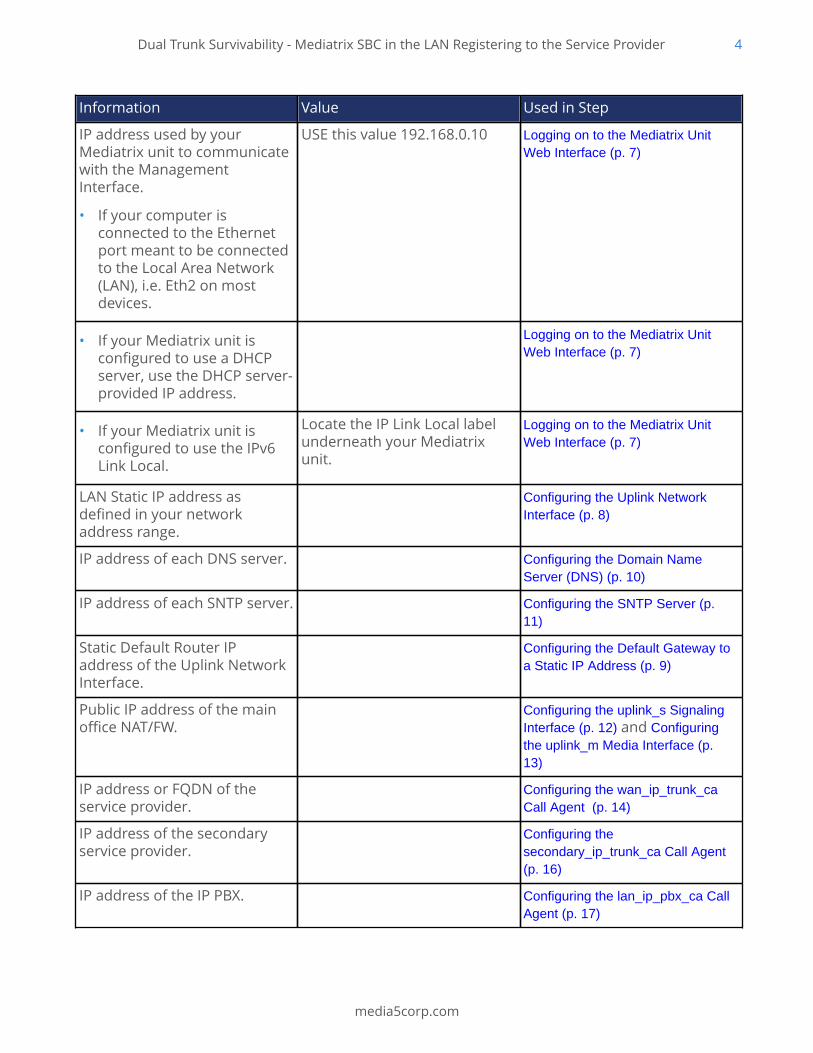
Information to Know Before StartingBefore starting to use these configuration notes, complete the following table to make sureyou have the required information to complete the different steps.
Note: These configuration notes can be successfully executed, provided your unit is using theFactory default settings.
Dual Trunk Survivability - Mediatrix SBC in the LAN Registering to the Service Provider 4
media5corp.com
Information Value Used in Step
IP address used by yourMediatrix unit to communicatewith the ManagementInterface.
• If your computer isconnected to the Ethernetport meant to be connectedto the Local Area Network(LAN), i.e. Eth2 on mostdevices.
USE this value 192.168.0.10 Logging on to the Mediatrix UnitWeb Interface (p. 7)
• If your Mediatrix unit isconfigured to use a DHCPserver, use the DHCP server-provided IP address.
Logging on to the Mediatrix UnitWeb Interface (p. 7)
• If your Mediatrix unit isconfigured to use the IPv6Link Local.
Locate the IP Link Local labelunderneath your Mediatrixunit.
Logging on to the Mediatrix UnitWeb Interface (p. 7)
LAN Static IP address asdefined in your networkaddress range.
Configuring the Uplink NetworkInterface (p. 8)
IP address of each DNS server. Configuring the Domain NameServer (DNS) (p. 10)
IP address of each SNTP server. Configuring the SNTP Server (p.11)
Static Default Router IPaddress of the Uplink NetworkInterface.
Configuring the Default Gateway toa Static IP Address (p. 9)
Public IP address of the mainoffice NAT/FW.
Configuring the uplink_s SignalingInterface (p. 12) and Configuringthe uplink_m Media Interface (p.13)
IP address or FQDN of theservice provider.
Configuring the wan_ip_trunk_caCall Agent (p. 14)
IP address of the secondaryservice provider.
Configuring thesecondary_ip_trunk_ca Call Agent(p. 16)
IP address of the IP PBX. Configuring the lan_ip_pbx_ca CallAgent (p. 17)

Dual Trunk Survivability - Mediatrix SBC in the LAN Registering to the Service Provider 5
media5corp.com
Information Value Used in Step
Sip credentials (username,password and IP address ofregistrar)
Configuring a Registration Agent (p.18)
Dual Trunk Survivability - Mediatrix SBC in the LAN Registering to the Service Provider 6
media5corp.com
Dual Trunk Survivability
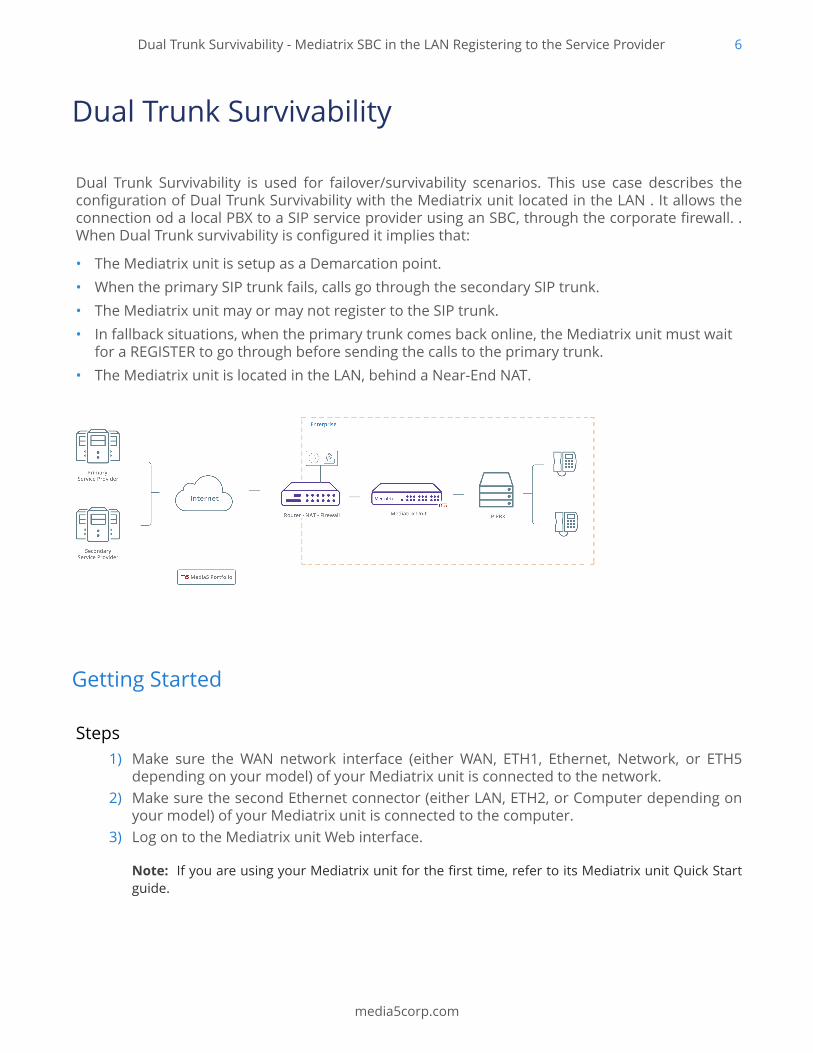
Dual Trunk Survivability is used for failover/survivability scenarios. This use case describes theconfiguration of Dual Trunk Survivability with the Mediatrix unit located in the LAN . It allows theconnection od a local PBX to a SIP service provider using an SBC, through the corporate firewall. .When Dual Trunk survivability is configured it implies that:
• The Mediatrix unit is setup as a Demarcation point.• When the primary SIP trunk fails, calls go through the secondary SIP trunk.• The Mediatrix unit may or may not register to the SIP trunk.• In fallback situations, when the primary trunk comes back online, the Mediatrix unit must wait
for a REGISTER to go through before sending the calls to the primary trunk.• The Mediatrix unit is located in the LAN, behind a Near-End NAT.
Getting Started
Steps1) Make sure the WAN network interface (either WAN, ETH1, Ethernet, Network, or ETH5
depending on your model) of your Mediatrix unit is connected to the network.2) Make sure the second Ethernet connector (either LAN, ETH2, or Computer depending on
your model) of your Mediatrix unit is connected to the computer.3) Log on to the Mediatrix unit Web interface.
Note: If you are using your Mediatrix unit for the first time, refer to its Mediatrix unit Quick Startguide.

Dual Trunk Survivability - Mediatrix SBC in the LAN Registering to the Service Provider 7
media5corp.com
Next StepLogging on to the Mediatrix Unit Web Interface (p. 7)
Logging on to the Mediatrix Unit Web Interface
InformationFor better performances, it is recommended to use the latest available version of Microsoft InternetExplorer, Google Chrome, or Mozilla Firefox.
Note: You may not be able to log on to the Mediatrix unit Web interface if you are using olderbrowser versions. The computer's network card must be on the same subnet as the Mediatrix unit.
Steps1) In your Web browser, enter the IP address used by your Mediatrix unit to communicate
with the Web interface.
• If your computer is connected to the Ethernet port, commonly used to be connected to theLocal Area Network (LAN), i.e. ETH2 on most devices, use the 192.168.0.10 IP address.
• If your Mediatrix unit is configured to use a DHCP server with IPv4, use the provided DHCPserver IP address.
2) Enter public as your username and leave the password field empty.
Note: The public username account has administrator rights.
Note: You can also use admin as a username and administrator as password.
3) Click Login.

Dual Trunk Survivability - Mediatrix SBC in the LAN Registering to the Service Provider 8
media5corp.com
ResultThe Information page of the Web interface is displayed.
Next StepConfiguring the Uplink Network Interface (p. 8)
Configuring the Uplink Network Interface
InformationIf you are not familiar with the meaning of the fields and buttons, click Show Help, located at theupper right corner of the Web page. When activated, the fields and buttons that offer online helpwill change to green and if you hover over them, the description will be displayed.
Steps1) Go to Network/Interfaces.2) In the Network Interface Configuration table, from the Link selection list located next
to Uplink, leave the default value.3) From the Type selection list, select IpStatic (IPv4 Static).
Note: The Uplink Network Interface must be set with a fixed public IP address for the NAT/routerto be able to do port-forwarding to the unit. It will also be easier for the PBX to communicate withthe unit if the address is static.
4) In the Static IP Address field enter the LAN static IP address.5) From the Activation selection list, select Enable.6) Click Apply to apply all changes to the configuration.
Note: Once the changes are applied, the connection with the unit might be lost. You may need toreconnect to the web page using the new address.
ResultThe unit can be reached (via the Web) with the Static Address.
Dual Trunk Survivability - Mediatrix SBC in the LAN Registering to the Service Provider 9
media5corp.com
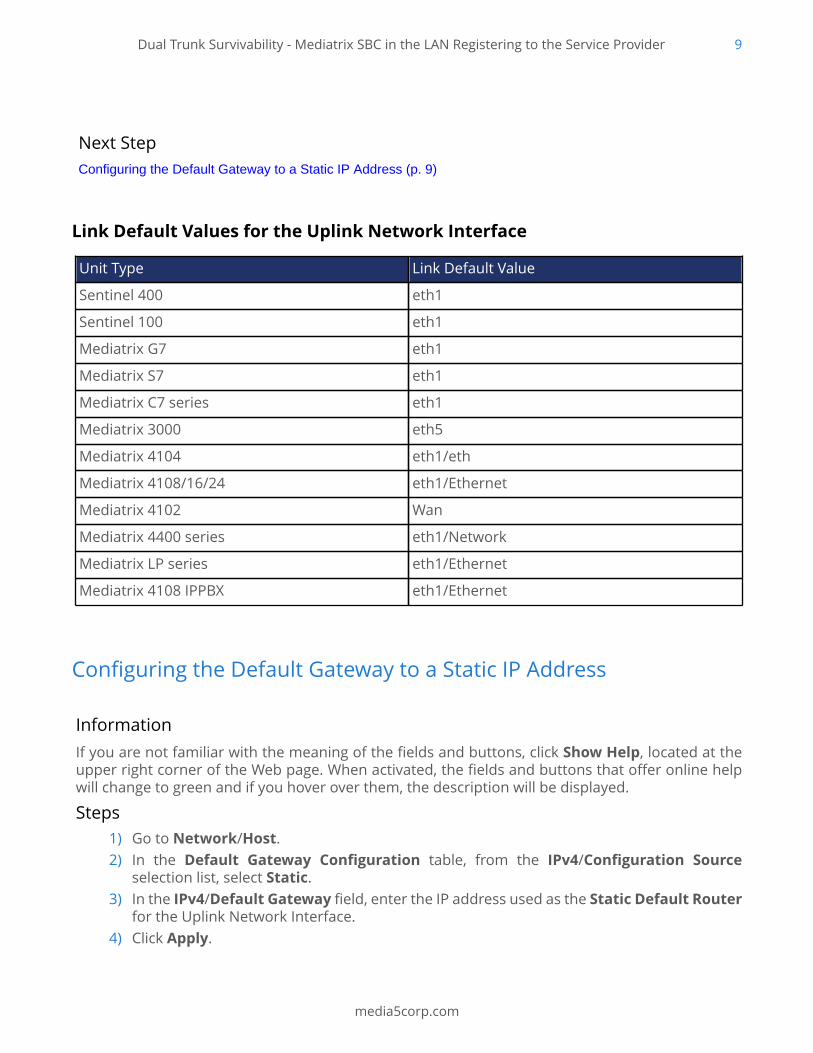
Next StepConfiguring the Default Gateway to a Static IP Address (p. 9)
Link Default Values for the Uplink Network Interface
Unit Type Link Default Value
Sentinel 400 eth1
Sentinel 100 eth1
Mediatrix G7 eth1
Mediatrix S7 eth1
Mediatrix C7 series eth1
Mediatrix 3000 eth5
Mediatrix 4104 eth1/eth
Mediatrix 4108/16/24 eth1/Ethernet
Mediatrix 4102 Wan
Mediatrix 4400 series eth1/Network
Mediatrix LP series eth1/Ethernet
Mediatrix 4108 IPPBX eth1/Ethernet
Configuring the Default Gateway to a Static IP Address
InformationIf you are not familiar with the meaning of the fields and buttons, click Show Help, located at theupper right corner of the Web page. When activated, the fields and buttons that offer online helpwill change to green and if you hover over them, the description will be displayed.
Steps1) Go to Network/Host.2) In the Default Gateway Configuration table, from the IPv4/Configuration Source
selection list, select Static.3) In the IPv4/Default Gateway field, enter the IP address used as the Static Default Router
for the Uplink Network Interface.4) Click Apply.
Dual Trunk Survivability - Mediatrix SBC in the LAN Registering to the Service Provider 10
media5corp.com
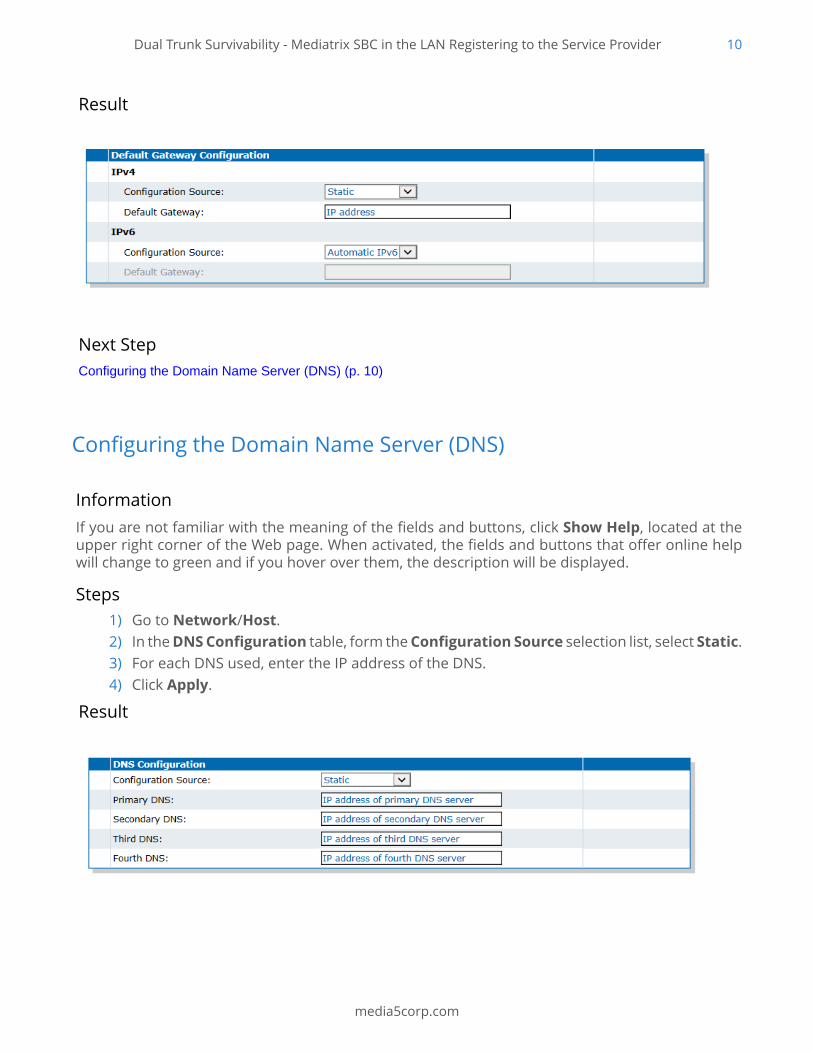
Result
Next StepConfiguring the Domain Name Server (DNS) (p. 10)
Configuring the Domain Name Server (DNS)
InformationIf you are not familiar with the meaning of the fields and buttons, click Show Help, located at theupper right corner of the Web page. When activated, the fields and buttons that offer online helpwill change to green and if you hover over them, the description will be displayed.
Steps1) Go to Network/Host.2) In the DNS Configuration table, form the Configuration Source selection list, select Static.3) For each DNS used, enter the IP address of the DNS.4) Click Apply.
Result
Dual Trunk Survivability - Mediatrix SBC in the LAN Registering to the Service Provider 11
media5corp.com
Next StepConfiguring the SNTP Server (p. 11)
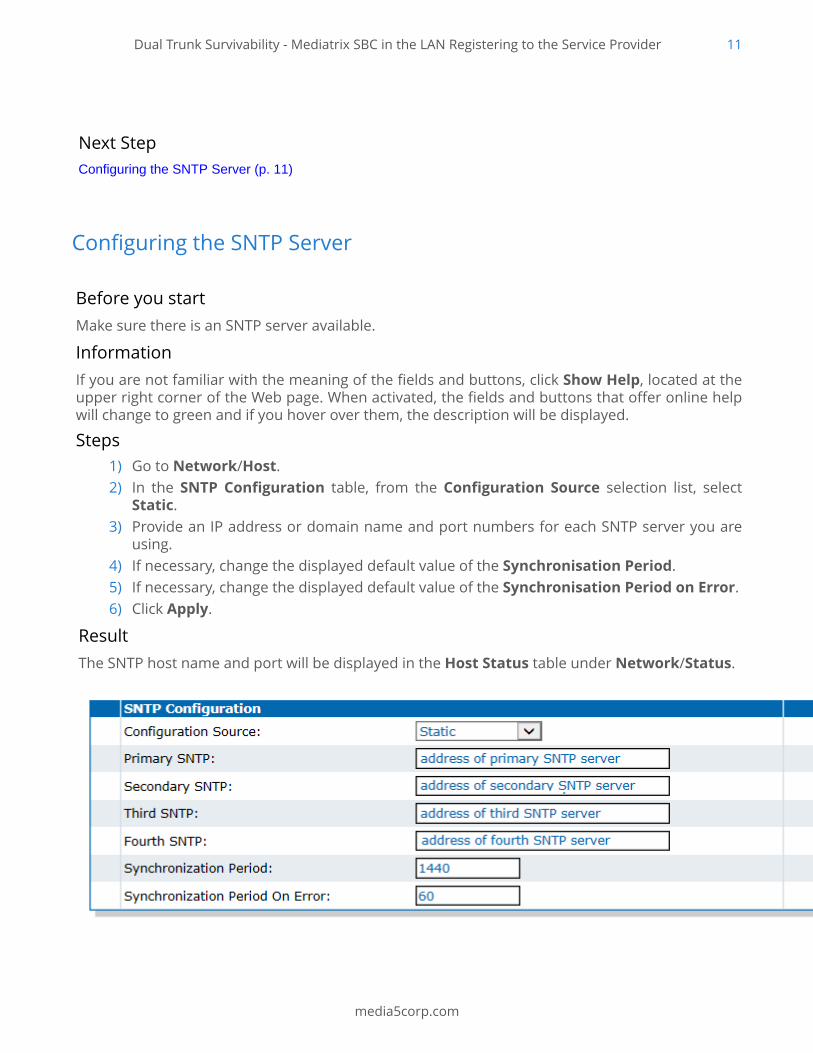
Configuring the SNTP Server
Before you startMake sure there is an SNTP server available.
InformationIf you are not familiar with the meaning of the fields and buttons, click Show Help, located at theupper right corner of the Web page. When activated, the fields and buttons that offer online helpwill change to green and if you hover over them, the description will be displayed.
Steps1) Go to Network/Host.2) In the SNTP Configuration table, from the Configuration Source selection list, select
Static.3) Provide an IP address or domain name and port numbers for each SNTP server you are
using.4) If necessary, change the displayed default value of the Synchronisation Period.5) If necessary, change the displayed default value of the Synchronisation Period on Error.6) Click Apply.
ResultThe SNTP host name and port will be displayed in the Host Status table under Network/Status.
Dual Trunk Survivability - Mediatrix SBC in the LAN Registering to the Service Provider 12
media5corp.com
Next StepConfiguring the uplink_s Signaling Interface (p. 12)
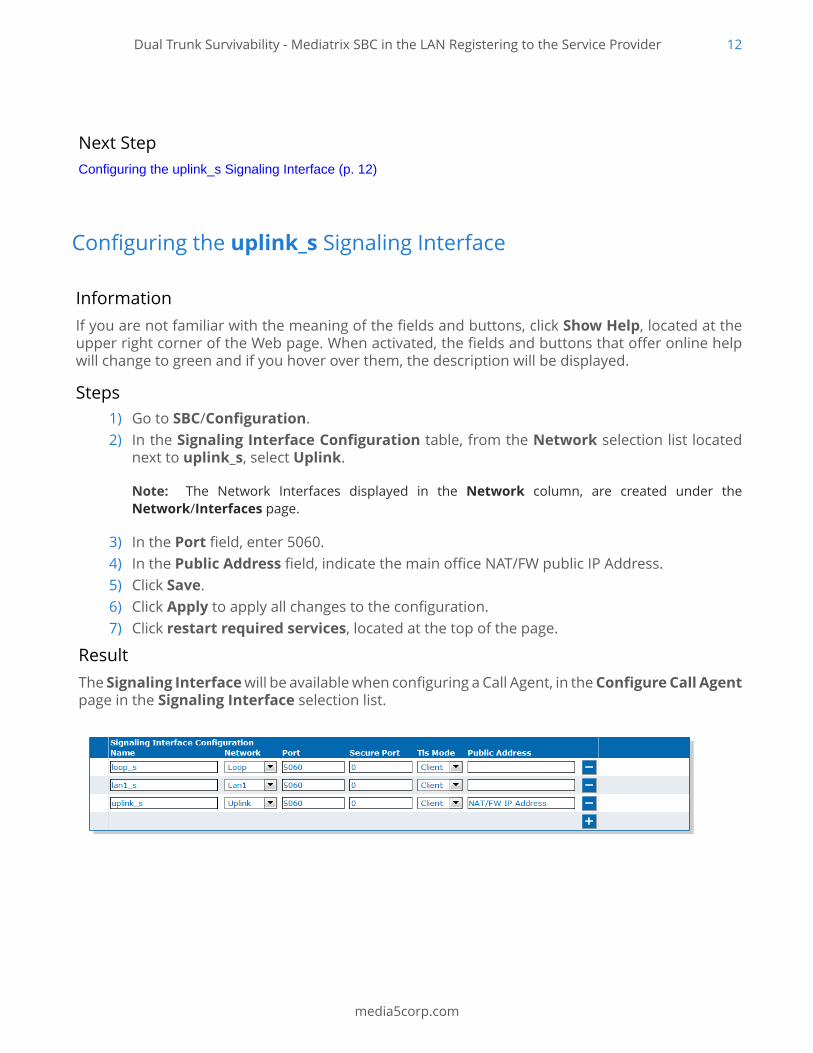
Configuring the uplink_s Signaling Interface
InformationIf you are not familiar with the meaning of the fields and buttons, click Show Help, located at theupper right corner of the Web page. When activated, the fields and buttons that offer online helpwill change to green and if you hover over them, the description will be displayed.
Steps1) Go to SBC/Configuration.2) In the Signaling Interface Configuration table, from the Network selection list located
next to uplink_s, select Uplink.
Note: The Network Interfaces displayed in the Network column, are created under theNetwork/Interfaces page.
3) In the Port field, enter 5060.4) In the Public Address field, indicate the main office NAT/FW public IP Address.5) Click Save.6) Click Apply to apply all changes to the configuration.7) Click restart required services, located at the top of the page.
ResultThe Signaling Interface will be available when configuring a Call Agent, in the Configure Call Agentpage in the Signaling Interface selection list.
Dual Trunk Survivability - Mediatrix SBC in the LAN Registering to the Service Provider 13
media5corp.com
Next StepConfiguring the uplink_m Media Interface (p. 13)
Configuring the uplink_m Media Interface
InformationIf you are not familiar with the meaning of the fields and buttons, click Show Help, located at theupper right corner of the Web page. When activated, the fields and buttons that offer online helpwill change to green and if you hover over them, the description will be displayed.
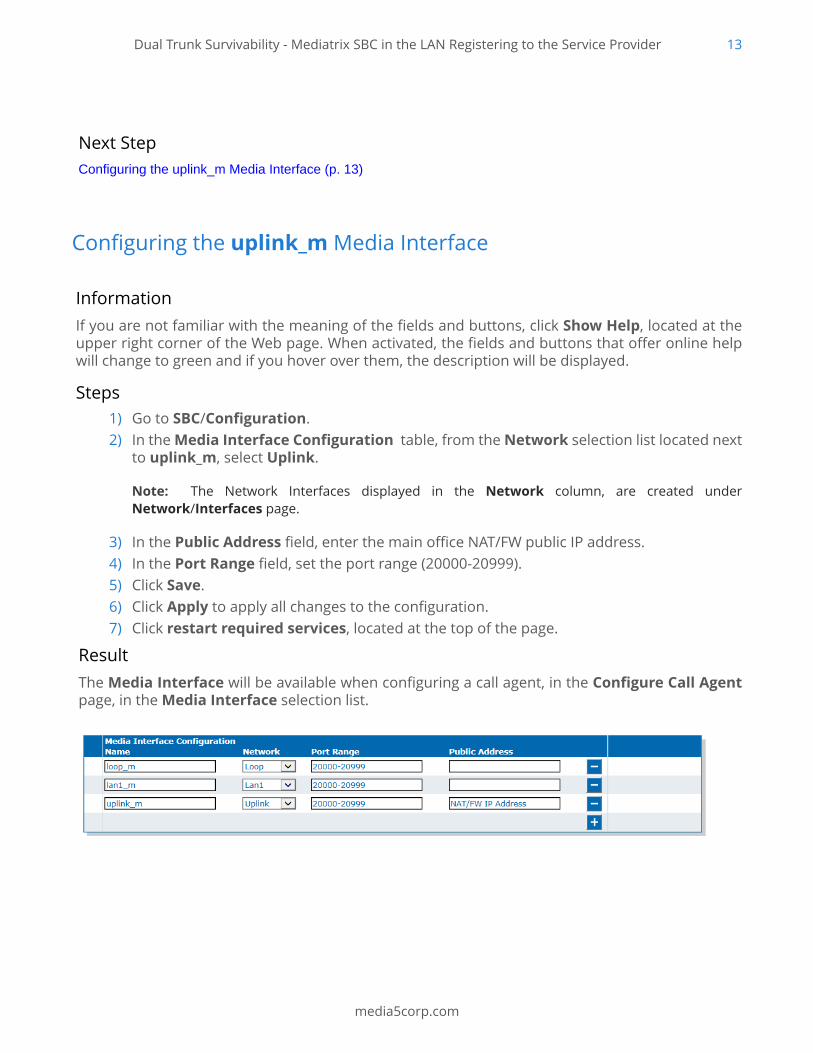
Steps1) Go to SBC/Configuration.2) In the Media Interface Configuration table, from the Network selection list located next
to uplink_m, select Uplink.
Note: The Network Interfaces displayed in the Network column, are created underNetwork/Interfaces page.
3) In the Public Address field, enter the main office NAT/FW public IP address.4) In the Port Range field, set the port range (20000-20999).5) Click Save.6) Click Apply to apply all changes to the configuration.7) Click restart required services, located at the top of the page.
ResultThe Media Interface will be available when configuring a call agent, in the Configure Call Agentpage, in the Media Interface selection list.

Dual Trunk Survivability - Mediatrix SBC in the LAN Registering to the Service Provider 14
media5corp.com
Next StepConfiguring the Office NAT/FW (p. 14)
Configuring the Office NAT/FW
InformationThis procedure is executed on the device that is used as the NAT/FW.
Steps1) Set port forwarding on the public IP address for UDP/UTC protocols port 5060 to the
Mediatrix unit's IP address on port 5060.
Note: This allows the connection to the Mediatrix unit uplink_s Signaling Interface.
2) Set port forwarding on the public IP address for UDP port 20000-20999 to the Mediatrixunit's IP address on port 20000-20999.
Note: This allows the connection to the Mediatrix unit uplink_m Media Interface.
3) Allow connections from the service provider's IP address to port 5060 and ports20000-20999.
Next StepConfiguring the wan_ip_trunk_ca Call Agent (p. 14)
Configuring the wan_ip_trunk_ca Call Agent
InformationIf you are not familiar with the meaning of the fields and buttons, click Show Help, located at theupper right corner of the Web page. When activated, the fields and buttons that offer online helpwill change to green and if you hover over them, the description will be displayed.
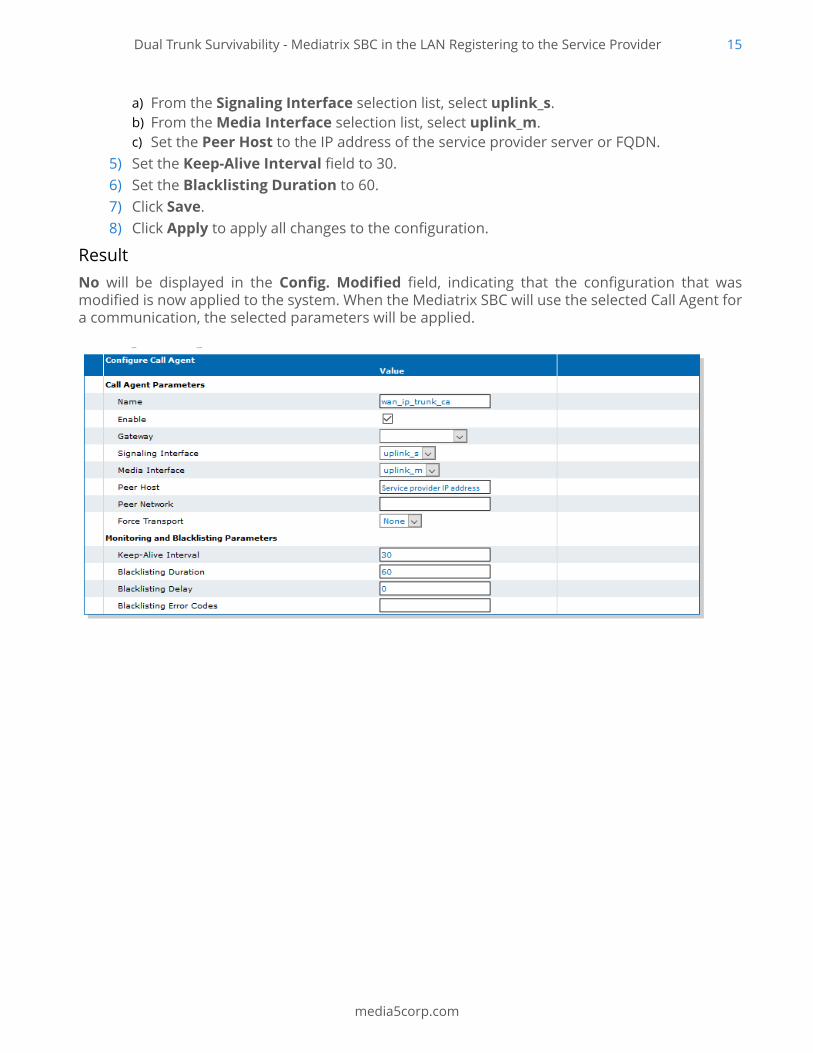
Steps1) Go to SBC/Configuration.2) Select the Enable check box, located next to wan_ip_trunk_ca.3) In the Call Agent Configuration table, click next to wan_ip_trunk_ca.4) In the Configure Call Agent table, complete the following fields:
Dual Trunk Survivability - Mediatrix SBC in the LAN Registering to the Service Provider 15
media5corp.com
a) From the Signaling Interface selection list, select uplink_s.b) From the Media Interface selection list, select uplink_m.c) Set the Peer Host to the IP address of the service provider server or FQDN.
5) Set the Keep-Alive Interval field to 30.6) Set the Blacklisting Duration to 60.7) Click Save.8) Click Apply to apply all changes to the configuration.
ResultNo will be displayed in the Config. Modified field, indicating that the configuration that wasmodified is now applied to the system. When the Mediatrix SBC will use the selected Call Agent fora communication, the selected parameters will be applied.
Dual Trunk Survivability - Mediatrix SBC in the LAN Registering to the Service Provider 16
media5corp.com
Next StepConfiguring the secondary_ip_trunk_ca Call Agent (p. 16)
Configuring the secondary_ip_trunk_ca Call Agent
InformationIf you are not familiar with the meaning of the fields and buttons, click Show Help, located at theupper right corner of the Web page. When activated, the fields and buttons that offer online helpwill change to green and if you hover over them, the description will be displayed.
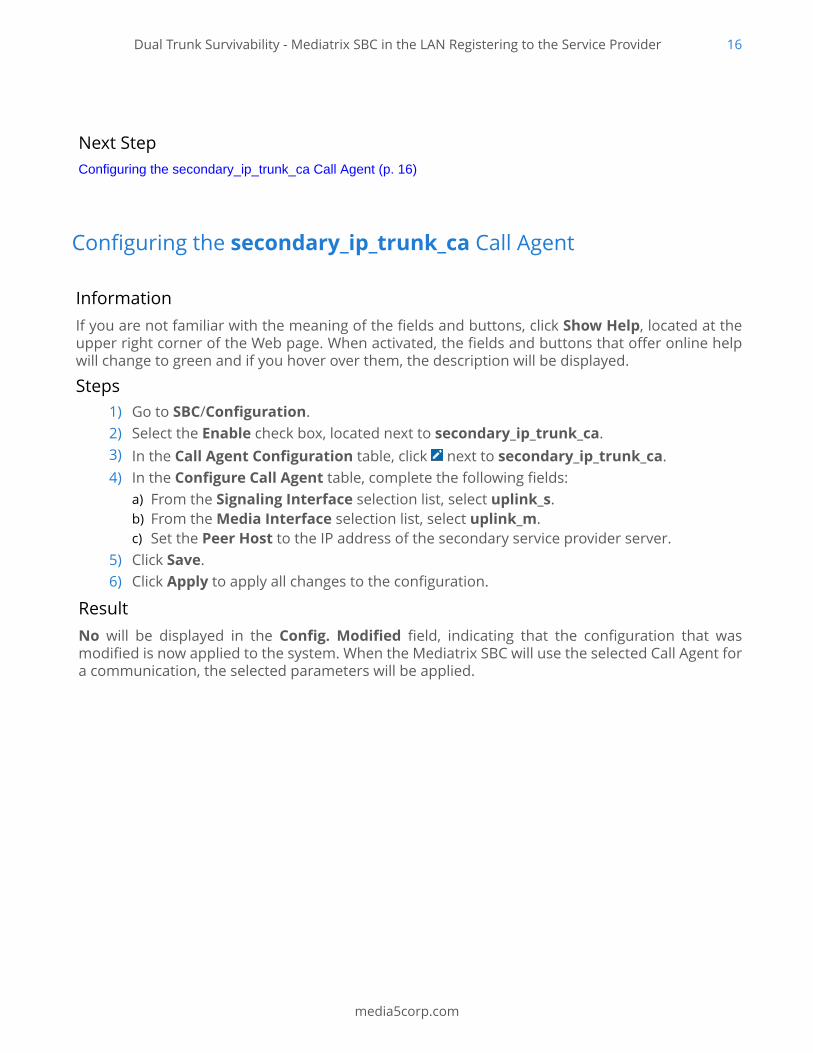
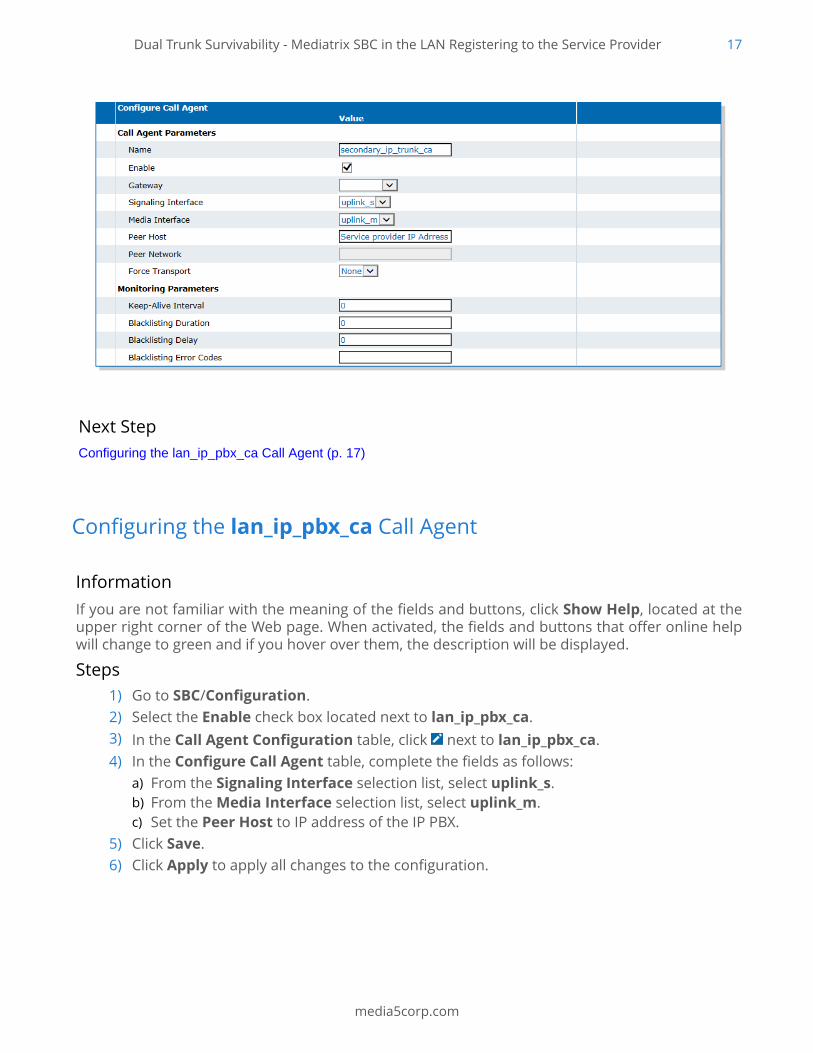
Steps1) Go to SBC/Configuration.2) Select the Enable check box, located next to secondary_ip_trunk_ca.3) In the Call Agent Configuration table, click next to secondary_ip_trunk_ca.4) In the Configure Call Agent table, complete the following fields:
a) From the Signaling Interface selection list, select uplink_s.b) From the Media Interface selection list, select uplink_m.c) Set the Peer Host to the IP address of the secondary service provider server.
5) Click Save.6) Click Apply to apply all changes to the configuration.
ResultNo will be displayed in the Config. Modified field, indicating that the configuration that wasmodified is now applied to the system. When the Mediatrix SBC will use the selected Call Agent fora communication, the selected parameters will be applied.
Dual Trunk Survivability - Mediatrix SBC in the LAN Registering to the Service Provider 17
media5corp.com
Next StepConfiguring the lan_ip_pbx_ca Call Agent (p. 17)
Configuring the lan_ip_pbx_ca Call Agent
InformationIf you are not familiar with the meaning of the fields and buttons, click Show Help, located at theupper right corner of the Web page. When activated, the fields and buttons that offer online helpwill change to green and if you hover over them, the description will be displayed.
Steps1) Go to SBC/Configuration.2) Select the Enable check box located next to lan_ip_pbx_ca.3) In the Call Agent Configuration table, click next to lan_ip_pbx_ca.4) In the Configure Call Agent table, complete the fields as follows:
a) From the Signaling Interface selection list, select uplink_s.b) From the Media Interface selection list, select uplink_m.c) Set the Peer Host to IP address of the IP PBX.
5) Click Save.6) Click Apply to apply all changes to the configuration.

Dual Trunk Survivability - Mediatrix SBC in the LAN Registering to the Service Provider 18
media5corp.com
ResultNo will be displayed in the Config. Modified field, indicating that the configuration that wasmodified is now applied to the system. When the Mediatrix SBC will use the selected Call Agent fora communication, the selected parameters will be applied.
Next StepConfiguring a Registration Agent (p. 18)
Configuring a Registration Agent
Information
Note: This procedure is only necessary if your Mediatrix unit registers to the service provider.
Steps1) Go to SBC/Registration.2) In the Registration Agent Configuration table, click .

Dual Trunk Survivability - Mediatrix SBC in the LAN Registering to the Service Provider 19
media5corp.com
Note: A new line of fields is added.
3) Complete the User Name, Friendly Name, and Domain parameters fields according tothe service provider's requirements.
4) In the Contact field, enter credentials to register against the service provider. Format mustbe sip:user@public_IP Address or sip:public_IP Address or sips:user@public_IP_Address:siplistening port;uri-parameters of the unit.
5) If necessary, repeat step 2 to step 4 if you are using more than one service provider.6) Click Apply.
Result
Next StepImporting Rulesets (p. 19)
Importing Rulesets
Before you startRulesets must be imported. The latest Ruleset package can be found on the Media5 Support Portal(you will be required to supply a user name and password).
InformationThis procedure is valid for Call Agent and Routing Rulesets.
Steps1) Go to Management/File.
Note: Required Rulesets depend on the scenario being configured. Refer to the Call Agent andRouting Ruleset sections of the configuration notes for details on Rulesets needed to complete theconfiguration.
Note: Step 2 is only required when importing the first Ruleset and if you are not using a secureconnexion to access the Management Interface (http://).
2) Click Activate unsecure file transfer through web browser.
Dual Trunk Survivability - Mediatrix SBC in the LAN Registering to the Service Provider 20
media5corp.com
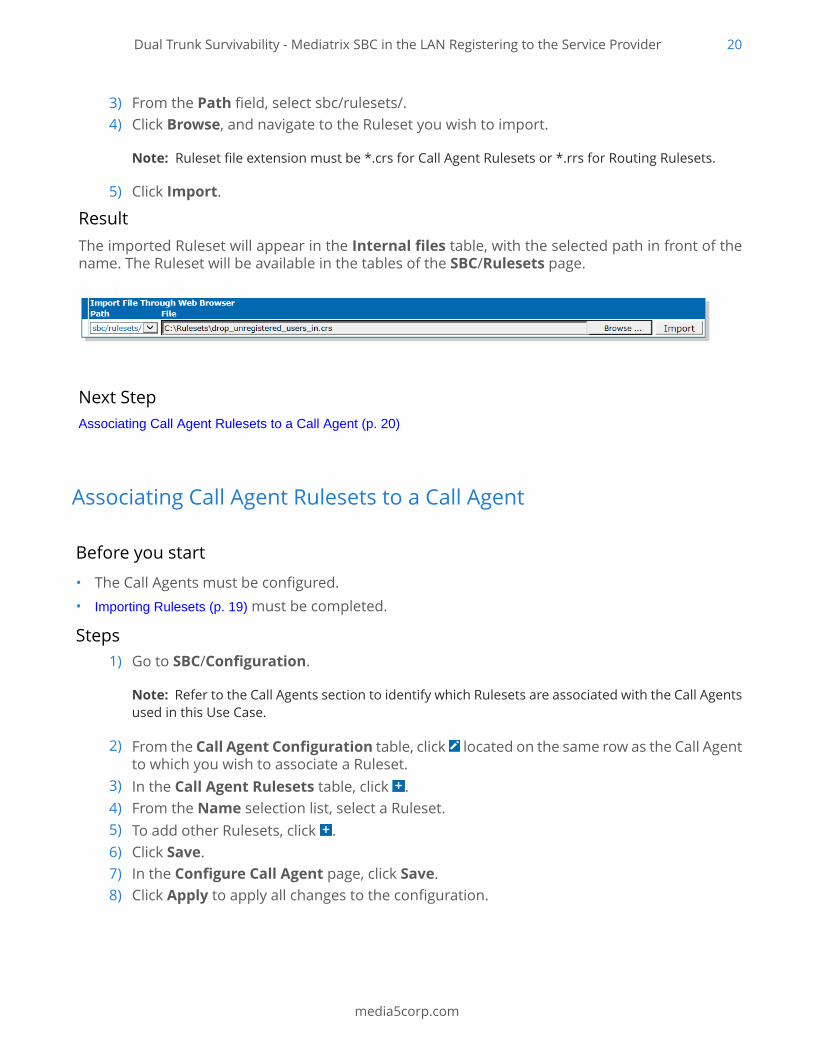
3) From the Path field, select sbc/rulesets/.4) Click Browse, and navigate to the Ruleset you wish to import.
Note: Ruleset file extension must be *.crs for Call Agent Rulesets or *.rrs for Routing Rulesets.
5) Click Import.
ResultThe imported Ruleset will appear in the Internal files table, with the selected path in front of thename. The Ruleset will be available in the tables of the SBC/Rulesets page.
Next StepAssociating Call Agent Rulesets to a Call Agent (p. 20)
Associating Call Agent Rulesets to a Call Agent
Before you start
• The Call Agents must be configured.• Importing Rulesets (p. 19) must be completed.
Steps1) Go to SBC/Configuration.
Note: Refer to the Call Agents section to identify which Rulesets are associated with the Call Agentsused in this Use Case.
2) From the Call Agent Configuration table, click located on the same row as the Call Agentto which you wish to associate a Ruleset.
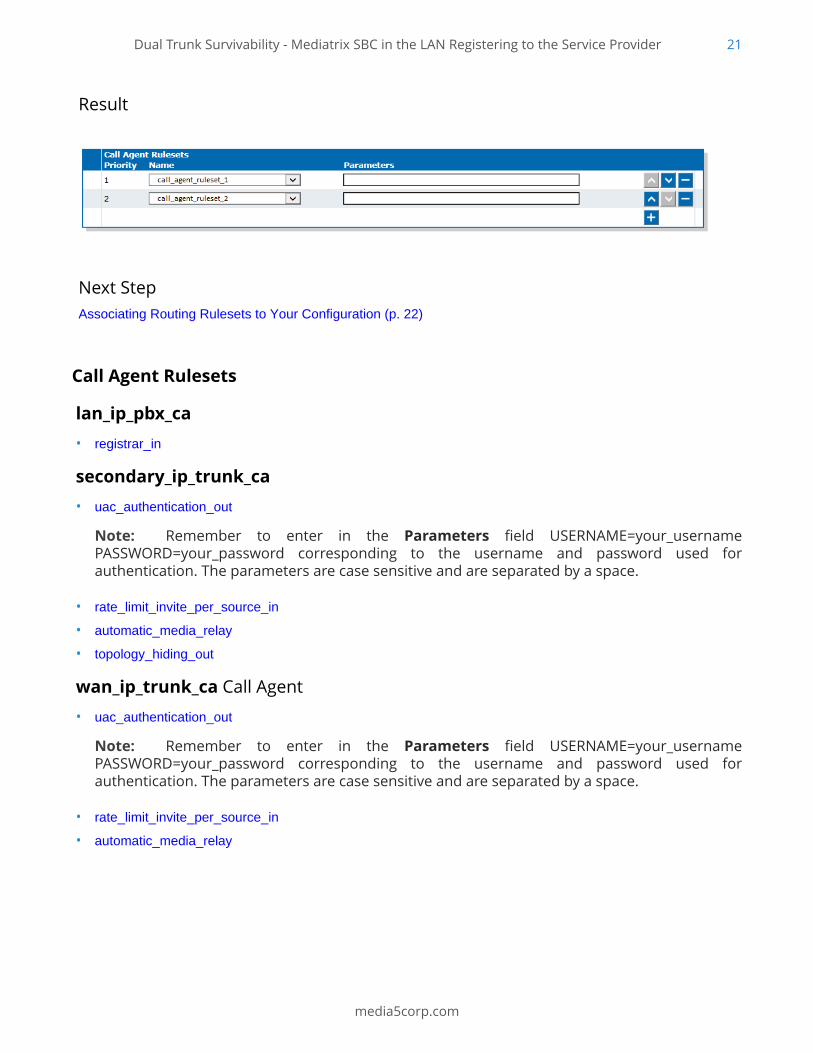
3) In the Call Agent Rulesets table, click .4) From the Name selection list, select a Ruleset.5) To add other Rulesets, click .6) Click Save.7) In the Configure Call Agent page, click Save.8) Click Apply to apply all changes to the configuration.
Dual Trunk Survivability - Mediatrix SBC in the LAN Registering to the Service Provider 21
media5corp.com
Result
Next StepAssociating Routing Rulesets to Your Configuration (p. 22)
Call Agent Rulesets
lan_ip_pbx_ca• registrar_in
secondary_ip_trunk_ca• uac_authentication_out
Note: Remember to enter in the Parameters field USERNAME=your_usernamePASSWORD=your_password corresponding to the username and password used forauthentication. The parameters are case sensitive and are separated by a space.
• rate_limit_invite_per_source_in
• automatic_media_relay
• topology_hiding_out
wan_ip_trunk_ca Call Agent
• uac_authentication_out
Note: Remember to enter in the Parameters field USERNAME=your_usernamePASSWORD=your_password corresponding to the username and password used forauthentication. The parameters are case sensitive and are separated by a space.
• rate_limit_invite_per_source_in
• automatic_media_relay
Dual Trunk Survivability - Mediatrix SBC in the LAN Registering to the Service Provider 22
media5corp.com
• topology_hiding_out
Associating Routing Rulesets to Your Configuration
Before you startImporting Rulesets (p. 19) must be completed for Routing Rulesets to be available.
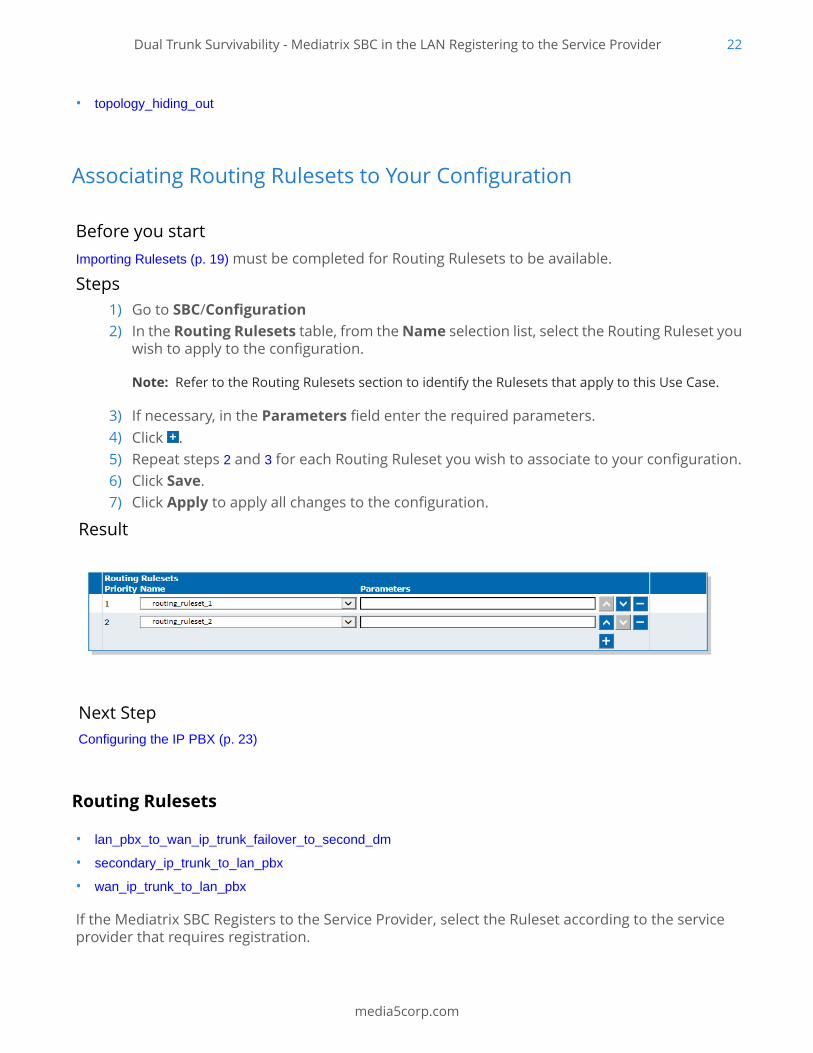
Steps1) Go to SBC/Configuration2) In the Routing Rulesets table, from the Name selection list, select the Routing Ruleset you
wish to apply to the configuration.
Note: Refer to the Routing Rulesets section to identify the Rulesets that apply to this Use Case.
3) If necessary, in the Parameters field enter the required parameters.4) Click .5) Repeat steps 2 and 3 for each Routing Ruleset you wish to associate to your configuration.6) Click Save.7) Click Apply to apply all changes to the configuration.
Result
Next StepConfiguring the IP PBX (p. 23)
Routing Rulesets
• lan_pbx_to_wan_ip_trunk_failover_to_second_dm
• secondary_ip_trunk_to_lan_pbx
• wan_ip_trunk_to_lan_pbx
If the Mediatrix SBC Registers to the Service Provider, select the Ruleset according to the serviceprovider that requires registration.

Dual Trunk Survivability - Mediatrix SBC in the LAN Registering to the Service Provider 23
media5corp.com
• registration_to_wan_ip_trunk_failover_to_second
Configuring the IP PBX
InformationThe IP PBX server is configured with the IP address and port of the Mediatrix SBC lan1_s SignalingInterface. The Mediatrix unit must be configured in the PBX as a SIP Trunk.
StepsConfigure the PSTN phone number(s) to be forwarded to the PBX's IVR.
Next StepConfiguring Your Main Office Phones (p. 23)
Configuring Your Main Office Phones
Steps1) Set the SIP server, username and password according to the IP PBX configuration.
Note: These phones do not use the Mediatrix unit to communicate with the PBX.
2) Make a call from the PSTN to the Lan.3) Make a call from the Lan to the PSTN.
ResultThe call signal should be routed from the PSTN to the Lan, and vice-versa. At this point, theconfiguration of this use case is completed. Under SBC/Registration, in the Registration Cachetable, a value should be displayed in the AoR field.

Dual Trunk Survivability - Mediatrix SBC in the LAN Registering to the Service Provider 24
media5corp.com
Available Documentation
For more details, refer to the Mediatrix Documentation.

Dual Trunk Survivability - Mediatrix SBC in the LAN Registering to the Service Provider 25
media5corp.com
Copyright NoticeCopyright © 2018 Media5 Corporation.
This document contains information that is proprietary to Media5 Corporation.
Media5 Corporation reserves all rights to this document as well as to the Intellectual Property ofthe document and the technology and know-how that it includes and represents.
This publication cannot be reproduced, neither in whole nor in part, in any form whatsoever, withoutwritten prior approval by Media5 Corporation.
Media5 Corporation reserves the right to revise this publication and make changes at any time andwithout the obligation to notify any person and/or entity of such revisions and/or changes.


