38
Getting Started Guide DVD Manager Utility Windows XP Software Application Version 3.0

Getting Started Guide
DVD Manager UtilityWindows XP Software Application
Version 3.0

2
DVD Manager Utility (DMU) Getting Started Guide Copyright © 2008 WatchGuard Video All rights reserved. WatchGuard and DV-1 are trademarks of WatchGuard Video. Enforcement Video LP is a Texas Limited Partnership doing business as WatchGuard Video. WatchGuard Video 3001 Summit Avenue Plano, Texas 75074 (800) 605-6734 Toll Free Sales (866) 384-8567 Toll Free Support (972) 423-9777 Main (972) 423-9778 Fax

3
Table of Contents
1 Introduction..............................................................................................................................4 1.1 Welcome Statement and Company Values ................................................................................................................... 4 1.2 About the DVD Manager Utility Software ....................................................................................................................... 4 1.3 Notices and Cautions..................................................................................................................................................... 4 1.4 Using This Document..................................................................................................................................................... 5 1.5 Please Give us your Suggestions .................................................................................................................................. 6 1.6 Feature Updates ............................................................................................................................................................ 6 1.7 Customer Service Contact Information .......................................................................................................................... 6 1.8 Related Documents ....................................................................................................................................................... 6
2 Software Installation ................................................................................................................ 7 2.1 Installation Instructions .................................................................................................................................................. 7 2.2 Running the Application ................................................................................................................................................. 8 2.3 Application Version Information ..................................................................................................................................... 8
3 Changing DVD Manager Utility Options ..................................................................................9
4 Diagnostics and DVD Authentication.....................................................................................11 4.1 Main Disc & Drive Diagnostics Screen......................................................................................................................... 11 4.2 DVD Disc Information .................................................................................................................................................. 12 4.3 Video Content Authentication ...................................................................................................................................... 13
4.3.1 DVD or VIDEO_TS Folder Authentication ..................................................................................................... 13 4.3.1.1 Authentication Results – Passed ................................................................................................. 14 4.3.1.2 Authentication Results – Failed ................................................................................................... 16
4.4 Disc Erase ................................................................................................................................................................... 17
5 Playing Video Content ........................................................................................................... 18 5.1 Turning Off Auto-Play for Other Media Players............................................................................................................ 18 5.2 Playing a DV-1 DVD-Video Disc .................................................................................................................................. 19 5.3 Playing Content from a VIDEO_TS Folder................................................................................................................... 20 5.4 Playing an MPEG-2 File............................................................................................................................................... 22 5.5 Video Player Controls .................................................................................................................................................. 24 5.6 Saving a Snapshot....................................................................................................................................................... 26 5.7 Playing the Video at Different Play Speeds ................................................................................................................. 26 5.8 Reversing Playback Direction ...................................................................................................................................... 27 5.9 Turning Closed-captioning ON/OFF ............................................................................................................................ 27 5.10 Returning to the Main Menu of the DVD or VIDEO_TS Folder .................................................................................... 27 5.11 Navigating Titles and Chapters in the DVD or VIDEO_TS Folder................................................................................ 28 5.12 Resetting the Player/Releasing the DVD Disc ............................................................................................................. 28
6 Copying a DVD Disc.............................................................................................................. 29 6.1 Configuring Source and Target Drive........................................................................................................................... 31
7 Exporting Titles as MPEG-2 Files..........................................................................................32
8 Recovering Video from Problem Discs ..................................................................................34
Index.............................................................................................................................................. 37

4
1 Introduction 1.1 WELCOME STATEMENT AND COMPANY VALUES Thank you for choosing the DVD Manager Utility as your DVD-Video manager. The management of WatchGuard Video places an emphasis on developing individual character qualities essential for true success, and the company is dedicated to maintaining a culture of service. Our management staff is encouraged to practice servant-based leadership within their groups with the knowledge that by serving God, people are empowered to better serve each other. This environment creates the framework for WatchGuard Video to ultimately serve our customers in a manner that instills the highest level of trust, confidence, and satisfaction.
1.2 ABOUT THE DVD MANAGER UTILITY SOFTWARE The DVD Manager Utility is a Windows XP/Windows XP Media Center Edition software application that provides a software player for playback of video content created by a WatchGuard DV-1 system. It also includes the capability to perform the following functions on video content created by a WatchGuard DV-1 DVD-Video Recorder system: authenticate, copy, store as MPEG-2 files, and recover data from damaged DVD-Video discs.
1.3 NOTICES AND CAUTIONS
WARNING!
Warnings provide information pertaining to possible data loss.
CAUTION!
Cautions describe critical information that, if ignored, could result in damage to the DV-1, inoperability or degradation in function, or injury to personnel.
Cautions always appear before the critical text to which they apply.

5
NOTICE
Notices provide useful supplemental information that is pertinent to the task being described.
Notices may appear either before or after the text to which they apply.
1.4 USING THIS DOCUMENT This document is applicable to the DVD Manager Utility (DMU) 3.0 for Windows XP Pro and Windows XP Media Center Edition.
This document covers the following DVD Manager Utility topics: • Software Installation – Install the application on a PC. • Changing DVD Manager Utility Options – Enable/disable auto-
seek, clean up transfer cache upon exit, display a list of CODECs for the computer, or enable/disable trace logging.
• Diagnostics and DVD Authentication – Recorded DVDs now include encrypted information used by the WatchGuard DVD Manager Utility program to prove that a DVD has not been tampered with. This allows you to authenticate either DVD-Video discs that have been created by a WatchGuard DV-1 system or DV-1 video content stored in a VIDEO_TS folder on a PC. This section also discusses how to display detailed information about a DVD drive or DVD disc.
• Playing Video Content – Play DVD-Video discs that have been created by a WatchGuard DV-1 system, DV-1 video content from a VIDEO_TS folder stored on a PC, or MPEG-2 files created from DV-1 video content; copy a frame of video content to the Clipboard to insert into an existing document or store as a separate JPEG file.
• Copying a DVD Disc – Make copies of DV-1 DVD-Video discs. • Exporting Titles as MPEG-2 Files – Extract one or more video
titles from the DVD disc to store on a PC and play from the local drive.
• Recovering Video from Problem Discs – Extract video data from DVDs that have been damaged or are corrupt.
NOTICE
For other tasks, refer to the section Related Documents on page 6 for a reference to the appropriate documentation.
The left side of each page contains informational text, procedures, and notices. The right side contains the buttons and screens required to perform the tasks described on the left. Once familiar with DMU operation, you should be able to perform many tasks by referring to the illustrations on the right.

6
1.5 PLEASE GIVE US YOUR SUGGESTIONS We want to hear from you. Tell us about your experiences with the DMU software. We will do our best to accommodate any suggestions you may have in future software revisions.
Please call Customer Service at (800) 605-6734, or email us at [email protected] with your comments, questions, and concerns.
1.6 FEATURE UPDATES We are committed to the continual testing and improvement of the DVD Manager Utility software. Updates are provided to your agency free for the life of the product.
As these updates become available, we will contact your agency and provide you with the latest update. At any time, you may check http://www.watchguardvideo.com/support/ for information about product updates.
1.7 CUSTOMER SERVICE CONTACT INFORMATION WatchGuard Video Attn: Customer Service Department 3001 Summit Avenue Plano, Texas 75074 (800) 605-6734 [email protected]
1.8 RELATED DOCUMENTS Refer to www.watchguardvideo.com/support/ for the following supporting documentation: • DV-1 User Manual • DV-1 Quick Reference Guide • Overhead System Installation Overview • Modular System Installation Overview • DV-1 Menu Navigation Guides (GUI) • Fleet Manager Utility (FMU) Getting Started Guide

7
2 Software Installation 2.1 INSTALLATION INSTRUCTIONS
NOTICE
The DVD Manager Utility (DMU) installer requires the installation of Microsoft .NET Framework 2.0. If the .NET Framework 2.0 software is not found on the target computer, the installer will attempt to automatically download and install it from the Microsoft web site. If an internet connection is not available, the installer will report an error that it cannot access the Microsoft web site.
In the case that internet connectivity is not available, the .NET Framework 2.0 software can be manually installed by running the dotnetfx.exe application from the root folder of the installation CD.
Installing the DVD Manager Utility on Windows XP Pro/Windows XP Media Center Edition: 1. Insert the DVD Manager Utility installation CD
into a CD drive on your computer. 2. If auto-run is enabled for your CD drive, then the
installation setup program automatically launches.
3. If the setup program does not automatically launch, use Windows Explorer to navigate to the appropriate CD drive on your computer. In the root folder of the installation CD, there is a file called Setup.exe. Double-click it to launch the setup program for the DVD Manager Utility.

8
The initial installation screen is displayed.
Follow the prompts in the installation program to complete the installation of the application on your computer’s hard disk.
A new menu item called WatchGuard DVD Manager Utility is automatically created under the Windows Start/Programs menu. A desktop icon is also created.
2.2 RUNNING THE APPLICATION
After the installation is complete, run the application by selecting Start > Programs > WatchGuard DVD Manager Utility.
2.3 APPLICATION VERSION INFORMATION To determine the current version information of the DVD Manager Utility, select Help > About… from the application’s main window as shown on the right.
Knowing this detailed version information is of assistance when communicating with WatchGuard Customer Service and/or in determining when it is necessary to upgrade to a newer version of the DVD Manager Utility.

9
3 Changing DVD Manager Utility Options
To set DVD Manager Utility Options, select Tools > Options… from the application’s main window.
Select or deselect items in the Options window, and click the Save button to activate them.
To cancel any changes made and close the Options window, click the Cancel button.
To reset options to their default values, click Reset to default settings, at the bottom left of the Options window.
These parameters may be set in the Options window:
Use auto-seek logic when media content does not support dragging slider bar to a given time code – If the video stream does not support navigation to a specified time code, this option allows the DVD Manager Utility to transition into 100X playback speed (either forward or reverse) to find the time code, then resume 1X forward playback.
Delete local DVD transfer cache data upon application exit – This option prompts the DVD Manager Utility to remove all temporary storage files and folders that are created during DVD copying and/or DVD authentication, upon closing the DVD Manager Utility.

10
Show codec list for this computer – When clicked, a dialog box similar to the one shown on the right is displayed. It lists the current CODECs installed on the computer.
If you would like to copy the info to your clipboard for use in pasting to another application, click OK, otherwise click Cancel to close the dialog box.
More codec information – When clicked, a dialog box is displayed which offers you the opportunity to learn more about DVD-Video CODECs from the WatchGuard web site.
Click Yes to navigate to the web site, or No to close the dialog box.
Trace Log – This option turns on trace logging, which is useful in troubleshooting. Trace logging has a minor effect on system performance.
Open Log Folder – When trace logging is enabled, click the Open Log Folder link to open the DVD Manager Utility log folder in Windows Explorer.
If trace logging is not enabled, the dialog box shown on the right is displayed. Click Yes to enable trace logging and open the log folder, or No to return to the Options window without enabling trace logging.

11
4 Diagnostics and DVD Authentication 4.1 MAIN DISC & DRIVE DIAGNOSTICS SCREEN
To access DVD Manager Utility diagnostics and authentication functions, click the Disc & Drive Diagnostics button on the DVD Manager Utility main screen.
The Drive & Disc Diagnostics screen is displayed.
If a DVD disc is inserted, the Drive & Disc Diagnostics screen lists the available optical devices for your computer. If multiple DVD discs are inserted, each DVD drive is displayed on the left.
Select a device to display its drive properties and supported DVD media formats, shown with a green box and white checkmark.
To launch Windows Explorer for the selected drive, click the folder button on the far left side of the Drive & Disc Diagnostics toolbar.
To eject a DVD from the selected local drive, click the Eject button. This feature is available when supported by the DVD drive.
To close the tray of the selected local DVD drive, click the Close tray button. This feature is available when supported by the DVD drive.
12
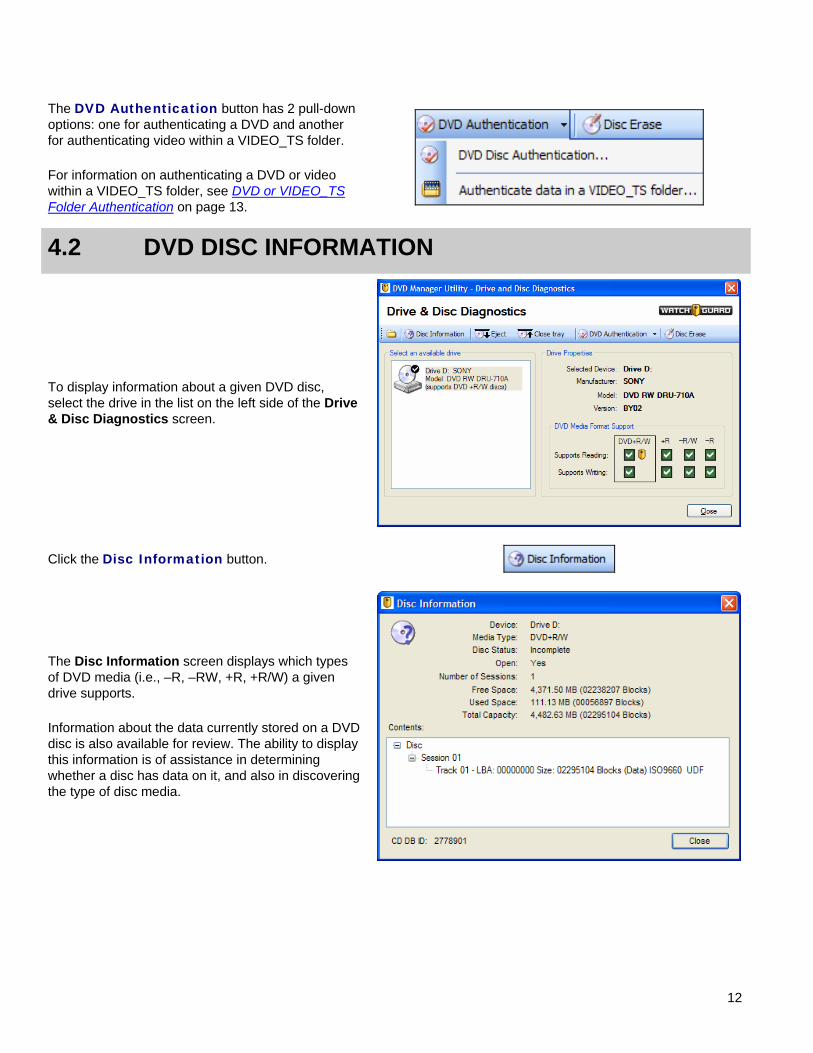
The DVD Authentication button has 2 pull-down options: one for authenticating a DVD and another for authenticating video within a VIDEO_TS folder.
For information on authenticating a DVD or video within a VIDEO_TS folder, see DVD or VIDEO_TS Folder Authentication on page 13.
4.2 DVD DISC INFORMATION
To display information about a given DVD disc, select the drive in the list on the left side of the Drive & Disc Diagnostics screen.
Click the Disc Information button.
The Disc Information screen displays which types of DVD media (i.e., –R, –RW, +R, +R/W) a given drive supports.
Information about the data currently stored on a DVD disc is also available for review. The ability to display this information is of assistance in determining whether a disc has data on it, and also in discovering the type of disc media.

13
4.3 VIDEO CONTENT AUTHENTICATION DVDs recorded on a Version 5.0 (or later) DV-1 contain embedded and 128-bit encrypted information that is used by the new WatchGuard DVD Manager (Version 3.0). WatchGuard’s disc authentication scheme makes rewritable DVDs secure and provides the tools to ensure that the video on the DVD is authentic WatchGuard video.
4.3.1 DVD or VIDEO_TS Folder Authentication To authenticate a DV-1 DVD that is inserted into a local drive, click the drop-down arrow at the right of the DVD Authentication button and select DVD Disc Authentication… on the Drive & Disc Diagnostics screen.
Alternatively, to authenticate video from a VIDEO_TS folder, select the Authenticate data in a VIDEO_TS folder and navigate to the stored video folder. After navigating to the stored folder, the steps for authenticating video within a VIDEO_TS folder are identical to those for authenticating a DV-1 DVD.
For information on saving video to a VIDEO_TS folder, see Playing Content from a VIDEO_TS Folder on page 20.
or
To start authenticating the DVD (or VIDEO_TS folder contents), click the Run button.
14
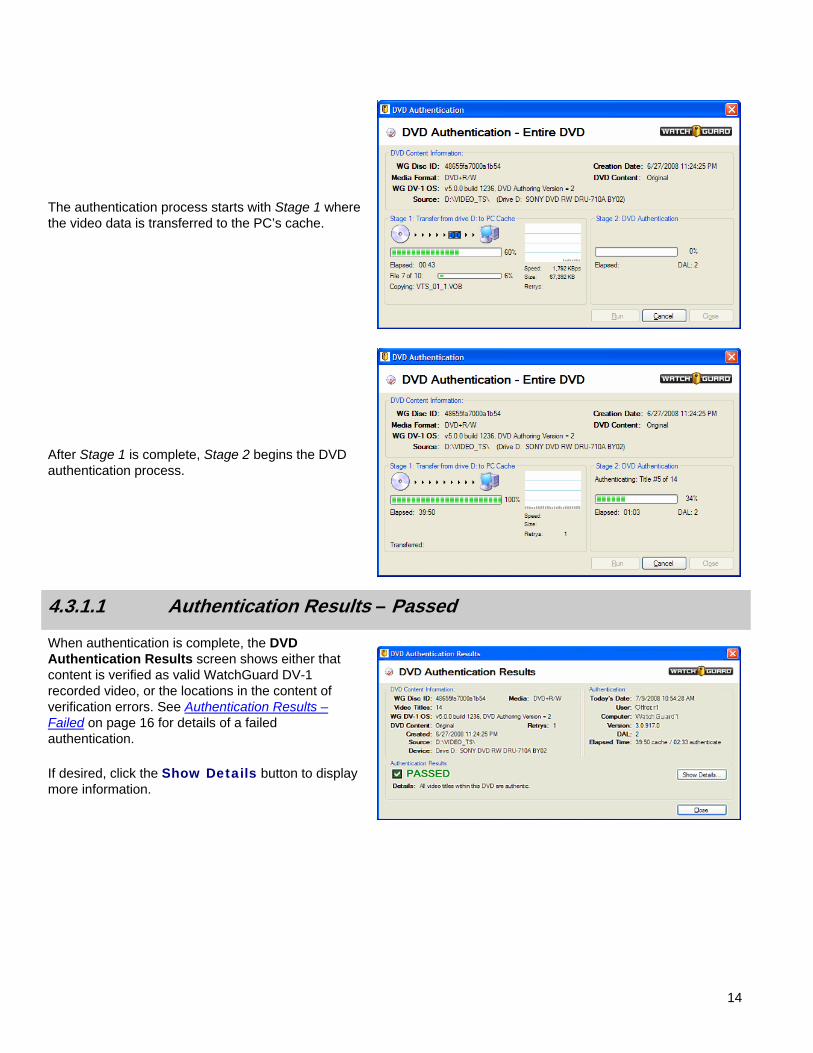
The authentication process starts with Stage 1 where the video data is transferred to the PC’s cache.
After Stage 1 is complete, Stage 2 begins the DVD authentication process.
4.3.1.1 Authentication Results – Passed
When authentication is complete, the DVD Authentication Results screen shows either that content is verified as valid WatchGuard DV-1 recorded video, or the locations in the content of verification errors. See Authentication Results – Failed on page 16 for details of a failed authentication.
If desired, click the Show Details button to display more information.

15
All titles on the DVD (or within the VIDEO_TS folder) are displayed at the bottom of the screen.
If desired, select the title and click the Show Video Title Details… button.
The details of the selected title are displayed. For a passed authentication, the bar is green, indicating that no unverified sectors were found.
Click Close when done.

16
4.3.1.2 Authentication Results – Failed
When a DVD (or video content from a VIDEO_TS folder) fails authentication, a screen similar to the one shown on the right is displayed. If desired, click the Show Details button to display more information.
All titles on the DVD (or within the VIDEO_TS folder) are displayed at the bottom of the screen. In the example shown on the right, Titles #1 & #9 have unverified sectors.
If desired, select the title and click the Show Video Title Details… button.
17
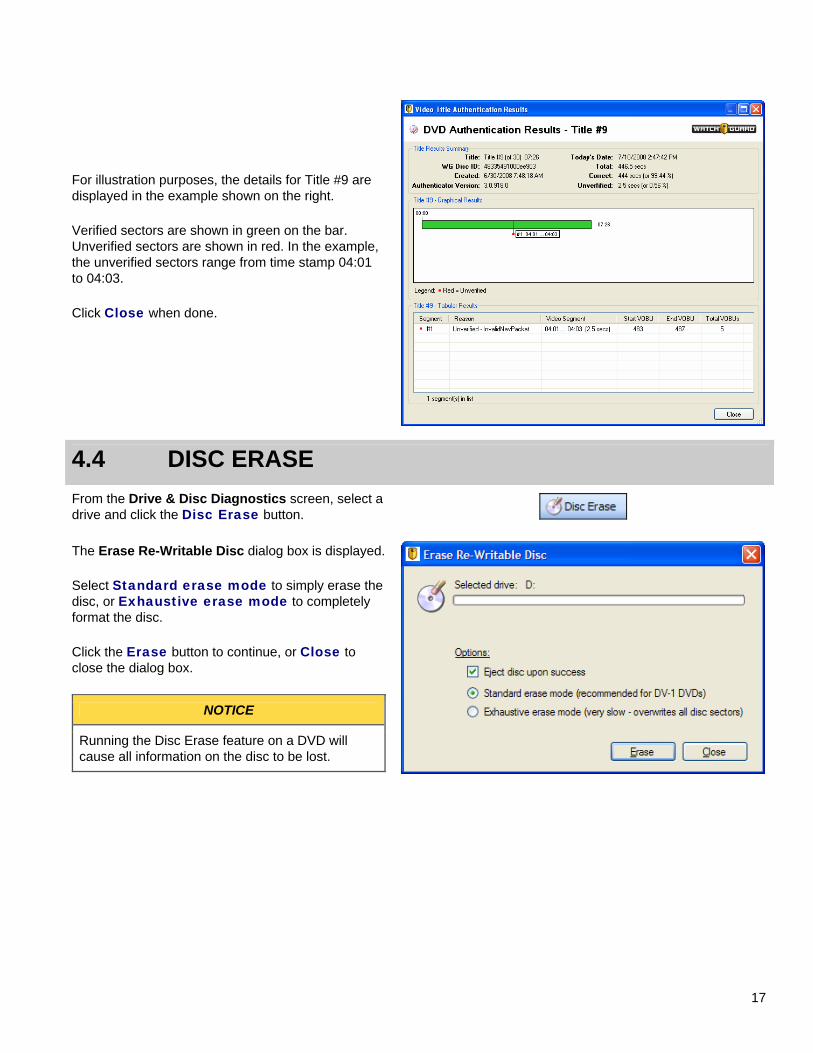
For illustration purposes, the details for Title #9 are displayed in the example shown on the right.
Verified sectors are shown in green on the bar. Unverified sectors are shown in red. In the example, the unverified sectors range from time stamp 04:01 to 04:03.
Click Close when done.
4.4 DISC ERASE From the Drive & Disc Diagnostics screen, select a drive and click the Disc Erase button.
The Erase Re-Writable Disc dialog box is displayed.
Select Standard erase mode to simply erase the disc, or Exhaustive erase mode to completely format the disc.
Click the Erase button to continue, or Close to close the dialog box.
NOTICE
Running the Disc Erase feature on a DVD will cause all information on the disc to be lost.

18
5 Playing Video Content 5.1 TURNING OFF AUTO-PLAY FOR OTHER MEDIA
PLAYERS Before playing a DVD-Video disc with the DVD Manager Utility, DVD auto-play features that might be enabled in the computer’s Windows XP settings should be turned off. If other installed media players are launched and/or running at the same time as the DVD Manager Utility, they may compete for control of the DVD drive as a resource, making the DVD Manager Utility (and possibly the other media players) behave unpredictably. To turn off DVD auto-play capabilities for a specific DVD drive: • Open File Explorer and select My Computer • Right-click the DVD drive you wish to configure
and select Properties
The Properties window for the DVD drive is displayed. • Select the AutoPlay tab.
• Select DVD Movie from the drop-down list.
• Click the Select an action to perform radio button.
• Scroll to the bottom of the list of actions and select the Take no action item.
• Click OK to save your auto-play behavior settings for the given DVD drive.
Repeat this procedure for any additional DVD drives for which you wish to disable auto-play. The next time that a DVD-Video disc is inserted into the newly configured DVD drive, Windows XP should not auto-launch a media player and you can run the DVD Manager Utility to play the disc without resource contention problems.
DVD-Video discs and DV-1 DVD content stored to a PC folder or as an MPEG-2 file can be reviewed by using the video playback capabilities within the DVD Manager Utility.

19
5.2 PLAYING A DV-1 DVD-VIDEO DISC
Insert a WatchGuard DV-1 DVD disc into a DVD drive on your computer.
Click the Play Video button on the main screen.
The Video Player screen is displayed. The More options link is a shortcut to the options in the File menu.
Click the Load DVD link in the center of the screen or select File > Open DVD. The application will automatically search available optical drives for a DVD-Video disc. The first DVD disc found in an optical drive on the computer is then loaded.

20
The titles on the DVD are displayed. To play video of a title, use the mouse to select the thumbnail icon of the title.
The Video Player screen can be arranged or resized by grabbing an edge to make the window larger or smaller in either width or height.
NOTICE
If the DVD drive is configured to auto-launch an application when a DVD disc is inserted, the operating system will run Windows Media Player (or some other media player application). Close the other media player to prevent it from utilizing the DVD drive as a resource, and disable the auto-play feature for your DVD player(s) as described in Turning Off Auto-Play for Other Media Players on page 18.
5.3 PLAYING CONTENT FROM A VIDEO_TS FOLDER
DV-1 DVD content may be stored to a PC folder and viewed directly from that folder, with the same capabilities available during DVD-Video disc playback.
To store DV-1 DVD content to a PC folder, browse to the drive where the DVD is inserted.
Copy both the VIDEO_RM and VIDEO_TS folders from the DVD into the target folder on the local hard disk.
To play video content stored on the local hard disk, click the Play Video button on the main screen.

21
The Video Player screen is displayed.
Select File > Open VIDEO_TS folder….
Browse to the stored VIDEO_TS folder.
Select the folder and click OK.
As an alternative to accessing the VIDEO_TS folder using the Video Player File menu, you can select and drag a VIDEO_TS folder from within Windows Explorer into the Video Player screen.
The titles stored in the VIDEO_TS folder are displayed. To play video of a title, use the mouse to select the thumbnail icon of the title.
The Video Player screen can be arranged or resized by grabbing an edge to make the window larger or smaller in either width or height.

22
5.4 PLAYING AN MPEG-2 FILE DV-1 DVD content may be exported to an MPEG-2 file and viewed directly from that file. Video recovered from problem DVD discs can be stored and played as MPEG-2 files.
See Exporting Titles as MPEG-2 Files on page 32 for more information about exporting MPEG-2 files.
See Recovering Video from Problem Discs on page 34 for more information about recovering video to MPEG-2 files.
To play an MPEG-2 file stored on the local hard disk, click the Play Video button on the main screen.
The Video Player screen is displayed.
Select File > Open MPEG-2 file….

23
Browse to the stored MPEG-2 file.
Select the file and click Open.
The MPEG-2 file is loaded into the video player. Click the PLAY button to play the video.
The Video Player screen can be arranged or resized by grabbing an edge to make the window larger or smaller in either width or height.

24
5.5 VIDEO PLAYER CONTROLS This section describes the various controls on the Video Player screen.
The toolbar buttons on the Video Player screen are described, from left to right, below.
Menu
Returns the Video Player to the main graphical thumbnail menu of the DVD-Video disc or VIDEO_TS folder. The Menu button is not available during playback of MPEG-2 files.
Titles
Displays the list of all available video titles for the currently loaded DVD-Video disc or VIDEO_TS folder. The Titles button is not available during MPEG-2 playback.
Copy Makes full disc and single-title copies of DVD-Video discs. The Copy feature is available only for DVD-Video discs that were generated by a WatchGuard DV-1 recording system. The Copy button is not available during MPEG-2 playback.
Export Exports DVD-Video disc titles as MPEG-2 files. The Export feature is available only for DVD-Video discs that were generated by a WatchGuard DV-1 recording system. The Export button is not available during MPEG-2 playback.
Recover
Recovers DVD-Video disc titles from problem discs that are scratched or corrupted. The Recover feature is available only for DVD-Video discs that were generated by a WatchGuard DV-1 recording system. The Recover button is not available during MPEG-2 playback.
Snapshot Saves a snapshot of a frame of video content to the Clipboard to insert into an existing document or store as a separate JPEG file.
Close Media / Reset Player
Closes the DVD or file from which video content is currently playing or resets the player by releasing control of the DVD drive, PC folder, or MPEG-2 file.

25
The following settings are described, from left to right, below.
Closed Caption Button Toggle switch for Closed-captioning
Slide bar Volume Control Controls audio volume
Mute Silences audio
Slide bar Balance Control Controls audio balance
Center Balance Resets audio balance to center
Wireless/Cabin Balance Control
Adjusts the volume level of the wireless microphone vs. the cabin microphone
The following settings and controls are described, from left to right, below.
Reverse button Reverses the direction of the currently playing video title
Play button Plays video title at 1X
Pause button Pauses video playback
Forward button Moves video forward one frame and then pauses playback
Progress bar Slider control and playback progress of the currently
playing video title
Timer Expired time for the currently playing video title
Previous button Navigates to the previous chapter. The Previous button is not available during playback of MPEG-2 files.
Next button Navigates to the next chapter. The Next button is not available during playback of MPEG-2 files.
Status information about the currently loaded disc is displayed at the bottom of the window.
26
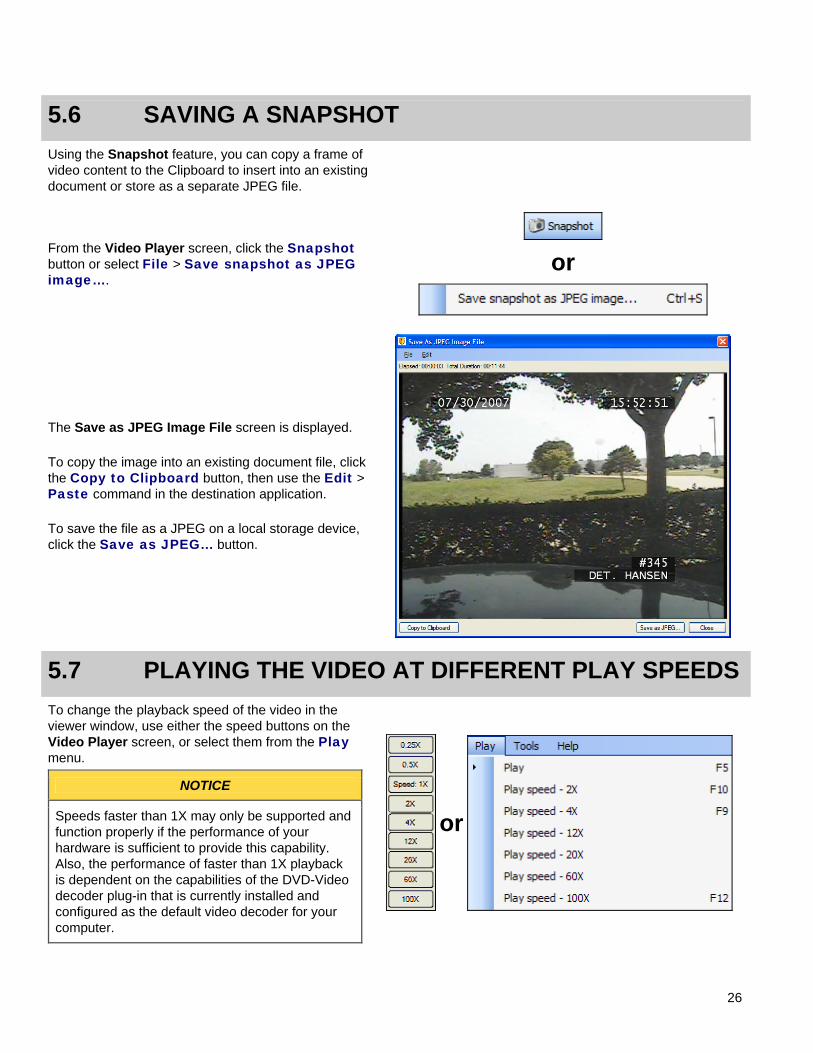
5.6 SAVING A SNAPSHOT Using the Snapshot feature, you can copy a frame of video content to the Clipboard to insert into an existing document or store as a separate JPEG file.
From the Video Player screen, click the Snapshot button or select File > Save snapshot as JPEG image….
or
The Save as JPEG Image File screen is displayed.
To copy the image into an existing document file, click the Copy to Clipboard button, then use the Edit > Paste command in the destination application.
To save the file as a JPEG on a local storage device, click the Save as JPEG… button.
5.7 PLAYING THE VIDEO AT DIFFERENT PLAY SPEEDSTo change the playback speed of the video in the viewer window, use either the speed buttons on the Video Player screen, or select them from the Play menu.
NOTICE
Speeds faster than 1X may only be supported and function properly if the performance of your hardware is sufficient to provide this capability. Also, the performance of faster than 1X playback is dependent on the capabilities of the DVD-Video decoder plug-in that is currently installed and configured as the default video decoder for your computer.
or

27
5.8 REVERSING PLAYBACK DIRECTION To reverse the direction of the video title being played, click either the Reverse button on the Video Player screen during playback, or select the Play backwards option from the Play menu.
Clicking the Reverse button again causes the video title to play in the forward direction. All play speeds represented in the previous section are supported when playing a video title in the reverse direction.
or
5.9 TURNING CLOSED-CAPTIONING ON/OFF To turn the display of closed-captioning on and off, click either the CC button on the Video Player screen, or select the Turn Closed Captioning On/Off option from the Play menu.
When closed-captioning is on, the button shows a green icon. When closed-captioning is off, the button is grayed-out. Closed-captioning within the DVD Manager Utility is supported only if closed-captioning data is available on the DVD-Video disc and if the current default video decoder plug-in supports Line21 closed-captioning functionality. By default, WatchGuard DV-1 DVDs contain closed-captioning information.
(on)
(off)
or
5.10 RETURNING TO THE MAIN MENU OF THE DVD OR VIDEO_TS FOLDER
To return to the main menu that contains the graphical thumbnails of a DVD or VIDEO_TS folder, click either the Menu button on the Video Player screen, or select the Menu option from the Play menu.
or

28
5.11 NAVIGATING TITLES AND CHAPTERS IN THE DVD OR VIDEO_TS FOLDER
Each DVD or VIDEO_TS folder recording, regardless of its length, is represented by a single navigable title (represented by a thumbnail as shown on the right). A title is further subdivided into up to 30-minute chapters. For example, for a 75-minute recording, there is only 1 thumbnail on the DVD or VIDEO_TS folder title menu. However, the title will contain 3 chapters, of these lengths: 30 minutes, 30 minutes, and 15 minutes.
To navigate between the titles, select the Menu button to display the graphical thumbnails.
To page forward or backward among the titles, click either of the blue left or right arrows displayed at the top of the thumbnail menu screen, indicated by red circles in the example shown on the right.
To navigate to a different title when a chapter is playing in the viewer window, click the Titles button on the Video Player screen and then select the desired title.
To navigate among chapters within a title that is playing in the viewer window, click the Previous or Next buttons on the Video Player screen.
5.12 RESETTING THE PLAYER/RELEASING THE DVD DISC
To reset the player while playing a DVD, content from a VIDEO_TS folder, or MPEG-2 file, or to simply release control of the DVD drive, PC folder, or MPEG-2 file, click the Reset button on the Video Player screen or select File > Close media.
or

29
6 Copying a DVD Disc
The DVD Manager Utility allows you to make full disc copies or single-title copies of DVD-Video discs that were generated by a WatchGuard DV-1 recording system.
Follow the instructions for Playing Video Content on page 18 to load the desired DVD.
To play the DVD, click the Play Video button on the main screen.
Review the video on the DVD, if necessary, to select the title(s) to copy.
Click the Copy button on the Video Player screen or select Tools > Copy video to new DVD…
or
The Copy Video from DVD window is displayed.
Select the desired option, depending on what kind of DVD copy you would like to make.
If the single-title copy option is selected, then you must select a specific title from the displayed list.
Click the Copy Entire Disc or Copy Single Title Only button. The context of the button depends on the contents selected to copy.

30
The Burn DVD window is displayed.
Select the desired settings to be used when making the new DVD disc.
Click the Start Transfer button to begin the Stage 1 task of caching the data from the DVD disc to the local PC’s hard disk. This task can be canceled at any time by clicking the Cancel button.
When Stage 1 is complete, the progress bar will show 100% completion.
NOTICE
The relative performance speed of the Stage 1 copy task will vary based on the performance of your computer and the performance of the DVD drive that is in use at the time. Note also that this speed may vary as the performance of the DVD drive may change slightly as data toward the end of the DVD is read.
When Stage 1 is complete, a prompt to remove the original source DVD disc is displayed.

31
Insert a blank DVD disc. Select the drive that contains the blank DVD disc from the drop-down list of drives and configure the following settings as desired: • Eject After Write – The DVD drive ejects the
DVD disc when copying is completed. • Buffer Protection – The DVD Manager Utility
burn process regulates its speed to match the speed of the DVD drive, to ensure that the burn is completed without errors.
• Auto-Verify – The DVD Manager Utility verifies that data was burned to the DVD disc without errors.
For normal operations, the Eject After Write and the Buffer Protection options can be checked. The Auto-Verify option can be unchecked.
NOTICE
PERFORMANCE AND COST SAVINGS TIP: The WatchGuard DV-1 system requires DVD+R/W media to be used as the original media that is burned in the vehicle’s DV-1. However, when you make copies of original WatchGuard DV-1 discs using this application, you can choose blank DVD–R media as the target media type for the newly created DVD. In general, the benefits of using DVD–R media include lower cost, and many DVD burner drives can burn DVD–R media faster than DVD+R/W media.
Select the Burn New DVD button to begin the Stage 2 burning task.
To review the video data on the newly burned DVD disc, place the disc back into the drive and click the Play Video button in the DVD Manager Utility’s main window.
6.1 CONFIGURING SOURCE AND TARGET DRIVE
If you have two or more DVD drives connected to the computer at the same time, you can use one DVD drive for the source DVD disc and another DVD burner drive for the blank DVD disc. Using two drives in this manner allows you to make your selections at the beginning, and then launch both Stage 1 and Stage 2 tasks. The caching process and the burning process will happen automatically and, if there are no errors, both drive doors (if your drives support this feature) are ejected at the completion of the burn process.
NOTICE
PERFORMANCE TIP: If your DVD drive seems to be performing more slowly than usual, try removing the DVD disc from the drive and re-inserting it. Then, retry the copy operation. Also, if your computer has not been rebooted recently (within the last 24 hours), then a reboot sometimes causes the DVD drive to perform better. Your individual results will vary based on your computer hardware.

32
7 Exporting Titles as MPEG-2 Files Using the Export as MPEG-2 File feature, you can extract (i.e., rip) one or more video titles from a DVD-Video disc that was generated by a WatchGuard DV-1 recording system and store the results locally on a storage device.
From the Video Player screen, click the Export button or select Tools > Export titles as MPEG-2 files…
or
The Export Titles as MPEG-2 Files screen is displayed.
The user-configurable options are: 1. May change the default file location for storing the
extracted files by clicking the Choose Folder… button.
2. May choose whether a sub-directory will be created that includes the date/timestamp of the original DVD disc.
3. May choose whether a user-defined filename prefix will be used for each video title’s MPEG-2 filename.
4. May choose whether to overwrite existing filenames if any filename collisions are encountered in the destination folder.
Select one or more video titles from the list of titles on the current DVD disc. To begin the extraction task, click the Save X Titles button (X is the number of titles selected).

33
At the completion of the save operation, a summary of the completed extraction is displayed.
If desired, click the Print This Report button to display a printable HTML version of the report, or Explore Folder to view the extracted files.
See Playing an MPEG-2 File on page 22 for information about playing exported MPEG-2 files.

34
8 Recovering Video from Problem Discs This application includes a recovery mode feature. In the case of damaged or corrupt DVD-Video discs that were generated by a WatchGuard DV-1 recording system, this recovery mode feature allows you to extract fragments of a given video title while attempting to skip over the problem areas of a disc.
Some DVD media discs contain fatal media read errors due to scratches, defects, etc. The recover mode feature in this application is designed to encounter and then skip over the fatal media read errors and continue to extract video data despite the presence of problem areas on the disc.
If fatal media read errors are encountered during a recover operation, then the resulting MPEG-2 files generated in the destination folder will actually be a set of fragmented files for each title. One file will be created in the destination folder for each good fragment of a given video title. For example, if a given video title contains only one media read error, then that video title would be split into two different fragment MPEG-2 files when the title is recovered. If a video title contains two media read errors, then three fragmented MPEG-2 files will be created as a result, and so on.
From the Video Player screen, click the Recover button or select Tools > Recover titles from a problem DVD as MPEG-2 files…
or

35
The Recover Titles as MPEG-2 Files screen is displayed.
The user-configurable options are: 1. May change the default file location for storing the
extracted files by clicking the Choose Folder… button.
2. May choose whether a sub-directory will be created that includes the date/timestamp of the original DVD disc.
3. May choose whether a user-defined filename prefix will be used for each video title’s MPEG-2 filename.
4. May choose whether to overwrite existing filenames if any filename collisions are encountered in the destination folder.
CAUTION!
In the event that media read errors are encountered on a DVD disc while trying to recover data, the performance of the DVD drive will likely be very slow. Each DVD drive manufacturer’s model will likely have a different timeout value for when to return the error to the software application in the event that media read errors are encountered. Some DVD drives may return status in a matter of seconds. Other DVD drives employ a high number of read retries and in such cases don’t respond for as long as 10 to 20 minutes. Due to these behaviors of DVD drives, the recover feature in the DVD Manager Utility may be a very slow process.
If media read errors (encountered previously by the DVD Manager Utility) relate to the currently loaded DVD disc, then the number of those media read errors will appear by the label entitled Number of currently known media errors for this disc, on the Recover Titles as MPEG-2 Files screen.

36
To review the details about the known media errors, click the Show Error History button.
The Known Media Read Errors for Current Disc screen is displayed.
In the example, two media read errors are shown in the tabular list of errors. These two errors are also displayed graphically in the figure at the top of this screen and are denoted by the red circle containing the exclamation point. This graphical representation shows where the errors occur with respect to the video title that contains each error.
Both errors occur in video title 2. If the current DVD disc contains no other errors, then all other video titles can be assumed to be error-free. You could make a single-title copy of the error-free titles or save each as an MPEG-2 file.
The graphical list of video titles in the example figure also shows how video titles relate to the VOB file that contains each title. A description of VOB files and the DVD-Video Specification is beyond the scope of this document. However, the graphical information regarding VOB files may be helpful to advanced users and to WatchGuard Customer Service if additional diagnostic investigation for a given DVD disc is required.
See Playing an MPEG-2 File on page 22 for information about playing recovered video as MPEG-2 files.

37
Index A
Application running, 8
Authentication, 13 Authentication Results
failed, 16 passed, 14
Auto-Play turning off, 18
C
Chapters, 29 Closed-Captioning
turning on/off, 28 CODEC
information, 10 Contact Information, 6 Copy DVD Disc, 30 Customer Service, 6
D
Diagnostics and DVD Authentication, 11 Disc Erase, 17 DVD
authentication, 13 copying, 30 disc information, 12 main menu, 28 navigating, 29 recovering, 35 resetting, 29 speeds, 27 video player controls, 25
DVD Disc format, 17
DVD Drives configuring, 32
E
Erase DVD disc, 17
F
Feature Updates, 6
I
Installation, 7
M
Main Menu, 28 MPEG-2 Files
exporting, 33 playing video content, 23
O
Options changing, 9
P
Playback reversing, 28
R
Related Documents, 6 Reset DVD, 29
S
Snapshot copying to Clipboard, 27 saving as JPEG, 27
Software Installation, 7
T
Titles, 29 Tools Menu
options, 9 Trace Logging, 10
V
Version Information, 8 Video Content
authentication, 13 playing, 18 speeds, 27
Video Player Controls, 25 VIDEO_TS Folder
authentication, 13 main menu, 28 navigating, 29 playing video content, 21

DVD Manager Utility (DMU) Getting Started Guide WatchGuard Video 3001 Summit Avenue Plano, Texas 75074 (800) 605-6734 Toll Free Sales (866) 384-8567 Toll Free Support (972) 423-9777 Main (972) 423-9778 Fax


