Designed by ALPINE Japan 68-30368Z09-A EN FR ES DVD-VIDEO/CD PLAYER DVE-5300 • OWNER’S MANUAL Please read before using this equipment. • MODE D’EMPLOI Veuillez lire avant d’utiliser cet appareil. • MANUAL DE OPERACIÓN Léalo antes de utilizar este equipo. R R ALPINE ELECTRONICS OF AMERICA, INC. 19145 Gramercy Place, Torrance, California 90501, U.S.A. Phone 1-800-ALPINE-1 (1-800-257-4631) Thank you for purchasing this Alpine product. Please take a moment to protect your purchase by registering your product now at the following address: www.alpine-usa.com/registration . You will be informed of product and software updates (if applicable), special promotions, news about Alpine, and entered for a chance to win prizes. Merci d’avoir acheté ce produit Alpine. Nous vous invitons à consacrer un moment à la protection de votre achat en enregistrant votre produit dès maintenant à l’adresse suivante : www.alpine-usa.com/registration . Vous serez tenu informé des mises à jour des produits et des logiciels (le cas échéant), des promotions spéciales, de l’actualité d’Alpine, et vous aurez une chance de remporter des prix. Gracias por adquirir este producto Alpine. Con solo unos pocos pasos podrá proteger su producto, registrándolo a través de la siguiente dirección: www.alpine-usa.com/registration . Recibirá información sobre nuevos productos y software, promociones especiales, novedades sobre Alpine y participará en el sorteo de premios.
Transcript
Designed by ALPINE Japan68-30368Z09-A
EN
FR
ES
DVD-VIDEO/CD PLAYER
DVE-5300
• OWNER’S MANUALPlease read before using this equipment.
• MODE D’EMPLOIVeuillez lire avant d’utiliser cet appareil.
• MANUAL DE OPERACIÓNLéalo antes de utilizar este equipo.
RR
ALPINE ELECTRONICS OF AMERICA, INC.19145 Gramercy Place, Torrance,
California 90501, U.S.A.Phone 1-800-ALPINE-1 (1-800-257-4631)
Thank you for purchasing this Alpine product. Please take a moment to protect your purchase by registering your product now at the following address: www.alpine-usa.com/registration.You will be informed of product and software updates (if applicable), special promotions, news about Alpine, and entered for a chance to win prizes.
Merci d’avoir acheté ce produit Alpine. Nous vous invitons à consacrer un moment à la protection de votre achat en enregistrant votre produit dès maintenant à l’adresse suivante : www.alpine-usa.com/registration.Vous serez tenu informé des mises à jour des produits et des logiciels (le cas échéant), des promotions spéciales, de l’actualité d’Alpine, et vous aurez une chance de remporter des prix.
Gracias por adquirir este producto Alpine. Con solo unos pocos pasos podrá proteger su producto, registrándolo a través de la siguiente dirección: www.alpine-usa.com/registration.Recibirá información sobre nuevos productos y software, promociones especiales, novedades sobre Alpine y participará en el sorteo de premios.
WARNING ................................................. 5CAUTION .................................................. 5PRECAUTIONS ........................................ 6Discs playable on this unit ..................... 7
Getting StartedWhen Using the Remote Control ..................... 9Battery Replacement ........................................ 9Turning Power On and Off ............................. 10Loading and Unloading Discs ........................ 10Operating the DVE-5300 Video Player .......... 11
DVD/Video CDPlaying DVD/Video CD ................................. 12Stopping Playback .......................................... 12Fast-forwarding/Fast-reversing ...................... 12Finding the Beginning of Chapters or
Tracks .......................................................... 13Playing Still Frames (pausing) ....................... 13Frame-by-frame Playback .............................. 13Searching by Title Number (DVD only) ........ 13Searching Directly by Chapter or Track
Number ....................................................... 13Chapter/Track/Title Repeat Playback ............. 14Switching the Audio Tracks ........................... 14
Video CDs with multiplex audio ................ 14Switching the Angle (DVD only) ................... 14Switching the Subtitles (subtitle language)
(DVD only) ................................................. 14Displaying the Disc Status (DVD only) ......... 15Displaying the Disc Status
(Video CD only) .......................................... 15
CDPlayback ..........................................................16M.I.X. (Random Play) ....................................16Repeat Play .....................................................16Searching Directly by Track Number .............16
MP3/WMA/AAC/WAVPlayback ..........................................................17Selecting Folders .............................................17M.I.X. (Random Play) ....................................17Repeat Play .....................................................17Folder/File Name Search ................................18Searching Directly by File Number ................18About MP3/WMA/AAC .................................18
DVD SetupDVD Setup Operation .....................................20
Switching the Bar Color .................................. 20Setting the TV Screen ...................................... 20Delaying Image Output ................................... 21Returning to the Initial Setting ........................ 21
DVD Contents Setup ...................................21Setting the language ........................................ 21
CD Contents Setup ......................................22Playing MP3/WMA/AAC/WAV Data ............. 22Setting the Video CD Play Mode .................... 22Displaying the Disc Status Automatically
Setting the Digital Output ................................ 22Setting the Downmix Mode ............................. 22
InformationAbout DVDs ...................................................23About WAV .....................................................23Terminology ....................................................24List of Language Codes ..................................25In Case of Difficulty .......................................26Specifications ..................................................28
Installation ...................................................... 30Connections .................................................... 33System Example ............................................. 34
LIMITED WARRANTY
4-EN
Operating Instructions
DO NOT WATCH VIDEO WHILE DRIVING.Watching the video may distract the driver from looking ahead of the vehicle and cause an accident.
DO NOT OPERATE ANY FUNCTION THAT TAKES YOUR ATTENTION AWAY FROM SAFELY DRIVING YOUR VEHICLE.Any function that requires your prolonged attention should only be performed after coming to a complete stop. Always stop the vehicle in a safe location before performing these functions.Failure to do so may result in an accident.
KEEP THE VOLUME AT A LEVEL WHERE YOU CAN STILL HEAR OUTSIDE NOISES WHILE DRIVING.Excessive volume levels that obscure sounds such as emergency vehicle sirens or road warning signals (train crossings, etc.) can be dangerous and may result in an accident. LISTENING AT LOUD VOLUME LEVELS IN A CAR MAY ALSO CAUSE HEARING DAMAGE.
MINIMIZE DISPLAY VIEWING WHILE DRIVING.Viewing the display may distract the driver from looking ahead of the vehicle and cause an accident.
DO NOT DISASSEMBLE OR ALTER.Doing so may result in an accident, fire or electric shock.
USE ONLY IN CARS WITH A 12 VOLT NEGATIVE GROUND.(Check with your dealer if you are not sure.) Failure to do so may result in fire, etc.
KEEP SMALL OBJECTS SUCH AS BATTERIES OUT OF THE REACH OF CHILDREN.Swallowing them may result in serious injury. If swallowed, consult a physician immediately.
USE THE CORRECT AMPERE RATING WHEN REPLACING FUSES.Failure to do so may result in fire or electric shock.
DO NOT BLOCK VENTS OR RADIATOR PANELS.Doing so may cause heat to build up inside and may result in fire.
USE THIS PRODUCT FOR MOBILE 12V APPLICATIONS.Use for other than its designed application may result in fire, electric shock or other injury.
DO NOT PLACE HANDS, FINGERS OR FOREIGN OBJECTS IN INSERTION SLOTS OR GAPS.Doing so may result in personal injury or damage to the product.
HALT USE IMMEDIATELY IF A PROBLEM APPEARS.Failure to do so may cause personal injury or damage to the product. Return it to your authorized Alpine dealer or the nearest Alpine Service Certer for repairing.
WARNING
WARNINGThis symbol means important instructions. Failure to heed them can result in serious injury or death.
CAUTIONThis symbol means important instructions. Failure to heed them can result in injury or material property damage.
5-EN
PRECAUTIONSProduct CleaningUse a soft dry cloth for periodic cleaning of the product. For more severe stains, please dampen the cloth with water only. Anything else has the chance of dissolving the paint or damaging the plastic.
TemperatureDo not operate your unit in ambient temperature above +60°C (+140°F) or below -10°C (+14°F).
Moisture CondensationYou may notice the disc playback sound wavering due to condensation. If this happens, remove the disc from the player and wait about an hour for the moisture to evaporate.
Damaged DiscDo not attempt to play cracked, warped, or damaged discs. Playing a bad disc could severely damage the playback mechanism.
MaintenanceIf you have problems, do not attempt to repair the unit yourself. Return it to your Alpine dealer or the nearest Alpine Service Station for servicing.
Never Attempt the FollowingDo not grip or pull out the disc while it is being pulled back into the player by the automatic reloading mechanism.Do not attempt to insert a disc into the unit when the unit power is off.
Inserting DiscsYour player accepts only one disc at a time for playback. Do not attempt to load more than one disc.Make sure the label side is facing up when you insert the disc.Press to eject any disc that is inserted incorrectly.Playing a disc while driving on a very bumpy road may result in skips, but this will not scratch the disc or damage the player.
New DiscsAs a protective measure to prevent the disc from jamming, press to eject any disc with irregular surface or inserted incorrectly.When a new disc is inserted into the player and ejected after initial loading, using your finger, feel around the inside of the certer hole and outside edge of the disc. If you feel any small bumps or irregularities, this could inhibit proper loading of the disc. To remove the bumps, rub the inside edge of the hole and outside edge of the disc with a ball-point pen or other such instrument, then insert the disc again.
Irregular Shaped DiscsBe sure to use round shaped discs only for this unit and never use any special shaped discs.Use of special shaped discs may cause damage to the mechanism.
Installation LocationMake sure the DVE-5300 will not be installed in a location subjected to:
• Direct sun and heat• High humidity and water• Excessive dust• Excessive vibrations
Correct HandlingDo not drop the disc while handling. Hold the disc so you will not leave fingerprints on the surface. Do not affix tape, paper, or gummed labels to the disc. Do not write on the disc.
Disc CleaningFingerprints, dust, or soil on the surface of the disc could cause the DVD player to skip. For routine cleaning, wipe the playing surface with a clean, soft cloth from the certer of the disc to the outer edge. If the surface is heavily soiled, dampen a clean, soft cloth in a solution of mild neutral detergent before cleaning the disc.
Disc AccessoriesThere are various accessories available on the market for protecting the disc surface and improving sound quality.However, most of them will influence the thickness and/or diameter of the disc. Using such accessories can cause operational problems. We recommend not using these accessories on discs played in Alpine DVD players.
Certer Hole
Bumps
Certer HoleNew Disc
Outside (Bumps)
CORRECT
INCORRECT CORRECT
Transparent Sheet Disc Stabilizer
6-EN
Discs playable on this unitPlayable DiscsThe discs listed below can be played on this unit.
* Two-layer DVD disc compatible
Discs that cannot be playedDVD-ROMs, DVD-RAMs, CD-ROMs (excluding MP3/WMA/AAC/WAV files), photo CDs, etc.
DualDiscThis unit is not compatible with DualDisc.Using a DualDisc may cause unit malfunction, and may cause disc damage when the disc is inserted/ejected.
DVD region number (playable region number)This DVD player will play back any disc whose region number is 1 (or All). DVDs with a region number other than those listed below, cannot be played on this DVD player.
Video CDsThis DVD unit is compatible with playback control (PBC) compatible video CDs (version 2.0).“PBC” is a function by which you can use menu screens recorded on the disc to find the scene you want to watch and view various types of information in dialog style.
Using compact discs (CD/CD-R/CD-RW)If you use unspecified compact discs, correct performance cannot be guaranteed.You can play CD-Rs (CD-Recordable)/CD-RWs (CD-ReWritable) which have been recorded only on audio devices.You can also play CD-Rs/CD-RWs containing MP3/WMA/AAC/WAV formatted audio files.
• Some of the following discs may not play on this unit:Flawed discs, discs with fingerprints, discs exposed to extreme temperatures or sunlight (e.g., left in the car or this unit), discs recorded under unstable conditions, discs on which a recording failed or a re-recording was attempted, copy-protected CDs which do not conform to the audio CD industry standard.
• Use discs with MP3/WMA/AAC/WAV files written in a format compliant with this unit. For details, MP3/WMA/AAC: see page 18, WAV: see page 23.
To customers using CD-R/CD-RW• If a CD-R/CD-RW cannot be played back, make sure the last
recording session was closed (finalized).• Finalize the CD-R/CD-RW if necessary, and attempt playback
again.
Tips for making your own CDsThe DVE-5300 plays DVD Video, Video CD, Audio CD and has a built in MP3/WMA/AAC decoder.
The following information is designed to help you create your own music CDs (either Audio CD or MP3/WMA/AAC encoded CD-R/RW files).
What is the difference between an Audio and MP3/WMA/AAC CD?An Audio CD is the same format as the commercial CDs you buy in the store (also known as CD-DA). MP3 (MPEG-1 Audio Layer 3)/WMA (Windows Media Audio)/AAC (Advanced Audio Coding) is a data file that uses a compression scheme to reduce the size of the music file.*
Mark (logo)Recorded content
Disc sizeMax. playing
time
DVD Video
Audio+
Video12 cm*
One-sideddiscApprox.4 hours
Two-sideddiscApprox.8 hours
Video CD
Audio+
Video12 cm
Approx.74 Minutes
Music CD
Audio 12 cmApprox.74 Minutes
DIGITAL VIDEO
1 ALL
7-EN
Hybrid Audio CD and Data (MP3/WMA/AAC) CD-R/RW discs:The DVE-5300 can read either sector on the disc. Choose CD-DA to play the CD audio section or MP3/WMA/AAC to play the MP3/WMA/AAC section.*
Multi session CD-R/RW:Once a recording has been stopped, this is considered one session. If the disc is not closed (finalize), additional data may be added. Once this additional data has been recorded, this becomes a “multi-session” CD. The DVE-5300 can only read multi-session DATA Formatted discs (MP3/WMA/AAC files - Not Audio CD files).
Properly formatted MP3/WMA/AAC Discs:Use ISO9660 formatting to insure proper playback. You may use standard ISO naming Level 1 (8.3 DOS standard), Level 2 (32 characters) or Joliet (Windows or Macintosh long filenames) file naming conventions.*
* Please consult the Owner’s manual for additional information.
Using DVD-Rs/DVD-RWs/DVD+Rs/DVD+RWs• This unit is compatible with discs recorded in the standard
DVD-Video format.• Note that discs not finalised (processed to enable to play on
playback-only DVD players) cannot be played on this DVD player.
• Some discs may not play back, depending on the recording device and disc format.
• Discs or files utilising copy protection, may not be playable. Some recording systems may not properly format copied files to enable proper playback.
• In the following cases, the disc may not play on this unit: discs recorded by certain DVD recorders, certain irregular discs, flawed discs, dirty discs, when the pickup lens of this DVD player is dirty, or when moisture condensation has occurred inside the unit.
• Be sure to follow all cautions included with your DVD-Rs/DVD-RWs/DVD+Rs/DVD+RWs discs.
• Do not put stickers, seals, or tape on the label side of DVD-Rs/DVD-RWs/DVD+Rs/DVD+RWs.
• Compared to the regular discs, DVD-Rs/DVD-RWs/DVD+Rs/DVD+RWs are more affected by heat, moisture, and direct sunlight. If left in a car, etc., damage may occur and it might not play on this unit.
Disc terminologyTitleIf titles are programmed for the DVD, these are the largest units of division of the information recorded on the disc.
ChapterEach Title may also be divided into smaller divisions, called chapters. These can be specific scenes or musical selections.
• This product incorporates copyright protection technology that is protected by method claims of certain U.S. patents and other intellectual property rights owned by Macrovision Corporation and other rights owners. Use of this copyright protection technology must be authorized by Macrovision Corporation, and is intended for home and other limited viewing uses only unless otherwise authorized by Macrovision Corporation. Reverse engineering or disassembly is prohibited.
• The terms HDMI and HDMI High-Definition Multimedia Interface, and the HDMI Logo are trademarks or registered trademarks of HDMI Licensing, LLC in the United States and other countries.
• Manufactured under license from Dolby Laboratories. Dolby, Pro Logic and the double-D symbol are trademarks of Dolby Laboratories.
• is a trademark of DVD Format/Logo Licensing Corporation.
• Windows Media and the Windows logo are trademarks, or registered trademarks of Microsoft Corporation in the United States and/or other countries.
• MPEG Layer-3 audio coding technology licensed from Fraunhofer IIS and Thomson. Supply of this product only conveys a license for private, non-commercial use and does not convey a license nor imply any right to use this product in any commercial (i.e. revenue-generation) real time broadcasting (terrestrial, satellite, cable and/or any other media), broadcasting/streaming via internet, intranets and/or other networks or in other electronic content distribution systems, such as pay-audio or audio-on-demand applications. An independent license for such use is required. For details, please visit http://www.mp3licensing.com
On handling compact discs (CD/CD-R/CD-RW)• Do not touch the surface.• Do not expose the disc to direct sunlight.• Do not affix stickers or labels.• Clean the disc when it is dusty.• Make sure that the disc is smooth and flat.• Do not use commercially available disc accessories.
Do not leave the disc in the car or the unit for a long time. Never expose the disc to direct sunlight.Heat and humidity may damage the disc and you may not be able to play it again.
8-EN
When Using the Remote Control• When you first use the remote control, please remove
the insulation sheet in the battery case.• Point the remote control at the remote sensor within
about 2 meters.• It may not be possible to operate the remote control if
the remote control sensor is exposed to direct sunlight.
• The remote control is a small, lightweight precision device. To avoid damage, short battery life, operational errors and poor response, observe the following. - Do not subject the remote control to excessive
shock.- Do not put in a trouser pocket.- Keep away from food, moisture and dirt.- Do not place in direct sunshine.
Battery ReplacementBattery type: CR2025 battery or equivalent.
1 Opening the battery caseSlide out the battery cover while firmly pressing in the direction of the arrow.
2 Replacing the batteryPut the battery in the case with the (+) indication upward as shown in the illustration.
• Placing a battery in backwards way may cause a malfunction.
Getting Started
9-EN
3 Closing the coverSlide the cover as illustrated until a click is heard.
Turning Power On and Off
1 Press of the remote control.The power turns on.
2 To turn the power off, press again.
Loading and Unloading DiscsTurn on the power before loading and unloading discs. (Refer to “Turning Power On and Off” on page 10.)
Insert the disc with the label side facing upwards.Once the disc is partially inserted, it is drawn in automatically. Playback starts.
• If the ignition key is on ACC or ON, a disc can be inserted even when the power is OFF.
• For two-sided DVDs, play one side of the disc to the end, then unload the disc, turn it over and reload it to play the other side.
• Never insert map discs for navigation purposes as they could damage the equipment.
• If wrong disc, upside-down discs or dirty discs have been inserted, “DISC ERROR” is displayed. Press and eject the disc.
Press .Be sure to remove the disc.
• If the disc is not removed within a few moments, it will be reloaded automatically.
• If the ignition key is set to ACC or ON, a disc can be removed even when the power is OFF. After removing the disc, the power turns OFF again automatically.
• During ACC OFF or while the disc is being loaded (“LOADING” is displayed), the disc will not be ejected even if you press .
WarningDO NOT OPERATE ANY FUNCTION THAT TAKES YOUR ATTENTION AWAY FROM SAFELY DRIVING YOUR VEHICLE.Any function that requires your prolonged attention should only be performed after coming to a complete stop. Always stop the vehicle in a safe location before performing these functions. Failure to do so may result in an accident.
Play Position Memory FunctionIf you turn power off or switch the ignition key to OFF during playback, playback will continue from the point where playback stopped when the power is turned ON again. The play position memory is canceled when the disc is removed.
Loading discs
Unloading discs
10-EN
Operating the DVE-5300 Video Player
(POWER) buttonTurns the power ON and OFF.
DISP. buttonDisplays playback status on the screen.
ENT. buttonDetermines the selected item.
REPEAT buttonRepeats playback.
buttonSelects MP3/WMA/AAC/WAV folders.
AUDIO buttonVideo CD: Switches the audio output.DVD: Switches the audio language.
SUBTITLE buttonSwitches the subtitle (DVD only).
CLR (ALL CLR) buttonRemoves numbers (one character at a time) that have been selected and input.Press and hold for 2 seconds. All the characters which were selected and input are erased.
ANGLE buttonSwitches the angle (DVD only).
buttonCD mode: Press the button to go back to the beginning
of the current track. Press and hold to fast reverse.
MP3/WMA/AAC/WAV mode:Press the button to go back to the beginning of the current file. Press and hold to fast reverse.
DVD/Video CD mode:• Move to the desired position on the disc.• During playback, press and hold for more
than 1 second to reverse the disc at double speed. Hold for more than 5 seconds to reverse the disc at 8 times the normal speed. Hold for more than 10 seconds to reverse the disc at 32 times the normal speed.
• The picture is reversed by one frame each time the button is pressed in the pause mode (DVD only).
/ buttonSwitches between play and pause.
MENU buttonVideo CD: Switches between PBC On and Off.DVD: Displays the DVD menu.
SETUP buttonDisplays the SETUP (initial setting) screen.
• Please setup before insert the disc or during stop status.
buttonSelects MP3/WMA/AAC/WAV folders.
RETURN buttonReturns to the selection screen just prior to the current screen.
, , , buttonsSelects the items displayed on the screen.
M.I.X. buttonM.I.X. play for CDs and MP3/WMA/AAC/WAV.
Numeric KeypadInputs numbers.
LIST buttonMP3/WMA/AAC/WAV Folder and File Search.
buttonCD mode: Press the button to advance to the beginning
of the next track. Press and hold to fast forward.
MP3/WMA/AAC/WAV mode:Press the button to advance to the beginning of the next file. Press and hold to fast forward.
DVD/Video CD mode:• Move to the desired position on the disc.• During playback, press and hold for more
than 1 second to forward the disc at double speed. Hold for more than 5 seconds to forward the disc at 8 times the normal speed. Hold for more than 10 seconds to forward the disc at 32 times the normal speed.
• The picture is forwarded by one frame each time the button is pressed in the pause mode.
TOP M. buttonDisplays the Top Menu (DVD only).
buttonStops the playback.
• Operation may not be possible depending on the type of disc and the playback conditions. At such a time the following mark is displayed on the screen:
11-EN
Playing DVD/Video CD
Insert a disc with the label side facing up.To load discs, see “Loading and Unloading Discs” on page 10. Playback starts.
• The reverse side of a double-sided DVD will not be played automatically. Remove the disc, turn it over, and reinsert it.
• It may take some time before playback starts after loading a disc.
On DVDs and video CDs with playback control (PBC), menu screens may appear automatically. If this happens, perform the operation described below to start playback.
• For many discs, the menu screen can also be displayed by pressing MENU.
DVD menuPress , , or to select the desired item, then press ENT.
• For some discs it is possible to select items directly from the menu screen using the number keys (“0” to “9”).
Video CD menuUse the number keys (“0” to “9”) to select the desired number, then press ENT.
• The menu screen does not appear when the PBC function is turned off. In this case, press MENU to turn on the PBC function.
Stopping PlaybackPress during playback.“STOP” is displayed, and playback stops.
• Playback starts from the beginning when / is pressed while playback is stopped.
Fast-forwarding/Fast-reversing
1 During playback, press and hold (fast-reverse) or (fast-forward) .When pressed for more than 1 second, the disc is forwarded/reversed at double speed.When held for 5 more seconds, the disc is forwarded/reversed at 8 times the normal speed.When held for 10 more seconds, the disc is forwarded/reversed at 32 times the normal speed.
2 Release or to return to normal playback.
• No sound appears during fast-forward/fast-reverse.• For DVDs and video CDs with playback control (PBC), the menu
screen may reappear during fast-forwarding/fast-reversing.• This operation may not be possible on certain discs.
DVD/Video CD
Caution• Not all functions will operate for every DVD. See the individual
DVD’s instructions for details on the features supported.• Fingerprints on a disc may adversely affect playback. If a
problem occurs, remove the disc and check for fingerprints on the playback side. Clean the disc if necessary.
• When using the remote control, be careful to press one button at time. Pressing multiple buttons at the same time may cause erroneous operation.
• If you switch the power or ignition key OFF during playback, playback will continue where you left off when you resume playback.
• If you try to perform an invalid operation (based on the type of disc being played), the following mark is displayed on the monitor screen:
DISP.RETURN
Numberkeys(0 to 9)
AUDIO
ENT.
REPEAT
SUBTITLECLR
ANGLE
MENU
o
u
a
p
e
d
i
If a menu screen appears
12-EN
Finding the Beginning of Chapters or TracksDuring playback, press or .The chapter/track switches each time the button is pressed, and playback of the selected chapter/track starts.
• Some DVDs do not have chapters.• The beginning of a track may not be found on the Video CD equipped
with PBC (playback control). Press MENU to turn the PBC function off.
Playing Still Frames (pausing)
1 During playback, press / .
2 Press / to resume playback.
• No sound is played during the still mode.• The image or sound may stop temporarily when playback starts from
the pause mode. This is not a malfunction.
Frame-by-frame Playback
1 In the pause mode, press or .The picture advances or reverses by one frame each time the button is pressed.
2 Press / to resume normal playback.
• No sound is played during frame-by-frame playback.• For video CD, reverse frame-by-frame playback is not available.
Searching by Title Number (DVD only)Use this function to easily find positions on the DVD using the DVD’s title.
1 When playback stops, input the number of the title you want to play using the number keys (“0” to “9”).
2 Press ENT.Playback starts from the selected title number.
• This function cannot be used on discs on which no title numbers are recorded.
• Press CLR to delete the last digit in the title number. Press and hold CLR for at least 2 seconds to clear all title numbers.
• Press RETURN to cancel the title search mode.• Depending on the number of digits input, playback may start
automatically even if ENT. is not pressed in step 2.
Searching Directly by Chapter or Track NumberUse this function to easily move to the beginning of the chapters or tracks on the disc.
1 During playback, input the number of chapter or track you desire by using the number keys (“0” to “9”).
2 Press ENT.Playback starts from the selected chapter or track.
• This function cannot be used on discs on which no chapter numbers are recorded.
• The beginning of a track number may not be directly found on the Video CD equipped with PBC (playback control). Press MENU to turn the PBC function off.
• Depending on the number of digits input, playback may start automatically even if ENT. is not pressed in step 2.
• Press CLR to delete the last digit in the chapter/track number. Press and hold CLR for at least 2 seconds to clear “Chapter” and “Track” numbers.
• Press RETURN to cancel the chapter/track search mode and resume normal playback.
: Press this to start playback from the beginning of the following chapter or track.
: Press this to start playback from the beginning of the current chapter or track.Press repeatedly to start playback from the beginning of a previous chapter or track.
Supplementary explanation“Chapters” are divisions of movies or musical selections on DVDs.“Tracks” are divisions of movies or musical selections on video and music CDs.
13-EN
Chapter/Track/Title Repeat PlaybackUse this function to play the disc’s titles, chapters or tracks repeatedly.
During playback, press REPEAT.The repeat mode switches each time the button is pressed.
DVD
VIDEO CD
• The track/disc repeat modes cannot be used on video CDs with playback control (PBC). Press MENU to turn the PBC function off.
• For some discs it is not possible to switch the repeat mode.
Switching the Audio TracksDVDs can have up to 8 different audio tracks. These alternate tracks can be switched during playback.
During playback, press AUDIO.The sound switches between the alternate audio tracks recorded on the disc each time the button is pressed.
• The selected alternate track becomes the default setting every time the power is turned on or the disc is replaced. If the disc does not include that track, the disc’s default language is selected instead.
• Not all discs will allow changing the alternate audio tracks during playback. In these cases, select audio tracks from the DVDs menu.
• There may be a delay before the selected alternate track begins to play.
During playback, press AUDIO.The left and right channels will be output as shown in the figure below, each time the button is pressed.
Switching the Angle (DVD only)On DVDs in which scenes have been filmed from multiple angles, the angle can be switched during playback.
During playback, press ANGLE.The angle switches between the angles recorded on the disc each time the button is pressed.
• Some time may be required for the angle to change.• Depending on the disc, the angle may switch in one of two ways.
- Seamless: The angle switches smoothly.- Non-seamless: When the angle is switched, a still picture is
displayed first, after which the angle switches.
Switching the Subtitles (subtitle language) (DVD only)With multiple subtitle language DVDs, the subtitle language can be switched during playback, or subtitles can be hidden.
During playback, press SUBTITLE.The subtitle switches between the languages recorded on the disc and OFF each time the button is pressed.
• There may be a delay before the selected subtitle appears.• Not all discs will allow changing the subtitles during playback. In
these cases, select subtitles from the DVD's menu.• The selected subtitle language becomes the default setting every time
the power is turned on or the disc is replaced. If the disc does not include that language, the disc’s default language is selected instead.
• For some discs, the subtitles will be displayed even when this is set to off.
Video CDs with multiplex audio
LR LL RR LR
The chapter is played repeatedly.
The title is played repeatedly.
The mode returns to normal playback. (Factory default)
Chapter (RPT CHAPTER)
Title (RPT TITLE)
Off (RPT OFF)
The track is played repeatedly.
Playback does not repeat. (Factory default)
Track (RPT TRACK)
Off (RPT OFF)
TipsSwitching from the disc menuFor some discs, the audio language, angle and subtitles can be switched from the disc menu.
1 Press MENU, select the item, then press ENT.2 Press , , or to select the language or angle,
then press ENT.(For some discs, they can be selected using the number keys (“0” to “9”) while the language or the angle menu is displayed.)
14-EN
Displaying the Disc Status (DVD only)Use the procedure described below to display the status (title number, chapter number, etc.) of the currently playing DVD on the monitor screen.
During playback, press DISP.The playback status is displayed.
The playback status display closes when pressed DISP. again.
Displaying the Disc Status (Video CD only)Use the procedure described below to obtain an on-screen display of the status (track number, etc.) of the currently playing video CD on the monitor screen.
During playback, press DISP.The playback status is displayed.
The playback status display closes when pressed DISP. again.
• When PBC is set to On, the current track number and track playback time is not displayed.
A u d i o : E N G 1 / 4 DOLBY D3 / 2 .1
SubT. : JPN 11 / 22 ANGLE: 1 / 3
181
0 1 : 2 3 ' 4 5 "O f f
DVD–V NTSC
Playback diskTV system(NTSC or PAL)
Current chapternumber
Chapter playback time
Current audio numberCurrent subtitlenumber
Current angle number
Current titlenumber
Playbackstatus Repeat setting
(Default setting -repeat off)
Current audiolanguage
Current subtitlelanguage
P B C O f f
A u d i o : L R1 2 ' 3 4 "
O f f
VCD
1
Current audiostatus
Playback disk
Current tracknumber
Playbackstatus
Playback control(PBC)
Repeat setting (Default setting - repeat disc)
Track playback time
15-EN
Playback
1 Insert a disc with the label side facing up.To load discs, see “Loading and Unloading Discs” on page 10.Playback starts.
2 During playback, press or to select the desired track.
Returning to the beginning of the current track :Press .Press repeatedly to start playback from the beginning of a previous track.
Fast backward :Press and hold .
Advancing to the beginning of the next track :Press .
Fast forward :Press and hold .
3 To pause playback, press / .Pressing / again will resume playback.
• CD playback information (track no., TEXT etc.) will be displayed on the monitor during playback.
M.I.X. (Random Play)Press M.I.X. in the play or pause mode.The tracks on the disc will be played back in random sequence.
To cancel M.I.X. play, press M.I.X. again.
• If the M.I.X. mode is activated during Repeat playback, the Repeat Play mode will be canceled.
Repeat PlayPress REPEAT to play back repeatedly the track being played.The track will be played repeatedly.
Press REPEAT again and select OFF to deactivate repeat play.
• If the Repeat Play mode is activated during M.I.X. playback, the M.I.X. mode will be canceled.
Searching Directly by Track NumberUse this function to easily move to the beginning of the tracks on the disc.
1 Input the number of track you desire by using the number keys (“0” to “9”).
2 Press ENT.Playback starts from the selected track.
• Depending on the number of digits input, playback may start automatically even if ENT. is not pressed in step 2.
• Press CLR to delete the last digit in the track number. Press and hold CLR for at least 2 seconds to clear “Track” numbers.
• Press RETURN to cancel the track search mode and resume normal playback.
CD
RETURN
Numberkeys(0 to 9)
ENT.
REPEAT
CLR
a
d
M.I.X.
16-EN
PlaybackThe DVE-5300 will play back MP3/WMA/AAC/WAV files stored on CD-Rs and CD-RWs. The format used must be compliant with ISO9660 level 1 or level 2.For further information about playing or storing MP3/WMA/AAC files, refer to page 18 before using the unit.
1 Insert a disc containing an MP3/WMA/AAC/WAV file with the label side facing up.To load discs, see “Loading and Unloading Discs” on page 10.
2 Press or to select the desired track.
Returning to the beginning of the current track :Press .Press repeatedly to start playback from the beginning of a previous track.
Fast backward :Press and hold .
Advancing to the beginning of the next track :Press .
Fast forward :Press and hold .
3 To pause playback, press / .Pressing / again will resume playback.
• MP3/WMA/AAC/WAV playback information (folder no., file no., tag information, etc.) will be displayed on the monitor during playback.
• The unit can play discs containing audio data and MP3/WMA/AAC/WAV data.
• For MP3/WMA/AAC/WAV discs, some time may be required until playback starts.
• Some discs will not play back depending on the writing or MP3 conversion software used for the disc. In that case, try other software.
• Any file protected by DRM (Digital Rights Management) copy protection, cannot be played back on this unit.
• During playback of a VBR (Variable Bit rates) file, the file or elapsed time may not be correctly displayed.
Selecting FoldersPress or to select the folder.
• If is pressed during M.I.X. disc playback, new files will be played back in a random sequence. If is pressed, the beginning of the current file will be played back.
M.I.X. (Random Play)Press M.I.X. in the play or pause mode.The M.I.X. mode switches each time the button is pressed.
Press M.I.X. to deactivate the M.I.X. play.
• If the M.I.X. mode is activated during Repeat playback, the Repeat Play mode will be canceled.
Repeat PlayDuring playback, press REPEAT.The repeat mode switches each time the button is pressed.
Press REPEAT again and select Off (RPT OFF) to deactivate the repeat play.
• If the Repeat Play mode is activated during M.I.X. playback, the M.I.X. mode will be canceled.
MP3/WMA/AAC/WAV
RETURN
Numberkeys(0 to 9)
ENT.
REPEAT
CLR
u
a
d
i
LIST
M.I.X.
Only files in a folder are played back in a random sequence.
The files on the disc will be played back in a random sequence.
(factory default)
Folder (M.I.X. FOLDER)
(M.I.X.)
Off (M.I.X. OFF)
The file is played back repeatedly.
Only files in a folder are repeatedly played back.
The mode returns to normal. (Factory default)
File (RPT FILE)
Folder (RPT FOLDER)
Off (RPT OFF)
17-EN
Folder/File Name SearchYou can display the names of folders/files and search for a folder/file to play.
1 Press LIST during playback.The Folder Name list is displayed.
2 Press or to select a folder name, then press ENT.The File Name list of the selected folder is displayed.
3 Press or to select a file name, then press ENT.The selected file is played back.
• When there are 9 or more names on the list, a page number is displayed. Press or to change the page.
• Press RETURN to deactivate the Search mode during the Folder Name Search mode.
• While in File Name Search mode, press RETURN to switch to Folder Name Search mode.
• While in Folder Name Search/File Name Search mode, press LIST to cancel the Folder Name Search/File Name Search mode.
Searching Directly by File NumberUse this function to easily move to the beginning of the files on the disc.
1 Input the number of file you desire by using the number keys (“0” to “9”).
2 Press ENT.Playback starts from the selected file.
• Depending on the number of digits input, playback may start automatically even if ENT. is not pressed in step 2.
• Press CLR to delete the last digit in the file number. Press and hold CLR for at least 2 seconds to clear “File” numbers.
• Press RETURN to cancel the file search mode and resume normal playback.
About MP3/WMA/AAC
What is MP3?
MP3, whose official name is “MPEG Audio Layer 3”, is a compression standard prescribed by the ISO, the International Standardisation Organisation and MPEG which is a joint activity institution of the IEC.
MP3 files contain compressed audio data. MP3 encoding is capable of compressing audio data at extremely high ratios, reducing the size of music files to as much as one-tenth their original size. This is achieved while still maintaining near CD quality. The MP3 format realizes such high compression ratios by eliminating the sounds that are either inaudible to the human ear or masked by other sounds.
What is WMA?
WMA, or “Windows Media™ Audio”, is compressed audio data.WMA is similar to MP3 audio data.
What is AAC?
AAC is the abbreviation for “Advanced Audio Coding”, and is a basic format of audio compression used by MPEG2 or MPEG4.
Method for creating MP3/WMA/AAC files
Audio data is compressed using software with MP3/WMA/AAC codecs. For details on creating MP3/WMA/AAC files, refer to the user’s manual for that software.MP3/WMA/AAC files that are playable on this device have the file extensions.MP3: “mp3”WMA: “wma” (ver. 7.x, 8.x, 9.x are supported)AAC: “m4a”WMA is not supported for the following files, Windows Media Audio Professional, Windows Media Audio 9 Voice or Windows Media Audio 9 Pro Lossless.
There are many different versions of the AAC format. Confirm that the software being used conforms to the acceptable formats listed above. It’s possible that the format may be unplayable even though the extension is valid. Playback of AAC files encoded by iTunes is supported.
Supported playback sampling rates and bit rates
MP3
WMA
AAC
This device may not play back correctly depending on sampling rates.
ID3 tags/WMA tags
This device supports ID3 tag v1.0, v1.1, v2.2, v2.3, v2.4, and WMA tag Ver.1.x. If tag data is in an MP3/WMA/AAC file, this device can display the title (track title), artist name, and album name ID3 tag/WMA tag data (maximum 64 characters).For non-supported characters, “?” is displayed.The number of characters may be limited, or not correctly displayed, depending on the tag information.
Producing MP3/WMA/AAC discs
MP3/WMA/AAC files are prepared, then written to a CD-R or CD-RW (DVD-R/DVD-RW/DVD+R/DVD+RW) using CD-R writing software. A disc can hold up to 4,096 files/256 folders (including Root Folders). Playback may not be performed if a disc exceeds the limitations described above.
Media supported
The media that this device can play back are CD-Rs, CD-RWs, DVD-R, DVD-RW, DVD+R and DVD+RW.
CAUTIONExcept for private use, duplicating audio data (including MP3/WMA/AAC data) or distributing, transferring, or copying it, whether for free or for a fee, without permission of the copyright holder is strictly prohibited by the Copyright Act and by international treaty.
This device supports discs formatted with ISO9660 Level 1 or Level 2.
Under the ISO9660 standard, there are some restrictions toremember.The maximum nested folder depth is 8 (including the root directory). The number of characters for a folder/file name is limited.Valid characters for folder/file names are letters A-Z (all caps), numbers 0-9, and ‘_’ (underscore).
This device also can play back discs in Joliet, Romeo, etc., and other standards that conform to ISO9660. However, sometimes the file names, folder names, etc., are not displayed correctly.
Formats supported
This device supports Mixed Mode CD, Enhanced CD (CD-Extra) and Multi-Session.This device cannot correctly play back discs recorded with Track At Once or packet writing.
Order of files
Files are played back in the order that the writing software writes them to the disc. Therefore, the playback order may not be what is expected. Verify the writing order in the software’s documentation. The playback order of the folders and files is as follows.
* The folder No./folder Name will not be displayed if no file is contained in the folder.
Bit rateThis is the “sound” compression rate specified for encoding. The higher the bit rate, the higher the sound quality, but also the larger the files.
Sampling rateThis value shows how many times per second the data is sampled (recorded). For example, music CDs use a sampling rate of 44.1 kHz, so the sound is sampled (recorded) 44,100 times per second.The higher the sampling rate, the higher the sound quality, but also the larger the volume of data.
EncodingConverting music CDs, WAVE (AIFF) files, and other sound files into the specified audio compression format.
TagSong information such as track title, artist names, album names, etc., written into MP3/WMA/AAC files.
Root folderThe root folder (or root directory) is found at the top of the file system. The root folder contains all folders and files. It is created automatically for all burned discs.
Root Folder
Folder MP3/WMA/AAC/WAV File
Terminology
19-EN
DVD Setup Operation
1 Press SETUP before inserting a disc, or when in stop mode.The setup menu appears on the monitor.
2 Press or to select the desired setup item, then press ENT.
Setting items: System Setup / DVD Contents Setup / CD Contents Setup / Audio Setup
3 Select setting items or setting contents you want to change in the selected setup by pressing , , ,
, and press ENT.
Setting itemsSystem Setup:
Bar Color / TV Screen / Video Delay / Setup InitializeDVD Contents Setup:
LanguagesCD Contents Setup:
CD Play Mode / VCD Play Mode / Auto DisplayAudio Setup:
Digital Out / Downmix Mode
4 Press RETURN repeatedly to exit setup mode.
• When settings are changed, old settings are overwritten. Make a note of the current settings before making changes. If the vehicle’s battery is disconnected, the settings will be cleared and will return to the factory settings.
Switching the Bar ColorSelect the colors (8) used for highlighting items in the System Setup screen.
Setting item: Bar ColorSetting contents: Blue / Green / Light blue / Amber (Initial
setting) / Aqua blue / Yellow / Red / White
Setting the TV ScreenUse the procedure described below to set the output screen according to the type of TV monitor being used.
• For some discs, the picture may not be set to the selected screen size. (For details, refer to the explanation on the disc’s jacket.)
• Press RETURN to return to the previous screen.
DVD Setup
The following steps 1 to 4 are common operations to eachsetting item of DVD settings. Refer to each section for details.
Numberkeys(0 to 9)
RETURNENT.
o
u
p
i
SETUP
S y s t e m S e t u p
D V D C o n t e n t s S e t u pC D C o n t e n t s S e t u pA u d i o S e t u p
Setup
System Setup
20-EN
16 : 9 (Wide)Select this when connected to a wide screen TV.
4 : 3 LB (Letter Box)Select this when connected to a conventional 4:3 size (normal TVaspect ratio) monitor. There may be black bands visible at the top and bottom of the screen (when playing a 16:9 size movie). The width of these stripes will depend upon the original aspect ratio of the theater release of the movie.
4 : 3 PAN (Pan Scan)Select this when connected to a conventional 4:3 size monitor. The picture will fill the entire TV screen. However, due to the mismatch in aspect ratio, parts of the movie at the extreme left and right sides will not be visible (when playing a 16:9 size movie).
Delaying Image OutputUse this function when an external audio processor is connected. Depending on the connected audio processor, the audio and image currently played back may not be output at the same time. In this case, you can output an image delayed by 0.1 second by setting to On.
Setting item: Video DelaySetting contents: Off (Initial setting) / On
• If a disc with a high compression rate is played back, the image and audio may be distorted.
Returning to the Initial SettingYou can return the contents you previously set to the initial factory settings.
Setting item: Setup InitializeSetting contents: Yes / No (Initial setting)
Setting the languageThe audio language, subtitle language and menu language can be set according to your preferences.Once set, this becomes the default language. This function is convenient when you always want to listen in English. (Not all discs allow changing the default language. If not, the factory default language applies.)
Setting item: LanguagesSetting contents: Audio / Subtitle / Menu
Further Setting contents: Auto *1 (Initial setting) / Off *2 (Subtitle only) / English / French / Japanese / Italian / German / Swedish / Spanish / Chinese / Russian / Others *3
*1 AutoThe disc is played with the audio language or subtitle language set as the priority language for the disc.
*2 OffSubtitles are not displayed. (Subtitle only)
*3 OthersSet this to play the disc with a language other than one of the languages displayed. Press ENT. , then use the numeric keypad (“0” to “9”) to input the 4-digit language code. Then press ENT. again. For the language codes, refer to “List of Language Codes” (page 25).
• If you change the language setting when the disc is in the unit, the setting is decided with one of the following operations.-Disc (disc) eject.-Turn OFF the main unit.-Switch the source on the head unit.
• To temporarily change the language of the current disc, either do so from the DVD menu or using the operation described in the section “Switching the Audio Tracks” (page 14).
• If the disc does not include the selected language, the disc’s default language is set.
• Languages set upon shipment from the factory:Audio language : AutoSubtitle language : AutoMenu language : Auto
• Press RETURN to return to the previous display.
On: Output image is delayed by 0.1 second.
Yes: Returns to the initial setting.
No: Does not returns to the initial setting.
DVD Contents Setup
Audio: Set the audio track language.
Subtitle: Set the language of the subtitles displayed on the screen.
Menu: Set the language used for the menus (title menu, etc.).
21-EN
Playing MP3/WMA/AAC/WAV Data
Setting item: CD Play ModeSetting contents: CD-DA (Initial setting) / CompressThis unit can play back CDs containing both CD and MP3/WMA/AAC/WAV data (created in Enhanced CD (CD Extra) format).
• Perform this setting before inserting a disc. If a disc has already been inserted, remove it first.
Setting the Video CD Play ModeWhen playing a Playback Control (PBC) enabled video CD, you can choose to set PBC On or Off.
Setting item: VCD Play ModeSetting contents: PBC On (Initial setting) / PBC Off
• You can set PBC On or Off directly by pressing MENU.
Displaying the Disc Status Automatically (CD/MP3/WMA/AAC/WAV Only)When playing a CD/MP3/WMA/AAC/WAV file, you can choose to display the Disc Status(track number,etc.) automatically.
Setting item: Auto DisplaySetting contents: Off/On (Initial setting)
Setting the Digital OutputUse the following procedure to set the digital audio signal output from the DVE-5300.
Setting item: Digital OutOutput Modes: Dolby D / DTS
Compress: Only MP3/WMA/AAC/WAV data can be playedback.
PBC On: The PBC menu is displayed.
PBC Off: The PBC menu is not displayed.
On: The Disc Status is displayed automatically while playing back.
Off: Disc Status is not displayed automatically while playing back.
Audio Setup
Bitstream: Select “Bitstream” when you want to connect a digital audio processor to play Dolby Digital or DTS audio. When “Bitstream” is selected, the HDMI audio will be muted. The DVE-5300 optical output must be used for the external processor.
LPCM: The audio signal recorded on the disc is converted to 48 kHz/16 bit (for DVDs) or 44.1 kHz (for video CDs and CDs) linear PCM audio signals for output.
Disc Audio recording format Digital
output setting
Optical digital audio output
(when a digital audio processor
is connected)
Digital audio output (HDMI
output)Format Fs Q
LPCM (DVD, CD)
48/96kHz 16/20/24bit
BitstreamLPCM 2ch Down mix
(48kHz/16bit)
⎯
LPCMLPCM
2ch Down mix (48kHz/16bit)
44.1kHz 16bit
BitstreamLPCM 2ch
(44.1kHz/16bit)
⎯LPCM LPCM 2ch
(44.1kHz/16bit)
Dolby Digital (DVD)
48kHz 16/18/20bit
Bitstream Bit stream (Max 7.1ch) ⎯
LPCM Decoded 2ch
Down mix (48kHz/16bit)
Decoded 2ch Down mix
(48kHz/16bit)
DTS (DVD, CD)
48/96kHz 16/20/24bit
Bitstream Bit stream (Max 6.1ch) ⎯
LPCM Decoded 2ch
Down mix (48kHz/16bit)
Decoded 2ch Down mix
(48kHz/16bit)
44.1kHz 16/20/24bit
Bitstream Bit stream (Max 5.1ch) ⎯
LPCM Decoded 2ch
Down mix (44.1kHz/16bit)
Decoded 2ch Down mix
(44.1kHz/16bit)
MPEG1 (DVD, Video CD)
48kHz 16bit
Bitstream Bit stream (Max 5.1ch) ⎯
LPCM Decoded 2ch
Down mix (48kHz/16bit)
Decoded 2ch Down mix
(48kHz/16bit)
44.1kHz 16bit
Bitstream Bit stream ⎯LPCM Decoded 2ch
(44.1kHz/16bit) Decoded 2ch (44.1kHz/16bit)
MPEG2 (DVD) 48kHz 16bit
Bitstream Bit stream (Max 5.1ch) ⎯
LPCM Decoded 2ch
Down mix (48kHz/16bit)
Decoded 2ch Down mix
(48kHz/16bit)
MP3/WMA/AAC
8/11.025/12/16/
22.05/24/32/44.1/48kHz
16bit
Bitstream Decoded 2ch
(32kHz, 44.1kHz or
48kHz/16bit)
⎯
LPCM
Decoded 2ch (32kHz,
44.1kHz or 48kHz/16bit)
WAV 44.1kHz 16bit
Bitstream Decoded 2ch (44.1kHz/16bit)
⎯LPCM Decoded 2ch
(44.1kHz/16bit)
Stereo: Stereo Downmix.
Surround Encoded:Surround compatible Downmix.
22-EN
About DVDsMusic CDs and DVDs have grooves (tracks) in which the digital data is recorded. The data is represented as microscopic pits recorded into the track – these pits are read by a laser beam to play the disc. On DVDs, the density of the tracks and pits is twice that of CDs, so DVDs can contain more data in less space.
A 12 cm disc can contain one movie or about four hours of music. In addition, DVDs provide sharp picture quality with vivid colors thanks to a horizontal resolution of over 500 lines (compared to less than 300 for VHS tape). With the addition of an optional, digital audio processor (PXA-H800, etc.), you can recreate the power and presence of a movie theater with Dolby Digital 5.1-channel Surround.
In addition, DVDs offer a variety of functions.
• Multiple audio* (page 14)Movies can be recorded in up to eight languages. The desired language can be selected from the remote control.
• Multi angle function* (page 14)When the DVD contains a movie shot from multiple angles, the desired angle can be selected from the remote control.
• Subtitles function* (page 14)Movies can include subtitles in up to 32 languages. The desired subtitle language can be selected from the remote control.
• Multi story function*With this function, a single movie includes various story lines. You can select different story lines to view various versions of the same movie.Operation differs from disc to disc. Story line selection screens including instructions appear during the movie. Just follow the instructions.
* The functions, audio languages, subtitle languages, angles, etc., differ from disc to disc. For details, refer to the disc’s instructions.
About WAVWAV, whose official name is “WAVE FORMAT” is a standard format of Windows® audio file.• Extension: “.wav”• Sampling rate: 44.1 kHz• Quantization bit number: 16• Channel number: up to 2ch• Format: PCM only
Information
CDs
Minimum pitlength -0.9 µm
1.2 mmTrack pitch - 1.6 µm
DVDs
Minimum pit length - 0.9 µm
0.6 mm Track pitch - 0.74 µm0.6 mm
23-EN
Terminology
Dolby Digital is a digital audio compression technology developed by Dolby Laboratories that allows large quantities of audio data to be efficiently recorded on discs. It is compatible with audio signals from mono (1 channel) all the way up to 5.1-channel surround sound. The signals for the different channels are completely independent, and since the sound is high quality digital there is no loss of sound quality.
* The separately sold digital audio processor (PXA-H800, etc.) is required to enjoy full 5.1-channel surround sound.
This is a home-use digital sound format of the DTS Sound System. This is a high quality sound system, developed by Digital Theater Systems, Inc. for use in movie theaters. DTS has six independent sound tracks. The theater presentation is fully realized in the home, etc. DTS is the abbreviation for Digital Theater System.
* To enjoy DTS surround sound you need the separately sold DTS digital audio processor (PXA-H800, etc.). The DVD video software must also have a DTS sound track.
Dolby Pro Logic is the technology used to decode programs encoded in Dolby Surround. Pro Logic decoding will provide you with four channels of sound (front left/right, certer and monaural rear surround) from a 2-channel (stereo) source.
* The separately sold digital audio processor (PXA-H800, etc.) is required to enjoy Dolby Pro Logic surround sound.
Dolby Pro Logic II plays 2-channel sources in 5 channels over the entire frequency range.This is done with an advanced, high sound quality matrix surround decoder which draws out the spatial properties of the original recording without adding any sounds to or changing the sound of the source.
* The separately sold digital audio processor (PXA-H800, etc.) is required to enjoy Dolby Pro Logic II surround sound.
LPCM is a signal recording format used for music CDs. Whereas music CDs are recorded at 44.1 kHz/16 bits, DVDs are recorded at 48 kHz/16 bits to 96 kHz/24 bits, thereby achieving higher sound quality than music CDs.
Dolby Digital
DTS
Center speaker
Front speakers
Rear speakers
Subwoofer
Speaker layout for enjoying Dolby Digital sound/dts sound
Dolby Pro Logic
Dolby Pro Logic II
Linear PCM audio (LPCM)
24-EN
List of Language Codes(For details, see page 21.)
Langua g e Kirundi Romanian Russian Kin y arwanda Sanskrit Sindhi Sangho Serbo-Croatian Singhalese Slo v ak Slo v enian Samoan Shona Somali Albanian Serbian Sis w ati Sesotho Sundanese Sw edish Swahili T amil T elugu T ajik Thai Tig riny a T ur kmen T agalog Sets w ana T onga T ur kish Tsonga T atar T wi Ukrainian Urdu Uzbek Vietnamese V olapuk W olof Xhosa Y or uba Chinese Zulu
Abbre viation AA AB AF AM AR AS AY AZ BA BE BG BH BI BN BO BR CA CO CS CY DA DE DZ EL EN EO ES ET EU FA FI FJ FO FR FY GA GD GL GN GU HA HI HR HU HY IA
Language Af ar Abkhazian Afr ikaans Amhar ic Arabic Assamese A ymara Az erbaijani Bashkir By elorussian Bulgar ian Bihari Bislama Bengali, Bangla Tibetan Breton Catalan Corsican Czech W elsh Danish Ger man Bhutani Greek English Esperanto Spanish Estonian Basque P ersian Finnish Fiji F aroese F rench F r isian Ir ish Scots Gaelic Galician Guarani Gujarati Hausa Hindi Croatian Hungarian Ar menian Inter lingua
Abbre viation IE IK IN IS IT IW JP JI JW KA KK KL KM KN KO KS KU KY LA LN LO LT LV MG MI MK ML MN MO MR MS MT MY NA NE NL NO OC OM OR PA PL PS PT QU RM
Language Inter lingue Inupiak Indonesian Icelandic Italian Hebrew J apanese Yiddish J a v anese Georgian Kazakh Greenlandic Cambodian Kannada K orean Kashmir i K urdish Kirghiz Latin Lingala Laothian Lithuanian Latvian, Lettish Malagasy Maor i Macedonian Mala y alam Mongolian Moldavian Marathi Mala y Maltese Bur mese Nauru Nepali Dutch Norw egian Occitan (Af an) Oromo Or iy a Punjabi P olish P ashto , Pushto P or tuguese Quechua Rhaeto-Romance
Abbreviation RN RO RU RW SA SD SG SH SI SK SL SM SN SO SQ SR SS ST SU SV SW TA TE TG TH TI TK TL TN TO TR TS TT TW UK UR UZ VI VO WO XH YO ZH ZU
No function or display.• Vehicle’s ignition is off.
- If connected following the instructions, the unit will not operate with the vehicle’s ignition off.
• DVE-5300 is turned off.- Turn on the DVE-5300 by remote control.
• Improper power lead connections.- Check power lead connections.
• Blown fuse.- Replace the fuse on the battery lead of the unit with the proper
value.Disc playback sound is wavering.• Moisture condensation in the disc unit.
- Allow enough time for the condensation to evaporate (about 1 hour).
Disc insertion not possible.• A disc is already in the DVD player.
- Eject the disc and remove it.• The disc is being improperly inserted.
- Re-insert the disc following the instructions in the “Loading and Unloading Discs” section.
Unable to fast forward or reverse the disc.• The disc has been damaged.
- Eject the disc and discard it; using a damaged disc in your unit can cause damage to the mechanism.
Disc playback sound skips due to vibration.• Improper mounting of the unit.
- Securely re-mount the unit.• The disc is very dirty.
- Clean the disc.• The disc has scratches.
- Change the disc.• The pick-up lens is dirty.
- Do not use a commercial available lens cleaner disc.Consult your nearest ALPINE dealer.
Disc playback sound skips without vibration.• Dirty or scratched disc.
- Clean the disc; damaged disc should be replaced.CD-R/CD-RW playback not possible.• Close session (finalization) has not been performed.
- Perform finalization and attempt playback again.Error displays• Mechanical error
- Press . After the error indication disappears, insert the disc again. If the above-mentioned solution does not solve the problem, consult your nearest ALPINE dealer.
MP3/WMA/AAC/WAV is not played back.• Writing error occurred. The CD format is not compatible.
- Make sure the CD has been written in a supported format.Refer to “About MP3/WMA/AAC” on page 18, or “About WAV” on page 23, then rewrite in the format supported by this device.
Unit does not operate.• Monitor’s power is not turned on.
- Turn on the monitor’s power.• Condensation
- Wait a while (about 1 hour) for the condensation to dry.
No picture is produced.• Monitor’s mode is not switched to the mode you want to see.
- Switch to the mode you want to see.• Monitor’s parking brake cord is not connected.
- Connect the monitor’s parking brake cord and set the parking brake. (For details, refer to the monitor’s instructions.)
• Monitor’s parking brake is not set.- Connect the monitor’s parking brake cord and set the parking
brake. (For details, refer to the monitor’s instructions.)Playback does not start.• Disc is loaded upside-down.
- Check the disc and load it with the labeled side facing upward.• The disc is dirty.
- Clean the disc.• A disc not able to playback with this unit is loaded.
- Check if the disc is able to be played back.• Setup menu is displayed.
- Press RETURN to turn the menu off.Picture is unclear or noisy.• Disc is being fast-forwarded or fast-reversed.
- The picture may be unclear, but this is normal.• Vehicle’s battery power is weak.
- Check the battery power and wiring.(The unit may malfunction if the battery power is under 11 volts with a load applied.)
• Monitor’s fluorescent tube is worn out.- Replace the monitor’s fluorescent tube.
Image stops sometimes.• Disc is scratched.
- Replace with a non-scratched disc.
• Mechanism error.1) Press and eject the disc.
If the disc does not eject, press again for at least 3 seconds and eject the disc. The disc may drop when force to eject. Please pay attention to protect the disc.If the disc still does not eject, consult your Alpine dealer.
2) When the error indication remains after ejecting, press again.If the error indication still does not turn off after pressing a few times, consult your Alpine dealer.
• No disc is inserted.- Insert a disc.
• Although a disc is inserted, “NO DISC” is displayed and the unit does not start to play or eject the disc.- Remove the disc by pressing again for at least 3 seconds.- The disc may drop when force to eject. Please pay attention to
protect the disc.
If you encounter a problem, please turn the power off, then on again. If the unit is still not functioning normally, please review the items in the following checklist. This guide will help you isolate the problem if the unit is at fault. Otherwise, make sure the rest of your system is properly connected or consult your authorized Alpine dealer.
Indication
DISC ERROR
NO DISC
26-EN
• Remote control operation is not possible.- For some discs or playing modes, certain operations are not
possible. This is not a malfunction.
• Disc does not match regional code number.- Load a disc that matches the regional code number.
• Protective circuit is activated at high temperature.- The indicator will disappear when the temperature returns to
within operation range.- Leave the power OFF until the temperature decreases and then
turn the power ON again.
• Mechanism error.1) Press and eject the disc.
If the disc does not eject, press again for at least 3 seconds and eject the disc. The disc may drop when force to eject. Please pay attention to protect the disc.If the disc still does not eject, consult your Alpine dealer.
2) When the error indication remains after ejecting, press again.If the error indication still does not turn off after pressing a few times, consult your Alpine dealer.
• A copy-protected WMA file was played back.- You can only play back non-copy-protected files.
• A disc with an unsupported region code or other copyright infringement has been inserted.- Change to another disc.
• The unit cannot read a disc's TOC because the disc has many scratches or is very dirty. - Clean the dirty disc, and insert it again. Damaged discs should
be replaced.
REGIONAL CODE
VIOLATION
HI-TEMP
LOADING ERROR
EJECT ERROR
PROTECTED
ILLEGAL FORMAT
READ ERROR
27-EN
Specifications
PICKUP
REMOTE CONTROL
GENERAL
CHASSIS SIZE
• Due to continuous product improvement, specifications and design are subject to change without notice.
CAUTION
Frequency Response CD: 5 – 20,000 Hz (± 1 dB)Wow & Flutter (% WRMS) Below measurable limitsTotal Harmonic Distortion 0.02 % (at 1 kHz)Dynamic Range 95 dB (at 1 kHz)Channel Separation 65 dB (at 1 kHz)Horizontal resolution 500 lines or greaterVideo output level 1Vp-p (75 ohms)Video S/N ratio DVD: 60 dBAudio S/N ratio 95 dB
Wave length DVD: 665 nmCD: 800 nm
Laser power CLASS II
Battery Type CR2025 batteryWidth 42 mm (1-5/8")Height 90 mm (3-1/2")Depth 11.6 mm (15/32")Weight 30 g (1 oz) (battery excluded)
Power Requirement 14.4 V DC(11–16 V allowable)
Operating Temperature +14°F to +140°F(-10°C to + 60°C)
HDMI Output Format 480pWeight 1.2kg (2 lbs. 10 oz)
Width 170 mm (6-3/4")Height 50 mm (2")Depth 154 mm (6-1/16")
CAUTION-Laser radiation when open, DO NOT STARE INTO BEAM
(Bottom side of player)
28-EN
Installation and ConnectionsBefore installing or connecting the unit, please read the following and pages 5 and 8 of this manual thoroughly for proper use.
WarningMAKE THE CORRECT CONNECTIONS.Failure to make the proper connections may result in fire or product damage.
USE ONLY IN CARS WITH A 12 VOLT NEGATIVE GROUND.(Check with your dealer if you are not sure.) Failure to do so may result in fire, etc.
BEFORE WIRING, DISCONNECT THE CABLE FROM THE NEGATIVE BATTERY TERMINAL.Failure to do so may result in electric shock or injury due to electrical shorts.
DO NOT ALLOW CABLES TO BECOME ENTANGLED IN SURROUNDING OBJECTS.Arrange wiring and cables in compliance with the manual to prevent obstructions when driving. Cables or wiring that obstruct or hang up on places such as the steering wheel, gear lever, brake pedals, etc., can be extremely hazardous.
DO NOT SPLICE INTO ELECTRICAL CABLES.Never cut away cable insulation to supply power to other equipment. Doing so will exceed the current carrying capacity of the wire and result in fire or electric shock.
DO NOT DAMAGE PIPE OR WIRING WHEN DRILLING HOLES.When drilling holes in the chassis for installation, take precautions so as not to contact, damage or obstruct pipes, fuel lines, tanks or electrical wiring. Failure to take such precautions may result in fire.
DO NOT USE BOLTS OR NUTS IN THE BRAKE OR STEERING SYSTEMS TO MAKE GROUND CONNECTIONS.Bolts or nuts used for the brake or steering systems (or any other safety-related system), or tanks should NEVER be used for installations or ground connections. Using such parts could disable control of the vehicle and cause fire, etc.
KEEP SMALL OBJECTS SUCH AS BATTERIES OUT OF THE REACH OF CHILDREN.Swallowing them may result in serious injury. If swallowed, consult a physician immediately.
DO NOT INSTALL IN LOCATIONS WHICH MIGHT HINDER VEHICLE OPERATION, SUCH AS THE STEERING WHEEL OR GEARSHIFT.Doing so may obstruct forward vision or hamper movement, etc., and result in a serious accident.
CautionHAVE THE WIRING AND INSTALLATION DONE BY EXPERTS.The wiring and installation of this unit requires special technical skill and experience. To ensure safety, always contact the dealer where you purchased this product to have the work done.
USE SPECIFIED ACCESSORY PARTS AND INSTALL THEM SECURELY.Be sure to use only the specified accessory parts. Use of other than designated parts may damage this unit internally or may not securely install the unit in place. This may cause parts to become loose resulting in hazards or product failure.
ARRANGE THE WIRING SO IT IS NOT CRIMPED OR PINCHED BY A SHARP METAL EDGE.Route the cables and wiring away from moving parts (like the seat rails) or sharp or pointed edges. This will prevent crimping and damage to the wiring. If wiring passes through a hole in metal, use a rubber grommet to prevent the wire’s insulation from being cut by the metal edge of the hole.
DO NOT INSTALL IN LOCATIONS WITH HIGH MOISTURE OR DUST.Avoid installing the unit in locations with high incidence of moisture or dust. Moisture or dust that penetrates into this unit may result in product failure.
Precautions• Be sure to disconnect the cable from the (–) battery post before
installing your DVE-5300. This will reduce any chance of damage to the unit in case of a short-circuit.
• Be sure to connect the color coded leads according to the diagram. Incorrect connections may cause the unit to malfunction or damage to the vehicle's electrical system.
• When making connections to the vehicle's electrical system, be aware of the factory installed components (e.g. on-board computer). Do not tap into these leads to provide power for this unit. When connecting the DVE-5300 to the fuse box, make sure the fuse for the intended circuit of the DVE-5300 has the appropriate amperage. Failure to do so may result in damage to the unit and/or the vehicle. When in doubt, consult your ALPINE dealer.
• The DVE-5300 uses HDMI extension Cable for connection to other units (e.g. monitor). For details, please contact your authorized ALPINE dealer for assistance.
IMPORTANTPlease record the serial number of your unit in the space provided below and keep it as a permanent record. The serial number plate is located on the bottom of the unit.
SERIAL NUMBER:INSTALLATION DATE:INSTALLATION TECHNICIAN:PLACE OF PURCHASE:
29-EN
InstallationCheck accessory parts.
Angle of installationInstall at an angle between horizontal and 30°. Note that installing at an angle outside of this range will result in a loss of performance and possibly damage.
2 Connect all other leads of the unit according to details described in the “Connections” (page 33).
3 Mounting the unit in a car.
* To securely connect the ground lead, use an already installed screw on a metal part of the vehicle (marked ( )) or a clean, bare metal spot on the vehicle’s chassis.
• Fix the cables carefully. Do not damage them by tucking them into movable parts, such as a seat rail, or by locating them against sharp or pointed edges.
HDMI-extension Cable (1.5 m)
Remote Control Eye Remote Control
Power Cable HDMI Hold-down Bracket
HDMI Hold-down screw
Velcro fastener Flat head screw (M5 × 8)
Do not mount the unit in a location of extreme temperature fluctuations (such as near an air conditioner or heater vent). Disc read failures or other problems may result.If mounted in such location, failures such as “Disc can not read.” or other failure may occur.
x 1 x 1 x 1
x 1 x 1 x 1
x 2 x 4
0 - 30°
Installation example using the Original Mounting Bracket
Ground Lead*
1 Mount the original mounting bracket to the unit using the supplied screws ( ).
Chassis
Screws (M5 × 8) (included)
Original Mounting Bracket
30-EN
1 Place Velcro fastener .Place two pieces of Velcro fastener to the mounting location with the rough side facing toward the DVD unit.
2 Place the matching pieces of Velcro fastener onto the pieces already on the mounting positions.Remove the protective paper covering the adhesive on the Velcro fastener . Press the unit onto the strips at the mounting position.
When using HDMI connection cables, secure the cables to the HDMI Terminals with the supplied HDMI Hold-down Bracket.
1 Insert the HDMI Hold-down Bracket into the grooves (A).
2 Secure it with the screw ( ).
When mounting using Velcro fastener
Note on using HDMI Connection Cables
Velcro fastener
Floor
HDMI Hold-down
Bracket (included)
HDMI Hold-down
screw
HDMI Terminal
(A)(A)
31-EN
Connection Diagram of SPST Switch (sold separately)
• If your vehicle has no ACC power supply, add an SPST (single-pole, single-throw) switch (sold separately) and fuse (sold separately).• The diagram and the fuse amperage shown above are in the case when the unit is used individually.• If the switched power (ignition) lead of the unit is connected directly to the positive (+) post of the vehicle’s battery, the unit draws some current
(several hundred milliamperes) even when its switch is placed in the OFF position, and the battery may be discharged.
If an ACC power supply is not available
DVE-5300(Red)
(Yellow)
SPST SW (Optional)FUSE (5A) (Optional)
FUSE (20A) (Optional)
Battery
ACC
BATTERY
To prevent external noise from entering the audio system.• Locate the unit and route the leads at least 10 cm away from the car harness.• Keep the battery power leads as far away from other leads as possible.• Connect the ground lead securely to a bare metal spot (remove any paint, dirt or grease if necessary) of the car chassis.• If you add an optional noise suppressor, connect it as far away from the unit as possible. Your Alpine dealer carries various
noise suppressors, contact them for further information.• Your Alpine dealer knows best about noise prevention measures so consult your dealer for further information.
32-EN
Connections
• Connect properly.Never connect to parts other than the ones indicated in these operating instructions.
• Also refer to the operating instructions of the other products in the system.
• HDMI Output ConnectorThis connector is used in combination with the video/audio inputs of another ALPINE product.
• Remote Control Output LeadThis lead is used in combination with an ALPINE main unit’s remote control input lead.
• Remote Control Input LeadThis lead is used in combination with an ALPINE main unit’s remote control output lead.
• Ground LeadConnect this lead to a good chassis ground on the vehicle. Make sure the connection is made to bare metal and is securely fastened using the sheet metal screw provided.
• Battery LeadConnect this lead to the positive (+) post of the vehicle’s battery.
Cable Color Cable Specifications
Brown
Brown
Black
Yellow
Red Connect this lead to an open terminal on the vehicle’s fuse box or another unused power source which provides (+) 12V only when the ignition is turned on or in the accessory position.
• Switched Power Lead (Ignition)
• Digital Output Terminal (Optical)This terminal is used to connect DVE-5300 to ALPINE digital audio processor (PXA-H800, etc.). These products include a fiber optic cable that will plug directly into the digital output terminal of the DVE-5300.
• Remote Control Eye JackConnect the remote control eye to this jack.
To remote control output lead
Connect to a metal part of chassis body with a screw
Ignition Key
Remote Control Eye(Included)
Fuse(5A)
REMOTE IN
IGNITION
To remote control input lead
REMOTE OUT
GND
BATTERY
33-EN
System Example
Caution!When “Bitstream” is selected, there will be no HDMI audio output from DVE-5300. For details, refer to “Setting the Digital Output” (page 22).
• Also refer to the operating instructions of the other products in the system.
Connecting an ALPINE main unit, Digital Audio Processor (PXA-H800, etc.)
Connecting an HDMI compatible Monitor, Digital Audio Processor (PXA-H800, etc.)
ALPINE main unit (Sold Separately)
HDMI Input Connector
Digital Input Terminal (Optical) (for DVD Player)
Digital Audio Processor PXA-H800 etc.
(Sold Separately)
Fiber Optic Cable(Sold separately)
Remote Control input lead
Remote Control Output lead
Remote Control Output lead
Remote Control Input lead
DVD Player DVE-5300
HDMI Output Connector
Digital OutputTerminal (Optical)
HDMI-Extension Cable (Included with DVE-5300)
ALPINE Monitor with HDMI (Sold Separately)
Fiber Optic Cable(Sold separately)
DVD Player DVE-5300
HDMI Output Connector
Remote Control Eye Jack
Digital InputTerminal (Optical)(for DVD Player)
Digital Audio ProcessorPXA-H800 etc
(Sold Separately)HDMI Input Connector
Remote Control Eye (Included)
HDMI-Extension Cable (Included with DVE-5300)
Digital Output Terminal (Optical)
34-EN
LIMITED WARRANTYALPINE ELECTRONICS OF AMERICA, INC. (“Alpine”), is dedicated to quality craftsmanship and is pleased to offer this Warranty. We suggest that you read it thoroughly. Should you have any questions, please contact your Dealer or contact Alpine at one of the telephone numbers listed below.
PRODUCTS COVERED:This Warranty covers Car Audio Products and Related Accessories (“the product”). Products purchased in the Canada are covered only in the Canada. Products purchased in the U.S.A. are covered only in the U.S.A.
LENGTH OF WARRANTY:This Warranty is in effect for one year from the date of the first consumer purchase.
WHO IS COVERED:This Warranty only covers the original purchaser of the product, who must reside in the United States, Puerto Rico or Canada.
WHAT IS COVERED:This Warranty covers defects in materials or workmanship (parts and labor) in the product.
WHAT IS NOT COVERED:This Warranty does not cover the following: Damage occurring during shipment of the product to Alpine for
repair (claims must be presented to the carrier). Damage caused by accident or abuse, including burned voice coils
caused by over-driving the speaker (amplifier level is turned up and driven into distortion or clipping). Speaker mechanical failure (e.g. punctures, tears or rips). Cracked or damaged LCD panels. Dropped or damaged hard drives.
Damage caused by negligence, misuse, improper operation or failure to follow instructions contained in the Owner’s manual.
Damage caused by act of God, including without limitation, earthquake, fire, flood, storms or other acts of nature.Any cost or expense related to the removal or reinstallation of the product.
Service performed by an unauthorized person, company or association.
Any product which has the serial number defaced, altered or removed.
Any product which has been adjusted, altered or modified without Alpine’s consent.
Any product not distributed by Alpine within the United States, Puerto Rico or Canada.
Any product not purchased from an Authorized Alpine Dealer.
HOW TO OBTAIN WARRANTY SERVICE: You are responsible for delivery of the product to an Authorized
Alpine Service Center or Alpine for repair and for payment of any initial shipping charges. Alpine will, at its option, repair or replace the product with a new or reconditioned product without charge. If the repairs are covered by the warranty, and if the product was shipped to an Authorized Alpine Service Center or Alpine, Alpine will pay the return shipping charges.
You should provide a detailed description of the problem(s) for which service is required.
You must supply proof of your purchase of the product.
You must package the product securely to avoid damage during shipment. To prevent lost packages it is recommended to use a carrier that provides a tracking service.
HOW WE LIMIT IMPLIED WARRANTIES:ANY IMPLIED WARRANTIES INCLUDING FITNESS FOR USE AND MERCHANTABILITY ARE LIMITED IN DURATION TO THE PERIOD OF THE EXPRESS WARRANTY SET FORTH ABOVE AND NO PERSON IS AUTHORIZED TO ASSUME FOR ALPINE ANY OTHER LIABILITY IN CONNECTION WITH THE SALE OF THE PRODUCT.
HOW WE EXCLUDE CERTAIN DAMAGES:ALPINE EXPRESSLY DISCLAIMS LIABILITY FOR INCIDENTAL AND CONSEQUENTIAL DAMAGES CAUSED BY THE PRODUCT. THE TERM “INCIDENTAL DAMAGES” REFERS TO EXPENSES OF TRANSPORTING THE PRODUCT TO THE ALPINE SERVICE CENTER, LOSS OF THE ORIGINAL PURCHASER’S TIME, LOSS OF THE USE OF THE PRODUCT, BUS FARES, CAR RENTALS OR OTHERS COSTS RELATING TO THE CARE AND CUSTODY OF THE PRODUCT. THE TERM “CONSEQUENTIAL DAMAGES” REFERS TO THE COST OF REPAIRING OR REPLACING OTHER PROPERTY WHICH IS DAMAGED WHEN THIS PRODUCT DOES NOT WORK PROPERLY. THE REMEDIES PROVIDED UNDER THIS WARRANTY ARE EXCLUSIVE AND IN LIEU OF ALL OTHERS.
HOW STATE/PROVINCIAL LAW RELATES TO THE WARRANTY:
This Warranty gives you specific legal rights, and you may also have other rights which vary from state to state and province to province. In addition, some states/provinces do not allow limitations on how long an implied warranty lasts, and some do not allow the exclusion or limitation of incidental or consequential damages. Accordingly, limitations as to these matters contained herein may not apply to you.
IN CANADA ONLY:This Warranty is not valid unless your Alpine car audio product has been installed in your vehicle by an Authorized Installation Center, and this warranty stamped upon installation by the installation center.
HOW TO CONTACT CUSTOMER SERVICE:Should the product require service, please call the following number for your nearest Authorized Alpine Service Center.
Or visit our website at; http://www.alpine-usa.com
CAR AUDIO 1-800-ALPINE-1 (1-800-257-4631)
NAVIGATION 1-888-NAV-HELP (1-888-628-4357)
ALPINE ELECTRONICS OF AMERICA, INC., 19145 Gramercy Place, Torrance, California 90501, U.S.A.Do not send products to this address.Call the toll free telephone number or visit the website to locate a service center.
Don’t forget to take a moment to protect your purchase by registering your product now at the following address: www.alpine-usa.com/registration.
N’oubliez pas de consacrer un moment à la protection de votre achat en enregistrant votre produit dès maintenant à l’adresse suivante : www.alpine-usa.com/registration.
Recuerde que con solo unos pocos pasos podrá proteger su producto, registrándolo a través de la siguiente dirección: www.alpine-usa.com/registration.


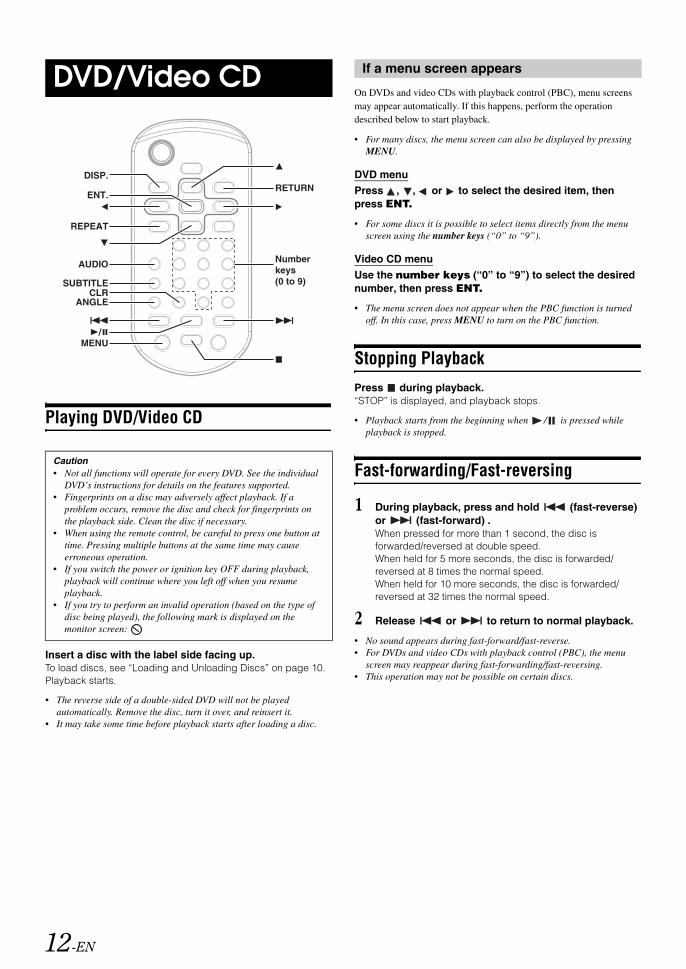


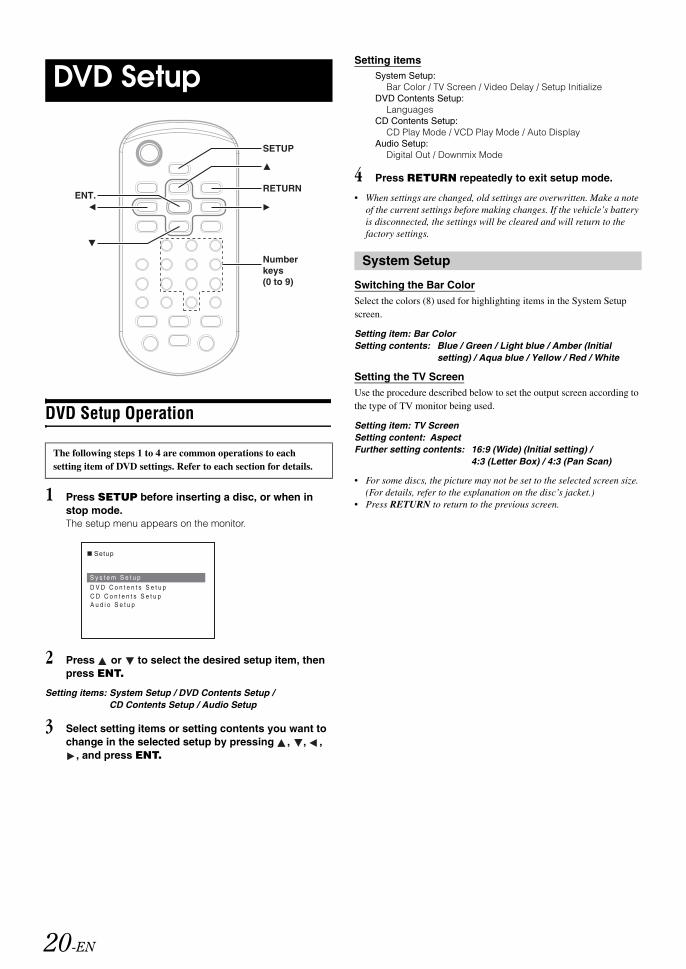

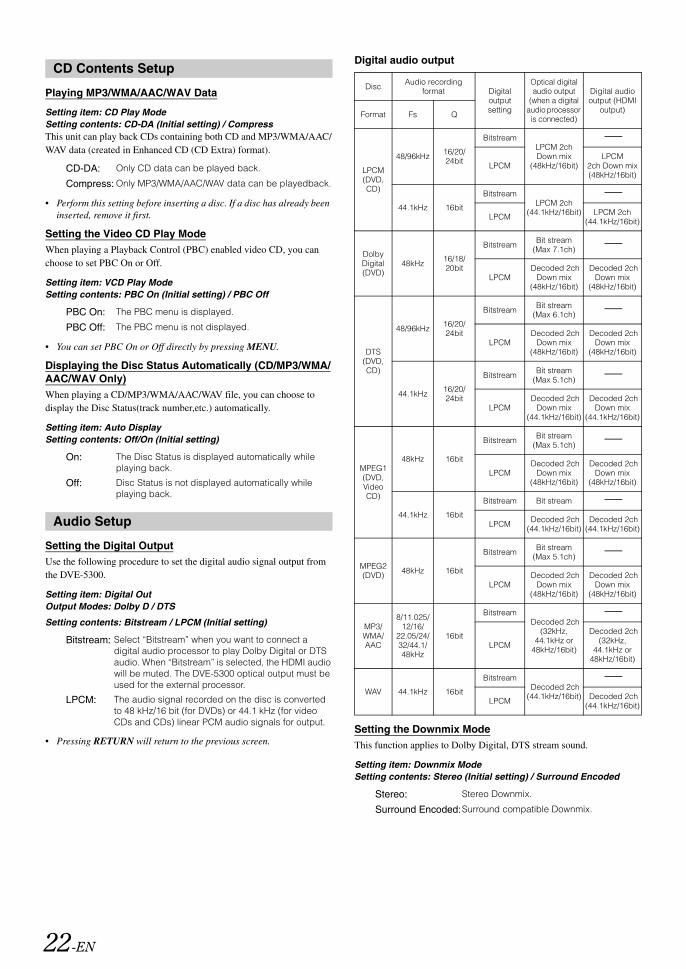


![ORAL FAST DISSOLVING FILMS-AN INNOVATIVE DRUG DELIVERY … · 2019. 12. 10. · KEYWORDS: Oral dissolving film, Film forming polymer, Challenges, Evaluation. ORAL DISSOLVING FILMS[22,30,60,68]](https://static.documents.pub/doc/80x56/61296ff54735c37777083b50/oral-fast-dissolving-films-an-innovative-drug-delivery-2019-12-10-keywords.jpg)


