34
dynamic and static ropes manual
dynamic and static ropesmanual
Content:
Categories of ropes .............................................4
Meanings of individual symbols ..................... 8
Testing of climbing ropes ...............................10
Choosing the right climbing ropes ...............14
Testing ropes with low elongation .............15
Choosing the right static rope .......................16
Testing of accessory cords .............................17
Negative conditions for rope ..........................17
Service life ............................................................ 21
Caring for your rope ..........................................22
Knots ......................................................................27
A few words in conclusion .............................33

Congratulations!a brief introduction
First of all, let us congratulate you for choosing our product!Believe us; you really have made the right choice. TENDON rope is a world leader for quality and has become a trusted partner for young, active climbers in more than 70 countries around the world. It has taken its own path the path of a young, modern, progressive brand of ropes and it offers smooth user comfort, with pleasant ropes not only for recreational climbing, but also for other adrenaline activities, for work at heights and for rescue work. The TENDON international development group works together with leading experts to constantly expand technical boundaries. Thanks to that, LANEX – the maker of TENDON ropes – has become the world’s first and only maker of climbing ropes licensed to use DuPont™ TEFLON® fabric protector.Thank you for choosing TENDON. We wish you many thrilling adventures when using our ropes.
Innovation for the 21st century
It goes without saying that all of our products comply with UIAA and ISO 9001:2000 standards. We already consider these standards to be a matter of course, and we are truly proud of our modern in-house testing laboratory. This facility plays a key role in the development and manufacture of our ropes. A drop tower and climate-controlled chamber let us simulate falls that can happen in real climbing environments. Using the measured values, we verify the number of falls that individual rope models can withstand and that we can guarantee to their users.New developed ropes go to European laboratories for certification already fully prepared and with known technical parameters. We mainly use the accredited laboratory in Vienna for our products.The goal of all the individuals who participate in making climbing ropes is to earn the maximum satisfaction of you – our customers. So if you are satisfied, we are twice as satisfied.
Categories of ropesAccording to their use, ropes are categorized as dynamic ropes for mountain climbing or as less flexible static ropes that are intended for work at heights, for rescue work and for caving. Products with the same design but with a smaller diameter (less than 8 mm) are called cords.
DIFFERENCES BETWEEN STATIC AND MOUNTAIN CLIMBING ROPES AND REEP/ ACCESSORY CORDS
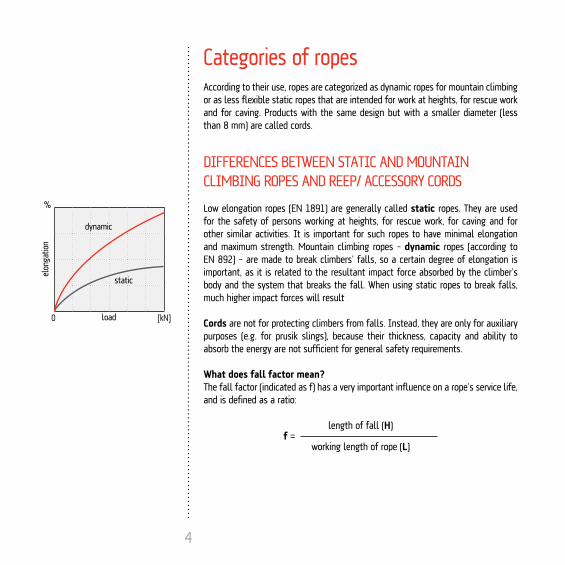
Low elongation ropes (EN 1891) are generally called static ropes. They are used for the safety of persons working at heights, for rescue work, for caving and for other similar activities. It is important for such ropes to have minimal elongation and maximum strength. Mountain climbing ropes – dynamic ropes (according to EN 892) – are made to break climbers’ falls, so a certain degree of elongation is important, as it is related to the resultant impact force absorbed by the climber’s body and the system that breaks the fall. When using static ropes to break falls, much higher impact forces will result
Cords are not for protecting climbers from falls. Instead, they are only for auxiliary purposes (e.g. for prusik slings), because their thickness, capacity and ability to absorb the energy are not sufficient for general safety requirements.
What does fall factor mean?The fall factor (indicated as f) has a very important influence on a rope’s service life, and is defined as a ratio:
length of fall (H)f =
working length of rope (L)
static
dynamic
load
elon
gatio
n
[kN]
%
0
4

The standard range for the fall factor is from f = 0 up to f = 2. A higher fall factor may not occur when a person is using a rope secured to a fixed anchor point. Only when climbing on a so-called via ferrata (or Klettersteig in German), mountain trails with fixed climbing aids, the situation can occur where the fall factor will be greater than two. This is a case where a climber is secured by a short sling of rope attached to a fixed (steel) cable. In case of a fall, if the distance between the cable’s anchors is 5 meters and we have a sling of rope 1 meter long, the fall factor may be as high as f = 7! The impact force rises to unbearable limits, and can lead to breaking of the sling or to serious injury to the climber. For this reason, on routes with fixed climbing aids, special kits are used with built-in shock absorbers, which dampens the impact force. Our via ferrata sets allow a maximum impact force of 5 kN.
Graphic Illustration of Fall Factors:
f = 0,5 f = 1 f = 2 f › 2
L
L
H
L
H
starting position
position after fall
anchor point
H
H = L
5

6
Impact force
Impact force depends mainly on the construction of the rope, the fall factor, the weight of the climber and the length of the fall. In practice, impact force rises with the number of falls a rope has withstood and with older ropes as well. The values of impact force against the last belay anchor may be nearly double because of the accumulation of force (weight of the falling climber and of the belayer). Every mountain climber must be prepared for this when setting up belay anchors.All of this implies the need during actual climbing to reduce as much as possible any impact force that will affect the climbers and the belaying system in case of a fall.
How to reduce impact force:• place the first advance belay anchor as soon as possible, thereby lowering the fall
factor,• maintain a low fall factor throughout the ascent belay anchors at short
intervals,• run rope through belay anchors loosely (with minimum friction) so that when
breaking a fall, it can absorb force along its entire length,• use kinetic shock absorbers with advance belay anchors especially when climbing
on ice and when using natural belay points,• use a dynamic method of breaking falls – this requires practice and experience.
WarnInG! Only a dynamic climbing rope is able to absorb the energy of a fall and may be used for breaking a fall. Never use static ropes, strong reep cords or tape slings! Even a short fall on a static sling is an enormous strain on the climber and the belaying system and can destroy the anchor point. So be careful when moving at the belay station if you are bound to the anchor by a static strap.

3
2 1
2 3
1
7
Climbing rope
Static rope
Climbing ropeClimbing rope is able to break the fall of climbers while producing a small impact force. This is dynamic rope made from braided thread extending without interruption over the rope’s entire length. The rope consists of a core (1) with a sheath (2) and a thread (3) inside the core for checking the year the rope was made. The material used for making dynamic rope is polyamide. Its flexibility (elongation) and strength give the rope the correct dynamic properties to break falls safely and with less shock for the climber.
Our company currently manufactures three types of climbing rope:- single ropes, - half ropes,- twin ropes.
Static ropeStatic ropes are braided textile ropes, the design of which is similar to mountain climbing ropes. They also consist of a core (1) and a sheath (2). The core serves mainly for supporting weight and consists of individual strands. The sheath holds the strands together and protects them from various influences (mechanical wear, chemicals, heat etc.).Inside the rope is a control strip (3) that provides important identifying information.
Our company currently manufactures two kinds of static ropes:- rope type A,- rope type B (lower level of performance).
LANEX makes all of its TENDON ropes and accessory cords in compliance with the EU standards EN 892, EN 1891 and EN 564 and to UIAA requirements. These standards cover both the testing methods and the minimum technical parameters. All of the requirements under these norms guarantee that only a safe product will reach the customer.
LaBELInG rOPESThe manufacturer labels ropes with a piece of adhesive tape bearing the number of the norm according to which the rope has been made (EN 892 or EN 1891), the type of rope – single, half and twin for mountain climbing ropes, type A or B for static ropes – and the length of the rope in meters.
8
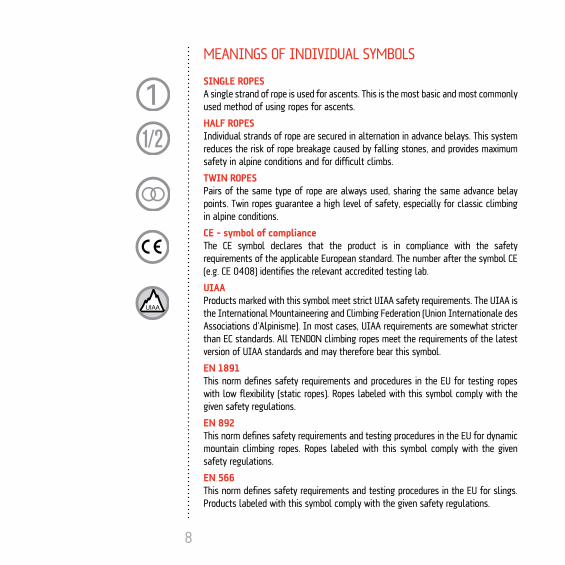
MEANINGS OF INDIVIDUAL SYMBOLS
SInGLE rOPES A single strand of rope is used for ascents. This is the most basic and most commonly used method of using ropes for ascents.
HaLF rOPES Individual strands of rope are secured in alternation in advance belays. This system reduces the risk of rope breakage caused by falling stones, and provides maximum safety in alpine conditions and for difficult climbs.
TWIn rOPES Pairs of the same type of rope are always used, sharing the same advance belay points. Twin ropes guarantee a high level of safety, especially for classic climbing in alpine conditions.
CE – symbol of complianceThe CE symbol declares that the product is in compliance with the safety requirements of the applicable European standard. The number after the symbol CE (e.g. CE 0408) identifies the relevant accredited testing lab.
UIaaProducts marked with this symbol meet strict UIAA safety requirements. The UIAA is the International Mountaineering and Climbing Federation (Union Internationale des Associations d’Alpinisme). In most cases, UIAA requirements are somewhat stricter than EC standards. All TENDON climbing ropes meet the requirements of the latest version of UIAA standards and may therefore bear this symbol.
En 1891This norm defines safety requirements and procedures in the EU for testing ropes with low flexibility (static ropes). Ropes labeled with this symbol comply with the given safety regulations.
En 892This norm defines safety requirements and testing procedures in the EU for dynamic mountain climbing ropes. Ropes labeled with this symbol comply with the given safety regulations.
En 566This norm defines safety requirements and testing procedures in the EU for slings. Products labeled with this symbol comply with the given safety regulations.
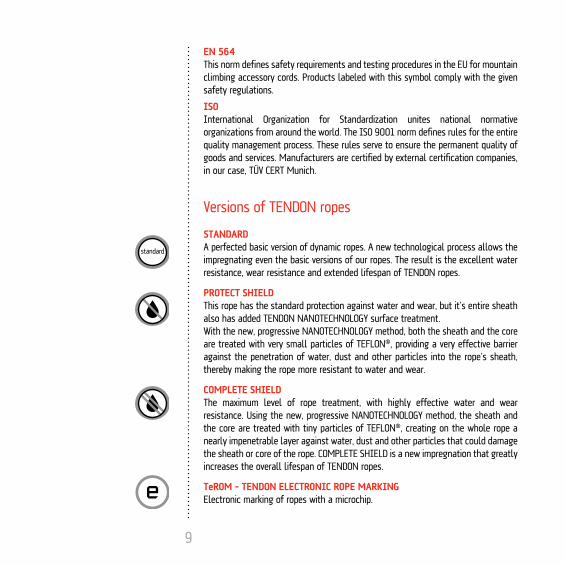
En 564This norm defines safety requirements and testing procedures in the EU for mountain climbing accessory cords. Products labeled with this symbol comply with the given safety regulations.
ISO International Organization for Standardization unites national normative organizations from around the world. The ISO 9001 norm defines rules for the entire quality management process. These rules serve to ensure the permanent quality of goods and services. Manufacturers are certified by external certification companies, in our case, TÜV CERT Munich.
Versions of TENDON ropes
STanDarDA perfected basic version of dynamic ropes. A new technological process allows the impregnating even the basic versions of our ropes. The result is the excellent water resistance, wear resistance and extended lifespan of TENDON ropes.
PrOTECT SHIELDThis rope has the standard protection against water and wear, but it’s entire sheath also has added TENDON NANOTECHNOLOGY surface treatment.With the new, progressive NANOTECHNOLOGY method, both the sheath and the core are treated with very small particles of TEFLON®, providing a very effective barrier against the penetration of water, dust and other particles into the rope’s sheath, thereby making the rope more resistant to water and wear.
COMPLETE SHIELDThe maximum level of rope treatment, with highly effective water and wear resistance. Using the new, progressive NANOTECHNOLOGY method, the sheath and the core are treated with tiny particles of TEFLON®, creating on the whole rope a nearly impenetrable layer against water, dust and other particles that could damage the sheath or core of the rope. COMPLETE SHIELD is a new impregnation that greatly increases the overall lifespan of TENDON ropes.
TerOM – TEnDOn ELECTrOnIC rOPE MarKInGElectronic marking of ropes with a microchip.
9
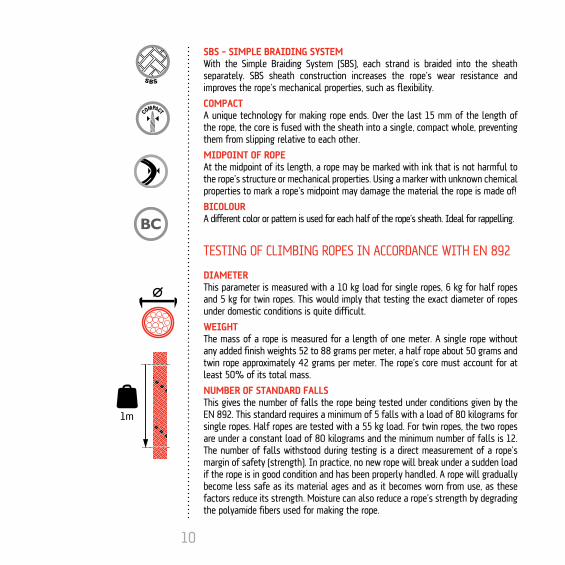
SBS – SIMPLE BraIDInG SYSTEMWith the Simple Braiding System (SBS), each strand is braided into the sheath separately. SBS sheath construction increases the rope’s wear resistance and improves the rope’s mechanical properties, such as flexibility.
COMPaCTA unique technology for making rope ends. Over the last 15 mm of the length of the rope, the core is fused with the sheath into a single, compact whole, preventing them from slipping relative to each other.
MIDPOInT OF rOPEAt the midpoint of its length, a rope may be marked with ink that is not harmful to the rope’s structure or mechanical properties. Using a marker with unknown chemical properties to mark a rope’s midpoint may damage the material the rope is made of!
BICOLOUrA different color or pattern is used for each half of the rope’s sheath. Ideal for rappelling.
TESTING OF CLIMBING ROPES IN ACCORDANCE WITH EN 892
DIaMETEr This parameter is measured with a 10 kg load for single ropes, 6 kg for half ropes and 5 kg for twin ropes. This would imply that testing the exact diameter of ropes under domestic conditions is quite difficult.
WEIGHTThe mass of a rope is measured for a length of one meter. A single rope without any added finish weights 52 to 88 grams per meter, a half rope about 50 grams and twin rope approximately 42 grams per meter. The rope’s core must account for at least 50% of its total mass.
nUMBEr OF STanDarD FaLLS This gives the number of falls the rope being tested under conditions given by the EN 892. This standard requires a minimum of 5 falls with a load of 80 kilograms for single ropes. Half ropes are tested with a 55 kg load. For twin ropes, the two ropes are under a constant load of 80 kilograms and the minimum number of falls is 12. The number of falls withstood during testing is a direct measurement of a rope’s margin of safety (strength). In practice, no new rope will break under a sudden load if the rope is in good condition and has been properly handled. A rope will gradually become less safe as its material ages and as it becomes worn from use, as these factors reduce its strength. Moisture can also reduce a rope’s strength by degrading the polyamide fibers used for making the rope.
10

active (fall) length of rope
L = 5 m
f = 5 5
= 1
MaXIMUM IMPaCT FOrCEImpact force is the force that occurs during a first fall under defined conditions (mass of the load, fall factor, etc.) and that is absorbed by the rope. Under testing, the impact force increases for each additional test fall the rope is subjected to. How fast the impact force increases determines the number of standard falls withstood. The higher the number of standard falls, the longer the service life of the rope for the user. The practical use of ropes in real climbing or on training walls is different from laboratory conditions. During standard rope tests, the end of the rope is firmly secured, but in real climbing, belaying equipment and systems allow for some slippage of the rope, breaking the fall dynamically. Dynamic belaying dissipates some of the fall’s energy, thereby lowering the impact force. For that reason, it is important to know how to use appropriate dynamic belaying.WarnInG! The fall factor is also of key importance for the amount of impact force. How far you fall is virtually insignificant for the impact force. The amount of the fall factor is much more important. A five meter fall with a fall factor of f = 1 will result in a much lower impact force than a fall of the same length with a factor of f = 2. The energy of the climber’s fall is absorbed by the active length of the rope (shown in the illustrations in red).
leader leader
advance belay anchor
belayerbelay stationanchor point
anchor point
belayerbelay station
length of fallH = 5 m
length of fallH = 5 m
active (fall) length of rope
L = 2,5 m
f = 52,5
= 2
rIGHT ¸ WrOnG!!!
11

SHEaTH SLIPPaGEUsing a special machine, this test determines how much the surface of a rope will slip relative to the core when subjected to a load. The EN 892 establishes that slippage may not exceed 40 mm when stretching a length of rope measuring 1930 mm, i.e. ca. ±1 %.If the sheath slides over the core during actual climbing, it can lead to bulges and so-called stockings. If the ends of ropes have not been sealed properly, the core at the end of the rope can come loose from the sheath or the sheath may extend longer than the core. The ends of our ropes are sealed with ultrasound into one indivisible whole, and if the limits for slippage are complied with, the situation described above will not occur.
STaTIC ELOnGaTIOnUsable static elongation is tested by applying an 80 kg load to the rope. Elongation may not exceed 10 % for single ropes (one strand) and twin ropes (two strands tested in tandem) and 12 % for half ropes (one strand).
DYnaMIC ELOnGaTIOn DUrInG a FIrST DrOPThis parameter measures the elongation of the rope during the first standard drop. The maximum allowable dynamic elongation is 40 %. This measurement is a better indicator of the rope’s properties than the static elongation value.
KnOTaBILITYOne of the most important requirements for mountain climbing rope is outstanding flexibility. How is this measured? A section of the tested rope is tied into a simple knot. Weight is then applied to the rope (10 kg for a single rope). Then the interior diameter of the knot is measured. The ratio between that diameter and the diameter of the rope gives the coefficient of knotability. The maximum value of the coefficient is 1.1 times the diameter of the rope.
WarnInG! A rope with poor flexibility is harder to tie in knots and slides less efficiently through the carabiners of a belaying system. The effects of the elements or of improper care can reduce a rope’s flexibility.
LANEX has built its own laboratory for testing its TENDON ropes, including its own drop tower. Newly developed ropes to European labs for certification already fully prepared and with known technical parameters. Most TENDON ropes are tested at the accredited TÜV lab in Vienna.
12

requirements of the norm En 892 – dynamic climbing ropes
required values
Monitored parameter Single rope Half rope Twin rope
Rope diameter undefined undefined undefined
Rope weight undefined undefined undefined
Sheath slippage +- 20 mm +- 20 mm +- 20 mm
Static elongation 10 % * 12 % * 10 % **
Dynamic elongation 40 % + 40 % *** 40 % ++
Impact force of the first fall 12 kN + 8 kN *** 12 kN ++
No. of falls Min. 5 + Min. 5 *** Min. 12 ++
* test of one strand of rope + test of one strand of rope, load: 80 kg** test of two strands of rope ++ test of two strands of rope, load: 80 kg
*** test of one strand of rope, load: 55 kg
13

CHOOSING THE RIGHT CLIMBING ROPES
SInGLE rOPESThese ropes are used in single strands, so they are ideal where there is no increased danger of ropes being severed by falling rocks. They are appropriate for rocks, cliffs, vertical rock faces, artificial walls and for climbing big walls. Simple ropes usually have a diameter of 9 mm or greater. As ropes get thicker, they get stronger and withstand more falls. Unfortunately, they also get heavier. That is why you need to choose the right balance between thickness and weight. This will depend on the experience of the climber and the nature of the climbing involved. Experienced climbers prefer thin, light ropes. On the other hand, beginners or less experienced climbers choose thicker ropes with better safety parameters. When climbing new routes where the risk of falling is greater, a thicker, heavier rope is more appropriate. On long, multiple pitch routes, you need to make a compromise between thickness and weight. Of course, everything depends on the experience of the climber. For top rope climbing, we recommend using ropes made for that purpose – indoor ropes. Choosing the right rope will prolong its life many times.
TWIn rOPESPairs of ropes of the same kind are used, sharing the same belaying points. Twin ropes are ideal for classic climbing activities in the mountains and in unstable terrain – wherever you need increased protection from falling rocks breaking ropes or from sharp edges damaging rope sheaths. This is not necessarily only for climbing mountains. You may also find unstable conditions in unfamiliar rocky areas.
HaLF rOPESIf pairs of ropes (twin ropes) are used, they provide only standard safety. Half rope technology, where a left and a right rope lead separately through different belaying points, can greatly increase safety. If the belay anchors are wide apart, this method leads to reduced friction while also lowering impact force. For belaying, methods that allow independent control of each rope must be used. The great advantage of this system is the possibility of alternate and independent belaying of each strand separately. Half ropes are useful in alpine conditions, in difficult rock climbing, for climbing on ice and in mixed terrain.
WarnInG! It is not possible to combine twin and half rope belaying elements. Ropes may be burned if they pass through the same belaying point because of different speeds of slippage of individual strands if the leader falls.
14
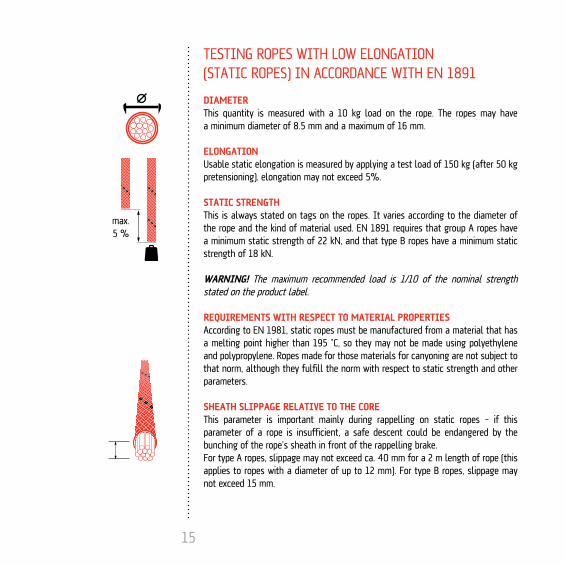
TESTING ROPES WITH LOW ELONGATION (STATIC ROPES) IN ACCORDANCE WITH EN 1891
DIaMETErThis quantity is measured with a 10 kg load on the rope. The ropes may have a minimum diameter of 8.5 mm and a maximum of 16 mm.
ELOnGaTIOnUsable static elongation is measured by applying a test load of 150 kg (after 50 kg pretensioning). elongation may not exceed 5%.
STaTIC STrEnGTHThis is always stated on tags on the ropes. It varies according to the diameter of the rope and the kind of material used. EN 1891 requires that group A ropes have a minimum static strength of 22 kN, and that type B ropes have a minimum static strength of 18 kN.
WarnInG! The maximum recommended load is 1⁄10 of the nominal strength stated on the product label.
rEqUIrEMEnTS WITH rESPECT TO MaTErIaL PrOPErTIESAccording to EN 1981, static ropes must be manufactured from a material that has a melting point higher than 195 °C, so they may not be made using polyethylene and polypropylene. Ropes made for those materials for canyoning are not subject to that norm, although they fulfill the norm with respect to static strength and other parameters.
SHEaTH SLIPPaGE rELaTIvE TO THE COrEThis parameter is important mainly during rappelling on static ropes – if this parameter of a rope is insufficient, a safe descent could be endangered by the bunching of the rope’s sheath in front of the rappelling brake.For type A ropes, slippage may not exceed ca. 40 mm for a 2 m length of rope (this applies to ropes with a diameter of up to 12 mm). For type B ropes, slippage may not exceed 15 mm.
max. 5 %
15

DYnaMIC PErFOrManCEThe testing equipment is similar to that used for testing climbing ropes, except that the rope is ca. 2 m long. At the ends it is tied in figure eight knots and it is tested with five falls with a fall factor of 1. During the test, the rope must withstand all five falls. Type A ropes are tested with a load of 100 kg. Type B ropes are tested with a load of 80 kg.
KnOTaBILITYThis is tested in the same way as mountain climbing ropes: it must not be possible to insert a bar with a diameter greater than a multiple of 1.2 times the diameter of the rope into the opening in the knot tightened by the testing force.
requirements of the norm En 1891 – static ropesrequired values
Monitored Parameters rope Type a rope Type BRope diameter 8,5 – 16 mmKnotability coefficient Max. 1,2 Max. 1,2Sheath slippage Max. 40 mm Max. 15 mmElongation Max. 5 % Max. 5 %Shrinkage Undefined UndefinedImpact force Max. 6 kN Max. 6 kNNo. of falls with a fall factor of 1 Min. 5 Min. 5Strength without knots 22 kN 18 kNStrength with knots Min. 15 kN (3 minutes) Min. 12 kN (3 minutes)
CHOOSING THE RIGHT STATIC ROPE FOR THE jOBType a ropes are stronger and provide better dynamic performance, so always prefer to use these ropes. An example of the use of type B would be a caving expedition, where it is necessary to minimize the weight of equipment and gear, and where a certain level of carefulness and experience of the users of the ropes is expected. Persons using static ropes should be trained, since ropes can be damaged relatively easily by mechanical wear or chemical exposure. Users must know about the risks that can damage ropes, and particularly must know when static ropes cannot be used.
WarnInG! In practice, fall factor is only important for static ropes when deciding how to anchor ropes, because one of the basic rules of their use is that the attaching of ropes must be done in such a way that the secondary securing point and all of the other elements of the safety chain are not subjected to an impact force of a fall with a factor greater than f = 1!
M
M
x
x/2
100 max.
16
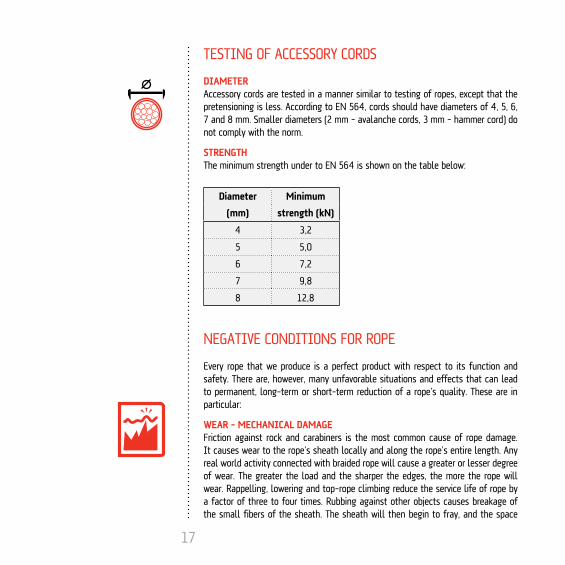
TESTING OF ACCESSORY CORDS
DIaMETErAccessory cords are tested in a manner similar to testing of ropes, except that the pretensioning is less. According to EN 564, cords should have diameters of 4, 5, 6, 7 and 8 mm. Smaller diameters (2 mm – avalanche cords, 3 mm – hammer cord) do not comply with the norm.
STrEnGTHThe minimum strength under to EN 564 is shown on the table below:
Diameter Minimum
(mm) strength (kn)
4 3,2
5 5,0
6 7,2
7 9,8
8 12,8
NEGATIVE CONDITIONS FOR ROPE
Every rope that we produce is a perfect product with respect to its function and safety. There are, however, many unfavorable situations and effects that can lead to permanent, long-term or short-term reduction of a rope’s quality. These are in particular:
WEar – MECHanICaL DaMaGEFriction against rock and carabiners is the most common cause of rope damage. It causes wear to the rope’s sheath locally and along the rope’s entire length. Any real world activity connected with braided rope will cause a greater or lesser degree of wear. The greater the load and the sharper the edges, the more the rope will wear. Rappelling, lowering and top-rope climbing reduce the service life of rope by a factor of three to four times. Rubbing against other objects causes breakage of the small fibers of the sheath. The sheath will then begin to fray, and the space
17

between individual fibers begins to widen. Moisture is absorbed into the rope more quickly, bringing with it micro-particles of dust, greatly accelerating the destruction of the rope. Sharp rock edges, falling rocks or accidental blows with an ice-axe can seriously damage a rope.
WarnInG! It is particularly necessary to monitor carefully any damage to single ropes if there is no back-up rope to rely on if it is damaged.
IMPaCT FOrCE IMPaCT LOaDSShort falls with a low fall factor during sports climbing only cause minimal damage to mountain climbing ropes. During intensive use and with frequent short falls, ropes may become stiff and gradually lose their flexibility. Even bigger falls from ten or fifteen meters do not mean the end for a rope, assuming that dynamic belaying techniques were used. The important thing for the service life of such a rope is the value of the fall factor and the impact force.
WarnInG! A longer fall with a fall factor greater than 1 that is not sufficiently restrained can significantly reduce a rope’s margin of safety. Under no circumstances should such a rope be used again for alpine climbing or in areas with sharp edges. If you are using static ropes in a system that prevents falls, it is always necessary to prevent persons on such ropes from falling or to minimize the effect of impact force by using shock absorbers.
FrICTIOn anD EFFECTS OF HEaTBurns caused by friction are an extreme form of wear which can occur if one rope rubs against another during rapid and improper rappelling or during the breaking of an extreme fall. Excessively fast rappelling can heat the rappelling brake so that the sheath of the rope is scorched at certain points. This reduces the strength of the rope at those points.
WarnInG! For this reason, we recommend rappelling at a moderate speed.
Melting can be recognized by glassy, transparent, charred or dark colored areas on the rope’s sheath. The fused fibers of the sheath become inflexible, and may break if the rope is bent over a small radius (e.g. in a carabiner). In cases of serious heat damage, we recommend changing ropes.Great care is also necessary on very busy trails, where several teams are using the same anchor points. In such cases, the same carabiners should not be used for multiple climbing teams. With carabiners used in this way, ropes moving at varying
18
speeds come into contact with each other, causing uncontrollable friction between them. It is also necessary to be careful on busy routes that ropes do not cross. If one climber should fall, there is a great danger that crossing ropes will burn each other.
Heat damage can also be caused by:radiating heat sources (e.g. drying ropes near a stove), open flame or sparks, contact with hot objects.
Mechanical damage can be caused by contact of rope during use with:grinding and cutting machines and tools, sharp edges, rough surfaces etc., mechanical aids for ascent and descent.Ropes may also be damaged by tight knots or the movement of ropes across a small radius (unsuitable carabiners).
CHEMICaL DaMaGEDamage from exposure to chemicals usually happens during transport, on expeditions, during construction work, industrial rescue work and during long-term rope storage. This can involve damage to the rope by a chemical spilled in a backpack, in a vehicle storage area, e.g. by sulfuric acid or its fumes from a car battery or fuel fumes, including fluid for cooking equipment (gasoline or diesel fuel), or other substances.
WarnInG! Chemical damage to rope fibers is often not obviously visible, especially when only the core has been damaged. For prevention of chemical damage to ropes, one must carefully inspect the location of the rope when it is not being used, and especially when it is being transported.
Damaging of ropes by caustic substances may be indicated by localized narrowing of the diameter or by soft places on the rope. In extreme cases, the fibers on the surface of the rope may be separated or ground into to dust. A change of color of material can also signal chemical damage. The chemical resistance of PAD and PES fibers is generally extremely good, but solutions of organic acids (at any temperatures) can damage ropes made of PAD. Hot alkaline solutions gradually dissolve PES fibers, reducing the strength of the material and weakening the rope.
WarnInG! Ropes should generally be protected from contact with chemicals, paints, hydrocarbons and other substances because it is difficult to determine whether their long-term effects will reduce the strength of the ropes’ material.
19

If a rope gets dirty, clean it in warm water (30 °C) and let it dry in the shade, away from direct radiating heat sources.
MOISTUrEIf a rope gets wet, it gets heavier and harder to use. If ropes made of PAD are soaked in water, their strength is even reduced, although the strength returns once they dry out. If a wet rope freezes, its performance characteristics are reduced, and especially its dynamic performance.
WarnInG! Given variable weather conditions, we recommend using water repellant products. This extends the life of your rope, and also makes it safer.
Uv raDIaTIOnIf a rope is used and stored properly, the effects of aging (degrading of polymers) will almost never appear, so the rope will wear out from climbing use before its material is aged by the effects of solar radiation. On the other hand, rappelling slings and fixed ropes left on alpine trails are another matter altogether. In those cases, one should consider whether to use such materials at all. Tests have shown ropes to be resistant to large static loads, but in this case, caution is appropriate.Although our products have been stabilized against UV radiation, polyamides will gradually age, reducing the sturdiness of the rope’s material. The recommended service life of a rope is always stated in its instruction manual.
TWISTInG OF rOPETwisting causes spiral deformation of the rope. This can be caused by twisting when lowering across an edge below a certain angle or through diagonally mounted carabiners.Rope that has been severely twisted is difficult to use for belaying, and during rappelling there is a danger that twisting ropes will get tangled with each other. This problems tends to get worse with older rope, but in most cases it is caused by improper handling when coiling and uncoiling rope, during its use in the field and during storage.
20

SERVICE LIFE
When is it time to get new ropes, and what should you know about the service life of rope and about dynamic effects on its useful life?It is very difficult to define the exact service life of a rope. It is very helpful for climbers to keep a rope diary, recording the number of meters ascended and rappelled down and, of course, any falls and their distances.
WarnInG! In general, any rope should be replaced immediately after a major fall where the fall factor value is higher than 1. Ropes should also be replaced at a minimum at the moment when you subjectively no longer feel confident with them.
You should always dispose of a rope, regardless of how long it has been used, if:• it has come into contact with chemicals, and especially acids,• the sheath is damaged so that the core is visible,• the sheath is extremely worn or excessively frayed,• sheath slippage is visible,• the rope looks very distorted (stiffness, indentations, hardened or weakened places),• the rope has been subjected to extreme loads (e.g. by hard falls),• the rope is extremely dirty and does not respond to normal washing,• the rope has been damaged by heat, abrasion or friction,• the recommended service life stated in the instruction manual has expired (even if
the rope has never been used).
DETErMInInG THE aGE OF a rOPEThe whole length of the climbing rope incorporates coloured yarns (one or two) or a marker tape inside the core. In the case of climbing ropes with coloured yarn inside the core, the year of manufacture can be identified by the colour of the yarn. Colour combinations are reused every 11 years. If you are in any doubt about the identification of your rope, please contact us.
2000 black/yellow 2006 yellow
2001 red/blue 2007 black
2002 red/green 2008 red/yellow
2003 red/black 2009 blue/yellow
2004 green 2010 green/yellow
2005 blue 2011 black/yellow
WarnInG! Ropes made by other manufacturers use different markings for year of manufacture.
21

Our other climbing ropes contain a marker tape inside the core which identifies:Rope manufacturer: LANEX • Rope type: Tendon Dynamic • Rope made in compliance with Standard: EN 892 • Number of authorized test laboratory: CE 0408 • Certified by: UIAA • Year of manufacture of the rope: stated in numeralsThis information is repeated approx every 20 cm. In accordance with En 1891, inside a static rope is a marker tape stating:Rope manufacturer: LANEX • Rope made in accordance with Standard: EN 1891 • Rope Type: A or B • Material used: e.g. PAD, PES etc. – either by name or by colour indication • Year of manufacture of the rope: stated in numeralsThis information is repeated approx every 20 cm.
rECOvErY PErIOD aFTEr a FaLLEvery time a rope breaks a fall and absorbs an impact, the rope has been subjected to a shock from which it should be allowed to recover for as long as possible. The harder the fall, the longer the relaxation period should be (up to several weeks).
WarnInG! If the situation does not allow you to let the rope recover (the climb cannot be immediately ended), you should switch the leading end of the rope. To achieve increased safety, retie the knot connecting it to the harness more loosely, because tightening of the knot during a fall reduces the dynamic force in the rope by ca. 1.5 kN. This procedure is mainly appropriate for sports climbing, where frequent falls at short intervals may be expected. We recommend that immediately after a fall, you release the rope rather than keeping it under tension (i.e. do ot keep hanging from it).
CARING FOR YOUR ROPEEvery rope that leaves our factory has been made following the strict conditions of the quality management system and has passed a final inspection with no signs of any defects. Even the best rope, however, will only provide optimum performance characteristics when properly used and cared for.
COILInG rOPE – PrEParInG a rOPE FOr ITS FIrST USEDuring manufacturing, rope is wound onto a drum and then rewound onto smaller reels or into a bundle (hank) according to the customer’s wishes and packaging standards. This gives the rope its basic shape retention. When using a rope for the first time, it must be unwound in such a way that prevents the formation of tangling loops.
22
To uncoil a rope, proceed as follows: Unfasten the rope, and insert both hands from opposite sides into the loops of rope. While maintaining constant tension on the rope, roll it away from yourself so that coils of rope fall onto the floor. Be careful that the other end of the rope does not get caught on your wrist, preventing further uncoiling. After uncoiling the rope, pull it through your hands two or three times one meter at a time while shaking it gently to release any twisting. In this way, the rope is ready to be transported or stored in the rope bag. Uncoil the rope over a ground cover (like the rope bag) or at home to keep the rope from getting unnecessarily dirty.In the past, when climbing ropes were not yet of today’s quality and when they were not yet used in such lengths as is the case today, it was recommended to stretch out the rope to its full length from both ends and then to drop it to the ground. That procedure rids the rope of any remaining shape retention. Today this practice has been abandoned, both because of the length of the ropes and the risk of getting them dirty. The fact remains, however, that this procedure was good for the rope.
COILInG anD PaCKInG rOPEEqually important is the procedure for coiling the rope after use. Proper rope coiling is the first step towards proper storage, transport and subsequent use.
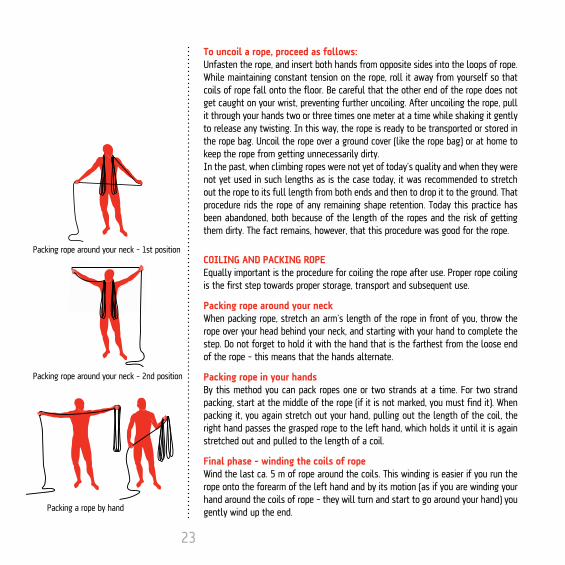
Packing rope around your neckWhen packing rope, stretch an arm’s length of the rope in front of you, throw the rope over your head behind your neck, and starting with your hand to complete the step. Do not forget to hold it with the hand that is the farthest from the loose end of the rope – this means that the hands alternate.
Packing rope in your handsBy this method you can pack ropes one or two strands at a time. For two strand packing, start at the middle of the rope (if it is not marked, you must find it). When packing it, you again stretch out your hand, pulling out the length of the coil, the right hand passes the grasped rope to the left hand, which holds it until it is again stretched out and pulled to the length of a coil.
Final phase – winding the coils of ropeWind the last ca. 5 m of rope around the coils. This winding is easier if you run the rope onto the forearm of the left hand and by its motion (as if you are winding your hand around the coils of rope – they will turn and start to go around your hand) you gently wind up the end.
Packing rope around your neck – 1st position
Packing rope around your neck – 2nd position
Packing a rope by hand
23

Pull the last meter through the middle of the rope with your left hand (red arrow) and run the end of the rope under the resulting bow (blue arrow), and then tie it in a knot so it does not come out of the bow.
Packing rope in a bagThis is a very easing packing procedure. Always tie a knot in the end of the rope! Put it at the bottom of the bag, and begin winding the rope into small coils that you put gradually upwards from the bottom of the bag. Occasionally shake the bag on the ground so that the rope settles into it.Tie an anchoring knot in the last meter of rope, and lay it in the bag so that it is easy to find by feel. If you have the length of the rope marked with a label only at one end, that end should be at the top of the bag, so the rope will be easy to identify.
Packing long ropesRopes that are 100 meters long and longer are hard to pack. There is a trick to it. just sit down and wrap the rope around your legs (soles of your feet and your knees). It’s very easy. Wrap the last five or six meters of rope around the coils of rope, making a hank to prevent the coils from coming loose.
rOPE BaG − TO PrOTECT anD TranSPOrT YOUr rOPEFor sports climbing, a rope bag is the best and easiest way to carry rope and to keep it clean. This way, the rope is always safely and securely stored during transport. During climbing the rope lies on the spread-out package and is again isolated from contamination from the ground.
WarnInG! The rope bag thus makes a considerable contribution to protecting the rope and lengthening its service life. It is particularly appropriate for sports climbing on single pitch climbs.
HOLDInG rOPE aT THE BELaY STaTIOnDuring multi-pitch climbs, you must be sure that at the advance belay anchor the rope is kept in the most organized an systematic way possible. On alpine trails, when climbing on ice or mixed terrain, it is important that bundles of rope do not drag far down the cliff, where they might become stuck on an uneven surface, which could lead to rope damage when pulling the rope free. Experienced climbers hold ropes at the belay station in coils alternating to the left and right across their belaying rope, thigh or foot, so they always have the rope under control. If the same leader continues to climb the next pitch, the rope must first be completely rearranged so that it can be pulled up again smoothly.
Packing rope in a bag for rappelling
Wrapping long ropes around your legs
24
Completion of packing of ropes
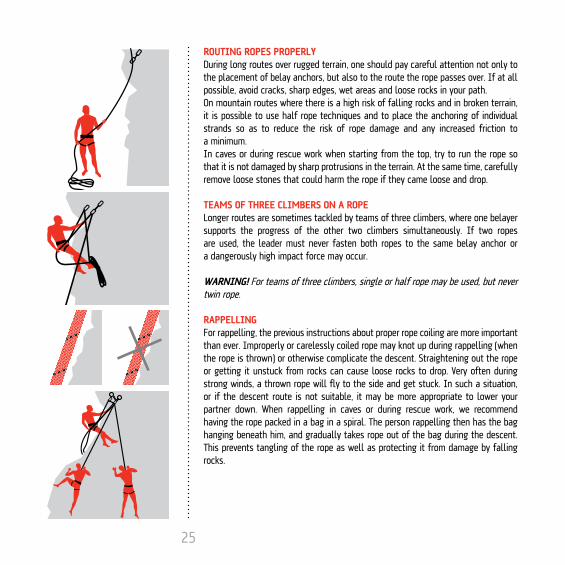
rOUTInG rOPES PrOPErLY During long routes over rugged terrain, one should pay careful attention not only to the placement of belay anchors, but also to the route the rope passes over. If at all possible, avoid cracks, sharp edges, wet areas and loose rocks in your path. On mountain routes where there is a high risk of falling rocks and in broken terrain, it is possible to use half rope techniques and to place the anchoring of individual strands so as to reduce the risk of rope damage and any increased friction to a minimum.In caves or during rescue work when starting from the top, try to run the rope so that it is not damaged by sharp protrusions in the terrain. At the same time, carefully remove loose stones that could harm the rope if they came loose and drop.
TEaMS OF THrEE CLIMBErS On a rOPELonger routes are sometimes tackled by teams of three climbers, where one belayer supports the progress of the other two climbers simultaneously. If two ropes are used, the leader must never fasten both ropes to the same belay anchor or a dangerously high impact force may occur.
WarnInG! For teams of three climbers, single or half rope may be used, but never twin rope.
raPPELLInGFor rappelling, the previous instructions about proper rope coiling are more important than ever. Improperly or carelessly coiled rope may knot up during rappelling (when the rope is thrown) or otherwise complicate the descent. Straightening out the rope or getting it unstuck from rocks can cause loose rocks to drop. Very often during strong winds, a thrown rope will fly to the side and get stuck. In such a situation, or if the descent route is not suitable, it may be more appropriate to lower your partner down. When rappelling in caves or during rescue work, we recommend having the rope packed in a bag in a spiral. The person rappelling then has the bag hanging beneath him, and gradually takes rope out of the bag during the descent. This prevents tangling of the rope as well as protecting it from damage by falling rocks.
25

PULLInG rOPE FrEE FrOM a rInG aFTEr raPPELLInG If a rope runs through a rappelling ring, after rappelling always pull the rope from the side towards the rock, or else the rope may be pinched between the rock and the ring by the weight of the rope being pulled.
rEGULar InSPECTIOn OF rOPESRopes are the most important tools used by climbers, and they therefore deserve to be regularly and thoroughly inspected. You should inspect your ropes at regular intervals, depending on the intensity of climbing, after any serious fall, and after each use with crampons, ice axes or other sharp objects.
WarnInG! Check rope visually and by touch. Slide the rope through a clenched fist and feel for irregularities on its surface. If you find an irregularity, inspect the sheath and core visually for any damage. If you feel a bulge, lump, very soft spot or other inconsistency, we recommend replacing the rope.
WarnInG! Ropes intended for work at heights (or for rescue work) must be inspected every 12 months by the manufacturer or by a person authorized by the manufacturer. Written records must be kept of the inspections.
CLEanInGDirty ropes have reduced performance characteristics and are harder to handle. If your ropes get dirty, you can wash them by hand in warm water up to 30°C or in a washing machine on the setting for wool. Do not run ropes through the spin cycle, as this may damage them. Occasional washing maintains good handling characteristics and prolongs the life of the rope. Soap or soap flakes are best for washing rope. Dry your ropes spread out in a ventilated area at room temperature, away from direct sunlight and radiating heat sources. Drying out rope is very important, and may take over a week.
DISInFECTInGFor disinfecting ropes, only use disinfectants that are recommended by the manufacturer.
STOrInGStore ropes in a dry, dark place, away from the effects of chemical vapors, suspended on a special sling or loop, but never by one strand of a hank! We also do not recommend storing ropes in a garage, workshop or work areas where they may be damaged by vapors from car batteries, paint and other stored chemicals.
26
KNOTS RECOMMENDED FOR ANCHORING ROPES
If you tie a knot in a rope, you reduce its capacity. The strands of rope in a knot are stressed unevenly, not only by pulling, but also by bending and pressure within the knot. Under extreme forces, a rope will always break at the knot. The following knots are recommended for use with mountain climbing and static ropes.
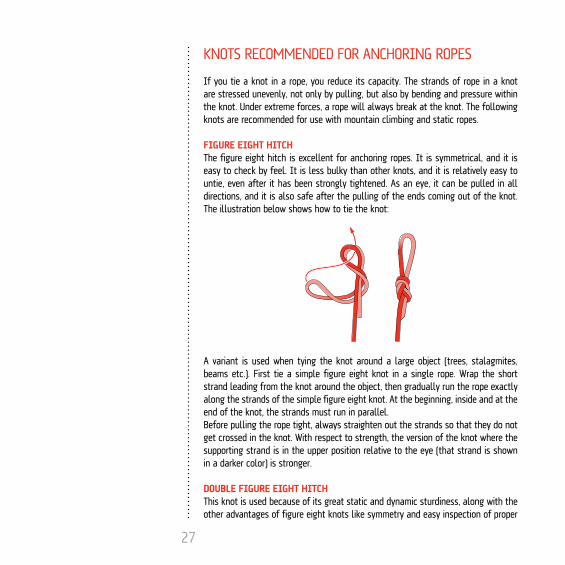
FIGUrE EIGHT HITCHThe figure eight hitch is excellent for anchoring ropes. It is symmetrical, and it is easy to check by feel. It is less bulky than other knots, and it is relatively easy to untie, even after it has been strongly tightened. As an eye, it can be pulled in all directions, and it is also safe after the pulling of the ends coming out of the knot. The illustration below shows how to tie the knot:
A variant is used when tying the knot around a large object (trees, stalagmites, beams etc.). First tie a simple figure eight knot in a single rope. Wrap the short strand leading from the knot around the object, then gradually run the rope exactly along the strands of the simple figure eight knot. At the beginning, inside and at the end of the knot, the strands must run in parallel.Before pulling the rope tight, always straighten out the strands so that they do not get crossed in the knot. With respect to strength, the version of the knot where the supporting strand is in the upper position relative to the eye (that strand is shown in a darker color) is stronger.
DOUBLE FIGUrE EIGHT HITCHThis knot is used because of its great static and dynamic sturdiness, along with the other advantages of figure eight knots like symmetry and easy inspection of proper
27

tying. This version of a hitch is ideal for anchoring in the shape of a “Y”, when as needed it is possible to have a changeable setting of the length of individual loops without untying the knot. This, for example, allows rappelling down the middle of a well without touching the sides. The maximum angle of the strands of the knot (taking into account the distribution of force) is 120°.The method of tying is clear in the illustration below. Before tightening the knot, it is necessary to straighten out the strands in the knot so that they are aligned according to the “upper version” (the darker strand). Put the loop that you turn over after running it through the knot in the middle of the knot.
DOUBLE FISHErMan’S KnOTThis is basically the best known way of joining two ropes by a knot. It can be used for joining cords and ropes of different thicknesses and types. Its main use is for joining load-bearing ropes and for making rope hitches. Before using this knot, do not forget to check the knot and to pull it very tight. Under a strong load, it may come untied, and cause you problems.The method of tying is clear in the illustration below. Turn the loops towards the middle of the knot (not the other way – that would result in a knot that is much less strong). After making the first loop, make another loop across the first strand – it may not be parallel. Then run the short und under the loops, so that it leads away from the knot. Learn to tie it on one end – first tie one half of the knot, turn the rope in your hands and tie the other part. Always tie both parts of the knot in the same direction, and you will not have to think hard about which way to turn the loops. It is practical to wind the loops around the thumb of your left hand lying on the rope, and after the second winding, to run the end of the rope in the direction after the pulling finger – i.e. away from the middle of the rope.
28
Abbildungen – doppelter Achterknoten
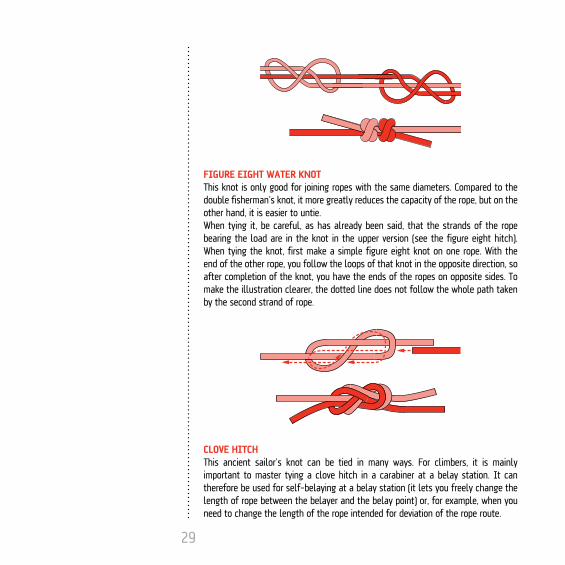
FIGUrE EIGHT WaTEr KnOT This knot is only good for joining ropes with the same diameters. Compared to the double fisherman’s knot, it more greatly reduces the capacity of the rope, but on the other hand, it is easier to untie.When tying it, be careful, as has already been said, that the strands of the rope bearing the load are in the knot in the upper version (see the figure eight hitch). When tying the knot, first make a simple figure eight knot on one rope. With the end of the other rope, you follow the loops of that knot in the opposite direction, so after completion of the knot, you have the ends of the ropes on opposite sides. To make the illustration clearer, the dotted line does not follow the whole path taken by the second strand of rope.
CLOvE HITCHThis ancient sailor’s knot can be tied in many ways. For climbers, it is mainly important to master tying a clove hitch in a carabiner at a belay station. It can therefore be used for self-belaying at a belay station (it lets you freely change the length of rope between the belayer and the belay point) or, for example, when you need to change the length of the rope intended for deviation of the rope route.
29

When tying this variant, remember that you grasp the more distant strand of rope in the carabiner between the nearer strand and the cliff (on the opposite side from the catch on the carabiner), then you make a loop on that strand which you turn according to the picture, and then you put it onto the carabiner. If you turn the loop the wrong way, you get a different knot (lark’s head).
HaLF HITCHThe half hitch is used mainly for securing of the lead climber. It allows the free changing of the length of the rope between the belayer and the climber. The half hitch can be clipped in a carabiner according to whether you are taking on or letting off rope. During a fall, the rope often slips before the fall comes to a stop, and this reduces the impact force.
Tying a half hitch is easy:a) gradually insert a coil with a bow into the open, b) close the finished half hitch into the carabiner.
Notice that you grab the strand of rope with your hand after the carabiner (at the more distant end). When using this knot, do not forget to tighten the safety on the carabiner. By pulling in the direction of the arrow, you turn the knot over in the carabiner, thus changing the direction of the drawing of the rope.
30
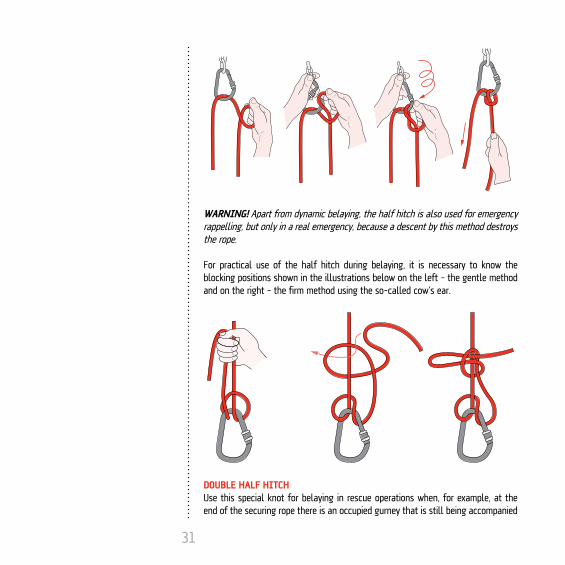
WarnInG! Apart from dynamic belaying, the half hitch is also used for emergency rappelling, but only in a real emergency, because a descent by this method destroys the rope.
For practical use of the half hitch during belaying, it is necessary to know the blocking positions shown in the illustrations below on the left – the gentle method and on the right – the firm method using the so-called cow’s ear.
DOUBLE HaLF HITCHUse this special knot for belaying in rescue operations when, for example, at the end of the securing rope there is an occupied gurney that is still being accompanied
31
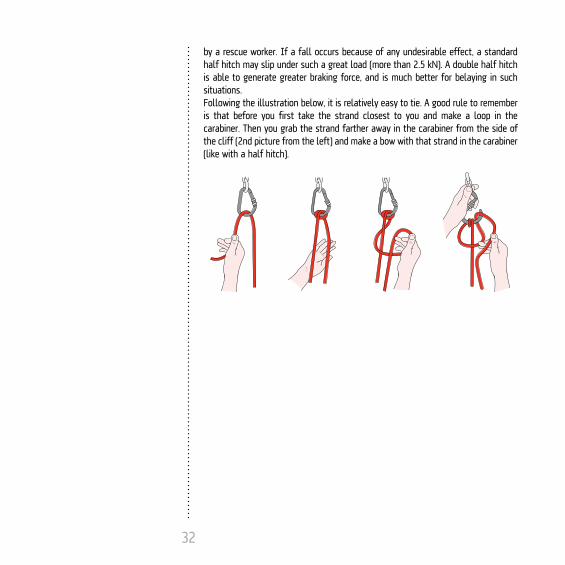
by a rescue worker. If a fall occurs because of any undesirable effect, a standard half hitch may slip under such a great load (more than 2.5 kN). A double half hitch is able to generate greater braking force, and is much better for belaying in such situations.Following the illustration below, it is relatively easy to tie. A good rule to remember is that before you first take the strand closest to you and make a loop in the carabiner. Then you grab the strand farther away in the carabiner from the side of the cliff (2nd picture from the left) and make a bow with that strand in the carabiner (like with a half hitch).
32
A few words in conclusion
We can have various kinds of relationships with braided rope. We can view it as something that we have bought, so that our ownership allows us to treat it however we wish. The opposite opinion is that braided rope is a friend that we must treat kindly. That way our mutual relationship is firm enough to withstand all of the toughest situations. We, the manufacturers, take this second approach, because at a deeper level one may compare a rope to the thread of life. If a rope breaks, the life of the user usually also comes to an end.We believe that you will create the right relationship with your rope, enriching your life with lots of beautiful experiences in the mountains, on cliffs and training walls and in caves. But you can also be more comfortable at work with a feeling of safety and security when working at heights or over a vertical drop.
33

LANEX a.s., Hlučínská 1/96, 747 23 Bolatice, Czech Republic
tel.: +420 553 751 111, fax: +420 553 654 130, e-mail: [email protected]
www.mytendon.com


