20
Version 3.09.07.07 Setup Guide

Version 3.09.07.07
S e t u p G u i d e

- 2 -
TRADEMARKS AND COPYRIGHT Trademarks
Microsoft Windows, Windows NT, and the brand names and other product names of other Microsoft products are trademarks of Microsoft Corporation in the United States and/or other countries.
All other product names and logos are trade and service marks of their respective companies.
Copyright Copyright © 2006-2007 TOSHIBA TEC CORPORATION All rights reserved
The information contained in this document is the property of Toshiba (Australia) Pty Limited.
Neither receipt nor possession hereof confers or transfers any right to reproduce or disclose whole or any part of the contents hereof, without the prior written consent of Toshiba (Australia) Pty Limited.
Disclaimer
The following notice sets out the exclusions and limitations of liability of TOSHIBA TEC CORPORATION (including its employees, agents and sub-contractors) to any purchaser or user (‘User’) of the e-BRIDGE Job Separator, including its accessories, options and bundled software (‘Product’). 1. The exclusion and limitations of liability referred to in this notice shall be effective to the fullest extent permissible at law. For the avoidance of doubt, nothing in this notice shall be taken to exclude or limit TOSHIBA TEC CORPORATION’s liability for death or personal injury caused by TOSHIBA TEC CORPORATION’s negligence or TOSHIBA TEC CORPORATION‘s fraudulent misrepresentation. 2. All warranties, conditions and other terms implied by law are, to the fullest extent permitted by law, excluded and no such implied warranties are given or apply in relation to the Products. 3. TOSHIBA TEC CORPORATION shall not be liable for any loss, cost, expense, claim or dam-age whatsoever caused by any of the following: (a)use or handling of the Product otherwise than in accordance with the manuals, including but not limited to Operator’s Manual, User‘s Guide, and/or incorrect or careless handling or use of the Product; (b)any cause which prevents the Product from operating or functioning correctly which arises from or is attributable to either acts, omissions, events or accidents beyond the reasonable control of TOSHIBA TEC CORPORATION including without limitation acts of God, war, riot, civil commotion, malicious or deliberate damage, fire, flood, or storm, natural calamity, earthquakes, abnormal voltage or other disasters; (c)additions, modifications, disassembly, transportation, or repairs by any person other than service technicians authorized by TOSHIBA TEC CORPORATION; or (d)use of paper, supplies or parts other than those recommended by TOSHIBA TEC COR-PORATION.

- 3 -
4. Subject to paragraph 1, TOSHIBA TEC CORPORATION shall not be liable to Customer for: (a)loss of profits; loss of sales or turnover; loss of or damage to reputation; loss of production; loss of anticipated savings; loss of goodwill or business opportunities; loss of customers; loss of, or loss of use of, any software or data; loss under or in relation to any contract; or (b)any special, incidental, consequential or indirect loss or damage, costs, expenses, financial loss or claims for consequential compensation; whatsoever and howsoever caused which arise out of or in connection with the Product or the use or handling of the Product even if TOSHIBA TEC CORPORATION is advised of the possibility of such damages. TOSHIBA TEC CORPORATION shall not be liable for any loss, cost, expense, claim or dam-age caused by any inability to use (including, but not limited to failure, malfunction, hang-up, virus infection or other problems) which arises from use of the Product with hardware, goods or software which TOSHIBA TEC CORPORATION has not directly or indirectly supplied
- 4 -
Table Of Contents Introduction ………………………………………………………………..…….
5
System Requirements .…..…………………………………………….……….
6
Pre-requisites …...…………………………….………………………………….
6
Software Installation ……………………………………………………………
7
Additional Separator Printers………………………………………………….
11
Interface Description …………………………………………………………..
12
Performing Job Separation ..………………………………………………….
14
Save & Load Template …..…………………………………………………....
17
FAQ's ……………………………………………………………………………....
20
- 5 -
Introduction
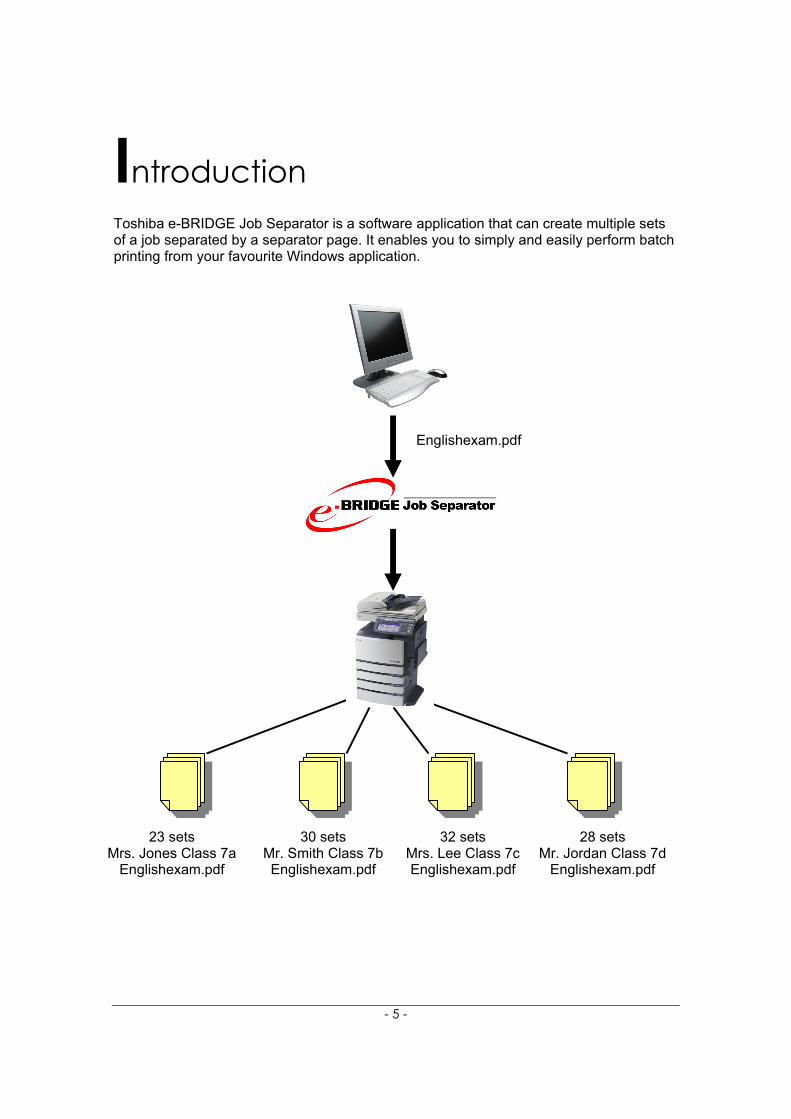
Toshiba e-BRIDGE Job Separator is a software application that can create multiple sets of a job separated by a separator page. It enables you to simply and easily perform batch printing from your favourite Windows application.
23 sets Mrs. Jones Class 7a
Englishexam.pdf
30 sets Mr. Smith Class 7b Englishexam.pdf
32 sets Mrs. Lee Class 7c Englishexam.pdf
28 sets Mr. Jordan Class 7d
Englishexam.pdf
Englishexam.pdf

- 6 -
System Requirements
Installation and configuration of this software should only be conducted by a person who has the required skills and knowledge in the following areas:
• Microsoft Windows • Adding/configuring a printer
To install the e-BRIDGE Job Separator printers on a Windows workstation, the following minimum specifications are required:
• Display Resolution 1024 x 768 dots or more
• Display Colour High Colour (16bit) or higher is recommended
• CPU Pentium 266 MHz minimum or faster recommended
• Memory 128 megabytes (MB) of RAM or higher recommended
• Operating System Windows XP Professional with Service Pack 1 (32bit)
Pre-requisites
• Toshiba Multifunction Device. e-STUDIO MFD with print option (if not standard) utilising e-BRIDGEI/II architecture. (Check with Toshiba Representative for latest product compatibility.)
• e-BRIDGE Postscript (PS3) print driver.
The e-BRIDGE Postscript (PS3) print driver must be installed on a local port. (Toshiba e-BRIDGE Job Separator will not function with shared printers, PCL5c and PCL6 print drivers.)

- 7 -
Software Installation
1. Double click ‘Setup.exe’
2. Click [Next >]

- 8 -
3. Read the License Agreement and select ‘I accept the terms in the license agreement’ then click [Next >]
4. By default, “Anyone who uses this computer (all users)” is selected, please make
changes if necessary then click [Next >].

- 9 -
5. Click [Install]
6. The default name will appear “e-BRIDGE Job Separator” please add the
appropriate e-Studio model to the printer name and specify the Toshiba e-STUDIO printer of your preference then click [OK]
7. Click [OK]

- 10 -
8. Installation is Complete. Click [Finish]
9. Deselect SNMP communication Make sure SNMP communication is disabled. This can be found in “Start” ‘Printers and Faxes’ and then the Properties of the print driver, under the Configuration tab.
Note ! Failing to deselect SNMP communication will result in a long delay when selecting the Job Separator printer.

- 11 -
Additional Separator Printers
You may want to have additional e-BRIDGE Job Separator printers for each Toshiba e-STUDIO printers on your network. To add an additional e-BRIDGE Job Separator driver, please complete the following steps: 1. Go to the [Start] → [All Programs] → [TOSHIBA e-BRIDGE] → [Job Separator]
→ [Add new Job Separator Printer]
2. The default name will appear “e-BRIDGE Job Separator” please add the appropriate e-Studio model to the printer name and specify the Toshiba e-STUDIO printer of your preference then click [OK]
3. Click [OK]
Note ! Remember to deselect SNMP communication for each printer (see page 9).

- 12 -
Interface Description
A - No. Of Copies The number of sets to be printed for each group separation. Number of copies cannot be greater than 999. B - Department Code Separation Page Content If applicable, enter a 5 digit department code for each job separation. If an incorrect department code was entered the associated separation job and page will be placed in the INVALID queue of the Toshiba e-BRIDGE MFD. C - Separation Page Title Enter the desire page content to appear on the Job Separator page. Number of characters cannot be greater than 185. D - Paper Source Select the paper source for the Job Separator page. The paper source selection is determined by the Toshiba e-STUDIO model installed with you Job Separator printer.
A
B
C
D
E
F
G
I
J
K
L
O
M
HN P

- 13 -
E - Paper Type Select the paper type for the Job Separator page. The paper type selection is determined by the Toshiba e-STUDIO model installed with you Job Separator printer. F - Paper Size Select the paper size for the Job Separator page. The paper size selection is determined by the Toshiba e-STUDIO model installed with you Job Separator printer. G - Orientation Select between Portrait and Landscape for the Job Separator page. H - Add to Job List Add the settings associated with each job separation to the Separation Job List. I - Load Job Separator Template To load a previously saved Job Separator template to the Separation Job List. J - Save Template To save a Separation Job List so that it can be easily retrieved and loaded for future use. K - Delete Delete a job highlighted in the Separation Job List. L - Edit Edit the settings of a job highlighted in the Separation Job List. M - Clear Clear all jobs in the Separation Job List. N - Print Print all jobs in the Separation Job List. O - Cancel Cancel job separation and exit from Job Separator. P - Help e-BRIDGE Job Separator help.
- 14 -
Performing Job Separation The following outline summarizes the steps for job separation from any application.
• Create a document. • Print to e-BRIDGE Job Separator Driver. • Select printer properties settings. • Complete the Separation Job List. • Print the job.
Job Separation from Windows Applications
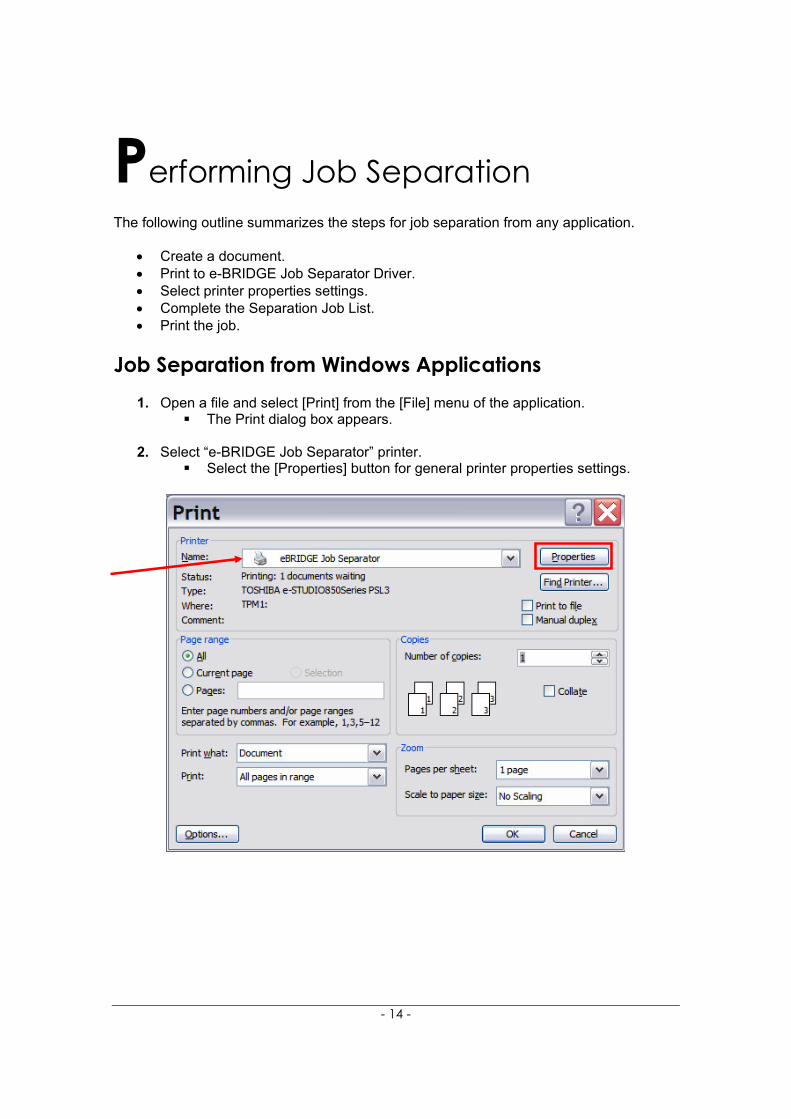
1. Open a file and select [Print] from the [File] menu of the application. The Print dialog box appears.
2. Select “e-BRIDGE Job Separator” printer.
Select the [Properties] button for general printer properties settings.

- 15 -
3. Specify printer properties settings and click [OK].
Note ! The “Number of Copies” will be determined by e-BRIDGE Job Separator. Saddle Stitch mode is not supported by e-BRIDGE Job Separator.
4. Click [OK] again for the e-BRIDGE Job Separator settings.

- 16 -
5. Now you can enter the separation settings and select [ADD >>] to add to “Separation Job List”.
Select [Save Template] to save the completed separation job list as a template.
Select [Delete] to delete a particular job separation. Select [Edit] to make adjustment for particular job separation settings. Select [Clear] to clear all job separation on the “Separation Job List”.
6. Once completed the “Separation Job List”, click on [Print].

- 17 -
Save & Load Template 1. Once completed the ‘Separation Job List’ select [Save Template].
2. Before you save the template please make sure:
Select the location of where you want the template to be saved Give an appropriate and meaningful template name and select [Save]

- 18 -
3. The template is saved and you can now [Print] this job or [Cancel] to exit.
4. To load a saved template select [Browse].

- 19 -
5. To open a saved template: Locate where template file is saved Once you have selected the template file it will appear in the ‘File name’ field Select [Open]
6. The template is loaded and you can now [Print] this job.

- 20 -
Frequently Asked Questions
Q. After I select the Job Separator printer it takes a long time for the print driver to
appear. A. Make sure you have deselected SNMP communication (see page 9) Q. I am trying to add a new Job Separator printer but the Toshiba MFD does not
appear in the ‘Select a Toshiba Printer’ list. A. Make sure you have the Postscript (PSL3) driver installed and not the PCL driver.
e-BRIDGE Job Separator only works with a Postscript print driver.
Q. I cannot install e-BRIDGE Job Separator. A. To install e-BRIDGE Job Separator you need Administrator rights to your PC.
Check user accounts in the Control Panel and confirm that you have administrative rights.
Q. After sending the print job from Job Separator the JOB STATUS light starts to
flash, and it is asking to “Place Paper in the Bypass tray. Is there any way to make it auto feed from bypass?
A. For Auto Feed on Bypass, please contact your Toshiba dealer for assistance. Q. I have selected the number of copies in the printer properties but it does not
reflect in the Job Separator screen. A. The “Number of Copies” will be determined by e-BRIDGE Job Separator settings
and not the printer properties settings. Q. Will booklet/saddle stitch mode work with print jobs sent from Job Separator? A. Booklet/Saddle stitch mode is not supported by e-BRIDGE Job Separator. Q. I am getting an “Error: Unable to add this printer. Please select another PostScript
Printer”. A. Did you install the Toshiba MFD as a local printer or network printer?
e-BRIDGE Job Separator can only be used with local printers. A. Please make sure the local printer installed is not shared.


