ibm.com/redbooks Redpaper e-commerce Patterns for z/Linux Using WebSphere Commerce Suite V5.1 Patterns for e-business Series Bill Moore Installation and configuration of Commerce Suite Solution development guidelines Implementation examples
Transcript
ibm.com/redbooks Redpaper
e-commerce Patterns for z/Linux Using WebSphere Commerce Suite V5.1Patterns for e-business Series
Bill Moore
Installation and configuration of Commerce Suite
Solution development guidelines
Implementation examples
Front cover
e-commerce Patterns for z/Linux Using WebSphere Commerce Suite V5.1 Patterns for e-business Series
This edition applies to IBM WebSphere Commerce Suite Pro Edition for Linux for ^ z900 and S/390.
Comments may be addressed to:IBM Corporation, International Technical Support OrganizationDept. HZ8 Building 662P.O. Box 12195Research Triangle Park, NC 27709-2195
When you send information to IBM, you grant IBM a non-exclusive right to use or distribute the information in any way it believes appropriate without incurring any obligation to you.
Take Note! Before using this information and the product it supports, be sure to read the general information in “Special notices” on page v.
iv e-commerce Patterns for z/Linux using WebSphere Commerce Suite V5.1
Special notices
References in this publication to IBM products, programs or services do not imply that IBM intends to make these available in all countries in which IBM operates. Any reference to an IBM product, program, or service is not intended to state or imply that only IBM's product, program, or service may be used. Any functionally equivalent program that does not infringe any of IBM's intellectual property rights may be used instead of the IBM product, program or service.
Information in this book was developed in conjunction with use of the equipment specified, and is limited in application to those specific hardware and software products and levels.
IBM may have patents or pending patent applications covering subject matter in this document. The furnishing of this document does not give you any license to these patents. You can send license inquiries, in writing, to the IBM Director of Licensing, IBM Corporation, North Castle Drive, Armonk, NY 10504-1785.
Licensees of this program who wish to have information about it for the purpose of enabling: (i) the exchange of information between independently created programs and other programs (including this one) and (ii) the mutual use of the information which has been exchanged, should contact IBM Corporation, Dept. 600A, Mail Drop 1329, Somers, NY 10589 USA.
Such information may be available, subject to appropriate terms and conditions, including in some cases, payment of a fee.
The information contained in this document has not been submitted to any formal IBM test and is distributed AS IS. The use of this information or the implementation of any of these techniques is a customer responsibility and depends on the customer's ability to evaluate and integrate them into the customer's operational environment. While each item may have been reviewed by IBM for accuracy in a specific situation, there is no guarantee that the same or similar results will be obtained elsewhere. Customers attempting to adapt these techniques to their own environments do so at their own risk.
Any pointers in this publication to external Web sites are provided for convenience only and do not in any manner serve as an endorsement of these Web sites.
Other company trademarksThe following terms are trademarks of other companies:
C-bus is a trademark of Corollary, Inc. in the United States and/or other countries.
Java and all Java-based trademarks and logos are trademarks or registered trademarks of Sun Microsystems, Inc. in the United States and/or other countries.
Microsoft, Windows, Windows NT, and the Windows logo are trademarks of Microsoft Corporation in the United States and/or other countries.
PC Direct is a trademark of Ziff Communications Company in the United States and/or other countries and is used by IBM Corporation under license.
ActionMedia, LANDesk, MMX, Pentium and ProShare are trademarks of Intel Corporation in the United States and/or other countries.
UNIX is a registered trademark in the United States and other countries licensed exclusively through The Open Group.
SET, SET Secure Electronic Transaction, and the SET Logo are trademarks owned by SET Secure Electronic Transaction LLC.
Other company, product, and service names may be trademarks or service marks of others.
vi e-commerce Patterns for z/Linux using WebSphere Commerce Suite V5.1
Preface
This Redpaper discusses the installation, configuration and customization of IBM WebSphere Commerce Suite Pro Edition for Linux for ^ z900 and S/390. It is intended both for technicians who need to install and administer Commerce Suite, and for developers who need to design and customize e-commerce sites for deployment on IBM WebSphere Commerce Suite Pro Edition for Linux for ^ z900 and S/390.
We assume that the readers of our Redpaper are familiar with the Linux operating system and have a good base of knowledge about WebSphere Commerce Suite. Also this Redpaper builds on the information and examples documented in the Redbooks:
� WebSphere Commerce Suite V5.1 Handbook, SG24-6167
� WebSphere Commerce Suite V5.1 Customization and Transition Guide, SG24-6174
� e-commerce Patterns for Building B2C Web Sites Using IBM WebSphere Commerce Suite V5.1, SG24-6180
This Redpaper is part of the Patterns for e-business series and re-uses information developed in the redbook e-commerce Patterns for Building B2C Web Sites Using IBM WebSphere Commerce Suite V5.1, SG24-6180.
The team that wrote this RedpaperThis Redpaper was produced by a team of specialists working at the International Technical Support Organization, Raleigh Center.
Bill Moore is a WebSphere Specialist at the International Technical Support Organization, Raleigh Center. He writes extensively and teaches IBM classes on WebSphere and related topics. Before joining the ITSO, Bill was a Senior AIM Consultant at the IBM Transarc lab in Sydney, Australia. He has 16 years of application development experience on a wide range of computing platforms and using many different coding languages. He holds a Master of Arts degree in English from the University of Waikato, in Hamilton, New Zealand. His current areas of expertise include the VisualAge family of application development tools, object-oriented programming and design, and e-business application development.
Thanks to the following people for their contributions to this project:
Geert Van De PutteBob HaimowitzInternational Technical Support Organization, Raleigh Center
Roy CostaInternational Technical Support Organization, Poughkeepsie Center
Anthony CicconeRick KumarJohn TaoEric RadzinskiIBM Santa Teresa
Steve WehrIBM Poughkeepsie
NoticeThis publication is intended for people who implement and develop e-commerce sites using IBM WebSphere Commerce Suite Pro Edition for Linux for ^ z900 and S/390 The information in this publication is not intended as the specification of any programming interfaces that are provided by IBM WebSphere Commerce Suite Pro Edition for Linux for ^ z900 and S/390 See the PUBLICATIONS section of the IBM Programming IBM WebSphere Commerce Suite Pro Edition for Linux for ^ z900 and S/390 for more information about what publications are considered to be product documentation.
Comments welcomeYour comments are important to us!
We want our papers to be as helpful as possible. Send us your comments about this Redpaper or other redbooks in one of the following ways:
� Use the online Contact us review redbook form found at:
This Redpaper is part of the Patterns for e-business series. In this chapter we provide an overview of how to work with the e-business patterns and discuss the Composite patterns on which we base the e-commerce examples shown in this Redpaper.
For a fuller discussion of Patterns for e-business, please refer to the Web site:
http://ibm.com/developerworks/patterns/
For details of the Electronic commerce composite pattern, see the redbook e-commerce Patterns for Building B2C Web Sites Using IBM WebSphere Commerce Suite V5.1, SG24-6180.
The job of an IT architect is to evaluate business problems and to architect a solution. The architect begins by gathering input on the problem, the desired solution, and any special considerations or requirements that need to be factored in. The architect takes this input and designs a solution that includes one or more applications that provide the necessary functions.
It is to our advantage to capture the experience of these IT architects in such a way that future engagements are made simpler. Taking this experience and crafting a repository that provides a way for architects to use this experience to build future solutions using proven scenarios saves time and money and helps ensure a solid solution that will stand the test of time.
The IBM Patterns for e-business effort does just this. Its purpose is to capture e-business approaches that have been tested and proven. The information captured is thought to fit the majority of situations. By making these approaches available and classifying them into useful categories, we save the e-business planners, architects and developers both time and money.
These approaches are further refined into useful, tangible guidelines. The patterns and their associated guidelines allow the architect to start with a problem and a vision, find a conceptual pattern that fits this vision, define the necessary functional pieces that the application will need to succeed, and then actually build the application using coding techniques outlined in the guidelines.
The highest level of patterns defines the possible business interactions required in the solution. The business function will typically fall into one or more of these defined Business patterns.
1.1 How to use the Patterns for e-businessThe Patterns for e-business are structured in a way that each level of detail builds on the last. At the highest level are Business patterns that describe the entities involved in the e-business solution. A Business pattern describes the relationship between the users, the business organization or applications, and the data to be accessed.
There are four primary Business patterns:
1. Self-Service pattern, formerly known as the User-to-Business pattern, which describes situations where users are interacting with a business application to view or update data.
2. Collaboration pattern, formerly known as the User-to-User pattern, which describes the interaction between users. This would include e-mail and workflow processes.
3. Information Aggregation pattern, formerly known as the User-to-Data pattern, which describes situations where users access and manipulate large amounts of data collected from multiple sources.
4. Extended Enterprise pattern, formerly known as the Business-to-Business pattern, which describes the programmatic interaction between two distinct businesses.
2 e-commerce Patterns for z/Linux using WebSphere Commerce Suite V5.1
It would be very convenient if all problems fitted nicely into these four slots, but reality says that things will often be more complicated. The patterns assume that most problems, when broken down into their most basic components will fit one or more of these patterns. When a problem requires multiple Business patterns, the Patterns for e-business provide additional patterns in the form of Integration patterns.
Integration patterns allow us to tie together multiple Business patterns to solve a business problem. The Integration patterns include:
� Access Integration pattern, which provides for front-end integration of multiple services and information through a common portal. It is responsible for handling multiple client device types, single sign-on, personalization, and providing a common look and feel to the application.
� Application Integration pattern, which provides for the seamless back-end integration of multiple applications and data without the user accessing them directly.
Where the same combination of Business and Integration patterns has been identified in the marketplace we refer to the combination as a Composite pattern. Several common uses of Business and Integration patterns have been identified and formalized into Composite Patterns:
The make up of these patterns is variable in that there will be basic patterns present for each type, but the Composite can easily be extended to meet additional criteria.
Visually, we can view the patterns as in Figure 1-1. This figure can represent a custom design in a particular installation or it can represent a common Composite pattern. These patterns are discussed in more detail a little later.
Chapter 1. Patterns for e-business 3
Figure 1-1 Business and Integration patterns
Once the Business pattern is identified, the next step is to define the high-level logical components that make up the solution and how these components interact. This is known as the Application pattern. A Business pattern will usually have multiple possible Application patterns. An Application pattern may have logical components that describe a presentation tier for interacting with users, an application tier, and a back-end application tier.
The Application pattern is underpinned by one or more Runtime patterns. Runtime patterns define functional nodes that represent middleware functions that must be performed. The Application pattern exists as an abstract representation of high-level application functions, whereas the Runtime pattern is a more concrete representation of the middleware functions that are required, the network structure to be used, and the systems management features, such as load balancing and security.
Once a Runtime pattern has been identified, the next logical step is to determine the actual product and platform to use for each node. The Patterns for e-business have Runtime product mappings that correlate to the Runtime patterns, describing actual products that have been used to build an e-business solution for this situation.
Finally, guidelines assist you in creating the application using best practices that have been identified through experience.
S e lf-S erv ice
C o llabora tion
In fo rm a tion A ggregation
E xtended E nte rprise
Acc
ess
Inte
grat
ion
App
licat
ion
Inte
grat
ion
4 e-commerce Patterns for z/Linux using WebSphere Commerce Suite V5.1
Figure 1-2 Patterns for e-business components
We will look at each of these steps in more detail.
1.1.1 Choosing a Business patternWhen faced with the challenge of designing a solution for a business problem, the first step is to take a high-level view of the goals you are trying to achieve. A proposed business scenario should be described and each element should be matched to an appropriate Business pattern. You may find that the total solution will require one or more Business patterns.
For example, suppose an insurance company wants to reduce the amount of time and money spent on call centers that handle customer inquiries. By allowing customers to view their policy information and to request changes online, they will be able to cut back significantly on the resources spent handling this by phone. The objective is to allow policy holders to view their policy information stored in legacy databases.
RuntimePatterns
ApplicationPatterns
Business &IntegrationPatterns
Best Practice GuidelinesApplication Design Application Development
Technology ChoicesSystems Management
ProductMappings
CompositePatterns
Performance
Chapter 1. Patterns for e-business 5
The Self-Service business pattern fits this scenario perfectly. It is meant to be used in situations where users need direct access to business applications and data.
1.1.2 Choosing an Application patternApplication patterns break the application down into the most basic conceptual components, identifying the goal of the application. In our example, the application falls into the Self-Service business pattern and the goal is to build a simple application that allows users to access back-end information. The Application pattern shown in Figure 1-3 fulfills this requirement:
Figure 1-3 Self -Service application pattern 2
The Application pattern consists of a presentation tier that handles the request/response to the user. The application tier represents the component that handles access to the back-end applications and data. The multiple application boxes on the right represent the back-end applications that contain the business data. The type of communication is specified as synchronous (one request/one response, then next request/response) or asynchronous (multiple requests and responses intermixed).
Pres.
Presentationsynchronous App.
WebApplication
synch/asynch Back-end
Application 1
Application nodecontaining new ormodified components
Application node containingexisting components withno need for modificationor which cannot be changed
Read / Write data
Back-endApplication 2
6 e-commerce Patterns for z/Linux using WebSphere Commerce Suite V5.1
Suppose that the situation is a little more complicated than that. Let's say that the automobile policies and the homeowner policies are kept in two separate and dissimilar databases. The user request would actually need data from multiple, disparate back-end systems. In this case there is a need to break the request down into multiple requests (decompose the request) to be sent to the two different back-end databases, then to gather the information sent back from the requests, and then put this information into the form of a response (recompose). In this case the Application pattern shown in Figure 1-4 would be more appropriate.
Figure 1-4 Self-Service application pattern 6
This Application pattern extends the idea of the application tier that accesses the back-end data by adding decomposition and recomposition capabilities.
1.1.3 Choosing a Runtime patternThe Application pattern can be further refined with more explicit functions to be performed. Each function is associated with a runtime node. In reality these functions, or nodes, can exist on separate physical machines or may co-exist on the same machine. In the Runtime pattern this is not relevant. The focus is on the logical nodes required and their placement in the overall network structure.
Applicationnodecontainingexistingcomponents with noneed for modification orwhich cannot be changed
Read /Writedata
Transient data- Work in progress- Cached committed data- Staged data (data replicationflow)
Back-endApplication 1
Back-endApplication 2
Chapter 1. Patterns for e-business 7
As an example, let's assume that our customer has determined that his solution fits into the Self-Service business pattern and that Application pattern 1 is the most descriptive of the situation. The next step is to determine the Runtime pattern that is most appropriate for his situation.
He knows that he will have users in the Internet accessing his business data and he will therefore require a measure of security. Security can be implemented at various layers of the application, but the first line of defense is almost always one or more firewalls that define who and what can cross the physical network boundaries into his company network.
He also needs to determine the functional nodes required to implement the application and security measures. The Runtime pattern shown in Figure 1-5 is one of his options.
Figure 1-5 Self-Service runtime pattern
Internal networkDemilitarized Zone (DMZ)Outside world
INTERNET
Domain NameServer
Public KeyInfrastructure
User
WebApplication
Server
Pro
toco
lFir
ewal
l
Database
Do
mai
nFi
rew
all
Directory andSecurityServices
Application Pattern 1
Presentation Application
8 e-commerce Patterns for z/Linux using WebSphere Commerce Suite V5.1
By overlaying the Application pattern on the Runtime pattern, you can see the roles that each functional node will fulfill in the application. The presentation and application tiers will be implemented with a Web application server, which combines the functions of an HTTP server and an application server. It handles both static and dynamic Web pages.
Application security is handled by the Web application server through the use of a common central directory and security services node.
A characteristic that makes this Runtime pattern different from others is the placement of the Web application server between the two firewalls. The following Runtime pattern is a variation on this. It splits the Web application server into two functional nodes by separating the HTTP server function from the application server. The HTTP server (Web server redirector) will serve static Web pages and redirect other requests to the application server. It moves the application server function behind the second firewall, adding further security. See Figure 1-6.
Figure 1-6 Self-Service runtime pattern variation
Demilitarized Zone (DMZ)
Web ServerRedirector
Pro
toco
lFir
ewal
l
Dom
ain
Fir
ewal
l
Application Pattern 1
Presentation Application
Database
Internal network
ApplicationServer
Directory andSecurityServices
INTERNET
Domain NameServer
Public KeyInfrastructure
User
Outside world
Chapter 1. Patterns for e-business 9
These are just two examples of the possible Runtime patterns available. Each Application pattern will have one or more Runtime patterns defined. These can be modified to suit the customer’s needs. For example, a customer may want to add a load-balancing function.
1.1.4 Choosing a Runtime product mappingThe last step in defining the network structure for the application is to correlate real products with one or more runtime nodes. The patterns Web site will show each Runtime pattern with products that have been tested in that capacity. The product mappings are oriented toward a particular platform, though more likely, the customer will have a variety of platforms involved in the network. In this case, it is simply a matter of mix and match.
For example, the runtime variation above could be implemented using the product set depicted in Figure 1-7.
Figure 1-7 Runtime product mapping
Internal networkDemilitarized Zone (DMZ)Outside world
WebApplication
Server
Pro
toco
lFir
ewal
l
Do
mai
nFi
rew
all
Windows NT 4.0SecureWay Firewall 4.1 Directory
and securityservices
Database
Windows 2000DB2 UDB 7.2
Windows 2000 + SP2WebSphere App Serv 4.0JDK 1.3.0DB2 UDB 7.2IBM HTTP Server 1.3.19
INTERNET
Public KeyInfrastructure
UserNode
Domain NameServer
Windows NT 4.0 + SP6aSecureWay Directory 3.1.15DB2 UDB 6.1 (Fixpack 4)
10 e-commerce Patterns for z/Linux using WebSphere Commerce Suite V5.1
1.1.5 Applying the guidelinesThe Application patterns, Runtime patterns, and Runtime product mappings are intended to guide you in defining the application requirements and the network layout. The actual application development has not been addressed yet. The patterns Web site provides guidelines for each Application pattern that include techniques for developing, implementing, and managing the application.
� Design guidelines instruct you on tips and techniques for designing the applications.
� Development guidelines take you through the process of building the application, from the requirements phase all the way through the testing and rollout phases.
� System management guidelines address the day-to-day operational concerns, including security, backup and recovery, application management, etc.
� Performance guidelines give information on how to improve the application and system performance.
1.2 Composite patternsComposite patterns combine Business patterns and Integration patterns to create complex, advanced e-business applications. There are numerous potential combinations of Business patterns and Integration patterns, but a solution design composed of these multiple building blocks is considered a Composite pattern only when it is recurrently employed to solve the problems of businesses across a wide range of industries.
Some common example of Composite patterns are as follows:
� Electronic Commerce
Electronic Commerce combines the Self-Service and Information Aggregation business patterns with the Application Integration pattern to facilitate user interaction. Additionally, an electronic commerce site can integrate supply-chain management functionality into the solution through the Extended Enterprise pattern, or e-mail confirmation of orders to customers through the Collaboration pattern.
� e-Marketplace
e-Marketplaces are trading exchanges that facilitate and promote buying, selling and business communities among trading partners within certain industries. These solutions represent some of the most comprehensive and complex e-business applications that exist today.
Chapter 1. Patterns for e-business 11
� Portals
Though designed to facilitate many variations of similar functionality, a Portal solution typically aggregates multiple information sources and applications to provide a single, seamless and personalized access to users. The Composite pattern for Portal applications is made up of an Access Integration pattern that facilitates functions such as single sign-on, multiple device support and personalization, plus at least one other Business pattern.
� Account Access
Account access solutions provide customers around-the-clock access to their account information. They also allow users to inquire, update, and delete information on their individual accounts. Many applications fall under this category of solutions, ranging from trading applications provided by online brokerages to account manager functions provided by utilities such as telephone companies.
Visually, we can view the patterns as in Figure 1-8. This figure can represent a custom design in a particular installation or it can represent a common Composite pattern.
Figure 1-8 Business and Integration patterns
Integration Patterns
Acc
ess
Inte
grat
ion
Ap
plic
atio
nIn
teg
rati
on
Information Aggregation
Collaboration
Self-Service
Extended Enterprise
Business Patterns
12 e-commerce Patterns for z/Linux using WebSphere Commerce Suite V5.1
When Business patterns and Integration patterns are combined to assemble solutions that perform complex business functions, certain recurring pattern combinations begin to emerge. For example, most solutions today provide a personalized user experience. These solutions typically expose key functions of line-of-business applications by integrating with them. Consequently, most of these solutions combine an Access Integration pattern, a Self-Service pattern, and an Application Integration pattern to enable this complex functionality. Composite patterns represent commonly occurring combinations of Business patterns and Integration patterns such as this, and typically solve major portions of functionality within a solution.
The Patterns for e-business are designed for reuse in nearly any Web-based application development scenario. As such, the possible combinations of Business patterns and Integration patterns to form Composite patterns are extensive. Below we list and describe the most commonly occurring Composite patterns.
1.2.1 Electronic CommerceElectronic commerce is the set of products and processes facilitating the secure purchase of goods and services over the Web, including such functions as:
� Advertising
� Marketing
� Shopping
� Purchasing
� Paying
� Shipping/delivery
e-commerce is a special case of online interaction between users and businesses where products are sold through a catalog using such components as a shopping cart or wallet. The pattern can also include links to back-end systems that provide inventory updates, order processing, delivery systems, and credit checking.
e-commerce solutions allow enterprises to reach new customers and manage transactions electronically. Consumers can purchase with confidence, knowing their transactions are secure and their privacy is protected.
In the early days of the Patterns for e-business work we described a fifth Business pattern called User to Online Buying. Those of you who explored the Patterns for e-business Web site prior to the August 2001 update saw a reference to this pattern and recognize that it was used primarily in Electronic Commerce applications.
Chapter 1. Patterns for e-business 13
In retrospect, the Patterns architects believe it is more accurate to describe an Electronic Commerce application as a Composite pattern because it is better represented by a combination of Business patterns and Integration patterns.
The Composite pattern for an Electronic Commerce solution will consist of:
� A Self-Service business pattern that provides customers access to Web site functions such as browsing the catalog, placing an order, making a payment and so on.
� An Information Aggregation pattern that is used to aggregate information from multiple sources into a unified catalog of items.
� An Application Integration pattern that is used to combine the Self-Service pattern and the Information Aggregation pattern to provide a unified solution to the customer.
Electronic Commerce solutions can have several variants that optionally include the following:
� An Access Integration pattern that provides for more sophisticated functions aimed at increasing the user-friendliness of the site, such as personalization and pervasive device access.
� A Collaboration business pattern that provides functions such as automatic order confirmation through e-mail or online chat capabilities with customer service representatives.
� An Extended Enterprise pattern that can be used to implement a direct connection with a shipping company that is used to ship the order to the customer.
1.2.2 e-Marketplacee-Marketplaces are trading exchanges that facilitate and promote buying, selling and business communities among trading partners within certain industries. These solutions represent some of the most comprehensive and complex e-business applications that exist today. There are three types of e-Marketplaces:
� Trading Exchange
� Sell-Side Hub
� Buy-Side Hub
Trading ExchangeA Trading Exchange allows buyers and sellers to trade goods and services on a public site. The Composite pattern for a Trading Exchange consists of:
14 e-commerce Patterns for z/Linux using WebSphere Commerce Suite V5.1
� The Self-Service business pattern that facilitates the interaction between the buyer and the e-Marketplace. Activities such as purchasing from an aggregated catalog, participating in auctions, or making exchanges are performed using this pattern.
� The Self-Service business pattern also helps the non-commerce seller perform functions such as updating the catalog, checking orders, checking Request for Quotations, and accessing orders.
� The Information Aggregation business pattern is used to create the e-Marketplace catalog from the multiple sources of suppliers’ product files, pricing files and advertising literature, and so on.
� The Application Integration pattern is used to integrate these two business patterns seamlessly and also to integrate with existing e-Marketplace support systems such as billing.
� The Access Integration pattern is used to provide a Portal interface, single sign-on functions and personalization functions for the e-Marketplace.
In addition to these basic functions, there could be many additional functions that can be added to an e-Marketplace as it evolves. For instance:
� The Collaboration business pattern can be used to enable the purchasing approval process.
� The Extended Enterprise business pattern can be used on both the buyer and seller side of the e-Marketplace. On the buyer side, the pattern defines the interaction between the buyer's procurement system and the commerce functions of the e-Marketplace. On the seller side, this pattern defines the interaction between the procurement functions of the e-Marketplace and its suppliers.
Sell-Side HubIn a Sell-Side Hub the seller owns the e-Marketplace and uses it as a vehicle to sell goods and services to prospective buyers across the Web. The Composite pattern for the Sell-Side Hub includes the following patterns:
� Access Integration pattern that helps provide a unified customer interface.
� Self-Service business pattern that allows users to browse through a catalog, create an order and place an order with the hub.
� Information Aggregation business pattern that is used to create the e-Marketplace catalog from the multiple sources of suppliers’ product files, pricing files and advertising literature and so on.
� Application Integration patterns that integrate the Business Patterns that are a part of the Sell-Side Hub.
Chapter 1. Patterns for e-business 15
In addition to these basic functions, there can be several variations on this pattern. These include:
� Adding a Collaboration business pattern that allows for and enables auctions, reverse auctions and other collaborative buying functions.
� Adding an Information Aggregation business pattern that will help integrate and present a unified catalog that combines raw catalog data with expert advice, product comparisons, and recommendations that can be pulled off public Internet sites.
� Adding an Extended Enterprise business pattern that will integrate the Sell-Side Hub with external service providers such as a financial institution to handle credit processing or shipping company to handle the physical delivery of goods.
Buy-Side HubIn a Buy-Side Hub the buyer of goods owns the e-Marketplace and uses it as a vehicle to leverage the buying or procurement budget to solicit the best deals for goods and services from prospective sellers across the Web. The Composite pattern for the Buy-Side Hub includes:
� Access Integration pattern that helps provide a unified customer sign-on capability and a personalized user interface.
� Collaboration business pattern that will allow users to post bids, participate in auctions, and respond to Requests for Proposals (RFP) and Requests For Quotations (RFQ).
� Self-Service business pattern that allows buyers to create RFQs and RFPs.
� Application Integration patterns that integrate the Buy-Side Hub with procurement systems and other core business applications.
In addition to these basic functions, there can be several variations on this pattern. These include:
� Adding an Information Aggregation business pattern that will help integrate content sources across the Web.
� Adding an Extended Enterprise business pattern that will integrate the Buy-Side Hub with external service providers such as financial institutions.
16 e-commerce Patterns for z/Linux using WebSphere Commerce Suite V5.1
1.2.3 PortalsA Portal solution is typically designed to aggregate multiple information sources and applications to provide single, seamless and personalized access for its users. There are many variations of Portal applications. The Composite pattern for Portal applications is made up of an Access Integration pattern that facilitates functions such as single sign-on, multiple device support and personalization plus at least one other Business pattern.
Many variants of Portal applications exist. Two of the most commonly seen implementations include:
� An Enterprise Intranet portal
An Enterprise Intranet portal provides self-service functions that provide access to human resource applications such as payroll, benefits, travel expenses, and other such applications. In addition, this type of portal aggregates content from various sources and provides seamless access to this content. Finally many Enterprise Intranet portals provide collaboration functions such as virtual help desks, e-mail and instant messaging. IBM’s own intranet at w3.ibm.com is an excellent example of an Enterprise Intranet portal.
� A Collaboration ASP
A Collaboration Application Service Provider (ASP) typically provides Internet users access to a particular type of collaboration solution, such as e-mail or instant messaging.
1.2.4 Account AccessAccount Access solutions provide customers around-the-clock access to their account information. They also allow users to inquire, update, and delete information on their individual accounts. There are many applications that fall under this category of solutions, ranging from trading applications provided by online brokerages to account manager functions provided by utilities such as telephone companies. This category of solutions also includes account access applications provided by banks, credit card companies and insurance companies.
The Composite pattern for an Account Access solution consists of:
� An Access Integration pattern that provides a unified mechanism to implement single sign-on capabilities. This pattern is also used to provide a personalized experience to the account holder.
� A Self-Service business pattern that provides access to information stored in core business systems and databases.
Chapter 1. Patterns for e-business 17
� The solution may optionally include an Information Aggregation pattern in cases where information from multiple accounts is summarized to provide a single unified portfolio view to the customer.
� The solution can also include the Collaboration business pattern as functions such as online chat with a customer service representative and help desk support are added to it.
� If the solution has any one of the optional Business patterns the solution may optionally include an Application Integration pattern to seamlessly combine multiple Business patterns.
1.3 Working with the Electronic commerce composite pattern
This section provides an overview of the steps involved in working with the Electronic commerce composite pattern. It is a summary of information that can be found in the redbook e-commerce Patterns for Building B2C Web Sites Using IBM WebSphere Commerce Suite V5.1, SG24-6180 and on the Patterns Web site at:
http://ibm.com/developerworks/patterns/
1.3.1 Selecting the Application patternIf you've determined that the Electronic commerce composite pattern can provide an appropriate solution design for your business need, the next step is to select an Application pattern. The Electronic commerce composite pattern can be implemented using either of two Application patterns, providing solution flexibility so that the determined pattern can address the specific needs of the business process being automated.
There are two basic approaches to Electronic commerce patterns:
1. The first approach, which is often called a Web-up, is used to very quickly enable a Web-based buying site without any close integration with back-end systems.
2. The second approach, which is often referred to as Enterprise-out, extends an existing order processing system to a new Web-based buying channel. This case includes close integration with, and reuse of, existing back-end systems.
The Web-up Application pattern is a three-tier commerce application with deferred access to the third tier. This is shown in Figure 1-9.
18 e-commerce Patterns for z/Linux using WebSphere Commerce Suite V5.1
The Enterprise-out Application pattern is a three-tier commerce application with online access to the third tier. An additional fourth decomposition tier may be added. This is shown in Figure 1-10.
Presentationasynchronous
Read/write data Application nodecontaining new ormodified components
Application nodecontaining existingcomponents with noneed formodificationor which cannotbe changed
Transient data* work in progress* cached committed* staged
synchronous asynchronous Application2
Application
Application1
Presentation
Chapter 1. Patterns for e-business 19
Figure 1-10 The Enterprise-out Application pattern
1.3.2 Selecting the Runtime patternAfter you choose an appropriate Application pattern to meet your e-commerce needs, it is time to select the specific Runtime pattern used to design your solution. The Runtime pattern uses nodes to group functional and operational components. The nodes are interconnected to solve a business problem. Each Application pattern has at least one corresponding Runtime pattern. These runtime patterns are based on the Enterprise Solution Structure (ESS) Thin Client Transactional pattern and are representative solutions for the Electronic commerce composite pattern.
Each Runtime pattern may have additional variations as well. A variation is considered proven if it is based on technology that has been used for a while and has been the chosen method in many production systems. An emerging variation is one that is based on newer technology that might or might not have been proven in production environments but has significant benefits and is worth considering. Depending on the customer requirements, you might need to extend variations or combine them to achieve desired results. Figure 1-11 shows an example of the Web-up Runtime pattern.
synchronous synchronous
Read/write data Application nodecontaining existingcomponents with noneed for modificationor which cannotbe changed
synchronous
asynchronous asynchronous
CRMProductWIP
CRMLOB
Application nodecontaining new ormodified components
Read only dataTransient data* work in progress* cached committed* staged
Application2
Application1
CommerceApplication
DecompPresentation
20 e-commerce Patterns for z/Linux using WebSphere Commerce Suite V5.1
Figure 1-11 Web-up Runtime pattern
Figure 1-12 shows an example of the Enterprise-out Runtime pattern.
Internet
Retailcustomer
Cookie
Outside WorldDemilitarized Zone
(DMZ)Internal Network
Online completion oforders is not done
by shoppers
Pro
toco
lfire
wal
l
Dis
patc
her
Applicationnodes
ApplicationnodesD
omai
nfir
ewal
l
Secure andnon-secure
protocol
SecureInternet
protocol (IP)Databases
Applicationnodes
Orders are stored in the DB server node.Integration with back-end systems, if any,are not tightly integrated (could be batchor manual).
Contentcreation &
managementnode
CommerceapplicationlogicConnectionsto dataConnectionsto back ends(optional)
1.3.3 Selecting the product mappingAfter reviewing Runtime patterns, we now map the logical nodes defined in the Runtime pattern to specific products which implement the Runtime solution design on a selected platform. The product mapping identifies the platform, software product name, and often version numbers as well. The Patterns for
Internet
Retailcustomer
Cookie
Outside World Demilitarized Zone(DMZ)
Internal Network
Online completion oforders and data
Pro
toco
lfir
ewal
l
Dis
patc
her
Secure andnon-secure
protocol
Systemsmanagement
Security
Directory
Databases
SecureInternetProtocol
(IP)
CommerceapplicationlogicConnectionsto dataConnectionsto back ends(optional)
CommerceApplicationServer Node
Web ServerStatic contentRedirect
Contentcreation &
managementnode
Batch transfer of ordersand data is not used in
this implementation
- Static pages- Promotions
Do
mai
nfi
rew
all
-Databases-Work in progress
Application2
Application1
DecompCommerceApplication
Application pattern 2
Presentation
Databaseserver node
Applicationnodes
Applicationnodes
Applicationnodes
Integrationnode
22 e-commerce Patterns for z/Linux using WebSphere Commerce Suite V5.1
e-business architectures are designed on the open standards and practices of the IBM Software Strategy for e-business, which provides support for many platforms, including IBM AIX, IBM OS/400, IBM OS/390, Sun Solaris, HP-UX, Linux, and Windows NT/2000.
The open standards and practices of the IBM Software Strategy for e-business let you develop and test an e-business application on your development runtime platform and easily deploy the application on any other supported platform. Further, it is common for a company to have a mixture of platforms within an integrated e-business solution. With their support for these multiple platforms, the IBM Software Strategy for e-business and the Patterns for e-business solution designs are an appealing choice when faced with the requirement for integration with a mixed platform environment.
Consider the following issues when deciding on a platform to host your e-business application:
� Existing systems and platform investments
� Available customer and developer skills
� Customer choice
The platform chosen should fit into the customer's environment and ensure quality of service, such as scalability and reliability, so that the solution can grow along with the e-business.
There are many reason why customers may choose Linux for S/390 when selecting the products used for their e-business applications. These include:
� S/390 can often provide the lowest incremental cost e-commerce solutions for medium-to-large businesses and institutions.
� They want to locate their e-commerce solution on the same system to attain tight integration with their fulfillment operations.
� They want to reuse existing skills and infrastructure.
� They want the system flexibility to handle unpredictable volumes of transactions.
� They want the flexibility to provide 24 x 7 availability without creating a vast server farm.
� They want bullet-proof security.
� They need to run Linux and Java applications in conjunction with existing traditional applications and data.
Figure 1-13 shows suggested product mappings for the Web-up pattern.
Chapter 1. Patterns for e-business 23
Figure 1-13 Web-up product mappings - Linux for S/390
Figure 1-14 shows suggested product mappings for the Enterprise-out pattern.
Note: The DB Server node shows a Linux option, but for both Web-up and Enterprise-out the database node can use DB2 Universal Database for OS/390 and z/OS.
Internet
Retailcustomer
Cookie
Outside WorldDemilitarized Zone
(DMZ)Internal Network
Linux for eServer z900 andS/390Universal Database EnterpiseEdition 7.2
IBM HTTP Server1.3.12.2 for Linux +WebsphereApplication Serverplug-in
DB servernode
Contentcreation &
managementnode
Pro
toco
lfire
wal
l
Dom
ain
firew
all
Applicationnodes
Applicationnodes
Applicationnodes
OS/390CICS or IMSDB2Custom or ERP
applicationsMQSeries 5.2
Linux for eServer z900 and S/390SUSE 7.0WebSphere Commerce Suite ProEdition for Linux for eServer z900and S/390 Version 5.1WebSphere ApplicationServer,Advanced Edition V3.5.3DB2 Universal DatabaseEnterpise Edition 7.2 Run-TimeClientMQSeries Client 5.2
26 e-commerce Patterns for z/Linux using WebSphere Commerce Suite V5.1
Chapter 2. Installation and configuration
This chapter provides an overview of the major tasks involved in the installation and configuration of IBM WebSphere Commerce Suite Pro Edition for Linux for ^ z900 and S/390. We describe two installation scenarios. The first has all products including IBM HTTP Server, WebSphere Application Server, Advanced Edition, WebSphere Payment Manager, DB2 Universal Database, and WebSphere Commerce Suite on a single z/Linux server; while in our second scenario we use a remote database under DB2 Universal Database for OS/390 and z/OS installed on a separate machine.
This chapter will help you plan and complete the installation of your Commerce Suite software, but it is not intended as a replacement for the relevant product installation guides. In particular we recommend that you read and follow the detailed instructions given in the IBM WebSphere Commerce Suite Pro Edition for Linux ^ z900 and S/390 Installation Guide and in the IBM WebSphere Payment Manager for Multiplatforms Install Guide Version 2.2.1 when completing your installation tasks for these products.
2.1 Preinstallation requirementsBefore beginning the installation of Commerce Suite, be sure to read the preinstallation requirements sections of the IBM WebSphere Commerce Suite Pro Edition for Linux ^ z900 and S/390 Installation Guide, paying particular attention to information on hardware and software prerequisites. For our installation scenarios we used two z/Linux instances. These were installed in a virtual machine running under the control of the VM/ESA operating system. We recommend that you refer to the redbook Linux for S/390, SG24-4987 for more details about installing and running z/Linux on S/390 systems. Some important things to check are:
1. Minimum memory requirements are met.
The recommended memory is 1 GB per z/Linux instance. We found that this is a key to the successful use of IBM WebSphere Commerce Suite Pro Edition for Linux for ^ z900 and S/390. On one of our z/Linux instances we initially had insufficient memory and this meant that we were unable to create a Commerce Suite instance. You can check the amount of memory available using the command free -m. Example 2-1 shows the reported memory on one of our z/Linux test systems.
The recommended minimums are one full volume (3300 cylinders) free disk space for the z/Linux system and one full volume (3300 cylinders) free disk space for WebSphere Commerce Suite, WebSphere Application Server, and DB2 Universal Database on Linux. If you plan to install the required software in the default locations, plan carefully to make sure that you can allocate enough space for /opt and /usr. Example 2-2 shows a display of the way in which we partitioned and allocated space on our z/Linux test systems.
28 e-commerce Patterns for z/Linux using WebSphere Commerce Suite V5.1
3. The correct version of the SuSE 7.0 Linux distribution is installed.
The requirements are:
– Level k_deflt-2.2.16-72 for the binary kernel package
– Level lx_suse_2.2.16.SuSE-43 for the source kernel package
Use the commands rpm -q k_deflt and rpm -q lx_suse to check the installed software on your z/Linux system. Example 2-3 shows the packages that were installed on our z/Linux test systems.
Example 2-3 SuSE kernel packages
vmlinux3:~ # rpm - q k_defltk_deflt-2.2.16-80vmlinux3:~ # rpm - q l_susepackage l_suse is not installed
2.2 Install DB2 Universal DatabaseWhen writing this Redpaper we tested two different configuration scenarios for our Commerce Suite test environments. In one environment the DB2 Universal Database on Linux was installed on the same machine as IBM WebSphere Commerce Suite Pro Edition for Linux for ^ z900 and S/390. In our second test environment, DB2 Universal Database for OS/390 and z/OS was installed on a remote machine and DB2 Connect Enterprise Edition was installed on our Commerce Suite machine. The following sections provide an overview of the main steps for installing and configuring DB2 for these scenarios, but please refer to IBM WebSphere Commerce Suite Pro Edition for Linux ^ z900 and S/390 Installation Guide for detailed instructions.
2.2.1 Scenario 1 local DB2 Universal Database on Linux This was a simple install and we followed the default procedure documented in the IBM WebSphere Commerce Suite Pro Edition for Linux ^ z900 and S/390 Installation Guide. The major steps of this install are:
1. Transfer DB2 Universal Database install files from the Commerce Suite product CD to your z/Linux machine.
2. Log on to z/Linux as root and untar the DB2 Universal Database install files.
3. Start the DB2 Universal Database installer using the db2setup command.
4. Choose to install DB2 UDB Enterprise Edition.
5. On the Create DB2 Services window select Create a DB2 Instance and press Enter.
Chapter 2. Installation and configuration 29
6. We accepted the default instance name of db2inst1 and allowed the DB2 installer to create a default users and groups for this instance. For a complete description of the choices you should make when creating the DB2 instance refer to the IBM WebSphere Commerce Suite Pro Edition for Linux ^ z900 and S/390 Installation Guide.
7. Review the summary window to make sure you have chosen the right components, select Continue and press Enter to start the installation.
8. After the installation completes, review the Status report to make sure that the install was successful.
After installing DB2 Universal Database apply the required DB2 maintenance. The steps to do this are:
1. Log on to z/Linux as root and untar the fix pack file
2. Start the fix pack install using the installpatch command
To verify that the DB2 install has been successful:
1. Switch to the DB2 instance owner ID:
su - db2inst1
2. Stop DB2:
db2stop
3. Start DB2:
db2start
2.2.2 Scenario 2 remote DB2 Universal Database for OS/390 and z/OSIn this scenario we used DB2 Universal Database for OS/390 and z/OS on a remote machine as our database server for WebSphere Application Server, WebSphere Payment Manager, and WebSphere Commerce Suite.
This requires that DB2 Connect Enterprise Edition be installed on the z/Linux machine where WebSphere, Payment Manager, and Commerce Suite are to be installed. The steps required to install DB2 Connect Enterprise Edition are:
1. Transfer the DB2 Universal Database install files from the Commerce Suite product CD to your z/Linux machine.
2. Log on to z/Linux as root and untar the DB2 Universal Database install files:
tar -xvf 041_EE_LNX390_NLV.tar
3. Start the DB2 Universal Database installer using the db2setup command:
cd 041_EE_LNX390_NLV./db2setup
30 e-commerce Patterns for z/Linux using WebSphere Commerce Suite V5.1
4. Select to install DB2 Connect Enterprise Edition as shown in Figure 2-1.
5. No customization is required for DB2 Connect Enterprise Edition, DB2 Product messages, and DB2 Product library.
6. Tab to OK and press Enter.
7. Create a DB2 Instance. Accept the default users and groups.
8. Optionally create a DB2 administration server.
After installing DB2 Connect Enterprise Edition apply the required DB2 maintenance. The steps to do this are:
1. Log on to z/Linux as root and untar the fix pack file:
tar -xvf FP3_MI00034.tar
2. Start the fix pack install using the installpatch command
cd FP3_MI00034./installpatch
To verify that the DB2 install has been successful:
Chapter 2. Installation and configuration 31
1. Switch to the DB2 instance owner ID:
su - db2inst1
2. Stop DB2:
db2stop
3. Start DB2:
db2start
2.3 Install IBM HTTP ServerBefore installing the IBM HTTP Server on your z/Linux machine you should check whether the Apache Web server is installed and running. Many standard Linux installs will include Apache and this can conflict with IBM HTTP Server, particularly if Apache is listening on the same port that you want to use for IBM HTTP Server. To check if Apache is installed enter the command:
rpm -q apache
You can check the status of Apache with the commands:
cd /etc/rc.d./apache status
Use ./apache full-status for a more detailed report on the status of the Apache Web server including details of the port it is listening on.
If Apache is installed you may wish to remove it or you could configure Apache to listen on a port that will be different from that used by IBM HTTP Server. We chose to change the port used by Apache from the default of 80 to 8080. To do this, edit the file /etc/httpd.httpd.conf as shown in Example 2-4.
Example 2-4 Apache configuration
## Port: The port to which the standalone server listens. For
Note: The steps above configure the base DB2 setup on your z/Linux machine. You will have to install DB2 Universal Database for OS/390 and z/OS on your remote database server, but it is beyond the scope of this Redpaper to describe installation for DB2 Universal Database for OS/390 and z/OS. Please refer to the DB2 Universal Database for OS/390 and z/OS Installation Guide, GC26-9936 for detailed install instructions. This manual is available with the DB2 product or can be viewed on the Web at:
http://ibm.com/software/db2os390
32 e-commerce Patterns for z/Linux using WebSphere Commerce Suite V5.1
# ports < 1023, you will need httpd to be run as root initially.#Port 8080
To stop, start, or restart Apache, the commands to use are:
./apache stop
./apache start
./apache restart
You must restart the Apache Web server after changing the port setting in the httpd.conf file to make the new port setting active.
To install IBM HTTP Server, follow the detailed instructions in the IBM WebSphere Commerce Suite Pro Edition for Linux ^ z900 and S/390 Installation Guide. In summary the steps to take are:
1. Transfer the WebSphere Application Server, Advanced Edition installation tar file to your z/Linux machine.
2. Log on to z/Linux as root.
3. Extract the IBM HTTP Server install files from the tar file.
4. Use the rpm command to install the packages for IBM HTTP Server.
Example 2-5 Error installing IBM HTTP Server package
rpm -ihv IBM_HTTP_Server-1.3.12-2.s390.rpmfile /etc/rc.d/init.d from install of IBM_HTTP_Server-1.3.12-2 conflicts with file from package aaa_dir-2000.12.20-1
Example 2-6 Force the install of IBM HTTP Server package
Attention: We discovered that when attempting to install the first IBM HTTP Server package listed by the IBM WebSphere Commerce Suite Pro Edition for Linux ^ z900 and S/390 Installation Guide that an error is produced because this package contains files that have the same name as already installed files. See Example 2-5 for the exact error message and Example 2-6 for details of how to complete the install by overwriting the existing files.
Chapter 2. Installation and configuration 33
5. Replace the default IBM HTTP Server httpd.conf file with the sample configuration file. The sample configuration file contains directives used to set up SSL for the IBM HTTP Server. If you want to understand these directives, or to manually add directives to the configuration file of an existing IBM HTTP Server installation, further details are provided in Chapter 16 of the IBM WebSphere Commerce Suite Pro Edition for Linux ^ z900 and S/390 Installation Guide.
6. Set up the IBM HTTP Administration Server using the ./setupadm command found in the /opt/IBMHTTPServer/bin directory.
7. Start the IBM HTTP Server using the ./apachectl start command found in the /opt/IBMHTTPServer/bin directory.
8. Start the IBM HTTP Administration Server using the ./adminctl start command found in the /opt/IBMHTTPServer/bin directory.
9. Create a Web user to access the IBM HTTP Administration Server. Example 2-7 shows the process of creating a user admin.
Example 2-7 Create Web user to administer IBM HTTP Server
cd /opt/IBMHTTPServer/bin/./htpasswd -m ../conf/admin.passwd adminNew password:Re-type new password:Adding password for user admin
10.To test that the IBM HTTP Server is working correctly enter the following URL in your Web browser:
http://<hostname>
Where <hostname> is the host name of the z/Linux machine where IBM HTTP Server is installed. The IBM HTTP Server welcome page as shown in Figure 2-2 will be displayed.
34 e-commerce Patterns for z/Linux using WebSphere Commerce Suite V5.1
Figure 2-2 IBM HTTP Server welcome page
11.To check that the IBM HTTP Administration Server is working correctly, select the Configure Server link in the welcome page shown in Figure 2-2, or enter the following URL in your Web browser:
http://<hostname>:8008
You will be prompted for the Web user name and password as shown in Example 2-7, and then the Web page shown in Figure 2-3 will be displayed.
Chapter 2. Installation and configuration 35
Figure 2-3 IBM HTTP Administration Server main page
2.4 Install WebSphere Application ServerThis section provides an overview of installing WebSphere Application Server, Advanced Edition and associated patches. Detailed install instructions are in the IBM WebSphere Commerce Suite Pro Edition for Linux ^ z900 and S/390 Installation Guide and we recommend that you use this guide. The main steps of the installation process are:
1. Log on to z/Linux as root
2. Stop the IBM HTTP Server. Also stop the IBM HTTP Administration Server.
3. Change to the WebSphere Application Server install directory, adv-linux-s390.
4. Start the WebSphere installation program:
./install.sh
36 e-commerce Patterns for z/Linux using WebSphere Commerce Suite V5.1
a. This will first install the prerequisite IBM Java Development Kit and then ask if you wish to install IBM HTTP Server. At this prompt enter 2 for no as we have already installed IBM HTTP Server.
b. When asked the database you wish to install enter 2 for a custom install.
c. Enter 1 for DB2.
d. Enter your database user ID.
e. Enter your database user password.
f. Enter the base directory of your DB2 install.
g. Enter the JDBC database URL.
WebSphere Application Server, Advanced Edition will be installed and the messages shown in Example 2-8 will be displayed.
Example 2-8 WebSphere Application Server, Advanced Edition installation
#################################################
Installing IBM WebSphere Application Server for LinuxIBMWebAS ##################################################A copy of the configuration file was made and is located at /opt/IBMWebAS//properties/bootstrap.properties.bakA copy of the configuration file was made and is located at /opt/IBMWebAS/bin/admin.config.bakA copy of the configuration file was made and is located at /opt/IBMWebAS/bin/startupServer.sh.bakA copy of the configuration file was made and is located at /opt/IBMWebAS/properties/initial_setup.config.bakA backup of your httpd.conf file has been made and is located at /opt/IBMHTTPServer/conf/httpd.conf.bak***Copying samples to IBM HTTP Server Document Root***Completed samples copyIBMWebAS-ADV-doc-en ###################################################################################################
IBM WebSphere Application Server for Linux installation is complete.Please run startupServer.sh in /opt/IBMWebAS/bin to invoke the server.Also, please restart your webserver if you selected IHS at this time toensure the plugin configuration is updated. If you installed with Apache,please refer to the install documentation for configuration information.
#################################################
5. Install the WebSphere Application Server fix pack.
Chapter 2. Installation and configuration 37
6. Configure an administration database for WebSphere Application Server. The way to do this depends on whether you are using DB2 Universal Database on Linux or DB2 Universal Database for OS/390 and z/OS.
The steps for configuring DB2 Universal Database on Linux are:
a. Change to the DB2 instance owner ID:
su - db2inst1
b. Drop the WebSphere Application Server administration database if it already exists:
drop db was
c. Create the WebSphere Application Server administration database:
cd /opt/IBMWebAS/bin./createdb2.sh
d. Catalog the administration database as if it were a remote database. First catalog a TCP/IP node for the z/Linux server where the database is installed, then catalog an alias for the administration database on the TCP/IP node.
db2 catalog tcpip node <node-name> remote <hostname> server <service-name>
Where <node-name> is any name you choose, <hostname> is the fully qualified host name of your database server machine, and <service-name> is the DB2 service name ( the default is db2cdb2inst1).
db2 catalog database was as <was-alias> at node <node-name>
Where <was-alias> is any name you choose. The IBM WebSphere Commerce Suite Pro Edition for Linux ^ z900 and S/390 Installation Guide suggests using wasloop.
e. Edit the file /opt/IBMWebAS/admin.config to change the JDBC URL to use the newly created <was-alias>:
com.ibm.ejs.sm.adminServer.dbUrl=jdbc:db2:wasloop
The steps for configuring DB2 Universal Database for OS/390 and z/OS are:
a. Create the WAS database on your database server. A sample JCL file db2390.sql is provided in the /opt/IBMWebAS/bin directory. Transfer this to your database server machine and edit the JCL. Edit the JCL and:
• Replace tgtVolume with a valid volume name
• Replace hlq with a valid value
• Replace wasdb with the name you want to use for the administration database
38 e-commerce Patterns for z/Linux using WebSphere Commerce Suite V5.1
• The db2390.sql sample supplied beginning with WebSphere Application Server Version 3.5.3 of for S/390 access is incomplete. The DB2 columns of type ROWID require the NOT NULL keyword, which is not supplied.
Also, the Add INCBEANTBL step requires a table definition, which is missing from the supplied JCL.
CREATE TABLE EJB.INCBEANTBL( PRIMARYKEY VARCHAR(50) NOT NULL, THEVALUE INTEGER WITH DEFAULT, PRIMARY KEY (PRIMARYKEY)) IN wasdb.INCBNTS;
Note that BUFFERPOOL can be changed later.
iv. Change all the following text occurrences in the JCL:
tgtvolume Target volume for data set allocation
hlq High Level Qualifier used for DB2 user data sets
wasdb Name of the DB2 database you want to create for the administrative repository
DBXX Name of the DB2 subsystem
Chapter 2. Installation and configuration 39
BP0 Contact your system administrator for the proper DB2 buffer pool. It will likely not be BP0.
v. In some environments, a JOBLIB card will need to be added for the SDSNLOAD library. Here is an example:
//JOBLIB DD DSN=DBV.SDSNLOAD,DISP=SHR
vi. Add a GRANT statement for the newly created EJB.INCBEANTBL object:
GRANT DELETE,INSERT,SELECT,UPDATE ON TABLE EJB.INCBEANTBL TO PUBLIC AT ALL LOCATIONS;
The included JCL grants access to the objects to PUBLIC. Instead, consider granting access only to the user IDs used by WebSphere.
b. Catalog the remote DB2 database on your z/Linux Commerce Suite machine. To do this switch to the DB2 instance owner ID by entering su - db2inst1 and then entering the following commands:
db2 catalog tcpip node <node-name> remote <host-name> server <drda-port>db2 catalog db <db-alias> as <db-name> at node <node-name> authentication dcsdb2 catalog dcs db <db-alias> as <location-name>
Where:
• <node-name> is a name of your choice
• <host-name> is the fully qualified host name of the server where DB2 Universal Database for OS/390 and z/OS is installed.
• <drda-port> is the TCP/IP port where your DB2 Universal Database for OS/390 and z/OS is listening.
• <db-name> is the name of the WebSphere Application Server administration database created by running the db2390.jcl.
• <db-alias> is a name of your choice.
• <location-name> is the location name of your DB2 Universal Database for OS/390 and z/OS database.
c. Before starting the WebSphere Application Server edit the file /opt/IBMWebAS/bin/admin.config and add the property:
com.ibm.ejs.sm.adminServer.dbInitialized=nocreate
40 e-commerce Patterns for z/Linux using WebSphere Commerce Suite V5.1
2.5 Enable SSL for the IBM HTTP ServerThe basic steps to enable SSL for the IBM HTTP Server are:
1. Modify the /opt/IBMHTTPServer/conf/httpd.conf file to enable SSL
The sample httpd.conf file installed as described in 2.3, “Install IBM HTTP Server” on page 32 includes sample SSL directives. To enable SSL uncomment these directives as described in the IBM WebSphere Commerce Suite Pro Edition for Linux ^ z900 and S/390 Installation Guide.
2. Create a security key file:
a. Change to the directory /opt/IBMHTTPServer/ssl.
b. Use either the ikeycmd command-line interface or the graphical user interface ikeyman to create a key file. If you use ikeyman you need to make sure that
3. Request a certificate
4. Set your production key file
5. Receive the certificate
For testing purposes we created a self-signed certificate. The steps we took were:
1. Start the ikeyman graphical user interface.
2. Create a new key database file as shown in Figure 2-4.
Chapter 2. Installation and configuration 41
Figure 2-4 Create key database file
3. Figure 2-5 shows the values we used when creating our new key file.
Figure 2-5 New key file database settings
4. Provide a key file password and choose to stash this password in a file as shown in Figure 2-6.
42 e-commerce Patterns for z/Linux using WebSphere Commerce Suite V5.1
Figure 2-6 Password for key file
5. Click OK and the password will be saved and the new key database file created. Figure 2-7 shows the confirmation message that is displayed.
Figure 2-7 Password creation dialog
6. Choose the menu options Create ->New Self-Signed Certificate as shown in Figure 2-8.
Chapter 2. Installation and configuration 43
Figure 2-8 Create self-signed certificate
7. Provide certificate details including a key label and organization, as shown in Figure 2-9 and click OK.
44 e-commerce Patterns for z/Linux using WebSphere Commerce Suite V5.1
Figure 2-9 Certificate settings
8. To test that SSL is working correctly, start IBM HTTP Server and then launch a Web browser. Enter the URL https://<hostname> and you will be prompted by the browser to accept the certificate. If you accept the certificate the IBM HTTP Server welcome window will be displayed.
9. To ensure that the WebSphere Application Server, Advanced Edition will respond to SSL requests, launch the WebSphere Administrative Console, select Virtual Host :default_host -> Advanced, and add host aliases in the format <hostname>:443, where 443 is the default port that SSL is using. See Figure 2-10 for an example.
Chapter 2. Installation and configuration 45
Figure 2-10 Add virtual host aliases for SSL
2.6 Install WebSphere Commerce SuiteThe following is an overview of the main steps required to install IBM WebSphere Commerce Suite Pro Edition for Linux for ^ z900 and S/390:
1. Log on to z/Linux as root.
2. Extract the Commerce Suite install files from the WCS510_PRO_LNX390.tar.
3. Change to the WCS510_PRO_LNX390 directory.
4. Start the install using the ./install.sh command.
46 e-commerce Patterns for z/Linux using WebSphere Commerce Suite V5.1
2.7 Install WebSphere Payment ManagerThis section provides an overview of the installation procedures for WebSphere Payment Manager. Full details are in the manual IBM WebSphere Payment Manager for Multiplatforms Install Guide Version 2.2.1 and we recommend that you read this guide, particularly if you are not familiar with installation of WebSphere Payment Manager. The main install steps are:
1. Create a Payment Manager database. To do this:
a. Switch to db2 instance owner ID:
su - db2inst1
b. If using DB2 Universal Database on Linux create the payman database:
db2 create database payman
c. If using DB2 Universal Database for OS/390 and z/OS:
i. Catalog a payman database using DCS. Example 2-9 shows the commands we used to catalog our Payment Manager database. These commands assume that the TCPIP node sc53 has already been cataloged. This node is where DB2 Universal Database for OS/390 and z/OS is installed and db7m is the name of the DB2 system. As an alternative to manually cataloging the payman database, you can use the DB390 script found in the Payment Manager installation directory. See Chapter 7 of the IBM WebSphere Payment Manager for Multiplatforms Install Guide Version 2.2.1 for details.
Example 2-9 Catalog payman database using DCS
db2 catalog db pay53 as payman at node sc53 authentication dcsdb2 catalog dcs db pay53 as db7m
ii. Connect to the Payment Manager database:
db2 connect to payman user <userid> using <password>
where <userid> is a valid user with dbadm authority on the system where DB2 Universal Database for OS/390 and z/OS is installed and <password> is the password for that user.
iii. Change to the sqllib/bnd directory and issue the bind command:
db2 bind @ddcsmvs.lst BLOCKING ALL SQLERROR CONTINUE GRANT PUBLIC
2. Unzip the Payment Manager .tgz file if necessary. Enter:
gunzip wpm2.2.1-linux390.tgz
Note: The Payment Manager installation procedure will create the remote database when you are using DB2 Universal Database for OS/390 and z/OS.
Chapter 2. Installation and configuration 47
3. Extract files from the Payment Manager tar file. Enter:
tar -xvf wpm2.2.1-linux390.tar
4. Change to the extracted install directory. Enter:
cd cdimage_FRAME
5. Make sure that the Java executables are in the system path.
6. Make sure that display is exported to the location of your X server.
7. Start the install by entering:
./Install
8. In the Payment Manager Install window, click Next. See Figure 2-11.
Figure 2-11 Payment Manager install window
9. Accept the software license agreement.
10.Wait while the preinstallation checks run on your system.
11.Accept the default installation directory of /opt/PaymentManager and click Next. See Figure 2-12.
48 e-commerce Patterns for z/Linux using WebSphere Commerce Suite V5.1
Figure 2-12 Payment Manager install directory
12.Accept the default location for the Web server publish directory and click Next. See Figure 2-13.
Chapter 2. Installation and configuration 49
Figure 2-13 Web server publish directory
13.Choose IBM Universal Database. Click Next.
14.Accept the default JDBC information or if necessary provide custom values. It is important the DB2 instance name is correct. Click Next. See Figure 2-14 for an example of the values we supplied.
50 e-commerce Patterns for z/Linux using WebSphere Commerce Suite V5.1
Figure 2-14 JDBC driver details
If you have supplied incorrect values or the JDBC driver cannot be loaded for any reason, an error message as shown in Figure 2-15 will be displayed.
Figure 2-15 JDBC load error
15.Provide details of the Payment Manager database and click Next as shown in Figure 2-16.
16.Accept the default Payment Engine TCP port of 8611 and click Next.
17.Provide the administrative node name for the WebSphere Application Server that you want to connect to and click Next as shown in Figure 2-17.
52 e-commerce Patterns for z/Linux using WebSphere Commerce Suite V5.1
Figure 2-17 WebSphere node name
18.Review the installation summary and click Next to begin the Payment Manager installation.
2.8 Test Payment ManagerAfter the installation of Payment Manager is complete, you may wish to test the basic operation of Payment Manager. You can do this without having to configure WebSphere Payment Manager to interoperate with WebSphere Commerce Suite. The following steps will test the base operation of Payment Manager:
1. Start the Payment Engine by entering the following commands:
cd /opt/PaymentManager./IBMPayServer &
The Payment Engine will display messages similar to those shown in Example 2-10.
Example 2-10 Start Payment Engine
vmlinux3:/opt/PaymentManager # Mon Dec 17 08:59:07 EST 2001 CEPFW0000: IBM WebSphere Payment Manager 2.2.1.0.
Chapter 2. Installation and configuration 53
Mon Dec 17 08:59:07 EST 2001 CEPFW0000: IBM WebSphere Payment Manager OfflineCard 2.2.1.0.
Mon Dec 17 08:59:07 EST 2001 CEPFW0000: IBM WebSphere Payment Manager CustomOffline 2.2.1.0.
Mon Dec 17 08:59:07 EST 2001 CEPOfflineCard1000: The OfflineCard Cassette has started.
Mon Dec 17 08:59:07 EST 2001 CEPCustomOffline1000: The CustomOffline Cassette has started.
Mon Dec 17 08:59:07 EST 2001 CEPFW0702: IBM WebSphere Payment Manager has started successfully.
2. Start the Payment Manager application server. This assume that the WebSphere Application Server, Advanced Edition is started and that you have launched the WebSphere Administrative Console. Expand the node tree for your host and select the application server WebSphere Payment Manager. Right-click and choose Start as shown in Figure 2-18.
54 e-commerce Patterns for z/Linux using WebSphere Commerce Suite V5.1
Figure 2-18 Start WebSphere Payment Manager application server
3. Open a Web browser and start the Payment Manager user interface by entering the following URL:
The Payment Manager logon page as shown in Figure 2-19 will be displayed.
Chapter 2. Installation and configuration 55
Figure 2-19 Payment Manager logon page
4. When Payment Manager is installed it uses a default security realm so you can log on using a user ID of admin and a password of admin. Click Logon. The Payment Manager welcome page as shown in Figure 2-20 will be displayed.
56 e-commerce Patterns for z/Linux using WebSphere Commerce Suite V5.1
Figure 2-20 Payment Manager welcome page
2.9 Create a Commerce Suite instanceThis section is an overview of the instance creation method we used when writing this Redpaper.
If using DB2 Universal Database for OS/390 and z/OS for the Commerce Suite instance database, complete the preconfiguration steps described in the IBM WebSphere Commerce Suite Pro Edition for Linux ^ z900 and S/390 Installation Guide,. The main steps are:
1. Increase the buffer pool size of the buffer pool that you will use for the Commerce Suite database. You need to set a minimum buffer pool size of 1000. To increase the buffer pool size, use the DB2 command:
Chapter 2. Installation and configuration 57
ALTER BPOOL(<BP-Name>) VPSIZE(1000)
where <BP-Name> is the buffer pool you plan to use.
2. Copy the CHECKV5 JCL job file from the /opt/WebSphere/CommerceSuite/jcl directory to your OS/390 or z/OS machine and edit the JCL to set values for your system.
3. Run the schemaupdate.sh command found in the /opt/WebSphere/CommerceSuite/bin directory.
Example 2-11 Running schemaudate.sh
Enter database name(default: WCS5DB):mallEnter data storage group name(default: WCS5TSSG):
Enter index storage group name(default: WCS5IXSG):
Enter data storage group volume(default: WCSDB2):totdciEnter index storage group volume(default: WCSDB2):totdciEnter buffer pool for tables(default: BP0):
Enter Primary (PRIQTY) Quantity(default: 96):
Enter Secondary (SECQTY) Quantity(default: 1440):
To create an instance, we used the graphical user interface tool provided by the WebSphere Commerce Suite Configuration Manager. See the IBM WebSphere Commerce Suite Pro Edition for Linux ^ z900 and S/390 Installation Guide for details of how to create an instance using the command-line tools. To create an instance using the Configuration Manager:
Important: We used the buffer pool BP0 for the Commerce Suite database. This was the buffer pool we specified when running the schemaupdate.sh command, but tablespaces were also created in BP16K0. So it was necessary to increase the size of the buffer pool BP16K0. Appendix C, “DB2 for OS/390 considerations” in the IBM WebSphere Commerce Suite Pro Edition for Linux ^ z900 and S/390 Installation Guide mentions that you must assign tables with columns of type LONG VARCHAR to 16 KB buffer pools, but it does not make it clear that BP16K0 will be used as a default by the instance creation process.
58 e-commerce Patterns for z/Linux using WebSphere Commerce Suite V5.1
1. Change to Commerce Suite bin directory:
cd /opt/IBMWebAS/bin
2. Start the Configuration Manager server:
./config_server.sh
3. Start the Configuration Manager client:
./config_client.sh
4. You will be prompted for configuration authentication as shown in Figure 2-21. The default user ID is webadmin and the default password is webibm. Click OK.
Figure 2-21 Configuration authentication
5. If this is the first time you have launched Configuration Manager, you will be prompted to change the default password as shown in Figure 2-22.
Figure 2-22 Change default configuration password
6. Supply a new password and click OK as shown in Figure 2-23.
Chapter 2. Installation and configuration 59
Figure 2-23 Modify password
7. In the main Configuration Manager window, expand the tree of your host name, right-click the instance list, and select Create Instance. See Figure 2-24 for an example.
60 e-commerce Patterns for z/Linux using WebSphere Commerce Suite V5.1
Figure 2-24 Create instance
8. Click No when asked if you wish to use an existing instance. The instance creation wizard will begin. The IBM WebSphere Commerce Suite Pro Edition for Linux ^ z900 and S/390 Installation Guide gives details of all the input fields on each page of the instance creation wizard. In most cases we were able to install using default values and only the instance, database and Web server pages required us to input changes.
9. On the instance page you must supply a merchant key. See Figure 2-25 for an example of the instance page of the wizard. For testing purpose any 16-digit hexadecimal key is sufficient for the merchant key, but for a production site be careful to use a sequence of numbers that is not easily guessed.
Chapter 2. Installation and configuration 61
Figure 2-25 Instance creation details
10.On the database page supply details of the WebSphere Commerce Suite database you will connect to. Figure 2-26 shows the values we used when the database was using DB2 Universal Database on Linux on the same machine as our WebSphere Commerce Suite instance.
62 e-commerce Patterns for z/Linux using WebSphere Commerce Suite V5.1
Figure 2-26 Commerce Suite database details using DB2 Universal Database on Linux
Figure 2-27 shows the database details we used when the Commerce Suite database was using DB2 Universal Database for OS/390 and z/OS on a remote database server. In this case note that the database user name and password are for the user with DBADM authority defined on the S/390 machine where the Commerce Suite database is installed.
Chapter 2. Installation and configuration 63
Figure 2-27 Commerce Suite database details using DB2 Universal Database for OS/390 and z/OS
11.Click Finish and the instance creation will begin. The creation of an instance can take some time. If you are using DB2 Universal Database for OS/390 and z/OS for your Commerce Suite database, then you will be prompted to run the CHECKV5 JCL job during the instance creation process. The main
64 e-commerce Patterns for z/Linux using WebSphere Commerce Suite V5.1
Configuration Manager window will display progress messages and a separate window will also show the progress. The Instance Creation wizard will close once the instance has been successfully created.
After instance creation has completed check for any errors in the log files found in the /opt/WebSphere/CommerceSuite/instances/<instance-name>/logs directory, where <instance-name> is the name you used for your instance. The default instance name is demo. In particular check the wcs.log file to make sure that the WebSphere Commerce Suite application server has started successfully.
2.10 Configuring Payment ManagerThe initial install of WebSphere Payment Manager does not require WebSphere Commerce Suite to be installed, but extra configuration is needed to ensure that Payment Manager can be used with Commerce Suite. These steps enable Payment Manager to use the security realm from Commerce Suite rather that its default realm. As a result, Commerce Suite administrators are also able to administer Payment Manager. For more details on the interaction of Commerce Suite and Payment Manager, see the redbook e-commerce Payment Solutions Implementation and Integration Using IBM WebSphere Payment Manager, SG24-6177.
The main configuration tasks required are:
1. Check the default_host Advanced tab in WebSphere Administrative Console to ensure that aliases still exist for SSL. If entries for <hostname>:443 do not exist add them as described in step 9. on page 45.
2. Stop the WebSphere Payment Manager application server.
3. Edit the PaymentServlet.properties file found in the Payment Manager install directory (the default install directory is /opt/PaymentManager) to specify WebSphere Commerce Suite parameters. For example enter the following:
7. To verify that Payment Manager is using WebSphere Commerce Suite for its security, start the Payment Manager user interface as described in 2.8, “Test Payment Manager” on page 53, but instead of logging on with the User ID admin use the default WebSphere Commerce Suite administrator ID of wcsadmin. The default password for the wcsadmin ID is wcsadmin.
2.11 Next stepsThis completes the base installation and setup of IBM WebSphere Commerce Suite Pro Edition for Linux for ^ z900 and S/390. Please refer to the IBM WebSphere Commerce Suite Pro Edition for Linux ^ z900 and S/390 Installation Guide should you wish to configure any of the optional Commerce Suite components.
Before working with your Commerce Suite instance we recommend that you do run batch compiles for the JavaServer Pages used by the WebSphere Commerce Suite tools. To do this:
1. Edit the file batchcompiler.config found in the directory /opt/IBMWebAS/bin and provide values for the following parameters:
a. adminNodename=<adminNodeName> where <adminNodeName> is the name of your WebSphere Application Server administration node
b. servername=WebSphere Commerce server - <instance_name> where <instance_name> is the name of your Commerce Suite instance
c. application=<compile-target> where <compile-target> is either WCS Stores or WCS Tools.
Example 2-12 shows the batchcompiler.config file we used to compile the JavaServer Pages used by the WebSphere Commerce Suite tools.
Example 2-12 batchcompiler.config
adminNodeName=vmlinux7serverName=WebSphere Commerce Server - demoapplication=WCS Toolsfilename=keepgenerated=
2. Change to the /opt/WebSphere/CommerceSuite/bin directory and launch the batch compile script:
./WCSJspBatchCompiler.sh
Note: Be sure to run the batch compile for both the WCS Stores and WCS Tools applications.
66 e-commerce Patterns for z/Linux using WebSphere Commerce Suite V5.1
Chapter 3. Create sample stores
In this chapter we describe the installation and administration of sample stores. These are used to verify that WebSphere Commerce Suite is working correctly and as the basis of the store customizations we discuss in Chapter 4, “Customize sample stores” on page 105.
3.1 Creating the Infashion sample storeThe Infashion sample store is a default model that is shipped with WebSphere Commerce Suite. We set up this sample store because it allowed us to test the basic functionality of Commerce Suite. To create the Infashion sample:
1. Start the WebSphere Application Server.
2. Start the WebSphere Commerce Suite application server.
3. Launch Store Services by entering the following URL in a Web browser that meets the Commerce Suite requirements:
http://<hostname>/storeservices
The Store Services Logon page will be displayed as shown in Figure 3-1.
4. The user name and password default to wcsadmin. For a production system, you should be sure to change the default password. Enter a user name and password and click Log On.
5. If this is the first time you have launched Store Services, the Create Store Archive page will be displayed as shown in Figure 3-3. If you have already created store archives then they will be listed as shown in Figure 3-2. Click New to display the Create Store Archive page.
68 e-commerce Patterns for z/Linux using WebSphere Commerce Suite V5.1
Figure 3-2 Store archives list
6. Select the SAR file infashion_en_US_es_ES.sar from the list of samples, enter a store archive name, a store directory name, and select the default organization as the store owner. See Figure 3-3 for an example. Click OK.
Chapter 3. Create sample stores 69
Figure 3-3 Create a store archive
7. A message will confirm that the SAR file has been created. See Figure 3-4 for an example.
Figure 3-4 Infashion.sar created
8. Store Services will then display a list of available archives. Select the Infashion.sar and click Publish. See Figure 3-5.
70 e-commerce Patterns for z/Linux using WebSphere Commerce Suite V5.1
Figure 3-5 Publish a store archive
9. Accept all the default options on the Publish Store Archive page as shown in Figure 3-6 and click OK.
Chapter 3. Create sample stores 71
Figure 3-6 Store archive publishing options
10.The publish status for the Infashion.sar will now change to Publishing as shown in Figure 3-7. Publishing a store archive may take a considerable amount of time. You can check the progress periodically by clicking Refresh in order to see the current publish status.
72 e-commerce Patterns for z/Linux using WebSphere Commerce Suite V5.1
Figure 3-7 Publishing status
11.After publishing is completed, the publish status becomes Publishing Completed Successfully, as shown in Figure 3-8.
Chapter 3. Create sample stores 73
Figure 3-8 Publishing complete
12.Select the Infashion.sar and click Publish Summary. This will display the Publish Summary page shown in Figure 3-9.
74 e-commerce Patterns for z/Linux using WebSphere Commerce Suite V5.1
Figure 3-9 Publish summary
13.You can test the Infashion sample store from the Publish Summary page. Click Launch Store and you will be prompted for the details of the Web application path as shown in Figure 3-10. Click OK.
Figure 3-10 Web application path for sample store
14.Figure 3-11 shows the home page of the Infashion store. We recommend that you bookmark the home page to make it easy to re-enter the store without having to launch from Store Services. The URL to launch a store is:
where <storeId> and <catalogId> are numbers assigned by the store creation process.
Figure 3-11 Infashion home page
3.2 Configure InFashion and Payment ManagerBy default Commerce Suite sample stores expect to use Payment Manager for payment processing, but for the Infashion sample it is necessary to configure Payment Manager so that the Infashion merchant is known to Payment Manager and can process orders using Payment Manager. To set up this interaction:
76 e-commerce Patterns for z/Linux using WebSphere Commerce Suite V5.1
Figure 3-12 Payment Manager welcome page
3. On the Payment Manager welcome page as shown in Figure 3-12,click Merchant Settings
4. Click Add a Merchant.
5. Enter values for:
Merchant name = any text, in our example WCSInFashion
Merchant number = Store ID for the InFashion store, in our example 10001
6. Select the authorized cassettes CustomOffline and OfflineCard.
7. Click Create Merchant. See Figure 3-13 for an example.
Chapter 3. Create sample stores 77
Figure 3-13 Merchant settings
8. When the merchant is successfully created, click Merchant Settings.
9. Click the OfflineCard icon as shown in Figure 3-14.
78 e-commerce Patterns for z/Linux using WebSphere Commerce Suite V5.1
Figure 3-14 Modify settings for OfflineCard
10.Click Accounts. See Figure 3-15 for an example.
Chapter 3. Create sample stores 79
Figure 3-15 Accounts for OfflineCard
11.Click Add an Account. The page shown in Figure 3-16 is displayed.
80 e-commerce Patterns for z/Linux using WebSphere Commerce Suite V5.1
Figure 3-16 Add an account
12.Figure 3-17 shows the values we entered for our new account.
Chapter 3. Create sample stores 81
Figure 3-17 Account values
13.Click Create Account.
14.Once the account has been created, click the account name (Offline Account 1 in our example) as shown in Figure 3-18.
82 e-commerce Patterns for z/Linux using WebSphere Commerce Suite V5.1
Figure 3-18 New account
15.Click Brands. See Figure 3-19.
Chapter 3. Create sample stores 83
Figure 3-19 Select Brands
16.Click Add a Brand. See Figure 3-20.
84 e-commerce Patterns for z/Linux using WebSphere Commerce Suite V5.1
Figure 3-20 Add a brand
17.Enter details for at least one brand that you want to use as a payment method with the Infashion store. We created a brand called Visa as shown in Figure 3-21. Click Create Brand.
Chapter 3. Create sample stores 85
Figure 3-21 Create brand
3.3 Verifying the InFashion storeNote: If you are familiar with the Infashion shopping process, you can skip the following descriptions, which are included here to provide a sample for readers who need to check that the Infashion store is working as expected.
To test that Infashion is functioning correctly, we made the following basic tests:
86 e-commerce Patterns for z/Linux using WebSphere Commerce Suite V5.1
1. We registered as a shopper by doing the following:
a. Click the Register link found on the left of all Infashion store pages.
b. On the Register or Login page click Register to create a new customer.
Figure 3-22 Register as shopper
c. Enter registration details and click Submit.
Chapter 3. Create sample stores 87
Figure 3-23 New customer
d. Click Edit my address book.
88 e-commerce Patterns for z/Linux using WebSphere Commerce Suite V5.1
Figure 3-24 Registration details
e. Click Add a new address.
Chapter 3. Create sample stores 89
Figure 3-25 Add new address
f. Enter address details and click Submit.
90 e-commerce Patterns for z/Linux using WebSphere Commerce Suite V5.1
Figure 3-26 Address details
g. Click the main register link again, enter the e-mail address and password for the shopper just created and click Login.
Chapter 3. Create sample stores 91
Figure 3-27 Login to Infashion
2. Completed a shopping order:
a. Click the Men’s link found at the top of Infashion store pages to browse the catalog.
b. Click Cords.
92 e-commerce Patterns for z/Linux using WebSphere Commerce Suite V5.1
Figure 3-28 Men’s catalog
c. Click Add to shopping cart.
Chapter 3. Create sample stores 93
Figure 3-29 Add to shopping cart
d. Click Checkout.
94 e-commerce Patterns for z/Linux using WebSphere Commerce Suite V5.1
Figure 3-30 Checkout
e. Select the default billing address and click Next.
Chapter 3. Create sample stores 95
Figure 3-31 Billing address
f. Select the default shipping address and click Next.
96 e-commerce Patterns for z/Linux using WebSphere Commerce Suite V5.1
Figure 3-32 Shipping address
g. Select the default shipping method and click Next.
Chapter 3. Create sample stores 97
Figure 3-33 Shipping method
h. Enter payment details as shown in Figure 3-34 and click Order Now.
98 e-commerce Patterns for z/Linux using WebSphere Commerce Suite V5.1
Figure 3-34 Payment details
i. Once the order is successfully processed, the confirmation page shown in Figure 3-35 will be displayed.
Chapter 3. Create sample stores 99
Figure 3-35 Order confirmation
3.4 Setting up the WebFashion demo storeThe WebFashion sample store is a standard WebSphere Commerce Suite sample that can be downloaded from:
We recommend that you always check the downloads site for any updates to the sample. WebFashion is distributed as a zip file webfashion.zip. Included in the WebFashion zip is user documentation in the WebFashion.pdf file. This PDF document is the IBM WebSphere Commerce Suite: WebFashion Installation, Configuration, and User Documentation. Please refer to this documentation for a full description of all the features of the WebFashion sample and for detailed instructions for installing and configuring the WebFashion store.
We installed WebFashion and configured its base features because this sample is the starting point for the customizations we describe in Chapter 4, “Customize sample stores” on page 105.
The following summarizes the major steps necessary to install and configure WebFashion:
1. Place the downloaded webfashion.zip in the /opt/WebSphere/CommerceSuite directory.
2. Extract all the files for webfashion.zip by entering the command:
unzip webfashion.zip
Allow the unzip to replace the DTD files catalog.dtd, command.dtd and store-all.dtd. Refer to the IBM WebSphere Commerce Suite: WebFashion Installation, Configuration, and User Documentation for full details of all the files that are contained in the zip and for details of where these files will be extracted to.
3. Register the SAR file used by WebFashion by editing the file /opt/WebSphere/CommerceSuite/xml/tools/devtools/SARRegistry.xml. Add the following at the end of the file just before the </SAR-properties> tag:
4. Using the WebSphere Administrative Console, modify the command-line arguments for the WebSphere Commerce Suite application server to include the WebFashion.jar in the WebSphere Commerce Suite application server command line argument classpath setting. Add the following to the classpath:
:./lib/WebFashion.jar
Click Apply to apply the changes.
5. Stop and start the Commerce Suite application server.
6. Create a new organization that will act as the store owner for WebFashion. The IBM WebSphere Commerce Suite: WebFashion Installation, Configuration, and User Documentation describes a manual process for doing this. In the additional material for our Redpaper (see Appendix A,
Chapter 3. Create sample stores 101
“Additional material” on page 127 for details) we provide a shell script called CreateNewOrganization.sh, which you can use to do this process.
7. Update the commit count setting in the file /opt/WebSphere/CommerceSuite/instances/<instance-name>/xml/<instance-name>.xml to set a CommitCount value of 10500.
8. Using Store Services, create a new store archive for WebFashion. The process of creating a store archive is described in more detail in 3.1, “Creating the Infashion sample store” on page 67. Figure 3-36 shows the values we used when creating our WebFashion store archive.
Figure 3-36 WebFashion store archive
9. Using Store Services publish the WebFashion store archive.
10.After the WebFashion store archive has been successfully published, check whether you need or want to configure any of the optional features described in the IBM WebSphere Commerce Suite: WebFashion Installation, Configuration, and User Documentation.
102 e-commerce Patterns for z/Linux using WebSphere Commerce Suite V5.1
11.We wanted to be able to register users in the WebFashion store so it was necessary to set up the discount handling features of WebFashion. This was done using the supplied script discount.db2.sh.
To test that WebFashion works correctly, you can do similar tests as described in 3.3, “Verifying the InFashion store” on page 86. The URL for starting WebFashion is: https://<hostname>/webapp/wcs/stores/servlet/StoreCatalogDisplay?storeId=<storeId>&langId=-1&catalogId=<catalogId>
where <storeId> and <catalogId> are numbers assigned by the store creation process.
Figure 3-37 shows the WebFashion welcome page. Note that the page already has some modifications from the default look and feel. For example, it has a link for product search that is one of the customizations described in Chapter 4, “Customize sample stores” on page 105.
Attention: The discount.db2.sh script included in the webfashion.zip has DOS character formats for line feeds. If you try to execute this script without correcting the formatting, it will fail. There are two approaches you can use to correct this:
� Extract the discount.db2.sh file from webfashion.zip on a DOS-based machine and FTP it to z/Linux using the ASCII FTP setting.
� Extract the discount.db2.sh from webfashion.zip on z/Linux and use the dos2unix utility to reformat the discount.db2.sh file. For example, enter:
dos2unix discount.db2.sh
Also note that the supplied shell script uses exit -1 which is not properly understood by the bash shell. Change the line in the shell script to something like exit 1. For example we changed the first lines of discount.d2.sh to:
104 e-commerce Patterns for z/Linux using WebSphere Commerce Suite V5.1
Chapter 4. Customize sample stores
In this chapter we describe some modifications made to the WebFashion sample store to implement custom requirements. This is to illustrate that well-architected and implemented Commerce Suite solutions can easily be deployed on different server platforms. Where any operating system-specific tasks are required we provide details of these requirements. These customizations are based on samples implemented for:
� WebSphere Commerce Suite V5.1 Customization and Transition Guide, SG24-6174
� e-commerce Patterns for Building B2C Web Sites Using IBM WebSphere Commerce Suite V5.1, SG24-6180
� WebSphere Commerce Suite Pro Edition for Linux for eServer z900 and S/390, V5.1. How to call a CICS transaction
Sample code from the redbook WebSphere Commerce Suite V5.1 Customization and Transition Guide, SG24-6174 can be obtained as part of the additional material for that book. We have not repackaged the redbook sample code with the additional material provided in our Redpaper. To obtain the necessary redbook sample code:
� Use a Web browser to go to:
ftp://www.redbooks.ibm.com/redbooks/SG246174
� Alternatively, you can go to the IBM Redbooks Web site at:
Select the Additional materials and open the directory that corresponds with the redbook form number.
4.1 Product searchThis sample implements the product search functionality described in the redbook WebSphere Commerce Suite V5.1 Customization and Transition Guide, SG24-6174.
Installing this sample was straightforward. We followed the instructions provided in the WebSphere Commerce Suite V5.1 Customization and Transition Guide, SG24-6174. The basic steps to follow are:
1. Obtain the required source files from the additional material for the WebSphere Commerce Suite V5.1 Customization and Transition Guide, SG24-6174.
2. Copy ProductSearch.jsp and sidebar.jsp to the Web assets store directory of your WebFashion sample store. In our case these files were placed in /opt/WebSphere/CommerceSuite/stores/web/Webfashion.
3. Copy productsearch5101.jar to the WebSphere Commerce Suite lib directory. In our case this was /opt/WebSphere/CommerceSuite/lib.
4. Copy productsearchbeandeployed5101.jar to the directory used for deployed Enterprise JavaBeans. In our case this was /opt/IBMWebAS/deployedEJBs.
5. Register the ProductSearch command. You can use the register_command.sql file provided in the WebSphere Commerce Suite V5.1 Customization and Transition Guide, SG24-6174 additional material to do this, provided that you remove DOS line-feed characters from the file. See the note on page 103 that discusses removing DOS characters from discount.db2.sh for more details.
6. Using the WebSphere Administrative Console, add the productsearch5101.jar file to the -classpath setting of your WebSphere Commerce Server.
7. Using the WebSphere Administrative Console, deploy the ProductSearch EJB.
8. Restart the application server WebSphere Commerce Server.
Figure 4-1 shows the input of a search for products in the WebFashion store using the keyword pants.
106 e-commerce Patterns for z/Linux using WebSphere Commerce Suite V5.1
Figure 4-1 Product search input
Figure 4-2 shows the results of the search on the keyword pants.
Chapter 4. Customize sample stores 107
Figure 4-2 Product search results
4.2 Product history crumb trailThis sample implements the product history functionality described in the redbook WebSphere Commerce Suite V5.1 Customization and Transition Guide, SG24-6174. To install this sample, you can use the instructions provided in this redbook. The basic steps to follow are:
1. Obtain the required source files from the additional material for the WebSphere Commerce Suite V5.1 Customization and Transition Guide, SG24-6174.
2. Copy ProductDisplay.jsp, topcategory.jsp, and subcategory.jsp to the Web assets store directory of your WebFashion sample store. In our case, these
108 e-commerce Patterns for z/Linux using WebSphere Commerce Suite V5.1
files were placed in /opt/WebSphere/CommerceSuite/stores/web/Webfashion.
Figure 4-3 shows an example of the product history crumb trail.
Figure 4-3 Product history crumb trail
4.3 Product compareThis sample implements the product compare functionality described in the redbook WebSphere Commerce Suite V5.1 Customization and Transition Guide, SG24-6174. To install this sample you can use the instruction provided in the redbook WebSphere Commerce Suite V5.1 Customization and Transition Guide, SG24-6174.
Chapter 4. Customize sample stores 109
The basic steps to follow are:
1. Obtain the required source files from the additional material for the WebSphere Commerce Suite V5.1 Customization and Transition Guide, SG24-6174.
2. Copy ProductCompare.jsp and subcategory.jsp to the Web assets store directory of your WebFashion sample store. In our case these files were placed in /opt/WebSphere/CommerceSuite/stores/web/Webfashion.
3. Copy productcompare5101.jar to the WebSphere Commerce Suite lib directory. In our case this was /opt/WebSphere/CommerceSuite/lib.
4. Register the ProductCompare command. You can use the register_command.sql file provided in the WebSphere Commerce Suite V5.1 Customization and Transition Guide, SG24-6174 additional material to do this, provided that you remove DOS line-feed characters from the file. See the note on page 103 that discusses removing DOS characters from discount.db2.sh for more details.
5. Using the WebSphere Administrative Console add the productcompare5101.jar file to the -classpath setting of your WebSphere Commerce Server.
6. Restart the application server WebSphere Commerce Server.
4.4 MessagingThis section describes the setup necessary to use MQSeries for outbound order messaging and use the order processing sample from the WebSphere Commerce Suite V5.1 Customization and Transition Guide, SG24-6174, to test the messaging setup.
4.4.1 Set up MQSeries serverMQSeries is not available as a server on Linux for ^ z900 and S/390, so you need to install and configure the MQSeries server product on a supported operating system in order to work with outbound messages from IBM WebSphere Commerce Suite Pro Edition for Linux for ^ z900 and S/390. For our testing we used an existing installation of MQSeries for Windows NT and Windows 2000, Version 5.2 on Windows 2000. To configure the MQSeries Server to work with WebSphere Commerce Suite the basic steps are:
1. Create the queues required by Commerce Suite in a queue manager of your choice. You can use the wcs-mq-defines.txt file provided with the additional material of the redbook WebSphere Commerce Suite V5.1 Customization and Transition Guide, SG24-6174 as input to runmqsc to do these defines.
110 e-commerce Patterns for z/Linux using WebSphere Commerce Suite V5.1
2. Create a server connection channel that will be used by the MQSeries client on your z/Linux Commerce Suite machine to communicate with the MQSeries server. We used the MQSeries Explorer to create the required server channel. Figure 4-4 shows the values we used when creating the server connection channel.
Figure 4-4 MQSeries server connection channel
It is important to make sure the correct authority is by any connections to this server channel. Figure 4-5 shows the MCA settings for our channel, where the MCA User ID mqadm represents a user on our Windows 2000 server that is part of the mqm group. As an alternative to using a user in the mqm group, you can specify any user who has system administrator rights. Both these options are acceptable in a test environment, but for production purposes you should use the authorization tools provided by MQSeries and grant only the required MQSeries authorities to a specific user ID.
Chapter 4. Customize sample stores 111
Figure 4-5 MQSeries server connection channel MCA settings
4.4.2 Set up the MQSeries clientAn MQSeries client must be installed on the z/Linux Commerce Suite machine. The basic steps required to set up the client are:
1. Download MQSeries client for Linux for S/390 from:
These steps are sufficient for a basic install in a test environment. For a production system, we recommend that you review the more detailed planning and installation steps described in the manual MQSeries for Linux Quick Beginnings ,GC34-5691 which is available from:
4.4.3 Set up the MQSeries classes for Java and Java Message Service
WebSphere Commerce Suite interacts with MQSeries using the Java Message Service (JMS) API so it is necessary to install and configure the MQSeries classes for Java and the MQSeries classes for Java Message Service on your z/Linux machine. These MQSeries classes are available from:
1. Download the file ma88_linux.tgz to the MQSeries installation directory on your z/Linux machine. The default install directory is /opt/mqm.
2. Enter cd /opt/mqm.
3. Extract the installation files:
tar -xzf /itso/mqseries/ma88_linux.tgz
To verify that the MQSeries classes for Java are correctly installed, you should use the installation verification tools. These are detailed in the manual MQSeries using Java, SC34-5456 which is available at:
– An IP address that matches that of the machine where you installed MQSeries server.
– Accept the default port of 1414.
– The server connection channel name created on your MQSeries server.
– The name of the queue manager on your MQSeries server.
Example 4-1 shows an example of a successful verification test.
Example 4-1 Verifying MQSeries for Java classes
Please enter the type of connection (MQSeries or VisiBroker) : (MQSeries)Please enter the IP address of the MQSeries server :m23vnx79Please enter the port to connect to : (1414)Please enter the server connection channel name :qm.m23vnx79.clientPlease enter the queue manager name :qm.m23vnx79Success: Connected to queue manager.Success: Opened SYSTEM.DEFAULT.LOCAL.QUEUESuccess: Put a message to SYSTEM.DEFAULT.LOCAL.QUEUESuccess: Got a message from SYSTEM.DEFAULT.LOCAL.QUEUESuccess: Closed SYSTEM.DEFAULT.LOCAL.QUEUESuccess: Disconnected from queue manager
Tests complete -SUCCESS: This MQSeries Transport is functioning correctly.Press Enter to continue ...
To verify that the MQSeries classes for Java Message Service are correctly installed, you should use the installation verification tools. These are detailed in the manual MQSeries using Java, SC34-5456. The basic steps required to verify correct installation of the MQSeries for Java Message Service classes are:
1. Set an environment variable to specify the location of the MQSeries for Java Message Service classes:
export MQ_JAVA_INSTALL_PATH=/opt/mqm/java/
2. Add required files to the classpath:
114 e-commerce Patterns for z/Linux using WebSphere Commerce Suite V5.1
Example 4-2 shows the results of a successful verification test.
Example 4-2 MQSeries classes for Java Message Service verification test without JNDI
MQSeries classes for Java(tm) Message Service 5.200Installation Verification Test
Creating a QueueConnectionFactoryCreating a ConnectionCreating a SessionCreating a QueueCreating a QueueSenderCreating a QueueReceiverCreating a TextMessageSending the message to SYSTEM.DEFAULT.LOCAL.QUEUEReading the message back again
JMSXDeliveryCount:1 JMS_IBM_PutApplType:28 JMS_IBM_Format:MQSTRA simple text message from the MQJMSIVT programReply string equals original stringClosing QueueReceiverClosing QueueSenderClosing SessionClosing ConnectionIVT completed OKIVT finished
4.4.4 Set up order processing exampleThis section details the steps required to set up the order processing example described in the redbook WebSphere Commerce Suite V5.1 Customization and Transition Guide, SG24-6174. To install this sample you can use the instructions provided in this redbook. The basic steps to follow are:
1. Obtain the required source files from the additional material for the WebSphere Commerce Suite V5.1 Customization and Transition Guide, SG24-6174.
2. Obtain the Linux-specific source files provided with the additional material of this Redpaper. See Appendix A, “Additional material” on page 127 for details on obtaining these files. The z/Linux specific files are:
– Run-jms-defines.sh
This shell script calls JMSAdmin to configure the JMS entities used by WebSphere Commerce Suite outbound messaging. It uses input from wcs-jms-defines.txt.
– Setup-OrderCreateXml.sh
This shell script runs SQL statements that set up OrderMessagingCmd, OrderResultsOKView and that redirect OrderOKView to OrderResultsOKView.
– IVTClientSetup
This shell script is a modification of the IVTSetup script that is shipped with the MQSeries classes for Java Message Service. The IVTSetup script assumes that an MQSeries server product is installed on the machine where the JMS installation verification tests are being run. The IVTClientSetup script modifies the JMS entities so that the verification test can use the MQSeries client to communicate with a remote MQSeries server. To use IVTClientSetup, edit the file and replace your-hostname with the correct host name of your MQSeries server machine.
116 e-commerce Patterns for z/Linux using WebSphere Commerce Suite V5.1
4. Change to the directory where you placed Setup-OrderCreateXml.sh and run the shell script, supplying the parameters for database name, database administrator user, administrator password and store ID for the WebFashion store. For example we entered:
Welcome to the Admin Tool's command-line interface
InitCtx>
9. At this stage you can take the option of running the installation verification for MQSeries classes for Java Message Service using JNDI. To do this:
a. Run the IVT client setup script to create JMS entities used by the verification test:
Example 4-4 shows an example of a successful verification test.
Example 4-4 MQSeries classes for Java Message Service verification test with JNDI
MQSeries classes for Java(tm) Message Service 5.200Installation Verification Test
Using administered objects, please ensure that these are available
Retrieving a QueueConnectionFactory from JNDICreating a ConnectionCreating a SessionRetrieving a Queue from JNDICreating a QueueSenderCreating a QueueReceiverCreating a TextMessageSending the message to SYSTEM.DEFAULT.LOCAL.QUEUEReading the message back again
Got message:JMS Message class: jms_text JMSType: null JMSDeliveryMode: 2 JMSExpiration: 0 JMSPriority: 4 JMSMessageID: ID:414d5120716d2e6d3233766e783739204d254c3c12a00000 JMSTimestamp: 1011910502680 JMSCorrelationID:null JMSDestination: queue:///SYSTEM.DEFAULT.LOCAL.QUEUE JMSReplyTo: null JMSRedelivered: false JMS_IBM_MsgType:8 JMSXAppID:MQSeries Client for Java JMSXUserID:MUSR_MQADMIN JMSXDeliveryCount:1 JMS_IBM_PutApplType:28 JMS_IBM_Format:MQSTRA simple text message from the MQJMSIVT programReply string equals original stringClosing QueueReceiverClosing QueueSenderClosing SessionClosing Connection
118 e-commerce Patterns for z/Linux using WebSphere Commerce Suite V5.1
IVT completed OKIVT finished
10.Edit the wcs-jms-defines.txt file and replace all occurrences of QM1 with the name of the queue manager you are using. Also add a line to specify that MQSeries client communication should be used:
alter qcf(JMSQueueConnectionFactory) transport(CLIENT)
11.Create the JMS entities used by Commerce Suite messaging by running the shell script Run-jms-defines.sh.
./Run-jms-defines.sh
12.Using the WebSphere Commerce Suite configuration tool enable the TransportAdapter component for your Commerce Suite instance. See Figure 4-6 for an example.
Figure 4-6 Enabling the TransportAdapter
Chapter 4. Customize sample stores 119
13.Using the WebSphere Administrative Console, add classes to Commerce Suite application server classpath. The required additions to the -classpath parameter are:
14.Using the Commerce Suite Administrative Console and selecting Messaging -> Transports, ensure that the MQSeries messaging transport is active as shown in Figure 4-7.
Figure 4-7 Commerce Suite Administrative Console messaging transports
Also ensure that the transport configuration parameters are correct as shown in Figure 4-8.
120 e-commerce Patterns for z/Linux using WebSphere Commerce Suite V5.1
Figure 4-8 Transport configuration parameters
15.Using the Commerce Suite Administrative Console and selecting Messaging -> Message Types, ensure that the message transport assignment is as shown in Figure 4-9.
Chapter 4. Customize sample stores 121
Figure 4-9 Message transport assignment message type
Also ensure that the message transport assignment parameters are as shown in Figure 4-10.
122 e-commerce Patterns for z/Linux using WebSphere Commerce Suite V5.1
Figure 4-10 Message transport assignment parameters
16.To verify that the order processing outbound messaging is working correctly, restart the WebSphere Commerce Suite instance and create an order using the checkout process for your sample store. You should then check that the outbound message is placed in the MSGSTORE table in your instance database and that a message is written to the MQSeries queue wcs_outbound. For more details of this process see the redbook WebSphere Commerce Suite V5.1 Customization and Transition Guide, SG24-6174.
4.5 Calling a CICS transactionThis sample sets up interaction between an existing CICS transaction and Commerce Suite. It is based on work documented by Steve Wehr of z/OS Technical Support in the white paper WebSphere Commerce Suite Pro Edition for Linux for eServer z900 and S/390, V5.1. How to call a CICS transaction, which can be found at:
We found that following the steps as documented in the white paper enabled us to easily create this sample and recommend that you refer to the white paper for a more detailed discussion of the sample. In particular, you should read the section on installing the CICS Transaction Gateway (CTG), since CICS installation and configuration is not covered in our Redpaper. The basic steps to install this sample are:
1. Configure your CICS system for EXCI or LU6.2 access.
2. Install the CICS Transaction Gateway server on your CICS system. For our Redpaper testing, we used an existing CICS system on OS/390 where the CTG server was already installed and configured.
3. Optionally install the sample CICS transaction on your CICS system. For our testing we used already installed CICS programs called ECIPROG and ECIPROGX. These programs take a 27 byte input and return date, time and application ID. ECIPROGX does data conversion while ECIPROG returns its results in EBCDIC.
4. Install CICS Transaction Gateway client classes on the z/Linux system where WebSphere Commerce Suite is running. Installing the client classes is simply a matter of copying the ctgclient.jar to your z/Linux system.
5. Run the stand-alone test program CICSStandalone to check that the CICS Transaction Gateway client and server can communicate.
We first ran the test program in a VisualAge for Java test environment that we had already configured as a Commerce Suite development environment. For details on how to set up a Commerce Suite test environment, refer to the IBM WebSphere Commerce Suite Programmer’s Guide and to the redbook WebSphere Commerce Suite V5.1 Handbook, SG24-6167. We created a VisualAge project for the CICS sample code as described in the white paper WebSphere Commerce Suite Pro Edition for Linux for eServer z900 and S/390, V5.1. How to call a CICS transaction and also followed the white paper directions for import the CTG client classes into a VisualAge project.
We used VisualAge for this testing because we modified the CICSStandalone code so that it communicated with our test CTG environment. Specifically we changed the code to provide new values for:
– ctg_url
– ctg_region
– ctg_progname
We also had to change the hard-coded section of CICSStandalone that sets the commarea because the commarea length of our test CICS program was shorter than that used by the white paper.
124 e-commerce Patterns for z/Linux using WebSphere Commerce Suite V5.1
After testing in VisualAge for Java, we exported our modified CICSStandalone code to a class file on our Windows developer machine and then used FTP to move this class file to our Commerce Suite environment on z/Linux. To test the program we exported the ctgclient.jar to our z/Linux CLASSPATH setting and then ran the Java test program. On our z/Linux test system both ctgclient.jar and CICSStandalone.class were in the directory /itso, so to run the test program we entered:
Example 4-5 shows the results of a successful call to the test program.
Example 4-5 CICSStandalone test on z/Linux
Before Invoking CTG, commarea= 9876543210Begin CTG Response ---------------------------Return Code= ECI_NO_ERRORAbend Code=Commarea length= 27Commarea= SCSCPAA6 25/01/02 12:44:17End CTG Response -----------------------------12:44:18:282 : LL-Socket[addr=9.1.38.37,port=2006,localport=4178]com.ibm.ctg.client.TcpJavaGateway@f5616d19: S-C: CCL6602I: GatewayRequest type = BASE, flow version = 4194304, flow type = 4, Gateway return code = 61444, length of data following the header = 0.
6. Using VisualAge for Java, we modified the CallCicsCmdImpl sample task command from the white paper WebSphere Commerce Suite Pro Edition for Linux for eServer z900 and S/390, V5.1. How to call a CICS transaction to set the correct connection parameters for calling our CTG and also to allow for the different commarea length of our CICS test program. We then used the WebSphere Test Environment of VisualAge for Java to run our Commerce Suite test store and check that the new command was called when we placed an order.
7. After testing in VisualAge for Java, we deployed the CICS code to our Commerce Suite test site on Windows and then to our z/Linux machine. The deployment steps for both environments were the same. The steps to follow are:
a. Export the CallCicsCmdImpl code from VisualAge for Java to a JAR file.
b. Using the WebSphere Administrative Console, add the exported JAR file to the -classpath setting of your Commerce Suite application server.
c. Register your new command in the Commerce Suite CMDREG database table. We supply a register_command.sql in the additional material of this
Chapter 4. Customize sample stores 125
Redpaper that you can use as an SQL input file with the DB2 command interface to update the CMDREG table.
d. Restart the Commerce Suite application server.
8. To test that the CICS code has been deployed successfully, place an order from your Commerce Suite test store and check the wcs.log file for successful output message from the CICS command code.
126 e-commerce Patterns for z/Linux using WebSphere Commerce Suite V5.1
Appendix A. Additional material
This Redpaper refers to additional material that can be downloaded from the Internet as described below.
Locating the Web materialThe Web material associated with this Redpaper is available in softcopy on the Internet from the IBM Redbooks Web server. Point your Web browser to:
ftp://www.redbooks.ibm.com/redbooks/redp0411
Alternatively, you can go to the IBM Redbooks Web site at:
ibm.com/redbooks
Select the Additional materials and open the directory that corresponds with the Redpaper form number, redp0411.
Using the Web materialThe additional Web material that accompanies this Redpaper includes the following files:
File name Descriptionredp0411.zip Zipped Code Samples
System requirements for downloading the Web materialThe following system configuration is recommended:
Hard disk space: 5 MB minimumOperating System: Windows NT or Windows 2000 or z/LinuxProcessor: 233 MHz or h128 MB or higher
How to use the Web materialThe redp0411.zip file was created on a Windows machine, so the text files it contains have DOS formatting characters.To use the sample code in the redp0411.zip file on a z/Linux machine, you can either:
� Download redp0411.zip to a Windows machine, unzip the files on Windows and then FTP individual files to a z/Linux machine choosing ASCII or binary transfer as appropriate to the file type
or
� Download redp0411.zip to a z/Linux machine, unzip files, and use the dos2unix command to remove DOS character formatting from the text files
128 e-commerce Patterns for z/Linux using WebSphere Commerce Suite V5.1
Related publications
The publications listed in this section are considered particularly suitable for a more detailed discussion of the topics covered in this Redpaper.
IBM RedbooksFor information on ordering these publications, see “How to get IBM Redbooks” on page 130.
� WebSphere Commerce Suite V5.1 Handbook, SG24-6167
� WebSphere Commerce Suite V5.1 Customization and Transition Guide, SG24-6174
� e-commerce Patterns for Building B2C Web Sites Using IBM WebSphere Commerce Suite V5.1, SG24-6180
� e-commerce Payment Solutions Implementation and Integration Using IBM WebSphere Payment Manager, SG24-6177
Other resourcesThese publications are also relevant as further information sources:
� WebSphere Commerce Suite Pro Edition for Linux for eServer z900 and S/390, V5.1. How to call a CICS transaction
How to get IBM RedbooksYou can order hardcopy Redbooks, as well as view, download, or search for Redbooks at the following Web site:
ibm.com/redbooks
You can also download additional materials (code samples or diskette/CD-ROM images) from that site.
IBM Redbooks collectionsRedbooks are also available on CD-ROMs. Click the CD-ROMs button on the Redbooks Web site for information about all the CD-ROMs offered, as well as updates and formats.
130 e-commerce Patterns for z/Linux using WebSphere Commerce Suite V5.1130 e-commerce Patterns for z/Linux using WebSphere Commerce Suite V5.1
BUILDING TECHNICALINFORMATION BASED ONPRACTICAL EXPERIENCE
IBM Redbooks are developed by the IBM International Technical Support Organization. Experts from IBM, Customers and Partners from around the world create timely technical information based on realistic scenarios. Specific recommendations are provided to help you implement IT solutions more effectively in your environment.
For more information:ibm.com/redbooks
Redpaper
e-commerce Patterns for z/Linux Using WebSphere Commerce Suite V5.1Patterns for e-business SeriesInstallation and configuration of Commerce Suite
Solution development guidelines
Implementation examples
This Redpaper is part of the Patterns for e-business series and discusses how to implement WebSphere Commerce Suite applications on z/Linux. We discuss patterns useful for building Commerce Suite applications on z/Linux and provide product mappings and implementation details of these patterns.
We give instructions for implementing the WebSphere Commerce Suite runtime on z/Linux and show how existing sample applivcations can be re-deployed on z/Linux.


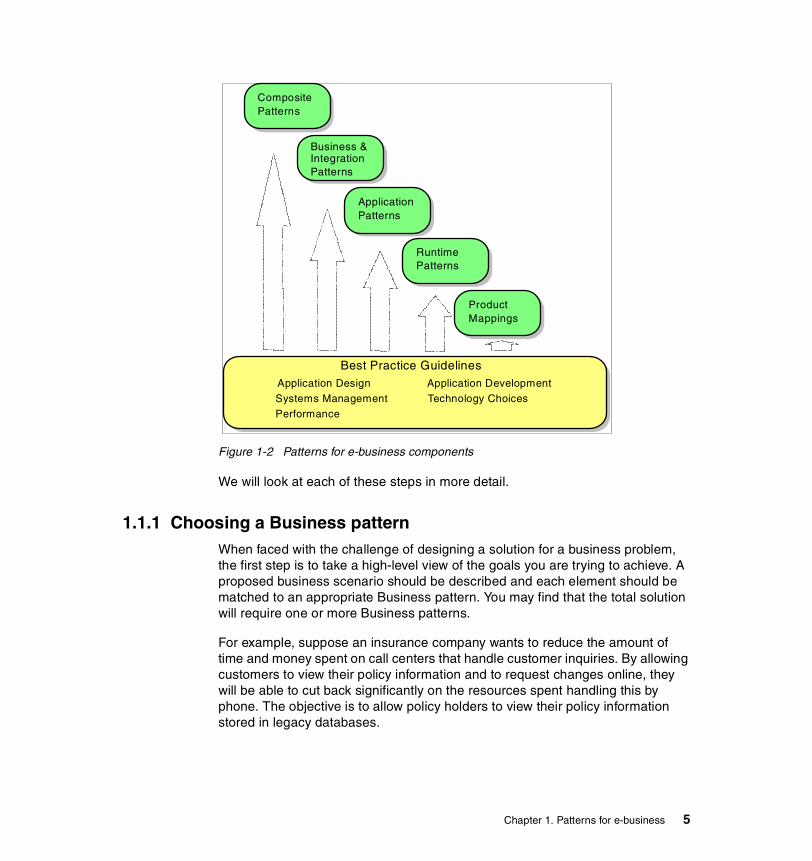


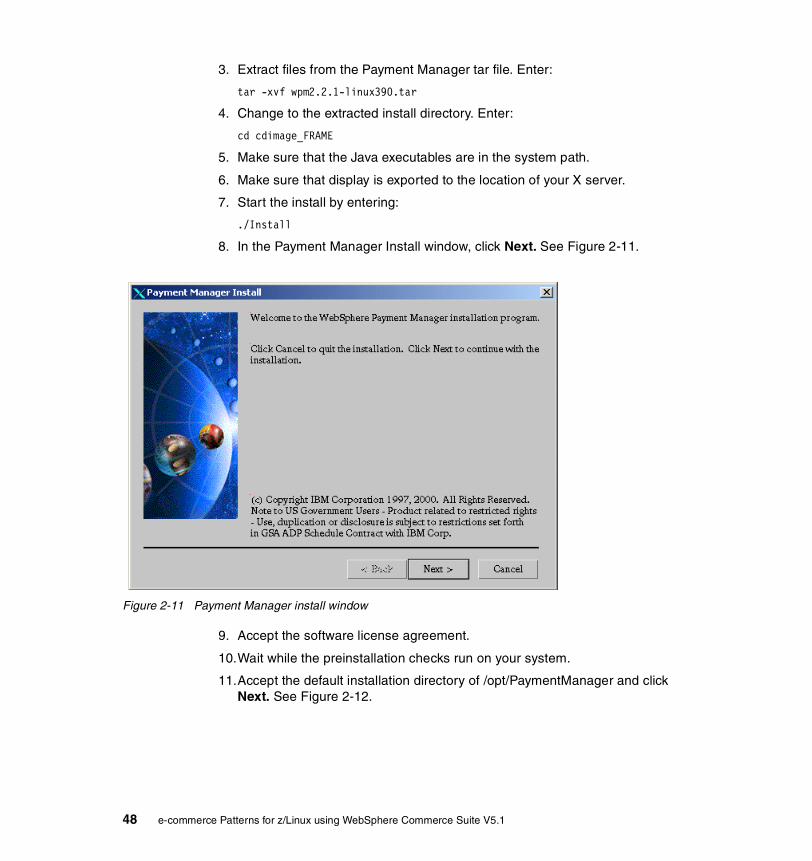


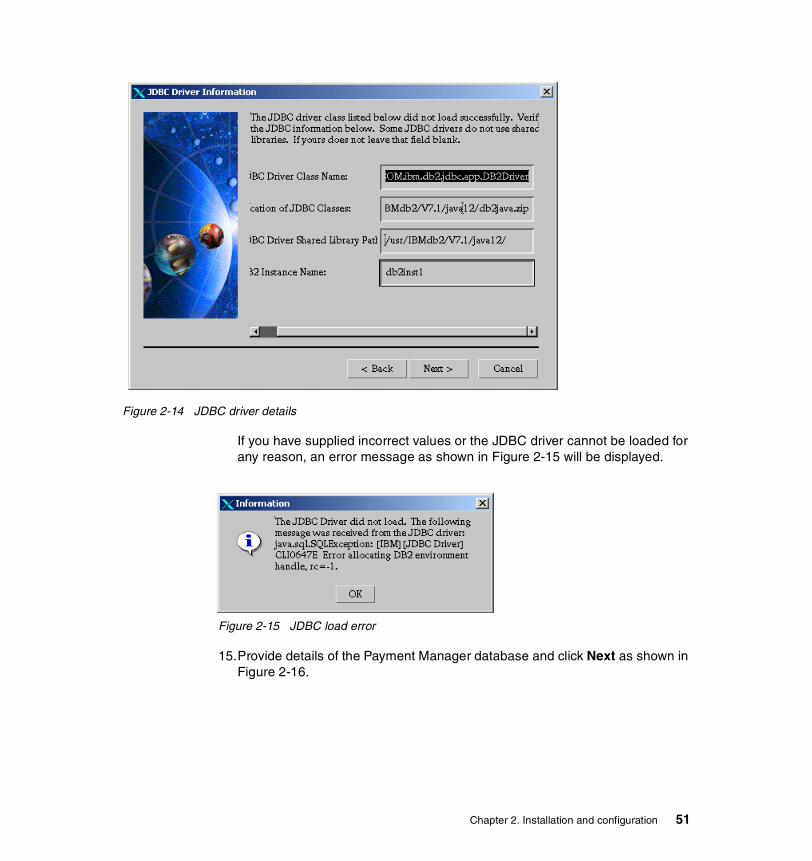


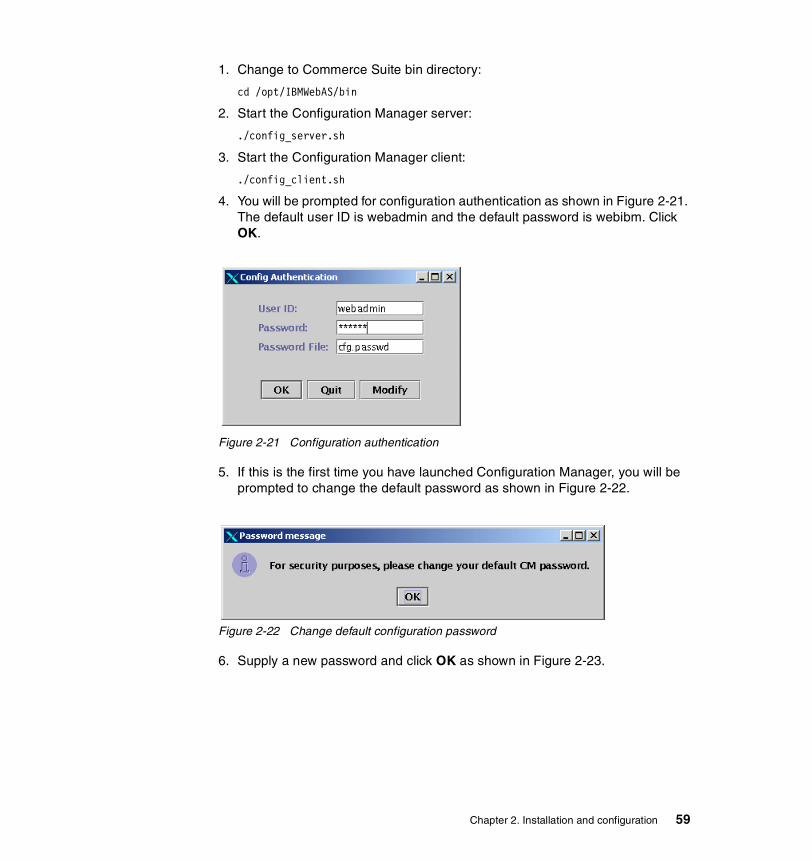


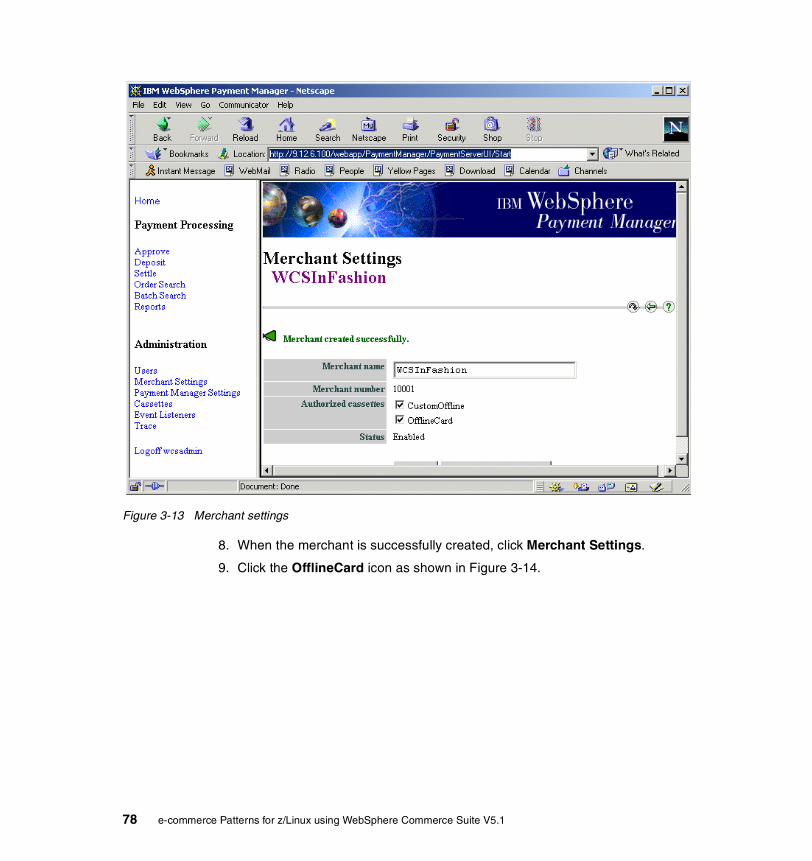


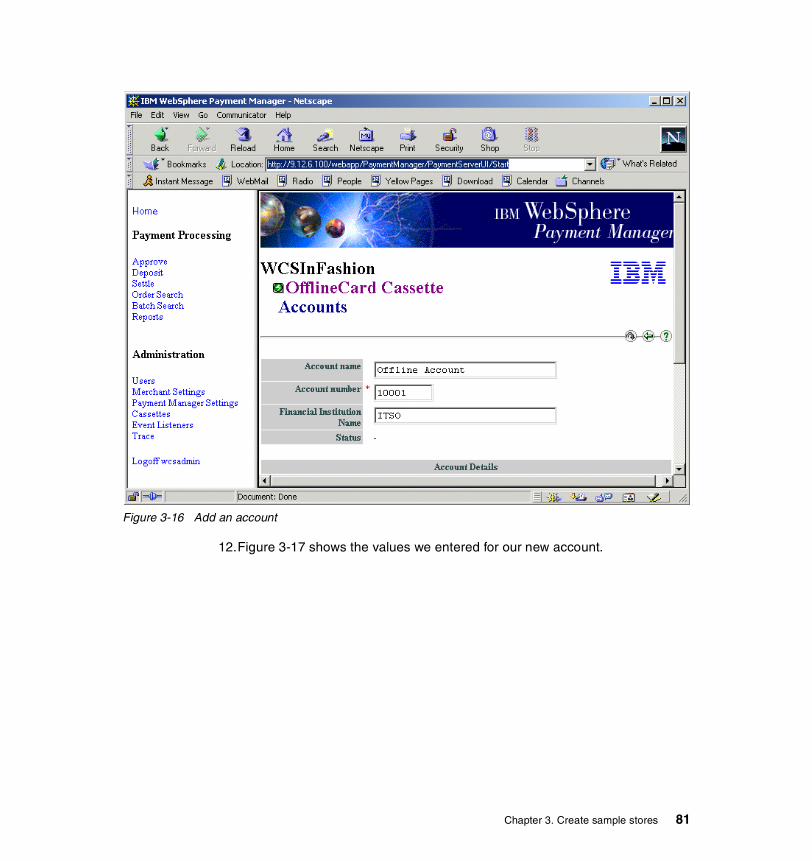


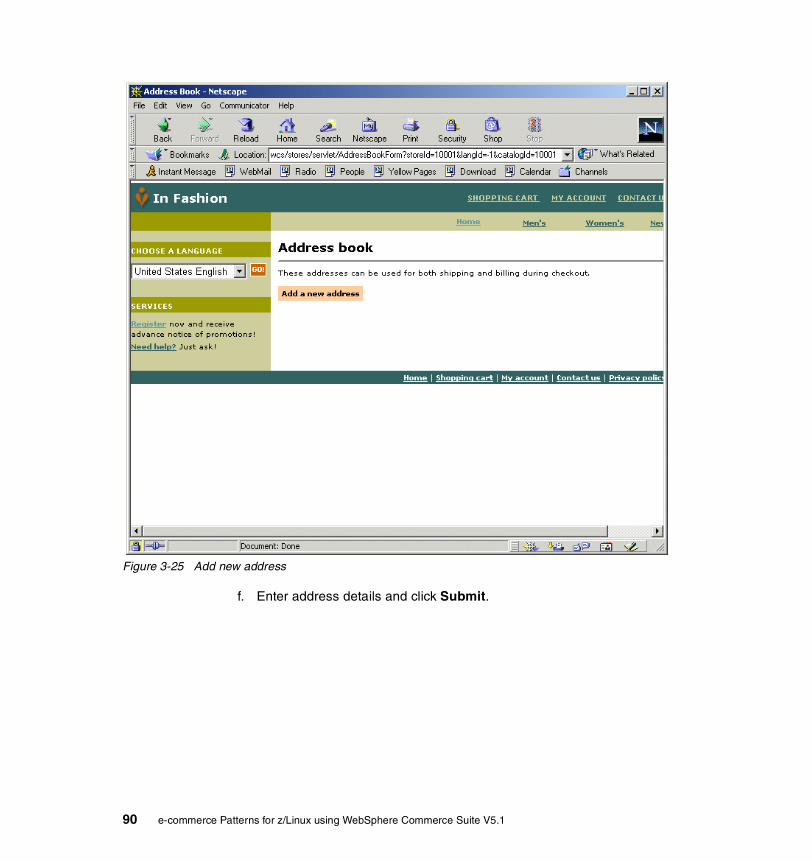


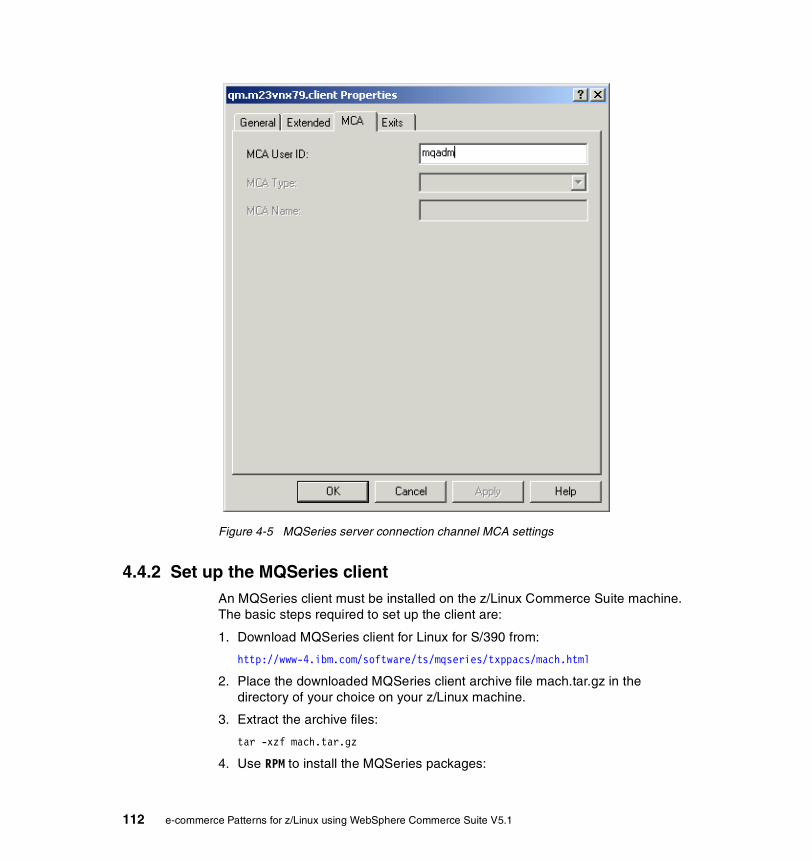


![Performance Monitor RedPaper[1]](https://static.documents.pub/doc/80x56/5520172a4a79595e718b4621/performance-monitor-redpaper1.jpg)

![Patterns for E-commerce applications...We have been mining patterns for designing Web applications for the last 5 years [Rossi96, Rossi97,Lyardet98, Lyardet99, Rossi99]. These patterns](https://static.documents.pub/doc/80x56/5f3979db3fef9476ef2398aa/patterns-for-e-commerce-applications-we-have-been-mining-patterns-for-designing.jpg)


