E Scow Tuning Guide NORTH SAILS ZENDA 262-275-9728 Andy Burdick [email protected]Harry Melges [email protected]Jim Gluek [email protected]For any question you may have on tuning your E Scow for speed, contact our experts: Photo David Thorenson onedesign.com Follow North Sails on...
This tuning guide is for E Scow sailors using the rig with the chainplates at the max aft position with longer spreaders. With this rig, backstays are not required, allowing the skipper to fully concentrate on tactics and boat speed.
BEFORE STEPPING THE MAST
1. Clean and lubricate turnbuckles, make sure that the top and bottom threaded studs are even in the turnbuckle tube.
2. Position mast so that base is locked in mast step plate on deck and top end is resting in the boom rest support.
3. Check all pins, wires and fittings for wear, and attach upper and lower shrouds.
4. Pull the forestay down along the top of the mast, pull firmly and mark the wire with a permanent marker at the top of the mast base casting or where the tube is cut off at the bottom. You will use this mark to measure your mast rake once the mast is in the up position.
5. Check the spreaders to make sure they are pinned in the forward hole for an all purpose setting. This puts the spreaders in the aft most position.
6. Make sure that all halyards are pulled down and are not fouled.
7. Using the feeder line that comes up through the mast step, tie this onto the bottom end of the jib halyard and pull the jib halyard through the deck. Take care not to loose the feeder line through the deck or you will have to re-run through the pulleys inside the backbone.
8. Using a person on the foredeck pulling on the spinnaker halyard and someone walking up the mast, step the mast and attach the forestay.
After stepping the mast, proper shroud tensions should be obtained. If you have a new North mainsail with the slug sewn into the sail, remove the screw holding the slug slide in the mast and remove the slug slide. This slide can be shackled on another sail for use of an older mainsail.
ALL PURPOSE SETTINGS
1. For all purpose setting of the side stays, set the mast rake by measuring up from the top of the black deck plate at the forestay along the forestay wire to the mark on the wire that corresponds to the mark you put on the wire at the bottom of the mast tube. This measurement should be 26 1/4”.
2. At this point , tighten the intermediate shrouds (shrouds that go to the forestay) so they measure 600 lbs. on a Model A Loos tension gauge. Make sure the intermediates are in the after most hole in the chain plates and also make sure you tighten each turnbuckle the same amount. If you want to really fine tune the rig, measure down to the deck at the chainplates using the jib halyard and adjust the intermediates to center the mast athwartship. This is a good all purpose setting for the intermediates. Note: If you have a new boat it is important to sail a few times in heavy air to stretch out the rigging before setting permanent marks on the shrouds and the mast rake. Double check the mast rake measurement after tightening shrouds and after sailing a new boat in good breeze..
Knowledge is power. We see this in every sport throughout the world. Racing sailboats is much different from the other sporting events. Sailing requires tuning for different wind and water conditions. Many of these tuning adjustments are very small, yet critical.
We have outlined for your information tuning information for many different boats which we race on a regular basis. The measurements achieved have been tested through countless hours on the water in a variety of conditions. What is truly unique with this guide is the fact that we have simplified the tuning process for all of these classes in order to make the process easy for our customers. You will be able to achieve new found speed in your class. These measurements coupled with the fastest one-design sails in the world will give you the knowledge for speed. In sailboat racing this is a combination for power and speed!
North Sails will continue to bring you the very best in sailing service and technology. Additional knowledge can be learned from the North Smart Book. Our objective is to allow you to set the pace in your racing
class.
North Sails Fast Sails, Friendly Service and Cutting Edge Knowledge for your sailing program!
3. To set the lowers you must go sailing. The lowers should be in the forward most hole in the chain plate with adequate pressure on the rig, sight up the aft side of the spar (up the tunnel) and adjust each lower so that there is approximately 1/2”-3/4” of leeward bend at the spreader height off of an imaginary line running from the base of the mast to where the sidestays attach near the top. This is a good all purpose setting for the lowers. For a ball park trailer tune of the lowers you can set them so they measure 150lbs on a model A Loos tension gauge. Make sure you site up the mast to make sure it is straight when the boat is sitting level on the trailer and you have 600lbs on the intermediates with the mast rake at the 25-1/2” setting.
We wanted to provide you with some helpful tips so that your learning curve moves upward. Please follow some of these initial tips so that you reach maximum performance right out of the gate. Teamwork is a major factor in this sport. So, work with your team and see what techniques may work for you specifically. The tips provided are a baseline to work from.
When setting up your Asymmetrical sheets – be sure to rig them so that you are doing “inside jibes”. The clew passes between the luff of the kite and the forestay. A quick way to ensure this is to lead the tack line over the starboard spinnaker sheet when you rig your sheets. Tack over sheet.
IMPORTANT MAST TUNING AND ASYMMETRICAL TECHNIQUES TO LEARN
As with any mast head spinnaker configuration the rig is more loaded and will require more attention to rig tuning and some changes in sailing technique.
DIAMOND STAYS
The diamond stays on the mast help to support the mast head spinnaker configuration and the tension on the diamonds is important to insure that the mast stays pre bent and in column. In wind ranging from 0-10knots it is OK to set the diamonds up so that the mast has 3.5” of pre-bend. To measure this you can pull the main halyard down along the back edge of the mast and touch the mast just above the boom. At a point just above the spreaders the distance from the aft edge of the mast to the main halyard should measure 3.5” or more. When the wind is over 10-12 knots it is important to start tightening up the diamonds to help support the mast head. When it is over 15 you need to have 4.5” of pre-bend in the mast, this equates to approximately 320 lbs on the diamonds when measured with a model A Loos tension gauge and the rake set at 26-1/4” and the intermediates at 600lbs. It is possible that looser diamonds will be faster in lighter wind, but, you must be very careful not to loosen them too much as they support the top of the mast when the mast head spinnaker is flying. We recommend not loosening up beyond 200lbs. On the diamond stays. So, loosen at your own risk.
Note: Diamond stays will stretch when they are new and you must check them
before and after heavy air races, especially when the rig is new.
Diamond stays will also measure differently with different tension on the Intermediates. It is best to measure the diamonds with the intermediates set at 600lbs.
SPREADERS
Spreaders should always be in the maximum aft setting on the mast to insure maximum spreader sweep. Note: This is the fast setting for all wind conditions, and this is true for the aft chainplate boats as well as the forward chainplate boats.
The upper spreaders are set from the factory with a 6” sweep when measuring from the back of the mast to a straight line from tip to tip where the wire passes through the tip. Sweeping the spreaders forward will make the top of the main sail fuller. We recommend not going forward of a 5” sweep as you begin to lose the forward support of the spreaders when the mast head kite is flying and the mainsail is eased all the way out.
SIDESTAY TENSION
With the forward chainplate rigs it is important to start to put some tension on the uppers once the breeze is over 10 knots. 400 lbs. On the uppers is necessary to insure that the mast stay prebent when sailing down wind. We recommend sailing with the uppers closer to 600 lbs once the breeze is over 15knots. This is the same for the aft chainplate rigs. With the aft chainplate rigs we rarely go below 600 lbs on the upper sidestay tension.
is important with the Asymmetrical to sail at slightly hotter or higher angles than with the symmetrical kites to achieve the greatest performance. This, along with the higher speeds you are achieving will bring the apparent wind angle forward and require the mainsail to be trimmed at a tighter angle. Also, more vang can be carried since you are sailing at hotter angles with more load on the mainsail. Because you are sailing at hotter angles and the A sails are so easy to jibe you should not ease the main sail out too far on the jibes. The maximum the sheet should ever be eased is about 10’ measuring from the aft corner of the boat to the boom. This technique along with keeping some vang on will help maintain a positive bend in the mast and regardless of backstay tension will help insure that the mast does not do an inverted bend.
RECIPE FOR MAST DAMAGE
Crew weight should never exceed 675lbs. on an E scow. The target weight for 4 people sailing in Heavy wind is 630lbs. Sailing heavier will dramatically increase loads on the boat and rigging and amplifies mistakes made with tuning and mainsail handling.
Jibing in heavy air with the vang loose and the mainsail eased out too far can be a recipe for mast problems. This is the single most important thing you need to concentrate on when sailing the A sail configuration. When you go into a jibe do not slow the boat down, go from high speed mode right into the jibe. I equate this to a high speed windsurfing jibe. If the diamonds are too loose and the uppers are too loose this will also compound the
situation and cause the mast to invert and could cause failure.
As with any powered up mast head configuration you have to learn the techniques to insure that you are safely performing the maneuvers. Once you understand the mechanics of the rig you will realize how much fun the A sails are and how much easier they are to sail. With the proper mechanics of boat handling and rig tuning the rigs are very durable and will stand up to a lot of wind.
It is very important to stay within the recommended rig settings. Do not overload the shroud tension or the crew weight as this places too much compression load on the mast and boat and can cause failures.
Downwind Asymmetrical Techniques
SETTING THE ASYMMETRICAL
The Top 10 List:
1. Pull the bow sprit all the way out – Important – You cannot pull the bowsprit out until you break the plane of the windward mark.
2. Mid crew opens the bag and prepares for the kite to exit the cockpit.
3. Make sure to keep the boat flat when in the hoisting process as this helps keep the spinnaker out of the water.
4. Jib Crew pulls the spinnaker halyard all the way up - Tip – have a permanent mark on the halyard in the “full up” position so you pull to that point every time.
5. After the halyard is all the way up, Jib Crew now pulls the tack of the asymmetrical all the way out. Make sure that you tail the foot of the spinnaker out of the bag and insure that the tack line and kite stay up on the deck as the tack goes out so that it does not get caught in the water rushing by.
6. Helmsperson Tip – on the set it is very important to help your crew out by heading dead downwind on the hoist. This allows the kite to go all the way up with ease. It is important to also make sure the mainsail is not let out to far. The halyard and head of the kite can get hung up behind the spreader delaying the hoist. Keep on eye on these things.
7. Once the halyard is up your Jib Crew should communicate “Made”. The helmsperson should freshen (head up) right away so that the kite blows away from the rig and then fills.
8. Limityour mistakes on the set – do not sail to high on the set – this makes it harder to pull the halyard up and the kite will fill early making it harder on the crew.
9. Limit your mistakes on the set – hoist straight out of the spinnaker bag with some help from the middle crew. Do not put the kite on the deck or near the water.
10. Be sure to have the hoist all the way up, then pull out the tack line and then trim the kite to fill.
11. Practice your timing on all of these things and know when you can push the envelope for the ultimate set!
1. When sailing downwind with the asymmetrical we sail with our boards all the way down. In varying conditions you may want to experiment with pulling your boards up some. This could be especially good in moderate winds and wavy conditions. Practice this technique and find out what is fast for your team. When in doubt though – keep the boards all the way down.
2. Angle of heel will not vary from the symmetrical kite set up.
3. Downwind Sailing Angles – this will vary some. Many think that you have to sail hot and fast in all conditions with this set up. This is not the case. Here is a brief guideline to go by.
Winds 0-8 Knots – a higher angle is required so that the boat builds apparent wind. With this speed you can begin to sail low. As soon as the boat slows even slightly or the boat begins to flatten in angle of heel – you need to head right back up and fire up the speed again. This requires constant attention and focus. One key factor in this condition is mainsheet trim. As your apparent wind moves forward you need to keep your mainsheet trimmed a lot more. Make sure your mainsail is not luffing. You will be amazed as to how the boat reacts to a tighter mainsheet and how much the boat likes to have the mainsheet worked downwind. Practice this. In this wind range you want to practice float jibes where you bear away slowly and ease the kite out and start pulling it around so it floats around the bow.
Winds 9-12 – you can experiment with sailing a lower or deeper angle in these conditions. As the breeze hits and the boat heels, begin to drive the boat down and sail deeper. Work your mainsheet. As you sail deeper the main will need to be eased slightly, but not nearly as far as would for a symmetrical sail.
Winds 13-25 – this is where it is really fun! Rock and Roll time! Crew should all be on the high side in their hiking straps. The mainsail will need to be trimmed in – almost all the way at times – as your apparent wind is way forward. The Jib Crew will need to work the jib and also the vang. It will feel like you are sailing a higher angle due to the speed build up. You really need to get the boat up and rolling – do not sail low or keep people in the boat – put them on the rail and go for a fast ride! The key is the mainsheet, keep the main trimmed. Do not ease the main much through your jibe either! Keep the sail in! In this wind condition you want to perform Mexican jibes, the skipper turns right into the jibe, you trim the sheet tight, strap the foot of the kite, let it back slightly onto the rig on the new windward side of the boat and as the main is coming across you blow the sheet off and trim the new sheet on quickly.
4. It is very important to keep your lines clean and drop coiled. You need to drop coil your spinsheets after every jibe so that the sheet run free through this maneuver.
5. Compass – it is very important to watch your compass angles downwind while staying in the freshest breeze on the course. These boats will be going very fast. Angles and wind really make the difference. Watch your compass as much if not more than you do going upwind.
ASYMMETRICAL TAKEDOWNS
The easiest take downs are the Windward take down or the Mexican take down. The leeward takedown is your third option.
WINDWARD TAKEDOWN
1. Head the boat virtually dead downwind. 2. Middle crew begins to pull the windward spin sheet around and then the Jib crew releases the tack line shortly after that. You can release the bow sprit line shortly after.
3. Middle Crew - Pull the windward sheet aggressively through the ratchet - all the way back so that the clew reaches the ratchet block. The sail will have inverted.
4. Middle Crew - Call for the halyard once you have the sail in hand.
5. Helmsperson - Before the halyard begins to drop be sure to steer up slightly so that the sail blows onto the deck of the boat. If you are dead downwind or sailing by the lee the kite will blow out away from the boat and go into the water. This is not good. It is very important that the helmsperson helps out the crew by steering up.
6. The Middle Crew stuffs the sail into the bag and prepares for the rounding.
MEXICAN TAKEDOWN
This takedown is effective when approaching the leeward mark on starboard tack and you need to jibe to go around the mark. As you reach a 3 boat length circle from the leeward mark you prepare to go into action. The key is that you need to be at about
150 degrees to true wind as you complete your jibe and you sail on port tack to the mark ( as you jibe you need to have the ability to head up on port jibe slightly so that the asymmetrical stays on the deck of the boat. If you come out of the jibe dead downwind the spinnaker will fall right into the water – again, the helmsperson needs to do their job to make the take down easy and effective). So, your relation to the leeward mark is critical – you want to exit the jibe and begin to reach toward the leeward mark
1. You enter the three boat length circle on starboard tack.
2. Helmsperson calls for a Mexican.
3. Middle Crew - Be sure to drop the windward board before entering the jibe.
4. Begin the jibe – the Middle Crew needs to trim the sheet hard so that the clew goes to the ratchet on the port side of the boat. This brings the clew and the foot of the sail to within reach for the take down.
5. The helmsperson turns the boat and enters the jibe. As the boom goes across he yells for the halyard release. The Jib Crew needs to release the halyard.
6. The helmsperson needs to head up so that the sail gets “pressed” into the rig on the port side. The key is to head up so that the sail falls onto the deck and into the rig keeping the sail away from the water.
7. The crew needs to be on the high side – on this port jibe as you approach the leeward mark – very important if it is windy as the boat will accelerate once you begin to reach to the mark.
8. The tack line and bow sprit line are the
last two items to be released. The Middle Crew needs to stuff the sail into the bag and hike hard as the boat rounds the mark.
9. Middle Crew pulls the board up on the port side as soon as possible or before the leeward mark.
LEEWARD TAKEDOWN
1. The key here is that the helmsman heads down for an easy takedown.
2. Release the tack line and trim the spinnaker sheet in.
3. Release the halyard slowly or with friction for the first 8 feet so that the halyard does not blow out and get hooked on the leech of the mainsail.
4. Middle Crew stuffs the kite into the bag.5. Final release is the bow sprit line which can occur shortly after the release of the tack line.
SET UP It is important to follow the North Sails Tuning Guide – I-1 Rig. Follow the amount of rig tension suggested for the varying conditions.
With the I-1 Rig your spreaders should be in the forward hole (for maximum sweep – standard setting).
When the breeze is up, we recommend you tighten your diamond stays – as noted above. For the forward chainplate rigs please follow the guidelines above for tuning.
SPECIAL CONSIDERATIONS
The angle of heel is very important on an E Scow. Upwind in up to 10 knots, go for maximum heel, but never let the water get up on the leeward deck. In more wind, sail with the bilge board vertical in the water. Don’t let the boat heel to much when sailing in a chop: it might feel good, but it is not fast. Just make sure that the bilge board is vertical, or that the boat is just a little flatter. When sailing in a lot of chop, be sure to have a very full jib, power up the main by keeping the rake forward, Cunningham off all the way and the outhaul pulled just until the vertical wrinkles disappear.
An E Scow travels at very high speeds for a sailboat, and is very maneuverable even though the rudders are only 10” X 16”. Still, it is important for the crew to be in tune with the skipper to help steer the boat. When a big puff hits, the bow has a tendency to blow to leeward, so the jib crew must be prepared to ease the sheet to prevent this. The most important thing to do when tacking an E Scow is to lower the new board at the right time. As the boat is turning through the tack, wait until the bow is just past head to wind to lower the board: if you do this to soon, it just creates extra drag and slows the boat down. Don’t worry about raising the windward board until the boat is up to speed on the new tack. We like to ease the main slightly and then trim it in to heel the boat as we come up into the wind, and then everybody rolls the boat together. In light to medium winds, keep the jib trimmed in until the boat is head to wind and let the wind break it across. When it starts to get windy it isn’t necessary to roll the boat, but ease the jib sooner so the bow can come up into the wind easier.
As far as tactical considerations go, at the start just remember that E Scows accelerate quickly, so it’s important to trim in before the boats around you or you might get rolled right away. If you have the room to leeward, simply put the boat on a tight reach with 15 seconds to go, get it up to speed by the time you hit the line, and make sure you can sail over the boat to leeward. E Scows don’t seem to create much of a wind shadow, so don’t be afraid to sail in someone’s bad air if you think it’s the right way to go, since the gains in a windshift can outweigh the loss of boat speed. These boats sail so fast that you are never out of the race. If you find yourself behind, several good windshifts can move you right through the fleet. The important thing to remember is to keep the pedal down and never give up.
All these generalizations are norms and averages that have proven fast over many years. Some experimentation by your part may be necessary to fine-tune your particular rig and sailing style. Good luck!
Your North Sails are constructed out of the best materials on the market today. We make sure of this by testing every roll of cloth we use. Through proper care and maintenance your sails will give you the performance you have come to expect from a North sail.
The most important factor for a long life for your sails is to watch them for signs of wear and tear in high load and chafe areas. Be sure to wash the sails off with fresh water and dry the sails thoroughly before storing. A dry, mild climate is best. Excessive heart can cause problems with the sails due to the possibility of shrinkage. It is best to roll the mainsail and jib.
MAINSAIL
When hoisting and lowering the sail try to minimize the amount of creasing or wrinkling of the sail. Every time the sail gains a crease the cloth breaks down that much faster. Always have someone contain the leech and luff during these procedures.
The battens can be left in the sail without any problems. Be sure to roll the sail down the leech so that the battens will not twist. This could cause damage to the battens.
JIB
When rolling the jib keep the battens perpendicular to the leech. Pay special attention to the battens and batten pockets for wear and tear.
SPINNAKER
The spinnaker is fairly straight forward. Be sure to repair all tears and pulled stitches. Folding the sail when storing is best.
This tuning guide only begins to cover all there is to know about racing the boat. The Scow team at North Sails One Design has prepared a professional, in depth Scow racing clinic that you and your fleet will be interested in learning more about. In the course of a weekend you will learn more about racing your Scow than you could possibly learn in a season of racing on your own.
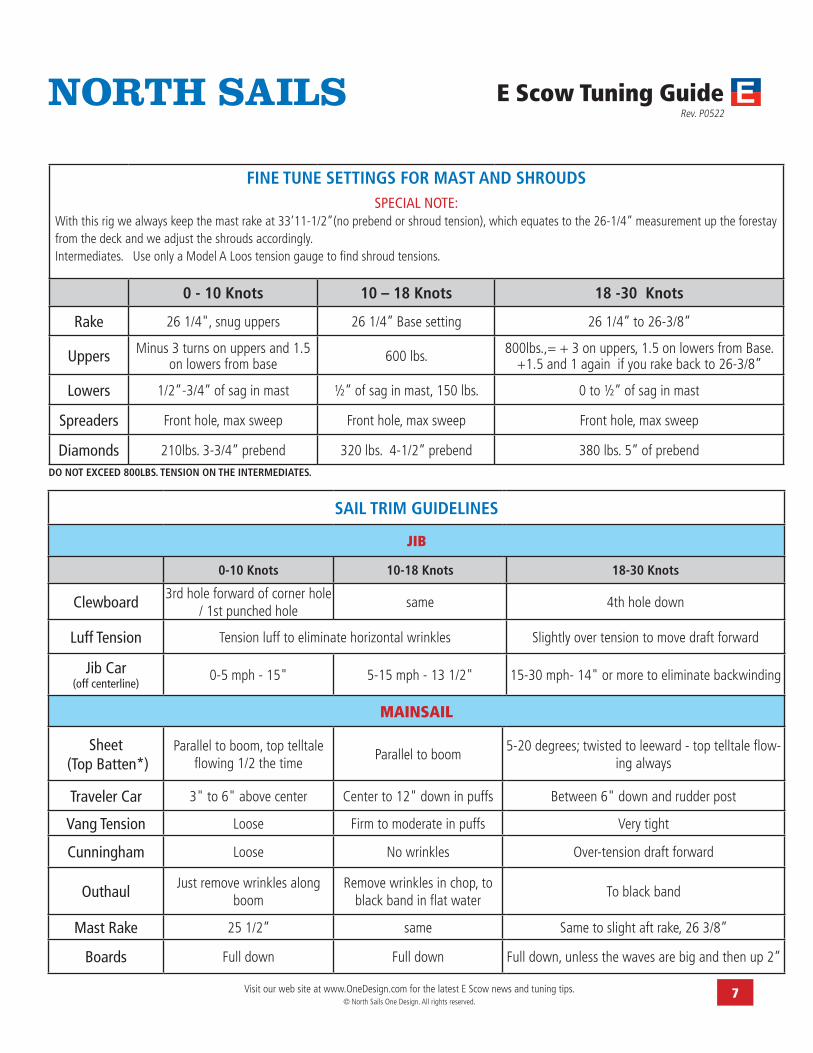
Luff Tension Tension luff to eliminate horizontal wrinkles Slightly over tension to move draft forward
Jib Car (off centerline)
0-5 mph - 15" 5-15 mph - 13 1/2" 15-30 mph- 14" or more to eliminate backwinding
MAINSAIL
Sheet (Top Batten*)
Parallel to boom, top telltale flowing 1/2 the time
Parallel to boom5-20 degrees; twisted to leeward - top telltale flow-
ing always
Traveler Car 3" to 6" above center Center to 12" down in puffs Between 6" down and rudder post
Vang Tension Loose Firm to moderate in puffs Very tight
Cunningham Loose No wrinkles Over-tension draft forward
Outhaul Just remove wrinkles along boom
Remove wrinkles in chop, to black band in flat water
To black band
Mast Rake 25 1/2” same Same to slight aft rake, 26 3/8”
Boards Full down Full down Full down, unless the waves are big and then up 2”
FINE TUNE SETTINGS FOR MAST AND SHROUDSSPECIAL NOTE:
With this rig we always keep the mast rake at 33’11-1/2”(no prebend or shroud tension), which equates to the 26-1/4” measurement up the forestay from the deck and we adjust the shrouds accordingly. Intermediates. Use only a Model A Loos tension gauge to find shroud tensions.
0 - 10 Knots 10 – 18 Knots 18 -30 Knots
Rake 26 1/4", snug uppers 26 1/4” Base setting 26 1/4” to 26-3/8”
Uppers Minus 3 turns on uppers and 1.5 on lowers from base 600 lbs. 800lbs.,= + 3 on uppers, 1.5 on lowers from Base.
+1.5 and 1 again if you rake back to 26-3/8”
Lowers 1/2”-3/4” of sag in mast ½” of sag in mast, 150 lbs. 0 to ½” of sag in mast
Spreaders Front hole, max sweep Front hole, max sweep Front hole, max sweep
Diamonds 210lbs. 3-3/4” prebend 320 lbs. 4-1/2” prebend 380 lbs. 5” of prebendDO NOT EXCEED 800LBS. TENSION ON THE INTERMEDIATES.