31
Easy Interactive Tools Ver. 4.0 Operation Guide

Easy Interactive Tools Ver. 4.0Operation Guide
2
Easy Interactive Tools Ver. 4.0 Operation Guide
Easy Interactive Tools Summary 3
Easy Interactive Tools Summary
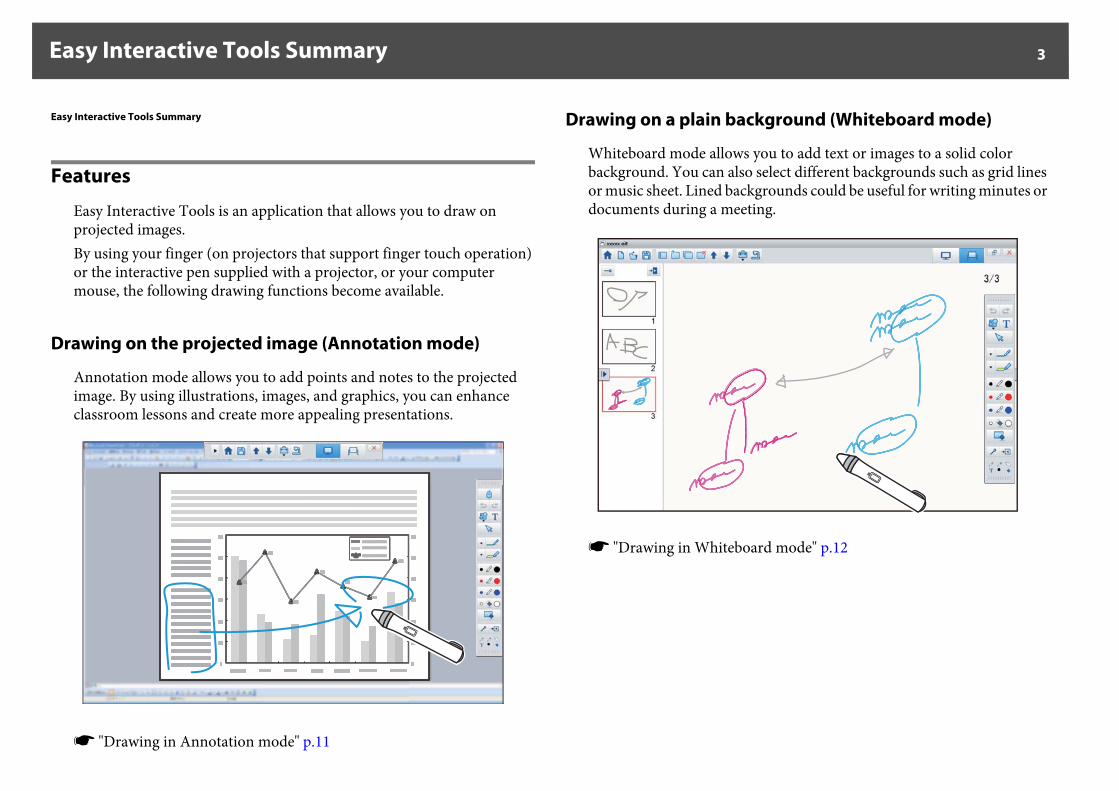
Features
Easy Interactive Tools is an application that allows you to draw on projected images.By using your finger (on projectors that support finger touch operation) or the interactive pen supplied with a projector, or your computer mouse, the following drawing functions become available.
Drawing on the projected image (Annotation mode)
Annotation mode allows you to add points and notes to the projected image. By using illustrations, images, and graphics, you can enhance classroom lessons and create more appealing presentations.
s "Drawing in Annotation mode" p.11
Drawing on a plain background (Whiteboard mode)
Whiteboard mode allows you to add text or images to a solid color background. You can also select different backgrounds such as grid lines or music sheet. Lined backgrounds could be useful for writing minutes or documents during a meeting.
s "Drawing in Whiteboard mode" p.12
Easy Interactive Tools Summary 4
Other interactive functions
You can also do the following:• Operate the computer's mouses "Operating a mouse from the projected image (mouse operations)" p.11
• Control devices connected to a computer, such as a projector or document cameras "Tool Panel Functions" p.16s "Camera Screen" p.18
• Edit content drawn on the projected screens "Adjusting and Editing Shapes and Images" p.26
• Save the content you created as a PowerPoint slide s "Slideshow Drawing Tool" p.27
• Network teleconferencingWhen you connect a projector to a computer over a network using EasyMP Network Projection or EasyMP Multi PC Projection, you can share the projected screen with a remote location.When used with Easy Interactive Tools, you can share annotations and drawings made on the projected screen with multiple locations. (Interactive pen and finger touch operations are supported only by EasyMP Network Projection.)For more information about EasyMP Network Projection and EasyMP Multi PC Projection, visit http://www.epson.com.
Easy Interactive Tools Summary 5
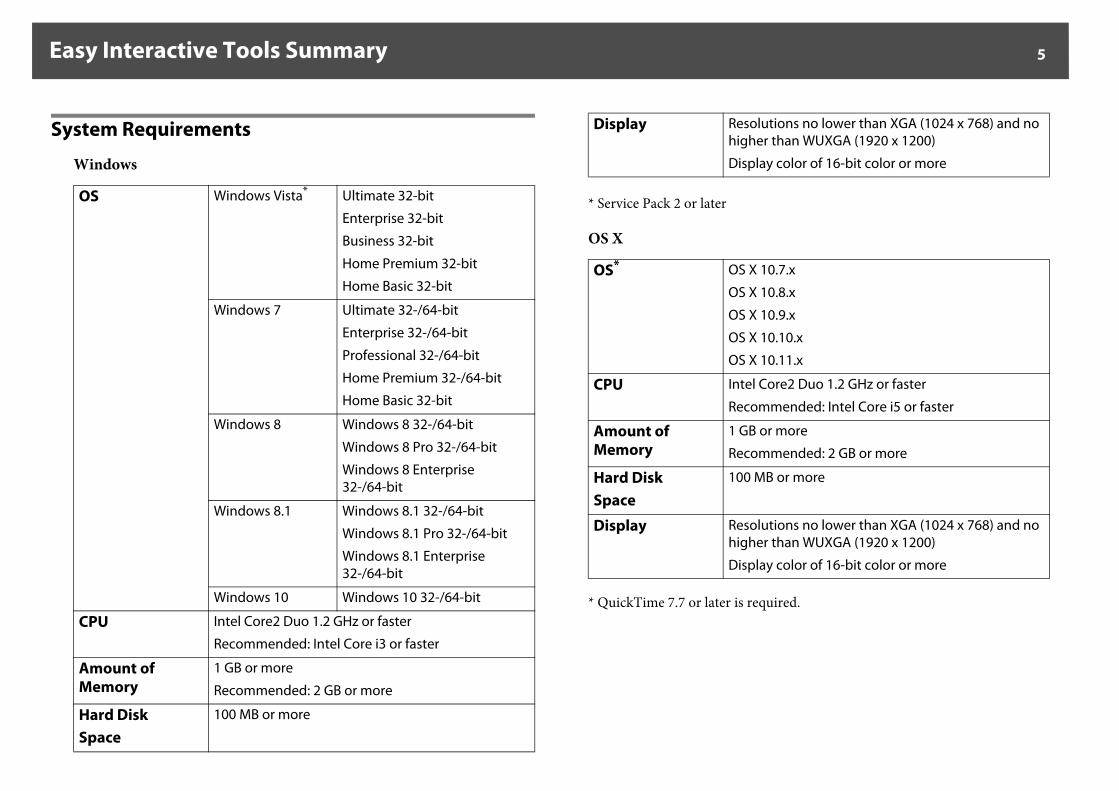
System Requirements
Windows
* Service Pack 2 or later
OS X
* QuickTime 7.7 or later is required.
OS Windows Vista* Ultimate 32-bit
Enterprise 32-bit
Business 32-bit
Home Premium 32-bit
Home Basic 32-bit
Windows 7 Ultimate 32-/64-bit
Enterprise 32-/64-bit
Professional 32-/64-bit
Home Premium 32-/64-bit
Home Basic 32-bit
Windows 8 Windows 8 32-/64-bit
Windows 8 Pro 32-/64-bit
Windows 8 Enterprise 32-/64-bit
Windows 8.1 Windows 8.1 32-/64-bit
Windows 8.1 Pro 32-/64-bit
Windows 8.1 Enterprise 32-/64-bit
Windows 10 Windows 10 32-/64-bit
CPU Intel Core2 Duo 1.2 GHz or faster
Recommended: Intel Core i3 or faster
Amount ofMemory
1 GB or more
Recommended: 2 GB or more
Hard DiskSpace
100 MB or more
Display Resolutions no lower than XGA (1024 x 768) and no higher than WUXGA (1920 x 1200)
Display color of 16-bit color or more
OS* OS X 10.7.x
OS X 10.8.x
OS X 10.9.x
OS X 10.10.x
OS X 10.11.x
CPU Intel Core2 Duo 1.2 GHz or faster
Recommended: Intel Core i5 or faster
Amount ofMemory
1 GB or more
Recommended: 2 GB or more
Hard DiskSpace
100 MB or more
Display Resolutions no lower than XGA (1024 x 768) and no higher than WUXGA (1920 x 1200)
Display color of 16-bit color or more
Install Easy Interactive Tools 6
Install Easy Interactive Tools
Installing
q • If your computer does not have a CD/DVD drive or you are using a Mac, an Internet connection is required to obtain the product software.
• Install the software as a user with administrator rights.• Close all running applications before starting the installation.
Windows
A Turn on your computer.
B Insert the product CD or go to www.epson.com/support (U.S.) or www.epson.ca/support (Canada) to download your product’s software package.
C Follow the on-screen instructions to run the setup program.If the installer on the CD does not start automatically, double-click the EIN_TTWInst.exe file to run the setup program.
D When you see the license agreement, accept the terms and click Next.
E At the Easy Interactive Tools Setup screen, select the following:If you are using Easy Interactive Tools with an interactive projector, select Drawing on the Desktop/Camera screen.If you are using the software with a document camera, select Drawing on the Camera screen.
F Click Install.
OS X
A Turn on your computer.
B Insert the product CD or go to www.epson.com/support (U.S.) or www.epson.ca/support (Canada) to download your product’s software package.
C Double-click the Install Navi icon in the EPSON window.
D Follow the on-screen instructions to install the software.
E When you see the license agreement, click Continue and then click Agree.
F At the Easy Interactive Tools Setup screen, select the following:If you are using Easy Interactive Tools with an interactive projector, select Drawing on the Desktop/Camera screen.If you are using the software with a document camera, select Drawing on the Camera screen.
G Click Install.
q For interactive projectors, you need to install the Easy Interactive Driver for OS X. Select Easy Install and install the Easy Interactive Driver for your projector model.
q For the latest Easy Interactive Tools version and information on supported products, go to http://www.epson.com.
Install Easy Interactive Tools 7
Uninstalling
Windows Vista/Windows 7
A Click or Start > Control Panel > Programs and Features.
B Select Easy Interactive Tools Ver.X.XX and click Uninstall.
Windows 8/Windows 8.1/Windows 10
A Navigate to the Apps screen (Windows 8.x) or click the start icon (Windows 10) and select Windows > Control
Panel > Programs and Features.
B Select Easy Interactive Tools Ver.X.XX and click Uninstall.
C Follow the on-screen instructions to uninstall.
OS X
A Double-click Applications - Easy Interactive Tools Ver.X.XX.
B Run the Easy Interactive Tools Uninstaller from the Tools folder.
C Follow the on-screen instructions to uninstall.
Basic Operation 8
Basic Operation
Starting Easy Interactive Tools
Make the following preparations before starting Easy Interactive Tools.
q The product’s setting method and items varies depending on the model being used. Also, models that do not support network connection cannot be connected to over a network. For more details, see the product’s User's Guide.
When connecting a computer to the product with a USB cable:• Connect the USB cable to the computer's USB port and the product’s
USB-B port.• If you’re using a document camera, connect the computer to your
projector with an HDMI or VGA cable.• Select the Extended menu settings from the projector's menu system.
(Set Pen mode to PC interactive, or select the mouse mode icon on your screen.)
When connecting a computer to a projector over a network:• Select network settings so that the computer can connect to the
network.• Connect a wireless LAN unit (if necessary) or a LAN cable so that the
projector can connect to the network.• Select the Network settings from the projector's menu system.• Install the EasyMP Network Projection software for the projector.• Open the Set options screen, select the General settings tab, and select
Use Interactive Pen and Use Easy Interactive Tools. (Only one interactive pen at a time is supported with EasyMP Network Projection.)
q Some projector models require a USB cable for interactivity. For more details, see the product’s User's Guide.
A Turn on the product and project images from the computer.
B Start Easy Interactive Tools on the computer.• Windows Vista/Windows 7: Click or Start > All Programs or
Programs > Easy Interactive Tools Ver.X.XX.• Windows 8/Windows 8.1: Navigate to the Apps screen and select Easy
Interactive Tools Ver.X.XX.• Windows 10: Click > All Apps > Easy Interactive Tools
Ver.X.XX.• OS X: From the Applications folder, double-click Easy Interactive
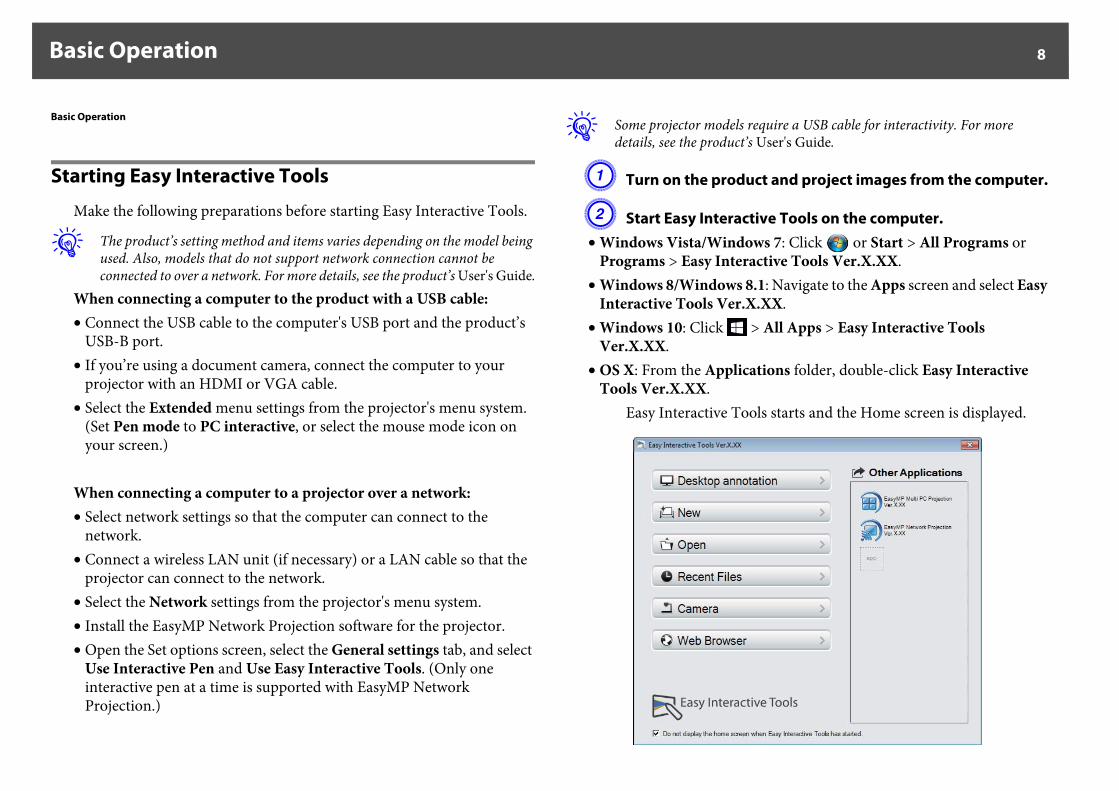
Tools Ver.X.XX.Easy Interactive Tools starts and the Home screen is displayed.
Basic Operation 9
C If you are using a document camera, click the Camera button and use the application’s toolbar to perform functions.
q If you start Easy Interactive Tools while playing a movie, the movie playback screen may turn black. Restart the application software that is playing the movie.
Operating the Interactive Pen
You can use the interactive pen supplied with your projector to operate the Easy Interactive Tools software.The functions and shape of the interactive pen differ depending on the projector model with which it was supplied. For more details, see the projector's User's Guide.Check that there is a battery in the interactive pen, and then turn it on.
q • You can use two interactive pens at the same time, if available for your projector model. However, you can only use one while connected to a network or while on a window displayed in Whiteboard mode. See your projector’s User’s Guide for more information.
• You can operate Easy Interactive Tools with up to six devices at the same time, such as a mouse connected to a computer, interactive pens, and finger touch.
• The following operations can only be performed by one device:- Operations on the Home screen, Settings screen, Camera screen, Insert image screen, and Select background screen- Adjusting and editing identical shapes and images- Using menus- Entering text- Operations on a window displayed in Whiteboard mode
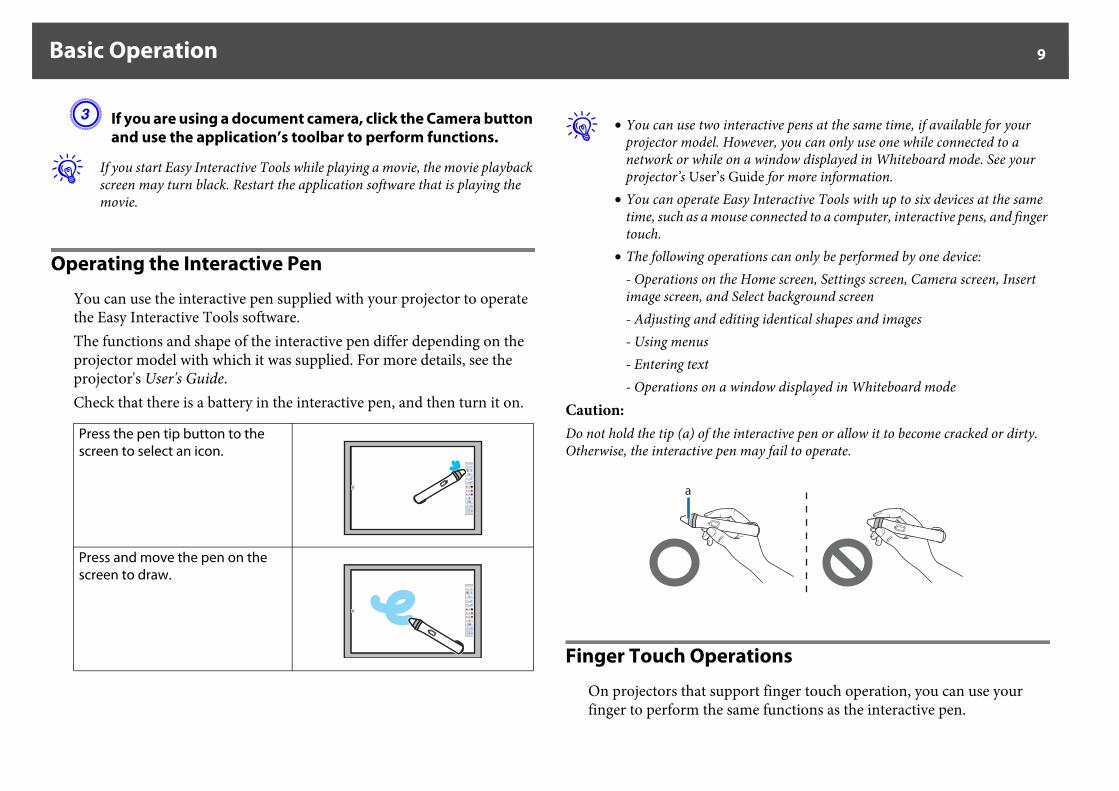
Caution:Do not hold the tip (a) of the interactive pen or allow it to become cracked or dirty. Otherwise, the interactive pen may fail to operate.
Finger Touch Operations
On projectors that support finger touch operation, you can use your finger to perform the same functions as the interactive pen.
Press the pen tip button to the screen to select an icon.
Press and move the pen on the screen to draw.
Basic Operation 10
When performing finger touch operations, you can use two fingers for multi-touch operations such as enlarging or reducing the image. The projector recognizes up to six multi-touch points. When a group of people are performing finger touch operations, all members must use the same drawing tool.
Drawing
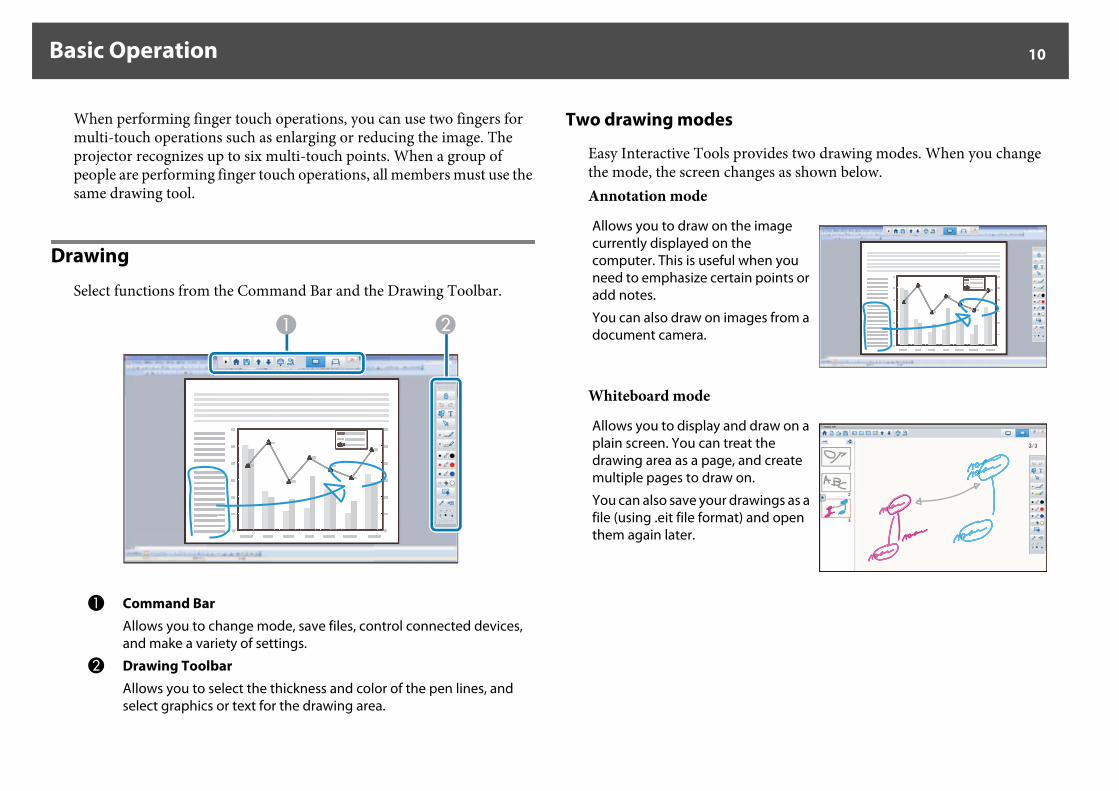
Select functions from the Command Bar and the Drawing Toolbar.
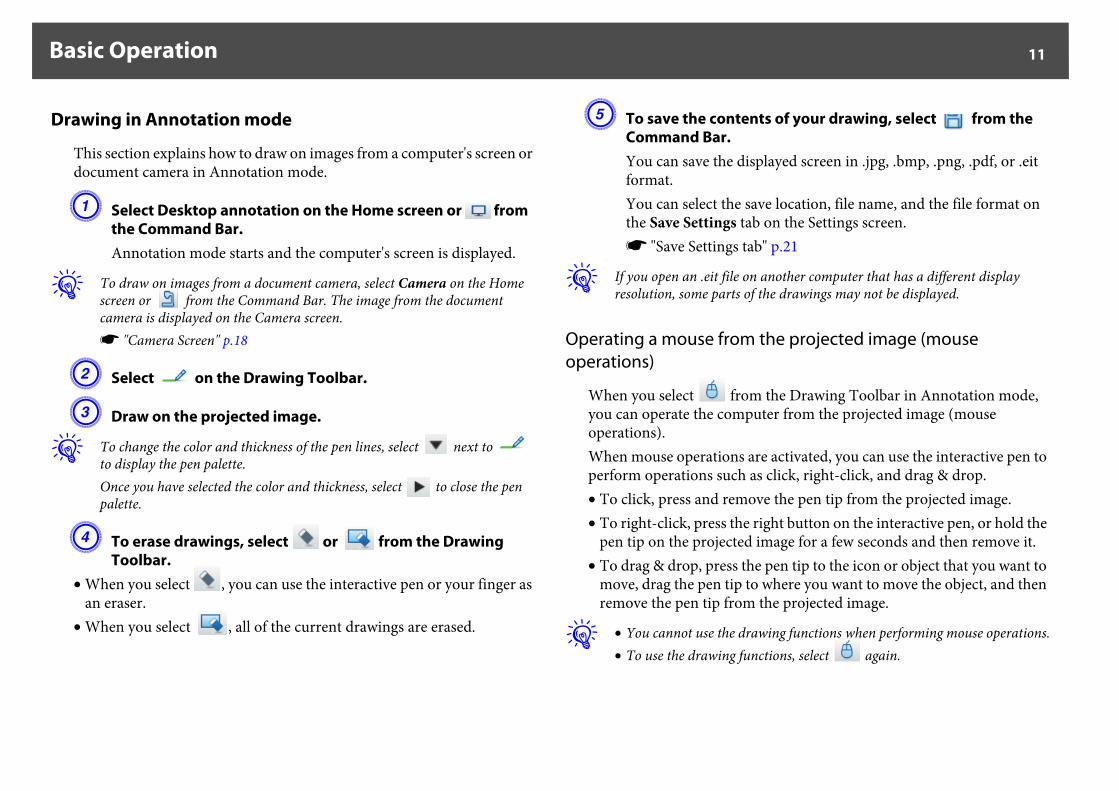
Two drawing modes
Easy Interactive Tools provides two drawing modes. When you change the mode, the screen changes as shown below.Annotation mode
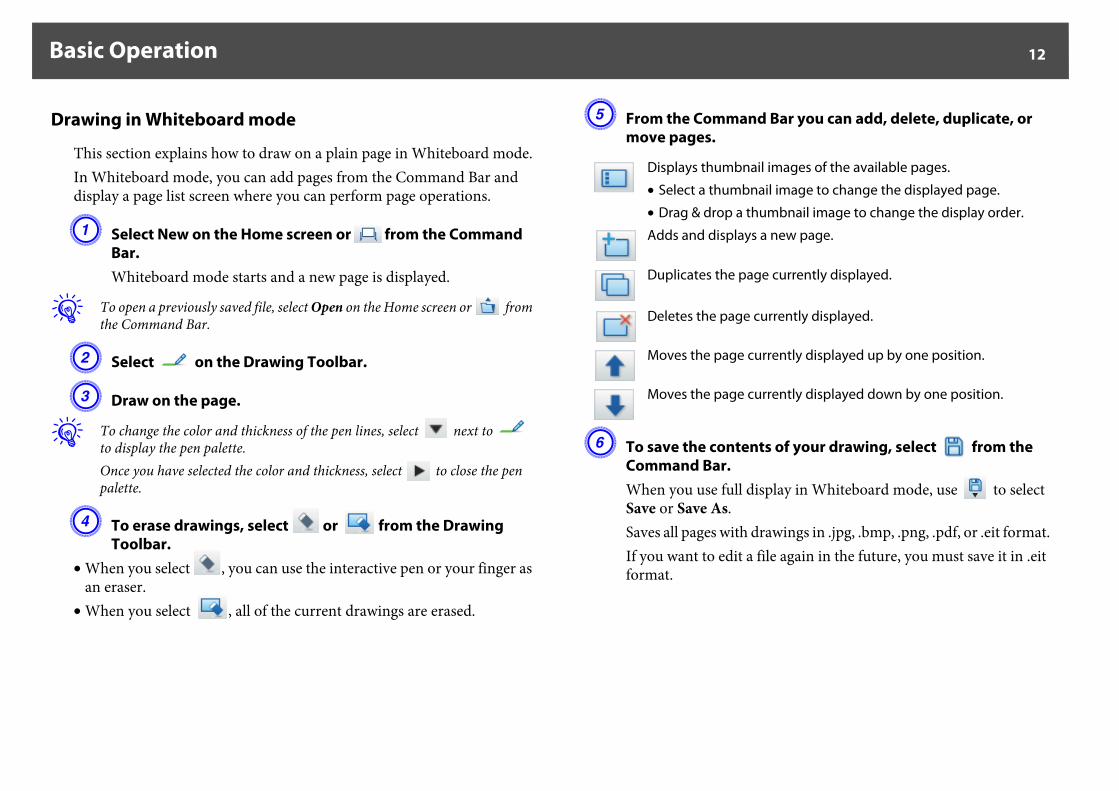
Whiteboard mode
A Command BarAllows you to change mode, save files, control connected devices, and make a variety of settings.
B Drawing ToolbarAllows you to select the thickness and color of the pen lines, and select graphics or text for the drawing area.
Allows you to draw on the image currently displayed on the computer. This is useful when you need to emphasize certain points or add notes.
You can also draw on images from a document camera.
Allows you to display and draw on a plain screen. You can treat the drawing area as a page, and create multiple pages to draw on.
You can also save your drawings as a file (using .eit file format) and open them again later.
Basic Operation 11
Drawing in Annotation mode
This section explains how to draw on images from a computer's screen or document camera in Annotation mode.
A Select Desktop annotation on the Home screen or from the Command Bar.Annotation mode starts and the computer's screen is displayed.
q To draw on images from a document camera, select Camera on the Home screen or from the Command Bar. The image from the document camera is displayed on the Camera screen.s "Camera Screen" p.18
B Select on the Drawing Toolbar.
C Draw on the projected image.
q To change the color and thickness of the pen lines, select next to to display the pen palette.Once you have selected the color and thickness, select to close the pen palette.
D To erase drawings, select or from the Drawing Toolbar.
• When you select , you can use the interactive pen or your finger as an eraser.
• When you select , all of the current drawings are erased.
E To save the contents of your drawing, select from the Command Bar.You can save the displayed screen in .jpg, .bmp, .png, .pdf, or .eit format.You can select the save location, file name, and the file format on the Save Settings tab on the Settings screen.s "Save Settings tab" p.21
q If you open an .eit file on another computer that has a different display resolution, some parts of the drawings may not be displayed.
Operating a mouse from the projected image (mouse operations)
When you select from the Drawing Toolbar in Annotation mode, you can operate the computer from the projected image (mouse operations).When mouse operations are activated, you can use the interactive pen to perform operations such as click, right-click, and drag & drop.• To click, press and remove the pen tip from the projected image.• To right-click, press the right button on the interactive pen, or hold the
pen tip on the projected image for a few seconds and then remove it.• To drag & drop, press the pen tip to the icon or object that you want to
move, drag the pen tip to where you want to move the object, and then remove the pen tip from the projected image.
q • You cannot use the drawing functions when performing mouse operations.• To use the drawing functions, select again.
Basic Operation 12
Drawing in Whiteboard mode
This section explains how to draw on a plain page in Whiteboard mode.In Whiteboard mode, you can add pages from the Command Bar and display a page list screen where you can perform page operations.
A Select New on the Home screen or from the Command Bar.Whiteboard mode starts and a new page is displayed.
q To open a previously saved file, select Open on the Home screen or from the Command Bar.
B Select on the Drawing Toolbar.
C Draw on the page.
q To change the color and thickness of the pen lines, select next to to display the pen palette.Once you have selected the color and thickness, select to close the pen palette.
D To erase drawings, select or from the Drawing Toolbar.
• When you select , you can use the interactive pen or your finger as an eraser.
• When you select , all of the current drawings are erased.
E From the Command Bar you can add, delete, duplicate, or move pages.
F To save the contents of your drawing, select from the Command Bar.When you use full display in Whiteboard mode, use to select Save or Save As. Saves all pages with drawings in .jpg, .bmp, .png, .pdf, or .eit format.If you want to edit a file again in the future, you must save it in .eit format.
Displays thumbnail images of the available pages.
• Select a thumbnail image to change the displayed page.
• Drag & drop a thumbnail image to change the display order.
Adds and displays a new page.
Duplicates the page currently displayed.
Deletes the page currently displayed.
Moves the page currently displayed up by one position.
Moves the page currently displayed down by one position.
Basic Operation 13
q If you open an .eit file on another computer that has a different display resolution, some parts of the drawings may not be displayed.
You can select the save location, file name, and the file format on the Save Settings tab on the Settings screen.s "Save Settings tab" p.21
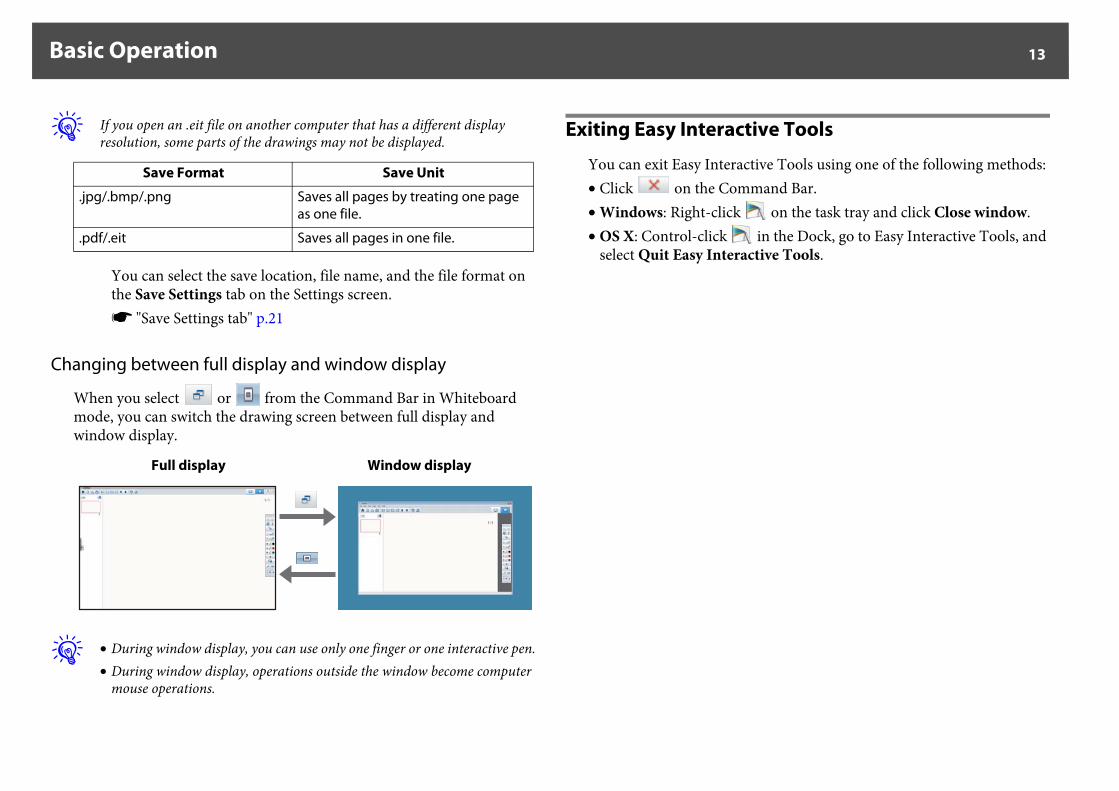
Changing between full display and window display
When you select or from the Command Bar in Whiteboard mode, you can switch the drawing screen between full display and window display.
q • During window display, you can use only one finger or one interactive pen.• During window display, operations outside the window become computer
mouse operations.
Exiting Easy Interactive Tools
You can exit Easy Interactive Tools using one of the following methods:• Click on the Command Bar.• Windows: Right-click on the task tray and click Close window.• OS X: Control-click in the Dock, go to Easy Interactive Tools, and
select Quit Easy Interactive Tools.
Save Format Save Unit
.jpg/.bmp/.png Saves all pages by treating one page as one file.
.pdf/.eit Saves all pages in one file.
Full display Window display
Home Screen Functions 14
Home Screen Functions
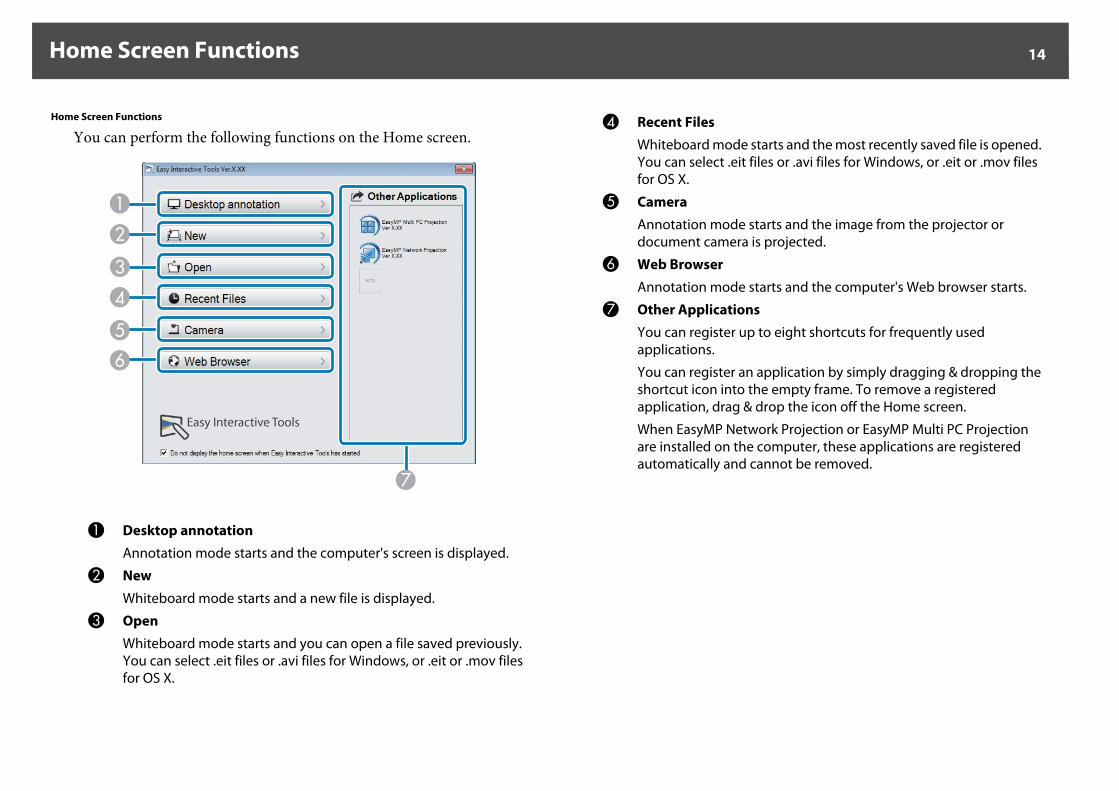
You can perform the following functions on the Home screen.
A Desktop annotationAnnotation mode starts and the computer's screen is displayed.
B New
Whiteboard mode starts and a new file is displayed.
C OpenWhiteboard mode starts and you can open a file saved previously. You can select .eit files or .avi files for Windows, or .eit or .mov files for OS X.
D Recent FilesWhiteboard mode starts and the most recently saved file is opened. You can select .eit files or .avi files for Windows, or .eit or .mov files for OS X.
E CameraAnnotation mode starts and the image from the projector or document camera is projected.
F Web Browser
Annotation mode starts and the computer's Web browser starts.
G Other ApplicationsYou can register up to eight shortcuts for frequently used applications.
You can register an application by simply dragging & dropping the shortcut icon into the empty frame. To remove a registered application, drag & drop the icon off the Home screen.
When EasyMP Network Projection or EasyMP Multi PC Projection are installed on the computer, these applications are registered automatically and cannot be removed.
Command Bar Functions 15
Command Bar Functions
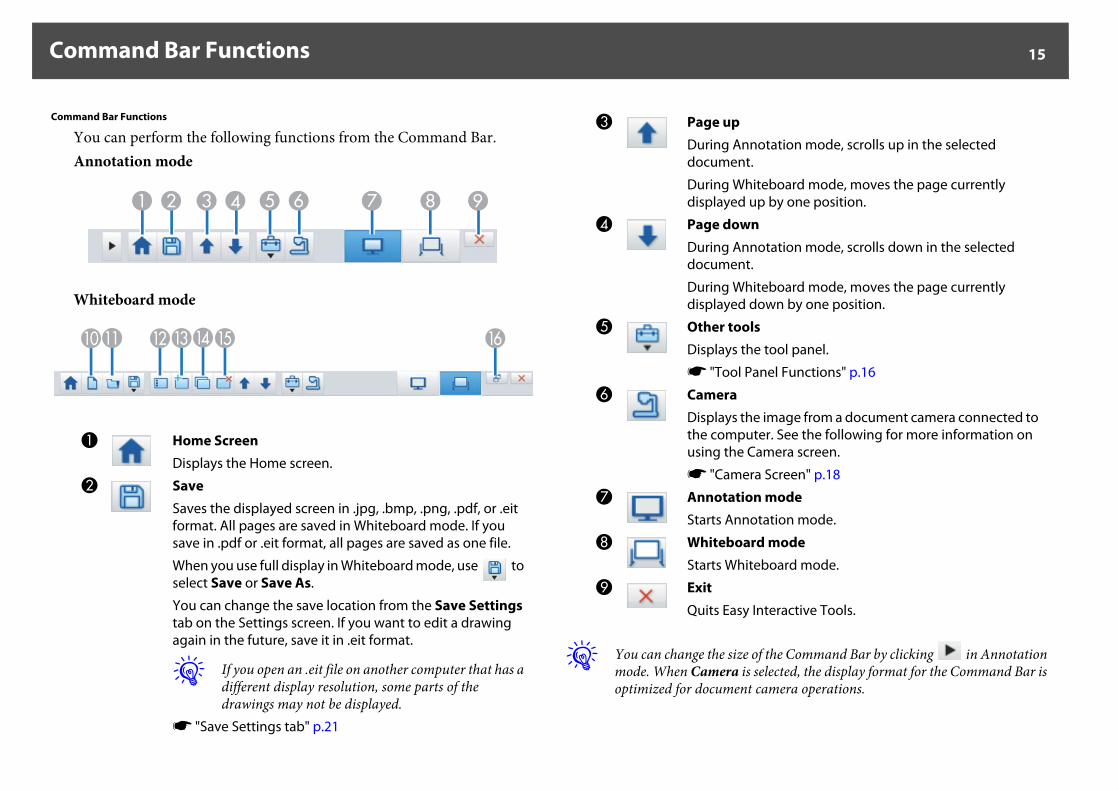
You can perform the following functions from the Command Bar.Annotation mode
Whiteboard mode
q You can change the size of the Command Bar by clicking in Annotation mode. When Camera is selected, the display format for the Command Bar is optimized for document camera operations.
A Home ScreenDisplays the Home screen.
B Save
Saves the displayed screen in .jpg, .bmp, .png, .pdf, or .eit format. All pages are saved in Whiteboard mode. If you save in .pdf or .eit format, all pages are saved as one file.
When you use full display in Whiteboard mode, use to select Save or Save As.
You can change the save location from the Save Settings tab on the Settings screen. If you want to edit a drawing again in the future, save it in .eit format.
q If you open an .eit file on another computer that has a different display resolution, some parts of the drawings may not be displayed.
s "Save Settings tab" p.21
C Page upDuring Annotation mode, scrolls up in the selected document.
During Whiteboard mode, moves the page currently displayed up by one position.
D Page down
During Annotation mode, scrolls down in the selected document.
During Whiteboard mode, moves the page currently displayed down by one position.
E Other toolsDisplays the tool panel.
s "Tool Panel Functions" p.16
F CameraDisplays the image from a document camera connected to the computer. See the following for more information on using the Camera screen.
s "Camera Screen" p.18
G Annotation modeStarts Annotation mode.
H Whiteboard modeStarts Whiteboard mode.
I Exit
Quits Easy Interactive Tools.
Command Bar Functions 16
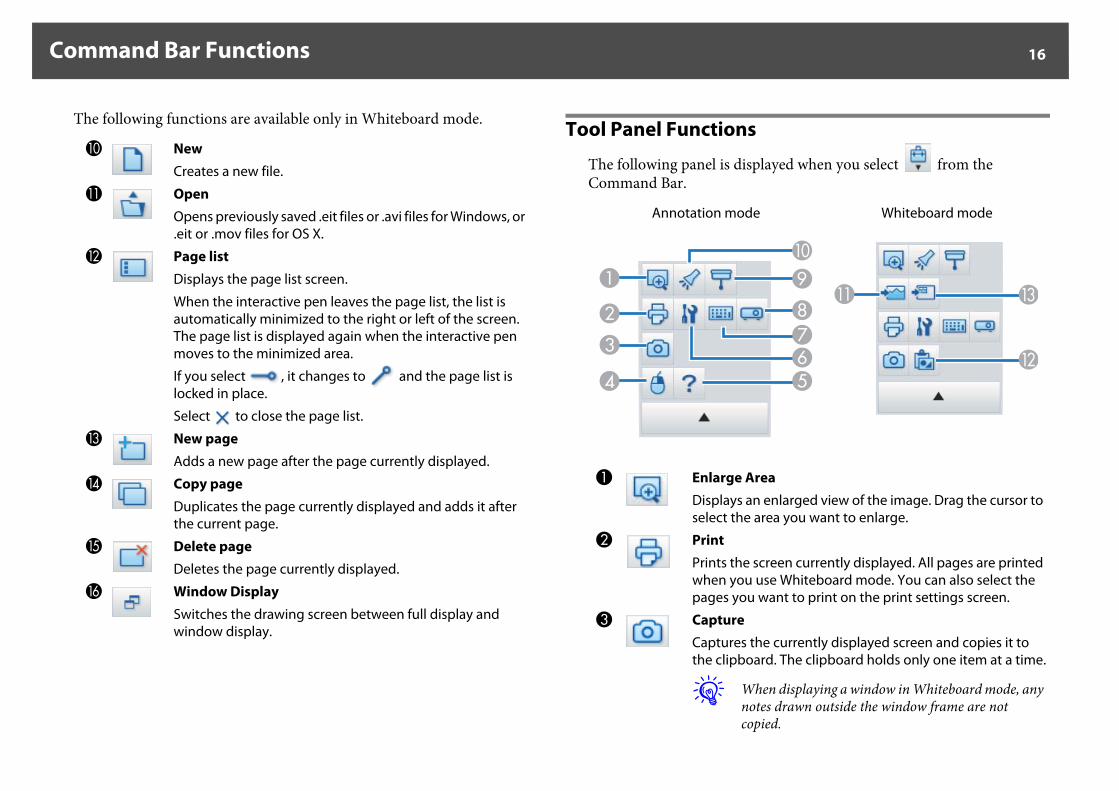
The following functions are available only in Whiteboard mode. Tool Panel Functions
The following panel is displayed when you select from the Command Bar.
J NewCreates a new file.
K OpenOpens previously saved .eit files or .avi files for Windows, or .eit or .mov files for OS X.
L Page list
Displays the page list screen.
When the interactive pen leaves the page list, the list is automatically minimized to the right or left of the screen. The page list is displayed again when the interactive pen moves to the minimized area.
If you select , it changes to and the page list is locked in place.
Select to close the page list.
M New pageAdds a new page after the page currently displayed.
N Copy page
Duplicates the page currently displayed and adds it after the current page.
O Delete pageDeletes the page currently displayed.
P Window Display
Switches the drawing screen between full display and window display.
Annotation mode Whiteboard mode
A Enlarge AreaDisplays an enlarged view of the image. Drag the cursor to select the area you want to enlarge.
B PrintPrints the screen currently displayed. All pages are printed when you use Whiteboard mode. You can also select the pages you want to print on the print settings screen.
C CaptureCaptures the currently displayed screen and copies it to the clipboard. The clipboard holds only one item at a time.
q When displaying a window in Whiteboard mode, any notes drawn outside the window frame are not copied.
Command Bar Functions 17
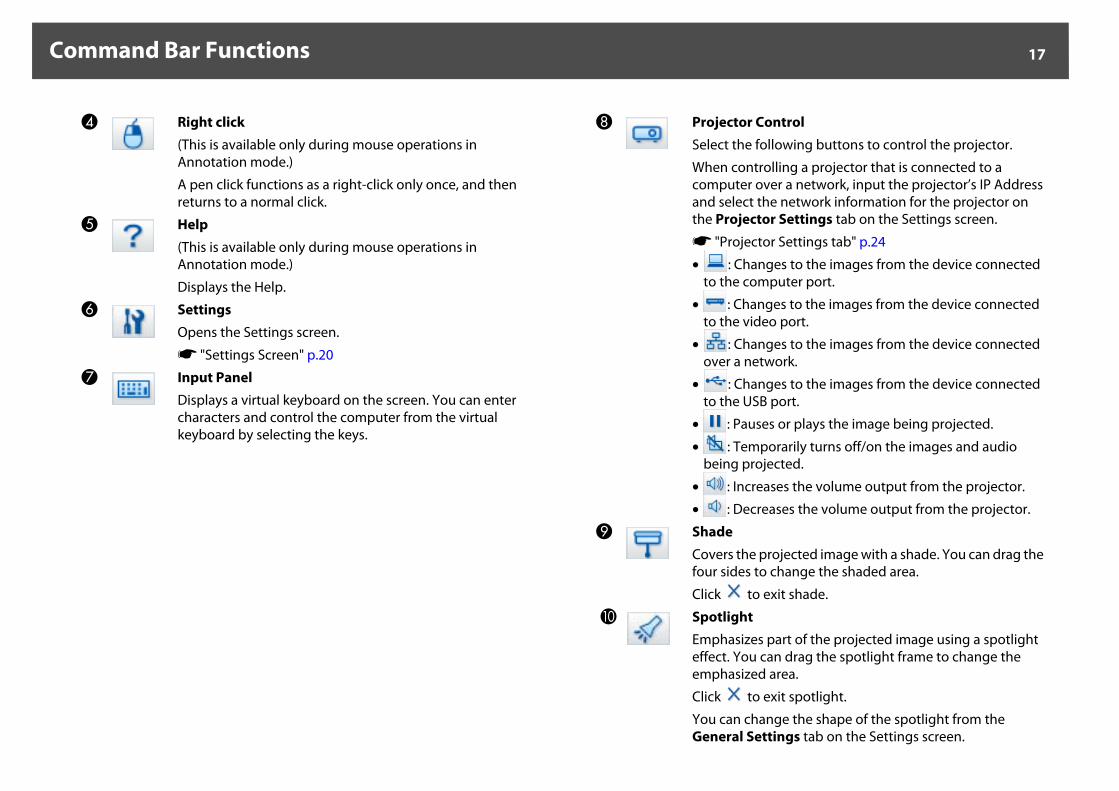
D Right click(This is available only during mouse operations in Annotation mode.)
A pen click functions as a right-click only once, and then returns to a normal click.
E Help
(This is available only during mouse operations in Annotation mode.)
Displays the Help.
F SettingsOpens the Settings screen.
s "Settings Screen" p.20
G Input PanelDisplays a virtual keyboard on the screen. You can enter characters and control the computer from the virtual keyboard by selecting the keys.
H Projector ControlSelect the following buttons to control the projector.
When controlling a projector that is connected to a computer over a network, input the projector’s IP Address and select the network information for the projector on the Projector Settings tab on the Settings screen.
s "Projector Settings tab" p.24
• : Changes to the images from the device connected to the computer port.
• : Changes to the images from the device connected to the video port.
• : Changes to the images from the device connected over a network.
• : Changes to the images from the device connected to the USB port.
• : Pauses or plays the image being projected.
• : Temporarily turns off/on the images and audio being projected.
• : Increases the volume output from the projector.
• : Decreases the volume output from the projector.
I Shade
Covers the projected image with a shade. You can drag the four sides to change the shaded area.
Click to exit shade.
J SpotlightEmphasizes part of the projected image using a spotlight effect. You can drag the spotlight frame to change the emphasized area.
Click to exit spotlight.
You can change the shape of the spotlight from the General Settings tab on the Settings screen.
Command Bar Functions 18
The following functions are available only in Whiteboard mode.
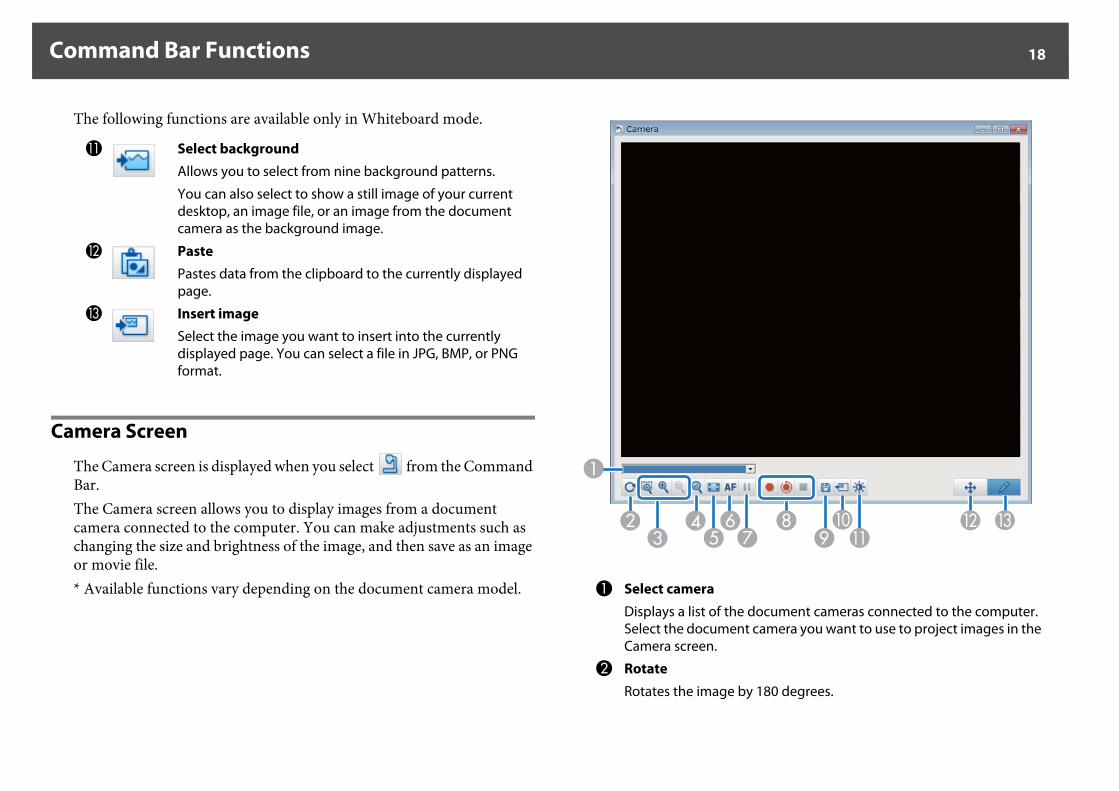
Camera Screen
The Camera screen is displayed when you select from the Command Bar.The Camera screen allows you to display images from a document camera connected to the computer. You can make adjustments such as changing the size and brightness of the image, and then save as an image or movie file.* Available functions vary depending on the document camera model.
K Select backgroundAllows you to select from nine background patterns.
You can also select to show a still image of your current desktop, an image file, or an image from the document camera as the background image.
L PastePastes data from the clipboard to the currently displayed page.
M Insert imageSelect the image you want to insert into the currently displayed page. You can select a file in JPG, BMP, or PNG format.
A Select camera
Displays a list of the document cameras connected to the computer. Select the document camera you want to use to project images in the Camera screen.
B Rotate
Rotates the image by 180 degrees.
Command Bar Functions 19
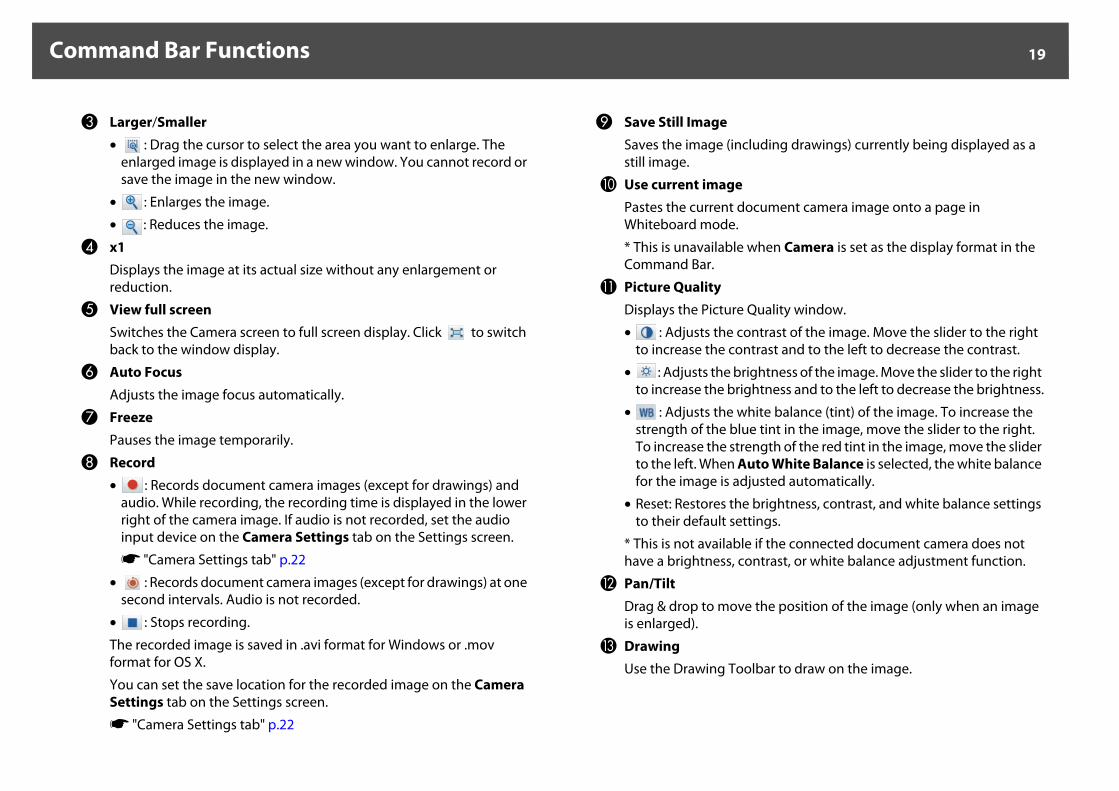
C Larger/Smaller• : Drag the cursor to select the area you want to enlarge. The
enlarged image is displayed in a new window. You cannot record or save the image in the new window.
• : Enlarges the image.
• : Reduces the image.
D x1Displays the image at its actual size without any enlargement or reduction.
E View full screenSwitches the Camera screen to full screen display. Click to switch back to the window display.
F Auto Focus
Adjusts the image focus automatically.
G FreezePauses the image temporarily.
H Record• : Records document camera images (except for drawings) and
audio. While recording, the recording time is displayed in the lower right of the camera image. If audio is not recorded, set the audio input device on the Camera Settings tab on the Settings screen.
s "Camera Settings tab" p.22
• : Records document camera images (except for drawings) at one second intervals. Audio is not recorded.
• : Stops recording.
The recorded image is saved in .avi format for Windows or .mov format for OS X.
You can set the save location for the recorded image on the Camera Settings tab on the Settings screen.
s "Camera Settings tab" p.22
I Save Still ImageSaves the image (including drawings) currently being displayed as a still image.
J Use current imagePastes the current document camera image onto a page in Whiteboard mode.
* This is unavailable when Camera is set as the display format in the Command Bar.
K Picture QualityDisplays the Picture Quality window.
• : Adjusts the contrast of the image. Move the slider to the right to increase the contrast and to the left to decrease the contrast.
• : Adjusts the brightness of the image. Move the slider to the right to increase the brightness and to the left to decrease the brightness.
• : Adjusts the white balance (tint) of the image. To increase the strength of the blue tint in the image, move the slider to the right. To increase the strength of the red tint in the image, move the slider to the left. When Auto White Balance is selected, the white balance for the image is adjusted automatically.
• Reset: Restores the brightness, contrast, and white balance settings to their default settings.
* This is not available if the connected document camera does not have a brightness, contrast, or white balance adjustment function.
L Pan/Tilt
Drag & drop to move the position of the image (only when an image is enlarged).
M DrawingUse the Drawing Toolbar to draw on the image.
Command Bar Functions 20
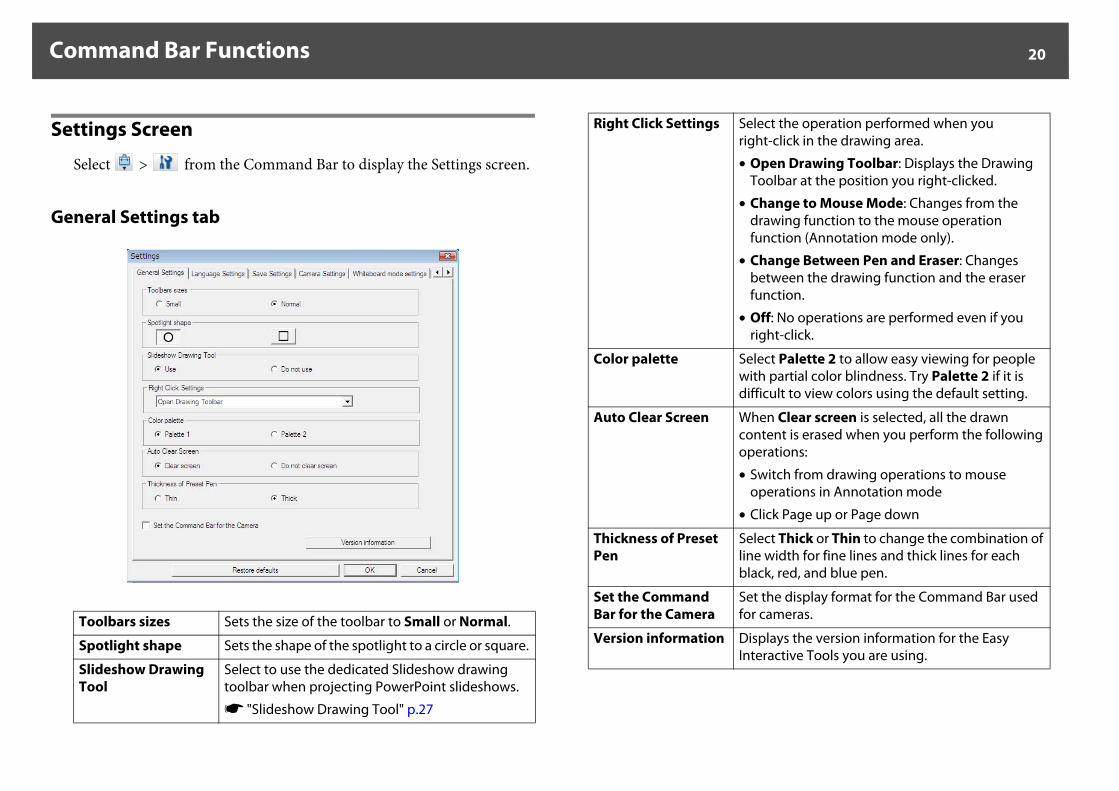
Settings Screen
Select > from the Command Bar to display the Settings screen.
General Settings tab
Toolbars sizes Sets the size of the toolbar to Small or Normal.
Spotlight shape Sets the shape of the spotlight to a circle or square.
Slideshow Drawing Tool
Select to use the dedicated Slideshow drawing toolbar when projecting PowerPoint slideshows.
s "Slideshow Drawing Tool" p.27
Right Click Settings Select the operation performed when you right-click in the drawing area.
• Open Drawing Toolbar: Displays the Drawing Toolbar at the position you right-clicked.
• Change to Mouse Mode: Changes from the drawing function to the mouse operation function (Annotation mode only).
• Change Between Pen and Eraser: Changes between the drawing function and the eraser function.
• Off: No operations are performed even if you right-click.
Color palette Select Palette 2 to allow easy viewing for people with partial color blindness. Try Palette 2 if it is difficult to view colors using the default setting.
Auto Clear Screen When Clear screen is selected, all the drawn content is erased when you perform the following operations:
• Switch from drawing operations to mouse operations in Annotation mode
• Click Page up or Page down
Thickness of Preset Pen
Select Thick or Thin to change the combination of line width for fine lines and thick lines for each black, red, and blue pen.
Set the Command Bar for the Camera
Set the display format for the Command Bar used for cameras.
Version information Displays the version information for the Easy Interactive Tools you are using.
Command Bar Functions 21
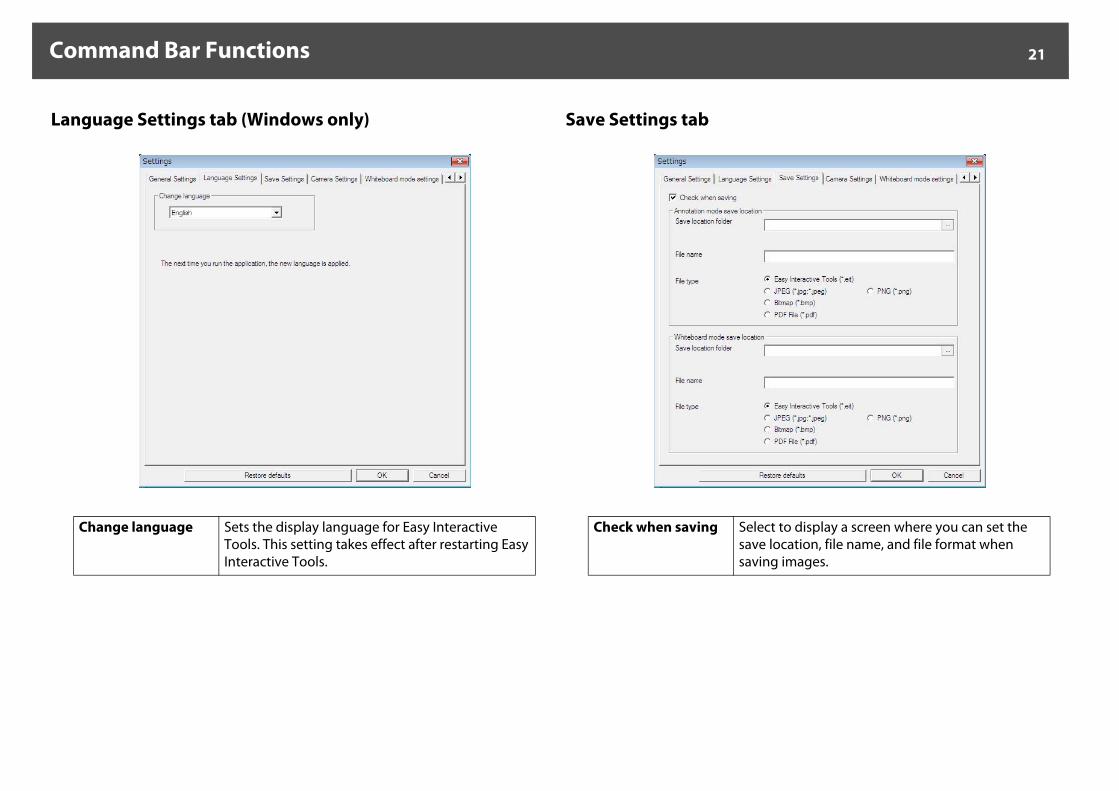
Language Settings tab (Windows only) Save Settings tab
Change language Sets the display language for Easy Interactive Tools. This setting takes effect after restarting Easy Interactive Tools.
Check when saving Select to display a screen where you can set the save location, file name, and file format when saving images.
Command Bar Functions 22
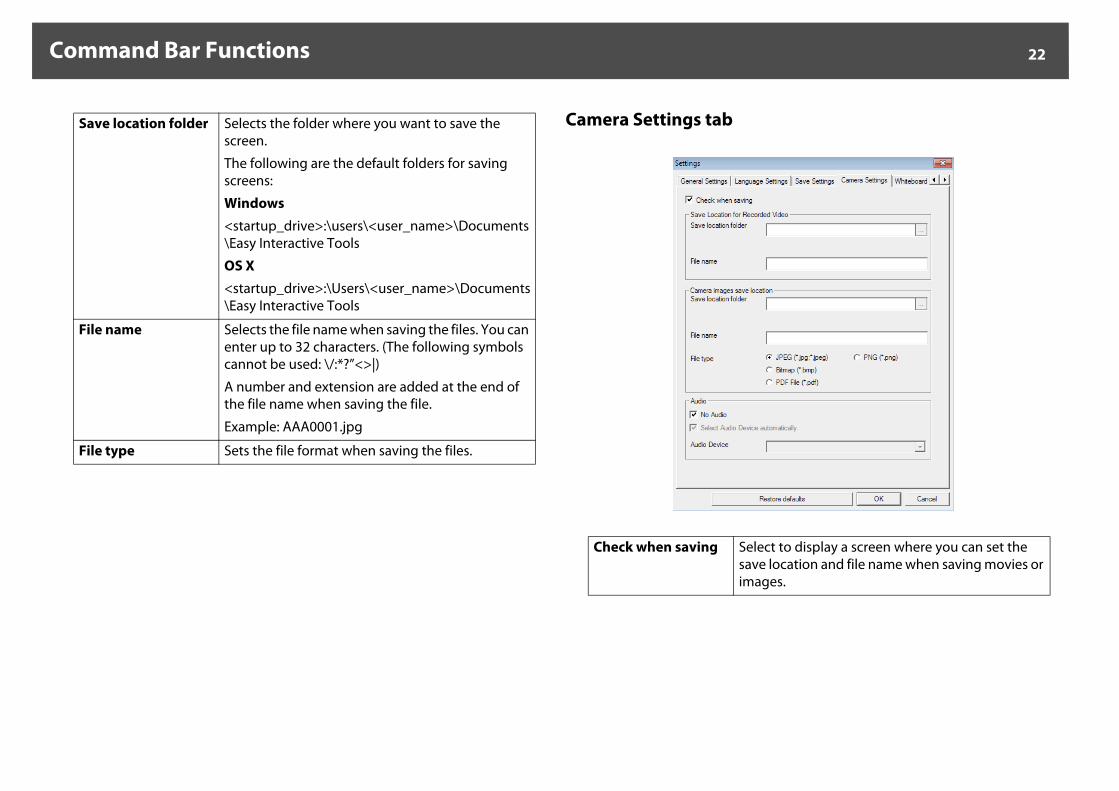
Camera Settings tabSave location folder Selects the folder where you want to save the screen.
The following are the default folders for saving screens:
Windows
<startup_drive>:\users\<user_name>\Documents\Easy Interactive Tools
OS X<startup_drive>:\Users\<user_name>\Documents\Easy Interactive Tools
File name Selects the file name when saving the files. You can enter up to 32 characters. (The following symbols cannot be used: \/:*?”<>|)
A number and extension are added at the end of the file name when saving the file.
Example: AAA0001.jpg
File type Sets the file format when saving the files.
Check when saving Select to display a screen where you can set the save location and file name when saving movies or images.
Command Bar Functions 23
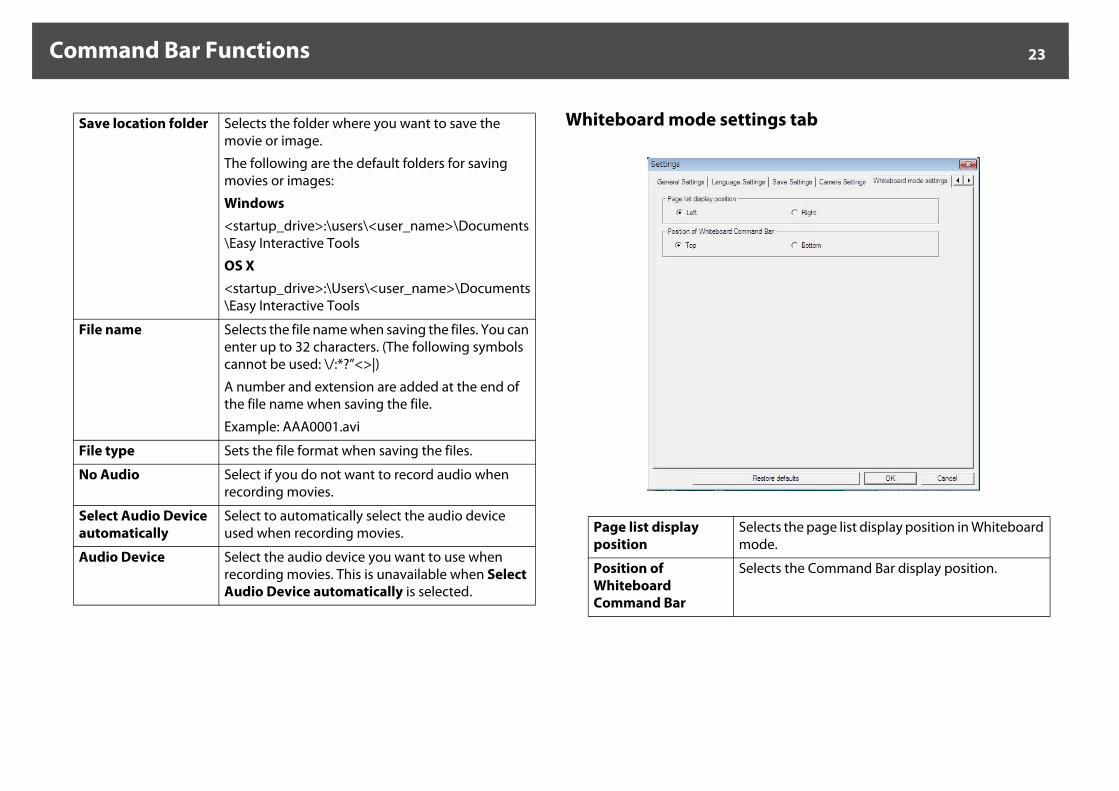
Whiteboard mode settings tabSave location folder Selects the folder where you want to save the movie or image.
The following are the default folders for saving movies or images:
Windows
<startup_drive>:\users\<user_name>\Documents\Easy Interactive Tools
OS X<startup_drive>:\Users\<user_name>\Documents\Easy Interactive Tools
File name Selects the file name when saving the files. You can enter up to 32 characters. (The following symbols cannot be used: \/:*?”<>|)
A number and extension are added at the end of the file name when saving the file.
Example: AAA0001.avi
File type Sets the file format when saving the files.
No Audio Select if you do not want to record audio when recording movies.
Select Audio Device automatically
Select to automatically select the audio device used when recording movies.
Audio Device Select the audio device you want to use when recording movies. This is unavailable when Select Audio Device automatically is selected.
Page list display position
Selects the page list display position in Whiteboard mode.
Position of Whiteboard Command Bar
Selects the Command Bar display position.
Command Bar Functions 24
Projector Settings tab
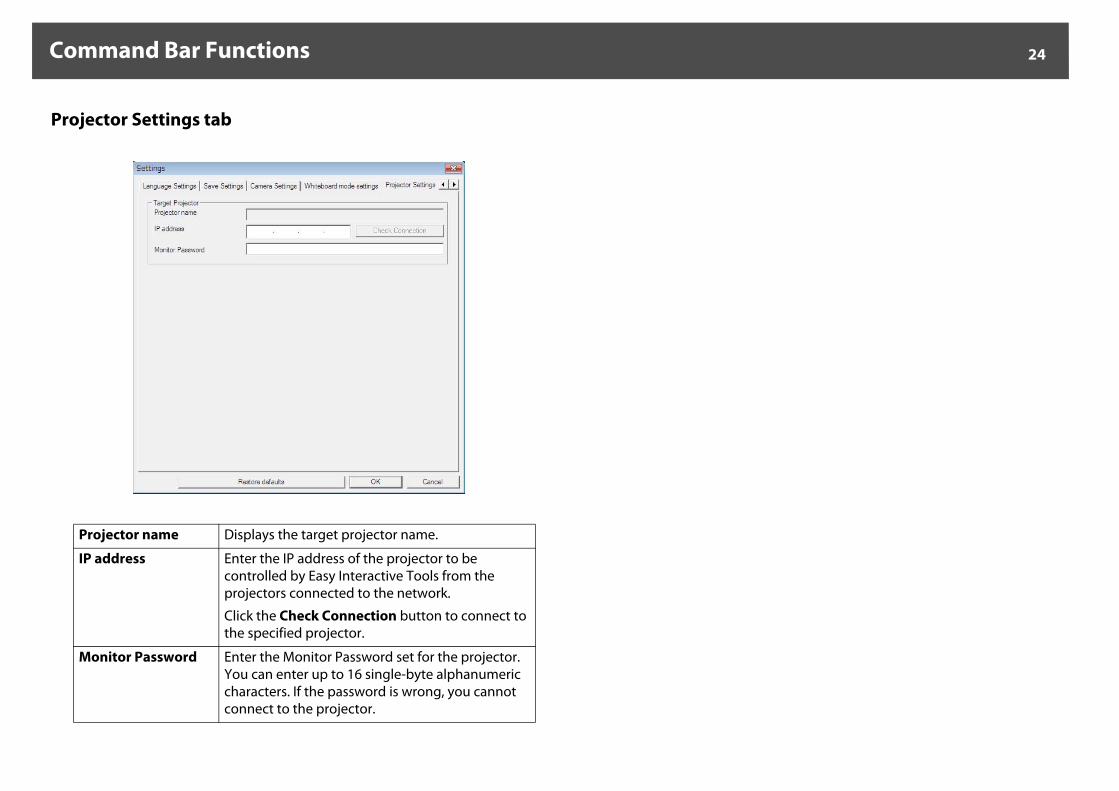
Projector name Displays the target projector name.
IP address Enter the IP address of the projector to be controlled by Easy Interactive Tools from the projectors connected to the network.
Click the Check Connection button to connect to the specified projector.
Monitor Password Enter the Monitor Password set for the projector. You can enter up to 16 single-byte alphanumeric characters. If the password is wrong, you cannot connect to the projector.

Drawing Toolbar Functions 25
Drawing Toolbar Functions
You can select the following functions from the Drawing Toolbar.
Annotation mode Whiteboard mode
A Mouse(This is available only in Annotation mode.)
Switches from drawing operations to mouse operations, and the cursor on the computer screen becomes a normal mouse cursor. You can click and drag on the projected image using the interactive pen or your finger.
Click this icon again to return to drawing operations.
B UndoUndo the previous operation.
C Shapes
Select the shape you want from the shapes provided. You can also select the color and line width of the shape.
D SelectSelect the drawn content or inserted image, and then perform operations such as moving the item or adjusting the size.
E PenSwitches to a pen to draw freely. Click on the left of the icon to change the color and width of the pen line.
F Highlighter penSwitches to a highlighter pen that can draw translucent lines. Click on the left of the icon to change the color and width of the highlighter pen line.
G Black penSwitches to a black pen to draw freely. Click on the right of the icon to draw thick lines, and click on the left of the icon to draw fine lines.
H Red penSwitches to a red pen to draw freely. Click on the right of the icon to draw thick lines, and click on the left of the icon to draw fine lines.
Drawing Toolbar Functions 26
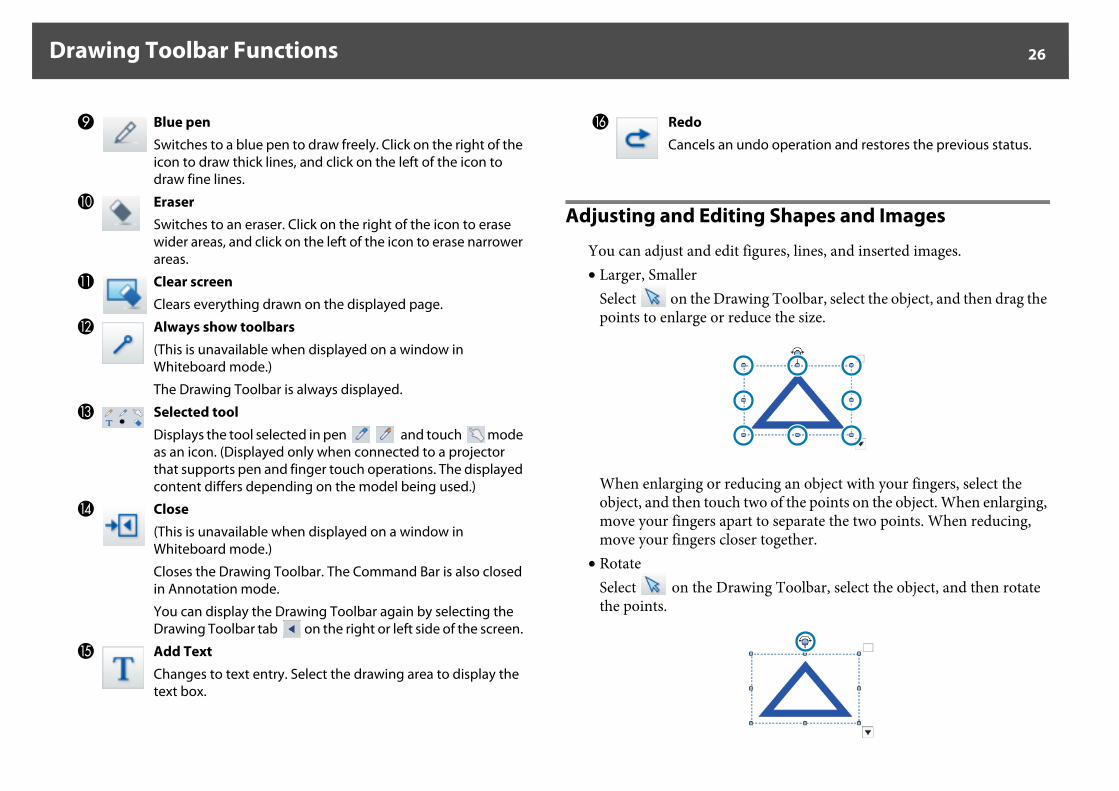
Adjusting and Editing Shapes and Images
You can adjust and edit figures, lines, and inserted images.• Larger, Smaller
Select on the Drawing Toolbar, select the object, and then drag the points to enlarge or reduce the size.
When enlarging or reducing an object with your fingers, select the object, and then touch two of the points on the object. When enlarging, move your fingers apart to separate the two points. When reducing, move your fingers closer together.
• RotateSelect on the Drawing Toolbar, select the object, and then rotate the points.
I Blue penSwitches to a blue pen to draw freely. Click on the right of the icon to draw thick lines, and click on the left of the icon to draw fine lines.
J EraserSwitches to an eraser. Click on the right of the icon to erase wider areas, and click on the left of the icon to erase narrower areas.
K Clear screenClears everything drawn on the displayed page.
L Always show toolbars(This is unavailable when displayed on a window in Whiteboard mode.)
The Drawing Toolbar is always displayed.
M Selected tool
Displays the tool selected in pen and touch mode as an icon. (Displayed only when connected to a projector that supports pen and finger touch operations. The displayed content differs depending on the model being used.)
N Close(This is unavailable when displayed on a window in Whiteboard mode.)
Closes the Drawing Toolbar. The Command Bar is also closed in Annotation mode.
You can display the Drawing Toolbar again by selecting the Drawing Toolbar tab on the right or left side of the screen.
O Add Text
Changes to text entry. Select the drawing area to display the text box.
P RedoCancels an undo operation and restores the previous status.
Drawing Toolbar Functions 27
When rotating an object with your fingers, select the object, and then touch two of the points on the object. Move your fingers in the direction you want to rotate to the object.
q When selecting a figure drawn with lines, make sure you select the solid line.
You can perform the following operations from the sub menu by selecting on the Drawing Toolbar, selecting the object, and then selecting .
q Shortcut operations, such as pressing the Ctrl + A key on the computer's keyboard, are not supported.
Slideshow Drawing Tool
The following PowerPoint versions are supported.
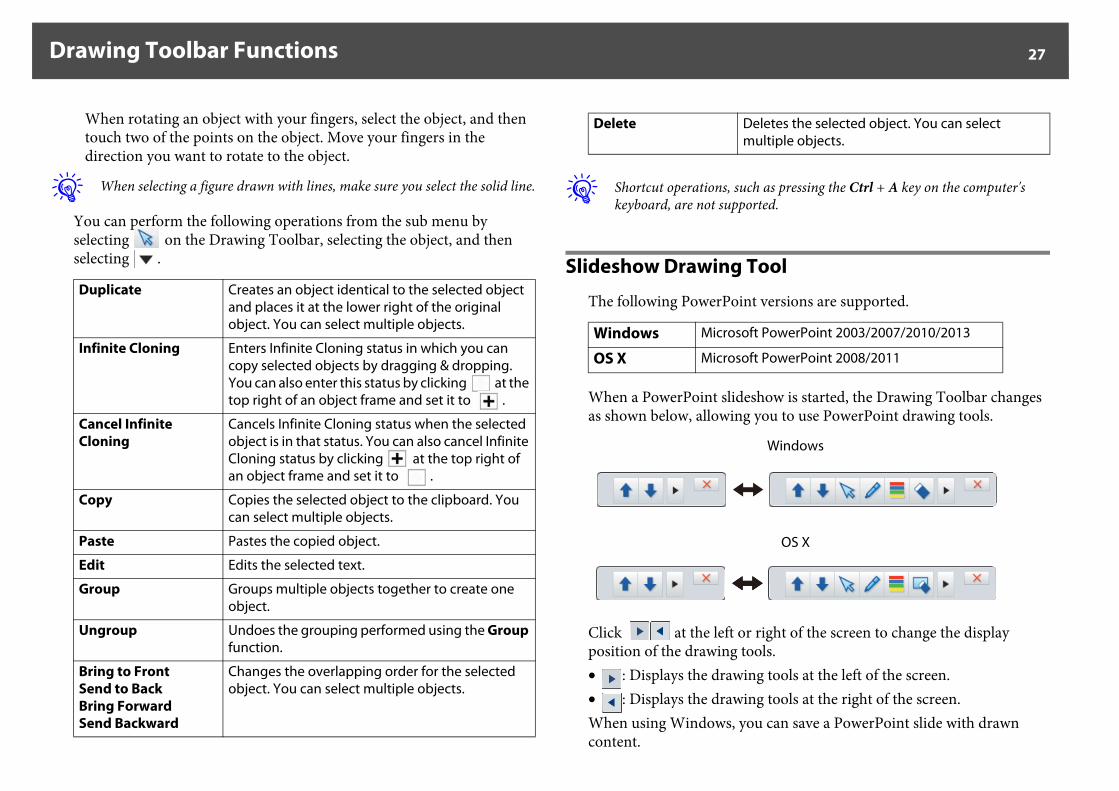
When a PowerPoint slideshow is started, the Drawing Toolbar changes as shown below, allowing you to use PowerPoint drawing tools.
Click at the left or right of the screen to change the display position of the drawing tools.• : Displays the drawing tools at the left of the screen.• : Displays the drawing tools at the right of the screen.When using Windows, you can save a PowerPoint slide with drawn content.
Duplicate Creates an object identical to the selected object and places it at the lower right of the original object. You can select multiple objects.
Infinite Cloning Enters Infinite Cloning status in which you can copy selected objects by dragging & dropping. You can also enter this status by clicking at the top right of an object frame and set it to .
Cancel Infinite Cloning
Cancels Infinite Cloning status when the selected object is in that status. You can also cancel Infinite Cloning status by clicking at the top right of an object frame and set it to .
Copy Copies the selected object to the clipboard. You can select multiple objects.
Paste Pastes the copied object.
Edit Edits the selected text.
Group Groups multiple objects together to create one object.
Ungroup Undoes the grouping performed using the Group function.
Bring to FrontSend to BackBring ForwardSend Backward
Changes the overlapping order for the selected object. You can select multiple objects.
Delete Deletes the selected object. You can select multiple objects.
Windows Microsoft PowerPoint 2003/2007/2010/2013
OS X Microsoft PowerPoint 2008/2011
Windows
OS X
Drawing Toolbar Functions 28
When using OS X, you can only draw.
q • Make sure you start Easy Interactive Tools before starting a PowerPoint slideshow.
• You can make settings to choose whether or not to use the Slideshow drawing tool when using PowerPoint on the General Settings tab.s "General Settings tab" p.20
Troubleshooting 29
Troubleshooting
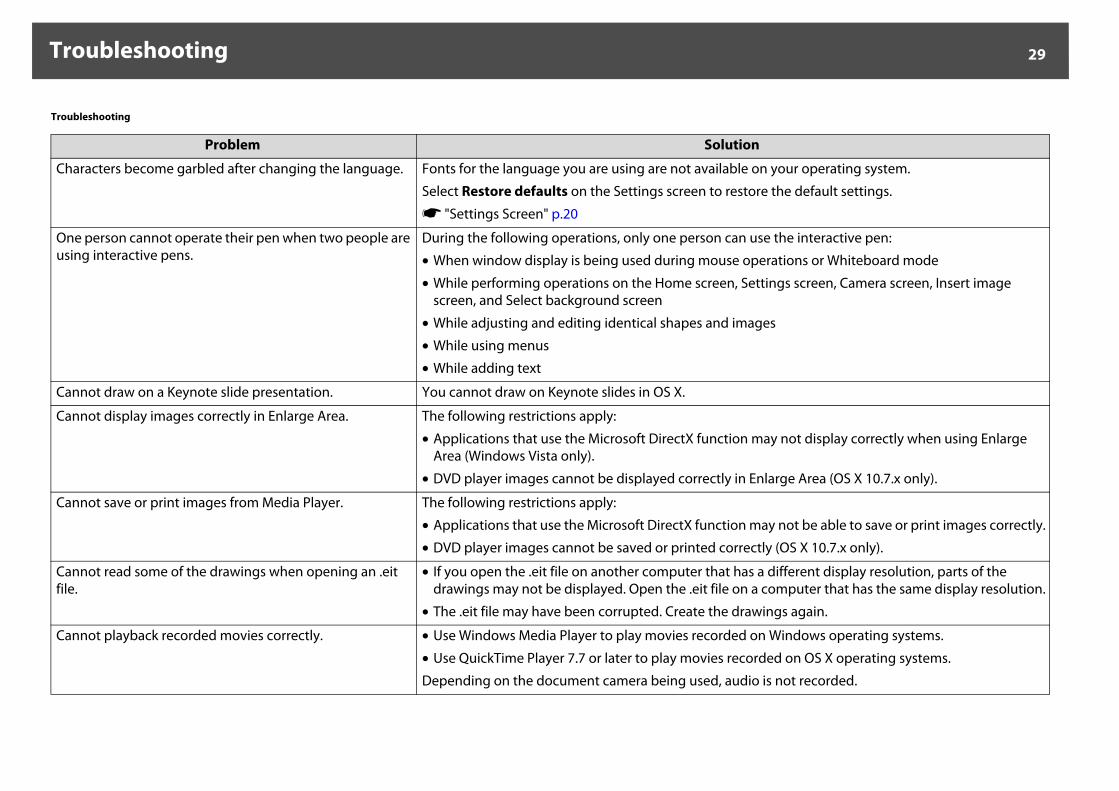
Problem Solution
Characters become garbled after changing the language. Fonts for the language you are using are not available on your operating system.
Select Restore defaults on the Settings screen to restore the default settings.
s "Settings Screen" p.20
One person cannot operate their pen when two people are using interactive pens.
During the following operations, only one person can use the interactive pen:
• When window display is being used during mouse operations or Whiteboard mode
• While performing operations on the Home screen, Settings screen, Camera screen, Insert image screen, and Select background screen
• While adjusting and editing identical shapes and images
• While using menus
• While adding text
Cannot draw on a Keynote slide presentation. You cannot draw on Keynote slides in OS X.
Cannot display images correctly in Enlarge Area. The following restrictions apply:
• Applications that use the Microsoft DirectX function may not display correctly when using Enlarge Area (Windows Vista only).
• DVD player images cannot be displayed correctly in Enlarge Area (OS X 10.7.x only).
Cannot save or print images from Media Player. The following restrictions apply:
• Applications that use the Microsoft DirectX function may not be able to save or print images correctly.
• DVD player images cannot be saved or printed correctly (OS X 10.7.x only).
Cannot read some of the drawings when opening an .eit file.
• If you open the .eit file on another computer that has a different display resolution, parts of the drawings may not be displayed. Open the .eit file on a computer that has the same display resolution.
• The .eit file may have been corrupted. Create the drawings again.
Cannot playback recorded movies correctly. • Use Windows Media Player to play movies recorded on Windows operating systems.
• Use QuickTime Player 7.7 or later to play movies recorded on OS X operating systems.
Depending on the document camera being used, audio is not recorded.
General Notices 30
General Notices
Copyright Notice
All rights reserved. No part of this publication may be reproduced, stored in a retrieval system, or transmitted in any form or by any means, electronic, mechanical, photocopying, recording, or otherwise, without the prior written permission of Seiko Epson Corporation. No patent liability is assumed with respect to the use of the information contained herein. Neither is any liability assumed for damages resulting from the use of the information contained herein.Neither Seiko Epson Corporation nor its affiliates shall be liable to the purchaser of this product or third parties for damages, losses, costs, or expenses incurred by the purchaser or third parties as a result of: accident, misuse, or abuse of this product or unauthorized modifications, repairs, or alterations to this product, or (excluding the U.S.) failure to strictly comply with Seiko Epson Corporation's operating and maintenance instructions.Seiko Epson Corporation shall not be liable against any damages or problems arising from the use of any options or any consumable products other than those designated as Original Epson Products or Epson Approved Products by Seiko Epson Corporation. The contents of this guide may be changed or updated without notice.Illustrations in this guide and the actual product may differ.
Operating System References
Trademarks
Microsoft® Windows Vista® operating systemMicrosoft® Windows® 7 operating systemMicrosoft® Windows® 8 operating systemMicrosoft® Windows® 8.1 operating systemMicrosoft® Windows® 10 operating system
In this guide, the operating systems above are referred to as "Windows Vista", "Windows 7", "Windows 8", "Windows 8.1", and "Windows 10". Furthermore, the collective term Windows may be used to refer to Windows Vista, Windows 7, Windows 8, Windows 8.1, and Windows 10 and multiple versions of Windows may be referred to as, for example, Windows Vista/7/8/10, with the Windows notation omitted.
OS X 10.7.xOS X 10.8.xOS X10.9.xOS X 10.10.xOS X 10.11.x
In this guide, the operating systems above are referred to as "Mac OS X 10.7.x", "Mac OS X 10.8.x", "Mac OS X 10.9.x", "Mac OS X 10.11.x" and "Mac OS X 10.10.x". Furthermore, the collective term "OS X" is used to refer to them all.
EPSON is a registered trademark and EPSON Exceed Your Vision is a registered logomark of Seiko Epson Corporation.
Mac and OS X are trademarks of Apple Inc., registered in the U.S. and other countries.
Microsoft, DirectX, Microsoft Office, PowerPoint, Windows, and Windows Vista are trademarks or registered trademarks of Microsoft Corporation in the United States and/or other countries.
General Notices 31
Open Source Software License
Z 2015 Epson America, Inc., 12/15.CPD-50116
Other product names used herein are for identification purposes only and may be trademarks of their respective owners. Epson disclaims any and all rights in those marks.
zlib
This projector product includes the open source software program "zlib" which applies the terms and conditions provided by owner of the copyright to the "zlib".
The "zlib" are WITHOUT ANY WARRANTY; without even the implied warranty of MERCHANTABILITY AND FITNESS FOR A PARTICULAR PURPOSE.
List of zlib programs
zlib-1.2.8License terms of conditions of each program which are provided by owner of the copyright to the "zlib" are as follows.
Copyright notice:
(C) 1995-1998 Jean-loup Gailly and Mark Adler
This software is provided 'as-is', without any express or implied warranty. In no event will the authors be held liable for any damages arising from the use of this software.
Permission is granted to anyone to use this software for any purpose, including commercial applications, and to alter it and redistribute it freely, subject to the following restrictions:
1. The origin of this software must not be misrepresented; you must not claim that you wrote the original software. If you use this software in a product, an acknowledgment in the product documentation would be appreciated but is not required.
2. Altered source versions must be plainly marked as such, and must not be misrepresented as being the original software.
3. This notice may not be removed or altered from any source distribution.
Jean-loup Gailly
Mark Adler
If you use the zlib library in a product, we would appreciate *not* receiving lengthy legal documents to sign. The sources are provided for free but without warranty of any kind. The library has been entirely written by Jean-loup Gailly and Mark Adler; it does not include third-party code.
If you redistribute modified sources, we would appreciate that you include in the file ChangeLog history information documenting your changes.


