38
Easyclaim and Online Claiming with PracSoft Last updated: Wednesday, May 04, 2011 © 2011 Health Communication Network Limited Level 4, 201 Pacific Highway, St Leonards, NSW 2065 1
Easyclaim and Online Claiming with PracSoft Last updated: Wednesday, May 04, 2011 © 2011 Health Communication Network Limited Level 4, 201 Pacific Highway, St Leonards, NSW 2065 1
Easyclaim and Online Claiming with PracSoft
Last updated: Wednesday, May 04, 2011 © 2011 Health Communication Network Limited Level 4, 201 Pacific Highway, St Leonards, NSW 2065 2
Contents Before You Begin .............................................................................................................................................................................................................. 3
Important Information ...................................................................................................................................................................................................... 3
Overview of the Online Claiming Process ......................................................................................................................................................................... 4
Installing a Location Certificate ......................................................................................................................................................................................... 5
Create a New Store for your Location (site) Certificate. ............................................................................................................................................. 5
Installing your Location (site) Certificate into the store .............................................................................................................................................. 6
Setup Location Certificate details in PracSoft ................................................................................................................................................................... 7
On the Server: ............................................................................................................................................................................................................. 7
On the Workstation(s): ............................................................................................................................................................................................... 7
Activate Online Claiming in PracSoft ................................................................................................................................................................................. 8
Setting up Practitioners to use Online Claiming ................................................................................................................................................................ 9
Batching Bulk Claims Using HIC Online ........................................................................................................................................................................... 10
Facility IDs ....................................................................................................................................................................................................................... 11
Recording a Facility ID in PracSoft ............................................................................................................................................................................. 11
Specifying the Facility ID when Recording a Visit in PracSoft .................................................................................................................................... 12
Sending Claims to Medicare Australia ............................................................................................................................................................................ 13
Step 1 ‐ Selecting Claims ........................................................................................................................................................................................... 13
Advance Options of the Select Claim Tab ..................................................................................................................................................... 13
Step 2 ‐ Preparing Claim Data for Transmission ........................................................................................................................................................ 14
Correcting Failed Vouchers ........................................................................................................................................................................... 14
Step 3 ‐ Print Claim Reports ...................................................................................................................................................................................... 15
Step 4 ‐ Transmitting Claims ..................................................................................................................................................................................... 15
Step 5 ‐ Requesting Online Claiming Reports ............................................................................................................................................................ 16
Editing a Voucher ............................................................................................................................................................................................................ 17
Cancelling Claims and Deleting All Visits ......................................................................................................................................................................... 17
Deleting Claims (same‐day delete) ................................................................................................................................................................................. 17
Performing a Same‐Day Deletion ................................................................................................................................................................. 18
Resolving Exceptions....................................................................................................................................................................................................... 18
Displaying the Status of Claims ....................................................................................................................................................................................... 20
Immunisation Claims ...................................................................................................................................................................................................... 20
What to do if an immunisation claim fails preparation. ............................................................................................................................................ 20
Options for resolving failed immunisation claims. .................................................................................................................................................... 21
Option 1: Dropping the immunisation claim................................................................................................................................................. 21
Option 2: Modifying the immunisation claim. .............................................................................................................................................. 21
Option 3: Releasing the immunisation claim. ............................................................................................................................................... 22
Online Patient Verification (OPV) ................................................................................................................................................................................... 22
Medicare Easyclaim ........................................................................................................................................................................................................ 23
How it works ............................................................................................................................................................................................................. 23
Accounts paid in full ..................................................................................................................................................................................... 23
Unpaid or partially paid accounts (rebates obtained by Medicare Online) .................................................................................................. 23
For bulk billing .............................................................................................................................................................................................. 23
For Large Practice Bulk Bill (optional) ........................................................................................................................................................... 23
Enabling Medicare Easyclaim .................................................................................................................................................................................... 24
Claiming with Medicare Easyclaim ............................................................................................................................................................................ 28
Fully‐paid Patient Claims with Medicare Easyclaim ..................................................................................................................................... 29
Part Paid Patient Claims ............................................................................................................................................................................... 30
Unpaid Patient Claims with Medicare Easyclaim ......................................................................................................................................... 31
Bulk Bill with Medicare Easyclaim ................................................................................................................................................................ 33
Information for Large Practices about Bulk Billing ....................................................................................................................................... 34
Resubmitting Medicare Easyclaim Bulk Bill Claims ....................................................................................................................................... 35
Easyclaim Transaction Status ....................................................................................................................................................................... 35
Troubleshooting .............................................................................................................................................................................................................. 36
Ancillary Information ...................................................................................................................................................................................................... 38
Exception Reason Codes ................................................................................................................................................................................................. 38
Easyclaim and Online Claiming with PracSoft
Last updated: Wednesday, May 04, 2011 © 2011 Health Communication Network Limited Level 4, 201 Pacific Highway, St Leonards, NSW 2065 3
Before You Begin
o Ensure you have an active Internet connection.
o Ensure you have recorded your Practice's Details. Setup > Practice Details.
o Ensure you have enabled Online Claiming. This is a global setting ‐ once you have enabled it on one PracSoft computer, everyone using the same PracSoft database will also have this functionality enabled. Setup > Global Settings.
• You may also consider enabling EFTPOS/Medicare Easyclaim if you wish to take advantage of these services at your practice. This option should only be enabled if you have already installed the Tyro EFTPOS machine. Setup > Global Settings.
o Register with Medicare Australia’s eBusiness to use Online Claiming. You will need to know your Minor ID or HSS number. This can be found on your PracSoft registration details letter.
o Apply and receive from HeSA the necessary PKI Certificates and associated Personal Identification codes (PIC Passphrase). Practices can use either,
• Location certificates only, or
• Location certificates plus individual certificates (IKeys/smartcards) for each practitioner. If you use individual certificates, you must also use a location certificate. Furthermore, using an individual certificate requires that you enter your password for any claims you prepare.
o Ensure you have installed and setup your Location Certificate and (if desired) individual practitioner PKI Certificate(s).
o A mandatory requirement for using Medicare Australia Online is that all patients have their Medicare Card personal reference number recorded in PracSoft. Once Medicare Australia Online has been activated, this requirement will be enforced whilst recording any new visits.
o If you offer bulk billing for services provided at a hospital, you must record a Facility ID for each hospital you visit.
Important Information
Server / Workstation environment: It is recommended that the location certificate is installed only on the server, with the workstations configured to access this shared central store location, via PracSoft’s Workstation Settings.
Terminal Services: It is recommended that the location certificate is installed only on the Server, with the profiles and workstations/fat‐clients configured to access this shared central store location, via PracSoft’s Workstation Settings.
Essentials: o You must be logged in as a Windows Administrator to setup Online Claiming.
o The default PSI store location is C:\Program Files\Common Files\PKI, and is automatically shared when PracSoft 3 is installed.
Multiple PracSoft Databases: Running multiple PracSoft databases, using different PKI Certificates on a single server is not supported.
Easyclaim and Online Claiming with PracSoft
Last updated: Wednesday, May 04, 2011 © 2011 Health Communication Network Limited Level 4, 201 Pacific Highway, St Leonards, NSW 2065 4
Overview of the Online Claiming Process
The following information is an overview of the steps and processes required for sending Bulk Bill claims to Medicare Australia Online or Department of Veterans' Affairs (DVA) claims.
1. A patient is added to the Waiting Room, and a visit recorded for them. Alternatively, when conducting a home visit (or similar), you can record the visit without actually adding the patient to the Waiting Room by selecting Account > Add Visit from either the patient's record or the Waiting Room.
o Indicate on the Record Visit window whether the visit is to be invoiced to Bulk Bill or DVA.
o On the Record Visit window, click the Claim button to create a (claim) voucher for this visit.
Vouchers are not immediately sent to Medicare upon clicking the Claim button. Rather, PracSoft holds the vouchers first, bundling them into individual 'Claims'; a single 'Claim' can contain multiple 'Claim Vouchers' (one for each visit recorded), up to a maximum of 80, specified via the Online Claiming tab of PracSoft's Global Settings. Setup > Global Settings.
2. Before Claims (bundles of claim vouchers) can be sent to Medicare Australia they must first be 'batched'. Batching a Claim involves you analysing (or processing) the Claim to determine whether there are any inconsistencies that might prevent Medicare from accepting the Claim, and assigning a Claim number to each Claim. Claim numbers can be added manually, but it is recommended that you have PracSoft generate these numbers automatically for you by ticking the 'Auto‐Claim No. Generation' checkbox via the Online Claiming tab of PracSoft's Global Settings.
3. Once a Claim has been batched it can be sent to Medicare with other batched claims immediately via Online Claiming. However, common practice is to send claims in bulk, once a day, towards the end of the day.
This process differs slightly for sites taking advantage of Medicare Easyclaim. For these sites, claims are processed immediately via Medicare Easyclaim; it is not necessary to process the claims in PracSoft first, nor then batch them and send them manually in bulk lots.
4. A request is sent to Medicare periodically (usually once per day) to provide you with exception reports or payment reports about previous claims you have sent. Reports cannot be requested on the same day you transmit the claim.
o An exception report contains information as to why particular vouchers within a given claim were rejected, or perhaps why the refund Medicare issued differs from what you claimed. It is also possible (although rare) for an entire claim to be rejected.
o A payment report contains the amount of benefit paid by Medicare. If you have a batch that has had all the vouchers rejected, there will not be a corresponding payment report, and once you resolve the exceptions, that batch will no longer exist.
Reports are requested via the Request Reports tab of the Online Claiming window ‐ the same window used to select, prepare and transmit claims to Medicare.
5. Now, payment reports can be compared with your actual banking, and exception reports can assist you with resolving the exceptions.
6. (Optional) Normally, payments are auto‐receipted. However there may be occasions where you must manually receipt a bulk payment.
Easyclaim and Online Claiming with PracSoft
Last updated: Wednesday, May 04, 2011 © 2011 Health Communication Network Limited Level 4, 201 Pacific Highway, St Leonards, NSW 2065 5
Installing a Location Certificate
o The following procedure need only be performed on 1 computer.
o The PIC for the location certificate will have been provided to your practice by Medicare Australia in a letter. The PIC is case‐sensitive.
o Launch the PKI Certificate Manger via Windows’ Control Panel. The PKI Certificate Manager is installed with PracSoft.
Create a New Store for your Location (site) Certificate.
o You can search for an existing store if you know you already have one.
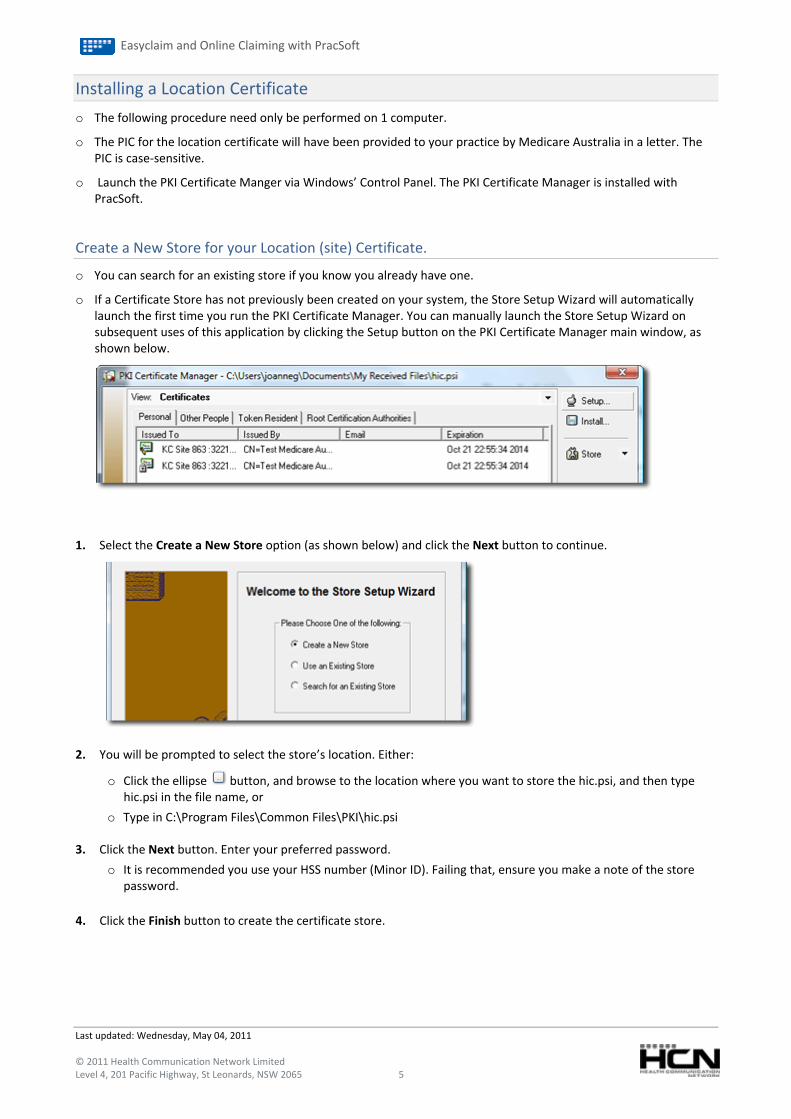
o If a Certificate Store has not previously been created on your system, the Store Setup Wizard will automatically launch the first time you run the PKI Certificate Manager. You can manually launch the Store Setup Wizard on subsequent uses of this application by clicking the Setup button on the PKI Certificate Manager main window, as shown below.
1. Select the Create a New Store option (as shown below) and click the Next button to continue.
2. You will be prompted to select the store’s location. Either:
o Click the ellipse button, and browse to the location where you want to store the hic.psi, and then type hic.psi in the file name, or
o Type in C:\Program Files\Common Files\PKI\hic.psi
3. Click the Next button. Enter your preferred password.
o It is recommended you use your HSS number (Minor ID). Failing that, ensure you make a note of the store password.
4. Click the Finish button to create the certificate store.
Easyclaim and Online Claiming with PracSoft
Installing your Location (site) Certificate into the store
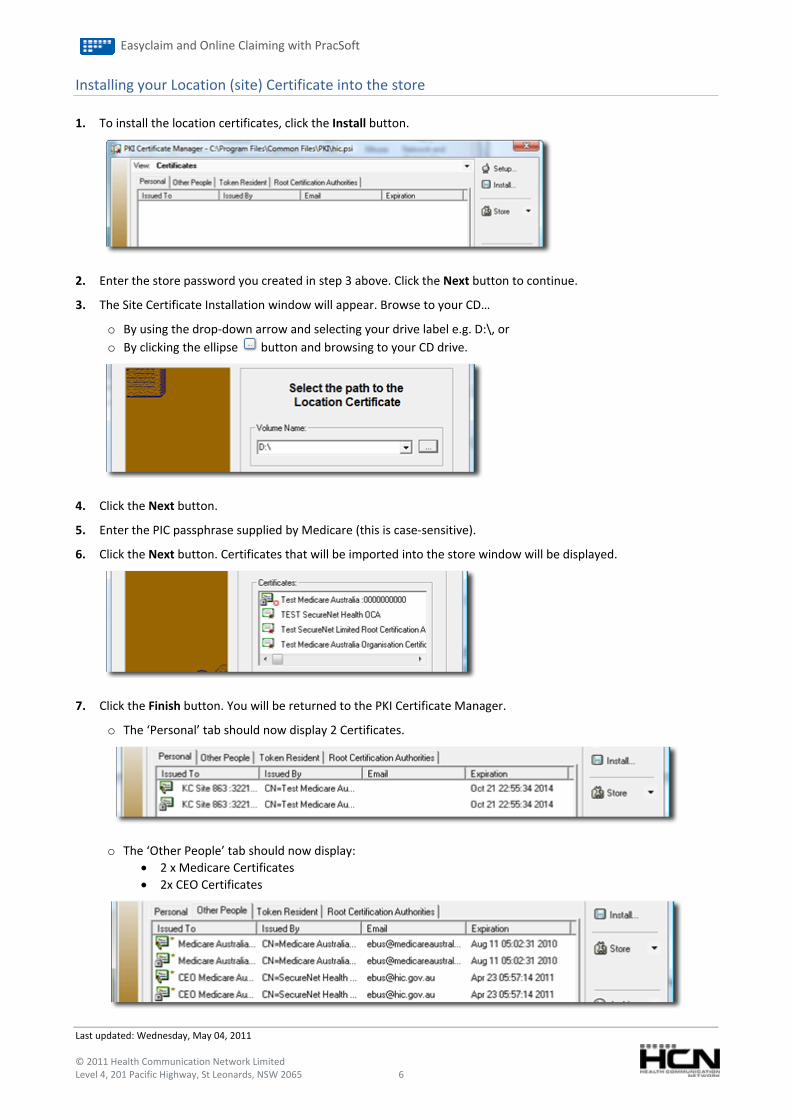
1. To install the location certificates, click the Install button.
2. Enter the store password you created in step 3 above. Click the Next button to continue.
3. The Site Certificate Installation window will appear. Browse to your CD…
o By using the drop‐down arrow and selecting your drive label e.g. D:\, or o By clicking the ellipse button and browsing to your CD drive.
4. Click the Next button.
5. Enter the PIC passphrase supplied by Medicare (this is case‐sensitive).
6. Click the Next button. Certificates that will be imported into the store window will be displayed.
7. Click the Finish button. You will be returned to the PKI Certificate Manager.
o The ‘Personal’ tab should now display 2 Certificates.
o The ‘Other People’ tab should now display: • 2 x Medicare Certificates • 2x CEO Certificates
Last updated: Wednesday, May 04, 2011 © 2011 Health Communication Network Limited Level 4, 201 Pacific Highway, St Leonards, NSW 2065 6
Easyclaim and Online Claiming with PracSoft
Last updated: Wednesday, May 04, 2011 © 2011 Health Communication Network Limited Level 4, 201 Pacific Highway, St Leonards, NSW 2065 7
Setup Location Certificate details in PracSoft
On the Server:
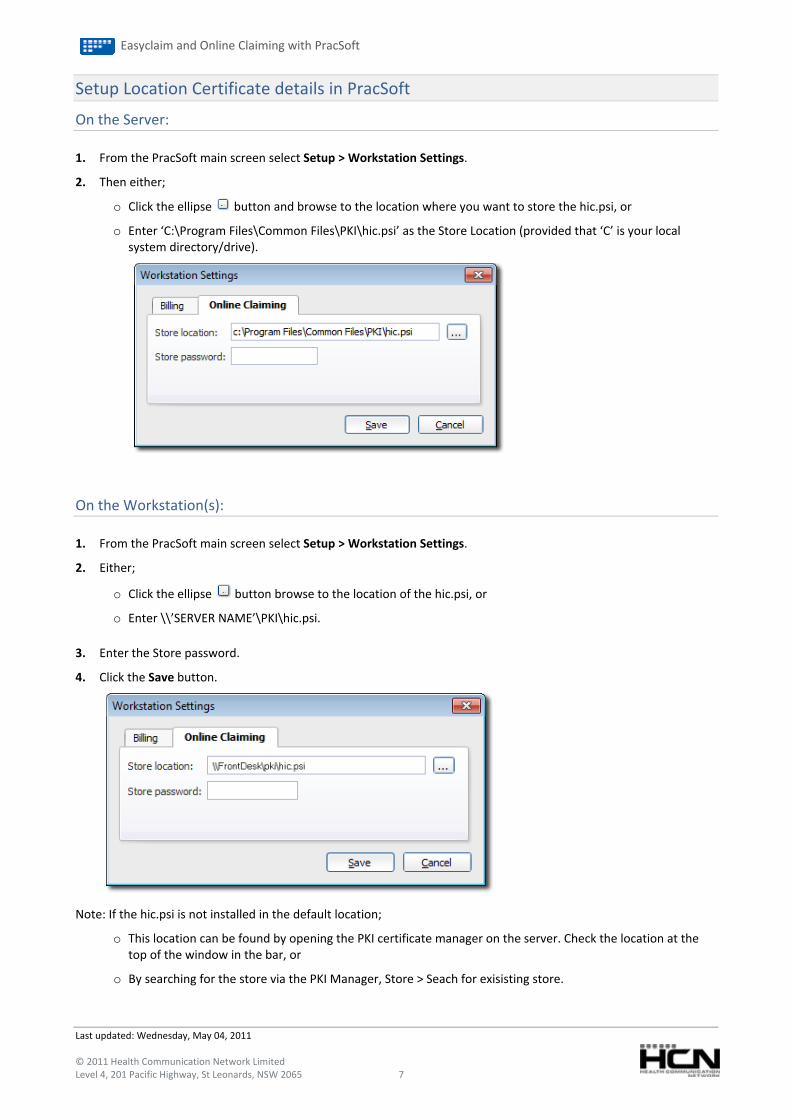
1. From the PracSoft main screen select Setup > Workstation Settings.
2. Then either;
o Click the ellipse button and browse to the location where you want to store the hic.psi, or
o Enter ‘C:\Program Files\Common Files\PKI\hic.psi’ as the Store Location (provided that ‘C’ is your local system directory/drive).
On the Workstation(s):
1. From the PracSoft main screen select Setup > Workstation Settings.
2. Either;
o Click the ellipse button browse to the location of the hic.psi, or
o Enter \\’SERVER NAME’\PKI\hic.psi.
3. Enter the Store password.
4. Click the Save button.
Note: If the hic.psi is not installed in the default location;
o This location can be found by opening the PKI certificate manager on the server. Check the location at the top of the window in the bar, or
o By searching for the store via the PKI Manager, Store > Seach for exisisting store.
Easyclaim and Online Claiming with PracSoft
Activate Online Claiming in PracSoft
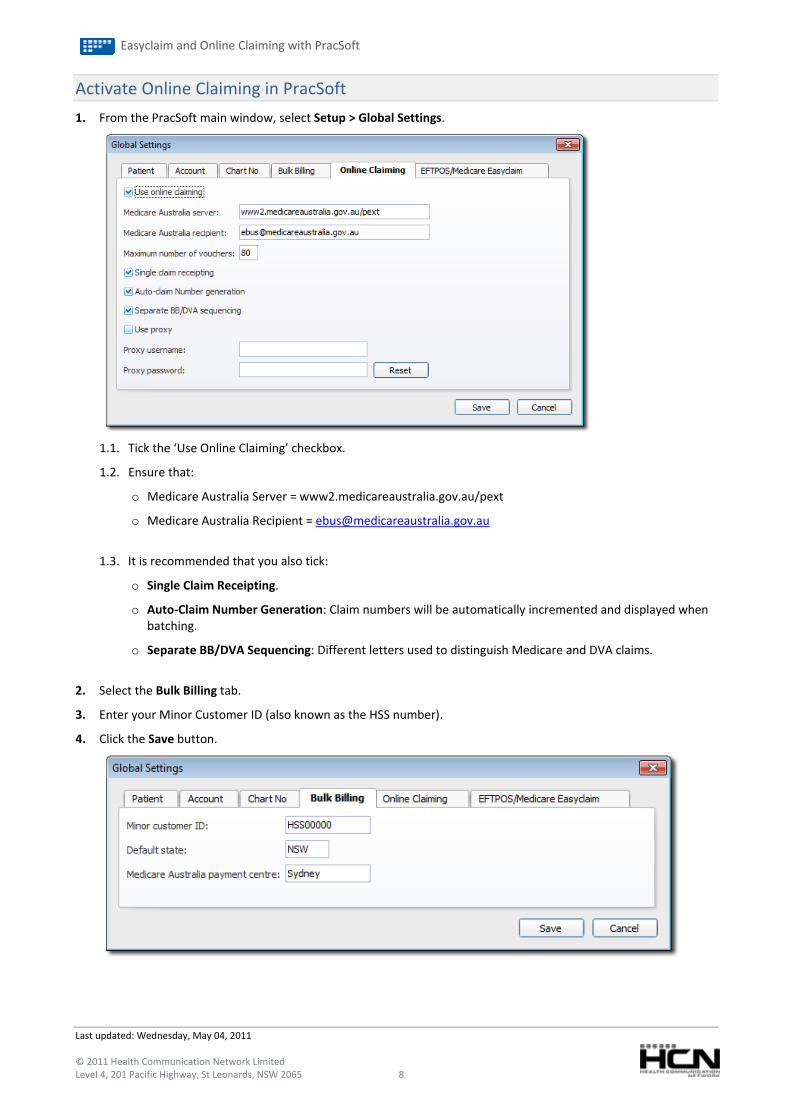
1. From the PracSoft main window, select Setup > Global Settings.
1.1. Tick the ‘Use Online Claiming’ checkbox.
1.2. Ensure that:
o Medicare Australia Server = www2.medicareaustralia.gov.au/pext
o Medicare Australia Recipient = [email protected]
1.3. It is recommended that you also tick:
o Single Claim Receipting.
o Auto‐Claim Number Generation: Claim numbers will be automatically incremented and displayed when batching.
o Separate BB/DVA Sequencing: Different letters used to distinguish Medicare and DVA claims.
Last updated: Wednesday, May 04, 2011 © 2011 Health Communication Network Limited Level 4, 201 Pacific Highway, St Leonards, NSW 2065 8
2. Select the Bulk Billing tab.
3. Enter your Minor Customer ID (also known as the HSS number).
4. Click the Save button.
Easyclaim and Online Claiming with PracSoft
Last updated: Wednesday, May 04, 2011 © 2011 Health Communication Network Limited Level 4, 201 Pacific Highway, St Leonards, NSW 2065 9
Setting up Practitioners to use Online Claiming
1. From the PracSoft main window, select Admin > Practitioners.
2. Select the Practitioner you wish to edit from the list and click the Edit button.
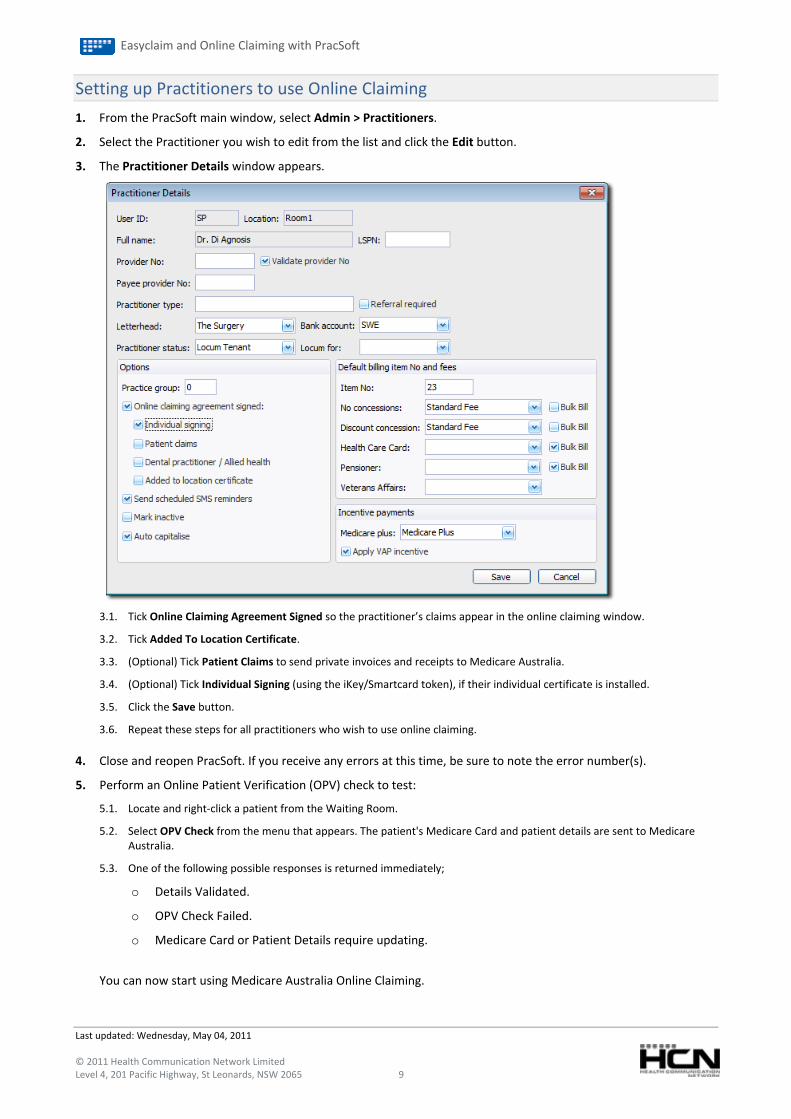
3. The Practitioner Details window appears.
3.1. Tick Online Claiming Agreement Signed so the practitioner’s claims appear in the online claiming window.
3.2. Tick Added To Location Certificate.
3.3. (Optional) Tick Patient Claims to send private invoices and receipts to Medicare Australia.
3.4. (Optional) Tick Individual Signing (using the iKey/Smartcard token), if their individual certificate is installed.
3.5. Click the Save button.
3.6. Repeat these steps for all practitioners who wish to use online claiming.
4. Close and reopen PracSoft. If you receive any errors at this time, be sure to note the error number(s).
5. Perform an Online Patient Verification (OPV) check to test:
5.1. Locate and right‐click a patient from the Waiting Room.
5.2. Select OPV Check from the menu that appears. The patient's Medicare Card and patient details are sent to Medicare Australia.
5.3. One of the following possible responses is returned immediately;
o Details Validated.
o OPV Check Failed.
o Medicare Card or Patient Details require updating.
You can now start using Medicare Australia Online Claiming.
Easyclaim and Online Claiming with PracSoft
Last updated: Wednesday, May 04, 2011 © 2011 Health Communication Network Limited Level 4, 201 Pacific Highway, St Leonards, NSW 2065 10
Batching Bulk Claims Using HIC Online
1. From the PracSoft main screen, select;
1.1. Processing > Batch Bulk Claims > Medicare, or
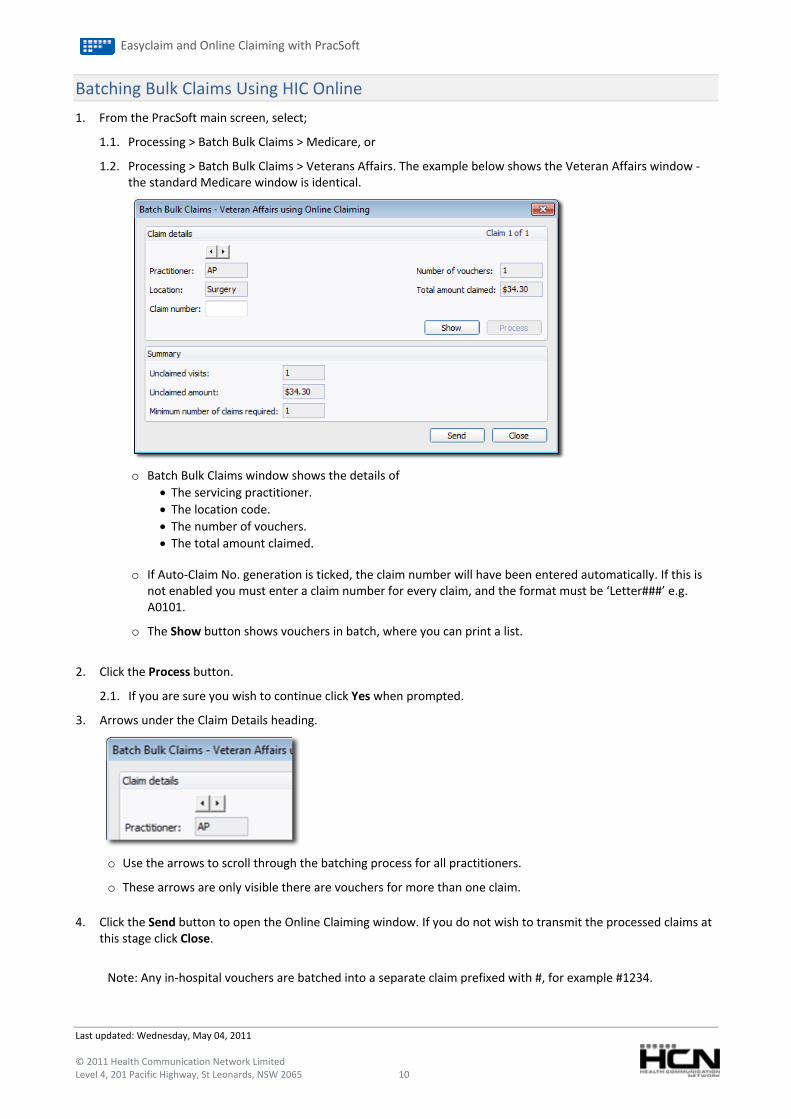
1.2. Processing > Batch Bulk Claims > Veterans Affairs. The example below shows the Veteran Affairs window ‐ the standard Medicare window is identical.
o Batch Bulk Claims window shows the details of • The servicing practitioner. • The location code. • The number of vouchers. • The total amount claimed.
o If Auto‐Claim No. generation is ticked, the claim number will have been entered automatically. If this is
not enabled you must enter a claim number for every claim, and the format must be ‘Letter###’ e.g. A0101.
o The Show button shows vouchers in batch, where you can print a list.
2. Click the Process button.
2.1. If you are sure you wish to continue click Yes when prompted.
3. Arrows under the Claim Details heading.
o Use the arrows to scroll through the batching process for all practitioners.
o These arrows are only visible there are vouchers for more than one claim.
4. Click the Send button to open the Online Claiming window. If you do not wish to transmit the processed claims at this stage click Close.
Note: Any in‐hospital vouchers are batched into a separate claim prefixed with #, for example #1234.
Easyclaim and Online Claiming with PracSoft
Last updated: Wednesday, May 04, 2011 © 2011 Health Communication Network Limited Level 4, 201 Pacific Highway, St Leonards, NSW 2065 11
Facility IDs
If you offer bulk billing for services provided at a hospital, Medicare requires you record a Facility ID for each hospital you visit. The following information explains how to setup Facility IDs, and then how to use them when recording a visit.
The official name for Facility ID is Commonwealth Hospital Facility Provider Number. It is possible that the facilities you need to obtain this number from will not know what their Facility ID is. In such a case, it will be necessary for you to obtain the required information by other means;
o Contact the Department of Health and Ageing: http://www.health.gov.au/
o Contact the Department of Veterans' Affairs: http://www.dva.gov.au/
Recording a Facility ID in PracSoft
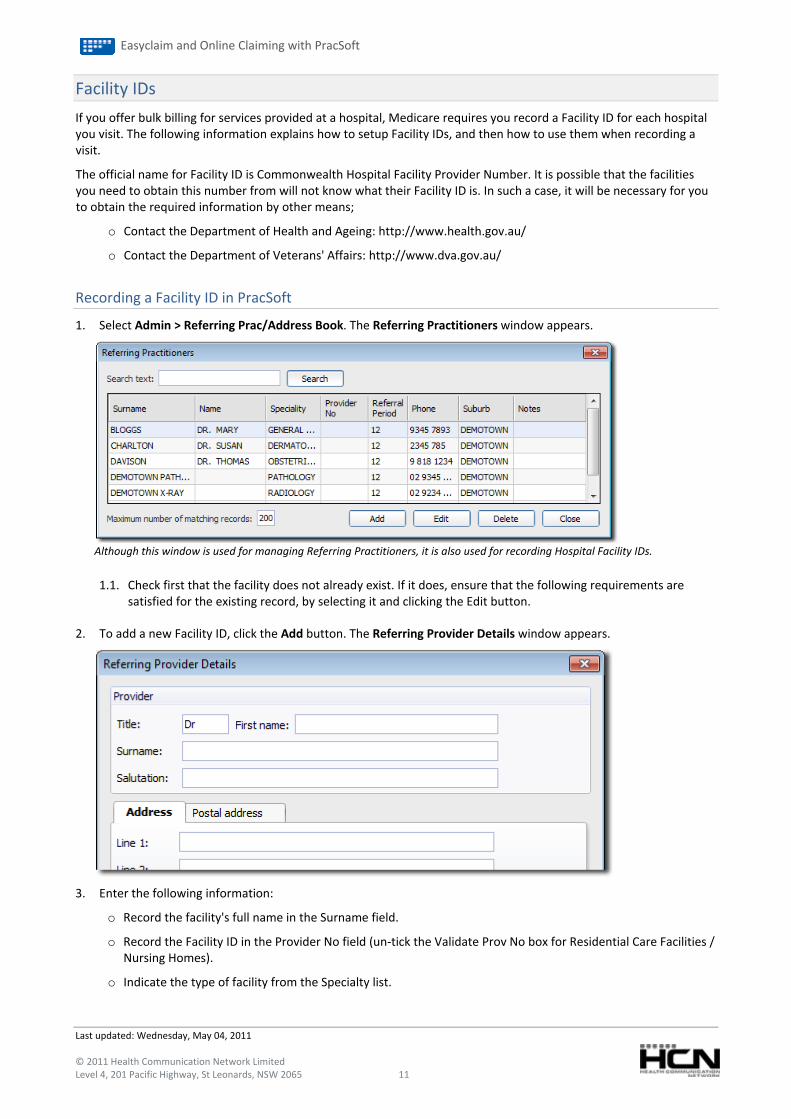
1. Select Admin > Referring Prac/Address Book. The Referring Practitioners window appears.
Although this window is used for managing Referring Practitioners, it is also used for recording Hospital Facility IDs.
1.1. Check first that the facility does not already exist. If it does, ensure that the following requirements are satisfied for the existing record, by selecting it and clicking the Edit button.
2. To add a new Facility ID, click the Add button. The Referring Provider Details window appears.
3. Enter the following information:
o Record the facility's full name in the Surname field.
o Record the Facility ID in the Provider No field (un‐tick the Validate Prov No box for Residential Care Facilities / Nursing Homes).
o Indicate the type of facility from the Specialty list.
Easyclaim and Online Claiming with PracSoft
Last updated: Wednesday, May 04, 2011 © 2011 Health Communication Network Limited Level 4, 201 Pacific Highway, St Leonards, NSW 2065 12
Specifying the Facility ID when Recording a Visit in PracSoft
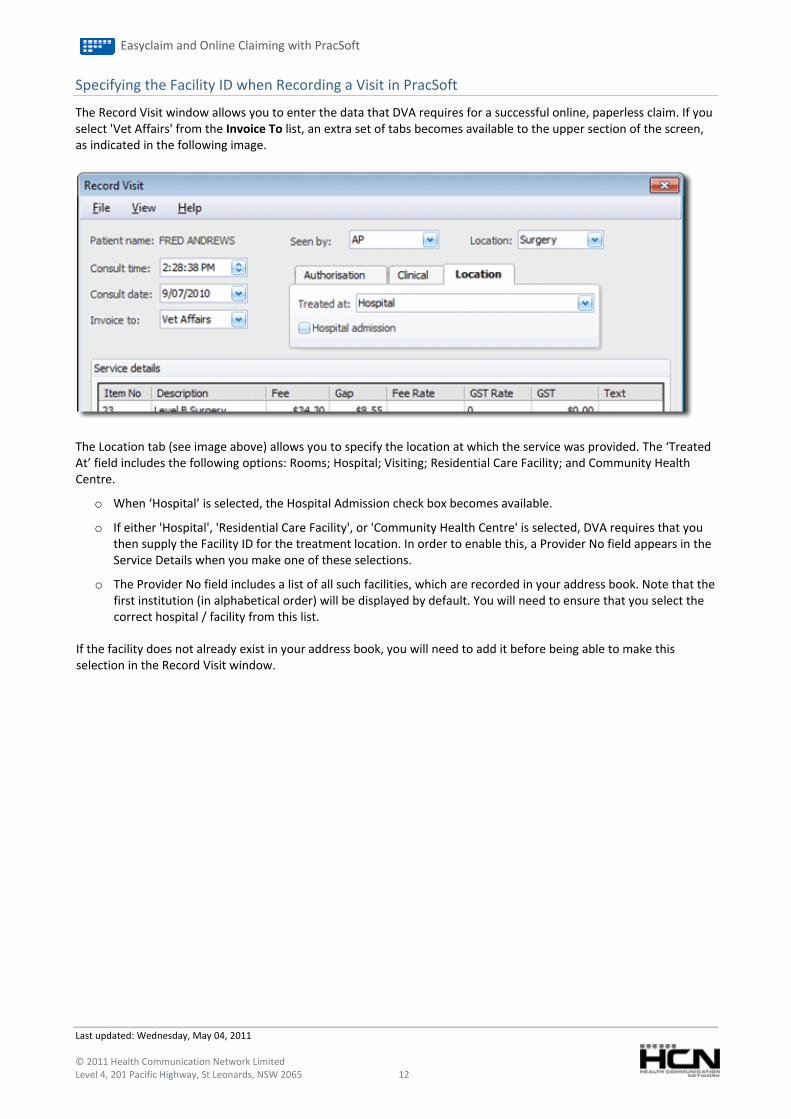
The Record Visit window allows you to enter the data that DVA requires for a successful online, paperless claim. If you select 'Vet Affairs' from the Invoice To list, an extra set of tabs becomes available to the upper section of the screen, as indicated in the following image.
The Location tab (see image above) allows you to specify the location at which the service was provided. The ‘Treated At’ field includes the following options: Rooms; Hospital; Visiting; Residential Care Facility; and Community Health Centre.
o When ‘Hospital’ is selected, the Hospital Admission check box becomes available.
o If either 'Hospital', 'Residential Care Facility', or 'Community Health Centre' is selected, DVA requires that you then supply the Facility ID for the treatment location. In order to enable this, a Provider No field appears in the Service Details when you make one of these selections.
o The Provider No field includes a list of all such facilities, which are recorded in your address book. Note that the first institution (in alphabetical order) will be displayed by default. You will need to ensure that you select the correct hospital / facility from this list.
If the facility does not already exist in your address book, you will need to add it before being able to make this selection in the Record Visit window.
Easyclaim and Online Claiming with PracSoft
Last updated: Wednesday, May 04, 2011 © 2011 Health Communication Network Limited Level 4, 201 Pacific Highway, St Leonards, NSW 2065 13
Sending Claims to Medicare Australia
There are 5 steps to sending claims to Medicare Australia Online, all of which are explained below:
1. Selecting Claims.
2. Preparing Claim Data for Transmission.
3. Print Claim Reports.
4. Transmitting Claims.
5. Requesting Online Claiming Reports.
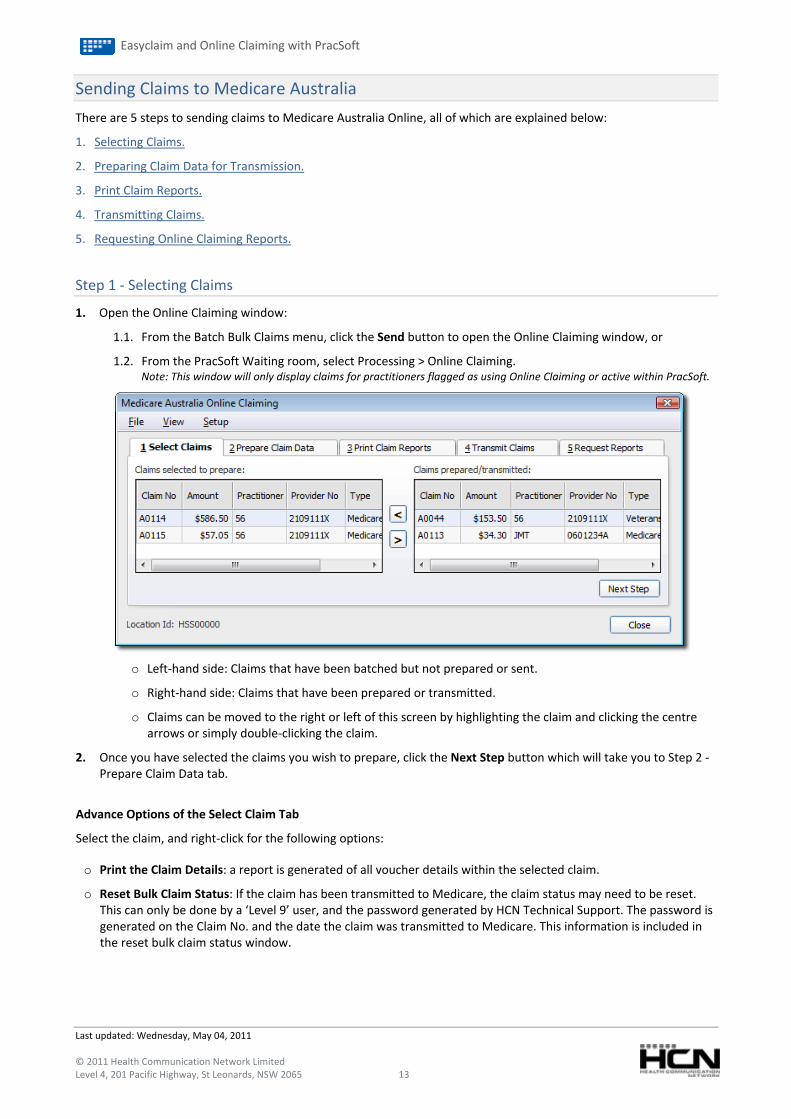
Step 1 ‐ Selecting Claims
1. Open the Online Claiming window:
1.1. From the Batch Bulk Claims menu, click the Send button to open the Online Claiming window, or
1.2. From the PracSoft Waiting room, select Processing > Online Claiming. Note: This window will only display claims for practitioners flagged as using Online Claiming or active within PracSoft.
o Left‐hand side: Claims that have been batched but not prepared or sent.
o Right‐hand side: Claims that have been prepared or transmitted.
o Claims can be moved to the right or left of this screen by highlighting the claim and clicking the centre arrows or simply double‐clicking the claim.
2. Once you have selected the claims you wish to prepare, click the Next Step button which will take you to Step 2 ‐ Prepare Claim Data tab.
Advance Options of the Select Claim Tab
Select the claim, and right‐click for the following options:
o Print the Claim Details: a report is generated of all voucher details within the selected claim.
o Reset Bulk Claim Status: If the claim has been transmitted to Medicare, the claim status may need to be reset. This can only be done by a ‘Level 9’ user, and the password generated by HCN Technical Support. The password is generated on the Claim No. and the date the claim was transmitted to Medicare. This information is included in the reset bulk claim status window.
Easyclaim and Online Claiming with PracSoft
Last updated: Wednesday, May 04, 2011 © 2011 Health Communication Network Limited Level 4, 201 Pacific Highway, St Leonards, NSW 2065 14
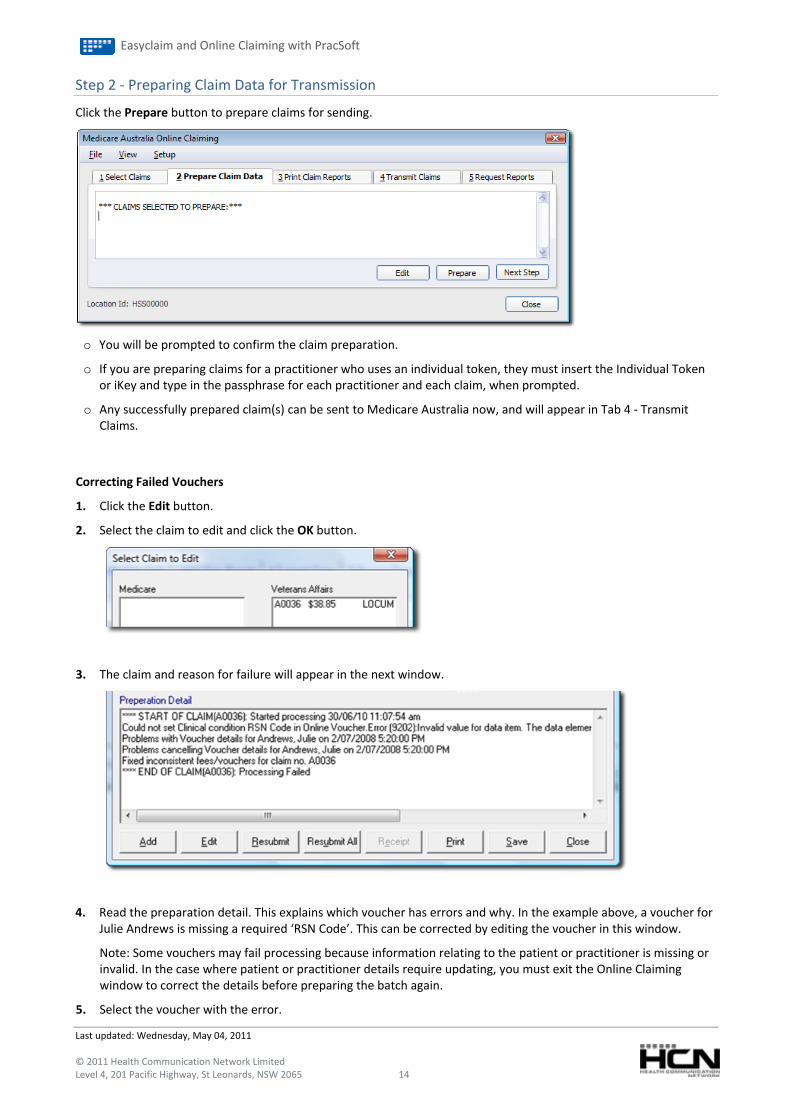
Step 2 ‐ Preparing Claim Data for Transmission
Click the Prepare button to prepare claims for sending.
o You will be prompted to confirm the claim preparation.
o If you are preparing claims for a practitioner who uses an individual token, they must insert the Individual Token or iKey and type in the passphrase for each practitioner and each claim, when prompted.
o Any successfully prepared claim(s) can be sent to Medicare Australia now, and will appear in Tab 4 ‐ Transmit Claims.
Correcting Failed Vouchers
1. Click the Edit button.
2. Select the claim to edit and click the OK button.
3. The claim and reason for failure will appear in the next window.
4. Read the preparation detail. This explains which voucher has errors and why. In the example above, a voucher for Julie Andrews is missing a required ‘RSN Code’. This can be corrected by editing the voucher in this window.
Note: Some vouchers may fail processing because information relating to the patient or practitioner is missing or invalid. In the case where patient or practitioner details require updating, you must exit the Online Claiming window to correct the details before preparing the batch again.
5. Select the voucher with the error.
Easyclaim and Online Claiming with PracSoft
Last updated: Wednesday, May 04, 2011 © 2011 Health Communication Network Limited Level 4, 201 Pacific Highway, St Leonards, NSW 2065 15
6. Click the Edit button.
6.1. Always choose Yes to the prompt to ensure all items remain on the same voucher.
6.2. Fix the voucher details (by adding an RSN Code, in the case above).
7. Press the Voucher button to update the voucher. Repeat for all vouchers with errors.
8. Repeat steps 2 ‐ 5 for all failed claims until all remaining claims prepare successfully.
9. Once all claims have been corrected, repeat the process by attempting to prepare and transmit the claims.
10. Press the Next Step button to proceed to Step 3 ‐ Print Claim Reports.
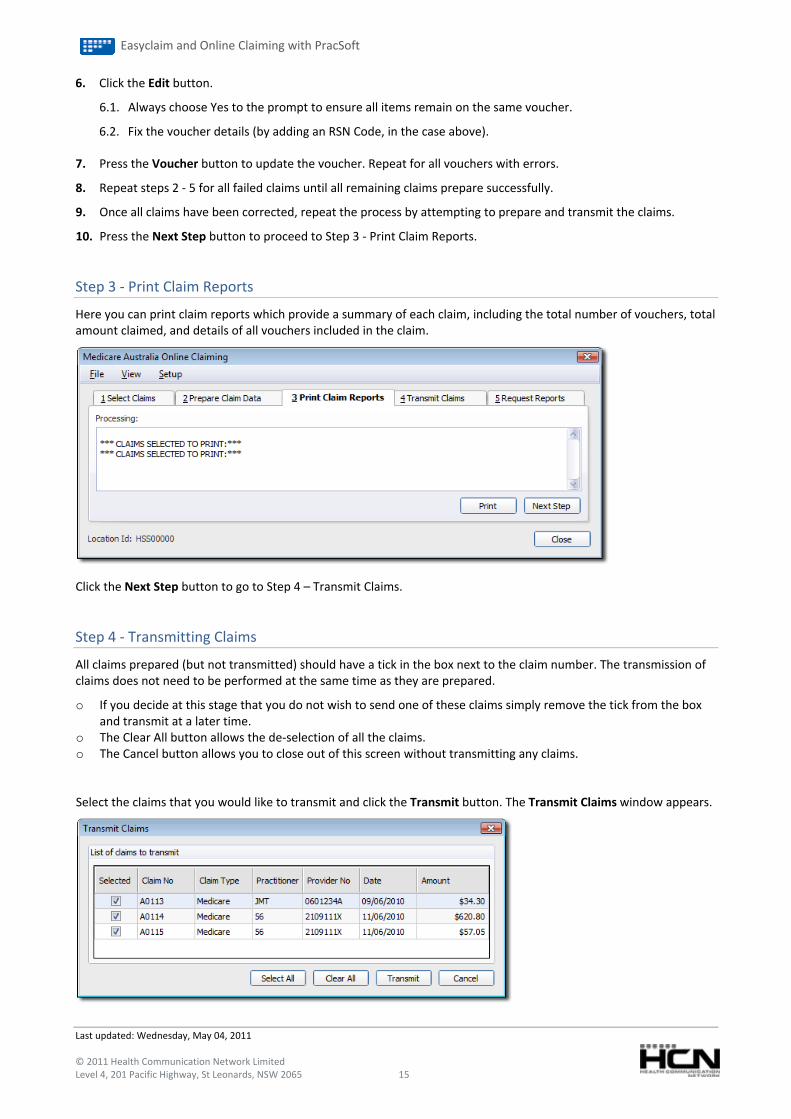
Step 3 ‐ Print Claim Reports
Here you can print claim reports which provide a summary of each claim, including the total number of vouchers, total amount claimed, and details of all vouchers included in the claim.
Click the Next Step button to go to Step 4 – Transmit Claims.
Step 4 ‐ Transmitting Claims
All claims prepared (but not transmitted) should have a tick in the box next to the claim number. The transmission of claims does not need to be performed at the same time as they are prepared.
o If you decide at this stage that you do not wish to send one of these claims simply remove the tick from the box and transmit at a later time.
o The Clear All button allows the de‐selection of all the claims. o The Cancel button allows you to close out of this screen without transmitting any claims.
Select the claims that you would like to transmit and click the Transmit button. The Transmit Claims window appears.
Easyclaim and Online Claiming with PracSoft
Last updated: Wednesday, May 04, 2011 © 2011 Health Communication Network Limited Level 4, 201 Pacific Highway, St Leonards, NSW 2065 16
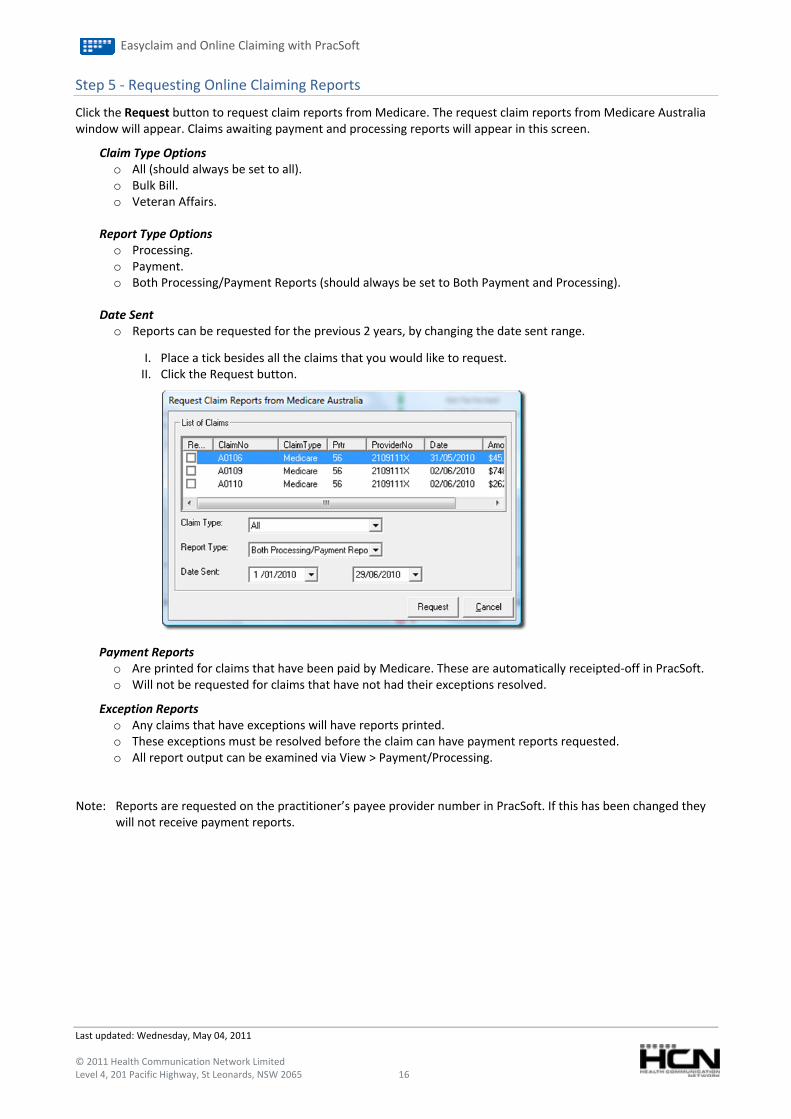
Step 5 ‐ Requesting Online Claiming Reports
Click the Request button to request claim reports from Medicare. The request claim reports from Medicare Australia window will appear. Claims awaiting payment and processing reports will appear in this screen.
Claim Type Options o All (should always be set to all). o Bulk Bill. o Veteran Affairs.
Report Type Options o Processing. o Payment. o Both Processing/Payment Reports (should always be set to Both Payment and Processing).
Date Sent o Reports can be requested for the previous 2 years, by changing the date sent range.
I. Place a tick besides all the claims that you would like to request. II. Click the Request button.
Payment Reports o Are printed for claims that have been paid by Medicare. These are automatically receipted‐off in PracSoft. o Will not be requested for claims that have not had their exceptions resolved.
Exception Reports o Any claims that have exceptions will have reports printed. o These exceptions must be resolved before the claim can have payment reports requested. o All report output can be examined via View > Payment/Processing.
Note: Reports are requested on the practitioner’s payee provider number in PracSoft. If this has been changed they will not receive payment reports.
Easyclaim and Online Claiming with PracSoft
Last updated: Wednesday, May 04, 2011 © 2011 Health Communication Network Limited Level 4, 201 Pacific Highway, St Leonards, NSW 2065 17
Editing a Voucher
Errors in a voucher must be fixed before you can send a batched claim.
1. Select and open the patient whose voucher you wish to edit.
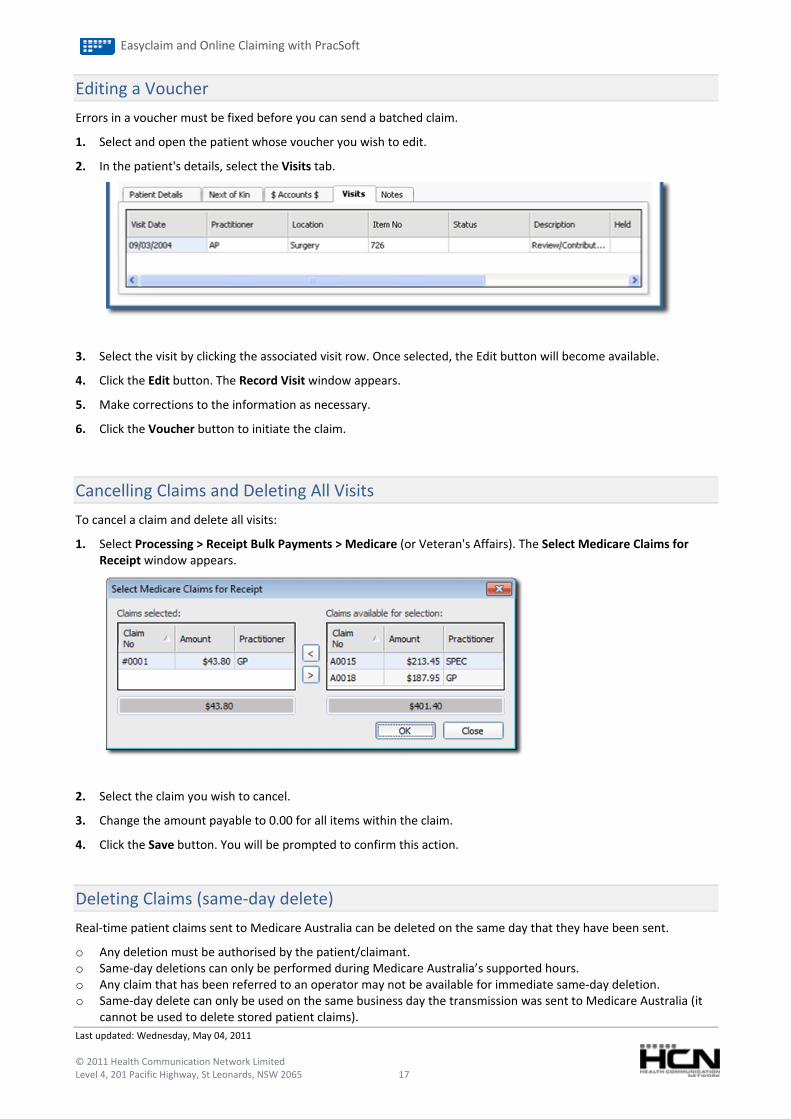
2. In the patient's details, select the Visits tab.
3. Select the visit by clicking the associated visit row. Once selected, the Edit button will become available.
4. Click the Edit button. The Record Visit window appears.
5. Make corrections to the information as necessary.
6. Click the Voucher button to initiate the claim.
Cancelling Claims and Deleting All Visits
To cancel a claim and delete all visits:
1. Select Processing > Receipt Bulk Payments > Medicare (or Veteran's Affairs). The Select Medicare Claims for Receipt window appears.
2. Select the claim you wish to cancel.
3. Change the amount payable to 0.00 for all items within the claim.
4. Click the Save button. You will be prompted to confirm this action.
Deleting Claims (same‐day delete)
Real‐time patient claims sent to Medicare Australia can be deleted on the same day that they have been sent.
o Any deletion must be authorised by the patient/claimant. o Same‐day deletions can only be performed during Medicare Australia’s supported hours. o Any claim that has been referred to an operator may not be available for immediate same‐day deletion. o Same‐day delete can only be used on the same business day the transmission was sent to Medicare Australia (it
cannot be used to delete stored patient claims).
Easyclaim and Online Claiming with PracSoft
Performing a Same‐Day Deletion
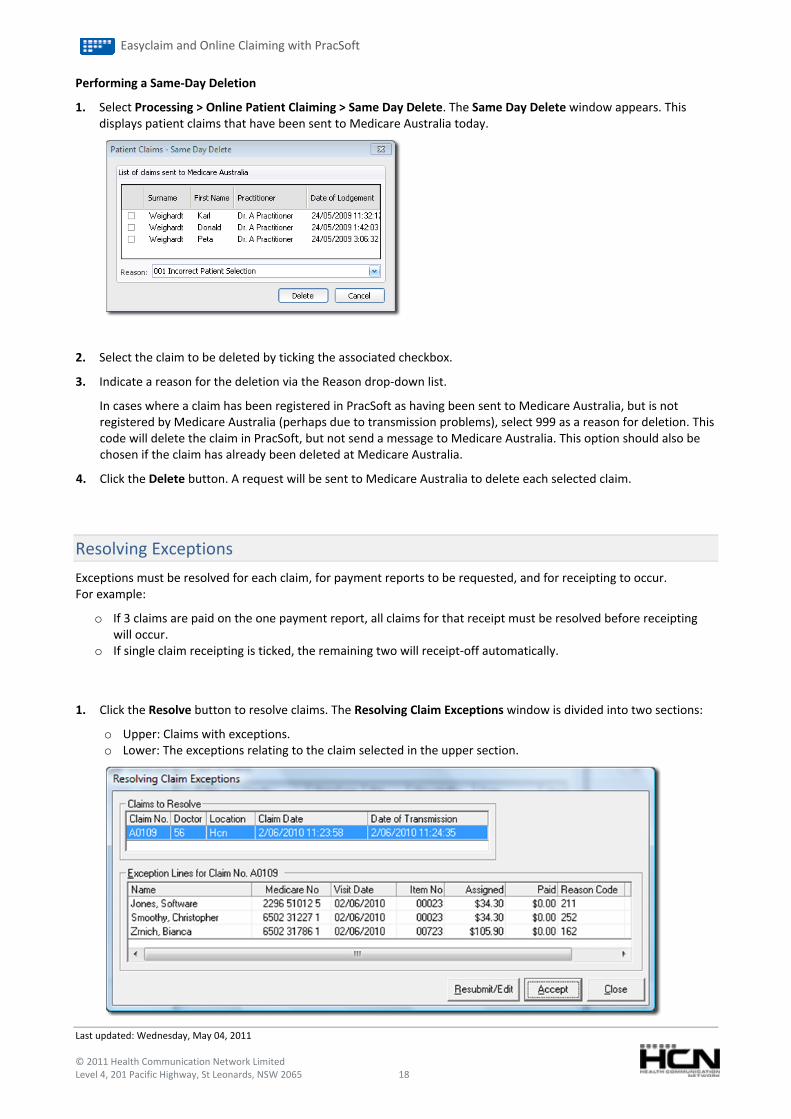
1. Select Processing > Online Patient Claiming > Same Day Delete. The Same Day Delete window appears. This displays patient claims that have been sent to Medicare Australia today.
2. Select the claim to be deleted by ticking the associated checkbox.
3. Indicate a reason for the deletion via the Reason drop‐down list.
In cases where a claim has been registered in PracSoft as having been sent to Medicare Australia, but is not registered by Medicare Australia (perhaps due to transmission problems), select 999 as a reason for deletion. This code will delete the claim in PracSoft, but not send a message to Medicare Australia. This option should also be chosen if the claim has already been deleted at Medicare Australia.
4. Click the Delete button. A request will be sent to Medicare Australia to delete each selected claim.
Last updated: Wednesday, May 04, 2011 © 2011 Health Communication Network Limited Level 4, 201 Pacific Highway, St Leonards, NSW 2065 18
Resolving Exceptions
Exceptions must be resolved for each claim, for payment reports to be requested, and for receipting to occur. For example:
o If 3 claims are paid on the one payment report, all claims for that receipt must be resolved before receipting will occur.
o If single claim receipting is ticked, the remaining two will receipt‐off automatically.
1. Click the Resolve button to resolve claims. The Resolving Claim Exceptions window is divided into two sections:
o Upper: Claims with exceptions. o Lower: The exceptions relating to the claim selected in the upper section.

Easyclaim and Online Claiming with PracSoft
Last updated: Wednesday, May 04, 2011 © 2011 Health Communication Network Limited Level 4, 201 Pacific Highway, St Leonards, NSW 2065 19
2. Select the claim to resolve in the upper window.
o Clicking on the reason code exception for that voucher will show the below screen.
3. Proceed with one of the following two options:
o Accept Exceptions: click the Accept button to accept Medicare's exception. For exceptions returned by Medicare where a partial payment has been made, you must accept these exceptions ‐ you cannot edit and resubmit them.
o Resubmit/Edit Exceptions: Click the Resubmit/Edit button to edit and resubmit the claim.
i. The voucher can then be edited and batched in a subsequent claim.
ii. You will be prompted to enter a comment for why you are editing or resubmitting the voucher. It is not essential to enter a comment when editing.
This comment does not get sent to Medicare ‐ only comments added to the text field of service details within the voucher are sent.
iii. Confirm that you wish to edit and resubmit the voucher by clicking the Yes button. The Edit Visit from Claim window will appear.
iv. Make any changes you think necessary to resolve the exception reported by Medicare.
1.1. Click the Voucher or Claim button to confirm your modifications.
1.2. You will be returned to the Resolving Claim Exceptions window.
1.3. Click Close when all exceptions are resolved.
Once all exceptions are resolved when closing the resolve exception window PracSoft will automatically request the payment report and receipt the claim.
Easyclaim and Online Claiming with PracSoft
Last updated: Wednesday, May 04, 2011 © 2011 Health Communication Network Limited Level 4, 201 Pacific Highway, St Leonards, NSW 2065 20
Displaying the Status of Claims
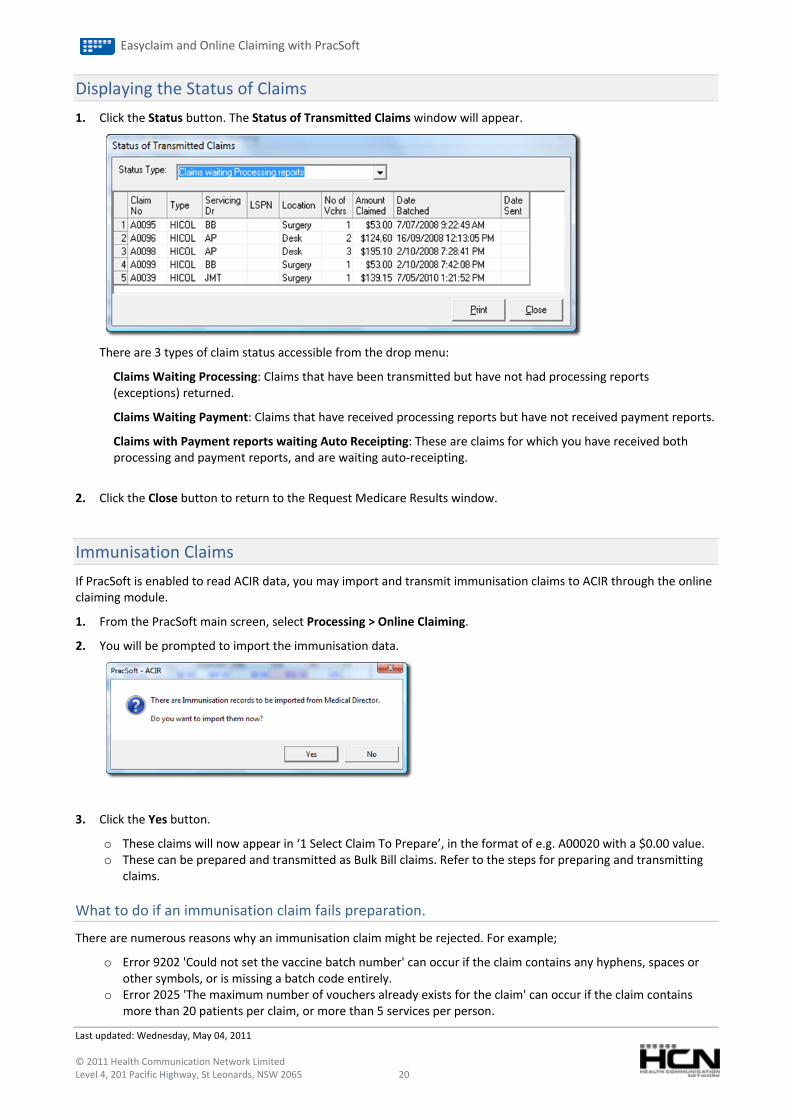
1. Click the Status button. The Status of Transmitted Claims window will appear.
There are 3 types of claim status accessible from the drop menu:
Claims Waiting Processing: Claims that have been transmitted but have not had processing reports (exceptions) returned.
Claims Waiting Payment: Claims that have received processing reports but have not received payment reports.
Claims with Payment reports waiting Auto Receipting: These are claims for which you have received both processing and payment reports, and are waiting auto‐receipting.
2. Click the Close button to return to the Request Medicare Results window.
Immunisation Claims
If PracSoft is enabled to read ACIR data, you may import and transmit immunisation claims to ACIR through the online claiming module.
1. From the PracSoft main screen, select Processing > Online Claiming.
2. You will be prompted to import the immunisation data.
3. Click the Yes button.
o These claims will now appear in ‘1 Select Claim To Prepare’, in the format of e.g. A00020 with a $0.00 value. o These can be prepared and transmitted as Bulk Bill claims. Refer to the steps for preparing and transmitting
claims.
What to do if an immunisation claim fails preparation.
There are numerous reasons why an immunisation claim might be rejected. For example;
o Error 9202 'Could not set the vaccine batch number' can occur if the claim contains any hyphens, spaces or other symbols, or is missing a batch code entirely.
o Error 2025 'The maximum number of vouchers already exists for the claim' can occur if the claim contains more than 20 patients per claim, or more than 5 services per person.
Easyclaim and Online Claiming with PracSoft
Last updated: Wednesday, May 04, 2011 © 2011 Health Communication Network Limited Level 4, 201 Pacific Highway, St Leonards, NSW 2065 21
Options for resolving failed immunisation claims.
1: Dropping the Immunisations Claim
2: Modifying the Immunisation Claim
3: Releasing the Immunisation Claim
Option 1: Dropping the immunisation claim.
Right‐click on the claim and select Drop the Immunisation Claim from the menu that appears.
Note: Prior to dropping a claim it advisable to print a list, as this removes the claim from the list of those selected for preparation. These will need to be sent manually to ACIR or deleted and recreated in Medical Director. To pint a copy follow the steps below.
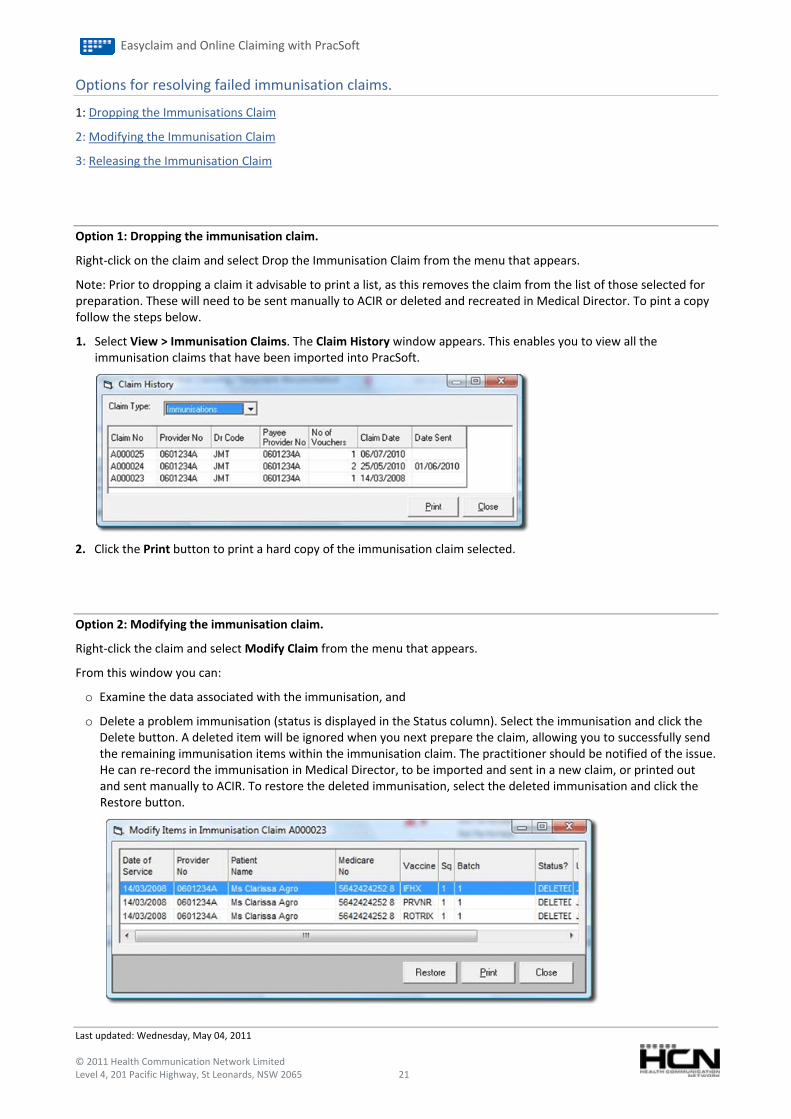
1. Select View > Immunisation Claims. The Claim History window appears. This enables you to view all the immunisation claims that have been imported into PracSoft.
2. Click the Print button to print a hard copy of the immunisation claim selected.
Option 2: Modifying the immunisation claim.
Right‐click the claim and select Modify Claim from the menu that appears.
From this window you can:
o Examine the data associated with the immunisation, and
o Delete a problem immunisation (status is displayed in the Status column). Select the immunisation and click the Delete button. A deleted item will be ignored when you next prepare the claim, allowing you to successfully send the remaining immunisation items within the immunisation claim. The practitioner should be notified of the issue. He can re‐record the immunisation in Medical Director, to be imported and sent in a new claim, or printed out and sent manually to ACIR. To restore the deleted immunisation, select the deleted immunisation and click the Restore button.
Easyclaim and Online Claiming with PracSoft
Last updated: Wednesday, May 04, 2011 © 2011 Health Communication Network Limited Level 4, 201 Pacific Highway, St Leonards, NSW 2065 22
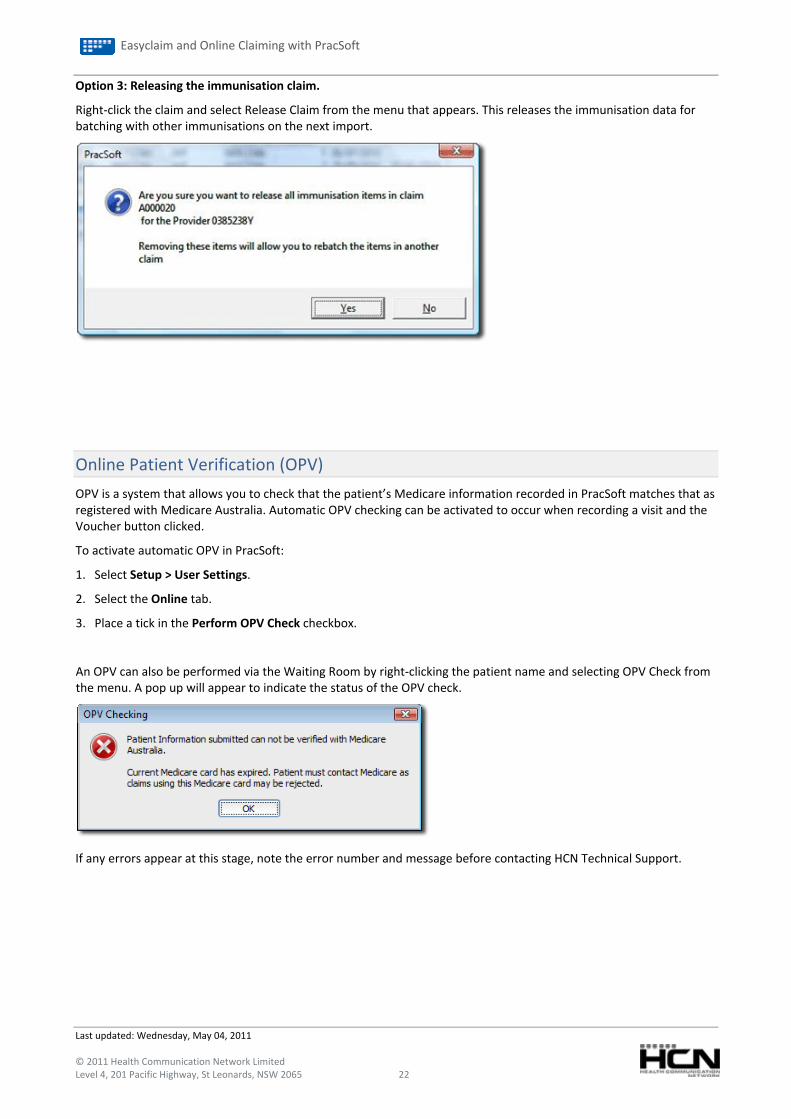
Option 3: Releasing the immunisation claim.
Right‐click the claim and select Release Claim from the menu that appears. This releases the immunisation data for batching with other immunisations on the next import.
Online Patient Verification (OPV)
OPV is a system that allows you to check that the patient’s Medicare information recorded in PracSoft matches that as registered with Medicare Australia. Automatic OPV checking can be activated to occur when recording a visit and the Voucher button clicked.
To activate automatic OPV in PracSoft:
1. Select Setup > User Settings.
2. Select the Online tab.
3. Place a tick in the Perform OPV Check checkbox.
An OPV can also be performed via the Waiting Room by right‐clicking the patient name and selecting OPV Check from the menu. A pop up will appear to indicate the status of the OPV check.
If any errors appear at this stage, note the error number and message before contacting HCN Technical Support.
Easyclaim and Online Claiming with PracSoft
Last updated: Wednesday, May 04, 2011 © 2011 Health Communication Network Limited Level 4, 201 Pacific Highway, St Leonards, NSW 2065 23
Medicare Easyclaim
Medicare Easyclaim is a system that allows patients to claim instant Medicare rebates at the practice, via your Tyro EFTPOS terminal while at the surgery. You can process Patient Claiming and Bulk Bill via Medicare Easyclaim using PracSoft's Integrated Easyclaim functionality. Detailed information on Medicare Easyclaim can be found from the Medicare Australia Easyclaim web site at: http://www.medicareaustralia.gov.au/public/claims/easyclaim.jsp
Tyro and HCN have developed the first integrated Medicare Easyclaim solution, which links practice software to the EFTPOS/Easyclaim terminal. Other systems currently offer standalone Medicare Easyclaim through conventional EFTPOS terminals. HCN and Tyro have worked closely with Medicare Australia and the medical community to improve the EFTPOS based Medicare Easyclaim solution and further capture the needs of the market. The PracSoft and Tyro Easyclaim solution streamlines the billing process and negates the need for re‐keying information, saving practice staff valuable time.
Please note that in order to take advantage of this facility you will need to obtain an EFTPOS / Easyclaim terminal from Tyro. The minimum Tyro Production software version compatible with Integrated EFTPOS is 07.01.09. The version information for your installed Tyro software can be accessed from the terminal via Menu > Settings > Terminal Info.
Please contact Tyro Payment Solution Sales, on (02) 8907 1780, to enquire about obtaining a Tyro EFTPOS/Easyclaim terminal. If at any time you have questions about the terminal or pairing the terminal with PracSoft you can call Tyro Payments helpdesk at the toll free support number 1300 966 639. Tyro Payments' trained staff will assist you with any questions you might have about the terminal.
How it works
Accounts paid in full
1. After the patient/claimant pays their account (using cash, credit card or EFTPOS), their Medicare card details are automatically transmitted from PracSoft.
2. PracSoft sends the claim details to Medicare Australia for verification. The claim is checked and an approval is sent back a few seconds later.
3. The patient/claimant then swipes their EFTPOS card through the EFTPOS / Easyclaim terminal, enters their PIN and their rebate is paid into their nominated cheque or savings account on the same day.
4. Practice staff give the patient/claimant an EFTPOS receipt to confirm their rebate has been paid.
Important: Easyclaim rebates can only be deposited into cheque or savings account.
Unpaid or partially paid accounts (rebates obtained by Medicare Online)
1. Medicare card details are automatically transmitted from PracSoft.
2. The claim is checked and claim submission is accepted or declined instantly. A cheque made out to the health service provider is posted to the patient/claimant within 14 days.
3. When the patient/claimant receives the cheque, they will send it to the health service provider along with any other outstanding balance payment.
For bulk billing
1. If the patient is bulk billed, the patient will press a button on the EFTPOS keypad to assign their benefit to the health service provider. No signature is required.
2. The Claim and patient Medicare card details are automatically transmitted from PracSoft.
3. Claim is checked and approval is sent within seconds.
For Large Practice Bulk Bill (optional)
1. Patient presents to Reception and OPV/OCV check is performed.
2. Administrative staff print a DB4 form and attach it to the patient file if desired.
3. Patient has consultation with the Practitioner who completes the DB4 form and has the patient sign.
4. Administrative staff collect the DB4 form(s) and process claims through Medicare Easyclaim at a later time. Consider also Medicare rulings regarding this.
Easyclaim and Online Claiming with PracSoft
Last updated: Wednesday, May 04, 2011 © 2011 Health Communication Network Limited Level 4, 201 Pacific Highway, St Leonards, NSW 2065 24
Enabling Medicare Easyclaim
An important note for Windows 2000 Users: In order to configure Medicare Easyclaim for the first time, you must be logged into Windows with Administrative privileges, after which you can login as a non‐admin user to change the configuration settings if required.
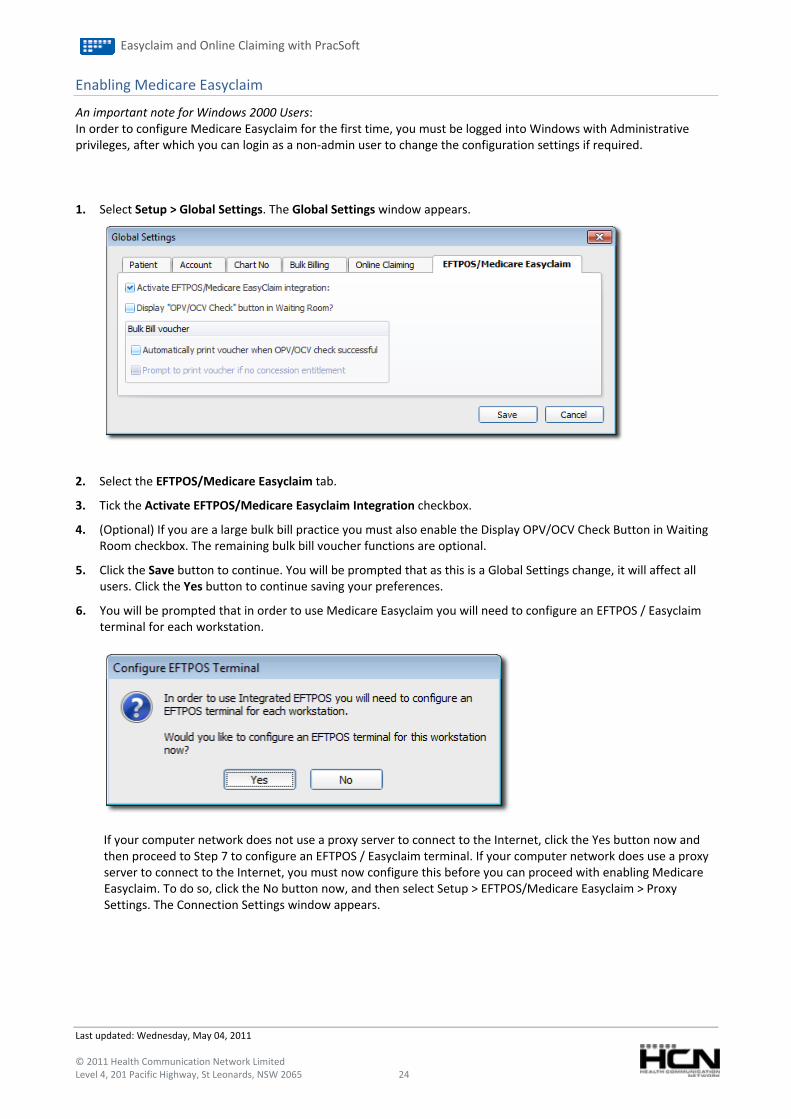
1. Select Setup > Global Settings. The Global Settings window appears.
2. Select the EFTPOS/Medicare Easyclaim tab.
3. Tick the Activate EFTPOS/Medicare Easyclaim Integration checkbox.
4. (Optional) If you are a large bulk bill practice you must also enable the Display OPV/OCV Check Button in Waiting Room checkbox. The remaining bulk bill voucher functions are optional.
5. Click the Save button to continue. You will be prompted that as this is a Global Settings change, it will affect all users. Click the Yes button to continue saving your preferences.
6. You will be prompted that in order to use Medicare Easyclaim you will need to configure an EFTPOS / Easyclaim terminal for each workstation.
If your computer network does not use a proxy server to connect to the Internet, click the Yes button now and then proceed to Step 7 to configure an EFTPOS / Easyclaim terminal. If your computer network does use a proxy server to connect to the Internet, you must now configure this before you can proceed with enabling Medicare Easyclaim. To do so, click the No button now, and then select Setup > EFTPOS/Medicare Easyclaim > Proxy Settings. The Connection Settings window appears.
Easyclaim and Online Claiming with PracSoft
Last updated: Wednesday, May 04, 2011 © 2011 Health Communication Network Limited Level 4, 201 Pacific Highway, St Leonards, NSW 2065 25
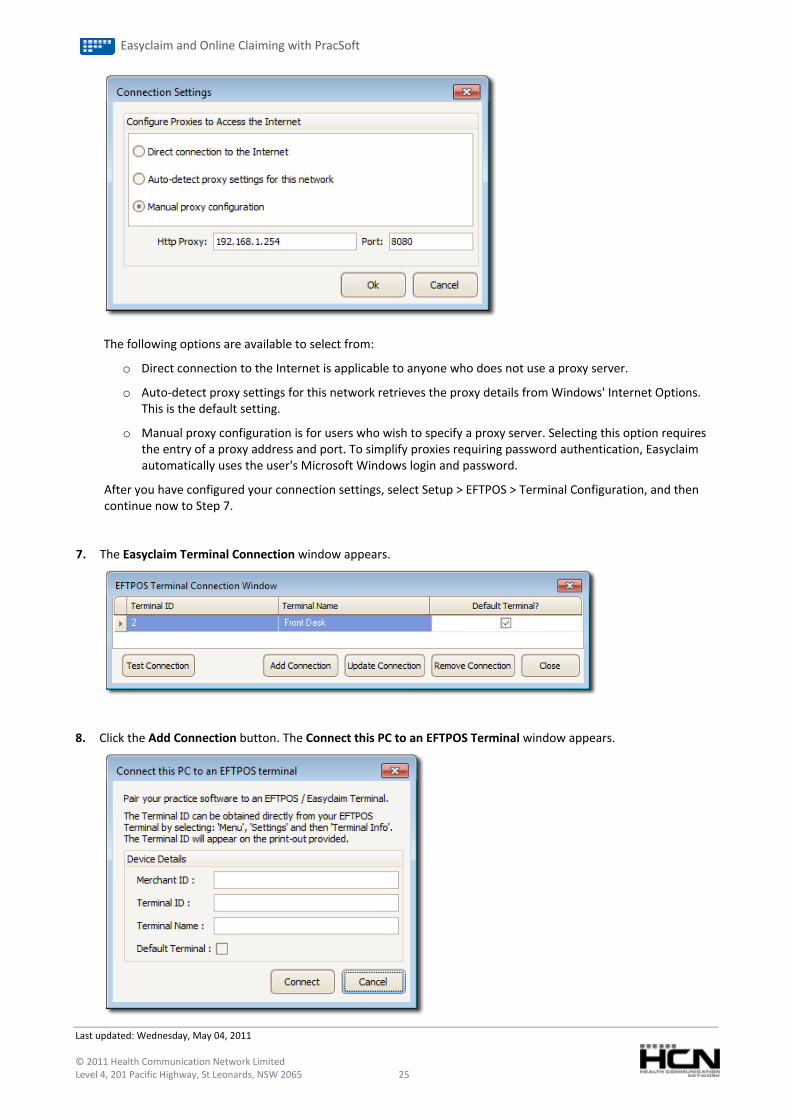
The following options are available to select from:
o Direct connection to the Internet is applicable to anyone who does not use a proxy server.
o Auto‐detect proxy settings for this network retrieves the proxy details from Windows' Internet Options. This is the default setting.
o Manual proxy configuration is for users who wish to specify a proxy server. Selecting this option requires the entry of a proxy address and port. To simplify proxies requiring password authentication, Easyclaim automatically uses the user's Microsoft Windows login and password.
After you have configured your connection settings, select Setup > EFTPOS > Terminal Configuration, and then continue now to Step 7.
7. The Easyclaim Terminal Connection window appears.
8. Click the Add Connection button. The Connect this PC to an EFTPOS Terminal window appears.
Easyclaim and Online Claiming with PracSoft
Last updated: Wednesday, May 04, 2011 © 2011 Health Communication Network Limited Level 4, 201 Pacific Highway, St Leonards, NSW 2065 26
o Enter your Merchant ID. Your Merchant ID is supplied by TYRO and is accessible via the EFTPOS / Easyclaim terminal by selecting Menu > Settings > Terminal Info on the terminal.
o Enter the Terminal ID for the EFTPOS / Easyclaim terminal connected to your computer network. The Terminal ID is supplied by TYRO and is accessible via the EFTPOS / Easyclaim terminal by selecting Menu > Settings > Terminal Info on the terminal. Each EFTPOS / Easyclaim terminal connected to your network has a unique ID.
o Create and enter a Terminal Name for the EFTPOS / Easyclaim terminal. This is usually something that identifies this EFTPOS / Easyclaim terminal from others, e.g. 'FrontDesk'. It is advisable to create a unique name for each of your EFTPOS / Easyclaim terminals.
o (Optional) Tick the Default Terminal checkbox to indicate that this particular EFTPOS / Easyclaim terminal will be the default used for Medicare Easyclaim processing on this computer. This is handy of you have multiple EFTPOS / Easyclaim terminals on your network. You can change this setting on‐the‐fly if you need to later.
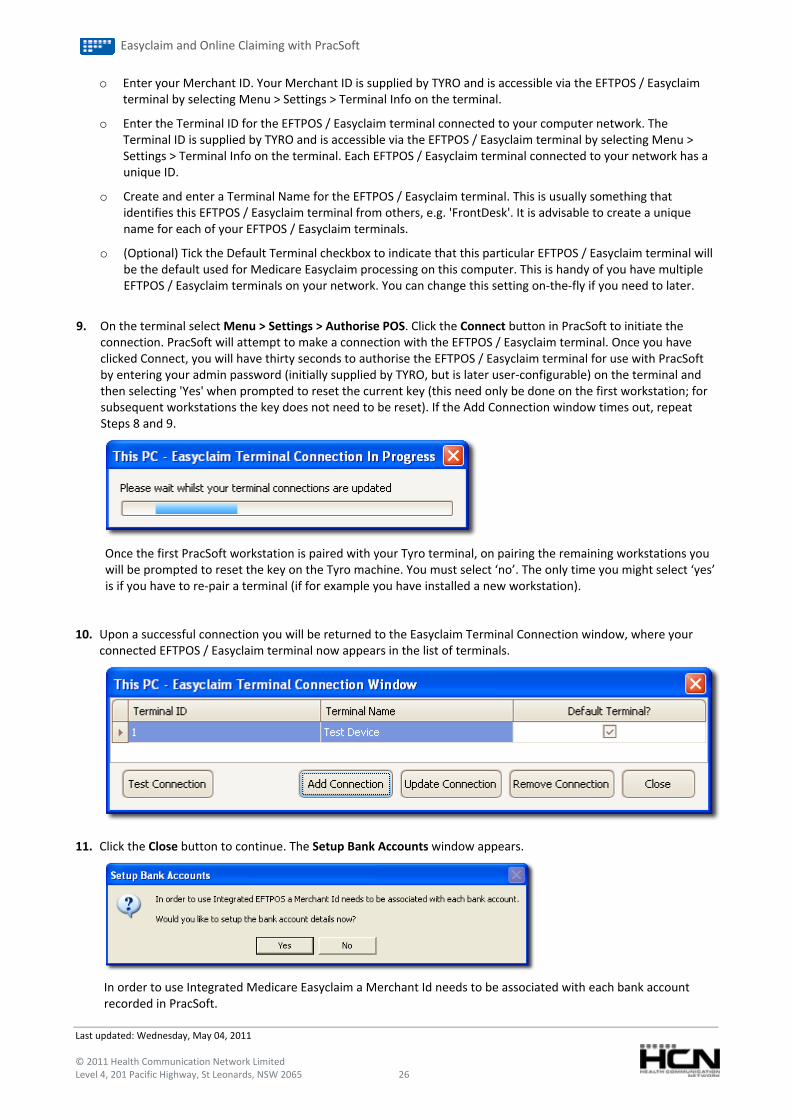
9. On the terminal select Menu > Settings > Authorise POS. Click the Connect button in PracSoft to initiate the
connection. PracSoft will attempt to make a connection with the EFTPOS / Easyclaim terminal. Once you have clicked Connect, you will have thirty seconds to authorise the EFTPOS / Easyclaim terminal for use with PracSoft by entering your admin password (initially supplied by TYRO, but is later user‐configurable) on the terminal and then selecting 'Yes' when prompted to reset the current key (this need only be done on the first workstation; for subsequent workstations the key does not need to be reset). If the Add Connection window times out, repeat Steps 8 and 9.
Once the first PracSoft workstation is paired with your Tyro terminal, on pairing the remaining workstations you will be prompted to reset the key on the Tyro machine. You must select ‘no’. The only time you might select ‘yes’ is if you have to re‐pair a terminal (if for example you have installed a new workstation).
10. Upon a successful connection you will be returned to the Easyclaim Terminal Connection window, where your connected EFTPOS / Easyclaim terminal now appears in the list of terminals.
11. Click the Close button to continue. The Setup Bank Accounts window appears.
In order to use Integrated Medicare Easyclaim a Merchant Id needs to be associated with each bank account recorded in PracSoft.

Easyclaim and Online Claiming with PracSoft
Last updated: Wednesday, May 04, 2011 © 2011 Health Communication Network Limited Level 4, 201 Pacific Highway, St Leonards, NSW 2065 27
12. Click the Yes button to setup the bank account details. The Bank Account Setup window appears.
13. Select the account for which you wish to use Medicare Easyclaim, and then click the Edit button. The Bank Account Details window appears.
14. Enter the Merchant ID for this bank account. This information will be provided to you via e‐mail once your application has been Credit Checked and approved by Tyro, and is also available via the EFTPOS / Easyclaim terminal by selecting Menu > Settings > Terminal Info. Click the Save button to confirm.
15. Repeat these steps for each bank account you wish to use Medicare Easyclaim with. Failing to setup each bank account's Merchant ID will result in you being prompted for this information when you perform a receipt for the practitioner.
16. When you have completed modifying bank accounts, click the Close button on the Bank Account Setup window.
Pairing Terminals: Once the first PracSoft workstation is paired with your Tyro terminal, on pairing the remaining workstations you will be prompted to reset the key on the Tyro machine. You must select ‘no’. The only time you might select ‘yes’ is if you have to re‐pair a terminal (if for example you have installed a new workstation).
Tyro terminal: To restart your Tyro terminal, remove and replace the power cable.
Easyclaim and Online Claiming with PracSoft
Last updated: Wednesday, May 04, 2011 © 2011 Health Communication Network Limited Level 4, 201 Pacific Highway, St Leonards, NSW 2065 28
Claiming with Medicare Easyclaim
The following topics explain how to process different claims with Medicare Easyclaim.
o Fully‐paid Patient Claims.
o Part Paid Patient Claims.
o Unpaid Patient Claims.
o Bulk Bill Claims.
The following items are not accepted through Medicare Easyclaim:
o In‐hospital items.
o ACIR information.
o Bulk Bill claims more than 2 years from date of service.
o Patient claims more than 2 years from date of service.
o Time duration dependent items.
o Notional charges.
o Patient claims pathology items excepting group 9 items.
o Bulk Bill pathology items which are self deemed or rule 3 exemptions.
o Patient claims and Bulk Bill claims with non‐standard referrals.
o Items where the charge exceeds $9,999.99.
o Department of Veterans' Affairs (DVA) claims.
o Currently item 105 cannot be claimed more than once a day using Medicare Easyclaim. Medicare Australia is considering enhancing the system to allow additional items to be claimed more than once a day using the 'not duplicate' indicator.
o Claims for Allied Health Workers.
In the unfortunate event that Medicare Easyclaim is not available at the practice the practice needs to issue the patient/claimant an account/statement and advise the patient/claimant to lodge their claim through an alternate channel, i.e. at the appropriate Medicare office. Bulk Bill claims need be the completed as with the current existing processes. Since Medicare Easyclaim works independent from EFTPOS services, it is possible that Medicare is available while EFTPOS is not and vice versa.
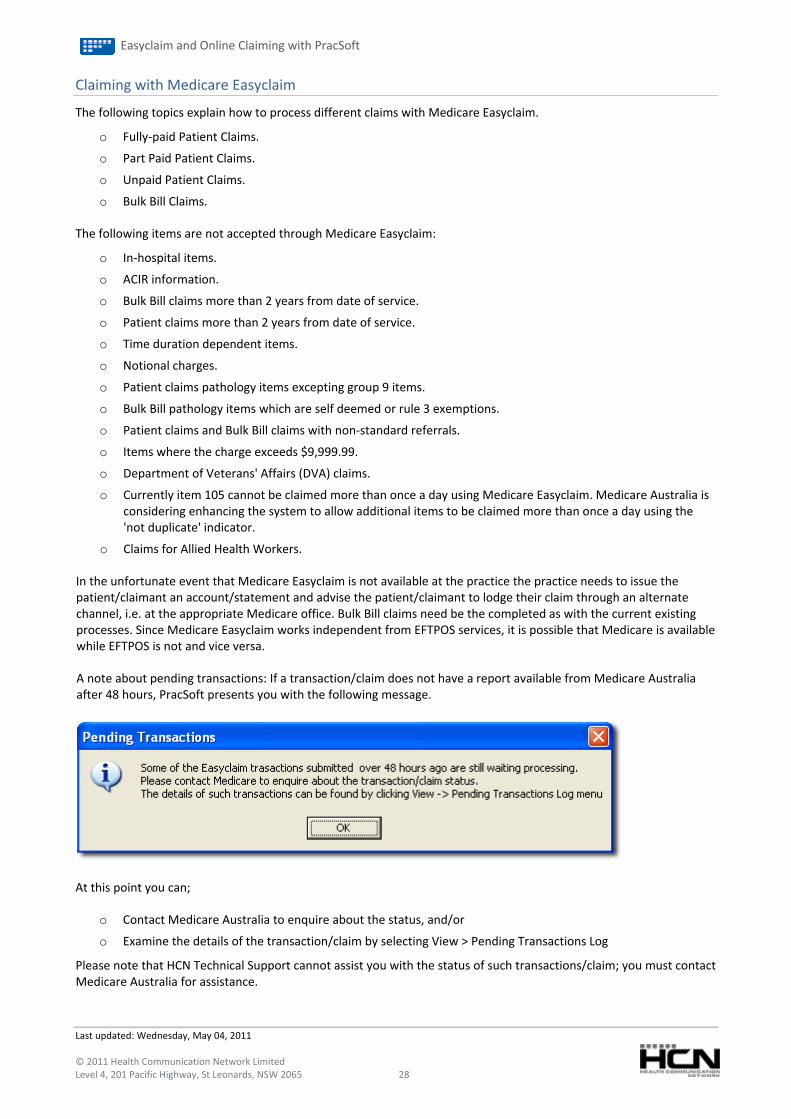
A note about pending transactions: If a transaction/claim does not have a report available from Medicare Australia after 48 hours, PracSoft presents you with the following message.
At this point you can;
o Contact Medicare Australia to enquire about the status, and/or
o Examine the details of the transaction/claim by selecting View > Pending Transactions Log
Please note that HCN Technical Support cannot assist you with the status of such transactions/claim; you must contact Medicare Australia for assistance.

Easyclaim and Online Claiming with PracSoft
Last updated: Wednesday, May 04, 2011 © 2011 Health Communication Network Limited Level 4, 201 Pacific Highway, St Leonards, NSW 2065 29
Fully‐paid Patient Claims with Medicare Easyclaim
1. Ensure you have configured PracSoft to use Medicare Easyclaim.
2. With a patient selected in the Waiting Room, press F5. The Record Visit window appears.
3. Ensure that you have a selection in the Seen by Dr. drop‐down list. If you selected a Practitioner for the patient via the Waiting Room, this field will already be populated.
4. Ensure that you have a selection in the Location drop‐down list. If you selected a Practitioner for the patient via the Waiting Room, this field will already be populated.
5. (Optional) Modify the Consult Time and Consult Date using the associated controls, if necessary.
6. Via the Invoice To drop‐down list, select Patient.
7. Enter service items as necessary. If you are unsure of the fee number for a given item, you can search the standard item list by pressing Ctrl+S.
o To add additional items, click the Add button.
o To delete a service item, select the item and then click the Delete button.
8. For each Service Item ensure you select an associated Fee Rate. To do this, click in the Fee Rate field for the service item. A drop‐down list of Fee Rates will appear, from which you can make the appropriate selection.
9. (Optional) You may modify the fees for individual items by clicking in the Fee column and typing a new amount.
10. In the Payment Options section of the window select the Pay Now radio button option.
11. In the Payment Details section of the window, select the Full Payment radio button option.
12. Select a Payment Type via the associated drop‐down list.
13. Click the Receipt button to process the payment. The New Patient Claim window appears. Note that if the refund method selected earlier was EFTPOS Auto, the New Patient Claim window will appear after the Integrated EFTPOS payment has completed.
Easyclaim and Online Claiming with PracSoft
Last updated: Wednesday, May 04, 2011 © 2011 Health Communication Network Limited Level 4, 201 Pacific Highway, St Leonards, NSW 2065 30
The Refund Method of EFTPOS Card will be selected by default. With this option selected, the Medicare Easyclaim payment is made automatically and directly into the claimant's bank account. If you have chosen this option, continue now to Step 14. If the EFTPOS Card option is greyed‐out, Medicare Easyclaim is not supported for this claim – select one of the other options to transmit the claim via Medicare Online or press Cancel to edit the claim.
(Optional) Choose the ‘cheque’ option if the claimant wishes to have the Medicare payment returned to them as a cheque. Enter the residential address details for the claimant. Alternatively you can tick the Use Medicare Address checkbox to use the claimant's residential address details as recorded with Medicare Australia. Medicare Online is used for this type of refund.
(Optional) Choose the EFT option if the claimant wishes to have the Medicare payment deposited into a designated bank account. You must then enter the claimant's BSB Number, Bank Account Number and Bank Account Name. Funds will be deposited after Medicare Australia has processed the claim. Medicare Online is used for this type of refund.
14. Click the Transmit button. The claim is processed. If you have selected the EFTPOS Card refund method, the claimant will be prompted to insert their EFTPOS card and enter their PIN.
Part Paid Patient Claims
1. Ensure you have configured PracSoft to use Medicare Easyclaim.
2. With a patient selected in the Waiting Room, press F5. The Record Visit window appears.
3. Ensure that you have a selection in the Seen by Dr. drop‐down list. If you selected a Practitioner for the patient via the Waiting Room, this field will already be populated.
4. Ensure that you have a selection in the Location drop‐down list. If you selected a Practitioner for the patient via the Waiting Room, this field will already be populated.
5. (Optional) Modify the Consult Time and Consult Date using the associated controls, if necessary.
6. Via the Invoice To drop‐down list, select Patient.
7. Enter Service Items as necessary. If you are unsure of the fee number for a given item, you can search the standard item list by pressing Ctrl+S.
o To add additional items, click the Add button.
o To delete a service item, select the item and then click the Delete button.
8. (Optional) You may modify the fees for individual items by clicking in the Fee column and typing a new amount.
9. (Optional) Enter a Gap figure for given Service Items as necessary. This will change the Fee amount. You may also change the Fee amount which will in turn affect the Gap amount.
10. For each Service Item ensure you select an associated Fee Rate. To do this, click in the Fee Rate field for the service item. A drop‐down list of Fee Rates will appear, from which you can make the appropriate selection. The image above indicates that a fee rate of Schedule Fee has been selected for service item 23.
11. In the Payment Options section of the window select the Pay Now radio button option.
12. In the Payment Details section of the window select the Gap Payment radio button option. Note that for Medicare Easyclaim, gap payments referred to here can be a part payment for a service and not necessarily the gap amount between the Medicare benefit and the amount charges by the provider.
13. Select a Payment Type from the associated drop‐down list.
14. Click the Receipt button to process the payment.
Easyclaim and Online Claiming with PracSoft
Last updated: Wednesday, May 04, 2011 © 2011 Health Communication Network Limited Level 4, 201 Pacific Highway, St Leonards, NSW 2065 31
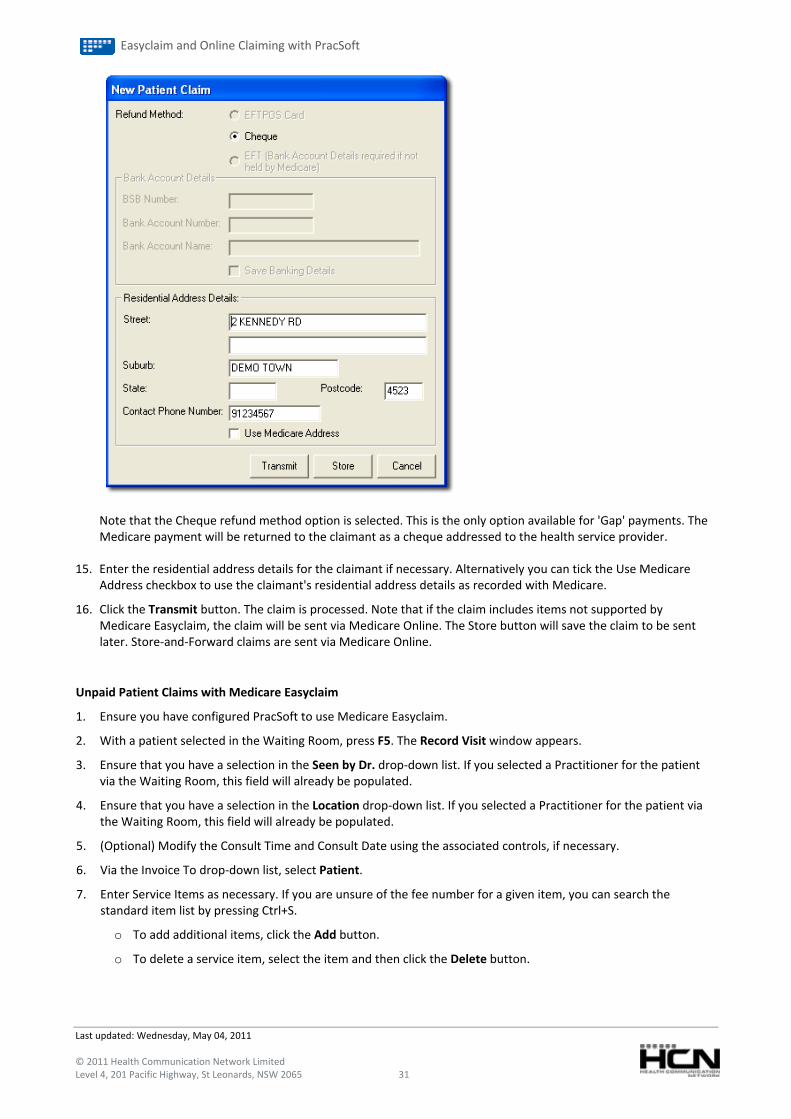
Note that the Cheque refund method option is selected. This is the only option available for 'Gap' payments. The Medicare payment will be returned to the claimant as a cheque addressed to the health service provider.
15. Enter the residential address details for the claimant if necessary. Alternatively you can tick the Use Medicare Address checkbox to use the claimant's residential address details as recorded with Medicare.
16. Click the Transmit button. The claim is processed. Note that if the claim includes items not supported by Medicare Easyclaim, the claim will be sent via Medicare Online. The Store button will save the claim to be sent ater. Store‐and‐Forward claims are sent via Medicare Online. l
Unpaid Patient Claims with Medicare Easyclaim
1. Ensure you have configured PracSoft to use Medicare Easyclaim.
2. With a patient selected in the Waiting Room, press F5. The Record Visit window appears.
3. Ensure that you have a selection in the Seen by Dr. drop‐down list. If you selected a Practitioner for the patient via the Waiting Room, this field will already be populated.
4. Ensure that you have a selection in the Location drop‐down list. If you selected a Practitioner for the patient via the Waiting Room, this field will already be populated.
5. (Optional) Modify the Consult Time and Consult Date using the associated controls, if necessary.
6. Via the Invoice To drop‐down list, select Patient.
7. Enter Service Items as necessary. If you are unsure of the fee number for a given item, you can search the standard item list by pressing Ctrl+S.
o To add additional items, click the Add button.
o To delete a service item, select the item and then click the Delete button.
Easyclaim and Online Claiming with PracSoft
Last updated: Wednesday, May 04, 2011 © 2011 Health Communication Network Limited Level 4, 201 Pacific Highway, St Leonards, NSW 2065 32
8. For each Service Item ensure you select an associated Fee Rate. To do this, click in the Fee Rate field for the service item. A drop‐down list of Fee Rates will appear, from which you can make the appropriate selection. The image above indicates that a fee rate of Schedule Fee has been selected for service item 23.
9. (Optional) You may modify the fees for individual items by clicking in the Fee column and typing a new amount.
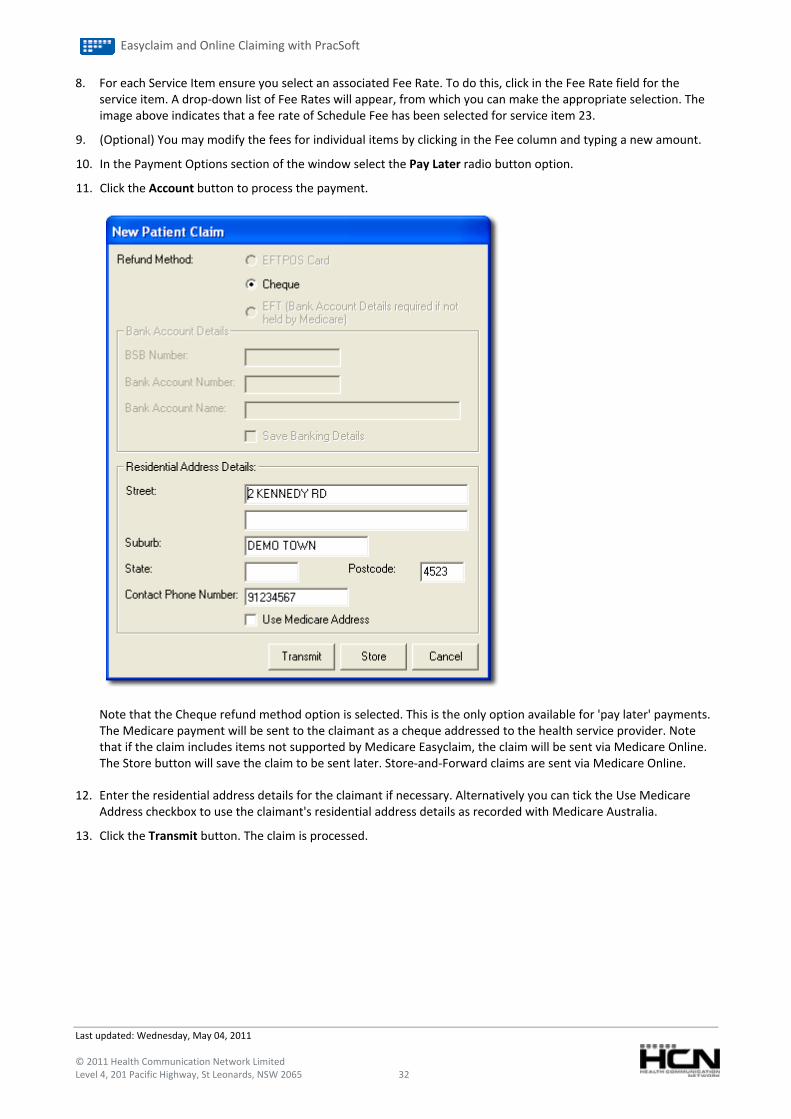
10. In the Payment Options section of the window select the Pay Later radio button option.
11. Click the Account button to process the payment.
Note that the Cheque refund method option is selected. This is the only option available for 'pay later' payments. The Medicare payment will be sent to the claimant as a cheque addressed to the health service provider. Note that if the claim includes items not supported by Medicare Easyclaim, the claim will be sent via Medicare Online. The Store button will save the claim to be sent later. Store‐and‐Forward claims are sent via Medicare Online.
12. Enter the residential address details for the claimant if necessary. Alternatively you can tick the Use Medicare Address checkbox to use the claimant's residential address details as recorded with Medicare Australia.
13. Click the Transmit button. The claim is processed.
Easyclaim and Online Claiming with PracSoft
Last updated: Wednesday, May 04, 2011 © 2011 Health Communication Network Limited Level 4, 201 Pacific Highway, St Leonards, NSW 2065 33
Bulk Bill with Medicare Easyclaim
1. Ensure you have configured PracSoft to use Medicare Easyclaim.
2. With a patient selected in the Waiting Room, press F3. The Record Visit window appears.
3. Ensure that you have a selection in the Seen by Dr. drop‐down list. If you selected a Practitioner for the patient via the Waiting Room, this field will already be populated.
4. Ensure that you have a selection in the Location drop‐down list. If you selected a Practitioner for the patient via the Waiting Room, this field will already be populated.
5. (Optional) Modify the Consult Time and Consult Date using the associated controls, if necessary.
6. Via the Invoice To drop‐down list, select Bulk Bill.
7. The 'Retain Claim for Checking' checkbox allows you to defer a selected Bulk Bill claim from the standard Medicare Easyclaim process to be batched later using Medicare Australia Online batching.
8. Enter Service Items as necessary. If you are unsure of the fee number for a given item, you can check it via the Fee Listing window.
o To add additional items, click the Add button.
o To delete a service item, select the item and then click the Delete button.
9. For each Service Item ensure you select an associated Fee Rate. To do this, click in the Fee Rate field for the service item. A drop‐down list of Fee Rates will appear, from which you can make the appropriate selection. The image above indicates that a fee rate of Schedule Fee has been selected for service item 23.
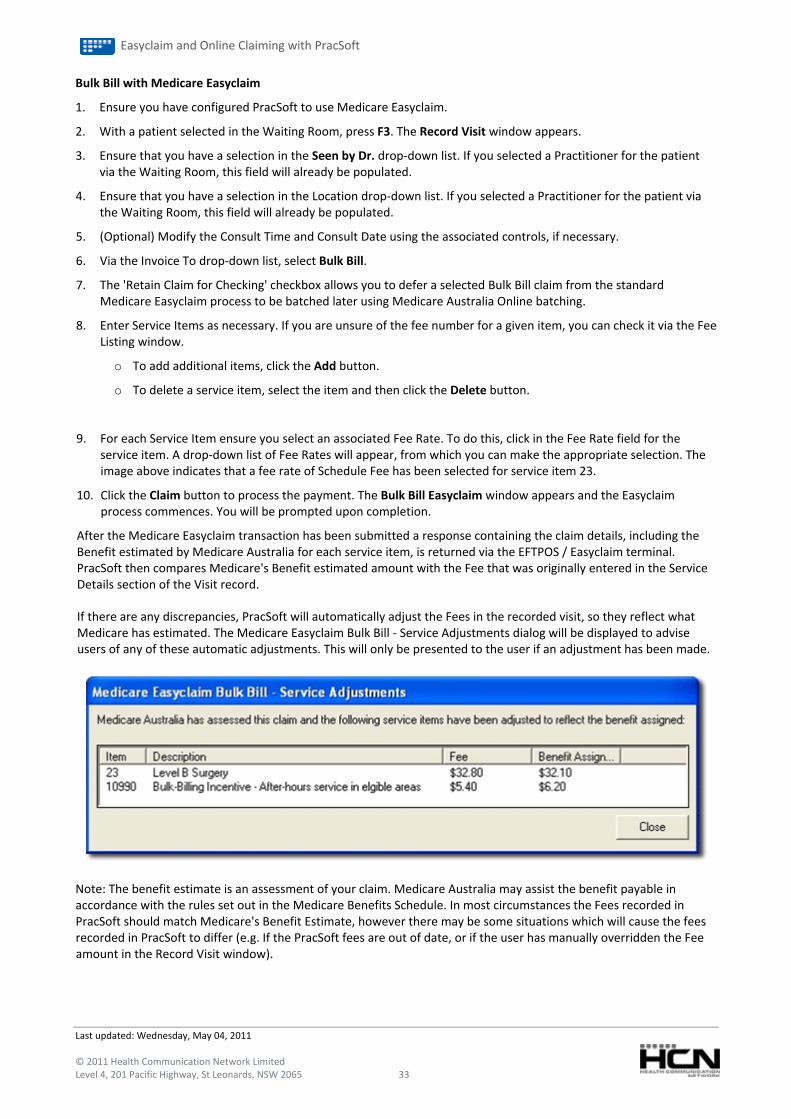
10. Click the Claim button to process the payment. The Bulk Bill Easyclaim window appears and the Easyclaim process commences. You will be prompted upon completion.
After the Medicare Easyclaim transaction has been submitted a response containing the claim details, including the Benefit estimated by Medicare Australia for each service item, is returned via the EFTPOS / Easyclaim terminal. PracSoft then compares Medicare's Benefit estimated amount with the Fee that was originally entered in the Service Details section of the Visit record.
If there are any discrepancies, PracSoft will automatically adjust the Fees in the recorded visit, so they reflect what Medicare has estimated. The Medicare Easyclaim Bulk Bill ‐ Service Adjustments dialog will be displayed to advise users of any of these automatic adjustments. This will only be presented to the user if an adjustment has been made.
Note: The benefit estimate is an assessment of your claim. Medicare Australia may assist the benefit payable in accordance with the rules set out in the Medicare Benefits Schedule. In most circumstances the Fees recorded in PracSoft should match Medicare's Benefit Estimate, however there may be some situations which will cause the fees recorded in PracSoft to differ (e.g. If the PracSoft fees are out of date, or if the user has manually overridden the Fee amount in the Record Visit window).

Easyclaim and Online Claiming with PracSoft
Last updated: Wednesday, May 04, 2011 © 2011 Health Communication Network Limited Level 4, 201 Pacific Highway, St Leonards, NSW 2065 34
A note about pending transactions: If a transaction/claim does not have a report available from Medicare Australia after 48 hours, PracSoft presents you with the following message.
At this point you can;
o Contact Medicare Australia to enquire about the status, and/or
o Examine the details of the transaction/claim by selecting View > Pending Transactions Log
Please note that HCN Technical Support cannot assist you with the status of such transactions/claim; you must contact Medicare Australia for assistance.
Information for Large Practices about Bulk Billing
The setup and procedures for processing bulk bill claims for large bulk bill practices is much the same as for other sites. The differences are as follows:
Setup: To enable Medicare Easyclaim, follow the standard steps. However, at Step 1 on the EFTPOS/Medicare Easyclaim window, you must also enable the Display OPV/OCV Check Button in Waiting Room checkbox as shown below. The remaining bulk bill voucher functions are optional.
Suggested process for bulk bill practices:
1) Patient presents to Reception and OPV/OCV cheque is performed.
2) Administrative staff prints a DB4 form and attach it to the patient's file.
3) Patient has consultation with the Practitioner who fills in the DB4 form and has the patient sign.
4) Administrative staff collects DB4 Forms and process claim through Medicare Easyclaim at a later time.

Easyclaim and Online Claiming with PracSoft
Last updated: Wednesday, May 04, 2011 © 2011 Health Communication Network Limited Level 4, 201 Pacific Highway, St Leonards, NSW 2065 35
Resubmitting Medicare Easyclaim Bulk Bill Claims
Should you need to resubmit a Medicare Easyclaim transaction, click the Resubmit button on the Medicare Easyclaim Transaction Details window.
If a transaction needs to be resubmitted because of an exception, this should be performed via the Resolve Exceptions window instead.
The Resubmission of Medicare Easyclaim transactions (except from the Resolve Exceptions dialog) is password protected (similar to resetting the status of an Online Claiming Bulk Bill claim). Users will be prompted to contact HCN Technical support to obtain a password to unlock the Medicare Easyclaim transaction before the transaction can be resubmitted.
After unlocking the transaction, the original Medicare Easyclaim transaction will be resubmitted and a new visit record will be created with the details from the original claim. You can then re‐transmit the Medicare Easyclaim request by pressing the Claim button in the Record Visit window and follow the normal Medicare Easyclaim Bulk Bill process.
Note: Easyclaim transactions with a status of 'Receipted Off', 'No Benefit Payable' or 'Resubmitted' cannot be resubmitted and the Resubmit button will not be visible from the Medicare Easyclaim Transaction Details window.
Easyclaim Transaction Status
The following information describes the various Easyclaim Transaction states, and how to deal with them, where applicable. The status of Easyclaim Transactions is available within PracSoft via Processing > Receipt Bulk Payments > Easyclaim.
Note: Bulk Bill claims via Easyclaim are handled as single transactions, although displayed as a 'batch' within PracSoft. This will be a change to the current process that Medicare Online claim users are familiar with.
Transmitted: The Easyclaim transaction has been transmitted to Medicare and the Bulk Bill Integrated Reports have not yet been requested. The user will need to request Processing/Payment Reports at a later time.
Waiting Processing: The Bulk Bill Integrated report has been requested but is not yet available for the Easyclaim transaction. The Bulk Bill Integrated Report will need to be re‐requested at a later date once Medicare has finished processing the claim. The user will need to request Processing/Payment Reports at a later time.
Exceptions: The Bulk Bill Integrated report has been retrieved and exceptions were returned for the Easyclaim transaction in the report. Exceptions need to be resolved (i.e. accepted or resubmitted) before continuing. This requires 'Resolve Exceptions' processing.
Processed: The Bulk Bill Integrated report has been retrieved for the Easyclaim transaction and either no exceptions have been reported or all exceptions have been resolved. The user will need to request Processing/Payment Reports at a later time.

Easyclaim and Online Claiming with PracSoft
Last updated: Wednesday, May 04, 2011 © 2011 Health Communication Network Limited Level 4, 201 Pacific Highway, St Leonards, NSW 2065 36
Paid: The Easyclaim transaction has been processed and the Payment details have been extracted from the Bulk Bill Integrated report. Medicare has paid a Benefit for this claim. The user will need to request Processing/Payment Reports at a later time.
Receipted Off: The Payment details have been processed for the Easyclaim transaction and the total Claim Benefit Paid is equal to the total Benefit Assigned as recorded in PracSoft. A receipt has been generated for the claim.
No Benefit Payable: The Easyclaim transaction has been processed and the Payment details have been extracted from the Bulk Bill Integrated report. Medicare has not paid a Benefit for this claim. This requires 'Resolve Exceptions' processing.
Resubmitted: The user has resubmitted the Easyclaim transaction to be reprocessed.
It is recommended that you wait a full 24 hours from Medicare’s COB (5pm) before requesting reports for Easyclaim, to ensure that the previous day’s transactions have been finalised by Medicare. It is recommended that any state not participating in Daylight Savings wait an additional hour.
Troubleshooting
o All batched claims will appear in Receipt Bulk Payments.
o When receipting‐off claims that have been sent to Medicare, you will be notified of the date the claims were sent. If there is no notification message, this indicates the claims have not been sent to Medicare.
o Claim numbers can be found in the patient’s record on the Visits tab. No claim number indicates the voucher is not batched.
o The status of claims can be found on Step 1 of the online claiming window.
o The Bulk Claim Summary Report shows every claim ever batched, and the status of each.
Problem: EFT Payment for (Claim Number) total amount expected ($figure) is not equal to deposit ($figure).
Cause: Usually due to the claim having been altered in some way after it was sent electronically to Medicare Australia. It is possible that the amounts have been changed.
Resolution:
1. Contact Medicare Australia for a manual payment report.
2. Confirm patients and items billed are the same as in claim in PracSoft.
3. Check exception report to ensure exceptions have been resolved correctly. 4. Is the amount in the claim the same as the payment report?
5. Manually receipt off the claim.
Problem: 9201: Could not set the vaccine batch number. Invalid format for data item.
Cause: Caused by an invalid ‘Vaccine Batch Number’. Any Vaccine batch number which is blank or contains spaces, hyphens or any other special characters (e.g.: ! @ # $ % ^ and * / \) is invalid and cannot be received by ACIR.
Resolution:
1. Select Processing > Online Claiming.
2. Select View > Immunisation Claims.
3. Right‐click on the affected claim and choose Modify Claim.
3.1. Find any invalid batch numbers.
3.2. Make note of the patients and affected immunisation.
Easyclaim and Online Claiming with PracSoft
Last updated: Wednesday, May 04, 2011 © 2011 Health Communication Network Limited Level 4, 201 Pacific Highway, St Leonards, NSW 2065 37
3.3. Highlight the affected immunisation and click the Delete button at the bottom of the screen. This will not remove the immunisation from this window, but changes the status to ‘deleted’.
3.4. Prepare and send the claim.
Note: In order to send the immunisations affected to ACIR you can delete and re‐enter them in the patient file in MD, or you can simply phone ACIR and relay the details.
Problem: Claims not showing in the Online Claiming Window.
Cause: This is usually caused by the practitioner not being enabled to use online claiming, or they are inactive.
Resolution:
1. Select Admin > Practitioners.
2. Highlight the Practitioner for which claims are not showing, and click the Edit button.
3. Ensure the Practitioner is ticked to use online claiming and active. If inactive, activate them.
4. Undo batch – edit voucher and re‐batch.
Problem: Importing immunisations error message Practitioner is not setup in PracSoft.
Cause: Practitioner is not setup in PracSoft or provider no in MD is different.
Resolution: Check provider number, if it does not have a 0 in front of it in the error screen.
1. Select MD User > Set Up Users.
2. Select Dr > Edit.
3. Prefix the Provider Number with a zero (0).
Problem: Token required for claim authorisation when preparing/transmitting claims.
Cause: Practitioner may be using a token/individual signing key. If not, please see resolution.
Resolution:
o If the practitioner is using a token, insert the token and enter their passphrase.
o If the practitioner does not have token, select Admin > Drs, and remove the tick from individual signing.
Problem: OPV check functionality not available.
Cause: No internet access or have just set up online claiming, or no access to the hic.psi store.
Resolution:
1. Open your Internet browser, close and re‐open PracSoft. 2. Check for errors. 3. Re‐browse to the PKI store.
Problem: Claims are not showing in the transmit window.
Cause: The claims have errors and have failed preparation.
Resolution:
1. Select Processing > Online Claiming and proceed through the preparation of claims as per the instructions above.
2. Read all that is in the preparation window, making a note of any error numbers and the text before and after, and calling HCN Technical Support.
Easyclaim and Online Claiming with PracSoft
Last updated: Wednesday, May 04, 2011 © 2011 Health Communication Network Limited Level 4, 201 Pacific Highway, St Leonards, NSW 2065 38
Ancillary Information
Tyro terminal: To restart your Tyro terminal, remove and replace the power cable.
Transaction IDs: Transaction IDs are 25 characters long, with the last character being a letter. A dissected Transaction ID is as follows:
o First 3 numbers indicate it a Tyro transmission.
o Next 6 numbers indicate the date (YYMMDD).
o Next 6 numbers indicate the time (HHMMSS).
o The remainder indicate ascending algorithm.
o The suffix letter indicates a Medicare transmission.
OCV check: Medicare obtains information via a live connection with Centrelink. If Medicare does not receive data from the Centrelink server, Medicare will use the data stored on its system. So, if for example there is no concession card registered with Medicare, the client will receive a message that the patient has been verified, but no Medicare concession entitlement.
OPV check: When performing an OPV check, PracSoft sends requests to Medicare for:
o Medicare card number.
o Patient’s first name (first 5 characters only).
o Medicare reference number.
If any of these are different, a check of the patient’s DOB is performed. If the patient’s details are updated after the OPV check and the patient has another patient as their payer, ensure that the payer’s details are updated also, otherwise refunds will fail, usually with a no benefit payable.
Billing excisions: Excisions are usually billed at 100% for the first item, 75% for the second item and 50% for the third and any subsequent items. When these are billed through the Tyro terminal, they will all be returned as 100%. It appears that Medicare are changing the amounts to 100% for all items received, but when the reports are returned, they show exceptions for the correct amount. Due to this, it is advisable that sites do not send these via Easyclaim, but retain them for later lodgement, transmitting them via online claiming.
Exception Reason Codes
Reason Codes will assist you to resolve exceptions returned by Medicare for Bulk Bill claims you have submitted. DVA Reason Codes are available for download from http://www.medicareaustralia.gov.au/provider/vendors/reason‐codes/index.jsp
Health Communication Network Limited
Level 4, 201 Pacific Highway,
St Leonards, NSW 2065
Tel: +61 2 9906 6633
Fax: +61 2 9906 8910
www.hcn.com.au
A.B.N. 76 068 458 515
Copyright© 2011


