40
easyFan Installation and operating instructions v 1.0_08/2016 EN

easyFan Installation and operating instructions
v 1.0_08/2016 EN

getAir GmbH & Co. KGKrefelder Straße 670 | D-41066 MönchengladbachT +49 2161 990 950 | F +49 2161 990 959 [email protected] | www.getair.eu
EN 2
All rights reserved.
These instructions have been compiled with the greatest care. Nevertheless, the publisher will accept no liability for any damage resulting from missing or incorrect details therein. We reserve the right to make partial or entire changes to these instructions without prior announcement.All information contained in these documents is the property of getAir GmbH & Co. KG. Any publishing thereof, whether in part or in whole, requires the written consent of getAir GmbH & Co. KG. Copying the instructions within the same company for the purpose of evaluating the product or for other product-related uses is permitted and not subject to prior approval.
© 2016 getAir GmbH & Co. KG

3 EN
Table of content1 General remarks ......................................................................................................................... 42 System overview ........................................................................................................................ 6
2.1 Functioning ......................................................................................................................... 63 Installation preparations ........................................................................................................... 8
3.1 Contents .............................................................................................................................. 83.2 PUSH control unit components ...................................................................................... 93.3 Dimensions .......................................................................................................................103.4 Required tools ...................................................................................................................103.5 Positioning .........................................................................................................................11
4 Electrical installation ...............................................................................................................124.1 Installation recommendations for the control unit ....................................................124.2 Cabling and wiring ...........................................................................................................13
5 Installation .................................................................................................................................145.1 Making the hole in the wall .............................................................................................14
5.1.1 Use of a prefabricated installation block .........................................................145.1.2 Use of a core-drilled hole ....................................................................................15
5.2 Inserting the mounting tube ..........................................................................................165.3 Cabling ...............................................................................................................................175.4 Installation of the outside cover ....................................................................................175.5 Positioning of the fan and heat exchanger unit .........................................................185.6 Inserting the inside cover ...............................................................................................19
6 Operating the system ..............................................................................................................206.1 easyFan ..............................................................................................................................20
6.1.1 Shutting the inside cover ....................................................................................206.1.2 Opening the inside cover ....................................................................................21
6.2 PUSH control unit.............................................................................................................226.2.1 User interface ........................................................................................................226.2.2 Operating modes and functions .......................................................................23
7 Cleaning and maintenance ....................................................................................................247.1 Maintenance interval .......................................................................................................247.2 Maintenance instructions ...............................................................................................25
7.2.1 Dustfilter/pollenfiltermaintenance ..............................................................257.2.2 Fan unit maintenance..........................................................................................267.2.3 Heat exchanger maintenance ...........................................................................27
8 Troubleshooting .......................................................................................................................289 Disposal .....................................................................................................................................3010 Technical data ..........................................................................................................................3111 Energyefficiencylabelandproductinformationsheet .............................................................3312 Warranty ....................................................................................................................................3513 Attachment ...............................................................................................................................37

EN 4
1 General remarksThis document contains installation and operating instructions for the getAir easyFan.
Though its contents have been checked for consistency with the described hard- and
software, deviations cannot be ruled out, meaning that no guarantee of complete
consistency can be given. This documentation is updated on a regular basis. Necessary
corrections and useful addenda will always be included in subsequent versions. They are
also available at www.getair.eu/downloads/.
1.1 Usage
The easyFan is suitable for use in the controlled ventilation of residential buildings (houses,
apartments,hotels,publicbuildingsandoffices).Itcanbeinstalledeitherinnewbuildings
or in existing buildings undergoing refurbishment and/or modernisation. easyFan usage
is authorised solely in accordance with the described use cases and only in association
with components recommended by getAir GmbH & Co. KG and listed in this document.
Other easyFan usages are not permitted. The system is unsuitable for extracting smoke or
drying buildings, for rooms containing aggressive and/or caustic gases or extreme levels
of dust.
To guarantee the fault-free and safe use of the system, it is vital to ensure appropriate trans-
port and storage, professional planning and installation, as well as proper operation and
maintenance.Modificationsandreconfigurationsoftheunit/systemarenotpermitted.
Before starting installation, the project needs to have been planned properly, detailing the
number and positioning of the ventilation units and their associated controls, and the ven-
tilationprincipleapplied(cross-ventilation,singleroomventilation,airextraction).
During planning, installation and operation, all relevant requirements, building and fire
protection regulations and accident prevention regulations are to be complied with. In
the planning phase, details need to be checked with the respective chimney sweep or
ventilation expert.

5 EN
1.2 Safety information
Attention is to be paid to the safety information contained in these instructions for instal-
ling and operating the control unit. Before any work is carried out on the unit / system, the
instructions and safety information are to be read carefully in full. Non-compliance with
the safety information can lead to harm/damage to persons and/or equipment.
Assembly, electrical installation and system start-up should only be performed by skilled
persons.Thesearepeoplewithrelevantsafetytrainingandqualifiedtoinstall,commission
and label equipment, systems and cabling in accordance with current safety standards.
The following list contains descriptions of the symbols and terms used in these instructions:
Hazard symbol
CautionThis hazard symbol warns about the danger of injury.
ElectricityThis hazard symbol warns about the danger of electrocution.
Warning symbol Please noteThis warning symbol indicates important information.

1 3
4
5
6
2
EN 6
2 System overview
TheeasyFanconsistsofairflow-optimisedcovers for inside (1)andoutside (2),afilter
unit(3),afanunit(4),aheatexchangerunit(5)andanmountingtube(6).TheeasyFanis
always installed in an outside wall. The mounting tube into which the fan and heat exch-
anger units are inserted is sealed inside the wall. The inside and outside covers can be
insertedwithouttools.Theyconstitutethefinishingelementsofthesystemandensure
optimalairflow,therebyguaranteeingmoreefficientventilation.
2.1 Functioning
Wherever possible, easyFans should be operated in pairs, i.e. with one unit blowing in fresh
air and the other expelling spent air. The units change direction concurrently after 50 - 70
seconds(dependingontheselectedfanspeed).Thisallowsaroomtobeproperlyaired,
balancingairinflowandoutflowinaccordancewithDIN1946-6.Theintegratedheatexch-
angerextractsandstoresheatfromtheoutflowingair.Whenthedirectionchangesand
freshairissuckedin,itiswarmedbyflowingovertheheatexchanger.Theheatrecovery
rate can reach 90%.

7 EN
Example of optimal ventilation
TO ENSURE PROPER VENTILATION THROUGHOUT A BUILDING (I.E. NOT JUST IN ONE ROOM) IT IS IMPORTANT TO FORESEE FURTHER SUITABLE VENTILATION VENTS, FOR INSTANCE SPACE UNDER DOORS (CA. 15 - 20 MM) OR THE USE OF VENTILATION GRILLES.
Example for wet rooms
GENERALLY SPEAKING, WET ROOMS REQUIRE (1) TWO UNITS TO BE INSTALLED, AND (2) PRECAUTIONS TO BE TAKEN THAT WET ROOM AIR DOES NOT MIX WITH THE AIR OF OTHER ROOMS. THIS SYSTEM IS NOT SUITABLE FOR WET ROOMS WITH NO OUTSIDE WALL.
WC
BATHROOM

EN 8
3 Installation preparationsBefore starting installation, please check that all components are present, as otherwise it
will not be possible to complete the installation.
3.1 Contents
Article name Item Content Number
Full easyFan set
1 easyFaninsidecoveranddustfilter 1
2 easyFan outside cover
(dependentontheselectedversion)
1
3 easyFan fan unit 1
4 easyFan heat exchanger unit 1
5 Mounting tube 500 mm 1
6 Plastering cover 2
Article name Item Content Number
easyFan building shell set
2 easyFan outside cover
(dependentontheselectedversion)
1
5 Mounting tube 500 mm 1
6 Plastering cover 2
Article name Item Content Number
easyFan finishingset
1 easyFaninsidecoveranddustfilter 1
3 easyFan fan unit 1
4 easyFan heat exchanger unit 1

3
2
1
4
Article name Item Content Number
PUSH control unit
1 PUSH operating panel 1
2 Frame 1
3 Power supply unit 1
4 Pattress box for the PUSH control unit* 1*ThepattressboxisnotincludedinthePUSHcontrolunitset.ItcanbepurchasedfromgetAirasanaccessory(seeAccessories)
9 EN
3.2 PUSH control unit components

154
190
205
>315
197
40
46 2
14
EN 10
3.3 Dimensions
3.4 Required tools
The following equipment is needed to install the easyFan:
• CoredrillwithaØ162mmbit
• Sabresawforsawingplastic
• Mountingadhesive/sealanttofixthemountingtubeinplace
• Hammerandchiselforcableducts/slits
• Deeppattressforflushmounting (singleordouble,dependentonthechoiceofinstallation)
500 160
3
500
162
240
220

11 EN
3.5 Positioning
The best position for the easyFan is determined in the project planning phase. Please pay
attention to the minimum distances, as otherwise no guarantee can be given that the units
will function properly.
Minimum distance to the ceilingand to the floor
The minimum distance to the ceiling must not be less than300mm,andtothefloornotlessthan1000mm.
Minimum distance to other objects (e.g. windows or doors) or walls
The distance to other building elements such as windows, doors or other walls should be at least 150 mm, both inside and outside.
Minimum distance between two easyFan units on the same wall
The distance between two units, whether horizontally or vertically, should not be less than 1000 mm.
Minimum distance between two easyFan units installed on two neighbouring walls
When installing units on neighbouring walls, make sure that each unit is at least 1000 mm away from the other wall. In addition, the diagonal distance between the two units must not be less than 1400 mm.
> 300 mm
> 1000 mm
> 150 mm
> 1000 mm
> 1400 mm
> 1000 mm
> 1
000
mm

EN 12
4 Electrical installationeasyFan units can only be operated in conjunction with a control unit, purchasable separately.
Up to four easyFan units can be connected to one control unit. Where more than four easyFan
units are needed, additional independent groups managed by further control units will be
needed. The control unit can be installed anywhere. 3-pole cables (preferably LiYY cables
with cross-sections between 0,25mm² and 0,75mm²) are required. To ensure adequate
power, the cable length between the control unit and fan unit must not exceed 100 m.
Example of the wiring of four easyFans
4.1 Installation recommendations for the control unit
Installthecontrolunitatstandardwallheight(105cmdistancetofloor)inadeeppattress
box. The power supply unit can also be installed in the box. The frame must be correctly
positioned in the pattress box to allow the control panel to be clicked in. Please make sure
that the bottom side of the control panel is unobstructed and that the opening for the
humidity sensor is not blocked.
THE INSTALLATION IS TO BE DONE IN SUCH A WAY THAT THE 12V OUTPUT CABLE AND THE 230V INPUT CABLE ARE NOT ON THE SAME SIDE OF THE POWER SUPPLY (INSTALL THE 230 V CABLE UNDERNEATH).
Instead of a power supply unit in a pattress box, a DIN rail power supply may be used.
However, such a power supply requires a further cable duct for the cable to the fuse box.
Power
230 V AC
Control

13 EN
4.2 Cabling and wiring
Allelectricalworkmustbeperformedbyaqualifiedelectrician.Makesurethatallwiring
is done correctly.
ThestartingdirectionofthefanisdefinedbytheconnectoronthePCB(IN=Startdirection
supplyair,OUT=Startdirectionexhaustair).Thestartingdirectionisalsousedinfull-blast
mode. To connect the control unit to the fan units, a 3-pin plug must be connected to the
cable. The plug must be wired as shown below.
INCORRECT WIRING CAN CAUSE DAMAGE TO THE FAN UNIT.
Powersupply
black
red
Fan Fan
FanFan
Connection fan unit
Plug fan unit
Labelling Cable colour fan unit Functioning
RED Red +12VPUR Purple PWMBLU Blue GND

EN 14
5 Installation
PLEASE READ THE INSTRUCTIONS CAREFULLY BEFORE BEGINNING THE INSTALLATION.
5.1 Making the hole in the wall
DEPENDING ON HOW THE UNIT IS TO BE INSTALLED PLEASE FOLLOW EITHER THE INSTRUCTIONS FOR THE USE OF AN PREFABRICATED INSTALLATION BLOCK OR FOR CORE-DRILLING A HOLE THROUGH THE WALL.
5.1.1 Use of a prefabricated installation block
Insert the pre-fabricated Neopor® installation block into the wall, following the instructions
for its installation. The hole must point downwards to the outside to allow any condensate
todrainoff.Cutoffanyprotrudingmaterialsothattheblockisflushwiththewall.

15 EN
5.1.2 Use of a core-drilled hole
Drill a hole in the wall using a core drill and a 162 mm bit. The hole must have a gradient
of1–3°,allowinganycondensatetoflowoutwards.Itisbesttodrilltheholefrominside
to outside.
WHEN CORE DRILLING, PLEASE MAKE SURE THAT THERE IS ADEQUATE PROTECTION FROM FALLING MASONRY ON THE OUTSIDE OF THE BUILDING, ENSURING THAT NO PERSON OR MATERIAL WILL BE HARMED/DAMAGED.
Inside Outside
1 - 3°

EN 16
5.2 Inserting the mounting tube
WHEN USING A SPECIAL SOLUTION, PLEASE REFER TO ITS SPECIFIC INSTRUCTIONS.
Measure the thickness of the wall. Should any plastering still need to be done, allow for
plaster thickness when shortening the mounting tube. Shorten the mounting tube using
asabresaw insuchawaythat themountingtubeendsareflushwithboth insideand
outside walls. In the inside-facing side of the mounting tube, cut a 10 mm wide and 30 mm
longslit(1).ThiswillbeusedlatertoaccommodatetheBUScabletothefanunit.When
using thicker cables, the slit will need to be wider.
Coattheoutsideofthemountingtubewiththesealant(2)andinsertitintothehole(3).
Pay attention to how long the sealant needs to dry. Proceed to the next step.
MAKE SURE THAT THE MOUNTING TUBE IS FIXED AND SEALED AT THE OUTSIDE WALL BEFORE YOU CONTINUE TO THE NEXT STEP.
WHEN USING A METAL HOOD ON THE OUTSIDE WALL, THE MOUNTING TUBE MUST NOT BE FLUSH WITH THE OUTSIDE WALL, BUT MUST PROTRUDE CA. 5 MM.
INSERT THE PLASTERING COVERS INTO THE MOUNTING TUBE. ONLY CONTINUE INSTALLATION WORK ONCE ALL BUILDING WORK HAS BEEN COMPLETED.

17 EN
5.3 Cabling
THE LENGTH OF THE CABLE IN THE MOUNTING TUBE IS DEPENDENT ON STRUCTURAL CONDITIONS. MAKE SURE THAT THE FAN UNIT CAN BE EASILY CONNECTED UP AND THAT THE CABLE DOES NOT UNNECESSARILY BLOCK THE AIRFLOW.
Use slits in the wall or cable ducts to lead the cables to the hole in the wall. Make sure
that the length of the cable in the mounting tube corresponds to the thickness of the wall
minus150mm.Wiretheplugforconnectingupthefanunit(seeElectricalinstallation).
Should cables with a diameter > 6.1 mm be used, the top layer of insulation will need to be
removed to prevent problems with the further installation.
5.4 Installation of the outside cover
Once all work on the building‘s facade has been finished, the outside cover can be
installed. Remove the plastering cover and insert the outside cover into the mounting
tube. When inserting it, make sure that the air vent points downwards and sits tight.
Due to the special mounting slats, the outside cover can be installed without any tools
and sits tight in the mounting tube.

EN 18
When using an outside grille, make sure that the grille is properly positioned with the
curvedslatspointingdownwards.Beforedoingthis,thestopper(partoftheset)must
be glued to the outward-facing upper edge on the inside of the mounting tube, where
itactsasastopperfortheheatexchangerunit.Thenscrew(screwsattheside)the
outside grille to the mounting tube.
SHOULD YOU BE USING AN OUTSIDE HOOD INSTEAD OF A GRILLE, PLEASE REFER TO ITS SEPARATE INSTALLATION INSTRUCTIONS.
5.5 Positioning of the fan and heat exchanger unit
Onceallworkhasbeenfinishedontheinsidewallsandtheoutsidegrilleorhoodhasbeen
installed, the fan and heat exchanger units can be installed. Start by connecting the two
units. This is done by sliding the fan unit over the front end of the heat exchanger unit.
Theninsertthetwointothemountingtube(2),withtheinsectfilterfacingoutwards.Push
the unit carefully into the mounting tube until it touches the outside cover.
THE STRAP MUST POINT INWARDS (TOWARDS THE ROOM), ALLOWING THE HEAT EXCHANGER TO BE REMOVED FOR MAINTENANCE.

19 EN
5.6 Inserting the inside cover
Once all work inside the building has been completed, the inside cover can be installed.
Place the filter unit in the slots for the filter inside the cover. Insert the cover into the
mounting tube, making sure that the air vent points upwards and that the cover sits tightly.
THE UNITS MUST HAVE A FILTER INSERTED BEFORE BEING TURNED ON FOR THE FIRST TIME.

EN 20
6 Operating the system6.1 easyFan
The inside cover can be shut, should you not use the system over a longer period or should
you want to prevent smoke for instance entering the room.
DO NOT OPERATE THE SYSTEM WHEN THE INSIDE COVER IS SHUT!
6.1.1 Shutting the inside cover
Step 1: Pull the inside cover out of the mounting tube.
Step 2: Usetheflapattachedtothe insideofthe cover.
Step 3: Press the flap into the flexible foamuntil it sits tightly.
Step 4: Reinsert the inside cover into the mounting tube.

21 EN
6.1.2 Opening the inside cover
Step 1: Pull the inside cover out of the mounting tube.
Step 2: Pulltheflapoutoftheflexiblefoam.
Step 3:Reattachtheflaptotheinsidecover. Step 4: Carefully reinsert the inside cover into the mounting tube.

1 2
3
4
65 7
8
EN 22
6.2 PUSH control unit
6.2.1 User interface
1 Fan speed displayShows the manually selected fan speed, or the speed auto-matically selected by the humidity sensor.
2 Arrow Up/ON Increases the fan speed and/or turns the system on.
3 Automatic mode Activates/deactivates automatic mode.
4 Arrow down/OFF Decreases the fan speed and/or turns the system off.
5 Eco-Mode Activates heat recovery mode.
6 Full-blast mode Activates full-blast mode.
7 Sleep mode Activates sleep mode.
8 Filter change display Tellstheusertochangethefilter.

23 EN
6.2.2 Operating modes and functions Eco-ModeOperatinginpairs,theunitschangeairflowdirectionevery50-70secondsdependentonthe selected fan speed, ensuring heat recovery.
Full-blast modeThe system runs in just one direction, allowing a room to be thoroughly ventilated. Heat recovery is not available in this mode.
Automatic modeWhen running in automatic mode, the integrated humidity sensor automatically determi-nes fan speed.
Sleep modeThesystemstopsworkingforonehour,givingaroom‘soccupantssufficienttimetogetto sleep. Once the selected duration is over, the system will continue in the previously activated mode.
Filter change displayAnintegratedmeterisusedtodeterminewhenafilterchangeisneeded.Thisiscalculatedonthebasisoftheairflowvolumes.Whenthefilterneedschanging,thefilterchangeLEDstarts blinking. Once it has been changed, just press the button to reset the meter.
THE OPTIMAL TIME FOR CHANGING A FILTER IS DEPENDENT ON LOCAL CONDITIONS AND CAN THUS VARY.

EN 24
7 Cleaning and maintenanceTo ensure the efficient functioning of your easyFan, all componentsmust be regularly
checked and maintained.
7.1 Maintenance interval
Component Interval What is to be done
Inside grille Once every
three months
• Wipe the surface with a damp cloth.
Dustfilter Once every
three months
• Useavacuumcleanertofreethefilterofdust.
• Then wash it warm water.
• Replaceanycloggedup/defectivefilter.
Pollenfilter Once a month • Useavacuumcleanertofreethefilterofany
pollen.
• Replaceanycloggedup/defectivefilter.
Fan unit Once a year • Clean the fan unit using a brush first, then a
vacuum cleaner.
Heat exchanger
unit
Once a year • Use a vacuum cleaner to clean the heat
exchanger.
• Hold it under the tap and wash it with warm
water.
Controls Once a month • Wipethesurfacewithamicrofibrecloth.

25 EN
7.2 Maintenance instructions
WHEN CARRYING OUT MAINTENANCE WORK, THE SYSTEM MUST BE SWITCHED OFF.
WHEN CARRYING OUT MAINTENANCE WORK ON THE FAN UNIT, THE SYSTEM MUST BE DISCONNECTED FROM THE MAINS.
NEVER PULL THE PLUG OUT OF THE FAN UNIT BY THE CABLE. USE A PAIR OF PLIERS AND PULL ON THE PLUG.
7.2.1 Dust filter / pollen filter maintenance
Step 1: Pull the inside cover out of the mounting tube.
Step 2: Removethefilterfrom its holder.
Step 3: Checkthefilter.When necessary, clean or replace it.
Step 4a - Dust filter: Replacethefilterinitsholder.
Step 4b - Pollen filter: Insertthefilterunitintotheholder with the lighter side first.
Step 5: Reinsert the inside cover (with the air intake pointingupwards)intothemounting tube.
EN 26
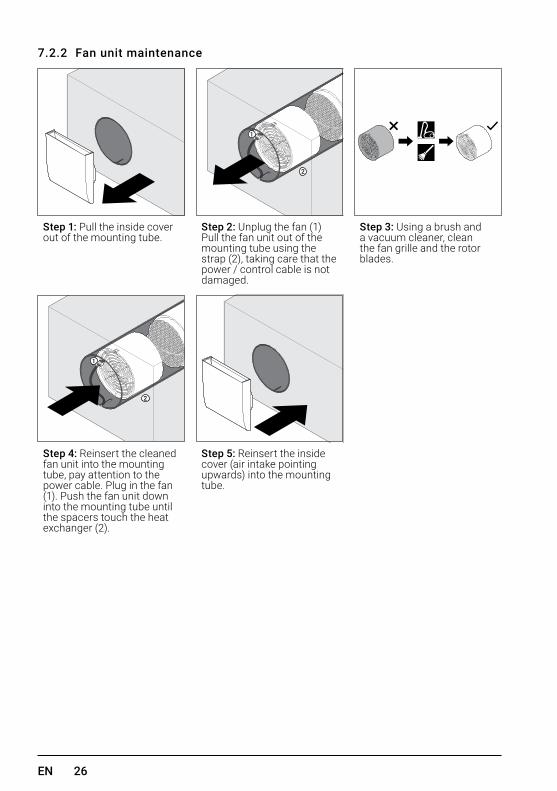
7.2.2 Fan unit maintenance
Step 1: Pull the inside cover out of the mounting tube.
Step 2:Unplugthefan(1)Pull the fan unit out of the mounting tube using the strap(2),takingcarethatthepower / control cable is not damaged.
Step 3: Using a brush and a vacuum cleaner, clean the fan grille and the rotor blades.
Step 4: Reinsert the cleaned fan unit into the mounting tube, pay attention to the power cable. Plug in the fan (1).Pushthefanunitdowninto the mounting tube until the spacers touch the heat exchanger(2).
Step 5: Reinsert the inside cover (air intake pointing upwards)intothemountingtube.

27 EN
7.2.3 Heat exchanger maintenance
Step 1: Pull the inside cover out of the mounting tube.
Step 2: Unplugthefan(1).Pull the fan unit out of the mounting tube using the strap(2),takingcarethatthepower cable is not damaged.
Step 3: Pull the heat exchan-ger unit out of the mounting tube using the strap, taking care that the power / sensor cable is not damaged.
Step 4: Clean the heat exchanger unit using a vacuum cleaner or wash with warm water. Only clean the ceramic parts with water!Let the heat exchanger dry.
Step 5: Reinsert the heat exchanger in the mounting tube, taking care not to damage the cables in the mounting tube.
Step 6: Reinsert the cleaned fan unit into the mounting tube.Pluginthefan(1).Push the fan unit down into the mounting tube until the spacers touch the heat exchanger(2).
Step 7: Reinsert the inside cover (with the air intake pointingupwards)intothemounting tube.

EN 28
8 TroubleshootingFault Cause Remedy
Fan unit not changing direction.
Control unit operating in "full-blast" mode.
• Set the controls to eco-mode (heatrecovery).
Fan unit not working.properly. • Replace the fan unit.
Control unit / power supply not working properly.
• Replace the control unit / power supply.
Fan unit not functioning.
No power. • Restore power supply.
Installation error.• Check the cabling and wiring.• Check whether all plugs have
been properly connected.
Fan unit not working properly. • Replace the fan unit.
Control unit / power supply not working properly.
• Replace the control unit / power supply.
Control unit not functio-ning.
Installation error.• Check the cabling and wiring.• Check that the control unit is
installed correctly.
Power supply not working properly. • Replace the power supply.
Control unit not working properly. • Replace the control unit.
Noise level higher than normal when operating in normal mode.
Rotor blades dirty.• Clean the rotor blades.• Clean the ventilation unit.
Dirt or other elements in the fan.
• Remove dirt or other elements.• Clean the ventilation unit.
Distance between the heat exchanger unit and fan unit too small.
• Check the spacers on the fan unit.
• Increase the distance.
Fan speed too high. • Switch to a lower speed.

29 EN
Fault Cause Remedy
Low level of airflow.
Inside cover is shut. • Open the inside cover.Filter clogged up. • Cleanthefilterorreplaceit.
Heat exchanger unit dirty.• Clean the heat exchanger unit.• Clean the ventilation unit.
Fan speed too low. • Switch to a higher speed.Units not working in conjuncti-onwitheachother(inpairs).
• Check that the units are correctly connectedto the control unit.
Incoming air is cold.
Control unit is operating in „full-blast“ mode.
• SelectEco-mode(heatrecovery)at the control unit.
Heat exchanger unit missing. • Insert the heat exchanger.

EN 30
9 DisposalDue to little or no harmful materials being used in their production, the majority of compo-
nents described in these operating instructions can be recycled. Should you want to dis-
pose of your ventilation unit, please do so in accordance with current national regulations.
Contact the appropriate authority. Packaging material should be sorted before disposal.
Disposal recommendations for all components:
Component Material Disposal
Inside cover ASA Collection of recyclable materials
Outside cover ASA Collection of recyclable materials
Outside grille ASA Collection of recyclable materials
Outside hood Stainless steel Metal recycling
Fan unit EPP / Electrical
components
Electronics recycling
Heat exchanger unit Ceramics / PUR Collection of recyclable materials
Dustfilter PE Household refuse
Pollenfilter PP Household refuse
Mounting tube PPs Collection of recyclable materials
Control units ABS / Electrical
components
Electronics recycling

31 EN
10 Technical data10.1 easyFan
Heat recovery rate Up to 90%
Level 1 Level 2 Level 3 Level 4
AirflowvolumeEco-mode/full-blastmode1)[m³/h] 16 22 30 43
SoundpressureleveldB(A) 14 20 32 35
Energy comsumption2)[W] 0.9 1.1 1.6 2.8
Input voltage [V] 12 DC SELV
Type of protection IP 22
Software class A
Specificpowerinput3)[W/(m³/h] min 0.12
Standard sound level difference Dn,w [dB] 40 / 443)
Air intake free of aggressive gases, dust and oil
Permissible operating temperature [°C] -20 ... 60
Diameter of the core hole [mm] 162
Minimum wall thickness4)[mm] 280
Optimal wall thickness [mm] 315 or thicker
Size of the inside cover 190x214x40(WxHxD)
Size of the outside cover 197x205x46(WxHxD)
Weight [kg] 4.6
Energyefficiencyclass(VO1254/2014) A
Conformity
1) when operated in pairs2)without power supply unit3)with optional sound insulation set4) when using a metal outside hood

EN 32
10.2 PUSH control unit
Operating voltage [V] 12 DC
Power consumption [W] 1.2
Software class A
Permissible operating temperature [°C] 0 ... 40
Type of protection IP 40
Contamination level 2
Dimensions [mm] 150x75x10(WxHxD)
Colour White
Conformity

2016 1254/2014
dB
ENERGIA · ЕНЕРГИЯ · ΕΝΕΡΓΕΙΑ · ENERGIJA · ENERGY · ENERGIE
A++
A+
m3/h
A
easyFan
43 43
33 EN
11 Energyefficiencylabelandproductinformationsheet11.1 Energy efficiency label

Produktdatenblatt (gem. VO 1254/2014 EU vom 11. Juli 2014) / Product datasheet (acc. REG 1254/2014 EU of 11 July 2014)
P. Beschreibung / Description Werte / Data
a Lieferant / Supplier‘s name getAir
b Modellkennung / Supplier‘s model identifier easyFan
c SEV-Klasse /Spezifischer EnergieverbrauchSEC class / Specific energy consumption [kWh/m²a]
kalt/cold A+ -82,48
durchschnittlich/average A -40,61
warm/warm E -16,62
d Lüftungstyp / Typology ZLG / BVU
e Art des Antriebes / Type of drive installed 1,5
f Art Wärmerückgewinnung / Type of heat recovery system Regenerativ / regenerative
g Temperaturänderungsgrad ƞt / Thermal efficiency of heat recovery [%] 0,825
h Höchster Luftvolumenstrom / Maximum flow rate [m³/h] 43
i Elektrische Eingangsleistung1) (inkl. Regelung) / Electric power input [W] 5,6
j Schallleistungspegel Lwa / Sound power level [dB(A)] 42,7
k Bezugsluftvolumenstrom / Reference flow rate [m³/h] 30
l Bezugsdruckdifferenz / Reference pressure difference [Pa] 0
m SEL / SPI [W/m³/h] 0,118
n Steuerungsfaktor / Control factor 0,85
o Innere und äußere Übertragung / Internal and external leakage rate [%] 0
p Mischquote / Mixing rate [%] 0
q Lage und Beschreibung der Filterwechselanzeige / Position of visual filter warning
Steuerung (optische Anzeige) / Control (visual
display)
r Anweisungen zu regelbaren Zu- und Abluftgittern an der Fassade (nur Ein-Richtungs-LG) / Regulatetd supply and exhaust grills in the facade -
s Internetadresse / Internet address www.getair.eu
t Druckschwankungsempfindlichkeit / Airflow sensitivity [%] 69
u Luftdichtheit zw. innen und außen / indoor and outdoor air tightness [m³/h] 2,0
v Jährlicher Stromverbrauch / Annual electricity consumption [kWh/(m²a)] 1,27
w Jährliche Einsparung Heizenergie / Annual heating saved kWh/(m²a)]
kalt/cold 85,67
durchschnittlich/average 43,79
warm/warm 19,80
1) without power supply unit
EN 34
11.2 Product information sheet

12.1 Warranty conditions
getAir GmbH & Co. KG provides a 24-month warranty on its easyFan ventilation system
(or30monthsfromtheeasyFan‘sdateofmanufacture).Warrantyclaimsapplysolelyto
material and/or construction faults which occur during the warranty period. Under the
warranty conditions, repairs may only be carried out with getAir‘s prior written consent. A
warranty on components exists solely when these have been supplied by the manufactu-
rer and have been installed by a technician recognised by the manufacturer.
The warranty expires in the following cases:
• whenthewarrantyperiodhascometoanend;
• whenafilterisusedthathasnotbeenapprovedbythefanunitmanufacturer;
• whennon-originalreplacementpartsareinstalled;
• whentheunitisusedincorrectly/improperly;
• whenthefaults/defectsaretheresultoffaultyinstallation,improper/incorrect
useordirt;
• whenunapprovedchangesormodificationshavebeenmadetothesystem.
OUTSIDE GERMANY, THE WARRANTY IS COVERED BY THE WARRANTY REGULA-TIONS OF THE COUNTRY IN WHICH THE SYSTEM WAS SOLD. IN SUCH A CASE, PLEASE CONTACT THE DISTRIBUTOR IN YOUR HOME COUNTRY.
35 EN
12 Warranty
12.2 Liability
The system has been developed and manufactured for the decentralised ventilation of
homes and functional premises.
Any other usage is considered to be improper and can cause damage to the easyFan or to
persons. In such a case, the manufacturer cannot be held liable. The manufacturer cannot
be held liable for any damage resulting from one of the following causes:
• whenthesafety,operatingandmaintenanceinstructionscontainedinthis
documenthavenotbeenfollowed;
• whentheinstallationwasnotperformedcorrectly;
• whennon-originalreplacementparts(notapprovedbythemanufacturer)are
installed;
• whenthefaults/defectsaretheresultoffaultyinstallation,improper/incorrect
useordirt;
• Normalwearandtear.
12.3 Complaints
Please check the contents of the delivered material in accordance with the delivery note.
Also check for any transport damage. Report any missing items to your supplier within
four weeks of delivery.
12.4 Documentation
Theabovedocumentationdescribes the functionalityof thestandardconfiguration.To
maintain clarity, we are unable to take account of every possible installation, operating or
maintenanceconfiguration.Thediagramsinthisdocumentationmaydeviateslightlyfrom
the design of the product you have purchased. Even when this is the case, the functions
basically remain the same.
12.5 Service
For technical advice, please contact your supplier, dealer or our service staff.
EN 36

13 Attachment13.1 Accessories
Article Article no.
General
easyFandustfilterset(4filters) 101430
easyFanpollenfilterset(4filters) 101431
Sound insulation set 2R 101221
Control unit
PUSH control unit 101100
Pattress box for the PUSH control unit 101160
Power supply unit 12 V
(forinstallationinapattressbox)
102150
DIN rail power supply unit 12V 102151
Installation
Pre-fabricated installation block 100220
Mounting tube 500 mm 100440
Mounting tube 700 mm 100441
Mounting adhesive / sealant 100222
Special versions:
Reveal building shell set 90 100240
Reveal building shell set 60 100241
Roof building shell set DA 100251
Cellar building shell set KA 100260
Replacement parts
easyFan inside cover 101400
easyFan outside cover 101401
easyFan fan unit 101410
easyFan heat exchanger unit 101420
A complete list of accessories and replacement parts is available on our website:
www.getair.eu
37 EN

13.2 Cabling protocol
Ventilati-on unit
FloorName of the room and ventilation unit
position
Initial direction
Air intake Exhaust
1
2
3
4
5
6
7
8
9
10
11
12
13
14
15
16
17
18
19
20
21
22
23
24
EN 38


