19
Asunto: WebBilling FAQ Impreso: 22/02/2011 Página 1 de 19 Origen: FSC Versión: 2011-v3 EBILLING FAQ

Asunto: WebBilling FAQ
Impreso: 22/02/2011 Página 1 de 19
Origen: FSC Versión: 2011-v3
EBILLING FAQ
Asunto: WebBilling FAQ
Impreso: 22/02/2011 Página 2 de 19
Origen: FSC Versión: 2011-v3
Contents
1. Which web page you should access to upload the invoices ................................................................ 3
2. Invoice management ........................................................................................................................... 4
2.1 How to create an individual invoice ................................................................................................... 4
2.2 File upload .......................................................................................................................................... 9
2.2.1 How to create the file for a massive upload ............................................................................... 9
2.2.2 How to upload the file .............................................................................................................. 13
2.3 How to upload an invoice or file with different rates ...................................................................... 13
2.4 How to upload an invoice or file with different taxes ...................................................................... 14
2.5 How to view the invoices that you have sent ................................................................................... 14
3. User management .................................................................................................................................. 16
3.1 How to reset the access codes ......................................................................................................... 16
3.2 How to change your access codes.................................................................................................... 19
Asunto: WebBilling FAQ
Impreso: 22/02/2011 Página 3 de 19
Origen: FSC Versión: 2011-v3
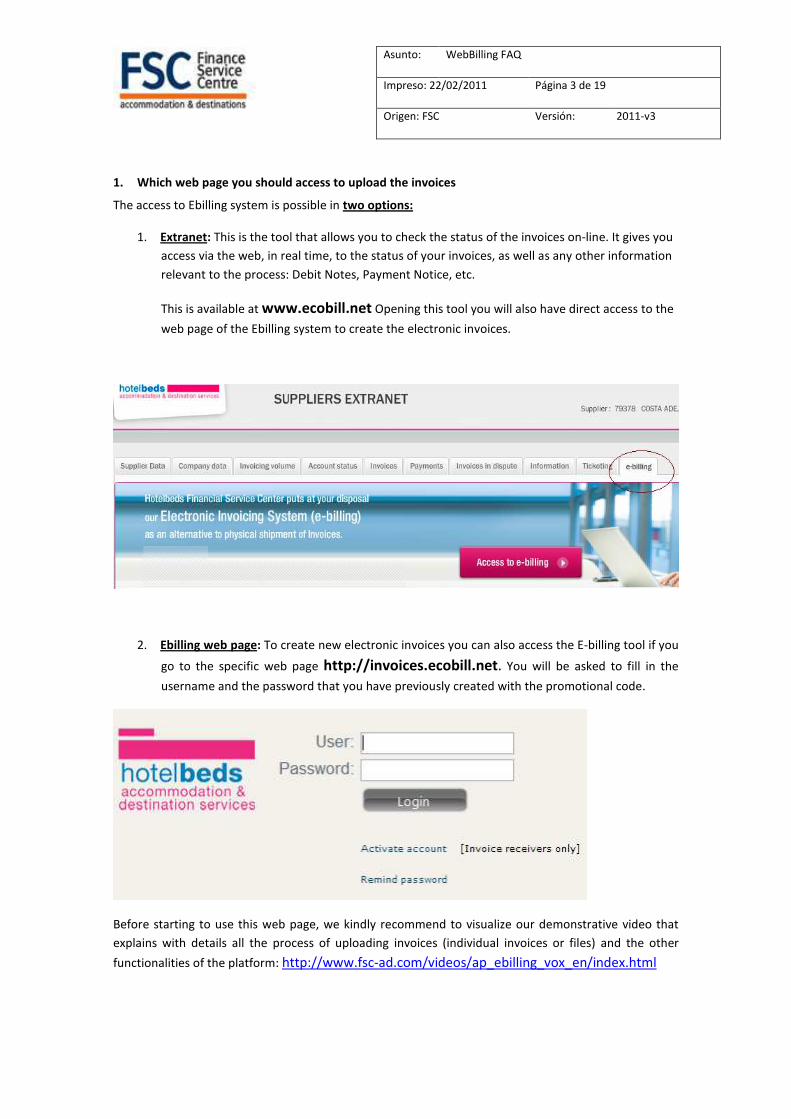
1. Which web page you should access to upload the invoices
The access to Ebilling system is possible in two options:
1. Extranet: This is the tool that allows you to check the status of the invoices on-line. It gives you
access via the web, in real time, to the status of your invoices, as well as any other information
relevant to the process: Debit Notes, Payment Notice, etc.
This is available at www.ecobill.net Opening this tool you will also have direct access to the
web page of the Ebilling system to create the electronic invoices.
2. Ebilling web page: To create new electronic invoices you can also access the E-billing tool if you
go to the specific web page http://invoices.ecobill.net. You will be asked to fill in the
username and the password that you have previously created with the promotional code.
Before starting to use this web page, we kindly recommend to visualize our demonstrative video that
explains with details all the process of uploading invoices (individual invoices or files) and the other
functionalities of the platform: http://www.fsc-ad.com/videos/ap_ebilling_vox_en/index.html

Asunto: WebBilling FAQ
Impreso: 22/02/2011 Página 4 de 19
Origen: FSC Versión: 2011-v3
2. Invoice management
2.1 How to create an individual invoice
The WebBilling Module is accessible from the left menu of the Clients Area as shown on figure 1.
Figure 1.
To write out an invoice you will need to fill in first the Invoice Header information form and afterwards
the Invoice Details form. It will be possible to navigate between these two forms in order to make any
necessary amendments:
- Invoice Header information
- Invoice Details
Invoice Header Tab
The data required in the Invoice Header tab are described next (figure 2):

Asunto: WebBilling FAQ
Impreso: 22/02/2011 Página 5 de 19
Origen: FSC Versión: 2011-v3
Figure 2.
- Sender: The suppliers name has to be added here. By default the system will use the name of the
supplier logged into the Clients area.
- Client: the customer has to be selected here. A combo box showing all your WebBilling possible
recipients will help you select the right company.
- Invoice number: The invoice number has to be added here
- Invoice type: it is required to select either a Debit or a Credit note type for the invoice. The system
defaults to debit.
- Date: Issue date of the invoice.
- Total: total amount of the invoice
- Currency: the currency in which invoice amounts are specified has to be input here.
- Invoice line amounts are tax included: this checkbox (selected by default) is used to specify that the
total amounts in the line items include taxes.
- Specify Tax rate in all lines: when selecting this checkbox two new fields appear for the selection of
the Tax type and the Tax rate. The specified rate will apply to every line item of the invoice.
- Comments: optional field used to add any additional comment to the invoice.

Asunto: WebBilling FAQ
Impreso: 22/02/2011 Página 6 de 19
Origen: FSC Versión: 2011-v3
It is necessary to fill in all fields in the Header tab in order to proceed to the Detailstab using the option
“Enter line items>>”.
In the event that a header field was not correctly filled out the system will show this field with an error
icon next to it (figure 3). When selecting the error field
Figure 3.
The “Delete invoice” button allows you to erase all input data and reset the form to blank or the default
stage.
Details Tab
Within the Details Tab it is possible to enter the data for each line item of the invoice.
This form has a double function:
- On one hand you have to introduce each line of the invoice. The system will calculate the total amount
of the detail lines and add them up in the “Cumulative Total” tag.
- On the other hand the Cumulative Total is updated according to the data input
on the detail lines. The system checks automatically that this amount equals the total amount input at
the Header Tab or Declared total. If these amounts are not the same it will not be possible to send the
invoice, showing an error:
“Sum of line item amounts does not match the total amount specified in the invoice header.”
The Details tab shows a list of the invoice lines already entered together with an option to add new lines
(figure 4).
Figure 4.
When pressing the “New line item” button, a window pop-up appears to create the new line (figure 5).
The fields contained in this window are described next. Please bear in mind that it is mandatory to fill in
all fields marked with an asterisk (*) together with those expressly requested by your client recipient of
the invoice.

Asunto: WebBilling FAQ
Impreso: 22/02/2011 Página 7 de 19
Origen: FSC Versión: 2011-v3
Figure 5.
- Sender Ref #: The internal reference number of the supplier for this line item has to be input here (this
field is normally left blank).
- Hotelbeds Booking #: This field is essential and, therefore, mandatory.
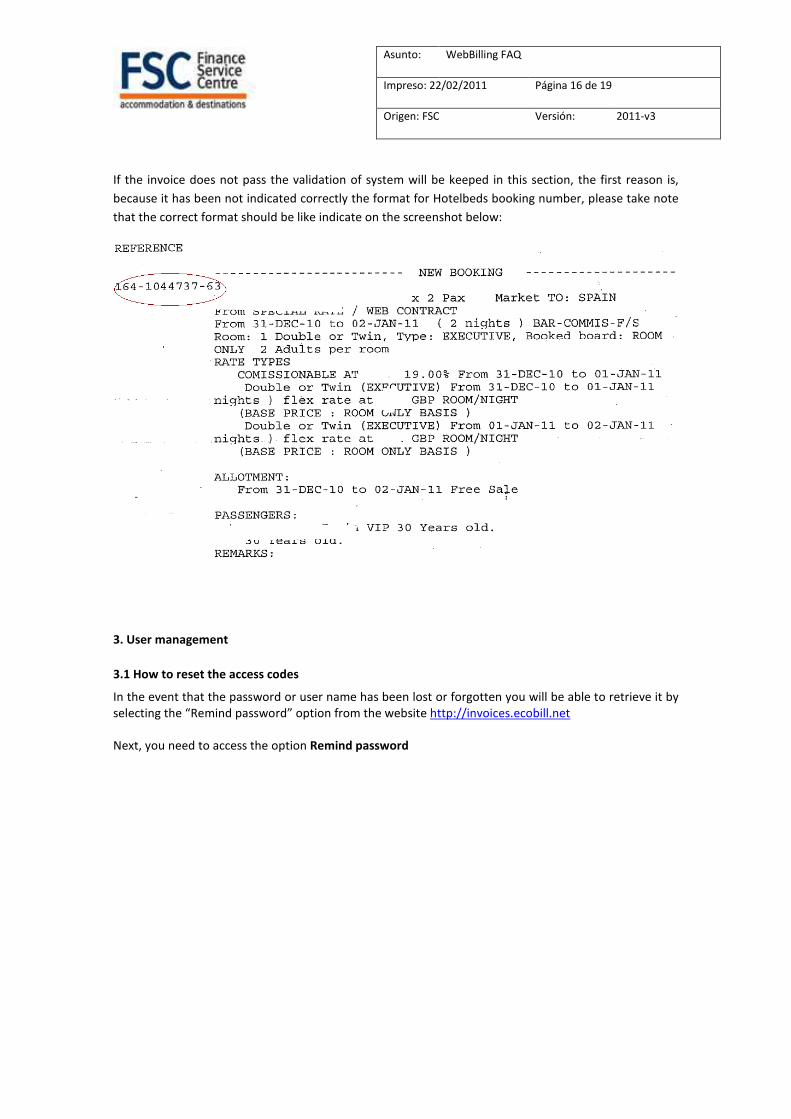
IMPORTANT! The booking must have the Hotelbeds booking number structure: receptive-reservation-
control digits. For example: 164-1044737-63. This information it is provided on the voucher sent by
Hotelbeds Booking Department:
- Pax leader: Name of the person who made the reservation. This field is mandatory.
- Pax #: Number of people.
- Check-in Date: The check-in date has to be input here. This field contains a calendar to ease the search
of the date. This field is mandatory by default.

Asunto: WebBilling FAQ
Impreso: 22/02/2011 Página 8 de 19
Origen: FSC Versión: 2011-v3
- Check-out Date: The check-out date has to be input here. This field contains a calendar to ease the
search of the date. This field is mandatory by default.
- Comment: optional field used to add any additional comment to the detail line.
- Quantity: Number of invoiced units of the service (i.e., number of nights to be invoiced at a given unit
price). This field is mandatory by default.
- Description: Description of the service. This field is mandatory by default.
- Unit Price: Rate applicable to every unit specified in the quantity field. The amount has to be specified
with no discounts but including or not taxes according to the Invoice line amounts are tax included field
of the Header Tab. Otherwise the amount has to be specified with no tax. This field is mandatory by
default.
- Discounts: The amount of any applicable discounts has to be specified in this field.
- Tax %: This field is used to introduce the tax percentage. This field is mandatory by default.
- Tax amount: The amount of tax has to be input in this field. As an option it is possible to use the field
Apply % to automatically calculate the tax amount.
- Tax type: This field is used to identify the tax type.
The fields Net Total and Line Total are updated when any data is introduced in the detail line window.
The “Save line item” button adds the new line to the invoice (figure 6).
Figure 6.
The “Edit” button allows you to edit each detail line separately to modify any value; the “Modify
line” button located at the bottom of the edition window will apply the changes to the line.
The “Erase” button allows you to delete the corresponding detail line.
The system automatically updates the field Cumulative total according to the data input on each detail
line. When all the detail lines have been introduced the system compares the Cumulative Total with the
Total amount input at the Header Tab or Declared total. If these amounts are not the same it will not be
possible to send the invoice and an error message will be displayed.
It is possible to navigate to the Header tab using the option “<<Modify invoice
header”>> to modify any data from the invoice header.
Asunto: WebBilling FAQ
Impreso: 22/02/2011 Página 9 de 19
Origen: FSC Versión: 2011-v3
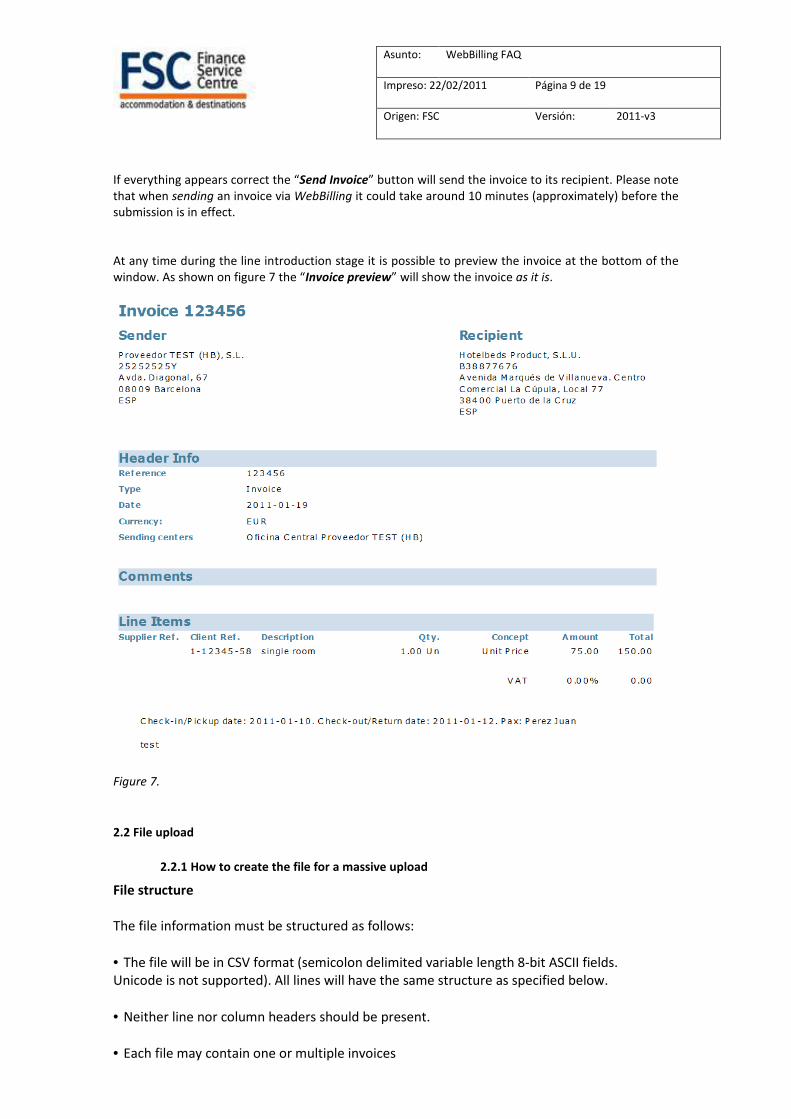
If everything appears correct the “Send Invoice” button will send the invoice to its recipient. Please note
that when sending an invoice via WebBilling it could take around 10 minutes (approximately) before the
submission is in effect.
At any time during the line introduction stage it is possible to preview the invoice at the bottom of the
window. As shown on figure 7 the “Invoice preview” will show the invoice as it is.
Figure 7.
2.2 File upload
2.2.1 How to create the file for a massive upload
File structure
The file information must be structured as follows:
• The file will be in CSV format (semicolon delimited variable length 8-bit ASCII fields.
Unicode is not supported). All lines will have the same structure as specified below.
• Neither line nor column headers should be present.
• Each file may contain one or multiple invoices
Asunto: WebBilling FAQ
Impreso: 22/02/2011 Página 10 de 19
Origen: FSC Versión: 2011-v3
• Each invoice may contain one or multiple booking numbers
• For each booking number, there may be multiple lines representing separate invoiced
Services
• Lines must be terminated by a line-feed character. Carriage return characters may appear,
but will be ignored.
• Numeric values should only contain numbers and full-stops (periods) as decimal separators.
Any negative numbers should be preceded by a minus sign.
• All amounts will be tax inclusive
• Discounts will be indicated as detail lines with negative amount.
• Dates should be in ISO format, i.e. DD-MM-YYYY.
• Currencies should be in 3 digit standard ISO 4217 format.
• In case a field is not used, two contiguous semicolons, i.e. “;;”, must be inserted.
• The file name must start with a constant prefix, such as “Invoice”. Any prefix is allowed but
the use of the “Invoice” prefix is recommended.
Asunto: WebBilling FAQ
Impreso: 22/02/2011 Página 11 de 19
Origen: FSC Versión: 2011-v3
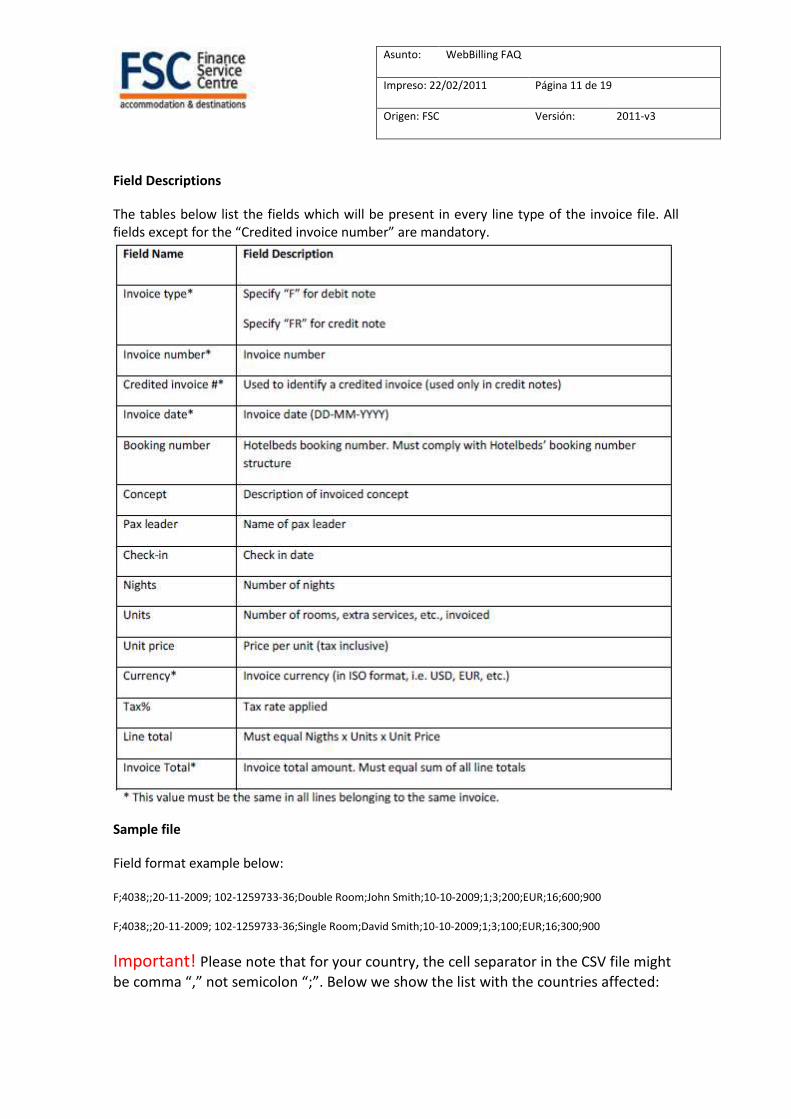
Field Descriptions
The tables below list the fields which will be present in every line type of the invoice file. All
fields except for the “Credited invoice number” are mandatory.
Sample file
Field format example below:
F;4038;;20-11-2009; 102-1259733-36;Double Room;John Smith;10-10-2009;1;3;200;EUR;16;600;900
F;4038;;20-11-2009; 102-1259733-36;Single Room;David Smith;10-10-2009;1;3;100;EUR;16;300;900
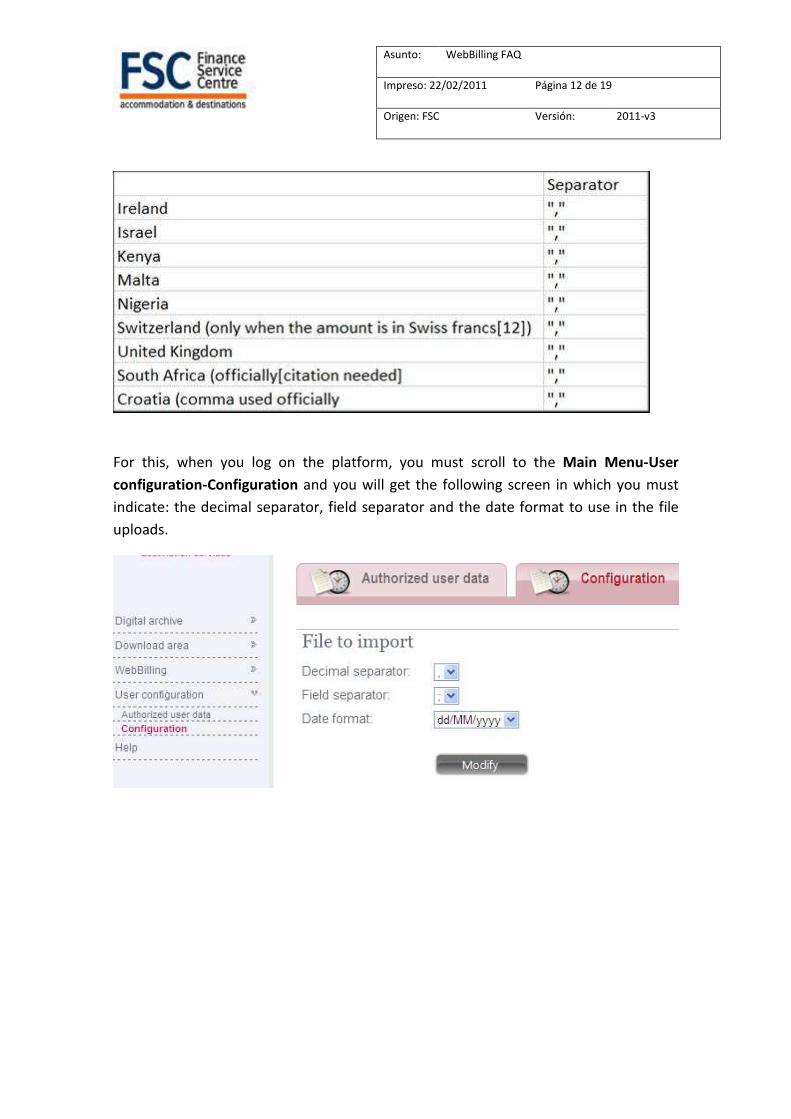
Important! Please note that for your country, the cell separator in the CSV file might
be comma “,” not semicolon “;”. Below we show the list with the countries affected:
Asunto: WebBilling FAQ
Impreso: 22/02/2011 Página 12 de 19
Origen: FSC Versión: 2011-v3
For this, when you log on the platform, you must scroll to the Main Menu-User
configuration-Configuration and you will get the following screen in which you must
indicate: the decimal separator, field separator and the date format to use in the file
uploads.

Asunto: WebBilling FAQ
Impreso: 22/02/2011 Página 13 de 19
Origen: FSC Versión: 2011-v3
2.2.2 How to upload the file
In order to upload a file you will have to select WebBilling -> import invoice file:
After that you will have to search the file already created on your own computer and selected in order
to upload the file.
Remember that the file must be exactly as explained and with the correct File structure and fields
format. Otherwise you will not be able to upload the invoices.
Important! After you click the button “Import” to upload a file, it might late a few minutes in
finishing the process. Afterwards, please refresh the page.
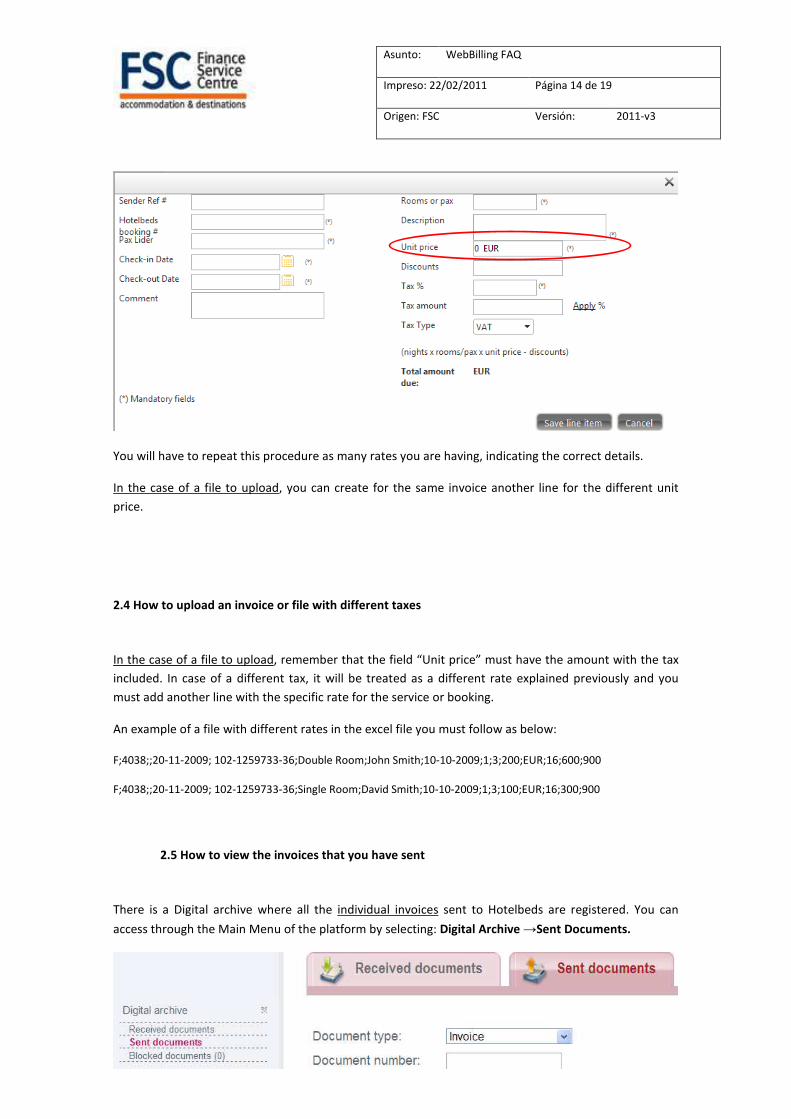
2.3 How to upload an invoice or file with different rates
In the case of individual invoice, you will have to create a line item per each rate that you have on the
invoice.
Remember: Select New line item
And introduce the details of the service and indicate the rates you want to introduce
Asunto: WebBilling FAQ
Impreso: 22/02/2011 Página 14 de 19
Origen: FSC Versión: 2011-v3
You will have to repeat this procedure as many rates you are having, indicating the correct details.
In the case of a file to upload, you can create for the same invoice another line for the different unit
price.
2.4 How to upload an invoice or file with different taxes
In the case of a file to upload, remember that the field “Unit price” must have the amount with the tax
included. In case of a different tax, it will be treated as a different rate explained previously and you
must add another line with the specific rate for the service or booking.
An example of a file with different rates in the excel file you must follow as below:
F;4038;;20-11-2009; 102-1259733-36;Double Room;John Smith;10-10-2009;1;3;200;EUR;16;600;900
F;4038;;20-11-2009; 102-1259733-36;Single Room;David Smith;10-10-2009;1;3;100;EUR;16;300;900
2.5 How to view the invoices that you have sent
There is a Digital archive where all the individual invoices sent to Hotelbeds are registered. You can
access through the Main Menu of the platform by selecting: Digital Archive →Sent Documents.

Asunto: WebBilling FAQ
Impreso: 22/02/2011 Página 15 de 19
Origen: FSC Versión: 2011-v3
In the case of the uploaded files, you can access through the Main Menu of the platform by selecting:
Webbilling → Import invoice file you can visualize two steps: 1. Import: to upload the file and 2.
Imported files: to check the status of the sent files.
2.6. How to view the invoices that haven't been sent (BLOCKED DOCUMENTS)
In the case that the invoice has not passed the validation, these will be registered in the Main Menu. You can access through the Main Menu of the platform by selecting: Digital archive →Blocked
documents
Asunto: WebBilling FAQ
Impreso: 22/02/2011 Página 16 de 19
Origen: FSC Versión: 2011-v3
If the invoice does not pass the validation of system will be keeped in this section, the first reason is,
because it has been not indicated correctly the format for Hotelbeds booking number, please take note
that the correct format should be like indicate on the screenshot below:
3. User management
3.1 How to reset the access codes
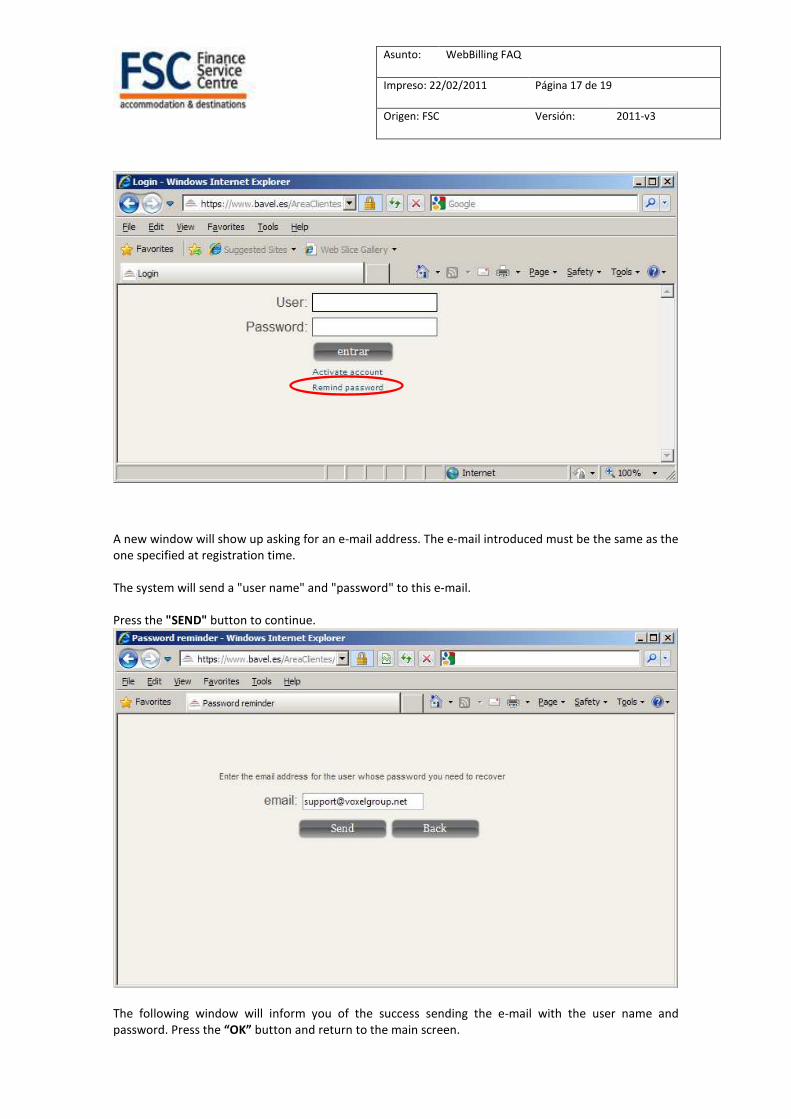
In the event that the password or user name has been lost or forgotten you will be able to retrieve it by
selecting the “Remind password” option from the website http://invoices.ecobill.net
Next, you need to access the option Remind password
Asunto: WebBilling FAQ
Impreso: 22/02/2011 Página 17 de 19
Origen: FSC Versión: 2011-v3
A new window will show up asking for an e-mail address. The e-mail introduced must be the same as the
one specified at registration time.
The system will send a "user name" and "password" to this e-mail.
Press the "SEND" button to continue.
The following window will inform you of the success sending the e-mail with the user name and
password. Press the “OK” button and return to the main screen.

Asunto: WebBilling FAQ
Impreso: 22/02/2011 Página 18 de 19
Origen: FSC Versión: 2011-v3
The system will automatically send an e-mail to confirm that the process ended successfully.
Next, you will receive a mail with a link, where you will be able to create your username and password,
like the below one.
Asunto: WebBilling FAQ
Impreso: 22/02/2011 Página 19 de 19
Origen: FSC Versión: 2011-v3
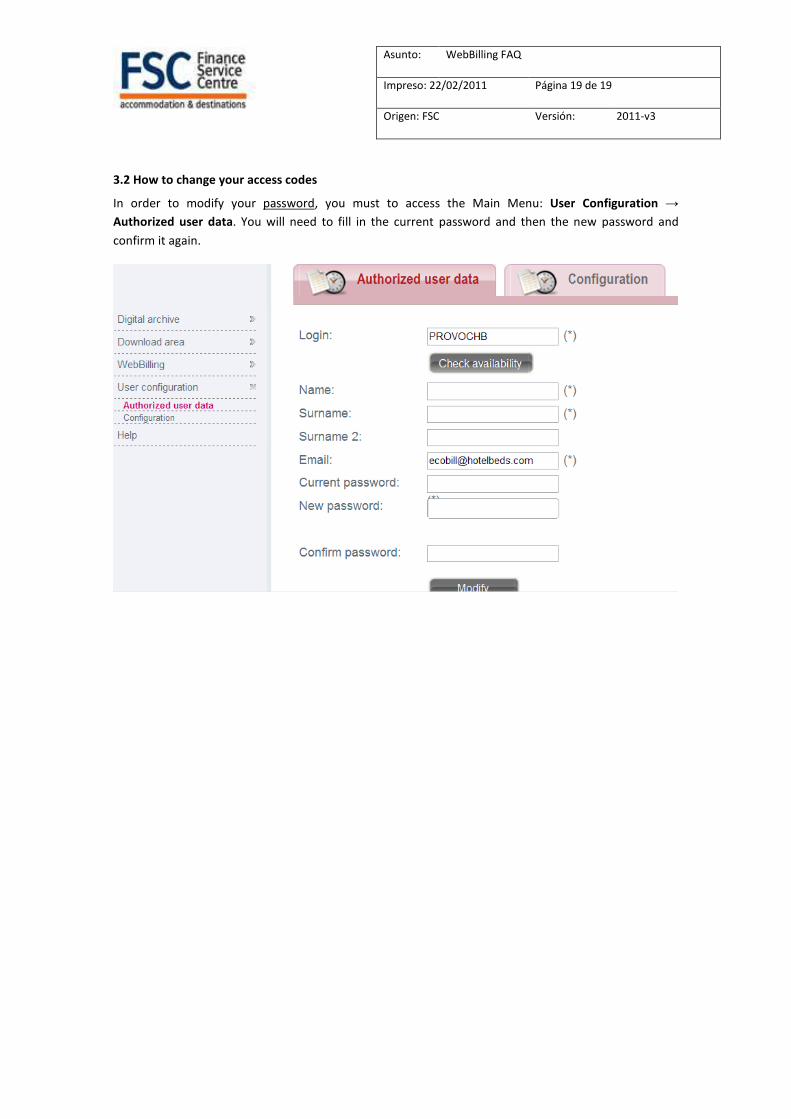
3.2 How to change your access codes
In order to modify your password, you must to access the Main Menu: User Configuration →
Authorized user data. You will need to fill in the current password and then the new password and
confirm it again.


