34
eCDF Plateforme électronique de Collecte des Données Financières U SER G UIDE FOR THE PDF S OLUTION C ENTRE DES T ECHNOLOGIES DE L ’I NFORMATION DE L ’É TAT Ver : 2.0

eCDF Plateforme électronique de Collecte des Données Financières
USER GUIDE FOR THE PDF SOLUTION
CENTRE DES TECHNOLOGIES DE L’INFORMATION DE L’ÉTAT Ver : 2.0

CTIE eCDF-PDF_Solution_user_documentation-2.0-EN.pdf - 1 -
Table of contents
TABLE OF CONTENTS 1
1. PUBLIC ECDF PAGES 2
1.1. SELECTING A FORM 2 1.2. FUNCTION BUTTONS 3
1.2.1. FORM PREVIEW 3 1.2.2. DESCRIPTION AND TERMS OF A FORM DEPOSIT 4 1.2.3. VALIDATION RULES 5
2. ACCESS TO ADVANCED ECDF FUNCTIONALITY 6
2.1. ECDF ACCESS REQUEST 6 2.1.1. REQUEST OF A FIRST ECDF ACCESS 6 2.1.2. REQUEST FOR MODIFICATION OF AN EXISTING ECDF ACCESS 7
2.2. ACCESS TO THE EXTERNAL APPLICATION CI.GUE 8 2.3. ACCESS TO THE EXTERNAL APPLICATION CI.MAN 9 2.4. ACCESS TO THE ECDF PLATFORM 9
3. ECDF DECLARER FOR HIMSELF 10
3.1. GENERAL PRESENTATION OF THE DECLARER’S MENUS 10 3.2. PREPARING A PDF DECLARATION 11
3.2.1. PAGE FOR CREATING A DECLARATION AS A FILLABLE PDF 11 3.2.2. GENERAL PRESENTATION OF A FILLABLE PDF FORM 12 3.2.3. STANDARD CAPTURE OF A PDF FORM 15 3.2.4. SPECIFIC CAPTURE OF THE CHARTS OF ACCOUNTS (PCN) 16 3.2.5. VALIDATING AND SAVING ON THE SERVER 17 3.2.6. ECDF DEPOSIT 20 3.2.7. SAVE LOCALLY 21
3.3. FINDING ONGOING PDF DECLARATIONS 22 3.4. DEPOSITED DECLARATIONS 23
3.4.1. LIST OF DEPOSITED DECLARATIONS 23 3.4.2. DEPOSIT SEARCH 24
3.5. SPECIAL CASES FOR THE DECLARER 25 4. ECDF AGENT 26
4.1. USING CI.GUE 26 4.2. USING CI.MAN 26
4.2.1. DEFINING A PRINCIPAL 27 4.2.2. DEFINING A MANDATE 27
4.3. PREPARING A PDF DECLARATION 28 4.3.1. PAGE FOR CREATING A DECLARATION AS A FILLABLE PDF 28
4.4. FINDING AN ONGOING DECLARATION 29 4.5. DEPOSITED DECLARATIONS 31
4.5.1. LIST OF DEPOSITED DECLARATIONS 31 4.5.2. DEPOSIT SEARCH 32
4.6. SPECIAL CASES FOR THE AGENT 33

CTIE eCDF-PDF_Solution_user_documentation-2.0-EN.pdf - 2 -
1. Public eCDF pages The platform for electronic gathering of financial data (eCDF) is accessible at the URL www.eCDF.lu and a part of the functionality is immediately visible (without logging in). The most important information is :
information on technical requirements ; access information, with the subscription form for the system ; user documentation, like this document.
and mainly :
a preview of all available forms, together with their description and the corresponding validation rules.
All information about forms can be found via the “Forms” menu.
1.1. Selecting a Form
Figure 1 – Form Selection
Selecting a form is done by choosing values from four drop-down lists which are activated one after the other during the selection :
Category : allows to choose the business domain of the form searched for, like for example annual accounts, VAT declarations, declaration appendices, etc. ;
Type : As soon as a category has been selected, all types of forms corresponding to that category are displayed in this list ;
Period : this drop-down list allows to choose the form’s reference year (the beginning of the financial year) ;
Language : allows to choose the form’s display language, without changing the website’s language for displaying the description and the validation rules. Depending on the type of form, the possible languages are French, German and English, the site itself being available in these three languages (see the flags at the top right of the screen).
CTIE eCDF-PDF_Solution_user_documentation-2.0-EN.pdf - 3 -
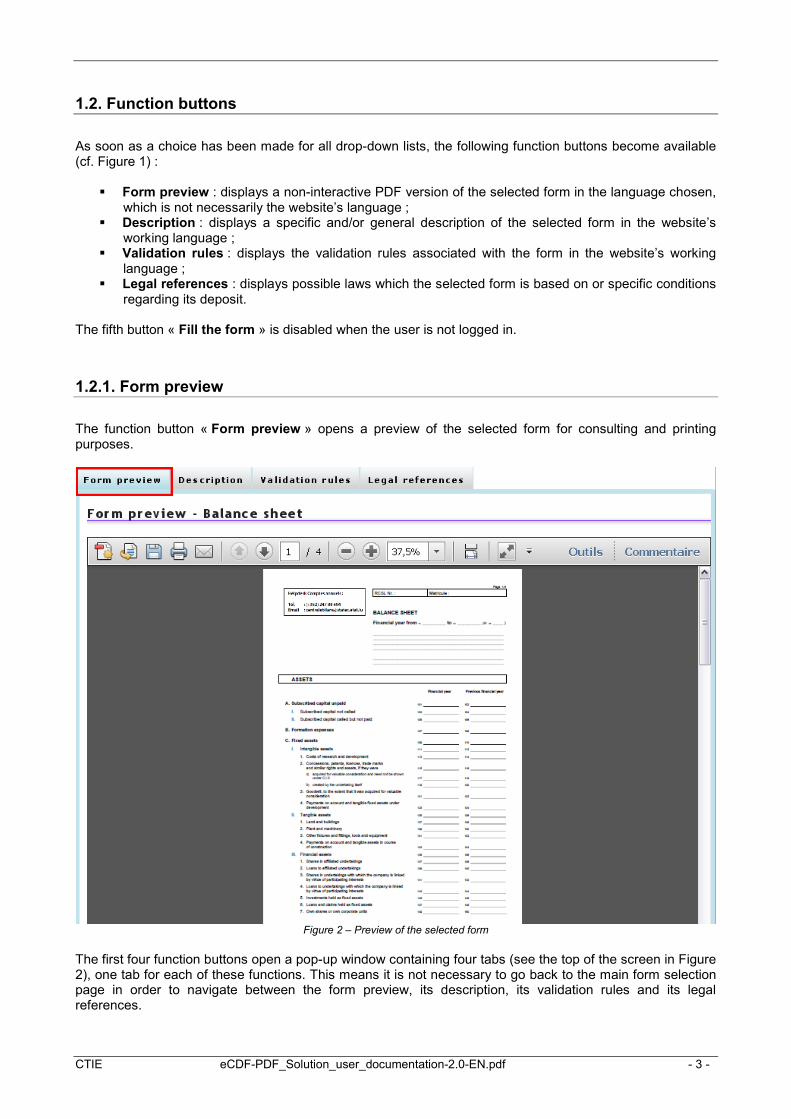
1.2. Function buttons
As soon as a choice has been made for all drop-down lists, the following function buttons become available (cf. Figure 1) :
Form preview : displays a non-interactive PDF version of the selected form in the language chosen, which is not necessarily the website’s language ;
Description : displays a specific and/or general description of the selected form in the website’s working language ;
Validation rules : displays the validation rules associated with the form in the website’s working language ;
Legal references : displays possible laws which the selected form is based on or specific conditions regarding its deposit.
The fifth button « Fill the form » is disabled when the user is not logged in.
1.2.1. Form preview
The function button « Form preview » opens a preview of the selected form for consulting and printing purposes.
Figure 2 – Preview of the selected form
The first four function buttons open a pop-up window containing four tabs (see the top of the screen in Figure 2), one tab for each of these functions. This means it is not necessary to go back to the main form selection page in order to navigate between the form preview, its description, its validation rules and its legal references.

CTIE eCDF-PDF_Solution_user_documentation-2.0-EN.pdf - 4 -
1.2.2. Description and terms of a form deposit
The function button “Description” displays every available description for the selected form as well as general descriptions.
Figure 3 – Description and deposit terms of the selected form
In case of annual accounts this page contains for example the following important links :
The link to a document which explains how to fill the fields that refer to the figures of the previous year (if applicable for that form).
The link « General information concerning the deposit of annual accounts », a very useful link for eCDF users since it refers to a document prepared by the RCSL about the terms of deposits of annual accounts with or without preparation in eCDF depending on the company’s legal form. It is important to note that :
o The eCDF platform does not make a link between the selected forms for preparation of accounts to be deposited at RCSL and the legal form of the company ;
o The eCDF platform also does not check whether the company has to prepare accounts through the eCDF system or has to perform a direct deposit through RCSL without capturing data in eCDF ;
o The first financial years of annual accounts accepted in the eCDF platform are those beginning on 01/01/2011 or later and ending no sooner than on 31/12/2011 (meaning non-abridged financial years of 2011 and subsequent financial years). The other financial years still have to be deposited as usual directly at RCSL, even if this deposit will be done after 2011.
For questions about the content of the form, please contact the responsible specified on the top of the form. For annual account forms, it’s the support of the STATEC ([email protected]) that has to be contacted.
For questions regarding the official deposit at the RCSL, please contact directly the support of the “Registre de Commerce et des Sociétés” ([email protected]).
Questions about the use of the eCDF platform should be addressed to the CTIE ([email protected]).
The link « List of form fields in text file format for download» is useful for the company’s interface developers, since it allows them to work with a text file (which is readable by any text editor like Notepad) containing all field labels in the website’s language as well as their corresponding field numeration in the form. In order to obtain the field labels in another language, the website’s working language has to be changed.
CTIE eCDF-PDF_Solution_user_documentation-2.0-EN.pdf - 5 -
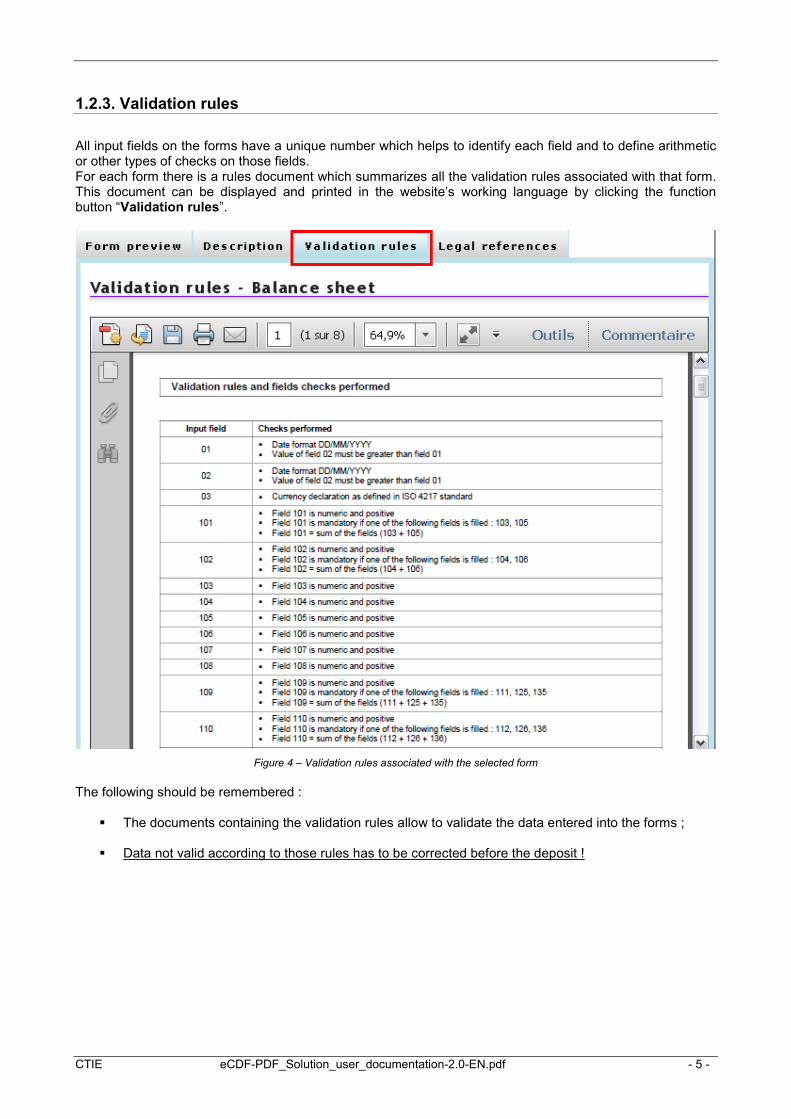
1.2.3. Validation rules
All input fields on the forms have a unique number which helps to identify each field and to define arithmetic or other types of checks on those fields. For each form there is a rules document which summarizes all the validation rules associated with that form. This document can be displayed and printed in the website’s working language by clicking the function button “Validation rules”.
Figure 4 – Validation rules associated with the selected form
The following should be remembered :
The documents containing the validation rules allow to validate the data entered into the forms ; Data not valid according to those rules has to be corrected before the deposit !

CTIE eCDF-PDF_Solution_user_documentation-2.0-EN.pdf - 6 -
2. Access to advanced eCDF functionality Besides the functionality available on the public site, a part of the site’s functionality is only available for users who are logged in. Access to the eCDF system may be obtained by following the detailed steps mentioned below. The first prerequisite is the possession of an activated professional Luxtrust certificate (smartcard or signing stick).
2.1. eCDF access request
The website www.ecdf.lu contains the menu “eCDF access”, that contains all information concerning the request or the modification of an access to the advanced eCDF functionality.
Figure 5 – Access menu
The request forms available in the menus described hereafter may be used to either request a first eCDF access (cf. chapter 2.1.1) or request the modification or extension of an existing eCDF access (cf. chapter 2.1.2). In order to be taken into account, the originals of these request forms have to be sent by postal mail to the CTIE address specified on the form.
Access rights for additional users cannot be requested using the request forms but have to be created by the agent company’s eCDF account manager by using the management application for internal company users CI.GUE, without having to make a request to the CTIE (cf. chapter 4.1).
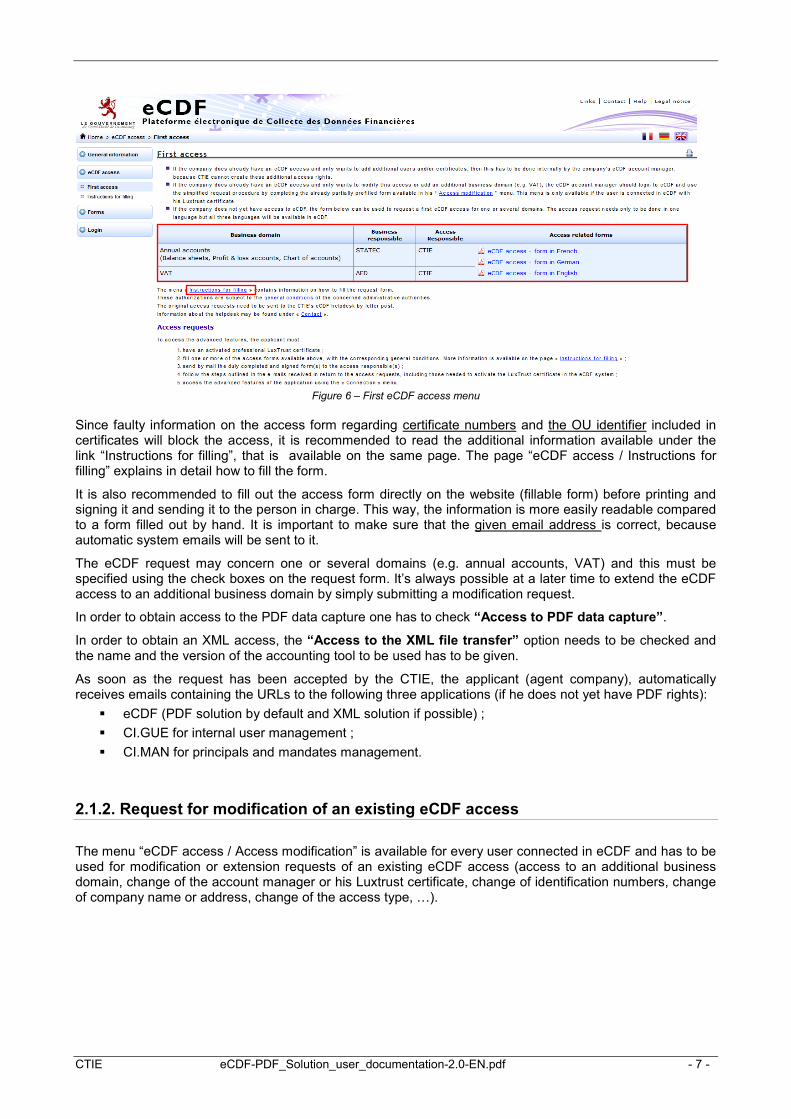
2.1.1. Request of a first eCDF access
The menu “eCDF access / First access” lets a company, which does not yet have an eCDF access, request eCDF access rights for a first user, who will become the company’s eCDF account manager. The access request form has to be conscientiously filled out and sent to the person in charge of accesses mentioned on the website as well as on the form itself. The language of the request form is not relevant given that every eCDF access lets the users work in all three languages available in eCDF.
CTIE eCDF-PDF_Solution_user_documentation-2.0-EN.pdf - 7 -
Figure 6 – First eCDF access menu
Since faulty information on the access form regarding certificate numbers and the OU identifier included in certificates will block the access, it is recommended to read the additional information available under the link “Instructions for filling”, that is available on the same page. The page “eCDF access / Instructions for filling” explains in detail how to fill the form.
It is also recommended to fill out the access form directly on the website (fillable form) before printing and signing it and sending it to the person in charge. This way, the information is more easily readable compared to a form filled out by hand. It is important to make sure that the given email address is correct, because automatic system emails will be sent to it.
The eCDF request may concern one or several domains (e.g. annual accounts, VAT) and this must be specified using the check boxes on the request form. It’s always possible at a later time to extend the eCDF access to an additional business domain by simply submitting a modification request.
In order to obtain access to the PDF data capture one has to check “Access to PDF data capture”.
In order to obtain an XML access, the “Access to the XML file transfer” option needs to be checked and the name and the version of the accounting tool to be used has to be given.
As soon as the request has been accepted by the CTIE, the applicant (agent company), automatically receives emails containing the URLs to the following three applications (if he does not yet have PDF rights):
eCDF (PDF solution by default and XML solution if possible) ; CI.GUE for internal user management ; CI.MAN for principals and mandates management.
2.1.2. Request for modification of an existing eCDF access
The menu “eCDF access / Access modification” is available for every user connected in eCDF and has to be used for modification or extension requests of an existing eCDF access (access to an additional business domain, change of the account manager or his Luxtrust certificate, change of identification numbers, change of company name or address, change of the access type, …).

CTIE eCDF-PDF_Solution_user_documentation-2.0-EN.pdf - 8 -
For this the menu contains request forms which are already prefilled with the information concerning the agent company and on which the requestor only needs to add the information concerning the requested modification. It’s of course possible to modify the prefilled information on the form if the modification request is about this data (e.g. identifiers, designation, address, account manager, …). In case of an access extension to an additional domain, the prefilled request form guarantees that the request is in line with the existing eCDF access and respects the following requirements:
• Same “OU” company identifier (organizational unit): The “OU” company identifier on the request form has to be the same than the one of the existing eCDF access in order to make sure that all users of the agent company can work together on declarations from all business domains.
• Same eCDF account manager: Problems during the access creation can be avoided if the request form contains the same account manager than the existing eCDF access. It also simplifies the internal management of additional eCDF users in the company.
Figure 7 – eCDF access modification menu
2.2. Access to the external application CI.GUE
One of the access emails received after an access request has been made contains a link to the management application for internal company users (CI-GUE) and allows the main technical contact person (mentioned in the request form) to define further accesses for additional users of his company. A declarer working alone with the application and being therefore defined as the main technical contact person, has access by default to eCDF and does not have to be defined in CI.GUE. In this case this application as well as the received link can be ignored.
CTIE eCDF-PDF_Solution_user_documentation-2.0-EN.pdf - 9 -
2.3. Access to the external application CI.MAN
A second access email received after an access request contains a link to the principals and mandates management application (CI.MAN). In case a declarer only needs to deposit declarations for himself, the use of this application will not be necessary. Agents on the other hand, who have to deposit declarations on behalf of their principals, will need this application in order to define their mandates. Unless they define one mandate per principal, they will not be able to prepare and deposit declarations for those principals.
2.4. Access to the eCDF platform
The link in the third email will grant access to the advanced functionality of the platform for electronic gathering of financial data (eCDF). The shortened link www.ecdf.lu is an easier way to get to the eCDF website than the complete link mentioned in the email. After logging in, additional menus and options become visible. The menu “Login” switches to “Logout” and the logged in user’s name is displayed at the top right of the screen.
CTIE eCDF-PDF_Solution_user_documentation-2.0-EN.pdf - 10 -
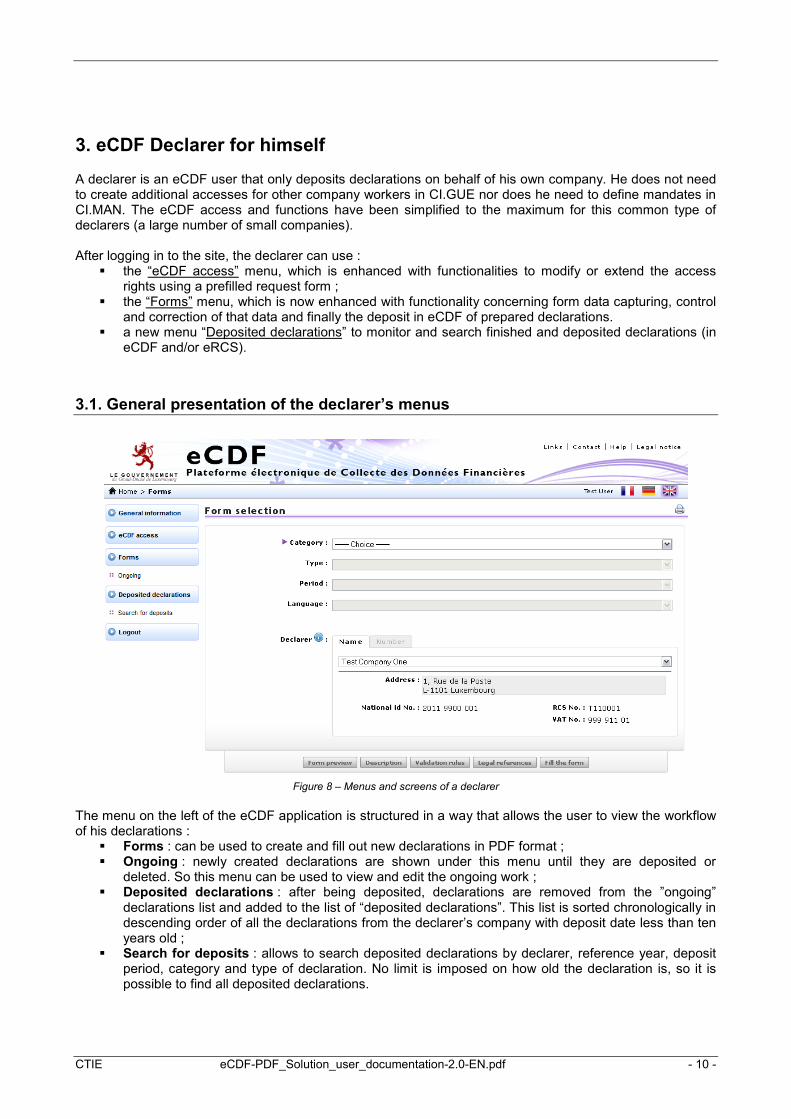
3. eCDF Declarer for himself A declarer is an eCDF user that only deposits declarations on behalf of his own company. He does not need to create additional accesses for other company workers in CI.GUE nor does he need to define mandates in CI.MAN. The eCDF access and functions have been simplified to the maximum for this common type of declarers (a large number of small companies). After logging in to the site, the declarer can use :
the “eCDF access” menu, which is enhanced with functionalities to modify or extend the access rights using a prefilled request form ;
the “Forms” menu, which is now enhanced with functionality concerning form data capturing, control and correction of that data and finally the deposit in eCDF of prepared declarations.
a new menu “Deposited declarations” to monitor and search finished and deposited declarations (in eCDF and/or eRCS).
3.1. General presentation of the declarer’s menus
Figure 8 – Menus and screens of a declarer
The menu on the left of the eCDF application is structured in a way that allows the user to view the workflow of his declarations :
Forms : can be used to create and fill out new declarations in PDF format ; Ongoing : newly created declarations are shown under this menu until they are deposited or
deleted. So this menu can be used to view and edit the ongoing work ; Deposited declarations : after being deposited, declarations are removed from the ”ongoing”
declarations list and added to the list of “deposited declarations”. This list is sorted chronologically in descending order of all the declarations from the declarer’s company with deposit date less than ten years old ;
Search for deposits : allows to search deposited declarations by declarer, reference year, deposit period, category and type of declaration. No limit is imposed on how old the declaration is, so it is possible to find all deposited declarations.

CTIE eCDF-PDF_Solution_user_documentation-2.0-EN.pdf - 11 -
3.2. Preparing a PDF declaration
General workflow :
3.2.1. Page for creating a declaration as a fillable PDF
Figure 9 – Creating a new form
The menu “Forms” can be used the same way as in the logged off mode, to select a specific form. When the user is logged in, an additional component “Declarer” which identifies the declarer of the declaration is displayed. In case of a declarer on behalf of his own company, the company name, address as well as the national id number, RCS number and VAT number are pre-selected. If the declarer does not have a RCS number or a VAT number, those numbers are set to “NE” (non-existing).
Forms
Ongoing
Deposited declarations
Search for deposits
Declaration creation and capture
Declaration deposit
Declaration control, correction, validation and saving operations

CTIE eCDF-PDF_Solution_user_documentation-2.0-EN.pdf - 12 -
Note 1 : The name and address mentioned in this screen are the ones stored on the State’s servers for the first eCDF access, which are either the ones available the “Registre de Commerce et des Sociétés”, the ones provided in the initial access request or the ones modified by a later request. In case of a wrong name or address, the declarer has to request the modification of that name or address by sending an eCDF access request form containing a request for modification to the CTIE (person in charge of eCDF), since this name and address will be the official information used for the declarations (and therefore also for RCSL deposits as far as annual accounts are concerned). Note 2 : The eCDF platform is not able to check what type of form a certain company has to deposit. This means that the system will allow the creation of any type of form. After selecting the parameters in the four drop-down lists, the button “Fill the form” is enabled. As soon as this button is pressed the selected declaration is created in the submenu “Ongoing” (and stays there until the declaration is deposited) and is displayed in a pop-up window on the declarer’s screen.
3.2.2. General presentation of a fillable PDF form
Figure 10 – Fillable PDF form
The header of a fillable PDF form contains the following information :
A unique reference for every single declaration (generated automatically) ; Helpdesk : the helpdesk for business questions regarding the form. For technical questions the
eCDF helpdesk may be contacted ; The company’s RCS number and the company’s national id number identifying the declarer (this
information is pre-filled) ;
Header
Declaration body

CTIE eCDF-PDF_Solution_user_documentation-2.0-EN.pdf - 13 -
The declaration’s eCDF entry date (empty when the declaration is created, if displayed it is the eCDF deposit date and therefore a proof that the declaration has been deposited in eCDF) ;
The selected declaration type from the previous page (complete balance sheet, abridged…) ; The fields to be filled in the header: dates of the beginning and end of the financial year, the currency
used in the form (depending on the type of form) ; The already prefilled official name and address of the declarer.
The action buttons which appear on every fillable form are :
Validate / Save : checks the form against the validation rules and saves it on the CTIE server. Forms containing errors will be saved too so that work can be continued on them later on through the “Ongoing” menu. This also allows to save declarations stepwise in order to avoid losing already entered data ;
Deposit : this button will deposit the ongoing declaration if the validation started automatically with the pressing of this button was successful. If no validation error occurs, the declaration changes its status to “Deposited in eCDF” and will appear in the list of deposited declarations. The system fills out the entry date field on the form with the deposit date. Annual account declarations are only considered deposited if they are officially deposited on the website www.rcsl.lu. This is not the case for VAT or tax declarations. If however a validation error occurs the declaration status “Ongoing” remains unchanged and the eCDF entry date field stays empty ;
Save locally : allows to save a NON EDITABLE copy of the declaration on the local computer. This copy can be sent to other persons by email. In case of server errors, it can be used as a local backup copy that can be reintegrated on the server at any later point ;
Print : prints the declaration ; Options : opens a submenu with additional options for this form.
The available options for all fillable forms are :
Electronic signature : this option deactivated by default can be used to visually sign the document during the deposit by clicking the signature field at the end of the document. Communication with the server is already highly secured by HTTPS (secured network) and the connection with LuxTrust certificates even without this very complex technical option. This visualized electronic signature has no real additional benefits as far as security is concerned. In case the user would still like to sign electronically, it may occur that the LuxTrust card’s PIN code has to be entered twice, depending on the user’s PC configuration. It should also be noted that the deposit process will take longer. The visual signature has to be applied at every deposit trial and will not be visible in the PDF/A version anymore after the declaration has successfully been deposited !
Error Report : In case one or more errors have been detected in the declaration after validation, a list containing those errors is displayed if this option is activated. This useful error report is shown at the end of the document and can be printed. Nevertheless this option is deactivated by default since it is probably only interesting at the beginning of data capture when the forms with the corresponding rules are not yet well-known. Normally, the fields containing errors have tooltips (which are present even if the error report is not activated) and those should be sufficient. The report is not displayed if the declaration is error free, even if it is activated ;
Automatic calculation : this essential option is selected by default. It greatly helps with filling out the declaration form and can be time saving (cf. chapter 3.2.3 et 3.2.4.for more information) ;
Close options : allows to go back to the initial state by hiding the options and showing the form action buttons again.
Note : When the options are changed, they are saved together with the form’s data until the deposit of the declaration.

CTIE eCDF-PDF_Solution_user_documentation-2.0-EN.pdf - 14 -
Forms can also contain buttons that are specific to one type of form. Button to « Prefill previous year »: In the annual accounts category, the balance and the profit and loss account forms (complete, abridged and S.P.F.) contain a column with fields that refer to the previous financial year. The explanations as to why these fields exist and how they should be filled can be found in the document « Information on the filling of the fields concerning the previous financial year (Translation of the French notice provided by the ministry of justice) » available in the « Description » tab of the forms. In order to ease the form completion, forms as of reference year 2012 contain a « Prefill previous year » button, by which the user can prefill the fields referring to the previous year with figures coming from the declaration that is considered by the eCDF system to be the latest declaration officially deposited at the RCSL and referring to the previous year. The refilling function does however only consider declarations which have been deposited in eCDF by the company of the current user.
When the start and end dates of the financial year have been entered, the prefill button can be used to check if a declaration for the previous financial year is available in the eCDF system. Among the declarations of the same type deposited in eCDF and at the RCSL, it’s the one with the most recent financial year end date proceeding the current financial year that is considered to be the official declaration of the previous year. This declaration’s details (financial year start and end dates and the RCSL deposit date) are displayed to the user so that he can decide if the declaration suggested by the eCDF system is really the one referring to the previous financial year. If the user accepts the prefilling based on the suggested declaration, the fields in the column referring to the previous year are prefilled and all the figures already present in these fields are lost. During the prefilling, for each line of the current form, the figures from the previous declaration are copied to the current form into the fields referring to the previous year. This prefilling function allows saving time for the majority of declarations that are covered by the following standard case:
• The current declaration and the one of the previous financial year are based on forms having the same structure.
• The validation rules are the same for both declarations. • The figures on the declarations are comparable (same currency, same duration of the financial year)
For all declarations not falling into this standard case, the user has to manually adjust the figures referring to the previous financial year in order to make them valid according to the current form’s validation rules and comparable to the current financial year’s figures. The adjustment of the figures has to be done for comparability reasons and has to be justified in the annexes of the annual accounts. A user who wants to correct figures of a previous deposit has to do a new deposit in eCDF and a corrective deposit in RCSL.

CTIE eCDF-PDF_Solution_user_documentation-2.0-EN.pdf - 15 -
3.2.3. Standard capture of a PDF form
Figure 11 – Standard automatic calculation
The automatic calculation is activated by default in all forms in order to initialize (calculate) the fields representing a sum of other fields which simplifies and accelerates the capturing process. It is even recommended to only fill out the lowest level fields and let the program complete the remaining entries. (example : by filling out the fields 113, 114, 117, 118, 119 and 120, the fields 109, 110, 111, 112, 115 and 117 are added by the system in order to respect the validation rules). Nevertheless the automatic calculation may be disabled with the checkbox “automatic calculation” accessible via the form’s «Options» button. When the automatic calculation is activated, as soon as a value is entered into a detail field, the corresponding sum field is added immediately and becomes read-only. The automatic calculation replaces any value that was previously entered manually into a calculated field. For any form other than the standard chart of accounts (PCN), a sum field always represents the sum of detail fields which means that in any case the most detailed level has to be captured.

CTIE eCDF-PDF_Solution_user_documentation-2.0-EN.pdf - 16 -
3.2.4. Specific capture of the charts of accounts (PCN)
Figure 12 – Automatic calculation in the PCN
The standard chart of accounts (PCN) is a special type of form and its concept is different compared to the other forms :
It is possible to fill a sum field without filling its detail fields ; Since every line contains one column for the debit and one column for the credit, only one of those
two columns has to be filled per line. This means that the calculation of totals and subtotals gets significantly more complex since those totals have to be entered into the correct column. This is also true if a sum equals to ‘’0’’ between a credit and a debit balance : in this case, according to the validation rules, the ‘’0’’ has to be entered in the credit (right) column and not in the debit (left) column !
Example of total and sub-total calculation :
o Subtotal field 0109 = field 0111 – field 0144. [3100,00 = 3200,00-100,00]
o Total field 0101 = field 0109 – field 0116 – field 0118. [2000,00 = 3100,00 – 800,00 – 300,00]
Since the file of a PDF containing a PCN is large, it must be expected that opening it will take more time compared to smaller files. The same is true for any kind of operation on that file (validation, deposit …).
CTIE eCDF-PDF_Solution_user_documentation-2.0-EN.pdf - 17 -
Nevertheless for the PCN even more than for other forms it is normally recommended to keep the automatic calculation activated, fill out only the needed detail fields and let the program complete the numerous sub-totals and totals in the correct columns. But of course the automatic calculation can be deactivated at any moment. It is generally recommended to save (« Validate/Save » button) the entered data regularly instead of waiting until all the data has been captured, especially with a large form like the PCN.
3.2.5. Validating and saving on the server
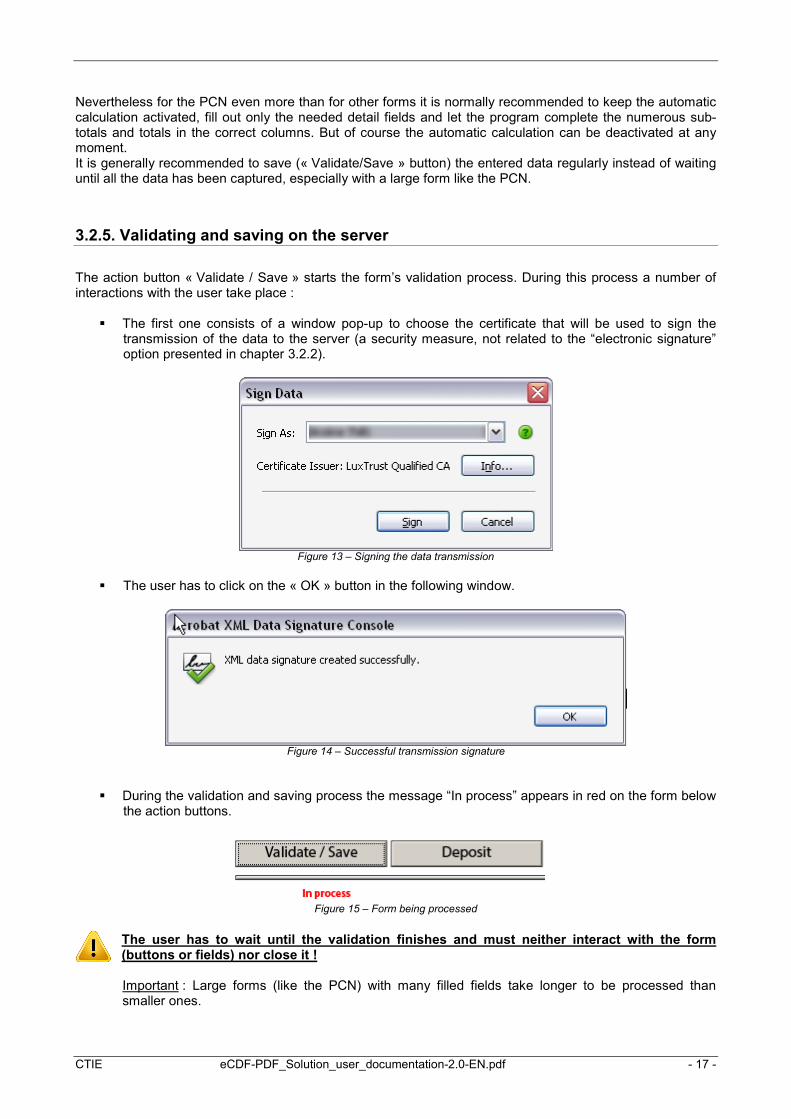
The action button « Validate / Save » starts the form’s validation process. During this process a number of interactions with the user take place :
The first one consists of a window pop-up to choose the certificate that will be used to sign the transmission of the data to the server (a security measure, not related to the “electronic signature” option presented in chapter 3.2.2).
Figure 13 – Signing the data transmission
The user has to click on the « OK » button in the following window.
Figure 14 – Successful transmission signature
During the validation and saving process the message “In process” appears in red on the form below the action buttons.
Figure 15 – Form being processed
The user has to wait until the validation finishes and must neither interact with the form (buttons or fields) nor close it ! Important : Large forms (like the PCN) with many filled fields take longer to be processed than smaller ones.

CTIE eCDF-PDF_Solution_user_documentation-2.0-EN.pdf - 18 -
After the validation on the server, if no error has been detected, a pop-up window informs the user that the declaration is ready to be deposited.
Figure 16 – Declaration ready to be deposited
In the opposite case, a message pops up saying that the declaration the user tried to validate contains errors and that they must be corrected before the declaration can be deposited.
Figure 17 – Declaration needing corrections
Closing the window or interrupting the processing most not be done before one of these messages appears !
If there are errors, they are displayed in the PDF.
Erroneous fields are marked with a red border. By passing with the mouse pointer over the erroneous field, a tooltip containing the violated rule appears (cf. Figure 18).
Figure 18 – Field containing an error with information tooltip
However, no tooltip is displayed for fields that are calculated automatically, even if they contain an error (the automatic calculation technically blocks the field containing that tooltip).
CTIE eCDF-PDF_Solution_user_documentation-2.0-EN.pdf - 19 -
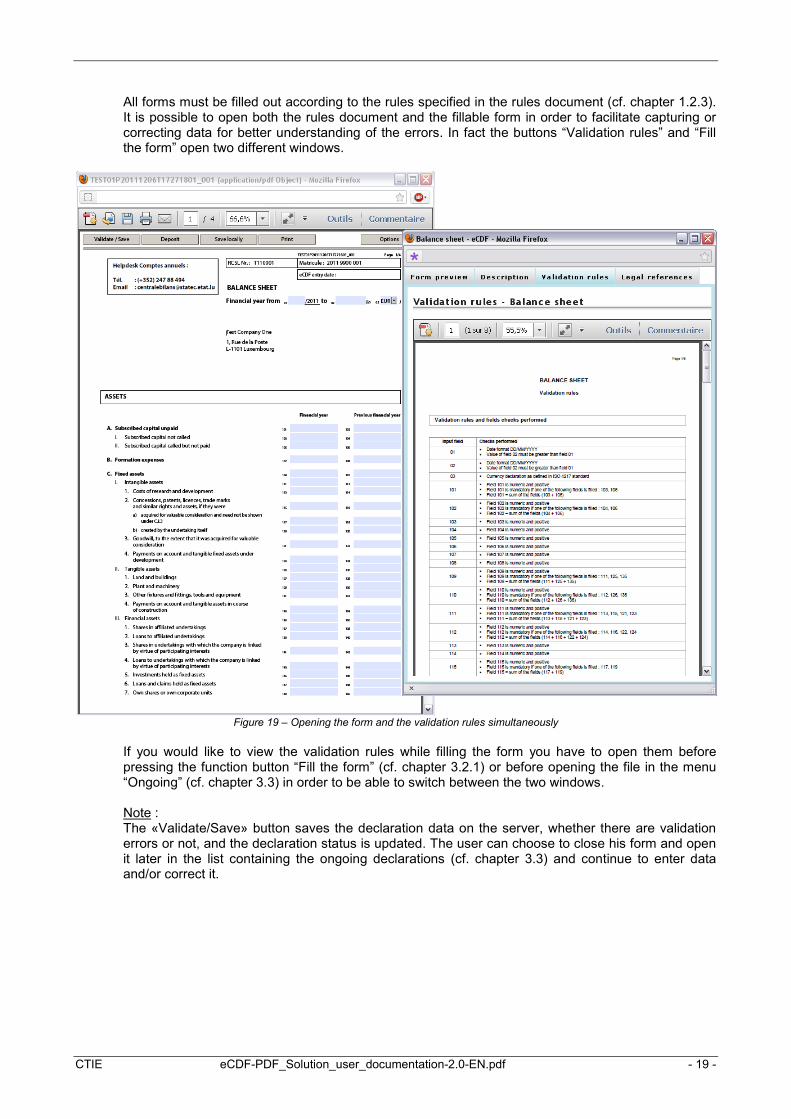
All forms must be filled out according to the rules specified in the rules document (cf. chapter 1.2.3). It is possible to open both the rules document and the fillable form in order to facilitate capturing or correcting data for better understanding of the errors. In fact the buttons “Validation rules” and “Fill the form” open two different windows.
Figure 19 – Opening the form and the validation rules simultaneously
If you would like to view the validation rules while filling the form you have to open them before pressing the function button “Fill the form” (cf. chapter 3.2.1) or before opening the file in the menu “Ongoing” (cf. chapter 3.3) in order to be able to switch between the two windows. Note : The «Validate/Save» button saves the declaration data on the server, whether there are validation errors or not, and the declaration status is updated. The user can choose to close his form and open it later in the list containing the ongoing declarations (cf. chapter 3.3) and continue to enter data and/or correct it.

CTIE eCDF-PDF_Solution_user_documentation-2.0-EN.pdf - 20 -
An error report containing all errors consolidated in a table can be shown at the end of the form. Activating this report is done by enabling the checkbox «Options» – «Error report».
Figure 20 – Error Report
3.2.6. eCDF Deposit
As soon as all the data has been entered, the declaration can be deposited in eCDF by using the button «Deposit». Before the deposit, the final data is validated again and the declaration is only deposited if it is valid.
Figure 21 – eCDF deposit done and eRCS deposit required
In case the declaration belongs to the “annual accounts” type, the eCDF deposit is not enough. The official deposit still has to be made in the eRCS system of the “Registre du Commerce des Sociétés” (www.rcsl.lu). The message box reminds the user of that fact.
Figure 22 – Header of a deposited declaration
If the eCDF deposit was successful, an eCDF entry date appears on the form.

CTIE eCDF-PDF_Solution_user_documentation-2.0-EN.pdf - 21 -
The form becomes read-only and the buttons are hidden. The document format is PDF/A and can be printed or saved locally by using the toolbar button with the printer or floppy disk icon.
Figure 23 – Printing or Saving the PDF/A with help of the toolbar
Locally saving the PDF/A file, including the eCDF entry date can be used as a local hard drive copy for proof of eCDF deposit. A declaration deposited in eCDF is moved from the “Ongoing” list (cf. chapter3.3) to the list of deposited declarations (cf. chapter 3.4.1).
3.2.7. Save locally
The action button «Save locally» saves a NON EDITABLE copy of the declaration to the user’s computer. This copy cannot be used to enter data. The «Save locally» button can be used • in case of internet or eCDF server problems
In order to avoid losing data already entered into the form in case of internet or eCDF server problems, the user can save the form locally. As soon as the eCDF server connection is available again, the user can send the data from the local form to the server by using the buttons available in the PDF. This requires that the declaration still exists in the list of ongoing declarations (cf. chapter 3.3) and that it has not been deleted).
• as an intermediate step before the eCDF deposit
For a declaration that has been entered in eCDF using a fillable PDF form, the « Validate / Save » button may be used to save the data on the eCDF server in the « Forms / Ongoing » menu and to do a validation of the data against the applicable business rules. Possible problems are pointed out to the user who can than do the required corrections. For these declarations, the « Ongoing » status is shown in red. As soon as the declaration is valid according to the eCDF validation rules, it’s ready to be deposited in eCDF and its « Ongoing » status is shown in green.
As an intermediate step, it’s then possible to use the « Save locally » button to save a local READ ONLY copy of the ongoing declaration as PDF file on the user’s PC, which can be sent (by email) for approval to responsibles, auditors, shareholders, general assemblies…. This locally saved declaration cannot be used to enter data. After approval of the declaration, the user may open the declaration on the server from the « Forms / Ongoing » menu by clicking on the PDF icon and do the deposit in eCDF by using the « Deposit » button available in the PDF form.
• as the final step of the eCDF deposit
In order to pass on information on a completed eCDF deposit to a third party that will have to do the official deposit in eRCS but having no access to the data deposited in eCDF, it’s possible to locally save a declaration as PDF and send it to this third party. For declarations deposited in eCDF, the « Save locally » button is not available anymore but the local save can still be done using the « Floppy disk » icon on the top at left.

CTIE eCDF-PDF_Solution_user_documentation-2.0-EN.pdf - 22 -
3.3. Finding ongoing PDF declarations
Figure 24 – Ongoing forms
After opening a PDF form, it appears in the list of “Ongoing” declarations. This list contains all ongoing declarations belonging to the connected user’s company. The following information is displayed :
Date : date and time of the declaration’s latest save ; Declarer / Declaration : the declarer’s name as well as the title of the declaration and the
corresponding period. The declarer’s name is a hyperlink and clicking it displays a detailed view containing information about the declarer at the moment the declaration was last saved. This information consists of the company name, the national id number, the RCS number, the VAT number and the address. The PDF icon opens the declaration in order to continue filling out the form in the language chosen when the declaration was created. However it is always possible to open the ongoing declaration in a different language by clicking one of the three links on the right-hand side of the declaration title. When depositing, the last language used becomes the deposit language ;
eCDF Reference / Mandate : the declaration’s eCDF reference and the type of mandate used. If the declarer declares for himself the mandate is replaced with a “-“ symbol ;
Status : the declaration’s status. Its title is always “ongoing” but the text color can change : o Black : the declaration was created but never saved / validated ; o Red : the declaration has already been validated but it contains errors ; o Green : the declaration has been validated and contains no errors. This does not necessarily
mean that the declaration is ready to be deposited (it can very well be valid while being incomplete) ;
Delete : the recycle bin icon will delete the ongoing declaration (after user confirmation). After the delete it is not possible to get the declaration back, therefore please only delete declarations that will never be deposited. A locally saved declaration must not be deleted in the “Ongoing” list if it should still be deposited later on.
The list of ongoing declarations only includes declarations less than one year old. After this delay, ongoing declarations are automatically deleted and disappear from this temporary workspace. The « Refresh » button refreshes the list, which can be useful after a deposit for instance. In fact, after depositing a declaration in eCDF it disappears from the list and can be found in the “deposited declarations” list.

CTIE eCDF-PDF_Solution_user_documentation-2.0-EN.pdf - 23 -
3.4. Deposited declarations
3.4.1. List of deposited declarations
Figure 25 – Deposited declarations
Declarations that have been deposited during the last ten years by the connected user’s company are displayed in the menu “Deposited declarations”. Declarations of the category “annual accounts” must be deposited in eRCS on the website www.rcsl.lu (see the terms of deposit of annual accounts in chapter 1.2.2). The information displayed in this list of deposits is :
eCDF deposit : date and time of the declaration’s deposit in eCDF ; eRCS deposit : date and time of the deposit in eRCS. This field is empty in case the eRCS deposit
has not yet been done or if the declaration belongs to a type other than annual accounts. If the eRCS deposit was cancelled in the eRCS application, it is mentioned in this column with a text in red showing the deletion date. In that case it will not be possible to deposit the same declaration in eRCS. If a new deposit needs to be done, the declaration can be copied with the corresponding icon or a new one can be created via the “Forms” menu ;
Declarer / Declaration : the declarer’s name (as a hyperlink that shows the declarer’s details at the moment of deposit) as well as the declaration title and the period it concerns. The PDF icon opens the declaration in PDF/A format in the language used during the deposit. The three hyperlinks will force the PDF/A to be opened in the languages used in eCDF, (French, German, English) ;
eCDF Reference : the declaration’s eCDF reference and the solution used for the deposit (PDF or XML). The magnifying glass icon opens the declaration’s details ;
Copy : Makes a copy of a deposited declaration in order to correct it and make a new deposit. A copied declaration can be found in the “Ongoing” menu under a new reference.
Since this list can be long, it is paginated and only the declarations deposited during the past ten years are shown. The number of elements shown per page can be changed at the bottom right of the page and the current page can be chosen at the bottom left. There is a button to refresh the list of deposited declarations. The tabs above the list allow to either display annual accounts or VAT declarations. The “Annual accounts only” tab contains a check box above the list, by which all the annual accounts which have already been deposited at the RCSL can be hidden. For declarations of the category “Annual accounts”, the official deposit on the eRCS website www.rcsl.lu is mandatory.

CTIE eCDF-PDF_Solution_user_documentation-2.0-EN.pdf - 24 -
After the official deposit at the RCSL, the eCDF platform automatically makes the annual accounts available to the concerned administrations (“Administration des Contributions”, “Administration de l’Enregistrement et des Domaines” and “Statec”). For VAT declarations, the deposit in eCDF is considered the official deposit and the data will be transferred to the “Administration de l’Enregistrement et des Domaines”.
3.4.2. Deposit search
Figure 26 – Deposit search by name
The deposit search can be used to find a deposited declaration, no matter how old it is. To use it you have to select a declarer first. In case of a declarer for himself, his company is automatically selected by default in the “Name” tab. The reference year as well as the category of the declarations must also be selected. The search can be refined using the “Deposit period” and the “Type” criteria.
Clicking “Search” will show all the declarations matching the search criteria.
Figure 27 – Deposit search by number

CTIE eCDF-PDF_Solution_user_documentation-2.0-EN.pdf - 25 -
Note : The “Number” tab remains available in this search and it is pre-filled in case of a declarer for himself, but it also allows to search declarations that have been made under different declarer numbers (national id, RCS or VAT) if those have changed. The deposit search results page looks similar to the deposited declarations page except for the fact that the copy icon is not available and the declarer information together with the search criteria are shown above the result list.
Figure 28 – Search results
There is no pagination here since the list size is limited by the fact that the search is always by declarer.
3.5. Special cases for the declarer
There is a special case in which also the declarer for himself has to use the mandate management application CI.MAN (cf. chapter 2.3). If one of the three numbers (national id, RCSL or VAT) has changed and the modification request has been done by using the access request form, a declaration using the old numbers that has not yet been deposited can only be deposited if the declarer creates a mandate for himself. It is therefore recommended to finalize all declarations with the old numbers first before requesting the number modification at the CTIE.
CTIE eCDF-PDF_Solution_user_documentation-2.0-EN.pdf - 26 -
4. eCDF agent An eCDF agent is defined in the following way :
He can use the same functionalities as a declarer, which means he can deposit declarations for his company (see previous chapter in this case) ;
He can use additional functionality that allows him to deposit declarations on behalf of his clients (his principals). This functionality is described in this chapter.
4.1. Using CI.GUE
After the request access has been validated, the eCDF account manager (main technical contact person) defined in the access request form is authorized to access the eCDF application. It is very likely that the principal is not the only user in his company who has to work in eCDF. In this case he has to create additional eCDF access rights for his co-workers, which can be done in the external application (CI.GUE) to manage internal users as the access to this application comes together with the eCDF access (cf. chapter 2.2). The eCDF account manager has to explicitly assign access rights in CI.GUE for every business domain in order for his colleagues to be able to deposit such declarations. This means that in order to be able to deposit annual accounts, the colleague needs to get access to “eCDF – Annual accounts” (eCDF – Comptes annuels) and for the deposit of VAT declarations, he needs to get “eCDF – VAT” (eCDF-TVA) access rights. Once these access rights have been created, the co-workers can, similarly to the eCDF account manager, log in to the eCDF application with their professional LuxTrust card, on the condition that the certificate is based on the same “Organizational unit” (OU) as the LuxTrust card of the technical contact person ! Note : In CI.GUE, every user belongs to a default group and is allowed to view all declarations created by his company. However it is possible to assign users to groups other than the default group. Those users will only be able to see declarations prepared or deposited by a person belonging to their group. Even though it might be necessary in some precise cases, usually it is recommended to avoid working with groups (risk of declarations being blocked within a group and being therefore inaccessible).
4.2. Using CI.MAN
Access to the external mandate management application (CI.MAN) is at first limited to the eCDF account manager who has gotten the CI.MAN access rights together with his eCDF access (cf. chapter 2.3). The account manager can however assign CI.MAN access rights to his colleagues using the CI.GUE application. In order to make the principal (client) available in eCDF, the following to steps have to be executed in CI.MAN:
1. Define a principal (client) 2. Define a mandate (authorized action)

CTIE eCDF-PDF_Solution_user_documentation-2.0-EN.pdf - 27 -
4.2.1. Defining a principal
In order to fill out declarations on behalf of his clients, an agent has first to predefine his clients in the external mandate management application (CI.MAN). The clients (principles) are defined by entering their national id number, the RCS number and the VAT number if they exist. The link between those three numbers allows the eCDF system to transmit declarations to the different administrations. When a principal is created, his name and address have to be verified and carefully entered since it will be the official information appearing on the declarations deposited in eCDF and in eRCS. As “Principal reference” an internal customer number or the name of the customer can be used.
In case there exists an incoherence between the national id number and the RCS number or between the national id number and the VAT number during the principal definition in CI.MAN, the agent has to contact the eCDF helpdesk ([email protected]) in order to clarify the links by sending an email with the denomination and the known numbers of the principal.
4.2.2. Defining a mandate
After defining a principal, a deposit mandate has still to be created (mandated action = “Deposit”). This mandate is linked to the agent and allows him to fill out and deposit declarations on behalf of that principal for a specific business domain (e.g. annual accounts, VAT). It’s thus required to create a mandate for every business domain for which declarations have to be deposited. CI.MAN offers a copy function by which it’s possible to copy mandates from a first business domain to a second one. Working with a mandate as an agent depends however on the status of this mandate :
Active : The mandate can be used to create and deposit declarations of the principal ; Inactive : The mandate is temporarily deactivated and cannot be used for creating an depositing
declarations of the principal. However, declarations already deposited for this principal can be found in the deposit search ;
Revoked (by the CTIE) : After a written request by the principal (exceptional case), the CTIE closed the mandate created by the agent and it cannot be used to create or deposit declarations in the principal’s name. The principal can delete the mandate in this case ;
Deleted (by the agent) : The agent has ended the mandate in the usual way and it cannot be used anymore to create and deposit declarations of the principal.

CTIE eCDF-PDF_Solution_user_documentation-2.0-EN.pdf - 28 -
4.3. Preparing a PDF declaration
4.3.1. Page for creating a declaration as a fillable PDF
After logging in to the eCDF platform (cf. chapter 2.4), an agent can choose the declarer / principal for whom he would like to create a declaration by using two different tabs on the form creation page.
The first one of those tabs is the « Name » tab.
Figure 29 – Selecting a declarer/principal by name
In this tab, the first element of the list is the agent’s own company, which allows him to fill out declarations for himself (except for foreign agents that cannot make deposits for themselves). The next elements on the list are the principals defined in CI.MAN that have a corresponding mandate with an “Active” status.
If a declarer/principal is not present in this list, a mandate for this declarer/principal has to be added in CI.MAN and the mandate’s status has to be set to “Active”.
A declarer appears in the list as soon as any mandate has been defined for him in CI.MAN, even if for the currently selected form no mandate exists. If a declarer appears twice in the list, it means there are two mandates for different numbers (national id number, RCS number, VAT number) already defined in CI.MAN (this is possible if the company’s legal form changed). After choosing one of the declarers/principals on the list, his address, national id, RCSL and VAT numbers are automatically completed. If the declarer/principal does not have a RCS or VAT number, those fields are set to “NE” (non-existing). If the name or the address of the declarer/principal has changed it must be modified in CI.MAN before creating the declaration.

CTIE eCDF-PDF_Solution_user_documentation-2.0-EN.pdf - 29 -
The second tab is the « Number » tab.
Figure 30 - Selecting a declarer/principal by number
This tab can be used by the agent to search a declarer/principal for whom an active deposit mandate is defined. In order to do this he has to enter at least one of the three numbers (national id, RCS, VAT) and click the “Search” button. If the search fails, an error message appears below the address, mentioning the cause of the error.
If a declarer/principal is not found, a mandate for this declarer/principal has to be added in CI.MAN and the mandate’s status has to be set to “Active”. If the declarer/principal is found, his address and his three identification numbers are automatically completed. If the declarer/principal does not have a RCS number or a VAT number, those fields are set to “NE” (non-existing). If the declarer/principal’s name or address has changed, it must be changed in CI.MAN before creating the declaration. If the user does not have the access rights for the business domain corresponding to the selected form (e.g. the user has the access rights for the annual accounts but not for the VAT declarations) then a corresponding message is shown when the “Fill the form” button is clicked.
4.4. Finding an ongoing declaration
The columns in this table are defined like those in chapter 3.3 for a declarer for himself. If the user is an agent the list includes his own ongoing PDF declarations as well as those in preparation for his principals. Those two can be distinguished by looking at the second column where the declarer’s name together with the ongoing declaration is shown and by looking at the “eCDF Reference / Mandate” column where the deposit mandate is mentioned instead of there being a “-“ symbol.

CTIE eCDF-PDF_Solution_user_documentation-2.0-EN.pdf - 30 -
Figure 31 – The agent’s ongoing declarations
Note 1 : When an ongoing form is created for a principal, the deposit mandate is verified : if its status is “Active”, opening the form will work as usual. On the other hand, if the mandate has a different status (inactive, revoked or deleted), opening the form is cancelled and an error message is displayed. A principal’s ongoing form cannot be opened without an active mandate! Note 2 : Since numerous of the agent’s coworkers can work in parallel on different declarations, it is important to realize that the same work space is used by all of them and therefore ongoing declarations of co-workers should not be deleted. It is recommended to distribute the work based on the declaration’s principals. Note 3 : After depositing a certain type of declaration for the principal, it is recommended to delete (see recycle bin in the right column) any other created declaration of that type belonging to the same principal. This could avoid giving a co-worker (in case of absence) the impression that a declaration has still to be prepared and has to be immediately filled out/edited by them before the deposit deadline.
CTIE eCDF-PDF_Solution_user_documentation-2.0-EN.pdf - 31 -
4.5. Deposited declarations
4.5.1. List of deposited declarations
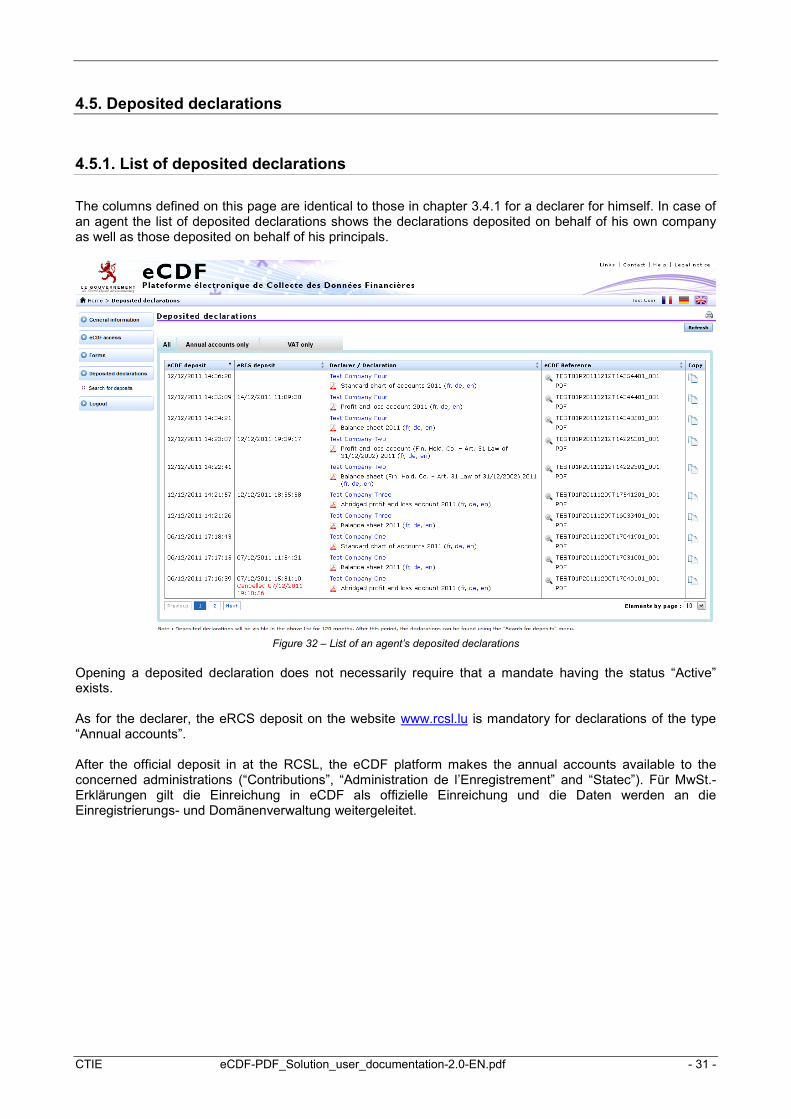
The columns defined on this page are identical to those in chapter 3.4.1 for a declarer for himself. In case of an agent the list of deposited declarations shows the declarations deposited on behalf of his own company as well as those deposited on behalf of his principals.
Figure 32 – List of an agent’s deposited declarations
Opening a deposited declaration does not necessarily require that a mandate having the status “Active” exists. As for the declarer, the eRCS deposit on the website www.rcsl.lu is mandatory for declarations of the type “Annual accounts”. After the official deposit in at the RCSL, the eCDF platform makes the annual accounts available to the concerned administrations (“Contributions”, “Administration de l’Enregistrement” and “Statec”). Für MwSt.-Erklärungen gilt die Einreichung in eCDF als offizielle Einreichung und die Daten werden an die Einregistrierungs- und Domänenverwaltung weitergeleitet.
CTIE eCDF-PDF_Solution_user_documentation-2.0-EN.pdf - 32 -
4.5.2. Deposit search
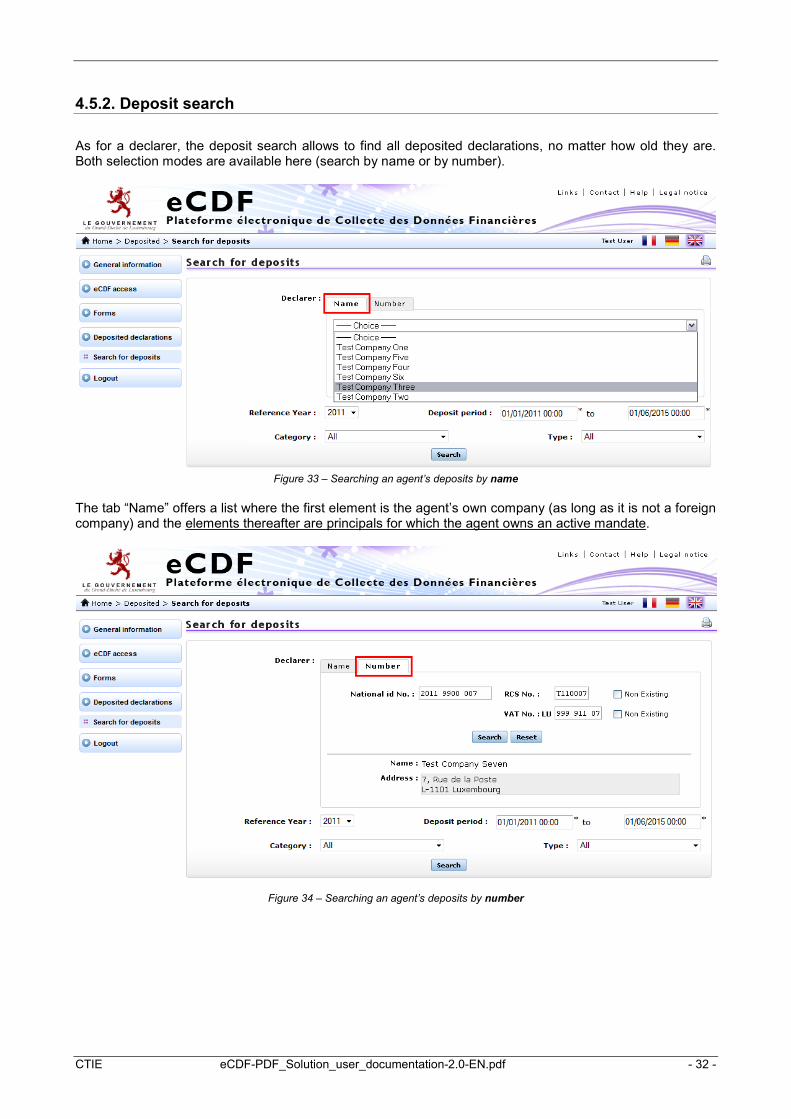
As for a declarer, the deposit search allows to find all deposited declarations, no matter how old they are. Both selection modes are available here (search by name or by number).
Figure 33 – Searching an agent’s deposits by name
The tab “Name” offers a list where the first element is the agent’s own company (as long as it is not a foreign company) and the elements thereafter are principals for which the agent owns an active mandate.
Figure 34 – Searching an agent’s deposits by number
CTIE eCDF-PDF_Solution_user_documentation-2.0-EN.pdf - 33 -
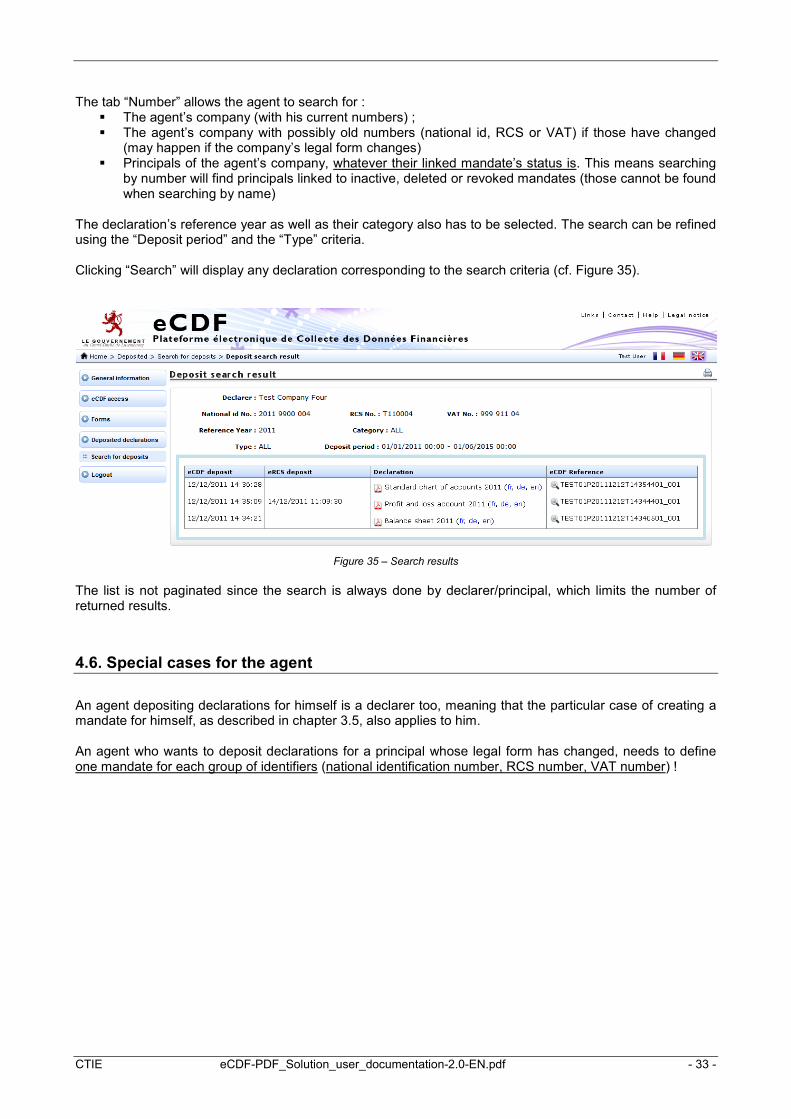
The tab “Number” allows the agent to search for : The agent’s company (with his current numbers) ; The agent’s company with possibly old numbers (national id, RCS or VAT) if those have changed
(may happen if the company’s legal form changes) Principals of the agent’s company, whatever their linked mandate’s status is. This means searching
by number will find principals linked to inactive, deleted or revoked mandates (those cannot be found when searching by name)
The declaration’s reference year as well as their category also has to be selected. The search can be refined using the “Deposit period” and the “Type” criteria. Clicking “Search” will display any declaration corresponding to the search criteria (cf. Figure 35).
Figure 35 – Search results
The list is not paginated since the search is always done by declarer/principal, which limits the number of returned results.
4.6. Special cases for the agent
An agent depositing declarations for himself is a declarer too, meaning that the particular case of creating a mandate for himself, as described in chapter 3.5, also applies to him. An agent who wants to deposit declarations for a principal whose legal form has changed, needs to define one mandate for each group of identifiers (national identification number, RCS number, VAT number) !


