51
ECHA Accounts Manual for Industry Users

ECHA Accounts Manual for Industry Users

2 ECHA Accounts Manual Version 4.0
Annankatu 18, P.O. Box 400, FI-00121 Helsinki, Finland | Tel. +358 9 686180 | Fax +358 9 68618210 | echa.europa.eu
Changes to this document
Version Changes Date
1.0 First release September 2014
2.0 Update December 2014
3.0 Update June 2016
4.0 Update March 2018

ECHA Accounts Manual 3
Annankatu 18, P.O. Box 400, FI-00121 Helsinki, Finland | Tel. +358 9 686180 | Fax +358 9 68618210 | echa.europa.eu
Title: ECHA Accounts Manual for Industry Users
Reference: ECHA-14-B-18-EN
Issue date: September 2014
Language: en
© European Chemicals Agency, 2014
Cover page © European Chemicals Agency
Reproduction is authorised provided the source is fully acknowledged in the form “Source: European Chemicals Agency, http://echa.europa.eu/”, and provided written notification is given to the ECHA Communication Unit ([email protected]).
If you have questions or comments in relation to this document, please send them to ECHA via the information request form at the address below, quoting the reference and issue date given above:
http://echa.europa.eu/about/contact_en.asp
European Chemicals Agency
Mailing address: P.O. Box 400, FI-00121 Helsinki, Finland
Visiting address: Annankatu 18, Helsinki, Finland
4 ECHA Accounts Manual Version 4.0
Annankatu 18, P.O. Box 400, FI-00121 Helsinki, Finland | Tel. +358 9 686180 | Fax +358 9 68618210 | echa.europa.eu
Table of Contents
1. Introduction ........................................................................................................................... 8 1.1 Objective................................................................................................................................ 8 1.2 Icons, abbreviations and terminology ......................................................................................... 8 2. Definitions and concepts ........................................................................................................ 9 2.1 Legal Entity ............................................................................................................................ 9 2.2 Users in ECHA Accounts ........................................................................................................... 9 2.3 User roles ............................................................................................................................. 10 2.4 Contacts............................................................................................................................... 11 2.5 Password management policy ................................................................................................. 11 3. How to sign-up for the first-time ......................................................................................... 12 3.1 User details .......................................................................................................................... 12 3.2 Email verification ................................................................................................................... 14 3.3 How to encode your Legal Entity ............................................................................................. 16 4. How to log in ........................................................................................................................ 19 4.1 How to log in using ECHA Accounts .......................................................................................... 19 4.2 How to log in to an ECHA application ....................................................................................... 20 4.2.1 REACH-IT .......................................................................................................................... 20 4.2.2 R4BP 3 .............................................................................................................................. 21 4.2.3 ECHA Cloud services ........................................................................................................... 21 4.2.4 ePIC ................................................................................................................................. 21 4.3 Logging out .......................................................................................................................... 22 5. How to manage your Legal Entity ........................................................................................ 22 5.1 How to update Legal Entity details ........................................................................................... 22 5.2 How to add a new contact ...................................................................................................... 24 5.3 How to modify an existing contact ........................................................................................... 25 5.4 How to delete an existing contact ............................................................................................ 27 5.5 How to create a new user ....................................................................................................... 27 5.5.1 First time login steps for the new user ................................................................................... 29 5.6 How to update user details ..................................................................................................... 31 5.7 How to delete a user .............................................................................................................. 35 5.8 How to export user information ............................................................................................... 36 5.9 How to reset a user password ................................................................................................. 37 5.10 How to unlock a user account ................................................................................................ 38 5.11 How to remove a user role .................................................................................................... 39 5.12 What is a foreign user?......................................................................................................... 39 5.12.1 How to add a foreign user .................................................................................................. 40 5.12.2 How to remove a foreign user ............................................................................................ 42 5.12.3 How to work as a foreign user in ECHA applications .............................................................. 43 6. Account recovery ................................................................................................................. 44 6.1 How to recover a password ..................................................................................................... 45
ECHA Accounts Manual 5
Annankatu 18, P.O. Box 400, FI-00121 Helsinki, Finland | Tel. +358 9 686180 | Fax +358 9 68618210 | echa.europa.eu
6.2 How to recover a username .................................................................................................... 47 6.3 How to change a password ..................................................................................................... 48

6 ECHA Accounts Manual Version 4.0
Annankatu 18, P.O. Box 400, FI-00121 Helsinki, Finland | Tel. +358 9 686180 | Fax +358 9 68618210 | echa.europa.eu
Table of Figures
Figure 1: Roles in ECHA Accounts ................................................................................... 10 Figure 2: ECHA Account sign-up ..................................................................................... 12 Figure 3: Create an account ........................................................................................... 13 Figure 4: Security question ............................................................................................ 14 Figure 5: Email address verification ................................................................................ 14 Figure 6: Resend email verification ................................................................................. 14 Figure 7: Email verification link ...................................................................................... 15 Figure 8: Email verified confirmation ............................................................................... 15 Figure 9: Login page ..................................................................................................... 15 Figure 10: ECHA Accounts portal .................................................................................... 16 Figure 11: Create Legal Entity ........................................................................................ 16 Figure 12: Add Legal Entity identification ......................................................................... 17 Figure 13: Legal Entity details ........................................................................................ 18 Figure 14: Legal Entity UUID ......................................................................................... 18 Figure 15: ePIC/R4BP/REACH-IT/ECHA Cloud Services link ................................................ 19 Figure 16: ECHA Accounts portal .................................................................................... 20 Figure 17: Login to REACH-IT ........................................................................................ 20 Figure 18: Login to R4BP 3 ............................................................................................ 21 Figure 19: Login to ECHA Cloud Services ......................................................................... 21 Figure 20: Edit LE details ............................................................................................... 22 Figure 21: Edit identification .......................................................................................... 23 Figure 22: Billing address .............................................................................................. 23 Figure 23: Company name change ................................................................................. 24 Figure 24: Add contact .................................................................................................. 24 Figure 25: Add contact details ........................................................................................ 25 Figure 26: List of contacts ............................................................................................. 26 Figure 27: Edit contacts ................................................................................................ 26 Figure 28: Edit contact details ........................................................................................ 26 Figure 29: List of contacts ............................................................................................. 27 Figure 30: How to delete contacts .................................................................................. 27 Figure 31: Delete contacts confirmation .......................................................................... 27 Figure 32: Existing users ............................................................................................... 28 Figure 33: Create a new user ......................................................................................... 28 Figure 34: Successful user registration ............................................................................ 29 Figure 35: Email verified ............................................................................................... 29 Figure 36: Password reset ............................................................................................. 30 Figure 37: Change password and security question ........................................................... 30 Figure 38: Password has been changed ........................................................................... 31 Figure 39: List of users ................................................................................................. 31 Figure 40: List of users - update .................................................................................... 31 Figure 41: View account details ...................................................................................... 32 Figure 42: Edit user details ............................................................................................ 32 Figure 43: Email updated .............................................................................................. 33 Figure 44: Email not verified .......................................................................................... 33 Figure 45: Email address update .................................................................................... 34 Figure 46: Email address not verified .............................................................................. 34 Figure 47: Non-unique email address .............................................................................. 34 Figure 48: Email updated .............................................................................................. 35 Figure 49: Email verified ............................................................................................... 35 Figure 50: User details .................................................................................................. 35 Figure 51: Delete user .................................................................................................. 36 Figure 52: Confirm delete user ....................................................................................... 36 Figure 53: Successfully deleted user ............................................................................... 36 Figure 54: Export user information ................................................................................. 37

ECHA Accounts Manual 7
Annankatu 18, P.O. Box 400, FI-00121 Helsinki, Finland | Tel. +358 9 686180 | Fax +358 9 68618210 | echa.europa.eu
Figure 55: List of users – password reset ........................................................................ 37 Figure 56: Reset user password confirmation ................................................................... 37 Figure 57: Password reset confirmation ........................................................................... 38 Figure 58: List of users – Unlock .................................................................................... 38 Figure 59: List of users – no records ............................................................................... 39 Figure 60: List of users – foreign user ............................................................................. 40 Figure 61: Add a foreign user ......................................................................................... 41 Figure 62: Add a role to a foreign user ............................................................................ 41 Figure 63: Confirm registration ...................................................................................... 42 Figure 64: Successful user registration ............................................................................ 42 Figure 65: My Legal Entities ........................................................................................... 42 Figure 66: List of users with foreign user ......................................................................... 43 Figure 67: Remove foreign user ..................................................................................... 43 Figure 68: Account selection in ePIC ............................................................................... 43 Figure 69: Account selection in R4BP 3 ........................................................................... 44 Figure 70: Account selection in REACH-IT ........................................................................ 44 Figure 71: Account selection in ECHA Cloud services ......................................................... 44 Figure 72: ECHA Accounts main page ............................................................................. 45 Figure 73: Recover password ......................................................................................... 45 Figure 74: Lost password request confirmation ................................................................ 46 Figure 75: Link to security question ................................................................................ 46 Figure 76: Answer security question ............................................................................... 46 Figure 77: Change password .......................................................................................... 47 Figure 78: Forgot your username ................................................................................... 47 Figure 79: Recover username ........................................................................................ 48 Figure 80: Recover username confirmation ...................................................................... 48 Figure 81: ECHA Accounts - change password .................................................................. 48 Figure 82: Password reset ............................................................................................. 49 Figure 83: Change password .......................................................................................... 49 Figure 84: Change password confirmation ....................................................................... 50

8 ECHA Accounts Manual Version 4.0
Annankatu 18, P.O. Box 400, FI-00121 Helsinki, Finland | Tel. +358 9 686180 | Fax +358 9 68618210 | echa.europa.eu
1. Introduction
1.1 Objective This manual explains the required steps for an industry user to access ECHA’s IT tools (REACH-IT, ePIC, R4BP 3 and ECHA Cloud Services).
The document details how to sign up to ECHA Accounts, how to administer accounts and how to make use of the support functionalities.
1.2 Icons, abbreviations and terminology This manual uses various icons and specific abbreviations throughout. The icons are displayed to highlight useful information.
The following icons are used:
Useful information, guidance, assistance
Very important note
The following abbreviations and icons are used throughout this manual:
DUNS Data Universal Numbering System for identification of a Legal Entity
ECHA applications REACH-IT, ePIC, R4BP 3 and ECHA Cloud services
ePIC Prior Informed Consent IT tool
R4BP 3 Register for Biocidal Products IT tool
REACH-IT Registration, Evaluation, Authorisation and Restriction of Chemicals IT tool
LE Legal Entity
LE UUID Legal Entity universally unique identifier
LEOX Legal Entity object
PIC Prior Informed Consent
UUID Universally unique identifier
VAT number Value-added tax number associated with the Legal Entity
* The fields marked with asterisk are mandatory
Displays additional information

9 ECHA Accounts Manual
Annankatu 18, P.O. Box 400, FI-00121 Helsinki, Finland | Tel. +358 9 686180 | Fax +358 9 68618210 | echa.europa.eu
2. Definitions and concepts
2.1 Legal Entity A Legal Entity (LE) may represent anything between a complex business structure and a simple organised business, for example a corporation, company, or a single person. LEs are identified by their name, universally unique identifier (UUID), address, country, and general contact information. The LE account creation needs to be done with the sign-up process in ECHA Accounts. More information is available in Chapter 3. How to sign-up for the first time. A LE UUID is a key information to identify unambiguously your LE as unique during the submission of a notification, application or registration to ECHA. Please note:
• Once a LE has been created, the LE UUID and country cannot be changed. Other information of the LE can be modified at a later stage.
• Changing the LE name and other identifiers does not affect the legal status on the ownership of the assets, notifications, and registrations.
2.2 Users in ECHA Accounts Users are identified by their usernames. Once created, a username cannot be modified or duplicated; usernames are used to control access and trace the actions of users. Every user account needs a valid email address for account and password recovery. Permissions and access to the data are managed through roles assigned to users. Only users with a LE manager role can create other users for the same LE account. The following user types exist:
• Legal entity (LE) manager is the first user in the LE. LE managers are responsible for managing the users within the same LE account. A LE manager can see and administer everything related to the users of the LE, including passwords.
• Users have access to an ECHA application based on the role assigned to them by the LE manager. To ease the user administration, the ECHA Accounts portal provides links to self-service tools for users to change and recover their lost passwords and usernames. More information is available in Chapter 6 Account recovery functionalities.
• A foreign user is an external user from company B who has been appointed by the LE manager from company A to work for company A. More information is available in Chapter 5.12 Foreign user.
It is advisable to have at least 2 users with the LE manager role per LE. This will ensure that in case of personnel or organisational changes, there is more than one user who can create or modify the accounts in the LE.
10 ECHA Accounts Manual Version 4.0
Annankatu 18, P.O. Box 400, FI-00121 Helsinki, Finland | Tel. +358 9 686180 | Fax +358 9 68618210 | echa.europa.eu
In case of outsourcing user account management, it is advisable for your company to have at least one user with “LE manager” role.
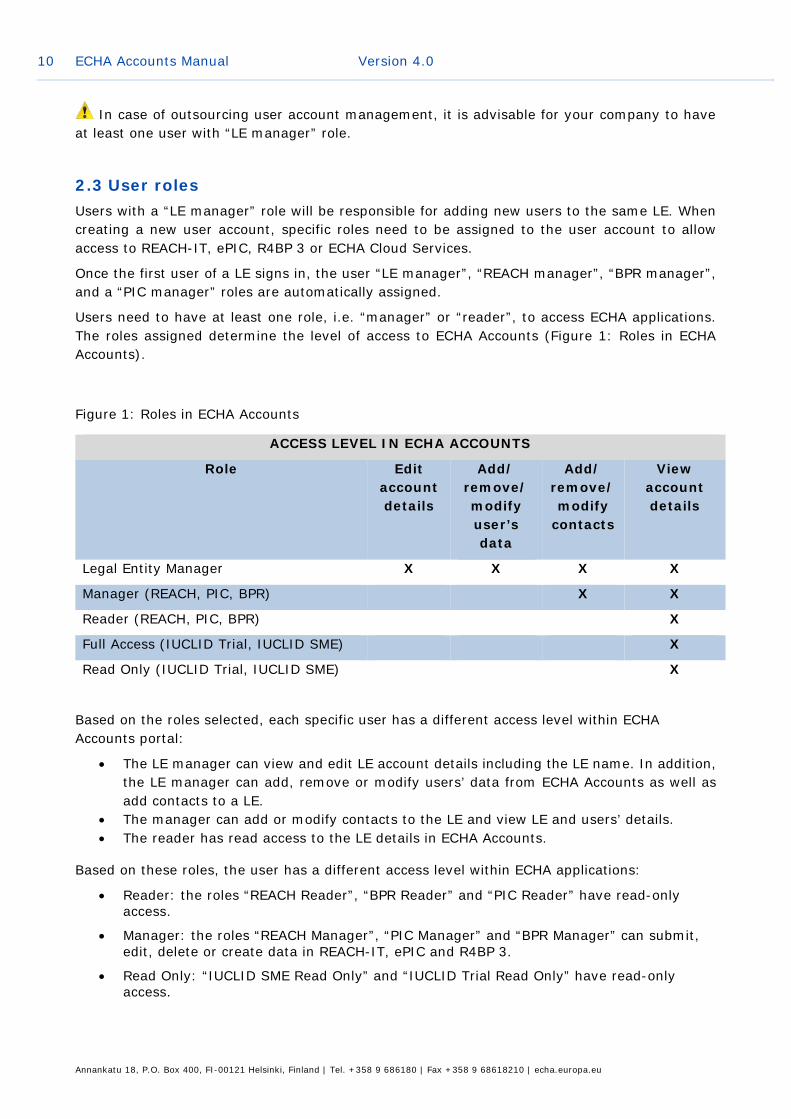
2.3 User roles Users with a “LE manager” role will be responsible for adding new users to the same LE. When creating a new user account, specific roles need to be assigned to the user account to allow access to REACH-IT, ePIC, R4BP 3 or ECHA Cloud Services.
Once the first user of a LE signs in, the user “LE manager”, “REACH manager”, “BPR manager”, and a “PIC manager” roles are automatically assigned.
Users need to have at least one role, i.e. “manager” or “reader”, to access ECHA applications. The roles assigned determine the level of access to ECHA Accounts (Figure 1: Roles in ECHA Accounts).
Figure 1: Roles in ECHA Accounts
ACCESS LEVEL IN ECHA ACCOUNTS
Role Edit account details
Add/ remove/ modify user’s data
Add/ remove/ modify
contacts
View account details
Legal Entity Manager X X X X
Manager (REACH, PIC, BPR) X X
Reader (REACH, PIC, BPR) X
Full Access (IUCLID Trial, IUCLID SME) X
Read Only (IUCLID Trial, IUCLID SME) X
Based on the roles selected, each specific user has a different access level within ECHA Accounts portal:
• The LE manager can view and edit LE account details including the LE name. In addition, the LE manager can add, remove or modify users’ data from ECHA Accounts as well as add contacts to a LE.
• The manager can add or modify contacts to the LE and view LE and users’ details. • The reader has read access to the LE details in ECHA Accounts.
Based on these roles, the user has a different access level within ECHA applications:
• Reader: the roles “REACH Reader”, “BPR Reader” and “PIC Reader” have read-only access.
• Manager: the roles “REACH Manager”, “PIC Manager” and “BPR Manager” can submit, edit, delete or create data in REACH-IT, ePIC and R4BP 3.
• Read Only: “IUCLID SME Read Only” and “IUCLID Trial Read Only” have read-only access.
11 ECHA Accounts Manual
Annankatu 18, P.O. Box 400, FI-00121 Helsinki, Finland | Tel. +358 9 686180 | Fax +358 9 68618210 | echa.europa.eu
• Full Access: the roles “IUCLID SME Full Access” and “IUCLID Trial Full Access” “IUCLID SME Full Access” and “IUCLID Trial Full Access” can submit, edit, delete or create data in ECHA Cloud Services.
2.4 Contacts The contacts can be used by ECHA and the national authorities to contact the LE. The contacts are created in ECHA Accounts. The contacts do not have access to ECHA Applications.
In the case of REACH-IT, the contacts are managed in REACH-IT.
2.5 Password management policy Passwords are used to protect your user identity and confidentiality of the data related to your LE. The password must have at least 8 characters and contain three of the following character types:
• uppercase letter [A to Z], lowercase letter [a to z]. • number [0-9] and non-alphabetical. • must not contain username, first name or last name. • cannot be the same as a previously used password. • cannot be changed more than once a day.
The maximum number of unsuccessful login attempts is 10. Once the number of maximum attempts is reached, the user account is locked for 2 hours. After that, the account is released, and a user will be able to log in. If a password is forgotten, a recovery link is available in the login page. If a user knows the answer to the security question, the “Forgot password” functionality can be used to receive a reset password link in their email address. If a user does not remember the security answer, or the email address linked to that username is incorrect, the LE manager can provide you with a new password. For more information refer to Chapter 6 Account recovery functionalities. A LE manager can reset the password of the users under the same LE. A new password needs to be sent to the users by email. In case the LE managers are unable to reset their password, they can contact ECHA: https://echa.europa.eu/contact

12 ECHA Accounts Manual Version 4.0
Annankatu 18, P.O. Box 400, FI-00121 Helsinki, Finland | Tel. +358 9 686180 | Fax +358 9 68618210 | echa.europa.eu
3. How to sign-up for the first-time To use an ECHA application users need to have a valid ECHA account. To create a new account, open ECHA Accounts portal and click “Sign-up” (Figure 2: ECHA Account sign-up).
Figure 2: ECHA Account sign-up
Users have alternative ways to create a new account: by accessing directly REACH-IT, R4BP 3, ePIC or ECHA Cloud Services portal and select:
• “Register a company” (if you access through REACH-IT and R4BP 3); • “Sign-up” (if you access through ePIC); • “Register” (if you access through ECHA Cloud Services).
3.1 User details To create an account (“Create account page”) users need to complete the following steps:
• Enter user details (Figure 3: Create account). • Verify email address (Figure 5: Email address verification). • Enter LE details (Figure 12: Add Legal Entity identification). • Confirm or modify the contact details.
Only users with a LE manager role can create other users for the same LE account.

13 ECHA Accounts Manual
Annankatu 18, P.O. Box 400, FI-00121 Helsinki, Finland | Tel. +358 9 686180 | Fax +358 9 68618210 | echa.europa.eu
Figure 3: Create an account
When indicating the email address, users need to keep in mind that this email address will be used for important notifications regarding their ECHA account e.g. password reset.
The username, which is unique across the system and cannot be changed, must be composed of at least four characters. For more information refer to Chapter 2.5 Password management policy for password requirements.
To complete the creation of an account, users need to select one of the security questions and specify an answer in the field “Security Answer”.

14 ECHA Accounts Manual Version 4.0
Annankatu 18, P.O. Box 400, FI-00121 Helsinki, Finland | Tel. +358 9 686180 | Fax +358 9 68618210 | echa.europa.eu
Figure 4: Security question
Under section “Security”, it is mandatory to provide a security question and an answer (Figure 4: Security question). Remembering the answer to a security question is as important as remembering the password since the answer to the security question allows to reset the password in the future. The security answer is case sensitive.
3.2 Email verification Once users have completed the “create account” page, a pop-up message will prompt them to verify their email address (Figure 5: Email address verification).
Figure 5: Email address verification
Users need to verify their email to make sure that they have access to that email address. In case a verification email is not received, users need to follow the instruction displayed in the warning message (Figure 6: Resend email verification).
Figure 6: Resend email verification
Users need to verify that they have received an ECHA email with the subject “Your account has been created” (Figure 7: Email verification link).

15 ECHA Accounts Manual
Annankatu 18, P.O. Box 400, FI-00121 Helsinki, Finland | Tel. +358 9 686180 | Fax +358 9 68618210 | echa.europa.eu
Figure 7: Email verification link
Clicking on the link will open a new browser window. The window will display an acknowledgement showing that the users’ email has been verified. It will also ask the user to log in to their ECHA account to continue the process (Figure 8: Email verified confirmation).
Figure 8: Email verified confirmation
Follow the steps in (Figure 9: Login page).
Figure 9: Login page
Once the users click on “login”, they will be directed to the ECHA Accounts portal (Figure 10: ECHA Accounts portal).

16 ECHA Accounts Manual Version 4.0
Annankatu 18, P.O. Box 400, FI-00121 Helsinki, Finland | Tel. +358 9 686180 | Fax +358 9 68618210 | echa.europa.eu
Figure 10: ECHA Accounts portal
To continue with the sign-up process, users need to click on “Account, Users & Parties management”.
3.3 How to encode your Legal Entity If a user has a LE definition file in LEOX file format they click on “Import IUCLID format file” and select the LEOX file they wish to import. (Figure 11: Create Legal Entity)
If the LE already exists, an error message will be shown.
Figure 11: Create Legal Entity
If users do not have the LE definition file in LEOX file format they will need to click on “Encode Legal Entity” (Figure 12: Add Legal Entity identification). The LE information should correspond to the company information.

17 ECHA Accounts Manual
Annankatu 18, P.O. Box 400, FI-00121 Helsinki, Finland | Tel. +358 9 686180 | Fax +358 9 68618210 | echa.europa.eu
Figure 12: Add Legal Entity identification
Please note:
• The selected country cannot be modified once the information is saved. • Billing address information is not needed for users of the ePIC application. ePIC users can
leave the selected option by default. Click “Save”.
Users have now access to their account (Figure 13: Legal Entity details).

18 ECHA Accounts Manual Version 4.0
Annankatu 18, P.O. Box 400, FI-00121 Helsinki, Finland | Tel. +358 9 686180 | Fax +358 9 68618210 | echa.europa.eu
Figure 13: Legal Entity details
Once the LE account is saved and created, a UUID number is assigned to the LE (Figure 14: Legal Entity UUID).
Figure 14: Legal Entity UUID
The LE details are now associated to a LE UUID. The LE UUID is used to unambiguously identify your LE. The UUID number is unique and cannot be modified. It is also recommended that users keep a copy of the UUID. This is useful in any future communication with ECHA on access issues.

19 ECHA Accounts Manual
Annankatu 18, P.O. Box 400, FI-00121 Helsinki, Finland | Tel. +358 9 686180 | Fax +358 9 68618210 | echa.europa.eu
To access an ECHA application, users can select the “ePIC/R4BP/REACH-IT/ECHA Cloud” link under the ECHA banner (Figure 15: ePIC/R4BP/REACH-IT/ECA Cloud Services link).
Figure 15: ePIC/R4BP/REACH-IT/ECHA Cloud Services link
4. How to log in ECHA Accounts is the central place where registered LE managers can administer the contact details and accounts of their users. ECHA Accounts also allows a user to log into an ECHA application once a relevant role or roles are granted in the user details section.
There are two ways to access ECHA applications:
1. Log in through ECHA Accounts first, then select the appropriate ECHA application.
2. Log in directly into the ECHA application using the appropriate link.
4.1 How to log in using ECHA Accounts Once users log into ECHA Accounts, they will be redirected to the ECHA Accounts portal (Figure 16: ECHA Accounts portal). The ECHA Accounts portal will allow users to select:
• ECHA Accounts (Account, Users & Parties management)
• REACH-IT submission tool
• R4BP 3
• PIC submission tool
• ECHA Cloud Services

20 ECHA Accounts Manual Version 4.0
Annankatu 18, P.O. Box 400, FI-00121 Helsinki, Finland | Tel. +358 9 686180 | Fax +358 9 68618210 | echa.europa.eu
Figure 16: ECHA Accounts portal
4.2 How to log in to an ECHA application
4.2.1 REACH-IT Users need to go to REACH-IT and click “Login” (Figure 17: Login to REACH-IT).
Figure 17: Login to REACH-IT

21 ECHA Accounts Manual
Annankatu 18, P.O. Box 400, FI-00121 Helsinki, Finland | Tel. +358 9 686180 | Fax +358 9 68618210 | echa.europa.eu
4.2.2 R4BP 3 Users need to go to R4BP 3 and click “Login” (Figure 18: Login to R4BP 3).
Figure 18: Login to R4BP 3
4.2.3 ECHA Cloud services Users need to go to ECHA Cloud services and click “Login” (Figure 19: Login to ECHA Cloud Services).
Figure 19: Login to ECHA Cloud Services
4.2.4 ePIC Users need to click on ePIC.
Users who sign-up to ECHA Accounts and access an ECHA application will need to accept the terms and conditions before gaining access to that application.
22 ECHA Accounts Manual Version 4.0
Annankatu 18, P.O. Box 400, FI-00121 Helsinki, Finland | Tel. +358 9 686180 | Fax +358 9 68618210 | echa.europa.eu
4.3 Logging out
It is advisable to close the browser after logging out of the ECHA application. This ensures that no one else can log into the account. This is important also when using multiple accounts from the same computer.
5. How to manage your Legal Entity The LE details contain relevant information of your company:
• General details
• General contact information
• Address information
• Billing address
A user with the manager role can also edit the contact details of a user, remove or add a contact user.
5.1 How to update Legal Entity details
Only a user with the “LE manager” role can edit the LE details.
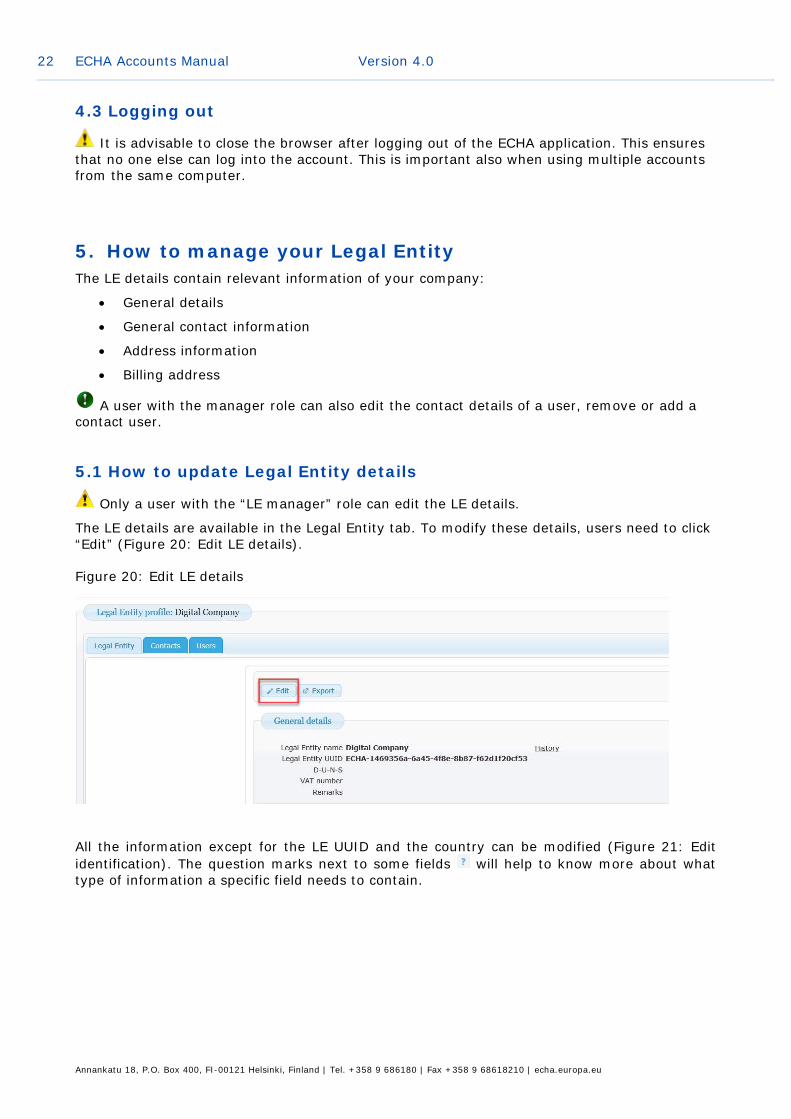
The LE details are available in the Legal Entity tab. To modify these details, users need to click “Edit” (Figure 20: Edit LE details).
Figure 20: Edit LE details
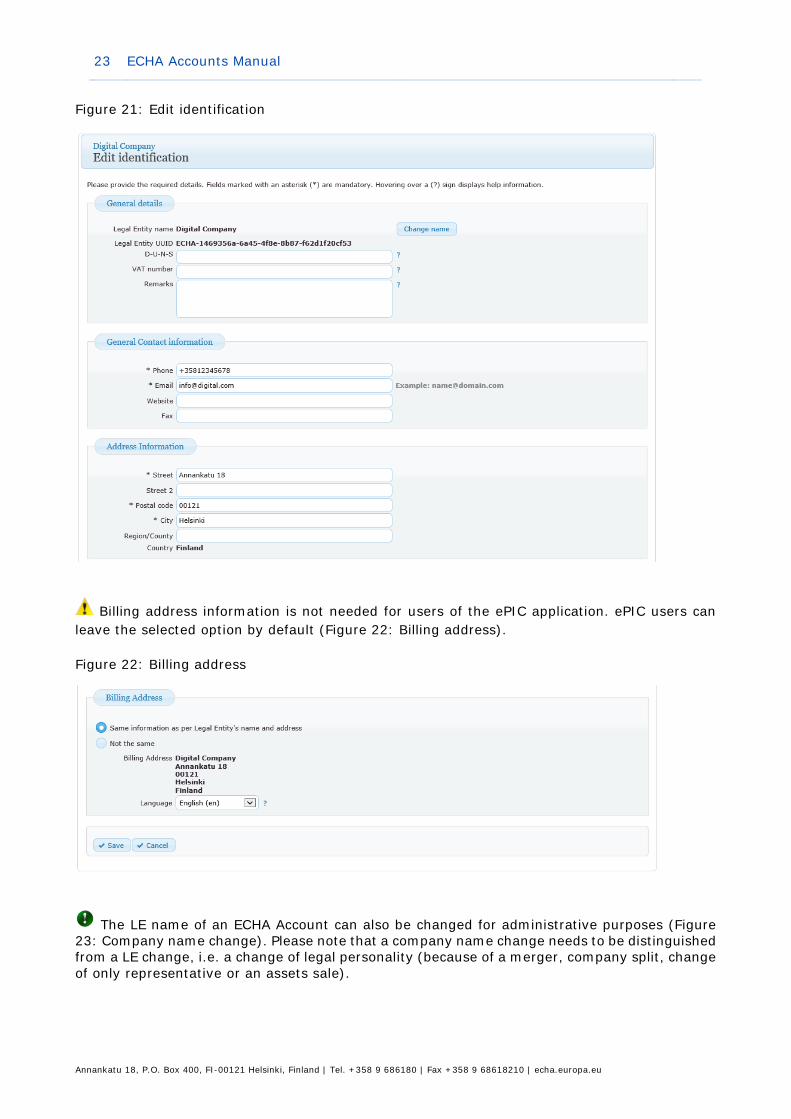
All the information except for the LE UUID and the country can be modified (Figure 21: Edit identification). The question marks next to some fields will help to know more about what type of information a specific field needs to contain.
23 ECHA Accounts Manual
Annankatu 18, P.O. Box 400, FI-00121 Helsinki, Finland | Tel. +358 9 686180 | Fax +358 9 68618210 | echa.europa.eu
Figure 21: Edit identification
Billing address information is not needed for users of the ePIC application. ePIC users can leave the selected option by default (Figure 22: Billing address).
Figure 22: Billing address
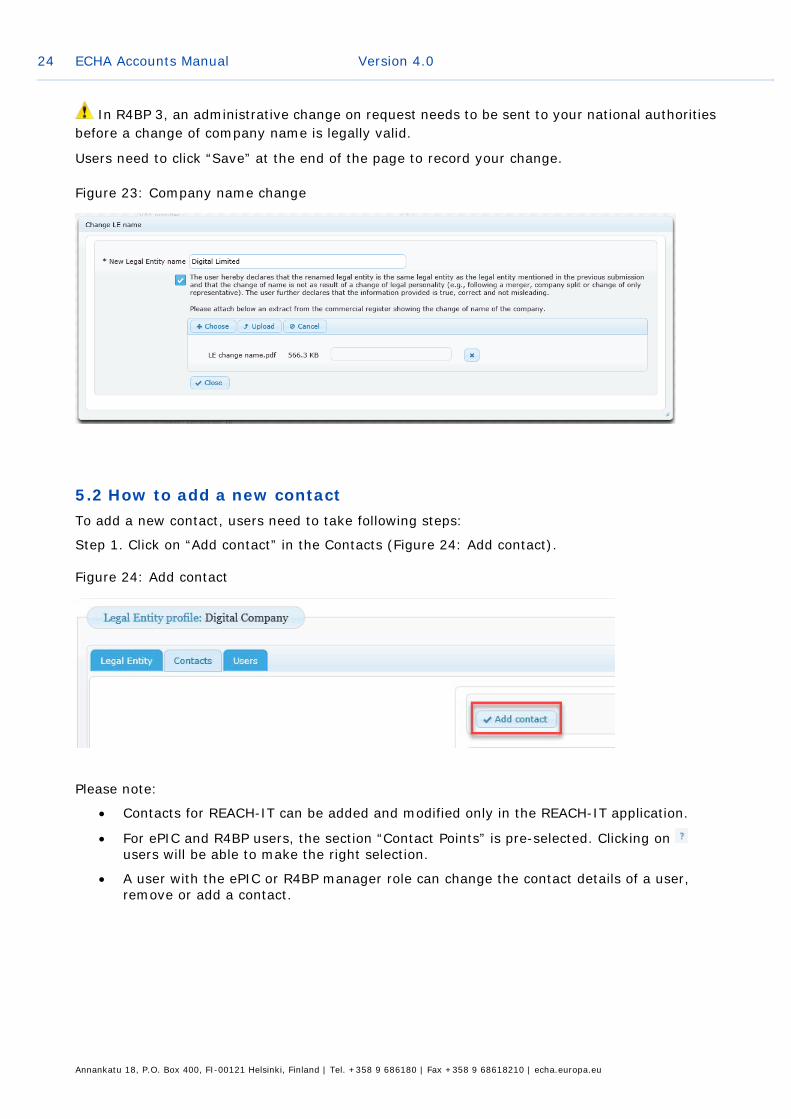
The LE name of an ECHA Account can also be changed for administrative purposes (Figure 23: Company name change). Please note that a company name change needs to be distinguished from a LE change, i.e. a change of legal personality (because of a merger, company split, change of only representative or an assets sale).
24 ECHA Accounts Manual Version 4.0
Annankatu 18, P.O. Box 400, FI-00121 Helsinki, Finland | Tel. +358 9 686180 | Fax +358 9 68618210 | echa.europa.eu
In R4BP 3, an administrative change on request needs to be sent to your national authorities before a change of company name is legally valid.
Users need to click “Save” at the end of the page to record your change.
Figure 23: Company name change
5.2 How to add a new contact To add a new contact, users need to take following steps:
Step 1. Click on “Add contact” in the Contacts (Figure 24: Add contact).
Figure 24: Add contact
Please note:
• Contacts for REACH-IT can be added and modified only in the REACH-IT application.
• For ePIC and R4BP users, the section “Contact Points” is pre-selected. Clicking on users will be able to make the right selection.
• A user with the ePIC or R4BP manager role can change the contact details of a user, remove or add a contact.

25 ECHA Accounts Manual
Annankatu 18, P.O. Box 400, FI-00121 Helsinki, Finland | Tel. +358 9 686180 | Fax +358 9 68618210 | echa.europa.eu
Step 2. Fill in the information and click “Save” (Figure 25: Add contact details).
Figure 25: Add contact details
5.3 How to modify an existing contact To modify the contact details, users need to take the following steps:
Step 1. Click on contact (Figure 26: List of contacts).

26 ECHA Accounts Manual Version 4.0
Annankatu 18, P.O. Box 400, FI-00121 Helsinki, Finland | Tel. +358 9 686180 | Fax +358 9 68618210 | echa.europa.eu
Figure 26: List of contacts
Step 2. Click on “Edit” in the “View contact details” page (Figure 27: Edit contacts).
Figure 27: Edit contacts
Step 3. Modify the relevant information and click on “Save” (Figure 28: Edit contact details).
Figure 28: Edit contact details

27 ECHA Accounts Manual
Annankatu 18, P.O. Box 400, FI-00121 Helsinki, Finland | Tel. +358 9 686180 | Fax +358 9 68618210 | echa.europa.eu
5.4 How to delete an existing contact To delete a contact, users need to take the following steps:
Step 1. Click on contact (Figure 29: List of contacts).
Figure 29: List of contacts
Step 2. Click on “Delete” (Figure 30: How to delete contacts).
Figure 30: How to delete contacts
Step 3. Click on “Yes” and contact is removed (Figure 31: Delete contacts confirmation).
Figure 31: Delete contacts confirmation
5.5 How to create a new user The details of existing users appear when the “Users” is clicked (Figure 32: Existing users).
To create a new user, the LE manager needs to take the following steps:

28 ECHA Accounts Manual Version 4.0
Annankatu 18, P.O. Box 400, FI-00121 Helsinki, Finland | Tel. +358 9 686180 | Fax +358 9 68618210 | echa.europa.eu
Step 1. Click on “Add new user” (Figure 32: Existing users).
Figure 32: Existing users
Step 2. Fill in the information and grant required roles for the new user (Figure 33: Create a new user).
Figure 33: Create a new user
The email address entered in the “Add new user” page will be used to communicate the username and password to the user. Therefore, a valid email address must be provided, and the username must be unique. The system checks whether a username is already used.
Under section “User profile”, LE managers can add roles to users by selecting one available
role and clicking on the forward arrow . More than one role can be selected for a user.
Step 3. Click on “Save” to confirm the entries.
Step 4. A screen indicating the successful user registration will appear (Figure 34: Successful user registration).

29 ECHA Accounts Manual
Annankatu 18, P.O. Box 400, FI-00121 Helsinki, Finland | Tel. +358 9 686180 | Fax +358 9 68618210 | echa.europa.eu
Figure 34: Successful user registration
A verification email with username is automatically sent to the email address included once the user is created.
Step 5. Click on link next to “Mail to:” and a new email is generated.
Step 6. Send this email with the one-time password to the user.
5.5.1 First time login steps for the new user The new user needs to take the following steps in first time login:
1. Receive an email from [email protected] with a subject “An account has been created for you”
2. Verify the email address by clicking on the link in the email. The user will be notified that the email has been verified (Figure 35: Email verified).
Figure 35: Email verified
3. Receive an email from the LE manager with username and one-time password. The
user needs to click “here” (Figure 35: Email verified) to enter the username and the one-time password (Figure 36: Password reset).

30 ECHA Accounts Manual Version 4.0
Annankatu 18, P.O. Box 400, FI-00121 Helsinki, Finland | Tel. +358 9 686180 | Fax +358 9 68618210 | echa.europa.eu
Figure 36: Password reset
4. Complete the information as shown in the Figure 37: Change password and security question.
Figure 37: Change password and security question

31 ECHA Accounts Manual
Annankatu 18, P.O. Box 400, FI-00121 Helsinki, Finland | Tel. +358 9 686180 | Fax +358 9 68618210 | echa.europa.eu
5. Receive a notification that “Your password has been changed” and needs to click on “log in” to access ECHA applications (Figure 38: Password has been changed).
Figure 38: Password has been changed
A new user will be included in the “List of users” (Figure 39: List of users)
Figure 39: List of users
5.6 How to update user details The LE manager needs to take the following steps to update user details:
Step 1. Click on username (Figure 40: List of users - update).
Figure 40: List of users - update
Step 2. Click on “Edit” (Figure 41: View account details).

32 ECHA Accounts Manual Version 4.0
Annankatu 18, P.O. Box 400, FI-00121 Helsinki, Finland | Tel. +358 9 686180 | Fax +358 9 68618210 | echa.europa.eu
Figure 41: View account details
Step 3. Modify required account details including “First Name,” “Last Name” and “Email” (Figure 42: Edit user details).
Figure 42: Edit user details

33 ECHA Accounts Manual
Annankatu 18, P.O. Box 400, FI-00121 Helsinki, Finland | Tel. +358 9 686180 | Fax +358 9 68618210 | echa.europa.eu
Step 4. Choose available role and click on to select the role.
A user can have more than one role. If a role needs to be removed, the user clicks on the
role under the “Selected roles” and clicks on . Assigning all the roles and removing them can be done with a single click on and .
Step 5. Click on “Save” to complete the changes.
If LE manager or user wishes to modify the “Email” (Figure 42: Edit user details), they need to take the following steps:
Step 1. Modify the email address of a user and click on “Save”
Step 2. A notification appears (Figure 43: Email updated)
Figure 43: Email updated
Step 3. When the email address is modified, the user needs to verify the email address. On the next login to ECHA applications, they will receive a warning message (Figure 44: Email not verified)
Figure 44: Email not verified
Step 4. Enter the username and password for email address update, click “Submit” (Figure 45: Email address update)

34 ECHA Accounts Manual Version 4.0
Annankatu 18, P.O. Box 400, FI-00121 Helsinki, Finland | Tel. +358 9 686180 | Fax +358 9 68618210 | echa.europa.eu
Figure 45: Email address update
Step 5. Enter the email address and click on “Send Verification” (Figure 46: Email address not verified)
Figure 46: Email address not verified
Step 6. Click “Yes”. (Figure 47: Non-unique email address). This notification appears, if users have more than one account linked to same email address
Figure 47: Non-unique email address
Step 7. Close the “Email updated” notification by clicking on (Figure 48: Email updated)

35 ECHA Accounts Manual
Annankatu 18, P.O. Box 400, FI-00121 Helsinki, Finland | Tel. +358 9 686180 | Fax +358 9 68618210 | echa.europa.eu
Figure 48: Email updated
Step 8. Check your inbox for a noreply email with the subject “Verify your email address”.
Step 9. Click on link in the email.
Step 10. Click on “login” (Figure 49: Email verified).
Figure 49: Email verified
Users can modify their own user details by clicking on “My account” (Figure 50: User details).
Figure 50: User details
5.7 How to delete a user A user with a “LE manager” role can remove users from ECHA account.
To delete a user, a LE manager needs to take the following steps:
Step 1. Click on (Figure 51: Delete user).

36 ECHA Accounts Manual Version 4.0
Annankatu 18, P.O. Box 400, FI-00121 Helsinki, Finland | Tel. +358 9 686180 | Fax +358 9 68618210 | echa.europa.eu
Figure 51: Delete user
Step 2. Click “Yes” to confirm the deletion of the user (Figure 52: Confirm delete user).
Figure 52: Confirm delete user
The LE manager will get the following message: “Successfully deleted user “username”” (Figure 53: Successfully deleted user).
Figure 53: Successfully deleted user
A deleted username(s) cannot be used again.
5.8 How to export user information A LE Manager can export the users by clicking “Export (.csv)”. The file contains useful information i.e. foreign user’s status, creation date, last login, password last changed (Figure 54: Export user information).
37 ECHA Accounts Manual
Annankatu 18, P.O. Box 400, FI-00121 Helsinki, Finland | Tel. +358 9 686180 | Fax +358 9 68618210 | echa.europa.eu
Figure 54: Export user information
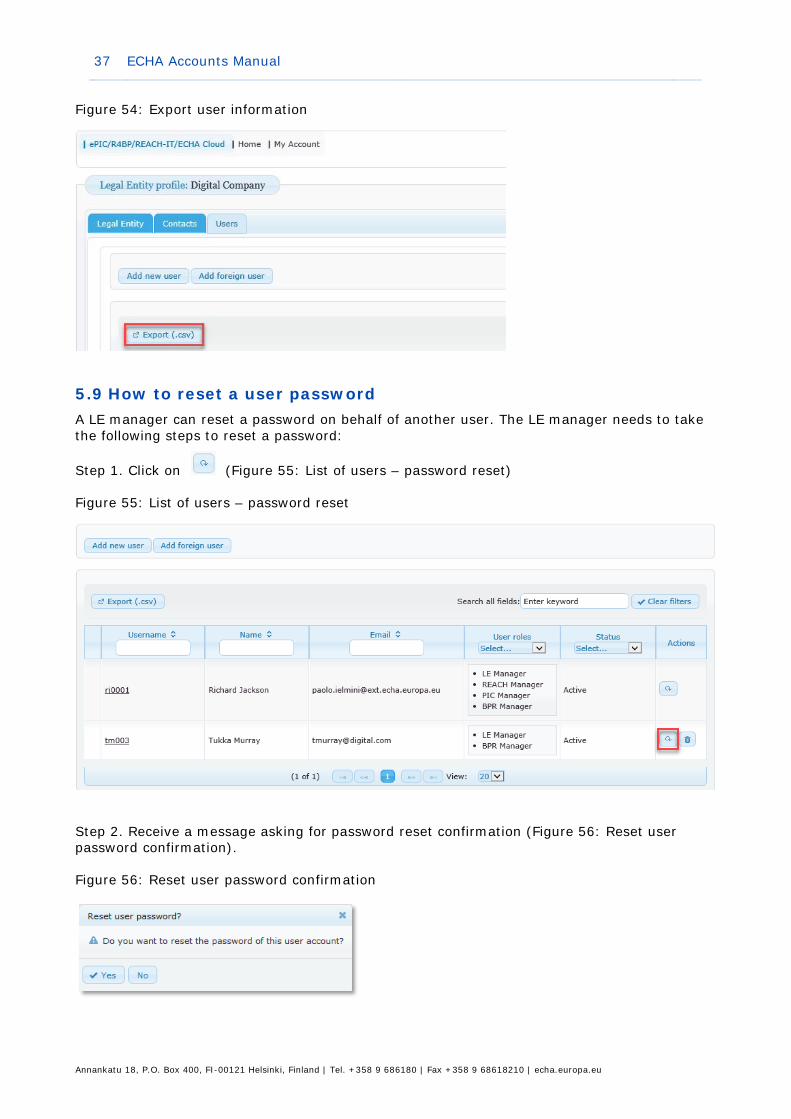
5.9 How to reset a user password A LE manager can reset a password on behalf of another user. The LE manager needs to take the following steps to reset a password:
Step 1. Click on (Figure 55: List of users – password reset)
Figure 55: List of users – password reset
Step 2. Receive a message asking for password reset confirmation (Figure 56: Reset user password confirmation).
Figure 56: Reset user password confirmation

38 ECHA Accounts Manual Version 4.0
Annankatu 18, P.O. Box 400, FI-00121 Helsinki, Finland | Tel. +358 9 686180 | Fax +358 9 68618210 | echa.europa.eu
Step 3. Click on “Yes”.
Step 4. Click on email address link and send the email to the user (Figure 57: Password reset confirmation).
Figure 57: Password reset confirmation
5.10 How to unlock a user account A user is locked after 10 unsuccessful login attempts. Due to security reasons, an account is locked for 2 hours. During this time, the help functionality cannot be used to recover a password.
If the user needs immediate access to ECHA Accounts, they need to contact the LE manager.
The LE manager needs to click on (Figure 58: List of users - Unlock).
Figure 58: List of users – Unlock
If a LE manager is locked and has no other LE manager for the same account, they
will need to contact the ECHA Helpdesk to request the unlocking of the account.

39 ECHA Accounts Manual
Annankatu 18, P.O. Box 400, FI-00121 Helsinki, Finland | Tel. +358 9 686180 | Fax +358 9 68618210 | echa.europa.eu
5.11 How to remove a user role If the LE manager removes all user roles, users will remain visible. However, when the roles for the user have been removed, they will have no access to an ECHA application.
To remove a role, the LE manager needs to take the following steps:
Step 1. Click on the users(s) below “Username”.
Step 2. Click on “Edit”.
Step 3. Select the role(s) available under the selected roles column.
Step 4. Click on and click on “Save”.
As a result, “No records found.” is displayed under “User roles” (Figure 59: List of users – no records).
Figure 59: List of users – no records
5.12 What is a foreign user? A user with the “LE manager” role in “company A”, can allow a user, linked to “company B”, to have access to “company A” to work on its behalf.
A foreign user can perform actions on behalf of the company that grants them permission to use an account from their own ECHA account.
Granting access to third party (foreign user) users may expose confidential data. It is important that companies agree the scope of access and how the confidential information is handled.
When roles (Figure 1: Roles in ECHA Accounts) are granted to foreign users, they can do the following:
• In ECHA Accounts: view LE and user details in read-only view
• In ECHA Accounts: modify or add new contacts to the LE (only if they have any manager roles).
• In ECHA applications: perform actions based on the level of access (manager or reader roles) assigned to them.

40 ECHA Accounts Manual Version 4.0
Annankatu 18, P.O. Box 400, FI-00121 Helsinki, Finland | Tel. +358 9 686180 | Fax +358 9 68618210 | echa.europa.eu
The company who grants access to the foreign user has access to submit applications, receive messages in ECHA applications or receive and complete tasks items – in case the foreign user is not able to perform actions on their behalf.
A foreign user (company B) working for “company A”, can modify contact details but cannot modify LE or user details of a “company A”.
For R4BP 3 a foreign user does not replace a case owner who submits an application/notification on behalf of an authorization holder (case owner different from the asset owner). When a case owner submits on behalf of the asset owner both entities have different accounts, and the case owner is responsible to follow-up the status of any communications submitted by authorities.
5.12.1 How to add a foreign user To add a foreign user, the user of company B needs to sign-up in ECHA Accounts as described in chapter 3. How to sign-up for the first-time of this manual.
The LE manager of company A will need to log into their ECHA account and click on “Add foreign user” (Figure 60: List of users – foreign user).
Figure 60: List of users – foreign user
The LE manager will need to indicate the “Username” and “Primary Legal Entity UUID” (information related to the foreign user and their company) (Figure 61: Add a foreign user).

41 ECHA Accounts Manual
Annankatu 18, P.O. Box 400, FI-00121 Helsinki, Finland | Tel. +358 9 686180 | Fax +358 9 68618210 | echa.europa.eu
Figure 61: Add a foreign user
To add a foreign user, the LE manager assigns the required roles (Figure 62: Add a role to a foreign user). For further details, please see chapter 5.6 How to update user details.
A foreign user must always have a role assigned, otherwise they cannot be added.
Figure 62: Add a role to a foreign user
The LE manager needs to take the following steps:
Step 1. Click on “Save”.

42 ECHA Accounts Manual Version 4.0
Annankatu 18, P.O. Box 400, FI-00121 Helsinki, Finland | Tel. +358 9 686180 | Fax +358 9 68618210 | echa.europa.eu
Step 2. Click on “Yes” (Figure 63: Confirm registration).
Figure 63: Confirm registration
The LE manager will receive a “Successful user registration” message (Figure 64: Successful user registration).
Figure 64: Successful user registration
Once the foreign user accesses their account, the LE details can be found in the LE tab (Figure 65: My Legal Entities).
Figure 65: My Legal Entities
5.12.2 How to remove a foreign user To remove a foreign user, the LE manager needs to take the following steps:
Step 1. Click on (Figure 66: List of users with foreign user).
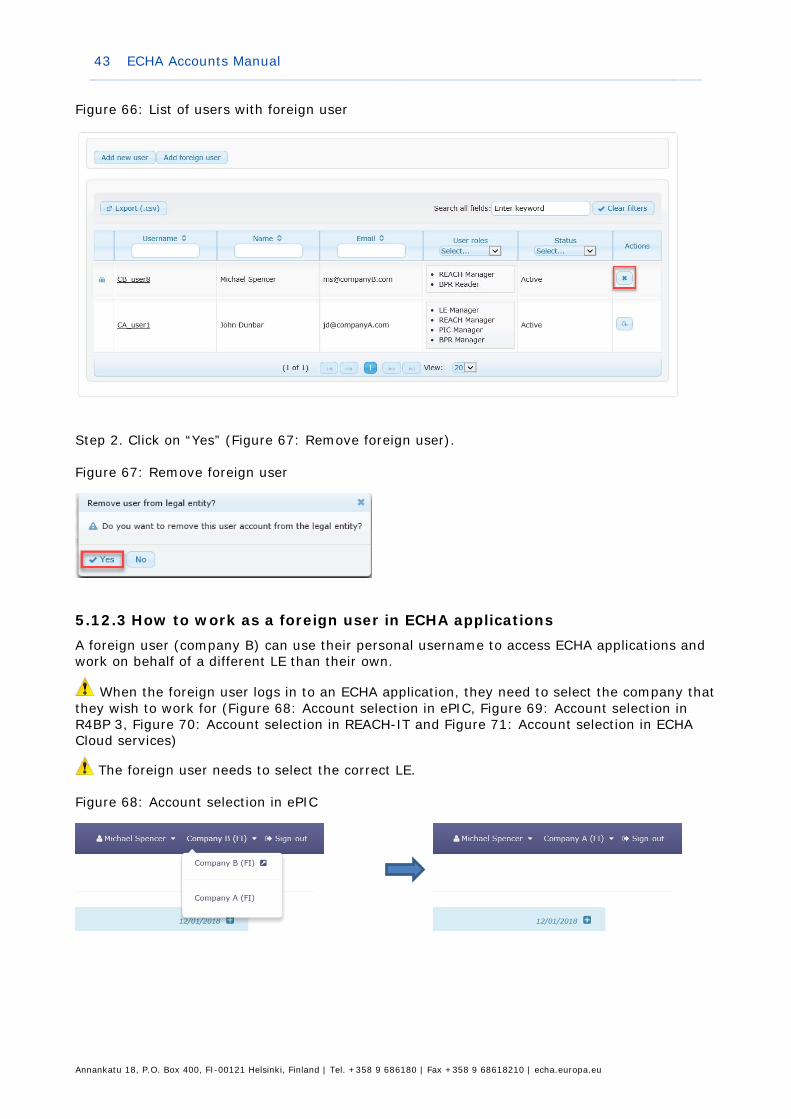
43 ECHA Accounts Manual
Annankatu 18, P.O. Box 400, FI-00121 Helsinki, Finland | Tel. +358 9 686180 | Fax +358 9 68618210 | echa.europa.eu
Figure 66: List of users with foreign user
Step 2. Click on “Yes” (Figure 67: Remove foreign user).
Figure 67: Remove foreign user
5.12.3 How to work as a foreign user in ECHA applications A foreign user (company B) can use their personal username to access ECHA applications and work on behalf of a different LE than their own.
When the foreign user logs in to an ECHA application, they need to select the company that they wish to work for (Figure 68: Account selection in ePIC, Figure 69: Account selection in R4BP 3, Figure 70: Account selection in REACH-IT and Figure 71: Account selection in ECHA Cloud services)
The foreign user needs to select the correct LE.
Figure 68: Account selection in ePIC

44 ECHA Accounts Manual Version 4.0
Annankatu 18, P.O. Box 400, FI-00121 Helsinki, Finland | Tel. +358 9 686180 | Fax +358 9 68618210 | echa.europa.eu
Figure 69: Account selection in R4BP 3
Figure 70: Account selection in REACH-IT
Figure 71: Account selection in ECHA Cloud services
Even if a foreign user is working on behalf of a company, email notifications will still be sent
only to the contacts that have been specified.
6. Account recovery Users can administer an ECHA account by themselves:
• Recover a password. • Recover a username. • Change password.
Users should remember their username and the answer to the security question to be able to recover their password.
45 ECHA Accounts Manual
Annankatu 18, P.O. Box 400, FI-00121 Helsinki, Finland | Tel. +358 9 686180 | Fax +358 9 68618210 | echa.europa.eu
If a user cannot use the help functionalities, the LE manager for the same LE can help users to gain access to the account.
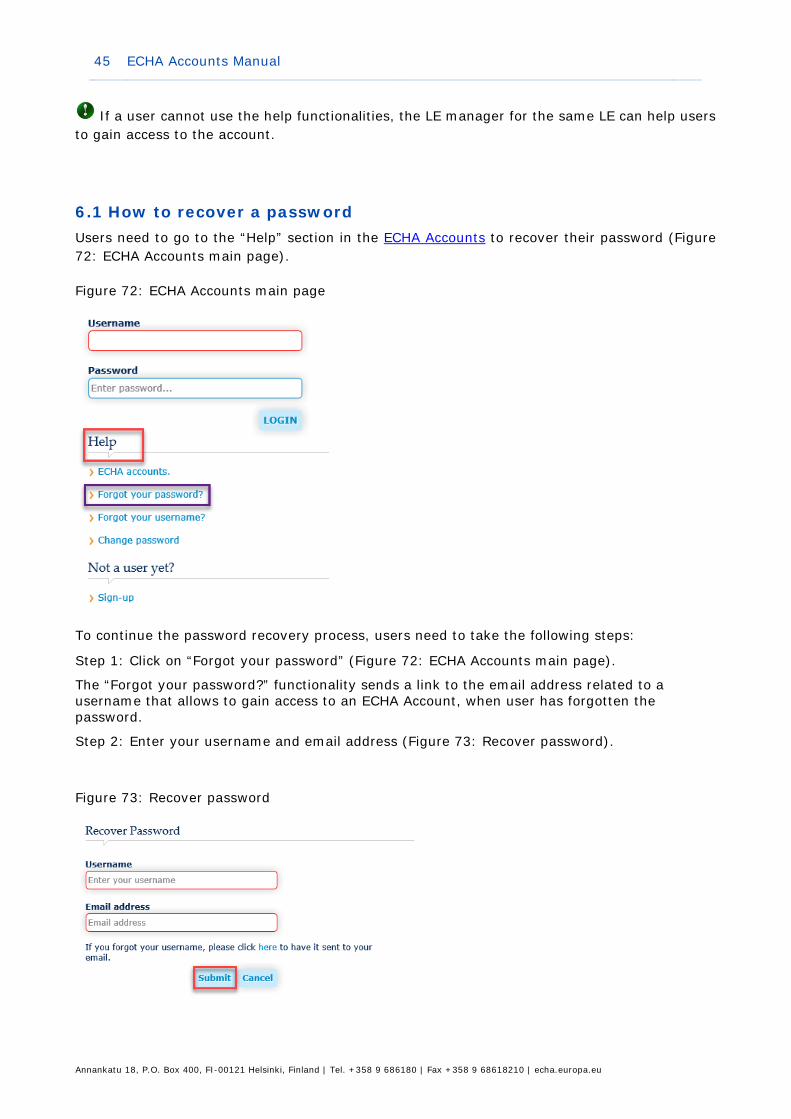
6.1 How to recover a password Users need to go to the “Help” section in the ECHA Accounts to recover their password (Figure 72: ECHA Accounts main page).
Figure 72: ECHA Accounts main page
To continue the password recovery process, users need to take the following steps:
Step 1: Click on “Forgot your password” (Figure 72: ECHA Accounts main page).
The “Forgot your password?” functionality sends a link to the email address related to a username that allows to gain access to an ECHA Account, when user has forgotten the password.
Step 2: Enter your username and email address (Figure 73: Recover password).
Figure 73: Recover password

46 ECHA Accounts Manual Version 4.0
Annankatu 18, P.O. Box 400, FI-00121 Helsinki, Finland | Tel. +358 9 686180 | Fax +358 9 68618210 | echa.europa.eu
Step 3. Click on “Ok” (Figure 74: Lost password request confirmation).
Figure 74: Lost password request confirmation
Step 4. Check your inbox for a noreply email with the subject “Request to recover password” (Figure 75: Link to security question).
Figure 75: Link to security question
Step 5. Click on “here” (Figure 75: Link to security question).
Step 6. Answer the security question and click “Submit” (Figure 76: Answer security question).
Figure 76: Answer security question
The answer to the security question is always user-specific. The user account details, including the answer to the security question, are available in “My account”.
If users don’t remember the answer to their security question, they need to contact their LE manager.
Step 7. Provide a new password (Figure 77: Change password).
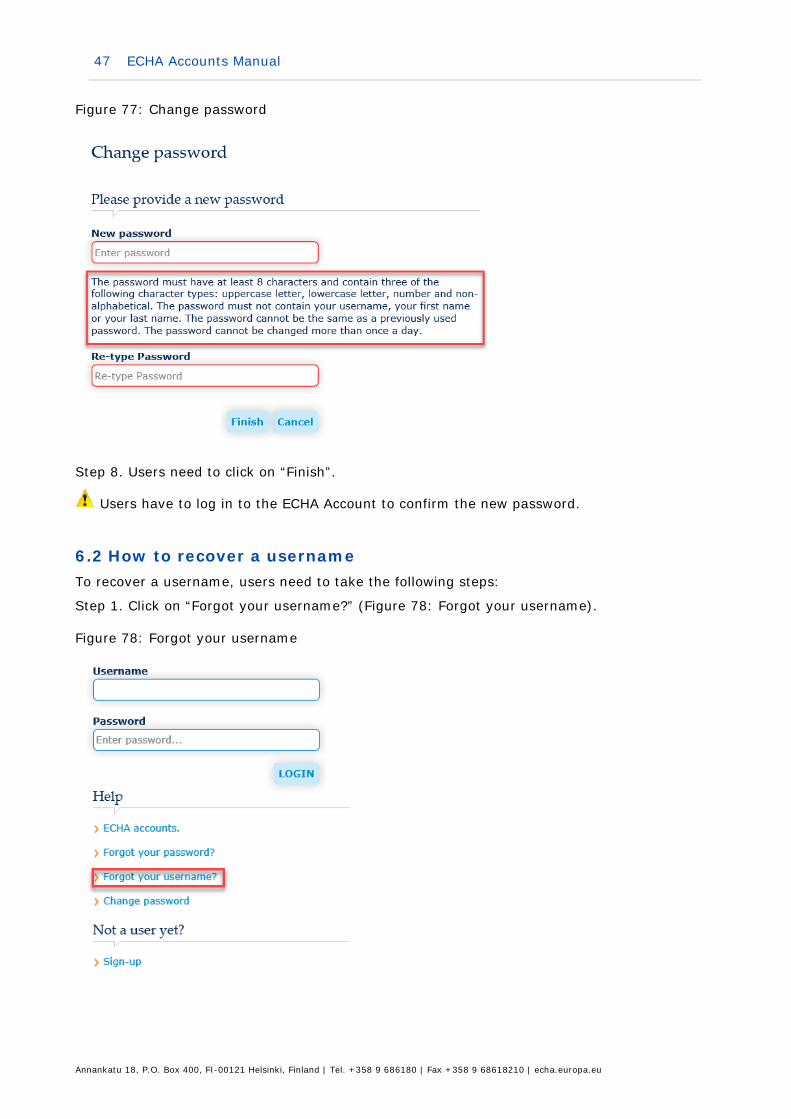
47 ECHA Accounts Manual
Annankatu 18, P.O. Box 400, FI-00121 Helsinki, Finland | Tel. +358 9 686180 | Fax +358 9 68618210 | echa.europa.eu
Figure 77: Change password
Step 8. Users need to click on “Finish”.
Users have to log in to the ECHA Account to confirm the new password.
6.2 How to recover a username To recover a username, users need to take the following steps:
Step 1. Click on “Forgot your username?” (Figure 78: Forgot your username).
Figure 78: Forgot your username

48 ECHA Accounts Manual Version 4.0
Annankatu 18, P.O. Box 400, FI-00121 Helsinki, Finland | Tel. +358 9 686180 | Fax +358 9 68618210 | echa.europa.eu
Step 2: Enter the email address (Figure 79: Recover username).
Figure 79: Recover username
Step 3: Click on “Ok” (Figure 80: Recover username confirmation).
Figure 80: Recover username confirmation
Step 4: Check your inbox for a noreply email with the subject “Request to recover username” with the username(s) linked to your email address.
6.3 How to change a password Users need to go to ECHA Accounts to change their password.
To change a password, users need to take the following steps:
Step 1: Click on “Change password” (Figure 81: ECHA Accounts - change password).
Figure 81: ECHA Accounts - change password

49 ECHA Accounts Manual
Annankatu 18, P.O. Box 400, FI-00121 Helsinki, Finland | Tel. +358 9 686180 | Fax +358 9 68618210 | echa.europa.eu
Step 2: Enter the username and current password (Figure 82: Password reset).
Figure 82: Password reset
Step 3. Click on “Submit”
Step 4: Enter new password and re-type it (Figure 83: Change password).
Figure 83: Change password
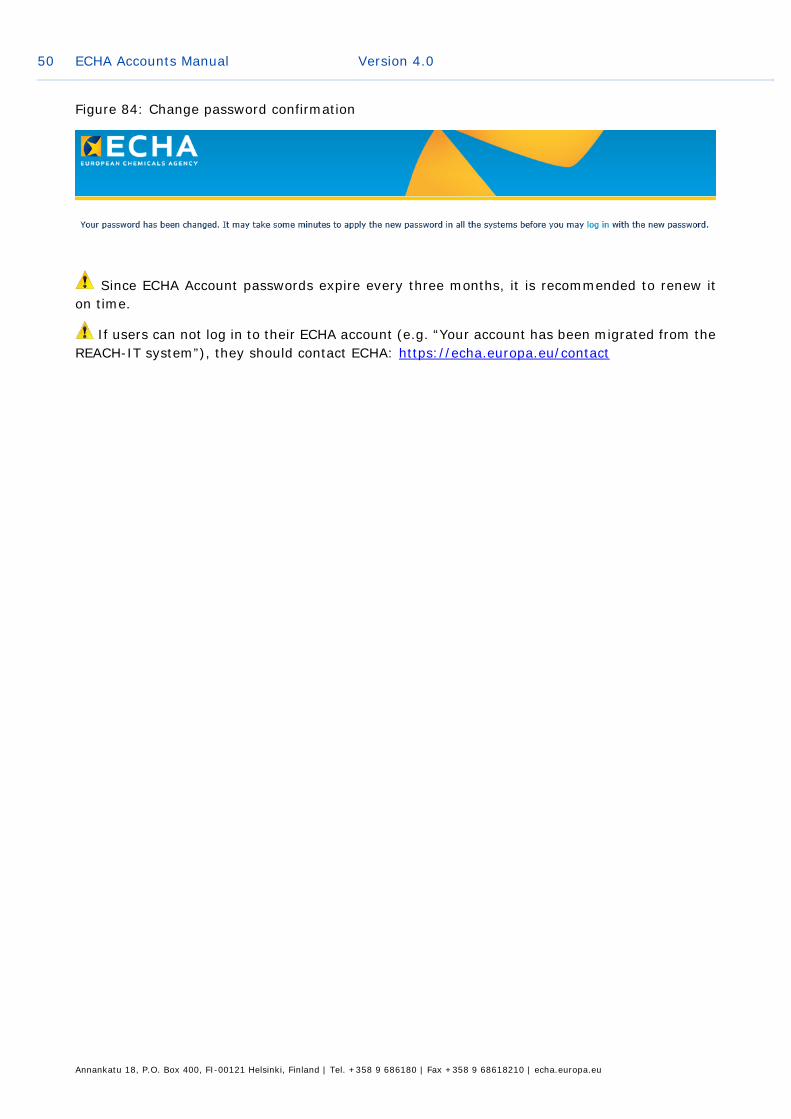
Step 5. Click on “Finish” and a message “Your password has been changed.” appears. An email is automatically sent to user’s mailbox with subject “Password updated” (Figure 84: Change password confirmation).
50 ECHA Accounts Manual Version 4.0
Annankatu 18, P.O. Box 400, FI-00121 Helsinki, Finland | Tel. +358 9 686180 | Fax +358 9 68618210 | echa.europa.eu
Figure 84: Change password confirmation
Since ECHA Account passwords expire every three months, it is recommended to renew it on time.
If users can not log in to their ECHA account (e.g. “Your account has been migrated from the REACH-IT system”), they should contact ECHA: https://echa.europa.eu/contact

EUROPEAN CHEMICALS AGENCY ANNANKATU 18, P.O. BOX 400, FI-00121 HELSINKI, FINLAND ECHA.EUROPA.EU


