200
eCopy ShareScan ® 5.0 Administration Console Help-as-PDF

eCopy ShareScan® 5.0
Administration Console Help-as-PDF

1 - Welcome
Welcome to eCopy ShareScan. To access the Help-wide search function, open the Search panel.
Click here for information about getting started with the Administration Console.
Click here for information about Customer Support services.
Licensing, Copyright, and Trademark information© 2010 Nuance Communications. All Rights Reserved.
Part of the software embedded in this product is gSOAP software.
Portions created by gSOAP are Copyright © 2001-2004 Robert A. van Engelen, Genivia inc. All RightsReserved.
The software in this product was in part provided by Genivia Inc and any express or implied warranties,including, but not limited to, the implied warranties of merchantability and fitness for a particular purpose aredisclaimed. in no event shall the author be liable for any direct, indirect, incidental, special, exemplary, orconsequential damages (including, but not limited to, procurement of substitute goods or services; loss ofuse, data, or profits; or business interruption) however caused and on any theory of liability, whether incontract, strict liability, or tort (including negligence or otherwise) arising in any way out of the use of thissoftware, even if advised of the possibility of such damage.

Customer Support services
Customer Support services include the following components:
n Customer support for licensing, registration, and other non-technical issues
n Technical support
n Hardware RMA (Return Merchandise Authorization), where applicable
Note:
Nuance Communications does not provide hardware support. Contact your hardware dealer/distributor, or system
integrator for support information.
The support services are available to registered users of Nuance Communications software during thewarranty period or for the duration of your software Maintenance and Support (M&S) agreement. Contactyour supplier for details, as described in the M&S agreement.
The main Support page is at http://support.nuance.com, where you can obtain information about CustomerSupport services, hours of operation, contact information, policies, and process descriptions. In the list ofproducts, select the eCopy product and then click Go. The Support Overview page opens.
In addition to support provided by your dealer or distributor, the Ask eCopy Web site provides 24x7 accessto a knowledge base. To access Ask eCopy, click the link on the main Support page.
If you purchased your software directly from Nuance Communications, check Ask eCopy for solutions toyour technical problems. If necessary, open a ticket from the Ask eCopy Web site.
Contact information
US/North America
Corporate Headquarters Telephone: +1.781.565.5000
Customer Support Services Telephone: +1.781.565.4600
Outside North America
Please contact your local dealer or national sales organization.
2 - Getting Started
In the Administration Console, all system functions are available on the Ribbon and there are separate tabsfor configuring services, connectors, and devices. System functions are available on the Home tab and theAdvanced tab. The Home tab contains the most frequently used functions, such as managing the ShareScanManager; the Advanced tab contains less frequently used functions and several new functions, such asmanaging the ShareScan database.
Note:
There is a functionality that runs only once, when the Administration Console is started for the first time: you have to
specify a valid 22 character long license key during the product installation. When the Administration Console is started

for the first time, it opens a dialog offering the installation of the license represented by that license key entered into the
installerWizard screen. If you click OK on this dialog, the application tries to download the license from the Nuance
license server, and install it (this is successful only if the computer running the Administration Console has a working
Internet connection). If for any reason the download fails, youmust add or import the licensemanually as described in
the LicensingWizard.
When you open the Administration Console, the Welcome page lists the main functions in the recommendedorder for performing each function:
2.1- Configure the services
Configure one or more installed services, so that they will be available when you configure connectors anddevices. There are three types of services: services that you apply to a connector, services that you apply todevices or device groups, and services that you apply to connectors and devices. Note: Only the servicesthat you have valid license for, will be shown in this pane.
1. Click the Services link.
2. Select the Services tab. The Configure Services pane displays a list of the installed services.
3. Select a service and then configure it. You can enable the service in the service's Configure pane or,later, in the Settings pane for the connector or device that will use the service.
2.2- Configure the connector profiles
Configure one or more profiles for the installed connectors that will be used on the scanning devices. Youcan create multiple profiles for each connector and you can activate each connector profile on multipledevices.
1. Select the Connectors tab. The Configure Connectors pane displays a list of the installedconnectors. Note: Only the connectors that you have valid license for, will be shown in this pane.You can refresh the list of the available services by right clicking the Connectors pane and selectingRefresh connectors from the context menu.
2. Select the connector for which you want to configure a profile. 1
3. Specify the settings for the connector profile and then click Save current profile.
2.3- Configure devices
Configure one or more eCopy devices. If you are using the simulator, proceed to step 3.
1. On the Ribbon, click Add Device. The Discover and Select Device window opens. For moreinformation, see Adding devices.
1Most connectors offer aWizard option; eCopy recommends that you use theWizard to initially configure a connector profile. You can create
multiple profiles by clickingSave current profile as, entering a name for the new profile, and then clickingSave.

2. Select the device or devices that you want to add and then click OK. You can also drag and dropdevices onto the Devices tab.
3. Select one or more profiles to activate on the devices and then enable the services to be used on thedevices. Click Save.
4. Test your configuration, either by using the built-in Simulator or by verifying the configuration at theconfigured devices.
3 - About the basic functions
There are four categories on the Home (basic) tab:
n Navigate
n System
n Devices
n Simulator
3.1- Navigate settings
The Navigate function enables you to navigate through the screens of the Administration Console using theNext and the Previous icons:
n Previous icon: When you click the button, the viewing area displays the previous screen where youcame from.
n Next icon: When you click the button, the viewing area displays the next screen. This button istypically enabled when you go from screen B back to screen A (using the Previous button) and wouldlike to return to screen B.
When clicked on the Home button, the viewing area displays the Welcome page:
3.1.1 - Welcome page description
Settings Description
Link to the Services tab Provides a link to the Services tab.
Link to the Connectors tab Provides a link to the Connectors tab.
Link to the Devices tab Provides a link to the Devices tab.
Link to Nuance’s registration site Provides a link to company's registration site.
Company/Product name/Link to Nuance’s web site Displays information on company, product name and
provides a link to company's web site.

The primary use of the Welcome page is to get you started with the tool. You need to configure the Servicesfirst to be available for the Connectors and/or Devices. In addition, the Connectors need to be configured tobe used for a device or devices.
3.2- About Devices
Functions in the Devices area help you to select eCopy-enabled devices, add them to the Device tab, andmanage them.
You can also manage device licenses from here in the Administration Console. There are four functions inthe Devices area:
n Licensing
n Add Device
n Manage
n Confirm
3.2.1 - Adding devices
This feature discovers and selects eCopy enabled device or devices using UDP, SNMP, or TCP/IP protocolsand adds them to the Device tab.
This feature also allows you to manually detect a device. Each device that you add to the system is associatedwith a Manager.
Notes:
New devices from the samemanufacturer inherit their initial settings from the default device.
When adding a device, be aware that the Administration Console resolves the name of the device via the DNS, and the
name registered in the DNS is used to update the name of the device in the device tree. If the name registered in the
DNS is different from the name that is given in the administration UI device. Thus, after adding the device to ShareScan,
the name can change.
3.2.1.1 - To Add A Device To The Manager
1. Make sure that the device that you want to add is running and that the ShareScan Client is running onthe device. For more information on ShareScan Client, see related Installation Guide documentation.Note: This is valid ONLY for the non-web (embedded clients). For web clients there is nothingadditionally needed to get the device connected.
2. You can either right-click Device configuration and select the Add device menu item or click theAdd device on the ribbon bar to discover and add eCopy-enabled devices.
The Add devices window opens. The window displays available devices along with information suchas the host name, the IP address, the Client software version, and the Manager that is currentlymanaging the device.

3. If a device that you want to add does not appear in the list of available devices, choose from a drop-down list in Discovery, select a protocol, and click Refresh.
4. Select the device or devices that you want to license and then click OK.
5. When the system prompts you to confirm the device that you want to add to the device list, clickYes.
3.2.1.2 - Add Devices Settings
Settings Description
Discovery The following device discovery modes are available: UDP, SNMP, and TCP/IP. The
default value is UDP.
Vendor Select a vendor from a list (default value is none).
Device name/IP If you choose TCP/IP in Discovery setting, enter a device name or IP address.
Note: The value cannot be empty. The parameter name should follow a
hostNameOrAddress pattern.
If an invalid IP address is specified, amessage Failed to retrieve data for:
occurs.
IP range The IP range value (From). The range of the valid IP addresses is defined by your
network configuration. For detailed information, contact the IT personnel in your
organization.
Example: A valid IP Range is from 10.10.12.1 to 10.10.12.55. Invalid/Unsupported
IP Range is 10.10.12.1 to 10.10.13.5.
To The IP range value (To). The value follows an xxx.xxx.xxx.xxx pattern.
Note: If you enter an invalid value, an Invalid IP Range...verify and try again
message occurs.
Refresh Clicking refresh button forces the Administration Console to scan the network for
available devices.

Settings Description
Devices group window Check the checkbox on the dialog and click OK to add to the devices list.
If no connectors are selected for the device, then an appropriate message is presented
at the ShareScan Client.
Devices list includes the following values:
lHost name: The host name of the device where the client is running. Note: Not all
types of devices provide the host name in this list. Instead, the IP address is shown
as the host name.
l IP address: The IP address of the device where the client is running.
lVendor: Vendor name of the device where the client is running.
lVersion: The current version of the client. In case of web-based clients, this is the
current ShareScan version.
lManager: The name of themanager if the client is already configured.
lDomain: The domain name in which the client is running.
lLocation: The location of the client, typically a description entered at theMFP.
lEmbedded: A flag indicating whether the client is embedded in theMFP or not
(Yes/No).
Total Total number of currently detected devices.
OK Clicking the OK button adds any devices “checked” to the Devices tab. It does not add
the devices to any group.
Cancel Closes the dialog without adding any devices.
(Sorting) Any column in the list can be sorted by clicking on the columns header. Once sorted,
you can quickly search through the list (host names only) by clicking on the first
column and start typing in the desired host name. Clicking the same column header
toggles between ascending/descending order.
If the Add Device dialog is opened again, the devices which are already added are automatically checked andthe font is in italic and has light blue background for that row, which is an indication that this device wasdetected in the network, but is already added to the current ShareScan Manager. Note: During the deviceaddition, several Wizard screens or dialogs may appear, depending on the type of device being added.
Once the device is added and selected on the Device Configuration tab, the entire configuration UI isdisplayed in the viewing area (including Connector Profile selection, Settings, and Scanner).
The ShareScan Manager uses the model name to control the rotation behavior of the ShareScan Manager,when creating the output document (pages) from the scanned images. The different MFP vendors and thespecific models of the vendors may show different behavior with regards the orientation of the scanned filesin the different scanning modes, depending on paper size, single or double sided mode, feeding source etc.
Note:
TheModel name differs from the name of the Device. The (network) name of the Device (host name) can not be
changed in the Admin Console, only via the admin UI of the Device and / or in the network DNS (Domain name server).

The ShareScan Manager has a built-in configuration file called RotationAngles.xml (and a similar one for theScanStation devices with the name ScanStationRotationAngles.xml). This describes the “factory default”values for the different vendors and models to ensure that the output pages have the correct orientation.These files are not to be changed by the user (administrator).
However, there can be new models and firmware updates that interfere with these settings and result in anunexpected rotation of the page(s) with specific combinations of the scanner settings. To resolve theseissues without product updates and hotfixes, there is an override file to define rules for these special cases,called UserRotationAngles.xml (and UserScanStationRotationAngles.xml, respectively for ScanStationdevices) .
If you have any issue with the orientation of the pages of the output document, contact Nuance technicalsupport where you will be provided with appropriate documentation and support to set up the exceptionrules in the mentioned files.
To enable some model/device specific control features, a model name needs to be assigned after thesuccessful addition of the device is completed. This is done on a dialog that appears automatically after thedevice addition. In this dialog, model names are offered to select from, but you also have the possibility tospecify a unique name that can be any character string. This model name is used to properly set up somemodel-specific behaviors like rotation of scanned pages and so on.
3.2.2 - Licensing Wizard
Every device that you use with Nuance Communications software requires a valid license. ShareScan 5.0uses a digitally signed license file, which contains a unique license key generated by Manufacturing. Thelicense key is a unique ID that is associated with the hardware ID (HID) of the PC where the ShareScandatabase is installed.
When you install a license key, you can activate the device’s license immediately after you add it to the locallicense database (recommended), or you can activate it later. You have 30 days to activate the license afterthe first device is added to the system. During activation, a license is associated with a PC where theShareScan database is installed.
It is also possible to designate a PC as a failover server that can be used in case of the failure of the PC thatruns the database server used for the ShareScan system.
You need to activate a license only once. If you try to add more devices than the total number specified inthe license file, the system displays an error. You need to purchase additional licenses for the additionaldevices.
In case you need to reinstall the ShareScan system including the creation of the configuration database,import the licenses you have activated previously on the same database server, and after the add/import,perform the activation for these licenses. Until the HID of the database server is the same, activate thelicenses in case of a reinstall.
Notes:
ShareScan 5.0 licensing is different from ShareScan 4.x licensing, which was based on the association of a product key
with a device. Licensing is no longer associated with a particular device, but the HID of the SQL server.

If you have reinstalled the operating system, changed the hard drive or modified the hardware of the computer used as a
database server, or the database server is running on a totally different computer, then the activation will not be
successful and you have to reactivate your licenses via Nuance technical support.
Site licenses, valid for activation with a predefined number of devices, are also available. After a license file iscreated for the specified number of devices, it cannot be modified to increase the number of devices; if youpurchase additional devices, you need to purchase additional license(s), and those license(s) will be deliveredas separate license files. When you load the new license file, the Administration Console can merge theoriginal license file with the new file.
After adding a license, you can add one or more embedded or integrated devices to the Manager. (You canadd these devices at any time. However, if you add them before activating the license, a 30-day grace periodstarts for the license.)
For ScanStation systems, the local device is automatically added; then, when the administrator selects thedriver, the system verifies the validity of the license file.
ShareScan 5 includes a Licensing Wizard, which handles the following license-related tasks:
n loading licenses,
n activating licenses,
n loading activated licenses,
n reactivating licenses,
n removing licenses.
3.2.2.1 - Loading Licenses
You can use the automatic license download function, or import the license file(s). If no internet connectioncan be detected, only the second option is available.
1. Click the Load license button of the License Wizard. The Welcome screen is displayed. Read theinstructions carefully, and ensure that this is the operation you want to perform.
2. Click Next to continue.
3. Select Download license automatically when specifying the source. The Automatic licensedownload screen is displayed.
4. Copy the license keys of the licenses to download in the text box. Click Add after each. When thelist below is complete, click Next. The Load screen is displayed.If you selected Import license from file and clickedNext, the Select license file to load screenappears.
5. Click the Browse button to add new files to the list of files to be imported. When finished, clickNext. The Load screen is displayed.
6. Click Start to begin loading licenses.
7. Click Finish to close the License Wizard.

3.2.2.2 - Activating Licenses
You need to activate a license only once; thereafter, it is associated with the PC where the ShareScandatabase is installed.
Note:
You do not need to activate the license(s) immediately to start to use ShareScan. You’ll have a 30 day grace period that
allows full functionality for ShareScan. Activate the license(s) only if you’re sure that the SQL Server used for the
ShareScan system (either the local one installed with ShareScan or an existing one) are the final one, as the activation
process binds the licenses to the SQL Server machine.
1. Click the Activate button of the License Wizard. The Welcome screen is displayed. Read theinstructions carefully, and ensure that this is the operation you want to perform.
2. Click Next to continue. The server name and the Hardware ID of the currently used database serverare displayed on screen.
3. Check the Use Failover Server ID for activation checkbox, if you want to set up a failover databaseserver. There are three options to specify the HWFP of the failover server:
1. Use a previously specified ID (if there is one)
2. Enter it manually, if you previously have run the gethwfp.exe tool on the PC where thefailover database is installed, or will be installed. The command line tool displays a 12-character long ID you have to enter manually into this input field.
3. If the SQL Server is already up and running on the PC you want to use as a failover machine,enter the server name (including the instance name separated with a backslash, if a namedinstance is used), the sa user name and password, then click the Read ID button. An saaccount is required to perform the HWFP read operation.
4. Click Next to continue.
5. If you have an active Internet connection on the PC where you use the ShareScan AdministratorConsole, select Automatic activation on the Select activation mode screen, then click Next
6. Click Start. Automatic activation will be started via Internet. After finishing the automatic activation,the Results screen is displayed, showing the success or the error status of the individual licenses.
7. If you do not have an active Internet connection on the PC, select theManual activation option.
8. Click Next to continue. The Output file creation / Activation screen is displayed.
9. Click Start to begin activation. The Specify file output screen is displayed.
10. Specify a folder and a file name for the ZIP file that contains the licenses to be activated. Transferthis file to a portable media or to a network share.
11. Upload the resulting file to the activation server via the Nuance activation website. Follow theinstructions provided on the web page. After the successful activation, the server automatically sends

the files back and you can save and transfer the files back to the connectionless PC running theAdministration Console.
12. Click Load Activated licenses to import the file.
13. Click Next to continue.
14. Click Finish to close the License Wizard.
3.2.2.3 - Loading Activated Licenses
Use this option when importing already activated licenses to ShareScan.
1. Click the Load activated button of the License Wizard. The Welcome screen is displayed. Read theinstructions carefully, and ensure that this is the operation you want to perform.
2. Click Next to continue. The Select license files to load screen is displayed.
3. Click the Browse button to add new files to the list of files to be imported. When finished, clickStart import.
4. Click Start to begin loading licenses.
5. Click Finish to close the License Wizard.
3.2.2.4 - Reactivating Licenses
Reactivation is necessary when the hardware running the database server is replaced, or when the wholesystem is rebuilt and the same licenses are re-used on the new system, having a different hardware for theSQL database Server. In the latter case, the licenses should be loaded to the empty system as describedabove, and they will not be activated on this new system. As those licenses have been activated previously,Reactivation is needed instead of automatic or manual activation.
1. Click the Reactivate button of the License Wizard. The Welcome screen is displayed. Read theinstructions carefully, and ensure that this is the operation you want to perform.
2. Click Next to continue.
3. Check the Use Failover Server ID for activation checkbox. There are three options to specify theHWFP of the failover server:
1. Use a previously specified ID (if there is one)
2. Enter it manually, if you previously have run the gethwfp.exe tool on the PC where thefailover database is installed, or will be installed. The command line tool displays a 12-character long ID you have to enter manually into this input field.
3. If the SQL Server is already up and running on the PC you want to use as a failover machine,enter the server name (including the instance name separated with a backslash, if a namedinstance is used), the sa user name and password, then click the Read ID button. An saaccount is required to perform the HWFP read operation.
4. Click Next to continue.

5. If you have an active Internet connection on the PC where you use the ShareScan AdministratorConsole, select Automatic activation on the Select activation mode screen, then click Next
6. Click Start. Automatic activation will be started via Internet. After finishing the automatic activation,the Results screen is displayed, showing the success or the error status of the individual licenses.
7. If you do not have an active Internet connection on the PC, select theManual activation option.
8. Click Next to continue. The Specify file output screen is displayed.
9. Enter the output file name and the path of the collected licenses.
10. Click Next to continue. The Output file creation screen is displayed.
11. Click Start to create the output file.
12. Click Finish to close the License Wizard.
13. Send the resulting file to Nuance Technical Support with your reactivation request. After processingthe request, the reactivated licenses will be sent back as a zip file, and can be loaded into the systemvia the Load activated function (described above).
3.2.2.5 - Removing Licenses
Use this option when transferring licenses from the current ShareScan installation. After the removal iscomplete, the licenses can be safely transferred and reactivated.
1. Click the Remove button of the License Wizard. The Welcome screen is displayed. Read theinstructions carefully, and ensure that this is the operation you want to perform.
2. Click Next to continue. The Select licenses screen is displayed.
3. Select the license(s) you want to remove, then click Next.
4. Click Start to remove the selected license(s).
5. Click Finish to close the License Wizard.
3.2.3 - Generating a license report
The license report helps you to create a report of the installed licenses. It is recommended to generate alicense report whenever you activate your licenses. Keep the report in a safe place in case you need torestore the license information or for troubleshooting purposes.
3.2.3.1 - To Generate License Report
1. Select the License information tab.
2. Go to the Advanced options tab and click License report .
3. Browse and save the *.DMP file.

3.2.4 - Device connection management
The Manage function enables you to manage the connection of devices for which web-based managementhas been enabled. You do this using a web page that is provided by the device. The installation guide foryour device provides you with information about support for web-based clients.
3.2.4.1 - To Manage The Connection Of A Device
1. On the Devices tab, select the device and right-click on it.
2. In the pop-up menu, click Manage. The Management screen appears. (TheManage menu item isgrayed out if the device does not support web-based management).
Note:
This is only available for the devices with web-basedManagement enabled.
3.2.5 - Confirming connection of devices
By clicking the Confirm button in the Devices pane you can confirm connectivity of attached devices withcurrent ShareScan Manager.
The device configuration window appears with the list of Devices and Device groups.
You can use this feature when the host name of a device has changed (on the device, via the web-basedmanagement of the device or in the network configuration) to make sure that the new name is read andstored in the ShareScan database. If the name of the device has changed, after the Confirm operation thedevice is presented with the new name in the Devices pane.
3.3- About the simulator
Click the Simulator button to access the ShareScan Client in Simulator mode.
The simulator is a web-based dynamic preview tool (Tomcat web server URL:http://127.0.0.1:8080/ShareScan).
Use it to:
n Test the settings you have specified in the Administration Console.
n Discover new features of the current program version.
n Learn and practice software usage.
n Verify issues: should you encounter problems while using a physical device, testing whether youexperience the same in the simulator provides helpful information for technical support.
The main advantage of the simulator is that you do not have to publish your settings to a physical deviceevery time you intend to test changes.
Note:
Only Internet Explorer 7 or later is supported.

3.3.1 - Using the simulator
On the left side of the simulator you can choose from the following settings.
3.3.1.1 - The Simulator Settings
Settings Description
Paper size The following paper sizes are available: Auto, Letter, Legal, Ledger, or A4.
Resolution The following resolution types are available: 200 DPI and 300 DP.
Output paper size The following output paper sizes are available: Letter, Legal, Ledger,
Statement, A3, A4, A5, B4, B5, or Auto.
Inverse Select Yes to invert page colors.
Deskew Set to Yes to straighten pages.
Mirror Set to Yes to flip pages horizontally.
Scaling Scaling is available between 10 and 100 percent.
Brightness Brightness is available between 10 and 100 percent.
The simulator is designed to be a generic presentation of a device display. The actual display on your MFPdepends on its capabilities and may differ from the simulator. Using MFP device emulator programs insidethe Administration Console is not supported.
Since the presence of an actual device is not required to use this tool, no actual scanning is performed duringsimulator use. The simulator uses sample TIF or JPEG images stored in the file system. Image parameters(size, color mode, etc) are read from the sample files, therefore scan settings (paper size, resolution, etc)inside the simulator may not take effect.
To replace sample simulator images, complete the following steps:
1. Install ShareScan.
2. Browse to the Apache installation directory.
3. Locate the \Tomcat 5.5\webapps\ShareScan\WEB-INF\test subfolder.
4. Replace the images with your own samples. All samples must be of the same format. Follow thenaming convention Image<n>.<ext>, where 'n' is a sequential number and <ext> is TIF or JPG..
Note:
Scanner settings (like paper size, resolution etc.) on the Simulator main screen have no effects on the images
streamlined to theManager for processing, as these images are coming from the folder described above.
3.4- About the System area
The system area provides access to the system related features and activities.
There are four categories on the System tab:

n Settings
n Activity monitor
n Reporting
n Starting, stopping, and restarting a ShareScan Manager .
3.4.1 - ShareScan Settings
The Settings area specifies properties that apply to all devices connected to the current ShareScan Manager.Clicking the Settings button brings up the UI in the viewing panel as a property grid with various categories.
3.4.1.1 - Configure Settings
The control used to display the data is a property grid, which is typically displayed with categories andproperties. The categories are in bold and do not hold a control on the right hand side of the grid. Eachcategory can have one or more properties and can contain multiple sub-categories. Clicking each propertyenables its control for typing (if it is an editable field) or for selection.
3.4.1.2 - Configure Settings Properties
Section Field Description
ShareScan Manager Port number ShareScanManager's listening port number. The default
value is 9600.
Scanning mode
(embedded, non-web
devices only)
Enable Start button Enables the Start button to be used to initiate scanning on a
device with ShareScan embedded (non-web client)
software.
Encryption Passwordminimum length Theminimum number of characters that make up the
password. When you specify theminimum password length,
remember that the longer the password, themore difficult it is
to break. Minimum password sizemust be in the range 1 to
45. The default value is 1.
Passwordmust be
alphanumeric
Requires that passwords include a combination of
characters and numbers. Mark Yes to ensure that passwords
are not dictionary words and are not easily guessed. The
passwordmust contain at least one character and number.

Section Field Description
Searchable text OCR Languages The language(s) you want the searchable text engine (OCR
engine) to use. At least one languagemust be selected that
will be used for scanning documents. Default is the language
specified under Language in the Soft keyboards field.
OCR Mode Select faster or most accurate search. The default value is
Faster.
Secure delete Enable secure delete of
temporary files
Enables complete deletion of temporary image files from the
PC running the Services Manager. When this check box is
selected (Yes), ShareScan writes over the files in the
ShareScanTemp folder multiple times with random
characters.
Regional and language
settings)
Client display language Select a language from the list to be displayed at the Client.
Default language is English (United States).
Note: All the Clients connected to the Managerdisplays the same language. Selecting a language perdevice or client is not supported.
Add language Adds a new language to the System glossary. TheAdministration Console and the Clients can run indifferent languages. Selecting a Client Display languagedoes not affect the Administration Console’s language.Refer to the Glossary Tool for additional languages.
Remove language Removes a language from the System glossary. Removing
language does not affect the Administration Console’s
language as the given languages cannot be removed. Note:
BEFIGS languages cannot be removed.
Formats To change the way the client displays numbers, currencies,
dates, and time, select an entry from the format list. The
default format is English (United States).
Soft keyboards Select a keyboard from the list to change the input language
at the Client.
Language Allows you to select a keyboard language to be used at the
Client. Default language is English (United States).
Default .com entry The default extension for the .com key on the soft keyboard,
such as .com (maximum eight characters).

Section Field Description
Addmore entries Used to specify additional
extensions presented to
include in the list that
appears when you press
the arrow next to the .com
key. Additional entries can
contain more than eight
characters.
To add or remove
extensions for the .com
key:
1. Enterdatadirectlyinto thelist andpress theEnter
key toaddmoreentries.
2. Select anentryandpress theDeletekey toremovean entry.
3. Choosebetweenthefollowingkeys ina drop-downlist:.com,.edu, or.org.

3.4.1.3 - Customer Information Settings
Settings Description
Customer information Browse and add a custom image to display at the client (MFP). The PNG and GIF file
formats are supported. To delete the image, click the left side of the column and press
the Delete key.
Note: Imagemust not exceed 140x50 pixels.
Contact Include the following contact information:
lPhone: The phone number.
lFax: The fax number.
lEmail: The email address.
lSupport email: The support email address.
lWeb: TheWeb site URL.
The Save button is not enabled until a change is made in the property grid. Once the Save button is clicked,you are prompted to restart the Manager for the changes to take effect.
3.4.2 - Activity Monitor
The Activity Monitor enables you to monitor activity between one or more devices and the ShareScanManager. This is useful for finding performance bottlenecks as it shows all activity and timing information inreal time without the overhead of writing to a file.
To access and manage the activity log
1. Choose Activity Monitor in the System group of the Home tab. The Activity area displays a list ofall requests and status information.
2. Click Start monitoring or Stop monitoring.
3. In the Filter list, selectMonitor all devices to view activity for all ShareScan enabled devices orselect a specific device whose activity you want to view.
4. Send a text version of the activity log to a file, right-click the list and then select Send to file.
5. The Activity Monitor successfully written to file message appears and you can see the locationwhere the log file is saved. Click OK.
6. Click Clear to clear all existing entries from the activity log.
3.4.2.1 - Activity Monitor Settings
Settings Description
Start Monitoring Click this button to start monitoring.
Stop Monitoring Click this button to stopmonitoring.

Settings Description
Filter Select none to view activity for all ShareScan enabled devices or select from a list a
specific device whose activity you want to view.
Clear Clears all entries.
Activity Shows all Activity entries. You can send a text version of the activity log to a file by right
clicking the list and selecting Send to file option.
Device Shows a Device type.
Date/Time Date is presented in MM/dd/yyyy and time in AM/PM format.
Devices Connected Lists all connected devices. Refresh rate for this field is five seconds.
3.4.3 - Reporting
The Reporting function enables you to display the total number of pages scanned. The report includesactivity for all devices connected to a ShareScan Manager or for a single device.
The Reporting function displays the total number of scans done from a device on a particular day in agraphical (Bar Graph) representation.
For all reports Previewing, Printing, and Exporting of base reporting data to XML is supported. If the reportgenerates more than 10 data points (elements), the report is split across multiple pages and Previous andNext buttons are displayed for navigation.
3.4.3.1 - To View A Report Of Scanning Activity
1. In the console tree, under System select Reporting.
2. Select the appropriate option:
n Device: Displays the total number of pages scanned at the selected device. After selecting a device,specify the time period for which you want to create the report.
n Manager: Displays the total number of pages scanned at each device connected to the selectedManager.
3. Click Print to print the current bar graph or Export to save the data report in the XMLformat.
4. Click Refresh to update the graph to reflect recent activity.
3.4.3.2 - Reporting Settings
Settings Description
Manager Selects aManager. The Select All option selects all Managers.
Device Selects a Device or a Simulator.

Settings Description
Period For Device reports, the Scans per Month or Day are displayed and the reports can be
created for: Previous Day, Current Day, Previous Month, Current Month, Past 3
Months, Past 6Months, Past 1 Year, and Date Range.
Type For both ShareScanManager and Device reports, the following types of charts are
available: Vertical Bar chart, Horizontal Bar chart, and Pie chart .
Status For SingleManager reports, the Devices can be filtered by:
lActive only.
l Inactive only.
This feature is not available for reports with Multiple Managers selected.
From Selects a starting date. The date is presented in MM/dd/yyyy.
To Selects an ending date. The date is presented in MM/dd/yyyy.
Print The ShareScan Reportingmodule allows you to print reports showing the Black and
white, Color, and Total scans processed per device for selected ShareScanManagers
or by individual devices based on the selected ShareScanManagers.
Preview The ShareScan Reportingmodule allows you to preview reports showing the Black
and white, Color, and Total scans processed per device for selected ShareScan
Managers or by individual devices based on the selected ShareScanManagers.
When the Preview button is selected, Page setup is displayed that prompts for
selection of Print options. The following Page Setup settings are available:
lPaper (Size and Source).
lOrientation (Portrait and Landscape).
lMargins (Left, Right, Top, and Bottom in inches).
lPrinter (connect to printer using a network or choose from a list).
After selecting OK, a Print preview window displays all pages of the reportbefore printing and the Final Report page displays summary page presentingdata in a text format.
Export When the Export button is selected, Save as dialog is displayed. This allows the
report data to be saved in the XML format to the specified file locations.
The File name is pre-populated using a prefix based on the report type and a suffix
based on the host name and IP address of theManager or Device, for example
Report_Previous Day_TDC_00001(192.168.1.10).xml.
Refresh When the Refresh button is selected, the report is refreshed.
Display area Displays Bar charts and reports datamessages.
3.4.4 - Starting, stopping, and restarting a Manager
The ShareScan Manager runs as a Windows service. You can start, stop, and restart the ShareScan Managerfrom the Administration Console.

To switch between ShareScan Managers, click the Remote Management button, which displays a list ofShareScan Managers registered in the database to which the Administration Console is currently connected.The ShareScan Manager that you are configuring is grayed out.
Also, you can check the currently managed ShareScan manager instance if you look at the status bar of theAdministration Console (at the left-lower edge of the window).
Double-click or search for a ShareScan Manager by specifying a name in the Search by name or IP addressfield. When the Manager name appears in the list, click the button next to it. The system prompts you tosave any unsaved data and gives you an opportunity to terminate the operation. The status bar reflects thenew Manager information. After confirmation, the configuration data of the selected Manager will be readinto the Administration Console.
You can Start, Stop, or Restart the ShareScan Manager currently being configured.
Note:
This also involves starting, stopping, or restarting the Tomcat service.
4 - About the advanced functions
There are three categories on the Advanced tab:
n Configure (Timers, Auto Sync, Database, Preferences, and Tools)
n View details (Services, Connectors, Devices)
n Console language
These features are assumed to be used occasionally.
4.1- Timers
Configure the inactivity timers for the user interface presented at the device. Timer values are in seconds.Click Timers on the Advanced pane of Administration Console to open the Configure Timers window.
4.1.1 - Configure Timers
All the timers have a range 0 - 360.000 seconds, that is, 10 minutes maximum.
Note:
Only numeric numbers are allowed for the timers. Zero (0) implies that the timer is disabled.
The timers are affective as soon as the Session Logon/Main Form is displayed.

4.1.1.1 - Configure Timers Settings
Settings Description
System forms Configures system forms:
lSession Logon: Default is 30 seconds.
lMain: Default is 60 seconds.
lScanMore: Default is 120 seconds.
lEncryption: Default is 60 seconds.
lAdvance File Naming: Default is 60 seconds.
lAdditional Fields; Default is 60 seconds.
lSystem Dialogs: Default is 30 seconds.
lRedirect: Default is 30 seconds.
Connector forms Configures Connector forms. By default, the timer defined in a Connector form is
overridden by the values in the Connector forms category. If you want the timers defined
in a Connector form to override, check this feature. If checked, and the Connector form
does not have a timer defined, the timer in the previous window are added automatically.
lConnector forms: All Connector Forms - applies to all Connectors. Default is 60
seconds.
lConnector dialogs: All Connector Dialogs - applies to all Connectors. Default is 30
seconds.
lUseConnector timers: Set to True if you would like the timer defined in a Connector (if
present) to override the previous values.
Auto restart ShareScan
Manager
Automatically restarts ShareScanManager:
lTime: Sets the time when the ShareScanManager should restart automatically.
lFrequency: Sets the day when the ShareScanManager should restart automatically.
lEnabled: Enables/Disables the automatic ShareScanManager restart. If set to
Enabled, grays out the Time and Frequency options. In case of numerous or long offline
jobs, ensure that the Auto Restart option is disabled to prevent the possibility of losing
the offline jobs.
Save Saves the changed data and closes the dialog.
Cancel Cancels the configuration and closes the dialog.
Defaults Set to Yes if you would like to restore to default timers that overwrite your existing
settings.
If the client is already displaying any of these forms, a refresh code is sent out to the clients to get the formwith the new timer values.
Note:
Manager restart is not required.

4.2- Auto Sync
You can automatically synchronize the configuration data for services and connectors across all the managersconnected to the current database with the Auto Sync feature.
Note:
The Auto Sync feature is set toOff by default. Also, all connectors and their dependencies must be installed on all
managers if AutoSync is to be used. If AutoSync is On, ensure that the device groups across theManagers in the
system have unique names.
4.2.1 - Auto Sync settings
Settings Description
On When saving a profile when AutoSync is ON, edited on any of the Administration Consoles, theprofiles are automatically published to all managers connected to the same database. Changes arereflected immediately on all devices currently using this profile. If the client is busy, changes arereflected when displaying the Session Logon/Main Form. All the devices across all the managersconnected to this database share all the connector profiles.
Note: You cannot choose a connector profile selectively to be shared across manager/devices(either you share all or none).
Important: The first Administration Console that you turn on becomes the master to start with.Ensure that this setting is turned on only on a single Administration Console
Once Auto Sync is set to On, you can save the profile (service/connector) from any Administration
Console. That is, the profiles currently on the administeringmanager override any existing profiles across
all managers. This means that in the database, all the connector profiles are shared among all themanagers
(instead of duplicating the profiles).

Settings Description
Off When you enable the Auto Sync function, you share the configuration data for the services, connector
profiles, and connector settings with all ShareScanmanagers in the current database. At any point of time if
you choose not to share the profiles across managers, you can uncheck the Auto Sync feature that
duplicates the profiles across managers and breaks the share.
Note: Existing settings are now lost. You can backup your database before enabling Auto Sync tosave existing settings.
For example, if there are two Administration Consoles running (pointed to the same database)and if you turn Auto Sync on from Admin 1 and go to Admin 2 and try to save any profile, thefollowing message occurs:A new profile has been detected and the AdminConsole has to reload before saving any
changes.
The changes made prior to the re-load are lost. At this point, the Administration Console reloadsthe new data (which was saved from Admin 1). You can now make changes and save it back.
Note: The consequence of the previous behavior is that the concurrent editing of the profiles is,even if it is not prohibited, not encouraged. While managing the same system with two instancesof the Administration Console concurrently from two different workstations is possible, it is notrecommended, mainly because there are many pieces of information that are displayed in theAdministration Console, but not refreshed immediately when the data is changed in theunderlying database by another Administration Console.
4.3- Database Configuration
To take a backup or restore from a previous checkpoint, use database configuration option by selecting therelevant database. The entire configuration of each Manager is stored in the database.
From Administration console, click Database and launch the ShareScan database configuration window.
4.3.1 - ShareScan database configuration
ShareScan database configuration allows selection of a different database. Use ShareScan databaseconfiguration to detect and browse to any eCopy-enabled database.
The ShareScan agent and manager use SQL authentication when communicating with the ShareScandatabase. The ShareScan database uses the default SQL TCP port (1433) for communication.
4.3.1.1 - ShareScan Database Configuration Settings
Settings Description
Server Name The Server name. Select a SQL server instance in the network for your connection. By
clicking the Server Name button you can detect eCopy-enabled SQL server instances.

Settings Description
User Name The user name.
Password The password.
Time-Out Connection timeout in seconds, indicating the amount of time required to wait before the
application can give up when connecting to the database. The default value is 30
seconds.
OK Saves the changed data. The database connection string in the registry is set with the
new SQL server details and the Administration Console will always connect to the new
one.
Cancel Cancels the configuration and closes the dialog.
4.4- Backing up the database
You can quickly perform a complete backup of the current configuration and also be able to restore theconfiguration from an existing checkpoint.
Enter the following connection and location information for your backup:
4.4.1 - ShareScan database backup settings
Settings Description
Action Choose Backup.
Data source The data source is displayed.
User name The user name.
Password The password.
Location Displays location (for example C:\Program Files\Microsoft SQL
Server\MSSQL10.ECOPY\MSSQL\Backup)
File name prefix You can rename file name prefix. Default name is Backup. The file is saved as a *.BAK file.
File format Default file format is Prefix - Database - MMDDYYY - HHMMMAM/PM.
4.5- Database Restore Wizard
ShareScan 5 provides a quick and easy way to restore databases by using the Database Restore Wizard,accessible via the Administration Console. To restore a database, follow the steps below.
1. Click the Restore Database Wizard menu item. The Welcome screen is displayed.
2. Click Next. The Specify destination server dialog is displayed.
3. Select the server to be restored.

4. Enter the username / password to access the server. Note that the user account must haveadministration (sa) rights on the target server, as a database is created and set to Trustworthy duringthe restore process.
5. Click Test connection to check the supplied credentials.
6. Click Next. The Select backup file to restore dialog is displayed.
7. Enter the folder path and file name of the backup file you want to restore. Note that the file has to belocated on the computer itself running the SQL Database Server that is the target of the restoreoperation. That is, if you restore the database to a local SQL Server, the backup file can be on thismachine, but if you want to perform the restore on a remote server, you have to ensure that theBackup file is on that remote server, and you have to specify the path of the backup file on thatserver.
8. Click Start. The Results screen is displayed.
4.6- System preferences
The Preferences function provides you with several user interface options. Clicking the Preferences buttondisplays a list with three options:
4.6.1 - Minimize to tray on exitWhen this option is selected and if you try to shutdown the Administration Console, the console hides itself by
minimizing to the system tray. This means that the Administration Console is still running but is just not visible as a
visible application on the desktop (does not show up on the taskbar).
The following message appears at the system tray:Administration Console is still running. Right-click on the icon below to view options.
Complete one of the following options to re-launch the hidden Administration Console:
n Right-click the system tray icon, which brings up a small menu, and select Open ShareScanAdministration Console.
n Double-click the system tray icon (Administration Console icon).
n Click the shortcut available in Start and then Programs, which launches the already runninginstance.
Complete one of the following options to shutdown the Administration Console:
n Click theMinimize to tray on exit function and right-click the Close button.
n Close the Administration Console, right-click its icon on the system tray, and select Exit.

4.6.2 - Show Welcome Page at startupIf you always want the Administration Console to remember the last page that you access and to redisplay it when you
start the console, select this option. By default, this option is not selected, that is, the icon is not highlighted.
4.6.3 - Auto-Confirm Devices at startupWith this option selected, the Administration Console confirms the connectivity and configuration of all the devices at
startup, and it also updates the device (network) name of the devices from the system DNS (Domain NameServers). If
you have numerous devices connected to theManager the Admin Console is managing, it is not recommended to have
this setting turned on, as the checking of devices may take a significant amount of time. You can always right-click an
individual device, and select Confirm.
4.7- Data Publishing Mapping tool
Various components publish data using the ShareScan Manager Data Publishing interface. Connectors usethis data to authenticate backend, to send the final document to its destination, and to store the finaldocument. Potential data sources include ShareScan Manager, in-house document services, and third-partydocument services.
The Data Publishing Mapper tool in the ShareScan Administration Console enables you to map publishedvalues to values requested by connectors. ShareScan Clients, with a user interface or without a user interface,can use the mapping information.
To access the tool, select the Advanced tab, click Tools in the Configure area, and then select DataPublishing Mapper. The Data Publishing Mapper dialog box appears.
4.7.1 - Data Publishing Mapper settings
The keys published by the ShareScan Manager, by document services, and by third-party services, along withinformation about them, appear in the first three columns in the grid; connector keys, along with informationabout them, appear in the last three columns in the grid. The tool displays the warnings icon if source keys(published keys) and destination keys (connector keys) do not match. For the keys to match, their type andformat must be the same.
The following table summarizes the settings you use to map a published key to a connector key.
Note:
You cannot modify the type or the format of keys published by ShareScanManager or by Document Services.
Settings Description
Published Key You can add a key manually by typing a key name in the Published Key cell.
Type You can edit the Type value only for published keys that you addmanually. The following
types are available: Boolean, Datetime, Float, Integer, and String.

Settings Description
Format You can edit the Format value only for published keys that you addmanually, and only for
some types of keys. The following formats are available:
lDate format (default is MM/dd/yyyy).
lTime format (default is None).
lString format (default is None).
Note: You cannot modify the format of the Boolean, Float, and Integer types.
Display area Displays the publisher of the key, such as “System”, and any additional attributes.
Connector key If a key name is duplicated in the Published Key list or the Connector Key list, the key
name has an index associated with it in the list. At run time, the system uses the actual
key name, not the key namewith the index.
At run time, ShareScan Manager converts incoming published keys to connectorkeys for the specified connector profile and adds them to the publishinginterface. Connectors can access the values from the publishing interface.
Type Not modifiable.
Format Not modifiable.
Display area Displays the publisher of the key, such as “System”, and any additional attributes.
Open Enables you to open an XML file to load publishers’ keys.
Delete Enables you to delete an entry.
Save Enables you to save themapping table.
Filter Enables you to filter the keys that appear in the table:
lPublished Keys: Enables you to select the filter that you want to apply to the Published
Keys in the table. Show All displays all keys from all publishers and their profiles.
Common Keys displays keys that are common to all the profiles for the System
publisher.
lConnector Keys: Enables you to select the filter that you want to apply to the connector
keys in the table. Show All displays all keys from all publishers and their profiles.
Common Keys displays keys that are common to all the profiles for the System
publisher. Default displays only the keys that are specific to a connector profile.
The filtered keys appear in a drop-down list in the Published Key and ConnectorKey columns. When you apply a filter and then click a new cell, the tool displaysonly the items that correspond to the filter.
Dialog Pin/UnPin button Clicking the Pin buttonmakes the window a topmost window, if its current status is “Not
on Top”. If the current status is “On Top” and you click the Pin button, the position is no
longer “On Top”.
4.7.2 - DataPublishing XML for Mapping
Third-party services can publish their mapping variables in an XML file. If the variables are not published inan XML document, you must enter them manually.

The keys can be published for specific profiles or can be published as common keys that are applicable to allthe profiles. If a profile-specific key and a common key the same ID, the connector uses the profile-specifickey. The ShareScan Manager uses the common key format for all other profiles at run time.
4.8- Activity Tracking report tool
The Activity Tracking report tool provides quick and easy access to the tracked activity in the form of an UIinstead of writing to a flat file. If the Activity Tracking report is configured in the Services tab and enabledfor a device, all the scan job activity information is recorded into the database and is presented with a userinterface with all the information.
When the Activity Tracking function is enabled for a device, Manager generates a log file. This file is in XMLformat and enables easy processing with many of the available tools.
4.8.1 - To configure the Activity Logging function
1. In the console tree, select Devices > <device name/IP address>.
2. Select Activity Tracking in the Services tab and then Enabled.
3. Specify the settings and click Save.
From Administration Console, under Advanced, click the Tools section to open the Activity Trackingreport tool. The Activity Tracking dialog appears.
4.8.2 - Activity Tracking settings
The Activity Tracking tool allows you to view the basic columns or extend the grid by right-clicking andselecting columns, such as File size, Document type, Total documents, and so on. Clicking an individual rowdisplays additional information about the Scan Job in the bottom panel.
Settings Description
Select Manager This tool displays by default the activity for all the devices (which have the service
enabled) connected to the selectedManager. Clicking it displays a list of Managers. Use
this function to see the activity of devices configured for different Managers. This
window does not list all the devices for every Manager. It is assumed that you know
which device or devices are configured with whichManager.

Settings Description
Filter by This is a filter based on a Device, Connector, Date Time, or the authenticated user
(choose the filters appropriately). The filter works as an “and” condition and displays only
those rows based on the condition selected.
The Select one or more filters dialog appears. Enter the following values:
lDate Time: Presents date and time of the job successfully sent. The display is locale-
specific date and time. An icon (attachment) is visible in front of the Date Time field if
Document Tracking is enabled. Date and time are presented in MM/dd/yyyy and AM/PM
formats.
lDevice information: Device name and Device IP address of the device from where the
job is performed.
lAuthenticated user: Session Logon username or the username published by the
Connector.
Note:
The username published by the Connector supersedes the Session logon username.
lConnectors: You can filter by the connectors used for this job.
lStatus: You can filter by All, Success, and Failure.
lApply: You can apply the settings.
Export Exports the filtered list to an XML file.
Refresh icon Fetches the new transactions and scan job activity from the database.
Dialog Pin/UnPin Clicking the Pin buttonmakes the window a TopMost window. Unpinning it removes it
from being a TopMost window.
Date Time Date and time of the job successfully sent.
Device name Device name and device IP address of the device from where the job is performed.
Authenticated user Session logon username or the username published by the Connector.
Connector Name of the Connector used for this job. Profile name and the button text (also known as
display name) is displayed in the details panel when the row is clicked.
Total scans Total number of pages scanned before any processing, page removal, and so on is
applied.
Destination Filled in by the Connector in use.
Example: If using Exchange connector, the recipients list will be displayed. If using a
Fax Connector, either the recipients or the Fax numbers is displayed.
Status For a successful job, this column has Success as the value. If the profile in use has
Offline Processing enabled, this field will contain either the success or the failure
message. For a Failure as the value, a detailedmessage is available.
Display area Provides information on Activity Tracking entry settings.

Settings Description
Additional columns To view additional fields in the columns, right-click in the list view control, to bring up a
menu and either select each individual column or click Select all:
lDocument type: The following formats are supported: TIFF, PDF, and JPEG.
lDocument size: Size of the final document in kB. If multiple documents are generated
due to batching, the size is the total size of all the documents combined.
lTotal documents: Total number of documents generated for the job.
lDocument encryption: Indicates whether the document created is encrypted or not
(Yes/No).
lSearchable text: Indicates whether searchable text is performed or not (Yes/No).
lBlank Page removal: Indicates whether blank page removal is enabled or not (Yes/No).
lBatching: Indicates whether batching is enabled or not (Yes/No).
lBates/Endorsement: Indicates whether Bates/Endorsement is enabled or not
(Yes/No).
lSelect all: You can select all fields at once.
Any column can be sorted in an ascending or descending order by clicking the column header. Rearranging ofthe columns is not provided. Only Adding and Removing the extended columns is supported.
If Document tracking is enabled for any of the Connector Profiles, an icon is added to the first column of therow for that scan job, indicating that the document has been tracked. Hovering over the attachment icon willdisplay the name and location of the tracked document.
Double-clicking the attachment prompts the Administration Console to open the document (with the defaultPDF viewer on the computer ) if it has access to the Document tracked location. If the location cannot beaccessed, an appropriate message indicating the error is displayed.
Final documents have the name of the final document or documents sent out by the Connector. If multipledocuments were created with the same name, and the tracked copy already exists with the same name in theDocument Tracking folder, the timestamp is appended to the file name to provide a unique name for thetracked copy.
If the Connector renames the file name passed to it by the Manager, it is the Connector’s responsibility topublish that information to the Manager for tracking purposes. If the Connector does not publish therenamed files, the filename or filenames generated by the Manager are displayed.
4.8.3 - Activity Tracking operation
The scan job activity is written to the database after the Connector sends the final document to itsdestination successfully. By the time the Redirect form is displayed, the transaction is being written to thedatabase in the background. In case of an error sending the document using the Connector, since theRedirect form is not displayed, the activity is not written to the database. This means that only successfultransactions and activity are being recorded.

When a Connector profile has Offline processing enabled, the final document creation and processing isperformed in the background (Error message or Redirect form status is not available).
In this case, the following scenario can happen:
n If the final document is created successfully, but could not be sent out to its destination using theConnector, the activity is logged into the database with an error message returned by the Connectoralong will all the additional information about the scan job.
n If the final document creation failed, then the activity is logged into the database with an errormessage returned by the Manager along with all the additional information about the scan job.
n If the final document was created successfully and sent to its destination using the Connector, theactivity is logged into the database with a Success message along will all the additional informationabout the scan job.
A part of the Activity Report has the data filled in by the Connector at run time. It is the Connectorsresponsibility to fill this information using the Publishing Interface.
4.9- Viewing details of services, connectors, and devices
The View details menu displays additional information in a grid view on Services, Connectors, and Devices.The following information is displayed for the currently configured Manager:
4.9.1 - View details settings
Settings Description
Name The name of Services, Connectors, and Devices.
Description The description of Services, Connectors, and Devices.
Version The version number.
Vendor The vendor's name.
Location The location of Services, Connectors, and Devices.
Clicking a function displays the details in a window inside the Viewing Area and shows the Tab Control onthe left side with the appropriate tab selected.
4.10- Console language
The Console language menu can be found in the Administration Console under the Advanced bar.
Console Language provides a quick access for you to change the locale of the Administration Consolewithout re-installing the product.
4.10.1 - Changing the language of the Administration Console
The display language of the Administration Console can be switched between the given languages at anypoint of time by simply selecting the language from this category.
The Administration Console application must be restarted after changing the user interface language.
Note:
English (United States) language is a default language.
5 - About configuring services
The Administration Console enables you to configure and administer Managers, Connectors, Services, andscanning devices. You can create profiles for a service and associate them with Connector profiles. When youscan a document using a Connector with an associated service, the document is scanned, processed by theservice, and then passed to the Connector workflow.
5.1- Document services
Document services are image and document processing add-ons. Document service is a type of Connectorwith an exception that this component does not send the documents to any destination. Document Servicesare used for:
n Enhanced Image Cleanup (punch hole removal, black border removal, and so on)
n Indexing
n Batching based on Barcode
n Document Building
Note:
Document service is a “Post Scan/Pre-Connector” component (always called/executed after scanning is done and after
all the services are displayed, but before calling the Connector.
In ShareScan 5, the Document service operations are always performed before the first connector screen is displayed (if
there is any), even if the connector profile is configured as offline.
To learn more about Document services, contact your ShareScan vendor.
5.2- About connector services
Connector services are services that can be applied to a Connector.
There are three categories in connector services:
n Bates/Endorsement services
n BusinessAutomation services with two main parts licensed independently:
l Image Enhancement service
l Barcode Recognition service
n Document tracking services

5.2.1 - Document Tracking service
The Document Tracking service is located on the Configure services tab under the Connector servicessection.
If the Document Tracking service is enabled for any of the Connector profiles, an icon is added to the firstcolumn of the row for that Scan Job in Activity Tracking, indicating that the Document has been tracked.Hovering over the attachment icon displays the name and location of the tracked document. Double-clickingthe attachment attempts the ShareScan Administration Console to open the document, if it has access to thelocation of the document. If the location cannot be accessed, an appropriate message indicating the error isdisplayed.
5.2.1.1 -
Setting Description
Configured Configuring Service: Document Tracking:
lChecked (Yes): Allows a device to use the Document Tracking service. This option
creates a black and white PDF file, without encryption or searchable text
information. The file name for the document is added to the Activity Tracking log.
lUnchecked: The device cannot use the Document Tracking service. All the fields
and properties are disabled.
Folder location The full path and file name for the folder. The locationmust be in the current Windows
domain or in a trustedWindows domain (it can be even on the local machine where the
ShareScanManager is running, but you have tomake it a shared network folder with
the proper access rights. Click the button on the far right side in the folder location
value area to select file location.
The Browse for folder window appears that allows you to browse the network for a
shared folder. If you type in a folder location, make sure you use a UNC format
(\\servername\foldername) – amapped drive format cannot be used.
Credentials Youmust have access rights to the specified location. Enter the following credentials
to access the Activity Tracking folder:
lUser name: User's login name.
lPassword: User's password (hidden characters).
lDomain: The domain associated with the user's login name and password.
5.2.2 - Configuring eBAS
The Image Enhancement Service enables you to save a collection of settings as a profile. You can thenassociate a Service profile with the Connector profiles, which allows the Connector to use the functionalityof the service
The Image Enhancement Service is installed with a default profile that you can modify. However, if you planto use the service with multiple connector profiles, you may find it easier to create custom service profilesthat match the requirements of the connector profiles. is installed with a default profile that you can modify.

However, if you plan to use the service with multiple connector profiles, you may find it easier to createcustom service profiles that match the requirements of the connector profiles.
5.2.2.1 - To Create A Service Profi le
1. In the console tree, select Configure services > BusinessAutomation.
2. Select the Image Enhancement tab and then select the settings that you want to use to improvethe readability of your document (see Image Enhancement Settings).
3. Click Save or Save current profile as to select or specify the profile name in the Save Profilewindow.
4. Click Save. The system saves your settings as part of the Service profile, or creates a new profile.
5. After creating a Service profile you must associate it with a Connector profile to enable the servicefunctionality to be used by the Connector (see Associating a service profile with a Connectorprofile).
5.2.3 - The eCopy Image Enhancement Service
The eCopy Image Enhancement service is an eCopy document service designed to enhance the eCopyscanning and image capture process. This service enables you to make corrections and clean up scannedimages and thus reducing the need to rescan documents. The functions include despeckling (removingnoise), straightening pages, cropping, smoothing characters, removing halftones and colored backgrounds,and thickening/thinning scanned lines. Removing lines and enhancing text quality is often needed to preparetext in a scanned document for Optical Character Recognition (OCR) operations. For poor quality scans ordocuments, you may need to perform multiple functions such as straightening pages, despeckling, andremoving lines.
5.2.4 - Image Enhancement settings
Use the Image Enhancement tab to configure the settings that you want to apply to the scanneddocuments.
5.2.4.1 - Image Enhancement Tab
Option Description
Convert to B&W Converts color or grayscale images to black-and-white. This option opens the Black and white and Thicken or thin settings.
lAuto threshold: Automatically defines threshold.
lManual threshold: The value us between 0 and 255. The default value is 50.
Note: Higher values can cause the image to be darker. The exact value that you need depends on the paper and ink on the page, and on the
scanner brightness setting.

Option Description
Black and white The Black and white option allows you to remove as follows:
lSmooth characters: Smoothes the edges of text. This improves the image's appearance and reduces the file size. It removes small bumps
and pits on the edges of characters. This option improves Optical Character Recognition (OCR) accuracy, improves legibility, and reduces
storage needs.
lRemove halftones: Black-and-white scanned images use dithering (often called "dot shading") to simulate shades of gray. This option
removes areas of dot shading, including black-on-white shading. Use this feature to change a TIFF file from grayscale to black and white.
lRemove lines: Removes all vertical and horizontal lines detected by the service. This can be useful when preparing the document for OCR.
lDespeckle: Removes speckles that are smaller than the pixel size defined in the Size in pixels field. This feature removes speckles that are
not touching anything else in the image. It allows you to remove very large speckles without harming text. However, if you select a speckle
size that is too large, you can unintentionally remove small text and sequences of periods, called "dot leaders," from images.
Note: Because these operations cannot be undone, it is recommended that you initially specify a small speckle size.
Thicken or thin Enhances scanned images that use too low a contrast threshold or too light a background. If scanned files are too light or too dark, the service
enables you to thicken or thin the image:
lNone
lThin: Looks at every black pixel in the original image and removes one pixel around it. This makes single pixels "thin" into small dots.
lThicken: Looks at every black pixel in the original image and then adds one additional pixel around it in every direction (horizontal, vertical,
and along both diagonals). This makes single pixels "grow" into small dots, expanding the borders of text characters.
Color and grayscale The Image Enhancement feature in the Color and grayscale group box can be applied to all image types. The imagemust be converted to
black and white in order to use those functions that only work with black and white images. If the source image is already black and white, the
conversion is ignored.
lStraighten page: During scanning, straightens the image using detected text as the basis for alignment. In scanned documents, corrects
alignment issues.
lAuto-orient: Allows you to set the page orientation automatically.
lRemove borders: Removes borders without page cropping.
lSize in pixels: The size is between 0 and 100. The default value is 1.
Hole Punch removal Automatically detects the location of the punch holes on the image and removes as follows: Remove left, Remove right, Remove top, and
Remove bottom.
Notes:
Profile settings apply to all pages of a scanned file.
5.3- About device services
Device services are services that can be applied to Device(s) or Device Groups.
The following categories are available in Device services:
n Activity Tracking
n Common Access Card (CAC)
n Cost Recovery

n Identification
n Session Logon
5.3.1 - Activity Tracking service
Activity Tracking service is accessed from the Configure services tab in the Device services section.Activity Tracking service tracks the success of the send, the recipients, and the one who sent the document.It provides quick and easy access to the tracked activity in the form of an UI.
The Activity Tracking service enables you to perform the following tasks:
n Configure the Activity Tracing function.
n Configure additional Activity Tracking fields.
The Activity Tracking service writes detailed information about each job to a log file.
5.3.1.1 - Activity Tracking Settings
Setting Description
Configured Allows the device to use the Activity Tracking service when selecting the Yes check
box; or disables the device to use the Activity Tracking service (also disables all fields
and properties).
Additional fields Enables Additional Fields for the device when selecting the Yes check box. The
Additional Fields row appears.
Click the button on the far right in the Additional Field value area to generate a key. For
more information, see Configuring the Additional Fields function.
Enable for all devices Enables the service for all devices when selecting the Yes check box; or disables the
service for all devices.
Once you click the Additional Fields value area, the Additional Fields settings window appears.
5.3.2 - Configuring the Additional Fields function
The Additional Fields function enables you to obtain more tracking information, such as an account numberor patient ID. The system prompts you to enter the information before the document is scanned. The systemadds the information to each entry in the log file.
Note:
The Additional Fields function is not available if you are using the Cost Recovery service. If the eCopy Cost Recovery
Service is supported on your device, you can integrate the device with an Equitrac or Copitrak terminal.
5.3.2.1 - To Configure Additional Activity Tracking Fields
1. In the Administration Console, select the Configure services tab.
2. Select Activity Tracking from the Device services pane.

3. In the Configuring Service: Activity Tracking setting, select the Yes option to allow a device touse the Activity Tracking service.
4. Enable the Additional Fields option by selecting Yes. The No additional fields in list messageappears.
5. Click the button on the far right in the Additional Field value area to generate a key.
6. Click Save.
5.3.2.2 - Additional Fields Settings
Setting Description
New Configures new Additional Field Editor settings.
Edit Edits the Additional Field Editor settings.
Remove Removes Additional Field from the list.
Move Up Moves up Additional Field in the list.
Move Down Moves down Additional Field in the list.
Additional Fields dialog window The following information is displayed in the columns after you enter Field Editor settings: Field Name, Default, Minimum, Maximum, and UserModify.
Click Done when you are finished.
Note:
You need to have at least one field defined in the grid to close the dialog.
Once you click New, the Field Editor window appears.
Field Editor settings
Setting Description
Name The Field Name (required). The default value is Name1.
Type Set the following settings for alphanumeric or numeric type:
lMinimum: Choose between 0 and 1000.
lMaximum: Choose between 0 and 1000.
lRemember: Choose between 0 and 1000.
The default value is 0.
Note: These settings represent the length of the alphanumeric or numericstring, and not interpreted as a range in case of the numeric field.
Default The default field entry (optional). This value is presented on the client (MFP) form by
default when you enter information into the Activity Tracking fields.
User Modify If set to Yes (default), you are allowed tomodify at the client (MFP).
Click OK once you are finished or click Cancel to cancel your selection.

5.3.3 - Identification service
The Identification service is located on the Configure services tab under the Device services section.
Identification services are available on compatible MFP devices that use identification devices such as cardfingerprint readers or proximity cards. Identification service allows the user authentication credentials fromthe identification device to be encrypted and passed to ShareScan. This preserves security and streamlinesthe logon process by allowing you to avoid entering authentication credentials at the device.
Identification service enables the integration of ID devices with eCopy ShareScan by providing a way for thethird-party applications to send credentials (username, password, domain, or userID) to ShareScan so thatyou are not challenged again.
The following settings are available for Configuring Service: Identification:
5.3.3.1 - Identification Settings
Setting Description
Configured Allows the device to use the Identification service when selecting the Yes checkbox; or prohibits the device to use the Identification service (this disables all theother fields and properties).
Keep connection alive Keeps the TCP connection alive to communicate to the ID device:
lChecked (Yes): Allows pulsing to occur between the ID device and the Identification
service; the TCP socket connection stays open and connected until you log out, times
out, ends the current session, or the ID device terminates its connection.
lUnchecked: Drops its connection to the ID device after it receives the data packet.
Port Number The Port number that the ShareScanManager listens to for ID device (client)
connections. The default value is 9425.
Note: ShareScanManager and the ID device should be configured for the same port.
5.3.3.2 -
Setting Description
Type Enables encryption for your Identification service, if appropriate:
lNone: Passes credentials to ShareScan without encryption. Not recommended.
lTripleDES: Enables you to encrypt the information from the application that is
supplying the credentials to ShareScan. You can do this by creating an encryption key
that you store on the computer where theManager is running and on the ID device
Path Set the path for the encryption type to the eCopyKey.txt file. This file contains the key
specified in the Key field. The ID device should have a copy of this file and use the same
key if encryption is TripleDES. It specifies a path to the storage destination for the
encryption key on the device where theManager is running.

Setting Description
Key Generates the encryption key and stores it in the eCopyKey.txt file. Youmust manually
copy this file to the device. If you regenerate the key, youmust copy the new key to the
device. The TripleDES key is used for encryption. Click the button on the far right side of
the Key field value area to generate a key.
Note: If the key value is changed, the ID device should take a new eCopyKey.txt file
and use the new value for TripleDES encryption.
Important: All devices that use Identification Services and aremanaged by the same
Managermust use the same encryption key. After generating a key for the first device,
when you configure subsequent devices youmust select the same path you selected for
the first device. ShareScan automatically recognizes the key file that is already in the
storage destination.
Enable for all devices Enables the service for all devices when selecting the Yes check box; or disablesthe service for all devices.
Save button Saves the changes made in the Identification service page.
5.3.4 - eCopy Identification Service Terminal Emulator
eCopy Identification Service Terminal Emulator appears when you click Test in Configuring Service:Identification.
To configure the emulator, launch the dialog by clicking the Config button on the main dialog.
5.3.4.1 - Configuration Settings
Setting Description
Server name Specifies the name or IP address of themachine running the TCP server. The default value is localhost, which is the
machine that the emulator is running on.
Port number Must match the port number set in ShareScan Administration Console. The default value is 9425, whichmatches the
default for ShareScan.
Timeout (secs) Value in seconds until the terminal times out if no pulses are received from ShareScanManager. The default value is
120 seconds.
Device IP Specifies the IP address of device.
ID device credentials The following ID device credentials are required:
lUsername: The login name of the user.
lPassword: The user’s password (optional).
lDomain: The Domain name you are amember of.

Setting Description
XML attributes The following ID device credentials are required:
lXML name: Insert name for the attribute of the XML entry.
lValue: Insert value that is matched with the XML label.
You can add, view, and clear XML attributes:
Add XML: Press this button to add the name or value pair to the XML attribute. This is added to the stream on the
bottom of the dialog, that is, aaa=111, bbb=222, and so on (additional attributes that have been entered or saved that
exist if the text is longer than the dialog box).
View XML: Press this button to view the XML file that is sent to server. This includes the username, password, domain,
email address and extra attributes added.
Clear XML: This button clears all of the additional attributes to be passed to server.
Encryption type The type of encryption used to encrypt the XML data:
lNone: Passes credentials to ShareScan without encryption.
lTripleDES: Enables you to encrypt the information sent from the application that is supplying the credentials to
ShareScan. You can do this by creating an encryption key that you store on the computer where theManager is
running and on the Identification Service device.
Key path Browse for the path location of the eCopyKey.txt encryption file. This file contains the Secret key value used for
TripleDES encryption.
Save and close Saves all field data.
Once the emulator has been configured, it is ready for use.
Note:
The text at the top of the status window (a default value of Waiting for server messages) gives helpful tips about the
state of the emulator.
5.3.4.2 - Terminal Emulator Settings
Setting Description
Status Window Displays the time-stamped status messages.
Connect Connects to ShareScan using the server name and port configured in the configuration
dialog.
Note: This button is disabled once a connection has been established.
End Only enabled once a connection has been established as disconnects from the TCP
server.
Clear Clears all text in the status window.
Keep connection alive When checked, the TCP connection between the Emulator and Server is kept alive. If
not checked, it terminates the TCP connection after the logon packet is sent to server
and no timer or pulsing events occurs.
Original XML Format When checked, the original XML format is used.

Setting Description
Top Most When checked, the emulator is always displayed on top of any window. When
unchecked, the emulator retains its normal order.
Seconds left until lock Displays a running countdown in seconds until the emulator times out. When the
emulator times out, it disconnects from the TCP server. Maximum timeout is 120
seconds.
Config Enables the configuration dialog.
NetStat Enables a command prompt window that runs the netstat –a –p TCP command .
Exit Closes the application.
5.3.5 - Session Logon service
The Session Logon service is located on the Configure Services tab under the Device Services section.
The Session Logon service provides secure access to the application and avoids prompting you multipletimes for credentials; that is, it provides a single sign-on for ShareScan.
Session Logon is provided as a single point of authentication for the entire workflow. If Session Logon isconfigured and enabled for a device, you need to log on only once into ShareScan. The logon information iseffective for the entire session. You do not have to enter your logon information each time you select aconnector during the current session. The ShareScan Manager passes the logon information to the Connectorusing an internal interface called "Credentials" in Data Publishing.
Note:
If you need to access different servers, and the logon credentials are not the same on those servers, the system
prompts you to enter logon information, even when Session Logon is enabled.
If you enable Session Logon for the Quick Connect, LDAP/SMTP, or Fax via SMTP connectors, refer tothe connector-specific configuration section for information about selecting the authentication type.
5.3.5.1 - Session Logon Settings
Setting Description
Configured Enables Session Logon in the Device pane when selecting the Yes check box; or
disables Session Logon in the Device panel (this disables all the other fields and
properties).
Directory services Specifies the directory service that manages your list of users (Windows Active
Directory or Novell Directory Services).
Type The directory service type. The default type is Windows Active Directory.
If the ShareScan Administration Console detects that the Novell client is installed,
Novell Directory Services (NDS) is added to the list.

Setting Description
Domain The domain associated with your login name and password (you can also specify
another domain name):
lWindows Active Directory: The current domain for the local machine is default.
lNovell Directory services: Youmust specify the NDS Server and ID.
Search parameters Specifies the parameters for searching the selected directory.
Search on The search criterion by which the system searches the user list:
lWindows Active Directory: First Name, Last Name, Display Name, or Account
Name.
lNovell Directory Services: First Name, Last Name, or User ID.
Automatic Base DN detection If enabled, theManager performs an auto-detection for the base DN in the domain
when doing type-ahead search.
Base DN The Base DN or directory root which is the starting point of the search. This option
defaults to the root of themain tree. Use this option to select the specific DN or
context where you want the search to begin.
Restrict users to this DN Limits the scope of the search to the specified DN.
Scope The scope of the search at one level down from the Base DN or down to the lowest
level of the tree: Base, One level, and Subtree.
Directory Access Specifies the type of access required to retrieve user names from the directory.
Type Specifies the type of access required to retrieve user names from the directory:
Anonymous or Use credentials (User name and Password settings are required).
User name The user name.
Password The user password (hidden by asterisks).
Search while typing Click Yes to enable the type-ahead feature when you start entering a user name at
the device.
Enable for all devices Select the Yes check box to enable the service for all devices; clear the check box to
disable the service for all devices.
The Test button allows you to quickly verify the Session Logon configuration without having to wait to addthe device and test the same details at the Client. It is enforced to use the Test feature successfully beforesaving the settings of the Session Logon Service.
5.3.5.2 -
You can verify configuration by entering your name and password, selecting the domain, and then clickingthe Logon button.
Setting Description
User name The user name.
Password The user password.

Setting Description
Domain The domain in which you are testing the configuration.
Success/Failure message A message indicating success or failure appears in the bottom of the pane. If the test
fails, the following error message appears:
Error: Failed to authenticate the user - Logon failure: unknown user
name or bad password.
Logon Attempts to log on using the specified credentials.
Cancel Terminates the test session.
After Session Logon is configured, enabled for a device, and tested, Session Logon is the first screen thatyou see at the Client. You must enter a valid username and password to log on to the selected domain. TheShareScan Manager verifies the credentials and passes them to the selected Connector.
The Connector must also verify the credentials passed to. If the authentication fails, the Connector mustchallenge you for the credentials again. The Connector must also display an appropriate error message.
Note:
The ShareScanManager does not retain the credentials entered for testing.
5.3.5.3 - Bypassing Session Logon
You have the possibility to control a number of bypass options for this service:
n Bypass session logon (no authentication): This option enables the ShareScan client to beconfigured to bypass the Session Logon form when only the user identification is received from thedevice, Cost Recovery or ID Services and the password is not provided. While a networkauthentication is not performed by ShareScan Session logon, if the username is provided it is used bythe individual connectors when needed.
n Bypass session logon (authenticate user): This option enables a network authentication to beperformed by ShareScan using the username and password provided by the device, Cost Recovery,ID Services or ShareScan Single Sign on Extender.
Note:
If no password is provided, available or password caching is not enabled, the user is prompted to enter their password.

Alternatively, you can use the ShareScan Single Sign On Extender, which enables secure storage (passwordcaching) of the user’s network passwords for use in a single sign on workflow. This enables the user to swipea card (or use any other available method to identify themselves) and have this log the user into eCopyShareScan and to access network resources.
5.3.6 - Common Access Card (CAC) service
The Common Access Card (CAC) service is located on the Configure services tab under the Deviceservices section.
The CAC service is used as a general identification card as well as for authentication to enable access toUnited States Department of Defense (DoD) computers, networks, and certain DoD facilities. The CACservice enables the use of Public Key Infrastructure (PKI) authentication tools, and establishes anauthoritative process for the use of identity credentials.
5.3.6.1 - Common Access Card Settings
Setting Description
Configured Allows a device to use the CAC service when selecting the Yes check box; ordisables a device to use the CAC service (also disables all fields andproperties).
Display warning in seconds Shows the warning window for a certain period of time at the Client (the default value
is 10).
Enable for all devices Enables the service for all devices when selecting the Yes check box; or disables the
service for all devices.
Click Yes to save your settings or click Cancel to cancel your selection.
5.4- About common services
Common services are built-in services that can be applied to Connectors and Devices/Device groups.
There are two categories on the Common Services tab :
n Notification services
n Tracing services
After creating a Service profile, you can associate Service with Connector profile in order to make Service'sfunctionality available.
5.4.1 - Associating a Service profile with a Connector profile
After creating a Service profile, you associate it with a Connector profile so that the Service's functionality isavailable. For more information on creating Connector profiles, see the "Configuring the connector" topic forthe connector with which you are working.
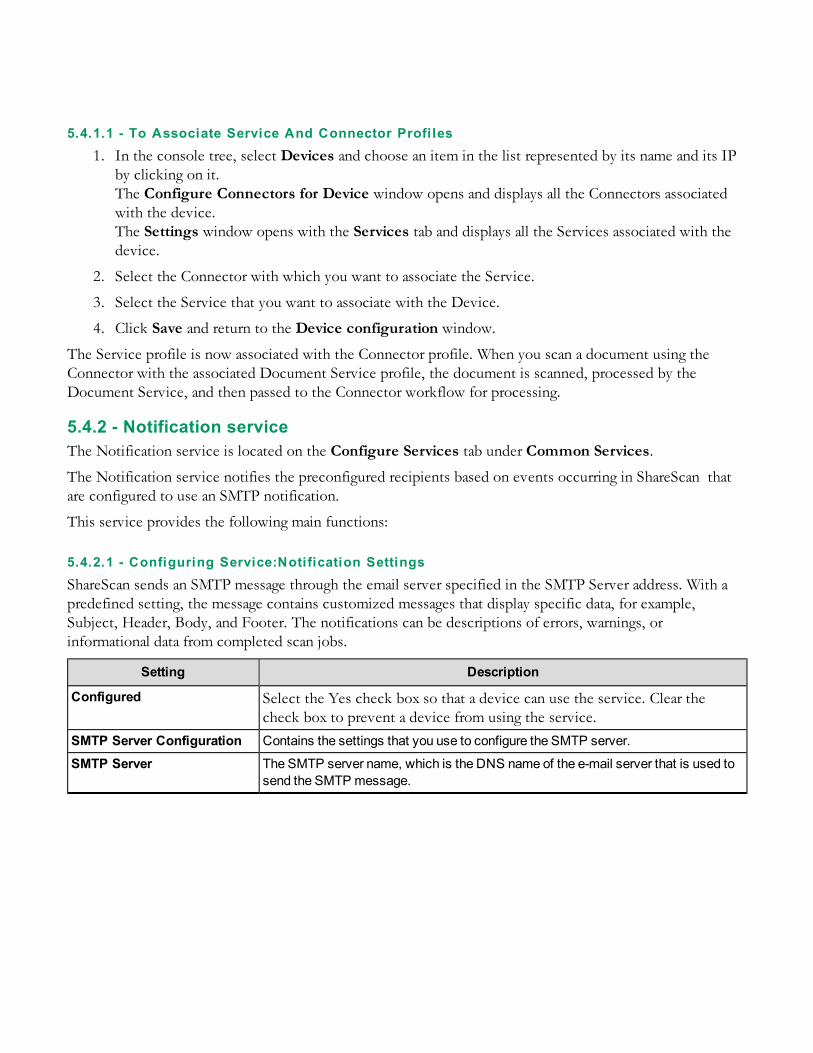
5.4.1.1 - To Associate Service And Connector Profi les
1. In the console tree, select Devices and choose an item in the list represented by its name and its IPby clicking on it.The Configure Connectors for Device window opens and displays all the Connectors associatedwith the device.The Settings window opens with the Services tab and displays all the Services associated with thedevice.
2. Select the Connector with which you want to associate the Service.
3. Select the Service that you want to associate with the Device.
4. Click Save and return to the Device configuration window.
The Service profile is now associated with the Connector profile. When you scan a document using theConnector with the associated Document Service profile, the document is scanned, processed by theDocument Service, and then passed to the Connector workflow for processing.
5.4.2 - Notification service
The Notification service is located on the Configure Services tab under Common Services.
The Notification service notifies the preconfigured recipients based on events occurring in ShareScan thatare configured to use an SMTP notification.
This service provides the following main functions:
5.4.2.1 - Configuring Service:Notification Settings
ShareScan sends an SMTP message through the email server specified in the SMTP Server address. With apredefined setting, the message contains customized messages that display specific data, for example,Subject, Header, Body, and Footer. The notifications can be descriptions of errors, warnings, orinformational data from completed scan jobs.
Setting Description
Configured Select the Yes check box so that a device can use the service. Clear thecheck box to prevent a device from using the service.
SMTP Server Configuration Contains the settings that you use to configure the SMTP server.
SMTP Server The SMTP server name, which is the DNS name of the e-mail server that is used to
send the SMTP message.

Setting Description
SMTP Server Authentication The authenticationmethod used to send SMTP mail to the SMTP server. In the
second column, click the authentication option, Anonymous, or Use Credentials:
lAnonymous: The default value. When Anonymous, pointer moves automatically to
the Email address section.
lUseCredentials: Activates the Username, Password, and Domain fields so that
you can specify the values.
Username The SMTP username.
Password The SMTP password.
Domain The SMTP domain.
Email address All the addresses must be in the SMTP format ([email protected]).
From Email address from which email messages are sent (originator of themessage).
To Email address to which an email is delivered (recipient of themessage). Semicolons
are used to separate addresses.
Cc Email address to which an email is delivered (carbon copied recipient of the
message). Semicolons are used to separate addresses.
Send to session logon user Select Yes to send a notification email to a Session Logon user or clear the check
box if you do not want to send it.
Message Specifies the settings for the components of amessage.
Subject Specifies the subject that appears in the email.
Header Specifies the header to include in the email error message, which is appended to the
top of themessage. Press Ctrl+Enter to start a new line.
Body Specifies the custom text that is included in the email error message, which is
appended to the body of themessage. Press Ctrl+Enter to start a new line.
Footer Specifies the text that is included in the email error message appended to the bottom
of themessage. Press Ctrl+Enter to start a new line.
Message Type The following SMTP message types are available:
lPlain Text: The SMTP message is sent as a plain text.
lHTML: The SMTP message is sent in an HTML format with background color and
product logo as the signature.
5.4.2.2 - Enable For All Connector Profi les Settings
Setting Description
Enabled Select the Yes check box to enable the service for all Connector profiles. Clear the
check box to disable the service for all Connector profiles.

Setting Description
Notification level The notification levels are available:
lAll: Sends all messages by ShareScan.
lWarnings: Warningmessages sent by ShareScan.
lErrors: Sends only error messages sent by ShareScan.
l Job successfully sent: Sends amessage containing details about the completed
scan.
5.4.2.3 - Enable For All Devices Settings
Setting Description
Enabled Select the Yes check box to enable the service for all devices. Clear the check box to
disable the service for all devices.
Notification This feature is not supported yet.
5.4.2.4 - Enable For Licensing Notification
Setting Description
Enabled Select the Yes check box to enable licensing notification. Clear the check box to
disable licensing notification.
When you click the Test button, and the Notification service is correctly configured, a test message appears.If the configuration includes an invalid email server or addresses, an error is not generated or reported.
To ensure that the service works correctly, send a test message and make sure that it is sent with the correctinformation. At run time, the ShareScan Manager uses the information to trigger an email notification basedon the notification level.
5.4.3 - Tracing service
The Tracing service enables you to configure the capture of trace information in a log file; this informationhelps troubleshoot connector issues. You typically do this only when working with customer support astracing slows down overall system performance.
The Tracing service provides a mechanism to ShareScan Manager, Connectors, and eCopy services to writemessages and errors to log files while running inside the ShareScan Manager.
Tracing service is located in Administration Console in the Configure services tab under Commonservices section. Only a ShareScan Manager trace is available.

5.4.3.1 - Tracing Settings
Setting Description
Configured Allows a device to use the Tracing service when selecting the Yes check box; or
disables a device to use the Tracing service.
Note: Configuring this service does not enable tracing for Connectors or
Devices, it just means that it is ready for use.
Verbose Enables detailed tracing when selecting the Yes check box or disables a detailed
tracing.
Trace File options Options to create the log files.
File size (kB) Tracing file size in kB. Minimum value is 500 kB, the default value is 500 kB, and
maximum value is 51.200 kB.
Note:As the tracing happens into an internal binary format, and the size
specified here will determine the size of the binary file, the size specified here will
not match the size of the exported trace file if the export target format is TXT.
If you want to get trace files from the system for diagnostic ortroubleshooting purposes, ensure that the file size is set to a minimum of10.000 kB, because if this file size is set to too low, the important tracinginformation might not be recorded.
Enable for all devices Enables the service for all devices when selecting the Yes check box; or
disables the service for all devices.
Enable for all connector profiles Enables the service for all connector profiles when selecting the Yes check box;
or disables the service for all connector profiles.
Export By clicking the Export button, you can export the internal trace file into a binary or
a text log file into a specified folder. A Save As dialog appears if you click the
button, where you can specify a folder, a file name, and a file type (the latter can
be binary or text). Note: For troubleshooting purposes of technical support, binary
format is recommended..
Click Yes to save your settings or click Cancel to cancel your selection.
Table 1:
6 - About eCopy Connectors
A ShareScan system uses the following types of connectors:
n eCopy connectors included with ShareScan, such as mail and fax connectors for Microsoft Exchange,Lotus Notes, and SMTP via LDAP.
n The following connectors are available for download or purchase, depending on your version ofShareScan: Quick Connect; Open Text Fax Server, RightFax Edition; Microsoft® SharePoint®;iManage WorkSite; Open Text Document Management, eDOCS Edition; Open Text Content Server;and EMC® Documentum®.
n Third-party connectors, developed using the ShareScan Software Development Kit (SDK).

In addition, ShareScan supports Business Automation services that enable connectors to use ImageEnhancement and Barcode Recognition.
You configure connectors by creating connector profiles that specify various settings, such as the appearanceof the connector’s button and the image format that you want to use during scanning. You can createmultiple profiles for each connector and you can activate each connector profile on multiple devices.
6.1- Installing and removing connectors
During installation of the ShareScan software, you can install all the eCopy connectors supplied with theinstallation package purchased by your organization. After you license a device, you can activate any installedconnectors.
6.2- About connector profiles
You can configure multiple profiles for each connector as each connector profile defines a set ofconfiguration options for that connector. In addition, you can activate multiple profiles for each connectoron a single device. For example, you can create two unique profiles for the Exchange connector and activateboth on device X.
6.2.1 - Example of two profiles for the same connector activated on a singledevice
Profile
nameProfile description Device
Expense
Reports
Scans and sends expense reports to a Payroll inbox. DeviceX
Resumes Scans and sends resumes to a HumanResources (HR) inbox. DeviceX
For more information on configuring a connector profile, refer to the connector-specific Configuring theconnector topic.
6.3- Planning connectors
To obtain the best result from your connector, you may want to consider the ways the connector is used in your
work environment, as well as a number of other factors, for instance:
n Saving time: If you want to reduce the amount of time your users spend at the device, you can setup an Express connector profile that allows users to scan and send documents by simply pressing theconnector button at the device.You can create multiple buttons and configure each to scan documents to, or store documents in adifferent destination. You can also control the number of destinations presented to the user at thedevice and the attributes for each destination.Users can also save time by not having to enter their credentials each time they use the device. To

enable your users to skip this step in the scanning process, select the Logon as option on theAuthentication tab when you configure the destination for your connector profile.You may also want to consider the ShareScan Session Logon feature, which - when set - allows usersto bypass the Logon screen altogether.
n Enhancing security: If you want to keep track of the documents sent by each user, select theLogon at runtime option on the Authentication tab when you configure the destination for yourconnector profile. This forces users to log on each time they use the connector and allows the systemto keep a record of the documents sent by each user in the log file.
n Controlling access: depending on the individual connectors, you can limit the accessibledestinations in a number of ways, including
n Configure connector profiles that allow access to a single destination, or to a limited set ofdestinations.
n Disable the Allow subfolder navigation option if you do not want your users to have accessto the folders and sub-folders of the configured destination.
n Disable the Enable navigation option if you do not want your users to have access to thelocations below the configured destination.
n Select the Logon at runtime option at the Authentication tab when you configure thedestination for your connector profile.
n Configure connector profiles that only allow access to a single profile.
n Configure connector profiles that allow access to a limited set of libraries.
n Select Session logon and Runtime as the Authentication type when you configure thescanning destination for your connector profile.
6.4- Configuring connectors
After installing and activating a connector, it must be configured for use. The instructions below provide ageneral guideline for configuring the various connector profiles:
1. In the Administration Console, select the Connectors tab. The Configure connectors panedisplays a list of the installed connectors.
2. Select the connector name. The Configure connector and the Settings panes open.
3. To create a new profile, click Save current profile as, enter a name for the profile, and then clickSave. To modify an existing profile, select the profile name from the list.
4. Use the Settings pane to specify the following settings:n Display settings
n Document settings
n Services settings

n Scanner settings
n Offline processing settings
Note:
Each connector profile supports a unique group of settings. If a setting is not available for the connector you are
configuring, it will be grayed out.
5. In the Configure Connector pane, underDestinations, click New. The Create a destinationwindow opens.
6. Specify the destination settings. Each destination that you create for the profile appears in theDestinations list. When you select a destination, the settings configured for the destination and thescreens that will be visible to the user at the device appear in the Summary list.
7. Click the Save current profile button. The system saves your settings as part of the connectorprofile.
6.4.1 - Configuring Express connector profiles (optional)
An Express connector profile allows you to control the number of screens that the user sees at the device.The profile that you create in the following procedure allows the user to scan and store the document bysimply pressing the button on the Home screen. You can customize the profile so that the user sees as manyor as few screens as you want. The following instructions present a generic guideline for Express connectorsettings; minor details may vary, depending on the connector in question.
1. In the Administration Console, select the Connectors tab.
2. Select the connector you want to configure.
3. To create a new Express profile, click Save current profile as, enter a name for the profile, and thenclick Save.
4. In the Settings pane, configure the Display settings and make sure that none of the other availablesettings is set to User modify.
5. Set the authentication method (Login as as the Type or configure Session login).
6. Enter the user name and password for the destination.
7. Click Test, if applicable.
8. Configure the connector-specific destination settings.
9. Under Screen options:n Select profile: Make sure that Allow selection is not selected.
n Display fields: Select None.

n Selecting these screen options, along with use of a profile that contains no required fields orthat pre-fills fields, ensures that the user at the device does not see the Profile selection orthe Document profile screens.
n Confirm storage: Select No. This ensures that the user at the device does not see thestorage confirmation message.
10. Confirm your settings.
11. Click Save current profile to save the profile.
6.4.2 - Defining a scanning destination (optional)
Defining a scanning destination enables you to control how the connector behaves during the Authenticate,Navigate, and Index phases at the device.
You must define at least one destination. If you define more than one destination, the connector will promptthe user to select one during the scanning process.
The Destinations tab displays a list of destinations that you can make available to the user on theDestinations screen at the device. The Destinations list displays the name and type of each destination. TheDestinations list displays the destination name in the second column, and an icon in the first column forExpress destinations. For more information on each destination, move the cursor over the destination namein the list.
Placing your cursor over a destination in the list displays information for that destination. You specify theinformation in the Destination window.
Selected destinations, indicated with a check mark, appear on the Destinations screen at the device.
Worksite and SharePoint connectors have specific considerations, click the links for more details.
To define a scanning destination:
1. On the Configure tab, click New. The Create a destination window opens and displays theAuthentication tab.
2. Enter aName for the new destination. This is the destination name that the user sees at the device
3. Select the relevant destination for this connector profile.
4. Specify the Authentication settings, if applicable.
5. Specify the Location settings.
6. Use the If filename already exists option to specify the connector behavior when the scanneddocument has the same name as another document stored in the scanning destination.
7. Click OK to save your destination settings and return to the Destinations tab.

6.5- Activating connector profiles
To make connector profiles available at a device, you activate the connectors and then select the connectorprofiles. Each connector profile that is activated on a device is represented by a separate button on theShareScan Client screen.
6.5.1 - To activate connector profiles
1. In the Administration Console, select the Devices tab. The Device configuration pane displays alist of the available devices and device groups.
2. Select the device or device group on which you want to activate the connector. The Configureconnectors for device and the Settings panes open. The Configure connectors for device panehas the following columns:
n Select profiles: Select a default connector from the list.
n Display name: Displays connector's name.
n Configured: Choose Yes orNo.
n Layout: Numbers in order of selecting.
3. In the Select profiles column, select the connector profile that you want to activate. You can onlyselect configured profiles which appear in black. Profiles that are not configured appear in red. Onlythe connectors that have valid licenses for the selected device will appear.
4. Click OK and then click Save.
5. Click the Layout button. The Arrange layout window opens with the following settings:n Connector
n Profile
n Display name
n Order of appearance
6. Drag and drop the profiles to re-arrange the order of appearance of the connector buttons at the clientand click OK.
7. Click Save. The profile is now activated on the device. Note that the web-browser enabled MFPdevices and the simulator there may experience a minor delay (typically less than 30 seconds) untilthe new connector settings and connector associations are propagated.
Note:
You can publish connector profiles individually or in groups to one or more eCopy-enabled devices.

6.6- Using connectors
Below, you can find a typical workflow, which provides an overview on how the connectors work.Depending on the connector, minor details may vary.
At the scanning device, the user follows the standard eCopy workflow to scan and send a document. If youconfigure a connector profile to use the Express function, users will not need to perform many of the stepsincluded in the procedure in this section.
6.6.1 - Scan
1. Place your document in the feeder or on the glass.
2. If your system is configured to use the Session Logon feature, enter your user credentials on theLogin screen and then press Login. If your Session login credentials are not valid, the Login screenfor the connector will appear after you preview the scanned document.If Search while typing is enabled on the Session login tab, ShareScan will search for matchingaddress list entries after each character you enter in the User name field. Select your name from thelist that appears as you enter each character. If Search while typing is disabled on the Deviceservices tab, it overrides this setting. However, even when Search while typing is disabled, youcan still perform a search by entering characters and pressing the Search icon.When you have successfully logged in, the Home screen appears.
3. Review the default scanner settings in the left pane; use the down arrow button to view additionalscanner options.To change a setting, select the option, such as “Paper size,” and then select the setting on the toolbarthat appears. ShareScan will use the modified scanner settings for all subsequent pages that you scanduring this session, unless you change settings from the Preview screen.
4. Press the connector button.

6.6.2 - Preview
1. When the connector finishes scanning the document, review the scanned images. The buttons on thePreview screen enable you to view, delete, rotate, and change the magnification of the images.
2. If necessary, scan additional pages or re-scan any of the original pages by placing the pages in thefeeder, or on the glass, and then pressing the Scan more button.When you scan additional pages, the client inserts them after the page that is currently displayed onthe Preview screen. For example, if the client is displaying page 5 of an 8-page document and youscan two more pages, the client inserts the new pages after page 5.
3. To review and change the scanner settings, press the Scanner settings button on the Previewscreen. The Scanner settings... screen appears. After changing the scanner settings, select OK.
4. To review and change the document settings, select the Document settings button on the Previewscreen. After changing the document settings, press OK.
5. When you are ready to send or store the document, press Next.
6.6.3 - Authenticate and Navigate
1. If the Logon screen appears after you preview the document, enter your user credentials, then pressNext.
2. If you configure the connector to allow navigation, the Folder navigation screen appears. The listcan display 200 entries at one time.
3. Select the target subfolder in the destination folder.
4. Select sub-levels in the list until the complete path appears in the Path field at the top of the screen.
5. When you have selected the destination, press Next.
6.6.4 - Send
1. If the Send screen appears, specify the settings
2. Press Next.
3. Select one of the post-scanning options.

6.6.5 - Post-scanning options
Option Description
Log out Displays the Logon screen. Appears only when Session Logon is enabled.
Done Displays the Home screen.
New
document
Displays the Preview screen and enables you to scan a new document using the current settings.
Place the new document in the feeder or on the glass and then press Scan more.
New destination Enables you to send the scanned document to another connector. Press the button and then
select the target connector from the list. The client opens the target connector and displays the
scanned document on the Preview screen. Press Next and then follow the prompts provided by
the target connector.
7 - Configuring devices
An eCopy-enabled device can be:
n A multifunction peripheral (MFP)
n A scanner that is connected to an eCopy ScanStation
n An MFP with eCopy software running in the device
The ShareScan Manager supports a single device connected to a ScanStation or multiple devices running theeCopy software.
Use the Devices tab in the Administration Console to manage the devices. The Devices tab provides youaccess to two main functions:
7.1- Device configuration
To perform the following device configuration functions, right-click the Device configuration area andchoose the function:
n Add devices: Discover and select an eCopy-enabled device.
n Create device group: Create a group and add devices into this group.
n Rename device groups: Rename the group with a unique name.
n Model name assignment: Specify a new model name for the device selected or select an alreadydefined setting from the drop-down list.
n Delete device group: Delete the group and all the devices inside this group.
n Lock/Unlock group: Lock or unlock the group.
n Find device: Find a device by name or IP address.
n Collapse/Expand all: Expand or collapse all the nodes.

7.2- User configuration
To perform the following user configuration functions, right-click the User configuration area and choosethe function:
n Select organization: Select an organization unit from the Active directory.
n Remove organization: remove the organization unit from the list of User configurations.
n Restrict personalization: Restrict this organization from selecting connectors from All Users group.
For more information, see User configuration.
Configuring devices also involves:
n Activating connector profiles
n Configuring services for devices
n Configuring scanner settings for devices
7.3- Finding devices
You can quickly find a device in the device configuration list.
7.3.1 - To find a device
1. In the Administration Console, right-click the Device configuration tab and select Find device.The Find device window opens.
2. In the Device name field, enter a device name. As you enter each character, the Search while typingfunction searches for a matching device name. If it finds a match, it highlights the device on theDevices tab.
3. In the Device IP field, enter the complete ID address. The system searches for the device.
7.3.2 - Find Device settings
Option Description
Device name Enter a device name. Type-ahead feature is enabled for the Device Name field. Typing in a
partial name, highlights the device on the Devices tab, if found.
Note: The complete IP address needs to be entered in the Device IP field for the search to begin.
Device IP Enter a device IP value. Type-ahead feature is enabled for Device IP field. The value should
follow an xxx.xxx.xxx.xxx pattern.
Finding Devices
window
The following values are displayed after the search: Device name, Device IP, Vendor, Version,
and Location.

7.4- Creating and deleting device groups
You can quickly create and delete device groups in the device configuration list.
7.4.1 - To create a device group
1. In the Administration Console, right-click Device configuration tab and select Create devicegroup. A New entry field is created underDevice groups.
2. Rename aNew entry field , if needed, and press Enter.
3. Once a group is created, drag and drop existing devices or add new devices (by dragging and droppingfrom within the Add device window) into the group.
Note:
When creating a device group, ensure that the name of the device group is unique (no device or group can have the
same name).
7.4.2 - To delete a device group
1. In the Administration Console, right-click on a group name from aDevice groups list and selectDelete group.
2. Click Yes to delete the selected group.
7.5- Renaming device groups
You can quickly rename device groups at any time in the device configuration list.
7.5.1 - To rename a device group
1. In the Administration Console, right-click a group name from aDevice groups list.
2. Select the Rename device group menu item to change the name of the group and then press Enter.
7.6- Locking device groups
You can quickly lock and unlock device groups in the device configuration list.
7.6.1 - To lock a device group
1. In the Administration Console, right-click on a group name from aDevice groups list.
2. Select the Lock group menu item to lock all the devices.
Note that any new devices that are added to the group are not locked.

7.6.2 - To unlock a device group
1. In the Administration Console, right-click on a group name from aDevice groups list.
2. Select the Unlock group menu item to unlock all the devices.
7.7- User configuration
The User Configuration function is available to all devices and device groups for which Session Logon hasbeen enabled. You use this function to select an organization and to configure connectors for all users:
n Organizations: Displays all the Organization units (departments) that are currently configured andenables you to select an organization:
7.7.1 - To select an organization
1. In the User Configuration pane, right-click Organizations and then click Select Organization.The Organization Units window displays organizations that are configured in the Active Directory.The window includes domain and access information.
2. In the Organizational Units window, double-click the Organizational units to add to the list ofdepartments for User configuration and click OK.
Note:
To remove an organization unit, right-click it and then click Remove Organization. To restrict an organization
unit from selecting connectors that are available via the All Users group, select the organization unit and then
click Remove Personalization.
n All Users: In addition to connectors selected for the Organization unit you belong to, thisconfiguration is available to all users authenticated using Session Logon.
7.8- Role based configuration
With this feature you can allow specific Connectors to be displayed based on the Organizational Unit (OU) inthe Windows Active Directory. Before you start, complete the following prerequisites:
n Session Logon must be configured to add an OU to this list.
n User configuration setting must be enabled for the device or group of devices.
Double-click an OU to add to the list. Now, the Connector Profile selection page is presented where you canselect a set of Connector Profiles instead of the Connectors selected for the device.
The authenticated user (via Session Logon) is presented with the set of Connectors that are configured byyou for the OU/Department the user belongs to.

7.8.1 - Role based configuration options
n If the OU the user belongs to is not configured with any Connectors, the Connectors in the All Usersgroup are displayed at the Main form, along with theMy Config button, where you can customizethe selection of Connectors for your account.
n If the All Users group is not configured with any Connectors, the device’s default set of Connectorsis displayed.
n If the device is not configured with any Connectors, the No Connectors are configured message isdisplayed on the Main Form.
n If the OU/Department the user belongs to and the All Users group is configured with one or moreConnectors, then by default (for the first time), the OU Connectors are displayed along with theMyConfig button, where you can customize the Connectors for your account.
You can restrict an OU/Department from not being able to customize the Connectors from the All Usersgroup by right-clicking the OU and selecting Restrict All Users. This is useful, when you want to restrictcertain departments from customizing the generally available Connectors from the All Users group.
7.8.2 - Role based configuration restrictions
n Renaming an OU is not allowed.
n An OU can be removed from the list by right-clicking the OU and selecting the RemoveOrganization menu item.
n The Settings and Scanner tabs are hidden when configuring this feature as they only apply to aDevice/Device Group.
7.8.3 - Device/Role based configuration chart
Device OU/Department All Users
Connectors
displayed on
Main Form
Device A None (no Active Connector profiles). None (no Active Connector profiles). Device
Connectors.
Device A One ormore Active Connectors. None (no Active Connector profiles). Connectors in
OU (default).
Personalization
is not available.

Device OU/Department All Users
Connectors
displayed on
Main Form
Device A One ormore Active Connectors. One or more Active Connectors. Connectors in
OU (default).
Personalization
available via My
Config button
(Personalization
button on the
Main form,
through which
you can
personalize
your choice of
Connectors at
run time.
Device A One ormore Active Connectors.
Restrict All Users (menu item, if checked,
restricts the OU/Department from using the
Connectors from the All Users group, that is,
Personalization is restricted).
One or more Active Connectors. Connectors in
OU (default).
Personalization
is not available.
Device A None (no Active Connector profiles). One or more Active Connectors. Connectors in
All
Users(default).
Personalization
is available via
My Config
button
(Personalization
button on the
Main form,
through which
you can
personalize
your choice of
Connectors at
run time).
7.9- Personalization feature
With this feature you can configure Connectors, make them available for any user. This gives the user theability to maintain the user's own personal set of Connector profiles based on the user's login information.

You can personalize the set of Connectors only when Session Logon along with the User Configurationoptions are enabled and if at least one or more Connectors are activated in the All Users group.
Note:
If there is only one active profile in the All Users group, theMy Config button is still visible, even though you cannot
access My Config at runtime.
When you log in for the first time, you are presented with Connectors selected for this department, alongwith theMy Config button. You can click theMy Config button to further select any generally availableConnectors other than the departmental Connectors. Once you select the desired Connectors and click OK,the Main form is reflected with the changes immediately. At least one Connector profile must be selected forpersonalization
Note:
When the user first logs in Departmental Connectors, they always supersede Connectors listed in the All Users group.
In other words, Connectors selected in the Department the user belongs to are displayed on theMain form and the user
can customize Connectors by usingMy Config, where they are presented with both the Departmental and Connectors
from the All Users group.
7.9.1 - Personalization restrictions
n If the same Connector profile is selected in both the Department and the All Users group, only oneentry or instance of this profile is visible in the list presented in theMy Config page (at the Client).
n If the Department does not have any Connectors selected, Connectors form the All Users group andare displayed by default on the Main Form, along with the personalization button (My Config).
From the main form you can continue with your activity and or log off at any time. The next time you log in,the Main form is presented with all the buttons configured in the previous login. You can choose to reselectany of the available Connectors via theMy Config button.
If at any point of time you want to remove/modify a generally available Connector profile (from the AllUsers group), it is reflected immediately the next time you log into the system. In case of an unselected ordeleted Connector profile, the profile is removed from your personal set of Connectors.
8 - About configuring scanners
When you configure a device, you also specify scanner settings for a device.
Select Devices > <device name/IP address> > Settings > Scanner.
8.1- Specifying default scanner settings
You can specify default scanner settings for devices.

8.1.1 - To specify default scanner settings for a device
1. In the Administration Console, select the Devices tab.
2. Select the device that you want to configure.
3. In the Settings pane, select the Scanner tab. The information that you see depends on the deviceyou are using.
4. Specify the default scanner settings in Scanner defaults.
5. Click Save.
8.1.2 - Scanner defaults settings
Settings Description
Resolution The following resolution types are available: DPI 100, DPI 150, DPI 200, DPI 300,
DPI 400, and DPI 600.
Input paper size The following input paper sizes are available: Letter, Letter R, Legal, Ledger,Statement, Statement R, A4, A4 R, A3, A5, A5 R, B4, B5, B5 R, Auto, andMixed.
Output paper size The following output paper sizes are is available: Letter, Legal, Ledger, Statement,
A4, A3, A5, B4, B5, and Auto (default value).
Orientation The following orientation types are available: Portrait, Landscape, and Same as
originals.
Scaling Scaling can be adjusted between 25-100 percent.
Color The following color options are available: Black and white (B&W), Grayscale, Full
color, Auto color grayscale, and Auto color B&W.
Image mode The following imagemodes are available: Text, Text photo, and Photo.
Two sided The following two sidedmodes are available: Single sided, Double book, and Double
calendar.
Image quality adjustment
label
The following image quality adjustment labels are available: Remove background,
Prevent bleedthru, and None.
Inverse Enables inverse with Yes.
Deskew Enables deskew with Yes.
Mirror Enables mirror with Yes.
Two page separation Enables two page separation with Yes.
Brightness Brightness can be adjusted between 10-90 percent.
Sharpness Sharpness can be adjusted between 10-90 percent.
Note:

TheUser modify option in theScanner defaults tab enables you to specify whether or not the users at the device can
override.
8.2- Configuring scanner settings for ScanStation
You can specify scanner settings for devices.
8.2.1 - To specify scanner settings for a device
1. In the Administration Console, select the Devices tab.
2. Select the device that you want to configure.
3. In the Settings pane, select the Scanner tab. The information that you see depends on the deviceyou are using.
4. Specify the scanner settings in Configuration.
5. Click Save.
8.2.2 - Scanner configuration settings
Settings Description
Driver name Browse and select the driver to be used for scanning. The currently selected driver is
shown.
Click the row and click the right corner to open the Select scanner window. Nuance
Scanner SetupWizard automatically starts that helps you with scanner configuration.
For more information, see Nuance Scanner SetupWizard .
Type Type of driver currently selected or in use (TWAIN or ISIS).
Show title bar If a kiosk mode is not desired, setting this value to Yes creates a resizable window with
a title bar.
Password (exit) Prompted when you try to exit the ScanStation Client by pressing the Exit button in
the kiosk mode.
8.3-
8.4- Setting up scanning devices
Nuance Scanner Setup Wizard is used to configure ScanStation (a ShareScan Client) to communicate with ascanning device (scanner or network MFP) for the best possible scanning results.

8.4.1 - Scanning device settings
1. In the Administration Console, select Devices > <device name/IP address> > Settings > Scanner.
2. Click the Driver Name row and click the far right corner. The Select Scanner window appearswith the list of all available scanning devices. In some cases, the scanning devices are locatedelsewhere in a network. The scanning devices fall into two categories: TWAIN and ISIS.
3. Select the scanning device to be used by ScanStation in the Wizard.
n Setup: Launches the Wizard in order to test your scanning device. The Wizard performs some tests,creates and stores hints, and returns to Administration Console.
n OK: Selects the scanning device and returns to Administration Console if the scanning device alreadyhas hints. Otherwise, launches the Wizard if there are no hints, that is, the setup has not beenperformed yet.
n Cancel: Aborts the operation.
Note:
Nuance recommends performing all tests in order to create necessary hints. Hints are scanning device specific data
used for optimizing scanning process.
You select a TWAIN/ISIS driver when you license a TWAIN/ISIS scanning device. You select a differentdriver in the following cases:
n If you change the device.
n If you selected the wrong driver.
8.4.2 - Testing scanning device
You can test your scanning device in the Wizard to make sure it works properly and to perform additionaltests.
There are only few scanning device drivers which fully meet the appropriate standard. Also, there are someambiguities in the standards themselves. Therefore, the Wizard uses hints to cover these differences. Thesehints are stored in a database installed with the Wizard for all scanners which were tested by Nuance. Whenperforming tests, the Wizard tests the connection between the computer and your scanning device andcreates hints for the scanning devices.
8.4.2.1 - To Perform Tests
Before you start, make sure the scanning device is powered and the cable is connected and close any otherapplications that might be using your scanner. Also check that the device is set to online mode.
1. Select from the following options that you want to apply: Basic scan test (recommended),Check ADF capabilities, Paper sizes supported, Black and white scan test, Gray scan test, andColor scan test.

For advanced users: Additional tests, Advanced settings, and Hint editor (optimizes your scanner’sperformance but you risk degrading its performance or even disabling its scanning capability).
2. You are prompted a basic scan check and additional tests (for advanced users). Insert a testdocument or photograph in your scanning device, and then click Next.
3. When your scanning device's native user interface appears, choose all the default settings inone of the color modes and proceed through a complete scan.
4. After basic scan test has passed, if the scan appears to be correct, click Next to perform thenext test. Otherwise, make the image correct with the following options: invert, rotate, fliphorizontally, or flip vertically.
5. If the image is missing or incomplete, there may be an issue with your scanning device. Inthis case, check that you correctly inserted a document or photograph and that the page sizesetting is suitable and click Next.
6. Check the ADF capabilities: The Wizard determines your scanner type. If this is incorrect,select the appropriate type. This test checks how your scanner's ADF detects the presence ofpaper in its input. If the test fails, your scanner either continues to scan endlessly from theflatbed when the ADF becomes empty or a dialog from Administration Console appears oneach page.
7. Check paper sizes supported: The Wizard determines your scanner type. If this is incorrect,select the appropriate type. You are presented some page sizes that your scanner supports byits flatbed. Click Adjust to change paper sizes.
8. Black and white scan test: If the Wizard detects that your scanner is capable to scan in blackand white, it tries to scan in black and white (binary) mode.
9. After the scan test has passed, if the scan appears to be correct, click Next to perform thenext test. Otherwise, make the image correct with the following options: invert, rotate, fliphorizontally, or flip vertically.
10. The last two selections are repeated for grayscale and color modes.
11. Click Finish to go back to the Select Scanner window.
8.5- Startup Configuration for ScanStation
You can manage and configure the Client from the Administration Console by specifying ScanStation startupconfiguration.
8.5.1 - To specify ScanStation startup configuration
1. In the Administration Console, select the Devices tab.
2. Select the device that you want to configure.

3. In the Settings pane, select the Scanner tab. The information that you see depends on the deviceyou are using.
4. Specify ScanStation configuration in ScanStation startup configuration.
5. Click Save.
8.5.2 - ScanStation startup configuration settings
Settings Description
Automatic logon At ScanStation startup, or when the device is restarted, automatically logson to Windows using the specified user name, password, and domain.You can configure by clicking Yes to make the ScanStation toautomatically start the Client and log on as a specified user whenever theScanStation is started.
Note: If you do not do this, you must start the Client manually each timeyou start the ScanStation.
User name The user name.
Password The user's password (hidden).
Domain The domain.
Start ScanStation automatically Starts the Client as soon as you log on to the ScanStation or after an automatic
logon.
9 - The eCopy Barcode Recognition Service
The eCopy Barcode Recognition Service is an eCopy service designed to enhance the scanning and imagecapture process. The service enables you to split files at barcodes and use the barcode data to rename the file.Also, if your business workflow demands it, the service can pass scanned files to document managementsystems and legal applications.
The ShareScan Administration Console enables you to configure and administer ShareScan managers,connectors, services, and scanning devices. ShareScan enables administrators to create profiles for the serviceand associate them with connector profiles. When a user at the device scans a document using a connectorwith an associated service, the document is scanned, processed by the service, and then passed to theconnector workflow.
9.1- What's new in the Service
New functionality in this version of the service includes:
n Barcode restrictions:
l An option is added to always require a checksum.

l The use of start-stop characters in Code 39.
l Length (minimum and maximum length values).
l Full page templates based on full page barcodes.
9.2- Configuring the Service
The Barcode Recognition service enables you to save a collection of settings as a profile. You can thenassociate a service profile with connector profiles, which allows the connector to use the functionality of theservice.
The service is installed with a default profile that you can modify. However, if you plan to use the servicewith multiple connector profiles, you may find it easier to create custom service profiles that match therequirements of the connector profiles.
1. In the ShareScan Administration Console, select the Configure services tab. The tab displays a listof installed services.
2. Select the service name. The service configuration and the settings pane open.
3. On the configuration pane, select BusinessAutomation service. The BusinessAutomation servicefields become active.
4. Select the Page Templates tab.
5. Select and open one of the templates in the editor with the Edit button or click the New button tobring the Template settings dialog for initial setup.
6. Modify a template and save the changes. The templates are saved independent of the profile so thatcan be reused in multiple profiles.
7. After creating a service profile you must associate it with a connector profile to enable the servicefunctionality to be used by the connector (see Associating a service profile with a connector profile).
9.3- Improving barcode quality
In the eCopy environment, the print quality of the original document as well as the scanner settings can havea significant impact on the ability of the software to read barcode data.
ShareScan then passes control of the scanned document to the service, which extracts the barcodeinformation. The service passes the barcode information to ShareScan, which uses the information to splitthe document and name each of the resulting files. The service does not alter the image; therefore, if theoriginal document is of poor quality, or if the scanning quality is poor, the service's ability to recognize thescanned barcodes is less accurate.

eCopy suggests the following practices to increase the quality of scanned barcodes:
n Visually inspect the barcodes in the original document. Look for bars that are touching each other orthat are full of dots. Use an image processing tool to zoom in on or to magnify the barcodes.
n Print barcode pages on a laser printer at a resolution of at least 600 dpi.
n Increase the resolution of your scanning device to 300 dpi, or higher.
n Use the eCopy Image Enhancement Service to improve the quality of the image. For moreinformation about this service, contact Nuance.
9.4- Associating a service profile with a connector profile
After creating a service profile, you can associate it with a connector profile so that the service's functionalityis available to the user at the device.
For more information on creating connector profiles, see the eCopyShareScan online Help.
To associate service and connector profiles:1. In the console pane, select Devices. The Device Configuration window opens.
2. Select Device Groups orDevices. Configure connectors for device window opens and displaysall the connectors associated with the device. The following settings are displayed:
n Select profiles
n Display name
n Configured
n LayoutYou can drag and drop the profiles to re-arrange the order of appearance of the Connector buttons atthe client with Layout.
3. Select the connectors with which you want to associate the services.
4. Select the services with which you want to associate the connectors in the Settings window.
Note:
For User Configuration to be selected, enable Session Logon first.
5. Click Save.
The service profile is now associated with the connector profile. When you scan a document using theconnector with the associated document service profile, the document is scanned, processed by thedocument service, and then passed to the connector workflow for processing.

9.4.1 - Configuring batch-based indexing for Quick Connect
If you have eCopy Quick Connect, you can use batch-based index values. This enables you to create indexfiles with separate barcode values for each batch by assigning a base name (Data publishing option in theTemplate settings window) to the position of the barcode.
All Publishing Names also have batch information available for eCopy Quick Connect™ to use.
Note:
Only the first value found per publishing name is published for the session.
For example, a document is divided into two batches. It begins with a page that contains three barcodes andis split by another page that also contains three barcodes. On both pages the barcodes follow the samesequence but have different values:
Batch-based indexing example
Barcode Number Batch-based index value Index value, page 1
Index
value,
page
2
1 Document number 1 2
2 Locator 4455 6677
3 Extension 1234 5678

The following diagram shows the four page document and how, after processing, the scanned document isstored with the correct index information.
When you configure a device and select this connector profile, you must then select the correspondingDocument service profile that you set up in the Barcode Recognition Service (see Associating a serviceprofile with a connector profile).
9.5- Data Publishing
Data publishing functionality is used for:
n Passing specific metadata information from the device and services and between eCopy connectors.
n Configuring to map fields within any service or connector which can use the information.
This includes Bates numbering, fields captured using a Document service and metadata, filename and filepath information that can then be tied to similar metadata fields or applied to the a body of text. Through theuse of Document services or any other service or connector, information is “captured” and then categorizedand mapped to fields in any connector, per document, real time, or asynchronously.
When a connector’s profile is configured for “No User Interface”, it would like to tell the ShareScan systemand document sources about the data required to successfully send or store a document. A document sourcecan use this information to ensure it sends required values and that data is formatted correctly (length, range,and so on). The ShareScan Administration Console uses this information to map published value names tothose the connector’s profile look for.
Indexing takes place before the document is split. The service calculates the barcode index number based onthe sequential position of the barcode in the document. The first barcode has an index value of 1, the secondhas an index value of 2, and so on.

Indexing is done using the Data publishing option in the Template settings window. For moreinformation, see Template settings.
9.6- Template settings
The Page Templates tab shows all the templates for your ShareScan Manager. The same template can beused by multiple profiles. You can move a template into the Active Page Templates list for use by thecurrent profile. The purpose of this is to match the active templates to the scanned page based on their orderin the active list.
Templates can be moved up and down to reorder the list. In general, the more restrictive or specifictemplates should be at the top of the list so they are matched before more general templates are tried.
Templates can also be removed from the Page Templates list. This deletes the template permanently andmakes it unavailable to other profiles.
9.6.1 - Page templates settings
Option Description
New template Specifies the type of the full page template. The Barcode page dialog appears where you can specify
the settings of the template.
Edit template Modifies the settings of an existing template. The same dialog appears as in the previous case. It is
initialized with the settings of the selected template.
Remove template Allows deleting defined templates from the list.
Move up and down Changes the order of active templates. The buttons have effect on the right side list only meaning that
the client attempts tomatch the templates with pages in this order.
9.7- Specifying the full page template settings
Select and open one of the templates in the editor with the Edit button or click the New button to bring theTemplate settings dialog for initial setup. The Template settings dialog displays the following options:
9.7.1 - Template tab settings
Option Description
Name Specifies the name of the template. You can refer to the template by this property. This value also defines the name of the
template file where the definition is saved.
Barcodes group Defines the barcode properties on the given pages.
When you define a barcode based template the following controls have to be filled up:

Option Description
Barcode types Specifies the types of the barcodes.
Note:
The types are not fully independent from each other. For example, if the UPC-A barcode type is selected, then the EAN-13
type is also selected automatically. If the EAN-13 type is deselected, then the UPC-A type is also deselected. This behavior
comes from the limitation of the Softek engine as it does not recognize UPC-A type if EAN-13 is turned off.
The drop-down items checkboxes allow multiple selections (all types supported by Softek engine are listed ).
Orientation of barcodes Specifies the orientation of barcodes. The following options are available:
lHorizontal
lVertical
lHorizontal and vertical (default)
Publishing keys You can set as many data publishing keys (maximum is 10) as many barcodes are expected on the page. The associated list
box supplied with in-place editing capability shows the defined keys; the toolbar buttons control adding, editing, and removing
the keys and also changing their order. Renaming the keys is possible by clicking the selected item.
9.7.2 - Barcodes tab settings
Group Setting Description
Layout search order Layout search order defines the order in whichmultiple
barcodes in the same zone are indexed. The options are as
follows:
lTop to Bottom
lLeft to Right (default)
lRight to Left
Barcode
enhancementsSkew tolerance Controls themaximum angle, from either the horizontal or
vertical orientation, at which a barcode is recognized. Select a
value that tells the service to read from one of the following
approximatemaximum angles:
l0 = up to 5 degrees
l1 = 13 degrees
l2 = 21 degrees
l3 = 29 degrees
l4 = 37 degrees
l5 = 45 degrees

Group Setting Description
Reduce noise Before the service scans the scanned image file for barcodes,
the noise reduction filter removes marks that are unlikely to be
part of a barcode. This improves the chances of finding a
barcode, even in a poor quality image, but also increases the
time required to process an image. A typical value for this
option is 10.
Filter You can select between:
lDespeckle: Removes white speckles inside the bars of a
barcode. eCopy recommends that you start with a value of
one and increase to a value as high as four, depending on
your needs..
lMedian filter: This is a useful option for high resolution
images that contain speckles of black and white. It is not
recommended for images where the black bars or white
spaces are less than two pixels wide.
Color threshold When you scan in color, the color threshold enables the
software tomore accurately recognize barcodes in color
images. The color threshold is the value used by the software
to decide whether a pixel should be considered black or white.
You can use the following settings:
lValue: The range is 0 to 255. The default setting is 231. If the
value is 0, the software analyzes the image to determine the
best value to use.
lAuto detect: Determines the threshold at which the software
can read the barcodes in the document.
For optimal results, eCopy recommends that you test these
settings on a sample of the documents that you plan to scan.
Barcode indexing Delimiter The delimiter character splits a barcode into multiplebarcodes at each delimiter. This allows more than onepiece of information to be published from one barcode.
Merge terminator When found at the end of a barcode, themerge terminator
character signifies that the next barcode should bemerged
with the previous one. This allows for more information to be
published as a single item thanmight normally be allowed for
that barcode type.
Barcode confidence Confidence threshold Use the barcode confidence threshold to ignore barcodes that
do not equal or exceed the threshold set.
Set the barcode confidence threshold between 0 and 100. The
default value is 90.

Group Setting Description
Barcode restrictions Always require checksum Set to always require checksum as barcodes can include a
checksum to help validate the value. In this case, barcodes
without a checksum are ignored.
Code 39 uses start-stop Require start-stop characters for code 39. This is a default
setting.
Length Minimum andmaximum length setting filters out badmatches.
Select the following values to:
lMinimum length: Set aminimum length between 2 and 16.
The default value is 4.
lMaximum length: Set amaximum length. The default value is
999.
Note:
Global Barcode settings defined on theBarcodes tab apply to all barcode zones.
9.8- Understanding document splitting
You can set up page handling rules for all the active templates in the Document Splitting tab.
9.8.1 - Document splitting display
Option Description
Template When a templatematches a page, its rules are applied. Only one template is used per page (the first template in the list that matches).
Barcode page removal ShareScan has a feature for page removal in a special case when the double-sided paper documents in a job are separated by full page barcode pages. Typically, the backside of the barcode page is blank and does
not belong to the original document. This blank page has to be dropped from the batch if double-sided scanning job runs on the client.
The Document Splitting tab on themain panel contains the list of the defined templates. The Barcode page removal column provides three options if the selected template is a barcode page:
lDisabled (default)
lEnabled
lEnabled double-sided scan
Note:
The client workflow has to change accordingly. To apply the option to a batch, the connector checks if a double-sided scan job runs (see IPublishing.DoubleSided bool value). The blank page detection algorithm is
applied to the page next to the barcode page and it is removed only if the page is really blank as it prevents from data loss.
Split at page The document can be split into multiple documents at this page.
Override default file naming The split document can be named according to the current ShareScan file naming settings, or they can be overridden here. The format of the filename is displayed and can be clicked to bring up the file naming dialog
(see File naming).

9.9- File naming
On the Document splitting tab, if split on page is checked and override default file naming is checked, thefile format string becomes a clickable link, which opens the File Name Dialog (FileNameDlg) window.
9.9.1 - File name dialog
Option Description
Name/Type/Length/Default By clicking these settings, the >File name field editor dialog window appears.
Format Construct a name format out of multiple name fields. The <yyyyMMdd> value is default. Fields can be created, edited, removed, and reordered.
Preview A preview is displayed.
If file name already exists Create unique file name, for example _1, _2, and so on. All file name conflicts at runtime are resolved by appending a number to the end until it becomes unique.
ClickingNew or Edit brings up the File Name Filed Editor dialog.
9.9.2 - File name field editor settings
Option Description
Name Displays a name.
Type You can pick from a list of predefined field types plus each of the published data fields they have defined for this template. Each Field type has different parameters:
lAlphanumeric: This type allows you to define a fixed string of text.
lBatch number: This type displays the current batch index and lets you specify the number of leading zeros.
lDate: You can pick from predefined date formats. The <yyyyMMdd> value is default.
lDevice name: This type displays the runtime device. You can choose a default name and amaximum length for the amount the runtime device name used (64 is default).
lPage number: This type displays the page number and lets you specify the number of leading zeros.
lSeparator: Separator is a streamlined Alphanumeric which allows you to define a character to place between other fields. The "-" value is default.
lTime: You can pick from predefined time formats. The <HHmmss> value is default.
lPublished data: This type displays published data. You can choose a default name and amaximum length for the amount the runtime device name used (64 is default). The default name is used if no data is found.
10 - The eCopy Bates/Endorsement Service
The eCopy Bates/Endorsement Service adds an electronic "stamp" to each page of the scanned document.The stamp comprises an endorsement, which includes a unique page number, a text message, which caninclude any standard required text, and the date and time. Two format types are supported:
n System formats: You can create a range of basic formats that can be used or modified.
n User formats: You can create formats at the device by modifying an existing system format and savingit under a new name. You can modify most of the format attributes except for the position and themargin. You can modify the text message only if you select the Allow User Modify option when youcreate the format.

10.1- Page numbering
When you create a Bates/Endorsement format, you specify the starting page number. By default, eachdocument that is scanned using that format uses the same starting page number. However, you can controlthe page numbering by performing any of the following tasks:
n Manually specifying the starting page number when you select a Bates/Endorsement format.
n Using a checkpoint: When users want to number a collection of separate documents sequentially, youcan create a Checkpoint identifier.
n Using the options available on the Document sent successfully screen.
10.2- What's new in the service
New functionality in this version of the service includes:
n Ability to change the alignment position of the Bates stamp.
n Support for color fonts for Bates number.
n Auto-scaling of scanned image prior to the application of a Bates stamp.
n Bates numbering service has been renamed to Bates/Endorsement service.
10.3- Configuring the service
After you install the service on your system, enable it for the system and create numbering formats that userscan select at the device.
When you have enabled the service for the system, you can select and enable it for individual connectorprofiles.
To enable the service:1. In the Administration Console, select the Configure Services tab. The tab displays a list of installed
services.
2. Select the service name. The service configuration and the settings pane open.
3. On the configuration pane, select Configuring Service: Bates/Endorsement and then click Save.The service is configured to use the formats shown in the format list.
Note:
To addmore format options, create new formats.
To create a new Bates/Endorsement format:1. On the configuration pane, click New. A new format is added to the format list with a default name

ofNew.
2. Select the format and, under Configure Format on the Settings pane, and type a name for the newformat.
3. Use the Settings pane to specify the format settings. As you specify the settings, the SampleDocument area displays the results of the settings as they appear on the page.
4. When the format appears correctly, click Save. The new format is saved with your settings.
Note:
Tomodify an existing format, select the format in the list, modify the settings, and click Save. The change is that the
settings take effect for all connector profiles that use the format.
10.3.1 - Bates/Endorsement format settings
The following settings are available for the Bates/Endorsement service:
10.3.1.1 - Configure Format Settings
Setting Description
Configure format The Bates/Endorsement format setting.
Format name The Bates/Endorsement format name.
Note: The Bates/Endorsement format name cannot be empty.
10.3.1.2 - Endorsement Settings
Endorsement settings always include the page number and can also include a prefix and a suffix. The servicenumbers pages are sequentially from the specified starting point. You can specify a Checkpoint and thusenable related documents to be numbered continuously.
Setting Description
Prefix The text to display before the page number.
Space left The number of spaces to insert before the page number. The default value is 2.
Page The starting page number. The default value is 00001.
Space right The number of spaces to insert after the page number. The default value is 2.
Suffix The text to display after the page number.
Date The date to display after the suffix.
Time The time to display after the date.
Note:

Auto-scale option allows you to auto-scale down the scanned image to allow the Bates number to be printed on each
page without interfering with the scanned image during a single scanning session.
10.3.1.3 - Text Message Settings
The Text Message is a standard message that is stamped on every page, such as a copyright notice, a legalstatement, or a disclaimer.
Setting Description
Message (optional) The text message that is printed on each page (optional).
Press Ctrl+Enter to start a new line. Only two lines of text message are supported.
Allow user modify Allows users tomodify themessage at the device by marking Enabled.
10.3.1.4 - Font And Justification Settings
You can configure the font and justification settings for the Endorsement and the Text Message separately.The same settings are available for each of them.
Setting Description
Font The font for the endorsement. When the Font dialog box pops up, use the drop downmenu
to set the following font attributes:
lType (the default value is Arial).
lStyle (the default value is Regular).
lSize (the default value is 10) .
lEffects (Strikeout and Underline options are available).
lColor (the default value is Black).
lScript (the default value is Western).
Note: You can see text example in the Sample window.
Font style The style (Bold or Italic) of the font.
Font effects Enables underlining by marking Underline.
Justification The position (Left, Right, or Center) for the endorsement or the text message. The default
value is Right.
10.3.1.5 - Position Settings
Position settings specify where the Bates/Endorsement is put on the page.
Note:
You cannot modify position settings at the device.

Setting Description
Align The alignment (Top, Bottom, or Right). The default value is Bottom.
Margin The distance to place text from the vertical edges of the page. The default value is 0.25.
Units The unit of measurement (inches or millimeters) for themargin. The default value is inches.
10.4- Numbering related documents
The Checkpoints feature enables you to automatically add continuous page numbering to a set of relateddocuments. Once you have configured a Checkpoint, you can scan any number of documents at any time andall the pages are numbered sequentially. For example, if you create a sequence called KP1 and select thisidentifier before scanning each of two 10-page documents, the pages of the first document are numbered 1through 10, and the pages of the second document are numbered 11 through 20.
Note:
Youmust create the Checkpoint identifier before you scan the first document. Also, because Checkpoints are device-
specific, you cannot create a Checkpoint at device A and use the same sequence to scan from device B.
To create a new Checkpoint identifier:1. On the main Bates/Endorsement screen, press Checkpoint.
2. In the Checkpoints field, enter a Checkpoint identifier.
3. Press Open.
Note:
Make sure that you select the Checkpoint identifier that you want to use before you scan the first document.
To continue numbering using an existing sequence:1. On the main Bates/Endorsement screen, press Checkpoint.
2. In the Checkpoints list, select a Checkpoint.
3. Press the folder icon to return to the main Bates/Endorsement screen.
Note:
Since the software can only save a limited number of Checkpoints, make sure that you delete Checkpoints when you
are finished using them.
To delete a Checkpoint:1. On the main Bates/Endorsement screen, press Checkpoint.
2. In the Checkpoints list, select the Checkpoint that you want to delete.
3. Press the red X (Delete).

4. Press Cancel to close the dialog box and return to the main Bates/Endorsement screen.
10.5- Activating the service for connector profiles
After enabling the service on the system and creating endorsement formats, you can activate the service forone or more connector profiles.
To activate the service for a connector profile:1. On the Configure Connectors pane, select the connector name.
2. Select the connector profile that you want to modify.
3. In the Settings pane, under Services, enable Bates/Endorsement.
4. Click the Save current profile button. The system saves your settings as part of the connectorprofile.
5. Repeat for any additional Connectors.
Note:
Bates/Endorsement works as follows for other services that you select:
n Batching: Numbering is continuous in a document that is split into several batches.
n Blank page removal: When this feature is enabled, blank pages are removed from the document andthen Bates/Endorsement is applied, resulting in uninterrupted sequential numbering.
10.6- Scanning with the Bates/Endorsement Service
When Bates/Endorsement is installed on the system and enabled for a Connector, the Bates/Endorsementbutton (a page with a rubber stamp) appears in the scan preview window on the eCopy-enabled device. Youcan press the button to activate the service for the current scan and choose the endorsement format that youwant to use for the document.
Note:
If the Bates/Endorsement button does not appear on the screen, the service is not enabled for the connector profile that
you are using.
To use the service:1. Scan the document and review the scanned pages.
2. Press the Bates/Endorsement button on the Preview screen to view the default settings.
3. Use the On/Off button to enable or disable Bates/Endorsement for this scan job.

4. Select a format from the Formats list. The service displays the default settings for the format.
5. To modify the prefix, suffix, or page number, press the keyboard button next to the correspondingfield, type the text, and press OK.
6. Press Font to configure the following settings:n To modify the amount of space before or after the page number use the up and down arrows..
n To change the font size, or style, or set the position of the endorsement, enter the settings,and then press OK. (You cannot change the font name at the device).
7. To view or modify the text message and appearance, press Text on the main Bates/Endorsementscreen.
8. Type any changes to the message, the alignment, and the font size and style, then press OK.
9. To set the date and time, use the Date and time lists to select the format.
10. When you finish specifying the settings, press OK to return to the scan preview screen.
Note:
The Checkpoint feature enables you to add continuous page numbering to a set of related documents.
11. When you have scanned and sent your document, you can use the post scanning options.
11 - The eCopyCost Recovery Service
The eCopyCost Recovery Service is compatible with major cost recovery systems. When cost recovery isenabled, scanning functions are unavailable until the user unlocks the cost recovery terminal or applicationand specifies the billing account information:
n Scan date and time.
n The name of the scanning device.
n The scanning function used (e-mail, fax, scan to desktop, and so on).
n The number of pages scanned.
n The size of the document.
n Sender and recipient information.
n Any additional information provided by the cost recovery system.
At the end of the session, you can log off using the terminal and ShareScan returns to the “locked” state.
11.1- Configuring the service
The ShareScan software includes timers that automatically log you off after a certain period of inactivity.However, when the Cost Recovery Service is enabled, these timers are disabled and you remain logged onuntil you press End or Complete on the terminal, or until the terminal times out.

To configure the service:1. In the ShareScan Administration Console, select the Configure services tab. The tab displays a list
of installed services.
2. Select the service name. The service configuration and the settings pane open.
3. On the configuration pane, select Configuring Service: Cost Recovery. The Cost Recovery Servicefields become active.
4. To use Encryption, specify the settings.
5. To use the Activity log, specify the settings.
6. To enable the service for all devices, select Enabled.
7. Click Save, then click Test. The eCopy Cost Recovery Terminal Emulator opens.
Note:
If you are passing user credentials from your cost recovery terminal to the eCopyCost Recovery Service, Session
Logonmust be set toEnabled in theEnable for all devices tab andConfigured in theConfiguring Service: Session
Logon tab. This functionality is only available if you are using the Unicode/XML (v3) protocol.
To test the service:In the eCopy Cost Recovery Terminal Emulator, click Connect to connect with your server.
11.2- Cost Recovery settings
The following table describes the settings available for the Cost Recovery Service.
11.2.1 - Cost Recovery settings
Setting Description
Configure Cost Recovery service Configures the Cost Recovery Service settings.
Configured Enables all settings for the service.
Port number Enters port number. The port numbermust match the TCP port configured for
the cost recovery device. The default port is 9325.
Note: If you change the Port field, theManager is automatically restarted after
saving your settings.
Show Lock Button Shows Lock Button at the client. This button allows you to lock the terminal
from any screen during a session. This option is only available for ScanStation
devices.

Setting Description
Protocols Selects the protocol. This version of the service supports cost recovery
terminals that were configured to work with previous versions of the eCopy
Cost Recovery Service.
lUnicode/XML (v3): Select this option if your terminal is configured to use the
latest version of the Cost Recovery Service.
lAuto detect (v1, v2): Select this option if your terminal is configured to work
with earlier versions of the Cost Recovery Service.
Note: All devices controlled by aManager must use the same protocol.
Encryption Encryption settings must be used if a password is included.
Type The encryption type for Cost Recovery:
lNone: Passes credentials to ShareScan without encryption.
lTripleDES: Enables you to encrypt the information from the application that
is supplying the credentials to ShareScan. You can do this by creating an
encryption key that you store on the computer where theManager is running
and on the Cost Recovery device.
Path Set the path for the encryption key. Specifies a path to the storage destination
for the encryption key on the device where theManager is running.
Key Generates a new key. Generates the encryption key and stores it in the
eCopyCRSKey.txt file. Youmust manually copy this file to the Cost Recovery
device. If you regenerate the key, youmust copy the new key to the Cost
Recovery device.
Important: All devices that use Cost Recovery Service and aremanaged by
the sameManagermust use the same encryption key. After generating a key
for the first device, when you configure subsequent devices, youmust select
the same path you selected for the first device. ShareScan automatically
recognizes the key file that is already in the storage destination.
Activity log Includes the standard eCopy ShareScan user activity log information.
Configure Track Cost Recovery using activity logging. Enables all settings for the
service.
Location Root folder for all Cost Recovery logs. The default location is
%ProgramData%\Nuance\ShareScan\costrecovery.log or
%ProgramData%\Nuance\ShareScan\costrecovery.xml.
Maximum log size Maximum file size in kB. Maximum Log Size is 5000 kB.
File overflow type Activity log file types. Enables file overflow for Cost Recovery, if appropriate:
lRolling filenames: ShareScan001, ShareScan002, and so on.
lOverwrite oldest events: New events will overwrite the oldest events in the
log.

Setting Description
Field separator The field separator used in Cost Recovery activity logging. Adds a field
separator ",".
Extended fields Allows extended fields in Cost Recovery activity logging.
Device specific activity Allows separate Cost Recovery activity logging for each spcific device.
Enable for all devices Enables for all devices settings.
Enabled Enables the service for all devices.
Note:
If the key is re-generated, the eCopyCRSKey.txt file must be copied to the Cost Recover terminal again. If a key
mismatch occurs, the data is not decrypted correctly.
11.3- eCopy Cost Recovery Terminal Emulator
eCopy Cost Recovery Terminal Emulator appears when you click Test in Configure Cost Recoveryservice.
To configure the emulator, launch the dialog by clicking the Config button on the main dialog.
11.3.1 - Configuration settings
Setting Description
Server name Specifies the name or IP address of themachine running the TCP server. The default value is localhost, which is the
machine that the emulator is running on.
Port number Must match the port number set in ShareScan Administration Console. Default value is 9325, whichmatches the default for
ShareScan.
Timeout (seconds) Value in seconds until the terminal times out if no pulses are received from ShareScanManager. The default value is 120
seconds.
Device IP Specifies the IP address of device.
CLID Emulates the type of data fields (client identification) you enter in a terminal.
Delimiter The field delimiter for the activity tracking and fake CLID andMID fields. This valuematches the value set up in ShareScan
Administration Console, the default is ",", whichmatches the default used in ShareScan.
MID Emulates the type of data fields (Multiplex Identification) you enter in a terminal.
XML name Inserts the XML name.
Value Inserts values.
Note: You can add, view, and clear the XML attributes.

Setting Description
Encryption type The type of encryption used to encrypt the XML data:
lNone: Passes credentials to ShareScan without encryption.
lTripleDES: Enables you to encrypt the information sent from the application that is supplying the credentials to ShareScan.
You can do this by creating an encryption key that you store on the computer where theManager is running and on the Cost
Recovery device. If TripleDES encryption is enabled, the eCopyCRSKey.txt file must reside in the path location specified in
the eCopyShareScan Administration (Activity Tracking, Cost Recovery tab). After this file is generated by the Administrator
Console, the file is copied to the Cost Recovery Terminal so that it uses the same TripleDES key encryption value.
Key path You can browse for the path location of the encryption eCopyCRSKey.txt file. This file contains the Initialization Vector (IV) key
used to seed the encryption provider.
Protocol version You can choose which eCopy protocol to send and receive data between the Cost Recovery terminal and ShareScan
Manager. The following versions are available: v1, v2, and v3 (default).
Enter credentials Click to bring up a dialog to enter the following user credentials for use: Username, Password, Domain, and UserID.
Note: If UserID is being used, UserName, Password, and Domainmust be blank.
Save and close Saves all field data to tcpclient.ini. The emulator always tries to load any value held in this file, which is located in the
same folder as the emulator executable.
Note:
The text at the top of the status window (default value of Waiting for server messages) gives helpful tips about the
state of the emulator.
Once the emulator has been configured, it is ready for use.
11.3.1.1 - Terminal Emulator Settings
Setting Description
Status window Displays time stamped status messages.
Connect Connects to ShareScan using the server name and port configured in the configuration
dialog. Once a connection has been established, the emulator sends an ECOPY_SCAN_
BEGINmessage to ShareScan. The CLID, MID, and Device ID values are all passed
with this message.
Note: This button is disabled once a connection has been established.
End Only enabled once a connection has been established. Sends an ECOPY_LOCK_NOW
message, waits for an ECOPY_LOCKmessage from ShareScan, and then disconnects
from the TCP server.
Clear Clears all text in the status window.
Top most When checked, the emulator is always displayed on top of any window. When
unchecked, the emulator retains its normal order.

Setting Description
Seconds left until lock Displays a running countdown in seconds until the emulator times out. When the
emulator times out, it sends the ECOPY_LOCK_NOWmessage, waits for the ECOPY_LOCK
message from ShareScan, and then disconnects from the TCP server. Maximum
timeout is 120 seconds.
Config Pops up the configuration dialog.
NetStat Pops up a command prompt window that runs the netstat –a –p TCP command.
Exit Closes the application.
12 - The eCopy Connector for Open Text Document Man-agement, eDOCS Edition
The eCopy Connector for Open Text Document Management, eDOCS Edition enables users to scandocuments directly into an Open Text document management system or a Hummingbird Enterprise DMdocument management system from an eCopy-enabled device.
Users can store documents in any eCopy-supported format (PDF, PDF/A, TIF Fax, TIF, JPG, DOC,DOCX, XPS, XLS, and XLSX).
12.1- What's new in the connector
New functionality in this version of the connector includes:
n Retooling of the User Interface
12.2- Configuring the connector
For the generic connector configuration options, click here.

12.2.1 - Authentication settings
Field Name Description
Type Determines whether the user authenticates at the device.
lLogin as: Allows the user to use the connector without entering authentication information.
The connector uses the specified user name and password as the authentication credentials
at the device.
lRuntime: Displays the Authentication screen at the device and requires users to enter their
eDOCS user name and password each time they use the connector. If you use Session
Logon and then select Runtime, the system will try to log in using the Session Logon
credentials. If this fails, the connector Logon screen will appear and the user must enter the
eDOCS DM credentials.
This connector supports eDOCS Library, Windows and Novell authentication.
User name and
Password
These credentials, which are required for use of the connector, are configured on your eDOCS
system. They function differently depending on the type of authentication you select:
lLogin As: This account is used to access the connector at the device and to store the
scanned documents.
lRuntime: This account is used to retrieve the user list from the eDOCS server. The account
must have rights to access all the libraries that you want to make available from the
scanning device.
Note: If you select Runtime authentication, the Author field at the device will display the name
of the authenticated user.
Test Tests the connection between eCopy ShareScan and the eDOCS server. Youmust test the
connection before you can save your configuration. When the connection is tested
successfully, the Library list displays the available libraries.
12.2.2 - Configure tab settings
Field
NameDescription
Library
list
Defines the libraries that are available to the user at the device. When you click Test, the list displays all
the libraries that are available on the server. The libraries to which the user does not have access are
disabled:
lEnable: Includes the library in the list of libraries on the Login screen at the device.
lDefault: Displays the library as the initial selection in the list of libraries that the connector displays at the
device.
If you add a library to, or remove a library from your eDOCS server, youmust test and save the connector
profile to make the change visible at the device.

Field
NameDescription
Select
profile
Defines the behavior of the Profile selection screen at the device.
Display
fields
Defines the behavior of the Document profile screen at the device:
lAll: The screen always appears and includes all fields. This is the default.
lRequired: Always displays the screen and includes only the fields designated as required in your
eDOCS system.
lNone: If all required fields have default values, the screen does not appear and the document is stored
with the default values. If any of the required fields do not have a default value, the screen appears and
the user can provide values before storing the document.
Confirm
storage
Defines the display of the storage confirmation screen at the device.
Use Cost
Recovery
values
Enables you to use values from the eCopy Cost Recovery Service as your default values for the client
andmatter fields instead of the values from the eDOCS server. This functionality requires the eCopyCost
Recovery Service.
12.3- About profile selection
eDOCS allows you to create profiles that are used to collect information when documents are stored. Theseprofiles are maintained on the eDOCS server and, depending on how you configure the connector and theversion of eDOCS that you use, are available to the user at the device.
When you configure the connector to allow the user to select profiles, the user at the device can select theeDOCS profile for the scanned document from a list on the Select profile screen. To populate the list ofprofiles, the connector retrieves profiles stored on the eDOCS server. There are two types of profiles. Theconnector first searches for Type 1 profiles and then, if there are no Type 1 profiles, it searches for Type 2:
n Type 1: Profiles configured for groups to which the authenticated user belongs, and for theapplications that correspond to the file type of the scanned document.
n Type 2:
l eDOCS 6: Profiles not associated with any applications.
l eDOCS 5: A single Primary profile.
Note:
The eDocs RM (RecordManagement) feature is not supported by the connector. If set to a group on the eDocs server,
DM profile forms, RM profile forms and search forms (for example, LAWQBE) are displayed by the connector on the
profile selection form, but selecting a search form or an RM profile form results in an error message, as the scanned

document cannot be stored. To avoid this situation, do not set RM profile form and search form to a group on the eDocs
server.
12.3.1 - Profile selection settings
Version Configuration selection Profiles used
eDOCS 5 Allow selection lType 1 profiles.
l If there is only one profile, the Profile selection screen does not appear.
l If there are no Type 1 profiles, the Profile selection screen does not
appear. The connector uses the Type 2 Primary profile.
Use first form lThe connector uses the user’s Primary profile and the Profile selection
screen does not appear.
eDOCS 6 Allow selection lType 1 profiles.
l If there are no Type 1 profiles, the system uses the first Type 2 profile and
the Profile selection window does not appear.
l If there is only one profile, the Profile Selection screen does not appear
Use first form lThe connector uses the first Type 1 profile.
l If there are no Type 1 profiles, the list includes Type 2 profiles.
Notes:
l If the authentication type is Login as, the authenticated user is the user specified on theConfigure tab.
lThe file type of the scanned document is set in the Administration Console, inSettings > File Format.
l If you are using eDOCS6 Server, a Profile type list also appears.
12.4- About related fields and default values
The fields and values available to the user at the device on the Document profile screen depend on how youhave configured eDOCS.
12.4.1 - Related fields
If the fields in your database are linked together in a hierarchy of parent - child relationships, theserelationships are reflected when the user selects values on the Document Profile screen at the device.Selecting a value in a field populates the fields above it in the hierarchy (parents, grandparents, and above)and in related fields at the same level (siblings). If the field is linked to fields lower in the hierarchy (children

and below), the values available in the lower fields are filtered to show only the values that are compatiblewith your selection.
12.4.2 - Default values
eDOCS also lets you specify default field values for the connector to use. You can specify default values atmultiple levels, with a strict hierarchy that determine which default value takes precedence.
Note:
The connector always uses the strict hierarchy ordering rules followed by DM 5, even if you are using DM6.

Table 2: Default precedence values
Type Assigned by Applies toDM5
Precedence
Group defaults eDOCS administrator All documents saved by all users in the
specified group
1 (lowest)
Personal
defaults
Individual user All documents saved by that user 2
Group app.
defaults
eDOCS administrator All documents with a specific file extension
saved by all users in the specified group
3
Personal app.
defaults
Individual user All documents with a specific file extension
saved by that user
4 (highest)
12.5- Document security
The default ACL of a document stored using the connector will be the same as that for a document stored bythe same user through the eDOCS Extensions Windows or Web clients.
On the Document profile screen, the user at the device can choose to activate document security. Thefollowing table shows the security selections available:
Table 3: Secure document settings
Type Assigned by Applies to
Unchecked All Full
Checked Authenticated user Full
Author Full
Users andGroups in the default ACL As specified in the default ACL
Note:
Formore information on the use of ACLs by eDOCS, please consult the eDOCS product documentation.

12.6- Configuring an Express connector profile
To create an Express connector profile that does not display the Document Profile screen at the device, youmust first create an eDOCS default profile for the user. The profile must either not contain any requiredfields or, if it contains required fields, the fields must be pre-filled with default values. For more informationon configuring Express connector profiles, click here.
12.7- About searching on the Document profile screen
Some fields are followed by search (magnifying glass) buttons. You can use the button to open a Searchscreen that allows you to search the columns of the tables associated with the field.
To search for a document profile field value:
1. In the Document profile screen, click the search button of the field whose values you want tosearch for. The Search screen opens.
2. Use the Filter field to select the table column in which you want to search and then use the By fieldto search for specific information in the column. The filtered information appears in the list.
3. Select an item that you want to appear in the selected field on the Document profile screen.Information from all the other columns associated with the field appears on the right.
4. Click OK. The selected information appears in the field on the Document profile screen and relatedfields are either populated or filtered.
Note:
You do not need to configure the Search feature in the Administration Console.
13 - The eCopy Connector for EMC Documentum
The eCopy Connector for EMC® Documentum® allows users to scan documents directly into the EMCDocumentum Repository of an EMC Documentum system from an eCopy-enabled device.
Users can store documents in any eCopy-supported format (PDF, PDF/A, TIF Fax, TIF, JPG, DOC, XPS,and XLS). For EMC Documentum server 6.0 or later, DOCX and XLSX formats are also supported.
13.1- What's new in the connector
New functionality in this version of the connector includes:
n Retooling of the User Interface
n Data publishing: client ID and matter number

13.2- Configuring the connector
For the generic connector configuration options, click here.
13.2.1 - Configuring a destination
The options available via the Configure tab allow you to configure the destinations used by the connector.
Field Name Description
Express Wizard Click this button to create an express destination via theWizard. The express
destination can be saved either to a new profile or to the current profile.
New Displays the destination dialog for adding a new destination.
Edit Displays the destination dialog for the selected destination, allowing you to edit its
properties.
Copy Copies the selected destination with a new name.
Remove Deletes the selected destination from the list.
Move up Moves the selected destination up the list.
Move down Moves the selected destination down the list.
Summary Displays themain settings. Every client form has amain row in this list with
summary information according to its settings. The settings can be hidden by
clicking the arrow icon.
13.2.1.1 - Destination Dialog, Generic Options
Field Name Description
Destination name Specify a unique destination name.
Express destination If checked, the Logon as option is selected on theAuthentication tab, Store in
specified cabinet or folder is selected on theNavigation tab and the list on the
Doctypes tab can contain only one document type which has no attributes to be
shown.
If file name already exists The following actions can be set:
lAllow duplicated name
lCreate unique name (.1, .2, etc.)
lReturn error

13.2.1.2 - Destination Dialog, Authentication Tab
Field Name Description
Logon as If checked, a specified account is used to logon on the client side, thus the
Authentication form is not shown. This is the express mode of the client
authentication form
Logon at runtime If checked, the Authentication form asks for user name, password and domain on
the client side. This is the non-express mode of client authentication form, and the
dialog enables selecting from theSearch while typing dropdown list.
Repository The dropdown list shows the connectable Repositories.
User name Specifies the administrator's user name. Modifying the user name disables
Navigation, Doctypes and If file name already exists settings, until a successful
connection test.
Password Specifies the administrator's password. Modifying the password disables
Navigation, Doctypes and If file name already exists settings, until a successful
connection test.
Domain Specifies the administrator's domain name. The dropdown list shows domain
names on the network, you can select one from there, or type it manually.
Modifying the domain name disables Navigation, Doctypes and If file name
already exists settings, until a successful connection test.
This field is optional.
Test Connects to the specified Repository with the specified administrator's account. If
successful, Navigation, Doctypes and If file name already exists settings are
enabled.
Search while typing Connects to the Documentum server with the administrator's account and retrieves
users list on runtime. The dropdown list becomes enabled when Logon at runtime
is checked.
13.2.1.3 - Destination Dialog, Navigation Tab
Field Name Description
Store in specified cabinet or
folder
If checked, the document is stored in a specific cabinet/folder and the Location
form is not shown. This is the express mode of the client location form.
Allow user to navigate Enables you to select the types of cabinets that the user sees on the Location
screen at the device. This is the non-express mode of the client location form.
Specific
cabinet or folder
Sets the root point of the subfolder navigation to a specific location.

Field Name Description
Entire Repository Sets the root point of the subfolder navigation for the entire repository. The following
values can be selected:
lAll Cabinets: shows all Cabinets.
lPublic and users private Cabinets: shows public Cabinets and private Cabinets
owned by logged on users.
lUsers private Cabinets: shows only private Cabinets owned by logged on users.
Enable home cabinet Displays theHome cabinet button on the Location screen at the device, allowing
documents to be stored in the user’s Home cabinet.
Enable
subscriptions
Displays theSubscriptions button on the Location screen at the device, allowing
documents to be stored in the user's subscription locations.
Enable subfolder
navigation
Enables the user to navigate folders below the location chosen in theSpecify
location field. The user cannot access folders above the specified location.
13.2.1.4 - Destination Dialog, Doctypes Tab
Field Name Description
Doctypes The list view displays configured Doctypes. Note that at least one valid Doctype is
required.
lThe first column indicates if the Doctype attributes are properly configured.
lThe second column displays the Doctype name
lThe third column displays the number of shown attributes from the selected
attributes
lThe fourth column displays the defined file format of the document type.
If a single Doctype is configured and the default format type corresponding to the
scanned document type is specified, the Document form is skipped on the client.
New Opens a window showing available doctypes.
Edit Enables you to configure the attributes of the selected Doctype. The Doctype icon
shows the Doctype as invalid until the attributes are configured, and theOK button
is clicked. The attributes that you have configured and set as Show appear on the
Attributes screen at the device.
Remove Deletes the selected Doctype from the list.
Move up Moves the selected Doctype up the list.
Move down Moves the selected Doctype down the list.

13.2.2 - Express Wizard
This wizard enables creating an express destination in a new express profile (a profile which has only oneexpress destination) or in the current profile step by step..
13.2.2.1 - Welcome Page
This page displays generic information on the aim of the Wizard.
13.2.2.2 - Destination Page
Field Name Description
Create destination in a new
profile
After finishing the wizard, all destinations are deleted and an express destination is
created with the specified name in the current profile. The user can save the profile
with a new name retaining the data of the current profile.
Create destination in the
current profile
The destination is created in the current profile after finishing the wizard.
Destination name Specify destination name. The destination namemust meet the following criteria:
lMust be unique in the profile.
l Is case sensitive.
lName has to be specified.
The length of name is not limited.
13.2.2.3 - Authentication Page
Field Name Description
Repository The dropdown list shows the connectable Repositories.
User name Specifies the administrator's user name. Modifying the user name disables
Navigation, Doctypes and If file name already exists settings, until a successful
connection test.
Password Specifies the administrator's password. Modifying the password disables
Navigation, Doctypes and If file name already exists settings, until a successful
connection test.
Domain Specifies the administrator's domain name. The dropdown list shows domain
names on the network, you can select one from there, or type it manually.
Modifying the domain name disables Navigation, Doctypes and If file name
already exists settings, until a successful connection test.
This field is optional.
Test Connects to the specified Repository with the specified administrator's account. If
successful, Navigation, Doctypes and If file name already exists settings are
enabled.

13.2.2.4 - Location Page
Field Name Description
Specific
cabinet or folder
Sets the root point of the subfolder navigation to a specific location.
13.2.2.5 - Doctypes Page
Field Name Description
Doctypes The list view displays configured Doctypes. Note that at least one valid Doctype is
required.
lThe first column indicates if the Doctype attributes are properly configured.
lThe second column displays the Doctype name
lThe third column displays the number of shown attributes from the selected
attributes
lThe fourth column displays the defined file format of the document type.
If a single Doctype is configured and the default format type corresponding to the
scanned document type is specified, the Document form is skipped on the client.
New Open a window showing available doctypes.
Edit Enables you to configure the attributes of the selected Doctype. The Doctype icon
shows the Doctype as invalid until the attributes are configured, and theOK button
is clicked. The attributes that you have configured and set as Show appear on the
Attributes screen at the device.
Remove Deletes the selected Doctype from the list.
14 - The eCopy Connector for Fax via Microsoft Exchange
The eCopy Connector for Fax via Microsoft Exchange enables users to scan and fax documents from aneCopy-enabled device through an email-to-fax gateway on the Microsoft Exchange server. To use thisconnector, you must have a network fax server and the appropriate Exchange server plug-in.
The recipient’s fax number is included in the To field (on the ShareScan Client) in the format required by thefax server. The server plug-in recognizes the recipient address as a fax number and hands the request off tothe network fax server for delivery as a fax.
While ShareScan always uses the ShareScan user account information to log on to the Exchange server andretrieve the Global Address List, it sends scanned documents from this account only if the Login Asauthentication option is selected.

14.1- About Exchange Environment connection protocols
The connector supports six combinations of connection protocols that can be used to connect to yourExchange server, depending on your environment. The Wizard automatically selects the protocol based onthe Exchange environment information that you supply.
Protocol con-
figuration
Microsoft Outlook
required?Description Suggested use
MAPI/MAPI Yes Requires Exchange 5.5
server or later.
Use it to access old Exchange versions
(Exchange 2003 or even older). MAPI
requires aMicrosoft mail client on the
machine running the ShareScanManager.
MAPI protocol does not support saving
new contacts to the users' Personal
Contact list; queries against Personal
Contacts can be executed.
LDAP/MAPI Yes Requires that the specified
Service Account has access
to a Global catalog server in
the forest where the
ShareScanManager is
running.
Requires Exchange Server
2000 or later.
MAPI along with LDAP is recommended
when your organizational unit uses old
Exchange versions, but Global Catalog
servers are available for GAL queries. You
can restrict LDAP queries with profile
settings for the organizational unit which
uses a particular scanning device; queries
are executed faster, and the result lists are
considerably shorter.
LDAP/WEBDAV No Requires that the specified
Service Account has access
to a Global catalog server in
the forest where the
ShareScanManager is
running.
Requires Exchange server
2000 or later.
If your operating system is
Microsoft Windows 2000,
youmust install Microsoft
ADO (ActiveX Data Objects)
2.8. for this protocol to work
correctly.
WEBDAV along with LDAP is
recommended when your company
employs lot of people, uses Exchange
2007 or earlier Exchange servers, and
needs simple firewall setups and
communication over secured HTTPS.
TCP ports 80 and 443 are supported (the
latter for HTTPS communication).
WEBDAV is not supported in Exchange
versions above 2007, it was replaced by
EWS in Exchange 2010.

Protocol con-
figuration
Microsoft Outlook
required?Description Suggested use
WEBDAV/WEBDAV No Requires the front-end
Exchange Server to be
version 2000 or later.
If your operating system is
Microsoft Windows 2000,
youmust install Microsoft
ADO (ActiveX Data Objects)
2.8. for this protocol to work
correctly.
WEBDAV is recommended when your
company uses Exchange 2007 or earlier
Exchange servers, and needs simple
firewall setups and communication over
HTTP/HTTPS.
TCP ports 80 and 443 are supported (the
latter for HTTPS communication).
WEBDAV is not supported in Exchange
versions above 2007, it was replaced by
EWS in Exchange 2010.
LDAP/EWS No Requires Exchange Server
2007 with Service Pack 1 or
later.
EWS along with LDAP is recommended
when your company employs a number of
people, uses multiple Exchange servers,
and you want to take advantage of the
service URL autodiscover feature
(administrator do not need to reconfigure
ShareScan when the Exchange
infrastructure is changed).
You can restrict LDAP queries with profile
settings for the organizational unit which
uses a particular scanning device; queries
are executed faster, and result lists are
considerably shorter. Our LDAP protocol
implementation autodetects the Global
Catalog server, and supports SSL
communication as well. EWS also
supports cross domain setups, so can be
used when ShareScan and the target
Exchange server exist within separate
domains.

Protocol con-
figuration
Microsoft Outlook
required?Description Suggested use
EWS/EWS No Requires Exchange Server
2007 with Service Pack 1 or
later.
Recommended when the ShareScan
Manager works outside of Active Directory
domains (can be used within the domain as
well), and simple firewall setup is a
requirement. Also the best choice when
your Exchange server is hosted in a
Datacenter, and you want to access that
via HTTPS.
EWS (ExchangeWeb Services) is based
on SOAP/HTTPS, which transfers request
and responses via TCP 443 port. EWS
supports service URL autodiscovery,
making it advantageous in environments
where service endpoints change
frequently.
Limitations: supported versions are
Exchange 2007 SP1 and above; Search
while typing during login has limited
functionality.
Extras: Users can save new contacts into
their Personal Contacts folder.
Notes:
WhenMicrosoft Outlook is required, youmust install it on the same computer as the ShareScanManager so that the
two applications can share commonDLLs.
Youmust configure it as the default mail package. Youmust configureMicrosoft Outlook 2000 to work with your
Exchange server prior to using the ScanStation Client. eCopy also recommends that you configureMicrosoft Outlook
2002, 2003, 2007, and 2010 to work with the Exchange server.
14.2- Configuring the connector
For the generic connector configuration options, click here.
14.2.1 - Exchange Profile Wizard settings
The Profile wizard helps the administrator to setup a basic protocol composite containing one or twoprotocols. The additional settings are set up with their defaults; any further tuning of the setting can be doneby editing Properties.

Configuring via the Wizard follows the steps below:
1. Select protocol composite
Field Name Description
Protocol Select the protocol combination to be used.
User name Enter the user name.
Password Enter the password.
Domain Enter the selected domain name.
Authentication Select the type of authentication to be used.
Search user names Turn theSearch while typing function on or off.
2. Configure selected compositeThe components of this page differ according to the selected protocol combination.
Field Name Description
LDAP settings The following options can be set via the LDAP settings page:
lLocate server at runtime: allows you to select an LDAP server during
runtime.
lAlways use the following server: allows you to set an LDAP server to be
used.
lLDAP port: set the LDAP port here. The default port number is 389.
lServer requires SSL: check this to enable SSL connection.
MAPI settings The following options can be set via theMAPI settings pane:
lSpecified by user's default Outlook profile: allows you to use the default
Outlook profile settings of the user.
lCustom settings: allows you to specify an Exchange server, mail
address, andmailbox ID to be used.
Exchange Web Services
settings
The following option can be set via the ExchangeWeb Services settings:
lUse the following service URL: allows you to enter a predefined service
URL
WebDAV settings The following options can be set via theWebDAV settings page:
lExchange server: The name or IP address of the Exchange server.
lServer requires SSL for communication: communication with Exchange
occurs via secure connection.
lUseUPN Format for User Credentials ([email protected]): Uses UPN
format for credentials instead of domain/username format.
lServer uses forms-based authentication: Check this box when the
Exchange server is configured to use Forms Based Authentication.

3. Configure fax format.
4. Review Summary.
14.2.2 - Protocol selector
Select the protocol combination to be used via this tab.
Field Name Description
Protocol Select the protocol composition you want to use.
User name Enter the user name to be used.
Password Enter the password to be used.
Domain Enter the domain to be used.
Authentication Select the authentication type:
lRuntime: the client user is required to log on at the beginning of the workflow.
lLogin As: the provided credential is used for login at client side.
Search user names Setting this combobox controls how the client sideAuthentication form manages the logon
information:
lSearch while typing: The list of user names is queried as the user enters characters into the
User name text box.
lSearch on demand: The query for the user names based on the entered few characters runs
when the button with magnifier is pressed.
lDisable search: The user is expected to enter the full user name, password and domain at
client side.
TheGlobal Address book provider runs the query for the hints. Themethod of searching
depends on the provider.
Testing the
connectionClicking the Test button tests the connector with the current settings.
14.2.3 - Protocol properties
The Protocol properties tab varies based on the selected protocol.
14.2.3.1 - LDAP Settings
Field Name Description
Locate server at runtime Click the Find button to locate the LDAP server during runtime.
Always use the following server Specify the LDAP server manually.

Field Name Description
Server requires SSL Check if the server requires SSL connection. The default SSL port is 636.
LDAP port Enter the port number to be used. The default is 389.
Credential type Select the credential type:
lUse the default credential: specified on the Protocol selector tab.
lConnect anonymously
lUseUser defined credential: Specify the user DN and the passwordmanually.
User DN Only valid if Use User defined credential is specified.
Password Only valid if Use User defined credential is specified.
LDAP search Allows you to specify the attributes of the LDAP searches.
The available settings are:
lBase DN: Determines the LDAP search starts when typing in the LDAP
authentication form or the Send form. Empty base DN prompts an error.
lSearch scope: Can be set toAll levels below starting point orOne level
below starting point.
lSearch on: Allows defining the attributes to be searched on.
lMax results: Sets the amount of results returned. The default value is 200.
Testing the connection Clicking the Test button tests the connector with the current settings.
14.2.3.2 - WebDAV Settings
Field Name Description
Exchange server The name or IP address of the Exchange server.
Login URL Specifies the ending of the ExchangeWebDav URL used for the user login. It is set
to “Exchange” by default for Exchange 2003 servers, and “owa” for Exchange 2007
servers. The edit field has a tooltip, which always shows the full Login URL, based
on the current WebDav settings.
Defaults Press this button to update the following fields of the dialog window with the default
settings for Exchange 2003 or 2007 server: Login URL, Form based
authentication URL,Mail box URL, Enable mail box URL discovery.
Pressing the arrow on the right to switch between “Exchange 2003” and“Exchange 2007”.
Server requires SSL for
communicationWhen checked, all WebDAV communications with the Exchange store occur over
HTTPS instead of HTTP.
Server uses nonstandard port Allows the administrator to specify a nonstandard port for all WebDAV
communication.

Field Name Description
Server uses forms-based
authenticationCheck this box when the Exchange server is configured to use Forms Based
Authentication (FBA). When FBA is configured on the Exchange server Outlook
Web Access (OWA) presents users with a web page to enter credentials when
instead of a dialog box.
Forms-based authentication
URLSpecifies the ending of the ExchangeWebDav URL used for the form-based
authentication. It is set to exchweb/bin/auth/owaauth.dll by default for
Exchange 2003 servers, and owa/auth/owaauth.dll for Exchange 2007 servers.
The edit field has a tooltip, which always shows the full FBA URL, based on the
current WebDav settings.
Mailbox URL This setting is used if themailbox URL could not be discovered by the connector.
The connector composes themail box URL based on the available information.
You have the following choices:
n Default for Exchange 2003This setting means that the mailbox URL is composed in the defaultway for Exchange 2003 servers (the Login URL followed by a slashand the exchange username). For example, if Login URL ishttp://server/Exchange, username is testuser, the composed mailbox URL is http://server/Exchange/testuser.
n Default for Exchange 2007This setting means that the mailbox URL is composed in the defaultway for Exchange 2007 servers,(the Login URL followed by a slash,then the exchange username, then the @ sign, followed by thedomain). For example, if Login URL is http://server/Exchange,username is testuser, domain is testdomain, then the composed mailbox URL is http://server/Exchange/testuser@testdomain/.
n Root URL, assuming redirectThis setting means that the mailbox URL does not have to becomposed, but simply the Login URL has to be used, as theExchange server always redirects to the correct page. This workswith Exchange 2007.
Use UPN Format for user
credentialsThis enables the connector to pass credentials in the User Principal Name format
([email protected]) instead of the Domain\Username format. Some frontend
servers can be configured to accept credentials only in the UPN format.
Enter the domain names that
the user can select at the deviceThis option allows the user to specify a set of domains to be displayed to the user
to pick from, as WebDAV/OWA queries do not return the Domain name for the
users.
Testing the connection Clicking the Test button tests the connector with the current settings.

14.2.3.3 - MAPI Settings
Field Name Description
Exchange 2010 Client Access
ServerYou can specify if you want to use the Exchange Client Access Server (CAS). The
following options are available:
lDo not use CAS: select this option if you do not want to use CAS.
lUseCAS: select this option if you want to use CAS. Choosing this option results
in theService account properties being displayed.
Server name Specify the CAS server name (required if you use CAS).
Service account properties
(Only visible if CAS is used)
The following options can be set:
lSpecified by user's default Outlook profile: allows you to use the default Outlook
profile settings of the user.
lCustom settings: allows you to specify an Exchange server, mail address, and
mailbox ID to be used.
Test Clicking the Test button tests the connector with the current settings.
14.2.4 - Web Services
Field Name Description
Use the following service URL Enter a valid full URL.
Autodiscover Service URL with usage
of the email address belowEnter an email address to be used during the Autodiscovery process.
Redirection during discovery to these
servers is allowedEnter the URLs to which redirection is allowed.
Testing the connection Clicking the Test button tests the connector with the current settings.
14.2.5 - General settings
Allows you to set the generic settings of the Exchange connector.
Field Name Description
Search recipients while typing If checked, the hints appear at the client Send form as the user starts entering the
recipient. If unchecked, the hints appear when the user presses theSearch button
next to the To orCc field.
Enable user to manually enter
fax numberThe client is allowed to type the fax numbers manually.
Add message to Sent Items
folderIf this feature is enabled, themessage sent successfully is copied to the named
folder.

14.2.6 - Sending options
This dialog tab provides control for the administrator over the default content of the mail – recipients,subject and note – and allows setting the express mode client workflow.
Field Name Description
Display options Manages the client side workflow.
Default recipients Allows you tomanage the list of default recipients. TheAdd button allows you to add new
members to the list, theEdit button allows you tomodify the properties of the selected
recipient, and theRemove button removes the selected recipient from the list.
You can use the dropdown list to configure the data publishing behavior, selecting from the
following options:
lNone: Default recipients
lData publishing
lDefault recipients and Data publishing
14.2.7 - Fax format settings
All settings in this table apply only to the eCopy Connector for Fax via Microsoft Exchange.
Section Field Name Description
Fax address format Cover page / No cover
page
Displays the fax format that you define in the Fax address format
window.
Format Opens the Fax Address Format window where you define the fax
address format required by your fax server application or Internet
fax service.
Refer to the documentation for your fax application to obtain the
correct format for the fax address.
Since fax application vendors change these formatting schemes
frequently, make certain you obtain the current format.
Valid characters in FAX number The administrator can specify the valid characters accepted by the
FAX server. The user is notified if invalid characters are entered on
the client form.
The defaults are: 01234567890()+-

14.3- Exchange connector profile settings
The Edit Profile window enables administrators who are more familiar with Exchange server environments tofine-tune the settings without relying on the Wizard. eCopy recommends that you use the Wizard to initiallyconfigure a connector profile. You can set the following:
n Protocol to be used
n Protocol properties
n Generic settings
n Sending options
n Fax format
14.4- Exchange Connector properties
The Properties window enables administrators who are more familiar with Exchange server environments tofine-tune the settings without relying on the Wizard. eCopy recommends that you use the Wizard to initiallyconfigure a connector profile. The Properties settings that are available depend on the connection protocolssupported by your environment.
14.4.1 - Local address book
The Local address book tab enables you to configure the local address books that store Internet emailaddresses entered at the device, addresses that are not in the Global address list or in the Contacts folder. Forinformation about creating and configuring address books, see Configuring support for Local addressbooks.
When you select the Enable user to manually enter addresses when sending email option on theGeneral settings tab and you enable the Internet address book option on the Local address book tab,the system displays a Save recipient form, where you can save the email address. Saving the email address isnot required; you can send the message without that.
15 - The eCopy Connector for Fax via Lotus Notes
The eCopy Connector for Fax via Lotus Notes enables users to scan and fax documents from an eCopy-enabled device through an email-to-fax gateway on the Lotus Notes server. To use this connector, you musthave a network fax server and the appropriate Notes server plug-in.

The scanned document, along with sender and recipient information, is sent to the Notes server using thelocal Lotus Notes client.
Before faxing from a personal Lotus Notes account, you must first configure the eCopyMail pass-throughdatabase on a Domino HTTP server. Refer to the technical documentation in the following directory forfurther information and setup instructions: <INSTALL_PATH>\Server\LNotes\ The default install path isc:\program files\Nuance\ShareScan5.
The connector provides access to the Lotus Notes address book as well as to the local Internet address book. When
sending from a personal Lotus Notes account, a copy of themessage is automatically delivered to the sender’s Inbox
folder.
Important!
Youmust install and configure the Lotus Notes client on the computer running the ShareScanManager before you can
install the Lotus Notes e-mail or fax connector. If you install the client after installing ShareScan, youmust manually add
the Lotus Notes client executable to the Path environment variable.
If the Lotus Notes client installation program prompts you to choose between theMulti-User Install option and the
Single User Install option, make sure that you select theSingle User Install option. After the client installation
program is finished, close it before configuring the connector in the Administration Console.
The recipient’s fax number is included in the To field (on the ShareScan Client) in the format required by thefax server. The Notes server plug-in recognizes the recipient address as a fax number and hands the requestoff to the network fax server for delivery as a fax.
ShareScan typically uses the logon name specified in the Active ID file to access the Global Address List,while sending messages from the user’s personal Lotus Notes account.
15.1- Configuring the connector
For the generic connector configuration options, click here.
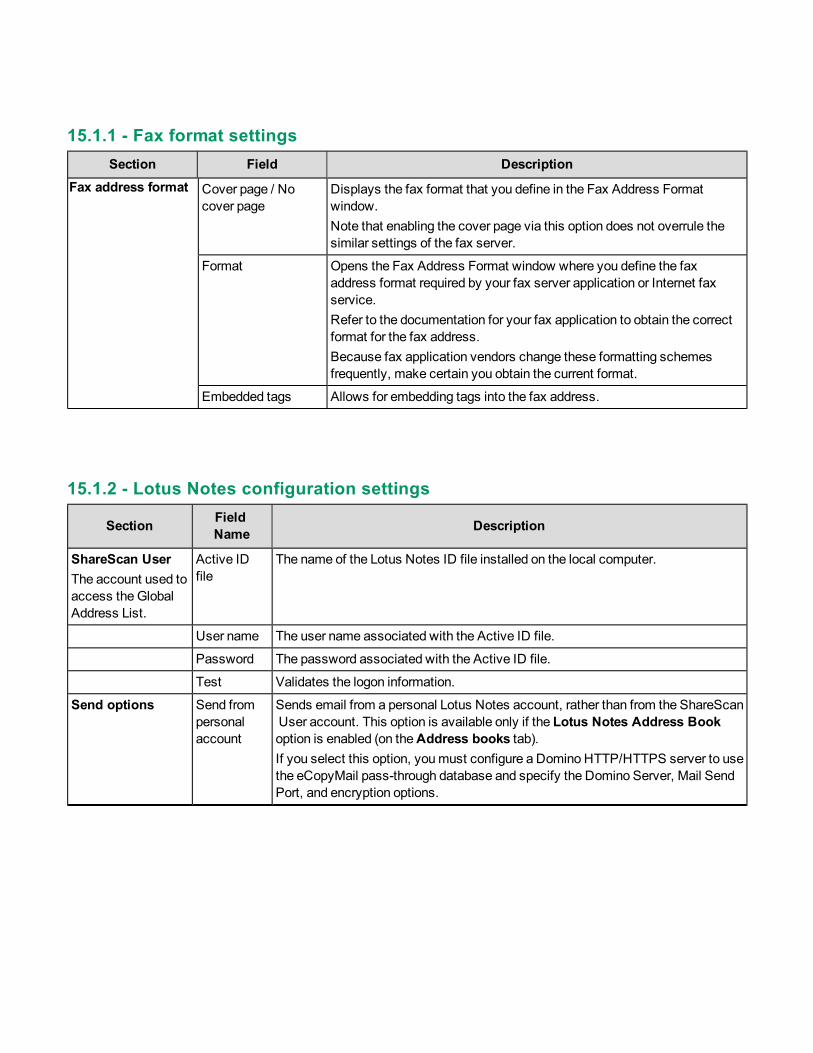
15.1.1 - Fax format settings
Section Field Description
Fax address format Cover page / No
cover page
Displays the fax format that you define in the Fax Address Format
window.
Note that enabling the cover page via this option does not overrule the
similar settings of the fax server.
Format Opens the Fax Address Format window where you define the fax
address format required by your fax server application or Internet fax
service.
Refer to the documentation for your fax application to obtain the correct
format for the fax address.
Because fax application vendors change these formatting schemes
frequently, make certain you obtain the current format.
Embedded tags Allows for embedding tags into the fax address.
15.1.2 - Lotus Notes configuration settings
SectionField
NameDescription
ShareScan User
The account used to
access the Global
Address List.
Active ID
file
The name of the Lotus Notes ID file installed on the local computer.
User name The user name associated with the Active ID file.
Password The password associated with the Active ID file.
Test Validates the logon information.
Send options Send from
personal
account
Sends email from a personal Lotus Notes account, rather than from the ShareScan
User account. This option is available only if the Lotus Notes Address Book
option is enabled (on theAddress books tab).
If you select this option, youmust configure a Domino HTTP/HTTPS server to use
the eCopyMail pass-through database and specify the Domino Server, Mail Send
Port, and encryption options.

SectionField
NameDescription
Domino
server
The name of the HTTP/HTTPS server where the eCopyMail pass-through
database is installed:
lFor HTTP: Enter the server name, IP address, or fully qualified domain name, as
appropriate, for your Domino environment.
lFor SSL/HTTPS: Enter the server name exactly as it appears in the SSL
certificate. For example, if the name is “lsphere.ecopydocs.com”, enter this text
in the field.
Mail send
port
The port number used to sendmail (defaults are 80 for HTTP; 443 for SSL/HTTP).
Use
SSL/HTTPS
Encrypts communication with the HTTP server using SSL/HTTPS.
Note:
eCopy recommends that you create a generic Lotus Notes account for use by ShareScan.
15.1.3 - Content settings
Field Name Description
Subjects Displays a list of subjects appearing in the Subjects List of the client UI Send Form.
Buttons are provided toAdd, Edit andDelete subjects, as well as move a selected
subject up or down in the list. Use of wildcards is allowed, the supported wildcards
are:
l $$USER_NAME$$ - Sender.
l$$FILENAME$$ - File name.
15.1.4 - Address book
Section/Field Name Description
Lotus Notes address book If checked, enables the Lotus Notes address book. Use theAddress
book dropdown list to select a directory to be used, and theSearch on
dropdown list to set the search criterion.

Section/Field Name Description
Fax address book If checked, enables the Fax address book. Using theConfigure
button, you can access additional settings for the address book:
lSetting database, address book, user, and search criteria
lManaging the address book via theAdd, Delete, Import, andExport
options
Search while typing If checked, enables the functionality.
15.1.5 - Express settings
Express mode allows the connector to function with a minimum of user input at the device. The subject,note, and recipient list are preconfigured on the Express tab so the user does not have to enter any of thisinformation.
Field Name Description
Enable Enabling the Express function designates the profile you are creating as an Express profile.
Subject Enter the subject to be used for messages.
Note Enter the note you want to use.
Formatted fax email
addresses
Use theAdd andDelete buttons tomanage the list of fax recipients.
Attach cover sheet Send a cover sheet containing the Name, Fax number, and Note to the recipient with each
faxed document. A cover sheet can only be sent with a fax if theUse Cover Sheet option is
enabled in the RightFax FaxUtil client for the authenticated user (see your RightFax
documentation).
16 - The eCopy Connector for Fax via Print
The eCopy Connector for Fax via Print is for use with MFPs or scanners that are connected to an eCopyScanStation.
The connector enables users to scan and fax documents from an eCopy-enabled device through a third-partyfax driver. The fax driver displays its own user interface, if any, on the ScanStation. Some fax drivers displayan email client.
Note:
You can create Fax via Print connector profiles on any ShareScanManager and publish them to any Manager that
supports the ShareScan embedded software. However, you cannot run the Fax via Print connector on a device running
the ShareScan embedded software.

You must configure the ScanStation Client to use the hard keyboard. This is because the soft keyboard doesnot support a third-party fax driver interface.
Before configuring a Fax via Print connector profile, install the fax driver on the ScanStation, or, if supportedby the driver, on a network print server.
The connector supports the following Print/Fax drivers:
n Canon Fax
n RightFax
n Nortel CallPilot Fax
16.1- Configuring the connector
For the generic connector configuration options, click here.
Section/Field Name Description
Print driver A list of the available print drivers that you can use to fax scanned documents.
Authenticate user Specifies the type of user authentication at the device:
lNone: The connector will not prompt the user for logon information.
lNovell: The default Novell Netware tree.
lWindows: The default Windows NT domain.
17 - The eCopy Connector for Fax via SMTP
The eCopy Connector for Fax via SMTP enables users to scan and fax documents from an eCopy-enableddevice through an SMTP email-to-fax gateway. To use this connector, you must have a network fax serverand the appropriate SMTP server plug-in.
The scanned document along with the sender and recipient information is sent to the SMTP server as aMIME-formatted mail message.
The recipient's fax number is included in the To field (on the ShareScan Client) in the format required by thefax server. The server plug-in recognizes the recipient address as a fax number and hands the request off tothe network fax server for delivery as a fax.
17.1- What's new in the connector
New functionality in this version of the connector includes:
n SSL support for SMTP
n Retooling of the User Interface

17.2- Configuring the connector
For the generic connector configuration options, click here.
17.3- Connector properties
The Properties window enables administrators who are more familiar with LDAP to fine-tune the settings,without relying on the Wizard.
n Logon / SMTP settings
n LDAP settings
n Address book settings
n Sending options settings
n Fax format settings
17.3.1 - Logon / SMTP settings
Select the protocol combination to be used via this tab.
Field Name Description
Authentication Select the authentication type from the dropdown list:
lRuntime: LDAP
lNone: Send from generic
lNone: Send from generic email address specified by Data
Publishing
Allow user to modify If checked, the user is able to customize the email field on each
scan.
Generic email: Allows the administrator to provide a generic email address to
specify as the sender.
Server IP or DNS name of the SMTP server.
Port Port address of the SMTP server. Default is 25.
Test Clicking the Test button tests the connector with the current
settings.
Server requires SSL Specifies if SSL is used for the SMTP communication.

Field Name Description
Authentication Define the type of authentication behavior for the SMTP server:
lRuntime: Prompt sender for a username and password:
the SMTP Authentication form is displayed to the user at
runtime after the Send form.
lNone: When selected, the user is not prompted for a
username and password. In addition the connector does not
attempt any authentication with the SMTP server. The email
send process may fail if the server requires authentication.
lLogin as: When selected the fields Username and Password
will display below the Authentication combo in admin. Here
the administrator can specify a set of credentials that will
always be used when sending an email from the connector.
lUse senders LDAP userID attribute and runtime
password: When this option is selected and if the LDAP
address book is enabled, the connector utilizes the LDAP
userID attribute and password provided at the User Logon
form to authenticate them against the SMTP server. If the
LDAP address book is not enabled at the time of closing the
properties dialog wewill show an error to the user and tell
them LDAP must be enabled or a different SMTP
authentication typemust be chosen.
Use specified domain if secure SMTP is enabled If checked, the domain box is enabled and the user can input a
domain. During the send process, the connector provides this
domain along with username and password to the SMTP
server.
17.3.2 - LDAP settings
Controls the various LDAP settings of the connector.
Field Name Description
Enable LDAP address book Click the Find button to locate the LDAP server during runtime.
Server IP or DNS name of the LDAP server.
Port Port number of the LDAP server for communication purposes. The default is 389.
Server requires SSL Check if the server requires SSL connection.
User DN User DN of the logged in user.
Password Password of the logged in user.
Connect anonymously Determines if the connector connects to the LDAP anonymously or if a UserDN
and password are provided. Not all LDAP servers allow anonymous connections.

Field Name Description
Advanced LDAP settings Allows you to define what the actual attribute is called on the LDAP server itself
and allows customization of LDAP attributes to return during your searches.
The available settings are:
lPerson: Allows defining the actual ObjectClass to represent the “person” class
during a recipient and sender search.
lGroup: Allows defining a secondObjectClass to represent the “Group” class
during a recipient search only.
lFirst name: Allows defining the actual attribute name to search for.
lLast name: Allows defining the actual attribute name to search for.
lCommon name: Allows defining the actual attribute name to search for.
lUser ID: Allows defining the actual attribute name to search for.
lEmail: Allows defining the actual attribute name to search for.
lSender: Specifies custom attributes belonging to the class. Note that anything
outside the square brackets is displayed as plain text.
LDAP search Allows you to specify the attributes of the LDAP searches.
The available settings are:
lBase DN: Determines the LDAP search starts when typing in the LDAP
authentication form or the Send form. Empty base DN prompts an error.
lSearch scope: Can be set toAll levels below starting point orOne level
below starting point.
lSearch on: Allows defining the attributes to be searched on.
lSearch while typing
lMax results: Sets the amount of results returned. The default value is 200.
Test Clicking the Test button tests the connector with the current settings.
17.3.3 - Address book
Section/Field Name Description
Enable Nuance address book Enables the Nuance address book.
Database Enables you toSelect orCreate a database.
To create a database, youmust provide the following data:
lSQL server name: a valid SQL server name and instance
lDatabase: the database name for the Nuance address book.
lUser ID: the identification of the user.
lPassword: the password required to access the database.

Section/Field Name Description
Search on Set the search parameters you want to use.
Address book Shows the name of the selected address book.
User Displays the name of the selected user.
Manage Use theAdd, Delete, Import, andExport buttons tomanage the
address data list.
17.3.4 - Sending options
You can set up the Express mode using the Sending options tab.
Section/Field Name Description
Display options Allows you to set the send form options:
lShow
lShow without CC field
lSkip and send to default recipients
lSkip and send to self
Default cover sheet Sends you a copy of eachmessage sent.
Manage contents Sends you a copy of eachmessage sent.
Default recipients Sends you a copy of eachmessage sent.
Data publishing Allows you to set the data publishing action:
l Ignore Data Publishing values
lRecipients are taken from Data Publishing only
lCombine values with default recipients
Send copy to sender Allows you to set the default message.
Manage content Allows you to set the action taken.

17.3.5 - Fax Format settings
Section Field Description
Fax address format Cover page / No
cover page
Displays the fax format that you define in the Fax Address Format
window.
Format Opens the Fax address format window where you define the fax address
format required by your fax server application or Internet fax service.
Refer to the documentation for your fax application to obtain the correct
format for the fax address.
Because fax application vendors change these formatting schemes
frequently, make certain you obtain the current format.
Embedded tags Allows for embedding tags into the fax address.
17.3.6 - Connector Wizard settings
The Wizard enables administrators to initially configure the connector. Many windows contain a Test buttonthat enables you to validate the logon information or test the server connection.
Wizard window Field Description
LDAP server type Server type The available server types:
lNone (disable LDAP address book)
lGeneric LDAP server
lWindows Active Directory
lWindows Active Directory (Untrusted)
lNovell eDirectory
lNetscape LDAP server
lOpen LDAP server
l IBM Domino server
If your server type is not on the list, select theGeneric LDAP server
option
LDAP attributes Enables you to set the attributes for the LDAP classes used by your
server or to accept the defaults shown here.
Windows Active
Directory server
account
Account settings Active Directory Server Account settings:
lUser name
lPassword
lDomain
TheWizard uses this information to set the user DN and server name.
Available only if you select Active Directory as the server type.

Wizard window Field Description
LDAP server
settingsConnect
anonymously
Bypasses the Select LDAP User window and allows anonymous
connection to the LDAP server, if the server supports anonymous
authentication.
Not available if you select Active Directory as the server type.
LDAP server LDAP server settings:
lUser DN
lPassword
lServer
lPort
lServer requires SSL
Youmust provide the full user DN if the server requires it. TheWizard
assumes that the server is using the default port number (389). The
Wizard resets the port back to 389 if it was changed in theProperties
dialog box. Clicking the Test button checks your settings.
Search settings Defines how the LDAP server searches the address book. Enables you to select a user from
the LDAP tree in the Select LDAP User window.
Not available if you select Active Directory as the server type.
Base DN The node on the LDAP tree from which all searches should begin. If you
do not know the node, click theBrowse button and select the node
from the tree structure in the selection window.
Search scope Select a search level:
lAll levels below search starting point: Allows expanded searching.
lOne level below search starting point: Optimizes LDAP queries and
improves performance.
Sender search The search criterion that the server uses to find the sender:
lFirst Name
lLast Name
lCommonName
lUser ID (default)
The setting defines the information that the user sees on the Logon
screen at the device.
Search while typing Enables or disables theSearch while typing functionality for the
related field at the device.
Max results The limit on the number of results to be returned by the LDAP search.
The default value is 200.
SMTP settings Select your SMTP server and the type of authentication that will be required of the user at the
device.

Wizard window Field Description
Server The SMTP server name
Port The SMTP port number.
Authentication The type of authentication to use on the SMTP server. Available only if
SMTP Basic Authentication is enabled on the server.
User login settings Generic e-mail A generic email address that is used as the sender account for all
email.
User Modify The user at the device canmodify the sender’s email address.
Runtime: LDAP Requires the user at the device to enter the user name and password
specified for the LDAP server.
Runtime: Windows Enables users at the device to use theirWindows logon information, via
the SAMAccountName attribute, to log on.
TheDomain field specifies theWindows domain name, populated from
the Account Settings window. This is required if you select the
Windows option.
Available only if you select Active Directory as the server type.
Runtime: Novell The Novell tree. This is required if you select theNovell option.
Available only if you select eDirectory as the server type.
Fax address format Cover page / No
cover page
Displays the fax format that you define in the Fax Address Format
window.
Format Opens the Fax address format window where you define the fax
address format required by your fax server application or Internet fax
service.
Refer to the documentation for your fax application to obtain the correct
format for the fax address.
Since fax application vendors change these formatting schemes
frequently, make certain you obtain the current format.
Settings summary Enables you to review your settings. Use theBack button if you need to change any settings.
Use the Finish button to apply your settings to the connector profile.

17.3.7 - SMTP settings
Section Field Description
SMTP server Server The IP address or DNS name of the SMTP server to use for outgoing
messages. If the server supports anonymous access, it must be disabled if
you want to use SMTP authentication.
Port The SMTP port number (default is 25).
Server requires SSL Enables Secure Socket Layer (SSL) to be used for SMTP communication. If
you select this option, youmust install a valid SSL certificate on the same
device as the connector.
Authentication Runtime: Prompt
Sender for a user name
and password
Prompts the user at the device to enter a user name and password when the
user presses theSend button on the Send screen.
Available only if SMTP Basic Authentication is enabled on the server.
Note:
If Session Logon is enabled, and SSL is not enabled, eCopy recommends
that you select “None” or “Login as”.
None Use if the SMTP server does not require authentication.
The user at the device is not required to supply any credentials.
If the server requires authentication, the email send process can fail.
Login as Enables the user at the device to connect to the SMTP server without being
prompted for authentication information. The connector uses the user name
and password set by the administrator.
Use Sender’s User ID,
LDAP attribute, and
runtime password
Uses the sender’s LDAP authentication information to connect to the SMTP
server.
To use this option, youmust enable the LDAP address book on the LDAP
settings tab.
18 - The eCopy Connector for Lotus Notes
The eCopy Connector for Lotus Notes Mail enables users to send scanned documents from an eCopy-enabled device as email attachments from either a generic Lotus Notes account or from the user's personalLotus Notes account. eCopy recommends that you create a generic Lotus Notes account for use byShareScan.
Before email can be sent from a personal Lotus Notes account, you must first configure the eCopyMail pass-through database on a Domino HTTP server. Refer to the technical documentation in the following directoryfor further information and setup instructions: <INSTALL_PATH>\Server\LNotes\ The default install path isc:\program files\Nuance\ShareScan5.
The connector provides access to the Lotus Notes address book as well as to the local Internet address book. When
sending from a personal Lotus Notes account, a copy of themessage is automatically delivered to the sender’s Inbox
folder.

Important!
Youmust install and configure the Lotus Notes client on the computer running the ShareScanManager before you can
install the Lotus Notes email or fax connector. If you install the client after installing ShareScan, youmust manually add
the Lotus Notes client executable to thePath environment variable.
If the Lotus Notes client installation program prompts you to choose between theMulti-User Install option and the
Single User Install option, make sure that you select theSingle User Install option. After the client installation
program is finished, close it before configuring the connector in the Administration Console.
ShareScan typically uses the logon name specified in the Active ID file to access the Global Address List,while sending messages from the user’s personal Lotus Notes account.
18.1- Configuring the connector
For the generic connector configuration options, click here.
SectionField
NameDescription
ShareScan User
The account used
to access the
Global Address
List.
Active ID
file
The name of the Lotus Notes ID file installed on the local computer.
User name The user name associated with the Active ID file.
Password The password associated with the Active ID file.
Test Validates the logon information.
Send options Send from
personal
account
Sends email from a personal Lotus Notes account, rather than from the ShareScan
User account. This option is available only if the Lotus Notes Address Book
option is enabled (on theAddress books tab).
If you select this option, youmust configure a Domino HTTP/HTTPS server to use
the eCopyMail pass-through database and specify the Domino Server, Mail Send
Port, and encryption options.
Domino
server
The name of the HTTP/HTTPS server where the eCopyMail pass-through database
is installed:
lFor HTTP: Enter the server name, IP address, or fully qualified domain name, as
appropriate, for your Domino environment.
lFor SSL/HTTPS: Enter the server name exactly as it appears in the SSL
certificate. For example, if the name is “lsphere.ecopydocs.com”, enter this text in
the field.
Mail send
port
The port number used to sendmail (defaults are 80 for HTTP; 443 for SSL/HTTP).

SectionField
NameDescription
Use
SSL/HTTPS
Encrypts communication with the HTTP server using SSL/HTTPS.
Send to self Disables the list of recipients and sends the scanned documents only to thelogged on user. You can use the $$FILENAME$$ name variable on theSubject or Notes line to distinguish among scanned documents.
Enable user to Cc recipients
when sending mail
Enables the user at the device to send a copy of amessage to one or more
recipients who are not the primary recipients.
Note:
eCopy recommends that you create a generic Lotus Notes account for use by ShareScan.
18.1.1 - Address book
Section/Field Name Description
Lotus Notes address book If checked, enables the Lotus Notes address book. Use theAddress
book dropdown list to select a directory to be used, and theSearch on
dropdown list to set the search criterion.
Internet address book If checked, enables the Internet address book. Using theConfigure
button, you can access additional settings for the address book:
lSetting database, address book, user, and search criteria
lManaging the address book via theAdd, Delete, Import, andExport
options
Search while typing If checked, enables the functionality.

18.1.2 - Content settings
Field Name Description
Subjects Displays a list of subjects appearing in the Subjects List of the client UI Send Form.
Buttons are provided toAdd, Edit andDelete subjects, as well as move a selected
subject up or down in the list. Use of wildcards is allowed, the supported wildcards
are:
l$$USER_NAME$$ - Sender.
l$$FILENAME$$ - File name.
Notes Select this option of the dropdownmenu to display a list of customized notes that
appear on the Notes List of the client UI. Moving the cursor over a Note in the list
displays an informational “bubble” with the entire contents of the Note. This allows
the user to view an entire Note regardless of its length. Use of wildcards is allowed,
the supported wildcards are:
l$$USER_NAME$$ - Sender
l$$RECIPIENTS$$ - Recipients
l$$FILENAME$$ - File name
l$$FILESIZE$$ - File size
l$$PAGECOUNT$$ - Page count
Email address format in
message content
Set the email display format for themessage.
Byline Displays a customizablemessage in the body of the email.
18.1.3 - Express settings
Express mode allows the connector to function with a minimum of user input at the device. The subject,note, and recipient list are preconfigured on the Express tab so the user does not have to enter any of thisinformation.
Field Name Description
Enable Enabling the Express function designates the profile you are creating as an Express profile.
Subject Enter the subject to be used for messages.
Note Enter the note you want to use.
To Use theAdd andDelete buttons tomanage the recipients.
Cc Use theAdd andDelete buttons tomanage the recipients.

19 - The eCopy Connector for Microsoft Exchange
The eCopy connector for Microsoft Exchange enables a user to send scanned documents from an eCopy-enabled device as email attachments from a generic Microsoft Exchange account or from the user's personalMicrosoft Exchange account. eCopy recommends that you create a generic Microsoft Exchange account foruse by ShareScan.
While ShareScan always uses the ShareScan user account information to log on to the Exchange server andretrieve the Global Address List, it sends scanned documents from this account only if the Login Asauthentication option is selected.
19.1- About Exchange Environment connection protocols
The connector supports six combinations of connection protocols that can be used to connect to yourExchange server, depending on your environment. The Wizard automatically selects the protocol based onthe Exchange environment information that you supply.
Protocol con-
figuration
Microsoft Outlook
required?Description Suggested use
MAPI/MAPI Yes Requires Exchange 5.5
server or later.
Use it to access old Exchange versions
(Exchange 2003 or even older). MAPI
requires aMicrosoft mail client on the
machine running the ShareScanManager.
MAPI protocol does not support saving
new contacts to the users' Personal
Contact list; queries against Personal
Contacts can be executed.
LDAP/MAPI Yes Requires that the specified
Service Account has access
to a Global catalog server in
the forest where the
ShareScanManager is
running.
Requires Exchange Server
2000 or later.
MAPI along with LDAP is recommended
when your organizational unit uses old
Exchange versions, but Global Catalog
servers are available for GAL queries. You
can restrict LDAP queries with profile
settings for the organizational unit which
uses a particular scanning device; queries
are executed faster, and the result lists are
considerably shorter.

Protocol con-
figuration
Microsoft Outlook
required?Description Suggested use
LDAP/WEBDAV No Requires that the specified
Service Account has access
to a Global catalog server in
the forest where the
ShareScanManager is
running.
Requires Exchange server
2000 or later.
If your operating system is
Microsoft Windows 2000,
youmust install Microsoft
ADO (ActiveX Data Objects)
2.8. for this protocol to work
correctly.
WEBDAV along with LDAP is
recommended when your company
employs lot of people, uses Exchange
2007 or earlier Exchange servers, and
needs simple firewall setups and
communication over secured HTTPS.
TCP ports 80 and 443 are supported (the
latter for HTTPS communication).
WEBDAV is not supported in Exchange
versions above 2007, it was replaced by
EWS in Exchange 2010.
WEBDAV/WEBDAV No Requires the front-end
Exchange Server to be
version 2000 or later.
If your operating system is
Microsoft Windows 2000,
youmust install Microsoft
ADO (ActiveX Data Objects)
2.8. for this protocol to work
correctly.
WEBDAV is recommended when your
company uses Exchange 2007 or earlier
Exchange servers, and needs simple
firewall setups and communication over
HTTP/HTTPS.
TCP ports 80 and 443 are supported (the
latter for HTTPS communication).
WEBDAV is not supported in Exchange
versions above 2007, it was replaced by
EWS in Exchange 2010.

Protocol con-
figuration
Microsoft Outlook
required?Description Suggested use
LDAP/EWS No Requires Exchange Server
2007 with Service Pack 1 or
later.
EWS along with LDAP is recommended
when your company employs a number of
people, uses multiple Exchange servers,
and you want to take advantage of the
service URL autodiscover feature
(administrator do not need to reconfigure
ShareScan when the Exchange
infrastructure is changed).
You can restrict LDAP queries with profile
settings for the organizational unit which
uses a particular scanning device; queries
are executed faster, and result lists are
considerably shorter. Our LDAP protocol
implementation autodetects the Global
Catalog server, and supports SSL
communication as well. EWS also
supports cross domain setups, so can be
used when ShareScan and the target
Exchange server exist within separate
domains.
EWS/EWS No Requires Exchange Server
2007 with Service Pack 1 or
later.
Recommended when the ShareScan
Manager works outside of Active Directory
domains (can be used within the domain as
well), and simple firewall setup is a
requirement. Also the best choice when
your Exchange server is hosted in a
Datacenter, and you want to access that
via HTTPS.
EWS (ExchangeWeb Services) is based
on SOAP/HTTPS, which transfers request
and responses via TCP 443 port. EWS
supports service URL autodiscovery,
making it advantageous in environments
where service endpoints change
frequently.
Limitations: supported versions are
Exchange 2007 SP1 and above; Search
while typing during login has limited
functionality.
Extras: Users can save new contacts into
their Personal Contacts folder.
Notes:

WhenMicrosoft Outlook is required, youmust install it on the same computer as the ShareScanManager so that the
two applications can share commonDLLs.
Youmust configure it as the default mail package. Youmust configureMicrosoft Outlook 2000 to work with your
Exchange server prior to using the ScanStation Client. eCopy also recommends that you configureMicrosoft Outlook
2002, 2003, 2007, and 2010 to work with the Exchange server.
19.2- Configuring the connector
For the generic connector configuration options, click here.
19.2.1 - General settings
Allows you to set the generic settings of the Exchange connector.
Field Name Description
Search Global Address List Allows searching in the Global Address List.
Search Outlook contacts Allows searching in the Outlook contacts.
Search recipients while typing If checked, the hints appear at the client Send form as the user starts entering the
recipient. If unchecked, the hints appear when the user presses theSearch button
next to the To orCc field.
Enable user to manually enter
email addressThe client is allowed to enter email addresses manually.
Importance Set the Importance of themail message.
Delivery receipt Set if you request a delivery receipt.
Sensitivity Set the sensitivity of themessage.
Read receipt Set if you request a read receipt.
Add message to Sent Items
folderIf this feature is enabled, themessage sent successfully is copied to the named
folder.
19.2.2 - Protocol selector
Select the protocol combination to be used via this tab.
Field Name Description
Protocol Select the protocol composition you want to use.
User name Enter the user name to be used.
Password Enter the password to be used.

Field Name Description
Domain Enter the domain to be used.
Authentication Select the authentication type:
lRuntime: the client user is required to log on at the beginning of the workflow.
lLogin As: the provided credential is used for login at client side.
Search user names Setting this combobox controls how the client sideAuthentication form manages the logon
information:
lSearch while typing: The list of user names is queried as the user enters characters into the
User name text box.
lSearch on demand: The query for the user names based on the entered few characters runs
when the button with magnifier is pressed.
lDisable search: The user is expected to enter the full user name, password and domain at
client side.
TheGlobal Address book provider runs the query for the hints. Themethod of searching
depends on the provider.
Testing the
connectionClicking the Test button tests the connector with the current settings.
19.2.3 - Protocol properties
The Protocol properties tab varies based on the selected protocol.
LDAP settings
19.2.3.1 - LDAP Settings
Field Name Description
Locate server at runtime Click the Find button to locate the LDAP server during runtime.
Always use the following server Specify the LDAP server manually.
Server requires SSL Check if the server requires SSL connection. The default SSL port is 636.
LDAP port Enter the port number to be used. The default is 389.
Credential type Select the credential type:
lUse the default credential: specified on the Protocol selector tab.
lConnect anonymously
lUseUser defined credential: Specify the user DN and the passwordmanually.
User DN Only valid if Use User defined credential is specified.
Password Only valid if Use User defined credential is specified.

Field Name Description
LDAP search Allows you to specify the attributes of the LDAP searches.
The available settings are:
lBase DN: Determines the LDAP search starts when typing in the LDAP
authentication form or the Send form. Empty base DN prompts an error.
lSearch scope: Can be set toAll levels below starting point orOne level
below starting point.
lSearch on: Allows defining the attributes to be searched on.
lMax results: Sets the amount of results returned. The default value is 200.
Testing the connection Clicking the Test button tests the connector with the current settings.
19.2.3.2 - WebDAV Settings
Field Name Description
Exchange server The name or IP address of the Exchange server.
Login URL Specifies the ending of the ExchangeWebDav URL used for the user login. It is set
to “Exchange” by default for Exchange 2003 servers, and “owa” for Exchange 2007
servers. The edit field has a tooltip, which always shows the full Login URL, based
on the current WebDav settings.
Defaults Press this button to update the following fields of the dialog window with the default
settings for Exchange 2003 or 2007 server: Login URL, Form based
authentication URL,Mail box URL, Enable mail box URL discovery.
Pressing the arrow on the right to switch between “Exchange 2003” and“Exchange 2007”.
Server requires SSL for
communicationWhen checked, all WebDAV communications with the Exchange store occur over
HTTPS instead of HTTP.
Server uses nonstandard port Allows the administrator to specify a nonstandard port for all WebDAV
communication.
Server uses forms-based
authenticationCheck this box when the Exchange server is configured to use Forms Based
Authentication (FBA). When FBA is configured on the Exchange server Outlook
Web Access (OWA) presents users with a web page to enter credentials when
instead of a dialog box.
Forms-based authentication
URLSpecifies the ending of the ExchangeWebDav URL used for the form-based
authentication. It is set to exchweb/bin/auth/owaauth.dll by default for
Exchange 2003 servers, and owa/auth/owaauth.dll for Exchange 2007 servers.
The edit field has a tooltip, which always shows the full FBA URL, based on the
current WebDav settings.

Field Name Description
Mailbox URL This setting is used if themailbox URL could not be discovered by the connector.
The connector composes themail box URL based on the available information.
You have the following choices:
n Default for Exchange 2003This setting means that the mailbox URL is composed in the defaultway for Exchange 2003 servers (the Login URL followed by a slashand the exchange username). For example, if Login URL ishttp://server/Exchange, username is testuser, the composed mailbox URL is http://server/Exchange/testuser.
n Default for Exchange 2007This setting means that the mailbox URL is composed in the defaultway for Exchange 2007 servers,(the Login URL followed by a slash,then the exchange username, then the @ sign, followed by thedomain). For example, if Login URL is http://server/Exchange,username is testuser, domain is testdomain, then the composed mailbox URL is http://server/Exchange/testuser@testdomain/.
n Root URL, assuming redirectThis setting means that the mailbox URL does not have to becomposed, but simply the Login URL has to be used, as theExchange server always redirects to the correct page. This workswith Exchange 2007.
Use UPN Format for user
credentialsThis enables the connector to pass credentials in the User Principal Name format
([email protected]) instead of the Domain\Username format. Some frontend
servers can be configured to accept credentials only in the UPN format.
Enter the domain names that
the user can select at the deviceThis option allows the user to specify a set of domains to be displayed to the user
to pick from, as WebDAV/OWA queries do not return the Domain name for the
users.
Testing the connection Clicking the Test button tests the connector with the current settings.

19.2.3.3 - MAPI Settings
Field Name Description
Exchange 2010 Client Access
ServerYou can specify if you want to use the Exchange Client Access Server (CAS). The
following options are available:
lDo not use CAS: select this option if you do not want to use CAS.
lUseCAS: select this option if you want to use CAS. Choosing this option results
in theService account properties being displayed.
Server name Specify the CAS server name (required if you use CAS).
Service account properties
(Only visible if CAS is used)
The following options can be set:
lSpecified by user's default Outlook profile: allows you to use the default Outlook
profile settings of the user.
lCustom settings: allows you to specify an Exchange server, mail address, and
mailbox ID to be used.
Test Clicking the Test button tests the connector with the current settings.
19.2.4 - Web Services
Field Name Description
Use the following service URL Enter a valid full URL.
Autodiscover Service URL with usage
of the email address belowEnter an email address to be used during the Autodiscovery process.
Redirection during discovery to these
servers is allowedEnter the URLs to which redirection is allowed.
Testing the connection Clicking the Test button tests the connector with the current settings.
19.2.5 - Sending options
This dialog tab provides control for the administrator over the default content of the mail – recipients,subject and note – and allows setting the express mode client workflow.
Field Name Description
Display options Manages the client side workflow.

Field Name Description
Default recipients Use theAdd button to populate the list. Click theRemove button to delete the selected entry.
You can use the dropdown list to configure the data publishing behavior, selecting from the
following options:
lNone: Default recipients
lData publishing
lDefault recipients and Data publishing
Send copy to sender Using this option, the recipient list can be extended with the logged on user dynamically.
Default message Allows you to set the following options:
lDefault Subject
lDefault Note: use theManage Content button to specify a default note.
19.3- Exchange connector profile settings
The Edit Profile window enables administrators who are more familiar with Exchange server environmentsto fine-tune the settings without relying on the Wizard. eCopy recommends that you use the Wizard toinitially configure a connector profile. You can set the following:
n Protocol to be used
n Protocol properties
n Generic settings
n Sending options
19.4- Exchange Connector properties
The Properties window enables administrators who are more familiar with Exchange server environments tofine-tune the settings without relying on the Wizard. eCopy recommends that you use the Wizard to initiallyconfigure a connector profile. The Properties settings that are available depend on the connection protocolssupported by your environment.
19.4.1 - Local address book
The Local address book tab enables you to configure the local address books that store Internet emailaddresses entered at the device, addresses that are not in the Global address list or in the Contacts folder. Forinformation about creating and configuring address books, see Configuring support for Local address books.

When you select the Enable user to manually enter addresses when sending email option on theGeneral settings tab and you enable the Internet address book option on the Local address book tab,the system displays a Save recipient form, where you can save the email address. Saving the email address isnot required; you can send the message without that.
19.4.2 - Exchange Profile Wizard settings
The Profile wizard helps the administrator to setup a basic protocol composite containing one or twoprotocols. The additional settings are set up with their defaults; any further tuning of the setting can be doneby editing Properties.
Configuring via the Wizard follows the steps below:
1. Select protocol composite
Field Name Description
Protocol Select the protocol combination to be used.
User name Enter the user name.
Password Enter the password.
Domain Enter the selected domain name.
Authentication Select the type of authentication to be used.
Search user names Turn theSearch while typing function on or off.
2. Configure selected composite

The components of this page differ according to the selected protocol combination.
Field Name Description
LDAP settings The following options can be set via the LDAP settings page:
lLocate server at runtime: allows you to select an LDAP server during
runtime.
lAlways use the following server: allows you to set an LDAP server to be
used.
lLDAP port: set the LDAP port here. The default port number is 389.
lServer requires SSL: check this to enable SSL connection.
MAPI settings The following options can be set via theMAPI settings pane:
lSpecified by user's default Outlook profile: allows you to use the default
Outlook profile settings of the user.
lCustom settings: allows you to specify an Exchange server, mail
address, andmailbox ID to be used.
Exchange Web Services
settings
The following option can be set via the ExchangeWeb Services settings:
lUse the following service URL: allows you to enter a predefined service
URL
WebDAV settings The following options can be set via theWebDAV settings page:
lExchange server: The name or IP address of the Exchange server.
lServer requires SSL for communication: communication with Exchange
occurs via secure connection.
lUseUPN Format for User Credentials ([email protected]): Uses UPN
format for credentials instead of domain/username format.
lServer uses forms-based authentication: Check this box when the
Exchange server is configured to use Forms Based Authentication.
3. Review Summary.
20 - The eCopy Connector for Microsoft SharePoint
The eCopy Connector for Microsoft® SharePoint® enables users to scan documents directly into aSharePoint document management system using different, configurable workflows. When you install theSharePoint Connector and create and activate a connector profile on an eCopy-enabled device, a SharePointbutton is added to the eCopy ShareScan Home screen.
The connector supports the selection of document destinations and the storage of documents in SharePointsites, libraries, folders, and lists. Users can also store SharePoint column (metadata) information with theirdocuments.

Users can store documents in any eCopy-supported format (PDF, PDF/A, TIF Fax, TIF, JPG, DOC, XPS,and XLS).
20.1- What's new in the connector
New functionality in this version of the connector includes:
n Support for the following SharePoint column types:
l Single-select lookup columns
l Person or Group
n Support for My Site
n Batching
n Data publishing
n You can now configure the connector to show the locations on the Navigation screen in alphabeticalorder or grouped by type.
n You can now configure the connector to filter the locations shown to the user on the Navigationscreen.
20.2- Configuring the connector
For the generic connector configuration options, click here.
20.2.1 - Defining a scanning destination
For a generic description of defining a scanning destination, click here.
If Content types are enabled for a location in which you want to store a document, users can select a contenttype for the document from the list at the device. The fields on the screen change according to the selectedcontent type.
You can only add documents to the top level of a Discussion board. You cannot add documents in responseto existing items.

20.2.2 - Destination settings: Authentication tab
Field Name Description
Name The alias you specify for the destination. This is the destination name seen by the
user at the device.
If you aremodifying an existing destination, you cannot change the name.
Hyperlink The URL of the SharePoint location in which you want to store documents.
The address must not include any characters after the location. If you cut and paste
an address from your browser into this field, youmust remove any characters that
appear after the location. For example:
http://sp2003/sites/pm/DocLibrary/Forms/AllItems.aspx
Youmust remove the characters shown in bold.
Enable Navigation Select this setting if you want the user to be able to navigate the available storage
locations of the selected destination, such as sub-sites or document libraries.
If you choose a site as the destination of your documents, youmust enable
navigation so that the users can store documents in libraries, lists, and folders within
the site.
Type lLogon As: All documents scanned and stored to this destination use the credentials
that you enter in theUser name andPassword fields. The user is not required to
log on at the device.
lRuntime: During each session at the device, prompts the user to provide logon
credentials before storing the file. For Runtime authentication, the user name and
password are used to retrieve the list of users from the SharePoint server.
Search while
typing
Enables or disables the Search while typing functionality for the user name field at
the device.
User name and Password The user name and password required to use the connector. Since this connector
uses Windows Authentication, youmust specify the domain\user information to use
for authentication.
The connector also uses the user name and password to retrieve the user list from
the SharePoint server. TheSearch while typing function uses the user list at the
device
If you change credential information on the SharePoint server, youmust also change
it for this connector profile.
Test Verifies the authentication information. If the test is successful, you can enter
information on theNavigation andColumns tabs.

20.2.3 - Destination settings: Navigation tab
You can configure the connector to filter the types of SharePoint locations that the user sees on the Navigation
screen at the device. You can also define the way in which the locations are grouped and whether the user at the
device can change any of the filter settings.
Field Name Description
Default filter type There are two types of filter:
lStandard: All supported location types are shown at the device.
lCustom: Only the location types selected in the custom filter section
are shown at the device.
User modify Enables the user to switch between the custom and standard filters at the
device. If you select this setting, youmust define a custom filter for the
user to select.
Define custom filter Enables the settings in the Custom filter section.
Custom filter Custom filter settings: You can limit the SharePoint locations available to
the user at the device to any combination of Sites, Document and Picture
libraries, folders, and lists.
Grouping type Defines how the locations are presented:
lAlphabetical: Locations appear in alphabetical order.
lBy type: Locations are grouped by SharePoint location type.
Support My Site This option can only be set if the login type is set toRuntime, as the ‘My
Site’ location is tied to the user. TheMy Site URL is filled when the
destination URL entered on theAuthentication tab has been tested.
If the test is succesful, theMy Site URL is automatically filled with the
port number according to the destination URL specified on the
Authentication tab.
If no value is specified in theMy Site URL, the default relative location of
theMy Site locations on SharePoint 2007 (personal) are displayed.
The destination can be changed to support those configurations where
My Site is on a different server than the team site. In most cases, the
automatically filledMy Site URL requires no change, you only have to
modify it when using SharePoint 2010 (as the default value of the relative
location of My Site locations is different (my/personal) than in
SharePoint 2007).
20.2.4 - Destination settings: Columns tab
This tab enables you to configure the SharePoint columns that are available to the user at the device. ForDate/Time settings, use the Settings button on the ribbon bar of the Administration Console to set the

format, which is picked up by the connector. If a user enters only the date, not the time, the systemautomatically formats the time to 0 hour, 0 minutes using the regional settings at the next change of inputfocus.
Field Name Description
Show Columns contain the document indexing information (metadata) that the
connector sends to SharePoint to be stored with the document. You can
control the information that the user enters at the device:
lNone: Nometadata is required from the user. If you select this option,
youmust make certain that the destination does not include any
required fields.
lAll: All supported columns (metadata fields) are visible to the user.
lRequired: Only required fields are visible to the user.
lAutoindex: the data grid is enabled and populated with all columns
pertaining to the location entered in theHyperlink field on the
authentication tab. An error is displayed if the hyperlink does not point to
a storable location. The user can select any column listed in the grid and
click theEdit button to configure the column.
20.3- Column information
When you configure your SharePoint columns in the ShareScan Administration Console, the user sees thesettings on the Column information screen at the device. This screen enables users to enter metadata relatedto the documents they are scanning.
If your implementation of SharePoint includes the use of content types, this will be the first field on thescreen. The other fields on the screen will change depending on the content type you select. When thescreen first appears, only fields that are configured for the default content type are available. All availablecontent types for the selected location are available from the Content type list.
The names of required fields are shown in yellow.
20.3.1 - SharePoint configuration considerations
Hidden columns: If a column in SharePoint is configured to be hidden for the location into which youwant to store the scanned document, the field for that column will not appear on the Column Informationscreen.
Validation: All column information that the user enters into the connector at the device is entered asstrings. When the user clicks the Next button, the connector may validate information in some fields,depending on the settings for the column in the SharePoint library. Validation includes the checking ofnumeric range and date formats.

20.3.2 - Supported SharePoint column types
If a SharePoint column has been configured to hold a type of information that the connector does notsupport, and if that field is set as required in the connector, the user will see a warning message. When theuser clicks OK in the warning message dialog box, the connector returns the user to the Storage optionswindow. The user can then select a destination where the unsupported column type is not required.
The connector supports the following column types:
SharePoint Column type Description
Lookup (single select) The user can select a single value from a list of values associated with the
Lookup column in SharePoint. The eCopy SharePoint Web Services must be
installed on the SharePoint server.
Single line of text The user can enter a line of text. This can include punctuation but not line breaks.
Multiple lines of text The user can enter multiple lines of text, but the connector determines how many
lines are displayed in the column field, regardless of the Number of Lines to
Display setting for the field on the SharePoint server.
Choice The user can select from a list of values. The user can enter a value that is not on
the list if the SharePoint server is configured to use the Allow Fill-in choices
option.
Number The user can enter only numeric characters. A percentage sign is added to the
right of the field if the SharePoint server is configured to show a percentage.
Yes/No The user can select either Yes or No as a value for the field.
Currency The user can enter a currency amount. The connector does not validate the
information.
Date and Time The connector validates the values entered by the user against the values
configured in the Administration Console Columns tab.
Hyperlink or Picture The user must enter the Hyperlink type and the Hyperlink description type. The
Hyperlink type defaults to http:// if no the SharePoint server does not provide a
default value.
Person or Group Allows the user to choose a group or person associated with the site the user is
storing a document to. Only a single selection is allowed. The server
configuration of a ‘Person or Group’ column allows various options such as
showing only people or people and groups. This release of the connector does
not support this option.
21 - The eCopy Connector for Open Text Content Server
The eCopy Connector for Open Text Content Server enables users to scan documents directly into an OpenText document management system using different, configurable workflows. When you install, create andactivate a connector profile on an eCopy-enabled device, a button is added to the eCopy ShareScan Homescreen.

Users can store documents in any eCopy-supported format (PDF, PDF/A, TIF Fax, TIF, JPG, DOC, XPS,and XLS).
21.1- What's new in the connector
New functionality in this version of the connector includes:
n Retooling of the User Interface
21.2- Configuring the connector
For the generic connector configuration options, click here.
21.2.1 - Database & authentication settings
Field Name Description
Name The Livelink destination name; must be unique.
Livelink
serverTheOpen Text Content Server-Enterprise Server name. The server must either be on the same local
area network (LAN) as the Services Manager or must be connected to theManager by a Virtual Public
Network (VPN).
Database The Livelink database name
Port The port used by the server. The default is 2099.
Use default
authenticationUse this if clients log in with the same username/password combination. The authentication form is
not displayed on the client side.
Logon at
runtimeUse this option if you want the clients to authenticate themselves during runtime.
Search while
typingEnabled only for Logon at runtime. TheUser name textbox of the Authentication form on the client
side displays available Livelink usernames.
User name
and PasswordWhen you create libraries in Open Text Content Server, you set up credentials for users who have
access to the information stored in each library. The user name and password that you enter heremust
provide access to the library referenced by this destination. The user name and password are also
used to access the list of names used for theSearch while typing function at the device. If you
change this information on theOpen Text Content Server, youmust also change it for this connector
profile.
Test Test that the authentication information connects to the specified database.

21.2.2 - Navigation & Attributes settings
Field Name Description
Store in specified folder /
Allow user to navigateUse these buttons to enable or disable the navigation form on the client side.
Default folder Sets the default folder for document storage.
Document attributes of
default folderDocument attributes associated with the default folder. Required ones aremarked with
an exclamation point.
Attribute options lShow all attributes: Displays all attributes available in the Open Text Content Server
database.
lShow required attributes only: Limits the attributes displayed at the device to those
designated as Required in the Open Text Content Server database.
lHide all and use preset attributes of the default folder.
Document naming Set the document name.
If you use the Express Wizard to configure the connector profile, the user will press the connector button atthe device and the document will be scanned to the destination you specify in the wizard without any furtherinput from the user.
To use the Express Wizard:
1. In the Administration Console, select the Connectors tab.
2. Select the Open Text Content Server Connector.
3. To create a new Express profile, click Save current profile as, enter a name for the profile, and thenclick Save.
4. In the Settings pane, configure the Display settings and make sure that none of the other availablesettings is set to User modify.
5. In the Configure connector pane, click Express Wizard.
The Express Wizard window opens.
6. Click Next and then enter the Name of the destination, the database and authentication settings,and then test the connection.
7. When the test is successful, click Next.
8. Configure the storage folder and attributes settings.
You must specify default values for required attributes.
9. Click Finish to return to the Configure tab.
10. Click Save current profile to save the profile.

21.2.3 - Express settings
Express settings only work if the following criteria are met:
lDefault login is allowed
lFolder navigation is disallowed (documents are saved into the default folder)
lAll required attributes are set
lDocument attributes form is set to be skipped
lUsers are not allowed to change the document names.
lDefault login is allowed
lFolder navigation is disallowed (documents are saved into the default folder)
lAll required attributes are set
lDocument attributes form is set to be skipped
lUsers are not allowed to change the document names.
Field Name Description
Enable Express
modeClicking this button sets the connector parameters tomeet the criteria above, if the user confirms
the changes.
22 - eCopy Quick Connect
Quick Connect enables users to scan documents and deliver them to predetermined network locations, Weblocations, databases, or to an SMTP server, with minimal data entry requirements. It is ideally suited toenvironments where large numbers of documents must be scanned quickly into automated or manualworkflows.
22.1- What's new in the connector
New functionality in this version of the connector includes:
n Support for batch based index values.
n You can now configure the connector to include an Expression for the destination settings
n Retooling of the User Interface
22.2- Configuring the connector
For the generic connector configuration options, click here.

22.2.1 - Destination settings
Field/Button Description
New Adds a new destination.
Edit Edits an existing destination
Copy Copies the selected destination.
Remove Removes the selected destination.
Move up Moves the selected destination up in the list.
Move sown Moves the selected destination down in the list.
Expression Displays the Expression dialog.
22.2.1.1 - Generic Destination Settings
Field/Button Description
Name The name of the destination.
Type The type of the destination. The following destination types are available:
lWindows folder
lNovell Netware folder
lFTP folder
lWebDAV folder
lSMTP Message
lDatabase
lDestination List

22.2.1.2 - Folder Location Settings
Field/Button Description
Folder location Destination information for the scanned documents.
lForWindows or Novell folders, click the ... button and browse for an existing folder or create a new
folder and select it.
lFor an FTP folder, enter the FTP location, such as “ftp://ftp01/scans”.
lFor aWebDAV folder, specify the root URL to aWebDAV folder, starting with either http:// or
https://.
Note that Quick Connect does not support long UNC paths, thus full path names are limited to 260
characters,
Secure
connection
(FTPS explicit)
Check this box to enable a secure connection. Only available for FTP folders.
Enable
subfolder
navigation
Enables users to select a subfolder at the device.
Maximum
folder level
The number of folder levels down that users may navigate. The default is 3.
Subfolder
creation
This button displays a dialog which configures subfolder names where documents are stored.
The text box under Folder Location specifies the root folder of the destination. A usercan navigate subfolders underneath this root folder.
If subfolder navigation is enabled at the device, Quick Connect creates subfolderunderneath the user-specified folder and stores documents in the created folder.
If subfolder navigation is disabled, Quick Connect creates a subfolder underneath the rootfolder and stores documents in the created folder.
The location where documents are stored is:<Root folder>\<user navigated subfolders>\<subfolder to becreated>\<document.pdf>
lThe subfolder routing dialog consists of tree view and list view control. The tree view defines the
hierarchy of subfolders while the list view defines folder naming rule for the selected subfolder. The
text of tree node displays the names of field.
lField names must be unique across subfolders.
l If a field is user modifiable, Quick Connect displays the Subfolders form at the device, between
Folder Navigation and File Name form.
lAlphanumeric, Numeric, List and Database fields publish a DP key, so administrators canmap
document services DP keys to these fields to retrieve runtime value.

22.2.1.3 - Authentication Settings
Field/Button Description
Authenticate
user
The options are:
lNone: Sends scanned documents to the destination without requiring user authentication. The
Manager requires write access to the destination.
lLogon As: All documents scanned and stored to this destination use the credentials that you enter
in theUser name andPassword fields. The user is not required to log on at the device. Specify the
domain/tree, user ID, and password to use for authentication. The specified account requires write
access to the destination.
lRuntime: During each session at the device, prompts the user to provide logon credentials before
storing the file. You specify the domain/tree to use for authentication.
User ID All Authentication types require a user name and password if Logon As is selected as the user
authenticationmethod.
Password Specifies the password for the Logon as user.
Domain Select either Logon as orRunTime authenticationmode to enable this combobox.
l In Logon asmode, the combobox must specify the domain name for the Logon-as-user.
l InRunTimemode, the combo box specifies the default domain namewhich is initially displayed on
the Logon form but this is optional.
22.2.1.4 - SMTP Message Destination Settings
Field/Button Description
Name Specifies the SMTP server via name or IP address.
Port Specifies the port number used. The default is 25.
Account Sets the account to be used for authentication. The following options are available:
lGeneric account - None Authentication
lPersonal account -Windows Authentication
lPersonal account - Netware Authentication
lPersonal account - LDAP Authentication
Reply To: Specifies the sender's email address. Available only for Generic account None Authentication.
Domain Specifies the domain name used as initial value on the Logon form. Available only for Personal
account -Windows Authentication.
Tree Specifies the tree name used as initial value on the Logon form. Available only for Personal account -
Netware Authentication.
LDAP settings Displays the LDAP server settings dialog. Available only for Personal account - LDAP
Authentication.

Field/Button Description
Cc sender: Checking this box sends a copy of eachmessage to the sender.
To listbox Use theAdd button to add the SMTP addresses of the recipients.
Subject Set the subject of themessage.
22.2.1.5 - Database Destination Settings
For more information on database types and settings, see Database types and settings.
Field/Button Description
DB type The configured database types are displayed here. The available types are as follows:
lMicrosoft Access
lMicrosoft SQL
lOracle
Data source Displays the data source.
Catalog Displays the catalog name, if supported.
Table Displays the table namewith schema, if applicable.
Document data
(BLOB)
Displays the column name for the document's data (BLOB).
Document
name
Displays the column name for the document name.
Document
extension
Displays the column name for the document extension.
Configure Displays a situation-based dialog. If the administrator is defining a new Database destination,
clicking this button displays the Configure Data Source dialog to define database connection. If a
defined database connection exists, theSelect recent data source dialog with previously used
connections is displayed, thus the administrator can reuse existing connection setting or go to
Configure data source dialog via theNew… button. If an existing connection setting is selected or
new connection setting has defined, the connector displays theMap document destination dialog
to define datamapping.

22.2.1.6 - Destination List Settings
Field/Button Description
Name
Location,
and Logon
Enables you to create a list of destinations to which the connector profile can send scanned
documents. Clicking theAdd button displays theAdd destination to ... window, where you can set
the attributes of the chosen destination.
When you add a destination to the list, you specify the destination name, type, and location, as well as
the authentication information. TheNew destinationwindow then lists all the destinations.
Note:
Tomake sure that users have to log on, at most once, at the device, you cannot mix certain combinations of destination
type and authentication in a destination list.
Example:
If you add aWindows Folder or Novell Netware Folder destination that uses Runtime authentication, and you then add
an FTP Folder destination, the Authenticate User combo box without Runtime authenticationmode is shown.
Invalid options will not be available in the Authenticate User list.
22.2.2 - LDAP server settings
Field/Button Description
Server The IP address, DNS name, or URL of the LDAP server associated with the directory you want to
use.
Port The LDAP server port number. The default is 389.
User ID The ID of the administrator who logs on to the LDAP server. This administrator account is used to
query e-mail address for runtime-log-on user from the LDAP server.
Password The password associated with the server account.
Connect
anonymously
Allows anonymous connection to the LDAP server, if the server supports anonymous
authentication.
Base DN The DN of the base or root of the directory in which to search. This varies depending on the server
you are using and the portion of the directory you wish to search.
Test Pressing this button checks the connection to the specified LDAP server. If the test succeeds, the
OK button is enabled.

22.2.3 - Setting a database as a destination
Setting a database as a destination enables you to configure a connector profile so that users at the device canscan and index documents and store them in the specified database. You can configure the profile to storethe index information in a file, in the same database as the scanned document, or in a different database.
To set a database as a destination:
1. On the Configure tab, click New.
The New destination window opens.
2. In the Name field, enter a name for the destination.
3. In the Type list, select Database.
4. Under Destination, click Configure .
The Configure data source window opens.
5. Configure a new data source.1. Select the database type and specify the settings.
2. Click Test connection.
3. When the system displays the “Test succeeded” message, click OK twice.
Or
Configure an existing data source
n If the Select recent data source window opens, select the data source that you want to use.
n Click OK.
The data source is the database where the scanned documents will be stored.
6. Depending from the purpose, the following windows are displayed:1. Map document destination for database destinations.
2. Choose fields dialog for database fields
3. Map index fields dialog for index files.
4. Click OK. The New destination window displays the database settings.
5. Click OK to save the settings. The Destinations list displays the name and summaryinformation for the database destination you created.
Note:
The Index file tab displays themapped database column name in the Table Column in the Index File list view.

22.2.4 - Database types and settings
Database type Settings
Microsoft Access Specifies the path to the Access database (*.MDB), which can be on a local drive or on a
Universal Naming Convention (UNC) path.
If the database is on a local drive and does not require a user name and password, select
the Blank Username and Password check box.
If the database is on a UNC path, enter the appropriate credentials. The user must have
permission to access the specified path.
Microsoft SQL Specifies the SQL server, user name, and password used to access the SQL Server, and
the Catalog/Database.
lSQLServer: The SQL server that you want to use. If theMicrosoft SQL Server
Management Object component is installed on the computer, the system automatically
fills the SQL Server list with the names of SQL servers on the local segment of the
network and you can select the server from the list. If MDAO is not installed, you can
type the server name in the field.
lUsername: SQL server user name.
lPassword: Password for the specified user.
lCatalog/Database: The database where you want to start browsing tables. You can
select the catalog or database from the list, if MDAO is installed, or you can type the
catalog or database name in the field.
Oracle Specifies the listener, user name, and password used to access the Oracle database.
lTNS Name: Listener on theOracle database server.
lUsername: Oracle user name for the integrated security user on the target database.
lPassword: Oracle password for the specified user.
22.2.5 - Map a document destination
When you set a database as a destination, you can use theMap document destination feature to map thename and file extension of the scanned document to STRING fields in a table in the database. This enablesyou, or a database administrator, to create associations between the scanned document and any indexinformation that the user enters on the Index screen for the document, wherever that index information isstored.

Database type Settings
Connection information Displays current database connection information:
lData source: name of the data source.
lCatalog: displays catalog name, orN/A, if none is available.
lTable: table namewith schema (if available).
lColumn: not used for document mapping.
lDefault value: not used for document mapping.
Use theModify button to edit the displayed information, and theRefresh button to clear
table selection and field mapping.
Select Table Name Displays available tables in the current data source. If a table is selected from the list, it
gets bold and theMap Fields data grid view gets enabled.
Map Fields Displays which fields aremapped to which database columns. The administrator selects a
column name from dropdown list.
The column for Document Data (BLOB)must be specified but Document Name and
Document Extension is optional.
If an already assigned column is reselected, the dialog shows an error message and clears
column selection.
22.2.6 - Using a database as the source of field values
You can create a file name field or an index field that uses a database as the source of field values. Users atthe device can then select from a list of available values for that field..
If the database administrator modifies, in a database, values that are associated with a Quick Connect field,users will have access to the changed values. You do not need to make any changes to the field in theAdministration Console.
To use a database as the source of field values:
1. On the File name or the Index file tab, click New.
The appropriate Field editor window opens (File name field editor or Index file field editor).
2. In the Name field, enter a name for the new field.
3. In the Type field, select Database as the type.
4. Check User modify if you want the user at the device to be able to alter this part of the file name.
5. Select the Required option if you want to require users at the device to specify a file name or indexvalue.
6. Click Configure.
If you have previously configured a data source, the Select recent data source window opens.
l To use an existing data source, select it and then click OK.
l If you do not want to use an existing data source, click New.
The Configure data source window opens. Follow the instructions to configure a new datasource.
l If you have not previously configured a data source, the Configure data source windowopens. Follow the instructions for configuring a new data source.
l After selecting or configuring a data source, the Choose field window opens.
6. Select a table, select a column in the table, and then select the default file name or index value fromthe list of available values. The user at the device can accept the default value for the field or select avalue from the list.
7. Click OK to return to the Field editor window.
The window displays the settings you have configured.
8. Click OK to save the settings and return to the File name or Index file tab.
The tab displays the name and summary information for the Database field you created.
22.2.7 - Defining Expressions for destinations
You can define parameters, operators, and constant values via the Expression dialog. The parameters arepublished to the Data Mapping tool and mapped to published data from a document service. Documentservice publishes data as string and the connector converts the string to specific data type according toparameter type.

Field/Button Description
New Allows adding a new parameter via a dialog, where you can set the name and type of the
new parameter. The available data types are the following:
lString
l Integer
lDecimal
Edit Edits the selected parameter.
Remove Removes the selected parameter from the list view.
Operator Select a parameter to display the available operators defining how to compare parameter
and constant values. The set of operators varies according to parameter type.
Constant Select a parameter to display the constant value which is compared to parameter value
during runtime. The input text must be formatted properly to successfully process the
equation.
22.2.8 - Defining file naming fields
The file name generated at the eCopy-enabled device is composed of one or more fields. Note that if filename is not published by document service, Quick Connect uses its file naming rule even if you check UseDocument Service file name.
To define file naming fields:
1. Select the File Name tab.
2. Click New.
3. Use the File name field editor to specify a name for the field and set the default values.
4. Click OK.
5. Repeat this procedure for each new file naming field.
Or
Select Use Document Service file name to use the file name configured for the DocumentService.
6. Click the Save current profile button.
The system saves your settings as part of the connector profile.
Note:
If a scanned document already exists in a selected destination you are presented with a number of options.

22.2.9 - File name tab
Field/Button Description
New Adds a new entry via the File name field editor.
Edit Edits an existing entry via the File name field editor.
Remove Removes the selected entry from the list view.
Move up Moves the selected entry up in the list view.
Move down Moves the selected entry down in the list view.
Use Document
service's file name
Checks published entry name by a document service. If the file name is published, the
connector uses the published name as an output file name instead of the File naming form and
constructing the file name according to file naming rule.
If file name already
exists:
Set themethod for resolving file name conflicts:
lCreate unique file name (.1,.2,etc): The connector creates a unique file name by appending a
rolling number with a dot separator.
lOverwrite always: Overwrite the existing file with the scanned document.
lReturn error: Show an error message at the device. The User has to specify a different name
at the device or cancel the current job.
22.2.9.1 - File Name Field Editor
Field Type Description
Name Specifies a unique file name field name. Not case sensitive. If you increase theminimal
length, this field becomes required.
Type Specifies a type of field. Type-dependent settings change according to the field. For more
information, see the Field types table below.
lAlphanumeric
lNumeric
lDate
lTime
lList
lDatabase
lBatch-based index value
lBatch number
lSeparator
lDevice name
lLogged on user

Field Type Description
Export to Index File Specifies whether the entry name field value is exported to the index file. If checked, a field
which has a name of FileNameField.<field name> is added to the Index File list view control
in the Index File tab.
22.2.9.2 - Field Types
Field Type Description
Alphanumeric Inserts text into the file name. the text can contain any printable characters except those that
are restricted fromWindows file naming conventions or any characters that you define as
separators.
lMinimum/maximum length: Theminimum andmaximum number of characters allowed.
lRemember: The number of previous entries to display when the user is prompted for the
naming information. If set to zero, no previous values appear in the drop-down list.
Batch number Inserts the current batch number into the file name.
l Leading zeroes: Pads all values with leading zeroes tomake their length equal to the
maximum field size. For example, if you specify "3" in the Length field and you enable
leading zeroes, batches are numbered “001”, “002”, … , “010”, “011”, … , “100”, “101”, … ,
“999”.
If you do not enable leading zeroes, batches are numbered "1", "2", etc.
lLength: Themaximum number of digits allowed for the batch number, including leading
zeroes.
Batch-based index
value
You can only use batch-based index values if you have the eCopy Barcode Recognition
Service. Batch-based indexing enables you to create index files with separate barcode
values for each batch.
Database Inserts a value from the database into the file name.
Click theConfigure button and configure a data source.
Date Inserts the date on which the document was scanned into the file name.
Format: The format in which you want the date to appear in the file name.
Device name The name of the device from which the document is scanned.
No additional settings.
Numeric Inserts numeric characters into the file name.
lDefault: Only numeric characters can be entered in this field.
lField Size: Theminimum andmaximum number of digits allowed.
lLeading zeroes: Pads all values with leading zeroes tomake their length equal to the
maximum field size.
lRemember: The number of previous entries to display when the user is prompted for the
naming information. If set to zero, no previous values appear in the drop-down list.

Field Type Description
Separator Character: The character that you want to use to separate the fields in the file name. The
character that you select cannot be used in any other file name field.
List Enables you to create a list of values from which the user can select a single value at the
device.
If you select theRequired option, the user at the devicemust select a value from the list. If
you do not select this option, the user at the device can leave the field blank. If you select the
Required option and do not select theUser modify option, youmust set one of the list items
as the default value.
Time Inserts the time at which the document was scanned into the file name.
Format: The format in which you want the time to appear in the file name.
22.2.10 - Defining index files
Setting up an index file enables the user at the device to enter indexing information for the scanneddocument in one or more fields. Quick Connect writes the field names that you create on the Index file tabto an index file, and creates data mapping information between field names and database columns. Thedefault values that you associate with each index field, or the values entered for the field by the user at thedevice are also stored in the index file or database table.
The information describes the content of the document, such as a case ID, a client name, or a documenttype. Quick Connect saves the index information with the scanned document. This option is useful withback-end applications that can process the scanned documents (image files) and index files in the destinationfolder.
To configure an index file:
1. Select the Index File tab.
2. Click New.
3. Use the Index Field Editor to define an index field and its default values.
4. Click OK.
5. Repeat this procedure for each new index field.
6. In the File format area, select the format of the index file.
7. If the Document splitting option is enabled on the Settings pane and you want to create a singleindex file, select Create single index file when Splitting is enabled.
8. If you want to duplicate unchanging index values, select Repeat unchanging index values.
9. Click the Save current profile button.
The system saves your settings as part of the connector profile.

22.2.11 - Index file tab
Field/Button Description
New Adds a new field via the Index file field editor.
Edit Edits an existing file via the Index file field editor.
Remove Removes the selected file from the list view.
Move up Moves the selected file up in the list view.
Move down Moves the selected file down in the list view.
Mapping The Select Recent Data Source or Map Index Fields dialog is displayed directly, if no
connection settings are stored to the registry. In the dialog you can assign Index fields to
database columns. If at least one index field is configured and theDatabase button is
clicked, this button gets enabled.
File format The following file types are available:
lXML
lCSV
lTSV
lDatabase
Note: When selecting theDatabase option, theMapping button is enabled on the toolbar.
Convert XML file Select XML index file format to enable this control. If this control is checked, the controls in
XSLT group are enabled.
XSLT group The following options are available via the XSLT group:
lXSLT file: set the location of the XSLT file.
lExtension: specifies an extension for the result file of the XSL transformation.
Create single index file
when Batching is
enabled
If checked, the connector creates a single index file per job. If unchecked, an index file per
batch is created.
Repeat unchanging
index values
Available only if Create single index file when Batching is enabled is checked. If
checked, the connector records the system- or job-based index values for every batch. If
unchecked, the connector records the system- or job-based index values only once and
records batching-based index values for every batch.

22.2.11.1 - Index File Field Editor
Field Type Description
Name Specifies a unique file name. Not case sensitive.
Type Specifies a type of field. Type-dependent settings change according to the field. For more
information, see the Field Types table below.
lAlphanumeric
lNumeric
lDate
lTime
lList
lDatabase
lLogged on user
lDestination Path
lFile name
lFile size (KB)
lNumber of pages
lBatch-based index value
22.2.11.2 - Field Types
Field Type Description
Alphanumeric Records the text which contains any printable character into the index file.
Batch-based
index value
Pulls published value from DataPublishing based on current batch number and records into the index
file.
Database Records the selected value from the database into the index file.
Date Records the formatted text of the date into the index file when the job was started
Destination
path
Records the location where the document is sent into the index file. The location information differs
according to destination type:
lWindows Folder – A path to local or network folder
lNovell Netware – A path to local or network folder
lFTP Folder – An URL
lWebDAV Folder – A URL
lSMTP Message – Concatenated email addresses of recipients with semicolon
lDatabase – <Data source> - <Catalog>.<Table>
Device name Records the name of the device on which the client is running into the index file. The device name is
retrieved when the connector starts.

Field Type Description
File name Records the file name of the document into the index file.
Logged on
user
Records the logged on user’s name into the index file.
If the destination uses Runtime authentication, the connector records runtime-logon-user name (either
Session SignOn user, CAC user or connector’s log on user). If authenticationmode is Logon as, it
uses preconfigured user name. Otherwise it records empty string.
Number of
pages
Records the number of pages in the document into the index file
Numeric Records the text which contains only numeric characters into the index file.
File size (kB) Records the file size of the document in kB into the index file.
List Records the selected value from the list into the index file.
Time Records the formatted text of the time into the index file when the job was started.
22.2.12 - Index file formats
The index file has the same name as the scanned document, but has a different file extension. The availableformats of the index file are:
n XML
n CSV (comma-separated value)
n TSV (tab-separated value)
n Database
Example:
Click here to view file format examples:
CSV
filename,device,date,time,user-tag1<CRLF>
MyDocument.pdf,MEAP01,03052003,110534AM,value 1
TSV
filename<TAB>device<TAB>date<TAB>time<TAB>user-tag1<CRLF>
MyDocument.pdf<TAB>MEAP01<TAB>03052003<TAB>110534AM<TAB>value 1
XML
<?xml version="1.0" encoding="UTF-8" standalone="yes"?>
<data>
<index id="filename">MyDocument.pdf</index>
<index id="device">MEAP01</index>
<index id="date">03052003</index>

<index id="time">110534AM</index>
<index id="user-tag1">value 1</index>
</data>
22.2.13 - Document splitting settings
When the Document splitting option is enabled on the Settings pane, you can configure Quick Connect tocreate a single index file that records the index values entered at the device for all scan jobs of a batch.
n The connector uses the file name that you create on the File name tab to create a name for the indexfile. If you do not configure a file name, the connector uses the default file naming rule.
If the file name includes the Batch number field, the connector sets the current batch number inthat field; otherwise, the connector adds an underscore (_) to the batching number, as in “document-20070131_1.pdf”.
If a file name already exists and the Create unique file name option is configured on the Filename tab, the connector adds a period to the rolling number, as in “document-20070131_1.1.pdf”.
n Index fields are divided into three types. The type of index value determines the frequency ofchanges to index values:
l System: The index field retains the same index value when the user at the device starts a newscan job.
Used with the following field type: Device Name.
l Scan Job: The index values in index fields of this type are the same for the entire scan job.
Used with the following field types: Alphanumeric, Numeric, Date, Time, List,Authenticated user, Destination path, Database.
l Splitting job: A scan job can comprise multiple document splitting jobs. The index values inindex fields of this type change for each document splitting job.
Used with the following field types: File name, Number of pages, File size, and Batch-basedindex value.
n The Repeat unchanging index values option enables you to record the index values for a batchjob each time the user enters the index values, even if the user at the device enters the same indexvalues many times.
l If you do not select this option, the connector records the system- and scan job-dependentindex values only once.
l Since batch job-dependent index values have different values based on the job, they will berecorded multiple times by default. However, if there is only a single batching job, the indexvalues will be treated like system- and scan job-dependent values.

l If you select this option, batch job-dependent index values will be recorded in a differentnode (for an XML file) or a different row (for CSV and TSV files, and database tables). Thisdoes not apply when the connector is processing only one batch scanning job
22.2.14 - Mapping index fields to fields in a database
This feature enables you to specify a database that will store index values entered at an eCopy-enableddevice. You can map any type of Quick Connect index field to fields in an SQL, Access, or Oracle database.When a user enters values in mapped index fields, the connector profile stores the values in the associateddatabase fields.
Note:
The connector profile stores all mapped index values in the target database as STRING data, regardless of the type of
index field.
If you store scanned documents in a database and you want to create a relationship between the databasefields where the documents are stored and the database fields where the index values are stored, make surethat one of the mapped index fields is of the type “File name”. Index fields of type “File name” automaticallyuse the file name of the scanned document that is stored in the database destination.
Example:
Click here to see the example:
You configured a connector profile to scan insurance claims using the following file naming format:
eCopyClaims<Date><Time>
You configured the profile to store the scanned documents, named as shown below, in the target database:
eCopyClaims20060523123318.pdf
eCopyClaims20060523123319.pdf
eCopyClaims20060523123320.pdf
You created several Quick Connect index fields to capture account information andmapped them to fields in a
database.
To associate the database record used to store the scanned documents with the database record used to store the
scanned document’s index values, youmust have an index field of type “File name” that captures the file name during
scanning.
To map index fields to fields in a database:
1. Select the Index file tab, click New, and then define each index field that you want to map.
2. Under File format, select Database and then click Map Fields.
The Configure data source window opens.

3. If you have not yet configured a data source, configure it now.
To use the current data source, proceed to step 4.
If you do not want to use the current data source, click Modify to select a different data source.When the Select recent data source window opens, click New and follow the instructions forconfiguring a new data source.
4. If you previously configured a data source, theMap index fields window opens, displaying theconnection information.
5. Via Select table name, select a table.
6. UnderMap fields, which displays the index fields that you created, select the Quick Connect indexfield that you want to map to a database field. You do not have to map all the Quick Connect fields.
In the Database field column, which only displays fields of STRING data type, select the targetfield. The index values that the user at the device enters in the index fields will be stored in thedatabase fields after the document is scanned.
7. Click OK to save the settings and return to the Index file tab.
22.2.15 - Configuring batch-based indexing
If you have the eCopy Barcode Recognition Service, you can use batch-based index values. Batch-basedindexing enables you to create index files with separate barcode values for each batch by assigning a basename (Publishing Name) to the position of the barcode.
All Publishing Names also have batch information available for Quick Connect to use. Note that only thefirst value found per Publishing Name is published for the session.
For example, a document is divided into two batches. It begins with a page that contains three barcodes andis split by another page that also contains three barcodes. On both pages the barcodes follow the samesequence but have different values:
Table 4: Batch-based indexing example
Barcode Number Batch-based index value - Publishing NameIndex value,
page 1
Index value,
page 2
1 Document Number 1 2
2 Locator 4455 6677
3 Extension 1234 5678
The following diagram shows the four page document and how, after processing, the scanned document isstored with the correct index information.

To configure batch based indexing in Quick Connect:
1. Select the Index file or File name tab.
2. Click New.
The relevant Field editor opens.
3. Enter the Data Publishing name to receive the Published Key from the service. You can specify anyname to the Name field. The Name field provides descriptive information for you.
4. Select Batch-based index value as the Type, and click OK.
5. Follow steps 2 through 4 above for each value that you want to use.
6. Save the connector profile with the values.
When you configure a device and select this connector profile, you must then select the correspondingService profile that you set up in the Barcode Recognition Service.
22.2.16 - Quick Connect and Data Publishing
Quick Connect can read data published to a Data Publishing service by a connector. For example, a companycan install a barcode recognition service and then use Quick Connect to access the barcode data that theservice publishes.
The ShareScan administrator is responsible for the following tasks:
n Install and configure the Service on the same PC as the eCopy Manager. For more information seethe Help for the Service in question.
n Work with the developer of the service, which may be available from eCopy or from a third party, toidentify the data that the Service publishes and the names of the fields that will contain the published

data. For example, assume that the document to be scanned contains barcodes. The service extractsdata from the following barcode fields and publishes the data to a COM object:
Barcode1, which contains a user name.
Barcode2, which contains a date.
Barcode3, which contains a company name.
Barcode4, which contains a city.
n Define Quick Connect index fields that reflect the names of the fields containing the published data.Using the example, the administrator must define index fields named Barcode1, Barcode2, Barcode3,and Barcode4.
n Configure the Quick Connect index file.
When a user scans a document at an eCopy-enabled device, the Manager starts the installed Service. TheService creates the COM object and publishes data from the scanned document to the COM object. TheManager passes the COM object to Quick Connect, which searches the COM object for the configured fieldnames. If Quick Connect finds a match, for example, if it finds a field named “Barcode1”, it reads the valuein that field and writes the value over the default value in the “Barcode1” index field in the index file. QuickConnect then sends both the scanned image document and the index file to the target destination.
23 - eCopy Connector for Open Text Fax Server, RightFaxEdition
The eCopy Connector for Open Text Fax Server, RightFax Edition enables users to scan and fax documentsfrom the eCopy-enabled device through an existing Open Text Fax Server.
When configured appropriately, users can send files from their personal RightFax account and access theirpersonal RightFax phone book for recipient selection. Delegation, cover pages, and billing codes are alsosupported when configured on the Open Text Fax Server.
23.1- What's new in the connector
New functionality in this version of the connector includes:
n Retooling of the User Interface
23.2- Configuring the connector
For the generic connector configuration options, click here.

23.2.1 - Configuration settings
The following tables describe the settings on the Configure tab.
Table 5: RightFax Server configuration settings
Field Name Description
Server The name of your RightFax server.
User The name of the user account used by the connector to log on to RightFax. The user account
information is always used to log on to the RightFax server and retrieve the user list. If you plan to
useWindows NT authentication, enter the user name for aWindows NT domain account.
Password The account password.
Test After you configure the settings in the fields of the RightFax server section, click to test the
connection to the RightFax server. If the test fails, resolve the connection issue before proceeding.
Verify that your spelling is correct and that the name of the RightFax server is accurate.
Send from
personal
account
Allows the user to log on to the RightFax server and then sends the fax from that user’s personal
RightFax account (or from a delegate account). If you do not select this option, the connector always
sends the faxes from the user account specified in the User field.
Use delegation If enabled, and an authenticated user is set up to send as someone else, the Send As button is
shown on the UI.
Use Windows
NT
authentication
Available only for RightFax Server 8.7, 9.0, 9.3, and 9.4. If selected, all users must log on to the
RightFax server using theirWindows NT credentials.
Note: Windows NT and RightFax UID authentication aremutually exclusive.

Table 6: Phone books configuration settings
Field Name Description
Enable Allows the user's personal phone book to be available for recipient selection.
Add new
recipients
Allows users to add new recipients to their personal phone book using the Save Recipient option
on the Send > Details screen at the device.
Limit to phone
book recipients
Allows users to send faxes only to recipients already in the phone book.
Table 7: Cover sheet configuration settings
Field Name Description
Yes/No Specifies the default setting.
Hide buttons If you select this option, the connector profile hides the cover sheet buttons from the user and uses
your selected default setting (Yes or No) to determine whether to attach a cover sheet.
In all cases, if the authenticated user’s RightFax account has not been configured to send cover
sheets, an error message appears when the user presses the Send button.
Important!
A cover sheet can only be sent with a fax if theUse cover sheet option is enabled in the RightFax FaxUtil client for the
authenticated user (see your RightFax documentation).
23.2.2 - Billing codes settings
Field Name Description
Fields 1, 2,
and 3
Available billing codes are defined on the RightFax server and displayed in these fields. You can
enable the fields for use with scanned documents. Each enabled field appears on the Billing Codes
form at the device. (If you do not enable any fields, the Billing Codes form does not appear.) For each
field, select the appropriate options.
Enable Prompts the user to select or enter a billing code. If the field is defined as required on the RightFax
server, it is highlighted in yellow on the Billing Codes form and the user must enter a value in the field.
Youmust enable the first field in order to enable the second field, and the second field to enable the
third field.
Verify Validates the information entered by the user at the device against the list of billing codes defined on
the RightFax server. Youmust enable verification for the first field in order to enable verification for
the second field. There is noVerify option for the third field (theDescription field).

Field Name Description
Read billing
codes from
Cost Recovery
If your company uses the Cost Recovery Service, you can choose to obtain the billing codes directly
from the service through eCopy Data Publishing.
When theRead billing codes from Cost Recovery option is selected, theVerify option is disabled
for all billing codes. For more information on Cost Recovery, see the relevant sections of the Help.
Billing codes
form display
options
Enables you to control the display of the Billing Codes form at the device:
Hide Billing Codes form: The form does not appear at the device.
Show Billing Codes form: The form at the device displays the fields that you enable on theBilling
codes tab. Users canmodify the contents of the fields.
Show Billing Codes form read-only: The form at the device displays the fields that you enable on the
Billing codes tab. Users cannot modify the contents of the fields.
23.2.3 - Content settings
The Cover sheet notes section on the Content tab enables you to create notes that the user at the device canadd to the fax cover sheet.
When you add a new note to the list of notes available to the user at the device, you can use the followingvariables:
Variable Description
$$USER_NAME$$ Replaces the variable with the sender name.
$$RECIPIENTS$$ Replaces the variable with the recipient name(s).
$$FILESIZE$$ Replaces the variable with the size of the file (in KB).
$$FILENAME$$ Replaces the variable with the name of the file.
$$PAGECOUNT$$ Replaces the variable with the number of pages in the document.
23.2.4 - Fax format
This tab allows you to specify valid characters for the Fax number. If the fax number contains charactersother than these, the fax cannot be sent on the Send form or the recipient entry cannot be saved into thephone book on the Details dialog at the client side and an error message appears. If no character is specifiedas valid (the textbox is empty), then all characters are valid for fax number and there will be no validation onthe client side.
Variable Description
Valid characters in fax number Enter the valid fax number characters here.

23.2.5 - Express Settings
A RightFax Express connector profile allows you to scan and fax the document by simply pressing the buttonon the main screen.
Field Name Description
Enable Enabling the Express function designates the profile you are creating as an Express profile. The
information that you configure on this tab will be used for every document that you fax using this
profile..
Billing codes 1 and
2 description
Enter the codes that you want to use for documents sent using this connector profile. When this
information is pre-configured, the user at the device does not see the Billing codes screen.
Name The name of the fax recipient.
Fax number The fax number to which the scanned document is sent.
Note The text included in the body of the fax to which the scanned document is attached.
Attach cover sheet Send a cover sheet containing the Name, Fax number, and Note to the recipient with each
faxed document. A cover sheet can only be sent with a fax if theUse cover sheet option is
enabled in the RightFax FaxUtil client for the authenticated user (see your RightFax
documentation).
Note:
If you use Express with a RightFax connector profile, youmust save the connector profile with the RightFax server
information before you test your Express configuration.
If you select theSend from personal account option on theConfigure tab and then configure the connector profile to
use Express, the connector will prompt the user at the device to enter authentication information.
23.2.6 - Send screen settings
Field/Option Description
From A read-only field populated with the name of the sender.
Search Specifies the user ID of a recipient to search for in your RightFax phone book. When youmove to the
next field, the connector will fill in the recipient and fax number information from the RightFax phone
book.
Recipient The name of the recipient of the fax.
If the recipient is in the RightFax phone book, this field is populated automatically when the user ID is
selected in theSearch field.
If the recipient is not in the RightFax phone book, enter the recipient name and fax number or, click
Details and use the Details window to enter the user information.
Fax number The recipient's fax number (required).

Field/Option Description
Notes Notes to include in themessage body (optional). Useful if you attach a cover sheet. The arrow button
next to the text box displays a list of available, preconfiguredmessages.
Attach cover
page
Specifies whether to attach a cover page to the fax.
If you select Yes and your RightFax account is not configured to use a cover sheet, the connector
ignores your selection. The connector profile can be configured to hide the cover page buttons.
Details Displays information about the specified recipient. If the user exists in the RightFax phone book, you
cannot change any of the information. Phone book entries can only be changed on the RightFax
server.
To add a new recipient to the RightFax phone book, click Details and then enter the recipient’s name,
user ID and any other user information in the blank fields in the Details window. UnderSave
recipient, select Yes and then press OK.
Send as Allows the user to impersonate another RightFax user via the Delegation feature available in
RightFax.
The feature is only available if you have rights on the RightFax server to send faxes from another
user’s account and the feature is enabled for the connector.
Press Send as. Select the RightFax user ID of the other user and then press OK.
24 - The eCopy Scan to Desktop connector
The Scan to Desktop connector enables ShareScan users at an eCopy-enabled device to scan documents andsend them to recipients’ scan inboxes or to network home directory folders, where the scanned documentscan be retrieved by using eCopy PaperWorks, which was called eCopy Desktop in previous versions ofShareScan. For information about using eCopy PaperWorks, refer to the eCopy PaperWorks documentationor Help.
Depending on the configuration of the connector, the recipient may be the user scanning the document orany other eCopy PaperWorks user whose scan inbox is set up to receive scanned documents via theconnector. The connector can also be configured to send scanned documents to storage destinations,specifically Windows, or Novell folders.
Notes:
n When a ShareScan user at an eCopy-enabled device chooses a recipient, the scanned document isdelivered to the recipient’s scan inbox or to the specified folder in the recipient’s network homedirectory.
n You can configure the connector to secure the scan inboxes of recipients. Users must enter thenetwork password associated with a recipient’s scan inbox before the connector can send scanneddocuments to the scan inbox. The Authenticate users option is automatically selected when theinbox type is set to “Home Directories”. Any user can send a scanned document to any user’s scaninbox. However, only the owner can read from the scan inbox

n The list of available recipients that appears on the Specify Recipient screen (in the ShareScan Client)includes all users in the Windows Active Directory or Novell eDirectory, unless you restrict usage bychoosing a base DN that limits the scope of the search.
24.1- Configuring the connector
For the generic connector configuration options, click here.
24.2- About scan inboxes and home directories
eCopy PaperWorks can use either scan inboxes or network home directories to store scanned documentsreceived from the Scan to Desktop Connector:
n Scan inboxes: The connector creates scan inboxes when users first use the connector at a device.The connector creates scan inboxes in folders located beneath the Inbox root directory.
When the connector creates scan inboxes, it assigns the permissions needed to ensure the appropriatelevel of scan inbox privacy. The connector uses the ShareScan Administrator group you designate inthe Scan to Desktop Properties window to implement the required security.
n Home Directories: The network administrator must create these directories. If you configure theconnector to use a network home directory to store scanned documents, the connector automaticallyuses the Scan to Self and Authenticate Users options. Network security ensures that only theLocal Administrator, the ShareScan Administrator, and the local user can read from or write to theroot of the network home directory or to the specified subdirectory. Scan to Desktop must connectto the specified folder as the owner of the home directory.
Important!
Network home directories configured through a logon script are not supported.
You configure a Scan to Desktop connector profile to scan to a single inbox type: scan inboxes or networkhome directories. You cannot configure the connector profile to scan to both types of inboxes. However, ifyou modify the inbox type in the connector profile, so that some users have scan inboxes while others havenetwork home directories, both types of inboxes can coexist on the same system.
24.2.1 - Security settings for scan inboxes
System Role Permissions
Windows Active
DirectoryAdministrators Full control

System Role Permissions
Domain Administrators Full control
Not used in workgroups
<groupname> (your
designated ShareScan
Administrator group)
Full control
<owner> Full control of the owner's individual inbox folder
Novell Admin Full control
<groupname> (your
designated ShareScan
Administrator group)
Full control
<owner> Full control
24.2.2 - Examples of scan inbox locations
System User Domain Inbox Location
Windows Active
DirectoryUser1 Using theMultiple
domainmode
option (only if
required)
\\Server\InboxRoot\xyz.com\<domain_name>\User1
Novell (NDS) Cn=testuser,
ou=engineering,
0=ecopy
When using the
Use eDirectory
hierarchy (only if
required)
\\Server\InboxRoot\eCopy\engineering\testuser
24.3- About the Inbox root directory
The Inbox root directory, which was called “Inbox Management Directory” in previous versions ofShareScan, contains scan inboxes and a file named userdirs.txt. When users at a device use the connector forthe first time, their names and the paths to their scan inboxes or network home directories are added to theuserdirs.txt file.
The Inbox Agent uses the userdirs.txt file to provide eCopy PaperWorks with the path information that eCopyPaperWorks needs to connect to scan inboxes or network home directories.
Before you can use the Scan to Desktop Connector, you must configure the Inbox root directory.
The connector automatically assigns specific file and folder permissions to ensure inbox security dependingon your network environment.

24.3.1 - Inbox root directory permissions (Windows)
Windows (NTFS)
<inbox root
directory>Administrators Full control: applied automatically
<groupname> (your designated ShareScan Administrator
group)
Full control: applied automatically
Everyone Read (List folder): applied
automatically
userdirs.txt Administrators Full control: applied automatically
<groupname> (your designated ShareScan Administrator
group)
Full control: applied automatically
Everyone Read: applied automatically
24.3.2 - Inbox root directory permissions (Novell Netware [NDS])
Novell Netware (NDS)
<inbox root
directory>Administrators Full control: applied
automatically
Domain Admins (not used in workgroups) Full control: applied
automatically
<groupname> (your designated ShareScan Administrator
group)
Full control: applied
automatically
Everyone List folder: appliedmanually
userdirs.txt Administrators Full control: applied
automatically
Domain Admins (not used in workgroups) Full control: applied
automatically
<groupname> (your designated ShareScan Administrator
group)
Full control: applied
automatically
Everyone None: appliedmanually
Supporting multiple Inbox root directories:
For information on the support of multiple Inbox root directories, refer to the Ask eCopy knowledge base,or contact eCopy Customer Support.
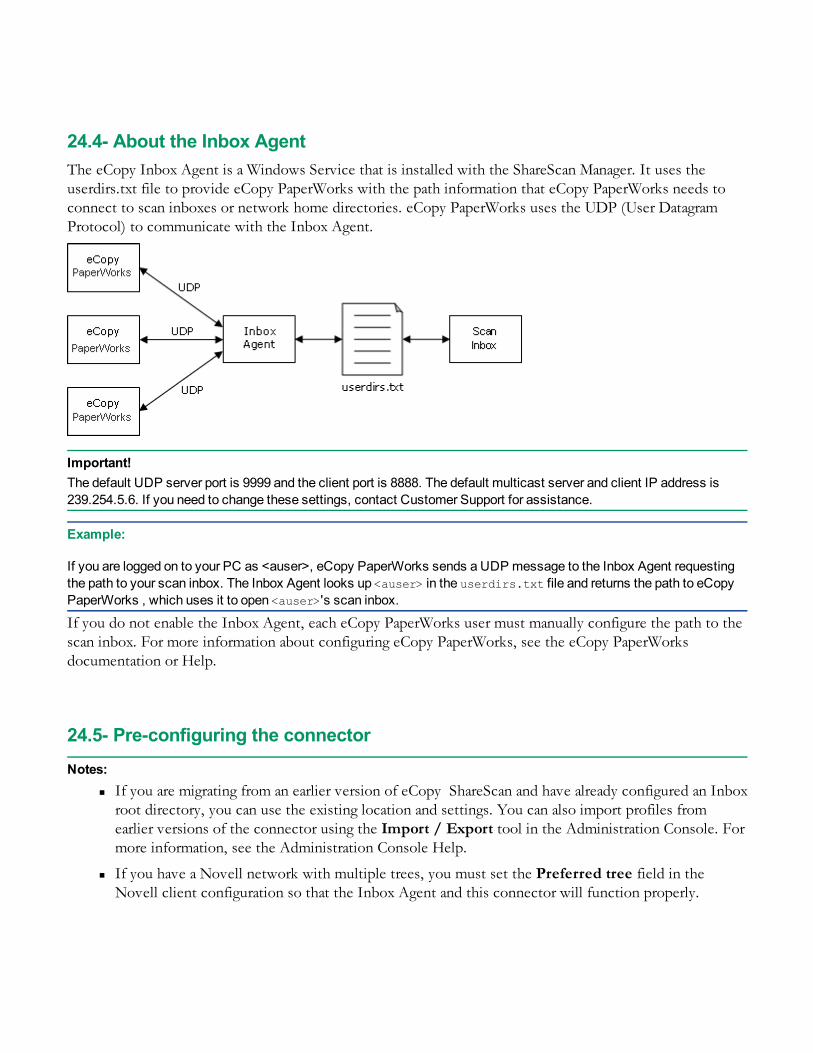
24.4- About the Inbox Agent
The eCopy Inbox Agent is a Windows Service that is installed with the ShareScan Manager. It uses theuserdirs.txt file to provide eCopy PaperWorks with the path information that eCopy PaperWorks needs toconnect to scan inboxes or network home directories. eCopy PaperWorks uses the UDP (User DatagramProtocol) to communicate with the Inbox Agent.
Important!
The default UDP server port is 9999 and the client port is 8888. The default multicast server and client IP address is
239.254.5.6. If you need to change these settings, contact Customer Support for assistance.
Example:
If you are logged on to your PC as <auser>, eCopy PaperWorks sends a UDP message to the Inbox Agent requesting
the path to your scan inbox. The Inbox Agent looks up <auser> in the userdirs.txt file and returns the path to eCopy
PaperWorks , which uses it to open <auser>'s scan inbox.
If you do not enable the Inbox Agent, each eCopy PaperWorks user must manually configure the path to thescan inbox. For more information about configuring eCopy PaperWorks, see the eCopy PaperWorksdocumentation or Help.
24.5- Pre-configuring the connector
Notes:
n If you are migrating from an earlier version of eCopy ShareScan and have already configured an Inboxroot directory, you can use the existing location and settings. You can also import profiles fromearlier versions of the connector using the Import / Export tool in the Administration Console. Formore information, see the Administration Console Help.
n If you have a Novell network with multiple trees, you must set the Preferred tree field in theNovell client configuration so that the Inbox Agent and this connector will function properly.

Before you can configure Scan to Desktop, a network administrator must complete the following steps:
To pre-configure Scan to Desktop:
1. Create the Inbox root directory.
If the directory is on a Microsoft or Novell network, you must share it.
2. Create a service account that will deliver scanned documents to scan inboxes or to network homedirectories.
3. Add the service account to a new or existing group in one of the following locations:
l On the domain controller, for Windows domain-based networks.
l On NDS, for Novell networks.
l On the local machine, for workgroups.
Note:
ShareScan uses this group when assigning permissions to the Inbox root directory and scan inboxes.
4. Give the group Full Control access rights to the Inbox root directory.
5. For workgroup implementations only, on the PC where the scan inboxes are located, create a localaccount for each user of Scan to Desktop.
Note:
If multiple Managers are pointing to the same userdirs.txt file in the Inbox root directory, the group to which the
service account belongs must be identical on all thoseManagers.
24.6- Scan Inbox settings
The environment settings depend on the environment type that you select in the Scan to Desktop Propertieswindow. The General Settings are the same for all environments.
Field Name Description
Environment type Select the environment type from the dropdown list:
lWindows Active Directory
lNovell eDirectory
lLocal Computer (Workgroup)
Service account settings The given credentials must be validated via the Test button,
otherwise you cannot proceed. To access the advanced
customization options, click theAdvanced button.

Field Name Description
ShareScan Administrator Select a group you are part of. That group is used when creating
files and applying permissions to them. The permissions allow
members of the selected group to read the created files.
Inbox Setup the destination path. For more customized settings, click
the Advanced button.
If same file name already exists The following options are available:
lOverwrite always: overwrites the existing file with the new
one.
lCreate unique file name (.1, .2): creates a new file with a
number postponed to its end.
lReturn error: returns an error indicating the problem. The user
will have to go back and do anything which is necessary to
create a new filename
24.6.1 - Inbox settings
Field Name Description
Root path Determines where the files are created. A userdirs.txt file is
created, to store the connector's accounting information.
Note that if the user does not have a home directory, the root
path is used as a fallback, and the system creates a folder for
the user automatically to be used as a scan inbox.
Inbox type Select from the following options:
lShareScan Inbox: a $domain\$user structure is created
under the specifiedRoot path. Files aremoved to the
appropriate user’s directory. When selected, the user can
choose to send it to multiple recipients by selecting
Recipient: Multiple.
lHome directory: a single recipient is allowed, and a
subdirectory is needed. The connector puts the files under
that directory. Root path is ignored in this case. If the
subdirectory does not exist, it is created.
Subfolder Name of the subfolder for the Home directory.
24.6.2 - Destination settings
Scan to Desktop enables you to scan to the following destination types:

n Windows Folder
n Novell Folder
For each type of folder, you must supply the folder location and authentication settings.
Section Field Description
If a scanned image file already exists Specifies the action for the connector to take if the recipient’s scan inbox
already contains a scanned document with the same file name:
lOverwrite always: Replaces an existing scanned document with the
one the connector is currently saving.
lReturn error: Displays an error message prompting the user at the
device to change the file name.
lCreate unique file name: Adds a unique number to the file name, for
example filename.1, filename.2. The scanned document is saved
to the location using a unique file name and the existing document is
not overwritten.
Folder location Path to the folder Destination information for the scanned documents.
Click theBrowse button and then select a folder.
Enable subfolder
navigation
Enables users to select a subfolder at the device.
Maximum folder
levels
The number of folder levels down that users may navigate.
Authentication Authenticate user The options are:
l None: Sends scanned documents to the destination without requiring
user authentication. The Services Manager requires write access to
the destination.
lLogon as: Sends scanned documents to the destination using the
specified authentication information; the user does not need to enter
authentication information at the device. Specify the domain/tree, user
ID, and password to use for authentication. The specified account
requires write access to the destination.
lRuntime: Sends scanned documents to the destination after the user
enters authentication information at the device and logs on to the
destination. Specify a user ID, password and a domain or tree so that
the connector can retrieve the user list at runtime and enable users to
search the user list. Test the credentials to verify that the connector
can retrieve the user list using the specified credentials.
Advanced Enables you to configure the Advanced account settings.

24.6.3 - Advanced account settings
Advanced account settings are used in the configuration of scan inboxes and destinations.
Windows Active Directory advanced settings
Field Name Description
Global Catalog server You can set the following options for the Global Catalog server:
lLocate server at runtime: the connector checks for the Global
Catalog during runtime. If it fails, the user cannot validate the
service account.
lAlways use the following server: the validation uses the given
server
lLDAP port: LDAP port number of the Global Catalog server.
The default is 3268.
lServer requires SSL: check if the server requires
communication via SSL.
Search Allows you to specify the attributes of the searches.
The available settings are:
lBase DN: Determines the LDAP search starts when typing in
the LDAP authentication form or the Send form. Empty base
DN prompts an error.
lScope: Can be set toAll levels below starting point orOne
level below starting point.
lSearch on: Allows defining the attributes to be searched on.
lSearch while typing
Domain controller settings You can set the following options:
lLDAP port
lServer requires SSL

24.6.3.1 - Novell EDirectory Settings
Field Name Description
eDirectory server You can set the following options for the eDirectory server:
lLocate server at runtime: the connector checks for the
eDirectory server during client runtime. If it fails, the user
cannot validate the service account.
lAlways use the following server: the validation uses the given
server.
lLDAP port: LDAP port number of the Global Catalog server.
The default is 389.
lServer requires SSL: check if the server requires
communication via SSL.
lServer allows Anonymous Bind
Search Allows you to specify the attributes of the searches.
The available settings are:
lBase DN: Determines the LDAP search starts when typing in
the LDAP authentication form or the Send form. Empty base
DN prompts an error.
lScope: Can be set toAll levels below starting point orOne
level below starting point.
lSearch on: Allows defining the attributes to be searched on.
lSearch while typing
24.6.3.2 - Local Computer (Workgroup) Settings
Field Name Description
Search Allows you to specify the attributes of the searches.
The available settings are:
lSearch on: Allows defining the attributes to be searched on.
lSearch while typing
25 - eCopy Scan to File
Scan to File enables users to scan documents and deliver them to predetermined network locations, Weblocations, or to an SMTP server, with minimal data entry requirements. It is ideally suited to environmentswhere large numbers of documents must be scanned quickly into automated or manual workflows.

25.1- Configuring the connector
For the generic connector configuration options, click here.
25.1.1 - Destination settings
Field/Button Description
New Adds a new destination.
Edit Edits an existing destination
Copy Copies the selected destination.
Remove Removes the selected destination.
Move up Moves the selected destination up in the list.
Move down Moves the selected destination down in the list.
25.1.1.1 - Generic Destination Settings
Field/Button Description
Name The name of the destination.
Type The type of the destination. The following destination types are available:
lWindows folder
lNovell Netware folder
lFTP folder
lWebDAV folder
lSMTP Message

25.1.1.2 - Folder Location Settings
Field/Button Description
Folder location Destination information for the scanned documents.
lForWindows or Novell folders, click the ... button and browse for an existing folder or create
a new folder and select it.
lFor an FTP folder, enter the FTP location, such as “ftp://ftp01/scans”.
lFor aWebDAV folder, specify the root URL to aWebDAV folder, starting with either http://
or https://.
Note that Quick Connect does not support long UNC paths, thus full path names are limited to
260 characters,
Secure connection
(FTPS explicit)
Check this box to enable a secure connection. Only available for FTP folders.
Enable subfolder
navigation
Enables users to select a subfolder at the device.
Maximum folder level The number of folder levels down that users may navigate. The default is 3.
25.1.1.3 - Authentication Settings
Field/Button Description
Authenticate
user
The options are:
lNone: Sends scanned documents to the destination without requiring user authentication. The
Manager requires write access to the destination.
lLogon As: All documents scanned and stored to this destination use the credentials that you enter
in theUser name andPassword fields. The user is not required to log on at the device. Specify the
domain/tree, user ID, and password to use for authentication. The specified account requires write
access to the destination.
lRuntime: During each session at the device, prompts the user to provide logon credentials before
storing the file. You specify the domain/tree to use for authentication.
User ID All Authentication types require a user name and password if Logon As is selected as the user
authenticationmethod.
Password Specifies the password for the Logon as user.
Domain Select either Logon as orRunTime authenticationmode to enable this combobox.
l In Logon asmode, the combobox must specify the domain name for the Logon-as-user.
l InRunTimemode, the combo box specifies the default domain namewhich is initially displayed on
the Logon form but this is optional.

25.1.1.4 - SMTP Message Destination Settings
Field/Button Description
Name Specifies the SMTP server via name or IP address.
Port Specifies the port number used. The default is 25.
Account Sets the account to be used for authentication. The following options are available:
lGeneric account and None Authentication
l Personal account -Windows Authentication
lPersonal account - Netware Authentication
lPersonal account - LDAP Authentication
Reply To: Specifies the sender's email address. Available only for Generic account None Authentication.
Domain Specifies the domain name used as initial value on the Logon form. Available only for Personal
account -Windows Authentication.
Tree Specifies the tree name used as initial value on the Logon form. Available only for Personal account -
Netware Authentication.
LDAP settings Displays the LDAP server settings dialog. Available only for Personal account - LDAP
Authentication.
Cc sender: Checking this box sends a copy of eachmessage to the sender.
To listbox Use theAdd button to add the SMTP addresses of the recipients.
Subject Set the subject of themessage.
25.1.2 - File name tab
Field/Button Description
New Adds a new entry via the File name field editor.
Edit Edits an existing entry via the File name field editor.
Remove Removes the selected entry from the list view.
Move up Moves the selected entry up in the list view.
Move down Moves the selected entry down in the list view.
Use Document
service's file name
Checks published file name by a document service. If the file name is published, the connector
uses the published name as an output file name instead of the File naming form and
constructing the file name according to file naming rule.

Field/Button Description
If file name already
exists:
Set themethod for resolving file name conflicts:
lCreate unique file name (.1,.2,etc): The connector creates a unique file name by appending a
rolling number with a dot separator.
lOverwrite always: Overwrite the existing file with the scanned document.
lReturn error: Show an error message at the device. The User has to specify a different name
at the device or cancel the current job.
25.1.2.1 - File Name Field Editor
Field Type Description
Name Specifies a unique file name field name. Not case sensitive.
Type Specifies a type of field. Type-dependent settings change according to the field. For more
information, see the Field types table below.
lAlphanumeric
lNumeric
lDate
lTime
lList
lBatch-based index value
lBatch Number
lSeparator
lDevice Name
lLogged on user
25.1.2.2 - Field Types
Field Type Description
Alphanumeric Inserts text into the file name. the text can contain any printable characters except those that
are restricted fromWindows file naming conventions or any characters that you define as
separators.
lMinimum/maximum length: Theminimum andmaximum number of characters allowed.
lRemember: The number of previous entries to display when the user is prompted for the
naming information. If set to zero, no previous values appear in the drop-down list.

Field Type Description
Batch number Inserts the current batch number into the file name.
l Leading zeroes: Pads all values with leading zeroes tomake their length equal to the
maximum field size. For example, if you specify "3" in the Length field and you enable
leading zeroes, batches are numbered “001”, “002”, … , “010”, “011”, … , “100”, “101”, … ,
“999”.
If you do not enable leading zeroes, batches are numbered "1", "2", etc.
lLength: Themaximum number of digits allowed for the batch number, including leading
zeroes.
Batch-based index
value
You can only use batch-based index values if you have the eCopyBarcode Recognition
Service. Batch-based indexing enables you to create index files with separate barcode
values for each batch.
Date Inserts the date on which the document was scanned into the file name.
Format: The format in which you want the date to appear in the file name.
Device name The name of the device from which the document is scanned.
No additional settings.
Numeric Inserts numeric characters into the file name.
lDefault: Only numeric characters can be entered in this field.
lField Size: Theminimum andmaximum number of digits allowed.
lLeading zeroes: Pads all values with leading zeroes tomake their length equal to the
maximum field size.
lRemember: The number of previous entries to display when the user is prompted for the
naming information. If set to zero, no previous values appear in the drop-down list.
Separator Character: The character that you want to use to separate the fields in the file name. The
character that you select cannot be used in any other file name field.
List Enables you to create a list of values from which the user can select a single value at the
device.
If you select theRequired option, the user at the devicemust select a value from the list. If
you do not select this option, the user at the device can leave the field blank. If you select the
Required option and do not select theUser modify option, youmust set one of the list items
as the default value.
Time Inserts the time at which the document was scanned into the file name.
Format: The format in which you want the time to appear in the file name.
26 - Scan to Printer
The eCopy Scan to Printer Connector enables users at an eCopy-enabled device to scan and print documentsto a network printer, regardless of its physical location. Users can select various printing and page layoutoptions.

26.1- Configuring the connector
For the generic connector configuration options, click here.
26.2- Connector Document settings
Document settings enable you to specify default settings for options specific to a connector profile,including encryption, searchable text, and file format. They also enable you to specify whether users at theeCopy-enabled device can change the settings; user-modifiable options are available when the user pressesthe Document settings button on the Preview screen.
Note:
Each connector profile supports a unique group of settings. If a setting is not available for the connector you are
configuring, it will be grayed out.
Option Setting Description
File format The connector supports only JPG format.
Color compression Select High or Medium compression for color documents.
26.2.1 - Configure settings
Section/Field Name Description
Enable QuickPrint Does not display the settings screen to the user at the device. The
scanned documents print directly to the default printer, using the
default print settings from the connector.
Available printers The printers that will be available at the device.
Set as Default printer Enables you to specify the default printer. Indicated by a checkmark
icon before the printer's name in the list.
Move up Moves the selected printer up in the list. If youmove a printer to the top
of the list, you can confirm it as the default printer.
Move down Moves the selected printer down in the list. Moving a printer from the top
of the list sets the new topmost printer as default.
Refresh Refreshes the printer list.
Printer information Gives information on the location, model, and status of the selected
printer.
Printer preferences Informs you of the printing preferences (collation and duplex printing) for
the selected device.

27 - Scan to USB
The eCopy Scan to USB Connector enables users at an eCopy-enabled device to scan documents to an USBdevice.
27.1- Configuring the connector
For the generic connector configuration options, click here.
27.1.1 - Configure settings
Section/Field Name Description
If a scanned image file already exists then
take this action
Allows you to set the action taken
lOverwrite always
lReturn error
lCreate unique file name (.1, .2, etc.)

The eCopy Connector for SMTP viaLDAPThe eCopy Connector for SMTP using LDAP enables users to send scanned documents from an eCopy-enabled device as email attachments using an SMTP server on the network. When a user sends email from apersonal SMTP account (including a Gmail account), the system prompts users to log on to validate theiridentity. The Global Address List is provided by an LDAP server.
27.2- What's new in the connector
New functionality in this version of the connector includes:
n SSL support for SMTP
n Integration with Gmail, allowing to access a user's Gmail contacts
n Retooling of the User Interface
27.3- Configuring the connector
For the generic connector configuration options, click here.
27.4- Connector properties
The Properties window enables administrators who are more familiar with LDAP to fine-tune the settings,without relying on the Wizard.
n Logon / SMTP settings
n LDAP settings
n Address book settings
n Sending options settings
27.4.1 - Logon / SMTP settings
Select the protocol combination to be used via this tab.

Field Name Description
Authentication Select the authentication type from the dropdown list:
lRuntime: LDAP
lNone: Send from generic
lNone: Send from generic email address specified by Data
Publishing
Allow user to modify If checked, the user is able to customize the email field on each
scan.
Generic email: Allows the administrator to provide a generic email address to
specify as the sender.
Server IP or DNS name of the SMTP server.
Port Port address of the SMTP server. Default is 25, when an
unencrypted communication channel is used. For encrypted
SMTP communication, port 587 is selected.
Test Clicking the Test button tests the connector with the current
settings.
Server requires SSL Specifies if SSL is used for the SMTP communication. Must be
set to on (checked) when using Gmail.
Reset Click this button to set the default values for setting Gmail or
generic SMTP servers.
For Gmail, the defaults are as follows:
lHostname: SMTP.GMAIL.COM
lService port: 587
lServer requires SSL: ON (checked)
lServer requires authentication
Searching your Gmail contacts is also enabled. TheSearch
while typing feature can be configured on theAddress book
tab.

Field Name Description
Authentication Define the type of authentication behavior for the SMTP server:
lRuntime: Prompt sender for a username and password:
the SMTP Authentication form is displayed to the user at
runtime after the Send form.
lNone: When selected, the user is not prompted for a
username and password. In addition the connector does not
attempt any authentication with the SMTP server. The email
send process may fail if the server requires authentication.
lLogin as: When selected the fields Username and Password
will display below the Authentication combo in admin. Here
the administrator can specify a set of credentials that will
always be used when sending an email from the connector.
lUse senders LDAP userID attribute and runtime
password: When this option is selected and if the LDAP
address book is enabled, the connector utilizes the LDAP
userID attribute and password provided at the User Logon
form to authenticate them against the SMTP server. If the
LDAP address book is not enabled at the time of closing the
properties dialog wewill show an error to the user and tell
them LDAP must be enabled or a different SMTP
authentication typemust be chosen.
Use specified domain if secure SMTP is enabled If checked, the domain box is enabled and the user can input a
domain. During the send process, the connector provides this
domain along with username and password to the SMTP
server.
27.4.2 - LDAP settings
Controls the various LDAP settings of the connector.
Field Name Description
Enable LDAP address book Click the Find button to locate the LDAP server during runtime.
Server IP or DNS name of the LDAP server.
Port Port number of the LDAP server for communication purposes. The default is 389.
Server requires SSL Check if the server requires SSL connection.
User DN User DN of the logged in user.
Password Password of the logged in user.
Connect anonymously Determines if the connector connects to the LDAP anonymously or if a UserDN
and password are provided. Not all LDAP servers allow anonymous connections.

Field Name Description
Advanced LDAP settings Allows you to define what the actual attribute is called on the LDAP server itself
and allows customization of LDAP attributes to return during your searches.
The available settings are:
lPerson: Allows defining the actual ObjectClass to represent the “person” class
during a recipient and sender search.
lGroup: Allows defining a secondObjectClass to represent the “Group” class
during a recipient search only.
lFirst name: Allows defining the actual attribute name to search for.
lLast name: Allows defining the actual attribute name to search for.
lCommon name: Allows defining the actual attribute name to search for.
lUser ID: Allows defining the actual attribute name to search for.
lEmail: Allows defining the actual attribute name to search for.
LDAP search Allows you to specify the attributes of the LDAP searches.
The available settings are:
lBase DN: Determines the LDAP search starts when typing in the LDAP
authentication form or the Send form. Empty base DN prompts an error.
lSearch scope: Can be set toAll levels below starting point orOne level
below starting point.
lSearch on: Allows defining the attributes to be searched on.
lSearch while typing
lMax results: Sets the amount of results returned. The default value is 200.
Test Clicking the Test button tests the connector with the current settings.
27.4.3 - Address book
Section/Field Name Description
Enable Nuance address book Enables the Nuance address book.
Database Enables you toSelect orCreate a database.
To create a database, youmust provide the following data:
lSQL server name: a valid SQL server name and instance
lDatabase: the database name for the Nuance address book.
lUser ID: the identification of the user.
lPassword: the password required to access the database.
Search on Set the search parameters you want to use.
Address book Shows the name of the selected address book.
User Displays the name of the selected user.

Section/Field Name Description
Manage Use theAdd, Delete, Import, andExport buttons tomanage the
address data list.
GMail Check theEnable using Gmail Contacts checkbox to access the
user's contacts list via the Gmail Contact API; this way, when the user
enters recipients on the Send form of the connector, the Gmail
contacts are visible and selectable along with, for example, the eCopy
addressbook contacts. Use theSearch on dropdown list to specify the
search criterion.
27.4.4 - Sending options
You can set up the Express mode using the Sending options tab.
Section/Field Name Description
Display options Allows you to set the send form options:
lShow
lShow without CC field
lSkip and send to default recipients
lSkip and send to self
Default message Allows you tomanage the default recipients. Using theAdd button,
you can select whether you want to add the recipients to the To, CC, or
BCC fields.
Manage contents Sends you a copy of eachmessage sent.
Default recipients Sends you a copy of eachmessage sent.
Data publishing Allows you to set the data publishing action:
l Ignore Data Publishing values
lRecipients are taken from Data Publishing only
lCombine values with default recipients
Send copy to sender Allows you to set the default message.
Manage content Allows you to set the action taken.
27.4.5 - Connector Wizard settings
The Wizard enables administrators to initially configure the connector. Many windows contain a Test buttonthat enables you to validate the logon information or test the server connection.

Wizard window Field Description
LDAP server type Server type The available server types:
lNone (disable LDAP address book)
lGeneric LDAP server
lWindows Active Directory
lWindows Active Directory (Untrusted)
lNovell eDirectory
lNetscape LDAP server
lOpen LDAP server
l IBM Domino server
If your server type is not on the list, select theGeneric LDAP server
option
LDAP attributes Enables you to set the attributes for the LDAP classes used by your
server or to accept the defaults shown here.
Windows Active
Directory server
account
Account settings Active Directory Server Account settings:
lUser name
lPassword
lDomain
TheWizard uses this information to set the user DN and server name.
Available only if you select Active Directory as the server type.
LDAP server
settingsConnect
anonymously
Bypasses the Select LDAP User window and allows anonymous
connection to the LDAP server, if the server supports anonymous
authentication.
Not available if you select Active Directory as the server type.
LDAP server LDAP server settings:
lUser DN
lPassword
lServer
lPort
lServer requires SSL
Youmust provide the full user DN if the server requires it. TheWizard
assumes that the server is using the default port number (389). The
Wizard resets the port back to 389 if it was changed in theProperties
dialog box. Clicking the Test button checks your settings.
Search settings Defines how the LDAP server searches the address book. Enables you to select a user from
the LDAP tree in the Select LDAP User window.
Not available if you select Active Directory as the server type.

Wizard window Field Description
Base DN The node on the LDAP tree from which all searches should begin. If you
do not know the node, click theBrowse button and select the node
from the tree structure in the selection window.
Search scope Select a search level:
lAll levels below search starting point: Allows expanded searching.
lOne level below search starting point: Optimizes LDAP queries and
improves performance.
Sender search The search criterion that the server uses to find the sender:
lFirst Name
lLast Name
lCommonName
lUser ID (default)
The setting defines the information that the user sees on the Logon
screen at the device.
Recipient search The search criterion that the server uses to find the recipient:
lCommonName (default)
lFirst Name
lLast Name
lUser ID
The setting defines the information that the user sees on the Send
screen at the device.
Tip: If you are using an Active Directory server and want the list of
recipients to display groups as well as individuals, eCopy recommends
that you retain the default setting, CommonName. If you select any
other search criterion, users who want to send documents to a group
must enter the complete e-mail address of the group at the device.
Search while typing Enables or disables theSearch while typing functionality for the
related field at the device.
Max results The limit on the number of results to be returned by the LDAP search.
The default value is 200.
SMTP settings Select your SMTP server and the type of authentication that will be required of the user at the
device.
Server The SMTP server name
Port The SMTP port number.
Authentication The type of authentication to use on the SMTP server. Available only if
SMTP Basic Authentication is enabled on the server.

Wizard window Field Description
User login settings Generic email A generic email address that is used as the sender account for all
email.
User Modify The user at the device canmodify the sender’s email address.
Runtime: LDAP Requires the user at the device to enter the user name and password
specified for the LDAP server.
Runtime: Windows Enables users at the device to use theirWindows logon information, via
the SAMAccountName attribute, to log on.
TheDomain field specifies theWindows domain name, populated from
the Account Settings window. This is required if you select the
Windows option.
Available only if you select Active Directory as the server type.
Runtime: Novell The Novell tree. This is required if you select theNovell option.
Available only if you select eDirectory as the server type.
Settings summary Enables you to review your settings. Use theBack button if you need to change any settings.
Use the Finish button to apply your settings to the connector profile.
27.4.6 - SMTP settings
Section Field Description
SMTP server Server The IP address or DNS name of the SMTP server to use for outgoing
messages. If the server supports anonymous access, it must be disabled if
you want to use SMTP authentication.
Port The SMTP port number (default is 25).
Server requires SSL Enables Secure Socket Layer (SSL) to be used for SMTP communication. If
you select this option, youmust install a valid SSL certificate on the same
device as the connector.
Authentication Runtime: Prompt
Sender for a user name
and password
Prompts the user at the device to enter a user name and password when the
user presses theSend button on the Send screen.
Available only if SMTP Basic Authentication is enabled on the server.
Note:
If Session Logon is enabled, and SSL is not enabled, eCopy recommends
that you select “None” or “Login as”.

Section Field Description
None Use if the SMTP server does not require authentication.
The user at the device is not required to supply any credentials.
If the server requires authentication, the email send process can fail.
Login as Enables the user at the device to connect to the SMTP server without being
prompted for authentication information. The connector uses the user name
and password set by the administrator.
Use Sender’s User ID,
LDAP attribute, and
runtime password
Uses the sender’s LDAP authentication information to connect to the SMTP
server.
To use this option, youmust enable the LDAP address book on the LDAP
settings tab.
28 - eCopy Connector for iManage WorkSite
The eCopy Connector for iManage WorkSite allows users to scan documents directly into the WorkSitelibrary of an iManage WorkSite system from an eCopy-enabled device.
Users can store documents in any eCopy-supported format (PDF, PDF/A, TIF Fax, TIF, JPG, DOC, XPS,and XLS).
28.1- What's new in the connector
New functionality in this version of the connector includes:
n The ability to configure Folder and Workplace searching in the Administration Console.
n Improved navigation to select document storage locations.
n Data publishing for all fields
n The ability to publish to a destination.
n Retooling of the User Interface
28.2- Configuring the connector
For the generic connector configuration options, click here.
28.3- Defining a scanning destination
For a generic description of defining a scanning destination, click here.

If you select Specify, then you must specify a location, such as a folder or Document Worklist, that can holddocuments.
Selecting the Auto Index option enables you to configure the index field values. The Document Profilescreen does not appear at the device.
Selecting any of the other Behavior options disables the eCopy values table and displays the DocumentProfile screen at the device unless you also specify values for all of the default fields.
28.3.1 - Authentication settings
Field Name Description
Name Enter the display name of the destination.
User name Enter the user name to be used. If Login as is selected, this user name is also used for
authentication instead of prompting the scanning user for this information. If Runtime is
selected, the scanning user is prompted for credentials at the scanning device.
Password Enter the password to be used.
Server Enter the server you want to connect to.
Type Determines the authentication at the ScanStation. If Login As is selected, the
authentication form is skipped and the credentials provided are used for login. If Runtime is
selected, the authentication form is displayed at the scanning device.
Search while typing Enables or disables the functionality.
Use trusted login If checked, the trusted login settings are used when a user authenticates at the scanning
device.
Trusted login settings Set the following options:
l Impersonation password: if login to the current domain/tree is successful, the connector
logs the user in via the administrator password.
lWindows/Novell: sets what to authenticate against.
Test Clicking the Test button tests the connector with the current settings.
28.3.2 - Navigation settings

Field Name Description
Behavior Select the behavior you want to use:
lNavigate workarea: if selected, the user is able to browse the entireWorksite server, and can
choose any valid folder to store documents as a target.
lSpecify: select a valid folder as final scanning destination. The navigation form on the client
side is skipped.
lSpecify and browse: select a valid folder as a default scanning destination. Users can browse
for different folders,
lAutoselect: the connector navigates a target automatically using the data publishing values.
Three Data Publishing fields are used in this feature: ECOPY_CLIENT_ID (or ECOPY_CUSTOM1),
ECOPY_MATTER_NUMBER (or ECOPY_CUSTOM2) and WORKSITEFOLDER. The first two are used to
navigate to a workspace which relates to the client andmatter. When a workspace is
identified, the navigation to the folder can happen in two ways: the connector tries to find a
folder with an administrator-defined name, or a folder with the name published via the
WORKSITEFOLDER data publishing key. If the ellipsis button of theNavigation tab is pressed
when this behavior is selected, the Search folder dialog is displayed, and the administrator
can specify folder name source. Using the displayed dialog window, checking theCreate
folder option allows automatic folder creation with the provided name, if the workspace is
identified succesfully, but the folder does not exist yet.
Clicking theBrowse button resets the content of the list control to the content before clicking
on theSearch button if the list contains search results. Otherwise it resets to the content which
was in the list when the form was displayed.
Folder name Displays the selected folder name. Use the ... button to browse the folder structure.
Provide a storage
confirmation screenEnables or disables client-side displaying of the successfully stored document's Worksite
document ID.
Provide
autonavigation
property screen as
needed
Enabling allows the user to enter the Client ID andMatter number on a separate client form if
these values are not received through data publishing. The connector performs workspace
search based on the entered values and the document is stored at the found location. If
disabled, the standard navigation form appears
28.3.3 - Attributes settings

Field Name Description
Behavior Select the behavior you want to use. The available options are:
lShow selected fields: the connector displays all required fields and selected optional custom
fields for the client, and prepopulate them from the source defined by the administrator.
lShow required fields: the connector displays all required fields for the client, and prepopulates
them from the source defined by the administrator.
lAuto-index: the connector pre-populates attributes from the source defined by the
administrator. When the automatic profile population creates a valid profile, the document
attributes forms on the scanning device are skipped. If it fails, the document profile attributes
form is displayed on the device screen, and the end user can correct the issue.
Select fields Click this button to customize the visible fields.
eCopy values Select an entry in the table and click theEdit button to configure the default value of the
attribute. The following attributes can be configured:
lDatabase: can be configured only if the target is theDocument worklist and theWorksite
server manages more than one database.
lDescription: always configurable. Can be populated from the <FILENAME> system variable as
well.
lAuthor: always configurable. Can be populated from the <OPERATOR> system variable as well.
lType, Class, Subclass, and custom fields: configurable via the Default value dialog.
The Default value of <attribute> dialog provides a checkbox in order the enable/disable attribute
value population from data publishing. The default value can be configured for folder default
value, or administrator predefined value. Predefining is available if the target database is
unambiguous, and works by either clicking the value on the displayed list, or entering it
manually. The predefined value is validated against the target database, if it is possible. If not, a
warning dialog is displayed, the validation process is skipped, and values are validated just
before the document storing.
When configuring a sub-attribute (a subcategory of amain attribute), the valid values list
contains only those values which are real sub-categories of the already configuredmain
category. The Category - Sub-Category pairs are: Class-SubClass, Custom1- Custom2 and
Custom29-Custom30.
28.3.4 - Data Publishing keys
Published key Mapped Worksite attribute Note
ATTYPE_CLASS Class Used by theAuto selectmode as well.
ATTYPE_SUBCLASS Subclass Used by theAuto selectmode as well.

Published key Mapped Worksite attribute Note
ATTYPE_CUSTOM1 Custom1 When data are provided in both ECOPY_CLIENT_ID
and ATTYPE_CUSTOM1, ECOPY_CLIENT_ID takes
precedence.
ATTYPE_CUSTOM2 Custom2 When data are provided in both ECOPY_MATTER_
NUMBER and ATTYPE_CUSTOM2, ECOPY_MATTER_
NUMBER takes precedence.
ATTYPE_CUSTOM3 Custom3
ATTYPE_CUSTOM4 Custom4
ATTYPE_CUSTOM5 Custom5
ATTYPE_CUSTOM6 Custom6
ATTYPE_CUSTOM7 Custom7
ATTYPE_CUSTOM8 Custom8
ATTYPE_CUSTOM9 Custom9
ATTYPE_CUSTOM10 Custom10
ATTYPE_CUSTOM11 Custom11
ATTYPE_CUSTOM12 Custom12
ATTYPE_CUSTOM29 Custom29
ATTYPE_CUSTOM30 Custom30
WORKSITEFOLDER - Used by theAuto selectmode as well.


