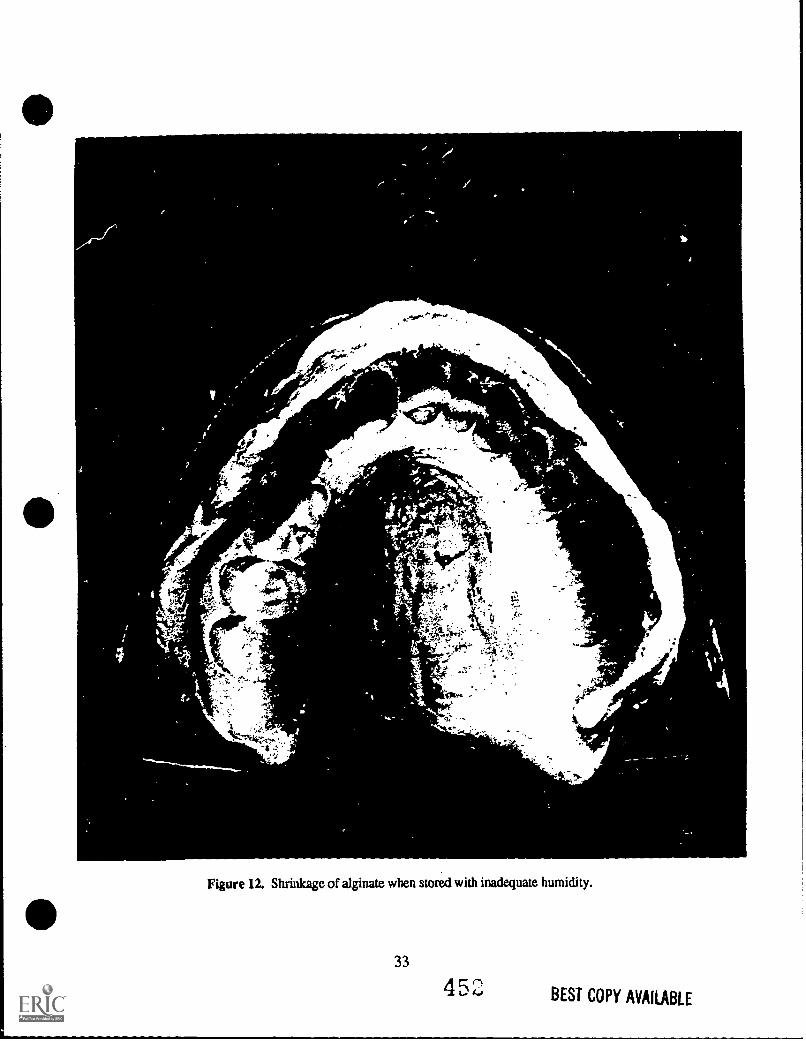
DOCUMENT RESUME ED 354 307 CE 062 985 TITLE Fundamentals of Dental Assisting and Expanded Functions. Curriculum Guide. Volumes 1-2. [Revised.] Invest in Success. INSTITUTION Idaho State Dept. of Education, Boise. Div. of Vocational Education. REPORT NO Vo-Ed-258 PUB DATE 92 NOTE 552p.; For a related document, see ED 346 277. PUB TYPE Guides Classroom Use Teaching Guides (For Teacher) (052) EDRS PRICE MF02/PC23 Plus Postage. DESCRIPTORS *Allied Health Occupations Education; Competency Based Education; Curriculum Development; *Dental Assistants; Dental Evaluation; *Dental Hygienists; Dentistry; Educational Research; Job Analysis; Job Performance; *Job Skills; Job Training; *Occupational Information; Postsecondary Education; Program Content; State Curriculum Guides; State Programs; Statewide Planning; Task Analysis IDENTIFIERS *Idaho ABSTRACT Under the Idaho stpte system for curriculum development in vocational education, Technical Committees made up solely of industry personnel are responsible for drawing up task lists for each program. Accordingly, a task list for dental assistants was drawn up and used as a basis for revising the curriculum guide for fundamentals of dental assisting and expanded functions. The two volumes of the guide contain seven modules. Module 1, Fundamentals for Dental Assisting, consists of an instructor's guide with teaching guidelines, supplemental module, and a module on introduction to dental materials. Module 2, Applications of Pit and Fissure Sealants, includes a self-study module with course description, evaluation form, informational material, study questions, and references. Module 3, Temporary Crown Restorations, provides an instructor's guide detailing course requirements, materials and supplies; testing procedures; and a student module with course outline, informational material, and study questions. Module 4,. Polishing Amalgam, consists of a self-study module with course outline, evaluation form, informational material. study questions, and references. Module 5, Aiding in the Administration of Nitrous Oxide-Oxygen Analgesia, contains an instructor /student module with course outline, informational material, self-examination, and bibliography. Module 6, Taking Alginate Impressions, provides a self-study module with course description, evaluation form, information material, study questions, and references. Module 7, Coronal Polishing, consists of an instructor's guide with a synopsis, outline of kinds of background knowledge students should have, lists of terminology and objectives, student module with course outline, informational material, and study questions. Each module contains a final examination with answer key. (YLB)
Transcript
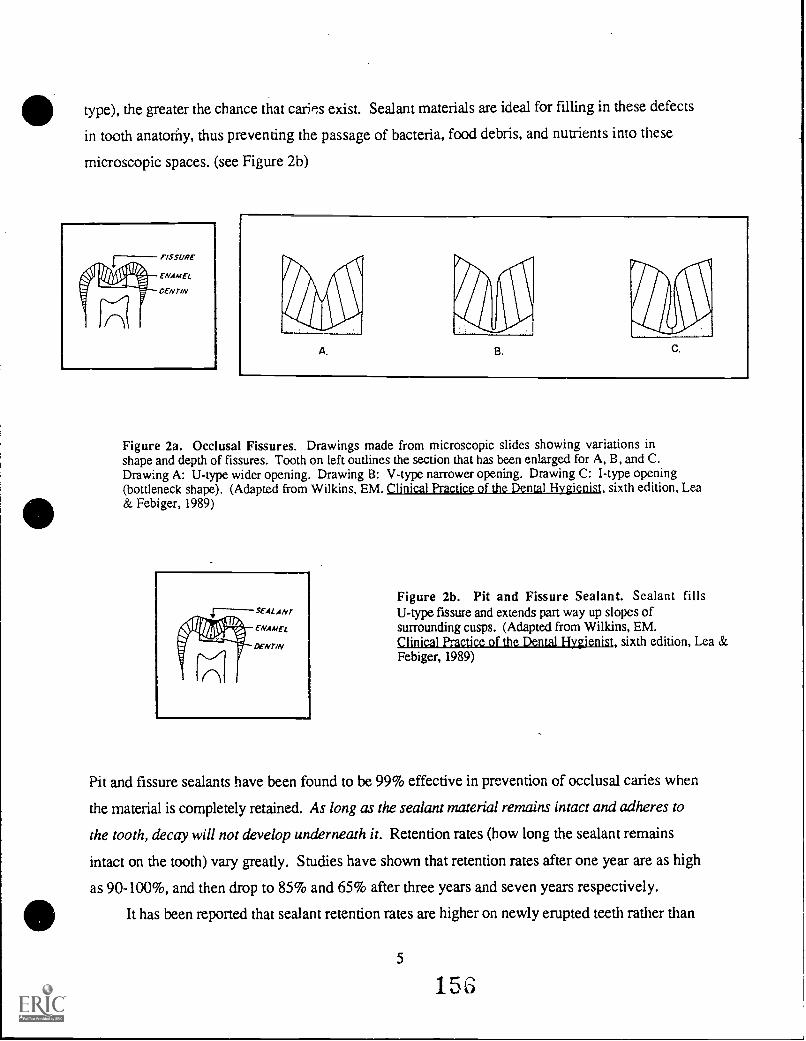
DOCUMENT RESUME
ED 354 307 CE 062 985
TITLE Fundamentals of Dental Assisting and ExpandedFunctions. Curriculum Guide. Volumes 1-2. [Revised.]Invest in Success.
INSTITUTION Idaho State Dept. of Education, Boise. Div. ofVocational Education.
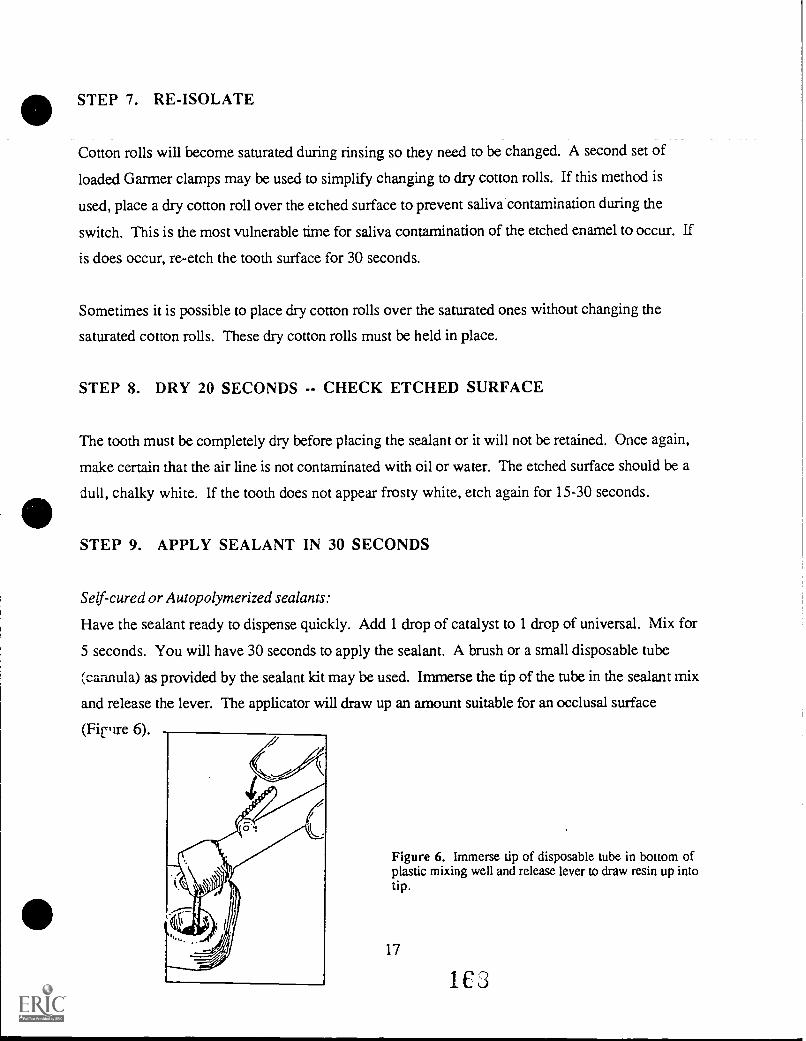
REPORT NO Vo-Ed-258PUB DATE 92NOTE 552p.; For a related document, see ED 346 277.PUB TYPE Guides Classroom Use Teaching Guides (For
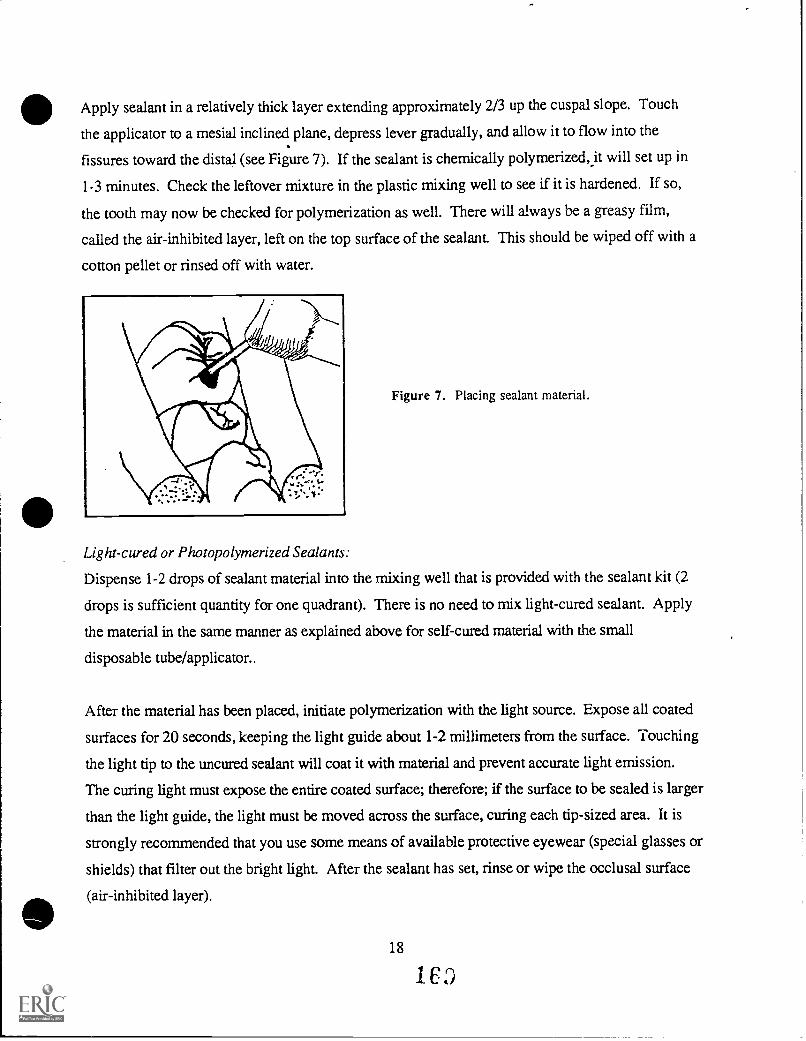
Teacher) (052)
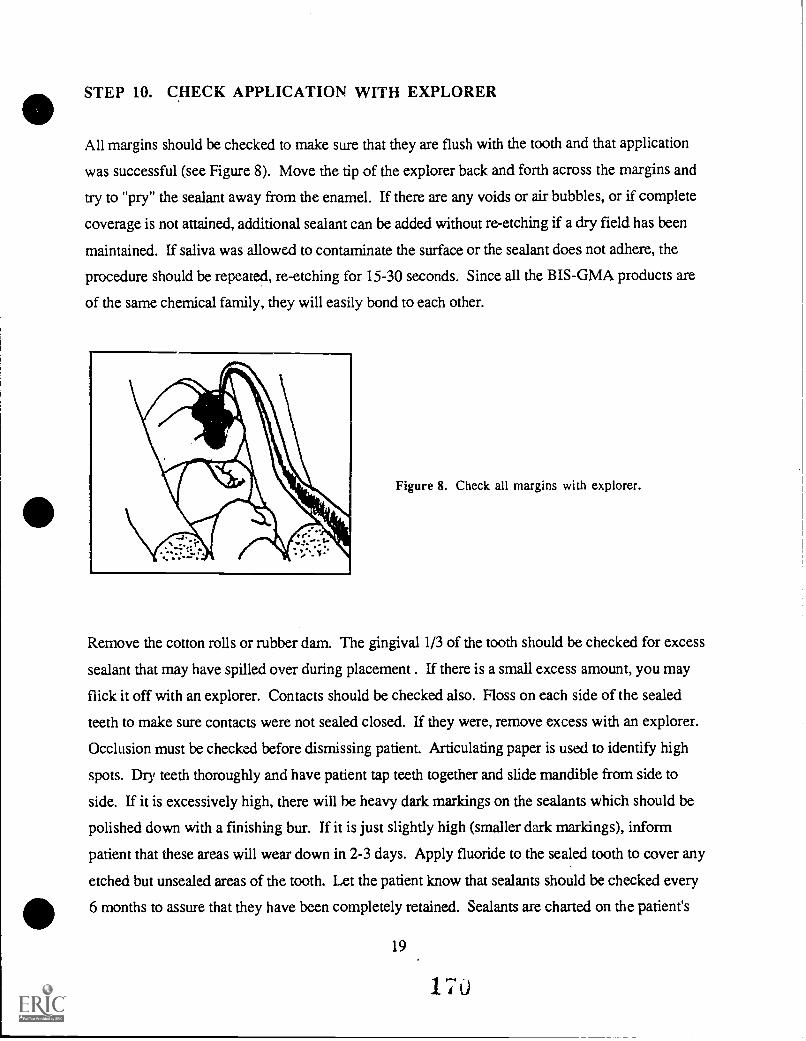
EDRS PRICE MF02/PC23 Plus Postage.DESCRIPTORS *Allied Health Occupations Education; Competency
Based Education; Curriculum Development; *DentalAssistants; Dental Evaluation; *Dental Hygienists;Dentistry; Educational Research; Job Analysis; JobPerformance; *Job Skills; Job Training; *OccupationalInformation; Postsecondary Education; ProgramContent; State Curriculum Guides; State Programs;Statewide Planning; Task Analysis
IDENTIFIERS *Idaho
ABSTRACTUnder the Idaho stpte system for curriculum
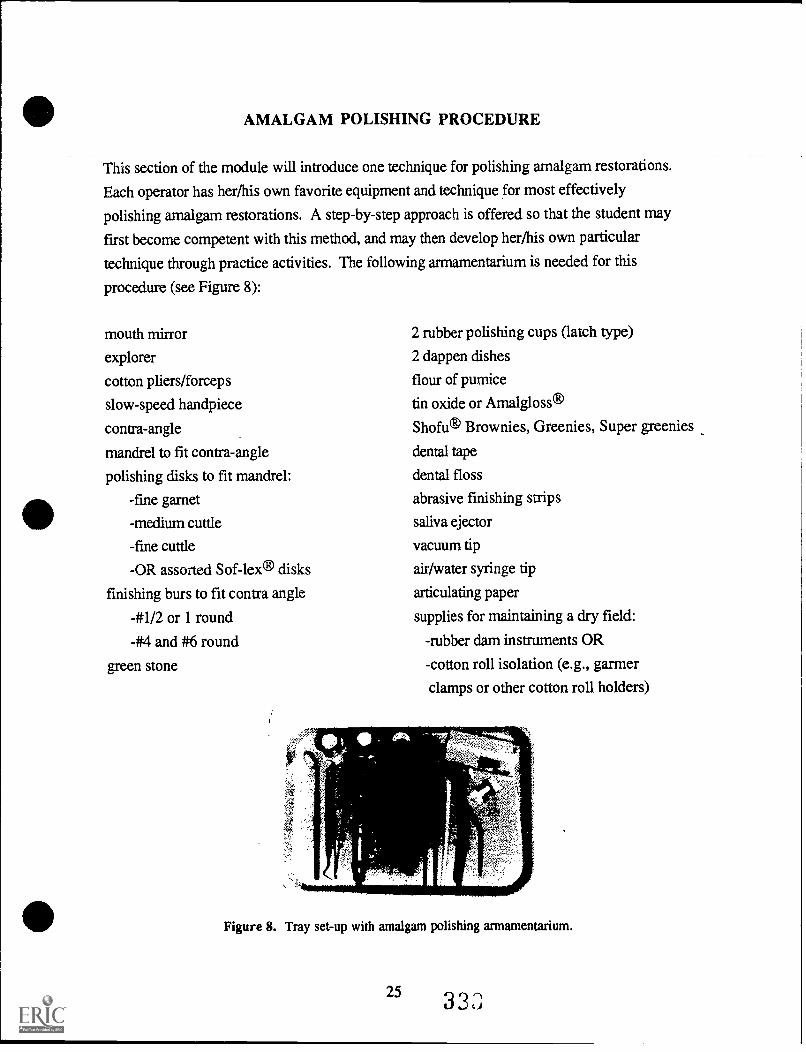
development in vocational education, Technical Committees made upsolely of industry personnel are responsible for drawing up tasklists for each program. Accordingly, a task list for dentalassistants was drawn up and used as a basis for revising thecurriculum guide for fundamentals of dental assisting and expandedfunctions. The two volumes of the guide contain seven modules. Module1, Fundamentals for Dental Assisting, consists of an instructor'sguide with teaching guidelines, supplemental module, and a module onintroduction to dental materials. Module 2, Applications of Pit andFissure Sealants, includes a self-study module with coursedescription, evaluation form, informational material, studyquestions, and references. Module 3, Temporary Crown Restorations,provides an instructor's guide detailing course requirements,materials and supplies; testing procedures; and a student module withcourse outline, informational material, and study questions. Module4,. Polishing Amalgam, consists of a self-study module with courseoutline, evaluation form, informational material. study questions,and references. Module 5, Aiding in the Administration of NitrousOxide-Oxygen Analgesia, contains an instructor /student module withcourse outline, informational material, self-examination, andbibliography. Module 6, Taking Alginate Impressions, provides aself-study module with course description, evaluation form,information material, study questions, and references. Module 7,Coronal Polishing, consists of an instructor's guide with a synopsis,outline of kinds of background knowledge students should have, listsof terminology and objectives, student module with course outline,informational material, and study questions. Each module contains afinal examination with answer key. (YLB)
Curriculum Guide forFUNDAMENTALS OF
DENTAL ASSISTING ANDEXPANDED FUNCTIONS
Vo. Ed. #258
nvestift Success
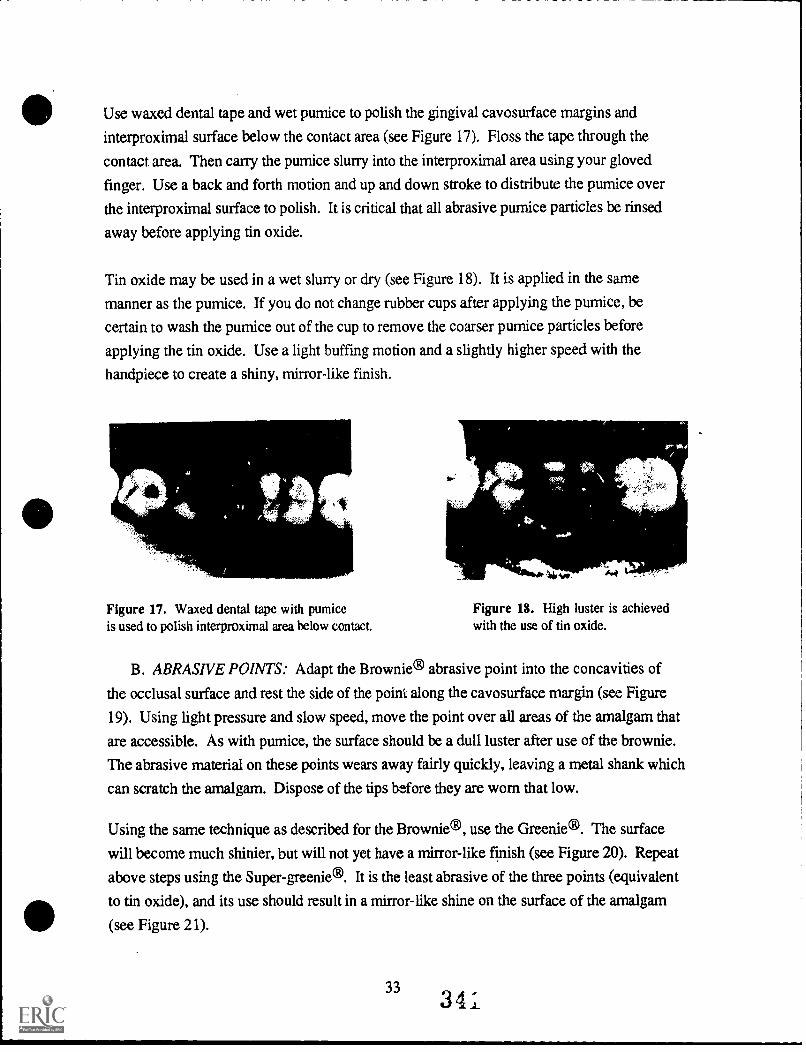
STATE DIVISION OFVOCATIONAL EDUCATION
U.S. DEPARTMENT OF EDUCATION
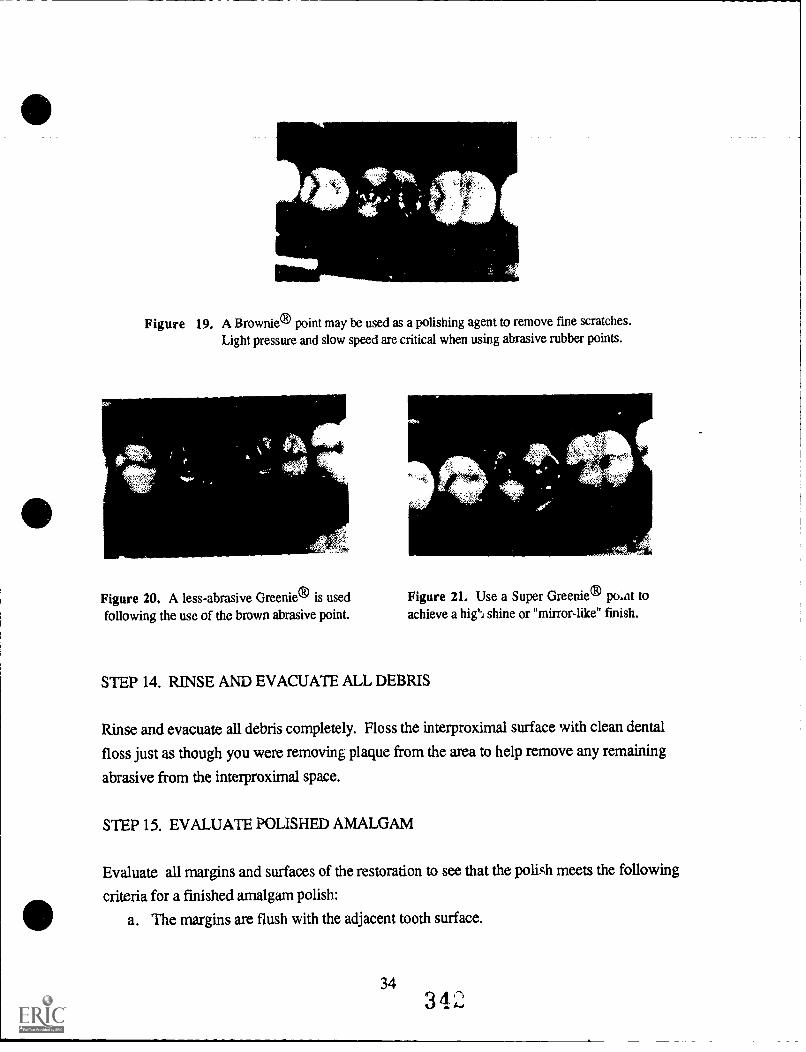
Office of Educational Researchand Improvement
EDUCATIONAL RESOURCES INFORMATIONCENTER (ERIC)
LO"rs document has been reproduced asreceived from the person or organization
The Division of Vocational Education is pleased to provideyou with this State Curriculum Guide as a part of our commitmentto your efforts in conducting quality educational programs forstudents who are preparing for employment in meaningful andrewarding occupations.
We know that a great deal of time and effort goes into the operationof a Vocational Education program, and we applaud your localefforts to make these programs available for students. This StateGuide should assist you in these efforts.
The competency-based State Guide was developed from a TechnicalCommittee Report prepared with the assistance of industry personnel.The Report includes a Task List which is the basis for the State Guide.The Tasks identified in the Technical Committee Report were representativeof the competencies needed by a worker to be hired or employed in Idahobusinesses.
Vocational Education has adopted the Competency-Based approach asthe primary method of delivering Vocational Education skills tostudents. Competency Profiles are available for each student enrolledin programs as a means of recording student progress. The Profileis used as a student record when additional training is soughtaiding in the program articulation process. The Profile also communicatesto employers those skills the student has mastered.
We hope you find this document useful. Your comments are welcome!
) -
Trudy Anderson, Ph.D.Administrator
Equal Opportunity Employer
INTRODUCTION
The curriculum development process undertaken by the Idaho Divisionof Vocational Education involves the active use of industrypersonnel. Industry personnel comprise the sole membership onTechnical Committees which are responsible for the development ofTask Lists for each program. A Technical Committee Report isprepared on completion of the Committee's assignment. ThispublizItion is the Technical Committee Report.
The Task List prepared in the Technical Committee Report reflectthe current trends and skills necessary for an employee to: 1)
Obtain a job in Idaho's industry, 2) retain a job once hired, and,3) to advance in the occupational field. Task Lists are groupedaccording to Duty areas generally used in industry settings. Dutyareas are used as the basis for modules in the Statewide CurriculumGuide development process. The Technical Committee segment is thesingle most significant step in the curriculum development process.All future curriculum activities are predicated 'n the premise thatan accurate picture of industry needs are refa,,cted in the TaskList.
Instructional personnel are selected to develop the StatewideCurriculum Guide. These instructors write Performance Objectivesfor each Task and the subsequent Enabling Objectives for eachPerformance Objective. The committee members prepare all materialin a competency-based format so as to have an effective andefficient methodology for determining student progress. TheStatewide Guides are designed as the prime determiner of programcontent. All programs must follow the established Guide in orderto be approved for operation. Any deviation from this Guiderequires written approval from the respective program supervisor atthe Division of Vocational Education. It is not the intent of theDivision that all programs be designed to be exactly the same, butassurance is needed to ensure that the program meets the minimumstandards for operation, based on the community needs, equipment,and facilities available to the local school or institution.
The Technical Committee Report does not dictate the level ofinstruction The Task List developed represents tie entireoccupational field. Schools and Institutions determine what skillscan be taught and what depth of instruction can be proded. Theymust choose the Tasks to be taught from the Technical CommitteeReport but are free to determine how many or which ones can beincorporated into their program.
The Technical Committee Report is also used as the primary list forgenerating Student Profiles. These Profiles are used as acumulative record of each student's progress. They are printed ina folder format and have levels of performance scales for each Taskso that student competence can be recorded for individual skills ortasks. This document will become the main component forArticulation activities in the event that the student desires to goon for additional training or education.
ACKNOWLEDGEMENTS
The curriculum guide for Dental Assisting was revised to includethe additional expanded functions for Dental Assistant. It wasdetermined that it was necessary to update the Fundamentalscomponent as well in order to have all segments as technicallycurrent as possible. The Division of Vocational Education enlistedthe assistance of a Technical Committee to develop a task list forDental Assistants and utilized this task list as a basis forrevising the curriculum guide. The Technical Committee Report forFundamentals of Dental Assisting is available from the Division asa separate publication.
A team of writers comprised of faculty from the Dental Hygienistprogram at Idaho State University was assembled to rewrite sectionsof the existing guides and to develop the new Expanded Functionscomponents needed. We are indebted to the following people fortheir assistance in preparing the Curriculum Guide for DentalAssisting: Denise Bowen, Kelly Reich, LuAnn Spain, CarlenePaarman, Carole Christie, Carole Kawamura, and Lisa S. Fleming.The following people served on the Technical Committee: Dr. RichardSmart, Coeur d' Alene; Dr. Curtis Eastin, Coeur d' Alene; Dr. SkipPierce, Boise; Dr. Lon Blair, Boise; Dr. Timothy Thompson, TwinFalls; Janet Ingrao, Nampa; Debbie Russell, Boise; Dr. AnthonyWolff, Nampa; Jerry Davis, Boise; Sylvia Boyle, Boise; and DeniseBowen, Pocatello.
A training seminar was conducted in Pocatello for instructors fromthe six Postsecondary Vocational Technical Schools following thedevelopment of the guide. Instructors who attended this seminarwere selected by the respective postsecondary school and areexpected to serve as the trainer for other Dental professionals intheir region. Each Vocational institution will offer the DentalAssisting program in on-campus or off-campus courses to Dentalprofessionals in an attempt to upgrade the skills of the DentalAssistants employed by Dentists. We are confident that the healthof Idaho residents will be improved through the efforts of thededicated professionals who assisted the Division in developingthese instructional materials.
Trudy Anderson, State AdministratorDivision of Vocational Education
It is the official policy of the Division of VocationalEducation that no person shall, on the grounds of race,handicap, sex, religion, creed, national origin or age, beexcluded from participation in, be denied the benefits of, orbe subjected to discrimination under any program, activity, oremployment.
Module 1
FUNDAMENTALS FOR DENTAL ASSISTING
O
Module 1-A
FUNDAMENTALS FOR DENTAL ASSISTING
Instructor's Guide
fpNDAMENTALS FOR DENTAL ASSISTING
INSTRUCTOR'S GUIDE
Developed by
Kelly Reich, RDH, BA
Idaho State Board for Vocational Education650 West State Street
Boise, Idaho
1991
TABLE OF CONTENTS
FUNDAMENTALS FOR DENTAL ASSISTANTS ii
INTRODUCTION 1
GUIDELINES FOR TEACHING FUNDAMENTALS I AND II 2
FUNDAMENTALS I 2
SUGGESTED CLASSROOM ACTIVITIES 2
FUNDAMENTALS II 3
CLASSROOM ACTIVITIES 5
INSTRUCTIONS FOR ADMINISTERING THE FINALEXAMINATION FOR FUNDAMENTALS FOR DENTAL ASSISTING....6
Clock Hours: 36Self Study: 36Clinical: Optional
FUNDAMENTALS FOR DENTAL ASSISTANTS
This course is designed to provide the student with basicbackground and knowledge in the areas of sterilization, charting,terminology, ethics and jurisprudence, local anesthesia and cavityclassification. It is a prerequisite to the course "ExpandedFunctions for Dental Assistants."
I. Dental Terminology (5 hours)
II. Ethics and Jurisprudence (6 hours)
III. Recording Dental Charting (6 hours)
Introduction to ChartingCharting SymbolsRecording Services Rendered
IV. Infection Control (4 hours)
Introduction to Disease Transmission/ControlSterile Instrument Preparation/HandlingDisinfection
V. Auxiliary's Role in Administration of Local Anesthesia(3 hours)
Basic EquipmentAnestheticsArmamentarium Selection/AssemblageAssisting with Administration
VI. Cavity Classification (6 hours)
Terminology ReviewBlacks Cavity ClassificationComponents of Prepared CavitiesElements of Cavity Design
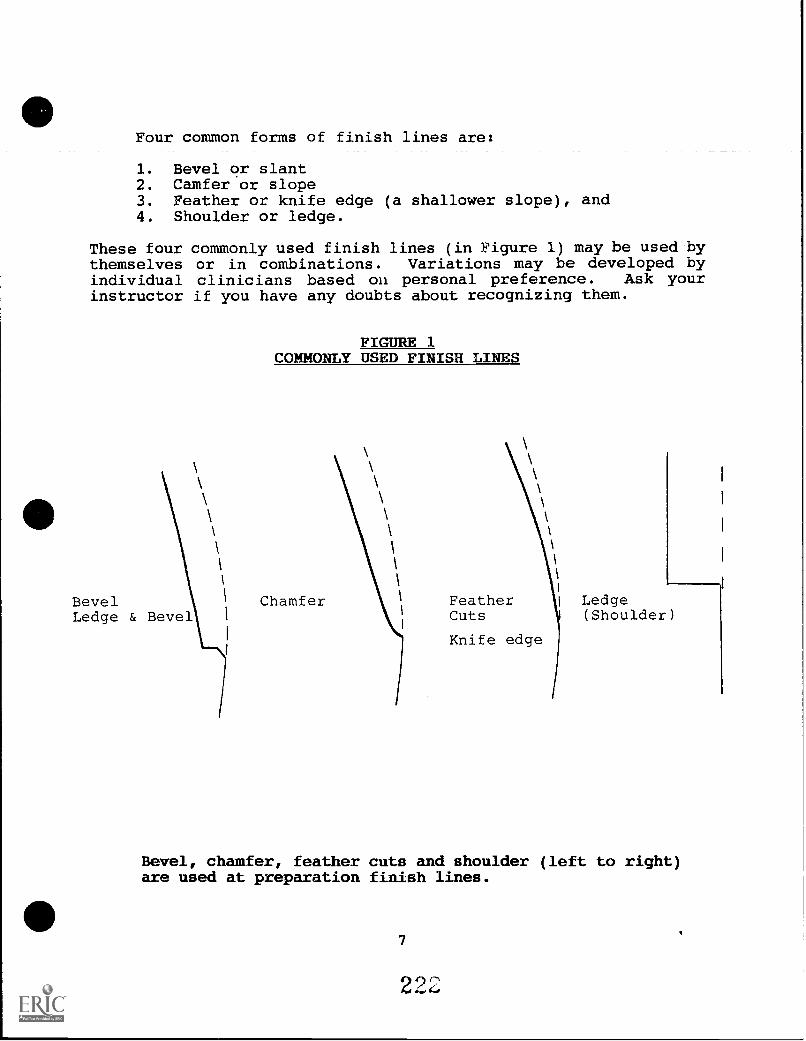
VII. Dental Materials (6 hours)
ii
INTRODUCTION
This instructional guide is provided to aid the instructor inteaching the Vocational Education Dental Assisting Fundamentalscourse. It has been designed to serve only as a guide and can beimplemented into the course at the discretion of the instructor.
The module, "An Introduction to Instructional Methodology" shouldbe used as a reference when teaching the Fundamentals course. Itoffers suggestions for teaching and explains the importance oflearning styles.
It may be helpful to design various exercises which will test thestudent's knowledge and learning style. The use of post-tests andmultiple choice test items will help the instructor determine thelevel of learning for each student.
Additional references have been listed in the Supplemental Modulefor Fundamentals II. It would be advantageous for the instructorto read the articles, since they would provide a broader knowledgebase for teaching. It also is suggested, in the SupplementalModule for Fundamentals II, that the student read the articles.It is impossible to expose the student to all of the informationthat is available, so additional reading is necessary.
The following guidelines are intended for use with the SupplementalModules Fundamentals I and II. Some of the ideas and suggestionsalso could be used in teaching the Ethics and Jurisprudence andDental Materials Course.
Refer to the course outline for course description, course texts,clock hours, and course requirements. Evaluation/Grading is basedupon the final examination. Instructions for administering theexam, a copy of the final examination and an answer key areattached.
1
iso
GUIDELINES FOR TEACHING
FUNDAMENTALS I AND II
FUNDAMENTALS I
Read the Colwell Self-Instructional Module and the coincidingSupplemental Module for Fundamentals I and suggested readings.Review the Instructional Goals.
Additional information has been added to the Dental Terminologyportion of Fundamentals I (in the Supplemental Module). Dentalterms are related to the subject matter covered in the chapters.
Incorporate the material from the Supplemental Module and thesuggested readings into the lecture portion of the class.
Additional dental terminology has been provided in the SupplementalModule and should be used in conjunction with the Chapter 12Glossary (in the Colwell Self-Instructional Module). Theterminology applies to new material covered in the SupplementalModule for Fundamentals I and II, and Dental Materials.
SUGGESTED CLASSROOM ACTIVITIES
As simplistic as it may seem, some individuals have a difficulttime with the pronunciation and spelling of dental terms.
1. It may be advantageous for the student to have a spellingreview. Terms may be selected at random and the student mustcorrectly spell the word. To further test their knowledge ofthe word, a definition must also be written.
Depending on the time frame, you may want to correct thetests, or have the students correct their own tests. Allowfor additional time outside of class, if you are evaluatingtheir work. As an instructor, you may have a betterunderstanding of their progress if you evaluate their tests.
It is essential that any time student Tiestions are given, ora quiz is administered, the material is reviewed duringclassroom time. This classroom review allows the student toparticipate in classroom discussions, and to ask questionsthat may arise at the time of discussion.
2. The next type of classroom activity must involve everyone'sparticipation. Depending on the class size, you may want todo this activity at two separate times. A topic 5s chosen bythe instructor, (e.g., dental charting) and the student must
2
write one question and answer on the subject. The studentmust sign their name, and the papers are collected. Theinstructor will randomly pick a student, excluding the personwho wrote the question, and present the question. If thestudent does not know the answer, the class should participateand answer the question.
The student's answer on the paper should be checked. A noteshould be made if the answer is incorrect.
3. Role playing is another activity that allows the student tospeak on a subject that may be difficult for them. Theactivity may center around situations that may arise in thedental office, and how they would handle the situations.
Patient rapport, explanation of dental procedures to thepatient, and charting symbols are examples of subjects thatmay be used in role playing.
Note: Five hours has been allowed for teaching Fundamentals I.It will be at the instructor's discretion to decide how thistime will be used. It is suggested that a portion of thistime be used in preparing for class and student evaluation.
FUNDAMENTALS II
Infection Control
Review the Instructional Goals for Chapters One, Two and Three inthe Colwell Self-Instructional Module for Fundamentals II.
Additional instructional goals have been added in the SupplementalModule pertaining to the tonics of: Infection Control, HerpesSimplex, AIDS, Disinfection and Sterilization.
Before beginning the Colwell Self-Instructional Module forFundamentals II, read the Instructional Guidelines for CompletingFundamentals II.
The information in the Supplemental Module is designed to be taughtin conjunction with the Fundamentals II material. The informationfrom the Supplemental Module and the suggested readings should beincorporated into the lecture portion of the class.
An instructional program and three videotapes have beenincorporated into Fundamentals II. The following instructionsshould serve as a guideline for incorporating the material into thecourse.
3
Is
1. First read the instructional program "Infection Control inthe Dental Environment" produced by the American DentalAssociation. It contains current information on infectioncontrol, and infection control practices. This manual is forthe instructor's use only and will not be provided tostudents.
2. A. review of literature is also included with this information.Some material does not pertain to dentistry, so it may benecessary to decide what is pertinent for your particularclass. It has been stressed throughout the SupplementalModules, to refer to additional information to help gain abetter understanding of the subject matter. Additional.references have been listed in the Supplemental Module forthis reason.
It is important when teaching Infection Control, that theinformation is presented in a systematic and logical manner.Organize the topics and present the information in smallsteps.
3. Review the Instructional Goals for each chapter with theclass.
4. The ADA videotape entitled "Principles and Fundamentals ofInfection Control", should be shown after reviewing ChaptersOne and Two in the Colwell Self-Instructional Module.
5. Sterilization and Disinfection (Chapters Three and Four),should be completed in the Colwell Self-Instructional Modulebefore showing the ADA videotape entitled "Sterilization andDisinfection."
6. The ADA videotape entitled "Clinical Procedures" should beshown after the information concerning proper infectioncontrol procedures has been covered in the classroom.Presenting this information first will give the student ageneral understanding of the subject, as the videotape is morespecific.
7. Study questions have been included in the Fundamentals II,Supplemental Module. The questions include new informationfrom the Supplemental Module.
The test may be given after the infection control informationand videotapes have been covered.
4
CLASSROOM ACTIVITIES
1. If a dental office is available, it would be helpful for thestudent to practice proper infection control procedures.
Access to dental materials would be helpful, but notnecessary. The dental unit could be set up for pre-treatment,patient, and post-treatment procedures.
Each student would demonstrate or describe setting up for adental procedure. Questions should be asked during thedemonstration, to assure that the student understands therationale for infection control.
2. Role playing may be helpful to demonstrate how many timescross-contamination can occur during a procedure.
A dental office is not necessary, but may be useful. Twostudents would work together, one playing the role of theoperator and the other as the chairside assistant. They couldre-enact a dental procedure and demonstrate how to avoidcross-contamination. Suggestions for avoiding cross-contamination would be given by the instructor as the roleplaying occurs.
3. If possible, additional time could be set up to review thevideotapes while other classroom activity is taking place.
An additional six hours has been allowed for teachingFundamentals II. The Infection Control section of the ColwellSelf-Instructional Module has been updated. Minor changeswere incorporated in the Local Anesthesia section.
The approximate viewing time for the three videotapes is onehour. Preparation time for classroom instruction will dependon the individual instructor. Classroom activities should beincorporated into Fundamentals II, the length of time forthese activities will be at the discretion of the instructor.
4. The time allotted for the Colwell Self-Instructional Module,"Ethics and Jurisprudence" is six hours. No additionalsupplemental module is necessary for teaching this portion ofthe course. "Ethics and Jurisprudence" should be taught afterFundamentals II. It is suggested that a portion of this timewill be used in preparing for class and student evaluation.
5. An additional module, "Introduction to Dental Materials" hasbeen designed for Fundamentals for Dental Assisting. The timeallotted for teaching this portion of the course is six hours.
5
18
Study items have been included in the module, and should bediscussed as the material is covered in class. Suggestedreadings have been listed which may provide a broaderknowledge base for the ir$tructor and student. It issuggested that a portion of this time be used in preparingfor class and student evaluation.
Introduction to Dental Materials is designed to provide thestudent with basic knowledge of dental materials. It isstrongly recommended that the student seek additionalexperience in a dental setting to gain a better understandingof dental materials. "Introduction to Dental Materials"should be taught after "Ethics and Jurisprudence."
6
19
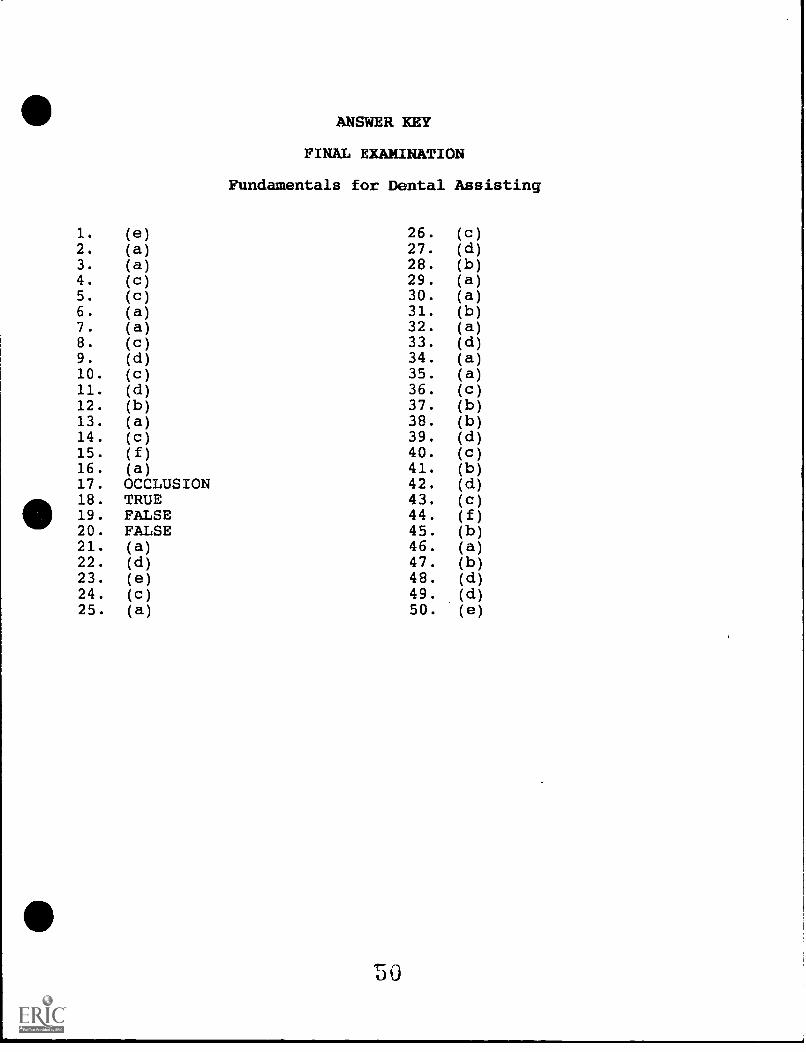
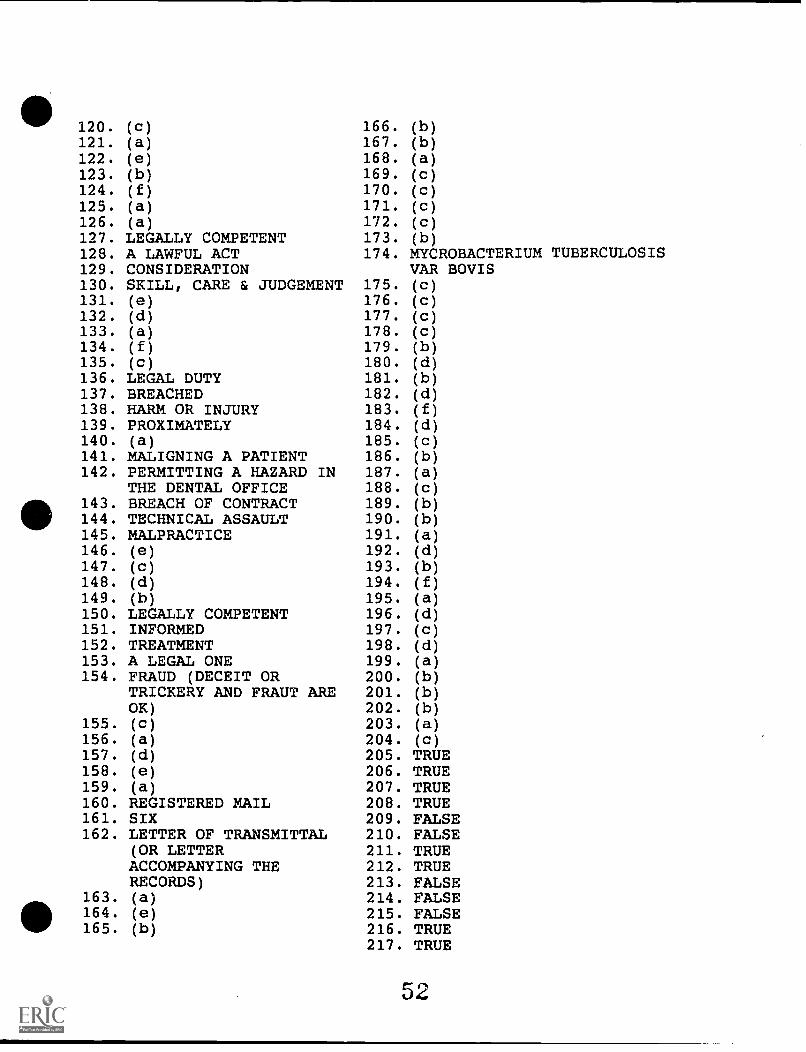
INSTRUCTIONS FOR ADMINISTERING THE FINAL EXAMINATIONFOR FUNDAMENTALS FOR DENTAL ASSISTING
The final examination for Fundamentals for Dental Assisting shouldtake the student approximately two hours and 30 minutes tocomplete. The student must achieve a minimum score of 80% tosuccessfully pass the examination.
Matching terms, definitions, fill in the blank, and true or falsequestions are worth ONE point each. Multiple choice questions areworth TWO points each. There is only one correct answer for eachquestion or statement. (Refer to the Answer Key provided.)
The calculated percentages for the Final Examination are asfollows:
(a) impacted(b) to be extracted(c) missing(d) extruded
6
27
MATCH THESE TERMS AND DEFINITION r%
42. CLASS I CAVITIES
43. CLASS II CAVITIES
44. CLASS III CAVITIES
45. CLASS IV CAVITIES
46. CLASS V CAVITIES
(a) Smooth surface cavitiesoccurring in the gingivalthird of the lingual orfacial surface of anytooth.
(b) Cavities in the proximalsurfaces of the anteriorteeth which require theremoval and restoration ofthe incisal angle.
(c) Cavities in the proximalsurfaces of the posteriorteeth.
(d) Pit and fissure cavitieswhich begin in structuraldefects of teeth.
(e) Cavities involving theabraded incisal edge orocclusal surface of atooth.
(f) Cavities beginning in theproximal surfaces of theanterior teeth which donot involve the incisalangle.
47. On January 11, 1991, the maxillary right first premolar hadthe distal and occlusal surfaces restored with an amalgamrestoration. Local anesthesia was used and a cement basewas placed under the restoration. The correct "servicerendered" entry for this would be:
anes, C.B., amalanes, C.B., amalanes, C & B, amalanesthesia, amalgam
48. On December 10, 1990, the mandibular left second primarymolar was extracted. Local anesthesia was used, a periapicalx-ray was taken. The correct "service rendered" entry forthis would be:
(a) 10/12/90- T anes, x-ray,(b) 12/20/90- T anes, x-ray,(c) 12/10/90- L anex, ext(d) 12/10/90- K anex, x-ray,
extext
ext 7
MATCH THE FOLLOWING TERMS AND DEFINITIONS.
49. INCISORS (a)
50. CANINES
51. PREMOLARS
52. MOLARS (b)
(c)
teeth with a broad workingsurface which is used forgrinding the more solid offood which require the useof heavy forces.
those teeth which will bereplaced by permanentteeth.
those teeth which havepointed cusps for graspingand tearing; however, theyalso have a broader surfacefor grinding and chewingfood.
(d) those teeth with a thin,sharp cutting edge whichare used for cutting andbiting.
(e) the heavy teeth designedto cut and tear thosethings that are too toughfor incisors to cut.
53. Facial caries in the buccal groove of a molar would be aClass cavity.
54. From a facial/lingual view, a tooth is contoured so that itis near the occlusal surface andnear the gingiva.
(a) narrower wider(b) wider narrower
55. A is formed where two walls of cavitymeet along a line.
8
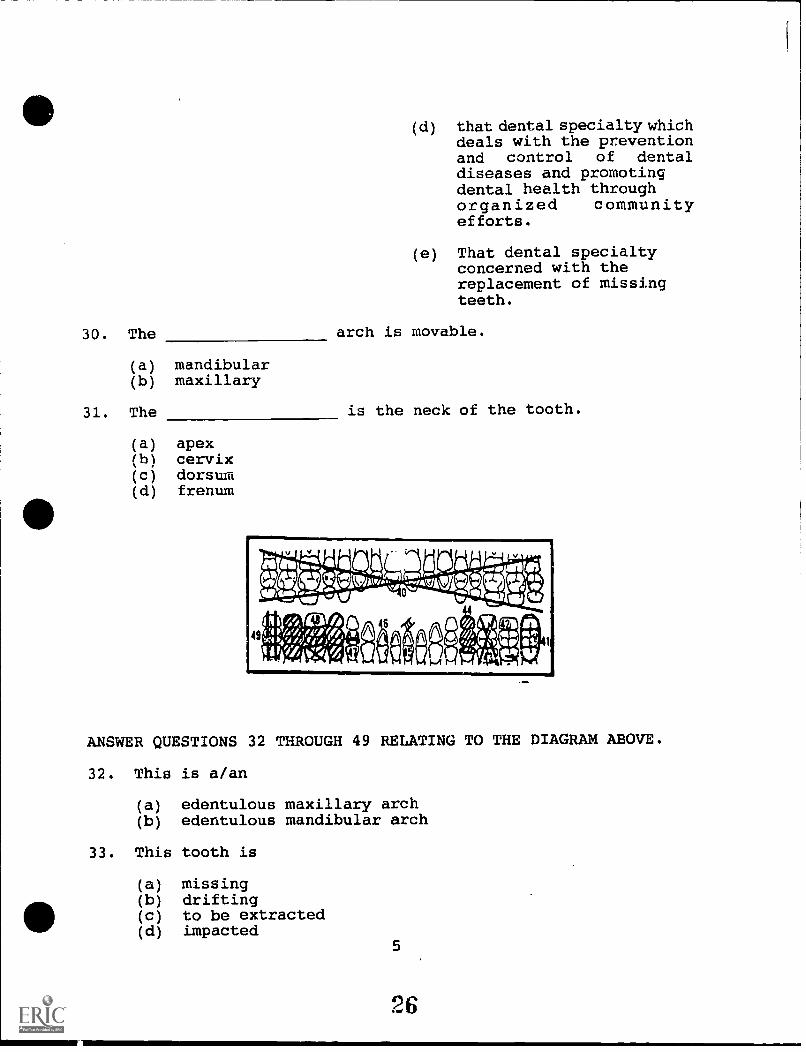
56. The is the sensitive living tissue of thetooth.
(a) cementum(b) dentin(c) enamel(d) pulp
57. Adjacent teeth touch each other at their widest points.Where they touch is known as the point.
(a) adjunct(b) contact(c) embrasure(d) occlusal
58. The
(a) cervix(b) apex(c) frenum(d) dorsum
is the tip of the root.
59. A is formed where three walls of acavity meet at a corner.
TRUE OR FALSE. MARK TO FOR TRUE, F FOR FALSE ON THE ANSWER SHEETPROVIDED.
60. Enamel is the hardest tissue of the body.
61. An abutment is a dummy tooth used to replace amissing tooth in a fixed bridge.
62. An occlusal x-ray shows all of themaxillary and mandibular arches in
63. Study models and diagnostic castsfor the same thing.
64. Recording services rendered entries are always madein ink.
65. The chart entry for a tooth that has had an apicoectomy wouldbe a at the end of the root tip.
teeth in theone film.
are two names
(a) circle(b) dot(c) straight line(d) triangle(e) zig-zag line
9
30
MATCH THE FOLLOWING TERMS AND ABBREVIATIONS.
anesthesia
suture treatment
amalgam
fluoride treatment
cement base
sedative treatment
crown and bridge
66. AMAL (a)
67. ANES (b)
68. S.T. (c)
69. F.T. (d)
70. C & B (e)
(f)
(g)
71. A is a localized area of infection atthe tip of the root of the tooth.
119. Dry heat sterilization at the temperature of 3400 F requiresminutes.
(a) 30(b) 60(c) 120
16
MATCH THE FOLLOWING TERMS AND DEFINITIONS.
120.-STATUTES OFLIMITATIONS
121. CONTRACT
(a) An agreement between two ormore competent parties coveringa specified lawful act for aconsideration.
(b) "Let the master answer." An122. TECHNICAL ASSAULT employer is held responsible
for the wrongdoings of123. RESPONDEAT SUPERIOR employees, if the wrongdoing
was committed within the scope124. CONTRIBUTORY of their employment.
NEGLIGENCE(c) The legal time limit within
which a civil suite for analleged wrong, such asmalpractice, must be filed.
(d) Any professional misconductor unreasonable lack of skillor fidelity in performance ofprofessional duties.
(e) A wrongful act, intentionalor inadvertent, involvingcontact between people whichis not consented to, norpermitted by, social usage(even without injury).
(f) Failure on the part of thepatient to follow the dentist'sinstructions both during andafter treatment.
125. A/an is a means of assigning expanded functionsin which there is a restrictive itemization of the specifictasks which may be performed by the auxiliary.
(a) list(b) open provision
126. To legally withdraw from a case the dentist must notify thepatient in writing of his intent at least 30 days in advanceof the effective date of such withdrawal.
(a) true(b) false
17
36
To be valid, a contract must have three elements. They are:
127. Those entering ,upon the agreement must be
128. The specific act must be
129. There must be a
130. Complete the following statement, "The auxiliary has alegal duty to useat all times."
MATCH THE FOLLOWING TERMS AND DEFINITIONS.
131. ABANDONMENT (a) A discipline dealing with goodand evil and with moral duty.
132. LICENSURE(b) A wrongful act, except one
133. ETHICS involving breach of contract,for which the injured party can
134. RECIPROCITY recover damages in civil action.
135. DENTAL (c ) Those laws, and interpretationsJURISPRUDENCE thereof, that apply to and
affect the dental professionfrom a legal standpoint.
(d) The granting of licenseexpressly to practice aprofession. Legal permissionto engage in a profession orbusiness.
(e) Desertion, or the practitioner'snot being accessible to apatient under treatment at anytime the patient may reasonablyrequire assistance.
(f) An agreement between two ormore states to allow anindividual who is licensed inone state to receive, withoutfurther examination, a licensein any of the other statesentering into that agreement.
18
39
The four elements which must be present for a tort to have beencommitted are:
136. A is owed by someone to another.
137. The duty has been by the accused.
138. There was to the accuser.
139. The above was caused by theaccused's action.
140. Under the doctrine of Respondeat Superior theis responsible for the acts of the hygienist or other licensedemployee.
The five (5) types of acts for which theprofessionally liable are:
dentist may be held
141.
142.
143.
144.
145.
MATCH THE FOLLOWING TERMS AND DEFINITIONS.
146. ADMISSION AGAINSTINTEREST
147. LIABILITY INSURANCE
148. STATE BOARD OF DENTALEXAMINERS
149. EXPANDED FUNCTIONS
(a) The obligation, under law,of one person to another.
(b) The assignment to dentalauxiliaries of greaterskill and responsibilitywhich were formerlyperformed by the dentist.
(c) Insurance coverage carriedby the professional toprotect him/her againstthe event of legal action.
(definitions continued on next page)
19
40
(d) An agency of the state inwhich it exists whose basicresponsibility is toadminister and enforce theDental Practice Act of thatparticular state.
(e) A statement made by anindividual which serves todefeat his/her owninterests.
The five (5) factors necessary for valid consent are:
150. The one giving consent must be
151. The consent must be
152. The consent is for a specific
153. The act consented to must be
154. Consent must not have been obtained by
MATCH THE FOLLOWING TERMS AND DEFINITIONS.
155. REASONABLE SKILL,CARE AND JUDGEMENT
(a)
156. CONSENT(b)
157. MALPRACTICE
158. STATE DENTAL PRACTICEACT
(c)
To give permission forsomething to be done byanother.
Breaking of a contract byeither party failing tokeep his/her part of anexpressed contract.
The responsibility of thedentist, and auxiliary topossess and use thatreasonable degree ofknowledge and skill thatis ordinarily possessed bypracticing in the samecommunity.
(d) Any professional misconductor unreasonable lack ofskill or fidelity inperformanceof professionalduties.
(e) The state law whichcontrols the practice of
20 dentistry.
41
159. The terms malpractice and negligence are frequently usedinterchangeably.
(a) True(b) False
The three (3) steps to be followed in the transfer of records are:
160. The records must be sent by
161. Request that they be kept on file for at least years.
162. Keep on file: the request for records; a copy of theand the postal receipt.
163. The medical history should be routinely updated
(a) at each appointment(b) every six months(c) at every other appointment(d) yearly
164. Infection control procedures recommended by theshould be adopted by all offices.
(a) Environmental Protection Agency(b) Center for Disease Control(c) State Health Agency(d) American Dental Association(e) b and d(f) c and d(g) b, c and d(h) a, b and d
165. Composites are a combination of
(a) simple and complex metallic elements(b) any basic metallic, ceramic and polymer materials(c) urethanes and silicones(d) non-metallic elements
166. is an internal reaction, or resistance,within a body to an externally applied force.
(a) force(b) strain(c) stress(d) tensile force
167. Malleability with increase in temperature.
(a) decreases(b) increases 21
42
168. The Herpes Simplex Virus can survive on surfaces and handsfor
(a) many hours(b) an indefinite period of time(c) one day(d) one week
169. types of Hepatitis are known.
(a) two(b) three(c) four(d) none of the above
170. is the process by which dissimilarmaterials (molecules) are joined together.
(a) a cavity varnish(b) a base or liner(c) a cavity varnish, base or liner
23
182. The use of gloves, masks, and eyewear provide an effectivebarrier in preventing the transmission of
(a) the AIDS virus(b) the hepatitis B virus(c) herpes simplex I(d) a and b(e) a and c(f) all of the above
183. The HBV can be transmitted through
(a) blood(b) saliva(c) semen and other bodily secretions(f) a and b(g) b and c(h) all of the above
184. When a zinc phosphate cement base is used,should be placed first.
(a) calcium hydroxide(b) cavity varnish(c) zinc oxide eugenol(d) a and b(e) a and c(f) b and c(g) all of the above
185. A is a colloid in which the medium is water.
(a) gel(b) sol(c) hydrocolloid
186. Alginate is a(an) hydrocolloid.
(a) reversible(b) irreversible
187. Agar-agar is a (an) hydrocolloid.
(a) reversible(b) irreversible
188. impression material has a strong odorand will stain clothing.
(a) Silicone(b) Polyether(c) Polysulfide
24
45
189. When replacing the protective cap on the dental needle,
(a) the two handed technique should be used(b) the scoop technique should be used(c) the needle should be bent first(d) the protective cap should not be replaced prior to
disposing of the needle
190. The function of a luting cement
(a) is to seal the dentinal tubules(b) is to provide retention between the tooth surface and
the restoration surface(c) is to provide a barrier between the pulp and the
restoration(d) is to provide additional strength to the restoration
191. A major advantage of using Glass ionomer cement is the
(a) slow release of fluoride onto the tooth structure(b) sedative properties of the cement on the pulp(c) ability of the cement to flow into surface
irregularities of the tooth
192. When placing a base in a deep restoration, the cement ofchoice would be
(a) restorative materials(b) temporary coverage for a tooth(c) the fabrication of dentures(d) a and b(e) a and c(f) all of the above
25
46
195. A/an denotes a molecule that is made upof many monomers-
(a) polymer(b) ionomer(c) ion
196. is a form of Periodontal Disease.
(a) gingivitis(b) periodontitis(c) pulpitis(d) a and b(e) a and c(f) all of the above
197. Composite resins are a
(a) tooth-colored restorative material designed for usein the anterior teeth
(b) tooth-colored restorative material designed for usein the posterior teeth
(c) tooth-colored restorative material designed for usein the anterior and posterior teeth
198. Acid etch can be applied as a
(a) gel(b) liquid(c) paste(d) a and b(e) a and c(f) b and c(g) all of the above
199. Acid etch should be on the tooth surface.
(a) dabbed(b) rubbed(c) burnished
200. Composite resins may be to the pulp.
(a) soothing(b) irritating
201. The composite material is more resistant toabrasion and difficult to polish, when compared to othertypes of composite material.
(a) hybrid(b) macrofilled(c) microfine 26
47
202. A is a layer of tooth-colored restoration thatis attached to the surface of a prepared tooth or teeth.
(a) composite(b) veneer
203. means the image will appear opaque or lightin color on the x-ray.
(a) Radiopaque(b) Radiolucent(c) none of the above
204. will increase the hardness as well as thestrength of a gypsum product.
(a) increasing the water/powder ratio(b) decreasing the density of the plaster or stone(c) excluding air from the mix(d) incorporating air into the mix
TRUE OR FALSE. MARK A T FOR TRUE OR AN F FOR FALSE ON THE ANSWERSHEET PROVIDED.
205. Luting cements can be applied as a permanent or temporarycement.
206. Heat is produced when zinc phosphate powder and liquidare mixed together.
207. Bone loss is present in periodontitis.
208. Polymerization is also referred to as curing.
209. An immunization is now available for the AIDS virus.
210. Persistent generalized lymphadenopathy is a symptom ofHepatitis B.
211. One common site for oral candidiasis is the buccalmucosa.
212. Disinfecting agents may cause deterioration of the glovematerial.
213. Infection control procedures should not be the same forevery patient.
214. Sterilization of handpieces is not recommended.
27
48
215. -A surface does not have to be cleaned prior to using _adisinfecting agent.
216. Phenolics may be used to disinfect handpieces.
217. Hybrid composite material combines the macrofilled andmicrofilled particle sizes.
WHEN YOU HAVE COMPLETED THE EXAMINATION, RETURN THE EXAMINATION ANDYOUR ANSWER SHEET TO THE EVALUATOR.
CO CO CO CO CO CO +4 +4 +4 +.1 +4 +4 +4 +4 +4 +4 cn cn cm cn Ch cn ON CN CA Ch Ln Ln Ln Ln Ln Ln Ln Ln Ln
Ln 41. Lo CD VD CO +.1 CI Ln Co NJ Fa CD %.0 CO +4 CR Ln Lo NJ F-4 CD to co Cm Ln 4N LO NJ FJ
C7H qj 0-, ...--, ..--, e--... I-3 y iv 1i pa nj.....,..--.. ti-------
tr go 0 a C6 na Z ri HI tr CD an tr trul a 1-h Co 0 a Po. >0 mi c) tr 0' CL 1-4 tr ti) go 0
Ittg ....., crirtai_c.............._.z............._.._.til til CJI En tii z rii
atTi pip, 1-3
tTiZ 01-3 0 t'
t ltii
hci
ti
rrrrrrrrrrrrrrrrrrF. k0 %0 1.0 kr) CO CO CO COH H H I-1 I-4 I-1 H 0 0 0 0 0 0 0 0 0 0 t.0 CO -.4 C1 111 4:t H t0'.0 CO Ui oiN (A) t%) H 0 '.0 CO .4 01 LT1 Cr) N H 0
tr a tr a() tr tr C) w P) 0 go go CL tro a a tr tro n tro trtrtrw a tr tr
120.121.122.123.124.125.126.127.
(c)(a)(e)(b)(f)(a)(a)LEGALLY COMPETENT
166.167.168.169.170.171.172.173.
(b)(b)(a)(c)(c)(c)(c)(b)
128. A LAWFUL ACT 174. MYCROBACTERIUM TUBERCULOSIS129. CONSIDERATION VAR BOVIS130. SKILL, CARE & JUDGEMENT 175. (c)131. (e) 176. (c)132. (d) 177. (c)133. (a) 178. (c)134. (f) 179. (b)135. (c) 180. (d)136. LEGAL DUTY 181. (b)137. BREACHED 182. (d)138. HARM OR INJURY 183. (f)139. PROXIMATELY 184. (d)140. (a) 185. (c)141. MALIGNING A PATIENT 186. (b)142. PERMITTING A HAZARD IN 187. (a)
THE DENTAL OFFICE 188. (c)143. BREACH OF CONTRACT 189. (b)144. TECHNICAL ASSAULT 190. (b)145. MALPRACTICE 191. (a)146. (e) 192. (d)147. (c) 193. (b)148. (d) 194. (f)149. (b) 195. (a)150. LEGALLY COMPETENT 196. (d)151. INFORMED 197. (c)152. TREATMENT 198. (d)153. A LEGAL ONE 199. (a)154. FRAUD (DECEIT OR 200. (b)
TRICKERY AND FRAUT ARE 201. (b)OK) 202. (b)
155. (c) 203. (a)156. (a) 204. (c)157. (d) 205. TRUE158. (e) 206. TRUE159. (a) 207. TRUE160. REGISTERED MAIL 208. TRUE161. SIX 209. FALSE162. LETTER OF TRANSMITTAL 210. FALSE
(OR LETTER 211. TRUEACCOMPANYING THE 212. TRUERECORDS) 213. FALSE
grateful to the following people for theirthis module.
for suggestions in outlining the material.
helpful suggestions and encouragement throughout
Dana Meyers for technical typing suppport.
53
Module 1-C
FUNDAMENTALS FOR DENTAL ASSISTING
Supplemental Module
54
IDAHO VOCATIONAL EDUCATIONAL SUPPLEMENTAL MODULE
FOR
"FUNDAMENTALS FOR DENTAL ASSISTING"
FUNDAMENTALS I AND II
Developed by
Kelly Reich, RDH, BA
Idaho State Board of Vocational Education650 West State Street
Boise, Idaho
June 1991
55
TABLE OF CONTENTS
COURSE OUTLINE ii
SECTION I. SUPPLEMENTAL MODULE FOR FUNDAMENTALS I 1
INTRODUCTION 2
INSTRUCTIONS FOR COMPLETING THE IDAHO VOCATIONALEDUCATION SUPPLEMENTAL MODULE FOR FUNDAMENTALSI, "DENTAL TERMINOLOGY, CHARTING AND CAVITYCLASSIFICATION" 3
DENTAL MATERIALS 8
SECTION II. SUPPLEMENTAL MODULE FOR FUNDAMENTALS II 10
Fundamentals for Dental Assisting is designed as an introductorycourse for individuals interested in pursuing a career in dentalassisting. This course provides basic background knowledgeessential for employment in a dental office.
The method of study may be offered through lecture and classroomdemonstrations, or self-study texts and supplemental modules.Since this course provides limited dental knowledge, it is stronglyrecommended that individuals seek additional experience in a dentaloffice to help maximize learning.
Upon completion of the classroom or self-study course, a minimumscore of 80% on the final examination must be achieved to receivea certificate of completion in Fundamentals for Dental Assisting.Fundamentals for Dental Assisting is a prerequisite for any of thesix Expanded Functions Dental Assisting Courses.
Employment in a dental office is not a prerequisite forFundamentals for Dental Assisting (either the lecture or self-studycourse). An individual is eligible to challenge the FundamentalsFor Dental Assisting final examination, at any time. Previousdental experience or employment in a dental office is not arequirement prior to taking the examination.
REQUIRED TEXTS
A. Colwell Systems Inc. Instructional Materials
I. Fundamentals I, "Introduction to Dental Terminology,Charting and Cavity Classification."
II. Fundamentals II, "Infection Control, LocalAnesthesia, and Oral Surgery."
ii
III. Fundamentals For Dental Auxiliaries, "Ethics andJurisprudence."
B. Idaho Vocational Educational Supplemental Modules
I. Idaho Vocational Education Supplement to ColwellSelf-Instructional Module, Fundamentals"Introduction to Dental Terminology, Charting andCavity Classification".
II. Idaho Vocational Education Supplement to ColwellSelf-Instructional Module, Fundamentals"Infection Control, Local Anesthesia, and OralSurgery."
III. "Introduction to Dental Materials," a self-studymodule developed by Kelly Reich, RDH, BA.
COURSE REQUIREMENTS FOR LECTURE COURSE
1. Attend all lecture and classroom demonstrations
2. Complete all assigned readings in the Colwell Self-
. Instructional Module, as well as the Vocational EducationalSupplemental Modules. The Supplemental Modules are designedto be used in conjunction with the required Self-InstructionalModules and will often refer back to the required modules.Additional information has also been provided in theSupplemental Modules, so it is important to comprehend thisinformation as well.
The final examination will cover material from the ColwellSelf-Instructional Modules and the Vocational EducationSupplemental Modules.
3. Complete all chapter exercises in the Colwell Self-Instructional Modules and any additional exercises in theVocational Educational Supplemental Modules.
4. Achieve a minimum score of 80% on the final examination.
COURSE REQUIREMENTS FOR SELF-STUDY COURSE
1. Read, in succession, all required Colwell Self-InstructionalModules and Vocational Educational Supplemental Modules. TheSupplemental Modules are designed to be used in conjunctionwith the required Self-Instructional Modules, and will oftenrefer back to these required modules. Additional information
iii
has been provided in the Supplemental Modules, so it isimportant to comprehend this information as well.
The final examination will cover material from the ColwellSelf-Instructional Modules and Vocational EducationalSupplemental Modules.
2. Complete all chapter exercises in the Colwell Self-Instructional Modules and any additional exercises in theVocational Educational Supplemental Modules.
3. Achieve a minimum score of 80% on the final examination.
NOTE: It is suggested that the average student will completethe Self-Study course in approximately 45 hours. Dueto variations in learning styles, it is anticipated thatsome individuals will achieve this goal in less time andother students may need additional time.
EVALUATION/GRADING
This course is designed on a Pass/Fail basis. In order tosuccessfully complete the course, the student must follow thecourse requirements for either the Self-Study or Lecture course andachieve a minimum score of 80% on the final examination.
iv
SECTION I.
SUPPLEMENTAL MODULE FOR
FUNDAMENTALS I
"INTRODUCTION TO DENTAL TERMINOLOGY, DENTALCHARTING, AND CAVITY CLASSIFICATION"
60
INTRODUCTION
This Vocational Education Supplemental Module (referred to as theSupplemental Module), has been designed to be used in conjunctionwith the Colwell Systems Inc. Self-Instructional ModuleFundamentals I, "Introduction to Dental Terminology, Charting andCavity Classification." It is important to follow each ColwellSelf-Instructional Module in succession.
The Supplemental Module will be used to help enhance learning, andprovide the student with additional information on the subjectarea.
All reading assignments and the amount of time required for eachsubject area will also be listed in the Supplemental Module. Theinformation in the Supplemental Module will correspond to thereading material in the Colwell Self-Instructional Module.
1. Follow the instructions in the Supplemental Module beforebeginning the Colwell Self-Instructional Module.
2. Review the instructional objectives in the Colwell Self-Instructional Module.
3. Complete the chapter exercises in the Colwell Self-Instructional Module as the reading assignments are completed.
4. Refer to the Glossary to use while reading if terminologyis unfamiliar.
2
61
INSTRUCTIONS FOR COMPLETING THEIDAHO VOCATIONAL EDUCATION SUPPLEMENTAL MODULE FOR
FUNDAMENTALS I, "DENTAL TERMINOLOGY, CHARTINGAND CAVITY CLASSIFICATION"
INSTRUCTIONS
1. Read the Instructional Goals in the Colwell Self-InstructionalModule Fundamentals I.
2. Follow all the reading assignments listed on the followingpages. The additional dental terminology in the SupplementalModule will correspond to the reading material in the ColwellSelf-Instructional Module, Fundamentals I.
3. Read Chapter 1 in the Colwell Self-Instructional Module, andcomplete the Chapter 1 exercises. Read the following dentalterminology.
PERIODONTAL DISEASE
Periodontitis is a form of Periodontal Disease. Periodontitisaffects the alveolar bone and other supporting structures of theteeth. If the disease is not treated, it may result in tooth loss.
Periodontal pockets are present with periodontitis because thealveolar bone has been destroyed causing the sulcus to becomedeeper. Once bone has been destroyed, the support of the tooth ispermanently lost.
Periodontitis can be successfully treated. Success of treatmentdepends upon early detection and frequent recalls for maintenancetherapy.
Daily homecare (e.g., brushing, flossing, etc.) will remove theplaque that accumulates on the teeth. Plaque will also accumulateon calculus because it is a porous surface.
Calculus cannot be removed by patient homecare regimes. These harddeposits are removed by hand instruments (e.g., curets, scalers,etc.). A dentist or dental hygienist is licensed to remove harddeposits from the teeth. The procedure by which calculus isremoved from the teeth is referred to as scaling and/or rootplaning.
3
6G
TISSUES OF THE TEETH-
The dentin has many tiny canals which lead to the pulp. Thesecanals are called Dentinal Tubules. When a tooth is prepared(drilled), tooth structure is removed and the dentinal tubules areexposed. When a dental material is placed on the dentin, it isimportant to first protect the pulp by placing a material over thedentin that will act as a barrier between the dental material andthe pulp. If the dentinal tubules are protected, the irritantscannot reach the pulp.
4
63
INSTRUCTIONS
Read Chapter 2, 3 and 4 in the Colwell Self-Instructional Module,and complete the Chapter 2, 3 and 4 exercises. Read the followingdental terminology.
DECAY
A prepared tooth means the decayed or damaged tooth structure hasbeen removed by the dentist and the tooth has been prepared forretention of a restorative material. A temporary or permanentrestorative material is then placed in the cavity preparation.
If the decay has extended into the dentin and involves a largeportion of the tooth, a significant amount of dentin may be lost.Materials are available which are placed on the dentin to promotethe formation of new dentin. This new dentin is referred to assecondary dentin formation and aids in repairing the toothstructure.
Various types of restorative materials may be used to fill a cavitypreparation after the decay has been removed. For example, dentalcements may be used as a temporary filling material. A tooth-colored restoration, for example a composite, may be placed ineither the anterior or posterior teeth. Amalgam, (silver fillingmaterial) is another commonly used restorative material.
PIT AND FISSURE SEALANTS
The dental material that is used in sealing pits and fissures onthe occlusal surfaces of the teeth is similar to the compositematerial placed in anterior and posterior restorations. Thematerial may be clear or tinted, and will harden (set) by achemical reaction or with the use of a light source.
ACID ETCH
In order for the sealant material to adhere to the tooth structure,a liquid or gel is first placed on the enamel. The liquid or gelis an acid that etches (makes the surface more porous) the enameland enables the sealant material to flow into the surfaceirregularities of the tooth. Acid etch also is used beforecomposite restorations are placed.
5
C4
BASE AND CATALYST
The two components of the sealant are mixed together. One of thecomponents is referred to as a Base and the other component isreferred to as the Catalyst (sometimes called the initiator orreactor depending on the material). The catalyst initiates thereaction. Without the catalyst a reaction would not occur. Manymaterials in dentistry are mixed together as a base and a catalyst.
MONOMERS AND POLYMERS
Monomers are single molecules. When many of these molecules jointogether, they form Polymers, a higher molecular mass. Hair is anaturally-occurring polymer. Rayon and rubber are synthetic (man-made) polymers.
Monomers and Polymers are mixed together to bring about a desiredresult. When these types of components are mixed together, theoutcome is usually much different than the original state of thematerials. Examples of polymers uped in dentistry include rubberbase impression materials and sealant materials.
Read Chapter 5, 6 and 7 in the Colwell Self-Instructional Module,and complete the Chapter 5, 6 and 7 exercises. Read the followingdental terminology.
OCCLUSION
It is important to check the patient's occlusion after restorativework has been completed. If the patient is not biting correctlyon all the teeth, trauma may result. The tooth or teeth surfacesmay be high, causing the patient to occlude (bite) incorrectly.This causes additional stress on the periodontal ligament, andsensitivity or tenderness may occur when biting.
6
65
INSTRUCTIONS
1. Complete the remaining Chapters 8 through 11, in the ColwellSelf-Instructional Module, and complete the remaining Chapterexercises.
2. Review the Chapter 12 Glossary. For additional terminology,read the following section in this Supplemental Module. Thisterminology will be important to understanding the materialin Fundamentals I and II, and the Dental Materials Module.
7
66
DENTAL TERMINOLOGY
The following dental terminology should be used in conjunction withthe Chapter 12 Glossary in the Colwell Self-Instructional Module.The definitions pertain to information covered in the SupplementalModules for Fundamentals I and II, and Dental Materials.
Adhesion - Two unlike molecules are attached by a force. The forcemay be chemical, mechanical or both.
Antiseptic - A substance which inhibits or kills bacteria.
Cast - Duplication or replica of the teeth or dental area.
Casting - The product which is obtained as a result of filling amold with molten metal.
Colloid - A suspension of particles in a medium, such as water,which consists of two or more phases. Colloid is used to describea state of matter.
Composite - A tooth-colored resin material used for restorativepurposes.
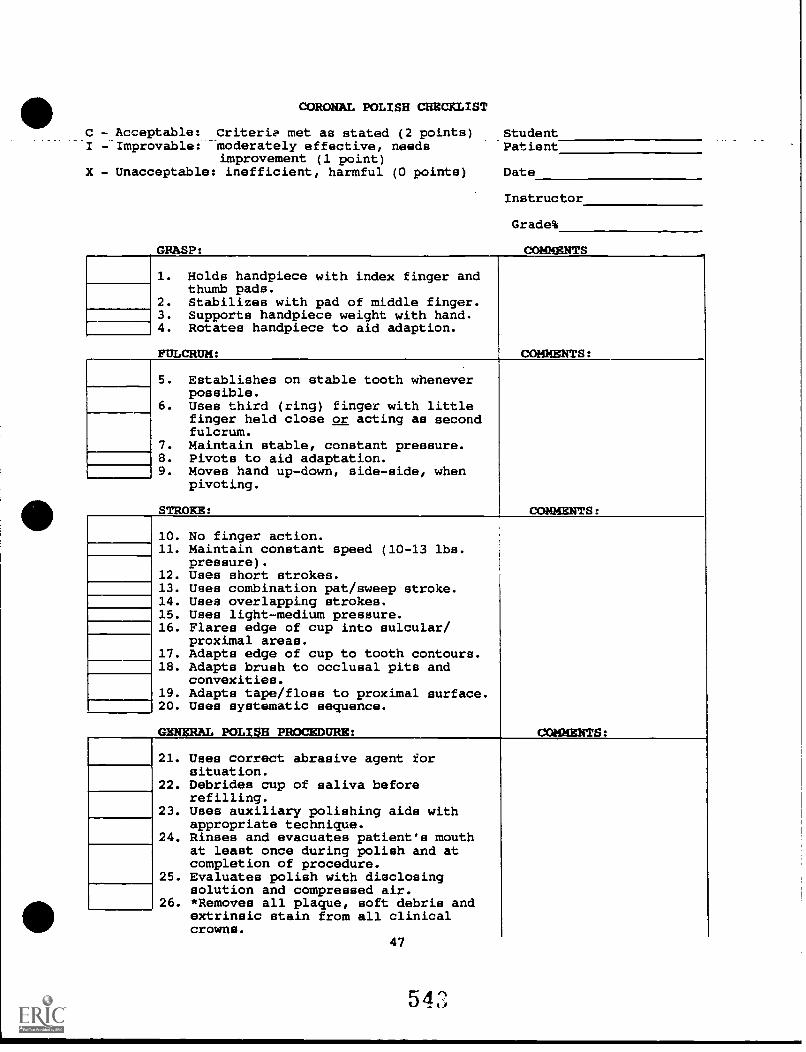
Coronal Polishing - A procedure by which plaque and extrinsic stainis removed from the teeth. All calculus must be removed from theteeth prior to polishing.
Curing - The process of polymerization.
Dental Auxiliary - Personnel employed by the dentist. Whenreferring to dental procedures, the dental auxiliary involved areusually the dental assistant(s) and dental hygienist(s).
Disinfectant - An agent or chemical used to kill harmfulmicroorganisms.
Extrinsic Stain - Stain that appears on the surface of the toothand can be removed by polishing. The stain may vary in color.
Gel - The solid phase of a colloid.
Hydrocolloid - A colloidal solution in which water is used as adispensing medium.
Monomer - A substance composed of single molecules.
Polymer - When many monomers join together they form a polymer, ora chain of polymers.
8
67
Radiolucent - Freely penetrable by x-rays. The image on the x-raywill appear dark gray to black.
SOL - Colloidal particles dispersing in a liquid.
Synthetic Resin - A man-made material which has plasticcharacteristics. It can be molded into various forms and thenhardened. Resins are used in dentistry for orthodontic appliances,restorative materials, temporary coverage, custom impression trays,and cements.
Systemic - Relating to a system or entire bodily system.
9
SECTION II.
SUPPLEMENTAL MODULE FOR
FUNDAMENTALS II
"INFECTION CONTROL, LOCAL ANESTHESIA, AND
ORAL SURGERY"
INTRODUCTION
This Vocational Education Supplemental Module (referred to as theSupplemental Module), has been designed to be used in conjunctionwith the Colwell Systems Inc. Self-Instructional ModuleFundamentals II, "Infection Control, Local Anesthesia, and OralSurgery."
It is important to follow each Self-Instructional Module insuccession. This module will be used to help enhance learning, andprovide the student with additional information not covered in theColwell Self-Instructional Module.
Learning styles may vary with each individual. The amount of timeprojected for completion of Fundamentals II, is only.a guideline.Some may exceed this limit, while others may complete the materialwithin a shorter time period.
It is important to have an understanding of all the informationand to successfully complete all exercises in Fundamentals II.
Study questions are included in this module, and will coverinformation from the Self-Instructional and Supplemental Module.
Additional references have been provided to give the student abroader knowledge of infection control, hepatitis B, and HIVinfection.
INSTRUCTIONAL GOALS
The following instructional goals are continuous with theinstructional goals for Disease Transmission and Infection Controlin the Colwell Self-Instructional Module Fundamentals II. Read theinstructional goals in the Colwell Self-Instructional Module andthen read the instructional goals listed below.
DISEASE TRANSMISSION
4. Explain why it is important to update ahistory.
5. Describe how cross-contamination maydental procedure.
6. List the four types of Hepatitis.
patient's medical
be reduced during a
7. Describe how Herpes Simplex I may be transmitted in a dentalsetting.
11
8. State the routes of disease transmission for Hepatitis B.
9. Discuss the differences and similarities between HIV infectionand AIDS.
10. Describe the signs and symptoms of HIV infection.
11. State which type of people are at high risk for contractingAIDS.
12. List two oral manifestations of AIDS.
INFECTION CONTROL
10. Explain why handwashing is important after removing gloves.
11. List four infection control procedures used during pre-treatment.
12. List two types of surface disinfectants.
13. Describe why a surface must be cleaned prior to using asurface disinfectant.
14. Discuss the importance of the Microorganism, MycobacteriumTuberculosis var. Bovis in dentistry.
15. List three types of chemical agents.
16. State four uses for chemical agents in dentistry.
17. Describe why it is important to follow the manufacturer'sdirections when using chemical agents.
12
INFECTION CONTROL
INSTRUCTIONS
Read Chapter 1 in the Colwell Self-Instructional ModuleFundamentals II and complete the Chapter exercises. Aftercompleting Chapter 1, read the following information on DiseaseTransmission.
DISEASE TRANSMISSION
Personal Contact
The area around the mouth, as well as the oral mucosa shouldroutinely be checked before a dental procedure is begun. Thisexamination may alert the dental auxiliary to any sores (lesions)which may be present during the examination.
It may be necessary to re-appoint a patient if lesions are foundaround the mouth, or in the oral cavity. The potential of diseasetransmission is present, and the person may reinfect another areaof the mouth if dental work is done. If a lesion is found, it isimportant to check with the dentist before any dental procedure isbegun.
Carrier Contact
The medical history of each patient should be routinely updated ateach appointment. A thorough medical history is important becauseit may alert the dental auxiliary to possible infectious diseases.Unfortunately, a person may not be aware they have an infectiousdisease.
Medical consultation may be necessary when the patient has had ahistory of active infection, or a systemic disease has been notedin the medical history.
Each patient must be considered potentially infectious, and thesame infection control procedures should be used for ALL patients.
Droplet Infection
Much of the mist that comes from a high-speed handpiece is notnoticeable. It dries on the skin, clothing, and other surfaces asa clear film. It is important to remember that the aerosols orsplatter produced by a high-speed handpiece, ultrasonic handpiece,or air-water syringe contain potentially dangerous microorganisms.
13
Indirect Transmission
Infection control procedures recommended by the American DentalAssociation and the Centers for Disease Control should be adoptedby all dental offices. It is everyone's ethical and legalresponsibility to ensure that the infection control guidelines arefollowed.
All items that come in direct contact with the oral cavity, andsoft and hard tissue, should be handled with caution. Items andmaterials used during the dental procedure should remain in onearea to prevent cross-contamination. Once an item or area iscontaminated, microorganisms can be carried from that area toanother person.
Place items that cannot be sterilized in an area away fromcontaminated objects or surfaces. If a non-contaminated objectmust be touched, cover it with some type of barrier before touchingthe surface.
Remember, gloves used during patient care are contaminated. Anysurface that is touched by these gloves (e.g., switches, pencils,telephone, dental charts, and eyewear) will be contaminated. Ifit becomes necessary to leave the operatory, dispose of gloves andmask, and wash hands with an antiseptic soap.
The dental procedure should be well organized, and materials shouldbe available before seating the patient. Stop and Think! Thiswill eliminate unnecessary movement to other areas and preventcross contamination.
Herpes
Herpes Simplex I can cause recurrent infections on the mouth, face,
and fingers. The virus may remain active from two days to twoweeks. The virus may be transmitted if broken skin touches an areawhere blisters or ulcerations are present.
If the patient has an area where lesions are present, dentalpersonnel may reinfect the patient in another area in or aroundthe mouth. Also, touching the lesion, the virus may then betransmitted to other individuals if infection control proceduresare not followed.
The Herpes Simplex virus can survive on surfaces and hands for manyhours.
14
7:3
Hepatitis
Four types of Hepatitis are known: hepatitis A, hepatitis B, non-A, non-B hepatitis, and delta hepatitis.
Hepatitis B
The hepatitis B virus (HBV) is more resilient than the AIDS virus,HBV is a hardy virus that is able to live on surfaces for weeks ata time. Hands should be thoroughly washed before and after glovesare worn. Microorganisms are also capable of surviving underfingernails if the hands have not been properly cleansed.
The majority of people who are HBV carriers arehaving the disease, or they may have contractedcarrier without ever experiencing the diseaseindividuals can transmit the HBV virus throughsemen, and other secretions. Persons who becomeinfectious for the rest of their life.
unaware of everthe virus as aitself. Thesesaliva, blood,carriers may be
The use of gloves, mask, and protective eyewear should be a routinepractice with every patient. The use of masks, gloves, and eyewearprovide an effective barrier in preventing the transmission of thehepatitis B virus. Sterilization procedures should also befollowed to decrease risk of transmission.
The Centers for Disease Control recommend that health care workerswho are at risk for HBV, have the hepatitis B vaccine.
A blood test may be taken prior to the immunization, to determineif antibodies are present. If the level is high enough,immunization may not be necessary.
The immunization is given in a series of three injections. Theinitial injections are given at one month intervals. The lastinjection is administered 6 months after the first injection.
Minor side effects have appeared in a small percentage of thepopulation who have had the vaccine.
HIV Infection and AIDS
The virus suppresses the immune system, so the body is moresusceptible to infections and disease.
The term HIV positive or HIV infection means that the humanimmunodeficiency virus is present in the blood. It may also bepresent in other body fluids. People who have HIV infection, areINFECTIOUS and may have no symptoms of the disease. However, thevirus can be transmitted even though the patient has no symptomsof the disease.
15
After a period of time, sometimes longer than seven years,individuals may begin to develop symptoms. These symptoms arepresent in the later stages of HIV infection or AIDS.
Signs and symptoms of HIV infection are flu-like. Symptoms mayinclude: persistent generalized lymphadenopathy (swollen andtender lymph modes), unexplained weight loss, fatigue, diarrhealasting for more than one month, fever for more than one month, ora combination of these symptoms.
A person is said to have AIDS when an opportunistic infection, suchas pneumonia or cancer, is diagnosed. People who have AIDS stillhave HIV infection, because it is the human immunodeficiency virusthat causes the disease.
When treating patients who are in the advanced stages of AIDS, thedental personnel are also at risk of exposure to secondaryinfectious agents such as hepatitis B, and Herpes Simplex.
High Risk Groups
Homosexuals, hemophiliacs, past or present intravenous (IV) drugusers, heterosexuals with multiple sexual partners, and individualswho have received blood transfusions are at risk of contracting theAIDS virus. Some groups are at higher risk than others. Dentalpersonnel are at risk due to the exposure to blood/body fluidsduring the dental procedure.
Oral Conditions
Conditions associated with HIV infection may be seen in the oralcavity. The herpes simplex virus infection may cause ulcers thatpersist for longer than a month. Another oral manifestation of HIVinfection is hairy leukoplakia. This is a hairy looking whiteplaque found on the lateral border of the tongue. It mayeventually spread to the dorsal surface of the tongue, and alsoappear on the palate and buccal mucosa. The gingival tissue andbone structure are affected with HIV infection.
Although not included among the diagnostic criteria for AIDS, oralcandidiasis (thrush) is frequently seen in individuals who are HIVpositive.
Four major types of oral candidiasis have been recognized. Thespecific types will not be covered in great detail, but a briefdescription of the clinical signs of oral candidiasis will bementioned. Oral candidiasis may appear as a creamy white oryellowish plaques on any part of the oral mucosa, and mLy be
75
16
scraped off to reveal a bleeding surface. Another type of oralcandidiasis is characterized by white plaques, and cannot beremoved by scraping.
Oral candidiasis may also appear as a fiery red spot or a smallpink spot. The color intensity of the lesion may also vary.
Various areas of the mouth may be affected by oral candidiasis.Depending upon the type of candidiasis, the location of thelesion(s) may vary. Common sites for candidiasis are the palate,tongue, buccal mucosa, and the area around the mouth.
Other oral manifestations can be present with HIV infection, inaddition to the conditions listed.
Ethical Considerations
The American Dental Association believes, as stated in its policyon AIDS, that HIV-infected individuals should be treated withcompassion and dignity. Current scientific and epidemiologicevidence indicates that there is little risk of transmission ofinfectious diseases through dental treatment if recommendedinfection control procedures are routinely followed. Suchinfection control procedures provide protection for patients anddental personnel.(1)
For information on AIDS as it relates to dentistry, chemicaldisinfecting/sterilizing agents and barrier techniques call the ADACouncil on Dental Therapeutics (312) 440-2528.
American Dental AssociationDivision of Scientific AffairsCouncil on Dental Therapeutics211 East Chicago AvenueChicago, IL 60611
Additional references have been listed at the end of thissupplemental module to help the student gain a better understandingof infectious diseases and infection control procedures.
(1) American Dental Association Council on Dental Therapeutics,"Facts About AIDS for the Dental Team," October 1988.
7$
17
INSTRUCTIONS
Read Chapter 2 in the Colwell Self-Instructional ModuleFundamentals II and complete the chapter exercises. Aftercompleting Chapter 2, read the following information.
INFECTION CONTROL
Gloves
Hands should be washed prior to placing gloves on. Gloves shouldbe inspected for puncture holes or tears before being placed on thehands.
Use a handwashing agent that contains an antiseptic agent. Thiswill help kill many organisms that are not removed by handwashing.
Hands should always be washed after removing gloves for numerousreasons. Small holes or tears may result during treatment,disinfecting agents may cause deterioration of the glove material,and organisms on the hands can multiply in the moist environmentof gloved hands.
Handwashing
Fingernail polish or false fingernails should be avoided whenworking in a dental setting. Microorganisms can multiply on thesesurfaces and may not be removed by handwashing.
Disposable towels should be used for drying hands.
Masks
The following rules are in conjunction with the Basic Rules for aMask, as listed in the Colwell Self-Instructional Module.
3. Adjust the mask so it fits snugly against the face.
4. Remove it as soon as treatment is completed. Do not leave theoperatory with your mask.
5. When removing the mask, handle it by the cloth strings, orelastic handles. Try to never touch the mask itself.
18
77
Infection Control During Pre-treatment
Look around the operatory. Remove unnecessary items that will notbe used during treatment. Keeping the operatory uncluttered willreduce the number of items that can become contaminated.
Run handpiece and air-water syringes for at least three minuteseach morning to flush out lines.
Organize and set out all dental materials, instruments, x-rays, anditems before the patient is seated. Planning ahead minimizes theneed to enter drawers or cabinets during the dental procedure andreduces the r:Lsk of contamination.
The use of pre-arranged tray set-ups can also eliminate the needto enter drawers during the dental procedures.
Use disposable items (items that are used once and then thrownaway) as much as possible. The use of disposables can eliminatethe problem of decontaminating hard-to-clean items.
Identify the items and objects that will be contaminated during theprocedure. Use barrier techniques on the equipment and surfacesthat will be contaminated. Try to keep all contaminated items inone area. Place all items that cannot be sterilized away from thecontaminated area.
Each office will be unique in its infection control procedures.Barriers placed on the dental equipment and dental unit may beexpensive. Disinfectants are less expensive, but can stain andcorrode some materials. It is the personal choice of the dentistand dental auxiliary to decide what type of infection controlmeasures will be used.
Dental personnel should be well informed about aseptic techniques,and the ADA guidelines that have been established for infectioncontrol. Infection control procedures must be used on everypatient and incorporated into the office as part of the routinedental procedure.
Patient Treatment
During patient treatment, precautions should be taken by theassistant when passing or receiving sharp instruments. Sharp edgesshould be kept away from the assistant and the operator. Disposeof all sharp items as soon as possible. Do not leave uncappedneedles on instrument trays.
Protective eyewear, gloves and masks must be worn during the dentalprocedure.
19
OPERATORY CLEAN-UP
INSTRUCTIONS
Read Chapter 3 in the Colwell Self-Instructional Module
Fundamentals II and complete the chapter exercises. Aftercompleting Chapter 3, read the following information.
INFECTION CONTROL DURING POST-TREATMENT
All surfaces not protected by barriers must be cleaned first, andthen disinfected with a surface disinfectant, such as iodophor,phenolic solution, or diluted household bleach.
Sterilization of handpieces is recommended. Some handpieces cannotbe sterilized. If a handpiece cannot be sterilized, disinfect itwith an EPA registered hospital disinfectant that is
tuberculocidal. Some disinfectant chemicals may damage a
handpiece. Always read and follow manufacturer's directions.
Disinfection
A surface should be cleaned prior to disinfecting or sterilizing.Cleaning the surface first reduces the amount of microorganisms andremoves blood and debris which may cause the chemical agent to beless effective.
Microorganisms will vary in their resistance to chemical agents.An endospore is a very resistant type of bacteria. The termsporicidal means the product is capable of destroying bacterialspores.
The microorganism MYCOBACTERIUM TUBERCULOSIS var. BOVIS, is usedin laboratories to test the killing power of chemical agents. Thisis a very resistant type of bacteria, and is a relative of thebacterium that causes tuberculosis. If an agent is capable ofdestroying Mycobacterium Tuberculosis var. Bovis, it is alsocapable of destroying less resistant microorganisms.
Disinfection that kills Mycobacterium Tuberculosis var. Bovis willalso destroy Hepatitis B and the HIV virus. It may not be capableof killing bacterial spores.
Some chemical agents will destroy all bacteria, fungi and someviruses. These low-level disinfectants (which are effective, butnot as potent) will not destroy bacterial spores, or MycobacteriumTuberculosis var. Bovis.
20
It is essential that dental personnel read all labels andmanufacturer's directions before using a chemical agent.
The label will identify what microorganisms the chemical agent willdestroy, and specific directions for its use. Attention should begiven to the shelf life and activated use life of these products.
Some disinfectants are harmful to skin and eyes, so caution shouldbe used with all chemical agents.
Liquid Chemical Agents
The Environmental Protection Agency is a governmental agency thatregisters chemicals as either disinfectants or sterilants (capableof sterilizing).
The product must have an EPA number on the label, and must beregistered by the EPA.
Products which have the American Dental Association seal ofacceptance have been accepted by the Council of Dental Therapeuticsfor use in dentistry.
Glutaraldehydes
Glutaraldehydes are used as disinfectants or sterilants.
Proper ventilation is important when using glutaraldehyde. Thefumes are toxic and the agent can irritate the eyes and skin.
Follow label directions carefully for each type of glutaraldehydeproduction.
Iodophors
Iodophors are used as disinfectants on surfaces and some dentalequipment. Countertops, drawers,and dental units, etc., must becleaned prior to using Iodophors.
Iodophors contain iodine, and may stain certain dental items.Repeated use of Iodophor on metal instruments will corrode themetal.
21
Sodium Hvpochlorite (Household Bleach)
Household bleach is used in a solution of 1/4 cup of bleach to 1gallon of water. The solution should be mixed daily. Dilutedsolutions will lose their effectiveness.
The surface or item must be cleaned before using sodiumhypochlorite.
Bleach should not be used on oxidizable metals or aluminum.
Phenolics
Phenolics are available as liquids or sprays. The spray is usedfor disinfecting equipment and surfaces. The diluted solution canbe used for disinfecting prosthetic appliances.
Phenolics may also be used to disinfect handpieces.
Because each chemical agent has a specified use in dentistry, itis not safe to assume each product will perform the same. Alwaysfollow manufacturer's recommendations for use.
Infection Control for Laboratory Work
All impression material should be rinsed thoroughly under gentlerunning water. This will remove debris and blood from theimpression material.
Gloves should be worn when handling any material that comes incontact with the oral cavity.
Gypsum casts may be sprayed with an iodophor disinfectant after thecast has been separated from the impression.
When possible, items should be disinfected before they are sent tothe laboratory. This will prevent contamination of the laboratoryand lab equipment.
Consult the manufacturer for disinfection recommendations forimpression material.
22
81
INSTRUCTIONS
Read the remaining Chapters 6-8 in the Colwell Self-InstructionalModule and complete the Chapter exercises. After completingChapters 6-8, complete the Fundamentals II Post-Test.
Study questions have been included in this Supplemental Module tofurther test your knowledge on the topic of Infection Control.If a topic area was not clear, go back and review the informationbefore completing the post-test or study questions.
23
E22
FUNDAMENTALS II
INFECTION CONTROL STUDY QUESTIONS
1. Aerosol or splatter may be produced by
2. Why should a patient's medical history be routinely updated?
3. If a non-contaminated object must be touched during the dentalprocedure, what steps should be taken to prevent cross-contamination?
4. The Herpes Simplex virus may remain active for how many days?
5. The use of , andprovide an effective barrier in preventing the transmissionof Hepatitis B and AIDS.
6. An immunization is available for the prevention of whatinfectious disease?
7. A person is said to have when an opportunisticinfection is diagnosed.
a. HIV infectionb. AIDSc. Herpes Simplex
8. The letters, HIV mean what?
9. Symptoms may develop in the stages of HIVinfection.
a. earlyb. late
10. Name four (4) types of individuals who are at high risk fordeveloping AIDS:
1.
2.3.
4.
11. State two (2) oral manifestations associated with HIVinfection.
1.
2.
24
12. What is hairy leukoplakia?
13. Handwashing agents should contain a(an) agent.
14. Why should a mask be discarded before leaving the operatory?
15. Handpieces and air-water syringes should be run for at leastminutes each morning.
a. twob. threec. four
16. Name two chemical agents which may be us3d as surfacedisinfectants.
1.
2.
17. Why should a surface be cleaned prior to disinfecting?
18. What microorganism is used in laboratories to test the killingpower of chemical agents?
19. Repeated use of on metal instruments willcorrode the metal.
a. Phenolicsb. Iodophorsc. All chemical agents
20. Sodium Hypochlorite is also known as
TRUE/FALSE
T F 1. Infection control procedures should beindividualized for every patient.
T F 2. Once a lesion is present in the mouth, other areasof the oral mucosa cannot be infected.
T F 3. Medical consultation may be necessary when asystemic disease has been noted in a patient'smedical history.
25
84
T
T
F
F
4.
5.
Gloves should be washed with an antiseptic soapbefore being used on another patient.
Herpes Simplex I cannot be transmitted by cross-contamination.
T F 6. The AIDS virus is more resilient than the HepatitisB virus.
T F 7. The HBV virus cannot be transmitted through saliva.
T F 8. People who have HIV infection are not infectious.
T F 9. People who have AIDS do not have HIV infection.
T F 10. Oral candidiasis will always appear as creamy, whiteor yellowish plaques.
T F 11. False fingernails are acceptable to wear in a dentalsetting if gloves are used.
T F 12. ADA guidelines have been established for infectioncontrol procedures in the dental office.
T F 13. Sterilization of handpieces is not recommended.
T F 14. Disinfection that kills Mycobacterium Tuberculosisvar. Bovis will not destroy the HIV virus.
T F 15. Chemical agents registered by the EnvironmentalProtection Agency must have an EPA number on the'.... A.
T F 16. Glutaraldehydes are used as disinfectants orsterilants.
T F 17. Low-level disinfectants will also destroy bacteriaspores.
T F 18. Iodophors may stain certain dental items.
T F 19. Sodium hypochlorite should not be mixed daily whenusing it as a disinfectant.
T F 20. Impression material must not be disinfected if beingsent to a laboratory.
26
E5
BIBLIOGRAPHY
References
Fair, Joanna L., CDA, RDH, BS, Crawford, James, MA, Ph.D, Forbes,Eleanor A., BS, RDH. "AIDS: A New Concern in Dentistry,"Dental Hygiene, November 1984.
"Facts About AIDS for the Dental Team," ADA Council on DentalTherapeutics, Second Edition, October 1988.
"Infection Control in the Dental Environment," (continuingeducation course). Washington, D.C., Department of Health andHuman Services, 1988.
Molinari, John, Ph.D., and Merchant, Virginia A, DMD. "ViralHepatitis--An Occupational Dental Disease," The DentalAssistant, March/April, 1984.
Maeman, Denise, RDH, MS. "Hepatitis: Types, Protection and LegalRamifications," Seminars in Dental Hygiene, Volume 1, Number1, May 1989.
Suggested Readings
"Infection Control Procedures and Products: Cautions and CommonSense," Judy Jakush, JADA, Vol. 117, August 1988.
"Infection Control Recommendations for the Dental Office and theDental Labori.tory," JADA, Vol. 116, February 1988.
27
66
Module 1-D
FUNDAMENTALS FOR DENTAL ASSISTING
Introduction to Dental Materials
INTRODUCTION TO DENTAL MATERIALS
SUPPLEMENTAL MODULE FOR
FUNDAMENTALS FOR DENTAL ASSISTING
Developed by
Kelly Reich, RDH, BA
Idaho State Board for Vocational Education650 West State Street
Boise, Idaho
1991
TABLE OF CONTENTS
OBJECTIVES ii
SECTION 1. INTRODUCTION AND BACKGROUND INFORMATION
INTRODUCTION 2
BACKGROUND INFORMATION 3
I. CLASSIFICATIONS AND TYPES OF DENTALMATERIALS 3
II. MECHANICAL PROPERTIES OF DENTALMATERIALS 4
FACTORS INFLUENCING DENTAL MATERIALS 12
BASES, LINERS AND CEMENT BASES 14
I. CAVITY VARNISHES AND LINERS 14
II. CEMENTS 16
SECTION II. PROPERTIES OF COMMONLY USED DENTALMATERIALS
IMPRESSION MATERIALS 18
I. PURPOSE OF IMPRESSION MATERIALS 18
II. REQUIREMENTS OF AN IMPRESSION MATERIAL 18
III. TYPES OF IMPRESSION MATERIALS 19
DENTAL CEMENTS 27
I. CEMENTS 27
RESTORATIVE MATERIALS 33
I. TYPES OF RESTORATIVE MATERIALS 33
GYPSUM PRODUCTS 42
I. GYPSUM PRODUCTS 42
BIBLIOGRAPHY 48
ACKNOWLEDGEMENTS 49
OBJECTIVES
After completing this dental materials module, thebe able to:
student should
1. Define the terms: metals, polymers, ceramics, and composites.
2. State the mechanical properties of dental materials and howeach one relates to dentistry.
3. Explain the three types of force.
4. Explain the three types of stress and strain.
5. Describe the factors which may influence dental materials inthe opal cavity.
6. State the requirements of a dental material that is used inthe oral cavity.
7. Explain the purpose of impression materials used in dentistry.
8. Define Irreversible and reversible hydrocolloid, and providean example of each.
9. List the three types of rubber impression material.
10. Explain the two techniques available for taking rubber baseimpressions.
11. State the purpose of a cavity varnish and liner.
12. Define the term luting cement.
13. List six uses for a dental cement.
14. List the five types of dental cements which may be used asluting agents.
15. Discuss the rationale for placing a base and cavity varnishin a preparation before using zinc phosphate cement.
16. List two cements which may be irritating to the pulp.
17. Explain the rationale for cleaning the cavity preparationbefore using polycaboxylate cement.
18. Discuss two advantages of using Glass ionomer cement.
ii
19. List four common types of restorative materials.
20. Define the .terms resin and synthetic resin.
21. Explain the term polymerization.
22. State three ways polymerization can occur in resin material.
23. Explain the composition of composite resins.
24. Explain the need for acid etch prior to placing a compositerestoration.
25. State the classification of composite resins.
26. List four desired results of a finished composite.
27. Discuss additional uses for composite resins other than as arestorative material.
28. State three types of gypsum products.
iii
A
SECTION 1.
INTRODUCTION AND BACKGROUND INFORMATION
INTRODUCTION
Introduction to Dental Materials has been designed to provide thestudent with basic background information about dental materials.The main goal of this module is to help the student have anunderstanding and knowledge of the materials available, and theiruses in dentistry. Due to the vast amount of information availableand the limitations of this course, it is strongly recommended thatth.2 student seek additional references to enhance their knowledgeof dental materials.
Much of the desired results when using dental materials is
dependent on the dental assistant's knowledge of the manipulationof the materials. The assistant should be able to recognize thematerials which are placed in the patient's mouth, and understandtheir weaknesses and strengths. In order to gain a completeunderstanding of the manipulation and properties of dentalmaterials, experience should be gained in a dental office.
2
BACKGROUND INFORMATION
The chemistry of a dental material, handling characteristics andthe performance of the material are basic considerations whenselecting a dental material.
The chemistry of a material describes its composition and thefactors which allow it to be shaped or formed. The material maybe placed in the mouth permanently like a restoration or crown, orit may be used during a procedure and then discarded.
All dental materials can be classified as: metals, polymers,composites, or ceramics.
I. CLASSIFICATION (TYPES) OF DENTAL MATERIALS
A. Metals
Most metals are not found in their natural state.Exceptions would be gold and platinum. Sometimes copper,mercury, and silver are found in a natural state. Mostmetals are combined with non-metals and must be refinedand purified to release the metal.
Pure meals are very soft and can be bent and shapedeasily. Many metals can be rolled to produce thinsheets. Some examples of metal used in dentistry are:aluminum (temporary crowns), lead (foil behind x-rays),and silver (endodontic points).
In most cases the metals are used because of the ease inwhich they can be manipulated. However, if additionalstrength is required, the metal must be combined withother metals or non-metallic elements.
B. Polymers
Natural polymers exist in the form of cellulose (woodpulp and cotton) and various other forms. Nucleic acidand collagen are polymers which are the structuralbuilding blocks of living things.
Polymers are also man-made and are used in dentistry.Some examples are acrylics, urethanes and silicones.These materials will be discussed later in the module.
3
Q4
C. Ceramics
Ceramics are either simple or complex, and a combinationof metallic or non-metallic elements. They are hard andabrasive.
These materials have high melting points. The mixtureof simple and complex ceramics, at high temperatures,form viscous liquids known as glasses and porcelains.
D. Composites
Composites are a combination of any of the basic metallicceramic and polymer materials. Tooth-coloredrestorations are made from composite resin materials.These types of restorations may be placed in either theanterior or posterior teeth. Uses for composite materialin dentistry will also be discussed later in the module.
II. MECHANICAL PROPERTIES OF DENTAL MATERIALS
It is important to know the composition of dental materials.To understand how a dental material will function in themouth, you must first understand how the material will respondin the mouth. What is its strength? Will the materialfracture when the teeth occlude? Will it discolor? It iseasier to predict what a material will do, if you understandthe basic properties of the dental materials.
A. Force
A force is any push or pull upon matter. The matter(object) moves or is clu,.nged in shape by the force. Aforce can be measured in pounds, such as 15 lbs. offorce. In response to force, there is also stress andstrain. Try to remember the saying, "For every action,there is a reaction."
There are three types of force:
1. Shearing force will shear material apart. Scissorswill shear paper.
2. Tensile force pulls and strengths material. Whenchildren play tug-of-war tensile force is appliedto the rope.
3. Compressive force pushes a material together.Biting and chewing uses compressive force.
4
'35
B. Stress and Strain
Stress is an internal reaction, or resistance, within abody to an externally applied force. Stress cannot occurinternally without an applied force outside. If theapplied force is great, the stress within the materialwill also be great.
There are three types of stress:
1. Shearing stress is produced when a structure istwisted, rotated or deformed by sliding one partparallel to another part.
2. Tensile stress occurs when an applied forceelongates (stretches a structure). For example,stretching a wire will cause the wire to becomelonger.
3. Compressive stress occurs when an applied force ispushed against a material.
Remember that each type of st1,-Is is capable of producinga deformation (distortion) in the body of matter. Atension or pulling force results in elongation of a body.A compressive or pushing force results in shortening ofthe body.
Strain is the distortion or change produced in a body asa result of stress. Every type of stress creates a typeof strain. So, in reaction to tensile stress, tensilestrain is created. Compressive stress is alwaysaccomplished by compressive strain and shearing stressis always accompanied by shearing strain.
C. Elasticity
Elasticity is the ability of a body (of matter) that hasbeen changed under stress to assume its original shapewhen the stress is removed. An object that can gain itsoriginal shape when the stress is removed is elastic.A rubber band is said to be elastic because it can bestretched and will return to its original shape. Anobject which remains permanently changed aftercompressive stress is said to be inelastic.
5
Knowledge of the limit of dental materials is usefulbecause it helps the dentist estimate when the shape ofa dental appliance or restoration will be permanentlychanged by a given stress.
Study Questions
1. What is the difference between stress and strain?
2. What is the definition of force and elasticity?
3. State the three types of force?
4. What is the meaning of compressive stress?
D. Ultimate Strength
Ultimate strength is the greatest stress that a materialcan withstand without having the material fracture orrupture. The breaking point is referred to as afracture. When the pressure applied to a tooth exceedsthe strength of the tooth, a fracture will occur. It isimportant to place materials in the mouth that have greatstrength in order to prevent fracture.
E. Ductility
Ductility is the ability of a material to withstanddeformation under tensile strength without fracture.Ductility decreases with increase in temperature.If a dental structure needs to be bent or contoured, itis important that the structure will not fracture underpressure.
F. Malleability
If the metal is being compressed, its ability towithstand permanent deformation under compressivestrength without rupture is known as malleability.Malleability increases with increase in temperature.If a metal can be hammered or rolled into a sheet, it ismalleable.
6
Most metals used in dentistry are ductile and malleable.Gold is the most ductile and malleable metal known, andplaced in areas of the mouth where strength is veryImportant.
G. Flow
Some materials continue to deform permanently understress, even though the stress remains the same. Whena glass rod is supported at both ends by its own weight,in time the glass eventually bows or flows (deforms)under its own weight. With dental materials, flow isusually measured under compressive strength. Forexample, a cylinder of material may be placed undercompressive strength and the amount of flow measured.This is done by measuring the shortening in length of thecylinder.
Flow is also used to determine how impression materialsand dental waxes deform under a constant pressure. Willthe wax be able to withstand the biting forces in themouth, and still give an accurate impression?
H. Hardness
Surface hardness in dentistry is generally measured interms of resistance of a material to indentation. Thereare various tests available to determine the hardness ofa material. A hardness test is very valuable indetermining the properties of dental materials beforethey are placed in the mouth.
The hardness tests will not be discussed, so referenceshould be made to the Bibliography section of this modulefor additional reading.
I. Relaxation
By stretching or compressing a material to permanentlychange its shape, the internal structure of the atomsthat make up the material are also re-arranged. Thisleaves the material in a state of tension, since theatoms would like to go back to their originalarrangement. As time passes, the displaced atoms willmove back to their original structure. The higher thetemperature, the faster this action will occur. Oncethe stresses and strains are removed, and the internalstructure is restored, the material has relaxed. The
7
3
process by which this occurs is called relaxation.Such changes are important in dentistry because theresult of relaxation may cause the misfit of an applianceor restoration.
J. Thermal Properties
Thermal conductivity is the ability of a material toconduct heat. Tooth structure is a great heat insulator.It has a low thermal conductivity value, which meansunder normal conditions the tooth can protect itself fromthermal changes. Metal, on the other hand, is a greatconductor of heat and cold. A tooth which has a metalrestoration, may be sensitive to hot and cold if enoughtooth structure has been removed. This is because thetemperature at the pulpal floor of a large metalrestoration is the same as the occlusal surface, and theheat or cold is then transferred to the pulp of thetooth. This is why some people experience sensitivityafter a large or deep restoration is placed.
Temperature changes in teeth or dental materials willcause expansion and contraction. Even though the changein temperature is the same for the tooth and thematerial, the material will expand or contract at adifferent rate than the tooth.
Study Items
1. Define malleability.
2. Explain flow, and state an example.
3. Define relaxation.
4. Name a metal which is ductile and malleable.
5. Why may sensitivity occur after a restoration has beenplaced?
6. Explain thermal sensitivity.
7. Define the relationship between ultimate strength andfracture.
K. Adhesion
Adhesion is a process by which dissimilar materials arejoined together or attached by the bonding of atoms or
8
SD
molecules. Some materials will not adhere or stick toa tooth structure because they do not contain similarmolecules. Adhesion is the force which attaches theseunlike molecules together. A stronger bond is formedwhen the molecules from two substances attach themselvestogether. The adhesion may be a strong physical force,or it can be a chemical reaction. An adhesive is amaterial which joins two materials together. Thesubstance to which the adhesive is applied is referredto as the adherent. When placing cement on a tooth, thetooth would be the adherent.
In order for adhesion to take place, the materials beingjoined must be in close contact. The adhesive action ofliquids involves four components which include: wetting,viscosity, film thickness, and tension.
1. Wetting
Some dental materials will flow much easier over thesurface of a tooth, even though the surface may bevery rough. This characteristic of a liquid iscalled wetting. If an adhesive spreads over thesurface in a thin film, the liquid is said to "wet"the solid well.
2. Viscosity
The resistance to flow is known as viscosity.Different dental materials have differentviscosities. A viscous material will be slow-flowing, due in part to the filler particles in thematerial. An example of a viscous liquid is syrup.A material which has a lower viscosity will 'wet"the surface well.
Two additional factors which affect the viscosityof a material are time and temperaturi. Most dentalmaterials will begin to set after they are mixed andthe viscosity increases with time. An example wouldbe most dental cements and impression materials.When a dental cement is first mixed, it is usuallyless viscous than when it begins to set.
3. Film Thickness
Film thickness refers to the thickness of theadhesive films. The thinner the fill, the strongerthe adhesive.
9
4. Surface Tension
Substances with a high surface tension have a strongcohesive force between the molecules. It is thisattraction between the molecules that determines thesurface tension of a material. For example, liquidmercury has a high surface tension and will formdroplets when placed on most surfaces. Water doesnot have a high surface tension nor a low surfacetension, but is somewhere in between. It formsdroplets on some surfaces, such as rubber impressionmaterials, but will spread when placed on a cleanporcelain surface.
The higher the surface tension, the easier anadhesive will stick to it. Metals have a highsurface tension and are easier to wet. Materialssuch as polytef (Teflon) have a low surface tensionand are not easy to wet.
L. Mechanical Bonding
Mechanical bonding can be accomplished by the penetrationof a semi-viscous glue or liquid into smallirregularities in the tooth. The glue or liquid willflow into the irregularities and harden. The manyfinger-like projections act as "footholds" for mechanicalbonding. Another example of mechanical bonding is in theuse of resin (plastic) restorations. The resin will notbond to the tooth naturally, so an acid etch must firstbe placed. The acid etch will flow into the surfaceirregularities of the tooth and produce minute pores inthe enamel. The resin is then placed into the preparedtooth surface and flows into these pores. When thematerial hardens, the finger-like projections once againimprove the mechanical bonding of the restoration. Themechanical bonding helps to "lock" the material to thetooth surface.
The composition of enamel and dentin varies from oneanother. A material that will adhere to enamel is notlikely to adhere to dentin.
10
101
Study Items
1. Define mechanical bonding and give an example how itrelates to dentistry.
2. Explain adhesion.
3. Define adherent.
4. Define the term viscosity and what is meant by a viscousliquid.
11
102
FACTORS INFLUENCING DENTAL MATERIALS
Dental materials must be able to function in a wide variety ofchanges in the mouth. The oral cavity is a moist environment thatcan withstand extreme temperatures of heat and cold. The teethmust also be able to withstand pressure from the foods we eat andchew. If dental materials are used in the mouth, the materialsmust also be able to survive biting forces and changes intemperature. In addition to these requirements, materials in themouth should:
1. Not be harmful or poisonous to the body;
2. Help protect the oral cavity and the tooth;
3. Not irritate or hurt the oral cavity;
4. Be aesthetically pleasing to the patient; and,
5. Restore the natural look and functions of the teeth.
The average person (with natural dentition) puts a biting force of170 pounds in the posterior area of the mouth. To understand thisbetter, 28,000 pounds of pressure per square inch is placed on asingle cusp of a molar tooth. It is important to understand whymaterials placed in the mouth must be able to withstand anexcessive amount of pressure.
Think of a day when the temperature outside has been 100 degreesor more. The temperature in your mouth can be as great as 100 to150 degrees, and change to near freezing temperatures in a matterof seconds. Any type of dental material placed in the mouth mustadapt to these sudden changes. As liquids pass over a tooth, thefilling material and the crown of the tooth will expand andcontract. It is now understandable why material placed in thetooth must expand and contract similarly to tooth enamel.
Some foods we eat are very acidic (acid-like), while some foods maybe more alkaline (basic). Citrus fruits are acidic. A lemon isconsidered very acidic. When plaque is present on the tooth andsugar is eaten, acid is also produced. This acid may be harmfulto the tooth and the dental materials in the mouth. Any type ofacidic or alkaline substance allowed to remain on the tooth willdeteriorate non-metallic materials, and corrode some metallicrestorations.
Galvanic shock occurs when a small electrical current is createdwhen two different metals are present in the mouth. Because themetals are wet with saliva, an action like that of a battery iscreated. When a metallic restoration is touched by a metal fork,
12
a galvanic shock may occur. When placing metallic or goldrestorations in the mouth, the dentist will consider what type ofrestoration may already be present.
Study Items
Can you list the eight factors that may influence theselection of dental materials.
If you can, check your answers with the list below. If youwere not able to list the factors, review the section again.
Answer:
--The dental material must be able to withstand thermalchanges in the mouth.
--The material must be able to withstand pressure from bitingand chewing.
--The material should not be harmful or poisonous to the oralcavity.
--It should protect the oral cavity and the tooth structure.
--It should be aesthetically pleasing.
--The material should restore the natural contour and functionto the tooth.
--The material should not easily break down when exposed toacid/alkaline in the mouth.
--Galvanic shock may occur when two different types of metalsare placed in the mouth.
13
IC
BASES. LINERS AND CEMENT BASES
I. CAVITY VARNISHES AND LINERS
A. Cavity Varnishes
Prior to placement of a restoration, the dental pulp mayhave been irritated or damaged. If the damage is
extensive, a root canal may be needed first. If not, thedentin must be protected before the restoration can beplaced. If a restoration is placed without firstprotecting the pulp, sensitivity may result. This cancause extreme discomfort to the patient, and interferewith normal occlusion.
When a tooth is prepared, it is very sensitive to therestorative materials and fluids of the oral cavity. Toprotect the dentin, a varnish first must be placed whichwill provide a barrier against these irritants. Thevarnish seals the dentinal tubules (microscopic holes inthe tooth 'structure) and provides a layer of protectionbetween the dental material and the dentin.
A cavity varnish is a natural gum product, or a syntheticresin, dissolved in an organic solvent. The cap shouldbe placed back on the bottle after use because thematerial will evaporate.
Common brand name: Copalite
Note: When polycarboxylate and zinc oxide-eugenolcements are used, varnish is not necessary. Thesematerials are non-irritating to the pulp. Varnish shouldnot be placed under restorative resins. The solvent inthe varnish may soften the resin material.
B. Liner
A liner serves basically the same purpose as a varnish,although it will not seal the dentinal tubules. It isapplied to protect the underlying tooth structures,primarily the pulp. A liner also acts as a barrier tokeep irritating substances away from the pulp. It shouldhave therapeutical properties to help treat the pulp andencourage secondary dentin formation. In situationswhere the cavity preparation is deep, the liner will beplaced before the varnish.
14
Liners containing calcium hydroxide promote secondarydentin formation. The liner should be placed as a thinlayer over the pulpal floor.
Common brand names: Dycal, Procal, Renew, Zinc Oxcide-Eugenol, Zinc Phosphate, Zinc Polycarboxylate Glass-lonomer (on top of a calcium hydroxide base), EBA,Calcium Hydroxide, Light Cure Dycal.
C. Cement Bases
When placing a cement base, the material should be ofappropriate thickness to protect the pulp from thermalshock and chemical irritants. The base acts as areplacement for the dentin which has been lost due tocaries or removed due to tooth preparation.
Some cements may be used as liners or bases. It isimportant to become familiar with the products used inthe dental office, since the materials can be usedinterchangeably. The type of liner or base materialselected will depend on the procedure and the type ofrestorative material being placed.
Different types of materials may be used as bases. Whena zinc phosphate cement base is to be used, a cavityvarnish, calcium hydroxide cement, or zinc oxide-eugenolshould be placed first. The rationale for this sequenceis to protect the pulp from the irritation of thephosphate cement.
15
106
0 II. CEMENT§
There are various uses for cements in dentistry. Theselection of the cement type will depend on the type ofclinical procedure and the restorative material being used.
Cement may be used for the following reasons:
--Cavity linings--Luting (seals space between the casting and the prepared
tooth)--Temporary fillings--Pulp capping--Root canal sealing--Retention of orthodontic brackets
A. Luting Cements
The function of a luting cement is to provide retentionbetween the tooth surface and the restoration surface.The luting cement joins the surfaces by interlocking thesurface irregularities of the tooth and the restoration.The luting cement is applied to the dentin.
Study Questions
1. Define cavity varnish and state one of its uses.
2. State two uses for a liner.
3. Explain the importance of calcium hydroxide in a cavitypreparation.
4. Discuss the rationale for placing a base prior torestoring the tooth.
5. List two common brand names of dental cements which mayalso be used as a base.
6. State two uses for dental cements.
16
1C7
SECTION II.
PROPERTIES OF COMMONLY USED DENTAL MATERIALS
IMPRESSION MATERIALS
I. PURPOSE OF IMPRESSION MATERIALS
Impressions are used in dentistry to make a replica of an areain the mouth. Impressions can be taken of an edentulous arch,or a whole dentition. The material also is used for takingan impression of an area of the mouth that has been preparedfor crown and bridge or inlays.
The type of impression material used is dependent upon thetype of dental procedures planned. Some procedures requirean impression material that is stronger and allows a moreaccurate impression of the area. Crown and bridge workrequire impression material of this nature. When impressionsare needed for study models, as in orthodontic work, a lessrigid impression material can be used.
The impression gives a negative reproduction or copy of thearea; The impression is then filled with dental stone orother model material, and a positive model or cast is made.A positive model or cast means it is identical to that whichis in the mouth.
Accuracy, quality, and detail are very important in the finalmodel.
II. REQUIREMENTS OF AN IMPRESSION MATERIAL
A basic requirement for an impression material is that it canbe placed in the mouth as a semi-liquid sol. The sol phaseallows the impression material to easily flow around thestructures in the mouth. After a certain amount of time, theimpression material must set (harden) into a solid which isstrong enough to be removed without deformity (tearing orfalling apart).
Another desirable quality of dental impression material isaccuracy. The impression should be able to reproduce the sizeand shape of the oral structure, including all fine detailsof the structure. The material should also have a pleasantodor, taste and aesthetic color. Many qualities are necessaryfor an ideal impression material; only a few have beenmentioned.
18
109
III. TYPES OF IMPRESSION MATERIALS
A. Hydrocolloids
A colloid is a suspension of particles, or groups ofsmall molecules, in some type of medium. A hydrocolloidis a colloid in which the medium is water. Hydro meanswater. A colloid has two phases: the sol phase and thegel phase. A hydrocolloid may be either reversible orirreversible.
1. Irreversible Hvdrocolloids
a. Alginate
Dental alginate impressions may be used in theformation of temporary crowns, and primaryimpressions in edentulous mouths. The dentistmay also require impressions taken of apatient's mouth for use later as study modelsfor treatment planning, or orthodontic work.
Alginate material has good elastic qualities.It begins as a sol and within a matter ofminutes reaches the gel phase. The materialgels by a chemical reaction, and once the gelhas formed it cannot be changed back into asol.
The alginate powder is supplied in canistersor small sealed packets, and the mixing isrelatively easy. Directions require thatmeasured quantities of liquid and powder aremixed together. This step is important becausethe incorrect amount of water or powder willalter the mix and setting time, and also thestrength of the impression. Alginatehydrocolloids, when used correctly andaccurately, show details in the mouth. Thisaccuracy is not as precise as reversiblehydrocolloids.
Trays (disposable) are selected for size andfit in the patient's mouth.. The alginateimpression material is mixed and placed in thetray while in the sol phase. The material isthen placed in the mouth and brought intocontact with the ora, tissues. The tray isheld without movement until the
19
1 0
impression material has set and reached the gelphase. The tray with the impression materialis removed from the mouth, disinfected, and adental material is poured into the impressionto make a positive model for the area.
Alginate dental impression material is lessexpensive when compared to other impressionmaterials.
Disinfection of the dental impression materialis also necessary because viruses may betransferred to other dental personnel who comein contact with the impression material. Itmay be necessary to review Fundamentals II,Infection Control Guidelines for dentalmaterials.
Common brand names: COE Alginate,Caulk/Dentsply Jeltrate Plus, S.S. WhiteAlginate, and others.
2. Reversible Hvdrocolloids
a. Agar-Agar
Agar is obtained from certain types of seaweed,and is more compatible with gypsum productsthan alginate. Reversible hydrocolloids areused when final impressions are needed forcrown and bridge work.
The preparatioa of agar colloids requiresadditional equipment and preparation time, whencompared to other impression materials. Thisfactor does not decrease the performance of thematerial. Agar hydrocolloids, when usedcorrectly, provide excellent detail andaccuracy.
Alginate impression material is not suitablewhen a final impression is needed for a crownor bridge preparation. The material does notform a gel that is strong enough to reproducethe minute details. The agar hydrocolloidimpression materials are reversible agar gels.When this material is heated, it will go intothe sol state, and when cooled it returns to
20
the gel state. This process can be repeatedover again, thus making the materialreversible.
The agar gel is contained in tubes of varyingsize. The tube is immersed in boiling waterfor a period of time. After boiling, the tubeis then placed in warm water and manipulatedto ensure even cooling. The tube is opened anda tray is filled with the agar gel. The filledtray is tempered (brought to the correcttemperature) in water. The material is placedin the mouth, and the impression material iscooled by tap water which circulates aroundtubes built into the tray. The correcttemperature must be maintained to preventdistortion of the impression material. Oncethe material has set, the tray is removed.
From a patient's point of view, this materialmay cause thermal shock to the teeth, becausethe material is heated before being placed inthe mouth. Thermal sensitivity may also occurwhen the material is cooled to reach a solidstate.
Brand names: Lactone-Surgident, Lacona-Thompson, and Van R.
b. . Agar-Alginate
The agar impression materials have adequatestrength and elastic properties, which allowspecific duplication of undercuts. Theadvantage of the agar-alginate system comparedto the agar system is the simplicity of thesystem.
A syringe type of agar in a cartridge is heatedin boiling water for a specific amount of time.Regular set alginate is then mixed withapproximately 10% more water, and placed in thetray. The agar is then injected around theprepared area and the alginate tray is placedon top of the agar material. During thesetting time, a bond begins form between theagar and the alginate. The tray is removedafter the material has set.
Common brand names: Cohere, Dentloid, HNSY
21
3. Rubber Impression Materials
Rubber impression material, another type of finalimpression material, is used in dentistry. Thismaterial is not a gel, but possesses a more rubber-like quality. It is superior to irreversiblehydrocolloids for final impressions. When handledcorrectly, the material is comparable to reversiblehydrocolloids in terms of accuracy and reproductionof tissue.
The rubber impression material can be used foralmost any type of impression. However, the primaryuse for this material is to create final impressionsfor inlays, crowns, and bridges.
This material, which is synthetic rubber, isreferred to as elastomeric. The process of changingthis elastomeric base, into the final rubber-likematerial is known as curing. The curing of thismaterial is a chemical reaction, and begins when thematerials are mixed together. Curing occurs in twostages:
--The initial set (first stage) results in astiffening of the paste, but no elasticproperties.
--The final set (second stage) is when the materialbegins to have an elastic appearance, and soonchanges to a solid rubber mass.
There are three major types of rubber impressionmaterials that will be covered: Polysulfides,Silicones, and Polyethers.
a. Polysulfides
Polysulfide impression material is a paste thatis supplied in collapsible tubes. The tubesare labeled base and accelerator.
The PollJulfide base, which is usually white,is formed into a paste by the addition offillers. The second tube contains a pastewhich produces a reaction that forms the softrubber. This tube is labeled accelerator orcatalyst, and contains sulfur and lead dioxide.
22
I
A liquid plasticizer is added to these twopowders to form a paste. Special care shouldbe taken with this material, since it will havea tendency to stain clothing, and produces astrong odor.
b. Silicones
Two types of silicones are used as rubber baseimpression materials. The impression materialsare classified by their chemical reactions ascondensation and addition types.
1) Condensation silicones are also suppliedas a base and an accelerator, and come incollapsible tubes. The base containsfillers, and may have the consistency ofputty. The accelerator may be a liquid,or with the addition of a thickeningagent, paste consistency. This type ofimpression material is odor free,relatively easy to mix, and clean tohandle.
To mix the base and accelerator, ameasured length of base and acceleratorpaste are squeezed onto a mixing surface.The material is mixed until a homogenous,streak-free mix is obtained.
To mix the base paste and liquid, ameasured amount of base is used and aspecified number of drops are added ofliquid reactor. The material is mixeduntil a homogenous, streak-free mix isobtained.
Ethyl alcohol is released as a by-productof the reaction. This causes theimpression material to have a relativelyhigh curing shrinkage, and poordimensional stability. The impressionshould be poured immediately.
Common brand names: Coltex, Coltofax,Optisil Plus, Siccoform, Verone, andothers.
23
114
Addition types of impression material areavailable in very heavy, heavy, medium,and _ow putty consistencies.The chemistry and properties of additionsilicone is much different thancondensation silicone. Additional readingis suggested to understand the propertiesof the two silicones.
The material is supplied as a two pastesystem in metal tubes, or plastic jars ifthe putty material is used. The mixingof materials is the same as for siliconeimpression material. The additionalsilicones are odor free, easy to mix, andclean to handle.
No by-products are produced when the baseand accelerator area mixed together. Thecuring shrinkage is small and thedimensional stability of the product isgood. Most manufacturers state that thepouring time can be delayed up to sevendays.
Common brand names: Exaflex, Express,Precise, Permagum, Reprosil.
c. Polyether
The base and reactor are supplied as pastes incollapsible tubes. The material as it sets,is quite stiff, so a third material, called athinner or body modifier, is available toreduce the stiffness. The thinner will reducethe viscosity of the unset material.
The polyethers are odor free, clean to handle,and easy to mix. The working time is veryshort, but can be extended. The polyether doesnot produce a by-product, and the curing anddimensional stability is comparable to additionsilicones. The polyethers will absorb waterand swell, so the impression should be storedin a dry area.
24
115
Some people have been known to have a reactionto this type of material. If a knownhypersensitivity exists, another impressionmaterial should be chosen.
Common brand names: Impregum, Permadyne (twoviscosity system).
3. Techniques for Rubber Impression Material
Two types of techniques are possible for takingrubber base impressions.
The first technique involves a one-step, singleimpression. It involves the mixing of materialswith two different viscosities, and requires thefollowing steps:
a) First, the lower viscosity material is mixedand placed in a syringe.
b) The material is then placed in the mouth andinjected in the cavity preparation, and otherareas where detail is needed.
c) The higher viscosity material is mixed as step#3 is taking place.
d) The high viscosity material is placed in a trayand placed in the patient's mouth until thematerial has set.
Some materials have only a single viscosity, so themix would be prepared twice. As the viscosityincreases, the material is then used in the tray.
The second basic technique requires a two-stepimpression process. A first impression is taken ofthe area, using a putty viscosity type of material.The impression does not have to produce accuratedetail. The steps for this second technique are:
a) The lower viscosity material is mixed andplaced in a syringe.
b) The material is then injected into the cavitypreparation.
25
The first impression material is reseated inthe mouth, over the syringe material.
d) The tray is held steady, and then removed whenthe syringe material is set.
Study Items
1. List two uses for impression material in dentistry.
2. State a basic requirement for an impression material.
3. Define the terms hydrocolloid and colloid.
4. List two types of reversible hydrocolloids.
5. Describe one major type of rubber impression material.
6. State one disadvantage or polysulfide impressionmaterial.
7. State one advantage of polyether impression material.
8. Describe the two types of techniques that may be usedwhen taking rubber base impressions.
26
117
DENTAL CEMENTS
I. CEMENTS
There are various uses for cements in dentistry. Theselection of the cement type will depend on the type ofclinical procedure and the restorative material being used.
Cements may be used for the following reasons:
1. Cavity Linings2. Luting (seals the space between the casting and the
prepared tooth)3. Temporary Filling4. Pulp Cappimg5. Root Can Sealing6. Retention of Orthodontic Brackets
Table 1 outlines classification and uses of various dentalcements. Because luting cements are frequently used indentistry, a discussion of common luting materials follows.
A. Luting Cements
The function of a luting cement is to provide retentionbetween the tooth surface and the restoration surface.The luting cement joins the surfaces by interlocking thesurface irregularities of the tooth and the restoration.The luting cement is applied to the dentin exposed in thecavity preparation.
Luting cements can be applied as a permanent or temporarycement. Temporary cementation of crowns or bridges isnecessary until the permanent crown or bridge isprepared. Once the permanent crown or bridge is placed,a more permanent type of cement is used.
Sensitivity can be a problem when tooth structure hasbeen removed. An advantage of glass ionomer cement isthe release of fluoride into the tooth structure,providing a resistance to secondary caries.
Luting cements must have a high compressive strength.The cement must be able to "hold" the restoration, etc.,to the tooth structure even when excessive force (e.g.,biting or chewing) is applied.
The luting cement must also form a seal between thematerial and the tooth, preventing microleakage. Ifbacteria or irritants are allowed to leak inside thetooth, sensitivity or secondary caries may result.
27
113
B. Types of Luting Cements
1. Zinc Phosphate Cement
This cement is supplied as a powder and a liquid.When the two materials are mixed together, heat isproduced. Care should be taken when mixing thematerial and placing it in the cavity preparation,as heat can damage the pulp. To avoid overheating,mix by slowly incorporating the powder into theliquid.
At times, an operator may want to prolong theworking time available before using zinc phosphatecement. Extended mixing will prolong the workingtime. When the temperature of the glass mixing slabis cooled, the chemical reaction will be slowed.Although additional time may be allowed, thehardening or setting time of zinc phosphate cementshould be accurately controlled.
Zinc phosphate cement does not adhere to the toothstructure. Retention of the casting to the toothis achieved primarily by the design of the cavitypreparation. The cement merely aids in adhesion,which takes place by a mechanical locking of thesurfaces being joined. For example, when a crownis cemented on a tooth, the cementing agent flowsinto the surface irregularities of the tooth and thecrown in place.
The thinner the cement film, the better theretention of the casting and the prepared cavity.If the cement is too thick, it will interfere withthe cementation of the casting and the tooth. Ifthe cement is not adequately mixed, the acid in thecement is free to penetrate the dentinal tubuleswhich causes tooth sensitivity.
Zinc phosphate is sensitive to oral fluids in themouth during the first 24 hours. It is recommendedthat a cavity varnish be placed over the margins ofthe restoration to protect the cement during thisperiod.
This cement may be irritating to the pulp. Calciumhydroxide and a cavity varnish should be applied inthe cavity preparation prior to placement of zincphosphate.
Common brand names: De They's Zinc, Fleck's.28
2. Zinc Oxide - Eugenol Cement
The zinc oxide-eugenol cements are less irritatingto the pulp, and are often used with deeprestorations. The eugenol has sedative propertieswhich are soothing to the pulp.
Zinc oxide-eugenol cements are more soluble thanzinc phosphate cement. When a material is moresoluble, there is a greater risk of microleakageand, thus, a greater chance of secondary caries orsensitivity. The cement may be affected over aperiod of time by the fluids in the oral cavity.
Traditional zinc oxide-eugenol cements did not havethe compressive strength needed for a luting agent.Additional fillers have been added which improve thecompressive strength of these cements. Thesecements may be referred to as "modified","reinforced", or "improved" zinc oxide-eugenolcements.
When mixing zinc oxide-eugenol cement, the rate atwhich the powder is incorporated into the liquid isnot as critical as with other cements.
Common brand names: Reinforced Zinc Oxide-EugenolCement, Zinc Oxide Improved Powder.
3. Polvcarboxylate Cement
Polycarboxylate cement absorbs water, and if thefilm thickness is excessive, the luting cement maysoften and be dissolved by oral fluids. Althoughpolycarboxylate cement does not possess anytherapeutic properties, this cement is lessirritating to the pulp.
The proper mix of polycarboxylate cement is shinyand has a glossy appearance. The cement is somewhatthick, but will form a thin strand when picked upby the spatula. When the mixing time is prolonged,the cement will become tacky, and take on a dullappearance. This loss of gloss is unacceptable, soa new mix should be prepared.
The tooth must be cleaned before placing the cementin the cavity preparation. Pumice may be used ina slurry, and then the preparation must be rinsedand dried.
29
12'0
The compressive strength of this cement is less t, nzinc phosphate cement.
Common brand name: Durelon.
4. Glass Ionomer Cements
These cements adhere chemically to both the dentinand enamel of the tooth. The slow release offluoride from Glass ionomer luting cement is themajor advantage of this material.
There are various types of Glass ionomercements,(Type I and II), which are used for therestoration of anterior teeth, as well as for lutingagents for restorations.
Glass ionomer cements have a short working time, andthe setting time can be slowed when the glass slabhas been cooled.
The tooth should not be overly dried before placingthe cement. Instead, a quick blast of air is usedto remove any excess moisture. Completely dryingthe tooth may open the dentinal tubules allowingirritation to the pulp, causing sensitivity afterthe cement is placed.
While the material is setting, a layer of varnishis applied to protect the cement from oral fluidsbecause initially, the cement is very soluble tooral fluids in the mouth.
Common brand names: Aspa, Chembond, Fuji, AquaChem, Ketac-Bond, Ketac-Cem.
5. Resin Cement
Resin cement can be irritating to the pulp, so thepulpal floor should be protected by a layer ofcalcium hydroxide.
This cement does not adhere to the tooth structure.The solubility of the cement may be affected overa period of time when exposed to oral fluids.
The film thickness may be higher with these cements,and difficulty may occur when cementing the casting.
Common brand names: Caulk Comspan.
30
121
Study Items
1. List 3 uses for dental cements.
2. State the function of a luting cement.
3. Name 2 uses for a luting cement in dentistry.
4. Explain why it is important to slowly incorporate thepowder into the liquid with zinc-phosphate cement.
5. List 2 advantages of using zinc oxide-eugenol cements.
6. State the major advantage of Glass ionomer cements.
7. Explain why it is important not to over-dry the cavitypreparation before placing a Glass ionomer cement.
31
122
TABLE 1CLASSIFICATION, USES OF DENTAL CEMENTS
CEMENT INDICATIONS
ZINC PHOSPHATE Luting agent for restorations.
Thermal-insulating base in deep cavitypreparations (calcium hydroxide and acavity varnish should be applied priorto placing zinc phosphate).
Temporary restorations in primary andpermanent teeth.
ZINC OXIDE- Temporary restorations.EUGENOL
Temporary and permanent luting agent forrestorations.
Thermal insulating base.
POLYCARBOXYLATE Luting agent for restorations.
Thermal insulating base.
GLASS IONOMER Luting agent for restorations.
Class V restorations.
Anterior restorations.
Thermal insulating bases.
RESIN Luting agent for conventional crownsand bridges.
Luting agent for restorations.
Temporary Restorations.
32
1 kel (-)
-L ci
RESTORA-IVE MATERIALS
I. TYPES OF RESTORATIVE MATERIALS
Many types of restorative materials are available forpreparing tooth structure. A restorative material does notreplace the original structures of the tooth, but serves asa functional substitute for the tooth.
The most common materials available for restoring teethinclude the following:
AmalgamResins (composite resins)Glass Ionomer CementOther Cement MaterialsCast Gold or Metal (this information will not be covered)
When a carious lesion is present in a tooth, the decay mustbe removed, the cavity must be prepared for restoration, anda restorative material must be placed. Circumstances alsooccur where replacement of tooth structure is necessary forreasons other than decay (e.g.,: fractured teeth, replacementof existing restoration, aesthetics, etc.).
The type of restorative material used will depend upon theprocedure being preformed, and the personal preference of thedentist and patient.
A. Amalgam
Amalgam is one of the oldest restorative materials usedin dentistry. The demand for amalgam restorations haslessened, due to the advancements in tooth-coloredrestorative materials.
Since amalgam does not adhere to enamel or dentin, thepreparation of the tooth must be able to retain theamalgam within its structure. When large restorationsare placed, significant tooth structure is lost aid theremaining tooth structure is weakened.
Mercury is a component of dental amalgam and should behandled with caution. The mercury and the amalgam shouldnot be touched with the hands.
When used, amalgam is usually dispensed in capsules andplaced in an amalgamator which mixes the elements
33
124
together. The amalgam is then condensed (placed) in thecavity preparation. Because amalgam is silver in color,it generally is used in posterior teeth.
B. Resins
A synthetic resin is an artificially produced,nonmetallic compound which can be molded into variousforms and then hardened. Resins are used in dentistryfor a variety of reasons. For example, dentures,restorative materials, and temporary coverage for a
tooth. Before a resin can be used as a final product,the material must be hardened by a process calledpolymerization.
Monomers are single particles. When these molecules jointogether, they form a polymer or chain. The joiningtogether of these molecules is known as polymerization.
Polymerization, also known as curing, takes place whenthe catalyst or initiator becomes chemically activated.This process affects the monomer and the material beginsto set.
In relation to resin material, polymerization may occurin one of three ways: self-cured, heat-cured, or light-cured.
Heat-cured resins require heat under pressure tobring about a reaction, for example, in thefabrication of dentures in a dental lab.
Light-cured resins must be exposed to a light sourcefor polymerization to take place, for example,composite restorations.
Self-cured resins react when the base and thecatalyst (accelerator) are mixed together manually,for example, pit and fissure sealants.
1. Composite Resins
Composite resins are tooth-colored restorationmaterial originally designed for use in the anteriorteeth. Composite restorative material has recentlybeen designed for use in the posterior teeth aswell.
Composite restorative material consists of anorganic polymeric matrix, commonly the BIS-GMA resin
34
system. The matrix has inorganic filler such asglass, quartz, or silicate particles. The fillerhas been added to the material to give the dentalmaterial a desired quality, for example, addedstrength. The materials may also contain elementswhich make the material radiopaque, so that it canbe seen on a dental x-ray.
Composites are available as a single paste system,a powder-liquid system, or a two-paste system. It
is important to follow manufacturer's directionsbecause materials may vary, as well as the methodof polymerization.
Moisture will inhibit the polymerization reaction,so the material should be protected from moistureduring setting. ZOE (Zinc Oxide-Eugenol) cementwill also interfere with the polymerizationreaction, so the composite material should not bein direct contact with this cement.
The blending of shades for aesthetic restorationsis very important. The shade selected must matchthe color of the tooth structure. The color ofshades will vary with the type of composite productused.
Composite resins can be irritating to the pulp, anda Glass ionomer dentin bonding agent or calcium-hydroxide liner should first be placed.
Study Items
1. List 4 types of common restorative materials used indentistry.
2. Define synthetic resin.
3. List 2 uses for resin material in dentistry.
4. Define polymerization.
5. Describe the 3 ways polymerization may occur with resinmaterial.
6. State the composition of composite restorative material.
7. Explain why it is important that ZOE does not come indirect contact with composite material in a cavitypreparation.
35
12G
a. Classification of Composite Resins
Materials and techniques in the use of compositematerials may vary somewhat with each individualoperator. Due to the variations in the products,the manufacturer's recommendations should befollowed when using any composite materials.
There are several classifications to describecomposite resins. These will not be covered ingreat detail, but it is important to know thecomposition of the composite material may vary witheach type of composite material used. Somecomposite material may contain finer fillerparticles compared to other composite material whichmay contain larger particular sizes. The particlesize will affect the desired outcome of thecomposite material.
*Macrofilled or Conventional Composites
The large particles shapes are more resistantto abrasion and more difficult to polish. Thelarge particles in the conventional filler haveregular particle shapes such as rods andspheres. Various materials are included in thefiller, which is radiopaque.
The large particle shapes cause the finishsurface to remain rough. The rough surfacecreates an area where plaque may accumulate.
The Hybrid material combines the advantages ofthe large and microfine composites and particlesizes will vary. Rounded shapes of particlesimproves the packing of the material, andlimits the amount of material needed.
Common brand names: Self-cured brands:Bioglass, Miradapt, P 10, Vytol. Lightactivated: Aurafill, Brilliant, Command,Ultrafine, Lumifor, Profile TLC, Hericulite.
b. Acid Etch and Bonding of Composite Resins
Acid etch is used on the prepared enamel surfaceprior to placing the composite. Acid etch providesa higher surface area to enhance wetting, increasedsurface area for bonding, and a demineralized porousarea into which the composite material can flow.
To ensure that the composite will adequately bondto the enamel, the surface must be adequately etchedand isolated from moisture and oral fluids. Thebond which takes place between the enamel and thecomposite resin is primarily mehanical.
Several acids are available to etch the enamelsurface. The most commonly used acid is a bufferedphosphoric acid, which is supplied either as aliquid or a colored gel. It is important not toetch beyond the prepared enamel surface, which wouldallow the etch to contaminate the dentin or liningsurface.
The etch should be dabbed on the surface, notrubbed. Rubbing the surface will fracture theenamel lattice work formed by the acid etch. Theetch should remain on the tooth the required amountof time. The tooth is then rinsed and dried. Theproperly etched tooth surface will appear white andfrosty when dried.
Manufacturers may vary in the amount of time thatis required to etch and rinse. Always follow themanufacturer's directions for the type of materialbeing used.
37
1
Materials have also been developed which form a.iadhesive bond to the dentin vs. a mechanical bondingwith the acid etch and enamel. The bonding ofdentin to the composites by acid etching (phosphoricacid) is not suggested. Acid etch when exposed todentin, will open the dentinal tubules (which leadto the pulp) and may expose the pulp to chemicalirritants. Dentin-bonding agents are applied in amanner similar to acid etch.
In the area of aesthetic materials, such ascomposite restorations, the improvement in dentalmaterials has been significant. Changes areevidenced by the extended application of compositesas posterior restorative materials. Because anumber of composite products are available today,the selection of restorative matccial will bedependent upon the procedure being performed, aswell as the personal preference of the dentist.
Light-cured composites are easy to manipulate fromthe standpoint that additional time can be taken toprepare and place the material.
When light-cured materials are used, caution shouldbe taken not to stare at the light source. This canlead to permanent eye damage. Protective shieldsare available to protect the eyes when using thelight.
Study Items
I. Explain the need for acid etch prior to placing acomposite restoration.
2. Describe the correct application of acid etch.
3. Describe the appearance of a properly acid etched tooth.
c. Composites for Posterior Restorations
Recently, materials have been developed specificallyfor use in the posterior teeth. These have hybridparticle size to increase strength and have someradiopacity. Changes are likely to occur in thetechniques and materials as future improvements aremade.
38
120
Common brand names: Estilux Posterior, Ful-fil,Helio-Molar, Herculite, Occlusion, P 30.
d. Finishing the Composite Material
After the composite restoration is placed, thematerial must be finished to achieve a result whichis non-irritating to the gingiva.
The finishing procedure should achieve the followingdesired results:
*A restoration contour that is acceptable tothe surrounding tissue. The finishedrestoration should not be bulky or impinge onthe tissue.
*The surface should be smooth and reflect lightsimilar to that of the tooth structure.
*The cavosurface margin should be smooth, andflush with the tooth surface.
*The occlusal relationship of the teeth shouldnot be affected.
*The contour of the restoration should followthe normal contour of the tooth, and beaesthetically pleasing.
a smooth surface should be achieved byabrasive product that has abrasivewhich are fine in size. The fine
will not remove the composite material,leave only microscopic grooves in the
A course disk is used initially for the grossremoval of the excess material, followed by finerdisks which produce a smoother surface texture. Thesequence and use of the disks may vary withindividual operators.
A high-speed handpiece is used by the dentist forfinishing posterior and anterior composites whenadditional contouring or anatomy is needed.
39
d. Other Uses for Composite Resins
The following are additional uses for composite.resins and vary somewhat from the compositerestorations used to replace tooth structure.
1. Porcelain Bonding
For various reasons, a porcelain crown orbridge may fracture and a portion of theporcelain may break off. It is not alwaysnecessary to remove the crown or bridge torepair the fracture. The porcelain isroughened to allow for better mechanicalretention, and a composite material is bondedto the chipped area.
A patient's occlusion should always be takeninto consideration when repairing, or addingmaterial to an existing restoration, crown,etc. The patient may not have ideal occlusion,in which case the biting force is not evenlydistributed on the teeth. It is important tomaintain or restore an occlusal relationshipthat will be functional for the patient.
2. Anterior Veneers
A veneer is a layer of tooth-coloredrestoration that is attached to the surface ofa prepared tooth or teeth. Veneers may beplaced on teeth that are discolored or stained,or to improve the contour of a tooth or teeth.Sometimes the stain or discoloration is withinthe tooth structure (intrinsic), and cannot beremoved by scaling or polishing.
Different types of material may be used tofabricate a veneer. Conventional compositeresins or microfilled resins may be used, orporcelain veneers are also available.
Tooth-colored restorative material may be addedto the prepared tooth in one appointment, orthe veneer may be fabricated in the laboratory,in which case, the patient would need anadditional appointment for cementation of theveneer.
40
131
3. Cement Material/Glass Ionomer
Glass ionomer cement is not radiopaque. Silverparticles have been incorporated into thematerial which give it radiopagcity and anincreased resistance to abrasion. This versionis referred to as Cermet cement.
Glass ionomer is useful in restoring some typesof restorations, and has been used as a basein conjunction with a more abrasive orresistant composite or metal restoration. Itserves as a build-up material when additionaltooth structure is needed.
Common brand name: Miracle Mix.
Study Items
1. List 4 desired results of a finish composite.
2. State how a smooth surface is obtained when finishing acomposite material.
3. Define veneer.
4. State one use of Glass ionomer cement, other than as aluting agent.
41
1j4
GYPSUM MATERIALS
I. GYPSUM PRODUCTS
Gypsum products serve many purposes in dentistry. A few ofthe uses for gypsum products in dentistry are: impressionmaterials, dental stone for a model used in the fabricationof a crown or bridge and in the construction of dentures.
Decreasing the water/powder ratio, excluding air from the mix,and increasing the density of the plaster or stone, willincrease the hardness as well as the strength of the gypsumproduct.
The following factors will affect the setting time of thegypsum product:
*Manufacturing process-the amount of gypsum crystals inthe powder will affect how fast the material will set.The more porous the material the faster the setting time.
*Water/powder Ratio-the addition of more water, willprolong the setting time.
*Temperature-usually temperatures higher than normal,will increase the setting time, and vice versa.
*Mixing-the longer the gypsum product is mixed, theshorter the setting time.
*Retarders and Accelerators chemicals may be added whichshorten the setting time (accelerators), or lengthen thesetting time (retaders).
There are three types of somewhat pure gypsum products usedin dentistry: impression plaster, model plaster, and dentalstone.
A. Impression Plaster
Great strength is not a requirement of impressionplaster. The material should also have a short settingtime, and a low setting expansion.
A higher water/powder ratio is usually used when mixingimpression plaster. This reduces the strength and allowsthe impression to be withdrawn easily. If the impressionmaterial has great strength, it would set around theteeth and become difficult to remove. For this reason,impression is not frequently used in the oral cavity.
42
I_ 3 3
B. Model Plaster
Model plaster is mixed with water to form a paste-likemass which hardens into a material similar to dentalstone.
An impression is first taken of the area. The plasteris mixed with the water and poured into the impression.When the plaster has set, the impression is pulled awayfrom the model and an exact replica or cast of the areais formed. The cast is then used in the fabrication ofdental appliances, crown and bridge work, etc.
The powder particles of plaster are usually rough,porous, and randomly shaped. Because the powder isporous, too much water will weaken the final product andaffect the strength and hardness of the material.
C. Dental Stone
The powder particles of stone are somewhat different thanplaster. The particles in the stone are smooth, well-crystallized, and less porous.
The water/powder ratio for dental stone is much differentthan that of plaster. This material does not require asmuch water, due to the smooth, dense particles.
Dental stone contains modifiers which regulate thesetting time, and more time should be allowed for dentalstone than plaster.
Stone is naturally white, and hard to distinguish fromplaster. To eliminate the problem, color is added to thestone.
Study Items
1. State 2 uses for gypsum products in dentistry.
2. List 4 factors which will affect the setts g time ofgypsum products.
3. Describe 2 types of gypsum products used in dentistry.
4. Describe the powder particles of dental stone.
5. State why color is added to dental stone.
43
134
FINAL STUDY QUESTIONS
1. What is one example of a man-made polymer?
2. Composites are a combination of what materials?
3. What type of force pushes a material together?
4. Stress is an internal reaction, or resistance, within thebody to what type of force?
5. is the distortion or change producedin a body as a result of stress.
a. elasticityb. compressive stressc. shearing stress
6. is the ability of a material towithstand deformation under tensile strength withoutfracture.
a. elasticityb. compressive strengthc. ductility
7. What metal is the most ductile and malleable?
8. What type of changes will cause expansion and contractionof dental materials placed in the oral cavity?
9. is a process by which dissimilarmaterials are joined together or attached by the bondingof atoms or molecules.
a. wettingb. adhesionc. bondingd. curing
10. The resistance to flow is known as what?
11. What is one requirement of a dental material that isplaced in the mouth?
44
13 5
12. A seals the dentinal tubules?
13. In situations where the cavity preparation is deep, thewill be placed before the
Torres, Hazel 0., G.D.A., R.D.A., R.D.A.E.F., M.A., Erlich, Ann,C.D.A., M.A. Modern Dental Assisting, 4th Edition,Philadelphia: W.B. Saunders Company, 1990.
SUGGESTED READINGS
Elements of Dental Materials, Ralph W. Phillips, M.S., D.Sc.
Restorative Dental Materials, 8th Edition, Robert Craig, Ph.D.
Modern Dental Assisting, 4th Edition, Hazel 0. Torres, C.D.A.,R.D.A., R.D.A.E.F., M.A. and Ann Erlich, C.D.A., M.A.
48
ACKNOWLEDGEMENTS
The author would like to acknowledge the following individuals:
Ronald Sheppard, D.D.S. for suggestions and careful review of thismodule.
Denise Bowen, R.D.H., M.S. for support and guidance.
Dana Meyers, for technical typing support.
49
140
Module 2
APPLICATION OF PIT AND FISSURE SEALANTS
141
Module 2-A
APPLICATION OF PIT AND FISSURE SEALANTS
Instructor/Student Module
14 2
APPLICATION OF PIT AND FISSURE SEALANTSA Self-Study Module
developed byCarlene Paarmann, RDH, MEdDepartment of Dental Hygiene
Idaho State UniversityJune, 1991
Adopted by
Idaho State Board for Vocational Education650 West State Street
Boise, Idaho
TABLE OF CONTENTS
Introduction
Course Description iii
Course Schedule 1
Permission Slip 2
Objectives 3
Background Information 4
Considerations in Patient and Tooth Selection 6
Acid Etching/Conditioning 7
Types of Sealants 9
Instructions to the Patient or Parent 11
Sealant Failure 12
Placement Procedure 13
Study Questions 21
References 23
Pit and Fissure Evaluation Form 24
INTRODUCTION
On July 1, 1989, the application of pit and fissure sealants was recognized as a legal
procedure for Idaho dental assistants to perform under the direct supervision of a dentist.
Assistants must first successfully complete coursework approved by the Idaho State Board
of Dentistry. A certificate or diploma of course completion as issued by the teaching
institution will be the assistant's verification of compliance with Board standards. This
module was designed to be utilized by Board-approved teaching entities. It offers basic
information on the application of pit and fissure sealants which is intended to be
supplemented with formal classroom, laboratory and clinical instruction.
The procedure described in this module represents one method for sealant placement.
There are several minor variations of this technique, which are dependent upon operator
preference and current research. The videotape that accompanies this module was
originally developed by Ardean Nickerson, Eastern Washington University. Although it
was produced a few years ago, the basic technique for sealant application has not changed
significantly. The original videotape has been edited by Idaho State University to include
more recent developments on this topic.
S
The exact technique used by the reader in clinical practice will depend, to an extent, upon
individual office philosophy. For example, there are a variety of opinions regarding
appropriate etching times and procedures for preparing/cleansing teeth to be sealed.
Whichever technique is employed, the reader is advised to refer to the manufacturer's
instructions prior to working with any new material.
To acquire the knowledge and skills necessary to place pit and fissure sealants, the
following instructional pattern is suggested:
1. Read the module in its entirety and answer the study questions that are included at the
end. Familiarize yourself with the armamentarium that will be needed. Also review the
practice activities and evaluation mechanisms that are included in your course outline.
2. Review the videotape of the procedure during a class session. The videotape presents
the operator's view, thus enabling you to see all steps of the procedures as you will be you
performing them.
3. Perform all activites listed in the course outline. Complete self-evaluations as well as
instructor evaluations as you progress.
At the end of the practice sessions, a short written test will be administered. Your
instructor will provide further information about the final clinical certifying exam during
your course.
COURSE DESCRIPTIONAPPLICATION OF PIT AND FISSURE SEALANTS
Clock Hours
Lecture/Demonstration:Laboratory and Clinical:Written Examination:Final Practical Examination:
Course Description
2 hours5-1/2 hours30 minutesFor the convenience of both students andexaminers, it is suggested that the final examfor this course be offered concurrently with thefinal exam for coronal polishing. By doing so,it will be necessary to obtain only one patient.
The primary goal of this course is to provide the dental assistant with background knowledge and
clinical experience in applying pit and fissure sealants. Upon successfulcompletion of this course,
the student will receive a certificate of completion/recognition indicating competency in performing
this procedure.
Ruired Text
Application of Pit and Fissure Sealants, a self-study module developed by Carlene Paarmann,
RDH, MEd, Idaho State University, 1991.
Course Requirements
1. Attend all class, laboratory, and clinical sessions.
2. Place two acceptable pit and fissure sealants on extracted teeth: one self-cured and one
light-cured.
3. Place one acceptablet sealant on a student partner (material of choice by student).
4. Place four acceptablet sealants on clinical patients (material of choice by student):
-one maxillary and one mandibular sealant on an adult patient
-one maxillary and one mandibular sealant on achild patient
5. Achieve a minimum of 75% on the written examination.
tsee Pit and Fissure Sealant Evaluation Form. If a critical task (marked on
evaluation form with *) is not completed, the evaluation is automatically unsatisfactoryand must be redone. A minimum score of 86% must be acheived on each sealant.
6. Successfully complete the final practical examination to receive a certificate ofcompletion/recognition to perform this function (one acceptable maxillary and oneacceptable mandibular pit and fissure sealant--may be same patient as used for coronal
polishing final exam).
7. Materials to be supplied by the student (see page 13 of module):
a. two extracted teeth, suitable for sealants, mounted in plaster
b. basic tray setupc. supplies for isolationd. curing light (if available)e. slow-speed handpiece, prophy brush, pumice, finishing bur or stone
f. garmer clamps, rubber dam armamentarium or other isolation materials
g. evacuator tipsh. 2 x 2 gauze squaresi. dental flossj. other expendable supplies as designated by the instructor
Sealant materials (self-cure and light-cure) will be supplied by Vocational Education.
Evaluation/Grading
This course is designed on a Pass/Fail basis. In order for the student to pass the course, therequirements listed above must be successfully completed. As previously stated, the minimumpercentage for acceptable sealants is 86%. All critical tasks listed on the evaluation form (identified
by *) must be completed. If a critical task is not completed (in other words, a "2" is notachieved),
the process evaluation is unsatisfactory and must be redone, regardless of the score. A minimumscore of 75% must be achieved on the written examination. A description for determining the
percentage scores is presented below.
A. Calculating Percentages for Pit and Fissure Sealants
Refer to the attached evaluation form (it is the same as the evaluation form on page 24 of the
corresponding module). Each criteria is evaluated as follows:
C = Criterion met = 2 pointsI = Criterion improvable = 1 pointX = Unacceptable = 0 points
Since there are 22 criteria, each worth a maximum of 2 points, there are 44 total points possible for
each pit and fissure sealant. A percentage score can then be calculated by adding the total number
of points earned and dividing by the total points possible (44). To facilitate calculations, the
following evaluation scale is provided:
Points Achi;ved Percentage
44 100
43 98
42 95
41 93
40 91
39 89
38 86 Proficiency Level
37 84
36 82
35 79
34 77
33 75
32 73
31 70
B . Calculating Percentages for Written Examination
For each wrong answer on the written examination subtract 4 points from 100 to determine
final score.
Procedure
1. Read the self-study module, 4palicatioufTiLaDdE5surtScalailla.2. Answer study questions on page 21 of module.
3. Answer objectives listed above.4. For supplementary reading, refer to references listed on page 23 of the module.
20. Patient is instructed about need for appropriate recall and/or
reappointed for resealing. 2 1 0 2 1 0
21. Sealants are charted and recorded accurately. 2 1 0 2 1 0
22. Professional judgment and patient are managed appropriately. 2 1 0 2 1 0
/44
vll
151
COURSE SCHEDULE
Clock Method of AssignedHours Instruction Topic/Activity Readings
2 Lecture/ Introduction to CourseDemonstration Types of fissures
Retention of sealantsTypes of sealants
-self cure-light cure
Patient instructionsModes of failureProcedure
-select appropriate teeth-pumice and rinse-isolate-dry and acid etch-rinse-re-isolate-dry and check for frost-apply sealant-check with explorer-check occlusion-apply fluoride
Self-study module,pp. 1-22
Videotape View videotape"Application of Pit and Fissure Sealants"
5-1/2 Laboratory/ Place sealants on extracted teeth.Clinical Place sealants on student partners.
Place 4 acceptable sealants on patients(one adult and one child).*Refer to Course Requirements
30 WrittenMinutes Examination
A comprehensive written exam consisting ofmultiple choice and/or true/false questions.
0 NOTE: The final practical examination is offered in conjunction with the Coronal Polishing finalexam.
1 1.52
CORONAL POLISHINGPIT AND FISSURE SEALANTS
PERMISSION SLIP
This is to verify that I examined(patient name)
on and diagnosed the treatment approved below. I give my(date)
permission for this patient to receive coronal polishing and/or pit and fissure sealants as
part of the Statewide Expanded Functions for Dental Assistants certification program.
O Coronal polish (check here if hard deposits have been removed and treatment isapproved)
O Pit and Fissure Sealants (check here if teeth were radiographically and clinicallyexamined and treatment is approved)Please list tooth/teeth approved for sealants:
Dentist Signature
Date
According to Idaho State law, the application of pit and fissure sealants and coronal polishing are procedures
that must be diai, losed by a dentist. Patients receiving treatment in this program must receive permission
from his/her family dentist before the procedure(s) can be performed. Return this form to the course
instructor.
OBJECTIVES
Following completion of lecture and laboratory/clinical activities, the student will be able to:
1. Explain why pits and fissures have a high susceptibility to caries.
2. Explain the purpose of pit and fissure sealants.
3. Describe types of sealant materials and their relative advantages, disadvantages,and properties.
4. Discuss considerations in patient and tooth selection.
5. Describe the mechanism by which the sealant attaches to the tooth.
6. List conditions that can interfere with bonding of the sealant to the tooth surface.
7. List and explain different methods used to maintain a dry field.
8. State the precautions that must be taken with regard to the following:a. selection of a polishing agentb. use of the air syringe in drying the teethc. rinsing the etched tooth surface
9. Explain and demonstrate the suggested procedure for application of various types of pitand fissure sealants.
10 Evaluate the results of pit and fissure application.
11. Discuss current controversies relevant to sealant placement.
12. Describe common errors in the placement of pit and fissure sealants.
13. Discuss information that should be relayed to the patient and/or parent regarding sealantplacement and subsequent recall appointments.
14. Discuss the Idaho State Board of Dentistry regulations for Idaho dental assistants withrespect to applying pit and fissure sealants.
BACKGROUND INFORMATION
The term pit and fissure sealant is used to describe a resin material that is introduced into the
occlusal pit and fissures of caries-susceptible teeth for the purpose of acting as a physical protective
barrier against caries-producing bacteria. It has been well documented in the literature that occlusal
surfaces in young patients have a high caries susceptibility. The incidence of caries is relatively
low on smooth, self-cleansing surfaces (i.e., buccal, lingual, mesial, distal) where fluorides are
highly effective in reducing decay. Unfortunately, fluoride is not nearly as effective in the pits and
fissures where approximately 50-85% of decay is found. Bacteria are able to breed in the deep,
narrow faults (fissures) where enamel did not completely form (called noncoalscence of enamel).
In many cases toothbrush bristles cannot reach to the depths of these spaces to remove bacteria (see
Figure 1).
Figure 1. Many times toothbrush bristles cannot reach the depth of the pits and fissures.
Although the shape and depth of pits and fissures vary considerably even within one tooth, there
are three principal types of pit and fissure configurations that have been identified: U type (wider
opening), V type (narrower opening), and I type (bottleneck shape). See Figure 2a. The steeper
the slope of the inclined planes of the cusps (e.g., deep, narrow pits and fissures such as the I
type), the greater the chance that caries exist. Sealant materials are ideal for filling in these defects
in tooth anatomy, thus preventing the passage of bacteria, food debris, and nutrients into these
microscopic spaces. (see Figure 2b)
FISSURE
ENAMEL
OENT/N
Figure 2a. Occlusal Fissures. Drawings made from microscopic slides showing variations inshape and depth of fissures. Tooth on left outlines the section that has been enlarged for A, B, and C.Drawing A: U-type wider opening. Drawing B: V-type narrower opening. Drawing C: I-type opening(bottleneck shape). (Adapted from Wilkins, EM. Clinical Practice of the Dental Hygienist sixth edition, Lea& Febiger, 1989)
Figure 2b. Pit and Fissure Sealant. Sealant fillsU-type fissure and extends part way up slopes ofsurrounding cusps. (Adapted from Wilkins, EM.Clinical Practice of the Dental Hygienist, sixth edition, Lea &Febiger, 1989)
Pit and fissure sealants have been found to be 99% effective in prevention of occlusal caries when
the material is completely retained. As long as the sealant material remains intact and adheres to
the tooth, decay will not develop underneath it. Retention rates (how long the sealant remains
intact on the tooth) vary greatly. Studies have shown that retention rates after one year are as high
as 90-100%, and then drop to 85% and 65% after three years and seven years respectively.
It has been reported that sealant retention rates are higher on newly erupted teeth rather than
5
15G
mature enamel, on first molars rather than second molars, and on mandibular rather than maxillary
teeth. The increased retention in mandibular teeth could be due to the fact that operator access is
better on the mandible, maintainance of a dry working area is easier, and gravity assists the sealant
in flowing into the fissures. No difference in retention rates between light-cured and self-cured
material has been documented. Clinical studies show that the majority of sealant failures are due to
the operator's techniques; therefore, sealants are extremely technique sensitive.
CONSIDERATIONS IN PA I1ENT AND TOOTH SELECTION
Pit and fissure sealants are indicated for selected patients as part of a total preventive program.
There are no explicit, foolproof, ideal criteria for selecting individuals or teeth requiring sealants.
Children are most susceptible to caries and are usually the age group targeted. Sealants should be
placed as soon as possible following eruption to prevent thr litiation of the caries process;
however, criteria should not be limited to age. The following indications and contraindications are
outlined in Primary Preventive Dentistry (Harris, N, and Christen, A, 3rd edition, Appleton and
Lange, 1991):
Indications - A sealant is indicated if:1. A deep fissure, fossa, or pit is present, especially if it catches the tip
of the explorer (for example, occlusal pits and fissures, buccal pits of mandibular
molars, lingual pits of maxillary incisors).
Contraindications - A sealant is contraindicated if:1. Patient behavior does not permit use of adequate dry field (isolation) techniques
throughout the procedure.
2. There is an open occlusal carious lesion.
3. Caries, particularly proximal lesions, exist on other surfaces of the same tooth
(radiographs must be current).4. A large occlusal restoration is already present.
A sealant is probably indicated if:1. The fossa selected for sealant placement is well isolated from another fossa with a
restoration (for example, a maxillary molar with a restoration on the mesial
portion of the occlusal surface).
6154
2. The area selected is confined to a fully erupted fossa, even though the distal fossais impossible to seal due to inadequate eruption.
3. An intact occlusal surface is present where the contralateral tooth surface i.e.,same tooth surface on the other side of the arch) is carious or restored, as teeth on
opposite sides of the mouth are usally equally as prone to caries.
4. There is an incipient lesion (early developing caries) in the pit and fissure; this
decision would be a matter of professional judgment.
Other Considerations:
Where cost-benefit is critical and priorities must be established, ages 3-4 are mostimportant times for sealing primary teeth, ages 6-8 for first permanent molars, and ages 11-13 for second permanent molars. These ages correspond with normal eruption patterns.Sealants should be considered for adults if there is evidence of impending cariessusceptibility, for example following excessive intake of sugar, or drug-or radiation-inducedxerostomia (abnormal dryness of the mouth). The disease susceptibility of the tooth shouldbe considered, not the age of the individual.
Sealants are applied only after the patient has had an examination and been diagnosed by the
dentist. Teeth that do not require restorations may be candidates for sealant placement. If you
have any questions about the treatment plan or the tooth surfaces that have been indicated, confirm
the diagnosis with the dentist.
ACID ETCHING/CONDITIONING
Sealants must form a strong mechanical bond with the enamel surface in order for the resin to be
effectively retained. In its natural state, an enamel surface that has been cleaned but not otherwise
treated, will not allow penetration of the sealant resin. Instead, the resin will just spread over the
enamel surface. Sealant kits, therefore, are supplied with phosphoric acid etchant, which is
applied to the cleansed tooth immediately prior to sealant application. Etching or "conditioning" the
tooth with the phosphoric acid for one minute increases the enamel surface area by producing a
selective dissolution of the enamel, opening pores into which the resin can flow. Enamel minerals
are removed from the surface to a depth of approximately 25 microns. Clinically, the surface
appears dull and frosted compared with the translucence of normal enamel. A sealant placed over
an acid conditioned tooth penetrates into these surface irregularities created by the etchant to form
7
153
resin "tags" approximately 15-25 microns in length. The tags markedly increase the mechanical
retention and are responsible for clinical retention and success of the sealant (see Figure 3).
ORIGINALSURFACE
A.
SEALANT
ORIGINALSURFACE
B.
CONDITIONED ENAMEL SURFACE
ENAMELPRISMS
NON CONDITIONED ENAMEL SURFACE
ENAMELPRISMS
Figure 3. Enamel surface before and after acidetching. Microscopic sealant tags extend into thesurface of acid conditioned enamel (A.) but do notpenetrate the nonconditioned surface. Adapted fromPreventing Pit and Fissure Caries: A Guide to Sealant Use.Massachusetts Health Research Institute, MassachusettsDepartment of Public Health, 1986.
The most critical period in the sealant application is the acid-etch process. If saliva is allowed to
contact the etched tooth prior to resin placement, proteins from the saliva will adhere to the etched
enamel. Upon contact with saliva, remineralization of enamel begins immediately, interfering with
penetration of the sealant and significantly reducing bond strength between sealant and enamel. If
a conditioned tooth becomes contaminated with saliva prior to resin placement, it should be re-
etched for 20-30 seconds. Therefore, the importance of maintaining a dry field through proper
isolation of the tooth cannot be overemphasized. The acid etchant should not be allowed to contact
the oral soft tissues, skin or eyes at any time. If it does contact any tissue other than enamel, rinse
the area with water right away. The solubility rate of etched enamel returns to that of normal
enamel after a 24-hour exposure to the saliva.
The tooth must be thoroughly washed (20-30 seconds) and dried following the etching process. If
this step is omitted, the presence of microscopic calcium phosphate particles, resulting from the
interaction of the phosphoric acid conditioner and the enamel surface, will contaminate the prepared
surface. As with saliva contamination, this form of contamination interferes with retention and can
affect the clinical outcome of the sealant.
Research regarding the most effective acid concentration and the duration of application time varies
considerably. Acid concentrations range from 30-70% phosphoric acid, and application times
8
159
range from 10-60 seconds. Acid conditioning has been carried out for one minute in most of the
published studies. Currently, the most commonly used concentration is 35-37% phosphoric acid
with application time between 30-60 seconds. There is no apparent difference in the clinical
performance of sealants related to the various phosphoric acid concentrations. However, because
of the variability in research findings it is prudent for the clinician to follow the manufacturer's
directions for acid concentration and conditioning time.
TYPES OF SEALANTS
There are numerous brands of sealant materials available from a variety of manufacturers. The
most commonly used material is a liquid resin monomer (a plastic) whose base is the reaction
product of three parts bisphenol A-glycidyl methacrylate (Bis-GMA) and one part methyl
methacrylate (MMA). The MMA is added to decrease viscosity so it can flow into etched enamel to
create a good seal. Bis-GMA is the same base material that is used in composite restorations.
When used as a restorative material in the placement of tooth-colored restorations, filler particles
(e.g. glass, quartz) are added for strength. Sealants usually do not require a great deal of strength
since their benefit is in the depth of the pits and fissures. Sealants, therefore, are most commonly
of the "unfilled" variety; i.e., the resin does not contain glass filler particles.
The main difference in types of sealant material is in the method of polymerization, or the
hardening process. The two methods of polymerization are: 1) chemically-cured (also known as
self-cure or autopolymerization); and 2) light-cured (also referred to as photocure,
photopolymerize, or photoinitiation). Whatever system is used, finished sealants are essentially
the same. The chemically polymerized sealants are packaged as two-component systems: the
liquid catalyst which contains benzoyl peroxide and the liquid base, which is an organic amine.
When the peroxide and amine are mixed they react chemically to polymerize in about 60 seconds.
The light-cured sealants are packaged as one-paste systems that contain a photoinitiator which is
activated by an intense light of specific wavelength. The light is transmitted by a rather expensive
hand-held light source (see Figure 4) which affects the polymerization, usually within a 20-second
period. The original light-cured resins were initiated with the use of ultraviolet light, but their use
91
0 has declined with the introduction of the improved visible light-curing units and sealant materials.
o
Figure 4. Visible Light Curing Unit. Thishand-held light source is designed for polymerizing visiblelight-cure dental materials, such as pit and fissure sealants.(Taken from 3M Dental Products instruction manual)
Advantages and disadvantages of the chemically-cured and light-cured sealant systems are outlined
below:
Self Cure:
Light Cure:
Advantages Disadvantages
1. simple to use 1. once mixing has started, the operator must2. less expensive -- continue mixing and immediately place thedoes not require additional sealant, or stop and make a new mix if aequipment. problem should occur.
2. the catalyst and base must be mixed prior toplacement, increasing the chance of incorporatingair bubbles into final product.
1. operator has control overthe initiation of polymerization2. supplied as single liquid sono mixing is required
1. requires extra piece of equipment that canbreak down.2. high cost of curing light3. shorter shelf life of material
Sealants are available as clear, white, or tinted. The advantage of the opaque white or tinted sealants is
the increased visibility which allows for more accurate placement during application as well as
visibility during follow-up evaluations. The clear sealants are preferred by many patients because of
esthetic reasons. Some clinicians opt for placing opaque sealants in the molar region and clear sealants
on the premolars.
10
161
INSTRUCTIONS TO THE PATIENT OR PARENT
It is necessary to receive consent from the parent or guardian of a minor or a mentally-impaired
patient prior to placing a sealant. The patient and/or parent must understand that sealants can only
help prevent caries on the tooth surfaces where the sealants are applied; and that plaque control,
fluoride therapy, and sugar discipline are still necessary to prevent decay on the rest of the tooth
surfaces. Discuss the life expectancy (retention rate) of sealants with the patient/guardian. Use a
mouth mirror whenever possible to show the patient and/or parent which tooth has been sealed.
Explain that it may feel "high" immediately after placement, but that it should feel normal in one to
three days through normal chewing action. If it does not, the patient should return to the dental
office to have the excess height reduced.
The patient or parent should be advised to check the sealant during routine oral hygiene procedures
and to contact the dental office if there is any sign of sealant loss or breakage. Inform the patient or
parent of the need for six-month recall appointments to monitor sealant retention. At the recall
appointment, the sealed tooth should be categorized and treated according to one of the three
following categories:
Recall Status of Tooth Treatment
All pits and fissures covered No treatment required
Sealant missing from some or all of the pits and Reseal the exposed pits and fissuresfissures; exposed surface sound (i.e., sealant placement)
Sealant missing from some or all of the pits andfissures; caries present
Restore carious pits and fissures(i.e., restorative procedures by theDDS)
Adapted from Preventing Pit and Fissure Caries: A Guide to Sealant Use. Massachusetts Health Research Institute, Massachusetts
Department of Public Health, 1986.
11
162
SEALANT FAILURE
The success of sealants is dependent upon a strong sealant-to-enamel bond, with sufficient
mechanical retention being the primary determinant of clinical success. Improper technique is the
major cause of failure or early loss of sealants; therefore, it is imperative that the operator strictly
adhere to proper sealant placement. The following list describes common technique errors.
1. Contamination may be caused by either saliva or calcium phosphate products as
described earlier. The enamel surface must be re-etched if contaminated.
2. Inadequate surface preparation may be caused by improper cleansing prior to applying
the etchant and/or the etching process itself.
3. Incomplete or slow mixing of self-cure sealants affects polymerization of the Bis-GMA
material. If polymerization is negatively affected (e.g., starts to set-up before placement), a new
mix should be made.
4. Too slow application of the material results in a less viscous (thicker) mix that cannot
flow easily into the pits and fissures, causing an incomplete seal. Place material within the time
frame recommended by the manufacturer.
5. Air entrapment due to whipping or vigorous mixing can occur during the mixing of self-
cured sealants. It is important to replace the caps on the resin bottles since moisture can be lost
through evaporation. The result is a less viscous material which does not flow properly.
6. Over-extension of the material beyond the conditioned tooth surface results in a
weakened sealant in the areas that are over extended. If the sealant margins extend beyond etched
tooth structure, those areas will cause increased microleakage beneath the sealant and/or fracture of
the sealant. The sealant should be replaced, confining the area of placement to etched tooth
structure.
PLACEMENT PROCEDURE
This section of the module will introduce the application of pit and fissure sealants in 10 steps. If
these 10 steps are followed correctly, you should have a high success rate in the sealants you
apply. The following armamentarium is needed for this procedure:
mouth mirror, explorer, cotton pliers/forceps cotton rolls (short and long)
2 sets of garmer clamps, or other armamentarium for maintaining a dry field
gauze prophy brush
flour of pumice slow speed handpiece
cotton pellets floss
evacuator tips (saliva ejector and high speed) air/water syringe tip
sealant dappen dish sealant applicator
sealant material: acid etch
- universal and catalyst (for self-cure) acid etch brush
unive sal resin (for light-cure)
light curing unit (for light-cure)
STEP 1. SELECT APPROPRIATE TEETH
Sealants are not for all caries-free pits and fissures. Teeth should be evaluated in terms of:
1. overall caries susceptibility
2. existing restorations and carious lesions
3. occlusal anatomy
Sealants should be applied to teeth with caries-free occlusal surfaces, to teeth with deep pits and
fissures, to teeth with no proximal decay, and to newly-erupted teeth. Sealants should not be
applied to teeth in the mouth with rampant interproximal decay, or to teeth with shallow, well-
coalesced pits and fissures in a mouth that shows no existing restorations or carious lesions.
Sealants are placed only after a thorough examination, including radiographic evaluation, and
subsequent diagnosis by the dentist.
13
1 C
Patients who will most often need sealants are children ages 6-13 who exhibit newly-erupted 6-
year molars, permanent premolars, or l2 -year molars. Partially-erupted teeth may be sealed
provided there is no tissue flap over the occlusal surface to interfere with application. Premolars
and primary molars may be sealed as well as newly-erupting 3rd molars. It is necessary to receive
consent from the parent or guardian of a minor or a mentally-impaired patient prior to placing a
sealant.
STEP 2. PUMICE OCCLUSAL SURFACE AND RINSE
Flour of pumice applied with a rotary brush works well for cleansing the tooth surface of debris.
It is important that there be no oil and no fluoride present in the cleaning agent. Both interfere with
the etching process. Therefore, commercial prophy pastes are not recommended for cleansing
prior to sealant placement. After polishing the tooth surface to be sealed, rinse the tooth well with
water to remove the pumice.
Many operators advocate the use of hydrogen peroxide or the Prophy Jet® rather than pumice for
optimal plaque removal. Since all three methods will effectively remove plaque if properly
performed, the clinician should defer to office policy or personal preference when selecting which
method to use. However, Idaho dental assistants currently are not permitted by law to use the
Prophy Jet®.
STEP 3. REMOVE PUMICE FROM GROOVE WITH EXPLORER
Pumice particles may become wedged in deep pits and fissures. Check all pits with explorer to be
sure any remaining pumice or plaque has been removed. Sometimes it is impossible to remove all
the stain from the pits. In this case, you may seal over the stain. Rinse again after removing all
plaque and/or pumice.
14
165
STEP 4. ISOLATE
There are several ways to isolate the teeth. Rubber dam isolation is ideal but cotton roll isolation is
most commonly used. For maximum results, it is suggested that you isolate both maxillary and
mandibular quadrants for each sealant application.
Gartner clamps (demonstrated in the videotape which accompanies this module) are very effective
in maintaining a dry field. With these clamps, a long cotton roll may be placed in the mandibular
vestibule and wrapped in a horseshoe-shape fashion to extend to the maxillary vestibule thus
isolating the maxillary and mandibular teeth of the same side at the same time. This way the
mandibular teeth are sealed first--then the maxillary teeth, so that an entire side of the mouth is
sealed all at once. A garmer clamp also may be used with two short cotton rolls for isolation of the
mandibular teeth. The maxillary teeth may then be isolated with either a gauze square or a single
cotton roll. Other methods of isolation include the placement of saliva absorbers (for example,
Lorvic's dri- aids ®) over the parotid ducts (salivary openings on the inner cheek) next to maxillary
molars, or the use of small plastic cotton roll holders. These techniques might be useful in cases
where patient management is not a problem or salivary flow is minimal.
Isolation technique is extremely important in the success of the sealant. Saliva contamination of an
etched tooth will interfere with sealant retention. If there is difficulty retaining a sealant, a rubber
dam should be considered when reapplying the sealant. You may also want to consider the use of
bite blocks to keep the patient's mouth open during the procedure.
STEP 5. DRY AND ETCH
Thoroughly dry the tooth (30 seconds) to prevent dilution of the acid etch solution. Check the air
line to make certain it is free of oil prior to drying the tooth because oil and moisture will interfere
with sealant bonding. To check the air line, blow air from the air syringe onto the surface of the
mouth mirror until there is no trace of oil or moisture.
Apply etchant solution with the acid-etch brush which is packaged with in sealant kit or a cotton
15
166
pellet. Place the etchant 2/3 up the cuspal slopes using a gentle dabbing motion. A rubbing motion
will break the fragile enamel lattice work formed during the etching process. Review the
manufacturer's instructions for proper etching time for the sealant material you are using. Usual
etching time for permanent teeth is 60 seconds. If using acid gel, let it set untouched for the
recommended time period (usually 60 seconds). Do not allow the etchant to contact the oral
mucosa, skin or eyes. If it does, thoroughly rinse the area with water.
The acid should be applied over an area that is 2-3 millimeters beyond the area to be sealed (see
Figure 5). It is critical that sealant margins end within the etched enamel area to prevent
microleakage. If the sealant margin ends on untreated enamel, it will be weak, fracture away
easily, or allow bacteria to lodge under the margin. Deciduous teeth should be etched for 1 1/2-2
minutes and fluorosed teeth (teeth that have been stained or pitted due to excessive fluoride during
formation) should be etched for 15 seconds longer than the regular time
STEP 6. RINSE 20-30 SECONDS
Figure 5. Apply acid etch 2-3 millimeters beyondarea to be sealed. In this example, cotton rollisolation is being used to maintain a dry field, whichis critical to the success of sealant retention.
Suction excess acid from the tooth surface first. Then rinse the tooth with water, holding the
evacuator tip close to the tooth to suction remaining acid and water. Rinsing for the full 20-30
seconds is crucial in removing surface by-products of etching which interfere with sealant
retention.
OSTEP 7. RE-ISOLATE
Cotton rolls will become saturated during rinsing so they need to be changed. A second set of
loaded Garmer clamps may be used to simplify changing to dry cotton rolls. If this method is
used, place a dry cotton roll over the etched surface to prevent saliva contamination during the
switch. This is the most vulnerable time for saliva contamination of the etched enamel to occur. If
is does occur, re-etch the tooth surface for 30 seconds.
Sometimes it is possible to place dry cotton rolls over the saturated ones without changing the
saturated cotton rolls. These dry cotton rolls must be held in place.
STEP 8. DRY 20 SECONDS -- CHECK ETCHED SURFACE
The tooth must be completely dry before placing the sealant or it will not be retained. Once again,
make certain that the air line is not contaminated with oil or water. The etched surface should be a
dull, chalky white. If the tooth does not appear frosty white, etch again for 15-30 seconds.
STEP 9. APPLY SEALANT IN 30 SECONDS
Self-cured or Autopolymerized sealants:
Have the sealant ready to dispense quickly. Add 1 drop of catalyst to 1 drop of universal. Mix for
5 seconds. You will have 30 seconds to apply the sealant. A brush or a small disposable tube
(cannula) as provided by the sealant kit may be used. Immerse the tip of the tube in the sealant mix
and release the lever. The applicator will draw up an amount suitable for an occlusal surface
(Figiire 6).
Figure 6. Immerse tip of disposable tube in bottom ofplastic mixing well and release lever to draw resin up intotip.
17
1C3
Apply sealant in a relatively thick layer extending approximately 2/3 up the cuspal slope. Touch
the applicator to a mesial inclined plane, depress lever gradually, and allow it to flow into the
fissures toward the distal (see Figure 7). If the sealant is chemically polymerized,.it will set up in
1-3 minutes. Check the leftover mixture in the plastic mixing well to see if it is hardened. If so,
the tooth may now be checked for polymerization as well. There will always be a greasy film,
called the air-inhibited layer, left on the top surface of the sealant. This should be wiped off with a
cotton pellet or rinsed off with water.
Figure 7. Placing sealant material.
Light-cured or Photopolymerized Sealants:
Dispense 1-2 drops of sealant material into the mixing well that is provided with the sealant kit (2
drops is sufficient quantity for one quadrant). There is no need to mix light-cured sealant. Apply
the material in the same manner as explained above for self-cured material with the small
disposable tube/applicator..
After the material has been placed, initiate polymerization with the light source. Expose all coated
surfaces for 20 seconds, keeping the light guide about 1-2 millimeters from the surface. Touching
the light tip to the uncured sealant will coat it with material and prevent accurate light emission.
The curing light must expose the entire coated surface; therefore; if the surface to be sealed is larger
than the light guide, the light must be moved across the surface, curing each tip-sized area. It is
strongly recommended that you use some means of available protective eyewear (special glasses or
shields) that filter out the bright light. After the sealant has set, rinse or wipe the occlusal surface
(air-in hi bited layer).
STEP 10. CHECK APPLICATION WITH EXPLORER
All margins should be checked to make sure that they are flush with the tooth and that application
was successful (see Figure 8). Move the tip of the explorer back and forth across the margins and
try to "pry" the sealant away from the enamel. If there are any voids or air bubbles, or if complete
coverage is not attained, additional sealant can be added without re-etching if a dry field has been
maintained. If saliva was allowed to contaminate the surface or the sealant does not adhere, the
procedure should be repeated, re-etching for 15-30 seconds. Since all the BIS-GMA products are
of the same chemical family, they will easily bond to each other.
Figure 8. Check all margins with explorer.
Remove the cotton rolls or rubber dam. The gingival 1/3 of the tooth should be checked for excess
sealant that may have spilled over during placement . If there is a small excess amount, you may
flick it off with an explorer. Contacts should be checked also. Floss on each side of the sealed
teeth to make sure contacts were not sealed closed. If they were, remove excess with an explorer.
Occlusion must be checked before dismissing patient. Articulating paper is used to identify high
spots. Dry teeth thoroughly and have patient tap teeth together and slide mandible from side to
side. If it is excessively high, there will be heavy dark markings on the sealants which should be
polished down with a finishing bur. If it is just slightly high (smaller dark markings), inform
patient that these areas will wear down in 2-3 days. Apply fluoride to the sealed tooth to cover any
etched but unsealed areas of the tooth. Let the patient know that sealants should be checked every
6 months to assure that they have been completely retained. Sealants are charted on the patient's
19
10
411 dental charting and an entry made in the record of services.
a
A summary of the steps for sealant application follows:
1. select appropriate teeth according to the dentist's diagnosis and criteria for selection
2. pumice and rinse
3. remove pumice from grooves with explorer and rinse
4. isolate teeth to be sealed
5. dry and etch 60 for seconds
6. rinse for 20-30 seconds
7. re-isolate
8. dry for 20 seconds check etched surface
9. apply sealant: if using self-cured material, place within 30 seconds of mixing; if using light-cured,
place material and expose the entire surface with the curing light for recommended time.
10. check application with explorer and floss
NOTE: Do not dismiss patient until occlusion has been checked and fluoride has been applied to
the sealed tooth/teeth.
The application of pit and fissure sealants is one of the most valuable preventive procedures that
can be provided for patients. They are part of a total preventive program which also includes
fluoride, oral hygiene, diet control, and regular checkups. Good oral hygiene is essential to
prevent caries on the tooth surfaces where sealants have not been applied. Sealants should be
checked by patients during routine homecare procedures for loss or breakage, and should be
replaced when indicated. Recall appointments should be scheduled every six months to monitor
sealant retention.
20
STUDY QUESTIONS
Directions: Answer the following questions on a separate piece of paper to the best of yourability. You may use the module to look up needed information. Upon completion of thequestions, review all responses to familiarize yourself with pertinent information.
1. What is a pit and fissure sealant?
2. What is the purpose of pit and fissure sealants?
3. Why are pits and fissures more susceptible to caries than the smooth tooth surfaces?
4. Describe the three principle pit and fissure configurations, indicating which type is mostsusceptible to caries.
5. How effective are sealants?
6. Retention rates vary greatly and, to some extent, are impacted by the teeth on whichthey have been placed. Which teeth have high retention rates?
7. When are sealants indicated for placement?
8. When are sealants contraindicated for placement?
9. What factors should be considered for possible sealant placement?
10. By what means does the sealant attach to the tooth?
11. How does the acid etch increase the bonding ability of the sealant material?
12. What are two types of contamination that can interfere with retention and affect theoutcome of the sealant?
13. What type of acid is most commonly used to etch or condition the tooth prior to sealantplacement?
14. How long should the acid etch remain on the tooth prior to rinsing?
15. Describe the clinical appearance of properly etched enamel.
21
172,
16. What are the initials of the liquid resin that is commonly used as a sealant material?
17. Are sealants more commonly of the filled variety or the unfilled variety?
18. What is the difference between filled and unfilled resin?
19. Explain the differences and similarities between light-cured and chemically-curedsealants.
20. What are the advantages and disadvantages of the light-cured and chemically-curedsealant systems?
21. What instructions should be given to the patient and/or parent regarding pit and fissuresealants?
22. Clinical studies show that the majority of sealant failures are due to the operator'stechnique. What are six common technique errors?
23. What considerations should be given to selection of a polishing/cleansing agent?
41024. What methods are effective for establishing a dry field of operation?
25. Why is an explorer used in the pits and fissures after the tooth has beenpolished/cleansed with pumice?
26. How and where should the etchant be applied for:-etchant solution (liquid)?-etchant gel?
27. How should the resin be applied for:self-cured sealant?for light-cured sealant?
28. How should the air-inhibited (non-polymerized) layer be removed?
29. If additional sealant resin must be added because of voids or incomplete coverage, howshould it be accomplished?
30. How is the occlusion checked and adjusted if necessary?
Dietz, E.R., Pit and fissure sealants, Dent. Assist., Nov./Dec. 1988.
Harris, N.O., and Christen, A.G. Primary Preventive Dentistry, third edition. Appleton& Lange, 1991.
Massachusetts Health Research Institute. Preventing pit and fissure caries: A guide tosealant use. Massachusetts Department of Public Health, 1986.
Mertz-Fairhurst, E.J., Fairhurst, C.W., Williams, J.E., et al. A comparative clinical studyof two pit and fissure sealants: Six year results in Augusta, Ga. J. Amer. Dent. Assn.,105, 1982.
National Institutes of Health, Consensus development conference statement on dentalsealants in the prevention of tooth decay, J.A.D.A., Vol. 108, No. 2, Feb. 1984.
National Institute of Dental Research, Conference proceedings: Dental sealants in theprevention of tooth decay, J. Dent. Ed., Vol. 48, No. 2 (Supplement) Feb. 1984.
Silverstone, L.M., The current status of adhesive sealants, Dent. Hyg., Vol. 57, No. 5,May 1983.
Simonsen, R.J., Five-year results of sealant effects on prevalence and treatment costs. J.Dent. Res., 61, 1982.
Straffon, L.H., More, F.G., and Dennison, J.B. Three year clinical evaluation of sealantapplied under rubber dam isolation. J. Dent. Res., 63, 1984.
United States Department of Health and Human Services. Dental treatment needs of UnitedStates children, 1979-1980. The national caries prevalence survey. N.I.H. PublicationNo, 83-2246, December.
Woodall, I.R., Dafoe, B.R., Young, N.S., Weed-Fonner, L., Yankell, S.L.Comprehensive Dental Hygiene Care, second edition. The C.V. Mosby Company, 1985.
Wilkins, E.M. Clinical Practice of the Dental Hygienists, sixth edition. Lea & Febiger,1989.
23
PIT AND FISSURE SEALANTEVALUATION FORM
Clinician Patient
Date Instructor
Tooth # & surface Score
Key: C = Criterion Met = 2I = Criterion Improvable = 1
X = Unacceptable = 0
* = Critical task; if a 2 is not achieved on a critical task, the process evaluation is
unsatisfactory and must be redone.
TASK C
SELF
I X
INSTRUCTOR
C I X
1. Instructs patient/parent about procedure and obtains consent 2 1 0 2 1 0
2. Teeth and surfaces selected meet criteria for sealant placement.* 2 1 0 2 1 0
3. Armamentarium is complete. 2 1 0 2 1 0
4. Teeth are properly cleansed.* 2 1 0 2 1 0
5. Teeth are well isolated.* 2 1 0 2 1 0
6. Surfaces to be sealed are dried. 2 1 0 2 1 0
7. Surfaces to be sealed are properly etched.* 2 1 0 2 1 0
20. Patient is instructed about need for appropriate recall and/or
reappointed for resealing. 2 1 0 2 1 0
21. Sealants are charted and recorded accurately. 2 1 0 2 1 0
22. Professional judgment and patient are managed appropriately. 2 1 0 2 1 0
44
25
1
Module 2-B
APPLICATION OF PIT AND FISSURE SEALANTS
Final Examination
NameGrade
PIT AND FISSURE SEALANTSWRITTEN EXAMINATION
Directions: Circle the best answer to the questions below.
1. Pit and fissure sealants are intended to:a. trap bacteria in the tooth to increase caries productionb. prevent caries-producing bacteria from entering the toothc. eliminate cries- producing bacteria
2. As long as sealant remains intact, and properly adheres to the tooth surface, decay will notdevelop beneath it.a. trueb. false
3. Sealant retention rates are higher on:a. newly-erupted teeth rather than mature enamelb. second molars rather than first molarsc. maxillary rather than mandibular teeth
4. Clinical studies show that light-cured sealants have a much higher rate of retention than self-curedsealants.a. trueb. false
5. A pit and fissure sealant is indicated for placement on a tooth ifa. a faulty restoration is presentb. a deep occlusal fossa is presentc. a large occlusal carious lesion is presentd. caries exist on adjacent surfaces of the tooth
6. Which of the following teeth is a candidate for a pit and fissure sealant in a 12 year old patient:a. first permanent mandibular molar with a proximal caries on the mesialb. maxillary central incisor which is caries free with a deep lingual pitc. first permanent premolar with caries on the distald. second permanent molar with a composite on the occlusal
7. Sealants must form a stong chemical bond with the enamel surface in order for the resin to beretained.a. trueb. false
8. The primary reason for etching enamel before placing a sealant is toa. create surface irregularities to increase the area for retentionb. torm a smooth surface to enhance flow of the sealantc. create a chemical reaction with enamel to evaporate saliva
9. If saliva contacts an etched surface before sealing:a. the retentive ability will be increasedb. the enamel may remineralizec. the patient must be reappointed
10. When an acid etch is used in preparation for a pit and fissure sealant, the most effective etch isachieved usinga. boric acidJ. acetic acidc. citric acidd. phosphoric acide. hydrochloric acid
11. To prepare a clean surface of a permanent tooth for a .,ealant, the surface should be etched fora. 10 secondsb. 60 secondsc. 90 secondsd. check manufacturer's instructionse. b and d
12. A properly etched tooth will appeara. chalkyb. dullc. frostyd. glossye. a, b, and cf. all of the above
13. Most sealants used today area. methyl glycidyl methacrylateb. methyl methacrylatec. bisphenol A glycidal methacrylate and methyl methacrylate
14. The accepted methods of polymerizing pit and fissure sealants are:a. autopolymerizationb. photopolymerizationc. monomerpolymerizationd. a and be. a, b, and c
17J
15. If correctly used, cotton rolls can be as effective as a rubber dam in maintaining a dry field insealant placement.a. trueb. false
16. The main advantage of using the light-cured resins is:a. decreased costb. simplified isolation techniquec. control of polymerization timed. shortened shelf lifee. increased capacity for bonding
17. The single greatest reason for sealant failure is:a. topical fluorideb. operator error in techniquec. acidity of the salivad. none of the above
18. The correct type of hand movement to use when applying etching solution on a tooth inpreparation for a dental sealant isa. gentle dabbingb. gentle rubbingc. vigorous rubbingd. vigorous brushing
19. After polymerization with curing light, which of the following should be done to the residual filmof unpolymerized sealant in order to complete the procedures accurately?a. kepolymerize the surface for 10 secondsb. wash the surface film offc. wipe the unpolymerized film away with a cotton pledgetd. b or c
20. More sealant may be added to the tooth when1. a void is found2. coverage of pits and fissures is incomplete3. the tooth remains uncontaminated.ANSWER:
a. 1 onlyb. 2 onlyc. 1, 2, and 3
21. A patient presents to your office for an examination in which you find that a sealant is faulty.Steps in caring for this patient would include which of the following:a. re-etch over the faulty sealant and reapply sealant materialb. remove as much of the faulty sealant as possible, re-etch and reapply the sealant materialc. re-etching is not necessary, reapply the sealant materiald. sealants cannot be replaced after a prolonged period of time
22. Which of the following are indicated after placing an enamel sealant?1. Examine for occlusal interference2. Assess retention of the sealant3. Examine for voids and irregularities4. Advise the patient not to chew on the side of the sealant for 24 hours
ANSWER:a. 1, 2, 3b. 1, 2, 4c. 2 and 3 onlyd. 2, 3, and 4
23. When the unfilled sealant is polymerized, how should major occlusal discrepancies (heavy darkmarkings with articulating paper) be removed?a. finishing burb. pumicec.finishing stripd. natural abrasion
24. When the unfilled sealant is polymernized, how should minor occlusal discrepancies (small darkmarkings with articulating paper) be removed?a. finishing burb. pumicec.finishing stripd. natural abrasion
25. It is not necessary to inform the parent about a newly placed sealant since they are usually clearand cannot be easily detected by the parent or patient anyway.a. trueb. false
1E1
ANSWER KEY FOR PIT AND FISSURE SEALANTS WRITTEN EXAMINATION
1. b2. a
3. a
4. b5. b6. b7. b
8. a
9. b10. d11. e
12. e
13. c14. d15. a
16. c17. b18. a
19. d20. c21. b22. a
23. a
24. d25. b
1L2
Module 3
TEMPORARY CROWN RESTORATIONS
1E3
Module 3-A
TEMPORARY CROWN RESTORATIONS
Instructor's Guide
PLACING TEMPORARY CROWNS
INSTRUCTOR'S GUIDE
Developed by
LuAnn Spain, C.D.A.
Idaho State Board for Vocational Education650 West State Street
Boise, Idaho
1991
1E5
TABLE OF CONTENTS
Clock Hours 1
Course Requirements 1
Materials and Supplies 2
Testing Procedures for Final Practical Examination 3
Calculating Percentages for Temporary Crowns 5
Verification of Completion 6
PLACING TEMPORARY CROWNS
INSTRUCTOR'S GUIDE
This course is designed for the currently employed dental assistant(at least six months) that has successfully completed theFundamentals of Dental Assisting Course as stated in theRegulations of the Idaho State Board of Dentistry. Section 10.c.ii. The course is intended to be taught separately or incombination with one or all of the other expanded functions coursesaccording to the needs of the students enrolled in the program.
The goal of the course is to provide the dental assistant with thebackground knowledge and necessary skills in placement of temporarycrowns under the direct supervision of a dentist.
Upon successful completion of the course, the student will receivea certificate of completion/recognition to perform this function.
The required text for this course is Temporary Crown Restorations.The original text was developed by Project ACCORDE but has beenrevised and updated by LuAnn Spain, C.D.A. (1991). Suggestedreading material is listed at the end of Module 5.
For successful completion of the course, each participant mustcomplete the following requirements:
1. Attend all class and laboratory sessions.
2. Place two (2) acceptable preformed aluminum crowns.
3. Place two (2) acceptable preformed polycarbonate crowns.
4. Place two (2) acceptable custom acrylic crowns.
After completing the practice for each temporary crown, it shouldbe feasible for the student to complete a temporary crown in less
1
187
time. The suggested time for practice of an aluminum temporarycrown is: 55 minutes, first trial; 30 minutes, second trial.
The suggested time for practice of polycarbonate temporary crownsis: 1 hour, first trial; 40 minutes, second trial.
The suggested time for practice of custom acrylic temporary crownsis: 2 hours, first trial; 1 hour, second trial.
Materials and Supplies
Each student enrolled in the course will be provided with thenecessary Columbia Model #860 dentiform. These dentiforms areavailable at each of the area vocational-technical schools. Thespecified teeth to accompany the dentiform will also be providedby the school. These teeth include:
#18 full coverage preparation for aluminum crown#14 full coverage preparation for custom acrylic crown#8 full coverage preparation for polycarbonate crown
It will be the student's responsibility to provide the necessaryarmamentarium which is listed at the beginning of each module.The students are required to supply their own slow-speed handpiecewith a straight sleeve.
It is recommended that the instructor have study models of thetemporary crowns for the student to evaluate. The instructor willneed two study models of each type of temporary: one meeting allcriteria and one with sample deficiencies. The deficienciessuggested for the second study model follow:
1) The study model for aluminum temporary crown #18 willhave the following deficiencies:
Distal - crown extends beyond the finish lineLingual - crown margin is 0.8 mm short of the finish lineFacial - insufficient crimping at margin
2) The study model for polycarbonate temporary crown #8 willhave the following deficiencies:
Lingual - heavily over contouredIncisal - trimmed to stub without polishing; incisal edge
is too longFacial - undercontoured in gingival third and pitted.
3) The study model for custom temporary crown #14 will havethe following deficiencies:
Custom temporary #14 - uneven occlusal surface fromdistortion during polymerization
The necessary criteria and deficiencies for each temporary crownstudy model is listed in the Practice section of the text for thestudents to review.
The videotapes that accompany the aluminum and polycarbonatemodules are from the original Project ACCORDE course; they are out-dated according to the proper asepsis techniques. The instructoris encouraged to stress the importance of proper asepsis techniquesas stated in the course. The video's still have valuable contentfor the fabrication of aluminum and polycarbonate crowns, althoughthey are in black and white. The instructor should show thevideotapes to students immediately after lecture and prior to thelaboratory activity.
The videotape for custom temporary crowns was developed by GordonJ. Christensen entitled "Simple Temporary Restorations for FixedProsthodontics." This video describes all aspects of temporarycrowns with emphasis being placed on the custom temporary crowns.The videotape will demonstrate the various techniques available inthe fabrication of temporary crowns.
Gordon J. Christensen's videotape can be purchased from:
Practical Clinical Courses3707 North Canyon Road, Suite 3DProvo, UT 84604(801) 226-6569
TESTING PROCEDURES FOR FINAL PRACTICAL EXAMINATION
This course is designed on a Pass/Fail basis. In order for thestudent to pass the course, the requirements listed on the courseoutline must be successfully completed.
A short written examination (approximately 30 minutes) is providedand should be administered at the conclusion of the course. A copyof the written, final examination and the answer key are provided.A. minimum of 75% must be achieved on the written examination. Theexamination is worth a total of 100 points possible: 4 points foreach multiple choice question and 2 points for each true/false
3
1E3
question. For each incorrect multiple choice question, subtract4 points and for each incorrect true/false question, subtract 2points from the total of 100 points to determine the final grade.
Prior to the final practice examination, a date should be scheduledfor the examiners (evaluators). Time and date for the finalpractical examination should be at the discretion of the instructorand/or examiners, after completion of all course requirements.
Two examiners will grade the final temporary crown restoration.The examiners will include:
1) The area dentist(s) or standardized examiner designatedby the Idaho State Board of Dentistry.
2) The primary course instructor.
The final practical examination on temporary crown restorationswill be timed as follows:
1) The time allotted for the aluminum temporary crown duringthe final practical examination is thirty minutes.
2) The time allotted for the polycarbonate temporary crownduring the final practical examination is forty-fiveminutes.
3 The time allotted for the custom acrylic temporary crownduring the final practical examination is one hour.
The final practical exam on temporary crown restorations will bebased on a percentage grade. The student must achieve a minimumscore of 85% on each temporary crown to successfully pass thecourse.
The temporary crown restoration will be evaluated by two examiners(evaluators). If an error is noted on the evaluation form by oneexaminer, it must be noted in the same areas on the secondevaluator's form. Only when the two examiners agree on the sameerror will it be considered "valid". Only valid errors will beconsidered when calculating the final percentage grade. If a thirdopinion is needed or a question should arise concerning thetemporary crown restoration, a third examiner should be consulted.It may also be necessary to require a third examiner when the finalpercentage grade is in question.
4
1
41, Calculating Percentages for Temporary Crowns
Refer to the attached evaluation forms. Each criteria is evaluatedas follows:
2 =1 =0 =
AcceptableImprovableUnacceptable
Points are assigned to each of the above as follows:
2 = 2 Points1 = 1 Point0 = 0 Points
For aluminum crowns, there are 7 criteria, each worth a maximum of2 points for a total of 14 points possible. For the polycarbonateand custom acrylic crowns, the evaluation forms list 10 criteria,again worth a maximum of 2 points each for a total of 20 pointspossible. A percentage score can then be calculated by adding thetotal number of points earned and dividing by the total pointspossible (either 14 or 20).
To facilitate calculations, the following calculations scale isprovided:
The final examination of the students should not be discussed amongthe examiners. Anonymity of students must be maintained throughoutthe testing session. Students are assigned a number to be used inlieu of their names during the examination. A course instructorshould keep a list of students' names and corresponding numbersuntil the examination is completed.
Verification of Completion
Students successfully completing the course will receive acertificate verifying completion from the appropriate areaVocational-Technical School. Should a student fail the course, thestudent may be retested or repeat the course. Instructors shouldcheck with the Vocational-Technical School for current State Boardof Dentistry policies on re-examination.
6
0
Module 3-B
TEMPORARY CROWN RESTORATIONS
Final Examination
Name:
TEMPORARY CROWNSWRITTEN FINAL EXAMINATION
Date:Grade:
MULTIPLE CHOICE (4 points each): CIRCLE THE BEST ANSWER TO THEQUESTIONS BELOW.
1. Why are temporary crowns placed?
1. to preserve the tooth until an amalgam restoration canbe placed
2. to maintain occlusion3. to protect dentin from oral fluids4. to protect sensitivity in a prepared tooth
Answer: a. all of the aboveb. 1, 2 and 3
c. 1, 2 and 4d. 2, 3 and 4
2. What is the chief disadvantage of an aluminum crown?
a. malleabilityb. expensec. softnessd. poor aesthetic quality
3. On what teeth are custom acrylic resin crowns used?
a. only on molars and premolarsb. only on teeth in the mandibular archc. only on anterior teethd. on any tooth in the mouth
4. What should be done if the margin of a preformed aluminumcrown is short of the finish line?
a. the crown can be altered with contouring pliers to makeit fit
b. the finish line can be adjustedc. another crown must be selected
1
5. What should be done if an aluminum crown is slightly small andlacks adequate contact?
a. a larger crown must be selected since the metal cannotbe stretched
b. nothing should be done because it is better to be toosmall than too large
c. a ball burnisher can be used to increase the sizeslightly to achieve contact.
6. Which of the following types of temporary crowns have superiorfit and external contours?
a. the preformed polycarborate crownb. the custom acrylic crownc. the preformed aluminum crownd, the cellulose crown form
7. When occlusal patterns are examined, what does a marking onevery tooth except the crown restoration indicate?
a. the crown is in supraocclusionb. the crown is in infraocclusionc. the crown is in the ideal position
8. Why is it important to thoroughly mix the monomer (liquidportion) with the polymer (powder portion) when constructinga polycarbonate crown?
a. exothermic reaction must be avoidedb. the monomer in its pure form is toxic to the toothc. exact proportions must be maintainedd. the polymer in its pure form is toxic to the tooth
9. Which measurement is a major consideration in determiningwhich size crown to use?
a. facial-lingualb. mesial-distalc. occlusal-gingival
10. When mixed, the polymer and the monomer of resin polymerizeproducing heat; this is known as which of the followingreactions?
a. polythermicb. endothermicc. hypothermicd. exothermic
2
1'2 5
11. Select the best order of use for trimming and polishing customacrylic resin or polycarbonate crowns.
1. carbide acrylic bur2. fine pumice3. garnet d'sc4. cuttle disc
Answer: a. 1, 3, 4 and 2b. 3, 1, 4 and 2c. 1, 4, 3 and 2d. 3, 1, 2 and 4
12. What is the first step in fabricating a temporary crown?
a. measuring the mesial distal space between the c( +-actareas
b. selecting the appropriate crown sizec. obtaining an alginate impressiond. checking occlusion for prematurities
13. What is a possible solution if the preformed polycarbonatecrown binds at the preparation finish line?
1. adjust the finish line2. increase the marginal diameter with a carbide bur3. adjust the interior of the crown with a round bur
Answer: a. all of the aboveb. 1 and 2c. 2 and 4d. 2 onlye. 3 only
14. What direction should an explorer be used to check themarginal adaptation of a temporary crown?
a. around the circumference of the crownb. from the gingival to the occlusal surfacec. from the occlusal to the gingival surfaced. all of the above
15. What type of resin material is bi-acryl?
a. methyl methacrylateb. ethyl methacrylatec. composited. epimine
3
12G
16. Which type of resin material results in the greatest amountof shrinkage?
a. vinyl ethyl methacrylateb. methyl methacrylatec. epiminesd. composite
17. When fabricating a custom acrylic crown, what is the bestindicator that the crown is ready to be placed on the tooth?
1. high gloss2. heat production3. loss of highlights4. doughy consistency
Answer: a. all of the aboveb. 1 and 4c. 2 and 3d. 3 and 43. 1 and 2
18. Which of the following types of temporary crowns can berelined?
Instructor will announce finalpractical examination time duringthis course.
Course Description
The primary goal of this course is to provide the dental assistantwith background knowledge and laboratory instruction in theplacement of temporary crown restorations. Instruction includesplacement in three types of temporary crowns: preformed aluminum,preformed polycarbonate and custom acrylic. Upon successfulcompletion of the course, the student will receive a certificateof completion/recognition to perform this function. Studentstaking this course are required to have successfully completed theFundamentals of Dental Assisting course and have six months dentalassisting experience prior to enrolling.
Required Text
Temporary Crown Restorations, second edition, Project ACORDE--U.S.Department of Health, Education and Welfare, 1979, Updated version1991, LuAnn Spain, C.D.A.
Course Requirements
For successful completion of the course, each participant mustcomplete the following requirements:
1. Attend all class and laboratory sessions.
2. Place 2 acceptable preformed aluminum c owns during laboratorysession.
3. Place 2 acceptable pre2ormed polycarbonate crowns duringlaboratory session.
4. Place 2 acceptable custom acrylic crowns during laboratorysession.
2 C:
vi
After completing the practice for each temporary crown, it shouldbe fecsible for the student to complete a temporary crown in lesstime. The suggested time for practice of aluminum temporary crownsis: 55 minutes, first trial; 30 minutes, second trial.
The suggested time for practice for the polycarbonate temporarycrowi is: 1 hour, first trial; 40 minutes, second trial.
The suggested time for practice for the custom acrylic crown is:2 hours, first trial; 1 hour, second trial.
A minimum score of 85% must be reached to be considered acceptable.This may require placing several temporary restorations to meet anacceptable level.
5. Achieve a minimum of 75% on the written examination.
6. Successfully complete the final practical examination toreceive a certificate of completion/recognition to performthis function (preformed aluminum crown on Columbia DentiformTooth #19; polycarbonate crown on Columbia Dentiform Tooth #8;custom acrylic temporary crown on Columbia Dentiform Tooth#14). A minimum score of 85% must be reached to be consideredacceptable.
7. Materials to be supplied by the student:
a. anterior and posterior preformed temporary crowns;
b. refer to armamentarium in each module;
c. slow speed handpiece with straight sleeve;
d. expendable supplies as designated by the instructor.
Evaluation/Grading
This course is designed on a Pass/Fail basis. In order for thestudent to pass the course, the requirements listed above must besuccessfully completed. As previously stated, the minimumpercentage for acceptable temporary crowns is 85% and a minimum of75% must be achieved on the written examination. A description fordetermining the percentage of scores is presented below.
A. Calculating Percentages for Temporary Crowns
Refer to the attached evaluation forms (they are the same asthe forms found on pages 35, 60 and 77 of the corresponding
vii
2 ", 0
Temporary Crown Restorations Module). Each criteria isevaluated as follows:
2 = Acceptable1 = Improvable0 = Unacceptable
Points are assigned to each of the above as follows:
2 = 2 points1 = 1 point0 = 0 points
For the aluminum crowns (page 35) there are 7 criteria, eachworth a maximum of 2 points--for a total of 14 points possible.For the polycarbonate (page 60) and custom acrylic crowns (page77), the evaluation forms list 10 criteria, again worth a maximumof 2 points each for a total of 20 points possible. A percentagescore can then be calculated by adding the total number of pointsearned and dividing by the total points possible (either 14 or 20).
To facilitate calculations, the following calculation scale isprovided:
B. Calculating Percentages for Written Examination
For each wrong answer on the written examination, subtract 4points for each multiple choice and 2 point for each true/falsefrom 100 to determine final score.
211
Objectives
Following completion of lecture and laboratory activities, thestudent will be able to:
1. Explain why temporary crown restorations are placed.
2. List and describe the types of temporary crowns, theiradvantages and disadvantages.
3. List and explain the types of finish line forms.
4. Describe types of resin materials and their advantages,disadvantages, and demonstrate proper mixing technique.
5. Describe the procedures of each type of temporary crown.
6. Fabricate a crown from each module according to thestated criteria.
7. Define and explain the importance of correct occlusion.
8. Demonstrate the ability to correctly evaluate eachcrown placement that meet and do not meet the criteriafor restorations of these preparations.
9. List and describe additional techniques that are employedfor fabrication of custom crowns.
10. Explain the advantages of the updated techniques forcustom temporary crowns.
11. Define the purpose of temporary cement.
12. Explain aseptic techniques as it applies to thesemodules.
Procedure
1. Read Temporary Crown Restorations Modules.
2. Answer study questions on pages 18, 36, 61, 79, and 85 ofmodules.
3. Answer objectives listed above.
4. For supplementary reading, refer to the references listed atthe end of the modules.
ix
COURSE SCHEDULE
Clock Method ofHours Instruction
2 Lecture/Demonstration
CrownRestoration
Videotape
2 Laboratory
Topic/ActivitvAssignedReadings
Introduction to CourseBackground Information--Purpose of temporarycoverage
- -Types of temporary crowns- -Types of Resins
Aluminum Temporary CrownsMaterials and Instruments- -Selection of crown
Students practice placementof preformed aluminum crownson dentiforms to completecourse requirements* (2acceptable aluminum crowns)*Refer to Page , CourseRequirements
Students practice placementof preformed plastic crownson dentiforms to completec.-ow n requiremGats.*(2 acceptable polycarbonatecrowns)*Refer to Course RequirementsPage vi.
View Gordon Christensen'svideotape "Simple TemporaryFixed Prosthodontics"
TemporaryCrownRestorationModulepgs. 66-79
Students practice placement ofcustom acrylic crowns ondentiforms to complete courserequirements.*(2 acceptable custom acryliccrowns)*Refer to Course Requirements,page vi.
xi
211_ it
30 Written A comprehensive writtenminutes Examination examination consistinr of
multiple choice and true/falsequestions.
NOTE: Your instructor will provide further information about thefinal practical examination during your course.
xii
213
;i
moduleintroduction to the course
A41
se 1,
2 1 G
iamb Ps4
TEMPORARY CROWN RESTORATIONS
INTRODUCTION
The Project ACCORDE Temporary Crown Restorations consists ofthree modules, "Preformed Metal Crowns," "Preformed PlasticCrowns," and "Custom Resin Crowns." For additional reference, thesupplemental module "Additional Techniques Employed for Fabricationof Custom Temporary Crowns" has been included in the ProjectAccorde module. It is essential that you read the backgroundinformation, a description of procedures and criteria, and reviewthe evaluation form.
The procedure description will provide step-by-stepinstructions for each procedure involved in the temporary crownrestoration. Procedures outlined in the modules are designedspecifically for the learning situation, with an emphasis onintroducing new concepts and skills. It should be understood thatprocedures and techniques may vary with each dental office. Onlya limited amount of experience can be gained in a lab situation,so it is suggested that students seek additional experience in thedental office.
Evaluation is a vital element of this course and it is theresponsibility of both the student and the instructor. Yourability to evaluate your own work, according to the criteria, willhelp you gain an even better understanding of the proper techniquesand procedures. In a dental situation, the quality of yourtemporary crowns will depend largely on your ability to self-assessyour work. The instructor's evaluation will guide you in theapplication of the accepted criteria and in the development of yourskills.
Tests are an important part of the evaluation process. Theycheck your knowledge of the technical background information andyour ability to apply both knowledge and skill to similar butdifferent temporary crown restorations. Your instruction will testyou on the different temporary crowns, after competence has beengained in all areas.
2
217
BACKGROUND INFORMATION
When the pathology of a tooth is such that a cavitypreparation and amalgam or a tooth-colored restoration areconsidered inadequate to restore the tooth to its original form andfunction--that is, if the tooth is badly decayed, brittle as aresult of endodontic treatment, losing function, or unaesthetic- -one satisfactory restorative method is the application of a crown.Crowns are also used to cover undamaged teeth when bridge abutmentsare required.
From the standpoint of the patient's oral health, the care andplacement of temporary crowns is essential for the followingreasons:
1. TO PREVENT SENSITIVITY IN THE PREPARED TOOTH.
During crown preparation, portions of the teeth's enameland dentin are removed. Dentin contains microscopic tubulesthat originate in the pulp and terminate at the dento-enameljunction. As the dentin is prepared, the tubules are severedand left open, leaving the highly sensitive pulp of the toothexposed. It is important not to desiccate the preparationbecause of the sensitivity that occurs with the tubulessevered. Because the tubules are open, it is necessary toconsider the chemical composition of the material that isplaced adjacent to the dentin. If potentially irritatingsubstances must be used, dentin can be protected by coatingthe surface of the preparation with a substance that seals thetubules.
2. TO PROTECITHE DENTIN FROM ORAL FLUIDS.
Oral fluids may cause sensitivity.
3. TQ MAINTAIN OCCLUSION.
To prevent supra-eruption of the prepared tooth or theopposing tooth, and to prevent movement of the prepared toothor the adjacent teeth.
The cc.Itact of the mandibular teeth against the opposingmaxillary teeth during functional and non-functional movementof the mandible is called occlusion. Occlusion will bediscussed in more detail later in this module.
3
TO PREVENT FRACTURING OF THE FINISH LINE OR BREAKDOWN OF THEPREPARED TOOTH.
Emphasis is given to the finish line of the preparation,commonly stated as the place where the bur stops. The finishline is a continuous edge that borders the entire preparation.It is essential that you have a mental image of the locationand contour of a preparation's finish line in order to contoura temporary restoration for that tooth. (Shown later.are thevarious forms of finish lines.)
5. TO PREVENT CHANGES IN GINGIVAL TISSUE, CAUSED BY INFRINGEMENTOF THE CROWN MARGIN ON THE FREE GINGIVA, OR BY FOOD IMPACTION.
Since most clinical crown preparations presentsubgingival finish lines, crown margin contour is critical tothe health of the gingiva. Should the crown intrude on thegingiva, irritation will result, causing the patientdiscomfort. Recession, inflammation, ulceration, andinfection of the gingiva are possibilities.
Food impaction is likely to occur if the walls of a crownare not properly contoured to reproduce normal anatomy or itscontacts with adjacent teeth are not adequately established.Firm contacts normally exist between teeth (in the middlethird for posterior teeth and in the incisal third foranterior teeth), which force food to be broken down into twoparts and distributed down the facial and lingual surfaces oft1a teeth. If there is no contact, biting pressure forcesfood between the teeth and gingiva. The food can causeirritation, which may lead to inflammation and infection.
6. TO PROVIDE FOR LOST FUNCTION.
A temporary crown may be placed to protect a chippedtooth and to restore ideal occlusion and surface anatomy.
7. TO MAINTAIN FOR LOST FUNCTION.
This is especially important in the anterior permanentteeth.
8. TO ALLOW THE PATIENT TO BEGIN ADJUSTING TO A. PERMANENT CROWN.
9. TO RESTORE OR IMPROVE THE CONTOUR OF THE ORIGINAL TOOTH.
An example would be a chipped incisal edge.
4
2 1(3
TYPES OF TEMP9RARY CROWNS
Several types of temporary crowns and crown material areavailable. Those that are commercially available are: preformedanatomical metal crowns, non-anatomical metal crowns, preformedpolycarbonate crowns. Cellulose crown forms, as well as syntheticresin the operator can use to fabricate custom resin crowns.
Anatomical Metal Crowns
The term "anatomical" refers to crown forms whose exteriorsapproximate natural teeth in facial, lingual, mesial and distalcontours, as well as in the contours of the occlusal surfaces(cusps, ridges, pits, and grooves).
1. The Stainless Steel Crown is the most durable of thepreformed anatomical crowns, which is used most often inrestoring primary teeth. Such a crown can providetemporary coverage for months or years. The shortcomings of the stainless steel crown include its pooraesthetic quality for placing on an anterior tooth andthe difficulty of adapting its rigid metal margin to thetooth preparation.
2. An Anodized Aluminum Crown is used most commonly onpremolars and molars because of their resistance to wear,strength and unaesthetic appearance. The chief advantageof this crown is its malleability, which allows for goodocclusal adjustment. Tin, silver alloy crowns are thesoftest and most ductile crowns commercially availablefor temporary coverage of posterior permanent teeth. Thesoftness of the alloy eases marginal and occlusaladaptation, as the material will stretch up to 50%. Itcan also be contoured and burnished without wrinkling.Softness, however, is the chief disadvantage of thiscrown. It can easily wear through during normalmastication; hence, is recommended for a short time,unless it can again be re-lined with acrylic resin foradded strength.
Non-anatomical Preformed Metal Crown
These crowns are sometimes referred to as "tin cans," oraluminum shell crowns. They are made chiefly of aluminum alloy andare simple cylindrical shells for protecting posterior teeth. Allcontours and occlusion must be developed by the operator. The onlyadvantage of the non-anatomical metal crown is its low cost. Ithas been largely replaced in recent years by the more efficientanatomical metal crown.
5
22
Preformed Plastic Crowns
These crowns are used as temporary coverage for anteriorteeth. The advantage of these crowns from the patient's point ofview is that they are tooth-colored making them aestheticallypleasing replacements. From the operator's view, they can be madeto fit the preparation easily, as it can be shortened by cutting,or lengthened by adding resin.
1. Polycarbonate Preformed Crowns. These crowns are hollow,tooth-shaped with walls about 0.3 mm thick.Polycarbonate crowns are usually available in two tooth-colored shades. The operator selects the lighter ordarker shade, which ever is closer to the color of thetooth being restored. The polycarbonate preformed crownsare more commonly used in practice than cellulose crowns.
2. Cellulose Crown Forms. This type of crown is a clear,hollow crown form. The advantage to this particularcrown is that the operator is able to be more selectiveon the shade of the tooth. The disadvantage with thecellulose crown form is that when the form is removedfrom the acrylic resin, the adjacent teeth may beslightly out of contact. However, the operator is ableto choose a larger variety of shapes and colors with thistype of crown.
Custom Resin Crowns
The custom resin crown is tooth colored and is completelyfabricated by the operator. The fit and external contours of thecrown are superior to those of any other temporary crown, since itis made in an impression of the patient's mouth. The disadvantageto this crown is that some operators feel it takes longer toproduce. But in time the operator may benefit with this type ofcrown.
The choice of an appropriate temporary crown depends on whichtooth is to be restored, the patient's concern for aesthetics, andthe length of time a temporary restoration must serve. With thisinformation, you can make the judgement.
Finish Lines
The finish line is a continuous edge that borders the entirepreparation commonly the location where the bur stops. It isessential that you have a mental image of the location and contourof a preparation's finish line in order to contour a temporaryrestoration for that tooth.
6
22i
Four common forms of finish lines are:
1. Bevel or slant2. Camfer or slope3. Feather or knife edge (a shallower slope), and4. Shoulder or ledge.
These four commonly used finish lines (in Figure 1) may be used bythemselves or in combinations. Variations may be developed byindividual clinicians based on personal preference. Ask yourinstructor if you have any doubts about recognizing them.
FIGURE 1COMMONLY USED FINISH LINES
ChamferLedge & Beve
FeatherCuts
Ledge(Shoulder)
Bevel, chamfer, feather cuts and shoulder (left to right)are used at preparation finish lines.
7
When a preparation is cut, the circumference of the tootheither increases or remains the same, with the finish line alwaysat the greatest circumference. This shape permits easy placementand removal of a restoration. A chamfer, bevel or shoulder providesomewhat of a shelf which the restoration can "hug," thus achievinga snug fit of the crown's margin (the gingival edge). Thetemporary restoration, when well adapted, protects the finish linefrom chipping and prevents marginal leakage of mouth fluids andbacteria, which could cause sensitivity and decay of the exposeddentin.
Should a preparation narrow towards the finish line, that areawould be an undercut. Such narrowing is an error in preparationthat makes placement of the crown impossible and prevents marginalseal and/or full seating. Since a crown is fabricated to fit thelargest circumference of a preparation, any area gingival to thatlargest dimension will not be sealed. Convexities (positivecontours) present similar problems and also tend to preventmarginal seal.
Resin Materials
Resin material is used to line the preformed polycarbonatecrown, cellulose crown form, or as a liner for aluminum temporarycrowns. It is also fabricated to form a custom temporary crown.The commonly used resin is a combination of a polymer (powder) anda monomer (a liquid); however, it is important that all of thepowder used be incorporated into the liquid. There is no exactproportion of monomer to polymer. The more powder there is, thestronger the mix is, but if the mix is too dry (if it has too muchpowder), it does not flow and, therefore, does not conform to thecontours of the preparation. If there is too much liquid, the mixruns out of the crown when it is placed. While the acrylic resinhas some very desirable qualities, it also has some characteristicsthat require special attention. Because monomer in its pure formis toxic to the tooth, it is extremely important that it bethoroughly incorporated into the mix. When mixed, the polymer andthe monomer polymerize (react chemically) and produce heat, in anexothermic reaction. If large amounts of dentin have been removedfrom a tooth during preparation, the tooth is likely to besensitive to the heat. The gingiva are also heat-sensitive, sothe air spray should be used to cool the area while the resin ishardening.
Five major categories for temporary resin materials are:
Methyl methacrylate is formed by the mixture of a monomer(liquid) and a polymer (powder) which polymerizes (chemicallybonds) and hardens into a durable plastic. Various mixingtechniques will be explained later.
Methyl methacrylates have an advantage for their excellentcolor, stability and wear res!.stance. If it is important tomaintain the vertical dimension or if strength is very important,it is recommended that the temporary crown be fabricated withmethyl methacrylate. Unfortunately, this material tends togenerate more heat during the polymerization which increases thepossibility of pulp irritation when it is in contact with thecavity preparation during fabrication. It will be important toremove the temporary crown during the polymerization period or toapply air from the air/water syringe during this process. Theother disadvantage is the extensive setting shrinkage because ofthe heat that is generated.
Licht-Cure Resin
A new type of methyl methacrylate resin that is not shown onthe table is a light-cure resin. This resin material is not self-curing, meaning it does not cure until it is exposed to a visiblelight. (The visible light is the type of light that is used withcomposite resin material.) The light-cured resin comes in amonomer and polymer form but because the resin does not curewithout light, it allows the operator time for preparation andcorrection before curing. In cases of temporary inlay and onlaywith undercuts, removal of undercuts, etc., can be easily performedafter extracting the rubber-like resin from the mouth. Thisparticular resin is of very low shrinkage and excellent colorstability. The other advantage with the light-cured resin is thatit will adapt with the conventional chemical self-cure resin thatis of the same methyl methacrylate base. A common brand name fora light-cure material is Unifast LC.
NOTE: There are light-cure resins that do not come in amonomer or polymer form but in a putty-like consistency. Theyhave an excellent ease of use. A common brand name for thistype of light-cure resin is Triad.
Ethyl or Vinyl Ethyl Methacrylates
Ethyl or vinyl ethyl methacrylates have similar clinicalproperties, except with the color stability; ethyl methacrylateshave been found to be less stable. Their decreased color stabilitymay or may not be a disadvantage depending on the length of timethe temporary will be in service and its location.
9
2'
Ethyl and vinyl ethyl methacrylates do generate less heat thanthe methyl methacrylates, resulting in a decrease in settingshrinkage. They have an advantage over methyl methar:rylatesbecause they are easier to use and there is less potential damageto the tissue. Factors that may cause tissue irritation includethe intimate contact of free monomer, the heat generated by thesetting reaction, and an allergic reaction. Therefore, care shouldbe taken to lightly coat tissues with petroleum jelly to preventthese irritations while the resins are undergoing chemical andthermal reactions.
Epimines
Epimines is a combination of base and catalyst which forms apaste. The epimines generate little heat during polymerizationwhich creates the least amount of shrinkage of any of the resinmaterials. The disadvantage of this resin is its poor colorstability and wear resistance. Epimine resins do not react withzinc oxide eugenol (ZOE) cement. Therefore, the operator canremove the old ZOE cement from the internal aspect of the temporarycrown and re-cement it without experiencing the usual soft, rubberycondition noted when using the methyl or ethyl methacrylates.
Composites
Another type of material that is not listed on the table isbis-acryl composite. A common brand is Protemp. This materialcomes in two-tube form: one of catalyst and one of base. They havehigh strength, very low heat and shrinkage. The disadvantage withbis-acryl composite is that it does not have a putty stage and isfairly expensive. Because bis-acryl is a composite resin it willadhere to other composite restorations. For example, compositerestorative material can be used to cover voids when the crown doesnot meet the finish line.
10
F I MIRE 2CLINICAL PROPERTIES OF MAJORPROVISIONAL RESIN PROPERTIES
Table 16-1.Clinical Properties of Major Provisional Resin Materials
MethylMethacrylates
EthylMethacrylates
Vinyl EthylMethacrylates Epimines
Examples Jet (Lang) Splintline (Lang) Trim II ScutariTemporary
The contact of the mandibular teeth against the opposingmaxillary teeth during functional and non-functional movement ofthe mandible is called occlusion. The static position of the biteis called centric occlusion.
In the normal adult dentition, the supporting cusps maintaincentric stop contacts with opposing fossae and/or ridges and thusmaintain the occlusal vertical dimension of the face. In order tomaintain a stable centric occlusion, the forces applied to thesecentric stops should be directed down the long axes of the teeth.
The lingual cusps of the maxillary molars and premolars aresupporting cusps that create centric stop contact with the opposingmandibular fossae and/or ridges. The facial buccal cusps of themandibular molars and premolars are also supporting cusps thatcontact opposing maxillary fossae and/or ridges.
The maxillary facial buccal cusps have no centric contact.They are positioned with facial horizontal overlap relative to themandibular facial buccal cusps, and they serve to keep thepatient's cheek off the occlusal table.
The mandibular lingual cusps also have no centric contact.They are positioned with lingual horizontal overlap relative to themaxillary lingual cusps, and they serve to keep the patient'stongue off the occlusal table.
From a facial view of the dentiform's occlusion, you willnotice the posterior teeth have a tooth-to-two-teeth centriccontact (Figure 3). That is, each posterior mandibular toothcontacts two opposing maxillary teeth, and each posterior maxillarytooth contacts two opposing mandibular teeth. Though there areother theories of occlusion and you will find unlimited variationson patients, this occlusal pattern is described in this coursebecause manikins or dentoforms are typically manufactured with thisscheme.
It is expected that the student will have some background inocclusion before beginning the course; therefore, only a functionalexplanation of occlusal checks is given.
In the clinical situation, occlusal patterns should berecorded on the patient's diagnostic casts. If the casts arearticulated (hinged together to reproduce mandibular movements),articulating paper (blue carbon) can be used directly on the caststo produce markings that indicate maxillary-mandibular contacts.Near-ideal occlusion is assumed on the dentiforms, so a marking
12
227
should appear on each tooth except the incisors, which aretypically out of occlusion (Figure 4). Ideal occlusion wouldproduce the markings that appear in Figure 5. The identicalpattern should appear after crown placement. Clinically, excursiveand protrusive occlusion would also be checked, but this is notpractical with dentiforms and is therefore not required here.
A marking on every tooth except the crown restorationindicates that the restoration is in infra-occlusion, or below theocclusal plane of the adjacent teeth. This could initiate supra-eruption (extrusion beyond the occlusal plane of the adjacentteeth) by the opposing teeth, an irreversible process. Theappearance of a marking on the crown alone indicates the crown isin supraocclusion (beyond the occlusal plane of the adjacent teeth)which may cause opposing teeth to intrude into their sockets,thereby weakening and sensitizing them. Another destructiveprocess that can be instigated by improper occlusion is themovement (drift) of teeth that can result when occlusal forces arenot directed along the long axis of the teeth. From the operator'spoint of view, it is important for temporary crown restorations tomaintain a stable occlusal relationship because a prepared toothwithout occlusal contact may erupt or shift position within a fewdays. If this occurs, the permanent crown will be insupraocclusion (too high) or impossible to seat, necessitating thefabrication of another permanent crown. Because of thesepossibilities, great attention is given to checking and restoringproper occlusion during temporary crown placement.
Blue marks on the slopes of cusps or on marginal ridgesindicate destructive forces and are unacceptable. If they occur,continue articulating until you achieve an acceptable occlusion.Since teeth in dentiforms are difficult to maneuver and to maintainin ideal occlusal relationships, it will only be necessary to haveone of the four centric marks at the same intensity as produced onthe unprepared tooth, in order to fulfill the occlusal requirementwhen the crown has been placed. (Acceptable occlusion in adentiform is shown in Figure 4.)
Temporary Cement
Temporary cement is used to hold the restoration in place.It fills the space between the crown and the preparation, thussupporting the occlusal contours, filling and sealing themargin/finish line area.
Zinc oxide and eugenol (Z.O.E.) are commonly combined as atemporary cement. The eugenol is an anodyne (a substance with asedative effect), which reduces pain perception. Z.O.E. is alsodesirable because it is easy to remove from the tooth after thetemporary crown has served its purpose, thereby limiting trauma to
13
2'
EngmAj_TOOTH-TO-TWO TEETH CENTRIC CQNTACT
Tooth -to -two -teeth centricof posterior teeth.
FIGURE 4 PATTERN OF OCCLUSAL FIGURE 5 IDEAL PATTERNS OF
contact
MARKINGS
k
_Al
Model teelth showing a patternof occlusal markingsacceptable in dentiforms. 220
14
OCCLUSAL MARKINGS
.
vy
07. '
4
Model teeth showing theideal patterns ofocclusal markings
BEST COPY AVAILABLE
the dentin. In combination with saliva, Z.O.E. tends to break downacrylic resin and therefore is questionable for use with acryliccrowns. But non-eugenol cements, of which there is a largeselection, would be equally appropriate for temporary restorations.Keep in mind that temporary cement is soluble in water and salivaand will break it down in time.
During cementation it is imperative to remove all debris, torinse and dry (not to desiccate) the preparation, and to isolatethe area with cotton rolls to prevent contamination by saliva.Depending on the consistency of the cement mix, cement createspressure as it dries, occasionally forcing the crown in an occlusaldirection. This can be detected by a post-cementation occlusalcheck. Minor occlusal prematurities (high contacts) can generallybe adjusted with the crown in the patient's mouth. Grossmalocclusion (deviation from acceptable contact) will also tend tolift the crown from the preparation finish line; adjustmentnecessitates removal and re-cementation of the crown. Holding theteeth firmly together in centric occlusion during cementationshould prevent most of these problems.
Placing Temporary Crowns
Although the placement of each type of temporary crown isdifferent, there are some conditions that must be met in order fora temporary restoration to be satisfactory: the margin of thecrown must fit snugly against the finish line of the preparationand must be sealed so that no oral fluids seep into the preparedarea; the contacts with adjacent teeth and the occlusal patternthat exists before the tooth is prepared must be replicated notonly when the finis_led crown is placed, but while the temporarycrown is in service.
Many criteria for accomplishing the tasks that are describedare stated in terms of a range of acceptable adjustment. A smalldegree of error in some areas will not distort the fit of therestoration or disturb the patient. The allowable errors for anytemporary crown are:
1. The crown margin may be up to 0.5 mm short of (occlusalto) the preparation finish line. Marginal error awayfrom the gingiva will not cause gingival irritation,whereas 0.5 mm toward the gingiva would be unacceptable.Up to 0.5 mm distance between the crown margin and thepreparation finish line can be filled with cement withoutdistorting fit or seal. This area is also protected bythe gingiva since the finish line is normally apical tothe gingival crest.
15
230
2. Assuming ideal gingiva, the facial and lingual surfacesof a crown may be slightly over-contoured withoutdisturbing healthy tissue. Gross convexities, however,would create areas where food and bacteria could lodge.
3. Under-contouring in the gingival third on theinterproximal surfaces is preferable to over-contouring,as it will not produce gingival pressure and irritation.
In an instructional setting, the student strives to producea temporary crown that is "perfect;" however, in a clinicalsituation, temporary crowns frequently do not fit "perfectly"because the time to achieve perfection is too great, the crown isonly temporary and the patient's oral health is not jecpardized.
16
ASEPTIC TECHNIOUE
Prevention of disease transmission by careful attention toaseptic technique before, during and after temporary restorationis required, as it is for all intra-oral procedures. Infectioncontrol guidelines for dental offices which have been published bythe Canter for Disease Control should be followed. Personalprotection and barrier protection measures should be followed(e.g., gloves, mask, protective eye wear and lab coat). Cross-contamination should be avoided. Do not touch instruments, areaswhich have not been sterilized or disinfected. Practice properhand washing techniques, properly clean, sanitize, disinfect orsterilize all instruments and equipment.
The patient treatment area should be clean, orderly and assanitary as possible before, during and after use. The laboratoryarea used for clinical practice should also be kept as clean andorderly as possible. You are encouraged to be conservative withyour dental materials, to keep mixtures of alginate, acrylicresins, and cements in small areas on the mixing pad and in themixing bowl, to produce the best mix; and to perform all cutting,trimming, contouring, and finishing outside the mouth, clear of thedentiform, as you would with a patient. An efficient techniquewill result from having developed habits such as these.
17
23Z
STUDY QUESTIONS
1. Why are temporary crowns placed?
2. What care should be taken in placing temporary crowns?
3. What are the types of temporary crowns?
4. What is the purpose of a finish line?
5. List the major types of resin materials. What are theiradvantages and disadvantages?
6. Why is it vital that the liquid of the acrylic resin bethoroughly mixed with the powder?
7. What caution needs to be taken with monomer (liquid) and why?
8. What is occlusion and centric occlusion?
9. Why is it important to practice proper asepsis technique?
10. Why is it important that temporary crowns maintain a stableocclusion? What causes unstable occlusion?
11. During cementation, why is it imperative not to desiccate thepreparation?
18
233
module 2placing a preformed aluminum
temporary crown
.(Y
my
a
iit
MODULE 2
PLACING A PREFORMED ALUMINUMTEMPORARY CROWN
Module 2 details the procedure for placing a temporaryaluminum anatomical crown on the mandibular left second molar(#18). This crown is designed as a temporary covering forposterior teeth that have been prepared for full crowns. The chiefadvantage of the temporary aluminum crown is its malleability,which allows for good occlusal adjustment. Such aluminum crownsare used only on molars and premolars, where aesthetics is not aprimary consideration.
Temporary aluminum crowns are thin-walled (slightly less than0.5 mm) tooth-shaped shells, commercially produced to conform toideal tooth anatomy. They are available in a range of sizessufficient to cover most preparations. Although there is no sizingconvention among manufacturers, preformed metal temporary crownstypically are produced for both molnrs and premolars and differ insize and occlusal anatomy. The aluminum crown is short and easilyshaped so the idealized occlusal anatomy can be partially shapedinto occlusion by the opposing teeth. Because these crowns are sosoft, they must be handled gently.
Overview of Procedure
The first step in preparing a tooth for a temporary crown isto check occlusion, determining where the normal centric marksappear on the teeth. The dentiform should exhibit occlusalmarkings on every tooth except the incisors. The identical patternof markings, with the same intensity as noted before preparation,should be replicated after placement of the temporary crowns.
After the tooth has been prepared, an impression is made anda cast is made and sent to the laboratory, where the crown isfabricated.
The mesio-distal space of the tooth to be restored is theprimary dimension to be considered in selecting the crown. Becausenatural teeth vary in size and shape, it is unlikely that anypreformed crown will ever fit a tooth without adjustment. When thebest-fitting crown has been selected, it is then cut to theappropriate length, the edges crimped (bent upwardly) with handinstruments until proper fit is achieved. The rough edges of thecrown are smoothed, and when proper occlusion is re-established,the crown is cemented over the preparation.
20
23
This temporary restoration procedure requires that you firststudy the contour of the unprepared tooth, certain features ofwhich must be duplicated on the aluminum shell. Next, you shouldhave an understanding of the slope of the chamfered enamel to thefinish line of the prepared tooth, to help visualize the trimmingand contouring required for the crown to fit snugly. To protectthe prepared tooth, the ideal preparation is shaped to ensure goodmarginal seal when the crown margin is trimmed and crimped to hugthe finish line of the preparation. Finally, attention to theocclusal plane and centric contacts will help replicate pre-preparation occlusion, which is to preserve tooth alignment and toensure patient comfort.
Figure 6 shows the mesial view of the proximal surface oftooth #18. Figure 6a illustrates the unprepared tooth; the solidline in Figure 6b shows the prepared tooth and the broken lineindicated the crown.
Figure 7 shows the facial view of tooth #18 unprepared (a)and prepared with crown (b).
Figure 8 shows the lingual view of the unprepared tooth andthe crown.
Figure 9 illustrates the occlusal view of the unpreparedtooth; the broken line indicates the finish line.
FIGURE 6 MESIAL VIEW OF TOOTH #18
NM&
21
236 BEST COPY AVAILABLE
FIGURE 7 FACIAL VIEW OF TOOTH #18
finish line
CELT
gingiva
Mesial view of proximal surface of unprepared tooth #18 (a);prepared tooth with broken line indicating crown (b).
FIGURE 8 LINGUAL VIEW OF TOOTH #18
a
finish linegingivaCEJ
Facial view of unprepared tooth #18 (a); prepared tooth and crown(b).
FIGURE 9 OCCLUSAL VIEW OF TOOTH #18
Lingual view of prepared tooth Occlusal view of prepared toothwith crown. #18.
for tooth #185. dental mirror6. curved crown and bridge scissors7. explorer8. contouring pliers9. dental floss10. T-ball, flat-tail burnisher or belling pliers11. sandpaper disc (fine, medium garnet)12. mandrels13. pumice--impregnated rubber wheel14. cotton rolls15. lubricant (petroleum jelly or coca butter)16. mixed pad
23
233
e
PROCEDURES
Preliminary Procedures
1. CHECK TO BE SURE YOU HAVE ALL THE SUPPLIES LISTED IN THEARMAMENTARIUM.
2. CHECK THE OCCLUSION of the unprepared tooth on dentiform.Place blue articulating paper between the left maxillary andmandibular arches, and gently cap the teeth together incentric occlusion. There must be at least one occlusal markon each tooth in both arches. This occlusal pattern must bereplicated with the temporary crown.
3. PLACE THE PREPARED TOOTH (118) IN THE DENTIFORM. Retain theunprepared tooth with its occlusal markings for futurereference.
4. VISUALLY AND TACTUALLY LOCATE THE FINISH LINE of thepreparation with the explorer and the mirror.
Crown Placement Procedures
1. MEASURE MESIO-DISTAL SPACE AT THE CONTACT AREA AND SELECT THECROWN.
Retract the cheek with the dental mirror, and use amillimeter ruler to measure the width of the mesio-distalspace from the contact area of the left third molar #17, tothe contact area of #19 molar in the middle third of thetooth. Select a crown whose width is equal to or greater thanthe measurement. It is better to select a crown that isslightly larger than the space, rather than too small, becausethe crown can be trimmed and shaped to fit. A crown that fitsthe mesio-distal space, is long enough occluso-gingivally andcan be modified to fit snugly at the finish line.
Criterion
a. Procedure completed.
24
23'3
2. TRY THE CROWN, AND CHECK ITS FIT.
Orient the crown, and, using finger pressure, gently pushit over the preparation until it is seated. The crown can beadjusted to approximate the contours of the unprepared tooth
and to re-establish occlusal and proximal contacts if thefollowing relationships are observed:
a. The crown fits the mesio-distal space.
b. The facial and lingual contours of the crown should bein the same plane as those of the adjacent teeth.Use direct and indirect (mirror) vision to sight alongthe quadrant mesio-distally to make sure that the crownis not rotated or tilted on the preparation.
c. The crown should encompass the finish line of thepreparation. If the crown is so long that it cannot beseated but it nevertheless meets the mesio-distal andfacio-lingual size and contour criteria, it can probablybe shortened to fit. If the crown margin is short of thefinish line, it is too short, and another crown must beselected. Try crown forms until one meets the criteria.
d. The occlusal surface of the crown should be at orslightly above the occlusal plane of the adjacent teeth.Hold the mirror at the facial to view the occlusal planeof the teeth, and use the marginal ridges as anadditional guide to proper seating, by comparing theirlevel to those of the adjacent molars.
Criteria
a. The crown fits the mesio-distal space,
b. The facial and lingual contours of the crown are in thesame planes as those of the adjacent teeth.
c. The crown margin meets or extends gingival to thepreparation finish line.
d. The occlusal surface and the marginal ridges of thecrown are in a plane with, or within 0.5 mm occlusalto the occlusal surface and the marginal ridges ofthe adjacent molars.
This is the first criteria stage of crown placement. Itrequires you to determine size and contour criteria visually.Be aware of minute shifts in the position of the crown and howthey affect alignment with the adjacent teeth.
25
240
3. SCRIBE A TRIM LINE ON THE CROWN THAT FOLLOWS THE FINISH LINECONTOUR.
The crown length usually needs adjustment. If theocclusal surface of the crown is above the occlusal plane ofthe adjacent teeth and the crown margin extends gingivallybeyond the preparation finish line, the crown margin can betrimmed slightly to lower the occlusal surface. Study thecontour of the preparation finish line with the dental mirror.With the crown fully seated on the preparation, estimate theamount of aluminum that will be necessary to remove to enablethe crown margin to meet the finish line of the preparationexactly. The level and contour of the preparation finish linewill be your guides for trimming the crown margin.
There are two methods of determining the trim line. Bothare indirect and require you to visualize a reference pointwhile scribing the trim line on the facial and lingualsurfaces of the crown with an explorer. In one method holdthe crown on the preparation, covering the preparation finishline. While visualizing the level of the preparation finishline, scribe a corresponding trim line along the marginalportion of the crown with an explorer. You may want to usethe dental mirror to stabilize the crown while scribing. Bythe other method, hold the crown just above the preparationfinish line so that its contour can be copied on the facialand lingual surfaces of the crown as you visualize the amountof trimming that is necessary (Figure 10). The contours ofthe finish line must be duplicated to obtain the properoccluso-gingival height. Since this may require severalattempts, it is advisable to trim only a small amount at atime thereby avoiding over-trimming.
Criteriona. Trim lithe scribed along the marginal area of the
crown.
4. ADJUST THE LENGTH OF THE CROWN.
Remove the crown from the preparation, and use the curvedcrown and bridge scissors to trim the crown margin to thescribed line. Begin trimming at a line angle (the junctionof two horizontal adjacent tooth surfaces, such as mesial andfacial), making sure that the curve of the blades follows thecurve to be trimmed (Figure 11). Trim the interproximal areasof the crown with the same contours as the interproximal areaof the preparation finish line. Use care not to cut themargin too short. Any sharp curve left after cutting must beblended into a smooth line.
26
FIGURE 10PREPARATION FINISH LINE AND THE TRIM _DINE
trim line
The crown is held high as a trim line replicating thereparation finish line is scribed on it.
FIGURE 11CURVED SCISSOR BLADES AND THE TRIM LINE
The curved blades of the scissors follow the curve ofthe trim lines
27
242BEST COPY AVAILABLE
When the crown is trimmed, replace it on the preparationand inspect the margin of the crown to see how it conforms tothe finish line. Check this by holding the explorer firmlyagainst the finish line and then following along its contour.The crown margin should coincide with the finish line. Checkthat the marginal ridges of the crown are at or within 0.5 mmocclusal to the marginal ridges of the adjacent molars.
Criteria
a. Crown is trimmed so that its margin meets andconforms to the contours of the preparation finishline.
b. Crown margin is free of sharp edges.
c. Occlusal plane of crown is at or 0.5 mm occlusalto that of the adjacent teeth.
5. REDUCE THE CIRCUMFERENCE OF THE CROWN MARGIN.
When a crown fits the mesio-distal space, it willprobably not fit the gingival margin of the preparation. Toreduce the circumference of the crown margin, use a pair ofcontouring pliers to crimp (bend inward) the edges of crown.While the crimping reduces the marginal circumference, theaction of the pliers tends to distend the crown wallsImmediately occlusal to the margin. Besides reducing thecircumference of the crown with crimping, the length of thecrown is also reduced.
Use the contouring pliers to crimp inwardly and evenlyaround the gingival third of the crown until the crown fitssnugly against the margin of the preparation. Work in smallincrements in order to maintain the general contour of thecrown walls.
Check the marginal adaptation of the crown by placing itover the preparation, and with a finger on the occlusalsurface move the crown in a facio-lingual direction, notingwhere additional crimping is needed. Use the explorer tip ina gingivo-occlusal direction to determine where there is spacebetween the crown and the preparation. You will notice onlya slight catching as the explorer tip moves from enamel to
aluminum if the margin is well-fitted. If the explorercatches in a space under the crown, more crimping is required.Interproximal areas of the crown margin are particularlydifficult to check and need careful attention. Continue tocrimp and check the crown on the preparation until the crown
28
fits firmly against the finish line of the preparation. Whenthe marginal circumference of the crown is sufficientlyreduced, a slight clicking sound is produced when it contactsthe preparation margin. Caution: There is also a clickingsound when the crown is too long and snaps over the margin.
Criteria
a. Crown margin conforms to the contour of thepreparation finish line.
b. Crown walls show no convexities or distensions.
6. SMOOTH THE EDGES OF THE CROWN.
Use the straight handpiece and a sandpaper disc withshort, light strokes to smooth any rough edges on the crownmargin. Figure 12 shows the thumb-to-thumb finger rest andthe angle the disc should make with the crown margin. Cleanall debris from the crown.
Criterion
a. Crown margin is a smooth curve free of sharp edgesand debris.
FIGURE 12THUMB-TO-THUMB FINGER REST
A proper angle of disc to margin and a stablethumb -to -thumb rest are important for smoothingthe crown's edge.
29
24BEST COPY AVAILABLE
7. DEVELOP THE CROWN'S OCCLUSAL ANATOMY.
Seat the crown on the preparation, and close the mandibleinto centric occlusion with slight pressure. The opposingteeth should impress and shape the occlusal surface of thecrown. Take care to exert only slight force, as excessivepressure will deform the crown. In a later step, the crownwill be filled with cement so the final occlusal features canbe safely developed with slightly more pressure.
Criterion
a. Preliminary occlusal anatomy of the crown isimpressed on the crown.
8. CHECK OCCLUSION.
Clean and dry preparation, and use the air jet to dry allother teeth.
Place articulating paper between the arches, and tap theteeth into centric occlusion. Examine the teeth in thequadrant for markings; at least one point of contact shouldbe present on each tooth. Compare with pre-preparationmarkings. If there are more and/or darker marks on the crownthan were perceived at the pre-preparation check, or if onlythe maxillary teeth and the temporary crown show marks fromthe articulating paper, the crown is in supraocclusion (toohigh). To reduce the heights of the crown, trim, re-crimp,smooth the margin, clean the crown, and check the occlusionagain. If no marks register on the crown, it is in infra-occlusion (too low), and you must fit a new crown.
Criterion
a. Pre-preparation occlusion is replicated, and allthe teeth, including the crown, produce at least oneocclusal contact mark of the same intensity as theydid in the pre-preparation check.
9. CHECK CONTACT.
Check for proximal contacts bypassing a length of dentalfloss through both the mesial and the distal contact areas.The floss should meet some resistance, but should snap throughthe contact areas. Remove floss through the embrasure, so asnot to dislodge the crown.
30
If there is no contact, remove the crown. Place thecrown on a paper pad for cushioning, and with the ball end ofthe T-ball burnisher, impress an ovoid shape on the innersurface of the middle third of the crown slightly toward thefacial surface. The burnishing will stretch the aluminumoutward, to produce a convexity and establish contact.Replace the crown, and recheck.
If a contact is too tight, use contouring pliers to bendand flatten the contact area. If the marginal area isdeformed during this process, some re-crimping may benecessary.
Criterion
a. Interproximal contacts are established betweenthe crown and the adjacent teeth.
10. SMOOTH CROWN
When you are satisfied that the crown meets all criteriarelated to margin, contacts, and occlusion, use a rubber wheelimpregnated with pumice in the handpiece to smooth the margin.Polish off any written identification on the crown, takingcare not to deform any contours. Use the air jet to clean thecrown of debris.
Criterion
a. The crown has a smooth margin and is free ofdebris.
11. CEMENT TEMPORARY CROWN ON PREPARATIQN
Lubricate the exterior of the crown with petroleum jellyso excess cement will be easier to remove. Rinse and air drythe preparation but do not desiccate the tooth. When workingwith a patient, it is necessary to place a cotton roll betweenthe cheek and the preparation and another between the tongueand the preparation, to keep the tooth dry (cement will notadhere if the preparation is too moist).
Prepare a mix of temporary cement according to themanufacturer's directions. When the cement is of uniformconsistency and flows slowly from the end of the spatula, coatall internal surfaces of the crown. Add additional cement sothat the crown is from one-third to one-half full.
Place the crown in its predetermined position on thepreparation; use the marginal ridges of the adjacent teeth as
31
24G
a guide for proper seating then use an explorer to check thatthe crown is seated. Gently bring the mandible into occlusionand maintain centric occlusal contact until the cement sets.This contact will further shape the occlusal surface of thecrown. Avoid excess pressure, as it can produce infra-occlusion.
The cement is set when the tip of the explorer does notpenetrate its surface. After the cement has set, use anexplorer to carefully remove all excess cement frominterproximal areas and the gingival margin. Since smallchips of cement can easily get embedded in the gingivalsulcus, remove the excess cement in the largest piecespossible. Floss the contact areas to remove any cement chipsin the proximal areas, adding a knot to the floss willhelp. Remember to remove the floss and move it laterally notup through the contact.
Remove the cotton rolls, and thoroughly rinse and dry therestoration area.
Criteria
a. Crown contacts with the adjacent: mesially, distally.
b. Facial and lingual surfaces are in the same plane as theadjacent teeth.
c. Crown margins:- Ranges from the preparation finish line to0.5 mm occlusally of the finish line.
- Fits snugly against he finish line.-Is sealed with cement.
d. Excess cement removed from interproximal and gingivalareas.
12. MAKE FINAL CHECK FOR OCCLUSION
Place articulating paper between the teeth, and performa post-cementation check of the occlusion of the entire arch.Should the crown be in infra-occlusion, it will be necessaryeither to remove it and re-contour its occlusal surface or toadapt a new crown form.
Criteria
a. There is at least one centric mark on the crown that isof the same intensity as those on the adjacent teeth.
b. There is at least one centric mark on each tooth.32
247
Procedures
SUMMARY OF PROCEDURES AND CRITERIA
Criteria
1. Measure mesiodistal spaceat the contact area, andselect the crown.
2. Try the crown,
its fit.
a. Procedure complete.
and check a.
b.
c.
d.
3. Scribe a trim line on thecrown that follows thefinish line contour.
a.
4. Adjust the length of crown. a.
b.
c.
5. Reduce the circumferenceof the crown margin.
a.
b.
6. Smooth the edge of the crown. a.
33
2
The crown fits the mesio-
distal space.Facial and lingual contoursof the crown are in thesame planes as those of theadjacent teeth.Crown margin meets orextends gingivally frompreparation finish line.The occlusal surface andthe marginal ridges of thecrown are in a plane with,or within 0.5 mm occlusalto, the occlusal surfaceand the marginal ridgesof the adjacent molars.
Trim line scribed along themarginal area of the crown.
Crown is trimmed so thatits margin meets andconforms to the contoursof the preparation finishline.Crown margin is free ofsharp edges.Occlusal plane of crownis at or 0.5 mm occlusalto that of the adjacentteeth.
Crown margin is crimped tohug the preparation finishline.Crown walls show noconvexities or distensions.
Crown margin is a smoothcurve free of sharp edgesand debris.
7. Develop the crown's a. Preliminary occlusalocclusal anatomy. anatomy of the crown is
impressed.
8. Check occlusion. a. Pre-prepared occlusion isreplicated, and all theteeth, including the crown,produce at least oneocclusal contact mark ofthe same intensity as theydid in the pre-preparationcheck.
9. Check contacts. a.
10. Smooth crown. a.
11. Cement temporary crown onpreparation.
a.
b.
c.
12. Make final check forocclusion.
Interproximalcontactsareestablished between thecrown and the adjacentteeth.
Crown has a smooth marginand is free of debris.
Crown contacts with theadjacent teeth: distally,mesially.
Facial and lingual surfacesare in the same plane asthe adjacent teeth.
Crown margin:- Ranges from thepreparation finish lineto 0.5 mm occlusallyof the finish line.- Fits snugly against thefinish line.-Is sealed with cement.
d. Excess cement removed frominterproximal and gingivalareas.
a. There is at least onecentric mark on the crownthat is the same intensityas those on the adjacentteeth.
b. There is at least onecentric mark on each tooth.
5. All centric marks areconsistent on eachtooth (same intensityas adjacent teeth
6. Crown surfaces aresmoothed
Crown fitted within reasonable time limit.
Trial 1, 55 minutes(2 errors or less acceptable)
Trial 2, 30 minutes(3 errors or less acceptable)
STUDY QUESTIONS
1. What advantages does a temporary aluminum crown have overother preformed crowns?
2. What measurement is a major consideration in determiningwhich size crown to use?
3. Why is it important that the margin fit well?
4. What functions does the temporary cement serve, other thanadhering the crown to the preparation?
5. What criteria determines whether a temporary aluminum crownis properly placed?
36
25;
PRACTICE
This section will help you learn the skills you will need inorder to produce and evaluate preformed aluminum temporary crownrestorations. Complete each activity independently or with thedirection of your instructor. Be sure to ask the instructor forassistance if you need it. Feel free to use the magnifying glassto examine the features preparation.
Model Study
List of Models for Study
a) Temporary aluminum crown contoured and adjusted forprepared tooth #18, not cemented, all criteria met; withprepared tooth.
b) Temporary aluminum crown on prepared tooth #18, with thefollowing deficiencies:
Distal surface: crown extends beyond finish line.
Lingual surface:
Facial surface:
crown margin is 0.8 mm short offinish line.
insufficient crimping at margin.
1. Examine the unprepared mandibular and maxillary left secondpermanent molars. Notice the anatomical features of theocclusal surfaces, as well as the convex curve of the facialsurfaces, especially in the gingival third. Identify thecusps, ridges, and fossae of the teeth.
Occlude the two arches, and look at the relationship betweenthe teeth. Notice particularly that the maxillary facialcusps and the mandibular lingual cusps do not make contact.
Use articulating paper to locate the centric markings (theremust be one centric mark on each tooth). If the appropriatecentric markings do not occur, articulate the dentiform.
Use dental floss to check that there are mesial and distalcontacts.
Also observe the facial and lingual contours of the archeswith the mirror, and note how the second molars are placed inthose arcs.
37
252
Examine a selection of aluminum crowns for molars andpremolars, and identify the differences in occlusal contouras well as in size. Practice orienting the crowns to theteeth until you feel confident that you can easily tell thelingual cusps from the facial cusps. Note the malleabilityof the aluminum.
3. Examine the prepared tooth in the dentiform, and visuallylocate its finish line with the magnifying glass. Use themouth mirror and the explorer to trace along the finish line,observing its contour, especially interproximally. Notice thecurve of the chamfer, which widens towards the gingiva toensure a tight seal.
4. Examine the model of the finished crown with a magnifyingglass, and note particularly the finish line of thepreparation and the adaptation of the margin of the crown tothe finish line. Pull the explorer in a gingivo-occlusaldirection to feel the texture of the seal, and to feel whetherit is complete.
Examine models and review the criteria liste' on theEvaluation Form to test your understanding of the criteria.
5. Examine the model of the crown that has met all the criterion.Place and remove the crown to get "the feel of the fit" andto learn to recognize the feeling and the sound when a crownis seated.
6. Compare the models of finished crowns that do and do not meetthe criteria. Hold each model, looking at the mesial surface,and note the slight marginal convexity of the crimped crownon its facial and lingual surfaces and compare it to theuncontoured surface of the unfinished crown. Identify anydeficiencies you can in the models, and be sure you understandwhat procedures may have caused them, as well as how they canbe corrected. The consequences of such errors should be clearto you.
7. If you are inexperienced in working with metal, take a pieceof metal matrix material and practice cutting smooth curves.Place the metal on a paper pad, then use the T-ball burnisherto make a slight indentation in the metal.
8. Your instructor will help you assemble your low-speedhandpiece. If you are not familiar with its operation, listento its sound at different speeds, and practice changing discs.Ask for assistance in mastering any other instruments withwhich you are not familiar.
38
2,53
9. You should understand and be able to visualize the followingconcepts before beginning the procedure:
10. Use the mouth mirror to practice sighting across the lingualsurfaces of the anterior and posterior teeth. Hold the mirrordistal to the portion being viewed, and look across the teethmesio-distally. Hold the mirror on the facial or lingualsides to view the incisal or occlusal edges (occlusal plane)of both maxillary and mandibular teeth. Practice holding yourmirror in different positions to view the lingual, facial, andocclusal surfaces of the teeth. Position the mirror, ratherthan your head, to provide the best possible view. Ask yourinstructor for assistance with these techniques, as they willhelp you seat and align the crown.
11. With the dentiform, open and close the arches into centricocclusion. Observe the tooth-to-two-teeth occlusal patternof the posterior teeth. Check the occlusion of the arches tobe sure that at least one centric mark appears on all teethbut the incisors.
12. Practice checking contacts on the dentiform, to familiarizeyourself with the feeling of dental floss snapping through.Always remove the floss laterally through the embrasure.
Crown Adaptation and Evaluation
1. Review the video tape.
2. After making the first occlusal check, remove the toothcarefully, taking care not to disturb the blue occlusal marks.That occlusal pattern must be replicated when the crown isseated, the tooth will help you refresh your visual memory.
3. Place the prepared tooth in the dentiform. When progressingthrough the numbered procedures, read each one in its entiretybefore beginning to follow that procedure. Explanations areintermingled with directions throughout the steps, and it ishelpful to have a sense of the whole process before you makeany attempt to place the crown.
4. Perform all the steps in placing the crown, up to the pointat which it is ready to be cemented. Evaluate your placingof the crown in the dentiform on the Evaluation Form, then
39
request evaluation from the instructor. Correct any featuresof the crown that are marked "improvable," and re-evaluate.If the crown is marked "not acceptable," make a note of thatresult after "Explanation of Errors," and select a new crownfor fitting. When you and the instructor agree that allcriteria have been adequately met, practice mixing the cement.Your instructor will inform you as to whether to cement thecrown on the dentiform or not.
6. You will be given 55 minutes to complete your first trial.Your instructor will limit your second trial to 30 minutes,to help increase your speed and to simulate a clinicalexperience. Practice the procedures until you produce atleast one crown restoration that meets the criteria.
7. After you complete the procedure, evaluating other students'work will help you develop your visual discrimination.
PREPARATION FOR MODULE 3
1. Examine pre-prepared tooth #8.
2. View the videotape for Module 3.
3. Read the Module 3 Syllabus.
4. Familiarize yourself with the criteria and the evaluationform.
5. Answer the Study Questions, to check your backgroundknowledge.
40
module 3placing a preformed plastic
temporary crown
111
4
MODULE 3
PLACING A PREFORMED POLYCARBONATETEMPORARY CROWN
The crown used in this module is polycarbonate (a form ofsynthetic resin). This material is widely used for temporarycrowns for several reasons: it is strong yet flexible enough tocontour easily; it bonds chemically to a self-curing acrylic resinmaterial used to fill the shell. Although plastic crowns do notbend and draw as metal crowns do, they have almost perfect bondingproperties. Any area of a plastic crown, including the incisaledge, can be extended by adding layers of acrylic and smooth them.
Plastic crowns are commercially produced to conform tostandard surface contours of teeth and are available in a range of
sizes sufficient to cover most preparations. Although themanufacturers have no sizing convention, the sizes of mostpolycarbonate crowns vary by increments of approximately 0.5 mmmesio-distally. Incisal crowns, when fitted to preparations mesio-distally, are generally too wide facio-lingually.
In this module the maxillary right permanent central incisor(#8) is to be temporarily restored with a preformed polycarbonatetemporary crown. The tooth has been prepared for a permanentporcelain-fused-to-metal crown. Figure 13 presents facial andmesial views of the unprepared tooth and the prepared tooth witha crown.
Overview of Procedure
The procedure for temporarily restoring this tooth with apreformed plastic crown begins and ends with occlusion checks.After occlusion is checked, a preformed plastic crown that willcover the prepared tooth and contact the adjacent teeth isselected. The size of the crown is determined by measuring thespace between the mesial and distal contacts of the tooth with aBoley gauge.
As the plastic shell js placed over the tooth, it will beimmediately obvious that the internal form of the crown does notapproximate that of the preparation. The crown must be in place,marked and trimmed until the crown margin conforms to the contourof the finish line of the preparation. An acrylic resin is thenmixed and placed in the crown, which is subsequently seated on thepreparation. The viscous resin fills the spaces between theprepared tooth and the crown and as the acrylic resin hardens, thecontours of the pre-prepared tooth are replicated. With the
42
2
crown in place, occlusion is checked; then extra resin removed, themargin of the crown trimmed, the incisal length adjusted, andcontacts established. Finally, the crown is cemented in place anda last occlusion check is made.
Success in placing this crown depends on careful trimming andcontouring of the polycarbonate crown shell and the acrylic resin.
FIGURE 13FACIAL /)4ESIAL VIEWS OF TOOTH #8
CEJgingivafinish line
CEJgingivafinish line
Facial (at top) and mesial view of tooth #8,unprepared and prepared.
43'
ARMAMENTARIUM
1. articulatimg paper and holder2. prepared -Jooth #83. assortment of preformed polycarbonate temporary crowns for
tooth #84. explorer5. dental mirror6. round bur (#6 or #8)7. flame-shaped acrylic bur8. green stone9. sharpened soft lead pencil (#1)10. curved crown and bridge scissors11. cotton rolls12. lubricant (petroleum jelly or cocoa butter)13. 4 dappen dishes14. acrylic resin kit15. spatula (#7)16. gauze pads (2" x 2")17. excavator18. towel clamps (Backus)19. magnifying glass20. small camel's-hair brush21. boley gauge or micrometer caliper22. unwaxed dental floss23. mandrels (Moore's)24. coarse garnet disc (3/4")25. fine cuttle disc (3/4")26. fine pumice (optional)27. buffing wheel (optional)28. temporary cement kit29. mixing pad30. double-ended plastic instrument
44
253
PROCEDURES
Preliminary Procedure
Before the temporary plastic crown placement procedure isbegun on a patient, the anterior maxillary quadrant should bethoroughly cleaned to remove plaque and deLris, the occlusion ofthe quadrant should be checked, and maxillary right central incisor#8 should be prepared for ultimate placement of the porcelain-fused-to-metal permanent full crown.
1. Check the Armamentarium to be sure you have all the necessarysupplies and equipment.
2. Remove the unprepared tooth from the dentiform after checkingocclusion, and set it aside for later reference. Note whetherthe tooth was in occlusion.
3. Place the prepared tooth in the dentiform.
Crown Placement Procedure
1. MEASURE THE IIESIO- DISTAL SPACE BETWEEN THE CONTACT AREAS, ANDSELECT THE CROWN.
With a micrometer caliper (or boley gauge), measure thespace between the mesial and the distal contact areas of thetooth #8 at the level of the incisal third of the adjacentteeth. From the selection of sample crowns, choose a crownthat is the same size or wider than the space. (A wider crownensures an adequate lining of acrylic all around thepreparation.)
To facilitate placing on and removing the crown from thepreparation, maintain the tab on the incisal edge.
Criterion
a. Procedure completed.
2. TRY THE CROWN FOR FIT, AND ADJUST THE BINDING.
Gently press the crown over the prepared tooth; keep thefacial surface in the same plane as those of the adjacent teeth.There should be enough clearance between the preparation and thecrown to allow the crown margins to reach the finish line of thepreparation. Almost any crown will need adjustment to fit;following are some of the common problems and solutions.
45
2 6u
a. If the crown fits mesio-distally, but is too tightinternally prevc,nting the crown from meeting thepreparation finish line, use a round bur in a straighthandpiece at low speed to adjust the interior of thecrown. You may need to place and remove the crownseveral times to determine the exact point of binding;take care to place the crown in exactly the same positioneach time you place it on the preparation.
b. If the crown should bind at the preparation's finishline, increase the marginal diameter with an ac7Tlic bur.Determine with an explorer the exact place of binding,usually in an interproximal area.
c. If the proximal surfaces of the crown bind on theadjacent teeth, but a smaller preformed crown is toonarrow to make contact, remove a small amount of plasticfrom the contact areas with an acrylic bur in thestraight handpiece. Should you accidentally perforatethe plastic crown, you can correct it later by addingacrylic.
d. When the crown has been adjusted to fit mesio-distally,there usually remains several other adjustments to bemade. Typically the crown extends gingivally over thefinish line, is longer at the incisal edge than theadjacent tooth and is too wide facio-lingually at thefinish line. Don't expect a perfect fit too soon; theseadjustments will be made later in the procedure.
Criteria
a. Crown fits the mesio-distal space of the toothto be restored.
b. Crown fits over preparation without binding.
c. Crown contacts adjacent teeth.
3. ADJUST GINGIVAL LENGTH OF MARGIN AND MARGINAL CONTOUR OFCROWN.
In this step, the margin of the crown will be grosslytrimmed; final fitting will take place after the crown hasbeen lined. The crown margin should be just gingival to thefinish line so that the acrylic lining will be able to flowfreely, extruding all around the margin and thus reproducingthe finish line of the preparation.
46
2 61
Study the contour and location of the finish line, placethe crown over the preparation and with a sharpened soft leadpencil mark the finish line. Remove the crown and with thecurved crown and bridge scissors, begin trimming the gingivalmargin of the crown at the facial. Cutting carefully towardthe proximal, trim only a small amount of plastic at a time,since cracking or outright fracture of the crown sometimesresults if large pieces are cut. Place the crown on the toothoccasionally to check how closely the margin conforms to thefinish line.
This same procedure can be achieved with the acrylic burin the straight handpiece, holding the handpiece in a palmgrasp. Assume a thumb-to-thumb finger rest; trim, thin, andsmooth the crown margin until it is smooth and of uniformthickness. When the crown is in place over the preparation,the preparation finish line should be just visible where thecrown margin meets the prepared tooth. Use the mouth mirrorto view the lingual marginal area. Replace the crown on thetooth occasionally to check how closely the margin conformsto the finish line.
It is important to seat the crown in the same positioneach time you try it on the preparation. The adjacent centralincisal edge and facial surface can serve as guides for this.When you line the crown up on any one plane, you should sightfrom two vantage points 90 apart; for example, view thefacial plane from the incisal edge and from the distal side.
Criteria
a. Crown margin fits over preparation.
b. Crown margin approximates the finish line contourand extends slightly gingival to the finish line.
c. Crown margin is smooth and of uniform thickness.
d. Major areas that will need re-contouring are noted.
4. CLEAN AND DRY THE PREPARATION AND CROWN, ISOLATE THE AREA, ANDLUBRICATE THE PREPARATION AND THE ADJACENT TEETH.
Clean and dry the preparation with water and a flow ofair. Clean all debris from the crown, and dry the crown withair pressure. Since moisture will interfere with acrylicpolymerization, place a cotton roll between the lip and thegingiva. To prevent the acrylic from adhering to thepreparation, the adjacent teeth and the gingiva, coat a cotton
47
9
roll with some petroleum jelly and lubricate the areas.Remember that the lubricant will contaminate the acrylic resinduring polymerization so that it will not bound properly withany additional acrylic resin you might wish to add later.
Criterion
a. Procedure completed.
5. FILL THE CROWN WITH ACRYLIC RESIN, AND SEAT IT ON THEPREPARATION.
Seat the crown on the preparation in the exact positionfor which the margin has been trimmed, and note its alignment.Once it is fully seated, hold the facial surface of the crownflush with that of the adjacent central incisor for correctpositioning. This position will have to be duplicated whenthe crown is filled with acrylic resin.
For the placement of the crown, it is assumed that alarger quantity of acrylic resin will be needed. Follow themanufacturer's directions exactly. Place a few drops ofmonomer in a dappen dish and add polymer; mix the monomer andpolymer with a spatula or tap on the counter to incorporatethoroughly and to eliminate air entrapment. When the resinmix has a creamy consistency, use a spatula to apply a thickcoat to the interior of the crown. Begin at the incisal depthof the crown, filling carefully so bubbles do not form. Coatthe walls thoroughly, filling the crown until there is onlya shallow concave surface of acrylic resin at the marginal endof the crown. Avoid overfilling the crown.
When the acrylic resin loses its highlights and surfaceshine (after about 1 minute), seat the crown on the preparedtooth, taking care not to rotate it from its correct position.Hold the facial and incisal surface stable with yourforefinger on the crown and the adjacent central incisor for2 or 3 minutes. Be especially careful to guard against mesialand distal rotation.
The acrylic resin will fill the space between the crownand the preparation and the excess will flow gingivallycovering the finish line.
If only a small amount is needed to fill a void or toextend a contact area, the bead-brush or the brush-flowtechnique is recommended. For this, you line up three dappendishes, shallow end up. Place a drop or two of monomer ineach of the first and second dishes (one of these is for
48
rinsing the brush) and a little polymer in the third dish.Dip the brush in the monomer; then touch it to the powder, toform a bead on the tip of the brush. Brush the bead onto thecrown where it is needed, and smooth it in place with thebrush. Rinse the brush in the rinsing dish of monomer, andwipe it on a piece of gauze before dipping it into the cleanmonomer and then into the polymer again, to form another bead;and apply it as before.
Criteria
a. Polymer and monomer are mixed thoroughly toconsistency.
b. Crown interior is almost completely filled withresin, which forms a shallow concave surfacemarginal end of the crown.
a cream
acrylicat the
c. Crown is fully seated on the preparation, with its facialsurface flush with that of the adjacent central incisor.
d. Resin has extruded over the finish line.
6. REMOVE CROWN AND TRIM AWAY EXCESS ACRYLIC RESIN.
Excess acrylic resin must be removed from the crownbefore it is completely hard to prevent the crown from bindinginterproximally. If the acrylic resin hardens beforetrimming, the crown or the tooth may break when you attemptto remove the crown. Use the explorer to check theconsistency of the excess resin at the margins. When theresin has become doughy (when it does not run and has littlestretch to it), remove the crown from the tooth. Using thecrown and bridge scissors, trim away the excess acrylic resin.
Criterion
a. Margin is free of gross excess resin.
7. RESEAT CROWN WHILE POLYMERIZATION 1p COMPLETED.
Immediately reseat the crown. Stabilize the crown withyour finger. Test the marginal acrylic resin with theexplorer. At this point, you may want to take the crown onand off the preparation a few times. When the explorer cannotindent the acrylic resin, polymerization is complete.
Remove the crown. Should this be difficult, use a pieceof gauze to get a purchase on the crown. If the crown still
49
does not unseat, gently pry around the margin with anexcavator. If needed, use Backus towel clamps to pull thecrown off.
Use a magnifying glass to examine the internal surfacesof the crown and the marginal area. The preparation and thefinish line should be replicated; acrylic resin should be freeof large voids. If 95% of the finish line is not successfullyreplicated, fit a new crown; small voids can be filled.
Replace the crown over the preparation. It should fitsnugly, and it should resist if you try to move it with yourfinger.
Criteria
a. Acrylic resin liner has polymerized; it is hard.
b. The preparation and at least 95% of the finish line isimpressed in the acrylic resin.
c. Acrylic resin liner is free of large voids.
d. Crown fits preparation snugly without binding.
TRIM CROWN MARGIN.
Remove the crown. Locate the impressed finish line ofthe preparation on the interior of the crown, mark it with asharpened, soft lead pencil.
Figure 14 shows two sectioned crowns; one is unlined,the other lined. The pencil line indicates the impressedfinished line of the preparation. Use an acrylic bur to trimthe resin that extends gingival of the finish line. Shortintermittent strokes of the bur will reduce softening andtearing of the resin. As you trim the margin, clean away thedebris and place it occasionally on the preparation until themargin conforms to the finish line.
Criteria
a. Crown margin meets preparation finish line exactly.
b. Crown is clean of debris.
50
25
FIGURE 14CUTAWAY OF UNFINISHED PREFORMED
PLASTIC CROWN SHELLS
4'
H.
Cutaway of unfinished preformed plastic crown shells,right trim line marked on lined shell.
9. ADJUST OCCLUSION, INCISAL LENGTH, FACIAL AND LINGUAL CONTOURSAND FACIO -LINGUAL WIDTH OF CROWN.
Gross occlusal adjustment is necessary at this time.For this step, first dry the prepared area, the crown, theadjacent maxillary teeth, and the opposing mandibular teeth.(Articulating paper will not mark a wet surface.) Seat thecrown, place blue articulating paper between the maxillary andthe mandibular incisors, and gently tap the teeth together.If the mark on the crown is heavier than the mark on theunprepared tooth (as it is likely to be), the lingual surfaceof the crown is too thick. Thin that area at the blue markusing the acrylic bur in the straight handpiece at low speed.After using the bur, use gauze to wipe all traces of blue fromthe teeth. Check occlusion again, and repeat the procedureuntil the crown occlusion replicates the occlusion of theunprepared tooth.
51
2 Ek;
BEST COPY AVAILABLE
To check the incisal length of the crown, be sure thecrown is fully seated, and compare the location of its incisaledge with that of the adjacent central incisor. Use asharpened, soft lead pencil to draw a line from mesial todistal across the facial surface of the crown, indicatingwhere to trim. Remove the crown from the preparation, andbreak off the tab. Use the acrylic bur at low speed to trimthe areas that require reduction. In some areas it may benecessary to trim away the plastic shell entirely and contourthe underlying acrylic resin. Reseat the crown frequently toreassess the contours.
Use the mirror to compare the facial contour of the crownwith that of the other central incisor (Figure 15). Hold themirror to the distal of the lateral as you sight across thecentral incisors. Use a pencil to shade any area that needsreduction or addition.
FIGURE 15USE OF TUE MOUTH MIRROR TO COMPARE
CROWN FACIAL CONTOURS
The crown's facial contours can be compared withthose of the adjacent teeth by using the mouth mirror.
52
2 6 '7
BEST COPY AVAILABLE
From the fitting and lining procedures it was apparentthat the lingual surface was too thick and required the mosttrimming. In the majority of clinical situations, the finishline is subgingival and the contour is critical because over-contouring in the area can cause gingival irritation andpatient discomfort. Take time to examine the marginal areaon the lingual surface carefully with the mirror and explorer.Check for any overhang that catches the explorer, and usevarious sighting techniques to compare the overall contour ofthe crown with that of the adjacent central incisor. Again,use a pencil to shade any areas that need adjustment.
Compare the facio-lingual width of the incisal edge ofthe crown with that of the other central after you haveadjusted the incisal length. Shortening a crown increasesthe width of the incisal edge enough that facial and lingualcontouring may be necessary to reduce that dimension on thecrown.
Criteria
a. Crown occlusion replicates the occlusion of theunprepared tooth.
b. Tab is removed.
c. Needed contouring is adjusted.
d. Crown is the same length gingivo-incisally as tooth #9.
10. REFINE INCISAL, FACIAL AND LINGUAL CONTOURS, FACIO-LINGUALWIDTH, AND INTERPROXIHAL AREAS
If an area of the crown is under-contoured, acrylic resinmay be added to the area by the bead-brush technique.
Last, inspect the crown for overall contour, and compareit to the adjacent central incisor. Check the interproximalcontours in the gingival half, and remember that the patient'scomfort and aesthetics depend upon your ability to reproducethe original, unprepared tooth.
Criteria
a. Crown margin exactly meets the preparation finish line.
b. Crown contour resembles that of tooth #9 facially,lingually, incisally, and interproximally in the gingivalhalf.
53
2C3
11. CHECK AND ADTEETH.
1'ST THE T OF THE CR WITH THE AD ENT
Check the mesial and distal contacts of the crown withthe adjacent teeth by using dental floss. If the flossencounters some resistance incisally but snaps through, thecontact is well established. When no contact exists, use thebead-brush technique to add acrylic resin to the incisal thirdof the crown on the proximal surface. Allow the resin tobecome doughy, and then seat the crown till the acrylichardens, to establish the contact. Next, remove the crown,and smooth any pits or bumps with the acrylic bur. Shouldthe contacts be so tight that the floss cannot pass through,use the acrylic bur to trim the incisal third. Replace thecrown, and check that both contacts have been adequatelyestablished.
Criterion
a. Mesial and distal contacts re-established.
12. REFINE THE CONTOUR, AND POLISH CROWN SURFACES.
While holding the crown in your hand, use the coarsegarnet disc or acrylic bur in the handpiece with the thumb-to-thumb rest, to finish and refine the contour; excludecentric stops, crown margin, and interproximal contacts.Light pressure and intermittent strokes will minimize thegeneration of heat. Coat a fine cuttle disc with petroleumjelly, place it in the handpiece, and polish the crown untilit is free of pits and rough areas or you may refine the crownsurfaces on the lathe with a buffing wheel and a thin slurryof fine pumice.
Criterion
a. All surfaces, except centric stops, margin, andinterproximal contacts, are smooth and polished.
13. FINAL CHECK OF MARGINAL FIT, INTERPROXIMAL CONTACTS, ANDOCCLUSION.
Rinse and dry the crown with the water and air spray, toclean away all debris. Reseat the crown, and check with theexplorer that its margin meets the preparation finish line.The explorer should catch only slightly when moved in agingivo-incisal direction along the junction of the margin andthe finish line.
54
2 6 a
Use dental floss to check again for the presence ofinterproximal contacts. Then recheck the occlusion. Theocclusion marks (if any) should replicate those noted beforethe procedure was begun. Remove the crown.
Criteria
a. Crown margin exactly meets and fits the preparationfinish line.
b. Mesial and distal contacts re-established.
c. Crown occlusion replicates the occlusion of theunprepared tooth.
14. CLEAN, DRY AND ISOLATE PREPARED TOOTH, AND LUBRICATE CROWN.
Isolate the anterior maxillary area with a cotton rollbetween the lip and the gingiva. With a cotton roll lubricatethe exterior surfaces of the crown with a light coating ofpetroleum jelly or cocoa butter, to prevent excess cement fromadhering to the crown. Caution: no lubricant should contactthe surfaces to be cemented.
Criteria
a. Preparation is isolated with cotton rolls.
b. Crown exterior is lubricated.
15. CEMENT THE CROWN ON THE PREPARATION.
Prepare a mix of temporary cement according to themanufacturer's directions. When the mixture is of uniformconsistency, use a plastic instrument to coat the internalsurfaces of the crown evenly with only a thin layer of cement.Dry the preparation with light air or a dry gauze. Place thecrown on the preparation, and check the margin with theexplorer to see whether it is properly seated. Insert acotton roll between the maxillary and the mandibular incisors,and bring the teeth together, holding them with moderatepressure for about 3 minutes until the cement sets. (You canremove the extruded cement with the explorer after it driesto the point where the tip of the explorer does not penetrateits surface.)
55
270
Criteria
a. Temporary cement is mixed to uniform consistency.
b. Interior of crown is coated with a thin layer of cement.
c. Dry the preparation with light air pressure or with a drygauze.
d. Crown is fully seated on the preparation and held inplace by a cotton roll between maxillary and mandibularincisors until the cement is set.
16. CLEAN AND DRY THE CROWN AND ADJACENT TEETH.
Remove excess cement from the interproximal areas, themargins, and the sulcus with the explorer and an excavator;the cement can cause considerable irritation. Use dentalfloss to free the contact areas of cement. A knot added tothe floss will ease out interproximal cement. Wipe therestored tooth with gauze, remove the cotton roll, and washand dry the entire area with the air/water spray.
Criterion
a. Restored tooth and surrounding area are free of excesscement and are clean and dry.
17. FINAL CHECK OF OCCLUSION AND MARGIN.
Check the occlusion with blue articulating paper. Checkthe marginal seal with the explorer. Should incisalprematurities appear, trim and polish with the fine discs, andthen check again.
Criteria
a. Occlusion of the restored tooth replicated that of theunprepared tooth.
b. Crown margin is sealed.
56
271
Procedure
SUMMARY OF-PROCEDURES AND CRITERIA-
Criteria
1. Measure the mesio-distalspace between the contactareas, and select the crown.
a.
2. Try the crown for fit, and a.
adjust any binding.
3. Adjust gingival length andmarginal contour of crown.
b.
c.
a.
b.
c.
d.
4. Clean and dry preparation a.and crown, isolate the area,lubricate the preparation andadjacent teeth.
5. Fill the crown with acrylic a.resin and seat it on thepreparation.
b.
c.
57
27
d.
Procedure completed.
Crown fits the mesio-distal space of the toothto be restored.Crown fits over preparationwithout binding.Crown contacts adjacentteeth.
Crown margin fits overpreparation.Crown margin approximatesthe finish line contourand extends slightlygingival to the finishline.Crown margin is smooth andof uniform thickness.Major areas that will needre-contouring are noted.
Procedure completed.
Polymer and monomer isincorporated thoroughly toa creamy consistencyeliminating air entrapment.Crown interior is almostcompletely filled withacrylic resin, which formsa shallow, concave surfaceat the marginal end of thecrown.Crown is fully seated onthe preparation rith itsfacial surface flush withthat of adjacent centralincisor.Resin has extruded overthe finish line.
6. Remove crown, and trim awayexcess acrylic resin.
7. Reseat crown, and completepolymerization.
8. Trim crown margin.
9. Adjust occlusion, incisallength, facial and lingualcontours, facio-lingualwidth of crown.
10. Adjust incisal length,facial and lingualcontours, facio-lingualwidth, and interproximalareas.
11. Check and adjust the contactsof the crown with theadjacent teeth.
12. Refine the contour, andpolish crown surfaces.
58
a. Margin is free of grossresin.
a. Acrylic resin liner is set.b. Interior of the crown
replicates the preparationand at least 95% of thefinish line is reverse.
c. Acrylic resin liner isfree of large voids.
d. Crown fits preparationsnugly without binding.
a. Crown margin meetspreparation finish lineexactly.
b. Crown is clean of debris.
a. Crown occlusion replicatesthe occlusion of the unpre-pared tooth.
b. Tab is removed.c. Needed contouring is
adjusted.d. Crown is the same length
gingivo-incisally as tooth#9.
a. Crown margin exactly meetsthe preparation finishline.
b. Crown contour resemblesthat of tooth #9 facially,lingually, incisally,interproximally in thegingival half.
a. Mesial and distal contactsre-established.
a. All crown surfaces, exceptcentric stops, margin andinterproximal contacts,are smooth and polished.
2 7 3
13. Final check of marginal fit, a. Crown margin exactly meetsinterproximal contacts, and and fits the preparationocclusion. finish line.
b. Mesial and distal contactsre-established.
c. Crown occlusion replicatesthe occlusion of theunprepared tooth.
14. Isolate the prepared tooth, a. Preparation is isolatedand lubricate crown. with cotton rolls.
b. Crown exterior islubricated.
15. Cement the crown on thepreparation.
16. Clean and dry the crownand tae adjacent teeth.
17. Final check of occlusionand margin.
59
a. Temporary crown is mixedto uniform consistency.
b. Interior of crown iscoated with a thin layerof cement.
c. Dry the preparation withlight air pressure or witha dry gauze.
d. Crown is fully seated onpreparation and held inplace by a cotton rollbetween maxillary andmandibular incisors untilcement is set.
a. Restored tooth andsurrounding area are freeof excess cement and areclean and dry.
a. Occlusion of the restoredtooth replicates that ofthe unprepared tooth.
Trial 2, 40 minutes(4 errors or more is unacceptable)
60
2 e
STUDY QUESTIONS
1. What techniques are used to adjust the size of a temporarypolycarbonate crown?
2. What indicates that a temporary crown is over-contoured on thelingual? On the facial?
3. Why must the crown be removed from the preparation before theacrylic resin filler is completely polymerized?
4. What difference would it make if the crown were a little over-contoured at the gingival third?
5. What difference would it make if the incisors were not inocclusion at the preparation check, but they were after thecrown was cemented in place?
6. What is the function of the acrylic resin liner?
7. Why is it vital that the liquid of the acrylic filling bethoroughly incorporated with the powder?
61
2? ,-s.)
PRACTICE
These preliminary exercises are intended to alert you to thenature of the polycarbonate crown and the acrylic resin you workwith in this module, as well as familiarize you with sometechniques designed to help beginning students avoid pitfalls.
Model Study
List of Models for Study
a) Temporary plastic crown contoured and adjusted forprepared tooth #8, all criteria met;
b) Temporarycontoured.
plastic crown, acrylic-lined, untrimmed and
c) Temporary plastic crown on prepared tooth #8, with thefollowing deficiencies:
Lingual surface:
Incisal edge:
Facial surface:
marginal area heavily over-contoured
trimmed to a stub, not smoothed
under-contoured in gingival third,pitted
1. Examine the unprepared rirtht maxillary central incisor inplace and out of the denti._ a. Notice the contours and sizeof the tooth. Study the prepared tooth #8, and compare it tothe unprepared tooth to see how much of the surface has beenreduced. Use the magnifying glass to follow the finish-linecontour and the vertical shoulders on the facial surface.Place the prepared tooth in the dentoform, and locate thefinish line with the explorer and the mirror.
2. Compare the size and contour of a plastic crown shell withthose of an unprepared tooth #8. Viewing both from themesial, place the crown form behind the unprepared tooth, andnotice the over-contouring of the crown, especially in thegingival third and on the lingual surface. Visualize theareas that will have to be reshaped if the crown is toreplicate the unprepared tooth.
Now compare the crown shell to the prepared tooth. Holdingthe crown over the prepared tooth, notice the excess lengthof the crown that will need trimming and the excess facio-
62
lingual width that will be filled with acrylic and laterrecontoured. Hold the prepared tooth and the crown form upto a light, to see how far the crown seats on the preparation.You will need to develop a feel for all these dimensions; theyare not visible when the tooth is in the dentiform.
3. Review the features of the prepared tooth, and identify thefinish line and the vertical shoulders; visualize how muchenamel and dentin have been removed.
4. Using the magnifying glass to locate the finish line that hasbeen impressed on the untrimmed acrylic lining of the crownshell, visualize what trimming will be necessary in order tocontour the crown margin.
5. Read the directions for mixing both the acrylic resin and thetemporary cement you will be using. Mix the acrylic so youcan observe how much heat is produced by the polymerizationprocess. You may also want to practice the bead-brushtechnique for adding acrylic to the polycarbonate shell.Watch how the resin changes consistency as it polymerizes.
6. Study the ideal model of the restored tooth #8. Use theexplorer to feel its marginal integrity, especially when therestoration is in the dentiform.
Study each of the models while you hold them in your hand andwhen they are in the dentiform and note the deficiencies.Note particularly the lingual contour in the gingival third,and test how it feels with the explorer.
Use the magnifying glass to examine the finish line that isimprinted in the acrylic-lined shell.
7. Ask for assistance from your instructor in learning to masterany instruments you have not used before.
Crown Adaptation and Evaluation
1. Review the videotape. Note the follow.ng details as well asthe procedure steps:
a. Thumb-to-thumb finger rest.
b. Angle of carbide bur to crown during trimming.
c. Angle of discs to crown during finishing.
63 2"t.)
d. Amount of acrylic put in crown shell.
e. Texture of acrylic when doughy.
f. Amount of cement applied to crown shell.
g. Angle of explorer and mirror for marginal fitting checks.
2. After making the first occlusal check, note whether #8 is inor out of occlusion, and remember that you must replicate thisposition with your crown.
3. Practice adapting and placing a preformed plastic temporarycrown. Complete the evaluation form after each trial. Onehour is allotted for the first trial and forty minutes for thesecond trial.
PREPARING FOR MODULE 4
1. Examine the pre-prepared tooth #14.
2. View the videotape for Module 4.
3. Read the Module 4 Syllabus.
4. Familiarize yourself with the criteria and the EvaluationForm.
5. Answer the Study Questions, to check your backgroundknowledge.
64
module 4placing a custom plastic
temporary crown
RI%
MODULE 4
PLACING A CUSTOM RESIN TEMPORARY CROWN
This particular crown can be fabricated for a posterior oranterior tooth. A custom resin crown can be made for a fullcoverage, 3/4 crown, inlay or onlay preparation without a greatdeal of involvement. It has a superior occlusal and gingival fitbecause it is molded from an impression of the patient's tooth.The crown's tooth-like appearance is an additional advantage.Construction of this crown may take longer to learn initially; oncethe contouring technique is mastered, it can be quick and easy.
In this module, the fabrication of a custom resin crown fortooth #14, the maxillary left first molar, is presented.
Overview of Procedure
The procedure begins and ends with checking occlusion. Afterchecking occlusion, the operator will need to take an alginateimpression before the tooth is prepared. Check the impression forair bubbles or voids in the area of the tooth that v-ill be preparedfor the crown.
After the tooth is prepared, the operator may want to removeproximal tags from the impression and reseat the impression tocheck for proper placement over the prepared tooth. An acrylicresin is then mixed and placed in the alginate over the impressionof the tooth that has been prepared for a crown. The impression,which is filled with acrylic, is then placed over the preparedtooth. As the acrylic resin polymerizes over the prepared tooth,it will replicate the contour of the unprepared tooth. Thetemporary crown is then gently eased out of the impression andready for trimming and contouring to fit the finish line of theprepared tooth. Once the contacts and occlusion are established,the crown is polished and cemented in place.
To prepare for the fabrication of an acrylic resin temporarycrown, first clean the left maxillary quadrant.
1. Check to be sure you have all the supplies listed in theArmamentarium.
2. Check occlusion with the unprepared tooth #14 by placing bluearticulating paper between the left maxillary and the leftmandibular arches, and gently tapping the teeth together incentric occlusion. There must be at least one occlusal markon each tooth. (Note: This pattern must be replicated whenthe temporary crown is placed.)
3. Take an impression of the maxillary arch before the tooth isprepared for a crown.
4. Place the prepared tooth #14 in the dentiform; retain theunprepared tooth with its occlusal markings for futurereference.
Crown Fabrication and Placement Procedures
1. TAKE AN ALGINATE IMPRESSION OF THE PREPARED TOOTH .
Select proper tray size. A sectional tray works bestsince the temporary crown will be constructed for a singletooth and there is no need to use a full arch tray. Thereare two types of sectional trays. One type is a hard plasticor metal tray held in place by the operator while the alginatesets. The other type is a disposable plastic tray which isheld in place by the patient occluding on it until thealginate sets.
Mix the alginate according to manufacturer'sinstructions. Inspect the impression to be sure all detailsof the prepared tooth are accurately replicated and theImpression is free of large voids and torn areas or potentialundercut bulges. If the impression is acceptable, use a labknife (or scalpel) to trim large overhangs of alginate thatextend beyond the impression tray and thus might causedistortion. Remove interproximal tags from the alginateimpression with a sharp instrument or cotton pliers. Thisallows the impression to be reinserted more easily and gives
68
2 E :;
sufficient bulk to the temporary. Use the air and water sprayto clean the impression. Wrap with a moist paper towel untilready for acrylic resin.
Criteria
a. Impression shows all details of the prepared tooth.
b. Impression is free of large voids, torn areas, anddefects.
c. Impression is free of large overhangs of alginate.
d. Impression is free of interproximal tags of alginate.
e. Impression is clean and wrapped in moist paper towel.
2. PLACE TOOTH IN DENTIFORM
After placing the tooth in the dentiform, reseat theimpression to check for proper placement over the preparedtooth.
3. FABRICATE THE ACRYLIC RESIN CROWN.
The technique for mixing the acrylic resin can be donedirectly in the alginate impression or it may be mixed in adappen dish and applied to the impression mold of the area tobe temporized. In order to add directly to the impression,begin by adding a small amount of polymer then a few drops ofmonomer (liquid) with an eye dropper directly in theimpression mold of the unprepared tooth. (Let the drops fallon the walls of the preparation in order to prevent bubbles.)Then add sufficient polymer (powder) to absorb the liquid.Each ingredient is added repeatedly in turn until the toothmold is approximately two-thirds full.
In order to use the dappen dish technique, partially fillthe dapper. dish with the monomer and then the polymer toabsorb the liquid. The operator can add polymer graduallywhile tapping the dappen dish on the counter top to helpsaturate the monomer and eliminate air bubbles which couldweaken the mix.
Regardless of which technique is used to mix the resin,the key elements are to apply the monomer and polymerrepeatedly and to keep the eye dropper of monomer fromtouching the mix plus, taking further caution not to over fillthe impression should help you form a solid crown which isfull of bubbles.
69
The resin in the impression is ready to be placed overthe prepared tooth when it has lost its highlights and surfaceshine. With even pressure, hold the impression in place orhave the patient occlude; if using the disposable bite tray.The operator can hold excess acrylic resin between the fingersin order to monitor polymerization. The impression trayshould be held very still until polymerization occurs(approximately 3-5 minutes). The acrylic resin will beslightly rubbery when it is ready to be removed.
Criteria
a. Acrylic resin is mixed to proper consistency.
b. Impression of tooth is two-thirds full of acrylic resinmix.
c. Impression is seated .r..-er prepared toothheidd verystill for approximately 3 to 5 minutes.
d. Acrylic is at the slightly rubbery stage when removed.
4. REMOVE CROWN FROM IMPRESSION AND EXAMINE IT
Remove the crown from the impression. Use very gentlemovement if the crown remains on the tooth when the impressionis removed. The operator can ease the crown off of thepreparation. Move very quickly at this point to trim excessbulk. Use curved crown and bridge scissors to trim awayexcess from the interproximal, buccal and lingual crownmargins. All of the bulk excess should be trimmed quickly toprevent final set before placing the crown on the tooth. Iffinal set occurs before placement, the crown may shrink orwarp and will not fit properly.
Inspect the crown for voids. If any voids are present,fill them with acrylic resin, using the bead-brush technique.The crown should be clean and dry before each addition ofresin. Dip the brush into monomer and then into polymer;paint the mixture into the void; clean the brush in a seconddish of monomer; and wipe the brush on gauze. Repeat untilthe void is slightly overfilled.
Criterion
a. Crown replicates the unprepared tooth on its outersurface and the prepared tooth on its interior surface.
70
elf;4,10-
5. REMOVE MARGINAL EXCESS FROM CROW'S.
Mark the preparation finish line with soft lead pencil.Trim the marginal excess to the finish line with an acrylicbur and/or assorted discs. If the gingival 1/3 of the crownhas excess bulk where the interproximal tags of the impressionwere trimmed, remove excess with the acrylic bur, and cleanthe crown of debris with an air spray.
Criteria
a. Crown is trimmed to the impressed margin.
b. Crown is free of debris.
6. CHECK CONTACTS MARGINAL ADAPTATION. AND CONTOURS OF THE CROWN
Place the crown on the prepared tooth, and assess itsfit. If the crown does not seat completely, one or bothcontacts may be too bulky. Acrylic resin may be removed withthe acrylic bur. Reseat the crown and check the contacts withdental floss. Should the contact areas (in the middle third)be under contoured, add acrylic resin to the crown with thebead-brush technique. The crown must be clean and dry for theresin to adhere, and it should be seated / hen the resin is atthe rubbery stage in order to establish the contacts. Trimthe acrylic resin additions with the acrylic bur, and cleanaway the debris with an air spray.
Once the crown is fully seated, make sure the marginmeets the finish line and conforms to it. If the crown hasan open margin or needs more retention, at this point you canreline the interior of the crown with resin. Relining isaccomplished by mixing the resin in a dappen dish or addingmonomer to the interior of the crown and slowly adding thepolymer. It is important that the operator seats the crownproperly and applies pressure as the acrylic polymerizes. Inthe clinical setting, the operator would want the patient toocclude on a cotton roll or use an index finger to assure evenpressure. Acrylic additions should be smoothed with anacrylic bur or discs. A mouth mirror is used to compare thebuccal and lingual contour of the crown with that of theadjacent teeth. Contour the crown as necessary.
Criteria
a. Mesial and distal contacts re-established.
b. Crown margin is adapted to the finish line.
71
2
c. Buccal and lingual contour of crown conforms to that ofthe adjacent teeth.
d. Crown is free of debris.
7. CHECK OCCLUSION.
The thickness and contour of the occlusal surface of thecrown depend on the pressure that was exerted duringpolymerization. Check occlusion after seating the crown onthe prepared tooth. Compare the markings on the crown withthose of the unprepared tooth. Remove any prematurities withthe acrylic bur.
If the crown is in infra-occlusion, add acrylic resin,using the bead-brush technique. After applying the acrylicresin, wait a moment for the acrylic resin to develop a doughytexture; then seat the crown and close the teeth intoocclusion to contour the occlusal surface of the crown.
Criterion
a. Crown's occlusion replicated that of the unpreparedtooth.
8. SMOOTH AND POLISH THE CROWN.
Remove the crown. With a straight handpiece and apumice-impregnated rubber wheel smooth all its surfaces. Uselight, intermittent strokes to keep from deforming thecontours and contacts. For a highly polished surface, you mayuse a polishing agent with the rag wheel on a lathe.
Crite,.ion
a. Crown is smooth and shiny.
9. CHECK CROWN BEFORE CEMENTATION.
Reseat the crown. Check its marginal adaptation,contacts, contours, and occlusion, as before.
Criteria
a. Crown margin meets, contours to, and fits snugly againstpreparation finish line.
b. Crown contacts adjacent teeth.
72
2E: ;
c. Crown's contours duplicate those of unprepared tooth #14.
d. Crown's occlusion replicates the occlusion of unpreparedtooth #14.
10. CEMENT THE CROWN.
Remove the crown; rinse and dry the preparation area.Isolate the area with rolls of cotton. Apply a thin layer ofpetroleum jelly to the exterior of the crown, to facilitatethe removal of excess cement. The lubricant should notcontact the interior of the crown; it will prevent adherence.
Mix temporary cement according to the manufacturer'sdirections. When it has a uniform consistency and flowsfreely, use a plastic instrument to coat the internal surfacesof the crown with a thin layer of the cement.
Seat the crown on the preparation. Place a cotton rollon the occlusal surface of the crown, and occlude the teeth.Check with the explorer at the crown's margin to see that thecrown is fully seated. Hold the teeth in occlusion until theexplorer can no longer penetrate the extruded cement.
When the cement is set, remove the cotton rolls, and usethe explorer to chip away any excess cement. Use dental flossto free the interproximal areas of cement. A knot can be tiedin the floss to aid in interproximal removal of cement. Rinseand air dry the restoration.
Criteria
a. Preparation is clean, dry and isolated.
b. The exterior of the crown is lubricated.
c. The interior of the crown is coated with a thin layer oftemporary cement.
d. Crown's margin fits snugly at preparation finish linewhen crown is seated.
e. No excess cement is present.
f. Restoration is clean and dry.
73
r
11. CHECK CROWN AFTER CEMENTATION.
Using the mirror and the explorer, check the crown marginfor fit and seat. At least 95% of the margin must meet thefinish line. Compare the contours of the crown with those ofthe adjacent teeth.
Check contacts, and make a final occlusal check. Shouldthe crown need re-contouring, use a green stone, and then afine disc.
Criteria
a. At least 95% of crown margin meets preparation finishline, and entire margin is sealed with cement.
b. Crown contours are aligned with those of adjacent teeth.
c. Crown contacts adjacent teeth mesially and distally.
d. Crown's occlusion matches occlusion of unprepared tooth.
74
2E )
SUMMARY OF PROCEDURES AND CRITERIA
Procedures Criteria
1. Take an alginate impression a. Impression shows all ofthe prepared tooth, and details of the preparedtrim it. tooth.
b. Impression is free oflarge voids, tin areas,and defects.
c. Impression is free ofinterproximal tags andlarge overhangs ofalginate.
d. Impression is clean andfree of excess water.
2. Test seating the alginateimpression on dentiform.
3. Fabricate the acrylic resincrown.
a. The impression of theprepared tooth seats fullyinto the dentiform of theunprepared tooth.
a. Impression of tooth #14 istwo-thirds full of acrylicresin mix.
b. Impression is fully seatedon the dentiform with evenpressure.
c. Impression is held verystill (approximately 3-5minutes) until slightlyrubbery.
4. Remove crown from impression a. Crown replicates theand examine it. unprepared tooth on its
outer surfaces and theprepared tooth on itsinterior.
5. Remove marginal excess from a. Crown is trimmed to thecrown. impressed margin.
b. Crown is free of debris.
6. Check contacts, marginal a. Mesial and distal contactsadaptation, and contours of re-established.the crown. b. Crown margin is adapted to
the finish line.c. Buccal and lingual contour
of crown conforms to thatof the adjacent teeth.
d. Crown is free of debris.75
2';')6
7. Check occlusion. a. Crown's occlusionreplicates that of theunprepared tooth.
8. Smooth and polish the crown. a. Crown is smooth and shiny.
9. Check crown before Crown margin meets,cementation. contours to, and fits
snugly against preparationfinish line.
b. Crown contacts adjacentteeth.
c. Crown contours replicatethose of unpreparedtooth #14.
d. Crown occlusion replicatesthat of unprepared tooth#14.
10. Cement the crown.
11. Check crown aftercementation.
76
a. Preparation is clean, dryand isolated.
b. The exterior of the crownis lubricated.
c. The interior of the crownis coated with a thin layerof temporary cement.
d. Crown margin fits snuglyat preparation finish linewhen crown is seated.
e. No excess cement ispresent.
f. Restoration is clean anddry.
a. At least 95% of crownmargin meets preparationfinish line, and entiremargin is sealed withcement.
b. Crown contours are alignedwith those adjacent teeth.
c. Crown contacts adjacentteeth mesially anddistally.
d. Crown occlusion matchesthe occlusion of theunprepared tooth.
21
Name:Date:Grade:
EVALUATION FORMCUSTOM PLASTIC TEMPORARY CROWNS
1. Crown contactsadjacent tooth:MesiallyDistally
2. Crown margins meetpreparations with0.5 mm of thefinish lineBuccal/LingualInterproximal:Mesial/Distal
3. Marginal ridgeheight of crownis acceptable withadjacent teethMesialDistal
4. Crown contourresembles that ofthe original toothFacialLingualIncisal/occlusal
Study the models of the cemented and uncemented crowns witha magnifying glass, and note the differences in the thickness ofthe acrylic resin, in contour, and in fit. Using the explorer atthe junction of the margin and finish line, feel the marginalintegrity. Repeat with the models placed on the dentiform. Noticeparticularly the fit of the uncemented crown to the prepared tooth.
Model Study
List of Models for Study
a) Temporary custom plastic crown trimmed and contoured, allcriteria met; with prepared tooth.
b) Temporary custom plastic crown with uneven occlusalsurface from distortion during polymerization.
Study the prepared tooth. Examine the finish line with anexplorer and magnifying glass. Inspect the models of defectivecrowns, and determine what errors in technique could have causedthe defects. How could those techniques have been improved?
Crown Fabrication and Evaluation
1. Review the videotape.
2. After making the preliminary occlusal check, remove tooth #14without disturbing the blue marks. Save the tooth forcomparison when you check the occlusion of the fabricatedcrown.
3. No evaluation form is provided for making the impression. Ifyou are concerned about the adequacy or either, consult yourinstructor.
4. Practice fabricating the custom crown, evaluate using the formprovided. Two hours is allotted for the first trial and onehour for the second trial.
78
2Q3
PREPARING FOR MODULE 5
1. Review the videotape from Module 4.
2. Read the Module 5 syllabus.
3. Familiarize yourself with the updated techniques.
4. Answer the study questions.
STUDY QUESTIONS
1. What advantages and disadvantages do custom plastic temporarycrowns present?
2. How can you hasten polymerization.
3. What possible errors could distort the contours of a customplastic temporary crown during polymerization?
4. Why must the original occlusal pattern be replicated when thetemporary crown is placed?
79
2
MODULE5
ADDITIONAL TECHNIQUES EMPLOYED
FOR FABRICATION OF
CUSTOM TEMPORARY CROWNS
118411A A A
Y
2 E 5
1/4
MODULE 5
ADDITIONAL TECHNIQUES EMPLOYED FOR FABRICATIONOF CUSTOM TEMPORARY CROWNS
The previous modules have listed the basic objectives anddescribed the technique for fabrication of a custom acrylictemporary crown. There are a few other techniques that areemployed in some dental practices. This segment of the temporarycrown module is intended to familiarize the student with thesealternative techniques; however, actual practice is recommendedprior to attempting them in the clinical setting.
Additional techniques for fabrication of custom temporarycrowns which will be discussed include the following:
1. Wax molding technique2. Silicone putty impression3. Intraoral molding technique4. Vacuum-formed plastic resin tray5. Relining of the aluminum temporary crown.
Wax Moulding Technique
Instead of taking an alginate impression, the operator may usepink baseplate wax for taking the impression.
1. Cut a piece of 3"x 5" plate wax to approximately3"x 2 1/2" and fold it in half lengthwise. Place the waxin a bowl of hot water to soften or place over hot waterfacet or a flame.
2. Place the wax over the prepared tooth and finger burnishit onto the occlusal surface and into interproximalareas. Wax is hardened by cooling with air fromair/water syringe. Once the wax matrix hardens, removeit from the prepared tooth and trim excess wax.
3. Use the wax moulded impression in the same manner as analginate impression. The operator may want to cool theacrylic resin while it is polymerizing with the air fromthe air/water syringe.
Some operators prefer the wax moulding technique because itis less expensive than alginate impressions and trays and it savestime.
Silicone Putty Imoression
Another impression material used for custom temporary crownsis silicone putty. Silicone putty is placed in a sectional traylike the alginate impression material.
1. The silicone putty is mixed with two equal parts ofcompound.
2. The operator kneads the putty with his/her fingers toproduce a homogenous, streak-free mix. The material iskneaded for about one minute.
3. The silicone putty is then placed in the tray and appliedover the unprepared tooth until it is set.
4. The operator has now prepared a custom tray which can beused for fabrication of the temporary crown. Somesilicone materials are very stable and can be kept forextended periods of time.
Some operators prefer silicone putty impressions because oftheir versatility for use in a broad range of techniques. Mostmanufacturers supply additional curing silicones in variousviscosities: heavy body, regular, light body wash. The advantagewith the silicone putty is that the final impression is taken withthe putty impression being your custom tray.
Intraoral Moulding Technique
An alginate impression of the tooth is not necessary when theintraoral moulding technique, or "blob" technique is employed. Theacrylic resin itself is used to fabricate the temporary crownwithout any preliminary impression prior to tooth preparation.
1. Mix the acrylic resin in a dappen dish as describedpreviously.
2. When the acrylic has lost its highlights and has a doughyconsistency (like putty), the operator moulds the resininto a rectangular "blob."
3. The acrylic is moulded over the preparel tooth and thepatient occludes in order to establish the impression.
4. Gross excess will be present on the buccal, lingual andinterproximal surfaces. The excess is trimmed in themouth with a sharp instrument, or the temporary isremoved from the mouth and crown and bridge scissors are
82
2(1'
used for trimming. It is important to proceed quicklyat this point to prevent shrinkage. The finalpolymerization should be done in the mouth. Thepatient's tongue can help mould the resin on the lingualsurface.
5. Proceed with trimming and contouring according to dentalanatomy of the particular tooth being restored. Checkocclusion.
6. Sometimes it is necessary to re-line the first attemptor to add to contact areas or the occlusal surface. Thisre-lining is easily accomplished as described in Module3 and 4.
The advantage of this technique is that it does not requireany initial work before the tooth is prepared. It is preferred bysome operators when patients have broken teeth and a preliminaryimpression of the unprepared tooth is needed. The intraoralmoulding technique works well for anterior or posterior teethalike. It also has excellent margin adaptation. This technique isparticularly suitable for inlays, onlays, and 3/4 crowns.
Vacuum-formed Plastic Resin Tray
A vacuum-formed plastic resin tray is a plastic matrix heatedto the shape of the arch using a vacuum forming system. It can bea full arch matrix or a sectional matrix. it is used when thedentist is making multiple crowns or several unit bridges. In thiscase, it is very helpful to have a clear plastic resin sheetvacuum-formed to the study model.
This type of tray enables the operator to have a custom traymade to fit the patient's mouth without the distortion that canoccur with an alginate impression. This custom form can be re-useda number of times if needed, unlike the alginate impression. Thedisadvantage of the plastic resin tray technique is that it mayrequire two appointments: one for the impressions and study modelswhich are needed for vacuum-forming the tray prior to the crownpreparation appointment. The advantage is the clear tray allowsthe operator to see if it is seated properly.
Relining Aluminum Shell Crowns
At times, aluminum shell crowns may not have adequateretention or marginal adaptation. It is possible to reline theshell with acrylic resin. This technique would result in analuminum temporary crown which fits better and lasts longer.
83
2('
To review the steps in relining a temporary crown with acrylicresin, the following summary is provided:
1. Coat prepared tooth with petroleum jelly.
2. Mix acrylic in a dappen dish or directly in the aluminumshell.
3. Place acrylic in the aluminum shell (2/3 full) and allowtime for surface to dull.
4. Place lined shell on prepared tooth and apply evenpressure, or have the patient occlude, until acrylic haspolymerized.
5. Trim excess acrylic in the mouth with a sharp instrument.
6. Smooth, polish, and clean crown before cementing.
84
2c`G
STUDY QUESTIONS
1. What are the different technqiues for fabrication of a customtemporary crown?
2. Which of the techniques is considered the most versitle andaffordable?
3. What are the advantages of each of these techniquez?
4. Why is it necessary for the operator to reline the aluminumshell if it already fits snuggly to the finish line?
85
U
SUMMARY
This module has provided instruction in fabrication andplacement of temporary crowns. Specific procedures have beendescribed for the following types of temporary crowns: aluminum,polycarbonate, and custom. Additional techniques were discussedin an attempt to familiarize the student with a few of the vastarray of techniques employed in dentistry. It should be understoodthat a clinical setting will present an indefinite variety of casesthat may require alternate steps.
The information in thts written instructional module isintended for use in conjunction with a classroom/laboratory course.The course should provide practice and competency evaluation forthe student learner. Once the student has had the experience ofworking with different types of crowns and techniques, he/she canevaluate which technique is most suitable for the particular caseand for a given office setting.
86
3 I.
ORIGINAL EDITION
PROJECT ACCORDE STAFF:Marjorie L. Kelley,Sharon Entwistle, M.Richard P. Cohan, D.Nelva B. Richardson,Michael Cunningham,
DENTAL CONSULTANTS:Donald B. Beck, D.D.S., M.S., B.S.Larry G. Loos, D.D.S., B.A.
UPDATED VERSION
By LuAnn Spain, C.D.A.1991
CONSULTANTS:Denise M. Bowen, R.D.H., M.S.David F. McCune, III, D.D.S.Kelly Reich, R.D.H., B.S.
TECHNICAL TYPIST:Dana Meyers, B.S.Management Solutions Consulting & Training Services
87
3 1 1Th4.
REFERENCES
Baum, Lloyd, McCoy, Richard B. Advanced Restorative Dentistry.Philadelphia: W.B. Saunders Co., 1984.
Castano, Frances, A., Alden, Betsy. Handbook of Expanded DentalAuxiliary Practice. J. B. Lippincott Co., 1973.
Chasteen,C.V.
Phillips,W. B
Joseph E. Essentials of Clinical Dental Assisting. TheMosby Co., 1989.
William J. Saunders
. Elements of Dental MaterialsCo., 1984.
Simon, William J. Clinical Dental Assisting.Inc., 1973.
. Philadelphia:
Harper and Row,
Spohn, Eric E., Halowski, Wendy A., and Berry, Thomas G. OperativeDentistry Procedures for Dental Auxiliaries. The C. V. MosbyCo., 1981.
88
3
Curriculum Guide forFUNDAMENTALS OF
DENTAL ASSISTING ANDEXPANDED FUNCTIONS
Volume 2
Vo. Ed. #258
Investin Saccess
STATE DIVISION OFVOCATIONAL EDUCATION
1992
3 0 4
Module 4
POLISHING AMALGAM
3 :5
Module 4-A
POLISHING AMALGAM
Instructor/Student Module
3 0i;
POLISHING AMALGAM RESTORATIONSA Self-Study Module
developed byCarlene Paarmann, RDH, MEdDepartment of Dental Hygiene
Idaho State University
June, 1991
Adopted by
Idaho State Board for Vocational Education650 West State Street
Boise, Idaho
307
TABLE OF CONTENTS
Introduction 1
Course Outline 3
Objectives 9
Background Information 10
Purposes of Polishing Restorations 10
Properties of Amalgam 14
Selection of Restorations to be Polished 15
Principles of Polishing 18
Precautions 20
Armamentarium 21
Amalgam Polishing Procedure 25
Study Questions 36
References 39
Amalgam Polishing Evaluation Form 40
3 nc,
INTRODUCTION
In order for Idaho dental assists to legally polish amalgam restorations under the direct
supervision of a dentist, they must first successfully complete coursework approved by the
Idaho State Board of Dentistry. A certificate or diploma of course completion as issued by
the teaching institution will be the assistant's verification of compliance with Board
standards. This module was designed to be utilized by Board-approved teaching entities. It
offers basic information which is intended to be supplemented with formal classroom,
laboratory and clinical instruction.
There are a variety of techniques for polishing amalgam restorations. To minimize
confusion, this module describes only one technique. This technique provides the basic
knowledge necessary to learn the skill of polishing amalgam restorations. The polishing of a
Class II amalgam restoration is described so that the student will have an opportunity to learn
the technique for polishing both the occlusal and interproximal surfaces. By so doing, both
concave and convex surfaces will be polished, and the skills gained from polishing a Class II
can be easily transferred to other classifications of amalgam restorations (e.g., Class I,
Class V).
It should be pointed out that the polishing technique described herein does not include the
technique for removing amalgam overhangs. Overhang removal (i.e., margination) is a
procedure which requires training in itself. This polishing technique includes only those
margination procedures which can be accomplished using the armamentarium listed in the
module. As such, only minute amounts of excess amalgam from any margin of the
restoration will be removed. Any restoration with substantial excess amalgam at the proximal
margins, particularly the gingival proximal margin, will require the attention of a person
skilled in overhang removal/margination procedures prior to completion of the amalgam
polish procedure.
To acquire the knowledge and skills necessary to polish amalgam restorations, the following
instructional pattern is suggested:
3 'ID
1. Read the module in its entirety and answer the study questions which are included at the
end. Familiarize yourself with the armamentarium that will be needed. Also review the
practice activities and evaluation mechanisms that are included in your course outline.
2. Review the videotape of the procedure during a class session.
3. Perform all activities listed in the course outline. Complete self-evaluations as well as
instructor evaluations as you progress.
At the end of the practice sessions, a short written test will be administered. Your instructor
will provide further information about the final practical certifying exam during your course.
3102
COURSE OUTLINEPOLISHING AMALGAM RESTORATIONS
Clock Hours
Lecture/Demonstration:
Laratory:Written Examination:
Final Practical Examination:
Course Description
3 hours8-1/2 hours
30 minutesFor the convenience of both students andexaminers, it is suggested that the final examfor this course be offered concurrently with thefinal exam for temporary crowns and alginate
impressions.
The primary goal of this course is to provide practicing dental assistants with background
knowledge and laboratory/clinical experience in the application of principles and procedures used
in polishing amalgam restoration. Upon successful completion of this course, the student will
receive a certificate of completion/recognition indicating competency in performing this procedure.
Required Text
Polishing Amalgam Restorations, a self-study module developed by Carlene Paarmann,
RDH, MEd, Idaho State University, 1991.
Course Requirements
I. Attend all class, laboratory, and clinical sessions.
2. Requirements on dentoforms: complete 3 acceptable Class II amalgam polishings onColumbia Dentoform Teeth #5, #14, #19.
3. Requirements on patients: complete 1 acceptable Class II amalgam polishing.
tree Amalgam Polishing Evaluation Form. If a critical task (marked on
evaluation form with *) is not completed, the evaluation is automatically unsatisfactoryand must be redone. A minimum score of 80% must be achieved on each polish.This may require polishing several amalgam restorations to meet an acceptable level.)
Patients who are invited to participate in this class must verify permission from theirfamily dentist. A permission slip (see page 8) must be signed by their dentist,
indicating that the treatment was diagnosed and permission is granted to perform theservice(s) listed on the form. Permission slips are given to the course instructor prior
to performing the procedures.
NOTE: Amalgams may be polished on other students to complete requirements.
4. Achieve a minimum of 75% on the written examination.
5. Successfully complete the final practical examination to receive a certificate ofcompletion/recognition to perform this function (Columbia Dentoform Tooth #30-MO).
6. Materials to be supplied by the student (see page 25):a. Class II amalgam restorations to complete lab requirements (Columbia Teeth
No's. 5, 14, 19)b. slow speed handpiece and contra-anglec. disks /mandrelsd. green stonese. finishing bursf. gamier clamps, rubber dam armamentarium or other isolation materials
g. evacuator tipsh. finishing stripsi. dental floss/tapej. polishing cupsk. polishing agents1. basic setupm. other expendable supplies as designated by the instructor
Evaluation/Grading
This course is designed on a Pass/Fail basis. In order for the student to pass the course, therequirements listed above must be successfully completed. As previously stated, the minimumpercentage for acceptable amalgam polishings is 80%. All critical tasks listed on the evaluation
form (identified by *) must be completed. If a critical task is not completed (in other words, a "2"is not achieved), the process evaluation is unsatisfactory and must be redone, regardless of thescore. A minimum score of 75% must be achieved on the written examination. A description for
determining the percentage scores is presented below.
A. Calculating Percentages for Amalgam Polishings
1110Refer to the attached evaluation form (it is the same as the evaluation form on page 40 of the
corresponding module). Each criteria is evaluated as follows:
C = Criterion met = 2 pointsI = Criterion improvable = 1 pointX = Unacceptable = 0 points
Since there are 10 criteria, each worth a maximum of 2 points, there are 20 total points possible for
each amalgam polish. A percentage score can then be calculated by adding the total number of
points earned and dividing by the total points possible (20). To facilitate calculations, the
following evaluation scale is provided:
Points Achieved Percentage
20 100
19 9518 9017 8516 80 Proficiency Level
15 7514 7013 6512 6011 55
B. Calculating Percentages for Written Examination
For each wrong answer on the written examination subtract 5 points from 100 to determine
final score.
1. Read the self-study module, Polishing Amalgam Restorations.2. Answer study questions on page 36 of module.3. Answer objectives listed at the beginning of the module.
4. For supplementary reading, refer to references listed on page 39 of the module.
COURSE SCHEDULE
Clock Method of AssignedHours Instruction Topic/Activity Readings
3 Lecture/ Introduction to CourseDemonstration Purpose of polishing restorations
Properties of amalgamSelection of restorations to
be polishedPrinciples of polishingPrecautionsArmamentariumAmalgam Polishing Procedure
anatomical contours, and smoothing the surface i oughness of the restoration. Polishing is
performed to obtain a smooth, shiny luster on the surface of the amalgam. In some cases,
restorations may also need to be recontoured. This involves changing the form or shape of
the restoration, which is necessary if the restoration does not reproduce the original contours
of the tooth. Uncorrected marginal excess or improper contouring can make oral hygiene
difficult or impossible since adjacent areas may become inaccessible to a toothbrush or dental
floss, thus leading to an accumulation of dental plaque.
PURPOSES OF POLISHING RESTORATIONS
The next few paragraphs of this module explain several important reasons why amalgam
restorations should be polished: prevention of recurrent decay, prevention of deterioration of
the amalgam surface, maintenance of periodontal health, and prevention of occlusal
problems. The information presented in this section is taken from Operative Dentistry
Procedures for Dental Auxiliaries, (Spohn, E., Halowski, W., and Berry, T., The C.V.
Mosby Company, 1981).
103 1 3
Both previously placed "old" and newly placed amalgam restorations will be improved by
finishing and polishing. Because ow restorations have undergone some degree 9f tarnish
and corrosion, they take a little longer to finish and may not exhibit the same smooth, shiny
surface as can be achieved by polishing new restorations. An additional benefit of polishing
amalgams is that of increased patient motivation. Because the amalgam is more esthetically
pleasing, it may be perceived as more valuable andcontribute to the patient's desire and
motivation to clean and take care of the restoration.
Prevention of recurrent decay. After carving is completed, the surface of the amalgam is
still somewhat rough and the margins are not as smooth as they can be. As a result, the
potential of increased plaque accumulation and retention of debris exists, both on the surface
of the restoration and along the margins. These conditions increase the likelihood of
recurrent decay around the restoration. Finishing and polishing amalgam restorations result
in a smooth, lustrous finish of surfaces and margins. Plaque and debris collection are
reduced, and the restoration is easier to clean.
Prevention of amalgam deterioration. One of the shortcomings of amalgam as a
restorative material is its tendency to tarnish and corrode. Tarnish is a discoloration on the
surface of the amalgam, primarily a film of sulfides which usually results from certain foods
or oral debris. As the tarnish layer becomes thicker and darker with the aging of the
amalgam, it becomes readily visible. By itself it is not particularly damaging to the amalgam,
but it is unsightly. It can occur on a polished amalgam, but generally at a much slower rate
than on an unpolished restoration. Corrosion, on the other hand, is a destructive attack on
both the surface and subsurface of the restoration, and is one of the causes of surface pitting
and/or the breakdown of the margins of the restoration. Marginal breakdown may, in turn,
lead to recurrent caries or fracture of the restoration. Corrosion is an actual chemical
deterioration of the amalgam resulting from the reaction of the metal with such things as air,
moisture, acid or alkaline solutions and other chemicals. A smooth, polished surface is less
likely to accumulate acids, plaque, and debris, which may encouragegalvanic action on the
surface, and thus is less likely to develop a tarnished appearance.
Maintenance of periodontal health. Any restoration must not only maintain a healthy
environment for the soft tissues but must also ensure the patient's ability to cleanse the area.
The facial, lingual, and proximal surfaces are critical areas that may affect die patient's oral
hygiene and the periodontium. Proximal contact areas are surrounded by "spaces", known
as embrasures, on all four sides of the contact areas: occlusal, gingival, buccal, and lingual,and they are named according to their location. The gingival embrasure may not be as easilyvisible as the other embrasures because it houses the interdental papilla which usually fills theentire space. Embrasures are vital to the maintenance of a healthy periodontium. They serveas spillways or escapeways for the passage of food from the occlusal surfaces and providestimulation to the surrounding soft tissues. Proximal contours of the teeth and embrasurespaces are intimately related since the shape of the embrasure spaces is dependent upon theshape of the proximal surfaces. Figures 1 and 2 below demonstrate normal proximalcontours and embrasure spaces.
Occlusal Embrasures
I
Gingival Embrasures
Figure 1. Proper anatomic contour.Arrows are pointing to the occlusaland gingival embrasure spaces.
Lingual Embrasure
Buccal Embrasure
Figure 2. Proper anatomic contour.Arrows are pointing to the buccal andlingual embrasure spaces.
Restorations that are improperly contoured contribute to periodontal breakdown. Anovercontoured surface presents an area that quickly collects and harbors plaque, resulting inirritation. This bulky contour may interfere with the patient's ability to cleanse the area. Aslightly undercontoured restoration is less of a potential problem because it is less likely tointerfere with the patient's ability to clean the area. The restoration overcontoured in thegingival embrasure leaves less space for the papilla. This encroachment on the space maylead to strangulation or physical displacement of the papilla. Either situation increases thelikelihood of tissue breakdown. An undercontoured proximal area may have a poor contact,
12
320
which increases the potential for food impaction. Food impaction is not only frustrating forthe patient but irritating to the soft tissues. A properly contoured proximal surface is easilycleansed with dental floss. A contact area that is too tight presents the potential formechanical irritation from floss being forced through the contact. A rough contact area maytear the floss. The frustration of the patient may contribute to inadequate flossing. Figures 3and 4 demonstrate improperly contoured proximal surfaces and embrasure spaces.
A
Figure 3. PROXIMAL CONTOURS A & D: proper anatomic contourB (distal): inadequate amalgam on distal (undercontoured)B (mesial): excess amalgam on gingival embrasure and
occlusal embrasure (overcontoured)C: excess amalgam on distal (overcontoured)
Figure 4. BULKY EMBRASURES (buccal and lingual)
The gingival floor of the proximal box is frequently subgingival, and restorations withextreme excess in these areas can lead to severe periodontal trauma. As mentioned in theintroduction to this module, excess amalgam at the gingival margin of the restoration(overhang) that is too bulky to remove with armamentarium other than that listed for thepolishing procedure described herein, will require the attention of a person skilled in
13
A:d A
overhang removal/margination procedures prior to completion of the amalgam polish
procedure.
Recontouring, finishing, and polishing provide an opportunity to correctdiscrepancies in the
anatomical contours of the restoration. With the use of specific instruments, the contours of
the amalgam can be altered, and the health of the adjacent tissues can be preserved if
recontouring and finishing procedures are accomplished within a reasonable timeframe.
Prevention of occlusal problems. Potential occlusal problems may be prevented by the
finishing of amalgam restorations. Occasionally, a restoration maybe left in premature
occlusion, which can lead to several problems. The tooth may exhibit pain or sensitivity,
especially during mastication. In more severe cases, the restoration or the opposing tooth
may fracture. The tooth may undergo slight orthodontic movement because of the pressures
of premature occlusion. This problem can be corrected during the recontouring process.
All of the above-listed reasons for performing finishing and polishing procedures lead to an
increased serviceable lifetime of the restoration. The benefits gained from finishing and
polishing amalgam restorations should be explained to your patients as part of your routine
patient education program. The amount of discussion will, of course, vary with the
individual patient, but generally your explanation should include: 1) reasons for polishing
amalgam restorations; 2) the general sequence of procedures used to accomplish the task;
and 3) sensations that the patient may experience during the polishing procedure.
PROPERTIES OF AMALGAM
Because mercury is one of the components incorporated into amalgam restorations, the use of
amalgam is currently somewhat of a controversial issue and is being closPly scrutinized by
both dental professionals and consumers. The controversy is not a new one; in fact it dates
back to the 1800's. Nevertheless, amalgam remains the most widely used restorative
material. It is likely that amalgam will remain at the top of the list until longitudinal studies
confirm the superiority of other materials (e.g. composite) for posterior restorations. Until
that time, the "tried and true" dental amalgam will continue to be popular.
Dental amalgam is produced by mixing mercury with a silver-tin alloy which usually contains
a small amount of copper and zinc. An amalgam's characteristics are determined by the
components of the particular alloy and their specific chemical combination, the size and shape
of the alloy particles, the ratio of mercury to alloy, and manipulation variables such as the
trituration (mixing) time and adequacy of condensation. When correctly placed, the alloy has
high crushing strength and completely fills the cavity, leaving no voids. Its surface can
easily be highly polished so that it will not irritate the gingival tissues. Amalgam is most
generally used for posterior restorations where its strength is needed to resist biting stresses
and where esthetic properties are unimportant.
There are several causes of excess amalgam extending beyond the margins of a cavity
preparation: 1) the amalgam was incorrectly condensed; 2) the condensed amalgam
restoration was poorly carved; 3) moisture contamination during the restorative procedure
has led to expansion and corrosion of the finished restoration over a period of time; and (4) a
natural expansion of the amalgam has occurred over a long period of time. Most of these
overextensions are eliminated during the final polishing procedures, although the procedure
is sometimes neglected altogether since the restoration cannotbe polished immediately after
placement of the amalgam. The finishing and polishing procedures should not be initiated
on an amalgam restoration until the amalgam has reached its final set, at least 24 hours after
it has been placed and carved. Premature finishing and polishing will interfere with the
crystalline structure of the hardening amalgam. The result will be a weakened restoration.
Studies have been conducted on polishing high copper amalgams ten minutes after placement;
however, it is presently recommended that at least 24 hours pass before the polishing
procedure is attempted.
Single restorations may be polished at the next recall appointment. Multiple restorations
should be polished at a specific polish appointment. An amalgam restoration is not
considered complete until it is polished.
SELECTION OF RESTORATIONS TO BE POLISHED
All amalgam restorations must be evaluated carefully prior topolishing to determine if they
are serviceable and what, if any, modifications are necessary. If there is doubt about the
acceptability of their condition, they should be evaluated by a dentist for replacement.
Most newly placed amalgams will easily pass the criteria for acceptability; however,
occasionally something will have occurred during placement or in the interim between the
placement and polishing appointments which makes the amalgam a candidate for replacement
(e.g., fracture, etc.). Older amalgams indicated for polishing should be evaluated carefully
using the same criteria established for new amalgams. Thecriteria for serviceable amalgams
that indicate polishing include:
1. No fractures in the restoration. When evaluating the restoration(s) to be polished,
carefully assess it both visually and tactilely in good light. Dry the restoration if it is wet.
Notice the rough non-reflective appearance of the surface. Look for fractures on the occlusal
surface and marginal ridges. Use a mirror and light reflection to improve vision in all areas.
2. Proximal contact is present in Class II restorations when toothposition makes it
possible. The contact area is checked by passing a piece of dental floss through it. Floss
through the contact area just as if you were flossing to remove plaque. You should feel a
slight resistance to passage through the contact area. In most cases extreme resistance or no
resistance indicates the contact is not correct. Very tight contacts may be improved during the
polishing procedure but lack of contact when one should be present indicates the amalgam
should be replaced. Open contacts trap food and debris and may lead to the breakdown of
the periodontium in the area The height and contour of the contact is evaluated visually to
determine if any modifications are necessary.
3. The anatomy can be maintained or improved. Be aware that occasionally a patient's
dental anatomy, occlusion or tooth position is vastly different from normal, ideal anatomy.
In these cases the anatomy of the restoration is usually modifed to suit the situation when it is
being placed. This may mean the anatomy will be much flatter than normal or the height or
position of a cusp or ridge may be modifed. Perhaps the contact is in an unusual place. A
look at the anatomy and position of the patient's other teeth will help you evaluate the
appropriateness of the anatomy and occlusion of the restoration to be polished. Before
making any alterations in anatomy confirm your decision with the supervising dentist.
Some examples of anatomy that could be improved during the polishing procedure include:
bulky embrasures, broad contact areas, high areas of amalgam that contact first (premature
contacts), marginal ridges that extend beyond the height of occlusion (if a marginal ridge is
excessively high, it is likely that it will fracture from occlusal forces), and indistinct anatomy.
On the other hand, excessively deep occlusal anatomy or marginal ridges below the plane of
occlusion cannot be improved by finishing and polishing procedures and are, therefore,
contraindicated `'or polishing.
4. All margins can be contoured to be flush with the cavosurface margin of the cavity
preparation. Using an explorer, look and feel for excess amalgam or areas where amalgam
is deficient at the margins. If the margin is rough and ragged rather than following the
smooth line of the cavity preparation, there is most likely flashing and/or ditching present.
Flashing is an excess of amalgam which extends over the cavosurface margin of the cavity
preparation. If the tip of the explorer catches when moving from tooth structure to amalgam
but not from amalgam to tooth, it indicates there is an excess of amalgam which needs to be
removed. If the flashing appears at the gingival margin of the restoration it is commonly
referred to an an overhang.
Ditching is a deficiency of amalgam along the margin, preventing the margin of the cavity
preparation from being flush. If the explorer tip catches going from amalgam to tooth
structure, but not from tooth to amalgam, it indicates there is inadequate amalgam at the
margin. An area of ditching is also commonly referred to as a submarginal area and it
requires removing tooth structure or replacing the amalgam to correct the situation.
If the tip of the explorer catches when moved in both directions across the margin, it indicates
there is an open margin (there is a distinct space between the amalgam and the wall of the
cavity preparation) and the amalgam should probably be replaced. Figure 5 depicts flashing,
ditching, and open margins.
Figure 5. Flashing Ditching
17
3 :)"
Open Margin
At the completion of the polishing procedure, all of the margins should be flush (the explorer
moves smoothly in either direction with no catching at all); areas with excess amalgam can be
finished. Margins that are slightly deficient require the removal of enamel to assure smooth
flush margins. According to Idaho state law, dental assistants or hygienists are not allowed
to remove tooth structure. As such, the supervising dentist must remove tooth structure as
needed. Margins that are greatly deficient or open cannot be corrected during the polishing
procedure and are considered contraindications to polishing.
5. The occlusion can be maintained or improved. Occlusion must be checked prior to
isolating the teeth involved in the procedure to determine what, if any, modifications must be
made to correct it. The occlusion can be checked visually to identify shiny burnished areas
on the amalgam where the restoration has become worn because it prematurely contacts the
opposing teeth. Occasionally these areas look flat due to the premature occlusion. These
areas are called wear facets. Wear facets should be polished down to correct the occlusion.
Examples of restorations that are contraindicated for polishing that do not fit into one of the
five categories above include: 1) restorations with gross overhangs that need to be replaced;
2) restorations in teeth to be extracted or crowned; and 3) restorations with recurrent decay
that need to be replaced.
PRINCIPLES OF POLISHING
Finishing and polishing the restoration can be divided into two separate procedures
performed with different abrasive agents. Finishing the restoration involves contouring,
removal of marginal discrepancies, defining the anatomy, and smoothing the amalgam
surface. Polishing enhances the quality of the restoration by producing the smoothest and
shiniest surface possible--one which will offer better resistance to corrosion and tarnish.
These procedures are significantly interrelated and can be distinguished by the abrasive used.
Finishing procedures are completed prior to polishing and require abrasive agents that are
coarse enough to remove the bulk from the surface. Polishing procedures require more
mildly abrasive materials for smoothing and shining the amalgam surface.
An abrasive changes the surface of the tooth by frictional grinding, rubbing, scraping,
scratching, etc., to remove irregularities. As this process proceeds from coarse abrasion
18 3' 2'
(finishing) to very fine abrasion (polishing), the surface of the restoration passes through
various stages: from an irregular surface, to a grooved surface, to a finely scratched surface
which is much smoother and better reflects light. The last state, finely scratched surface, is
regarded as the polished surface and, to the human eye, will appear as a high shine.
Therefore, it is extremely important to use abrasive agents in the order of decreasing
coarseness, concluding with the least abrasive material. The likelihood of achieving a high
shine with a mirror-like finish is decreased if very coarse abrasive agents are immediately
followed by fine abrasive agents. The fine abrasive agents will not remove the large, deep
scratches left by the coarse abrasive agents.
Factors determining the abrasiveness or polishing potential of an agent include its hardness,
size, shape, and concentration of abrasive material. Different abrasives vary considerably in
their hardness and shape. Within the same abrasive, sizes are graded from coarse to fine.
With abrasive compounds that are harder, of rougher shape, increased particle size, or high
concentration, abrasiveness is increased. For example, both garnet disks and cuttle disks are
available in coarse, medium, fine, and extra fine varieties. However, garnet is more abrasive
than cuttle because of its hardness, size, and shape. As such, a coarse garnet disk will
remove many more irregularities than will the coarse cuttle disk.
Additional factors which relate to abrasiveness must also be considered. These include the
pressure and speed used to apply the abrasive material. The greater the pressure or speed
used while applying the abrasive, the greater the friction which results in the production of
heat. The creation of heat during the polishing procedure is potentiallydangerous for two reasons: 1) heat can cause thermal damage to the pulp (and pain to the
patient!); and 2) heat brings the mercury to the surface of the restoration which results in a
dull, cloudy surface, and a surface that is more susceptible to corrosion.
To minimize heat production:
1. Use light, intermittent pressure with rotary instruments lifting the instrument off of
the restoration frequently. Heavy or prolonged pressure generates heat.
2. Use slow to moderate speed with rotary instruments. High speeds increase friction
and thus generate more heat. Increase speed only to produce the final high shine.
3. Use abrasive agents that are wet rather than dry. Some abrasive materials (pumice
and tin oxide, for example) can be mixed with water or alcohol to help lubricate and
cool the agents.
4. Use compressed air directed at the amalgam surface during polishing.
PRECAUTIONS
The patient's health and safety are your responsibility during this procedure. It is the moral
and ethical responsibility of every dental auxiliary engaged in polishing amalgam restorations
to prepare her/himself carefully to perform at a high standard of competence. One of the
most important precautions to be aware of during this procedure - the minimization of heat
production - is discussed above. There are several other important precautions which should
be taken during this procedure to prevent damage to the tooth, the restoration, and the
patient's soft tissue:
Maintain functional anatomy by using polishing instruments in the prescribed manner.
Do not destroy functional anatomy by flattening cusps or marginal ridges, by removing the
contact, or by ditching or grooving the restoration. To prevent loss of anatomy:
1. Start all rotary instruments just prior to touching the restoration.
2. Keep instruments moving over the surface.
3. Use short overlapping strokes.
4. Use each polishing instrument on the surface it was designed for.
Do not weaken the restoration by improper contouring. Excessively deep grooves and
pits, flattened embrasures, excessive reduction of marginal ridge heights, and excessive
removal of amalgam around the cavosurface margins are examples of damaging the original
tooth anatomy by improper use of the burs and disks. Too much pressure and improper
direction of force on the tip of a bur can cause gouging and/or grooving of the amalgam
surface. The application of excessive pressure in one area or lack of movement of any bur or
disk can also cause undesired grooving.
Prevent damage to the patient's soft tissues. Some of the abrasive materials used for this
procedure (particularly disks and finishing strips) can be very painful and/or damaging to the
patient if the operator should accidentally "slip" off the tooth. To avoid such situations
always:
1. Retract the tongue, cheeks and lips during the procedure.
20323
2. Position instruments so they will not abrade or lacerate gingival tissues while
polishing.
3. Use a secure grasp and stable fulcrum with all instruments.
4. Rinse all abrasive agents out of sulcus area and mouth after polishing.
Protect the patient from polishing debris. Protect the patient from the possibility of
aspirating polishing agents and debris by carefully vacuuming up allmaterials as they
accumulate. Prevent potential damage to the patient's eyes from flying debris by having the
patient close his eyes or provide a shield (e.g. glasses, a towel, etc.) during the procedure.
In addition, do not carry instruments or other armamentarium over the patient's eyes or face.
ARMAMENTARIUM
There is a wide variety of instruments available for recontouring, finishing, and polishing
amalgam restorations. Because many of the instruments serve essentially the same purpose
and achieve duplicate results, it is important to select a few instruments that can be adapted to
the majority of clinical situations. Limiting the number of instruments will help keep the
technique simple and will contribute to speed and efficiency in performing the procedure.
This section of the module will describe armamentarium that is recommended for the
particular technique presented in this module.
Basically, the instruments can be divided into rotary instruments and hand instruments. As
discussed previously, the more abrasive materials are used for recontouring and finishing,
while the mildly abrasive materials are used for the final polishing to achieve a high shine.
There is a large variety of materials/instruments available- -the list is limited only by operator
preference - -and it is not the intent of this module to describe all of the available instruments.
Rotary Instruments. The most commonly used rotary instruments are abrasive stones, disks
and finishing burs. They are available in a variety of shapes, sizes, degrees of abrasiveness,
and in either high speed or slow speed. To reduce the frictional heat and thus minimize the
potential for damage to the tooth and/or restoration, the technique described in this module
recommends the use of a slow speed handpiece rather than a high speed handpiece. The
choice of abrasive stones, disks, and burs is dependent upon the size of the restoration, the
adaptability to the tooth surface, and the amount of amalgam to be removed. Figures 5 and 6
show the rotary instruments that are used for the technique described in this module.
21 3 2 '3
Figure 6. Rotary instruments used Figure 7. Rotary instruments usedfor recontouring and fmishing, for final polishing.
a. Green stones are available as tapered points, pear shape, round, or a variety of other
shapes. They are usually composed of silicon carbide, which is a very abrasive material.
They are, therefore, fast cutting and produce a moderately rough surface. Since the green
stone is harder than enamel, care must be taken not to scratch the tooth surface. Green stones
are not necessary for all amalgam polishings. They are used for reducing bulky amalgam,
Hopefully, if the amalgam has been recently placed, the carving procedure will not require
removal of bulky amalgam necessitating the use of a green stone. Frequently older amalgams
will require a green stone as part of the polishing procedure.
b. Finishing burs differ from cutting burs (used for cavity preparations) in that their
blades are finer, their sizes smaller, and their number of blades greater. They, too, are
available in a variety of shapes and sizes. The small round bur ( #1!2 or #1) is very useful for
defining and smoothing the grooves and fossae of the restoration. It is recommended that a
#4 or #6 (whichever best fits the area) finishing bur is used to smooth the cavosurface
margins and smooth the occlusal amalgam surface. Finishing burs should be operated in the
burnishing direction rather than cutting direction. To test the direction of the bur, use a
plastic test stick (or fingernail if in the laboratory situation). If it "grabs" or "catches" it is
moving in the cutting direction. Adjust your handpiece to reverse the direction that the bur is
rotating- -the bur should now run smoothly across the plastic test stick rather than grab.
c. Finishing disks are also available in a variety of sizes and grits. The appropriate disk
is determined by the amount of excess to be removed and by the accessibility to the area.
Use of a medium grit disk is always followed by the application of a finer grit disk which
cuts less. Disks are used primarily on the proximal, buccal, or lingual surfaces. Because of
their flatness, they are not routinely used on the convex and concave areas of the occlusal
surface.
Disks have a hole in the middle which is either plain (to allow it be used with the screw-on
type mandrel) or the hole has a metal rim to allow it to be snapped or popped directly onto the
head of the mandrel. Select the type of disks which may be used with the mandrel you have
selected. The disks may be mounted on the mandrel so the abrasive faces either toward the
contra angle or away from it depending on the accessibility of the area being polished.
Because the rotary instruments (other than burs) do not have blades, all rotary instruments
may be run in the same direction as the finishing buy. The only exception to this is the
finishing disks. Sometimes it is necessary to change the direction of the finishing disks.
You will know when to change direction--the disk will "grab" in the interproximal area. Stop
and reverse the direction of your handpiece to avoid damaging the restoration or adjacent
tissues.
Hand Instruments: The cleoid end of a discoid-cleoid hand instrument (not shown here) is
often used to smooth the base of the grooves and/or fossae when a small bur cannotreach the
depth of them. It may also be used to smooth the cavosurface margins. Finishing strips,
while not necessarily an "instrument" may fit into this category. They are used to smooth the
gingival margin and interproximal surface below the contact area of a Class II restoration.
Finishing strips are usually either plastic or linen coated with an abrasive on one side. The
abrasive comes in various textures and the strips in a variety of widths. A narrow strip with
fine abrasive material is recommended for most situations since the space in the interproximal
area is usually limited and the abrasiveness required to polish this surface should be minimal.
If the strip does not have an abrasive-free area in the middle of the strip where it may be
passed through the contact area without removing amalgam or enamel, it should be tapered to
a point on one end with a pair of scissors to facilitate passing it through the interproximal area
below the contact point.
Polishing Agents: Pumice and tin oxide are two commonly used polishing agents. Pumice
is an abrasive powder of volcanic origin and is available in a variety of grits. Fine grades of
pumice are used for polishing amalgam restorations. It is usually mixed with water (slurry of
pumice) to help reduce the heat created by the friction of the abrasiveparticles during
polishing. Tin oxide or Amalgloss® is used as the finest abrasive agent. It may be applied
in a slurry, applied dry, or applied first as a slurry followed by dry tin oxide. Both pumice
and tin oxide are applied to the tooth with separate rubber polishing cups.
Other polishing agents are available in the form of abrasive-impregnated rubber points and
cups (Shofu® Brownies, Greenies, Super Greenies). These points and cups are very easy to
use, readily adapt into all areas of the restoration, and are less messy than the pumice and tin
oxide. The drawbacks to their use are expense and the fact that the rubber contributes to heat
generation (refer to precautions for minimizing heat production). They are to be used in the
following order (most abrasive to least abrasive): Brownies, Greenies, followed by Super
greenies.
There are no unique aseptic procedures required for finishing and polishing amalgams. The
same precautions for pat...:.nt and self-protection (e.g., gloves, facemask, eyeglasses) and for
sterilization are required for this procedure as for any other intra-oral procedures. All
reuseable items should be appropriately sterilized after use, while all contaminated disposable
items should be disposed of in a biohazardous waste receptacle.
24332
AMALGAM POLISHING PROCEDURE
This section of the module will introduce one technique for polishing amalgam restorations.
Each operator has her/his own favorite equipment and technique for most effectively
polishing amalgam restorations. A step-by-step approach is offered so that the student may
first become competent with this method, and may then develop her/his own particular
technique through practice activities. The following armamentarium is needed for this
procedure (see Figure 8):
mouth mirror
explorer
cotton pliers/forceps
slow-speed handpiece
contra-angle
mandrel to fit contra-angle
polishing disks to fit mandrel:
-fine garnet
-medium cuttle
-fine cuttle
-OR assorted Sof-lex disks
finishing burs to fit contra angle
-#1/2 or 1 round
-#4 and #6 round
green stone
2 rubber polishing cups (latch type)
2 dappen dishes
flour of pumice
tin oxide or Amalglosse
Shofu® Brownies, Greenies, Super greenies
dental tape
dental floss
abrasive finishing strips
saliva ejector
vacuum tip
air/water syringe tip
articulating paper
supplies for maintaining a dry field:
-rubber dam instruments OR
-cotton roll isolation (e.g., garmer
clamps or other cotton roll holders)
Figure 8. Tray set-up with amalgam polishing armamentarium.
STEP 1. REVIEW PROCEDURE WITH PATIENT
Patients should be carefully educated about the value of thepolish procedure. Explain to
your patients Alla you are doing this; what it will do for them; how you are going to do it;
and, when you are finished, show them the polished restoration.
STEP 2. EVALUATE RESTORATION TO BE POLISHED
Using an explorer, evaluate the cavosurface margins for marginal integrity (ditching,
flashing, open margins). Determine the presence and extent of any marginal discrepancies.
Critically evaluate the contour of the restoration. Using a mouth mirror, look at all embrasure
spaces to determine the patient's ability to brush or floss around the restoration. Is the health
of adjacent tissues being affected because of impropercontours? It is helpful to compare the
tooth you are working on with the contralateral tooth (same tooth on the opposite side of the
mouth) and the adjacent teeth as guides for proper contour. Refer to page 8 of this module
for criteria for selecting restorations to be polished. If you have any doubt about the
acceptability of a restoration, ask your supervising dentist to evaluate it.
Figure 9. Use an explorerto evaluate the margins of therestoration to be polished.
STEP 3. CHECK OCCLUSION OF RESTORATION
Articulating paper is used to help identify the occlusal pattern. Mark the occlusal contacts in
centric occlusion and excursive (side to side) movements. The markings should be of the
same intensity as the other occlusal contacts. Areas that need to be reduced will be identified
by darker markings on the restoration. Before altering the occlusion of a restoration for a
patient confirm your decision to make these adjustments with the supervising dentist.
A tapered green stone may be used to reduce the high spots. Establish a secure fulcrum and,
using a slow to moderate speed, start the stone rotating just before applying it to the tooth.
The green stone can quickly cut away the amalgam and tooth structure so display caution
when using it. Recheck the occlusion with articulating paper frequently to be sure you are
not removing too much amalgam thereby taking the restoration completely out of occlusion.
Ask the patient if his/her bite feels comfortable. Continue to recheck and adjust if the patient
indicates discomfort.
Figure 10. Use a green stone toreduce high spots.
STEP 4. ISOLATE
After proper occlusion has been established, the restorations to be polished should be
isolated. A rubber dam is recommended to increase vision and accessibility in the area,
control moisture, and help protect the patient's soft tissue by retracting gingival tissues,
tongue and lips. The dam also prevents polishing particles from entering the oral cavity and
simplifies washing and evacuating debris during the procedure. Generally, patients will not
be anesthetized for this procedure; therefore, care must be taken to prevent discomfort from
the rubber dam clamp. Occasionally, a little topical anesthetic will be needed on the gingival
tissue to maintain patient comfort.
Cotton roll isolation is commonly used during the amalgam polishing procedure rather than a
rubber dam. Gamier clamps are very effective in maintaining a dry field. With these clamps,
a long cotton roll may be placed in the mandibular vestibule and wrapped in a horseshoe-
shape fashion to extend to the maxillary vestibule thus isolating the maxillary and mandibular
teeth of the same side at the same time. A gamier clamp also may be used with two short
cotton rolls for isolation of the mandibular teeth. Small plastic disposable cotton roll holders
are useful in cases where patient management is not a problem or salivary flow is minimal.
STEP 5. REMOVE_ OCCLUSAL EXCESS
Remove areas of gross flash with a tapered green stone. Rest the side of the gmen stone
against the excess amalgam with the tip in the central groove area, and move the stone parallel
to the margin of the restoration. The green stone may also be used to recontour any poorly
carved areas. Again, use slow to moderate speed with light pressure being careful not to
over reduce the amalgam whit using the green stone. Any recontouring or reshaping that is
done must blend with the remaining tooth structure.
Because of its abrasiveness, the green stone is used only when a rather major correction is
necessary. It is used more commonly on old amalgam restorations and rather infrequently on
newly placed amalgams. Therefore, if the occlusion is not high, there is no gross flashing
along the cavosurface margins, and/or recontouring is not necessary, the green stone does
not need to be used at all for the amalgam polishing.
STEP 6. DEFINE OCCLUSAL ANATOMY
Sometimes the grooves and triangular fossae are not well defined when the amalgam is
carved. Although it is not desirable to have deep grooves through the amalgam, they should
be well defined and be continuations of the grooves in the tooth. The grooves serve definite
functions and should not be omitted. The fossae should extend to a depth consistent with the
rest of the occlusal anatomical contours and should be defined accordingly.
Use a small #1/2 or #1 round finishing bur to define the developmental grooves and fossae.
Use the side of the small bur to trace down each groove. The grooves should be distinct but
not too deep. When retracing the groove with the bur, be careful to trace the bur exactly in
the first tracing/groove--do not over trace and put more than one groove in that area.
Occasionally, the bur cannot reach to the very depth of a groove. In such a case, the cleoid
end (pointed end) of a discoid-cleoid carver can be used to "burnish" the amalgam in these
deeper areas. See Figures 11 and 12.
Figure 11. Use a small round burto define occlusal anatomy.
Oak
Figure 12. A discoid cleoid isbeing used to define grooves.
STEP 7. SMOOTH OCCLUSAL CAVOSURFACE MARGINS
The primary objective of amalgam polishing is to achieve smooth, flush cavosurfaces
margins which will resist plaque accumulation and contribute to the health of the tooth and
surrounding soft tissues. The margins can be smoothed easily by using a round bur.
Choose a #4 or #6 round finishing bur--whichever will best fit the area you are working on.
Place the side of the bur against both amalgam and tooth surface. Use medium speed and
light pressure to prevent excessive reduction of the amalgam or cutting away tooth structure.
Move the bur along all cavosurface margins. This procedure is not designed to reshape,
rather it is to assure that the blend of tooth structure to amalgam is perfect. Run the tip of an
explorer back and forth across the margins to ascertain if they are smooth and flush.
STEP 8. SMOOTH OCCLUSAL SURFACE
Further smoothing of the amalgam surface is accomplished with the use of a large round
finishing but Again, choose a #4 or #6, whichever best fits the area you are working on.
This step is often times completed in conjunction with step 7 (see Figure 13). If marginal
descrepancies are minimal, it is possible to smooth the broad occlusal surfaces and marginal
ridges while working on the cavosurface margins. To save time and decrease the possibility
of creating unwanted ridges, select the largest bur that will fit the area.
The bur is used to eliminate scratches and graininess from the amalgam. After its use the
amalgam should appear smooth and will have a shine. Very minute scratches will still be
present (these will be difficult to detect with the human eye), but they will be removed during
the final polishing.
Figure 13. The large round buris used to smooth cavosurface margins and
the broad occlusal amalgam surface.
This is one of most critical steps in polishing amalgam restorations and is probably the most
difficult for beginners, only because they have not yet developed an "eye" for what the
surface should look like. Once you have gained that "eye" this step is easy and fun because
you begin to see a dramatic difference in the appearance of the amalgam. Using the side of
the finishing bur, smooth the entire occlusal surface and marginal ridges. It is suggested that
you start working in one area (e.g. the mesio-buccal cusp) and continue in that area until all
scratches and irregularities are removed. Then move on to a new area (e.g. mesio-lingual
cusp). By so doing, you will be assured of removing all scratches and will get less frustrated
than going back over the entire restoration time and time again to remove scratches.
Use light pressure and moderate speed as you move the bur back and forth across all
surfaces. Do not hold the bur in one spot too long or use unequal pressure--either case can
result in unwanted grooves or ridges in the amalgam. It is important that all strokes overlap
each other to prevent that occurrence. Move the bur mesio-distally, overlapping each stroke.
Then cover the same area in a bucco-lingual direction, overlapping each stroke (see Figure
14). If you follow this sequence and use equal pressure, the unwanted grooves or ridges
will be avoided. Do not move on to a new area of the restoration until the area you are
working on is smooth.
Mesio-distal overlapping strokes
Bucco-lingual overlapping strokes
Figure 14. When using the finishing bur, overlap each stroke to achieve the smoothest surface possible.
30
333 BEST COPY AVAILABLE
STEP 9. RECONTOUR PROXIMAL AREA
Remove any excess amalgam located in the occlusal embrasure areas with a finishing disk
(see Figure 15). The coarseness of the abrasive selected will depend upon the condition of
the amalgam surface. A good rule of thumb for new amalgam is to start with a fine garnet
followed by a medium cuttle and then a fine cuttle disk.
Figure 15. Recontouring proximal area with finishing disk.
Rotate the disk so it will move from amalgam to tooth structure and will turn up and away
from the gingiva. Use very light strokes and stop frequently to evaluate the results. Contour
the buccal and lingual embrasures and interproximal surfaces of the restoration. Be careful
not to damage the contact area. The disk will cut soft tissue, so avoid getting too close.
View from the occlusal, buccal and lingual aspects to assure proper contouring.
STEP 10. SMOOTH PROXIMAL CAVOSURFACE MARGINS AND SURFACE
Check the restoration frequently with the explorer to evaluate the integrity of the margins and
to determine the smoothness/roughness of the polished surface. A finishing strip may be
needed to complete the smoothing and polishing of the gingival cavosurface margins and
interproximal space if these surfaces cannot be reached adequately with other polishing
instruments (disks, etc.).
To eliminate the possibility of opening the contact, do not polish the contact area with a
polishing strip unless it is extremely tight or broad. Rather, pass the smooth area of the strip
through the contact and polish back and forth across the restoration below the contact area
while using a stable fulcrum. Be careful in handling the polishing strip as the edge of the
strip will easily cut gingival tissues, tongue or lips.
31 33J
STEP 12. SMOOTH FACIAL AND LINGUAL SURFACES
Recontour and smooth convex facial and lingual surfaces with finishing disks. Adapt the
edge of the disk to the margin of the restoration and, using a light sweeping stroke, move the
disk toward the occlusal surface of the tooth. Smooth the amalgam with a less abrasive (fine)
disk. When a concave area is involved, such as near the buccal or lingual grooves, use a
finishing bur to smooth the area. Select one that best fits the area and use it in the same
manner as described earlier (Step 8).
STEP 13. POLISHING THE RESTORATION
The polishing phase consists of first removing the very light scratches remaining after use of
the finishing burs. It is achieved by using progressively finer abrasive agents and can be
accomplished by the use of a couple of different methods--or a combination of the two
methods. Either method is acceptable and both will be discussed.
A. PUMICE AND TIN OXIDE: flour of pumice is mixed with water to form a slurry.
It is applied to all surfaces with a rubber cup (see Figure 16). Use fairly light pressure and
sweeping strokes, adapting the cup to marginal ridges and as far interproximally as possible.
Do not hold the cup in one place or use too much pressure as either will create heat
Replenish the moist pumice often since the pumice should do the polishing--not the rubber
cup. Rinse and evacuate all pumice from the area. The amalgam should have a smooth, satin
finish (dull luster). If deep scratches and irregularities are present, return to the appropriate
finishing bur. It may be necessary to use a little more pressure with the bur in the areas
where scratches and irregularities are present.
'4211111111a
32 340
Figure 16. Apply slurry of pumicewith rubber cup.
Use waxed dental tape and wet pumice to polish the gingival cavosurface margins and
interproximal surface below the contact area (see Figure 17). Floss the tape through the
contact area. Then carry the pumice slurry into the interproximal area using your gloved
finger. Use a back and forth motion and up and down stroke to distribute the pumice over
the interproximal surface to polish. It is critical that all abrasive pumice particles be rinsed
away before applying tin oxide.
Tin oxide may be used in a wet slurry or dry (see Figure 18). It is applied in the same
manner as the pumice. If you do not change rubber cups after applying the pumice, be
certain to wash the pumice out of the cup to remove the coarser pumice particles before
applying the tin oxide. Use a light buffing motion and a slightly higher speed with the
handpiece to create a shiny, mirror-like finish.
Figure 17. Waxed dental tape with pumiceis used to polish interproximal area below contact.
Figure 18. High luster is achievedwith the use of tin oxide.
B. ABRASIVE POINTS: Adapt the Brownie® abrasive point into the concavities of
the occlusal surface and rest the side of the point along the cavosurface margin (see Figure
19). Using light pressure and slow speed, move the point over all areas of the amalgam that
are accessible. As with pumice, the surface should be a dull luster after use of the brownie.
The abrasive material on these points wears away fairly quickly, leaving a metal shank which
can scratch the amalgam. Dispose of the tips before they are worn that low.
Using the same technique as described for the Brownie®, use the Greenlee. The surface
will become much shinier, but will not yet have a mirror-like finish (see Figure 20). Repeat
above steps using the Super-greenie®. It is the least abrasive of the three points (equivalent
to tin oxide), and its use should result in a mirror-like shine on the surface of the amalgam
(see Figure 21).
11.11111161,
1111111oh..._
Figure 19. A Brownie point may be used as a polishing agent to remove fine scratches.Light pressure and slow speed are critical when using abrasive rubber points.
Figure 20. A less-abrasive Greenie® is used Figure 21. Use a Super Greenie® goad tofollowing the use of the brown abrasive point. achieve a hie-, shine or "mirror-like" finish.
STEP 14. RINSE AND EVACUATE ALL DEBRIS
Rinse and evacuate all debris completely. Floss the interproximal surface with clean dental
floss just as though you were removing plaque from the area to help remove any remaining
abrasive from the interproximal space.
STEP 15. EVALUATE POLISHED AMALGAM
Evaluate all margins and surfaces of the restoration to see that the polish meets the following
criteria for a finished amalgam polish:
a. The margins are flush with the adjacent tooth surface.
b. The contour of the restoration is consistent with surrounding tooth structure, the
contact areas have been maintained, and the grooves are well defined.
c. The entire surface is smooth with no scratches or graininess.
d. The surface is lustrous, with a mirror-like shine.
e. There is no damage to the restoration or adjacent tooth structure.
STEP 16. RECHECK OCCLUSION
Remove the rubber dam or cotton rolls and recheck the occlusion with articulating paper.
Have the final product checked by the supervising dentist before dismissing the patient.
STEP 17. CHART ENTRY
The amalgam polish procedure should be legibly recorded in the patient's dental chart. The
final chart entry should be in ink, dated, and signed by the person performing the procedure.
The chart entry should include the number of each tooth and the names of the surfaces
involved (e.g., #30-MO amalgam polished).
STUDY QUESTIONS
Directions: Answer.the following questions on a separate piece of paper to the best of your
ability. You may use the module to look up needed information. Upon completion of the
questions, review all responses to familiarize yourself with pertinent information.
1. Your patient wants to know why his amalgams need to be polished. List four reasons
why he should have his amalgams polished.
2. How does polishing an amalgam help to prevent recurrent decay?
3. Explain the difference between tarnish and corrosion. Which is more destructive?
4. How does an improper proximal contact (either too tight or open) contribute to the
patient's periodontal breakdown?
5. What are wear facets?
1116. What are possible results of leaving a restoration in premature occlusal contact?
7. Why is amalgam so popular for use as a posterior restorative material?
8. List four reasons why amalgam might extend beyond the margins of cavity
preparations.
9. After the restoration has been carved, how much time should pass before finishing and
polishing takes place?
10. Why is it necessary to wait the time period mentioned in question #9 above?
11. List five criteria that indicate an amalgam is serviceable and acceptable for polishing.
12. List three contraindications for polishing amalgams.
13. Explain the term "ditching."
14. Explain the term "flashing."
15. What is an "open" margin?
16. What is the difference between finishing and polishing? Which is performed first?
17. Why is it important to use abrasive agents in order of decreasing coarseness?
18. What factors determine the abrasiveness of a material?
19. Why is the production of heat potentially dangerous?
20. How can heat production be minimized?
21. Besides minimizing heat production, what precautions should be taken during amalgam
polishing procedures? Explain what they are, why each is important, and how to best
accomplish each precaution.
22. Which is more abrasive: a green stone or a bur? a green stone or a disk? In what areas
and how are they each used?
23. Why might a discoid-cleoid be used?
24. How and why is a disk used?
25. Describe the various polishing agents that may be used for final polishing, their order
of use, and the advantages or disadvantages of each.
26. How should a patient's occlusion be checked and altered for amalgam polishing?
27. What are the advantages of using a rubber dam during amalgam polishing?
28. Beside rubber dam, what are other methods of isolating the area?
29. How is the occlusal anatomy (grooves and fossae) defined?
30. Why do the cavosurface margins need to be smoothed? How is it best accomplished?
31. Explain how to smooth the occlusal surface with a large finishing bur.
32. What should the surface look like after each step of the finishing and polishing
procedure (i.e. after green stone? after bur? after pumice? after tin oxide? after
Brownie®? after Greenie ®? after super greenie?)
33. How can the proximal area best be recontoured and proximal cavosurface margins
smoothed?
34. Explain how and why a finishing strip is used.
35. Discuss the criteria used to evaluate a polished amalgam restoration.
Hobbs, E. Amalgam Polish. A Self-Learning Instructional Unit for Dental AuxiliaryEducation. Published by Kellogg Allied Health Education Project, Office of Research inMedical Education. University of Washington, Seattle, Washington, 1976.
Paarmann, C.S., and Christie, C.R. A clinical comparison of amalgam polishing agents.Dent. Hyg., Vol. 60, No. 7, July 1986.
Spohn, E.E., Halowski, W.A., and Berry, T.G. Operative Dentistry Procedures forDental Auxiliaries, the C.V. Mosby Company, 1981.
Woodall, I.R., Dafoe, B.R., Young, N.S., Weed-Fonner, L., Yankell, S.L,Comprehensive Dental Hygiene Care, third edition, the C.V. Mosby Company, 1989.
U.S. Department of Health, Education and Welfare. Recontouring, Finishing, andPolishing, HEW Contract No. 231-75-0407. Produced by Quercus Corporation, 1976.
AMALGAM POLISHINGEVALUATION FORM
Clinician Patient
Date Instructor
Tooth # & surface Score
Key: C = Criterion Met = 2I = Criterion Improvable = 1
X = Unacceptable = 0
* = Critical task: if a 2 is not achieved on a critical task, the process evaluation is
unsatisfactory and must be redone.
TASK
1. Margins are flush along the cavosurface margins:
a. occlusal
b. proximal
2. Contour of the restoration is correct:
a. marginal ridge
b. embrasures
c. contact area maintained*
d. groove definition
3. Amalgam is smooth on entire surface (no voids, scratches,
or graininess):
a. occlusal
b. proximal
4. Amalgam surface is lustrous.
5. No damage to the restoration, adjacent teeth, or tissue.
C
SELF
I X
INSTRUCTOR
C I X
2 1 0 2 1 0
2 1 0 2 1 0
2 1 0 2 1 0
2 1 0 2 1 0
2 1 0 2 1 0
2 1 0 2 1 0
2 1 0 2 1 0
2 1 0 2 1 0
2 1 0 2 1 0
2 1 0 2 1 0
NOTE: Restorations must pass criteria for acceptability before polishing.
ao
4)
e
Module 4-B
POLISHING AMALGAM
Final Examination
343
NameGrade
POLISHING AMALGAM RESTORATIONSWRITTEN EXAMINATION
Directions: Circle the best answer to the questions below.
1. A highly polished surface of an amalgam restoration will:a. prevent voidsb. minimize overhangsc. resist tarnish and corrosiond. all of the above
2. Amalgam restorations should not be polished for at leastamalgam to completely set.a. 8 hoursb. 10 hoursc. 18 hoursd. 24 hours
after insertion to allow the
3. The term used to describe a discoloration on the surface of the amalgam which does not causepitting or marginal breakdown is:a. deteriorationb. tarnishc. corrosiond. oxygenation
4. Scratches, pits, and irregularities found when closely observing amalgam restorations afterpolishing, indicates that more work was needed with:a. pumiceb. tin oxidec. green stoned. finishing bur
5. If an explorer is passed over the cavosurface margin from amalgam on to the tooth structurewithout catching, but catches as the explorer is moved from tooth to amalgam, which of thefollowing conditions exist?a. ditchingb. submarginal areac. flashingd. open margin
e
6. Polishing strips are used primarily to polish:a. marginal ridgesb. interproximal surface below contactc. occlusal ridges and cuspsd. occlusal cavosurface margins
7. Which of the following indicates the most appropriate order for using amalgam polishingarmamentarium?a. green stone, finishing bur, tin oxide, pumiceb. finishing bur, green stone, pumice, tin oxidec. green stone, finishing bur, pumice, tin oxided. green stone, pumice, tin oxide, finishing bur
8. The phrase which best describes the appearance of the surface of the amalgam restoration afterpolishing it with pumice or a Brownie® point is:a. shiny scratchesb. mirror-like finishc. dull, satin luster
True/False: Circle T if the statement is correct; circle F if the statement is incorrect.
T F 9. Pumice is used to give the final luster to amalgam polishing.
T F 10. A disk can be used to give definition to the central groove.
T F 11. Since overheating can result in recrystallization of some of the structure of the amalgamand thus weaken the restoration, wet or lubricated abrasives (e.g. slurry of pumice) areused to minimize temperature rise during the procedure.
T F 12. When polishing amalgam restorations, tin oxide should be followed by a slurry ofpumice.
T F 13. Overheating during the polishing procedure is likely to cause trauma to the pulp tissue.
T F 14. Greenie® points should be followed by Super-greenies®, which should be followed byBrownie® points.
T F 15. A discoid-cleoid instrument may be used to smooth developmental grooves.
T F 16. The purpose of recontouring a restoration is to replicate the contour of an "ideal" tooth,not what is natural in the patient's mouth.
T F 17. Light pressure and intermittent strokes should be used to minimize heat build-up.
T F 18. Cutt le disks are more abrasive than garnet disks.
T F 19. A fractured restoration should not be polished.
T F 20. A wear facet appearing on the surface of a newly placed restoration indicates that there
Denise M. Bowen, R.D.H., M.S.Associate Professor and ChairDepartment of Dental Hygiene
Idaho State University
Adopted by the Idaho State Board ofVocational Education and theIdaho State Board of Dentistry
1991
3 5,-;
AIDING IN THE ADMINISTRATION OFNITROUS OXIDE-OXYGEN ANALGESIA
INTRODUCTION
This module provides instruction in the administration of nitrousoxide-oxygen for analgesic purposes. The term "nitrous oxide" willbe utilized throughout the module to indicate this type ofadministration.
The technique and procedures described represent one method foradministration of nitrous oxide. Several other methods areemployed by various practitioners; however, this technique has beenselected due to two advantages:
1. It individualizes administration for each patient; and,
2. It has been utilized safely in a number of clinicalsituations.
The module has been designed to provide necessary instruction basedupon the assumption that no previous knowledge exists relevant tothe topic. The reader should complete each portion of the moduleand answer the self-examination included. In this manner, allpertinent information can be understood clearly.
BROAD OBJECTIVES
1. Describe the physiologic effects of nitrous oxide inhalation.
2. Describe the pharmacological effects of nitrous oxide.
3. Explain the indications and contraindications for use ofnitrous oxide analgesia based upon a thorough medical andpersonal history evaluation.
4. Describe the stages of anesthesia and the planes of analgesiaincluding signs and symptoms of each.
5. Discuss and identify clinical symptoms ofvarious levels of nitrous oxide sedation.
6. Aid in the proper administration of nitrouspatient.
a patient at the
oxide to a dental
7. Monitor all signs and symptcms of nitrous oxide sedation ina clinical setting.
1
57
TABLE OF CONTENTS
COURSE OUTLINE iv
COURSE SCHEDULE
INTRODUCTION 1
BROAD OBJECTIVES 1
BACKGROUND INFORMATION 2
Physiological Effects of Nitrous Oxide 3
Pharmacological Effects and Properties ofNitrous Oxide 6
Side Effects and Adverse Reactions 9
ANESTHESIA AND ANALGESIA 11
Stages of Anesthesia 11
Planes of Analgesia: Clinical Effects 12
INDICATIONS AND CONTRAINDICATIONS FOR NITROUS OXIDE-OXYGEN INHALATION SEDATION 19
Primary Indications 19
Indications with Special Consideration 20
Contraindications 21
ARMAMENTARIUM 23
The Central Storage System 23
Nitrous Oxide-Oxygen Machine 24
Breathing Apparatus 25
Safety Features 25
PROCEDURES FOR ADMINISTRATION OF NITROUS OXIDE 26
Vital Signs 27
Preanesthetic Preparation 30
Techniques for Administration 31
Legal Chart Entries and Other Legal Considerations 36
CONTROVERSY IN LITERATURE RELEVANT TO NITROUS OXIDE 40
Occupational Exposure 40
SELF EXAMINATION 42
BIBLIOGRAPHY 45
ii
35k)
EXPANDED FUNCTIONS FOR THE DENTAL ASSISTANT-AIDING IN THE ADMINISTRATION OF NITROUS OXIDE
COURSE OUTLINE
Course Description
This course is designed to provide the practicing dental assistantwith the background knowledge necessary for aiding in theadministration of nitrous oxide-oxygen analgesia.
I. Physiologic and Pharmacologic Effects of Anesthesia
II. Side Effects and Adverse Reactions
III. Analgesia vs. Anesthesia
IV. Indications and Contraindications
V. Clinical Manifestations of Analgesia/Anesthesia
VI. Armamentarium Used in the Administration of Nitrous Oxide
VII. Preanesthetic Preparation
VIII. Techniques for Administration
IX. Legal Considerations and Chart Entries
X. Occupational Exposure
XI. Current Literature
The course is intended to involve six hours of lecture. Acomprehensive final examination is administered to the students whocomplete this course. A 75% score is required on the written finalexamination in order to obtain certification for "aiding in theadministration of nitrous oxide." Clinical experience is notrequired because dental assistants cannot legally administernitrous oxide-oxygen analgesia.
Required Text
Bowen, D.M. Aiding in the Administration of Nitrous Oxide-OxygenAnalgesia, Adopted by Idaho State Board of Dentistry and IdahoState Board of Vocational Education, 1991.
iii
36J
Videotapes Recommended for Course:
1. "ADA Telecourse: Nitrous Oxide Sedation." J. TheodoreJastak, D.D.S., Ph.D., Professor of Oral and Maxillofacial Surgeryand Head of the Division of Dentistry at the University Hospitalof the University of Oregon Health Sciences Center. Not availablefor purchase. Can be rented from the ADA Bureau of HealthEducation and Audiovisual Services by calling 1-813-541-4710. Costof 1991 rental is about $20.00. This telecourse videotapediscusses pharmacology and indications and contraindications,stages of anesthesia nd planes of analgesia, equipment, and sideeffects. It is not intended as a review of techniques for
administration.
2. "Introduction to Nitrous Oxide and N20 Overdose," Universityof Kentucky School of Dentistry. Although this videotape is abouta decade old, most of the information presented remains accurate.It provides two demonstrations of nitrous oxide-oxygenadministration. The first demonstration shows how to introduce apatient to nitrous oxide-oxygen analgesia for the first time. Thesecond demonstration is particularly valuable because it depictsa N20 overdose so students can see the signs and symptoms leadingto it. The course instructor can correct any contraindicationswith the module by clarifying that the module is more current.
iv
35 _L.'
COURSE SCHEDULE
Week 1: Three Hours -Physiologic and PharmacologicEffects- Side Effects and AdverseReactions-Analgesia vs. Anesthesia-Indications/Contraindications-Armamentarium-ADA Telecourse Videotape
Week 2: Three Hours -Preanesthetic Preparation-Vital Signs-Technique for Administration- Legal Considerations-Occupational Exposure-University of Kentucky Videotape
FINAL EXAMINATION
36
8. Be aware of methods for handling possible side effects.
9. Discuss legal considerations involved with administeringnitrous oxide in the dental office and record proper legalchart entries.
10. List and explain all parts of nitrous oxide equipment anddescribe necessary care and maintenance.
11. Discuss occupational hazards associated with chronic exposureof dental personnel to low levels of nitrous oxide.
BACKGROUND INFORMATION
Nitrous oxide (N20) is employed in dentistry for the primarypurpose of reducing anxiety in the dental patient. It is estimatedthat 20 to 40 million adults in America avoid dental treatmentbecause of fear.
The N20 gas was discovered by Joseph Priestly in 1772. By 1800,Sir Humphrey Davy had discovered its analgesic effect andrecommended its use as an anesthetic. In 1844, Gardner QuincyColton was publicly demonstrating the exhilarating effects ofnitrous oxide as "laughing gas" while presenting popular sciencelectures. Dr. Horrace Wells, a dentist, observed one of thesedemonstrations and requested that Colton use it on him duringdental treatment. Dr. Wells had a tooth extracted while under theinfluence of nitrous oxide and no pain was experienced! These twomen unsuccessfully advocated use of this gas in dentistry from 1845to 1863.
In 1868, Dr. Edmund Andrews, a Chicago surgeon, established theneed to mix oxygen with nitrous oxide for use in operations of longduration. By the turn of the century (1903), Dr. Charles Teter,a Cleveland dentist, had applied this finding to invent the firstnitrous oxide-oxygen machine.
After that time, periods of interest in nitrous oxide were followedby periods of little use. Research on the safe administration ofnitrous oxide continued. In the 1950's and 1960's, nitrous oxidewas becoming more frequently used in dentistry. The first "fail-safe" system was marketed in 1962.
These developments provided the basis for the system of nitrousoxide administration employed in dentistry today. Experimentscontinue on the physiologic actions and pharmacological effects ofthis gas. Much information is lacking; however, many questionshave been answered during the research process.
2
3U :;
Physiologic Effects of Nitrous Oxide
Two essential body systems are involved directly in the physiologyof nitrous oxide. These systems include the nervous system and therespiratory system. A review of these systems and theirrelationship to the effects of nitrous oxide is essential prior tounderstanding the pharmacological effects of this gas.
The nervous system has two components: the central nervous system(CNS) and the autonomic nervous system (ANS). The CNS includes thebrain and spinal cord. Three parts of the brain are involved whennitrous oxide is administered: 1) the cerebrum, 2) the brain stem,and 3) the cerebellum. The cerebrum is responsible for consciousfunctions of the nr,:7ous system. The outer surface of the cerebrumis called the cortex. The cortex receives sensoryinformation from the skin, eyes, ears,nose, mouth, etc. A personresponds to sensations in these regions on the basis of pastexperience. For example, if a foreign object becomes lodged in theeye, the eye will water and the individual will close itImmediately, based on previous experiences of relief when the eyeis closed. An infant or young child may not respond as quickly ifthey had never experienced this sensation. When applying thisinformation to dental pain and anxiety, it can be seen that thepatient might react to an oral injection by jerking or turning thehead as the cortex receives this sensation from the oral cavity.The brain stem is located at the base of the brain continuous withthe spinal cord. It is responsible for several functions which areapplicable to the physiologic effects of nitrous oxide. thesefunctions include:
1. the movement and sensation related to controlling thethroat, neck and face;
2. the reflex activity involved in breathing;
3. the reflex activity involved in eye movement;
4. the control over the "wakefulness state" of the entirebrain; and,
5. the major relay system and integration center for allsenses except smell (called the thalamus).
Later in the module, effects of nitrous oxide on each of thesefunctions will be discussed. The major point to consider, at thistime, is that all pain sensations are relayed from the thalamus (apart of the brain stem) to the cortex. This is important becausepain in the oral cavity will be received in the brain stem andrelayed to the cortex for purposes of receiving that sensation.The patient then will react to pain based on the past experience.
3
3
If nitrous oxide is to slow pain reaction, or the patient'sresponse to pain, it must have a physiologic effect on these twoparts of the brain (i.e., the cortex and the brain stem). Thefinal segment of the brain which is affected by nitrous oxide is
the cerebellum. The cerebellum is responsible for a person'sorientation in space; therefore, light headedness or a floatingfeeling may be related to effects on the cerebellum. Patientssometimes respond to nitrous oxide administration in this manner.
The second component of the nervous system that is involved in thephysiology of nitrous oxide is the autonomic nervous system (ANS).It is responsible for innervating smooth muscle, viscera and glandswhich make-up many of the major internal body systems and/ororgans. The innervation has a dual effect: increasing theactivity of the tissue/organ and decreasing the activity of thetissue/organ. Some of these responses, which might be affected bythe administration of nitrous oxide include:
1) dilation/constriction of the pupils,2) acceleration/deceleration of the heart, and3) increased/decreased respiration.
Figure 1 includes a basic diagram of the brain and spinal cord.the major functions of each portion are outlined as a brief summaryof the previously presented information relevant to physiology.
The second body system involved in the physiology of nitrous oxideis the respiratory system. Respiration is the transport of oxygenfrom the atmosphere to the cells and, in turn, transport of carbondioxide from cells back to the atmosphere. When an individualbreathes room air, oxygen is inhaled and carbon dioxide is exhaled.
The respiratory system can be divided into two segments: 1) thoseparts involved in transporting air from the atmosphere into thelungs and, 2) those parts involved in the exchange of gases fromthe lung into the blood stream and to the body's cells. Theseportions of the respiratory system are called "externalrespiration" and "internal respiration" respectively. Externalrespiration involves the nose, pharynx, larynx, trachea, bronchi,and bronchioles. The final exchange of air from the lungs to theblood stream occurs in the alveolus. The alveolus is a pocket ofair surrounded by a thin membrane that contains many capillaries(or small blood vessels). This thin wall is important for therapid exchange of gases from the lung to the blood. There are 300million alveoli (plural for alveolus) involved in respiration.Air is filtered, humidified and warmed as it travels to the lungs.It moves from the external environment through external respirationbecause of differences in pressure within the respiratory system.The inhaled air moves through the nose and throat, down the trachea
FIGURE 1
THE BRAIN
CEREBRUMconscious functionsreceives sensory information
5
THALAMUSreflex activitythroat, neck, face controlcontrol over wakeful statesensory relay
BRAIN STEM
CEREBELLUMorientation to space
3P u
to the lungs. Once the air reaches the lungs, it travels throughthe many smaller chambers until it reaches the smallest ones calledthe alveoli of the lungs. Here, gases are absorbed from the lungsinto the blood stream. The blood stream carries oxygen toindividual tissues and cells and the cells use it to complete theirdesignated function. The cells undergo their own process ofrespiration and return carbon dioxide to the blood stream. Thecarbon dioxide is transported back to the lungs and exhaled intothe atmosphere. Expired air has a higher concentration of carbondioxide (4.0%) than inspired air (0.4%).
Normally, 97 percent of oxygen transported from lungs to tissue iscarried by a chemical bond to hemoglobin. Hemoglobin is a pigmentof the red blood cell. Oxygen uses this mechanism to attach to ared blood cell and be transported through the blood stream. Inthis way, hemoglobin buffers (i.e., reduces shock) oxygen tocontrol air pressure in the tissues.
Sometimes breathing and respiration are not normal. A person maybreath more or less rapidly than normal; or a person may breathnormally, but respiration may not be completed properly due to sometype of complication. The following terms are related to breathingand/or respiration and are defined here for clarity:
1. eupnea - normal breathing;
2. tachvpnea - rapid breathing;
3. bradvpnea - slow breathing;
4. hvperpnea - over respiration;
5. hvpopnea - under respiration;
6. anoxia - total lack of oxygen;
7. hvpoxia - decreased oxygen in tissue.
The effect of nitrous oxide on breathing and respiration will bediscussed later in the module. At this time, the informationrelevant to physiology should be reviewed and understood prior toproceeding to the pharmacology of nitrous oxide.
Pharmacologic Effects and Properties of Nitrous Oxide
Nitrous oxide is a nonirritating, colorless gas with a sweet tasteand odor. It is dispensed a liquid under pressure in a containerwhich is always marked BLUE for identification. The gas is stableat normal temperatures; it is non-flammable, but will burn readily
6
367
if ignited. Nitrous oxide is soluble in water. It is a relativelysafe gas; however, all gases should be handled with caution.
Nitrous oxide is a true general anesthetic and meets all of theproperties of anesthetics. It is the least potent of allanesthetic gases. For example, halogen (an anesthetic gas used forsurgical depth anesthesia in operating rooms) is 100% potent.Nitrous oxide is approximately 15% potent. The fact that N20 isa weak agent is beneficial for its use in dentistry because of itswide margin of safety.
The exact mechanism by which anesthetics act on the brain isunknown. Nitrous oxide travels through the respiratory system fromthe nose to the lungs in the same manner as oxygen. The gas istransferred into the blood stream through the alveoli in the lungs.The difference between respiration of nitrous oxide and respirationof oxygen is found in the transport of nitrous oxide through theblood stream. Rather than attaching to hemoglobin for transport(as oxygen does), nitrous oxide travels through the blood streamin a free gas state, without combining with any cell or portion ofa cell. Nitrous oxide replaces nitrogen (N2) in the blood andbecause it is much more soluble than nitrous or oxygen, largevolumes of N20 are absorbed. Total saturation in the blood occurswithin 3 to 5 minutes of N20-02 administration. This fact isimportant because a patient may not react to initial administrationwithin this time period. The clinician should be cautious aboutincreasing the N20 concentration until maximal clinical effect hasoccurred.
At one time, it was thought that the anesthetic effect of N20 wascaused by a decrease of oxygen (hypoxia) in the cells of the brain.It is now known that Ng) can, even in the presence of adequateoxygen, cause an effect on the central nervous system (brain andspinal cord). Tissues with a greater blood flow--such as thebrain, heart, liver and kidneys--will receive greater amounts ofN20 and absorb higher concentrations because the blood supply issaturated with the gas; thus, brain cells will react most readilyto administration of nitrous oxide. The cerebrum, thalamus andmidbrain functions discussed previously will be depressed when N20inhalation anesthesia is delivered.
Because of the depressing action of N20 on the brain, signs andsymptoms of nitrous oxide can be related to the CNS. Somnolenceis the production of sleep. Since the brain stem is responsiblefor the "wakefulness state" of the brain, this symptom of N2') canbe correlated with effects on the brain stem. Dissociation, or adistorted spatial orientation, can be related to the function ofthe cerebellum since it is responsible for orientation in space.Finally, decreased sensory perception, which reduces a person'sability to perceive pain, can be correlated with effects on the
7
363
thalamus and cortex. Remember, all pain sensations are relayedfrom the thalamus to the cortex. Almost all forms of sensation aredepressed including not only pain but also sight, hearing andtouch. Memory also is dulled with degree of amnesia depending onconcentration of N20 administered.
The uptake of nitrous oxide by other tissues with a lesser bloodsupply than the brain, like muscle and fat, absorb only a verysmall amount of N20. For this reason, recovery from nitrous oxideafter its administration is relatively fast. Only minute tracesof nitrous oxide (1%) can be found in the blood several hours afteradministration.
As mentioned previously, the total circulation time for one breathof N20 is three to five minutes. This means that the gas isabsorbed into the blood stream, transported through the body andreturned to the lungs at a fairly rapid rate. Likewise, thediffusion of N20 from the blood stream after administration isterminated is quite rapid. If the patient is permitted to breathroom air at this time, a phenomenon called "diffusion hypoxia"occurs. Diffusion hypoxia causes decreased oxygen and results innausea, headache and lethargy--or a "hangover" feeling. In orderto prevent it, the clinician must always administer 100% oxygen toa patient for at least three to five minutes immediately followingadministration of N20. Oxygen is administered until the patientregains normalcy; recovery is rapid and complete and negative sideeffects are prevented.
When administered properly, N20-02 has little effect on other partsof the central nervous system, on the cardiovascular system, or onthe respiratory system. There are no changes in heart rate (pulse)or blood pressure. Changes in respiratory rate are related moreto the relaxation of the patient than to the nitrous oxide itself;it is nonirritating to the lungs. With higher concentrations ofnitrous oxide, greater than 70%, hypoxia can occur. Depression ofheart rate, respiration and brain functioning can occur. For thisreason, it is imperative that appropriate levels of nitrous oxideand oxygen are administered. Side effects can be avoided withproper techniques and concentrations.
Pharmacologic effects of N20-02 will differ between patients.Average effects with various concentrations of N20 are:
100% will produce anoxia.
80% will produce hypoxia with hallucinations and bizarredreams; may cause respiratory, cardiovascular, kidney or liverdamage.
65% can cause patients to enter the excitement stage.
8
Pharmacological Effects - continued
35% usually provides maximum analgesia with maintenance andcooperation of the patient.
25% is claimed as analgesic as 10mg morphine sulphate.
Because the needs of individual patients will vary, the triturationmethod is recommended for administration of N20-02. In thismethod, the concentration of N20 is slowly increased until thepatient has reached an acceptable level of analgesia.Concentrations over 50% should not be administered without specialconsideration.
Side Effects and Adverse Reactions
As stated previously, side effects can be minimized or preventedwith proper administration. Nausea is the most common side effect.Its incidence increases1
1. with prolonged administration or rapid induction,
2. with higher concentrations of N20,
3. following a heavy meal,
4. following fasting (empty stomach),
5. in motion sickness sufferers or patients with previoushistory of vomiting.
Nausea can be prevented by using the lowest effectiveconcentration, administering oxygen every 45 minutes duringprolonged procedures, suggesting that patients eat a light mealprior to the appointment, and avoiding use in patients with motionsickness or with a previous history of vomiting.
Adverse reactions associated with N20 are infrequent. Whenconcentrations below 50% are used and nitrous oxide is administeredby the trituration method, the record of patient safety isexcellent. Clinicians must be careful not to become complacent,however, assuming that N20 is harmless. The potential for adversereactions increases with improper administration and with higherconcentrations.
9
37.3
The following are known adverse reactions which can be prevented:
1. Hypoxia: most obvious and immediately lethal effect.Always administer enough oxygen. Check analgesia machineregularly, and especially after refilling tanks, to besure fail safe system is operating Lorrectly. Also, besure to fully oxygenate patients upon completion ofadministration in order to prevent diffusion hypoxia.
2. Bone Marrow Depression: nitrous oxide may have somecytotoxic effect in humans, especially with increasedfrequency of use. This hazard may not be relevant todental inhalation unless a patient receives frequent andprolonged exposures to N20. But, dental personnel whofrequently use N20 should be concerned.
3. Pressure/Volume Effect: N20 diffusion into any air-containing body cavity temporarily increases either thevolume or the pressure in the air space. These changescan affect the middle ear and auditory acuity, intestinalgas volume leading to gastrointestinal distention, or airemboli in the blood stream.
4. Psychologic Reactions: particularly hallucinations orclaustrophobia. Patients with a history of psychiatricdisorders should not receive N20 without specialconsideration and medical consultation. Also, sincedreams and hallucinations associated with N20 aresometimes sexually oriented, the operator should not bealone while administering it.
5. Fire: N20 is combustible. Be particularly careful whenusing electrocautery. Also, never allow grease tocontact valves of N20 tanks.
6. Protecave Reflexes: present knowledge is incomplete.It seems that normal protective reflexes remain intact,yet reactive gag reflexes of anxious patients arereduced. Methods for prevention of airway complicationsare recommended.
REMEMBER: The safety of any pain control technique dependsupon the health status of the patient, the inherent toxicityof the drug used, and the competence of the practitioner.
10
371
ANESTHESIA AND ANALGESIA
As stated previously, nitrous oxide is classified as an anesthetic;however, many dental practitioners refer to it as an analgesic.The terms anesthesia and analgesia need to be understood prior todiscussing the administration of this drug.
Anesthesia produces a lack of all sensation. When an injection isgiven for local anesthesia, the nerve is blocked and the patientdoes not feel pain in that particular area. Surgery is oftenperformed under a general anesthetic and the patient is
unconscious, thereby producing a total lack of sensation.Analgesia creates a decreased ability or inability to perceivepain. Total analgesia completely eliminates a patient's reactionto pain. Relative analgesia, which is accomplished in dentistrythrough the use of nitrous oxide, decreases a patient's painreaction; but, the patient is able to cooperate. Sedation is thecalming of a nervous apprehensive patient without loss of
consciousness.
General anesthetics can be employed to various levels to produceanalgesic results or anesthetic results depending upon desiredeffects. There are four stages of anesthesia. An explanation ofeach stage follows.
Stages of Anesthesia
I. Analgesia: the patient is conscious, comfortable andcooperative. Pain reaction is decreased.
II. Delirium: this is the excitement stage. The patientbecomes extremely stimulated, raged and possibly angry.Loss of consciousness begins in Stage II. Delirium isan undesirable effect; therefore, it should be avoided.
III. Surgical: at this point, the patient is unconscious andlife support is required. There is a total lack ofsensation.
IV. Respiratory Paralysis: death occurs in this stage.
When a general anesthetic is administered for surgery, the patientis brought through the first two stages rapidly and maintained instage three. Any of the general anesthetics, however, can beutilized to maintain a patient in stage one: analgesia. Nitrousoxide is particularly good at this level because it is a relativelyweak general anestnetic. In dentistry, nitrous oxide most commonlyis utilized at analgesic levels. This is why many practitionersrefer to nitrous oxide as an analgesic even though it is classifiedas an anesthetic.
11
The stage of analgesia has been divided further into three planes.Each plane has a variety of possible signs and reactions; although,all of them probably will not be seen in one particularadministration. A list of clinical manifestations for each planeof analgesia follows.
Planes of Analgesia: Clinical Effects
1. Plane 1
a. Patient appears normal, relaxed, awake.
b. Patient may feel slight tingling in toes, fingers,tongue, or lips.
c. Patient may giggle.
d. There are no definite clinical manifestations.
e. Vital signs remain normal.
2. Plane 2
a. Patient may have dreamy look
b. Reactions of patient are slowed.
c. Partial amnesia may occur.
d. Voice will sound "thrc
e. Patient will feel warm and drowsy.
f. Patient may drift in and out of environment.
g. Patient may hear pleasant ringing in ears.
h. Vital signs remain normal.
i. Pain is reduced or eliminated but touch and pressure isstill perceived.
j. Patient is less aware of surroundings; sounds and smellsare dulled.
12
3. Plane 3
a. Patient becomes angry with hard stare.
b. Patient's mouth tends to close frequently.
c. Patient no longer cooperates.
d. Patient is totally unaware of surroundings.
e. Patient may hallucinate.
f. Patient's chest may feel heavy.
g. Sensation of flying or falling or uncontrolled spinning.
h. Pupils may dilate.
It is essential that clinicians who administer nitrous oxide becometotally familiar with the signs and symptoms of each plane in orderto maintain a patient at the desired level. In most cases, planetwo will be ideal. The patient will be comfortable, pain reactionwill be decreased or eliminated and the patient will be able tocooperate. Plane three is undesirable because, at this point, thepatient is approaching stage two of anesthesia (delirium). If thepatient is in deep plane two, approaching plane three, he/she willnot hear you or the mouth will tend to close. The patient alsomay not be able to follow instructions. At this point, theconcentration of nitrous oxide should be reduced so that thepatient is maintained in plane two. These symptoms might occurbefore plane three; but, pain will still be perceived. Tables 1-3 describe clinical manifestations in each plane of analgesia.Each clinician involved in the monitoring or administration ofnitrous oxide must be able to recognize clinical manifestations ineach plane of analgesia in order to monitor the patient's response.Be sure to study the information presented in this section and inthese tables prior to proceeding to the next segment of the module.
13
37.;
TABLE 1
THE PLANES OF ANALGESIA:PLANE 1
CHARACTERISTICS PATIENT REACTION
Respiration Normal and regular
General Muscles Normal
Eyes Pupils normal and contractnormally to light; conjunctivasensitive
Pulse Rate Normal
Blood Pressure Normal
Patient maintains an openmouth without mouth props
Yes
Patient follows directions Yes
Degree of Amnesia Very slight
Effect on Pain Elevation of pain reactionthreshold
Effect on Fear Diminished
Appearance of Patient Normal; relaxed, i'.., fullyconscious patient
Subjective Reactions A feeling of relaxation; mayexperience tingling in fingers,toes, lips and tongue
Gag Reflex Reduced
NOTE: Some patients prefer Plane 1, especially if they areapprehensive about N20 effects, or unfamiliar with feelings ofsedation.
1437;.)
TABLE 2
THE PLANES OF ANALGESIA:PLANE 2
CHARACTERISTICS PATIENT REACTIONS
Respiration Normal, but breathing may beslower due to relaxation
General Muscles Normal, but relaxed
Eyes Pupils normal; rate of winkingreduced; a relaxed dreamy,far-away look
Pulse Rate Normal
Blood Pressure Normal
Patient Maintains an OpenMouth Without Mouth Props
Yes
Patient Follows Directions Yes, but more slowly
Degree of Amnesia Moderate to complete
Effect on Pain Pain reaction markedly reduced oreliminated
Effect on Fear Eliminated
Appearance of Patient Relaxed; euphoric; less aware ofimmediate surroundings and lessconcerned with activity aroundhim/her
15
STABLE 2 - continued
CHARACTERISTICS PATIENT REACTIONS
Subjective Reactions May feel a warm wave suffuseentire body; humming, droning, orvibratory sensation; a feeling ofheadiness, lethargy or drowsiness;voice becomes "throaty"; a feelingof euphoria, safety; thoughts maywander beyond treatment room; lessidea of lapse of time
Gag Reflex Depressed
Note: Plane 2 is considered ideal for many apprehensive, anxiousor fearful dental patients.
General Muscles Usually normal; sometimes rigidmandible or rigid body
Eye Very hard stare; angry or very sleepylook; eyes may close; eyeball maybecome eccentric; pupils may bedilated
Pulse Rate Normal; may be accelerated
Blood Pressure Normal
Patient Maintains an OpenMouth Without Mouth Props
No; mouth tends to close; may openif operator presses on lower lip;but immediately closes again
Patient Follows Directions Most usually not
Degree of Amnesia Complete
Effect on Pain Pain reaction eliminated
Effect on Fear A short exposure (1-2 minutes) tothis plane is useful for control-ing extreme fear; longer exposurebrings many patients into a stateof fear and then excitement
17
373
TABLE 4 - continued
CHARACTERISTICS PATIENT REACTIONS
Appearance of Patient Begins to assume appearance ofunconsciousness, totally unawareof surroundings; jaw may becomerigid; body may stiffen
Subjective Reactions May have hallucinatory dreams;experience fear, a feeling offalling, a fear of dying withinability to do anything about it
Note: Plane 3 is not recommended.
18
373
INDICATIONS AND CONTRAINDICATIONS FORNITROUS OXIDE-OXYGEN INHALATION SEDATION
The primary reason for administration of N20-02 to dental patientsis to reduce fear and anxiety. Even nonthreatening dentalprocedures can be traumatic for patients who experience dentalfear. Dental office personnel have the responsibility of selectingappropriate cases for administration of nitrous oxide. An updated,thorough personal and health history must be completed for eachpatient prior to administration. Indications (reasons why N20-02should be given) and contraindications (when N20-02 should beavoided) are discussed in this section.
Primary Indications
1. Fear and Anxiety
Fearful or anxious patients will present patient managementproblems. They also are more prone to medical emergenciesbecause stress can initiate an exacerbation of their medicalproblems. Patients who have a history of upsetting or painfulexperiences in the dental office may be more anxious. Nitrousoxide-oxygen sedation can serve to safely relax most fearfulor anxious dental patients. Some persons, however, are notcomfortable with the effects of N20 and others will notachieve adequate sedation at safe concentrations. Whenadequate sedation cannot be achieved within safe limits,another form of sedative should be selected for that patient.
2. Patient who refuses or is allergic to local anesthesia
Although N20-02 is not a true substitute for local anesthesia,it can be used to reduce pain sensation when local anesthesiais contraindicated.
3. Prominent gag reflex
Gagging is a potential problem during many dental procedures.Administration of N20-02 will reduce or eliminate severegagging without jeopardizing protective cough reflexes.Seating the patient in an upright position might also behelpful.
4. Patient gets impatient at long appointments
Patients who are nervous or stressed sometimes becomeimpatient at long appointments. Because nitrous oxide reducesthe patient's awareness of the lapse of time, it can bebeneficial in these cases. A clinician should, however,
19
3 u1
administer pure oxygen every 45 minutes to reduce thepotential for adverse reactions associated with prolongedadministration.
Indications with Special Consideration
In the recent past, N20-02 sedation has become increasinglyimportant in management of medically compromised patients. It isparticularly indicated when these patients are stressed or anxiousbecause stress can result in an oxygen deficit or cause an acuteexacerbation of an underlying medical problem. Nitrous oxideshould only be administered to these patients with specialconsideration given to each case. It is critical to determinewhether the medical condition is under treatment and control. If
not, administration of N20 is not recommended. A physicianconsultation is recommended prior to administering N20-02 sedation.As long as the following conditions am not severe, nitrous oxideis the sedative of choice because of its margin of safety and itsadjunctive use of oxygen during administration.
1. Cardiovascular disease
N20-02 inhalation sedation can minimize the risk of myocardialinfarction (heart attack) or angina pectoris (chest pain)resulting from stress during a dental appointment. It is themost appropriate technique for sedating patients with a
history of cardiovascular disease. It is not recommended,however, within 6 to 9 months following a heart attack or whenthere is cardiac dysfunction.
2. Cerebrovascular disease
The patient who has cerebrovascular disease, or a history ofa stroke, can receive N20-02 for stress/anxiety reduction.Levels beyond 50% are not recommended due to the threat ofhypoxia.
3. Respiratory disease: asthma
Patients with bronchial asthma can receive nitrous oxidebecause it is nonirritating to the bronchial and pulmonarytissues. Increased stress can lead to an asthmatic attack;therefore, N20-02 sedation can be helpful. Refer tocontraindications for respiratory diseases that prohibit theuse of nitrous oxide.
20
3
administer pure oxygen every 45 minutes to reduce thepotential for adverse reactions associated with prolongedadministration.
Indications with Special Consideration
In the recent past, N20-02 sedation has become increasinglyimportant in management of medically compromised patients. It isparticularly indicated when these patients are stressed or anxiousbecause stress can result in an oxygen deficit or cause an acuteexacerbation of an underlying medical problem. Nitrous oxideshould only be administered to these patients with specialconsideration given to each case. It is critical to determinewhether the medical condition is under treatment and control. Ifnot, administration of N20 is not recommended. A physicianconsultation is recommended prior to administering N20-02 sedation.As long as the following conditions are not severe, nitrous oxideis the sedative of choice because of its margin of safety and itsadjunctive use of oxygen during administration.
1. Cardiovascular disease
N20-02 inhalation sedation can minimize the risk of myocardialinfarction (heart attack) or angina pectoris (chest pain)resulting from stress during a dental appointment. It is themost appropriate technique for sedating patients with ahistory of cardiovascular disease. It is not recommended,however, within 6 to 9 months following a heart attack or whenthere is cardiac dysfunction.
2. Cerebrovascular disease
The patient who has cerebrovascular disease, or a history ofa stroke, can receive N20-02 for stress/anxiety reduction.Levels beyond 50% are not recommended due to the threat ofhypoxia.
3. Respiratory disease: asthma
Patients with bronchial asthma can receive nitrous oxidebecause it is nonirritating to the bronchial and pulmonarytissues. Increased stress can lead to an asthmatic attack;therefore, N?0-02 sedation can be helpful. Refer tocontraindications for respiratory diseases that prohibit theuse of nitrous oxide.
20
4. Hepatic disease
Hepatic (liver) disease, such as hepatitis or cirrhosis, oftencontraindicates administration of drugs because the agent isbiotransformed in the liver. Since N20-02 is notbiotransformed anywhere in the body, it can be used inpatients with hepatic disease.
5. Epilepsy and other seizure disorders
Again, because stress might trigger the onset of a seizure,the use of N20-02 can be useful in these patients. It isimportant to avoid hypoxia; therefore, higher concentrationsof N20 must be avoided.
Many of these drugs cause depression of the central nervoussystem; therefore, it is difficult to predict and control thepharmacological effects of nitrous oxide. All drugs taken bypatients who are to receive nitrous oxide should be evaluatedfor effects on the CNS, or for contraindications withanesthetics. Some examples include tranquilizers (diazepam),analgesics (morphine, percodan, meperidine), and hypnotics(barbiturates). Nitrous oxide should not be used inconjunction with these drugs unless absolutely necessary. Ifused, N20 should be administered in low concentrations.
7. Patients using alcohol
Nitrous oxide is not recommended for patients who are chronicalcohol abusers or for patients who may have had a socialdrink immediately prior to the dental appointment
8. Allergies
There are no known allergies to nitrous oxide.
Contraindications
In the following cases, administration of nitrous oxide is notrecommended. A careful review of the health history should be madeto rule out these contraindications.
1. Nasal Obstruction
Patients with nasal obstruction cannot sufficiently inhale theN20-0 gases administered. Conditions which might lead tonasal blockage include:
a. the common cold21
b. upper respiratory infections (URI) or bronchitis
c. allergies or hay fever
d. deviated nasal septum
In conditions such as the common cold, bronchitis or URI, thenasal hood will be contaminated during use. If nitrous oxideadministration is attempted, a disposable nosepiece should beused or the nosepiece should be sterilized before cross-contamination of personnel or other patients can occur.
2. Chronic Obstructive Pulmonary Diseases (COPD)
COPD will prevent the sedative effect of N20 andcontraindicate its use. Patients with emphysema,tuberculosis, eustachian tube blockage and other chronicrespiratory disorders should not receive nitrous oxide. Itcan result in immunosuppression, abnormal pulmonary function,secondary bacterial infections, or hypoxia.
3. Debilitating cardiac or cerebrovascular disease
If heart disease or valvular damage limits a person's dailyactivities, N20 is not recommended. Patients who reportcyanosis (blue coloring), dyspnea (shortness of breath), needfor increased pillows when sleeping, or artery blockage shouldavoid all CNS depressants including N20.
4. Pregnancy
Nitrous oxide does cross the placenta to the fetus and itaffects the baby's CNS. Studies in animals show that a singledose of N20 is usually safe when administered in properconcentrations. Nitrous oxide also has been shown to be themost highly recommended sedation agent when one must beemployed during pregnancy, In the opinion of this author,however, administration of all drugs should be avoidedwhenever possible during pregnancy, and particularly duringthe first trimester. If a sedative is absolutely essentialfor dental treatment, a medical consultation should be madeprior to administration.
5. Patients with psychiatric disorders or compulsivepersonalities
It is difficult to predict the effects of N20-02 in patientswith psychiatric disorders or compulsive personalities. Drugsgiven to psychiatric patients, such as mood-alteringantidepressants, also should be carefully evaluated. Alteringthe consciousness of patients with psychiatric disorders orpatients who fear "losing control" may result in negativereactions. 22
3Q i.
6. Claustrophobic patients
Some patients are not able to tolerate the nasal mask withouta feeling of suffocation. The nasal cannula can be used inthese cases; however, this technique is not routinelyrecommended because of the risk of exposure of trace elementsto dental personnel.
7. Children with severe behavioral problems
Nitrous oxide can be used to control fear and anxiety in mostpedodontic patients. A severely disruptive child, however,cannot give the degree of cooperation needed for
administration of N20-02 inhalation sedation. Forcedadministration is never recommended.
8. The patient who does not want N.L0 =02
Patients should never be forced or coerced to receive N20 (orany other drug) against their will. Doing so can result innegative side effects or legal repercussions.
ARMAMENTARIUM
There are many types of inhalation sedation units. This modulediscusses the most common apparatus used. A brief review of thecentral storage system, the nitrous oxide-oxygen machine, thebreathing apparatus and safety features follows.
The Central Storage System
The central storage system is where the large tanks of nitrousoxide and oxygen are stored. It is usually separated from thetreatment rooms. As mentioned previously, the nitrous oxide tanksare always marked blue for identification, and the oxygen tanks aregreen. A Pin Index Safety System prevents attaching the wrongcylinder to the yokes during installation. Cylinders should behandled with care, stored upright and kept in tact.
A pressure gauge monitors the pressure within each cylinder. Thenitrous oxide is stored at approximately 750 psig (pounds persquare inch of gas) and the oxygen has approximately 1800-2150psig. N20 and 02 are stored as a liquid under pressure which isreleased as a gas.
Pressure regulators are usually mounted inside of a box frame.They act to reduce cylinder pressure to about 50 psig to be usedin the system.
23
3E5
23
When turning on the tanks in the control storage system, it isimportant to open the valves slowly in a counter clockwisedirection. No grease, oil, or lubricant of any type should be usedon any of the valves, regulators, gauges, or tanks. It can beextremely dangerous if these lubricants come in contact with thegases because an explosion could result.
When the nitrous oxide and oxygen are turned on, the operatorshould check each pressure gauge and pressure regulator to be surethat the gases are flowing properly. Manufacturer's instructionsshould be read to ascertain proper readings.
Nitrous Oxide-Oxygen Machine
Several types of machines are available for use in nitrous oxide-oxygen inhalation sedation. The gases generally are tra%spol:tedto the machine at chairside through a series of copper tubings fromthe central storage area. Some offices have portable nitrousoxide-oxygen machines which house small tanks of N20 and 02. Theportable units usually are employed when nitrous oxide isadministered infrequently.
The most common machine used in dentistry has ball-type flow meterswhich indicate the amount of gas being administered. The machinehas an on-off knob which allows the gases to flow into the tubingand nasal mask. Two additional knobs are used to regulate theamount of nitrous oxide or oxygen flow which is displayed in twoseparate glass tubings. As each knob is turned to a more openposition, more gas enters the glass tubing in the flow meter anda ball floats to indicate how much gas is being dispensed. Theflow tubes have markings that are numbered to show how many litersper minute are being dispensed. These two "ball flow meters" (onefor N20 and one for 02) enable the clinician to regulate the flowup to a maximum of 10 liters per minute (L./min.). The nitrousoxide can be turned off to 0 L./min., but the minimum oxygen flowpermitted is about 2.5-3 L./min. This safety feature preventsadministration of pure nitrous oxide.
A reservoir bag, or breathing bag is located beneath the flowmeter.This bladder-type bag, made of rubber or silicone, holds a portionof the gas(es) that are available to be delivered into theflowmeter system. The main purpose of this bag is to storeadditional gas(es) in case the patient's respiratory demands exceedthe amount being delivered through the flowmeter.' During normalrespiration, nitrous oxide and oxygen are delivered directly intothe flowmeter and none is taken from the reservoir bag. It alsoexpands and contracts when a patient breathes so that respirationcan be monitored during administration of nitrous oxide.
24
3
Conducting tubes, or hoses, connect the nitrous oxide machine tothe copper tubing leading to the central storage area. They alsoconnect the machine to the nasal mask, or hood, used to administernitrous oxide to the patient.
Breathing Apparatus
Three types of breathing apparatus can be used for inhalationsedation: the full face mask, the nasal hood, or the nasalcannula. The full face mask covers both the nose and the mouth,
so it is impractical for use in dentistry. It is recommended,however, for administration of forced oxygen in cases of medicalemergencies requiring oxygen for management. The nasal cannula ismade of soft plastic tubing with two short prongs which fit intothe nostrils for breathing. It is not recommended for routine usewith nitrous oxide due to concerns about long-term exposure ofdental personnel to trace elements of nitrous oxide in the
operatory. Thus, a nasal hood is most frequently employed indental practices.
The nasal hood fits comfortably, yet snugly, over the patient'snose. Two types are available. The traditional nosepiece has onehose on each side that is used for inhalation and exhaled gasesare eliminated through an exhaling valve located on the top of thenasal hood. Again, this exhaling valve creates concerns for
occupational exposure; thus, a scavenging nasal hood is
recommended. The scavenging nasal hood typically has four tubes(two on each side) connected to it. Two of the tubes containgas(es) flowing from the nitrous oxide machine. The other twotubes carry exhaled gases through a controlled ventilation systemwhich deposits them outside of the building, or to a saferepository away from the dental operatory.
When selecting a nasal hood, the clinician should be sure that itfits the patient's nose properly in order to prevent discomfort,but to ensure minimal or no leakage into the treatment room.Autoclavable nasal hoods, or disposable hoods, are recommended inorder to prevent disease transmission. Nasal hoods and tubing alsoshould be checked frequently for cracks which might allow leakageand replaced as needed.
Safety Features
All inhalation sedation units marketed in the United States containcertain safety features to prevent accidents from occurring. Theyare designed so that a minimum of 21% oxygen will always beadministered through the system. Any mechanical device can fail,however, so visual and verbal monitoring of a patient is alwayscritical.
25
3c"
A brief description of these safety features follows:
i. Pin index and diameter index safety systems - make itvirtually impossible to attach N20 tanks to 02yokes andvice verse.
2. Minimum oxygen liter flow - assures that 2.5-3.0 L./min.of oxygen is the minimum amount that can be administered;thus a maximum of 75-79% nitrous oxide can beadministered.
3. Oxygen fail-safe system - designed so that the nitrousoxide will automatically turn off when oxygen is depletedbefore the N20 tank is empty.
4. Emergency air inlet - designed to remain closed as longas gas(es) are being administered to the patient;however, when the oxygen fail safe system turns gasesoff, room air is allowed to enter the system so that thepatient can continue to breath through the nasal hood.
5. Fail-safe alarm - when the fail safe system turns off thegases, an audible alarm sounds to alert the clinicianthat the patient no longer is receiving N20-02.
6. Oxygen flush button - this flush mechanism allows for100% oxygen to be administered through the reservoir bagin the event of an emergency. For forced oxygendelivery, however, a full face mask is required.
7. Color coding - all parts (knobs, tanks, and sometimestubing) are color-coded blue for N20 and green for 02.
8. Texture of knobs - the knobs used to regulate liters ofgas flowing into each tube are often textured differentlyto differentiate between adjusting the flow of N20 andthe flow of 02.
PROCEDURE FOR ADMINISTRATIONOF NITROUS OXIDE
Prior to administration of nitrous oxide, the clinician mustcomplete a thorough medical history review and record vital signsof the patient. The medical history should be reviewed thoroughlywith all new patients and updated at each reappointment or recallappointment. Special consideration should be given to allindications and contraindications prior to the administration ofnitrous oxide.
26
3
Vital signs also must be recorded for each new patient or recallpatient. Three basic vital signs including pulse rate, bloodpressure and respiration are indicated. The first measurement ofeach vital sign is recorded as the baseline for any particularpatient. These baseline data will be used as that patient's normaland all future measurements will be compared to it to determine ifany change has occurred. This comparison becomes particularlyimportant in an emergency situation.
The measurement and recording of pulse, blood pressure andrespiration is simple to complete. Instructions for each procedurefollows.
Vital Signs
The pulse rate is obtained by placing the pads of two (or more)fingers over the radial artery which is located on the wrist, belowthe hand, on the same side as the thumb. The pulse should beobtained utilizing the index finger and middle finger since thethumb has a pulse of its own which might be confused with thepatient's pulse. Feel around the designated area, applying gentlepressure until a beat can be detected. Once the pulse is located,begin counting the beats for a 60 second period. Record the pulserate, (which is how many beats occur during the total 60 secondperiod) and compare it to normal rates. In an adult patient, 60to 100 beats/minute is considered normal; whereas in a childpatient, 80-120 beats/minute is average. An anxious patient mighthave a higher pulse rate due to fear of dental procedures. If thisis noted, wait 5 minutes and take the pulse again. It will usuallysubside during this resting period. An abnormal pulse rate shouldbe drawn to the dentist's or physician's attention prior toproceeding with any dental treatment.
Next, the blood pressure is taken. Blood pressure measures howmuch air pressure is needed to close off an artery. A cuff isinflated on the upper arm until the blood going through the arteryis stopped. This first measurement is called the "systolic"reading. The cuff is then slowly deflated until the artery iscompletely open and the blood flows freely through it. This secondmeasurement is called the "diastolic" reading. It is the mostimportant since it represents the constant pressure in the arterywhen the heart is beating at a normal rate and the artery is in itsnormal, open position.
Items needed for measuring the blood pressure include asphygmomanometer and a stethoscope. The sphygmomanometer consistsof a gauge, to measure air pressure in millimeters, connected bytwo hoses to an inflatable cuff. This cuff is wrapped around thepatient's bare upper arm one inch above the bend of the elbow, The
27
3 r.
patient's arm should be resting on the arm of the dental chair.The positioned cuff should allow enough room for two fingers to beinserted between the cuff and the arm. The gauge should bepositioned so that it is easily visible to the operator and thetubing should hang freely. A bulb is located at the end of thetubing. Turn the knob on the bulb until it is closed completely.Begin inflating the cuff by squeezing and releasing the bulb at theend of the tubing while palpating the radial artery (taking thepulse as previously described). Keep inflating the cuff until thepulse stops and continue inflating until the gauge rises 30millimeters beyond that point. Then, begin deflating the cuffslowly by turning the knob counter clockwise until the pulse canbe detected again. This level represents the approximate systolicreading. Be certain that the cuff is completely deflated beforeplacing the stethoscope. This may require you to squeeze the cuffto force all of the air out. The two ear plugs on the stethoscopeshould be placed in the operator's ears. The round, flat portionof the stethoscope is centered in the bend of the arm just belowthe cuff. Close the knob on the bulb again. Inflate the cuff 30mm above the previously determined approximate systolic reading.Deflate the cuff slowly while listening for changes in the pulse.At the point when pulse first appears, read the number on thegauge. This is the systolic pressure. Continue deflating the cuffslowly and listening until the pulse completely disappears. Atthis point, read the number on the gauge again. This is thediastolic pressure. The blood pressure is recorded as a fractionwith the systolic reading over the diastolic reading. Thepatient's blood pressure should be compared to normal rates.Normal blood pressure is approximately 120/80 (or 120 systolic and80 diastolic); however, systolic pressure less than 140 anddiastolic pressure less than 90 is acceptable for an average adultpatient. Clinical evaluation of blood pressure may lead todiscovery of abnormal rates. The appropriate steps to follow witheach reading are outlined in Table 4.
28
3S0
TABLE 4
CLINICAL EVALUATION OF BLOOD PRESSURE
BLOOD PRESSURESystolicDiastolic
DENTAL THERAPYCONSIDERATIONS
less than 140 andless than 90
140 to 160 and/or90 to 95
160 to 200 and/or95 to 115
greater than 200 and/orgreater than 115
Routine dental management;recheck in six months.
Recheck blood pressure prior todental therapy for three consecu-tive appointments. If all exceedthese guidelines, medicalconsultation is indicated.
Recheck blood pressure in fiveminutes. If still elevated,medical consultation prior todental therapy is indicated.
Recheck blood pressure in fiveminutes. If still elevated,immediate medical consultationis indicated. Na dental therapy.
Adapted from: Malamed, Stanley F. Medical Emergencies in theDental Office.
The third routine vital sign to be recorded is the respiratoryrate. This should be noted when the patient is unaware ofobservation; since it is often difficult for a patient to breathnormally when being watched. Some operators choose to observerespiration immediately after taking pulse for 60 seconds, leavingtheir fingers over the radial artery so the patient is unaware ofobservation. Respirations are counted by observing the rise andfall of thu patient's chest for 60 seconds. Normal respiratoryrate for an adult is 16 to 18 breaths per minutes; whereas, a childwill take 40 to 45 breaths per minute. Any significant variationin respiratory rate should be evaluated by the dentist prior todental therapy. If within normal range, the respiratory rate isrecorded with other vital signs and utilized as baseline data.
Any abnormality in medical history or vital signs should be drawnto the dentist's attention prior to proceeding with treatment.This is particularly important when nitrous oxide is going to be
29
3
administered. If all signs are normal, the operator should noteeach consideration mentally, as well as on the chart, so that theinformation is readily available in the event of an emergency.Once this has been completed, nitrous oxide can be administered.
Preanesthetic Preparation
The first step to preparing for administration of nitrous oxide isturning on the main tanks containing nitrous oxide and oxygen.Tanks should always be turned on slowly to avoid a build-up ofheat, and cylinders and gauges should be checked to be certain thatboth tanks are full. Procedure for this will vary, therefore,manufacturer's instructions should be read carefully prior tooperating any equipment.
The patient is seated comfortably and, as discussed previously,medical history and vital signs are checked. The analgesic machineshould be positioned behind the patient with controls readilyvisible and easily accessible to the operator. The appropriatesize nosepiece is selected to fit snugly over the patient's nosewithout causing an inability to breath or leakage around the sides.The nosepiece should be cleaned with a cold sterilizing agentrather than alcohol, since alcohol dries out the rubber and causesit to crack.
Prior to administration of nitrous oxide, the operator shoulddiscuss the procedure with the patient. The number one rule is toALWAYS BE POSITIVE when discussing techniques and effects withpatients. Describe expected results in positive terms. Tell thepatient that they will feel relaxed, warm and comfortable. Answerany questions they may have honestly; yet, do not use negativeterminology. For example, a patient might ask, "Does this N20 makeyou feel drunk or nauseous?" You can respond that "with properadministration, both of these side effects are rare; you shouldfeel very relaxed." At the same time that you are honestlyanswering the question, you are also reassuring the patient. Itis important that you review all of the clinical manifestations ofeach plane of analgesia at this time in order to become familiarwith each one so that you are capable of answering questions forthe patient.
Once the patient has been informed of all procedures and effects,consent to the administration of nitrous oxide can be obtained.If the patient agrees to proceed, administration of nitrous oxideis begun.
30
Techniques for Administration
The traditional nosepiece has an air valve in the center whichshould be opened about half way prior to, placing the nosepiece onthe patient's face. When using a scavenging mask, there is novalve that needs adjustment. Oxygen flow is begun at this time.the reason for completing these two procedures prior to placementof the nosepiece is to avoid causing a feeling of suffocation whencovering the patient's nose. Be certain that the tubing from themachine to the nosepiece is not tangled to provide for a smooth,even flow of gases. Place the nosepiece over the patient's noseand ask him/her to breath normally while only oxygen is flowing inorder to provide a period of adjustment to breathing out of thenosepiece.
At placement time, tae oxygen is set at 8 liters. As mentionedearlier, the gauge on the nitrous oxide-oxygen machine will havenumbers which represent liters of gaseous flow. Often linesbetween the numbers will indicate half liters. A small ball willrise and fall by turning the knob marked green for oxygen. Turnthis knob until the ball reaches 8 liters on the gauge. Afterplacing the nasal mask, ask the patient if this volume iscomfortable for their respiration. It may need to be adjusted upor down for their needs (5-10 L./min.).
After the patient has had a few minutes to adjust to breathingnormally, flow of nitrous oxide can be begun. Stress that thepatient should continue to breath through the nose sincemouthbreathing will cause an additional intake of oxygen from theroom air, thereby, changing the ratio of gases. Patients can beinformed that breathing through the mouth causes increased oxygeninhalation; therefore, they can regulate the effects of nitrousoxide by taking in room air if they feel that the nitrous oxide isa little stronger than desired. Request that they inform you ifthis should happen, so that you can adjust the flow of the gasesaccordingly. Talking will have the same effect as mouth breathing;therefore, patients should not talk to excess or the nitrous oxidewill be diluted with room air. Observe the reservoir bag to besure that the patient is breathing at a normal rate through thenose hood.
When the patient is breathing normally through the nosepiece,nitrous oxide flow can be started. At this time, the air valve onthe nosepiece is closed slightly to prevent leakage of nitrousoxide into the room air. In the trituration techniques describedin this module, the total flow of gas(es) will always remainconstant. Thus, if the clinician begins with 8 1pm (liters perminute) the total amount of N20 and 02 administered will alwaysequal 8 1pm. The first adjustment to begin N20 administration
31
I)
should equal about 20% N20 and 80% 02. Since 20% of 8 1pm isappropriately 1.5 1pm, the nitrous oxide would be started at 1.51pm and the oxygen would be reduced (from 8 1pm) to 6.5 1pm. Notethat 1.5 1 and 6.5 1 equals the eight liters total flow with whichthe administration was started. Each time the nitrous oxide isincreased 1/2 liter, the oxygen is decreased 1/2 liter. In thisway, a total flow of 8 liters is maintained continuously. Theoxygen is begun at 8 liters; 1 1/2 liter of nitrous oxide (N20) isadministered and the oxygen (02) is decreased to 6 1/2 liters;therefore, a total of 8 liters is maintained. Wait one minutebefore adjusting these levels again observing the patient'sreactions. Continue decreasing the oxygen by 1/2 liter followedby increasing the nitrous oxide by 1/2 liter and observing thepatient's response (i.e., 6 liters 02 and 2 liters N20 thenobserve; 5 1/2 liters 0 and 2 1/2 liters N20 then observe; and soon). The last adjustment of N20 should be made when the oxygen andthe nitrous oxide are each at 4 liters, again totalling 8 liters.At this point, 50 percent 02 and 50 percent N20 are beingadministered. This is the highest ratio of nitrous oxiderecommended for safe administration without special consideration.The importance of maintaining an appropriate ratio of oxygen tonitrous oxide cannot be over stressed. Remember that detrimentaleffects of nitrous oxide are caused by hypoxia. This is why oxygenis administered simultaneously with nitrous oxide.
In order to compute the ratio of oxygen to nitrous oxide, dividethe total flow of combined gases (in this case 8 liters) into theliters of nitrous oxide being administered. For example, if yourgauges are set at 5 liters 0Q and 3 liters N20, you would divide8 (total liters) into 3 (N20 liters) to find that .27 or 27 percentnitrous oxide was being administered. Next, subtract thepercentage of nitrous oxide from 100 percent (total flow) todetermine the percentage of oxygen being administered. In thisexample, 27 percent (NO) from 100 percent equals 73 percentoxygen. The ultimate ratio of nitrous oxide to oxygen should berecorded for each administration.
Remember, it takes one minute for any change in dosage to becomeevident. For this reason, the patient should be observed closelybefore readjusting the knobs. Carefully monitor the signs andsymptoms of the patient. You c..an communicate with your patientsto determine level of analgesia as long as they are not requiredto talk excessively, thereby inhaling too much room air. Be sureto use direct, specific questions while monitoring the patient.Ask "What are you feeling" rather than "How are you feeling?" Ask"are you breathing comfortably" or "do you feel warm and relaxed?"It is a good idea to tell patients you will use their name whenspeaking to them. Patients may drift in and out of the environmentand should be able to relax. With these instructions, they willnot feel forced to attempt to stay alert, listening to theoperators. They will, however, be able to respond and cooperatewhen addressed by name.
32
3c),-;
32
Another suggestion is to inform the patient of the time frameoccasionally, since time is often distorted under the effects ofnitrous oxide. Tell the patient how long they have been there inrelation to time remaining. For example, vou might say, "you havebeen here for 20 minutes and we are about half-way through yourtreatment."
When the patient reaches the appropriate level (generally, planetwo of analgesia), the dental treatment planned can be begun. Thepatient will feel relaxed and comfortable; and may feel drowsy andwarm; or may drift in and out of the environment, but will stillbe able to cooperate. Clinical signs and symptoms should continueto be monLtored closely for any change so further adjustments canbe made if necessary.
If patients become irritated or they can no longer cooperate andtheir mouth tends to close, plane three is being approached. Thisis an indication that the nitrous oxide level is too high. Also,changes in physical symptoms, such as dilation of pupils or nausea,would be an indication of too much nitrous oxide. At this pointthe clinician should take three steps to rectify the situation:
1. reduce the level of nitrous oxide or turn it offdepending upon severity of the side effect or reaction;
2. increase the level of oxygen; and
3. reassure the patient.
All models of nitrous oxide-oxygen analgesia machines have a devicecalled an oxygen "flush valve". When turned on, the breathing bagfills with oxygen rapidly at a flow of about 50 liters per minute.Any time that pure oxygen is needed quickly, the flush mechanismcan be employed. This may become important in an emergencysituation.
Since emergencies occur without notice and analgesia levelsfluctuate, it is important to monitor the patient continuouslywhile nitrous oxide is being administered. NEVER leave a patientunattended while under the effects of nitrous oxide. Somereferences suggest retaking vital signs during dental treatment tocompare with baseline data. Remember, vital signs will remainnormal with proper levels of analgesia. The ratio of oxygen tonitrous oxide should be maintained at a comfortable level accordingto the patient's response. Table 5 presents a few common clinicalfindings with appropriate procedures to follow in each.
33
32:7)
TABLE 5
CLINICAL FINDINGS DURING MAINTENANCE PERIODAND APPROPRIATE PROCEDURES TO FOLLOW
CLINICAL FINDINGS
1. Reduced activity of the eyes(either closed or comfort-ably fixed toward ceiling).
2. Increased activity of theeyes.
3. Fixed, hard stare of theeyes (possibly withdilation of pupils) .
4. Arms and legs crossed.
PROCEDURE TO FOLLOW
Means good sedation. Nochanges needed.
Usually too light. Best toascertain status by directquestioning. Probably needspositive verbal support and anincreased N20-02 ratio.
Too deep; approaching excitationstage. Reduce N20 to 0 2 ratio.Supply verbal and physicalcontact.Patient is not relaxed yet.Needs more N20 and suggestionsdesigned to achieve relaxation.( "As you feel your arms becomingmore and more relaxed let themrest naturally and comfortablyby your side, and as you feelyour legs becoming more and morerelaxed, let them uncross andrest naturally andcomfortably. " )
5. Patient talks too much. Too light due to mouthbreathing.Place rubber dam or cotton rollsand holder. Be aware of toomuch N20 when patient finallystops talking. May bring onsedation frighteningly fast.
6. Patient answers rapidly. Too light. May need to improvefit of nosepiece to preventdilation with air or increaseN20 or both.
34
TABLE 5 - continued
CLINICAL FINDINGS PROCEDURE TO FOLLOW
7. Patient answers slowlyand deliberately.
Good sedation.needed.
No changes
8. Patient does not answer. May be: 1) tired and asleep,or 2) too deep. If no pre-medication was used and ratioof gases is such thatanesthesia could not beproduced (i.e., 30% N20),either no change or reducedN20. If in doubt, arousepatient by physically proddingand check verbally.
9. Perspiration appears onface.
Indicates onset of peripheralvasodilation. No change in
of gases needed. Reassurepatient that this is expectedand will pass. Remove outergarments for use after theappointment and cover withlight blanket to reduce rateof evaporation and loss ofbody heat.
10. Paraesthesia (numbness ortingling) of extremities.
Indicates early phase of Stage1. and is closely related toperipheral vasodilationphenomenon. Reassure patientthat this is "just as it shouldbe". If no other changes occurin one or two minutes, increaseratio of N20 to 02 to achieveplane two.
11. Paraesthesia (numbness ortingling) of lips, tongueor oral tissues.
Indicates more profound depth,probably achieving analgesia,and permits injections of localanesthetic to be givencomfortably. After theinjections, the N20 may bereduced or turned off unlessneeded to control apprehension.
Adapted from: Langa, Harry, D.D.S. Relative Analgesia in DentalPractice.
3397
After dental treatment is completed, pure oxygen is administeredto stabilize the patient before dismissal. Turn the nitrous oxidecompletely off and increase the oxygen to 8 liters to "oxygenate"or "flush" the patient with oxygen. Pure oxygen should beadministered for a minimum of 3 to 5 minutes following nitrousoxide analgesia. Oxygen should be administered until the patientregains "normalcy". It may take longer for some patients to returnto normal than others. When oxygenating the patient, informhim/her that you are turning off the nitrous oxide and that, whilebreathing pure oxygen, the symptoms will disappear. An estimated38 percent of the effects of nitrous oxide are psychological.
Once the patient feels normal again, vital signs should be takenagain and compared to the baseline data. An operator who releasesa patient who has not regained normalcy can be held legally liablefor any harm that results. For this reason, oxygenation isessential. Also, if a patient is permitted to breath room airimmediately after inhalation of nitrous oxide-oxygen, "diffusionanoxia" can result. If the patient is adequately flushed withoxygen, this condition can be prevented. Once the patient isoxygenated and reports that he/she feels normal, the patient canbe dismissed. Some sources suggest administering a connect-the-dots test to patients to test their coordination prior todismissal. After the patient is dismissed, a legal chart entryshould be recorded.
Legal Chart Entries and Other Legal Considerations
There are two major reasons for being certain to recordadministration of nitrous oxide completely and accurately. First,in the event of a complaint by the patient or a malpractice suit,the dental chart will be considered a primary source of evidence.Second, dosage levels vary from patient to patient and even withthe same patient on a day to day basis. Factors contributing tothe variance include: amount of food or drink consumed prior tothe appointment; mental and/or emotional state of the patient atany specific point in time; amount of sleep or physical conditionof the patient; and increased tolerance with repeatedadministration. This is why the trituration technique presentedin this module suggests beginning with pure oxygen and increasingnitrous oxide slowly at each patient appointment. It is not safeto assume that the previous analgesic level will be appropriate onsequential visits. A very rapid induction also might cause nauseaor other adverse reactions.
A complete and accurate chart recording includes the followinginformation:
1. patient's vital signs (pre and post-op);
36
3C''
2. consent of the patient was granted;
3. routine information including date, procedure performed,and information given to the patient;
4. maximum levels of nitrous oxide and oxygen stated interms of percentages of each gas administered and totalvolume used;
5. length of administration;
6. any other anesthetics, premedication, or post medicationadministered;
7. length of oxygenation and patient's report of feelingnormal prior to dismissal;
8. any side effects or complications incurred, or the factthat none occurred.
A sample chart entry follows:
9/15/90 MH reviewed; pulse 75, PB 125/82, resp. 16; consentfor N2p obtained; 73% 02, 27% N20 for 20 min.; 3% Carboncaine1.2 ml inf. alv.; amalgam #30 MOD; 8 liter 02 for 5 min. untilpatient reported normalcy; no complications, post-op vital 70,120/80, 16.
Additional considerations necessary for the ethical and legaladministration of nitrous oxide should be made. Emergencyequipment must be readily available at all times. Be certain tofollow all previously discussed precautionary measures including:taking a thorough medical history including vital signs; makingsure that the patient has regained normalcy prior to dismissal;obtaining consent of the patient before administration of nitrousoxide; documenting procedures thoroughly.
It is essential that any clinicians involved in the administrationof nitrous oxide complete specific training prior to use. This isimportant for safety of the patient as well as legal protection forthe operator. The dentist, dental hygienist and/or assistant canbe held liable in any civil or malpractice suits filed by thepatient.
Idaho State Board of Dentistry Rules and Regulations state thatdental assistants who have completed training and obtainedcertification can "aid in the administration of nitrous oxide."This rule has been interpreted to mean that dental assistants canmonitor the patient and adjust levels of nitrous oxide to lower
37
concentrations after nitrous oxide-oxygen analgesia has beenadministered by a licensed dentist. Dental assistants are notcertified to legally administer nitrous oxide to patients or tobegin induction.
A related consideration is liability insurance. Prior to utilizingnitrous oxide in the dental office, the liability policy must becleared with the insurance carrier. Cost might be increased by aminimal amount; however, the increased cost is balanced byincreased ability in patient management.
This completes instruction in the procedure for administration ofnitrous oxide. Since the discussion presented was lengthyincluding explanations and justifications for each step, Table 6presents a summary of steps to follow. Be certain to becometotally familiar with the procedure prior to continuing.
TABLE 6
SUMMARY OF STEPS IN THEPROCEDURE FOR ADMINISTRATION OF N20
PROCEDURAL STAGE STEPS INVOLVED
Preanesthetic 1. Have patient visit the restroom.Preparation 2. Check all equipment.
3. Turn on main tanks and analgesicmachine.
4. Review medical history and takevital signs.
5. Explain procedure and effects topatient and obtain consent.
6. Select appropriate size nosepieceand clean with cold sterilizingagent.
During Administration 1. Open air valve in nosepiece.2. Begin flow of 02 at 8 liters.3. Place nosepiece over patient's nose
allowing breathing adjustment time.4. Slightly close air valve in
nosepiece.5. Begin N20 at 20% concentration ( 1.5
1pm) and 02 at 80% 6.51 1pm).6. Observe patient for one minute prior
to changing dosage.7. Increase N20 by 1/2 liter and
decrease 02 by 1/2 liter untildesired effect is obtained.
8. Monitor clinical manifestationsclosely adjusting levels as neededafter waiting one minute.
9. Oxygenate patient until normalcy isregained (minimum 3 to 5 minutes).
Legal Chart Entry 1. Record a complete and accurate lec-aand Considerations entry.
2. Have emergency equipment readilyavailable.
3. Complete proper training prior toadministration.
4. Check with liability insurancecarrier.
39
4
CONTROVERSY IN LITERATURERELEVANT TO NITROUS OXIDE
Many references state that nitrous oxide is the safest of allanesthetic gases. Some literature states that there is no harmassociated with nitrous oxide at all. There are also many studieswhich show detrimental effects due to nitrous oxide. Problems withthese studies leave some question relevant to their validity.Often nitrous oxide is not isolated for study. It is tested inoperating rooms where other anesthetic gases are employedsimultaneously. Most results from studies which do isolate nitrousoxide have consisted of laboratory investigations on animals.Finally, extremely high levels and prolonged administration havebeen utilized for testing purposes.
Levels and length of administration seem to contribute to a
significant difference in results. The lower level of nitrousoxide employed and less prolonged administrations have shown lesseror no detrimental side effects. In addition, nitrous oxide hasbeen shown to exhibit addictive properties and to increasesusceptibility to suggestion. Literature has documented somedetrimental effects related to occupational exposure to traceamounts of nitrous oxide.
Occupational Exposure
Trace amounts of gases unavoidably leak into room air duringutilization of nitrous oxide. With chronic exposure, such asdental personnel receive during daily administrations to patients,nitrous oxide is potentially tonic. Sources of leakage include:the nitrous machine itself, hoses, the nasal mask or nosepiece, andthe patient's mouth. Possible detrimental effects to dentalpersonnel include: increased kidney and liver diseases, increasedspontaneous abortion (miscarriage), increased cancer and decreasedbone marrow. The incidence seems to be greater in females thanmales.
Preventive measures should be taken in the dental office tominimize exposure. Primary control measures include:
1. Testing equipment for leakage and providing preventivemaintenance 4 times/year.
2. Low leakage technicries
a. proper fitting nosepiece;b. closed air value on nosepiece or preferably use of
scavenging nose hood;c. minimize patient conversation.
40
40'43
3. Manufactured devices for collection and disposal of gases
a.b.
scavenging masks;outdoor ventilation system.
4. Air monitoring program.
Your dental supply representative can be consulted regardingspecifications and cost involved in this protective equipment. Themore frequently nitrous oxide is administered in a particulardental practice, the more essential these items become.
A bibliography is provided for furt..er information relevant to alltopics included in this module. To complete your instruction inthe administration of nitrous oxide, answer all questions on theself-examination that follows.
41
403
SELF-EXAMINATION
AIDING IN THE ADMINISTRATION OF N20
Directions: Answer the following questions on a separate piece ofpaper to the best of your ability. You may use the module to lookup needed information. Upon completion of the exam, review allresponses to familiarize yourself with pertinent information.
1. What portion/functions of the CNS and ANS are affected bynitrous oxide?
2. How does oxygen travel through the respiratory system?
3. What changes in respiration/breathing are described by thefollowing terms?
a. bradypnea e. eupneab. tachypnea f. anoxiac.d.
hyperpneahypopnea
g. hypoxia
4. How does nitrous oxide travel through the respiratory system?
5. What effect does N20 have on CNS and ANS?
6. What are possible side effects and adverse reactions ofnitrous oxide and how can these be prevented?
7. What is the difference between anesthesia and analgesia?
8. What are the four stages of anesthesia and what reactions willa patient have in each stage?
9. What are the clinical manifestations observed in each planeof analgesia?
10. How can a clinician recognize that a patient is in deep planetwo, approaching plane three of analgesia? What should bedone when these signs and symptoms occur?
11. How are a patient's respiration, blood pressure, pulse andpupils affected by the administration of nitrous oxide whenin plane two of analgesia and when in plane three of analgesiaor light anesthesia?
12. When is the administration of nitrous oxide indicated fordental treatment?
42
13. When is the administration of nitrous oxide contraindicatedfor dental treatment?
14. Why are vital signs recorded prior to the administration ofN20?
15. How is the pulse rate obtained?
16. What are normal pulse rates for an adult patient and a childpatient?
17. How is blood pressure taken (describe the procedure indetail)?
18. What is the normal blood pressure range for an adult patient?
19. What alterations in dental treatment should be made when thepatient's blood pressure is 140 to 160 systolic and/or 90 to95 diastolic; 160 to 200 systolic and/or 95 to 115 diastolic;and greater than 200 systolic and/or greater than 155diastolic?
20. How is the respiratory rate observed?
21. What are the normal respiratory rates for an adult patient anda child patient?
22. What should a dental professional do when a significantabnormality in vital sign(s) is noted?
23. What steps are taken during preanesthetic preparation?
24. What is a fail-safe system?
25. How should a clinician explain the procedures and effects ofnitrous oxide to a patient who is going to receive it?
26. What steps are followed during the administration of nitrousoxide?
27. How is the ratio (percentage) of oxygen to nitrous oxidecomputed If 6 liters of 02 and 2 liters of N20 areadministered?
28. What is the maximum ratio of 02 to N20 that is recommended foradministration during routine dental therapy?
29. What procedures are instituted if a patient is receiving toomuch N20?
30. How and why is a patient oxygenated prior to dismissal?
43
4u
31. Why is a complete and accurate legal chart entry essentialfollowing nitrous oxide administration?
32. What points should be recorded in a complete and accuratelegal chart entry following administration of nitrous oxide?
33. How does the Idaho State Board of Dentistry define "aiding inthe administration" of nitrous oxide?
34. What are some of the variables which halle had an effect onnitrous oxide research?
35. What preventive measures should be taken in the dental officeto minimize occupational exposure to nitrous oxide?
Selected Texts
Malamed, S.F.
BIBLIQGMEIY
Sedation: A Guide to Patient Management. C.V.
Mosby Co., St. Louis, 1985.
Malamed, S.F. Handbook of Medical EmerC.V. Mosby Co., St. Louis, 1989.
encies in Dental Practice.
Bennett, C.R. Conscious Sedation in Dental Practice. C.V. MosbyCo., St. Louis, 1978.
Langa, H. Relative Analgesia in Dental Practice. W. B. SaundersCo., Philadelphia, 1976.
Selected Articles
Henry, R.J. and Quock, R.M. "Cardiovascular influences of nitrousoxide in spontaneously hypertensive rats," Anesth. Proq.,36(3):88-92, 1989.
Becker, D.E. "The respiratory effects of drugs used for conscioussedation and general anesthesia." JADA, 119:153-6, .Tuly 1989.
Jastak, J.T. "Issues of pain and anxiety control training andcontinuing education." J. Dent. Educ., 53 (5/6):293-6, 1989.
"Dental Phobia: Conquering fear with trust." JADA, 119:593-8,Nov. 1989.
Weinstein, P., et al. "The use of nitrous oxide in the treatmentof children: results of a controlled study." JADA, 112:325-331,March 1986.
"Conscious Sedation: Benefits and risks." JADA, 109:546 -55i, Oct.1984.
Duncan, G.H. and Moore, P. "Nitrous oxide and the dental patient:a review of adverse reactions." JADA, 108:213-9, Feb. 1984.
45
4f17
Module 5-B
AIDING IN THE ADMINISTRATION
OF
NITROUS OXIDE-OXYGEN ANALGESIA
Final Examination
4 CI
Name
AIDING IN THE ADMINISTRATIONOF NITROUS OXIDE/OXYGEN ANALGESIA
FINAL EXAMINATION
DateGrade
Directions: Answer the following multiple choice questions bycircling the one letter representing the most correctanswer.
1. How does nitrous oxide travel through the blood stream?
a. attached to hemoglobinb. in a free gas statec. by a chemical bondd. attached to red blood cells
2. Which of the following statements defines the term "hypoxia"?
a. underrespirationb. slow breathingc. normal breathingd. decreased oxygen in tissuee. increased oxygen in tissue
3. How is nitrous oxide classified when considering all of itsproperties?
a. anestheticb. analgesicc. sedatived. a and be. none of the above
4. Which of the following side effects can occur withadministration of nitrous oxide/oxygen at analgesic levels?
1. bone marrow depression2. hallucinations3. brain damage4. loss of protective reflexes5. nausea
Answer: a. 1, 2 and 3b. 1, 2 and 5c. 2, 3 and 4d. 2, 4 and 5e. all of the above
5. Which of the following reactions would indicate that a patientis being maintained at the appropriate level of relativeanalgesia?
a. the patient gigglesb. the patient's voice sounds "throaty"c. the patient is totally unaware of surroundingsd. the patient's pupils are dilatede. the patient feels a slight tingling in fingers and toes
4O)
6. Which of the following reactions would indicate that a patientis in deep plane two of analgesia (indicating overly profounddepth)?
a. the patient's voice scfunds "throaty"b. the patient's mouth tends to close frequentlyc. the patient has a dreamy lookd. the patient drifts in and out of environment
7. How are the patient's vital signs affected by administrationof nitrous oxide at the appropriate level cf relative analgesia?
a. pulse, respiration and blood pressure remain unchanged,within normal range
b. pulse is accelerated; respiration and blood pressureremain unchanged
c. pulse, respiration and blood pressure are all slowedd. blood pressure is reduced; pulse and respiration remain
unchanged
8. Which of the following conditions would contraindicateadministration of nitrous oxide?
Answer: a. 2, 3 and 4b. 1, 2 and 5c. 3, 4 and 5d. 3 and 5e. all of the above
9. What is the normal pulse rate for an adult patient"'
a. 80-120 beats/minuteb. 60-100 beats/minutec. 40-80 beats/minuted. 100-140 beats/minute
10. What is the normal blood pressure range for an adult patient?
a. less than 120 and c. 140 to 160 and/orless than 80 90 to 95
b. less than 140 and d. 160 to 200 and/orlessthan 90 95 to 115
410
11. What safety measures are important when administering nitrousoxide?
a. an alarm sounds if the equipment is malfunctioningb. a minimum of 2.5 to 3 liters of oxygen flows from the
machine at all timesc. the nitrous oxide will immediately turn itself off if
oxygen runs outd. all of the above
12. What is the maximum percentage of nitrous oxide that isrecommended for administration (with oxygen) to a dentalpatient?
a. 25%b. 50%c. 75%d. 90%
13. If a patient becomes irritated or he/she can no longercooperate during dental treatment with nitrous oxide, whatshould be done to rectify the situation?
a. reduce the level of nitrous oxideb. increase the level of oxygenc. reassure the patientd. all of the above
14. How should a patient be oxygenated prior to dismissal toinsure return to normalcy after a nitrous oxide administration?
a. remove the nosepiece and allow the patient to breathroom air for 3-5 minutes
b. administer low levels of nitrous oxide toward the endof the appointment
c. administer pure oxygen for 3-5 minutesd. allow the patient to sit in the waiting room until he/she
feels normal
15. Which of the following legal considerations are necessarywhen nitrous oxide is employed during dental patient therapy?
1. a complete and accurate chart entry2. obtaining consent of the patient3. readily available emergency equipment4. taking a thorough medical history including vital signs5. completing proper training prior to administering nitrous
oxide
Answer: a. 1, 2 and 3b. 2, 3 and 4c. 1, 3, 4 and 5d. all of the above
16. A patient comes to the office for root planing and curettage.The hygienist is performing these procedures and monitoringthe nitrous oxide which has been administered. After theseprocedures are completed, the dental assistant is asked tostay with the patient until a state of normalcy is reached.The patient is dismissed and has a car accident one blockfrom the office. Who could possibly be held liable if asuit were filed?
a. the dentist onlyb. the dental hygienist onlyc. the dental assistant onlyd. the hygienist and assistante. the dentist, hygienist and assistant
17. How should a clinician explain the procedures and effectsof nitrous oxide to a patient prior to administration?
a. warn patient of possible adverse reactionsb. assure patient that it is totally safec. tell patient that he/she might feel intoxicated or "high"
d. discuss techniques and effects in a positive mannere. all of the above
18. If a patient is talking frequently during dental treatmentwith nitrous oxide, what can be expected?
a. analgesia will be too lightb. analgesia will be too deepc. analgesia will not be affected
19. What color is utilized on all nitrous oxide tanks andequipment?
a. greenb. bluec. redd. no specific color
20. If 3 liters of nitrous oxide and 5 liters of oxygen are beingadministered to a patient, what is the percentage of nitrous
oxyde?
a. 25%b. 37%c. 50%d. 63%
41'
True/False: Answer the following items by circling T for correctstatements or F for incorrect statements.
T F 1. Nitrous Oxide equipment should be tested for leakageat least four times a year.
T F 2. Patients with psychological problems should receivenitrous oxide to calm them during dental procedures.
T F 3. Children should only receive nitrous oxide in raresituations.
T F 4. A patient may drift in and out of the environment whenthe proper level of nitrous oxide is being administered.
T F 5. Nitrous oxide should not be administered to epilepticpatients.
413
AIDING IN THE ADMINISTRATION OFNITROUS OXIDE/OXYGEN ANALGESIA
GRADING FOR. FINAL EXAMINATION
In order to successfuly complete the Aiding in the Administrationof Nitrous Oxide/Oxygen course, students must pass the finalexamination with a grade of 75% or higher. The followingcalculations are provided to the course instructor for determiningexamination grades. Multiple choice questions (#1-20) are twopoints each and true/false questions are one point each. Totalpoints possible are 45.
2. D 12. B3. A 13. D4. B 14. C5. B 15. D6. B 16. E7. A 17. D
8. D 18. A9. A 19. B10. A 20. B
True/False : 1 point each
1. T2. F3. F4. T5. F
415
Module 6
TAKING ALGINATE IMPRESSIONS
413
Module 6-A
TAKING ALGINATE IMPRESSIONS
FOR STUDY CASTS
Instructor /Student Module
e
TAKING ALGINATE IMPRESSIONS FOR STUDY CASTSA Self-Study Module
developed byCarole R. Christie, CDA, M.Coun.
Department of Dental Hygiene
Idaho State UniversityJune, 1991
Adopted byIdaho State Board for Vocational Education
650 West State Street
Boise, Idaho
4 .!6
TABLE OF CONTENTS
Introduction 1
Course Description 2
Objectives 8
Background Information 9
Physical Properties of Alginate 10
Composition of Alginate 10
Packaging of Alginate 11
Mixing of Alginate 11
Setting Time of Alginate 12
Dimensional Stability 12
Advantages of Alginate 13
Types of Impression Trays 13
Tray Selection 16
Tray Modifications 18
Tray Sterilization 18
Disinfection of Impression 19
Storage of Alginate 19
Labeling of the Impression 20
Gagging Patient - Variation in Technique 20
Tongue Space of the Mandibular Impression 21
Alginate Impression Procedure 22
Defects in the Impression and Possible Causes 34
Study Questions 35
References 38
Taking of Alginate Impressions for Study Casts Evaluation Form 39
4 ti)
oINTRODUCTION
The taking of alginate impressions for study casts is recognized as a legal procedure for
Idaho dental assistants to perform under the direct supervision of a dentist. Assistants must
first successfully complete coursework approved by the Idaho State Board of Dentistry. A
certificate or diploma of course completion as issued by the teaching institution will be the
assistant's verification of compliance with Board standards. This module was designed to
be utilized by Board-approved teaching entities. It offers basic information on the taking of
alginate impressions which is intended to be supplemented with formal classroom,
laboratory and clinical instruction.
The original module, Alginate Impressions and Diagnostic Casts, was produced by
Quercus Corporation in 1978 with the assistance of the U.S. Department of Health,
Education and Welfare (HEW Contract No. 299-74-0016) . The original module is no
longer in print. Much of the information in this module has been taken from the 1978
version and has been updated to include more recent developments on this topic.
COURSE DESCRIPTIONTaking Alginate Impressions for Study Casts
Clock Hours
Lecture/Demonstration:
Laboratory/Clinical:
Written Examination:
Final Practical Examination:
Course Description
2 hours
5-1/2 hours
30 minutes
Offered in conjunction with other
expanded function exams at completion
of 40-hour curriculum.
The primary goal of this course is to provide the dental assistant with the background
knowledge and clinical experience in taking acceptable alginate impressions for study casts.
Upon completion of this course, the student will receive a certificate of
compeletion/recognition indicating competency in performing this procedure.
Required Text
Taking Alginate Impressions for Study Casts. a self-study module developed by Carole R.
Christie, CDA, M. Coun., Idaho State University, 1991. The original module, Alginate
Impressions and Diagnostic Casts, was produced by Quercus Corporation in 1978 with the
assistance of the U.S. Department of Health, Education and Welfare (HEW Contract No.
299-70016).
Course Requirements
For successful completion of the course, each participant must complete the following
requirements:
1. .Attend all class and clinic sessions;
2. Take 4 sets of acceptable alginate impressions;
(a minimum score of 86% must be reached on each set of impressions to be
considered acceptable).
2
NOTE: Impressions may be taken on other students. However, to assure exposure
to a variety of patients, they may only be taken on a given student once.
3. Achieve a minimum of 75% on the written examination;
4. Successfully complete the final practical examination to receive a certification of
completion/recognition to perform this function.
5. Materials to be supplied by the student:
a. rubber mixing bowl
b. alginate spatula
c. assorted sizes of alginate trays
d. alginatee. powder/water measuring devices
f. utility wax strips
g. bite registration waxh. manufacturer's recemmened disinfecting agent for impressions and wax bite
Evaluation/Grading
This course is designed on a Pass/Fail basis. In order for the student to pass the course,
the requirements listed on page 2 must be successfully completed. As previously stated,
the minimum percentage for acceptable impressions is 86% and minimum of 75% must be
achieved on the written examination. A description for determining the percentage scores is
presented below.
A. Calculating Percentages for Alginate Impressions
Refer to the attached evaluation form on page 6 (it is the same as the evaluation form at
the end of the module). Each criteria is evaluated as follows:
C = Criterion met = 2 points
I = Improvable =1 point
X= Not Improvable = 0 points
Since there are 13 criteria (including the placement of a tongue space) for the mandibular
impression and 9 criteria for the maxillary impression, each worth a maximum of 2 points,
there are 44 total points possible for each set of impressions. A percentage score can then
be calculated by adding the total number of points earned and dividing by the total points
3
42 Z,
possible (44).
To facilitate calculations, the following evaluation scale is provided:
Points Achieved Percentage
44 100
43 98
42 95
41 93
40 91
39 89
86 Proficiency Level
37 84
36 82
35 79
34 77
33 75
32 73
31 70
B. Calculating Percentages for Written Examination
For each wrong answer on the written examination, subtract 5 points from 100 to
determine final score.
Procedure
1. Read the self-study module, Taking Alginate Impressions for Study Casts.
2. Answer objectives listed on page 8 .
3. Answer study questions on page 35 of the module.
4. For supplementary reading, refer to the reference list on page 38 of the module.
4
4 7 3
COURSE SCHEDULE
Clock Method of AssignedHours Instruction Topic/Activity Readings
2 Lecture/ Introduction to Course Self-study module,Demonstration Purpose of Alginate Impressons pp. 1-40
Physical Properties of AlginateComposition of AlginatePackaging of AlginateMixing of AlginateSetting Time of AlginateDimensional StabilityAdvantages of AlginateTypes of TraysTray SelectionTray ModificationsTray SterilizationDisinfection of ImpressionStorage of AlginateLabeling of the ImpressionGagging Patient-Variation in TechniqueTongue Space of the Mandibular ImpressionAlginate Impression ProcedureDefeats in Impression and Possible Causes
Videotape View videotapeTaking Alginate Impressions for Study Casts
5 1/2 Laboratory/Clinical Students practice taking impressions on one another tocomplete course requirements.(4 Accepttle impressions, all on different patients)*Refer to Course Requirements
30 WrittenMinutes Examination
A comprehensive written exam consisting ofmultiple choice and/or true/false questions.
5
42-;
TAKING ALGINATE IMPRESSIONS FOR STUDY CASTSEVALUATION FORM
Clinician Patient
Date Instructor
Key: C = Criterion Met = 2
I = Criterion Improvable = 1
X = Unacceptable = 0
* = Critical task; if a 2 is not achieved on a critical task, the process evaluation is
unsatisfactory and must be redone.
TASK
MANDIBULAR
1. All detail is reproduced, including the complete peripheral
C
SELF
I X
INSTRUCTOR
C I X
turn and a portion of the retromolar pads. 2 1 0 2 1 0
2. TN: detail is sharp, not blurred or indistinct. 2 1 0 2 1 0
3. Impression is free of voids in critical areas 2 1 0 2 1 0
4. Impressions is free of large folds of alginate 2 1 0 2 1 0
5. e no areas where the alginate has pulled away from the tray. 2 1 0 2 1 0
6. Impression is free of bulges or depressions that indicate a subsurface
bubble.
2 1 0 2 1 0
7. Impression is free of rips and tears, except in interpmximal areas. 2 1 0 2 1 0
8. Alginate thoroughly covers the tray (no tray is visible through the
alginate).
2 1 0 2 1 0
9. The alginate is smooth, not sponge-like 2 1 0 2 1 0
/18
6
423
For tongue space on the mandibular arch:
I. The surface is smooth. 2 1 0 2 1 0
2. The addition does not overlie the impression. 2 1 0 2 1 0
3. The addition is generally flat. 2 1 0 2 1 0
4. The addition is long enough to include the retromolar pads. 2 1 0 2 1 0
MAXILLARY
1. All detail is reproduced, including the complete peripheral turn,
Woodall, I.R., Dafoe, B.R., Young, N.S., Weed-Fonner, L., Yankell, S.L,Comprehensive Dental Hygiene Care, third edition, the C.V. Mosby Company, 1989.
U.S. Department of Health, Education and Welfare. Taking Alginate Impressions forStudy Casts, HEW Contract No. 231-75-0407. Produced by Quercus Corporation, 1976.
38
457
TAKING ALGINATE IMPRESSIONS FOR STUDY CASTSEVALUATION FORM
Clinician Patient
Date Instructor
Key: C = Criterion Met = 2
I = Criterion Improvable =1
X = Unacceptable = 0
* = Critical task; if a 2 is not achieved on a critical task, the process evaluation is
unsatisfactory and must be redone.
TASK
MANDIBULAR
1. All detail is reproduce, including the complete peripheral
C
SELFI X
INSTRUCTOR
C I X
turn and a portion of the retromolar pad. 2 1 0 2 1 0
2. The detail is sharp, not blurred or indistinct. 2 1 0 2 1 0
3. Impression is free of voids in critical areas 2 1 C 2 1 0
4. Impressions is free of large folds of alginate 2 1 0 2 1 0
5. There are no areas where the alginate has pulled away from the tray. 2 1 0 2 1 0
6. Impression is free of bulges or depressions that indicate a subsurface
bubble.
2 1 0 2 1 0
7. Impression is free of rips and tears, except in interproximal areas. 2 1 0 2 1 0
8. Alginate thoroughly covers the tray (no tray is visible through the
alginate).
2 1 0 2 1 0
9. The alginate is smooth, not sponge-like 2 1 0 2 1 0
/18
39
For tongue space on the mandibular arch:
1. The surface is smooth.
2. The addition does not overlie the impression. 2 1 0 2 1 0
3. The addition is generally flat. 2 1 0 2 1 0
4. The addition is long enough to include the retromolar pads. 2 1 0 2 1 0
MAXILLARY
1. All detail is reproduced including the complete peripheral turn,
2. The detail is sharp, not blurred or indistinct. 2 1 0 2 1 0
3. Impression is free of voids in critical areas. 2 1 0 2 1 0
4. Impression is free of large folds of alginate. 2 1 0 2 1 0
5. There are no areas where the alginate has pulleu away from the 2 1 0 2 1 0
tray.
6. Impression is free of rips and tears, except in interproximal
areas. 2 1 0 2 1 0
7. Alginate thoroughly covers the tray (no tray is visible through
the alginate. 2 1 0 2 1 0
8. Impression is free of bulges or depressions that indicate
subsurface bubble. 2 1 0 2 1 0
9. The alginate is smooth, not sponge-like. 2 1 0 2 1 0
/18
40
4 5 5
Module 6-B
TAKING ALGINATE IMPRESSIONS
FOR STUDY CASTS
Final Examination
460
NameDateGrade
TAKING ALGINATE IMPRESSIONS FOR STUDY CASTSWRITTEN EXAMINATION
directions: Circle the best answer to the questions below.
1. An alginate impression is a mold of the teeth.
a. positiveb. negative
2. Alginate is classified as:a. a reversible hydrocolloidb. an irreversible hydrocolloidc. a reversible plasterd. an irreversible plaster
3. The type of reaction that occurs when alginate gels is a:a. physical reactionb. thermal reactionc. chemical reaction
4. The setting time for a normal set alginate is:
a. 30 secondsb. 1-2 minutesc. 2-4.5 minutesd. 5-6 minutes
5. The average mixing time for alginate material is:
a. 40 seconds to 1 minuteb. 60 seconds to 1 1/2 minutesc. 55 seconds to 2 minutes
46. .
6. Increasing the temperature of the water used to mix alginate material will:1. decrease the setting time2. increase the setting time3. cause syneresis4. cause imbibition
ANSWER: a. 1 only
b. 2 only
7. The opposite of imbibition is:a. gelationb. moisture contaminationc. polymerizationd. syneresis
c. 1 and 3
d. 1 and 4
e. 2 and 3f. 2 and 4
8. Criteria for selection of the appropriate tray size for an alginate impression include:1. tray clears all tissues by at least 4mm2. tray does not cover the retromolar pads3. tray sides clearly depress frenum4. the patient does not feel pain or discomfort
ANSWER: a. 1 and 3
b. 1 and 4c. 2 and 4
d. 1, 2 and 4e. 2, 3 and 4f. all of the above
9. If an impression tray is the correct width, but not long enough, what can be done toensure an adequate impression?
a. select a larger trayb. fill the tray with extra alginatec. seat the tray from the anterior to posteriord. add extra wax to the back of the tray
10. Holding the patient's lip out so that it is completely extended and very tight whiletaking an alginate impression will result in:
a. "flattened" peripheral rollb. a void in the peripheral rollc. alginate sticking to the teeth
462
11. To minimize gagging and overcome fear, thea. mandibularb. maxillary
impression is taken first.
12. The proper position for the patient's tongue while taking a mandibular impression is :
a. rested on the floor of the mouthb. extended to the roof of the mouth
13. When removing an impression from a patient's mouth the air seal is "broken" by:
a. running you index finger around the periphery of the tray
b. using a quick, snapping motion to remove the trayc. using a slow, even motion to remove the tray
14. Proper storage for alginate impressions include?1. wrapped in dry cloth2. wrapped in damp cloth3. immersed in water4. placement in a humidor
ANSWER: a. 1
b. 2c. 3d. 4
e. 1 and 4f. 2 and 4g. 3 and 4
Circle "a." if the statement is correct or "b." if the statement is incorrect.
15. Diagnostic casts are a supplement to the oral examination.
a. correctb. incorrect
16. Care should be taken in shaking a "dustless" can of alginate.a. correctb. incorrect
17. Air entrapment can be minimized and a better mix can be obtained if the water is added
to the powder rather than the powder to the water.
a. correctb. incorrect
4 L. rt;
18. The handle of the tray should be positioned in the midline of the arch.a. correctb. incorrect
19. The alginate impression should be removed with a snap to minimize distortion.a. correctb. incorrect
20. Impressions only need to be rinsed and bagged before being sent to the laboratory.a. correctb. incorrect
4 6 -I:
Name KEY
Grade
ALGINATE IMPRESSIONSWRITTEN EXAMINATION
Pirectiou Circle the best answer to the questions below.
CORRECT ANSWERS ARE IN BOLD TYPE.
1. An alginate impression is aa. positiveb. negative
2. Alginate is classified as:a. a reversible hydrocolloidb. an irreversible hydrocolloidc. a reversible plasterd. an irreversible plaster
mold of the teeth.
3. The type of reaction that occurs when alginate gels is a:
a. physical reactionb. thermal reactionc. chemical reaction
4. The setting time for a normal set alginate is:a. 30 secondsb. 1-2 minutesc. 2-4.5 minutesd. 5-6 minutes
5. The average mixing time for alginate material is:
a. 40 seconds to 1 minuteb. 60 seconds to 1 1/2 minutesc. 55 seconds to 2 minutes
6. Increasing the temperature of the water used to mix alginate material will:1. decrease the setting time2. increase the setting time3. cause syneresis4. cause imbibition
ANSWER: a. 1 onlyb. 2 only
7. The opposite of imbibition is:a. gelationb. moisture contaminationc. polymerizationd. syneresis
c. 1. and 3
d. 1 and 4
e. 2 and 3f. 2 and 4
8. Criteria for selection of the appropriate tray size for an alginate impression include:1. tray clears all tissues by at least 4mm2. tray does not cover the retrornolar pads3. tray sides clearly depress frenum4. the patient does not feel pain or discomfort
ANSWER: a. 1 and 3b. 1 and 4c. 2 and 4
d. 1, 2 and 4e. 2, 3 and 4f. all of the above
9. If an impression tray is the correct width, but not long enough, what can be done toensure an adequate impression?
a. select a larger trayb. fill the tray with extra alginatec. seat the tray from the anterior to posteriord. add extra wax to the back of the tray
10. Holding the patient's lip out so that it is completely extended and very tight whiletaking an alginate impression will result in:
a. "flattened" peripheral rollb. a void in the peripheral rollc. alginate sticking to the teeth
46
11. To minimize gagging and overcome fear, thea. mandibularb. maxillary
imrression is taken first.
12. The proper position for the patient's tongue while taking a mandibular impression is :a. rested on the floor of the mouthb. extended to the roof of the mouth
13. When removing an impression from a patient's mouth the air seal is "broken" by:
a. running you index finger around the periphery of the tray
b. using a quick, snapping motion to remove the trayc. using a slow, even motion to remove the tray
14. Proper storage for alginate impressions includes:1. wrapped in dry cloth2. wrapped in damp cloth3. immersed in water4. placement in a humidor
ANSWER: a. 1
b. 2c. 3d. 4
e. 1 and 4f. 2 and 4g. 3 and 4
Circle "a." if the statement is correct or "b." if the statement is incorrect.
15. Diagnostic casts are a supplement to the oral examination.a. correctb. incorrect
16. Care should be taken in shaking a "dustless" can of alginate.a. correctb. incorrect
17. Air entrapment can be minimized and a better mix can be obtained if the water is added
to the powder rather than the powder to the water.
a. correctb. incorrect
4 7
18. The handle of the tray should be positioned in the midline of the arch.a. correctb. incorrect
19. The alginate impression should be removed with a snap to minimize distortion.a. correctb. incorrect
20. Impressions only need to be rinsed and bagged before being sent to the laboratory.a. correctb. incorrect
4
Module 7
CORONAL POLISHING
4E :-)
Module 7-A
CORONAL POLISHING
Instructor's Guide
USE OF THE MOUTH MIRROR
A GUIDE FOR INSTRUCTORS
LISA S. FLEMING, R.D.H., B. S., M.A.
477
USE OF THE MOUTH MIRROR
SYNOPSIS
The mouth mirror is utilized when performing an oral inspection, and duringinstrumentation procedures for indirect vision, illumination,' transillumination andretraction. This audiovisual program presents the proper technique for insertion of themouth mirror and use of a fulcrum when using it for indirect vision, illumination,transillumination and retraction.
Techniques which can cause patient discomfort such as retracting the buccal mucosa withthe shank and resting the mirror head on the alveolar bone are demonstrated. All of theprocedures shown in this audiovisual program are demonstrated on a patient.
Background Knowledge
For this audiovisual program to be most effective, the student should be familiar with thefollowing fundamentals:
design and classification of prophylaxis instruments
basic dental terminology
basic dental anatomy
intraoral landmarks
Terminology
The following terms are used in this instructional tape:
Upon completion of this instructional tape, and with supervised practice, the student will beable to:
1. Correctly demonstrate the use of the mouth mirror when performing an oral inspection.
2. Correctly demonstrate the use of the mouth mirror during instrumentation procedures.
3. Correctly demonstrate the use of the mouth mirror for indirect vision, illumination,transillumination and retraction.
473
USE OF THE PROPHYLAXIS ANGLEAND HANDPIECE
A GUIDE FOR INSTRUCTORS
LISA S. FLEMING, R.D.H., B.S., M.A.
Use of the Prophylaxis Angleand Iiandpiece
SYNOPSIS
Polishing refers to the use of an abrasive to create a smooth tooth surface. This can beaccomplished by the use of the prophylaxis angle and motor driven handpiecC, porte polisher andby air polishing. This audiovisual program presents the indications, contraindications and correcttechnique for using the prophylaxis angle and motor driven handpiece.
The mechanism for attachments to the prophylaxis angle is presented, as well as the indications foruse of the different abrasive agents. Correct technique, including proper grasp, fulcrum andactivation of the prophylaxis angle is demonstrated on a patient.
)3ackground Knowledge
For this audiovisual program to be most effective, the student should be familiar with the followingfundamentals:
basic dental terminology
basic dental anatomy
characteristics of abrasive agents
proper grasp, fulcrum and activation of an instrument
characteristics of the soft deposits that form on the teeth
design features of the prophylaxis angle and motor driven handpiece
Terminology
The following terms are used in this instructional tape:
Upon completion of this instructional tape, and with supervised practice, the student will be ableto:
1. List 7 contraindications for use of the prophylaxis angle and handpiece.
2. Identify the appropriate attachments and abrasive agent to be used on a given patient.
3. Identify the rationale its to why a topical fluoride treatment is indicated following polishingprocedures.
4. Demonstrate correct technique for use of the prophylaxis angle and handpiece.
471;
INSTRUMENT GRASPUSE OF A FULCRUM
ANDINSTRUMENT ACTIVATION
A GUIDE FOR INSTRUCTORS
LISA S. FLEMING, R.D.H., B. S., M.A.
477
INSTRUMENT GRASPUSE OF A FULCRUM
ANDINSTRUMENT ACITVATION
SYNOPSIS;
When performing intraoral procedures, it is essential that an appropriate graspand fulcrumbe utilized in order to practice both stable and efficient instrumentation. This audiovisualprogram presents the fundamental principles to be used in establishing a fulcrum andactivating an instrument.
This audiovisual program features demonstrations of the palm grasp, modified pen grasp,exploratory stroke, working stroke, as well as intraoral and extraoral fulcrums. A manikinis utilized in the program to demonstrate a fulcrum on anterior and posterior teeth.Additionally, the concept of keeping the shank of the instrument parallel to the long axis ofthe tooth is graphically illustrated in the program.
The two fundamental movements for activating an instrument are presented: the rolling armand the rocking arm motion. The program concludes with the operator performing thesetechniques on a patient.
Background Knowledge
For this audiovisual program to be most effective, the student should be familiar with thefollowing fundamentals:
* design and classification of prophylaxis instruments
* basic dental terminology
* basic dental anatomy
universal tooth numbering system
Terminology
The following terms are used in this instructional tape:
air and water syringe modified pen graspanterior curet mouth mirroranterior teeth occlusalexploratory stroke oral tissueshard deposits palm graspincisal posterior teethlong axis of tooth rocking aim motionextraoral fulcrum rolling arm motionintraoral fulcrum shankinstrument activation working areaintraoral working stroke
Objectives
Upon completion of this instructional tape, and with supervised practice, the student will beable to:
1. Correctly demonstrate and/or describe the modified pen grasp.,,
2. Correctly demonstrate and/or describe the palm grasp.
3. Correctly demonstrate the use of a fulcrum when performing intraoral procedures.
4. Correctly demonstrate the rolling arm motion when activating an instrument.
5. Correctly demonstrate the rocking arm motion when activating an instrument
4 ? 3
Module 7-B
CORONAL POLISHING
Final Examination
4a:0
CORONAL POLISH EXAMINATION
Name;
Date;
S core; (Possible 46)
1. Which of the following phrases describes what is polished during the coronal polishprocedures? (1 point)
a. anatomical crownb. clinical crownc. normal crownd. ideal crown
2. Which of the following phrases best describes the goal of the coronal polishprocedure? (1 point)
a. to remove all soft and hard deposits from the teethb. to remove all intrinsic stains from the teethc. to remove stains, films and dental plaque from the teethd. to remove all extrinsic stains from the teeth
3. Which of the following is not a usual function of the explorer during the coronalpolish? (1 point)
a. It is used to determine if stains on the teeth are intrinsic or extrinsicb. It is used to remove stain from the teethc. It is used to determine when all deposits have been removed from the teethd. It is used to determine if stains are attached to hard deposits
4. Which of the following explains the major reason for using water or other lubricantto wet the abrasive agent? (1 point)
a. to make it easier to carry to the tooth in the rubber cupb . to make it more palatable for the patientc. to make stain removal easierd. to minimize heat production during polishing
5. The pressure gauge on the dental unit should read how many,- pounds of pressureduring use of the handpiece for coronal polishing? (1 point)
6. Which surfaces of the teeth are aot, adequately polished with the rubber prophy cup?(1 point)
a. facialb. lingualc. interproxim ald. occlusale. b and df. c and d
7. Normally whit: part of the rubber cup does the polishing? (1 point)
a. a portion of the inner surface of the edgeb. a portion of the outer surface of the edgec. the middle of the cupd. the side of the cup
8. 3% hydrogen peroxide is particularly effective in removing which type of stain?(1 point)
a. orange stainb. green stainc. tobacco staind. tea stain
9. Interproximal surfaces and gingival surfaces of fixed restorations (e.g., bridges) arebest polished with which of the following? (1 point)
a. rubber cup and abrasive agentb. brush and abrasive agentc. dental tape and abrasive agentd. soft wooden point and abrasive agent
10. The polishing stroke is best described by which of the following phrases? (1 point)
a. short, light and intermittantb. short, heavy and intermittantc. short, light and continuousd. long, light and continuous
11. Dental floss should be carried through the contact at which angle? (1 point)
a. horizontallyb. at an oblique anglec. vertically
12. The handpiece should be activated Before/After touching the tooth with the rubbercup. (Circle correct response - 1 point)
13. The polishing instrument best suited to polish the occlusal surfaces of the teeth is therubber cup/brush. (Circle correct response - 1 point)
14. The more particles of abrasive applied to the teeth per unit of time the Lower/Fasterthe rate of abrasion. (Circle correct response - 1 point)
15. Write ygg. or ap. in each blank to indicate whether or not the listed abrasive agent isappropriate on the surfaces. (9 points)
Flour of pumice Zirconium silicate Tin oxide
Enamel Enamel Enamel
Root surface Root surface Root surface
Gold Gold Gold
16. Abrasion/Polishing is defined as the wearing away of surface material by friction.(Circle correct response - 1 point)
17. T F Presence of highly inflamed or traumatized gingiva is a contraindicationfor the coronal polish procedure. (1 point)
18. T F A patient chart entry is not considered complete unless it is written in ink.(1 point)
19. T F Using the pad of the third/middle finger resting on the instrument orhandpiece increases control when manipulating the instrument. (1 point)
20. T F State laws regulating dental practice including performance of the coronalpolish are uniform. (1 point)
21. T F As the operator during a coronal polish you are morally obligated to requestassistance and/or consultation when the procedure requires skills ortraining beyond your level. (1 point)
22. T F The saliva ejector is the best device to remove pumice and saliva from thepatient's mouth during the coronal polish procedure. (1 point)
23. T F Disclosing solution is applied after the coronal polish to help evaluate theeffectiveness of the coronal polish procedure. (1 point)
24. T F Items placed on the patient tray need to be sterilized or disposed of only ifthey have directly contacted the patient's mouth. (1 point)
25. T F If the coronal polish patient has had his medical history reviewed within thepast week, you need not review it again. (1 point)
26, T F 3% hydrogen peroxide is used undiluted to help remove green stain. (1 point)
27. T F Operator safety glasses are one means of preventing disease transmissionduring the coronal polish procedure. (1 polish)
28. T F It is the operator's obligation to see to it that a qualified person removeshard deposits from the teeth before or during the coronal polish procedurewhen they are detected. (1 point)
4S3
29. Describe the appearance gingival abrasion caused by improper use of the rubber cup.(2 points)
30. Explain the three topics you would discuss with a patient regarding the coronal polishprocedure. (3 points)
31. When you self-evaluate your coronal polish what 5 criteria should have been met.(5 points)
4 c'
FINAL EXAMINATION
CORONAL POLISH KEY
1. b
2.
3. b
4. d
5. b
6. f
7. a
8. b
9. c
10. a
11. b
12. before13. brush14. faster15. Flour of Pumice Zirconium Silicate Tin Oxide
29. Whitish burned area or red abraded or bleeding area.
Uneven gingival margin.
30. a. Purpose of coronal polishb. General sequence of procedures
c. Description of any sensation patient may experience
during the procedure.
31. a. Smooth tooth surfaceb. Lustrous/shiny tooth surface
c. Tooth surface free of deposit (extrinsic stain, soft deposit)
d. Gingival tissue has not been traumatized
e. Mouth free of abrasive particles
Module 7-C
CORONA. POLISHING
Student Module
M
CORONAL POLISHING
F 0 R
DENTAL ASSISTANTS
DEVELOPED BY
CAROLE KAWAMURA, RDH, MEd
Idaho State Board for Vocational Education650 West State StreetBoise, Idaho 83720
June 1991
ACINOWLEDGEMENTS
The author is very indebted to the following people for theircontributions to this module.
Meg Long for helpful critique of this module.
Dana Meyers of Management Solutions for typing themanuscripts.
Denise Bowen for encouragement and support.
Carlene Paarmann for encouragement and support.
4 P
Coronal Polish
TABLE OF CONTENTS
Section Paae No.
COURSE OUTLINE iii
COURSE SCHEDULE vii
PERMISSION SLIP viii
INTRODUCTION 1
CORONAL POLISHGoal 2
Rationale 2
Scope of Module 3
OBJECTIVES 4
LEGAL AND ETHICAL CONSIDERATIONS 5
PATIENT CARE
IDENTIFICATION OF DEPOSITS PRIOR TOCORONAL POLISH 9
INTRODUCTION 10
ARMAMENTARIUM 10
ASEPTIC TECHNIQUE 21
STUDY QUESTIONS 23
CORONAL POLISH PROCEDURES 31
Table of Contents - Continued
CORONAL POLISH CHECKLIST
STUDY QUESTIONS
BIBLIOGRAPHY
ii
490
47
50
56
CORONAL POLISH
Clock Hours:
Lecture/DemonstrationLaboratory/Clinical
Written Examination
Final Practical Examination:
Course Description:
3 hours3 hours laboratory8 hours clinical
30 minutes
For the convenience of bothstudents and examiners, it issuggested that the final examfor this course be offeredconcurrently with the finalexam for pit and fissuresealant. By doing so, itwill be necessary to obtainonly one patient.
The primary objective of this course is to provide the dentalassistant with the background knowledge and clinical experience incoronal polishing to enable them to perform this procedure in apractice setting. Upon successful completion of this course, thestudents will receive a certificate of completion/recognitionindicating competency in performing this procedure.
Required Text:
Coronal Polish, a self-study module developed by CaroleKawamura, RDH, MEd.; Idaho State University; 1991.
Course Requirements:
For successful completion of this course, each participantmust complete the following requirements:
1. Attend all class, laboratory and clinic sessions.
2. Polish on a dentoform in the laboratory setting.
3. Polish on a clinic partner and a patient who is not a courseparticipant.
4. Achieve a minimum of 75% on a written examination.
5. Successfully complete the final practical examination at aminimum of 85.7% to receive a certificate ofcompletion/recognition to perform this function.
This course is designed on a pass/fail basis. In order forthe student to pass the course, the requirements listed on page 1must be successfully completed. As previously stated, the minimumpercentage for acceptable coronal polish is 85.7% and a minimum of75% must be achieved on the written examination. A description fordetermining the percentage scores is presented below.
A. Calculating Percentages for Coronal Polish
Refer to the attached evaluation form. Each criteria isevaluated as follows:
C = Acceptable: Criteria met as stated
I = Improvable: moderately effective, needs improvement
X = Unacceptable: inefficient, harmful
NE = not evaluated
Points are assigned to each of the above.
C = 2 pointsI = 1 pointX = 0 points
Since there are 35 criteria, each worth a maximum of 2 points,there are a total of 70 points possible for the coronal polishprocedure. A percentage score can then be calculated byadding the total number of points earned and dividing by thetotal points possible.
iv
40'1.2
B. Calculating Percentages for Written Examination
46 10045 98
44 96
43 93
42 9141 89
40 87
39 85
38 8337 80
36 7835 76
34 74
33 7132 70
Objectives:
Proficiency level
Following completion of lecture and laboratory/clinicalactivities the student will be able to:
1. Explain the Idaho regulation with regard to coronal polish.
2. Explain the rationale for selective polishing vs. polishingthe entire dentition.
3. Recognize when modification or deferment of coronal polishis indicated.
4. Recognize situations where skills and training beyond personalability are required and request assistance as needed.
5. List the armamentarium required to perform coronal polish.
6. Explain the function of each component of the armamentarium.
7. Evaluate the patient's mouth and determine the appropriatepolishing agent for the coronal polish procedure.
8. Explain aseptic technique as it applies to this procedure.
9. Explain the technique for polishing with motor driveninstruments and auxiliary polishing aids.
10. Explain why a secure grasp and stable fulcrum are necessaryfor this procedure and describe how to establish them.
40 cl
11. Explain the uses of the mouth mirror when coronalpolishing.
12. Evaluate procedure and the final product to determinewhether it meets the criteria for acceptability.
13. Maintain armamentarium and treatment area as required.
Procedure:
1. Read self-study module, Coronal Polish.
2. Answer study questions in the module.
3. For supplementary reading, refer to references listed underbibliography of module.
vi
49:1.
COURSE SCHEDULE
ClockHours Instruction
Method of Topic/Activity AssignedReadings
3 Lecture/Demonstration
17 min. Videotapes40 sec.
Introduction to courseGoal of coronal polishRationale for coronal
polishLegal and Ethical
considerations relatedto coronal polish
Patient careArmamentarium for coronal
polishAseptic techniqueCoronal polish technique,
laboratory & clinical--patient operatorposition
--grasp, fulcrum--use of mirror andexplorer
- -Use of handpiece--maintenance of operative
area--use of--use of--use of--use of
strips- -use of dental floss--evaluation procedure
View University of Alabamavideotapes "Grasp, Fulcrum,""Use of mouth mirror, useof handpiece"
3 hrs. Laboratory Coronal polish on dentoform2 hrs. Clinical Coronal polish on a student
partnerComplete an acceptable coronal
polish on a patient*Refer to course requirements
30 mins. Written A comprehensive written examExamination consisting of multiple choice
and/or true/false questions.
NOTE: The final practical examination is offered in conjunctionwith the Pit and Fissure Sealant final examination.
vii
4Q't.)
CORONAL POLISHINGPIT AND FISSURE SEALANTS
PERMISSION SLIP
This is to verify that I examined(patient name)
on and diagnosed the treatment approved below. I give my(date)
permission for this patient to receive coronal polishing and/or pit and fissure sealants as
part of the Statewide Expanded Functions for Dental Assistants certification program.
0 Coronal polish (check herc, if hard deposits have been removed and treatment isapproved)
0 Pit and Fissure Sealants (check here if teeth were radiographically and clinicallyexamined and treatment is approved)Please list tooth/teeth approved for sealants:
Dentist Signature
Date
According to Idaho State law, the application of pit and fissure sealants and coronal polishing are procedures
that must be diagnosed by a dentist. Patients receiving treatment in this program must receive permission
from his/her family dentist before the procedure(s) can be performed. Return this form to the course
instructor.
viii4Q
INTRODUCTION
This course is designed for currently employed assistants toprovide them with the knowledge and skills necessary to perform,under direct supervision, the expanded function of coronal polishas provided for in the Regulations of the Idaho State Board ofDentistry, Section 10 C, ii (f), and iv, i. The regulation states,"None of the foregoing provisions shall, however, be construed toauthorize or allow a dental assistant to perform any of theactivities prohibited in Section 54-924, Idaho Code, nor any of the
activities below:
(i) Coronal polishing, unless authorized by a Certificateof Registration; this refers to the technique of removingsoft substances from the teeth with pumice or other suchabrasive substances with a rubber cup or brush. This inno way authorizes the mechanical removal of calculus noris it to be considered a complete prophylaxis. Thistechnique (coronal polish) would be applicable only afterexamination by a dentist and removal of calculus by adentist or dental hygienist."
Therefore, this course presents the knowledge and skillsnecessary for coronal polish using a rubber cup and bristle brushand does not present the techniques for coronal polish using anyair abrasive polishing device such as the Prophy Jet.
1
4Q
CORONAL POLISH
Goal:
Polish the clinical crowns of teeth to remove any extrinsicstain and soft deposit with minimum trauma to the hard or softtissues and with minimum discomfort to the patient.
Rationale:
Polishing has traditionally been viewed as the finishingprocedure of the oral prophylaxis. Over the last several years(since the early 1980's), the concept of selective polishing ofteeth exhibiting stain, rather than routine polishing of all theteeth has been discussed. The rationale for selective polishingis partly to ensure that the patient realizes his or her role in
maintaining oral cleanliness; the patient has the majorresponsibility for plaque removal, and partly to minimize polishingaway the fluoride-rich outer layer of enamel.
Routine polishing of all tooth surfaces has also becomequestionable because studies have shown polishing does not improvethe uptake of professionally applied fluoride and polishing changesthe shape of the teeth after several years of routine care.
The clinical rationale for polishing or not polishing is stillbeing investigated, but the trend is to selectively polish toremove obvious stains and to work with developing the patient'sability to remove his or her plaque in areas where the patient ishaving difficulty with plaque removal.
The main purpose of coronal polish under this new concept isfor removal of stain that cannot be removed by the patient.
Your own office philosophy regarding coronal polishing shouldbe determined. Should the office decide to follow the concept ofselective polishing, it is wise to share with the patient thepurpose for polishing, the effect of repeated polishing on theteeth, the rate of reformation of plaque on the teeth afterpolishing, and how the patient can participate in ongoingprevention of dental disease. A discussion of these concepts isrecommended because many patients have previously learned thatcoronal polishing is a necessary part of a complete oralprophylaxis for the maintenance of "healthy gums."
2
4 (13
Scope of the Module:
This module is a pre-laboratory and pre-clinical exercisewhich will provide you with the basic knowledge necessary toprepare you for laboratory practice and then clinical practice incoronal polish procedures. One laboratory exercise is included inthis module to enhance understanding of the principles andprocedures of coronal polishing. This laboratory practice willinclude coronal polishing of all surfaces of all the teeth in orderto develop the skill necessary to coronal polish all teeth in allareas of the mouth.
The polishing method described includes all the basictechniques required to accomplish a satisfactory coronal polishexcept for the procedures required for polishing removable dentalappliances.
The student should be aware that this module does not includethe techniques for removal of hard deposits (i.e., calculus) fromthe tooth surface. Calculus removal is a highly technicalprocedure which requires extensive training. Also, the Regulationsof the Idaho State Board of Dentistry prohibits assistants fromperforming a prophylaxis. Section 10, C, iv, j which reads, "Anyoral prophylaxis. (The law specifically forbids an assistant fromperforming a prophylaxis--this must be done by a licensed dentistor a licensed hygienist.)" The coronal polish includes onlypolishing techniques for removing extrinsic dental stains which arenot incorporated within hard deposits and soft deposits from theclinical crowns of teeth. Coronal polish is to be accomplishedonly after complete removal of all hard deposits by a qualifiedperson. Should you find any hard deposits remaining on the teethwhile you are performing the coronal, polish, it is yourresponsibility to see that a qualified person removes them.
This module only presents the technique for coronal polishingwith a prophylaxis angle using a rubber cup or bristle brush asspecified in the Regulations of the Idaho State Board of Dentistry,Section 10, iv, i. It does not include the technique of airabrasive air-powder polishing, as this technique has not beenapproved as a function which may be performed by a dentalassistant.
3
49 n)
OBJECTIVES
After completing this module, you should be able to:
1. Explain the Idaho regulations with regard to coronalpolishing.
2. Explain the rationale for selective polishing vs.polishing the entire dentition.
3. Recognize when modification or deferment of coronalpolish is indicated.
4. Recognize situations where skills and training beyondpersonal ability are required and request assistance asneeded.
5. List the armamentarium required to perform coronalpolish.
6. Explain the function of each component of thearmamentarium.
7. Evaluate the patient's mouth and determine the appropriateabrasive agent for the coronal polish procedure.
8. Explain aseptic technique as it applies to this procedure.
9. Explain the technique for polishing with motor driveninstruments and auxiliary polishing aids.
10. Explain why a secure grasp and stable fulcrum are necessaryfor this procedure and describe how to establish them.
11. Explain the uses of the mouth mirror when coronal polishing.
12. Evaluate procedure and the final product to determinewhether it meets the criteria for acceptability.
13. Maintain armamentarium and treatment area as required.
4
5th)
LEGAL AND ETHICAL CONSIDERATIONS
Each state has a dental practice act which regulates thepractice of dentistry in that state. The law 'iffers as to who mayperform which types of dental procedures including the coronalpolish procedure. It is the responsibility of each dentalauxiliary to be aware of and abide by the governing regulations ofthe state in which they practice.
Idaho State Dental Practice Act:
As of July 1, 1989, the Regulations of the Idaho State Boardof Dentistry were amended to include polishing of coronal surfacesof the teeth and application of pit and fissure sealants by dentalassistants who have successfully completed courses, which have beenapproved by the Idaho State Board of Dentistry.
Ethics:
The law requires formal training and education before one canperform this procedure. It is also the moral and ethicalresponsibility of every auxiliary performing coronal polishing tosufficiently prepare himself/herself to be able to perform at ahigh standard.
The patient's health and safety are your responsibility whenperforming this procedure. If an emergency arises or if diagnosticdecisions are necessary during treatment, request immediateassistance from the dentist/supervisor.
It is also your responsibility to request assistance orconsultation from a more qualified individual when the procedurerequires skills or training beyond your level of competency (aswhen calculus is present and you are not legally qualified toremove it).
5
PATIENT CARE
There are some important factors which should be consideredwhen performing a coronal polish for a patient. This sectionaddresses those factors.
Evaluation of the Patient's Condition:
Evaluation of the patient's medical, dental and psychologicalcondition prior to, during, and following the corona? polish is animportant aspect of the coronal polish procedure. It will assistyou with making appropriate clinical decisions about the care andservice you provide the patient.
Before beginning the coronal polish, determine whether thepatient's oral and medical conditions have been evaluated byanother qualified person and briefly review the findings withhim/her to familiarize yourself with any conditions requiringspecial care. If the patient has not been previously evaluated,you should review the medical/dental history with the patient,assess his/her current psychological state, and perform an oralexamination to determine whether any conditions exist which mightcontra-indicate or modify your procedures.
It is suggested tha. coronal polishing should be postponed oris contraindicated in the following situations: Polishing iscontraindicated when: (1) no unsightly stain is present; theprinciple of selective polishing is not to polish unless necessary;when stain is present on specific tooth surfaces, polishing can beapplied to selected areas without having to cover all the teeth ina generalized procedure; (2) when a patient is at increased riskfor dental caries; such as rampant caries (nursing bottle caries,root surface caries), presence of thin enamel (amelogenesisimperfecta), areas of demineralization, and the presence ofxerostomia (dry mouth); (3) patients with respiratory problems;(4) in areas of hypersensitivity; and, (5) newly erupted teeth.
Conditions requiring postponement of polishing are: (1) wheninstruction for personal plaque removal has not yet been given orthe patient has not demonstrated adequate plaque control; (2) whenthe gingival tissues are soft and spongy and bleed readily uponbrushing or gentle instrumentation; and, (3) immediately followingdeep subgingival scaling, root planing or soft tissue curettage.
The medical/dental conditions which might contra-indicatecoronal polish procedures are the same as those which contra-indicate other types of general dental procedures. It is expectedthat you are already familiar with the implications of findingsfrom the medical/dental history and oral inspection as they relateto providing dental care. If not, review this information beforeattempting this procedure for clinical patients.
6
502
Consult with your instr4ctor or the supervising dentist if youhave questions concerning the advisability of performing coronalpolish procedures on a particular patient.
Conditions Reauirina Modification in Technique/Procedure:
Herpes simplex (cold sores) are readily transmissible,therefore, contraindicate performance of the coronal polishprocedures. When herpes are present, the coronal polish should bedeferred until the lesions have healed.
Allergies may indicate the need to substitute another productfor one you normally use. Fortunately, allergies to most of thecommonly used products for coronal polish are fairly unusual. Theproducts of concern for allergies are specific ingredientscontained in disclosing solutions, lip lubricant, or polishingagent.
Coronal polish procedures may aggravate ulcerations and/orwounds of the lips and intraoral tissues and highly inflamed ortraumatized gingiva thereby complicating the healing process. Whenthese conditions are present, it is best to postpone coronalpolishing until healing takes place. If the lesions are small orare located in an area that will not be disturbed you may proceedwith coronal polishing. Lip wounds may be covered with a lightcoating of lubricant to protect them.
Hypersensitive teeth require slight modification in thecoronal polish procedure. The pain resulting from hypersensitiveareas is a very sharp extremely uncomfortable pain. Consequently,areas of hypersensitivity should be avoided with the rubber cup andabrasive agent. Use of the rubber cup and abrasive agent iscontra-indicated because hypersensitivity is the result of exposeddentinal tubules due to minimal or lack of cementum or enamel. Useof an abrasive agent further reduces the amount of cementum orenamel. Stain and/or plaque ix/these areas needs to be removed butshould be removed through scaling or toothbrushing. The stainshould be removed by scaling. Local anesthesia may be required toperform the scaling. The plaque may be removed by scaling or bytoothbrushing. Use of compressed air to dry the teeth should beavoided in areas of hypersensitivity. A gauze wipe, cotton roll,cotton swab, or cotton pellets may be used instead. Use only luke-warm water for rinsing. Avoid positioning the vacuum tip or salivaejector close to the sensitive teeth as they may also causediscomfort due to temperature change.
When Green stain due to chromogenic bacteria is present, itr(..aires slight alteration of the polishing procedure. EnameluIderneath green stain is frequently decalcified making it easy toburnish the stain into the enamel if only a rubber cup andpolishing agent are used. When green stain is present, a solution
7
5(33
of 3% hydrogen peroxide diluted in an equal amount of water shouldbe prepared in a dappen dish. Apply the solution to the stainedareas with a cotton swab. Leave the solution in place for 20-30seconds, then rinse thoroughly. Then use the rubber cup andpolishing agent as you would normally. The peroxide should removemost of the stain.
Try to avoid applying peroxide on the gingiva in order tominimize tissue irritation. The peroxide may make the gingivatingle slightly so you should forewarn the patient that this mayoccur.
Orthodontic and other fil:ed appliances or temporaryrestorations may require alteration of normal procedures. Consultyour instructor, or the supervising dentist for specific proceduresto be followed for each situation.
Patient Preparation:
Before the coronal polish procedure is begun, the patientshould be physically and psychologically prepared for theprocedure. The patient should be seated comfortably. A patientbib should be placed to protect clothing. Dentures and partialsshould be removed and placed in a container with water or mouthwashuntil they can be polished. The lips should be lubricated to keepthem from drying out and to prevent them from becoming stained whenapplying disclosing solution. You may want to have protective eyewear for the patient or you may instruct the patient to close theireyes during the polishing procedure to protect their eyes fromsplattering debris. At the completion of polishing, all polishingdebris must be removed from the patient's mouth, face, hair andclothes before he/she is dismissed.
The patient should be prepared psychologically for theprocedure by informing him of what you think he/she might want toknow about the procedure. The information given will vary for eachindividual but will generally include:
1. The reasons for doing a coronal polish;2. The sequence of procedures to be performed; and,3. A description of any sensation the patient might
experience during the procedure.
Chart Entry:
For legal documentation, the coronal polish must be recordedcompletely and accurately in the patient's record. The entryshould be in ink, dated and signed by the person who performed theprocedure. A description of any additional procedures performedat the appointment should also be included in the chart entry.
8
5n/..;
Summary
1. Review all the patient assessment data (medical/dental history,oral examination, psychological condition) before performingthe coronal polish procedure.
2. Contra-indications for coronal polish should be identified.
3. Conditions which require modification in coronal polishtechnique and procedures include:
a. herpes simplexb. allergiesc. ulcerations or other wounds of the lips or intra-oral
tissuesd. highly inflamed or traumatized gingivae. hypersensitive teethf. presence of green staing. orthodontic and other fixed appliancesh. temporary restoration
4. The patient should be prepared both physically andpsychologically for the coronal polish procedure.
5. Accurate chart entry for coronal polish should be made.
IDENTIFICATION OF DEPOSITS PRIOR TO CORONAL POLISH
It is very important to evaluate the deposits present beforebeginning the coronal polish. You should determine whether thestain can i,e removed. If it can be removed, will removal beaccomplished by coronal polishing procedures or will it requirescaling.
You must also determine the presence of supramarginal calculusas polishing a tooth surface with calculus will burnish thecalculus making it more difficult to detect and remove.
Soft deposit should also be identified so it can beeffectively removed or if you are selectively polishing, you canidentify the are& to assist the patient with plaque removal.
9
51'
INTRODUCTION
View Photograph #1 This is a photograph of a patient's teethbefore the coronal polish. All hard deposits have been removed.There is some stain present but the teeth are ready to be polished.View Photograph This shows the patient's teeth after disclosingwith a disclosing solution. The areas of plaque are readilyvisible. View Photograph #3 This shows the teeth after thecoronal polish has been completed. Note the clean, shiny stain-free, smooth appearance of the teeth. (Refer to Page 11 forphotographs.)
On completion of this module, you should be able to performa coronal polish which will render the tooth surface free of stainsand soft deposits with minimal trauma to the natient's hard andsoft tissues.
ARNAMENTARIUM
The armamentarium required for this procedure is listed below.It should be placed on a clean instrument tray and kept covered orplaced in a clean storage area until ready for use. The items left-to-right correspond with the numbered items in the list below andin the diagram on Page 12.
1. Tray with tray cover2. Mouth mirror3. Explorer4. 12-18" piece of dental floss5. Dappen dish containing disclosing solution6. 2 x 2 gauze sponges (3-5 should be sufficient)7. Cotton swabs (2)8. Finger cup containing wet abrasive agent or commercially
Following is an explanation of each component of thearmamentarium for coronal polishing.
The mouth mirror is used for retraction of the lip, tongue,or cheek, indirect vision, and to reflect light onto the working(operative) area. A front surface mirror will generally provide
a clearer image. It should be sterilized before and after use.
The explorer is used to help determine if stains present areintrinsic, extrinsic or attached to calcified deposits and todetermine whether all deposits have been completely removed. It
should have a fine, flexible tip which allows maximum tactilesensitivity. It should be sterilized before and after use.
The handpiece is used to hold the prophylaxis angle with itsvarious polishing attachments. It is attached to the dental unitbefore beginning the polishing procedure. A handpiece which runsat a relatively slow speed is recommended. The speed of thehandpiece is critical for minimizing frictional heat and ensuringeffective polishing. The handpiece should be operated at theslowest speed possible that moves the prophylaxis cup or brushagainst the tooth without stalling. Sound also provides a clue fordetermining whether a cup is rotating too rapidly. A high whineor whistle in the handpiece usually indicates excessive speed.Some handpieces have an adjustable speed changer. This should beset at the slowest speed. Review the instructions for thehandpiece you have if you are in doubt about its operation.
The handpiece must be carefully cleaned and lubricatedaccording to the manufacturer's directions. Use of an autoclavablehandpiece is recommended and it must be sterilized before and afteruse. If the handpiece is not autoclavable, it must be disinfectedbefore and after use. Any adherent material (blood, debris) shouldbe removed and then thoroughly wiped with absorbent materialsaturated with a chemical germicide that is registered with the EPAas a "hospital disinfectant" and is mycobatericidal at usedilution. The disinfecting solution should remain in contact withthe handpiece for a time specified by the disinfectant'smanufacturer.
The prophylaxis angle is the attachment for the handpiece towhich the rubber cup or the prophylaxis brush are attached. It isoften referred to as a prophy angle or right angle. The prophyangle may be a right angle screw-on variety or a right angle snap-on variety. The screw-on type prophy angle has a threaded holeinto which the attachments are placed. The snap-on type prophyangle has a small button-shaped protrusion at the head on which thepolishing attachments are placed. If desired, a button-shapedadaptor may be screwed into the screw-type prophy angle head sothat snap-on polishing attachments may be used. When selectingthe attachments for the prophy angle, be sure to select onesdesigned to fit the chosen prophy angle.
13
503
If using screw-on attachments, be sure the rotation of thehandpiece is adjusted so the polishing attachments (i.e., cups andbrushes) rotate in the direction that will keep them on rather thanscrew them off.
The prophy angle must be carefully cleaned and lubricatedaccording to the manufacturer's directions. Autoclavable prophyangles are recommended and they should be autoclaved after use.If the prophylaxis angle is not autoclavable it must be sanitizedbefore and after use. Disposable prophy angles are also available.
The rubber prophy cup is used to clean the labial, lingual,and buccal surfaces of the teeth and as far into the proximalsurfaces as possible. Its effectiveness is limited on the occlusalsurface because it does not extend into the pits and groves.
The prophy cup should be soft and flexible enough to readilyadapt to the contours of the teeth and to flex under the gingivalmargin.
Prophylaxis cups come in a variety of sizes. Size selectionis dependent on the size of the dentition being polished. The cupshould be small enough to easily adapt to the contours of the teethparticularly at the gingival margin. Generally, two sizes meet theneeds for coronal polishing (pedodontic size cups and regular oradult size cups).
If two abrasive agents of different abrasiveness are used, itis recommended that two cups be included in the armamentarium toprevent altering the abrasiveness of either agent.
The rubber prophy cup is screwed-on or snapped on to theprophy angle prior to beginning the coronal polish procedure. Theprophy cup should be autoclaved before use and discarded after eachuse.
The prophy brush is used to remove stain and soft depositsfrom the occlusal surfaces of the posterior teeth. It may also beused (with extreme caution after polishing technique has beenperfected) to clean deep developmental grooves on the lingualsurfaces of the anterior teeth. The brush should not be used atthe gingival one-third of the buccal or lingual surfaces of theteeth as it could cause severe damage to the gingiva or soft tissueit contacts.
The brush selected for coronal polish may have a flat ortapered cut. The diameter of the bristles of the brush should besuch that the bristles are flexible enough and small enough toadapt to all of the occlusal pits and fissures. If the brush istoo stiff, it may be soaked in hot water to increase itsflexibility.
14
510
The brush is left on the tray until polishing with the rubber cupis completed, then it is attached to the prophy angle. The brushis autoclaved before use and discarded after each patient use.
The abrasive agent is the material applied to the tooth withthe rubber cup, prophy brush, or dental tape which removes thestains or soft deposits, leaving a clean tooth surface. Thedefinition of an abrasive is: A material composed of particles ofsufficient hardness and sharpness to cut or scratch a softermaterial when drawn across its surface. An abrasive agent causesabrasion, the wearing away of surface material by friction. Markedor severe abrasion would be destructive to the tooth surface.Polishing is the production, especially by friction, of a smooth,glossy, mirror-like surface that reflects light. Avery fine agentis used for polishing after a coarser agent is used for cleaning.
The type of abrasive agent selected for a particular patientis determined by 1) the type of surface being polished, e.g.,enamel, exposed root surface (cementum, dentin), restorativematerials; and, 2) the type and amount of stain and soft depositthat must be removed with coronal polishing.
The abrasive agent(s) used in coronal polishing should be justcoarse enough to remove stains and soft deposits by abrasionwithout removing tooth structure unnecessarily, abrading gingivaltissue or producing excessive frictional heat. If the abrasiveagent selected does not also function as a polishing agent, theabrasive agent should be followed with a polishing agent.
You may choose a commercially prepared abrasive agent or a dryabrasive agent you moisten or lubricate yourself. Commerciallyprepared abrasives frequently contain pumice or silicon dioxide asthe abrasive agent. These agents are generally available in avariety of grits or particle sizes, e.g., coarse, medium, fine,extra fine or supra-fine. The other ingredients of commerciallyprepared prophylaxis pastes are: 1) Humectants which function tostabilize the ingredients and retain the moisture; glycerin orsorbitol are generally used; 2) Binding agents to preventseparation and splatter; 3) Sweetener which is artificial and non-carcinogenic; 4) Flavoring agent; and, 5) coloring agent.
Abrasive agents which are commonly used for coronal polishingare: 1) pumice, 2) super-fine Silex (silicon dioxide), 3)
Zirconium silicate (brand name Zircate), 4) Calcium carbonate(whiting, calcite, chalk).
Pumice is available in the following particle sizes or grits,pumice flour or super-fine which is the least abrasive and may beused to remove stains and soft deposits from the teeth, fine pumicewhich is mildly abrasive and can be used for stain that is moredifficult to remove, and coarse pumice which should not be used onthe tooth surface.
15
51_1
Silex or silicon dioxide is available in supra-fine which canbe used on the tooth surface and xxx Silex that is fairly abrasive.
Zirconium silicate (brand name Zircate) is both a cleaning anda polishing agent. It's abrasive particles lose their projectionsduring use as a cleansing agent and will then act as a finepolishing agent. It may be used on enamel as well as root surfaces(cementum and exposed dentin) and metallic restorations, includinggold.
Calcium carbonate (whiting, calcite, chalk) is available invarious grades which are used for different polishing techniques.Calcium carbonate or whiting is a polishing agent rather thanabrasive agent.
Tin oxide (putty powder, stannic oxide) is another polishingagent which can he used for teeth or metallic restorations. Tinoxide, however, is more frequently used for amalgam polishingprocedures rather than for polishing all tooth surfaces because ofits distasteful metallic taste.
Preparation of dry abrasive agents for use in coronalpolishing involves mixing the abrasive with water, mouthwash, orglycerin. Glycerin is used as a spreading agent and to preventsplatter as well as being a wetting agent. The consistency of thepaste produced should be as moist as possible, but transportablefrom the ringer cup or dappen dish to the patient's mouth. If thepaste is too moist a 2 x 2 gauze wipe may be used to absorb theexcess moisture. If the paste gets too dry, water or mouthwashmay be added.
Fluoride prophylaxis pastes are also available. Researchstudies, to date, have not been consistent in their results on thebenefits of topical fluoride applied via prophylaxis paste. Someof the limitations of fluoride prophylaxis pastes includeincompatibility of the fluoride with the abrasive agent or otheringredients of the prophylaxis paste. This can result indecreasing the shelf-life or neutralizing the fluoride. Anotherlimitation is that certain abrasives can remove a thin layer ofenamel during polishing. With the removal of enamel, the outerlayer of fluoride is also removed, possibly as rapidly as fluorideis added to the enamel from the fluoride paste. Because ofinsufficient and inconsistent research, use of fluoride containingprophylaxis paste is not contra-indicated, but at the present time,it should not be used to take the place of the professionallyapplied topical fluoride.
There are a variety of abrasive agents and commerciallyprepared prophylaxis pastes. It is recommended that you refer tothe ADA recommendations published in the book Accepted DentalTherapeutics for recommendations and instructions for use whenattempting to make a decision about an unfamiliar polishing agent.
16
5 1 2
The rate of abrasion during coronal polishing is not onlydetermined by the abrasive agent used but is also determined by themanner in which the abrasive agent is applied to the tooth surface,e.g., the quantity applied, the speed of application, and thepressure of application.
The more particles applied per unit of time, the faster therate of abrasion. Abrasive particles should be moistened withwater, mouthwash, glycerin or other vehicle to decrease the numberof abrasive particles applied to an area of the tooth surface andthereby decrease the rate of abrasion and reduce the amount offrictional heat produced. Reducing frictional heat is importantsince heat can damage the dental pulp. Moistening the abrasiveagent also facilitates the movement of the abrasive particlesacross the tooth surface thereby reducing frictional heatproduction. Use of dry abrasive agents is contra-indicated forcoronal polishing because of the increased frictional heat that isproduced by dry agents which increases the potential of thermalinjury to the dental pulp.
The greater the speed of application of abrasive particles,the faster the rate of abrasion. The amount of frictional heatproduced is also increased.
Pressure of application of the abrasive particles also affectsthe rate of abrasion. The greater the pressure applied against thetooth the faster the rate of abrasion. Abrasive particles to whichpressure is applied produce deep grooves in the tooth surface atfirst, but fracture according to their impact strength and maydisintegrate. Heavy pressure, however, is contra-indicated becauseit increases the production of frictional heat.
The following should be observed when applying abrasive agentsduring coronal polishing. Wet agents should be used, low speedshould be used, and the abrasive particles should be applied witha light, intermittent stroke.
The abrasive agent should be kept uncontaminated from diseasecarrying microorganisms. They should also be uncontaminated byother grades or types of abrasives unless deliberately mixed.Unused abrasive or polishing agents should be discarded aftercoronal polishing a patient.
Dental tape and floss made of spun silk or nylon thread. Tapeis flat like a ribbon and floss is round. Tape usually has a waxcoating. Floss may be waxed, slightly-waxed or unwaxed. The waxcoating affords some protection for the tissues, facilitatesmovement of the floss or tape, prevents excessive absorption ofmoisture, and helps to prevent shredding. A 12-18 " piece ofdental tape and dental floss should be placed on the tray.
17
5
Dental tape is used for polishing proximal tooth surfaces andthe gingival surface of fixed partial dentures.
Dental floss is used for removing debris and food particles,particles of polishing agents at completion of polishing proceduresfrom interprcximal areas, gingival sulci and gingival surfaces offixed partial dentures, and removal of abrasive particles after uRe
of finishing strips.
Waxed dental tape or unwaxed/waxed floss may be used forcoronal polishing. Research has shown that the wax coating of tapeor floss does not inhibit fluoride uptake by the tooth surface.Both tape and floss are discarded after use.
A cotton swab is used to apply the disclosing solution to theteeth. Another swab is used to apply lubricant such as vaselineto the patient's lips. Vaseline may be applied prior to
application of disclosing solution to prevent staining thepatient's lips and is also applied to keep the patient's lipslubricated for increased patient comfort. Cotton swabs should besterilized prior to use and are discarded after use.
Disclosing solution is used to help you identify plaque anddebris on the tooth surface. Disclosing solution may be used toidentify plaque which must be removed during coronal polish or bythe patient depending on your office philosophy on coronalpolishing. It may also be used to evaluate the effectiveness of
your polishing technique. A disclosing solution rather thantablets are recommended for coronal polishing since the area ofapplication can be limited. Also, the application can be bettercontrolled rather than relying on the patient's ability tothoroughly chew the tablet and swish the disclosant mixed withsaliva to effectively color the plaque. Disclosing solutionsshould be prepared and used according to the manufacturer'sdirections. Some solutions need to be diluted. Discard allsolutions placed on the tray after use.
A discussion of the types of disclosing solutions availableis not within the scope of this module. It is expected that youare familiar with the various types of disclosing solutions usedin dentistry and know the indications and contra-indications foruse of the type available to you.
The 2 x 2 gauze sponges will be used as a wipe to removepumice and saliva from the rubber cup or brush before refillingwith abrasive agent to prevent splattering and maintain the desiredconsistency of the prophylaxis paste. A gauze sponge may also beused to stabilize the finger cup on the thumb or index finger. The2 x 2 gauze is folded in half and placed on the index finger or
18
514k
thumb and the prophy cup is placed over the 2 x 2. The third useof a 2 x 2 gauze during coronal polishing is for drying the teethto prevent slippage of your fulcrum finger.
The saliva ejector is used to control moisture and debrisduring the coronal polish. Disposable saliva ejectors arerecommended. They are discarded after each patient. If the salivaejector is metal, it should be cleaned and sterilized after use.
Pumice and saliva tend to clog up the saliva ejector systemso it is recommended that water be run through the system aftereach coronal polish and at the end of the day a mild detergentsolution should be run through the saliva ejector system. Thesaliva ejector is placed in the dental unit hookup before beginningthe coronal polish.
The vacuum tip rather than the saliva ejector may be used toremove saliva and debris from the patient's mouth during and afterthe coronal polish. One precaution is that a vacuum hook-up systemwith plastic parts may become stained by disclosing solution, soyou may want to use the saliva ejector rather than the vacuumsystem for this reason. Vacuum tips are available in metal andplastic. The plastic tips come in autoclavable and non-autoclavable types. Use of metal or autoclavable type isrecommended and they should be cleaned and sterilized after use.If non-autoclavable plastic tips are used, they must be cleaned andproperly disinfected. To help prevent sealing against the softtissues of the patient's mouth when used, drill several small holesin the tip with a bur designed for laboratory use.
The vacuum tip is placed in the vacuum hose of the dental unitprior to beginning the coronal polish.
Bridge/Floss threads should be included in the armamentariumwhen they will be needed for a fixed bridge or orthodonticappliances. There are a variety of bridge or floss threaders andany of the types may be used. A small, narrow, flexible threaderwill generally be easier to use under the pontic without causingtissue trauma or patient discomfort. It should be as sanitary aspossible when removed from the storage area and is discarded afteruse.
Abrasive polishing strips or finishing strips should beincluded in the armamentarium when stain is present on the proximalsurfaces of anterior teeth. Finishing strips are made of linen orplastic with one smooth side and one side that has abrasiveparticles bonded to it. "Gapped" strips are available with anabrasive-free portion to permit sliding the strip through thecontact area without abrading the enamel. Finishing strips areavailable in extra narrow, narrow, medium, and wide widths andextra fine, fine, medium, or coarse grit. Only extra narrow ornarrow strips with extra fine or fine grit are suggested for stain
19
515
removal and only with discretion. They are used for stain removalon the proximal surfaces of only anterior teeth and only when otherpolishing techniques are unsuccessful. Use of the finishing stripshould be limited to use on the enamel surface. It should be usedwith caution as the edge of the strip is sharp and may lacerate thegingival tissue or lip. Caution should also be used to preventcreating a loose contact area. The abrasive side is capable ofremoving tooth structure and may make nicks or grooves in thecementum. A six to eight in,:h length strip is generallyappropriate. Strips should be as sanitary as possible when removedfrom the storage area and are discarded after use.
A lip lubricant such as vaseline should be a part of thearmamentarium. It may be applied before, during, or after thecoronal polish to keep the lips lubricated and for patient comfort.Vaseline should be applied prior to applying disclosing solutionto prevent staining the lips. To prevent cross-contamination, thelubricant can be placed on a 2 x 2 gauze sponge then from there thelubricant can be placed on the end of a cotton swab and applied tothe patient's lips.
The patient bib and chain are used to help protect thepatient's clothing during this procedure. The bib is placed on thepatient as soon as the patient is comfortably seated in the dentalchair. The bib is not to be used to wipe instruments with or asa resting place for instruments. The patient bib must be assanitary as possible when it comes from the storage area and isdiscarded after use. The chain should be sterilized ordisinfected.
A waste container (i.e., cup or sack) should be placed closeto the instrument tray for use during the procedure to be used fordisposal of used gauze sponges, dental tape and floss, etc.
A facial tissue should be given to each patient for his/herpersonal use during the procedure. Women should be asked to removetheir lipstick, if applicable, with the tissue prior to theprocedure to prevent smearing it.
hydrogen peroxide solution should be available for use whengreen stain is present. Green stain is produced by chromogenicbacteria and fungi and decomposed hemoglobin. It is more readilyremoved when hydrogen peroxide is applied to it before polishingthe area. The hydrogen peroxide is prepared for use by dilutinga small portion of it in an equal volume of water in a dappen dish.It is applied to the green stain with a cotton swab or small cottonpellet. The unused portion of the solution is discarded.
20
5 ,3
Summary:
1. Collect the coronal polish armamentarium.
2. Select the abrasive agents, disclosing solution and anyadditional armamentarium needed for specific patientconditions.
3. Prepare each component of the armamentarium as described.
4. Use suitable aseptic procedure for each component of thearmamentarium before and after use.
ASEPTIC TECHNIQUE
Prevention of disease transmission by careful attention toaseptic technique before, during and after coronal polishing isrequired, as it is for all intra -ora! procedures. Infectioncontrol guidelines for dental offices which have been published bythe Center of Disease Control should be followed. Personalprotection and barrier protection measures should be followed(e.g., gloves, mask, protective eye wear and lab coat). Cross-contamination should be avoided. Do not touch instruments, areaswhich have not been sterilized or disinfected, practice proper handwashing techniques, properly clean, sanitize, disinfect orsterilize all instruments and equipment.
During coronal polishing, the patient's eyes should beprotected by either providing a shield (e.g., glasses or towel) orby having the patient close his/her eyes.
The patient treatment area should be clean and orderly and assanitary as possible before, during, and after use. The laboratoryarea used for preclinical practice in coronal polishing should alsobe kept as clean, orderly, and sanitary as possible.
All products used should be as sanitary as possible. Dentaltape and floss, saliva ejectors, abrasive agents, disclosingagents, lip lubricant, patient bib, bridge threaders, polishingstrips are considered sanitary when taken from the manufacturerscontainer. Cotton swabs and 2 x 2 gauze sponges are generallylabeled as sterile or non-sterile from the manufacturer. If non-sterile ones are purchased, they should be sterilized at theoffice.
Any item placed on the patient's tray and not used isdiscarded unless it can be sterilized before returning to storage(e.g., 2x2 gauze sponges, cotton swabs).
21
5 0
Su:1. Use aseptic technique to prevent disease transmission.
2. Follow the Center for Disease Control guidelines forinfection control.
3. Protect the patient's eye during coronal polish.
4. Keep the operatory or laboratory cleantimes.
5. Use appropriate maintenance proceduresof the armamentarium.
22
and orderly at all
for the components
STUDY QUESTIONS #1
1. Why must the patient's condition be evaluated before, duringand after the coronal polish procedure?
2. Allergic responses, though rare, might be related to whichcomponents of the coronal polish armamentarium?
a.
b.
c.
3. Describe the procedure for using 3% hydrogen peroxide forremoving green stain.
4. What information should the patient be told about the coronalpolish procedure?
a.
b.
c.
5. What information should be included in the chart entry aftera coronal polish has been completed?
6. T F State laws regulating dental practice includingperformance of the coronal polish are uniform.
7. T F Morally, you are obligated to request assistance and/orconsultation when the procedure requires skills ortraining beyond your level.
23
5 .3
Study Questions #1
8. What is the goal of coronal polishing?
9. Which of the following are functions of the explorer as usedin the coronal polish?
a. used to determine if stains are intrinsicb. used to determine if stains are attached to calcified
depositsc. used to determine if all deposits have been removedd. a and c onlye. all of the above
10. Which surfaces of the teeth are not adequately polished withthe rubber prophy cup?
a. facialb. lingualc. interproximald. occlusale. b and df. c and d
11. List three criteria to be used when choosing a rubber prophycup?
a.
b.
c.
12. Define an abrasive agent.
13. Differentiate between abrasion and polishing.
14. What two factors would you consider when choosing an abrasiveagent for a particular patient?
a.
b.
24
5243
Study Questions #1
15. Write yes or no in each blank to indicate whether or not thelisted abrasive agent is appropriate on these surfaces.
Flour or pumiceEnamelRoot SurfaceGold
Zirconium silicateEnamelRoot SurfaceGold
Tin oxideEnamelRoot SurfaceGold
16. Why must the abrasive agent be prepared with water orlubricant?
17. Describe the desired consistency of the prepared abrasiveagent.
18. What armamentarium is available for checking the surfaces ofthe teeth for complete removal of deposits upon completion ofthe coronal polish?
a.
b.
19. List two uses of gauze sponges during the coronal polishprocedure:
a.
b.
20. Name two devices that can be used to remove moisture anddebris from the patient's mouth during coronal polishing.
a.
b.
25
52
Study Questions #1
21. Abrasive strips are sometimes tilized for coronal polish.Fill in the blank with information appropriate to use of thesestrips in the coronal polish procedure.
Acceptable width(s):
Acceptable grit(s):
Appropriate tooth surfaces:
22. What agent is effective in removing green stain?
23. List three precautions that can be taken to maintain operatorsafety.
a.
b.
c.
24. T F
25. T F
26. T F
Items placed on the patient tray need to be sterilizedor disposed of only if they have directly contacted thepatient's mouth.
A handpiece which provides a relatively high speed isrecommended for coronal polish because it allows foreasier removal of deposits.
If fluoride is to be applied following the coronalpolish, it makes no difference whether waxed or unwaxedfloss is used for polishing proximal tooth surfaces.
26
522
ANSWERS TO STUDY QUESTIONS
1. Why must the patient's condition be evaluated before, duringand after the coronal polish procedure?
It will allow you to make sound clinical judgmentsabout the care and service you provide the patient.You will be able to determine whether there are:1. contra-indications to treatment; and,2. conditions requiring modifications in treatment
procedure.
2. Allergic responses, though rare, might be related to whichcomponents of the coronal polish armamentarium?
a. abrasive agentb. disclosing solutionc. lip lubricants
3. Describe the procedure for using 3% hydrogen peroxide forremoving green stain.
Prepare a solution of 3% hydrogen peroxide dilutedin equal amounts of water in dappen dish. Applysolution to the stained areas with cotton swab.Leave solution in place 10-20 seconds and rinseaway thoroughly. Then polish normally. Avoidapplying peroxide directly onto gingiva.
4. What information should the patient be told about the coronalpolish procedure?
a. the reasons why coronal polish is doneb. general sequence of procedures to be usedc. a description of any sensation he/she might
experience during the procedure
.5. What information should be included in the chart entry aftera coronal polish has been completed?
Statement about coronal polish and description ofall procedures accomplished at the appointment.All entries in ink with signature and date.
6. T FO State laws regulating dental practice includingperformance of the coronal polish is uniform.
7. F Morally, you are obligated to request assistance and/orconsultation when the procedure requires skills ortraining beyond your level.
27
5 9 tJ
5 Study Questions #1 - Answers
8. What is the goal of coronal polishing?
To remove stains, film, and dental plaque after allhard deposits are removed from the teeth.
Rationale: A coronal polish is done to provide asmooth, shiny tooth surface which:a. resists accumulation of new depositsb. makes the teeth easier for the patient to keep
cleanc. enhances the appearance of the teethd. aids in motivating the patient to take care of
his/her teeth since he will be able to recognizethe appearance and feeling of a clean mouth.
9. Which of the following are functions of the explorer as usedin the coronal polish:
e. All of the above: the explorer is used to determineif the stains are intrinsic, extrinsic or attachedto calcified deposits and to help determine whenall deposits have been completely removed.
10. Which surfaces of the teeth are not adequately polished withthe rubber prophy cup?
f. interproximal, occlusal
11. List three criteria to be used when choosing a rubber prophycup.
a. softb. flexiblec. sized. not frayed
12. Define an abrasive agent.
A material composed of particles of sufficient hardnessand sharpness to cut or scratch a softer material whendrawn across its surface.
13. Differentiate between abrasion and polishing.
Abrasion is the wearing away of surface material byfriction. Polishing is the production, especiallyby friction, of a smooth, glossy, mirror-like surfacethat reflects light.
28
54
Study Questions #1 - Answers
14. What two factors would you consider when choosing an abrasiveagent for a particular patient?
a. type of surface being polishedb. type and amount of stain and soft deposits that must
be removed.
15. Write yes or no in each blank to indicate whether or not thelisted abrasive agent is appropriate on these surfaces.
Flour or pumiceEnamel - yesRoot Surface - noGold - no
16. Why must the abrasive agent be prepared with water orlubricant?
To facilitate particle movement across the tooth surfacethereby reducing the frictional heat produced.
17. Describe the desired consistency of the prepared abrasiveagent.
As moist as possible yet easily transportable betweenthe prophy cup ring and the teeth with whateverpolishing device is being used.
18. What armamentarium is available for checking the surfaces ofthe teeth for complete removal of deposits upon completion ofthe coronal polish?
a. disclosing solutionb. explorerc. air syringe (not specifically mentioned in
armamentarium)
19. List two uses of gauze sponges during the coronal polishprocedure:
a. as a wipe to remove pumice and saliva from therubber cup or brush
b. to stabilize the prophy finger cup on the indexfinger.
29
52;
Study Questions #1 - Answers
20. Name two devices that can be used to remove moisture anddebris from the patient's mouth during coronal polish.
a. saliva ejectorb. vacuum tip
21. Abrasive strips are sometimes utilized for coronal polish.Fill in the blanks with information appropriate to use ofthese strips in the coronal polish procedure.
Acceptable width(s): extra narrow or narrowAcceptable grit(s): fine or extra fineAppropriate tooth surfaces: interproximals on enamel
of anterior teeth
22. What agent is effective in removing green stain?
3% hydrogen peroxide diluted
23. List three precautions that can be taken to maintain operatorsafety.
a. wear safety glassesb. wear glovesc. wear masks
24. T U Items placed on the patient tray need to be sterilizedor disposed of only if they have directly contacted thepatient's mouth.
25. T ® A handpiece which provides a relatively high speed isrecommended for coronal polish because it allows foreasier removal of deposits.
26. 0D F If fluoride is to be applied following the coronalpolish, it makes no difference whether waxed or unwaxedfloss is used for polishing proximal tooth surfaces.
30
Jr'?
CORONAL POLISH PROCEDURE
This section of the module describes the techniques for performinga coronal polish.
Sequence of Procedures:
The sequence of procedures used when performing a coronalpolish on a patient is more involved than the laboratory coronalpolish sequence. Coronal polish on a patient involves ca_afulevaluation of the patient's psychological, medical, and dentalcondition prior to and during the procedure. Some of the importantconsiderations inpatient care and management are discussed in thissection, while others were discussed in more detail in the sectionon Patient Care and Management.
The general sequence of events for coronal polish as a labexercise and as a patient procedure is listed below for easycomparison.
Lab Procedure Patient Procedure
1. Prepare and set uparmamentarium.
2. Prepare dentoform for labexercises by marking it witha lead pencil.
31
1. Read patientchart and reviewmedical/dentalhistory and oralexamination forms.
4. Review medical/dentalhistory with patient.(Record any significantchanges since previousappointment.)
5. Perform general appraisaland oral inspection.
6. Determine type and extentof deposits on the teethby visual and tactileexamination.
5 9 "
7. Have qualified dentalhygienist or dentist removeall hard deposits, ifpresent.
3. Polish the buccal and lingual 8.
surfaces with the rubber cupand abrasive, working as farinter-proximally as possible(toothpaste may be used tominimize the amount ofsplatter)
4. Polish occlusal surfaceswith brush and abrasive.
5. Rinse and evacuate allpolishing agent and debris.
If your office philosophyis selective polishing,disclose to identify theareas of plaque and workwith the patient on aneffective technique ofremoving the plaque.
9. Polish buccal and lingualsurfaces exhibiting stainwith the rubber cup andabrasive; OR, if youroffice philosophy is topolish all teeth, polishall buccal and lingualsurfaces with rubber cupand abrasive, working asfar inter-proximally aspossible.
10. Polish occlusal surfaceswith stain with brush andabrasive; OR, Polish allocclusal surfaces(posterior teeth) withbrush and abrasive.
11. Rinse and evacuate allpolishing agent and debris.Frequency of evacuation willvary from patient topatient.
6. Polish all inter-proximalswith abrasive using dentaltape.
7. Rinse and evacuatethoroughly.
8. Floss all inter-proximalsto remove abrasiveparticles.
9. Rinse and evaluatethoroughly.
12. Polish inter-proximals whichexhibit stain with abrasiveusing dental tape. If theabrasive with dental tapeis ineffective in removingthe stain and the stain ison the anterior teeth, youmay use abrasive polishingstrip; OR, Polishall inter-proximals withabrasive using dental tape.If stain is present onanterior teeth and abrasivewith tape is ineffective,you may use an abrasivepolishing strip.
13. Rinse and evaluatethoroughly.
14. Floss all inter-proximalsto remove abrasiveparticles.
15. Rinse and evacuatethoroughly.
10. Dry teeth with air. 16. Dry teeth with air.
17. Apply disclosing solutionto all tooth surfaces.
11. Evaluate polish. 16. Evaluate polish.
12. Re-polish any areas missed. 19. Re-polish any areas missed.
13. Re-evaluate polish. 20. Polish or have polished anyremovable appliances.
21. Have dentist/supervisorevaluate final productbefore dismissing thepatient.
22. Write up patient chart.
14. Clean up lab area and 23. Clean up treatment areaarmamentarium. and armamentarium.
33
52
Additional considerations for patient procedure:
1. Saliva ejector or vacuum tip may be used periodicallythroughout the polishing procedure to remove saliva anddebris. Frequency will vary from patient to patient.
2. An additional step may be indicated between #19 and #20 if theabrasive agent selected needs to be followed by a lessabrasive agent or a polishing agent.
Patient Operator Position:
It is assumed that you are already familiar with therequirements for satisfactory patient/operator position. However,the important factors will be reviewed since both you and thepatient should be comfortably seated in order to increase the easeand efficiency with which the coronal polish is accomplished.
First, it is important for the operator stool to be at theproper height for the operator. This height is such that the upperand lower leg form a right angle (90°) at the knee. Your bodyweight should be completely supported by the chair (avoid sittingon the edge of the chair).
When the patient is positioned in the supine to semi-supineposition, the following positions should be evaluated. Thepatient's mouth should be at approximately the level of your elbowwhen you are both seated (measure this level when your arm ishanging beside your body). This will allow you to work comfortablywith your back straight and your arms in a position which minimizesstrain. If the patient is too high, you must raise your arms toreach into the mouth and this can be very fatiguing. If thepatient is too low, you will have to bend over to work and this canbe very tiring.
It is recommended that when working on the maxillary teeth,the back of the chair be positioned parallel to the floor and thepatient be requested to tilt the head so the occlusal plane of themaxillary teeth are perpendicular (at a 90° or right angle to thefloor). Then, when working on the mandibular teeth, the back ofthe chair is raised to a position of approximately a 20° angle tothe floor and the patient instructed to tip the head so theocclusal plane of the mandibular teeth is parallel to the floor.The patient's head can be tilted toward you or away from you. Agood rule of thumb is to request that the patient turn the headslightly away from you when you are working on the tooth surfacewhich is facing you and have the patient turn the head toward you
34
53)
when you are working on the tooth surface which is away from you(e.g., buccal of maxillary or mandibular right, lingual ofmaxillary or mandibular left)--patient turns head away from you.Lingual of maxillary or mandibular right and buccal of maxillaryor mandibular left--patient turns head toward you.
Access and visibility of the buccal aspect of the maxillaryposteriors is frequently difficult. A helpful technique for thisarea is to have the patient slide the lower jaw toward the side youare polishing and open approximately half way. Sometimes accessto the buccal aspect of mandibular molars is hampered by thepatient opening too wide which decreases the space between thetooth and cheek.
For patient comfort and to assist in maintaining aseptictechnique, ask the patient to make the changes in their headposition, rather than touching the face or head to move it. Also,to maximize patient comfort and minimize disease transmission, youshould try to keep your face 14-16 inches from the patient's face.
Your position will vary from an 8:00-12:00 o'clock positionif you are right-handed, and if you are left handed a 4:00-12:00o'clock position. Your position will depend on which area of themouth you are polishing and which position affords optimalvisibility and accessibility. It is suggested that in your earlytraining you work from 8:00-11:00 o'clock if right handed; 4:00-1:00 o'clock if left-handed while working on the facial surfacesof the anterior teeth and from 12:00 o'clock when polishing thelingual of the maxillary and mandibular anterior teeth. Experiencewill help you decide which positions are the most comfortable andwhich give the best visibility and accessibility.
Position all equipment and armamentarium as close andconvenient as possible to reduce reaching distance and maximizeefficiency.
Grasp/Fulcrum:
All instruments and the handpiece with prophy angle attachedare held with a modified pen grasp while performing coronal polishprocedures. A modified pen grasp is placing the index finger andthumb opposite each other on the handle of the instrument orhandpiece with the pad of middle finger placed on the shank of theinstrument. On the handpiece, the pad of the middle finger isplaced on the prophy angle at a distance from the polishing endthat allows you the greatest control and balance of the handpiece.When possible, the handpiece should rest against your hand forbalance and to help minimize operator fatigue from the weight ofthe handpiece. Your hand size will affect the exact positioning
35
53,;
of your fingers but remember to use the pad of the third finger onthe instrument, not the side of the finger. Using the pad of themiddle finger is critical for providing a secure grasp which willkeep the instrument from slipping or rotating unintentionally.
After a secure grasp is established a stable fulcrum must beestablished to assure complete control of the instrument andhandpiece during polishing. The ring finger is used as the fulcrumfinger when using the modified pen grasp. The purpose of a fulcrumwhile using dental instruments or the handpiece is to provide apivot point for the hand in order to move the instrument orhandpiece to adapt them to the contours of the teeth.
The fulcrum must be established on a stable surface. Wheneverpossible, the fulcrum should be on tooth-structure (e.g., occlusalor incisai surfaces or embrasure areas of facial or lingualsurfaces of the teeth). Placement of the fulcrum finger on thedirect labial or lingual surfaces is not recommended as thesesurfaces are generally slippery, so do not provide a stablefulcrum. Soft tissue such as lips, cheeks and chin also do notprovide a stable fulcrum. Additionally, pressure is applied whenfulcruming and this may pinch or bruise the tissue. Placing thefulcrum on the lips, cheeks, and chin is also not recommendedbecause aseptic technique is not maintained. Mobile or sensitiveteeth should be avoided as a fulcrum area because of the pressurewhich must be applied against them when fulcruming.
Sometimes, suitable tooth structure is not available for asecure fulcrum (e.g., only missing, mobile, or sensitive teeth arepresent in the fulcrum area). When these situations occur, it maybe helpful to place a finger of the opposite hand against thealveolar ridge or in the vestibule and fulcrum on your finger.
There may be times when fulcruming on soft tissue cannot beavoided. In these cases, it is advised that the soft tissue havea firm base (e.g., alveolar ridge, chin) and you should dry thetissue with a 2 x 2 gauze or compressed air to prevent slippage ofthe fulcrum finger. You should also place your fulcrum finger sothe fingernail of your fulcrum finger does not cause patientdiscomfort.
A proper grasp and a stable fulcrum are important duringcoronal polishing for stability and controlled action of thehandpiece or instrument. This will enhance patient comfort andconfidence in the operator's ability to manipulate the instrumentand decrease the risk of injuring the patient's soft tissue.
36
532
Use of Mirror/Explorer:
The mouth mirror and explorer are used for the detection ofstain and deposits before, during and after coronal polishing.
It is assumed that you know how to clinically identify stains,deposits, tooth structure, and restorations through visual andtactile sense. When you are in doubt about the nature of the stainor deposit present on the teeth you are about to polish, consultwith your instructor, dentist or hygienist. When you discoverdeposits which must be scaled off, it is your responsibility tohave these deposits removed by a qualified person (i.e., dentistor dental hygienist).
The mirror is used for indirect vision, indirect illumination,or retraction during coronal polishing. The mirror is used forindirect vision to view teeth or other intra-oral surfaces whichare difficult or impossible to view directly. You position themirror to see the reflection of the tooth or structure in themirror. Indirect vision is very useful when working on the lingualsurfaces of the teeth and in the most posterior areas of the mouth.You will find that by angulating the mirror, that is, by turningand tilting the mirror, even very inaccessible areas can be easilyseen.
It is important that you learn to use a mouth mirror forindirect vision so you can see where you are working with eachpolishing instrument. This will help prevent damage to the softtissue. It will also help you evaluate whether or not you areremoving the stain and deposit with your polishing technique. Ifyou have difficulty using the mouth mirror during coronal polish,consult your instructor.
Using the mouth mirror, for indirect illumination, is veryadvantageous for areas where you cannot direct sufficient light forgood vision. To use the mouth mirror for indirect illumination,adjust the dental unit light to provide the best illuminationpossible in the area, then position the mouth mirror so that itwill catch and reflect light directly onto the surfaces you wantto see.
The mouth mirror is also used for retraction of the lip,cheeks or tongue to increase your view of the areas in which youare working.
When using the mouth mirror, there are some precautions toconsider to prevent patient discomfort. Avoid resting the mouthmirror against the patient's alveolar bone. Also avoid pinchingthe lip between the mirror handle and the teeth or setting themirror or mirror handle directly against the teeth. It can also
37
533
be very uncomfortable for the patient if the mirror-handle isallowed to pull at the coroner of the patient's mouth. To avoiddoing this, use the back of the mirror to retract the cheek ratherthan using the handle to retract the corner of the mouth.
A right-handed operator usually holds the mirror in the lefthand to have the right hand free to manipulate other instrumentssuch as the handpiece or explorer. A modified pen grasp and stablefulcrum should be used. Also practice holding the mouth mirror inyour left hand throughout the polishing procedure to keepefficiency at a maximum. When the mirror is not being used, palmgrasp it with the mirror head by your little finger. (View thevideotape: "Use of the Mouth Mirror"--5:13 minutes.)
The explorer is used for tactile examination of the clinicalcrowns of the teeth to help you decide whether stains areintrinsic, extrinsic or are attached to calcified deposits to helpyou decide if the deposit can be polished off or if it must bescaled off.
The explorer is generally held in the right hand of the right-handed operator. A modified pen grasp and a secure fulcrum shouldbe used. A light touch is used to enhance detection of deposits.The side of the tip of the explorer is positioned against the toothsurface and short controlled strokes are used over the surfacebeing examined. (View the videotape: "Instrument Grasp, Use of aFulcrum and Instrument Activation --6.31 minutes.)
Use of Handpiece:
The rheostat (foot pedal) activates the dental engine whichruns the handpiece and rotates the end of the prophylaxis angle.A steady foot pressure is applied against the rheostat to producean even, slow speed.
The dental unit will have a pressure gauge to identify thepounds of pressure being used as you run the handpiece. Checkwhere this pressure should be for your particular dental unit andhandpiece. Most handpieces run between 10-13 pounds of pressure.If the pounds of pressure is insufficient, there will not be enoughtorque created to keep the cup or brush running when it is appliedagainst the tooth. The handpiece will stall. The handpiece shouldbe run at the slowest speed possible without the handpiece stoppingwhen the rubber cup or brush is placed against the tooth.
Running the handpiece at higher speeds will increase thefrictional heat produced and it is possible to overheat the tooth,causing pulp damage and patient discomfort. At higher speeds,tooth structure may be unnecessarily removed since abrasive agentsapplied at a high speed cause more abrasion. At high speeds, it
38
is also more difficult to control placement of the handpiece,increasing the risk of inadvertently abrading the soft tissueadjacent to the area you are polishing.
Learn to monitor the speed of the handpiece by its sound. Awhining sound of the handpiece is an indicator of a speed that istoo fast. It will require a little practice to maintain a constantspeed with the handpiece. Once learned, it will save time andenergy.
The handpiece is activated a'ter the rubber cup or brush havebeen placed inside the mouth and just prior to placing them againstthe tooth. This allows you to adjust the speed before applying thepolishing instrument to the tooth and to prevent splattering of thepolishing agent. Also, to prevent splattering of the polishingagent, saliva, and debris, release the foot pedal to stop therotation of the cup or brush if they are to be removed from thetooth surface for more than a moment.
Maintenance of Operative Area:
For the greatest effectiveness and efficiency, the area beingpolished should be kept dry and an adequate amount of abrasiveagent must be used. If a prophy finger cup or prophy paste holderwith the abrasive is placed on the index finger or thumb, theprophy paste can be readily carried to the tooth surface. Fill therubber cup with prophy paste or pick up abrasive on the ends of thebristle brush by placing the cup or brush into the abrasive andslowly engage the foot pedal to fill the rubber cup with abrasiveor adhere abrasive to the end of the brush. Wipe the abrasive overthe tooth surfaces of the area being polished (surface of 3-4teeth) then refill the rubber cup with paste when you are ready tomove to the next group of teeth.
To prevent splattering of the polishing agent or saliva whichadheres to the cup or brush, stop the rotation of the instrumentbefore it is removed from the mouth, and do not engage thehandpiece until the cup or brush are next to the tooth surface.Also, wipe the cup or brush frequently to remove saliva or debris.The saliva ejector or vacuum tip may also be used to remove salivaor debris from the cup or brush.
The operating area should be kept free of saliva and excessivepolishing agent for better vision, to provide a less slipperysurface for fulcruming, and for increased patient comfort. Toaccomplish this, the saliva ejector or vacuum tip may be used toremove saliva and the abrasive agent and it is desireable to rinsethe patient's mouth occassionally to debride the operating area.
39
535
Use of the Rubber Cup:
The rubber cup can be used to polish all surfaces of the teethand fixed appliances with the chosen abrasive agent. It is mostefficient on the buccal and lingual tooth surfaces and should beworked as far inter-proximally as possible. When fixed appliances(e.g., bridges) are present, the cup is adapted as far as possibleonto the gingival surfaces.
The only portion of the rubber cup that polishes is the edcre.Consequently, the edge of the cup must be the portion of the cupwhich is continually adapted to the area being polished. In orderto accomplish this, slight pressure is applied against the toothto phalange/flex the edge of the cup so more of the edge of the cuptouches the tooth surface. The cup is moved either up or sidewaysand upward to effectively have the edge of the cup with abrasivemove over the tooth surface to remove stain or soft deposit. Thecenter of the rubber cup aids only in transporting the abrasiveagent to the area being polished and will create a suction effectif the cup is placed flat on the tooth surface.
The polishing movement or stroke using the rubber cup shouldbe short, intermittent, overlapping, with light to medium pressureapplied against the tooth surface. The amount of pressure appliedis determined by how difficult it is to remove the stain or softdeposit. The stroke can be described as "touch and wipe," "pat andsweep," painting or brush stroke. In other words, the slowlyrevolving rubber cup is applied to the tooth surface with light tomedium pressure to adapt the cup edge, then moved a short distanceon the tooth, lifted off, then reapplied in an adjacent area so thenext stroke slightly overlaps the last. Short, intermittent lightto medium pressure strokes are used to minimize the amount offrictional heat produced. When you encounter stain that isdifficult to remove, move to another area, let the tooth cool, thenreturn to polish the area again.
A systematic sequence of polishing each tooth surface ensuresall areas will be cleaned. One effective sequence is to begin withthe cup placed just above the gingival margin as far onto themesial or distal proximal surface as possible. Flex the cup byapplying slight pressure into the sulcus, then sweep it toward theocclusal or incisal edge without jamming it into the contact. Liftthe cup off the tooth at the occlusal or incisal edge and place itnear the gingiva in the next stroke. Repeat this process aroundthe buccal or lingual surface of the tooth until the other proximalsurface is reached. The occlusal surface can be polished using therubber cup; however, the rubber cup is less effective than thebristle brush, particularly when the occlusal surface containsdefinite fissures and grooves. The brush is indicated for use onthe occlusal surfaces.
40
53
One must be careful to prevent the edge of the cup fromabrading the gingival tissue. This abrasion appears as a whitishburned area or a raw bleeding area depending on the severity.Healing takes approximately 7-14 days. Be careful.
In addition to polishing each tooth surface systematically,it is important to develop a sequence for polishing the entiremouth, so all areas will be polished as efficiently as possible.One efficient sequence is to begin on the distal lingual surfacesof the most posterior tooth in the mandibular right quadrant,polish all the lingual surfaces of the teeth around to the mostposterior tooth of the lower left, then polish all the buccalsurfaces around to the point where you started. The maxillary archis then polished in the same type of sequence. Whatever sequenceyou prefer to use is acceptable as long as you establish a definitepattern for routine use.
Use of Bristle Brush:
The occlusal surfaces are more effectively and efficientlycleaned with a soft bristle brush--especially occlusal surfaceswithout restorations. The bristles of the brush reach into thepits and grooves more effectively than the edge of a rubber cup.
The use of the brush is generally limited to the occlusalsurfaces. The brush can also be used, with caution, to polish thelingual pits of maxillary anterior teeth, if necessary. Using iton the other tooth surfaces increases the possibility of laceratingthe gingival tissues or causing grooves or scratches in the toothsurface, particularly the roots.
Distribute the abrasive agent on the occlusal surfaces of the
teeth to be polished. Establish a stable fulcrum and bring thebrush almost in contact with the tooth before engaging the footpedal. Use a short, brushing stroke beginning in the central fossaof the occlusal and stroking or brushing toward the buccal orlingual tooth surface following the inclined planes of the cusps.
The slowest speed of the handpiece should be used. The mouthmirror or fingers should be used to retract the tongue or cheek toprotect them from the revolving brush. (View video on the "Use ofthe Prophylaxis Angle and Handpiece," 6:05 minutes).
Use of Dental Tape:
The rubber cup cannot effectively polish the proximal surfacesof the teeth or the gingival surfaces of fixed bridges. Dentaltape with the abrasive agent is used to polish these surfaces.
41
5 3
Wipe some polishing abrasive along the buccal surfaces of theteeth with your finger so it can be carried onto the proximalsurface with the tape, or wipe the abrasive agent directly onto thetape. If you chose to spread the abrasive directly onto the teeth,do one quadrant or sextant at a time so the abrasive does not dryout before you use it.
A piece of tape 12"-18" long should be of sufficient lengthto polish all proximal tooth surfaces. Use the same technique withthe tape as used for floss being careful that you polish the entireproximal tooth surface without traumatizing the interdental papillaor free gingival margin.
Hold the tape with the thumb and index finger of each hand.Grasp it firmly with approximately 1/2 inch of tape between thefinger tips. The ends of the tape may be tucked into the palm andheld by the ring and little finger or the tape may be wrappedaround the middle fingers with more tape on one side than on theother. The tape can then be unwound from one middle finger andwound onto the other middle finger so a new piece of tape can beused in each interproximal area.
Establish a secure fulcrum for one hand to maximize control.You may use the side of a finger or the thumb for the fulcrum.Position the tape at an oblique angle, then carry the tape throughthe contact using a short back and forth motion and gentlepressure. This technique will help prevent "snapping" the tapethrough the contact and injuring the papilla. If the contact isvery tight, it may be helpful to apply gentle pressure against theproximal surface of one of the teeth as you work through thecontact to open the contact slightly.
A. Tape Oblique-correct-
B. Tape Horizontal-incorrect-
42
C. Pressure againstone tooth toopen tight contact.
As the tape is carried through the contact, it is gentlypressed against the surface of one of the teeth and wrapped aroundthat tooth to at least cover the line angles. Use an up and downand back and forth motion to polish the entire proximal surface.When one tooth is polished bring the tape over the top of theinterdental papilla and adapt it to polish the proximal surface ofthe adjacent tooth in the same manner as previously described.Remove the tape through the contact or puil it out through thefacial embrasure area. The distal of the most posterior teeth orother surfaces which do not have contacting teeth should not beleft unpolished.
As you work from tooth to tooth, use a new section of tape ineach interproximal. Replenish the polishing agent as needed.After taping, rinse the area thoroughly and evacuate all debris.For patient comfort, it is a good idea to rinse after taping onearch before going on to the next arch.
When there are fixed appliances (e.g., bridges or splints),the gingival surface of the appliance must be polished withabrasive using dental tape. Thread the tape under the applianceat the facial gingival embrasure area using bridge threaders, ifnecessary. When the threader or tape is pushed through, it iscaught on the lingual and the tape is pulled through. Polish withshort back and forth motions, employing gentle pressure in anocclusal/incisal direction. Cover the entire gingival surface ofthe appliance and the proximal surface of the abutment teeth.Rinse thoroughly.
43
Use of Abrasive Polishing Strips:
Abrasive polishing strips are used only on the proximalsurfaces of anteriors and their use is limited to the situationswhen small areas of stain remain on the proximal surface ofanterior teeth after other polishing techniques have beenunsuccessful (i.e., rubber cup and dental tape).
Abrasive strips should only be used on enamel because of theroughness of the abrasive particles on the strips.
Abrasive strips are available in extra fine, fine, medium orcoarse grit. Only extra narrow or narrow strips with fine or extrafine grit are suggested for stain removal. Selection is based onthe space available for use and the type and amount of stain to beremoved.
The edge of the strip is sharp and can easily lacerate thesoft tissue. Thus, retraction of the lip and tongue and a securefulcrum are important when using the abrasive strip for stainremoval.
A strip no longer than 6 inches is most easily controlled.Establish a well-controlled fulcrum and grasp. Protect the lip byretracting it with the thumb and index finger.
Direct the abrasive side of the strip toward the proximalsurface to be treated. Slowly and gently work the strip justthrough the contact area with a slight sawing motion. If the stripbreaks, floss the area to remove the abrasive particles. Press theabrasive side of the strip against the tooth and draw the stripback and forth in a 1/8 inch arch (facial/lingual) 2 or 3 times byrocking or pivoting on the established fulcrum. Caution should betaken to avoid altering the contact area (i.e., loosening orgrinding the contact). Re.aove the strip. Do not attempt to turnthe strip while it is in the interdental aree, In other words, thestrip must be removed and repositioned to polish the adjacent toothsurface, if indicated.
When the interdental papilla is missing so a space is clearlyvisible through an interproximal area, a narrow finishing strip maybe threaded through. The end of the strip may be cut on a diagonalto facilitate threading the strip through the interproximal area.
44
540
After polishing with strips, floss the proximal surfaces andrinse thoroughly to remove all abrasive particles.
Use of Dental Floss:
All the teeth should be flossed after polishing to remove anyparticles of abrasive agent which may remain after rinsing. Thiswill prevent gingival irritation, from the abrasive agent.
Evaluation Procedure:
The final result of the coronal polish procedure is thelustrous shine of thoroughly cleaned teeth. Polished enamel hasa high gloss which reflects light. All restorations and exposedtooth surfaces should have a glossy appearance as well. Allextrinsic stain, plaque, and other debris should no longer bepresent. The mouth should be free of all abrasive and polishingparticles and teeth should be smooth when explored with anexplorer. Soft tissue should be free of lacerations or abrasions.
Disclosing solution, the mouth mirror, air, and the dentallight should be used to evaluate the results of your polishingprocedure.
To apply disclosing solution, first apply vaseline to thepatient's lips then dry the teeth thoroughly. Using a cotton swab,apply disclosing solution to the clinical crowns of the teeth (DONOT apply disclosing solution to the dentoform). Have the patientrinse. Check each tooth carefully using the mouth mirror andcompressed air. Make sure the dental light is adjusted for optimalillumination to facilitate your identification of any stain,plaque, or debris remaining on the tooth surface. Re-polish anymissed areas.
Evaluation Criteria:
The coronal polish procedure and final product should becarefully evaluated to see that they meet the criteria listedbelow.
1. The type of stains and deposits will be determined andappropriate removal technique will be instituted (i.e., ifcalculus is present, a qualified person will remove it).
2. Appropriate polishing agent(s) will be selected according to:a. the type and amount of stain to be removed; and,b. the restorative materials present in the patient's mouth
and will be utilized on the appropriate areas.
45
54:
3. Auxiliary polishing aids will,be used when necessary (i.e.,dental floss, dental tape, finishing strips).
4. All handpiece attachments will be used on the portion of thetooth for which they were designed.
5. An efficient sequence for polishing will be utilized.
6. The technique for coronal polish will ensure effectiveness,efficiency, and patient comfort.
7. Modifications in polishing techniques and/or procedures willbe made according to special needs of a given patient.
8. The clinical crowns of the teeth will be free of all harddeposits, extreme stain, and soft debris and will be smoothand lustrous.
The checklist on the next page may be used to assist you inthe evaluation of coronal polish procedures and the final product.The checklist also provides a good summary of the key pointscovered in this section of the module.
46
5
CORONAL POLISH CHECKLIST
C - Acceptable: Criteria met as stated (2 points) _StudentI - Improvable: moderately effective, needs Patient
improvement (1 point)X - Unacceptable: inefficient, harmful (0 points) Date
GRASP:
Instructor
Grade%
COMMENTS
1. Holds handpiece with index finger andthumb pads.
2. Stabilizes with pad of middle finger.3. Supports handpiece weight with hand.4. Rotates handpiece to aid adaption.
FULCRUM: COMMENTS:
5. Establishes on stable tooth wheneverpossible.
6. Uses third (ring) finger with littlefinger held close or acting as secondfulcrum.
7. Maintain stable, constant pressure.8. Pivots to aid adaptation.9. Moves hand up-down, side-side, when
pivoting.
STROKE: COMMENTS:
10. No finger action.11. Maintain constant speed (10-13 lbs.
pressure).12. Uses short strokes.13. Uses combination pat/sweep stroke.14. Uses overlapping strokes.15. Uses light-medium pressure.16. Flares edge of cup into sulcular/
proximal areas.17. Adapts edge of cup to tooth contours.18. Adapts brush to occlusal pits and
convexities.19. Adapts tape/floss to proximal surface.20. Uses systematic sequence.
GENERAL POLISH PROCEDURE: COMMENTS :
21. Uses correct abrasive agent forsituation.
22. Debrides cup of saliva beforerefilling.
23. Uses auxiliary polishing aids withappropriate technique.
24. Rinses and evacuates patient's mouthat least once during polish and atcompletion of procedure.
25. Evaluates polish with disclosingsolution and compressed air.
26. *Removes all plaque, soft debris andextrinsic stain from all clinicalcrowns.
47
54,-)
GENERAL POLISHING PROCEDURE: COMMENTS:
27. *Produces no tissue trauma.28. Uses mirror for maximum vision and/or
retraction.29. Uses illumination for maximum vision.
GENERAL APPOINTMENT PROCEDURE: COMMENTS:
30. Reviews all patient records prior tobeginning procedures.
33. Positions patient for maximum comfort/accessibility.
34. Maintains good posture, with face about18" from patient.
35. Completes coronal polish in acceptablelength of time (as determined bysupervisor for the particular patient).
48
5 4
cal
2Lin al
0 0 0 0 0 0 0 03
94
5 6
97
8 9 10 11 12 13 14
19
15 16
18 17
0000001000000000Buccal
CORONAL POLISH EVALUATION CHART
Mark areas on this chart in blue where plaque, soft debris and/or extrinsicstain remain.
A = all tooth surfaces clean
I = 3 surfaces remain unpolished
X = more than 3 surfaces remain unpolished
To complete the case all plaque, soft debris and extrinsic stain must beremoved.
Mark areas on this chart in red where gingival tissue has been traumatized.
A = no tissue trauma
I = 1 slight area of tissue trauma (e.g., 1 mmg mildly abradedtissue, etc.)
X = more than 1 area of tissue trauma or 1 very traumatized area,(e.g., lacerated giginval margin, etc.)
49
545
STUDY QUESTIONS #2
1. Number the sequence of procedures for performing a coronalpolish on a patient (as described in this module).
Determine type of deposits present on teeth. (Have harddeposits removed.)Polish buccal, lingual, occlusal surfaces with rubbercup and abrasive.Floss interproximalPolish interproximal with tape and abrasivePolish occlusals with brushDry teeth and apply disclosing solution
2. T F The patient's mouth should be positioned atapproximately the operator's shoulder level in order tomaintain optimal comfort and visibility during thecoronal polish procedure.
3. When polishing the linguals of anterior teeth, theo'clock position is usually most convenient for the operator.
4. Describe the position of each finger when fulcruming andholding an instrument with a modified pen grasp.
Thumb:
Index finger:
Third finger:
Ring finger:
Little finger:
5. What are the purposes for a fulcrum and well-establishedgrasp?
a.
b.
c.
6. On what structures should you fulcrum?
50
546
0 Study Questions #2
7. List three functions of the mouth mirror during coronalpolishing:
a.
b.
c.
S. For the handpiece in coronal polishing, the pressure gaugeon the dental unit should read to pounds ofpressure.
9. The handpiece should be activated before/after touchingthe tooth with the rubber cup. (circle correct response)
10. Which part of the rubber cup actually polishes the teeth?
a. a portion of the inner surfa,.:e of the cup edgeb. a portion of the outer surface of the cup edgec. the middle of the cupd. the side of the cup
11. Describe the appearance and position of the rubber cup whenpolishing the cervical area of the tooth.
12. Describe the kind of strokes used when polishing with a rubbercup.
13. Describe the appearance of gingival abrasion caused byimproper use of the rubber cup.
14. Why is it important to have a sequence for polishing?
51
54'7
Study Questions #2
15. Which procedure is followed when using the brush to polishocclusal surfaces?
a. begin on the ridges move down into the grooves, endingup in the central fossa
b. beginning in the central fossa, move up into the groovesand end up by going over the ridge
16. Why is it important to keep instruments and operating areafree of saliva and excessive polishing agent?
a.
b.
17. How are interproximal surfaces and gingival surfaces of fixedrestorations polished?
18. What precautions should be taken when using abrasive polishingstrips?
19. Describe the final result of coronal polishing.
52
543
ANSWERS TO STUDY QUESTIONS #2
1. Number the sequence of procedures for perfo_Lming a coronalpolish on a patient.
1 Determine type of deposits present on teeth (have harddeposits removed)
2 Polish buccal, lingual, occlusal surfaces with rubber cupand abrasive
5 Floss interproximal4 Polish interproximal with tape and abrasive3 Polish occlusals with brush6 Dry teeth and apply disclosing solution
2. T qi) The patient's mouth should be positioned atapproximately the operator's shoulder level in order tomaintain optimal comfort and visibility during thecoronal polish procedure.
3. When polishing the linguals of anterior teeth, the 11-12o'clock position is usually most convenient for the operator.
4. Describe the position of each finger when fulcruming andholding an instrument with a modified pen grasp.
Thumb: across from index finger on same side of shank asrubber cup
Index finger: across from thumb on side opposite rubber cupThird finger: pad on shank of instrument, just a bit closer
to rubber cup than index fingerRing finger: fulcruming on hard surface near working areaLittle finger: next to ring finger, supplementary fulcrum
5. What are the purposes for a fulcrum and well-establishedgrasp?
a. stability for controlled action of handpiece orinstrument
b. prevention of injury to patient's oral tissuec. comfcrt for patient to enhance confidence in
operator's ability to control manipulation ofinstrument
6. On what structures should you fulcrum?
Tooth surfaces or other hard structures.
7. List three functions of the mouth mirror during coronalpolishing?
a. retraction of soft tissueb. indirect visionc. indirect illumination
53
54c3
Study Questions #2 - Answers
For the handpiece in coronal polishing, the pressure gauge onthe dental unit should read 10 to 13 pounds of pressure.
9. The handpiece should be activate befor-e)after touching thetooth with the rubber cup.
10. Which part of the rubber cup actively polishes the teeth?
a. a portion of the inner surface of the cup edge
11. Describe the appearance and position of the rubber cup whenpolishing the cervical area of the tooth.
Edge of cup and inner surface of edge should be flexedagainst the tooth so edge can move into gingival sulcusarea to clean cervical area of tooth.
12. Describe the kind of strokes used when polishing with a rubbercup.
Touch and wipe, pat and sweep, short overlapping strokes.
13. Describe the appearance of gingival abrasion caused byimproper use of the rubber cup.
Whitish burned area or raw bleeding area.
14. Why is it important to have a sequence for polishing?
So all areas are covered.
15. Which procedure is followed when using the brush to polishocclusal surfaces?
b. begin in the central fossa, up into the grooves,and end up by going over the ridges.
16. Why is it important to keep instruments and operating areafree of saliva and excessive polishing agents?
a. increase visionb. helps provide less slippery surface for fulcrum
17. How are interproximal surfaces and gingival sr-...faces of fixedrestorations polished?
Dental tape is used with polishing agent in a buccal,lingual polish stroke.
54
55)
Study Questions #2 - Answers
18. What precautions should be taken when using abrasive polishingstrips?
Retract lips and tongue and use a secure fulcrum.
19. Describe the final result of coronal polish.
The teeth will be free of all hard deposits, extrinsicstain and debris and gingival tissues will not betraumatized.
55
USA
Coronal PolishBIBLIOGRAPHY
Hobbs, Evelyn. Coronal Polish,Unit for Dental AuxiliaryCommission for VocationalHealth Education Project,Seattle, Washington; 1976.
a Self-Learning InstructionalEducation, Washington StateEducation, Kellogg AlliedUniversity of Washington,
Nield, Jill S., O'Connor, Ginger H. Fundamentals of Dental HygieneInstrumentation, 2nd edition, Philadelphia: Lea and Febiger1988.
Wilkins, Ester M. Clinical Practice of the Dental Hygienist. 6thedition, Philadelphia: Lea and Febiger, 1989.