CU0251401-00 D 1 Application Note EDC Firmware Update for QLogic 8Gb Fibre Channel Expansion Card (CIOv) for IBM BladeCenter 1 Introduction This document provides instructions for IBM ® technical personnel and system administrators on how to perform an electronic dispersion compensation (EDC) firmware update on a QLogic ® 8Gb Fibre Channel Expansion Card that is connected to one of these two switches: QLogic 8Gb switch Brocade ® 8Gb switch The update involves these steps: 1) Verify and update the OS driver version (Section 3), and 2) Update the expansion card flash image and install the EDC firmware image (Section 4). The update may optionally be verified (Section 5). The firmware image used must be appropriate for the switch connected to the expansion card. 2 Supported Platforms The following OSs are supported: RHEL ® 6.5 (x86 and x64) VMware ® ESXi 5.0 and 5.1 (5.5 is not supported) Windows ® 2008 SP2 x86, 2008 R2 SP1 x64, 2012 R2 NOTE If you want to use a different switch than these two, always choose the QLogic 8Gb switch when prompted to select one of the two switches. CAUTION The update process requires system reboot. DO NOT INTERRUPT THIS REBOOT ; it will take slightly longer than usual. If the reboot is interrupted, the card will not function properly,
Transcript
CU0251401-00 D 1
Application Note
EDC Firmware Update for QLogic 8Gb Fibre ChannelExpansion Card (CIOv) for IBM BladeCenter
1
IntroductionThis document provides instructions for IBM® technical personnel and system administrators on how to perform an electronic dispersion compensation (EDC)
firmware update on a QLogic® 8Gb Fibre Channel Expansion Card that is connected to one of these two switches:
QLogic 8Gb switch
Brocade® 8Gb switch
The update involves these steps: 1) Verify and update the OS driver version (Section 3), and 2) Update the expansion card flash image and install the EDC firmware image (Section 4). The update may optionally be verified (Section 5).
The firmware image used must be appropriate for the switch connected to the expansion card.
2
Supported PlatformsThe following OSs are supported:
RHEL® 6.5 (x86 and x64)
VMware® ESXi 5.0 and 5.1 (5.5 is not supported)
Windows® 2008 SP2 x86, 2008 R2 SP1 x64, 2012 R2
NOTE
If you want to use a different switch than these two, always choose the QLogic 8Gb switch when prompted to select one of the two switches.
CAUTIONThe update process requires system reboot. DO NOT INTERRUPT THIS REBOOT; it will take slightly longer than usual. If the reboot is interrupted, the card will not function properly,
3 – Verify/Update OS Driver Version
CU0251401-00 D 2
3
Verify/Update OS Driver Version
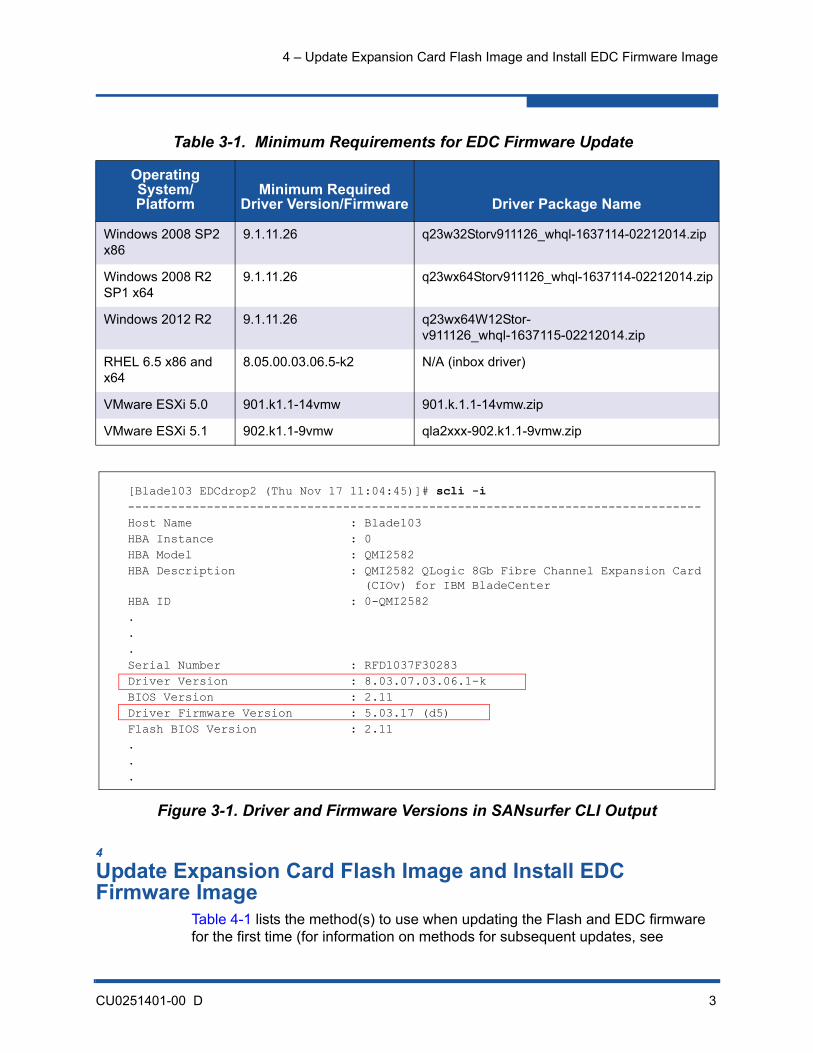
Before updating the EDC firmware, verify that the currently installed driver meets the minimum driver requirements listed in Table 3-1. The driver may be verified using either of the following methods:
If the QLogic SANsurfer® CLI (scli) utility is installed, the following command may be used:
scli -i
Note the following fields, as shown in Figure 3-1:
Driver Version
Driver Firmware Version
If the scli utility is not installed, issue the following command that corresponds to your OS:
If the current OS driver or firmware version does not meet the minimum requirements, install an updated driver using the installation instructions supplied with the driver package.
Once the driver version meets the minimum requirements for the EDC update, update the Flash and EDC firmware images, as described in Section 4.
NOTE
PowerPC® platform only: Proceed directly to Section 4. You do not need to perform the procedure described in this section.
4 – Update Expansion Card Flash Image and Install EDC Firmware Image
CU0251401-00 D 3
Figure 3-1. Driver and Firmware Versions in SANsurfer CLI Output
4
Update Expansion Card Flash Image and Install EDC Firmware Image
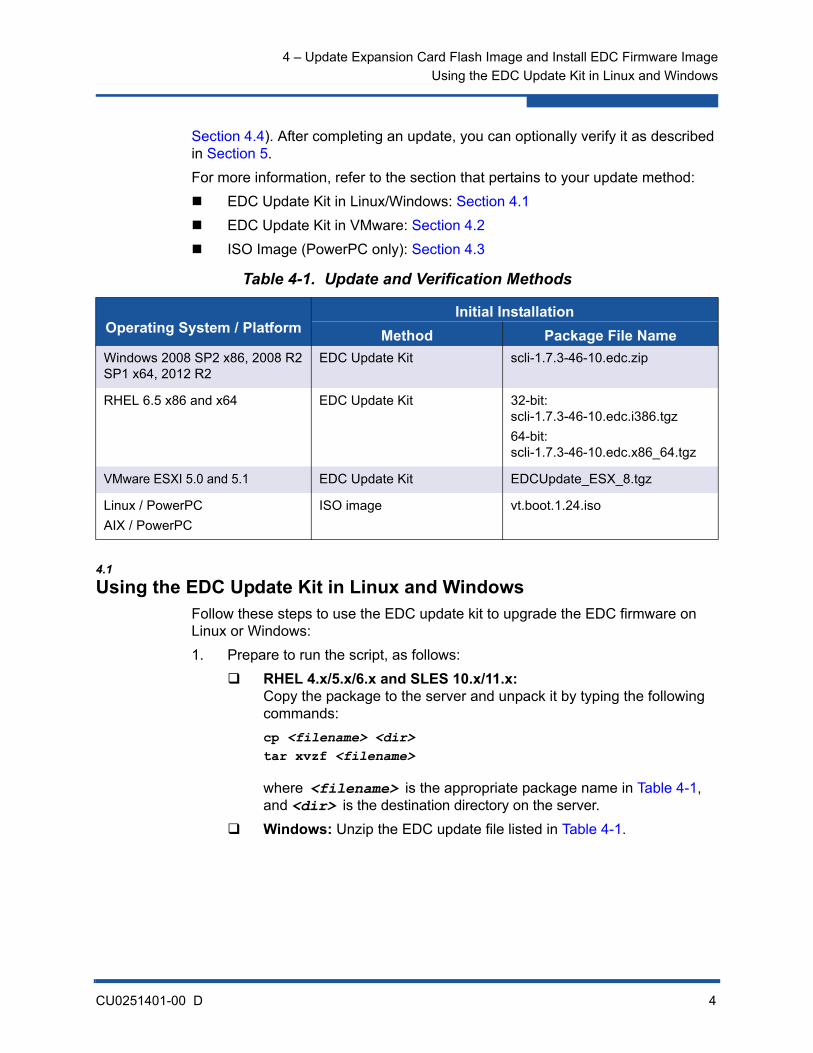
Table 4-1 lists the method(s) to use when updating the Flash and EDC firmware for the first time (for information on methods for subsequent updates, see
Table 3-1. Minimum Requirements for EDC Firmware Update
Operating System/Platform
Minimum RequiredDriver Version/Firmware Driver Package Name
[Blade103 EDCdrop2 (Thu Nov 17 11:04:45)]# scli -i--------------------------------------------------------------------------------Host Name : Blade103HBA Instance : 0HBA Model : QMI2582HBA Description : QMI2582 QLogic 8Gb Fibre Channel Expansion Card (CIOv) for IBM BladeCenterHBA ID : 0-QMI2582...Serial Number : RFD1037F30283Driver Version : 8.03.07.03.06.1-k BIOS Version : 2.11Driver Firmware Version : 5.03.17 (d5)Flash BIOS Version : 2.11...
4 – Update Expansion Card Flash Image and Install EDC Firmware Image
Using the EDC Update Kit in Linux and Windows
CU0251401-00 D 4
Section 4.4). After completing an update, you can optionally verify it as described in Section 5.
For more information, refer to the section that pertains to your update method:
EDC Update Kit in Linux/Windows: Section 4.1
EDC Update Kit in VMware: Section 4.2
ISO Image (PowerPC only): Section 4.3
4.1
Using the EDC Update Kit in Linux and WindowsFollow these steps to use the EDC update kit to upgrade the EDC firmware on Linux or Windows:
1. Prepare to run the script, as follows:
RHEL 4.x/5.x/6.x and SLES 10.x/11.x:Copy the package to the server and unpack it by typing the following commands:
cp <filename> <dir>tar xvzf <filename>
where <filename> is the appropriate package name in Table 4-1, and <dir> is the destination directory on the server.
Windows: Unzip the EDC update file listed in Table 4-1.
Table 4-1. Update and Verification Methods
Operating System / PlatformInitial Installation
Method Package File Name
Windows 2008 SP2 x86, 2008 R2 SP1 x64, 2012 R2
EDC Update Kit scli-1.7.3-46-10.edc.zip
RHEL 6.5 x86 and x64 EDC Update Kit 32-bit: scli-1.7.3-46-10.edc.i386.tgz
64-bit: scli-1.7.3-46-10.edc.x86_64.tgz
VMware ESXI 5.0 and 5.1 EDC Update Kit EDCUpdate_ESX_8.tgz
Linux / PowerPC
AIX / PowerPC
ISO image vt.boot.1.24.iso
4 – Update Expansion Card Flash Image and Install EDC Firmware Image
Using the EDC Update Kit in Linux and Windows
CU0251401-00 D 5
2. Execute the script from the scli directory (to pick up the special version of scli):
Linux:
a. Type these commands:
cd /root/scli./edcupdate.sh
b. When Enter selection: appears, type Q to set the EDC to QLogic, or type B to set the EDC to Brocade.
Windows:
Run the batch file by typing:
EdcUpdate <config>
where <config> is QLOGIC or BROCADE.
Figure 4-1 shows sample output from the Linux script setting the EDC to QLogic.
Figure 4-1. Sample Output From edcupdate.sh in Linux
--- ----- ------ EDC Flash Update --- ----- ------Choose one of the following options:
[B]rocade[Q]Logic[E]xit
Enter selection: qUpdating flash for QLogic configurationUpdating Flash on HBA port(s) - QMI2582. Please wait...Flash update complete. Changes have been saved to both ports of this HBA.Skipping flash update on HBA instance 1 - QMI2582Updating Global Nvram on HBA instance 0 - QMI2582. Please wait...Global NVRAM update complete. Changes have been saved to HBA instance 0 and are effective after a reboot.Skipping Global NVRAM update on HBA instance 1 - QMI2582
[Blade103 scli (Thu Nov 17 11:10:17)]#
4 – Update Expansion Card Flash Image and Install EDC Firmware Image
Using the EDC Update Kit in VMware
CU0251401-00 D 6
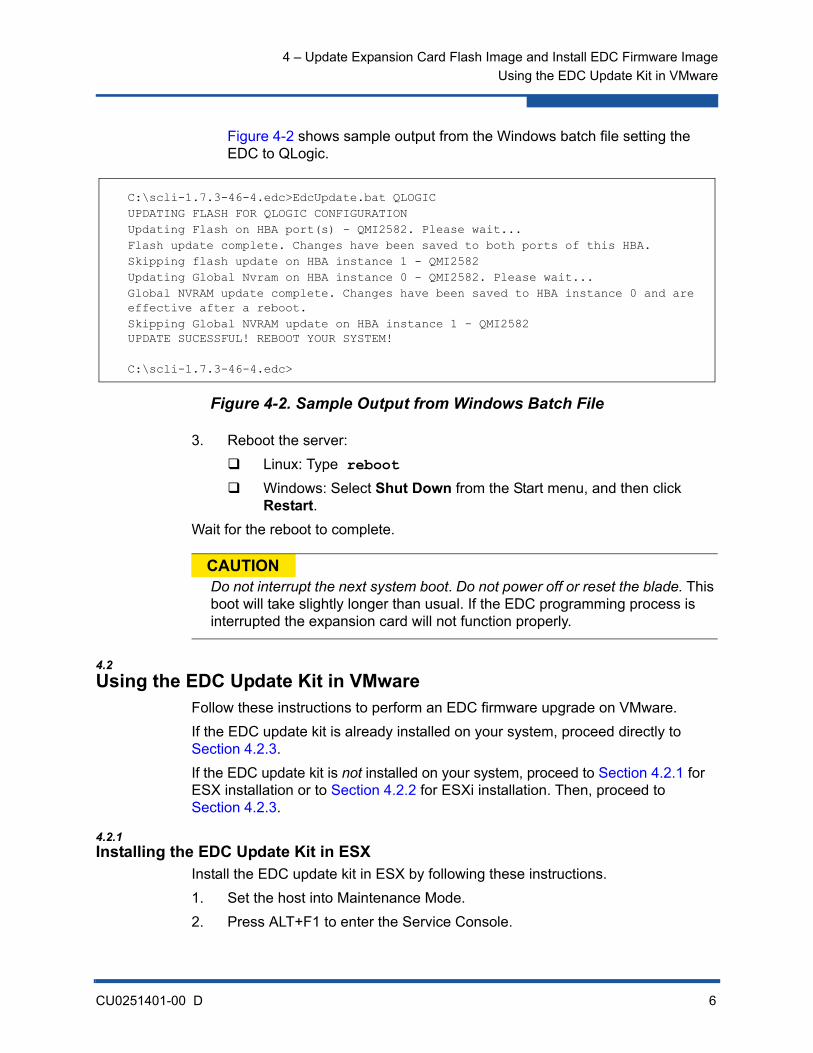
Figure 4-2 shows sample output from the Windows batch file setting the EDC to QLogic.
Figure 4-2. Sample Output from Windows Batch File
3. Reboot the server:
Linux: Type reboot
Windows: Select Shut Down from the Start menu, and then click Restart.
Wait for the reboot to complete.
4.2
Using the EDC Update Kit in VMwareFollow these instructions to perform an EDC firmware upgrade on VMware.
If the EDC update kit is already installed on your system, proceed directly to Section 4.2.3.
If the EDC update kit is not installed on your system, proceed to Section 4.2.1 for ESX installation or to Section 4.2.2 for ESXi installation. Then, proceed to Section 4.2.3.
4.2.1Installing the EDC Update Kit in ESX
Install the EDC update kit in ESX by following these instructions.
1. Set the host into Maintenance Mode.
2. Press ALT+F1 to enter the Service Console.
CAUTIONDo not interrupt the next system boot. Do not power off or reset the blade. This boot will take slightly longer than usual. If the EDC programming process is interrupted the expansion card will not function properly.
C:\scli-1.7.3-46-4.edc>EdcUpdate.bat QLOGICUPDATING FLASH FOR QLOGIC CONFIGURATIONUpdating Flash on HBA port(s) - QMI2582. Please wait...Flash update complete. Changes have been saved to both ports of this HBA.Skipping flash update on HBA instance 1 - QMI2582Updating Global Nvram on HBA instance 0 - QMI2582. Please wait...Global NVRAM update complete. Changes have been saved to HBA instance 0 and are effective after a reboot.Skipping Global NVRAM update on HBA instance 1 - QMI2582UPDATE SUCESSFUL! REBOOT YOUR SYSTEM!
C:\scli-1.7.3-46-4.edc>
4 – Update Expansion Card Flash Image and Install EDC Firmware Image
Using the EDC Update Kit in VMware
CU0251401-00 D 7
3. Enable SSH on the host as follows:
a. Type the following command:
# vi /etc/ssh/sshd_config
b. Set PermitRootLogin to yes.
c. Type the following command:
# service sshd restart
d. If needed, type this command:
# esxcfg-firewall -allowincoming --alowoutgoing
e. Reboot the ESX host.
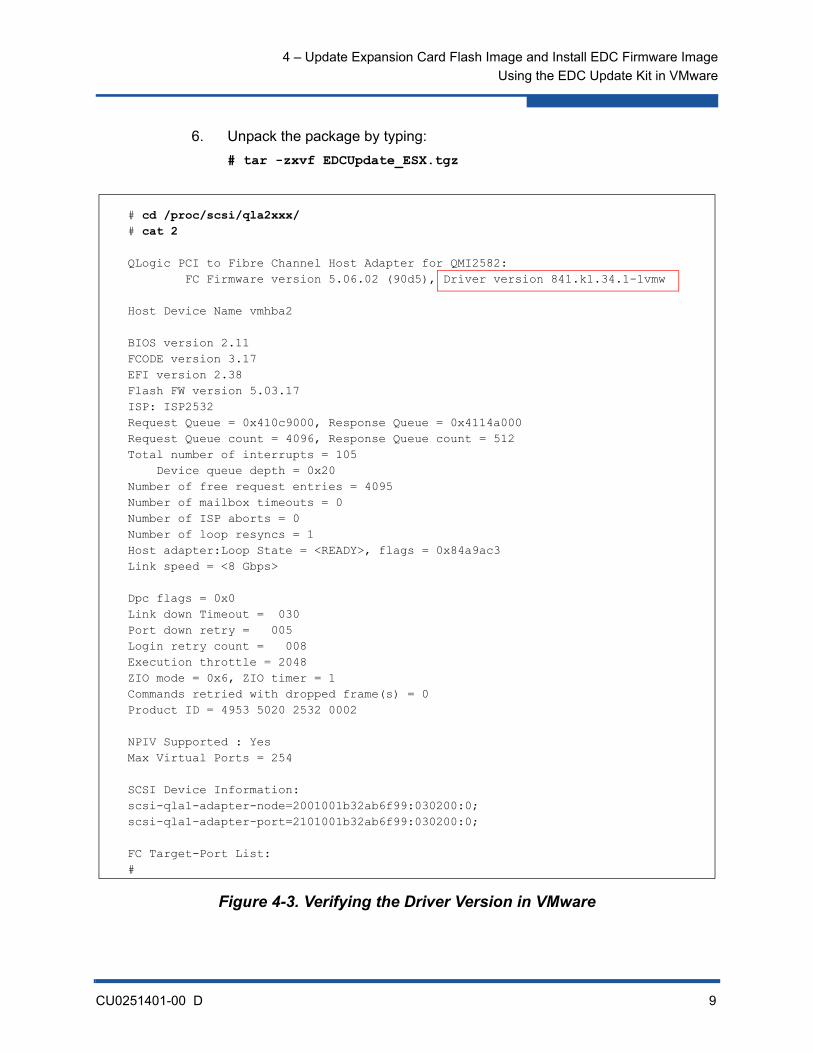
4. Verify that the host is now running the required driver package, as shown in Figure 4-3.
5. Download or copy the package to the ESX host:
# cp EDCUpdate_ESX.tgz /root/6. Unpack the package by typing:
# tar -zxvf EDCUpdate_ESX.tgz
4.2.2Installing the EDC Update Kit in ESXi
Install the EDC update kit in ESXi by following these instructions.
1. Set the host into Maintenance Mode.
2. Press ALT+F2 to enter System Customization.
a. Select Troubleshooting Options.
b. Enable the ESXi shell.
c. Enable SSH.
3. Press ALT+F1 to enter the Service Console.
a. Install the required ESX driver package for the expansion card (see Table 3-1).
b. Reboot the host. (Maintenance mode will no longer be required after driver installation.)
NOTE
On ESXi 4.0.0 installations, Service Console access is restricted and input commands will not appear on the screen as typed; however, you can still access the Service Console. To do so, press ALT+F1, type unsupported, press ENTER, and then type in the root password when prompted.
4 – Update Expansion Card Flash Image and Install EDC Firmware Image
Using the EDC Update Kit in VMware
CU0251401-00 D 8
4. Verify that the host is now running the required driver package, as shown in Figure 4-3.
5. Download or copy the package to the ESX host:
# cp EDCUpdate_ESX.tgz /root/
NOTE
For ESXi installations the package needs to be placed into the /store directory or one of its subdirectories. Unlike ESX, which keeps all directories persistent across reboots, ESXi may remove the package after a reboot if it is not placed into a persistent location.
4 – Update Expansion Card Flash Image and Install EDC Firmware Image
Using the EDC Update Kit in VMware
CU0251401-00 D 9
6. Unpack the package by typing:
# tar -zxvf EDCUpdate_ESX.tgz
Figure 4-3. Verifying the Driver Version in VMware
# cd /proc/scsi/qla2xxx/# cat 2
QLogic PCI to Fibre Channel Host Adapter for QMI2582: FC Firmware version 5.06.02 (90d5), Driver version 841.k1.34.1-1vmw
Host Device Name vmhba2
BIOS version 2.11FCODE version 3.17EFI version 2.38Flash FW version 5.03.17ISP: ISP2532Request Queue = 0x410c9000, Response Queue = 0x4114a000Request Queue count = 4096, Response Queue count = 512Total number of interrupts = 105 Device queue depth = 0x20Number of free request entries = 4095Number of mailbox timeouts = 0Number of ISP aborts = 0Number of loop resyncs = 1Host adapter:Loop State = <READY>, flags = 0x84a9ac3Link speed = <8 Gbps>
Dpc flags = 0x0Link down Timeout = 030Port down retry = 005Login retry count = 008Execution throttle = 2048ZIO mode = 0x6, ZIO timer = 1Commands retried with dropped frame(s) = 0Product ID = 4953 5020 2532 0002
4 – Update Expansion Card Flash Image and Install EDC Firmware Image
Using the ISO Image (PowerPC Only)
CU0251401-00 D 10
4.2.3Executing the Script in ESX/ESXi
Execute the script from the EDCUpdate_ESX directory, as shown in Figure 4-4.
Figure 4-4. Executing the Script in VMware
When the script finishes executing, reboot the host with the following command:
# reboot
4.3
Using the ISO Image (PowerPC Only)
CAUTIONDo not interrupt the next system boot. Do not power off or reset the blade. This boot will take slightly longer than usual. If the EDC programming process is interrupted the expansion card will not function properly.
NOTE
This section applies only to PowerPC blades JS23 and PS70x. The supplied platform update package should contain the ISO image.
# cd /root/EDCUpdate_ESX# ./EDCUpdate.sh QLOGICScript set to configure for QLogic Switchscript path = /root/EDCUpdate_ESX/EDCUpdate.shscript directory = /root/EDCUpdate_ESXFlash file /root/EDCUpdate_ESX/I25AF224.BIN exists.Global nvram file /root/EDCUpdate_ESX/2582QLGC.dat exists.Installation path = /root/EDCUpdate_ESXuTraceLevel = 0Refreshing...Done.Initiating flash updateUpdating Flash on HBA port(s) - QMI2582. Please wait...Flash update complete. Changes have been saved to both ports of this HBA.Flash update successful.Initiating Global NVRAM update.Updating Global Nvram on HBA instance 0 - QMI2582. Please wait...Global NVRAM update complete. Changes have been saved to HBA instance 0 and are effective after a reboot.Skipping Global NVRAM update on HBA instance 1 - QMI2582All operations succeeded.#
4 – Update Expansion Card Flash Image and Install EDC Firmware Image
Using the ISO Image (PowerPC Only)
CU0251401-00 D 11
On PowerPC systems where the EDC update kit cannot be used, the ISO image option provides an interface for setting the required EDC firmware.
This method does not require the driver version to be verified; the driver will be loaded from the ISO image as needed.
4.3.1 Update Procedure
To update the firmware using an ISO image, follow these instructions:
1. Burn the ISO image (vt.boot.1.24.iso) to a CD-ROM and place it in the IBM BladeCenter media tray (optical media).
2. Using the Media Tray switch on the blade or the Remote Control capability in the BladeCenter GUI, set the media tray to be controlled by the blade being updated.
Power-on/reboot the PowerPC blade being updated and select the System Management Services (SMS) menu.
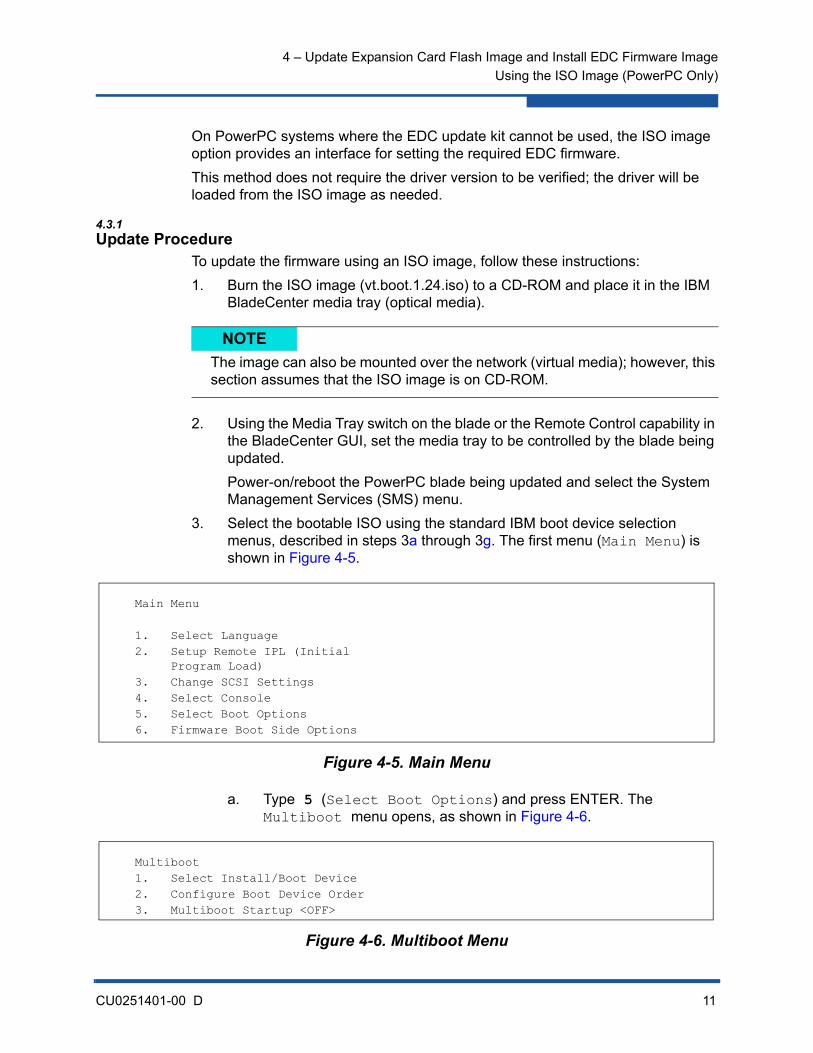
3. Select the bootable ISO using the standard IBM boot device selection menus, described in steps 3a through 3g. The first menu (Main Menu) is shown in Figure 4-5.
Figure 4-5. Main Menu
a. Type 5 (Select Boot Options) and press ENTER. The Multiboot menu opens, as shown in Figure 4-6.
Figure 4-6. Multiboot Menu
NOTE
The image can also be mounted over the network (virtual media); however, this section assumes that the ISO image is on CD-ROM.
Main Menu
1. Select Language 2. Setup Remote IPL (Initial Program Load) 3. Change SCSI Settings 4. Select Console 5. Select Boot Options 6. Firmware Boot Side Options
4 – Update Expansion Card Flash Image and Install EDC Firmware Image
Using the ISO Image (PowerPC Only)
CU0251401-00 D 12
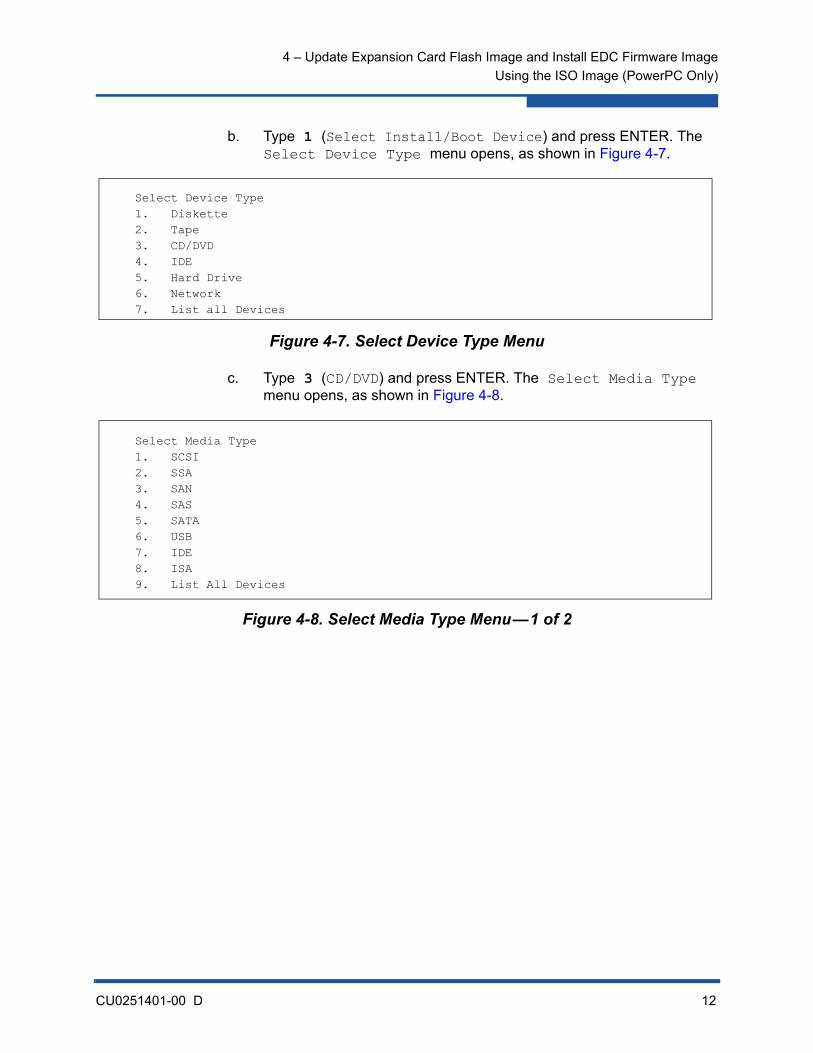
b. Type 1 (Select Install/Boot Device) and press ENTER. The Select Device Type menu opens, as shown in Figure 4-7.
Figure 4-7. Select Device Type Menu
c. Type 3 (CD/DVD) and press ENTER. The Select Media Type menu opens, as shown in Figure 4-8.
Figure 4-8. Select Media Type Menu—1 of 2
Select Device Type 1. Diskette 2. Tape 3. CD/DVD 4. IDE 5. Hard Drive 6. Network 7. List all Devices
Select Media Type 1. SCSI 2. SSA 3. SAN 4. SAS 5. SATA 6. USB 7. IDE 8. ISA 9. List All Devices
4 – Update Expansion Card Flash Image and Install EDC Firmware Image
Using the ISO Image (PowerPC Only)
CU0251401-00 D 13
d. Type the number that corresponds to the media type (for example, type 6 for USB) and press ENTER. The rest of the Select Media Type menu opens (Figure 4-9).
Figure 4-9. Select Media Type Menu—Part 2
e. Type the number of the boot media device and press ENTER (for example, type 1 for USB CD-ROM, as shown in Figure 4-9). The Select Task menu opens (Figure 4-10).
Figure 4-10. Select Task Menu
f. Type 2 (Normal Mode Boot) and press ENTER. The next prompt asks for confirmation before exiting (Figure 4-11).
Figure 4-11. Exit Confirmation
g. Type 1 (Yes) to confirm exit from System Management Services.
PowerPC FirmwareVersion EA350_895SMS 1.7 (c) Copyright IBM Corp. 2000,2008All rights reserved.------------------------------------------Select Device Device Current Device Number Position Name
1. - USB CD-ROM
( loc=U78A5.001.WIH2D5A-P1-T1-L1-L2-L3 )
------------------------------------------
Select TaskUSB CD-ROM ( loc=U78A5.001.WIH2D5A-P1-T1-L1-L2-L3 ) 1. Information 2. Normal Mode Boot 3. Service Mode Boot--------------------------------------
Are you sure you want to exit System Management Services? 1. Yes 2. No
4 – Update Expansion Card Flash Image and Install EDC Firmware Image
Using the ISO Image (PowerPC Only)
CU0251401-00 D 14
4. When prompted, type boot and press ENTER to start the Linux boot process.
5. Once the CD is booted, the Linux Flash Utility menu opens. Start the update process by selecting:
1 if connected to a QLogic switch.
2 if connected to a Brocade switch.
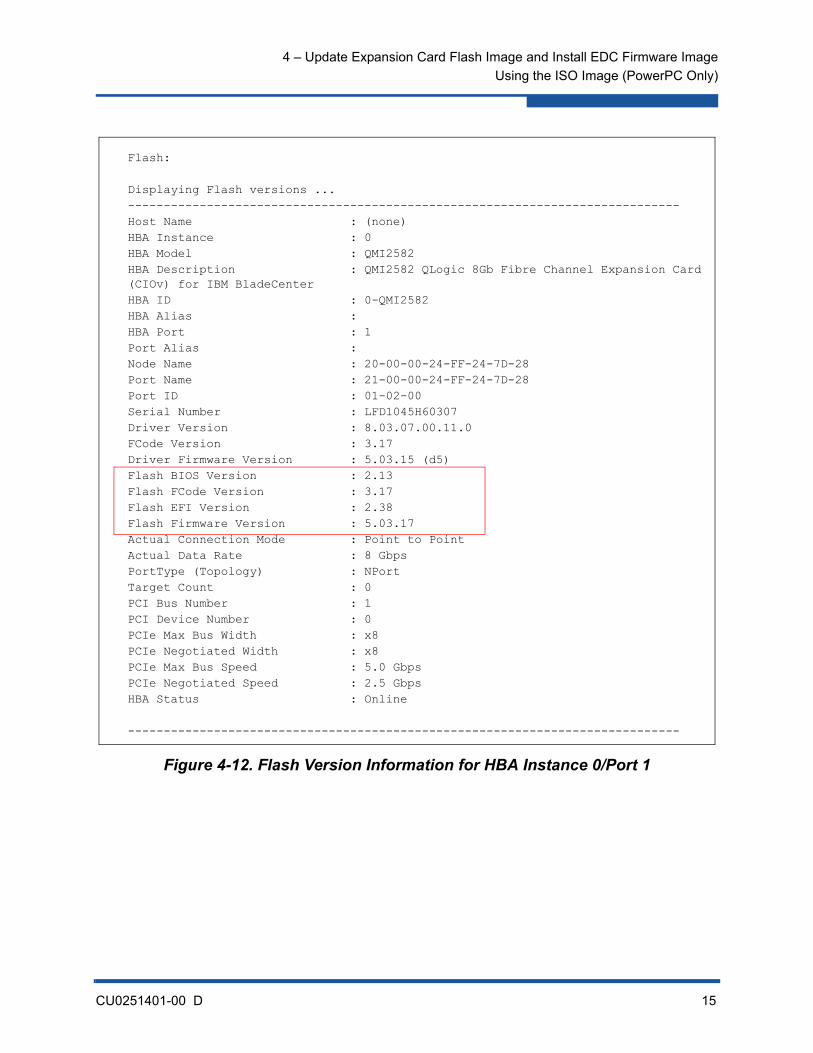
6. When the update is completed, the Flash utility lists the Flash version information for each HBA instance/port, as shown in Figure 4-12 and Figure 4-13.
When you are finished viewing this information, press ENTER to end the process.
NOTE
To run the scli command manually, refer to the README-MANUAL in /root/.
4 – Update Expansion Card Flash Image and Install EDC Firmware Image
Using the ISO Image (PowerPC Only)
CU0251401-00 D 15
Figure 4-12. Flash Version Information for HBA Instance 0/Port 1
Flash:
Displaying Flash versions ...-----------------------------------------------------------------------------Host Name : (none)HBA Instance : 0HBA Model : QMI2582HBA Description : QMI2582 QLogic 8Gb Fibre Channel Expansion Card (CIOv) for IBM BladeCenterHBA ID : 0-QMI2582HBA Alias :HBA Port : 1Port Alias :Node Name : 20-00-00-24-FF-24-7D-28Port Name : 21-00-00-24-FF-24-7D-28Port ID : 01-02-00Serial Number : LFD1045H60307Driver Version : 8.03.07.00.11.0FCode Version : 3.17Driver Firmware Version : 5.03.15 (d5)Flash BIOS Version : 2.13Flash FCode Version : 3.17Flash EFI Version : 2.38Flash Firmware Version : 5.03.17Actual Connection Mode : Point to PointActual Data Rate : 8 GbpsPortType (Topology) : NPortTarget Count : 0PCI Bus Number : 1PCI Device Number : 0PCIe Max Bus Width : x8PCIe Negotiated Width : x8PCIe Max Bus Speed : 5.0 GbpsPCIe Negotiated Speed : 2.5 GbpsHBA Status : Online
4 – Update Expansion Card Flash Image and Install EDC Firmware Image
Using the ISO Image (PowerPC Only)
CU0251401-00 D 16
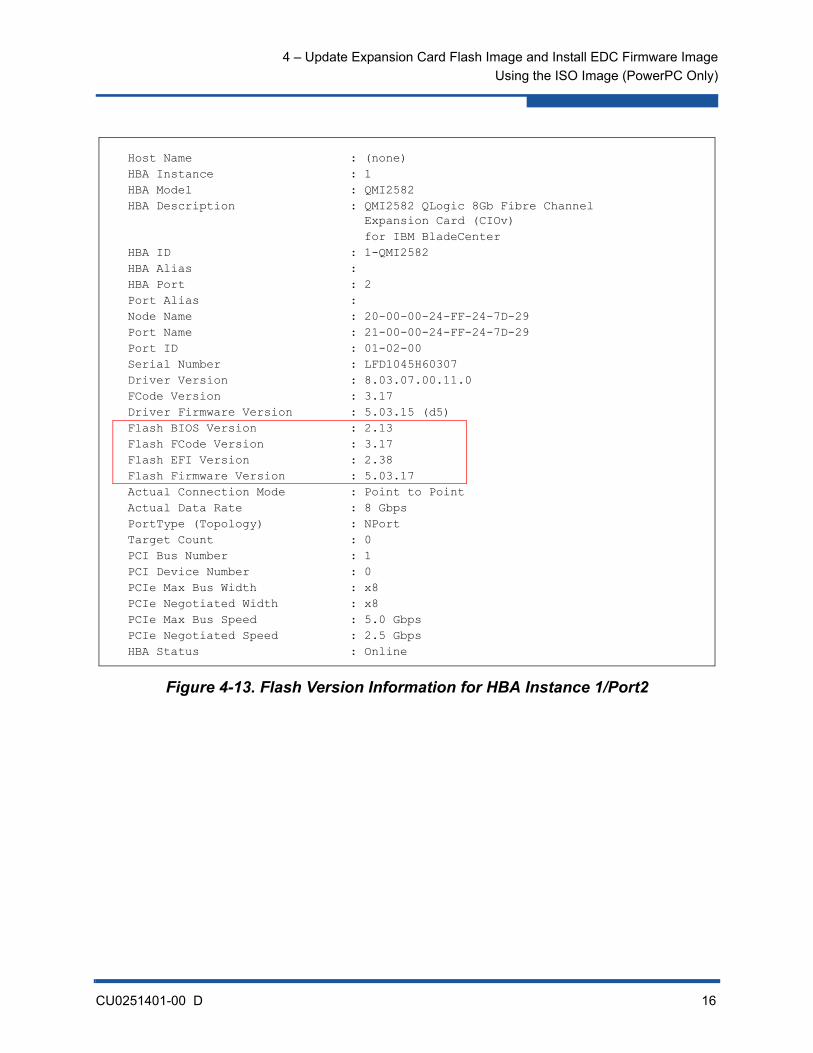
Figure 4-13. Flash Version Information for HBA Instance 1/Port2
Host Name : (none)HBA Instance : 1HBA Model : QMI2582HBA Description : QMI2582 QLogic 8Gb Fibre Channel
Expansion Card (CIOv) for IBM BladeCenterHBA ID : 1-QMI2582HBA Alias :HBA Port : 2Port Alias :Node Name : 20-00-00-24-FF-24-7D-29Port Name : 21-00-00-24-FF-24-7D-29Port ID : 01-02-00Serial Number : LFD1045H60307Driver Version : 8.03.07.00.11.0FCode Version : 3.17Driver Firmware Version : 5.03.15 (d5)Flash BIOS Version : 2.13Flash FCode Version : 3.17Flash EFI Version : 2.38Flash Firmware Version : 5.03.17Actual Connection Mode : Point to PointActual Data Rate : 8 GbpsPortType (Topology) : NPortTarget Count : 0PCI Bus Number : 1PCI Device Number : 0PCIe Max Bus Width : x8PCIe Negotiated Width : x8PCIe Max Bus Speed : 5.0 GbpsPCIe Negotiated Speed : 2.5 GbpsHBA Status : Online
4 – Update Expansion Card Flash Image and Install EDC Firmware Image
Subsequent EDC Update Methods
CU0251401-00 D 17
7. If the versions are correct, remove access to the provided ISO, and then power down and restart the blade.
8. Upon the next power cycle, the actual EDC is updated offline through the active boot code (BIOS, uEFI, or FCode).
To complete the process, refer to the documentation for the boot code that was used.
4.4
Subsequent EDC Update MethodsAfter you install the Flash image for the first time, use scli or the following boot code methods to change the EDC firmware when changing switch types:
BIOS
uEFI
FCode (PowerPC blades only)
Update method availability depends on the hardware platform as defined in Table 4-2.
CAUTIONDo not interrupt the next system boot. Do not power off or reset the blade. This boot will take slightly longer than usual. If the EDC programming process is interrupted the expansion card will not function properly.
Table 4-2. Subsequent Update Methods
Operating System
Hardware Platform
x86 PowerPC
Windows BIOS, uEFI n/a
Linux BIOS or uEFI (depends on hardware plat-form)
FCode, ISO Image
ESX, ESXi BIOS, uEFI n/a
AIX n/a ISO Image
4 – Update Expansion Card Flash Image and Install EDC Firmware Image
Subsequent EDC Update Methods
CU0251401-00 D 18
Each boot code method does the following:
1. Indicates for which switch (QLogic or Brocade) the EDC firmware type is currently set.
2. Allows you to update the expansion card’s global NVRAM flag that indicates which image to push to the EDC on the next reboot.
Rebooting the blade after selecting a new EDC image causes the following to occur:
1. The boot code comes up and checks the EDC load flag.
2. If the flag is not set, the boot process continues as normal.
3. If the flag is set, the boot code updates the EDC with the specified EDC code from Flash, resets the global NVRAM flag, sets the running flag, and then resets the QLogic chip on the card. Boot operation then resumes.
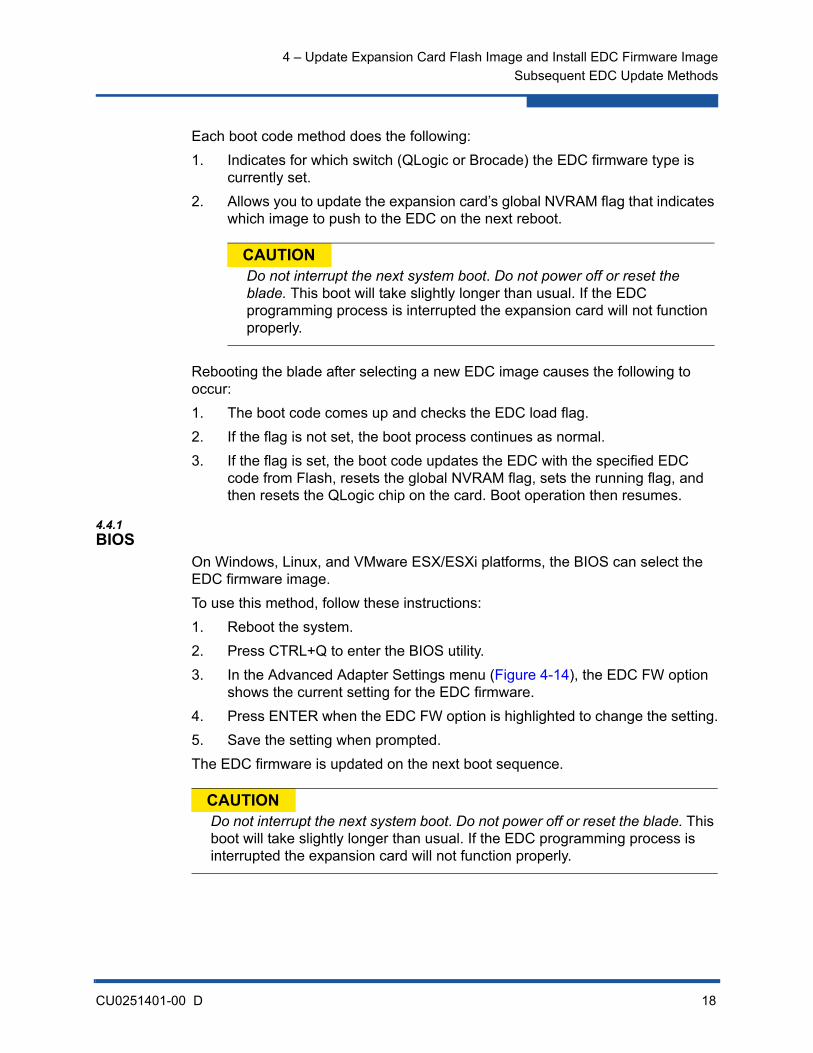
4.4.1BIOS
On Windows, Linux, and VMware ESX/ESXi platforms, the BIOS can select the EDC firmware image.
To use this method, follow these instructions:
1. Reboot the system.
2. Press CTRL+Q to enter the BIOS utility.
3. In the Advanced Adapter Settings menu (Figure 4-14), the EDC FW option shows the current setting for the EDC firmware.
4. Press ENTER when the EDC FW option is highlighted to change the setting.
5. Save the setting when prompted.
The EDC firmware is updated on the next boot sequence.
CAUTIONDo not interrupt the next system boot. Do not power off or reset the blade. This boot will take slightly longer than usual. If the EDC programming process is interrupted the expansion card will not function properly.
CAUTIONDo not interrupt the next system boot. Do not power off or reset the blade. This boot will take slightly longer than usual. If the EDC programming process is interrupted the expansion card will not function properly.
4 – Update Expansion Card Flash Image and Install EDC Firmware Image
Subsequent EDC Update Methods
CU0251401-00 D 19
Figure 4-14. BIOS Advanced Adapter Settings Menu
4.4.2uEFI
On Windows, Linux, and VMware ESX/ESXi platforms, the Unified Extensible Firmware Interface (uEFI) can select a different EDC firmware image. The uEFI driver’s HII configuration screens enable you to list and update the EDC configuration settings.
To use this method, follow these instructions:
1. Reboot the system.
2. When prompted, press F1 to enter System Setup.
4 – Update Expansion Card Flash Image and Install EDC Firmware Image
Subsequent EDC Update Methods
CU0251401-00 D 20
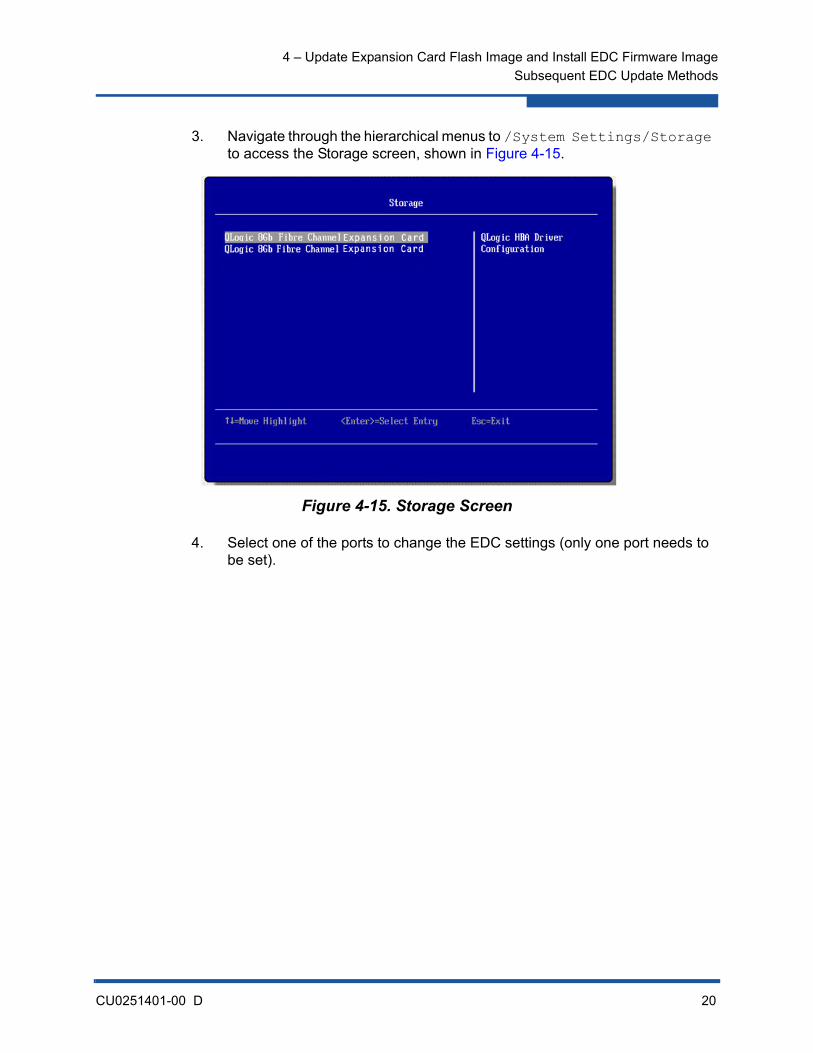
3. Navigate through the hierarchical menus to /System Settings/Storage to access the Storage screen, shown in Figure 4-15.
Figure 4-15. Storage Screen
4. Select one of the ports to change the EDC settings (only one port needs to be set).
4 – Update Expansion Card Flash Image and Install EDC Firmware Image
Subsequent EDC Update Methods
CU0251401-00 D 21
5. When the QLogic Main Menu appears, select Edit Advanced Settings. The Edit Advanced Settings screen appears, as shown in Figure 4-16.
Figure 4-16. Edit Advanced Settings Screen
6. The Current EDC field shows the current EDC settings. This field must match the installed IO module. This is a read-only field. Valid settings for this field are:
None: No EDC image is installed.
QLogic IO Module: QLogic FCSM (44X1905) or IPTM (44X1907) EDC image is installed.
Brocade IO Module: Brocade FCSM (44X1920) EDC image is installed.
Use the Update EDC field to change the EDC settings. Valid options for this field are:
None: No EDC changes are required.
QLogic IO Module: Install EDC image for QLogic FCSM (44X1905) or IPTM (44X1907) IO Module.
Brocade IO Module: Install EDC image for Brocade FCSM (44X1920) IO Module.
7. If the Current EDC field is set to None or to the wrong type of IO module, change the Update EDC field to the appropriate value, and then press ESC to save the change and return to the System Setup Main Menu.
4 – Update Expansion Card Flash Image and Install EDC Firmware Image
Subsequent EDC Update Methods
CU0251401-00 D 22
The uEFI systems continue to boot to the OS after exiting from HII. A system reboot is required for the EDC update to take effect.
4.4.3FCode
On Linux platforms, FCode can select the EDC firmware image. The set-edc-config command allows you to check and/or change the EDC configuration, as shown in Figure 4-24.
CAUTIONDo not interrupt the next system boot. Do not power off or reset the blade. This boot will take slightly longer than usual. If the EDC programming process is interrupted the expansion card will not function properly.
NOTE
This section applies only to PowerPC blades.
4 – Update Expansion Card Flash Image and Install EDC Firmware Image
Subsequent EDC Update Methods
CU0251401-00 D 23
To use this method, follow these instructions:
1. Get to the ok prompt as follows:
a. Power on the system. Disregard the prompt to enter Enter to continue; instead, wait until the IBM banner appears.
b. When the banner appears, type 2 at the prompt to set the language to English, as shown in Figure 4-17.
Figure 4-17. IBM Banner at Startup
c. Type the admin account password (default is admin) when prompted to do so, as shown in Figure 4-18. Each character you type is displayed as * for security.
Figure 4-18. Enter Password for admin Account
System is powering on. PRESS ENTER TO CONTINUE:
IBM IBM IBM IBM IBM IBM IBM IBM IBM IBM IBM IBM IBM IBM IBM IBM IBM IBM IBM IBM IBM IBM IBM IBM IBM IBM IBM IBM IBM IBM IBM IBM IBM IBM IBM IBM IBM IBM IBM IBM IBM IBM IBM IBM IBM IBM IBM IBM IBM IBM IBM IBM IBM IBM IBM IBM IBM
1 = SMS Menu 5 = Default Boot List 8 = Open Firmware Prompt 6 = Stored Boot List
Memory Keyboard Network SCSI Speaker
PowerPC Firmware Version SF240_320 LKM 1.6 (c) Copyright IBM Corp. 2000,2010 All rights reserved. --------------------------------------------------------------------------- Language Selection Menu
Current Language : ISO8859-1 English (United States)
1. Change Language 2. Continue to Password Entry
-------------------------------------------------------------------------- Type menu item number and press Enter: 2
.---------------------------------------------------------------. | Please enter the Service Processor 'admin' account password. | `---------------------------------------------------------------'
*****
4 – Update Expansion Card Flash Image and Install EDC Firmware Image
Subsequent EDC Update Methods
CU0251401-00 D 24
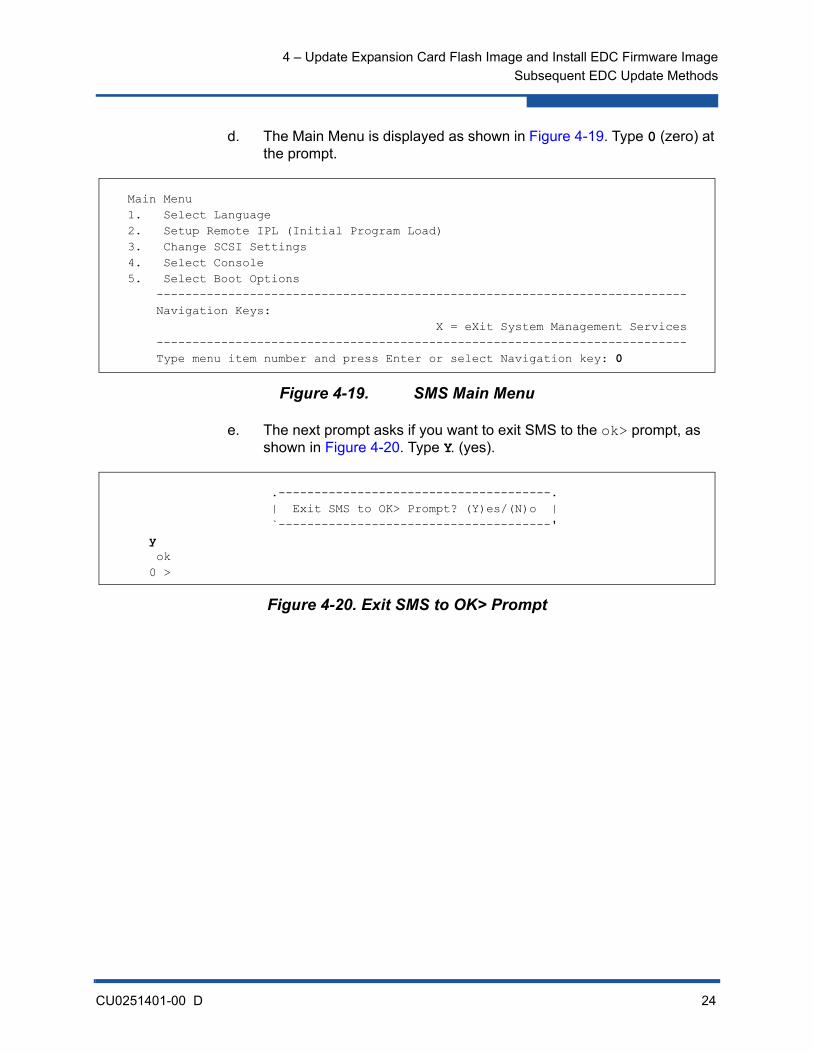
d. The Main Menu is displayed as shown in Figure 4-19. Type 0 (zero) at the prompt.
Figure 4-19. SMS Main Menu
e. The next prompt asks if you want to exit SMS to the ok> prompt, as shown in Figure 4-20. Type Y. (yes).
Figure 4-20. Exit SMS to OK> Prompt
Main Menu1. Select Language2. Setup Remote IPL (Initial Program Load)3. Change SCSI Settings4. Select Console5. Select Boot Options -------------------------------------------------------------------------- Navigation Keys: X = eXit System Management Services -------------------------------------------------------------------------- Type menu item number and press Enter or select Navigation key: 0
.--------------------------------------. | Exit SMS to OK> Prompt? (Y)es/(N)o | `--------------------------------------' y ok 0 >
4 – Update Expansion Card Flash Image and Install EDC Firmware Image
Subsequent EDC Update Methods
CU0251401-00 D 25
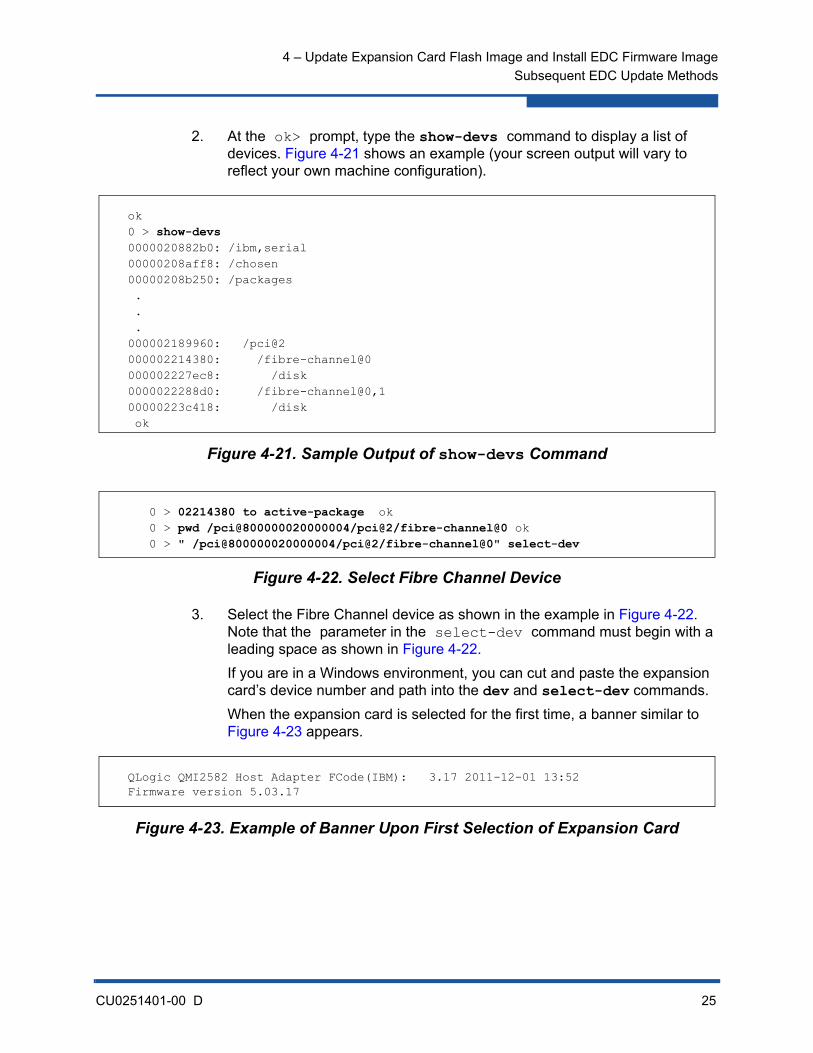
2. At the ok> prompt, type the show-devs command to display a list of devices. Figure 4-21 shows an example (your screen output will vary to reflect your own machine configuration).
Figure 4-21. Sample Output of show-devs Command
Figure 4-22. Select Fibre Channel Device
3. Select the Fibre Channel device as shown in the example in Figure 4-22. Note that the parameter in the select-dev command must begin with a leading space as shown in Figure 4-22.
If you are in a Windows environment, you can cut and paste the expansion card’s device number and path into the dev and select-dev commands.
When the expansion card is selected for the first time, a banner similar to Figure 4-23 appears.
Figure 4-23. Example of Banner Upon First Selection of Expansion Card
0 > 02214380 to active-package ok 0 > pwd /pci@800000020000004/pci@2/fibre-channel@0 ok 0 > " /pci@800000020000004/pci@2/fibre-channel@0" select-dev
QLogic QMI2582 Host Adapter FCode(IBM): 3.17 2011-12-01 13:52Firmware version 5.03.17
4 – Update Expansion Card Flash Image and Install EDC Firmware Image
Subsequent EDC Update Methods
CU0251401-00 D 26
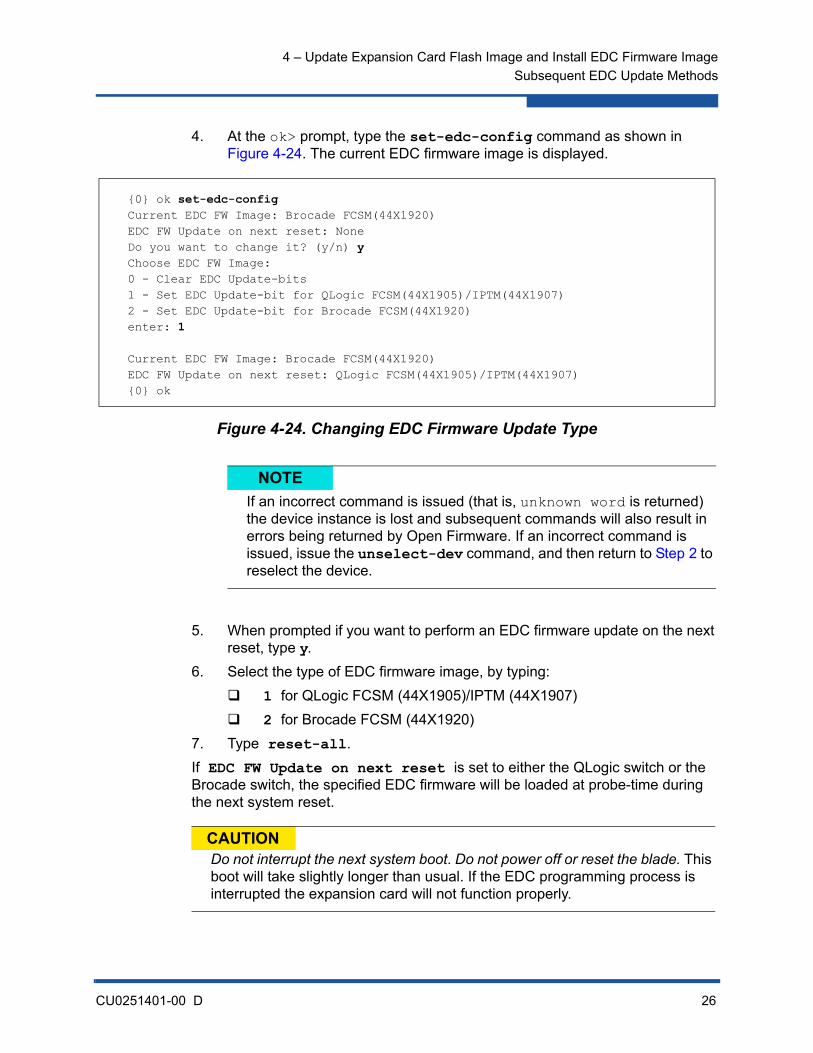
4. At the ok> prompt, type the set-edc-config command as shown in Figure 4-24. The current EDC firmware image is displayed.
Figure 4-24. Changing EDC Firmware Update Type
5. When prompted if you want to perform an EDC firmware update on the next reset, type y.
6. Select the type of EDC firmware image, by typing:
1 for QLogic FCSM (44X1905)/IPTM (44X1907)
2 for Brocade FCSM (44X1920)
7. Type reset-all.
If EDC FW Update on next reset is set to either the QLogic switch or the Brocade switch, the specified EDC firmware will be loaded at probe-time during the next system reset.
NOTE
If an incorrect command is issued (that is, unknown word is returned) the device instance is lost and subsequent commands will also result in errors being returned by Open Firmware. If an incorrect command is issued, issue the unselect-dev command, and then return to Step 2 to reselect the device.
CAUTIONDo not interrupt the next system boot. Do not power off or reset the blade. This boot will take slightly longer than usual. If the EDC programming process is interrupted the expansion card will not function properly.
{0} ok set-edc-configCurrent EDC FW Image: Brocade FCSM(44X1920)EDC FW Update on next reset: NoneDo you want to change it? (y/n) yChoose EDC FW Image:0 - Clear EDC Update-bits1 - Set EDC Update-bit for QLogic FCSM(44X1905)/IPTM(44X1907)2 - Set EDC Update-bit for Brocade FCSM(44X1920)enter: 1
Current EDC FW Image: Brocade FCSM(44X1920)EDC FW Update on next reset: QLogic FCSM(44X1905)/IPTM(44X1907){0} ok
5 – Verify the Update (Optional)
Subsequent EDC Update Methods
CU0251401-00 D 27
5
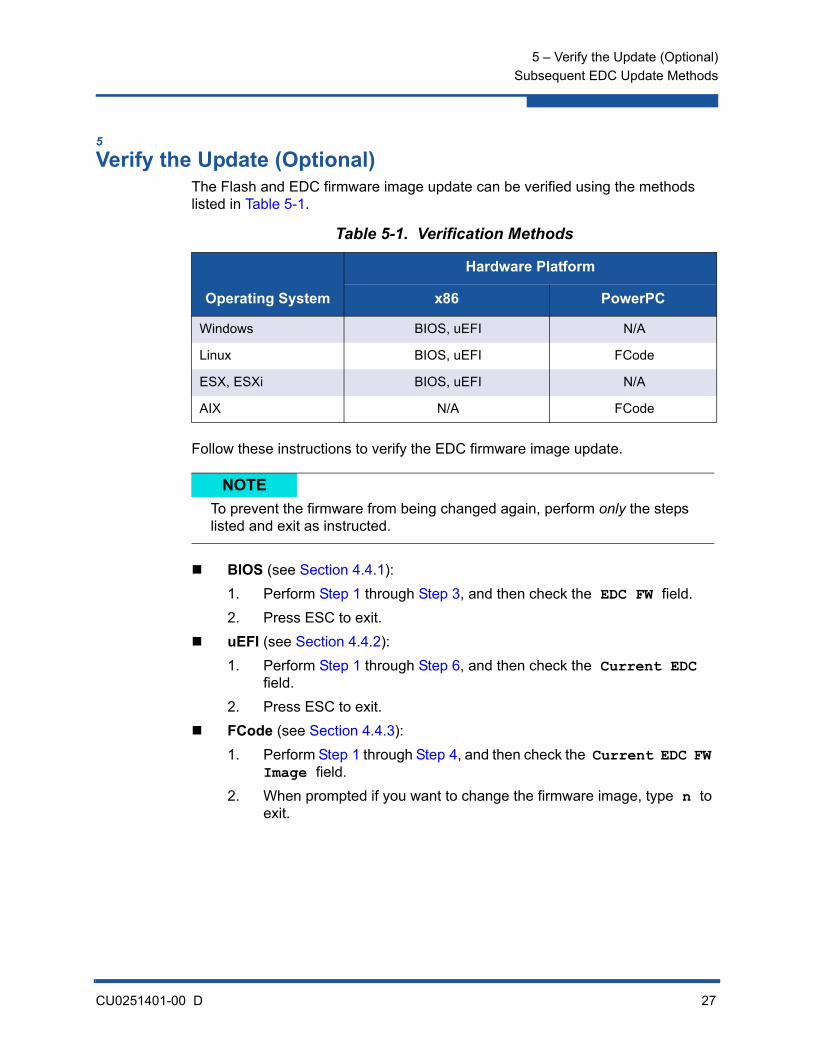
Verify the Update (Optional)The Flash and EDC firmware image update can be verified using the methods listed in Table 5-1.
Follow these instructions to verify the EDC firmware image update.
BIOS (see Section 4.4.1):
1. Perform Step 1 through Step 3, and then check the EDC FW field.
2. Press ESC to exit.
uEFI (see Section 4.4.2):
1. Perform Step 1 through Step 6, and then check the Current EDC field.
2. Press ESC to exit.
FCode (see Section 4.4.3):
1. Perform Step 1 through Step 4, and then check the Current EDC FW Image field.
2. When prompted if you want to change the firmware image, type n to exit.
Table 5-1. Verification Methods
Operating System
Hardware Platform
x86 PowerPC
Windows BIOS, uEFI N/A
Linux BIOS, uEFI FCode
ESX, ESXi BIOS, uEFI N/A
AIX N/A FCode
NOTE
To prevent the firmware from being changed again, perform only the steps listed and exit as instructed.
International Offices UK | Ireland | Germany | France | India | Japan | China | Hong Kong | Singapore | Taiwan
Document Revision History
Revision A, February 14, 2012
Revision B, March 16, 2012
Revision C, March 26, 2012
Revision D, May 9, 2014
Changes Sections Affected
Updated the RHEL, VMware, and Windows supported OSs. Removed SLES OSs.
2
Updated Table 3-1. 3
In Table 4-1, updated the values in the Operating System/Platform and Pack-age File Name columns.
4
In Step 1, updated the ISO image file name to vt.boot.1.24.iso. 4.3.1
Changed the paragraph following Step 7 to “The uEFI systems continue to boot to the OS after exiting from HII. A system reboot is required for the EDC update to take effect.”