EDI Manager Introduction The EDI Manager simplifies the workflow for electronic processes such as Claims, Remittance, Eligibility, Electronic Statements and Z-Pay payments. This module automatically communicates with ZirMed to upload and download files to and from e-Medsys. Features 1. On-line Activity Log For each EDI activity, the system maintains an on-line log that is viewable separately for each process. The on-line log will display the number of files created, the creation date, the total dollar amounts, the date the file was uploaded (applicable for claim batches, eligibility batches, and electronic statements), the date files were downloaded (applicable for eligibility response files and remittance files) and the date files were processed (the date the remittance file was posted electronically or the date the eligibility response file was parsed and patient records updated). There is also a date range selection so at a glance you will be able to see what activities took place for any given date range. 2. Automatic upload and download to ZirMed If you are using our EDI partner ZirMed, files will be automatically uploaded and downloaded using secure file transfer protocol (SFTP). The upload will take place following the creation of claim batches, eligibility batches, and electronic statements. The downloading of remittance (835) and eligibility response files (271) can also be automated by scheduling those processes to run after hours. Both of these operations can also be initiated from within the EDI Manager. 3. Detail view of patients/claims in the files Additional features include the ability to view all the claim batch detail for patients in a batch, view patients sent in the eligibility inquiry file and the received status of all inquiries, and view all patients and dollar amounts within your statement run. 4. View of electronic ANSI file format The raw data of the specific ANSI format or text file can also be viewed within the EDI Manager by using the “Open button” after selecting a file (claims, remittance, eligibility and statements).
Transcript
EEDDII MMaannaaggeerr
Introduction The EDI Manager simplifies the workflow for electronic processes such as Claims, Remittance, Eligibility, Electronic Statements and Z-Pay payments. This module automatically communicates with ZirMed to upload and download files to and from e-Medsys. Features 1. On-line Activity Log For each EDI activity, the system maintains an on-line log that is viewable separately for each process. The on-line log will display the number of files created, the creation date, the total dollar amounts, the date the file was uploaded (applicable for claim batches, eligibility batches, and electronic statements), the date files were downloaded (applicable for eligibility response files and remittance files) and the date files were processed (the date the remittance file was posted electronically or the date the eligibility response file was parsed and patient records updated). There is also a date range selection so at a glance you will be able to see what activities took place for any given date range. 2. Automatic upload and download to ZirMed If you are using our EDI partner ZirMed, files will be automatically uploaded and downloaded using secure file transfer protocol (SFTP). The upload will take place following the creation of claim batches, eligibility batches, and electronic statements. The downloading of remittance (835) and eligibility response files (271) can also be automated by scheduling those processes to run after hours. Both of these operations can also be initiated from within the EDI Manager. 3. Detail view of patients/claims in the files Additional features include the ability to view all the claim batch detail for patients in a batch, view patients sent in the eligibility inquiry file and the received status of all inquiries, and view all patients and dollar amounts within your statement run. 4. View of electronic ANSI file format The raw data of the specific ANSI format or text file can also be viewed within the EDI Manager by using the “Open button” after selecting a file (claims, remittance, eligibility and statements).
Page 2 of 19
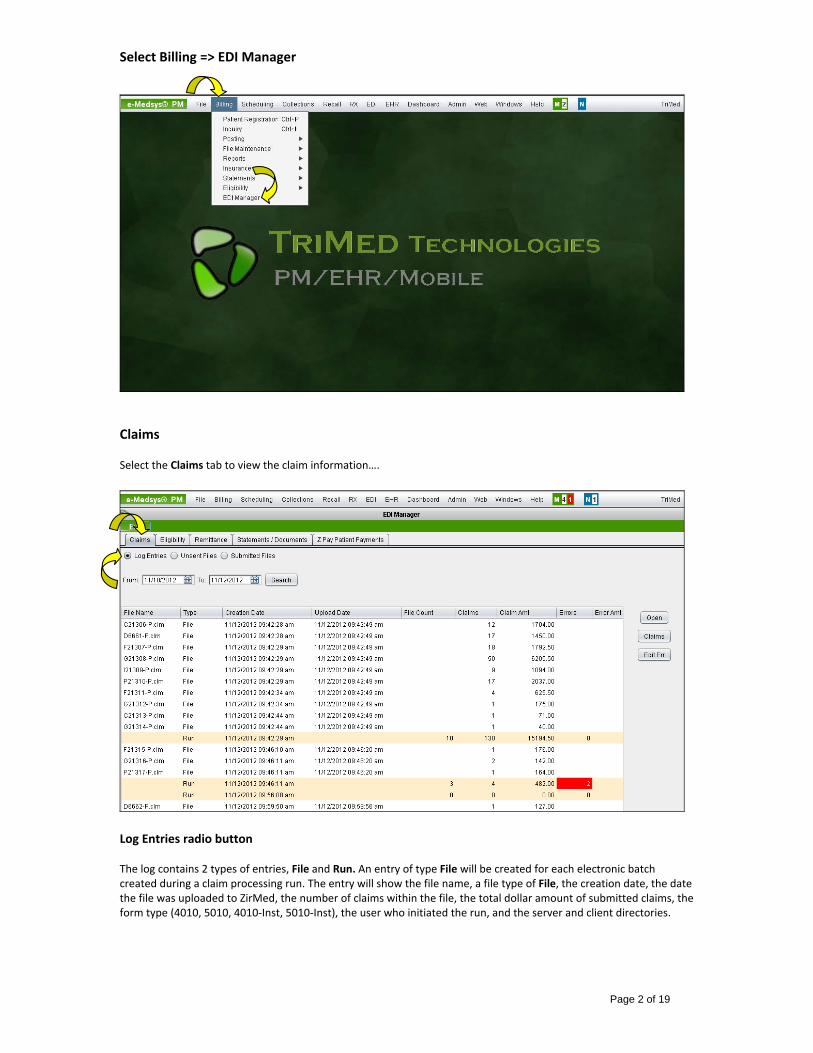
Select Billing => EDI Manager
Claims Select the Claims tab to view the claim information….
Log Entries radio button The log contains 2 types of entries, File and Run. An entry of type File will be created for each electronic batch created during a claim processing run. The entry will show the file name, a file type of File, the creation date, the date the file was uploaded to ZirMed, the number of claims within the file, the total dollar amount of submitted claims, the form type (4010, 5010, 4010-Inst, 5010-Inst), the user who initiated the run, and the server and client directories.
Page 3 of 19
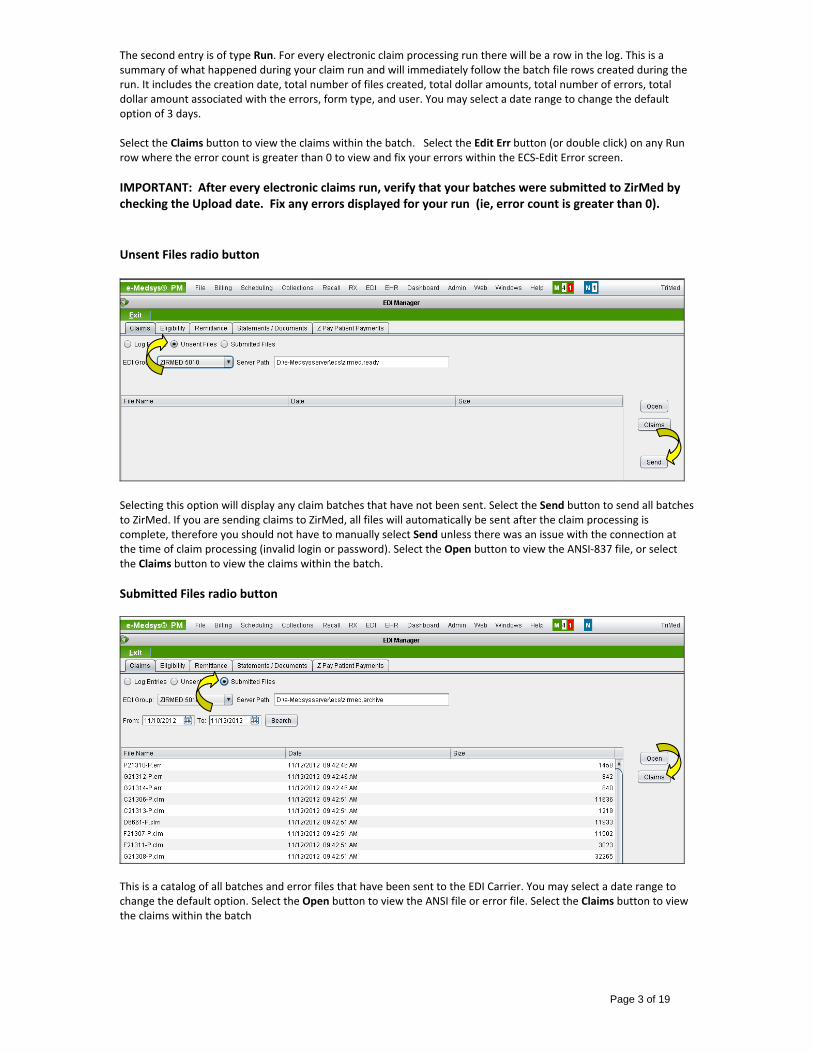
The second entry is of type Run. For every electronic claim processing run there will be a row in the log. This is a summary of what happened during your claim run and will immediately follow the batch file rows created during the run. It includes the creation date, total number of files created, total dollar amounts, total number of errors, total dollar amount associated with the errors, form type, and user. You may select a date range to change the default option of 3 days. Select the Claims button to view the claims within the batch. Select the Edit Err button (or double click) on any Run row where the error count is greater than 0 to view and fix your errors within the ECS-Edit Error screen. IMPORTANT: After every electronic claims run, verify that your batches were submitted to ZirMed by checking the Upload date. Fix any errors displayed for your run (ie, error count is greater than 0). Unsent Files radio button
Selecting this option will display any claim batches that have not been sent. Select the Send button to send all batches to ZirMed. If you are sending claims to ZirMed, all files will automatically be sent after the claim processing is complete, therefore you should not have to manually select Send unless there was an issue with the connection at the time of claim processing (invalid login or password). Select the Open button to view the ANSI-837 file, or select the Claims button to view the claims within the batch. Submitted Files radio button
This is a catalog of all batches and error files that have been sent to the EDI Carrier. You may select a date range to change the default option. Select the Open button to view the ANSI file or error file. Select the Claims button to view the claims within the batch
Page 4 of 19
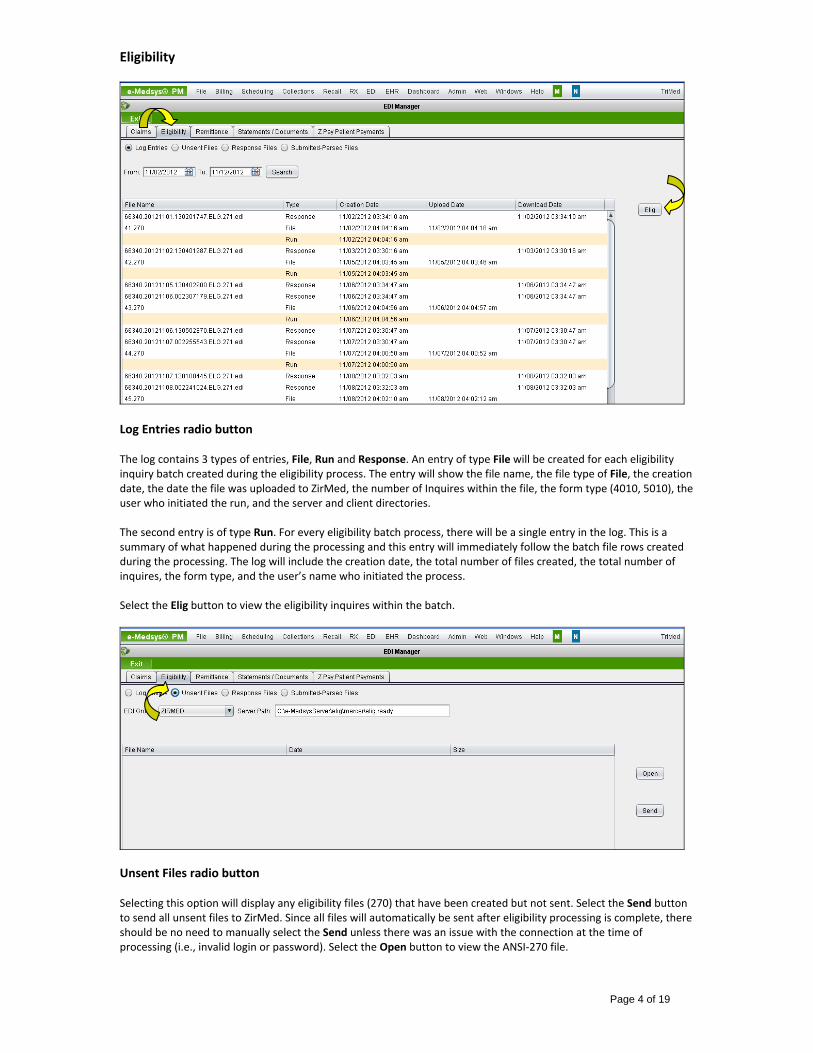
Eligibility
Log Entries radio button The log contains 3 types of entries, File, Run and Response. An entry of type File will be created for each eligibility inquiry batch created during the eligibility process. The entry will show the file name, the file type of File, the creation date, the date the file was uploaded to ZirMed, the number of Inquires within the file, the form type (4010, 5010), the user who initiated the run, and the server and client directories. The second entry is of type Run. For every eligibility batch process, there will be a single entry in the log. This is a summary of what happened during the processing and this entry will immediately follow the batch file rows created during the processing. The log will include the creation date, the total number of files created, the total number of inquires, the form type, and the user’s name who initiated the process. Select the Elig button to view the eligibility inquires within the batch.
Unsent Files radio button Selecting this option will display any eligibility files (270) that have been created but not sent. Select the Send button to send all unsent files to ZirMed. Since all files will automatically be sent after eligibility processing is complete, there should be no need to manually select the Send unless there was an issue with the connection at the time of processing (i.e., invalid login or password). Select the Open button to view the ANSI-270 file.
Page 5 of 19
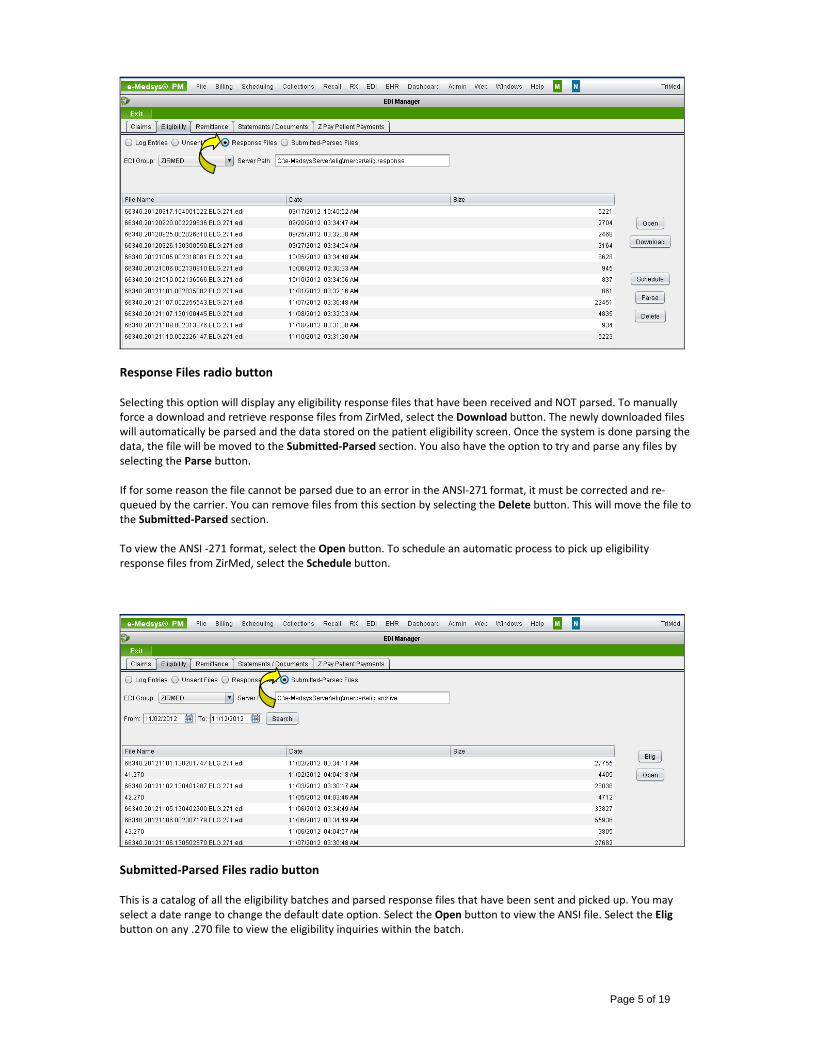
Response Files radio button Selecting this option will display any eligibility response files that have been received and NOT parsed. To manually force a download and retrieve response files from ZirMed, select the Download button. The newly downloaded files will automatically be parsed and the data stored on the patient eligibility screen. Once the system is done parsing the data, the file will be moved to the Submitted-Parsed section. You also have the option to try and parse any files by selecting the Parse button. If for some reason the file cannot be parsed due to an error in the ANSI-271 format, it must be corrected and re-queued by the carrier. You can remove files from this section by selecting the Delete button. This will move the file to the Submitted-Parsed section. To view the ANSI -271 format, select the Open button. To schedule an automatic process to pick up eligibility response files from ZirMed, select the Schedule button.
Submitted-Parsed Files radio button This is a catalog of all the eligibility batches and parsed response files that have been sent and picked up. You may select a date range to change the default date option. Select the Open button to view the ANSI file. Select the Elig button on any .270 file to view the eligibility inquiries within the batch.
Page 6 of 19
Eligibility Workscreen
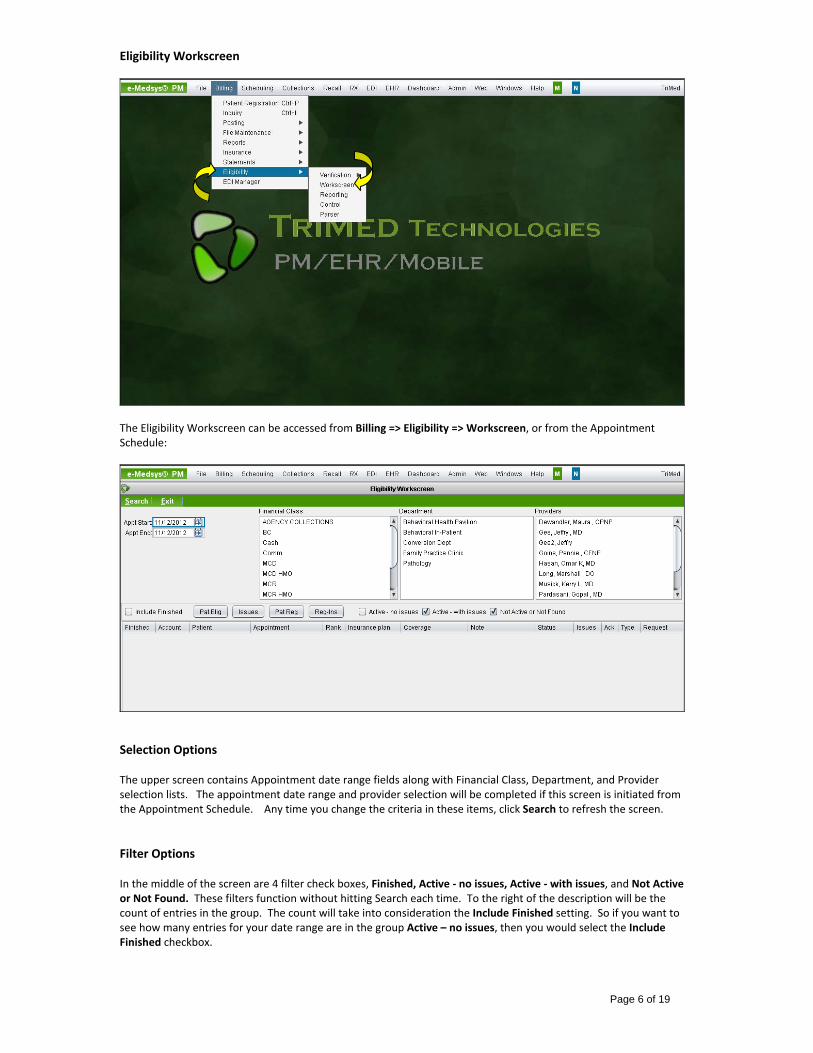
The Eligibility Workscreen can be accessed from Billing => Eligibility => Workscreen, or from the Appointment Schedule:
Selection Options The upper screen contains Appointment date range fields along with Financial Class, Department, and Provider selection lists. The appointment date range and provider selection will be completed if this screen is initiated from the Appointment Schedule. Any time you change the criteria in these items, click Search to refresh the screen. Filter Options In the middle of the screen are 4 filter check boxes, Finished, Active - no issues, Active - with issues, and Not Active or Not Found. These filters function without hitting Search each time. To the right of the description will be the count of entries in the group. The count will take into consideration the Include Finished setting. So if you want to see how many entries for your date range are in the group Active – no issues, then you would select the Include Finished checkbox.
Page 7 of 19
Definitions Finished An appointment is considered Finished if the most recent Eligibility check came back as Active - No Issues. Since by default the Include Finished check box filter is not checked, you won’t see these rows unless you enable the filter. Any row that the user manually marks as Finished will be excluded as well regardless of the Coverage status. Active - no issues These are appointment slots where the most recent Eligibility check came back with a coverage value of “Active”. This also means that there are no data conflicts to correct. By default these will be marked “Finished” so they do not need to be manually worked in the Workscreen. Active – with issues (Coverage column displayed in Yellow) These are appointment rows where the most recent Eligibility check came back as Active, but the system did determine that there are data conflict issues to correct. They are not marked Finished automatically and will show up by default unless you disable the Active - with Issues filter. The coverage column will display Active with a yellow background so these can be easily identified. Not Active or Not Found (Coverage column displayed in Red): These are the appointments in which the coverage value is one of the following: Inactive, Not Found, Active-Outdated, Cannot be checked, or Not checked. Below is an explanation of each value.
1. Inactive: A coverage value of Inactive means that payer responded indicating that the insurance plan is no longer active for the patient.
2. Not Found: A coverage value of Not Found indicates either the Eligibility response was not received or the patient could not be identified by the payer. A Status of WAITING means a response was never parsed into the system. Otherwise, look to the Rej Reason and Follow up columns to identify the problem.
3. Active – Outdated: Indicates that the last eligibility check came back as Active but is older than the appointment date minus the value in the Eligibility Recheck Days (specified in Company File Maintenance). For example, if the recheck days are set to 30, and the last eligibility check was 31 days prior to the appointment, the coverage value would indicate Active-Outdated.
4. Cannot be checked: There were no eligibility requests made for this insurance plan and the insurance plan is not set up for electronic eligibility.
5. Not checked: Eligibility checks can be done for this insurance plan but none have been done.
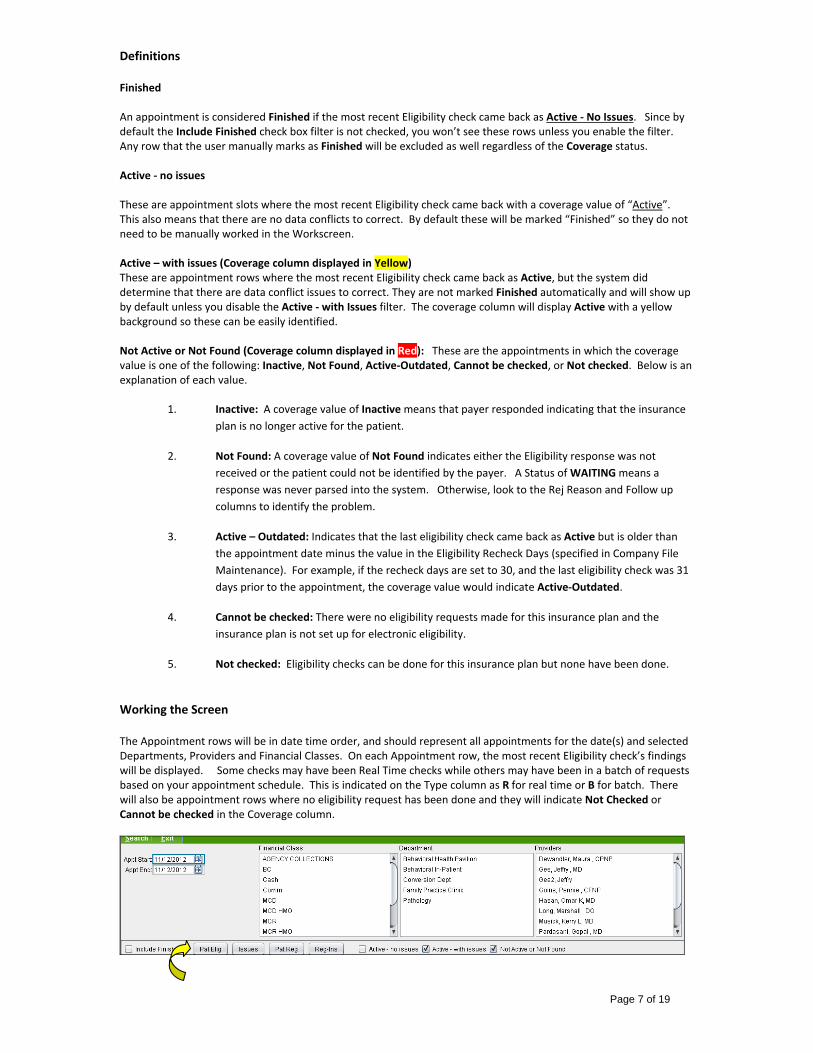
Working the Screen The Appointment rows will be in date time order, and should represent all appointments for the date(s) and selected Departments, Providers and Financial Classes. On each Appointment row, the most recent Eligibility check’s findings will be displayed. Some checks may have been Real Time checks while others may have been in a batch of requests based on your appointment schedule. This is indicated on the Type column as R for real time or B for batch. There will also be appointment rows where no eligibility request has been done and they will indicate Not Checked or Cannot be checked in the Coverage column.
Page 8 of 19
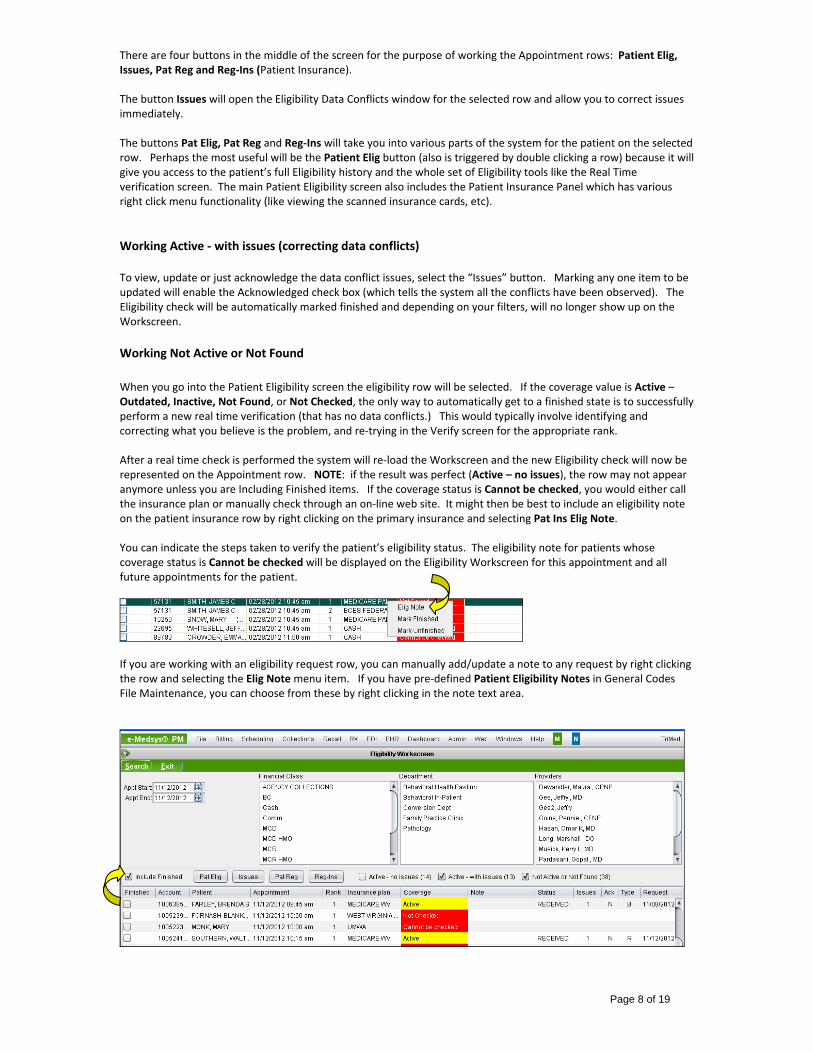
There are four buttons in the middle of the screen for the purpose of working the Appointment rows: Patient Elig, Issues, Pat Reg and Reg-Ins (Patient Insurance). The button Issues will open the Eligibility Data Conflicts window for the selected row and allow you to correct issues immediately. The buttons Pat Elig, Pat Reg and Reg-Ins will take you into various parts of the system for the patient on the selected row. Perhaps the most useful will be the Patient Elig button (also is triggered by double clicking a row) because it will give you access to the patient’s full Eligibility history and the whole set of Eligibility tools like the Real Time verification screen. The main Patient Eligibility screen also includes the Patient Insurance Panel which has various right click menu functionality (like viewing the scanned insurance cards, etc). Working Active - with issues (correcting data conflicts) To view, update or just acknowledge the data conflict issues, select the “Issues” button. Marking any one item to be updated will enable the Acknowledged check box (which tells the system all the conflicts have been observed). The Eligibility check will be automatically marked finished and depending on your filters, will no longer show up on the Workscreen. Working Not Active or Not Found When you go into the Patient Eligibility screen the eligibility row will be selected. If the coverage value is Active – Outdated, Inactive, Not Found, or Not Checked, the only way to automatically get to a finished state is to successfully perform a new real time verification (that has no data conflicts.) This would typically involve identifying and correcting what you believe is the problem, and re-trying in the Verify screen for the appropriate rank. After a real time check is performed the system will re-load the Workscreen and the new Eligibility check will now be represented on the Appointment row. NOTE: if the result was perfect (Active – no issues), the row may not appear anymore unless you are Including Finished items. If the coverage status is Cannot be checked, you would either call the insurance plan or manually check through an on-line web site. It might then be best to include an eligibility note on the patient insurance row by right clicking on the primary insurance and selecting Pat Ins Elig Note. You can indicate the steps taken to verify the patient’s eligibility status. The eligibility note for patients whose coverage status is Cannot be checked will be displayed on the Eligibility Workscreen for this appointment and all future appointments for the patient.
If you are working with an eligibility request row, you can manually add/update a note to any request by right clicking the row and selecting the Elig Note menu item. If you have pre-defined Patient Eligibility Notes in General Codes File Maintenance, you can choose from these by right clicking in the note text area.
Page 9 of 19
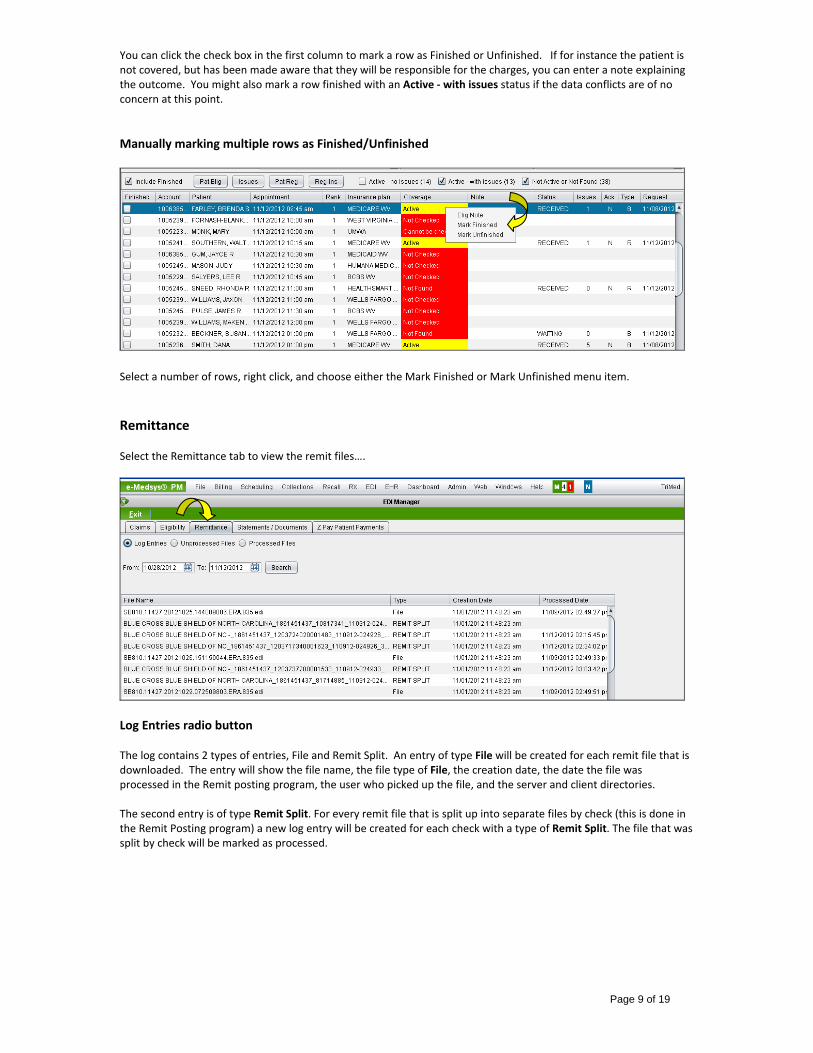
You can click the check box in the first column to mark a row as Finished or Unfinished. If for instance the patient is not covered, but has been made aware that they will be responsible for the charges, you can enter a note explaining the outcome. You might also mark a row finished with an Active - with issues status if the data conflicts are of no concern at this point. Manually marking multiple rows as Finished/Unfinished
Select a number of rows, right click, and choose either the Mark Finished or Mark Unfinished menu item. Remittance Select the Remittance tab to view the remit files….
Log Entries radio button The log contains 2 types of entries, File and Remit Split. An entry of type File will be created for each remit file that is downloaded. The entry will show the file name, the file type of File, the creation date, the date the file was processed in the Remit posting program, the user who picked up the file, and the server and client directories. The second entry is of type Remit Split. For every remit file that is split up into separate files by check (this is done in the Remit Posting program) a new log entry will be created for each check with a type of Remit Split. The file that was split by check will be marked as processed.
Page 10 of 19
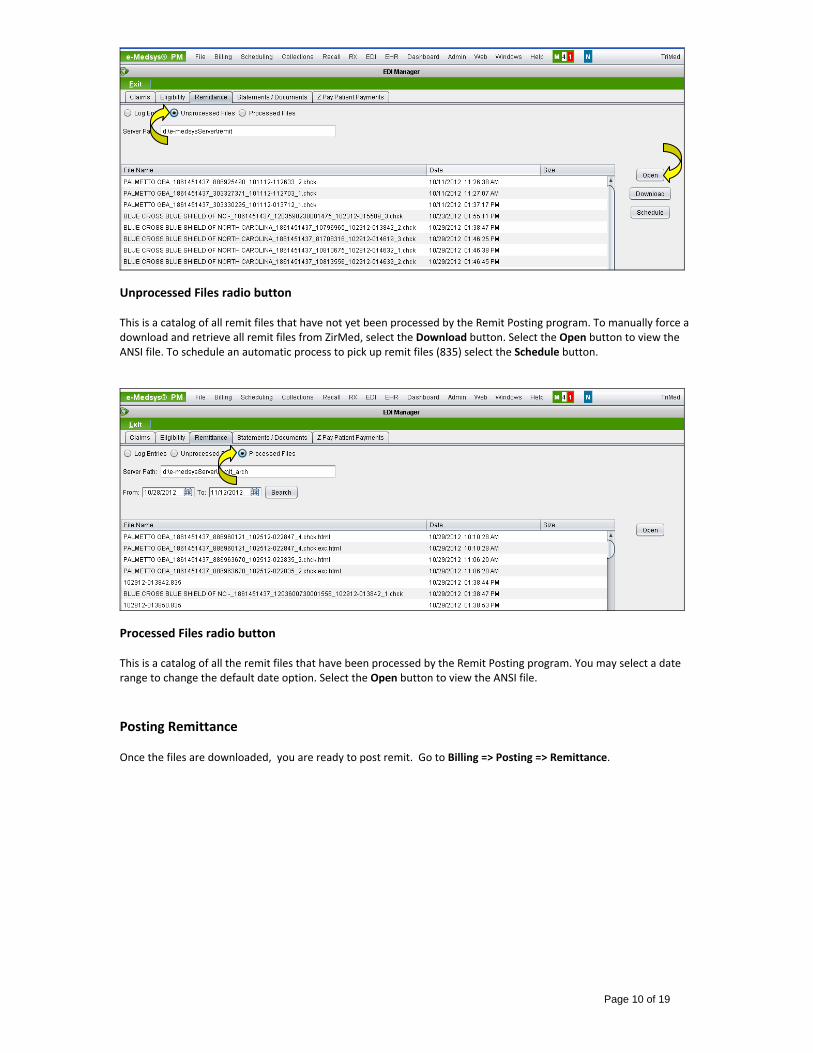
Unprocessed Files radio button This is a catalog of all remit files that have not yet been processed by the Remit Posting program. To manually force a download and retrieve all remit files from ZirMed, select the Download button. Select the Open button to view the ANSI file. To schedule an automatic process to pick up remit files (835) select the Schedule button.
Processed Files radio button This is a catalog of all the remit files that have been processed by the Remit Posting program. You may select a date range to change the default date option. Select the Open button to view the ANSI file. Posting Remittance Once the files are downloaded, you are ready to post remit. Go to Billing => Posting => Remittance.
Page 11 of 19
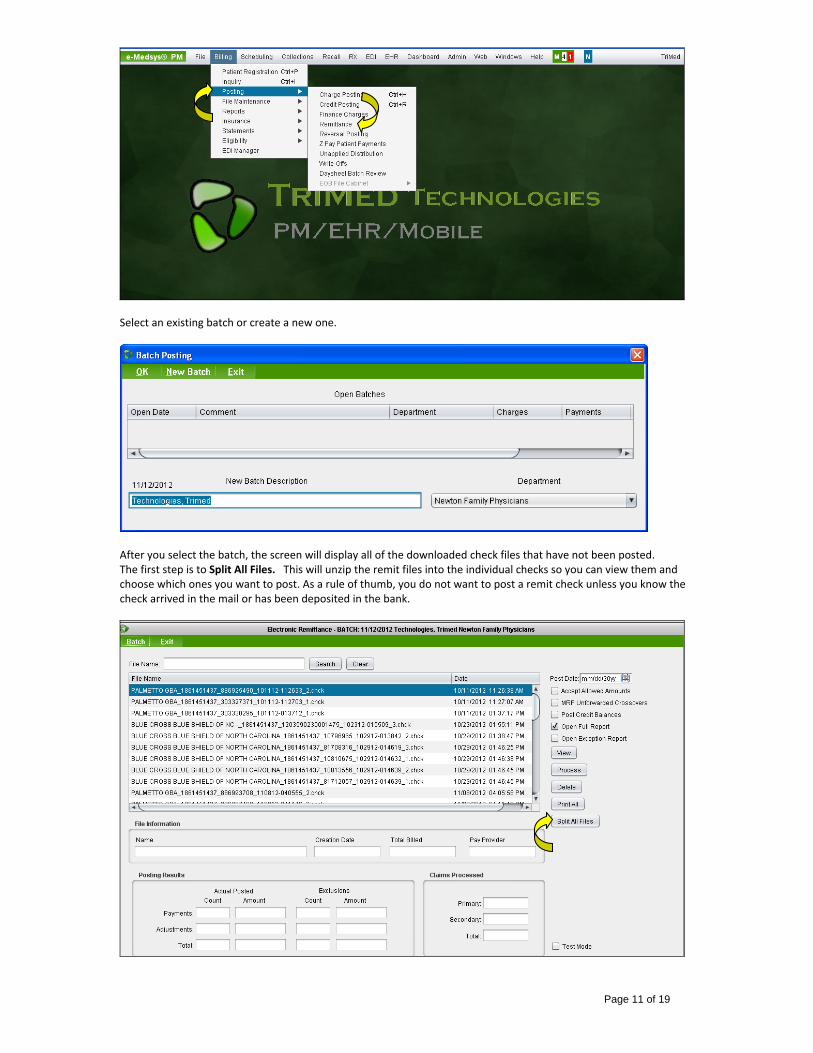
Select an existing batch or create a new one.
After you select the batch, the screen will display all of the downloaded check files that have not been posted. The first step is to Split All Files. This will unzip the remit files into the individual checks so you can view them and choose which ones you want to post. As a rule of thumb, you do not want to post a remit check unless you know the check arrived in the mail or has been deposited in the bank.
Page 12 of 19
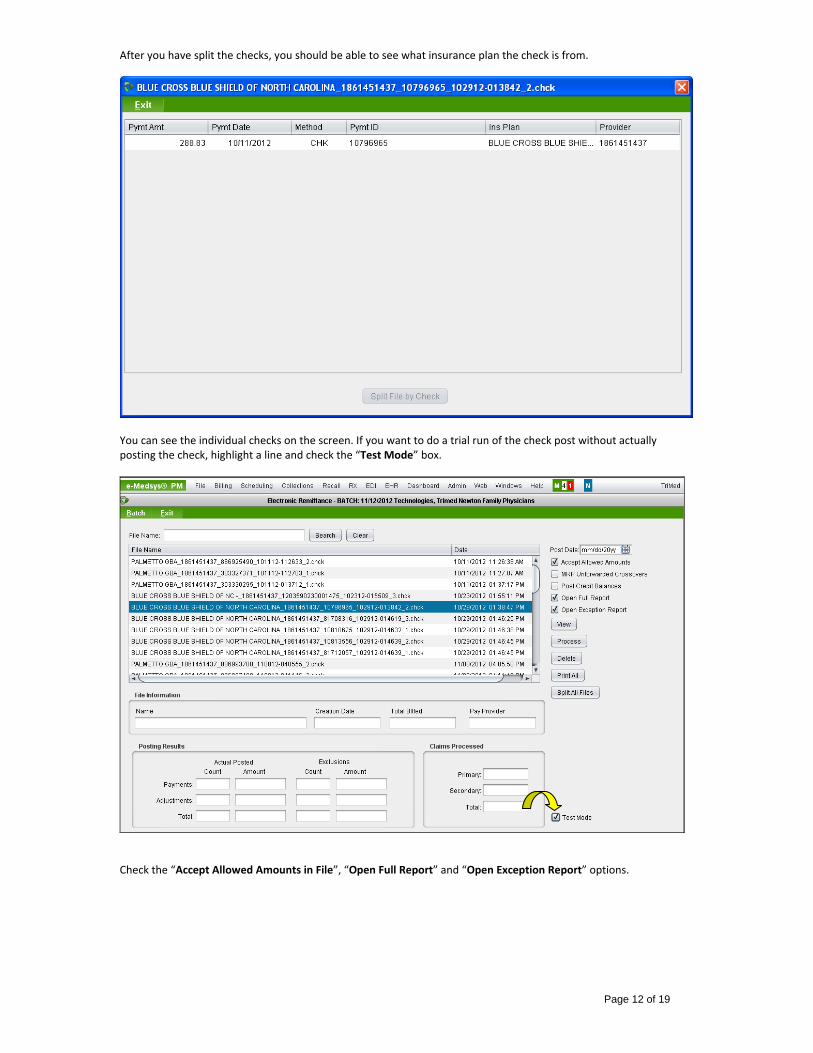
After you have split the checks, you should be able to see what insurance plan the check is from.
You can see the individual checks on the screen. If you want to do a trial run of the check post without actually posting the check, highlight a line and check the “Test Mode” box.
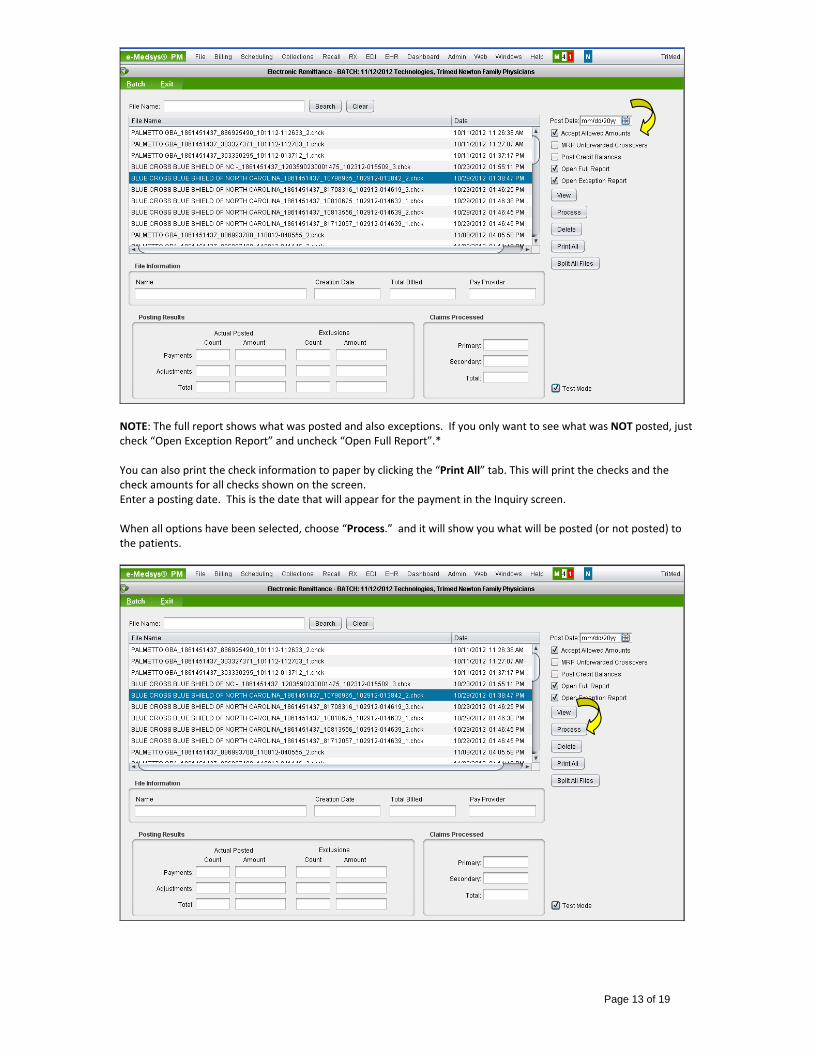
Check the “Accept Allowed Amounts in File”, “Open Full Report” and “Open Exception Report” options.
Page 13 of 19
NOTE: The full report shows what was posted and also exceptions. If you only want to see what was NOT posted, just check “Open Exception Report” and uncheck “Open Full Report”.* You can also print the check information to paper by clicking the “Print All” tab. This will print the checks and the check amounts for all checks shown on the screen. Enter a posting date. This is the date that will appear for the payment in the Inquiry screen. When all options have been selected, choose “Process.” and it will show you what will be posted (or not posted) to the patients.
Page 14 of 19
To run in “real” mode, select the options outlined above and make sure the “Test Mode” box is unchecked. The selected reports will display in Internet Explorer windows and can be printed from that window. The checks that are processed will be automatically removed from the check screen. Exceptions Only Report:
Exceptions will need to be posted manually. Most remit files will have some exceptions based on information forwarded from the payer. Full Report:
Compare the print out totals to the check totals using the summary at the bottom of the report.
Page 15 of 19
The batch that you selected when you started the Remit posting will have all of the entries that were posted. If you look at a patient in Inquiry you will be able to see the remit posted also. In Inquiry on the Claims screen, you will be able to view the remittance information posted to the claim. You will see a "Y" in the Remit column indicating that this claim was posted with Remit Posting. Highlight the claim line and click on the View ERA tab to see the remit info. Remit posting will also populate the Claim Review screen. Statements
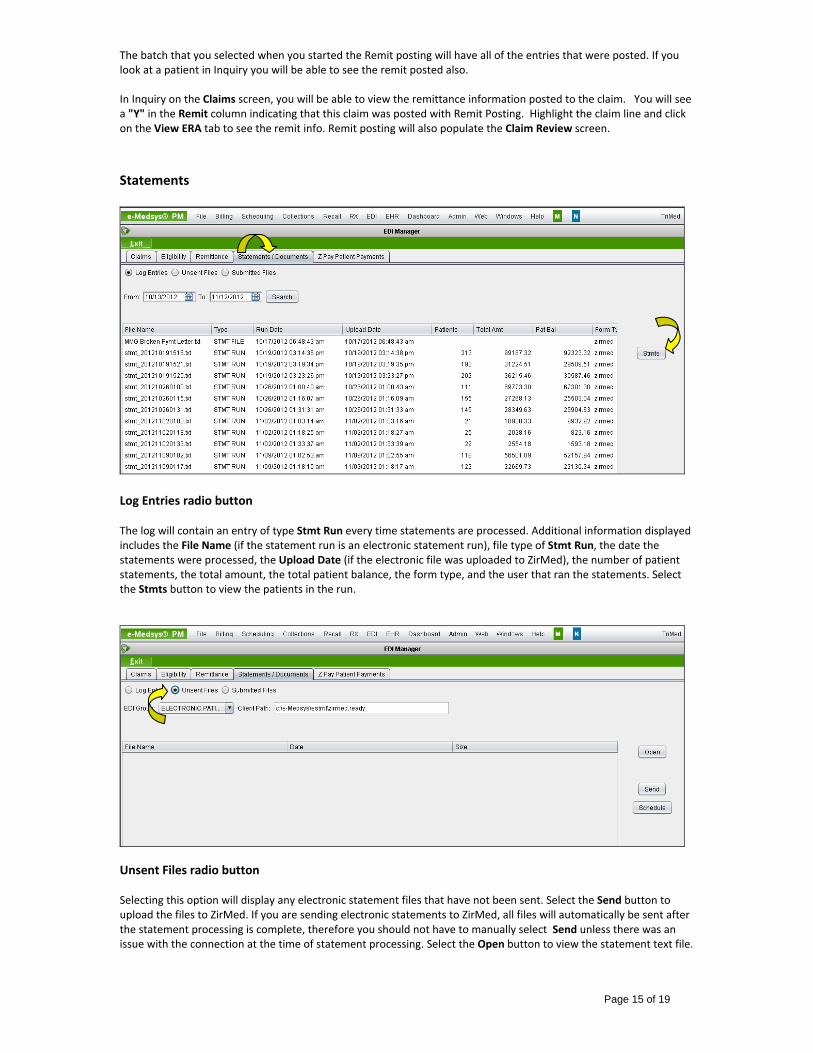
Log Entries radio button The log will contain an entry of type Stmt Run every time statements are processed. Additional information displayed includes the File Name (if the statement run is an electronic statement run), file type of Stmt Run, the date the statements were processed, the Upload Date (if the electronic file was uploaded to ZirMed), the number of patient statements, the total amount, the total patient balance, the form type, and the user that ran the statements. Select the Stmts button to view the patients in the run.
Unsent Files radio button Selecting this option will display any electronic statement files that have not been sent. Select the Send button to upload the files to ZirMed. If you are sending electronic statements to ZirMed, all files will automatically be sent after the statement processing is complete, therefore you should not have to manually select Send unless there was an issue with the connection at the time of statement processing. Select the Open button to view the statement text file.
Page 16 of 19
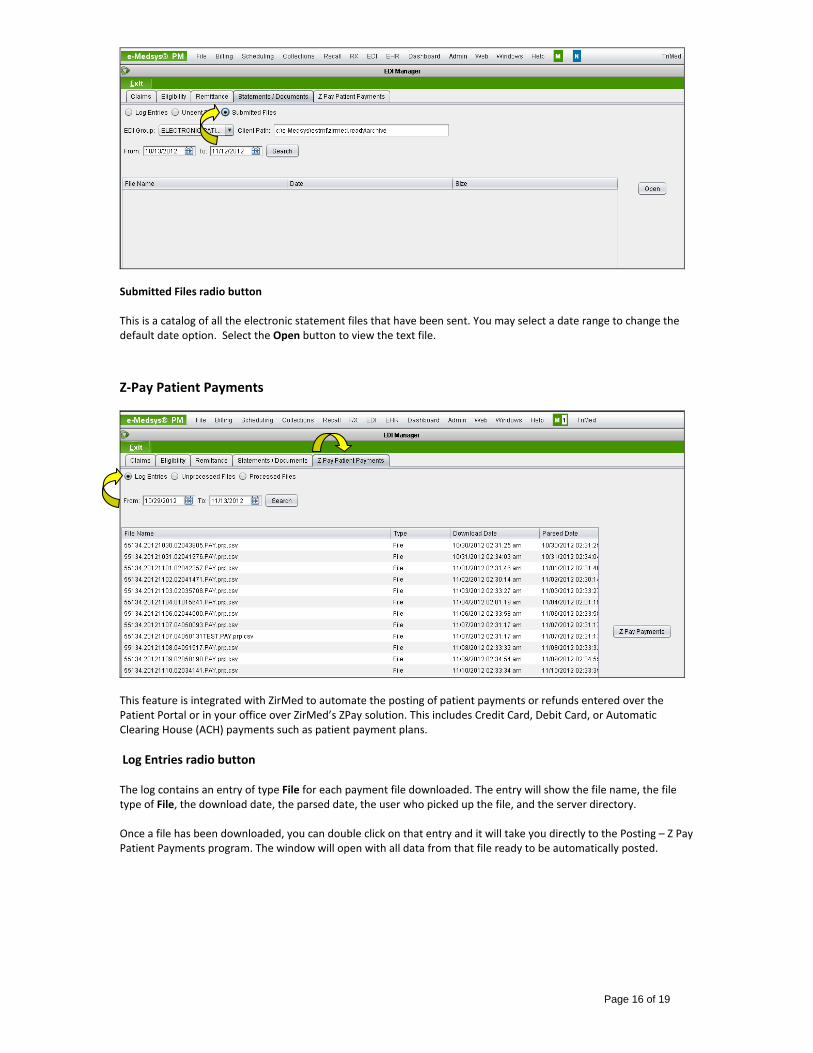
Submitted Files radio button This is a catalog of all the electronic statement files that have been sent. You may select a date range to change the default date option. Select the Open button to view the text file. Z-Pay Patient Payments
This feature is integrated with ZirMed to automate the posting of patient payments or refunds entered over the Patient Portal or in your office over ZirMed’s ZPay solution. This includes Credit Card, Debit Card, or Automatic Clearing House (ACH) payments such as patient payment plans. Log Entries radio button The log contains an entry of type File for each payment file downloaded. The entry will show the file name, the file type of File, the download date, the parsed date, the user who picked up the file, and the server directory. Once a file has been downloaded, you can double click on that entry and it will take you directly to the Posting – Z Pay Patient Payments program. The window will open with all data from that file ready to be automatically posted.
Page 17 of 19
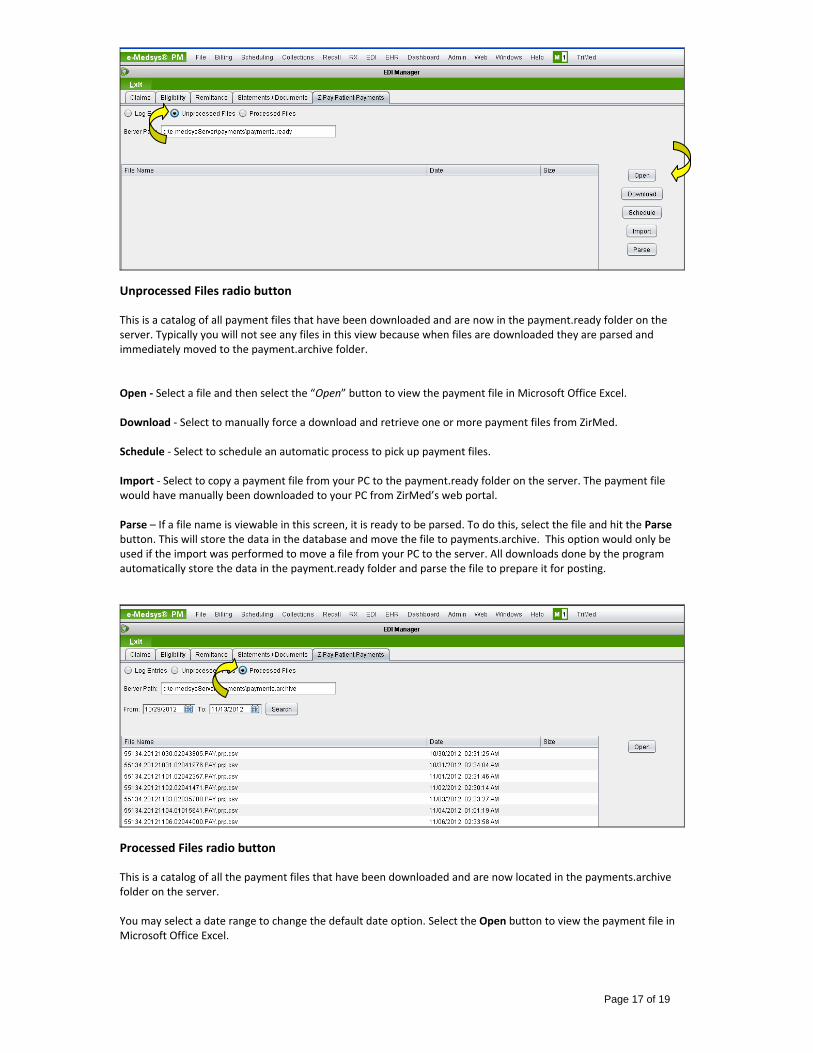
Unprocessed Files radio button This is a catalog of all payment files that have been downloaded and are now in the payment.ready folder on the server. Typically you will not see any files in this view because when files are downloaded they are parsed and immediately moved to the payment.archive folder. Open - Select a file and then select the “Open” button to view the payment file in Microsoft Office Excel. Download - Select to manually force a download and retrieve one or more payment files from ZirMed. Schedule - Select to schedule an automatic process to pick up payment files. Import - Select to copy a payment file from your PC to the payment.ready folder on the server. The payment file would have manually been downloaded to your PC from ZirMed’s web portal. Parse – If a file name is viewable in this screen, it is ready to be parsed. To do this, select the file and hit the Parse button. This will store the data in the database and move the file to payments.archive. This option would only be used if the import was performed to move a file from your PC to the server. All downloads done by the program automatically store the data in the payment.ready folder and parse the file to prepare it for posting.
Processed Files radio button This is a catalog of all the payment files that have been downloaded and are now located in the payments.archive folder on the server. You may select a date range to change the default date option. Select the Open button to view the payment file in Microsoft Office Excel.
Page 18 of 19
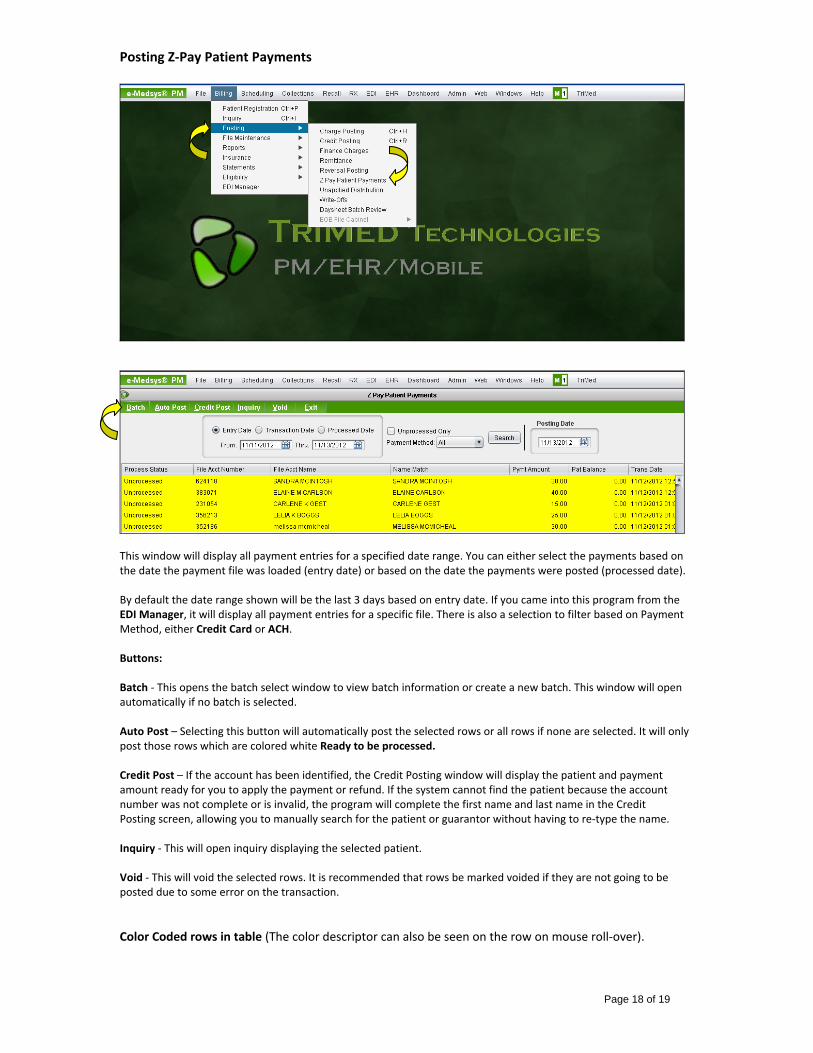
Posting Z-Pay Patient Payments
This window will display all payment entries for a specified date range. You can either select the payments based on the date the payment file was loaded (entry date) or based on the date the payments were posted (processed date). By default the date range shown will be the last 3 days based on entry date. If you came into this program from the EDI Manager, it will display all payment entries for a specific file. There is also a selection to filter based on Payment Method, either Credit Card or ACH. Buttons: Batch - This opens the batch select window to view batch information or create a new batch. This window will open automatically if no batch is selected. Auto Post – Selecting this button will automatically post the selected rows or all rows if none are selected. It will only post those rows which are colored white Ready to be processed. Credit Post – If the account has been identified, the Credit Posting window will display the patient and payment amount ready for you to apply the payment or refund. If the system cannot find the patient because the account number was not complete or is invalid, the program will complete the first name and last name in the Credit Posting screen, allowing you to manually search for the patient or guarantor without having to re-type the name. Inquiry - This will open inquiry displaying the selected patient. Void - This will void the selected rows. It is recommended that rows be marked voided if they are not going to be posted due to some error on the transaction. Color Coded rows in table (The color descriptor can also be seen on the row on mouse roll-over).
Page 19 of 19
White – This is the default color and indicates that the patient’s payment is ready to be processed. Red – A red row indicates a fatal error because the account number provided in the file could not be found in e-Medsys. Yellow – A yellow row indicates that the payment needs to be reviewed and manually posted. Typically this will occur if the patient’s balance is less the payment amount. This payment or a refund can either be manually posted or voided. Gray – A gray row indicates that the row has already been processed or the row has been voided. The exact status will be displayed in the first column Process Status. These rows can optionally be suppressed by selecting the checkbox Unprocessed Only and hitting the search button. Displayed columns Process Status – The current status of the transaction. It will either be Processed ,Unprocessed or Void. File Acct Number – This is the account number that was provided in the file. This number will only contain numeric data. If this is a family system the number should be the guarantor number. File Acct Name - The patient's name that was provided in the payment file. Name Match - The patient's name that was found in e-Medsys based on a patient search. For invalid accounts this will be blank. Pymt Amt - The amount of the payment or refund in the file. Pat Balance - The patient balance on the account. If this is a family system this will be the family balance. Trans Date - The transaction date from the file. This is the date and time the transaction took place. Status - Transaction status from the payment file. This is typically either Approved or Returned. Auth Number – The authorization number in the file. This number will be stored in the ABA number. Location – The location name in the file. Entry Point - This comes from the file and is typically either eCommerce or Payment Plan. Method – Method of payment. Valid entries are Credit Card or ACH. Card Type – The credit card type used to make the payment. Entries could include AMEX, VISA and MC. Entry Type – This describes how the payment was taken on Z pay. Valid entries include Manual or By Phone. Trans Type – This is the type of transaction. Valid entries include Payment, Refund, Void, and Return. This data pulls from the file. User – This is the user name within your office who initiated the transaction. For entries entered over the patient portal, the user name will be eCommerce. Processed Date – The date the transaction was posted within e-Medsys. File Name – The name of the downloaded file. Entered Date - The date the file is parsed by e-Medsys. Pymt Plan Amount – If the patient has a payment plan in e-Medsys, this amount is the balance due. Alert Message –If a Patient Note Type (Billing => File Maintenance => Patient Note Types) has been flagged for alert in Z Pay, and the patient /guarantor has a note of this type, it will appear in this column.