Decoder MX620, MX630, MX64D, Sound decoder MX640 Page 1 INSTRUCTION MANUAL 21-pins MX620 21-pins MX620N MX64D MX64DV MX630 MX640 PluX-16 MX630P MX640D 21-pins MINIATURE – DECODER MX620, MX620N, MX620R, MX620F HO – DECODER MX630, MX630R, MX60F, MX630P HO – SPECIAL DECODER HO – DECODER – 21 PINS MX630H, MX630V MX64D HO – SOUND DECODER MX640, MX640R, MX640F, MX640D 1. Overview.......................................................................................................................................................................... 2 2. Technical Information ...................................................................................................................................................... 3 3. Addressing and Programming – CV table........................................................................................................................ 6 4. Additional notes to Configuration Variables (CV’s) ............................................................................. 18 5. “Function mapping“ as per NMRA Standard; and ZIMO - Extensions .......................................................................... 27 6. ZIMO SOUND – Selection and Programming................................................................................................................ 33 7. “Bi-directional communication”....................................................................................................................................... 43 8. Installation and wiring .................................................................................................................................................... 43 9. MX64D, MX64DM, MX640D for C-Sinus / SoftDrive-Sinus............................................................................................... 50 10. ZIMO decoders and competitor systems .......................................................................................................................... 51 11. Special - CV - Sets ...................................................................................................................................................... 52 12. Converting binary to decimal ....................................................................................................................................... 53 13. Operating with Märklin MOTOROLA systems ............................................................................................................. 53 14. DC - Analog Operation ................................................................................................................................................ 54 15. AC - Analog Operation................................................................................................................................................. 54 16. ZIMO Decoder Software Update.................................................................................................................................. 55 A hard copy of this instruction manual is not part of a decoder purchase. Hard copies can be ordered from ZIMO (a nominal fee may apply) but can also be downloaded as a pdf document at no charge from www.zimo.at . NOTE: ZIMO decoders contain an EPROM which stores software that determines its characteristics and functions. The software version can be read out form CV #7 and #65. The current version may not yet be capable of all the functions mentioned in this manual. As with other computer programs, it is also not possible for the manufacturer to thoroughly test this software with all the numerous possible applications. Installing new software versions later can add new functions or correct recognized errors. SW updates can be done by the end user for all ZIMO decoders since production date October 2004, see chapter “Software Update”! Software updates are available at no charge if performed by the end user (except for the purchase of a programming module); Updates and/or up- grades performed by ZIMO are not considered a warranty repair and are at the expense of the customer. The warranty covers hardware damage exclusively, provided such damage is not caused by the user or other equipment connected to the decoder. For update versions, see www.zimo.at . EDITION First edition. SW version 25.0 for MX620, MX630, MX64D and MX640 – 2009 07 15 SW-version 26 – 2009 09 26
HO – SPECIAL DECODER HO – DECODER – 21 PINS MX630H, MX630V MX64D
HO – SOUND DECODER
MX640, MX640R, MX640F, MX640D
1. Overview..........................................................................................................................................................................2 2. Technical Information ......................................................................................................................................................3 3. Addressing and Programming – CV table........................................................................................................................6 4. Additional notes to Configuration Variables (CV’s) .............................................................................18 5. “Function mapping“ as per NMRA Standard; and ZIMO - Extensions ..........................................................................27 6. ZIMO SOUND – Selection and Programming................................................................................................................33 7. “Bi-directional communication”.......................................................................................................................................43 8. Installation and wiring ....................................................................................................................................................43 9. MX64D, MX64DM, MX640D for C-Sinus / SoftDrive-Sinus...............................................................................................50 10. ZIMO decoders and competitor systems..........................................................................................................................51 11. Special - CV - Sets ......................................................................................................................................................52 12. Converting binary to decimal .......................................................................................................................................53 13. Operating with Märklin MOTOROLA systems .............................................................................................................53 14. DC - Analog Operation ................................................................................................................................................54 15. AC - Analog Operation.................................................................................................................................................54 16. ZIMO Decoder Software Update..................................................................................................................................55
A hard copy of this instruction manual is not part of a decoder purchase. Hard copies can be ordered from ZIMO (a nominal fee may apply) but can also be downloaded as a pdf document at no charge from www.zimo.at .
NOTE:
ZIMO decoders contain an EPROM which stores software that determines its characteristics and functions. The software version can be read out form CV #7 and #65.
The current version may not yet be capable of all the functions mentioned in this manual. As with other computer programs, it is also not possible for the manufacturer to thoroughly test this software with all the numerous possible applications.
Installing new software versions later can add new functions or correct recognized errors. SW updates can be done by the end user for all ZIMO decoders since production date October 2004, see chapter “Software Update”!
Software updates are available at no charge if performed by the end user (except for the purchase of a programming module); Updates and/or up-grades performed by ZIMO are not considered a warranty repair and are at the expense of the customer. The warranty covers hardware damage exclusively, provided such damage is not caused by the user or other equipment connected to the decoder. For update versions, see www.zimo.at.
EDITION First edition. SW version 25.0 for MX620, MX630, MX64D and MX640 – 2009 07 15
The decoders described here are for the installation in N, HOe, HOm, TT, HO, OO, Om and O gauge en-gines. They are equally suited for locos with standard as well as core less motors (Faulhaber, Maxxon, Es-cap and others ZIMO decoders operate primarily according to the standardized NMRA-DCC data format and can there-fore be used within a ZIMO digital system or DCC systems of other manufacturers, as well as the MO-TOROLA protocol within Märklin systems and other MOTOROLA command stations.
MX620 Family
Miniature-Decoder, thoroughly equipped with all ZIMO characteristics and features, software is identical to the one in larger decoder types.
ATTENTION: Extra care is required during installation because the MX620, unlike the MX63, is not protected by a shrink tube!
TYPICAL APPLICATION: for the installation in N, HOe, HOm but also HO engines with limited available space or because of features that have not yet been imple-mented in the MX63/MX64 decoder (i.e. mph speed control).
Different versions according to their connections:
MX620
MX620N
MX620R
MX620F
Version with 7 highly flexible wires (120 mm long) for track, motor and 2 functions. Solder pads are available for two additional functions and SUSI.
MX620 with 6-pin interface per NEM651 and NMRA RP 9.1.1. Interface is mounted on circuit board, no wires.
MX620 with 8-pin interface per NEM652 and NMRA RP 9.1.1 on 70mm wires.
MX620 with 6-pin interface per NEM651 and NMRA RP 9.1.1 on 70mm wires.
MX630 Family
Compact HO loco decoder, for universal applications. The MX630 decoder is well protected in a transparent shrink tube against unwanted contact with other metal parts.
TYPICAL APPLICATION: Locomotives in HO, O or similar scale where space is lim-ited. Due to excellent dielectric strength (50V), the decoder is also suitable for analog operation with the old Märklin transformers.
Different versions according to their connections:
MX630
MX630R
MX603F
MX630P
Version with 9 highly flexible wires (120 mm long) for power, motor, 4 function out-puts. Solder pads are available for 2 additional outputs, logic level outputs and SUSI.
MX630 with 8-pin interface per NEM652 and NMRA RP 9.1.1 on 70mm wires.
MX630 with 6-pin interface per NEM651 and NMRA RP 9.1.1 on 70mm wires.
MX630 with 16-pin PluX interface on circuit board.
Special MX630 versions:
MX630H
MX630V1, MX630V5
High output version (1.8A), same as MX630 but with added heat sink.
MX630 with extended circuit board for low voltage supply of function outputs (1.5V or 5.0V).
MX64D
MX64DM
MZ64DH
MX64DV1, MX64DV5
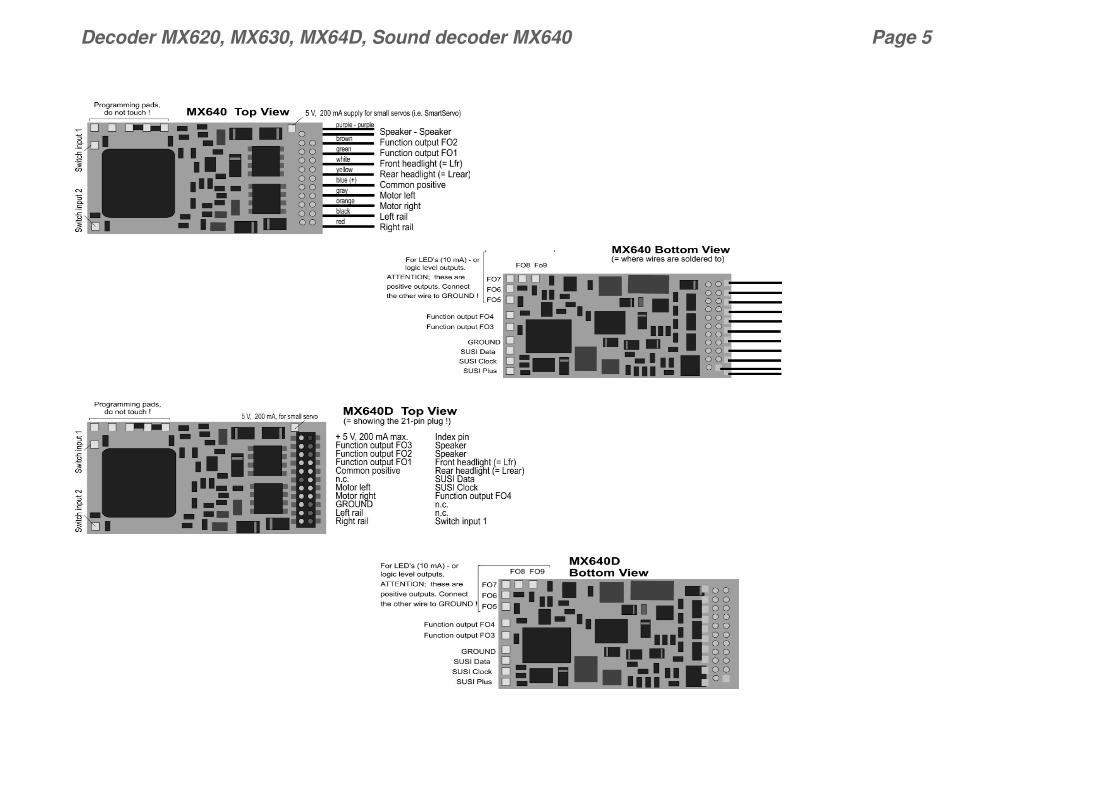
HO decoder with 21-pin interface on circuit board; functionality is the same as for the MX620 and MX630.
Version of MX64D for Märklin and Trix locomotives (with 21-pin interface) with C-Sinus or Softdrive-Sinus motor (via the locomotives C-Sinus board).
High-output version of the MX64D, especially for O-gauge.
MX64 with extended circuit board for low voltage supply of function outputs (1.5V or 5.0V).
MX640 Family
HO decoder with SOUND.
TYPICAL APPLICATION: HO locomotives as well as O gauge or similar with limited space.
Different versions according to their connections:
MX640
MX640R
MX640F
MX640D
MX640DM (= MX640C)
Version with 11 highly flexible wires (120 mm long) for power, motor, 4 function out-puts, speakers. Solder pads are available for 2 additional outputs, logic level outputs and SUSI.
MX640 with 8-pin interface per NEM652 and NMRA RP 9.1.1 on 70mm wires.
MX640 with 6-pin interface per NEM651 and NMRA RP 9.1.1 on 70mm wires.
MX640 with 21-pin interface on circuit board (according to NMRA RP 9.1.1.).
MX640 (with 21-pin interface for Märklin and Trix locomotives with C-Sinus or Soft-drive-Sinus motor (via the locomotives C-Sinus board).
Allowable Track voltage **) ................................................................................................minimum 10 V MX620 ……………………………………………….… max. 20V MX64D, MX640 ……………………………………….. max. 24V MX630 operated in DCC or DC analog …………….. max. 30V MX630 operated in AC analog ………………………. max. 45V Maximum continuous motor current ........... MX620 ....................................................................... 0.8 A MX630 .... .................................................................. 1.0 A MX630H ….................................................................. 1.8 A MX64D, MX64DM, MX64DV ....................................... 1.0 A MX64DH Special O gauge version ***)......................... 1.2 A MX640 ….…………………………………………………... 1.2 A
Peak motor current ...................................................................................................................... .. 2.0 A
Maximum total function output, continuous *)……..……….. .. MX620 ........................................... 0.5 A MX630, MX64D, MX640 .................. 0.8 A
MX640: Maximum continuous current for each of the 5 LED outputs ..………………………………….. 0.1 A
Maximum continuous total current (motor and functions)…………… = maximum continuous motor current
Operating temperature ..................................................................................................... - 20 to 100 oC
MX640: Sound memory size ……………………………………………………………………………….. 32 Mbit MX640: Sample rate……depending on sound sample…………………………………………..…11 or 22 kHz MX640: Number of independent sound channels ……………………………………………………………… 4 MX640: Sound amplifier output …………………………………………………………………………Sinus 1.1W MX640: Loud speaker impedance …………………………………………………………………………. 8 Ohm
Operating temperature ..................................................................................................... - 20 to 100 oC
Dimensions (L x W x H) … ............ MX620, MX620N excluding pins ............................. 14 x 9 x 2.5 mm MX630 ................................................................. 20 x 11 x 3.5 mm MX630H ............................................................... 20 x 11 x 6.0 mm MX630V ............................................................... 25 x 11 x 3.5 mm MX64D, MX64DM ............................................ 20.5 x 15.5 x 4.5 mm MX64DV ........................................................... 25.5 x 15.5 x 4.5 mm MX640 ................................................................ 32 x 15.5 x 6.0 mm
*) The short circuit protection is carried out for the total current of all outputs. In the unlikely event that the outputs are turned off due to cold-start problems of light bulbs (power surge at turn-on leading to a short), the “soft-start” option should be utilized (see CV #125 = 52 etc.)!
**) Note when operating with a DiMAX command station (Massoth): The DiMAX 1200Z command station is designed to keep the track voltage at 24V (which would exceed the DCC norm only marginally). In reality however a varying voltage is laid on the track (especially older command stations), changing with load; starting at 30V at idle (independent of mains voltage!) all the way down to 20V at heavy load. Contrary to many other products, ZIMO decoders are able to deal with the excessive voltage, although barely. It would be better to lower the track voltage to an allowable level by adding a “fake load” (about 0.5A).
Disclaimer related to Märklin/Trix locomotives (especially with C-Sinus):
It has become obvious that Märklin/Trix is not concerned about compatibility of their locomotives with third party products. Their decoder interfaces change often without notice. ZIMO can therefore not guarantee that the method of connection and operation described in this manual is possible with every locomotive. We are equally not liable for damages or destruction of locomotives and/or decoders as a result of mismatched interfaces.
Software Update:
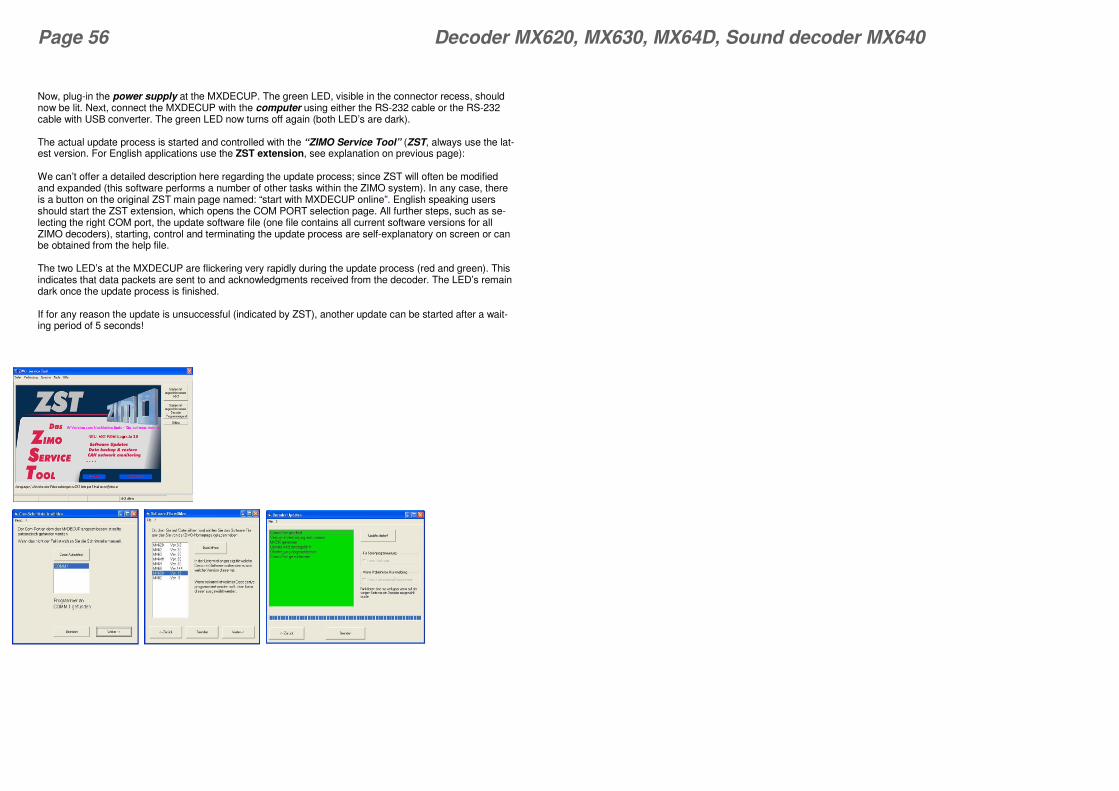
ZIMO DCC decoders are equipped to handle software updates by the user. A device capable of decoder update is required (ZIMO decoder update module MXDECUP, system-cab MX31ZL or command station MX10). The update process is carried out by either a USB stick / SD card (MX31ZL / MX10) or by a PC with Windows operating system and the program “ZIMO Sound Program” ZSP or the “ZIMO Rail Center” ZIRC.
The same hardware and software is also used to load sound projects into ZIMO sound decoder.
There is no need to remove the decoder or to open up the locomotive. Just set the locomotive on a section of track connected to the update module and start the update with the computer or other equipment mentioned above.
NOTE: Equipment inside the locomotive that is connected directly with the track (that is, not powered by the decoder) can interfere with the update procedure. The same goes for energy buffers that are installed with-out heeding the advice in the “Installation and wiring” chapter, section “Use of an external energy source” (regarding a choke coil).
See the last chapter in this manual for more information on updating decoders or www.zimo.at !
SW updates are of course still available for a small fee by sending decoders to ZIMO or your ZIMO dealer.
Overload and Thermal Protection:
The motor and function outputs of ZIMO decoders are designed with lots of reserve capacities and are ad-ditionally protected against excessive current draw and short circuits. Cutouts are encountered if the de-coder is overloaded.
Even though the decoder is well protected, do not assume it is indestructible. Please pay attention to the following:
Faulty decoder hook-up, connecting the motor leads to track power for instance or an overlooked connection between the motor brushes and rail pick-ups is not always recognized by the overload protection circuit and could lead to damage of the motor end stage or even a total destruction of the decoder.
Unfit or defective motors (e.g. shorted windings or commutator) are not always recognized by their high current consump-tion, because these are often just short current spikes. Nevertheless, they can lead to decoder damage including damage to end stages due to long-term exposure.
The end stages of loco decoders (motor as well as function outputs) are not only at risk of high current but also voltage spikes, which are generated by motors and other inductive consumers. Depending on track voltage, such spikes can reach several hundred volts and are absorbed by special protection circuits inside the decoder. Since the capacity and speed of such circuits is limited, the track voltage should not be selected unnecessarily high; that is not higher than recom-mended for the rolling stock in question.
All ZIMO decoders are equipped with temperature sensors to measure their own operating temperature. Power to the motor will be turned off once that temperature exceeds 1000C. The headlights start flashing rapidly, at about 5 Hz, to make this state visible to the operator. Motor control will resume automatically af-ter a drop in temperature of about 200C, typically in 30 to 60 seconds.
Every loco decoder requires a separate unique address with which the loco is controlled using a cab. All NMRA-DCC compliant decoders have 3 as their factory default address (NMRA standardized decoder address at delivery).
DECODER INSTALLATION:
After installing the new decoder in a locomotive (see chapter “Installation and wiring”), it can be tested with address #3. As a minimum, either the motor or headlights need to be connected (better yet both), to enable decoder acknowledgment during programming. Doing a complete installation before programming the de-coder is often more practical.
THE ADDRESSING AND PROGRAMMING PROCEDURE:
The procedure for programming and reading of addresses and configuration variables is covered in detail in the instruction manual for the cab (MX21, MX31....). For other systems consult the appropriate man-ual.
Programming a decoder with a PC and ADaPT software (by E.Sperrer, software developer) is a lot easier and more convenient!
Technical note to decoder acknowledgments during programming:
When programming or reading CV’s with the DCC system or a computer, each successful programming step will be ac-knowledged by the decoder and displayed on the cab and/or monitor.
The acknowledgment is based on short power pulses that the decoder generates by briefly turning the motor and headlights on, which the command station recognizes (at the programming track output). It follows that the acknowledgment and read out of a decoder is only successful if the current consumption is high enough, which means that the motor and headlights
have to be connected or at least one of the two.
The decoder won’t use the headlights for acknowledgment if CV #60 is set to a value of 40 or less. This is to prevent dam-age to bulbs since this setting is often used in conjunction with low voltage bulbs. The motor is then the only load used for
acknowledgments.
T h e f o l l o w i n g p a g e s s h o w :
� Helpful hints for CV programming
n e x t
� CV tables with configuration variables from #1 to #255
n e x t ( C h a p t e r 4 & 5 ) :
� Additional Notes (CV’s) and Function Mapping
n e x t ( C h a p t e r 6 , o n l y v a l i d f o r s o u n d d e c o d e r s ) :
� ZIMO SOUND Selection and Programming; description of basic functionality, operating procedures and
� CV TABLES with configuration variables from #256 to #511, valid for all types of the MX640 sound decoder family
HELPFUL HINTS FOR CV PROGRAMMING:
If you are familiar with CV programming please skip this section and go directly to the CV table below!
CV programming is not the same for all CV’s. While the programming procedure is the same for all CV’s, the calculation of the individual CV values varies.
For some CV’s it is obvious what the value is supposed to be and can easily be derived from the “Range” and/or “Description” column in the CV table. This kind of CV acts similar to a volume control. For instance, CV#2 determines the minimum speed applied at speed step 1:
CV Designation Range Default Description
Vstart 1 – 252 (See add.
notes) 2
Entered value = internal speed step assigned to lowest cab speed step.
Bit 4 in CV # 29 has to be 0; otherwise individual speed table is active.
The “range” column clearly suggests any value from 1 to 252. The higher the value the faster the en-gine runs at speed step 1 and vice versa.
Another similar CV is the “dimming” CV #60:
CV Designation Range Default Description
#60 Reduced function
output voltage (Dimming)
0 - 255 0
The actual function output voltage can be re-duced by PWM. Useful to dim headlights, for ex-ample.
Example values: # 60 = 0 or 255: full voltage # 60 = 170: 2/3 of full voltage. # 60 = 204: 80% of full voltage.
Again, the range column suggests using a value between 1 and 255 and in the “description” column it is explained that the brightness of the light increases with the value.
Other CV’s are easier to understand if you think of them as a small switch board, where you can turn individual switches ON or OFF. Such a CV is made up of 8 “individual switches” called Bits and the group of Bits is known as a Byte (which is the CV itself or the switch board, if you will). On some CV’s you can change the setting of all 8 Bits (switches) and on others only a select few. The Bits (switches) are numbered from 0 to 7 and each has a specific value (see the chapter “Converting binary to decimal” for more on binary calculations). Each Bit is turned ON by adding its value to the CV and turned OFF by subtracting its value. Add the value of each Bit you want to turn ON and enter the total to the CV.
CV #29 is calculated by adding the value of the individual bits that are to be “on”:
Values to turn “on”:
Bit 0: 1 Bit 1: 2 Bit 2: 4 Bit 3: 8 Bit 4: 16 Bit 5: 32 Bit 6: 64 Bit 7: 128
ZIMO MX21, MX31… cabs also display the individual bits; calculating bit values is no longer necessary!
0 - 63 2
Bit 0 - Train direction: 0 = normal, 1 = reversed
Bit 1 - Number of speed steps: 0 = 14, 1 = 28
Note: 128 speed steps are always active if corresponding in-formation is received!
Bit 2 - DC operation (analog): *) 0 = off 1 = on
Bit 3 - RailCom („bidirectional communication“) 0 = deactivated 1 = activated see CV #28!
Bit 4 - Individual speed table: 0 = off, CV # 2, 5, 6, are active. 1 = on, according to CV ‘s # 67 – 94
Bit 5 - Decoder address: 0 = primary address as per CV #1 1 = ext. address as per CV #17+18
Bits 6 and 7 are to remain 0!
You can only change the setting of Bit 0, 1, 2, 3, 4 and 5. Bits 6 and 7 have to remain OFF because they are not yet used for anything. To calculate the total CV value you have to first look at the de-scription field of that CV and determine which Bit (switch) you want to have ON. Let’s say we want speed steps 28 active, reverse the loco’s direction because it doesn’t agree with the cab’s direction indication and we want to use the individual speed table. This means we have to have the Bits 1, 0 and 4 turned ON (= 1). All other Bits can be OFF (= 0). In the “Designation” field it shows the value for each Bit: Bit 0 = 1, Bit 1 = 2, Bit 2 = 4, Bit 3 = 8, Bit 4 = 16, Bit 5 = 32, Bit 6 = 64, and Bit 7 = 128. If we want to have Bits 1, 0 and 4 turned ON we add up the values for these Bits (2 + 1 + 16) and en-ter the total of 19 to CV #29.
Lastly there is a third kind of CV that sort of fits between the other two. Here you don’t have to worry about Bits and their values. With those CV’s the digit’s position and value determines a specific ac-tion. Some of those digit positions act like a simple ON/OFF switch and others like a volume control.
For example, CV #56 can be used for fine-tuning a motor:
CV Designation Range Default Description
#56
Back-EMF control
P and I value
0 – 199 (See add.
notes)
0 (is equal
to 55, mid-
range)
But:
default is not suit-able for
coreless motors,
i.e. MAXXON,
FAUL-HABER!
Use
“100” instead.
Back-EMF compensation is calculated by PID al-gorithm (Proportional/Integral - Differential); modifying these values may improve the com-pensation characteristics in certain cases.
0 - 99: for „normal“ DC motors (LGB etc) 100 - 199: for coreless (MAXXON, Faulhaber, etc...)
Tens digit: Proportional (P) value; by default (0) is set to mid value and automatic adjustment with the goal of jerk free running. Proportional effect can be modified with settings of 1 – 4 and 6 – 10 (instead of the default 0 = 5).
Ones digit: Integral (I) value; is set by default to a mid value. The Integral effect can be modified with settings of 1 – 9 instead of the default 0 = 5).
As you can see in the “Range” field you can use any number between 0 and 199. However if you read the “Description” field it explains that each digit position controls a specific function. In this case, the hundredth digit (_xx) sets the decoder up for a coreless motor, the tens digit (x_x) modifies the proportional and the ones digit (xx_) the integral action. This hundredth digit acts just like a switch. If you use the hundredth digit (1__) the coreless motor function is turned ON. If you don’t use it (_xx), the function is turned OFF. So for a normal DC motor you would only use the ones and tenth digit. With the tens digit (0 – 9) you can modify the proportional value and with the ones digit (0 – 9) the in-tegral value.
Don’t worry about the terms “proportional” or “integral” - just use the “Step by step CV adjustment procedure” later in the manual.
Configuration Variables can be defined within the programming procedures to improve the driving charac-teristics of a locomotive, sound playback of sound decoders and for many other application specific adjust-ments.
The meaning of Configuration Variables (CV’s) is in part standardized by the NMRA DCC RECOM-MENDED PRACTICES, RP-9.2.2. There are however certain CV’s that are for Zimo decoders only, in some cases exclusively for specific types of Zimo decoders. Always use the specifications for the decoder in question, since the value range may differ between manu-facturers, even with standardized CV’s; in this case use the table below.
CV Designation Range Default Description
#1 Primary “short”
address 1 – 127 3
The “short” (1-byte) loco addresses; Is active when Bit 5 in CV #29 is 0.
#2 Vstart 1 – 252 (See add. notes) 1
Entered value = internal speed step assigned to lowest cab speed step.
Bit 4 in CV # 29 has to be 0; otherwise individual speed table is active.
#3 Acceleration rate 0 - 255 2
Multiplied by 0.9 equals’ acceleration time in sec-onds from stop to full speed.
Sound decoder: CV #3 determined by sound pro-ject.
#4 Deceleration rate 0 - 255 1
Multiplied by 0.9 equals’ deceleration time in sec-onds from full speed to complete stop.
Sound decoder: CV #3 determined by sound pro-ject.
#5 Vhigh
0 – 252 (See
add. notes)
1 (= 252)
Entered value = internal speed step assigned to highest cab speed step, according to the number of speed steps selected (14, 28 or 128).
0 and 1 = no effect.
Bit 4 in CV #29 has to be 0, otherwise speed table is active.
#6 Vmid
1,
A useful value for CV #6 is
¼ to ½ of the value in
CV #5
(See
add. notes)
1 ( = about 1/3 of top
speed)
Entered value = internal speed step assigned to the cabs center speed step (=step 7,14 or 63 ac-cording to the number of speed steps selected: 14, 28 or128)
“1" = default (is the same as entering a value of 85, which is 1/3 of full speed with speed regulator in center - bent speed curve).
The curve is automatically flattened and prevents a noticeable jump in speed in the center area!
Bit 4 in CV #29 has to be 0, otherwise speed table is active.
#7
Software version
ALSO SEE CV #65 for sub-version number
and
Read only CV A read-out always displays the de-coder version
number.
Pseudo program-ming values for
The value in CV #7 indicates the Software ver-sion. The sub-version Number is stored in CV #65 and must be read-out separately.
For Lokmaus-2 users:
CV Designation Range Default Description
Special procedure when program-ming with a “Lokmaus 2” and similar low level systems. See section “Operation within other systems” in this manual!
and for
special procedure when program-ming high-number CV’s with “me-
dium” level systems such as Intelli-box or Lenz; especially for sound sample selection and sound CV’s.
As an example: CV #300 = 100
Lokmaus 2 are:
1, 2, 10, 11, 12, 20, 21, 22
and for
sound program-ming:
110, 120, 130, 210, 220, 230
(see chapter 6)
Pseudo-programming (“Pseudo” because pro-grammed value is not really stored) is a pre-step for programming or reading out of higher CV’s (> #99) and/or higher values (>99) with a system that is limited in accessing high CV’s and high CV val-ues:
Ones digit = 1: The CV content entered during the actual programming will be increased by 100.
Ones digit = 2: … will be increased by 200.
Tens digit = 1: The CV number entered during the actual programming will be increased by 100.
Tens digit = 2: …. will be increased by 200.
One hundredth digit = 1: The CV number revalua- tion above remains in effect until the decoder is powered down.
One hundred digit = 2: The CV number revalua- tion above remains in effect until the Pseudo programming is can- celled with CV #7 = 0.
See section „ ZIMO decoders and competitor sys-tems “!
#8
Manufacturer ID and
HARD RESET with CV #8 = 8
or CV #8 = 0
or
LOADING
of special CV sets
Read only
all additional pro-
gramming is pseudo only; read-out always shows
“145”, which is ZIMO’s
assigned number
145 ( = ZIMO)
NMRA assigned manufacturer ID for Zimo is: 145 (”10010001”)
Pseudo-Programming (”Pseudo” = programmed value is not really stored):
CV #8 = “8” -> HARD RESET(NMRA standard); all CV’s reset to default values as shown in this CV table independent of any active CV sets or sound projects; that is, the de- coder is being restored to the same state it was in at delivery. ATTENTION: Sound may not play back after this reset. Use CV #8 = 0 instead.
CV #8 = “0” -> HARD RESET (ZIMO special re- set) for sound decoders: all CV’s reset to current sound project or the CV’s are reset to the last CV set used (see below: load CV sets). Can also be used when the CV set number is not known.
CV #8 = “xx” -> Loading of CV set provided it exists in the decoder (most often country specific or model specific, i.e. for locos of a specific manufacturer).
CV #8 = “9” -> HARD RESET for LGB-operation (14 speed steps, pulse chain commands); otherwise identical to CV #8 = 8.
(earlier SW versions had 0 as default but with same re-sult as 55)
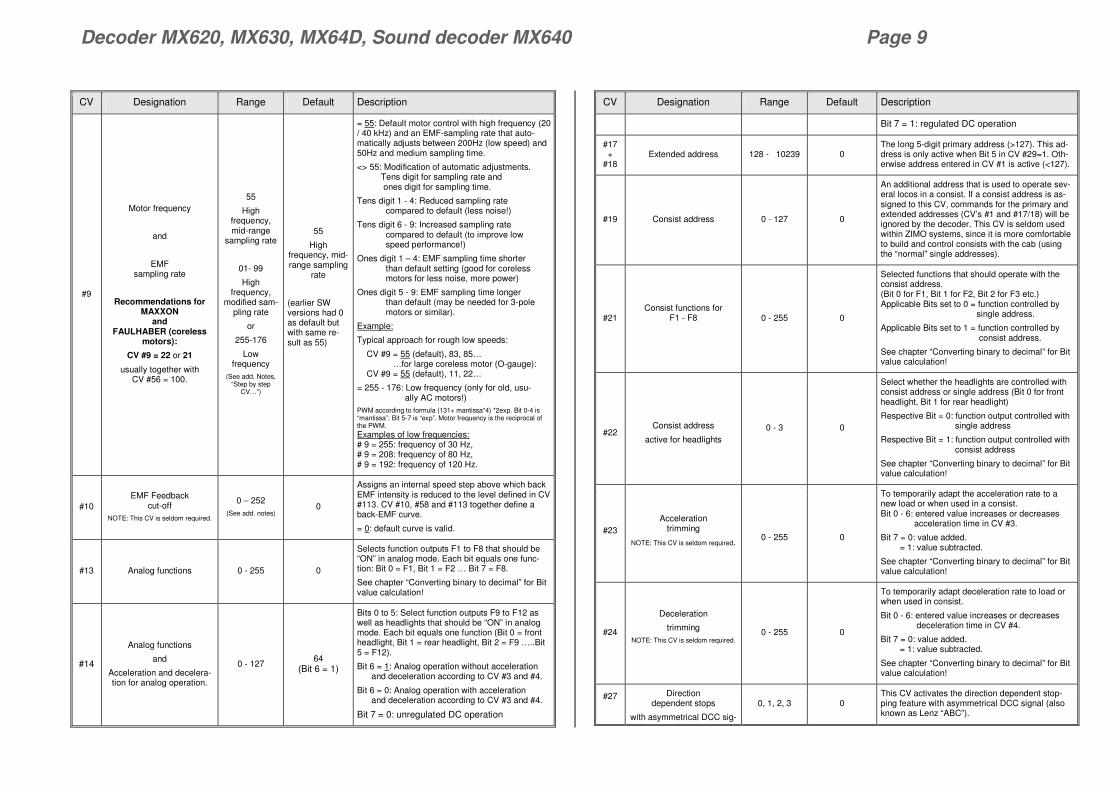
= 55: Default motor control with high frequency (20 / 40 kHz) and an EMF-sampling rate that auto-matically adjusts between 200Hz (low speed) and 50Hz and medium sampling time.
<> 55: Modification of automatic adjustments. Tens digit for sampling rate and ones digit for sampling time.
Ones digit 1 – 4: EMF sampling time shorter than default setting (good for coreless motors for less noise, more power)
Ones digit 5 - 9: EMF sampling time longer than default (may be needed for 3-pole motors or similar).
Example:
Typical approach for rough low speeds:
CV #9 = 55 (default), 83, 85… …for large coreless motor (O-gauge): CV #9 = 55 (default), 11, 22…
= 255 - 176: Low frequency (only for old, usu- ally AC motors!) PWM according to formula (131+ mantissa*4) *2exp. Bit 0-4 is “mantissa”; Bit 5-7 is “exp”. Motor frequency is the reciprocal of the PWM. Examples of low frequencies: # 9 = 255: frequency of 30 Hz, # 9 = 208: frequency of 80 Hz, # 9 = 192: frequency of 120 Hz.
#10 EMF Feedback
cut-off NOTE: This CV is seldom required.
0 – 252 (See add. notes)
0
Assigns an internal speed step above which back EMF intensity is reduced to the level defined in CV #113. CV #10, #58 and #113 together define a back-EMF curve.
= 0: default curve is valid.
#13 Analog functions 0 - 255 0
Selects function outputs F1 to F8 that should be “ON” in analog mode. Each bit equals one func-tion: Bit 0 = F1, Bit 1 = F2 … Bit 7 = F8.
See chapter “Converting binary to decimal” for Bit value calculation!
#14
Analog functions
and
Acceleration and decelera-tion for analog operation.
0 - 127 64
(Bit 6 = 1)
Bits 0 to 5: Select function outputs F9 to F12 as well as headlights that should be “ON” in analog mode. Each bit equals one function (Bit 0 = front headlight, Bit 1 = rear headlight, Bit 2 = F9 …..Bit 5 = F12).
Bit 6 = 1: Analog operation without acceleration and deceleration according to CV #3 and #4.
Bit 6 = 0: Analog operation with acceleration and deceleration according to CV #3 and #4.
Bit 7 = 0: unregulated DC operation
CV Designation Range Default Description
Bit 7 = 1: regulated DC operation
#17 +
#18 Extended address 128 - 10239 0
The long 5-digit primary address (>127). This ad-dress is only active when Bit 5 in CV #29=1. Oth-erwise address entered in CV #1 is active (<127).
#19 Consist address 0 - 127 0
An additional address that is used to operate sev-eral locos in a consist. If a consist address is as-signed to this CV, commands for the primary and extended addresses (CV’s #1 and #17/18) will be ignored by the decoder. This CV is seldom used within ZIMO systems, since it is more comfortable to build and control consists with the cab (using the “normal” single addresses).
#21 Consist functions for
F1 - F8
0 - 255 0
Selected functions that should operate with the consist address. (Bit 0 for F1, Bit 1 for F2, Bit 2 for F3 etc.) Applicable Bits set to 0 = function controlled by single address.
Applicable Bits set to 1 = function controlled by consist address.
See chapter “Converting binary to decimal” for Bit value calculation!
#22
Consist address
active for headlights 0 - 3 0
Select whether the headlights are controlled with consist address or single address (Bit 0 for front headlight, Bit 1 for rear headlight)
Respective Bit = 0: function output controlled with single address
Respective Bit = 1: function output controlled with consist address
See chapter “Converting binary to decimal” for Bit value calculation!
#23
Acceleration
trimming
NOTE: This CV is seldom required.
0 - 255
0
To temporarily adapt the acceleration rate to a new load or when used in a consist. Bit 0 - 6: entered value increases or decreases acceleration time in CV #3.
Bit 7 = 0: value added. = 1: value subtracted.
See chapter “Converting binary to decimal” for Bit value calculation!
#24
Deceleration
trimming NOTE: This CV is seldom required.
0 - 255 0
To temporarily adapt deceleration rate to load or when used in consist.
Bit 0 - 6: entered value increases or decreases deceleration time in CV #4.
Bit 7 = 0: value added. = 1: value subtracted.
See chapter “Converting binary to decimal” for Bit value calculation!
#27
Direction dependent stops
with asymmetrical DCC sig-
0, 1, 2, 3 0 This CV activates the direction dependent stop-ping feature with asymmetrical DCC signal (also known as Lenz “ABC”).
Bit 0 = 1: Stops are initiated if voltage in right rail is higher than left rail (in direction of travel). THIS, CV #27 = 1, IS THE COMMON APPLICTION for this feature (provided the decoder is wired to the correct rail).
Bit 1 = 1: Stops are initiated if voltage in left rail is higher than right rail (in direction of travel).
Stopping is directional if only one of the two bits is set (not both). Traveling in the opposite direction will have no effect. Use the other bit In case the train stops in the wrong direction!
Bit 0 and Bit 1 = 1 (CV #27 = 3): Stops in both directions, regardless of rail polarity.
NOTE: See CV #134 for setting the asymmetrical threshold if problems are encountered (e.g. train won’t stop with asymmetrical signal or stops with-out asymmetrical signal present.
See chapter “Converting binary to decimal” for Bit value calculation!
#28
RailCom Configuration
0 – 3 3
Use of RailCom channels (only active if RaiCom is turned on with CV #29, Bit 3):
Bit 0 = 0: Channel 1 turned OFF (Broadcast)
1: Channel 1 turned ON (Broadcast)
Bit 1 = 0: Channel 2 OFF (Data)
1: Channel 2 ON (Data)
NOTE: CV #28 for RailCom has been deleted temporarily by the “RailCom working group” and later reinstated slightly modified.
#29
Basic configuration
CV #29 is calculated by adding the value of the individual bits that are to be “ON”:
Values to turn Bit “ON”:
Bit 0: 1 Bit 1: 2 Bit 2: 4 Bit 3: 8 Bit 4: 16 Bit 5: 32 Bit 6: 64 Bit 7: 128
ZIMO MX21, MX31… cabs also display the individual bits;
calculating bit values is no longer necessary!
0 - 63 14 =
Bit sequence 0000 1110
Bit 0 - Train direction: 0 = normal, 1 = reversed
Bit 1 - Number of speed steps: 0 = 14, 1 = 28 Note: 128 speed steps are always active if corresponding information is received!
Bit 2 - DC operation (analog): *) 0 = disabled 1 = enabled
Function mapping according to NMRA: #33 - 46 = Outputs 1, 2, 4...are mapped by default to F0 - F12, which means that:
Headlights is switched with direction and F0, Function output FO1 is switched with F1, Function output FO2 is switched with F2, Function output FO3 is switched with F3, and so on…
Also see the “NMRA function mapping” table in the section “Function mapping”.
#49 Signal controlled
acceleration
0 - 255 0
ZIMO signal controlled speed influence (HLU) with ZIMO MX9 track section module or future module
or
when using the “asymmetrical DCC signal” stop-ping method (Lenz ABC).
The content of this CV, multiplied by 0.4, equals the time in seconds for the acceleration event from standstill to full speed.
#50 Signal controlled
deceleration
0 - 255 0
ZIMO signal controlled speed influence (HLU) with ZIMO MX9 track section module or future module
or
when using the “asymmetrical DCC signal” stop-ping method (Lenz ABC).
The content of this CV, multiplied by 0.4, equals the time in seconds for the deceleration event (braking) from full speed to standstill.
#51 #52 #53 #54 #55
Signal dependent speed limits
#52 for “U”, #54 for “L”, #51, 53, 55
for intermediate steps
0 - 252
20 40 (U) 70 110 (L) 180
ZIMO signal controlled speed influence (HLU) with ZIMO MX9 track section module or future module:
Each of the 5 speed limits (CV’s #51 – 55) that can be applied with the ZIMO “signal controlled speed influence” can be defined with an internal speed step.
(earlier SW versions had 0 as default but with same re-sult as 55)
Back-EMF compensation is calculated by PID al-gorithm (Proportional/Integral - Differential);
=55: Decoder adjusts itself automatically; in certain cases it may be necessary to modify the control characteristics by programming different values.
0 - 99: modified setting for “normal” DC motors 100 - 199: modified setting for coreless (MAXXON, Faulhaber, etc.)
Tens digit: Proportional (P) value; by default (5) is set to mid value and automatic adjust- ment with the goal of jerk free running. Proportional effect can be modified with settings of 1 – 4 and 6 – 10 (instead of the default 5).
Ones digit: Integral (I) value; is set by default to a mid value. The Integral effect can be modified with settings of 1 – 9 instead of the default 5).
Example: Typical test values to combat jerky motion at low speed: from CV #56 = 55 (default) to 33, 77, 73…
#57 Voltage reference 0 – 255
(See add. notes) 0
The entered value divided by ten is the peak volt-age applied to the motor at full speed.
#57 = 0: results in automatic adjustment to current track voltage (relative reference).
NOTE: The default setting CV #57 = 0 is only suit-able in connection with stabilized track voltage, which is supplied by all ZIMO command stations. With systems that can’t keep the track voltage stable, CV #57 should really be set to the avail-able track voltage when under full load.
EXAMPLE: The track voltage at idle (no train run-ning) is 22V, which is unimportant, but the voltage drops to 16V at full load, then CV #57 should be set between 140 to 160.
The decoder then tries to keep the train speed steady regardless of the actual track voltage, as if the track voltage is always at 14V or 16V (depend-ing whether CV #57 is set to 140 or 160).
CV #57 has a similar effect as CV #5; many users prefer this adjustment over CV #5!
#58 Back-EMF intensity
0 – 255 (See add. notes)
255
Intensity of back-EMF control for lowest speed step.
If required, an “intensity curve” can be achieved using CV #10, 58 and 113 to reduce load regula-tion at higher speeds.
Example: # 58 = 0: no back-EMF # 58 = 150: medium compensation, # 58 = 255: maximum compensation.
CV Designation Range Default Description
#59 Signal dependent
reaction time 0 - 255 5
ZIMO signal controlled speed influence (HLU) with ZIMO MX9 track section module or future module
or
when using the “asymmetrical DCC signal” stop-ping method (Lenz ABC):
This value divided by 10 is the delay in seconds until it starts a signal controlled acceleration after receiving a higher speed limit command.
#60
Reduced function output voltage
(Dimming)
Affects all function outputs. If only certain outputs
should be affected use the dimming mask in CV #114
additionally.
0 - 255 0
The actual function output voltage can be reduced by PWM. Useful to dim headlights, for example.
Example values: CV #60 = 0 or 255: full voltage CV #60 = 170: 2/3 of full voltage. CV #60 = 204: 80% of full voltage.
NOTE: Bulbs with voltage ratings as low as 12V can be dimmed with this CV without damage even if track voltages are considerably higher; but not bulbs rated for 5V or 1.2V. These must be pow-ered with an appropriate low voltage, which the decoder types MX630V or MX64DV are capable of providing.
#61 Special ZIMO
function mapping
0 – 7, 67, 98, 99
(See chapter “Function map-
ping”)
0
For applications not covered by NMRA function mapping (CV #33 - #46), for example: “Swiss light-ing”; see “function mapping – ZIMO extensions”.
= 67: Alternative function mapping without “left-shift” (see chapter “Function mapping”).
= 98: starts a flexible function mapping for directional function control.
#65 Subversion
number Read only CV!
This CV indicates the subversion number of a ver-sion noted in CV #7 (i.e. Version 4.2: CV #7 = 4 and CV #65 = 2).
0 - 99: Normal subversions 100 - 199: Beta-Versions 200 - 255: Special versions (usually for loco manufacturers)
#67- 94
Individual speed table 0 – 252
(See add. notes) **)
User programmable speed table.
Each CV corresponds to one internal speed step that can be “mapped” to an external step (in-between speed steps will be interpolated when us-ing 128 speed steps).
Only active if Bit 4 in CV #29 is set to 1.
#66 #95
Directional speed trimming
0 - 255 0 - 255
0 0
Multiplication of the current speed by “n/128” (n is the trim value in this CV)
#66: for forward direction #95: for reverse direction
Bit 0: 1 Bit 1: 2 Bit 2: 4 Bit 3: 8 Bit 4: 16 Bit 5: 32 Bit 6: 64 Bit 7: 128
ZIMO MX21, MX31… cabs also display the individual bits; calculating bit values is no longer necessary!!
0 – 255
4 = 00000100
ATTENTION
In some software versions: Bit #2 = 0
(loco ID is then turned off!)
Bit 1 = 0: Normal „service mode“ acknowledge- ment; i.e. ACKnowledgement occurs by turning on motor or lights. = 1: If the normal acknowledgement in Service Mode does not work because no motor or headlights are connected to the decoder or the total current draw is too low, the special high frequency / high power pulses can be activated as addi- tional ACKnowledgement; this is at the least helpful within a ZIMO environment, but it is at present not known how well this works with other DCC systems.
NOTE: Bit 1 of this CV used to activate a motor brake in earlier software versions. This feature has been moved to CV #151!
Bit 2 = 0: Loco number recognition OFF = 1: ZIMO loco number recognition ON
(Turning the loco number recognition off prevents a possible ticking sound if this feature is not used). The loco number pulses are turned off automati-cally when the decoder is operated by a non-ZIMO system.
Bit 3 = 0: reacts only to the (new) NMRA- MAN-Bit, 12 function mode = 1: reacts to old MAN bit also, 8 function mode
Bit 4 = 0: Pulse chain recognition OFF = 1: Pulse chain recognition ON (use with LGB systems)
Bit 5 = 0: 20 kHz motor control frequency = 1: 40 kHz motor control frequency
Bit 6 = 0: normal (also see CV #129 description) = 1: non-directional DC braking („Märklin- Brake mode)
Bit 7 = 0: no pulse chain generation
= 1: Generates pulse chain commands for LGB sound modules on output FO1.
Only in MOTOROLA format:
Bit 3 = 0: normal, 4 functions for each address
= 1: next higher address is used to control 4 more functions, for a total of 8 func- tions, which is otherwise not possible within a MOTOROLA system.
#113 EMF reduction
Note: This CV is rarely necessary
0 – 255 (See add.
notes)
0
Intensity of back-EMF is reduced above the speed step defined in CV #10, to the value entered here. Together, CV #10, #58 and #113 define a BEMF curve. If set to 0, BEMF is totally cut-off above the speed step defined in CV #10.
CV Designation Range Default Description
#114 Dimming mask
Bits 0 - 5 0
Function outputs entered here will not be dimmed as per CV #60.
Bit 0 = front headlight Bit 1 = rear headlight Bit 2 = function output FO1 Bit 3 = function output FO2 Bit 4 = function output FO3 Bit 5 = function output FO4, etc.)
Bit value=0: Output will be dimmed to the value defined in CV #60. Bit value=1: Output will not be dimmed.
Example:
CV #114 = 60: Outputs FO1, FO2, FO3 and FO4 will not be dimmed; front and rear headlights will be dimmed according to CV #60.
See chapter “Converting binary to decimal” for Bit value calculation!
#115
Uncoupler control (KROIS and ROCO)
“Pull-in” time and “hold” voltage CV # 115
alternatively used for
additional dim value (0-90% according to ones digit; set
tens digit to 0)
0 – 99 See add. notes
0
Active if “uncoupling” is selected (with value of 48) in CV #125......132:
Tens digit (0 – 9): Each value represents time in seconds (see table below) the coupler receives full voltage (pull-in time):
Value: 0 1 2 3 4 5 6 7 8 9
Full voltage for: 0 0.1 0.2 0.4 0.8 1 2 3 4 5 sec.
Ones digit (0 to 9): hold-in power in percent of track voltage, 0 - 90%. Applied after the pull-in time elapsed (for ROCO uncoupler, not needed for KROIS coupler).
#116 Automated
uncoupling procedure
#Coupler waltz”
0 – 99 0 – 199
See add. notes 0
Tens digit (0 – 9): Length of time the loco should move away from train; values as in CV #115.
Ones digit (0 – 9) x 4 = Internal speed step applied to loco (Momentum per CV #3 etc.)
Hundredths digit = 0: No tension relieve. = 1: Tension relieve: loco moves toward coupler (to re- lieve tension) before moving away.
Example:
CV #115 = 61: Loco uncouples and drives away from train for 2 seconds at speed step 4. CV #115 = 161: Loco pushes first against train to unload couplers, uncouples and then drives away from train for 2 seconds at speed step 4.
#117
Flasher functions
Outputs affected by this function are defined in CV
#118.
0 – 99 0
Duty cycle for flasher function:
Tens digit = ON time (0 = 100msec…..9 = 1 sec) Ones digit = OFF time (0 = 100msec…..9 = 1 sec)
Example:
CV #117 = 55: Flashes evenly at the same ON/OFF time.
Defines which outputs op-erate as flashers according to rhythm programmed in
CV #117.
Bits 0 – 7
0
Selects the outputs that are supposed to flash when turned ON.
Bit 0 = front headlight Bit 1 = rear headlight Bit 2 = function output FO1 Bit 3 = function output FO2 Bit 4 = function output FO3 Bit 5 = function output FO4
Bit values = 0: no flasher Bit values = 1: output flashes when turned ON.
Bit 6 = 1: FO2 flashes inverse! Bit 7 = 1: FO4 flashes inverse!
EXAMPLE:
CV #118 = 12: FO1 and FO2 are defined as flashers. CV #118 = 168: Alternate flashing of FO2 and FO4 (wig-wag).
See chapter “Converting binary to decimal” for Bit value calculation!
#119
Low beam mask for F6
-
Assigns outputs for (exam-ple) low/high beam head-
lights
Bits 0 - 7 0
Selects the outputs that are dimmed with F6 (CV #60 determines dim value).
Typical application: LOW/HIGH BEAM.
Bit 0 = front headlight Bit 1 = rear headlight Bit 2 = function output FO1 Bit 3 = function output FO2 Bit 4 = function output FO3 Bit 5 = function output FO4
Bit values = 0: no low beam function Bit values = 1: Low beam with F6 key, bright- ness determined by value in CV #60.
Bit 7 = 0: normal effect of F6. = 1: effect of F6 inverted.
EXAMPLE:
CV #119 = 131: Headlights switch from low to high beam when function key F6 is turned ON.
See chapter “Converting binary to decimal” for Bit value calculation!
#120 Low beam mask for F7 Bits 0 - 7 Same as in CV #119 but for F7 key.
#121 Exponential acceleration
0 – 99 (See add.
notes)
00
Acceleration time (momentum) can be stretched in the lower speed range:
Tens digit: Percentage of speed range to be included (0 to 90%). Ones digit: Exponential curve (0 to 9).
EXAMPLE:
CV #121 = 11 or 25: typical initial test values.
#122 Exponential deceleration
0 – 99 (See add.
notes)
00
Deceleration time (momentum) can be stretched in the lower speed range:
Tens digit: Percentage of speed range to be included (0 to 90%).
CV Designation Range Default Description
Ones digit: Exponential curve (0 to 9).
EXAMPLE:
CV #122 = 11 or 25: typical initial test values.
#123 Adaptive
acceleration and deceleration
0 – 99 (See add.
notes)
0
Raising or lowering the speed to the next internal step occurs only if the preceding step is nearly reached. The tolerance for reaching the preceding step can be defined by this CV (the smaller this value the smoother the acceleration/deceleration).
Value 0 = no adaptive accel. or decel.
Tens digit: 0 - 9 for acceleration Ones digit: 0 - 9 for deceleration
EXAMPLE:
CV #123 = 11: strongest effect; sometimes affects the start up too much. CV #123 = 22: typical setting.
#124
Shunting key functions:
Momentum reduction or deactivation
and
Low gear
and
DC stopping
(also see description in CV #29).
0 - 4, 6
and
Bit 5 for DC stopping
0
Selects shunting key for LOW GEAR ACTIVATION:
Bit 4 = 1 (and Bit 3 = 0): F3 as half speed key Bit 3 = 1 (and Bit 4 = 0): F7 as half speed key
Selects shunting key for MOMENTUM DEACTIVATION:
Bit 2 = 0 (and Bit 6 = 0): “MN” key for shunting, Bit 2 = 1 (and Bit 6 = 0): F4 key for shunting Bit 6 = 1 (Bit 2 is irrelevant): F3 as shunting key.
Effect of above key (MN, F3 or F4) on MOMENTUM:
Bit 0 = 0: no effect with above key’s = 1: removes momentum of CV #121+122
Bit 1 = 0: no effect, = 1: CV #3 + 4 reduced to ¼.
Bit 0 + Bit 1 = 0: no effect = 1: removes all momentum above. EXAMPLES: F3 for shunting key = CV #124 = 8. F3 for shunting key and F4 to remove momentum completely: Bits 0, 1, 2 & 4 = 1; that is CV #124 =23. F3 for half-speed key and removing momentum: Bits 0, 1, 4 &6 = 1; that is CV #124 = 83. Bit 5 = 1: For “DC” stopping method, also see CV #29!
See chapter “Converting binary to decimal” for Bit value calculation!
The CV definitions described here are valid for CV #125 through #132. Some of the functions below may not necessarily be suitable for CV #125 and #126 as these outputs are usually connected to headlights.
#1251
Special effects
American lighting effects,
Uncoupler (time-limited) ac-tivation,
Automated output activation (ON/OFF) to meet different
criteria,
“Soft start” of function outputs at activation
for Function output
“Front headlight”,
operates with F0 in forward direction by default, unless assigned different through
function mapping.
Effects can be further ad-justed and modified with
CV’s #62 - 64
and
CV #115 (for uncoupler).
0
Bits 1, 0 = xxxxxx00: active in both directions = xxxxxx01:active in forward direction =xxxxxx10:active in reverse direction
ATTENTION in case of CV #125 and #126: change CV’s #33, 34.... if direction is wrong!
Bits 7, 6, 5, 4, 3, 2 = Effect code Bits 765432(xx= Bits1&0 for direction, see above!) = 000001xx Mars light = 000010xx Random Flicker = 000011xx Flashing headlight = 000100xx Single pulse strobe = 000101xx Double pulse strobe = 000110xx Rotary beacon simulation. = 000111xx Gyralite = 001000xx Ditch light type 1, right = 001001xx Ditch light type 1, left = 001010xx Ditch light type 2, right = 001011xx Ditch light type 2, left = 001100xx Uncoupler as in CV#115 = 001101xx Soft start up of function output = 001110xx Automatic stop lights for street cars, afterglow at stop, see CV #63 = 001111xx Function output turns itself off at speed >0 (i.e. turns off cab light at start). = 010000xx Function output turns itself off after 5 min. (i.e. to protect a smoke generator from overheating). = 010001xx Turns itself off after 10 minutes. = 010010xx Speed or load dependent smoke generation for steam engines as per CV’s 137 – 139 (i.e. pre-heating at stand still, heavy smoke at high speed or high load). Smoke turns itself off as per CV #353; function key has to be pressed to reactivate smoke. = 010100xx Load dependent smoke genera- tion for diesel engines as per CV’s #137 – 139 (i.e. pre-heating at stand still, heavy smoke at high speed or high load). See CV #133 for synchronized control of fans through FO4. Smoke turns itself off as per CV #353; function key has to be pressed to reactivate
1 Note to ditch lights: Ditch lights are only active when headlights and function F2 (#3 on Zimo cab) are on, which is prototypical for North American railroads. The ditch lights will only be working if the applicable bits in CV #33 and 34 are on (the definition in CV #125 - 128 in itself is not enough but a necessary addition). Example: If ditch lights are defined for F1 and F2, the bits #2 and 3 in CV #33 and 34 have to be set accordingly (i.e. CV # 33 = 13 (00001101), CV #34 = 14 (00001110).
CV Designation Range Default Description
smoke.
EXAMPLES You want : Program CV #125 to:
Mars light forward only - 00000101 = 5 Gyralite independent of direction - 00011100 = 28 Ditch type 1 left, only forward - 00100101 = 37 Uncoupler - 00110000 = 48 Soft start of output - 00110100 = 52 Automatic stop light - 00111000 = 56 Automatic cab light OFF - 00111100 = 60 Auto. smoke OFF after 5 min – 01000000 = 64 Auto. smoke OFF after 10 min – 01000100 = 68 Speed/load depen. smoke - 01001000 = 72 Speed/load depen. diesel smoke - 01010000 = 80
See chapter “Converting binary to decimal” for Bit value calculation!
#126
Special effects
For rear headlight
(default F0 reverse)
0
Bits 1, 0 = xxxxxx00: active in both directions = xxxxxx01:active in forward direction =xxxxxx10:active in reverse direction
ATTENTION in case of CV #125 and #126: change CV’s #33, 34.... if direction is wrong!
See CV #125 for details.
#127
Special effects for FO1
(default F1)
0 See CV #125 for details.
#128
Special effects for FO2
(default F2)
0 See CV #125 for details.
#129 -
#132
Special effects
for FO3, FO4, FO5, FO6
(default F3, F4, F5, F6)
0 See CV #125 for details.
#62 Light effects modifications
0 - 9 0 Change of minimum dimming value (FX_MIN_DIM)
#63
Light effects modifications
or
Stop light OFF delay
0 – 99
0-255
51
Tens digit: sets cycle time (0 - 9, default 5), or start up time during soft start (0 - 0,9s)
Ones digit: extends “off” time
For stop light afterglow (001110xx in CV #125, 126 or 127): Time in tenths of a second the stop lights remain on after the street car comes to a full stop (range: 0 – 25 sec.).
= 0 (Default): FO4 is available as a normal func-tion output that is, not as cam sensor output.
= 1: FO4 sends cam sensor signals, either virtual signals or signals of a real cam sensor. See CV’s #267 and 268!
#133
Function output 4 (FO4) as virtual cam sensor output
for external sound modules
or
FO4 for synchronized fan control of smoke generators
on steam engines
FO4 controls DIESEL engine smoke fan if the special effect “010100xx” is selected; at any
function key.
Fan speed is defined in CV’s #351 and 352.
NOTE: Fan control is also influenced by the sound project.
NOTE: Large scale decoders (not covered in this manual) offer more adjusting possibilities for fans through FO10.
#134
Asymmetrical threshold for
stopping with asymmetrical DCC signal (Lenz ABC
method).
1 - 14,
101 - 114,
201 - 214
=
0,1 - 1,4 V
106
Hundredths digit: Sensitivity adjustment, changes the speed with which the asymmetry is being rec-ognized.
= 0: fast recognition (but higher risk of errors, i.e. unreliable stopping). = 1: normal recognition (@ 0.5 sec.), pretty save results (default). = 2: slow recognition (@ 1 sec.), very reliable.
Tenths and ones digit: Asymmetrical threshold in tenths of a volt. The voltage difference entered here, between the half waves of the DCC signal, is the minimum required to be recognized as asym-metrical that starts the intended effect (usually braking and stopping of a train). Also see CV #27!
= 106 (Default) therefore means 0.6 V. This value has proven itself to be appropriate under normal conditions; by using 4 diodes to generate the asymmetry, see chapter 4!
#135
Km/h – Speed regulation -
Activating, control and range
definition
2 – 20
See chapter
“Add. Notes”, section
„km/h – speed regulation“!
0
= 0: km/h – Regulation turned off; the “normal” speed regulation is in effect.
Start with Pseudo-Programming („Pseudo“ = pro-grammed value is not being stored):
CV #135 = 1 -> Initiates a calibration run (see chapter 4, „km/h – speed regulation“)
Continue with “normal“ programming of CV #135 (programmed value will be stored):
= 2 to 20: speed steps / km/h – factor; e.g.:
= 10: each step (1 to 126) represents 1 km/h: that is step 1 = 1 km/h, step 2 = 2 km/h, step 3 = 3 km/h,
= 20: each step represents 2 km/h; step 1 = 2 km/h, step 2 = 4 km/h, last step 126 = 253 km/h.
= 5: each step represents .5 km/h; step 1 = .5 km/h, step 2 = 1 km/h, last step 126 = 63 km/h.
CV Designation Range Default Description
#136
km/h – Speed regulation -
Control number read-out
See chapter
“Add. Notes”, section
„km/h – speed regulation“!
-
A numeric value can be read-out after a success-ful calibration run, which was used to calculate the speed. This value is interesting because it is (al-most) independent from the selected speed during the calibration run. The uniformity of the resulting values from several calibration runs may be an in-dication of the calibration quality. See chapter 4!
#137
#138
#139
Definition of smoke genera-tor characteristic, connected
to FO 1 – 6.
(if a “smoke” function is se-lected for the appropriate output in CV #127-132)
PWM at stand still
PWM at steady speed
PWM during acceleration
0 – 255
0 – 255
0 - 255
0
0
0
The values in CV #137 – 139 define a smoke characteristic for the function outputs (FO1, FO2, FO3, FO4, FO5 or FO6; referred to below as FOx), provided a “smoke function” for a diesel or steam engine has been selected in the associated CV #127 – 132 (i.e. 010010xx, 010011xx, 010100xx or 010101xx).
CV #137: PWM of FOx at standstill
CV #138: PWM of FOx at cruising speed
CV #139: PWM of FOx at acceleration
(PWM = Pulse With Modulation)
#140
Distance controlled stopping
(constant stopping distance)
Select start of braking and
braking process
0 - 255 0
Activates distance controlled stopping as per CV #141 in place of time-constant braking according to CV #4.
= 1: automatic stops with “signal controlled speed influence” or “asymmetrical DCC signal”.
= 2: manual stops using the cab.
= 3: automatic and manual stops.
The start of braking is delayed in above cases (= 1, 2, 3), if the train travels at less than full speed to prevent an unnecessary long “creeping” (recom-mended).
On the other hand:
= 11, 12, 13 selection as above but braking starts always immediately after entering the brake section.
#141
Distance controlled stopping
(constant stopping distance)
Distance calculation
0 - 255 0
This CV defines the “constant stopping distance”. The right value for the existing stop sections has to be determined by trial. Use these figures as a starting point:
CV #141 = 255 is about 500m (500 yards) for a real train or 6m (18 ft) in HO.
CV #141=50 about 100 m (1.2m in H0).
#142
Distance controlled stopping
(constant stopping distance)
High-speed correction using the ABC method
0 - 255 12
The delayed recognition (see CV #134) but also unreliable electrical contact between rail and wheels has a larger effect on a stop point at higher speeds than at lower speeds. This effect is cor-rected with CV #142.
= 12: Default. This setting usually works fine if CV #134 is set to default also.
Since the HLU method is more reliable than the ABC method, no recognition delay is usually re-quired in CV #134; therefore this CV can remain at default setting 0.
#144 Programming and
update lock
Bits
6, 7
0
or
255
(255 = „FF“,
which for “old” decoders is the
same as 0)
This CV was introduced to prevent unintentional decoder changes or loss of functions due to an in-advertent entry to the update mode.
= 0: Unrestricted CV programming and updating.
Bit 6 = 1: No programming possible in service mode: protection against unintentional programming. Note: “on-the-main” programming is still possible.
Bit 7 = 1: Software updates normally executed with the MXDECUP, MX31ZL or future devices are blocked.
(Unlock this CV with “on-the-main” programming)
#145 Alternative motor control method
0, 1, 10, 11, 12
0
= 0: normal control mode (DC & coreless motors (Faulhaber, Maxxon))
= 1: special control for low-impedance DC mo- tors (often Maxxon); this mode allows the connection of a capacitor (10 or 22uF) to the decoders positive and ground pads which puts less stress on the decoder and motor (but only if a capacitor is actually present !).
= 10: “normal” C-Sinus and Softdrive-Sinus con- trol mode (same as CV #112, Bit 0 = 1), FO4 is fixed and not available as a function output.
= 11: alternative C-Sinus / Softdrive Sinus con- trol mode, FO4 is available as normal function output (not suitable for all C-Sinus or Soft drive-Sinus equipped locomotives).
= 12: special C-Sinus and Softdrive-Sinus control mode for interfaces requiring the normal motor output instead of the other- wise more common C-Sinus output, FO4 is fixed and not available as function output.
=13: special C- / Softdrive-Sinus control mode for the Märklin “Gottardo” engine (and possibly future Märklin engines). FO3 is fixed and not available as function output. It is required for switching front/rear wipers with directions.
#146
Compensation for gear backlash
during direction changes in order to
reduce start-up jolt.
0 - 255 0
A certain backlash between gears of a drive train is required to prevent them from binding. This backlash may be more severe on some engines than on others, especially when fitted with a worm gear. An engine with a worn gearbox also exhibits excessive backlash. Excessive backlash leads to a peculiar behavior especially when changing the direction: When the motor starts spinning in the opposite direction it doesn’t move the engine because it has to elimi-nate the backlash first. And to make matters
CV Designation Range Default Description
worse, the motor starts to accelerate already dur-ing this phase. When the motor finally starts to move the engine, the motor’s speed has exceeded the normal start-up rpm, which results in an un-pleasant jolt. This can be avoided with the help of CV #146.
= 0: no effect = 1 to 255: the motor spins at minimum rpm (ac-cording to CV #2) for a specific time and only starts to accelerate after this time has elapsed. This CV will only be executed during a direction change.
How much time is required to overcome the back-lash depends on various circumstances and can only be determined by trial and error. Typical values are:
= 100: the motor turns about 1 revolution or a maximum of 1 second at the minimum speed.
= 50: about ½ a turn or max. ½ second. = 200: about 2 turns or max. 2 seconds.
Important: CV #2 (minimum speed) has to be set correctly, that is the engine has to move with the lowest speed step (1 of 128 or 1 of 28). Also, CV #146 is only useful if the load regulation is set to maximum or at least close to it (i.e. CV #58 = 200 – 255).
#151 Motor brake 0 - 9 0
For gearboxes without worm gears; to prevent roll-ing away on inclines.
=0: No motor brake =1 … 8: The motor brake is gradually actuated when the target speed 0 is reached during braking (reaches full braking over 1, 2 … 8 seconds by shorting both motor end stages).
=9: Applies full motor brake when speed 0 is reached by shorting both motor end stages immediately.
NOTE: The motor brake function was available in Bit 0 of CV #112 up to June 2009 (before SW ver-sion 25). It could be selected but was not adjust-able as it is now.
#161 Servo outputs:
Protocol
0 - 3 0
Bit 0 = 0: Servo protocol with positive pulses. = 1: Servo protocol with negative pulses.
Bit 1 = 0: Control wire active during movement = 1: … always active (consumes power, vibrates at times but holds position even under mechanical load).
SmartServo RC-1 must be set to CV #161 = 2!
Bit 2 = 0: Moves to center position if defined for two-key operation (see CV #181/182) when both function keys are OFF.
= 1: Servo runs only if function keys are pressed when in two-key operating
(Two-key mode operates as defined with CV #161, Bit 2)
#250 -
#254
Decoder ID SW-version 26 and higher
Write pro-tected
Unique decoder ID ( = serial number) is automati-cally written during production. The first byte (CV # 250) specifies the type of the decoder, second to fourth byte contain sequential number (serial). The decoder ID is used for the automatic login in a new layout (if RailCom is supported in the new layout) and is also needed for “coded” sound pro-jects, to obtain the Lade-Code (CV’s # 260 - 263) for coded sounds for this decoder.
CV Designation Range Default Description
#260 -
#263
Lade-Code for
“Coded” Sound-Projects SW-version 26 and higher
0 – 255
Coded" (= encrypted) Ready-to-use sound-projects are usually provided by extern ZIMO-partners (in the sound table called “providers”), and also by ZIMO.
The Lade-Code for coded sound-projects can be ordered from external ZIMO-Partners (“Providers”, for example: RhB, Heinz Däppen) for the whole bundle of sounds of the provider for one decoder. After telling the Decoder ID (CV#250 – CV#253) and paying a small charge, the received Lade-Code must be writ-ten in CV#260 to CV#263, before loading the encrypted sound-project in the decoder.
Decoders with already loaded coded sound-projects can be ordered also from ZIMO.
It is also possible to obtain the Lade-Code di-rectly from ZIMO, after telling the Decoder ID (CV#250 – CV#253) and paying a small charge.
Also see www.zimo.at and Software ZIRC.
MORE configuration variables for SOUND DECODERS are found in the chapter “ZIMO SOUND”!
4. Additional notes to Configuration Variables (CV’s)
Optimal Control, Automated Stops, Effects . . .
Two ways of programming speed curves:
Programmable speed curves can often optimize the driving characteristics of an engine. These curves alter the relationship between the cab’s speed regulator settings and the engines speed (that is between 14, 28 or 128 external speed steps of the cab and the 252 internal speed steps of the decoder). Which one of the two speed curves the decoder applies is determined by Bit 4 of Configuration Variable #29: “0" assigns the first type - Three Step Programming, defined by just three CV’s;”1" assigns the second type - Programmable Speed Ta-ble, defined by 28 individual CV’s.
Three step programming: by using the Configuration Variables #2 for Vstart, #5 for Vhigh and #6 for Vmid. Vstart defines one internal speed step out of a total of 252 to the first speed step of the cab, Vhigh to the highest speed step and Vmid to the center speed step of the cab. In this way a simple bent acceleration curve can be achieved with an expanded lower speed range. A slightly bent curve is active by default (CV #6 = 1), that is the center speed step is limited to 1/3 of full speed.
Programmable speed table: with the help of the programmable speed table, free programming of all Con-figuration Variables from #67 to 94 is possible. Each of the 28 external speed steps is assigned to one in-ternal step (0 to 252). If 128 external speed steps are used, an interpolation algorithm is used to calculate the steps in between.
NOTE: The three step programming is in most cases entirely sufficient for good drivability; the relatively complex procedure of defining a speed table is only recommended with the help of software like ADaPT that graphically draws the speed curve and automatically sends the data to the decoder.
Example of a freely programmed speed curve according to the values entered in to configurationvariables #67 - 94.
Motor control frequency and EMF scanning rate:
In case of Faulhaber, Maxxon or similar motors (Coreless):
Start with CV #9 = 22 and CV #56 = 100 programming ! ! !
The motor is controlled by pulse with modulation that can take place at either low or high frequency. This frequency is selected with configuration variable #9 (NMRA conforming formula, see CV table).
High frequency control: The motor is controlled at 20kHz in default mode or whenever a value of “0” is en-tered to CV #9, which can be raised to 40kHz with bit 5 in CV #112. The effect is comparable to operating with DC voltage and is likewise just as noiseless (no hum as with low frequency) and easy on the motor (minimum thermal and mechanical stress). It is ideal for coreless motors (recommended by Faulhaber!) and other high performance motors (most modern motors, including LGB). It is not recommended however, for AC motors and some older motors.
When operating at high frequency, power to the motor is interrupted periodically in order to determine the current speed by measuring back-EMF (voltage generated by the motor). The more frequently this interrup-tion takes place, that is the higher the EMF sampling frequency, the better the load compensation per-forms (see next page); but that also results in a certain loss of power. This sampling frequency varies automatically in the default mode (CV #9 = 0) between 200Hz at low speed and 50 Hz at maximum speed. CV #9 allows the adjustment of the sampling frequency as well as the sampling time.
* It is recommended in most cases where an improvement is still required for MAXXON, Faulhaber or similar motors, to select a lower sample frequency such as CV #9 = 11, 12, 21, 31 etc after CV #56 was programmed to 100; this will in any case reduce motor noise!
* for older type motors use rather the opposite, e.g. CV #9 = 88. Also see CV table and the following page!
Low frequency control: Entering a value between 176 and 255 to CV #9 drives the motor between 30 and 150 Hz. Most often used value is 208 for 80 Hz. This is rarely used today and is only suitable for AC motors with field coils.
The load compensation:
All Zimo decoders come equipped with load compensation, also known as BEMF to keep a constant speed, regardless whether the engine is pulling a short or long train uphill, downhill or around a tight radius (although the speed will not be held 100% constant, especially in the upper speed range). This is accom-plished by constantly comparing the desired value (speed regulator setting) and the actual value at the mo-tor, determined with the EMF method (EMF stands for Electro Motive Force and is the force (power) pro-duced by the motor when it is turned without power applied to it).
The Reference Voltage used for the BEMF algorithm can be defined by configuration variable #57 as either absolute or relative (default).
Absolute Reference: A voltage value is defined in CV #57 as a base line for the BEMF calculation. For example: if 14V is selected (CV value: 140), the decoder then tries to send the exact fraction of the voltage indicated by the speed regulator position to the motor, regardless of the voltage level at the track. As a re-sult the speed remains constant even if the track voltage fluctuates, provided the track voltage (more pre-cisely, the rectified and processed voltage inside the decoder, which is about 2V lower) doesn’t fall below the absolute reference voltage.
The "absolute reference" is to be preferred to the "relative reference" when using other vendors' systems (particularly those that don’t keep the track voltage stabilized)!
Relative Reference: The speed range is automatically adjusted to the available track voltage, if a 0 is en-tered to CV #57 (default). Therefore, the higher this voltage is set at the command station (adjustable be-tween 12V and 24V) the faster the train will be over its entire speed range.
The relative reference is suitable as long as a constant voltage is present (which is the case with all Zimo systems but not all competitor systems) and the resistance along the track is kept to a minimum.
The driving characteristic of an engine can further be optimized by adjusting the intensity of load compensation. The goal of load compensation, at least in theory, is to keep the speed constant in all circumstances (only limited by available power). In reality though, a certain reduction in compensation is quite often preferred.
100% load compensation is useful within the low speed range to successfully prevent engines from stalling or picking up speed under load. BEMF should rather be reduced as speed increases, so that at full speed the motor receives full power with little BEMF. A slight grade dependent speed change is often considered more prototypical. Consists also should never be operated with 100% BEMF because it causes the locomo-tives to fight each other by compensating too hard and too fast, which could lead to derailments.
The degree of load compensation can be defined with Configuration Variable #58 from no compensation (value 0) to full compensation (value 255). This, in effect, is the amount of compensation applied to the low-est speed step. Typical and proven values are in the range of 100 to 200.
If an even more precise load compensation is required (though hardly ever necessary), configuration variable #10 and #113 presents a solution. CV #10 defines a speed step at which the load compensation is reduced to the level defined in CV #113. Both CV’s have to have a value other than 0. If either CV #10 or #113 is set to 0, BEMF is again solely based on CV #58.
0102030405060708090
100110120130140150160170180190200210220230240250
0 20 40 60 80 100 150 200 252
Defaul t-Regelungskenn lin ie
CV # 58 = 255 , CV # 10 und # 113 = 0
volle Ausreglung bei Langsamfahrt,
absinkend bis 0 be i vol ler Fahrt.
Reg
leun
gsei
nflu
ß
Int. Fahrstufe
Kennlinie des Regelungseinflusses
CV # 58 = 180, CV # 10 und # 113 = 0
reduzierte Ausreglung in allen
Geschwindigkeitsbereichen.
0
102030405060708090
100110120130140150160170180190200210220230240250
0 20 40 60 80 100 150 200 252
Default-Rege
lungs kennlinie
Rege lungskennlinie
CV # 10 = 126 , CV # 113 = 200,
verst ärkte Ausreglung im
mit
Regarding configurations variable #56 – (proportional and integral control values):
See the following chapter “Step by step CV adjustments…..” !
Acceleration and deceleration characteristics (momentum):
Configuration Variables #3 and #4 provide a way of setting a basic linear acceleration and decelera-tion rate according to NMRA rules and regulations. That is, the speed is changed in equal time intervals from one speed step to the next.
To simply achieve smooth transitions during speed changes, a value between 1 and 3 is recommended. The true slow starts and stops begin with a value of about 5. Programming a value higher than 30 is seldom practical!
The momentum can be modified with Configuration Variables #121 and #122 to an exponential accel-eration and deceleration rate, independent from each other. This in effect expands the momentum in the lower speed range. The area of this expansion (percentage of speed range) and its curvature can be de-fined.
A typical and practical value is “25” (as starting point for further trials).
The adaptive acceleration and deceleration procedure defined by configuration variable #123 will not allow a change in speed until the previous target speed step of an acceleration/deceleration event is nearly reached.
Most often applied values are “22 or “11”, which can noticeably reduce a start-up jolt (the effect increases with decreasing values).
********************* Step by step CV adjustment procedure to optimize engine performance:
It is recommended to systematically program a decoder since the CV settings for load compensation and momentum can result in a certain interaction with each other:
* To begin, select the highest possible number of speed steps the system can operate in, that would be 128 steps for Zimo (select the number of speed steps at the cab for the decoder address in question); other systems may operate with only 28 or 14 speed steps. All Zimo decoders operate by default with 28 /128 speed steps (both variants are utilized). If used with systems that are restricted to 14 steps set Bit 1 in CV #29 to 0.
* Next set the engine to the lowest step, recognizable on the Zimo cab’s when the bottom LED next to the speed slider changes color from red to green and/or the speed step 1 is displayed on the screen of the MX21/MX31 cabs (first, change the cab to 128 speed steps for this address, if not done so or if it isn’t al-ready the default setting!).
If the engine is now running to slow or not at all, increase the value in CV #2 (default 2), if it runs too fast decrease the value. If the individual speed table is used (CV #67 - 94, active if bit 4 of CV #29 is set), set the lowest speed step with CV #67 instead and adjust the rest of the speed table CV’s accordingly.
* The EMF sampling process (see previous page) is critical for smooth even low speed behavior and quiet motor performance which can be modified with CV #9. This CV is also used to set the decoder to low fre-quency motor control, which is required only rarely with older AC motors.
By default (CV #9 = 0), the frequency is set to 20 kHz (can be raised to 40 kHz with Bit 5 of CV #112) and automatically adapts the EMF sample rate to the loco speed. If drivability is not flawless or too much motor noise is audible, fine-tuning is possible as follows:
CV #9 = 0 (default) has the same effect as when CV #9 = 55, that is a medium value for the ones as well as the tens digit. The value of the tens digit (1-9) in CV #9 determines the EMF sampling rate and the value of the ones digit (1-9) the EMF sampling time, which is the time the motor is not powered.
In general: High-efficient motors such as Faulhaber, Maxxon, Escap etc (coreless motors) can manage with short measuring times; the ones digit of CV #9 can therefore be set to a value of “2”. The ideal EMF sampling rate depends on the loco construction and weight: small, lightweight engines require a rather high sampling rate (i.e. “5”) while heavy engines (i.e. O-gauge or large HO engines) work well with a lower sam-pling rate (i.e. “2”). So for a typical HO engine with coreless motor (i.e. Faulhaber) a setting of CV #9 = 52 is often a good choice; for O-scale CV #9 =22. Further improvements in terms of smooth low speed perform-ance and reduced motor noise may be achieved by trial and error using different tens digit values in CV #9; and of course by means of CV #56 (see below).
If an engine with an older motor design runs rough at low speeds, the sample frequency (tens digit) is usually the one that needs to be set to a larger value (>5), which often requires the sample time (ones digit) to be set to a higher value as well (>5); i.e. CV #9 = 88.
* If, after setting CV #9, the engine still doesn’t run smoothly enough at the lowest speed step, changing the values of the ones and tens digit in CV #56 will often improve it. Here also, the default value of “0” is equal to the center setting of 55. These values define the proportional and integral portion of the PID con-trol. By default (CV #56 = 0), the proportional value adjusts itself automatically and the integral value is set to mid-value. Depending on the type of motor, other values than the default value may be useful, such as 77, 88 or 99 for older locos that run rough or 33, 22, or 11 for newer locos with more efficient motors (Faul-haber, MAXXON etc).
A possible overcompensation can be reduced with the help of the integral value (ones digit of CV #56).
For engines with Maxxon, Faulhaber (coreless motors) the setting CV #56 = 100 should be tried first (in-stead of the default “0” for normal DC motors). This setting is equal to CV #56 = 155, where the hundreds digit “1” causes an adjustment to the center setting to accommodate highly efficient motors. If necessary, further improvements may be achieved by trying different values of the tens and ones digit.
* After improving low speed performance (by increasing the value of CV #56 described above), check that the engine is not running jerkily at mid-speed level that could be caused by high CV #56 values (77, 88…). This effect can be compensated for by reducing the total amount of load compensation in CV #58 (default “250”) down to “200” or “150” or use CV #10 and #113 to cut the load compensation at a speed just below the start of the jerky motion (the compensation is reduced to the level defined with CV #113 at the speed step defined with CV #10).
* If after the above adjustments the engine’s speed is still fluctuating, use CV #57 for further fine-tuning. With a default value of 0, load compensation is based on the measured track voltage. If this voltage fluctu-ates, the speed will also fluctuate. The cause is usually a DCC system that can’t compensate for voltage drops (other than Zimo systems) or dirty wheels or track. To prevent such fluctuations a value representing the selected track voltage x10 is entered to CV #57 (not idle track voltage, rather voltage under load). For example, if an engine needs 14 V (measured under load) a value of 140 should be entered; better yet, keep this value about 20 to 50 points lower to compensate for a slight internal voltage drop in the decoder.
* Next, we check to see whether the loco’s initial start is smooth or abrupt. This can be seen well with some momentum added. Temporarily, set some momentum with CV #3 and #4. Start with a value of 5.
There are basically two different kinds of start up jolts: the jolt that happens every time an engine starts up and the one that only shows up after the engine changes direction (i.e. after the engine stopped, changed direction and starts up again). The “direction-change jolt” is due to gearbox backlash; see further down.
For the first kind of start-up jolt, the adaptive acceleration procedure can now be used to eliminate abrupt starts by changing the value of the tents digit in CV #123. Start with a value of 20. The lower the value, the stronger the effect will be (e.g. 10 results in the strongest effect for acceleration, 90 the weakest). A possible jolt when stopping can also be reduced with the help of the ones digit in CV #123. The tens digit is for defining the adaptive acceleration and the ones digit for the adaptive deceleration. CV #123 = 22 im-proves the start-up as well as the stop jolt. It may be of advantage to reduce the adaptive deceleration, i.e. CV #123 = 24 in order to improve repeatable stop points in automated operations (routes, block control etc.).
Beginning with SW version 5, the “direction-change jolt” can also be reduced using CV #146. Typical values are CV #146 = 50 or 100. See description in the CV table.
* After changing the values in CV #123 the basic momentum may need to be readjusted to your prefer-ences; first with CV’s #3 and #4 (basic momentum). Values higher than default are usually recommended, at a minimum CV #3 = 5 and CV #4 = 3. This improves the engine’s performance considerably. Much higher values are suitable for engines equipped with sound in order to match the sound to the engine’s movement (with sound decoders as well as external sound modules via SUSI).
Additionally the “exponential acceleration and deceleration” may be applied with CV #121 and #122. This allows for prototypical non-linear momentum coupled with extremely soft starts and stops without compro-mising the maneuverability in the upper speed range. This stretches the time the locomotive will spend in the lower speed range. Often used values for these CV’s are between 25 and 55, which means that 20% to 50% (according to the tens digit) of the total speed range will be included in the exponential acceleration curve, with a medium curvature (ones digit at ‘5’).
Notes on acceleration behavior versus speed steps:
An acceleration or deceleration sequence according to CV #3 and 4 that is the timely succession of speed steps is always based on the internal 252 steps which are spaced identical from 0 to full speed. Neither speed table (three steps nor individ-ual speed table) has any effect on the acceleration or deceleration behavior. The speed tables only define the target speed for a particular speed dialed-in by the cab.
This means that the acceleration or deceleration behavior cannot be improved by a bent speed curve as defined by CV #2, #5, #6 or the individual speed table CV’s #67 - 94. The exception to this could only be a cab or computer controlled accel-eration or deceleration event. A desired curve in a decoder controlled acceleration or deceleration event however is possible with the “exponential acceleration/deceleration” using CV #121 and #122.
- If applicable see section “Settings for the signal controlled speed influence“! - If applicable see section “Setting for stopping with ...“!
- If applicable see section “Distance controlled stopping” (constant stopping distance)!
Case studies of practical CV programming:
The fine-tuning of a locomotive is not difficult but represents uncharted territory for many users. The follow-ing is meant to assist you with actual programming cases, which were performed by ZIMO at cus-tomer’s or locomotive manufacturer’s requests or by close ZIMO partners.
The tuning of a locomotive reflects in part the personal preferences of an individual but must also take into account the special circumstances of its intended application; still valid suggestions can be drawn from it.
It must be pointed out that there can be significant mechanical deviations among mass-produced locomo-tives even among identical models but even more so between different models, so that further fine-tuning can be of advantage (although it is often not really necessary).
Roco loco of modern design (about 1995 and up) / Original-Roco-Motor
Such locomotives are operating very good even with the decoder’s default settings, which is also due to the fact that these locomotives are often used as reference during the ZIMO decoder software develop-ment.
The settings below are recommended when used with non-ZIMO com-mand stations:
CV #57 = xx, i.e. = 120 (12 V) or = 140 (14 V) or = 150 (15 V) etc.
as track voltage under load, but not higher than that.
Setting CV #57 to a specific value (i.e. CV #57 = 120) differs from the default set-ting (CV #57 = 0) in as much as the top speed no longer depends on the current track voltage, provided the track voltage is high enough. For example, if track voltage is >12V and CV #57 set to 120, the decoder regulates top motor speed to 12V.
This is an advantage if the command station is not from ZIMO, because most of them don’t regulate track voltage. Changing this CV makes no difference within a ZIMO system because the track voltage is kept constant (with the exception of voltage drops along the track, due to poor layout wiring). A disadvantage of using CV #57 with a specific value is that the value used has to be in relation to the ac-tual track voltage, which is a manual intervention whereas CV #57 = 0 is self-regulating.
CV #57 is also suitable for limiting top speed, alternatively to CV #5 and can of course also be utilized with ZIMO systems. For example: CV #57 = 130 and a track voltage of 18V will reduce the overall speed (all speed steps) by about 25%.
A minimal value of “2” in CV #3 and #4 eliminates visible speed changes between speed steps but has not much to do with prototypical momentum, which requires much higher values. Higher values (i.e. CV #3 and #4 = 6, CV #121 and #122 = 33), depending on operating situations and personal taste, are recommended.
The “Round motor” has been Fleischmann’s standard motor until this latest manual revision (2008); a small readjustment of the CV values is appropriate.
Furthermore … especially on these motors it is recommended to remove the capacitors and bypass the choke coils at the motor. Attention: often the “worst” capacitors are the ones that are least visible and/or accessible, especially between the motor brushes and rail or frame.
Beginning with SW version 9 of the MX620 and MX64D and the first version of the MX630, these com-ponents don’t have to be removed anymore.
CV #56= 33, 44.... It has been demonstrated that reducing the P and I regulation of the BEMF func-tion is beneficial for the “Round motor” (#56 < 55, which is lower than the default value of 0).
These recommendations are true here as in almost all other cases (see above “Roco Loc“).
NMJ Superline NSB Skd 2220c (small Norwegian switcher engine, built in 2007) Product of Norsk Modeljernbane, with Faulhaber-Motor,
MX63, with SW based on the version 30, is being installed at the factory; this decoder contains special software with a hard reset procedure that sets the decoder back to optimized CV values, similar values as are listed here. This engine served in the development of the regulated analog control!
ZIMO decoders are very well suited for Faulhaber motors, even with the default settings. An even better result can be achieved with the special Faulhaber setting in CV #56.
CV#9 = 12 That means shorter EMF measuring time and smaller frequency, which leads to reduced noise and extremely low crawling speed.
CV#56 = 155 That means Faulhaber typical measuring time (“1”), medium P/I regulation.
CV#57 = xx … See above under “Roco Loc“.
CV#112 = 0
That is: Bit 2 = 0, all other Bits are al-ready at 0 by de-fault.
ZIMO loco number ID turned off (Bit 2 = 0), which by default is turned on (Bit 2 = 1, that’s why CV #112 = 4). This prevents small ticking sounds (audible in metal locomotives).
This preventive step is only of significance in conjunction with a ZIMO DCC sys-tem, because no loco number pulses are produced in other systems (and there-fore no ticking sounds can be heard). If on the other hand the loco number identification within a ZIMO systems is being used (MX9 modules with MX9AZN boards), the loco number pulses must of course not be turned off!
These recommendations are true here as in almost all other cases (see above, “Roco Loc“).
Philotrain, 3-part multi unit (Built in 2007) Product of Philotrain, with Faulhaber motor,
MX64V1, with SW based on the version 30, installed by the manufacturer. Similar settings are rec-ommended for newer decoders such as the MX630.
Three part multi unit with low voltage headlight and interior light bulbs; for this reason a MX64V1 with 1.5V low voltage supply for function outputs is being used. The train runs pretty well with a ZIMO decoder as is; although a few changes are beneficial.
CV #9 = 13 Shorter EMF measuring time and smaller frequency, which leads to reduced noise and extremely low crawling speed.
CV #56 = 133 That means Faulhaber typical measuring time (“1”), a little less than medium P/I regulation (both digits “3” instead of “5”) results in best drivability.
CV #57 = xx … See above under “Roco Loc“).
CV #3 = 2 CV #4 = 2 CV #121 = 11 CV #122 = 33
These settings largely correspond to the general recommendations (see above under “Roco Loc”; only the range of the “exponential braking” (CV #122) was in-creased, which together with CV #123 results in smooth stops.
CV #123 = 95 The “adaptive acceleration” (“9”) is used here very sparingly (to prevent a start-up jolt), the “adaptive deceleration” (“5”) on the other hand a little stronger; this is - together with CV #122 (see line above) – practical, otherwise it could easily hap-pen that the train, due to the motor’s momentum, at first isn’t slowed down fast enough and then suddenly is stopped too fast. The adaptive deceleration adapts the brake response to the mechanical conditions: The braking distance increases and the locomotive comes to a smooth stop.
CV #112 = 0
That is: Bit 2 = 0, all other Bits are al-ready at 0 by de-fault.
ZIMO loco number ID (Bit 2 = 0) turned off, which by default is turned on (Bit 2 = 1, that’s why CV #112 = 4). This prevents small ticking sounds (audible in metal locomotives).
This preventive step is only of significance in conjunction with a ZIMO DCC sys-tem, because no loco number pulses are produced in other systems (and there-fore no ticking sounds can be heard). If on the other hand the loco number identification within a ZIMO systems is being used (MX9 modules with MX9AZN boards), the loco number pulses must of course not be turned off!
Märklin 8350 / SBB Series 460 / Maxxon-Motor 25260 Märklin-Product, upgraded with Maxxon motor 25260 (13 mm diameter) by SB-Modellbau.
NOTE: the motor used in this heavy model is actually a little under powered and the flywheel is extremely small. For this reason, this locomotive is one that is difficult to control and CV tuning is more important than usual. Even after the fine tuning a certain problem persists during downhill runs, where the locomo-tive tends to buck a little. Compared to other products, ZIMO decoders manage this locomotive with its motorization quite well (whereby the MX620 is better than the MX64). It is likely that with future control al-gorithm (SW versions in the coming month and years) a further perfection level may be achieved.
The attainable drivability especially in the extreme low speed range and the reaction to quick load changes are marginally better with the MX620 than with the MX64. This seems astounding considering the large and heavy engine, but might be due to the rather small motor (see above) with the characteris-tics of an N rather than an HO motor (the MX620 is designed for N-scale motors). Furthermore, an innova-tive automatic optimization of control parameters is in use, which has not (yet) been implemented in the MX63/MX64.
Equipped with MX64, SW version 30 (March 2007), favorable CV values are:
CV #9 = 61 Increased EMF frequency, shortened EMF measuring time (typical coreless) CV #56 = 199 Faulhaber-typical measuring time (“1”), full P/I regulation. CV #57 = 130 Reduced speed range to about 12V motor voltage.
Momentum in CV #3 and #4 should not be much smaller than “3” so that good starting and stopping behavior is still possible; the exponential accelera-tion/deceleration improves starting and stopping further; still higher values for these variables (i.e. CV #3, #4 = 6, CV #121, #122 = 33) according to operational circum-stances and personal taste correspond to even more realistic operations.
CV #123 = 33 Adaptive acceleration and deceleration (medium application) reduces start-up jolt and smoothes out stops.
Equipped with MX620 (similar to MX630), SW version 3.1 (Nov. 2006), favorable CV values are:
CV #9 = 61 Increased EMF frequency, shortened EMF measuring time (typical coreless) CV #56 = 141 Faulhaber-typical measuring time (“1”), low P regulation because the MX620 regu-
lates automatically, reduced I regulation. CV #57 = 120 Reduced speed range to about 12V motor voltage.
Momentum in CV #3 and #4 should not be much smaller than “3” so that good starting and stopping behavior is still possible; the exponential accelera-tion/deceleration improves starting and stopping further; still higher values for these variables (i.e. CV #3, #4 = 6, CV #121, #122 = 33) according to operational circum-stances and personal taste correspond to even more realistic operations.
CV #123 = 52 Low intensity for adaptive acceleration (“5“) because start-up acceleration with val-ues <5 may be hindered and uneven. Stronger intensity for adaptive deceleration (“2”) for smoother stops.
Fleischmann Steam Engine BR55 4155 H0 Gauge MX620, with SW version 9.
About the decoder: With SW version 9 (July 2008) driving characteristics were significantly im-proved for “difficult” engines while at the same time the influence of built-in interference compo-nents were reduced (although their removal might still be the better option).
The following information is valid only for SW version 9 (and presumably later versions).
CV # 2 = 10 CV #2 is not set to achieve the absolute lowest possible speed but rather for a smooth running engine at the lowest speed possible; this is also of impor-tance with the newly introduced (SW version 9) prevention of the “direction-jolt” per CV #146.
CV # 9 = 85 Increased EMF sampling rate to reduce jerky motion a slow speeds.
CV # 56 = 33 Slightly reduced proportional and integral regulation.
CV # 146 = 50 This takes care of the gear backlash: the motor turns about a half a turn at the lowest speed step (as per CV #2), before it starts to move the wheels. The setting of CV #146 = 50 prevents the motor speed from being raised during this time, which results in a smooth start.
CV # 3 = 3 CV # 4 = 3 CV # 121 = 11 CV # 122 = 11
These settings correspond to the general recommendations.
Tillig Diesel Engine BR218 02703 TT Gauge MX620, with SW version 9.
About the decoder: see above (“difficult” engine such as Fleischmann BR55)!
The following information is valid only for SW version 9 (and presumably later versions).
CV # 146 = 180 This takes care of the gear backlash: the motor turns almost 2 (!) turns very slowly before it starts to move the wheels. The setting of CV #146 = 180 pre-vents the motor speed from being raised during this time, which results in a smooth start.
CV # 3 = 3 CV # 4 = 3 CV # 121 = 11 CV # 122 = 11
These settings correspond to the general recommendations.
PIKO Siemens Dispolok ES64 TT Gauge MX620, with SW version 9.
About the decoder: see above (“difficult” engine such as Fleischmann BR55)!
The following information is valid only for SW version 9 (and presumably later versions).
CV # 2 = 15 See above (Fleischmann BR55)!
CV # 9 = 85 Increased EMF sampling rate to reduce jerky motion a slow speeds, default (“5”) sampling time.
CV # 56 = 33 Slightly reduced proportional and integral regulation.
CV # 146 = 60 This takes care of the gear backlash: the motor turns about ½ a turn at idle before it starts to move the wheels. The setting of CV #146 = 60 prevents the motor speed from being raised during this time, which results in a smooth start.
CV # 3 = 3 CV # 4 = 3 CV # 121 = 11 CV # 122 = 11
These settings correspond to the general recommendations.
Fleischmann piccolos 7355 N scale MX620, with SW version 9.
The following information is valid only for SW version 9 (and presumably later versions).
CV # 2 = 4 Slightly raised start-up voltage, which is of advantage for good performance.
CV # 9 = 92 Increased EMF sampling rate to reduce jerky motion a slow speeds, reduced (“2”) sampling time.
CV # 56 = 55 Default setting.
CV # 146 = 110 This takes care of the gear backlash: the motor turns about one turn at idle before it starts to move the wheels. The setting of CV #146 = 110 prevents the motor speed from being raised during this time, which results in a smooth start.
CV # 3 = 3 CV # 4 = 3 CV # 121 = 11 CV # 122 = 11
These settings correspond to the general recommendations.
Km/h – Speed regulation - CALIBRATION and operation The km/h speed regulation is a new, alternative method of driving with prototypical speeds in all operat-ing situations: the cab’s speed steps (1 to 126 in the so-called “128 speed step mode”) will be directly inter-preted as km/h. Preferably, all engines of a layout should be set to the same method. Engines equipped with non-ZIMO decoders can be set up similarly through the programmable speed table (although with more effort and less precise because there is no readjustment taking place by the decoder).
The ZIMO readjustment: the decoder is not limited to converting the speed steps to a km/h scale but rather ensures that the desired speed is held, by recalculating the already traveled distance and automati-cally readjusting itself.
A CALIBRATION RUN; to be performed with each loco:
First, we need to determine the calibration track: a section of track that measures 100 scale meters (plus the necessary acceleration and deceleration distances before and after), of course without inclines, tight ra-dii and other obstacles; for example, for HO (1:87) 115cm; for G-scale (1:22.5) 4.5m. Start and end points of the calibration distance need to be marked.
* Set the loco on the track, with the proper travel direction selected, about 1 to 2 meters before the start marker and the function F0 (headlights) turned off. Acceleration times (momentum in CV #3 of the decoder as well as settings in the cab) should be set to 0 or a small value to prevent any speed changes inside the calibration distance. Otherwise, the track length before the calibration marker needs to be increased ac-cordingly.
* The calibration mode is now activated by programming CV #135 = 1 (operations mode programming). This is a pseudo-programming because the value of 1 does not replace the value already stored in CV #135.
* Move the speed regulator to a medium speed position (1/3 to ½ of full speed); the loco accelerates to-wards the start marker.
* When the engine passes the start marker, turn on the function F0 (headlights); turn F0 off again when passing by the end marker. This ends the calibration run and the loco may be stopped.
* CV #136 can now be read out for checking purposes. The calibration “result” stored in that CV doesn’t mean very much by itself. If however, several calibration runs are performed, the value in CV #136 should approximately be the same every time, even if the traveling speed is varied.
Km/h speed regulation in operation:
CV #135 defines whether the “normal” or km/h operating mode is in use:
CV #135 = 0: The engine is controlled in “normal” mode; a possible km/h calibration run performed earlier has no effect but the calibration results remain stored in CV #136.
CV #135 = 10: each speed step (1 to 126) becomes 1 km/h: that is step 1 = 1 km/h, step2 = 2 km/h, step 3 = 3 km/h ... to step 126 = 126 km/h
CV #135 = 5: each speed step (1 to 126) becomes 1/2 km/h: that is step 1 = .5 km/h, step 2 = 1 km/h, step 3 = 1.5 km/h, ... to step 126 = 63 km/h (for local or narrow gauge railways!)
CV #135 = 20: each speed step (1 to 126) becomes 2 km/h: that is step 1 = 2 km/h, step 2 = 4 km/h, step 3 = 6 km/h, .to step 126 = 252 km/h (High speed trains!)
The speed regulation in km/h is not just useful for direct cab control, but also with speed limits through the “signal controlled speed influence” (CV’s 51 – 55). The values entered to those CV’s are also being inter-preted in km/h.
Mph speed regulation:
A mph speed regulation can be achieved by extending the calibration distance accordingly!
Settings for the
ZIMO ”signal controlled speed influence“ (HLU)
ZIMO digital systems offer a second level of communication for transmitting data from the track sections to engines that are in such sections. The most common application for this is the “signal controlled speed in-fluence”, that is the stopping of trains and applying of speed limits in 5 stages issued to the track sections as required with the help of MX9 track section modules or its successors. See ZIMO flyers at www.zimo.at and MX9 instruction manual.
The term “HLU” method was coined over the years after the speed limit designation “H” (=Halt or stop), “L” (=Low speed) and “U” (Ultra low speed).
* If the “signal controlled speed influence” is being used (only possible within a ZIMO system), the speed limits “U” and “L” (and the intermediate steps if need be) can be set with configuration variables #51 to #55 as well as acceleration and deceleration values (momentum) with CV #49 and #50 (see CV table).
Please note that the signal controlled acceleration and deceleration times are always added to the times and curves programmed to CV #3, 4, 121, 122 etc. Signal controlled accelerations and decelerations com-pared to cab controlled momentum can therefore progress either at the same rate (if CV #49 and #50 is not used) or slower (if CV #49 and/or #50 contain a value of >0), but never faster.
It is of utmost importance for a flawlessly working train control system using the signal controlled speed in-fluence that the stop and related brake sections are arranged properly everywhere on the layout, especially in terms of their length and consistency. Please consult the MX9 instruction manual and the STP manual.
The braking characteristics should be set up on a suitable test track so that all locos come to a complete stop within about 2/3 of the stop section, which is in HO typically about 15 to 20 cm before the end of a stop section (deceleration rate adjusted with CV #4 and CV #50 as well as the reduced speed with CV #52 for “U”). Setting the loco up to stop precisely within the last centimeter of a stop section is not recommended because such an exact stop point is, for various reasons, hardly repeatable every time.
Settings for stopping with ”asymmetrical DCC signal“ (Lenz ABC)
The “asymmetrical DCC signal” is an alternative method for stopping trains at a “red” signal, for example. All that is required is a simple circuit made up of 4 or 5 commercially available diodes.
3 diodes in series (4 when using Schottky diodes) and one in the opposite direction in parallel is the usual arrangement. The different voltage drops across the di-odes results in an asymmetry of about 1 to 2V. The direction in which the diodes are mounted determines the polarity of the asymmetry and with it the driving direction a signal stop is initiated.
The asymmetrical DCC signal stop mode needs to be activated in the decoder with CV #27. Normally bit 0 is set, that is CV #27 = 1, which results in the same direc-tional control as the “Gold” decoder from Lenz.
The asymmetrical threshold can be modified with CV #134 if necessary, default is 0.4V. At the time of writ-ing, the “asymmetrical DCC signal” has not been standardized and many DCC systems pay no attention to this feature!
When the type of constant stopping has been selected with CV #140 (= 1, 2, 3, 11, 12, 13), it keeps the stopping distance as close as possible to the one defined in CV #141, independent of the speed at the start of braking.
This method is especially suitable in connection with automated stops in front of a red signal with the help of the ZIMO signal controlled speed influence or the asymmetrical DCC-signal (see above). CV #140 is set for this purpose to 1 or 11 (see below for details).
Although of lesser practical value, the distance controlled stopping can also be activated directly by the cab or computer when the speed is set to 0 (by programming CV #140 with appropriate values of 2, 3, 12 or 13).
Spee
d
Distance
Entering the stop section. Desired stop point
Decele ra tion starts a t ful l speed
Deceleration starts at less than ful l speed, with “constant stopping distance
train stops at desired poin t by automatically reducing the deceleration vaules inspi te of immediately started stopping sequence.
” programmed as CV # 140 = 11,12,13 -
The same with disabled constant stopping distance, train stops to early.
Spee
d
Distance
Entering the stop section.(Or speed regulator turned to stop)
Desired stop point
Decele ra tion starts a t ful l speed
Deceleration sta rts a t less than ful l speed, with “constant stopp ing distance - train stops at desired point by automatically delaying start of braking followed by “normal” progression.
” programmed as CV # 140 = 1, 2, 3
The same with disabled constant stopping distance, train stops to early.
The distance controlled stopping can take place in two possible ways; see diagram above: The first is the recommended method (CV #140 = 1, etc.), where the train entering at less than full speed continues at the same speed for some time before it starts braking at a “normal” deceleration rate (same rate as would be applied at full speed).
In the second method (CV #140 = 11, etc.), the train immediately starts with the braking procedure even at slower entry speed into the stop section, which may lead to an un-prototypical behavior. It may however be useful to use this method if used together with decoders from other manufacturers that do not have the ca-pability above, in order to harmonize the brake sequences.
Also, the second method may be the preferred method if distance controlled stopping is used manually (CV #140 = 2 or 12), so that the train reacts immediately to speed changes.
“Distance controlled stopping“, when activated, is exclusively applied to decelerations leading to a full stop but not in speed reductions (these are still handled by CV #4). Neither is there any influence to acceleration events.
The traveled distance is constantly being recalculated in order to get as close as possible to the desired stop point. The deceleration rate within distance controlled stopping is always applied exponentially, that is the deceleration rate is high in the top speed range followed by gentle braking until the train comes to a full stop; which is not controlled by CV #122! The application of CV #121 for exponential acceleration however remains unchanged.
Halt (stop) section
Track power from command station
Silicium diodes,for example 1N5400x(3 A - Typen)
Travel direction
Switch to cancel stops when signal tunrs green.
Note3 diodes in series is theminimum number of diodesrequired to stop ZIMO decoders. 4 or more diodesare needed for decodersfrom other manufacturers!Because the diodes causean unwanted voltage drop,use the minimum number of diodes depending on decoder type.
Automated uncoupling procedure; with coupler tension relieve and loco/train separation:
also see “connecting an electric coupler” in chapter “Installation and wiring”:
As described in chapter 7, the control of an electric coupler (System Krois) is defined by CV’s #127, 128 etc. (function output effects) and CV #115 (timing).
With the help of CV #116 the decoder can be programmed so that the uncoupling loco automatically moves away (separates) from the adjoining coupler without actuating the speed regulator (which is sometimes in-convenient because the uncoupler key needs to be pressed at the same time).
The TENS DIGIT in CV #116 defines how long (0.1 to 5 sec) the loco should move away from the adjoin-ing coupler, the ONES DIGIT defines how fast (internal speed step 4 to 36) it should move away, see CV table. The momentum used during this acceleration/deceleration event is governed as usual by the relevant CV’s (#3, #4 etc.).
The HUNDREDS DIGIT of CV #116 causes the loco to automatically push against the adjoining coupler before the uncoupling process starts in order to relieve coupler tension (otherwise the couplers can’t open). The time it takes for this automated tension relieve is a ¼ of the time defined for the loco to move away from the train (tens digit) but at the same speed.
Other hints:
- The “automatic separation” procedure is activated if the tens digit in CV #166 is other than 0; if desired with preceding coupler tension relieve if CV #116 = 100!
- The automatic separation (or the preceding tension relieve) takes place at the moment the coupler is acti-vated, although only if the loco is at rest at the time of coupler activation (speed regulator in 0 position). If the loco is still moving, the uncoupling procedure starts as soon as the loco comes to a full stop provided the coupler function key is still activated.
- The uncoupling procedure stops when the coupler function is turned off (with the corresponding function key) or when the defined times in CV #115 (coupler activation) and #116 (separation) has elapsed.
- Actuating the speed regulator while an automated uncoupling procedure is in progress causes the proce-dure to be aborted immediately.
- The driving direction during coupler detachment is always according to the cab setting; directional settings in the “Effects” definition for uncoupling (Bits 0 and 1 of CV #127, CV #128 etc.) will not be applied.
Shunting and half-speed functions:
By defining the different Configuration Variables (#3, 4, 121, 122, 123), a prototypical acceleration and de-celeration behavior is achieved that often makes shunting very difficult.
With the help of CV #124, a shunting key can be defined (either the dedicated MAN key – only within a ZIMO system - or the F4 or F3 key) with which the acceleration and deceleration rates may be reduced or eliminated all together.
CV #124 may also be used to define either F7 or F3 as low gear key. With this function turned on, the full throttle range is used for half the decoder’s speed range, which is just like shifting down into low gear.
Example: The F7 key should act as low gear and the F4 key should reduce the momentum down to ¼. Ac-cording to the CV table, the bits in CV #124 are to be set as follows: Bit 0 = 0, Bit 1 = 1, Bit 2 = 1 and Bit 3 = 1. The sum of the individual bit values (0+2+4+8 = 14) is entered as a decimal value.
“On-the-fly” - programming (a.k.a. “on-the-main” or “operations mode”):
Configuration variables can not only be changed on the programming track but on the main track as well, without interfering with other trains operating on the layout.
All CV’s, with the exception of address CV’s, can be modified on the main. Please note though that the veri-fication and read-out of CV values will not be possible until the bidirectional communication is implemented (in the course of 2006 with SW updates for the ZIMO command stations “model 2000” and MX1EC as well as decoders).
If no bidirectional communication is available, “on-the-fly” programming should primarily be used for CV’s where a change is immediately visible (e.g. Vstart, Vmax, signal controlled speed influence settings, etc). Don’t use it to program the 28 individual speed steps in the speed table for example, which is preferably done at the programming track (where programming can be confirmed through acknowledgments).
Consult the ZIMO cab instruction manual for on-the-fly programming steps!
The allocation of function outputs (“function mapping”):
Depending on decoder type, ZIMO decoders have between 4 and 14 function outputs (FO ...). The loads connected to these outputs, such as headlights, smoke generator etc. are switched on and off with the func-tion keys (F...) of the cab. Which key (F...) controls which function output (FO...) can be specified by a se-ries of Configuration Variables.
The configuration variables #33 to #46 form the NMRA function mapping according to their rules and regulations (see table on the right); this procedure is quite limited though in its application because only one 8-bit register is available for each function and the headlights are the only function that can be con-trolled according to travel direction.
Extended flexibility and more directional controlled functions are offered by ZIMO through configuration variable #61:
CV #61 on the one hand offers fixed output assignments, which is especially liked for the Swiss lighting sys-tem (CV #61 = 6, 7…). On the other hand it also offers a flexible output assignment by means of a special programming procedure (CV #61 = 98), with which each function/direction combination can be assigned to specific function outputs (e.g. F... – forward/reverse) and additionally allows the definition of an automated turn-off feature, which turns designated function outputs OFF after the loco comes to a full stop.
See also the next 3 pages!
An alternative method for directional functions:
The NMRA function mapping allows only for F0 to be directional that is, only the headlights will switch from front to rear when the loco direction has been changed. All other functions (F1 – F12 or higher) only operate independent of direction.
CV’s #125 to 132 (Special Effects) and later possibly more CV’s within a special CV block allow more func-tions to become directional, by utilizing Bits 0 and 1 (while at the same time Bits 2 – 7 are left at 0).
Example 1: A couple of red taillights are connected to function outputs FO1 and FO2 (front and rear of engine). Both are to be actuated with F1 but should also change with direction. This requires the following CV settings: CV #35 = 12 (Bit 2 for FO1 and Bit 3 for FO2), as well as CV #127 = 1 and CV #128 = 2. Therefore FO1 is only ON in forward direction and FO2 only in reverse. Special Effect Bits 2 – 7 remain at 0. Example 2: Contrary to example 1 where the red taillights were switched independent from the white head-lights, in this example the headlights and taillights are switched ON/OFF together at the proper end of the locomotive with F0 or F1 (depending on which end the loco is coupled to the train).
This can be done as follows: White front headlights connected to function output “front headlights” / red front taillights to function output FO2 / white rear headlights to function output FO1 / red rear taillights to function output “rear headlights”.
CV #33 = 1 (= default, front white headlights on F0forw) / CV #34 = 8 (front red taillights on F0rev !) / CV #35 = 6 (both white headlights as well as red taillights in the rear on F1 !) / CV #126 = 1 / CV #127 = 2 (Direction dependence for rear white and red lights by means of “Special Effects” CV).
Alternative method: Use the function assignment procedure with CV #61 = 98; see dedicated pages in this chapter!
5. “Function mapping“ as per NMRA Standard; and ZIMO - Extensions
The configuration variables CV #33 to #46 refer to the function keys (F...) of the cab; the single bits to the function outputs (FO...) of the loco decoder. The function keys are matched to the function outputs by set-ting the appropriate bits (indicated in the table below with ����). Multiple assignments are permissible.
„Mapping“ according to NMRA standards with default assignment shown as ����:
Additional function outputs
Usually available on large-scale decoders only, but shown here for the sake of complete-
ness.
Function outputs;
The number of available outputs depends on the decoder type. Always available are the outputs “Front light” and “Rear light”.
The above table shows the default settings; that is, the function key numbers correspond to the same num-bered outputs. Therefore the following values were written to the configuration variables:
EXAMPLE of changing CV’s for individual assignments (����):
F2 # 36 3 7 6 5���� 4 3���� 2 1 0
F3 # 37 4 7 6 5���� 4 3 2 1 0
F4 # 38 5 7 6���� 5 4 3 2 1 0 EXAMPLE above: The output #4 (FO4) should be switched in addition to output #2 (FO2) with the F2 key (ZIMO #3 key). Outputs #7 (FO7) and #8 (FO8) should be switched (not additionally but instead) with the F3 and F4 keys, which results in the above configuration (����).
The new values to be entered are as follows: CV36=40; #37=32; #38=64.
ZIMO – Special Function Mapping Programming the desired number value in the configuration variable #61 activates the corresponding function output assignments. The function F1 as well as some other functions can, according to the NMRA function mapping,
be assigned through individual CV’s; this makes it possible for example that the function output FO1 can be mapped to function F2 (CV #35 = 4) or that a special “switcher lighting” can be realized (CV #35 = 3: front and rear headlights ON at all times).
CV #61 = 97 Alternative function mapping without “left-shift”, for MX640: CV #67 = 97 overrides the higher CV’s “left shift” (from CV #37 on up) of the NMRA function mapping (see previous page), which allows to map higher function keys with lower function outputs (e.g. It is not possible with NMRA function mapping to map F4 to FO1 but it is possible this way). Headlight Therefore: FA6 FA5 FA4 FA3 FA2 FA1 Rear Front
CV #61 = 1 or 2 is very similar to the normal NMRA function mapping (which is CV #61 = 0), but…
…for many applications desired: actuation of FO1 by the driving direction, that is by the “directional bit” (when CV #61 =1) or by F7 (when CV #61 = 2).
Typical application: F3 (FO9): Sound ON/OFF, F5 (FO8): Bell, F2 (FO7): Whistle when actuating an external (usually older) sound board. When CV #61 = 1 When CV #61 = 2
CV #61 = 3 or 4 are for the most part identical to the allocations on the previous page (CV #61 = 1 or 2), but with a direction dependent function F3, which actuates outputs FO3 or FO6 according to driving direction (typical applications are red taillights).
…Output FO1 is either controlled by driving direction (when CV #61 = 3), which is the directions bit, or with function key F6 (when CV #61 = 4).
Typical application: F3 (FO9): Sound ON/OFF, F7 (FO8): Bell, F6 (FO7): Whistle when actuating an external (usually older) sound board with an MX69V. When CV #61 = 11 When CV #61 = 12
CV # 61 = 13 or 14 are for the most part identical to the allocations on the previous page (CV #61 = 11 or 12), but with a direction dependent function F3, which actuates outputs FO3 or FO6 according to driving direction (typical applications are red taillights).
…Actuation of output FO1 with driving direction or F6.
CV #61 = 5 or 15: For electric and diesel locos where headlights and taillights as well as cab lights are to be actuated by one function key each (F3 and F4) and dependent on direction. Also included in this as-signment are the functions F2 and F5 (if CV #61 = 5) or F6 and F7 (if CV #61 = 15) on outputs FO7 and FO8 (preferably for whistle / bell of older external sound boards). These allocations were retained from the MX69 predecessors MX65 and MX66.
ZIMO – Special function mapping: Function mapping procedure with CV #61 = 98:
This procedure allows free allocation of function outputs to function keys (on the cab), which is not possible by setting fixed values in configuration variables.
To carry out this procedure requires a bit more time and attention from the user.
Preparation: The loco must be on the main track (not on the programming track); the whole procedure is per-formed with operations mode programming. Set the loco direction to “forward” and turn all functions off.
* CV #61 = 98 Writing value “98” to CV #61 (in operations mode) starts the actual allocation procedure.
The decoder is now in a special programming mode, which will not end until the whole programming procedure is completed or the loco is lifted from the track for a few seconds.
* The decoder is now ready to accept the first function output allocation, starting with function output F0 in forward direction.
The function outputs to be assigned to F0 in forward direction, are now actuated with the corresponding function keys (i.e. FLf, FLr, F1…F12). Any number of outputs can be included.
Because only one function key (F0) is available for FLf and FLr (headlights), it is necessary to press F0 repeatedly to select the desired configuration (which alternately actuates the front and rear head- lights).
The assignment must be confirmed by pressing the direction’s key.
* The decoder is now ready to accept the next output assignment for F0 but now for “reverse“.
Continue as above!
Again, once a selection is made press the direction’s key to apply.
* Continue in the same fashion for all function keys (28 function-direction-combinations)!
* After the last function key (F12 “reverse”) has been assigned, the function outputs FLf and FLr (both headlights) are turned on to indicate the end of this programming procedure.
* The finished allocations are automatically activated and CV #61 is set to “99“.
Deactivation:
CV # 61 = 0 ... 97 (any value except 98 and 99) deactivates the function assignment and again activates the function mapping according to CV #33 to #46 or CV #61, if a value between 1and 7 is entered. The assignment defined during this procedure though remains stored in the decoder.
Reactivating already stored data:
CV # 61 = 99 Reactivates the defined output allocations.
NOTES:
The special effects (US-lighting, uncoupler, soft-start etc) can also be assigned using above procedure. CV’s #125, 126 etc. always refer to actual outputs!
It is possible to store and selectively re-activate several function output allocations with the help of the “CV-set” feature!
For a better understanding, the following lists the sequence in which the function keys have to be defined:
An easy to work with tool is planned within the framework of the program “ZIMO Service Tool “ (ZST) that replaces the “CV #61 = 98” procedure, where the desired functions can be “mapped“ into a table and the
procedure described above will be carried out automatically!
� Shipping decoders with a ZIMO “sound collection” installed is the preferred way of delivery and a specialty of the ZIMO sound concept, which is possible due to the large data storage capacity of the decoders: sound samples and CV parameters for several engines (i.e. for 5 engines) are stored in each decoder. The preferred sound for a given locomotive can be selected with the cab (no need to load a different sound sample from the computer).
At the same time, the user is free to change acoustics of a locomotive to his/her own taste by select-ing for example a chuff sound from 5 different chuff samples and a whistle from 10 different whistles (or several whistles on different function keys); furthermore a selection of bells, compressors, steam shovel, oil burner or break squeal etc.
The “sound collection” itself is a special form of the “sound projects” (see below) and is also listed at www.zimo.at (under “UPDATE” and “decoder”), ready for download and installation in case the de-coder wasn’t ordered with the desired sound files.
� ZIMO “ready-to-use” sound projects are available from www.zimo.at (follow “UPDATE”, “De-coder”). On the same pages, information about the prototype with some videos and mp3 sound sam-ples are available as well as the project specific function assignments and CV settings. More sound projects will be added continuously; also with the assistance of ZIMO partners through their home pages or web shops.
The desired sound project is first downloaded and stored in the computer; then sent to the decoder with the help of the software “ZSP” (ZIMO Sound Program) and the decoder update module MXDECUP (or the system cab MX31ZL). As is the case with decoder firmware updates, the decoder remains in the locomotive and is set as is on the “update” track.
If so desired, the original ZIMO sound project can be edited with the ZIMO sound program (ZSP) be-fore sending it to the decoder – to change function assignments, random generators and other set-tings. Once the editing is done, the sound project can be sent to the decoder as described above.
It is possible to change function assignments, sound and other parameters during normal operations via the cab and if desired to upload the relevant data to the computer (again on the update track with the help of ZSP). In this way a new custom sound project can be put together, saved and used in other engines.
Still more comfortable is the use of an USB stick on the system cab MX31ZL for installing sound pro-jects into decoders – without a computer that requires first the program installation and a connection to the layout etc.
ZIMO sound decoders can also be special ordered with the favorite sound project installed.
� “Homemade” ZIMO sound projects using private sound files can also be put together with the help of the ZIMO sound program (ZSP). Sound samples from all available sources, including your own recordings, can be used.
In the course of 2008, ZSP will be further developed and later integrated into a new comprehensive program (ZISP or ZIRC). The development will be carried out side by side with the extension of the decoder software, in order to find new possibilities in sound composition:
� Shipping decoders with many samples (“Sound collections”) “on board” is also a trend-setting concept because advancing chip technology in the coming years will offer more and more storage capacities (at the same foot print and negligible increase in cost – ZIMO decoders will “grow” in this respect with every year).
� The sound is adjustable and fine-tunable with the help of “incremental programming” by gradually increasing or decreasing values, without awareness of the different CV values.
- sound to be heard on level track and no load (as per personal desire from “almost nothing” to full volume);
- how the sound should react to inclines, declines and acceleration events. This allows for a fast adaptation to changing operating situations (single engine or engine on heavy goods train);
- when the water drainage sound should be played at start up or the break squeal when stopping the train;
- how the steam chuffs should overlap each other at high speed (changing to a constant hiss or still accentuated chuffs);
- and much more.
Selecting the Sound Collection with CV #265 – current layout for the MX640: (Software and organization of sound will undergo changes over time; CV #265 may not yet be final)
CV Designation Range Default Description
#265 Loco type selection
1 2
…
101 102 …
1 or 101
(1 for steam,
101 for diesel)
= 0, 100, 200: Reserved for future applications
= 1, 2 … 32: Select among various steam sounds stored in the decoder, i.e. for loco BR01, BR28, BR50, etc... Chuff sounds as well as other sounds (whistle, compressor, bell…) will be matched.
= 101, 102 … 132: Select among various diesel and electric engines from the Sound Collection.
Operating the sound decoder for the first time (Sound collection “Euro-steam”):
As delivered, the MX640 comes with a typical engine sound activated and function-sounds allocated to function keys:
Function F8 – Sound ON/OFF, sounds activated by function keys remain active regardless (an ON/OFF key can be assigned for these as well with CV #311,
which could also be F8).
The sound pre-selected in the MX640 with “European steam collection” is of a 2-cylinder engine (the chuff rate can only be approximate without further tuning) with automated water drainage and brake squeal as well as some randomly played stationary sound.
The following sounds are allocated to these function keys:
F2 – short whistle F9 – compressor F4 – water drain (blow off…) F10 – generator F5 – long whistle (playable) F11 – injector F6 – bell F7 – coal shoveling or oil burner
F0, F1 and F3 are not allocated for sound by default since they are usually required for other tasks.
The following stationary sounds are allocated to the random sound generator:
Z1 – compressor Z2 – coal shoveling Z3 – injector
The switch inputs are allocated to the following by default:
Special procedures for owners of non-ZIMO DCC systems: (Owners of ZIMO MX1 “model 2000”, EC or HS command stations can skip this half page)
Configuration variables #266 to #355 are used for the selection and allocation of sound samples as well as other settings. Programming CV’s in this range is no problem for high-level systems (such as the current ZIMO DCC systems) both in “service mode” or “operations mode”.
There are however many DCC systems in use (some still in production) that can only access CV’s to #255 or even worse to #127 or CV #99.
If the CV value ranges are also limited (i.e. 0 to 99 instead of 0 to 255): see CV #7.
For such applications, ZIMO sound decoders offer an alternative way of reaching higher CV’s via lower numbers. This is done with an initial “Pseudo-Programming” of
CV #7 = 110 or = 120 or = 130
which increases the CV numbers about to be accessed by 100 or 200. For example:
If programming CV #266 = 45 is not possible, then programming CV #7 = 110 followed by CV #166 = 45 executes the desired programming of CV #266 = 45
or
if neither CV #266 = 45 nor CV #166 = 45 is possible, then programming CV #7 = 120 followed by CV #66 = 45 also leads to the result of CV #266 = 45.
The initial CV #7 – “Pseudo-Programming” state – remains active for further programming (which means CV #267 is entered as #167, CV #300 as #200 and so on) until the decoder is powered down. ATTENTION: After re-booting the system, the “Pseudo-Programming” is lost, that is programming CV #166 is indeed accessing CV #166 again. See below to prevent this!
With CV #7 = 0
the “Pseudo-Programming” is stopped, which means that programming CV #166 is again program-ming this CV.
Using as an initial “Pseudo-Programming”
CV #7 = 210 or 220
achieves the same results as above but remains active even after the system is powered down. This state can only be cancelled with
CV #7 = 0,
which is important to remember, if once again lower CV’s need to be programmed!
A simplified procedure (w/o CV #300) is available with MX31 (SW1.2 or higher) or MX31ZL (SW3.06 or higher).
Selecting a new or replacing the current chuff set (only for steam): The following procedures are always used in the same way in spite of the flexible decoder layout with different sound sample compilations. It is also worth mentioning that the sound samples can be lis-tened to and evaluated under actual operating conditions (with the engine running), not just on the computer.
The selection procedure is started with a “Pseudo-Programming” in operations mode (“on-the-main”): CV #300 = 100 (only for steam / not possible with DIESEL engines!).
The “Pseudo-Programming” (meaning that the entered value is not really stored in memory) has the effect that the function keys F0 to F8 no longer actuate function outputs but instead are now avail-able for special tasks within the sound selection procedure. The function keys should be set to mo-mentary, if possible, which would facilitate the procedure.
The function key identifications (and the MX31 cab displays) shown are typical for a ZIMO cab during the selection procedures (and for other sound adjustment procedures) but is analogous to the func-tion keys of third party cabs, although the layout may be different.
The function keys have the following special meaning during the selection procedure!
This is a drawing of the planned MX31 display, not an actual picture!
F0 = play: plays back the current chuff sound for evaluation; only possible with the engine at a stand still; the chuff sounds are played automatically when the engine is moving.
F1, F2 = prev., next: plays back the previous or next recording stored in the decoder; the sound file can immediately be evaluated with the engine stopped, with the engine running the selected file replaces the currently active.
F3 = CLEAR + end: The selection procedure is stopped and the selection is cleared, that is no chuff sound will be played (boiling and blow-off sound remains).
F8 = STORE + end: The selection procedure is stopped with the last selected chuff set replacing the current set.
The selection procedure is also stopped when programming anything else (e.g. CV #300 = 0 or any other value but also any other CV) or by turning off power to the system. In these cases, the current chuff set remains. Such “forced endings” are also useful when the “old” sound should remain as the current sound without first having to locate it again.
The selection procedure is supported with acoustic signals: The “cuckoo jingle” sounds when….
…. the last stored chuff sound is reached; use the key to scroll in the opposite direction (F1, F2) to listen to the other stored chuff sounds, …. playback is tried (F0) but no sound sample available, …. a wrong key is pressed (F4, F5 etc.)
The “confirmations jingle” is played after ending the selection procedure with F3 or F8.
MENU SOUND Selection . Chuff beat --- SAMPLE --- ((((( play ((((( prev ((((( next
The engines can be operated normally during the selection procedure: with speed regulator, direc-tion key and MAN key (the latter only with ZIMO cabs); functions cannot be actuated until the selec-tion procedure is terminated with F3, F8 or by other programming steps, see above. Selecting boiling, whistle, blow-off and brake squeal sounds:
The selection procedures for these “automated background sounds” are initiated with a “Pseudo-Programming” in operations mode programming
CV #300 = 128 for the boiling sound (STEAM only) CV #300 = 129 for direction-change sound CV #300 = 130 for the brake squeal CV #300 = 131 thyristor-control sound (electric engine) CV #300 = 132 for the “start” whistle CV #300 = 133 for blow-off sound =cylinder valves (STEAM only) NOTE: the blow-off sound selected here is also used as the blow-off sound actuated with a func- tion key (see CV #312). CV #300 = 134 for the driving sound of ELECTRIC engines CV #300 = 136 for the switchgear sound of ELECTRIC engines
The selection procedure for background sounds is the same as for the selection of chuff sounds EXCEPT the engine should be at a stand still because the speed regulator is used for setting the volume for the relevant sound file!
Note: these sound files can also be used as function sounds allocated to function keys (see next page); the automated back-ground sounds can then be cancelled with the function keys.
The function keys have the following special meaning during the selection procedure; speed regulator is used for volume setting!
Function keys are used as with chuff selections:
F0 = play: plays back the currently selected sound.
F1, F2 = prev., next: plays back the previous or next recording.
F4, F5 = prev, next : switches between sound groups
The speed regulator acts as volume control for the background sound during selection procedure.
F3 = CLEAR + end: Selection procedure is stopped and the current sample removed.
F8 = STORE + end: Selection procedure is stopped and new selection activated.
The selection procedure can also be ended by any other programming procedure or by removing power.
A simplified procedure (w/o CV #300) is available with MX31 (SW1.2 or higher) or MX31ZL (SW3.06 or higher).
Allocating sound samples to function keys F1 … F12:
A sound sample can be allocated to each function key F1…F12 from the sound samples stored in the decoder. It is absolutely permissible to have a function key assigned for a function output (FO1, FO2 etc.) as well as for a sound function, both of which will be activated when the key is pressed.
The allocation procedure for function sounds are initiated with a “Pseudo-Programming” in opera-tions mode programming:
CV #300 = 1 for function F1 CV #300 = 2 for function F2 CV #300 = 3 for function F3 etc. CV #300 = 20 for function F0 (!)
Note: Function F4 is by default used for water drainage sound (with CV #312); if F4 is to be used for something different, CV #312 must be set to zero (CV #312 = 0).
The allocation procedure is very similar to the selection procedures for driving and background sounds, with the difference that sound allocation is not limited to sound samples of a certain group but also allows switching between groups to find the desired sample.
.
Sound samples are organized in groups for easier location; i.e. groups like “short whistle” / “long whistle” / “horn” / “bell” / “shoveling coal / “announcements” and much more.
The engine should remain stationary though since the speed regulator is used for volume set-tings during the allocation procedure!
Depends on entry: F1 . . . F12
The function keys have the following special meaning during the selection procedure!
Drawing of an MX31 display, not a photo!
F0 = play: plays back the current chuff sound for evaluation.
F1, F2 = prev., next: plays back the previous or next recording stored in the decoder.
F4, F5 = prev., next: switches between sound groups (e.g. whistles, bells etc.); plays back the first sample of this group. The speed regulator acts as volume control for the selected sound during allocation procedure.
F6 = loop: If F6 is “on” when exiting the allocation procedures, the sound sample is stored and played back as long as the relevant function key is pressed by Playable whistle! repeating the sound between the loop marks (the loop marks are part of the sound file).
F7 = short: If F7 is “on” when exiting the allocation procedures, the sound sample is shortened and played back for the duration of the function actuation, by omitting the center portion.
Note: F6 and F7 are only effective provided the markers are included in the sample; basic settings are also saved; changes take effect only if F6 or F7 is actuated.
Note: If F6 or F7 are not actuated, the sound sample will always be played back in the same length it was saved, regardless how long the function key is pressed.
F3 = CLEAR + end: The allocation procedure is stopped without a sound allocated to this function key.
F8 = STORE + end: The allocation procedure is stopped and the last selected function sound is stored and played back when this function key is pressed.
The allocation procedure can also be ended by any other programming procedure (e.g. CV #300 = 0 or any other value or CV) or by removing power from the decoder. The “old” allocations remain ac-tive in such cases; such “forced endings” are also useful when the “old” sound should remain as the current sound without first having to locate it again.
The selection procedure is supported with sound signals:
The “cuckoo jingle” sounds when….
…. the last stored sound sample of that group is reached; use the key to scroll in the opposite direc-tion (F1, F2) to listen to the other stored sounds,
…. the last stored sound group is reached (with F4 or F5); use the other key (F4 or F5) to scroll in the opposite direction.
…. play-back is tried (with F0) but no sound sample is available,
…. a wrong key is pressed.
The “confirmations jingle” is played after ending the allocation procedure with F3 or F8
Allocation of sound samples to the random generators Z1…Z8:
The MX640 decoders provide 8 simultaneously playing random generators who’s timing is deter-mined by CV’s; see “CV table” from CV #315.
A sound sample from the pool of samples in the decoder can be added to each random generator.
The allocation procedure for random sound is initiated with a “Pseudo-Programming” in operations mode programming:
CV #300 = 101 for random generator Z1 (Z1 has special logic incorporated for the compressor and should therefore always be used for that)
CV #300 = 102 for random generator Z2
CV #300 = 103 for random generator Z3
etc. . Depends on entry: Z1 . . . Z8
The function keys have the following special meaning during the selection procedure
The meaning and action of the function keys is the same as for function sounds (see above):
F0 = play: play back
F1, F2 = prev, next: play back of previous or next sound sample
and so on
but
F6 = still: If F6 is active when ending the allocation procedure, the sound sample is played as random sound at standstill only (default).
F7 = cruise: If F7 is active when ending the allocation procedure, the sound sample is played as random sound when the locomotive is moving.
The allocation procedure for random sound is the same as for function sound!
A simplified procedure (w/o CV #300) is available with MX31 (SW1.2 or higher) or MX31ZL (SW3.06 or higher).
Allocation of sound samples to switch inputs S1 and S2:
The MX640 has 3 switch inputs available (at connector #2), of which two (“1” & “2”) are freely avail-able to the user while one (“3”) is usually reserved for a cam sensor input; which can also be used by the user if not used for a cam sensor (i.e. the virtual cam sensor is used instead). These inputs can accept reed switches, optical or hall-effect sensors and similar; see chapter 8.
To each switch input, a sound sample can be allocated from the pool of stored samples in the de-coder; play-back times can be set with the help of CV’s #341, 342 and 343, see CV table.
The switch input allocation procedure is initiated with the operations mode Pseudo-Programming
CV #300 = 111 for switch input S1 CV #300 = 112 for switch input S2 CV #300 = 113 for switch input S3 and so on…
Depends on entry: S1…S4
The function keys have the following special meaning during the selection procedure
.
The meaning and action of the function keys is the same as for function sounds (see above):
F0 = play: play back
F1, F2 = prev, next: play back of previous or next sound sample
Automated test run to determine the motors “basic load” factor:
The following procedure is necessary to enable load dependent chuff sounds (volume and sound changes with inclines and load….) that is, to optimize the current values.
Technical background:
The load dependent sound is based on EMF (Electro Motive Force) measurements inside the decoder, which is pri-marily used for keeping the motor speed constant with changes in load, also known as BEMF. For the decoder to produce the correct sound for the respective driving conditions it has to know first what these measurements are at normal no-load cruising speed (smooth rolling of the engine or train on straight level track) that is, the “basic load” of an engine or train, which due to gearbox losses, power pick-ups etc. is often considerably higher on model trains than on the real railroad. Deviations from this “basic load” will then be interpreted as inclines or declines, which will result in analogously changed chuff sounds.
Initiated with “Pseudo-Programming”
CV #302 = 75
an automated run is performed to record the “basic load” factor in forward direction;
ATTENTION: the engine (or the train) is driven automatically in forward direction for which unoccupied track must be available of at least 5 meters (15 feet), with absolutely no inclines
or declines and without any (tight) curves.
With CV #302 = 76
an automated recording run can be performed in reverse direction, for locomotives that have different “basic loads” in this direction (otherwise, reverse is considered identical to forward).
Note: A “heavy” train (a train with higher rolling resistance due to power pick ups of lighted coaches for example) may have a different “basic load” than an engine with nothing on the hook. A separate recording run may be required for such situation in order to obtain the best load dependent sound.
For easier handling of different “basic loads”, provisions will be made with a future SW version that allows the recording of several “basic load” factors and the easy switching between a light running locomotive and a “heavy” train.
A simplified procedure (w/o CV #300) is available with MX31 (SW1.2 or higher) or MX31ZL (SW3.06 or higher).
Programming sound CV’s:
Configuration variables are for optimizing the sound effect for a specific locomotive and for special operating situations. The programming can be done either on the programming track in service mode, on the main track in operations mode or with “incremental programming”.
The “incremental programming” is a special process of the “operations mode” programming with the following fundamental principle: the CV’s are not programmed with an absolute value (as is normally the case) but rather the current value of a CV is being incremented or decremented by a fixed value (defined in the decoder for each CV).
The function keys of the cab temporarily serve as instruments for the incremental programming during which they cannot be used for function output actuations. The function keys are assigned to this with the “Pseudo-Programming”
CV #301 = 66,
which changes the function keys to INC and DEC keys, first for CV #266 (that is the CV number de-rived from the value 66 + 200). Several CV’s are grouped together in one procedure for an easier and better handling. In the case of CV #301 = 66 is not only the leading CV #266 assigned for incremental programming but CV #266, #267 and #268 as well. This is again shown here by means of the ZIMO cab (with the planned special MX31 display) but is valid analogous for the function keys of other cabs.
The function keys have the following special meaning during the selection procedure!
Incrementing !
Decrementing !
Set to default !
Drawing of an MX31 display, not a photo!
The last line shown in gray (absolute CV values) will no be available until bidirectional communication is being implemented!
F0, F3, F6 = Incrementing, decrementing and default setting of the lead CV number that was entered during the “Pseudo-Programming” initiation CV #301 = … (or via menu with the MX31).
F1, F4, F7 = Incrementing, decrementing and default setting of the second CV number of that group; which CV’s that are part of a group is shown in the CV table or is indicated in the ZIMO MX31 cab display.
F2, F5, F8 = Incrementing, decrementing and default setting of the third CV number of that group (if the group includes 3 CV’s).
The incrementing and decrementing of CV values (usually in the 0…255 range) takes place in steps of 1, 5, 10 or 15; this is predefined by the decoder software and cannot be changed. Intermediate val-ues can be entered by direct CV programming, which in reality is hardly necessary.
The “cuckoo jingle” sounds when….
…. the upper or lower end of a CV value range is reached!
If RailCom is not available (because the system used is not equipped with RailCom), the value of a particular CV can only be determined by reading it out on the programming track. Although, most of the time this is not necessary since the reaction to a changed CV value can immediately be heard by the changing sound.
Note: All CV and parameter sets can be read out and written to the decoder and, if required, edited with a computer with the help of the MXDECUP programming module!
The following CV’s can be programmed both “normal” (i.e. CV #... = ...) and “incremental” (Excep-tion: CV #280 for diesel engines). “Incremental programming” is especially useful when the proper value cannot be calculated in advance and must be determined by trial, which is often the case with many sound parameters.
The “Lead CV” in each case is the first of 3 consequential CV’s that are edited and shown on the same screen of a ZIMO MX31 during the “incremental programming” procedure.
CV Designation Value range
INC steps
De-fault
Description
LEAD - CV
#266
Total volume
0 - 255 5 65
The value “65” results (mathematically) in the highest possible distortion-free play back volume; but values of up to 100 can be perfectly suitable because distortions in this volume range are hardly audible. Plus, the usefulness of a sound also depends on the quality of the sound sample used.
#267
Chuff sound fre-quency with „virtual
cam sensor“
For STEAM engines
0 - 255 1 70
CV #267 active only if CV #268 = 0:
Chuff beats follow the “virtual cam sensor”; an ac-tual cam sensor is not needed in this case.
The default setting “70” results in about 4, 6 or 8 chuffs per wheel revolution, depending on the chuff set selected; because it also depends in large part on the motor and gearbox used, an in-dividual adjustment is necessary in most cases in order to achieve the desired chuff frequency. This is the reason for CV #267:
The lower the value the higher the chuff frequency and vice versa.
#268
Switching to real cam sensor
and
trigger count for chuff rate
For STEAM engines
0 - 255 1 0
= 0: “Virtual“ cam sensor is active (to be adjusted with CV #267, see above).
= 1: real cam sensor is active (connected to switch input 2 of the MX640, see chapter 8); each negative spike results in a chuff beat.
= 2, 3, 4 … real cam sensor, several triggers in sequence (2, 3, 4 …) result in a chuff beat.
LEAD - CV
#269
Lead-chuff accentuated
For STEAM engines 0 - 255 10 0
A typical sound signature of a passing steam en-gine is that one chuff out of a group of 4 or 6 chuffs is louder in volume than the rest; this effect is already part of the chuff set but can be further amplified with the help of CV #269.
# 270
PROJEKT not functional yet:
Longer chuff length at very low speeds
For STEAM engines
0 - 255 10 ?
PROJECT (not yet implemented):
The chuff sounds of a real engine are extended when driving at very low speeds due to the me-chanical valve control. This effect can be more or less accentuated with CV #270.
CV Designation Value range
INC steps
De-fault
Description
#271 Overlapping effect at
high speed
For STEAM engines
0 – 255
(useful up to about 30)
1 16
The individual steam chuffs should overlap each other at high speed like on a real engine. Because the frequency of the chuffs increase but won’t shorten to the same extend they will eventually blend in to a weakly modulated swoosh.
This is not always desired in model railroading because it doesn’t sound that attractive, hence CV #272 with which an adjustment is possible whether the chuffs should be accentuated at high speed or rather fade away.
LEAD - CV
#272
Blow-off duration
For STEAM engines
0 - 255
=
0 - 25 sec
10 50
=
5 sec
Opening the cylinder valves on a prototype steam engine for the purpose of water drainage is en-tirely up to the engineer. An automated draining at start-up is more suitable in model railroading; CV #272 defines how long after start-up the blow-off sound should play.
Value in CV #272 = time in tenths of a second!
Note: If the blow-off sound is also allocated to a function key (on F4 as delivered, see CV #312), the automated blow-off sound can be shortened or extended with the relevant function key. Auto-mated blow-off and function blow-off are inevitably the same (per selection/allocation).
= 0: no blow-off sound played back
#273 Delayed start after
blow-off
For STEAM engines
0 - 255
=
0 - 25 sec
1 0
Opening the cylinder valves and with it the related blow-off sound on a real steam engine starts most often before the engine even starts to move.
This can be imitated with CV #273 by automati-cally delaying the start.
This effect is cancelled when a shunting function with momentum deactivation is being activated (see allocation of F3 or F4 in CV #124!)
= 0: no delay
= 1: Special setting for blow-off via speed regulator; no delay but the lowest speed step means “no driving but blow-off instead” (only with 128 speed steps).
= 2: Start-up delay in tenths of a second, Recommendation: no value > 20 (> 2 sec
#274 Blow-off schedule
For STEAM engines
0 - 255
=
0 - 25 sec
10 30
During shunting operations that often requires many short trips with associated idle times, open-ing and closing the cylinder valves every time is not usually done. CV #274 causes the blow-off sound to be suppressed if the engine wasn’t standing still for the time defined here.
can be achieved by actuating the function key that is assigned for blow-off sound (F4 by default or by function key assignment with CV #312 = 2, 3, 4…, see above).
To set up load dependent sound do the follow-ing in the order shown:
“Automated recording of the motor’s “basic load” factor”; see above!
Adjusting sound volume in CV #275 and #276.
Adjusting CV #277 (should have been “0” up to this point), see below!
If required also CV #278 and #279.
LEAD - CV
#275
Engine (chuff) sound volume at low speed
and no-load 0 - 255 10 60
With this CV the chuff volume at “basic load” (that is under the same conditions as during the auto-mated recording run) is adjusted at a speed of about 1/10 of full speed.
Note: For practical purposes (but not absolutely necessary), CV #275 is set to the proper value by trial using the “incremental programming” at low speed. Because the volume at various speeds is interpolated between the values in CV #275 and #277 it is not necessary to run at an exact speed step during this set-up, as long as it is around 1/10 of full speed.
This adjustment is best performed with CV #277 set to “0” (default) so that the setting for “unloaded driving” is not influenced by load factors.
#276 Engine (chuff) sound
volume at high speed and no-load
0 - 255 10 80
Same procedure as in CV #275 above, but for high speed.
CV #276 defines the “no-load” chuff sound volume at full speed. Set the speed regulator to maximum during this set-up.
All notes in CV #275 are also valid for this CV!
#277
Degree of volume change under load for driving (chuff)
sound.
0 - 255 10
0
= no
change
When deviating from the basic load (as deter-mined by the “Automated recording of the motor’s “basic load” factor”, see above) the chuff beat vol-ume should be increasing (on inclines) or de-creasing (or muted) on declines.
CV #277 defines the degree of change, which is to be set to the proper value by trial.
LEAD - CV
#278
Load change threshold
0 - 255 10 0
With this CV, a change in sound to small load changes can be suppressed (i.e. in curves) in or-der to prevent chaotic sound impressions.
Suitable settings can only be determined by trial (with “incremental programming).
CV Designation Value range
INC steps
De-fault
Description
#279 Reaction time to load
change 0 - 255 1 0
With this CV the reactions in sound to changes in load can be delayed, whereas the factor is not just time but rather “load-change dependent time” (= the bigger the change the faster the effect). This CV is also used to suppress chaotic sound changes.
Suitable settings can only be determined by trial (with “incremental programming” of CV’s #278 and #279 together).
#280
Load influence
For DIESEL engines
0 - 255 10 0
This CV determines (at least temporarily in SW version 15) the reaction of the diesel sound to load: RPM levels and load steps of diesel-hydraulic engines, cruise/idle rpm of diesel-electrics and shift points of geared engines.
= 0: no influence, dependent on motor rpm = to 255: large influence.
It is highly recommended that the automated test run with CV #302 = 75 is performed first (see text above under CV #302).
LEAD - CV
#281
Acceleration threshold for full load
sound
0 – 255 (internal speed steps)
1
1
Compared to the “basic load”, more powerful and louder chuff sounds should be played back for in-creased power requirements during accelerations. As is the case with the prototype, the increased sound should be noticeable before the increase in speed becomes visible, since the latter is a result of the increased steam volume supplied to the pis-tons. It is therefore practical that the heavy accel-eration sound is played back when the speed has increased by just one speed step (when no real speed change is noticed), to be able to control the proper sound sequence with the speed regulator.
The “engineer” can in this fashion adjust the sound (by increasing the speed by 1 step) in an-ticipation of an imminent incline.
=1: Acceleration sound played back at full volume if speed has increased by just one speed step.
= 2, 3…. Acceleration sound played back at full volume only after increasing speed by this number of speed steps; before that: proportional volume.
#282 Duration of
acceleration sound
0 - 255
=
0 - 25 sec
10
30
=
3 sec
The acceleration sound should remain for a cer-tain length of time after the speed increased (oth-erwise each single speed step would be audible, which is unrealistic).
Value in CV #282 = time in tenths of a second!
#283 Engine sound
volume at full accel-eration
0 - 255 10 255
The volume of steam chuffs at maximum accel-eration is set with CV #283 (default: 255 = full vol-ume). If CV #281 = 1 (acceleration threshold set to 1 speed step), the volume defined here is applied with each speed increase, even if it’s just 1 step.
Steam chuffs should be played back at less vol-ume (or no sound at all) signifying the reduced power requirement during deceleration. The sound reduction logic is analog to a reversed acceleration (per CV #281 to #283).
= 1: Reduces sound to minimum (as per CV #286) when speed is reduced by just 1 step.
= 2, 3 ... sound reduced to minimum after lowering speed by this number of steps.
#285 Duration of reduced
volume on deceleration
0 - 255
=
0 - 25 sec
10 30
=
3 sec
After the speed has been reduced, the sound should remain quieter for a specific time (analog to the acceleration case).
Value in CV #285 = time in tenths of a second!
#286 Volume level during
deceleration
0 - 255
10
20
CV #286 is used to define the chuff volume during deceleration (Default: 20 = pretty quiet but not muted).
If CV #284 = 1 (deceleration threshold set to 1 speed step), the volume defined here is applied with every reduction in speed (even if decreased by just 1 step).
LEAD - CV
#287
Brake squeal threshold
0 – 255 (internal speed steps)
10 20
The brake squeal should start when the speed drops below a specific speed step. It will be auto-matically stopped at speed 0 (based on back-EMF results).
#288
Minimum driving time before brake squeal
0 - 255
=
0 - 25 sec
10
50
The brake squeal is to be suppressed when an engine is driven for a short time only. That is usu-ally a shunting run and often without any cars (in reality it is mostly the cars that are squealing not the engine itself!).
Note: Brake squeal sounds can also be assigned to a function key (see allocation procedure CV #300 = …), with which they can be played manu-ally or stopped!
#289
Thyristor control:
Sound pitch for stepping effect
of ELECTRIC engines
From SW version 20
1 - 255 10 1
The pitch of the thyristor control sound of many engines (typical example: Taurus) should not as-cend evenly but rather in steps.
= 1: no stepping effect, even ascend
1 - 255: ascending scale according to the corre-sponding speed step interval.
LEAD - CV
#290
Thyristor control:
Sound pitch at medium speed
for ELECTRIC engines
From SW-version 20!
0 - 100 10 40
Percentage of the increased pitch of the thyristor sound at medium speed compared to standstill. Define the “medium speed” in CV #292.
= 0: no change, pitch remains the same as at standstill.
= 1- 99: corresponding change in pitch
CV Designation Value range
INC steps
De-fault
Description
= 100: pitch doubled already at “medium speed”.
#291
Thyristor control:
Sound pitch at maximum speed
for ELECTRIC engines
From SW-version 20!
0 - 100 10 100
Percentage of the increased pitch of the thyristor sound at maximum speed compared to standstill.
= 0: no change, pitch remains the same as at standstill.
= 1- 99: corresponding change in pitch
= 100: pitch doubled at “medium speed”.
#292
Thyristor control Speed step for medium speed
For ELECTRIC engines
0 - 255 10 100
Internal speed step defined as “medium speed” for the pitch level according to CV #290.
The CV’s #290 – 292 form a three-point charac-teristic curve for the pitch of the thyristor control sound, starting at standstill, whenever the original sample is being played back.
LEAD - CV #293
Thyristor control
Volume at steady speed
for
ELECTRIC engines
0 - 255 10 30
Thyristor control-sound volume at steady speed (no acceleration or deceleration in process).
Note: sound changing to load will be set with CV’s #277 and up but is not yet possible with SW-Version 4.
#294
Thyristor control
Volume during acceleration
for
ELECTRIC engines
0 - 255 10 100
Volume during heavier accelerations; the value in CV #294 should be larger than in CV #293 to be useful (so that the volume increases when the en-gine accelerates).
At lesser accelerations a lower volume is selected automatically (exact algorithm is not finalized with SW-Version 4).
#295
Thyristor control
Volume during deceleration
Motor sound of
ELECTRIC engines
0 - 255 10 50
Volume during heavier decelerations (braking); the value in CV #295 may be higher or lower than in CV #293, depending on whether the thyristors are stressed during power feedback to the net (which increases the volume) or not (which rather decreases the volume).
LEAD - CV
#296
Motor sound, highest volume
for ELECTRIC engines
0 -255 10 100 Maximum volume of motor sound at full speed or at the speed defined by CV #298.
#297
Motor sound, when sound
becomes audible for ELECTRIC engines
0 -255 10 30
Internal speed step at which the motor sound be-comes audible; the sound starts quietly at this speed and reaches the maximum volume as per CV #296 at the speed defined in CV #298.
#298
Motor sound, starting point of full volume for
ELECTRIC engines
0 -255 (> CV#297)
10 128
Internal speed step at which the motor sound reaches full volume; at this speed step the motor sound is played back at full volume according to CV #296.
The motor sound playback speed increases, ac-cording to this CV, with increasing speed.
= 0: Pitch (playback speed) will not be raised.
= 1 … 100: Intermediate values.
= 100: Doubles pitch
> 100: same as 100 for now; reserve for SW expansion.
MORE CV’s belonging to this group beyond the next table (from CV #344 up) !!!
The following CV’s are not suitable for the “incremental programming”, because they either are too difficult to test immediately (large time intervals for random generators) or single bits need to be set. They are programmed the usual way (CV # = …).
CV Designation Value range
De-fault
Description
#310 On/off key for engine and random sound
0 - 12,
255 8
Defines the function key (by default F8) that turns the engine sound (chuffs, boiling, blow-off’s, brake squeals...) as well as the random sound (compressor, coal shoveling...) ON or OFF.
= 255: engine and random sound is always ON.
#311 On/off key for function sound
0 - 12 0
A key can be assigned with which all function sounds (i.e. F2 – whistle, F6 – bell etc.) can be turned on and off. No key is programmed for this at delivery.
= 0: does not mean that F0 is assigned for this task but rather that the function sounds are always active.
= (#310), if the same value is entered here as in CV #310, the key defined in #310 turns all sound on/off.
= 1 ... 12: Assigns separate key to turn function sound on/off.
#312 Blow-off key 0 - 12 4
= F4
Defines a function key to play-back the blow-off sound manu-ally (that is the same sound programmed with CV #300 = 133 to be played back automatically). For example: to do shunting with „open valves“.
= 0: no key assigned (use this setting if keys are used for other purposes).
#313 Mute key
from SW version 2 0 – 12 8
This CV assigns a function key with which the driving sounds can be faded in and out, i.e. when the train becomes invisible after disappearing behind scenery. F8 is used by default, which is already the sound on/off key but now does so softly.
= 0: No mute key or mute function.
#314 Mute
fade in/out time 0 – 255 0
Time in tenth of a second for sound fading in/out when mute button is pressed. Range is 25 seconds.
=0: 1 sec, which is the same as a value of 10.
CV Designation Value range
De-fault
Description
#315
Minimum interval for
random generator Z1
0 - 255
=
0 - 255 sec
1
The random generator produces internal pulses in irregular in-tervals that are used to playback a sound file assigned to the random generator. CV #315 defines the shortest possible in-terval between two consecutive pulses.
Sound samples are assigned to the random generator Z1 with the help of the procedure CV #300 = 101, see above! By de-fault, the compressor is assigned to Z1.
Special note to random generator Z1:
The random generator Z1 is optimized for the compressor (which should be played back shortly after the train has stopped); therefore the default assignment should be retained or at the most be used for a different compressor. CV #315 also determines the proper time the compressor is started af-ter coming to a stop!
#316 Maximum interval
for random generator Z1
0 - 255
=
0 - 255 sec
60
CV #316 defines the maximum time interval between two consecutive pulses of the random generator Z1 (that is most often the start of the compressor); the actual pulses are evenly spaced between the values in CV #315 and #316.
#317 Playback length for
random generator Z1
0 - 255
=
0 - 255 sec
5
The sound sample assigned to the random generator Z1 (most often the compressor) is played back for the duration defined in CV #317.
= 0: Sample plays once (in the defined duration)
#318 #319 #320
As above but for sound generator Z2
0 - 255 0 - 255 0 - 255
20 80 5
By default, Z2 is assigned for coal shoveling.
#321 #320 #323
As above but for sound generator Z3
0 - 255 0 - 255 0 - 255
30 90 3
By default, Z3 is assigned for the injector.
#324 #325 #326
As above but for sound generator Z4
0 - 255 0 - 255 0 - 255
As delivered, this random generator is not assigned to any sound.
#327 #328 #329
As above but for sound generator Z5
0 - 255 0 - 255 0 - 255
As delivered, this random generator is not assigned to any sound.
#330 #331 #332
As above but for sound generator Z6
0 - 255 0 - 255 0 - 255
As delivered, this random generator is not assigned to any sound.
#333 #334 #335
As above but for sound generator Z7
0 - 255 0 - 255 0 - 255
As delivered, this random generator is not assigned to any sound.
#336 #337 #338
As above but for sound generator Z8
0 - 255 0 - 255 0 - 255
As delivered, this random generator is not assigned to any sound.
0 The sound sample allocated to switch input 1 is played back for the duration defined with this CV.
= 0: Play sample back once (as recorded)
# 342 Switch input 2
Playback time
0 - 255
=
0 - 255 sec
0 The sound sample allocated to switch input 2 is played back for the duration defined with this CV.
= 0: Play sample back once (as recorded)
# 343
Switch input 3 (if not used for the cam
sensor)
Playback time
0 - 255
=
0 - 255 sec
0
The sound sample allocated to switch input 3 is played back for the duration defined with this CV.
= 0: Play sample back once (as recorded)
Table from CV #299 continues here !!!
CV Designation Value range
De-fault
Description
#344
Run-on time of motor sounds after stops (Cooling fan etc.)
for DIESEL and ELEC-TRIC engines
0 – 255
=
0 – 25 sec.
0
After the engine is stopped some accessories are still operat-ing (i.e. cooling fans) and stop after the time defined here, provided the engine didn’t start up again.
= 0: Won’t run after stop
= 1 … 255: Runs for another 1 to 25 seconds.
#345
Quick-select key for the sound of a
MULTI-SYSTEM engine
1 - 19 0
Defines a function key (F1 – F19) which switches between two sound types (i.e. between an electro and diesel sound of a multi-system engine). This feature is only intended for cer-tain sound projects (i.e. RhB Gem), where the two sound types are part of the same sound collection.
#350
Delay of switchgear sound after start up
for ELECTRIC engines.
0 – 255
=
0 – 25 sec.
0
The switchgear on some engines (i.e. E10) should not be heard immediately after start but rather after some time de-fined here.
= 0: Switchgear is heard immediately after start.
#351 Smoke fan speed at
steady speed
for DIESEL engines 1 – 255 128
The fan speed is adjusted with PWM; the value in CV #351 defines the speed at steady cruise.
= 128: Half of the available voltage is applied to the fan motor.
#352
Smoke fan speed at acceleration and motor start-up
for DIESEL engines
1 - 255 255
To generate the puff of smoke at start-up or heavy smoke un-der hard acceleration, the fan motor is set to a higher speed (usually full speed).
= 255: Motor receives full voltage at start-up.
#353
Automatic shut-down of smoke generator
for STEAM and DIESEL engines
0 – 255
=
0 – 25 sec.
0
If the smoke generator is controlled by one of the Special Effects “010010xx” or “010100xx” in CV’s 127 – 132 (for one of the function outputs FO1 to FO6), it will turn off automati-cally after the time defined here (to prevent overheating).
= 0: Won’t turn off automatically.
= 1 … 252: Switches off automatically after 25 seconds/unit. Maximum time therefore is about 6300 sec. = 105 minutes.
The future oriented technology that has been installed (hardware) on all ZIMO decoders since 2004, is func-tional since 2007 in all current ZIMO decoders including the MX640.
“Bidirectional” means that the information transfer within the DCC protocol is not only flowing towards the decoder but also in the opposite direction; that is not just driving, function and switch commands are being sent to decoders but also messages such as acknowledgements and status information are being received from decoders.
The definitions for RailCom are determined by the “RailCom working group” (Lenz, Kühn, Tams and ZIMO), before that by the NMRA RP’s 9.3.1 and 9.3.2 for bidirectional communication; with the goal of a uniform platform for “RailCom” applications.
The functionality is based on short cut-outs (max. 500 micro seconds) introduced to the otherwise continu-ously sent DCC signal by the command station. These cut-outs provide the opportunity and enough time for the decoders to send a few bytes of data to locally mounted detectors.
With the help of = bidirectional communication, it will
be possible that the decoder can acknowledge received commands -
- which increases operational reliability and the bandwidth of the DCC system because already acknowl-edged commands don’t need to be sent repeatedly;
up-to-date information from decoders is sent to the command station (“global de-tector”) -
- e.g. “real” train speed, motor load, routing and position codes, “fuel reserves”, current CV values on de-mand from decoders to command station or more precisely, to a global detector in the command station;
Decoder addresses are recognized by “local” detectors -
- the actual loco positions are determined by local detectors connected to individual track sections (inte-grated in the MX9 track section modules). This however has been possible with ZIMO’s own loco number recognition for over two decades without bidirectional communication but only with ZIMO decoders.
RailCom will be further developed over the coming years and will bring new applications, which of course require new software updates in decoders and other equipment. ZIMO decoders of 2009 are able to send their own loco address from an isolated section of track (with a so called broadcast method, very fast, al-though only for one loco inside that section), send CV content on demand along with some decoder data such as actual speed in km/h, load and decoder temperature.
On the system side, a third party product has been available from the beginning – the address display LRC120, which is a “local” RaiCom detector displaying the loco address of one track section. Since 2007, the MX31ZL became available with an integrated “global” RailCom detector and finally “global” RailCom de-tectors for the installation into ZIMO command stations MX1EC, MX1, MX1HS as well as MX31 cabs.
The RailCom function is activated with CV #29, Bit 3 (see chapter 3, CV table and CV #28). „RailCom“ is a trademark of Lenz Elektronik GmbH.
8. Installation and wiring
General information:
There has to be enough free space inside the engine so that the decoder can freely be mounted. Pay par-ticular attention that no pressure is exerted on the decoder when the loco housing is being reinstalled and the wires can’t get caught by movable parts.
All direct connections that are present in the original wiring configuration between the power pick-ups (wheels and wipers) and the motor must be isolated; otherwise the decoder end stage may get damaged at power-up.
The same goes for the headlights and other additional accessories, which must be completely isolated.
Do noise suppression components on a locomotive motor have a negative affect on motor regulation?
Yes, sometimes . . .
Explanation: Motors of model railroad locomotives are often equipped with choke coils and capacitors, which are supposed to suppress or filter out noise (poor TV reception etc.) caused by the sparks arcing across the motor’s brushes.
Such components impair the motor regulation. Compared to others, ZIMO decoder manage quite well, that is there is hardly a difference in performance with or without those components in place. However, in recent years larger choke coils are being installed in many locomotives than was the case earlier – and these can noticeably compromise drivability.
The potentially “harmful” choke coils are often recognizable by their shape of a resistor with color bands (in contrast to a wire wound ferrite bar). That doesn’t mean though that these choke coils have a negative effect in all cases.
Fleischmann locomotives with “Round motors” often have extremely bad filter components; espe-cially dangerous are those capacitors that connect between the motor connections and the frame; they are sometimes responsible for the destruction of the motor end stage. These components are of-ten hard to see and to get at.
Indications of an actual negative effect of such components, besides a general unsatisfactory motor control (jerking…), are:
- weak control compensation: as a test, set the decoder to low frequency – CV #9 = 200 – and check to see whether the control compensation becomes stronger. If that’s the case, the choke coils are most likely to blame for the weak compensation in the high frequency range.
- if a difference in compensation is noticeable between 20 and 40 kHz (select in CV #112, Bit 5); if the com-pensation (further) diminishes at 40 kHz, it is very possible that the choke coils or capacitors are the cause.
Remedy: Bypass or remove choke coils! Remove capacitors! Capacitors are less likely to interfere with motor regulations but cannot be ruled out (see “Round motor” above).
Locomotives with 6 or 8 pin NMRA interface . . . . . . are easy to retrofit with the MX...R, MX...F, MX...N (e.g. MX63R or MX64F) etc. They come with the ap-propriate 8 (R) or 6 (F, N) pin connector. There is usually enough room provided in such locos, at least for the smaller MX62 or MX63 decoders. By removing the dummy plug from the loco, all damaging connections mentioned above should be interrupted and the decoder can be plugged in instead. This is unfortunately not always true with some loco manufacturers. It is advisable to use an ohmmeter to confirm this before plug-ging in a decoder.
In some cases it is necessary to hardwire some decoder leads besides just plugging in a plug. An example of this is the MX630R that has more outputs available than the standard 8-pin plug has room for. For hard-wiring of decoder leads use the explanations below.
Hard-wiring a locomotive… … with a DC motor and headlights:
This probably represents the most common wiring diagram for HO installations. All other diagrams that follow are modified or extended versions of this one.
Red
Black
OrangeblueYellow
WhiteGray
Right railLeft rail
M
Headlights Rear Front
DC Motor
Right
Left Lights connected as shown on this diagram are direction controlled and switched on/off by the F0 key (1 on Zimo cab). The lights can also be controlled independently with F0 and F1 for example (1 and 2 on Zimo cab), using function mapping CV’s #33, 34, 35.
PLEASE NOTE: Body mounted light bulbs that are hard to insulate can be left as is. The body acts as the power supply to the bulb. The blue lead from the decoder must not be connected to the bulbs in such cir-cumstances. The white and yellow leads are connected to the other side of the bulbs. The brightness of the headlights will be reduced in such an application.
. . . with an AC engine:
Two additional 1N4007 diodes (or equivalent) are required as shown in the diagram below when installing a decoder in a loco equipped with an AC motor. They can be obtained at your local electronic store or from ZIMO.
Red
Black
OrangeBlueYellow
WhiteGray
Right railLeft rail
M
Headlights Rear Front
AC-motor
Field coils
2 Diodes 1N4007
Rotor
Most locomotives with an AC motors get the power supplied by a third rail, which doesn’t mean anything as far as the motor hook-up is concerned. The above schematic is therefore valid for AC locomotives running on two or three rail track (instead of “right rail” and “left rail” think “outside rails” and “center rail”).
Note: many locomotive manufacturers supply field magnets that can be used in place of the motor’s field coil. Using a field magnet turns an AC motor into a DC motor, which is connected as such (see above) and can also utilize the decoders BEMF feature (BEMF does not work with AC motors).
Additional hook-up for cab lighting controlled with F0 key:
This is no longer of much use today; it is a remainder from a time when decoders only had two function out-puts, which were used for the headlights and the cab light. Cab lights connected this way can be switched with the F0 key but in contrast to the headlights were non-directional.
This is however a general schematic that can be used in cases where something is to be operated by sev-eral different function outputs, but the same outputs used independent of each other. There are 2 diodes re-quired (type 1N4007 or equivalent) available from ZIMO or any electronic parts supply store.
BlueYellowWhite
Headlights Rear Front
2 Diodes 1N4007
Cab light bulb
Connecting function outputs FO1 and FO2:
The MX620 has solder pads available for function outputs FO1 and FO2; other types have wires and can be connected in the same fashion as the headlight bulbs. The outputs can be used for different things such as cab lighting, smoke generator or uncouplers (also see relevant section below). For mapping the outputs to function keys, see chapter 5; by default the function outputs FO1 and FO2 are mapped with function keys F1 and F2.
Red
Black
blueYellowWhite
Solder pad FO1
Right railLeft rail
Headlights
Rear Front
E.g
.C
ab li
ght
Using logic level outputs:
ZIMO decoders also have so called logic level outputs in addition to the normal function outputs, to which current consuming devices may not be connected directly. Use a M4000A amplifier board or similar transis-tor switching device, when connecting logic level outputs with a load.
In addition to the 4 normal outputs, the MX620 offers two more logic level outputs (FO3 and FO4) at the “SUSI-CLOCK” and SUSI-DATA” connections when setting CV #124 Bit 7 = 1 (if SUSI is not required); see CV #124 in the CV table and function mapping in chapter 5!
This is similar with the MX630 decoder but for logic level outputs FO5 and FO6, alternative to “SUSI-CLOCK” and SUSI-DATA”.
The brown lead of an amplifier module M4000Z is connected with the relevant logic level output solder pad of the decoder.
To tra ck
Brow n
2 x bla c k
B lue (+ )
G re e n (-)
e.g.Sm oke generator,uncoupler e tc. M 4 0 0 0 Z
C o n n e ct to S U S I-C L OC K o r S U S I-D ATA so ld e r p a d s o f th e M X 6 2 0 , co n ve rt th e o u tp u ts to fu n ctio no u tp u ts w ith C V # 1 2 4 , B it 7 .
Connecting DIETZ sound modules without “SUSI” / “virtual cam sensor”
See Dietz instruction manual regarding the installation and connection of their sound modules to a ZIMO de-coder.
For a good acoustic impression of steam engines, it is important that the chuffs are synchronized to wheel revolutions. Therefore a cam sensor should be installed and connected to the sound module (reed switch, optical or hall-effect sensor), which sends exactly 2 or 4 pulses to the module (depending on loco type).
Sound modules can usually generate their own chuff rate based on speed information (e.g. coming from the SUSI interface of a decoder), if no cam sensor can be installed or installation proves too difficult. The result is often poor with a chuff rate that is too fast at low speeds (the SUSI protocol is not precise enough in that respect).
To improve this situation, ZIMO decoders come with a “virtual cam sensor”. They use the function output FO4, which is converted to a “virtual cam sensor” function with the help of CV #133 and connected with the cam sensor input of the sound module (e.g. Dietz, reed switch input); naturally in addition to SUSI or other connections.
The virtual cam sensor is of course not capable of synchronizing chuff rates to wheel positions but rather to wheel speed, which is of little difference to the viewer.
The chuff rate of the “virtual cam sensor” can be defined per wheel revolution with CV #267; consult the CV table in ZIMO sound chapter.
Connecting a DIETZ or other sound module to “SUSI”:
The SUSI interface developed by Dietz is an NMRA standard and defines the connection between sound modules and loco decoders, provided the sound module is also equipped with such an interface. Due to space restrictions on small decoders, the SUSI interface composed of 4 conductors (2 data, ground and power) is not built as a plug-in connector but instead uses 4 solder pads (see decoder drawings in the chapter “Technical specifications” in this manual).
Speed and load information (e.g. to change sound intensity when going uphill, downhill, start up etc.), as well as sound-configuration variables (CV’s #890…) are sent via the SUSI data lines (CLOCK and DATA) from the decoder to the sound module.
Accessing SUSI CV’s in the SUSI module: These CV’s are in the 890 range, according to the standard (NMRA DCC Draft RP), which is not accessible with many DCC systems (ZIMO cabs MX2 and MX21 were also limited to 255 - until mid 2004). For this reason, ZIMO decoders allow access to these CV’s with num-bers in the 190’s!
Connecting an electric uncoupler (System “Krois”):
In order to prevent damage to the delicate core of an uncoupler from continuous power, appropriate adjust-ments can be made with special CV’s for one or several function outputs.
First, write the value “48” to the CV that is assigned to the same output the uncoupler is connected to (e.g. CV #127 for output #1, CV #128 for output #2 etc.)
Next define the uncoupler activation time limit in CV #115 (see CV-table):
With the “Krois uncouplers”, it is recommended to use a value of “60”, “70” or “80” for CV #115; this means that the pull-in voltage (full track voltage) is limited to 2, 3 or 4 seconds. A reduced “hold” voltage is not required for Krois, that’s why the ones digit is left at 0. Other uncouplers may need a reduced hold volt-age though, like the ones from ROCO for example.
Regarding the “automated coupler detachment” and/or “automatic tension release” see CV #116 in the chap-ter “Additional Notes to…”.
MX620R, MX630R, MX640R with NMRA 8-pin interface (NEM 652):
The “R” designated decoders’ come with an 8-pin plug mounted to the end of its wires, which fits in to the socket of a DCC ready loco. Remove the dummy connector from the socket and plug the decoder in its place, that’s all.
All the necessary connections to power, motor and headlights are es-tablished with this interface. Other outputs have to be hard wired.
MX620F, MX630F with NMRA 6-pin interface (NEM 651):
The “F” designated decoders’ come with a 6-pin plug mounted to the end of its wires, which fits into the socket of a DCC ready loco.
The brightness of the headlight is reduced since the blue wire (common supply) is not part of this interface. The light bulbs get their power direct from the power pick up.
The blue wire is still available at the decoder and can be connected to the bulb if more light is needed. The power supply from the track to the bulb needs to be cut first, of course!
MX620N plugs directly into the 6-pin interface (NEM 651):
Many N, HOe, HOm as well as some HO engines have this socket installed with the required minimum space of 14 x 9 mm to accept the decoder.
ATTENTION: Plug the decoder into the socket with the pins down and the micro processor on top (visible)!
MX64D, MX64DV, MX640D – Decoders with 21-pin interface:
These decoders have a 21-pin female plug on the circuit board (no wires), which allows the decoder to be plugged directly in to the 21-pin male receptacle of locomotives equipped with such interfaces. There are ac-tually 22 pins present but one of those (#11, top right) pins serves as a key to pre-vent wrong installations.
The meaning of the individ-ual pins is usually not impor-tant to the user. The pins marked “n.c” are not used, they are reserved for special applications (Hall-effect sen-sors …).
The MX64D can be plugged-in two ways; the board below the connector is perforated, so that depending on the locomotive, the decoder can be plugged in from the top or bottom end. The key pin 11 prevents a wrong installation by not allowing the decoder to be pushed all the way down, as long as the in-staller ensures that the decoder sits firm and level on the plug.
MX64D plugged into TRIX loco board
MX64D plugged in right side up, Pins of the loco boardpenetrate through the decoder board into the socket.
MX64D plugged into BRAWA loco board
MX64D is plugged in upside down !
Loco board
Loco board
The MX64DV is largely identical to the MX64D but with a low voltage power supply circuit added on the ex-tended circuit board for low voltage bulbs or other equipment. For more information go to the section „MX64V1, MX64V5, MX64DV“ in this chapter of the manual!
MX620, MX630, MX64D – Connecting servo and smart servo motors:
2 servo control outputs are available at the MX620, MX630 and MX64D (solder pads or part of the 21-pin socket) for the control of commercially available servo motors or SmartServo RC-1 (Manufactured by TOKO Corp. Japan). Each output can be connected directly with a servo input.
The model MX64DV5 and MX630V5 also supply the servo with 5V operating voltage.
The 5V operating voltage for the other de-coders must be supplied by an external volt-age regulator such as the readily available LM7805 as shown in the drawing. The outputs can be activated for servo con-trol duty with CV’s #181 and CV #182 (the value in each must be different than 0). With the help of CV #181 and #182, the servo functions can be mapped to various function keys (and direction) and selected for control with either one or two function keys. CV’s #161 to #169 define the servos end po-sitions and rotating speed, see CV table.
The servo outputs use the same connections as the SUSI CLOCK and DATA lines on the decoder. It is therefore not possible to use the SUSI interface as long as the outputs are configured for servo control. CV #161 is also used to select the appropriate pro-tocol. “Normal” for most servos are positive pulses (which is also the default setting); furthermore a se-lection can be made whether the servo is powered only while it is being moved or remains powered at all times. The latter should only be used if the servo position can be changed by mechanical influences.
Two servo connections are provided on the MX640 for commercially available servos and SmartServos RC-1 (Manufacturer: TOKI Corp., Japan). These are normally the SUSI outputs but can also be used as servo outputs instead. They are in the form of either solder pads or part of the 21-pin socket, depending on the decoder type. Each output can be connected directly with a servo input.
“Energy-saving” servos (max. 200mA) can be powered directly by the MX640!
For servos with higher energy consumptions, the 5V operating voltage must be supplied by an external volt-age regulator such as the readily available LM7805 as shown in the drawing.
The outputs can be activated for servo control duty with CV’s #181 and CV #182 (the value in each must be different than 0). With the help of CV #181 and #182, the servo functions can be mapped to various function keys (and direction) and selected for control with either one or two function keys.
CV’s #161 to #169 define the servos end positions and rotating speed, see CV table.
CV #161 is also used to select the appropriate protocol. “Normal” for most servos are positive pulses (which is also the default setting); furthermore a selection can be made whether the servo is powered only while it is being moved or remains powered at all times. The latter should only be used if the servo position can be changed by mechanical influences. For the SmartServo: Bit 1 of CV #161 must always be set, that is CV #161 = 2!
MX640 – Schematic for Sound Connections
Connecting speaker, cam sensor:
In order to operate the MX640 as a sound decoder, the following items must/may be connected:
- mandatory – SPEAKER – Any 8-ohm speaker or two 4 Ohm speakers connected in series can be used. Speaker with higher impedance are also allowed but will result in reduced volume.
An additional tweeter (also 8 ohms or higher) can be connected, if desired; the connection should be made via a bipolar capacitor (10 uF bipolar for 2 kHz frequency).
Speaker installation – TO BE ADDED LATER
- optional – CAM SENSOR – Normally, ZIMO decoders are programmed for the “virtual cam sensor”, which can be fine-tuned with CV #267. If a real cam sensor is to be used, the settings of CV #267 must be changed to 0 or 1 depending whether each pulse or every second pulse should trigger a chuff beat. See chapter 6!
Mechanical contacts, Reed switches, optical switches and Hall Effect switches are suitable as cam sensors.
Use of an external energy source (capacitor) for uninterrupted driving on dead track sections:
With the help of an electrolytic capacitor, gold cap or a battery the
- driving performance on dirty track sections (or wheels) can be improved
- flickering of lights is reduced
- and stalling of trains, especially when crawling, can be eliminated
The energy storage increases with the capacity of a condenser and from 100uF (Microfarad) onwards an ef-fect will be noticed. 1000uF to 10’000uF are recommended if the necessary space is available. The required voltage strength of the capacitor is given by the track voltage; 25V is suitable for all cases. Smaller 16V ca-pacitors should only be used if track voltage will never be higher than that.
The capacitor is connected between ground (available on all ZIMO decoders as solder pad) and power (blue wire or SUSI-POWER) of the decoder. Match polarity!
When using a 220uF or possibly a 470uF capacitor no other parts are really required for “simple” loco con-trol; although installing a choke coil (100 mH / 100 mA, available from ZIMO) is recommended in the posi-tive wire to guarantee that the decoder can be updated with the update module MXDECUP and that the ZIMO loco number identification works.
If larger capacitors are used, which is actually a good idea, extra circuitry is required. The condenser is re-charged through the 100 ohm resistor. This is to prevent a shut down of the command station during start-up. If a large number of loco’s so equipped are on the layout the command station could interpret the current flow to these capacitors as a short circuit. The diode (e.g. 1N4007) is required to bypass the resistor when power is needed by the decoder.
NOTE: If signal stops by “asymmetrical DCC signal” (= Lenz ABC, implemented in ZIMO decoders early 2005) is employed, the resistor-diode combination is necessary in any case (even when using small capaci-tors) to ensure that the decoder can detect the asymmetry of the signal!
The purpose of the resistor 3K3 shown in the drawing above (not required in all cases) is: even though a large condenser supplies the motor and lights for just a few tenths of a second (1000uF) or a few seconds (e.g. 4700uF) the remaining power, although at a voltage level below what is required by the motor and lights, is sufficient power to keep the decoders memory alive for quite some time (several min-utes). This is sometimes a rather undesired effect. For example: If a running loco is taken from the track and the speed then set to zero, the loco would briefly run at the previous speed when it is set back on the track after about a minute. Using the above-mentioned resistor would erase the memory after just a few seconds.
ZIMO offers a collection of components under the term (order number) SPEIKOMP that are required for building a do-it-yourself energy module to be connected to ZIMO decoders MX620, MX630 and MX640. The set contains a diode, resistors, choke coil and a few capacitors (you can and should use larger capacitors if space is available).
Smart stop management on “dead” track sections In cases where power to the decoder is interrupted due to dirty rails, wheels or insulated frogs, the decoder automatically keeps the engine going even though a currently active brake application should bring the train to a stop. Only when power to the decoder is restored is the loco allowed to stop, with subsequent testing to ensure power to the decoder is still available after the engine stopped (if not, the engine is moved again a short distance).
MX64DV1, MX64DV5 - The special MX64D design with built-in low voltage supply
The MX64DV1 contains an efficient 1.2V voltage regulator, which can be directly connected to low voltage bulbs. This facilitates the decoder installation considerably especially in high quality brass models (which are often equipped with such bulbs), because it eliminates the installation of an external voltage regulator (that often requires some sort of heat dissipation).
As delivered, the low voltage is available at the common positive pins 16 and 17; meant for locomotives that use low voltage bulbs only. The usual full track voltage is not available.
The MX64V5 is a variant of the MX64V1 with a 5V regulator, mostly for installations in large scale such as O-scale or higher (LGB), where 5V bulbs are often found. The 5V supply can also be used to power servos so that an external voltage regulator is not required.
Full track voltage is provided on pin 16 after rearranging a jumper wire. This is practical for applications that require full track voltage as well as low voltage.
9. MX64D, MX64DM, MX640D for C-Sinus / Soft-Drive-Sinus
The MX64D, MX64DM, MX640D and MX640C are made especially for Märklin and Trix engines with
C-Sinus motors, provided the locomotive comes with a 21-pin interface. They can be switched to a matching output configuration required for the control of the C-Sinus boards found in these locomotives. The decoder also supplies the necessary 5V the C-Sinus board needs to operate (which „normal“ decoders are not capable of!).
The MX64D (or MX640D) is plugged into the pins of the loco board with the top side of the decoder pointing up, whereby the pins are being pushed through the decoder board in order to make contact with the decoder socket. The position is given by the loco board and is also keyed by the missing pin 11 (on the loco board) and missing hole in the same location on the decoder board.
The picture below shows a sample layout; the loco board may however vary from case to case.
Loc o board w ith 21-p in in ter fac e and M X64D p lugged in F la t r ibbon c able to C -S inus -M otor
First, check the C-Sinus board whether it contains 0-Ohm resistors; see CAUTION on the right!!
The switch-over to the C-Sinus control takes place with CV #145 = 10 (usually the correct value if a Märk-lin/Trix decoder was installed before) or CV #145 = 12 (usually the correct value if an ESU decoder was in-stalled, typically identifiable by a blue circuit board).
With the help of CV #145 the decoder can also be configured for some special versions, which becomes necessary due to different decoder interface layouts on the part of Märklin/Trix, see CV table!
The loco number identification pulses can cause interference and should therefore be turned off with CV #112, Bit 2 if this feature is not used (CV #112 = 0).
An MX64D equipped C-Sinus locomotive can be operated in the NMRA-DCC-data format as well as the MOTOROLA protocol but not in analog mode (DC)!
No motor regulation, known as BEMF, takes place when the decoder operates in the C-Sinus mode, since the motor tries to keep the target speed precisely in all situations. The relevant configuration variables, among them CV #9, #56 and #58, are without effect!
The MX64DM or MX640C (with SOUND) is a special development for locomotives with SoftDrive-Sinus and some locomotives with C-Sinus motors (which won’t operate with the MX64D). It differs from the MX64D in so far only that the function outputs FO3 and FO4 (= AUX3, AUX4 according to NMRA interface specifications) are designed as logic level outputs, which supply the 5V required for powering up the Softdrive loco board (also required by some C-Sinus boards).
CAUTION:
Unfortunately, Märklin/Trix has played a “dirty trick” (although probably not on purpose): Beginning with a specific model or past a certain date, the protective resistors on the loco board input have been omitted, or more precisely, instead of the 100kO resistors useless 0 Ohm resistors are being installed. As a result, a high voltage from the MX64D or MX64DM reaches the loco board that will not only destroy the board but can also damage the decoder; unless the decoder has been set first to the C-Sinus (Softdrive-Sinus) mode with CV #145 = 10 or 12.
But even if CV #145 = 10 or 12 is set, there is no guarantee that the loco board will survive (even though there is no visible problem at the moment)!
Background information: Although the 21-pin interface in Märklin and Trix locomotives is virtually identical to the standardized NMRA-DCC 21-pin interface, Märklin keeps modifying it whenever the need arises (several versions, misapplication of function outputs for motor activation and now the mentioned electrical input changes); their own brand decoder is the only one that is being taken into account through all this. The in-stallation of other brand decoders is, to be sure, undesired…
CORRECTIVE MEASURE: The MX64D/MX64DM or MX640D/MX640C must not be installed if zero-ohm resistors (markings “000”) are found on the loco board. It is imperative that these are being replaced with 100KO resistors (“104”) before installing the decoder. ZIMO MX64DM decoders will be delivered with the necessary resistors.
Below is a picture showing a loco board with the useless (“000”) resistors; in such cases it is not allowed to plug in a MX64D / MX64DM decoder!
Due to the many different C-Sinus boards that have been produced it is impossible for us to provide precise information about the location of these resistors on each board. Because the resistors may be mounted in different locations on the board in your engine, we would suggest that you find them by following the tracers. First study the picture below. The blue and pink arrows are pointing out the tracers that connect these resis-tors with the processor. Note the processor pins those tracers are leading to.
Next find the same pins on the processor of your board and follow those tracers carefully. They should lead to resistors marked as either “104” or as “000” (see below). If they are “104” proceed with the decoder instal-lation. If they are marked as “000” they have to be replaced before the decoder is installed. This picture shows a different Märklin C-Sinus board and how the resistors in question can be located by fol-lowing the tracers back from the controller pins.
CAUTION II – Disclaimer of Liability
Märklin/Trix obviously is not concerned about compatibility of their locomotives with third-party products. The interfaces are being changed often and without notice. ZIMO cannot guarantee that the information given in this manual regarding connection and programming/operating procedures are correct in all instances and cannot assume liability for damages to loco boards and/or decoders as a result of such circumstances.
10. ZIMO decoders and competitor systems
All Zimo decoders comply with NMRA standards and recommended practices and can be used on layouts with other brands of NMRA compliant systems.
What most systems of other manufacturers have in common, in contrast to ZIMO systems, is that track power is not stabilized or only partly stabilized and often relatively weak (in regards to voltage but also am-perage). This can lead to uneven speeds and/or limited top speed because Zimo decoders are of course programmed by default to operate on stabilized and regulated track power of up to 24V from a Zimo com-mand station.
It is recommended if required to:
- change CV #57 (reference voltage) from ”0” (automatic regulation based on given track voltage) to a fixed voltage. For example: “140” for a DCC system with a typical track voltage of 16 - 18V. In this case 14V will be used as reference, which leaves a certain safety margin during voltage drops.
Note that the MX62 always uses a fixed voltage.
. . . with Lenz “DIGITAL plus” from software version 2.0
This system uses 28 speed steps beginning with version 2.0 and 128 steps with version 3.0 and up. It also programs in direct mode according to NMRA DCC standards and is therefore fully compatible with Zimo de-coders.
All Zimo decoders are set to 28 speed steps by default. Make sure the system is also set to 28 steps for the decoder address in question. Incompatibility will be the result if the speed steps between decoder and sys-tem do not agree with each other; which is most often noticed by non working headlights. It would only make sense to switch the system from 14 steps to 28 or 128 speed steps rather then setting the decoder back to 14 steps, which would result in unnecessary poor drivability.
All configuration variables are accessible; see the manual for the cab in question. The address is located in the registry’s position #1. The configuration variables #49 to #54 will have no effect, since the signal controlled speed influence is only supported by a Zimo system.
. . . with ROCO Lokmouse-2
Although the Lokmaus-2 allows CV programming, its display is limited to two digits only and therefore limits the number of CV’s and their values to 99.
Zimo decoders offer a special pseudo-programming feature with CV #7 (that normally stores the software version number) to allow unrestricted programming. It is called pseudo-programming because the perma-nently stored value in CV #7 cannot be overwritten but rather holds a temporary value that allows the Lok-mouse2 to be used for expanded programming capabilities (see CV table); the engine must not be running during the programming procedure!
Example:
To enter a value of 160 (which is not possible with a Lokmouse-2 because value is >99) to CV #5 (max. speed) proceed as follows:
First program CV #7 to 1, followed immediately by setting CV #5 to 60. No power interruptions between those steps are allowed.
Explanation: The value 1 in CV #7 actually 01 (tens digit=0 and ones digit=1) causes the decoder to add 100 to the CV value that will be entered in the next programming step. Therefore, a value of 60 entered to CV #5 with the Lokmouse2 is stored as 160!
Example:
To program CV #122 (exponential deceleration), for example, with a value of 25 do the following:
Again, go to CV #7 and enter a value of 10, then go to CV #22 and enter a value of 25.
Explanation: CV #7 = 10. The 1 in the tens digit causes the decoder to add 100 to the CV address in the fol-lowing programming step. As a result, CV #122 will be programmed instead of CV #22!
. . . with DIGITRAX Chief
No problems expected with this system!
The Digitrax system usually operates at 28 or 128 speed steps. If for some reason the headlights don’t work, confirm that indeed the system and the decoder are set to the same number of speed steps and if neces-sary, change the speed steps at your cab to 28 or 128 steps.
There have been some malfunctions in the past during system boot up. For example: locomotives would not start unless the power to the decoder was interrupted briefly (by tipping the locomotive off one rail). It is not quite clear whether the causes have ever been fully identified and eliminated; it may also depend on the command station model (year of manufacture) and the software version in the Digitrax command station.
. . . with UHLENBROCK Intellibox
Operation, addressing and programming are possible without limitations!
Normally the speed step mode of the Intellibox and the ZIMO decoder are a match (by default in both cases 28 or 128 speed steps, which is fine either way). If the headlights don’t work even though the decoder is wired properly, make sure the decoder address is not set to 14 speed steps – this would need to be cor-rected on the cab to 28 or 128 speed steps.
11. Special - CV - Sets
This feature allows easy programming of a group of predefined values to the decoder’s appropriate configu-ration variables. Such “CV sets” may be part of the decoder software at delivery (as listed and described in the table below) or defined by the user.
Typical applications are: Railroad specific lighting, motor specific data for perfect slow speed behavior, pro-totypical loco specific acceleration, easy switching between a passenger and goods train or single loco ver-sus consist.
Programming of such CV-sets (either supplied or self defined) is accomplished by a pseudo-programming sequence of CV #8 in Service Mode programming on the programming track (CV #8 contains “145”, the manufacturer code for ZIMO and cannot really be overwritten, therefore the term pseudo-programming).
At the time this was written (July 2009) there are no ready-made CV sets available for the MX620, MX630 or MX640, only for the MX63 and MX64.
More such sets and the possibilities for self-definition are planned for a future software version.
On the other hand, there are CV settings for the MX640C within SOUND projects, which will be handled similarly during a HARD RESET.
HARD RESETS:
CV #8 = 8 as hard reset will reset all configuration variables to default values according to the CV-table.
CV #8 = 0 the “traditional” ZIMO hard reset – known from ZIMO cabs (MX2, MX21, MX31… by programming a decoder to address 0), will set a decoder to the last defined “Special CV Set” or to the stored sound pro-ject.
If, according to the CV table, a CV calls for setting individual bits (which is the case with CV #29, 112 and 124, for example) proceed as follows:
Each bit has a specific value:
Bit 0 = 1 Bit 1 = 2 Bit 2 = 4 Bit 3 = 8 Bit 4 = 16 Bit 5 = 32 Bit 6 = 64 Bit 7 = 128
The decimal values of all bits of a CV that are supposed to be set are added up (Bit... = 1 in the CV- table). All other bits (Bit....= 0) are ignored. Note that bits are numbered from right to left.
Example:
Bit 0, 2, 4 and 5 are supposed to be set (Bit...=1); but not the others 1, 3, 6 and 7 (Bit…=0).
This results in a bit-set of 00110101and a decimal value of:
Bit 7 Bit 6 Bit 5 Bit 4 Bit 3 Bit 2 Bit 1 Bit 0 0 0 1 1 0 1 0 1
The calculation in reverse: A trial and error method is used to determine individual bits from a decimal figure: start with the largest value. If a number is larger or equal to 128 then Bit 7 = 1. If the remaining number is larger or equal to 64 then Bit 6 = 1 and so on.
Example: The decimal figure of 53 is neither larger or equal to 128, nor larger/equal to 64 but is larger than 32. There-fore Bit 7 = 0, Bit 6 = 0 but Bit 5 = 1; the rest of 21 (53 - 32 = 21) is larger than 16 (Bit 4 = 1), the remaining 5 (21 - 16 = 5) is not larger than 8 but is larger than 4 (Bit 3 = 0, Bit 2 = 1), and finally 1 (5 - 4 = 1) is not lar-ger/equal to 2 but is equal to 1 (Bit 1 = 0, Bit 0 = 1).
13. Operating with Märklin MOTOROLA systems
Using the MOTOROLA mode only makes sense if the system used is not capable of operating in the DCC format. DCC is substantially more powerful and should to be the preferred protocol with a multi-protocol sys-tem.
The MOTOROLA data format is recognized automatically by the decoder.
Addressing and CV programming is possible with the current Mobile Station as well as the Märklin 6021 command station. The update method in the first case is automated and easy to do (see operating manual of the Mobile Station); with older systems however it is very tedious (because this system doesn’t provide much help):
Programming CV's with Märklin 6021 central unit:
Start the programming mode by:
1. selecting the address of the engine to be programmed
2. press the "STOP" key at the central unit and wait a few seconds
3. Crank the speed regulator past the left stop and hold (direction switch)
4. press the "START" key
5. release the speed regulator
The front headlight of the engine should now be flashing once per second indicating that the decoder is in the programming mode.
You can now choose between two programming modes:
1. Short mode: programming is limited to CV’s 1 – 79 and a value range from 0 – 79
2. Long mode: the values to be used in each case are split and transmitted in two steps (CV 1-799, value range 0-255)
The short mode is always active after entering the programming mode.
To change to the long mode write 80 to CV #80 (enter address 80 and change direction twice to change to the long mode).
Short mode:
Enter the CV to be programmed in the central unit as an address and briefly operate the direction switch.
The headlight now quickly flashes twice.
Now enter the desired value to the selected CV and again operate the direction switch briefly (enter 80 for a value of 0).
The headlight flashes once indicating that you can program the next CV or end the programming by turning power to the track off.
Long mode:
Remember to set address 80 to a value of 0!
Enter the hundreds and tens digit in the central unit of the CV you want to program (for example: for CV 123 enter 12) and operate the direction switch.
Now enter the ones digit of the same CV (for example: for CV 123 enter 03) and operate the direction switch again.
The headlight briefly flashes 3 times.
Enter the hundreds and tens digit in the central unit of the value you want to program and operate the direc-tion switch.
The headlight briefly flashes 4 times.
Now enter the ones digit of the value and operate the direction switch again.
Again, the headlight flashes once indicating that you can program the next CV or end the programming by turning power to the track off.
14. DC - Analog Operation
ZIMO decoders switch automatically to analog when DC voltage is present and CV #29 is set accordingly (Bit 2 = 1, which is the default setting).
Operation is possible with diverse power packs:
– “normal” DC throttles, with poor or no ripple control
– smooth power from a power supply unit
– PWM throttles such as the Roco analog mouse.
The following CV adjustments are possible for analog operation:
� CV #14, Bit 7 = 0: Analog operation without motor regulation
Bit 7 = 1: Analog operation with motor regulation (is of particular value with sound; for example: that the chuff frequency fits the wheel movements)
� CV #14, Bit 6 = 0: Analog operation with momentum as per CV #3 and 4.
Bit 6 = 1: Analog operation without momentum.
� CV #13, CV #14: Select function outputs that should be ON in analog mode.
15. AC - Analog Operation
ATTENTION: Only the decoders of the MX630 family have the dielectric strength to withstand the over-voltage pulse that is required for direction change in the classic AC operation.
16. ZIMO Decoder Software Update … and Sound Installation
All current ZIMO decoders can be updated with new firmware by the end user with the help of the update module MXDECUP or MXDECUPU (with USB converter), the MX31ZL or with the MX10 command station (as of end of 2009). New software versions can be downloaded at no charge from ZIMO’s web site: www.zimo.at (under “UP-DATE”) and add new features, improvements and corrections to the decoder. Downloading the latest
First download a so-called “Decoder Software Collection File” from the UPDATE pages at the zimo web site: www.zimo.at. Downloading the file collection marked aktuell (usually the last line in the update list) con-tains the latest firmware for all ZIMO decoders. The correct file for the decoder at hand will be automatically selected during the update process.
The update itself can be done in different ways:
� With the decoder update module MXDECUP via a computer, using the serial port with the MXDECUP or the USB-serial convertor with the MXDECUPU.
The MXDECUP(U) is connected with the computer, the track output with a section of track. Set the engine onto this “update” track. Start the program “ZIMO Rail Center” (ZIRC) on the computer. ZIRC selects the proper software from the “decoder software collection file” and installs it in to the decoder when prompted to do so. The “ZIMO Sound Program” (ZSP) can also be used instead of ZIRC. As the name implies, this program is used for editing and in-stalling sound files to ZIMO sound decoders but can also be used to update decoder firmware in all ZIMO decoders (sound, non-sound and accessory decoders).
The programs ZIRC and ZSP can also be downloaded at no charge from www.zimo.at
� With the system cab MX31ZL and a computer using the USB interface of the MX31ZL.
The MX31ZL is used in this case just like an MXDECUP (see above) and the procedure is also controlled by the PC with ZIRC or ZSP.
This is of advantage especially to the ZIMO system user, since the cost of a MX31ZL is about the same as a MX31 with MXDECUPU. The MX31ZL can also be used for updates without a computer (see below) and most of all; it is also a complete DCC system.
The ZIMO Service Tool (ZST from version 1.4) is also required for the update procedure. This software can also be downloaded at no charge from www.zimo.at.
Note that the decoder update page of the current ZST program (Version 1.7.1) is still in German. Until a new ZST version is released, a program extension can be downloaded with this page translated to English. Please download both, the original ZST mentioned above and the ZST extension from www.zimo.at. Once both are installed on your PC, the extension can be started as a stand-alone program for decoder updates.
� From the USB stick using a MX31ZL,
In this case, the “decoder software collection file” is first loaded onto the USB stick. Plug the stick to the MX31ZL (with the help of the adapter that comes with the MX31ZL) and use the MX31ZL to proceed with updating as many decoders as desired (but of course, only ZIMO decoders). This process doesn’t require a computer and no direct connection to one (see MX31ZL instruction manual).
� From the USB stick using a MX10 command station,
similar procedure as with MX31ZL; more information will follow when the MX10 becomes available.
RS-232 – SUBD-9-socket To “update track”, to power supply MX31ZL with USB stick control-LED’s behind socket
Implementation and operation:
A section of track is used as “update track” and connected to the 2-pin screw terminal of the MXDECUP. Set the engine with the decoder that is to be updated on the track. The decoder can of course be connected with its red and black wires directly to the track connector of the module instead.
In contrast to the CV-programming procedure, the update procedure with the corresponding acknowledg-ment does not depend on the load connected to the decoder (such loads are neither necessary nor hinder-ing).
Please note...
Electrical loads in the loco that are not connected to the decoder may potentially present a problem (since the decoder cannot turn the load off), because of the 150mA power limit of the MXDECUP. The update
process may fail in such cases and the relevant loads must first be removed or remove the decoder from the locomotive.
Make sure the choke coil recommended in chapter 17 is actually installed, if external buffer circuits (ca-pacitors) are used to maintain power to the decoder on dirty track sections. Acknowledgments from the de-
coder to the MXDECUP are otherwise not possible. Although there is a “blind update option” available in ZST that operates without acknowledgements, its use is
Now, plug-in the power supply at the MXDECUP. The green LED, visible in the connector recess, should now be lit. Next, connect the MXDECUP with the computer using either the RS-232 cable or the RS-232 cable with USB converter. The green LED now turns off again (both LED’s are dark). The actual update process is started and controlled with the “ZIMO Service Tool” (ZST, always use the lat-est version. For English applications use the ZST extension, see explanation on previous page): We can’t offer a detailed description here regarding the update process; since ZST will often be modified and expanded (this software performs a number of other tasks within the ZIMO system). In any case, there is a button on the original ZST main page named: “start with MXDECUP online”. English speaking users should start the ZST extension, which opens the COM PORT selection page. All further steps, such as se-lecting the right COM port, the update software file (one file contains all current software versions for all ZIMO decoders), starting, control and terminating the update process are self-explanatory on screen or can be obtained from the help file. The two LED’s at the MXDECUP are flickering very rapidly during the update process (red and green). This indicates that data packets are sent to and acknowledgments received from the decoder. The LED’s remain dark once the update process is finished. If for any reason the update is unsuccessful (indicated by ZST), another update can be started after a wait-ing period of 5 seconds!