Development Kit for EES20 and EES25 Technical Support Release 1.0 04/2012 https://hirschmann-support.belden.eu.com EES Quick Start Guide Embedded Ethernet Switch Product Family Development Kit for EES20 and EES25
Transcript
Development Kit for EES20 and EES25 Technical Support Release 1.0 04/2012 https://hirschmann-support.belden.eu.com
EES Quick Start Guide
Embedded Ethernet Switch Product Family
Development Kit for EES20 and EES25
2 Development Kit for EES20 and EES25 Release 1.0 03/2012
The naming of copyrighted trademarks in this manual, even when not specially indicated, should not be taken to mean that these names may be considered as free in the sense of the trademark and tradename protection law and hence that they may be freely used by anyone.
Manuals and software are protected by copyright. All rights reserved. The copying, reproduction, translation, conversion into any electronic medium or machine scannable form is not permitted, either in whole or in part. An exception is the preparation of a backup copy of the software for your own use. For devices with embedded software, the end-user license agreement on the enclosed CD applies.
The performance features described here are binding only if they have been expressly agreed when the contract was made. This document was produced by Hirschmann Automation and Control GmbH according to the best of the company's knowledge. Hirschmann reserves the right to change the contents of this document without prior notice. Hirschmann can give no guarantee in respect of the correctness or accuracy of the information in this document.
Hirschmann can accept no responsibility for damages, resulting from the use of the network components or the associated operating software. In addition, we refer to the conditions of use specified in the license contract.
You can get the latest version of this manual on the Internet at the Hirschmann product site (www.hirschmann.com).
Printed in Germany Hirschmann Automation and Control GmbH Stuttgarter Str. 45-51 72654 Neckartenzlingen Germany Tel.: +49 1805 141538
Development Kit for EES20 and EES25 3 Release 1.0 03/2012
Contents
Safety instructions 4 About this Guide 6
Purpose 6
Legend 6
1 Hardware set up 7
1.1 Check Kit Contents 7
1.2 Plug the EES 20/25 Series into development board. 7
1.3 Apply Power to the EES Baseboard 8
1.4 Connect the Board 8
2 Network Management Interfaces 10
2.1 Web Interface 10
2.2 RS–232 serial communication 13
2.3 Telnet access via Ethernet and TCP/IP 15
3 Changing the default IP-Address 18
3.1 Serial communication 18
3.2 Hirschmann’s HiDiscovery Tool 18
A Further Support 20
■ Technical Questions 20
■ Hirschmann Competence Center 20
4 Development Kit for EES20 and EES25 Release 1.0 03/2012
Safety instructions
This documentation contains instructions which must be observed to ensure your own personal safety and to avoid damage to devices and machinery.
■ Certified usage
The device may only be employed for the purposes described in the catalog and technical description, and only in conjunction with external devices and components recommended or approved by the manufacturer. The product can only be operated correctly and safely if it is transported, stored, installed and assembled properly and correctly. Furthermore, it must be operated and serviced carefully.
■ Qualification requirements for personnel
Qualified personnel as understood in this manual and the warning signs, are persons who are familiar with the setup, assembly, startup, and operation of this product and are appropriately qualified for their job. This includes, for example, those persons who have been:
► trained or directed or authorized to switch on and off, to ground and to label power circuits and devices or systems in accordance with current safety engineering standards;
► trained or directed in the care and use of appropriate safety equipment in accordance with the current standards of safety engineering;
► trained in providing first aid.
■ National and international safety regulations
□ Make sure that the electrical installation meets local or nationally applicable safety regulations.
■ Note on the CE marking
The EES is not intended for end users in accordance with item 2(1)b) of the EMC Directive 2004/108/EG. See also chapter 1.2 in “Guide for the EMC Directive 2004/108/EC (21st May 2007)”. The manufacturer or distributor of the end device in which the EES was installed, is responsible for adhering to the applicable EU directives, as well as the CE marking.
The EES adheres to the EMC standards as listed in section 5.1 of this document.
Development Kit for EES20 and EES25 5 Release 1.0 03/2012
The EMC tests were performed in combination with the Evaluation Board.
■ Maintenance
□ When designing this device, Hirschmann was largely able to forego using wear parts. The parts subject to wear are dimensioned to last longer than the lifetime of the product when it is operated normally.
□ Relays are subject to natural wear. This wear depends on the frequency of the switching operations. Depending on the frequency of the switching operations, check the volume resistance of the closed relay contacts and the switching function.
□ Hirschmann are continually working on improving and developing their software. You should regularly check whether there is a new version of the software that provides you with additional benefits. You will find software information and downloads on the product pages of the Hirschmann website.
■ ESD guidelines
The media modules contain components highly sensitive to electrostatic fields.These components can be easily destroyed or have their lives shortened by an electrical field or by a discharge caused by touching the contacts. You can find more informationen about devices vulnerable to electrostatic fields in IEC/TR 61340-5-2 (2007-08)
■ Recycling note
After usage, this product must be disposed of properly as electronic waste, in accordance with the current disposal regulations of your county, state and country.
6 Development Kit for EES20 and EES25 Release 1.0 03/2012
About this Guide
Purpose
This document is a step-by-step guide that covers hardware and software installation procedures required to set up an EES20 or EES25 Development Kit with factory default settings.
In addition to your Development Kit, make sure you have the following items available:
► EES Module
► PC with Ethernet connection
► Power supply, 24 VDC
► Ethernet cable and optionally terminal cable RS-232
► Java Runtime Environment (JRE) installed on your PC for Running the WEB interface
Legend
The symbols used in this manual have the following meanings:
► Listing □ Work step ■ Subheading
Development Kit for EES20 and EES25 7 Release 1.0 03/2012
1 Hardware set up
These steps, as described in detail, are used to set up the Hirschmann hardware:
□ Check Kit Contents
□ Plug the EES 20/25 Series into baseboard.
□ Apply power to the EES baseboard
□ Connect the Module
1.1 Check Kit Contents
Item Quantity in Development Kit
Development board
1x Baseboard Note: The EES Module is not included
Product-CD
1x
1.2 Plug the EES 20/25 Series into development boar d.
Plug the EES 20/25 Series module into the sockets on the top of the baseboard (CO103–CO101) as seen above.
8 Development Kit for EES20 and EES25 Release 1.0 03/2012
1.3 Apply Power to the EES Baseboard
Connect the 18-32V DC (24V DC is recommended) power supply directly into the development board’s DC power connector as seen in Figure 1-1.
Figure 1-1: DC–Jack
1.4 Connect the Board
Using an Ethernet cable, connect the PC to any Ethernet port on the EES Baseboard. The Ethernet port’s green LED should be “On” when connected.
In addition to the Ethernet connection, the device also has a RS-232 serial connection to obtain Command Line Interface (CLI) access.
Figure 1-2 illustrates these connections.
You will find a detailed description of CLI in the "Command Line Interface" reference manual.
Development Kit for EES20 and EES25 9 Release 1.0 03/2012
Figure 1-2: Board Connection
10 Development Kit for EES20 and EES25 Release 1.0 03/2012
2 Network Management Interfaces
This chapter explains how to access your EES, Embedded Ethernet Switch. The EES Series can be controlled using three different interfaces:
► WEB Interface via Ethernet
► RS-232 serial communication
► Telnet access via Ethernet (In the delivery state, the telnet session is set to “Off”)
2.1 Web Interface
The EES Module and PC should be in the same IP subnet. By default, the EES IPv4 address is 192.168.1.1 and the subnet mask is 255.255.255.0 (for a Class C network).
Configure the PC’s Ethernet port IP address. In a Windows environment, the PC IP-address can be changed in the TCP/IP Settings window. Select an IP address in the same subnet as the EES Module.
The EES web-based interface provides a convenient way to modify the embedded switch configuration and access the built-in monitoring and network administration functions via a standard browser.
The Web browser uses an applet which communicates with the device via the Simple Network Management Protocol (SNMP).
Perform the following steps to access the EES web-based interface.
□ Connect the Ethernet cable to any EES Ethernet port.
□ Open a Web browser, for example Mozilla Firefox version 1 or later, or Microsoft Internet Explorer version 6 or later.
□ Establish a connection to the EES by entering the IP address in the following form: http://192.168.1.1. The Web login window in Figure 2-1 will be displayed.
Note: The Web-based interface uses Java software 6 (“Java™ Runtime Environment Version 1.6.x”). Install the software from the enclosed CD-ROM. To do this, you go to “Additional Software”, select Java Runtime
Development Kit for EES20 and EES25 11 Release 1.0 03/2012
Environment and click on “Installation”. Optional you can download JRE updates from the site: http://www.java.com/de/.
12 Development Kit for EES20 and EES25 Release 1.0 03/2012
□ The device’s default settings allow you to have read access. To have read/write access, enter the login "admin" and the password “private”. The language can also be changed. The device allows you to choose between English and German.
□ Click OK to continue.
□ The Web base interface of the device appears on the screen. Use the Menu Tree on the left side of the window to open and configure each of the EES’s functions.
Figure 2-2: Basic Settings
Development Kit for EES20 and EES25 13 Release 1.0 03/2012
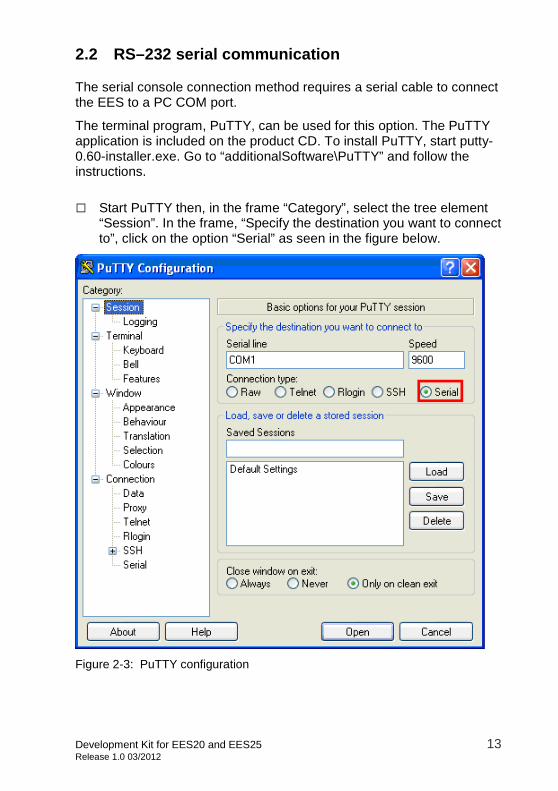
2.2 RS–232 serial communication
The serial console connection method requires a serial cable to connect the EES to a PC COM port.
The terminal program, PuTTY, can be used for this option. The PuTTY application is included on the product CD. To install PuTTY, start putty-0.60-installer.exe. Go to “additionalSoftware\PuTTY” and follow the instructions.
□ Start PuTTY then, in the frame “Category”, select the tree element “Session”. In the frame, “Specify the destination you want to connect to”, click on the option “Serial” as seen in the figure below.
Figure 2-3: PuTTY configuration
14 Development Kit for EES20 and EES25 Release 1.0 03/2012
□ In the frame “Category” select “Connection: Serial”
□ Enter the serial configuration parameters of the terminal emulation program shown in Figure 2-4.
Figure 2-4: PuTTY serial configuration
Development Kit for EES20 and EES25 15 Release 1.0 03/2012
□ Press the “Open” button to connect to the EES. The console login screen will appear.
Figure 2-5: Login Screen
2.3 Telnet access via Ethernet and TCP/IP
The Telnet Console looks and operates in precisely the same manner as the RS-232 Interface.
Perform the following steps to access the console utility via Telnet.
16 Development Kit for EES20 and EES25 Release 1.0 03/2012
□ Start web interface via Ethernet
□ Using the menu tree open, Security: Management Access: Server: Telnet, as seen in Figure 2-6 below.
□ Set operation mode ‘On’
Figure 2-6: Unlock Telnet session
□ Open a Telnet session to the EES.
Figure 2-7: Telnet session
Development Kit for EES20 and EES25 17 Release 1.0 03/2012
□ Press Enter to open the Console login screen.
Figure 2-8: Login Screen
□ Enter "admin" at the User prompt and enter "private" at the Password prompt to obtain read/write access on the module.
□ Press “Enter” and the EES CLI Global Menu will be displayed. The CLI commands are described in detail in the user manual.
18 Development Kit for EES20 and EES25 Release 1.0 03/2012
3 Changing the default IP-Address
There are two ways to change default IP-Address to establish a connection:
► By accessing serial communication RS-232 directly or,
► By using device discovery software such as, Hirschmann’s HiDiscovery tool.
3.1 Serial communication
Using the CLI Command, network parms , you set the IP Address, subnet mask and the IP of the gateway IP router (optional). The IP Address and the gateway must be in the same subnet.
□ In the User Exec mode enter: “enable ” to change to the Privilege Exec Mode.
□ In the Privilege Exec mode enter the command: network parms <ipaddr><networkmask> [gateway]. The gateway entry is optional. e.g. network parms 192.168.1.1 255.255.255.0
□ Any changes must be saved to the devices memory to be persistent after a power cycle. Therefore, enter command: “save ”
3.2 Hirschmann’s HiDiscovery Tool
Install the HiDiscovery software on your PC. The software is on the CD supplied with the development kit. The HiDiscovery application uses the first PC network card found. If your computer has several network cards, you can select these from the HiDiscovery toolbar. The HiDiscovery application provides an easy-to-use and effective way to set-up a network profile on the EES.
Note : The software package WinPcap Version 3.1 is also included with the installation of HiDiscovery.
Development Kit for EES20 and EES25 19 Release 1.0 03/2012
When HiDiscovery is started, it automatically searches the network in a VLAN Broadcast domain for devices that support the HiDiscovery protocol. On delivery, the EES HiDiscovery protocol is “enabled” and access is set to “read-write” which allows you to change device IP-Address.
Figure 3-1: HiDiscovery
Note : If the HiDiscovery application does not find any devises, check to ensure that your firewalls are disabled.
The HiDiscovery protocol allows you, from your PC via an Ethernet connection, to allocate an IP address to the EES device based on its MAC address as seen below.
Figure 3-2: Setting IP-Parameters
20 Development Kit for EES20 and EES25 Release 1.0 03/2012
A Further Support
■ Technical Questions
For technical questions, please contact any Hirschmann dealer in your area or Hirschmann directly. You will find the addresses of our partners on the Internet at http://www.hirschmann.com Contact our support at https://hirschmann-support.belden.eu.com You can contact us in the EMEA region at
The Hirschmann Competence Center is ahead of its competitors:
► Consulting incorporates copmprehensive technical advice, from system evaluation through network planning to project planning.
► Training offers you an introduction to the basics, product briefing and user training with certification.
► The current training courses to technology and products can be found at http://www.hicomcenter.com
► Support ranges from the first installation through the standby service to maintenance concepts.
With the Hirschmann Competence Center, you have decided against making any compromises. Our client-customized package leaves you free to choose the service components you want to use. Internet: http://www.hicomcenter.com


![Cisco IR1101 Integrated Services Router Software ......IP address for this interface: 192.168.1.1 Subnet mask for this interface [255.255.255.0] : Class C network is](https://static.documents.pub/doc/80x56/5eaf132aa3fe5a5ff51cd929/cisco-ir1101-integrated-services-router-software-ip-address-for-this-interface.jpg)


