34
eFACILITY Version 2 USER GUIDE
| Date post: | 30-Aug-2018 |
| Category: |
Documents |
| Upload: | nguyenkhanh |
| View: | 215 times |
| Download: | 0 times |
Last Updated: August 2018 Page 1 of 34
eFACILITY
Version 2
USER GUIDE
Last Updated: August 2018 Page 2 of 34
Table of Contents eFacility ......................................................................................................................................................... 3
Logging In .................................................................................................................................................. 3
Creating User ID’s...................................................................................................................................... 3
Completing Inspections ................................................................................................................................ 5
Out of Province Inspection ....................................................................................................................... 5
Salvage Inspection .................................................................................................................................... 8
Commercial Inspection ........................................................................................................................... 11
Decals .......................................................................................................................................................... 16
Decal Replacement ................................................................................................................................. 16
Decal Management ................................................................................................................................. 17
Completing a Search for a Vehicle Inspection ............................................................................................ 18
Completing a Reprint for a Certificate or Record of Inspection that Gives a PDF Error ............................. 20
Completing a ReInspection of a Vehicle ..................................................................................................... 22
Correcting Information on an Inspection Certificate .................................................................................. 24
Managing User IDs and Facilities ................................................................................................................ 26
Changing Facilities ................................................................................................................................... 26
Changing Facility Information on User IDs .............................................................................................. 26
Helpful Hints ............................................................................................................................................... 27
Frequently Asked Questions (FAQs) ........................................................................................................... 28
Error Messages ........................................................................................................................................... 30

Last Updated: August 2018 Page 3 of 34
eFacility
Logging In 1. Open your internet browser (i.e. Internet Explorer, Google Chrome, Safari , etc.) and go to
https://www.trans.gov.ab.ca/TravisWebLogin/redirect.htm. 2. Enter your User Name and Password and click the ‘Submit’ button. NOTE – User names and
passwords are issued by Alberta Transportation. If you do not have a user name and password, refer to “Creating User ID’s”.
3. Select the “eFacility” link.
Creating User ID’s 1. Open your internet browser (i.e. Internet Explorer, Google Chrome, Safari , etc.) and go to
https://www.trans.gov.ab.ca/TravisWebLogin/redirect.htm. 2. Select the “Register” link below the login.
3. Users must select “I Agree” to continue.
Last Updated: August 2018 Page 4 of 34
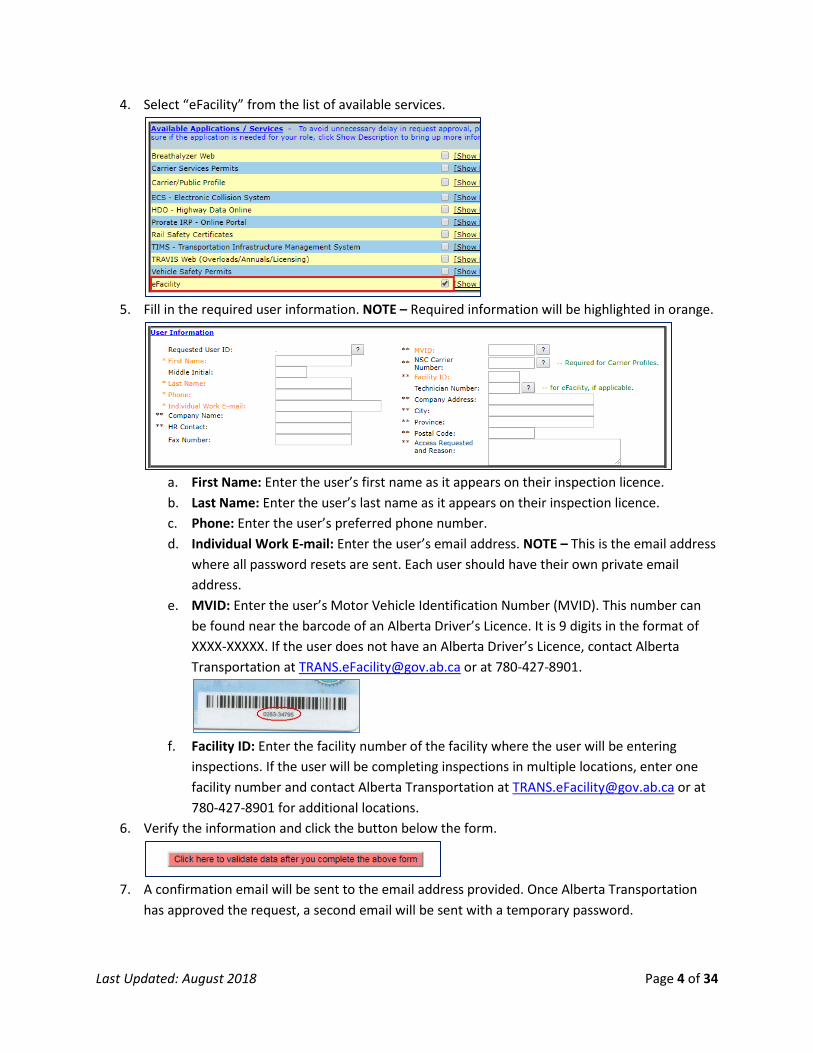
4. Select “eFacility” from the list of available services.
5. Fill in the required user information. NOTE – Required information will be highlighted in orange.
a. First Name: Enter the user’s first name as it appears on their inspection licence. b. Last Name: Enter the user’s last name as it appears on their inspection licence. c. Phone: Enter the user’s preferred phone number. d. Individual Work E-mail: Enter the user’s email address. NOTE – This is the email address
where all password resets are sent. Each user should have their own private email address.
e. MVID: Enter the user’s Motor Vehicle Identification Number (MVID). This number can be found near the barcode of an Alberta Driver’s Licence. It is 9 digits in the format of XXXX-XXXXX. If the user does not have an Alberta Driver’s Licence, contact Alberta Transportation at [email protected] or at 780-427-8901.
f. Facility ID: Enter the facility number of the facility where the user will be entering
inspections. If the user will be completing inspections in multiple locations, enter one facility number and contact Alberta Transportation at [email protected] or at 780-427-8901 for additional locations.
6. Verify the information and click the button below the form.
7. A confirmation email will be sent to the email address provided. Once Alberta Transportation
has approved the request, a second email will be sent with a temporary password.
Last Updated: August 2018 Page 5 of 34
Completing Inspections
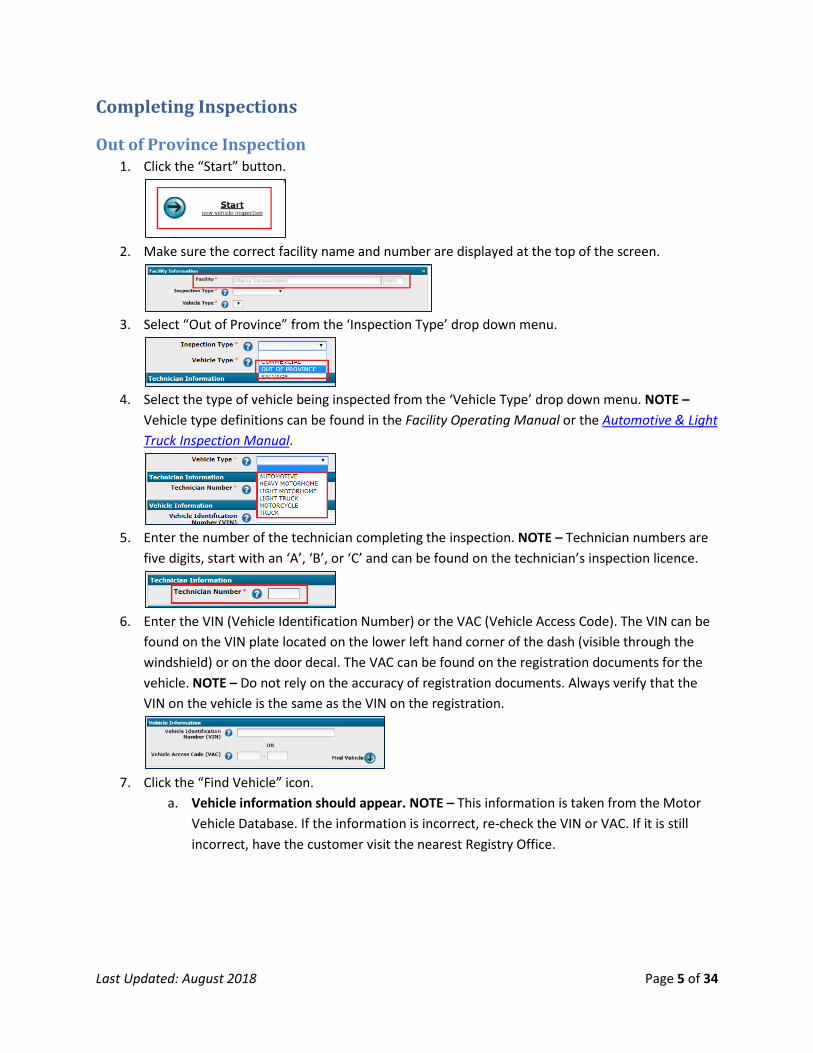
Out of Province Inspection 1. Click the “Start” button.
2. Make sure the correct facility name and number are displayed at the top of the screen.
3. Select “Out of Province” from the ‘Inspection Type’ drop down menu.
4. Select the type of vehicle being inspected from the ‘Vehicle Type’ drop down menu. NOTE –
Vehicle type definitions can be found in the Facility Operating Manual or the Automotive & Light Truck Inspection Manual.
5. Enter the number of the technician completing the inspection. NOTE – Technician numbers are
five digits, start with an ‘A’, ‘B’, or ‘C’ and can be found on the technician’s inspection licence.
6. Enter the VIN (Vehicle Identification Number) or the VAC (Vehicle Access Code). The VIN can be
found on the VIN plate located on the lower left hand corner of the dash (visible through the windshield) or on the door decal. The VAC can be found on the registration documents for the vehicle. NOTE – Do not rely on the accuracy of registration documents. Always verify that the VIN on the vehicle is the same as the VIN on the registration.
7. Click the “Find Vehicle” icon.
a. Vehicle information should appear. NOTE – This information is taken from the Motor Vehicle Database. If the information is incorrect, re-check the VIN or VAC. If it is still incorrect, have the customer visit the nearest Registry Office.

Last Updated: August 2018 Page 6 of 34
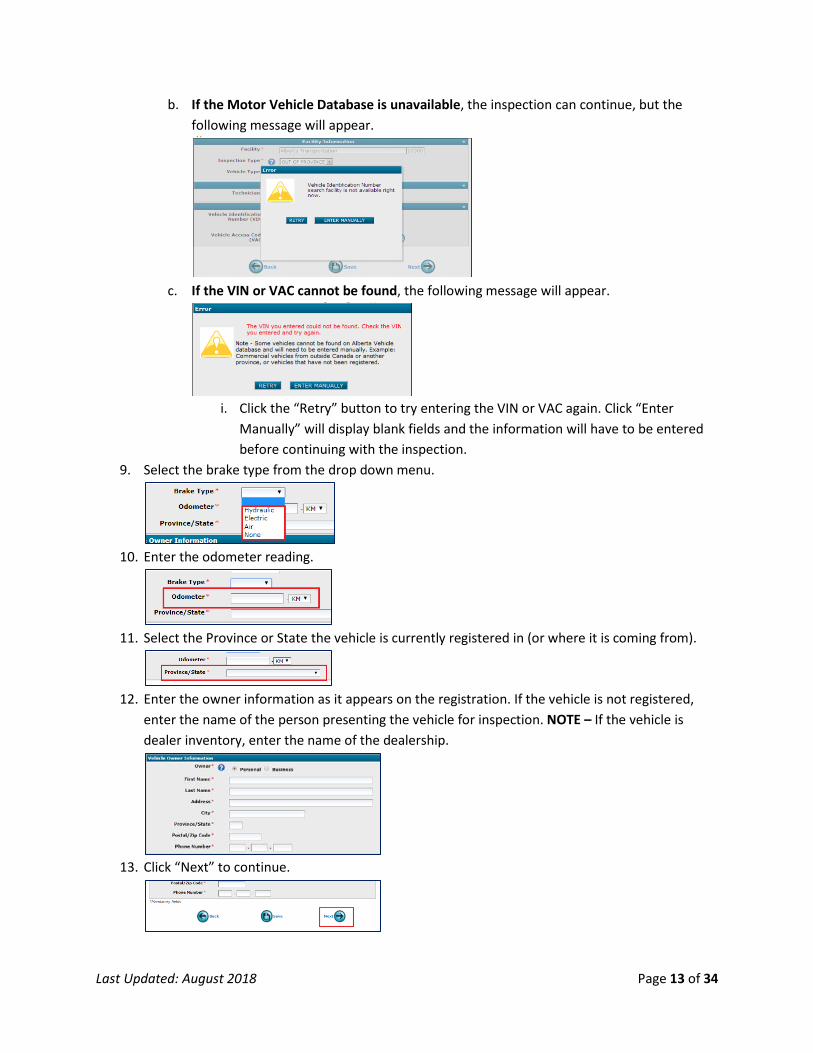
b. If the Motor Vehicle Database is unavailable, the inspection can continue, but the following message will appear.
c. If the VIN or VAC cannot be found, the following message will appear.
i. Click the “Retry” button to try entering the VIN or VAC again. Clicking “Enter
Manually” will display blank fields and the information will have to be entered before continuing with the inspection.
8. Select the brake type from the drop down menu.
9. Enter the odometer reading.
10. Select the Province or State the vehicle is currently registered in (or where it is coming from).
11. Enter the owner information as it appears on the registration. If the vehicle is not registered,
enter the name of the person presenting the vehicle for inspection. NOTE – If the vehicle is dealer inventory, enter the name of the dealership.
12. Click “Next” to continue.

Last Updated: August 2018 Page 7 of 34
13. Complete each section of the Record of Inspection (ROI) by selecting either “P” for pass, “F” for failed, or “NA” for not applicable. NOTE – Clicking on the “P”, “F”, or “NA” link at the top of each section will mark all the radio buttons for that section.
14. Indicate if the vehicle “Passed” or “Failed” the inspection by clicking the radio buttons at the
bottom of the screen.
15. Click the “Next” button.
16. Click the “Confirm & Save” button. NOTE – Clicking this button will create the inspection
certificate with the inspection date.
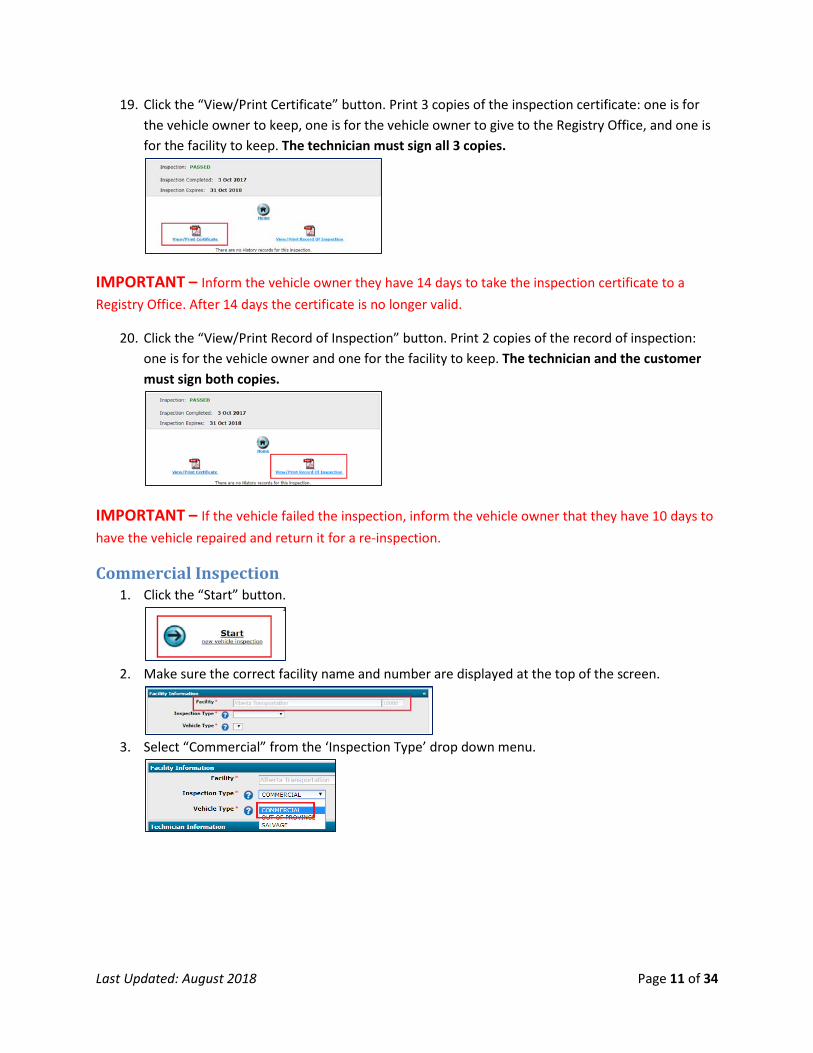
17. Click the “View/Print Certificate” button. Print 3 copies of the inspection certificate: one is for
the vehicle owner to keep, one is for the vehicle owner to give to the Registry Office, and one is for the facility to keep. The technician must sign all 3 copies.
IMPORTANT – Inform the vehicle owner they have 14 days to take the inspection certificate to a Registry Office. After 14 days the certificate is no longer valid.
18. Click the “View/Print Record of Inspection” button. Print 2 copies of the record of inspection: one is for the vehicle owner and one for the facility to keep. The technician and the customer must sign both copies.
Last Updated: August 2018 Page 8 of 34
IMPORTANT – If the vehicle failed the inspection, inform the vehicle owner that they have 10 days to have the vehicle repaired and return it for a re-inspection.
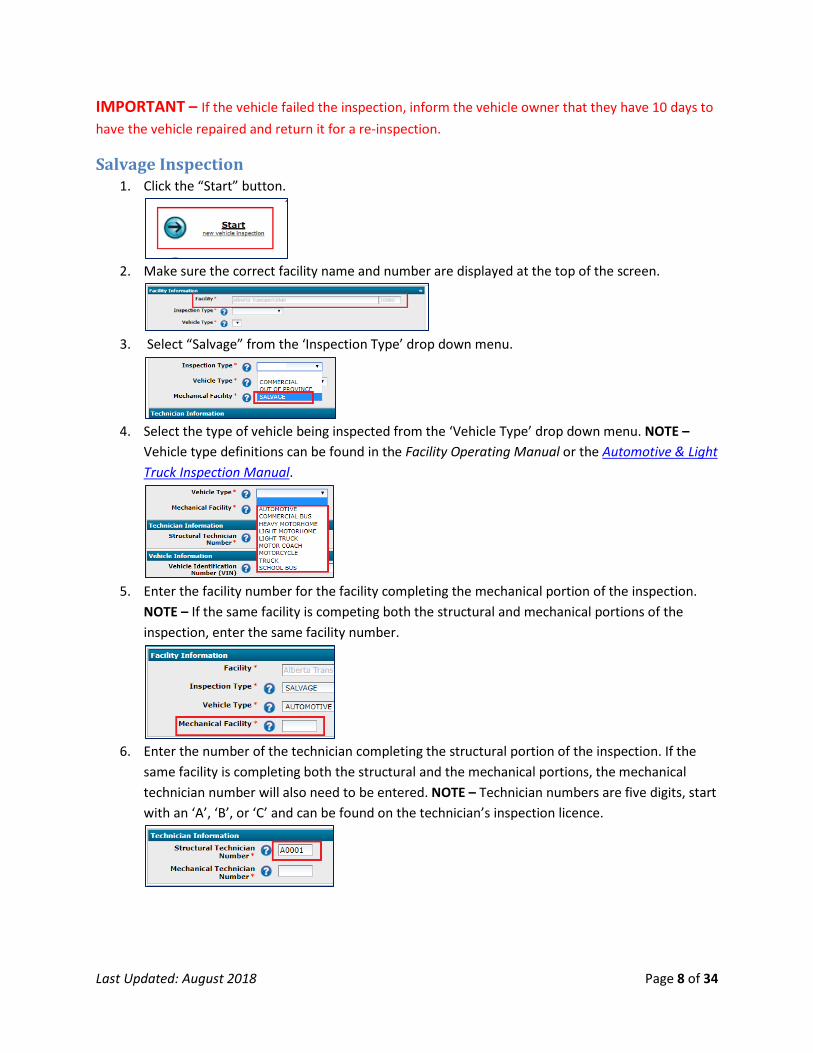
Salvage Inspection 1. Click the “Start” button.
2. Make sure the correct facility name and number are displayed at the top of the screen.
3. Select “Salvage” from the ‘Inspection Type’ drop down menu.
4. Select the type of vehicle being inspected from the ‘Vehicle Type’ drop down menu. NOTE –
Vehicle type definitions can be found in the Facility Operating Manual or the Automotive & Light Truck Inspection Manual.
5. Enter the facility number for the facility completing the mechanical portion of the inspection.
NOTE – If the same facility is competing both the structural and mechanical portions of the inspection, enter the same facility number.
6. Enter the number of the technician completing the structural portion of the inspection. If the
same facility is completing both the structural and the mechanical portions, the mechanical technician number will also need to be entered. NOTE – Technician numbers are five digits, start with an ‘A’, ‘B’, or ‘C’ and can be found on the technician’s inspection licence.

Last Updated: August 2018 Page 9 of 34
7. Enter the VIN (Vehicle Identification Number) or the VAC (Vehicle Access Code). The VIN can be found on the VIN plate located on the lower left hand corner of the dash (visible through the windshield) or on the door decal. The VAC can be found on the registration documents for the vehicle. NOTE – Do not rely on the accuracy of registration documents. Always verify that the VIN on the vehicle is the same as the VIN on the registration.
8. Click the “Find Vehicle” icon.
a. Vehicle information should appear. NOTE – This information is taken from the Motor Vehicle Database. If the information is incorrect, re-check the VIN or VAC. If it is still incorrect, have the customer visit the nearest Registry Office.
b. If the Motor Vehicle Database is unavailable, the inspection can continue, but the following message will appear.
c. If the VIN or VAC cannot be found, the following message will appear.
i. Click the “Retry” button to try entering the VIN or VAC again. Click “Enter
Manually” will display blank fields and the information will have to be entered before continuing with the inspection.
9. Select the brake type from the drop down menu.
10. Enter the odometer reading.
11. Select the Province or State the vehicle is currently registered in (or where it is coming from).

Last Updated: August 2018 Page 10 of 34
12. Enter the owner information as it appears on the registration. If the vehicle is not registered, enter the name of the person presenting the vehicle for inspection. NOTE – If the vehicle is dealer inventory, enter the name of the dealership.
13. Click “Next” to continue.
14. For facilities doing both parts of the inspection (structural and mechanical), the entire Record of
Inspection will be displayed. For facilities doing the structural portion, only the structural part of the Record of Inspection will be displayed.
a. If the same facility is completing both portions of the inspection, click “Next” to continue.
b. If different facilities are completing each portion, click “Forward”. NOTE – Clicking the “Forward” button will send the inspection to the Mechanical Facility.
15. Complete each section of the Record of Inspection by selecting either “P” for pass, “F” for failed, or “NA” for not applicable. NOTE – Clicking on the “P”, “F”, or “NA” link at the top of each section will mark all the radio buttons for that section.
16. Indicate if the vehicle “Passed” or “Failed” the inspection by clicking the radio buttons at the
bottom of the screen.
17. Click the “Next” button.
18. Click the “Confirm & Save” button. NOTE – Clicking this button will create the inspection
certificate with the inspection date.
Last Updated: August 2018 Page 11 of 34
19. Click the “View/Print Certificate” button. Print 3 copies of the inspection certificate: one is for the vehicle owner to keep, one is for the vehicle owner to give to the Registry Office, and one is for the facility to keep. The technician must sign all 3 copies.
IMPORTANT – Inform the vehicle owner they have 14 days to take the inspection certificate to a Registry Office. After 14 days the certificate is no longer valid.
20. Click the “View/Print Record of Inspection” button. Print 2 copies of the record of inspection: one is for the vehicle owner and one for the facility to keep. The technician and the customer must sign both copies.
IMPORTANT – If the vehicle failed the inspection, inform the vehicle owner that they have 10 days to have the vehicle repaired and return it for a re-inspection.
Commercial Inspection 1. Click the “Start” button.
2. Make sure the correct facility name and number are displayed at the top of the screen.
3. Select “Commercial” from the ‘Inspection Type’ drop down menu.

Last Updated: August 2018 Page 12 of 34
4. Select the type of vehicle being inspected from the ‘Vehicle Type’ drop down menu. NOTE – Vehicle type definitions can be found in the Facility Operating Manual or the Commercial Vehicle Inspection Manual.
5. Enter the number of the technician completing the inspection. NOTE – Technician numbers are
five digits, start with an ‘A’, ‘B’, or ‘C’ and can be found on the technician’s inspection licence.
6. Enter the VIN (Vehicle Identification Number) or the VAC (Vehicle Access Code). The VIN can be
found on the VIN plate located on the lower left hand corner of the dash (visible through the windshield) or on the door decal. The VAC can be found on the registration documents for the vehicle. NOTE – Do not rely on the accuracy of registration documents. Always verify that the VIN on the vehicle is the same as the VIN on the registration.
7. If the vehicle is a trailer and does not have a VIN, check the “No VIN” box.
a. Once you have completed the remaining information and click the “Next” button, you
will see the following pop-up.
b. You will need to contact Vehicle Safety prior to continuing the inspection. Vehicle Safety
will review the vehicle history and inform you if an assigned VIN is required. 8. Click the “Find Vehicle” icon.
a. Vehicle information should appear. NOTE – This information is taken from the Motor Vehicle Database. If the information is incorrect, re-check the VIN or VAC. If it is still incorrect, have the customer visit the nearest Registry Office.
Last Updated: August 2018 Page 13 of 34
b. If the Motor Vehicle Database is unavailable, the inspection can continue, but the following message will appear.
c. If the VIN or VAC cannot be found, the following message will appear.
i. Click the “Retry” button to try entering the VIN or VAC again. Click “Enter
Manually” will display blank fields and the information will have to be entered before continuing with the inspection.
9. Select the brake type from the drop down menu.
10. Enter the odometer reading.
11. Select the Province or State the vehicle is currently registered in (or where it is coming from).
12. Enter the owner information as it appears on the registration. If the vehicle is not registered,
enter the name of the person presenting the vehicle for inspection. NOTE – If the vehicle is dealer inventory, enter the name of the dealership.
13. Click “Next” to continue.
Last Updated: August 2018 Page 14 of 34
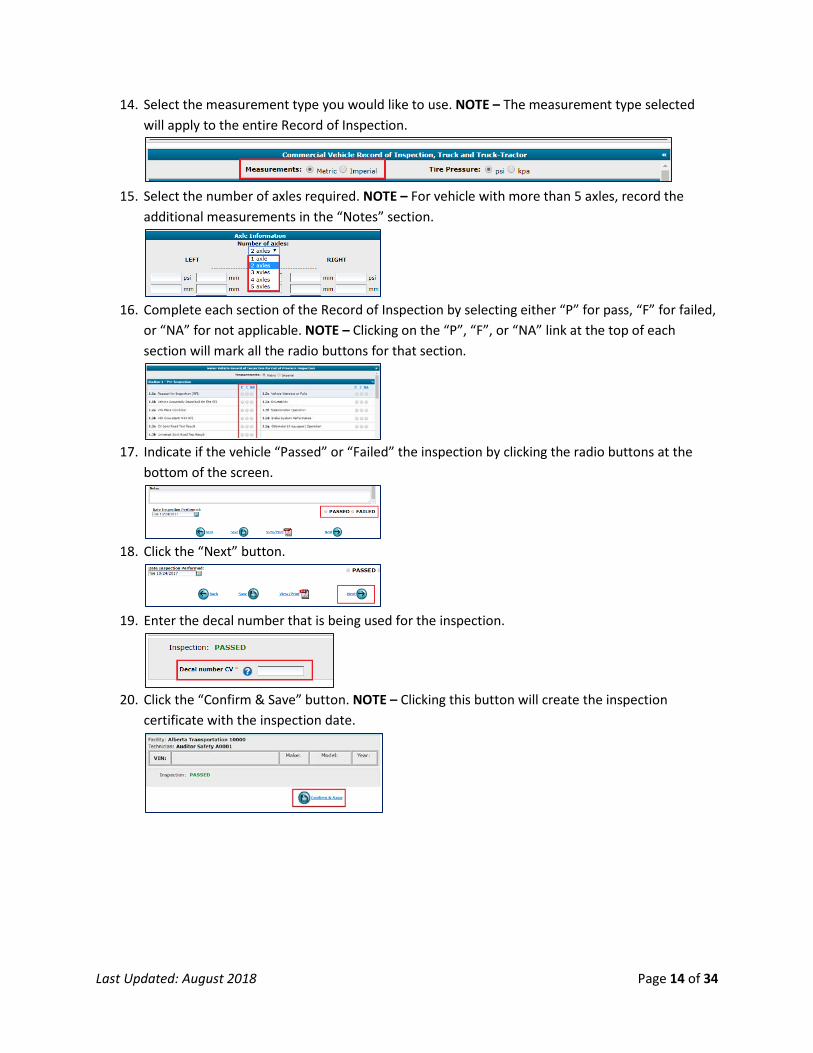
14. Select the measurement type you would like to use. NOTE – The measurement type selected will apply to the entire Record of Inspection.
15. Select the number of axles required. NOTE – For vehicle with more than 5 axles, record the
additional measurements in the “Notes” section.
16. Complete each section of the Record of Inspection by selecting either “P” for pass, “F” for failed,
or “NA” for not applicable. NOTE – Clicking on the “P”, “F”, or “NA” link at the top of each section will mark all the radio buttons for that section.
17. Indicate if the vehicle “Passed” or “Failed” the inspection by clicking the radio buttons at the
bottom of the screen.
18. Click the “Next” button.
19. Enter the decal number that is being used for the inspection.
20. Click the “Confirm & Save” button. NOTE – Clicking this button will create the inspection
certificate with the inspection date.

Last Updated: August 2018 Page 15 of 34
21. Click the “View/Print Certificate” button. Print 3 copies of the inspection certificate: one is for the vehicle owner to keep, one is for the vehicle owner to give to the Registry Office, and one is for the facility to keep. The technician must sign all 3 copies.
IMPORTANT – Inform the vehicle owner they have 14 days to take the inspection certificate to a Registry Office. After 14 days the certificate is no longer valid.
22. Click the “View/Print Record of Inspection” button. Print 2 copies of the record of inspection: one is for the vehicle owner and one for the facility to keep. The technician and the customer must sign both copies.
IMPORTANT – If the vehicle failed the inspection, inform the vehicle owner that they have 10 days to have the vehicle repaired and return it for a re-inspection.
Last Updated: August 2018 Page 16 of 34
Decals
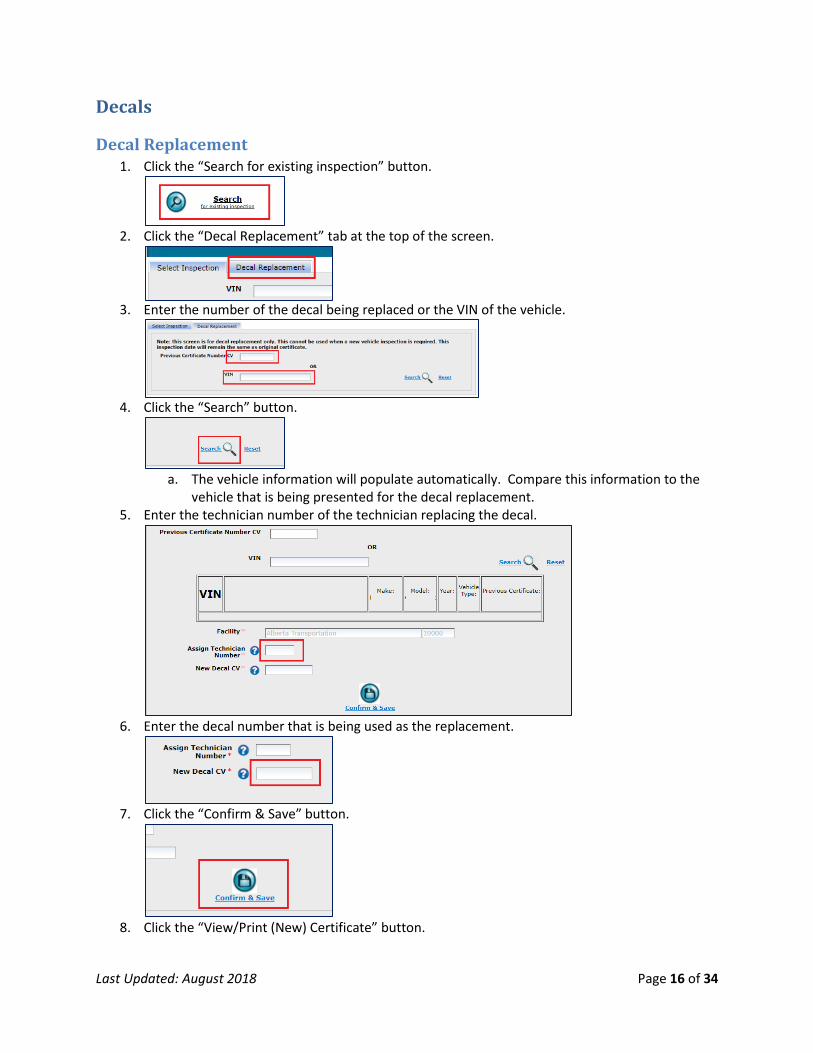
Decal Replacement 1. Click the “Search for existing inspection” button.
2. Click the “Decal Replacement” tab at the top of the screen.
3. Enter the number of the decal being replaced or the VIN of the vehicle.
4. Click the “Search” button.
a. The vehicle information will populate automatically. Compare this information to the
vehicle that is being presented for the decal replacement. 5. Enter the technician number of the technician replacing the decal.
6. Enter the decal number that is being used as the replacement.
7. Click the “Confirm & Save” button.
8. Click the “View/Print (New) Certificate” button.

Last Updated: August 2018 Page 17 of 34
Decal Management Frequently Asked Questions
1. What do I do with a decal that has been damaged or was punched wrong? Send an email to [email protected] and write “CANCEL DECAL” in the subject line. In the email, include the number of the decal that was damaged. After the email has been sent, the decal can be destroyed.
2. What do I do if I cannot find a decal or book of decals?
Send an email to [email protected] and write “MISSING DECAL” in the subject line. In the email, include the number(s) of the decal(s) that are missing.
3. I put the decal on the wrong vehicle. What do I do? Send an email to [email protected] or call 780-427-8901, toll free within Alberta by first dialing 310-0000. Explain the error and eFacility support will let you know how it can be corrected.
4. I’m running low on decals. How do I order more? Inspection facilities can purchase decals online via the eFacility system. Commercial decals are no longer available through Transtrue Vehicle Safety. You can visit Alberta Transportation’s website at www.transportation.alberta.ca/3749.htm for additional information on purchasing decals online.
5. Can I replace a decal originally issued using a carbon copy inspection certificate? Yes. Refer to the “Decal Replacement” procedure. If the decal number you enter cannot be found, contact eFacility support at 780-427-8901, toll free within Alberta by first dialing 310-0000.
Last Updated: August 2018 Page 18 of 34
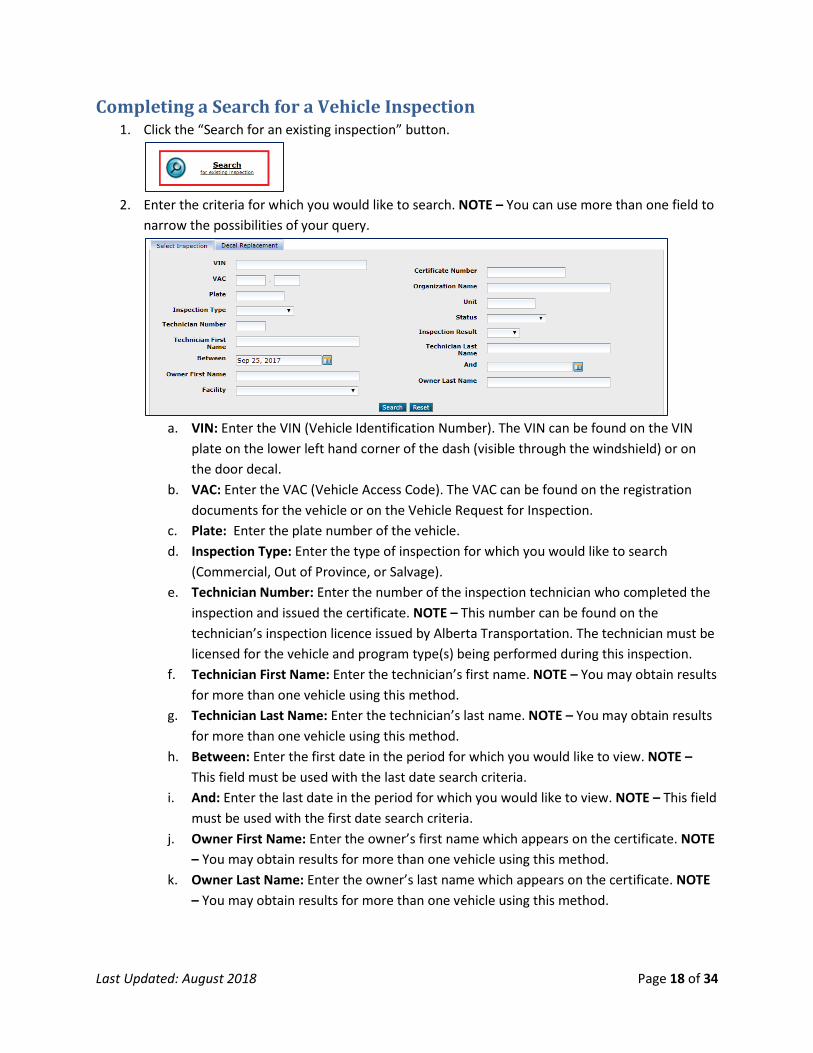
Completing a Search for a Vehicle Inspection 1. Click the “Search for an existing inspection” button.
2. Enter the criteria for which you would like to search. NOTE – You can use more than one field to
narrow the possibilities of your query.
a. VIN: Enter the VIN (Vehicle Identification Number). The VIN can be found on the VIN
plate on the lower left hand corner of the dash (visible through the windshield) or on the door decal.
b. VAC: Enter the VAC (Vehicle Access Code). The VAC can be found on the registration documents for the vehicle or on the Vehicle Request for Inspection.
c. Plate: Enter the plate number of the vehicle. d. Inspection Type: Enter the type of inspection for which you would like to search
(Commercial, Out of Province, or Salvage). e. Technician Number: Enter the number of the inspection technician who completed the
inspection and issued the certificate. NOTE – This number can be found on the technician’s inspection licence issued by Alberta Transportation. The technician must be licensed for the vehicle and program type(s) being performed during this inspection.
f. Technician First Name: Enter the technician’s first name. NOTE – You may obtain results for more than one vehicle using this method.
g. Technician Last Name: Enter the technician’s last name. NOTE – You may obtain results for more than one vehicle using this method.
h. Between: Enter the first date in the period for which you would like to view. NOTE – This field must be used with the last date search criteria.
i. And: Enter the last date in the period for which you would like to view. NOTE – This field must be used with the first date search criteria.
j. Owner First Name: Enter the owner’s first name which appears on the certificate. NOTE – You may obtain results for more than one vehicle using this method.
k. Owner Last Name: Enter the owner’s last name which appears on the certificate. NOTE – You may obtain results for more than one vehicle using this method.

Last Updated: August 2018 Page 19 of 34
l. Certificate Number: Enter the certificate number you would like to view. NOTE – If you do not choose an inspection type, you may receive results for all programs that you are licensed for.
m. Organization Name: Enter the organization’s name at the time of inspection. n. Unit: Enter the unit number for the vehicle. NOTE – You may obtain results for more
than one vehicle using this method. o. Status: Choose the vehicle status. NOTE – You may obtain results for more than one
vehicle using this method. p. Inspection Result: Choose whether the vehicle has Passed or Failed. NOTE – You may
obtain results for more than one vehicle using this method. 3. Click the “Search” button.
4. The certificates relating to the search criteria entered will appear. Choose the certificate that is
required and use the action field to open the certificate by clicking “Open”.
Last Updated: August 2018 Page 20 of 34
Completing a Reprint for a Certificate or Record of Inspection that Gives a PDF Error
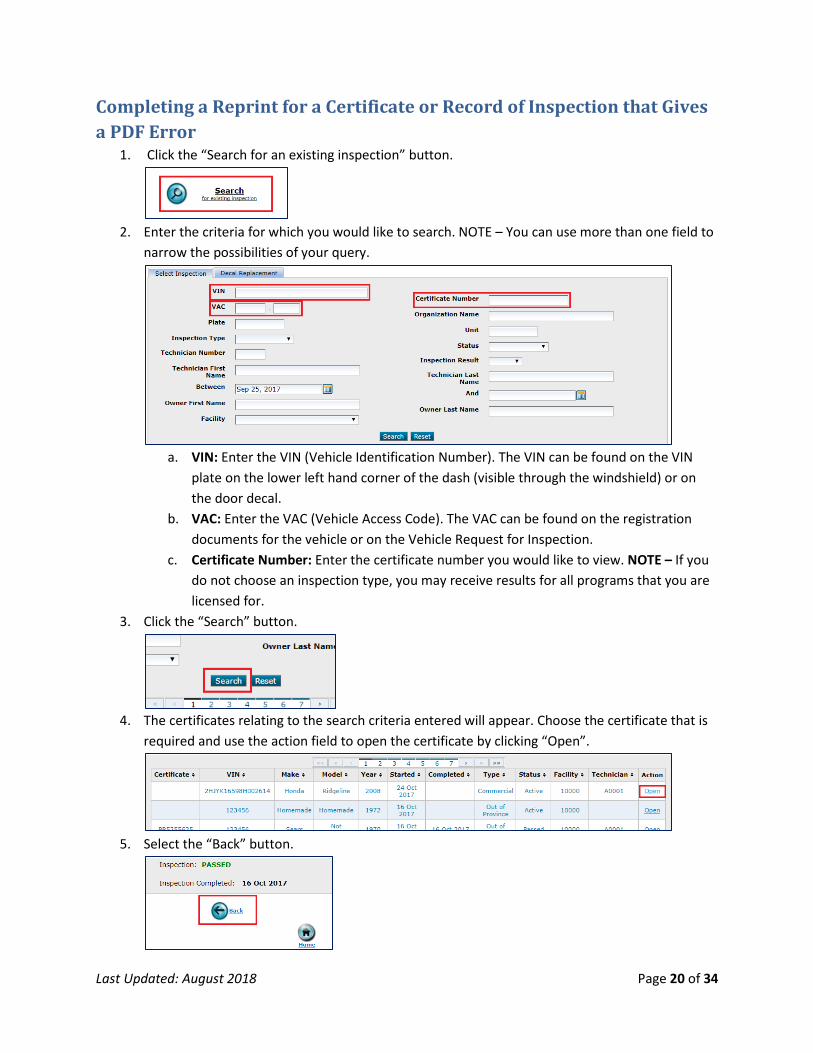
1. Click the “Search for an existing inspection” button.
2. Enter the criteria for which you would like to search. NOTE – You can use more than one field to
narrow the possibilities of your query.
a. VIN: Enter the VIN (Vehicle Identification Number). The VIN can be found on the VIN
plate on the lower left hand corner of the dash (visible through the windshield) or on the door decal.
b. VAC: Enter the VAC (Vehicle Access Code). The VAC can be found on the registration documents for the vehicle or on the Vehicle Request for Inspection.
c. Certificate Number: Enter the certificate number you would like to view. NOTE – If you do not choose an inspection type, you may receive results for all programs that you are licensed for.
3. Click the “Search” button.
4. The certificates relating to the search criteria entered will appear. Choose the certificate that is
required and use the action field to open the certificate by clicking “Open”.
5. Select the “Back” button.
Last Updated: August 2018 Page 21 of 34
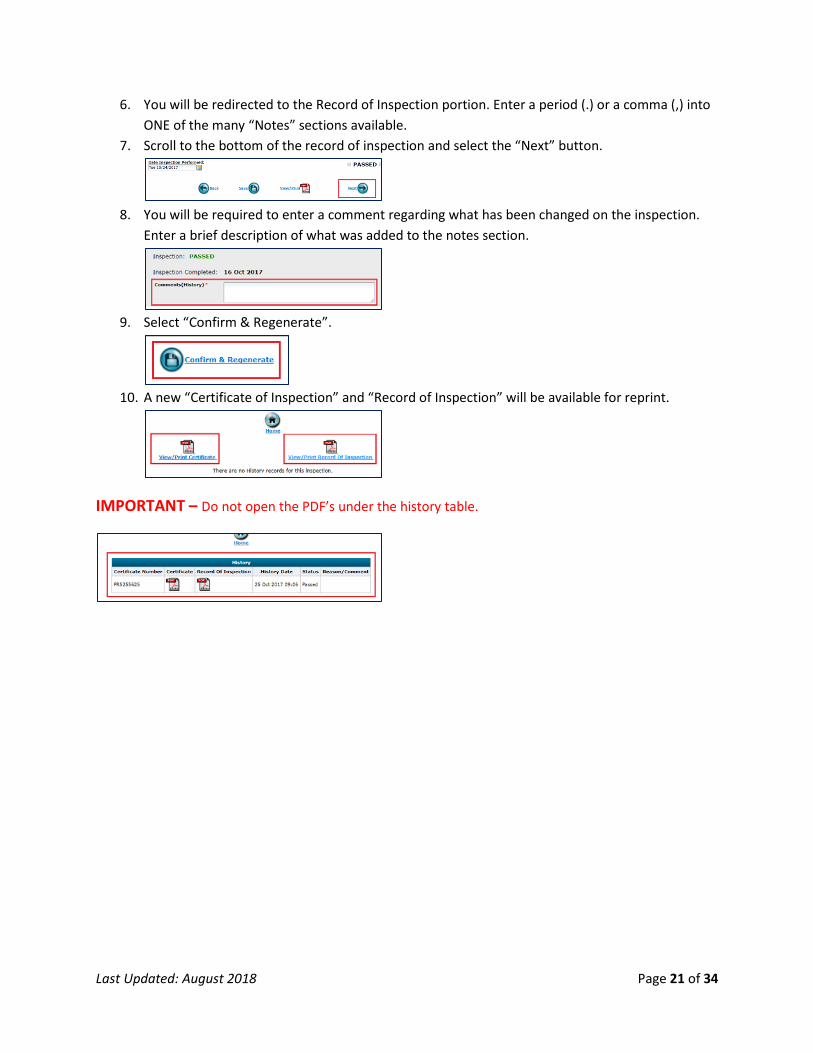
6. You will be redirected to the Record of Inspection portion. Enter a period (.) or a comma (,) into ONE of the many “Notes” sections available.
7. Scroll to the bottom of the record of inspection and select the “Next” button.
8. You will be required to enter a comment regarding what has been changed on the inspection.
Enter a brief description of what was added to the notes section.
9. Select “Confirm & Regenerate”.
10. A new “Certificate of Inspection” and “Record of Inspection” will be available for reprint.
IMPORTANT – Do not open the PDF’s under the history table.

Last Updated: August 2018 Page 22 of 34
Completing a ReInspection of a Vehicle 1. Click the “Search for an existing inspection” button.
2. Enter the criteria for which you would like to search. NOTE – You can use more than one field to
narrow the possibilities of your query.
a. VIN: Enter the VIN (Vehicle Identification Number). The VIN can be found on the VIN
plate on the lower left hand corner of the dash (visible through the windshield) or on the door decal.
b. VAC: Enter the VAC (Vehicle Access Code). The VAC can be found on the registration documents for the vehicle or on the Vehicle Request for Inspection.
c. Certificate Number: Enter the certificate number you would like to view. 3. Click the “Search” button.
4. The certificates relating to the search criteria entered will appear. Choose the certificate that is
required and use the action field to open the certificate by clicking “ReInspect”.
NOTE – The “ReInspect” and “Open” are two separate buttons.
5. Enter the “Technician Number” of the individual completing the reinspection under Technician Information.
6. Confirm that the previously entered information is correct under both Vehicle Information and
the Vehicle Owner Information.
Last Updated: August 2018 Page 23 of 34
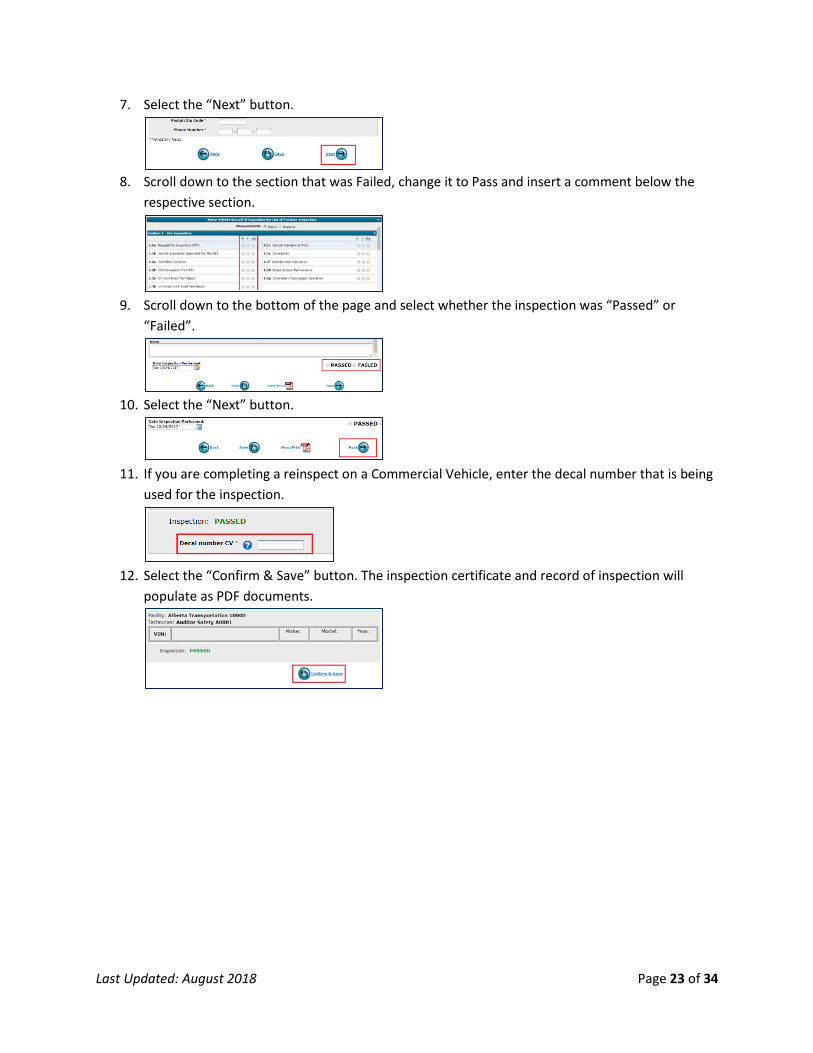
7. Select the “Next” button.
8. Scroll down to the section that was Failed, change it to Pass and insert a comment below the
respective section.
9. Scroll down to the bottom of the page and select whether the inspection was “Passed” or
“Failed”.
10. Select the “Next” button.
11. If you are completing a reinspect on a Commercial Vehicle, enter the decal number that is being
used for the inspection.
12. Select the “Confirm & Save” button. The inspection certificate and record of inspection will
populate as PDF documents.

Last Updated: August 2018 Page 24 of 34
Correcting Information on an Inspection Certificate 1. Click the “Search for an existing inspection” button.
2. Enter the criteria for which you would like to search. NOTE – You can use more than one field to
narrow the possibilities of your query.
a. VIN: Enter the VIN (Vehicle Identification Number). The VIN can be found on the VIN
plate on the lower left hand corner of the dash (visible through the windshield) or on the door decal.
b. VAC: Enter the VAC (Vehicle Access Code). The VAC can be found on the registration documents for the vehicle or on the Vehicle Request for Inspection.
c. Certificate Number: Enter the certificate number you would like to view. 3. Click the “Search” button.
4. The certificates relating to the search criteria entered will appear. Choose the certificate that is
required and use the action field to open the certificate by clicking “Open”.
5. Select the “Back” button.

Last Updated: August 2018 Page 25 of 34
6. You will be redirected to the Record of Inspection portion of the inspection. Make the changes required, if applicable, and insert a comment as to why the changes were made.
a. You can select the “Back” button again to reach the page with the Vehicle and Customer information, if this requires updating.
b. Should the VIN or VAC require an update, please send an email requesting the change to [email protected].
7. Select the “Next” button until you reach the final page.
8. Insert a comment as to what was changed.
9. Select “Confirm & Regenerate”.

Last Updated: August 2018 Page 26 of 34
Managing User IDs and Facilities
Changing Facilities 1. If you are looking to change what facility you will be completing inspections for, select the
“Change Facility” option on the home page of the eFacility system.
2. In the dialog box that populates, select the “Continue” button for the facility that you will be
inspecting for.
3. You will then be asked to acknowledge and confirm the facility information is correct. Select the
“I Agree” if this is the correct information.
Changing Facility Information on User IDs 1. The primary facility contact will need to complete an eFacility User Access Form and return it to
Alberta Transportation for processing.
The eFacility User Access Form can be found at www.transportation.alberta.ca/4950.htm.

Last Updated: August 2018 Page 27 of 34
Helpful Hints - eFacility is meant to be a user friendly system, so please feel free to contact Alberta
Transportation with any questions or concerns by email at [email protected] or by phone at 780-427-8901, toll free in Alberta by first dialling 310-0000.
- Alberta Transportation suggests that each technician have their own User ID and password for completing inspections. User IDs can be deactivated should the technician change facilities. The primary contact must inform Alberta Transportation immediately of changes in technicians by completing an eFacility User Access Form.
- User IDs should be in the following format: Firstname.Lastname - Dates on inspection certificates cannot be changed as they are automatically populated. - If an Out of Province or Salvage inspection are completed, but the client is not returning to pick
up the vehicle for a couple of days, save the record of inspection, but do not Confirm & Save. You can retrieve an inspection that has been saved by selecting “Search for an existing inspection” on the home page.
- Commercial inspections are valid until the end of the month of issue; not the month in which the inspection was started.
- Use the “Help” and support guide on the home page; as well as the facility and technician inspection program manuals for assistance with eFacility. These will be the best methods for obtaining information.
- Alberta Transportation’s eFacility support hours are Monday to Friday, 8:15am to 12:00pm and 1:00pm to 4:30pm. We are closed on all statutory holidays.
- Commercial facilities are responsible to monitor their decal inventory. Decals can be purchased through eFacility. Click HERE for the decal purchase guide.

Last Updated: August 2018 Page 28 of 34
Frequently Asked Questions (FAQs) 1. Should each one of the technicians working in my facility have different login IDs?
Yes. Alberta Transportation recommends that each technician have their own User ID and password for completing inspections. User IDs can be deactivated should the technician change facilities. The primary contact must inform Alberta Transportation immediately of changes in technicians by completing an eFacility User Access Form.
2. Can I change the date on an inspection? Dates cannot be changed on inspections as it is automatically populated.
3. What should I do if I have issued an out of province or salvage certificate and the client has not picked up the vehicle? Call the client and notify them that the inspection has been completed and they have 14 days from the date of inspection to take the inspection certificate to any Alberta Registry. They do not have to register the vehicle at this time; however, the certificate must be taken to the registry to have the vehicle status updated. After the 14 days, a new inspection will need to be completed before the status can be changed.
4. I’m getting an error message that I do not understand. Use the “Help” and support guide on the home page; as well as the facility and technician operating manuals for assistance with eFacility. These will be the best methods for obtaining information. Alberta Transportation’s eFacility support hours are Monday to Friday, 8:15am to 12:00pm and 1:00pm to 4:30pm. We are closed on all statutory holidays.
5. I forgot my password. On the homepage for eFacility, enter the user ID and select “Reset Password” below Forgot Your Password? An email requesting the confirmation to reset your password will be sent to the email that you have provided Alberta Transportation. Alberta Transportation’s eFacility support hours are Monday to Friday, 8:15am to 12:00pm and 1:00pm to 4:30pm. We are closed on all statutory holidays.
6. I’m running out of commercial decals, how do I get more? Decals can be purchased through eFacility. Click HERE for the decal purchase guide.
7. I get an error that my technician number cannot be found. What do I do? Search for the inspection and select “Open”. Select the “Back” button until you reach the first page of the inspection where the vehicle and client information is displayed. In the Technician number box, remove the number and select “Save”. You will receive an error that a number must be entered into the box. Enter your technician number again and select “Save”. Select the “Next” button until you reach the last page and select “Confirm & Regenerate”.
8. There is an Internal User Internal Error 9. I have more axles on the vehicle than eFacility allows me to enter. Where do I record the
additional measurements? All additional measurements can be recorded in any of the notes sections.
Last Updated: August 2018 Page 29 of 34
10. I have a new technician. How do I get them registered to my facility? The primary facility contact will need to complete an eFacility User Access Form and return it to Alberta Transportation either, by email at [email protected] or by fax to 780-988-7628. Alberta Transportation’s eFacility support hours are Monday to Friday, 8:15am to 12:00pm and 1:00pm to 4:30pm. We are closed on all statutory holidays.
Last Updated: August 2018 Page 30 of 34
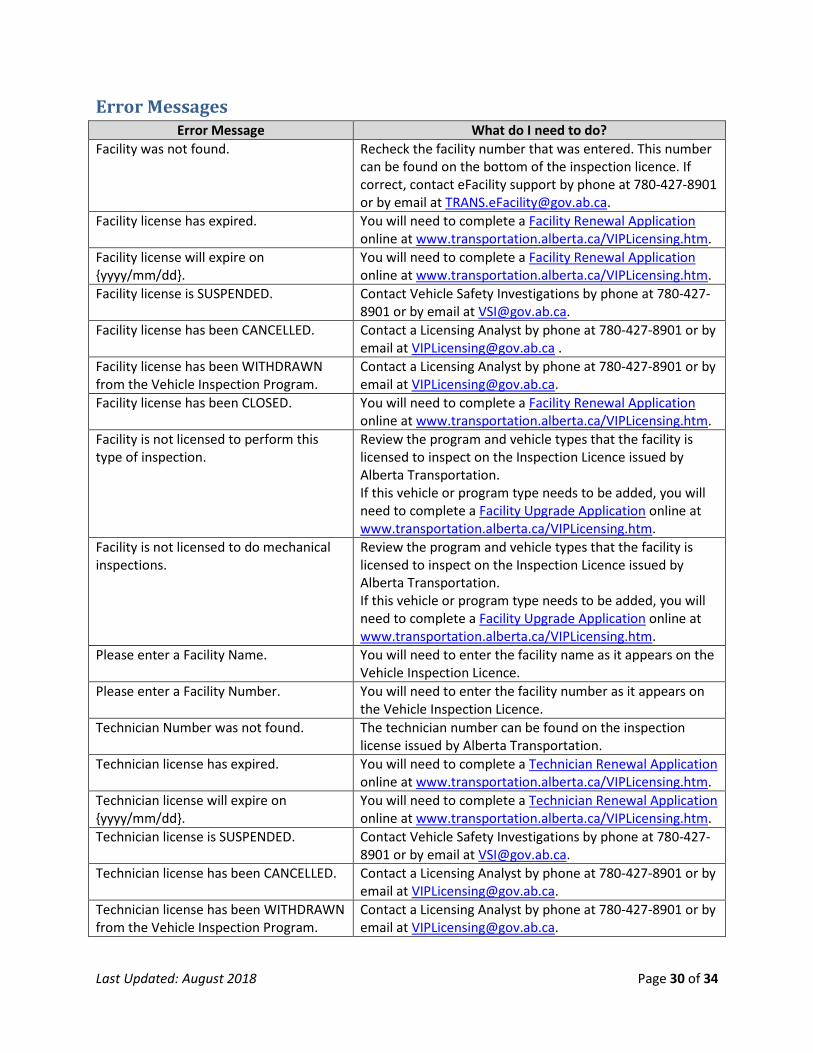
Error Messages Error Message What do I need to do?
Facility was not found. Recheck the facility number that was entered. This number can be found on the bottom of the inspection licence. If correct, contact eFacility support by phone at 780-427-8901 or by email at [email protected].
Facility license has expired. You will need to complete a Facility Renewal Application online at www.transportation.alberta.ca/VIPLicensing.htm.
Facility license will expire on {yyyy/mm/dd}.
You will need to complete a Facility Renewal Application online at www.transportation.alberta.ca/VIPLicensing.htm.
Facility license is SUSPENDED. Contact Vehicle Safety Investigations by phone at 780-427-8901 or by email at [email protected].
Facility license has been CANCELLED. Contact a Licensing Analyst by phone at 780-427-8901 or by email at [email protected] .
Facility license has been WITHDRAWN from the Vehicle Inspection Program.
Contact a Licensing Analyst by phone at 780-427-8901 or by email at [email protected].
Facility license has been CLOSED. You will need to complete a Facility Renewal Application online at www.transportation.alberta.ca/VIPLicensing.htm.
Facility is not licensed to perform this type of inspection.
Review the program and vehicle types that the facility is licensed to inspect on the Inspection Licence issued by Alberta Transportation. If this vehicle or program type needs to be added, you will need to complete a Facility Upgrade Application online at www.transportation.alberta.ca/VIPLicensing.htm.
Facility is not licensed to do mechanical inspections.
Review the program and vehicle types that the facility is licensed to inspect on the Inspection Licence issued by Alberta Transportation. If this vehicle or program type needs to be added, you will need to complete a Facility Upgrade Application online at www.transportation.alberta.ca/VIPLicensing.htm.
Please enter a Facility Name. You will need to enter the facility name as it appears on the Vehicle Inspection Licence.
Please enter a Facility Number. You will need to enter the facility number as it appears on the Vehicle Inspection Licence.
Technician Number was not found. The technician number can be found on the inspection license issued by Alberta Transportation.
Technician license has expired. You will need to complete a Technician Renewal Application online at www.transportation.alberta.ca/VIPLicensing.htm.
Technician license will expire on {yyyy/mm/dd}.
You will need to complete a Technician Renewal Application online at www.transportation.alberta.ca/VIPLicensing.htm.
Technician license is SUSPENDED. Contact Vehicle Safety Investigations by phone at 780-427-8901 or by email at [email protected].
Technician license has been CANCELLED. Contact a Licensing Analyst by phone at 780-427-8901 or by email at [email protected].
Technician license has been WITHDRAWN from the Vehicle Inspection Program.
Contact a Licensing Analyst by phone at 780-427-8901 or by email at [email protected].
Last Updated: August 2018 Page 31 of 34
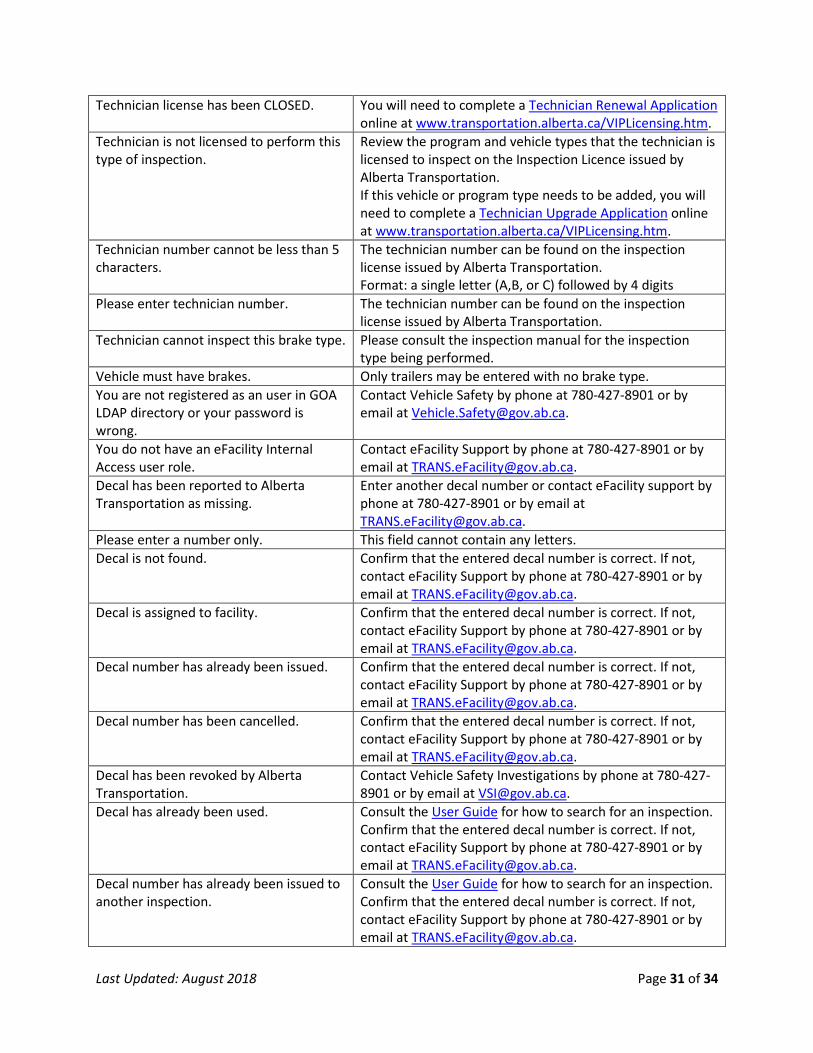
Technician license has been CLOSED. You will need to complete a Technician Renewal Application online at www.transportation.alberta.ca/VIPLicensing.htm.
Technician is not licensed to perform this type of inspection.
Review the program and vehicle types that the technician is licensed to inspect on the Inspection Licence issued by Alberta Transportation. If this vehicle or program type needs to be added, you will need to complete a Technician Upgrade Application online at www.transportation.alberta.ca/VIPLicensing.htm.
Technician number cannot be less than 5 characters.
The technician number can be found on the inspection license issued by Alberta Transportation. Format: a single letter (A,B, or C) followed by 4 digits
Please enter technician number. The technician number can be found on the inspection license issued by Alberta Transportation.
Technician cannot inspect this brake type. Please consult the inspection manual for the inspection type being performed.
Vehicle must have brakes. Only trailers may be entered with no brake type. You are not registered as an user in GOA LDAP directory or your password is wrong.
Contact Vehicle Safety by phone at 780-427-8901 or by email at [email protected].
You do not have an eFacility Internal Access user role.
Contact eFacility Support by phone at 780-427-8901 or by email at [email protected].
Decal has been reported to Alberta Transportation as missing.
Enter another decal number or contact eFacility support by phone at 780-427-8901 or by email at [email protected].
Please enter a number only. This field cannot contain any letters. Decal is not found. Confirm that the entered decal number is correct. If not,
contact eFacility Support by phone at 780-427-8901 or by email at [email protected].
Decal is assigned to facility. Confirm that the entered decal number is correct. If not, contact eFacility Support by phone at 780-427-8901 or by email at [email protected].
Decal number has already been issued. Confirm that the entered decal number is correct. If not, contact eFacility Support by phone at 780-427-8901 or by email at [email protected].
Decal number has been cancelled. Confirm that the entered decal number is correct. If not, contact eFacility Support by phone at 780-427-8901 or by email at [email protected].
Decal has been revoked by Alberta Transportation.
Contact Vehicle Safety Investigations by phone at 780-427-8901 or by email at [email protected].
Decal has already been used. Consult the User Guide for how to search for an inspection. Confirm that the entered decal number is correct. If not, contact eFacility Support by phone at 780-427-8901 or by email at [email protected].
Decal number has already been issued to another inspection.
Consult the User Guide for how to search for an inspection. Confirm that the entered decal number is correct. If not, contact eFacility Support by phone at 780-427-8901 or by email at [email protected].

Last Updated: August 2018 Page 32 of 34
Please select Inspection Type. Choose that type of inspection being performed. Only the programs that are listed on the Inspection Licence will be permitted.
You cannot change this inspection. Inspections cannot be changed by the facility after a certificate is issued. Contact eFacility Support by phone at 780-427-8901 or by email at [email protected].
Please select PASSED or FAILED. Choose either the Passed or Failed radio button. Please select either Trailer or Converter. Consult the Inspection Manuals for vehicle definitions. Please deselect all fails in each section or select FAILED.
Review the Record of Inspection (ROI) for errors. If the section has been failed, you will need to change the selection to a PASS or select PASSED at the bottom of the ROI to continue.
No vehicle inspection can be done due to current vehicle status.
Contact eFacility Support by phone at 780-427-8901 or by email at [email protected].
Due to current vehicle status, only a Salvage Vehicle Inspection can be completed. Facility is also licensed to perform a salvage inspection on {vehicle type}.
Review the request for inspection for the type of inspection required. If the vehicle owner does not have a request for inspection, they will be required to obtain one from any Alberta registry.
Due to current vehicle status, only a Salvage Vehicle Inspection can be completed. Facility cannot perform a salvage inspection on {vehicle type}.
Review the request for inspection for the type of inspection required. If the vehicle owner does not have a request for inspection, they will be required to obtain one from any Alberta registry. Review the vehicle types that are listed on the Inspection Licence. If this vehicle or program type needs to be added, you will need to complete a Facility Upgrade Application online at www.transportation.alberta.ca/VIPLicensing.htm.
Due to current vehicle status, only a Salvage Vehicle Inspection can be completed. Facility is not licensed to perform a salvage inspection.
Review the request for inspection for the type of inspection required. If the vehicle owner does not have a request for inspection, they will be required to obtain one from any Alberta registry. Review the vehicle types that are listed on the Inspection Licence. If this vehicle or program type needs to be added, you will need to complete a Facility Upgrade Application online at www.transportation.alberta.ca/VIPLicensing.htm.
Please enter Make. This information can be found on the vehicle registration document, on the request for inspection, or on the manufacturer’s label on the inside of the driver’s side door.
Please enter Model. This information can be found on the vehicle registration document, on the request for inspection, or on the manufacturer’s label on the inside of the driver’s side door.
Please enter Year. This information can be found on the vehicle registration document, on the request for inspection, or on the manufacturer’s label on the inside of the driver’s side door.
Please enter Brake Type. Only trailers may be entered with no brake type. Please enter Odometer. Enter the odometer reading from the odometer in the dash. Please select KM/MI. Enter either KM for kilometers or MI for miles.

Last Updated: August 2018 Page 33 of 34
Please enter jurisdiction. Enter the province for which the vehicle is registered or plated.
Please enter Unit. Enter a unit number, if available, or N/A , if not applicable. Please enter GVW. Enter the gross vehicle weight (GVW), if available, or N/A, if
not applicable. Please select GVW Metric. Select KM or MI. Please enter either the GVW or Seating Capacity.
Enter the GVW or the seating capacity which can be found on the registration document or on the manufacturer’s label on the inside of the driver’s side door.
VIN should be empty for “No VIN”. No VIN should be entered. The “No VIN” option is only available for commercial trailer inspections.
Select “No VIN” and save. Email eFacility Support at [email protected] to approve the selection prior to continuing with the inspection.
All fields cannot be blank. Please enter either the VIN or VAC, or select “No VIN”.
The VIN can be found on the VIN plate located on the lower left hand corner of the dash (visible through the windshield) or on the manufacturer’s label on the inside of the driver’s door. The VAC can be found on the registration document for the vehicle.
Both fields cannot be blank. Please enter either the VIN or VAC.
The VIN can be found on the VIN plate located on the lower left hand corner of the dash (visible through the windshield) or on the manufacturer’s label on the inside of the driver’s door. The VAC can be found on the registration document for the vehicle.
Please enter a maximum of 17 digits for the VIN.
The VIN can be found on the VIN plate located on the lower left hand corner of the dash (visible through the windshield) or on the manufacturer’s label on the inside of the driver’s door.
Please select brake type: Hydraulic/Electric or Air.
Only trailers may be entered with no brake type.
The vehicle you entered could not be found. Please check the numbers you entered and try again, or search by VIN.
The VIN can be found on the VIN plate located on the lower left hand corner of the dash (visible through the windshield) or on the manufacturer’s label on the inside of the driver’s door. The VAC can be found on the registration document for the vehicle. If the vehicle cannot be found, you will need to enter the information manually. This may happen for vehicles that are not registered in Alberta.
Vehicle Identification Number search is not available right now.
If the vehicle cannot be found, you will need to enter the information manually. This may happen for vehicles that are not registered in Alberta.
There is an existing Inspection for this vehicle. Do you want to start a new one or use an existing one?
Inspections can be saved and continued at a later date. You can choose to continue a started inspection or start a new inspection for this vehicle.
Current facility cannot perform {program type}.
You will need to complete a Facility Upgrade Application online at www.transportation.alberta.ca/VIPLicensing.htm.
Please select Owner Type. Select either Business or Personal.

Last Updated: August 2018 Page 34 of 34
Please enter Organization Name. Enter the owner information as it appears on the registration. If the vehicle is not registered, enter the name of the person presenting the vehicle for inspection. (* Note: If the vehicle is dealer inventory, enter the name of the dealership.)
Please enter the First Name. Enter the owner information as it appears on the registration. If the vehicle is not registered, enter the name of the person presenting the vehicle for inspection.
Please enter Last Name. Enter the owner information as it appears on the registration. If the vehicle is not registered, enter the name of the person presenting the vehicle for inspection.
Please select the correct value for Owner Type.
Select either Business or Personal.
Please enter Address. Enter the owner information as it appears on the registration. If the vehicle is not registered, enter the address of the person presenting the vehicle for inspection.
Please enter City. Enter the city of residence. Please enter Province. Enter the province of residence. Please enter Postal Code. Enter the postal code of residence. Please enter Phone Number. Enter the phone number. Both fields cannot be blank. Please enter the Certificate Number or VIN.
When replacing a decal, you must enter a VIN or the decal number you are replacing.
End Date should be equal to or greater than the Start Date.
Review the data criteria in the search screen.
You cannot re-inspect vehicle. You will need to start a new inspection.


