Technical white paper EFI Preboot Guidelines and Windows 8 UEFI Secure Boot for HP Business Notebooks and Desktops PPS Business Notebook and Desktop Table of contents EFI preboot guidelines 2 Supported models 2 HP_TOOLS for HP EFI and preboot applications 2 EFI and custom imaging 3 EFI architecture 3 How BIOS launches EFI applications 5 Creating or restoring an HP_TOOLS partition on the hard drive 5 Errors when launching the preboot applications 5 Preboot Security Requirements 6 Secure Boot 7 Firmware Policies 7 Secure Boot Key management 9 The BIOS Signing Key 10 TPM and Measure Boot 11 POST 12 Win8 Hybrid Boot and flash 12 BitLocker 12 Boot Order 12 OA3 15 Computrace 16 F10 Restore Default Behavior 17 Appendix 20 General UEFI requirements 20 For more information 21 Call to action 21
Transcript
Technical white paper
EFI Preboot Guidelines and Windows 8 UEFI Secure Boot for HP Business Notebooks and Desktops PPS Business Notebook and Desktop
Table of contents
EFI preboot guidelines 2
Supported models 2
HP_TOOLS for HP EFI and preboot applications 2
EFI and custom imaging 3
EFI architecture 3
How BIOS launches EFI applications 5
Creating or restoring an HP_TOOLS partition on the hard drive 5
Errors when launching the preboot applications 5
Preboot Security Requirements 6
Secure Boot 7
Firmware Policies 7
Secure Boot Key management 9
The BIOS Signing Key 10
TPM and Measure Boot 11
POST 12
Win8 Hybrid Boot and flash 12
BitLocker 12
Boot Order 12
OA3 15
Computrace 16
F10 Restore Default Behavior 17
Appendix 20
General UEFI requirements 20
For more information 21
Call to action 21
2
EFI preboot guidelines
As computer technology has advanced, the BIOS has expanded to handle new components, larger and more complex chipsets, add-in cards, and other enhancements. This expansion has made the BIOS increasingly intricate.
Development of the Extensible Firmware Interface (EFI) is the computer industry’s solution to BIOS limitations. EFI is a set of modular interfaces that replaces the set of traditional BIOS interfaces between the OS and platform firmware.
EFI is derived from high-level C language, is driver-based, scalable, and is easy to debug and upgrade. EFI uses a modular, platform-independent architecture that can perform boot and other BIOS functions. HP employs this technology to implement an EFI partition on all of its business notebook and desktop computers.1 Along with replacing the traditional BIOS interface, the HP EFI partition adds tools to the preboot system environment.
The HP EFI partition is viewable on the hard drive, labeled as HP_TOOLS. Starting with 2008, HP business notebook and desktop platforms that included the EFI BIOS, HP created the EFI partition as a FAT32 primary partition, due to EFI limitations with accessing other partition formats. These guidelines include specifications for the Windows® 8 (Win8) OS.
All mentions of notebooks and desktops in this document reference HP business notebooks and desktops. For more information about EFI, go to http://www.hp.com/go/techcenter.
Supported models Beginning with 2012 models, the following HP business notebook and desktop computers support EFI Preboot Guidelines and Win8 UEFI Secure Boot:
2012 HP EliteBook p series
2012 HP ProBook b series
2012 HP ProBook m series
2012 HP ProBook s series
2012 HP Compaq 8300 Elite series
2012 HP Compaq 6300 Pro series
2012 HP Compaq 6305 Pro series
HP_TOOLS for HP EFI and preboot applications Partitions and directory paths for preboot deliverables have changed in Win8. Table 1 shows the Win8 changes.
Table 1: Preboot deliverables with partition and directory paths for Win7 and Win8
Component Win 7 partition name and folder path
(MBR)
Win 8 partition name and folder path (GPT)
BIOS images [HP_TOOLS] /HEWLETT-PACKARD/BIOS
[/New, /Current, /Previous]
[ESP] /EFI/HP/BIOS [/New, /Current,
/Previous]
UEFI Bios Update [HP_TOOLS] /HEWLETT-
PACKARD/BiosUpdate
[ESP] /EFI/HP/ BiosUpdate
System Diagnostics [HP_TOOLS] /HEWLETT-
PACKARD/SystemDiags
[ESP] /EFI/HP/SystemDiags
Language [HP_TOOLS] /HEWLETT-PACKARD
/Language
[HP_TOOLS] /HEWLETT-PACKARD
/Language
Custom Logo [HP_TOOLS] /HEWLETT-PACKARD/Logo [HP_TOOLS] /HEWLETT-PACKARD/Logo
SpareKey Language [HP_TOOLS] /HEWLETT-PACKARD/SpareKey [HP_TOOLS] /HEWLETT-PACKARD/SpareKey
The HP EFI applications and preboot applications provide extensive preboot functions to the system BIOS residing in the flash ROM. You can find information for GUID Partition Table (GPT) formatted disks on page four of this document.
NOTE: Do not encrypt the HP_TOOLS partition using software encryption programs such as Windows BitLocker or Full Volume Encryption for HP ProtectTools. When the partition is encrypted, the HP preboot applications cannot function.
HP System Diagnostics during startup
The HP System Diagnostics, accessible during computer startup, allows you to perform tests on the primary hard drive and system memory modules. You can also use this tool to obtain computer-related information such as model number, processor type, total memory, and serial number.
BIOS recovery
The BIOS Recovery utility is a notebooks-only feature that allows you to recover the BIOS image if it becomes corrupted. You can use BIOS Recovery in two ways:
On notebooks, you can automatically detect a corrupted BIOS and repair it by flashing the BIOS image. A BIOS Recovery utility is not included on desktops. If the BIOS on a desktop is corrupted during a flash, the next boot will automatically enter a recovery mode (signaled by an 8-blink/beep POST error indication), and the system will look for a USB storage device with the BIOS binary file in the root directory, or in the root of the HDD. It will then reflash the system to recover.
You can force the recovery on notebooks with the BIOS recovery utility. Again, desktops recover automatically when a a corrupt BIOS is detected without the recovery utility.
Initially, the notebook BIOS recovery directory contains the first released version of the BIOS for the platform. Later, as HP releases BIOS updates, two HP BIOS flash utilities (HPQFlash and SSM flash) will automatically perform updates with the most current version of the BIOS. Note that the current version of the eROMPAQ flash utility does not support this function. Since desktops do use a recovery utility, the BIOS flash utilities are not required.
Launching EFI applications
You can launch EFI applications using the following utilities:
System Diagnostics (Both notebooks and desktops) – During startup, press the Esc key when the “Press Esc for startup menu” message is displayed. Then press F2 to launch System Diagnostics. F2 will not wake the system from the off state or the Sleep/Hibernation state. F2 can be used only during POST when the BIOS keys are displayed.
BIOS Recovery (Notebooks only) – While booting the computer, hold down the four arrow keys, and then press the power button to launch BIOS Recovery.
EFI and custom imaging If you use your own custom image and you want to maintain system partition functionality, you must create a FAT32 partition named HP_TOOLS. Failure to do so results in the loss of the following features:
Automatic BIOS corruption detection and recovery
Ability to use all System Diagnostics functions
EFI architecture Use caution when modifying the HP_TOOLS partition. The partition is not protected and can be deleted. Backing up the computer using the Windows Complete PC Backup does not back up the EFI partition. With no EFI partition backup, corruption or failure of the partition will result in loss of all data on the partition, plus loss of EFI functionality. HP recommends that you do not place additional data on the EFI partition.
Volume name
The volume name is HP_TOOLSxxxx. HP_TOOLS in the initial release and the version number (represented here by “xxxx”) at the end of the volume name is for future expansion and is under the control of the HP Preinstall team and subject to change. Software should not hard code the volume version. Instead, software should search for the “HP_TOOLS” prefix and identify the Fat32 HP partition using the prefix only.
4
The HP_TOOLs partition is not assigned a drive letter. Any application that accesses the partition first mounts the partition. HP CASL provides the interface for mount/un-mount.
Directories and descriptions
The HP_TOOLS EFI partition file and folder structure are similar to the Windows file and folder structure. The installation of an EFI application proceeds as follows.
HP EFI application SoftPaqs unbundle into the C:\swsetup directory. The EFI software installation then searches for the FAT32 partition labeled HP_TOOLS and installs itself into the following directory:
:\Hewlett-Packard\softwarename
Disk Layout
The GPT disk layout will look like this:
EFI System partition (ESP):
File system: Fat32
Primary OS Partition: File system: NTFS
Data Partition 1 – n (Where applicable): File system: NTFS
HP_TOOLS partition:
File system: Fat32
Recovery partition:
File system: NTFS
The MBR Disk layout will look like this:
System partition (Where applicable):
File system: NTFS
Primary OS Partition: File system: NTFS
Data Partition 1 – n (Where applicable): File system: NTFS
HP_TOOLS partition:
File system: Fat32
Recovery partition:
File system: NTFS
In this scenario, the “Recovery partition” is the Windows Recovery Environment (WinRe).
HP_TOOLS Partition Size
The 2012 plan for EFI applications are:
System Diagnostics: 5MB
UEFI BIOS Update: 3MB
BIOS HDD Auto Recovery Images: 20 MB
BIOS misc: 10MB (Custom Logo, language, SpareKey)
Reserved for Hypervisor: 100MB
The total HP_TOOLS partition size for 2012 is 2 GB.
HP_TOOLS Partition Directories and Descriptions
The HP_TOOLS partition structure should mirror what we already have for NTFS file system. And the EFI application and preboot application installation should follow the rules for other HP software.
Web-released preboot deliverables require current softpaqs. When a softpaq is run, it will extract into the “C:\swsetup directory”, the same as other softpaqs. Then the preboot software installation should search for the Fat 32 partition with the “HP_TOOLS” label and install itself under the directory “:\HEWLETT-PACKARD\softwarename.”
For example, you place the HP System Diagnostic and its digital signature under “:\HEWLETT-PACKARD\SYSTEMDIAGS\SystemDiags.efi” and “SystemDiags. Sig.”
ESP partition for HP EFI and Preboot applications for GPT formatted disks
When a native UEFI aware operating system is installed, the ESP partition is automatically created. One of the elements the ESP contains is the boot loader image for the operating system. The ESP is an enumerable Fat32 partition and does not have a drive letter assigned. The ESP must follow the format defined in the “EFI System Partition Subdirectory Registry”, please refer to http://www.uefi.org/specs/esp_registry for details.
Starting with 2012 platforms, a preinstall image of UEFI Win8 is available. Several HP components now reside on the ESP instead of the HP_TOOLS partition. The advantage of residing in ESP partition vs. HP_TOOLS is that components are available when you are not using the HP preinstall image. However, the default size of the ESP is 100MB so HP’s overall component size is limited.
Installation software for these EFI components should first enumerate all Fat32 partitions, and copy the firmware packages to the ESP. The ESP can be located comparing the partition GUID to the ESP GUID definition, see the UEFI Specification version 2.3.1 for details. If the installation software cannot find the ESP, This indicates that the ESP is a legacy MBR system, not the GPT system.
How BIOS launches EFI applications When an EFI application is launched, it has as much control of the system resources as the BIOS does. Because EFI applications reside on the publicly accessible drive partition, they are not secure. BIOS launches only EFI applications signed by HP.
NOTE: To reduce security vulnerability, execute only HP-signed EFI applications.
For HP-signed EFI applications
All HP EFI applications contain two files stored under the same subdirectory as the EFI application: filename.efi and filename.sig.
Non–HP-signed EFI applications
Currently there are two methods that provide user level launch capability for the EFI Shell and other EFI Applications. The first method is to boot to the EFI Shell or other EFI Applications by using the Boot from EFI File option. The second method is to boot directly to the EFI Shell. Both options are currently listed under the Boot Option Menu listed under Boot Manager (F9)
Boot from EFI File
The first method, Boot from EFI File is invoked by pressing the F9 Key to launch Boot Manager. All available boot options are list under the Boot Option Menu. Selecting Boot from EFI File presents the File Explorer Screen which lists all available file system mappings. Each entry allows traversing for that volume structure, once the desired EFI Application is found, highlight the entry followed by pressing the enter key will launch the application. For security reasons, the function can be disabled by the BIOS administrator.
Creating or restoring an HP_TOOLS partition on the hard drive Use the following steps to create an HP_TOOLS partition and install related SofPaqs onto the partition:
Use Partition Magic to create a partition on a local hard drive that has a System partition with the following characteristics:
– Partition type: FAT32
– Partition size: 2 GB
– Volume name: HP_TOOLS
In the new partition, create a folder called HEWLETT-PACKARD.
Refer to Table 1 for preboot deliverables and directory paths.
Errors when launching the preboot applications If the application launch keys fail to operate, the partition may have become corrupt. Reinstall the application using the related SoftPaq from http://www.hp.com/support. If a reinstalled application does not function, contact technical support.
The following errors may be displayed if a problem occurs when launching EFI applications:
HP_TOOLS Partition not found: can’t find Fat 32 partition starting with “HP_TOOLS”
Application not found: can’t find preboot application in directory
Invalid signature: BIOS fails to verify the signature of the preboot application.
If there is a backup version of the application in BIOS flash (for example, HP System Diagnostics). BIOS will launch the backup. Otherwise, BIOS displays an error message.
Preboot Security Requirements Signed preboot applications
When a preboot application is launched, it has as much control of the system resource as the BIOS. Since these applications reside on the public hard drive partition which are easily accessible and thus hacked, it’s necessary for BIOS to only launch HP signed preboot applications.
Additional F10 Policies for Preboot Environment in notebooks only
BIOS F10 provides several policies to control the availability of “Boot from EFI File” option in the Boot Manager when F9 is pressed (for details, see How EFI Launches EFI Applications).
Follow this path to access polices.
System Configuration Device Configurations
These are the policies presented to users by the Boot Manager.
UEFI Boot Mode
“Disable (for legacy OS)”
“Hybrid (with CSM) (for Win7 64 UEFI)”
“Native (without CSM) (for WIN8 64)”
This policy controls (settings) whether the BIOS allows to boot to an EFI file.
Customized Logo
“Enable/Disable” (Default: Disable)
When UEFI Boot Mode is disabled, the “Boot from EFI File” option will not show up in the Boot Manager when F9 is pressed. In such a case, the only way to launch HP EFI applications is to use the hot key.
The EFI BIOS provides the nice feature for the user to customize the logo displaying during the boot. The logo is a bitmap file that a customer can add/change on the HP_TOOLS partition.
Since BIOS can’t check the signature of the customized logo bitmap files, it may be used as an attack tool of the BIOS post process. Thus an option is needed to disable this capability for the highly sensitive security environment.
7
Secure Boot
This section outlines the design requirements for an UEFI BIOS to meet the Win8 Logo requirements as well as HP preinstall and service needs. Secure Boot is a feature to ensure that only authenticated code can get started on a platform. The firmware is responsible for preventing launch of an untrusted OS by verifying the publisher of the OS loader based on policy. It is designed to mitigate root kit attacks.
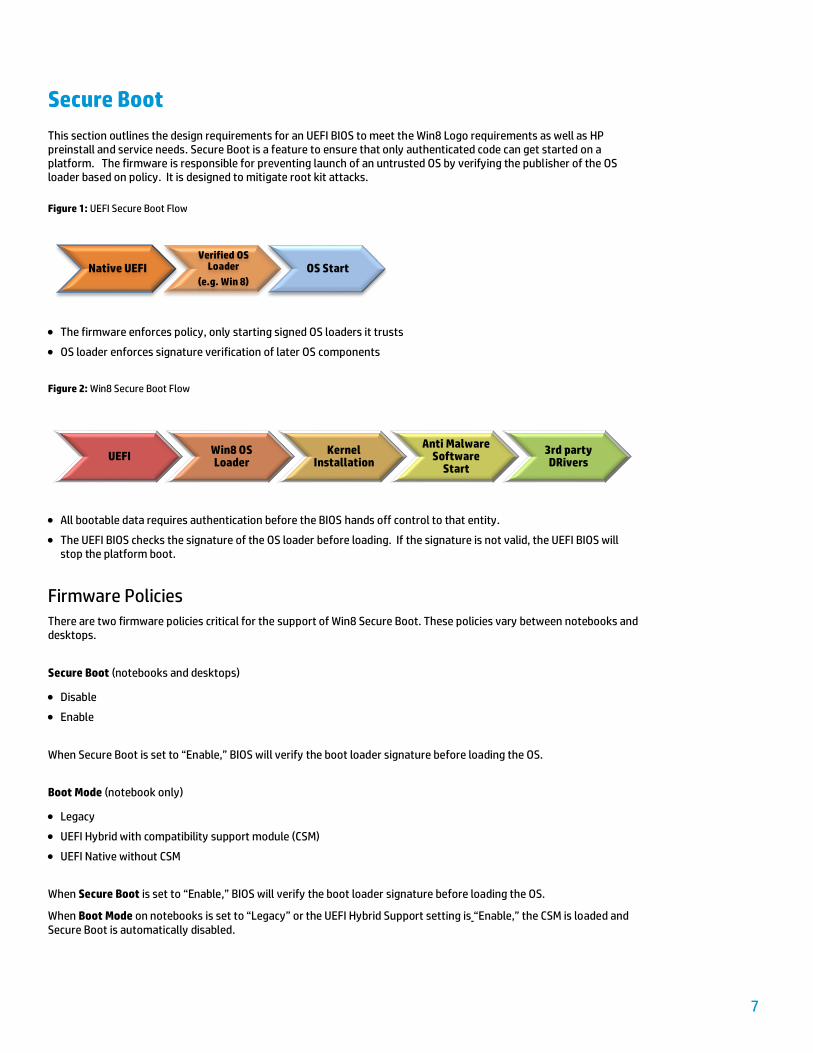
Figure 1: UEFI Secure Boot Flow
The firmware enforces policy, only starting signed OS loaders it trusts
OS loader enforces signature verification of later OS components
Figure 2: Win8 Secure Boot Flow
All bootable data requires authentication before the BIOS hands off control to that entity.
The UEFI BIOS checks the signature of the OS loader before loading. If the signature is not valid, the UEFI BIOS will stop the platform boot.
Firmware Policies There are two firmware policies critical for the support of Win8 Secure Boot. These policies vary between notebooks and desktops.
Secure Boot (notebooks and desktops)
Disable
Enable
When Secure Boot is set to “Enable,” BIOS will verify the boot loader signature before loading the OS.
Boot Mode (notebook only)
Legacy
UEFI Hybrid with compatibility support module (CSM)
UEFI Native without CSM
When Secure Boot is set to “Enable,” BIOS will verify the boot loader signature before loading the OS.
When Boot Mode on notebooks is set to “Legacy” or the UEFI Hybrid Support setting is “Enable,” the CSM is loaded and Secure Boot is automatically disabled.
UEFI Win8 OS Loader
Kernel Installation
Anti Malware Software
Start
3rd party DRivers
Native UEFI Verified OS
Loader
(e.g. Win 8) OS Start
8
Operating System Boot Mode Change A change to the operating system Secure Boot mode is pending. Please enter the pass code displayed below to complete the change. If you did not initiate this request, press the ESC key to continue without accepting the pending change. Operating System Boot Mode Change (021) XXXX + ENTER - to complete the change ESC – continue without changing For more information, please visit: www.hp.com/go/techcenter/startup
For Win7 desktops and earlier, the F10 settings combination of Legacy Support “Enabled” Secure Boot “Disabled”, and Fast Boot “Disabled” results in CSM support. This is the desktop equivalent of the notebook “Legacy” setting (There is an actual “Legacy Support” setting in the desktop BIOS).
For Win8 desktops with Secure Boot, the F10 settings combination of Legacy Support “Disabled”, Secure Boot ”Enabled”, and Fast Boot “Enabled” results in no CSM support. This is the desktop equivalent of the notebook “UEFI Native”, but there is no explicit “UEFI Native” setting in the desktop BIOS.
For Win8 desktops without Secure Boot, the F10 settings combination of Legacy Support “Enabled”, Secure Boot “Disabled”, and Fast Boot “Disabled” results in having both EFI and CSM support. The cost of having the CSM support is not having Secure Boot. This is the desktop equivalent of the notebook “UEFI Hybrid”, but there is no explicit “UEFI Hybrid” setting in the desktop BIOS.
NOTE: On all HP business platforms, factory settings disable Legacy Support on Secure Boot settings by default. If you try to enable Legacy Support with Secure Boot “enabled”, the BIOS will generate a warning.
After a complete BIOS re-flash the default configuration is as follows:
Secure Boot = Disabled
Boot Mode = Legacy (Other modes will be set by Preinstall at the factory according to the OS to be preinstalled.)
The Preinstall should set the Secure Boot/Boot Mode policy to “Enable” and “Legacy,” and to “Disable” for Win8 64/32.
Table 2: Policy settings and OS supported
Boot Mode\ Secure Boot Disable Enable
Legacy Legacy OS: XP, Vista, Windows 7, Linux Invalid
UEFI Hybrid Legacy OS: XP, Vista, Windows 7, Linux Invalid
UEFI Native Linux, Win8 with Native UEFI but no Secure Boot Win8
If the OS and the BIOS policies have a mismatch, the system may fail to boot.
NOTE: Secure Boot “Enabled” with “UEFI Hybrid” (notebooks only) or “Legacy” selected is an INVALID state. The BIOS will ignore this change if it is requested.
The user can use BIOS Setup (F10) to Enable/Disable Secure Boot or it can be changed remotely using the WMI interface, which uses WMI scripts, or by using HP’s BIOSConfig utility.
When Secure Boot “Disable” command is sent from WMI to BIOS, the status of the Secure Boot doesn’t change immediately. At next reboot, the physical presence must be checked to prevent malicious software attacks.
To complete the process, the customer or technician is required to type in a random four-digit verification code that is displayed in the message generated by the BIOS.
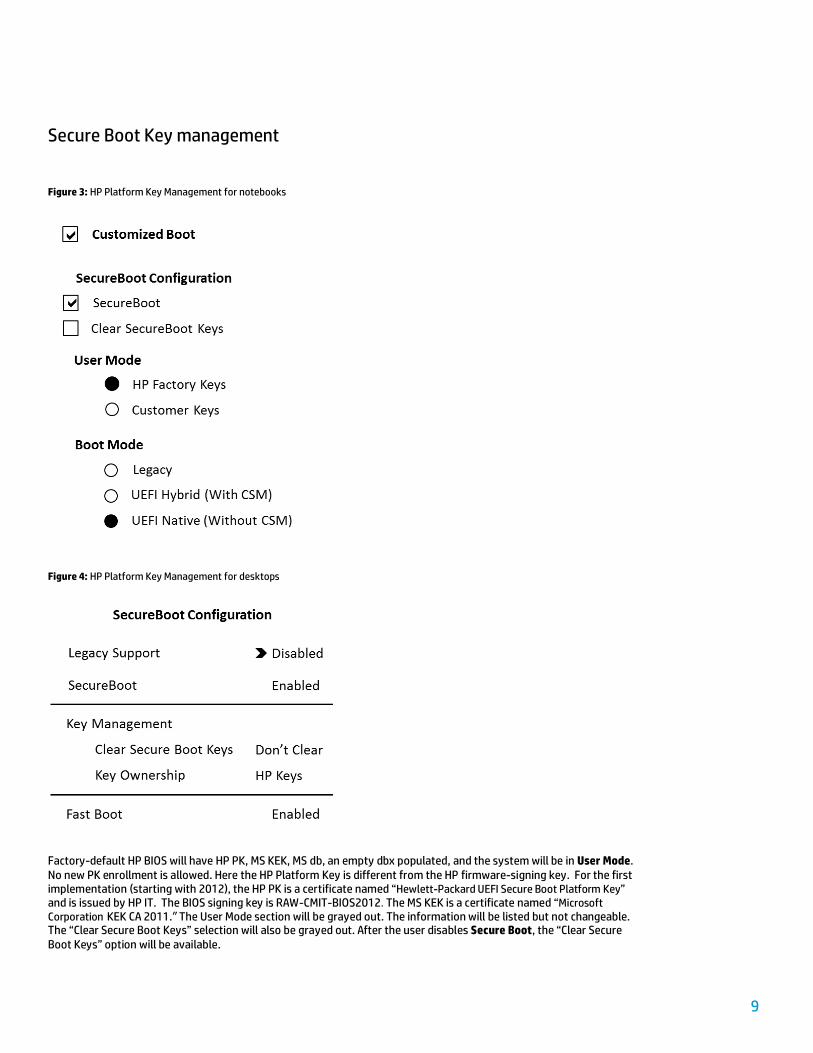
Figure 3: HP Platform Key Management for notebooks
Figure 4: HP Platform Key Management for desktops
Factory-default HP BIOS will have HP PK, MS KEK, MS db, an empty dbx populated, and the system will be in User Mode. No new PK enrollment is allowed. Here the HP Platform Key is different from the HP firmware-signing key. For the first implementation (starting with 2012), the HP PK is a certificate named “Hewlett-Packard UEFI Secure Boot Platform Key” and is issued by HP IT. The BIOS signing key is RAW-CMIT-BIOS2012. The MS KEK is a certificate named “Microsoft Corporation KEK CA 2011.” The User Mode section will be grayed out. The information will be listed but not changeable. The “Clear Secure Boot Keys” selection will also be grayed out. After the user disables Secure Boot, the “Clear Secure Boot Keys” option will be available.
10
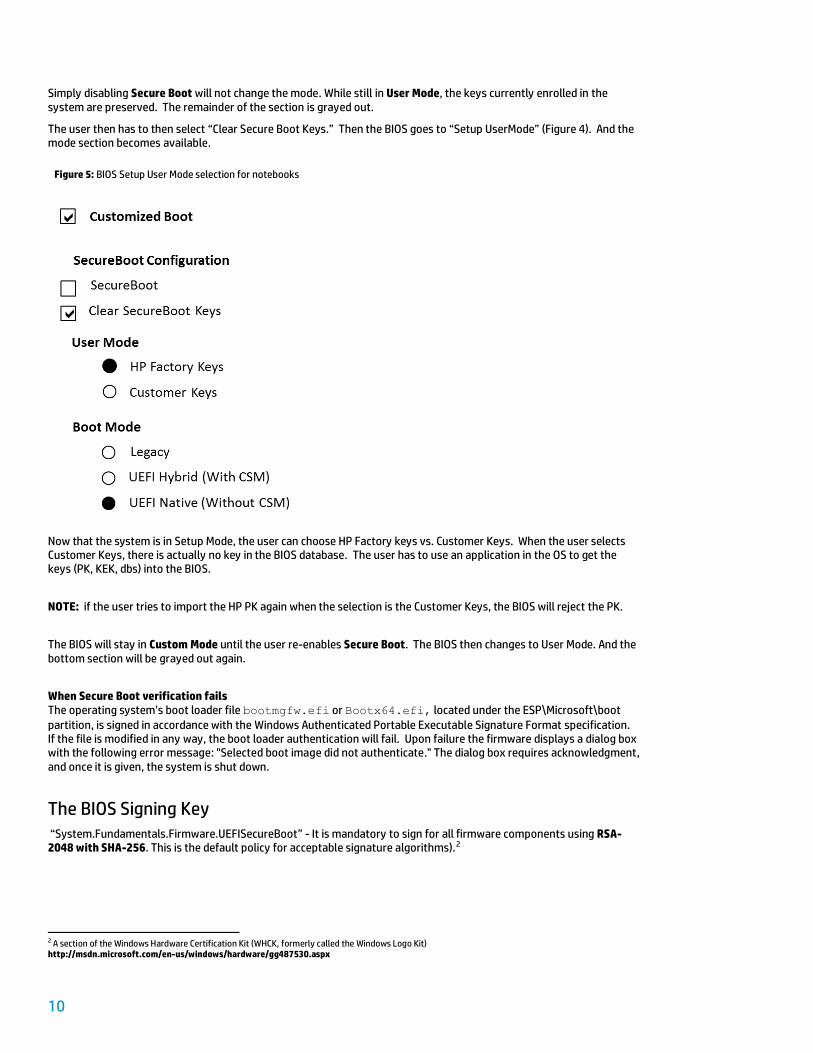
Simply disabling Secure Boot will not change the mode. While still in User Mode, the keys currently enrolled in the system are preserved. The remainder of the section is grayed out.
The user then has to then select “Clear Secure Boot Keys.” Then the BIOS goes to “Setup UserMode” (Figure 4). And the mode section becomes available.
Figure 5: BIOS Setup User Mode selection for notebooks
Now that the system is in Setup Mode, the user can choose HP Factory keys vs. Customer Keys. When the user selects Customer Keys, there is actually no key in the BIOS database. The user has to use an application in the OS to get the keys (PK, KEK, dbs) into the BIOS.
NOTE: if the user tries to import the HP PK again when the selection is the Customer Keys, the BIOS will reject the PK.
The BIOS will stay in Custom Mode until the user re-enables Secure Boot. The BIOS then changes to User Mode. And the bottom section will be grayed out again.
When Secure Boot verification fails The operating system’s boot loader file bootmgfw.efi or Bootx64.efi, located under the ESP\Microsoft\boot partition, is signed in accordance with the Windows Authenticated Portable Executable Signature Format specification. If the file is modified in any way, the boot loader authentication will fail. Upon failure the firmware displays a dialog box with the following error message: "Selected boot image did not authenticate." The dialog box requires acknowledgment, and once it is given, the system is shut down.
The BIOS Signing Key “System.Fundamentals.Firmware.UEFISecureBoot” - It is mandatory to sign for all firmware components using RSA-2048 with SHA-256. This is the default policy for acceptable signature algorithms).2
2 A section of the Windows Hardware Certification Kit (WHCK, formerly called the Windows Logo Kit) http://msdn.microsoft.com/en-us/windows/hardware/gg487530.aspx
TPM and Measure Boot For systems with the Trusted Platform Module (TPM) hardware chip, Win8 will perform a comprehensive chain of measurements, called measured boot, during the boot process. These measurements can be used to authenticate the boot process to make sure that the operating system is not compromised by root kits and other malware. Each component is measured, from firmware up through the boot start drivers. These measurements are stored in the TPM on the machine. This log is then available remotely so that the boot state of the client can be verified.
Win8 BitLocker PCR Sealing
The Win8 hardware certification requirements require native UEFI boot.
On a native UEFI boot system BitLocker will seal by default to the PCRs[0,2,4,11].
On Connected Standby systems, BitLocker will seal to PCRs[7,11].
NOTE: Conflicting Connected Standby System requirements--The WHQL demands Connected Standby systems are required to implement measurements of Secure Boot policy information into PCR[7]. The TCG requires Secure Boot policy information in PCR[6]. To reference the PCR numbers, see the “PCR Measurement Table” A1 in the Appendix of this paper.
Physical Presence
There is a new flag in the TCG PPI spec 1.2. It is the NoPPIProvision flag and the recommended default is “True” by BIOS. The preinstall team should set this flag to “True” for Win8 and newer OSes and set it to “False” for any other OSes. When NoPPIProvision is “True” and there is no TPM owner, the BIOS will not prompt for physical presence when the first Enable/Activate command is received.
When NoPPIProvision is “False,” the BIOS will prompt for physical presence.
The default for NoPPIProvision Flag The required default for the NoPPIProvision flag is “True” for Win8. This default allows Win8 to take ownership of the TPM without any user confirmation.
Special China requirement with Win8 For China, the legal requirement is that the TPM must be shipped in a disabled state and can only be enabled with the user's physical presence.
For a physical presence prompt, If the TPM presence is enabled, the BIOS will display the message below. Otherwise, the physical presence prompt will be the normal (F1, F2) message.
惠普特别提醒:在您在系统中启用TPM功能前,请您务必确认,您将要对TPM的使用遵守相关的当地法律、
法规及政策,并已获得所需的一切事先批准及许可(如适用)。若因您未获得相应的操作/使用许可而发生的
合规问题,皆由您自行承担全部责任,与惠普无涉。
确认启用TPM, 按 “+”。 取消, 按 “-“.
NoPPIProvision Flag in F10 The default for the NoPPIProvision flag is based on the factory setting.
TPM auto-provisioning
Win8 will automatically take TPM ownership to ease the deployment scenario. On an out of box setup , the OS will automatically prepare the TPM for use. It does this by making use of the new PPI flag defined in the “PPI v1.2 PC client Specific TPM interface” spec. The default scenario for first OS start is ”TPM is not ready for use” and the NoPPIProvision flag is set to “True” (the user will not be prompted for TPM provisioning). At this point TPM’s state is “Disabled”, “Deactivated,” and “Not Owned.” The OS will then issue the TPM command 10 and after the first boot cycle the TPM will be “Enabled and Activated.” Finally, after the second OS start, the TPM will be “Owned” and Windows will report that the TPM is ready for use. If users choose not to employ this TPM auto-provisioning option, they can use the Windows Wizard to manually provision the TPM.
12
POST POST includes these tools and information:
Drivers and firmware versions of installed software
Information about disk drives directly attached to the chipset (not to a Smart Array Controller)
POST logo requirements
POST in native resolution
Design your logo :
– Centered horizontally
– 38.2% from the top of the screen
The logo’s size should be:
– <= 40% of the screen height
– <= 40% of the screen width
Position your logo on-screen at POST
Add your logo to the BGRT
POST time
Remove USB Initialization on default boot. Fast boot initializes the internal HDD only to achieve the required boot time.
Win8 Hybrid Boot and flash By default, Hybrid Boot is enabled for Win8 shutdown. It is the hibernation without user data. Thus at the next boot, the OS does a resume from S4 instead of the cold boot. However, when BIOS changes certain system configurations, either via flash or some setting change during POST, a full restart is required for the OS to pick up the changes. In such cases, the BIOS must inform the OS to do a full boot using the ACPI specification.
The Firmware ACPI Control Structure (FACS) table (from the ACPI specification), contains a four-byte field at offset 8 called “Hardware Signature” with the following description:
The value of the system’s “hardware signature” at last boot is calculated by the BIOS on a best effort basis to indicate the base hardware configuration of the system such that different base hardware configurations can have different hardware signature values. OS-directed Power Management (OSPM) uses this information in waking from an S4 state, by comparing the current hardware signature to the signature values saved in the nonvolatile sleep image. If the values are not the same, OSPM assumes that the saved non-volatile image is from a different hardware configuration and cannot be restored.”
BitLocker
Systems which support TPM and wired LAN networking must support the EFI_DHCP4_protocol, the EFI_DHCP4_SERVICE_BINDING_PROTOCOL, the EFI_DHCP6_protocol, and the EFI_DHCP6_SERVICE_BINDING_PROTOCOL for wired LAN as defined in UEFI 2.3.1.
At preboot, BitLocker must be able to discover its Network Unlock provider on a Windows Deployment Server (WDS) via DHCP, and unlock the OS volume after retrieving information from WDS.
Boot Order In UEFI design, the BootOrder variable contains an array of UINT16’s that make up an ordered list of the Bootnumbers options. The first element in the array is the value for the first logical boot option, the second element is the value for the second logical boot option, etc. The BootOrder list is used by the firmware’s boot manager as the default boot order. The OS, as well as BIOS, can add/remove Boot numbers.
This is different than the boot options provided in the legacy F10 boot order menu. HP suggests that the user create two separate Boot Orders in the BIOS:
13
The legacy Boot Order, as it exists when Legacy Support is enabled
A UEFI Boot Order list when Legacy Support is disabled
For the UEFI F10 Static Boot Order, the BIOS assigns certain Boot numbers for the fixed devices in the system. For example, Boot0000 can be OS Boot Manager for a hard drive, Boot0001 can be PXE IPV4, and Boot0002 can be for a built-in DVD. Certain HP-supported UEFI apps should also be listed, such as HP UEFI diagnostics. Win8 will add Boot numbers for “OS Boot Manager”, for the hard drive, and “Windows to go” for the USB disk.
When Legacy Support is disabled, the BIOS is in native UEFI mode and POST time is critical. If the generic USB device or USB hard drive is not listed first in the Boot Order and the next boot is not set to “USB Hard Drive“ or “generic USB device” by the OS, the BIOS will not enumerate USB. Thus any removable USB devices attached to the system will not be enumerated and Boot Order will not show the detailed USB device information. The only entry will be the generic USB device, and there be no external USB optical drive or external USB disk devices in the F10 Boot Order.
When no button is pressed during POST, the BIOS will pass this static Boot Order list to the OS. In turn, the OS will display it in its Advanced Options.
Figure 6: F10 Boot Order when Legacy Support is enabled and disabled
F10 Boot Order when Legacy Support Is enabled. Both UEFI and legacy Boot options are shown. Notebook Ethernet IPV4 and IPV6 boot options are disabled by default due to long delays.
[✔] Legacy Support
[ ] Secure Boot
Boot Options
[✔] Legacy PXE Internal NIC boot
[ ] UEFI PXE IPV4 NIC boot
[ ] UEFI PXE IPV6 NIC boot
UEFI Boot Order
OS Boot Manager
USB Hard Drive
Notebook Ethernet IPV4
Notebook Ethernet IPV6
Notebook Upgrade Bay
eSata Drive
SD Card
HP Hypervisor
Generic USB Device
Customized Boot
Delete Add
Legacy Boot Order
Notebook Upgrade Bay
Notebook Hard Drive
USB Floppy
USB CD-ROM
USB Hard Drive
Notebook Ethernet
SD Card
Dock Upgrade Bay
eSata Drive
F10 Boot Order when Legacy Support is disabled. All legacy boot order items are dynamically removed. Notebook Ethernet IPV4 and IPV6 boot options are enabled by default.
[ ] Legacy support
[✔] Secure Boot
Boot Options
[✔] UEFI PXE IPV4 NIC boot
[✔] UEFI PXE IPV6 NIC boot
[✔] USB
UEFI Boot Order
OS Boot Manager
USB Hard Drive
Notebook Ethernet IPV4
Notebook Ethernet IPV6
Notebook Upgrade Bay
eSata Drive
SD Card
HP Hypervisor
Generic USB Device
Customized Boot
Delete Add
When delete is selected, only those entries added by OS/User can be deleted. i.e. OS Boot Manager, Customized Boot.
When add is selected, the user can add a customized boot path
14
Windows Vista, Windows 7, and Linux systems don’t support UEFI Secure Boot. For these systems, enable Legacy Support and disable Secure Boot. With Secure Boot disabled and Legacy Support enabled, note that both UEFI and legacy boot sources are available for boot. This configuration allows for the most flexibility in booting from various devices, but at the cost of not having Secure Boot.
The BIOS will base the boot sequence from the boot order list. If the first device on the boot order list is not bootable, then BIOS will try the next device. The user can permanently change the boot order by changing the F10 Boot Order. For a one-time boot order change, the user can use the Win8 interface to set Next Boot to a certain device. This will only be effective at the next boot.
If the user presses F9 during POST, the BIOS will now enumerate all USB devices attached to the system and display a dynamic F9 Boot Order list. For example, if there is one USB DVD and one USB hard disk attached to the platform and the user disables the UEFI PXE IPV6 NIC boot, the static F10 Boot Order and the dynamic F9 Boot Order will be different. Also the BIOS will pass the F9 Boot Order to the OS in such a case.
Figure 7: The dynamic F9 Boot Order and the static F10 Boot Order
F9 Boot Order
[ ] Legacy support
[✔] Secure Boot
Boot Options
[✔] UEFI PXE IPV4 NIC boot
[ ] UEFI PXE IPV6 NIC boot
[✔] USB
UEFI Boot Order
OS Boot Manager
USB Hard Drive
Notebook Ethernet IPV4
Notebook Ethernet IPV6
Notebook Upgrade Bay
eSata Drive
SD Card
HP Hypervisor
External USB DVD
External USB CD
Customized Boot
Delete Add
F10 Boot Order
[ ] Legacy support
[✔] Secure Boot
Boot Options
[✔] UEFI PXE IPV4 NIC boot
[ ] UEFI PXE IPV6 NIC boot
[✔] USB
UEFI Boot Order
OS Boot Manager
USB Hard Drive
Notebook Ethernet IPV4
Notebook Ethernet IPV6
Notebook Upgrade Bay
eSata Drive
SD Card
HP Hypervisor
Generic USB Device
Customized Boot
Delete Add
15
OA3 Win8 features a new version of the OEM activation mechanism, the OEM Activation 3.0 (OA 3.0).
Microsoft Digital Marker Key injection
A standard HP method to inject the Microsoft Digital Marker (MSDM) key into ACPI will be supported by the BIOS for usage by the factory and service using the HP BIOS Configuration interface available in both Windows (Public WMI) and UEFI. The following processes are supported by the implementation.
Manufacturing Process The key is cleared when a complete BIOS flashing occurs. The key remains unlocked until the first time the key is written. The key may be written multiple times in manufacturing mode (MPM or other) without unlocking. If the key is written in manufacturing mode, it will be locked when manufacturing mode is exited. After the key is locked, a key unlock using a Physical Presence Check is required to rewrite the key.
NOTE: It is important that a key is always written before the unit leaves the factory. For non-Win8 systems, all FFh must be written to the key to assure that the MSDM table in ACPI is cleared (no MSDM entry appears in ACPI space.).
Service process The key is locked when it leaves the factory. Changing the key first requires an unlock using a Physical Presence Check. After the Physical Presence Check is completed, writing all FFh is used to clear the key from the MSDM ACPI table. A reboot is required after the all-FFh write to set the MSDM table in ACPI.
BIOS functionality
The following functionality is provided by the BIOS to manage the OA3 key:
Reading the key:
– The key can always be read from WMI or UEFI under “MS Digital Marker.”
– Reading the key always returns the last key value accepted by the BIOS.
– After a full BIOS reflash, the MS Digital Marker property will not be present in the BIOS, and the ACPI MSDM table will be cleared.
Writing a key:
– Writing the key from WMI using “MS Digital Marker” requires a blank key slot, or that the key is first unlocked by using Physical Presence Check or by a complete BIOS flash.
– After a key is written, a reboot is always required to set the key in the MSDM ACPI table.
– Writing all FFh as a key clears the MSDM Table in ACPI (See “Clearing the Key” below).
Clearing the key:
– A complete BIOS re-flash clears the key and the MSDM table in ACPI.
o This method is used only in the factory environment.
o Reading the key after the re-flash
– Writing the key as all FFh clears the MSDM table in ACPI.
o See “Writing the key” for Physical Presence Check requirements.
o Reading the key after the write returns all FFh.
o A reboot is required in order to clear the MSDM ACPI table.
SMC_RESET_PLATFORM_TO_FACTORY_DEFAULT - No other method is provided to clear the key. This includes:
– Reset to Factory default through F10, WMI
– SMC_RESET_BIOS_TO_FACTORY_DEFAULT_SAVE_IDENTITY
– Standard BIOS updates
16
Microsoft Windows Product Activation Key Change A change to the Microsoft Windows Product Activation Key is pending. Please contact Hewlett-Packard support (www.hp.com/support) for instructions on how to complete the request. Otherwise press the “ESC” key to continue without any changes. Windows Product Activation Key (020) ESC – continue without changing For more information, please visit: www.hp.com/go/techcenter/startup
HP BIOS configuration (REPSET) functionality
The HP BIOS Configuration utility supports the following functions for Windows key insertion:
English
MS Digital Marker
“Value”
The Values are:
Unlock – used to unlock the key for writing.
– Requires reboot with Physical Presence Check
– Not required in MPM mode or first write after re-flash
Key – Text string representation of Windows key
– Use all FFh to clear the key in the ACPI MSDM table.
Physical Presence Check
To prevent malicious software attacks, a Physical Presence Check must be performed to inject a “new” key or “clear” a key. During the next reboot after a new key is written to Public WMI, the following message will be displayed to the user.
A Physical Presence Check is not required if the system is in Manufacturing Mode or if the key has not been set since it was last cleared by a complete BIOS re-flash.
To complete the process of inserting a new key, the technician or user must enter the verification code “9466” when the message is displayed. The message will be displayed for 60 seconds. If the code is not entered, the key will not be changed, and the boot will continue.
Computrace The Absolute Computrace Preboot module writes to the hard disk if it detects the needed hard drive components are no longer present. This provides persistent support and prevents the malicious deletion of files from the system. However, this method can impact OS stability. Preboot module support will fail when the OS partition or the hard drive is encrypted.
In Win8, a new method has been proposed. The WPBT is a fixed Advanced Configuration and Power Interface (ACPI) table that enables boot firmware to provide Windows with a platform binary that the operating system can execute. The binary handoff medium is physical memory, allowing the boot firmware to provide the platform binary without modifying the Windows image on disk. In the initial version, the WPBT simply contains a physical address pointer to a flat, Portable Executable (PE) image that has been copied to physical memory.
If you are running Win7 or an older OS and the HDD is not encrypted, use the older method (changing the OS file).
If you are running Win8 and the HDD is encrypted, publish WPBT. For older OSes, the WPBT will be ignored.
Virtualization Technology for Directed I/O (VTd) Yes
Trusted Execution Technology (TXT) Yes
HP Hypervisor Yes
Multi Core CPU N/A
Intel HT Technology N/A
NumLock on at boot Yes
Express Card Link Speed Yes
Power on unit when AC is detected Yes
Deep Sleep Yes
Built-In Device Options
Wireless Button State Yes
Embedded WLAN Device Yes
Embedded Bluetooth Device Yes
Embedded LAN Controller Yes
LAN/WLAN Switching Yes
Wake On LAN Yes
19
Tab Option Default Restored?
Wake on LAN on DC mode Yes
Notebook Upgrade Bay Yes
Power Monitor Circuit Yes
Audio Device Yes
Microphone Yes
Speakers and Headphones Yes
Wake unit from sleep when lid is opened Yes
Power on unit when lid opened Yes
Boost Converter Yes
Port Options
Serial Port Yes
Parallel Port Yes
Flash media reader Yes
USB Port Yes
1394 Port Yes
Express Card Slot Yes
eSATA Port Yes
AMT Options
USB Key Provisioning Support Yes
Unconfigure AMT on next boot Yes
SOL Terminal Emulation Mode Yes
Firmware Progress Event Support Yes
Initiate Intel CIRA Yes
BIOS Power-On
Sunday Yes
Monday Yes
Tuesday Yes
Wednesday Yes
Thursday Yes
Friday Yes
Saturday Yes
BIOS Power-On Time (hh:mm) Yes
20
Appendix
Table A1: PCR measurement
PCR BNB expected BNB actual
PCR 0 S-CRTM’s version identifier using the event type EV_S_CRTM_VERSION
All Host Platform firmware using the event type EV_POST_CODE
ACPI data using event type EV_EFI_HANDOFF_TABLES
S-CRTM’s version identifier using the event type EV_S_CRTM_VERSION
All Host Platform firmware using the event type EV_POST_CODE
PCR 1 Not used
PCR 2
Non manufacturer controlled options/UEFI drivers
Not used Currently measuring FV(??)
PCR 3 Not used
PCR 4 If the BIOS is configured or designed to not record each device the BIOS attempts to boot, an EV_OMIT_BOOT_DEVICE_EVENTS event MUST be measured once. See Section 11.3.1 (Event Types).
The BIOS MUST record the EV_ACTION event “Calling INT 19h” or the EV_EFI_ACTION event “Calling EFI Application from Boot Option.” See Section 11.3.3 (EV_ACTION Event Types).
The BIOS MUST record the EV_ACTION event “Calling INT 19h” or the EV_EFI_ACTION event “Calling EFI Application from Boot Option.” See Section 11.3.3 (EV_ACTION Event Types).
PCR 5 Not used Calling EFI application event, GPT
PCR 6 Not used (UEFI Secure Boot data in spec but MS indicates that they want that in PCR 7)
Secure Boot variables
PCR 7 Not used
General UEFI requirements A UEFI BIOS supporting Win8 implements the following sections of the UEFI 2.3.1 specification:
Visit the websites listed below if you need additional information.
Resource description Web address
UEFI Specification Version 2.3.1 http://www.uefi.org/specs/download
Windows Compatibility Support Module Opt-Out Mechanism for Legacy Free OSes v1.1 by Microsoft Windows Authenticated Portable Executable Signature Format specification
Microsoft Security Development Lifecycle http://www.microsoft.com/security/sdl/default.aspx
Call to action
To learn more about HP business notebooks and desktops, contact your local HP sales representative, or go to hp.com/go/notebooks or hp.com/go/desktops.
Get connected hp.com/go/getconnected
Current HP driver, support, and security alerts delivered directly to your desktop
Windows, Windows Vista, Windows 7, and Windows 8 are U.S. registered trademarks of Microsoft Corporation. Intel is a trademark of Intel Corporation in the U.S. and other countries.


![[Eng]WirelessLAN Win8](https://static.documents.pub/doc/80x56/577cd8371a28ab9e78a0b116/engwirelesslan-win8.jpg)


