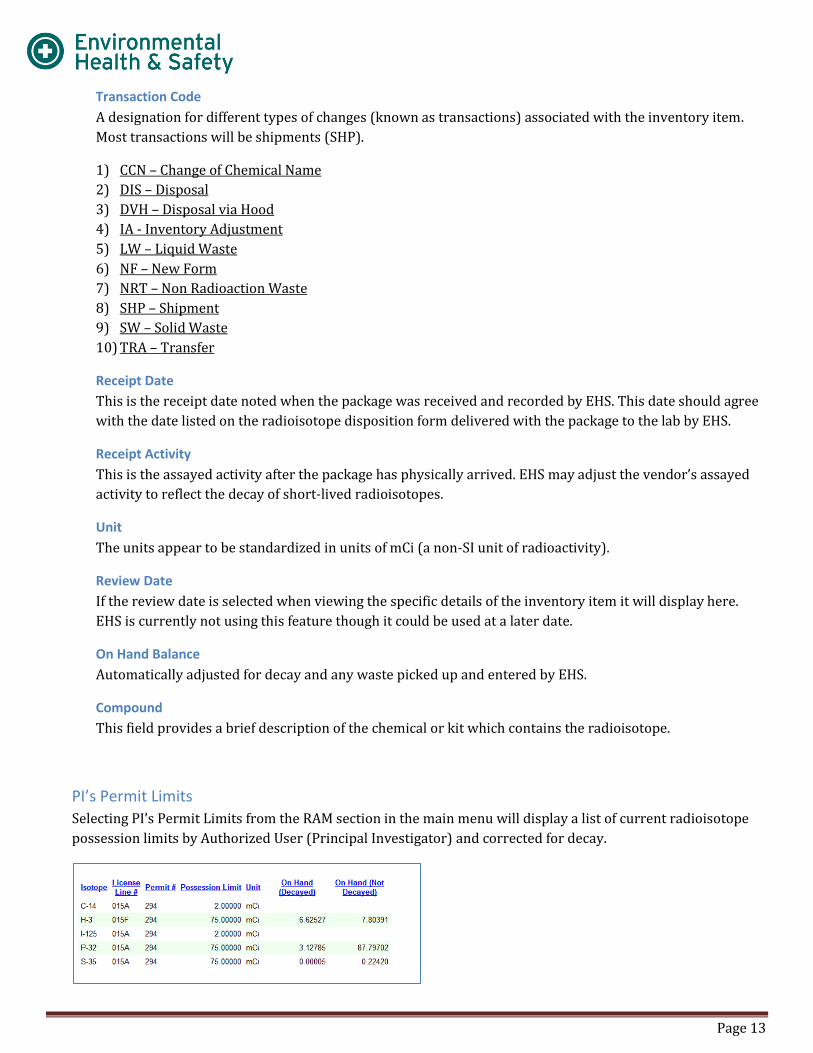
Page 11 RAM Inventory/Disposals Selecting Inventory/Disposals from the RAM section in the main menu will default to a list of current radioisotope inventory by PI (a.k.a. authorized user or AU). There is also a radial button that allows toggle options for viewing disposed and archived inventory. Currently, the majority of the features are “read-only”. Some editing privileges may be provided at a later date. Radioisotope Inventory/Disposal Display Selecting any of the column headers in bold blue will sort the fields alpha numerically from A-Z or Z-A. The “Select” option in bold blue to the far left of each row opens up additional information about each inventory item.
Transcript
Page 11
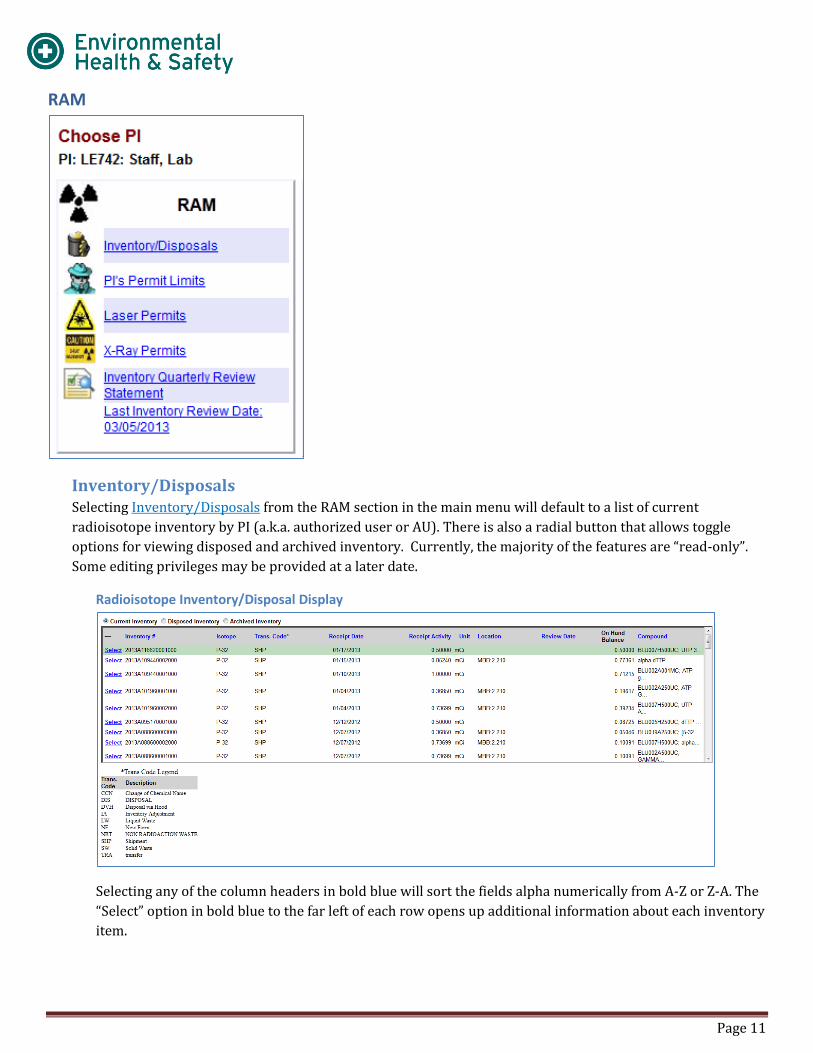
RAM
Inventory/Disposals Selecting Inventory/Disposals from the RAM section in the main menu will default to a list of current
radioisotope inventory by PI (a.k.a. authorized user or AU). There is also a radial button that allows toggle
options for viewing disposed and archived inventory. Currently, the majority of the features are “read-only”.
Some editing privileges may be provided at a later date.
Radioisotope Inventory/Disposal Display
Selecting any of the column headers in bold blue will sort the fields alpha numerically from A-Z or Z-A. The
“Select” option in bold blue to the far left of each row opens up additional information about each inventory
item.
Page 12
Radioisotope Inventory – Additional Information Display
Additional information about the inventory item is provided here. The majority of this information is
“read only” at this time and cannot be edited. The EHS Radiation Safety option will continue to handle
the administrative aspects of selecting the “Totally Disposed?” check box, editing any of the fields,
manually typing review dates, and adding disposals. Selecting the “Mark as Reviewed” button however,
will auto populate the current data in the “Last Review” field. Once this date is added it cannot be edited
and shows up in the initial display summary for this inventory item. EHS is currently not using this field
though it may be used at a future date.
Inventory #
A unique 17 character inventory number for each vial or container of radioactive material that has been
purchased by an Authorized User is displayed.
The inventory number can be broken down into three components with an example shown below.
1) PO Number (2013A11662)
2) Line Item or Order (0001)
3) Multiple Orders within a Line Item (000)
Isotope
Corresponds to radioisotope and is usually abbreviated such as P-32 for Phosphorus-32.
Page 13
Transaction Code
A designation for different types of changes (known as transactions) associated with the inventory item.
Most transactions will be shipments (SHP).
1) CCN – Change of Chemical Name
2) DIS – Disposal
3) DVH – Disposal via Hood
4) IA - Inventory Adjustment
5) LW – Liquid Waste
6) NF – New Form
7) NRT – Non Radioaction Waste
8) SHP – Shipment
9) SW – Solid Waste
10) TRA – Transfer
Receipt Date
This is the receipt date noted when the package was received and recorded by EHS. This date should agree
with the date listed on the radioisotope disposition form delivered with the package to the lab by EHS.
Receipt Activity
This is the assayed activity after the package has physically arrived. EHS may adjust the vendor’s assayed
activity to reflect the decay of short-lived radioisotopes.
Unit
The units appear to be standardized in units of mCi (a non-SI unit of radioactivity).
Review Date
If the review date is selected when viewing the specific details of the inventory item it will display here.
EHS is currently not using this feature though it could be used at a later date.
On Hand Balance
Automatically adjusted for decay and any waste picked up and entered by EHS.
Compound
This field provides a brief description of the chemical or kit which contains the radioisotope.
PI’s Permit Limits
Selecting PI’s Permit Limits from the RAM section in the main menu will display a list of current radioisotope
possession limits by Authorized User (Principal Investigator) and corrected for decay.
Page 14
Isotope
Corresponds to radioisotope and is usually abbreviated such as P-32 for Phosphorus-32.
License Line #
This refers to the Texas and USNRC licenses that all authorized users operate under and is used by EHS for
internal tracking purposes.
Permit #
This is the authorized user number that departmental purchasers need for placing radioactive material
orders on your behalf.
Possession Limit
The maximum amount you can have on hand for each radioisotope you are authorized for.
Unit
The units appear to be standardized in units of mCi.
On Hand (Decayed)
The amount of radioactive material you currently have in your possession, corrected for decay. This
amount cannot exceed your possession limit.
On Hand (Not Decayed)
The amount of radioactive material you currently have in your possession, not corrected for decay.
Laser Permits Selecting Laser Permits from the RAM section in the main menu will display a list of laser permits associated
with a custodian or PI.
Permit #’s for lasers will start with the prefix “z” followed by a hyphen and five numbers.
Type and Protocol Type will default to “LASER”
Permit Status will be listed as “Active” or “Inactive”.
Page 15
Laser Permit Report
Select “View” to open up a laser permit report (in PDF) containing a list of lasers by PI/Custodian.
X-ray Permits Selecting X-Ray Permits from the RAM section in the main menu will display a list of x-ray permits associated
with a custodian or PI.
Permit #’s for x-rays will start with the prefix “R” followed by a hyphen and three numbers.
Type and Protocol Type will default to “X-Ray”
Permit Status will be listed as “Active” or “Inactive”.
X-ray Permit Report
Select “View” to open up a PDF containing a list of lasers by PI/Custodian.
Page 16
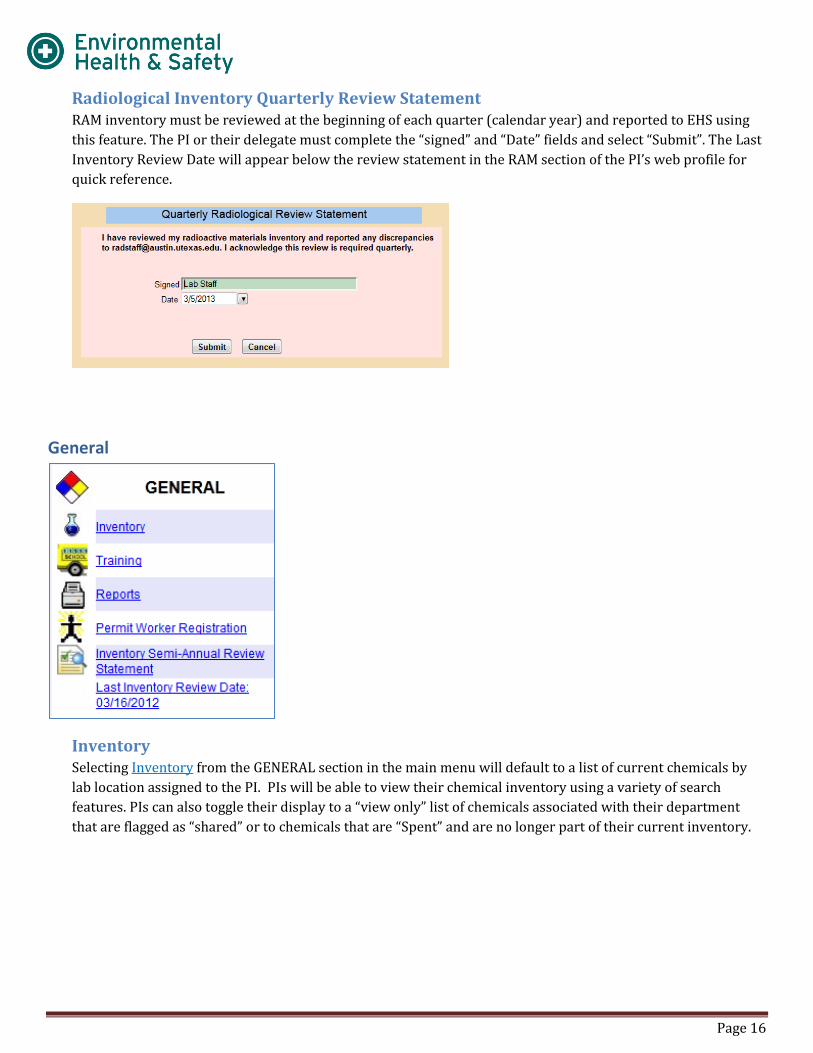
Radiological Inventory Quarterly Review Statement RAM inventory must be reviewed at the beginning of each quarter (calendar year) and reported to EHS using
this feature. The PI or their delegate must complete the “signed” and “Date” fields and select “Submit”. The Last
Inventory Review Date will appear below the review statement in the RAM section of the PI’s web profile for
quick reference.
General
Inventory Selecting Inventory from the GENERAL section in the main menu will default to a list of current chemicals by
lab location assigned to the PI. PIs will be able to view their chemical inventory using a variety of search
features. PIs can also toggle their display to a “view only” list of chemicals associated with their department
that are flagged as “shared” or to chemicals that are “Spent” and are no longer part of their current inventory.
Page 17
Chemical Inventory Display/Search Features
Current Inventory, Spent Inventory, Search Shared [Department]
1. All Items: Displays all items in inventory of PI regardless of location. This is the default view for the
Inventory Display.
2. Show me chemicals where: Will provide sorting options for Chemical Description, Chemical Abstract
Service # (CAS#), Inventory # (auto-generated unique identifier), or a specific Storage Location within a lab
such as a workbench, storage shelf, or refrigerator. The keyword search can be adjusted to look for a
description that starts with, contains, or equals the wording entered. Press Show after you have specified
your search parameters.
3. Show chemicals by Location: Select the desired location from a drop down list of labs assigned to the PI.
Press Show to display the list of chemicals associated with the lab location you selected. The number of
chemicals by lab will also be displayed in parentheses to the right of the room number in the drop down
box.
Chemical Inventory Display
Page 18
Shared Chemicals
You can share your chemical inventory list with other researchers in your department. The shared
inventory list will give “view only” privileges to other researchers. They will not be able to modify your
chemical inventory. You can choose which chemicals to share by checking or unchecking the share box
near the chemical description or when editing the chemical entry. When editing the chemical entry you
will be given the option to set the information to private (viewable only by PIs delegated lab personnel)
or you can select “Share Within Department” (viewable by departments PIs and their delegated lab
personnel). You can also select all or deselect all chemicals you want to be shared or unshared in the
inventory display.
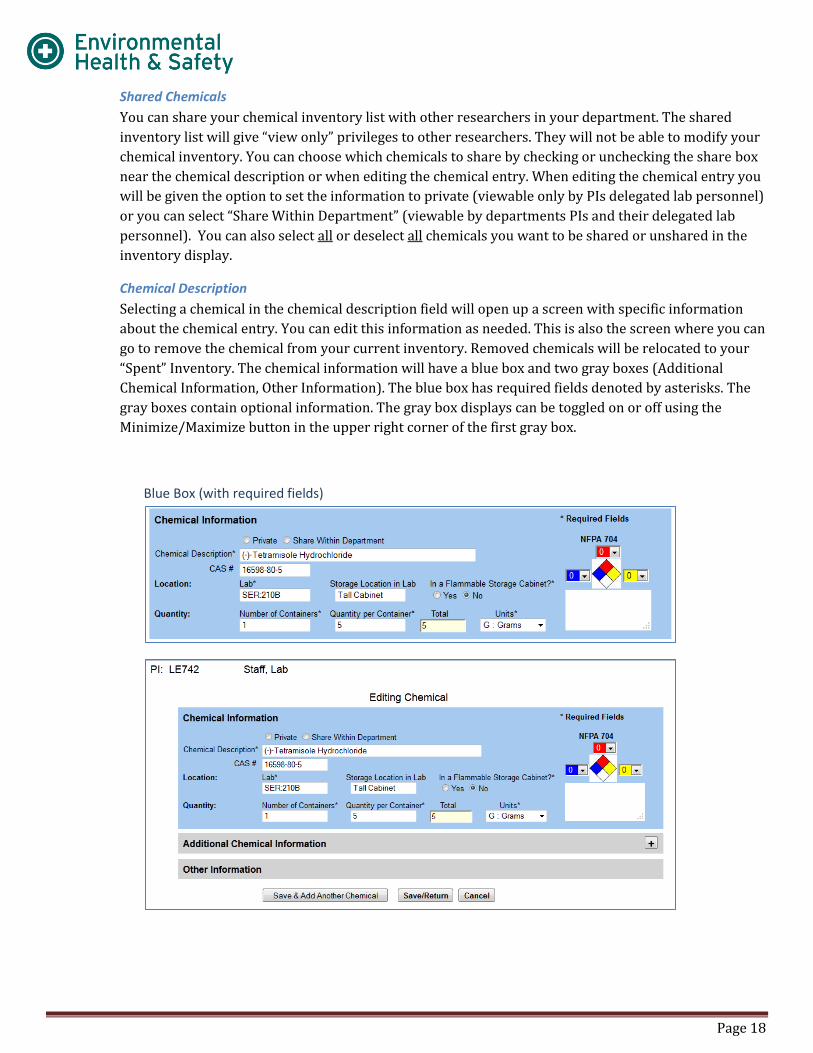
Chemical Description
Selecting a chemical in the chemical description field will open up a screen with specific information
about the chemical entry. You can edit this information as needed. This is also the screen where you can
go to remove the chemical from your current inventory. Removed chemicals will be relocated to your
“Spent” Inventory. The chemical information will have a blue box and two gray boxes (Additional
Chemical Information, Other Information). The blue box has required fields denoted by asterisks. The
gray boxes contain optional information. The gray box displays can be toggled on or off using the
Minimize/Maximize button in the upper right corner of the first gray box.
Blue Box (with required fields)
Page 19
Gray Boxes (with optional fields) – Maximized
Gray Boxes (with optional fields) – Minimized
Spent Chemical
A chemical is “spent” when it is removed from your current inventory which is usually
associated with EHS disposal. To remove a chemical from your current inventory follow the
prompts in the Chemical Description section to open up the screen that provides additional
information about the chemical. At the bottom of the first gray box you will find a field called
“Totally Spent?” with Yes and No radial buttons. The radial button default is set to No. To
remove the chemical from your inventory select Yes and choose one of the save options at the
bottom of the screen. The spent chemical can now be found in the Spent Inventory display. If
you want to move the chemical back to your current inventory go to the Spent Inventory
display, select the chemical to open up the editing options, and select the Yes radial button in
the gray box titled Additional Chemical Information.
Page 20
Adding a Chemical
The “Add Chemical” button is located on the left side of the chemical inventory display view. Chemical
information can be entered manually by lab personnel or a list of chemicals can be provided to EHS to
upload upon request. If an upload by EHS is desired, the data must first be entered using a template
provided by EHS (available upon request). To manually enter a chemical, select the Add Chemical
button in the Inventory Display screen. The blue box contains required fields denoted by asterisks (*).
The gray boxes contain optional information.
Chemical Sharing (View Only)
Users of EHS Assist within the same department can view your chemicals if you choose to share
them. The researcher can choose which chemicals he/she would like to share. The default option is
set to private (not sharing).
Page 21
Chemical Description*
The chemical description field has smart word search features. As you are typing the name of the
chemical a list of available options from the chemical catalog will appear. You can choose one of the
chemicals from the list or you can manually enter the name of a chemical (even if it doesn’t appear
on the list). If you choose to manually enter a chemical instead of selecting one from the drop down
list select Cancel and the list will disappear. The text you entered will still remain. A chemical
selected from the chemical catalog will also populate the CAS# field if available.
CAS#
The chemical abstract service # (CAS#) is a unique identifier for a specific chemical. Many chemical
names have synonyms but they will have the same CAS#. The CAS# field has smart number search
features. When you are typing the CAS# a list of available options from the chemical catalog will
appear. This is the same chemical list that would appear if you were entering information into the
chemical description field. If you choose to manually enter a CAS# instead of selecting one from the
drop down list select Cancel and the list will disappear. The text you entered will still remain. A
CAS# selected from the chemical catalog will also populate the Chemical Description field.
Page 22
NFPA 704
The NFPA 704 information is used for emergency responders to readily identify a chemical’s
hazards. This is now a field that can be edited for a new chemical. The chemical catalog will have
predetermined NFPA 704 values. Chemicals not in the catalog will eventually be added by EHS and
assigned values. The NFPA 704 diamond is a hazard classification system created by the National
Fire Protection Association. You may see the same diamond and color coding on chemical
containers you receive from vendors. The diamond is color coded by hazard groups. The blue, red,
and yellow fields (Threat to Human Health, Flammability, and Reactivity) all use a numbering scale
ranging from 0 to 4. A rating of zero means that the material poses essentially no hazard; a rating of
four indicates extreme danger. The fourth value (associated with white) tends to be more variable,
both in meaning and in what letters or numbers are written there.
Fire
Health Reactivity
Special
Notes
NFPA 704
SPECIAL NOTES
OXY = OXIDIZER
W = USE NO WATER
ACID = ACID
ALK = ALKALI
COR = CORROSIVE
REACTIVITY
4 = MAY DETONATE
3 = SHOCK/HEAT MAY DETONATE
2 = VIOLENT CHEMICAL CHANGE
1 = UNSTABLE IF HEATED
0 = STABLE
FLAMMABILITY
4 = EXTREMELY FLAMMABLE
3 = IGNITES AT MOST TEMP.
2 = IGNITES IF HEATED
1 = IGNITES IF PREHEATED
0 = WILL NOT BURN
HEALTH
4 = DEADLY
3 = EXTREME DANGER
2 = HAZARDOUS
1 = SLIGHTLY HAZARDOUS
0 = ORDINARY HAZARD
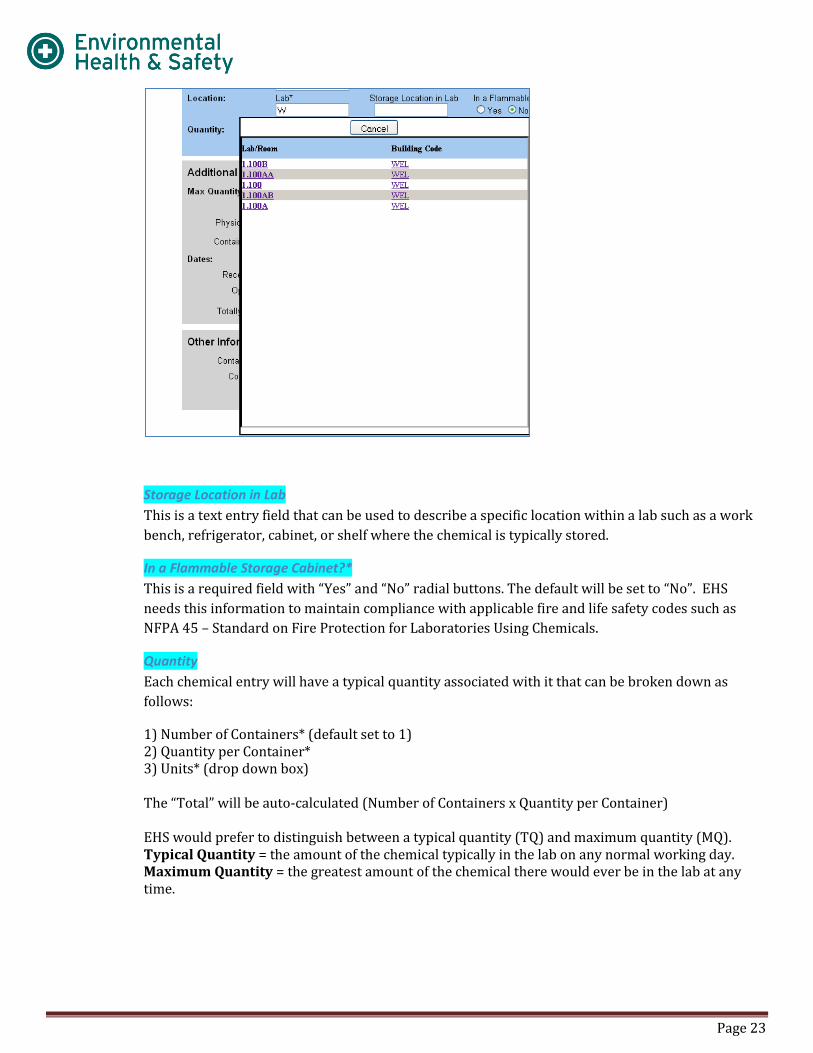
Lab*
This is a text entry field that also has smart word search features. Typing in the three letter
abbreviation of a building (Bldg. Code) followed by a colon and a room number (Ex. NHB:9.999) is
the required nomenclature for this field. The smart word features will display a list of lab locations
assigned to the PI. You can select the room number from this drop down display to auto populate
this field. You can also cancel out of this box and manually enter any location. The main menu
screen has a quick reference feature displaying locations assigned to the PI. If you feel additional
locations should be added, contact EHS for assistance. When you save a chemical entry, the last lab
you entered will be populated in this field when you begin another entry.
Page 23
Storage Location in Lab
This is a text entry field that can be used to describe a specific location within a lab such as a work
bench, refrigerator, cabinet, or shelf where the chemical is typically stored.
In a Flammable Storage Cabinet?*
This is a required field with “Yes” and “No” radial buttons. The default will be set to “No”. EHS
needs this information to maintain compliance with applicable fire and life safety codes such as
NFPA 45 – Standard on Fire Protection for Laboratories Using Chemicals.
Quantity
Each chemical entry will have a typical quantity associated with it that can be broken down as
follows:
1) Number of Containers* (default set to 1) 2) Quantity per Container* 3) Units* (drop down box) The “Total” will be auto-calculated (Number of Containers x Quantity per Container) EHS would prefer to distinguish between a typical quantity (TQ) and maximum quantity (MQ). Typical Quantity = the amount of the chemical typically in the lab on any normal working day. Maximum Quantity = the greatest amount of the chemical there would ever be in the lab at any time.
Page 24
Max Quantity
The Max Quantity contains the same information as the Quantity field in the blue box and will auto-
populate with the same values. These values can be manually adjusted if the maximum quantity
(MQ) differs from the typical quantity (TQ).
Physical State
The physical state contains radial buttons for solid, liquid, and gas that will auto-populate
depending on which unit is selected. You can manually override this section.
Container Type
The container type provides a drop down box with several options. If the option you are looking for
is not present contact EHS to have it added. Some options such as “EXC: Chemical Exchange Area”
are used internally by EHS to track staging areas for chemicals. They cannot be removed at this time
but it is important to distinguish between these virtual containers (locations) and an actual
container such as “GB: Glass Bottle”.
Vendor
The manufacturer of the chemical can be manually entered into this field.
Molecular Formula
Molecular formula can be manually entered into this field.
Dates
Some chemicals become unstable or degrade over time so it is important to keep track of when the
chemical was received, opened, or when it will expire (if applicable). The Receipt Date will be auto-
populated with the day the chemical entry is started. This can be manually adjusted as needed.
Totally Spent? (Removing Chemicals)
This field has “Yes” and “No” radial buttons with the default set to “No”. To remove this chemical
from your current inventory select “Yes” and choose one of the save options provided at the
bottom. The chemical entry will be moved to a “Spent Inventory” list.
Page 25
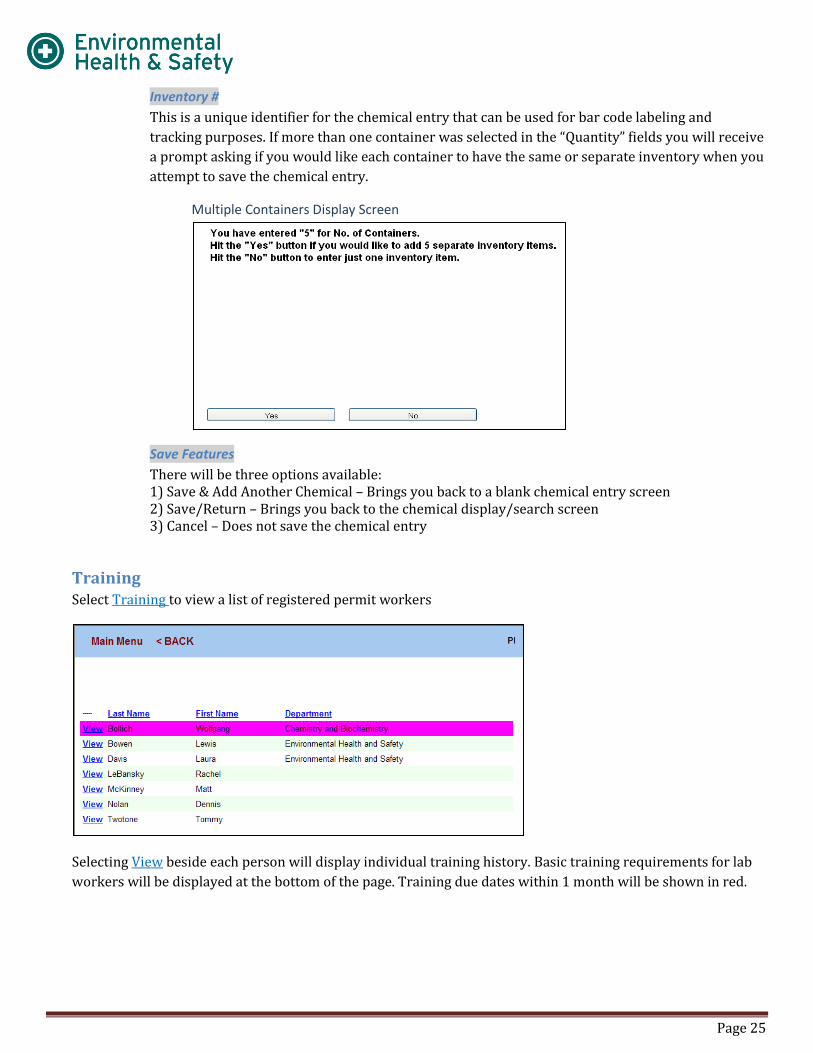
Inventory #
This is a unique identifier for the chemical entry that can be used for bar code labeling and
tracking purposes. If more than one container was selected in the “Quantity” fields you will receive
a prompt asking if you would like each container to have the same or separate inventory when you
attempt to save the chemical entry.
Multiple Containers Display Screen
Save Features
There will be three options available: 1) Save & Add Another Chemical – Brings you back to a blank chemical entry screen 2) Save/Return – Brings you back to the chemical display/search screen 3) Cancel – Does not save the chemical entry
Training Select Training to view a list of registered permit workers
Selecting View beside each person will display individual training history. Basic training requirements for lab
workers will be displayed at the bottom of the page. Training due dates within 1 month will be shown in red.