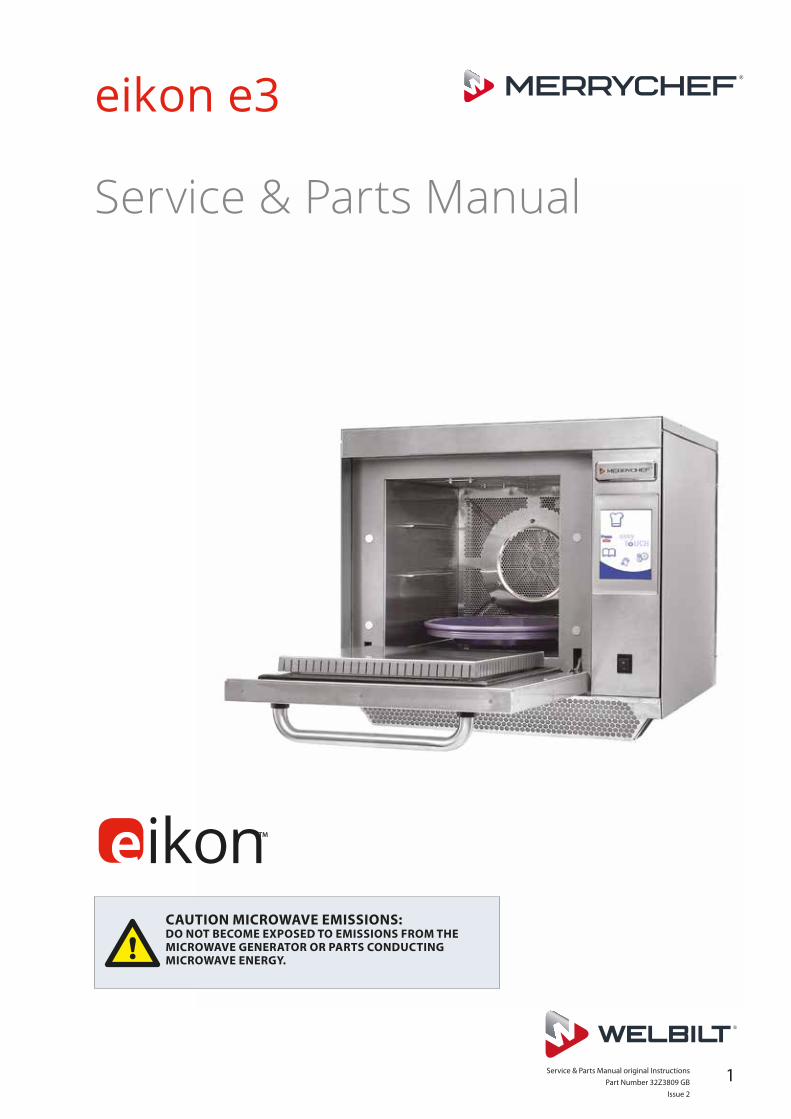
Service & Parts Manual original Instructions Part Number 32Z3809 GB Issue 2 1 e ikon TM CAUTION MICROWAVE EMISSIONS: DO NOT BECOME EXPOSED TO EMISSIONS FROM THE MICROWAVE GENERATOR OR PARTS CONDUCTING MICROWAVE ENERGY. Service & Parts Manual eikon e3
Transcript
Service & Parts Manual original Instructions
Part Number 32Z3809 GB
Issue 2
1
eikonTM
CAUTION MICROWAVE EMISSIONS:DO NOT BECOME EXPOSED TO EMISSIONS FROM THE MICROWAVE GENERATOR OR PARTS CONDUCTING MICROWAVE ENERGY.
Service & Parts Manual
eikon e3
2 Service & Parts Manual original InstructionsPart Number 32Z3809 GBIssue 2
1
SYMBOLS
The symbols below are used, where applicable, as visual guidance throughout this manual.
DANGERThis symbol is shown if there is a high risk of severe personal physical injury. The relevant safety precautions MUST be observed and implemented at all times.
WARNINGThis symbol is shown if there is a possible risk of personal physical injury or if damage may occur to the equipment. The relevant safety precautions MUST be observed and implemented at all times.
INFORMATIONThis symbol is used to highlight useful or important information. For example: The manual consists of main sections (tab markers on the extreme left and right of the pages), followed by the main subject heading, sub-headings and text. Text with a reference number or letter, such as (1) refers to the same reference on the image.
Service & Parts Manual original InstructionsPart Number 32Z3809 GB
Issue 2
3
SAFE
TY &
RE
GU
LATI
ON
SPR
OD
UCT
D
ETA
ILS
TEST
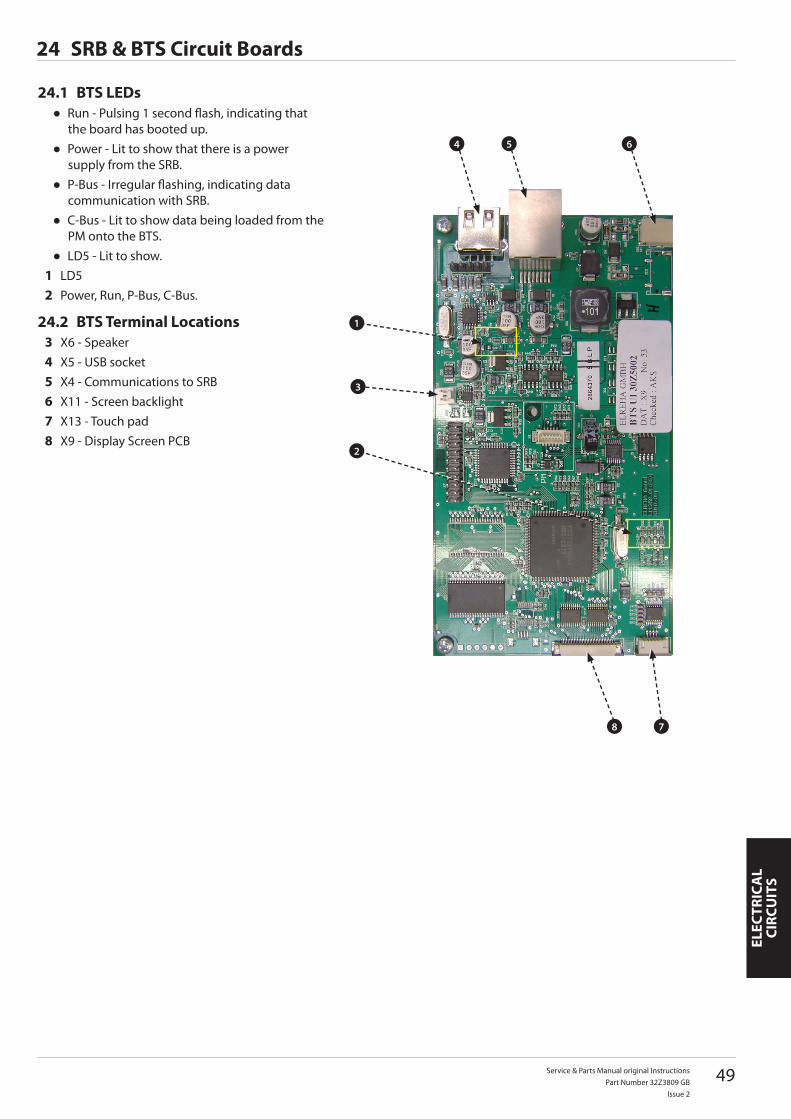
ING
CO
MPO
NEN
TSSE
RVIC
ING
SPA
RES
&
REPL
ACE
MEN
TFA
ULT
FIN
DIN
GEL
ECTR
ICA
L CI
RCU
ITS
COM
MIS
SIO
NIN
G
SAFETY & REGULATIONS1 SAFETY REQUIREMENTS 4
1.1 Important: 4
PRODUCT DETAILS2 PRODUCT OVERVIEW & FUNCTIONS 53 MAIN FEATURES 64 TECHNICAL SPECIFICATIONS 7
4.1 Specifications 74.2 Serial Number (Rating Plate): 74.3 Compliances: 7
5 INSTALLATION 95.1 OVEN LOCATION AND POSITIONING 9
8.1 START UP 128.2 USING A COOKING PROGRAM 138.3 SCREEN SAVER 13
9 OPERATING GUIDE: FULL SERVICE OVEN 149.1 easyToUCH MAIN MENU & KEYBOARD SCREEN 149.2 DEVELOPMENT MODE: CREATING A COOK PROGRAM 159.3 PRESS & GO 169.4 USING A COOKBOOK PROGRAM 169.5 CHANGING THE OVEN TEMPERATURE 179.6 VIEWING & EDITING PROGRAMS 179.7 ADDING A NEW PROGRAM GROUP 189.8 MOVE A PROGRAM WITHIN A PROGRAM GROUP 189.9 ADDING A PROGRAM TO A GROUP 199.10 MANAGING PROGRAM GROUPS 19
10 OVEN CONTROL SETTINGS 2010.1 Oven mode/navigation settings (A) 2010.2 Language options (B) 2010.3 Oven temperature settings and labels (C) 2010.4 Recipe counters (E) 2110.5 Date and Time settings (F) 2110.6 Sound levels (G) 2110.7 Oven Timer (H) 2110.8 USB oven programs (J) 2210.9 Temperature Band (K) 2210.10 Change Password (L) 2210.11 Screen saver (M) 22
11 COOLING THE OVEN DOWN BEFORE CLEANING 2311.1 Oven cool down 2311.2 Preparing to clean the oven 23
12 Cold oven CLEANING INSTRUCTIONS e3 24
SERVICING13 SERVICING THE OVEN 25
13.1 Servicing Procedure: 2513.2 Enter Service mode: 25
16.1 Equipment required 3116.2 Earth/Insulation Test: 3116.3 Screen calibration: 3116.4 OVEN TESTS 3216.5 Microwave Power Test 3216.6 Microwave Leakage Test 3316.7 Temperature Control Test 3416.8 Soak Test 3516.9 Recommission Test 35
17 HIGH VOLTAGE COMPONENTS 3617.1 Power Transformer Test 3617.2 High Voltage Rectifier Test (Diode Board) 3617.3 High Voltage Capacitor Test 3717.4 High Voltage Magnetron Test 37
18 MAINS VOLTAGE COMPONENTS 3818.1 Door Interlock Adjustment 38
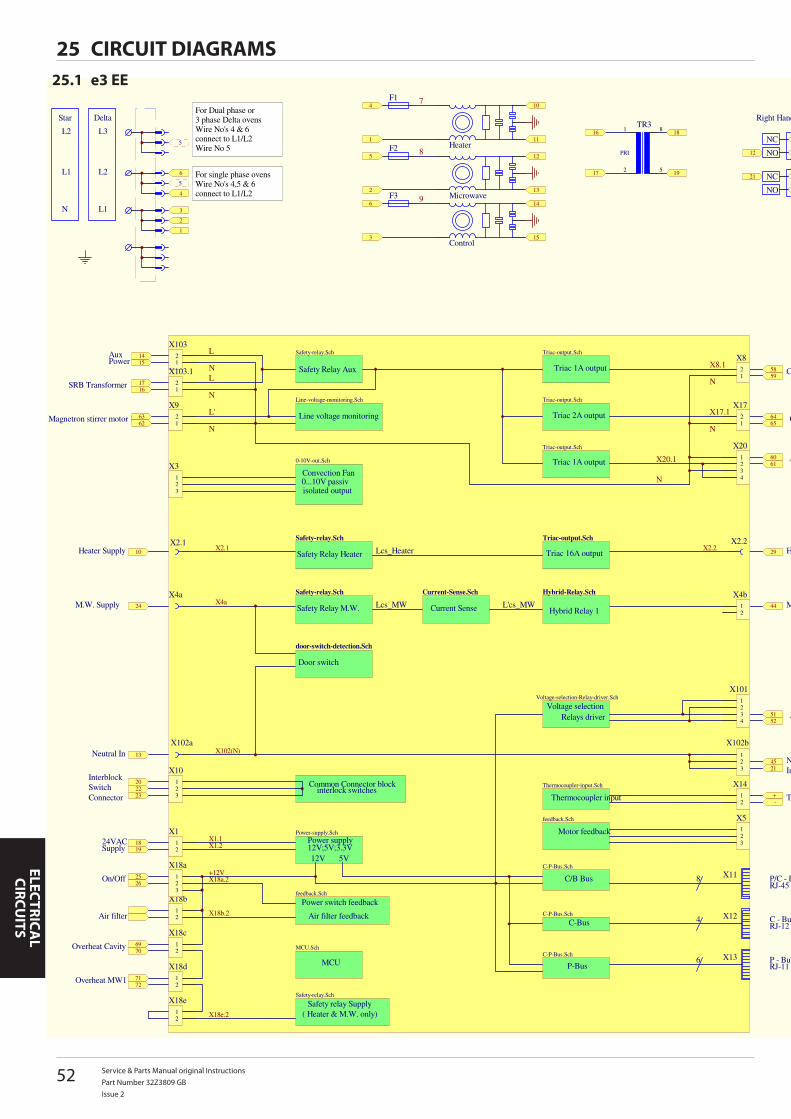
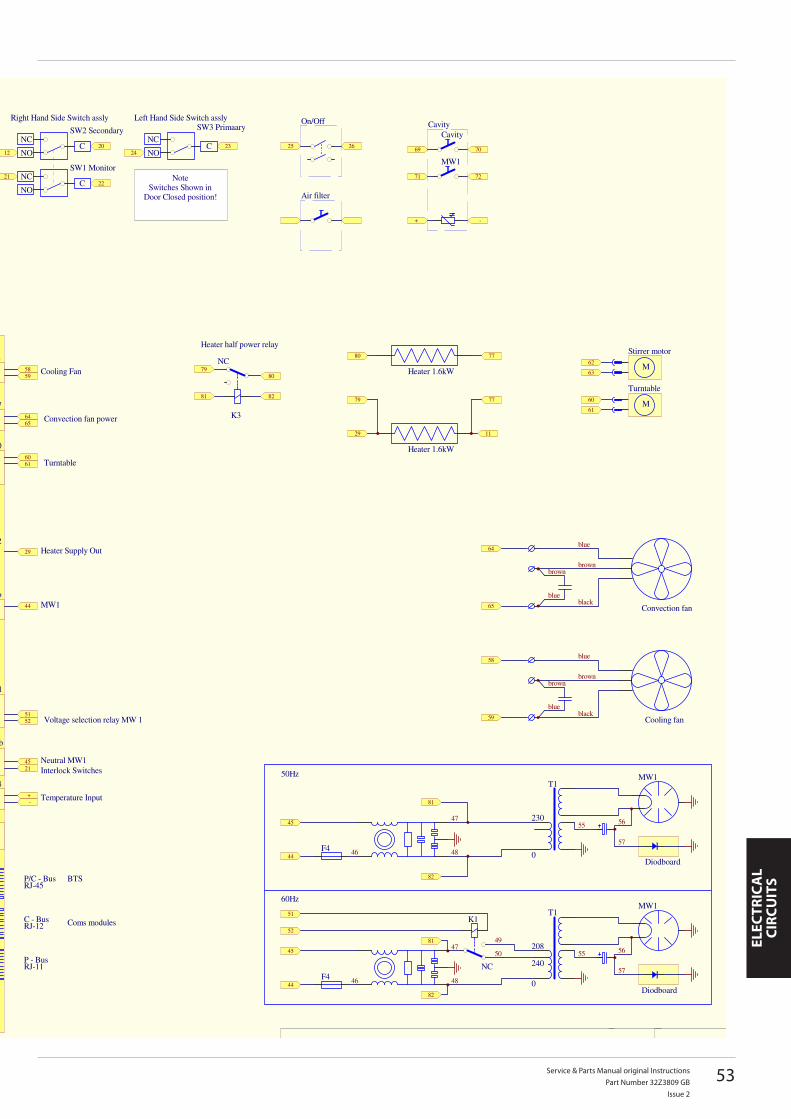
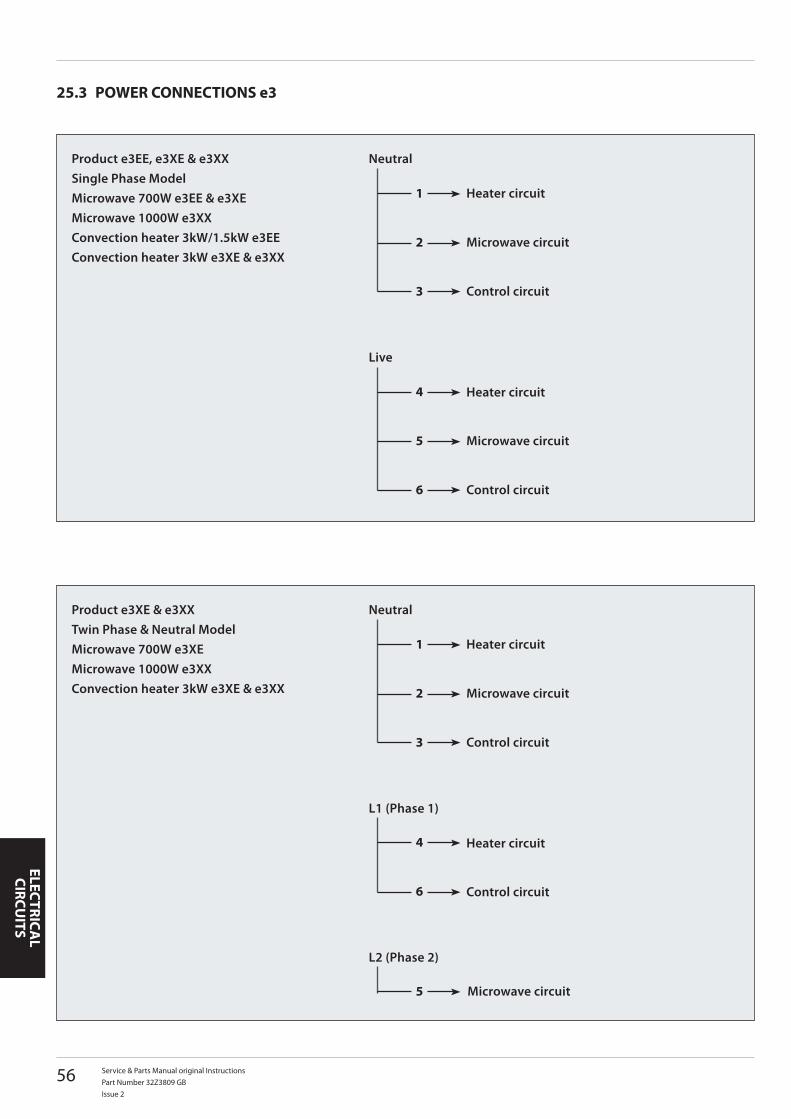
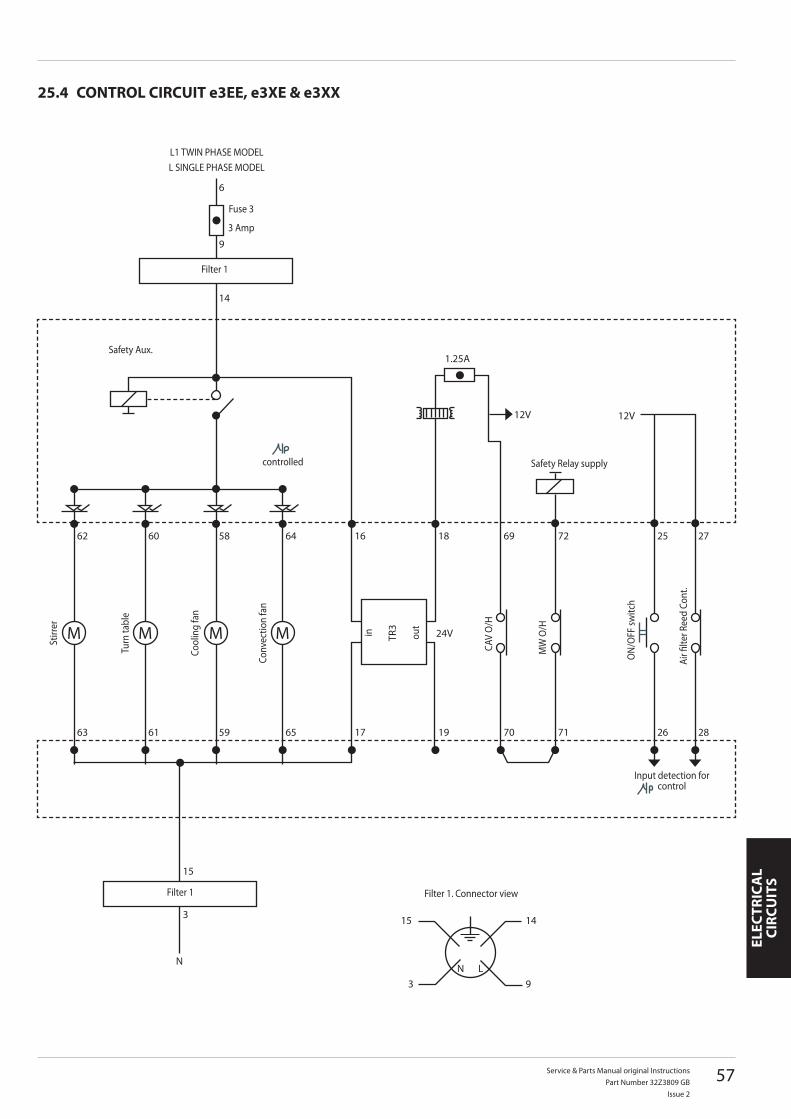
25 CIRCUIT DIAGRAMS 5225.1 e3 EE 5225.2 e3 XE : e3 XX 5425.3 POWER CONNECTIONS e3 5625.4 CONTROL CIRCUIT e3EE, e3XE & e3XX 5725.5 HEATER CIRCUIT e3EE 5825.6 HEATER CIRCUIT e3XE & e3 XX 5925.7 MICROWAVE CIRCUIT e3EE 6025.8 MICROWAVE CIRCUIT e3XE & e3XX 61
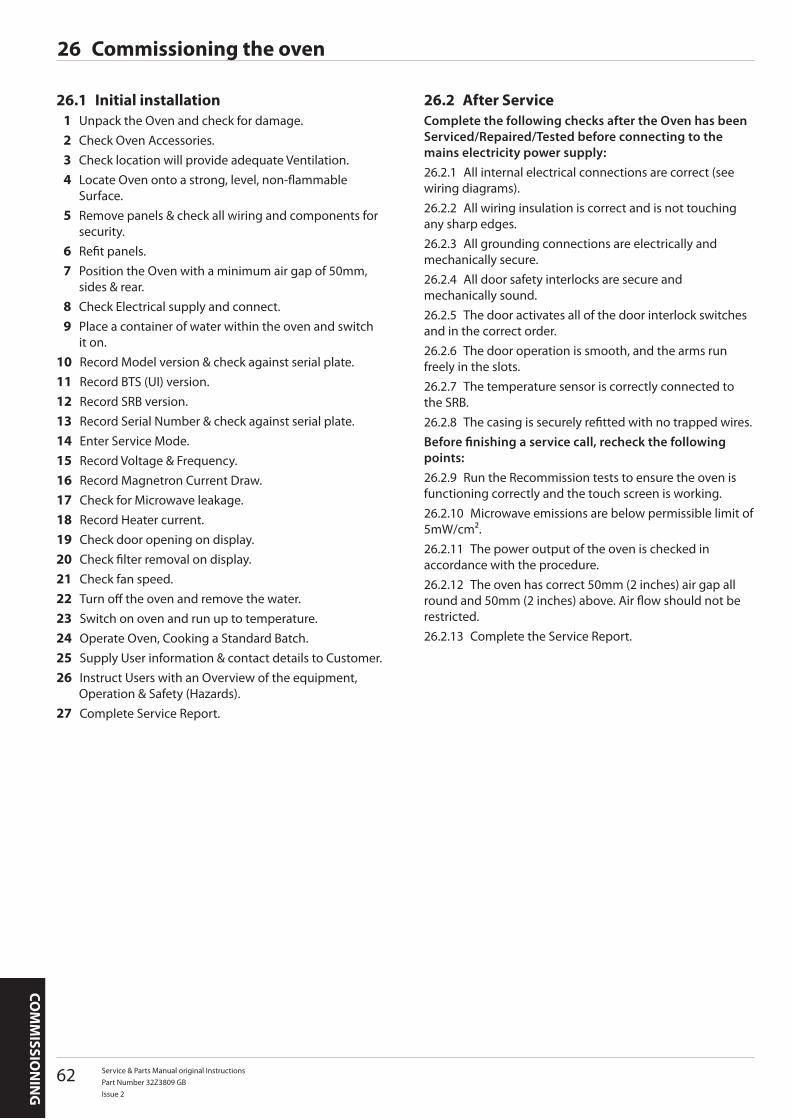
COMMISSIONING26 Commissioning the oven 62
26.1 Initial installation 6226.2 After Service 62
CONTENTS
4 Service & Parts Manual original InstructionsPart Number 32Z3809 GBIssue 2
SAFETY &
REG
ULATIO
NS
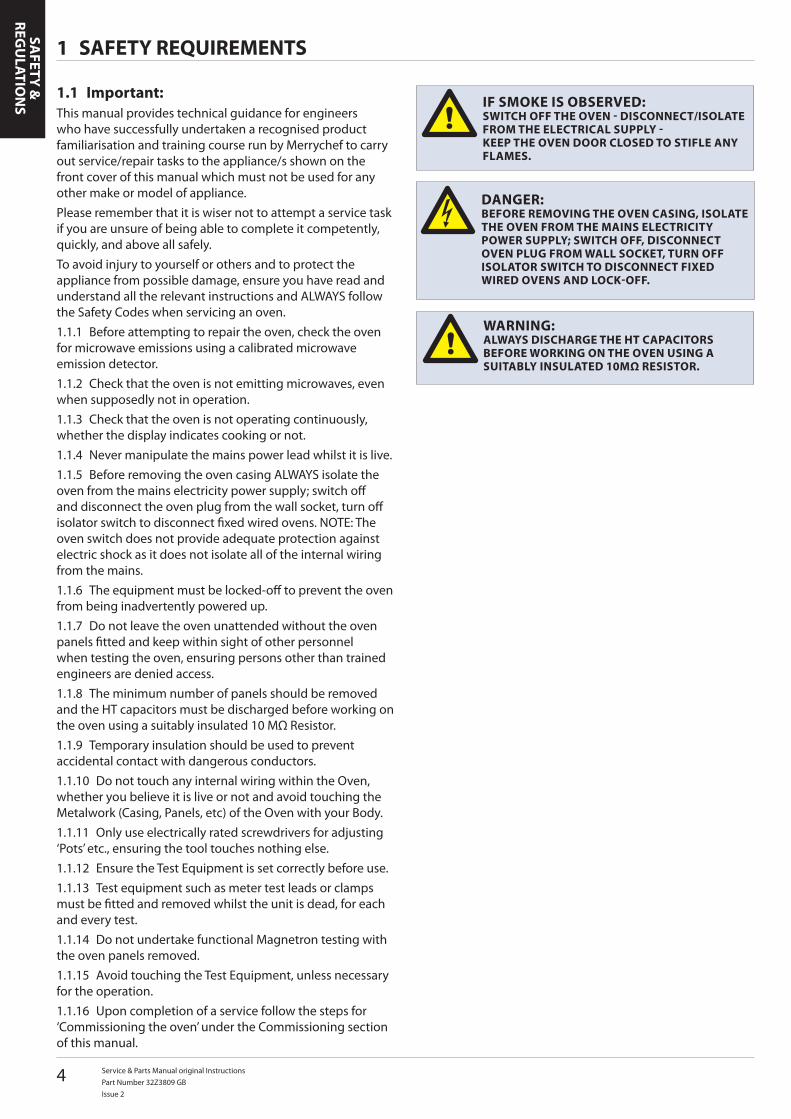
Important:1.1 This manual provides technical guidance for engineers who have successfully undertaken a recognised product familiarisation and training course run by Merrychef to carry out service/repair tasks to the appliance/s shown on the front cover of this manual which must not be used for any other make or model of appliance.Please remember that it is wiser not to attempt a service task if you are unsure of being able to complete it competently, quickly, and above all safely.To avoid injury to yourself or others and to protect the appliance from possible damage, ensure you have read and understand all the relevant instructions and ALWAYS follow the Safety Codes when servicing an oven.
Before attempting to repair the oven, check the oven 1.1.1 for microwave emissions using a calibrated microwave emission detector.
Check that the oven is not emitting microwaves, even 1.1.2 when supposedly not in operation.
Check that the oven is not operating continuously, 1.1.3 whether the display indicates cooking or not.
Never manipulate the mains power lead whilst it is live.1.1.4 Before removing the oven casing ALWAYS isolate the 1.1.5
oven from the mains electricity power supply; switch off and disconnect the oven plug from the wall socket, turn off isolator switch to disconnect fixed wired ovens. NOTE: The oven switch does not provide adequate protection against electric shock as it does not isolate all of the internal wiring from the mains.
The equipment must be locked-off to prevent the oven 1.1.6 from being inadvertently powered up.
Do not leave the oven unattended without the oven 1.1.7 panels fitted and keep within sight of other personnel when testing the oven, ensuring persons other than trained engineers are denied access.
The minimum number of panels should be removed 1.1.8 and the HT capacitors must be discharged before working on the oven using a suitably insulated 10 MΩ Resistor.
Temporary insulation should be used to prevent 1.1.9 accidental contact with dangerous conductors.
Do not touch any internal wiring within the Oven, 1.1.10 whether you believe it is live or not and avoid touching the Metalwork (Casing, Panels, etc) of the Oven with your Body.
Only use electrically rated screwdrivers for adjusting 1.1.11 ‘Pots’ etc., ensuring the tool touches nothing else.
Ensure the Test Equipment is set correctly before use.1.1.12 Test equipment such as meter test leads or clamps 1.1.13
must be fitted and removed whilst the unit is dead, for each and every test.
Do not undertake functional Magnetron testing with 1.1.14 the oven panels removed.
Avoid touching the Test Equipment, unless necessary 1.1.15 for the operation.
Upon completion of a service follow the steps for 1.1.16 ‘Commissioning the oven’ under the Commissioning section of this manual.
SAFETY REQUIREMENTS1
DANGER:BEFORE REMOVING THE OVEN CASING, ISOLATE THE OVEN FROM THE MAINS ELECTRICITY POWER SUPPLY; SWITCH OFF, DISCONNECT OVEN PLUG FROM WALL SOCkET, TURN OFF ISOLATOR SWITCH TO DISCONNECT FIXED WIRED OVENS AND LOCk-OFF.
WARNING:ALWAYS DISCHARGE THE HT CAPACITORS BEFORE WORkING ON THE OVEN USING A SUITABLY INSULATED 10MΩ RESISTOR.
IF SMOkE IS OBSERVED:SWITCH OFF THE OVEN - DISCONNECT/ISOLATE FROM THE ELECTRICAL SUPPLY - kEEP THE OVEN DOOR CLOSED TO STIFLE ANY FLAMES.
Service & Parts Manual original InstructionsPart Number 32Z3809 GB
Issue 2
5
PRO
DU
CT
DET
AIL
S
PRODUCT OVERVIEW & FUNCTIONS2
CONSTRUCTIONStainless Steel cavity and casework.
CONTROL SYSTEMColour touchscreen, icon driven.Storage for up to 1024 programs with 6 stages per cooking program providing a user instruction for each stage.USB memory stick data transfer.Support for optional remote communications Ethernet module.Safety system: ensures control area temperature is within limits.
MICROWAVE POWERDistribution system, rotating active antennae.Microwave settings, off or 5-100% in 1% increments.Safety system: Agency approved monitored interlock door system, current monitoring and overheat detection for magnetron.
CONVECTED HEATTemperature settings 0°C off and from 100°C to 275°C in 1° C steps.Distribution system, convection fan.Safety system: oven cavity overheat detection.
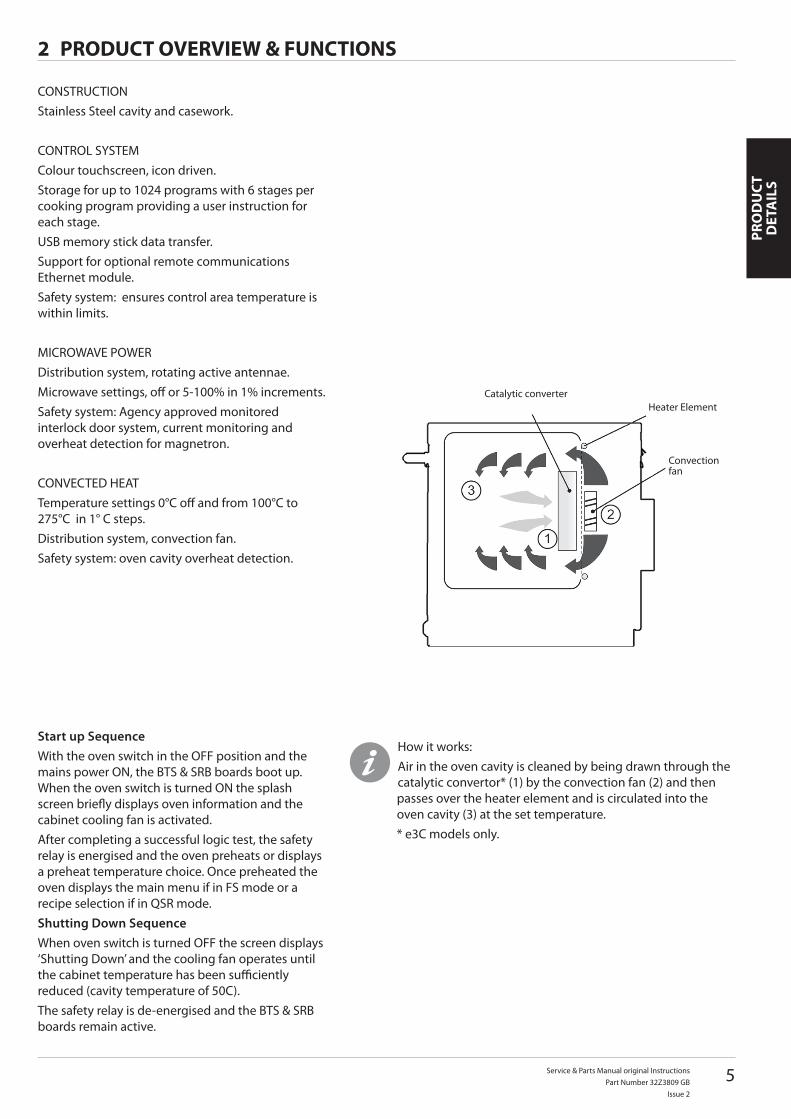
How it works:Air in the oven cavity is cleaned by being drawn through the catalytic convertor* (1) by the convection fan (2) and then passes over the heater element and is circulated into the oven cavity (3) at the set temperature.* e3C models only.
Start up SequenceWith the oven switch in the OFF position and the mains power ON, the BTS & SRB boards boot up. When the oven switch is turned ON the splash screen briefly displays oven information and the cabinet cooling fan is activated.After completing a successful logic test, the safety relay is energised and the oven preheats or displays a preheat temperature choice. Once preheated the oven displays the main menu if in FS mode or a recipe selection if in QSR mode.Shutting Down SequenceWhen oven switch is turned OFF the screen displays ‘Shutting Down’ and the cooling fan operates until the cabinet temperature has been sufficiently reduced (cavity temperature of 50C).The safety relay is de-energised and the BTS & SRB boards remain active.
Catalytic converterHeater Element
Convection fan
6 Service & Parts Manual original InstructionsPart Number 32Z3809 GBIssue 2
PROD
UCT
DETA
ILS
1
5
8
10 11
12
2
6
9
34
7
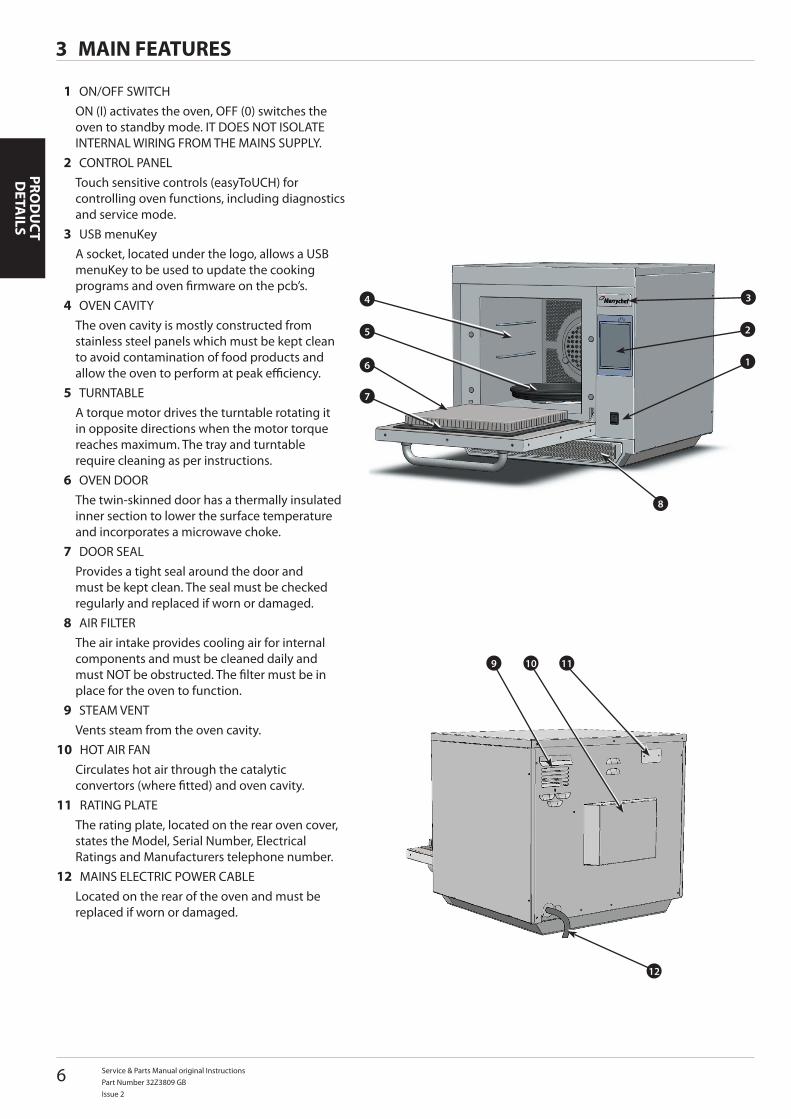
MAIN FEATURES3
ON/OFF SWITCH1 ON (I) activates the oven, OFF (0) switches the oven to standby mode. IT DOES NOT ISOLATE INTERNAL WIRING FROM THE MAINS SUPPLY.CONTROL PANEL2
Touch sensitive controls (easyToUCH) for controlling oven functions, including diagnostics and service mode.USB menuKey3
A socket, located under the logo, allows a USB menuKey to be used to update the cooking programs and oven firmware on the pcb’s.OVEN CAVITY4
The oven cavity is mostly constructed from stainless steel panels which must be kept clean to avoid contamination of food products and allow the oven to perform at peak efficiency.TURNTABLE5
A torque motor drives the turntable rotating it in opposite directions when the motor torque reaches maximum. The tray and turntable require cleaning as per instructions.OVEN DOOR6
The twin-skinned door has a thermally insulated inner section to lower the surface temperature and incorporates a microwave choke.DOOR SEAL7
Provides a tight seal around the door and must be kept clean. The seal must be checked regularly and replaced if worn or damaged.AIR FILTER8
The air intake provides cooling air for internal components and must be cleaned daily and must NOT be obstructed. The filter must be in place for the oven to function.STEAM VENT9
Vents steam from the oven cavity.HOT AIR FAN10
Circulates hot air through the catalytic convertors (where fitted) and oven cavity.RATING PLATE11
The rating plate, located on the rear oven cover, states the Model, Serial Number, Electrical Ratings and Manufacturers telephone number.MAINS ELECTRIC POWER CABLE12
Located on the rear of the oven and must be replaced if worn or damaged.
Service & Parts Manual original InstructionsPart Number 32Z3809 GB
Issue 2
7
551m
m21
.7in
598mm23.5in
381mm15.0in
558mm22.0in
24.5in622mm
PRO
DU
CT
DET
AIL
S
TECHNICAL SPECIFICATIONS4
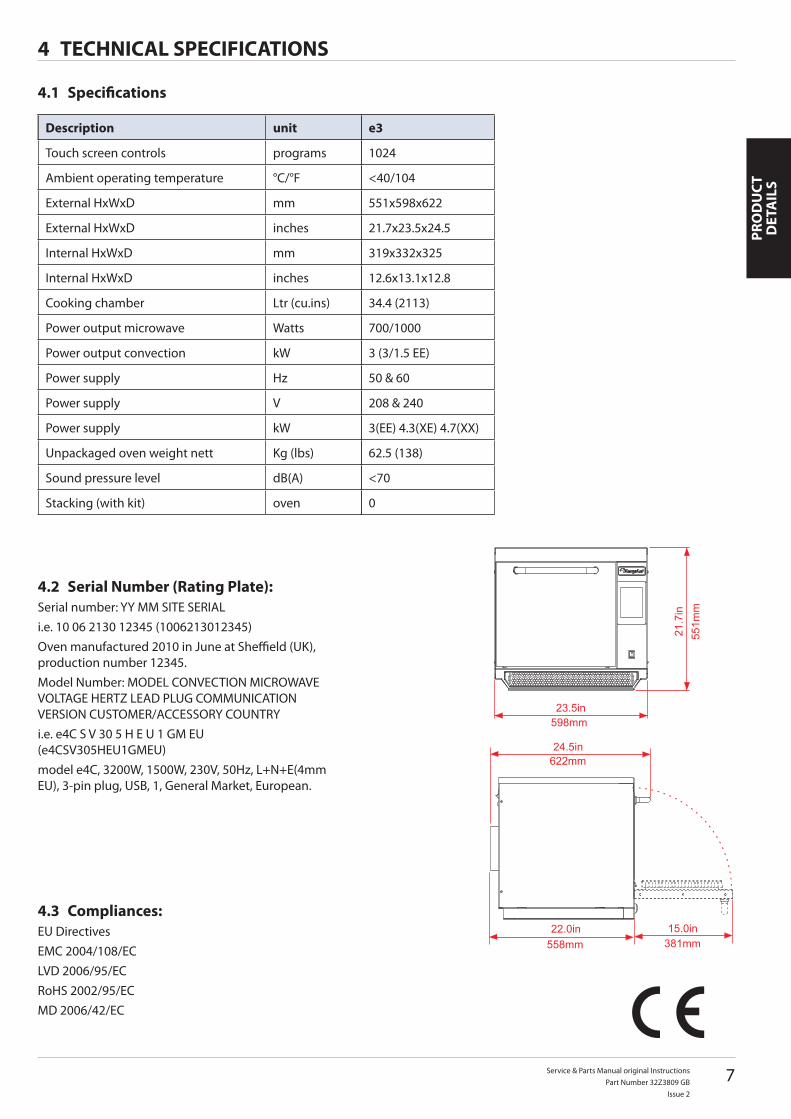
Specifications4.1
Serial Number (Rating Plate):4.2 Serial number: YY MM SITE SERIALi.e. 10 06 2130 12345 (1006213012345)Oven manufactured 2010 in June at Sheffield (UK), production number 12345.Model Number: MODEL CONVECTION MICROWAVE VOLTAGE HERTZ LEAD PLUG COMMUNICATION VERSION CUSTOMER/ACCESSORY COUNTRYi.e. e4C S V 30 5 H E U 1 GM EU (e4CSV305HEU1GMEU)model e4C, 3200W, 1500W, 230V, 50Hz, L+N+E(4mm EU), 3-pin plug, USB, 1, General Market, European.
Compliances:4.3 EU DirectivesEMC 2004/108/ECLVD 2006/95/ECRoHS 2002/95/ECMD 2006/42/EC
Description unit
Touch screen controls programs
Ambient operating temperature °C/°F
External HxWxD mm
External HxWxD inches
Internal HxWxD mm
Internal HxWxD inches
Cooking chamber Ltr (cu.ins)
Power output microwave Watts
Power output convection kW
Power supply Hz
Power supply V
Power supply kW
Unpackaged oven weight nett Kg (lbs)
Sound pressure level dB(A)
Stacking (with kit) oven
e3
1024
<40/104
551x598x622
21.7x23.5x24.5
319x332x325
12.6x13.1x12.8
34.4 (2113)
700/1000
3 (3/1.5 EE)
50 & 60
208 & 240
3(EE) 4.3(XE) 4.7(XX)
62.5 (138)
<70
0
8 Service & Parts Manual original Instructions
Part Number 32Z3809 GB
Issue 2
PR
OD
UC
T D
ETAILS
EC Declaration of ConformityManufacturer
Equipment detailsGeneric Model Numbers eikon e3, eikon e4, eikon e5 Description Commercial Combination Microwave OvenDeclaration of Conformity with directives and standardsThe manufacturer hereby declares that its commercial combination microwave ovens listed above comply with the following directives and standards.Compliance with DirectivesThe commercial combination microwave ovens comply with the relevant provisions of the following European DirectivesEMC 2004/108/CE LVD 2006/95/EC RoHS 2002/95/EC MD 2006/42/ECHarmonised Standards AppliedThe commercial combination microwave ovens comply with the relevant requirements of the following European standards.
EN 60335-2-90: 2006� EN 60335-1: 2002+A11+A1+A12+A2+A13� EN 62233:2008� EN 55014-2:1997 inc A2:2008 in accordance with Category IV requirements� Electrostatic discharge IEC 61000-4-2:1995Radiated RF interference IEC 61000-4-3:1996Fast transient common mode, AC port IEC 61000-4-4:1995Mains surge, AC port IEC 61000-4-5:1995RF current, common mode, AC port IEC 61000-4-6:1996Mains voltage dips & interruptions IEC 61000-4-11:1994
Flicker IEC 61000-3-11:2000� �
Mains terminal disturbance voltage Table 2a Table 5a
Merrychef, Ashbourne House The Guildway, Old Portsmouth RoadGuildfordGU3 1LR
Merrychef
Service & Parts Manual original InstructionsPart Number 32Z3809 GB
Issue 2
9
PRO
DU
CT
DET
AIL
S
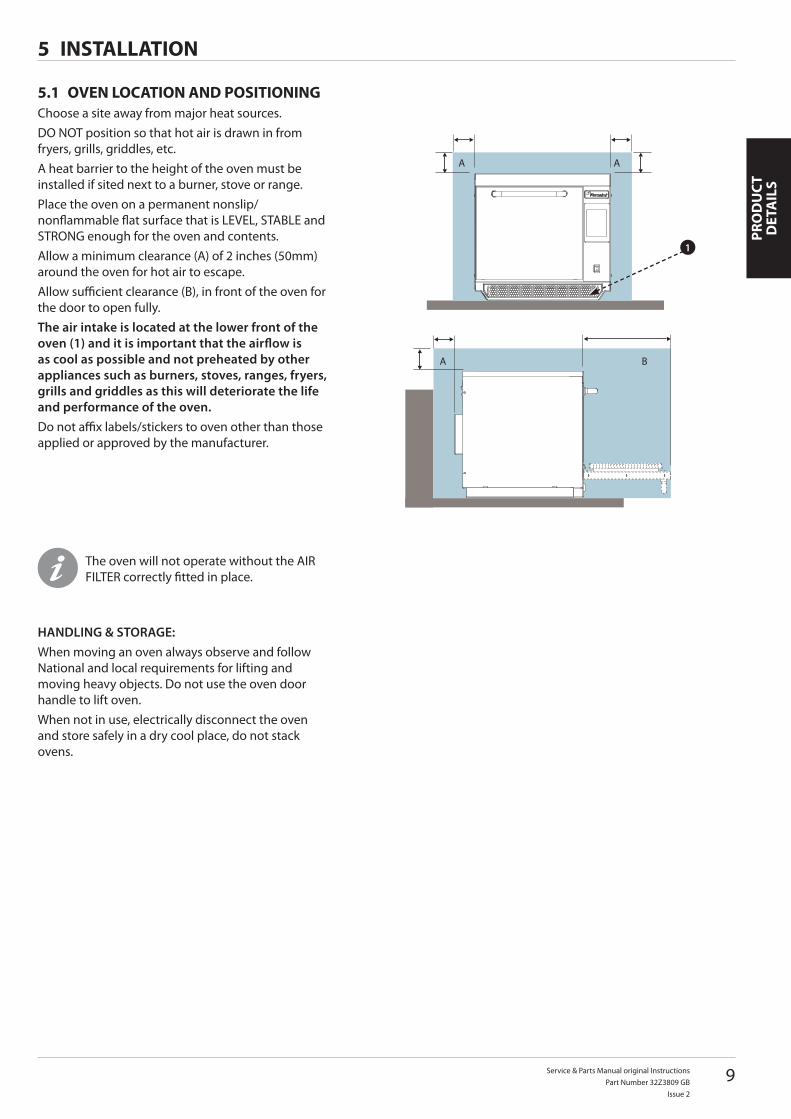
1
A A
A B
The oven will not operate without the AIR FILTER correctly fitted in place.
INSTALLATION5
OVEN LOCATION AND POSITIONING5.1 Choose a site away from major heat sources.DO NOT position so that hot air is drawn in from fryers, grills, griddles, etc.A heat barrier to the height of the oven must be installed if sited next to a burner, stove or range.Place the oven on a permanent nonslip/nonflammable flat surface that is LEVEL, STABLE and STRONG enough for the oven and contents.Allow a minimum clearance (A) of 2 inches (50mm) around the oven for hot air to escape.Allow sufficient clearance (B), in front of the oven for the door to open fully.The air intake is located at the lower front of the oven (1) and it is important that the airflow is as cool as possible and not preheated by other appliances such as burners, stoves, ranges, fryers, grills and griddles as this will deteriorate the life and performance of the oven.Do not affix labels/stickers to oven other than those applied or approved by the manufacturer.
HANDLING & STORAGE:When moving an oven always observe and follow National and local requirements for lifting and moving heavy objects. Do not use the oven door handle to lift oven.When not in use, electrically disconnect the oven and store safely in a dry cool place, do not stack ovens.
10 Service & Parts Manual original InstructionsPart Number 32Z3809 GBIssue 2
PROD
UCT
DETA
ILS
2
1
ELECTRICAL INSTALLATION6
Establishments with standard (Type ‘B’) circuit breakers are sensitive to ‘surges’ which occur on switching on freezers, refrigerators and other catering equipment, including microwave ovens. Because of this, we strongly recommend that a separate Type ‘C’ circuit breaker (designed specifically for this type of equipment) must be fitted. An individual, suitably rated circuit breaker should be fitted for each oven installed.
DANGER!THIS APPLIANCE MUST BE EARTHED. FAILURE TO DO SO MAY RESULT IN ELECTRIC SHOCk AND DEATH.
The oven must be connected to a separate electrical supply installed by a qualified and approved electrician.A suitably rated isolating switch with a 3mm contact gap on all poles should be fitted for each oven installed.
WARNING: HIGH LEAkAGE CURRENT EARTH CONNECTION IS ESSENTIAL.
If you are in any doubt about your electrical supply, seek the advice of a qualified electrician.
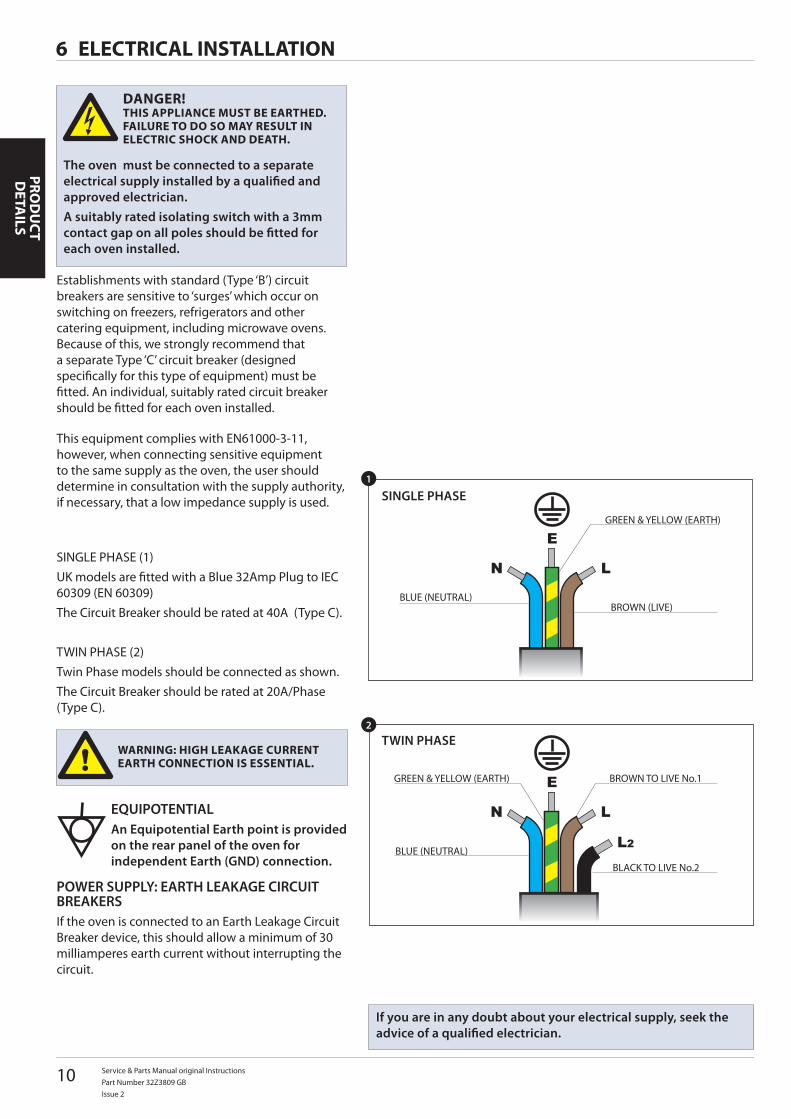
SINGLE PHASE
BLUE (NEUTRAL)
GREEN & YELLOW (EARTH)
BROWN (LIVE)
TWIN PHASE
GREEN & YELLOW (EARTH)
BLUE (NEUTRAL)
BROWN TO LIVE No.1
BLACK TO LIVE No.2
This equipment complies with EN61000-3-11, however, when connecting sensitive equipment to the same supply as the oven, the user should determine in consultation with the supply authority, if necessary, that a low impedance supply is used.
SINGLE PHASE (1)UK models are fitted with a Blue 32Amp Plug to IEC 60309 (EN 60309)The Circuit Breaker should be rated at 40A (Type C).
TWIN PHASE (2)Twin Phase models should be connected as shown.The Circuit Breaker should be rated at 20A/Phase (Type C).
EQUIPOTENTIALAn Equipotential Earth point is provided on the rear panel of the oven for independent Earth (GND) connection.
POWER SUPPLY: EARTH LEAKAGE CIRCUIT BREAKERSIf the oven is connected to an Earth Leakage Circuit Breaker device, this should allow a minimum of 30 milliamperes earth current without interrupting the circuit.
Service & Parts Manual original InstructionsPart Number 32Z3809 GB
Issue 2
11
PRO
DU
CT
DET
AIL
S
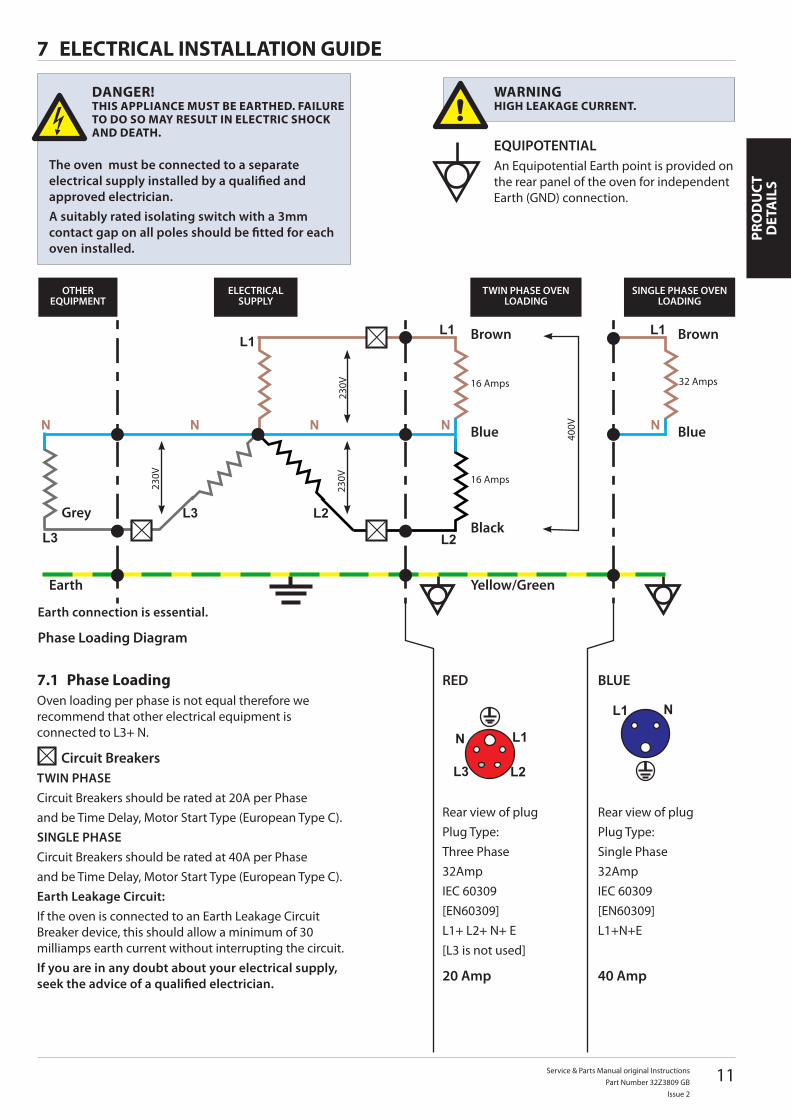
230V
230V
230V
400V
16 Amps
16 Amps
32 Amps
Brown
Blue
Black
Yellow/GreenEarth
Grey
Brown
Blue
DANGER!THIS APPLIANCE MUST BE EARTHED. FAILURE TO DO SO MAY RESULT IN ELECTRIC SHOCk AND DEATH.
The oven must be connected to a separate electrical supply installed by a qualified and approved electrician.A suitably rated isolating switch with a 3mm contact gap on all poles should be fitted for each oven installed.
WARNINGHIGH LEAkAGE CURRENT.
EQUIPOTENTIALAn Equipotential Earth point is provided on the rear panel of the oven for independent Earth (GND) connection.
Phase Loading7.1 Oven loading per phase is not equal therefore we recommend that other electrical equipment is connected to L3+ N.
Circuit BreakersTWIN PHASE Circuit Breakers should be rated at 20A per Phaseand be Time Delay, Motor Start Type (European Type C).SINGLE PHASE Circuit Breakers should be rated at 40A per Phaseand be Time Delay, Motor Start Type (European Type C).Earth Leakage Circuit: If the oven is connected to an Earth Leakage Circuit Breaker device, this should allow a minimum of 30 milliamps earth current without interrupting the circuit.If you are in any doubt about your electrical supply, seek the advice of a qualified electrician.
ELECTRICAL INSTALLATION GUIDE7
OTHER EQUIPMENT
ELECTRICAL SUPPLY
TWIN PHASE OVEN LOADING
SINGLE PHASE OVEN LOADING
Earth connection is essential.
Phase Loading Diagram
RED
Rear view of plugPlug Type:Three Phase32AmpIEC 60309[EN60309]L1+ L2+ N+ E[L3 is not used]
20 Amp
BLUE
Rear view of plugPlug Type:Single Phase32AmpIEC 60309[EN60309]L1+N+E
40 Amp
12 Service & Parts Manual original InstructionsPart Number 32Z3809 GBIssue 2
PROD
UCT
DETA
ILS
2
1
3
4
5
QUICk START GUIDE: QUICk SERVICE OVEN8
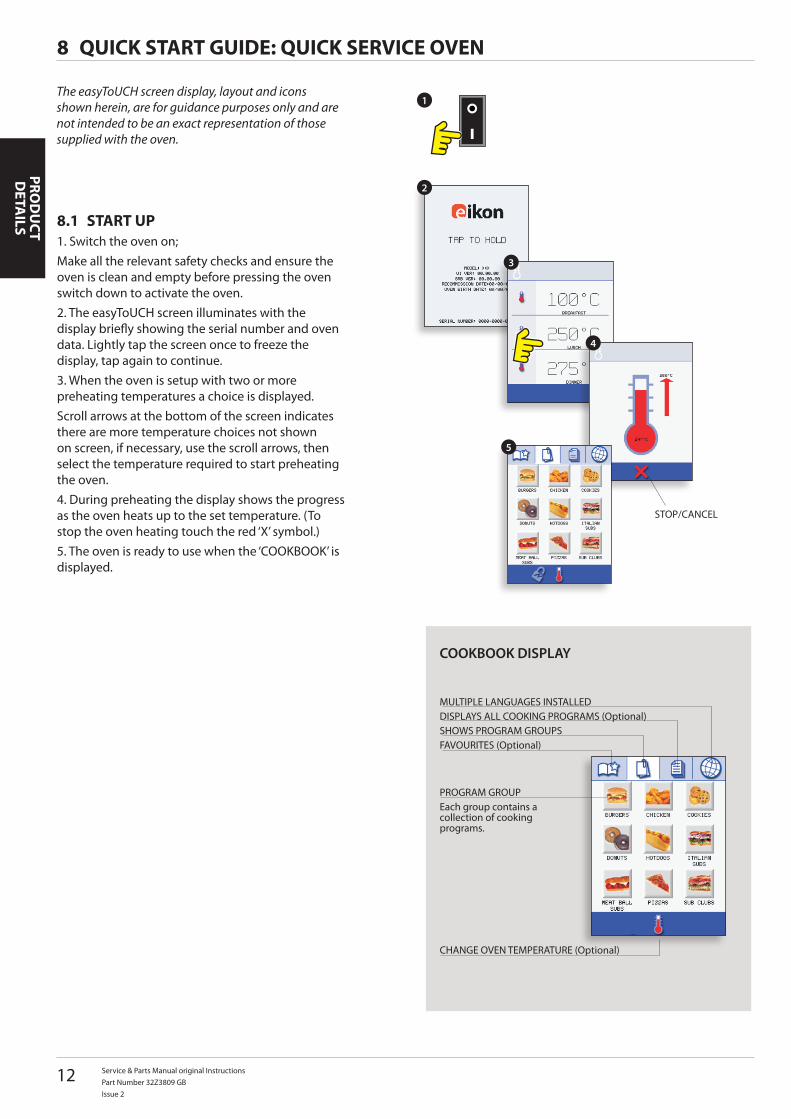
START UP8.1 1. Switch the oven on;Make all the relevant safety checks and ensure the oven is clean and empty before pressing the oven switch down to activate the oven.2. The easyToUCH screen illuminates with the display briefly showing the serial number and oven data. Lightly tap the screen once to freeze the display, tap again to continue.3. When the oven is setup with two or more preheating temperatures a choice is displayed. Scroll arrows at the bottom of the screen indicates there are more temperature choices not shown on screen, if necessary, use the scroll arrows, then select the temperature required to start preheating the oven.4. During preheating the display shows the progress as the oven heats up to the set temperature. (To stop the oven heating touch the red ‘X’ symbol.)5. The oven is ready to use when the ‘COOKBOOK’ is displayed.
MULTIPLE LANGUAGES INSTALLEDDISPLAYS ALL COOKING PROGRAMS (Optional)SHOWS PROGRAM GROUPSFAVOURITES (Optional)
CHANGE OVEN TEMPERATURE (Optional)
PROGRAM GROUPEach group contains a collection of cooking programs.
STOP/CANCEL
COOKBOOK DISPLAY
The easyToUCH screen display, layout and icons shown herein, are for guidance purposes only and are not intended to be an exact representation of those supplied with the oven.
Service & Parts Manual original InstructionsPart Number 32Z3809 GB
Issue 2
13
PRO
DU
CT
DET
AIL
S
1
5
6
2 3
4
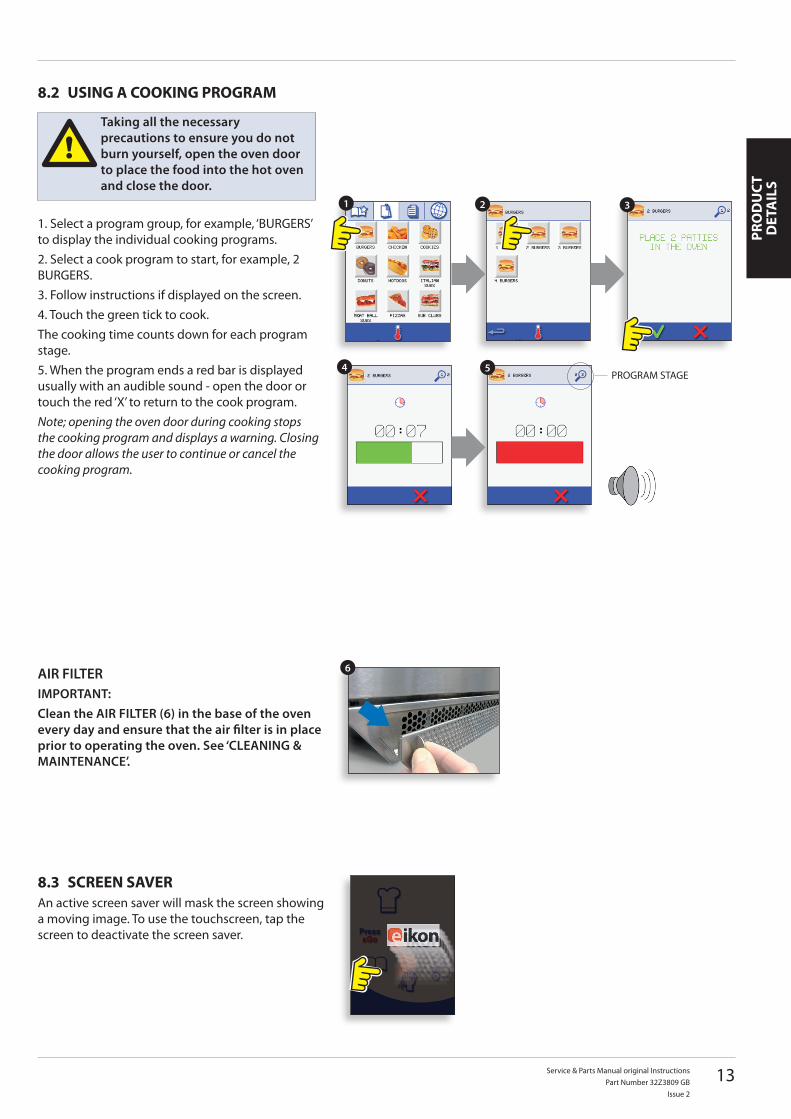
1. Select a program group, for example, ‘BURGERS’ to display the individual cooking programs.2. Select a cook program to start, for example, 2 BURGERS.3. Follow instructions if displayed on the screen.4. Touch the green tick to cook.The cooking time counts down for each program stage.5. When the program ends a red bar is displayed usually with an audible sound - open the door or touch the red ‘X’ to return to the cook program.Note; opening the oven door during cooking stops the cooking program and displays a warning. Closing the door allows the user to continue or cancel the cooking program.
Taking all the necessary precautions to ensure you do not burn yourself, open the oven door to place the food into the hot oven and close the door.
PROGRAM STAGE
USING A COOkING PROGRAM8.2
AIR FILTERIMPORTANT:Clean the AIR FILTER (6) in the base of the oven every day and ensure that the air filter is in place prior to operating the oven. See ‘CLEANING & MAINTENANCE’.
SCREEN SAVER8.3 An active screen saver will mask the screen showing a moving image. To use the touchscreen, tap the screen to deactivate the screen saver.
14 Service & Parts Manual original InstructionsPart Number 32Z3809 GBIssue 2
PROD
UCT
DETA
ILS
1
2
3
4
5
6
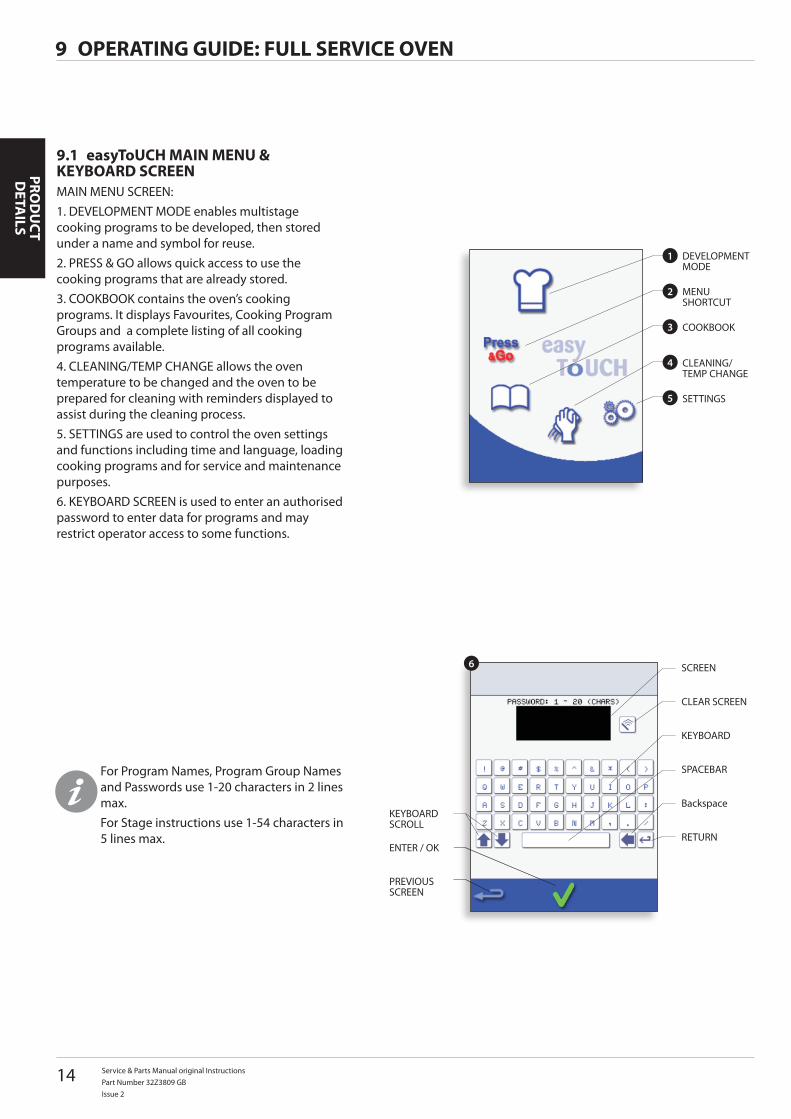
easyToUCH MAIN MENU & 9.1 kEYBOARD SCREENMAIN MENU SCREEN:1. DEVELOPMENT MODE enables multistage cooking programs to be developed, then stored under a name and symbol for reuse.2. PRESS & GO allows quick access to use the cooking programs that are already stored.3. COOKBOOK contains the oven’s cooking programs. It displays Favourites, Cooking Program Groups and a complete listing of all cooking programs available.4. CLEANING/TEMP CHANGE allows the oven temperature to be changed and the oven to be prepared for cleaning with reminders displayed to assist during the cleaning process.5. SETTINGS are used to control the oven settings and functions including time and language, loading cooking programs and for service and maintenance purposes.6. KEYBOARD SCREEN is used to enter an authorised password to enter data for programs and may restrict operator access to some functions.
For Program Names, Program Group Names and Passwords use 1-20 characters in 2 lines max.For Stage instructions use 1-54 characters in 5 lines max.
OPERATING GUIDE: FULL SERVICE OVEN9
DEVELOPMENT MODE
MENU SHORTCUT
COOKBOOK
CLEANING/TEMP CHANGE
SETTINGS
SCREEN
KEYBOARD SCROLL
KEYBOARD
PREVIOUS SCREEN
Backspace
CLEAR SCREEN
ENTER / OK
SPACEBAR
RETURN
Service & Parts Manual original InstructionsPart Number 32Z3809 GB
Issue 2
15
PRO
DU
CT
DET
AIL
S
1
5
2
6
3
4
2
6
3
4
5
1
7
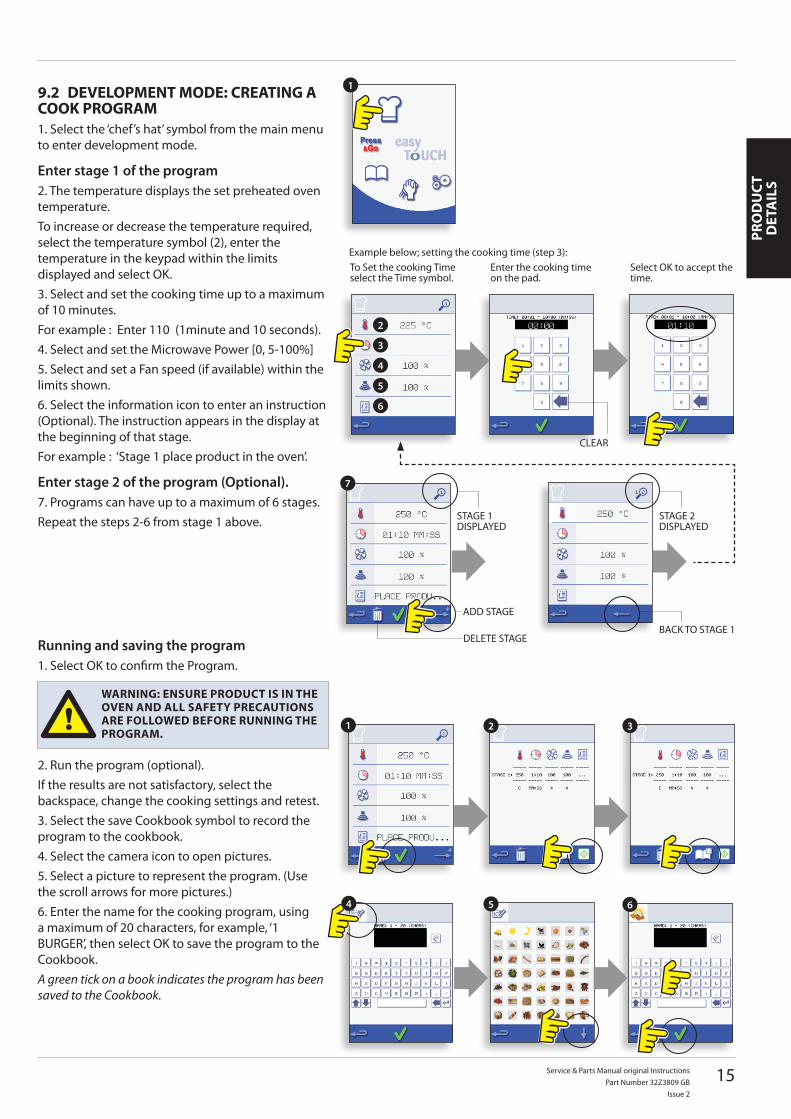
Running and saving the program1. Select OK to confirm the Program.
2. Run the program (optional).If the results are not satisfactory, select the backspace, change the cooking settings and retest.3. Select the save Cookbook symbol to record the program to the cookbook.4. Select the camera icon to open pictures.5. Select a picture to represent the program. (Use the scroll arrows for more pictures.)6. Enter the name for the cooking program, using a maximum of 20 characters, for example, ‘1 BURGER’, then select OK to save the program to the Cookbook.A green tick on a book indicates the program has been saved to the Cookbook.
DEVELOPMENT MODE: CREATING A 9.2 COOk PROGRAM1. Select the ‘chef’s hat’ symbol from the main menu to enter development mode.
Enter stage 1 of the program2. The temperature displays the set preheated oven temperature.To increase or decrease the temperature required, select the temperature symbol (2), enter the temperature in the keypad within the limits displayed and select OK.3. Select and set the cooking time up to a maximum of 10 minutes.For example : Enter 110 (1minute and 10 seconds).4. Select and set the Microwave Power [0, 5-100%]5. Select and set a Fan speed (if available) within the limits shown.6. Select the information icon to enter an instruction (Optional). The instruction appears in the display at the beginning of that stage.For example : ‘Stage 1 place product in the oven’.
Enter stage 2 of the program (Optional).7. Programs can have up to a maximum of 6 stages.Repeat the steps 2-6 from stage 1 above.
WARNING: ENSURE PRODUCT IS IN THE OVEN AND ALL SAFETY PRECAUTIONS ARE FOLLOWED BEFORE RUNNING THE PROGRAM.
Enter the cooking time on the pad.
Select OK to accept the time.
To Set the cooking Time select the Time symbol.
Example below; setting the cooking time (step 3):
STAGE 1 DISPLAYED
ADD STAGE
STAGE 2 DISPLAYED
BACK TO STAGE 1
CLEAR
DELETE STAGE
16 Service & Parts Manual original InstructionsPart Number 32Z3809 GBIssue 2
PROD
UCT
DETA
ILS
1
1
2
2
3
5
3
4
1 2 3
Change the order of a selected item shown in the Press & Go screen.
Move a selected item to or from the Press & Go screen.
Select to scroll a list up or down.
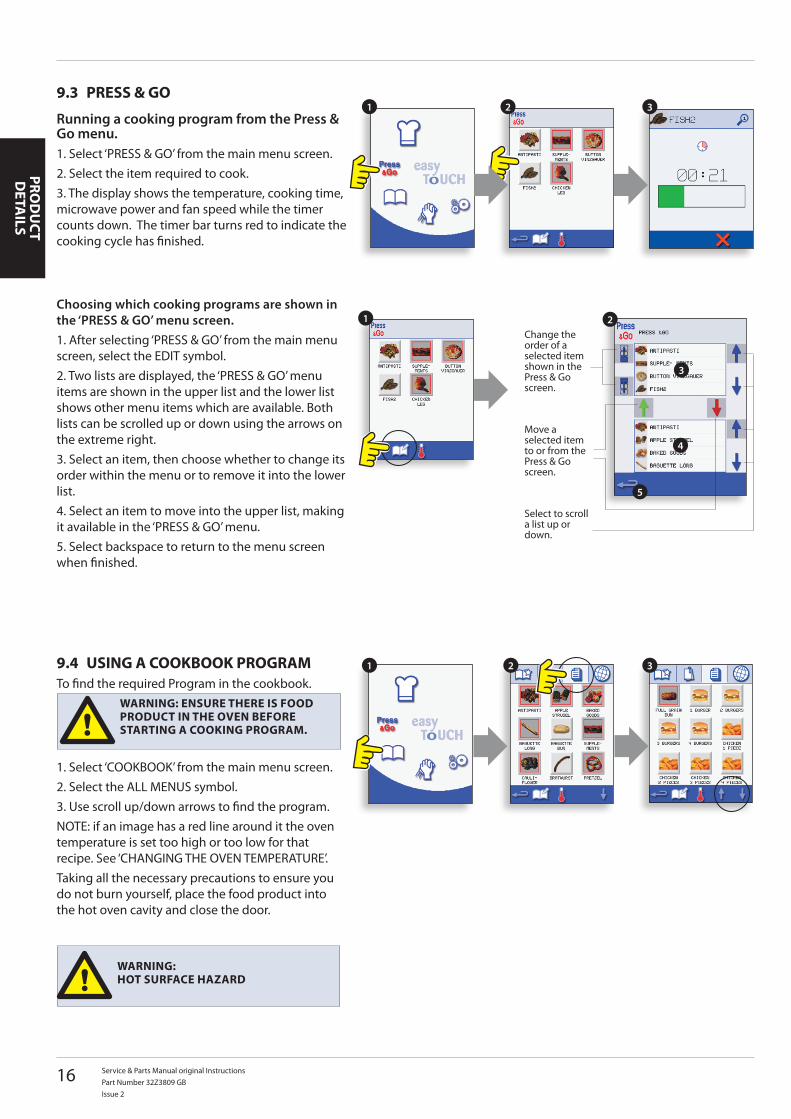
PRESS & GO9.3
Running a cooking program from the Press & Go menu.1. Select ‘PRESS & GO’ from the main menu screen.2. Select the item required to cook.3. The display shows the temperature, cooking time, microwave power and fan speed while the timer counts down. The timer bar turns red to indicate the cooking cycle has finished.
Choosing which cooking programs are shown in the ‘PRESS & GO’ menu screen.1. After selecting ‘PRESS & GO’ from the main menu screen, select the EDIT symbol.2. Two lists are displayed, the ‘PRESS & GO’ menu items are shown in the upper list and the lower list shows other menu items which are available. Both lists can be scrolled up or down using the arrows on the extreme right.3. Select an item, then choose whether to change its order within the menu or to remove it into the lower list.4. Select an item to move into the upper list, making it available in the ‘PRESS & GO’ menu.5. Select backspace to return to the menu screen when finished.
WARNING: ENSURE THERE IS FOOD PRODUCT IN THE OVEN BEFORE STARTING A COOkING PROGRAM.
WARNING:HOT SURFACE HAzARD
USING A COOkBOOk PROGRAM9.4 To find the required Program in the cookbook.
1. Select ‘COOKBOOK’ from the main menu screen.2. Select the ALL MENUS symbol.3. Use scroll up/down arrows to find the program. NOTE: if an image has a red line around it the oven temperature is set too high or too low for that recipe. See ‘CHANGING THE OVEN TEMPERATURE’.Taking all the necessary precautions to ensure you do not burn yourself, place the food product into the hot oven cavity and close the door.
Service & Parts Manual original InstructionsPart Number 32Z3809 GB
Issue 2
17
PRO
DU
CT
DET
AIL
S
1 2 3
5 64
1 2 3
4 5
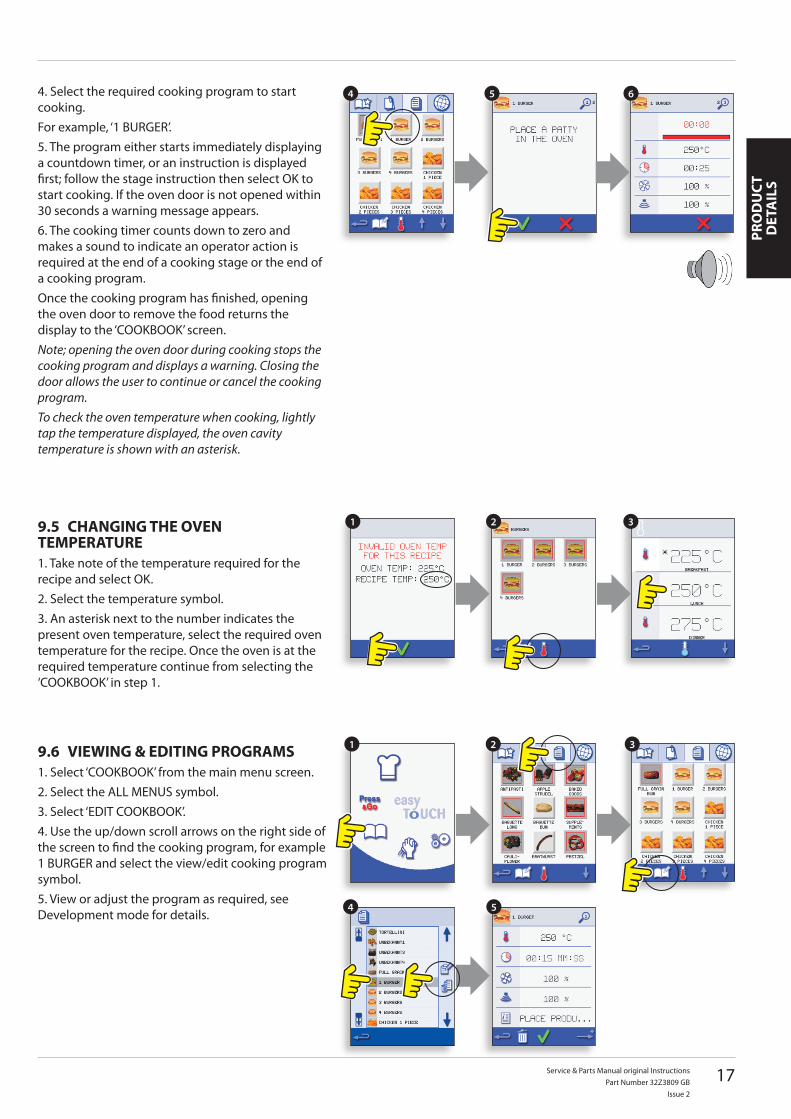
CHANGING THE OVEN 9.5 TEMPERATURE1. Take note of the temperature required for the recipe and select OK.2. Select the temperature symbol.3. An asterisk next to the number indicates the present oven temperature, select the required oven temperature for the recipe. Once the oven is at the required temperature continue from selecting the ‘COOKBOOK’ in step 1.
4. Select the required cooking program to start cooking.For example, ‘1 BURGER’.5. The program either starts immediately displaying a countdown timer, or an instruction is displayed first; follow the stage instruction then select OK to start cooking. If the oven door is not opened within 30 seconds a warning message appears.6. The cooking timer counts down to zero and makes a sound to indicate an operator action is required at the end of a cooking stage or the end of a cooking program.Once the cooking program has finished, opening the oven door to remove the food returns the display to the ‘COOKBOOK’ screen.Note; opening the oven door during cooking stops the cooking program and displays a warning. Closing the door allows the user to continue or cancel the cooking program.To check the oven temperature when cooking, lightly tap the temperature displayed, the oven cavity temperature is shown with an asterisk.
VIEWING & EDITING PROGRAMS9.6 1. Select ‘COOKBOOK’ from the main menu screen.2. Select the ALL MENUS symbol.3. Select ‘EDIT COOKBOOK’.4. Use the up/down scroll arrows on the right side of the screen to find the cooking program, for example 1 BURGER and select the view/edit cooking program symbol.5. View or adjust the program as required, see Development mode for details.
18 Service & Parts Manual original InstructionsPart Number 32Z3809 GBIssue 2
PROD
UCT
DETA
ILS
1 2 3
4
1
5
2
6
3
4
Scroll to show programs in the current Program Group
Move the selected program within the Program Group
Program Group
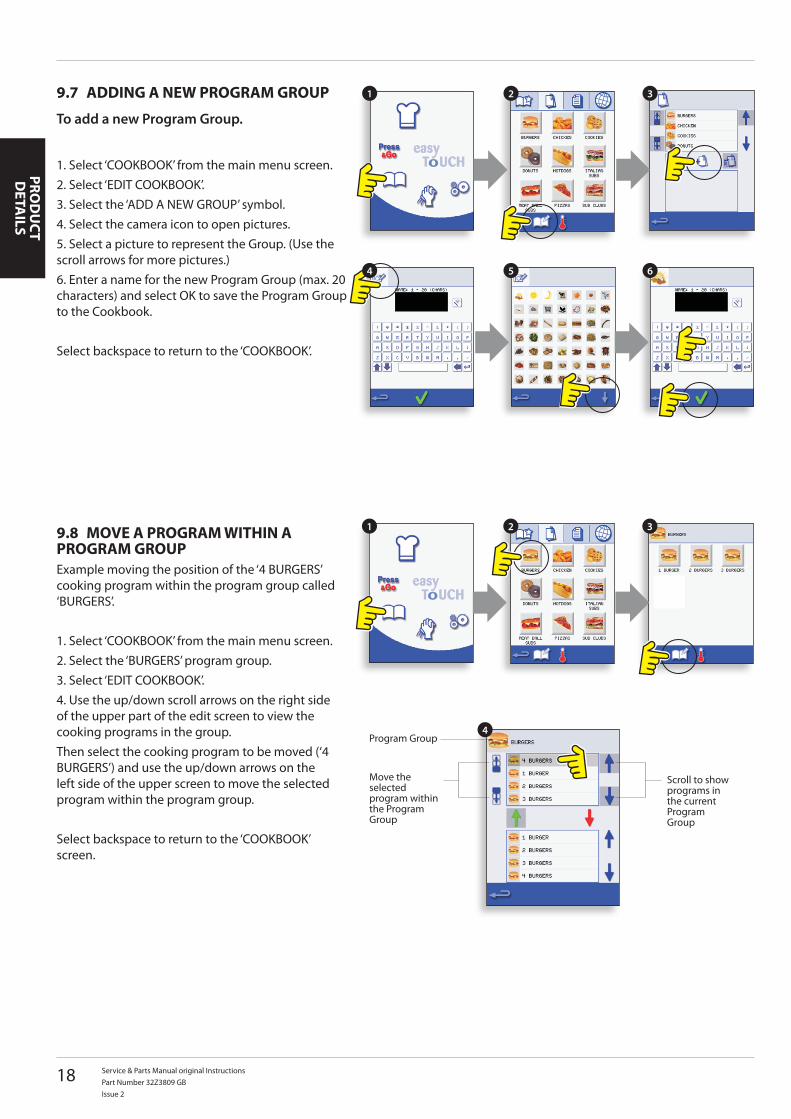
ADDING A NEW PROGRAM GROUP9.7
To add a new Program Group.
1. Select ‘COOKBOOK’ from the main menu screen.2. Select ‘EDIT COOKBOOK’.3. Select the ‘ADD A NEW GROUP’ symbol.4. Select the camera icon to open pictures.5. Select a picture to represent the Group. (Use the scroll arrows for more pictures.)6. Enter a name for the new Program Group (max. 20 characters) and select OK to save the Program Group to the Cookbook.
Select backspace to return to the ‘COOKBOOK’.
MOVE A PROGRAM WITHIN A 9.8 PROGRAM GROUPExample moving the position of the ‘4 BURGERS’ cooking program within the program group called ‘BURGERS’.
1. Select ‘COOKBOOK’ from the main menu screen.2. Select the ‘BURGERS’ program group.3. Select ‘EDIT COOKBOOK’.4. Use the up/down scroll arrows on the right side of the upper part of the edit screen to view the cooking programs in the group.Then select the cooking program to be moved (‘4 BURGERS’) and use the up/down arrows on the left side of the upper screen to move the selected program within the program group.
Select backspace to return to the ‘COOKBOOK’ screen.
Service & Parts Manual original InstructionsPart Number 32Z3809 GB
Issue 2
19
PRO
DU
CT
DET
AIL
S
1
5
2
34
1
5
2
6
3
4
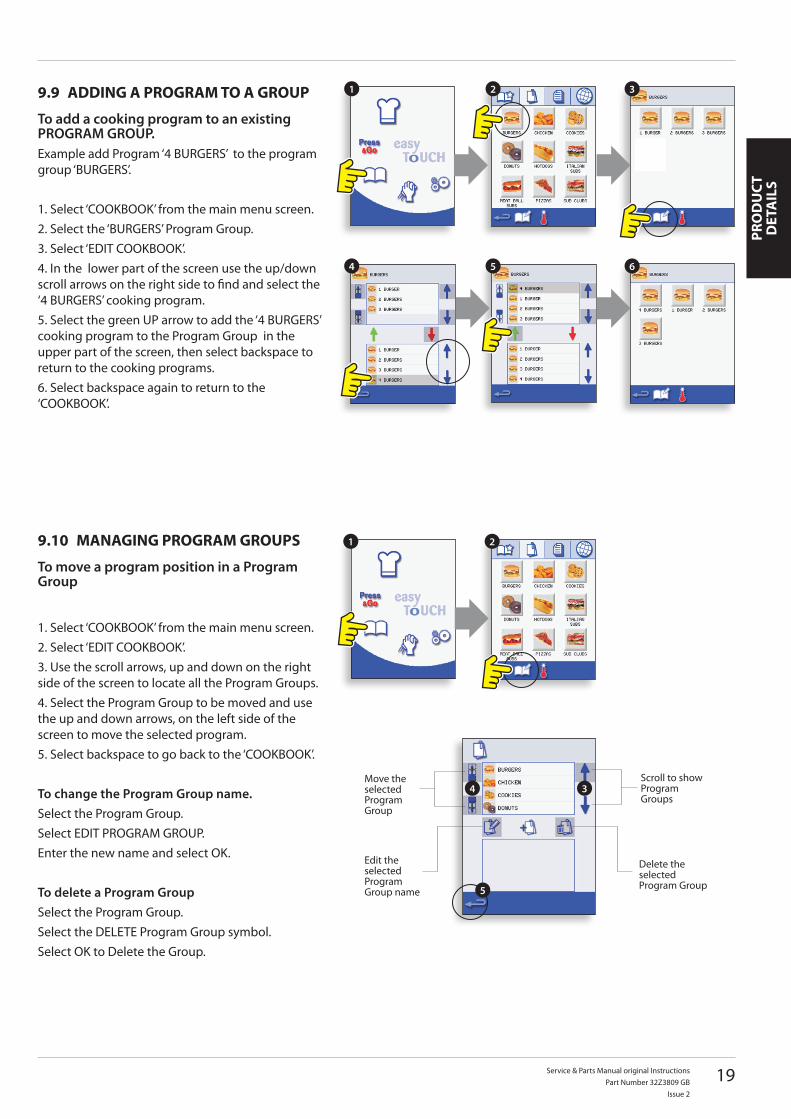
MANAGING PROGRAM GROUPS9.10
To move a program position in a Program Group
1. Select ‘COOKBOOK’ from the main menu screen.2. Select ‘EDIT COOKBOOK’.3. Use the scroll arrows, up and down on the right side of the screen to locate all the Program Groups.4. Select the Program Group to be moved and use the up and down arrows, on the left side of the screen to move the selected program.5. Select backspace to go back to the ‘COOKBOOK’.
To change the Program Group name.Select the Program Group.Select EDIT PROGRAM GROUP.Enter the new name and select OK.
To delete a Program GroupSelect the Program Group.Select the DELETE Program Group symbol.Select OK to Delete the Group.
Scroll to show Program Groups
Move the selected Program Group
Edit the selected Program Group name
Delete the selected Program Group
ADDING A PROGRAM TO A GROUP9.9
To add a cooking program to an existing PROGRAM GROUP.Example add Program ‘4 BURGERS’ to the program group ‘BURGERS’.
1. Select ‘COOKBOOK’ from the main menu screen.2. Select the ‘BURGERS’ Program Group.3. Select ‘EDIT COOKBOOK’.4. In the lower part of the screen use the up/down scroll arrows on the right side to find and select the ‘4 BURGERS’ cooking program.5. Select the green UP arrow to add the ‘4 BURGERS’ cooking program to the Program Group in the upper part of the screen, then select backspace to return to the cooking programs.6. Select backspace again to return to the ‘COOKBOOK’.
20 Service & Parts Manual original InstructionsPart Number 32Z3809 GBIssue 2
PROD
UCT
DETA
ILS
A
B
C
D
1 2
D
G
KA B
E
C
F
J
M
H
L
3 4
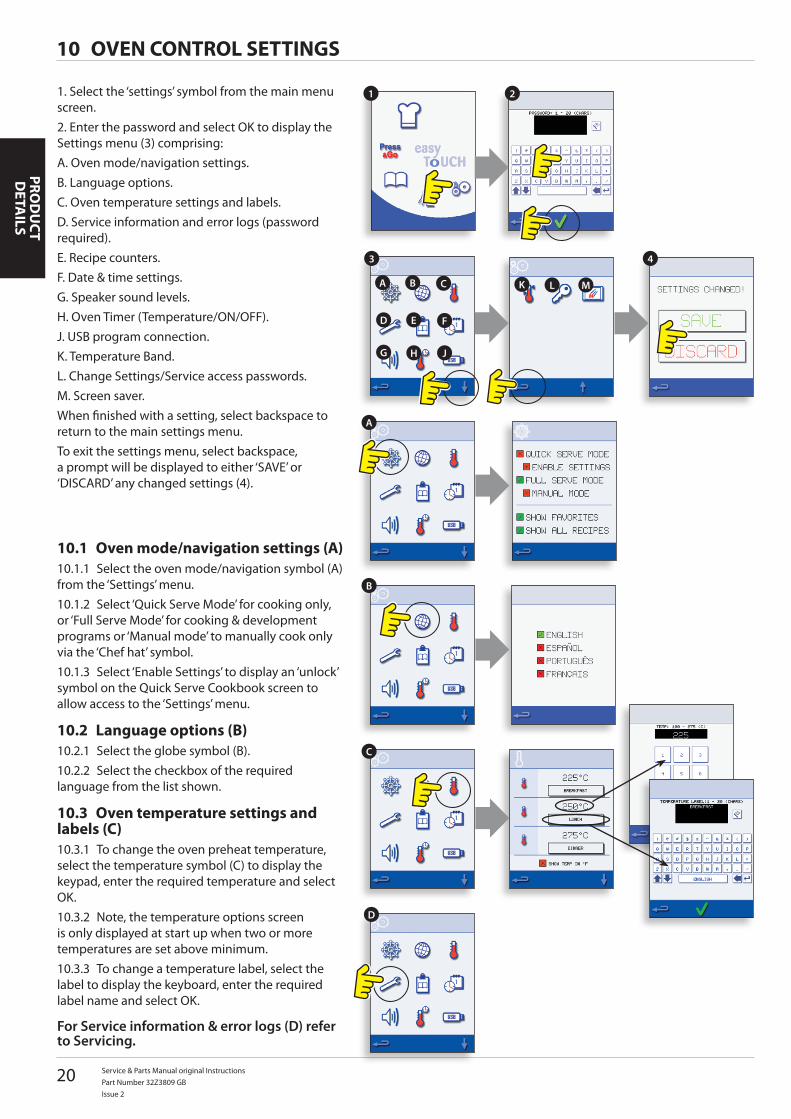
1. Select the ‘settings’ symbol from the main menu screen.2. Enter the password and select OK to display the Settings menu (3) comprising:A. Oven mode/navigation settings.B. Language options.C. Oven temperature settings and labels.D. Service information and error logs (password required).E. Recipe counters.F. Date & time settings.G. Speaker sound levels.H. Oven Timer (Temperature/ON/OFF).J. USB program connection.K. Temperature Band.L. Change Settings/Service access passwords.M. Screen saver.When finished with a setting, select backspace to return to the main settings menu.To exit the settings menu, select backspace, a prompt will be displayed to either ‘SAVE’ or ‘DISCARD’ any changed settings (4).
OVEN CONTROL SETTINGS10
Oven mode/navigation settings (A)10.1 Select the oven mode/navigation symbol (A) 10.1.1
from the ‘Settings’ menu.Select ‘Quick Serve Mode’ for cooking only, 10.1.2
or ‘Full Serve Mode’ for cooking & development programs or ‘Manual mode’ to manually cook only via the ‘Chef hat’ symbol.
Select ‘Enable Settings’ to display an ‘unlock’ 10.1.3 symbol on the Quick Serve Cookbook screen to allow access to the ‘Settings’ menu.
Language options (B)10.2 Select the globe symbol (B).10.2.1 Select the checkbox of the required 10.2.2
language from the list shown.
Oven temperature settings and 10.3 labels (C)
To change the oven preheat temperature, 10.3.1 select the temperature symbol (C) to display the keypad, enter the required temperature and select OK.
Note, the temperature options screen 10.3.2 is only displayed at start up when two or more temperatures are set above minimum.
To change a temperature label, select the 10.3.3 label to display the keyboard, enter the required label name and select OK.
For Service information & error logs (D) refer to Servicing.
Service & Parts Manual original InstructionsPart Number 32Z3809 GB
Issue 2
21
PRO
DU
CT
DET
AIL
S
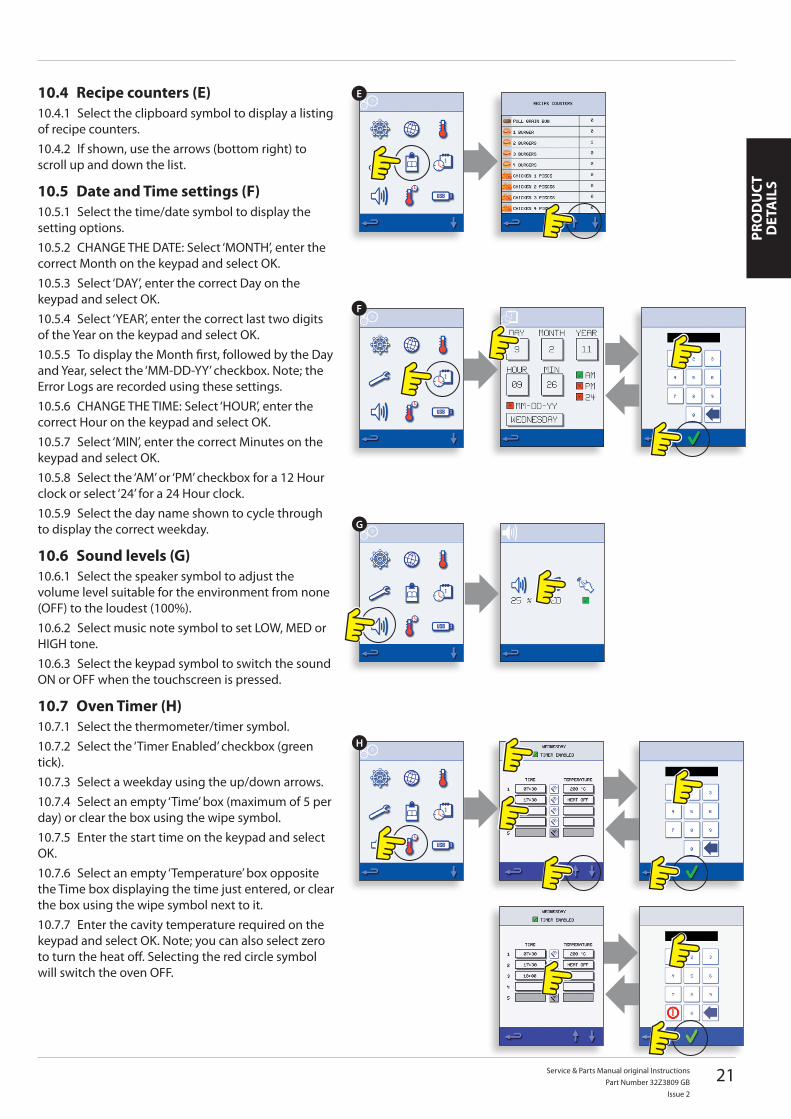
E
F
G
H
Recipe counters (E)10.4 Select the clipboard symbol to display a listing 10.4.1
of recipe counters.If shown, use the arrows (bottom right) to 10.4.2
scroll up and down the list.
Date and Time settings (F)10.5 Select the time/date symbol to display the 10.5.1
setting options.CHANGE THE DATE: Select ‘MONTH’, enter the 10.5.2
correct Month on the keypad and select OK.Select ‘DAY’, enter the correct Day on the 10.5.3
keypad and select OK.Select ‘YEAR’, enter the correct last two digits 10.5.4
of the Year on the keypad and select OK.To display the Month first, followed by the Day 10.5.5
and Year, select the ‘MM-DD-YY’ checkbox. Note; the Error Logs are recorded using these settings.
CHANGE THE TIME: Select ‘HOUR’, enter the 10.5.6 correct Hour on the keypad and select OK.
Select ‘MIN’, enter the correct Minutes on the 10.5.7 keypad and select OK.
Select the ‘AM’ or ‘PM’ checkbox for a 12 Hour 10.5.8 clock or select ‘24’ for a 24 Hour clock.
Select the day name shown to cycle through 10.5.9 to display the correct weekday.
Sound levels (G)10.6 Select the speaker symbol to adjust the 10.6.1
volume level suitable for the environment from none (OFF) to the loudest (100%).
Select music note symbol to set LOW, MED or 10.6.2 HIGH tone.
Select the keypad symbol to switch the sound 10.6.3 ON or OFF when the touchscreen is pressed.
Oven Timer (H)10.7 Select the thermometer/timer symbol.10.7.1 Select the ‘Timer Enabled’ checkbox (green 10.7.2
tick).Select a weekday using the up/down arrows.10.7.3 Select an empty ‘Time’ box (maximum of 5 per 10.7.4
day) or clear the box using the wipe symbol.Enter the start time on the keypad and select 10.7.5
OK.Select an empty ‘Temperature’ box opposite 10.7.6
the Time box displaying the time just entered, or clear the box using the wipe symbol next to it.
Enter the cavity temperature required on the 10.7.7 keypad and select OK. Note; you can also select zero to turn the heat off. Selecting the red circle symbol will switch the oven OFF.
22 Service & Parts Manual original InstructionsPart Number 32Z3809 GBIssue 2
PROD
UCT
DETA
ILS
K
L
M
JUSB oven programs (J)10.8 IMPORTANT: Downloading from a USB will clear all the existing programs.Check that the key has the correct number/code for the programs you want to load into the oven memory.
With the oven switched off, slide the 10.8.1 Merrychef badge (oven front top right) upwards and insert the USB Memory Stick into the slot.
Switch the oven ON.10.8.2 The files automatically download from the 10.8.3
USB showing the progress and confirmation screens for the update.
On completion the oven displays the start up 10.8.4 screen.
Remove the USB and keep in a safe place. 10.8.5 Reposition the USB cover.
Temperature Band (k)10.9 Select the ‘Temp Band’ symbol at which the 10.9.1
oven controls i.e. ±10°C.Select the required temperature band 10.9.2
checkbox, shown by a green tick. Note; although the lowest practical Temp Band should be used, if the set oven temperature falls by more than the selected Temp Band, the ready to cook mode and Temp Band are deactivated until the oven reaches the preheat temperature.
Change Password (L)10.10 Select the key symbol to change the oven 10.10.1
passwords.Select the oven Settings or Service symbol.10.10.2 Enter the existing password and select OK 10.10.3
to confirm.Enter the new password, select OK.10.10.4 Confirm new password, select OK.10.10.5
Screen saver (M)10.11 Select the ENABLED checkbox to switch the 10.11.1
screen saver ON or OFF.Select the time box below to enter a time 10.11.2
delay on the keypad from 1 to 30 minutes before the screen saver starts and select OK to confirm.
Service & Parts Manual original InstructionsPart Number 32Z3809 GB
Issue 2
23
PRO
DU
CT
DET
AIL
S
1
5
2
3 4
WARNING: DO NOT USE CAUSTIC CLEANERS ON ANY PART OF THE OVEN OR OVEN CAVITY AS IT WILL CAUSE PERMANENT DAMAGE TO THE CATALYTIC CONVERTORS
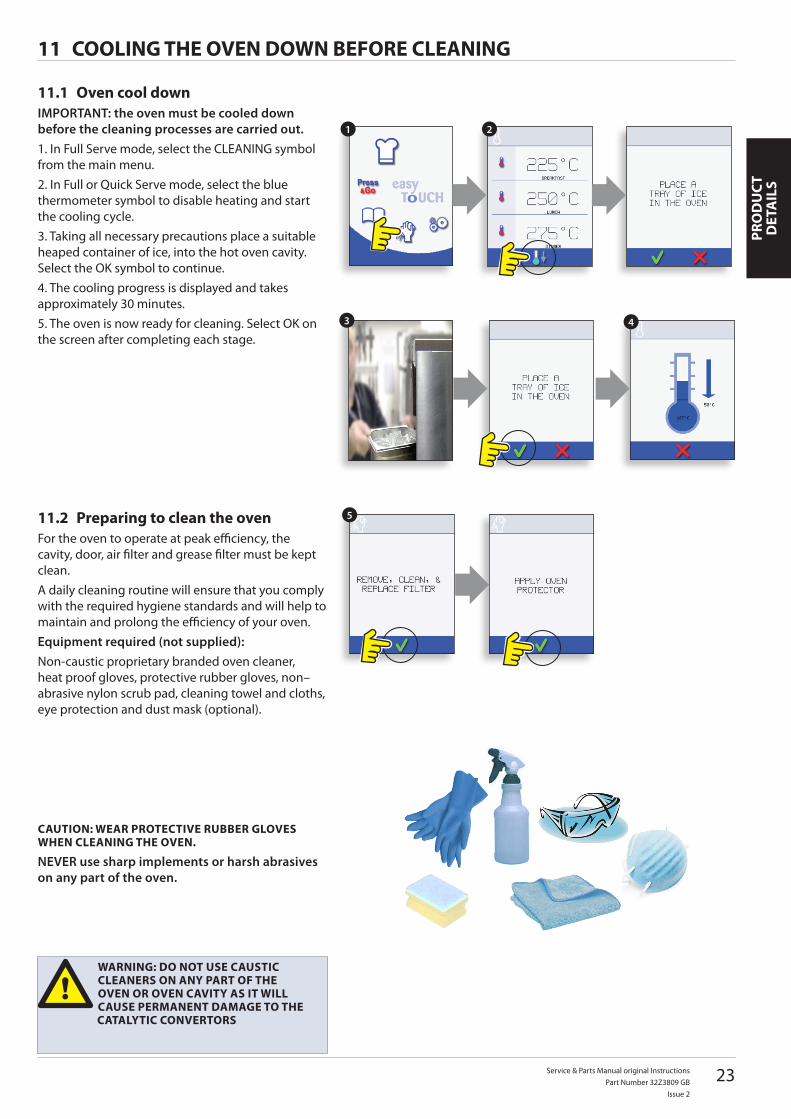
Oven cool down11.1 IMPORTANT: the oven must be cooled down before the cleaning processes are carried out.1. In Full Serve mode, select the CLEANING symbol from the main menu.2. In Full or Quick Serve mode, select the blue thermometer symbol to disable heating and start the cooling cycle.3. Taking all necessary precautions place a suitable heaped container of ice, into the hot oven cavity. Select the OK symbol to continue.4. The cooling progress is displayed and takes approximately 30 minutes.5. The oven is now ready for cleaning. Select OK on the screen after completing each stage.
COOLING THE OVEN DOWN BEFORE CLEANING11
Preparing to clean the oven11.2 For the oven to operate at peak efficiency, the cavity, door, air filter and grease filter must be kept clean.A daily cleaning routine will ensure that you comply with the required hygiene standards and will help to maintain and prolong the efficiency of your oven.Equipment required (not supplied):Non-caustic proprietary branded oven cleaner, heat proof gloves, protective rubber gloves, non–abrasive nylon scrub pad, cleaning towel and cloths, eye protection and dust mask (optional).
CAUTION: WEAR PROTECTIVE RUBBER GLOVES WHEN CLEANING THE OVEN.
NEVER use sharp implements or harsh abrasives on any part of the oven.
24 Service & Parts Manual original Instructions
Part Number 32Z3809 GB
Issue 2
PR
OD
UC
T D
ETAILS
2
3
3
4
1
1
2
1 2 3
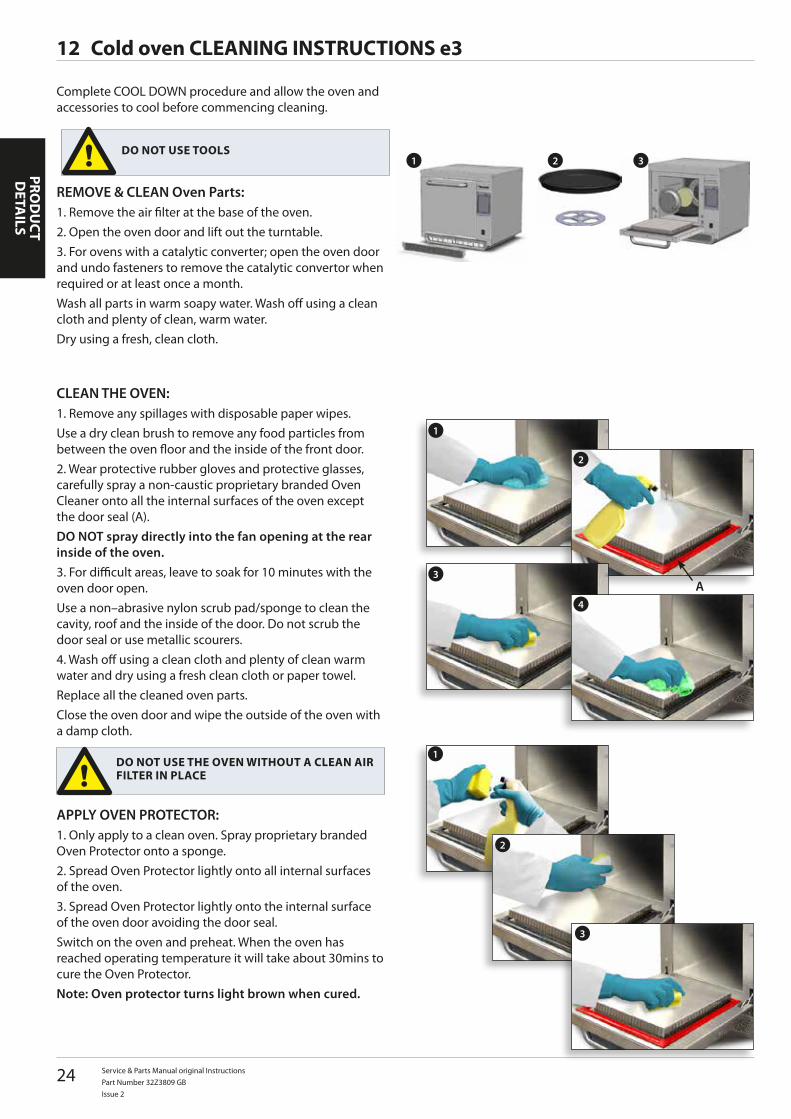
Complete COOL DOWN procedure and allow the oven and accessories to cool before commencing cleaning.
REMOVE & CLEAN Oven Parts:
2. Open the oven door and lift out the turntable.
3. For ovens with a catalytic converter; open the oven door and undo fasteners to remove the catalytic convertor when required or at least once a month.
cloth and plenty of clean, warm water.
Dry using a fresh, clean cloth.
Cold oven CLEANING INSTRUCTIONS e312
DO NOT USE TOOLS
CLEAN THE OVEN:1. Remove any spillages with disposable paper wipes.
Use a dry clean brush to remove any food particles from
2. Wear protective rubber gloves and protective glasses, carefully spray a non-caustic proprietary branded Oven Cleaner onto all the internal surfaces of the oven except the door seal (A).
DO NOT spray directly into the fan opening at the rear inside of the oven.
oven door open.
Use a non–abrasive nylon scrub pad/sponge to clean the cavity, roof and the inside of the door. Do not scrub the door seal or use metallic scourers.
water and dry using a fresh clean cloth or paper towel.
Replace all the cleaned oven parts.
Close the oven door and wipe the outside of the oven with a damp cloth.
APPLY OVEN PROTECTOR:1. Only apply to a clean oven. Spray proprietary branded Oven Protector onto a sponge.
2. Spread Oven Protector lightly onto all internal surfaces of the oven.
3. Spread Oven Protector lightly onto the internal surface of the oven door avoiding the door seal.
Switch on the oven and preheat. When the oven has reached operating temperature it will take about 30mins to cure the Oven Protector.
Note: Oven protector turns light brown when cured.
DO NOT USE THE OVEN WITHOUT A CLEAN AIR FILTER IN PLACE
A
Service & Parts Manual original InstructionsPart Number 32Z3809 GB
Issue 2
25
SERV
ICIN
G
1 2 3
4
Servicing Procedure:13.1 Disconnect/isolate the oven from the power 13.1.1
supply.Check the oven is correctly installed as 13.1.2
described in the Installation Instructions (Product Details section).
Visually check the cleanliness/condition of the 13.1.3 power supply/cable/gland, oven casing, cavity and door for signs of wear, damage, distortion etc., if required, refer to the ‘Spares & Replacement’ section.
Complete an ‘Earth/Insulation test’ (Testing 13.1.4 Components section) on the oven before switching on.
Check the display for Error messages, if 13.1.5 an Error is shown, refer to ‘Errors & Diagnostics’ (Servicing section).
Note; If a Firmware update is required, follow 13.1.6 the instructions under ‘Firmware Updates’ (Servicing section) before continuing with the service procedure.
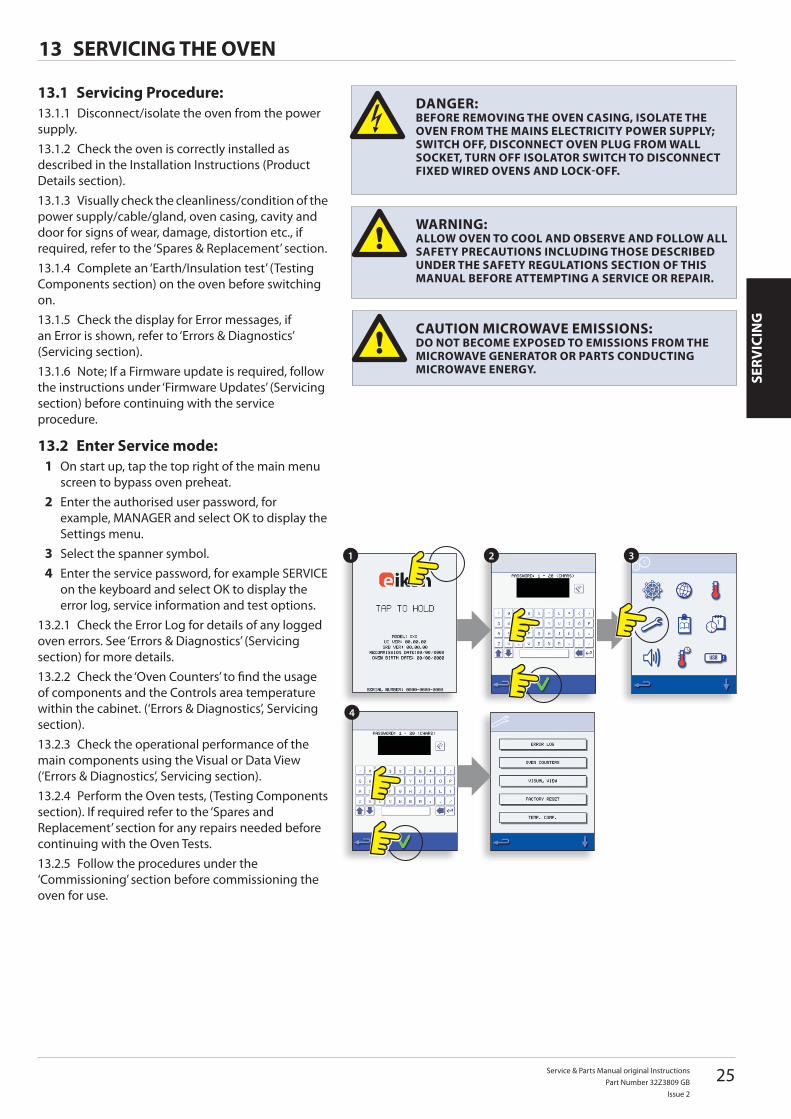
Enter Service mode:13.2 On start up, tap the top right of the main menu 1 screen to bypass oven preheat.Enter the authorised user password, for 2 example, MANAGER and select OK to display the Settings menu.Select the spanner symbol.3 Enter the service password, for example SERVICE 4 on the keyboard and select OK to display the error log, service information and test options.
Check the Error Log for details of any logged 13.2.1 oven errors. See ‘Errors & Diagnostics’ (Servicing section) for more details.
Check the ‘Oven Counters’ to find the usage 13.2.2 of components and the Controls area temperature within the cabinet. (‘Errors & Diagnostics’, Servicing section).
Check the operational performance of the 13.2.3 main components using the Visual or Data View (‘Errors & Diagnostics’, Servicing section).
Perform the Oven tests, (Testing Components 13.2.4 section). If required refer to the ‘Spares and Replacement’ section for any repairs needed before continuing with the Oven Tests.
Follow the procedures under the 13.2.5 ‘Commissioning’ section before commissioning the oven for use.
SERVICING THE OVEN13
DANGER:BEFORE REMOVING THE OVEN CASING, ISOLATE THE OVEN FROM THE MAINS ELECTRICITY POWER SUPPLY; SWITCH OFF, DISCONNECT OVEN PLUG FROM WALL SOCkET, TURN OFF ISOLATOR SWITCH TO DISCONNECT FIXED WIRED OVENS AND LOCk-OFF.
WARNING:ALLOW OVEN TO COOL AND OBSERVE AND FOLLOW ALL SAFETY PRECAUTIONS INCLUDING THOSE DESCRIBED UNDER THE SAFETY REGULATIONS SECTION OF THIS MANUAL BEFORE ATTEMPTING A SERVICE OR REPAIR.
CAUTION MICROWAVE EMISSIONS:DO NOT BECOME EXPOSED TO EMISSIONS FROM THE MICROWAVE GENERATOR OR PARTS CONDUCTING MICROWAVE ENERGY.
26 Service & Parts Manual original InstructionsPart Number 32Z3809 GBIssue 2
SERVICIN
G
A
C
D
B
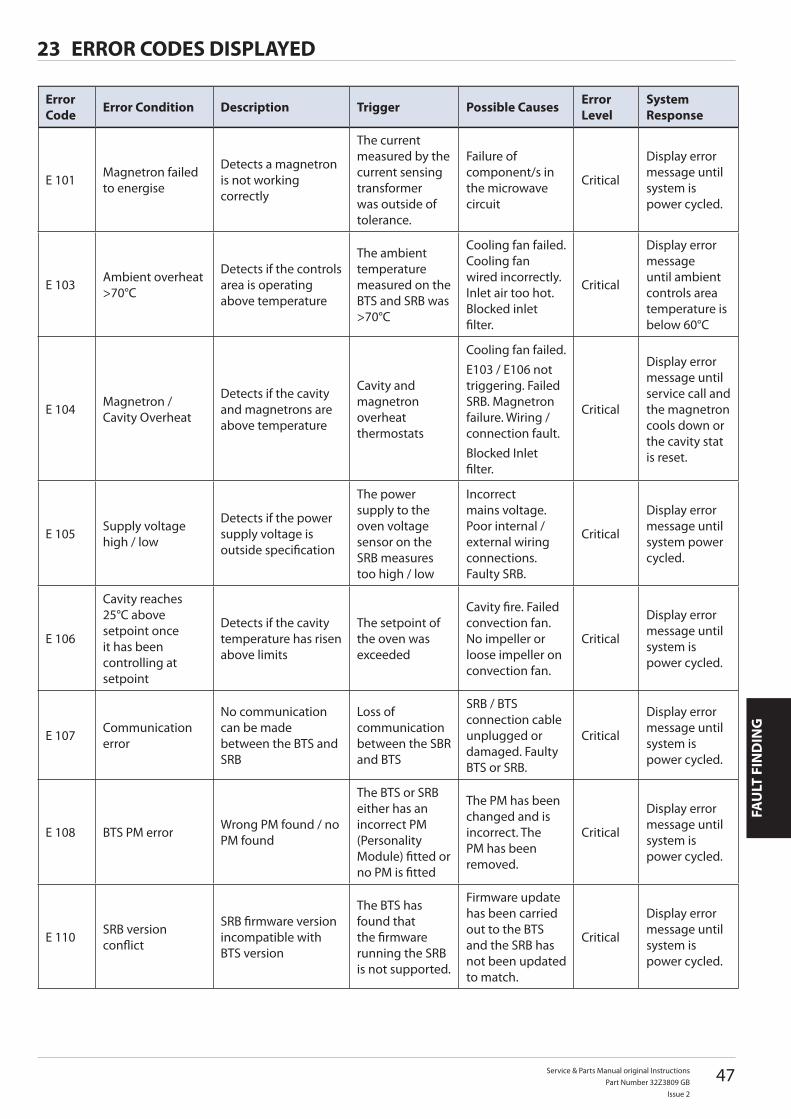
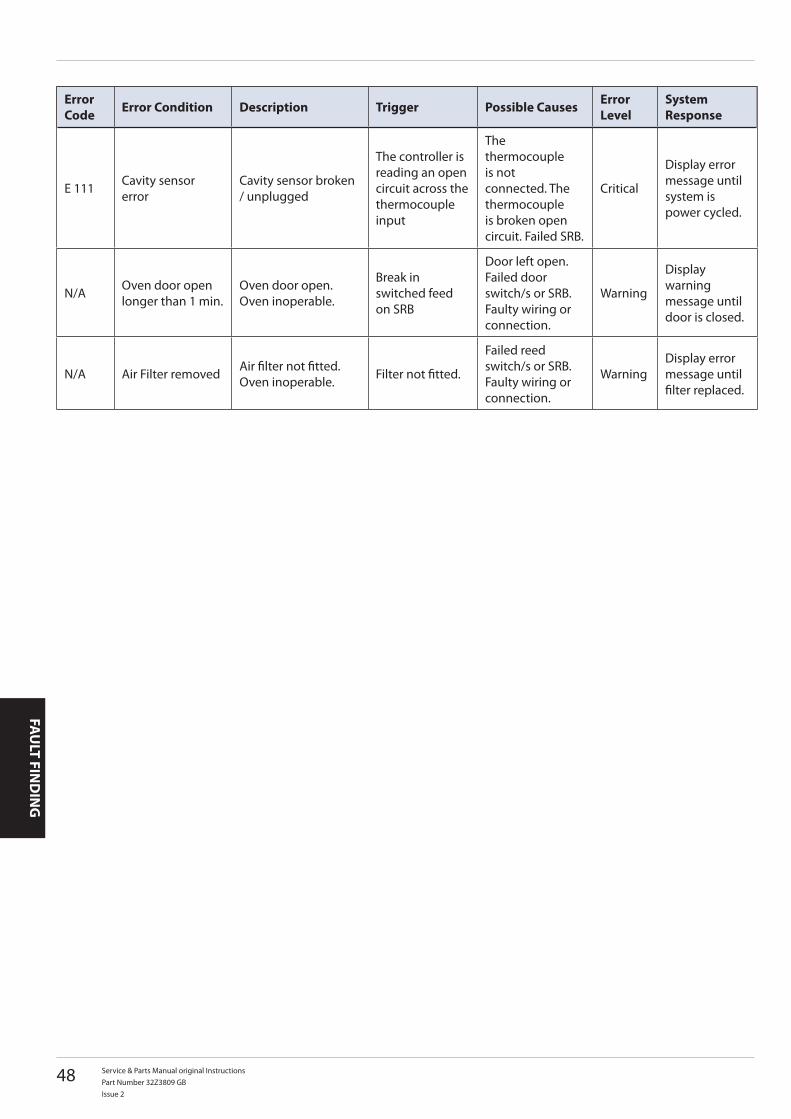
ERRORS & DIAGNOSTICS14
ERROR MESSAGES14.1 A description of the type of error is shown. 14.1.1
Check for a number following ‘ERROR:’ (A) and refer to the Error Codes (Fault Finding section) for more details. The Oven Serial Number, Model, UI (BTS) version and SRB version information is also displayed below.
Clear the Error message by power cycling the 14.1.2 mains power supply to the oven (not the oven ON/OFF switch).
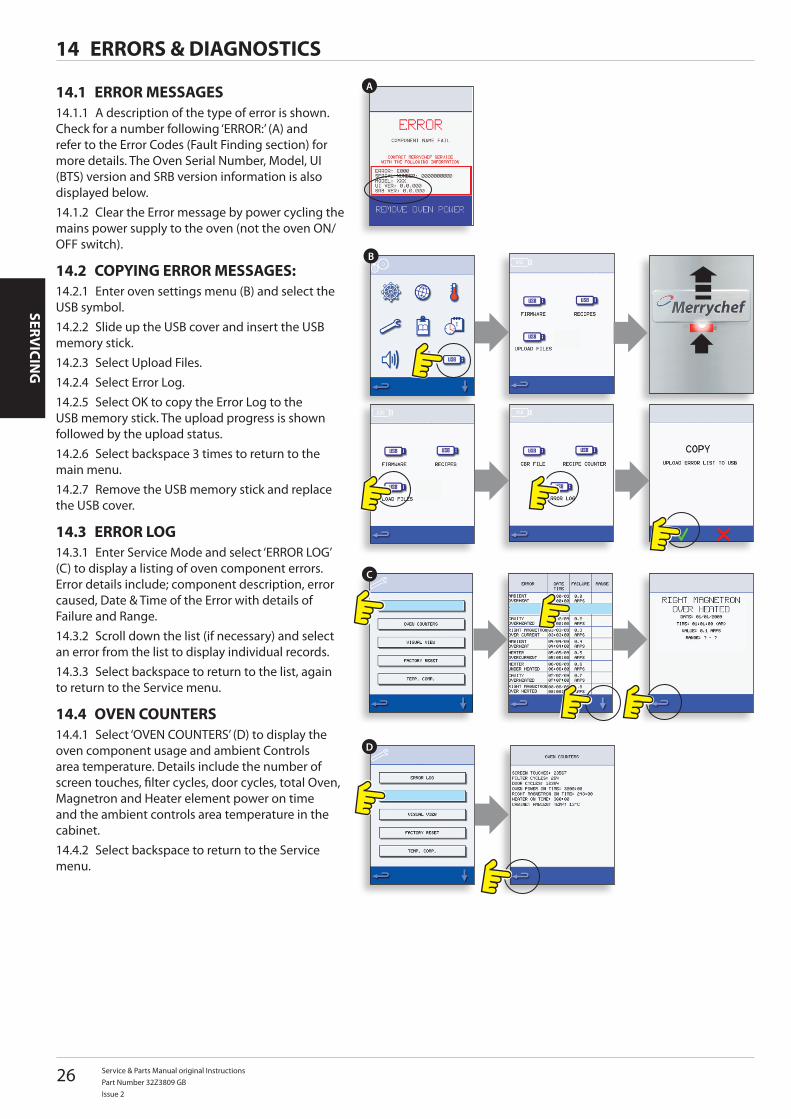
COPYING ERROR MESSAGES:14.2 Enter oven settings menu (B) and select the 14.2.1
USB symbol.Slide up the USB cover and insert the USB 14.2.2
memory stick.Select Upload Files.14.2.3 Select Error Log.14.2.4 Select OK to copy the Error Log to the 14.2.5
USB memory stick. The upload progress is shown followed by the upload status.
Select backspace 3 times to return to the 14.2.6 main menu.
Remove the USB memory stick and replace 14.2.7 the USB cover.
ERROR LOG14.3 Enter Service Mode and select ‘ERROR LOG’ 14.3.1
(C) to display a listing of oven component errors. Error details include; component description, error caused, Date & Time of the Error with details of Failure and Range.
Scroll down the list (if necessary) and select 14.3.2 an error from the list to display individual records.
Select backspace to return to the list, again 14.3.3 to return to the Service menu.
OVEN COUNTERS14.4 Select ‘OVEN COUNTERS’ (D) to display the 14.4.1
oven component usage and ambient Controls area temperature. Details include the number of screen touches, filter cycles, door cycles, total Oven, Magnetron and Heater element power on time and the ambient controls area temperature in the cabinet.
Select backspace to return to the Service 14.4.2 menu.
Service & Parts Manual original InstructionsPart Number 32Z3809 GB
Issue 2
27
SERV
ICIN
G
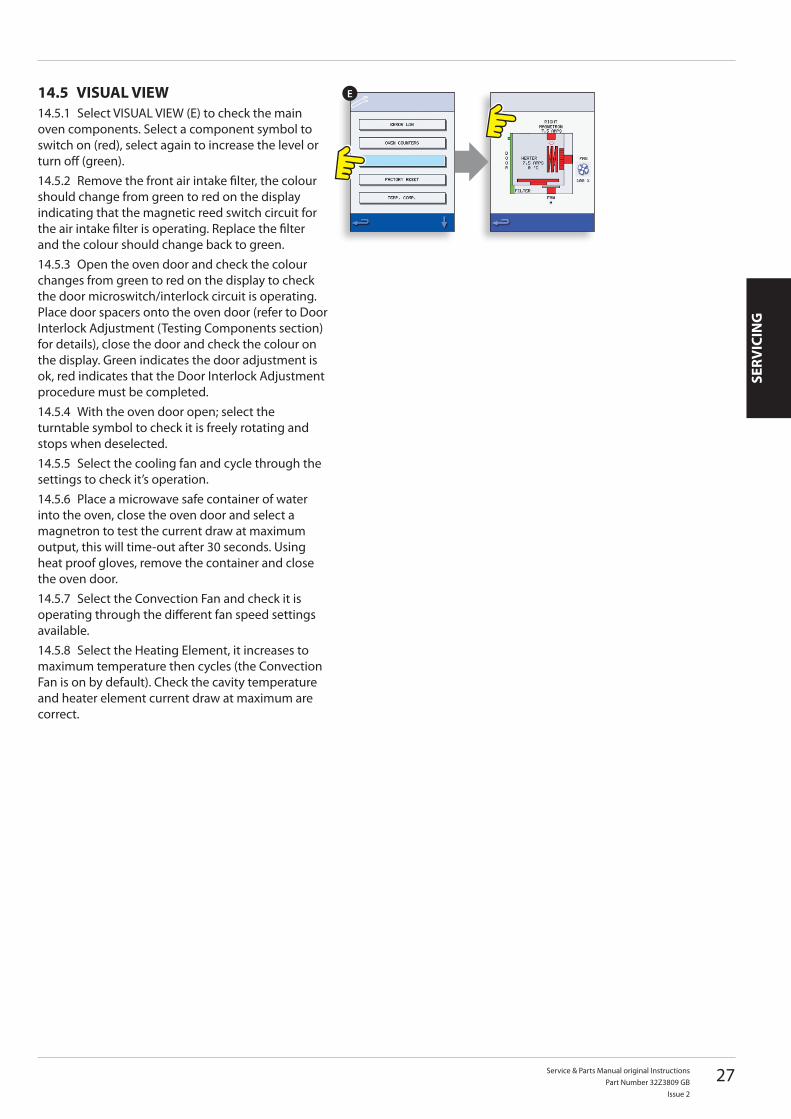
EVISUAL VIEW14.5 Select VISUAL VIEW (E) to check the main 14.5.1
oven components. Select a component symbol to switch on (red), select again to increase the level or turn off (green).
Remove the front air intake filter, the colour 14.5.2 should change from green to red on the display indicating that the magnetic reed switch circuit for the air intake filter is operating. Replace the filter and the colour should change back to green.
Open the oven door and check the colour 14.5.3 changes from green to red on the display to check the door microswitch/interlock circuit is operating. Place door spacers onto the oven door (refer to Door Interlock Adjustment (Testing Components section) for details), close the door and check the colour on the display. Green indicates the door adjustment is ok, red indicates that the Door Interlock Adjustment procedure must be completed.
With the oven door open; select the 14.5.4 turntable symbol to check it is freely rotating and stops when deselected.
Select the cooling fan and cycle through the 14.5.5 settings to check it’s operation.
Place a microwave safe container of water 14.5.6 into the oven, close the oven door and select a magnetron to test the current draw at maximum output, this will time-out after 30 seconds. Using heat proof gloves, remove the container and close the oven door.
Select the Convection Fan and check it is 14.5.7 operating through the different fan speed settings available.
Select the Heating Element, it increases to 14.5.8 maximum temperature then cycles (the Convection Fan is on by default). Check the cavity temperature and heater element current draw at maximum are correct.
28 Service & Parts Manual original InstructionsPart Number 32Z3809 GBIssue 2
SERVICIN
G
3
5
4
6
1 2
FIRMWARE UPDATES15
Note: if icons are not displayed on the screen, press in the same positions on screen as the missing icons to select.
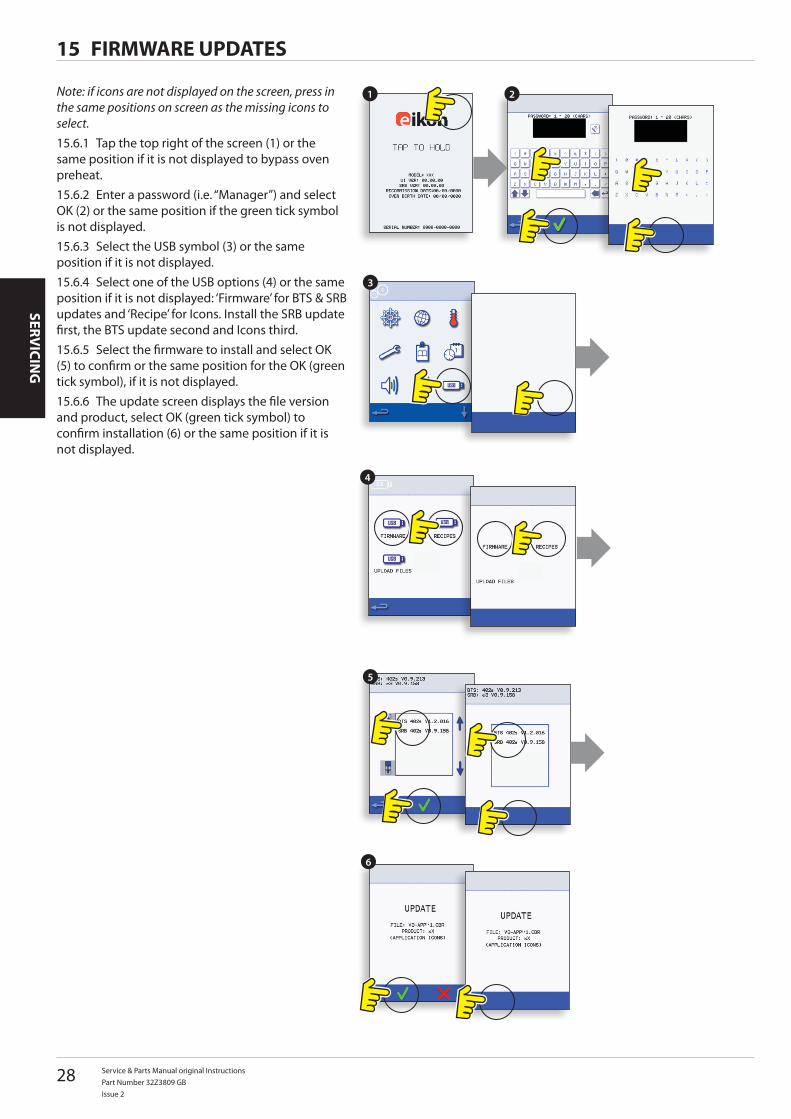
Tap the top right of the screen (1) or the 15.6.1 same position if it is not displayed to bypass oven preheat.
Enter a password (i.e. “Manager”) and select 15.6.2 OK (2) or the same position if the green tick symbol is not displayed.
Select the USB symbol (3) or the same 15.6.3 position if it is not displayed.
Select one of the USB options (4) or the same 15.6.4 position if it is not displayed: ‘Firmware’ for BTS & SRB updates and ‘Recipe’ for Icons. Install the SRB update first, the BTS update second and Icons third.
Select the firmware to install and select OK 15.6.5 (5) to confirm or the same position for the OK (green tick symbol), if it is not displayed.
The update screen displays the file version 15.6.6 and product, select OK (green tick symbol) to confirm installation (6) or the same position if it is not displayed.
Service & Parts Manual original InstructionsPart Number 32Z3809 GB
Issue 2
29
SERV
ICIN
G14 15
16
7
10
8
11 12
9
13
54 6
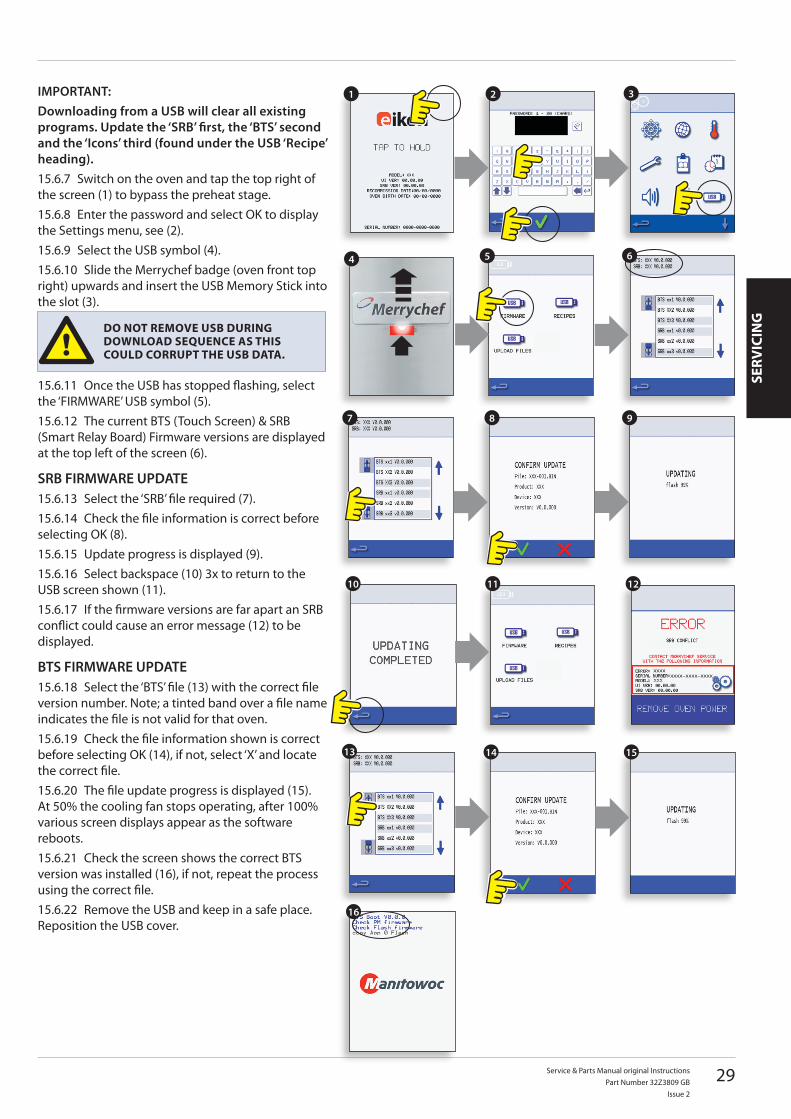
1 2 3IMPORTANT:Downloading from a USB will clear all existing programs. Update the ‘SRB’ first, the ‘BTS’ second and the ‘Icons’ third (found under the USB ‘Recipe’ heading).
Switch on the oven and tap the top right of 15.6.7 the screen (1) to bypass the preheat stage.
Enter the password and select OK to display 15.6.8 the Settings menu, see (2).
Select the USB symbol (4).15.6.9 Slide the Merrychef badge (oven front top 15.6.10
right) upwards and insert the USB Memory Stick into the slot (3).
Once the USB has stopped flashing, select 15.6.11 the ‘FIRMWARE’ USB symbol (5).
The current BTS (Touch Screen) & SRB 15.6.12 (Smart Relay Board) Firmware versions are displayed at the top left of the screen (6).
SRB FIRMWARE UPDATESelect the ‘SRB’ file required (7).15.6.13 Check the file information is correct before 15.6.14
selecting OK (8).Update progress is displayed (9).15.6.15 Select backspace (10) 3x to return to the 15.6.16
USB screen shown (11).If the firmware versions are far apart an SRB 15.6.17
conflict could cause an error message (12) to be displayed.
BTS FIRMWARE UPDATESelect the ‘BTS’ file (13) with the correct file 15.6.18
version number. Note; a tinted band over a file name indicates the file is not valid for that oven.
Check the file information shown is correct 15.6.19 before selecting OK (14), if not, select ‘X’ and locate the correct file.
The file update progress is displayed (15). 15.6.20 At 50% the cooling fan stops operating, after 100% various screen displays appear as the software reboots.
Check the screen shows the correct BTS 15.6.21 version was installed (16), if not, repeat the process using the correct file.
Remove the USB and keep in a safe place. 15.6.22 Reposition the USB cover.
DO NOT REMOVE USB DURING DOWNLOAD SEQUENCE AS THIS COULD CORRUPT THE USB DATA.
30 Service & Parts Manual original InstructionsPart Number 32Z3809 GBIssue 2
SERVICIN
G
8
9
10
7
6
2
31
4 5
DO NOT REMOVE USB DURING DOWNLOAD SEQUENCE AS THIS COULD CORRUPT THE USB DATA.
IMPORTANT:Downloading from a USB will clear all existing programs.Only use an empty USB memory stick formatted as follows:A) FAT16 to update from UI BTS-XX-XXXXX-V1.2.16B) FAT16 or FAT32 to update from UI BTS-XX-XXXXX-V1.2.17 or later.Copy the following firmware files to the ROOT directory of the USB memory stick:
For update A) follow all instructions:For update B) follow the first 2 instructions:
With the oven switched off, slide the 15.6.37 Merrychef badge (oven front top right) upwards and insert the USB Memory Stick into the slot (1).
Switch the oven ON (2).15.6.38 Tap the top right of the screen (3) to bypass 15.6.39
the preheat stage.Enter the password and select OK to display 15.6.40
the Settings menu, see (4).Select the USB symbol (5).15.6.41 Select the ‘FIRMWARE’ USB symbol (6).15.6.42 Select the ‘BTS’ file (7) with the correct file 15.6.43
version number. Note; a tinted band over a file name indicates the file is not valid for that oven.
Check the file information shown is correct 15.6.44 before selecting OK (8), if not, select ‘X’ and locate the correct file.
The CBR file is checked and the download 15.6.45 progress from the USB is displayed (9) followed by the update status and confirmation screens.
The BTS, SRB and Application Icon files then 15.6.46 download automatically showing the progress, status and reboot confirmation screens for each file update.
On completion the oven start up screen (10) 15.6.47 is displayed showing the updated firmware versions followed by the oven pre-heat temperature screen.Confirming the oven update:After an oven update the oven copies files back to the USB memory stick.
Load the files from the USB memory stick to 15.6.48 a computer and open the update (UPDATE.txt) file.
An oven update is confirmed below the 15.6.49 oven serial number with ‘updated’ following the BTS/SRB firmware and App Icons.
Service & Parts Manual original InstructionsPart Number 32Z3809 GB
Issue 2
31
TEST
ING
CO
MPO
NEN
TS
A
B
DANGER!THIS APPLIANCE MUST BE EARTHED. FAILURE TO DO SO MAY RESULT IN ELECTRIC SHOCk AND DEATH.
DANGER:BEFORE REMOVING THE OVEN CASING, ISOLATE THE OVEN FROM THE MAINS ELECTRICITY POWER SUPPLY; SWITCH OFF, DISCONNECT OVEN PLUG FROM WALL SOCkET, TURN OFF ISOLATOR SWITCH TO DISCONNECT FIXED WIRED OVENS AND LOCk-OFF.
WARNING:ALLOW OVEN TO COOL AND OBSERVE AND FOLLOW ALL SAFETY PRECAUTIONS INCLUDING THOSE DESCRIBED UNDER THE SAFETY REGULATIONS SECTION OF THIS MANUAL BEFORE ATTEMPTING A SERVICE OR REPAIR.
CAUTION MICROWAVE EMISSIONS:DO NOT BECOME EXPOSED TO EMISSIONS FROM THE MICROWAVE GENERATOR OR PARTS CONDUCTING MICROWAVE ENERGY.
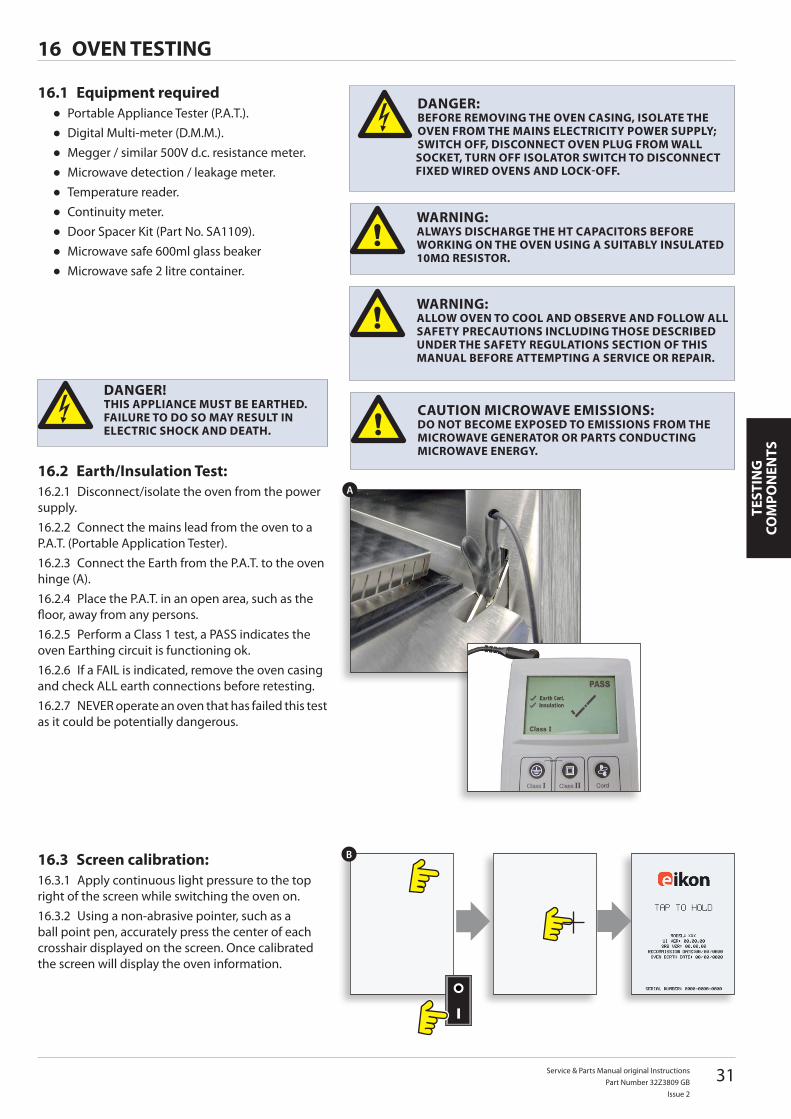
Earth/Insulation Test:16.2 Disconnect/isolate the oven from the power 16.2.1
supply.Connect the mains lead from the oven to a 16.2.2
P.A.T. (Portable Application Tester).Connect the Earth from the P.A.T. to the oven 16.2.3
hinge (A).Place the P.A.T. in an open area, such as the 16.2.4
floor, away from any persons.Perform a Class 1 test, a PASS indicates the 16.2.5
oven Earthing circuit is functioning ok.If a FAIL is indicated, remove the oven casing 16.2.6
and check ALL earth connections before retesting.NEVER operate an oven that has failed this test 16.2.7
as it could be potentially dangerous.
WARNING:ALWAYS DISCHARGE THE HT CAPACITORS BEFORE WORkING ON THE OVEN USING A SUITABLY INSULATED 10MΩ RESISTOR.
Screen calibration:16.3 Apply continuous light pressure to the top 16.3.1
right of the screen while switching the oven on.Using a non-abrasive pointer, such as a 16.3.2
ball point pen, accurately press the center of each crosshair displayed on the screen. Once calibrated the screen will display the oven information.
32 Service & Parts Manual original InstructionsPart Number 32Z3809 GBIssue 2
TESTING
CO
MPO
NEN
TS
A
C
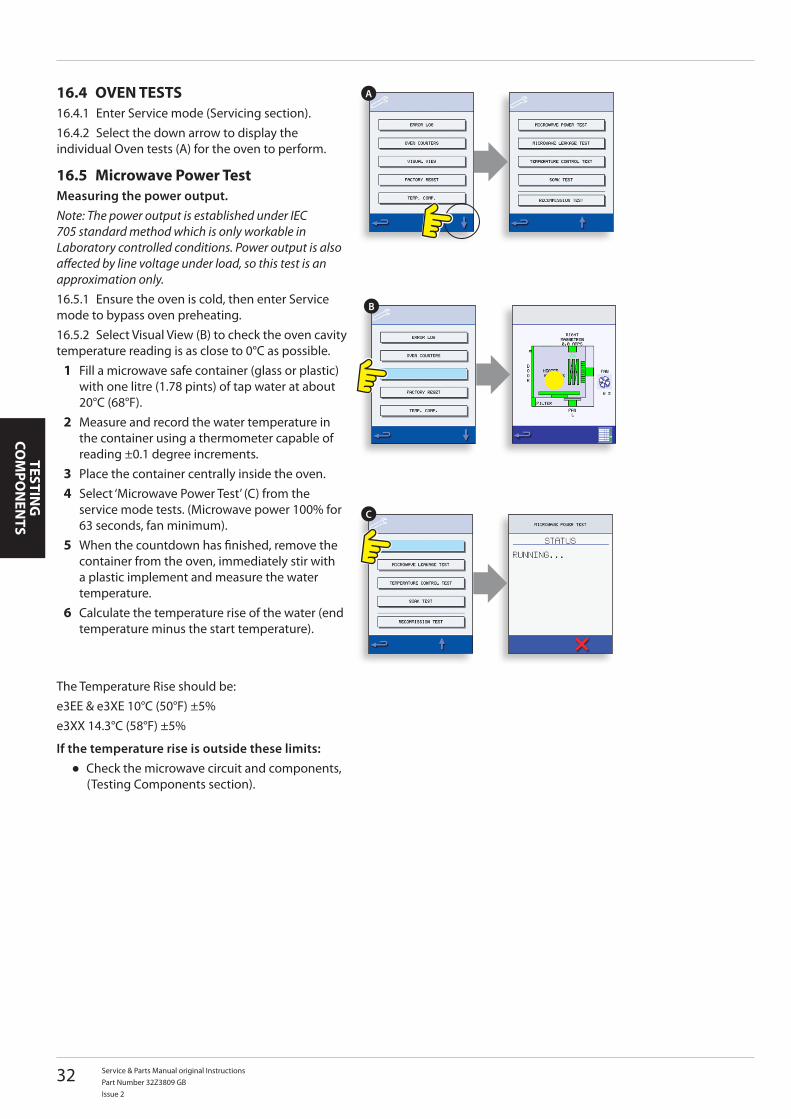
B
OVEN TESTS16.4 Enter Service mode (Servicing section).16.4.1 Select the down arrow to display the 16.4.2
individual Oven tests (A) for the oven to perform.
Microwave Power Test16.5 Measuring the power output.Note: The power output is established under IEC 705 standard method which is only workable in Laboratory controlled conditions. Power output is also affected by line voltage under load, so this test is an approximation only.
Ensure the oven is cold, then enter Service 16.5.1 mode to bypass oven preheating.
Select Visual View (B) to check the oven cavity 16.5.2 temperature reading is as close to 0°C as possible.
Fill a microwave safe container (glass or plastic) 1 with one litre (1.78 pints) of tap water at about 20°C (68°F).Measure and record the water temperature in 2 the container using a thermometer capable of reading ±0.1 degree increments.Place the container centrally inside the oven.3 Select ‘Microwave Power Test’ (C) from the 4 service mode tests. (Microwave power 100% for 63 seconds, fan minimum).When the countdown has finished, remove the 5 container from the oven, immediately stir with a plastic implement and measure the water temperature.Calculate the temperature rise of the water (end 6 temperature minus the start temperature).
If the temperature rise is outside these limits:Check the microwave circuit and components, ●(Testing Components section).
The Temperature Rise should be:e3EE & e3XE 10°C (50°F) ±5%e3XX 14.3°C (58°F) ±5%
Service & Parts Manual original InstructionsPart Number 32Z3809 GB
Issue 2
33
TEST
ING
CO
MPO
NEN
TS
A
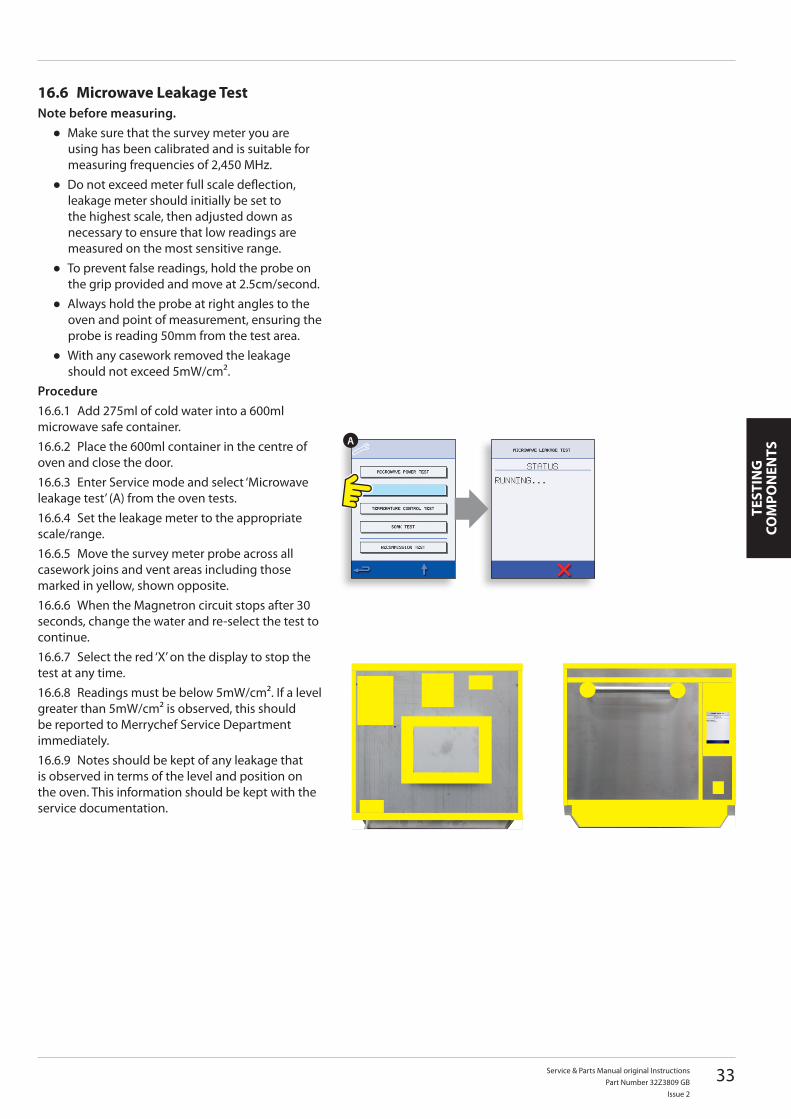
Microwave Leakage Test16.6 Note before measuring.
Make sure that the survey meter you are ●using has been calibrated and is suitable for measuring frequencies of 2,450 MHz.Do not exceed meter full scale deflection, ●leakage meter should initially be set to the highest scale, then adjusted down as necessary to ensure that low readings are measured on the most sensitive range.To prevent false readings, hold the probe on ●the grip provided and move at 2.5cm/second.Always hold the probe at right angles to the ●oven and point of measurement, ensuring the probe is reading 50mm from the test area.With any casework removed the leakage ●should not exceed 5mW/cm².
ProcedureAdd 275ml of cold water into a 600ml 16.6.1
microwave safe container.Place the 600ml container in the centre of 16.6.2
oven and close the door.Enter Service mode and select ‘Microwave 16.6.3
leakage test’ (A) from the oven tests.Set the leakage meter to the appropriate 16.6.4
scale/range.Move the survey meter probe across all 16.6.5
casework joins and vent areas including those marked in yellow, shown opposite.
When the Magnetron circuit stops after 30 16.6.6 seconds, change the water and re-select the test to continue.
Select the red ‘X’ on the display to stop the 16.6.7 test at any time.
Readings must be below 5mW/cm². If a level 16.6.8 greater than 5mW/cm² is observed, this should be reported to Merrychef Service Department immediately.
Notes should be kept of any leakage that 16.6.9 is observed in terms of the level and position on the oven. This information should be kept with the service documentation.
34 Service & Parts Manual original InstructionsPart Number 32Z3809 GBIssue 2
TESTING
CO
MPO
NEN
TS
A B
C D
E
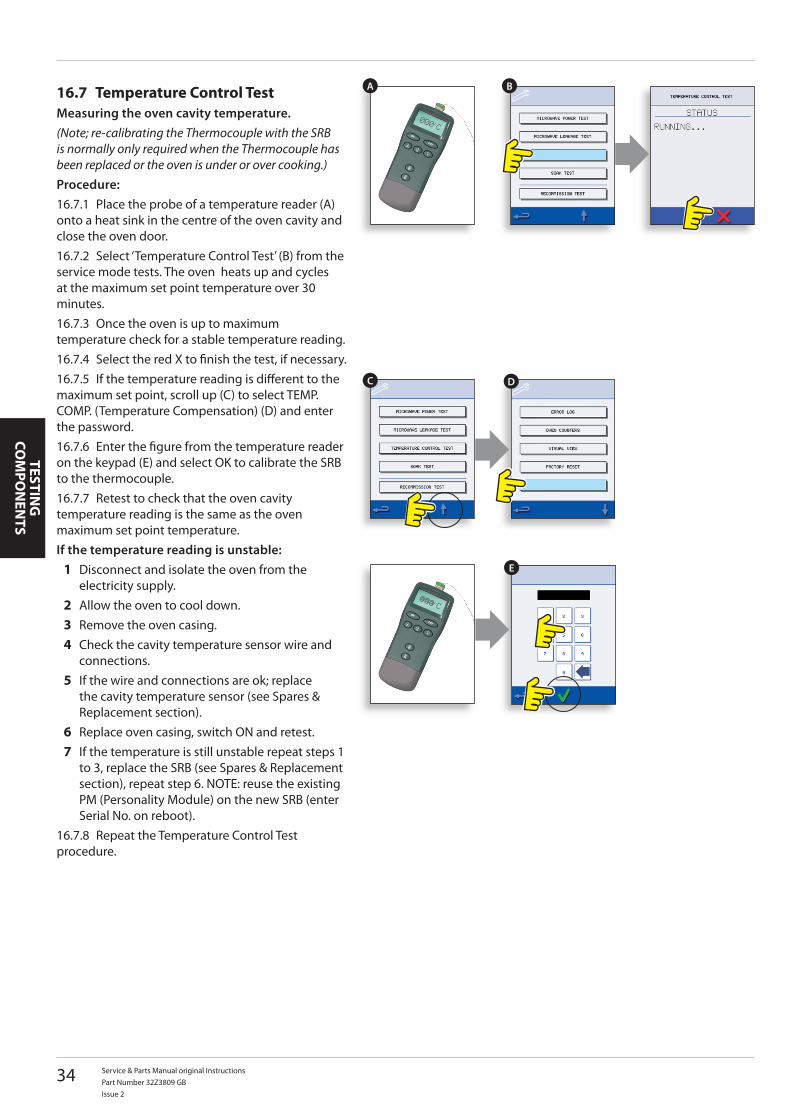
Temperature Control Test16.7 Measuring the oven cavity temperature.(Note; re-calibrating the Thermocouple with the SRB is normally only required when the Thermocouple has been replaced or the oven is under or over cooking.)Procedure:
Place the probe of a temperature reader (A) 16.7.1 onto a heat sink in the centre of the oven cavity and close the oven door.
Select ‘Temperature Control Test’ (B) from the 16.7.2 service mode tests. The oven heats up and cycles at the maximum set point temperature over 30 minutes.
Once the oven is up to maximum 16.7.3 temperature check for a stable temperature reading.
Select the red X to finish the test, if necessary.16.7.4 If the temperature reading is different to the 16.7.5
maximum set point, scroll up (C) to select TEMP. COMP. (Temperature Compensation) (D) and enter the password.
Enter the figure from the temperature reader 16.7.6 on the keypad (E) and select OK to calibrate the SRB to the thermocouple.
Retest to check that the oven cavity 16.7.7 temperature reading is the same as the oven maximum set point temperature.If the temperature reading is unstable:
Disconnect and isolate the oven from the 1 electricity supply.Allow the oven to cool down.2 Remove the oven casing.3 Check the cavity temperature sensor wire and 4 connections.If the wire and connections are ok; replace 5 the cavity temperature sensor (see Spares & Replacement section).Replace oven casing, switch ON and retest.6 If the temperature is still unstable repeat steps 1 7 to 3, replace the SRB (see Spares & Replacement section), repeat step 6. NOTE: reuse the existing PM (Personality Module) on the new SRB (enter Serial No. on reboot).
Repeat the Temperature Control Test 16.7.8 procedure.
Service & Parts Manual original InstructionsPart Number 32Z3809 GB
Issue 2
35
TEST
ING
CO
MPO
NEN
TS
A
A
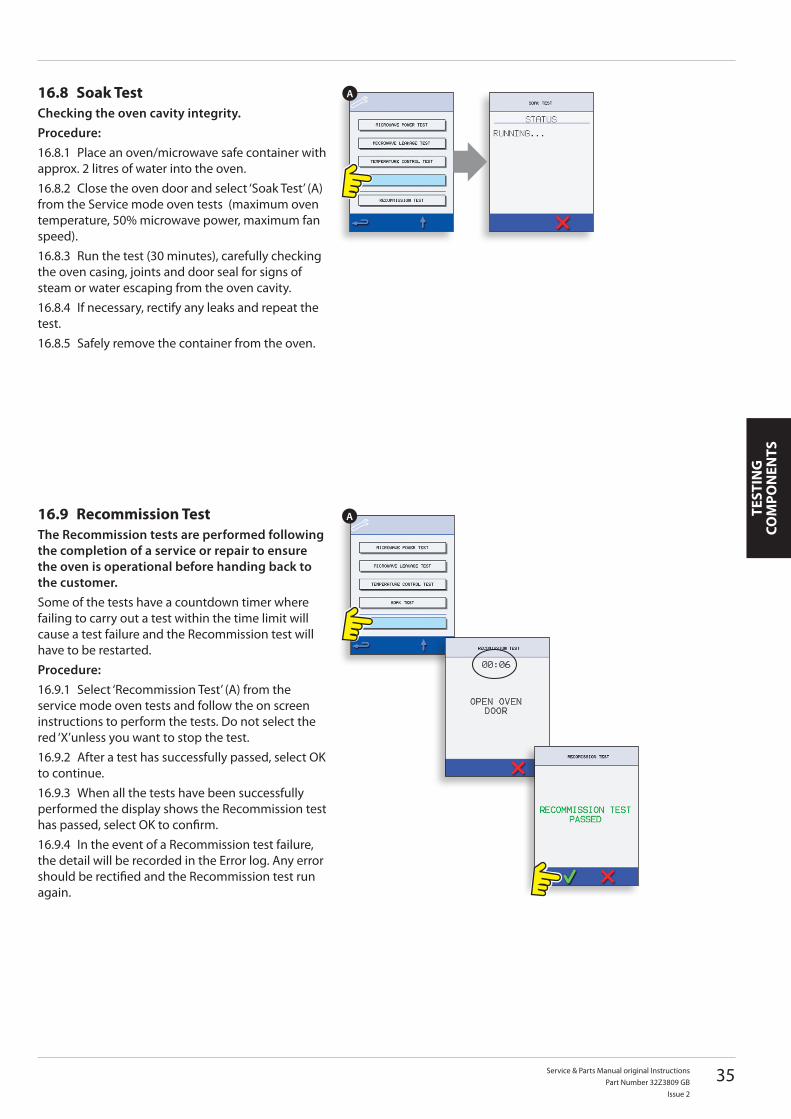
Soak Test16.8 Checking the oven cavity integrity.Procedure:
Place an oven/microwave safe container with 16.8.1 approx. 2 litres of water into the oven.
Close the oven door and select ‘Soak Test’ (A) 16.8.2 from the Service mode oven tests (maximum oven temperature, 50% microwave power, maximum fan speed).
Run the test (30 minutes), carefully checking 16.8.3 the oven casing, joints and door seal for signs of steam or water escaping from the oven cavity.
If necessary, rectify any leaks and repeat the 16.8.4 test.
Safely remove the container from the oven.16.8.5
Recommission Test16.9 The Recommission tests are performed following the completion of a service or repair to ensure the oven is operational before handing back to the customer.Some of the tests have a countdown timer where failing to carry out a test within the time limit will cause a test failure and the Recommission test will have to be restarted.Procedure:
Select ‘Recommission Test’ (A) from the 16.9.1 service mode oven tests and follow the on screen instructions to perform the tests. Do not select the red ‘X’unless you want to stop the test.
After a test has successfully passed, select OK 16.9.2 to continue.
When all the tests have been successfully 16.9.3 performed the display shows the Recommission test has passed, select OK to confirm.
In the event of a Recommission test failure, 16.9.4 the detail will be recorded in the Error log. Any error should be rectified and the Recommission test run again.
36 Service & Parts Manual original InstructionsPart Number 32Z3809 GBIssue 2
TESTING
CO
MPO
NEN
TS
1
2
3
DANGER:BEFORE REMOVING THE OVEN CASING, ISOLATE THE OVEN FROM THE MAINS ELECTRICITY POWER SUPPLY; SWITCH OFF, DISCONNECT OVEN PLUG FROM WALL SOCkET, TURN OFF ISOLATOR SWITCH TO DISCONNECT FIXED WIRED OVENS AND LOCk-OFF.
WARNING:ALLOW OVEN TO COOL AND OBSERVE AND FOLLOW ALL SAFETY PRECAUTIONS INCLUDING THOSE DESCRIBED UNDER THE SAFETY REGULATIONS SECTION OF THIS MANUAL BEFORE ATTEMPTING A SERVICE OR REPAIR.
CAUTION MICROWAVE EMISSIONS:DO NOT BECOME EXPOSED TO EMISSIONS FROM THE MICROWAVE GENERATOR OR PARTS CONDUCTING MICROWAVE ENERGY.
WARNING:ALWAYS DISCHARGE THE HT CAPACITORS BEFORE WORkING ON THE OVEN USING A SUITABLY INSULATED 10MΩ RESISTOR.
HIGH VOLTAGE COMPONENTS17
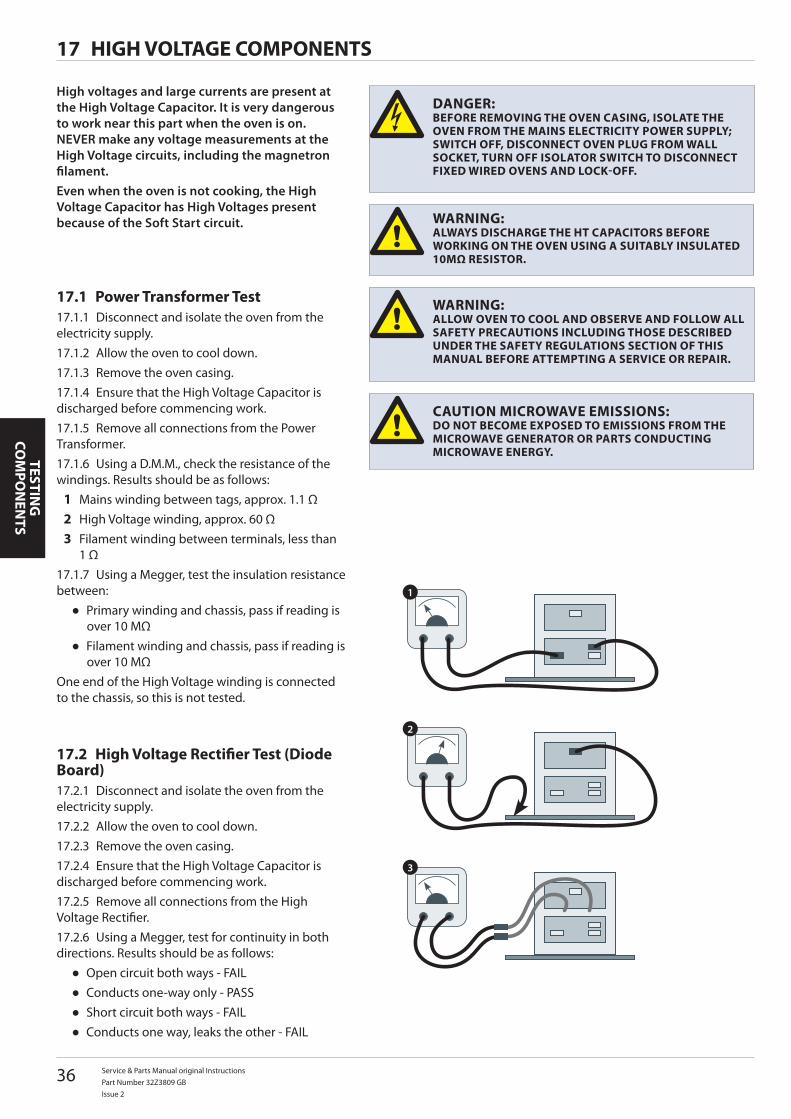
Power Transformer Test17.1 Disconnect and isolate the oven from the 17.1.1
electricity supply.Allow the oven to cool down.17.1.2 Remove the oven casing.17.1.3 Ensure that the High Voltage Capacitor is 17.1.4
discharged before commencing work.Remove all connections from the Power 17.1.5
Transformer.Using a D.M.M., check the resistance of the 17.1.6
windings. Results should be as follows:Mains winding between tags, approx. 1.1 Ω1 High Voltage winding, approx. 60 Ω2 Filament winding between terminals, less than 3 1 Ω
Using a Megger, test the insulation resistance 17.1.7 between:
Primary winding and chassis, pass if reading is ●over 10 MΩFilament winding and chassis, pass if reading is ●over 10 MΩ
One end of the High Voltage winding is connected to the chassis, so this is not tested.
High voltages and large currents are present at the High Voltage Capacitor. It is very dangerous to work near this part when the oven is on. NEVER make any voltage measurements at the High Voltage circuits, including the magnetron filament.Even when the oven is not cooking, the High Voltage Capacitor has High Voltages present because of the Soft Start circuit.
High Voltage Rectifier Test (Diode 17.2 Board)
Disconnect and isolate the oven from the 17.2.1 electricity supply.
Allow the oven to cool down.17.2.2 Remove the oven casing.17.2.3 Ensure that the High Voltage Capacitor is 17.2.4
discharged before commencing work.Remove all connections from the High 17.2.5
Voltage Rectifier.Using a Megger, test for continuity in both 17.2.6
directions. Results should be as follows:Open circuit both ways - FAIL ●Conducts one-way only - PASS ●Short circuit both ways - FAIL ●Conducts one way, leaks the other - FAIL ●
Service & Parts Manual original InstructionsPart Number 32Z3809 GB
Issue 2
37
TEST
ING
CO
MPO
NEN
TS
1
1
2
2
High voltages and large currents are present at the High Voltage Capacitor. It is very dangerous to work near this part when the oven is on. NEVER make any voltage measurements at the High Voltage circuits, including the magnetron filament.Even when the oven is not cooking, the High Voltage Capacitor has High Voltages present because of the Soft Start circuit.
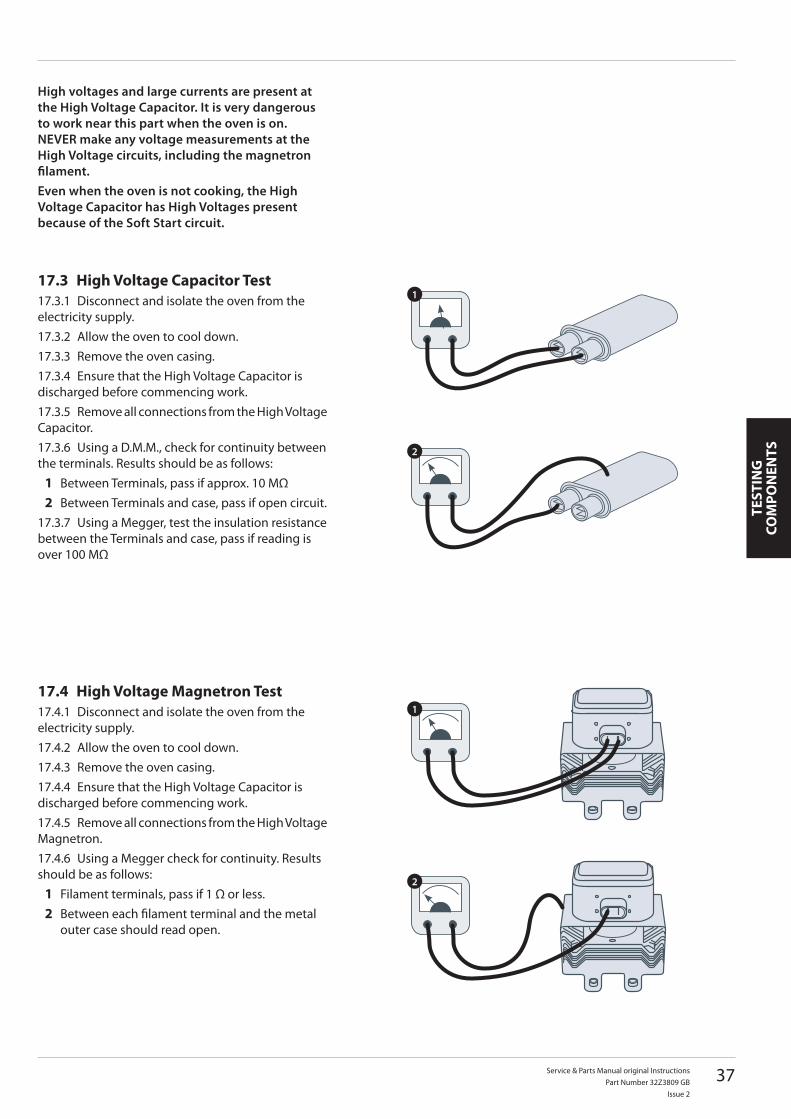
High Voltage Capacitor Test17.3 Disconnect and isolate the oven from the 17.3.1
electricity supply.Allow the oven to cool down.17.3.2 Remove the oven casing.17.3.3 Ensure that the High Voltage Capacitor is 17.3.4
discharged before commencing work.Remove all connections from the High Voltage 17.3.5
Capacitor.Using a D.M.M., check for continuity between 17.3.6
the terminals. Results should be as follows:Between Terminals, pass if approx. 10 MΩ1 Between Terminals and case, pass if open circuit.2
Using a Megger, test the insulation resistance 17.3.7 between the Terminals and case, pass if reading is over 100 MΩ
High Voltage Magnetron Test17.4 Disconnect and isolate the oven from the 17.4.1
electricity supply.Allow the oven to cool down.17.4.2 Remove the oven casing.17.4.3 Ensure that the High Voltage Capacitor is 17.4.4
discharged before commencing work.Remove all connections from the High Voltage 17.4.5
Magnetron.Using a Megger check for continuity. Results 17.4.6
should be as follows:Filament terminals, pass if 1 Ω or less.1 Between each filament terminal and the metal 2 outer case should read open.
38 Service & Parts Manual original InstructionsPart Number 32Z3809 GBIssue 2
SW1
SW2 SW3
SW3
L1
N
SW1
SW2L1
N
TESTING
CO
MPO
NEN
TS
6
5
3
2
1
SW1SW2
SW3
MAINS VOLTAGE COMPONENTS18
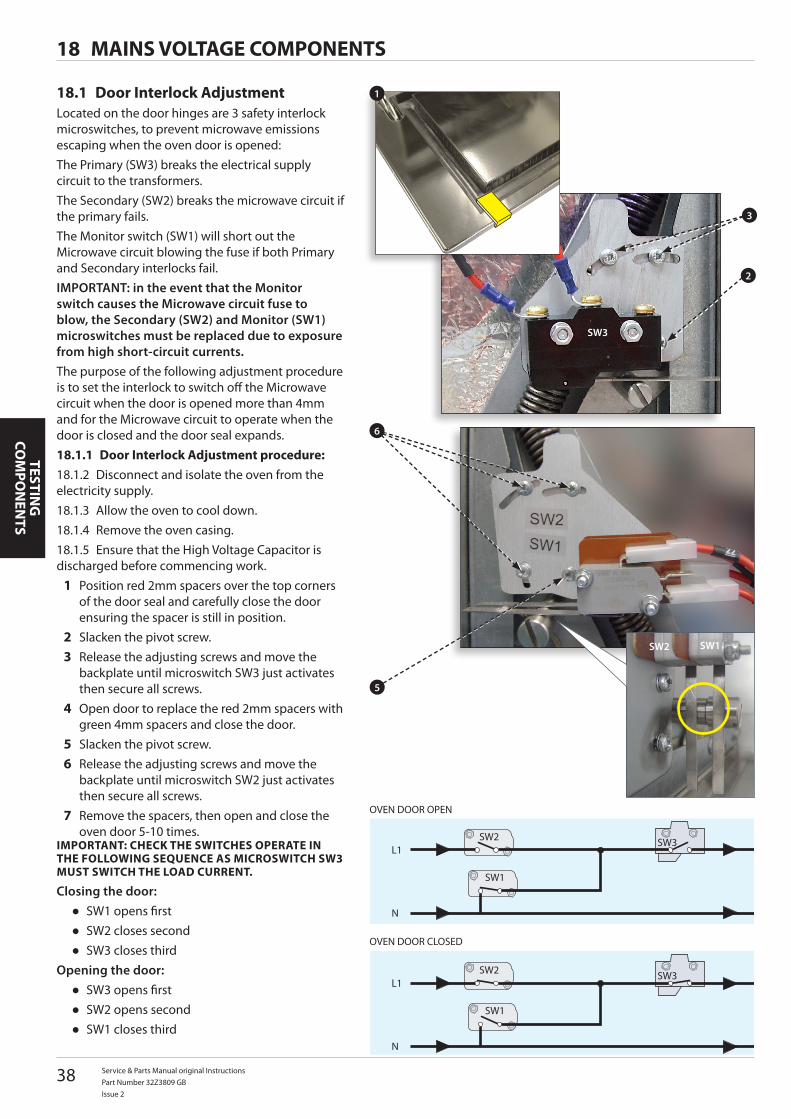
Door Interlock Adjustment18.1 Located on the door hinges are 3 safety interlock microswitches, to prevent microwave emissions escaping when the oven door is opened:The Primary (SW3) breaks the electrical supply circuit to the transformers.The Secondary (SW2) breaks the microwave circuit if the primary fails.The Monitor switch (SW1) will short out the Microwave circuit blowing the fuse if both Primary and Secondary interlocks fail.IMPORTANT: in the event that the Monitor switch causes the Microwave circuit fuse to blow, the Secondary (SW2) and Monitor (SW1) microswitches must be replaced due to exposure from high short-circuit currents.The purpose of the following adjustment procedure is to set the interlock to switch off the Microwave circuit when the door is opened more than 4mm and for the Microwave circuit to operate when the door is closed and the door seal expands.
Door Interlock Adjustment procedure:18.1.1 Disconnect and isolate the oven from the 18.1.2
electricity supply.Allow the oven to cool down.18.1.3 Remove the oven casing.18.1.4 Ensure that the High Voltage Capacitor is 18.1.5
discharged before commencing work.Position red 2mm spacers over the top corners 1 of the door seal and carefully close the door ensuring the spacer is still in position.Slacken the pivot screw.2 Release the adjusting screws and move the 3 backplate until microswitch SW3 just activates then secure all screws.Open door to replace the red 2mm spacers with 4 green 4mm spacers and close the door.Slacken the pivot screw.5 Release the adjusting screws and move the 6 backplate until microswitch SW2 just activates then secure all screws.Remove the spacers, then open and close the 7 oven door 5-10 times.
IMPORTANT: CHECk THE SWITCHES OPERATE IN THE FOLLOWING SEQUENCE AS MICROSWITCH SW3 MUST SWITCH THE LOAD CURRENT.
Closing the door:SW1 opens first ●SW2 closes second ●SW3 closes third ●
Opening the door:SW3 opens first ●SW2 opens second ●SW1 closes third ●
OVEN DOOR OPEN
OVEN DOOR CLOSED
Service & Parts Manual original InstructionsPart Number 32Z3809 GB
Issue 2
39
SPA
RES
&
REPL
ACE
MEN
T
4
1378 70 16 64 10 10 6 6 8 10 10
11 14 82 81 2
DANGER:BEFORE REMOVING THE OVEN CASING, ISOLATE THE OVEN FROM THE MAINS ELECTRICITY POWER SUPPLY; SWITCH OFF, DISCONNECT OVEN PLUG FROM WALL SOCkET, TURN OFF ISOLATOR SWITCH TO DISCONNECT FIXED WIRED OVENS AND LOCk-OFF.
WARNING:ALLOW OVEN TO COOL AND OBSERVE AND FOLLOW ALL SAFETY PRECAUTIONS INCLUDING THOSE DESCRIBED UNDER THE SAFETY REGULATIONS SECTION OF THIS MANUAL BEFORE ATTEMPTING A SERVICE OR REPAIR.
CAUTION MICROWAVE EMISSIONS:DO NOT BECOME EXPOSED TO EMISSIONS FROM THE MICROWAVE GENERATOR OR PARTS CONDUCTING MICROWAVE ENERGY.
OVEN COMPONENTS19
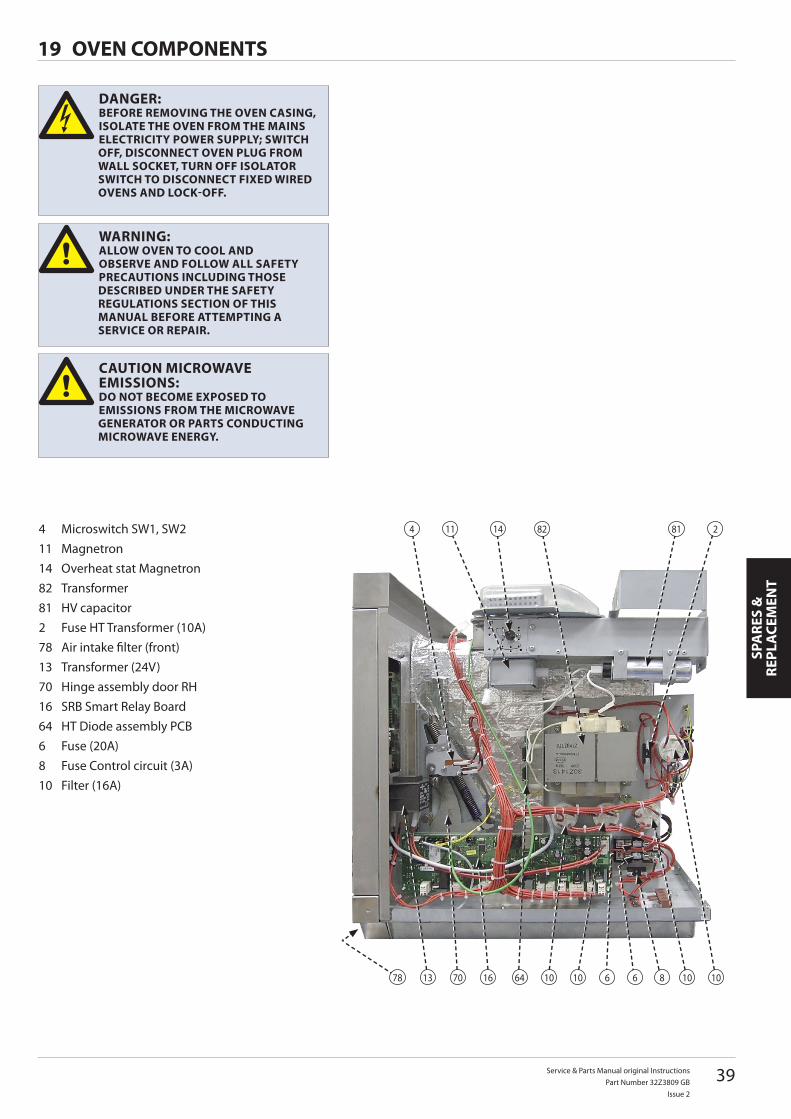
4 Microswitch SW1, SW211 Magnetron14 Overheat stat Magnetron82 Transformer81 HV capacitor2 Fuse HT Transformer (10A)78 Air intake filter (front)13 Transformer (24V)70 Hinge assembly door RH16 SRB Smart Relay Board64 HT Diode assembly PCB6 Fuse (20A)8 Fuse Control circuit (3A)10 Filter (16A)
40 Service & Parts Manual original InstructionsPart Number 32Z3809 GBIssue 2
SPARES &
REPLA
CEMEN
T
47
5 21 83 12 9
17 69 76 58 45 38 68
46 65 15 67
74 72
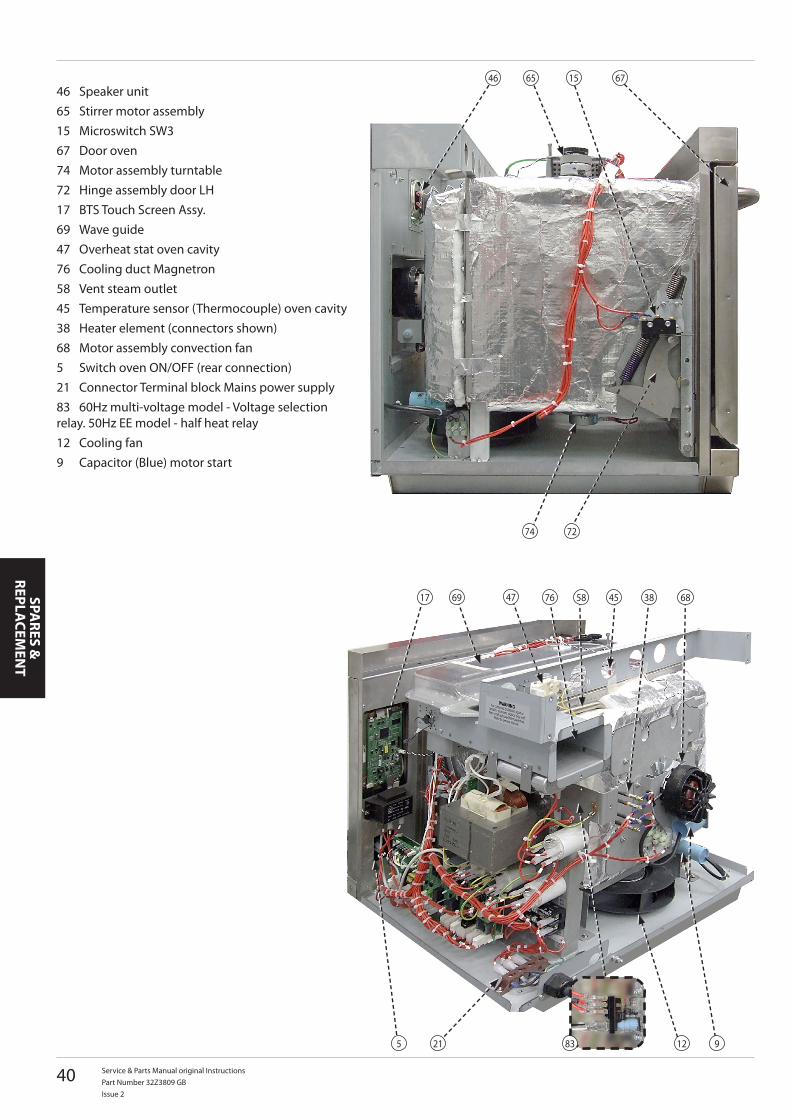
46 Speaker unit65 Stirrer motor assembly15 Microswitch SW367 Door oven74 Motor assembly turntable72 Hinge assembly door LH17 BTS Touch Screen Assy.69 Wave guide47 Overheat stat oven cavity76 Cooling duct Magnetron58 Vent steam outlet45 Temperature sensor (Thermocouple) oven cavity38 Heater element (connectors shown)68 Motor assembly convection fan5 Switch oven ON/OFF (rear connection)21 Connector Terminal block Mains power supply83 60Hz multi-voltage model - Voltage selection relay. 50Hz EE model - half heat relay12 Cooling fan9 Capacitor (Blue) motor start
Service & Parts Manual original InstructionsPart Number 32Z3809 GB
Issue 2
41
SPA
RES
&
REPL
ACE
MEN
T
21
3
4
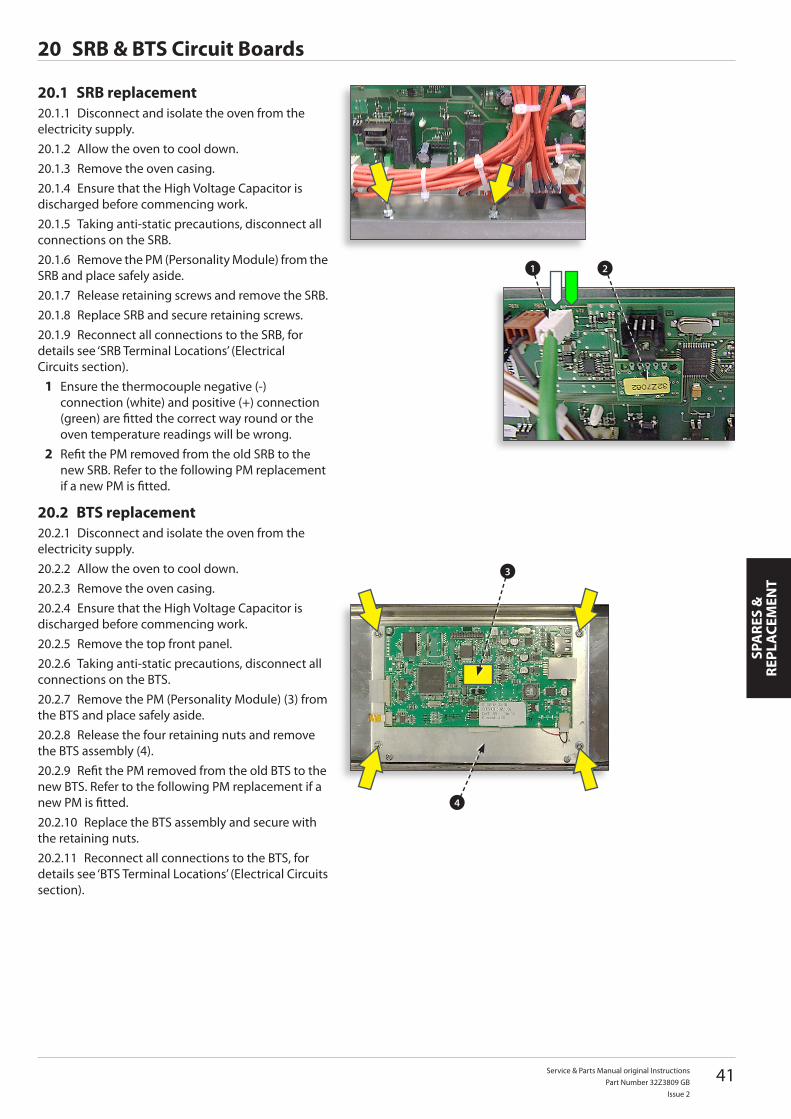
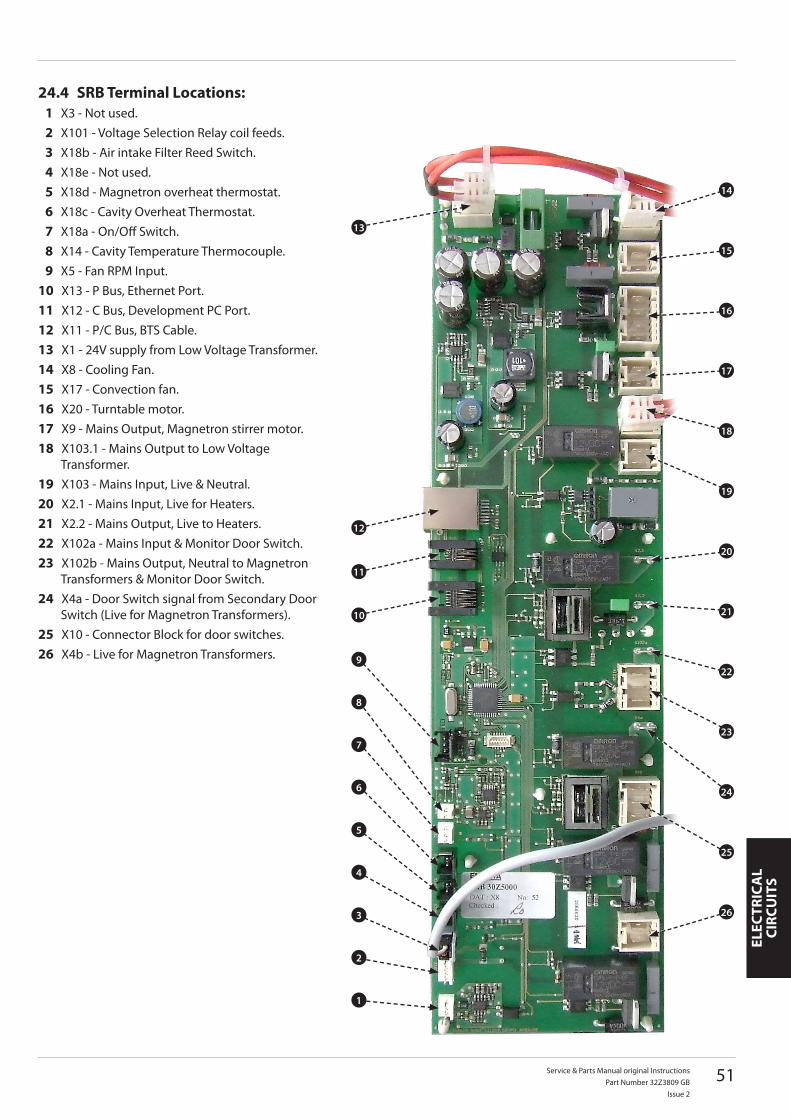
SRB & BTS Circuit Boards20
SRB replacement20.1 Disconnect and isolate the oven from the 20.1.1
electricity supply.Allow the oven to cool down.20.1.2 Remove the oven casing.20.1.3 Ensure that the High Voltage Capacitor is 20.1.4
discharged before commencing work.Taking anti-static precautions, disconnect all 20.1.5
connections on the SRB.Remove the PM (Personality Module) from the 20.1.6
SRB and place safely aside.Release retaining screws and remove the SRB.20.1.7 Replace SRB and secure retaining screws.20.1.8 Reconnect all connections to the SRB, for 20.1.9
details see ‘SRB Terminal Locations’ (Electrical Circuits section).
Ensure the thermocouple negative (-) 1 connection (white) and positive (+) connection (green) are fitted the correct way round or the oven temperature readings will be wrong.Refit the PM removed from the old SRB to the 2 new SRB. Refer to the following PM replacement if a new PM is fitted.
BTS replacement20.2 Disconnect and isolate the oven from the 20.2.1
electricity supply.Allow the oven to cool down.20.2.2 Remove the oven casing.20.2.3 Ensure that the High Voltage Capacitor is 20.2.4
discharged before commencing work.Remove the top front panel.20.2.5 Taking anti-static precautions, disconnect all 20.2.6
connections on the BTS.Remove the PM (Personality Module) (3) from 20.2.7
the BTS and place safely aside.Release the four retaining nuts and remove 20.2.8
the BTS assembly (4).Refit the PM removed from the old BTS to the 20.2.9
new BTS. Refer to the following PM replacement if a new PM is fitted.
Replace the BTS assembly and secure with 20.2.10 the retaining nuts.
Reconnect all connections to the BTS, for 20.2.11 details see ‘BTS Terminal Locations’ (Electrical Circuits section).
42 Service & Parts Manual original InstructionsPart Number 32Z3809 GBIssue 2
SPARES &
REPLA
CEMEN
T
6 7
8 9 10
5
32 4
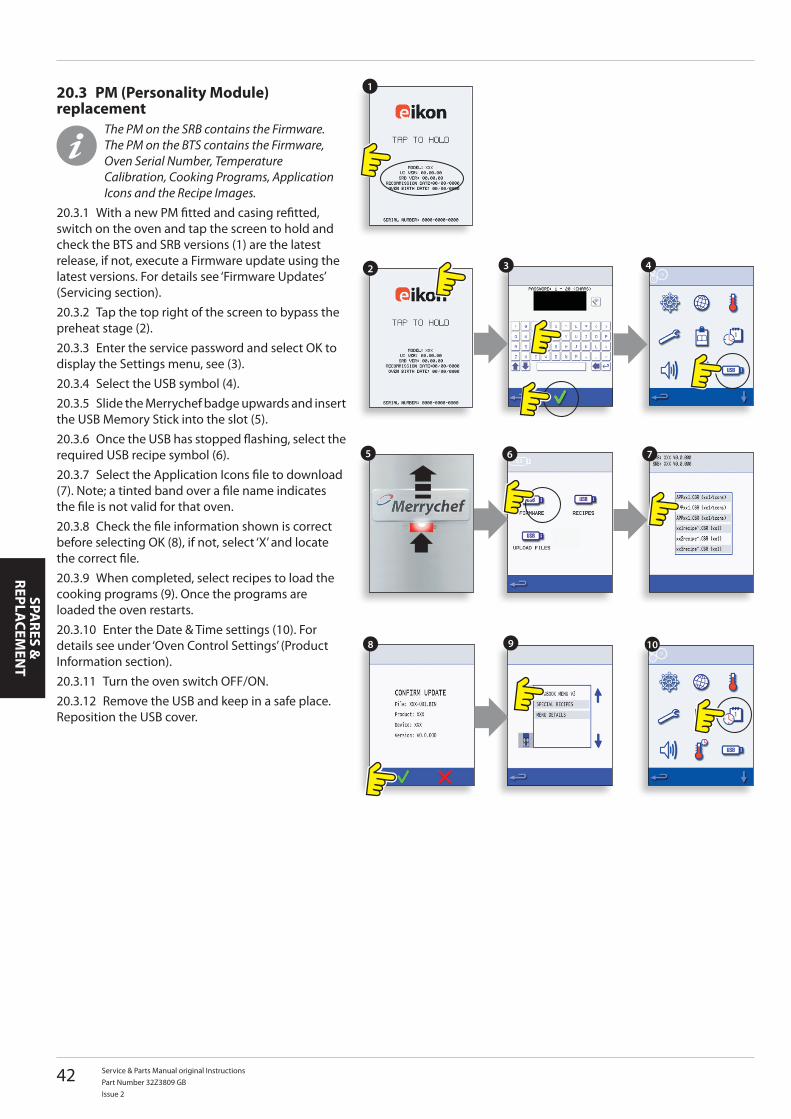
1PM (Personality Module) 20.3 replacement
The PM on the SRB contains the Firmware. The PM on the BTS contains the Firmware, Oven Serial Number, Temperature Calibration, Cooking Programs, Application Icons and the Recipe Images.
With a new PM fitted and casing refitted, 20.3.1 switch on the oven and tap the screen to hold and check the BTS and SRB versions (1) are the latest release, if not, execute a Firmware update using the latest versions. For details see ‘Firmware Updates’ (Servicing section).
Tap the top right of the screen to bypass the 20.3.2 preheat stage (2).
Enter the service password and select OK to 20.3.3 display the Settings menu, see (3).
Select the USB symbol (4).20.3.4 Slide the Merrychef badge upwards and insert 20.3.5
the USB Memory Stick into the slot (5).Once the USB has stopped flashing, select the 20.3.6
required USB recipe symbol (6).Select the Application Icons file to download 20.3.7
(7). Note; a tinted band over a file name indicates the file is not valid for that oven.
Check the file information shown is correct 20.3.8 before selecting OK (8), if not, select ‘X’ and locate the correct file.
When completed, select recipes to load the 20.3.9 cooking programs (9). Once the programs are loaded the oven restarts.
Enter the Date & Time settings (10). For 20.3.10 details see under ‘Oven Control Settings’ (Product Information section).
Turn the oven switch OFF/ON.20.3.11 Remove the USB and keep in a safe place. 20.3.12
Reposition the USB cover.
Service & Parts Manual original InstructionsPart Number 32Z3809 GB
Issue 2
43
56
5475
46
25
55
3053
20/7
7
52
79
12
21
4043
44
4142
23
17/3
2
5
51
19
4950 48
69
13
70
33
81
14
76
11
29
39
78
27
61
5860
9
9
16/2
2/31
24
28
3845
47
57
59
65
66
1
67
68
72
74
83
84
85
10
64
23 67 8
8271
18
4
73
15
34
80
35
26
3663
37
SPA
RES
&
REPL
ACE
MEN
T
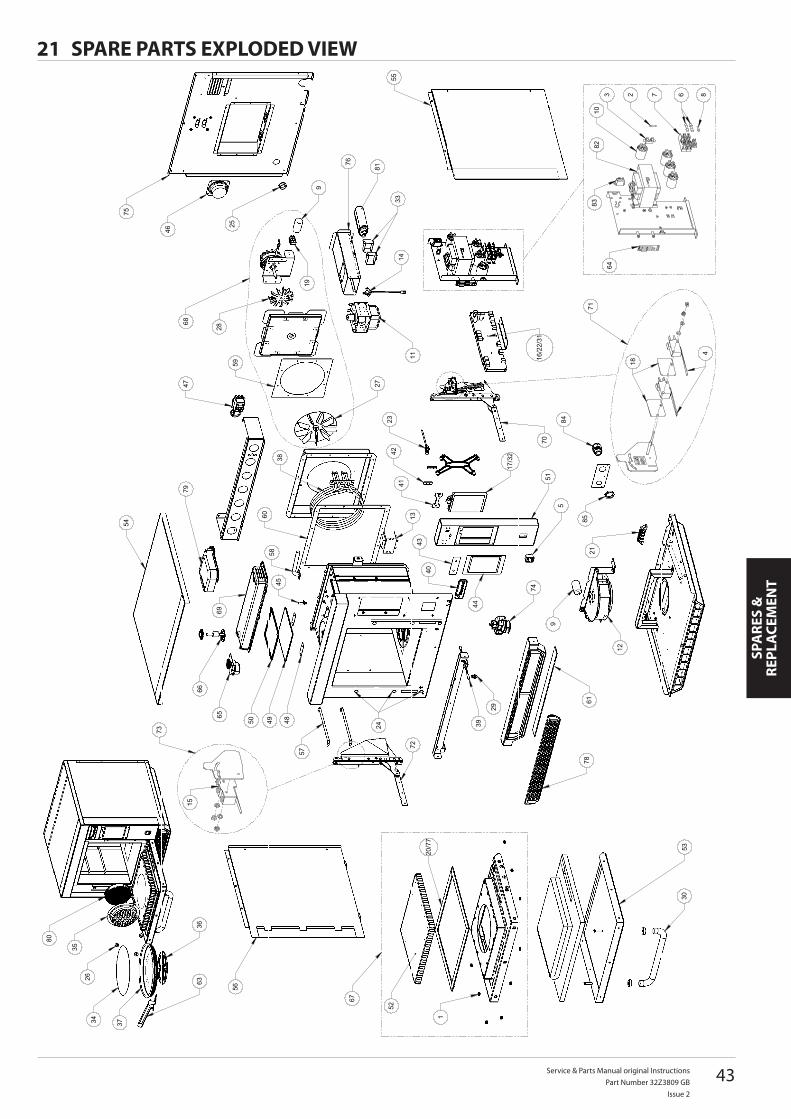
SPARE PARTS EXPLODED VIEW21
44 Service & Parts Manual original InstructionsPart Number 32Z3809 GBIssue 2
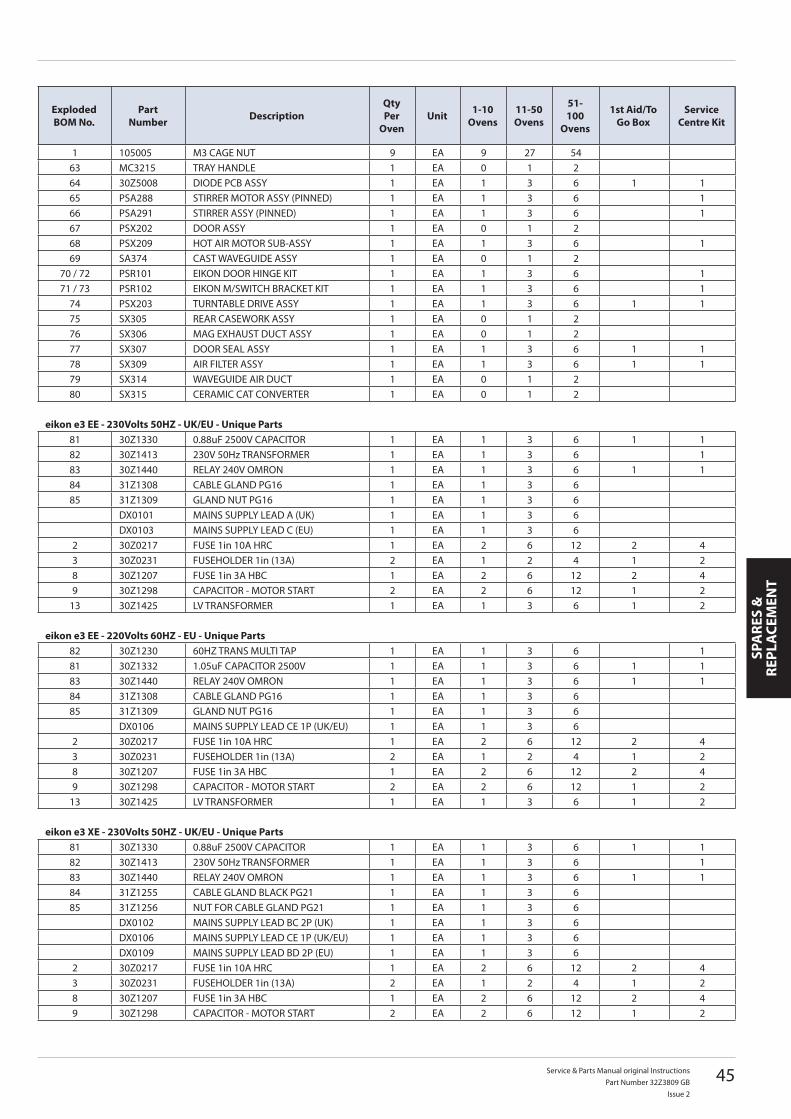
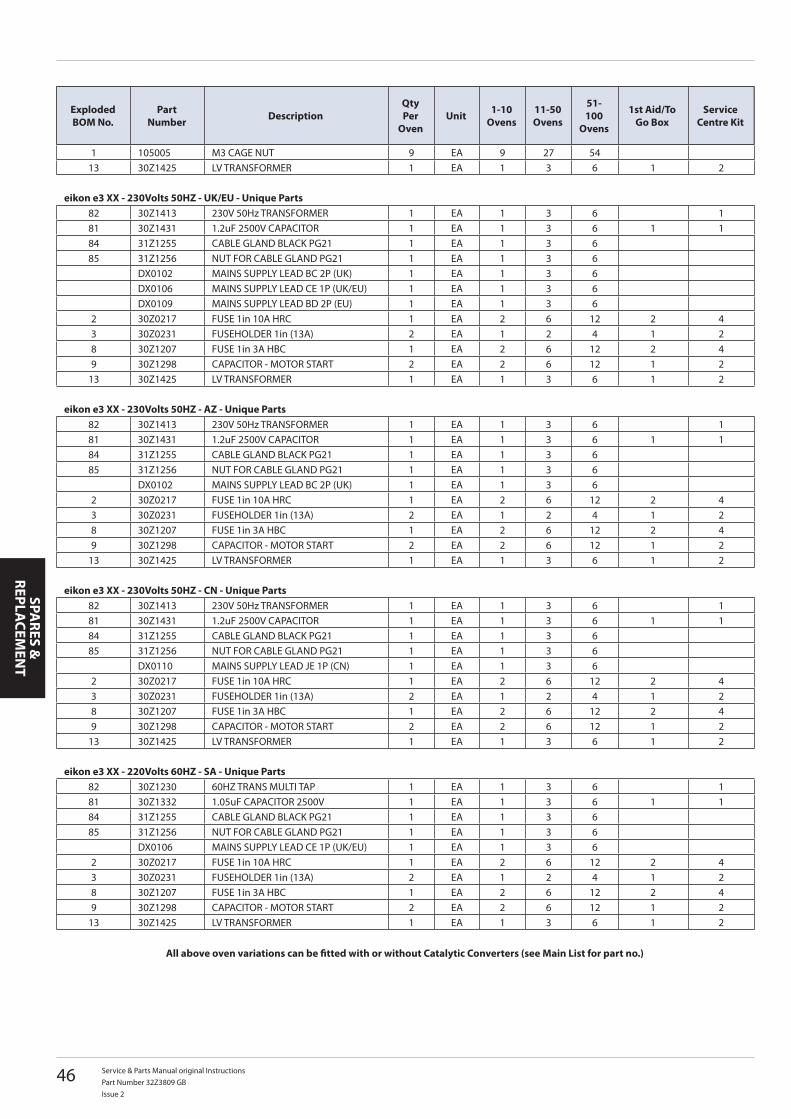
SPARES &
REPLA
CEMEN
T
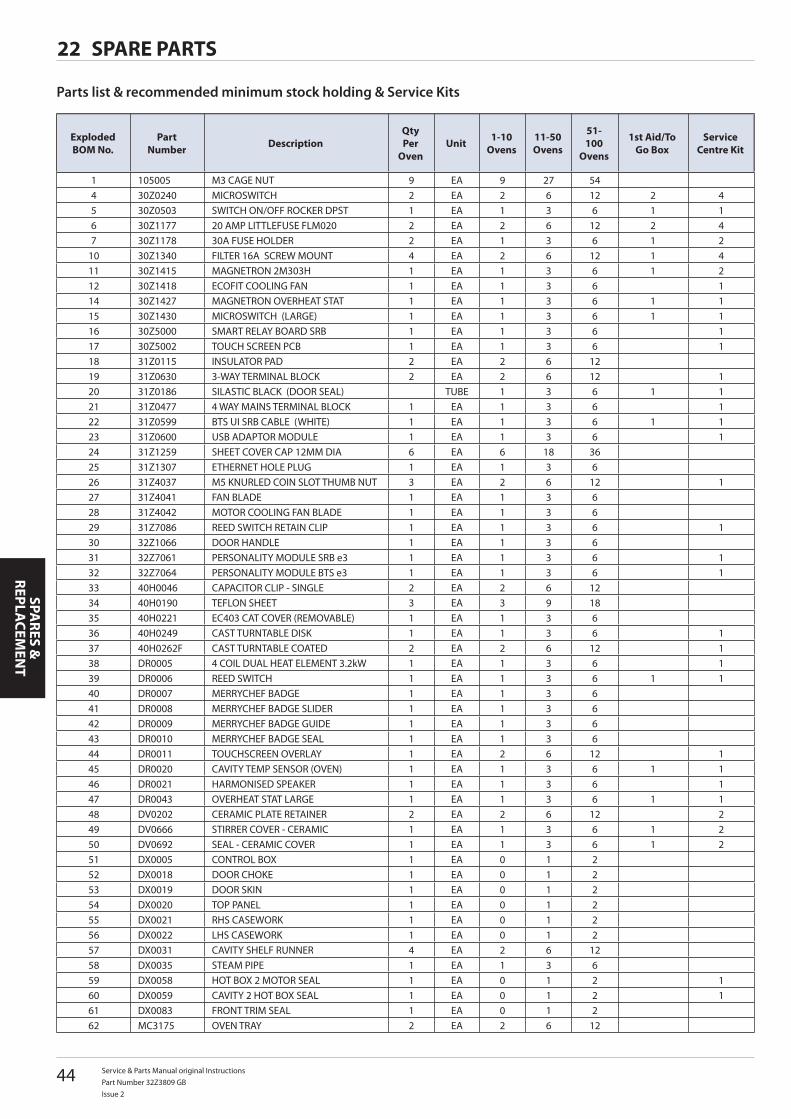
SPARE PARTS22
Parts list & recommended minimum stock holding & Service Kits
DX0101 MAINS SUPPLY LEAD A (UK) 1 EA 1 3 6DX0103 MAINS SUPPLY LEAD C (EU) 1 EA 1 3 6
2 30Z0217 FUSE 1in 10A HRC 1 EA 2 6 12 2 43 30Z0231 FUSEHOLDER 1in (13A) 2 EA 1 2 4 1 28 30Z1207 FUSE 1in 3A HBC 1 EA 2 6 12 2 49 30Z1298 CAPACITOR - MOTOR START 2 EA 2 6 12 1 2
13 30Z1425 LV TRANSFORMER 1 EA 1 3 6 1 2
eikon e3 EE - 220Volts 60Hz - EU - Unique Parts82 30Z1230 60HZ TRANS MULTI TAP 1 EA 1 3 6 181 30Z1332 1.05uF CAPACITOR 2500V 1 EA 1 3 6 1 183 30Z1440 RELAY 240V OMRON 1 EA 1 3 6 1 184 31Z1308 CABLE GLAND PG16 1 EA 1 3 685 31Z1309 GLAND NUT PG16 1 EA 1 3 6
DX0106 MAINS SUPPLY LEAD CE 1P (UK/EU) 1 EA 1 3 62 30Z0217 FUSE 1in 10A HRC 1 EA 2 6 12 2 43 30Z0231 FUSEHOLDER 1in (13A) 2 EA 1 2 4 1 28 30Z1207 FUSE 1in 3A HBC 1 EA 2 6 12 2 49 30Z1298 CAPACITOR - MOTOR START 2 EA 2 6 12 1 2
13 30Z1425 LV TRANSFORMER 1 EA 1 3 6 1 2
eikon e3 XE - 230Volts 50Hz - Uk/EU - Unique Parts81 30Z1330 0.88uF 2500V CAPACITOR 1 EA 1 3 6 1 182 30Z1413 230V 50Hz TRANSFORMER 1 EA 1 3 6 183 30Z1440 RELAY 240V OMRON 1 EA 1 3 6 1 184 31Z1255 CABLE GLAND BLACK PG21 1 EA 1 3 685 31Z1256 NUT FOR CABLE GLAND PG21 1 EA 1 3 6
DX0102 MAINS SUPPLY LEAD BC 2P (UK) 1 EA 1 3 6DX0106 MAINS SUPPLY LEAD CE 1P (UK/EU) 1 EA 1 3 6DX0109 MAINS SUPPLY LEAD BD 2P (EU) 1 EA 1 3 6
2 30Z0217 FUSE 1in 10A HRC 1 EA 2 6 12 2 43 30Z0231 FUSEHOLDER 1in (13A) 2 EA 1 2 4 1 28 30Z1207 FUSE 1in 3A HBC 1 EA 2 6 12 2 49 30Z1298 CAPACITOR - MOTOR START 2 EA 2 6 12 1 2
46 Service & Parts Manual original InstructionsPart Number 32Z3809 GBIssue 2
SPARES &
REPLA
CEMEN
T
Exploded BOM No.
Part Number Description
Qty Per
OvenUnit 1-10
Ovens11-50 Ovens
51-100
Ovens
1st Aid/To Go Box
Service Centre kit
1 105005 M3 CAGE NUT 9 EA 9 27 5413 30Z1425 LV TRANSFORMER 1 EA 1 3 6 1 2
eikon e3 XX - 230Volts 50Hz - Uk/EU - Unique Parts82 30Z1413 230V 50Hz TRANSFORMER 1 EA 1 3 6 181 30Z1431 1.2uF 2500V CAPACITOR 1 EA 1 3 6 1 184 31Z1255 CABLE GLAND BLACK PG21 1 EA 1 3 685 31Z1256 NUT FOR CABLE GLAND PG21 1 EA 1 3 6
DX0102 MAINS SUPPLY LEAD BC 2P (UK) 1 EA 1 3 6DX0106 MAINS SUPPLY LEAD CE 1P (UK/EU) 1 EA 1 3 6DX0109 MAINS SUPPLY LEAD BD 2P (EU) 1 EA 1 3 6
2 30Z0217 FUSE 1in 10A HRC 1 EA 2 6 12 2 43 30Z0231 FUSEHOLDER 1in (13A) 2 EA 1 2 4 1 28 30Z1207 FUSE 1in 3A HBC 1 EA 2 6 12 2 49 30Z1298 CAPACITOR - MOTOR START 2 EA 2 6 12 1 2
13 30Z1425 LV TRANSFORMER 1 EA 1 3 6 1 2
eikon e3 XX - 230Volts 50Hz - Az - Unique Parts82 30Z1413 230V 50Hz TRANSFORMER 1 EA 1 3 6 181 30Z1431 1.2uF 2500V CAPACITOR 1 EA 1 3 6 1 184 31Z1255 CABLE GLAND BLACK PG21 1 EA 1 3 685 31Z1256 NUT FOR CABLE GLAND PG21 1 EA 1 3 6
DX0102 MAINS SUPPLY LEAD BC 2P (UK) 1 EA 1 3 62 30Z0217 FUSE 1in 10A HRC 1 EA 2 6 12 2 43 30Z0231 FUSEHOLDER 1in (13A) 2 EA 1 2 4 1 28 30Z1207 FUSE 1in 3A HBC 1 EA 2 6 12 2 49 30Z1298 CAPACITOR - MOTOR START 2 EA 2 6 12 1 2
13 30Z1425 LV TRANSFORMER 1 EA 1 3 6 1 2
eikon e3 XX - 230Volts 50Hz - CN - Unique Parts82 30Z1413 230V 50Hz TRANSFORMER 1 EA 1 3 6 181 30Z1431 1.2uF 2500V CAPACITOR 1 EA 1 3 6 1 184 31Z1255 CABLE GLAND BLACK PG21 1 EA 1 3 685 31Z1256 NUT FOR CABLE GLAND PG21 1 EA 1 3 6
DX0110 MAINS SUPPLY LEAD JE 1P (CN) 1 EA 1 3 62 30Z0217 FUSE 1in 10A HRC 1 EA 2 6 12 2 43 30Z0231 FUSEHOLDER 1in (13A) 2 EA 1 2 4 1 28 30Z1207 FUSE 1in 3A HBC 1 EA 2 6 12 2 49 30Z1298 CAPACITOR - MOTOR START 2 EA 2 6 12 1 2
13 30Z1425 LV TRANSFORMER 1 EA 1 3 6 1 2
eikon e3 XX - 220Volts 60Hz - SA - Unique Parts82 30Z1230 60HZ TRANS MULTI TAP 1 EA 1 3 6 181 30Z1332 1.05uF CAPACITOR 2500V 1 EA 1 3 6 1 184 31Z1255 CABLE GLAND BLACK PG21 1 EA 1 3 685 31Z1256 NUT FOR CABLE GLAND PG21 1 EA 1 3 6
DX0106 MAINS SUPPLY LEAD CE 1P (UK/EU) 1 EA 1 3 62 30Z0217 FUSE 1in 10A HRC 1 EA 2 6 12 2 43 30Z0231 FUSEHOLDER 1in (13A) 2 EA 1 2 4 1 28 30Z1207 FUSE 1in 3A HBC 1 EA 2 6 12 2 49 30Z1298 CAPACITOR - MOTOR START 2 EA 2 6 12 1 2
13 30Z1425 LV TRANSFORMER 1 EA 1 3 6 1 2
All above oven variations can be fitted with or without Catalytic Converters (see Main List for part no.)
Service & Parts Manual original InstructionsPart Number 32Z3809 GB
Issue 2
47
FAU
LT F
IND
ING
Error Code Error Condition Description Trigger Possible Causes Error
LevelSystem Response
E 101 Magnetron failed to energise
Detects a magnetron is not working correctly
The current measured by the current sensing transformer was outside of tolerance.
Failure of component/s in the microwave circuit
Critical
Display error message until system is power cycled.
E 103 Ambient overheat >70°C
Detects if the controls area is operating above temperature
The ambient temperature measured on the BTS and SRB was >70°C
Cooling fan failed. Cooling fan wired incorrectly. Inlet air too hot. Blocked inlet filter.
Critical
Display error message until ambient controls area temperature is below 60°C
E 104 Magnetron / Cavity Overheat
Detects if the cavity and magnetrons are above temperature
Cavity and magnetron overheat thermostats
Cooling fan failed.E103 / E106 not triggering. Failed SRB. Magnetron failure. Wiring / connection fault.Blocked Inlet filter.
Critical
Display error message until service call and the magnetron cools down or the cavity stat is reset.
E 105 Supply voltage high / low
Detects if the power supply voltage is outside specification
The power supply to the oven voltage sensor on the SRB measures too high / low
Cavity reaches 25°C above setpoint once it has been controlling at setpoint
Detects if the cavity temperature has risen above limits
The setpoint of the oven was exceeded
Cavity fire. Failed convection fan. No impeller or loose impeller on convection fan.
Critical
Display error message until system is power cycled.
E 107 Communication error
No communication can be made between the BTS and SRB
Loss of communication between the SBR and BTS
SRB / BTS connection cable unplugged or damaged. Faulty BTS or SRB.
Critical
Display error message until system is power cycled.
E 108 BTS PM error Wrong PM found / no PM found
The BTS or SRB either has an incorrect PM (Personality Module) fitted or no PM is fitted
The PM has been changed and is incorrect. The PM has been removed.
Critical
Display error message until system is power cycled.
E 110 SRB version conflict
SRB firmware version incompatible with BTS version
The BTS has found that the firmware running the SRB is not supported.
Firmware update has been carried out to the BTS and the SRB has not been updated to match.
Critical
Display error message until system is power cycled.
ERROR CODES DISPLAYED23
48 Service & Parts Manual original InstructionsPart Number 32Z3809 GBIssue 2
FAU
LT FIND
ING
Error Code Error Condition Description Trigger Possible Causes Error
LevelSystem Response
E 111 Cavity sensor error
Cavity sensor broken / unplugged
The controller is reading an open circuit across the thermocouple input
The thermocouple is not connected. The thermocouple is broken open circuit. Failed SRB.
Critical
Display error message until system is power cycled.
N/A Oven door open longer than 1 min.
Oven door open. Oven inoperable.
Break in switched feed on SRB
Door left open. Failed door switch/s or SRB. Faulty wiring or connection.
Warning
Display warning message until door is closed.
N/A Air Filter removed Air filter not fitted. Oven inoperable. Filter not fitted.
Failed reed switch/s or SRB. Faulty wiring or connection.
WarningDisplay error message until filter replaced.
Service & Parts Manual original InstructionsPart Number 32Z3809 GB
Issue 2
49
ELEC
TRIC
AL
CIRC
UIT
S
1
2
78
3
4 5 6
SRB & BTS Circuit Boards24
BTS LEDs24.1 Run - Pulsing 1 second flash, indicating that ●the board has booted up.Power - Lit to show that there is a power ●supply from the SRB.P-Bus - Irregular flashing, indicating data ●communication with SRB.C-Bus - Lit to show data being loaded from the ●PM onto the BTS.LD5 - Lit to show. ●
50 Service & Parts Manual original InstructionsPart Number 32Z3809 GBIssue 2
ELECTRICAL
CIRCUITS
1
2
3
4
5
6
7
8
9
10
11
SRB LED’s24.3 P-Bus - Irregular flashing, indicating data ●communication with BTS.Run - Pulsing 1 second flash, indicating that ●the board has booted up.12v & 5v - Lit to show voltage outputs from ●inboard transformer.Relay & Triac - Lit to show that a signal has ●been sent to energise that component.
Cooling fan.1 Convection fan.2 Stirrers / Turntable.3 5v supply.4 12v supply.5 Heater safety.6 Heater drive.7 P-BUS: flashes when data is being sent / 8 received. RUN: 1 second flash.Oven Door.9 Microwave safety relay.10 Microwave drive.11
Service & Parts Manual original InstructionsPart Number 32Z3809 GB
Issue 2
51
ELEC
TRIC
AL
CIRC
UIT
S
14
15
16
17
18
19
20
21
22
23
24
25
26
12
11
10
9
8
7
6
5
4
3
2
1
13
SRB Terminal Locations:24.4 X3 - Not used.1 X101 - Voltage Selection Relay coil feeds.2 X18b - Air intake Filter Reed Switch.3 X18e - Not used.4 X18d - Magnetron overheat thermostat.5 X18c - Cavity Overheat Thermostat.6 X18a - On/Off Switch.7 X14 - Cavity Temperature Thermocouple.8 X5 - Fan RPM Input.9 X13 - P Bus, Ethernet Port.10 X12 - C Bus, Development PC Port.11 X11 - P/C Bus, BTS Cable.12 X1 - 24V supply from Low Voltage Transformer.13 X8 - Cooling Fan.14 X17 - Convection fan.15 X20 - Turntable motor.16 X9 - Mains Output, Magnetron stirrer motor.17 X103.1 - Mains Output to Low Voltage 18 Transformer.X103 - Mains Input, Live & Neutral.19 X2.1 - Mains Input, Live for Heaters.20 X2.2 - Mains Output, Live to Heaters.21 X102a - Mains Input & Monitor Door Switch.22 X102b - Mains Output, Neutral to Magnetron 23 Transformers & Monitor Door Switch.X4a - Door Switch signal from Secondary Door 24 Switch (Live for Magnetron Transformers).X10 - Connector Block for door switches.25 X4b - Live for Magnetron Transformers.26
52 Service & Parts Manual original InstructionsPart Number 32Z3809 GBIssue 2
Service & Parts Manual original InstructionsPart Number 32Z3809 GB
Issue 2
57
ELEC
TRIC
AL
CIRC
UIT
S
6062 58
6
9
14
15
3
64 16
N
18 69
12V
24V
12V
1.25A
72 2725
TR3
6163 59 65 17 19
N L
70 71 2826
15
3
14
9
L1 TWIN PHASE MODEL
Filter 1. Connector view
CONTROL CIRCUIT e3EE, e3XE & e3XX25.4
Filter 1
Filter 1
Safety Aux.
Input detection for control
in out
Stirr
er
Turn
tabl
e
Cool
ing
fan
Conv
ectio
n fa
n
Air fi
lter R
eed
Cont
.
CAV
O/H
MW
O/H
ON/
OFF
switc
h
Safety Relay supplycontrolled
Fuse 3
L SINGLE PHASE MODEL
3 Amp
58 Service & Parts Manual original InstructionsPart Number 32Z3809 GBIssue 2
ELECTRICAL
CIRCUITS
N L
11
1
10
7
11
11
1
N
4
7
10
x2.1x14.1
x14.2
x2.2
29
29 7982
81
80
77
Filter 3
normally closed
Filter 3
Temperature thermocouple
Heat half Power Relay
Heater Element
Filter 3. Connector view
Processor controlled
input forSafety Heater Relay. Powered by Safety Supply
relay
Fuse 1
HEATER CIRCUIT e3EE25.5
20 Amp
L
Service & Parts Manual original InstructionsPart Number 32Z3809 GB
Issue 2
59
ELEC
TRIC
AL
CIRC
UIT
S
N L
11
1
10
7
11
11
1
N
4
7
10
x2.1x14.1
x14.2
x2.2
29
29 78 78
77
Filter 3
Filter 3
Temperature thermocouple
Heater Element
Filter 3. Connector view
Processor controlled
input forSafety Heater Relay. Powered by Safety Supply
relay
Fuse 1
HEATER CIRCUIT e3XE & e3 XX25.6
20 Amp
L1 TWIN PHASE MODELL SINGLE PHASE MODEL
60 Service & Parts Manual original InstructionsPart Number 32Z3809 GBIssue 2
ELECTRICAL
CIRCUITS
N L
13
2
12
8
5
8
12
23
24
2221
20
X.10
x4a
2
13
44
46
4855
56
FA F
MW
571
47
82
81
x102b x102ax4b1
21
45
45
N
N L
47
45
48
46
81 82
Hybrid Relay
Safety Relay Microwave. Powered
by Safety Supply relay
Filter 2
LHS SW3 normally
open
Current Sense To SRB E101 Sense
Fuse 4
RHS SW1 normally
closed
Door Switches shown in door open position
RHS SW2 normally
open
Fuse 220 Amp
10 Amp
Heat half Power Relay
HV Transformer
Diode BoardFilter 2
Filter 4
Filter 4
Filter 4. Connector view
Filter 2. Connector view
MICROWAVE CIRCUIT e3EE25.7
L
Service & Parts Manual original InstructionsPart Number 32Z3809 GB
Issue 2
61
ELEC
TRIC
AL
CIRC
UIT
S
N L
13
2
12
8
5
8
12
23
24
222
20
X.10
x4a
2
13
44
46
4855
56
FA F
MW
571
47
x102b x102ax4b1
21
45
45
N
N L
47
45
48
46
Hybrid Relay
Safety Relay Microwave. Powered
by Safety Supply relay
Filter 2
LHS SW3 normally
open
Current Sense To SRB E101 Sense
Fuse 4
RHS SW1 normally
closed
Door Switches shown in door open position
RHS SW2 normally
open
Fuse 220 Amp
10 Amp
HV Transformer
Diode BoardFilter 2
Filter 4
Filter 4
Filter 4. Connector view
Filter 2. Connector view
MICROWAVE CIRCUIT e3XE & e3XX25.8
L1 TWIN PHASE MODEL
L SINGLE PHASE MODEL
62 Service & Parts Manual original InstructionsPart Number 32Z3809 GBIssue 2
COM
MISSIO
NIN
G
Commissioning the oven26
Initial installation26.1 Unpack the Oven and check for damage.1 Check Oven Accessories.2 Check location will provide adequate Ventilation.3 Locate Oven onto a strong, level, non-flammable 4 Surface.Remove panels & check all wiring and components for 5 security.Refit panels.6 Position the Oven with a minimum air gap of 50mm, 7 sides & rear.Check Electrical supply and connect.8 Place a container of water within the oven and switch 9 it on.Record Model version & check against serial plate.10 Record BTS (UI) version.11 Record SRB version.12 Record Serial Number & check against serial plate.13 Enter Service Mode.14 Record Voltage & Frequency.15 Record Magnetron Current Draw.16 Check for Microwave leakage.17 Record Heater current.18 Check door opening on display.19 Check filter removal on display.20 Check fan speed.21 Turn off the oven and remove the water.22 Switch on oven and run up to temperature.23 Operate Oven, Cooking a Standard Batch.24 Supply User information & contact details to Customer.25 Instruct Users with an Overview of the equipment, 26 Operation & Safety (Hazards).Complete Service Report.27
After Service26.2 Complete the following checks after the Oven has been Serviced/Repaired/Tested before connecting to the mains electricity power supply:
All internal electrical connections are correct (see 26.2.1 wiring diagrams).
All wiring insulation is correct and is not touching 26.2.2 any sharp edges.
All grounding connections are electrically and 26.2.3 mechanically secure.
All door safety interlocks are secure and 26.2.4 mechanically sound.
The door activates all of the door interlock switches 26.2.5 and in the correct order.
The door operation is smooth, and the arms run 26.2.6 freely in the slots.
The temperature sensor is correctly connected to 26.2.7 the SRB.
The casing is securely refitted with no trapped wires.26.2.8 Before finishing a service call, recheck the following points:
Run the Recommission tests to ensure the oven is 26.2.9 functioning correctly and the touch screen is working.
Microwave emissions are below permissible limit of 26.2.10 5mW/cm².
The power output of the oven is checked in 26.2.11 accordance with the procedure.
The oven has correct 50mm (2 inches) air gap all 26.2.12 round and 50mm (2 inches) above. Air flow should not be restricted.
Complete the Service Report.26.2.13
Service & Parts Manual original InstructionsPart Number 32Z3809 GB
Issue 2
63
64 Service & Parts Manual original Instructions
Part Number 32Z3809 GB
Issue 2
Ashb ourne House,
The G uildway, O ld Por tsmouth Road,
G uildford, GU3 1LR
Tel : +44(0)1483 464900
Fax: +44(0)1483 464905
w w w.merrychef.com
accepts no liability for any inaccuracies, errors or ommissions contained herein.
Correct disposal of this product (Waste Electrical & Electronic Equipment)
Applicable in the European Union and other European countries with separate collection systems.
This marking shown on the product or its literature indicates that it should not be disposed with other household
wastes at the end of its working life. To prevent possible harm to the environment or human health from uncontrolled waste disposal, please separate this from other types of wastes and recycle it responsibly to promote the sustainable reuse of material resources.
Household users should contact either the retailer where they purchased this product, or their local
can take this item for environmentally safe recycling.
Business users should contact their supplier and check the terms and conditions of the purchase contract. This product should not be mixed with other commercial wastes for disposal.