8
ELECTRIC COFFEE GRINDER INSTRUCTION MANUAL

ELECTRICC O F F E EGRINDER
INSTRUCTION MANUAL

IMPORTANT SAFEGUARDSTo reduce the risk of fire, electric shock and/or injury, basic safety precautions should always be followed when using this electrical appliances, including the following:
• Read carefully and save all the instructions provided with an appliance.• Always turn the power off at the power outlet before you insert or remove a plug. Remove by grasping the plug - do not pull on the cord.• Turn the power off and remove the plug when the appliance is not in use and before cleaning.• Do not use your appliance with an extension cord unless this cord has been checked and tested by a qualified technician or service person.• Always use your appliance from a power outlet of the voltage (A.C. only) marked on the appliance.• Never leave an appliance unattended while in use.• Young children should be supervised to ensure that they do not play with the appliance.• Do not use an appliance for any purpose other than its intended use.• Do not place an appliance on or near a hot gas flame, electric element or on a heated oven. Do not place on top of any other appliance.• Do not let the power cord of an appliance hang over the edge of a table or bench top or touch any hot surface.• For safety reasons and to avoid maintenance by unskilled persons.• Do not operate any electrical appliance with a damaged cord or after the appliance has been dropped or damaged in any manner. If damage is suspected, please contact the Mueller Customer Service.• Do not immerse the appliance in water or any other liquid unless recommended.
2

SAVE THESE INSTRUCTIONS
WARNING! To reduce the risk of fire or electric shock, do not remove any service covers. There were no user serviceable parts inside the Coffee Grinder. Only authorized personnel should repair the Coffee Grinder.PRECAUTIONS• Always place the unit on a flat, level surface.• Switch off and unplug at power point before cleaning.• Do not use the appliance continuously for more than 60 seconds at a time.• Do not remove Cover until blade has completely stopped.• Do not attempt operation without the cover being in place.• Do not immerse the motorized base or blade in liquid, or place in dishwasher. Only the transparent top cover may be immersed. • Do not attempt to chop ice.
Please read ALL of the instructions in this manual carefully before you begin to use this appliance. Proper care and maintenance will ensure a long life and a trouble-free operation for this appliance. Please save these Instructions and refer to them for cleaning and care tips.
3
Transparent coverEnables the user toobserve the coffee beans,as they are being groundto check the fineness ofthe grind for perfectresults every time.
As coffee beans arearomatic, the stainless steel grinding bowl surface ensures minimal transfer of flavors and odors.
One touch operation On/Off Switch Simple to use, press the operating button on thecover to commence grinding and release to stop.
Stainless steel wing-bladeEffortlessly grinds coffeebeans to powder in seconds.
Motor 130 watt grinding motorhandles a variety of grinding tasks.
PARTS IDENTIFICATION
Stainless steel grinding bowl
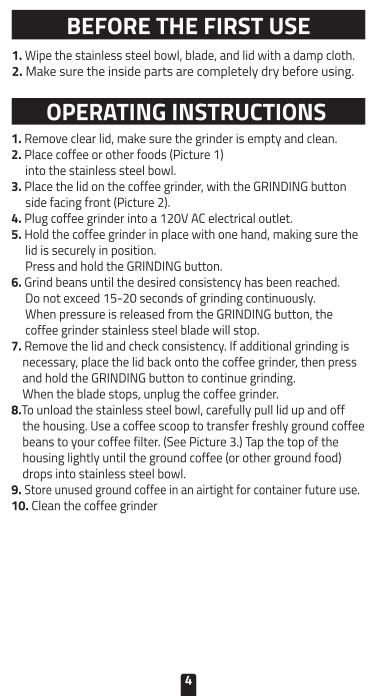
BEFORE THE FIRST USE
OPERATING INSTRUCTIONS
1. Wipe the stainless steel bowl, blade, and lid with a damp cloth.2. Make sure the inside parts are completely dry before using.
1. Remove clear lid, make sure the grinder is empty and clean.2. Place coffee or other foods (Picture 1) into the stainless steel bowl.3. Place the lid on the coffee grinder, with the GRINDING button side facing front (Picture 2).4. Plug coffee grinder into a 120V AC electrical outlet.5. Hold the coffee grinder in place with one hand, making sure the lid is securely in position. Press and hold the GRINDING button.6. Grind beans until the desired consistency has been reached. Do not exceed 15-20 seconds of grinding continuously. When pressure is released from the GRINDING button, the coffee grinder stainless steel blade will stop.7. Remove the lid and check consistency. If additional grinding is necessary, place the lid back onto the coffee grinder, then press and hold the GRINDING button to continue grinding. When the blade stops, unplug the coffee grinder.8.To unload the stainless steel bowl, carefully pull lid up and off the housing. Use a coffee scoop to transfer freshly ground coffee beans to your coffee filter. (See Picture 3.) Tap the top of the housing lightly until the ground coffee (or other ground food) drops into stainless steel bowl.9. Store unused ground coffee in an airtight for container future use.10. Clean the coffee grinder
4

COFFEE TIPS
COFFEE MEASUREMENT CHART
TIME CHART FOR GRINDING COFFEE BEANS
Note: This coffee grinder grinds up to 11 tablespoons of whole coffee beans.
For smaller batches of beans use less grind time.
• Purchase coffee beans in small quantities.• For a good cup of coffee only grind the amount you need for immediate use, as ground coffee quickly loses its flavor and aroma.• Store coffee beans in an airtight container in the freezer to remain freshness.• Coffee beans do not need to thawed before grinding and/or brewing.• Follow the recommendations of your coffeemaker brand for brewing quantities. Adjustments should be made to suit your own personal taste.• Grind your coffee beans to a very fine grind or a coarse grind.
BEAN QUANTITY
Tablespoons/coffee scoops3 tbls. 1 1/2 scoops5 Ibis. 2 1/2 scoops6 tbls. 3 Scoops8 tbls. 4 scoops10 tbls. 5 scoops11 tbls. 5 1/2 scoops
=GROUND COFFEE
In tablespoons3 tbls.5 tbls.6 tbls.8 tbls.10 tbls.11 tbls.
=CUPS OF COFFEE
5 oz. cups2 cups4 cups6 cups8 cups10 cups12 cups
TYPE OF GRIND
Perc/Regular Grind Drip Grind Espresso Grind
LEVEL TABLESPOON
11116
GRIND TIME
9 s15 s12 to 15 s
5
=1
1 2 3

SERVICE AND MAINTENANCE
CLEANING
If your Müeller Electric Coffee Grinder requires service, please contact Müeller Customer Support:
You may also visit our website www.muellerdirect.comTo make it as fast and easy as possible, please have the Müeller Coffee Grinder model number and date of purchase available when you call. The model number is on the bottom of the Coffee Grinder.
We welcome your questions, comments or suggestions.In all of your communications, please include your completename, address and telephone number and a description ofthe problem.
Unplug your coffee grinder.DO NOT PLACE THIS COFFEE GRINDER IN WATER, DO NOT IMMERSE THE BLADES OR MOTOR BASE IN WATER.Remove the coffee grinder cover and wash in warm sudsy water. The cover is not dishwasher safe.Use a clean cloth or paper towel to remove any remaining grounds from the grinding bowl.Be sure to cIean your coffee grinder completely after each use.Do not try to oil or sharpen the blades. The blades are permanently lubricated and never need sharpening.
12
3
4
56
6
(888)-632-9981 [email protected]
Brewing Method Grind
Turkish Coffee Very fine grind
Electronic Espresso Machines Fine grind
Stovetop Espresso or Filter Medium grind
Plunger or Percolator Coarse grind

WARRANTY INFORMATIONMüeller USA warrants that for a period of 2 years from the date of purchase, this product will be free from defects inmaterial and workmanship, at its option.Müeller will repair or replace this product or any component of the product found to be defective during the warranty period.
Replacement will be made with a new or re manufactured product or component. If the product is no longer available, replacement may be made with a similar product of equal or greater value. This is your exclusive warranty.
Do NOT attempt to repair or adjust anyelectrical or mechanical functions on this product. Doing so will void this warranty.This warranty is valid for the original retail purchaser from the date of initial retail purchase and is not transferable. Keep the original sales receipt.Proof of purchase is required to obtain warranty service.
This warranty does not cover the damage occurred while: negligent use or misuse of the product, use on improper voltage or current, use contrary to the operating instructions, or disassembly, repair or alteration.
7


