12
Revision Date: June 24, 2010 Electronic Leave Management System (ELMS) EMPLOYEE USER GUIDE Prepared by: Human Resources

Revision Date: June 24, 2010
Electronic Leave Management System
(ELMS)
EMPLOYEE USER GUIDE
Prepared by: Human Resources

Page 2 of 12
INTRODUCTION ..........................................................................................................................3
GETTING STARTED ....................................................................................................................4
REVIEW MY LEAVE BALANCES AND ALLOTMENTS .............................................................5
ENTERING A REQUEST FOR LEAVE ........................................................................................6
ENTERING A REQUEST FOR “OTHER LEAVE WITH PAY” ....................................................7
ENTERING MULTIPLE REQUEST(S) FOR LEAVE ....................................................................8
CANCELLING A REQUEST FOR LEAVE (BOOKED) ................................................................9
CANCELLING A REQUEST FOR LEAVE (TAKEN) ................................................................. 10
REQUESTING A CARRY-OVER TO THE NEW YEAR ............................................................. 11
APPROVALS ............................................................................................................................. 12

Page 3 of 12
Introduction
Welcome to Okanagan College’s Electronic Leave Management System (ELMS). Human Resources has implemented this system to automate many of the paper-based aspects of the leave process. This guide will assist you with the new system and process.
The system is designed to benefit you by facilitating: Faster processing of leave requests
Paperless leave submission and processing
Paper-based leave requests no longer need to be forwarded to Human Resources o (with the exception of Compensatory Time Off (CTO) and Partial Leave without Pay
(LWOP) – forms for these leaves can be found in MyOkanagan-Forms under Leaves.
Accessible via any web browser 24/7
You will use this system to: Review your leave balance(s) and allotment(s)
Initiate a new leave request
Initiate a cancellation/change to an existing leave request
IMPORTANT
ELMS is an hours-based system, therefore, a typical full-time work day is based on 7 hours for full-time non-instructional employees and 6 hours for full-time instructional employees. Enter your leave on the basis of your actual scheduled daily hours. Prior to submitting your leave for approval, it is your responsibility to ensure that your leave requests adhere to your respective policy / collective agreement language and does not exceed your maximum allotment(s). If you have any questions, please contact your Human Resources Advisor:
Please refer to your appropriate collective agreement or policy for terms and conditions of employment for leave eligibility, electronic copies of the agreements/policies can be found on the Human Resources Policies/Agreement website (www.okanagan.bc.ca/hr).

Page 4 of 12
Getting Started
Step 1 - Request for Leaves are accessible via My Okanagan. To login enter your username and password as shown below:
Step 2 - Click the Employee tab
Step 3 - Click Leave Balances (located under OC Express – Administrative Functions)
Page 5 of 12
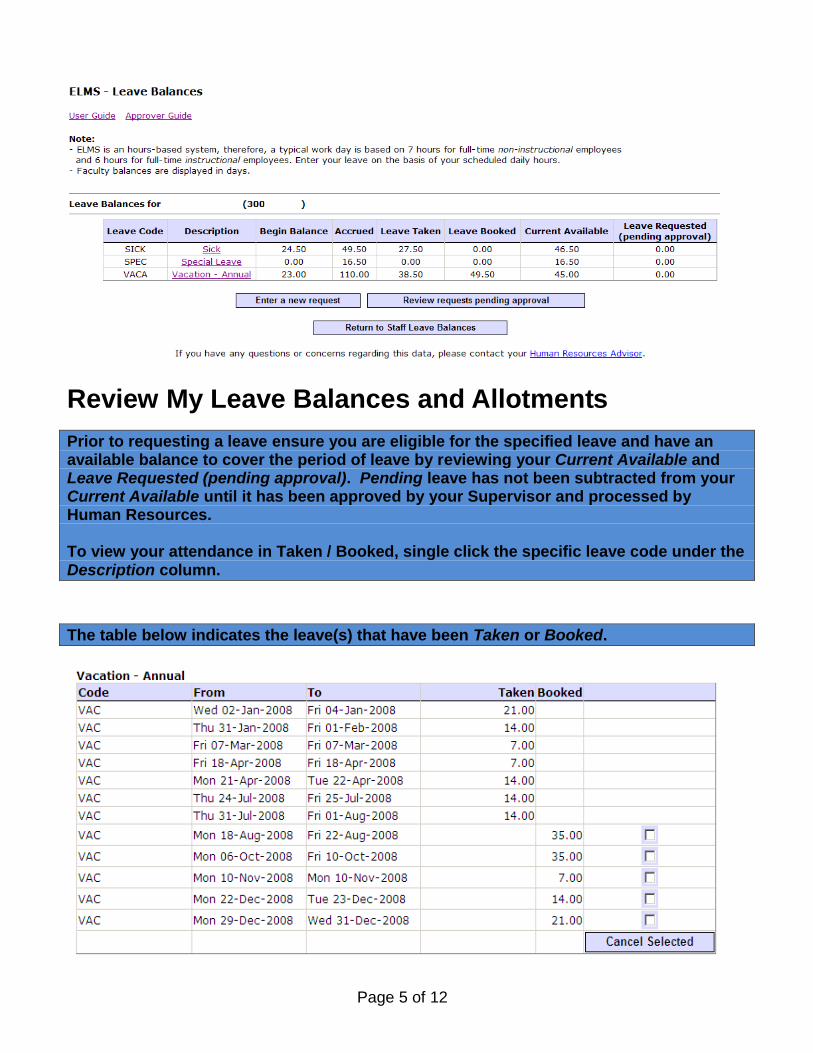
Review My Leave Balances and Allotments
Prior to requesting a leave ensure you are eligible for the specified leave and have an available balance to cover the period of leave by reviewing your Current Available and Leave Requested (pending approval). Pending leave has not been subtracted from your Current Available until it has been approved by your Supervisor and processed by Human Resources. To view your attendance in Taken / Booked, single click the specific leave code under the Description column.
The table below indicates the leave(s) that have been Taken or Booked.

Page 6 of 12
Entering a Request for Leave
Paper-based leave requests will no longer be processed by Human Resources with the exception of Compensatory Time Off (CTO) and Partial Leave without Pay (PLWOP). Human Resources has developed on-line forms for CTO and PLWOP to be forwarded via email to your respective Human Resources Advisor. Please consult your supervisor to determine how leaves will be processed in your area.
Step 1 – Click the Enter a new request button.
Step 2 – Select the Approver, Request Type, and the Start and End dates of your leave and then click the Send Request button.

Page 7 of 12
Entering a Request for “Other Leave with Pay”
Step 1 – Click the Enter a new request button.
Step 2 – Select the Approver, Request Type “Other Leave with Pay”, the Start and End dates of your leave and under Comments – add the reason for your leave and then click the Send Request button.
Other Leave with pay

Page 8 of 12
Entering Multiple Request(s) for Leave
Step 1 – Click the Enter a new request button.
Step 2 – Select the Approver, Request Type and the Start and End dates of your leave, then click the Add button to request additional leave(s). Click the Send Request button.

Page 9 of 12
Cancelling a Request for Leave (booked)
Step 1 – To cancel a leave that has been booked (but not taken), select the check box and click Cancel Selected.
Step 2 – A new request form appears with the dates selected for cancellation (in negative format). Select your approver and click the Send Request button.
Your approver receives your leave request via email notification. Any comments listed here will accompany this email.

Page 10 of 12
Cancelling a Request for Leave (taken)
Step 1 – To cancel a request for leave that has been taken, click the Enter a new request button.
Step 2 – Select the approver, request type, date to be cancelled (be sure to indicate the hours in negative format (as shown below) and click the Send Request button.
Be sure to indicate the hours in negative format

Page 11 of 12
Requesting a Carry-over to the New Year
Step 1 - Click the Enter a new request button.
Step 2 – Select the Approver, choose Vacation – Carry Over from the Request Type drop-down box. The system will correctly default to December 25th of the current year (do not change this date), adjust the Hours to reflect the number you are carrying over, and click the Send Request button.
December 25th is a system default
date (you cannot change this date). Enter the total number of “hours” to be carried over to the following year.

Page 12 of 12
Approvals
Once you complete
Once your approver has approved/denied your leave request, you will receive email notification


