50
Electronic Visit Verification ( EVV) EVV Portal Standard Reports and Search Tools A Job Aid for Program Providers and Financial Management Services Agencies (FMSAs) v2019_0912

Electronic Visit Verification (EVV)EVV Portal Standard Reports and Search Tools A Job Aid for Program Providers and Financial Management Services Agencies (FMSAs)
v2019_0912

ii v2019_0912
EVV Portal Standard Reports and Search Tools Job Aid for Program Providers and FMSAs
ContentsEVV Portal Standard Reports and Search Tools Job Aid 1
EVV Portal Standard Reports 2
Requesting EVV Portal Access: New TMHP Secure Portal Users 2Requesting EVV Portal Access: Existing TMHP Secure Portal Users 3Accessing the EVV Portal 4Accessing EVV Portal Standard Reports 5EVV Attendant History Report 6EVV Clock In/Clock Out Usage Report 9EVV Provider Report 13EVV Reason Code Usage and Free Text Report 16EVV Units of Service Summary Report 19EVV Usage Report 22EVV Visit Log Report 25
EVV Portal Search Tools 28
Accepted Visit Search Tab 28History/Rejected Visit Search Tab 35EVV Claim to Visit Search Tab 41

v2019_0912 1
EVV Portal Standard Reports and Search Tools Job Aid for Program Providers and FMSAs
EVV Portal Standard Reports and Search Tools Job Aid
The purpose of this job aid is to:
• Provide instructions for logging in to the EVV Portal
• Define the following EVV Portal standard reports program providers and Financial Management Services Agencies (FMSAs) can access in the EVV Portal:
○ EVV Attendant History Report
○ EVV Clock In/Clock Out Usage Report
○ EVV Provider Report
○ EVV Reason Code Usage and Free Text Report
○ EVV Unit of Summary Report
○ EVV Usage Report
○ EVV Visit Log Report
• Explain how to access the EVV Portal standard reports, and use the report criteria to run reports
• Describe EVV Portal search tools and explain how to use search criteria to run Accepted Visit searches, History/Rejected Visit searches, and EVV Claim to Visit searches
Note: All reports located in the EVV Portal will only show EVV visit transactions with dates of service on or after September 1, 2019.

2 v2019_0912
EVV Portal Standard Reports and Search Tools Job Aid for Program Providers and FMSAs
EVV Portal Standard Reports
Requesting EVV Portal Access: New TMHP Secure Portal Users
Providers who would like to access the secure functions of TMHP com must activate their Provider Account for online use and associate it to a TMHP User Account The TMHP User Account used during activation will receive administrator rights to that Provider Account
1) Go to www tmhp com and click providers at the top of the page
2) Click I would like to…
3) Click Activate my account

v2019_0912 3
EVV Portal Standard Reports and Search Tools Job Aid for Program Providers and FMSAs
4) Select your provider type (Acute Care, Long Term Care, Nursing Facility/Waiver Program, LTSS or similar provider), then click Next Complete all required steps to create a TMHP User Account
a) Long-term Services and Supports (LTSS) program providers who do not have a Texas Provider Identifier (TPI), but are enrolled directly with managed care organizations (MCOs) must click Create Account and link to an LTSS or similar provider for access to the EVV Portal
Use the TMHP Portal Security Provider Training Manual for detailed instructions on account activation, creating and managing TMHP user accounts and permissions, and requesting forgotten user names and resetting passwords
Requesting EVV Portal Access: Existing TMHP Secure Portal Users
TMHP secure portal users must contact their TMHP Provider Administrator to request EVV Portal access The Provider Administrator will:
1) Click Modify Permissions in the Manage Provider Accounts section of My Account
2) Select the applicable provider identifier

4 v2019_0912
EVV Portal Standard Reports and Search Tools Job Aid for Program Providers and FMSAs
3) Click the box in the EVV Portal Provider Profile column to assign EVV Portal access
Accessing the EVV Portal
To access the EVV Portal, use the Texas Medicaid & Healthcare Partnership (TMHP) secure online portal
1) Go to www tmhp com and click providers at the top of the page
2) Click Log in to My Account at the top of the page
3) Click EVV Search to go to the EVV Portal Search tabs, or click EVV Reports to go to the EVV Portal standard reports page

v2019_0912 5
EVV Portal Standard Reports and Search Tools Job Aid for Program Providers and FMSAs
Accessing EVV Portal Standard Reports
1) On the EVV Portal home page, click the Reports link
2) Use the Report Name drop-down list to click on a report name The Report Criteria section displays and is available for report criteria to be entered

6 v2019_0912
EVV Portal Standard Reports and Search Tools Job Aid for Program Providers and FMSAs
EVV Attendant History Report
The EVV Attendant History Report is used to review attendant history
1) To access the EVV Attendant History Report, choose EVV Attendant History Report from the Report Name drop-down list
2) To obtain report results, you must:
a) Select a National Provider Identifier (NPI)/Atypical Provider Identifier (API) from the NPI/API drop-down list;
And
b) Enter the Visit Date Range Begin Date and End Date
i) Enter the Begin Date and End Date manually, or use the calendar icon The date must be in the MM/DD/YYYY format
ii) The Visit Date Range cannot be greater than 180 days The Begin Date and the End Date must both be entered The end date must be the same as, or after the begin date

v2019_0912 7
EVV Portal Standard Reports and Search Tools Job Aid for Program Providers and FMSAs
3) Additional fields are optional and can be used to narrow report results Additional fields are:
a) Provider Number
b) TIN
c) Medicaid ID
d) Payer Name
e) Vendor Name
f) Texas EVV Attendant ID
Note: These optional fields can be used to narrow report results.
4) Select PDF or Excel from the Export Format drop-down list
5) Click one of the Create Report buttons to run the report, or click one of the Clear buttons to enter new report criteria
Note: In cases where more than 65,000 results are returned, an error message will appear. Narrow search criteria to return fewer results.
6) The EVV Attendant History Report will appear in the report format selected; either Microsoft Excel® or Adobe® PDF Once the report has run, a message will appear Click Open to view the report, Save to save the report to your computer, or Cancel to close the message The report can be printed using the print options in either Microsoft Excel or the Adobe program that displays the report

8 v2019_0912
EVV Portal Standard Reports and Search Tools Job Aid for Program Providers and FMSAs
v2019_0912 9
EVV Portal Standard Reports and Search Tools Job Aid for Program Providers and FMSAs
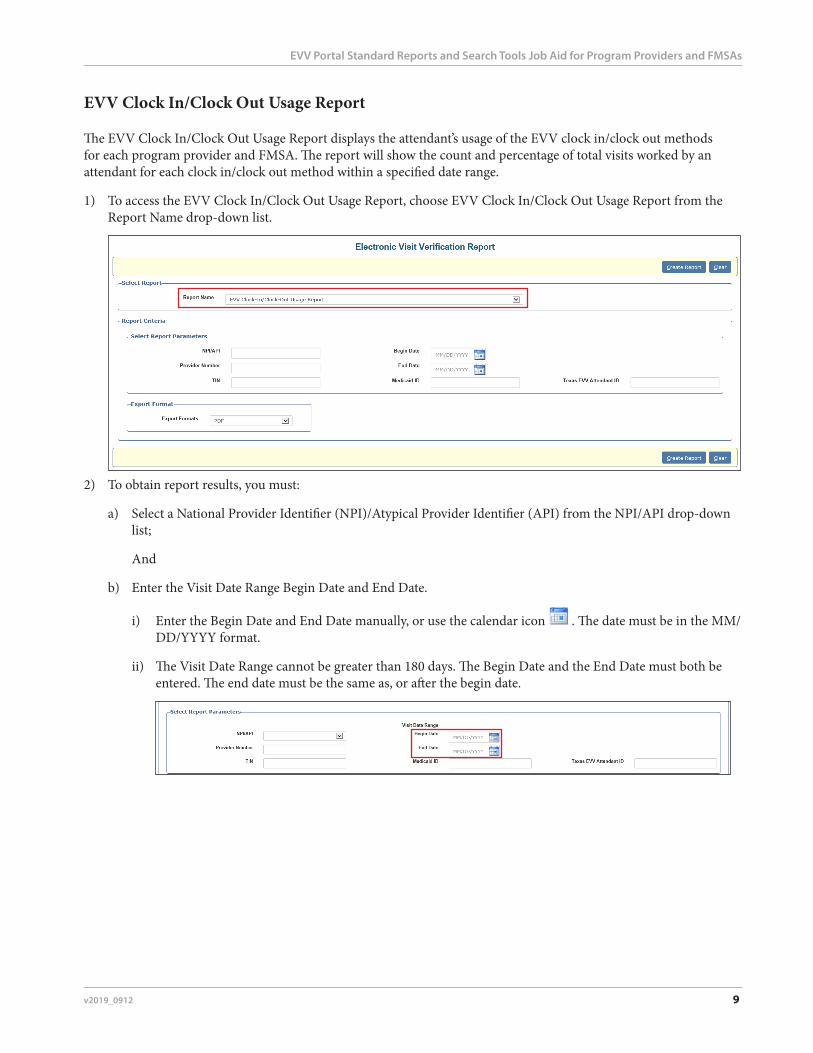
EVV Clock In/Clock Out Usage Report
The EVV Clock In/Clock Out Usage Report displays the attendant’s usage of the EVV clock in/clock out methods for each program provider and FMSA The report will show the count and percentage of total visits worked by an attendant for each clock in/clock out method within a specified date range
1) To access the EVV Clock In/Clock Out Usage Report, choose EVV Clock In/Clock Out Usage Report from the Report Name drop-down list
2) To obtain report results, you must:
a) Select a National Provider Identifier (NPI)/Atypical Provider Identifier (API) from the NPI/API drop-down list;
And
b) Enter the Visit Date Range Begin Date and End Date
i) Enter the Begin Date and End Date manually, or use the calendar icon The date must be in the MM/DD/YYYY format
ii) The Visit Date Range cannot be greater than 180 days The Begin Date and the End Date must both be entered The end date must be the same as, or after the begin date

10 v2019_0912
EVV Portal Standard Reports and Search Tools Job Aid for Program Providers and FMSAs
3) To obtain report results, you must also enter:
a) An Attendant ID in the Texas EVV Attendant ID field;
Or
b) A Medicaid ID in the Medicaid ID field
4) Additional fields are optional and can be used to narrow report results Additional fields are:
a) Provider Number
b) TIN
Note: These optional fields can be used to narrow report results.
5) Select PDF or Excel from the Export Format drop-down list
6) Click one of the Create Report buttons to run the report, or click one of the Clear buttons to enter new report criteria
Note: In cases where more than 65,000 results are returned, an error message will appear. Narrow the date range or select additional search criteria to return fewer results.

v2019_0912 11
EVV Portal Standard Reports and Search Tools Job Aid for Program Providers and FMSAs
7) The EVV Clock In/Clock Out Usage Report will appear in the report format selected; either Microsoft Excel or Adobe PDF Once the report has run, a message will appear Click Open to view the report, Save to save the report to your computer, or Cancel to close the message The report can be printed using the print options in either Microsoft Excel or the Adobe program that displays the report

12 v2019_0912
EVV Portal Standard Reports and Search Tools Job Aid for Program Providers and FMSAs

v2019_0912 13
EVV Portal Standard Reports and Search Tools Job Aid for Program Providers and FMSAs
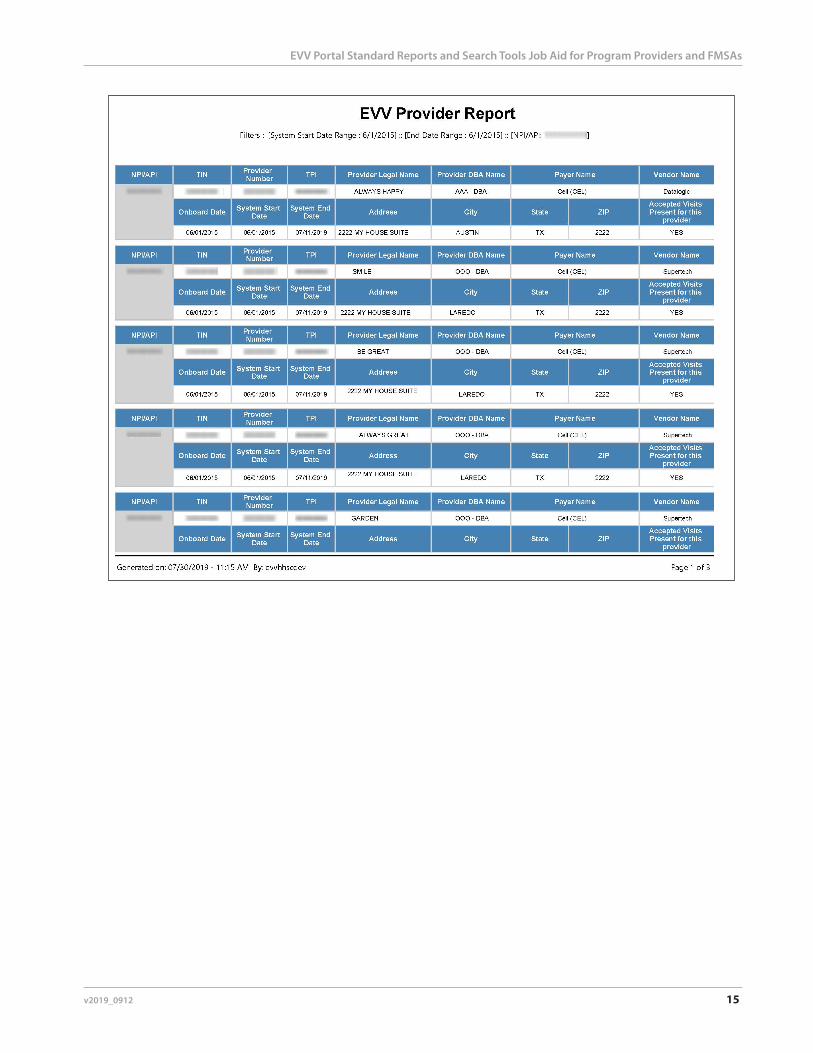
EVV Provider Report
The EVV Provider Report shows contract or enrollment data used to setup the program provider or FMSA in the EVV system Additionally, this report shows the:
• Onboarding date (the date EVV system training is completed),
• Start date (the date EVV services begin), and
• End date (the date EVV services end) with each vendor
Information will come from the EVV system
1) To access the EVV Provider Report, choose EVV Provider Report from the Report Name drop-down list
2) To obtain report results, you must:
a) Select an NPI or API from the drop-down list in the NPI/API field;
And
b) Enter the System Start Date Range and End Date Range
i) Enter the System Start Date and End Date manually, or use the calendar icon The date must be in the MM/DD/YYYY format
ii) The System Date Range cannot be greater than 180 days The Start Date and the End Date must both be entered The end date must be the same as, or after the begin date

14 v2019_0912
EVV Portal Standard Reports and Search Tools Job Aid for Program Providers and FMSAs
3) The following fields are optional:
a) Provider Number
b) TIN
c) Payer Name
d) Vendor Name
Note: These optional fields can be used to narrow report results.
4) Select PDF or Excel from the Export Format drop-down list
5) Click one of the Create Report buttons to run the report, or click one of the Clear buttons to enter new report criteria
Note: In cases where more than 65,000 results are returned, an error message will appear. Narrow the date range or select additional search criteria to return fewer results.
6) The EVV Provider Report will appear in the report format selected; either Microsoft Excel or Adobe PDF Once the report has run, a message will appear Click Open to view the report, Save to save the report to your computer, or Cancel to close the message The report can be printed using the print options in either Microsoft Excel or the Adobe program that displays the report
v2019_0912 15
EVV Portal Standard Reports and Search Tools Job Aid for Program Providers and FMSAs

16 v2019_0912
EVV Portal Standard Reports and Search Tools Job Aid for Program Providers and FMSAs
EVV Reason Code Usage and Free Text Report
The EVV Reason Code Usage and Free Text Report shows the reason code used on accepted EVV visit transactions during the month selected, the count of each reason code used in the month selected, and any free text saved on an accepted EVV visit transaction for the month selected
The reason code usage is always in transition based on the processing between the EVV system and the EVV Aggregator There may be EVV visit transactions in the EVV system that are pending export to the EVV Aggregator Once all EVV visit transactions are successfully exported to the EVV Aggregator, the reason code count will be updated
1) To access the EVV Reason Code Usage and Free Text Report, choose EVV Reason Code Usage and Free Text Report from the Report Name drop-down list
2) To obtain report result, you must select:
a) A year from the Year drop-down list;
And
b) A month from the Monthly Range drop-down list;
And
c) An NPI or API from the drop-down list in the NPI/API field

v2019_0912 17
EVV Portal Standard Reports and Search Tools Job Aid for Program Providers and FMSAs
3) The following fields are optional:
a) Provider Number
b) TIN
c) Medicaid ID
d) Payer Name
e) Vendor Name
Note: These optional fields can be used to narrow report results.
4) Select PDF or Excel from the Export Format drop-down list
5) Click one of the Create Report buttons to run the report, or click one of the Clear buttons to enter new report criteria
Note: In cases where more than 65,000 results are returned, an error message will appear. Narrow the date range or select additional search criteria to return fewer results.
6) The EVV Reason Code Usage and Free Text Report will appear in the report format selected; either Microsoft Excel or Adobe PDF Once the report has run, a message will appear Click Open to view the report, Save to save the report to your computer, or Cancel to close the message The report can be printed using the print options in either Microsoft Excel or the Adobe program that displays the report

18 v2019_0912
EVV Portal Standard Reports and Search Tools Job Aid for Program Providers and FMSAs

v2019_0912 19
EVV Portal Standard Reports and Search Tools Job Aid for Program Providers and FMSAs
EVV Units of Service Summary Report
The EVV Units of Service Summary Report shows the daily, weekly, and monthly totals of service units delivery for a specific Medicaid ID The report also helps identify breaks in services for that Medicaid ID EVV Portal users will need a provider number (also known as a contract number) to access report results
1) To access the EVV Units of Service Summary Report, choose EVV Units of Service Summary Report from the Report Name drop-down list
2) To obtain report results, you must:
a) Select an NPI or API from the drop-down list in the NPI/API field;
And
b) Enter a provider number in the Provider Number field
3) To obtain report results, you must also enter:
a) A Medicaid ID of the member in the Medicaid ID field;
And
b) The Visit Date Range Begin Date and End Date
i) Enter the Begin Date and End Date manually, or use the calendar icon The date must be in the MM/DD/YYYY format
ii) The Visit Date Range cannot be greater than 180 days The Begin Date and the End Date must both be entered The end date must be the same as, or after the begin date

20 v2019_0912
EVV Portal Standard Reports and Search Tools Job Aid for Program Providers and FMSAs
4) The Export Format is only available in an Adobe PDF format The field will be pre-populated with PDF No action is needed The report will be displayed in PDF format only
5) Click one of the Create Report buttons to run the report, or click one of the Clear buttons to enter new report criteria
Note: In cases where more than 65,000 results are returned, an error message will appear. Narrow the date range or select additional search criteria to return fewer results.
6) The EVV Units of Service Summary Report will appear in the Adobe PDF format Once the report has run, a message will appear Click Open to view the report, Save to save the report to your computer, or Cancel to close the message The report can be printed using the print options in the Adobe program that displays the report

v2019_0912 21
EVV Portal Standard Reports and Search Tools Job Aid for Program Providers and FMSAs

22 v2019_0912
EVV Portal Standard Reports and Search Tools Job Aid for Program Providers and FMSAs
EVV Usage Report
The EVV Usage Report displays the EVV provider Usage Score for the selected quarter The EVV Usage Score is a weighted score of manual EVV visit transactions and rejected EVV visit transactions This report will allow EVV Portal users to monitor the number of manually-entered EVV visit transactions and the number of rejected EVV visit transactions The report will also be used by payers when conducting the EVV Usage Review
1) To access the EVV Usage Report, choose EVV Usage Report from the Report Name drop-down list
2) To obtain report results, you must select:
a) An NPI or API from the drop-down list in the NPI/API field;
And
b) A fiscal year from the Fiscal Year drop-down list
i) The fiscal year for the State of Texas runs from September 1 to August 31 Keep in mind that the calendar year is different from the fiscal year
3) For example, to pull a report for September-November 2019, select 2020 as the fiscal year
And
a) A quarterly range of months from the Quarterly Range drop-down list

v2019_0912 23
EVV Portal Standard Reports and Search Tools Job Aid for Program Providers and FMSAs
4) The following search criteria fields are optional:
a) Provider Number
b) TIN
c) Payer Name
d) Vendor Name
Note: These optional fields can be used to narrow report results.
5) Select PDF or Excel from the Export Format drop-down list
6) Click one of the Create Report buttons to run the report, or click one of the Clear buttons to enter new report criteria
Note: In cases where more than 65,000 results are returned, an error message will appear. Narrow the date range or select additional search criteria to return fewer results.
7) The EVV Usage Report will appear in the report format selected; either Microsoft Excel or Adobe PDF Once the report has run, a message will appear Click Open to view the report, Save to save the report to your computer, or Cancel to close the message The report can be printed using the print options in either Microsoft Excel or the Adobe program that displays the report

24 v2019_0912
EVV Portal Standard Reports and Search Tools Job Aid for Program Providers and FMSAs

v2019_0912 25
EVV Portal Standard Reports and Search Tools Job Aid for Program Providers and FMSAs
EVV Visit Log Report
The EVV Visit Log Report displays EVV visit data sent to the EVV Aggregator, including, but not limited to, all EVV visit transactions accepted into the EVV Aggregator for the report visit date range selected and the planned visit schedule date and time, if applicable
1) To access the EVV Visit Log Report, choose EVV Visit Log Report from the Report Name drop-down list
2) To obtain report results, you must:
a) Select an NPI or API from the drop-down list in the NPI/API field;
And
b) Enter the visit date range Begin Date and End Date
i) Enter the Begin Date and End Date manually, or use the calendar icon The date must be in the MM/DD/YYYY format
ii) The visit date range cannot be greater than 180 days The Begin Date and the End Date must both be entered The end date must be the same as, or after the begin date

26 v2019_0912
EVV Portal Standard Reports and Search Tools Job Aid for Program Providers and FMSAs
3) The following fields are optional:
a) Provider Number
b) TIN
c) Medicaid ID
d) Payer Name
e) Vendor Name
f) Texas EVV Attendant ID
Note: These optional fields can be used to narrow report results.
4) Select PDF or Excel from the Export Format drop-down list
5) Click one of the Create Report buttons to run the report, or click one of the Clear buttons to clear Report Criteria fields and enter new report criteria
Note: In cases where more than 65,000 results are returned, an error message will appear. Narrow the date range or select additional search criteria to return fewer results.
6) The EVV Visit Log Report will appear in the format selected; either Microsoft Excel or Adobe PDF Once the report has run, a message will appear Click Open to view the report, Save to save the report to your computer, or Cancel to close the message The report can be printed using the print options in either Microsoft Excel or the Adobe program that displays the report

v2019_0912 27
EVV Portal Standard Reports and Search Tools Job Aid for Program Providers and FMSAs

28 v2019_0912
EVV Portal Standard Reports and Search Tools Job Aid for Program Providers and FMSAs
EVV Portal Search ToolsEVV Portal users can perform searches for EVV visit transactions and claims matching data in the EVV Portal An EVV claim match result code is used to indicate if an EVV claim line item matched, or did not match an accepted EVV visit transaction These search results can be printed or exported into Microsoft Excel
Accepted Visit Search Tab
The Accepted Visit Search tab displays the most current accepted EVV visit transactions, including those that have been resubmitted, within a specific date range The Accepted Visit Search tab is used to confirm that an EVV visit transaction has been accepted by the EVV Aggregator before submitting the associated EVV claim
To perform an Accepted Visit Search, different combinations of data can be entered to return results
1) To obtain search results, enter:
a) The Visit ID from the EVV system in the Visit ID field This is the only search criteria that may be used without a Visit Date Range;
Or
b) The Visit Date Range Begin Date and End Date

v2019_0912 29
EVV Portal Standard Reports and Search Tools Job Aid for Program Providers and FMSAs
i) Enter the Begin Date and End Date manually, or use the calendar icon The date must be in the MM/DD/YYYY format
ii) The Visit Date Range cannot be greater than 90 days The Visit Date Range Begin Date and the End Date must both be entered The end date must be the same as, or after the begin date
iii) An error message will appear listing any errors on the current section
2) To obtain search results, you must also enter:
a) An NPI or API in the NPI/API field

30 v2019_0912
EVV Portal Standard Reports and Search Tools Job Aid for Program Providers and FMSAs
3) The following search criteria fields are optional:
a) Provider Number
b) TIN
c) Medicaid ID
d) Member Last Name
e) Payer Name
f) Service Group
g) Service Code
h) HCPCS Code
i) Modifiers
j) Vendor Name

v2019_0912 31
EVV Portal Standard Reports and Search Tools Job Aid for Program Providers and FMSAs
Note: These optional fields can be used to narrow search results.
4) Click one of the Search buttons to run the search, or click one of the Clear buttons to enter new search criteria A list of results is shown at the bottom of the screen
5) Search results appear in the Accepted Visit Search Result section
Note: If only one search result is produced, the result will be listed in the Search Result section.
If no search results are produced, a message will appear in the Accepted Visit Search Results

32 v2019_0912
EVV Portal Standard Reports and Search Tools Job Aid for Program Providers and FMSAs
6) Click the Export Data To Excel link to open search results in a Microsoft Excel spreadsheet Only the first 10,000 search results will be exported to Microsoft Excel If you want all search results to be exported to Microsoft Excel, change search criteria to reduce the number of search results
7) Use the Previous and Next buttons to navigate through the search results when they appear on more than one page
8) Click the Visit ID link on the search result to view EVV Visit Details

v2019_0912 33
EVV Portal Standard Reports and Search Tools Job Aid for Program Providers and FMSAs
9) Click one of the Print buttons to print the EVV visit details, or the Return To Search Results buttons to close the window

34 v2019_0912
EVV Portal Standard Reports and Search Tools Job Aid for Program Providers and FMSAs
10) Click one of the Clear buttons to enter new search criteria, or click a different search tab to start a new search

v2019_0912 35
EVV Portal Standard Reports and Search Tools Job Aid for Program Providers and FMSAs
History/Rejected Visit Search Tab
The History/Rejected Visit Search tab displays all changes made to both accepted and rejected EVV visit transactions performed through visit maintenance EVV visit transactions with rejection codes also display in the search results
To perform a History/Rejected Visit Search, click the History/Rejected Visit Search tab Different combinations of data can be entered to return results
1) To obtain search results, enter:
a) The Visit ID in the Visit ID field;
Or
b) The Visit Date Range Begin Date and Visit Date Range End Date
i) Enter the Begin Date and End Date manually, or use the calendar icon The date must be in the MM/DD/YYYY format
ii) The Visit Date Range cannot be greater than 90 days The Visit Date Range Begin Date and the Visit Date Range End Date must both be entered The end date must be the same as, or after the begin date
iii) An error message will appear listing any errors on the current section

36 v2019_0912
EVV Portal Standard Reports and Search Tools Job Aid for Program Providers and FMSAs
2) To obtain search results, you must also select:
a) An NPI or API from the drop-down list in the NPI/API field
3) The following search criteria fields are optional:
a) Visit Indicator
b) Visit Status
c) Medicaid ID
d) Member Last Name
e) Payer Name
f) Provider Number
g) TIN
h) Vendor Name
Note: These optional fields can be used to narrow search results.

v2019_0912 37
EVV Portal Standard Reports and Search Tools Job Aid for Program Providers and FMSAs
4) Click one of the Search buttons to run the search, or click one of the Clear buttons to enter new search criteria A list of results is shown at the bottom of the screen
5) Search results appear in the History/Rejected Visit Search Result section
Note: If only one search result is produced, the result will be listed in the Search Result section.
If no search results are produced, a message will appear in the History/Rejected Visit Search Results

38 v2019_0912
EVV Portal Standard Reports and Search Tools Job Aid for Program Providers and FMSAs
6) Click the Export Data To Excel link to open search results in a Microsoft Excel spreadsheet Only the first 10,000 search results will be exported to Microsoft Excel If you want all search results to be exported to Microsoft Excel, change search criteria to reduce the number of search results
7) Use the Previous and Next buttons to navigate through the search results when they appear on more than one page
8) Click the Visit ID link on the search result to view History/Rejected Visit Search Details

v2019_0912 39
EVV Portal Standard Reports and Search Tools Job Aid for Program Providers and FMSAs
9) Click the Print button to print the History/Rejected Visit Search details, or the Return To Search Results button to close the window

40 v2019_0912
EVV Portal Standard Reports and Search Tools Job Aid for Program Providers and FMSAs
10) Click one of the Clear buttons to enter new search criteria, or click a different search tab to start a new search

v2019_0912 41
EVV Portal Standard Reports and Search Tools Job Aid for Program Providers and FMSAs
EVV Claim to Visit Search Tab
The EVV Claim to Visit Search tab displays match results for an EVV claim submitted to TMHP and all of its associated EVV visit transactions
To perform an EVV Claim to Visit search, click the EVV Claim to Visit Search tab Different combinations of data can be entered to return results
1) To obtain search results, you must enter the:
a) Claim Identifier Number or Internal Control Number (ICN) in the Claim Identifier/ICN field;
Or
b) Match Date Range Begin Date and Match Date Range End Date;
i) Enter the Begin Date and End Date manually, or use the calendar icon The date must be in the MM/DD/YYYY format
ii) The Match Date Range cannot be greater than 90 days The Match Date Range Begin Date and the Match Date Range End Date must both be entered The end date must be the same as, or after the begin date

42 v2019_0912
EVV Portal Standard Reports and Search Tools Job Aid for Program Providers and FMSAs
Note: The Match Date Range is required when the Visit Date Range is blank.
2) To obtain search results, you must also enter the:
a) Visit ID in the Visit ID field;
Or
b) Visit Date Range Begin Date and Visit Date Range End Date;
i) Enter the Begin Date and End Date manually, or use the calendar icon The date must be in the MM/DD/YYYY format
ii) The Visit Date Range cannot be greater than 90 days The Visit Date Range Begin Date and the Visit Date Range End Date must both be entered The end date must be the same as, or after the begin date
Note: The Visit Date Range is required when the Match Date Range is blank.
iii) An error message will appear if the visit date range entered is greater than 90 days If the required search criteria is not entered, an error message will appear
And

v2019_0912 43
EVV Portal Standard Reports and Search Tools Job Aid for Program Providers and FMSAs
c) An NPI or API from the drop-down list in the NPI/API field
3) The following search criteria fields are optional:
a) Claim Date of Service
b) Medicaid ID
c) Member Last Name
d) Provider Number
e) TIN
f) Visit ID
g) Payer Name
h) Vendor Name

44 v2019_0912
EVV Portal Standard Reports and Search Tools Job Aid for Program Providers and FMSAs
These optional fields can be used to narrow search results
4) Click one of the Search buttons to run the search, or click one of the Clear buttons to enter new search criteria A list of results is shown at the bottom of the screen
5) Search results appear in the EVV Claim to Visit Search Result section
Note: If only one search result is produced, the result will be listed in the Search Result section.
If no search results are produced, a message will appear in the Claims To Visit Search Results

v2019_0912 45
EVV Portal Standard Reports and Search Tools Job Aid for Program Providers and FMSAs
6) Click the Export Data To Excel link to open search results in a Microsoft Excel spreadsheet Only the first 10,000 search results will be exported to Microsoft Excel If you want all search results to be exported to Microsoft Excel, change search criteria to reduce the number of search results
7) Use the Previous and Next buttons to navigate through the search results when they appear on more than one page
8) Click the Visit ID link on the search result to view EVV Claim to Visit Search Details

46 v2019_0912
EVV Portal Standard Reports and Search Tools Job Aid for Program Providers and FMSAs
9) Click the Print button to print the EVV Claim to Visit Search details, or the Return To Search Results button to close the window

v2019_0912 47
EVV Portal Standard Reports and Search Tools Job Aid for Program Providers and FMSAs
10) Click one of the Clear buttons to enter new search criteria, or click a different search tab to start a new search

This document is produced by TMHP Training Services Contents are current as of the time of publishing and are subject to change Providers should always refer to the TMHP website for current and authoritative information


