EMC believes the information in this publication is accurate as of its publication date. The information is subject to change without notice.
THE INFORMATION IN THIS PUBLICATION IS PROVIDED “AS IS.” EMC CORPORATION MAKES NO REPRESENTATIONS OR WARRANTIES OF ANY KIND WITH RESPECT TO THE INFORMATION IN THIS PUBLICATION, AND SPECIFICALLY DISCLAIMS IMPLIED WARRANTIES OF MERCHANTABILITY OR FITNESS FOR A PARTICULAR PURPOSE.
Use, copying, and distribution of any EMC software described in this publication requires an applicable software license.
For the most up-to-date listing of EMC product names, see EMC Corporation Trademarks on EMC.com.
All other trademarks used herein are the property of their respective owners.
Contents
Preface
Part 1 Concepts and Procedures
Chapter 1 Introduction to the TimeFinder CLI Introduction to TimeFinder .................................................................................... 18
Understanding copy session limits ................................................................ 26Fully copying to a clone................................................................................... 26Creating a session in nocopy mode ............................................................... 26Starting to copy data before activating the session ..................................... 27Copying only changed data to a clone .......................................................... 27Copying from a source device to a larger target device ............................. 28Using the establish command......................................................................... 29Pairing an additional target device with each source device in a group . 29Performing operations on devices in a clone target list.............................. 29
Activating a clone copy session ............................................................................. 31Precopying data before activating the session ............................................. 31Making the target device not ready to the host ........................................... 31Activating copy sessions consistently ........................................................... 31Activating a clone session for an additional pair in a group ..................... 33
Modifying a clone copy session ............................................................................. 34 Recreating a clone copy device .............................................................................. 35
Starting to copy data before activating the session ..................................... 35Using the establish command......................................................................... 35Recreating a clone session for each pair in a group..................................... 36
Restoring data from a target device ...................................................................... 37 Splitting a clone device pair ................................................................................... 38 Terminating a clone copy session .......................................................................... 39 Querying clone pairs ............................................................................................... 40
Using the -summary option ............................................................................ 40
EMC Solutions Enabler Symmetrix TimeFinder Family CLI Version 7.2 Product Guide 3
Contents
Verifying clone pair states....................................................................................... 41 Using a clone from a clone target (both sessions are cascaded clone) ............. 43
Restore to Target ............................................................................................... 43Configuration Rules ......................................................................................... 43
Using a BCV as the clone source............................................................................ 45Pair states ruling clone operations................................................................. 45Example: Creating a clone from a source device ......................................... 46
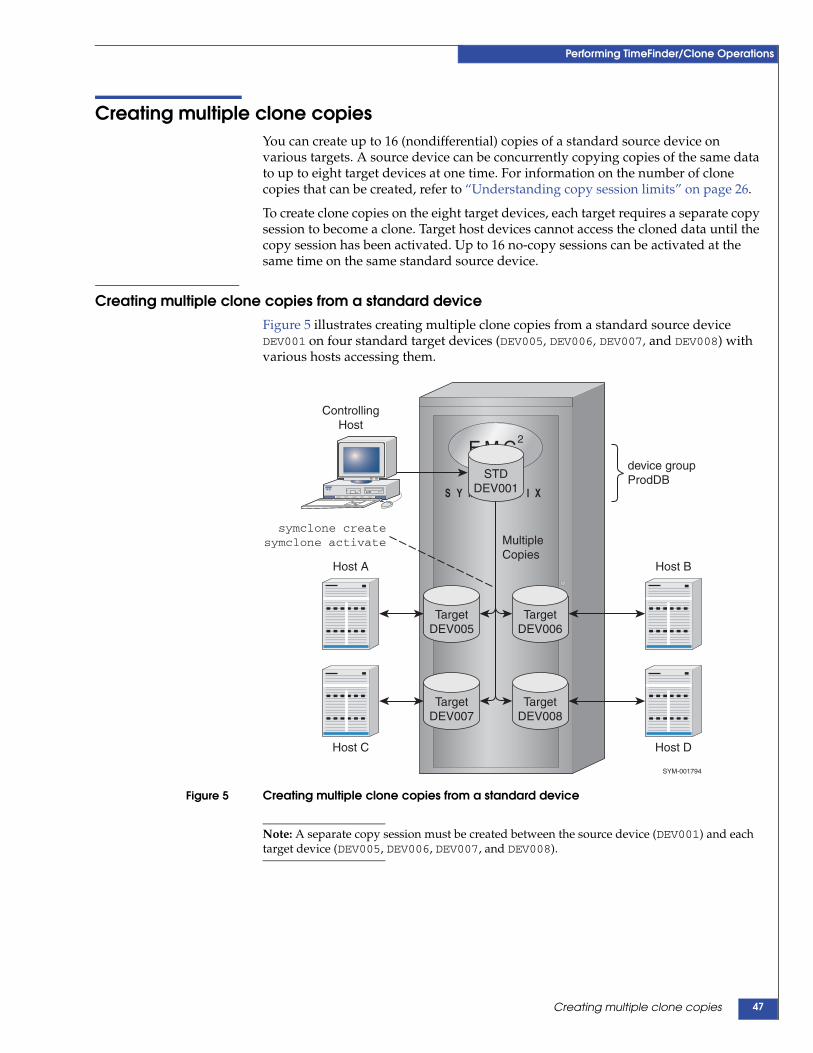
Creating multiple clone copies............................................................................... 47Creating multiple clone copies from a standard device ............................. 47
Cloning a copy on a remote Symmetrix array..................................................... 48Cloning a local R1 standard device................................................................ 48Cloning a copy of a local BCV device on a remote Symmetrix array ....... 49Cloning a copy on a hop-2 Symmetrix array................................................ 50
Cloning copies of the same data locally and remotely....................................... 51 Cloning multiple copies locally and remotely..................................................... 53 Cloning a copy at the tertiary site of a cascaded SRDF configuration ............. 55 Using composite groups to manage clone pairs across Symmetrix arrays ..... 57 Command options with device groups ................................................................ 59 Command options with composite groups.......................................................... 61 Command options with device files ..................................................................... 63
Understanding copy session limits................................................................ 67Multivirtual snaps ............................................................................................ 67Specifying a SAVE device pool ...................................................................... 68Monitoring SAVE device usage ..................................................................... 68Pairing an additional target device with each source device in a group . 69Copying a virtual device to another virtual device (duplicate snap) ....... 69
Activating a virtual copy session........................................................................... 70Making the target device not ready to the host ........................................... 70Activating copy sessions consistently ........................................................... 70Activating an additional copy session for each device pair in a group.... 71Activating a duplicate snap session............................................................... 72
Recreating a virtual copy session .......................................................................... 73 Restoring data from virtual devices ...................................................................... 74
Persistent restore............................................................................................... 74Incrementally restoring to a source ............................................................... 74Incrementally restoring to a BCV................................................................... 75Fully restoring to anywhere............................................................................ 77
Terminating a virtual copy session........................................................................ 78Terminating a duplicate snap session ........................................................... 78
Querying snap pairs ................................................................................................ 79Using the -summary option ............................................................................ 79
Verifying snap pair states........................................................................................ 80 Using a BCV as the snap source............................................................................. 82
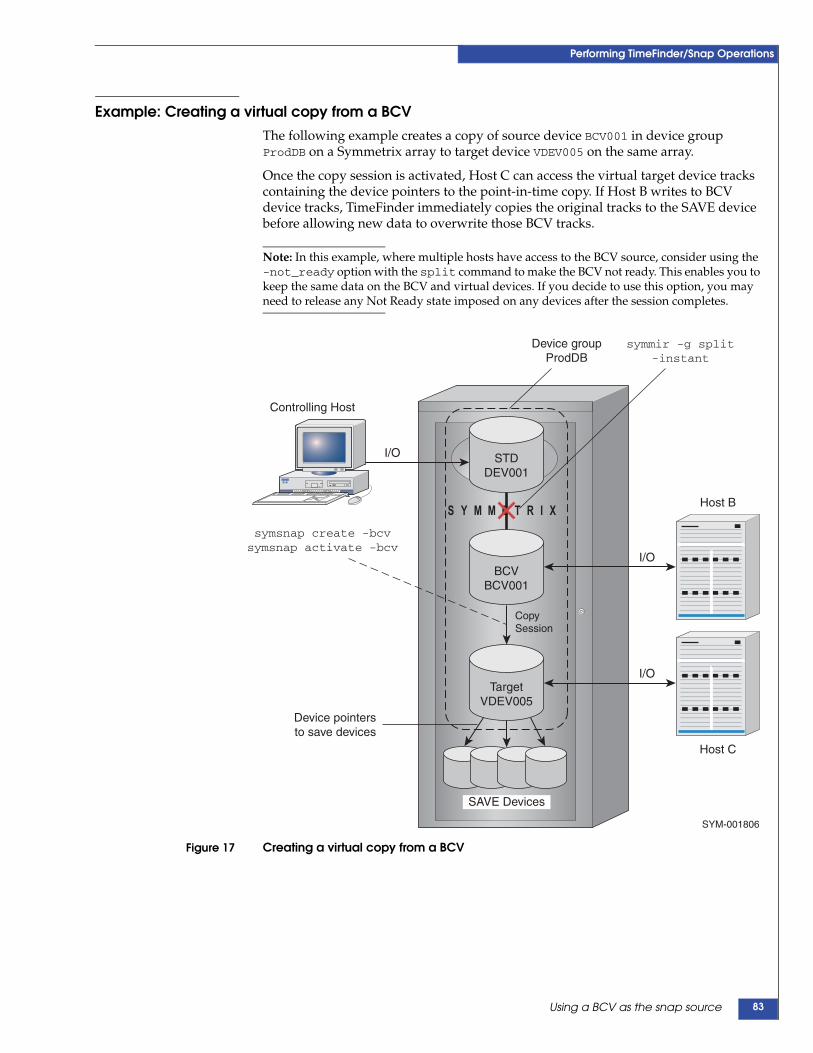
Pair states ruling snap operations.................................................................. 82Example: Creating a virtual copy from a BCV............................................. 83
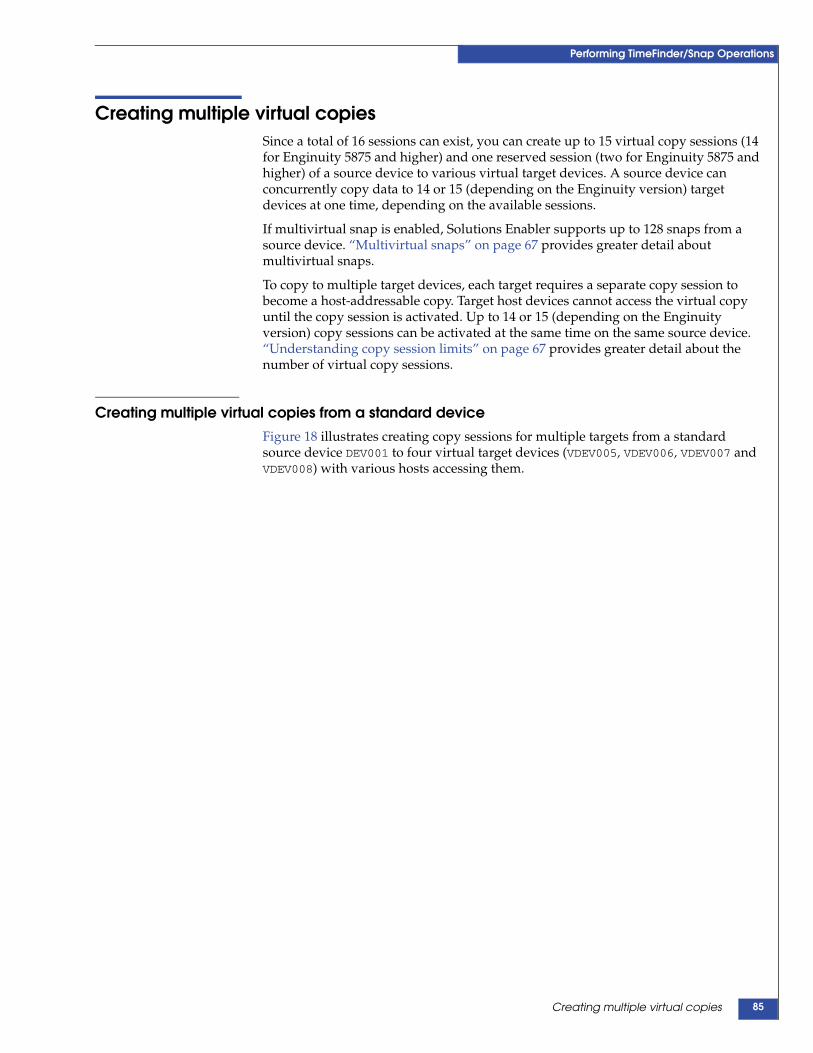
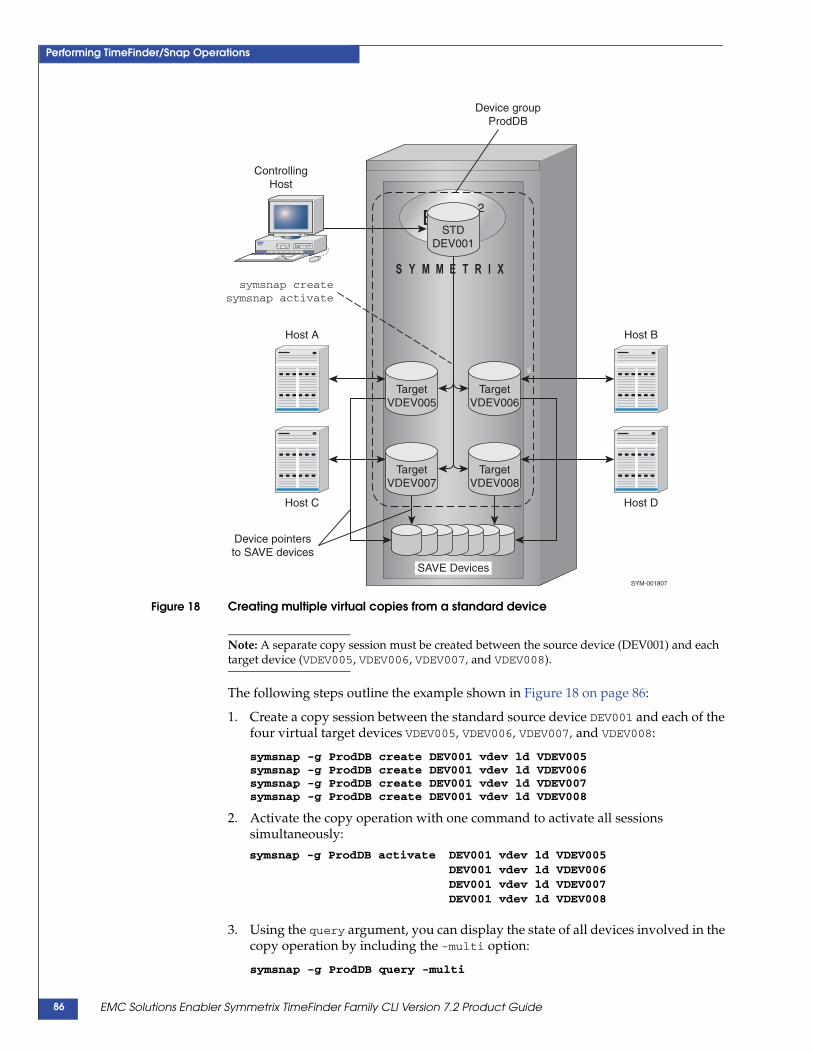
Creating multiple virtual copies ............................................................................ 85Creating multiple virtual copies from a standard device........................... 85Creating multiple virtual copies from a BCV device .................................. 88
Attaching source and target virtual devices ........................................................ 90 Using composite groups to manage snap pairs across Symmetrix arrays ...... 91
EMC Solutions Enabler Symmetrix TimeFinder Family CLI Version 7.2 Product Guide4
Contents
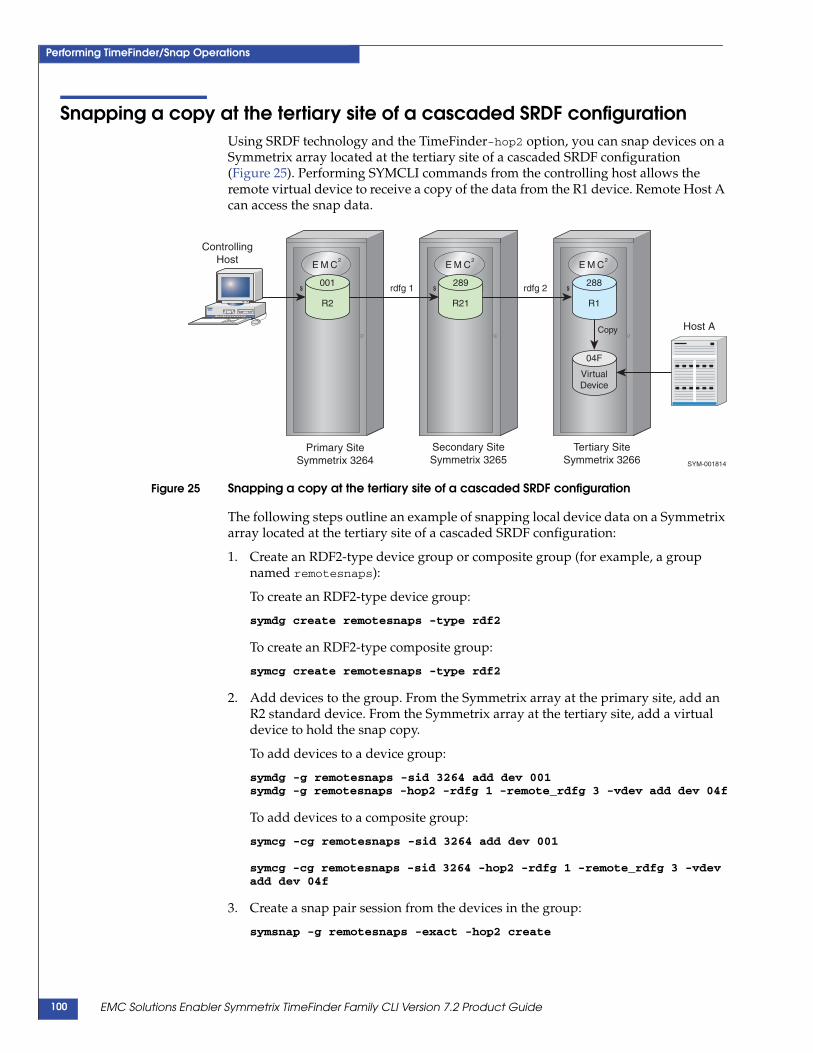
Snapping a copy on a remote Symmetrix array .................................................. 93 Snapping a copy from a remote BCV.................................................................... 94 Snapping copies of a source device’s data locally and remotely ...................... 96 Snapping multiple copies ....................................................................................... 98 Snapping a copy at the tertiary site of a cascaded SRDF configuration ........ 100 Snapping a copy from a clone target device ...................................................... 102 Command options with device groups or composite groups ......................... 103 Command options with device files ................................................................... 105
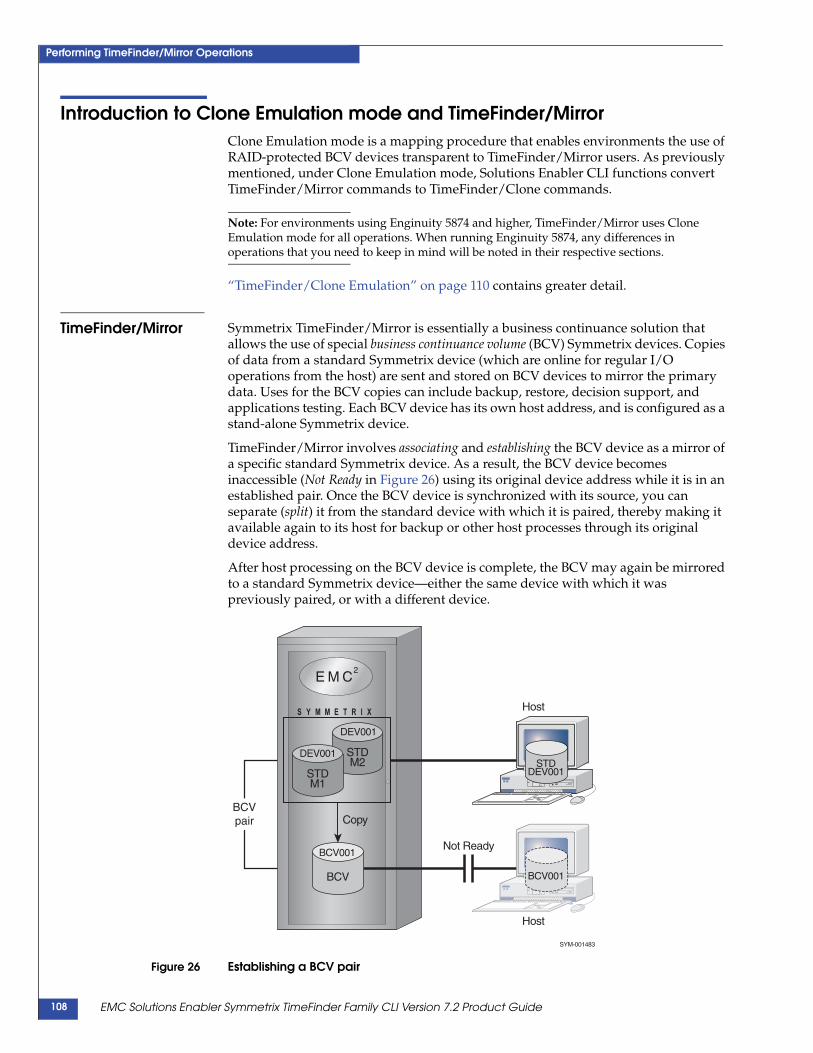
Chapter 4 Performing TimeFinder/Mirror Operations Introduction to Clone Emulation mode and TimeFinder/Mirror .................. 108
TimeFinder operations overview......................................................................... 112Device external locks...................................................................................... 112Disallow synchronization actions ................................................................ 112Wait for synchronization actions to complete............................................ 113
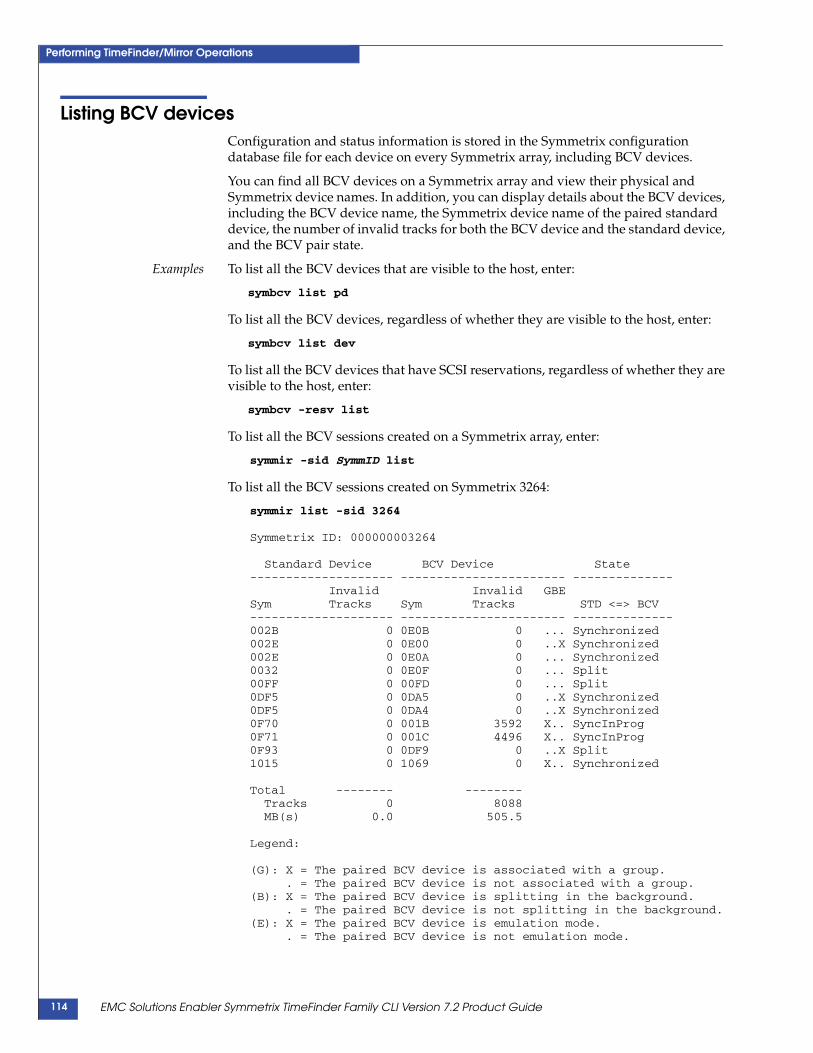
Listing BCV devices............................................................................................... 114 Associating BCV devices with a device group .................................................. 115 Disassociating BCV devices from a device group............................................. 118 Moving BCV devices from one device group to another device group......... 120 Managing BCV devices with composite groups ............................................... 121 Establishing BCV pairs.......................................................................................... 122
Specifying the default method for establishing BCV pairs ...................... 124 Incrementally establishing BCV pairs................................................................. 132 Splitting BCV pairs ................................................................................................ 135
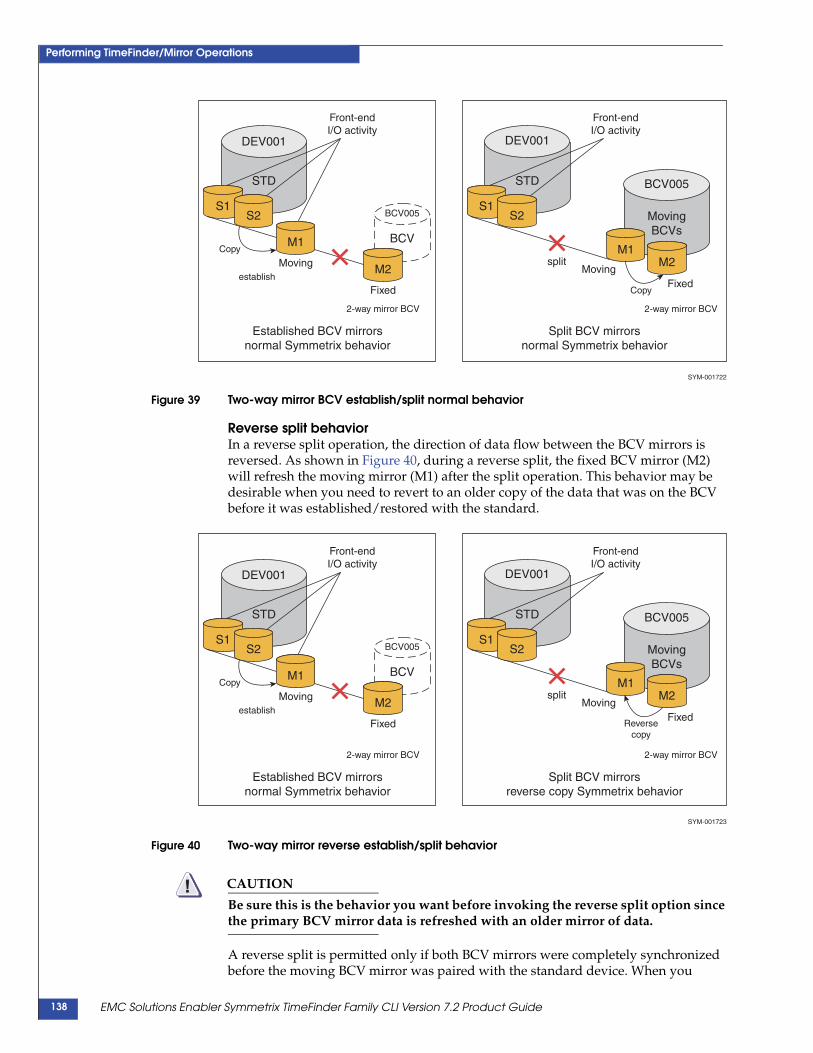
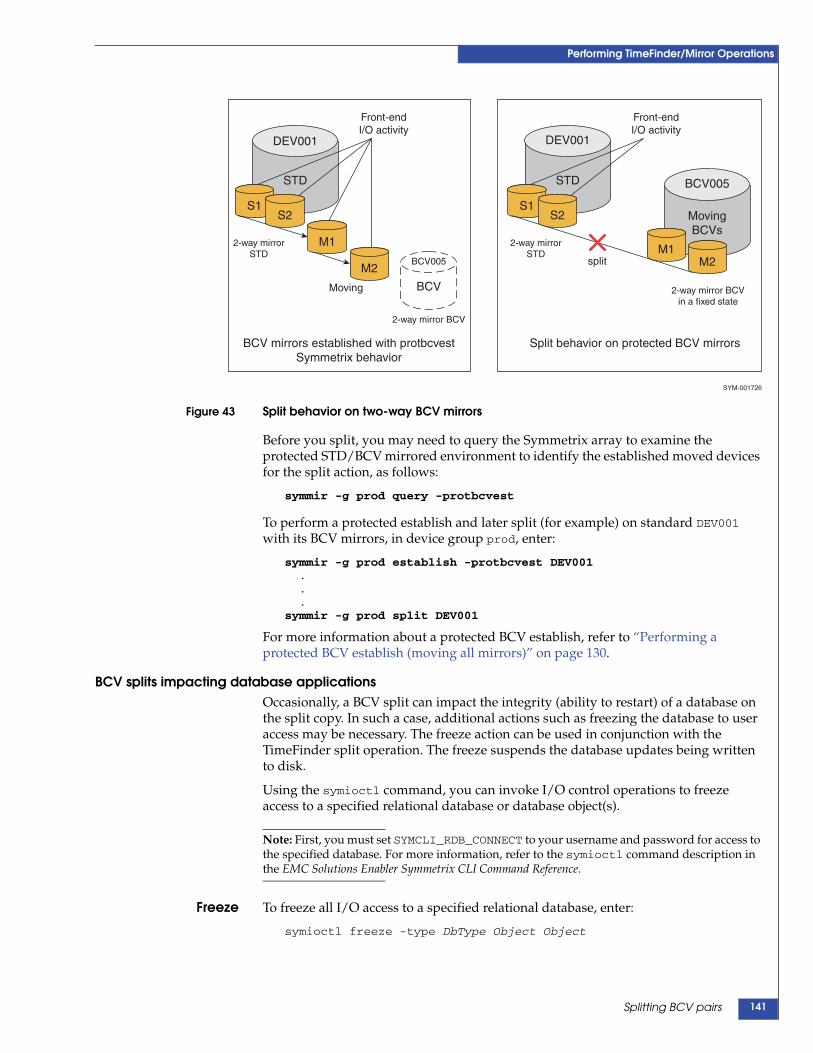
Performing a reverse split ............................................................................. 137TimeFinder consistent split ........................................................................... 142
Fully restoring BCV pairs ..................................................................................... 149 Incrementally restoring BCV pairs ...................................................................... 153 Protecting BCV data during full or incremental restores................................. 157 Cancelling BCV pairs............................................................................................. 158 Querying BCV pairs .............................................................................................. 159
Using the -summary option .......................................................................... 159 Verifying BCV pair states...................................................................................... 161 Using composite groups to manage BCV pairs across Symmetrix arrays .... 163 Preferred attachment of BCVs (optional operations)........................................ 165
Script summary for typical TimeFinder operations .................................. 167Script example for multi-BCV environment............................................... 168
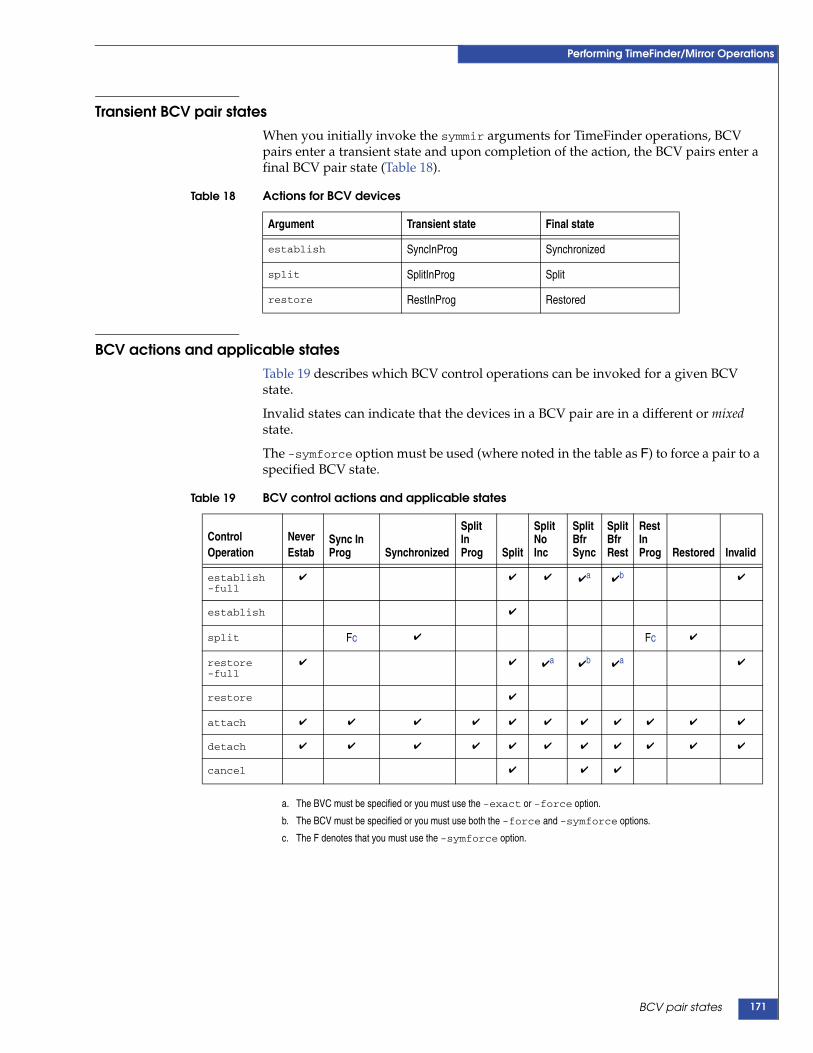
BCV pair states ....................................................................................................... 170Transient BCV pair states .............................................................................. 171BCV actions and applicable states................................................................ 171
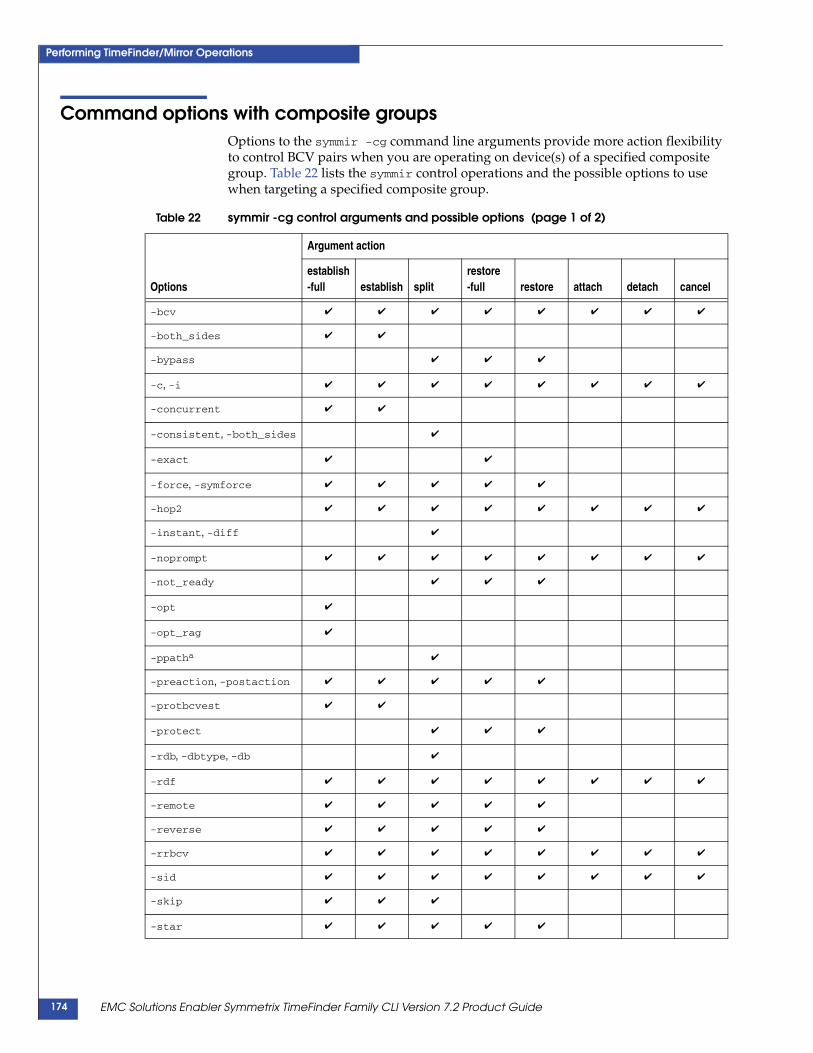
Command options with device groups .............................................................. 172 Command options with composite groups........................................................ 174 Command options with device files ................................................................... 176 Various remote multihop configurations ........................................................... 178
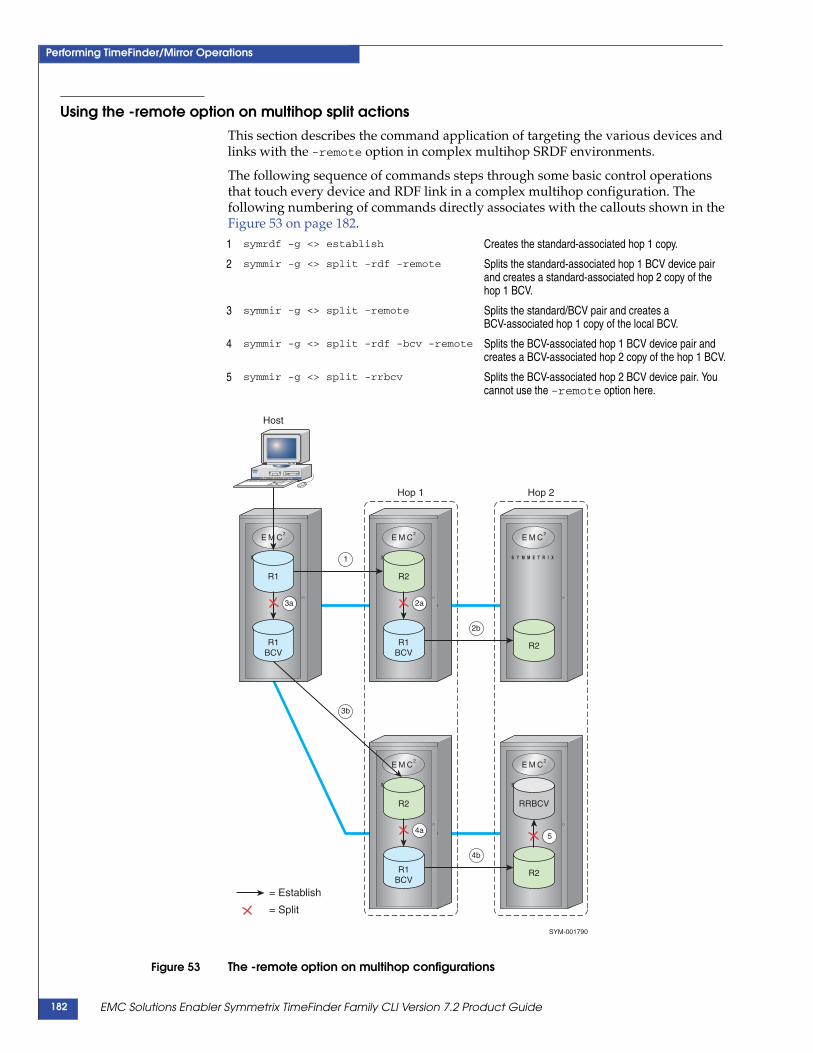
Commands to various multihop devices and links................................... 179Second-level controls for multihop SRDF environments ......................... 181Using the -remote option on multihop split actions ................................. 182
Part 2 Operational Examples
EMC Solutions Enabler Symmetrix TimeFinder Family CLI Version 7.2 Product Guide 5
Contents
Chapter 5 Performing TimeFinder/Clone Operations Example 1: Cloning a copy of a standard device to other standard devices . 186 Example 2: Cloning a copy of a standard device to BCV devices ................... 191 Example 3: Cloning copies from a BCV source device ..................................... 197 Example 4: Cloning multiple copies of a BCV ................................................... 204 Example 5: Cloning three copies from a single source device ......................... 209 Example 6: Using a composite group to control clone pairs............................ 212 Example 7: Cloning to a remote BCV .................................................................. 215 Example 8: Cloning to a local BCV and a remote BCV..................................... 218 Example 9: Cloning to multiple local and remote BCVs .................................. 221 Example 10: Cloning to a remote BCV from a local BCV ................................. 228 Example 11: Cloning in a multihop environment.............................................. 232 Example 12: Using a clone from a clone target .................................................. 238
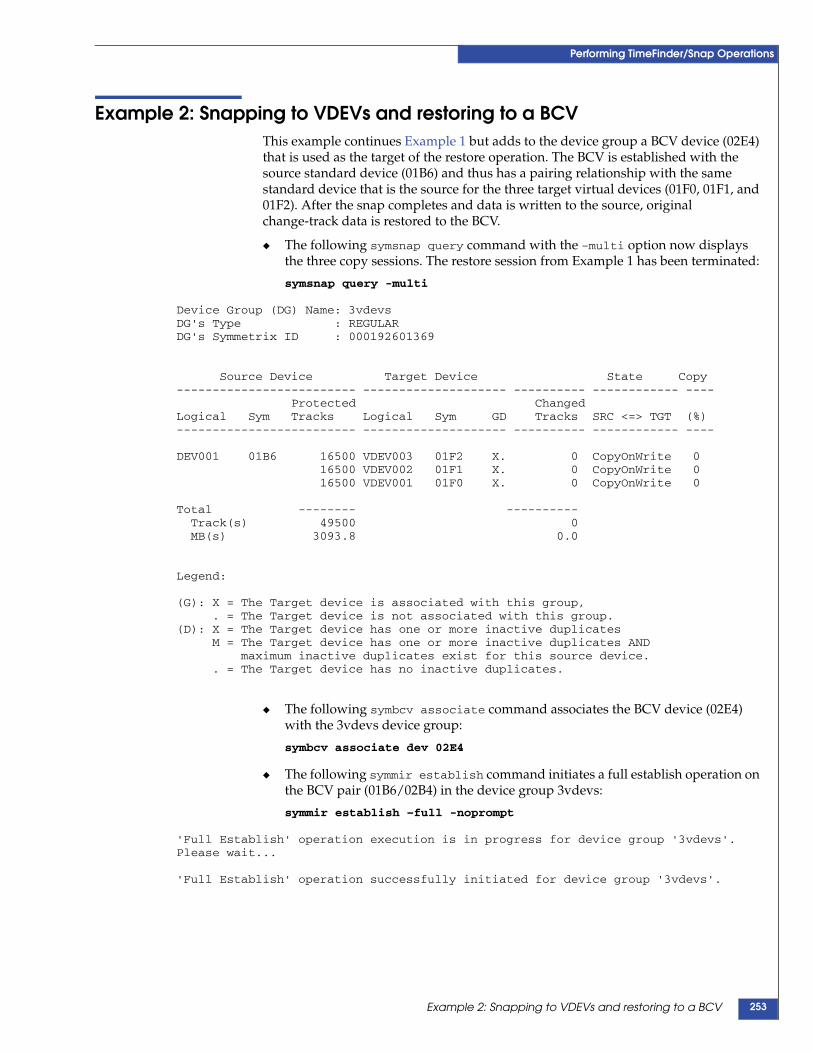
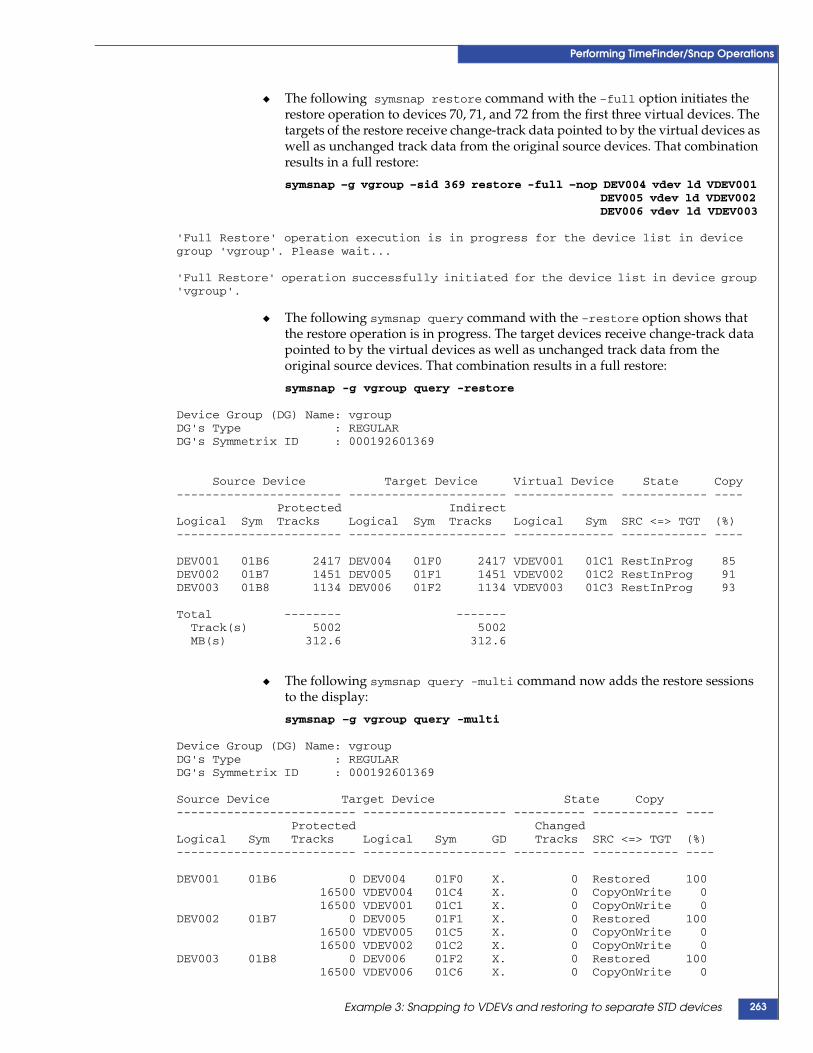
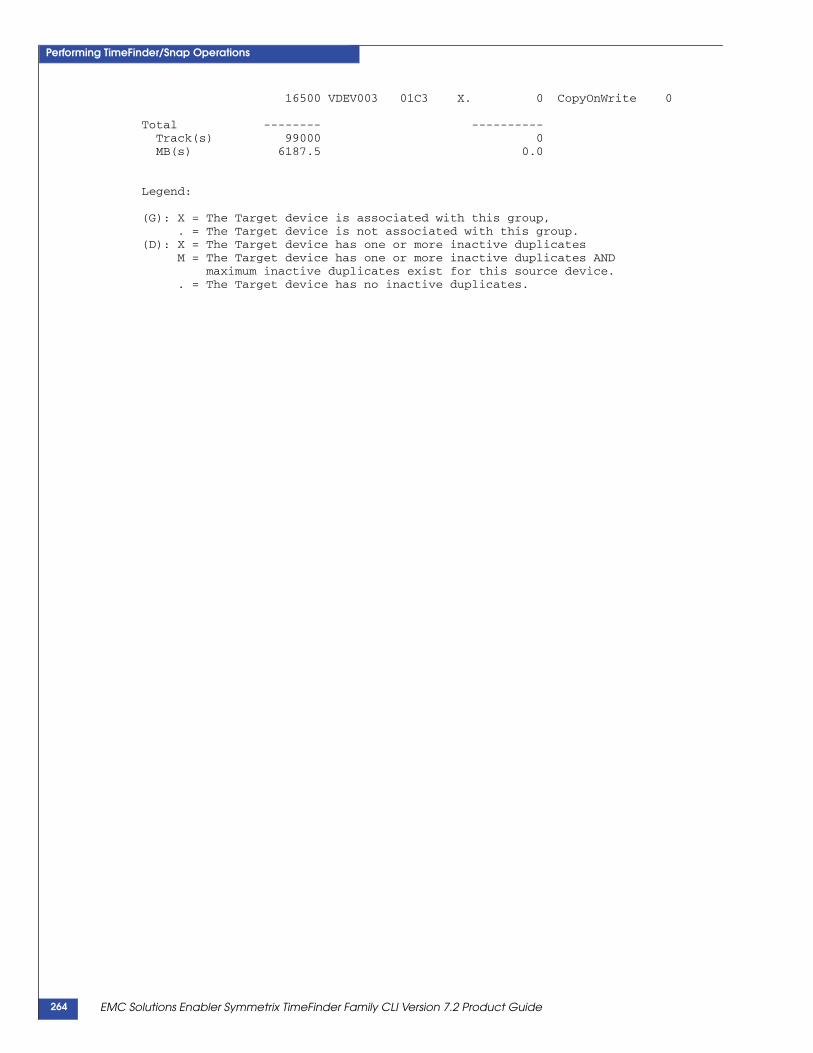
Chapter 6 Performing TimeFinder/Snap Operations Example 1: Snapping to VDEVs and restoring to the original SRC device ... 244 Example 2: Snapping to VDEVs and restoring to a BCV.................................. 253 Example 3: Snapping to VDEVs and restoring to separate STD devices ....... 258 Example 4: Using a composite group to control snap pairs............................. 267
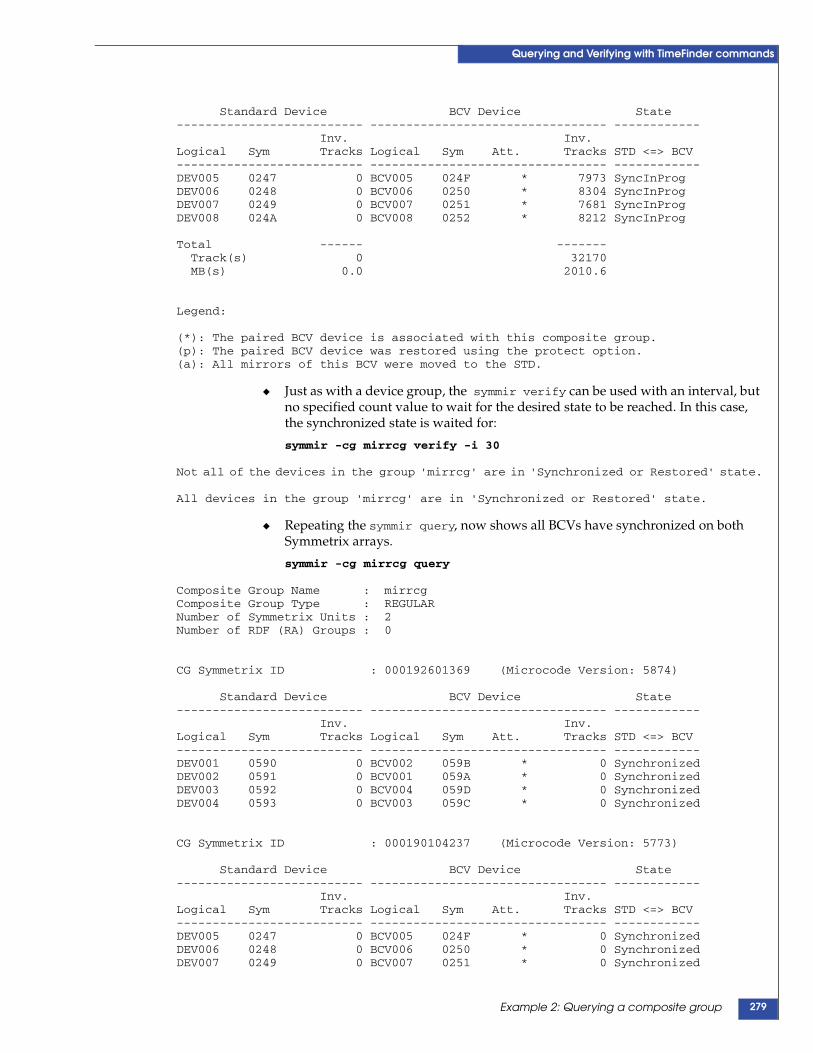
Chapter 7 Querying and Verifying with TimeFinder commands Example 1: Querying a device group .................................................................. 272 Example 2: Querying a composite group............................................................ 277
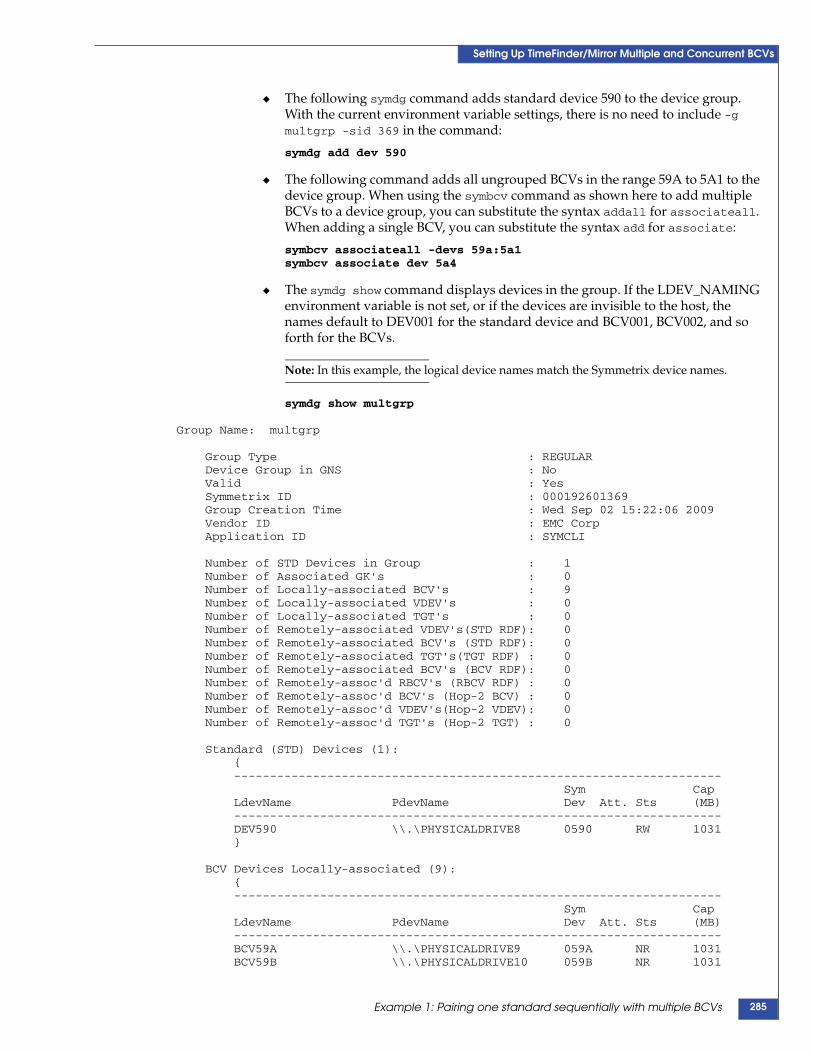
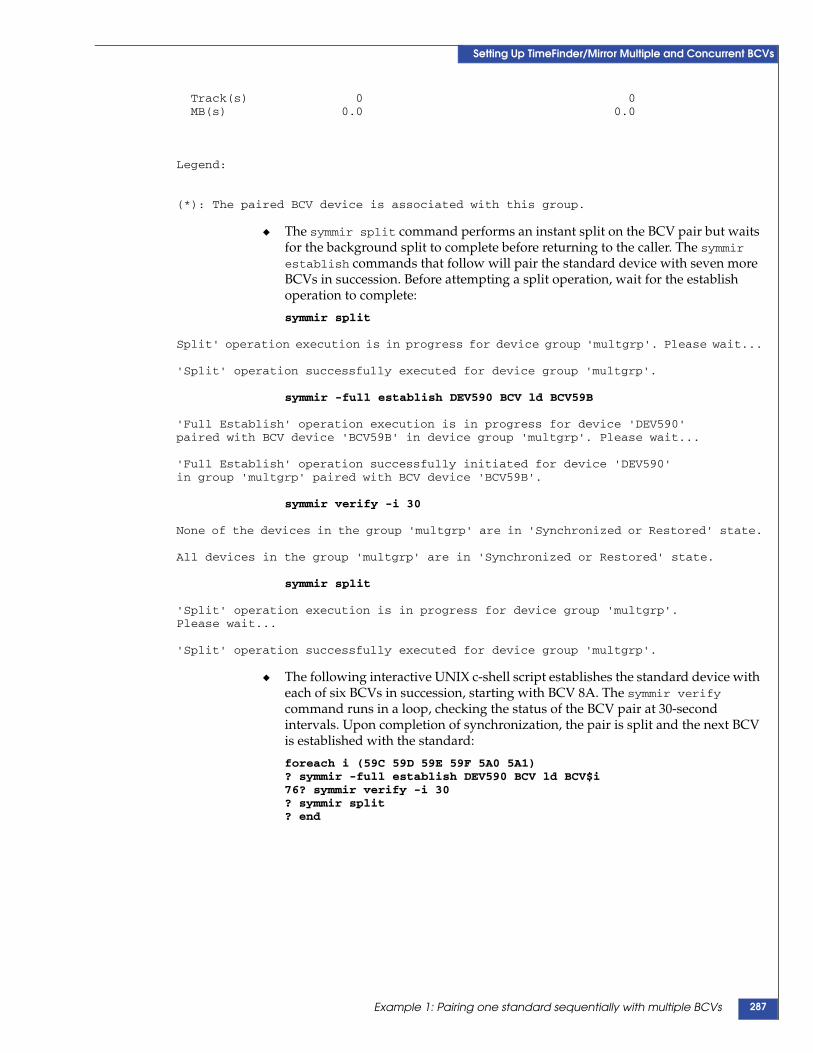
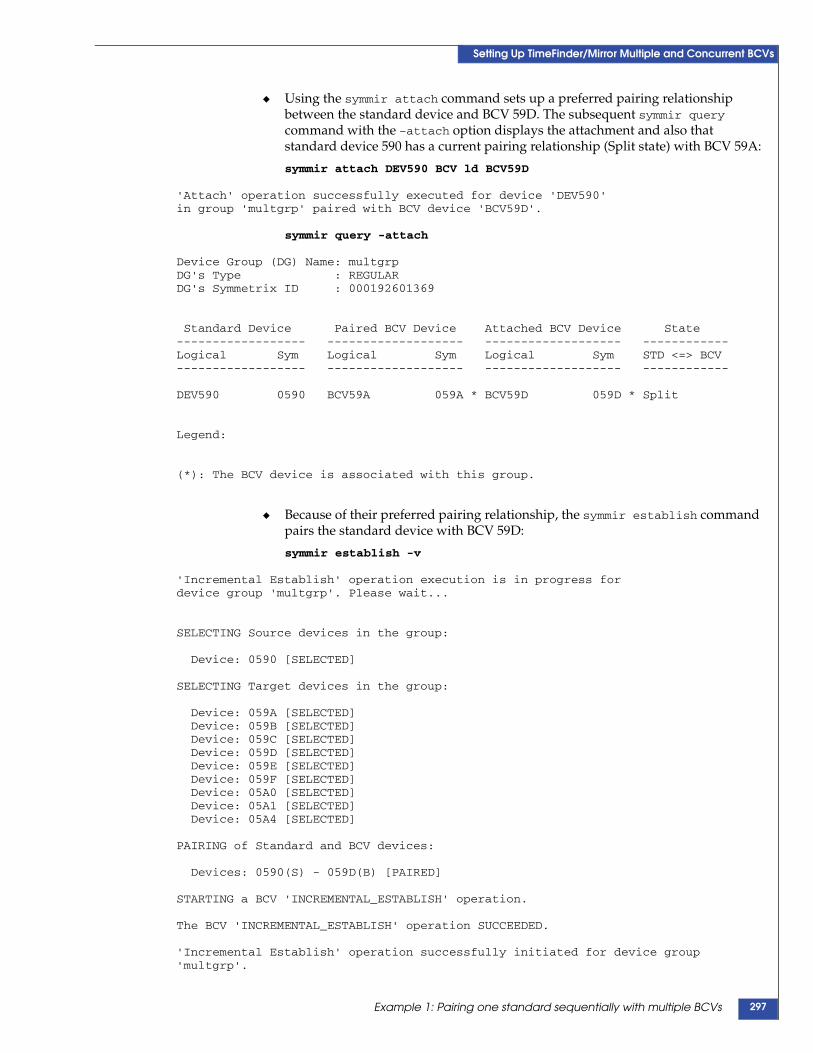
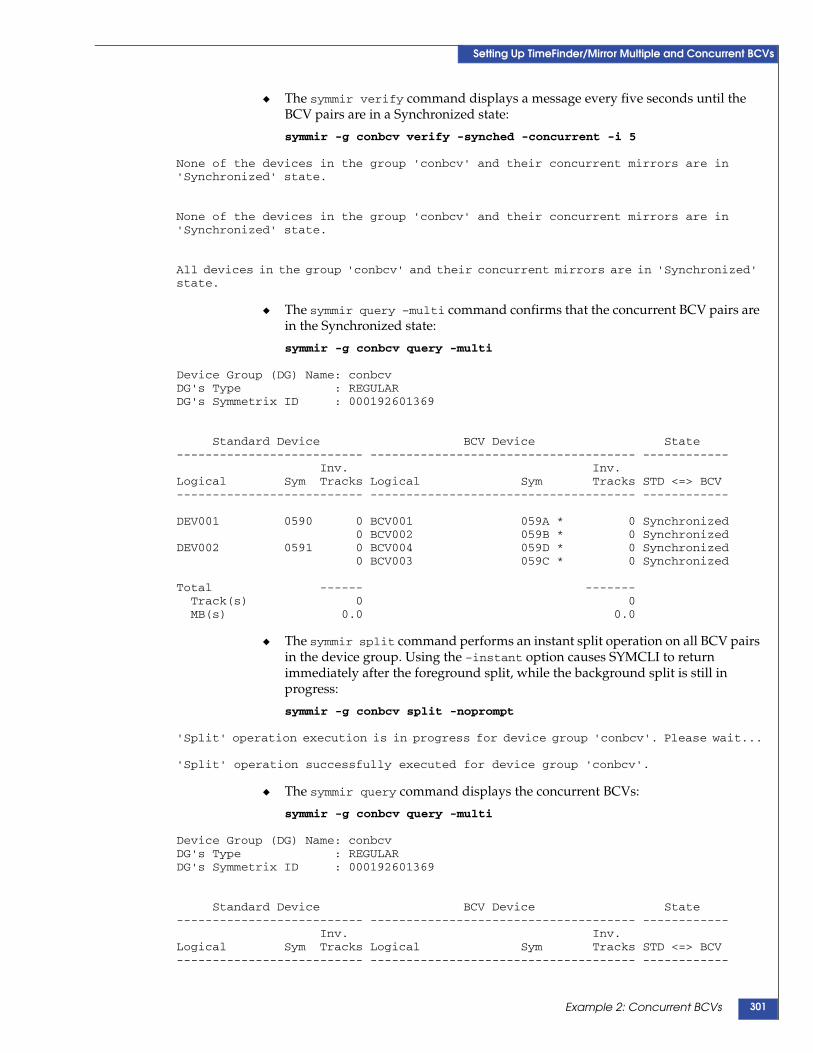
Chapter 8 Setting Up TimeFinder/Mirror Multiple and Concurrent BCVs Example 1: Pairing one standard sequentially with multiple BCVs............... 284 Example 2: Concurrent BCVs ............................................................................... 299
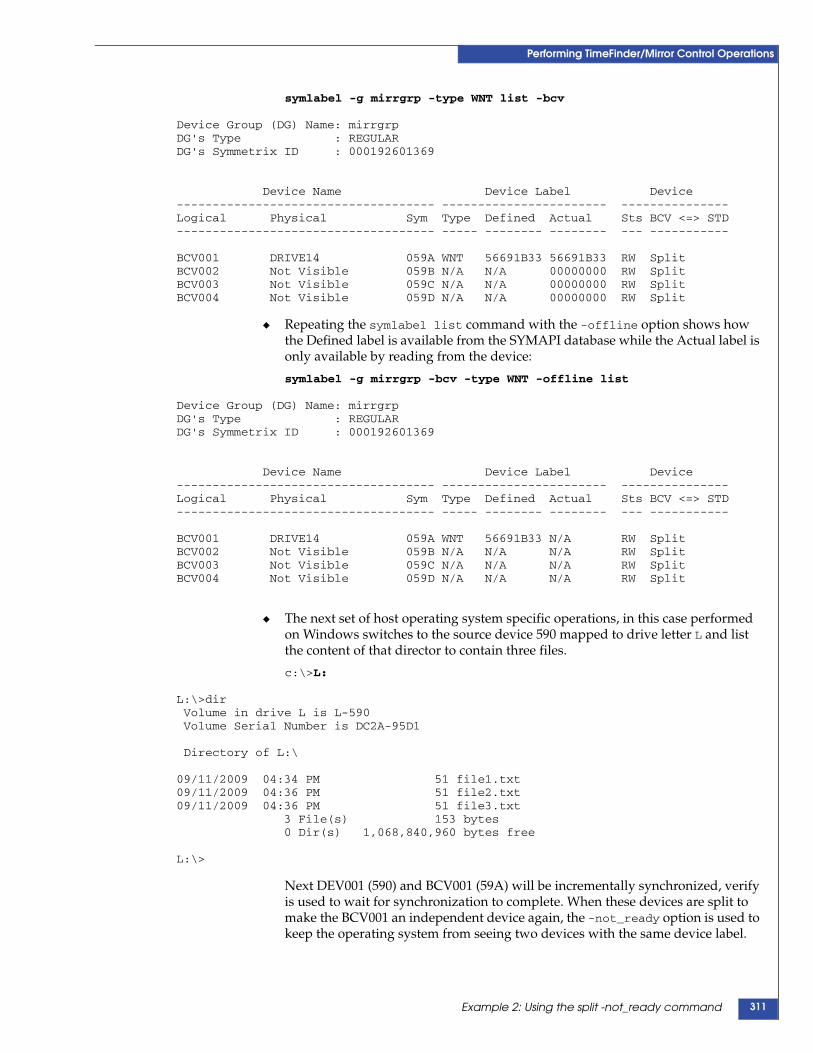
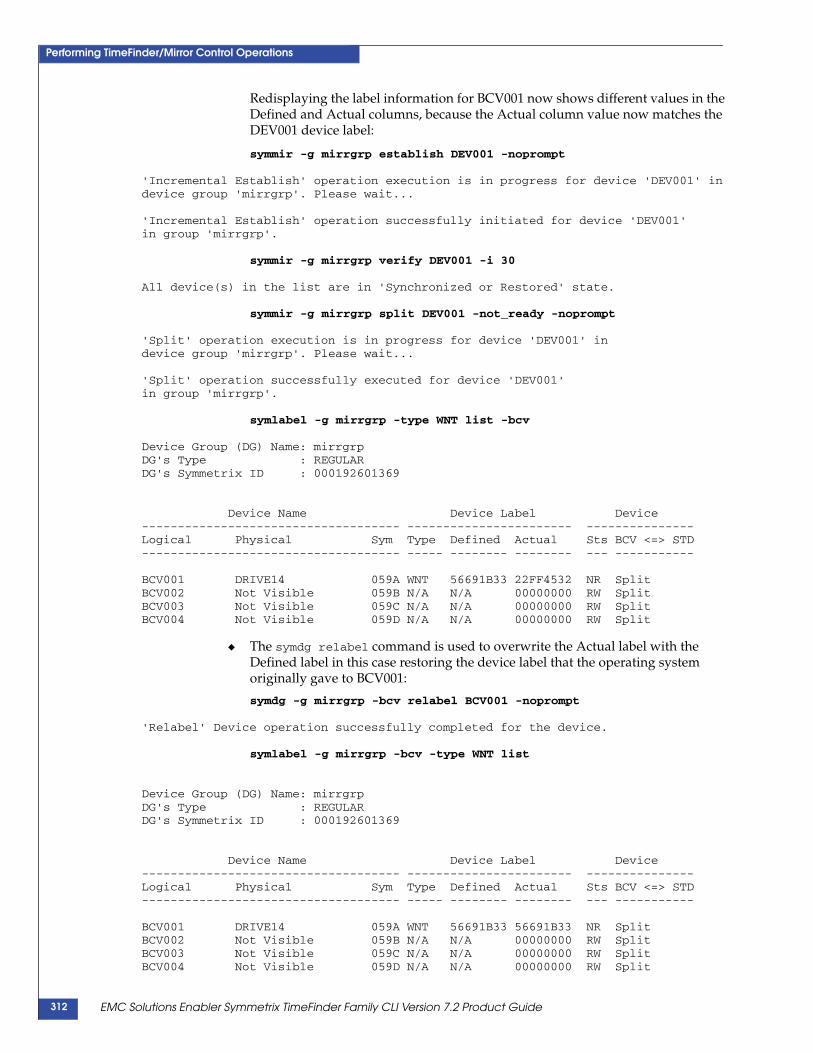
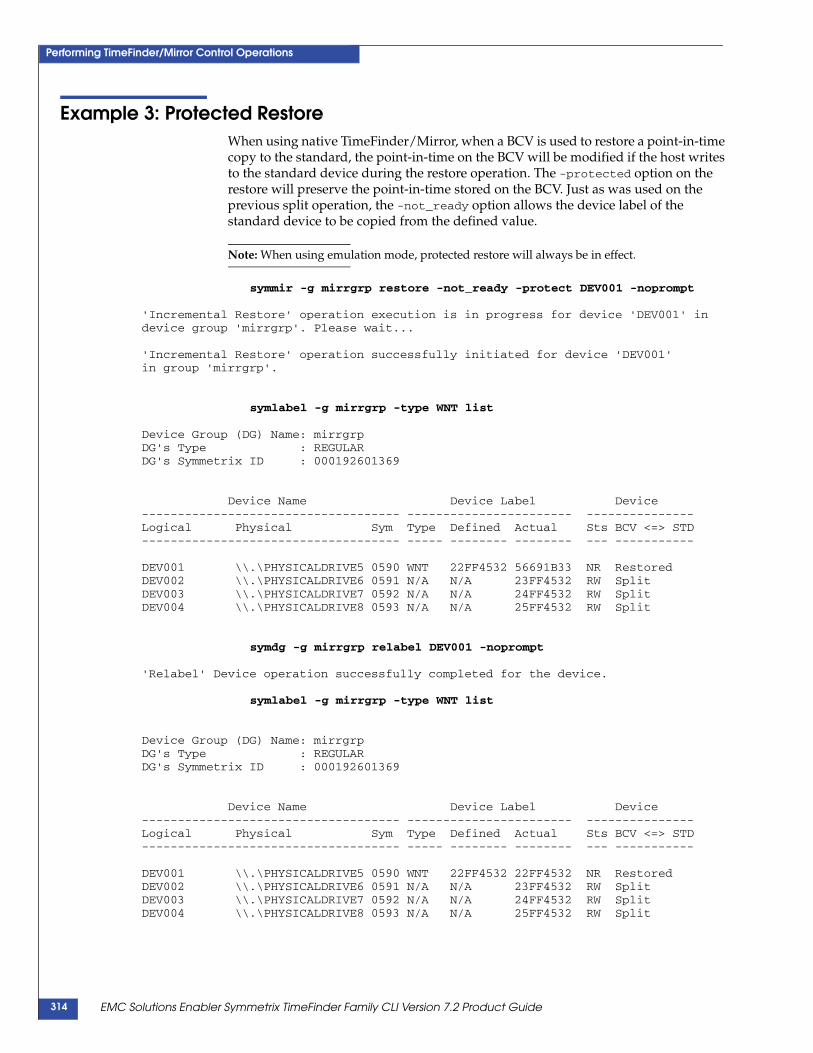
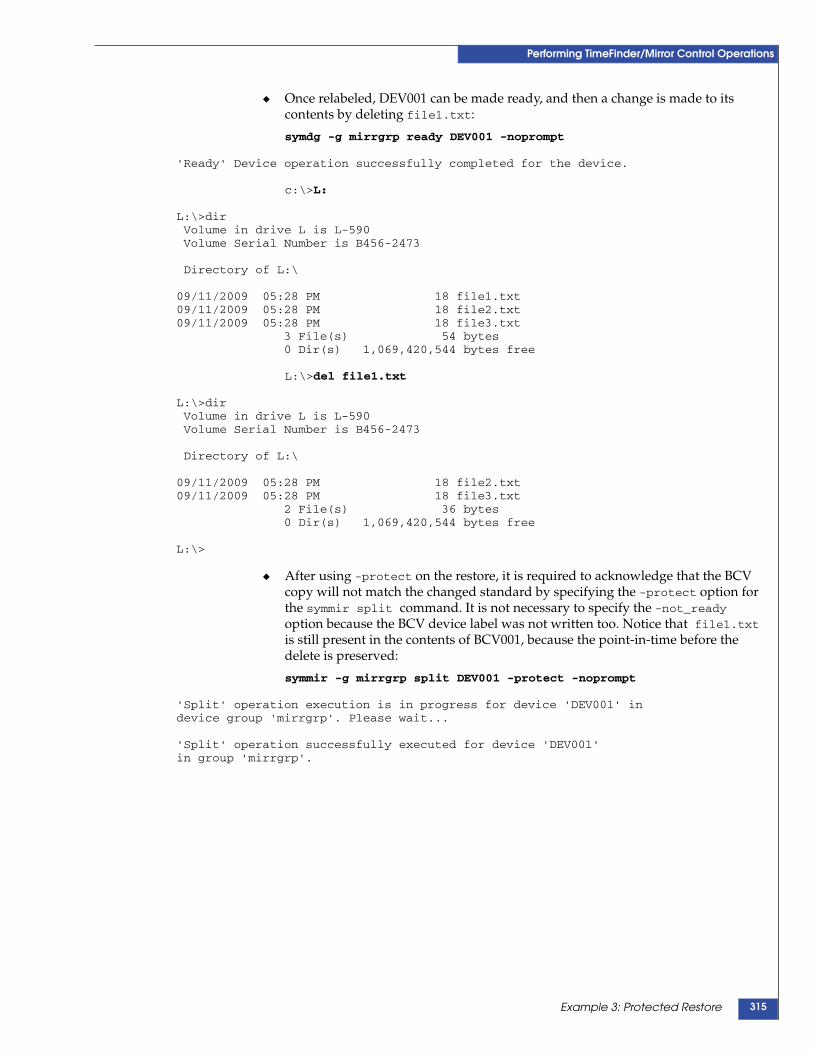
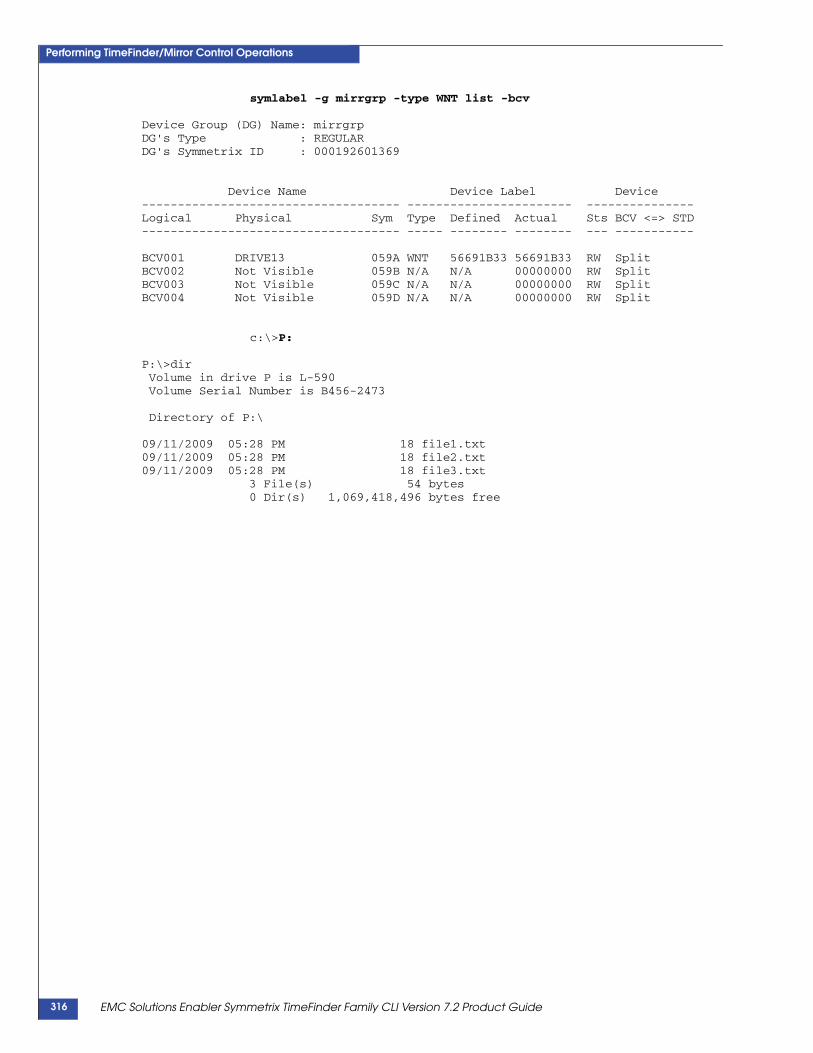
Chapter 9 Performing TimeFinder/Mirror Control Operations Example 1: Split operations .................................................................................. 306 Example 2: Using the split -not_ready command.............................................. 309 Example 3: Protected Restore ............................................................................... 314
Chapter 10 Performing Consistent Splits with TimeFinder Family Example 1: Creating an RDBMS-restartable copyon a local Symmetrix array................................................................................... 318
Example 2: ECA consistent split of a composite group .................................... 321 Example 3: Performing splits with database assist ........................................... 324
Splitting BCV pairs using SQL 2000 database assist.................................. 324Splitting BCV pairs using Oracle database assist....................................... 325
Chapter 11 Using SYMAPI Command Scope Example 1: symmir/symclone/symsnap control commands ......................... 328 Example 2: symmir/symclone/symsnap query command............................. 330 Example 3: symmir/symclone/symsnap verify command............................. 331 Example 4: Creating a DG with two standard devices and two BCV devices ............................................................................................ 332
EMC Solutions Enabler Symmetrix TimeFinder Family CLI Version 7.2 Product Guide6
Contents
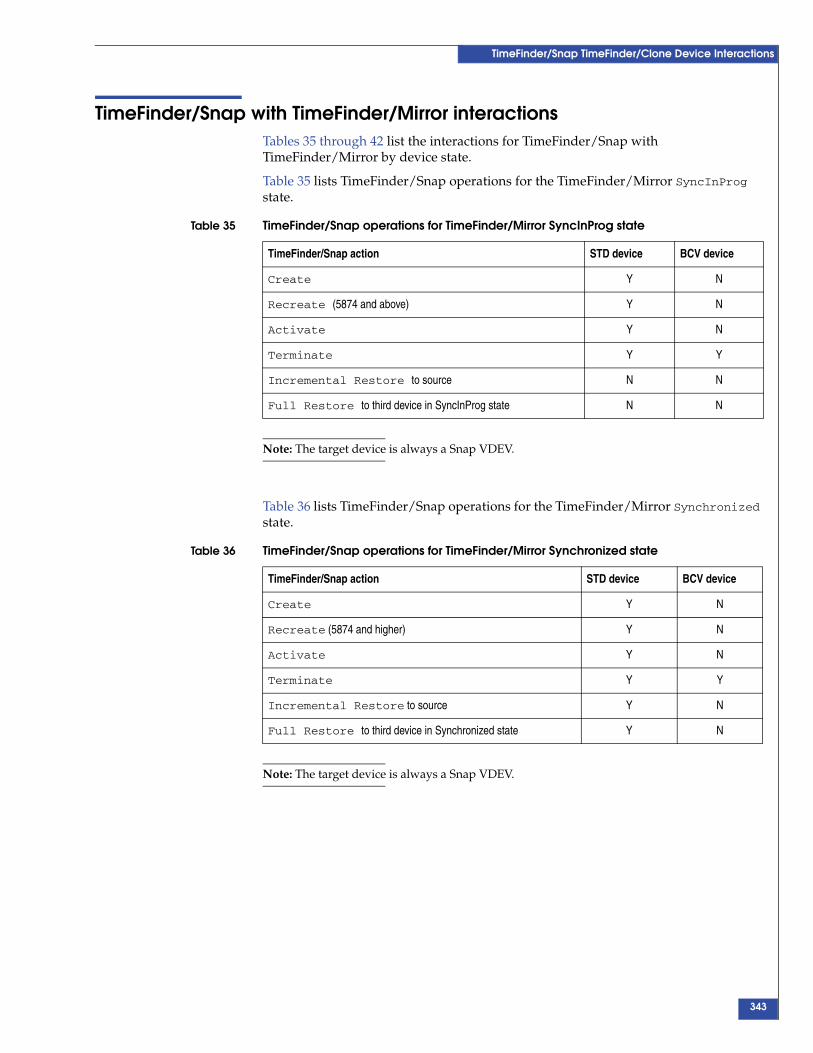
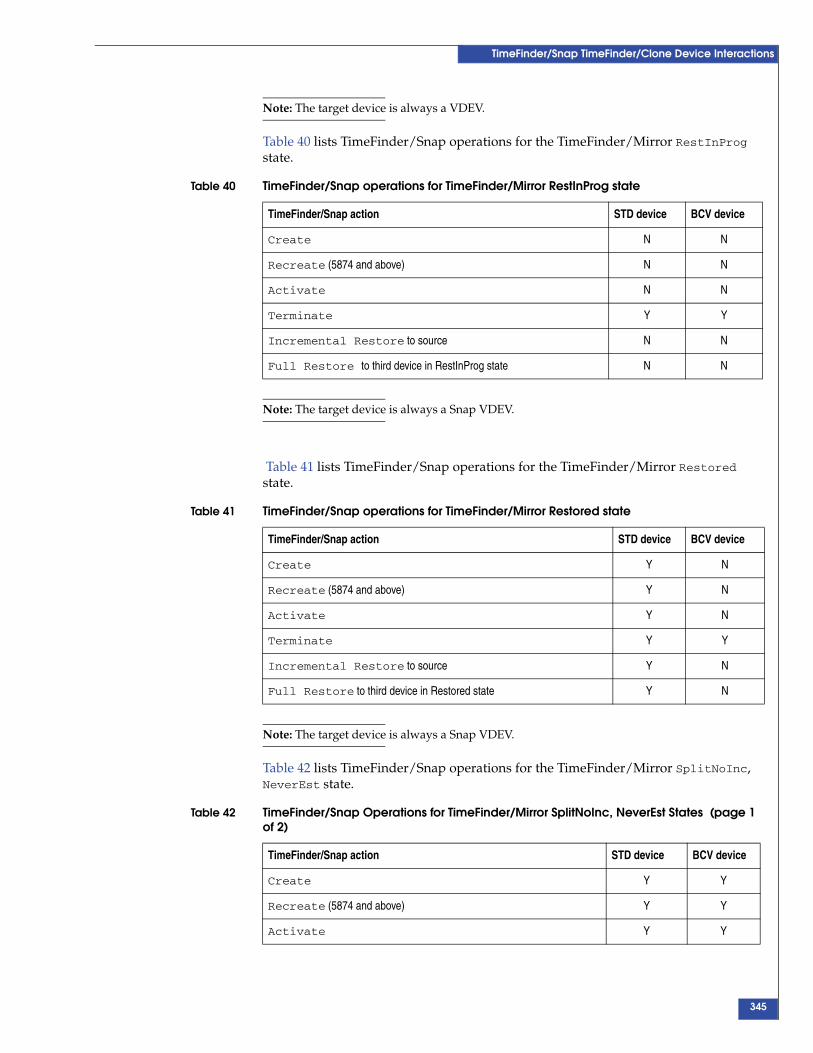
Appendix A TimeFinder/Snap TimeFinder/Clone Device Interactions TimeFinder/Clone with TimeFinder/Mirror interactions ............................. 338 TimeFinder/Snap with TimeFinder/Mirror interactions............................... 343
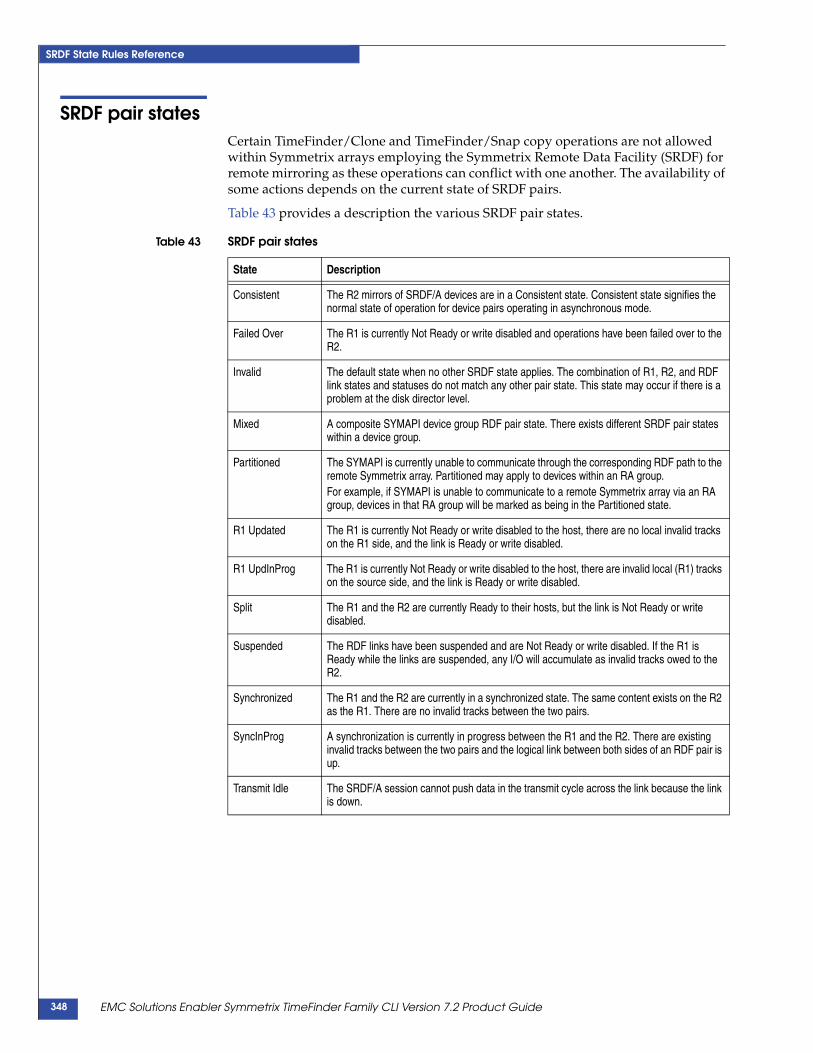
Appendix B SRDF State Rules Reference SRDF pair states .................................................................................................... 348 State rules for TimeFinder/Clone operations................................................... 349
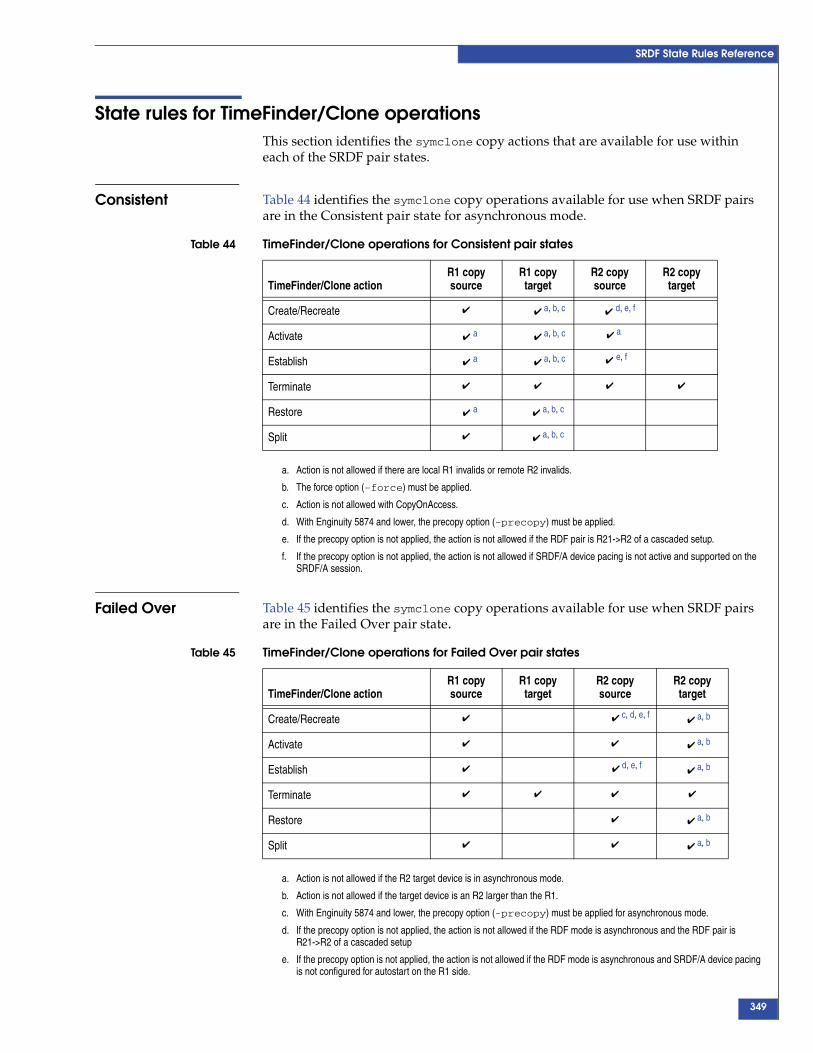
Consistent ........................................................................................................ 349Failed Over ...................................................................................................... 349Invalid .............................................................................................................. 350Partitioned ....................................................................................................... 350R1 updated ...................................................................................................... 351R1 update in progress .................................................................................... 351Split ................................................................................................................... 352Suspended ....................................................................................................... 352Synchronized................................................................................................... 353Sync in progress .............................................................................................. 353Transmit Idle ................................................................................................... 354
State rules for TimeFinder/Snap operations .................................................... 355Consistent ........................................................................................................ 355Failed Over ...................................................................................................... 355Invalid .............................................................................................................. 356Partitioned ....................................................................................................... 356R1 updated ...................................................................................................... 356R1 update in progress .................................................................................... 357Split ................................................................................................................... 357Suspended ....................................................................................................... 358Synchronized................................................................................................... 359Sync in progress .............................................................................................. 359Transmit Idle ................................................................................................... 360
EMC Solutions Enabler Symmetrix TimeFinder Family CLI Version 7.2 Product Guide 7
Contents
EMC Solutions Enabler Symmetrix TimeFinder Family CLI Version 7.2 Product Guide8
Title Page
Figures
1 TimeFinder/Clone copy of a standard device.................................................................. 252 TimeFinder/Clone consistent activate using ECA .......................................................... 323 Clone from clone target (both sessions are cascaded clone) ........................................... 434 Creating a TimeFinder/Clone from a BCV source .......................................................... 455 Creating multiple clone copies from a standard device.................................................. 476 Cloning a copy of a local R1 standard device on a remote Symmetrix array .............. 487 Cloning a copy of a local BCV device on a remote Symmetrix array............................ 498 Cloning a copy of a local R1 standard device on a Hop-2 Symmetrix array................ 509 Cloning copies of a local R1 standard to a local target and to a remote BCV target... 5110 Cloning copies of a local device to a local BCV target and to a remote BCV target.... 5211 Cloning multiple copies on local and remote Symmetrix arrays................................... 5312 Cloning a copy at the tertiary site of a cascaded SRDF configuration .......................... 5513 Using a composite group when a set of devices spans two Symmetrix arrays ........... 5714 Copy of a standard device to a virtual device (VDEV) ................................................... 6615 TF/Snap consistent activate using ECA ............................................................................ 7116 Incremental restore to a BCV............................................................................................... 7617 Creating a virtual copy from a BCV ................................................................................... 8318 Creating multiple virtual copies from a standard device ............................................... 8619 Creating multiple virtual copies from a BCV device ....................................................... 8820 Using a composite group when a set of devices spans two Symmetrix arrays ........... 9121 Snapping a copy on a remote Symmetrix array ............................................................... 9322 Snapping from a remote BCV source device .................................................................... 9423 Snapping copies on local and remote Symmetrix arrays ................................................ 9624 Snapping multiple copies on local and remote Symmetrix arrays ................................ 9825 Snapping a copy at the tertiary site of a cascaded SRDF configuration ..................... 10026 Establishing a BCV pair...................................................................................................... 10827 SRDF: Mirroring the local standard ................................................................................. 10928 Mirror configuration types ................................................................................................ 11029 Compounded remote configuration example................................................................. 11730 Initial BCV configuration ................................................................................................... 12231 Fully establishing a BCV pair ............................................................................................ 12332 Establishing a multi-BCV environment ........................................................................... 12533 Canceling a multi-BCV....................................................................................................... 12634 Cascaded Clone to a cascaded Clone Emulation session.............................................. 12835 Establish concurrent BCV pairs ........................................................................................ 13036 Establishing two-way BCV mirrors with protected establish ...................................... 13137 Establishing a multi-BCV environment ........................................................................... 13338 Split the BCV pair................................................................................................................ 13539 Two-way mirror BCV establish/split normal behavior ................................................ 13840 Two-way mirror reverse establish/split behavior ......................................................... 138
EMC Solutions Enabler Symmetrix TimeFinder Family CLI Version 7.2 Product Guide 9
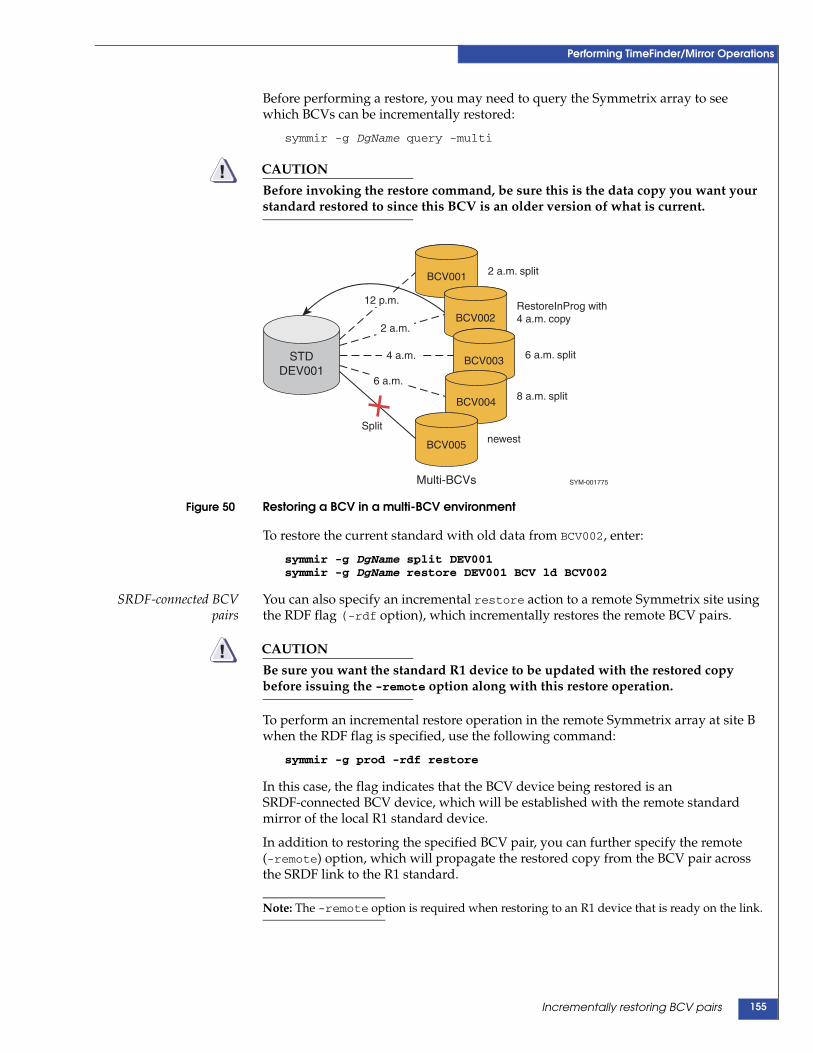
41 Practical use of a reverse split............................................................................................ 13942 Splitting concurrent BCV pairs.......................................................................................... 14043 Split behavior on two-way BCV mirrors.......................................................................... 14144 Consistency split on Oracle environment ........................................................................ 14445 Consistent split on both RDF sides using PowerPath.................................................... 14546 ECA consistent split ............................................................................................................ 14647 Consistent splits on both SRDF sides using ECA ........................................................... 14848 Full restore of the BCV pair................................................................................................ 14949 Incremental restore the STD............................................................................................... 15450 Restoring a BCV in a multi-BCV environment ............................................................... 15551 Using a composite group when a set of devices spans two Symmetrix arrays.......... 16352 Control operations on multihop SRDF configurations .................................................. 18053 The -remote option on multihop configurations ............................................................ 182
EMC Solutions Enabler Symmetrix TimeFinder Family CLI Version 7.2 Product Guide10
Title Page
Tables
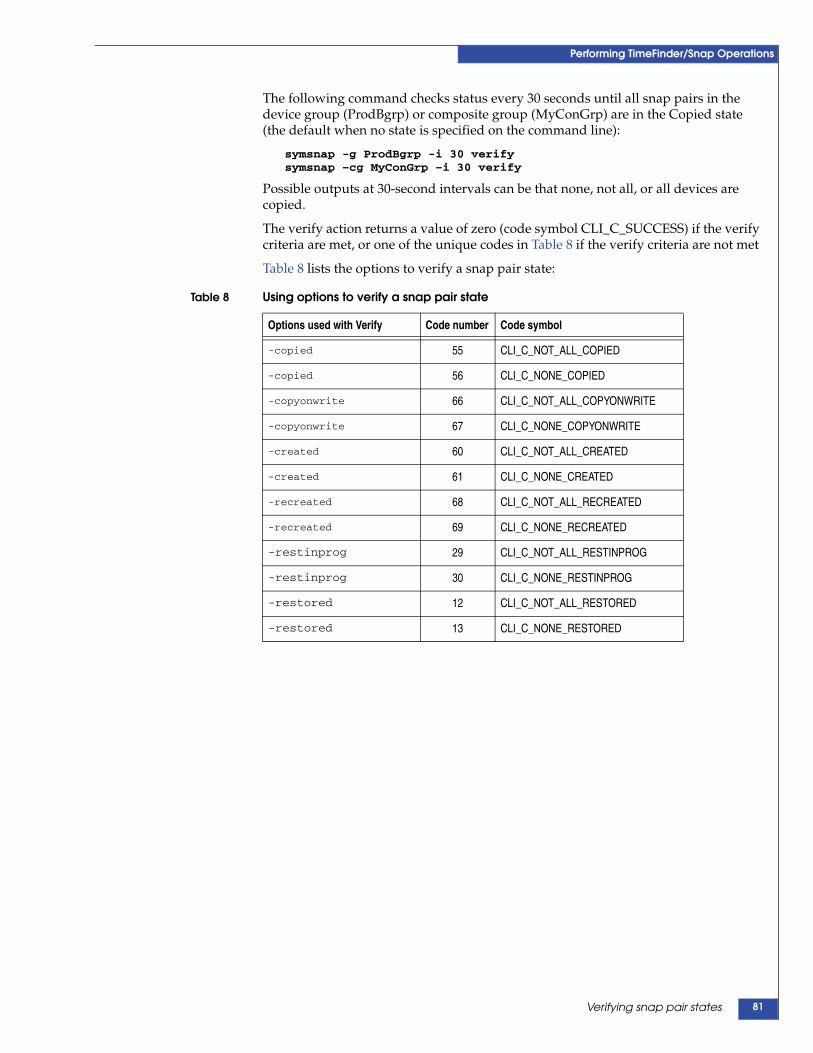
1 TimeFinder command summary ........................................................................................ 202 Number of session slots used per operation ..................................................................... 263 Using options to verify a clone pair state .......................................................................... 424 Clone from clone target session states (both sessions are cascaded clone) .................. 445 symclone -g control arguments and possible options ..................................................... 596 symclone -cg control arguments and possible options.................................................... 617 symclone -file control arguments and possible options.................................................. 638 Using options to verify a snap pair state ........................................................................... 819 symsnap -g and -cg control arguments and possible options ...................................... 10310 symsnap -file control arguments and possible options................................................. 10511 TimeFinder commands mapped to clone operation...................................................... 11012 Clone and B to C TimeFinder/Clone Emulation states................................................. 12813 Clone Emulation and clone target session states............................................................ 12914 Consistent split comparison: ECA versus PowerPath................................................... 14715 Using options to verify a BCV mirror state.................................................................... 16216 Using options to verify a BCV pair state ......................................................................... 16217 BCV pair states .................................................................................................................... 17018 Actions for BCV devices..................................................................................................... 17119 BCV control actions and applicable states....................................................................... 17120 symmir -g control arguments and possible options ...................................................... 17221 symmir -g view arguments and possible options .......................................................... 17322 symmir -cg control arguments and possible options..................................................... 17423 symmir -cg view arguments and possible options ........................................................ 17524 symmir -file control arguments and possible options ................................................... 17625 symmir -file view arguments and possible options....................................................... 17726 TimeFinder/Mirror pair states.......................................................................................... 33827 TimeFinder/Clone Operations for TimeFinder/Mirror SyncInProg State ................ 33828 TimeFinder/Clone operations for TimeFinder/Mirror Synchronized state.............. 33929 TimeFinder/Clone operations for TimeFinder/Mirror Split state.............................. 34030 TimeFinder/Clone operations for TimeFinder/Mirror SplitBfrSync state ................ 34031 TimeFinder/Clone operations for TimeFinder/Mirror SplitBfrRstr State................. 34132 TimeFinder/Clone operations for TimeFinder/Mirror RestInProg state .................. 34133 TimeFinder/Clone operations for TimeFinder/Mirror Restored state ...................... 34234 TimeFinder/Clone operations for TimeFinder/Mirror SplitNoInc, NeverEst state 34235 TimeFinder/Snap operations for TimeFinder/Mirror SyncInProg state ................... 34336 TimeFinder/Snap operations for TimeFinder/Mirror Synchronized state ............... 34337 TimeFinder/Snap operations for TimeFinder/Mirror Split state ............................. 34438 TimeFinder/Snap operations for TimeFinder/Mirror SplitBfrSync state.................. 34439 TimeFinder/Snap operations for TimeFinder/Mirror SplitBfrRstr state................... 34440 TimeFinder/Snap operations for TimeFinder/Mirror RestInProg state .................... 345
EMC Solutions Enabler Symmetrix TimeFinder Family CLI Version 7.2 Product Guide 11
41 TimeFinder/Snap operations for TimeFinder/Mirror Restored state ........................ 34542 TimeFinder/Snap Operations for TimeFinder/Mirror SplitNoInc, NeverEst States 34543 SRDF pair states ................................................................................................................... 34844 TimeFinder/Clone operations for Consistent pair states.............................................. 34945 TimeFinder/Clone operations for Failed Over pair states............................................ 34946 TimeFinder/Clone operations for Invalid pair states .................................................... 35047 TimeFinder/Clone operations for Partitioned pair states............................................. 35048 TimeFinder/Clone operations for R1 Updated pair states ........................................... 35149 TimeFinder/Clone operations for R1 Updinprog pair states ....................................... 35150 TimeFinder/Clone operations for Split pair states ........................................................ 35251 TimeFinder/Clone operations for suspended pair states ............................................. 35252 TimeFinder/Clone operations for synchronized pair states......................................... 35353 TimeFinder/Clone operations for SyncInProg pair states ............................................ 35354 TimeFinder/Clone operations for Transmit Idle pair states......................................... 35455 TimeFinder/Snap operations for consistent pair states................................................. 35556 TimeFinder/Snap operations for Failed Over pair states ............................................. 35557 TimeFinder/Snap operations for Invalid pair states...................................................... 35658 TimeFinder/Snap operations for Partitioned pair states .............................................. 35659 TimeFinder/Snap operations for R1 Updated pair states ............................................. 35660 TimeFinder/Snap operations for R1 UpdInProg pair states......................................... 35761 TimeFinder/Snap operations for Split pair states .......................................................... 35762 TimeFinder/Snap operations for Suspended pair states............................................... 35863 TimeFinder/Snap operations for Synchronized pair states.......................................... 35964 TimeFinder/Snap operations for SyncInProg pair states.............................................. 35965 TimeFinder/Snap operations for Transmit Idle pair states .......................................... 360
EMC Solutions Enabler Symmetrix TimeFinder Family CLI Version 7.2 Product Guide12
Preface
As part of an effort to improve and enhance the performance and capabilities of its product lines, EMC periodically releases revisions of its hardware and software. Therefore, some functions described in this document may not be supported by all versions of the software or hardware currently in use. For the most up-to-date information on product features, refer to your product release notes.
If a product does not function properly or does not function as described in this document, please contact your EMC representative.
Audience This document is part of the Solutions Enabler documentation set, and is intended for use by advanced command-line users and script programmers to manage various types of control operations on Symmetrix arrays and devices using the SYMCLI commands of the EMC Solutions Enabler software.
◆ EMC Host Connectivity Guides [for your operating system]
Note: Detailed man page descriptions of all SYMCLI commands, environment variables, option file parameters, and error codes are documented in the companion EMC Solutions Enabler Symmetrix CLI Command Reference.
Conventions used inthis document
In this document, every use of the word SYMCLI means Solutions Enabler. EMC uses the following conventions for notes, cautions, warnings, and danger notices.
Note: A note presents information that is important, but not hazard-related.
CAUTION!A caution contains information essential to avoid data loss or damage to the system or equipment. The caution may apply to hardware or software.
EMC Solutions Enabler Symmetrix TimeFinder Family CLI Version 7.2 Product Guide 13
Preface
IMPORTANT!An important notice contains information essential to operation of the software. The important notice applies only to software.
Typographical conventionsEMC uses the following type style conventions in this document:
Where to get help EMC support, product, and licensing information can be obtained as follows.Product information — For documentation, release notes, software updates, or for information about EMC products, licensing, and service, go to the EMC Powerlink website (registration required) at:http://Powerlink.EMC.com
Technical support — For technical support, go to Powerlink and choose Support. On the Support page, you will see several options, including one for making a service request. Note that to open a service request, you must have a valid support agreement. Please contact your EMC sales representative for details about obtaining a valid support agreement or with questions about your account.
Your comments Your suggestions will help us continue to improve the accuracy, organization, and overall quality of the user publications. Please send opinions of this document to:[email protected]
Normal Used in running (nonprocedural) text for:• Names of interface elements (such as names of windows, dialog boxes, buttons, fields,
and menus)• Names of resources, attributes, pools, Boolean expressions, buttons, DQL statements,
The Concepts and Procedures section of this product guide provides conceptual information and describes how to perform TimeFinder operations on Symmetrix devices using SYMCLI commands of the EMC Solutions Enabler software. These concepts and procedures are described in the subsequent chapters as follows:
Chapter 1, “Introduction to the TimeFinder CLI,” introduces the Solutions Enabler TimeFinder component and describes the types of devices used in TimeFinder configurations.
Chapter 2, “Performing TimeFinder/Clone Operations,” describes how to perform TimeFinder/Clone operations using the SYMCLI symclone command.
Chapter 3, “Performing TimeFinder/Snap Operations,” describes how to control copy sessions for virtual devices using the SYMCLI symsnap command.
Chapter 4, “Performing TimeFinder/Mirror Operations,” describes the business continuance model and how to manage and control TimeFinder/Mirror (BCV) devices using the SYMCLI. This is a legacy chapter relevant to Symmetrix environments running EMC Enginuity version 5773 and lower. Starting with Enginuity version 5874, the TimeFinder/Mirror functions are performed through TimeFinder/Clone software using a process called clone emulation.
Note: For practical examples illustrating how to perform specific array control tasks with SYMCLI command sequences, refer to Part 2 of this guide.
Concepts and Procedures
1
This chapter introduces the SYMCLI commands for the EMC Solutions Enabler TimeFinder family components.
Introduction to TimeFinderEMC® TimeFinder® is a family of Symmetrix replication products that allows you to nondisruptively create and manage point-in-time copies of data, enabling simultaneous action of business tasks that were previously sequential. For example, TimeFinder allows you to create a point-in-time copy of critical data while this data continues to be used in production operations.
The ability to access source data during the TimeFinder copy operation eliminates the backup window and provides benefits such as accelerated upgrades and high system availability. TimeFinder can also shorten the maintenance window, minimize infrastructure costs, and improve service levels.
The TimeFinder product family is used in environments configured with the following:
◆ EMC Symmetrix VMAX™ arrays
◆ Symmetrix DMX™ arrays
Symmetrix VMAX arrays require EMC Enginuity™ Operating Environment for Symmetrix systems release 5874 or later. Symmetrix DMX arrays require Enginuity 5773 and earlier.
TimeFinder conceptsFor a comprehensive description of TimeFinder replication concepts and devices, refer to the EMC Symmetrix TimeFinder Product Guide.
EMC Solutions Enabler Symmetrix TimeFinder Family CLI Version 7.2 Product Guide18
Introduction to the TimeFinder CLI
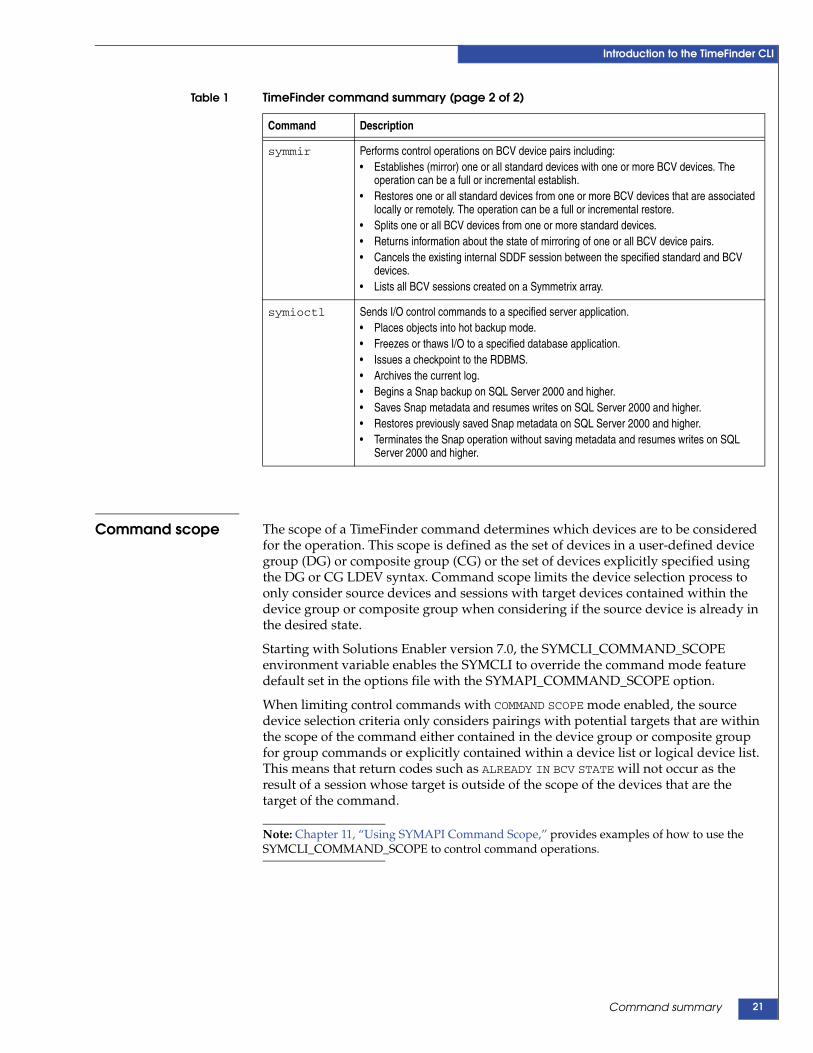
TimeFinder CLI overviewThe commands that comprise the TimeFinder component technologies of the EMC Solutions Enabler are: symclone, symsnap, symbcv, symmir, and symioctl. Table 1 on page 20 summarizes the TimeFinder control operations that these commands perform.
◆ The TimeFinder/Clone symclone command creates a point-in-time copy.
The TimeFinder/Clone operations are create, activate, recreate and activate (or establish that combines the two procedures into one operation), restore, and terminate. Chapter 2 describes the symclone command and the TimeFinder/Clone operations in greater detail.
◆ The TimeFinder/Snap symsnap command creates virtual device copy sessions between a source device and multiple virtual (VDEV) target devices. These virtual devices only store pointers to changed data blocks from the source device, rather than a full copy of the data.
The TimeFinder/Snap operations are create, activate, recreate, restore and terminate. Chapter 3 describes the symsnap command and the TimeFinder/Snap operations in greater detail.
◆ Base component commands such as symmir and symbcv perform a wide spectrum of monitor and control operations on Symmetrix standard/BCV device pairs within a TimeFinder environment.
TimeFinder CLI overview 19
Introduction to the TimeFinder CLI
Command summary
Note: To use the SYMCLI TimeFinder commands described in Table 1, make sure the SYMCLI environment is set up as instructed in the EMC Solutions Enabler Installation Guide.
As previously mentioned, the symbcv, symmir, symclone, symsnap, and symioctl commands make up the TimeFinder component technologies of the EMC Solutions Enabler. These commands perform control operations on device pairs, device groups, or composite groups. Table 1 summarizes the control operations that each command performs. The EMC Solutions Enabler Symmetrix CLI Command Reference provides complete detail about the command syntactical form.
Table 1 TimeFinder command summary (page 1 of 2)
Command Description
symclone Performs TimeFinder/Clone control operations on standard or BCV devices:• Creates a copy session for making multiple data copies between a source device and up
to 16 target devices.• Creates and activates a copy session • Modifies the mode in which a copy session is operating.• Activates a copy session to make data instantly accessible to multiple target hosts.• Copies (incrementally) all subsequent changes made to a source device to a target
device, after a clone session is fully copied.• Restores data from a target device back to a source device or to another device.• Terminates a copy session to remove holds on target devices and delete device pair
information from the Symmetrix array.• Queries information about the state of mirroring for multiple copy sessions.• Verifies the state for selected devices.• Lists all copy sessions that have been created on the Symmetrix array.
symsnap Performs Snap control operations for virtual copy sessions from normal Symmetrix devices to virtual devices. The source device can be either a standard or a BCV device and the target device must be a virtual device (VDEV).• Creates a virtual copy session for making multiple data copies between a source device
and up to 15 target devices (14 with Enginuity version 5875 and higher). The number of target devices increases to 128 when using multivirtual snap.
• Specifies a particular SAVE device pool for use in a virtual copy session.• Activates a virtual copy session to make data instantly accessible to multiple target hosts.• Recreates a snap session on existing VDEVs to prepare to active a new point-in-time
image and is only valid when issued against previously activated sessions.• Terminates a virtual copy session to remove holds on target devices and delete device
pairing information from the Symmetrix array.• Queries information about the state of mirroring for multiple copy sessions.• Verifies device states.• Attaches and detaches target devices as the preferred devices to use in a requested
Snap operation.• Restores a virtual device to another device, or to the original device.• Monitors the total percentage full of SAVE devices in a virtual copy session.• Lists all virtual copy sessions that have been created on the Symmetrix array.
symbcv Performs operations on one or more Symmetrix BCV devices:• Associates a device pair.• Disassociates a device pair.• Lists all BCV devices in the Symmetrix array.• Moves a BCV device from one group to another.• Removes all BCV devices from the specified device group.
EMC Solutions Enabler Symmetrix TimeFinder Family CLI Version 7.2 Product Guide20
Introduction to the TimeFinder CLI
Command scope The scope of a TimeFinder command determines which devices are to be considered for the operation. This scope is defined as the set of devices in a user-defined device group (DG) or composite group (CG) or the set of devices explicitly specified using the DG or CG LDEV syntax. Command scope limits the device selection process to only consider source devices and sessions with target devices contained within the device group or composite group when considering if the source device is already in the desired state.
Starting with Solutions Enabler version 7.0, the SYMCLI_COMMAND_SCOPE environment variable enables the SYMCLI to override the command mode feature default set in the options file with the SYMAPI_COMMAND_SCOPE option.
When limiting control commands with COMMAND SCOPE mode enabled, the source device selection criteria only considers pairings with potential targets that are within the scope of the command either contained in the device group or composite group for group commands or explicitly contained within a device list or logical device list. This means that return codes such as ALREADY IN BCV STATE will not occur as the result of a session whose target is outside of the scope of the devices that are the target of the command.
Note: Chapter 11, “Using SYMAPI Command Scope,” provides examples of how to use the SYMCLI_COMMAND_SCOPE to control command operations.
symmir Performs control operations on BCV device pairs including:• Establishes (mirror) one or all standard devices with one or more BCV devices. The
operation can be a full or incremental establish.• Restores one or all standard devices from one or more BCV devices that are associated
locally or remotely. The operation can be a full or incremental restore.• Splits one or all BCV devices from one or more standard devices.• Returns information about the state of mirroring of one or all BCV device pairs.• Cancels the existing internal SDDF session between the specified standard and BCV
devices.• Lists all BCV sessions created on a Symmetrix array.
symioctl Sends I/O control commands to a specified server application.• Places objects into hot backup mode.• Freezes or thaws I/O to a specified database application.• Issues a checkpoint to the RDBMS.• Archives the current log.• Begins a Snap backup on SQL Server 2000 and higher.• Saves Snap metadata and resumes writes on SQL Server 2000 and higher.• Restores previously saved Snap metadata on SQL Server 2000 and higher.• Terminates the Snap operation without saving metadata and resumes writes on SQL
Server 2000 and higher.
Table 1 TimeFinder command summary (page 2 of 2)
Command Description
Command summary 21
Introduction to the TimeFinder CLI
EMC Solutions Enabler Symmetrix TimeFinder Family CLI Version 7.2 Product Guide22
2
This chapter describes how to perform TimeFinder/Clone operations using the SYMCLI symclone command.
◆ TimeFinder/Clone overview....................................................................................... 24◆ Creating a clone copy session...................................................................................... 25◆ Activating a clone copy session .................................................................................. 31◆ Modifying a clone copy session .................................................................................. 34◆ Recreating a clone copy device ................................................................................... 35◆ Restoring data from a target device............................................................................ 37◆ Splitting a clone device pair......................................................................................... 38◆ Terminating a clone copy session ............................................................................... 39◆ Querying clone pairs .................................................................................................... 40◆ Verifying clone pair states............................................................................................ 41◆ Using a clone from a clone target (both sessions are cascaded clone)................... 43◆ Using a BCV as the clone source................................................................................. 45◆ Creating multiple clone copies.................................................................................... 47◆ Cloning a copy on a remote Symmetrix array .......................................................... 48◆ Cloning copies of the same data locally and remotely ............................................ 51◆ Cloning multiple copies locally and remotely .......................................................... 53◆ Cloning a copy at the tertiary site of a cascaded SRDF configuration .................. 55◆ Using composite groups to manage clone pairs across Symmetrix arrays........... 57◆ Command options with device groups...................................................................... 59◆ Command options with composite groups............................................................... 61◆ Command options with device files........................................................................... 63
PerformingTimeFinder/Clone
Operations
Performing TimeFinder/Clone Operations 23
Performing TimeFinder/Clone Operations
TimeFinder/Clone overviewFor a high-level overview of TimeFinder/Clone functionality, refer to the EMC Symmetrix TimeFinder Product Guide.
Symmetrix TimeFinder/Clone operations are performed using the symclone command to create clone copies of a source device on multiple target devices.
Depending on whether a device has associated BCVs, a single source device can have up to 16 clone copy sessions. You can copy up to eight full data copies simultaneously, without disruption to database production activity.
Note: With Enginuity versions prior to 5671, you can only copy up to four full data copies simultaneously. “Understanding copy session limits” on page 26 contains greater detail on the number of available copies.
EMC Solutions Enabler Symmetrix TimeFinder Family CLI Version 7.2 Product Guide24
Performing TimeFinder/Clone Operations
Creating a clone copy sessionInitially, you must create a clone copy session that defines and sets up the cloning devices you have selected for the clone operation.
To begin a clone copy session and define a specified target device DEV005 to be the clone of source device DEV001 in group ProdDB:
symclone -g ProdDB create DEV001 sym ld DEV005
Starting with Solutions Enabler version 7.0, you can specify -nocopy and -nodifferential flags on the symclone create command:
◆ The -nocopy flag creates a session without a background copy. The -nocopy flag is not allowed with the -differential flag.
◆ The -nodifferential flag creates a nondifferential session, which cannot be recreated or restored.
The symclone create action defines the clone copy session requirements and sets the track protection bitmap on the source device to detect which tracks are being accessed by the target host or written to by the source host, as shown in Figure 1.
Figure 1 TimeFinder/Clone copy of a standard device
◆ The target device is made Not Ready to its host and placed on hold status for clone copy session activity. This prevents other control operations from using the device.
◆ The device pair state will transition from CreateInProgress to Created when complete.
◆ The clone copy does not become accessible to its host until the copy session is activated. “Activating a clone copy session” on page 31 contains greater detail.
Note: You cannot verify that a device pair is in the CreateInProgress state. After the copy session completes, you can issue a symclone verify -created command to verify that the clone pair was successfully created. If a copy session is created and not activated, it can be terminated. Although, the data on the target device should then be considered invalid.
SourceDEV001
TargetDEV005
ControllingHost
symclone create
followedby
symclone activate
TargetHost
SYM-001791
Creating a clone copy session 25
Performing TimeFinder/Clone Operations
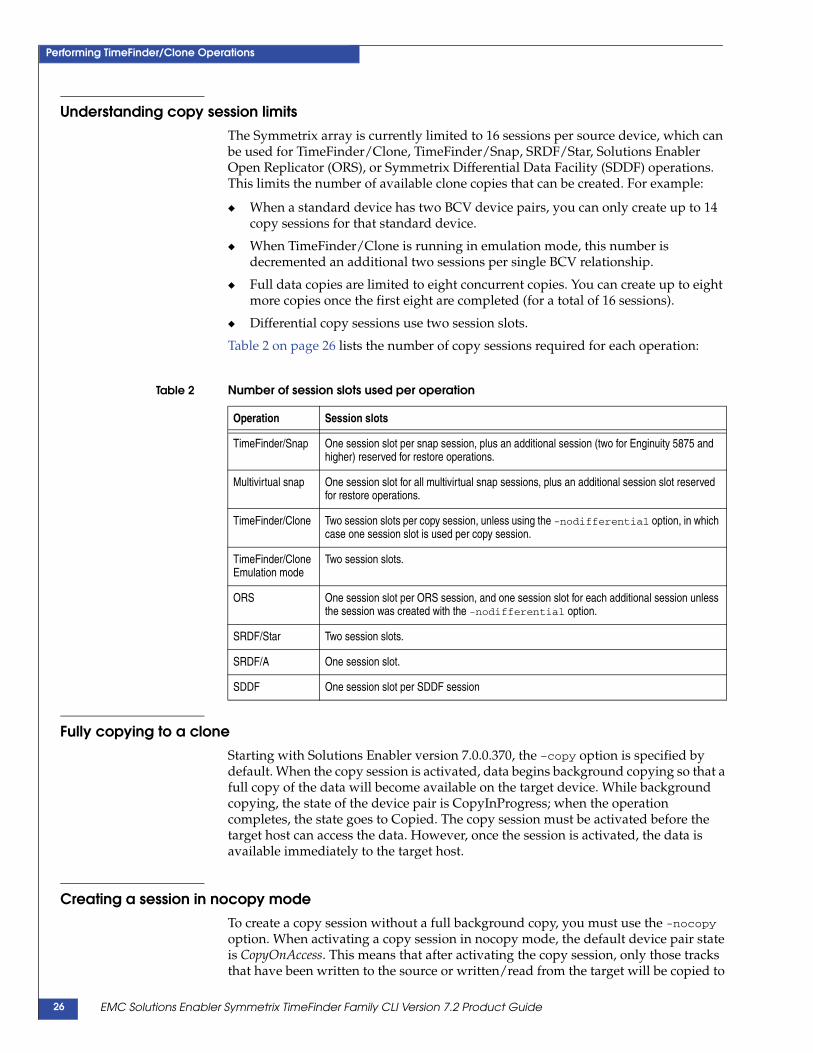
Understanding copy session limitsThe Symmetrix array is currently limited to 16 sessions per source device, which can be used for TimeFinder/Clone, TimeFinder/Snap, SRDF/Star, Solutions Enabler Open Replicator (ORS), or Symmetrix Differential Data Facility (SDDF) operations. This limits the number of available clone copies that can be created. For example:
◆ When a standard device has two BCV device pairs, you can only create up to 14 copy sessions for that standard device.
◆ When TimeFinder/Clone is running in emulation mode, this number is decremented an additional two sessions per single BCV relationship.
◆ Full data copies are limited to eight concurrent copies. You can create up to eight more copies once the first eight are completed (for a total of 16 sessions).
◆ Differential copy sessions use two session slots.
Table 2 on page 26 lists the number of copy sessions required for each operation:
Fully copying to a cloneStarting with Solutions Enabler version 7.0.0.370, the –copy option is specified by default. When the copy session is activated, data begins background copying so that a full copy of the data will become available on the target device. While background copying, the state of the device pair is CopyInProgress; when the operation completes, the state goes to Copied. The copy session must be activated before the target host can access the data. However, once the session is activated, the data is available immediately to the target host.
Creating a session in nocopy modeTo create a copy session without a full background copy, you must use the -nocopy option. When activating a copy session in nocopy mode, the default device pair state is CopyOnAccess. This means that after activating the copy session, only those tracks that have been written to the source or written/read from the target will be copied to
Table 2 Number of session slots used per operation
Operation Session slots
TimeFinder/Snap One session slot per snap session, plus an additional session (two for Enginuity 5875 and higher) reserved for restore operations.
Multivirtual snap One session slot for all multivirtual snap sessions, plus an additional session slot reserved for restore operations.
TimeFinder/Clone Two session slots per copy session, unless using the -nodifferential option, in which case one session slot is used per copy session.
TimeFinder/Clone Emulation mode
Two session slots.
ORS One session slot per ORS session, and one session slot for each additional session unless the session was created with the -nodifferential option.
SRDF/Star Two session slots.
SRDF/A One session slot.
SDDF One session slot per SDDF session
EMC Solutions Enabler Symmetrix TimeFinder Family CLI Version 7.2 Product Guide26
Performing TimeFinder/Clone Operations
the target device. A full data copy to the target device will not occur unless all of the device tracks are accessed or written to while participating in the active session.
Note: If a write occurs to the source device, old data is copied to the target device. If a write occurs to the target device, new data is written to the target device.
When Enginuity detects that a source-protected track was written, it copies the track to the target device and unprotects the track before accepting the new write. Data from the source then becomes available to a target-connected host during the active session.
You can modify this default device pair state to CopyOnWrite by setting the following parameter in the options file to ENABLE.
SYMAPI_CLONE_COPY_ON_WRITE = ENABLE | DISABLE
You can also modify the default device pair state by setting the following SYMCLI environment variable:
SYMCLI_CLONE_COPY_ON_WRITE = ENABLE | DISABLE
The environment variable will override the default settings specified in the options file.
Once you have enabled CopyOnWrite as the default pair state and activated a copy session, all reads will be handled from the source device and writes to the source device or target device during the active copy session will result in the data being copied to a target device.
Starting to copy data before activating the sessionWith Enginuity version 5671 and higher, you can use the -precopy option with the create argument to start copying tracks in the background, before activating the copy session. This allows the early movement of data before the point-in-time clone copy is established.
Note: When using -precopy, the target device is not ready to the host until the session is activated.
Precopy can occur in the Created or Recreated state. While in this state, the precopy process keeps checking for new writes to be precopied to the target device until the copy session is activated. Once activated, the normal background copy mechanism starts and the precopy operation ends. You can set the precopy mode in one of two ways:
◆ Include the –precopy option with the symclone create command. Using –precopy will result in a full copy. For example:
symclone –g ProdDB create –precopy SRC sym ld TGT
◆ Use the symclone set mode command as described in “Modifying a clone copy session” on page 34. For example:
symclone –g ProdDB set mode precopy SRC sym ld TGT
Copying only changed data to a cloneWith Enginuity version 5671 and higher, subsequent cloning to the same target can be performed as differential copying (that is, only new writes to the source device will be copied). You can use the –differential option the first time you create a clone
Creating a clone copy session 27
Performing TimeFinder/Clone Operations
copy session. Starting with Solutions Enabler version 7.0.0.370, the –differential option is specified by default.
Note: When the -differential option is used, the -nocopy option is not allowed.
A differential clone operation copies only those device tracks that have changed since the full clone was performed. However, to do this the copy session that existed for the full clone must still exist. You must also set up the differential clone during a full clone operation. Therefore, the –differential option must be used with the –copy (or –precopy) option. For example:
The –differential option creates an SDDF session for the source.
The symclone activate command initiates a full copy of the source device to the target device. For example:
symclone –g ProdDB activate SRC sym ld TGT
To capture subsequent writes to the source during this clone pair session, use symclone recreate to clone just those tracks that have changed since the full copy completed:
To save some steps, you can use the symclone establish command in the same way. For example, after the first full clone operation, you can capture any new writes with a subsequent clone operation that is automatically an incremental copy:
Copying from a source device to a larger target deviceClone source and target devices no longer have the requirement to be the same size. Now the size of a clone target device can be larger than the source device. This support requires the following SYMCLI environment variable be set:
SYMCLI_CLONE_LARGER_TGT = ENABLED
Limitations — The following limitations apply:
◆ Restore is not allowed.
◆ Full copy support only; must use -nodifferential.
◆ Concatenated metadevices are not supported.
◆ When using this feature on striped metadevices you have to preserve the metageometry. That is, the source and target devices should contain the same number of metamembers. However, the target device members can be larger than the source device members.
◆ Exact pairing are the only operations allowed, as follows:
-file
-g or -cg with -exact
-g or -cg with source and target ldev name supplied
EMC Solutions Enabler Symmetrix TimeFinder Family CLI Version 7.2 Product Guide28
Performing TimeFinder/Clone Operations
Using the establish commandTo create and then immediately activate a copy session with a single command, you can use the symclone establish command.
To create and then activate the copy session shown in the example on page 25, enter:
Note: The symclone establish command sets the target device to Not Ready for a short time. Therefore, you may want to unmount the target host before issuing the command.
Pairing an additional target device with each source device in a groupWhen working with either a composite or device group, you can use the -concurrent option with the create or full establish action to pair an additional target device with each source device in a group.
To pair an additional target device with each source device in group ProdDB, enter:
symclone -g ProdDB create -concurrent
When the copy session is created, an additional target device will be paired with each source device in the group. For example, if there were two target devices paired with each source device in the group before creating the session, there will be three target devices paired with each source device after the session is created.
To verify that each source device in the group has multiple targets, enter:
symclone -g ProdDB verify -created -concurrent
Performing operations on devices in a clone target listWhen working with either a composite or device group, you can use the -tgt option to indicate that devices from a local target list are to be used as targets for the specified action. You can also use the -tgt option together with the following options to indicate that devices from a remote target list are to be used as targets for the specified action:
◆ -rdf specifies remote attached devices (RTGTs).
◆ -hop2 specifies devices that are remotely associated on the second hop of a cascaded SRDF configuration (2TGTs).
The -tgt option will work with all symclone actions, except for query and verify, as these actions are source device oriented and will select all target devices paired with source devices by default, including TGT and RTGT.
When working with specific pairs, the following symclone syntax will support the target devices:
sym ld LdevNamesym dev SymDevNamesym pd PdevName
Note: The EMC Solutions Enabler Symmetrix Array Management CLI Product Guide contains information on creating and managing clone target lists.
In the following example, action can be any symclone action, except for query and verify.
Creating a clone copy session 29
Performing TimeFinder/Clone Operations
Copying from a local STD to a local TGTTo copy from a local standard device to a local target, use the following syntax:
EMC Solutions Enabler Symmetrix TimeFinder Family CLI Version 7.2 Product Guide30
Performing TimeFinder/Clone Operations
Activating a clone copy sessionTo activate the copy session created in “Creating a clone copy session” on page 25, enter:
symclone -g ProdDB activate DEV001 sym ld DEV005
This activates the copy operation from the source device to the target device. Activating the copy session places the target device in the Read/Write state. The target host can access the cloned data and has access to data on the source host until the copy session is terminated.
Note: Cloned data is made available as a point-in-time copy at the time of activation and not at the time that the session was created.
Precopying data before activating the sessionThe -precopy option can be used with the create or recreate actions to start copying tracks in the background, before the copy session is activated. When using this option, a point-in-time copy will be established when the session is activated.
While in the Created state, the pre-copy process never actually completes. Instead, the process keeps checking for new writes to be pre-copied to the target device until the session is activated. Once activated, the normal background copy mechanism finishes copying the remaining tracks and the pre-copy operation ceases.
Making the target device not ready to the hostThe -not_ready option can be used with the activate action to cause the target device to remain not ready to its host, as follows:
The copy session will be activated and the target device will be placed in the Not Ready state. The clone copy can later be read/write enabled to the host using either the symdg ready or symdev ready command.
Activating copy sessions consistentlyThe symclone activate command can be used with the -consistent option to create clone copies that are consistent with the database up to the point in time that the activation occurs. This feature can be implemented using either PowerPath®-connected devices, the Consistency Assist feature,1 or SRDF/A.
Note: PowerPath is not supported with Solutions Enabler version 7.2 and higher.
This feature can be used to create clone copies that are consistent with the database up to the point in time that the activation occurs. The feature suspends writes to the source devices during the activation.
When the activation has completed, writes are resumed and the target device contains a consistent production database copy of the source device at the time of
1. If the R2 is in a consistent state and the copy session is pre-copying data, setting the consistent option invokes SRDF/A to maintain consistency, instead of ECA.
Activating a clone copy session 31
Performing TimeFinder/Clone Operations
activation. For information on how PowerPath, ECA, and SRDF/A can be used for consistent split operations, refer to “TimeFinder consistent split” on page 142.
You can use the Enginuity Consistency Assist (ECA) feature to consistently activate copy sessions across multiple, heterogeneous hosts. To consistently activate copy sessions using ECA, you must have either a control host with no database or a database host with a dedicated channel to the gatekeeper devices. In a SAN environment, gatekeepers and DATA devices may share the same FA port on the Symmetrix array but the gatekeepers must be available on a separate host HBA than the DATA devices. This means that there must be a dedicated channel from a host HBA to the switch that can be used to access only gatekeepers and not devices that contain host data. This will ensure that in write intensive environments SYMAPI will be able to freeze and then thaw I/O to the devices in the device group within the ECA window, regardless of the number of outstanding I/Os held by the HBA.
Note: For detailed information on gatekeeper management, refer to the EMC Solutions Enabler Installation Guide.
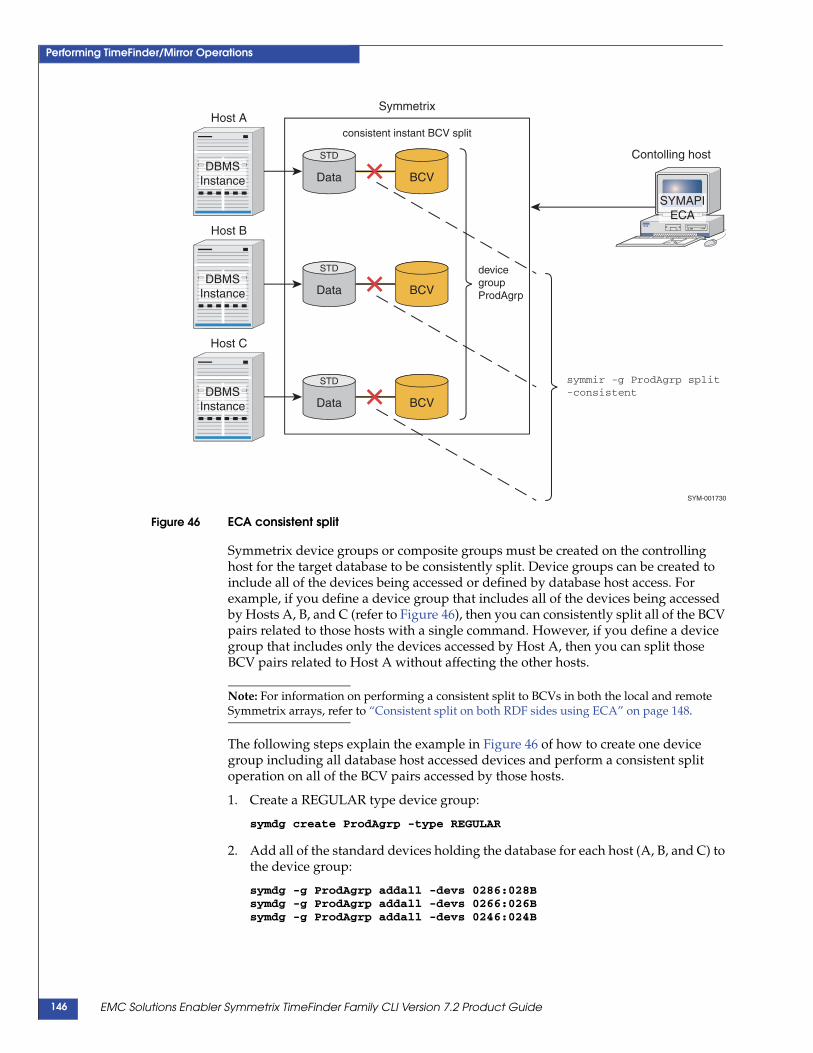
Figure 2 illustrates how a control host can consistently activate a copy session involving three database hosts that access devices on a Symmetrix array.
Figure 2 TimeFinder/Clone consistent activate using ECA
A Symmetrix device group, composite group, or a device file must be created on the controlling host for the target database to be consistently activated. Device groups can be created to include all of the devices being accessed or defined by database host access. For example, if you define a device group that includes all of the devices being accessed by Hosts A, B, and C (see Figure 2), then you can consistently activate all of the copy sessions related to those hosts with a single command. However, if you define a device group that includes only the devices accessed by Host A, then you can activate those copy sessions related to Host A without affecting the other hosts.
TargetDEV
TargetDEV
TargetDEV
consistently activate copy sessions
SYMCLIECA
CloneSource
Host A
Host B
Host C
SYM-001792
DBMSInstance
DBMSInstance
DBMSInstance
Contolling host
devicegroupProdAgrp
symsnap -g ProdAgrpactivate -consistent
CloneSource
CloneSource
EMC Solutions Enabler Symmetrix TimeFinder Family CLI Version 7.2 Product Guide32
Performing TimeFinder/Clone Operations
Activating a clone session for an additional pair in a groupWhen working with either a composite or device group, you can use the -concurrent option with the activate action to activate a copy session for an additional clone pair in a group.
Note: The copy session must exist prior to issuing the command.
To activate a copy session for an additional clone pair in group ProdDB, enter:
symclone -g ProdDB activate -concurrent
Activating a clone copy session 33
Performing TimeFinder/Clone Operations
Modifying a clone copy sessionUse the set mode command to modify the mode in which a copy session is operating.
Note: With Enginuity version 5x71 and higher, use set mode to modify the mode between Copy, Nocopy, and Precopy on clone pairs that are in a Created, Recreated, or Activated state.
Possible values are:
◆ Copy — If a session was created without the -copy option, a copy will initiate once the session is activated, or the copy will start immediately if the session is already activated.
◆ Nocopy — If a session was created with the -nocopy option, the session will become CopyOnWrite/CopyOnAccess once the session is activated and no full device copy will initiate, or the copy will stop if the session is already activated.
Note: Do not attempt to change a session created with the -differential option (default) to the nocopy mode, as the session will fail.
◆ Precopy — If a session was created without the -precopy option, setting the mode to precopy will cause a Pre-Copy to take effect. Once you are in Pre-Copy mode, you can change to No-Copy mode. Once the session is activated, the session changes to Copy mode. For more information on Precopy, refer to “Starting to copy data before activating the session” on page 27.
Example To change a copy session from Copy mode to Nocopy mode, enter:
symclone -g ProdDB set mode nocopy
EMC Solutions Enabler Symmetrix TimeFinder Family CLI Version 7.2 Product Guide34
Performing TimeFinder/Clone Operations
Recreating a clone copy deviceUse the symclone recreate command to incrementally copy all subsequent changes made to the source device (made after the point-in-time copy initiated) to the target device:
◆ With Enginuity 5772 and higher, you can use symclone recreate once a clone device is in the CopyInProg state to incrementally copy all subsequent changes made to the source device.
◆ With Enginuity releases prior to 5772 that support recreating a clone device, the clone device must be fully Copied state before you can use symclone recreate to incrementally copy subsequent changes.
To recreate a clone copy:
◆ The copy session must not have been created with the -nocopy or -nodifferential option.
◆ The session must have been activated to establish the new point-in-time copy.
While in the Recreated state, the target device will remain Not Ready to the host.
Example To recreate the copy session created in the example on page 25, enter:
symclone -g ProdDB recreate DEV001 sym ld DEV005
Starting to copy data before activating the sessionThe -precopy option can be used with the recreate argument to start copying tracks in the background, before the copy session is activated.
When using this option, a point-in-time copy will be established when the session is activated.
While in the Recreated state, the pre-copy process never actually completes. Instead, the process keeps checking for new writes to be pre-copied to the target device until the session is activated. Once activated, the normal background copy mechanism takes over and the pre-copy operation ceases.
You must use the -precopy option with the recreate argument if the session was initially created as a precopy session.
Using the establish commandYou can recreate and then immediately activate a clone session using the symclone establish command. To recreate and then activate the copy session shown in the example on page 25, enter:
symclone -g ProdDB establish DEV001 sym ld DEV005
Note: The symclone establish command sets the target device to Not Ready for a short time. Therefore, you may want to unmount the target device before issuing the command.
You can also use the -concurrent option with the establish command to activate an existing clone session for an additional clone pair in a group.
Example To recreate and then activate a copy session for an additional clone pair in group ProdDB, enter:
symclone -g ProdDB establish -concurrent
Recreating a clone copy device 35
Performing TimeFinder/Clone Operations
Recreating a clone session for each pair in a groupWhen working with either a composite or device group, you can use the -concurrent option with the recreate action to recreate a clone session for each clone pair in a group.
Example To recreate a copy session for each clone pair in group ProdDB, enter:
symclone -g ProdDB recreate -concurrent
EMC Solutions Enabler Symmetrix TimeFinder Family CLI Version 7.2 Product Guide36
Performing TimeFinder/Clone Operations
Restoring data from a target deviceUse the symclone restore command to copy target data to another device (full restore), or back to the original source device (incremental restore).
In the case of a full restore (-full), the original session will terminate and a copy session to the target of the restore will start.
In the case of an incremental restore, the original session copy direction is reversed and changed data is copied from the target device to the source device. To support this operation, the session must be in a fully Copied state.
Example To fully restore data from the original target device (DEV005) created in the example on page 25 to a device (DEV006) that was not involved in the original clone session, enter:
Note: When constructing a symclone restore command, the device receiving the data always appears first in the command, followed by the device from which the data is being copied. Therefore, in the above command, DEV006 is actually the target of the data being copied from DEV005.
With Solutions Enabler version 7.2 and higher, the use of an ORS control device as a clone restore target is allowed when the device is in a PUSH session and in the ORS Copied state.
Restoring data from a target device 37
Performing TimeFinder/Clone Operations
Splitting a clone device pairWith Enginuity version 5671 and higher, use the symclone split command to split a clone device pair that is in the Restored state. This command changes the direction of the clone relationship (that is, the original source device becomes the source device for a future copy), which enables you to use either the establish or recreate command.
Example To split the pair created in the example on page 25, enter:
symclone -g ProdDB split DEV001 sym ld DEV005
EMC Solutions Enabler Symmetrix TimeFinder Family CLI Version 7.2 Product Guide38
Performing TimeFinder/Clone Operations
Terminating a clone copy session
Terminating a copy session deletes the pairing information in the Symmetrix array and removes any hold on the target device.
Terminating a session while the device pairs are in the CopyOnAccess, CopyOnWrite, or CopyInProg state will cause the session to end. If the application has not finished accessing all of the data, the target copy is not a full copy.
The symclone terminate command is allowed for all TimeFinder/Clone pair states.
Example To terminate the copy session in the example in page 25 using the symclone command, enter:
symclone -g ProdDB terminate DEV001 sym ld DEV005
Note: A created and activated copy session may be terminated, but the data on the target device is not valid unless the state had previously been COPIED.
If the state is CopyInProg, then the -symforce option must be applied to terminate the session. But, this will also leave the target copy as an incomplete copy.
Terminating a clone copy session 39
Performing TimeFinder/Clone Operations
Querying clone pairsYou can perform a query to determine the state of a clone pair or all clone pairs in a device group, composite group, or device file. The query is sent via the gatekeeper device to the Symmetrix array, returning with information about the state of the clone pair(s).
The following forms enable you to target devices in a device group, composite group, or device file:
You can also obtain results using the -offline option, which looks at your configuration based on the Symmetrix host database.
The results of the query include the following information for each member of a clone pair in a device group:
◆ Logical device name◆ Symmetrix device name◆ Number of invalid tracks◆ Clone pair state
Using the -summary option
If you use the -summary option with the query argument, the results of the query will include the following information:
◆ Number of clone pairs in each clone pair state
◆ Number of invalid tracks
◆ Synchronization rate
◆ Estimated time to completion
The synchronization rate and estimated time to completion are shown only when -i or -c is specified and their has been a change in the number of invalid tracks since the previous iteration.
The -summary option also works with the verify argument.
Example To view the number of clone pairs in the prod device group that are in each state, and to view the estimated time to completion, enter:
symclone -g prod query -summary -i 60
EMC Solutions Enabler Symmetrix TimeFinder Family CLI Version 7.2 Product Guide40
Performing TimeFinder/Clone Operations
Verifying clone pair statesYou can use the symclone verify command to verify whether one or all clone pair(s) in a device group, composite group, or device file are in a particular state. The command can be used in scripts to guarantee that the clone device pair(s) are in a particular state prior to executing subsequent SYMCLI commands. If you do not specify any qualifiers with symclone verify, the default is to check for the Copied state.
The following forms enable you to target devices in a device group, composite group, or device file:
The following options qualify the symclone verify command. If you need to verify a concurrent clone pair, include –concurrent with the option (for example, –copied –concurrent):
◆ -copied verifies that the copy sessions are in the Copied state.
◆ -copyinprog verifies that the copy sessions are in the CopyInProgress state.
◆ -copyonaccess verifies that the copy sessions are in the CopyOnAccess state.
◆ -copyonwrite verifies that the copy sessions are in the CopyOnWrite state.
◆ -created verifies that the copy sessions are in the Created state.
◆ -cycled verifies that the copy sessions have completed one precopy cycle. This options requires the -precopy option.
◆ -precopy verifies that the copy sessions are in the Precopy state.
◆ -recreated verifies that the copy sessions are in the Recreated state.
◆ -restored verifies that the copy sessions are in the Restored state.
◆ -split verifies that the copy sessions are in the Split.
Examples For a multi-clone or concurrent clone device group, specifying the clone on the command line ensures that the verify operation checks the status of the clone. Otherwise, the verify operation checks the status of the standard device, which may no longer be established with the clone that you want to verify. For example, the following command returns the status of standard device DEV001 with its last paired clone:
symclone -g ProdBgrp verify DEV001
But the following command returns the status of a specific clone pair (DEV001 with DEV005):
symclone -g ProdBgrp verify DEV001 sym ld DEV005
Verifying clone pair states 41
Performing TimeFinder/Clone Operations
The following command checks status every 30 seconds until all clone pairs in the device group (ProdBgrp) or composite group (MyConGrp) are in the Copied state (the default when no state is specified on the command line):
Possible outputs at 30-second intervals can be that none, not all, or all devices are copied.
The verify action returns a value of zero (code symbol CLI_C_SUCCESS) if the verify criteria are met, or one of the unique codes in Table 3 if the verify criteria are not met.
Table 3 lists the options to verify a clone pair state:
Table 3 Using options to verify a clone pair state
Options used with Verify Code number Code symbol
-copied 55 CLI_C_NOT_ALL_COPIED
-copied 56 CLI_C_NONE_COPIED
-copyinprog 53 CLI_C_NOT_ALL_COPYINPROG
-copyinprog 54 CLI_C_NONE_COPYINPROG
-copyonaccess 57 CLI_C_NOT_ALL_COPYONACCESS
-copyonaccess 58 CLI_C_NONE_COPYONACCESS
-copyonwrite 66 CLI_C_NOT_ALL_COPYONWRITE
-copyonwrite 67 CLI_C_NONE_COPYONWRITE
-created 60 CLI_C_NOT_ALL_CREATED
-created 61 CLI_C_NONE_CREATED
-cycled 75 CLI_C_NOT_ALL_PRECOPY_CYCLED
-cycled 76 CLI_C_NONE_PRECOPY_CYCLED
-precopy 73 CLI_C_NOT_ALL_PRECOPY
-precopy 74 CLI_C_NONE_PRECOPY
-recreated 68 CLI_C_NOT_ALL_RECREATED
-recreated 69 CLI_C_NONE_RECREATED
-restored 12 CLI_C_NOT_ALL_RESTORED
-restored 13 CLI_C_NONE_RESTORED
-split 25 CLI_C_NOT_ALL_SPLIT
-split 26 CLI_C_NONE_SPLIT
EMC Solutions Enabler Symmetrix TimeFinder Family CLI Version 7.2 Product Guide42
Performing TimeFinder/Clone Operations
Using a clone from a clone target (both sessions are cascaded clone)In environments running Enginuity 5874 and higher with Solutions Enabler version 7.0 and higher, the target device of a clone session can be used as the source for one or more clone sessions. This cascading clone capability allows a clone operation to take place with a device that is already involved in a clone operation without ending the first clone session.
Note: Cascaded clone on thin devices is supported in environments running Enginuity version 5875 and higher with Solutions Enabler version 7.1 and higher. The only exception is that for devices AB in the Restored state, when A or C is a thin device, the creation of a new session AC is not permitted.
As Figure 3 shows, cascaded sessions are accepted from left to right. This means you can use TimeFinder to clone device A to device B. Then, while the relationship between A and B is preserved, you can clone device B to device C. If you have session ABC, then session BC can only be activated after session AB has been activated. Precopy sessions are allowed.
Figure 3 Clone from clone target (both sessions are cascaded clone)
Restore to Target Restore to Target (RTT) allows you to perform an incremental restore to a cascaded clone target. For example, devices in an ABC cascaded clone session can copy data from device C to device A (via device B). RTT is supported in environments running Enginuity 5875 and higher with Solutions Enabler version 7.2 and higher.
Configuration Rules When using a clone from a clone target, the following rules apply:
◆ If the session state is CopyInProg, SyncInProg or RestoreInProg, the -symforce flag is required.
◆ Recreate and incremental clone establish are allowed only on differential sessions.
◆ The mode nocopy can only be set on nondifferential sessions.
◆ The mode precopy can only be set in created and recreated states.
◆ Enginuity 5874 and higher only allows a 2 hop (device A target device Btarget device C) cascaded relationship provided the interactions rules on page 43 are followed. Any attempt to establish a 3 hop relationship (DC when ABC or Z A when ABC) will fail. Although circular cascading ABA is not allowed, devices A and B can have additional multiple targets. For example: AB(1)C(1) and AB(2) and AB(3)C(2). In a concurrent clone with cascaded relationship like ABC and AD Enginuity 5874 will not allow
A B C
Clone 1: The relationshipbetween A and B is preserved, allowing differential resynchronizationfollowing Clone 2.
Clone 2: Copy operation is allowedafter Clone 1 copy completes.Precopy session is allowed.
Clone 1: Clone to Clone copy operationPrecopy session is allowed.
Using a clone from a clone target (both sessions are cascaded clone) 43
Performing TimeFinder/Clone Operations
incremental restore D or BC. Likewise, with two separate clone pairs like A-B and C-D, Enginuity 5874 will not allow a create, full establish, or full restore between B and C.
Note: The operations allowed for each configuration are not all the same and are dependent on the states of both relationships. The Terminate and Cancel operations are allowed for all session states.
Table 4 lists the configuration rules for using a clone from a clone target.
Table 4 Clone from clone target session states (both sessions are cascaded clone)
Activate ABSet Mode AB Recreate BC (precopy)Set Mode BC
Recreate ABEstablish ABSet Mode AB Recreate BCSet Mode BC
Recreate AB Establish ABRestore ABSet Mode AB Recreate BCEstablish BCSet Mode BC Incr. Restore BC
Recreate BCEstablish BC
Split ABRecreate BCEstablish BCRestore BC
BC RestoreInProg
Not proper state Not proper state Not proper state Not proper state Not proper state
BC Restored
Full Restore ABSplit BC
Not proper state Not proper state Not proper state Split BCIncr. Restore BC
Split BC Split BC
EMC Solutions Enabler Symmetrix TimeFinder Family CLI Version 7.2 Product Guide44
Performing TimeFinder/Clone Operations
Using a BCV as the clone sourceAs Figure 4 shows, you can create a copy session between a BCV device and a target device. The controlling host performs I/O to the standard device that is established with a BCV as part of a BCV pair. At some point, when the BCV is synchronized with the standard device, you can split the BCV from the standard and create a copy session between the BCV and a target device that might be accessed by Host C. The split operation must be entirely complete, including the background phase, before you can create a copy session on it.
Figure 4 Creating a TimeFinder/Clone from a BCV source
For additional information on using the symmir command and how to perform an instant split operation, refer to Chapter 4.
Pair states ruling clone operationsBecause various other ongoing operations can conflict with a clone session, certain rules must be considered. The availability of some clone copy operations depends on the current state of SRDF and BCV pairs. The following rules apply to certain BCV pair states:
◆ If the source or target of a symclone create or activate operation is a BCV, the BCV pair state must be split. The split must be totally complete before the operation is allowed.
◆ Available with Enginuity 5874, a source device A to a target device B (BCV device) clone session is in Emulation Mode state and the source device B to target device C is a clone session.
◆ A TimeFinder standard device cannot be created or activated in a clone session if the BCV pair state is SplitBfrRest or RestInProg.
◆ The symclone terminate command is allowed for all TimeFinder pair states.
TargetDEV005
BCVBCV001
Host B
device groupProdDB
symmir -g split-instant
symclone createsymclone activate
I/O
I/O
I/O
Host C
SYM-001793
STDDEV001
ControllingHost
Copysession
Using a BCV as the clone source 45
Performing TimeFinder/Clone Operations
Note: Appendix C explains the TimeFinder pair states that apply to TimeFinder/Clone copy sessions. Table 17 on page 170 lists each BCV pair state. “State rules for TimeFinder/Clone operations” on page 349 contains specific information regarding possible SRDF pair state conflicts.
Example: Creating a clone from a source deviceThe following example creates a copy session between source device BCV001 in device group ProdDB and target device DEV005 on the same Symmetrix array.
Once the copy session is activated, Host C can access target device tracks. If the accessed target tracks have not yet been copied, Symmetrix Enginuity software copies them for immediate access for Host C. If Host B writes to BCV device tracks that have not yet been copied, the Enginuity software immediately copies the tracks before allowing new data to overwrite those BCV tracks.
Note: In this example, where multiple hosts have access to the BCV source, consider using the -not_ready option with the split command to make the BCV not ready. This keep the same data on the BCV and clone. If you decide to use this option, you may need to release any Not Ready state imposed on any devices once the session completes.
The following steps outline the example shown in Figure 4:
1. Perform an instant split on the BCV pair. Use the -not_ready option to prevent the BCV’s host from writing to it prior to the clone operation:
EMC Solutions Enabler Symmetrix TimeFinder Family CLI Version 7.2 Product Guide46
Performing TimeFinder/Clone Operations
Creating multiple clone copiesYou can create up to 16 (nondifferential) copies of a standard source device on various targets. A source device can be concurrently copying copies of the same data to up to eight target devices at one time. For information on the number of clone copies that can be created, refer to “Understanding copy session limits” on page 26.
To create clone copies on the eight target devices, each target requires a separate copy session to become a clone. Target host devices cannot access the cloned data until the copy session has been activated. Up to 16 no-copy sessions can be activated at the same time on the same standard source device.
Creating multiple clone copies from a standard deviceFigure 5 illustrates creating multiple clone copies from a standard source device DEV001 on four standard target devices (DEV005, DEV006, DEV007, and DEV008) with various hosts accessing them.
Figure 5 Creating multiple clone copies from a standard device
Note: A separate copy session must be created between the source device (DEV001) and each target device (DEV005, DEV006, DEV007, and DEV008).
TargetDEV005
STDDEV001
TargetDEV006
TargetDEV007
TargetDEV008
device groupProdDB
Host A
Host C
Host B
MultipleCopies
Host D
SYM-001794
symclone createsymclone activate
ControllingHost
Creating multiple clone copies 47
Performing TimeFinder/Clone Operations
Cloning a copy on a remote Symmetrix arrayThis section explains how to use SRDF to clone devices on a remote Symmetrix array.
Cloning a local R1 standard deviceFigure 6 illustrates how to clone a copy of a local R1 standard device on a remote Symmetrix array. Performing SYMCLI commands from the controlling host allows the remote target device to receive a copy of the data from the R2 device. The cloned data can be accessed by the remote host.
Figure 6 Cloning a copy of a local R1 standard device on a remote Symmetrix array
The following steps outline the example shown in Figure 6:
1. Create an RDF1 type device group:
symdg create Rdf1Grp –type rdf1
2. Add to the device group an R1 standard device (288) on the local Symmetrix array (sid 3264) to be the source device. Associate a target BCV device (097) on the remote Symmetrix array to hold the clone copy. Note that to perform a remote operation you will need to use a remote target list (RTGT or RBCV list). This example uses an RBCV list.
symdg -g Rdf1Grp –sid 3264 add dev 288symbcv -g Rdf1Grp associate dev 097 -rdf
3. Clone an immediate full copy from the source device (DEV001) to the remote BCV target device (RBCV001). DEV001 is the logical device name for device 288, and RBCV001 is the logical device name for BCV 097:
EMC Solutions Enabler Symmetrix TimeFinder Family CLI Version 7.2 Product Guide48
Performing TimeFinder/Clone Operations
4. To query the progress of the clone operation or verify when the copy is completed, issue the following commands that examine the clone pair (source and target):
Cloning a copy of a local BCV device on a remote Symmetrix arrayFigure 7 illustrates how to clone a copy of a local BCV device on a remote Symmetrix array. Performing SYMCLI commands from the controlling host allows the remote target device to receive a copy of the data from the R2 device. The cloned data can be accessed by remote Host A.
Figure 7 Cloning a copy of a local BCV device on a remote Symmetrix array
The following steps outline the example shown in Figure 7:
1. Create an RDF1 type device group:
symdg create Rdf1Grp –type rdf1
2. Add to the device group a BCV device (289) on the local Symmetrix array (sid 3264) to be the source device. Associate a target BCV device (289) on the local Symmetrix array. Associate a target BCV device (097) on the remote Symmetrix array to hold the clone copy. In this case, the remote target device must be a BCV:
symdg -g Rdf1Grp –sid 3264 add dev 288symbcv -g Rdf1Grp -sid 3264 associate dev 289 -rdfsymbcv -g Rdf1Grp associate dev 097 -rdf
3. Clone an immediate full copy from the BCV device (BCV001) to the remote BCV target device (RBCV001). DEV001 is the logical device name for device 288, and RBCV001 is the logical device name for BCV 097:
4. To query the progress of the clone operation or verify when the copy is completed, issue the following commands that examine the clone pair (source and target):
Cloning a copy on a hop-2 Symmetrix arrayFigure 8 illustrates how to clone a copy of a local R1 standard device on a remote Symmetrix array in the second level of a multihop environment. Performing SYMCLI commands from the controlling host allows the remote target device to receive a copy of the data from the R2 device. The cloned data can be accessed by remote Host A.
Figure 8 Cloning a copy of a local R1 standard device on a Hop-2 Symmetrix array
The following steps outline the example shown in Figure 8:
1. Create an RDF1 type device group:
symdg create Rdf1Grp –type rdf1
2. Add to the device group an R1 standard device (288) on the local Symmetrix array (sid 3264) to be the source device. Associate a BCV device (097) on the Hop-1 Symmetrix array. Associate a BCV device (098) on the second-level (Hop-2) remote Symmetrix array to hold the clone copy. To perform a remote operation, you must use a remote target list (RTGT or RBCV list). Our example uses an RBCV list:
symdg -g Rdf1Grp –sid 3264 add dev 288symbcv -g Rdf1Grp associate dev 097 -rdfsymbcv -g RDF1GRP associate dev 098 -rrdf
3. Clone an immediate full copy from the source device (DEV001) to the remote BCV target device (RRBCV001). DEV001 is the logical device name for device 288, and RRBCV001 is the logical device name for BCV 098:
Instead of specifying the device level, you can also specify the device group:
symclone -g Rdf1Grp establish -full -rrbcv
4. To query the progress of the clone operation or verify when the copy is completed, you can issue the following commands that examine the clone pair (source and target):
EMC Solutions Enabler Symmetrix TimeFinder Family CLI Version 7.2 Product Guide50
Performing TimeFinder/Clone Operations
Cloning copies of the same data locally and remotelyCopies of the same data can be cloned to devices on a local and remote Symmetrix array at the same time so that their target devices have the same originator data.
Note that in the examples that follow, the procedures are very similar. The only differences are the device types used for the local copy (local target and local BCV target) and the command arguments used for the respective device type.
Example 1 Figure 9 illustrates how you can clone copies of a local R1 standard device to a local target device and to a remote BCV target device on a remote Symmetrix array.
Figure 9 Cloning copies of a local R1 standard to a local target and to a remote BCV target
1. Create an RDF1 type device group:
symdg create Rdf1Grp –type rdf1
2. Add to the device group an R1 standard device (286) on the local Symmetrix array (sid 3264) to be the source device. Add a standard device target (287) on the local array. Associate a remote BCV target (097) on the remote array. To perform a remote operation, you must use a remote target list (RTGT or RBCV list). This example uses an RBCV list:
symdg -g Rdf1Grp –sid 3264 add dev 286symdg -g Rdf1Grp –sid 3264 add dev 287symbcv -g Rdf1Grp associate dev 097 -rdf
3. Clone an immediate full copy from the source device (DEV001) to the local and remote target devices (DEV002 and RBCV001, respectively). If there is no I/O to the source R1 device between these two commands, the same data will exist on both the local and remote target devices:
4. To query the progress of the local clone operation or verify when the local copy is completed, you can issue the following commands that examine the local cloned pair (source and target):
Example 2 Figure 10 illustrates how to clone copies of a local R1 standard device to a local BCV target device and to a BCV target device on a remote Symmetrix array.
Figure 10 Cloning copies of a local device to a local BCV target and to a remote BCV target
1. Create an RDF1 type device group:
symdg create Rdf1Grp –type rdf1
2. Add to the device group an R1 standard device (286) on the local Symmetrix array (sid 3264) to be the source device. Add a BCV target (287) on the local array. Associate a remote BCV target (097) on the remote array. To perform a remote operation, you must use a remote target list (RTGT or RBCV list). This example uses an RBCV list:
symdg -g Rdf1Grp –sid 3264 add dev 286symdg -g Rdf1Grp –sid 3264 add dev 287 -tgtsymbcv -g Rdf1Grp associate dev 097 -rdf
3. Clone an immediate full copy from the source device (DEV001) to the local and remote target devices (BCV001 and RBCV001, respectively). If there is no I/O to the source R1 device between these two commands, the same data will exist on both the local and remote target devices:
4. To query the progress of the local clone operation or verify when the local copy is completed, you can issue the following commands that examine the local cloned pair (source and target):
EMC Solutions Enabler Symmetrix TimeFinder Family CLI Version 7.2 Product Guide52
Performing TimeFinder/Clone Operations
Cloning multiple copies locally and remotelyMultiple copies of the same data can be cloned to devices on a local and remote Symmetrix array at the same time so that their target devices have the same originator data.
The configuration in Figure 11 is basically the same as the configuration in Figures 9 and 10 except that this configuration uses a single symclone command to clone copies from a source device to four target devices on each Symmetrix array instead of cloning copies to one target on each Symmetrix array. In this configuration, eight hosts have access to copies of the same target data.
Figure 11 Cloning multiple copies on local and remote Symmetrix arrays
The process for building an RDF1 type device group is similar to the previous section. To add a source standard R1 device, a range of four standard device targets from the local Symmetrix array, and a range of four targets from the remote Symmetrix array:
symdg -g Rdf1Grp –sid 3264 add dev 100symdg -g Rdf1Grp –sid 3264 addall dev range 101:104 -tgtsymdg -g Rdf1Grp addall dev range 214:218 -rdf -tgt
What is different about this configuration is the cloning of copies from a single source to multiple target devices. To clone the four local target devices (TGT002 – TGT005) from the local source device (DEV001), you need to issue four symclone establish commands, specifying the same source device with each of the four targets:
To clone the four remote target devices (RTGT001 – RTGT004) from the source device (DEV001), issue four symclone establish commands with the -rdf option:
EMC Solutions Enabler Symmetrix TimeFinder Family CLI Version 7.2 Product Guide54
Performing TimeFinder/Clone Operations
Cloning a copy at the tertiary site of a cascaded SRDF configurationUsing SRDF technology and the TimeFinder hop2 flag (-hop2 option), you can clone devices on a Symmetrix array located at the tertiary site of a cascaded SRDF configuration (Figure 12). Performing SYMCLI commands from the controlling host allows the tertiary target device to receive a copy of the data from the R2 device. The cloned data can be accessed by remote Host A.
Figure 12 Cloning a copy at the tertiary site of a cascaded SRDF configuration
The following steps outline an example of cloning devices on a Symmetrix array located at the tertiary site of a cascaded SRDF configuration:
Note: The following procedure provides examples of device group and composite group commands.
1. Create an RDF1-type device group or composite group (for example, a group named RDF1Grp):
To create an RDF1-type device group:
symdg create Rdf1Grp –type rdf1
To create an RDF1-type composite group:
symcg create Rdf1Grp –type rdf1
2. Add devices to the group. From the primary site Symmetrix array, add an R1 standard device to be the source device. From the tertiary site Symmetrix array, add a target BCV device (097) to hold the clone copy:
To add devices to a device group:
symdg -g Rdf1Grp –sid 3264 add dev 288symbcv -g Rdf1Grp -hop2 -rdfg 1 -remote_rdfg 2 add dev 097
To add devices to a composite group:
symcg -cg Rdf1Grp –sid 3264 add dev 288symbcv -cg Rdf1Grp –sid 3264 -hop2 -rdfg 1 -remote_rdfg 2 add dev 097
288R1
Primary siteSymmetrix 3264a
ControllingHost
289R21
Secondary siteSymmetrix 3265a
R2
Copy
097
102
Tertiary siteSymmetrix 3266
Host A
SYM-001801
rdfg 1 rdfg 2
Cloning a copy at the tertiary site of a cascaded SRDF configuration 55
Performing TimeFinder/Clone Operations
To add target devices to a device group using the -tgt option:
3. Clone an immediate full copy from the source device to the remote BCV target device:
symclone -g Rdf1Grp –hop2 create -precopy
Or, you can use the -tgt option:
symclone -g RdfGrp1 -hop2 create -precopy -tgt
4. To query the progress of the clone operation or verify when the copy is completed, you can issue the following commands that examine the clone pair (source and target):
EMC Solutions Enabler Symmetrix TimeFinder Family CLI Version 7.2 Product Guide56
Performing TimeFinder/Clone Operations
Using composite groups to manage clone pairs across Symmetrix arraysFigure 13 shows a production host locally connected to two Symmetrix arrays (A and B). A composite group is defined on the production host and includes source devices and target devices from each array. The target devices can be standard devices or BCV devices. Another locally connected host allows access to the clone targets.
Figure 13 Using a composite group when a set of devices spans two Symmetrix arrays
Although clone copy operations might normally be performed from the production host (Figure 13) because the composite group is defined there in its SYMAPI database, there are methods that would allow you to control clone operations from another locally connected host like the target host. One way is to copy the composite group definition to another host. A more efficient method is to enable Group Naming Services (GNS), which automatically propagates the composite group definition to the Symmetrix arrays and other locally attached hosts that are running the GNS daemon.
Note: For more information, refer to the EMC Solutions Enabler Symmetrix Array Management CLI Product Guide.
Target0085
Symmetrix A3807
Symmetrix B3143
Compositegroup
Source0072
Target0053
ProductionHost
SYMCLI
Host B
SYM-001802
SYMCLI
Source0095
Target004B
Using composite groups to manage clone pairs across Symmetrix arrays 57
Performing TimeFinder/Clone Operations
The following steps explain how to setup a composite group that spans two Symmetrix arrays as shown in Figure 13 on page 57:
1. From the production host, create a Regular type composite group (for example, MyGrp):
symcg create MyGrp –type regular
2. Add to the composite group those standard devices on Symmetrix A (3087) and Symmetrix B (3143) that are the source devices:
symcg –cg MyGrp –sid 3087 add dev 0072symcg –cg MyGrp –sid 3143 add dev 0095
3. Associate a BCV target device from each Symmetrix array with the composite group:
symbcv –cg MyGrp –sid 3087 associate dev 0053
4. Create clone pair sessions from those devices in the composite group:
symclone –cg MyGrp create
5. Activate these clone pair sessions:
symclone –cg MyGrp activate
Once you have setup the composite group, you can control specific clone pairs within it, as long as the devices reside in the same Symmetrix array. To create and activate only the DEV001/DEV002 clone pair from all devices in the group:
EMC Solutions Enabler Symmetrix TimeFinder Family CLI Version 7.2 Product Guide58
Performing TimeFinder/Clone Operations
Command options with device groupsTable 5 lists the symclone control operations and the possible options to use when targeting a specified device group.
Table 5 symclone -g control arguments and possible options (page 1 of 2)
EMC Solutions Enabler Symmetrix TimeFinder Family CLI Version 7.2 Product Guide60
Performing TimeFinder/Clone Operations
Command options with composite groupsTable 6 lists the symclone control operations and the possible options to use when targeting a specified composite group.
Table 6 symclone -cg control arguments and possible options (page 1 of 2)
Option
Argument action
create activateestablish-full establish recreate
restore-full restore terminate query verify
-bcv ✔ ✔ ✔ ✔ ✔ ✔ ✔ ✔ ✔ ✔
-both_sides ✔ ✔ ✔
-c, -i ✔ ✔ ✔ ✔ ✔ ✔ ✔ ✔ ✔ ✔
-concurrent ✔ ✔ ✔ ✔ ✔ ✔
-consistent ✔ ✔ ✔
-copied ✔
-copy ✔
-copyinprog ✔
-copyonaccess ✔
-copyonwrite ✔
-created ✔
-cycled ✔
-db ✔ ✔
-dbtype ✔ ✔
-differential ✔
-exact ✔ ✔ ✔ ✔
-force ✔ ✔ ✔ ✔ ✔ ✔ ✔ ✔
-hop2 ✔ ✔ ✔ ✔ ✔ ✔ ✔ ✔ ✔ ✔
-multi ✔
-noprompt ✔ ✔ ✔ ✔ ✔ ✔ ✔ ✔
-not_ready ✔ ✔ ✔ ✔ ✔
-offline ✔ ✔
-opt ✔ ✔
-opt_rag ✔ ✔
-ppatha ✔ ✔ ✔
-preaction, -postaction ✔ ✔ ✔
-precopy ✔ ✔ ✔
-preservetgtlocks, -lockid ✔ ✔ ✔ ✔ ✔ ✔ ✔ ✔
Command options with composite groups 61
Performing TimeFinder/Clone Operations
-rbcv ✔ ✔ ✔ ✔ ✔ ✔ ✔ ✔ ✔ ✔
-rrbcv ✔ ✔ ✔ ✔ ✔ ✔ ✔ ✔ ✔ ✔
-rdb, -db, -dbtype ✔
-rdf ✔ ✔ ✔ ✔ ✔ ✔ ✔ ✔ ✔ ✔
-recreated ✔
-restinprog ✔
-restored ✔
-skip ✔ ✔ ✔
-star ✔ ✔ ✔ ✔ ✔ ✔ ✔ ✔
-split ✔
-summary ✔ ✔
-symforce ✔
-tgt ✔ ✔ ✔ ✔ ✔ ✔ ✔ ✔
-v ✔ ✔ ✔ ✔ ✔ ✔ ✔ ✔
-vxfs ✔
a. Not supported with Solutions Enabler version 7.2 and higher.
Table 6 symclone -cg control arguments and possible options (page 2 of 2)
Option
Argument action
create activateestablish-full establish recreate
restore-full restore terminate query verify
EMC Solutions Enabler Symmetrix TimeFinder Family CLI Version 7.2 Product Guide62
Performing TimeFinder/Clone Operations
Command options with device filesTable 7 lists the symclone control operations and the possible options to use when targeting device pairs specified in a device file of a given Symmetrix array.
Table 7 symclone -file control arguments and possible options
EMC Solutions Enabler Symmetrix TimeFinder Family CLI Version 7.2 Product Guide64
3
This chapter describes how to control copy sessions for virtual devices using the SYMCLI symsnap command.
◆ TimeFinder/Snap overview ........................................................................................ 66◆ Creating a virtual copy session ................................................................................... 67◆ Activating a virtual copy session................................................................................ 70◆ Restoring data from virtual devices ........................................................................... 74◆ Recreating a virtual copy session................................................................................ 73◆ Terminating a virtual copy session............................................................................. 78◆ Querying snap pairs ..................................................................................................... 79◆ Verifying snap pair states............................................................................................. 80◆ Using a BCV as the snap source.................................................................................. 82◆ Creating multiple virtual copies ................................................................................. 85◆ Attaching source and target virtual devices.............................................................. 90◆ Using composite groups to manage snap pairs across Symmetrix arrays ........... 91◆ Snapping a copy on a remote Symmetrix array ....................................................... 93◆ Snapping a copy from a remote BCV ......................................................................... 94◆ Snapping copies of a source device’s data locally and remotely ........................... 96◆ Snapping multiple copies............................................................................................. 98◆ Snapping a copy at the tertiary site of a cascaded SRDF configuration.............. 100◆ Snapping a copy from a clone target device ........................................................... 102◆ Command options with device groups or composite groups .............................. 103◆ Command options with device files......................................................................... 105
PerformingTimeFinder/Snap
Operations
Performing TimeFinder/Snap Operations 65
Performing TimeFinder/Snap Operations
TimeFinder/Snap overviewFor a high-level overview of TimeFinder/Snap functionality, refer to the EMC Symmetrix TimeFinder Product Guide.
Snap operations are controlled from the host by using the symsnap command to create, activate, terminate, and restore the snap copy sessions. The snap operations described in this chapter explain how to manage the devices participating in a copy session using the SYMCLI.
Figure 14 illustrates a virtual copy session where the controlling host creates a copy of standard device DEV001 on target device VDEV005.
Figure 14 Copy of a standard device to a virtual device (VDEV)
StandardDEV001
Create Session
Source
Target
VirtualVDEV005
SaveDevices
ControllingHost
I/O
symsnap createsymsnap activate
TargetHost
Device pointers toSave Devices
I/O
Device pointersfrom virtual device
to original data
Original data copiedto save devices on
first write(CopyOnWrite)
SYM-001803
EMC Solutions Enabler Symmetrix TimeFinder Family CLI Version 7.2 Product Guide66
Performing TimeFinder/Snap Operations
Creating a virtual copy sessionInitially, you must create a virtual copy session that defines and sets up the snap devices you have selected for the snap operation. For example, to begin a copy session and define a specified target device VDEV005 to be the copy of source device DEV001 in group ProdDB, enter:
symsnap -g ProdDB create DEV001 vdev ld VDEV005
The symsnap create action defines the copy session requirements and sets the track protection bitmap on the source device to protect all tracks and detect which tracks are being accessed by the target host or written to by the source host. The target virtual device remains Not Ready to its host and placed on hold status for copy session usage. This prevents other control operations from using the device. The device pair state will transition from CreateInProg to Created when complete. The virtual data becomes accessible to its host when the copy session is activated. Refer to “Activating a virtual copy session” on page 70 for more information.
Understanding copy session limitsThe Symmetrix array is currently limited to 16 sessions per source, STAR, or ORS device, which can be used for TimeFinder or SDDF operations. This limits the number of available clone copies that can be created. Although a total of 16 concurrent CopyOnAccess copy sessions can be created from a standard device, one copy session (two for Enginuity 5875 and higher) is reserved for Restore operations. This number is decremented for each current TimeFinder/Clone, TimeFinder/Snap, TimeFinder/Mirror, and SDDF session. For example:
◆ When a standard device is two paired BCV devices, only 14 copy sessions can be created for that standard device.
◆ When running in TimeFinder/Clone Emulation mode, this number is decremented an additional two sessions per single BCV relationship.
Note: Depending on the specific level of Enginuity that you are running, snap restore operations using the symsnap restore command can create one or two additional copy sessions per the source device. For information on restoring virtual devices, refer to “Restoring data from virtual devices” on page 74.
Multivirtual snaps With multivirtual snaps enabled, Solutions Enabler supports up to 128 snaps from a source device. This support requires that you enable the following SYMCLI environment variable:
SYMCLI_MULTI_VIRTUAL_SNAP = ENABLED
This setting appears in the snap device output from symdev show. The Snap State Flags value will be MultiVirtual.
A single source device can only have snaps of one type.
Note: Multivirtual snaps are not supported with the Auto Cancel policy. Starting with Enginuity 5874 Q2 SR, multivirtual snap operations are supported with CKD devices. Snap recreate for multivirtual snap operations is supported in environments running Enginuity 5875 and higher.
Creating a virtual copy session 67
Performing TimeFinder/Snap Operations
Specifying a SAVE device poolSymmetrix supports the creation of multiple named SAVE device pools, allowing symsnap commands to use a particular pool.
The -svp option can be used with the create action to specify which SAVE device pool to use for an operation. For example, to instruct the copy session created in the example on page 67 to use the SAVE device pool Accounting, use the following symsnap command:
Note: The specified pool must exist and contain at least one enabled device before creating the copy session.
In addition to the -svp option, you can also set the environment variable SYMCLI_SVP to a poolname to be used when -svp is not present in the command line. If -svp and SYMCLI_SVP are not used, the operation will use the default pool, DEFAULT_POOL.
Note: SAVE devices can also be organized into Delta Set Extension pools for use with SRDF/A. For information on using SAVE devices in this manner, refer to the EMC Solutions Enabler SRDF Family CLI Product Guide.
Monitoring SAVE device usageUsing virtual copies requires proper planning to prevent the SAVE devices from filling up with pre-updated data. If the SAVE devices fill up, you will begin to lose the pre-update images of the newly changed tracks in the virtual copy session, the virtual device will be set to Not Ready, and the session will fail (only sessions with I/O activity will be in a failed state, sessions without I/O activity will continue to operate normally). Should this happen, you must terminate the failed sessions to clear the tracks on the SAVE devices. Once a session is terminated, the virtual data is lost and the SAVE device space associated with the session is freed and returned to the SAVE device pool for TimeFinder/Snap use. In addition, you should also examine how you are using the SAVE device pools and consider adding more SAVE devices.
You can monitor SAVE devices by using the symsnap monitor command to check the percentage full. When devices reach the specified percentage, an optional action script can be executed by the application to preserve the data or terminate sessions. The following is an example of the monitor command:
Note: You can also use the symcfg show command to display SAVE device pool details. For more information, refer to the Solutions Enabler Symmetrix Array Management CLI Product Guide.
In this example, the SAVE device pool Accounting will be monitored every minute for percentage full. When the percentage of the SAVE devices are 80 percent full, the associated action script SaveScript will be executed each time the threshold of 80 percent is met.
In addition to the monitor command, the following commands can also be useful for monitoring SAVE devices:
symsnap list -svp PoolName
EMC Solutions Enabler Symmetrix TimeFinder Family CLI Version 7.2 Product Guide68
Performing TimeFinder/Snap Operations
Displays the copy sessions related to the specified SAVE device pool.
symsnap list -svp PoolName -savedev
Lists the SAVE devices that are in the specified SAVE device pool.
symsnap list -pools [-v]
Lists all the SAVE device pools. The -v option displays a verbose listing for each pool.
symsnap show pool PoolName
Shows detailed information about the specified SAVE device pool.
Pairing an additional target device with each source device in a groupWhen working with either a composite or device group, you can use the -concurrent option with the create action to pair an additional target device with each source device in a group.
To pair an additional target device with each source device in group ProdDB, enter:
symsnap -g ProdDB create -concurrent
When the copy session is created, an additional target device will be paired with each source device in the group. For example, if there were two target devices paired with each source device in the group before activating the session, there will be three target devices paired with each source device after the session is activated.
To verify that each source device in the group has multiple targets, enter:
symsnap -g ProdDB verify -created -concurrent
Copying a virtual device to another virtual device (duplicate snap)Duplicate snap functionality (Enginuity 5875 and higher) allows you to duplicate a point-in-time copy of a virtual device, which is paired in a previously activated snap session, to another virtual device. This second point-in-time copy session resides with the source device of the original snap session and is charged as part of the maximum number of sessions for that source device.
Use the -duplicate option with the -create command to begin a copy session that will take one or more source virtual devices and create a copy of the point-in-time data to one or more target virtual devices. For example, to begin a copy session and define virtual device VDEV002 to be the copy of source device VDEV001 in group ProdDB, enter:
In this example, VDEV001 is the target of an activated snap session and VDEV002 is not snap paired. The resulting duplicate session is the same point-in-time as the original virtual device, but the time stamp is not inherited from the original virtual device’s session. The newly created session has its own time stamp indicating the time of its creation.
The following restrictions apply to the duplicate snap functionality:
◆ Snap create and activate operations cannot be mixed between normal snap sessions and duplicate snap sessions within the same operation.
◆ Two is the maximum number of duplicated sessions in the Created state.
Creating a virtual copy session 69
Performing TimeFinder/Snap Operations
◆ When a duplicate snap session is in the Created state, the original session cannot be terminated or recreated until the duplicate session is activated.
Activating a virtual copy sessionTo create a point-in-time image, you must activate the create copy session. To activate the copy session created in the example on page 67, use the following symsnap command:
symsnap -g ProdDB activate DEV001 vdev ld VDEV005
This activates the copy operation from the source device to the virtual target device. Activating the copy session starts the copy on first write mechanism and places the target device in the Read/Write state. The target host can access the copy and has access to data on the source host until the copy session is terminated.
Note: Virtual data is made available as a point-in-time copy at the time of activation and not at the time that the session was created.
Making the target device not ready to the hostThe Not Ready (-not_ready) option can be used with the activate action to start the copy-on-first-write mechanism but causes the target device to remain not ready to its host, as follows:
The copy session will be activated and the target device will be placed in the Not Ready state. The snap copy can later be Read/Write enabled to the host using the symdg ready command.
Activating copy sessions consistently You can consistently activate multiple virtual copy sessions involving a database using either PowerPath-connected devices or the Enginuity Consistency Assist (ECA) feature. These features allow snap copy sessions to be activated with a consistent, restartable copy of the database.
Note: PowerPath is not supported with Solutions Enabler version 7.2 and higher.
Using PowerPath To activate a virtual copy session using the PowerPath (-ppath) option, you need to specify either the source device(s) (SRCDEVS) or the PowerPath device and any pre-action and post-action scripts.
The following example activates a virtual copy session for the device group ProdDB using PowerPath source devices and scripts:
Using ECA You can use the Enginuity Consistency Assist (ECA) feature to activate virtual copy sessions that are consistent with the database up to the point in time that the activation occurs. The feature suspends writes to the source device during the activation.
EMC Solutions Enabler Symmetrix TimeFinder Family CLI Version 7.2 Product Guide70
Performing TimeFinder/Snap Operations
Use the symsnap activate command with the consistent (-consistent) option to invoke ECA. When the activation has completed, writes are resumed and the target device contains pointers for a consistent production database copy of the source device at the time of activation.
To consistently activate copy sessions using ECA, you must have either a control host with no database or a database host with a dedicated channel. This will ensure that in write intensive environments SYMAPI will be able to activate the copy sessions within the ECA window, regardless of the number of outstanding I/Os held by the HBA. Refer to Figure 15, for a depiction of how a control host can consistently activate a copy session involving three database hosts that access devices on a Symmetrix array.
A Symmetrix device group, composite group, or a device file must be created on the controlling host for the target database to be consistently activated. Device groups can be created to include all of the devices being accessed or defined by database host access. For example, if you define a device group that includes all of the devices being accessed by Hosts A, B, and C (Figure 15), then you can consistently activate all of the copy sessions related to those hosts with a single command. However, if you define a device group that includes only the devices accessed by Host A, then you can activate those copy sessions related to Host A without affecting the other hosts.
Figure 15 TF/Snap consistent activate using ECA
Activating an additional copy session for each device pair in a groupWhen working with either a composite or device group, you can use the -concurrent option with the activate action to activate an additional copy session for each device pair in a group.
TargetVDEV
TargetVDEV
TargetVDEV
consistently activate virtual copy sessions
SYMAPIECASource
Host A
Host B
Host C
SYM-001805
DBMSInstance
DBMSInstance
DBMSInstance
Contolling host
devicegroupProdAgrp
symsnap -g ProdAgrpactivate -consistent
Source
Source
Activating a virtual copy session 71
Performing TimeFinder/Snap Operations
To activate an additional copy session for each device pair in group ProdDB, enter:
symsnap -g ProdDB activate -concurrent
Activating a duplicate snap sessionOnce a duplicate snap session is activated, the copied session works like a normal snap session between the original source device and the duplicated virtual device. This session may be used for restore, recreate, and terminate operations.
Use the -duplicate option with the -activate command to activate a duplicate snap session. For example, to activate the copy session between target device VDEV002 and source device VDEV001 in group ProdDB, enter:
In this example, the result is an activated session between DEV001 and VDEV002, which is in addition to the original session between DEV001 and VDEV001.
Combining the create and activate commands for a duplicate snapYou can combine the symsnap create -duplicate and symsnap activate -duplicate commands into a single action by using the symsnap duplicate command. For example, to create and activate a copy session between target device VDEV002 and source device VDEV001 in group ProdDB, enter:
EMC Solutions Enabler Symmetrix TimeFinder Family CLI Version 7.2 Product Guide72
Performing TimeFinder/Snap Operations
Recreating a virtual copy sessionStarting with Enginuity 5874, snap sessions can be recreated on an existing virtual device (VDEV) in preparation of activating a new point-in-time image. Snap recreate is only valid when issued against sessions that have been previously activated. This process makes it more convenient to reuse a virtual device to acquire a new point-in-time image.
Since the recreate operation replaces the previous point-in-time image with a new one, the used tracks in the SAVE devices that were associated with the previous session are freed during the processing of this command.
Recreating a virtual snap copy session requires the following steps:
1. Create a snap session. (Refer to page 67.)
2. Activate a snap session. (Refer to page 70.)
3. Recreate a snap session.
4. Activate a snap session. (Refer to page 70.)
5. Repeat the recreate/activate a snap session, as necessary.
6. Terminate the snap session when no longer needed. (Refer to page 78.)
To recreate the copy session activated in the example on page 70 use the following symsnap command:
symsnap -g ProdDB recreate DEV001 vdev ld VDEV005
The snap recreate functionality is supported with the symsnap query and symsnap verify commands. For example:
Note: You can use the -recreated parameter in combination with other verify states when verifying for multiple states. When multiple verify states are listed, the states are evaluated in a logical OR fashion so the result will be true if the session is in any of the listed states.
The following restrictions apply to the snap recreate functionality:
◆ The session to be recreated must be in a CopyOnWrite or Copied state.
◆ Any restore session that exists on the device must be terminated prior to issue the recreate operation.
◆ Snap recreate for multivirtual snap operations is supported in environments running Enginuity 5875 and higher.
Recreating a virtual copy session 73
Performing TimeFinder/Snap Operations
Restoring data from virtual devicesThree types of restore operations can be performed for virtual device copy sessions:
◆ Incremental restore back to the original source device.
◆ Incremental restore to a BCV, which has been split from its original standard source device but maintains the incremental relationship with the source.
◆ Full restore to any standard or split BCV device outside of the existing copy session. The target device of the restore must be of the same size and emulation type as the source device.
A new restore copy session between the source device and the restore target device is created. A restore operation can only be performed if an additional copy session is available for use. Refer to “Understanding copy session limits” on page 67 for an explanation.
By default, any existing copy sessions persist until manually terminated by using the symsnap terminate command. After the virtual device has been restored to another device, the restore copy session must be terminated first, before another restore operation is allowed from that virtual device. Use the symsnap query -multi command to view all existing targets paired with a source device. The original snap copy session displays as being in the CopyOnWrite state, and the restore copy session displays as being either in the RestInProg or Restored state.
With Solutions Enabler version 7.2 and higher, the use of an ORS control device as a clone restore target is allowed when the device is in a PUSH session and in the ORS Copied state.
Persistent restorePersistent restore preserves all existing snap copy sessions by default, even after the virtual device has been restored to another device. To disable the persistent restore option so that the original snap copy session for the restore is automatically terminated, set the following parameter in the options file to DISABLE:
SYMAPI_SNAP_PERSISTENT_RESTORE = ENABLE | DISABLE
Note: Persistent restore cannot be disabled in Enginuity version 5671 and higher.
Incrementally restoring to a sourceThe following command-line entry shows an incremental restore operation back to the original source device DEV001 from the virtual device VDEV005:
symsnap restore DEV001 vdev ld VDEV005
In this example, through the use of device pointers to the SAVE device, the virtual device VDEV005 will be incrementally restored back to DEV001. Any changes made to the virtual device tracks during the active copy session will be restored back to the original source device.
Note: Any changes written to the original source device during the copy session will be overwritten by the virtual device tracks when the source device is restored.
The restore target device (source device DEV001) and virtual device (VDEV005) are automatically set to the Not Ready state while the track protection bitmaps are set up
EMC Solutions Enabler Symmetrix TimeFinder Family CLI Version 7.2 Product Guide74
Performing TimeFinder/Snap Operations
to copy any changed tracks. DEV001 automatically becomes available for use (Ready state) as soon as the track protection bitmap completes. The changed tracks then begin copying and will continue to copy in the background until all the protected tracks have been restored.
If you want to continue using the original copy session, the virtual device must be manually set to the Ready state after the restore operation has completed (all tracks are copied back to the source). Use one of the following commands to set the virtual device to the Ready state after the above restore operation:
Once the restore completes, both the original and restore copy sessions are maintained and must be terminated manually if not needed for future use. When a original session is terminated, the device pointers are deleted from the virtual device and the SAVE device space is freed for future use.
Note: The restored copy session must be terminated first, before the original copy session is allowed to be terminated.
Incrementally restoring to a BCVThe following command-line entry shows an incremental restore operation to a split BCV device BCV001 from the virtual device VDEV005:
symsnap restore BCV001 vdev ld VDEV005
To restore to a BCV device, the BCV device must be split from its standard device. The point-in-time snap copy is restored to the BCV as shown in Figure 16 on page 76. However, any further changes made to the point-in-time snap copy (from the attached host to the VDEV), during the active copy session, will also be included in the restore action to the split BCV device (BCV001). A new copy session begins between the source and target BCV and any changed tracks pointed to by the pointers are then copied to the split BCV from the source and SAVE devices. (Only the tracks that are different between the BCV and VDEV are copied.) Once the restore completes, both the original and restore copy sessions are maintained until manually terminated.
Note: You cannot restore to a BCV running in emulation mode.
Restoring data from virtual devices 75
Performing TimeFinder/Snap Operations
Figure 16 Incremental restore to a BCV
The target device (BCV001) and the virtual device (VDEV005) are automatically set to the Not Ready state while the track protection bitmaps are set up to copy any changed tracks. BCV001 automatically becomes available for use (Ready state) as soon as the track protection bitmap completes. The changed tracks then begin copying and will continue to copy in the background until all protected tracks have been restored.
If you want to continue using the original copy session, the virtual device must be manually set to the Ready state after the restore operation has completed (all tracks are copied to the split BCV). Use one of the following commands to set the virtual device to the Ready state after the above restore operation:
Original device pointers to sourcedevice are maintained.
Original device pointers tosave devices are maintained.
SYM-001804
BCV is split from itsstandard source
Restore
TargetBCV001
Restore target inherits device pointers.VDEV copy session is maintained.
2
31
1
3
1
The new copy session beginsbetween the source and target BCV.
2
Changed tracks are then copied to the restoretarget from source and save devices.
3
EMC Solutions Enabler Symmetrix TimeFinder Family CLI Version 7.2 Product Guide76
Performing TimeFinder/Snap Operations
To terminate the restored copy session, enter:
symsnap terminate DEV001 bcv ld BCV001 -restored
To terminate the original copy session, enter:
symsnap terminate DEV001 vdev ld VDEV005
Optionally, after terminating the copy session, you can also issue a TimeFinder symmir restore operation from the restored BCV back to the standard source device. For information on reestablishing and restoring BCV pairs, refer to Chapter 4.
Fully restoring to anywhereA full device restore operation from the virtual device is allowed to any device of the same size and emulation type as the source device. The following example uses the restore command with the -full option to fully restore a virtual device VDEV005 to another standard device DEV004:
symsnap -full restore DEV004 vdev ld VDEV005
Any changes made to the virtual device (VDEV005) during the active copy session will be restored to the specified device (DEV004). The restore target inherits the virtual device pointers. A new copy session begins between the source and target device and any changed tracks pointed to by the pointers are then copied to the target device from the source and SAVE devices. Upon completion of the restore operation, both the original and restore copy sessions are maintained until manually terminated.
The target device (DEV004) and the virtual device (VDEV005) are automatically set to the Not Ready state while the track protection bitmaps are set up to copy any changed tracks. DEV004 automatically becomes available for use (Ready state) as soon as the track protection bitmap completes. The changed tracks then begin copying and will continue to copy until all protected tracks have been restored.
If you want to continue using the original copy session, the virtual device must be manually set to the Ready state after the restore operation has completed (all tracks are copied to the restore target). Use one of the following commands to set the virtual device to the Ready state after the above restore operation:
Terminating a copy session deletes the pairing information in the Symmetrix array and removes any hold on the target device. Terminating the session causes the target host to lose access to data pointed to by the virtual device.
Terminating a session while the device pairs are in the CopyOnWrite state will cause the session to end. Once the virtual copy session is terminated, the information is no longer available on the virtual device.
If a copy session has been restored, the restored session must be terminated first, before the original copy session is allowed to be terminated.
Note: If the state is RestInProg, then the -symforce option must be applied to terminate the session.
Terminating a duplicate snap sessionYou can terminate a duplicate snap session in the Created state using the symsnap terminate -duplicate command. For example, enter:
Once a duplicate snap session is activated, the session appears as normal snap session and is terminated using the terminate command without the -duplicate option.
EMC Solutions Enabler Symmetrix TimeFinder Family CLI Version 7.2 Product Guide78
Performing TimeFinder/Snap Operations
Querying snap pairsYou can perform a query to determine the state of a snap pair or all snap pairs in a device group, composite group, or device file. The query is sent through the gatekeeper device to the Symmetrix array, returning with information about the state of the snap pair(s).
The following forms enable you to target devices in a device group, composite group, or device file:
Examples To query the state of the snap pairs in the prod device group, enter:
symsnap -g prod query
You can also obtain results using the -offline option, which looks at your configuration based on the Symmetrix host database.
The results of the query include the following information for each member of a snap pair in a device group:
◆ Logical device name◆ Symmetrix device name◆ Number of invalid tracks◆ Snap pair state
Using the -summary option
If you use the -summary option with the query argument, the results of the query will include the following information:
◆ Number of snap pairs in each snap pair state
◆ Number of invalid tracks
◆ Synchronization rate
◆ Estimated time to completion
The synchronization rate and estimated time to completion are shown only when -i or -c is specified and their has been a change in the number of invalid tracks since the previous iteration.
The -summary option also works with the verify argument.
Example To view the number of snap pairs in the prod device group that are in each state, and to view the estimated time to completion, enter:
symsnap -g prod query -summary -i 60
Querying snap pairs 79
Performing TimeFinder/Snap Operations
Verifying snap pair statesYou can use the symsnap verify command to verify whether one or all snap pair(s) in a device group, composite group, or device file are in a particular state. The command can be used in scripts to guarantee that the snap device pair(s) are in a particular state prior to executing subsequent SYMCLI commands. If you do not specify any qualifiers with symsnap verify, the default is to check for the Copied state.
The following forms enable you to target devices in a device group, composite group, or device file:
The following options qualify the symsnap verify command. If you need to verify a concurrent snap pair, include –concurrent with the option (for example, –copied –concurrent):
◆ -copied verifies that the copy sessions are in the Copied state.
◆ -copyonwrite verifies that the copy sessions are in the CopyOnWrite state.
◆ -created verifies that the copy sessions are in the Created state.
◆ -recreated verifies that the copy sessions are in the Recreated state.
◆ -restinprog verifies that the copy sessions are in the RestInProg state
◆ -restored verifies that the copy sessions are in the Restored state.
Examples For a multi-snap or concurrent snap device group, specifying the snap on the command line ensures that the verify operation checks the status of the snap. Otherwise, the verify operation checks the status of the standard device, which may no longer be established with the snap that you want to verify. For example, the following command returns the status of standard device DEV001 with its last paired snap:
symsnap -g ProdBgrp verify DEV001
But the following command returns the status of a specific snap pair (DEV001 with DEV005):
symsnap -g ProdBgrp verify DEV001 sym ld DEV005
EMC Solutions Enabler Symmetrix TimeFinder Family CLI Version 7.2 Product Guide80
Performing TimeFinder/Snap Operations
The following command checks status every 30 seconds until all snap pairs in the device group (ProdBgrp) or composite group (MyConGrp) are in the Copied state (the default when no state is specified on the command line):
Possible outputs at 30-second intervals can be that none, not all, or all devices are copied.
The verify action returns a value of zero (code symbol CLI_C_SUCCESS) if the verify criteria are met, or one of the unique codes in Table 8 if the verify criteria are not met
Table 8 lists the options to verify a snap pair state:
Table 8 Using options to verify a snap pair state
Options used with Verify Code number Code symbol
-copied 55 CLI_C_NOT_ALL_COPIED
-copied 56 CLI_C_NONE_COPIED
-copyonwrite 66 CLI_C_NOT_ALL_COPYONWRITE
-copyonwrite 67 CLI_C_NONE_COPYONWRITE
-created 60 CLI_C_NOT_ALL_CREATED
-created 61 CLI_C_NONE_CREATED
-recreated 68 CLI_C_NOT_ALL_RECREATED
-recreated 69 CLI_C_NONE_RECREATED
-restinprog 29 CLI_C_NOT_ALL_RESTINPROG
-restinprog 30 CLI_C_NONE_RESTINPROG
-restored 12 CLI_C_NOT_ALL_RESTORED
-restored 13 CLI_C_NONE_RESTORED
Verifying snap pair states 81
Performing TimeFinder/Snap Operations
Using a BCV as the snap sourceAs shown in Figure 17 on page 83, you can create a virtual copy session between a BCV source device and a virtual target device. The controlling host performs I/O to the standard device that is established with a BCV as part of a BCV pair. At some point, when the BCV is synchronized with the standard device, you can split the BCV from the standard and create a point-in-time copy of the BCV. The split operation must be entirely complete including the background phase before you can create a copy session on it.
Chapter 4 provides additional information on using the symmir command and how to perform an instant split operation.
Pair states ruling snap operationsBecause other operations can conflict with your copy session, certain rules must be considered. The availability of some snap copy operations depends on the current SRDF state, clone state, and BCV pair state. The following rules apply to certain BCV pair states:
◆ If the source of a symsnap create or activate operation is a BCV, the BCV pair state must be Split. The Split must be totally complete before the operation is allowed.
Note: The existing BCV snap copy session must be terminated before the BCV can be reestablished or restored again with its standard device.
◆ A TimeFinder standard source device cannot be created, activated or restored in a copy session if the BCV pair state is SplitBfrRest or RestInProg.
Note: If you have an active snap copy session from a standard device that also has an established BCV and you attempt to restore the standard from the BCV, the restore operation may fail due to insufficient space on the SAVE device. In this case it may be best to first restore and terminate the snap copy session, then attempt the BCV restore operation.
◆ The symsnap terminate command is allowed for all BCV pair states.
For the TimeFinder pair states that rule TimeFinder/Snap copy sessions, refer to Appendix C.
For information regarding possible SRDF pair state conflicts, refer to “State rules for TimeFinder/Snap operations” on page 355.
For a description of each BCV pair state, refer to BCV Pair States in Chapter 4.
EMC Solutions Enabler Symmetrix TimeFinder Family CLI Version 7.2 Product Guide82
Performing TimeFinder/Snap Operations
Example: Creating a virtual copy from a BCVThe following example creates a copy of source device BCV001 in device group ProdDB on a Symmetrix array to target device VDEV005 on the same array.
Once the copy session is activated, Host C can access the virtual target device tracks containing the device pointers to the point-in-time copy. If Host B writes to BCV device tracks, TimeFinder immediately copies the original tracks to the SAVE device before allowing new data to overwrite those BCV tracks.
Note: In this example, where multiple hosts have access to the BCV source, consider using the -not_ready option with the split command to make the BCV not ready. This enables you to keep the same data on the BCV and virtual devices. If you decide to use this option, you may need to release any Not Ready state imposed on any devices after the session completes.
Figure 17 Creating a virtual copy from a BCV
STDDEV001
BCVBCV001
TargetVDEV005
Controlling Host
Device pointersto save devices
Device groupProdDB
symsnap create -bcvsymsnap activate -bcv
Host C
Host B
I/O
I/O
SYM-001806
SAVE Devices
CopySession
symmir -g split-instant
I/O
Using a BCV as the snap source 83
Performing TimeFinder/Snap Operations
For this example, the device pair was set in the Not Ready state.
The following steps outline the example shown in Figure 17 on page 83:
1. Perform an instant split on the BCV pair. Use the -not_ready option to prevent the BCV’s host from writing to it:
EMC Solutions Enabler Symmetrix TimeFinder Family CLI Version 7.2 Product Guide84
Performing TimeFinder/Snap Operations
Creating multiple virtual copiesSince a total of 16 sessions can exist, you can create up to 15 virtual copy sessions (14 for Enginuity 5875 and higher) and one reserved session (two for Enginuity 5875 and higher) of a source device to various virtual target devices. A source device can concurrently copy data to 14 or 15 (depending on the Enginuity version) target devices at one time, depending on the available sessions.
If multivirtual snap is enabled, Solutions Enabler supports up to 128 snaps from a source device. “Multivirtual snaps” on page 67 provides greater detail about multivirtual snaps.
To copy to multiple target devices, each target requires a separate copy session to become a host-addressable copy. Target host devices cannot access the virtual copy until the copy session is activated. Up to 14 or 15 (depending on the Enginuity version) copy sessions can be activated at the same time on the same source device. “Understanding copy session limits” on page 67 provides greater detail about the number of virtual copy sessions.
Creating multiple virtual copies from a standard deviceFigure 18 illustrates creating copy sessions for multiple targets from a standard source device DEV001 to four virtual target devices (VDEV005, VDEV006, VDEV007 and VDEV008) with various hosts accessing them.
Creating multiple virtual copies 85
Performing TimeFinder/Snap Operations
Figure 18 Creating multiple virtual copies from a standard device
Note: A separate copy session must be created between the source device (DEV001) and each target device (VDEV005, VDEV006, VDEV007, and VDEV008).
The following steps outline the example shown in Figure 18 on page 86:
1. Create a copy session between the standard source device DEV001 and each of the four virtual target devices VDEV005, VDEV006, VDEV007, and VDEV008:
Creating multiple virtual copies from a BCV deviceFigure 19 illustrates how to create multiple copy sessions from a BCV source device BCV001 to four virtual target devices (VDEV005, VDEV006, VDEV007, and VDEV008) with various hosts accessing them.
Figure 19 Creating multiple virtual copies from a BCV device
The following steps outline the example shown in Figure 19:
1. Perform an instant split on the BCV pair. Use the -not_ready option to prevent the BCV’s host from writing to the device:
7. Incrementally reestablish the BCV pair (DEV001 and BCV001):
symmir -g ProdDB establish DEV001 -noprompt
symsnap -g ProdDB activateBCV001 vdev ld VDEV005
BCV001 vdev ld VDEV006
BCV001 vdev ld VDEV007
BCV001 vdev ld VDEV008
Creating multiple virtual copies 89
Performing TimeFinder/Snap Operations
Attaching source and target virtual devicesUse the symsnap attach and detach commands to set up preferred device pairs. Pre-determining attached device pairs eliminates the need to specify copy session target devices from within the device group for the create and activate arguments. The attached pairs will be used whenever a symsnap operation is requested for the specified device group. If a symsnap create or activate command does not specify a device pair from within the device group, the attached pair will automatically be used for the operation.
Note: The attach option can only be used when attaching a standard source device with a target VDEV device. You cannot use symsnap attach if the source device is a BCV device.
To set up a preferred attached device pair between source device DEV001 in device group ProdDB and target device VDEV002, enter:
symsnap -g ProdDB attach DEV001 vdev ld VDEV002
To invoke a copy session operation from within a specified device group ProdDB using the pre-determined device pairs, enter:
To detach (undo) the preferred device pair relationship, enter:
symsnap -g ProdDB detach DEV001 vdev ld VDEV002
EMC Solutions Enabler Symmetrix TimeFinder Family CLI Version 7.2 Product Guide90
Performing TimeFinder/Snap Operations
Using composite groups to manage snap pairs across Symmetrix arraysFigure 20 illustrates a production host that is locally connected to two Symmetrix arrays (A and B). A composite group is defined on the production host and includes source devices and target devices from these Symmetrix arrays. The target devices are virtual devices.
Figure 20 Using a composite group when a set of devices spans two Symmetrix arrays
Although snap operations might normally be performed from the production host because the composite group is defined there in its SYMAPI database, there are methods that would allow you to initiate copy sessions from another locally connected host like the target host. One way is to copy the composite group definition to another host. A more efficient method is to enable Group Name Services (GNS), which automatically propagates the composite group definition to the Symmetrix arrays and other locally attached hosts that are running the GNS daemon.
Symmetrix A3087
Symmetrix B3143
Compositegroup
SourceDevice
076
051
VirtualDevice
Controlling Host
SYMCLI
Target Host
SYM-001809
SYMCLI
SourceDevice
VirtualDevice
091
04F
Using composite groups to manage snap pairs across Symmetrix arrays 91
Performing TimeFinder/Snap Operations
The following steps outline the setup required for controlling a set of snap pairs that span two Symmetrix arrays, as shown in Figure 20 on page 91:
1. From the production host, create a Regular type composite group (for example, MyGrp):
symcg create MyGrp –type regular
2. Add to the composite group those standard devices on Symmetrix A (3087) and Symmetrix B (3143) that are the source devices:
symcg –cg MyGrp –sid 3087 add dev 0076symcg –cg MyGrp –sid 3143 add dev 0091
3. Add a virtual device from each Symmetrix array to the composite group:
symcg –cg MyGrp –sid 3087 add dev 0051 -vdevsymcg –cg MyGrp –sid 3143 add dev 004F -vdev
4. Create snap pair sessions from those devices in the composite group:
symsnap –cg MyGrp create
5. Activate the snap pair sessions:
symsnap –cg MyGrp activate
Composite group support allows the source of a snap operation to be a standard device (as shown in step 2 above) or a BCV device. If you add BCV devices to the composite group for the purpose of being snap sources, you must use the –bcv option with the symsnap commands. For example, the following command creates snap pairs in the composite group using the BCVs as source devices:
symsnap –cg MyGrp create -bcv
You can add nonsource BCV devices to the composite group for the purpose of restore operations. Composite group support allows you to restore to either the original source standard device or to a BCV that has been split from its paired standard device. The following commands split all BCV pairs in the composite group and perform a restore operation from the virtual devices to the BCVs:
For more information about performing an incremental restore to a BCV that is split from the original source device, refer to “Incrementally restoring to a BCV” on page 75.
You can control specific snap pairs within the composite group. To create and activate the DEV001/VDEV002 snap pair from devices in the group:
EMC Solutions Enabler Symmetrix TimeFinder Family CLI Version 7.2 Product Guide92
Performing TimeFinder/Snap Operations
Snapping a copy on a remote Symmetrix arrayYou can use a device group or composite group to snap devices on a remote Symmetrix array as shown in Figure 21. Performing SYMCLI commands from the controlling host allows the remote virtual device to receive a copy of the data from the R2 device. Remote Host A can access the snap data.
Figure 21 Snapping a copy on a remote Symmetrix array
The following steps outline an example of snapping local device data on a remote Symmetrix array:
1. Create an RDF1-type device group or composite group (for example, a device group named remotesnaps).
symdg create remotesnaps –type rdf1
2. Add to the device group an R1 standard device (001) to hold the production data. Add a virtual device (04F) on the remote Symmetrix to hold the snap copy:
symdg -g remotesnaps add dev 001 -sid 5870symdg -g remotesnaps add dev 04F –rdf -vdev
If the local Symmetrix array has more than one RDF group (that is, concurrent RDF) linking the remote Symmetrix array, include the RDF group option (for example, -rdfg 2) when adding the remote virtual device.
3. Create a snap pair session from the devices in the device group:
5. To query the progress of the remote snap operation:
symsnap -g remotesnaps query -rdf
R1
LocalSymmetrix 5870
ControllingHost
R2
001 288
04F
Copy
VirtualDevice
RemoteSymmetrix 6190
Host A
SYM-001810
Snapping a copy on a remote Symmetrix array 93
Performing TimeFinder/Snap Operations
Snapping a copy from a remote BCVUsing SRDF technology and the TimeFinder -rdf option, you can snap a copy from a BCV located on a remote Symmetrix array (Figure 22). By doing this, the remotely associated BCV is synchronized with the R2 device until you decide to split the BCV pair and snap a copy from the BCV to the virtual device.
Figure 22 Snapping from a remote BCV source device
The following steps outline an example of creating a copy session between a remote BCV source device and a remote virtual device:
1. Create an RDF1-type device group or composite group (for example, a device group named Rdf1Grp):
symdg create Rdf1Grp –type rdf1
2. Add to the device group an R1 standard device on the local Symmetrix array to hold production data. Add a virtual device on the remote Symmetrix array to hold the snap copy:
symdg -g Rdf1Grp add dev 288symdg -g Rdf1Grp add dev 097 –rdf -vdev
3. Associate with the device group an RBCV to be the snap source on the remote Symmetrix array:
symbcv -g Rdf1Grp associate dev 39F -rdf
4. Establish standard device 288 (DEV001) with the RBCV:
symmir -g Rdf1Grp establish -full DEV001 –rdf
5. When the remote BCV pair is fully synchronized, perform an instant split on the BCV pair:
symmir -g Rdf1Grp split -instant –rdf
R1
Local Symmetrix
Controlling Host
R2
288
097
Copy
VirtualDevice
RBCV
39F
Remote Symmetrix Host D
Host C
Instant Split
SYM-001811
EMC Solutions Enabler Symmetrix TimeFinder Family CLI Version 7.2 Product Guide94
Performing TimeFinder/Snap Operations
6. When the background split is complete, create and activate a copy session between the remote BCV source device and the remote virtual device:
7. To query the progress of the remote snap operation or verify the copy session, you can issue the following commands that examine the snapped pair (the RBCV source device and the virtual device):
Snapping copies of a source device’s data locally and remotelyFigure 23 combines elements of Figures 21 and 22 to illustrate how to snap copies of a source device’s data to devices on two Symmetrix arrays. By splitting the BCV pairs on both sides at the same time with a consistent split operation, the BCVs on both sides contain data that is consistent with the R1 source data up to the time of the split. The controlling host can then perform a local snap and a remote snap, resulting in the virtual devices on both sides having copies of the source device’s data (provided that the BCVs were not written to by their hosts prior to the snap operation).
Figure 23 Snapping copies on local and remote Symmetrix arrays
The following steps outline the example shown in Figure 23:
1. Create an RDF1-type device group or composite group (for example, a device group named Rdf1Grp):
symdg create Rdf1Grp –type rdf1
2. Add to the device group an R1 standard device (286) on the local Symmetrix array (sid 3264) to hold production data. Add local virtual device 287 and remote virtual device 097 to hold the snap copies:
symdg -g Rdf1Grp –sid 3264 add dev 286symdg -g Rdf1Grp –sid 3264 add dev 287 -vdevsymdg -g Rdf1Grp –sid 3264 add dev 097 –rdf -vdev
3. Associate with the device group local BCV 39A and remote BCV 39F:
symbcv -g Rdf1Grp –sid 3264 associate dev 39Asymbcv -g Rdf1Grp –sid 3264 associate dev 39F -rdf
4. Establish the BCV pairs on both Symmetrix arrays. DEV001 is the logical device name of the R1 source device (286):
EMC Solutions Enabler Symmetrix TimeFinder Family CLI Version 7.2 Product Guide96
Performing TimeFinder/Snap Operations
5. When the BCV pairs are fully synchronized, perform a consistent split on both BCV pairs. You can perform this operation with one command, using the –both_sides option. For example:
symmir -g Rdf1Grp split –consistent –both_sides
Note: To use the -consistent and -both_sides options, the SRDF pairs must be synchronized and in SRDF mode SYNCHRONOUS.
6. When the background split is complete, create the local and remote snap pairs:
8. To query the progress of the local snap operation or verify when the local copy is complete, you can issue the following commands that examine the local snap pair:
9. To query the progress of the remote snap operation or verify when the remote copy is complete, you can issue the following commands that examine the remote snap pair:
10. When subsequent snaps are no longer required, you can terminate the copy sessions by issuing commands that end copy sessions for the local and remote snap pairs:
Snapping copies of a source device’s data locally and remotely 97
Performing TimeFinder/Snap Operations
Snapping multiple copiesThe configuration in Figure 24 is basically the same as Figure 23 on page 96 except that this configuration snaps from a BCV source to four virtual devices on each Symmetrix array instead of to one virtual device on each Symmetrix array. This illustrates how a single symsnap command can create an image of a source device (a BCV in this case) on four virtual devices simultaneously.
As mentioned previously, by splitting the BCV pairs on both sides of an SRDF configuration at the same time, the BCVs on both sides contain data that is consistent with the R1 source data up to the time of the split. The controlling host can then perform a local snap and a remote snap, resulting in virtual devices on both sides having copies of the source device’s data (provided that the BCVs were not written to by their hosts prior to the snap operation). In this configuration, 10 hosts can have access to copies of the source device’s data (two copies on BCVs, and eight copies on virtual devices).
Figure 24 Snapping multiple copies on local and remote Symmetrix arrays
VDEV004
VDEV003 VDEV005
VDEV002
R1
Host 2
Host 3
Host 4
Host 5
ControllingHost
R2
Host 9
Host 10
Host 7
Host 1 Host 6
MultipleCopies
ConsistentSplit
Host 8
SYM-001813
Local Symmetrix Remote Symmetrix
BCV RBCV
RVDEV006 RVDEV008
RVDEV007 RVDEV009
EMC Solutions Enabler Symmetrix TimeFinder Family CLI Version 7.2 Product Guide98
Performing TimeFinder/Snap Operations
The process for building an RDF1-type device group is similar to the previous section. The difference is that a device group for this configuration contains the R1 standard device, two BCVs, and eight virtual devices. Establishing and splitting both BCV pairs is the same as the previous section.
What is different about this configuration is the ability to snap copies from a single source to multiple virtual devices simultaneously with a single command. Before initiating the snap operation, however, you must wait for completion of the BCV-pair background split involving the BCV that will be the source for the snap.
To snap copies to the four local virtual devices (DEV002 – DEV005) from the local BCV source device (BCV001), issue the symsnap create and the symsnap activate commands:
To snap copies to the four remote virtual devices (DEV006 – DEV009) from the remotely associated BCV source device (BCV002), issue the symsnap commands with the –rbcv option:
Snapping a copy at the tertiary site of a cascaded SRDF configurationUsing SRDF technology and the TimeFinder-hop2 option, you can snap devices on a Symmetrix array located at the tertiary site of a cascaded SRDF configuration (Figure 25). Performing SYMCLI commands from the controlling host allows the remote virtual device to receive a copy of the data from the R1 device. Remote Host A can access the snap data.
Figure 25 Snapping a copy at the tertiary site of a cascaded SRDF configuration
The following steps outline an example of snapping local device data on a Symmetrix array located at the tertiary site of a cascaded SRDF configuration:
1. Create an RDF2-type device group or composite group (for example, a group named remotesnaps):
To create an RDF2-type device group:
symdg create remotesnaps -type rdf2
To create an RDF2-type composite group:
symcg create remotesnaps -type rdf2
2. Add devices to the group. From the Symmetrix array at the primary site, add an R2 standard device. From the Symmetrix array at the tertiary site, add a virtual device to hold the snap copy.
To add devices to a device group:
symdg -g remotesnaps -sid 3264 add dev 001symdg -g remotesnaps -hop2 -rdfg 1 -remote_rdfg 3 -vdev add dev 04f
3. Create a snap pair session from the devices in the group:
symsnap -g remotesnaps -exact -hop2 create
R2
Primary SiteSymmetrix 3264
ControllingHost
R21
Secondary SiteSymmetrix 3265
R1
001 289 288
Copy
VirtualDevice
04F
Tertiary SiteSymmetrix 3266
Host A
SYM-001814
rdfg 1 rdfg 2
EMC Solutions Enabler Symmetrix TimeFinder Family CLI Version 7.2 Product Guide100
Performing TimeFinder/Snap Operations
4. Activate the snap pair session:
symsnap -g remotesnaps -hop2 activate
5. To query the progress of the remote snap session:
symsnap -g remotesnaps query -hop2
6. To terminate the remote snap session:
symsnap -g remotesnaps -hop2 terminate
Snapping a copy at the tertiary site of a cascaded SRDF configuration 101
Performing TimeFinder/Snap Operations
Snapping a copy from a clone target deviceYou can perform snap operations from clone target devices. This feature allows the target device of a clone session to be used as a source device for one or more snap sessions.
The following restrictions apply to snap from clone target devices:
◆ The original clone session (symclone) must be in the Copied or Split state.
◆ After one or more snap sessions begin using the original clone devices, the only action permitted on the original clone session is terminate. All other actions are blocked until all of the snaps are terminated.
The only actions permitted on a snap session with a clone session target as their source are activate and terminate. All other actions are blocked until the original clone session is terminated. For example:
EMC Solutions Enabler Symmetrix TimeFinder Family CLI Version 7.2 Product Guide102
Performing TimeFinder/Snap Operations
Command options with device groups or composite groupsOptions to the symsnap -g and -cg command line arguments provide more action flexibility to control copy sessions when you are operating on device(s) of a specified device group or composite group. Table 9 lists the symsnap control operations and the possible options to use when targeting a specified device group or composite group.
Table 9 symsnap -g and -cg control arguments and possible options (page 1 of 2)
EMC Solutions Enabler Symmetrix TimeFinder Family CLI Version 7.2 Product Guide104
Performing TimeFinder/Snap Operations
Command options with device filesWith the symsnap -file command, you can perform snap control operations on device pairs defined in a device file. The device file includes a source device number, a target virtual device number, and the Symmetrix ID. Table 10 lists the symsnap control operations and the possible options to use when targeting device pairs specified in a device file.
Table 10 symsnap -file control arguments and possible options
a. Not supported with Solutions Enabler version 7.2 and higher.
Command options with device files 105
Performing TimeFinder/Snap Operations
EMC Solutions Enabler Symmetrix TimeFinder Family CLI Version 7.2 Product Guide106
4
This chapter describes the business continuance model and explains how to manage and control TimeFinder/Mirror (BCV) devices.
For Symmetrix configurations running Enginuity version 5874 and Solutions Enabler version 7.0 and higher, the TimeFinder/Mirror functions described herein will be performed through TimeFinder/Clone software using a process called Clone Emulation. Clone Emulation mode makes the use of RAID-protected BCVs transparent to the TimeFinder/Mirror user.
For backward compatibility, TimeFinder/Clone Emulation mode transparently performs TimeFinder/Mirror commands and executes scripts written for Solutions Enabler up through version 6.5.2 running on Symmetrix arrays using Enginuity 5773 and lower.
◆ Introduction to Clone Emulation mode and TimeFinder/Mirror ....................... 108◆ TimeFinder/Mirror ..................................................................................................... 108◆ Listing BCV devices ..................................................................................................... 114◆ Associating BCV devices with a device group ........................................................ 115◆ Disassociating BCV devices from a device group ................................................... 118◆ Moving BCV devices from one device group to another device group.............. 120◆ Managing BCV devices with composite groups..................................................... 121◆ Establishing BCV pairs ............................................................................................... 122◆ Incrementally establishing BCV pairs ...................................................................... 132◆ Splitting BCV pairs...................................................................................................... 135◆ Fully restoring BCV pairs........................................................................................... 149◆ Incrementally restoring BCV pairs ........................................................................... 153◆ Protecting BCV data during full or incremental restores ...................................... 157◆ Cancelling BCV pairs.................................................................................................. 158◆ Querying BCV pairs.................................................................................................... 159◆ Verifying BCV pair states ........................................................................................... 161◆ Using composite groups to manage BCV pairs across Symmetrix arrays.......... 163◆ Preferred attachment of BCVs (optional operations)............................................. 165◆ BCV pair states ............................................................................................................ 170◆ Command options with device groups.................................................................... 172◆ Command options with composite groups............................................................. 174◆ Command options with device files......................................................................... 176◆ Various remote multihop configurations................................................................. 178
PerformingTimeFinder/Mirror
Operations
Performing TimeFinder/Mirror Operations 107
Performing TimeFinder/Mirror Operations
Introduction to Clone Emulation mode and TimeFinder/MirrorClone Emulation mode is a mapping procedure that enables environments the use of RAID-protected BCV devices transparent to TimeFinder/Mirror users. As previously mentioned, under Clone Emulation mode, Solutions Enabler CLI functions convert TimeFinder/Mirror commands to TimeFinder/Clone commands.
Note: For environments using Enginuity 5874 and higher, TimeFinder/Mirror uses Clone Emulation mode for all operations. When running Enginuity 5874, any differences in operations that you need to keep in mind will be noted in their respective sections.
“TimeFinder/Clone Emulation” on page 110 contains greater detail.
TimeFinder/Mirror Symmetrix TimeFinder/Mirror is essentially a business continuance solution that allows the use of special business continuance volume (BCV) Symmetrix devices. Copies of data from a standard Symmetrix device (which are online for regular I/O operations from the host) are sent and stored on BCV devices to mirror the primary data. Uses for the BCV copies can include backup, restore, decision support, and applications testing. Each BCV device has its own host address, and is configured as a stand-alone Symmetrix device.
TimeFinder/Mirror involves associating and establishing the BCV device as a mirror of a specific standard Symmetrix device. As a result, the BCV device becomes inaccessible (Not Ready in Figure 26) using its original device address while it is in an established pair. Once the BCV device is synchronized with its source, you can separate (split) it from the standard device with which it is paired, thereby making it available again to its host for backup or other host processes through its original device address.
After host processing on the BCV device is complete, the BCV may again be mirrored to a standard Symmetrix device—either the same device with which it was previously paired, or with a different device.
Figure 26 Establishing a BCV pair
Copy
STDM2
STDM1
DEV001
DEV001
BCVpair
STDDEV001
BCV001
Not Ready
Host
Host
SYM-001483
BCV001
BCV
EMC Solutions Enabler Symmetrix TimeFinder Family CLI Version 7.2 Product Guide108
Performing TimeFinder/Mirror Operations
A Symmetrix DMX 1 array allows up to four mirrors for each logical volume. The mirror positions are commonly designated M1, M2, M3, and M4. A single BCV can be the second, third, or fourth mirror of the standard device. In Figure 26, because standard device DEV001 is configured with two mirrors, BCV001 functions as the third mirror. A host logically views the Symmetrix M1/M2 mirrored devices as a single device.
SRDF-connected Symmetrix sitesSRDF is a Business Continuance solution that maintains a mirror image of data at the device level in Symmetrix arrays located in physically separate sites. In an SRDF configuration, the individual Symmetrix devices are designated as either a source or target to synchronize and coordinate SRDF activity.
Remotely mirroringthe local standard
There are multiple types of SRDF-connected BCV devices. An SRDF-connected BCV can be paired with the R1 mirror or R2 mirror of the local RDF standard devices (RBCV) as shown in Figure 27.
Figure 27 SRDF: Mirroring the local standard
Mirror types Once a BCV device is established as a mirror of a standard device, those two devices together are referred to as a BCV pair. The pair consists of two types of mirrors: the standard device mirror(s) and the BCV mirror.
The standard device mirrors contain copies of the data contained in their associated standard devices. There can be up to three standard device mirrors (M1, M2, M3).
A BCV mirror is a standard device mirror. It can be a two-way mirror (M1, M2) that is assigned upon creation of the BCV pair.
Note: Mirroring tasks such as establish, split, and restore use the symmir command and are described later in this chapter.
1. Unless noted otherwise, all references to Symmetrix arrays discussed in the context of TimeFinder/Mirror indicate a Symmetrix DMX running Enginuity 5773 and lower.
DEV001
Device group: prodDevice group type: RDF1
SRDF link(s)hop1
RA group: 1
Local
Symmetrix 0001
Host
Symmetrix 0002
Site A Site B
SYM-001484
STD R1
BCV001
BCV
STD R2
RBCV001
BCV
BCV pair
Introduction to Clone Emulation mode and TimeFinder/Mirror 109
Performing TimeFinder/Mirror Operations
Figure 28 Mirror configuration types
TimeFinder/Clone EmulationStarting with Enginuity version 5671, TimeFinder automatically maps a TimeFinder/Mirror command to the executable of the appropriate TimeFinder/Clone command when it encounters a BCV that is a RAID 5 or RAID 6 protected device. Under Clone Emulation mode, TimeFinder/Clone initiates the pre-copying of data.
Note: While Clone Emulation mode is primarily a RAID 5 BCV implementation, it can also be used with any other BCV protection. Clone Emulation is available with the TimeFinder/Clone license and can be used with existing TimeFinder/Mirror scripts.
When you establish a BCV pair under Clone Emulation, the symmir establish -full command maps to the symclone create -precopy -differential command. This action causes copying to begin while still checking for new writes. The symmir split command maps to the symclone activate command. This action causes the data to become available to the host as an instant point-in-time copy.
Table 11 details the mapping of TimeFinder/Mirror operations to their TimeFinder/Clone operational equivalents.
STD
M1M2
M3
3-way mirror STD
BCV
BCV005
M1M2
2-way mirror BCV
STD
DEV001
M1
1-Way mirror STD(unprotected)
Standard device mirrors BCV mirrors
SYM-001489
Table 11 TimeFinder commands mapped to clone operation (page 1 of 2)
FULL ESTABLISH CREATE with pre-copy and differential
SPLIT ACTIVATE or SPLIT
INCREMENTAL ESTABLISH RECREATE
FULL RESTORE FULL RESTORE
INCREMENTAL RESTORE INCREMENTAL RESTORE
VERIFY VERIFY
ATTACH ATTACH
DETACH DETACH
CANCEL TERMINATE
EMC Solutions Enabler Symmetrix TimeFinder Family CLI Version 7.2 Product Guide110
Performing TimeFinder/Mirror Operations
To operate in a mixed BCV set of RAID 5 BCVs and non-RAID 5 BCVs, you must set the Clone Emulation environment variable to ENABLED:
SYMCLI_CLONE_EMULATION=ENABLED
In a mixed BCV set, if Clone Emulation is disabled (the default), any control operation produces an error when a RAID 5 BCV is encountered.
When in Clone Emulation mode, a standard device can be paired with as many as eight concurrent BCVs (RAID 5 or any other BCV protection). Issue the symmir establish –concurrent command for the same standard device up to eight times, adding one additional BCV each time.
The following limitations apply to TimeFinder/Clone Emulation:
◆ The TimeFinder reverse split feature is not allowed.
◆ Restores will always be protected restores.
◆ Incremental Restore (Reverse Re-Snap) will only be accepted if all tracks were originally copied from the source prior to the restore taking place.
Note: With Clone Emulation mode, an incremental restore will only be accepted if the devices are in a Split state and there is no active split.
◆ The following option file settings will be ignored:
◆ The maximum number of BCVs that can be incrementally established with a standard device will be eight instead of the 16 allowed by TimeFinder. SYMCLI_MAX_BCV_PAIRS can at most be eight.
◆ The BCV states Split-Before-Sync and Split-Before-Restore are not valid states for an emulation device. In both cases, a forced split will complete the synchronization operation.
PROTECT RESTORE Default feature
PROT BCV ESTAB Default featurea
QUERY QUERY
List List
a. Only after the completion of split is the target device fully synchronized as in a protected BCV Establish.
Table 11 TimeFinder commands mapped to clone operation (page 2 of 2)
Introduction to Clone Emulation mode and TimeFinder/Mirror 111
Performing TimeFinder/Mirror Operations
TimeFinder operations overviewThe TimeFinder/Mirror control operations described in this chapter require a TimeFinder or TimeFinder/Mirror license unless otherwise specified.
These management operations can safely be performed with SYMCLI on a copy of an actively changing set of the business data. Business Continuance management operations include backing up a static copy of a database, or preparing for application upgrades.
Device external locksSYMCLI/SYMAPI uses device external locks in the Symmetrix array to lock device pairs during SRDF and TimeFinder control operations.
Note: The Solutions Enabler Symmetrix Array Management CLI Product Guide provides more information on external locks.
Skip locks During TimeFinder/Mirror operations, you can choose to bypass the device external locks on standard devices by using the -skip option with the symmir establish and split commands. If the specified source devices are either all locked or all unlocked, this option will explicitly not lock those source devices.
Preserve target locks Device external locks are used to lock BCV device pairs and devices participating in a copy session during TimeFinder BCV, Snap, and Clone operations. For target devices that have been previously locked with the same lock holder ID, you can preserve the original lock for use in performing additional TimeFinder control operations.
Use the -preservetgtlocks and -lockid options with the symmir establish, restore, and split commands to preserve the original device lock on target devices. You must specify the original lock holder ID number. This option causes the operation to not take out additional locks for the specified target devices.
Disallow synchronization actionsFor some sites, it may be desirable to block users on a specific host from performing either an establish or restore operation on any of the Symmetrix devices. The SYMAPI_SYNC_DIRECTION parameter in the options file allows you to confine TimeFinder and SRDF operations to either just establish or restore actions. In this way, you can block a user on a host from executing a restore or an establish action using the following form:
SYMAPI_SYNC_DIRECTION=ESTABLISH | RESTORE | BOTH
where:
ESTABLISH confines the possible operations to just establish actions.
RESTORE confines the possible operations to just restore actions, which includes (allows) restore, failback, and R1 update actions.
BOTH (default) does not restrict any TimeFinder or SRDF actions.
Note: The EMC Solutions Enabler Symmetrix CLI Command Reference provides more details about the options file.
EMC Solutions Enabler Symmetrix TimeFinder Family CLI Version 7.2 Product Guide112
Performing TimeFinder/Mirror Operations
Wait for synchronization actions to completeBy default, the symmir establish command initiates a series of tasks that begins the synchronization of one or more BCV pairs. SYMCLI returns control to the caller while the establish operation is still in progress. The WAIT_FOR_BCV_SYNC parameter in the options file enable you to delay returning control to the caller until the establish operation (or a restore operation) is complete:
SYMAPI_WAIT_FOR_BCV_SYNC = TRUE | FALSE
where:
TRUE waits for the operation to complete before returning control to the caller.
FALSE (default) returns control to the caller before the operation completes.
Note: The EMC Solutions Enabler Symmetrix CLI Command Reference provides more details about the options file.
TimeFinder operations overview 113
Performing TimeFinder/Mirror Operations
Listing BCV devicesConfiguration and status information is stored in the Symmetrix configuration database file for each device on every Symmetrix array, including BCV devices.
You can find all BCV devices on a Symmetrix array and view their physical and Symmetrix device names. In addition, you can display details about the BCV devices, including the BCV device name, the Symmetrix device name of the paired standard device, the number of invalid tracks for both the BCV device and the standard device, and the BCV pair state.
Examples To list all the BCV devices that are visible to the host, enter:
symbcv list pd
To list all the BCV devices, regardless of whether they are visible to the host, enter:
symbcv list dev
To list all the BCV devices that have SCSI reservations, regardless of whether they are visible to the host, enter:
symbcv -resv list
To list all the BCV sessions created on a Symmetrix array, enter:
symmir -sid SymmID list
To list all the BCV sessions created on Symmetrix 3264:
Total -------- -------- Tracks 0 8088 MB(s) 0.0 505.5
Legend:
(G): X = The paired BCV device is associated with a group. . = The paired BCV device is not associated with a group.(B): X = The paired BCV device is splitting in the background. . = The paired BCV device is not splitting in the background.(E): X = The paired BCV device is emulation mode. . = The paired BCV device is not emulation mode.
EMC Solutions Enabler Symmetrix TimeFinder Family CLI Version 7.2 Product Guide114
Performing TimeFinder/Mirror Operations
Associating BCV devices with a device groupVarious compound (even multihop) remote configurations can be managed by your host using various SYMCLI control components. To perform operations on a BCV device using the SYMCLI, the BCV device must be associated with an existing device group or composite group (this is not a requirement when using a device file).
Note: For information on associating BCV devices with a composite group, refer to “Associating BCV devices with a composite group” on page 121.
When you associate a BCV device with a device group, you can assign it a logical device name. If you do not assign the BCV device a logical device name, a logical device name will be assigned automatically.
Note: Mirroring tasks such as establish, split, and restore use the symmir command and are described later in this chapter.
Examples You can associate BCV devices with a device group by using either the physical device name, or the Symmetrix device name. To associate a BCV device with a physical device name of /dev/dsk/c0t2d0s2, to a device group named prod, and naming the BCV device BCV7, enter:
symbcv -g prod associate pd c0t2d0 BCV7
To associate a BCV device, with a Symmetrix device name of 001F, to a device group named prod, naming the BCV device BCV5, enter:
symbcv -g prod associate dev 001F BCV5
Multiple device groups By default, a BCV device cannot be associated with more than one device group at the same time when you are using one SYMCLI configuration database file. However, you can change this default behavior by enabling the SYMAPI_ALLOW_DEV_IN_MULT_GRPS parameter in the options file.
You can associate all BCV devices with a device group. Only BCV devices that are not already associated with a device group will be associated.
You can either associate all BCV devices that are visible to your host within a device group (the default), or are configured in a Symmetrix array.
To associate all BCV devices on Symmetrix 123 with a device group prod, enter:
symbcv -g prod -sid 123 associateall dev
Host-visible BCV devices To associate all BCV devices visible to your host with the device group prod, enter:
symbcv -g prod associateall
You can also associate a range BCV devices that are visible to your host. For example, to associate devices 039A through 039F with the device group prod, enter:
symbcv -g prod associateall -devs 039A:039F
You can associate remote BCV devices with a device group. The following options allow all remote BCV devices of a specific type to be associated with a device group:
◆ -rdf specifies remote attached BCVs (RBCVs).
◆ -bcv specifies remote BCVs that mirror local BCVs (BRBCVs). This option must be used with the -rdf option.
◆ -rrdf specifies BCVs that are remotely associated with remote BCVs (RRBCVs).
Associating BCV devices with a device group 115
Performing TimeFinder/Mirror Operations
◆ -hop2 specifies BCV devices (2BCVs) that are remotely associated on the second hop of a cascaded SRDF configuration.
SRDF-connected BCVdevice
An SRDF-connected BCV device must be associated with a device group before it can be paired with a remote standard device. Figure 29 on page 117 shows a device group of type RDF1 (there are three other device group types, RDF2, RDF21, and REGULAR, which are not shown). If the group is an RDF1 type, then the remote BCVs (RBCV) can only be paired with the R2 mirrors on the remote Symmetrix array. If the group is an RDF2 type, then the remote BCVs can only be paired with the R1 mirrors on the remote Symmetrix array. When dealing with concurrent RDF devices, you can only remotely associate with one RDF group.
To associate an SRDF-connected BCV device to a device group named prod, and assign it a logical device name of RBCV001, enter:
-bcv specifies that it is a remote BCV that mirrors the local BCV.
-RDFG 2 specifies an RDF group number 2, through which the remote BCV is reached.
EMC Solutions Enabler Symmetrix TimeFinder Family CLI Version 7.2 Product Guide116
Performing TimeFinder/Mirror Operations
Compounded remoteconfiguration
Figure 29 shows how devices in a compounded remote configuration can be associated.
Figure 29 Compounded remote configuration example
◆ At site A, the SRDF links remotely mirror a local Symmetrix array.
◆ The remote site B functions as the remote mirror to the standard devices at site A.
◆ Remote site C (third site) uses an SRDF link to remotely mirror the BCV devices in the Symmetrix array at site A.
◆ The second-level SRDF shows how:
• SRDF can be cascaded where remote site D (the Tertiary site) functions as a remote partner of the R21 device, which is the remote partner of the local RDF standard device.
• SRDF can include multiple sites, for example where remote site E functions as a remote mirror to the standard devices of site A.
DEV001
Device group: prodDevice group type: RDF1
SRDF link(s)hop1
RA group: 2
Local
Symmetrix 0001
Host
Symmetrix 0003
Site A
Site C
STD R1
BCV001
BCV
STD R2
BRBCV001
BCV
Symmetrix 0014
Site E
SYM-001490
STD R2
RRBCV001
BCV
SRDF link(s)hop2
SRDF link(s)hop1
RA group: 1
Symmetrix 0002
STD R21
RBCV001
BCV
Symmetrix 0013
STD R2
2BCV001
BCV
SRDF link(s)hop2
RA group: 1
Site B Site D
BCV pair
BCV pair
Sec
ond-
leve
l SR
DF
Associating BCV devices with a device group 117
Performing TimeFinder/Mirror Operations
Disassociating BCV devices from a device groupOnce a BCV device has been associated with a device group, you can disassociate it when the BCV device is in a state that allows it to be disassociated.
You can disassociate a BCV device by using either the physical device name, the Symmetrix device name, or the logical device name.
To disassociate a BCV device named BCV7 from the prod device group, enter:
symbcv -g prod disassociate ld BCV7
To disassociate a BCV device on Symmetrix device 000F from the prod device group, enter:
symbcv -g prod disassociate dev 000F
If the BCV device that you want to disassociate from a device group is currently paired via TimeFinder, TimeFinder/Snap, or TimeFinder/Clone, the -force option must be used.
Note: When you use the -force option, SYMCLI does not access the Symmetrix array (an offline operation). It disassociates the device from the device group without access to the Symmetrix array.
SRDF-connected BCVpair
An SRDF-connected BCV device can be disassociated from a device group.
You can disassociate a BCV device using either the Symmetrix device name or the logical device name.
To disassociate a remote BCV device that has a logical device name of RBCV001 from a device group named SAMPLE1, enter:
symbcv -g SAMPLE1 -rdf disassociate ld RBCV001
To disassociate a remote BCV device that has a Symmetrix device name of 002B from a device group named SAMPLE1, enter:
symbcv -g SAMPLE1 -rdf disassociate dev 002B
If you are attempting to disassociate a remote BCV device from a device group, and the BCV device is in the synchronized, restored, or transient BCV state, you must use the -force option.
Note: When you use the -force option, SYMCLI does not access the Symmetrix array (an offline operation). It disassociates the device from the device group without access to the Symmetrix array.
Remote SRDF-connectedBCV pair
You can disassociate a remote BCV pair that mirrors the local BCV device, which is shown associated in Figure 29 on page 117.
For example:
symbcv -sid 123 -g SAMPLE1 -rdf -bcv disassociate dev 002A
where:
123 is the ID of the local Symmetrix array.
-rdf specifies a remote attachment.
-bcv specifies that it is a remote BCV that mirrors the local BCV.
EMC Solutions Enabler Symmetrix TimeFinder Family CLI Version 7.2 Product Guide118
Performing TimeFinder/Mirror Operations
Remote BCV of a remoteBCV pair
You can disassociate a remote BCV that mirrors the remote BCV device, which is shown associated in Figure 29 on page 117. This option can be used to disassociate a BCV device that is accessible via SRDF links two hops away. The group must be an RDF group.
For example:
symbcv -sid 123 -g SAMPLE1 -rrdf disassociate dev 002A
where:
123 is the ID of the local Symmetrix array.
-rrdf specifies the BCV is being remotely disassociated with a remote BCV in the group.
Remote BCV on thesecond hop of a cascaded
SRDF configuration
You can disassociate a remote BCV on the second hop of a cascaded SRDF configuration, which is shown associated in Figure 29 on page 117. This option can be used to disassociate a BCV device that is accessible via SRDF links two hops away. The group must be an RDF group.
For example:
symbcv -sid 123 -g SAMPLE1 -hop2 disassociate dev 002A
where:
123 is the ID of the local Symmetrix array.
-hop2 specifies the BCV is in the second hop of a cascaded SRDF.
Disassociating BCV devices from a device group 119
Performing TimeFinder/Mirror Operations
Moving BCV devices from one device group to another device groupThe symbcv command can be used to move one or all BCV devices from one existing device group to another existing device group. The source and destination groups can be of different types. When moving a BCV device from one group to another, you can choose to have the device’s logical name renamed to the default naming convention of the destination group. This helps to avoid naming conflicts that may be encountered. Various other options are available to limit a move to the devices that meet a specified set of criteria, which can be specified along with the moveall action. For a full description of these options, refer to symbcv in the EMC Solutions Enabler Symmetrix CLI Command Reference.
Moving a specific device To move BCV device BCV001 from device group prod to the destination group NewGroup and rename the moved device, enter:
symbcv -g prod move ld BCV001 NewGroup -rename
Moving all BCV devices You can move all local BCV devices from one device group to another device group. The source and destination groups can be of different types.
To move all BCV devices that are visible to your host from device group prod to device group NewGroup, enter:
symbcv -g prod moveall NewGroup
Moving remote BCVdevices
Remote BCV devices can be moved from one device group to another device group. The following options allow all remote BCV devices of a specific type to be moved:
◆ -rdf specifies remote attached BCVs (RBCVs).
◆ -bcv specifies remote BCVs that mirror local BCVs (BRBCVs). This option must be used with the -rdf option.
◆ -rrdf specifies BCVs that are remotely associated with remote BCVs (RRBCVs).
◆ -hop2 specifies BCV devices (2BCVs) that are remotely associated on the second hop of a cascaded SRDF configuration.
Removing devices The symbcv command also contains a remove all action (rmall), which will remove all devices meeting the specified criteria from the specified device group.
EMC Solutions Enabler Symmetrix TimeFinder Family CLI Version 7.2 Product Guide120
Performing TimeFinder/Mirror Operations
Managing BCV devices with composite groupsWhen adding BCV devices to a composite group, consider the following:
◆ The user must specify a local Symmetrix array ID.
◆ If no devices have been added to the composite group yet, and if there is only one RDFG on the Symmetrix array, then that RDFG is assumed; otherwise, you must specify a RDFG when adding remote BCVs.
◆ The –host, -SA, and –P parameters are only valid when associating local BCV devices.
◆ If –bcv is specified, the BCV list affected is the BRBCV list (or the BCV of the remote BCV device).
Note: -rdf is required when –bcv is specified.
◆ If –rdf is specified and –bcv is not specified, the BCV list affected is the RBCV list.
◆ If –rrdf is specified, the BCV list affected is the RRBCV list.
◆ If -hop2 and -remote_rdfg are specified, the BCV list affected is the 2BCV list.
◆ If –rdf and –bcv and –rrdf are not specified, the BCV list affected is the BCV list.
Associating BCV devices with a composite groupUse the following syntax to associate a BCV using the given Symmetrix device name to the composite group:
Moving BCV devices to a composite groupUse the following syntax to move the BCV that has the given Symmetrix device name to the destination composite group:
Establishing BCV pairsAfter configuration and initialization of a Symmetrix array, BCV devices contain no data. The BCV devices, like the standard devices, have unique host addresses and are online and ready to the hosts to which they are connected. The full establish must be used the first time the standard devices are paired with BCV devices.
Figure 30 illustrates the initial Symmetrix configuration prior to performing any TimeFinder BCV operations. In this figure, the host views the Symmetrix M1/M2 mirrored pair as a single standard device (DEV001) and the BCV device as BCV001.
Figure 30 Initial BCV configuration
To obtain a copy of the data on a standard Symmetrix device, a BCV pair must be established. A BCV pair consists of a BCV device and a standard device. The standard device can have various mirror structures (unprotected, two-way or three-way mirrored, RAID, RAID with SRDF), as long as the number of mirrors does not exceed three. This constraint is in place because establishing a BCV pair requires assigning the BCV device as the next available mirror of the standard device.
Since there is a maximum of four mirrors allowed per device in the Symmetrix array, a device already having four mirrors is not able to accommodate another one.
Optionally, you can target devices in a device group, composite group, or device file:
Figure 31 illustrates the full establish of a BCV pair.
Figure 31 Fully establishing a BCV pair
When a full establish is initiated for each specified BCV pair in a device group:
◆ Command validity is checked. For example, the Symmetrix array makes sure that both the standard device and the BCV device are the same size, the device specified as the BCV has the BCV attribute, the standard device does not already have a BCV device assigned to it, and so on.
If the standard device is a metahead device, the BCV must also share the same metadevice properties. All metamembers will be implicitly established along with the metahead device.
◆ The BCV device is set as Not Ready to the host.
◆ The BCV device is assigned as the next available mirror of the standard device. A BCV can be the second, third, or fourth mirror of the standard device. For example, in Figure 31, it is the third mirror (M3).
◆ The contents of the standard device are copied to the BCV. For example, in Figure 31, the BCV device receives its data from both the first fully valid mirror of the source.
The BCV pair is synchronized when the standard device mirrors and the BCV mirror contain identical data.
Note: The BCV device is not available for host use during the time that it is assigned as a BCV mirror on a standard device. However, any new data written to the standard device is copied to the BCV device while the BCV pair exists.
Host
NotReady
SYM-001492
STD M2
STD M1
DEV001
DEV001
BCV M3
BCV001
STDDEV001
BCV001
Local
BCV pairCopy
Establishing BCV pairs 123
Performing TimeFinder/Mirror Operations
By default, Solutions Enabler rejects establish commands for CKD online devices. You can allow the establish command for CKD online devices by disabling the SYMAPI_TF_CHECK_ONLINE_CKD option. For instructions on disabling or enabling this option, refer to the EMC Solutions Enabler Installation Guide.
Specifying the default method for establishing BCV pairsWhen specifying the default method for establishing BCV pairs, you can either set it at the system level by using an options parameter, or at the user level by using an environment variable.
Note: User level settings (environment variables) will override system level settings (options file parameters).
CAUTION!Because of the load that establish operations place on a Symmetrix array, you should only change these settings under the direction of EMC. Please contact your EMC representative before changing these settings.
Specifying at the system levelTo specify the default method for establishing BCV pairs at the system level, set the SYMAPI_DEFAULT_BCV_ESTABLISH_TYPE parameter in the options file. Possible values are:
◆ SINGULAR specifies to issue an establish to a single device, including a metamember, at a time. This method allows other tasks access to the Symmetrix array when doing a large number of establishes.
◆ PARALLEL (default) specifies to issue an establish to each servicing disk adapter (DA) in parallel, and then wait for a DA to finish before issuing another establish to that DA.
◆ SERIAL specifies to issue establishes as fast as the Global Special Task (GST) queue can handle them. However, all members of a meta must be established before continuing to the next meta or device. This is the default method when using metadevices.
Note: The EMC Solutions Enabler Symmetrix CLI Command Reference contains information on changing the options file parameters.
Specifying at the user levelTo specify the default method for establishing BCV pairs at the user level, set the SYMCLI_BCV_EST_TYPE environment variable. Possible values for this variable are SINGULAR, PARALLEL, or SERIAL, as described earlier on this page.
When specifying the default method as SINGULAR or PARALLEL, you can also set the SYMCLI_BCV_EST_DELAY environment variable to specify how long to wait between sending commands to the Symmetrix array. Possible value for this variable range from 0 to 30, with 0 being the default setting.
Note: The EMC Solutions Enabler Symmetrix CLI Command Reference contains information on changing environment variables.
EMC Solutions Enabler Symmetrix TimeFinder Family CLI Version 7.2 Product Guide124
Performing TimeFinder/Mirror Operations
Instantly establishing multiple BCV pairsThe multi/instant establish option improves the performance of a typical establish operation by submitting multiple BCV pairs in a single system call to be established instantly. This feature requires Enginuity version 5671 or greater and will be ignored on previous Enginuity versions.
You can enable (default)/disable this feature with the SYMAPI_TF_MULTI_ESTAB_REST environment variable. Setting the SYMAPI_DEFAULT_BCV_ESTABLISH_TYPE parameter to SERIAL or SINGULAR will cause this option to be ignored.
Establishing multiple BCVs with a single standard deviceYou can fully establish (at different times) up to 16 BCV devices (8 when using emulation mode) associated with a single standard device. The BCV devices must also be associated to the same device group.
Note: Using the environment variable SYMCLI_MAX_BCV_PAIRS, the maximum number of pairs (established or restored) can be adjusted between 1 to 16 BCV devices.
With this feature, standard devices retain a relationship with multiple BCVs as long as those BCVs do not become paired with another standard. Here, the information about changed tracks is saved for a split BCV device when another BCV device is subsequently established and split from the same standard device. By invoking a series of split/-full establish commands over time (as shown in Figure 32), a multi-BCV environment becomes established that retains progressive historical images of the specified standard.
Note: When the maximum number of multi-BCV pairs is reached, you can alter the BCV pair cancel policy that controls the round-robin device usage as you fully establish the next device beyond the set maximum pair count. Using environment variable SYMCLI_BCV_PAIR_POLICY, you can cancel the incremental relationship between the STD and the oldest BCV (default), cancel the newest, or don’t cancel any BCV in the set.
Figure 32 Establishing a multi-BCV environment
To fully establish the standard with BCV005, enter:
In this environment, you can specify any one of these older BCVs to incrementally restore the standard back to a historical copy.
Canceling a multi-BCV relationshipYou can completely cancel the incremental relationship between the STD and any one of the split multi-BCV devices from the set using the cancel operation. This operation will put the BCV in either of the following states, depending on whether you are running TimeFinder in native or emulation mode:
You cannot incrementally establish or incrementally restore that BCV pair again until you have performed another full establish operation or a full restore operation.
To remove BCV001 from the set, enter:
symmir -g prod cancel DEV001 BCV ld BCV001
As shown in Figure 33, once you cancel the specified BCV, all records of track changes between the STD and the canceled BCV are destroyed.
Figure 33 Canceling a multi-BCV
SRDF-connected BCVpairs
You can specify an establish action to a remote Symmetrix using the RDF flag (-rdf), which fully establishes the remote BCV pairs.
To perform a full establish operation in the remote Symmetrix array at site B when the RDF flag is specified, use the following command:
symmir -g prod -rdf -full establish
To initiate a full establish on one remote BCV pair, DEV001, in the prod group, enter:
In this case, the flag indicates that the BCV device being established is an SRDF-connected BCV device, which will be established with the remote mirror of the local RDF standard device.
TimeFinder mode BCV state
Native SplitNoInc
Emulation Never Establish
STDDEV001
BCV001
BCV002
BCV003
BCV004
BCV005
Now
Multi-BCVs SYM-001494
SplitNoIncCancel
4 a.m. split
6 a.m. split
8 a.m. split
Synchronized
EMC Solutions Enabler Symmetrix TimeFinder Family CLI Version 7.2 Product Guide126
Performing TimeFinder/Mirror Operations
To perform a full establish operation in the remote Symmetrix array at site B when the RDF and BCV flags (-rdf and -bcv) are specified, use the following command:
symmir -g prod -rdf -bcv -full establishTo initiate a full establish on one remote BCV pair, BCV001, in the prod group, enter:
In this case, the -rdf parameter indicates that the BCV device being established is an SRDF-connected BCV device, which will be established with the remote standard mirror of the local R1 BCV device.
Second-level remote BCVpairs
You can specify an establish action to a second remote Symmetrix site using the remotely attached remote BCV flag (-rrbcv option), which fully establishes second-level remote BCV pairs. To perform a full establish operation in the remote Symmetrix array at site C when the remotely attached remote BCV flag (-rrbcv option) is specified, use the following command:
symmir -g prod -rrbcv -full establish
To initiate a full establish on one remote BCV pair, RBCV001, in the prod group, enter:
In this case, the flag indicates that the BCV device being established is a second hop SRDF-connected BCV device, which will be established with the remote standard mirror of the remote BCV device.
Hop 2 BCV pairs in acascaded SRDF
configuration
You can specify an establish action to a Symmetrix array located at the tertiary site of a cascaded SRDF configuration.
To perform a full establish operation in the remote Symmetrix array at the tertiary site (C) when the hop 2 flag is specified, use the following command:
symmir -g prod -hop2 establish -full
In this case, the flag indicates that the SRDF-connected BCV device (2BCV001) is being established with the remote partner of the R21 device, which is the remote partner of the local RDF standard device.
Using cascaded Clone Emulation to cascaded cloneIn environments running Enginuity release level 5874 with Solutions Enabler version 7.0 and higher, the target device of a Clone Emulation session can be used as the source for one or more clone sessions and vice versa:
◆ Clone session to a Clone Emulation session◆ Clone Emulation session to a clone session
In environments running Enginuity 5875 and higher with Solutions Enabler version 7.1 and higher, performing an incremental restore to a cascaded clone target is supported. For example, devices in an ABC cascaded clone session can copy data from device C to device A.
Clone session to a Clone Emulation session In this configuration, the source device A to target device B is a TimeFinder/Clone session, and source device B to target device C (BCV) is a TimeFinder/Clone Emulation session.
Establishing BCV pairs 127
Performing TimeFinder/Mirror Operations
Figure 34 Cascaded Clone to a cascaded Clone Emulation session
Table 12 lists the Clone to Clone Emulation target session states.
Note: When AB session is SyncInProgress or RestoreInProgress, the –symforce flag is required when performing a BC split operation.
Clone Emulation session to a clone target session In this configuration, the source device A to target device B (BCV) is a TimeFinder/Clone Emulation session, and source device B to target device C is a TimeFinder/Clone session. Table 13 lists the Clone Emulation to Clone target session states.
A B C
Clone 1: The relationshipbetween A and B is preserved, allowing differential resynchronizationfollowing Clone Emulation 2.
Clone 2: Copy operation is allowedafter Clone 1 copy completes.
Table 12 Clone and B to C TimeFinder/Clone Emulation states
BC session state
Clone A Clone B Clone Csession state
AB No session
AB Created, Recreated
ABPrecopy
ABCopyInProg CopyOnAccess CopyOnWrite
ABCopied Split
AB RestoreInProg
AB Restored
BC No session
Create ABFull Establish ABFull Restore ABFull Establish BC
Activate ABSet Mode AB
Activate ABSet Mode AB
Recreate ABEstablish ABSet Mode AB
Recreate ABEstablish ABRestore AB Set Mode AB
Full Establish BC Split ABFull Establish BC
BCSynchronized
Create AB Full Establish ABFull Restore ABSplit BC
Activate ABSet Mode AB
Activate AB Set Mode AB
Recreate AB Establish ABSet Mode AB
Recreate AB Establish ABRestore ABSet Mode AB Split BC
Split BC Split ABSplit BC
BCSyncInProgress
Full Restore AB Not proper state Not proper state Not proper state Not proper state Not proper state Split AB
BC Split (BG Split In Progress)
Full Restore ABEstablish BC
Activate ABSet Mode AB (no precopy)
Not proper state Set Mode AB(no precopy)
Restore ABSet Mode AB (no precopy)
Establish BC Split ABEstablish BC
BC Split (BG split done)
Create ABFull Establish ABFull Restore ABEstablish BCRestore BC
Activate ABSet Mode AB
Activate ABSet Mode AB
Recreate ABEstablish ABSet Mode AB
Recreate AB Establish ABRestore ABSet Mode AB
Establish BC Split ABEstablish BC
BCRestoreInProg
Not proper state Not proper state Not proper state Not proper state Not proper state Not proper state
BC Restored
Full Restore ABSplit BC
Not proper state Not proper state Not proper state Not proper state Split BC Split BC
EMC Solutions Enabler Symmetrix TimeFinder Family CLI Version 7.2 Product Guide128
Performing TimeFinder/Mirror Operations
Note: When AB session SyncInProgress or RestoreInProgress, –symforce flag is required on AB split.
Establishing concurrent BCV pairsWhen you establish a BCV device as a mirror of a standard device, that relationship is known as a BCV pair. When you sequentially establish/split/establish a number of BCV devices over time with a specified standard, that is known as a multi-BCV relationship.
You can establish two BCV devices (eight when using emulation mode) as concurrent mirrors of a single standard device all within the same symmir command line. This relationship is known as a concurrent BCV pair. This feature allows you or an application script to instantly generate two synchronized copies of the standard data. When the two BCVs are split from the standard, the BCV’s hosts can access the data on either BCV.
When establishing concurrent BCV pairs, you can either specify the BCVs, or use the -concurrent option to allow the Symmetrix array to select suitable (in terms of size, emulation, etc.) BCV(s) from the available BCV list.
Example: Specifying theBCVs
To concurrently establish BCV001 and BCV002 with standard DEV012 in device group CncGrp, enter:
While these examples pair both BCVs at the same time, you can also establish the first BCV device now and the second one later. In either case, the concurrent BCVs become synchronized to the standard and remain that way until you split the BCVs from the standard.
The following is a valid concurrent BCV pair example, provided there is no split action between these commands:
In this case, if the standard is already synchronized with one BCV, the Symmetrix array will synchronize one other BCV with it. If the standard device is not yet synchronized with a BCV, the Symmetrix array will still only synchronize one BCV with it.
Performing a protected BCV establish (moving all mirrors)The protected BCV establish (-protbcvest) option (also called the moveall establish) can be used with the establish action to move all mirrors of locally mirrored BCV devices to join the mirrors of the standard device. This protected BCV moving mirror feature (starting with Enginuity version 5670) improves the availability of the BCV mirrors, particularly after a split operation where all BCV mirrors are instantly synchronized. This feature, also known as instant BCV mirror sync, is available with full or incremental establish or restore operations. This feature is only useful in a native TimeFinder environment.
Note: This feature is not supported if the standard device is a dynamic concurrent SRDF device or if TimeFinder is in emulation mode.
Figure 36 compares the Symmetrix array behavior between a normal and a moving protected establish action.
STDDEV012
BCV001
BCV002establish
SYM-001499
Bothsynchronized
EMC Solutions Enabler Symmetrix TimeFinder Family CLI Version 7.2 Product Guide130
Performing TimeFinder/Mirror Operations
Figure 36 Establishing two-way BCV mirrors with protected establish
In a 2-way BCV mirror configuration for a normal establish, M2 is fixed and can only be updated from M1 after a split. For a 2-way BCV mirror device for a protected establish, both M1 and M2 move to the standard device mirror set and become instantly synchronized and available for updates from I/O activity on the standard device.
To initiate a full -protbcvest establish on a 2-way BCV pair with 2-way standard DEV001 in device group Prod, enter:
Incrementally establishing BCV pairsIncrementally establishing a BCV pair accomplishes the same thing as the establish process, with a major time-saving exception: the standard device (DEV001) copies to the BCV device (BCV001) only the new data that was updated on the standard device while the BCV pair was split. Any changed tracks on the BCV are also overwritten by the data on the corresponding tracks on the standard device.
This process is useful if the data yielded from running an application on the BCV device is not needed or if a fresh copy of current data is needed.
Optionally, you can target devices in a device group, composite group, or device file:
Examples To initiate an incremental establish on all the BCV pairs in the prod device group, enter:
symmir -g prod establish
To initiate an incremental establish on a BCV pair, DEV001, in the prod device group, enter:
symmir -g prod establish DEV001
To initiate an incremental establish on a list of specific BCV pairs in the prod device group, enter:
symmir -g prod establish DEV001DEV002DEV005
The establish defaults to re-establishing the previous BCV pairing, unless you use either the -full option.
Automatically converting an incremental establish to a full establishTimeFinder will automatically convert an incremental establish to a full establish when it determines that the requested devices (local or remote) have no prior relationship.
The SYMAPI_DEFAULT_BCV_ESTAB_INC_TO_FULL parameter in the options file allows you to enable this feature. Disabling this feature (default) will cause the SYMAPI to return the error SYMAPI_C_DEVICE_IS_NOT_PAIRED, as it did with previous versions.
Note: Enabling the SYMAPI_DEFAULT_BCV_ESTAB_INC_TO_FULL parameter does not eliminate the requirement to use the -full option with the -opt option.
Incrementally establishing multiple BCV pairsYou can incrementally establish (at different times) up to 16 (8 when using emulation) BCV devices associated with a single standard device. Note that initially, all the BCV devices must have been fully established before you perform any incremental establishes on them.
Note: Using the environment variable SYMCLI_MAX_BCV_PAIRS, the maximum number of pairs (established or restored) can be adjusted between 1 to 16 BCV devices.
EMC Solutions Enabler Symmetrix TimeFinder Family CLI Version 7.2 Product Guide132
Performing TimeFinder/Mirror Operations
With this feature, standard devices retain a relationship with multiple BCVs as long as those BCVs do not become paired with another standard. Here, the information about changed tracks is saved for a split BCV device if another BCV device is subsequently incrementally established and split from the same standard device. By invoking a series of split/increment establish commands over time (Figure 37), a multi-BCV environment becomes established that retains progressive historical images of the data on the specified standard.
Figure 37 Establishing a multi-BCV environment
To query for existing multi-BCVs that were originally all previously (full) established, and then to incrementally establish BCV005 with the standard, enter:
In this environment, you can specify any one of these older BCVs to incrementally restore or establish the standard back to a historical copy.
SRDF-connected BCVpairs
You can specify an incremental establish action to a remote Symmetrix site using the RDF flag (-rdf option), which incrementally establishes the remote BCV pairs.
To perform an incremental establish operation in the remote Symmetrix at site B when the -rdf option is specified, use the following command:
symmir -g prod -rdf -establish
In this case, the -rdf option indicates that the BCV device being established is an SRDF-connected BCV device, which will be established with the remote standard mirror of the local RDF standard device.
Second-level remote BCVpairs
You can specify an incremental establish action to a second remote Symmetrix site using the remotely attached remote BCV flag (-rrbcv option), which incrementally establishes second-level remote BCV pairs. An incremental establish operation in the remote Symmetrix array at site C when the remotely attached remote BCV flag (-rrbcv option) is specified with the following command:
symmir -g prod -rrbcv establish
To initiate a incremental establish on one remote BCV pair, RBCV001, in the prod group, enter:
In this case, the flag indicates that the BCV device being established is a second Hop SRDF-connected BCV device, which will be established with the remote standard mirror of the remote BCV device.
Hop 2 BCV pairs in acascaded SRDF
configuration
You can specify an incremental establish action to a Symmetrix array located at the tertiary site of a cascaded SRDF configuration.
Perform an incremental establish operation in the remote Symmetrix at the tertiary site (C) when the hop 2 flag is specified with the following command:
symmir -g prod -hop2 establish
In this case, the flag indicates that the SRDF-connected BCV device is being established with the remote partner of the R21 device, which is the remote partner of the local RDF standard device.
Protected BCVincremental establish
The protected BCV establish (-protbcvest) option (also known as the moveall establish) can be used with the incremental establish action to move all mirrors of locally mirrored BCV devices to join the mirrors of the standard device. This moving of the mirrors feature (starting with Enginuity version 5670) improves availability of the BCV mirrors, particularly after a split operation where all mirrors are instantly synchronized.
To initiate a protected (-protbcvest) incremental establish on a 2-way BCV pair with 2-way standard DEV001 in device group Prod, enter:
For more information about the protected BCV established environment, refer to “Performing a protected BCV establish (moving all mirrors)” on page 130.
EMC Solutions Enabler Symmetrix TimeFinder Family CLI Version 7.2 Product Guide134
Performing TimeFinder/Mirror Operations
Splitting BCV pairsAfter an establish operation and the standard device and BCV mirrors are synchronized, the BCV device becomes a mirror copy of the standard device. You can split the paired devices to where each holds separate valid copies of the data, but will no longer remain synchronized to changes when they occur. SYMCLI processes can then be executed with the BCV device once the split completes.
Optionally, you can target devices in a device group, composite group, or device file:
Examples To split all the BCV pairs in the prod device group, enter:
symmir -g prod split
To split a BCV pair, DEV001, in the prod device group, enter:
symmir -g prod split DEV001
To split a list of standard devices in the prod device group, enter:
symmir -g prod split DEV001 DEV002 DEV003
Figure 38 illustrates the splitting of a BCV pair.
Note: Relabeling devices is sometimes required in situations where devices are under an MS Windows type volume manager's control. If a BCV (TimeFinder) device holds an identical copy of its standard (paired) device, and when the BCV device becomes ready to the Windows operating system, the volume manager will detect two identical volumes with different mount points. This can cause the volume manager on Windows to exit and bring down a system.
Figure 38 Split the BCV pair
When a split is initiated for each specified BCV pair in a device group, the following occurs:
Host
SYM-001716
STD M2
STD M1
DEV001
DEV001
BCV
BCV001
STDDEV001
BCV001
Local
BCV pairSplit
Splitting BCV pairs 135
Performing TimeFinder/Mirror Operations
◆ Command validity is checked. For example, the Symmetrix array makes sure that the standard device has an active BCV mirror and that the standard and BCV devices comprise a BCV pair.
◆ Any pending write transactions to the standard device and the BCV device are destaged.
◆ The BCV device is split from the BCV pair.
◆ If the device is a meta device, all meta members are implicitly split as well.
◆ The BCV device state is changed to Ready, enabling host access through its separate address (BCV001).
◆ Operation with the standard device is resumed and any tracks changed from write operations to the standard device are marked. (This is necessary for updating the BCV device if it is reestablished with the same standard device at a later time.)
◆ If the BCV device has any of its own mirrors, the mirrors are synchronized, unless protected establish or emulation is used.
Once you finish running any Business Continuance processes on the BCV device, the following options are available:
◆ Incremental establish or reestablish of the BCV pair.
◆ Establish new using the same BCV devices with a different standard device.
◆ Restore data to a standard device from the BCV device.
◆ Incrementally restore data to the standard device from the BCV device (if the devices were previously paired).
SRDF-connected BCVpairs
You can specify a split action to a remote Symmetrix site using the RDF flag (-rdf option), which splits the remote BCV pairs.
To perform the splitting of a remote BCV pair, use the following command:
symmir -g prod -rdf split
In this case, the flag indicates that the BCV device being split is an SRDF-connected device, which will be split from the remote standard mirror of the local RDF standard device.
If a BCV device has its own mirrors (local or remote), these mirrors will become synchronized with its first mirror after the BCV pair is split.
Second-level remote BCVpairs
You can specify a split action to a second remote Symmetrix site using the remotely attached remote BCV flag (-rrbcv option), which splits second-level remote BCV pairs. To perform a split operation in the remote Symmetrix array at site C when the remotely attached remote BCV flag (-rrbcv option) is specified, use the following command:
symmir -g prod -rrbcv split
To initiate a split on one remote BCV pair, RBCV001, in the prod group, enter:
In this case, the flag indicates that the BCV device being split is a second HOP SRDF-connected BCV device, which will be split from the remote standard mirror of the remote BCV device.
EMC Solutions Enabler Symmetrix TimeFinder Family CLI Version 7.2 Product Guide136
Performing TimeFinder/Mirror Operations
Hop 2 BCV pairs in acascaded SRDF
configuration
You can specify a split action to a Symmetrix array located at the tertiary site of a cascaded SRDF configuration.
To perform an establish operation in the remote Symmetrix at the tertiary site (C) when the hop 2 flag is specified, use the following command:
symmir -g prod -hop2 split
In this case, the flag indicates that the SRDF-connected BCV device (2BCV001) is being split from the remote partner of the R21 device, which is the remote partner of the local RDF standard device.
Remote copy with BCVsplit
In addition to splitting a local BCV pair, you can further specify the remote (-remote) option which makes the R1 device ready on the link and propagates the R1 BCV copy across the SRDF link to the R2 that mirrors the BCV:
symmir -g prod split DEV001 -remote
Protected split The standard protect (-std_protect) option verifies that the standard device has either mirror protection, or RAID 5 protection prior to allowing the split to take place.
To verify a standard device’s mirror protection before allowing the split operation, enter:
symmir -g prod -std_protect split
If the standard device will be left in an unprotected state after the split, or if there are any invalid tracks on the standard device’s static mirrors, the command will fail.
Note: Protected split is not supported in TimeFinder/Clone Emulation mode.
Performing a reverse splitThe reverse (-reverse) option initiates a reverse data copy from the fixed BCV mirror to the primary (moving) mirror of the BCV upon the completion of the split operation. The reverse split feature is supported in Enginuity version 5x68 and higher.
Note: A reverse split is not supported in TimeFinder/Clone Emulation mode.
Normal split behaviorNormally, when a BCV has two mirrors, only the primary mirror (M1) joins the standard device in establish or restore operations. As shown in Figure 39, the content of the primary BCV mirror is refreshed by data from the standard, when the BCV is established. The secondary BCV mirror (M2) is refreshed by data from the primary BCV mirror (M1), after the BCV mirror is split from the standard. The primary BCV mirror is referred to as the moving mirror, because it moves between the standard and the secondary (fixed) mirror.
Usually, after a split, the fixed BCV mirror is refreshed from the moving BCV mirror. This can either be a full copy operation or a differential copy. In a differential copy, only the tracks that have changed on the moving mirror during the time it was synchronized with the standard are refreshed.
Splitting BCV pairs 137
Performing TimeFinder/Mirror Operations
Figure 39 Two-way mirror BCV establish/split normal behavior
Reverse split behaviorIn a reverse split operation, the direction of data flow between the BCV mirrors is reversed. As shown in Figure 40, during a reverse split, the fixed BCV mirror (M2) will refresh the moving mirror (M1) after the split operation. This behavior may be desirable when you need to revert to an older copy of the data that was on the BCV before it was established/restored with the standard.
CAUTION!Be sure this is the behavior you want before invoking the reverse split option since the primary BCV mirror data is refreshed with an older mirror of data.
A reverse split is permitted only if both BCV mirrors were completely synchronized before the moving BCV mirror was paired with the standard device. When you
STD
DEV001
BCV
BCV005S1
S2
M1
M2establish
2-way mirror BCV
Fixed
MovingCopy
Established BCV mirrorsnormal Symmetrix behavior
Front-endI/O activity
STD
DEV001
S1S2
2-way mirror BCV
SYM-001722
MovingFixed
split
Split BCV mirrorsnormal Symmetrix behavior
Front-endI/O activity
BCV005
M1M2
Copy
MovingBCVs
STD
DEV001
BCV
BCV005S1
S2
M1
M2establish
2-way mirror BCV
Fixed
MovingCopy
Established BCV mirrorsnormal Symmetrix behavior
Front-endI/O activity
STD
DEV001
S1S2
2-way mirror BCV
SYM-001723
MovingFixed
split
Split BCV mirrorsreverse copy Symmetrix behavior
Front-endI/O activity
BCV005
M1M2
Reversecopy
MovingBCVs
EMC Solutions Enabler Symmetrix TimeFinder Family CLI Version 7.2 Product Guide138
Performing TimeFinder/Mirror Operations
anticipate a need for future reverse split operations, the -reverse option is applied to an establish or restore operation. This option requests a verification check that the BCV’s fixed mirror has valid data. You must verify that both mirrors are in the Ready state after the split.
To establish DEV001/BCV005 and later perform a reverse split on DEV001 in device group Prod, enter:
Note: Data may not be immediately available. Use the verify command to check that both mirrors are in the Ready state for the data to be available.
Figure 41 illustrates a practical use of a reverse split. At midnight a split results in a good point-in-time copy of a database. At 10 a.m. a corruption is discovered in the database, necessitating a database recovery. At 10:30 a.m. a restore operation is initiated from the BCV copy. Because the good data is immediately available to the BCV pair, the recovery begins shortly after initiating the restore process. At 11:00 a.m, during the recovery, one of the logs re-corrupts the database. Though the data on the BCV’s moving mirror has changed during the recovery process, a reverse split can be initiated. At 11:20 a.m. the BCV’s fixed mirror refreshes its moving mirror, providing access to the good midnight copy of the data.
Figure 41 Practical use of a reverse split
Splitting concurrent BCV pairsSince Enginuity version 5x68, you can establish two BCV devices as concurrent mirrors of a single standard device. This relationship is known as a concurrent BCV pair. This feature allows you or an application to instantly generate two synchronized copies of the standard data (refer to “Establishing concurrent BCV pairs” on page 129).
When you apply a split action to a standard device that was concurrently established with two BCV mirrors, both BCVs become split from the standard. Moreover, the splitting of concurrent BCVs will be instantly split without explicitly invoking the -instant option.
To split concurrently established BCV001 and BCV002 with standard DEV012 in device group CncGrp, enter:
symmir -g CncGrp split DEV012
BCV splitfrom standard.Known good
copy
midnight 10:00 10:30 10:40 11:00 11:05 11:20
Corruptiondetected
on standard
Restore withthe -reverse
option isinitiated
from BCVto standard
Databaserecoverystartedon BCV
standard pair
Corruptionre-introducedon standard
and BCV
Reversesplit
initiated
BCVmirrors are
synchronized.Restore withthe -reverseoption canstart with
midnight copy.
Splitting BCV pairs 139
Performing TimeFinder/Mirror Operations
Figure 42 Splitting concurrent BCV pairs
Concurrent BCVs If you do not want both of the concurrent BCVs to simultaneously split together, you can individually target the split action by explicitly specifying the BCV with the standard as follows:
symmir -g CncGrp split DEV012 bcv ld BCV001
or:
symmir -g CncGrp split DEV012 bcv ld BCV002
Concurrent splits To display the status of the background concurrent split for both of these BCVs, enter:
symmir -g CncGrp query -multi -bg
Because invalid track tables are maintained, future concurrent incremental establish operations are possible on these split BCVs. After a concurrent split, it is possible to resynchronize just one BCV as follows:
symmir -g CncGrp establish DEV012
However, if you do not explicitly specify a BCV and you have not set an attachment preference, TimeFinder chooses the BCV to resynchronize, based on which of the two concurrent BCVs was split first.
You can also verify that the action has completed, as follows:
A split action splits both of the BCV mirrors away from the standard device that were previously established with a -protbcvest option. Figure 43 illustrates the initial protected BCV established state and the resulting behavior of a split action on these BCV mirrors. For any split command, there is no need to apply the -protbcvest option to move all the mirrors away from the standard.
STDDEV012
BCV001
BCV002split
SYM-001725
EMC Solutions Enabler Symmetrix TimeFinder Family CLI Version 7.2 Product Guide140
Performing TimeFinder/Mirror Operations
Figure 43 Split behavior on two-way BCV mirrors
Before you split, you may need to query the Symmetrix array to examine the protected STD/BCV mirrored environment to identify the established moved devices for the split action, as follows:
symmir -g prod query -protbcvest
To perform a protected establish and later split (for example) on standard DEV001 with its BCV mirrors, in device group prod, enter:
symmir -g prod establish -protbcvest DEV001...
symmir -g prod split DEV001
For more information about a protected BCV establish, refer to “Performing a protected BCV establish (moving all mirrors)” on page 130.
BCV splits impacting database applicationsOccasionally, a BCV split can impact the integrity (ability to restart) of a database on the split copy. In such a case, additional actions such as freezing the database to user access may be necessary. The freeze action can be used in conjunction with the TimeFinder split operation. The freeze suspends the database updates being written to disk.
Using the symioctl command, you can invoke I/O control operations to freeze access to a specified relational database or database object(s).
Note: First, you must set SYMCLI_RDB_CONNECT to your username and password for access to the specified database. For more information, refer to the symioctl command description in the EMC Solutions Enabler Symmetrix CLI Command Reference.
Freeze To freeze all I/O access to a specified relational database, enter:
symioctl freeze -type DbType Object Object
STD
DEV001
BCV
BCV005
S1S2
M1
2-way mirror BCV
2-way mirrorSTD
2-way mirrorSTD
Moving
BCV mirrors established with protbcvestSymmetrix behavior
Front-endI/O activity
STD
DEV001
S1S2
2-way mirror BCVin a fixed state
SYM-001726
split
Split behavior on protected BCV mirrors
Front-endI/O activity
BCV005
M1M2
MovingBCVs
M2
Splitting BCV pairs 141
Performing TimeFinder/Mirror Operations
SQL Server allows some or all databases to be specified. Oracle and Informix let you freeze or thaw an entire DB system.
To set the connection environment variables, enter:
symioctl freeze Object Object
To freeze databases HR and Payroll, enter:
symioctl freeze HR Payroll
Thaw Once the freeze action completes, the split may proceed. When the split operation completes, a symioctl thaw command must be sent to resume full I/O access to the database instance. For example:
symioctl thaw
Hot backup control For Oracle only, you can perform hot backup control on a list of tablespace objects, which must be performed before and after a freeze/thaw command. To split a group of BCV devices:
1. Issue the symioctl begin backup command.
2. Invoke symioctl freeze.
3. Split standard and BCV pairs. (This may involve several steps depending on your environment.)
4. Invoke symioctl thaw.
5. Issue the symioctl end backup command.
This operation on an Oracle database does not directly affect meta data I/O. The operation does not affect any Oracle files that are not related to this database instance or any non-Oracle files in the same file system. Consequently, just a freeze and thaw action does not guarantee an Oracle database integrity as consistent split does. However, this operation does enhance the performance of splits if you apply a consistent TimeFinder split operation.
TimeFinder consistent splitTimeFinder consistent split allows you to split off a consistent, restartable copy of a database management system within seconds with no interruption to online service. Consistency split helps to avoid inconsistencies and restart problems that can occur when splitting a database-related BCV without first quiescing the database. Consistent split can be implemented using either PowerPath®-connected devices, Enginuity Consistency Assist (ECA) functionality, or SRDF/A.
“Consistent split using Enginuity Consistency Assist” on page 145 contains greater detail. The EMC Solutions Enabler Symmetrix SRDF Family CLI Product Guide provides complete details on SRDF/A.
Note: PowerPath is not supported with Solutions Enabler version 7.2 and higher.
Note: With Enginuity 5874 and higher, TimeFinder includes the TimeFinder/Consistency Group (TimeFinder/CG) option. You do not need a separate license for TimeFinder/CG. For Enginuity 5875 and higher, the EMC Solutions Enabler Installation Guide provides all of the licensing information.
EMC Solutions Enabler Symmetrix TimeFinder Family CLI Version 7.2 Product Guide142
Performing TimeFinder/Mirror Operations
Consistent split using PowerPathConsistent splits using PowerPath can be implemented with an instant (-instant) split where you must also specify either a database or PowerPath device(s) and any pre-action and post-action scripts:
PowerPath consistent split operations require version 2.0.1 or higher PowerPath-connected devices on Symmetrix arrays. Through the assistance of PowerPath, a symmir consistent split (supplied with database or PowerPath parameters) initially suspends I/O to the devices that hold the database. This prevents the database application from proceeding.
The consistency split command also lets you specify the name of scripts using the -preaction and -postaction script options. The script commands are executed prior to the freeze and after the thaw operation, respectively.
Coding pre- or post-action scriptsWhen you code pre-action or post-action scripts for use with the symmir instant split command, you must return to the execution sequences of the symmir command with a 0 (zero for success) or a nonzero value (for any failure type unique to your script).
It is recommended you use the symreturn command supplied with SYMCLI for this purpose to exit your pre- or post-action scripts and re-enter the SYMCLI symmir instant split processing. Again, with symreturn, you supply a 0 argument for success or any nonzero value for a failure.
To return success, in your script enter:
symreturn 0
Figure 44 shows the sequences to execute a consistent instant split operation on an Oracle environment.
Splitting BCV pairs 143
Performing TimeFinder/Mirror Operations
Figure 44 Consistency split on Oracle environment
For example in the figure, the consistent instant split sequence starts with:
1. The symmir command sends a suspend I/O log message to PowerPath to suspend I/O on all devices that hold the database.
2. PowerPath suspends I/O to the specified devices where the database devices reside.
3. Oracle cannot write to devices and subsequently waits for devices to become available before resuming any further data I/O.
4. The symmir command sends an instant split request to all BCV devices in the specified group, and waits until the split occurs in the device foreground.
5. The symmir command sends a resume I/O message to PowerPath.
6. Oracle resumes writing to the devices.
Consistent split on both RDF sides using PowerPathIn an RDF environment as shown in Figure 45, you can perform a consistent split to the BCVs in both the local Symmetrix array and the remote Symmetrix array.
Note: This feature is not supported with R21 groups.
With Enginuity 5874 and higher, TimeFinder includes the TimeFinder/CG option. You do not need a separate license for TimeFinder/CG. For Enginuity 5875 and higher, the EMC Solutions Enabler Installation Guide provides all of the licensing information.
BCV
BCV
BCV
BCV
BCV
SYM-001728
Data
STD
Data
STD
Data
EMCPowerPath
22
3
4
4
5
1
SYMCLI(symmir)
Oracle DBapplication
Host Symmetrix
oracdb3
Yourapplication
STD
Logs
STD
Logs
STD
EMC Solutions Enabler Symmetrix TimeFinder Family CLI Version 7.2 Product Guide144
Performing TimeFinder/Mirror Operations
Figure 45 Consistent split on both RDF sides using PowerPath
The consistent instant split on both RDF sides is only implemented with an instant (-instant) split where you must also specify a database or PowerPath device(s).
To target a database target (both sides), use the following syntax:
Consistent split using Enginuity Consistency AssistYou can use Enginuity Consistency Assist (ECA) to perform consistent split operations across multiple, heterogeneous hosts without the use of PowerPath support.
Note: With Enginuity 5874 and higher, TimeFinder includes the TimeFinder/CG option. You do not need a separate license for TimeFinder/CG.
Using ECA to consistently split BCV devices from the standards, you must have either a control host with no database or a database host with a dedicated channel to the gatekeeper devices. The dedicated channel cannot be used for servicing other devices to freeze I/O.
Figure 46 depicts how a control host can perform ECA consistent splits for three database hosts that access devices on a Symmetrix array.
BCV
BCV
BCV
BCV
BCV
Data
STD
Data
STD
Data
EMCPowerPath
22
3
4
4
3
4
5
1
SYMCLI(symmir)
Oracle DBapplication
Host
symmir split -instant -both_sides
Symmetrix
oracdb3
Yourapplication
STD
Logs
STD
Logs
STD
BCV
BCV
BCV
BCV
BCV
SYM-001729
Data
STD
Data
STD
Data2
4
Remote Symmetrix
oracdb3a
STD
Logs
STD
Logs
STD
Splitting BCV pairs 145
Performing TimeFinder/Mirror Operations
Figure 46 ECA consistent split
Symmetrix device groups or composite groups must be created on the controlling host for the target database to be consistently split. Device groups can be created to include all of the devices being accessed or defined by database host access. For example, if you define a device group that includes all of the devices being accessed by Hosts A, B, and C (refer to Figure 46), then you can consistently split all of the BCV pairs related to those hosts with a single command. However, if you define a device group that includes only the devices accessed by Host A, then you can split those BCV pairs related to Host A without affecting the other hosts.
Note: For information on performing a consistent split to BCVs in both the local and remote Symmetrix arrays, refer to “Consistent split on both RDF sides using ECA” on page 148.
The following steps explain the example in Figure 46 of how to create one device group including all database host accessed devices and perform a consistent split operation on all of the BCV pairs accessed by those hosts.
1. Create a REGULAR type device group:
symdg create ProdAgrp -type REGULAR
2. Add all of the standard devices holding the database for each host (A, B, and C) to the device group:
4. Fully establish all BCV pairs in the device group:
symmir -g ProdAgrp establish -full -noprompt
Note: When the BCV pairs in device group ProdAgrp (Host A, B, and C - BCV pairs) are synchronized, you can perform the consistent split using the symmir split command to split all of the BCV pairs associated with those hosts.
5. Use the -consistent option to perform a consistent (instant) split on all BCV pairs in the device groups:
symmir -g ProdAgrp split -consistent
Once the symmir split -consistent command is issued, I/O to the device group is frozen and a 30-second Enginuity protection timer begins. After the split completes (or 30 seconds passes, whichever comes first), the I/O channels are thawed, granting (pent up) operations access to the standard devices. Splits across all devices in a group are considered consistent, if the BCV split execution is performed within that window.
If for some unknown host or I/O channel reason, not all devices are split within the 30-second window, symmir returns the following reply at completion:
Consistency window was closed on some devices before the operation completed.
At this point, the final successful split outside the window is no longer considered to be consistent in execution across the device group. For consistency and reliability sake, it is recommended that you reestablish the device group, and then (later) attempt the consistent split again.
Table 14 provides a comparison of support criteria characteristics for using Enginuity Consistency Assist (ECA) versus PowerPath.
Consistent split for SRDF/A devicesTimeFinder consistent split allows you to consistently split BCVs from R2 devices operating in asynchronous mode (SRDF/A).1
Although not required for SRDF/A mode, it is recommended that you use TimeFinder BCVs at the remote site to mirror R2 devices and preserve a consistent image of data before resynchronization operations. Also, R2 device BCVs can be split
Table 14 Consistent split comparison: ECA versus PowerPath
Support criteria -consistent -ppath
Multihost support Yes No
Available for non-PowerPath operating systems Yes No
Control host capability from a non-DBMS host Yes No
Requires a nondatabase control host or dedicated channel host Yes No
1. SRDF/A requires Enginuity version 5670 or higher.
Splitting BCV pairs 147
Performing TimeFinder/Mirror Operations
off of the R2 without having to drop the RDF links and without disruption to the SRDF/A operational cycles. R2 BCVs can be controlled from the R1-side or the R2-side host as long as the device groups have been defined on that host. Controlling the R2 BCVs from the R1-side host requires using the symmir command with the -rdf option. To consistently split BCVs off the R2 RDF/A device in group prod from the R1 host, enter:
symmir -g prod split -rdf -consistent
Consistent split on both RDF sides using ECAIn an RDF environment as shown in Figure 47, you can perform a consistent split to the BCVs in both the local and remote Symmetrix arrays.
Figure 47 Consistent splits on both SRDF sides using ECA
In the above example, the controlling host issues a single consistent split command with the -both_sides option to split devices on both the local and remote Symmetrix arrays. For the host to perform this operation, the SRDF links must be up, the RDF mode must be synchronous, and the devices must have an RDF state of Synchronized.
BCV
consistent instant BCV split
Local Symmetrix array
SYMAPIECA
Data
Host A
Host B
Host C
STD
BCVData
STD
BCVData
SRDF links
STD
DBMSInstance
DBMSInstance
DBMSInstance
Contolling host
devicegroupProdAgrp
symmir -g ProdAgrp split-consistent -both_sides
BCV
Remote Symmetrix array
Data
STD
BCVData
STD
BCV
SYM-001766
Data
STD
EMC Solutions Enabler Symmetrix TimeFinder Family CLI Version 7.2 Product Guide148
Performing TimeFinder/Mirror Operations
Fully restoring BCV pairsLike the full establish operation, a full restore operation copies the entire contents of the BCV devices to the standard device.
Optionally, you can target devices in a device group, composite group, or device file:
Examples To initiate a full restore on all the BCV pairs in the prod device group, enter:
symmir -g prod -full restore
To initiate a full restore on a BCV pair, DEV001, in the prod device group, enter:
symmir -g prod -full restore DEV001
To initiate a full restore on more than one (list) of BCV pairs in the prod device group, enter:
The restoration process (Figure 48) is complete when the standard device and BCV device contain identical data.
Figure 48 Full restore of the BCV pair
Note: The BCV device is not available for host use during the time that it is assigned as a BCV mirror on a standard device. However, unless the -protect option is used, any new data written to the standard device is copied to the BCV device while the BCV pair exists.
When a full restore is initiated for each specified BCV pair in a device group:
◆ Command validity is checked. For example, the command is rejected if the BCV device and the standard device are not the same size.
◆ The BCV device is set as Not Ready to the host.
◆ The BCV is assigned as the next available mirror of the standard device.
◆ The contents of the BCV device are copied to the standard device. For example, in Figure 48 on page 149, the Symmetrix array copies the contents of M3 to both M1 and M2, overwriting the data present on those devices.
To use a BCV device for Business Continuance procedures, you must again split the BCV pair to make the BCV device available to its host. If you want to use a fully synchronized copy of the data, suspend all applications that are using the standard device, and make sure that all host buffering and intermediate caching is flushed to the appropriate device on the Symmetrix array prior to performing the split operation. If you do not require a synchronized copy of the data for running a Business Continuance process, this step is unnecessary.
Note that the base tasks performed with symbcv such as list, associate, and disassociate locally or remotely connected BCV devices, are described at the beginning of this chapter.
By default, Solutions Enabler rejects restore commands for CKD online devices. With Solutions Enabler version 7.2 and higher, you can allow the restore command for CKD online devices by disabling the SYMAPI_TF_CHECK_ONLINE_CKD option. For instructions on disabling or enabling this option, refer to the EMC Solutions Enabler Installation Guide.
Specifying the default method for restoring BCV pairsThe SYMAPI_DEFAULT_BCV_RESTORE_TYPE parameter in the options file enables you to specify the default method for restoring BCV pairs. Valid values are:
◆ SINGULAR specifies to issue the restore to one device at a time. This method allows other tasks access to the Symmetrix array when doing a large number of restores.
◆ PARALLEL (default) specifies to issue the restore to each servicing DA in parallel, and then wait for a DA to finish before issuing another restore to that DA.
◆ SERIAL specifies to issue restores as fast as the GST queue can handle them. However, all members of a meta must be restored before continuing to the next meta or device. This is the default method when using metadevices.
Note: The EMC Solutions Enabler Symmetrix CLI Command Reference contains information on changing the option file parameters.
Instantly restoring multiple BCV pairsThe multi/instant restore option improves the performance of a typical restore operation by submitting multiple BCV pairs in a single system call to be restored instantly. This feature requires Enginuity version 5671 or higher.
You can enable (default)/disable this feature with the SYMAPI_TF_MULTI_ESTAB_REST environment variable. Setting the SYMAPI_DEFAULT_BCV_RESTORE_TYPE to SERIAL or SINGULAR will cause this option to be ignored.
EMC Solutions Enabler Symmetrix TimeFinder Family CLI Version 7.2 Product Guide150
Performing TimeFinder/Mirror Operations
SRDF-connected BCVpairs
You can also specify a full restore action to a remote Symmetrix site using the -rdf option, which fully restores the remote BCV pairs.
To perform a full restore operation in the remote Symmetrix at site B when the RDF flag is specified with the following command:
symmir -g prod -rdf -full restore DEV001
In this case, the flag indicates that the BCV device being restored is an SRDF-connected BCV device, which will be established with the remote standard mirror of the local RDF standard device.
To perform a full restore operation in the remote Symmetrix at site B when the -rdf and -bcv options are specified, use the following command:
symmir -g prod -rdf -bcv -full restore BCV001
In this case, the flags indicate that the BCV device being restored is an SRDF-connected BCV device, which will be established with the remote standard mirror of the local R1 BCV device.
Second-level remote BCVpairs
You can specify a full restore action to a second remote Symmetrix site using the remotely attached remote BCV-rrbcv option, which restores second-level remote BCV pairs.To perform a restore operation in the remote Symmetrix array at site C when the -rrbcv option is specified, use the following command:
symmir -g prod -rrbcv restore -full
To initiate a restore on one remote BCV pair, RBCV001, in the prod group, enter:
In this case, the flag indicates that the BCV device being restored is a second Hop SRDF-connected BCV device, which will be established with the remote standard mirror of the remote BCV device.
Hop 2 BCV pairs in acascaded SRDF
configuration
You can specify a full restore action to a Symmetrix array located at the tertiary site of a cascaded SRDF configuration.
To perform a restore operation in the remote Symmetrix array at the tertiary site (C) with the -hop2 option, use the following command:
symmir -g prod -hop2 restore -full
In this case, the -hop2 option indicates that the SRDF-connected BCV device (2BCV001) is being established with the remote partner of the R21 device, which is the remote partner of the local RDF standard device.
Fully restoring BCV pairs 151
Performing TimeFinder/Mirror Operations
Performing a remote copy with restoreIn addition to restoring the specified BCV pair, you can further specify the remote (-remote) option, which will propagate the restored copy from the BCV pair across the SRDF link from the R2 standard to its R1 BCV in one command step:
symmir -g prod restore -rdf -bcv -remote -full
Note: Since Enginuity version 5568, the -remote option is no longer supported for restoring from an R2 standard to an R1 BCV. Instead you should use the two step method.
CAUTION!Be sure you want the R1 BCV device to be updated with the restored copy before issuing the -remote option along with this restore operation.
It is good practice to perform restore operation at the remote site in two command steps (restore the BCV pair first, and then restore the R1 from the R2):
EMC Solutions Enabler Symmetrix TimeFinder Family CLI Version 7.2 Product Guide152
Performing TimeFinder/Mirror Operations
Incrementally restoring BCV pairsThe incremental restore process (Figure 49 on page 154) accomplishes the same thing as the restore process with a major time-saving exception: the BCV (BCV001) copies to the standard device (DEV001) only the new data that was updated on the BCV device while the BCV pair was split. Any changed tracks on the standard device are also overwritten by the data on the corresponding tracks on the BCV device. This maximizes the efficiency of the synchronization process.
This process is useful if the results from running a new application on the BCV device were desirable, and the user wants to port the data and the new application to the standard device.
The following forms enable you to target devices in a device group, composite group, or device file:
To initiate an incremental restore on all the BCV pairs in the prod device group, enter:
symmir -g prod restore
Note: It might be desirable for your site to set external device locks on all standard and BCV devices you are about to restore; refer to “Device external locks” on page 112.
To initiate an incremental restore on a BCV pair, DEV001, in the prod device group, enter:
symmir -g prod restore DEV001
To initiate an incremental restore on more than one (list) BCV pair in the prod device group, enter:
symmir -g prod restore DEV001 DEV002 DEV003
Incrementally restoring BCV pairs 153
Performing TimeFinder/Mirror Operations
Figure 49 illustrates an incremental restore of a BCV pair.
Figure 49 Incremental restore the STD
When an incremental restore is initiated for each specified BCV pair in a device group, the following occurs:
◆ Command validity is checked. For example, the command is rejected if the BCV device and the standard device were not previously paired.
◆ The BCV device is set as Not Ready to the host.
◆ The BCV device is assigned as the next available mirror of the standard device.
◆ The tracks are copied from the BCV device to the standard device. Any new data written to the BCV device while the BCV pair was split is written to the standard device. Any new data written to the standard device while the BCV pair was split is overwritten by the data on the corresponding track on the BCV device.
The BCV pair is synchronized when the standard device and the BCV device contain identical data.
Note: The BCV device is not available for host use while it is assigned as a BCV mirror on a standard device. However, any new data written to the standard device is copied to the BCV device while the BCV pair exists.
Multiple BCV pairs You can incrementally establish or restore up to 16 BCV pairs (8 pairs when using emulation) associated with a single standard device. Using the environment variable SYMCLI_MAX_BCV_PAIRS, the maximum amount of pairs can be adjusted from 1 to 16 BCV devices. If a series of split/increment establish commands were invoked over time (refer to “Incrementally establishing multiple BCV pairs” on page 132), a multi-BCV environment becomes established that retains progressive historical images of the specified standard.
With the incremental restore command, you can specify any one of these older BCVs to incrementally restore the standard back to a specific historical copy. Figure 50 shows the standard being restored by the BCV002 copy, which was split at 4 a.m.
Host
NotReady
SYM-001774
STDM2
STDM1
DEV001
DEV001
BCV
BCV001
STDDEV001
BCV
Local
Sync
BCV pair
EMC Solutions Enabler Symmetrix TimeFinder Family CLI Version 7.2 Product Guide154
Performing TimeFinder/Mirror Operations
Before performing a restore, you may need to query the Symmetrix array to see which BCVs can be incrementally restored:
symmir -g DgName query -multi
CAUTION!Before invoking the restore command, be sure this is the data copy you want your standard restored to since this BCV is an older version of what is current.
Figure 50 Restoring a BCV in a multi-BCV environment
To restore the current standard with old data from BCV002, enter:
You can also specify an incremental restore action to a remote Symmetrix site using the RDF flag (-rdf option), which incrementally restores the remote BCV pairs.
CAUTION!Be sure you want the standard R1 device to be updated with the restored copy before issuing the -remote option along with this restore operation.
To perform an incremental restore operation in the remote Symmetrix array at site B when the RDF flag is specified, use the following command:
symmir -g prod -rdf restore
In this case, the flag indicates that the BCV device being restored is an SRDF-connected BCV device, which will be established with the remote standard mirror of the local R1 standard device.
In addition to restoring the specified BCV pair, you can further specify the remote (-remote) option, which will propagate the restored copy from the BCV pair across the SRDF link to the R1 standard.
Note: The -remote option is required when restoring to an R1 device that is ready on the link.
STDDEV001
BCV001
BCV002
BCV003
BCV004
BCV005
12 p.m.
2 a.m.
4 a.m.
6 a.m.
Split
Multi-BCVs SYM-001775
2 a.m. split
RestoreInProg with4 a.m. copy
6 a.m. split
8 a.m. split
newest
Incrementally restoring BCV pairs 155
Performing TimeFinder/Mirror Operations
It is good practice to perform restore operations in two command steps (restore the BCV pair first, then restore the R1 from the R2):
You can specify a incremental restore action to a second remote Symmetrix site using the remotely attached remote BCV flag (-rrbcv option), which incrementally restores second-level remote BCV pairs.
To perform an incremental restore operation in the remote Symmetrix array at site C specifying the remotely attached remote BCV flag (-rrbcv option), use the following command:
symmir -g prod -rrbcv restore
To initiate a restore on one remote BCV pair, RBCV001, in the prod group, enter:
In this case, the flag indicates that the BCV device being restored is a second HOP SRDF-connected BCV device, which will be established with the remote standard mirror of the remote BCV device.
Hop 2 BCV pairs in acascaded SRDF
configuration
You can specify a incremental restore action to a Symmetrix array located at the tertiary site of a cascaded SRDF configuration.
To perform an incremental restore operation in the remote Symmetrix array at the tertiary site (C) specifying the hop 2 flag (-hop2 option), use the following command:
symmir -g prod -hop2 restore
In this case, the flag indicates that the SRDF-connected BCV device (2BCV001) is being established with the remote partner of the R21 device, which is the remote partner of the local RDF standard device.
EMC Solutions Enabler Symmetrix TimeFinder Family CLI Version 7.2 Product Guide156
Performing TimeFinder/Mirror Operations
Protecting BCV data during full or incremental restoresOnce you initiate a restore from the BCV to the standard device, data from the BCV is immediately available to a host accessing the standard device. During the time the pair are joined, writes are sent to the standard and the BCV, while reads are satisfied by the data on the BCV if the data on the standard has not yet been completely updated from the BCV. However, this process can alter the BCV data during the restore operation. If you want to retain the original BCV data, use the protected restore feature.
The protected restore feature allows the contents of a BCV to remain unchanged during and after a restore operation, even while the BCV and the standard are joined. Subsequently, any writes to the BCV pair are not propagated to the BCV while the standard and the BCV are joined in a RestInProg or Restored state. This protection offers the same advantage as a reverse split, but without the need for a mirrored BCV.
You can restore data from a BCV to a standard device without altering the contents of the BCV, by using the protect(-protect) option. It write-disables the BCV mirror(s) during and particularly after the restore operation.
Examples To initiate a protected full restore (for example) on the STD mirrors (DEV001) in the Prod group, enter:
symmir -g Prod -full restore -protect DEV001
To initiate a protected incremental restore (for example) on the STD mirrors (DEV001) in the Prod group, enter:
symmir -g Prod restore -protect DEV001
Note: If you ever need to split a device again that was protected restored, you must use the -protect option on the split command:
symmir -g Prod split -protect DEV001
To view device information for the protected restore operation, enter:
symmir -g Prod query -protect
Note: The standard invalid track count displayed in the query operation does not reflect any new writes while the device is in the RestInProg state. When the device state changes to Restored, the invalid track count displays as zero.
Protecting BCV data during full or incremental restores 157
Performing TimeFinder/Mirror Operations
Cancelling BCV pairsThe symmir cancel command allows you to cancel a BCV pair relationship on a device by device basis, or for all the devices in a device group or composite group.
When operating in native TimeFinder, cancelling a BCV pair cancels the existing relationship between the specified standard and BCV device(s). Once the relationship is cancelled, the corresponding BCV devices go into the SplitNoInc state, and the BCV pair can no longer be incrementally established or restored.
When operating in emulation mode, cancelling a BCV pair terminates the relationship between the specified standard and BCV device(s). Once the relationship is terminated, the corresponding BCV devices go into the Never Established state, and the BCV pair can no longer be incrementally established or restored.
When cancelling a muli-BCV relationship, only the primary BCV is cancelled. For information on cancelling a multi-BCV relationship, refer to “Canceling a multi-BCV relationship” on page 126.
The following forms enable you to target devices in a device group, composite group, or device file:
Examples To cancel the BCV relationship for all the devices in the Prod group, enter:
symmir -g Prod cancel
To cancel a specific standard/BCV pair relationship in the Prod group, enter:
symmir -g Prod cancel DEV001 BCV dev 009C
To cancel the relationship of SRDF-connected BCV pairs in the Prod device group, enter any of the following:
symmir -g prod cancel -rdf
Cancels the relationship between the remote mirror device(s) and the remote BCV device(s).
symmir -g prod cancel -rdf -bcv
Cancels the relationship between the SRDF-connected BCV pair remotely mirroring the local BCV device.
symmir -g prod cancel -rrbcv
Cancels the relationship between the remote mirror of the remotely attached BCV device (RBCV) and the remotely attached remote BCV (RRBCV).
symmir -g prod cancel -hop2
Cancels the relationship between the remote mirror and the BCV (2BCV) two hops away in a cascaded SRDF configuration.
EMC Solutions Enabler Symmetrix TimeFinder Family CLI Version 7.2 Product Guide158
Performing TimeFinder/Mirror Operations
Querying BCV pairsYou can perform a query to determine the state of a BCV pair or all BCV pairs in a device group, composite group, or device file. The query is sent via the gatekeeper device to the Symmetrix array, returning with information about the state of the BCV pair(s).
The following forms enable you to target devices in a device group, composite group, or device file:
You can also obtain results using the -offline option, which looks at your configuration based on the Symmetrix host database.
The results of the query include the following information for each member of a BCV pair in a device group:
◆ Logical device name◆ Symmetrix device name◆ Number of invalid tracks◆ BCV pair state
To query the state of a split action on multi-BCVs or concurrent BCVs in a group prod, enter:
symmir -g prod query -multi
To query the state of any background split action on multi-BCVs or concurrent BCVs in a group prod, enter:
symmir -g prod query -multi -bg
To query the percent initiated on restore, establish, and split operations, enter:
symmir -g prod query -bg -percent
Using the -summary option
If you use the -summary option with the query argument, the results of the query will include the following information:
◆ Number of BCV pairs in each BCV pair state
◆ Number of invalid tracks
◆ Synchronization rate
◆ Estimated time to completion
The synchronization rate and estimated time to completion are shown only when -i or -c is specified and their has been a change in the number of invalid tracks since the previous iteration.
Querying BCV pairs 159
Performing TimeFinder/Mirror Operations
The -summary option also works with the verify argument.
Example To view the number of BCV pairs in the prod device group that are in each state, and to view the estimated time to completion, enter:
symmir -g prod query -summary -i 60
EMC Solutions Enabler Symmetrix TimeFinder Family CLI Version 7.2 Product Guide160
Performing TimeFinder/Mirror Operations
Verifying BCV pair statesYou can use the symmir verify command to verify whether one or all BCV pair(s) in a device group, composite group, or device file are in a particular state. The command can be used in scripts to guarantee that the BCV device pair(s) are in a Synchronized, Restored, or Split state prior to executing subsequent SYMCLI commands. If you do not specify any qualifiers with the symmir verify, the default is to check for the Synchronized or Restored states.
The following forms enable you to target devices in a device group, composite group, or device file:
The following options qualify the symmir verify command. If you need to verify a concurrent BCV pair, include –concurrent with the option (for example, –synched –concurrent):
◆ –synched option verifies the Synchronized state.
◆ –syncinprog option verifies the SyncInProg state.
◆ –split option verifies the Split state. With an instant split, the system verifies the Split state immediately even though the background split is still in progress. To verify completion of a background split after an instant split, use the –split –bg option. Until the background split is complete, you cannot perform BCV control operations. You can use the –split –bg option to verify that the instant split is 100 percent complete in the background. For example:
◆ –restored option verifies the Restored state. You can use the –restored –protect option to verify the Protected Restored state. In a concurrent BCV setup, you can use –restored –concurrent successfully only if the first BCV has already restored the standard and you are restoring now with the second BCV.
◆ –restinprog option verifies the RestInProg state.
◆ –bcv_mirrors option verifies that the mirrors of locally mirrored BCV devices are in the specified state. If you do not specify a state with this option, the default is to verify a Synchronized state.
Examples For a multi-BCV or concurrent BCV device group, specifying the BCV on the command line ensures that the verify operation checks the status of the BCV. Otherwise, the verify operation checks the status of the standard device, which may no longer be established with the BCV that you want to verify. For example, the following command returns the status of standard device DEV002 with its last paired BCV:
symmir -g ProdBgrp verify DEV002
But the following command returns the status of a specific BCV pair (DEV002 with BCV001):
symmir -g ProdBgrp verify DEV002 BCV ld BCV001
Verifying BCV pair states 161
Performing TimeFinder/Mirror Operations
The following command checks status every 30 seconds until all BCV pairs in the device group (ProdBgrp) or composite group (MyConGrp) are in the Synchronized or Restored state (the default when no state is specified on the command line):
Possible outputs at 30-second intervals can be that none, not all, or all devices are synchronized or restored. The time to reach the Synchronized or Restored state varies with the number of devices being established or restored and the amount of data being copied.
The verify action returns a value of zero (code symbol CLI_C_SUCCESS) if the verify criteria are met, or one of the unique codes in Table 15 and Table 16 if the verify criteria are not met:
Table 16 lists the options to verify a BCV pair state.
Table 15 Using options to verify a BCV mirror state
EMC Solutions Enabler Symmetrix TimeFinder Family CLI Version 7.2 Product Guide162
Performing TimeFinder/Mirror Operations
Using composite groups to manage BCV pairs across Symmetrix arraysA composite group is a user-defined group of devices that can span multiple Symmetrix arrays. This feature provides greater flexibility than a device group, which can define devices only on a single Symmetrix array. You can control specific BCV pairs within the composite group instead of having to operate on the entire group as in previous versions.
Figure 51 illustrates a production host that is locally connected to two Symmetrix arrays (A and B). A composite group is defined on the production host and includes BCV pairs from each Symmetrix array. Another locally connected host allows you to access the BCVs once the BCV pairs are split.
Figure 51 Using a composite group when a set of devices spans two Symmetrix arrays
Symmetrix A3087
Symmetrix B3143
Compositegroup
STD
BCV
STD
BCV
Productionhost
SYMAPI
Host
SYM-001780
SYMAPI
Using composite groups to manage BCV pairs across Symmetrix arrays 163
Performing TimeFinder/Mirror Operations
Although TimeFinder control operations on BCV pairs might normally be performed from the production host (as shown in Figure 51) because the composite group is defined there in its SYMAPI database, there are methods that would allow you to initiate copy sessions from another locally connected host. One way is to copy the composite group definition to another host. A more efficient method is to enable Group Name Services (GNS), which automatically propagates the composite group definition to the Symmetrix arrays and other locally attached hosts that are running the GNS daemon. For more information, refer to the EMC Solutions Enabler Symmetrix Array Management CLI Product Guide.
If you do not create each BCV pair explicitly, certain options such as –opt, opt_rag, and –exact allow you to control how multiple devices in a composite group are paired. Otherwise, a device-pairing algorithm checks if there were any previous pair assignments among the devices and, if not, pairs standards and BCVs of equal sizes.
Used only with a full establish operation, the optimize option that you choose depends on whether you are establishing local BCV pairs or remote BCV pairs. The –opt option is for local. It optimizes pairings across the local Symmetrix array without regard for whether the devices belong to different RDF (RA) groups. The –opt_rag option is for remote and requires the –rdf option. It uses optimization rules to create remote BCV pairs from devices within the same RDF (RA) group on a Symmetrix array.
The following steps outline the setup required for controlling a set of BCV pairs that spans two Symmetrix arrays as shown in Figure 51 on page 163:
1. From the production host, create a Regular type composite group (for example, MyGrp):
symcg create MyGrp –type regular
2. Add to the composite group those standard devices on Symmetrix A (3087) and Symmetrix B (3143) that are the source devices:
symcg –cg MyGrp –sid 3087 add dev 0076symcg –cg MyGrp –sid 3143 add dev 0091
3. Add a BCV device from each Symmetrix array to the composite group:
symbcv –cg MyGrp –sid 3087 associate dev 0051symbcv –cg MyGrp –sid 3143 associate dev 004F
4. Create the BCV pairs and initiate full copying from the standards to the BCVs:
symmir –cg MyGrp establish -full
5. When the BCV pairs are fully synchronized, you can split all BCV pairs in the composite group to access the BCVs:
symmir –cg MyGrp split
You can control specific BCV pairs within the composite group instead of having to control the group as a whole. To establish only the DEV001/ BCV001 pair from all devices in the composite group MyGrp:
symmir –cg MyGrp establish DEV001 bcv ld BCV001
EMC Solutions Enabler Symmetrix TimeFinder Family CLI Version 7.2 Product Guide164
Performing TimeFinder/Mirror Operations
Preferred attachment of BCVs (optional operations)For advanced users, the preferred pair attachment (attach action) is an optional step in the management of BCV pairs that eliminates the need to specify a device for each subsequent full establish and full restore sequence in a script (for all Enginuity versions). It also applies to incremental establish and restore operations. It marks the specified BCV device as the preferred BCV to pair with the standard device.
After configuration and initialization of a Symmetrix array, BCV devices contain no data. The BCV devices, like the standard devices, have unique host addresses and are online and ready to the host(s) to which they are connected.
It is at this point, before any full establish or full restore operations are requested, you can validate your pairings as a preferred attachment before starting any data copy operations. The lists of individual standard devices and BCV devices can be examined, validated, and all devices sorted according to storage size, and subsequently, assigned as the preferred match (considering disk size) for attachment into BCV pairs.
Note: A full establish action with the optimize (-opt) or exact (-exact) option overrides the attach pairing scheme.
The following commands enable you to target devices in a device group, composite group, or a device file:
To initiate a preferred attachment on a BCV pair (DEV001) in the prod group, enter:
symmir -g prod attach DEV001 BCV ld BCV001
To initiate a preferred attachment on more than one BCV pair (list) in the prod group, enter:
Note: The attach and detach preferred relationship are only known to the SYMAPI database on which you are operating.
The attach action checks command validity. For example, the Symmetrix array makes sure that both the standard device and the BCV device are the same size, the device specified as the BCV has the BCV attribute, the standard device does not already have a BCV device assigned to it, and so on.
If the standard device is a metahead device, then the BCV must also share the same metadevice properties. All metamembers are implicitly established along with the metahead device.
From this point forward, when you invoke the full establish or full restore control action with a BCV control operation, you will not need to specify the device names.
Detaching BCVpreferences from devices
The detach action allows you to remove the preferred matched-pair association from the devices that was initially defined with the attach action.
The following forms enable you to target devices in a device group, composite group, or device file:
To detach the existing preferred attachment of various BCVs from their standard devices in the prod group, enter:
symmir -g prod detach
To detach the attached BCV preference on standard device (DEV001) in the prod group, enter:
symmir -g prod detach DEV001
Attaching remote devicesas preferred pairs
For advanced usage, you can also specify an attach action to a remote Symmetrix site using the RDF flag (-rdf option), which attaches the remote mirror device(s) to the remote BCV device(s) as preferred pair(s).
To perform a preferred attachment operation in the remote Symmetrix array at site B with the RDF option (-rdf) specified, use the following command:
symmir -g prod -rdf attach DEV001 bcv ld RBCV001
In this case, the RDF flag indicates that the BCV device being attached is an SRDF-connected BCV pair, which will provide remote mirroring to the local standard device.
To perform an attach operation in the remote Symmetrix array at site B with the RDF and BCV options (-rdf and -bcv) specified, use the following command:
In this case, the flags indicate that the BCV pair being attached is an SRDF-connected BCV pair, which provides remote mirroring to the local BCV device.
Detaching BCVpreferences for remote
devices
You can specify a detach preference action to a remote Symmetrix site using the RDF flag (-rdf option), which detaches the remote BCV(s) from the remote standard device(s) as preferred pair(s).
To perform a detach operation in the remote Symmetrix array at site B with the RDF option specified, use the following command:
symmir -g prod -rdf detach DEV001
In this case, the flag indicates that the preferred BCV device being detached is an SRDF-connected BCV, which provides remote mirroring to the local standard device.
To perform a detach operation in the remote Symmetrix array at site B with the RDF and BCV options (-rdf and -bcv) specified, use the following command:
In this case, the flags indicate that the BCV pair being detached is an SRDF-connected BCV pair, which would provide remote mirroring to the local BCV device.
Attaching second-levelremote devices as preferred
pairs
You can specify an attach action to a second remote Symmetrix site using the remotely attached remote BCV flag (-rrbcv option), which attaches BCV preferences to second-level remote BCV pairs.
To perform an attach operation in the remote Symmetrix array at site C with the remotely attached remote BCV option (-rrbcv) specified, use the following command:
symmir -g prod -rrbcv attach
EMC Solutions Enabler Symmetrix TimeFinder Family CLI Version 7.2 Product Guide166
Performing TimeFinder/Mirror Operations
To initiate an attach on one remote BCV pair, RBCV001, in the prod group, enter:
In this case, the flag indicates that the BCV device being attached is a second HOP SRDF-connected BCV device, which will be attached with the remote standard mirror of the remote BCV device.
Detaching BCVpreferences from
second-level remotedevices
You can specify a detach action to a second remote Symmetrix site using the remotely attached remote BCV flag (-rrbcv option), which detaches BCV preferences from second-level remote BCV pairs.
To perform a detach operation in the remote Symmetrix array at site C with the remotely attached remote BCV option (-rrbcv) specified, use the following command:
symmir -g prod -rrbcv detach
To initiate a detach on one remote BCV pair, RBCV001, in the prod group, enter:
In this case, the flag indicates that the BCV device being detached is a second HOP SRDF-connected BCV device, which will be detached from the remote standard mirror of the remote BCV device.
Attaching hop 2 devices aspreferred pairs in a
cascaded SRDFconfiguration
For advanced usage, you can specify an attach action to a Symmetrix array located at the tertiary site of a cascaded SRDF configuration.
To perform an attach operation in the remote Symmetrix array at the tertiary site (C) when the hop2 (-hop2 option) is specified with the following command:
symmir -g prod -hop2 attach DEV001bcv ld 2BCV001
In this case, the flag indicates that the SRDF-connected BCV device (2BCV001) is being attached with the remote partner of the R21 device, which is the remote partner of the local RDF standard device.
Detaching BCVpreferences from hop 2
devices in a cascadedSRDF configuration
For advanced usage, you can also specify an detach preference action to a Symmetrix array located at the tertiary site of a cascaded SRDF configuration.
To perform a detach operation in the remote Symmetrix array at the tertiary site (C) with the hop 2 (-hop2 option) specified, use the following command:
symmir -g prod -hop2 detach DEV001 BCV ld 2BCV001
In this case, the flag indicates that the SRDF-connected BCV device (2BCV001) is being detached from the remote partner of the R21 device, which is the remote partner of the local RDF standard device.
Script summary for typical TimeFinder operationsThe following is an example script of a set of typical operations using SYMCLI commands to manage a BCV environment:
1. Create a device group:
symdg create ProdBgrp
2. Add a standard device to a device group:
symdg -g ProdBgrp add pd c0t2d4
Repeat for all devices, or use RANGE, etc.
Preferred attachment of BCVs (optional operations) 167
Script example for multi-BCV environmentThe following is an example of a script for a multi-BCV environment:
You are tasked with testing business applications with incoming database data from certain anticipated peak periods in the day. Three copies of the database may be needed. To establish a multi-BCV environment, you must initially perform a full establish to each BCV device in the set.
1. For example, you plan to have BCV001 through BCV003 in the set to pair with DEV001 that is the source of your test data:
2. It is now 4:00 p.m. and BCV003 is still currently established with DEV001. At this point, you are testing your business applications and want to reset your database back to the business activity that was current up till 3:10 p.m. To incrementally restore DEV001 to the 3:10 p.m. business data:
3. You are now working successfully with the 3:10 p.m. data and want to continue test operations with this data and remove the second split BCV that occurred at 3:20 p.m. as this data will not be needed.
symmir -g MultigrpA cancel DEV001 BCV ld BCV002
EMC Solutions Enabler Symmetrix TimeFinder Family CLI Version 7.2 Product Guide168
Performing TimeFinder/Mirror Operations
4. You decide to call it a day, keeping the remaining two multi-BCVs and need to reestablish (incrementally establish) BCV003 to the current standard data:
Preferred attachment of BCVs (optional operations) 169
Performing TimeFinder/Mirror Operations
BCV pair statesWhen you invoke BCV control commands on a single BCV device, or on a group of BCV pair(s) using the symmir command, the BCV state is changed as illustrated in Table 17. You will see the abbreviated BCV pair state listed using the SYMCLI commands.
Table 17 BCV pair states
BCV pair stateBCV pair state(abbreviated for display) Description
Never Established NeverEstab The BCV device is available for use, and was never established. Only the BCV device name is valid.
Sync In Progress SyncInProg When the Establish action is executed, data is copied from the standard device to the BCV device until both devices contain identical data.
Restore In Progress RestInProg When the restore action is executed, data is copied from the BCV to the standard device until both devices contain identical data.
Synchronized Synchronized The BCV and standard devices have identical data. Any changes to the standard device are also written to the BCV. The BCV is unavailable to the host for BC processing.
Restored Restored The BCV and standard devices have identical data, although the data was originally on the BCV before being synchronized. Any changes to the standard device are also written to the BCV. The BCV is unavailable to the host for BC processing.
Split in Progress SplitInProg The BCV devices are in the process of being separated, or split from the standard devices.
Split Split The BCV devices are completely separated, or split from the standard devices allowing each device to be accessed separately by the host.
Split No Incremental SplitNoInc The BCV devices are completely separated, or split from the standard devices but cannot be incrementally established or restored.
Split Before Sync SplitBfrSync The split occurred when a BCV device was synchronizing. The BCV device is separated from the standard device although the BCV device is not completely synchronized.
Split Before Restore SplitBfrRest The split occurred when a BCV device was being restored to a standard device. The BCV device is separated from the standard device although the standard device is not completely synchronized.
Invalid Invalid Not all metamembers are in the same BCV state.
EMC Solutions Enabler Symmetrix TimeFinder Family CLI Version 7.2 Product Guide170
Performing TimeFinder/Mirror Operations
Transient BCV pair statesWhen you initially invoke the symmir arguments for TimeFinder operations, BCV pairs enter a transient state and upon completion of the action, the BCV pairs enter a final BCV pair state (Table 18).
BCV actions and applicable statesTable 19 describes which BCV control operations can be invoked for a given BCV state.
Invalid states can indicate that the devices in a BCV pair are in a different or mixed state.
The -symforce option must be used (where noted in the table as F) to force a pair to a specified BCV state.
a. The BVC must be specified or you must use the -exact or -force option.
b. The BCV must be specified or you must use both the -force and -symforce options.
c. The F denotes that you must use the -symforce option.
Table 18 Actions for BCV devices
Argument Transient state Final state
establish SyncInProg Synchronized
split SplitInProg Split
restore RestInProg Restored
Table 19 BCV control actions and applicable states
Control Operation
NeverEstab
Sync InProg Synchronized
SplitInProg Split
SplitNoInc
SplitBfrSync
SplitBfrRest
RestInProg Restored Invalid
establish -full
✔ ✔ ✔ ✔a ✔b ✔
establish ✔
split Fc ✔ Fc ✔
restore -full
✔ ✔ ✔a ✔b ✔a ✔
restore ✔
attach ✔ ✔ ✔ ✔ ✔ ✔ ✔ ✔ ✔ ✔ ✔
detach ✔ ✔ ✔ ✔ ✔ ✔ ✔ ✔ ✔ ✔ ✔
cancel ✔ ✔ ✔
BCV pair states 171
Performing TimeFinder/Mirror Operations
Command options with device groupsTable 20 lists the symmir control operations and the possible options to use when targeting a specified device group.
Table 20 symmir -g control arguments and possible options
Options
Argument action
establish-full establish split
restore-full restore attach detach cancel
-bcv ✔ ✔ ✔ ✔ ✔ ✔ ✔ ✔
-both_sides ✔ ✔
-bypass ✔ ✔ ✔
-c, -i ✔ ✔ ✔ ✔ ✔ ✔ ✔ ✔
-concurrent ✔ ✔
-consistent ✔
-exact ✔ ✔
-force, -symforce ✔ ✔ ✔ ✔ ✔ ✔
-hop2 ✔ ✔ ✔ ✔ ✔ ✔ ✔ ✔
-instant, -diff ✔
-noprompt ✔ ✔ ✔ ✔ ✔ ✔ ✔ ✔
-not_ready ✔ ✔ ✔
-opt ✔
-ppatha ✔
-preaction, -postaction ✔ ✔ ✔ ✔ ✔
-preservetgtlocks, -lockid ✔ ✔ ✔ ✔ ✔
-protbcvest ✔ ✔
-protect ✔ ✔ ✔
-rdb, -dbtype, -db ✔
-rdf ✔ ✔ ✔ ✔ ✔ ✔ ✔ ✔
-remote ✔ ✔ ✔ ✔ ✔
-reverse ✔ ✔ ✔ ✔ ✔
-rrbcv ✔ ✔ ✔ ✔ ✔ ✔ ✔ ✔
-star ✔ ✔ ✔ ✔ ✔ ✔
-std_protect ✔
-skip ✔ ✔ ✔
-v ✔ ✔ ✔ ✔ ✔ ✔ ✔ ✔
-vxfs ✔
a. Not supported with Solutions Enabler version 7.2 and higher.
EMC Solutions Enabler Symmetrix TimeFinder Family CLI Version 7.2 Product Guide172
Performing TimeFinder/Mirror Operations
Table 21 lists the symmir view arguments and the possible options to use when targeting a specified device group.
Note: The base tasks performed with symbcv such as list, associate, and disassociate locally or remotely attached BCV devices, are described at the beginning of this chapter.
Table 21 symmir -g view arguments and possible options
Options
Argument action
query verify
-attach ✔
-bcv, -rrbcv ✔ ✔
-bcv_mirrors ✔
-bg ✔ ✔
-c, -i ✔ ✔
-concurrent ✔
-force ✔
-hop2 ✔ ✔
-multi ✔
-offline ✔ ✔
-percent ✔ ✔
-protbcvest ✔
-protect ✔ ✔
-rdf ✔ ✔
-ready ✔
-restinprog ✔
-restored ✔
-sid ✔ ✔
-split ✔
-summary ✔ ✔
-synched ✔
-syncinprog ✔
Command options with device groups 173
Performing TimeFinder/Mirror Operations
Command options with composite groupsOptions to the symmir -cg command line arguments provide more action flexibility to control BCV pairs when you are operating on device(s) of a specified composite group. Table 22 lists the symmir control operations and the possible options to use when targeting a specified composite group.
Table 22 symmir -cg control arguments and possible options (page 1 of 2)
Options
Argument action
establish -full establish split
restore -full restore attach detach cancel
-bcv ✔ ✔ ✔ ✔ ✔ ✔ ✔ ✔
-both_sides ✔ ✔
-bypass ✔ ✔ ✔
-c, -i ✔ ✔ ✔ ✔ ✔ ✔ ✔ ✔
-concurrent ✔ ✔
-consistent, -both_sides ✔
-exact ✔ ✔
-force, -symforce ✔ ✔ ✔ ✔ ✔
-hop2 ✔ ✔ ✔ ✔ ✔ ✔ ✔ ✔
-instant, -diff ✔
-noprompt ✔ ✔ ✔ ✔ ✔ ✔ ✔ ✔
-not_ready ✔ ✔ ✔
-opt ✔
-opt_rag ✔
-ppatha ✔
-preaction, -postaction ✔ ✔ ✔ ✔ ✔
-protbcvest ✔ ✔
-protect ✔ ✔ ✔
-rdb, -dbtype, -db ✔
-rdf ✔ ✔ ✔ ✔ ✔ ✔ ✔ ✔
-remote ✔ ✔ ✔ ✔ ✔
-reverse ✔ ✔ ✔ ✔ ✔
-rrbcv ✔ ✔ ✔ ✔ ✔ ✔ ✔ ✔
-sid ✔ ✔ ✔ ✔ ✔ ✔ ✔ ✔
-skip ✔ ✔ ✔
-star ✔ ✔ ✔ ✔ ✔
EMC Solutions Enabler Symmetrix TimeFinder Family CLI Version 7.2 Product Guide174
Performing TimeFinder/Mirror Operations
Table 23 lists the symmir view arguments and the possible options to use when targeting a specified composite group.
-std_protect ✔
-v ✔ ✔ ✔ ✔ ✔ ✔ ✔ ✔
-vxfs ✔
a. Not supported with Solutions Enabler 7.2 and higher.
Table 22 symmir -cg control arguments and possible options (page 2 of 2)
Options
Argument action
establish -full establish split
restore -full restore attach detach cancel
Table 23 symmir -cg view arguments and possible options
Options
Argument action
query verify
-attach ✔
-bcv, -rrbcv ✔ ✔
-bcv_mirrors ✔
-bg ✔ ✔
-c, -i ✔ ✔
-concurrent ✔
-hop2 ✔ ✔
-force ✔
-multi ✔
-offline ✔ ✔
-percent ✔ ✔
-protect ✔
-rdf ✔ ✔
-restored ✔
-sid ✔ ✔
-split ✔
-synched ✔
-syncinprog ✔
-ready ✔
-restinprog ✔
-protbcvest ✔
-summary ✔
Command options with composite groups 175
Performing TimeFinder/Mirror Operations
Command options with device filesWith the symmir -file command, you can perform similar control operations on BCV device pairs defined in a device file of a specified Symmetrix array as you can when directing symmir to device groups (-g). These control operations (arguments) have similar options that allow flexibility in controlling STD/BCV pairs defined in a device file, as opposed to a device group. This command is particularly useful when operating on RDF BCV pairs in a remote Symmetrix array in the second-level multihop SRDF link.
Table 24 lists the symmir control operations and the possible options to use when targeting pairs specified in a device file of a given Symmetrix array.
Table 24 symmir -file control arguments and possible options
Options
Argument Action
establish-full establish split
restore-full restore attach detach cancel
-bypass ✔ ✔ ✔
-c, -i ✔ ✔ ✔ ✔ ✔ ✔ ✔ ✔
-consistent ✔
-force, -symforce ✔ ✔ ✔ ✔ ✔ ✔
-instant, -diff ✔
-noprompt ✔ ✔ ✔ ✔ ✔ ✔ ✔ ✔
-not_ready ✔ ✔ ✔
-ppatha ✔
-preaction, -postaction ✔ ✔ ✔ ✔ ✔
-preservetgtlocks, -lockid ✔ ✔ ✔ ✔ ✔
-protbcvest ✔ ✔
-protect ✔ ✔ ✔
-rdb, -dbtype, -db ✔
-remote ✔ ✔ ✔ ✔ ✔
-reverse ✔ ✔ ✔ ✔ ✔
-skip ✔ ✔ ✔
-star ✔ ✔ ✔ ✔ ✔ ✔
-std_protect ✔
-v ✔ ✔ ✔ ✔ ✔ ✔ ✔ ✔
-vxfs ✔
a. Not supported with Solutions Enabler version 7.2 and higher.
EMC Solutions Enabler Symmetrix TimeFinder Family CLI Version 7.2 Product Guide176
Performing TimeFinder/Mirror Operations
Table 25 lists the symmir view arguments and the possible options to use when targeting pairs specified in a device file of a given Symmetrix array.
Note: The Symmetrix ID option (-sid) is required for all symmir -file commands.
Table 25 symmir -file view arguments and possible options
Options
Argument Action
query verify
-attach ✔
-bcv_mirrors ✔
-bg ✔ ✔
-c, -i ✔ ✔
-concurrent ✔
-force ✔ ✔
-multi ✔
-offline ✔ ✔
-percent ✔ ✔
-protbcvest ✔
-protect ✔
-ready ✔
-restinprog ✔
-restored ✔
-split ✔
-summary ✔
-synched ✔
-syncinprog ✔
Command options with device files 177
Performing TimeFinder/Mirror Operations
Various remote multihop configurations
Various compounded remote configurations can be managed by your host using both the TimeFinder and SRDF components of SYMCLI.
As Figure 52 on page 180 shows, you can have multiple sites (for example, remote sites C, E, F, and H) on SRDF links to remotely mirror a local Symmetrix array at site A. Remote site F, functioning as a remote mirror to the standard devices at site A, is most typical. You then can have a third site on an SRDF link (remote site H) to remotely mirror just the BCV devices in the Symmetrix array at site A.
You can also multihop to a second level SRDF where Remote site G functions as a remote mirror to the standard devices of site A and Remote site I remotely mirrors Site A’s BCV.
In addition, you can also create a cascaded SRDF configuration, where tertiary site B functions as a remote partner to the R21 device at Site C, which is the remote partner of the local RDF standard device at Site A; and tertiary site D functions as a remote partner to the R21 device at Site E, which is the remote partner of the local BCV device at Site A.
Command symmir manages each of the BCV pairs at any site while symrdf manages the SRDF pairs in the SRDF link.
System-wide device groupsBefore you begin applying any symmir operations, you must be working with an existing group of RDF devices. To create a device group containing STD and BCV RDF1 devices, enter:
symdg create prod -type RDF1symdg -g prod add dev 0001 -sid 0001 DEV001symbcv -g prod associate dev 000A BCV001symbcv -g prod associate dev 000C -rdf RBCV001 symbcv -g prod associate dev 0009 -bcv -rdf BRBCV001symbcv -g prod associate dev 0004 -rrdf RRBCV001symbcv -g prod associate dev 0004 -hop2 2BCV001
At this point, all these devices must be established with the symmir and symrdf commands.
EMC Solutions Enabler Symmetrix TimeFinder Family CLI Version 7.2 Product Guide178
Performing TimeFinder/Mirror Operations
Commands to various multihop devices and linksThis section describes the command application of targeting the various devices and links in complex multihop SRDF environments.
The following sequence of commands steps through some basic control operations that touch every device and RDF link in a complex multihop configuration. The following numbering of commands directly associates with the bubble numbers shown in the Figure 52 on page 180.
1 symrdf -g <> establish Creates the standard-associated hop 1 copy.
2 symmir -g <> split -rdf Splits the standard-associated hop 1 BCV device pair.
3 symrdf -g <> establish -rbcv Creates the standard-associated hop 2 copy.
4 symrdf -g <> restore -rbcv Restores the standard-associated hop 1 BCV with the hop 2 copy.
5 symmir -g <> restore -rdf Restores the standard-associated hop 1 copy with the hop 1 BCV.
6 symrdf -g <> restore Restores the standard device with the hop 1 copy.
7 symmir -g <> split Splits the standard/BCV pair.
8 symrdf -g <> establish -bcv Creates the BCV-associated hop 1 remote copy.
9 symmir -g <> split -rdf -bcv Splits the BCV-associated hop 1 device pair.
10 symrdf -g <> establish -brbcv Creates the BCV-associated hop 2 copy.
11 symrdf -g <> restore -brbcv Restores the BCV-associated hop 1 BCV with the hop 2 copy.
12 symmir -g <> restore -rdf -bcv Restores the BCV-associated hop 1 copy with the hop 1 BCV.
13 symrdf -g <> restore -bcv Restores the BCV device with the hop 1 copy.
14 symmir -g <> restore Restores the standard device with the BCV copy.
15 symmir -file <> -sid 044 establish Creates the BCV-associated with the remote partner of the BRBCV (file only).
16 symmir -file <> -sid 044 split Splits the BCV-associated with the remote partner of the BRBCV (file only).
17 symrdf -g <> establish Creates the standard-associated hop 1 copy.
18 symrdf -g <> establish -hop2 Creates the standard-associated hop 2 copy.
19 symmir -g <> establish -hop2 Creates the BCV-associated hop 2 BCV copy.
20 symmir -g <> split -hop2 Splits the BCV-associated hop 2 device pair.
21 symrdf -g <> restore -hop2 Restores the standard with the hop 2 copy.
22 symrdf -g <> restore Restores the standard device with the hop 1 copy.
23 symrdf -g <> establish -bcv Creates the BCV-associated hop 1 remote copy.
24 symrdf -g <> establish -bcv -hop2 Creates the BCV-associated hop 2 copy.
25 symrdf -g <> restore -bcv -hop2 Restores the BCV-associated hop 2 copy.
26 symrdf -g <> restore -bcv Restores the BCV device with the hop 1 copy.
Various remote multihop configurations 179
Performing TimeFinder/Mirror Operations
Figure 52 Control operations on multihop SRDF configurations
R2
2BCV
1920
18
21
R21
BCV
R1
R1BCV
714
R1BCV
R2
R2
Symmetrix 033Site D
Hop 2
R2
25
R2
BCV
1615
R2
BCV BCV
912
R1BCV
R21
BCV
24
25
17
22
23
26
1
6
3
4
10
11
8
13
Symmetrix 034Site E
Hop 1
Host
Symmetrix 043Site H
Hop 1
Symmetrix 044Site I
SYM-001789
Symmetrix 031Site B
Symmetrix 032Site C
Symmetrix 041Site F
Symmetrix 042Site G
Hop 2
SymmetrixSite A
BCV
BCV
Standard
StandardStandardStandard
EMC Solutions Enabler Symmetrix TimeFinder Family CLI Version 7.2 Product Guide180
Performing TimeFinder/Mirror Operations
Second-level controls for multihop SRDF environmentsAs previously described, second-level multihop control operations were accomplished using the device file (-file) option for managing RDF BCV device pairs. You can use the symmir command for device groups (-g) for BCV control capability in second-level multihop SRDF environments.
The remote RDF BCV (RRBCV) devices must have been previously associated with the device group using the symbcv -rrdf command. “Compounded remote configuration” on page 117 contains specific information about how to associate second-level multihop BCVs with a device group.
Once the RRBCV devices have been associated with the device group, you can use the symmir command with the -rrbcv option to perform control operations on the remote mirror of the remote BCV to become established, split, or restored from its BCV. Other second-level multihop BCV control operations available with the symmir command include query, verify, attach, detach, and cancel.
Note: Since Solutions Enabler version 5.4, the symmir command and the -rrbcv option have been extended to work for composite groups (-cg).
Remote optimizing optionThe remote optimize (-opt_rag) option only applies to the full Establish operation in a remote Symmetrix array that optimizes the disk I/O on the standard/BCV pair selection to achieve a high copy speed between them. (Basically, the device pair selection attempts to pair devices that are not on the same disk adapter to distribute I/O.) This option overrides all current pairing relationships.
Note: This option is only applicable for remote Symmetrix array optimization targeting composite groups (-cg).
The command line must include the -rdf option, as follows:
symmir -cg CgName -full establish -rdf -opt_rag
Various remote multihop configurations 181
Performing TimeFinder/Mirror Operations
Using the -remote option on multihop split actionsThis section describes the command application of targeting the various devices and links with the -remote option in complex multihop SRDF environments.
The following sequence of commands steps through some basic control operations that touch every device and RDF link in a complex multihop configuration. The following numbering of commands directly associates with the callouts shown in the Figure 53 on page 182.
Figure 53 The -remote option on multihop configurations
1 symrdf -g <> establish Creates the standard-associated hop 1 copy.
2 symmir -g <> split -rdf -remote Splits the standard-associated hop 1 BCV device pair and creates a standard-associated hop 2 copy of the hop 1 BCV.
3 symmir -g <> split -remote Splits the standard/BCV pair and creates a BCV-associated hop 1 copy of the local BCV.
4 symmir -g <> split -rdf -bcv -remote Splits the BCV-associated hop 1 BCV device pair and creates a BCV-associated hop 2 copy of the hop 1 BCV.
5 symmir -g <> split -rrbcv Splits the BCV-associated hop 2 BCV device pair. You cannot use the -remote option here.
R1
R1BCV
3a
R1BCV
R2
R2
2a
R2
RRBCV
5
R2
4a
R1BCV
1
2b
4b
3b
Host
Hop 1
SYM-001790
Hop 2
= Establish
= Split
EMC Solutions Enabler Symmetrix TimeFinder Family CLI Version 7.2 Product Guide182
PART 2
The operational examples part of this product guide identifies and focuses on some specific TimeFinder tasks that represent the most typical practices in the management of your Symmetrix storage environment. These practical examples illustrate various TimeFinder processes by showing the SYMCLI command sequences to accomplish these tasks. These specific management tasks are described in the subsequent chapters as follows:
Chapter 5, “Performing TimeFinder/Clone Operations,” provides examples on cloning volume data on multiple target devices from a single source device.
Chapter 6, “Performing TimeFinder/Snap Operations,” provides examples on creating space-saving, instant point-in-time copies of volume data on multiple target devices from a single source device.
Chapter 7, “Querying and Verifying with TimeFinder commands,” provides examples on using the attach, query, and verify operations with TimeFinder family products.
Chapter 8, “Setting Up TimeFinder/Mirror BCV Pairs,” provides examples on setting up BCV pairs in the TimeFinder/Mirror environment. It focuses on creating and populating a device group and creating a BCV pair from a standard and BCV that belong to the same device group.
Chapter 8, “Setting Up TimeFinder/Mirror Multiple and Concurrent BCVs,” provides examples on setting up multiple and concurrent BCVs in the TimeFinder/Mirror environment. It focuses on pairing one standard device sequentially with multiple BCVs and pairing one standard device simultaneously with two BCVs.
Chapter 9, “Performing TimeFinder/Mirror Control Operations,” provides examples on creating and splitting a BCV pair, retrieving original BCV data from a fixed BCV mirror, and performing a BCV action while making the BCV or the standard device temporarily inaccessible to the host.
Chapter 10, “Performing Consistent Splits with TimeFinder Family,” provides examples on splitting off a consistent, DBMS-restartable BCV copy of your database without having to quiesce or shut down the database first.
Note: Some of the examples in this section were performed with earlier versions of software. Therefore, your ouput displays may not look exactly like the ones appearing in these examples.
Operational Examples
5fInvisible Body Tag
This chapter provides examples on cloning volume data on multiple target devices from a single source device.
Note: Unless noted otherwise, the operational examples illustrate TimeFinder/Clone functionality with Solutions Enabler version 7.0 and higher. The Symmetrix VMAX arrays are configured with Enginuity 5874 and higher.
◆ Example 1: Cloning a copy of a standard device to other standard devices ..... 186◆ Example 2: Cloning a copy of a standard device to BCV devices....................... 191◆ Example 3: Cloning copies from a BCV source device ......................................... 197◆ Example 4: Cloning multiple copies of a BCV ....................................................... 204◆ Example 5: Cloning three copies from a single source device............................. 209◆ Example 6: Using a composite group to control clone pairs................................ 212◆ Example 7: Cloning to a remote BCV...................................................................... 215◆ Example 8: Cloning to a local BCV and a remote BCV......................................... 218◆ Example 9: Cloning to multiple local and remote BCVs ...................................... 221◆ Example 10: Cloning to a remote BCV from a local BCV..................................... 228◆ Example 11: Cloning in a multihop environment ................................................. 232◆ Example 12: Using a clone from a clone target ...................................................... 238
PerformingTimeFinder/Clone
Operations
Performing TimeFinder/Clone Operations 185
Performing TimeFinder/Clone Operations
Example 1: Cloning a copy of a standard device to other standard devicesThis example was performed using Solutions Enabler version 7.0. The hardware setup consists of a single Symmetrix VMAX array (sid 369) connected to a Solaris controlling host. The source of the clone is standard device 07A7. The targets are standard devices 07A8 and 07A9.
◆ The following symdg command creates a Regular type device group named clonegrp:
symdg create clonegrp -type regular
◆ The following symdg command adds a device range (07A7 through 07A9) to the device group. By default, their logical device names will be DEV001, DEV002, and DEV003, respectively:
symdg -g clonegrp addall -devs 7a7:7a9 -sid 369
◆ The following symclone create command creates a copy session that immediately starts a full copy of source device DEV001 to target DEV002 when the clone operation is activated:
'Create' operation execution is in progress for device 'DEV001' paired with target device 'DEV002' in device group 'clonegrp'. Please wait...
'Create' operation successfully executed for device 'DEV001' in group 'clonegrp' paired with target device 'DEV002'.
◆ The following symclone query command indicates that the clone pair is in the Created state. The CG columns relate to the Legend: an X in the column means that a Legend item applies to the clone pair; a dot (.) in the column means that item does not apply:
symclone -g clonegrp query DEV001
Device Group (DG) Name: clonegrpDG's Type : REGULARDG's Symmetrix ID : 000192601369
(C): X = The background copy setting is active for this pair. . = The background copy setting is not active for this pair.(G): X = The Target device is associated with this group. . = The Target device is not associated with this group.(D): X = The Clone session is a differential copy session. . = The Clone session is not a differential copy session.(P): X = The pre-copy operation has completed one cycle . = The pre-copy operation has not completed one cycle.
EMC Solutions Enabler Symmetrix TimeFinder Family CLI Version 7.2 Product Guide186
Performing TimeFinder/Clone Operations
◆ The following symclone activate command activates the clone operation:
(C): X = The background copy setting is active for this pair. . = The background copy setting is not active for this pair.(G): X = The Target device is associated with this group. . = The Target device is not associated with this group.(D): X = The Clone session is a differential copy session. . = The Clone session is not a differential copy session.(P): X = The pre-copy operation has completed one cycle . = The pre-copy operation has not completed one cycle
◆ To ensure that you do not copy over previously copied data, the clone operation results in putting a hold on the target device. The following symdg list ld command with the –held option displays any devices in the device group that are currently being held. When you terminate the clone pair session, the hold is removed:
symdg -g clonegrp -held list ld
Device Group (DG) Name: clonegrpDG's Type : REGULARDG's Symmetrix ID : 000192601369
Standard Device Name Directors Device---------------------------------- ------------- ---------------------------- CapLogical Physical Sym SA :P DA :IT Config Att Sts (MB)---------------------------------- ------------- ----------------------------
DEV002 Not Visible 07A8 01C:0 09C:C2 2-Way Mir RW 1031
Example 1: Cloning a copy of a standard device to other standard devices 187
Performing TimeFinder/Clone Operations
◆ The following symclone create command creates a copy session between the same source device (DEV001) and a different target device (DEV003):
'Create' operation execution is in progress for device 'DEV001' paired with target device 'DEV003' in device group 'clonegrp'. Please wait...
'Create' operation successfully executed for device 'DEV001' in group 'clonegrp' paired with target device 'DEV003'.
◆ The following symclone query command with the –multi option displays the multiple copy sessions for source device DEV001 and the current state of each clone pair (DEV001/DEV003 and DEV001/DEV002):
symclone -g clonegrp query DEV001 -multi
Device Group (DG) Name: clonegrpDG's Type : REGULARDG's Symmetrix ID : 000192601369
(C): X = The background copy setting is active for this pair. . = The background copy setting is not active for this pair.(G): X = The Target device is associated with this group. . = The Target device is not associated with this group.(D): X = The Clone session is a differential copy session. . = The Clone session is not a differential copy session.(P): X = The pre-copy operation has completed one cycle . = The pre-copy operation has not completed one cycle
◆ The following symclone activate command initiates the full copy from DEV001 to DEV003:
'Activate' operation execution is in progress for device 'DEV001' paired with target device 'DEV003' in device group 'clonegrp'. Please wait...
'Activate' operation successfully executed for device 'DEV001' in group 'clonegrp' paired with target device 'DEV003'.
EMC Solutions Enabler Symmetrix TimeFinder Family CLI Version 7.2 Product Guide188
Performing TimeFinder/Clone Operations
◆ Another symclone query displays the multiple copy sessions for source device DEV001 and an updated state for each clone pair. The state of the DEV001/DEV003 pair has changed from Created to CopyInProg. The state of the DEV001/DEV002 pair is still CopyInProg:
symclone -g clonegrp query DEV001 -multi
Device Group (DG) Name: clonegrpDG's Type : REGULARDG's Symmetrix ID : 000192601369
(C): X = The background copy setting is active for this pair. . = The background copy setting is not active for this pair.(G): X = The Target device is associated with this group. . = The Target device is not associated with this group.(D): X = The Clone session is a differential copy session. . = The Clone session is not a differential copy session.(P): X = The pre-copy operation has completed one cycle . = The pre-copy operation has not completed one cycle
◆ Once the copy to DEV002 has completed, the following symclone terminate command ends the DEV001/DEV002 clone pair session normally. Normal termination is possible whenever a clone pair is in the Created, Copied, or CopyOnAccess state:
'Terminate' operation execution is in progress for device 'DEV001' paired with target device 'DEV002' in device group 'clonegrp'. Please wait...
'Terminate' operation successfully executed for device 'DEV001' in group 'clonegrp' paired with target device 'DEV002'.
Example 1: Cloning a copy of a standard device to other standard devices 189
Performing TimeFinder/Clone Operations
◆ The following symclone terminate command uses the –symforce option to force an end to the DEV001/DEV003 clone pair session, which is still in the CopyInProgress state:
Note: If you use the –symforce option, unmount file systems and shut down applications and databases prior to issuing the command.
'Terminate' operation execution is in progress for device 'DEV001' paired with target device 'DEV003' in device group 'clonegrp'. Please wait...
'Terminate' operation successfully executed for device 'DEV001' in group 'clonegrp' paired with target device 'DEV003'.
◆ The following symclone create command creates a CopyOnAccess copy session so that only accessed data will be cloned from source device DEV001 to target DEV002 when the clone operation is activated:
(C): X = The background copy setting is active for this pair. . = The background copy setting is not active for this pair.(G): X = The Target device is associated with this group. . = The Target device is not associated with this group.(D): X = The Clone session is a differential copy session. . = The Clone session is not a differential copy session.(P): X = The pre-copy operation has completed one cycle . = The pre-copy operation has not completed one cycle
EMC Solutions Enabler Symmetrix TimeFinder Family CLI Version 7.2 Product Guide190
Performing TimeFinder/Clone Operations
Example 2: Cloning a copy of a standard device to BCV devicesThis example was performed using Solutions Enabler version 7.0. running on a Symmetrix VMAX array. In this example, the three standard devices (07A7, 07A8, and 07A9) currently in the device group from Example 1 (clonegrp) are all source devices for this clone operation. Three BCV devices (07AD, 07AE, and 07AF) are added as targets.
◆ The following command associates three BCV devices (07AD, 07AE, and 07AF) with the device group:
◆ The symmir query command checks the device group for any current copy sessions. Because all copy sessions for devices in the device group were stopped in Example 1, the output below indicates no clone devices in the group:
symclone -g clonegrp query
Device group 'clonegrp' does not have any devices that are Clone source devices.
◆ The following command creates copy sessions for the standards and BCVs, pairing them in the order that they were added to the device group (for example, the first standard device, 07A7, with the first BCV device, 07AD):
symclone -g clonegrp create -v -noprompt
'Create' operation execution is in progress for device group 'clonegrp'. Please wait...
(C): X = The background copy setting is active for this pair. . = The background copy setting is not active for this pair.(G): X = The Target device is associated with this group. . = The Target device is not associated with this group.(D): X = The Clone session is a differential copy session. . = The Clone session is not a differential copy session.(P): X = The pre-copy operation has completed one cycle . = The pre-copy operation has not completed one cycle
◆ The following symclone activate command activates the clone operation for all clone pairs in the device group:
symclone -g clonegrp activate -noprompt
'Activate' operation execution is in progress for device group 'clonegrp'. Please wait...
'Activate' operation successfully executed for device group 'clonegrp'.
◆ Another query displays the clone pairs and changed state of each (from Created to CopyInProgress):
symclone -g clonegrp query -multi
Device Group (DG) Name: clonegrpDG's Type : REGULARDG's Symmetrix ID : 000192601369
EMC Solutions Enabler Symmetrix TimeFinder Family CLI Version 7.2 Product Guide192
Performing TimeFinder/Clone Operations
Legend:
(C): X = The background copy setting is active for this pair. . = The background copy setting is not active for this pair.(G): X = The Target device is associated with this group. . = The Target device is not associated with this group.(D): X = The Clone session is a differential copy session. . = The Clone session is not a differential copy session.(P): X = The pre-copy operation has completed one cycle . = The pre-copy operation has not completed one cycle
◆ The following symclone terminate command ends the clone pair sessions of all three clone pairs in the device group:
symclone -g clonegrp terminate -noprompt
'Terminate' operation execution is in progress for device group 'clonegrp'. Please wait...
'Terminate' operation successfully executed for device group 'clonegrp'.
◆ The following symclone query command with the –multi option checks the device group for any current copy sessions. Because all copy sessions for devices in the device group were stopped, the output below confirms that there are no longer any clone devices in the group:
symclone -g clonegrp query -multi
Device group 'clonegrp' does not have any devices that are Clone source devices.
◆ The following symclone create command creates three new clone pair sessions with the same standards and BCVs:
symclone -g clonegrp create -noprompt
'Create' operation execution is in progress for device group 'clonegrp'. Please wait...
'Create' operation successfully executed for device group 'clonegrp'.
◆ The symclone activate command also includes –preaction and –postaction options to run scripts named pre.sh and post.sh, respectively. For example:
• /.pre.sh — a -preaction script to log operations, such as one that unmounts a file system on target devices, or one that reports when the clone activate session starts (echo “starting a clone activate”>> mylog).
• /.post.sh — a -postaction script to that logs operations, such as one that unmounts the file system on the target devices, or reports when the clone activate session completes (echo “completed a clone activate”>>mylog):
(C): X = The background copy setting is active for this pair. . = The background copy setting is not active for this pair.(G): X = The Target device is associated with this group. . = The Target device is not associated with this group.(D): X = The Clone session is a differential copy session. . = The Clone session is not a differential copy session.(P): X = The pre-copy operation has completed one cycle . = The pre-copy operation has not completed one cycle
◆ The following symclone verify command with the –copied option checks all clone pairs every 120 seconds until all are in the Copied state:
symclone -g clonegrp verify -copied -i 120
None of the devices in group 'clonegrp' are in the 'Copied' state.
None of the devices in group 'clonegrp' are in the 'Copied' state.
All of the devices in group 'clonegrp' are in the 'Copied' state.
EMC Solutions Enabler Symmetrix TimeFinder Family CLI Version 7.2 Product Guide194
Performing TimeFinder/Clone Operations
◆ The following symclone create command with the –optimize option uses optimization to create clone pairs from the devices in the device group. Optimization attempts to match devices in such as way as to achieve a high-speed copy between them, first trying to pair devices on separate disk adapters (DA) and, failing that, devices on the same disk adapter but on different SCSI interfaces of the disk adapter and, failing that, devices that may be on the same DA and SCSI interface but on a separate spindle:
'Create' operation successfully executed for device group 'clonegrp'.
◆ The following query displays the new clone pairs. Optimization matched two of the three pairs differently than the previous clone operation: DEV001 with BCV002 and DEV002 with BCV001:
symclone -g clonegrp query -multi
Device Group (DG) Name: clonegrpDG's Type : REGULARDG's Symmetrix ID : 000192601369
Example 2: Cloning a copy of a standard device to BCV devices 195
Performing TimeFinder/Clone Operations
(C): X = The background copy setting is active for this pair. . = The background copy setting is not active for this pair.(G): X = The Target device is associated with this group. . = The Target device is not associated with this group.(D): X = The Clone session is a differential copy session. . = The Clone session is not a differential copy session.(P): X = The pre-copy operation has completed one cycle . = The pre-copy operation has not completed one cycle
◆ The following symclone activate command activates the clone operation for all clone pairs in the device group:
symclone -g clonegrp activate -noprompt
'Activate' operation execution is in progress for device group 'clonegrp'. Please wait...
'Activate' operation successfully executed for device group 'clonegrp'.
◆ The following symclone terminate command initiates termination of the three copy sessions:
symclone -g clonegrp terminate -noprompt
'Terminate' operation execution is in progress for device group 'clonegrp'. Please wait...
'Terminate' operation successfully executed for device group 'clonegrp'.
◆ The following symclone list command indicates that the copy sessions were successfully terminated and no longer exist:
symclone list
Symmetrix ID: 000192601369
No Copy sessions found.
EMC Solutions Enabler Symmetrix TimeFinder Family CLI Version 7.2 Product Guide196
Performing TimeFinder/Clone Operations
Example 3: Cloning copies from a BCV source deviceThis example was performed using Solutions Enabler version 7.0 running on a Symmetrix VMAX array. This example creates a new device group and pairs Symmetrix standard device 07A7 with BCV 07AD as a BCV pair. The source of the clone is BCV 07AD. The target is standard device 07A8.
◆ The symdg command creates a device group named clonebcv. The symdg commands add two standard devices to the group. By default, the logical device name of device 07A7 is DEV001. The example assigns CLONETGT as the logical device name for device 07A8. The symbcv command associates one BCV with the group. The example assigns CLONESRC as the logical device name of the BCV:
symdg create clonebcvsymdg -g clonebcv add dev 07A7 -sid 369symdg -g clonebcv add dev 07A8 CLONETGT -sid 369symbcv -g clonebcv associate dev 07AD CLONESRC
◆ The following symdg show command displays the details of the device group. The logical device names CLONETGT and CLONESRC make it easier to identify the clone target and clone source:
symdg show clonebcv
Group Name: clonebcv
Group Type : REGULAR Device Group in GNS : No Valid : Yes Symmetrix ID : 000192601369 Group Creation Time : Thu Jun 11 11:55:00 2009 Vendor ID : EMC Corp Application ID : SYMCLI
Number of STD Devices in Group : 2 Number of Associated GK's : 0 Number of Locally-associated BCV's : 1 Number of Locally-associated VDEV's : 0 Number of Locally-associated TGT's : 0 Number of Remotely-associated VDEV's(STD RDF): 0 Number of Remotely-associated BCV's (STD RDF): 0 Number of Remotely-associated TGT's(TGT RDF) : 0 Number of Remotely-associated BCV's (BCV RDF): 0 Number of Remotely-assoc'd RBCV's (RBCV RDF) : 0 Number of Remotely-assoc'd BCV's (Hop-2 BCV) : 0 Number of Remotely-assoc'd VDEV's(Hop-2 VDEV): 0 Number of Remotely-assoc'd TGT's (Hop-2 TGT) : 0
Standard (STD) Devices (2): { -------------------------------------------------------------------- Sym Cap LdevName PdevName Dev Att. Sts (MB) -------------------------------------------------------------------- DEV001 N/A 07A7 RW 1031 CLONETGT N/A 07A8 RW 1031 }
Example 3: Cloning copies from a BCV source device 197
Performing TimeFinder/Clone Operations
◆ The following symmir establish command initiates a full establish operation on the BCV pair identified by their logical device names (standard device DEV001 with the BCV named CLONESRC):
'Full Establish' operation execution is in progress for device 'DEV001' paired with BCV device 'CLONESRC' in device group 'clonebcv'. Please wait...
'Full Establish' operation successfully initiated for device 'DEV001' in group 'clonebcv' paired with BCV device 'CLONESRC'.
◆ The following symmir verify command checks the establish operation every 30 seconds and verifies when the operation is complete. That is, DEV001 has been fully copied to CLONESRC:
symmir -g clonebcv verify DEV001 -i 30
None of the device(s) in the list are in 'Synchronized or Restored' state.
None of the device(s) in the list are in 'Synchronized or Restored' state.
All device(s) in the list are in 'Synchronized or Restored' state.
◆ The following symmir split command performs an instant split on the BCV pair. Use the –not_ready option to prevent the BCV’s host from writing to it prior to the clone operation:
(C): X = The background copy setting is active for this pair. . = The background copy setting is not active for this pair.(G): X = The Target device is associated with this group. . = The Target device is not associated with this group.(D): X = The Clone session is a differential copy session. . = The Clone session is not a differential copy session.(P): X = The pre-copy operation has completed one cycle . = The pre-copy operation has not completed one cycle
Example 3: Cloning copies from a BCV source device 199
Performing TimeFinder/Clone Operations
◆ The following symclone query command displays the state of the clone operation:
symclone -g clonebcv query -bcv
Device Group (DG) Name: clonebcvDG's Type : REGULARDG's Symmetrix ID : 000192601369
(C): X = The background copy setting is active for this pair. . = The background copy setting is not active for this pair.(G): X = The Target device is associated with this group. . = The Target device is not associated with this group.(D): X = The Clone session is a differential copy session. . = The Clone session is not a differential copy session.(P): X = The pre-copy operation has completed one cycle . = The pre-copy operation has not completed one cycle
◆ The following symclone terminate command stops the copy session. The verbose (–v) option provides a more detailed output:
'Terminate' operation execution is in progress for device 'CLONESRC' paired with target device 'CLONETGT' in device group 'clonebcv'. Please wait...
SELECTING the list of Source devices in the group:
Device: 07AD [SELECTED]
SELECTING Target devices in the group:
Device: 07A8 [SELECTED]
PAIRING of Source and Target devices:
Devices: 07AD(S) - 07A8(T) [PAIRED]
STARTING a Clone 'TERMINATE' operation.
The Clone 'TERMINATE' operation SUCCEEDED.
'Terminate' operation successfully executed for device 'CLONESRC' in group 'clonebcv' paired with target device 'CLONETGT'.
◆ The following symdg list ld command with the –held option displays that the hold on the target device was released by indicating that no devices in the device group are being held:
symdg -g clonebcv -held list ld
EMC Solutions Enabler Symmetrix TimeFinder Family CLI Version 7.2 Product Guide200
Performing TimeFinder/Clone Operations
Device Group (DG) Name: clonebcvDG's Type : REGULARDG's Symmetrix ID : 000192601369
(+): BCV is paired with a member STD device.(-): BCV is paired with a non-member STD device.
◆ The following symmir establish command initiates an incremental establish on the BCV pair, which refreshes the BCV with any new writes that occurred on DEV001 while the BCV pair was split:
'Incremental Establish' operation execution is in progress for device 'DEV001' paired with BCV device 'CLONESRC' in device group 'clonebcv'. Please wait...
'Incremental Establish' operation successfully initiated for device 'DEV001' in group 'clonebcv' paired with BCV device 'CLONESRC'.
◆ The following symmir verify command verifies that the establish operation is complete:
symmir -g clonebcv verify DEV001
All device(s) in the list are in 'Synchronized or Restored' state.
◆ The following symmir split command performs an instant split on the BCV pair. Use the –not_ready option to prevent the BCV’s host from writing to it prior to the next clone operation:
'Split' operation execution is in progress for device 'DEV001' in device group 'clonebcv'. Please wait...
'Split' operation successfully executed for device 'DEV001' in group 'clonebcv'.
◆ The following symmir verify command checks every five seconds and verifies when the background split completes:
symmir -g clonebcv verify DEV001 -split -bg -i 5
All device(s) in the list have finished splitting in the background.
◆ The following command creates a new CopyOnAccess copy session for source device CLONESRC and target device CLONETGT, in preparation for cloning the refreshed data on the BCV source device:
Example 3: Cloning copies from a BCV source device 201
'Terminate' operation execution is in progress for device 'CLONESRC' paired with target device 'CLONETGT' in device group 'clonebcv'. Please wait...
SELECTING the list of Source devices in the group:
Device: 07AD [SELECTED]
SELECTING Target devices in the group:
Device: 07A8 [SELECTED]
PAIRING of Source and Target devices:
Devices: 07AD(S) - 07A8(T) [PAIRED]
STARTING a Clone 'TERMINATE' operation.
The Clone 'TERMINATE' operation SUCCEEDED.
'Terminate' operation successfully executed for device 'CLONESRC' in group 'clonebcv' paired with target device 'CLONETGT'.
◆ The following commands perform clean-up tasks so that these same devices are available for use in “Example 4: Cloning multiple copies of a BCV” on page 204. The symmir cancel command cancels the BCV pair relationship between DEV001 and CLONESRC so that the Symmetrix array no longer recognizes this relationship:
'Cancel' operation execution is in progress for device 'DEV001' paired with BCV device 'CLONESRC' in device group 'clonebcv'. Please wait...
'Cancel' operation successfully executed for device 'DEV001' in group 'clonebcv' paired with BCV device 'CLONESRC'.
EMC Solutions Enabler Symmetrix TimeFinder Family CLI Version 7.2 Product Guide202
Performing TimeFinder/Clone Operations
◆ The following symdg delete command deletes the device group clonebcv. The –force option is required when there are still devices in the device group:
symdg -force delete clonebcv
Example 3: Cloning copies from a BCV source device 203
Performing TimeFinder/Clone Operations
Example 4: Cloning multiple copies of a BCVThis example was performed using Solutions Enabler version 7.0, running on a Symmetrix VMAX array. This example creates a new device group and pairs Symmetrix standard device 07AA with BCV 07AD as a BCV pair. The clone source is BCV 07AD. The targets are standard devices 07A7, 07A8, and 07A9.
◆ The commands in this step do the following:
• The symdg command creates a device group named multiclone. • The first symdg command adds standard device 07AA to the group. By
default, the logical device name of device 00FF is DEV001. • The symbcv command associates the source BCV with the group. The example
assigns CLONESRC as the BCV's logical device name to make it easier to identify the clone source device.
• The remaining symdg commands add three target standard devices (07A7, 07A8, and 07A9) and assign CLONETGT logical device names that make it easier to identify the clone target devices:
symdg create multiclonesymdg -g multiclone add dev 07AAsymbcv -g multiclone associate dev 07AD CLONESRCsymdg -g multiclone add dev 07A7 CLONETGT1symdg -g multiclone add dev 07A8 CLONETGT2symdg -g multiclone add dev 07A9 CLONETGT3
◆ The symdg show command displays the details of the device group named multiclone:
symdg show multiclone
Group Type : REGULAR Device Group in GNS : No Valid : Yes Symmetrix ID : 000192601369 Group Creation Time : Mon Jun 15 10:58:02 2009 Vendor ID : EMC Corp Application ID : SYMCLI
Number of STD Devices in Group : 4 Number of Associated GK's : 0 Number of Locally-associated BCV's : 1 Number of Locally-associated VDEV's : 0 Number of Locally-associated TGT's : 0 Number of Remotely-associated VDEV's(STD RDF): 0 Number of Remotely-associated BCV's (STD RDF): 0 Number of Remotely-associated TGT's(TGT RDF) : 0 Number of Remotely-associated BCV's (BCV RDF): 0 Number of Remotely-assoc'd RBCV's (RBCV RDF) : 0 Number of Remotely-assoc'd BCV's (Hop-2 BCV) : 0 Number of Remotely-assoc'd VDEV's(Hop-2 VDEV): 0 Number of Remotely-assoc'd TGT's (Hop-2 TGT) : 0
Standard (STD) Devices (4): {
Group Type : REGULAR Device Group in GNS : No Valid : Yes Symmetrix ID : 000192601369 Group Creation Time : Mon Jun 15 10:58:02 2009 Vendor ID : EMC Corp Application ID : SYMCLI
EMC Solutions Enabler Symmetrix TimeFinder Family CLI Version 7.2 Product Guide204
Performing TimeFinder/Clone Operations
Number of STD Devices in Group : 4 Number of Associated GK's : 0 Number of Locally-associated BCV's : 1 Number of Locally-associated VDEV's : 0 Number of Locally-associated TGT's : 0 Number of Remotely-associated VDEV's(STD RDF): 0 Number of Remotely-associated BCV's (STD RDF): 0 Number of Remotely-associated TGT's(TGT RDF) : 0 Number of Remotely-associated BCV's (BCV RDF): 0 Number of Remotely-assoc'd RBCV's (RBCV RDF) : 0 Number of Remotely-assoc'd BCV's (Hop-2 BCV) : 0 Number of Remotely-assoc'd VDEV's(Hop-2 VDEV): 0 Number of Remotely-assoc'd TGT's (Hop-2 TGT) : 0
Standard (STD) Devices (4): {
◆ The following symmir establish command initiates a full establish operation on the BCV pair identified by their logical device names (standard device DEV001 with the BCV named CLONESRC):
'Full Establish' operation execution is in progress for device 'DEV001' paired with BCV device 'CLONESRC' in device group 'multiclone'. Please wait...
'Full Establish' operation successfully initiated for device 'DEV001' in group 'multiclone' paired with BCV device 'CLONESRC'.
◆ The following symmir verify command checks the establish operation every 30 seconds and verifies when the operation is complete. That is, DEV001 has been fully copied to CLONESRC:
symmir -g multiclone verify DEV001 -i 30
None of the device(s) in the list are in 'Synchronized or Restored' state.
None of the device(s) in the list are in 'Synchronized or Restored' state.
All device(s) in the list are in 'Synchronized or Restored' state.
◆ The following symmir split command performs an instant split on the BCV pair. Use the –not_ready option to prevent the BCV’s host from writing to it prior to the clone operation:
'Create' operation execution is in progress for device 'CLONESRC' paired with target device 'CLONETGT3' in device group 'multiclone'. Please wait...
'Create' operation successfully executed for device 'CLONESRC' in group 'multiclone' paired with target device 'CLONETGT3'.
◆ The following symclone query command with the –multi option displays that the source device and its four clone targets have been successfully created:
symclone -g multiclone -bcv query -multi
Device Group (DG) Name: multicloneDG's Type : REGULARDG's Symmetrix ID : 000192601369
(C): X = The background copy setting is active for this pair. . = The background copy setting is not active for this pair.(G): X = The Target device is associated with this group. . = The Target device is not associated with this group.(D): X = The Clone session is a differential copy session. . = The Clone session is not a differential copy session.(P): X = The pre-copy operation has completed one cycle . = The pre-copy operation has not completed one cycle.
EMC Solutions Enabler Symmetrix TimeFinder Family CLI Version 7.2 Product Guide206
Performing TimeFinder/Clone Operations
◆ The following symclone activate command activates the four copy sessions at the same time:
'Activate' operation execution is in progress for the device list in device group 'multiclone'. Please wait...
'Activate' operation successfully executed for the device list in device group 'multiclone'.
◆ The following command makes the BCV device ready again to its host:
symdg -g multiclone ready -bcv CLONESRC -noprompt
'Ready' Device operation successfully completed for the device.
◆ The following symclone query command with the –multi option displays the state of the clone operation, showing that all four copy operations are still in progress (CopyInProg) and the completion percent of each:
symclone -g multiclone -bcv query -multi
Device Group (DG) Name: multicloneDG's Type : REGULARDG's Symmetrix ID : 000192601369
(C): X = The background copy setting is active for this pair. . = The background copy setting is not active for this pair.(G): X = The Target device is associated with this group. . = The Target device is not associated with this group.(D): X = The Clone session is a differential copy session. . = The Clone session is not a differential copy session.(P): X = The pre-copy operation has completed one cycle . = The pre-copy operation has not completed one cycle
Example 4: Cloning multiple copies of a BCV 207
Performing TimeFinder/Clone Operations
◆ The following symclone verify command checks all clone pairs every 60 seconds until all are in the Copied state:
◆ The following commands terminate the copy sessions. Stopping a copy session deletes clone pair information from the SYMAPI database and removes any hold on a target device:
'Terminate' operation execution is in progress for device 'CLONESRC' paired with target device 'CLONETGT1' in device group 'multiclone'. Please wait...
'Terminate' operation successfully executed for device 'CLONESRC' in group 'multiclone' paired with target device 'CLONETGT1'.
'Terminate' operation execution is in progress for device 'CLONESRC' paired with target device 'CLONETGT2' in device group 'multiclone'. Please wait...
'Terminate' operation successfully executed for device 'CLONESRC' in group 'multiclone' paired with target device 'CLONETGT2'.
'Terminate' operation execution is in progress for device 'CLONESRC' paired with target device 'CLONETGT3' in device group 'multiclone'. Please wait...
'Terminate' operation successfully executed for device 'CLONESRC' in group 'multiclone' paired with target device 'CLONETGT3'.
◆ The following symmir establish command initiates an incremental establish on the BCV pair, which refreshes the BCV with any new writes that occurred on DEV001 while the BCV pair was split:
'Incremental Establish' operation execution is in progress for device 'DEV001' paired with BCV device 'CLONESRC' in device group 'multiclone'. Please wait...
'Incremental Establish' operation successfully initiated for device 'DEV001' in group 'multiclone' paired with BCV device 'CLONESRC'.
◆ The following symmir verify command checks the status of the establish operation every 30 seconds and verifies when the operation is complete:
symmir -g multiclone verify DEV001 -i 30
All device(s) in the list are in 'Synchronized or Restored' state.
EMC Solutions Enabler Symmetrix TimeFinder Family CLI Version 7.2 Product Guide208
Performing TimeFinder/Clone Operations
Example 5: Cloning three copies from a single source deviceThis example was performed using Solutions Enabler version 7.0, running on a Symmetrix VMAX array. This example creates a new device group containing a single standard device (07A7) as a clone source and three BCV devices (0192, 0193, and 0194) as clone targets.
◆ The commands in this step do the following:
• The symdg command creates a device group named clone3. • The symdg command adds standard device 07A7 to the group. By default, the
logical device name of device 07A7 is DEV001. • The symbcv command associates a range of three BCV devices (0192 through
0194) with the group and assigns them the logical device names BCV001 through BCV003:
◆ When cloning to multiple targets from the same source device, you must create each of the three source/target pairings separately. The first symclone create command creates the DEV001/BCV001 clone pair and displays the resulting output from the command:
◆ The following symclone query command with the –multi option displays that the source device and its three clone targets have been successfully created. Note that the last clone pair created is located at the top of the display list:
symclone -g clone3 query -multi
Device Group (DG) Name: clone3DG's Type : REGULARDG's Symmetrix ID : 000192601369
Example 5: Cloning three copies from a single source device 209
Performing TimeFinder/Clone Operations
(C): X = The background copy setting is active for this pair. . = The background copy setting is not active for this pair.(G): X = The Target device is associated with this group. . = The Target device is not associated with this group.(D): X = The Clone session is a differential copy session. . = The Clone session is not a differential copy session.(P): X = The pre-copy operation has completed one cycle . = The pre-copy operation has not completed one cycle
◆ The following symclone activate command activates the three clone pair sessions simultaneously. When you include the –consistent option, SYMAPI suspends any further I/O before activation. Suspending I/O during the brief period when activation occurs prevents any pending records from being included in the clone copy. When activation completes, SYMAPI allows I/O to resume:
'Activate' operation execution is in progress for the device list in device group 'clone3'. Please wait...
'Activate' operation successfully executed for the device list in device group 'clone3'.
◆ The following symclone query command with the –multi option displays the the source device and its three clone targets are in the Copied state. You can now clone data to any four targets simultaneously. You can continue to clone data to these targets as long as these copy sessions exist:
symclone -g clone3 query -multi
Device Group (DG) Name: clone3DG's Type : REGULARDG's Symmetrix ID : 000192601369
(C): X = The background copy setting is active for this pair. . = The background copy setting is not active for this pair.(G): X = The Target device is associated with this group. . = The Target device is not associated with this group.(D): X = The Clone session is a differential copy session. . = The Clone session is not a differential copy session.(P): X = The pre-copy operation has completed one cycle . = The pre-copy operation has not completed one cycle
EMC Solutions Enabler Symmetrix TimeFinder Family CLI Version 7.2 Product Guide210
Performing TimeFinder/Clone Operations
◆ When you are finished cloning data to these targets, you need to terminate each of the three source/target pairings separately. If you do not specify a BCV, the oldest session is terminated first. The following symclone terminate command terminates the DEV001/BCV001 clone pair session and displays the resulting output from the command:
Example 5: Cloning three copies from a single source device 211
Performing TimeFinder/Clone Operations
Example 6: Using a composite group to control clone pairsThis example was performed using Solutions Enabler version 7.0, running on a Symmetrix VMAX array. The hardware setup includes a host connected to two source Symmetrix arrays (sid 369 and sid 237). The example show a composite group defined on the host with a set of clone pairs that spans the two Symmetrix arrays.
You can create, activate, and control specific clone pairs within the composite group as well as performing control operations on the entire group as shown here. For example, you can terminate one clone session in the group without terminating the other sessions for the group.
◆ The symcg create command creates a Regular composite group named TFClone:
symcg create TFClone -type regular
◆ The following symcg commands add to the composite group a range of standard source devices from each of the two source Symmetrix arrays:
◆ The symclone create command creates optimized standard/BCV pairings among devices within each Symmetrix array and places each clone pair in the Created state:
symclone -cg TFClone create -optimize -noprompt
'Create' operation execution is in progress for composite group 'TFClone'. Please wait...
'Create' operation successfully executed for composite group 'TFClone'.
◆ The symclone query command displays the clone pairs and that they are in the Created state:
symclone -cg TFClone query
Composite Group Name : TFCloneComposite Group Type : REGULARNumber of Symmetrix Units : 2Number of RDF (RA) Groups : 0
CG Symmetrix ID : 000192601369 (Microcode Version: 5874)
(C): X = The background copy setting is active for this pair. . = The background copy setting is not active for this pair.(G): X = The Target device is associated with this group. . = The Target device is not associated with this group.(D): X = The Clone session is a differential copy session. . = The Clone session is not a differential copy session.(P): X = The pre-copy operation has completed one cycle . = The pre-copy operation has not completed one cycle
◆ The symclone activate command places each clone pair in the CopyInProg state. Full copying of the data begins immediately. The –consistent option causes the clone pairs to be consistently activated:
(C): X = The background copy setting is active for this pair. . = The background copy setting is not active for this pair.(G): X = The Target device is associated with this group. . = The Target device is not associated with this group.(D): X = The Clone session is a differential copy session. . = The Clone session is not a differential copy session.(P): X = The pre-copy operation has completed one cycle . = The pre-copy operation has not completed one cycle
◆ The symclone terminate command attempts to end all clone sessions in the composite group but cannot do so because the clone pairs are in the CopyInProg state:
symclone -cg TFClone terminate -noprompt
'Terminate' operation execution is in progress for composite group 'TFClone'. Please wait...
The session cannot be terminated because the device is 'Copy In Progress' or 'Restore In Progress' unless the Symmetrix force flag is used.
◆ The symclone terminate command with the –symforce option forces all clone sessions in the composite group to terminate:
'Terminate' operation execution is in progress for composite group 'TFClone'. Please wait...
'Terminate' operation successfully executed for composite group 'TFClone'.
EMC Solutions Enabler Symmetrix TimeFinder Family CLI Version 7.2 Product Guide214
Performing TimeFinder/Clone Operations
Example 7: Cloning to a remote BCVThis example was performed using Solutions Enabler version 7.0. The hardware setup includes a host connected to a source Symmetrix VMAX array (sid 369) that is RDF-connected to a remote Symmetrix VMAX array (sid 373). A device group is defined on the host. The device group contains a single standard device (594) as the clone source and a remote BCV device (3D8) as the remote clone target.
◆ The symdg create command creates an RDF1 type device group named Rdf1Grp. The symdg add command adds to the device group an R1 standard device (594) on the local Symmetrix (sid 369) to be the source device. The symbcv associate command associates a remote BCV device (3D8) on the remote Symmetrix to hold the clone copy. A remote target device can either be a BCV or a target:
symdg create Rdf1Grp -type rdf1symdg -g Rdf1Grp add dev 594 -sid 369symbcv -g Rdf1Grp associate dev 3d8 -rdf
◆ The symclone establish command initiates an immediate full copy from the source standard device to the remote BCV target device via the remote R2 device (3D4). The –rdf parameter is required to specify a remote target:
Remote 'Clone Full Establish' operation execution is in progress fordevice group 'Rdf1Grp'. Please wait...
Remote 'Clone Full Establish' operation successfully executed for device group'Rdf1Grp'.
Example 7: Cloning to a remote BCV 215
Performing TimeFinder/Clone Operations
◆ The symclone query command with the –rdf parameter displays the progress of the remote clone operation. Note that the data is being cloned from the R1 source device via its paired R2 (03D8)device:
symclone -g Rdf1Grp query -rdf
Device Group (DG) Name: Rdf1GrpDG's Type : RDF1DG's Symmetrix ID : 000192601369Remote Symmetrix ID : 000192601373
(C): X = The background copy setting is active for this pair. . = The background copy setting is not active for this pair.(G): X = The Target device is associated with this group. . = The Target device is not associated with this group.(D): X = The Clone session is a differential copy session. . = The Clone session is not a differential copy session.(P): X = The pre-copy operation has completed one cycle . = The pre-copy operation has not completed one cycle
◆ The following symclone verify command checks at 30-second intervals (-i 30) to determine when the clone pair reaches the Copied state:
symclone -g Rdf1Grp verify -rdf -i 30
None of the devices in group 'Rdf1Grp' are in the 'Copied' state.
All devices in the group 'Rdf1Grp' are in 'Copied' state.
EMC Solutions Enabler Symmetrix TimeFinder Family CLI Version 7.2 Product Guide216
Performing TimeFinder/Clone Operations
◆ A subsequent symclone query command confirms that the remote clone is in the Copied state:
symclone -g Rdf1Grp query -rdf
Device Group (DG) Name: Rdf1GrpDG's Type : RDF1DG's Symmetrix ID : 000192601369Remote Symmetrix ID : 000192601373
(C): X = The background copy setting is active for this pair. . = The background copy setting is not active for this pair.(G): X = The Target device is associated with this group. . = The Target device is not associated with this group.(D): X = The Clone session is a differential copy session. . = The Clone session is not a differential copy session.(P): X = The pre-copy operation has completed one cycle . = The pre-copy operation has not completed one cycle
◆ The symclone terminate command ends the clone copy session. Terminating a copy session removes any hold on the target device and deletes pair information about the terminated pair from the Symmetrix array:
symclone -g Rdf1Grp terminate -rdf -noprompt
Remote 'Terminate' operation execution is in progress fordevice group 'Rdf1Grp'. Please wait...
Remote 'Terminate' operation successfully executed for device group'Rdf1Grp'.
◆ The symdg delete command deletes the device group so that this same group name can be used in subsequent examples. The –force option is required when the group is not empty:
symdg delete Rdf1Grp -force
Example 7: Cloning to a remote BCV 217
Performing TimeFinder/Clone Operations
Example 8: Cloning to a local BCV and a remote BCVThis example was performed using Solutions Enabler version 7.0. The hardware setup includes a host connected to a source Symmetrix array (sid 369) that is RDF-connected to a remote Symmetrix array (sid 373). A device group is defined on the host. The device group contains a single standard device (594) as the clone source, and a local BCV (59A) and a remote BCV (3D8) as the clone targets.
◆ The symdg create command creates an RDF1 type device group named Rdf1Grp. The symdg add command adds to the device group an R1 standard device (594) on the local Symmetrix (sid 369) as the source device. The symbcv associate commands associate a local target BCV (59A) and a remote target BCV device (3D8) to hold clone copies. A remote target device can either be a BCV or a target:
symdg create Rdf1Grp -type rdf1symdg -g Rdf1Grp add dev 594 -sid 369symbcv -g Rdf1Grp associate dev 59asymbcv -g Rdf1Grp associate dev 3d8 -rdf
◆ The symclone establish command clones a full copy from the source standard device (594) to the local BCV target device (59A). When the source and target devices of a device group are not specified on the command line, the assumption is that the source is a standard device, and the target is a BCV:
symclone -g Rdf1Grp establish -full -noprompt
'Clone Full Establish' operation execution is in progress fordevice group 'Rdf1Grp'. Please wait...
'Clone Full Establish' operation successfully executed for device group 'Rdf1Grp'.
◆ The symclone query command shows that the local clone copy operation is in progress:
symclone -g Rdf1Grp query
Device Group (DG) Name: Rdf1GrpDG's Type : RDF1DG's Symmetrix ID : 000192601369
(C): X = The background copy setting is active for this pair. . = The background copy setting is not active for this pair.(G): X = The Target device is associated with this group. . = The Target device is not associated with this group.
EMC Solutions Enabler Symmetrix TimeFinder Family CLI Version 7.2 Product Guide218
Performing TimeFinder/Clone Operations
(D): X = The Clone session is a differential copy session. . = The Clone session is not a differential copy session.(P): X = The pre-copy operation has completed one cycle . = The pre-copy operation has not completed one cycle
◆ An SRDF symrdf query command shows that the SRDF pair (the local R1 standard device and its remote R2 device) are synchronized:
symrdf -g Rdf1Grp query
Device Group (DG) Name : Rdf1GrpDG's Type : RDF1DG's Symmetrix ID : 000192601369 (Microcode Version: 5874)Remote Symmetrix ID : 000192601373 (Microcode Version: 5874)RDF (RA) Group Number : 70 (45)
Source (R1) View Target (R2) View MODES-------------------------------- ------------------------ ----- ------------ ST LI STStandard A N ALogical T R1 Inv R2 Inv K T R1 Inv R2 Inv RDF PairDevice Dev E Tracks Tracks S Dev E Tracks Tracks MDAE STATE-------------------------------- -- ------------------------ ----- ------------
M(ode of Operation) : A = Async, S = Sync, E = Semi-sync, C = Adaptive Copy D(omino) : X = Enabled, . = Disabled A(daptive Copy) : D = Disk Mode, W = WP Mode, . = ACp off (Consistency) E(xempt): X = Enabled, . = Disabled, M = Mixed, - = N/A
◆ The symclone establish command initiates an immediate full copy from the source device to the remote BCV target via the remote R2 device (03D4). The –rdf parameter is required to specify a remote target:
(C): X = The background copy setting is active for this pair. . = The background copy setting is not active for this pair.(G): X = The Target device is associated with this group. . = The Target device is not associated with this group.(D): X = The Clone session is a differential copy session. . = The Clone session is not a differential copy session.(P): X = The pre-copy operation has completed one cycle . = The pre-copy operation has not completed one cycle
◆ Once the local and remote clone operations are complete, you can terminate the two clone sessions. The following command terminates the local clone session:
symclone -g Rdf1Grp terminate -noprompt
'Terminate' operation execution is in progress fordevice group 'Rdf1Grp'. Please wait...
'Terminate' operation successfully executed for device group'Rdf1Grp'.
◆ The following command uses the –rdf parameter to terminate the remote clone session:
symclone -g Rdf1Grp terminate -rdf -noprompt
Remote 'Terminate' operation execution is in progress fordevice group 'Rdf1Grp'. Please wait...
Remote 'Terminate' operation successfully executed for device group'Rdf1Grp'.
◆ The symdg delete command deletes the device group as was done in Example 7 at completion:
symdg delete Rdf1Grp -force
EMC Solutions Enabler Symmetrix TimeFinder Family CLI Version 7.2 Product Guide220
Performing TimeFinder/Clone Operations
Example 9: Cloning to multiple local and remote BCVsThis example was performed using Solutions Enabler version 7.0. The hardware setup includes a host connected to a source Symmetrix array (sid 369) that is RDF-connected to a remote Symmetrix array (sid 373). A device group is defined on the host. The device group contains a single standard device (594) as the clone source and a range of two local BCVs and two remote BCVs as the clone targets.
◆ The symdg create command creates an RDF1 type device group named Rdf1Grp. The symdg add command adds to the device group an R1 standard device (594) on the local Symmetrix (sid 369) to be the source device. The symbcv associateall commands associate a range of two local target BCVs (59A through 59B) and two remote target BCVs (3D8 through 3D9) to hold the clone copies:
◆ To clone the two local target devices from the local source device, first issue two symclone create commands, specifying the same source device with each of the two targets. The following command creates a clone session for the first local clone pair (DEV001 and BCV001). Setting the –precopy mode of operation initiates data copying in the background prior to activating the clone session, allowing the early movement of data prior to completing the full clone copy:
'Create' operation execution is in progress for device 'DEV001'paired with target device 'BCV002' indevice group 'Rdf1Grp'. Please wait...
'Create' operation successfully executed for device 'DEV001'in group 'Rdf1Grp' paired with target device 'BCV002'.
Example 9: Cloning to multiple local and remote BCVs 221
Performing TimeFinder/Clone Operations
◆ The symclone query command with the –multi option shows the status of the two local clone sessions. Each clone pair is in the PreCopy state and has various percents of copy completion:
symclone -g Rdf1Grp query -multi
Device Group (DG) Name: Rdf1GrpDG's Type : RDF1DG's Symmetrix ID : 000192601369
(C): X = The background copy setting is active for this pair. . = The background copy setting is not active for this pair.(G): X = The Target device is associated with this group. . = The Target device is not associated with this group.(D): X = The Clone session is a differential copy session. . = The Clone session is not a differential copy session.(P): X = The pre-copy operation has completed one cycle . = The pre-copy operation has not completed one cycle
EMC Solutions Enabler Symmetrix TimeFinder Family CLI Version 7.2 Product Guide222
Performing TimeFinder/Clone Operations
◆ You can activate the clone operation with one command that activates all sessions at the same time. Including the –consistent option means that SYMAPI will suspend I/O before activation, preventing any pending records from being included in the copy. After activation occurs, SYMAPI allows I/O to resume. The target devices will contain a copy of the source device that is consistent with the production database up until the time of the activation. The production DBMS instance has no knowledge that the suspend/ resume operation occurred:
(C): X = The background copy setting is active for this pair. . = The background copy setting is not active for this pair.(G): X = The Target device is associated with this group. . = The Target device is not associated with this group.(D): X = The Clone session is a differential copy session. . = The Clone session is not a differential copy session.(P): X = The pre-copy operation has completed one cycle . = The pre-copy operation has not completed one cycle
◆ To clone the two remote target devices from the local source device, first issue two symclone create commands, specifying the same source device with each of the two remote targets. The following command creates a clone session for the first
Example 9: Cloning to multiple local and remote BCVs 223
Performing TimeFinder/Clone Operations
remote clone pair (DEV001 and RBCV001). Setting the –precopy mode of operation initiates data copying in the background prior to activating a clone session. The –rdf parameter is required to indicate that this is a remote clone pair:
'Create' operation execution is in progress for device 'DEV001'paired with target device 'RBCV002' in device group 'Rdf1Grp'. Please wait...
Remote 'Create' operation successfully executed for device 'DEV001'in group 'Rdf1Grp' paired with target device 'RBCV002'.
◆ The symclone query command with the –multi and –rdf options shows the status of the four remote clone sessions. Although each clone pair is in the PreCopy state, each pair has already reached 100 percent copy completion:
symclone -g Rdf1Grp query -rdf -multi
Device Group (DG) Name: Rdf1GrpDG's Type : RDF1DG's Symmetrix ID : 000192601369Remote Symmetrix ID : 000192601373
(C): X = The background copy setting is active for this pair. . = The background copy setting is not active for this pair.(G): X = The Target device is associated with this group. . = The Target device is not associated with this group.(D): X = The Clone session is a differential copy session. . = The Clone session is not a differential copy session.(P): X = The pre-copy operation has completed one cycle . = The pre-copy operation has not completed one cycle
EMC Solutions Enabler Symmetrix TimeFinder Family CLI Version 7.2 Product Guide224
Performing TimeFinder/Clone Operations
◆ The symclone activate command activates all sessions for the remote clone pairs simultaneously. Ordinarily, activation of a full clone copy initiates the completion of the clone operation that began in precopy mode. But the copying for each session is already 100 percent complete. In this case, the activation simply transitions the clone pair states from PreCopy to Copied:
(C): X = The background copy setting is active for this pair. . = The background copy setting is not active for this pair.(G): X = The Target device is associated with this group. . = The Target device is not associated with this group.(D): X = The Clone session is a differential copy session. . = The Clone session is not a differential copy session.(P): X = The pre-copy operation has completed one cycle . = The pre-copy operation has not completed one cycle
◆ Once the local and remote clone operations are complete, you can terminate the clone sessions. The following two commands terminate the two local clone sessions:
'Terminate' operation execution is in progress for device 'DEV001'paired with target device 'RBCV002' in device group 'Rdf1Grp'. Please wait...
Remote 'Terminate' operation successfully executed for device 'DEV001' in group 'Rdf1Grp' paired with target device 'RBCV002'.
◆ The symdg delete command deletes the device group so that this same group name can be used in subsequent examples. The –force option is required when the group is not empty:
symdg delete Rdf1Grp -force
Example 9: Cloning to multiple local and remote BCVs 227
Performing TimeFinder/Clone Operations
Example 10: Cloning to a remote BCV from a local BCVThis example was performed using Solutions Enabler version 7.0. The hardware setup includes a host connected to a source Symmetrix array (sid 369) that is RDF-connected to a remote Symmetrix array (sid 373). A device group contains a single standard device (590) paired with a local BCV (59E). This local BCV is the source of a clone operation to a remote BCV target (3D8). First, the example copies the data to the local BCV, then via SRDF to a remote R2 device, and then to the remote BCV clone.
◆ The symdg create command creates a standard type device group named Group1. The symdg add command adds to the device group a standard device (8B) on the local Symmetrix (sid 58) to be paired with a local BCV. The first symbcv associate command associates the local R1 BCV device (CC), which will be the source of the clone operation via its remote R2 device. Then the example associates the remote target BCV device (4C3) to hold the clone copy:
symdg create Group1symdg -g Group1 add dev 590 -sid 369symbcv -g Group1 associate dev 59esymbcv -g Group1 associate dev 3d8 -bcv -rdf
◆ The symclone establish command clones a full copy from the source standard device (590) to the local BCV target device (59E). When the source and target devices of a device group are not specified on the command line, the assumption is that the source is a standard device, and the target is a BCV:
symclone -g Group1 establish -full -noprompt
'Clone Full Establish' operation execution is in progress fordevice group 'Group1'. Please wait...
'Clone Full Establish' operation successfully executed for device group 'Group1'.
Note: The symclone command to an R1 device works without any additional options because the R1 BCV is in the SRDF Split state (Suspended state would work as well). If SRDF was actively synchronizing the R1 and R2 pair, then the symclone command would fail with the error message “Cannot proceed in the current RDF state except if the force flag is used.” Repeating the command with the -force option would allow it to proceed.
◆ The symclone verify command checks at 30-second intervals (-i 30) to determine when the clone pair reaches the Copied state:
symclone -g Group1 verify -i 30
None of the devices in the group 'Group1' are in 'Copied' state.
All devices in the group 'Group1' are in 'Copied' state.
EMC Solutions Enabler Symmetrix TimeFinder Family CLI Version 7.2 Product Guide228
Performing TimeFinder/Clone Operations
◆ The SRDF symrdf establish command establishes the local R1 BCV with its remote R2 device. The –bcv parameter is required when the source device is an R1 BCV:
symrdf -g Group1 establish -bcv -noprompt
An RDF 'Incremental Establish' operation execution isin progress for device group 'Group1'. Please wait...
Write Disable device(s) on RA at target (R2)............Done.Suspend RDF link(s).....................................Done.Resume RDF link(s)......................................Started.Merge device track tables between source and target.....Started.Devices: 059E-059E in (1369,070)....................... Merged.Merge device track tables between source and target.....Done.Resume RDF link(s)......................................Done.
The RDF 'Incremental Establish' operation successfully initiated fordevice group 'Group1'.
◆ The SRDF symrdf query command shows that the local R1 BCV and its remote R2 device are in process of becoming synchronized:
symrdf -g Group1 -bcv query
Device Group (DG) Name : Group1DG's Type : REGULARDG's Symmetrix ID : 000192601369 (Microcode Version: 5874)Remote Symmetrix ID : 000192601373 (Microcode Version: 5874)RDF (RA) Group Number : 70 (45)
Source (R1) View Target (R2) View MODES-------------------------------- ------------------------ ----- ------------ ST LI STBCV A N ALogical T R1 Inv R2 Inv K T R1 Inv R2 Inv RDF PairDevice Dev E Tracks Tracks S Dev E Tracks Tracks MDAE STATE-------------------------------- -- ------------------------ ----- ------------
M(ode of Operation) : A = Async, S = Sync, E = Semi-sync, C = Adaptive Copy D(omino) : X = Enabled, . = Disabled A(daptive Copy) : D = Disk Mode, W = WP Mode, . = ACp off (Consistency) E(xempt): X = Enabled, . = Disabled, M = Mixed, - = N/A
Example 10: Cloning to a remote BCV from a local BCV 229
Performing TimeFinder/Clone Operations
◆ The SRDF symrdf verify command checks at 30-second intervals to determine when the R1 and R2 are fully Synchronized:
symrdf -g Group1 -bcv verify -i 30
NONE of the mirrored pairs are in the 'Synchronized' state.
All devices in the RDF group 'Group1' are in the 'Synchronized' state.
◆ The symclone establish command clones a copy of the remote R2 device to the remote BCV:
Remote 'Clone Full Establish' operation execution is in progress fordevice group 'Group1'. Please wait...
Remote 'Clone Full Establish' operation successfully executed for device group'Group1'.
◆ The symclone query command shows that the remote clone copy operation from the R1 BCV source is actually being copied from the BCV’s remote R2 device (3BA):
symclone -g Group1 query -bcv -rdf
Device Group (DG) Name: Group1DG's Type : REGULARDG's Symmetrix ID : 000192601369Remote Symmetrix ID : 000192601373
Total -------- -------- -------- Track(s) 9825 0 0
Legend:
(C): X = The background copy setting is active for this pair. . = The background copy setting is not active for this pair.(G): X = The Target device is associated with this group. . = The Target device is not associated with this group.(D): X = The Clone session is a differential copy session. . = The Clone session is not a differential copy session.(P): X = The pre-copy operation has completed one cycle . = The pre-copy operation has not completed one cycle
EMC Solutions Enabler Symmetrix TimeFinder Family CLI Version 7.2 Product Guide230
Performing TimeFinder/Clone Operations
◆ The symclone verify command checks at 30-second intervals (-i 30) to determine when the remote clone pair reaches the Copied state. The ellipsis (…) indicates omitted output:
symclone -g Group1 verify -bcv -rdf -i 30
None of the devices in group 'Group1' are in the 'Copied' state.
All devices in the group 'Group1' are in 'Copied' state.
◆ The symclone terminate command with the –rdf option terminates the remote clone session:
symclone -g Group1 terminate -bcv -rdf -noprompt
Remote 'Terminate' operation execution is in progress for device group 'Group1'. Please wait...
Remote 'Terminate' operation successfully executed for device group'Group1'.
◆ This command terminates the local clone session:
symclone -g Group1 terminate -noprompt
'Terminate' operation execution is in progress for device group 'Group1'. Please wait...
'Terminate' operation successfully executed for device group'Group1'.
◆ The symdg delete command deletes the device group as part of the normal clean-up process when you are finished using a particular device group. The –force option is required when the group is not empty:
symdg delete Group1 -force
Example 10: Cloning to a remote BCV from a local BCV 231
Performing TimeFinder/Clone Operations
Example 11: Cloning in a multihop environmentThis example was performed using Solutions Enabler version 7.0 and a variety of TimeFinder/Mirror, TimeFinder/Clone, and SRDF commands. The hardware setup includes a host connected to a source Symmetrix array (sid 95) that is RDF-connected to a remote Symmetrix array (a.k.a. Hop 1). Hop 1 is RDF-connected to a third Symmetrix array (Hop 2). First, the example copies the data using SRDF to a remote R2 device on Hop 1, and then from that R2 to an R1 BCV there. Next, the example clones a copy from that R1 BCV’s remote R2 device to a BCV on the Hop 2 Symmetrix array.
◆ The symdg create command creates an RDF1 type device group named Rdf1Grp. The symdg add command adds to the device group an R1 standard device (16C0) on the local Symmetrix (sid 95) to be the source device. The first symbcv associate command associates the R1 BCV (15A0) on the Hop 1 array, using the -rdf option to identify the BCV’s location. The second symbcv associate command uses the -rrdf option to associate the Hop 2 BCV (1570) that will hold the clone copy:
symdg create Rdf1Grp -type rdf1symdg -g Rdf1Grp add dev 16c0 -sid 95symbcv -g Rdf1Grp associate dev 15a0 -rdfsymbcv -g Rdf1Grp associate dev 1570 -rrdf
◆ The following symdg show command displays the details of the device group. Both the RBCV (Hop 1) and RRBCV (Hop 2) devices are listed. The RDF Information is also listed both for the standard device (DEV, Hop 1) and the RBCV (Hop 2) device. Ellipsis shows that command output was omitted from this printed display:
symdg show Rdf1Grp
Group Name: Rdf1Grp
Group Type : RDF1 (RDFA) Device Group in GNS : No Valid : Yes Symmetrix ID : 000194900095 Group Creation Time : Mon Sep 21 14:08:38 2009 Vendor ID : EMC Corp Application ID : SYMCLI
Number of STD Devices in Group : 1 Number of Associated GK's : 0 Number of Locally-associated BCV's : 0 Number of Locally-associated VDEV's : 0 Number of Locally-associated TGT's : 0 Number of Remotely-associated VDEV's(STD RDF): 0 Number of Remotely-associated BCV's (STD RDF): 1 Number of Remotely-associated TGT's(TGT RDF) : 0 Number of Remotely-associated BCV's (BCV RDF): 0 Number of Remotely-assoc'd RBCV's (RBCV RDF) : 1 Number of Remotely-assoc'd BCV's (Hop-2 BCV) : 0 Number of Remotely-assoc'd VDEV's(Hop-2 VDEV): 0 Number of Remotely-assoc'd TGT's (Hop-2 TGT) : 0
Standard (STD) Devices (1): {
-------------------------------------------------------------------- Sym Cap LdevName PdevName Dev Att. Sts (MB) --------------------------------------------------------------------
DEV001 N/A 16C0 RW 898
EMC Solutions Enabler Symmetrix TimeFinder Family CLI Version 7.2 Product Guide232
Device Group RDF Information { RDF Type : R1 RDF (RA) Group Number : 188 (BB)
Remote Symmetrix ID : 000194900093. . . }
Device Group RBCV RDF Information { RDF Type : R1 RDF (RA) Group Number : 248 (F7)
Remote Symmetrix ID : 000194900106
. . . }
◆ The symrdf query command shows that the RDF link between the local source array and Hop 1 is functioning normally and that the source R1 device and its remote R2 are synchronized:
symrdf -g Rdf1Grp query
Device Group (DG) Name : Rdf1GrpDG's Type : RDF1DG's Symmetrix ID : 000194900095 (Microcode Version: 5874)Remote Symmetrix ID : 000194900093 (Microcode Version: 5874)RDF (RA) Group Number : 188 (BB)
Source (R1) View Target (R2) View MODES-------------------------------- ------------------------ ----- ------------ ST LI STStandard A N ALogical T R1 Inv R2 Inv K T R1 Inv R2 Inv RDF PairDevice Dev E Tracks Tracks S Dev E Tracks Tracks MDAE STATE-------------------------------- -- ------------------------ ----- ------------
M(ode of Operation) : A = Async, S = Sync, E = Semi-sync, C = Adaptive Copy D(omino) : X = Enabled, . = Disabled A(daptive Copy) : D = Disk Mode, W = WP Mode, . = ACp off (Consistency) E(xempt): X = Enabled, . = Disabled, M = Mixed, - = N/A
◆ The symmir establish command with the -rdf option fully establishes the remote R2 device on Hop 1 with the BCV there:
symmir -g Rdf1Grp establish -full -noprompt -rdf
Remote 'Full Establish' operation execution is in progress fordevice group 'Rdf1Grp'. Please wait...
Remote 'Full Establish' operation successfully initiated for device group'Rdf1Grp'.
◆ The symmir verify command checks at 30-second intervals (-i 30) to determine when the remote BCV pair on Hop 1 reaches the Synchronized state:
symmir -g Rdf1Grp -rdf verify -i 30
None of the devices in group 'Rdf1Grp' are in the 'Synchronized or Restored' state.
All of the devices in group 'Rdf1Grp' are in the 'Synchronized or Restored' state.
◆ The symmir query command confirms that the BCV pair (R2 with the RBCV) on Hop 1 is synchronized:
symmir -g Rdf1Grp query -rdf
Device Group (DG) Name: Rdf1GrpDG's Type : RDF1DG's Symmetrix ID : 000194900095Remote Symmetrix ID : 000194900093
(*): The paired BCV device is associated with this group.
◆ While synchronized as a BCV pair, the R1 BCV on Hop 1 is temporarily suspended from copying data to its SRDF-paired R2 device on Hop 2. To resume mirroring between the two, split the Hop 1 BCV pair and then re-establish the Hop 1 BCV with its remote R2 mirror. The following command performs a consistent split on the Hop 1 BCV pair:
Remote 'Split' operation execution is in progress for
EMC Solutions Enabler Symmetrix TimeFinder Family CLI Version 7.2 Product Guide234
Performing TimeFinder/Clone Operations
device group 'Rdf1Grp'. Please wait...
Remote 'Split' operation successfully executed for device group'Rdf1Grp'.
◆ This symrdf establish command re-establishes the Hop 1 BCV with its remote R2 mirror on the Hop 2 Symmetrix array. The –rbcv option specifies that this operation involves the Hop 1 BCV:
symrdf -g Rdf1Grp establish -rbcv -noprompt
An RDF 'Incremental Establish' operation execution isin progress for device group 'Rdf1Grp'. Please wait...
The RDF 'Incremental Establish' operation successfully initiated fordevice group 'Rdf1Grp'.
◆ The symrdf query command with the -rbcv option shows that R1 BCV on Hop 1 is in the process of synchronizing with its SRDF-paired R2 device on Hop 2:
symrdf -g Rdf1Grp -rbcv query
Device Group (DG) Name : Rdf1GrpDG's Type : RDF1DG's Symmetrix ID : 000194900095 (Microcode Version: 5874)RBCV's Symmetrix ID : 000194900093 (Microcode Version: 5874)Remote Symmetrix ID : 000194900106 (Microcode Version: 5874)RDF (RA) Group Number : 248 (F7) R E M O T E S Y M M E T R I X
Source (R1) View Target (R2) View MODES-------------------------------- ------------------------ ----- ------------ ST LI STBCV A N ALogical T R1 Inv R2 Inv K T R1 Inv R2 Inv RDF PairDevice Dev E Tracks Tracks S Dev E Tracks Tracks MDAE STATE-------------------------------- -- ------------------------ ----- ------------
M(ode of Operation) : A = Async, S = Sync, E = Semi-sync, C = Adaptive Copy D(omino) : X = Enabled, . = Disabled A(daptive Copy) : D = Disk Mode, W = WP Mode, . = ACp off (Consistency) E(xempt): X = Enabled, . = Disabled, M = Mixed, - = N/A
◆ The symrdf verify command checks at 30-second intervals (-i 30) to determine when the Hop 1 BCV and its remote R2 mirror reaches the Synchronized state:
symrdf -g Rdf1Grp -rbcv verify -i 30
None of the devices in the group 'Rdf1Grp' are in 'Synchronized' state.
Example 11: Cloning in a multihop environment 235
Performing TimeFinder/Clone Operations
None of the devices in the group 'Rdf1Grp' are in 'Synchronized' state.
All devices in the group 'Rdf1Grp' are in 'Synchronized' state.
◆ The symrdf suspend command suspends mirroring between the Hop 1 BCV and its remote R2 mirror on Hop 2:
symrdf -g Rdf1Grp -rbcv suspend -noprompt
An RDF 'Suspend' operation execution isin progress for device group 'Rdf1Grp'. Please wait...
The RDF 'Suspend' operation successfully executed fordevice group 'Rdf1Grp'.
◆ Now that the R2 device on Hop 2 holds the data, it is possible to clone that data to a BCV on Hop 2. The symclone establish command clones a copy to the Hop 2 BCV target (RRBCV001). You specify the Hop 1 BCV as the source, and the data is copied from that BCV’s paired R2 device on Hop 2. The -rrbcv option specifies that this operation involves the Hop 2 BCV:
Note: The syntax specifying the logical name of the specific RBCV and RRBCV is only required if a subset of the device groups RBCVs are to be used or if there is a change from a previous incremental pairing. In this case with only a single RBCV associated with the device group, omitting the logical device syntax would have produced the same operational result.
'Clone Full Establish' operation execution is in progress for device 'RBCV001'paired with target device 'RRBCV001' indevice group 'Rdf1Grp'. Please wait...
'Clone Full Establish' operation successfully executed for device 'RBCV001'in group 'Rdf1Grp' paired with target device 'RRBCV001'.
◆ The symclone query command shows the progress of the Hop 2 copy operation:
symclone -g Rdf1Grp -rrbcv query
Device Group (DG) Name: Rdf1GrpDG's Type : RDF1DG's Symmetrix ID : 000194900095Remote Symmetrix ID : 000194900106
(C): X = The background copy setting is active for this pair.
EMC Solutions Enabler Symmetrix TimeFinder Family CLI Version 7.2 Product Guide236
Performing TimeFinder/Clone Operations
. = The background copy setting is not active for this pair.(G): X = The Target device is associated with this group. . = The Target device is not associated with this group.(D): X = The Clone session is a differential copy session. . = The Clone session is not a differential copy session.(P): X = The pre-copy operation has completed one cycle . = The pre-copy operation has not completed one cycle
◆ The symclone verify command checks at 30-second intervals (-i 30) to determine when the Hop 2 clone pair reaches the Copied state:
symclone -g Rdf1Grp -rrbcv verify -i 30
None of the devices in group 'Rdf1Grp' are in the 'Copied' state.
All devices in group 'Rdf1Grp' have a paired TGT device that is in the 'Copied' state.
◆ The symclone terminate command terminates the Hop 2 clone session:
symclone -g Rdf1Grp terminate -rrbcv -noprompt
'Terminate' operation execution is in progress fordevice group 'Rdf1Grp'. Please wait...
'Terminate' operation successfully executed for device group'Rdf1Grp'.
Example 11: Cloning in a multihop environment 237
Performing TimeFinder/Clone Operations
Example 12: Using a clone from a clone targetThis example was performed using Solutions Enabler version 7.0. The hardware setup includes a host connected to a source Symmetrix VMAX array (sid 369). A device group is defined on the host. The device group contains a single standard device a single BCV device and a single clone target device. This example of making a clone copy of a clone target will use a TimeFinder Clone Emulation for the first copy and Native TimeFinder/Clone for the second copy.
◆ The symdg create command creates a regular type device group named Clone2CloneGrp. The symdg add command adds to the device group an standard device (590) on the local Symmetrix (sid 369) to be the source device. The symbcv associate command associates a single BCV device (59A) that will be the target of the first clone operation and the source of the second clone operation. The symdg add command using the -tgt option adds device (592) that will be the target of the second clone operation:
symdg create Clone2CloneGrpsymdg -g Clone2CloneGrp add dev 590 -sid 369symbcv -g Clone2CloneGrp associate dev 59Asymdg -g Clone2CloneGrp add dev 592 -tgt
◆ The symmir establish command appears to create a standard to BCV TimeFinder/Mirror relationship, but actual is creating a TimeFinder/Clone relationship within the Symmetrix VMAX. When the source and target devices of a device group are not specified on the command line, the assumption is that the source is a standard device, and the target is a BCV.
Note: The Symmetrix VMAX array is running Enginuity 5874 which implements all TimeFinder/Mirror operations using TimeFinder clone emulation. On earlier Symmetrix models, the symmir command will automatically use TimeFinder clone emulation for RAID 5 or RAID 6 BCVs, or when the user selects emulation using the environmental variable SYMCLI_CLONE_EMULATION.
EMC Solutions Enabler Symmetrix TimeFinder Family CLI Version 7.2 Product Guide238
Performing TimeFinder/Clone Operations
Track(s) 0 0 MB(s) 0.0 0.0
Legend:
(*): The paired BCV device is associated with this group.
◆ The symmir split command removes the active copying status, so that the target of the copy BCV001 can be used as the source of the next clone copy.
Note: The rules for clone from a clone do not allow for both sessions to be in active copy mode at the same time. Both sessions can be created. Both sessions can be precopy. The first session can be created or copy in progress when second session is precopy or vice versa.
symmir -g Clone2CloneGrp split -noprompt
'Split' operation execution is in progress fordevice group 'Clone2CloneGrp'. Please wait...
'Split' operation successfully executed for device group'Clone2CloneGrp'.
◆ The symmir query command shows that the split operation has completed and the source and target are no longer actively copying. The source and BCV target retain a relationship for keeping track of changes from each other (Inv. Tracks) which would allow them to be incrementally synchronized:
symmir -g Clone2CloneGrp query
Device Group (DG) Name: Clone2CloneGrpDG's Type : REGULARDG's Symmetrix ID : 000192601369
(*): The paired BCV device is associated with this group.
◆ The symclone create command initiates the clone from clone copy relationship using BCV001 as the source and TGT001 as the target. Specifying the -bcv option selects the source device from the device group bcv list, and specifying the -target option selects the target device from the device group target list:
'Create' operation execution is in progress fordevice group 'Clone2CloneGrp'. Please wait...
Example 12: Using a clone from a clone target 239
Performing TimeFinder/Clone Operations
'Create' operation successfully executed for device group'Clone2CloneGrp'.
◆ The symclone query command shows that the clone create operation was successful. The -bcv option must be specified so it displays BCV devices in the device group as the source device. It is unnecessary to specify where the target device is, as that information is known from the source device clone information structure:
symclone -g Clone2CloneGrp query -bcv
Device Group (DG) Name: Clone2CloneGrpDG's Type : REGULARDG's Symmetrix ID : 000192601369
(C): X = The background copy setting is active for this pair. . = The background copy setting is not active for this pair.(G): X = The Target device is associated with this group. . = The Target device is not associated with this group.(D): X = The Clone session is a differential copy session. . = The Clone session is not a differential copy session.(P): X = The pre-copy operation has completed one cycle . = The pre-copy operation has not completed one cycle
◆ The symclone activate command initiates the clone from clone copy using BCV001 as the source and TGT001 as the target. Specifying the -bcv option selects the source device from the device group BCV list, and specifying the -target option selects the target device from the device group target list:
(C): X = The background copy setting is active for this pair. . = The background copy setting is not active for this pair.(G): X = The Target device is associated with this group. . = The Target device is not associated with this group.(D): X = The Clone session is a differential copy session. . = The Clone session is not a differential copy session.(P): X = The pre-copy operation has completed one cycle . = The pre-copy operation has not completed one cycle
◆ The symclone verify command checks at 30-second intervals (-i 30) to determine when the clone pair reaches the Copied state:
symclone -g Clone2CloneGrp verify -bcv -i 30
None of the devices in the group 'Clone2CloneGrp' are in 'Copied' state.
All devices in the group 'Clone2CloneGrp' are in 'Copied' state.
◆ The symclone terminate command with the -bcv -tgt options terminates the clone from clone session:
'Terminate' operation execution is in progress fordevice group 'Clone2CloneGrp'. Please wait...
'Terminate' operation successfully executed for device group'Clone2CloneGrp'.
◆ The symmir cancel command terminates the first emulated clone session:
symmir -g Clone2CloneGrp cancel -noprompt
'Cancel' operation execution is in progress fordevice group 'Clone2CloneGrp'. Please wait...
'Cancel' operation successfully executed for device group'Clone2CloneGrp'.
◆ The symdg delete command deletes the device group as part of the normal clean-up process when you are finished using a particular device group. The –force option is required when the group is not empty:
symdg delete Clone2CloneGrp -force
Example 12: Using a clone from a clone target 241
Performing TimeFinder/Clone Operations
EMC Solutions Enabler Symmetrix TimeFinder Family CLI Version 7.2 Product Guide242
6Invisible Body Tag
This chapter provides examples on creating space-saving, instant point-in-time copies of volume data on multiple target devices from a single source device.
Note: Unless noted otherwise, the operational examples illustrate TimeFinder/Snap functionality with Solutions Enabler version 7.0 and higher. The Symmetrix VMAX arrays are configured with Enginuity 5874 and higher.
◆ Example 1: Snapping to VDEVs and restoring to the original SRC device ........ 244◆ Example 2: Snapping to VDEVs and restoring to a BCV ...................................... 253◆ Example 3: Snapping to VDEVs and restoring to separate STD devices ............ 258◆ Example 4: Using a composite group to control snap pairs.................................. 267
PerformingTimeFinder/Snap
Operations
Performing TimeFinder/Snap Operations 243
Performing TimeFinder/Snap Operations
Example 1: Snapping to VDEVs and restoring to the original SRC deviceThis example was performed using Solutions Enabler version 7.0. The hardware setup consists of a Symmetrix array (sid 369) connected to a Windows 2000 host. The source of the snap is a standard device (07A7). The targets are three virtual devices (02E4, 02E5, and 02E6). At different points in time, each virtual device is paired with the standard device and is the target of snap operation. A device group is used to control these three snap pairs.
After the last snap completes, data is restored to the standard device from one of the virtual devices.
◆ The following symdev list command displays devices on the Symmetrix array that the example can use as the target virtual devices (VDEV). Devices with the SV attribute have been configured as SAVE devices.
To list VDEVs only, use symdev list –vdev. The ellipsis (...) indicates where superfluous output was omitted or truncated:
symdev -sid 369 list -vdev
Symmetrix ID: 000192601369
Device Name Directors Device--------------------------- ------------- ------------------------------------- CapSym Physical SA :P DA :IT Config Attribute Sts (MB)--------------------------- ------------- -------------------------------------
02E4 Not Visible ???:? NA:NA VDEV N/Asst'd NR 103102E5 Not Visible ???:? NA:NA VDEV N/Asst'd NR 103102E6 Not Visible ???:? NA:NA VDEV N/Asst'd NR 103102E7 Not Visible ???:? NA:NA VDEV N/Asst'd NR 1031
◆ The following symdg command creates a device group named 3vdevs. The set command defines the environment variable SYMCLI_DG so that you can omit the device group name in subsequent commands. The first symdg command adds the source standard device 0787 to the device group. The second symdg command adds the three target virtual devices (02E4, 02E5, and 02E6) to the device group:
◆ The following symdg list ld command displays the devices in the device group 3vdevs and shows that the virtual devices do not yet have copy sessions with the standard device (indicated by their status of NotCreated):
symdg list ld
Device Group (DG) Name: 3vdevsDG's Type : REGULARDG's Symmetrix ID : 000192601369
Standard Device Name Directors Device---------------------------------- ------------- ---------------------------- CapLogical Physical Sym SA :P DA :IT Config Att Sts (MB)---------------------------------- ------------- ----------------------------
DEV001 Not Visible 07A7 ???:? 09A:C2 2-Way Mir RW 1031
EMC Solutions Enabler Symmetrix TimeFinder Family CLI Version 7.2 Product Guide244
Performing TimeFinder/Snap Operations
Symmetrix Virtual Devices associated with this dg:
VDEV001 02E4 NR N/A N/A NotCreatedVDEV002 02E5 NR N/A N/A NotCreatedVDEV003 02E6 NR N/A N/A NotCreated
Legend for VDEV devices:
(+): VDEV is paired with a member device.(-): VDEV is paired with a non-member device.
◆ The following symsnap list command indicates that there are no copy sessions running on the Symmetrix array:
symsnap -sid 369 list
DSymmetrix ID: 000192601369
No Snap sessions found
◆ The following symsnap list command with the –savedevs option displays any SAVE devices that have been configured on this Symmetrix array to hold data for virtual devices. This display indicates there has not yet been any virtual device activity that caused tracks of data to be copied to these SAVE devices:
symsnap list -sid 369 -savedevs
Symmetrix ID: 000192601369
S N A P S A V E D E V I C E S--------------------------------------------------------------------- Device SaveDevice Total Used Free FullSym Emulation Pool Name Tracks Tracks Tracks (%)---------------------------------------------------------------------02E8 FBA DEFAULT_POOL 16500 0 16500 002E9 FBA DEFAULT_POOL 16500 0 16500 002EA FBA DEFAULT_POOL 16500 0 16500 002EB FBA DEFAULT_POOL 16500 0 16500 0
Example 1: Snapping to VDEVs and restoring to the original SRC device 245
Performing TimeFinder/Snap Operations
◆ The following symsnap create command creates the snap pair session, sets up a track protection bitmap for each of the paired devices, and places the snap pair in the Created state:
'Create' operation execution is in progress for device 'DEV001' paired with target device 'VDEV001' in device group '3vdevs'. Please wait...
SELECTING the list of Source devices in the group:
Device: 07A7 [SELECTED]
SELECTING Target devices in the group:
Device: 02E4 [SELECTED]
PAIRING of Source and Target devices:
Devices: 07A7(S) - 02E4(T) [PAIRED]
STARTING a Snap 'CREATE' operation.
The Snap 'CREATE' operation SUCCEEDED.
'Create' operation successfully executed for device 'DEV001' in group '3vdevs' paired with target device 'VDEV001'.
◆ The following symsnap activate command places the snap pair in the CopyOnWrite (copy-on-first-write) state and the target virtual device in the Read/Write (RW) state. The actual copying of data is deferred until you modify tracks on either the source or the target:
Total -------- ---------- Track(s) 16500 0 MB(s) 1031.3 0.0
Legend:
(G): X = The Target device is associated with this group, . = The Target device is not associated with this group.(D): X = The Target device has one or more inactive duplicates M = The Target device has one or more inactive duplicates AND maximum inactive duplicates exist for this source device. . = The Target device has no inactive duplicates.
◆ Although not shown, the example now writes some data to the source device.
◆ Another symsnap create command creates a second copy session for DEV001. This time the source device is paired with the target virtual device VDEV002:
'Activate' operation execution is in progress for device 'DEV001' paired with target device 'VDEV002' in device group '3vdevs'. Please wait...
SELECTING the list of Source devices in the group:
Device: 07A7 [SELECTED]
SELECTING Target devices in the group:
Device: 02E5 [SELECTED]
PAIRING of Source and Target devices:
Devices: 07A7(S) - 02E5(T) [PAIRED]
STARTING a Snap 'ACTIVATE' operation.
The Snap 'ACTIVATE' operation SUCCEEDED.
'Activate' operation successfully executed for device 'DEV001' in group '3vdevs' paired with target device 'VDEV002'.
◆ The following symsnap query command with the –multi option displays both copy sessions. Note that the write activity on the source prior to activating this second copy session caused the original data on 0 tracks to be copied to SAVE devices to which VDEV001 now points. However, the amount of data written was too small to cause the Copy column for VDEV001 to rise above 0%:
symsnap query -multi
Device Group (DG) Name: 3vdevsDG's Type : REGULARDG's Symmetrix ID : 000192601369
Total -------- ---------- Track(s) 33000 0 MB(s) 2062.5 0.0
Legend:
(G): X = The Target device is associated with this group, . = The Target device is not associated with this group.(D): X = The Target device has one or more inactive duplicates M = The Target device has one or more inactive duplicates AND maximum inactive duplicates exist for this source device. . = The Target device has no inactive duplicates.
EMC Solutions Enabler Symmetrix TimeFinder Family CLI Version 7.2 Product Guide248
Performing TimeFinder/Snap Operations
◆ Although not shown, the example now writes again to the same tracks on the source device.
Another symsnap create command creates a third copy session for DEV001:
Total -------- ---------- Track(s) 49500 0 MB(s) 3093.8 0.0
Legend:
(G): X = The Target device is associated with this group, . = The Target device is not associated with this group.(D): X = The Target device has one or more inactive duplicates M = The Target device has one or more inactive duplicates AND maximum inactive duplicates exist for this source device. . = The Target device has no inactive duplicates.
◆ Prior to performing a restore operation to the original source device, you should stop all activity on the file system. You can accomplish this task by unmounting the file system.
◆ The following symsnap restore command initiates an incremental restore operation that restores to DEV001 the original track data that was copied to a SAVE device during the DEV001/VDEV002 copy session:
symsnap restore DEV001 vdev ld VDEV003 -noprompt
'Incremental Restore' operation execution is in progress for device 'DEV001' paired with target device 'VDEV003' in device group '3vdevs'. Please wait...
'Incremental Restore' operation successfully initiated for device 'DEV001' in group '3vdevs' paired with target device 'VDEV003'.
EMC Solutions Enabler Symmetrix TimeFinder Family CLI Version 7.2 Product Guide250
Performing TimeFinder/Snap Operations
◆ The following symsnap query command with the -restore operation shows the restore in progress:
symsnap query -restore
Device Group (DG) Name: 3vdevsDG's Type : REGULARDG's Symmetrix ID : 000192601369
Total -------- ---------- Track(s) 49500 0 MB(s) 3093.8 0.0
Legend:
(G): X = The Target device is associated with this group, . = The Target device is not associated with this group.(D): X = The Target device has one or more inactive duplicates M = The Target device has one or more inactive duplicates AND maximum inactive duplicates exist for this source device. . = The Target device has no inactive duplicates.
Example 1: Snapping to VDEVs and restoring to the original SRC device 251
Performing TimeFinder/Snap Operations
◆ Once a restore operation is in progress (or complete), you can import the volume group and mount the file system.
Once the restore operation is complete, you should terminate the restore session. The following command terminates the DEV001/VDEV003 restore session, but does not affect its copy session:
'Terminate' operation execution is in progress for device 'DEV001' paired with target device 'VDEV003' in device group '3vdevs'. Please wait...
SELECTING the list of Source devices in the group:
Device: 07A7 [SELECTED]
SELECTING Target devices in the group:
Device: 02E6 [SELECTED]
PAIRING of Source and Target devices:
Devices: 07A7(S) - 02E6(T) [PAIRED]
STARTING a Snap 'TERMINATE' operation.
The Snap 'TERMINATE' operation SUCCEEDED.
'Terminate' operation successfully executed for device 'DEV001' in group '3vdevs' paired with target device 'VDEV003'.
◆ When a restore operation is initiated, both the virtual device and the original source device (target of the restore) are set to Not Ready. Once the restore operation is underway, the source device is automatically set to Ready again. However, if you need to access the virtual device after the restore completes, you must use the symdg ready command to set it to Ready again. The following command sets VDEV003 to Ready:
symdg ready VDEV003 –noprompt -vdev
The device is already in the requested state
EMC Solutions Enabler Symmetrix TimeFinder Family CLI Version 7.2 Product Guide252
Performing TimeFinder/Snap Operations
Example 2: Snapping to VDEVs and restoring to a BCVThis example continues Example 1 but adds to the device group a BCV device (02E4) that is used as the target of the restore operation. The BCV is established with the source standard device (01B6) and thus has a pairing relationship with the same standard device that is the source for the three target virtual devices (01F0, 01F1, and 01F2). After the snap completes and data is written to the source, original change-track data is restored to the BCV.
◆ The following symsnap query command with the –multi option now displays the three copy sessions. The restore session from Example 1 has been terminated:
symsnap query -multi
Device Group (DG) Name: 3vdevsDG's Type : REGULARDG's Symmetrix ID : 000192601369
Total -------- ---------- Track(s) 49500 0 MB(s) 3093.8 0.0
Legend:
(G): X = The Target device is associated with this group, . = The Target device is not associated with this group.(D): X = The Target device has one or more inactive duplicates M = The Target device has one or more inactive duplicates AND maximum inactive duplicates exist for this source device. . = The Target device has no inactive duplicates.
◆ The following symbcv associate command associates the BCV device (02E4) with the 3vdevs device group:
symbcv associate dev 02E4
◆ The following symmir establish command initiates a full establish operation on the BCV pair (01B6/02B4) in the device group 3vdevs:
symmir establish –full -noprompt
'Full Establish' operation execution is in progress for device group '3vdevs'. Please wait...
'Full Establish' operation successfully initiated for device group '3vdevs'.
Example 2: Snapping to VDEVs and restoring to a BCV 253
Performing TimeFinder/Snap Operations
◆ The following symmir verify command checks the establish operation every five seconds and verifies when the operation is complete. That is, DEV001 has been fully copied to BCV001:
symmir verify DEV001 -i 5
None of the device(s) in the list are in 'Synchronized or Restored' state.
None of the device(s) in the list are in 'Synchronized or Restored' state.
None of the device(s) in the list are in 'Synchronized or Restored' state.
All device(s) in the list are in 'Synchronized or Restored' state.
◆ The following symdg list ld command shows the addition of the BCV to the 3vdevs device group and that the BCV pair is in the Synchronized state:
symdg list ld
Device Group (DG) Name: 3vdevsDG's Type : REGULARDG's Symmetrix ID : 000192601369
Standard Device Name Directors Device---------------------------------- ------------- ---------------------------- CapLogical Physical Sym SA :P DA :IT Config Att Sts (MB)---------------------------------- ------------- ----------------------------
DEV001 Not Visible 01B6 + ???:? 08A:C7 2-Way Mir RW 1031
Legend for STD devices:
(+): Paired with a BCV device that is associated with this dg.(-): Paired with a BCV device that is non-associated with this dg.
(+): VDEV is paired with a member device.(-): VDEV is paired with a non-member device.
◆ The following symmir split command performs an instant split on the BCV pair:
symmir split -instant -noprompt
'Split' operation execution is in progress for device group '3vdevs'. Please wait...
'Split' operation successfully executed for device group '3vdevs'.
◆ The following symmir verify command checks the status of the background split every five seconds until it completes:
symmir verify -split -bg -i 5
All devices in group '3vdevs' have finished splitting in the background.
◆ The following symdg list ld command confirms that the BCV pair is now in the Split state and ready to be restored from the virtual device (VDEV001):
symdg list ld
Device Group (DG) Name: 3vdevsDG's Type : REGULARDG's Symmetrix ID : 000192601369
Standard Device Name Directors Device---------------------------------- ------------- ---------------------------- CapLogical Physical Sym SA :P DA :IT Config Att Sts (MB)---------------------------------- ------------- ----------------------------
DEV001 Not Visible 01B6 + ???:? 08A:C7 2-Way Mir RW 1031
Legend for STD devices:
(+): Paired with a BCV device that is associated with this dg.(-): Paired with a BCV device that is non-associated with this dg.
(+): VDEV is paired with a member device.(-): VDEV is paired with a non-member device.
◆ To continue with our example, the following command must be executed:
symmir cancel -noprompt
'Cancel' operation execution is in progress for device group '3vdevs'. Please wait...
'Cancel' operation successfully executed for device group '3vdevs'.
◆ Prior to performing a restore operation, you should stop all activity on the file system. You can accomplish this task by unmounting the file system.
◆ The following symsnap restore command initiates a full restore operation that restores to BCV001 the original track data that was copied to SAVE devices during the DEV001/VDEV001 copy session:
symsnap restore BCV001 vdev ld VDEV001 -noprompt
'Full Restore' operation execution is in progress for device 'BCV001' paired with target device 'VDEV001' in device group '3vdevs'. Please wait...
'Full Restore' operation successfully initiated for device 'BCV001' in group '3vdevs' paired with target device 'VDEV001'.
EMC Solutions Enabler Symmetrix TimeFinder Family CLI Version 7.2 Product Guide256
Performing TimeFinder/Snap Operations
◆ The following symsnap query command with the –restore option shows that the restore operation is complete (state is Restored):
symsnap query -restore
Device Group (DG) Name: 3vdevsDG's Type : REGULARDG's Symmetrix ID : 000192601369
'Terminate' operation execution is in progress for device 'DEV001' paired with target device 'BCV001' in device group '3vdevs'. Please wait...
SELECTING the list of Source devices in the group:
Device: 01B6 [SELECTED]
SELECTING Target devices in the group:
Device: 02E4 [SELECTED]
PAIRING of Source and Target devices:
Devices: 01B6(S) - 02E4(T) [PAIRED]
STARTING a Snap 'TERMINATE' operation.
The Snap 'TERMINATE' operation SUCCEEDED.
'Terminate' operation successfully executed for device 'DEV001' in group '3vdevs' paired with target device 'BCV001'..
◆ When a restore operation is initiated, both the virtual device and the target device are set to Not Ready. Once the restore operation is underway, the target device is automatically set to Ready again. However, if you need to access the virtual device after the restore completes, you must use the symdg ready command to set it to Ready again. The following command sets VDEV001 to Ready:
symdg ready VDEV001 –noprompt -vdev
The device is already in the requested state.
Example 2: Snapping to VDEVs and restoring to a BCV 257
Performing TimeFinder/Snap Operations
Example 3: Snapping to VDEVs and restoring to separate STD devicesThis example was performed using Solutions Enabler version 7.0. The hardware setup consists of a Symmetrix array (sid 369) connected to a Windows 2000 host. The source of the snap is three standard devices (01B6, 01B7, and 01B8). Two virtual devices are paired with each of the three source devices. The six virtual devices are VDEV devices 01C1through 01C6.
After the snap completes, the example restores data from the virtual devices to separate standard devices (70, 71, and 72).
◆ The following symdev list command displays devices on the Symmetrix array that the example can use as the virtual devices (VDEV). The six chosen are VDEV devices 48 through 4D. Devices with the SV attribute have been configured as SAVE devices. To list VDEVs only, use symdev list –vdev. The ellipsis (...) indicates where superfluous output was omitted or truncated:
symdev -sid 369 list -vdev
Symmetrix ID: 000192601369
Device Name Directors Device--------------------------- ------------- ------------------------------------- CapSym Physical SA :P DA :IT Config Attribute Sts (MB)--------------------------- ------------- -------------------------------------
01C1 Not Visible ???:? NA:NA VDEV N/Asst'd NR 103101C2 Not Visible ???:? NA:NA VDEV N/Asst'd NR 103101C3 Not Visible ???:? NA:NA VDEV N/Asst'd NR 103101C4 Not Visible ???:? NA:NA VDEV N/Asst'd NR 103101C5 Not Visible ???:? NA:NA VDEV N/Asst'd NR 103101C6 Not Visible ???:? NA:NA VDEV N/Asst'd NR 1031
◆ The following symdg create command creates a device group named vgroup:
symdg create vgroup –type regular
◆ The following symdg command adds to the device group standard devices 01B6, 01B7, and 01B8to be sources for the virtual device copies:
symdg –g vgroup -sid 369 addall dev –range 01B6:01B
◆ The following symdg command adds virtual devices 01C1, 01C2, 01C3, 01C4, 01C5, and 01C6 to the device group. Two virtual devices will be paired with each of the three source devices:
symdg –g vgroup -sid 369 addall dev –range 01C1:01C6 -vdev
EMC Solutions Enabler Symmetrix TimeFinder Family CLI Version 7.2 Product Guide258
Performing TimeFinder/Snap Operations
◆ Although not shown, the example creates a table on the new database and inserts 10 rows of data.
The following symsnap create command creates snap pairs from the three source standard devices and the first three virtual devices:
DEV001 01B6 16500 VDEV001 01C1 X. 0 Created 0DEV002 01B7 16500 VDEV002 01C2 X. 0 Created 0DEV003 01B8 16500 VDEV003 01C3 X. 0 Created 0
Total -------- ---------- Track(s) 49500 0 MB(s) 3093.8 0.0
Legend:
(G): X = The Target device is associated with this group, . = The Target device is not associated with this group.
Example 3: Snapping to VDEVs and restoring to separate STD devices 259
Performing TimeFinder/Snap Operations
(D): X = The Target device has one or more inactive duplicates M = The Target device has one or more inactive duplicates AND maximum inactive duplicates exist for this source device. . = The Target device has no inactive duplicates.
◆ The following symsnap activate command places each snap pair in the copy-on-first-write state:
Total -------- ---------- Track(s) 49500 0 MB(s) 3093.8 0.0
Legend:
EMC Solutions Enabler Symmetrix TimeFinder Family CLI Version 7.2 Product Guide260
Performing TimeFinder/Snap Operations
(G): X = The Target device is associated with this group, . = The Target device is not associated with this group.(D): X = The Target device has one or more inactive duplicates M = The Target device has one or more inactive duplicates AND maximum inactive duplicates exist for this source device. . = The Target device has no inactive duplicates.
◆ Although not shown, the example now writes some data to the source, inserting 100k rows of data into the database table.
The following symsnap create command creates a second set of snap pairs, matching the last three virtual devices with the three source standard devices:
'Activate' operation successfully executed for the device list in device group 'vgroup'.
◆ The following symsnap query -multi command shows multiple copy sessions for a source device paired with multiple virtual devices. Note that each source device has current copy sessions with two virtual devices. For example, the source device 6D has copy sessions with virtual devices 48 and 4B. Also, virtual devices from the first group now point to changed tracks that resulted from previous writes to the database:
symsnap –g vgroup query -multi
Device Group (DG) Name: vgroupDG's Type : REGULARDG's Symmetrix ID : 000192601369
Total -------- ---------- Track(s) 99000 0 MB(s) 6187.5 0.0
Legend:
(G): X = The Target device is associated with this group, . = The Target device is not associated with this group.(D): X = The Target device has one or more inactive duplicates M = The Target device has one or more inactive duplicates AND maximum inactive duplicates exist for this source device. . = The Target device has no inactive duplicates.
◆ The following symdg command adds to the device group those standard devices (01F0, 01F1, and 01F2) that will be targets of the restore operation:
symdg –g vgroup addall dev –range 01F0:01F2
EMC Solutions Enabler Symmetrix TimeFinder Family CLI Version 7.2 Product Guide262
Performing TimeFinder/Snap Operations
◆ The following symsnap restore command with the –full option initiates the restore operation to devices 70, 71, and 72 from the first three virtual devices. The targets of the restore receive change-track data pointed to by the virtual devices as well as unchanged track data from the original source devices. That combination results in a full restore:
'Full Restore' operation execution is in progress for the device list in device group 'vgroup'. Please wait...
'Full Restore' operation successfully initiated for the device list in device group 'vgroup'.
◆ The following symsnap query command with the –restore option shows that the restore operation is in progress. The target devices receive change-track data pointed to by the virtual devices as well as unchanged track data from the original source devices. That combination results in a full restore:
symsnap -g vgroup query -restore
Device Group (DG) Name: vgroupDG's Type : REGULARDG's Symmetrix ID : 000192601369
Example 3: Snapping to VDEVs and restoring to separate STD devices 263
Performing TimeFinder/Snap Operations
16500 VDEV003 01C3 X. 0 CopyOnWrite 0
Total -------- ---------- Track(s) 99000 0 MB(s) 6187.5 0.0
Legend:
(G): X = The Target device is associated with this group, . = The Target device is not associated with this group.(D): X = The Target device has one or more inactive duplicates M = The Target device has one or more inactive duplicates AND maximum inactive duplicates exist for this source device. . = The Target device has no inactive duplicates.
EMC Solutions Enabler Symmetrix TimeFinder Family CLI Version 7.2 Product Guide264
Performing TimeFinder/Snap Operations
◆ Before restoring the second set of virtual devices to the same target standard devices, you need to terminate the current restore sessions. The following symsnap terminate command with the –restored option terminates the restore sessions while leaving the copy sessions intact:
Total -------- ---------- Track(s) 99000 0 MB(s) 6187.5 0.0
Legend:
Example 3: Snapping to VDEVs and restoring to separate STD devices 265
Performing TimeFinder/Snap Operations
(G): X = The Target device is associated with this group, . = The Target device is not associated with this group.(D): X = The Target device has one or more inactive duplicates M = The Target device has one or more inactive duplicates AND maximum inactive duplicates exist for this source device. . = The Target device has no inactive duplicates.
◆ The following symsnap restore command with the –full option initiates the restore operation to devices 70, 71, and 72 from the last three virtual devices:
'Full Restore' operation execution is in progress for the device list in device group 'vgroup'. Please wait...
'Full Restore' operation successfully initiated for the device list in device group 'vgroup'.
◆ The following symsnap query command with the –restore option shows that the restore operation is in progress. The target devices receive change-track data pointed to by the virtual devices as well as unchanged track data from the original source devices. That combination results in a full restore:
symsnap -g vgroup query -restore
Device Group (DG) Name: vgroupDG's Type : REGULARDG's Symmetrix ID : 000192601369
◆ Once the restore operation completes, you should terminate the restore sessions as shown earlier. If you need to use the virtual devices again, you need to make them Ready again as described in the previous examples. The following command makes all virtual devices in the device group Ready (RW):
symdg -g vgroup ready -vdev -noprompt
The device is already in the requested state,m
EMC Solutions Enabler Symmetrix TimeFinder Family CLI Version 7.2 Product Guide266
Performing TimeFinder/Snap Operations
Example 4: Using a composite group to control snap pairsThis example was performed using Solutions Enabler version 7.0. The hardware setup includes a host connected to two source Symmetrix arrays (sid 369 and 350). A composite group defined on the host contains a set of snap pairs that spans the two Symmetrix arrays. The devices include standard devices and virtual devices. Snap pairs in the composite group are created, activated, and controlled together as a group.
You can create, activate, and control specific snap pairs within the composite group as well as performing control operations on the entire group as shown here. For example, you can restore or terminate one snap session in the group without restoring or terminating the group’s other sessions. You can also create a composite group of snap pairs and specify a named save pool, provided that the save pool exists on all Symmetrix arrays in the consistency group.)
◆ The following symcg create command creates a Regular type composite group named SNAP:
symcg create SNAP -type regular
◆ The following symcg commands add to the composite group a range of standard devices from each of the two source Symmetrix arrays:
◆ The following symcg commands with the –vdev option add to the composite group a range of virtual devices from each of the two source Symmetrix arrays:
◆ The following symsnap create command creates snap pair sessions, pairing standards and virtual devices from the composite group and placing each snap pair in the Created state:
symsnap -cg SNAP create -noprompt
'Create' operation execution is in progress for composite group 'SNAP'. Please wait...
'Create' operation successfully executed for composite group 'SNAP'.
Example 4: Using a composite group to control snap pairs 267
Performing TimeFinder/Snap Operations
◆ The following symsnap query command displays the snap pairs and that they are in the Created state:
symsnap -cg SNAP query Composite Group Name : SNAPComposite Group Type : REGULARNumber of Symmetrix Units : 1
Symmetrix ID : 000192601369 (Microcode Version: 5874)
Total -------- ---------- Track(s) 132000 0 MB(s) 8250.0 0.0
Legend:
(G): X = The Target device is associated with this group, . = The Target device is not associated with this group.(D): X = The Target device has one or more inactive duplicates M = The Target device has one or more inactive duplicates AND maximum inactive duplicates exist for this source device. . = The Target device has no inactive duplicates.
◆ The following symsnap activate command places each snap pair in the copy-on-first-write state and the target virtual device in the Read/Write (RW) state. As described previously, the actual copying of data is deferred until you modify tracks on either a source device or a target device. Keep in mind that any subsequent symsnap control operations must be performed on the entire composite group:
symsnap -cg SNAP activate -noprompt
'Activate' operation execution is in progress for composite group 'SNAP'. Please wait...
'Activate' operation successfully executed for composite group 'SNAP'.
◆ The following symsnap terminate command ends all snap sessions in the composite group:
symsnap -cg SNAP terminate -noprompt
EMC Solutions Enabler Symmetrix TimeFinder Family CLI Version 7.2 Product Guide268
Performing TimeFinder/Snap Operations
'Terminate' operation execution is in progress for composite group 'SNAP'. Please wait...
'Terminate' operation successfully executed for composite group 'SNAP'.
Example 4: Using a composite group to control snap pairs 269
Performing TimeFinder/Snap Operations
EMC Solutions Enabler Symmetrix TimeFinder Family CLI Version 7.2 Product Guide270
7Invisible Body Tag
This chapter provides examples on using the query and verify operations with TimeFinder/Mirror. These examples were conducted with Solutions Enabler version 7.0 and Enginuity 5874 on a Symmetrix VMAX array.
Note: With the 5874 version of Enginuity, all TimeFinder/Mirror operations are actually implemented using clone emulation. The operations and output would look the same if executed on an earlier Enginuity release executing native TimeFinder/Mirror.
◆ Example 1: Querying a device group....................................................................... 272◆ Example 2: Querying a composite group ................................................................ 277
Querying and Verifyingwith TimeFinder
commands
Querying and Verifying with TimeFinder commands 271
Querying and Verifying with TimeFinder commands
Example 1: Querying a device groupThis example shows BCVs with physical device names, signifying that the BCVs are addressable by the host on which the standards are visible. While using a single host is convenient for demonstration purposes, usually a second host is used for accessing BCVs for business continuance tasks such as backups and testing.
◆ Recall that the symdev list and symbcv list commands examine records inside the Symmetrix array and not information about any specific device group from records stored in the SYMAPI database file. Before creating a device group and adding devices to it, examine standard/BCV information inside the Symmetrix array to determine which devices are ungrouped and free from prior relationships.
Note: The abbreviated output from the symdev list command displays standards and BCVs that do not currently belong to a device group (N/Grp’d or N/Asst’d). The ellipsis (…) indicates where output was omitted.
symdev list -sid 369
Symmetrix ID: 000192601369
Device Name Directors Device--------------------------- ------------- ------------------------------------- CapSym Physical SA :P DA :IT Config Attribute Sts (MB)--------------------------- ------------- -------------------------------------
0050 \\.\PHYSICALDRIVE4 08F:0 09B:D6 2-Way Mir N/Grp'd RW 898. . .0590 \\.\PHYSICALDRIVE8 08F:0 08A:C7 2-Way Mir N/Grp'd RW 10310591 \\.\PHYSICALDRIVE9 08F:0 08B:D7 2-Way Mir N/Grp'd RW 10310592 \\.\PHYSICALDRIVE10 08F:0 09C:D7 2-Way Mir N/Grp'd RW 10310593 \\.\PHYSICALDRIVE11 08F:0 10D:D7 2-Way Mir N/Grp'd RW 10310594 \\.\PHYSICALDRIVE12 08F:0 07A:C2 RDF1+Mir N/Grp'd RW 10310595 \\.\PHYSICALDRIVE13 08F:0 09B:D2 2-Way Mir N/Grp'd RW 10310596 \\.\PHYSICALDRIVE14 08F:0 07C:C2 2-Way Mir N/Grp'd RW 10310597 \\.\PHYSICALDRIVE15 08F:0 09D:D2 2-Way Mir N/Grp'd RW 10310598 Not Visible ***:* 09C:D3 2-Way Mir N/Grp'd RW 11250599 Not Visible ***:* 07A:D3 2-Way Mir N/Grp'd RW 1125059A Not Visible ???:? 10A:C7 2-Way BCV Mir N/Asst'd RW 1031059B Not Visible ???:? 10B:D7 2-Way BCV Mir N/Asst'd RW 1031059C Not Visible ???:? 07C:D7 2-Way BCV Mir N/Asst'd RW 1031059D Not Visible ???:? 08D:D7 2-Way BCV Mir N/Asst'd RW 1031059E Not Visible ???:? 09A:C2 RDF1-BCV+Mir N/Asst'd RW 1031059F Not Visible ???:? 07B:D2 2-Way BCV Mir N/Asst'd RW 103105A0 Not Visible ???:? 09C:C2 2-Way BCV Mir N/Asst'd RW 103105A1 Not Visible ???:? 07D:D2 2-Way BCV Mir N/Asst'd RW 1031. . .07AB Not Visible ???:? NA:NA TDEV N/Grp'd (M) NR 1500007AC Not Visible ???:? NA:NA TDEV N/Grp'd (m) NR -
EMC Solutions Enabler Symmetrix TimeFinder Family CLI Version 7.2 Product Guide272
Querying and Verifying with TimeFinder commands
◆ The symbcv list command, which lists the BCVs on the left and standards on the right, displays that the devices of interest have never been established:
Total -------- -------- Track(s) 0 0 MB(s) 0.0 0.0
Legend for the Attribute of BCV Devices:
(*): Associated with a group.(+): Associated with a group and its paired STD device is a member of same.(-): Associated with a group but its paired STD device is NOT a member of same.
◆ The following commands build a device group using standard device 590 and BCV 59A:
symdg create mirrgrpsymdg -g mirrgrp add dev 590 -sid 369symbcv -g mirrgrp associate dev 59a
◆ The symdg list ld command examines information about the new device group recorded inside the SYMAPI database, symapi_db.bin, which resides on the host. The host’s SYMAPI database is typically located in /var/symapi/db or \Program Files\EMC\SYMAPI\db:
symdg -g mirrgrp list ld
Device Group (DG) Name: mirrgrpDG's Type : REGULARDG's Symmetrix ID : 000192601369
Standard Device Name Directors Device---------------------------------- ------------- ---------------------------- CapLogical Physical Sym SA :P DA :IT Config Att Sts (MB)---------------------------------- ------------- ----------------------------
DEV001 PHYSICALDRIVE4 0590 08F:0 08A:C7 2-Way Mir RW 1031
BCV Devices associated with this dg:
BCV Device Standard Device Status------------------------------------ --------------------------- ------------ Inv. Inv.
(+): BCV is paired with a member STD device.(-): BCV is paired with a non-member STD device.
◆ The following symmir query shows the current status of the devices:
symmir -g mirrgrp query
Cannot proceed because the device does not have any BCV pairing relationship.
Device group ‘mirrgrp’ does not have any standard devices that are BVC paired.
◆ The following is an attempt to incrementally establish the devices in the device group (590 with 59A). This command fails because of the current pairing relationship of standard 590 with BCV 59A:
symmir -g mirrgrp establish -noprompt
'Incremental Establish' operation execution is in progress for device group 'mirrgrp'. Please wait...
Cannot proceed because the device does not have any BCV pairing relationship
◆ The following command performs a full establish:
symmir -g mirrgrp -full establish -noprompt
'Full Establish' operation execution is in progress for device group 'mirrgrp'. Please wait...
'Full Establish' operation successfully initiated for device group'mirrgrp'.
◆ The symmir query command shows that the pairing information in the Symmetrix array has been updated to reflect the new BCV pair. The asterisk (*) beside 059A signifies its association with the group:
symmir -g mirrgrp query
Device Group (DG) Name: mirrgrpDG's Type : REGULARDG's Symmetrix ID : 000192601369
Device Group (DG) Name: mirrgrpDG's Type : REGULARDG's Symmetrix ID : 000192601369
Standard Device Name Directors Device---------------------------------- ------------- ---------------------------- CapLogical Physical Sym SA :P DA :IT Config Att Sts (MB)---------------------------------- ------------- ----------------------------
DEV001 Not Visible 0590 + ???:? 08A:C7 2-Way Mir RW 1031DEV002 Not Visible 0591 ???:? 08B:D7 2-Way Mir RW 1031DEV003 Not Visible 0592 ???:? 09C:D7 2-Way Mir RW 1031DEV004 Not Visible 0593 ???:? 10D:D7 2-Way Mir RW 1031
Legend for STD devices:
(+): Paired with a BCV device that is associated with this dg.(-): Paired with a BCV device that is non-associated with this dg.
(*): The paired BCV device is associated with this group.
EMC Solutions Enabler Symmetrix TimeFinder Family CLI Version 7.2 Product Guide276
Querying and Verifying with TimeFinder commands
Example 2: Querying a composite groupThis example was performed using Solutions Enabler version 7.0. The hardware setup includes a host connected to two source Symmetrix arrays (sid 369 and 273). A composite group defined on the host contains a set of BCV pairs that spans the two Symmetrix arrays. The devices include standard devices and BCV devices. BCV pairs in the composite group are created, activated, and controlled together.
◆ The symcg create command creates a Regular type composite group named mirrcg:
symcg create mirrcg
◆ The following symcg commands add to the composite group a range of standard devices from each of the two source Symmetrix arrays:
◆ The symmir establish command creates optimized standard/BCV pairings among devices within each Symmetrix array and performs a full establish operation on them:
''Full Establish' operation execution is in progress for composite group 'mirrcg'. Please wait...
'Full Establish' operation successfully initiated for composite group 'mirrcg'.
◆ The symmir query command shows synchronization is in progress (SyncInProg) for the BCV pairs. Note that devices 56 and 59 are metadevices (as are their paired BCV devices), and only the metahead device displays:
symmir -cg mirrcg query
Composite Group Name : mirrcgComposite Group Type : REGULARNumber of Symmetrix Units : 2Number of RDF (RA) Groups : 0
CG Symmetrix ID : 000192601369 (Microcode Version: 5874)
Total ------ ------- Track(s) 0 98821 MB(s) 0.0 6176.3
Legend:
(*): The paired BCV device is associated with this composite group.(p): The paired BCV device was restored using the protect option.(a): All mirrors of this BCV were moved to the STD.
◆ The following symmir verify shows that all of the BCV pairs are still synchronizing:
symmir -cg mirrcg verify
None of the devices in the group 'mirrcg' are in 'Synchronized or Restored' state.
◆ By the time this next symmir verify is executed, some, but not all, of the BCV pairs are synchronized:
symmir -cg mirrcg verify -synched
Not All devices in the group 'mirrcg' are in 'Synchronized' state.
◆ By the time this next symmir verify is executed, some, but not all, of the BCV pairs are still synchronizing:
symmir -cg mirrcg verify -syncinprog
Not All devices in the group 'mirrcg' are in 'SyncInProg' state.
◆ Repeating the symmir query, the BCVs have all synchronized on the Symmetrix VMAX array 369, but are still synchronizing on the Symmetrix DMX array 237:
symmir -cg mirrcg query
Composite Group Name : mirrcgComposite Group Type : REGULARNumber of Symmetrix Units : 2Number of RDF (RA) Groups : 0
CG Symmetrix ID : 000192601369 (Microcode Version: 5874)
Total ------ ------- Track(s) 0 32170 MB(s) 0.0 2010.6
Legend:
(*): The paired BCV device is associated with this composite group.(p): The paired BCV device was restored using the protect option.(a): All mirrors of this BCV were moved to the STD.
◆ Just as with a device group, the symmir verify can be used with an interval, but no specified count value to wait for the desired state to be reached. In this case, the synchronized state is waited for:
symmir -cg mirrcg verify -i 30
Not all of the devices in the group 'mirrcg' are in 'Synchronized or Restored' state.
All devices in the group 'mirrcg' are in 'Synchronized or Restored' state.
◆ Repeating the symmir query, now shows all BCVs have synchronized on both Symmetrix arrays.
symmir -cg mirrcg query
Composite Group Name : mirrcgComposite Group Type : REGULARNumber of Symmetrix Units : 2Number of RDF (RA) Groups : 0
CG Symmetrix ID : 000192601369 (Microcode Version: 5874)
(*): The paired BCV device is associated with this composite group.(p): The paired BCV device was restored using the protect option.(a): All mirrors of this BCV were moved to the STD.
◆ The symmir split command follows:
symmir -cg mirrcg split -noprompt
'Split' operation execution is in progress for composite group 'mirrcg'. Please wait...
'Split' operation successfully executed for composite group 'mirrcg'.
◆ A symmir query command checks the status of the split operation:
symmir -cg mirrcg query
Composite Group Name : mirrcgComposite Group Type : REGULARNumber of Symmetrix Units : 2Number of RDF (RA) Groups : 0
CG Symmetrix ID : 000192601369 (Microcode Version: 5874)
(*): The paired BCV device is associated with this composite group.(p): The paired BCV device was restored using the protect option.(a): All mirrors of this BCV were moved to the STD.
EMC Solutions Enabler Symmetrix TimeFinder Family CLI Version 7.2 Product Guide280
Querying and Verifying with TimeFinder commands
◆ As previously mentioned, the Symmetrix VMAX array 369 running Enginuity 5874 always uses TimeFinder clone emulation to implement the symmir actions. In this case using a CG, the Symmetrix DMX array 273 by default uses native TimeFinder/Mirror operations for symmir (except for RAID 5 or RAID 6 devices, or if the SYMCLI_CLONE_EMULATION environmental variable is set).
Notice that in all of the above examples there was no differences between the display for the symmir actions executed natively or with clone emulation. The only place to see a difference when using clone emulation is to look at the detailed display of a device showing the BCV Pair Information. The BCV State Flags value displays (Emulation) when clone emulation is in use:
symdev show 590 -sid 369
Device Physical Name : Not Visible
Device Symmetrix Name : 0590 Device Serial ID : N/A Symmetrix ID : 000192601369
Composite Group Name : mirrcg CG Device Logical Name : DEV001. . . Vendor ID : EMC Product ID : SYMMETRIX Product Revision : 5874. . . BCV Pair Information { Standard (STD) Device Symmetrix Name : 0590 Standard (STD) Device Serial ID : Not Visible Standard (STD) Device Group Name : Not/Grouped Standard (STD) Composite Group Name : mirrcg
BCV Device Symmetrix Name : 059B BCV Device Serial ID : Not Visible BCV Device Associated Group Name : Not/Associated BCV Device Associated CG Name : mirrcg
BCV Device Status : Ready (RW)
State of Pair ( STD <=\=> BCV ) : Split Time of Last BCV Action : Tue Sep 01 12:36:29 2009
State of BCV Mirrors : Synchronized
BCV State Flags : (AllReady)(Emulation) Percent Split : 100%
Number of Inv. Tracks for STD Device : 0 Number of Inv. Tracks for BCV Device : 0 }
Example 2: Querying a composite group 281
Querying and Verifying with TimeFinder commands
◆ The symdev show command displays the status of the standard device 247:
symdev show 247 -sid 237
Device Physical Name : Not Visible
Device Symmetrix Name : 0247 Device Serial ID : N/A Symmetrix ID : 000190104237
Composite Group Name : mirrcg CG Device Logical Name : DEV005. . . Vendor ID : EMC Product ID : SYMMETRIX Product Revision : 5773. . . BCV Pair Information { Standard (STD) Device Symmetrix Name : 0247 Standard (STD) Device Serial ID : Not Visible Standard (STD) Device Group Name : Not/Grouped Standard (STD) Composite Group Name : mirrcg
BCV Device Symmetrix Name : 024F BCV Device Serial ID : Not Visible BCV Device Associated Group Name : Not/Associated BCV Device Associated CG Name : mirrcg
BCV Device Status : Ready (RW)
State of Pair ( STD <=\=> BCV ) : Split Time of Last BCV Action : Tue Sep 01 12:36:29 2009
State of BCV Mirrors : Synchronized
BCV State Flags : (AllReady) Percent Split : 100%
Number of Inv. Tracks for STD Device : 0 Number of Inv. Tracks for BCV Device : 0 }
EMC Solutions Enabler Symmetrix TimeFinder Family CLI Version 7.2 Product Guide282
8Invisible Body Tag
This chapter provides examples on setting up multiple and concurrent BCVs in the TimeFinder/Mirror environment. It focuses on pairing one standard device sequentially with multiple BCVs and pairing one standard device simultaneously with two BCVs. The examples were conducted with Solutions Enabler 7.0 and Enginuity 5874 on a Symmetrix VMAX array.
Note: With the 5874 version of Enginuity, all TimeFinder/Mirror operations are actually implemented using clone emulation. The operations and output would look the same if executed on an earlier Enginuity release executing native TimeFinder/Mirror.
◆ Example 1: Pairing one standard sequentially with multiple BCVs.................... 284◆ Example 2: Concurrent BCVs .................................................................................... 299
Setting UpTimeFinder/Mirror
Multiple andConcurrent BCVs
Setting Up TimeFinder/Mirror Multiple and Concurrent BCVs 283
Setting Up TimeFinder/Mirror Multiple and Concurrent BCVs
Example 1: Pairing one standard sequentially with multiple BCVsThe examples show BCVs with physical device names, signifying that the BCVs are addressable by the host on which the standards are visible. While using a single host is convenient for demonstration purposes, usually a second host is used for accessing BCVs for business continuance tasks.
All splits are instant splits. Including the –instant option on the symmir split command line causes SYMCLI to return immediately after the foreground split. Omitting the –instant option causes SYMCLI to wait until the background split completes before returning.
Note: Another way to make SYMCLI wait for the background split to complete is to set the SYMAPI_WAIT_FOR_BG_SPLIT variable in the options file located in the SYMAPI configuration directory. Setting this variable to TRUE causes the wait regardless of whether the symmir split command includes the –instant option.
◆ Creating a device group and adding devices to it are prerequisites for establishing BCV pairs. The following command creates the device group multgrp:
symdg create multgrp
◆ The environment variables are set as shown. Setting DG prevents you from having to type -g multgrp in symdg and symmir commands. Setting SID identifies the Symmetrix device number for commands such as symdg and symbcv that may require it. Setting NOPROMPT disables prompting for control commands. Setting LDEV_NAMING assigns physical device numbers as logical names as opposed to DEV or BCV type names:
Note: The set commands used here to set environmental variables are host specific (these were used on a Windows host). In UNIX, the commands used would depend on which command shell was in use.
◆ The following SYMCLI command displays currently defined environment variables:
symcli –def
Symmetrix Command Line Interface (SYMCLI) Version V7.0.0.0 (Edit Level: 915)built with SYMAPI Version V7.0.0.0 (Edit Level: 915)
Current settings of the SYMCLI environmental variables:
EMC Solutions Enabler Symmetrix TimeFinder Family CLI Version 7.2 Product Guide284
Setting Up TimeFinder/Mirror Multiple and Concurrent BCVs
◆ The following symdg command adds standard device 590 to the device group. With the current environment variable settings, there is no need to include -g multgrp -sid 369 in the command:
symdg add dev 590
◆ The following command adds all ungrouped BCVs in the range 59A to 5A1 to the device group. When using the symbcv command as shown here to add multiple BCVs to a device group, you can substitute the syntax addall for associateall. When adding a single BCV, you can substitute the syntax add for associate:
symbcv associateall -devs 59a:5a1symbcv associate dev 5a4
◆ The symdg show command displays devices in the group. If the LDEV_NAMING environment variable is not set, or if the devices are invisible to the host, the names default to DEV001 for the standard device and BCV001, BCV002, and so forth for the BCVs.
Note: In this example, the logical device names match the Symmetrix device names.
symdg show multgrp
Group Name: multgrp
Group Type : REGULAR Device Group in GNS : No Valid : Yes Symmetrix ID : 000192601369 Group Creation Time : Wed Sep 02 15:22:06 2009 Vendor ID : EMC Corp Application ID : SYMCLI
Number of STD Devices in Group : 1 Number of Associated GK's : 0 Number of Locally-associated BCV's : 9 Number of Locally-associated VDEV's : 0 Number of Locally-associated TGT's : 0 Number of Remotely-associated VDEV's(STD RDF): 0 Number of Remotely-associated BCV's (STD RDF): 0 Number of Remotely-associated TGT's(TGT RDF) : 0 Number of Remotely-associated BCV's (BCV RDF): 0 Number of Remotely-assoc'd RBCV's (RBCV RDF) : 0 Number of Remotely-assoc'd BCV's (Hop-2 BCV) : 0 Number of Remotely-assoc'd VDEV's(Hop-2 VDEV): 0 Number of Remotely-assoc'd TGT's (Hop-2 TGT) : 0
Standard (STD) Devices (1): { -------------------------------------------------------------------- Sym Cap LdevName PdevName Dev Att. Sts (MB) -------------------------------------------------------------------- DEV590 \\.\PHYSICALDRIVE8 0590 RW 1031 }
BCV Devices Locally-associated (9): { -------------------------------------------------------------------- Sym Cap LdevName PdevName Dev Att. Sts (MB) -------------------------------------------------------------------- BCV59A \\.\PHYSICALDRIVE9 059A NR 1031 BCV59B \\.\PHYSICALDRIVE10 059B NR 1031
Example 1: Pairing one standard sequentially with multiple BCVs 285
Setting Up TimeFinder/Mirror Multiple and Concurrent BCVs
◆ The following command establishes the standard device with BCV 59A as the first pairing in a multi-BCV setup:
symmir -full establish DEV590 BCV ld BCV59A
'Full Establish' operation execution is in progress for device 'DEV590'paired with BCV device 'BCV59A' in device group 'multgrp'. Please wait...
'Full Establish' operation successfully initiated for device 'DEV590'in group 'multgrp' paired with BCV device 'BCV59A'.
◆ The symmir query commands display the progress of the synchronization. Another way to monitor progress is to use the verify action, shown later in this chapter. The ellipsis (...) indicates where output was omitted.
symmir query
Device Group (DG) Name: multgrpDG's Type : REGULARDG's Symmetrix ID : 000192601369
EMC Solutions Enabler Symmetrix TimeFinder Family CLI Version 7.2 Product Guide286
Setting Up TimeFinder/Mirror Multiple and Concurrent BCVs
Track(s) 0 0 MB(s) 0.0 0.0
Legend:
(*): The paired BCV device is associated with this group.
◆ The symmir split command performs an instant split on the BCV pair but waits for the background split to complete before returning to the caller. The symmir establish commands that follow will pair the standard device with seven more BCVs in succession. Before attempting a split operation, wait for the establish operation to complete:
symmir split
Split' operation execution is in progress for device group 'multgrp'. Please wait...
'Split' operation successfully executed for device group 'multgrp'.
symmir -full establish DEV590 BCV ld BCV59B
'Full Establish' operation execution is in progress for device 'DEV590'paired with BCV device 'BCV59B' in device group 'multgrp'. Please wait...
'Full Establish' operation successfully initiated for device 'DEV590'in group 'multgrp' paired with BCV device 'BCV59B'.
symmir verify -i 30
None of the devices in the group 'multgrp' are in 'Synchronized or Restored' state.
All devices in the group 'multgrp' are in 'Synchronized or Restored' state.
symmir split
'Split' operation execution is in progress for device group 'multgrp'. Please wait...
'Split' operation successfully executed for device group 'multgrp'.
◆ The following interactive UNIX c-shell script establishes the standard device with each of six BCVs in succession, starting with BCV 8A. The symmir verify command runs in a loop, checking the status of the BCV pair at 30-second intervals. Upon completion of synchronization, the pair is split and the next BCV is established with the standard:
(*): The paired BCV device is associated with this group.
◆ Because the default setting for MAX_BCV_PAIRS is 8 and BCV_PAIR_POLICY defaults to CANCEL_OLDEST, establishing a ninth BCV will cause the oldest BCV (59A) to lose its incremental relationship with standard device 590 and drop off the bottom of the list:
symmir -full establish DEV590 BCV ld BCV5A4
''Full Establish' operation execution is in progress for device 'DEV590'paired with BCV device 'BCV5A4' in device group 'multgrp'. Please wait...
'Full Establish' operation successfully initiated for device 'DEV590'in group 'multgrp' paired with BCV device 'BCV5A4'.
◆ The symmir query command shows that BCV 5A4 was added to the head of the list:
symmir query -multi
Device Group (DG) Name: multgrpDG's Type : REGULARDG's Symmetrix ID : 000192601369
Total ------ ------- Track(s) 0 12502 MB(s) 0.0 781.4
Legend:
(*): The paired BCV device is associated with this group.
◆ BCV 59A is now in the NeverEstab(lished) state as the symdg list ld command below shows. In earlier versions of Enginuity, and using native TimeFinder/Mirror, you may instead see the SplitNoInc state:
symdg list ld
Device Group (DG) Name: multgrpDG's Type : REGULARDG's Symmetrix ID : 000192601369
Standard Device Name Directors Device---------------------------------- ------------- ---------------------------- CapLogical Physical Sym SA :P DA :IT Config Att Sts (MB)---------------------------------- ------------- ----------------------------
DEV590 Not Visible 0590 + ???:? 08A:C7 2-Way Mir RW 1031
Legend for STD devices:
(+): Paired with a BCV device that is associated with this dg.(-): Paired with a BCV device that is non-associated with this dg.
Total -------- -------- Track(s) 0 0 MB(s) 0.0 0.0
Example 1: Pairing one standard sequentially with multiple BCVs 289
Setting Up TimeFinder/Mirror Multiple and Concurrent BCVs
Legend for BCV devices:
(+): BCV is paired with a member STD device.(-): BCV is paired with a non-member STD device.
◆ When BCV 59A was previously canceled, all record of track changes for this BCV was destroyed. To establish this BCV again requires a full establish operation. As our example shows, an incremental establish operation here would fail:
symmir establish DEV590 BCV ld BCV59A
'Incremental Establish' operation execution is in progress for device 'DEV590'paired with BCV device 'BCV59A' in device group 'multgrp'. Please wait...
The standard device and the BCV device do not form a BCV pair.
◆ A full establish is then performed:
symmir -full establish DEV590 BCV ld BCV59A
'Full Establish' operation execution is in progress for device 'DEV590'paired with BCV device 'BCV59A' in device group 'multgrp'. Please wait...
'Full Establish' operation successfully initiated for device 'DEV590'in group 'multgrp' paired with BCV device 'BCV59A'.
◆ A symmir query command shows device 59A is synchronized:
symmir query -multi
Device Group (DG) Name: multgrpDG's Type : REGULARDG's Symmetrix ID : 000192601369
(*): The paired BCV device is associated with this group.
EMC Solutions Enabler Symmetrix TimeFinder Family CLI Version 7.2 Product Guide290
Setting Up TimeFinder/Mirror Multiple and Concurrent BCVs
◆ The symdg list command shows the most recent BCV (5A4) in the NeverEstab state:
symdg list ld
Device Group (DG) Name: multgrpDG's Type : REGULARDG's Symmetrix ID : 000192601369
Standard Device Name Directors Device---------------------------------- ------------- ---------------------------- CapLogical Physical Sym SA :P DA :IT Config Att Sts (MB)---------------------------------- ------------- ----------------------------
DEV590 Not Visible 0590 - ???:? 08A:C7 2-Way Mir RW 1031
Legend for STD devices:
(+): Paired with a BCV device that is associated with this dg.(-): Paired with a BCV device that is non-associated with this dg.
Total -------- -------- Track(s) 0 0 MB(s) 0.0 0.0
Legend for BCV devices:
(+): BCV is paired with a member STD device.(-): BCV is paired with a non-member STD device.
Example 1: Pairing one standard sequentially with multiple BCVs 291
Setting Up TimeFinder/Mirror Multiple and Concurrent BCVs
◆ The symmir split command performs an instant split on the synchronized BCV pair but waits for the background split to complete before returning to the caller:
symmir split
'Split' operation execution is in progress for device group 'multgrp'. Please wait...
'Split' operation successfully executed for device group 'multgrp'.
◆ The SYMCLI_BCV_PAIR_POLICY environment variable is set to DONT_CANCEL:
set SYMCLI_BCV_PAIR_POLICY=DONT_CANCELsymcli -def
Symmetrix Command Line Interface (SYMCLI) Version V7.0.0.0 (Edit Level: 915)built with SYMAPI Version V7.0.0.0 (Edit Level: 915)
Current settings of the SYMCLI environmental variables:
'Full Establish' operation execution is in progress for device 'DEV590'paired with BCV device 'BCV5A4' in device group 'multgrp'. Please wait...
The maximum number of allowed Symmetrix SDDF sessions per device has been exceeded.
◆ This time the establish operation fails because the policy is DONT_CANCEL. BCV 90 remains in the SplitNoInc state. To explicitly cancel a BCV pair relationship, use the symmir cancel command. The BCV pair must be in the Split state for the cancel operation to work. BCV 59A is in the Split state:
symmir cancel DEV590 BCV ld BCV59B
'Cancel' operation execution is in progress for device 'DEV590'paired with BCV device 'BCV59B' in device group 'multgrp'. Please wait...
'Cancel' operation successfully executed for device 'DEV590'in group 'multgrp' paired with BCV device 'BCV59B'.
◆ BCV 5A4 is now in the NeverEstab state, as the symdg list ld command displays:
symdg list ld
Device Group (DG) Name: multgrpDG's Type : REGULARDG's Symmetrix ID : 000192601369
Standard Device Name Directors Device---------------------------------- ------------- ---------------------------- CapLogical Physical Sym SA :P DA :IT Config Att Sts (MB)---------------------------------- ------------- ----------------------------
DEV590 Not Visible 0590 - ???:? 08A:C7 2-Way Mir RW 1031
EMC Solutions Enabler Symmetrix TimeFinder Family CLI Version 7.2 Product Guide292
Setting Up TimeFinder/Mirror Multiple and Concurrent BCVs
Legend for STD devices:
(+): Paired with a BCV device that is associated with this dg.(-): Paired with a BCV device that is non-associated with this dg.BCV Devices associated with this dg:
(*): The paired BCV device is associated with this group.
◆ The symmir establish command pairs the most recently established BCV (5A4) with the standard device if no prior pairing preferences were set up using the attach action. The –v option provides a more detailed output:
symmir establish -v
'Incremental Establish' operation execution is in progress for device group 'multgrp'. Please wait...
EMC Solutions Enabler Symmetrix TimeFinder Family CLI Version 7.2 Product Guide294
Setting Up TimeFinder/Mirror Multiple and Concurrent BCVs
Example 1: Pairing one standard sequentially with multiple BCVs 295
Setting Up TimeFinder/Mirror Multiple and Concurrent BCVs
(*): The paired BCV device is associated with this group.
◆ A split operation is performed:
symmir split
'Split' operation execution is in progress for device group 'multgrp'. Please wait...
'Split' operation successfully executed for device group 'multgrp'.
EMC Solutions Enabler Symmetrix TimeFinder Family CLI Version 7.2 Product Guide296
Setting Up TimeFinder/Mirror Multiple and Concurrent BCVs
◆ Using the symmir attach command sets up a preferred pairing relationship between the standard device and BCV 59D. The subsequent symmir query command with the –attach option displays the attachment and also that standard device 590 has a current pairing relationship (Split state) with BCV 59A:
symmir attach DEV590 BCV ld BCV59D
'Attach' operation successfully executed for device 'DEV590'in group 'multgrp' paired with BCV device 'BCV59D'.
symmir query -attach
Device Group (DG) Name: multgrpDG's Type : REGULARDG's Symmetrix ID : 000192601369
(*): The paired BCV device is associated with this group.
◆ The symmir query –attach command displays a format showing that BCV 59D is the attached BCV and that BCV 59D is the device now having the current pairing relationship (Synchronized state) with standard device 590:
symmir query -attach
Device Group (DG) Name: multgrpDG's Type : REGULARDG's Symmetrix ID : 000192601369
(*): The BCV device is associated with this group.
EMC Solutions Enabler Symmetrix TimeFinder Family CLI Version 7.2 Product Guide298
Setting Up TimeFinder/Mirror Multiple and Concurrent BCVs
Example 2: Concurrent BCVsThe following commands that illustrate concurrent BCVs were issued in a separate SYMCLI session on a different host and Symmetrix array than the host/Symmetrix array used in Example 1. Therefore, the environment variables defined in Example 1 are no longer valid for the new environment.
The following symdg command creates a new device group called conbcv. The symdg commands add two standard devices to the group. The symbcv command associates four BCV devices with the group:
◆ The symdg show command displays the group’s devices and their assigned logical names:
symdg show conbcv
Group Name: conbcv
Group Type : REGULAR Device Group in GNS : No Valid : Yes Symmetrix ID : 000192601369 Group Creation Time : Wed Sep 02 20:37:17 2009 Vendor ID : EMC Corp Application ID : SYMCLI
Number of STD Devices in Group : 2 Number of Associated GK's : 0 Number of Locally-associated BCV's : 4 Number of Locally-associated VDEV's : 0 Number of Locally-associated TGT's : 0 Number of Remotely-associated VDEV's(STD RDF): 0 Number of Remotely-associated BCV's (STD RDF): 0 Number of Remotely-associated TGT's(TGT RDF) : 0 Number of Remotely-associated BCV's (BCV RDF): 0 Number of Remotely-assoc'd RBCV's (RBCV RDF) : 0 Number of Remotely-assoc'd BCV's (Hop-2 BCV) : 0 Number of Remotely-assoc'd VDEV's(Hop-2 VDEV): 0 Number of Remotely-assoc'd TGT's (Hop-2 TGT) : 0
Standard (STD) Devices (2): { -------------------------------------------------------------------- Sym Cap LdevName PdevName Dev Att. Sts (MB) -------------------------------------------------------------------- DEV001 \\.\PHYSICALDRIVE9 0590 RW 1031 DEV002 \\.\PHYSICALDRIVE10 0591 RW 1031
‘Attach' operation successfully executed for device 'DEV002' in group 'conbcv' paired with BCV device 'BCV003'.
◆ The following symmir establish command creates concurrent BCV pairs. BCV001 and BCV002 are matched with standard DEV001, while BCV003 and BCV004 are matched with DEV002:
◆ The symmir split command performs an instant split operation on all BCV pairs in the device group. Using the –instant option causes SYMCLI to return immediately after the foreground split, while the background split is still in progress:
symmir -g conbcv split -noprompt
'Split' operation execution is in progress for device group 'conbcv'. Please wait...
'Split' operation successfully executed for device group 'conbcv'.
◆ The symmir query command displays the concurrent BCVs:
symmir -g conbcv query -multi
Device Group (DG) Name: conbcvDG's Type : REGULARDG's Symmetrix ID : 000192601369
The BCV 'INCREMENTAL_ESTABLISH' operation SUCCEEDED.
'Incremental Establish' operation successfully initiated for device group'conbcv'.
◆ The following query displays the status of the concurrent BCVs and that the attached pairs have been re-established (their state is Synchronized). Those BCVs that were not participants in the previous establish operation are still Split:
symmir -g conbcv query -multi
Device Group (DG) Name: conbcvDG's Type : REGULARDG's Symmetrix ID : 000192601369
(*): The paired BCV device is associated with this group.
Example 2: Concurrent BCVs 303
Setting Up TimeFinder/Mirror Multiple and Concurrent BCVs
EMC Solutions Enabler Symmetrix TimeFinder Family CLI Version 7.2 Product Guide304
9Invisible Body Tag
This chapter provides examples on creating and splitting a BCV pair, retrieving original BCV data from a fixed BCV mirror, and performing a BCV action while making the BCV or the standard device temporarily inaccessible to the host.
These examples were conducted with Solutions Enabler 7.0 and Enginuity 5874 on a Symmetrix VMAX. With the 5874 version of Enginuity, all TimeFinder/Mirror operations are actually implemented using Clone Emulation. The operations and output would look the same if executed on an earlier Enginuity release executing native TimeFinder/Mirror.
◆ Example 1: Split operations ....................................................................................... 306◆ Example 2: Using the split -not_ready command .................................................. 309◆ Example 3: Protected Restore .................................................................................... 314
PerformingTimeFinder/Mirror
Control Operations
Performing TimeFinder/Mirror Control Operations 305
Performing TimeFinder/Mirror Control Operations
Example 1: Split operationsCreating a device group and adding devices to it are prerequisites for establishing BCV pairs. The symdg command creates a device group (mirrgrp). The symdg commands add standard devices to the group, using a device’s Symmetrix device (dev) name. The symbcv command associates one or all BCVs with the device group; the -range option can be used with the associateall action to limit the selection to the BCVs that are within the specified range:
Group Type : REGULAR Device Group in GNS : No Valid : Yes Symmetrix ID : 000192601369 Group Creation Time : Tue Sep 08 10:40:11 2009 Vendor ID : EMC Corp Application ID : SYMCLI
Number of STD Devices in Group : 4 Number of Associated GK's : 0 Number of Locally-associated BCV's : 4 Number of Locally-associated VDEV's : 0 Number of Locally-associated TGT's : 0 Number of Remotely-associated VDEV's(STD RDF): 0 Number of Remotely-associated BCV's (STD RDF): 0 Number of Remotely-associated TGT's(TGT RDF) : 0 Number of Remotely-associated BCV's (BCV RDF): 0 Number of Remotely-assoc'd RBCV's (RBCV RDF) : 0 Number of Remotely-assoc'd BCV's (Hop-2 BCV) : 0 Number of Remotely-assoc'd VDEV's(Hop-2 VDEV): 0 Number of Remotely-assoc'd TGT's (Hop-2 TGT) : 0
Standard (STD) Devices (4): { -------------------------------------------------------------------- Sym Cap LdevName PdevName Dev Att. Sts (MB) -------------------------------------------------------------------- DEV001 \\.\PHYSICALDRIVE10 0590 RW 1031 DEV002 \\.\PHYSICALDRIVE11 0591 RW 1031 DEV003 \\.\PHYSICALDRIVE12 0592 RW 1031
DEV004 \\.\PHYSICALDRIVE13 0593 RW 1031 }
BCV Devices Locally-associated (4): { -------------------------------------------------------------------- Sym Cap LdevName PdevName Dev Att. Sts (MB) -------------------------------------------------------------------- BCV001 N/A 059A NR 1031 BCV002 N/A 059B NR 1031 BCV003 N/A 059C NR 1031 BCV004 N/A 059D NR 1031}
EMC Solutions Enabler Symmetrix TimeFinder Family CLI Version 7.2 Product Guide306
Performing TimeFinder/Mirror Control Operations
◆ The symmir establish command matches BCV pairs using the –exact option:
'Full Establish' operation successfully initiated for device group'mirrgrp'.
◆ The symmir verify command verifies when the BCV pairs reach the Synchronized state. A new message is displayed every 30 seconds until the pair is established. Then the verify loop ends automatically. The time to reach the Synchronized or Restored state varies with the number of devices being established and the amount of data being copied to each BCV:
symmir -g mirrgrp verify -i 30
None of the devices in the group 'mirrgrp' are in 'Synchronized or Restored' state.
Not All devices in the group 'mirrgrp' are in 'Synchronized or Restored' state.
All devices in the group 'mirrgrp' are in 'Synchronized or Restored' state.
◆ The following command performs an instant split on BCV pairs in a device group mirrgrp while the group is being subjected to a high write load (70 percent write, 30 percent read). In UNIX, the timex command measures the time it takes to execute a command. The real time is the elapsed time. The foreground split completed in 0.90 seconds:
timex symmir -g mirrgrp split -noprompt
'Split' operation execution is in progress fordevice group 'mirrgrp'. Please wait...
'Split' operation successfully executed for device group'mirrgrp'.
real 0.90user 0.22sys 0.05
Example 1: Split operations 307
Performing TimeFinder/Mirror Control Operations
◆ The following symmir query command uses the -g option to display the status of the device group:
symmir -g mirrgrp query
Device Group (DG) Name: mirrgrpDG's Type : REGULARDG's Symmetrix ID : 000192601369
(*): The paired BCV device is associated with this group.
EMC Solutions Enabler Symmetrix TimeFinder Family CLI Version 7.2 Product Guide308
Performing TimeFinder/Mirror Control Operations
Example 2: Using the split -not_ready commandMany host operating systems do not behave consistently if presented with the same volume in two different places. If both the standard source and BCV target of a TimeFinder pair are visible to the same host after a split operation, problems associated with duplicate devices can arise. Often this is addressed by only making the BCV visible to different hosts. Solutions Enabler provides mechanisms to ensure that the disk label or signature of host-visible TimeFinder source and target devices remain distinct.
◆ The next operation adds target BCV 59A last paired with source device 590 to storage group myhostSG. This storage group is already in a view for this host, so the BCV becomes host visible:
◆ Host operating system commands are used to rescan the bus to locate the newly visible disk, and a disk signature is written to the BCV. The symcfg discover operation then scans the bus and sees the newly visible BCV as well, as shown by the sympd list command:
symcfg discover
This operation may take up to a few minutes. Please be patient...
sympd list
Symmetrix ID: 000192601369
Device Name Directors Device--------------------------- ------------- ------------------------------------- CapPhysical Sym SA :P DA :IT Config Attribute Sts (MB)--------------------------- ------------- -------------------------------------
◆ Since the source device 590 and the BCV target 59A are currently split, they can have different data including their device labels. The symlabel command can be used to display the device labels for both the standard devices in device group mirrgrp. The label stored by the operating system on the disk is displayed in the Actual column:
Example 2: Using the split -not_ready command 309
Performing TimeFinder/Mirror Control Operations
symlabel -g mirrgrp -type WNT list
Device Group (DG) Name: mirrgrpDG's Type : REGULARDG's Symmetrix ID : 000192601369
Device Name Device Label Device------------------------------------ ----------------------- ---------------Logical Physical Sym Type Defined Actual Sts BCV <=> STD------------------------------------ ----- -------- -------- --- -----------
◆ When synchronizing devices with TimeFinder, the entire device including the device label will be copied. To keep distinct labels on the standard and BCV volumes, the labels can be saved in the Solutions Enabler database file on the host using the symlabel define command. Redisplaying the labels, now the same Device Label value shows in the Defined and Actual columns:
◆ Repeating the symlabel list command with the -offline option shows how the Defined label is available from the SYMAPI database while the Actual label is only available by reading from the device:
symlabel -g mirrgrp -bcv -type WNT -offline list
Device Group (DG) Name: mirrgrpDG's Type : REGULARDG's Symmetrix ID : 000192601369
Device Name Device Label Device------------------------------------ ----------------------- ---------------Logical Physical Sym Type Defined Actual Sts BCV <=> STD------------------------------------ ----- -------- -------- --- -----------
◆ The next set of host operating system specific operations, in this case performed on Windows switches to the source device 590 mapped to drive letter L and list the content of that director to contain three files.
c:\>L:
L:\>dir Volume in drive L is L-590 Volume Serial Number is DC2A-95D1
Next DEV001 (590) and BCV001 (59A) will be incrementally synchronized, verify is used to wait for synchronization to complete. When these devices are split to make the BCV001 an independent device again, the -not_ready option is used to keep the operating system from seeing two devices with the same device label.
Example 2: Using the split -not_ready command 311
Performing TimeFinder/Mirror Control Operations
Redisplaying the label information for BCV001 now shows different values in the Defined and Actual columns, because the Actual column value now matches the DEV001 device label:
symmir -g mirrgrp establish DEV001 -noprompt
'Incremental Establish' operation execution is in progress for device 'DEV001' indevice group 'mirrgrp'. Please wait...
'Incremental Establish' operation successfully initiated for device 'DEV001'in group 'mirrgrp'.
symmir -g mirrgrp verify DEV001 -i 30
All device(s) in the list are in 'Synchronized or Restored' state.
'Split' operation execution is in progress for device 'DEV001' indevice group 'mirrgrp'. Please wait...
'Split' operation successfully executed for device 'DEV001'in group 'mirrgrp'.
symlabel -g mirrgrp -type WNT list -bcv
Device Group (DG) Name: mirrgrpDG's Type : REGULARDG's Symmetrix ID : 000192601369
Device Name Device Label Device------------------------------------ ----------------------- ---------------Logical Physical Sym Type Defined Actual Sts BCV <=> STD------------------------------------ ----- -------- -------- --- -----------
BCV001 DRIVE14 059A WNT 56691B33 22FF4532 NR SplitBCV002 Not Visible 059B N/A N/A 00000000 RW SplitBCV003 Not Visible 059C N/A N/A 00000000 RW SplitBCV004 Not Visible 059D N/A N/A 00000000 RW Split
◆ The symdg relabel command is used to overwrite the Actual label with the Defined label in this case restoring the device label that the operating system originally gave to BCV001:
symdg -g mirrgrp -bcv relabel BCV001 -noprompt
'Relabel' Device operation successfully completed for the device.
symlabel -g mirrgrp -bcv -type WNT list
Device Group (DG) Name: mirrgrpDG's Type : REGULARDG's Symmetrix ID : 000192601369
Device Name Device Label Device------------------------------------ ----------------------- ---------------Logical Physical Sym Type Defined Actual Sts BCV <=> STD------------------------------------ ----- -------- -------- --- -----------
BCV001 DRIVE14 059A WNT 56691B33 56691B33 NR SplitBCV002 Not Visible 059B N/A N/A 00000000 RW SplitBCV003 Not Visible 059C N/A N/A 00000000 RW SplitBCV004 Not Visible 059D N/A N/A 00000000 RW Split
EMC Solutions Enabler Symmetrix TimeFinder Family CLI Version 7.2 Product Guide312
Performing TimeFinder/Mirror Control Operations
◆ Only the label was changed, the rest of the data is a point-in-time copy of DEV001 as can be seen by making the device ready again and displaying the contents of the directory to show the previous three files for DEV001:
symdg -g mirrgrp -bcv ready BCV001 -noprompt
'Ready' Device operation successfully completed for the device.
c:\>P:P:\>dir Volume in drive P is L-590 Volume Serial Number is B456-2473
Example 3: Protected RestoreWhen using native TimeFinder/Mirror, when a BCV is used to restore a point-in-time copy to the standard, the point-in-time on the BCV will be modified if the host writes to the standard device during the restore operation. The -protected option on the restore will preserve the point-in-time stored on the BCV. Just as was used on the previous split operation, the -not_ready option allows the device label of the standard device to be copied from the defined value.
Note: When using emulation mode, protected restore will always be in effect.
◆ After using -protect on the restore, it is required to acknowledge that the BCV copy will not match the changed standard by specifying the -protect option for the symmir split command. It is not necessary to specify the -not_ready option because the BCV device label was not written too. Notice that file1.txt is still present in the contents of BCV001, because the point-in-time before the delete is preserved:
symmir -g mirrgrp split DEV001 -protect -noprompt
'Split' operation execution is in progress for device 'DEV001' indevice group 'mirrgrp'. Please wait...
'Split' operation successfully executed for device 'DEV001'in group 'mirrgrp'.
Example 3: Protected Restore 315
Performing TimeFinder/Mirror Control Operations
symlabel -g mirrgrp -type WNT list -bcv
Device Group (DG) Name: mirrgrpDG's Type : REGULARDG's Symmetrix ID : 000192601369
Device Name Device Label Device------------------------------------ ----------------------- ---------------Logical Physical Sym Type Defined Actual Sts BCV <=> STD------------------------------------ ----- -------- -------- --- -----------
EMC Solutions Enabler Symmetrix TimeFinder Family CLI Version 7.2 Product Guide316
10Invisible Body Tag
This chapter provides examples on splitting off a consistent, DBMS-restartable BCV copy of your database without having to quiesce or shut down the database first.
The following examples illustrate TimeFinder functionality in versions of EMC Solutions Enabler up to Version 6.0 running on Symmetrix arrays using Enginuity versions up to 5x71.
◆ Example 1: Creating an RDBMS-restartable copy on a local Symmetrix array . 318◆ Example 2: ECA consistent split of a composite group......................................... 321◆ Example 3: Performing splits with database assist ................................................ 324
Performing ConsistentSplits with TimeFinder
Family
Performing Consistent Splits with TimeFinder Family 317
Performing Consistent Splits with TimeFinder Family
Example 1: Creating an RDBMS-restartable copyon a local Symmetrix array
The hardware setup for this example consists of an HP-UX production host (api183) and an HP-UX secondary host (api213). Both hosts are connected to a local Symmetrix (sid 814). PowerPath 2.1 is installed on api183. Oracle 8.1.7.0.0 is installed on api183 and api213. The example uses PowerPath devices 286–28B and BCV devices 39A–39F. An Oracle database was created on the production host. All Oracle objects (data files, control files and redo logs) must be on the PowerPath devices.
Note: PowerPath is not supported with Solutions Enabler version 7.2 and higher
◆ The sympd list command issued from the production host displays a list of PowerPath devices on this Symmetrix that are visible to the host. The display below shows a portion of this list (PowerPath standard devices 286 through 28B). The ellipsis (…) represents truncated output.
Note that each PowerPath standard device has two SA (SCSI adapter) connections and physical device names (parent and child) that provide alternate paths for load-balancing and failover capabilities:
sympd list -powerpath
Symmetrix ID: 000185500814
P O W E R P A T H D E V I C E S
Device Name Directors Device ---------------------------- ---------- ---------------------------------------- Cap Physical Sym SA :P DA :IT Config Attribute Sts (MB)---------------------------- ---------- ----------------------------------------
EMC Solutions Enabler Symmetrix TimeFinder Family CLI Version 7.2 Product Guide318
Performing Consistent Splits with TimeFinder Family
◆ The sympd list command issued from the secondary host (api213) displays all devices on the Symmetrix that are visible to the host. This partial list shows some devices that are configured as BCV devices. The example will use these BCVs to hold the DBMS-restartable copy of the database. To display just a list of BCVs on a Symmetrix, regardless of whether they are host-visible, use the symdev list command with the –bcv option:
sympd list
Device Name Directors Device --------------------------- ------------- ------------------------------------- Cap Physical Sym SA :P DA :IT Config Attribute Sts (MB)--------------------------- ------------- -------------------------------------
◆ Creating a device group and adding devices to it are prerequisites for performing the following operations. The symdg create command issued from the production host creates a device group named oracle on this host. The symdg addall command adds the PowerPath standard devices to the group, using the command’s –range option to limit the selections to those devices between 286 and 28B. The symbcv command associates the BCV devices with the device group; the –range option is used with the associateall action to limit the selection to those BCVs that are within the specified range:
◆ The symmir establish command initiates a full establish operation on all BCV pairs in the device group:
symmir -g oracle establish -full -noprompt
'Full Establish' operation execution is in progress for device group 'oracle'. Please wait...
'Full Establish' operation successfully initiated for device group 'oracle'.
◆ The symmir verify command checks the state of the BCV pairs in the device group every 30 seconds until the BCV pairs are synchronized. Then the verify loop ends. The BCV pairs must be fully synchronized before you attempt a consistent split:
symmir -g oracle verify -i 30
None of the devices in group 'oracle' are in the 'Synchronized or Restored' state.
Not all devices in group 'oracle' are in the 'Synchronized or Restored' state.
All devices in group 'oracle' are in the 'Synchronized or Restored' state.
Example 1: Creating an RDBMS-restartable copy on a local Symmetrix array 319
Performing Consistent Splits with TimeFinder Family
◆ The following command performs a consistent split using Enginuity Consistency Assist (ECA) to momentarily suspend writes to the disks while the split is being processed (the -consistent option). This operation applies to all BCV pairs in the device group. When using ECA, you do not need PowerPath support. With ECA, the devices in the device group do not need to be PowerPath devices:
symmir -g oracle split -consistent -noprompt
'Split' operation execution is in progress for device group 'oracle'. Please wait...
'Split' operation successfully executed for device group 'oracle'.
Note: Solutions Enabler provides an alternate way to perform a consistent split using the -rdb option and specifies the Oracle database type. Additionally, in older versions of Enginuity, the predecessor of the ECA mechanism was implemented through PowerPath freezing and thawing only those devices that contain the Oracle database (that is, the Oracle data files, control files and redo logs). So for example, when you issue the symmir split command with the -rdb -dbtype option and the database type is Oracle, SYMCLI utilizes the SYMAPI mapping features to automatically determine which PowerPath devices need to be frozen. SYMCLI logs into Oracle and queries Oracle's catalog. For SYMCLI to access Oracle, you need to set the environment variable SYMCLI_RDB_CONNECT to the username and password of the Oracle system administrator’s account. The following command sets the variable to a username of system and a password of manager.
export SYMCLI_RDB_CONNECT=system/manager
◆ The export ORACLE_HOME command specifies the location of the Oracle binaries. The export ORACLE_SID command specifies the database instance name:
◆ Another symmir establish command re-establishes incrementally the six BCV pairs in the device group that are in the Split state:
symmir -g oracle establish -noprompt
'Incremental Establish' operation execution is in progress for device group 'oracle'. Please wait...
'Incremental Establish' operation successfully initiated for device group 'oracle'.
◆ The following command performs a consistent split using the -vxfs option and specifies the names of four Veritas file systems. When using Veritas file systems, PowerPath is not required. The freeze and thaw tasks are carried out by the Veritas file system:
'Split' operation successfully executed for device group 'oracle'.
EMC Solutions Enabler Symmetrix TimeFinder Family CLI Version 7.2 Product Guide320
Performing Consistent Splits with TimeFinder Family
Example 2: ECA consistent split of a composite groupThis example was performed using Solutions Enabler version 7.0. The hardware setup includes a host connected to two source Symmetrix arrays (sid 369 and 237). A composite group defined on the host contains a set of BCV pairs that spans the two Symmetrix arrays. The devices include standard devices and BCV devices. However, this same functionality can be applied to TimeFinder snap pairs and clone pairs.
◆ The symcg create command creates a regular type composite group named mirrcg:
symcg create mirrcg
◆ The following symcg commands add to the composite group a range of standard devices from each of the two source Symmetrix arrays:
◆ The symmir establish command creates optimized standard/BCV pairings among devices within each Symmetrix array and performs a full establish operation on them:
Total ------ ------- Track(s) 0 78308 MB(s) 0.0 4894.3
Legend:
(*): The paired BCV device is associated with this composite group.(p): The paired BCV device was restored using the protect option.(a): All mirrors of this BCV were moved to the STD.
◆ The symmir verify command with checks every 30 seconds to see if all devices have reached the Synchronized state:
symmir -cg mirrcg verify -i 30
Not All devices in the group 'mirrcg' are in 'Synchronized or Restored' state.
Not All devices in the group 'mirrcg' are in 'Synchronized or Restored' state.
All devices in the group 'mirrcg' are in 'Synchronized or Restored' state.
◆ The symmir split command performs an ECA consistent split on all BCV pairs in the composite group:
symmir -cg TimeFinder split -consistent -noprompt
symmir -cg mirrcg split -consistent -noprompt
'Split' operation execution is in progress for composite group 'mirrcg'. Please wait...
'Split' operation successfully executed for composite group'mirrcg'.
◆ The symmir query command shows the devices now in the Split state:
symmir -cg mirrcg query
Composite Group Name : mirrcgComposite Group Type : REGULARNumber of Symmetrix Units : 2Number of RDF (RA) Groups : 0
CG Symmetrix ID : 000192601369 (Microcode Version: 5874)
(*): The paired BCV device is associated with this composite group.(p): The paired BCV device was restored using the protect option.(a): All mirrors of this BCV were moved to the STD.
Example 2: ECA consistent split of a composite group 323
Performing Consistent Splits with TimeFinder Family
Example 3: Performing splits with database assistPerforming splits without PowerPath or ECA is similar for most supported databases in suspending writes to a database momentarily while an instant split occurs. The following examples show how to perform splits this way for an SQL 2000 database and an Oracle database.
Splitting BCV pairs using SQL 2000 database assistThis setup consists of a Windows 2000 host connected to a Symmetrix array (sid 505). SQL Server 2000, Enterprise Edition, software is installed on the host. An SQL 2000 database called SQL2000a was created on Symmetrix devices. A device group called sqlserv was created beforehand. The devices that hold the database were added to this device group. The BCV pairs in the device group were fully established.
The symmir query command displays the configuration and status of the BCV pairs that hold the database. All BCV pairs are currently in the Synchronized state:
symmir -g sqlserv query
Device Group (DG) Name: sqlservDG's Type : REGULARDG's Symmetrix ID : 000185500505
Total ------- ------- Track(s) 0 0 MB(s) 0.0 0.0Legend:
(*): The paired BCV device is associated with this group.
EMC Solutions Enabler Symmetrix TimeFinder Family CLI Version 7.2 Product Guide324
Performing Consistent Splits with TimeFinder Family
◆ For SYMCLI to access a specified database, set the SYMCLI_RDB_CONNECT environment variable to the username and password of the system administrator’s account. The export command sets this variable to a username of system and a password of manager, allowing a local connection:
set SYMCLI_RDB_CONNECT=system/manager
◆ The symioctl begin snapshot command sends the SQL command BACKUP DATABASE TO VIRTUAL_DEVICE WITH SNAPSHOP to SQL Server, which begins the snapshot backup and suspends writes to the database named SQL2000a. It also creates a savefile named sql.save:
symioctl begin snapshot SQL2000a savefile sql.save -type sqlserver -nop
◆ The symmir split command performs an instant split on all BCV pairs in the device group sqlserv.
symmir -g sqlserv split -instant -noprompt
'Split' operation execution is in progress for device group 'sqlserv'. Please wait...
'Split' operation successfully executed for device group 'sqlserv'.
◆ The symioctl end snapshot command causes the SQL command BACKUP DATABASE to complete. Writes to the database can resume, and the snapshot metadata is saved to the save file:
symioctl end snapshot -type sqlserver SQL2000a -noprompt
Splitting BCV pairs using Oracle database assistThe hardware setup for this example consists of a Solaris host (api179) connected to a local Symmetrix array. Oracle 8.1.7.0.0 software is installed on api179. A device group called oracle was created beforehand. The devices that hold the database were added to this device group. The BCV pairs in the device group were fully established.
For SYMCLI to access a specified database, set the SYMCLI_RDB_CONNECT environment variable to the username and password of the system administrator’s account. The first export command sets this variable to a username of system and a password of manager, allowing a local connection to Oracle. The export ORACLE_HOME command specifies the location of the Oracle binaries. The export ORACLE_SID command specifies the database instance name. (Other RDBMS database systems use environment variables specific to their system. For example, Sybase uses the variable SYBASE for the location of the Sybase binaries and uses DSQUERY to specify the server name.)
◆ The symrdb list command allows you to test basic database connectivity:
symrdb list -type oracle
DATABASE NAMES (ORACLE 8.1.7.0.0):
Database Name -------------
api179
Example 3: Performing splits with database assist 325
Performing Consistent Splits with TimeFinder Family
◆ The symioctl begin backup command places all tables in the Oracle database (api179) in hot backup mode:
symioctl -type oracle begin backup -noprompt
◆ The symioctl freeze command suspends writes to the Oracle database (api179).
symioctl -type oracle freeze -noprompt
◆ The symmir split command performs an instant split on all BCV pairs in the device group called oracle:
symmir -g oracle split -instant -noprompt
'Split' operation execution is in progress for device group 'oracle'. Please wait...
'Split' operation successfully executed for device group 'oracle'.
◆ The symioctl thaw command allows writes to the database to resume:
symioctl -type oracle thaw -noprompt
◆ The symioctl end backup command terminates hot backup mode:
symioctl -type oracle end backup –noprompt
EMC Solutions Enabler Symmetrix TimeFinder Family CLI Version 7.2 Product Guide326
11Invisible Body Tag
This chapter provides examples on of how to override the SYMCLI Command Mode default setting in the Solutions Enabler options file.
Command Scope is a user selectable option that changes the behavior of TimeFinder commands in relation to limiting the commands to interact only with the group being used in the command.
Note: These examples were conducted with Solutions Enabler 7.0 which has no dependency on Enginuity releases to support the Command Scope feature.
◆ Example 1: symmir/symclone/symsnap control commands .............................. 328◆ Example 2: symmir/symclone/symsnap query command.................................. 330◆ Example 3: symmir/symclone/symsnap verify command.................................. 331◆ Example 4: Creating a DG with two standard devices and two BCV devices .. 332
Using SYMAPICommand Scope
Using SYMAPI Command Scope 327
Using SYMAPI Command Scope
Example 1: symmir/symclone/symsnap control commandsWhen using command scope, keep the following in mind:
◆ When limiting control commands with SYMCLI_COMMAND_SCOPE = ENABLED, the source device selection criteria only considers pairings with potential targets that are within the scope of the command, such as:
• Either contained in the DG or CG for group commands
• Explicitly contained within a device list or logical device list.
This means that return codes such as ALREADY IN BCV STATE will not occur as the result of a session whose target is outside of the scope of the devices that are the target of the command. For example, given the following DG:
This occurs because DEV002 is already paired with BCV device 003F, which is not part of DG TestDg since the BCV device does not have a Logical Device Name, and has Pair State ‘synchronized.’
◆ When SYMCLI_COMMAND_SCOPE = ENABLED, the command succeeds because the relationship with device 003F is not considered since it is outside the scope of the devices that are the target of the command:
symmir –g TestDg establish -full –v
'Full Establish' operation execution is in progress fordevice group 'TestDg'. Please wait...
'Full Establish' operation successfully initiated for device group 'TestDg'.
Note: Although BCV device 003F is the target of the TimeFinder session with device DEV002, it is not in the group TestDg. The establish command does not return the ALREADY_IN_BCV_STATE error when the Command Scope is Enabled because devices outside of the group are not considered by the selection process.
Example 1: symmir/symclone/symsnap control commands 329
Using SYMAPI Command Scope
Example 2: symmir/symclone/symsnap query commandWhen using Command Scope, the output of the query command only displays sessions whose target devices are within the scope of the command, for example:
◆ When SYMCLI_COMMAND_SCOPE = DISABLED, the DG query output displays sessions for DEV002:
Note: The session between DEV002 and BCV device 003F displays even though device 003F is not part of DG TestDg.
◆ When SYMCLI_COMMAND_SCOPE = ENABLED, the DG query output no longer displays any sessions for DEV002 as a result of the target being outside the scope of the command:
EMC Solutions Enabler Symmetrix TimeFinder Family CLI Version 7.2 Product Guide330
Using SYMAPI Command Scope
Example 3: symmir/symclone/symsnap verify commandWhen using Command Scope, the verify command returns the following output:
◆ When the SYMCLI_COMMAND_SCOPE = DISABLED, the verify command scans all sessions for the source devices 0186 including those with target devices which are not in DG TestDg the result of the verify command will be as follows:
symmir –g TestDg verify -synched
All devices in the group 'TestDg' are in 'Synchronized' state.Not All of the Paired Target Devices are associated with the group 'TestDg'
◆ When the SYMCLI_COMMAND_SCOPE = ENABLED, the sessions with targets outside the scope of the DG will not be considered so the results of the same verify command will be as follows:
symmir –g TestDg verify -synched
Not All devices in the group 'TestDg' are in 'Synchronized' state.
Note: The Not All devices are in the Synchronized state because DEV002 only has a session whose target is out of the group.
Example 3: symmir/symclone/symsnap verify command 331
Using SYMAPI Command Scope
Example 4: Creating a DG with two standard devices and two BCV devices
When devices in a group have TimeFinder relationships with devices both in and out of the group, the behavior may be different when Command Scope is ENABLED or DISABLED. The best way to illustrate this is with an example where the same commands are issued first with SYMCLI_Command Scope=DISABLED (the default) and then with SYMCLI_Command Scope=ENABLED.
symdg create ShowScope
symdg -g ShowScope addall -devs 590:591 -sid 369
symbcv -g ShowScope associateall -devs 59a:59b
symdg show ShowScope
Group Name: ShowScope
Group Type : REGULAR Device Group in GNS : No Valid : Yes Symmetrix ID : 000192601369 Group Creation Time : Thu Aug 27 12:33:11 2009 Vendor ID : EMC Corp Application ID : SYMCLI
Number of STD Devices in Group : 2 Number of Associated GK's : 0 Number of Locally-associated BCV's : 2 Number of Locally-associated VDEV's : 0 Number of Locally-associated TGT's : 0 Number of Remotely-associated VDEV's(STD RDF): 0 Number of Remotely-associated BCV's (STD RDF): 0 Number of Remotely-associated TGT's(TGT RDF) : 0 Number of Remotely-associated BCV's (BCV RDF): 0 Number of Remotely-assoc'd RBCV's (RBCV RDF) : 0 Number of Remotely-assoc'd BCV's (Hop-2 BCV) : 0 Number of Remotely-assoc'd VDEV's(Hop-2 VDEV): 0 Number of Remotely-assoc'd TGT's (Hop-2 TGT) : 0
Standard (STD) Devices (2): { -------------------------------------------------------------------- Sym Cap LdevName PdevName Dev Att. Sts (MB) -------------------------------------------------------------------- DEV001 N/A 0590 RW 1031 DEV002 N/A 0591 RW 1031 }
EMC Solutions Enabler Symmetrix TimeFinder Family CLI Version 7.2 Product Guide332
Using SYMAPI Command Scope
To see an effect from Command Scope, it is necessary to create a TimeFinder relationship outside the group. Therefore a -file will be used to create a Clone relationship between source device 591 (in the group) and BCV device 59C (outside the group:
(C): X = The background copy setting is active for this pair. . = The background copy setting is not active for this pair.(G): X = The Target device is associated with this group. . = The Target device is not associated with this group.(D): X = The Clone session is a differential copy session. . = The Clone session is not a differential copy session.(P): X = The pre-copy operation has completed one cycle . = The pre-copy operation has not completed one cycle
c:\>
Next, a TimeFinder relationship within the group will also be created, a Clone relationship between source device DEV001 and BCV001:
'Create' operation execution is in progress for device 'DEV001'paired with target device 'BCV001' indevice group 'ShowScope'. Please wait...
'Create' operation successfully executed for device 'DEV001'in group 'ShowScope' paired with target device 'BCV001'.
Example 4: Creating a DG with two standard devices and two BCV devices 333
Using SYMAPI Command Scope
The symclone query command (with Command Scope in the default DISABLED mode) shows that both DEV001 and DEV002 have created clone relationships. However, DEV001 has an “X” in the G field denoting its target device is associated with the ShowScope device group and DEV002 has a “.” in the G field indicating that its Target device is not associated with the ShowScope device group:
symclone -g ShowScope query
Device Group (DG) Name: ShowScopeDG's Type : REGULARDG's Symmetrix ID : 000192601369
(C): X = The background copy setting is active for this pair. . = The background copy setting is not active for this pair.(G): X = The Target device is associated with this group. . = The Target device is not associated with this group.(D): X = The Clone session is a differential copy session. . = The Clone session is not a differential copy session.(P): X = The pre-copy operation has completed one cycle . = The pre-copy operation has not completed one cycle
The symclone verify command (with Command Scope in the default DISABLED mode) shows a mixed status. All standard devices are in the created states. However, it adds a line to indicate that not all the pairs are associated with targets in the same group as a user may really want to know:
symclone -g ShowScope verify -created
All devices in the group 'ShowScope' are in 'Created' state.Not All of the Paired Target Devices are associated with the group 'ShowScope'
EMC Solutions Enabler Symmetrix TimeFinder Family CLI Version 7.2 Product Guide334
Using SYMAPI Command Scope
The symclone activate command based on the ShowScope group with Command Scope in the default DISABLED mode fails. The -v option helps illustrate the problem, where it is trying to match source device 591 (DEV002) with target device 59B (BCV002) but fails, because 591 is in the created state with 59C outside the group:
symclone -g ShowScope activate -noprompt -v
'Activate' operation execution is in progress fordevice group 'ShowScope'. Please wait...
The Source device and the Target device do not form a Copy session
Command Scope can be enabled either within the process by setting the SYMCLI_COMMAND_SCOPE environmental variable or by enabling Command Scope for all users on the host by enabling the SYM_PREF_COMMAND_SCOPE options parameter. The commands for setting environmental variables are host specific, an example that would work in a Windows environment follows:
set SYMCLI_COMMAND_SCOPE=ENABLED
Environmental variables that are set can be displayed using the following symcli -def command:
symcli -def
Symmetrix Command Line Interface (SYMCLI) Version V7.0.0.0 (Edit Level: 915)built with SYMAPI Version V7.0.0.0 (Edit Level: 915)
Current settings of the SYMCLI environmental variables:
SYMCLI_COMMAND_SCOPE : ENABLED
Now, the query and verify actions will be repeated with Command Scope ENABLED. All commands will relate to only devices in the group.
The symclone query command with Command Scope ENABLED only shows the DEV001 created clone relationship. The DEV002 relationship is omitted because its target device is not associated with the ShowScope device group:
symclone -g ShowScope query
Device Group (DG) Name: ShowScopeDG's Type : REGULARDG's Symmetrix ID : 000192601369
(C): X = The background copy setting is active for this pair. . = The background copy setting is not active for this pair.(G): X = The Target device is associated with this group. . = The Target device is not associated with this group.(D): X = The Clone session is a differential copy session. . = The Clone session is not a differential copy session.(P): X = The pre-copy operation has completed one cycle . = The pre-copy operation has not completed one cycle
The symclone verify command with Command Scope enabled displays an unambiguous not all devices are in the desired state:
symclone -g ShowScope verify -created
Not All devices in the group 'ShowScope' are in 'Created' state.
Note: Repeating the symclone activate command will provide a similar failure as before with Command Scope DISABLED, because DEV002 is not in the created state relative to the group. However, given the output of the verify command that is expected. In some cases, commands that failed with Command Scope disabled will succeed with Command Scope ENABLED; for example the symmir establish would concurrently pair DEV002 with BCV002 as would be desired for working with only devices in the group (the user would not need to specify the -concurrent option because within the scope of the group, it is not a concurrent operation).
EMC Solutions Enabler Symmetrix TimeFinder Family CLI Version 7.2 Product Guide336
A
This appendix lists TimeFinder/Snap and TimeFinder/Clone interactions by device state.
◆ TimeFinder/Clone with TimeFinder/Mirror interactions.................................... 338◆ TimeFinder/Snap with TimeFinder/Mirror interactions ..................................... 343
TimeFinder/Clone with TimeFinder/Mirror interactionsTable 26 provides a description of the various TimeFinder/Mirror pair states.
Tables 27 through 34 list the interactions for TimeFinder/Clone with TimeFinder/Mirror by device state.
Table 27 lists TimeFinder/Clone operations for the TimeFinder/Mirror SyncInProg state.
Table 26 TimeFinder/Mirror pair states
BCV pair state Description
Sync In Progress When the Establish action is executed, data is copied from the standard device to the BCV device until both devices contain identical data.
Synchronized The BCV and standard devices have identical data. Any changes to the standard device are also written to the BCV. The BCV is unavailable to the host for BC processing.
Split in Progress The BCV devices are in the process of being separated or split from the standard devices.
Split The BCV devices are completely separated or split from the standard devices, allowing each device to be accessed separately by the host. No restrictions.
Split No Incremental The BCV devices are completely separated or split from the standard devices, but cannot be incrementally established or restored. No Restrictions.
Restore In Progress When the restore action is executed, data is copied from the BCV to the standard device until both devices contain identical data.
Restored The BCV and standard devices have identical data, although the data was originally on the BCV before being synchronized. Any changes to the standard device are also written to the BCV. The BCV is unavailable to the host for BC processing.
Split Before Sync The split occurred when a BCV device was synchronizing. The BCV device is separated from the standard device although the BCV device is not completely synchronized. No Restrictions.
Split Before Restore The split occurred when a BCV device was being restored to a standard device. The BCV device is separated from the standard device although the standard device is not completely synchronized. No Restrictions.
Table 27 TimeFinder/Clone Operations for TimeFinder/Mirror SyncInProg State
TimeFinder/Clone action STD left BCV left STD right BCV right
Create Y* N* N** N**
Recreate Y* N* N** N**
Activate Y* N* N** N**
Terminate Y* Y* Y** Y**
Split N* N* N** N**
Incremental Restore N** N** N* N*
Full Restore N** N** N* N*
EMC Solutions Enabler Symmetrix TimeFinder Family CLI Version 7.2 Product Guide338
TimeFinder/Snap with TimeFinder/Mirror interactionsTables 35 through 42 list the interactions for TimeFinder/Snap with TimeFinder/Mirror by device state.
Table 35 lists TimeFinder/Snap operations for the TimeFinder/Mirror SyncInProg state.
Note: The target device is always a Snap VDEV.
Table 36 lists TimeFinder/Snap operations for the TimeFinder/Mirror Synchronized state.
Note: The target device is always a Snap VDEV.
Table 35 TimeFinder/Snap operations for TimeFinder/Mirror SyncInProg state
TimeFinder/Snap action STD device BCV device
Create Y N
Recreate (5874 and above) Y N
Activate Y N
Terminate Y Y
Incremental Restore to source N N
Full Restore to third device in SyncInProg state N N
Table 36 TimeFinder/Snap operations for TimeFinder/Mirror Synchronized state
TimeFinder/Snap action STD device BCV device
Create Y N
Recreate (5874 and higher) Y N
Activate Y N
Terminate Y Y
Incremental Restore to source Y N
Full Restore to third device in Synchronized state Y N
Full Restore to third device in SplitNoInc, NeverEst state Y Y
Table 42 TimeFinder/Snap Operations for TimeFinder/Mirror SplitNoInc, NeverEst States (page 2 of 2)
EMC Solutions Enabler Symmetrix TimeFinder Family CLI Version 7.2 Product Guide346
B
This appendix describes the applicable SRDF pair states that rule the TimeFinder/Clone and TimeFinder/Snap copy session operations.
◆ SRDF pair states........................................................................................................... 348◆ State rules for TimeFinder/Clone operations ......................................................... 349◆ State rules for TimeFinder/Snap operations........................................................... 355
SRDF State RulesReference
SRDF State Rules Reference 347
SRDF State Rules Reference
SRDF pair statesCertain TimeFinder/Clone and TimeFinder/Snap copy operations are not allowed within Symmetrix arrays employing the Symmetrix Remote Data Facility (SRDF) for remote mirroring as these operations can conflict with one another. The availability of some actions depends on the current state of SRDF pairs.
Table 43 provides a description the various SRDF pair states.
Table 43 SRDF pair states
State Description
Consistent The R2 mirrors of SRDF/A devices are in a Consistent state. Consistent state signifies the normal state of operation for device pairs operating in asynchronous mode.
Failed Over The R1 is currently Not Ready or write disabled and operations have been failed over to the R2.
Invalid The default state when no other SRDF state applies. The combination of R1, R2, and RDF link states and statuses do not match any other pair state. This state may occur if there is a problem at the disk director level.
Mixed A composite SYMAPI device group RDF pair state. There exists different SRDF pair states within a device group.
Partitioned The SYMAPI is currently unable to communicate through the corresponding RDF path to the remote Symmetrix array. Partitioned may apply to devices within an RA group.For example, if SYMAPI is unable to communicate to a remote Symmetrix array via an RA group, devices in that RA group will be marked as being in the Partitioned state.
R1 Updated The R1 is currently Not Ready or write disabled to the host, there are no local invalid tracks on the R1 side, and the link is Ready or write disabled.
R1 UpdInProg The R1 is currently Not Ready or write disabled to the host, there are invalid local (R1) tracks on the source side, and the link is Ready or write disabled.
Split The R1 and the R2 are currently Ready to their hosts, but the link is Not Ready or write disabled.
Suspended The RDF links have been suspended and are Not Ready or write disabled. If the R1 is Ready while the links are suspended, any I/O will accumulate as invalid tracks owed to the R2.
Synchronized The R1 and the R2 are currently in a synchronized state. The same content exists on the R2 as the R1. There are no invalid tracks between the two pairs.
SyncInProg A synchronization is currently in progress between the R1 and the R2. There are existing invalid tracks between the two pairs and the logical link between both sides of an RDF pair is up.
Transmit Idle The SRDF/A session cannot push data in the transmit cycle across the link because the link is down.
EMC Solutions Enabler Symmetrix TimeFinder Family CLI Version 7.2 Product Guide348
SRDF State Rules Reference
State rules for TimeFinder/Clone operationsThis section identifies the symclone copy actions that are available for use within each of the SRDF pair states.
Consistent Table 44 identifies the symclone copy operations available for use when SRDF pairs are in the Consistent pair state for asynchronous mode.
a. Action is not allowed if there are local R1 invalids or remote R2 invalids.
b. The force option (-force) must be applied.
c. Action is not allowed with CopyOnAccess.
d. With Enginuity 5874 and lower, the precopy option (-precopy) must be applied.
e. If the precopy option is not applied, the action is not allowed if the RDF pair is R21->R2 of a cascaded setup.
f. If the precopy option is not applied, the action is not allowed if SRDF/A device pacing is not active and supported on the SRDF/A session.
Failed Over Table 45 identifies the symclone copy operations available for use when SRDF pairs are in the Failed Over pair state.
a. Action is not allowed if the R2 target device is in asynchronous mode.
b. Action is not allowed if the target device is an R2 larger than the R1.
c. With Enginuity 5874 and lower, the precopy option (-precopy) must be applied for asynchronous mode.
d. If the precopy option is not applied, the action is not allowed if the RDF mode is asynchronous and the RDF pair is R21->R2 of a cascaded setup
e. If the precopy option is not applied, the action is not allowed if the RDF mode is asynchronous and SRDF/A device pacing is not configured for autostart on the R1 side.
Table 44 TimeFinder/Clone operations for Consistent pair states
TimeFinder/Clone actionR1 copy source
R1 copy target
R2 copy source
R2 copy target
Create/Recreate ✔ ✔ a, b, c ✔ d, e, f
Activate ✔ a ✔ a, b, c ✔ a
Establish ✔ a ✔ a, b, c ✔ e, f
Terminate ✔ ✔ ✔ ✔
Restore ✔ a ✔ a, b, c
Split ✔ ✔ a, b, c
Table 45 TimeFinder/Clone operations for Failed Over pair states
TimeFinder/Clone actionR1 copy source
R1 copy target
R2 copy source
R2 copy target
Create/Recreate ✔ ✔ c, d, e, f✔ a, b
Activate ✔ ✔ ✔ a, b
Establish ✔ ✔ d, e, f✔ a, b
Terminate ✔ ✔ ✔ ✔
Restore ✔ ✔ a, b
Split ✔ ✔ ✔ a, b
349
SRDF State Rules Reference
f. If the RDF mode is asynchronous and the precopy option is not applied, the action is not allowed unless both the R1 and R2 Symmetrix systems contain Enginuity 5875 or higher.
Invalid Table 46 identifies the symclone copy operations available for use when SRDF pairs are in the Invalid pair state.
Partitioned Table 47 identifies the symclone copy operations available for use when SRDF pairs are in the Partitioned pair state.
a. Action is not allowed if the if the target device is an R2 larger than the R1.
Table 46 TimeFinder/Clone operations for Invalid pair states
TimeFinder/Clone actionR1 copy source
R1 copy target
R2 copy source
R2 copy target
Create/Recreate
Activate
Establish
Terminate ✔ ✔ ✔ ✔
Restore
Split
Table 47 TimeFinder/Clone operations for Partitioned pair states
TimeFinder/Clone ActionR1 copy source
R1 copy target
R2 copy source
R2 copy target
Create/Recreate ✔ ✔ ✔ ✔ a
Activate ✔ ✔ ✔ ✔ a
Establish ✔ ✔ ✔ ✔ a
Terminate ✔ ✔ ✔ ✔ a
Restore ✔ ✔ ✔ ✔ a
Split ✔ ✔ ✔ ✔ a
EMC Solutions Enabler Symmetrix TimeFinder Family CLI Version 7.2 Product Guide350
SRDF State Rules Reference
R1 updated Table 48 identifies the symclone copy operations available for use when SRDF pairs are in the R1 Updated pair state.
a. Action is not allowed if the -consistent option was specified.
b. With Enginuity 5874 and lower, the precopy option (-precopy) must be applied for asynchronous mode.
c. If the precopy option is not applied, the action is not allowed if the RDF mode is asynchronous and the RDF pair is R21->R2 of a cascaded setup
d. If the precopy option is not applied, the action is not allowed if the RDF mode is asynchronous and SRDF/A device pacing is not configured for autostart on the R1 side.
e. If the RDF mode is asynchronous and the precopy option is not applied, the action is not allowed unless both the R1 and R2 Symmetrix systems contain Enginuity 5875 or higher.
R1 update in progressTable 49 identifies the symclone copy operations available for use when SRDF pairs are in the R1 UpdInProg pair state.
a. Action is not allowed if the -consistent option was specified.
b. With Enginuity 5874 and lower, the precopy option (-precopy) must be applied for asynchronous mode.
c. If the precopy option is not applied, the action is not allowed if the RDF mode is asynchronous and the RDF pair is R21->R2 of a cascaded setup
d. If the precopy option is not applied, the action is not allowed if the RDF mode is asynchronous and SRDF/A device pacing is not configured for autostart on the R1 side.
e. If the RDF mode is asynchronous and the precopy option is not applied, the action is not allowed unless both the R1 and R2 Symmetrix systems contain Enginuity 5875 or higher.
Table 48 TimeFinder/Clone operations for R1 Updated pair states
TimeFinder/Clone actionR1 copy source
R1 copy target
R2 copy source
R2 copy target
Create/Recreate ✔ ✔b, c, d, e,
Activate ✔ a ✔
Establish ✔ a ✔ c, d, e
Terminate ✔ ✔ ✔ ✔
Restore ✔ a
Split ✔
Table 49 TimeFinder/Clone operations for R1 Updinprog pair states
TimeFinder/Clone actionR1 copy source
R1 copy target
R2 copy source
R2 copy target
Create/Recreate ✔ b, c, d, e
Activate ✔ a ✔
Establish ✔ a ✔ c, d, e
Terminate ✔ ✔ ✔ ✔
Restore ✔
Split
351
SRDF State Rules Reference
Split Table 50 identifies the symclone copy operations available for use when SRDF pairs are in the Split pair state.
a. Action is not allowed if the target device is an R2 larger than the R1.
b. Action is not allowed if the RDF mode is asynchronous and the RDF pair is R21->R2 of a cascaded setup
c. Action is not allowed if the RDF mode is asynchronous and SRDF/A device pacing is not configured for autostart on the R1 side.
d. If the RDF mode is asynchronous, the action is not allowed unless both the R1 and R2 Symmetrix systems contain Enginuity 5875 or higher.
Suspended Table 51 identifies the symclone copy operations available for use when SRDF pairs are in the Suspended pair state.
a. Action is not allowed if the target device is an R2 larger than the R1.
b. Action is not allowed if the RDF mode is asynchronous and the RDF pair is R21->R2 of a cascaded setup
c. Action is not allowed if the RDF mode is asynchronous and SRDF/A device pacing is not configured for autostart on the R1 side.
d. If the RDF mode is asynchronous, the action is not allowed unless both the R1 and R2 Symmetrix systems contain Enginuity 5875 or higher.
Table 50 TimeFinder/Clone operations for Split pair states
TimeFinder/Clone actionR1 copy source
R1 copy target
R2 copy source
R2 copy target
Create/Recreate ✔ ✔ ✔ b, c, d✔ a
Activate ✔ ✔ ✔ ✔ a
Establish ✔ ✔ ✔ b, c, d✔ a
Terminate ✔ ✔ ✔ ✔
Restore ✔ ✔ ✔ ✔ a
Split ✔ ✔ ✔ ✔ a
Table 51 TimeFinder/Clone operations for suspended pair states
TimeFinder/Clone actionR1 copy source
R1 copy target
R2 copy source
R2 copy target
Create/Recreate ✔ ✔ ✔ b, c, d✔ a
Activate ✔ ✔ ✔ ✔ a
Establish ✔ ✔ ✔ b, c, d✔ a
Terminate ✔ ✔ ✔ ✔
Restore ✔ ✔ ✔ ✔ a
Split ✔ ✔ ✔ ✔ a
EMC Solutions Enabler Symmetrix TimeFinder Family CLI Version 7.2 Product Guide352
SRDF State Rules Reference
Synchronized Table 52 identifies the symclone copy operations available for use when SRDF pairs are in the Synchronized pair state.
a. The force option (-force) must be applied.
b. Action is not allowed with CopyOnAccess.
Sync in progress Table 53 identifies the symclone copy operations available for use when SRDF pairs are in the SyncInProg pair state.
a. Action is not allowed if there are local R1 invalids or remote R2 invalids.
b. Action is not allowed if there are remote R1 invalids or local R2 invalids.
c. The force option (-force) must be applied.
d. Action is not allowed with CopyOnAccess.
e. If the precopy option is not applied, the action is not allowed if the RDF mode is asynchronous and the RDF pair is R21->R2 of a cascaded setup.
f. If the precopy option is not applied, the action is not allowed if the RDF mode is asynchronous and SRDF/A device pacing is not active and supported on the SRDF/A session.
Table 52 TimeFinder/Clone operations for synchronized pair states
TimeFinder/Clone ActionR1 copy source
R1 copy target
R2 copy source
R2 copy target
Create/Recreate ✔ ✔ a, b ✔
Activate ✔ ✔ a, b ✔
Establish ✔ ✔ a, b ✔
Terminate ✔ ✔ ✔ ✔
Restore ✔ ✔ a, b ✔
Split ✔ ✔ a, b ✔
Table 53 TimeFinder/Clone operations for SyncInProg pair states
TimeFinder/Clone actionR1 copy source
R1 copy target
R2 copy source
R2 copy target
Create/Recreate ✔ ✔ a, c, d ✔ e, f
Activate ✔ a ✔ a, c, d ✔ b
Establish ✔ a ✔ a, c, d ✔ b
Terminate ✔ ✔ ✔ ✔
Restore ✔ a ✔ a, c, d
Split ✔ ✔ a, c, d
353
SRDF State Rules Reference
Transmit Idle Table 54 identifies the symclone copy operations available for use when SRDF pairs are in the Transmit Idle pair state.
a. Action is not allowed if there are local R1 invalids or remote R2 invalids.
b. The precopy option (-precopy) must be applied for SRDF/A.
c. The force option (-force) must be applied.
Table 54 TimeFinder/Clone operations for Transmit Idle pair states
TimeFinder/Clone actionR1 copy source
R1 copy target
R2 copy source
R2 copy target
Create/Recreate ✔ ✔ ✔ b
Activate ✔ ✔ ✔ a
Establish ✔ ✔
Terminate ✔ ✔ ✔ ✔
Restore ✔ ✔ c
Split ✔ ✔
EMC Solutions Enabler Symmetrix TimeFinder Family CLI Version 7.2 Product Guide354
SRDF State Rules Reference
State rules for TimeFinder/Snap operationsThis section identifies what symsnap copy actions are available for use within each of the SRDF pair states.
Consistent Table 55 identifies the symsnap copy operations available for use when SRDF pairs are in the Consistent pair state.
a. Action is not allowed if there are local R1 invalids or remote R2 invalids.
b. The force option (-force) must be applied.
c. Action is not allowed if the RDF mode is asynchronous and the RDF pair is R21->R2 of a cascaded setup.
d. Action is not allowed if the RDF mode is asynchronous and SRDF/A device pacing is not active and supported on the SRDF/A session.
Failed Over Table 56 identifies the symsnap copy operations available for use when SRDF pairs are in the Failed Over pair state.
a. Action is not allowed if the RDF mode is asynchronous and the RDF pair is R21->R2 of a cascaded setup
b. Action is not allowed if the RDF mode is asynchronous and SRDF/A device pacing is not configured for autostart on the R1 side.
c. If the RDF mode is asynchronous, the action is not allowed unless both the R1 and R2 Symmetrix systems contain Enginuity 5875 or higher.
Table 55 TimeFinder/Snap operations for consistent pair states
TimeFinder/Snap actionR1 snap source
R1 snap target
R2 snap source
R2 snap target
Create/Recreate ✔ N/A ✔ c, d N/A
Activate ✔ a N/A ✔ N/A
Terminate ✔ N/A ✔ N/A
Incremental restore to source ✔ a, b N/A N/A
Incremental restore to a split BCV or full restore to any device
✔ N/A N/A
Table 56 TimeFinder/Snap operations for Failed Over pair states
TimeFinder/Snap ActionR1 snap source
R1 snap target
R2 snap source
R2 snap target
Create/Recreate ✔ N/A ✔ a, b, c N/A
Activate ✔ N/A ✔ N/A
Terminate ✔ N/A ✔ N/A
Incremental restore to source N/A ✔ N/A
Incremental restore to a split BCV or full restore to any device
✔ N/A ✔ N/A
355
SRDF State Rules Reference
Invalid Table 57 identifies the symsnap copy operations available for use when SRDF pairs are in the Invalid pair state.
PartitionedTable 58 identifies the symsnap copy operations available for use when SRDF pairs are in the Partitioned pair state.
R1 updated Table 59 identifies the symsnap copy operations available for use when SRDF pairs are in the R1 Updated pair state.
a. Action is not allowed if there are local R1 invalids or remote R2 invalids.
b. Action is not allowed if the R2 target is in asynchronous mode.
Table 57 TimeFinder/Snap operations for Invalid pair states
TimeFinder/Snap actionR1 snap source
R1 snap target
R2 snap source
R2 snap target
Create/Recreate N/A N/A
Activate N/A N/A
Terminate ✔ N/A ✔ N/A
Incremental restore to source N/A N/A
Incremental restore to a split BCV or full restore to any device
N/A N/A
Table 58 TimeFinder/Snap operations for Partitioned pair states
TimeFinder/Snap actionR1 snap source
R1 snap target
R2 snap source
R2 snap target
Create/Recreate ✔ N/A ✔ N/A
Activate ✔ N/A ✔ N/A
Terminate ✔ N/A ✔ N/A
Incremental restore to source ✔ N/A ✔ N/A
Incremental restore to a split BCV or full restore to any device
✔ N/A ✔ N/A
Table 59 TimeFinder/Snap operations for R1 Updated pair states
TimeFinder/Snap ActionR1 snap source
R1 snap target
R2 snap source
R2 snap target
Create/Recreate ✔ N/A ✔ c, d, e N/A
Activate ✔ a N/A ✔ N/A
Terminate ✔ N/A ✔ N/A
Incremental restore to source N/A ✔ b N/A
Incremental restore to a split BCV or full restore to any device
✔ a N/A ✔ b N/A
EMC Solutions Enabler Symmetrix TimeFinder Family CLI Version 7.2 Product Guide356
SRDF State Rules Reference
c. Action is not allowed if the RDF mode is asynchronous and the RDF pair is R21->R2 of a cascaded setup
d. Action is not allowed if the RDF mode is asynchronous and SRDF/A device pacing is not configured for autostart on the R1 side.
e. If the RDF mode is asynchronous, the action is not allowed unless both the R1 and R2 Symmetrix systems contain Enginuity 5875 or higher.
R1 update in progressTable 60 identifies the symsnap copy operations available for use when SRDF pairs are in the R1 UpdInProg pair state.
a. Action is not allowed if there are local R1 invalids or remote R2 invalids.
b. Action is not allowed if the R2 target is in asynchronous mode.
c. Action is not allowed if the RDF mode is asynchronous and the RDF pair is R21->R2 of a cascaded setup
d. Action is not allowed if the RDF mode is asynchronous and SRDF/A device pacing is not configured for autostart on the R1 side.
e. If the RDF mode is asynchronous, the action is not allowed unless both the R1 and R2 Symmetrix systems contain Enginuity 5875 or higher.
Split Table 50 identifies the symsnap copy operations available for use when SRDF pairs are in the Split pair state.
Table 60 TimeFinder/Snap operations for R1 UpdInProg pair states
TimeFinder/Snap actionR1 snap source
R1 snap target
R2 snap source
R2 snap target
Create/Recreate ✔ N/A ✔ c, d, e N/A
Activate ✔ a N/A ✔ N/A
Terminate ✔ N/A ✔ N/A
Incremental restore to source N/A ✔ b N/A
Incremental restore to a split BCV or full restore to any device
✔ a N/A ✔ b N/A
Table 61 TimeFinder/Snap operations for Split pair states
TimeFinder/Snap actionR1 snap source
R1 snap target
R2 snap source
R2 snap target
Create/Recreate ✔ N/A ✔ N/A
Activate ✔ N/A ✔ N/A
Terminate ✔ N/A ✔ N/A
Incremental restore to source ✔ N/A ✔ N/A
Incremental restore to a split BCV or full restore to any device
✔ N/A ✔ N/A
357
SRDF State Rules Reference
Suspended Table 62 identifies the symsnap copy operations available for use when SRDF pairs are in the Suspended pair state.
a. Action is not allowed if the RDF mode is asynchronous and the RDF pair is R21->R2 of a cascaded setup
b. Action is not allowed if the RDF mode is asynchronous and SRDF/A device pacing is not configured for autostart on the R1 side.
c. If the RDF mode is asynchronous, the action is not allowed unless both the R1 and R2 Symmetrix systems contain Enginuity 5875 or higher.
Table 62 TimeFinder/Snap operations for Suspended pair states
TimeFinder/Snap actionR1 snap source
R1 snap target
R2 snap source
R2 snap target
Create/Recreate ✔ N/A ✔ a, b, c N/A
Activate ✔ N/A ✔ N/A
Terminate ✔ N/A ✔ N/A
Incremental restore to source ✔ N/A ✔ N/A
Incremental restore to a split BCV or full restore to any device
✔ N/A ✔ N/A
EMC Solutions Enabler Symmetrix TimeFinder Family CLI Version 7.2 Product Guide358
SRDF State Rules Reference
Synchronized Table 63 identifies the symsnap copy operations available for use when SRDF pairs are in the Synchronized pair state.
a. The force option (-force) must be applied.
Sync in progress Table 64 identifies the symsnap copy operations available for use when SRDF pairs are in the SyncInProg pair state.
a. Action is not allowed if there are local invalids on the R1 side or remote invalids owed to the R1 on the R2 side.
b. Action is not allowed if there are remote invalids owed to the R2 on the R1 side or local invalids on the R2 side.
c. The force option (-force) must be applied.
d. Action is not allowed if the RDF mode is asynchronous and the RDF pair is R21->R2 of a cascaded setup.
e. Action is not allowed if the RDF mode is asynchronous and SRDF/A device pacing is not active and supported on the SRDF/A session.
Table 63 TimeFinder/Snap operations for Synchronized pair states
TimeFinder/Snap actionR1 snap source
R1 snap target
R2 snap source
R2 snap target
Create/Recreate ✔ N/A ✔ N/A
Activate ✔ N/A ✔ N/A
Terminate ✔ N/A ✔ N/A
Incremental restore to source ✔ a N/A ✔ N/A
Incremental restore to a split BCV or full restore to any device
✔ N/A ✔ N/A
Table 64 TimeFinder/Snap operations for SyncInProg pair states
TimeFinder/Snap actionR1 snap source
R1 snap target
R2 snap source
R2 snap target
Create/Recreate ✔ N/A ✔ d, e N/A
Activate ✔ a N/A ✔ b N/A
Terminate ✔ N/A ✔ N/A
Incremental restore to source ✔ a, c N/A N/A
Incremental restore to a split BCV or full restore to any device
✔ N/A ✔ N/A
359
SRDF State Rules Reference
Transmit IdleTable 65 identifies the symsnap copy operations available for use when SRDF pairs are in the Transmit Idle pair state.
a. Action is not allowed if the -consistent option was specified.
Table 65 TimeFinder/Snap operations for Transmit Idle pair states
TimeFinder/Snap actionR1 snap source
R1 snap target
R2 snap source
R2 snap target
Create/Recreate ✔ N/A N/A
Activate ✔ a N/A N/A
Terminate ✔ N/A N/A
Incremental restore to source ✔ a N/A N/A
Incremental restore to a split BCV or full restore to any device
✔ N/A N/A
EMC Solutions Enabler Symmetrix TimeFinder Family CLI Version 7.2 Product Guide360