Ohio Department of Health School and Adolescent Health
School Nursing Program
Project Staff
Angela Norton, MA; Program Administrator Dorothy Bystrom, RN, M.Ed.; School Nursing Program Supervisor
Ann Connelly, RN, MSN; School Nurse Consultant
Acknowledgements
Special thanks go to the following individuals for their outstanding contributions to the development and preparation of the Emergency Guidelines for Schools (EGS):
President; Ohio Chapter of the American Academy of Pediatrics
Ohio EMSC Grant Principal Investigator American Academy of Pediatrics Representative to the State Board of EMS
Christy Beeghly, MPH; Consultant We would also like to acknowledge the following for their contributions to the EGS development:
Staff at the Ohio Department of Public Safety, Division of Emergency Medical Services, EMS for Children (EMSC) Program
Members of the American Academy of Pediatrics, Ohio Chapter, Committee on Pediatric Emergency Medicine and the Ohio EMSC Committee
School nurses and other school personnel who took time to provide feedback on their use of the EGS so they could be improved for future users
The EMSC National Resource Center and other state EMSC programs that adopted the EGS and provided feedback
Original Project Staff - Ohio Department of Public Safety, Division of EMS
Original funding for this project included the Emergency Medical Services for Children Program, Health Resources and Services Administration, Maternal and Child Health Bureau, and the National Highway Traffic Safety Administration. Funding for the current edition was provided by the U.S. Department of Health & Human Services, Maternal and Child Health Bureau Grant # B04MC07800-01-00 and by the Centers for Disease Control (CDC) Bioterrorism Grant # U901CCU516983.
EMERGENCY GUIDELINES FOR SCHOOLS 3RD EDITION, 2007
Diana McMahon, RN, MSN; School Nurse Consultant – Emergency Preparedness
Wendy J. Pomerantz, MD, MS; Cincinnati Children's Hospital
William Cotton, MD; Columbus Children's Hospital
Emergency Guidelines for Schools, 2011 Florida Edition
January 2011
The Florida Emergency Medical Services for Children (EMSC) Program is pleased to provide the third edition of the Emergency Guidelines for Schools (EGS), a comprehensive and easy to use guide to handling a large variety of medical emergencies involving children.
The guidelines have been reviewed and endorsed by the Florida EMSC Advisory Committee; State EMSC Medical Advisor; Florida Department of Health, Bureau of Preparedness and Response; and the Florida Department of Education, Office of Safe Schools.
It is recommended that this book is placed in an area that is easily accessible and that all school staff is made aware of its availability. This important resource may serve as an essential tool to assist first responders with the principal steps necessary to achieve the best outcome when medical emergencies occur.
The EMSC Program is committed to providing useful resources and training to those who care for Florida’s children. You are encouraged to provide us with your comments regarding the Emergency Guidelines for Schools (EGS). Please feel free to contact any EMSC staff member at (850) 245-4440.
Permissions have been obtained from the Ohio Department of Health and the North Carolina Department of Health and Human Services for reproducing portions of this document, with modifications specific to Florida law and regulations.
Additional copies of the EGS can be downloaded and printed from the Florida Department of Health, Division of EMS at www.fl-ems.com – select EMS for Children.
Emergency Guidelines for Schools, 2011 Florida EditionEmergency Guidelines for Schools, 3rd edition
The Ohio Department of Health, School and Adolescent Health, in collaboration with the
(EMSC) program, and the Emergency Care Committee of the Ohio Chapter, American Academy of Pediatrics (AAP) have produced this third edition of the Emergency Guidelines for Schools (EGS). The initial EGS were field tested in seven school districts throughout Ohio in 1997 and revised based on school feedback. In March 2000, the EGS won the
to recognize a unique product designed to advance emergency medical services for children. To date, more than 35,000 copies of the EGS have been distributed in Ohio and thousands more throughout the United States, as they have been adapted for use in other states. The EGS were evaluated in spring 2000, and a second edition incorporated recommendations of school nurses and secretaries who used the book in their schools and completed the evaluation. This third edition is the result of careful review of content and changes in best practice recommendations for providing emergency care to students in Ohio schools.
serve as basic what-to-do-in-an-emergency information for school staff without nursing or medical training when the school nurse is not available. It is strongly recommended that staff who are in a position to provide first aid to students complete an approved first aid and CPR course. In order to perform CPR safely and effectively, skills should be practiced in the presence of a trained instructor. The EGS have been created as recommended procedures. It is not the intent of the EGS to supersede or make invalid any laws or rules established by a school system, a school board or the State of Ohio. Please consult your school nurse if you have questions about any of the recommendations. The document is three-hole punched so you may place it in a binder and add specific instructions for your school as needed. In a true emergency situation, use your best judgment.
ABOUT THE GUIDELINES
Ohio Department of Public Safety's (ODPS), Emergency Medical Services for Children
National EMSC Program's Innovation in Product Development Award. This award is given
Please take some time to familiarize yourself with the format and review the "How to Use the Guidelines" section prior to an emergency situation. The emergency guidelines are meant to
The EGS have been created as recommended procedures. It is not the intent of the EGS to supersede or make invalid any laws or rules established by a school system, a school board or the State of Florida. Please consult your school nurse if you have questions about any of the recommendations. In a true emergency situation, use your best judgment.
Section 381.0056, Florida Statute (F.S.) states that ”health services conducted as a part of the total school health program should be carried out to appraise, protect, and promote the health of children. School health services supplement, rather than replace, parental responsibility and are designed to encourage parents to devote attention to child health, to discover health problems, and to encourage use of the services of their physicians, dentists, and community health agencies” and that “In the absence of negligence, no person shall be liable for any injury caused by an act or omission in the administration of school health services.” Follow your agency’s guidelines related to medication administration and provision of health services to children attending your school or child care center.
Emergency Guidelines for Schools, 2011 Florida EditionEmergency Guidelines for Schools, 3rd edition
In an emergency, refer first to the guideline for treating the most severe symptom (e.g., unconsciousness, bleeding, etc.).
Learn when EMS (Emergency Medical Services) should be contacted. Copy
the When to Call EMS page and post in key locations. The back outside cover of the booklet contains important information about key
emergency numbers in your area. It is important to complete this information as soon as you receive the booklet as you will need to have this information ready in an emergency situation.
The guidelines are arranged with tabs in alphabetical order for quick access.
A colored flow chart format is
used to guide you easily through all steps and symptoms from beginning to ending. See the Key to Shapes and Colors.
Take some time to familiarize
yourself with the Emergency Procedures for Injury or Illness. These procedures give a general overview of the recommended steps in an emergency situation and the safeguards that should be taken.
In addition, information has
been provided about Infection Control, Planning for Students with Special Needs, Injury Reporting, School Safety Planning and Emergency Preparedness.
HOW TO USE THE EMERGENCY GUIDELINES
KEY TO SHAPES & COLORS
START Start here.
Provides first-aid instructions.FIRST AID
START & QUESTION
OR
QUESTION
STOP
NOTE
Asks a question. You will have a decision to make based on the student’s condition.
Stop here. This is the final instruction.
A note to provide background information. This type of box should be read before emergencies occur.
The back cover of the booklet contains important information about key emergency numbers in your area. It is important to complete this information as soon as you receive the booklet as you will need to have this information ready in an emergency situation.
Emergency Guidelines for Schools, 2011 Florida EditionEmergency Guidelines for Schools, 3rd edition
Call EMS if:
The child is unconscious, semi-conscious or unusually confused.
The child is not breathing.
The child is having difficulty breathing, shortness of breath or is choking.
The child has no pulse.
The child is coughing up or vomiting blood.
The child has been poisoned.
The child has a seizure for the first time or a seizure that lasts more than five minutes.
The child has injuries to the neck or back.
The child has sudden, severe pain anywhere in the body.
amputations or other injuries that may leave the child permanently disabled unless he/she receives immediate care).
the hospital.
Moving the child could cause further injury.
The child needs the skills or equipment of paramedics or emergency medical technicians.
Distance or traffic conditions would cause a delay in getting the child to the hospital.
If any of the above conditions exist, or if you are not sure, it is best to call EMS 9-1-1.
WHEN TO CALL EMERGENCY MEDICAL SERVICES (EMS) 9-1-1
The child's airway is blocked.
The child has bleeding that won' t stop.
The child's condition is limb-threatening (for example, severe eye injuries,
The child's condition could worsen or become life-threatening on the way to
Emergency Guidelines for Schools, 2011 Florida EditionEmergency Guidelines for Schools, 3rd edition
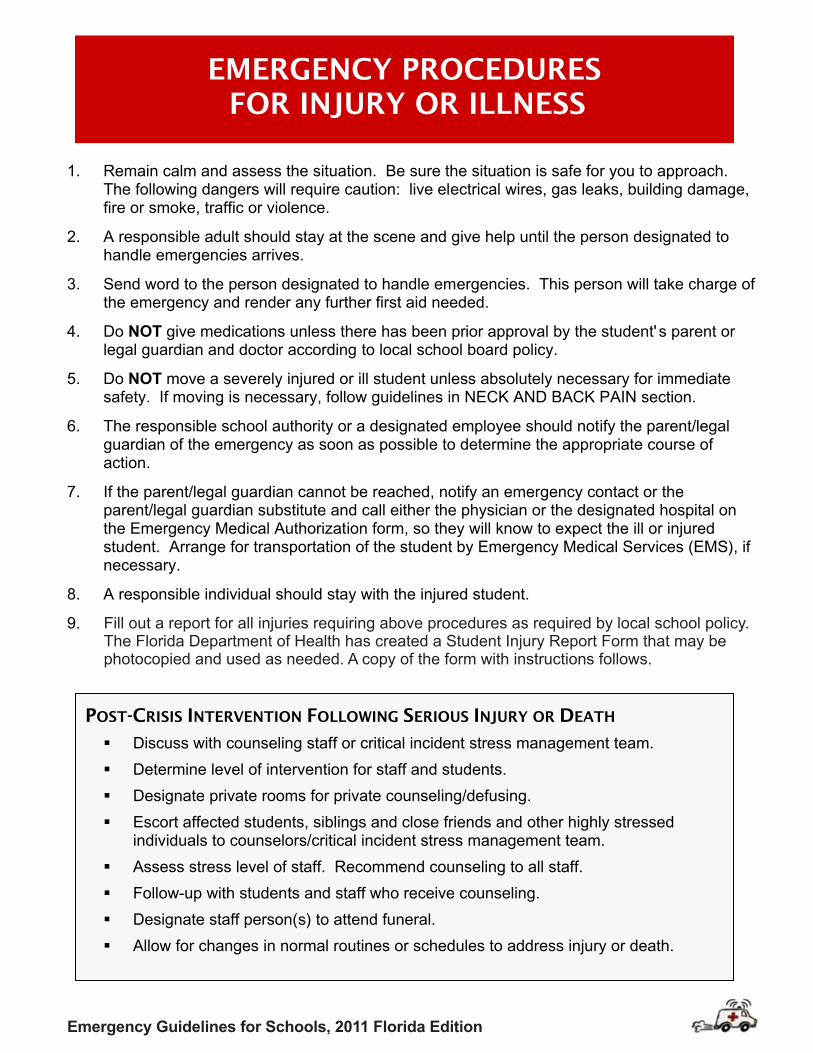
1. Remain calm and assess the situation. Be sure the situation is safe for you to approach.
The following dangers will require caution: live electrical wires, gas leaks, building damage, fire or smoke, traffic or violence.
2. A responsible adult should stay at the scene and give help until the person designated to handle emergencies arrives.
3. Send word to the person designated to handle emergencies. This person will take charge of the emergency and render any further first aid needed.
legal guardian and doctor according to local school board policy.
5. Do NOT move a severely injured or ill student unless absolutely necessary for immediate safety. If moving is necessary, follow guidelines in NECK AND BACK PAIN section.
6. The responsible school authority or a designated employee should notify the parent/legal guardian of the emergency as soon as possible to determine the appropriate course of action.
7. If the parent/legal guardian cannot be reached, notify an emergency contact or the parent/legal guardian substitute and call either the physician or the designated hospital on the Emergency Medical Authorization form, so they will know to expect the ill or injured student. Arrange for transportation of the student by Emergency Medical Services (EMS), if necessary.
8. A responsible individual should stay with the injured student.
9. Fill out a report for all injuries requiring above procedures as required by local school policy. The Ohio Department of Health has created a Student Injury Report Form that may be photocopied and used as needed. A copy of the form with instructions follows.
EMERGENCY PROCEDURES
FOR INJURY OR ILLNESS
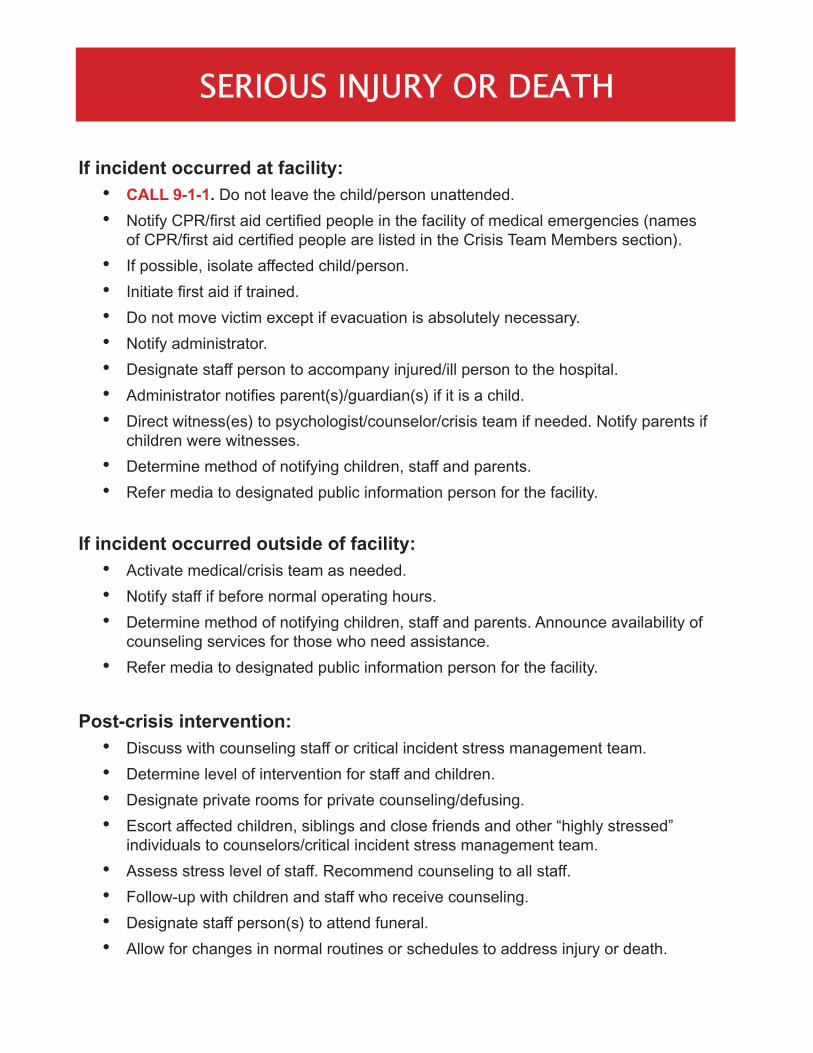
POST-CRISIS INTERVENTION FOLLOWING SERIOUS INJURY OR DEATH
Discuss with counseling staff or critical incident stress management team.
Determine level of intervention for staff and students.
Designate private rooms for private counseling/defusing.
Escort affected students, siblings and close friends and other highly stressed individuals to counselors/critical incident stress management team.
Assess stress level of staff. Recommend counseling to all staff.
Follow-up with students and staff who receive counseling.
Designate staff person(s) to attend funeral.
Allow for changes in normal routines or schedules to address injury or death.
4. Do NOT give medications unless there has been prior approval by the student' s parent or
Fill out a report for all injuries requiring above procedures as required by local school policy. The Florida Department of Health has created a Student Injury Report Form that may be photocopied and used as needed. A copy of the form with instructions follows.
Emergency Guidelines for Schools, 2011 Florida EditionEmergency Guidelines for Schools, 3rd edition
guidelines as an example for districts to use in tracking the occurrence of school-related injuries.
1.
2. The student seeks medical attention (health care provider office, urgent care center, emergency department).
3. EMS 9-1-1 is called.
Schools are encouraged to review and use the information collected on the injury report form to influence local policies and procedures as needed to remedy hazards.
INSTRUCTIONS
♦ Student, parent and school information: self-explanatory.
♦ Check the box to indicate the location and time the incident occurred.
♦ Check the box to indicate if equipment was involved; describe involved equipment. Indicate what type of surface was present where the injury occurred.
♦ Using the grid, check the body area(s) where the student was injured and indicate what type of injury occurred. Include all body areas and injuries that apply.
♦
♦ Provide a detailed description of the incident. Indicate any witnesses to the event and any staff members who were present. Attach another sheet if more room is needed.
♦ Incident response: include all areas that apply.
♦ Provide any further comments about this incident, including any suggestions for what might prevent this type of incident in the future.
♦ Sign the completed form.
♦ Route the form to the school nurse and the principal for review/signature.
♦ Original form and copies should be filed according to district policy.
STUDENT INJURY REPORT FORM GUIDELINES
Florida Department of Health
The Florida Department of Health (FDOH) provides the following Student Injury Report Form and
FDOH suggests completing the form when an injury leads to any of the following:
The student misses 1/2 day or more of school.
Check the appropriate box(es) for factors that may have contributed to the student' s injury.
A printer-friendly version of the form is available on the Florida Department of Health website (FDOH): http://www.doh.state.fl.us/demo - select Bureau of Emergency Medical Services (EMS), then EMS for Children.
STUDENT INJURY REPORT FORM Student Information Name______________________________________________ Date of Incident _________________________ Date of Birth ________________________________________ Time of Incident _________________________ Grade______________________________________________ Male Female Parent/Guardian Information Name(s) _________________________________________________________________________________________ Address __________________________________________________________________________________________ Phone # Work __________________________ Home ____________________________________ School Information School __________________________________________ Phone # _____________________________________ Principal__________________________________________ District __________________________________________ Phone # _____________________________________ Location of Incident (check appropriate box):
Athletic Field Playground Cafeteria No equipment involved Classroom Equipment involved (describe) _________________________ Gymnasium __________________________________________________ Hallway Bus Parking Lot Stairway Vocation/Shop Lab Restroom Other (explain):___________________________________________
When Did the Incident Occur (check appropriate box):
Recess Athletic Practice/Session: Field Trip Lunch Athletic Team Competition Unknown P.E. Class Intramural Competition Other _________________ In Class (not P.E.) Before School Class Change After School
Surface (check all that apply): Asphalt Dirt Lawn/Grass Wood Chips/Mulch Gymnasium Floor Carpet Gravel Mat(s) Tile Other (specify) ________ Concrete Ice/Snow Sand Synthetic Surface Type of Injury (check all that apply):
Contributing Factors (check all that apply): Animal Bite Overextension/Twisted Contact with Hot or Toxic Substance Collision with Object Foreign Body/Object Drug, Alcohol or Other Substance Involved Collision with Person Hit with Thrown Object Weapon Compression/Pinch Tripped/Slipped Specify__________________________ Fall Struck by Object (bat, swing, etc.) Unknown Fighting Struck by Auto, Bike, etc. Other _____________________________
Description of the Incident:_________________________________________________________________________ ____________________________________________________________________________________________________________________________________________________________________________________________________________________________________________________________________________________________________________________________________________________________________________________________________ Witnesses to the Incident: __________________________________________________________________________ _________________________________________________________________________________________________ Staff involved: Teacher Nurse Principal Assistant Staff Custodian Bus Driver
Secretary Cafeteria Other (specify)___________________________________________ Incident Response (check all that apply):
First Aid Time____________ By Whom_________________________________________
Parent/Guardian Notified Time____________ By Whom_________________________________________
Unable to Contact Parent/Guardian Time____________ By Whom_________________________________________
Parents Deemed No Medical Action Necessary Returned to Class Sent/Taken Home
Days of School Missed ________________ Assessment/Follow-up by School Nurse
Action Taken __________________________________________________________________ Called 9-1-1 Taken to Health Care Provider/Clinic/Hospital/Urgent Care
Diagnosis_____________________________________________________________________ Days of School Missed ________________
Hospitalized Diagnosis_____________________________________________________________________ Days of School Missed ________________
Restricted School Activity Explain_______________________________________________________________________ Length of Time Restricted ______________ Days of School Missed ________________
Other___________________________________________________________________________________ Describe care provided to the student: _________________________________________________________________ ___________________________________________________________________________________________________________________________________________________________________________________________________________________________________________________________________________________________________ _________________________________________________________________________________________________ Additional Comments:_______________________________________________________________________________ __________________________________________________________________________________________________________________________________________________________________________________________________ _________________________________________________________________________________________________ Signature of Staff Member Completing Form________________________________ Date/time_________________
Emergency Guidelines for Schools, 2011 Florida Edition
Some students in your school may have special emergency care needs due to health conditions, physical
disaster planning.
HEALTH CONDITIONS:
PHYSICAL ABILITIES:
COMMUNICATION CHALLENGES:
Other students in your school may have sensory impairments or have difficulty understanding special instructions during an emergency. For example, students who have:
Vision impairments Hearing impairments Processing disorders Limited English proficiency Behavior or developmental disorders Emotional or mental health issues
These students may need special communication considerations in the event of a school-wide emergency. All staff should be aware of plans to communicate information to these students.
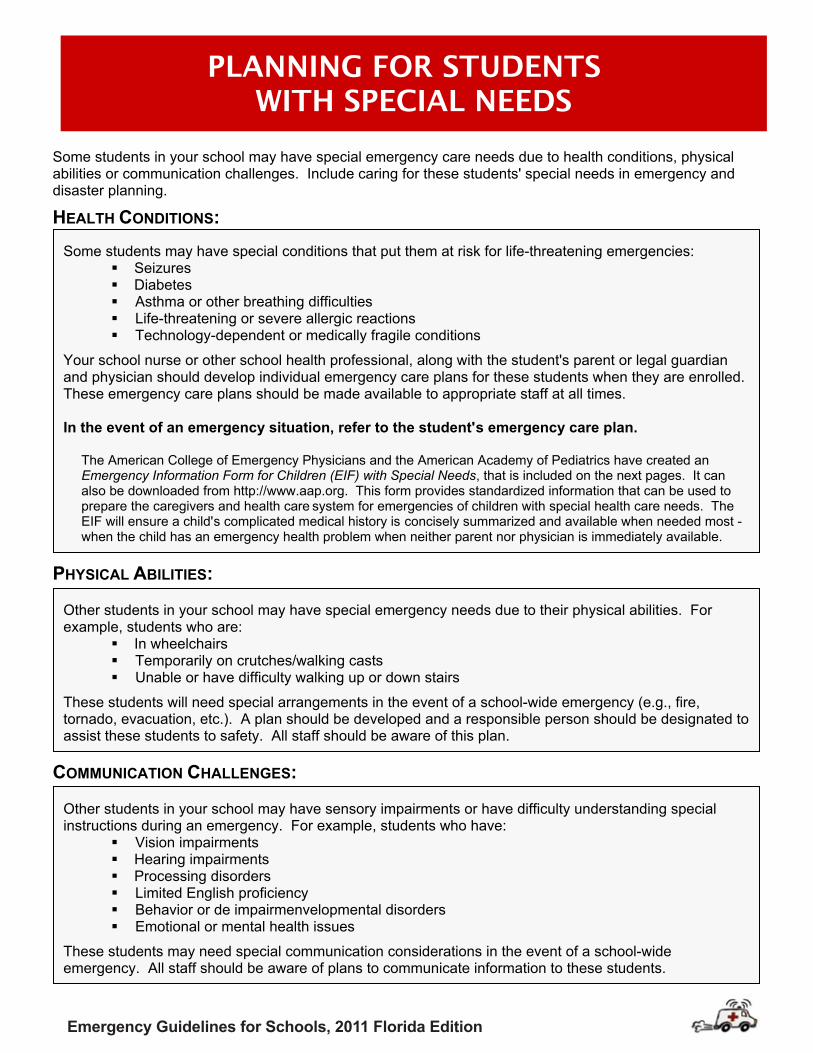
Some students may have special conditions that put them at risk for life-threatening emergencies: Seizures Diabetes Asthma or other breathing difficulties Life-threatening or severe allergic reactions Technology-dependent or medically fragile conditions
Your school nurse or other school health professional, along with the student�s parent or legal guardian and physician should develop individual emergency care plans for these students when they are enrolled. These emergency care plans should be made available to appropriate staff at all times.
The American College of Emergency Physicians and the American Academy of Pediatrics have created an Emergency Information Form for Children (EIF) with Special Needs, that is included on the next pages. It can also be downloaded from http://www.aap.org. This form provides standardized information that can be used to prepare the caregivers and health care system for emergencies of children with special health care needs. The
when the child has an emergency health problem when neither parent nor physician is immediately available.
Other students in your school may have special emergency needs due to their physical abilities. For example, students who are:
In wheelchairs Temporarily on crutches/walking casts Unable or have difficulty walking up or down stairs
These students will need special arrangements in the event of a school-wide emergency (e.g., fire, tornado, evacuation, etc.). A plan should be developed and a responsible person should be designated to assist these students to safety. All staff should be aware of this plan.
PLANNING FOR STUDENTS WITH SPECIAL NEEDS
abilities or communication challenges. Include caring for these students' special needs in emergency and
In the event of an emergency situation, refer to the student's emergency care plan.
EIF will ensure a child's complicated medical history is concisely summarized and available when needed most -
Some students in your school may have special emergency care needs due to health conditions, physical
disaster planning.
HEALTH CONDITIONS:
PHYSICAL ABILITIES:
COMMUNICATION CHALLENGES:
Other students in your school may have sensory impairments or have difficulty understanding special instructions during an emergency. For example, students who have:
Vision impairments Hearing impairments Processing disorders Limited English proficiency Behavior or de impairmenvelopmental disorders Emotional or mental health issues
These students may need special communication considerations in the event of a school-wide emergency. All staff should be aware of plans to communicate information to these students.
Some students may have special conditions that put them at risk for life-threatening emergencies: Seizures Diabetes Asthma or other breathing difficulties Life-threatening or severe allergic reactions Technology-dependent or medically fragile conditions
Your school nurse or other school health professional, along with the student's parent or legal guardian and physician should develop individual emergency care plans for these students when they are enrolled. These emergency care plans should be made available to appropriate staff at all times.
The American College of Emergency Physicians and the American Academy of Pediatrics have created an Emergency Information Form for Children (EIF) with Special Needs, that is included on the next pages. It can also be downloaded from http://www.aap.org. This form provides standardized information that can be used to prepare the caregivers and health care system for emergencies of children with special health care needs. The
when the child has an emergency health problem when neither parent nor physician is immediately available.
Other students in your school may have special emergency needs due to their physical abilities. For example, students who are:
In wheelchairs Temporarily on crutches/walking casts Unable or have difficulty walking up or down stairs
These students will need special arrangements in the event of a school-wide emergency (e.g., fire, tornado, evacuation, etc.). A plan should be developed and a responsible person should be designated to assist these students to safety. All staff should be aware of this plan.
PLANNING FOR STUDENTS WITH SPECIAL NEEDS
abilities or communication challenges. Include caring for these students' special needs in emergency and
In the event of an emergency situation, refer to the student's emergency care plan.
EIF will ensure a child's complicated medical history is concisely summarized and available when needed most -
Emergency Information Form for Children With Special Needs
Emergency Guidelines for Schools, 2011 Florida Edition
Emergency Guidelines for Schools, 3rd edition
To reduce the spread of infectious diseases (diseases that can be spread from one person to another), it is important to follow universal precautions. Universal precautions are a set of guidelines that assume all blood and certain other body fluids are potentially infectious. It is important to follow universal precautions when providing care to any student, whether or not the student is known to be infectious. The following list describes universal precautions:
• Wash hands thoroughly with running water and soap for at least 15 seconds:
1. Before and after physical contact with any student (even if gloves have been worn). 2. Before and after eating or handling food. 3. After cleaning. 4. After using the restroom. 5. After providing any first aid.
Be sure to scrub between fingers, under fingernails and around the tops and palms of hands. If soap and water are not available, an alcohol-based waterless
• Wear disposable gloves when in contact with blood and other body fluids.
• Wear protective eyewear when body fluids may come in contact with eyes (e.g., squirting blood).
• Wipe up any blood or body fluid spills as soon as possible (wear disposable gloves). Double bag the trash in plastic bags and dispose of immediately. Clean the area with an appropriate cleaning solution.
• Send soiled clothing (i.e., clothing with blood, stool or vomit) home with the student in a double-bagged plastic bag.
• Do not touch your mouth or eyes while giving any first aid.
INFECTION CONTROL
GUIDELINES FOR STUDENTS: • Remind students to wash hands thoroughly after coming in contact with
their own blood or body fluids.
• fluids.
hand sanitizer may be used according to manufacturer's instructions.
Remind students to avoid contact with another person's blood or body
Emergency Guidelines for Schools, 2011 Florida Edition
AEDs are devices that help to restore a normal heart rhythm by delivering an electric shock to the heart after detecting a life-threatening irregular rhythm. AEDs are not substitutes for CPR, but are designed to increase the effectiveness of basic life support when integrated into the CPR cycle.
AEDs are safe to use for children as young as age 1, according to the American Heart Association
pads. Do not use the child pads or energy doses for adults in cardiac arrest. If your school has an AED, obtain training in its use before an emergency occurs, and follow any local school policies and
American Heart Association Guidelines for AED/CPR Integration*
For a sudden, witnessed collapse in a child, use the AED first. Prepare AED to check heart rhythm and deliver 1 shock as necessary. Then, immediately begin 30 CPR chest compressions followed by 2 normal rescue breaths. Complete 5 cycles of CPR (30 compressions to 2 breaths). Then prompt another AED assessment and shock. Continue with cycles of 2 minutes CPR to 1 AED rhythm check.
For unwitnessed cardiac arrest, start CPR first. Continue for 5 cycles or about 2 minutes. Then prepare the AED to check the heart rhythm and deliver a shock as needed. Continue with cycles of 2 minutes CPR to 1 AED rhythm check.
*Currents in Emergency Cardiovascular Care, American Heart Association, Winter 2005-2006.
AUTOMATIC ELECTRONIC DEFIBRILLATOR (AEDS)
pads/child system for children 1-8 years if available. If child system is not available, use adult AED and (AHA).* Some AEDs are capable of delivering a "child" energy dose through smaller child pads. Use child
manufacturer' s instructions. The location of AEDs should be known to all school personnel.
Florida Statute (F.S.) References Related to AEDs Section 401.2915 Automated External Defibrillators- It is the intent of the Legislature that an automated external defibrillator may be used by any person for the purpose of saving the life of another person in cardiac arrest. In order to achieve that goal, the Legislature intends to encourage training in lifesaving first aid and set standards for and encourage the use of automated external defibrillators.
(1) As used in this section, the term:(a) “Automated external defibrillator” means a device as defined in s. 768.1325(2)(b).(b) “Defibrillation” means the administration of a controlled electrical charge to the heart to restore a
viable cardiac rhythm.
(2) In order to promote public health and safety:(a) All persons who use an automated external defibrillator are encouraged to obtain appropriate
training, to include completion of a course in cardiopulmonary resuscitation or successful completion of a basic first aid course that includes cardiopulmonary resuscitation training, and demonstrated proficiency in the use of an automated external defibrillator.
(b) Any person or entity in possession of an automated external defibrillator is encouraged to notify the local emergency medical services medical director of the location of the automated external defibrillator.
(c) Any person who uses an automated external defibrillator shall activate the emergency medical services system as soon as possible upon use of the automated external defibrillator.
(3) Any person who intentionally or willfully:(a) Tampers with or otherwise renders an automated external defibrillator inoperative, except during
such time as the automated external defibrillator is being serviced, tested, repaired, recharged, or inspected or except pursuant to court order; or
(b) Obliterates the serial number on an automated external defibrillator for purposes of falsifying service records,commits a misdemeanor of the first degree, punishable as provided in s. 775.082 or s. 775.083. Paragraph (a) does not apply to the owner of the automated external defibrillator or the owner’s authorized representative or agent.
(4) Each local and state law enforcement vehicle may carry an automated external defibrillator.
*American Heart Association 2010 Guidelines for CPR and Emergency Cardiovascular Care.
AEDs are safe to use for children of all ages, according to the American Heart Association (AHA).* Some AEDs are capable of delivering a “child” energy dose through smaller child pads. Use child pads/child system for children 1-8 years if available. If child system is not available, use adult AED and pads. Do not use the child pads or energy doses for adults in cardiac arrest. If your school has an AED, obtain training in its use before an emergency occurs, and follow any local school policies and manufacturer’s instructions. The location of AEDs should be known to all school personnel.
AUTOMATIC EXTERNAL DEFIBRILLATORS (AEDS) FOR CHILDREN OVER 1 YEAR OF AGE & ADULTS
CPR and AEDs are to be used when a person is unresponsive or when breathing or heart beat stops. If your school has an AED, this guideline will refresh information provided in training courses as to incorporating AED use into CPR cycles.
2.
3. follow the verbal instructions provided. Incorporate AED into CPR cycles according to instructions and training method.
. IF CARDIAC ARREST OR COLLAPSE WAS WITNESSED:
4. Use the AED first.
5. Prepare AED to check heart rhythm and deliver 1 shock as necessary.
6. Begin 30 CPR chest compressions followed by 2 normal rescue breaths. See age-appropriate CPR guideline.
7. Complete 5 cycles of CPR (30 chest compressions to 2 breaths at a rate of 100 compressions per minute).
8. Prompt another AED rhythm check.
9. Rhythm checks should be performed after every 2 minutes (about 5 cycles) of CPR.
10. REPEAT CYCLES OF 2 MINUTES OF CPR TO 1 AED RHYTHM CHECK UNTIL VICTIM RESPONDS OR HELP ARRIVES.
IF CARDIAC ARREST OR COLLAPSE WAS NOT WITNESSED:
4. Start CPR first. See age appropriate CPR guideline. Continue for 5 cycles or about 2 minutes of 30 chest compressions to 2 breaths at a rate of 100 compressions per minute.
5. Prepare the AED to check the heart
rhythm and deliver a shock as needed.
6. REPEAT CYCLES OF 2 MINUTES OF CPR TO 1 AED RHYTHM CHECK UNTIL VICTIM RESPONDS OR HELP ARRIVES.
1. Tap or gently shake the shoulder. Shout, "Are you OK?" If person is unresponsive, shout for help
years and adults).
and send someone to CALL EMS and get your school's AED if available.
Follow primary steps for CPR (see "CPR" for appropriate age group – infant, 1-8 years, over 8
If available, set up the AED according to the manufacturer' s instructions. Turn on the AED and
CPR and AEDs are to be used when a person is unresponsive or when breathing or heart beat stops. If your school has an AED, this guideline will refresh information provided in training courses as to incorporating AED use into CPR cycles.
2.
3. follow the verbal instructions provided.
. IF CARDIAC ARREST OR COLLAPSE WAS WITNESSED:
4. Use the AED first.
5. Prepare AED to check heart rhythm and deliver 1 shock as necessary.
6. Begin 30 CPR chest compressions followed by 2 normal rescue breaths. See age-appropriate CPR guideline.
7. Complete 5 cycles of CPR (30 chest compressions to 2 breaths at a rate of at least 100 compressions per minute).
8. Prompt another AED rhythm check.
9. Rhythm checks should be performed after every 2 minutes (about 5 cycles) of CPR.
10. REPEAT CYCLES OF 2 MINUTES OF CPR TO 1 AED RHYTHM CHECK UNTIL VICTIM RESPONDS OR HELP ARRIVES.
IF CARDIAC ARREST OR COLLAPSE WAS NOT WITNESSED:
4. Start CPR first. See age appropriate CPR guideline. Continue for 5 cycles or about 2 minutes of 30 chest compressions to 2 breaths at a rate of at least 100 compressions per minute.
5. Prepare the AED to check the heart
rhythm and deliver a shock as needed.
6. REPEAT CYCLES OF 2 MINUTES OF CPR TO 1 AED RHYTHM CHECK UNTIL VICTIM RESPONDS OR HELP ARRIVES.
1. Tap or gently shake the shoulder. Shout, "Are you OK?" If person is unresponsive, shout for help
years and adults).
and send someone to CALL EMS and get your school's AED if available.
Follow primary steps for CPR (see "CPR" for appropriate age group – infant, 1-8 years, over 8
If available, set up the AED according to the manufacturer' s instructions. Turn on the AED and
AUTOMATIC EXTERNAL DEFIBRILLATORS (AEDS)
Emergency Guidelines for Schools, 2011 Florida Edition
Emergency Guidelines for Schools, 3rd edition
ALLERGIC REACTIONStudents with life-
threatening allergies should be known to
appropriate school staff. An emergency care
plan should be developed. Staff in a position to administer approved medications
should receive instruction.
Children may experience a delayed allergic reaction up
to 2 hours following food ingestion, bee sting, etc.
Does the student have any symptoms of a severe allergic reaction which may include:
Check student’s airway. Look, listen and feel for breathing. If student stops breathing, start CPR. See "CPR."
Symptoms of a mild allergic reaction include:
Red, watery eyes.Itchy, sneezing, runny nose.Hives or rash on one area.
Adult(s) supervising student during normal activities should
be aware of the student’s exposure and should watch for
any delayed symptoms of a severe allergic reaction (see
above) for up to 2 hours.
If student is so uncomfortable that
he/she is unable to participate in school
activities, contact responsible school authority & parent or legal guardian.
CALL EMS 9-1-1.Contact responsible school authority &
parent or legal guardian.
Follow school policies for students with
severe allergic reactions. Continue CPR if needed.
Does student have an emergency care plan available?
Refer to student’s plan. Administer doctor-and
parent/guardian-approved medication as indicated.
NO
YESNO
YES
Hives all over body?Blueness around mouth, eyes?Difficulty breathing?Drooling or difficulty swallowing?Loss of consciousness?
Emergency Guidelines for Schools, 2011 Florida Edition
Emergency Guidelines for Schools, 3rd edition
CALL EMS 9-1-1.
CALL EMS 9-1-1.
ASTHMA - WHEEZING - DIFFICULTY BREATHING
A student with asthma/wheezing may have breathing difficulties which may include:
Uncontrollable coughing. Wheezing - a high-pitched sound during breathing out.Rapid breathing.Flaring (widening) of nostrils.Feeling of tightness in the chest.Not able to speak in full sentences.Increased use of stomach and chest muscles during breathing.
�������
Refer to student’s emergency care plan.
Administer medication as
directed.
Remain calm. Encourage the student to sit quietly, breathe slowly and deeply in through the
nose and out through the mouth.
Did breathing difficulty develop rapidly?Are the lips, tongue or nail beds turning blue?
��
Contact responsible
school authority & parent/legal
guardian.
Does student have doctor-and parent/guardian- approved medication?
Are symptoms not improving or getting worse?
Has an inhaler already been used? If yes, when and how often?
YES
NO
YES
YES
YES
NO NO
NO
Students with a history of breathing difficulties including asthma/wheezing should be known to appropriate school
staff. A care plan which includes an emergency action plan
should be developed. Section 1002.20 (3)(h), Florida Statutes
(F.S.), provides the authority for students with asthma to
carry a metered dose inhaler in the school setting, if parents provide written permission and a physician’s order. Staff must try to remain calm despite the
student’s anxiety. Staff in a position to administer approved
medications should receive instruction.
Emergency Guidelines for Schools, 2011 Florida Edition
Emergency Guidelines for Schools, 3rd edition
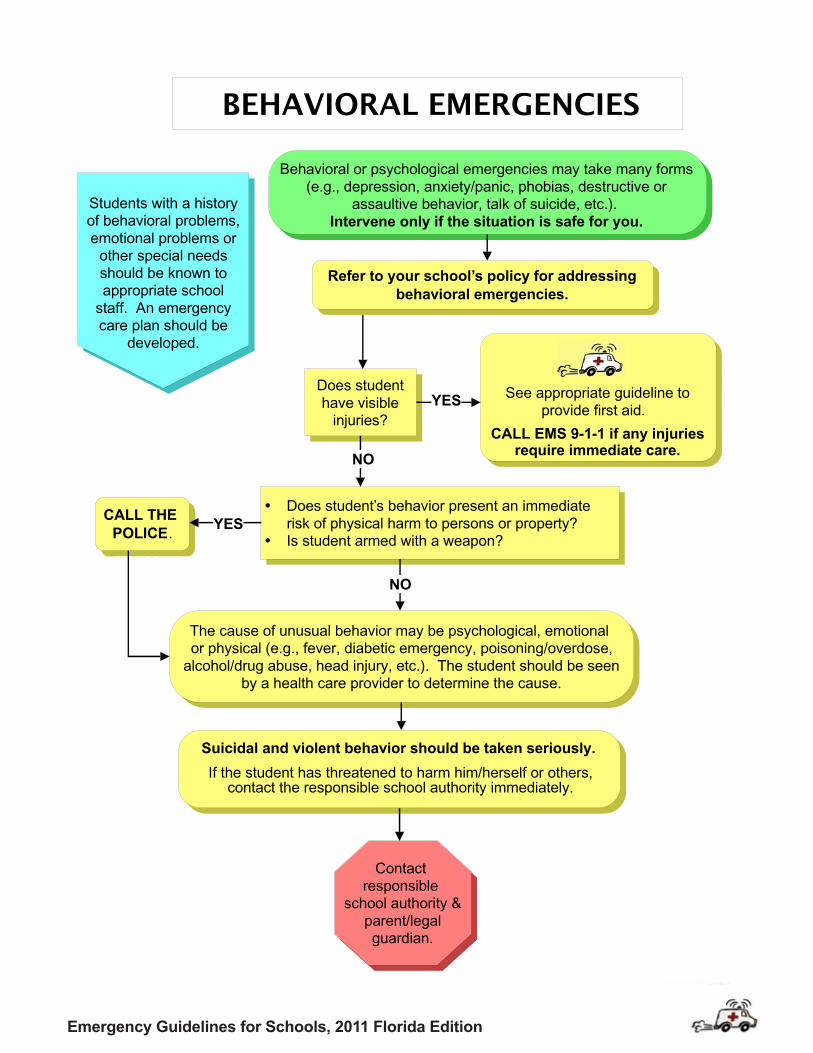
BEHAVIORAL EMERGENCIES
.
Behavioral or psychological emergencies may take many forms (e.g., depression, anxiety/panic, phobias, destructive or
assaultive behavior, talk of suicide, etc.). Intervene only if the situation is safe for you.
Students with a history of behavioral problems, emotional problems or
other special needs should be known to appropriate school
staff. An emergency care plan should be
developed.
CALL THE POLICE.
See appropriate guideline to provide first aid.
.
CALL EMS 9-1-1 if any injuries require immediate care.
Does student’s behavior present an immediate risk of physical harm to persons or property?
Is student armed with a weapon?
The cause of unusual behavior may be psychological, emotional or physical (e.g., fever, diabetic emergency, poisoning/overdose,
alcohol/drug abuse, head injury, etc.). The student should be seen by a health care provider to determine the cause.
Suicidal and violent behavior should be taken seriously. .
If the student has threatened to harm him/herself or others, contact the responsible school authority immediately.
Contact responsible
school authority & parent/legal guardian.
Does student have visible
injuries?YES
NO
YES
NO
Refer to your school’s policy for addressing behavioral emergencies.
Emergency Guidelines for Schools, 3rd edition
BEHAVIORAL EMERGENCIES
.
Behavioral or psychological emergencies may take many forms (e.g., depression, anxiety/panic, phobias, destructive or
assaultive behavior, talk of suicide, etc.). Intervene only if the situation is safe for you.
Students with a history of behavioral problems, emotional problems or
other special needs should be known to appropriate school
staff. An emergency care plan should be
developed.
CALL THE POLICE.
See appropriate guideline to provide first aid.
.
CALL EMS 9-1-1 if any injuries require immediate care.
Does student’s behavior present an immediate risk of physical harm to persons or property?
Is student armed with a weapon?
The cause of unusual behavior may be psychological, emotional or physical (e.g., fever, diabetic emergency, poisoning/overdose,
alcohol/drug abuse, head injury, etc.). The student should be seen by a health care provider to determine the cause.
Suicidal and violent behavior should be taken seriously. .
If the student has threatened to harm him/herself or others, contact the responsible school authority immediately.
Contact responsible
school authority & parent/legal guardian.
Does student have visible
injuries?YES
NO
YES
NO
Refer to your school’s policy for addressing behavioral emergencies.
Emergency Guidelines for Schools, 2011 Florida Edition
Emergency Guidelines for Schools, 3rd edition
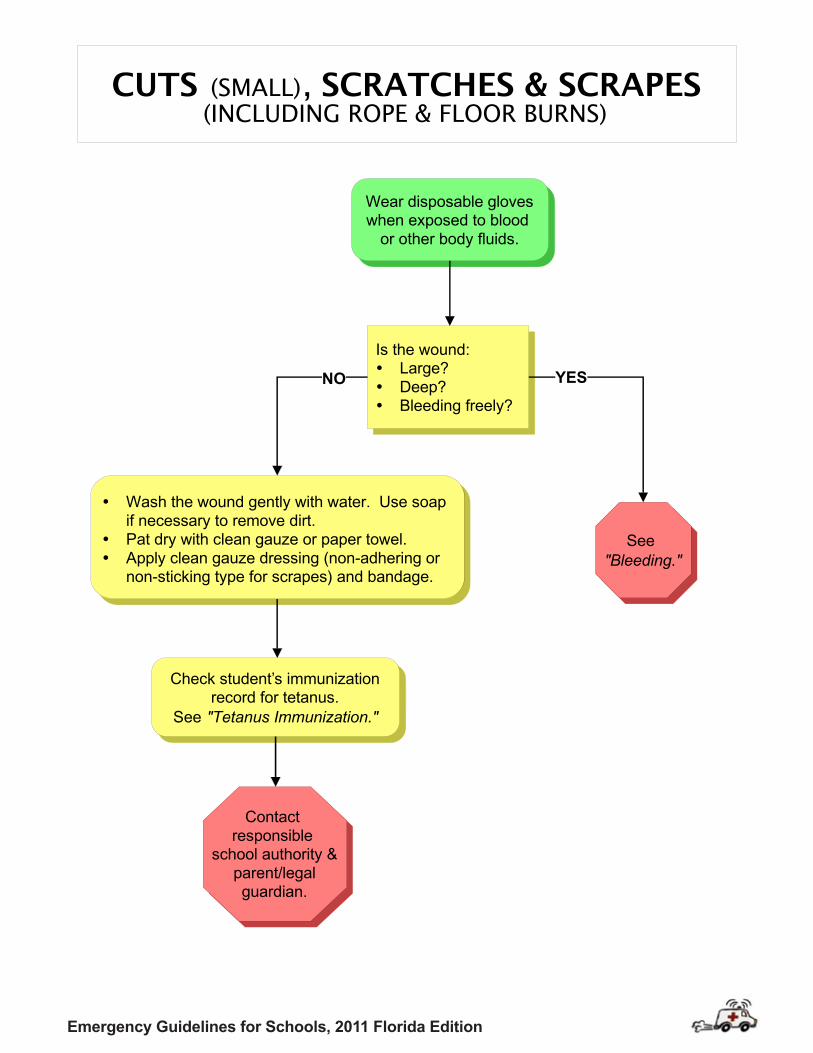
BITES (HUMAN & ANIMAL)
Wash the bite area with soap and water.
Wear disposable gloves when exposed to blood
or other body fluids.
Is student bleeding?
Hold under running water for 2-3 minutes.
Check student’s immunization record for tetanus. See "Tetanus Immunization."
Press firmly with a clean dressing. See "Bleeding."
Is bite from an animal or human?
If skin is broken, contact responsible school authority
& parent/legal guardian. .
URGE IMMEDIATE MEDICAL CARE.
Parents/legal guardians of the student
who was bitten and the student who was biting should be
notified that their student may have been exposed to blood
from another student. Individual confidentiality must be
maintained when sharing information.
If bite is from a snake, hold the bitten area still and below the
level of the heart.
CALL POISON CONTROL 1-800-222-1222
Follow their directions.
Is bite large or gaping?Is bleeding uncontrollable?
Bites from the following animals can carry rabies and may need medical attention:
Dog. Opossum. Raccoon. Coyote.
Bat.Skunk.Fox.Cat.
CALL EMS9-1-1.
Contact responsible school authority &
parent/legal guardian.
Report bite to proper authorities,
usually the local health department, so the
animal can be caught and watched
for rabies.
NO
YES
NO
HUMAN
ANIMAL
YES
Emergency Guidelines for Schools, 2011 Florida Edition
Emergency Guidelines for Schools, 3rd edition
BLEEDINGCheck student’s
immunization record for tetanus. See
"Tetanus Immunization."Wear disposable gloves when exposed to blood or other body fluids.
Is injured part amputated (severed)?
CALL EMS 9-1-1.
Place detached part in a plastic bag.Tie bag.Put bag in a container of ice water.Do NOT put amputated part directly on ice..
Send bag to the hospital with student.
Press firmly with a clean bandage to stop bleeding.Elevate bleeding body part gently. If fracture is suspected, gently support part and elevate.Bandage wound firmly without interfering with circulation to the body part. .Do NOT use a tourniquet.
Is there continued uncontrollable bleeding?
If wound is gaping, student may need stitches. Contact
responsible school authority & parent or legal guardian.
.
URGE MEDICAL CARE.
Contact responsible
school authority & parent or legal
guardian.
Have student lie down. Elevate student’s feet 8-10 inches unless this causes the student pain or discomfort or a neck/back injury is suspected.Keep student’s body temperature normal.Cover student with a blanket or sheet.
CALL EMS 9-1-1.
NO YES
NO
YES
Emergency Guidelines for Schools, 2011 Florida Edition
Emergency Guidelines for Schools, 3rd edition
most recent draft EGS 122006.igx
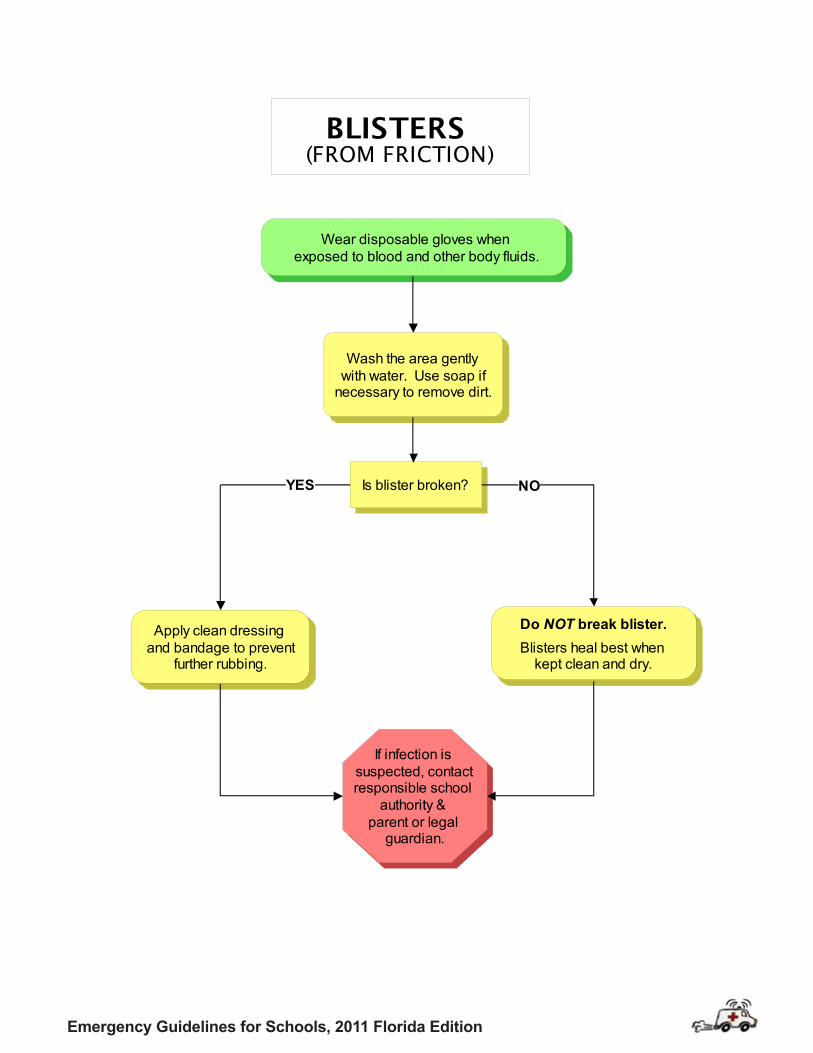
BLISTERS (FROM FRICTION)
Wear disposable gloves when exposed to blood and other body fluids.
Wash the area gently with water. Use soap if
necessary to remove dirt.
Is blister broken?
Do NOT break blister..
Blisters heal best when kept clean and dry.
If infection is suspected, contact responsible school
authority & parent or legal
guardian.
Apply clean dressing and bandage to prevent
further rubbing.
NOYES
Emergency Guidelines for Schools, 2011 Florida Edition
Emergency Guidelines for Schools, 3rd edition
BRUISES
If student comes to school with unexplained,
unusual or frequent bruising, consider the
possibility of child abuse. See "Child Abuse. "
Is bruise deep in the muscle?Is there rapid swelling?Is student in great pain?
Rest injured part.
Apply cold compress or ice bag, covered with a cloth or paper towel, for 20 minutes.
If skin is broken, treat as a cut. See "Cuts, Scratches
& Scrapes."
Contact responsible school authority & parent
or legal guardian.
YES
NO
Emergency Guidelines for Schools, 2011 Florida Edition
Emergency Guidelines for Schools, 3rd edition
If student comes to school with pattern burns (e.g., iron or cigarette shape) or glove-like burns,
consider the possibility of child abuse. See
"Child Abuse."
BURNS
Always make sure the situation is safe for you
before helping the student.
What type of burn is it?
Is student unconscious or unresponsive?
Flush the burn with large amounts of cool
running water or cover it with a clean, cool, wet cloth.
Do NOT use ice.
Wear gloves and if possible, goggles. Remove student’s clothing and jewelry if exposed to chemical. Rinse chemicals off skin, eyes IMMEDIATELY with large amounts of water. See "Eyes" if necessary. Rinse for 20-30 minutes.
CALL POISON CONTROL.
1-800-222-1222.
while flushing burn and follow instructions.
Is burn large or deep?Is burn on face or eye?Is student having difficulty breathing?Is student unconscious?Are there other injuries?
CALL EMS 9-1-1.
Cover/wrap burned part loosely with a
clean dressing.
Check student’s immunization record for tetanus.
See "Tetanus Immunization."
Contact responsible
school authority & parent or legal
guardian.
ELECTRICAL
NO
CHEMICAL
YES
HEAT
YES
NO
See "Electric Shock."
Emergency Guidelines for Schools, 3rd edition
The American Heart Association (AHA) issued new CPR guidelines for laypersons in 2010.* Other organizations such as the American Red Cross also offer CPR training classes. If the guidance in this book differs from the instructions you were taught, follow the methods you learned in your training class. In order to perform CPR safely and effectively, skills should be practiced in the presence of a trained instructor. It is a recommendation of these guidelines that anyone in a position to care for students should be properly trained in CPR.
Current first aid, choking and CPR manuals and wall chart(s) should also be available. The American Academy of Pediatrics offers the Pediatric First Aid for Caregivers and Teachers (PedFACTS) Resource Manual and 3-in-1 First Aid, Choking, CPR Chart for sale at http://www.aap.org.
CHEST COMPRESSIONS The AHA is placing more emphasis on the use of effective chest compressions in CPR. CPR chest compressions produce blood flow from the heart to the vital organs. To give effective compressions, rescuers should:
Follow revised guidelines for hand use and placement based on age. Use a compression to breathing ratio of 30 compressions to 2 breaths.
victims.
children. Allow the chest to return to its normal position between each compression. Use approximately equal compression and relaxation times. Limit interruptions.
BARRIER DEVICES
Barrier devices, to prevent the spread of infections from one person to another, can be used when performing rescue breathing. Several different types (e.g., face shields, pocket masks) exist. It is important to learn and practice using these devices in the presence of a trained CPR instructor before attempting to use them in an emergency situation. Rescue breathing technique may be affected by these devices.
*
NOTES ON PERFORMING CPR
Push hard and push fast. Compress chest at a rate of at least 100 compressions per minute for all
Compress at least 2 inches in adults and 1/3 the anterior-posterior chest diameter in infants and
Emergency Guidelines for Schools, 3rd edition
The American Heart Association (AHA) issued new CPR guidelines for laypersons in 2005.* Other organizations such as the American Red Cross also offer CPR training classes. If the guidance in this book differs from the instructions you were taught, follow the methods you learned in your training class. In order to perform CPR safely and effectively, skills should be practiced in the presence of a trained instructor. It is a recommendation of these guidelines that anyone in a position to care for students should be properly trained in CPR.
Current first aid, choking and CPR manuals and wall chart(s) should also be available. The American Academy of Pediatrics offers the Pediatric First Aid for Caregivers and Teachers (PedFACTS) Resource Manual and 3-in-1 First Aid, Choking, CPR Chart for sale at http://www.aap.org.
CHEST COMPRESSIONS The AHA is placing more emphasis on the use of effective chest compressions in CPR. CPR chest compressions produce blood flow from the heart to the vital organs. To give effective compressions, rescuers should:
Follow revised guidelines for hand use and placement based on age.
Use a compression to breathing ratio of 30 compressions to 2 breaths.
victims.
adults.
Allow the chest to return to its normal position between each compression.
Use approximately equal compression and relaxation times.
Try to limit interruptions in chest compressions.
BARRIER DEVICES
Barrier devices, to prevent the spread of infections from one person to another, can be used when performing rescue breathing. Several different types (e.g., face shields, pocket masks) exist. It is important to learn and practice using these devices in the presence of a trained CPR instructor before attempting to use them in an emergency situation. Rescue breathing technique may be affected by these devices.
*Currents in Emergency Cardiovascular Care, American Heart Association, Winter 2005-2006.
NOTES ON PERFORMING CPR
"Push hard and push fast." Compress chest at a rate of about 100 compressions per minute for all
Compress about 1/3 to 1/2 the depth of the chest for infants and children, and 1 1/2 to 2 inches for
CHOKING RESCUE- FLORIDA STATUTE (F.S.) REFERENCES
Section 509.213 Emergency first aid to choking victims.
(1) Every public food service establishment shall post a sign which illustrates and describes the Heimlich Maneuver procedure for rendering emergency first aid to a choking victim in a conspicuous place in the establishment accessible to employees.
(2) The establishment shall be responsible for familiarizing its employees with the method of rendering such first aid.
(3) This section shall not be construed to impose upon a public food service establishment or employee thereof a legal duty to render such emergency assistance, and any such establishment or employee shall not be held liable for any civil damages as the result of such act or omission when the establishment or employee acts as an ordinary reasonably prudent person would have acted under the same or similar circumstances.
*American Heart Association 2010 Guidelines for CPR and Emergency Cardiovascular Care.
Emergency Guidelines for Schools, 2011 Florida Edition
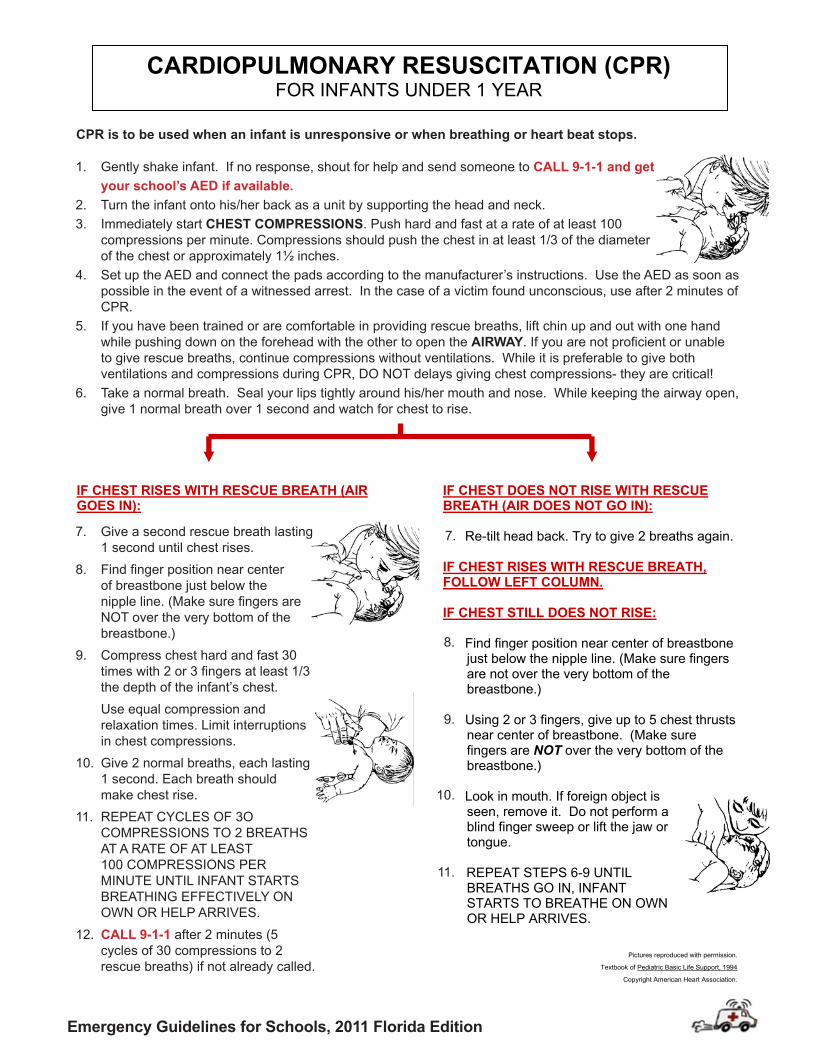
1. Gently shake infant. If no response, shout for help and send someone to CALL 9-1-1 and get
your school’s AED if available.
2. Turn the infant onto his/her back as a unit by supporting the head and neck.
3. Immediately start CHEST COMPRESSIONS. Push hard and fast at a rate of at least 100 compressions per minute. Compressions should push the chest in at least 1/3 of the diameter of the chest or approximately 1½ inches.
4. Set up the AED and connect the pads according to the manufacturer’s instructions. Use the AED as soon as possible in the event of a witnessed arrest. In the case of a victim found unconscious, use after 2 minutes of CPR.
5. If you have been trained or are comfortable in providing rescue breaths, lift chin up and out with one hand while pushing down on the forehead with the other to open the AIRWAY. If you are not proficient or unable to give rescue breaths, continue compressions without ventilations. While it is preferable to give both ventilations and compressions during CPR, DO NOT delays giving chest compressions- they are critical!
6. Take a normal breath. Seal your lips tightly around his/her mouth and nose. While keeping the airway open, give 1 normal breath over 1 second and watch for chest to rise.
Emergency Guidelines for Schools, 3rd edition
CPR is to be used when an infant is unresponsive or when breathing or heart beat stops. 1. Gently shake infant. If no response, shout for help and send someone to call EMS.
2. Turn the infant onto his/her back as a unit by supporting the head and neck.
3. Lift chin up and out with one hand while pushing down on the forehead with the other to open the AIRWAY.
movement, LISTEN for sounds of breathing and FEEL for breath on your cheek.
5. If infant is not breathing, take a normal breath. Seal your lips tightly around his/her mouth and nose. While keeping the airway open, give 1 normal breath over 1 second and watch for chest to rise.
IF CHEST RISES WITH RESCUE BREATH (AIR GOES IN): 6. Find finger position near center
of breastbone just below the nipple line. (Make sure fingers are NOT over the very bottom of the breastbone.)
7. Compress chest hard and fast 30
times with 2 or 3 fingers about 1/3 to
Use equal compression and relaxation times. Limit interruptions in chest compressions.
8. Give 2 normal breaths, each
lasting 1 second. Each breath should make chest rise.
9. REPEAT CYCLES OF 3O
COMPRESSIONS TO 2 BREATHS AT A RATE OF 100 COMPRESSIONS PER MINUTE UNTIL INFANT STARTS BREATHING EFFECTIVELY ON OWN OR HELP ARRIVES.
10. Call EMS after 2 minutes (5 cycles of 30
compressions to 2 rescue breaths) if not already called.
IF CHEST DOES NOT RISE WITH RESCUE BREATH (AIR DOES NOT GO IN):
6. Re-tilt head back. Try to give 2 breaths again. IF CHEST RISES WITH RESCUE BREATH, FOLLOW LEFT COLUMN. IF CHEST STILL DOES NOT RISE: 7. Find finger position near center of breastbone
just below the nipple line. (Make sure fingers are not over the very bottom of the breastbone.)
8. Using 2 or 3 fingers, give up to 5 chest thrusts
near center of breastbone. (Make sure fingers are NOT over the very bottom of the breastbone.)
9. Look in mouth. If foreign object is
seen, remove it. Do not perform a blind finger sweep or lift the jaw or tongue.
10. REPEAT STEPS 6-9 UNTIL
BREATHS GO IN, INFANT STARTS TO BREATHE ON OWN OR HELP ARRIVES.
Pictures reproduced with permission.
Textbook of Pediatric Basic Life Support, 1994
Copyright American Heart Association.
CARDIOPULMONARY RESUSCITATION (CPR) FOR INFANTS UNDER 1 YEAR
4. Check for BREATHING. With your ear close to infant's mouth, LOOK at the chest for
1/2 the depth of the infant's chest.
Emergency Guidelines for Schools, 3rd edition
CPR is to be used when an infant is unresponsive or when breathing or heart beat stops. 1. Gently shake infant. If no response, shout for help and send someone to call EMS.
2. Turn the infant onto his/her back as a unit by supporting the head and neck.
3. Lift chin up and out with one hand while pushing down on the forehead with the other to open the AIRWAY.
movement, LISTEN for sounds of breathing and FEEL for breath on your cheek.
5. If infant is not breathing, take a normal breath. Seal your lips tightly around his/her mouth and nose. While keeping the airway open, give 1 normal breath over 1 second and watch for chest to rise.
IF CHEST RISES WITH RESCUE BREATH (AIR GOES IN): 6. Find finger position near center
of breastbone just below the nipple line. (Make sure fingers are NOT over the very bottom of the breastbone.)
7. Compress chest hard and fast 30
times with 2 or 3 fingers about 1/3 to
Use equal compression and relaxation times. Limit interruptions in chest compressions.
8. Give 2 normal breaths, each
lasting 1 second. Each breath should make chest rise.
9. REPEAT CYCLES OF 3O
COMPRESSIONS TO 2 BREATHS AT A RATE OF 100 COMPRESSIONS PER MINUTE UNTIL INFANT STARTS BREATHING EFFECTIVELY ON OWN OR HELP ARRIVES.
10. Call EMS after 2 minutes (5 cycles of 30
compressions to 2 rescue breaths) if not already called.
IF CHEST DOES NOT RISE WITH RESCUE BREATH (AIR DOES NOT GO IN):
6. Re-tilt head back. Try to give 2 breaths again. IF CHEST RISES WITH RESCUE BREATH, FOLLOW LEFT COLUMN. IF CHEST STILL DOES NOT RISE: 7. Find finger position near center of breastbone
just below the nipple line. (Make sure fingers are not over the very bottom of the breastbone.)
8. Using 2 or 3 fingers, give up to 5 chest thrusts
near center of breastbone. (Make sure fingers are NOT over the very bottom of the breastbone.)
9. Look in mouth. If foreign object is
seen, remove it. Do not perform a blind finger sweep or lift the jaw or tongue.
10. REPEAT STEPS 6-9 UNTIL
BREATHS GO IN, INFANT STARTS TO BREATHE ON OWN OR HELP ARRIVES.
Pictures reproduced with permission.
Textbook of Pediatric Basic Life Support, 1994
Copyright American Heart Association.
CARDIOPULMONARY RESUSCITATION (CPR) FOR INFANTS UNDER 1 YEAR
4. Check for BREATHING. With your ear close to infant's mouth, LOOK at the chest for
1/2 the depth of the infant's chest. 8.
9.
10.
11.
7.
8.
9.
10.
11. CALL 9-1-1 after 2 minutes (5 cycles of 30 compressions to 2 rescue breaths) if not already called.
7.
CPR is to be used when an infant is unresponsive or when breathing or heart beat stops.
7. Give a second rescue breath lasting 1 second until chest rises.
8. Find finger position near center of breastbone just below the nipple line. (Make sure fingers are NOT over the very bottom of the breastbone.)
9. Compress chest hard and fast 30 times with 2 or 3 fingers at least 1/3 the depth of the infant’s chest.
Use equal compression and relaxation times. Limit interruptions in chest compressions.
10. Give 2 normal breaths, each lasting 1 second. Each breath should make chest rise.
11. REPEAT CYCLES OF 3O COMPRESSIONS TO 2 BREATHS AT A RATE OF AT LEAST 100 COMPRESSIONS PER MINUTE UNTIL INFANT STARTS BREATHING EFFECTIVELY ON OWN OR HELP ARRIVES.
12. CALL 9-1-1 after 2 minutes (5 cycles of 30 compressions to 2 rescue breaths) if not already called.
Emergency Guidelines for Schools, 3rd edition
CPR is to be used when an infant is unresponsive or when breathing or heart beat stops. 1. Gently shake infant. If no response, shout for help and send someone to call EMS.
2. Turn the infant onto his/her back as a unit by supporting the head and neck.
3. Lift chin up and out with one hand while pushing down on the forehead with the other to open the AIRWAY.
movement, LISTEN for sounds of breathing and FEEL for breath on your cheek.
5. If infant is not breathing, take a normal breath. Seal your lips tightly around his/her mouth and nose. While keeping the airway open, give 1 normal breath over 1 second and watch for chest to rise.
IF CHEST RISES WITH RESCUE BREATH (AIR GOES IN): 6. Find finger position near center
of breastbone just below the nipple line. (Make sure fingers are NOT over the very bottom of the breastbone.)
7. Compress chest hard and fast 30
times with 2 or 3 fingers about 1/3 to
Use equal compression and relaxation times. Limit interruptions in chest compressions.
8. Give 2 normal breaths, each
lasting 1 second. Each breath should make chest rise.
9. REPEAT CYCLES OF 3O
COMPRESSIONS TO 2 BREATHS AT A RATE OF 100 COMPRESSIONS PER MINUTE UNTIL INFANT STARTS BREATHING EFFECTIVELY ON OWN OR HELP ARRIVES.
10. Call EMS after 2 minutes (5 cycles of 30
compressions to 2 rescue breaths) if not already called.
IF CHEST DOES NOT RISE WITH RESCUE BREATH (AIR DOES NOT GO IN):
6. Re-tilt head back. Try to give 2 breaths again. IF CHEST RISES WITH RESCUE BREATH, FOLLOW LEFT COLUMN. IF CHEST STILL DOES NOT RISE: 7. Find finger position near center of breastbone
just below the nipple line. (Make sure fingers are not over the very bottom of the breastbone.)
8. Using 2 or 3 fingers, give up to 5 chest thrusts
near center of breastbone. (Make sure fingers are NOT over the very bottom of the breastbone.)
9. Look in mouth. If foreign object is
seen, remove it. Do not perform a blind finger sweep or lift the jaw or tongue.
10. REPEAT STEPS 6-9 UNTIL
BREATHS GO IN, INFANT STARTS TO BREATHE ON OWN OR HELP ARRIVES.
Pictures reproduced with permission.
Textbook of Pediatric Basic Life Support, 1994
Copyright American Heart Association.
CARDIOPULMONARY RESUSCITATION (CPR) FOR INFANTS UNDER 1 YEAR
4. Check for BREATHING. With your ear close to infant's mouth, LOOK at the chest for
1/2 the depth of the infant's chest.
Emergency Guidelines for Schools, 3rd edition
*Hand positions for child CPR: 1 hand: Use heel of 1 hand only. 2 hands: Use heel of 1 hand with
second on top of first.
CARDIOPULMONARY RESUSCITATION (CPR) FOR CHILDREN 1 to 8 YEARS OF AGE
CPR is to be used when a student is unresponsive or when breathing or heart beat stops. 1.
2. is suspected, DO NOT BEND OR TURN NECK.
3. Lift chin up and out with one hand while pushing down on the forehead with the other to open the AIRWAY.
4. LOOK at the chest for movement, LISTEN for sounds of breathing and FEEL for breath on your cheek.
5. If you witnessed the child�s collapse, first set up the AED and connect the pads according to the manufacturer�s instructions. Incorporate use into CPR cycles according to instructions and training method. For an unwitnessed collapse, perform CPR for 2 minutes and then use AED.
6. If child is not breathing, take a normal breath. Seal your lips tightly around his/her mouth; pinch nose shut. While keeping airway open, give 1 breath over 1 second and watch for chest to rise.
IF CHEST RISES WITH RESCUE BREATH (AIR GOES IN):
7. Find hand position near center of breastbone at the nipple line. (Do NOT place your hand over the very bottom of the breastbone.)
8. Compress chest hard and fast
30 times with the heel of 1 or 2
chest. Allow the chest to return to normal position between each compression.
Lift fingers to avoid pressure on ribs. Use equal compression and relaxation times. Limit interruptions in chest compressions.
9. Give 2 normal breaths, each
lasting 1 second. Each breath should make the chest rise.
10. REPEAT CYCLES OF 30 COMPRESSIONS TO 2
BREATHS AT A RATE OF 100 COMPRESSIONS PER MINUTE UNTIL CHILD STARTS BREATHING ON OWN OR HELP ARRIVES.
11. Call EMS after 2 minutes (5 cycles of 30
compressions to 2 rescue breaths) if not already called.
IF CHEST DOES NOT RISE WITH RESCUE BREATH (AIR DOES NOT GO IN): 7. Re-tilt head back. Try to give 2 breaths again. IF CHEST RISES WITH RESCUE BREATH, FOLLOW LEFT COLUMN. IF CHEST STILL DOES NOT RISE:
8. Find hand position near center of breastbone at the nipple line. (Do NOT place your hand over the very bottom of the breastbone.)
9. Compress chest fast and hard 5 times with the heel
of 1 or 2 hands.* Compress about 1/3 to 1/2 depth
avoid pressure on ribs.
10. Look in mouth. If foreign object is seen, remove it. Do NOT perform a blind finger sweep or lift the jaw or tongue.
11. REPEAT STEPS 6-9 UNTIL
BREATHS GO IN, CHILD STARTS TO BREATHE EFFECTIVELY ON OWN OR HELP ARRIVES.
Pictures reproduced with permission.
Textbook of Pediatric Basic Life Support, 1994
Copyright American Heart Association
Tap or gently shake the shoulder. Shout, "Are you OK?" If child is unresponsive, shout for
Turn the child onto his/her back as a unit by supporting head and neck. If head or neck injury
help and send someone to call EMS and get your school's AED if available.
Check for normal BREATHING. With your ear close to child' s mouth, take 5-10 seconds to
hands.* Compress about 1/3 to 1/2 depth of child's
of child' s chest. Lift fingers to
8.
9.
10.
11.
12.
13. CALL 9-1-1 after 2 minutes (5 cycles of 30 compressions to 2 rescue breaths) if not already called.
7.
8.
9.
10.
11.
1. Tap or gently shake the shoulder. Shout, “Are you OK?” If the child is unresponsive, shout for help and send someone to CALL 9-1-1 and get your school’s AED if available.
2. Turn the child onto his/her back as a unit by supporting the head and neck. If head or neck injury is suspected, DO NOT BEND OR TURN NECK.
3. Immediately start CHEST COMPRESSIONS. Push hard and fast at a rate of at least 100 compressions per minute. Compressions should push the chest in at least 1/3 of the diameter of the chest or approximately 2 inches.
4. Set up the AED and connect the pads according to the manufacturer’s instructions. Use the AED as soon as possible in the event of a witnessed arrest. In the case of a victim found unconscious, use after 2 minutes of CPR.
5. If you have been trained or are comfortable in providing rescue breaths, lift chin up and out with one hand while pushing down on the forehead with the other to open the AIRWAY. If you are not proficient or unable to give rescue breaths, continue compressions without ventilations. While it is preferable to give both ventilations and compressions during CPR, DO NOT delays giving chest compressions- they are critical!
6. Take a normal breath. Seal your lips tightly around his/her mouth; pinch nose shut. While keeping the airway open, give 1 breath over 1 second and watch for chest to rise.
7. Give a second rescue breath lasting 1 second until chest rises.
8. Find hand position near center of breastbone at the nipple line. (Do NOT place your hand over the very bottom of the breastbone.)
9. Compress chest hard and fast 30 times with the heel of 1 or 2 hands.* Compress at least 1/3 the depth of child’s chest. Allow the chest to return to normal position between each compression.
10. Lift fingers to avoid pressure on ribs. Use equal compression and relaxation times. Limit interruptions in chest compressions.
11. Give 2 normal breaths, each lasting 1 second. Each breath should make the chest rise.
12. REPEAT CYCLES OF 30 COMPRESSIONS TO 2 BREATHS AT A RATE OF AT LEAST 100 COMPRESSIONS PER MINUTE UNTIL CHILD STARTS BREATHING ON OWN OR HELP ARRIVES.
13. CALL 9-1-1 after 2 minutes (5 cycles of 30 compressions to 2 rescue breaths) if not already called.
Compress chest fast and hard 5 times with the heel of 1 or 2 hands.* Compress at least 1/3 the depth of child’s chest. Lift fingers to avoid pressure on ribs.
Emergency Guidelines for Schools, 2011 Florida Edition
Emergency Guidelines for Schools, 3rd edition
CARDIOPULMONARY RESUSCITATION (CPR) FOR CHILDREN OVER 8 YEARS OF AGE & ADULTS
CPR is to be used when a person is unresponsive or when breathing or heart beat stops. 1.
2. Turn the person onto his/her back as a unit by supporting head and neck. If head or neck
3. Lift chin up and out with one hand while pushing down on the forehead with the other to open the AIRWAY.
4. for movement, LISTEN for sounds of breathing and FEEL for breath on your cheek. Gasping in adults should be treated as no breathing.
5. instructions. Incorporate use into CPR cycles according to instructions and training method. For an unwitnessed collapse, perform CPR for 2 minutes and then use AED.
6. If victim is not breathing, take a normal breath, seal your lips tightly around his/her mouth; pinch nose shut. While keeping airway open, give 1 breath over 1 second and watch for chest to rise.
IF CHEST RISES WITH RESCUE BREATH (AIR GOES IN): 7. Give a second rescue breath lasting 1 second
until chest rises.
8. Place heel of one hand on top of the center of breastbone. Place heel of other hand on top of the first. Interlock fingers. (Do NOT place your hands over the very bottom of the breastbone.)
9. Position self vertically above victim�s chest and with straight arms, compress chest hard and fast
both hands. Allow the chest to return to normal position between each compression. Lift fingers when compressing to avoid pressure on ribs. Limit interruptions in chest compressions.
10. Give 2 normal breaths, each lasting 1 second.
Each breath should make the chest rise. 11. REPEAT CYCLES OF 30 COMPRESSIONS TO
2 BREATHS AT A RATE OF 100 COMPRESSONS PER MINUTE UNTIL VICTIM RESPONDS OR HELP ARRIVES.
12. Call EMS after 2 minutes (5 cycles of 30
compressions to 2 rescue breaths) if not already called.
IF CHEST DOES NOT RISE WITH RESCUE BREATH (AIR DOES NOT GO IN): 7. Re-tilt head back. Try to give 2
breaths again. IF CHEST RISES WITH RESCUE BREATH, FOLLOW LEFT COLUMN. IF CHEST STILL DOES NOT RISE:
8. Place heel of one hand on top of the center of breastbone. Place heel of other hand on top of the first. Interlock fingers. (Do NOT place your hands over the very bottom of the breastbone.)
with straight arms, compress chest 30 times with
avoid pressure on ribs.
10. Look in the mouth. If foreign object is seen, remove it. Do not perform a blind finger sweep or lift the jaw or tongue.
11. REPEAT STEPS 6-9 UNTIL BREATHS GO IN,
PERSON STARTS TO BREATHE EFFECTIVELY ON OWN OR HELP ARRIVES.
Pictures reproduced with permission.
Textbook of Pediatric Basic Life Support, 1994
Copyright American Heart Association.
Tap or gently shake the shoulder. Shout "Are you OK?" If person is unresponsive, shout for help and send
injury is suspected, DO NOT BEND OR TURN NECK.
someone to call EMS AND get your school's AED if available.
Check for normal BREATHING. With your ear close to person' s mouth, LOOK at the chest
If you witnessed the collapse, first set up the AED and connect the pads according to the manufacturer's
about 11/2 to 2 inches 30 times in a row with 9. Position self vertically above person' s chest and
both hands about 11/2 to 2 inches. Lift fingers to
1. Tap or gently shake the shoulder. Shout, “Are you OK?” If person is unresponsive, shout for help and send someone to CALL 9-1-1 and get your school’s AED if available.
2. Turn the person onto his/her back as a unit by supporting the head and neck. If head or neck injury is suspected, DO NOT BEND OR TURN NECK.
3. Immediately start CHEST COMPRESSIONS. Push hard and fast at a rate of at least 100 compressions per minute. Compressions should push the chest in at least 2 inches.
4. Set up the AED and connect the pads according to the manufacturer’s instructions. Use the AED as soon as possible in the event of a witnessed arrest. In the case of a victim found unconscious, use after 2 minutes of CPR.
5. If you have been trained or are comfortable providing rescue breaths, lift chin up and out with one hand while pushing down on the forehead with the other to open the AIRWAY. If you are not proficient or unable to give rescue breaths, continue compressions without ventilations. While it is preferable to give both ventilations and compressions during CPR, DO NOT delay giving chest compressions- they are critical!
6. Take a normal breath. Seal your lips tightly around his/her mouth; pinch nose shut. While keeping airway open, give 1 breath over 1 second and watch for chest to rise.
7.
8.
9.
10.
11.
12. CALL 9-1-1 after 2 minutes (5 cycles of 30 compressions to 2 rescue breaths) if not already called.
8.
9.
10.
11.
7.
Position self vertically above victim’s chest and with straight arms, compress chest hard and fast about 2 inches 30 times in a row with both hands. Allow the chest to return to normal position between each compression. Lift fingerswhen compressing to avoid pressure on ribs. Limit interruptions in chest compressions.
Position self vertically above person’s chest and with straight arms, compress chest hard and fast about 2 inches 30 times. Lift fingers to avoid pressure on ribs.
REPEAT CYCLES OF 30 COMPRESSIONS TO 2 BREATHS AT A RATE OF AT LEAST 100 COMPRESSONS PER MINUTE UNTIL VICTIM RESPONDS OR HELP ARRIVES.
Emergency Guidelines for Schools, 2011 Florida Edition
CHOKING (Conscious Victims)
Call EMS 9-1-1 after starting rescue efforts.
INFANTS UNDER 1 YEAR Begin the following if the infant is choking and is unable to breathe. However, if the infant is coughing or crying, do NOT do any of the following, but call EMS, try to calm the child and watch for worsening of symptoms. If cough becomes ineffective (loss of sound), begin step 1 below.
1. Position the infant,
with head slightly lower than chest, face down on your arm and support the head (support jaw; do NOT compress throat).
2. Give up to 5 back slaps with the heel of hand
3. If object is not coughed
up, position infant face up on your forearm with head slightly lower than rest of body.
4. With 2 or 3 fingers, give
up to 5 chest thrusts near center of breastbone, just below the nipple line.
5. Open mouth and look. If
foreign object is seen, sweep it out with finger.
6. Tilt head back and lift chin
up and out to open the airway. Try to give 2 breaths.
7. REPEAT STEPS 1-6
UNTIL OBJECT IS COUGHED UP OR INFANT STARTS TO BREATHE OR BECOMES UNCONSCIOUS.
8. Call EMS after 2 minutes (5 cycles of 30
compressions to 2 rescue breaths) if not already called.
IF INFANT BECOMES UNCONSCIOUS, GO TO STEP 6 OF INFANT CPR.
CHILDREN OVER 1 YEAR OF AGE & ADULTS Begin the following if the victim is choking and unable
do NOT do any of the following, but call EMS, try to calm him/her and watch for worsening of symptoms. If cough becomes ineffective (loss of sound) and victim cannot speak, begin step 1 below.
1. Stand or kneel behind child with arms encircling
child. 2. Place thumbside of fist against middle of
abdomen just above the navel. (Do NOT place your hand over the very bottom of the breastbone. Grasp fist with other hand.)
3. Give up to 5 quick inward and upward abdominal
thrusts. 4. REPEAT STEPS 1-2 UNTIL OBJECT IS
COUGHED UP, CHILD STARTS TO BREATHE OR CHILD BECOMES UNCONSCIOUS.
IF CHILD BECOMES UNCONSCIOUS, PLACE ON BACK AND GO TO STEP 7 OF CHILD OR ADULT CPR.
FOR OBESE OR PREGNANT PERSONS: Stand behind person and place your arms under the armpits to encircle the chest. Press with quick backward thrusts.
Pictures reproduced with permission.
Textbook of Pediatric Basic Life Support, 1994
Copyright American Heart Association.
to breathe. Ask the victim: "Are you choking?" If the
However, if the victim is coughing, crying or speaking, victim nods yes or can't respond, help is needed.
between infant's shoulder blades.
IF CHILD BECOMES UNCONSCIOUS, PLACE ON BACK AND GO TO STEP 6 OF CHILD OR ADULT CPR.
Emergency Guidelines for Schools, 2011 Florida Edition
Emergency Guidelines for Schools, 3rd edition
If student has visible injuries, refer to the appropriate guideline
to provide first aid. CALL EMS 9-1-1 if any injuries require immediate medical care.
All school staff are required to report suspected child abuse and neglect to the County Children Services
agency. Refer to your own school’s policy for additional guidance on reporting.
.
County Children Services Agency .
Phone #______________________
Abuse may be physical, sexual or emotional in nature. Some signs of abuse follow. This is NOT a complete list:
Depression, hostility, low self-esteem, poor self-image.Evidence of repeated injuries or unusual injuries.Lack of explanation or unlikely explanation for an injury.Pattern bruises or marks (e.g., burns in the shape of a cigarette or iron, bruises or welts in the shape of a hand).Unusual knowledge of sex, inappropriate touching or engaging in sexual play with other children.Severe injury or illness without medical care.Poor hygiene, underfed appearance.
If a student reveals abuse to you:Remain calm. Take the student seriously.Reassure the student that he/she did the right thing by telling.Let the student know that you are required to report the abuse to Children Services.Do not make promises that you can not keep.Respect the sensitive nature of the student’s situation.If you know, tell the student what steps to expect next.Follow required school reporting procedures.
Contact responsible school authority. Contact Children
Services. Follow up with school report.
CHILD ABUSE & NEGLECT
Child abuse is a complicated issue
with many potential signs. According
to Chapter 39, Section 201(1)(a),
Florida Statutes (F.S.), any person
who knows or has reason to suspect
that a child is abused, abandoned
or neglected shall report such
knowledge. Florida Statute requires
Children Services Agencies to keep
reporters’ identities confidential.
Failure to report suspected abuse
may result in penalty of law.
Emergency Guidelines for Schools, 3rd edition
most recent draft EGS 122006.igx
COMMUNICABLE DISEASE RESOURCES
Florida CHARTS
Use the Florida Community Health Assessment Resource Tool
Set (CHARTS) to find Florida health statistics that will help
identify health problems in your community. Use CHARTS and
navigate your way to better health! Reports use Florida Vital
Statistics and other data sets. www.floridacharts.com
Communicable Disease Frequency Reports
This system provides counts of communicable diseases
reported in Florida. The data is updated on a weekly basis.
http://www.floridacharts.com/merlin/freqrpt.asp
Emergency Guidelines for Schools, 2011 Florida Edition
Emergency Guidelines for Schools, 3rd edition
COMMUNICABLE DISEASES
For more information on protecting yourself from communicable diseases, see "Infection Control."
Chickenpox, pink eye, strep throat and influenza (flu) are just a few of the common communicable
diseases that affect children. There are many more. In general, there will be little you can do for
a student in school who has a communicable disease. Following are some general guidelines. .
Refer to your local school’s exclusion policy for ill students.
Signs of PROBABLE Illness:.
Sore throat.Redness, swelling, drainage of eye.Unusual spots/rash with fever or itching.Crusty, bright yellow, gummy skin sores.Diarrhea (more than 2 loose stools a day).Vomiting.Yellow skin or yellow "white of eye".Oral temperature greater than 100.0 F.Extreme tiredness or lethargy.Unusual behavior.
Signs of POSSIBLE Illness:.
Earache.
Fussiness.Runny nose. Mild cough.
Contact responsible school
authority & parent or legal guardian.
URGE MEDICAL CARE.
Monitor student for worsening of
symptoms. Contact parent/legal
guardian and discuss.
.
A communicable disease is a disease
that can be spread from one person to another.
Germs (bacteria, virus, fungus, parasite) cause communicable
diseases.
Emergency Guidelines for Schools, 3rd edition
COMMUNICABLE DISEASES
For more information on protecting yourself from communicable diseases, see "Infection Control."
Chickenpox, pink eye, strep throat and influenza (flu) are just a few of the common communicable
diseases that affect children. There are many more. In general, there will be little you can do for
a student in school who has a communicable disease. Following are some general guidelines. .
Refer to your local school’s exclusion policy for ill students.
Signs of PROBABLE Illness:.
Sore throat.Redness, swelling, drainage of eye.Unusual spots/rash with fever or itching.Crusty, bright yellow, gummy skin sores.Diarrhea (more than 2 loose stools a day).Vomiting.Yellow skin or yellow "white of eye".Oral temperature greater than 100.0 F.Extreme tiredness or lethargy.Unusual behavior.
����������
Signs of POSSIBLE Illness:.
Earache. Fussiness.Runny nose. Mild cough.
����
Contact responsible school
authority & parent or legal guardian.
URGE MEDICAL CARE.
Monitor student for worsening of
symptoms. Contact parent/legal
guardian and discuss.
.
A communicable disease is a disease
that can be spread from one person to another.
Germs (bacteria, virus, fungus, parasite) cause communicable
diseases.
Emergency Guidelines for Schools, 2011 Florida Edition
Wash the wound gently with water. Use soap if necessary to remove dirt. Pat dry with clean gauze or paper towel.Apply clean gauze dressing (non-adhering or non-sticking type for scrapes) and bandage.
Check student’s immunization record for tetanus.
See "Tetanus Immunization."
Contact responsible
school authority & parent/legal guardian.
See "Bleeding."
YESNO
Emergency Guidelines for Schools, 2011 Florida Edition
A student with diabetes may have the following symptoms:
Irritability and feeling upset. Change in personality. Sweating and feeling "shaky." Loss of consciousness. Confusion or strange behavior. Rapid, deep breathing.
Refer to student’s emergency care plan.
Is the student:Unconscious or losing consciousness?Having a seizure?Unable to speak?Having rapid, deep breathing?
CALL EMS 9-1-1.
.
If student is unconscious, see "Unconsciousness. "
Contact responsible
school authority & parent/legal
guardian.
Continue to watch the student. Is
student improving?
Is blood sugar less than 60 or "LOW" according to
emergency care plan? or
Is blood sugar "HIGH" according to emergency
care plan?
Allow student to check blood sugar.
Does student have a blood sugar
monitor available?
A student with diabetes should be known to appropriate school
staff. An emergency care plan should be developed.
Staff in a position to administer any approved
medications should receive training.
Fruit juice or soda pop (not diet) 6-8 ounces.Hard candy (6-7 lifesavers) or 1/2 candy bar.Sugar (2 packets or 2 teaspoons).Cake decorating gel (1/2 tube) or icing.Instant glucose.
YES
NO
LOW
YES
NO
YES
HIGH
NO
Continue to watch the student in a quiet place. The student should begin to improve within 10 minutes. Allow student to re-check blood sugar.
Give the student "sugar" such as:
Emergency Guidelines for Schools, 2011 Florida Edition
Emergency Guidelines for Schools, 3rd edition
DIARRHEA
Wear disposable gloves when exposed to blood or other body fluids.
A student may come to the office because of repeated diarrhea or
after an "accident" in the bathroom.
Allow the student to rest if experiencing any stomach pain.Give the student water to drink.
If the student’s clothing is soiled, wear
disposable gloves and double-bag the clothing to be sent home. Wash hands
thoroughly.
Does student have any of the following signs of probable illness:
More than 2 loose stools a day?Oral temperature over 100.0 F? See "Fever."Blood present in the stool?Severe stomach pain?Student is dizzy and pale?
Contact responsible school authority &
parent/legal guardian. .
URGE MEDICAL CARE.
YES
NO
Emergency Guidelines for Schools, 2011 Florida Edition
Emergency Guidelines for Schools, 3rd edition
most recent draft EGS 122006.igx
EARS
DRAINAGE FROM EAR
EARACHE
OBJECT IN EAR CANAL
Do NOT try to clean out ear.
Contact responsible school authority & parent or legal guardian.
.
URGE MEDICAL CARE.
Contact responsible school authority & parent/legal guardian.
.
URGE MEDICAL CARE.
Ask student if he/she knows what is in the ear.
Do you suspect a live insect is in the ear?
Do NOT attempt to remove.
Gently tilt head toward the affected side.
Did object come out on its own?
If there is no pain, the student
may return to class. Notify the parent or legal
guardian.
Do NOT attempt to remove.
Contact responsible school
authority & parent or legal guardian.
.
URGE MEDICAL CARE.
NO
NO
YES
YES OR NOT SURE
Emergency Guidelines for Schools, 2011 Florida Edition
Emergency Guidelines for Schools, 3rd edition
ELECTRIC SHOCK
TURN OFF POWER SOURCE, IF POSSIBLE.
DO NOT TOUCH STUDENT UNTIL POWER SOURCE IS SHUT OFF. Once power is off and situation is safe, approach the student and ask, "Are you OK?"If no one else is
available to call EMS, perform CPR first
for 2 minutes and then call EMS yourself.
Is student unconscious or unresponsive?
Treat any burns. See "Burns."
Contact responsible
school authority & parent or
legal guardian. .
URGE MEDICAL CARE.
Keep airway clear.Look, listen and feel for breath. If student is not breathing, start CPR. See "CPR."
CALL EMS 9-1-1.
Contact responsible
school authority & parent/legal guardian.
NOYES
Emergency Guidelines for Schools, 3rd edition
most recent draft EGS 122006.igx
EYESWith any eye problem,
ask the student if he/she wears contact lenses. Have student
remove contacts before giving any
first aid to eye.
EYE INJURY:
Keep student lying flat and quiet.
Is injury severe?Is there a change in vision?Has object penetrated eye?
Contact responsible school authority & parent or
legal guardian. .
URGE IMMEDIATE MEDICAL CARE.
If an object has penetrated the eye,
do NOT remove object.
Cover eye with a paper cup or similar object to
keep student from rubbing, but do NOT touch eye or put any pressure on eye.
YES NO
CALL EMS 9-1-1. .
Contact responsible school authority &
parent or legal guardian.
Emergency Guidelines for Schools, 2011 Florida Edition
Emergency Guidelines for Schools, 3rd edition
EYES
PARTICLE IN EYE
Keep student from rubbing eye.
If necessary, lay student down and tip head toward affected side.Gently pour tap water over the open eye to flush out the particle.
If particle does not flush out of eye or if eye pain continues, contact responsible school authority &
parent/legal guardian. .
URGE MEDICAL CARE.
CHEMICALS IN EYE
Wear gloves and if possible, goggles.Immediately rinse the eye with large amounts of clean water for 20 to 30 minutes. Use an eyewash if available.Tip the head so the affected eye is below the unaffected eye and water washes eye from nose out to side of the face.
CALL POISON CONTROL.
1-800-222-1222
Follow their directions.
If eye has been burned by chemical,
CALL EMS 9-1-1.
Contact responsible
school authority & parent/legal
guardian.
Emergency Guidelines for Schools, 2011 Florida Edition
Emergency Guidelines for Schools, 3rd edition
FAINTING
Not eating.Stress. Fatigue. Poisoning.
Fainting may have many causes including:
Injuries.Illness.Blood loss/shock.Heat exhaustion.Diabetic reaction. Severe allergic reaction.Standing still for too long.
.
If you know the cause of the fainting, see the appropriate
guideline.
If you observe any of the following signs of fainting, have the student lie down to prevent injury from falling:
Extreme weakness or fatigue.Dizziness or light-headedness.Extreme sleepiness.Pale, sweaty skin. Nausea.
Most students who faint will recover quickly when lying down. If student does not regain consciousness immediately,
see "Unconsciousness. "
Is fainting due to injury? Was student injured when he/she fainted?
Treat as possible neck injury. See "Neck & Back Pain."
.
Do NOT move student.
Keep student in flat position.Elevate feet.Loosen clothing around neck and waist.
Keep airway clear and monitor breathing.Keep student warm, but not hot.Control bleeding if needed (wear disposable gloves).Give nothing by mouth.
Are symptoms (dizziness, light-headedness, weakness, fatigue, etc.) still present?
If student feels better, and there is no danger of neck injury, he/she may be
moved to a quiet, private area.
Contact responsible
school authority& parent/legal
guardian.
Keep student lying down. Contact responsible school
authority & parent or legal guardian.
.
URGE MEDICAL CARE.
YES
NO
NO
YES ORNOT SURE
Emergency Guidelines for Schools, 2011 Florida Edition
Emergency Guidelines for Schools, 3rd edition
most recent draft EGS 122006.igx
FEVER & NOT FEELING WELL
Take student’s temperature. Note oral temperature over 100.0 F as fever.
Have the student lie down in a room that
affords privacy.
Give no medication, unless previously
authorized.
Contact responsible
school authority and parent or legal guardian.
Emergency Guidelines for Schools, 2011 Florida Edition
Emergency Guidelines for Schools, 3rd edition
most recent draft EGS 122006.igx
FRACTURES, DISLOCATIONS, SPRAINS OR STRAINS
Symptoms may include:Pain in one area.
Swelling.Feeling "heat" in injured area.
Discoloration.Limited movement.Bent or deformed bone.Numbness or loss of sensation.
Treat all injured parts as if they
could be fractured.
Is bone deformed or bent in an unusual way?Is skin broken over possible fracture?Is bone sticking through skin?
NO
Leave student in a position of comfort.Gently cover broken skin with a clean bandage. Do NOT move injured part.
Contact responsible
school authority & parent/legal
guardian.
Rest injured part by not allowing student to put weight on it or use it.Gently support and elevate injured part if possible.Apply ice, covered with a cloth or paper towel, to minimize swelling.
After period of rest, re-check the injury. Is pain gone?Can student move or put weight on injured part without discomfort?Is numbness/tingling gone? Has sensation returned to injured area?
Contact responsible school authority & parent or legal guardian.
.
URGE MEDICAL CARE.
If discomfort is gone after
period of rest, allow student to return to class.
YES
NOYES
CALL EMS 9-1-1.
Emergency Guidelines for Schools, 2011 Florida Edition
Emergency Guidelines for Schools, 3rd edition
most recent draft EGS 122006.igx
FROSTBITE
Frostbite can result in the same type of tissue damage as a burn. It is a serious
condition and requires medical
attention.
Exposure to cold even for short periods of time may cause "HYPOTHERMIA" in children (see "Hypothermia").The nose, ears, chin, cheeks, fingers and toes are the parts most often affected by frostbite.
Frostbitten skin may:Look discolored (flushed, grayish-yellow, pale).Feel cold to the touch.Feel numb to the student.
Deeply frostbitten skin may:Look white or waxy.Feel firm or hard (frozen).
Take the student to a warm place.Remove cold or wet clothing and give student warm, dry clothes.Protect cold part from further injury. Do NOT rub or massage the cold part or apply heat such as a water bottle or hot running water.Cover part loosely with nonstick, sterile dressings or dry blanket.
Does extremity/part:Look discolored - grayish, white or waxy?Feel firm/hard (frozen)?Have a loss of sensation?
Keep student and part warm.
Contact responsible authority &
parent or legal guardian.
YES NO
CALL EMS 9-1-1.Keep student warm and part covered.
Contact responsible
authority & parent or legal guardian.
Encourage medical care.
Emergency Guidelines for Schools, 2011 Florida Edition
Emergency Guidelines for Schools, 3rd edition
HEADACHE
Have student lie down for a short time in a room
that affords privacy.
See "Head
Injuries."
Has a head injury occurred?
Give no medication
unless previously authorized.
Apply a cold cloth or compress to the student’s head.
Is headache severe?Are other symptoms present such as:
Vomiting? Oral temperature over 100.0 F (See "Fever")?Blurred vision? Dizziness?
Contact parent/legal guardian.
.
URGE MEDICAL CARE .
YES
YES
NO
NO
If headache persists, contact
parent/legal guardian.
Emergency Guidelines for Schools, 2011 Florida Edition
Emergency Guidelines for Schools, 3rd edition
HEAD INJURIES.
Many head injuries that happen at school are minor. Head
wounds may bleed easily and form large bumps. Bumps to
the head may not be serious. Head injuries from
falls, sports and violence may be serious. If head is
bleeding, see "Bleeding. "
If student only bumped head and does not have any other complaints
or symptoms, see "Bruises."
With a head injury (other than head bump ), always suspect neck injury as well.Do NOT move or twist the back or neck. See "Neck & Back Pain" for more information.
Have student rest, lying flat.Keep student quiet and warm.
Is student vomiting?
Watch student closely. Do NOT leave student alone.
Turn the head and body together to the side, keeping
the head and neck in a straight line with the trunk.
Are any of the following symptoms present:.
Unconsciousness? Seizure? Neck pain?
Student is unable to respond to simple commands?Blood or watery fluid in the ears?Student is unable to move or feel arms or legs?Blood is flowing freely from the head?Student is sleepy or confused?
CALL EMS 9-1-1.
Even if student was only briefly
confused and seems fully recovered, contact
responsible school authority & parent or legal guardian.
.
URGE MEDICAL CARE. Watch for delayed
symptoms.
Give nothing by mouth. Contact responsible school
authority & parent or legal
guardian.
YES NO
YES
NOCheck student’s airway. Look, listen and feel for breathing. If student stops breathing, start CPR. See "CPR."
Emergency Guidelines for Schools, 2011 Florida Edition
Strenuous activity in the heat may cause heat-related illness. Symptoms may include:.
Red, hot, dry skin. Weakness and fatigue. Cool, clammy hands. Vomiting. Loss of consciousness.
Is student unconscious or losing consciousness?
Remove student from the heat to a cooler place. Have student lie down.
Does student have hot, dry, red skin?Is student vomiting?Is student confused?
Give clear fluids such as water, 7Up or Gatorade frequently in
small amounts if student is fully awake and alert.
Contact responsible authority & parent/legal
guardian.
Quickly remove student from heat to a cooler place.Put student on his/her side to protect the airway. Look, listen and feel for breath. If student stops breathing, start CPR. See "CPR."
Cool rapidly by completely wetting clothing with room
temperature water. .
Do NOT use ice water.
CALL EMS 9-1-1.Contact responsible authority & parent or legal guardian.
Strenuous activity in the heat may cause heat-related illness. Symptoms may include:.
Red, hot, dry skin. Weakness and fatigue. Cool, clammy hands. Vomiting. Loss of consciousness.
Is student unconscious or losing consciousness?
Remove student from the heat to a cooler place. Have student lie down.
Does student have hot, dry, red skin?Is student vomiting?Is student confused?
Give clear fluids such as water, juice or Gatorade frequently in
small amounts if student is fully awake and alert.
Contact responsible authority & parent/legal
guardian.
Quickly remove student from heat to a cooler place.Put student on his/her side to protect the airway. Look, listen and feel for breath. If student stops breathing, start CPR. See "CPR."
Cool rapidly by completely wetting clothing with room
temperature water. .
Do NOT use ice water.
CALL EMS 9-1-1.Contact responsible authority & parent or legal guardian.
YES
YES
NO
NO
Emergency Guidelines for Schools, 2011 Florida Edition
Emergency Guidelines for Schools, 3rd edition
most recent draft EGS 122006.igx
HYPOTHERMIA (EXPOSURE TO COLD)
Hypothermia happens after exposure to cold when the body
is no longer capable of warming itself. Young children are particularly susceptible to hypothermia. It can be a life-threatening condition if left
untreated for too long.
Hypothermia can occur after a student has beenoutside in the cold or in cold water. Symptoms may include:
Take the student to a warm place.Remove cold or wet clothing and wrap student in a warm, dry blanket.
Does student have:Loss of consciousness?Slowed breathing?Confused or slurred speech?White, grayish or blue skin?
CALL EMS 9-1-1.Give nothing by mouth.Continue to warm student with blankets.If student is sleepy or losing consciousness, place student on his/her side to protect airway.Look, listen and feel for breathing. If student stops breathing, start CPR. See "CPR".
Contact responsible
authority & parent or legal guardian.
Encourage medical care.
Continue to warm student with blankets. If student is fully
awake and alert, offer warm (NOT hot) fluids, but no food.
NO
Shivering.Sleepiness.White or grayish skin color.Impaired judgment.
YES
Emergency Guidelines for Schools, 2011 Florida Edition
Emergency Guidelines for Schools, 3rd edition
MENSTRUAL DIFFICULTIES
Is it possible that student is pregnant?
See "Pregnancy."
For mild cramps,
recommend regular
activities.
Are cramps mild or severe?
A short period of quiet rest may provide relief.
Give no medications unless previously authorized by
parent/legal guardian.
Urge medical care if disabling cramps or
heavy bleeding occurs.
YES OR NOT SURE
NO
SEVERE
MILD
Contact responsible
school authority & parent/legal
guardian.
Emergency Guidelines for Schools, 2011 Florida Edition
Emergency Guidelines for Schools, 3rd edition
MOUTH & JAW INJURIES
Wear disposable gloves when exposed to blood or other body fluids.
Have teeth been injured?See
"Teeth."
Has jaw been injured?
Do NOT try to move jaw. Gently support jaw with hand.
Contact responsible school authority &
parent/legal guardian.
URGE IMMEDIATE MEDICAL CARE.
If tongue, lips or cheeks are bleeding, apply direct pressure with sterile gauze or clean cloth.
Place a cold compress over the area to minimize swelling.
YES
Check student’s immunization record
for tetanus. See "Tetanus
Immunization."
Is cut large or deep?Is there bleeding that cannot be stopped?
See "Bleeding. "
Do you suspect a head injury other than mouth or jaw?
See "Head
Injuries."
Contact responsible
school authority & parent/legal guardian.
Encourage medical care.
YES
YES
YES
NO
NO
NO
NO
Emergency Guidelines for Schools, 2011 Florida Edition
Emergency Guidelines for Schools, 3rd edition
most recent draft EGS 122006.igx
NECK & BACK PAIN
Suspect a neck/back injury if pain results from:Falls over 10 feet or falling on head. Being thrown from a moving object.Sports.Violence.Being struck by a car or fast moving object.
Has an injury occurred?
Did student walk in or was student found lying down?
Do NOT move student unless there is IMMEDIATE danger of further physical harm. If student must be moved, support head and neck and move student in the direction of the head without bending the spine forward. .
Do NOT drag the student sideways.
Keep student quiet and warm.Hold the head still by gently placing one of your hands on each side of the head.
CALL EMS 9-1-1.Contact responsible
school authority & parent or legal
guardian.
Have student lie down on his/her back. Support head by holding it in
a "face forward" position. .
Try NOT to move neck or head.
A stiff or sore neck from sleeping in a "funny" position is different than neck pain from a sudden injury. Non-injured stiff necks may be uncomfortable but they are not emergencies.
If student is so uncomfortable that he
or she is unable to participate in normal
activities, contact responsible school
authority & parent/legal guardian.
WALK IN
YES
NO
LYING DOWN
Emergency Guidelines for Schools, 3rd edition
most recent draft EGS 122006.igx
NOSESee "Head Injuries" if
you suspect a head injury other than a nose- bleed or broken nose.
NOSEBLEED
Wear disposable gloves when exposed to blood
or other body fluids.
Place student sitting comfortably with head slightly forward or lying on side with head raised on pillow.
Encourage mouth breathing and discourage nose blowing, repeated wiping or rubbing.
If blood is flowing freely from the nose, provide constant uninterrupted pressure by
pressing the nostrils firmly together for about 15 minutes. Apply ice to nose.
If blood is still flowing freely
after applying pressure and ice,
contact responsible school authority &
parent/legal guardian.
BROKEN NOSE
Care for nose as in "Nosebleed" above. Contact responsible school authority & parent/legal guardian.
.
URGE MEDICAL CARE.
Emergency Guidelines for Schools, 2011 Florida Edition
Emergency Guidelines for Schools, 3rd edition
most recent draft EGS 122006.igx
OBJECT IN NOSE
Is object: Large?Puncturing nose?Deeply imbedded?
Do NOT attempt to remove.See "Puncture Wounds" if object has punctured nose.
Contact responsible school authority & parent or
legal guardian. .
URGE MEDICAL CARE.
If object cannot be removed easily, do NOT attempt to remove.
Did object come out on own?
If there is no pain, student may return to class. Notify parent or legal guardian.
Have student hold the clear nostril closed while
gently blowing nose.
NO
YES ORNOT SURE
NOYES
NOSE
Emergency Guidelines for Schools, 2011 Florida Edition
Emergency Guidelines for Schools, 3rd edition
POISONING & OVERDOSE
Possible warning signs of poisoning include:
Pills, berries or unknown substance in student’s mouth.Burns around mouth or on skin. Strange odor on breath. Sweating.Upset stomach or vomiting.Dizziness or fainting.Seizures or convulsions.
Poisons can be swallowed, inhaled, absorbed through the skin or eyes, or injected. Call Poison Control when you suspect poisoning from:
Medicines.Insect bites and stings.Snake bites.Plants.Chemicals/cleaners. Drugs/alcohol. Food poisoning.Inhalants.
Or if you are not sure.
Wear disposable gloves.Check student’s mouth. Remove any remaining substance(s) from mouth.
If possible, find out:Age and weight of student.What the student swallowed. What type of "poison" it was.How much and when it was taken.
CALL POISON CONTROL.
.1-800-222-1222
Follow their directions.
Do NOT induce vomiting or give anything UNLESS instructed to by Poison Control. With some poisons, vomiting can cause greater damage. Do NOT follow the antidote label on the container; it may be incorrect.
If student becomes unconscious, place on his/her side. Check airway. Look, listen and feel for breathing. If student stops breathing, start CPR . See "CPR."
CALL EMS 9-1-1. .
Contact responsible school authority & parent or legal guardian.
Send sample of the vomited
material and ingested material with its
container (if available) to the hospital with
the student.
Emergency Guidelines for Schools, 2011 Florida Edition
Emergency Guidelines for Schools, 3rd edition
PREGNANCY
Pregnant students should be known to appropriate school staff.
Any student who is old enough to be pregnant, might be pregnant.
Pregnancy may be complicated by any of the following:
SEVERE STOMACH PAIN
CALL EMS 9-1-1.Contact responsible school authority &
parent or legal guardian.
SEIZURE This may be a serious
complication of pregnancy.
MORNING SICKNESS Treat as vomiting. See "Vomiting."
AMNIOTIC FLUID LEAKAGEThis is NOT normal and may
indicate the beginning of labor.
VAGINAL BLEEDING
Contact responsible
school authority & parent/legal
guardian.
Contact responsible school authority & parent or legal guardian.
.
URGE IMMEDIATE MEDICAL
CARE.
Emergency Guidelines for Schools, 2011 Florida Edition
Emergency Guidelines for Schools, 3rd edition
PUNCTURE WOUNDS
Wear disposable gloves when exposed to blood
or other body fluids.
Has eye been wounded?
See "Eyes - Eye Injuries."
.
Do NOT touch eye.
Is object still stuck in wound?
Do NOT try to probe or squeeze.
Wash the wound gently with soap and water.Check to make sure the object left nothing in the wound (e.g., pencil lead).Cover with a clean bandage.
See "Bleeding " if wound is deep or bleeding freely.
Check student’s immunization record for tetanus. See "Tetanus Immunization."
Do NOT remove object. Wrap bulky dressing around object to support it. Try to calm student.
Is object large?Is wound deep?Is wound bleeding freely or squirting blood?
Contact responsible
school authority & parent or legal
guardian.
See "Bleeding " if wound is deep
or bleeding freely.CALL EMS 9-1-1.
YES
NO
NO
YES
NO
YES
Emergency Guidelines for Schools, 2011 Florida Edition
Emergency Guidelines for Schools, 3rd edition
most recent draft EGS 122006.igx
RASHES
Some rashes may be contagious. Wear disposable gloves to protect self when in
contact with any rash.
Rashes include such things as:Hives.Red spots (large or small, flat or raised).Purple spots.Small blisters.
Other symptoms may indicate whether the student needs medical care. Does student have:
Loss of consciousness?Difficulty breathing or swallowing?Purple spots?
If any of the following symptoms are present, contact responsible school authority & parent or legal guardian and URGE MEDICAL CARE:
Oral temperature over 100.0 F (See "Fever"). Headache.Diarrhea. Sore throat.Vomiting.Rash is bright red and sore to the touch.Rash (hives) all over body.Student is so uncomfortable (e.g., itchy, sore, feels ill) that he/she is not able to participate in school activities.
CALL EMS 9-1-1..
Contact responsible school authority &
parent/legal guardian..
Rashes may have many causes including heat,
infection, illness, reaction to medications, allergic
reactions, insect bites, dry skin or skin irritations.
See "Allergic Reaction" and
"Communicable Disease" for more
information.
NO
YES
Emergency Guidelines for Schools, 2011 Florida Edition
Emergency Guidelines for Schools, 3rd edition
SEIZURES
Seizures may be any of the following:Episodes of staring with loss of eye contact. Staring involving twitching of the arm and leg muscles. Generalized jerking movements of the arms and legs. Unusual behavior for that person (e.g., running, belligerence, making strange sounds, etc.).
Refer to student’s emergency care plan .
A student with a history of seizures should be known to appropriate school staff. An emergency care plan should be developed, containing a
description of the onset, type, duration and after effects
of the seizures.
If student seems off balance, place him/her on the floor (on a mat) for observation and safety. Do NOT restrain movements.Move surrounding objects to avoid injury.Do NOT place anything between the teeth or give anything by mouth.Keep airway clear by placing student on his/her side. A pillow should NOT be used.
Observe details of the seizure for parent/legal guardian, emergency personnel or physician. Note:
Duration. Kind of movement or behavior. Body parts involved.Loss of consciousness, etc.
Is student having a seizure lasting longer than 5 minutes?Is student having seizures following one another at short intervals?Is student without a known history of seizures having a seizure?Is student having any breathing difficulties after the seizure?
Seizures are often followed by sleep. The student may also be confused.
This may last from 15 minutes to an hour or more. After the sleeping period, the
student should be encouraged to participate in all normal class activities.
Contact responsible
school authority & parent or legal
guardian. CALL EMS 9-1-1.
NO
YES
Emergency Guidelines for Schools, 2011 Florida Edition
Emergency Guidelines for Schools, 3rd edition
SHOCK
Any serious injury or illness may lead to shock, which is a lack of blood and oxygen getting to the body tissues.Shock is a life-threatening condition.Stay calm and get immediate assistance.Check for medical bracelet or student’s emergency care plan if available.
See the appropriate guideline to treat the most severe (life or limb threatening) symptoms first. Is student:
Not breathing? See "CPR" and/or "Choking."Unconscious? See "Unconsciousness."Bleeding profusely? See "Bleeding."
Keep student in flat position of comfort.Elevate feet 8-10 inches, unless this causes pain or a neck/back or hip injury is suspected.Loosen clothing around neck and waist. Keep body normal temperature. Cover student with a blanket or sheet.Give nothing to eat or drink.If student vomits, roll onto left side keeping back and neck in straight alignment if injury is suspected.
If injury is suspected, see "Neck & Back Pain" and treat as a possible neck injury.
.
Do NOT move student unless he/she is endangered.
Signs of Shock:Pale, cool, moist, skin. Mottled, ashen, blue skin.Altered consciousness or confused.Nausea, dizziness or thirst.Severe coughing, high pitched whistling sound.Blueness in the face. Fever greater than 100.0 F in combination with lethargy, loss of consciousness, extreme sleepiness, abnormal activity.Unresponsive.Difficulty breathing or swallowing. Rapid breathing.Rapid, weak pulse.Restlessness/irritability.
Contact responsible school
authority & parent or legal guardian.
URGE MEDICAL CARE if EMS not called.
NOCALL EMS
9-1-1.
YES
Emergency Guidelines for Schools, 2011 Florida Edition
Emergency Guidelines for Schools, 3rd edition
SPLINTERS OR IMBEDDED PENCIL LEAD
Wear disposable gloves when exposed to blood
or other body fluids.
Check student’s immunization record for tetanus.
See "Tetanus Immunization."
Gently wash area with clean water and soap.
Is splinter or lead: Protruding above the surface of the skin?Small?Shallow?
Leave in place.Do NOT probe under skin.
Remove with tweezers unless this causes student pain.Do NOT probe under skin.
Were you successful in removing the entire splinter/pencil lead?
Wash again.Apply clean dressing.
YESNO
YES
NO
Contact responsible school
authority & parent or legal guardian.
Encourage medical care.
Emergency Guidelines for Schools, 2011 Florida Edition
Emergency Guidelines for Schools, 3rd edition
STABBING & GUNSHOT INJURIES
Refer to your school’s policy for addressing violent incidents.
CALL EMS 9-1-1 for injured student. Call the police. Intervene only if the situation is safe for you to approach.
Wear disposable gloves when exposed to blood or other body fluids.
Is the student:Losing consciousness?Having difficulty breathing? Bleeding uncontrollably?
Lay student down in a position of comfort if he/she is not already doing so.Elevate feet 8-10 inches, unless this causes pain or a neck/back injury is suspected.Press injured area firmly with a clean bandage to stop bleeding.Elevate injured part gently, if possible.Keep body temperature normal. Cover student with a blanket or sheet.
NO
YES
Contact responsible
school authority & parent or legal
guardian.
Emergency Guidelines for Schools, 3rd edition
STABBING & GUNSHOT INJURIES
Refer to your school’s policy for addressing violent incidents.
CALL EMS 9-1-1 for injured student. Call the police. Intervene only if the situation is safe for you to approach.
Wear disposable gloves when exposed to blood or other body fluids.
Is the student:Losing consciousness?Having difficulty breathing? Bleeding uncontrollably?
Lay student down in a position of comfort if he/she is not already doing so.Elevate feet 8-10 inches, unless this causes pain or a neck/back injury is suspected.Press injured area firmly with a clean bandage to stop bleeding.Elevate injured part gently, if possible.Keep body temperature normal. Cover student with a blanket or sheet.
Check student’s airway.Look, listen and feel for breathing. If student stops breathing , start CPR. See "CPR."
Check student’s immunization record for tetanus.
See "Tetanus Immunization."
NO
YES
Contact responsible
school authority & parent or legal
guardian.
• Check student’s airway.• If student stops breathing, start CPR. See “CPR.”
Check student’s immunization record for tetanus.
See “Tetanus Immunization.”
Contactresponsible
school authority &parent or legal
guardian.
Emergency Guidelines for Schools, 2011 Florida Edition
Emergency Guidelines for Schools, 3rd edition
CALL EMS 9-1-1.
STINGSStudents with a history of allergy to stings
should be known to all school staff. An
emergency care plan should be developed.
Refer to student’s emergency care plan.
Does student have: Difficulty breathing?A rapidly expanding area of swelling, especially of the lips, mouth or tongue?A history of allergy to stings?
If available, administer doctor- and parent- or
guardian-approved medications.
A student may have a delayed allergic reaction up to 2 hours after the
sting. Adult(s) supervising student during normal activities should be
aware of the sting and should watch for any delayed reaction.
Remove stinger if present.Wash area with soap and water.Apply cold compress.
See "Allergic
Reaction."
Contact responsible school authority & parent
or legal guardian.
NO YES
Check student’s airway.Look, listen and feel for breathing. If student stops breathing , start CPR. See "CPR."
Emergency Guidelines for Schools, 2011 Florida Edition
Menstrual difficulties.Psychological issues.Stress.Constipation.Gas pain.Pregnancy. Has a serious injury occurred
resulting from:Sports?Violence?Being struck by a fast moving object?Falling from a height?Being thrown from a moving object?
Contact responsible
school authority & parent/legal guardian.
.
URGE PROMPTMEDICAL CARE.
Does student have:Fever?Severe stomach pains?Vomiting?
Take the student’s temperature. Note temperature over 100.0 F
as fever. See "Fever."
Allow student to rest 20-30 minutes in a room that affords privacy.
Does student feel better?
If stomachache persists or becomes
worse, contact responsible school authority & parent or legal guardian.
Allow student to return to
class.
YES
Suspect neck injury. See "Neck and Back Pain. "
NO
YES
YES NO
NO
Emergency Guidelines for Schools, 3rd edition
most recent draft EGS 122006.igx
TEETHBLEEDING GUMS
Bleeding gums:Are generally related to chronic infection.Present some threat to student’s general health.
No first aid measure in the school will be of any
significant value.
Contact responsible
school authority & parent/legal guardian.
.
URGE DENTAL CARE.
TOOTHACHE OR GUM INFECTION
These conditions can be direct threats to student’s general health, not just local tooth problems.
No first aid measure in the school will be of any significant value.
Relief of pain in the school often postpones dental care. Do NOT place pain relievers
(e.g., aspirin, Tylenol) on the gum tissue of the aching tooth. They can burn tissue.
Contact responsible
school authority & parent/legal guardian.
.
URGE DENTAL CARE.
See "Mouth & Jaw" for tongue, cheek,
lip, jaw or other mouth injury not
involving the teeth.
Emergency Guidelines for Schools, 2011 Florida Edition
Emergency Guidelines for Schools, 3rd edition
TEETH
DISPLACED TOOTH
Do NOT try to move tooth into correct position.
Contact responsible
school authority & parent/legal guardian.
.
OBTAIN EMERGENCY
DENTAL CARE.
KNOCKED-OUT OR BROKEN PERMANENT TOOTH
Find tooth.Do NOT handle tooth by the root.
If tooth is dirty, clean gently by rinsing with water.
Do NOT scrub the knocked-out tooth.
The following steps are listed in order of preference..
Within 15 - 20 minutes: .
1. Place gently back in socket and have student hold in place with tissue or gauze, or2. Place in HBSS (Save-A-Tooth Kit) if available See ’’Recommended First Aid Supplies" on inside back cover, or3. Place in glass of milk, or4. Place in normal saline, or5. Have student spit in cup and place tooth in it, or6. Place in glass of water. .
TOOTH MUST NOT DRY OUT.
Apply a cold compress to face to minimize swelling.
Contact responsible school authority & parent
or legal guardian..
OBTAIN EMERGENCY DENTAL CARE. THE STUDENT SHOULD
BE SEEN BY A DENTIST AS SOON
AS POSSIBLE.
Do not replant primary (baby) teeth
back in socket.(No. 1 in list.)
Emergency Guidelines for Schools, 2011 Florida Edition
Emergency Guidelines for Schools, 3rd edition
most recent draft EGS 122006.igx
TETANUS IMMUNIZATION
Protection against tetanus should be considered with any wound, even a minor one. After any wound, check
the student’s immunization record for tetanus and notify parent or legal guardian.
A minor wound would need a tetanus booster only if it
has been at least 10 years since the last tetanus shot or if the student is 5 years old or younger.
Other wounds such as those contaminated by dirt, feces and saliva (or other body fluids); puncture wounds;
amputations; and wounds resulting from crushing, burns, and frostbite need a tetanus booster if it has been more
than 5 years since last tetanus shot.
Emergency Guidelines for Schools, 2011 Florida Edition
Emergency Guidelines for Schools, 3rd edition
.
Students should be inspected for ticks after time in woods or brush. Ticks may carry
serious infections and must be completely removed.
.
Do NOT handle ticks with bare hands .
TICKS
Refer to your school’s policy regarding the removal of ticks .
Wear disposable gloves when exposed to blood and other body fluids.
Wash the tick area gently with soap and water before attempting removal.
Using tweezers, grasp the tick as close to the skin surface as possible and pull upward with steady, even pressure. Do NOT twist or jerk the tick as the mouth parts may break off. It is important to remove the ENTIRE tick.Take care not to squeeze, crush or puncture the body of the tick as its fluids may carry infection.
After removal, wash the tick area thoroughly with soap and water.Wash your hands.Apply a bandage.
Ticks can be safely thrown away by placing them in container of alcohol or
flushing them down the toilet.
Contact responsible
school authority & parent/legal guardian.
Emergency Guidelines for Schools, 2011 Florida Edition
Emergency Guidelines for Schools, 3rd edition
most recent draft EGS 122006.igx
UNCONSCIOUSNESS
If student stops breathing, and no one else is available
to call EMS, administer CPR for 2 minutes and
then call EMS yourself.
See "Fainting". Did student regain consciousness immediately?
Unconsciousness may have many causes including:Injuries.Blood loss/shock. Poisoning.Severe allergic reaction. Diabetic reaction.
.
If you know the cause of the unconsciousness, see the appropriate guideline.
Is unconsciousness due to injury?
See "Neck & Back Pain" and treat as a possible neck injury.Do NOT move student.
Open airway with head tilt/chin lift.Look, listen and feel for breathing.
Is student breathing?
Keep student in flat position of comfort.Elevate feet 8-10 inches unless this causes pain or a neck/back or hip injury is suspected.Loosen clothing around neck and waist. Keep body normal temperature. Cover student with a blanket or sheet.Give nothing to eat or drink.If student vomits, roll onto left side keeping back and neck in straight alignment if injury is suspected.Examine student from head-to-toe and give first aid for conditions as needed.
Emergency Guidelines for Schools, 2011 Florida Edition
Emergency Guidelines for Schools, 3rd edition
most recent draft EGS 122006.igx
VOMITING
If a number of students or staff become ill with the
same symptoms, suspect food poisoning.
.
CALL POISON CONTROL 1-800-222-1222
and ask for instructions. See "Poisoning" and
notify local health department.
Vomiting may have many causes including:
Illness.Bulimia.Anxiety.Pregnancy.
.
Have student lie down on his/her side in a room that affords privacy and allow him/her to rest.Apply a cool, damp cloth to student’s face or forehead.Have a bucket available.Give no food or medications, although you may offer student ice chips or small sips of clear fluids containing sugar (such as 7Up or Gatorade), if the student is thirsty.
Contact responsible
school authority & parent/legal guardian.
.
URGE MEDICAL CARE
Take student’s temperature. Note oral temperature over
100.0 F as fever. See "Fever".
Does the student have:Repeated vomiting?Fever?Severe stomach pains?
Is the student dizzy and pale?
Wear disposable gloves when exposed to blood and other body fluids.
Emergency Guidelines for Schools, 2011 Florida Edition
Emergency Guidelines for Schools, 3rd edition
SCHOOL SAFETY PLANNING & EMERGENCY PREPAREDNESS
SECTION
Emergency Guidelines for Schools, 3rd edition
A school-wide safety plan must be developed in cooperation with school health staff, school administrators, local EMS, emergency management, hospital staff, health department staff, law enforcement and parent/guardian organizations. All employees should be trained on the emergency plan and a written copy should be available at all times. This plan should be periodically reviewed and updated as needed. It should consider the following:
• Staff roles are clearly defined in writing. For example, staff responsibility for giving care, accessing EMS and/or law enforcement, student evacuation, notifying responsible school authority and parents, and supervising and accounting for uninjured students are outlined and practiced. A responsible authority for emergency situations is designated within each building. In-service training is provided to maintain knowledge and skills for employees designated to respond to emergencies. A clear chain-of-command should be established for each school campus indicating who is in charge in the absence of the lead administrator.
• Appropriate staff, in addition to the nurse, are trained in CPR and first aid in each building. For example, teachers and employees working in high-risk areas (e.g., labs, gyms, shops, etc.) are trained in CPR and first aid.
• Student and staff emergency contact information is maintained in a confidential and accessible location. Copies of emergency health care plans for students with special needs should be available, as well as distributed to appropriate staff.
• First aid kits are stocked with up-to-date supplies and are available in central locations, high-risk areas, and for extra curricular activities. See “Recommended First Aid Supplies” on inside back cover.
• Schools have developed instructions for emergency evacuation, sheltering in place, hazardous materials, lock-down and any other situations identified locally. Schools have prepared evacuation To-Go kits containing class rosters and other evacuation information and supplies. These kits are kept up to date.
• Emergency numbers are available and posted by all phones. Employees are familiar with emergency numbers. See “Emergency Phone Numbers” on back cover.
EmErgEncy ProcEdurEs - Florida statutEs: §1006.07(4)District school boards are required to develop policies and procedures for both emergency drills and actual emergencies.
This plan must address all potential hazards to include:1. Weapon-use and hostage situations.2. Hazardous materials or toxic chemical spills.3. Weather emergencies, including hurricanes, tornadoes, and severe storms.4. Exposure as a result of a manmade emergency.
Emergency Guidelines for Schools, 2011 Florida Edition
Emergency Guidelines for Schools, 3rd edition
School personnel have communicated with local EMS regarding the emergency plan, services available, students with special health care needs and other important information about the school.
A written policy exists that describes procedures for accessing EMS without delay at all times and from all locations (e.g., playgrounds, athletic fields, field trips, extra- curricular activities, etc.).
Transportation of an injured or ill student is clearly stated in written policy.
Instructions for addressing students with special needs are included in the school
Shelter-in-place provides refuge for students, staff and public within the building during an emergency. Shelters or safe areas are located in areas that maximize the safety of inhabitants. Safe areas may change depending on the emergency.
Identify safe areas in each building.
Administrator instructs students and staff to assemble in safe areas. Bring all person(s) inside the building.
supplies.
Close all exterior doors and windows, if appropriate.
Turn off ventilation leading outdoors, if appropriate.
Staff should account for all students after arriving in designated area.
All persons must remain in designated areas until notified by administrator or emergency responders.
SHELTER-IN-PLACE PROCEDURES
Staff will take the evacuation To-Go Kit containing emergency information and
School Safety Plans – Continued
safety plan. See "Planning for Students with Special Needs."
• Emergency contact procedures for families and first responders.
• Parent-child reunification procedures.
• Emergency public information plan.
•
•
••
••
•
••••
Emergency Guidelines for Schools, 3rd edition
Items to be included in a portable container, secured in the main office, for use in an evacuation:
• Aerial Photos of the campus
• Area maps
• Campus layout or site plan
• Blueprint of school buildings
• School/district emergency plan/procedures
• Radio/cell phone with extra battery
• Vests for crisis team staff
• Teacher/employee roster
• Keys
• Fire alarm, sprinkler, and utility shut-off procedures
• Emergency resource list (Red Cross, counselors, FAA, etc.)
• Evacuation sites
• Student disposition forms and emergency data cards
• Student attendance roster
• Emergency contact information (parents, guardians)
• Inventory of staff resources (certifications, etc.)
• List of students with special needs
• First aid supplies location
• Emergency first aid supplies
• Flashlight and batteries
• Bullhorn
Compiled from:Ready to Go by Michael Dorn. Campus Safety Journal, August 2002. www.campusjournal.comEmergency Evacuation kit Revisited by Michael Dorn. School Planning and Management, March 2004. www.peterli.com/spm/index.shtm Crisis Response Box from the Crime and Violence Prevention Center, California’s Office of the Attorney General. www.caag.state.ca.us
Emergency Guidelines for Schools, 2011 Florida Edition
provide emergency information and supplies.
EVACUATION:
STAFF:
RELOCATION CENTERS:
Primary Relocation Center __________________________________________________ Address __________________________________________________________________ Phone ____________________________________________________________________ Other information ___________________________________________________________ Secondary Relocation Center ________________________________________________ Address __________________________________________________________________ Phone ____________________________________________________________________ Other information ___________________________________________________________
EVACUATION – RELOCATION CENTERS
responders alter route.
Close doors and turn off lights.
When outside building, account for all students. Inform administrator immediately if any students are missing.
If students are evacuated to relocation centers, stay with students. Take roll again when you arrive at the relocation center.
Prepare an evacuation To-Go Kit for building and/or classrooms to
Take evacuation To-Go Kit with you.
Direct students to follow normal fire drill procedures unless administrator or emergency
• CALL 9-1-1. Notify administrator.• Administrator orders evacuation procedures.• Administrator determines how students and staff should be evacuated: outside
of building, into another on-campus building or to one of the school’s off-campus relocation centers. ____________________________________ coordinates transportation if students are evacuated to a relocation center.
• Administrator notifies relocation center.• Direct students and staff to follow fire drill procedures and routes. Follow alternate
route if normal route is too dangerous.• Turn off lights,electical equipment, gas, water faucets, air conditioning and heating
systems. Close doors.• Notify parents of relocation and pick-up process.
• Identify a minimum of three student relocation centers.
• The primary site is located close to the facility.• The secondary sites are located further away from the facility in case of community-
wide emergency. Include maps to centers for all staff.
• Direct students to follow normal fire drill procedures unless administrator or emergency responders alter route.
• Take evacuation To-Go Kit with you.
• Close doors and turn off lights.
• When outside building, account for all students. Inform administrator immediately if any students are missing.
• If students are evacuated to relocation centers, stay with students. Take roll again when you arrive at the relocation center.
INCIDENT OCCURS IN SCHOOL:
INCIDENT OCCURS NEAR SCHOOL:
Consider extra staffing for students with special medical and/or physical needs.
HAZARDOUS MATERIALS
Notify building administrator.
Call 9-1-1 or local emergency number. If material is known, report information.
Fire officer in charge may recommend additional shelter or evacuation actions.
Follow procedures for sheltering or evacuation.
Secure/contain area until fire personnel arrive.
Consider shutting off heating, cooling and ventilation systems in contaminated area to reduce the spread of contamination.
Notify parent/guardian if students are evacuated, according to facility policy.
Resume normal operations after fire officials have cleared situation.
Fire or police will notify school administration.
Consider shutting off heating, cooling and ventilation systems in contaminated area to reduce the spread of contamination.
Fire officer in charge of scene will recommend shelter or evacuation actions.
Follow procedures for sheltering or evacuation.
Evacuate students to a safe area or shelter students in the building until transportation arrives.
Notify parent/guardian if students are evacuated, according to facility policy and/or guidance.
Resume normal operations after consulting with fire officials.
If advised, evacuate to an upwind location, taking evacuation To-Go Kit with you.
If possible, seal off area of leak/spill. Close doors.
Emergency Guidelines for Schools, 2011 Florida Edition
a. Vital student, staff and building information during the first minutes of an emergency evacuation.
b. Records to initiate student accountability. c. Quick access to building emergency procedures. d. Critical health information and first aid supplies. e. Communication equipment.
building characteristics that may need to be accessed in an emergency.
student rosters, list of students with special health concerns/medications). Additional supplies should be assembled for a shelter-in-place kit such as window coverings and food/water supplies.
4) Schools may develop:
in the office/administrative area and contains building-wide information for
maintained in the classroom and contains student specific information for use by the educational staff during an evacuation or lockdown situation.
an emergency.
with response protocols.
needs.
1) Developing a To-Go Kit provides your school staff with:
GUIDELINES TO USE A TO-GO-KIT
2) This kit can also be used by public health/safety responders to identify specific
This kit can also be one component of your shelter-in-place kit (emergency plan, 3) The To-Go Kit must be portable and readily accessible for use in an evacuation.
a. A building-level To-Go Kit (see Building To-Go Kit list) that is maintained
b. A classroom-level To-Go Kit (see Classroom To-Go Kit list) that is
5) The contents of the kits must be updated regularly and used only in the case of
6) The classroom and building kits should be a part of your drills for consistency
7) The building and classroom To-Go Kit lists that are included provide minimal supplies to be included in your schools kits. We strongly encourage you to modify the content of the kit to meet your specific building and community
use by the building principal/incident commander, AND/OR
SUPPLIES
_____Flashlight. _____First aid kit with extra gloves. _____CPR disposable mask. _____Battery-powered radio. _____Two-way radios and/or cellular phones available. _____Whistle. _____Extra batteries for radio and flashlight. _____Peel-off stickers and markers for name tags. _____Paper and pen for notetaking. _____Individual emergency medications/health equipment that would need to be removed from the building during an evacuation. (Please discuss and plan for these needs with your school nurse.) _____Other:_______________________________________________________________ _____Other:_______________________________________________________________
FORMS
_____Copies of all forms developed by your Emergency Response Team (chain of command, emergency plan, etc.). _____Map of building with location of phones, exits, first aid kits, and AED(s). _____Blueprint of school building including all utilities. _____Turn-off procedures for fire alarm, sprinklers and all utilities. _____Videotape of inside and outside of the building/grounds. _____Map of local streets with evacuation routes. _____Master class schedule. _____List of students requiring special assistance/medications. _____Student roster including emergency contacts. _____Current yearbook with pictures. _____Staff roster including emergency contacts. _____Local telephone directory.
Person(s) responsible for routine toolbox updates:_____________________________________ Person(s) responsible for bag delivery in emergency:_______________________________
BUILDING To-Go Kit
member of the Emergency Response Team to keep the To-Go Kit updated (change batteries, update phone numbers, etc.). Items in this kit are for emergency use only.
This kit should be portable and readily accessible for use in an emergency. Assign a
_____Lists of district personnel's phone, fax and beeper numbers.
This information is provided by the Florida Department of Health, Division of Emergency Medical Operations, Emergency Medical Services for Children Program. We strongly encourage you to customize this form to meet the specific needs of your school and community.
SUPPLIES
_____Flashlight. _____First aid kit with extra gloves. _____CPR disposable mask. _____Battery powered radio. _____Two-way radios and/or cellular phones available. _____Whistle. _____Extra batteries for radio and flashlight. _____Peel-off stickers and markers for name tags. _____Paper and pen for notetaking. _____Individual medications/health equipment. (Please discuss and plan for these needs with your school nurse.) _____Age-appropriate activities for students. _____Other:_____________________________________________________________ _____Other:_____________________________________________________________ _____Other:_____________________________________________________________
FORMS
_____Copies of all forms developed by your Emergency Response Team (chain of command, emergency plan, etc.). _____Map of building with location of phones and exits. _____Map of local streets with evacuation routes. _____Master schedule of classroom teacher. _____List of students with special health concerns/medications. _____Student roster including emergency contacts. _____Current yearbook with pictures. _____Staff roster including emergency contacts. _____Local telephone directory.
Person(s) responsible for routine toolbox updates:___________________________________
CLASSROOM To-Go Kit
This kit should be portable and readily accessible for use in an emergency. The classroom teacher is responsible to keep the To-Go Kit updated (change batteries, update phone numbers, etc.). Items in this kit are for emergency use only.
_____Lists of district personnel's phone, fax and beeper numbers.
This information is provided by the Florida Department of Health, Division of Emergency Medical Operations, Emergency Medical Services for Children Program. We strongly encourage you to customize this form to meet the specific needs of your school and community.
INFECTION CONTROL GUIDELINES FOR SCHOOLS
1) Recognize the symptoms of flu: • Fever • Headache • Cough • Body ache
2) Stay home if you are ill.
3) Cover your cough: • Use a tissue when you cough or sneeze and put used tissue in the nearest wastebasket. • If tissues are not available, cough into your elbow or upper sleeve area, not your hand. • Wash your hands after you cough or sneeze.
4) Wash your hands: • Using soap and water after coughing, sneezing or blowing your nose. • Using alcohol-based hand sanitizers if soap and water are not available.
5) Have regular inspections of the school hand washing facilities to assure soap and paper towels are available.
6) Follow a regular cleaning schedule of frequently touched surfaces including handrails, door handles and restrooms.
7) Have appropriate supplies for students and staff including tissues, waste receptacles for disposing used tissues and hand washing supplies (soap and water or alcohol-based hand sanitizers).
PANDEMIC FLU PLANNING FOR SCHOOLS
FLU TERMS DEFINED
Seasonal (or common) flu is a respiratory illness that can be transmitted person to person. Most people have some immunity and a vaccine is available.
Avian (or bird) flu is caused by influenza viruses that occur naturally among wild birds. The H5N1 variant is deadly to domestic fowl and can be transmitted from birds to humans. There is no human immunity and no vaccine is available.
Pandemic flu is virulent human flu that causes a global outbreak, or pandemic, of serious illness. Because there is little natural immunity, the disease can spread easily from person to person. Currently, there is no pandemic flu.
INFLUENZA SYMPTOMS According to the Centers for Disease Control and Prevention (CDC) influenza symptoms usually start suddenly and may include the following:
Source: Centers for Disease Control and Prevention (CDC)
Emergency Guidelines for Schools, 2011 Florida Edition
Emergency Guidelines for Schools, 3rd edition
The following are steps schools can take before, during and after a pandemic flu outbreak. Remember that a pandemic may have several cycles, waves or outbreaks so these steps may need to be repeated.
PREPAREDNESS/PLANNING PHASE - BEFORE AN OUTBREAK OCCURS
RESPONSE - DURING AN OUTBREAK
RECOVERY - FOLLOWING AN OUTBREAK
1. Develop a pandemic flu plan for your school using the CDC School Pandemic Flu Planning Checklist available at http://www.ohiopandemicflu.gov/schools/schools.htm.
2. Build a strong relationship with your local health department and include them in the planning process.
3. Train school staff to recognize symptoms of influenza.
4. Decide to what extent you will encourage or require students and staff to stay home when they are ill.
5. Have a method of disease recognition (disease surveillance) in place. Report increased absenteeism or new disease trends to the local health department.
6. Make sure the school is stocked with supplies for frequent hand hygiene including soap, water, alcohol-based hand sanitizers and paper towels.
7. Encourage good hand hygiene and respiratory etiquette in all staff and students.
8. Identify students who are immune compromised or chronically ill who may be most vulnerable to serious illness. Encourage their families to talk with their health care provider regarding special precautions during influenza outbreaks.
9. Develop alternative learning strategies to continue education in the event of an influenza pandemic.
1. Heighten disease surveillance and reporting to the local health department.
2. Communicate regularly with parents informing them of the community and school status and expectations during periods of increased disease.
3. Work with local education representatives and the local health officials to determine if the school should cancel non-academic events or close the school.
4. Continue to educate students, staff and families on the importance of hand hygiene and respiratory etiquette.
1. Continue to communicate with the local health department regarding the status of disease in the community and the school.
2. Communicate with parents regarding the status of the education process.
3. Continue to monitor disease surveillance and report disease trends to the health department.
4. Provide resources/referrals to staff and students who need assistance in dealing with the emotional aspects of the pandemic experience. Trauma-related stress may occur after any catastrophic event and may last a few days, a few months or longer, depending on the severity of the event.
SCHOOLS ACTION STEPS FOR PANDEMIC FLU
Emergency Guidelines for Schools, 3rd edition
1. Current first aid, choking and CPR manual and wall chart(s) such as the
(PedFACTS) Resource Manual and 3-in-1 First Aid, Choking, CPR Chart available at http://www.aap.org.
2. Cot: mattress with waterproof cover (disposable paper covers and pillowcases).
3. Small portable basin.
4. Covered waste receptacle with disposable liners.
Hank’s Balanced Salt Solution (HBSS) *available in the Save-A-Tooth emergency tooth preserving system manufactured by 3M®.
Non-mercury thermometer.
Expendable supplies:
Emergency Guidelines for Schools, 2011 Florida EditionEmergency Guidelines for Schools, 3rd edition
Principal, Administrator or Designee:
• Verify information
• CALL 9-1-1 or emergency number (if necessary)
• Seal off high-risk area
• Convene crisis team and implement crisis response procedures
• Notify other leadership as necessary
• Notify children and staff (depending on emergency, children may be notified by teachers)
• Evacuate children and staff or relocate to a safe area within the building (if necessary)
• Refer media to specified spokesperson (or designee)
• Notify community agencies (if necessary)
• Implement post-crisis procedures
• Keep detailed notes of crisis event
• Notify parent(s)/guardian(s)
Staff:
• Verify information
• Lock all doors, unless evacuation orders are issued
• Warn children (if advised)
• Account for all children
• Stay with children during an evacuation
• Take roster/list of children with you
• Refer media to specified spokesperson (or designee)
• Keep detailed notes of crisis event
• Keep staff and children on site, if possible, for accurate documentation and investigation
Emergency Guidelines for Schools, 3rd edition
Upon receiving a phone call that a bomb has been planted in facility:
• Listen closely to caller’s voice, speech patterns and noises in the background.
• After hanging up phone, immediately dial the call back service in your area to trace the call, if possible.
• Notify administrator or designee.
• CALL 9-1-1.
• Administrator orders evacuation of all people inside building(s), or other actions, per facility policy and emergency plan.
• If evacuation occurs, staff should take roster/list of children.
If threat is received by a written order:
• Immediately CALL 9-1-1.
• Avoid any unnecessary handling of note. It is considered evidence by law enforcement.
• Place note in plastic bag, if available.
Evacuation procedures:
• Administrator notifies children and staff. Do not mention “bomb threat”.
• Report any unusual activities/objects immediately to the appropriate officials.
• Take roster/list of children with you.
• Children and staff may be evacuated to a safe distance outside of the building(s), in keeping with facility policy. After consulting with appropriate official, administrator may move children to ___________________________ (primary relocation center), if indicated.
• Staff takes roll after being evacuated.
• No one may reenter building(s) until fire or police personnel declare entire building(s) safe.
• Administrator notifies children and staff of termination of emergency. Resume normal operations.
Notify parent(s)/guardian(s), per facility policies.
Emergency Guidelines for Schools, 2011 Florida EditionEmergency Guidelines for Schools, 3rd edition
In the event of a fire, smoke from a fire or gas odor has been detected:
• Pull fire alarm except when there is a gas odor and notify building occupants.
• If there is a gas odor use other non-sparking means of notification such as a land line telephone. Do not use a cell phone. Gas can be ignited by cell phones or anything that creates an electric spark.
• Evacuate children and staff to the designated area (map should be included in plan).
• CALL 9-1-1 and administrator.
• Follow normal fire drill route. Follow alternate route if normal route is too dangerous or blocked (map should be included in plan).
• Staff takes roster/list of children.
• Staff takes roll after being evacuated.
• Staff reports missing children to administrator immediately.
• After consulting with appropriate official, administrator may move children to _________________ if weather is inclement or building is damaged (primary relocation center).
• No one may re-enter building(s) until entire building(s) is declared safe by fire or police personnel.
Emergency Guidelines for Schools, 3rd edition
Flood Watch has been issued in an area that includes your facility:
• Monitor your local Emergency Alert Stations, weather radio and television. Stay in contact with your local emergency management officials.
• Review evacuation procedures with staff and prepare children.
• Check relocation centers. Find an alternate relocation center if primary and secondary centers would also be flooded.
• Line up transportation resources.
Flood Warning has been issued in an area that includes your facility:
• If advised by emergency responders to evacuate, do so immediately.
• Staff takes rosters/lists of children.
• Move children to designated relocation center quickly.
• Turn off utilities in building and lock doors, if safe to do so.
• Staff takes role upon arriving at relocation center. Report missing children to • administration emergency response personnel immediately.
• Notify parent(s)/guardian(s) according to facility policy.
• Monitor for change in status.
Emergency Guidelines for Schools, 2011 Florida EditionEmergency Guidelines for Schools, 3rd edition
Intruder – an unauthorized person who enters the property• Ask another staff person to accompany you before approaching intruder.
• Politely greet intruder and identify yourself.
• Ask intruder the purpose of his/her visit.
• Inform intruder that all visitors must register at a specified site.
• Notify administrator, principal, or police.
• If intruder’s purpose in not legitimate, ask him/her to leave. Accompany intruder to exit.
If intruder refuses to leave:• Warn intruder of consequences for staying on school or child care center property.
Inform him/her that you will call police.
• Notify principal or administrator if intruder still refuses to leave. CALL 9-1-1. Give police full description of intruder.
• Walk away from intruder if he/she indicates a potential for violence. Be aware of intruder’s actions at this time (where he/she is located in school, whether he/she is carrying a weapon or package, etc.).
• Principal or administrator may issue lock-down procedures.
Witness to hostage situation:• If hostage taker is unaware of your presence, do not intervene.
• CALL 9-1-1 immediately. Give dispatcher details of situation; ask for assistance from hostage negotiation team.
• Seal off area near hostage scene.
• Notify principal or administrator (he/she may wish to evacuate rest of building, if possible).
• Give control of scene to police and hostage negotiation team.
• Keep detailed notes of events.
If taken hostage:• Follow instructions of hostage taker.
• Try not to panic. Calm children if they are present.
• Treat the hostage taker as normally as possible.
• Be respectful to hostage taker.
• Ask permission to speak and do not argue or make suggestions.
Emergency Guidelines for Schools, 3rd edition
If incident occurred at facility:• CALL 9-1-1. Do not leave the child/person unattended.
• Notify CPR/first aid certified people in the facility of medical emergencies (names of CPR/first aid certified people are listed in the Crisis Team Members section).
• If possible, isolate affected child/person.
• Initiate first aid if trained.
• Do not move victim except if evacuation is absolutely necessary.
• Notify administrator.
• Designate staff person to accompany injured/ill person to the hospital.
• Administrator notifies parent(s)/guardian(s) if it is a child.
• Direct witness(es) to psychologist/counselor/crisis team if needed. Notify parents if children were witnesses.
• Determine method of notifying children, staff and parents.
• Refer media to designated public information person for the facility.
If incident occurred outside of facility:• Activate medical/crisis team as needed.
• Notify staff if before normal operating hours.
• Determine method of notifying children, staff and parents. Announce availability of counseling services for those who need assistance.
• Refer media to designated public information person for the facility.
Post-crisis intervention:• Discuss with counseling staff or critical incident stress management team.
• Determine level of intervention for staff and children.
• Designate private rooms for private counseling/defusing.
• Escort affected children, siblings and close friends and other “highly stressed” individuals to counselors/critical incident stress management team.
• Assess stress level of staff. Recommend counseling to all staff.
• Follow-up with children and staff who receive counseling.
• Designate staff person(s) to attend funeral.
• Allow for changes in normal routines or schedules to address injury or death.
Emergency Guidelines for Schools, 2011 Florida EditionEmergency Guidelines for Schools, 3rd edition
IF A PERSON THREATENS WITH A FIREARM OR BEGINS SHOOTING…
Staff and Children:
• If you are outside with the shooter outside – go inside the building as soon as possible. If you cannot get inside, make yourself as compact as possible; put something between yourself and the shooter; do not gather in groups.
• If you are inside with the shooter inside – turn off lights; lock all doors and windows; shut curtains, if it is safe to do so.
• Children, staff and visitors should crouch under furniture without talking and remain there until an all-clear is given by the administrator or designee.
• Check open areas for wandering children and bring them immediately into a safe area.
• Staff should take roll call and immediately notify the administrator of any missing children or staff when it is safe to do so.
Administrator/Police Liaison:
• Assess the situation as to:o The shooter’s locationo Any injurieso Potential for additional shooting
• CALL 9-1-1 and give as much detail as possible about the situation.
• Secure the facility, if appropriate.
• Assist children and staff in evacuating from immediate danger to safe area.
• Care for the injured as carefully as possible until law enforcement and paramedics arrive.
• Refer media to designated public information person per media procedures.
• Administrator to prepare information to release to media and parent(s)/guardian(s).
• Notify parent(s)/guardian(s) according to policies.
• Hold information meeting with staff.
• Initiate a crisis/grief counseling plan.
Emergency Guidelines for Schools, 3rd edition
Upon receiving a phone call that a chemical or biological hazard has been planted in facility:
• Listen closely to caller’s voice and speech patterns and to noises in the background.• Notify administrator or designee.• Notify local law enforcement agency.• Administrator orders evacuation of all people inside facility, or other actions, per police
advice or policy.• If evacuation occurs, staff should take a list of children present.
Upon receiving a chemical or biological threat letter:• Minimize the number of people who come into contact with the letter by immediately
limiting access to the immediate area in which the letter was discovered.• Ask the person who discovered/opened the letter to place it into another container,
such as a plastic zip-lock bag or another envelope.• CALL 9-1-1.• Separate “involved” people from the rest of the staff and children. If “involved”
people were exposed to a powder, liquid or other substance they should wash it off immediately if they can do so without exposing others to the substance.
• Move all “uninvolved” people out of the immediate area to a holding area.• Ask all people to remain calm until local public safety officials arrive.• Ask all people to minimize their contact with the letter or their surrounding, because
the area is now a crime scene.• Get advice of public safety officers as to decontamination procedures needed.
Evacuation procedures:• Administrator notifies staff and children if evacuation is deemed necessary. Do not
mention “terrorism” or “chemical or biological agent”.• Report any unusual activities immediately to the appropriate officials.• “Uninvolved” children and staff will be evacuated to a safe distance outside of the
facility in keeping with policy. After consulting with appropriate officials, administrator may move children and staff to a primary relocation center, if indicated.
• Staff must take roll after being evacuated noting any absences immediately to the administrator or designee.
• Children and staff “involved” in a letter opening or receiving a phone call will be evacuated as a group if necessary per consultation of the administrator and public safety officials.
• Administrator notifies staff and children of termination of emergency. Resume normal operations.
Notify parent(s)/guardian(s) according to policies.
Emergency Guidelines for Schools, 2011 Florida EditionEmergency Guidelines for Schools, 3rd edition
Tornado/Severe Thunderstorm Watch has been issued in an area near your facility:
• Monitor your local Emergency Alert Stations, weather radio and television. Stay in contact with your local emergency management officials.
• Bring all people inside building(s).• Close all windows and blinds.• Review tornado drill procedures and locations of safe areas. Tornado safe areas are
in interior hallways or rooms away from exterior walls and windows, and away from large rooms with high span ceilings. Get under furniture, if possible.
• Review “drop and tuck” procedures with children.
Tornado/Severe Thunderstorm Warning has been issued in an area near your facility, or tornado has been spotted near your facility:
• Move children and staff to safe areas.• Close all doors.• Remind staff to take rosters/lists of children.• Ensure that children are in “tuck” positions.• Account for all children.• Remain in safe area until warning expires or until emergency personnel have issued
an all-clear signal.
Attach building diagram to your emergency plan showing safe areas. Post diagrams in each room showing routes to safe areas.
Emergency Guidelines for Schools, 3rd edition
Crisis Team MembersPosition Name Work # Home # Cell # Room #Principal/
AdministratorDesigneeSecretaryTeacherGuidance
CounselorHealth Room
Staff
CPR/First Aid Certified StaffName Room #` CPR (Circle) Exp. Date First Aid
(Circle)
Exp. Date
Y N Y N Y N Y N Y N Y N Y N Y N Y N Y N
Crisis Contacts(Contact all of the following in the event of an emergency situation)
Name NumberSchool AdministrationCorporate AdministrationCounty Emergency
Management
Emergency Guidelines for Schools, 3rd edition
Complete this page as soon as possible and update as needed.
EMERGENCY MEDICAL SERVICES (EMS) INFORMATION Know how to contact your EMS. Most areas use 9-1-1; others use a 7-digit phone number.
EMERGENCY PHONE NUMBER: 9-1-1 or _________________________________
Name of EMS agency __________________________________________________
Their average emergency response time to your school ________________________
Directions to your school ________________________________________________
BE PREPARED TO GIVE THE FOLLOWING INFORMATION & DO NOT HANG UP BEFORE THE EMERGENCY DISPATCHER HANGS UP:
Name and school name ____________________________________________ School telephone number ___________________________________________ Address and easy directions _________________________________________ Nature of emergency_______________________________________________ Exact location of injured person (e.g., behind building in parking lot)__________ Help already given_________________________________________________ Ways to make it easier to find you (e.g., standing in front of building, red flag, etc.).
OTHER IMPORTANT PHONE NUMBERS
School Nurse ____________________________
Responsible School Authority ____________________________
Poison Control Center 1-800-222-1222
Fire Department 9-1-1 or _____________________
Police 9-1-1 or _____________________
Hospital or Nearest Emergency Facility ____________________________
County Children Services Agency ____________________________
Rape Crisis Center 1-800-656-HOPE
Suicide Hotline 1-800-SUICIDE
Local Health Department ____________________________
Taxi ____________________________
Other medical services information ____________________________ (e.g., dentists or physicians):
EMERGENCY PHONE NUMBERS
Location of the school's AED(s) ___________________________________________
Emergency Guidelines for Schools, 2011 Florida Edition