8
Revision 1.0. Fassung vom 09.07.2014 Emotion² Fly-market GmbH & Co. KG Am Schönebach 3 D-87637 Eisenberg Tel.: +49-8364-98330 Fax: +49-8364-983333 e-mail: [email protected] Owner’s manual

Revision 1.0. Fassung vom 09.07.2014
Emotion²
Fly-market GmbH & Co. KGAm Schönebach 3D-87637 EisenbergTel.: +49-8364-98330Fax: +49-8364-983333e-mail: [email protected]
Owner’s manual

With the harness system Emotion² you bought one of the most comfortable and functional allround harness, which is available on the market at present. Thank you for your confidence. Please read this instruction carefully and consider, that Skyman is not liable for accidents and damage, which result from disregarding of this operating instructions.
Technical description: The Emotion² is a paragliding harness for the use in a not motorized paraglider. Certification No.: EAPR GZ-0173/14.
a) b) Rescue system release handle c) Chest buckle with safety T-lockd) Lateral chest belt / adjustment bucklee) Main suspensionf) Outlet for speed systemg) Pulley for speed bar lineh) Shoulder belt with adjustment bucklei) Suspension for rescue parachute connection bridle (covered)
Rescue system container
j) Airbag Protectork) Seatboard inclination adjustmentl) Fixation for stirrupm)Fixation for speed bar linen) Air intake / valve protectoro) Storage bagp) Deployment bag with handle
1) Schematic description of how to mount the speedbar(Components partly covered)
Overview:
technical datas Small Medium Large
max. load 120 daN 120 daN 120 daNharness weight 3,6 kg 3,8 kg 4,1 kghangpoint height incl. carabiner 48 cm 50 cm 52 cmprotector system Mousse Bag Mousse Bag Mousse Bag
English version:
2
i)
f)
g)
h)
h)
j)
k)o)
1)
a)
f)
e)
d)
b)
j)
h)
c)
k)
m)
l)
d)
p) c)
n)
m) m)
l)l)
e) e)
Adjustment possibilities:
Adjustment possibilities are existing at the shoulder belts, the chest belt, the lateral chest belts, leg straps, seat bord/ lordosis inclination.By the versatile adjusting possibilities of the Emotion² we recommend in any case that all adjustments and settings are done in a simulator before the first flight to guarantee an optimal comfort.
The buckles of the chest belt / leg straps are secured against unintentional opening. To open these buckles you have to push both buttons of the buckle at the same time.
Adjust the chest belt:If the chest belt is closed, also the falling out safety device (Safe-T-System) is closed. The Click-Lock buckles must be closed audibly! The length of the chest belt can be adjusted and should not be tightened too much.
Adjusting the shoulder belts:Please note that with correct adjusting the shoulder belts are felt with light pressure on the shoulders. With the shoulder belts you adjust the harness on the pilot’s heigh, but also you adjust the seating position between upright and lying.
Adjusting the lateral chest belts:Adjusting the lateral chest belts take place as the third step and offers on one side again the variation of the seating position. On the other hand you adjust with the lateral chest belts the most comfortable seating position. During the adjustment pay attention to the fact that the body load is distributed equal on shoulder belt and lateral chest belt.
Adjusting of the leg belts:
Adjusting the seatboard inclination / lordosis:The inclination of the seat board/lodorsis is to be adjusted with the belt (k).
Attaching the speed bar:You can see in the schematic description 1) how the speedbar rope is running. The rope of the speedbar runs down from the risers to the pulley above the seatboard (g). The speedbar rope leaves the harness at the frontal edge of the seat board through the ring (l). Then the rope gets connected with the speedbar.
The length of the speedbar’s line must be adjusted in a simulator before flight!!!
When you put the harness on, please take care that the Click-Lock-buckles are closed correct and audible. The leg belts should be fastened tight but should leave your legs still enough space to move during take off and landing phase.
3
Emotion² Rucksack

2. Mounting the rescue parachute
The Emotion² has got a deployment bag with integrated release handle. Out of this reason you have to find out the right size of the deployment bag before mounting the rescue parachute. Therefore you need to know the volume of the rescue parachute. If it is not shown in the parachute manual, you can alternatively determine the volume of the rescue parachute by checking it’s weight.
As a rule of thumb multiply the weight by 3. For example: 1500 gr x 3 = 4500 ccm Volumen
You have the choice of two deployment bag sizes for the Emotion². Only an original deployment bag is allowed to be used:
Container size Medium from 3000 ccm to 6300 ccmContainer size Large from 5000 ccm to 8500 ccm
Volumes of the Skyman rescue parachutes which are compatible with the Emotion²:
Piccolo EVO: 3700 ccm = M Joker M: 6800 ccm = LAnnular 20 EVO: 4500 ccm = M Joker L: 7500 ccm = LAnnular 22 EVO: 5000 ccm = M or L Smart L: 5000 ccm = M or LAnnular 24 EVO: 5500 ccm = M or L Evo Cross 100: 4500 ccm = MAnnular 20 “Classic”: 5300 ccm = M or L Evo Cross 120: 5200 ccm = M or LAnnular 22 “Classic”: 6250 ccm = M or L Evo Cross 160: 5700 ccm = M or LAnnular 24 “Classic”: 7150 ccm = L
2.1. Placing the rescue parachute into the innercontainer:
After you have choosen the right size the rescue parachute is to be placed into the deployment bag. The steps of packing until you have reached the shown status below, has to be done according the rescue parachute manual!
The following guide shows the assembling of an Annular Evo. Other systems have to be build in the same way analogously. Please check if there are special remarks in your parachute manual! Steerable systems (expample Rogallo systems) can be installed in the Emotion² only with explicit approval of the rescue parachute manufacturer!
2. Remove the packing cord!1. Fold the parachute like a “S” on the width of the container, pull out the Ram-Air-pockets a little bit to the side (if the parachute is equipped with Ram-Air-pockets).
4
3a. Fold the canopy in small S-folds and place it in the deployment bag. Bundle the lines in 3x3 “8-folds”. Do not bundle the last 60 cm of lines.
Placing in deployment bag option a)
Placing in deployment bag option b)
3b. Fold the canopy in big, horizontal S-folds (stack pack). Bundle the lines in 3x3 “8-folds”. Do not bundle the last 60 cm of lines.
Both options are technically equivalent and can alternatively be used.
Attention: new rubber bands must be used for line bundles and container with every re-pack!
4. Close the deployment bag with the lines. First the right flap with the upper and lower flap.Depending of the rescue system size the inner or outer grommets can be used to adjust the deployment bag volume.
5. Close the left flap. Also here you can adjust the deployment bag volume by using the inner or outer grommets.First close the middle, then the outside!
5
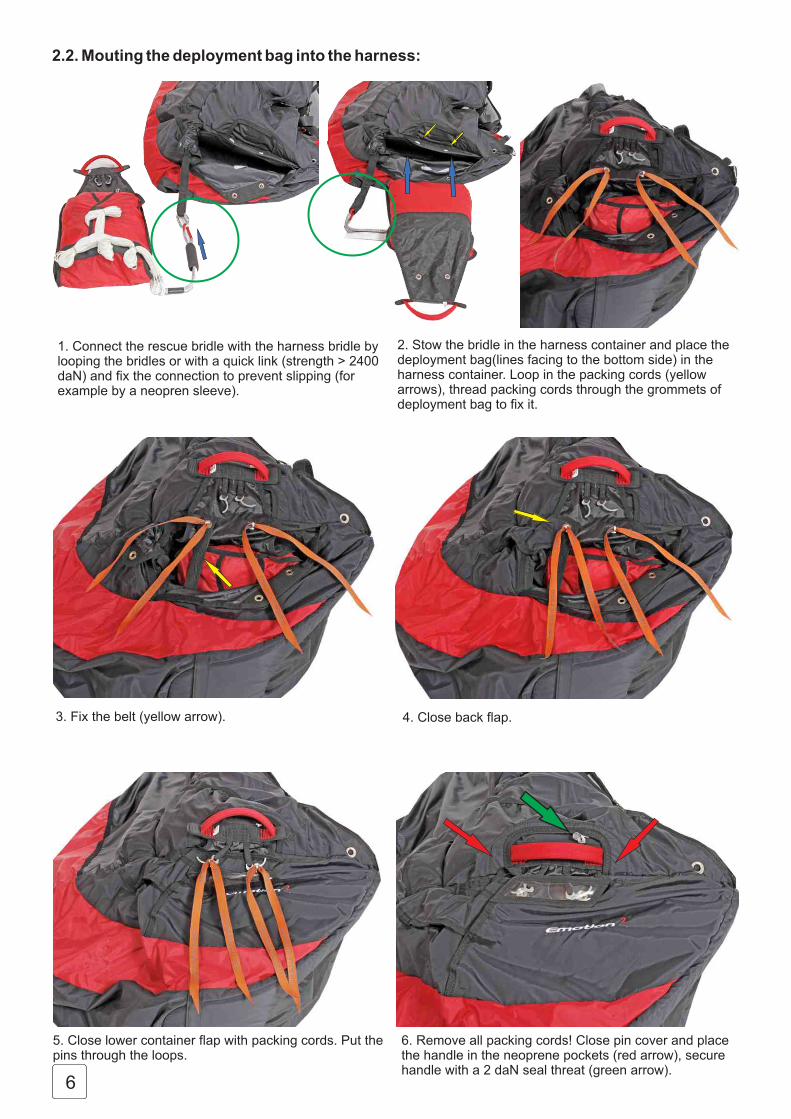
3. Fix the belt (yellow arrow).
2. Stow the bridle in the harness container and place the deployment bag(lines facing to the bottom side) in the harness container. Loop in the packing cords (yellow arrows), thread packing cords through the grommets of deployment bag to fix it.
2.2. Mouting the deployment bag into the harness:
1. Connect the rescue bridle with the harness bridle by looping the bridles or with a quick link (strength > 2400 daN) and fix the connection to prevent slipping (for example by a neopren sleeve).
4. Close back flap.
5. Close lower container flap with packing cords. Put the pins through the loops.
6. Remove all packing cords! Close pin cover and place the handle in the neoprene pockets (red arrow), secure handle with a 2 daN seal threat (green arrow).
6
2)3)
How to secure the release handle:
To avoid an unintentional opening it is obligatory to use a seal thread in the opening mechanism. This defines a minimum opening force. This special thread must be put through the loop at the release handle and harness and has to be fixed by a knot. (See picture 6 green arrow)
To secure the pin it is only allowed to use certified material because if the strength of this material is too high the save operation of the rescue system is not guaranteed.This thread is supplied by Flymarket GmbH & Co. KG! Do not use other threads which may look the same!
Attention:After every installation of a rescue-system in a harness there must be a test if the opening force is between 2 and 7 daN. If harness and rescue parachute are combined the first time a compatibility check have to be performed by an authorized person!The compatibility must be confirmed in the parachute repack log book.
Operating notes:
Conversion from harness to rucksack:
The Emotion² is a so called reversible harness. That means it can be transformed to a rucksack.To convert the harness to a rucksack you have to open the zipper of the storage bag completely. Then the seat-board can be turned upwards and the storage-bag can be turned inside out now. A rucksack is formed now, which contains the harness part and offers enough space for a paraglider as well. Further equipment can be attached to the outer side of the rucksack.
The conversion of the packsack to the harness is done vice versa.
Operation of the protector:
The Emotion² has a type certified back protector which is filled by the airstream during the flight.
During a hard landing the air inside of the protector will be compressed and the air will be deflated through the seams of the nylon fabric. The resulting deceleration distributes the impact energy over a longer period and protects the spine from extreme peak loads. The G-forces achieved in the type certification were very good. However, even the best back protection does not guarantee the prevention of back injuries!!!
For this reason, the protector should not be used for unnecessary seat board landings. With every use the protector will be less efficient and the effect of protection less - even if no damage is visible.If a damage is visible the protector is not to be used anymore as well as after a hard landing!! In this case the harness must be inspected by the manufacturer or an authorized dealer/workshop.
Before use of the harness the following points should be checked:
! Outer shell of the protector and the entire belt system intact? ! Air intake valve of protector intact and working, storage bag zipper fully closed?! Rescue container and release handle properly closed and mounted?! Acceleration system (if mounted) properly mounted and adjusted?! All harness buckles properly closed and adjusted?
Maintenance / service life of the protector:
The protector is almost maintenance free. Before each take off the protector should be checked for function (damages, air intake valve working).Visible damage (holes, cracks) must be repaired, otherwise the outer shell can break during an impact with a loss of damping. After a hard landing with the use of the protector and if a damage is visible the protector must be repaired or exchanged by the manufacturer or an authorised dealer/workshop.
7
Tandem flights:
The Emotion² is only suitable as a passenger harness. As a pilots harness the Emotion² it is not suitable because the rescue system container will not fit for a tandem rescue system.
Towing:
The Emotion² is suitable for towing if the main carabiners are used as attachment points for the towing release. There are no separate attachment points to mount a towing release!Please check the towing release manual for a correct adaption on the harness.
Behavior in particular casesBehavior in particular cases
During water and strong wind landings the pilot should disconnect himself as soon as possible from the paraglider / harness after landing. For that please loosen the leg belts and then open the leg and chest buckles. We generally recommend to carry a webbing cutter!For tree landings, etc. the pilot should first secure himself against a possible crash and should wait for professional help.Contrary to above recommendations, it is possible that a different behavior as described is required. The variety of possible situations not allows an universal or general advise for the right behavior. The right behavior is a case-to-case decision in full responsibility of the pilot.
Lifetime and replacement of parts, repair advice
The Emotion² is designed for high loads and stress. High demands were set in the choice of materials. The lifetime of the harness depends on a high degree of awareness and treatment of the pilot. We recommend to inspect the harness periodically for signs of wear. If necessary damaged components must be replaced.Damaged components may only be repaired by the manufacturer or an authorized workshop. Only original parts are to be used!If the harness is dirty, clean it only with water. Avoid mechanical stress as brush and rub. Chemical cleaners will damage fabric and webbing.Except the rubber bands of the deployment bag and sealing thread no spare part is necessary. Only approved rubber bands with the size of 30x3x1 mm or 25x3x1x mm should be used. An inexpensive purchase is possible through us.
Maintenance, inspection, periodic check:
The Emotion² is almost maintenance free but it requires a regular check for damage. Regular inspection gives you the guarantee of a full function of the harness.Take particulary care that no dirt gets into the mechanic of the buckles and that all moving parts of the buckle are running free and are not damaged. If needed you can oil the buckles a little bit.The maintenence of the protector is described separate.The harness must undergo at least after 24 months a complete check. The carabiner must be replaced according the carabiner manufacturer instructions, lately after 1000 hours or 5 years. Only original carabiners are to be used! The periodic check must be documented.
Storage and transport:
In order to prevent unnecessary weakening of the harness we recommend for storage and transport:
- avoid high temperatures (for example: closed car in summer)- avoid dealing with fire, sharp objects and chemicals close the harness- avoid unnecessary long exposure to sunlight as ultraviolet radiation destroys the molecular structure of the material- avoid contact with salt water or acid liquids- if the harness is not in use for a long time, especially the back protector should not be stored compressed. Store the harness in a cool, dry place.
Disposal:
The materials used in a paragliding harness require proper disposal. Please return the worn-out equipment to us. The equipment will be disposed properly by us.
Nature- and environment friendly behaviour:
Actually it’s self evident, but nevertheless mentioned particularly: Please do our nature near sport in a way which do not stress nature and environment!Please do not walk beside the marked ways, don’t leave your litter, don’t make unnecessary loud noises and respect the sensitive balance in the mountains.Especially at the take-off we have to take care for the nature!
8


![160224 SMI Manual englisch Druck - Standard Motor …standard-motor-interface.com/...SMI_Manual_EN.pdf · ð SMI and building management í X ^D/ t µ ] } Z v } o } P Ç î X ^d E](https://static.documents.pub/doc/80x56/5b9b1b1609d3f20b318cc55b/160224-smi-manual-englisch-druck-standard-motor-standard-motor-d-smi-and.jpg)