56
Empress ® Esthetic IPS Instructions for Use NORTH AMERICA
Empress® EstheticIPS
Instructions for UseNORTH AMERICA
2
Table of Contents
3 IPS Empress Esthetic
4 Combination at a Glance
5 IPS Empress Esthetic colour code
6 Composition
7 Description of the kits
7 IPS Empress Esthetic Ingot Kit
8 IPS Empress Esthetic Veneer Kit
11 IPS Empress 2 Special Investment Material
12 IPS Empress Universal Shade Kits
13 IPS Empress Universal Stains Kit
14 IPS Empress Die Material Kit
14 IPS Empress Accessories Kit
15 CEM Kit
16 Liquids
17 Shade determination, die shade selection, and ingot selection
19 Preparation guidelines and minimum requirements
22 Processing procedure IPS Empress Esthetic Fully Anatomical
22 Fabricating the model
22 Applying the spacer
23 Contouring
24 Sprueing the wax pattern
27 Investing
28 Preheating
29 Calibration
30 Pressing
31 Divesting
32 Removing the pressed object / finishing
33 Occlusion / surface structures
33 Die material / control die
34 Cleaning
34 Glaze and stain firing
35 Glazing
37 Processing procedure IPS Empress Esthetic Veneer
38 Fabricating the model
38 Contouring the wax-up
40 Cut-back
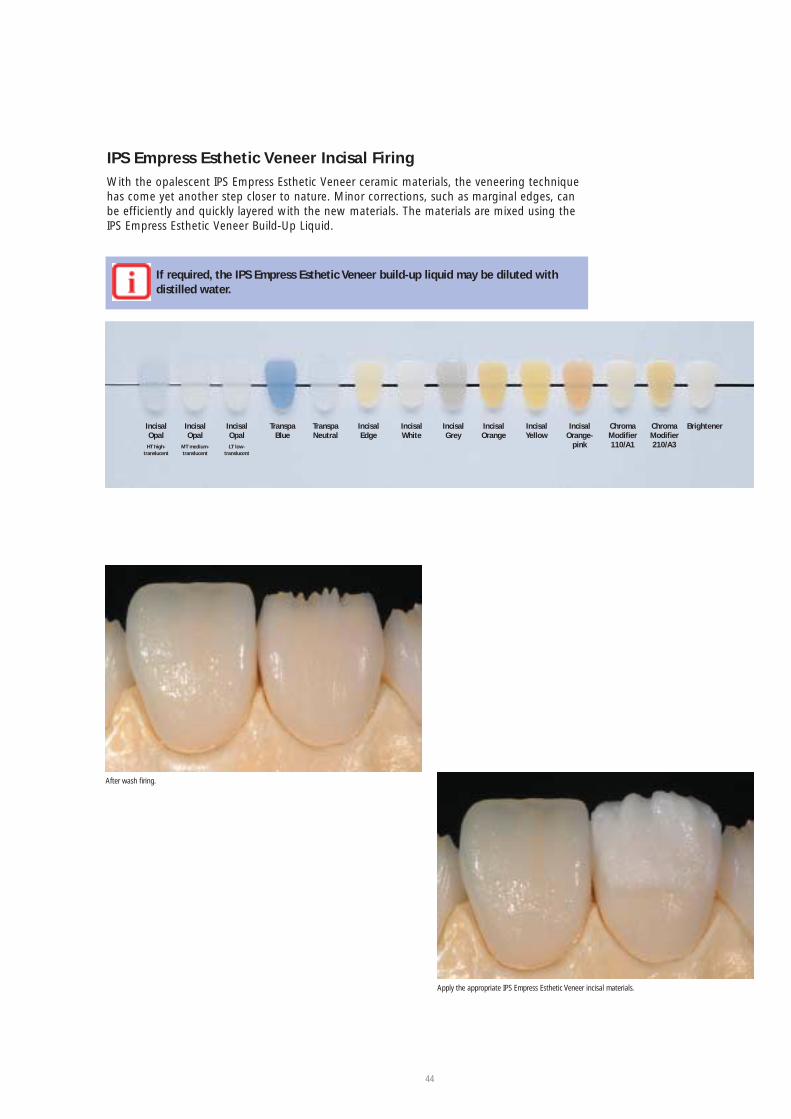
42 IPS Empress Esthetic Veneer wash firing
44 IPS Empress Esthetic Veneer incisal firing
46 Shape adjustment
47 Stain firing
47 Glaze firing
49 Subsequent adjustments
49 Etching
49 Cementation
50 Press and firing parameters
52 Materials combination table
54 IPS Empress Esthetic
3
Empress® EstheticIPS
Processing principle – easy andefficientAn anatomical wax-up of the restoration isfabricated, sprued, and invested. Afterpreheating the investment ring, the ceramicmaterial is pressed into the investment ringin the EP500 / EP600 / EP 600 Combi. Afterdivesting the pressed objects, complete therestorations according to the esthetic requirements using the IPS Empress stainingtechnique and the IPS Empress EstheticVeneer materials.
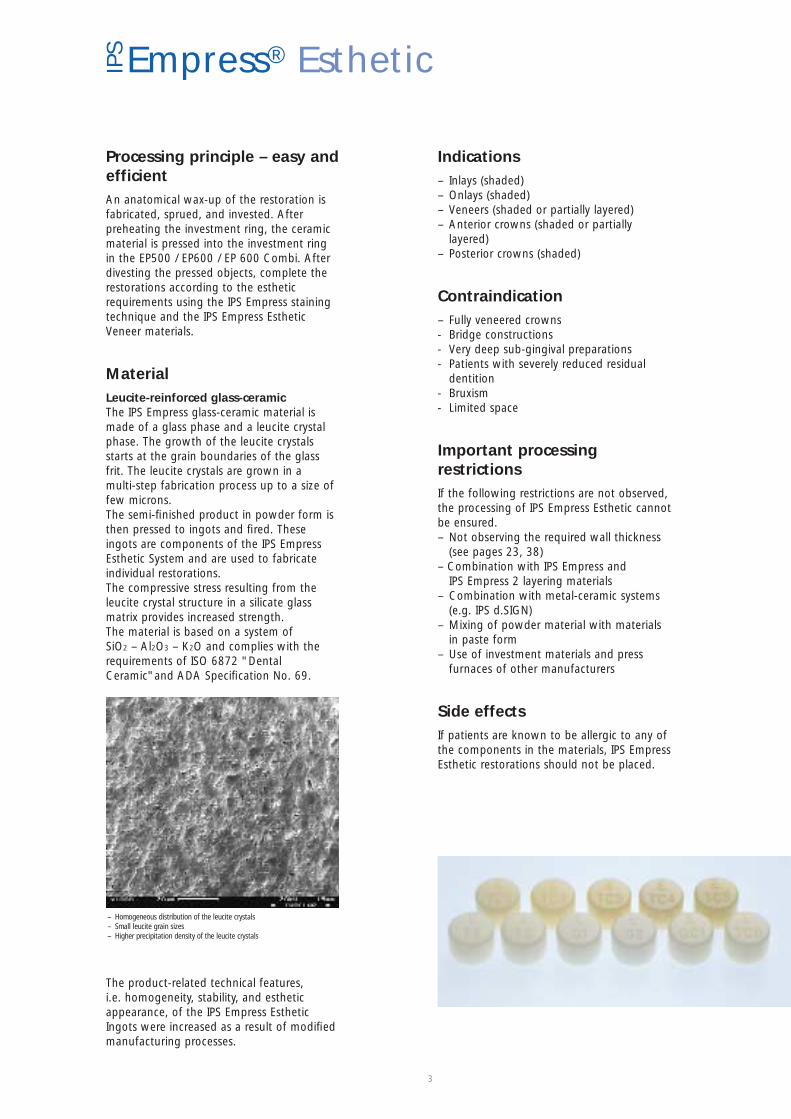
MaterialLeucite-reinforced glass-ceramicThe IPS Empress glass-ceramic material ismade of a glass phase and a leucite crystalphase. The growth of the leucite crystalsstarts at the grain boundaries of the glassfrit. The leucite crystals are grown in a multi-step fabrication process up to a size offew microns.The semi-finished product in powder form isthen pressed to ingots and fired. Theseingots are components of the IPS EmpressEsthetic System and are used to fabricateindividual restorations.The compressive stress resulting from theleucite crystal structure in a silicate glassmatrix provides increased strength.The material is based on a system of SiO2 – Al2O3 – K2O and complies with therequirements of ISO 6872 "DentalCeramic"and ADA Specification No. 69.
The product-related technical features, i.e. homogeneity, stability, and estheticappearance, of the IPS Empress EstheticIngots were increased as a result of modifiedmanufacturing processes.
Indications– Inlays (shaded)– Onlays (shaded)– Veneers (shaded or partially layered)– Anterior crowns (shaded or partially
layered)– Posterior crowns (shaded)
Contraindication– Fully veneered crowns- Bridge constructions- Very deep sub-gingival preparations- Patients with severely reduced residual
dentition- Bruxism- Limited space
Important processing restrictionsIf the following restrictions are not observed,the processing of IPS Empress Esthetic cannotbe ensured. – Not observing the required wall thickness
(see pages 23, 38)– Combination with IPS Empress and
IPS Empress 2 layering materials– Combination with metal-ceramic systems
(e.g. IPS d.SIGN)– Mixing of powder material with materials
in paste form– Use of investment materials and press
furnaces of other manufacturers
Side effectsIf patients are known to be allergic to any ofthe components in the materials, IPS EmpressEsthetic restorations should not be placed.
– Homogeneous distribution of the leucite crystals– Small leucite grain sizes – Higher precipitation density of the leucite crystals
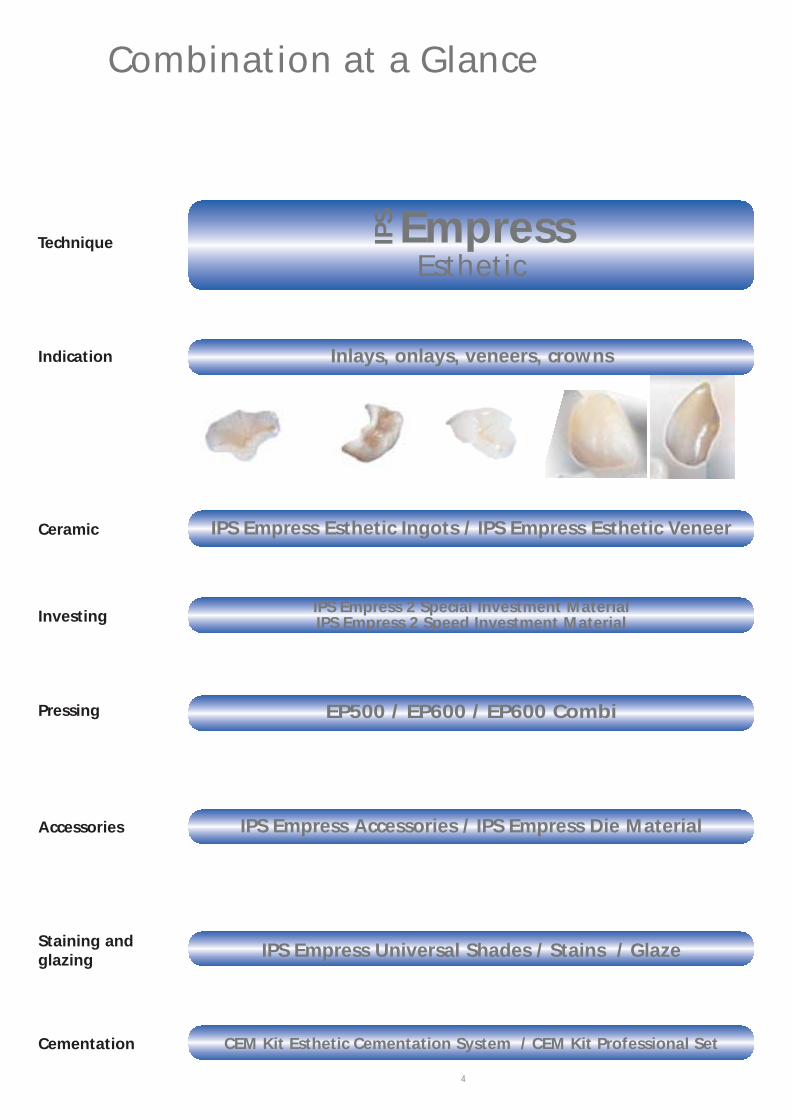
Combination at a Glance
4
Technique
Indication
Investing
Pressing
Accessories
Staining and glazing
Cementation
Inlays, onlays, veneers, crowns
IPS Empress 2 Special Investment MaterialIPS Empress 2 Speed Investment Material
Ceramic IPS Empress Esthetic Ingots / IPS Empress Esthetic Veneer
IPS Empress Universal Shades / Stains / Glaze
CEM Kit Esthetic Cementation System / CEM Kit Professional Set
IPS Empress Accessories / IPS Empress Die Material
EP500 / EP600 / EP600 Combi
EmpressEsthetic
IPS
5
IPSEmpress Esthetic
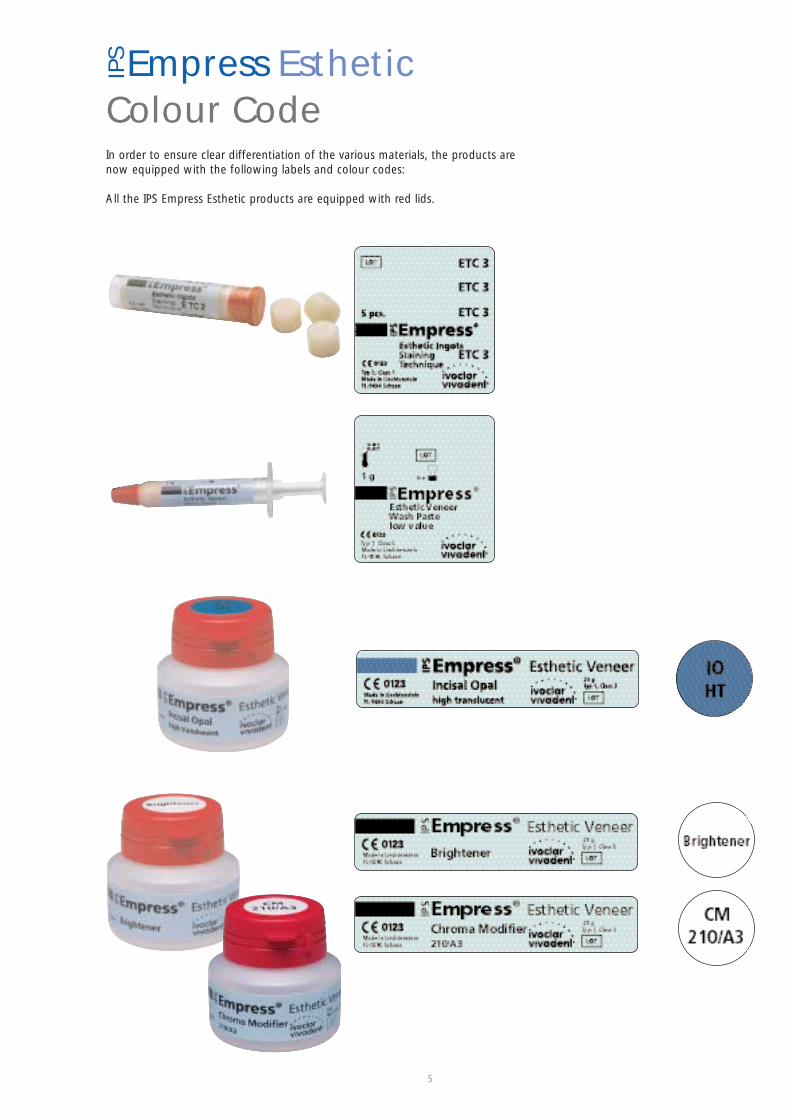
Colour CodeIn order to ensure clear differentiation of the various materials, the products arenow equipped with the following labels and colour codes:
All the IPS Empress Esthetic products are equipped with red lids.
6
Composition
The ceramic materials of the IPS Empress EstheticSystem consist of the following main components:
– SiO2 > 55 % wt. Additional components: K2O, Al2O3, Na2O, B2O3, CaO,TiO2, CeO2 and pigments
– IPS Empress Esthetic Veneer Build-Up Liquid 60 mlComponents: water, butandiol-chloride solution
– IPS Empress Universal Glaze and Stain Liquid 15 mlComponents: 100 % wt. butandiol
– IPS Empress Die MaterialComponents: polyester urethane dimethacrylate: 48–50 % wt.; paraffin oil: 4 % wt.; SiO2 and copolymer:47-50 % wt.
– IPS Empress Die Material Separating Liquid, 20 mlComponents: wax dissolved in > 95 % wt. hexane
– IPS Empress 2 Special Investment Material Liquid, 1000 mlComponents: 30 % wt. colloidal silicic acid in water
– IPS Empress 2 Special Investment Material PowderComponents: SiO2 (quartz powder) 80 % wt.; MgO andNH4H2PO4 20 % wt.
– IPS Empress 2 Speed Investment Material Liquid, 1000 mlComponents: 30 % wt. colloidal silicic acid in water
– IPS Empress 2 Speed Investment PowderComponents: SiO2 (quartz powder) 80 % wt.; MgO andNH4H2PO4 20 % wt.
7
Description of the Kits
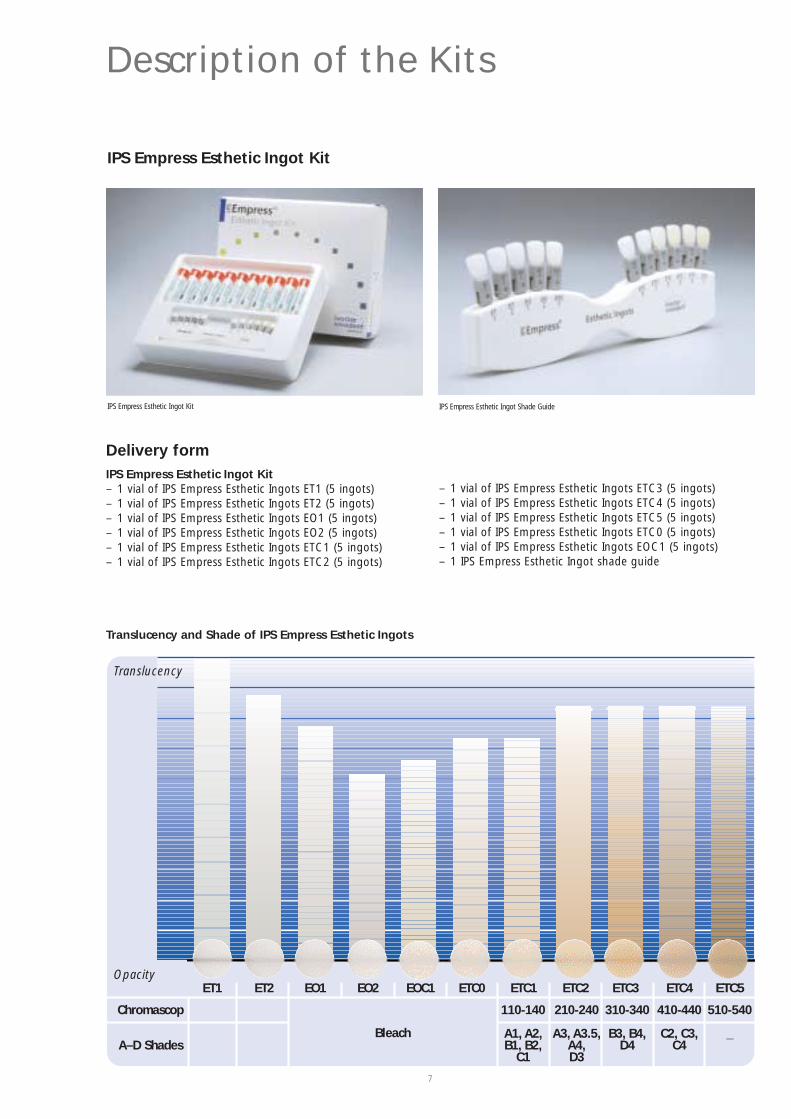
IPS Empress Esthetic Ingot Kit
IPS Empress Esthetic Ingot Kit IPS Empress Esthetic Ingot Shade Guide
Delivery formIPS Empress Esthetic Ingot Kit – 1 vial of IPS Empress Esthetic Ingots ET1 (5 ingots)– 1 vial of IPS Empress Esthetic Ingots ET2 (5 ingots)– 1 vial of IPS Empress Esthetic Ingots EO1 (5 ingots)– 1 vial of IPS Empress Esthetic Ingots EO2 (5 ingots)– 1 vial of IPS Empress Esthetic Ingots ETC1 (5 ingots)– 1 vial of IPS Empress Esthetic Ingots ETC2 (5 ingots)
Translucency and Shade of IPS Empress Esthetic Ingots
ET1
Translucency
OpacityET2 EO1 EO2 EOC1
Chromascop
A–D Shades Bleach
110-140
A1, A2,B1, B2,
C1
210-240
A3, A3.5,A4,D3
310-340
B3, B4,D4
410-440
C2, C3,C4
ETC0 ETC1 ETC2 ETC3 ETC4 ETC5
510-540
_
– 1 vial of IPS Empress Esthetic Ingots ETC3 (5 ingots)– 1 vial of IPS Empress Esthetic Ingots ETC4 (5 ingots)– 1 vial of IPS Empress Esthetic Ingots ETC5 (5 ingots)– 1 vial of IPS Empress Esthetic Ingots ETC0 (5 ingots)– 1 vial of IPS Empress Esthetic Ingots EOC1 (5 ingots)– 1 IPS Empress Esthetic Ingot shade guide
8
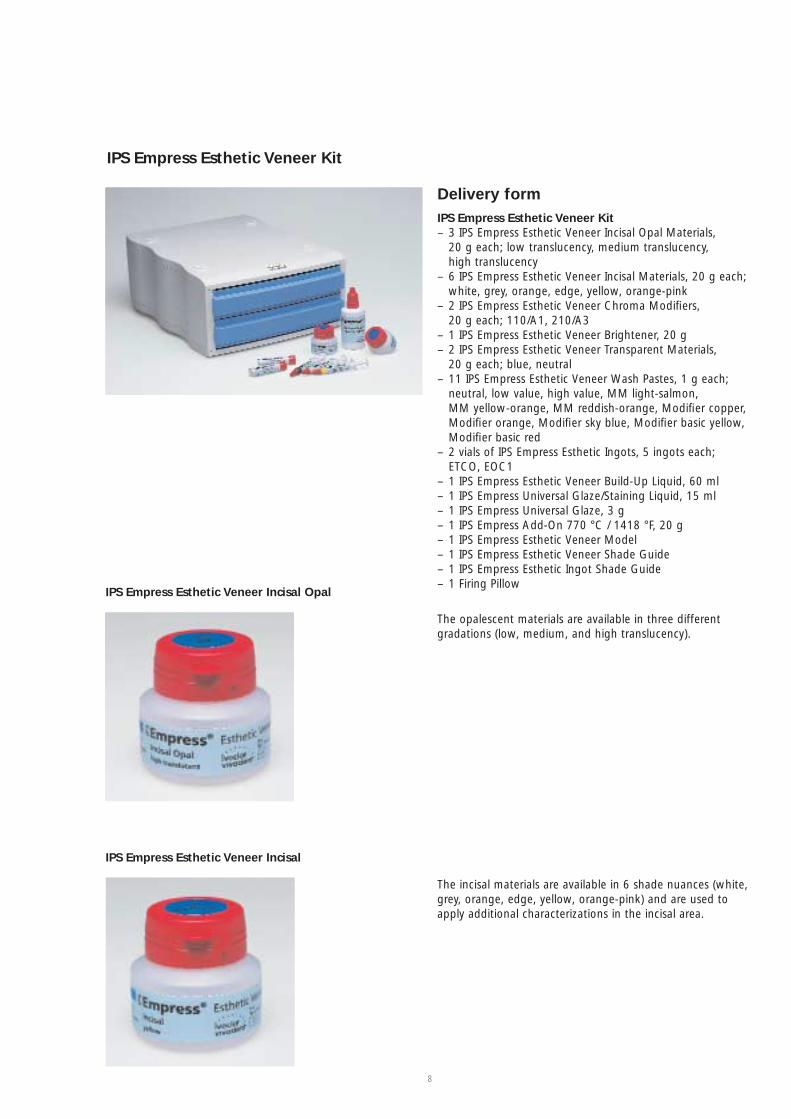
IPS Empress Esthetic Veneer Kit
IPS Empress Esthetic Veneer Incisal Opal
The opalescent materials are available in three different gradations (low, medium, and high translucency).
Delivery formIPS Empress Esthetic Veneer Kit – 3 IPS Empress Esthetic Veneer Incisal Opal Materials,
20 g each; low translucency, medium translucency, high translucency
– 6 IPS Empress Esthetic Veneer Incisal Materials, 20 g each;white, grey, orange, edge, yellow, orange-pink
– 2 IPS Empress Esthetic Veneer Chroma Modifiers, 20 g each; 110/A1, 210/A3
– 1 IPS Empress Esthetic Veneer Brightener, 20 g– 2 IPS Empress Esthetic Veneer Transparent Materials,
20 g each; blue, neutral– 11 IPS Empress Esthetic Veneer Wash Pastes, 1 g each;
neutral, low value, high value, MM light-salmon, MM yellow-orange, MM reddish-orange, Modifier copper,Modifier orange, Modifier sky blue, Modifier basic yellow,Modifier basic red
– 2 vials of IPS Empress Esthetic Ingots, 5 ingots each; ETCO, EOC1
– 1 IPS Empress Esthetic Veneer Build-Up Liquid, 60 ml– 1 IPS Empress Universal Glaze/Staining Liquid, 15 ml– 1 IPS Empress Universal Glaze, 3 g– 1 IPS Empress Add-On 770 °C / 1418 °F, 20 g– 1 IPS Empress Esthetic Veneer Model– 1 IPS Empress Esthetic Veneer Shade Guide– 1 IPS Empress Esthetic Ingot Shade Guide– 1 Firing Pillow
IPS Empress Esthetic Veneer Incisal
The incisal materials are available in 6 shade nuances (white,grey, orange, edge, yellow, orange-pink) and are used toapply additional characterizations in the incisal area.
9
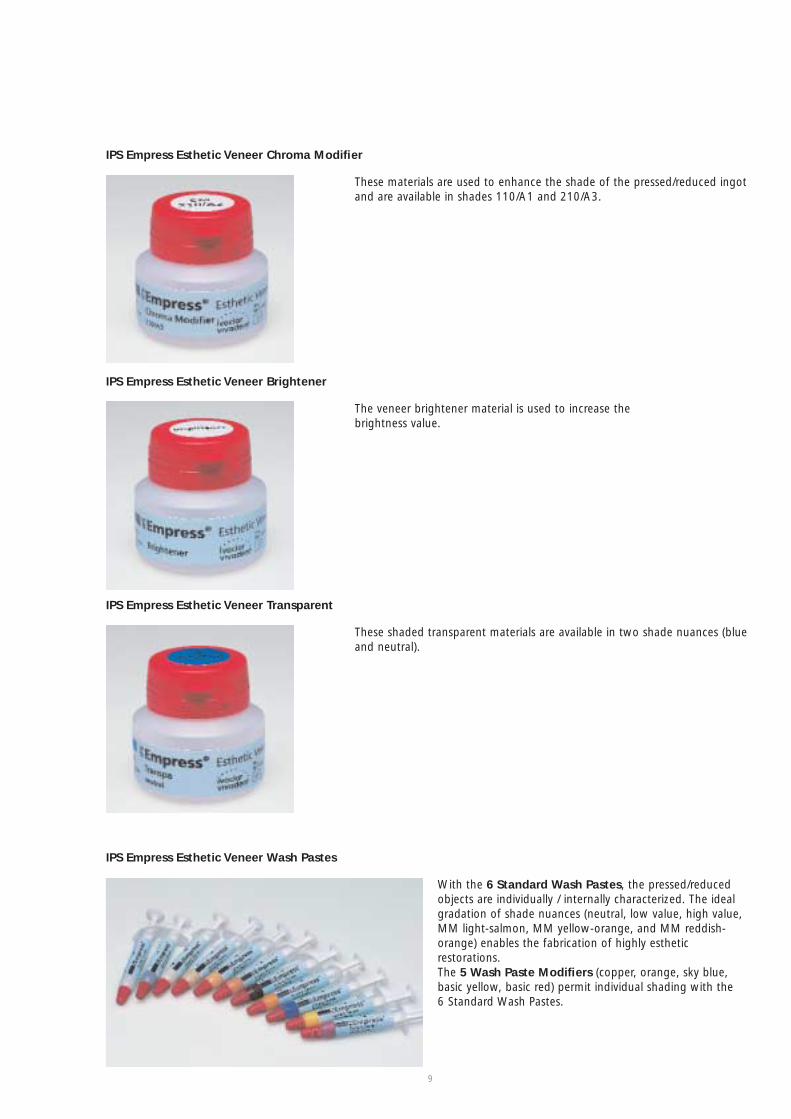
IPS Empress Esthetic Veneer Chroma Modifier
These materials are used to enhance the shade of the pressed/reduced ingotand are available in shades 110/A1 and 210/A3.
IPS Empress Esthetic Veneer Brightener
The veneer brightener material is used to increase thebrightness value.
IPS Empress Esthetic Veneer Transparent
These shaded transparent materials are available in two shade nuances (blueand neutral).
IPS Empress Esthetic Veneer Wash Pastes
With the 6 Standard Wash Pastes, the pressed/reduced objects are individually / internally characterized. The idealgradation of shade nuances (neutral, low value, high value,MM light-salmon, MM yellow-orange, and MM reddish-orange) enables the fabrication of highly esthetic restorations. The 5 Wash Paste Modifiers (copper, orange, sky blue,basic yellow, basic red) permit individual shading with the 6 Standard Wash Pastes.
10
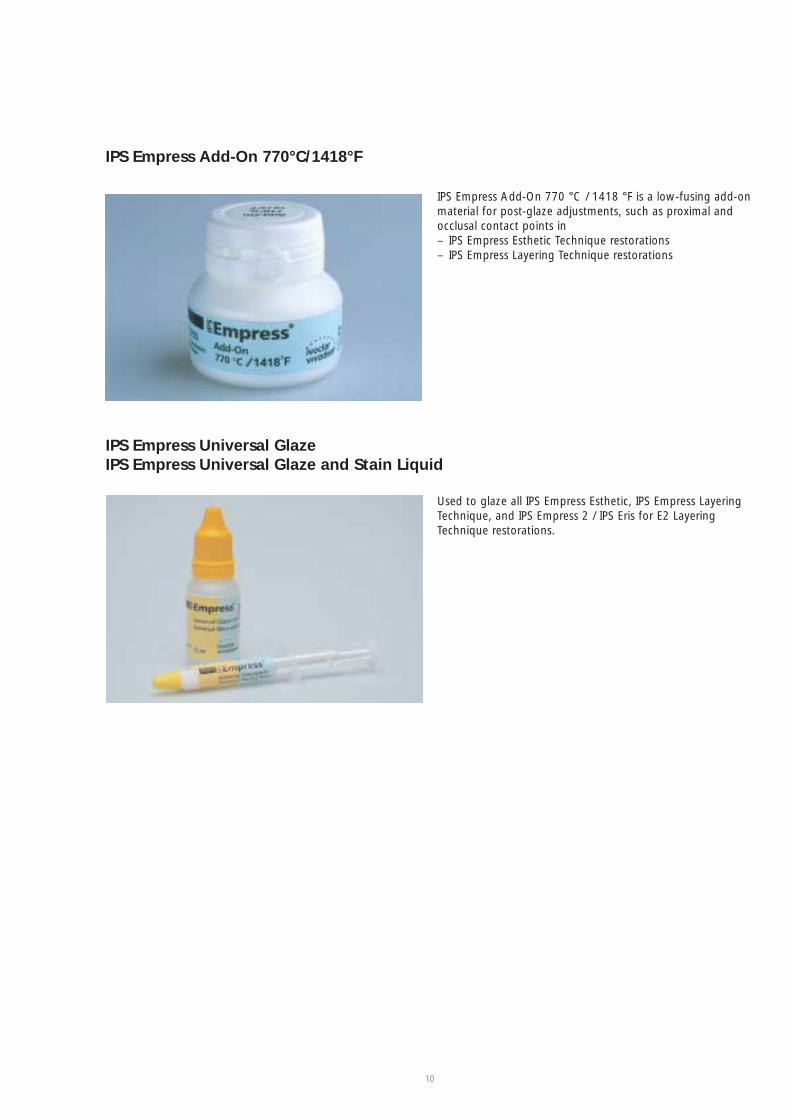
IPS Empress Add-On 770°C/1418°F
IPS Empress Universal GlazeIPS Empress Universal Glaze and Stain Liquid
IPS Empress Add-On 770 °C / 1418 °F is a low-fusing add-onmaterial for post-glaze adjustments, such as proximal andocclusal contact points in– IPS Empress Esthetic Technique restorations– IPS Empress Layering Technique restorations
Used to glaze all IPS Empress Esthetic, IPS Empress LayeringTechnique, and IPS Empress 2 / IPS Eris for E2 Layering Technique restorations.
11
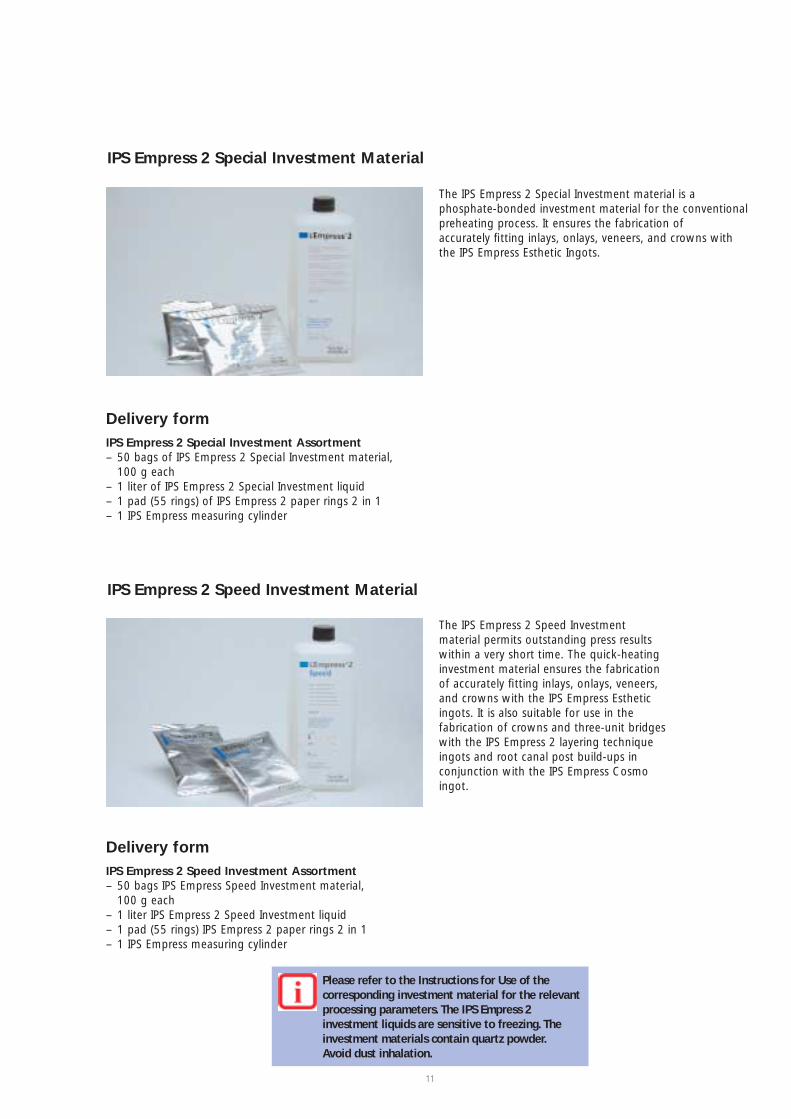
IPS Empress 2 Special Investment Material
Delivery formIPS Empress 2 Special Investment Assortment – 50 bags of IPS Empress 2 Special Investment material,
100 g each– 1 liter of IPS Empress 2 Special Investment liquid– 1 pad (55 rings) of IPS Empress 2 paper rings 2 in 1– 1 IPS Empress measuring cylinder
The IPS Empress 2 Special Investment material is a phosphate-bonded investment material for the conventionalpreheating process. It ensures the fabrication of accurately fitting inlays, onlays, veneers, and crowns withthe IPS Empress Esthetic Ingots.
Please refer to the Instructions for Use of the corresponding investment material for the relevantprocessing parameters. The IPS Empress 2 investment liquids are sensitive to freezing. Theinvestment materials contain quartz powder.Avoid dust inhalation.
IPS Empress 2 Speed Investment Material
Delivery formIPS Empress 2 Speed Investment Assortment – 50 bags IPS Empress Speed Investment material,
100 g each– 1 liter IPS Empress 2 Speed Investment liquid– 1 pad (55 rings) IPS Empress 2 paper rings 2 in 1– 1 IPS Empress measuring cylinder
The IPS Empress 2 Speed Investment material permits outstanding press resultswithin a very short time. The quick-heatinginvestment material ensures the fabricationof accurately fitting inlays, onlays, veneers,and crowns with the IPS Empress Estheticingots. It is also suitable for use in the fabrication of crowns and three-unit bridgeswith the IPS Empress 2 layering techniqueingots and root canal post build-ups in conjunction with the IPS Empress Cosmoingot.
12
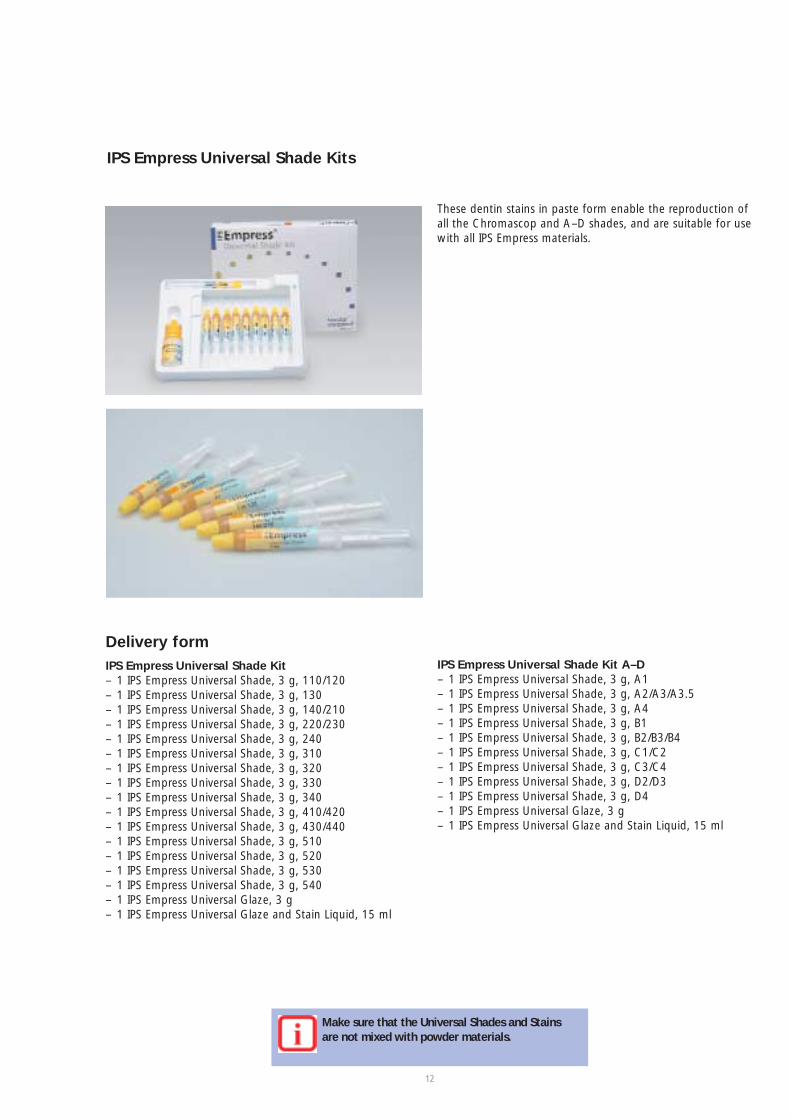
IPS Empress Universal Shade Kits
These dentin stains in paste form enable the reproduction ofall the Chromascop and A–D shades, and are suitable for usewith all IPS Empress materials.
Delivery formIPS Empress Universal Shade Kit – 1 IPS Empress Universal Shade, 3 g, 110/120– 1 IPS Empress Universal Shade, 3 g, 130– 1 IPS Empress Universal Shade, 3 g, 140/210– 1 IPS Empress Universal Shade, 3 g, 220/230– 1 IPS Empress Universal Shade, 3 g, 240– 1 IPS Empress Universal Shade, 3 g, 310– 1 IPS Empress Universal Shade, 3 g, 320– 1 IPS Empress Universal Shade, 3 g, 330– 1 IPS Empress Universal Shade, 3 g, 340– 1 IPS Empress Universal Shade, 3 g, 410/420– 1 IPS Empress Universal Shade, 3 g, 430/440– 1 IPS Empress Universal Shade, 3 g, 510– 1 IPS Empress Universal Shade, 3 g, 520– 1 IPS Empress Universal Shade, 3 g, 530– 1 IPS Empress Universal Shade, 3 g, 540– 1 IPS Empress Universal Glaze, 3 g– 1 IPS Empress Universal Glaze and Stain Liquid, 15 ml
IPS Empress Universal Shade Kit A–D – 1 IPS Empress Universal Shade, 3 g, A1– 1 IPS Empress Universal Shade, 3 g, A2/A3/A3.5– 1 IPS Empress Universal Shade, 3 g, A4– 1 IPS Empress Universal Shade, 3 g, B1– 1 IPS Empress Universal Shade, 3 g, B2/B3/B4– 1 IPS Empress Universal Shade, 3 g, C1/C2– 1 IPS Empress Universal Shade, 3 g, C3/C4– 1 IPS Empress Universal Shade, 3 g, D2/D3– 1 IPS Empress Universal Shade, 3 g, D4– 1 IPS Empress Universal Glaze, 3 g– 1 IPS Empress Universal Glaze and Stain Liquid, 15 ml
Make sure that the Universal Shades and Stains are not mixed with powder materials.
13
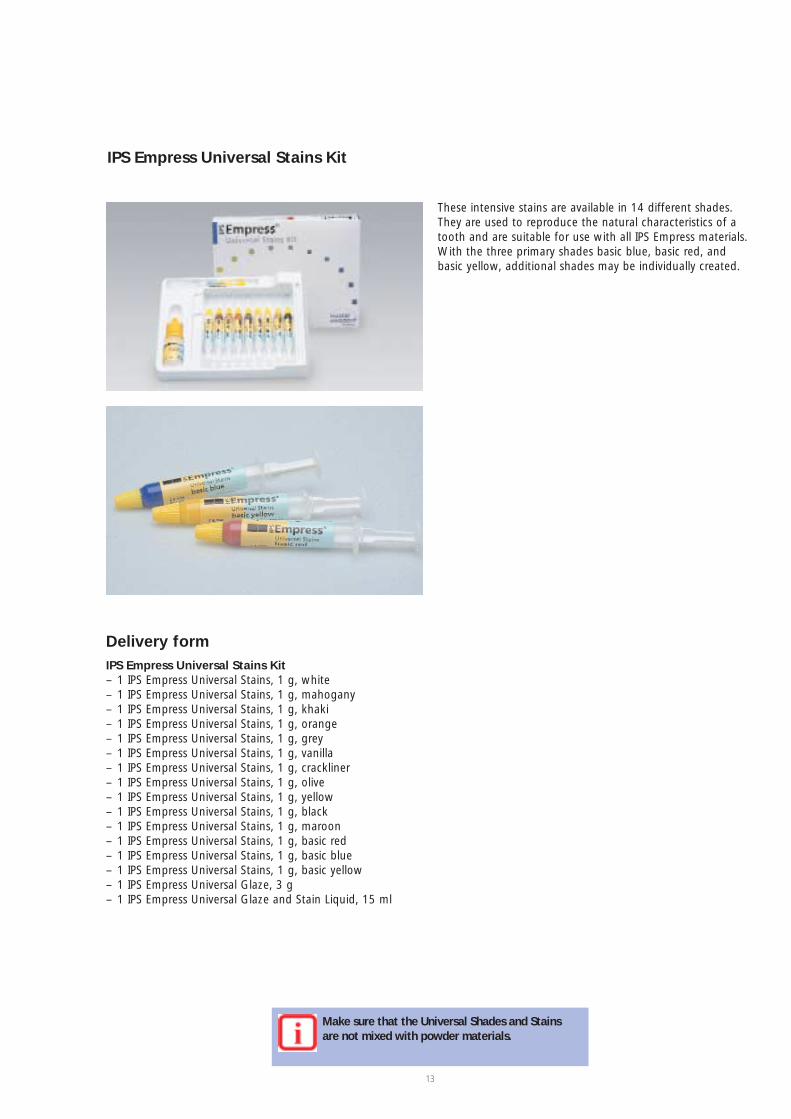
IPS Empress Universal Stains Kit
These intensive stains are available in 14 different shades.They are used to reproduce the natural characteristics of atooth and are suitable for use with all IPS Empress materials.With the three primary shades basic blue, basic red, andbasic yellow, additional shades may be individually created.
Delivery formIPS Empress Universal Stains Kit – 1 IPS Empress Universal Stains, 1 g, white– 1 IPS Empress Universal Stains, 1 g, mahogany– 1 IPS Empress Universal Stains, 1 g, khaki– 1 IPS Empress Universal Stains, 1 g, orange– 1 IPS Empress Universal Stains, 1 g, grey– 1 IPS Empress Universal Stains, 1 g, vanilla– 1 IPS Empress Universal Stains, 1 g, crackliner– 1 IPS Empress Universal Stains, 1 g, olive– 1 IPS Empress Universal Stains, 1 g, yellow– 1 IPS Empress Universal Stains, 1 g, black– 1 IPS Empress Universal Stains, 1 g, maroon– 1 IPS Empress Universal Stains, 1 g, basic red– 1 IPS Empress Universal Stains, 1 g, basic blue– 1 IPS Empress Universal Stains, 1 g, basic yellow– 1 IPS Empress Universal Glaze, 3 g– 1 IPS Empress Universal Glaze and Stain Liquid, 15 ml
Make sure that the Universal Shades and Stains are not mixed with powder materials.
14
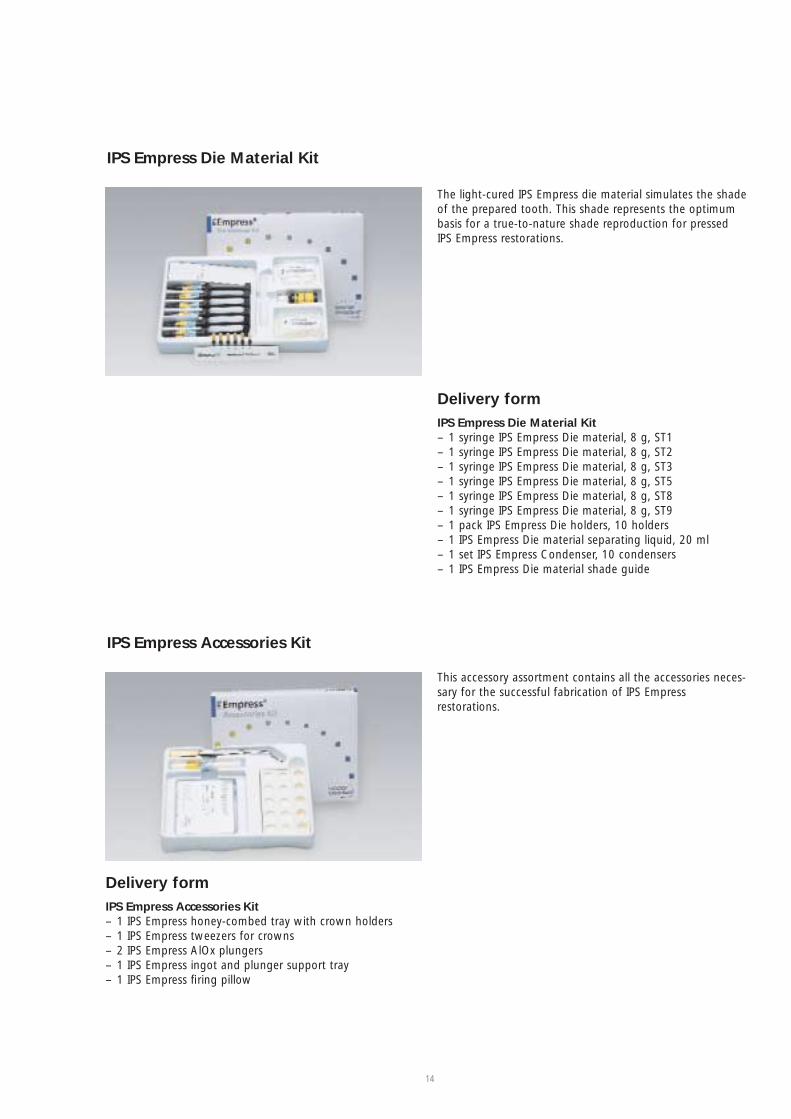
IPS Empress Die Material Kit
The light-cured IPS Empress die material simulates the shadeof the prepared tooth. This shade represents the optimumbasis for a true-to-nature shade reproduction for pressed IPS Empress restorations.
Delivery formIPS Empress Die Material Kit – 1 syringe IPS Empress Die material, 8 g, ST1– 1 syringe IPS Empress Die material, 8 g, ST2– 1 syringe IPS Empress Die material, 8 g, ST3– 1 syringe IPS Empress Die material, 8 g, ST5– 1 syringe IPS Empress Die material, 8 g, ST8– 1 syringe IPS Empress Die material, 8 g, ST9– 1 pack IPS Empress Die holders, 10 holders– 1 IPS Empress Die material separating liquid, 20 ml– 1 set IPS Empress Condenser, 10 condensers– 1 IPS Empress Die material shade guide
IPS Empress Accessories Kit
This accessory assortment contains all the accessories neces-sary for the successful fabrication of IPS Empress restorations.
Delivery formIPS Empress Accessories Kit – 1 IPS Empress honey-combed tray with crown holders– 1 IPS Empress tweezers for crowns– 2 IPS Empress AlOx plungers– 1 IPS Empress ingot and plunger support tray– 1 IPS Empress firing pillow
15
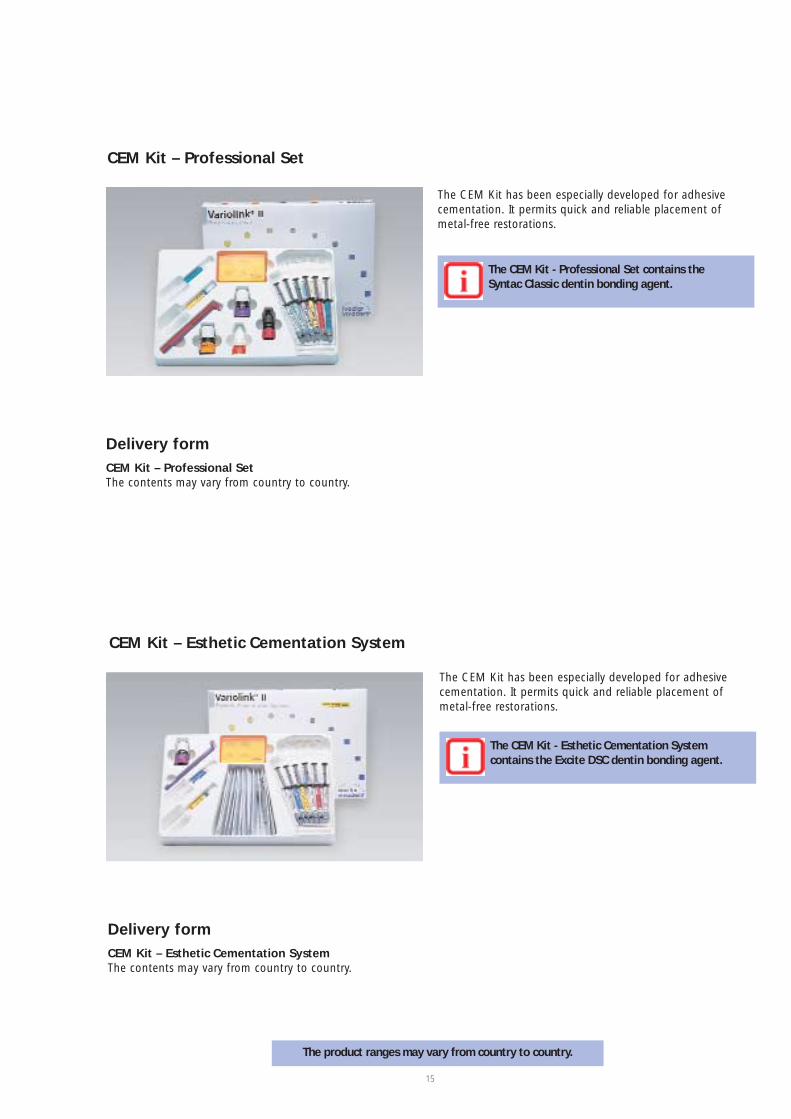
CEM Kit – Professional Set
The CEM Kit has been especially developed for adhesivecementation. It permits quick and reliable placement ofmetal-free restorations.
Delivery formCEM Kit – Professional Set The contents may vary from country to country.
The CEM Kit - Professional Set contains the Syntac Classic dentin bonding agent.
CEM Kit – Esthetic Cementation System
The CEM Kit has been especially developed for adhesivecementation. It permits quick and reliable placement ofmetal-free restorations.
Delivery formCEM Kit – Esthetic Cementation System The contents may vary from country to country.
The CEM Kit - Esthetic Cementation System contains the Excite DSC dentin bonding agent.
The product ranges may vary from country to country.
16
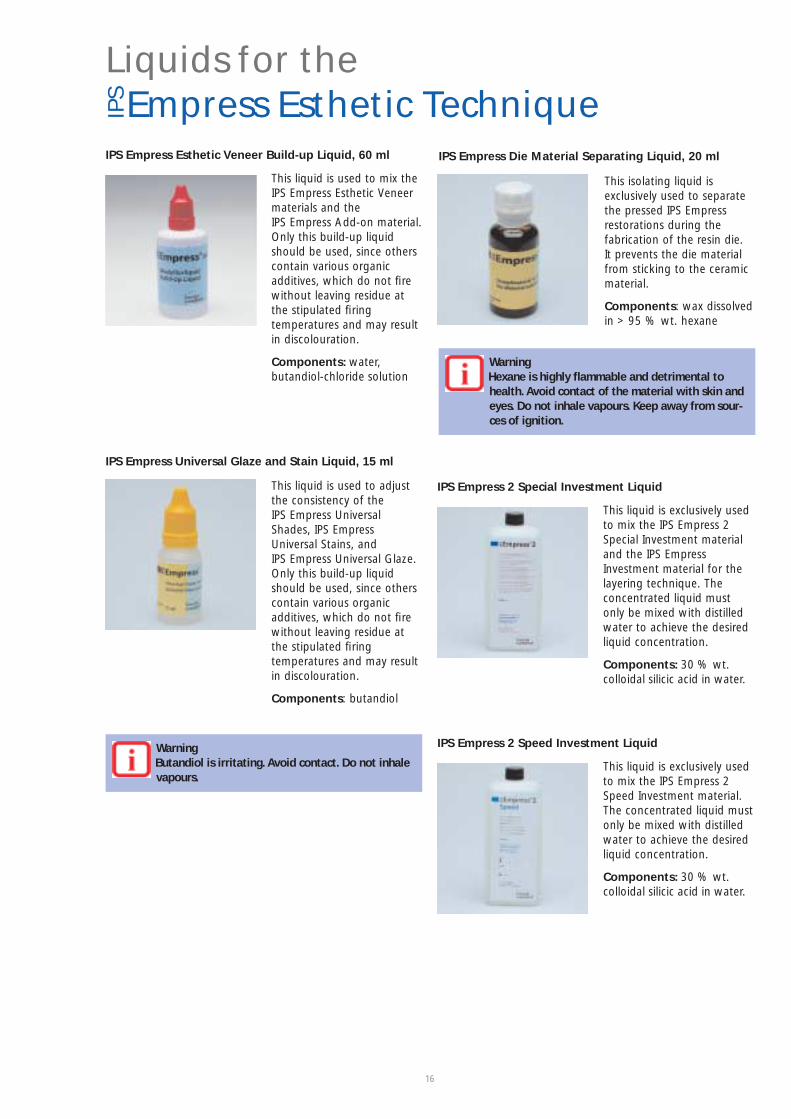
IPS Empress Esthetic Veneer Build-up Liquid, 60 ml
This liquid is used to mix theIPS Empress Esthetic Veneermaterials and the IPS Empress Add-on material.Only this build-up liquidshould be used, since otherscontain various organic additives, which do not firewithout leaving residue atthe stipulated firing temperatures and may resultin discolouration.
Components: water, butandiol-chloride solution
IPS Empress 2 Special Investment Liquid
This liquid is exclusively usedto mix the IPS Empress 2Special Investment materialand the IPS EmpressInvestment material for thelayering technique. The concentrated liquid mustonly be mixed with distilledwater to achieve the desiredliquid concentration.
Components: 30 % wt. colloidal silicic acid in water.
IPS Empress Universal Glaze and Stain Liquid, 15 ml
This liquid is used to adjustthe consistency of the IPS Empress UniversalShades, IPS EmpressUniversal Stains, and IPS Empress Universal Glaze.Only this build-up liquidshould be used, since otherscontain various organic additives, which do not firewithout leaving residue atthe stipulated firing temperatures and may resultin discolouration.
Components: butandiol
IPS Empress Die Material Separating Liquid, 20 ml
This isolating liquid is exclusively used to separatethe pressed IPS Empressrestorations during the fabrication of the resin die. It prevents the die materialfrom sticking to the ceramicmaterial.
Components: wax dissolvedin > 95 % wt. hexane
Liquids for the Empress Esthetic Technique
WarningButandiol is irritating. Avoid contact. Do not inhalevapours.
WarningHexane is highly flammable and detrimental tohealth. Avoid contact of the material with skin andeyes. Do not inhale vapours. Keep away from sour-ces of ignition.
IPS
IPS Empress 2 Speed Investment Liquid
This liquid is exclusively usedto mix the IPS Empress 2Speed Investment material.The concentrated liquid mustonly be mixed with distilledwater to achieve the desiredliquid concentration.
Components: 30 % wt. colloidal silicic acid in water.
17
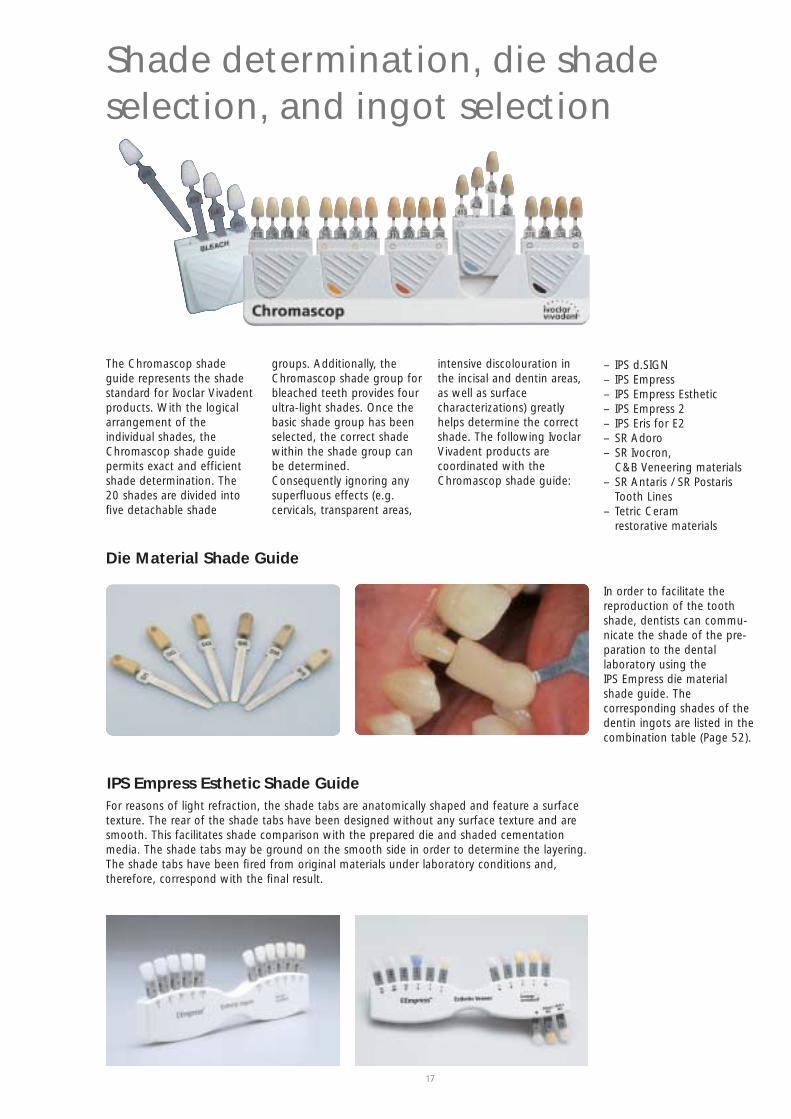
The Chromascop shadeguide represents the shadestandard for Ivoclar Vivadentproducts. With the logicalarrangement of the individual shades, theChromascop shade guidepermits exact and efficientshade determination. The 20 shades are divided intofive detachable shade
groups. Additionally, theChromascop shade group forbleached teeth provides fourultra-light shades. Once thebasic shade group has beenselected, the correct shadewithin the shade group canbe determined.Consequently ignoring anysuperfluous effects (e.g. cervicals, transparent areas,
intensive discolouration inthe incisal and dentin areas,as well as surface characterizations) greatlyhelps determine the correctshade. The following IvoclarVivadent products are coordinated with theChromascop shade guide:
– IPS d.SIGN– IPS Empress– IPS Empress Esthetic– IPS Empress 2– IPS Eris for E2– SR Adoro– SR Ivocron,
C&B Veneering materials– SR Antaris / SR Postaris
Tooth Lines– Tetric Ceram
restorative materials
Shade determination, die shade selection, and ingot selection
Die Material Shade Guide
In order to facilitate thereproduction of the toothshade, dentists can commu-nicate the shade of the pre-paration to the dental laboratory using the IPS Empress die materialshade guide. The corresponding shades of thedentin ingots are listed in thecombination table (Page 52).
IPS Empress Esthetic Shade GuideFor reasons of light refraction, the shade tabs are anatomically shaped and feature a surfacetexture. The rear of the shade tabs have been designed without any surface texture and aresmooth. This facilitates shade comparison with the prepared die and shaded cementationmedia. The shade tabs may be ground on the smooth side in order to determine the layering.The shade tabs have been fired from original materials under laboratory conditions and, therefore, correspond with the final result.
18
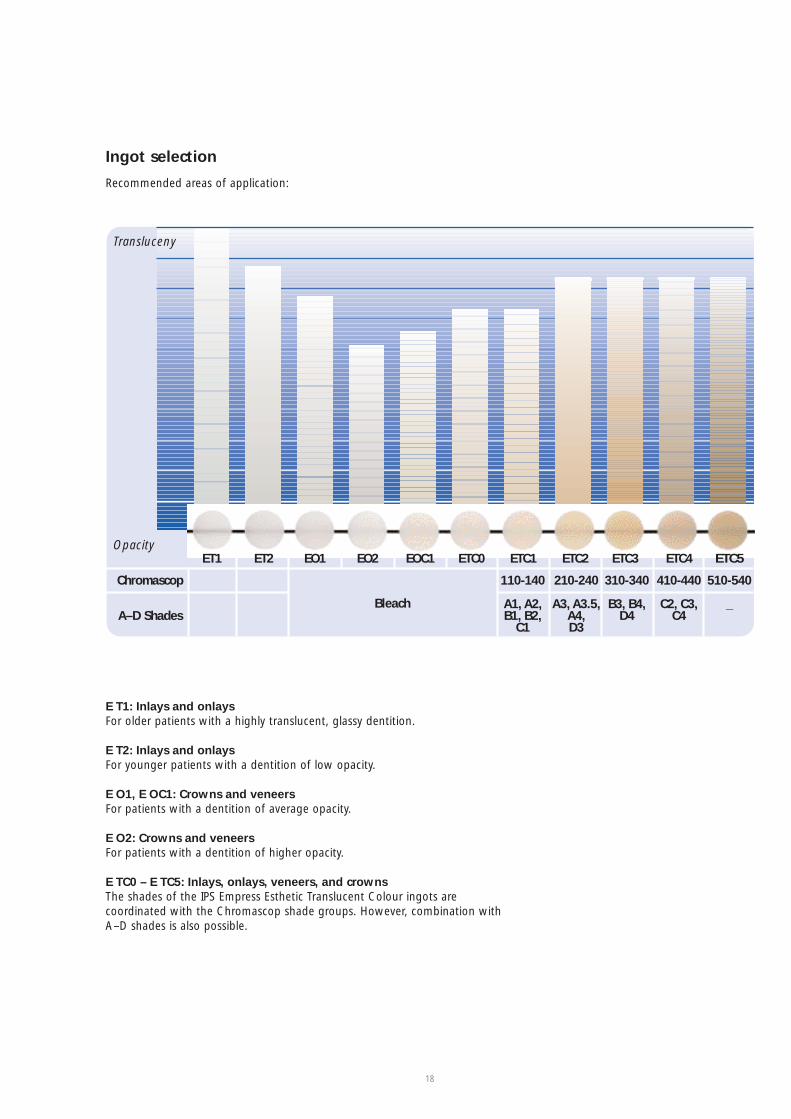
Ingot selection
Recommended areas of application:
E T1: Inlays and onlaysFor older patients with a highly translucent, glassy dentition.
E T2: Inlays and onlaysFor younger patients with a dentition of low opacity.
E O1, E OC1: Crowns and veneersFor patients with a dentition of average opacity.
E O2: Crowns and veneersFor patients with a dentition of higher opacity.
E TC0 – E TC5: Inlays, onlays, veneers, and crownsThe shades of the IPS Empress Esthetic Translucent Colour ingots are coordinated with the Chromascop shade groups. However, combination withA–D shades is also possible.
ET1
Transluceny
OpacityET2 EO1 EO2 EOC1
Chromascop
A–D ShadesBleach
110-140
A1, A2,B1, B2,
C1
210-240
A3, A3.5,A4,D3
310-340
B3, B4,D4
410-440
C2, C3,C4
ETC0 ETC1 ETC2 ETC3 ETC4 ETC5
510-540
_
19
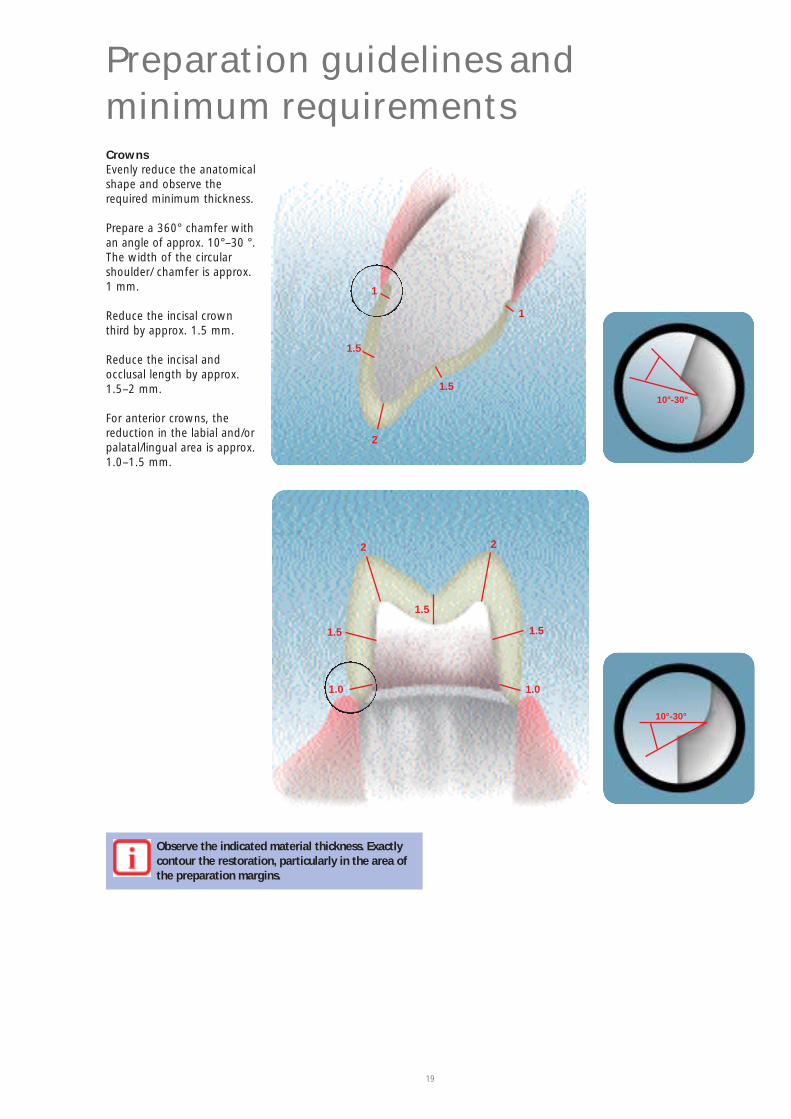
Preparation guidelines and minimum requirementsCrownsEvenly reduce the anatomicalshape and observe the required minimum thickness.
Prepare a 360° chamfer withan angle of approx. 10°–30 °.The width of the circularshoulder/ chamfer is approx.1 mm.
Reduce the incisal crownthird by approx. 1.5 mm.
Reduce the incisal and occlusal length by approx.1.5–2 mm.
For anterior crowns, thereduction in the labial and/orpalatal/lingual area is approx.1.0–1.5 mm.
10°-30°
10°-30°
1
1
1.5
1.5
2
2
1.5
2
1.51.5
1.01.0
Observe the indicated material thickness. Exactlycontour the restoration, particularly in the area ofthe preparation margins.
20
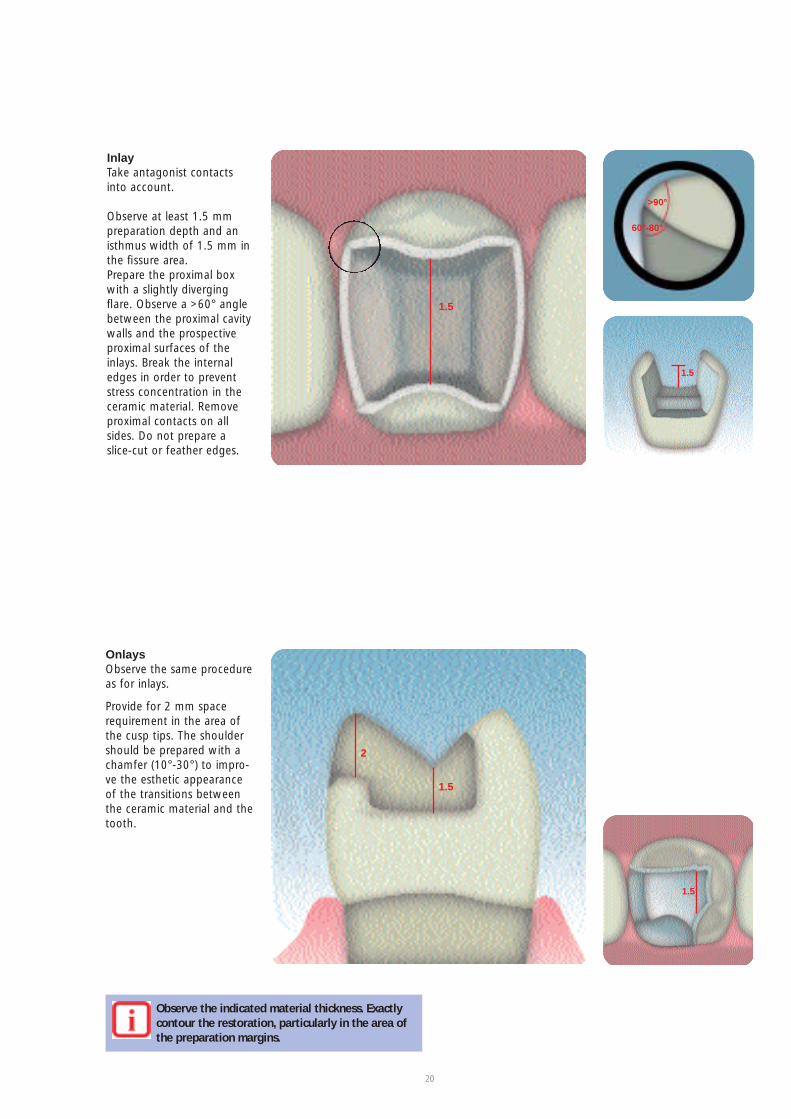
InlayTake antagonist contactsinto account.
Observe at least 1.5 mmpreparation depth and anisthmus width of 1.5 mm inthe fissure area. Prepare the proximal boxwith a slightly divergingflare. Observe a >60° anglebetween the proximal cavitywalls and the prospectiveproximal surfaces of theinlays. Break the internaledges in order to preventstress concentration in theceramic material. Removeproximal contacts on allsides. Do not prepare aslice-cut or feather edges.
1.5
1.5
OnlaysObserve the same procedureas for inlays.
Provide for 2 mm spacerequirement in the area ofthe cusp tips. The shouldershould be prepared with achamfer (10°-30°) to impro-ve the esthetic appearanceof the transitions betweenthe ceramic material and thetooth.
1.5
1.5
2
Observe the indicated material thickness. Exactlycontour the restoration, particularly in the area ofthe preparation margins.
>90°
60°-80°

21
10°-30°
0.6
0.7
1
Veneers If possible, the preparationshould be exclusively locatedin the enamel. Either designa classical preparation withlingual-incisal, chamfer-typeembrasure of the incisaledge, or a simple incisalreduction without embrasureof the incisal edge. Makesure that the incisal prepara-tion margin is not located inthe area of the abrasion surfaces.
The extent of the incisalreduction depends on thedesired translucency of theincisal area to be recon-structed. The more transparent the incisal edgeof the veneer is planned toappear, the larger the
reduction should be (incisalreductions: approx. 1.0–1.5 mm). By providingorientation grooves with agroove bur, a controlled enamel reduction can beachieved.
The minimum preparationthickness is approx. 0.6–1.0 mm depending onthe preparation techniqueselected.
Removing the proximalcontacts is not required.Discoloured teeth may haveto be further reduced.Prepare a cervical chamfer orshoulder with an angle ofapprox. 10°–30° (same as forcrowns).
Observe the indicated material thickness. Exactlycontour the restoration, particularly in the area ofthe preparation margins.
22
Processing procedure Empress Esthetic Fully AnatomicalIP
S
Hard stone (Type IV)
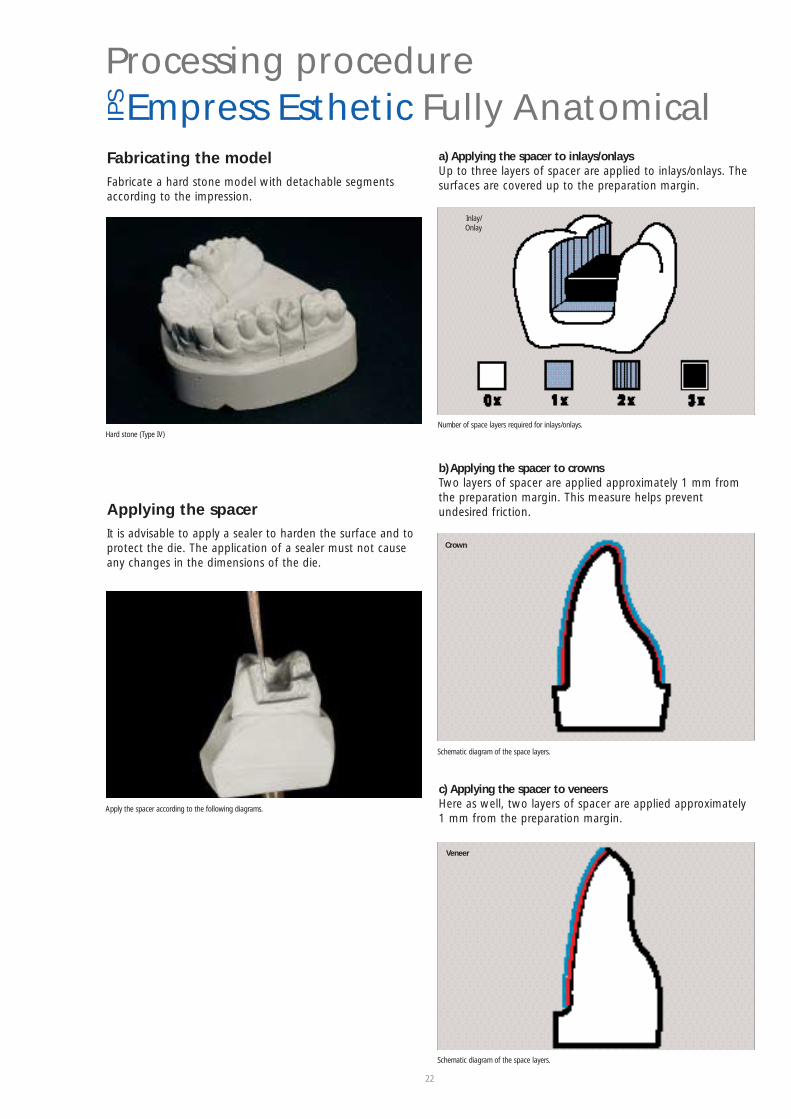
Fabricating the modelFabricate a hard stone model with detachable segmentsaccording to the impression.
a) Applying the spacer to inlays/onlays Up to three layers of spacer are applied to inlays/onlays. Thesurfaces are covered up to the preparation margin.
Applying the spacerIt is advisable to apply a sealer to harden the surface and toprotect the die. The application of a sealer must not causeany changes in the dimensions of the die.
Number of space layers required for inlays/onlays.
Inlay/Onlay
Apply the spacer according to the following diagrams.
b)Applying the spacer to crowns Two layers of spacer are applied approximately 1 mm fromthe preparation margin. This measure helps prevent undesired friction.
c) Applying the spacer to veneers Here as well, two layers of spacer are applied approximately1 mm from the preparation margin.
Schematic diagram of the space layers.
Schematic diagram of the space layers.
Crown
Veneer
23
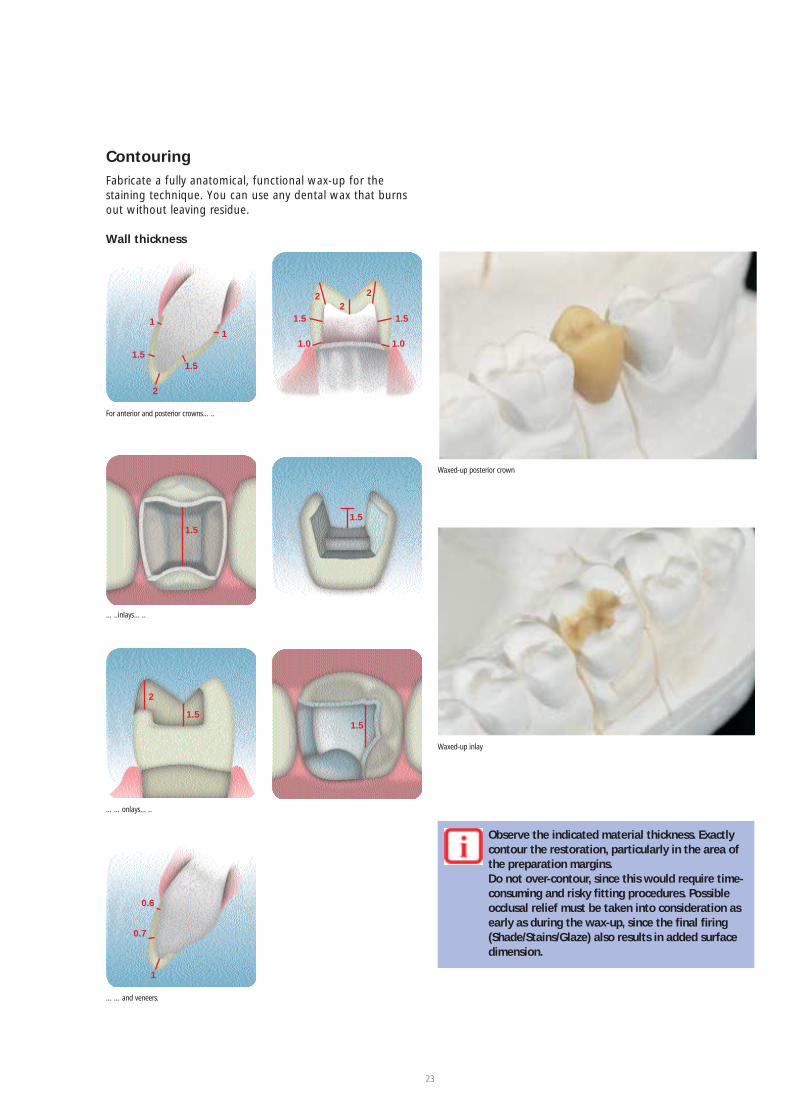
ContouringFabricate a fully anatomical, functional wax-up for the staining technique. You can use any dental wax that burnsout without leaving residue.
Wall thickness
For anterior and posterior crowns…..
…..inlays…..
……onlays…..
Waxed-up posterior crown
Waxed-up inlay
……and veneers.
1.51.5
22
2
1.51.5
1.01.0
1.5
2
1.5
11
1.51.5
2
0.6
0.7
1
Observe the indicated material thickness. Exactlycontour the restoration, particularly in the area ofthe preparation margins.Do not over-contour, since this would require time-consuming and risky fitting procedures. Possibleocclusal relief must be taken into consideration asearly as during the wax-up, since the final firing(Shade/Stains/Glaze) also results in added surface dimension.
24
Observe the indicated material thickness. Exactlycontour the restoration, particularly in the area ofthe preparation margins.
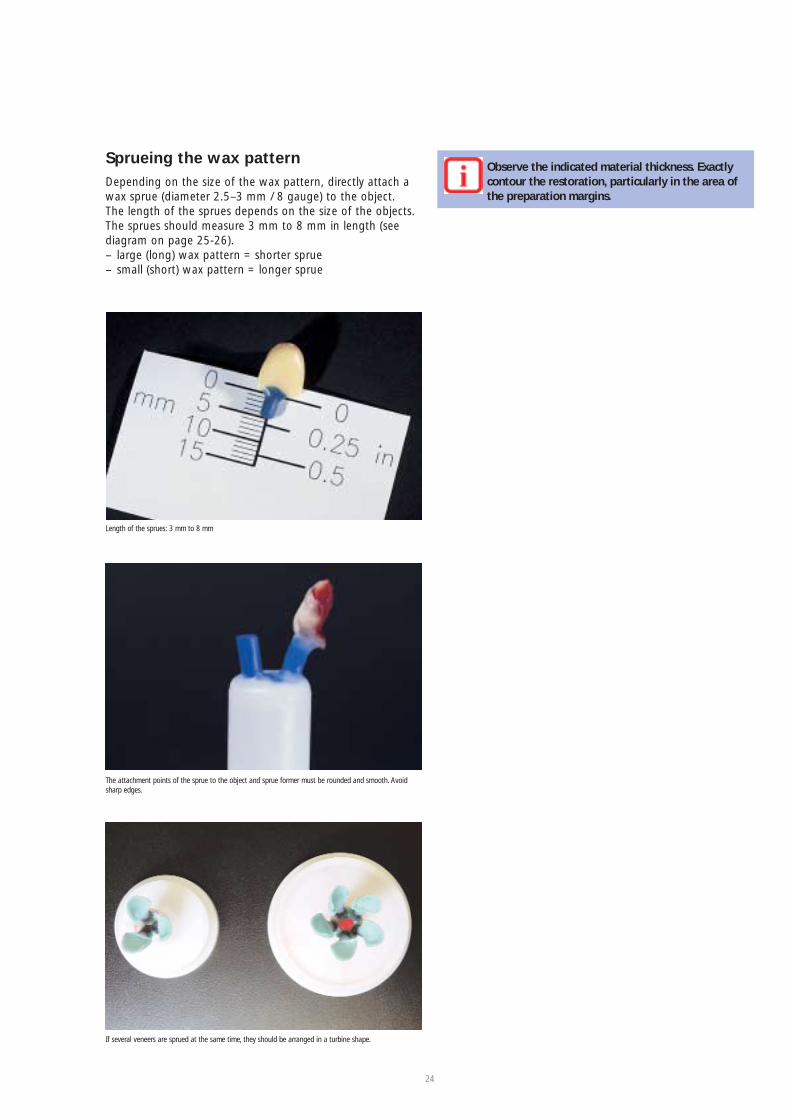
Sprueing the wax pattern Depending on the size of the wax pattern, directly attach awax sprue (diameter 2.5–3 mm / 8 gauge) to the object. The length of the sprues depends on the size of the objects.The sprues should measure 3 mm to 8 mm in length (seediagram on page 25-26).– large (long) wax pattern = shorter sprue– small (short) wax pattern = longer sprue
Length of the sprues: 3 mm to 8 mm
The attachment points of the sprue to the object and sprue former must be rounded and smooth. Avoidsharp edges.
If several veneers are sprued at the same time, they should be arranged in a turbine shape.
25
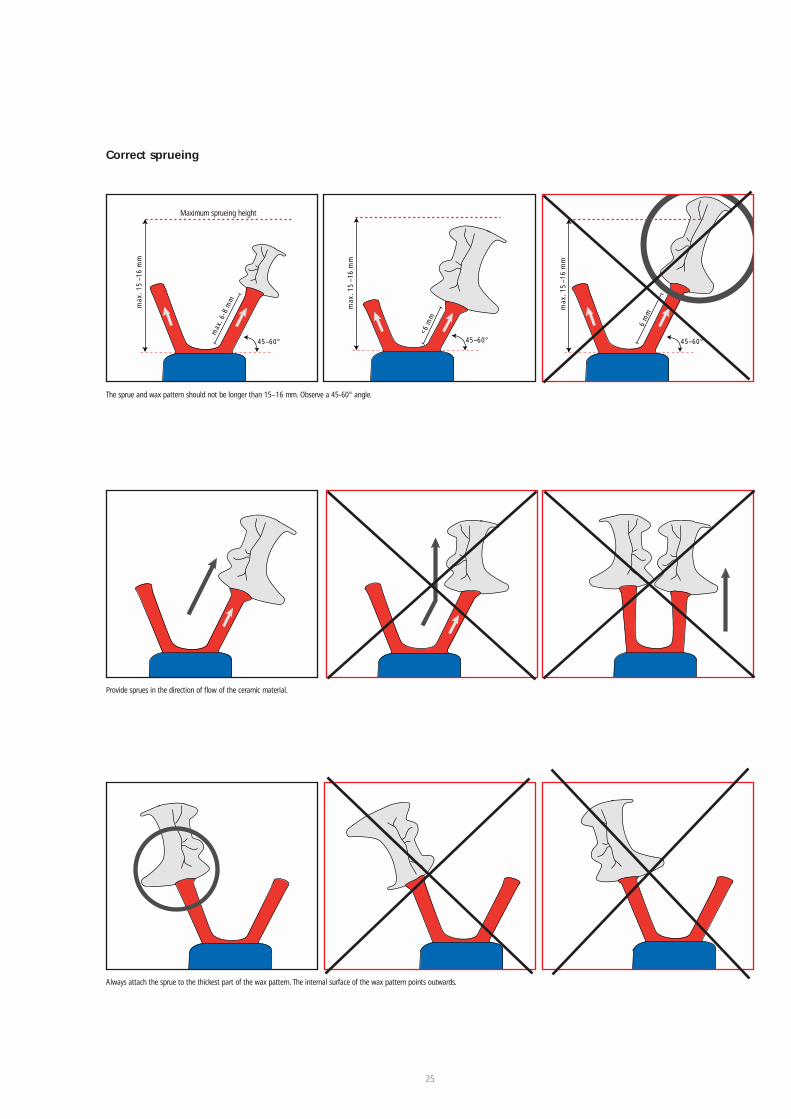
Correct sprueing
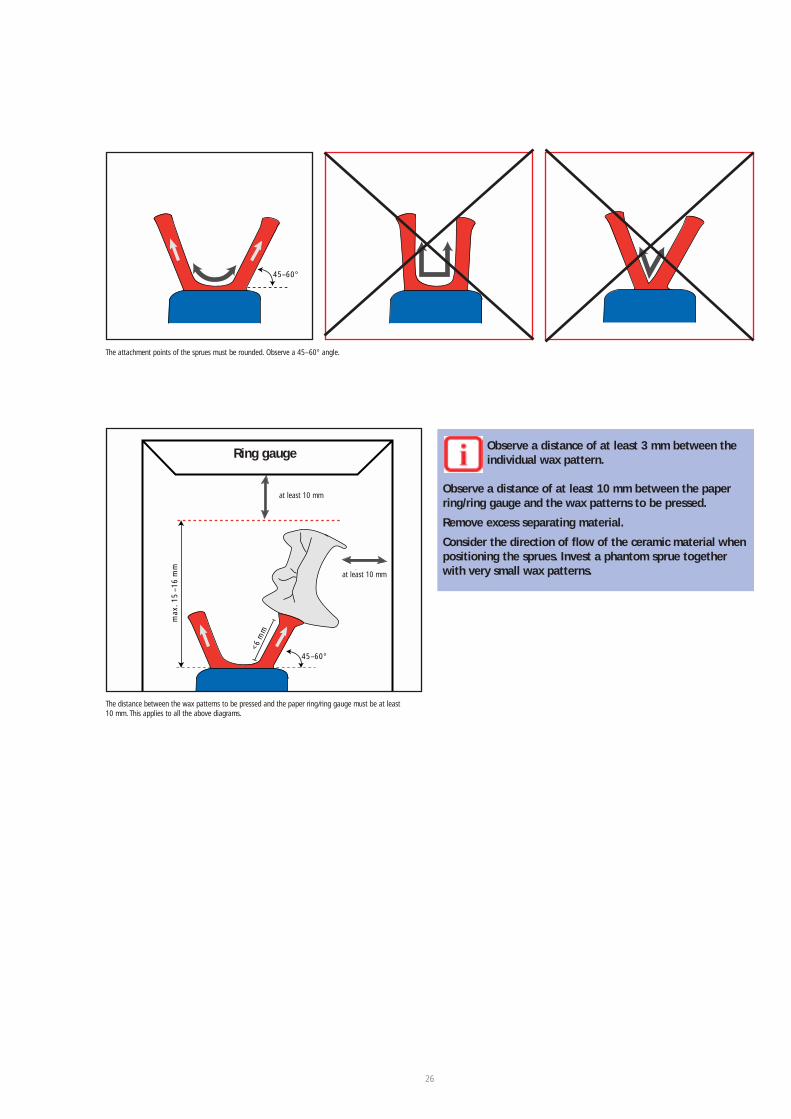
The sprue and wax pattern should not be longer than 15–16 mm. Observe a 45-60° angle.
max
. 6-8
mm
45–60°
max
. 15
–16
mm
<6 m
m
45–60°m
ax. 1
5 –1
6 m
m
6 m
m
45–60°
max
. 15
–16
mm
Provide sprues in the direction of flow of the ceramic material.
Always attach the sprue to the thickest part of the wax pattern. The internal surface of the wax pattern points outwards.
Maximum sprueing height
26
The distance between the wax patterns to be pressed and the paper ring/ring gauge must be at least 10 mm. This applies to all the above diagrams.
45–60°
The attachment points of the sprues must be rounded. Observe a 45–60° angle.
Observe a distance of at least 3 mm between theindividual wax pattern.
Observe a distance of at least 10 mm between the paperring/ring gauge and the wax patterns to be pressed.
Remove excess separating material.
Consider the direction of flow of the ceramic material whenpositioning the sprues. Invest a phantom sprue togetherwith very small wax patterns.
<6 m
m
45–60°
max
. 15
–16
mm
mind. 10 mm
mind. 10 mm
Ring gauge
at least 10 mm
at least 10 mm

27
– Large investment ringUp to max. 1.4 g wax weight and two ingots
– Small investment ringUp to max. 0.6 g wax weight and one small ingot
Invest a phantom sprue with a very small wax pattern (< 0.24 g) in order to avoid activating the abort criteria ofthe EP 500/ EP 600/EP 600 Combi.
InvestingInvestment is carried out with the IPS Empress 2 SpecialInvestment or IPS Empress 2 Speed Investment material. Werecommend the following procedure to determine the accurate wax weight:
1. Weigh the ring base (seal the opening of the ring base withwax).
2. Position the objects to be pressed on the ring base andattach them with wax. Weigh again.
3. The difference between the two values is the weight of thewax used.
Remove the protective tape from the 2-in-1 IPS Empresspaper ring. Form a cylinder exactly along the marked line.Tightly press the two ends together along the entireline (risk of predetermined breaking points if the adhesive areas overlap or even turn loose). When working with ready-to-use paper rings, double-check theadhesive area for optimum adhesion.
Mix IPS Empress 2 Special Investment or IPS Empress 2 Speed Investment material under vacuum. Check thevacuum.
Form a ring exactly along the marked line.
Set the paper ring on the base of the investment ring and check for correct fit. Use the ring stabilizer to stabilize the paper ring.
Pour the investment material slowly. Avoid the formation of air bubbles.
28
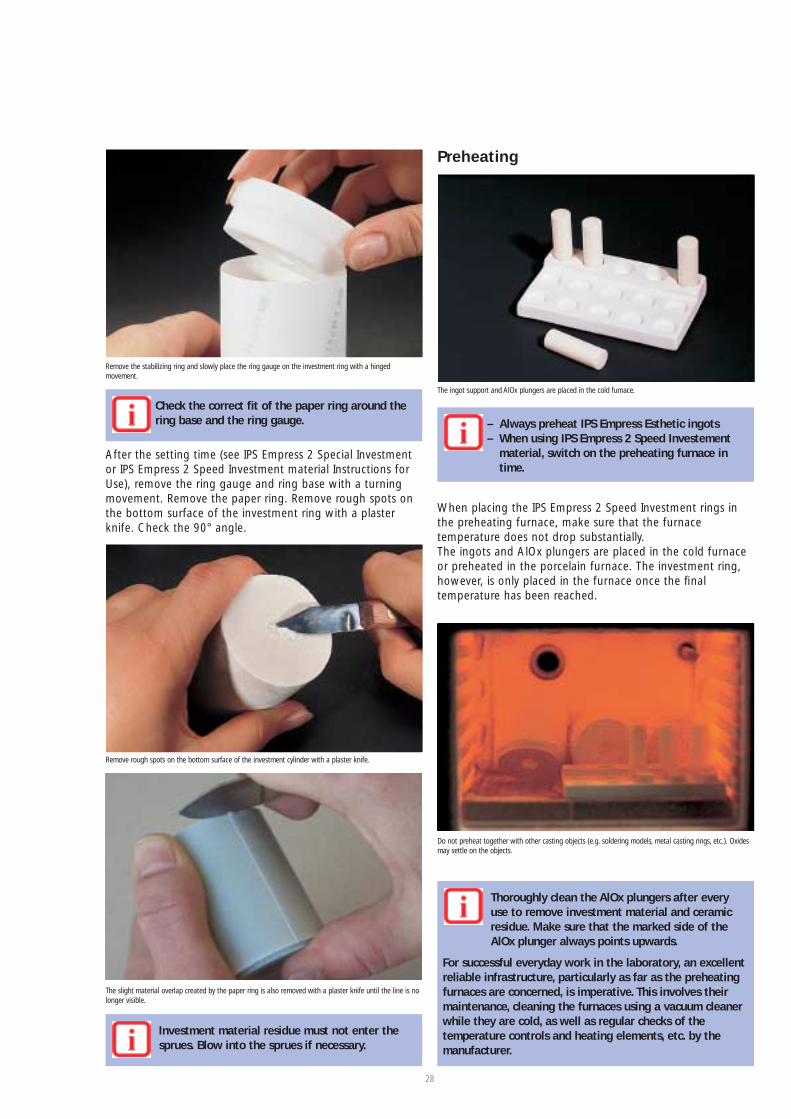
The slight material overlap created by the paper ring is also removed with a plaster knife until the line is nolonger visible.
After the setting time (see IPS Empress 2 Special Investmentor IPS Empress 2 Speed Investment material Instructions forUse), remove the ring gauge and ring base with a turningmovement. Remove the paper ring. Remove rough spots onthe bottom surface of the investment ring with a plasterknife. Check the 90° angle.
Remove rough spots on the bottom surface of the investment cylinder with a plaster knife.
Investment material residue must not enter the sprues. Blow into the sprues if necessary.
Thoroughly clean the AlOx plungers after every use to remove investment material and ceramic residue. Make sure that the marked side of the AlOx plunger always points upwards.
For successful everyday work in the laboratory, an excellentreliable infrastructure, particularly as far as the preheatingfurnaces are concerned, is imperative. This involves theirmaintenance, cleaning the furnaces using a vacuum cleanerwhile they are cold, as well as regular checks of the temperature controls and heating elements, etc. by themanufacturer.
The ingot support and AlOx plungers are placed in the cold furnace.
Preheating
When placing the IPS Empress 2 Speed Investment rings inthe preheating furnace, make sure that the furnace temperature does not drop substantially.The ingots and AlOx plungers are placed in the cold furnaceor preheated in the porcelain furnace. The investment ring,however, is only placed in the furnace once the final temperature has been reached.
Do not preheat together with other casting objects (e.g. soldering models, metal casting rings, etc.). Oxidesmay settle on the objects.
– Always preheat IPS Empress Esthetic ingots– When using IPS Empress 2 Speed Investement
material, switch on the preheating furnace intime.
Check the correct fit of the paper ring around thering base and the ring gauge.
Remove the stabilizing ring and slowly place the ring gauge on the investment ring with a hinged movement.
29
15 minutes (set timer) by pressing the STOP key twice. If you fail to interrupt the program, the ER16 error messageappears. Rectify this error by following the instructionsgiven on the corresponding list of error messages. Allowthe furnace to cool until the stand-by-temperature of 700 °C/1292 °F has been reached with the furnace headclosed. Hold this temperature for at least 30 minutes.
3.Place the calibration set on the honey-combed firing tray inorder to ensure the appropriate height (temperature range)in the furnace.
4.Conduct the calibration using the Temperature CheckingSet 2.
EP600 1.Place the melting sample in the ceramic base.
2.Tighten the contact pin to secure the melting sample.
Important:Do not use tweezers or tongs. Apply slight pressureto secure the melting sample in place.
3.Select the calibration program in the 'Miscellaneous' menu.The furnace head opens.
4.Remove the firing plate from the furnace and place it onthe cooling plate using the firing tongs.
5.Place the calibration tray in the holes for the AutomaticTemperature Checking Set ATK 1 in the stone lining.
6.Slightly press the calibration tray into place with the firingtongs until you feel it click into place.
7.Start the calibration program
8.Once the program is completed, remove the calibrationtray from the furnace using the tongs and allow it to cool.
ContraindicationDo not pull at the melting sample. The ceramic basemay fracture when you do so.
9.Replace the firing tray and select the firing program. Thefurnace head closes automatically.
10.Once it is cooled, disassemble the calibration tray.
11.Use a new melting sample for the next calibration procedure and start with item 1.
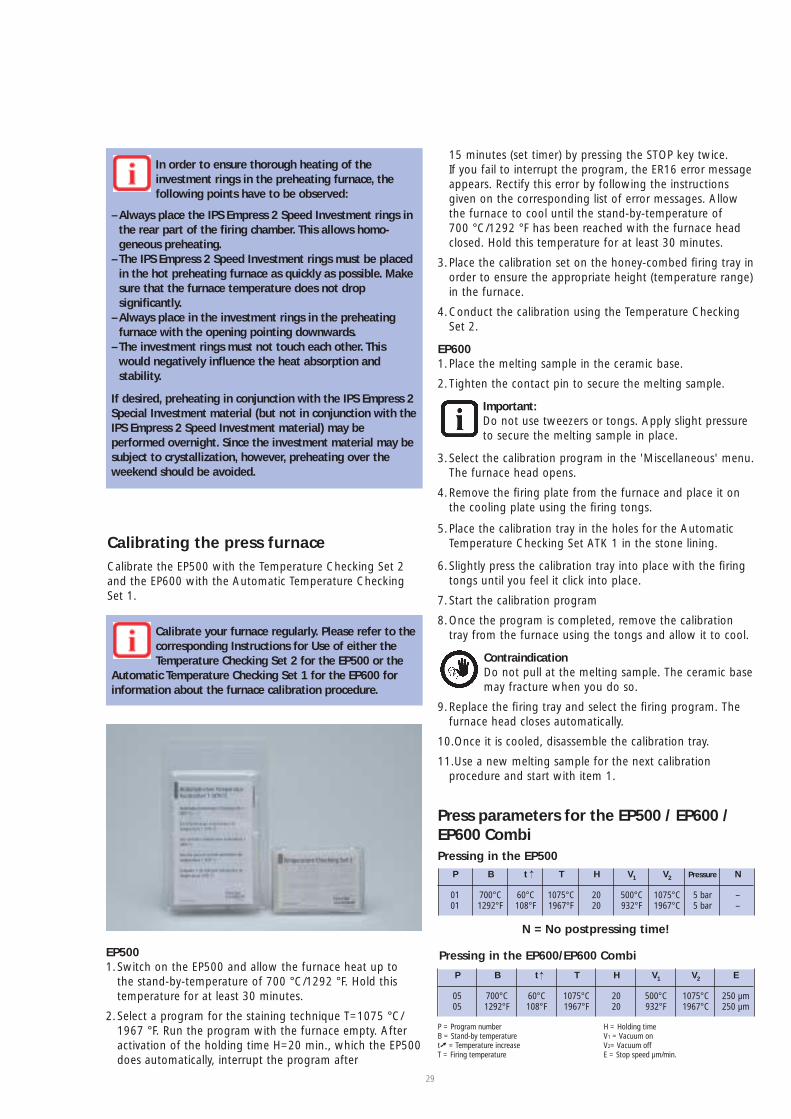
Calibrating the press furnace Calibrate the EP500 with the Temperature Checking Set 2and the EP600 with the Automatic Temperature CheckingSet 1.
Calibrate your furnace regularly. Please refer to thecorresponding Instructions for Use of either theTemperature Checking Set 2 for the EP500 or the
Automatic Temperature Checking Set 1 for the EP600 forinformation about the furnace calibration procedure.
EP5001.Switch on the EP500 and allow the furnace heat up to
the stand-by-temperature of 700 °C/1292 °F. Hold this temperature for at least 30 minutes.
2.Select a program for the staining technique T=1075 °C/1967 °F. Run the program with the furnace empty. Afteractivation of the holding time H=20 min., which the EP500does automatically, interrupt the program after
Press parameters for the EP500 / EP600 /EP600 CombiPressing in the EP500
N = No postpressing time!
P
0101
B
700°C1292°F
t
60°C108°F
T
1075°C1967°F
H
2020
V1
500°C932°F
V2
1075°C1967°C
Pressure
5 bar5 bar
N
––
→
P
0505
B
700°C1292°F
t
60°C108°F
T
1075°C1967°F
H
2020
V1
500°C932°F
V2
1075°C1967°C
E
250 µm250 µm
→
Pressing in the EP600/EP600 Combi
P = Program numberB = Stand-by temperature t➚ = Temperature increaseT = Firing temperature
H = Holding timeV1 = Vacuum onV2= Vacuum off E = Stop speed µm/min.
In order to ensure thorough heating of the investment rings in the preheating furnace, the following points have to be observed:
–Always place the IPS Empress 2 Speed Investment rings inthe rear part of the firing chamber. This allows homo-geneous preheating.
–The IPS Empress 2 Speed Investment rings must be placedin the hot preheating furnace as quickly as possible. Makesure that the furnace temperature does not drop significantly.
–Always place in the investment rings in the preheating furnace with the opening pointing downwards.
–The investment rings must not touch each other. Thiswould negatively influence the heat absorption and stability.
If desired, preheating in conjunction with the IPS Empress 2Special Investment material (but not in conjunction with theIPS Empress 2 Speed Investment material) may be performed overnight. Since the investment material may besubject to crystallization, however, preheating over theweekend should be avoided.
30
Pressing
Switch on the press furnace in time.
Leave the ingot tray support in the preheating furnace and allow it to cool slowly after you haveremoved the last AlOx plunger.
Large investment ringMax. 2 ingots per pressing cycle
Small investment ringMax. 1 ingot per pressing cycle
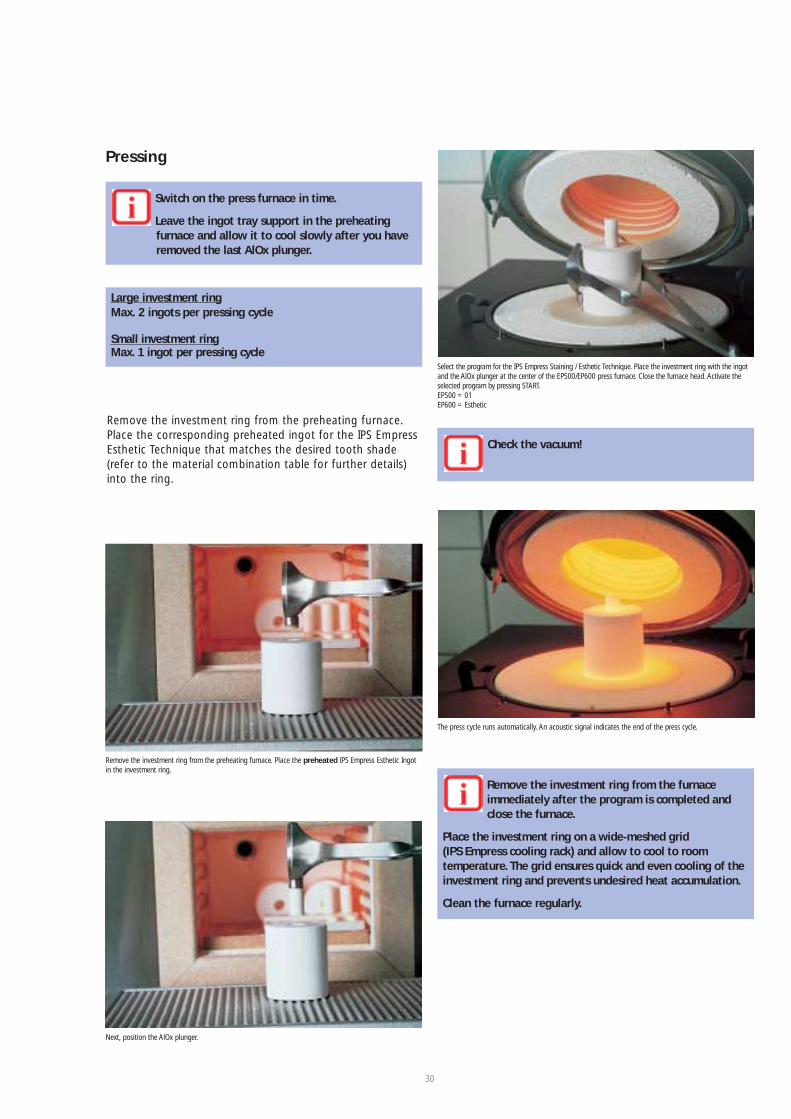
Remove the investment ring from the preheating furnace. Place the preheated IPS Empress Esthetic Ingotin the investment ring.
Next, position the AlOx plunger.
Remove the investment ring from the preheating furnace.Place the corresponding preheated ingot for the IPS EmpressEsthetic Technique that matches the desired tooth shade(refer to the material combination table for further details)into the ring.
Remove the investment ring from the furnaceimmediately after the program is completed andclose the furnace.
Place the investment ring on a wide-meshed grid (IPS Empress cooling rack) and allow to cool to room temperature. The grid ensures quick and even cooling of theinvestment ring and prevents undesired heat accumulation.
Clean the furnace regularly.
The press cycle runs automatically. An acoustic signal indicates the end of the press cycle.
Select the program for the IPS Empress Staining / Esthetic Technique. Place the investment ring with the ingotand the AlOx plunger at the center of the EP500/EP600 press furnace. Close the furnace head. Activate the selected program by pressing START.EP500 = 01EP600 = Esthetic
Check the vacuum!
31
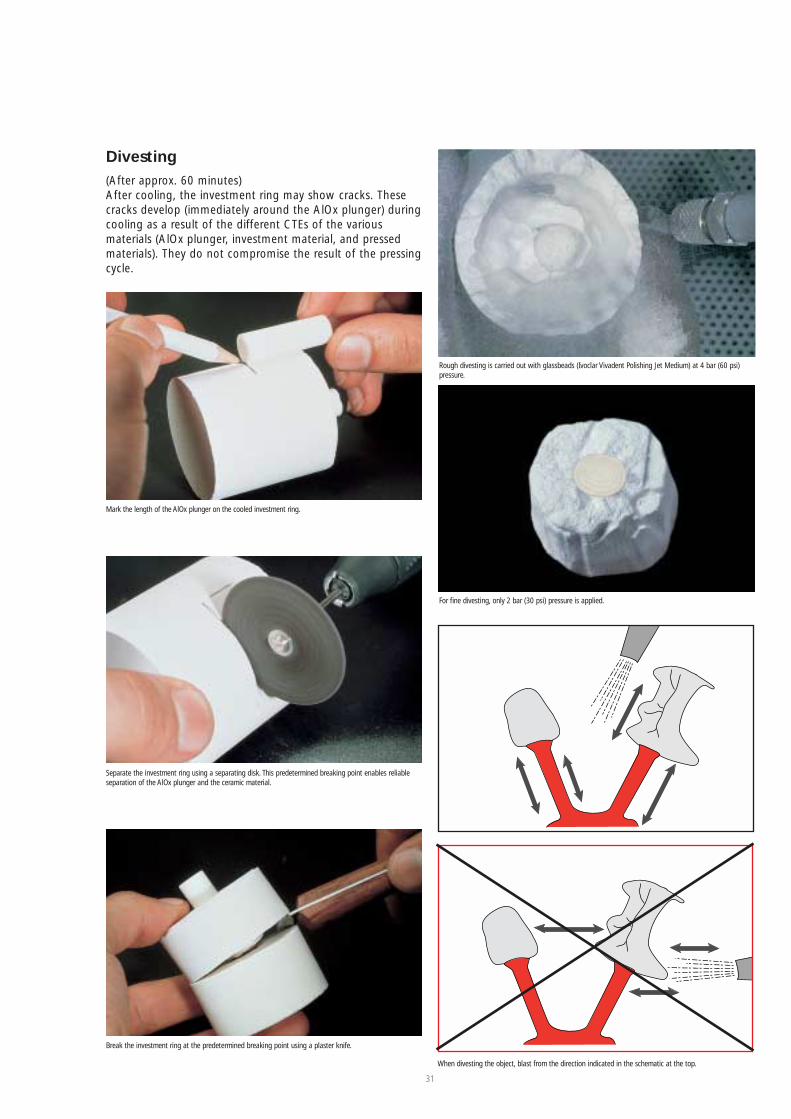
Divesting(After approx. 60 minutes)After cooling, the investment ring may show cracks. Thesecracks develop (immediately around the AlOx plunger) duringcooling as a result of the different CTEs of the various materials (AlOx plunger, investment material, and pressedmaterials). They do not compromise the result of the pressingcycle.
Mark the length of the AlOx plunger on the cooled investment ring.
Separate the investment ring using a separating disk. This predetermined breaking point enables reliableseparation of the AlOx plunger and the ceramic material.
Break the investment ring at the predetermined breaking point using a plaster knife.
Rough divesting is carried out with glassbeads (Ivoclar Vivadent Polishing Jet Medium) at 4 bar (60 psi)pressure.
For fine divesting, only 2 bar (30 psi) pressure is applied.
When divesting the object, blast from the direction indicated in the schematic at the top.
32
The investment material contains quartz powder.Avoid the inhalation of dust.
Always use glass beads (Type 80–100 microns) todivest ceramic restorations.
Completely remove the investment material from the objectat 2 bar (30 psi) pressure. Even the smallest bit of remaininginvestment material can lead to adverse results (bondingproblems and/or discolouration).
Apply. max 2 bar (30 psi) pressure for fine divesting (risk offracture).
Do not use aluminium oxide to divest ceramic restorations(too abrasive).
Thoroughly remove ceramic residue from the AlOx plungerwith glassbeads at 4 bar (60 psi) pressure. Ceramic residueon the AlOx plunger may cause the plunger to stick to theinvestment ring.
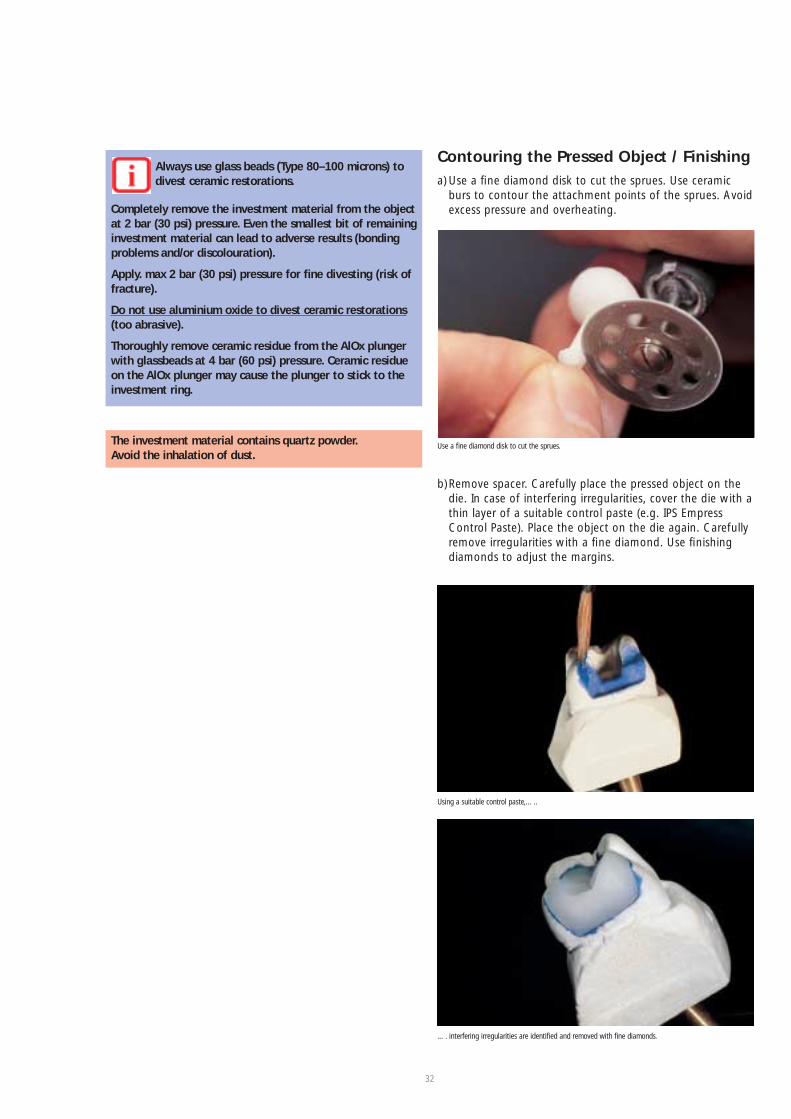
Contouring the Pressed Object / Finishinga) Use a fine diamond disk to cut the sprues. Use ceramic
burs to contour the attachment points of the sprues. Avoidexcess pressure and overheating.
b)Remove spacer. Carefully place the pressed object on thedie. In case of interfering irregularities, cover the die with athin layer of a suitable control paste (e.g. IPS EmpressControl Paste). Place the object on the die again. Carefullyremove irregularities with a fine diamond. Use finishingdiamonds to adjust the margins.
Use a fine diamond disk to cut the sprues.
Using a suitable control paste,…..
…. interfering irregularities are identified and removed with fine diamonds.
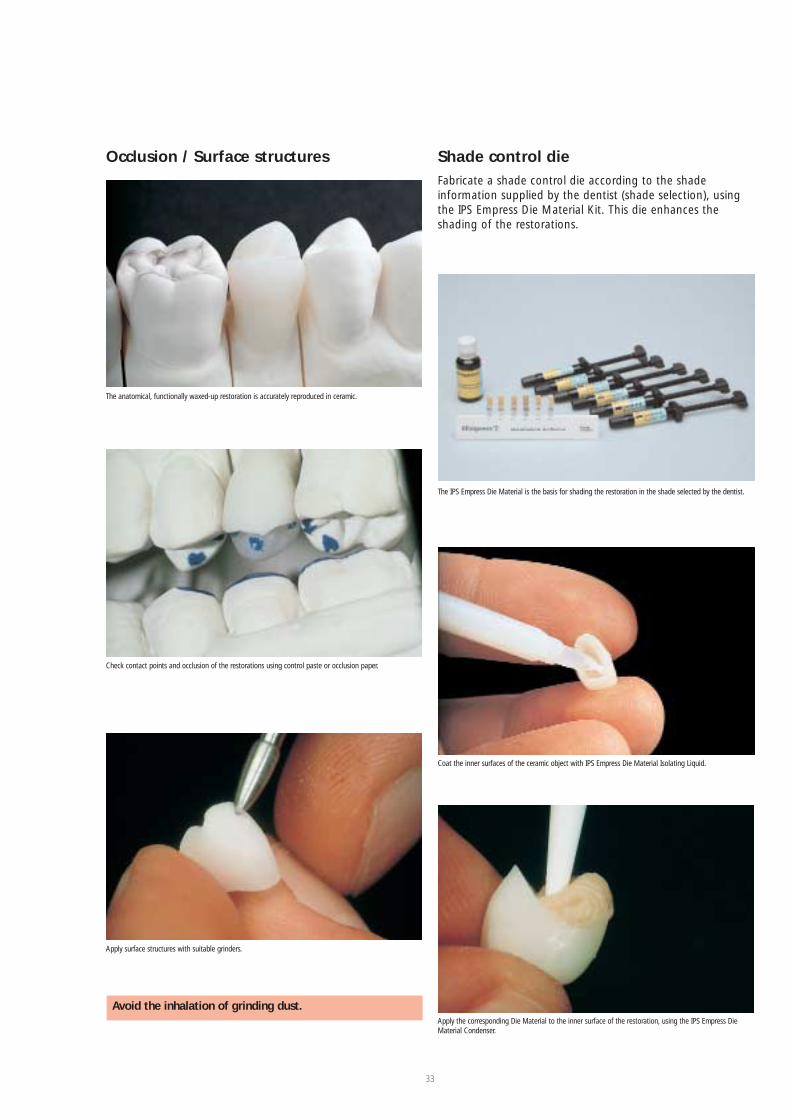
Occlusion / Surface structures
Avoid the inhalation of grinding dust.
The anatomical, functionally waxed-up restoration is accurately reproduced in ceramic.
Check contact points and occlusion of the restorations using control paste or occlusion paper.
Apply surface structures with suitable grinders.
33
Shade control dieFabricate a shade control die according to the shade information supplied by the dentist (shade selection), usingthe IPS Empress Die Material Kit. This die enhances the shading of the restorations.
The IPS Empress Die Material is the basis for shading the restoration in the shade selected by the dentist.
Apply the corresponding Die Material to the inner surface of the restoration, using the IPS Empress DieMaterial Condenser.
Coat the inner surfaces of the ceramic object with IPS Empress Die Material Isolating Liquid.
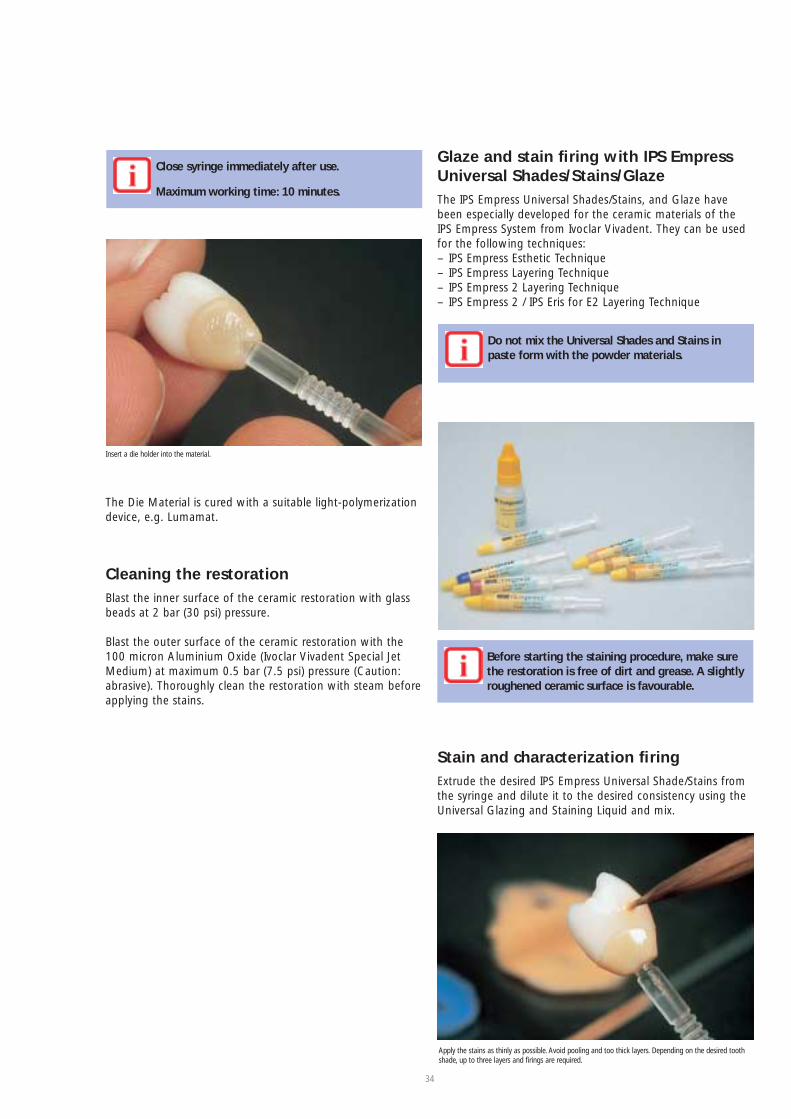
Glaze and stain firing with IPS EmpressUniversal Shades/Stains/Glaze The IPS Empress Universal Shades/Stains, and Glaze havebeen especially developed for the ceramic materials of theIPS Empress System from Ivoclar Vivadent. They can be usedfor the following techniques:– IPS Empress Esthetic Technique– IPS Empress Layering Technique– IPS Empress 2 Layering Technique– IPS Empress 2 / IPS Eris for E2 Layering Technique
Do not mix the Universal Shades and Stains inpaste form with the powder materials.
Before starting the staining procedure, make surethe restoration is free of dirt and grease. A slightlyroughened ceramic surface is favourable.
Stain and characterization firingExtrude the desired IPS Empress Universal Shade/Stains fromthe syringe and dilute it to the desired consistency using theUniversal Glazing and Staining Liquid and mix.
Apply the stains as thinly as possible. Avoid pooling and too thick layers. Depending on the desired toothshade, up to three layers and firings are required.
34
Close syringe immediately after use.
Maximum working time: 10 minutes.
Insert a die holder into the material.
The Die Material is cured with a suitable light-polymerizationdevice, e.g. Lumamat.
Cleaning the restoration Blast the inner surface of the ceramic restoration with glassbeads at 2 bar (30 psi) pressure.
Blast the outer surface of the ceramic restoration with the100 micron Aluminium Oxide (Ivoclar Vivadent Special JetMedium) at maximum 0.5 bar (7.5 psi) pressure (Caution:abrasive). Thoroughly clean the restoration with steam beforeapplying the stains.
Firing parameters for IPS Empress UniversalShade/Stains (220 V)
Firing parameters for IPS Empress UniversalShade/Stains (110 V)
ImportantWhen working with a furnace from another manu-facturer, these parameters have to be adjusted accordingly.
Never place the objects to be fired directly onto the firingtray. Contamination may cause discolouration of the restorations. Therefore, inlays/onlays and veneers that cannot be secured on a firing pin, must be placed on a firingpillow.
Use only the recommended firing set. Blast metal firing pinsregularly using Al2O3 at 1 bar pressure to clean them.Replace dirty firing pillows.
35
More intensive shades are achieved by severalstaining procedures, not by applying thicker layers.To check the shade, wet inner aspects of the crown
with IPS Empress Universal Glaze and Stain Liquid, replacethe object on the shaded die and compare the shade withthe corresponding Chromascop or A-D shade.
There are 14 IPS Empress Universal Stains available for individualized characterizations. They can be appliedwith the last stain firing.
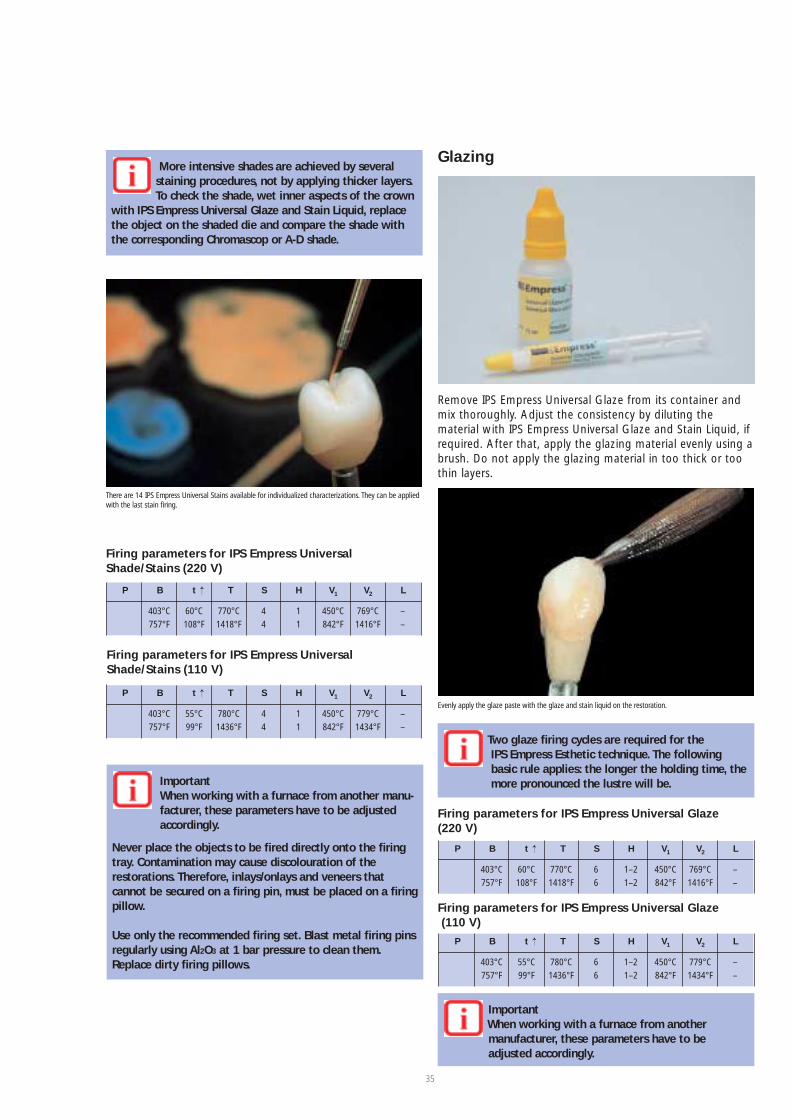
Glazing
Remove IPS Empress Universal Glaze from its container andmix thoroughly. Adjust the consistency by diluting the material with IPS Empress Universal Glaze and Stain Liquid, ifrequired. After that, apply the glazing material evenly using abrush. Do not apply the glazing material in too thick or toothin layers.
Evenly apply the glaze paste with the glaze and stain liquid on the restoration.
Two glaze firing cycles are required for the IPS Empress Esthetic technique. The following basic rule applies: the longer the holding time, themore pronounced the lustre will be.
ImportantWhen working with a furnace from another manufacturer, these parameters have to be adjusted accordingly.
Firing parameters for IPS Empress Universal Glaze (220 V)
Firing parameters for IPS Empress Universal Glaze (110 V)
P B
403°C757°F
t
60°C108°F
T
770°C1418°F
S
44
H
11
V1
450°C842°F
V2
769°C1416°F
L
––
→
P B
403°C757°F
t
55°C99°F
T
780°C1436°F
S
44
H
11
V1
450°C842°F
V2
779°C1434°F
L
––
→
P B
403°C757°F
t
60°C108°F
T
770°C1418°F
S
66
H
1–21–2
V1
450°C842°F
V2
769°C1416°F
L
––
→
P B
403°C757°F
t
55°C99°F
T
780°C1436°F
S
66
H
1–21–2
V1
450°C842°F
V2
779°C1434°F
L
––
→
36
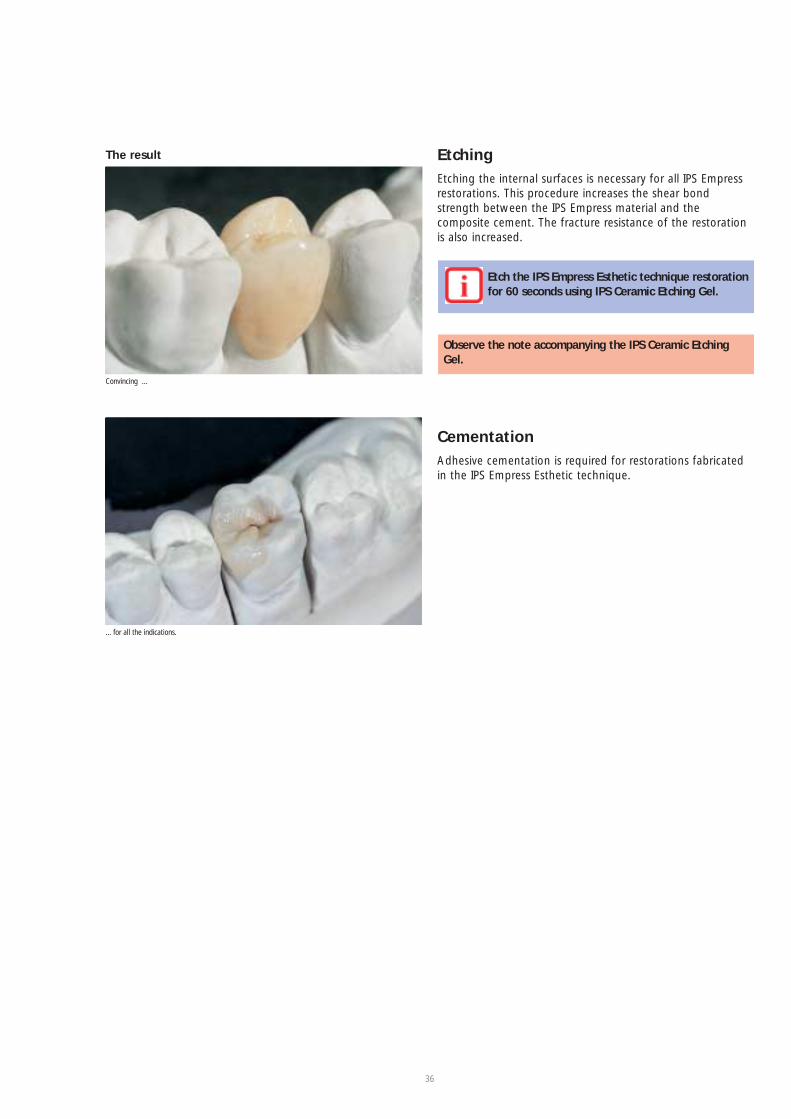
The result
... for all the indications.
Convincing ...
Observe the note accompanying the IPS Ceramic EtchingGel.
Etch the IPS Empress Esthetic technique restorationfor 60 seconds using IPS Ceramic Etching Gel.
EtchingEtching the internal surfaces is necessary for all IPS Empressrestorations. This procedure increases the shear bondstrength between the IPS Empress material and the composite cement. The fracture resistance of the restorationis also increased.
CementationAdhesive cementation is required for restorations fabricatedin the IPS Empress Esthetic technique.
37
Processing procedureEmpress Esthetic Veneer TechniqueIP
S
With IPS Empress Esthetic Veneer, you may choose between several ready-mixed IPS Estheic Veneer ceramic materials. Thesenew materials are suitable for quick and efficient layering on IPS Empress Esthetic Ingots.
Indication– Esthetic layering of pressed anterior veneers and crowns in
the incisal area– Minimum thickness of the pressed objects = 0.5 mm– Layering area: Incisal third– Maximum layer thickness = 0.5–1 mm
Contraindication– Fully layered crowns for the anterior and posterior region– Combination with other pressed ceramic materials (e.g.
IPS Empress and IPS Empress 2 / IPS Eris for E2 layeringmaterials) or materials of other manufacturers
– Combination with metal-ceramic systems (e.g. IPS d.SIGN) – Patients with severely reduced residual dentition – Bruxism– The technique with self-mixed materials in combination
with IPS Empress Esthetic ingots
Important processing restrictionsIf the following restrictions are not observed, successful processing of IPS Empress Esthetic Veneer cannot be ensured:– The necessary wall thicknesses must be observed. – Powder materials must not be mixed with materials in
paste form
0.5 mm
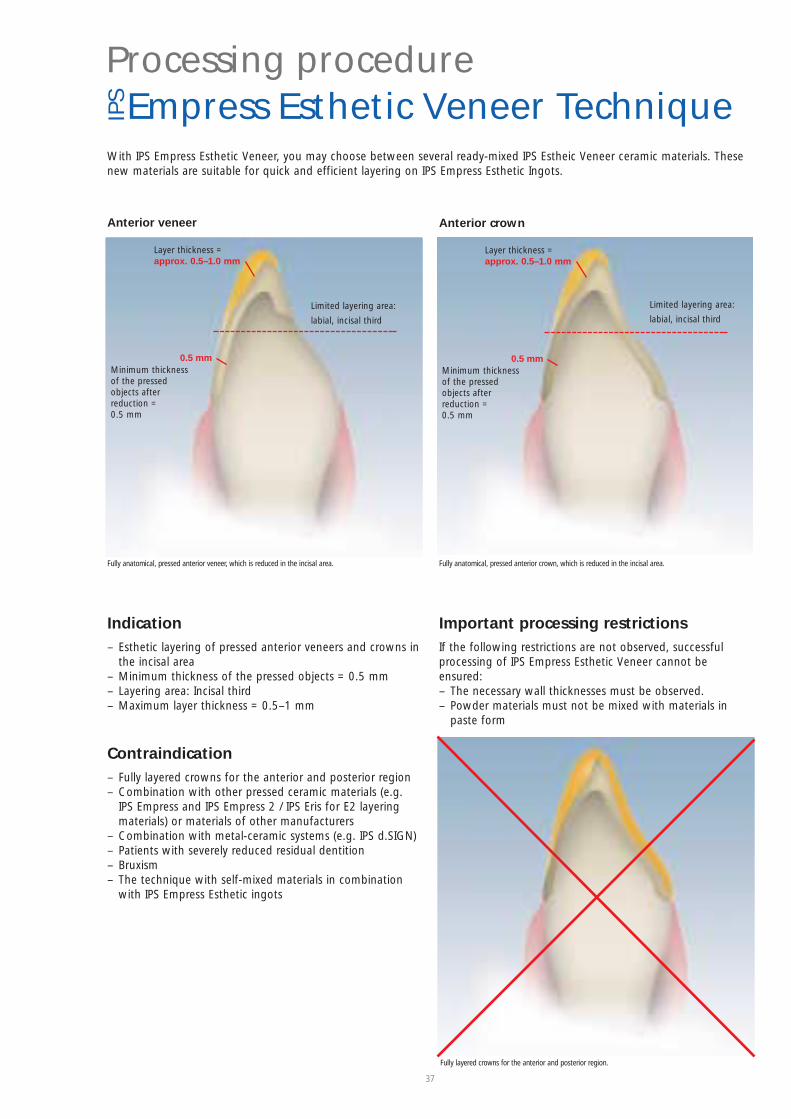
Fully anatomical, pressed anterior veneer, which is reduced in the incisal area.
Fully layered crowns for the anterior and posterior region.
Fully anatomical, pressed anterior crown, which is reduced in the incisal area.
Anterior veneer Anterior crown
Minimum thicknessof the pressedobjects after reduction = 0.5 mm
Layer thickness = approx. 0.5–1.0 mm
Limited layering area:
labial, incisal third
0.5 mm
Layer thickness = approx. 0.5–1.0 mm
Minimum thicknessof the pressedobjects after reduction = 0.5 mm
Limited layering area:
labial, incisal third
38
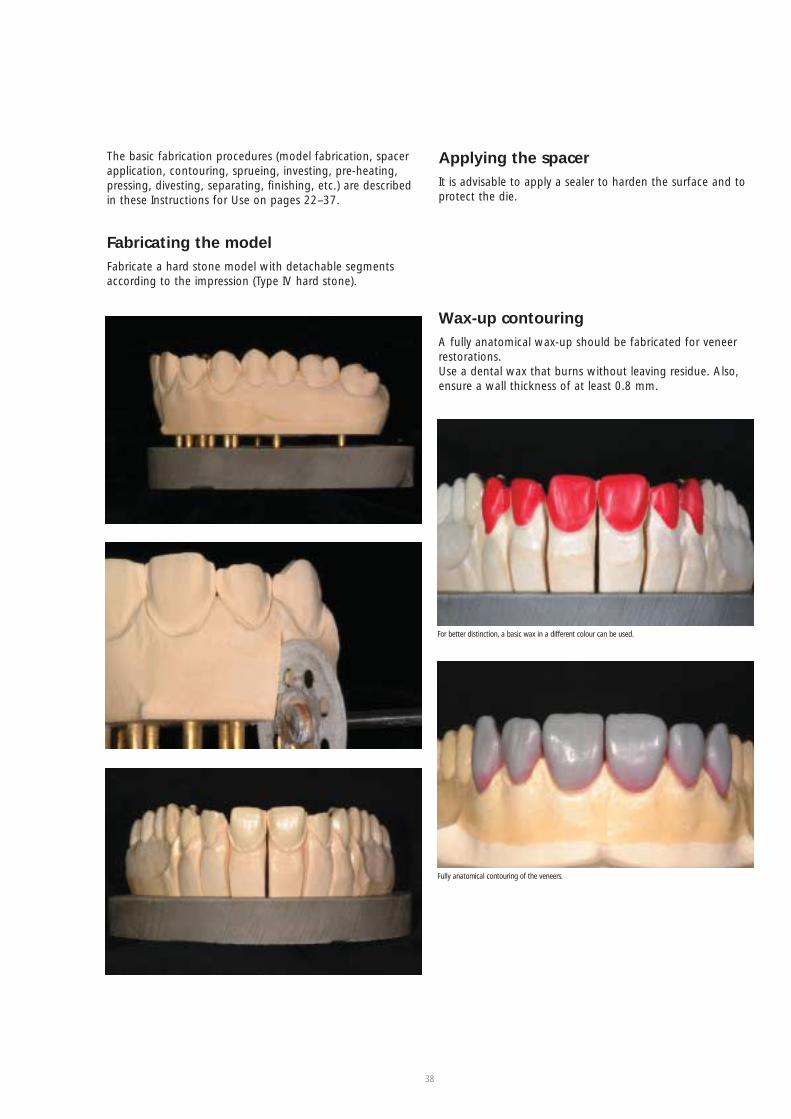
For better distinction, a basic wax in a different colour can be used.
Fully anatomical contouring of the veneers.
The basic fabrication procedures (model fabrication, spacerapplication, contouring, sprueing, investing, pre-heating,pressing, divesting, separating, finishing, etc.) are describedin these Instructions for Use on pages 22–37.
Fabricating the modelFabricate a hard stone model with detachable segmentsaccording to the impression (Type IV hard stone).
Wax-up contouringA fully anatomical wax-up should be fabricated for veneerrestorations. Use a dental wax that burns without leaving residue. Also,ensure a wall thickness of at least 0.8 mm.
Applying the spacerIt is advisable to apply a sealer to harden the surface and toprotect the die.
39
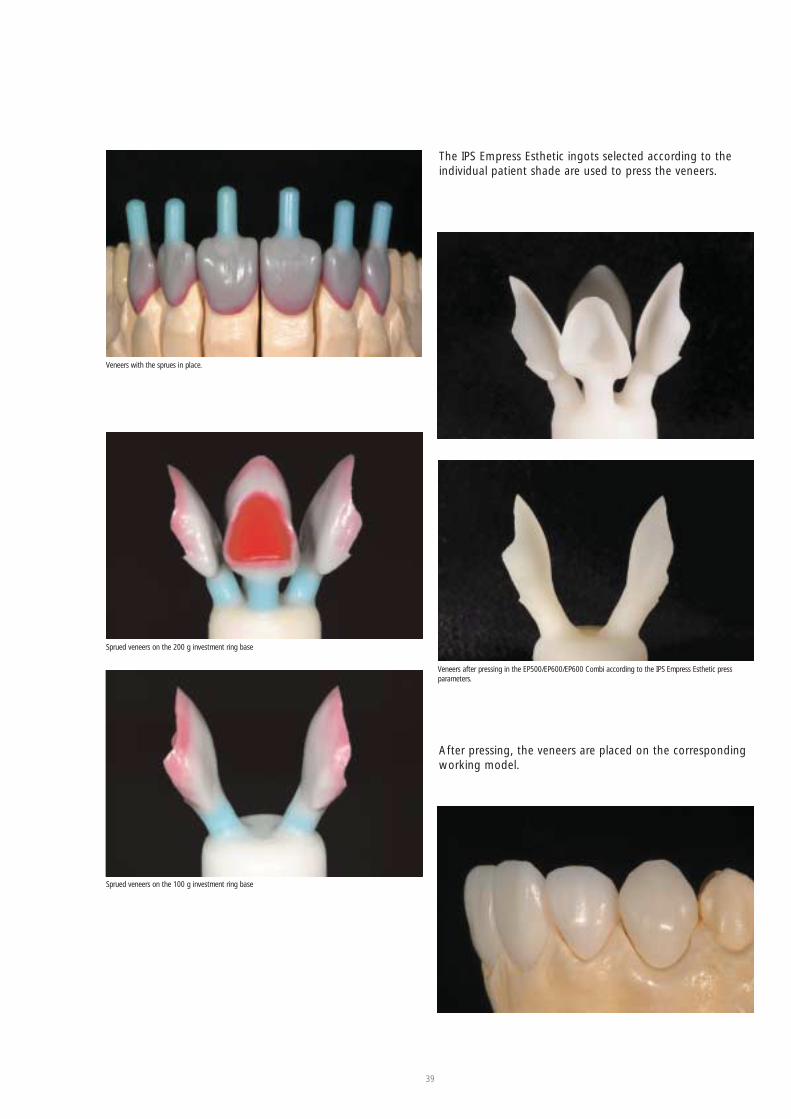
Sprued veneers on the 100 g investment ring base
Sprued veneers on the 200 g investment ring base
Veneers after pressing in the EP500/EP600/EP600 Combi according to the IPS Empress Esthetic press parameters.
The IPS Empress Esthetic ingots selected according to theindividual patient shade are used to press the veneers.
After pressing, the veneers are placed on the correspondingworking model.
Veneers with the sprues in place.
40
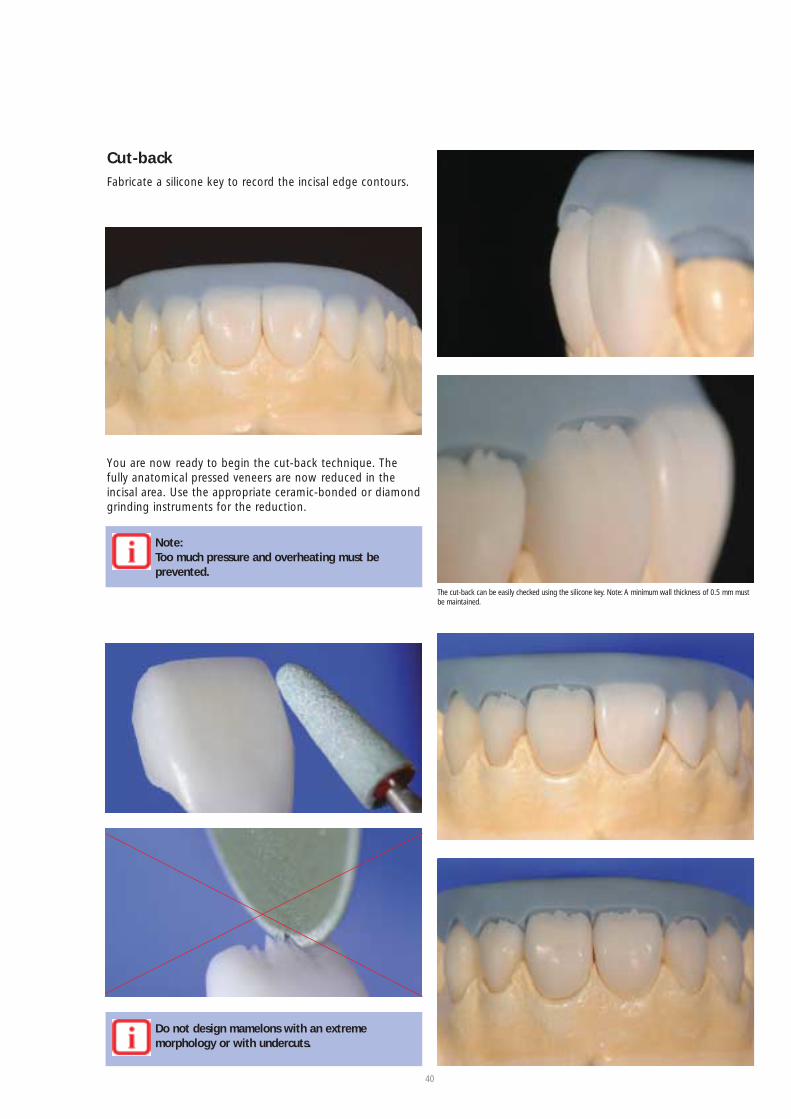
Cut-backFabricate a silicone key to record the incisal edge contours.
You are now ready to begin the cut-back technique. Thefully anatomical pressed veneers are now reduced in the incisal area. Use the appropriate ceramic-bonded or diamondgrinding instruments for the reduction.
Note:Too much pressure and overheating must be prevented.
Do not design mamelons with an extreme morphology or with undercuts.
The cut-back can be easily checked using the silicone key. Note: A minimum wall thickness of 0.5 mm mustbe maintained.

Control die for optimum shade adaptationFabricate a shade control die using IPS Empress die materialaccording to the shade information provided by the dentist(shade selection).
Cleaning the restorationCarefully blast the outer surface of the ceramic object usingIvoclar Vivadent Special Jet Medium Al2O3 (Type 100) at max.0.5 bar pressure (Caution: abrasive) and thoroughly cleanwith steam before continuing.
Before further processing, the restoration must befree of dirt and grease.
41
Coat the contact surface of the ceramic object with IPS Empress Die Material Isolating Liquid. Subsequently,the corresponding die material can be adapted to the restoration and polymerized with a suitable curinglight.
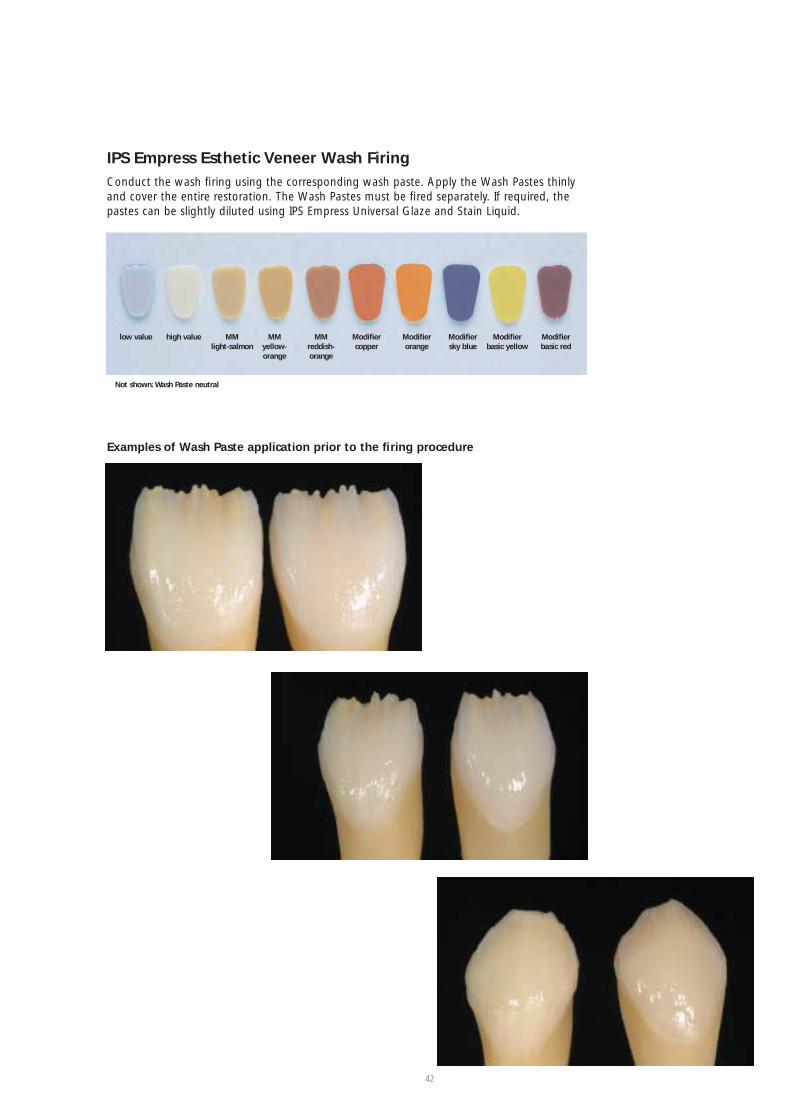
IPS Empress Esthetic Veneer Wash FiringConduct the wash firing using the corresponding wash paste. Apply the Wash Pastes thinlyand cover the entire restoration. The Wash Pastes must be fired separately. If required, thepastes can be slightly diluted using IPS Empress Universal Glaze and Stain Liquid.
low value high value MM light-salmon
MM yellow-orange
MM reddish-orange
Modifier copper
Modifier orange
Modifier sky blue
Modifier basic yellow
Modifier basic red
42
Not shown: Wash Paste neutral
Examples of Wash Paste application prior to the firing procedure
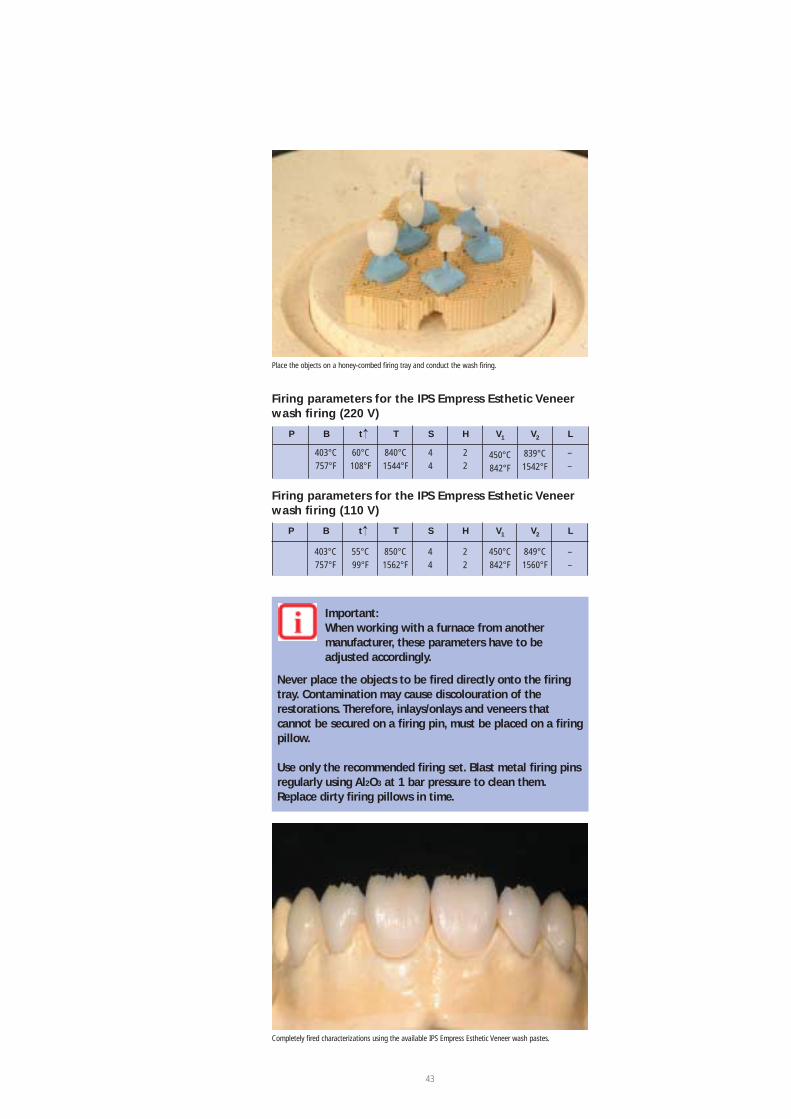
Firing parameters for the IPS Empress Esthetic Veneerwash firing (220 V)
Firing parameters for the IPS Empress Esthetic Veneerwash firing (110 V)
Place the objects on a honey-combed firing tray and conduct the wash firing.
Completely fired characterizations using the available IPS Empress Esthetic Veneer wash pastes.
43
Important:When working with a furnace from another manufacturer, these parameters have to be adjusted accordingly.
Never place the objects to be fired directly onto the firingtray. Contamination may cause discolouration of the restorations. Therefore, inlays/onlays and veneers that cannot be secured on a firing pin, must be placed on a firingpillow.
Use only the recommended firing set. Blast metal firing pinsregularly using Al2O3 at 1 bar pressure to clean them.Replace dirty firing pillows in time.
P B
403°C757°F
t
60°C108°F
T
840°C1544°F
S
44
H
22
V1
450°C842°F
V2
839°C1542°F
L
––
→
P B
403°C757°F
t
55°C99°F
T
850°C1562°F
S
44
H
22
V1
450°C842°F
V2
849°C1560°F
L
––
→
Apply the appropriate IPS Empress Esthetic Veneer incisal materials.
After wash firing.
If required, the IPS Empress Esthetic Veneer build-up liquid may be diluted withdistilled water.
IPS Empress Esthetic Veneer Incisal FiringWith the opalescent IPS Empress Esthetic Veneer ceramic materials, the veneering techniquehas come yet another step closer to nature. Minor corrections, such as marginal edges, canbe efficiently and quickly layered with the new materials. The materials are mixed using the IPS Empress Esthetic Veneer Build-Up Liquid.
Incisal Opal
HT high-translucent
Incisal Opal
MT medium-translucent
Incisal Opal LT low-
translucent
TranspaBlue
TranspaNeutral
IncisalEdge
IncisalWhite
IncisalGrey
IncisalOrange
IncisalYellow
IncisalOrange-
pink
ChromaModifier110/A1
ChromaModifier210/A3
Brightener
44

Firing parameters for the IPS Empress Esthetic Veneer1st and 2nd incisal firing (220 V)
Firing parameters for the IPS Empress Esthetic Veneer1st and 2nd incisal firing (110 V)
When working with a furnace from another manufacturer, these parameters have to be adjusted accordingly.The same firing program can be used for any subsequent firing procedures.
45
The layered structure should be slightly bigger than the final shape.
After incisal firing.
P B
403°C757°F
t
60°C108°F
T
830°C1526°F
S
44
H
22
V1
450°C842°F
V2
829°C1524°F
L
––
→
P B
403°C757°F
t
55°C99°F
T
840°C1544°F
S
44
H
22
V1
450°C842°F
V2
839°C1542°F
L
––
→
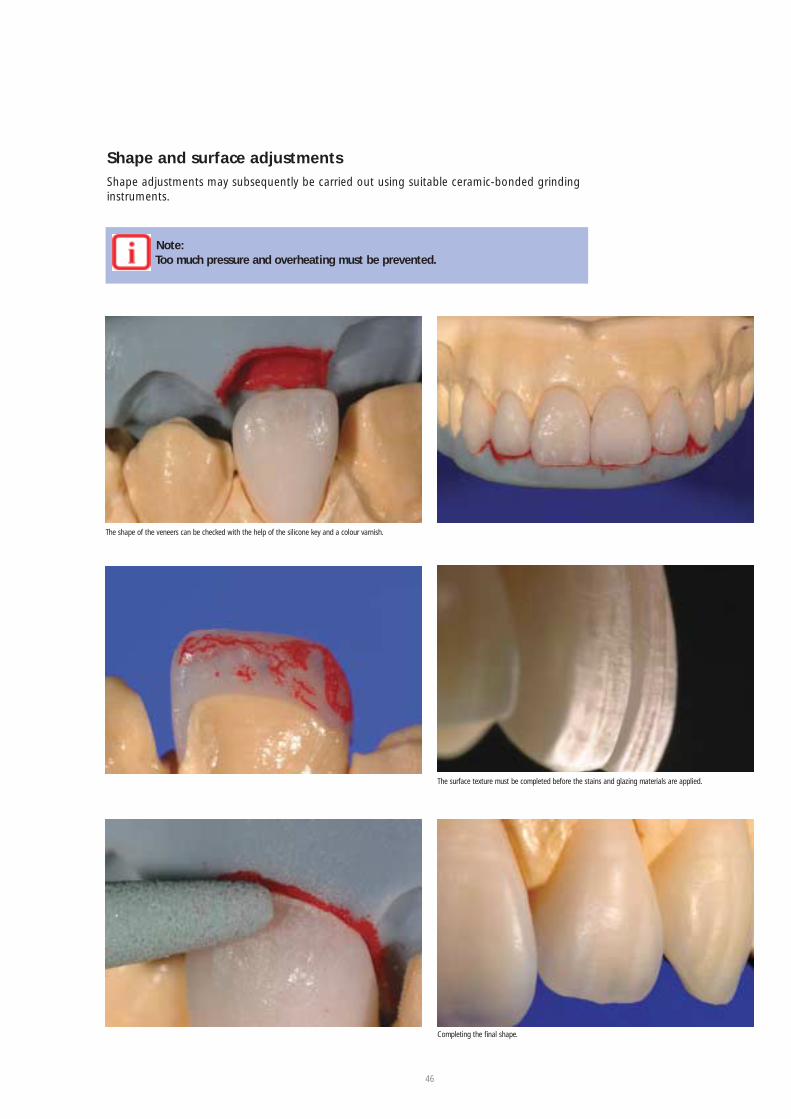
Note:Too much pressure and overheating must be prevented.
Shape and surface adjustmentsShape adjustments may subsequently be carried out using suitable ceramic-bonded grindinginstruments.
46
The shape of the veneers can be checked with the help of the silicone key and a colour varnish.
The surface texture must be completed before the stains and glazing materials are applied.
Completing the final shape.
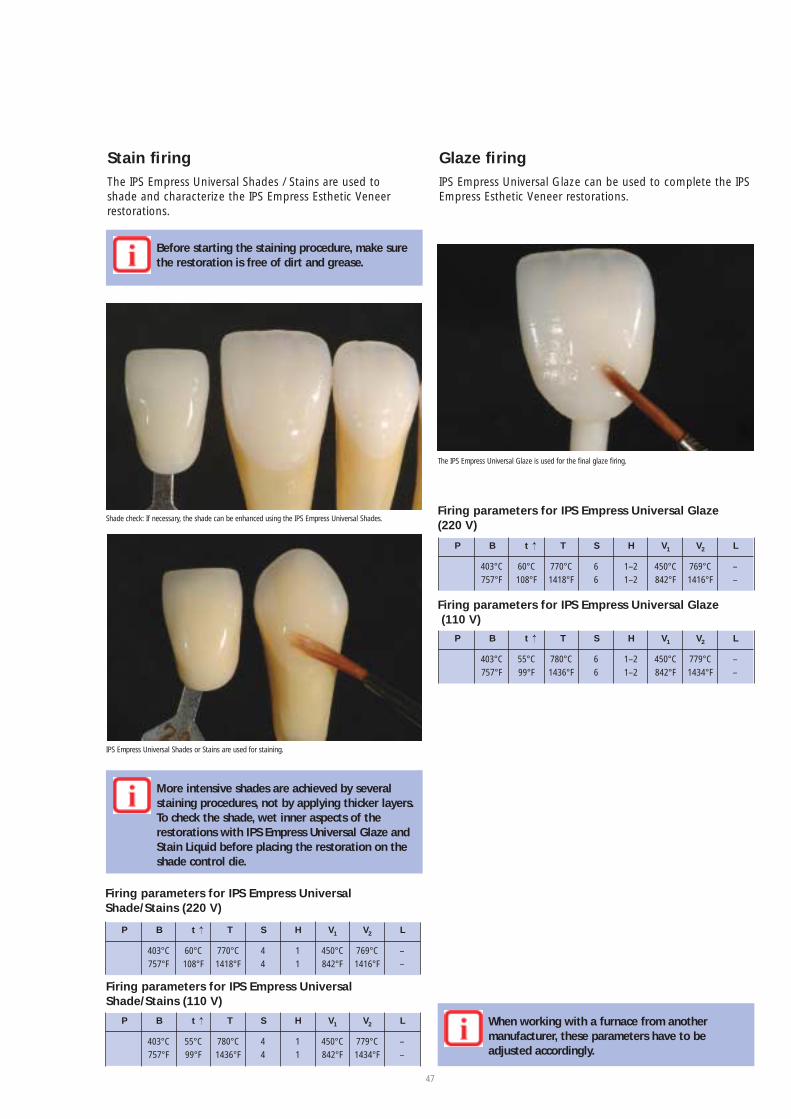
Before starting the staining procedure, make surethe restoration is free of dirt and grease.
More intensive shades are achieved by several staining procedures, not by applying thicker layers.To check the shade, wet inner aspects of the restorations with IPS Empress Universal Glaze andStain Liquid before placing the restoration on theshade control die.
Stain firing The IPS Empress Universal Shades / Stains are used to shade and characterize the IPS Empress Esthetic Veneerrestorations.
When working with a furnace from another manufacturer, these parameters have to be adjusted accordingly.
47
Glaze firing IPS Empress Universal Glaze can be used to complete the IPSEmpress Esthetic Veneer restorations.
Shade check: If necessary, the shade can be enhanced using the IPS Empress Universal Shades.
The IPS Empress Universal Glaze is used for the final glaze firing.
IPS Empress Universal Shades or Stains are used for staining.
Firing parameters for IPS Empress Universal Glaze (220 V)
Firing parameters for IPS Empress Universal Glaze (110 V)
P B
403°C757°F
t
60°C108°F
T
770°C1418°F
S
66
H
1–21–2
V1
450°C842°F
V2
769°C1416°F
L
––
→
P B
403°C757°F
t
55°C99°F
T
780°C1436°F
S
66
H
1–21–2
V1
450°C842°F
V2
779°C1434°F
L
––
→
Firing parameters for IPS Empress UniversalShade/Stains (220 V)
Firing parameters for IPS Empress UniversalShade/Stains (110 V)
P B
403°C757°F
t
60°C108°F
T
770°C1418°F
S
44
H
11
V1
450°C842°F
V2
769°C1416°F
L
––
→
P B
403°C757°F
t
55°C99°F
T
780°C1436°F
S
44
H
11
V1
450°C842°F
V2
779°C1434°F
L
––
→
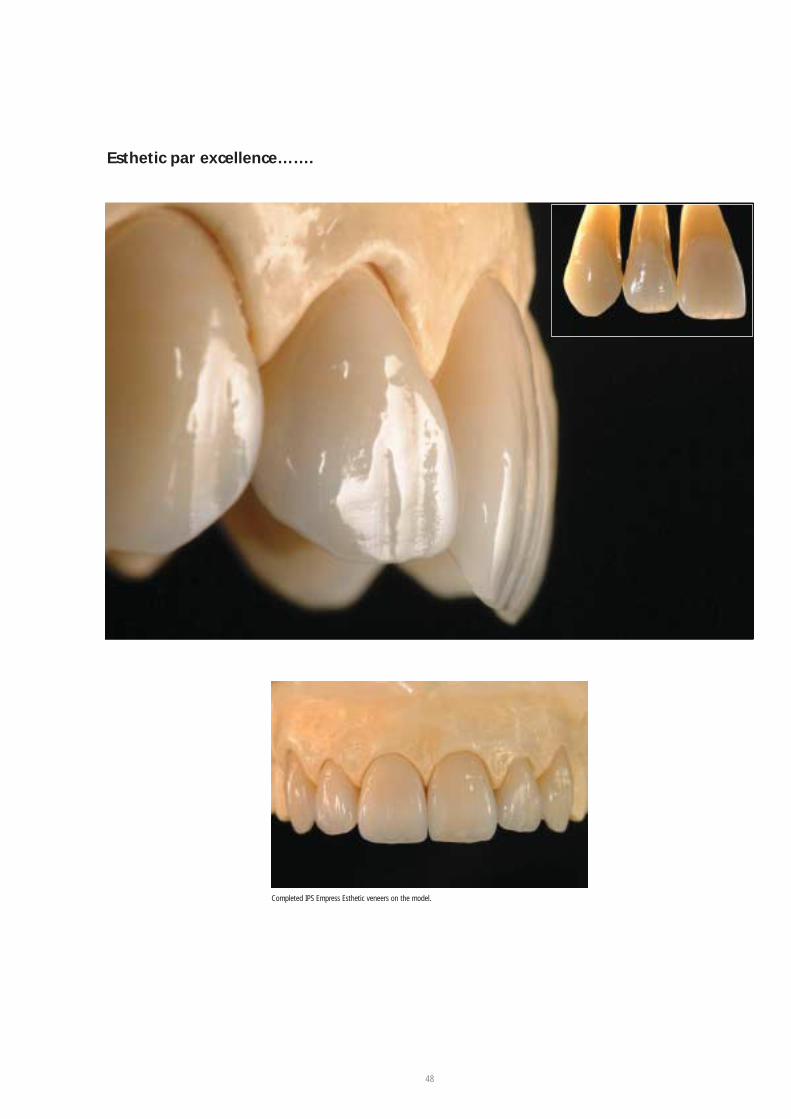
Esthetic par excellence…….
48
Completed IPS Empress Esthetic veneers on the model.
Observe the note accompanying the IPS Ceramic EtchingGel.
Etch IPS Empress Esthetic technique restorationsfor 60 seconds using IPS Ceramic Etching Gel.
EtchingEtching the internal surfaces is necessary for all IPS Empressrestorations. This procedure increases the shear bondstrength between the IPS Empress material and the composite cement. The fracture resistance of the restorationis also increased.
Cementation
Adhesive cementation is required for restorations fabricatedin the IPS Empress Esthetic technique.
Subsequent adjustments
Firing parameters for IPS Empress Add-On 770 °C/1418 °F (220 V)
Firing parameters for IPS Empress Add-On 770 °C/14818 °F (110 V)
Processing– The restoration must be free of dirt and grease prior to
adjustment. Carefully blast the areas to be adjusted withIvoclar Vivadent Special Jet Medium Al2O3 (Type 100) atmax. 0.5 bar pressure. Then, thoroughly clean the restoration with steam.
– Mix IPS Empress Add-On 770 °C / 1418 °F with IPSEmpress Build-Up liquid to a workable consistency. Makesure that the add-on material and liquid are evenly mixedso that an optimum firing result can be achieved.
– Carefully apply the mixed add-on material on the reduced,blasted, and cleaned areas using a brush. Slightly blot drywith an absorbent cloth.
– The adjusted restoration is then placed on a firing tray andonly placed in the ceramic furnace once the furnace headis completely open.
When working with a furnace from another manufacturer, these parameters have to be adjusted accordingly. The basic rule is: the longerthe holding time, the higher the lustre will be.
– Once the firing program has been completed and the buzzer has sounded, place the firing tray on the coolingtray using the firing tongs and allow the restoration tocool to room temperature.
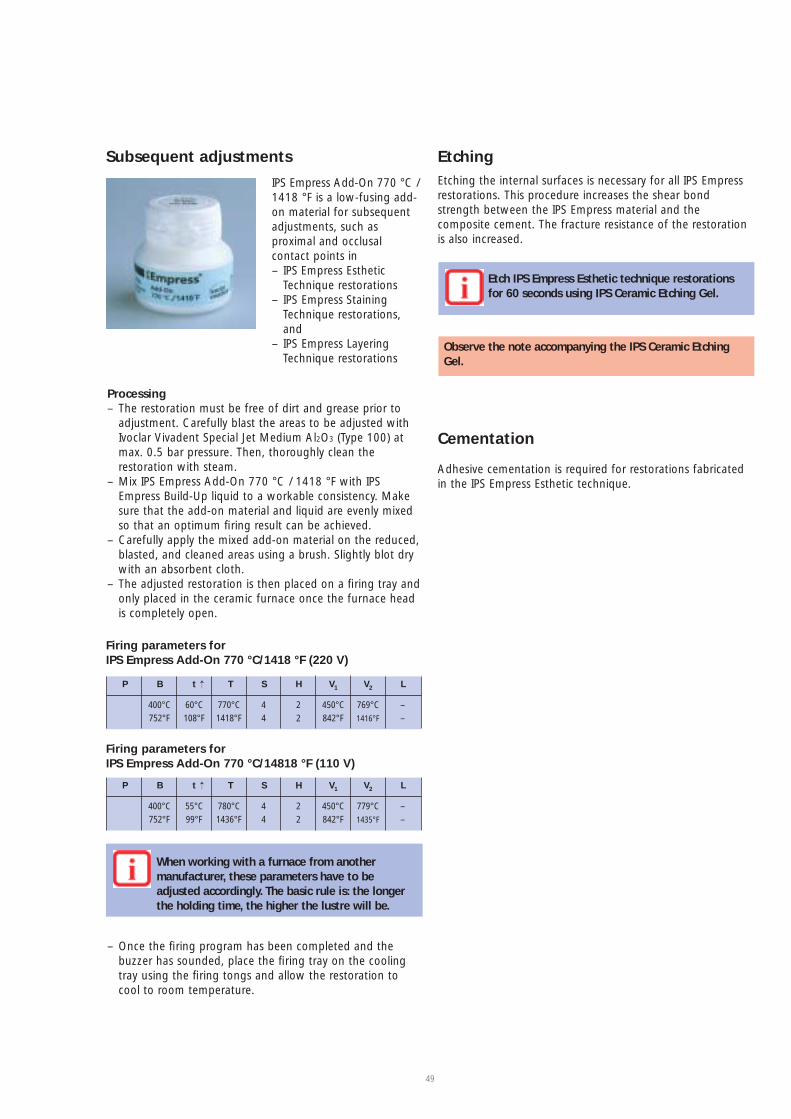
IPS Empress Add-On 770 °C /1418 °F is a low-fusing add-on material for subsequentadjustments, such as proximal and occlusalcontact points in – IPS Empress Esthetic
Technique restorations– IPS Empress Staining
Technique restorations,and
– IPS Empress Layering Technique restorations
49
P B
400°C752°F
t
60°C108°F
T
770°C1418°F
S
44
H
22
V1
450°C842°F
V2
769°C1416°F
L
––
→
P B
400°C752°F
t
55°C99°F
T
780°C1436°F
S
44
H
22
V1
450°C842°F
V2
779°C1435°F
L
––
→

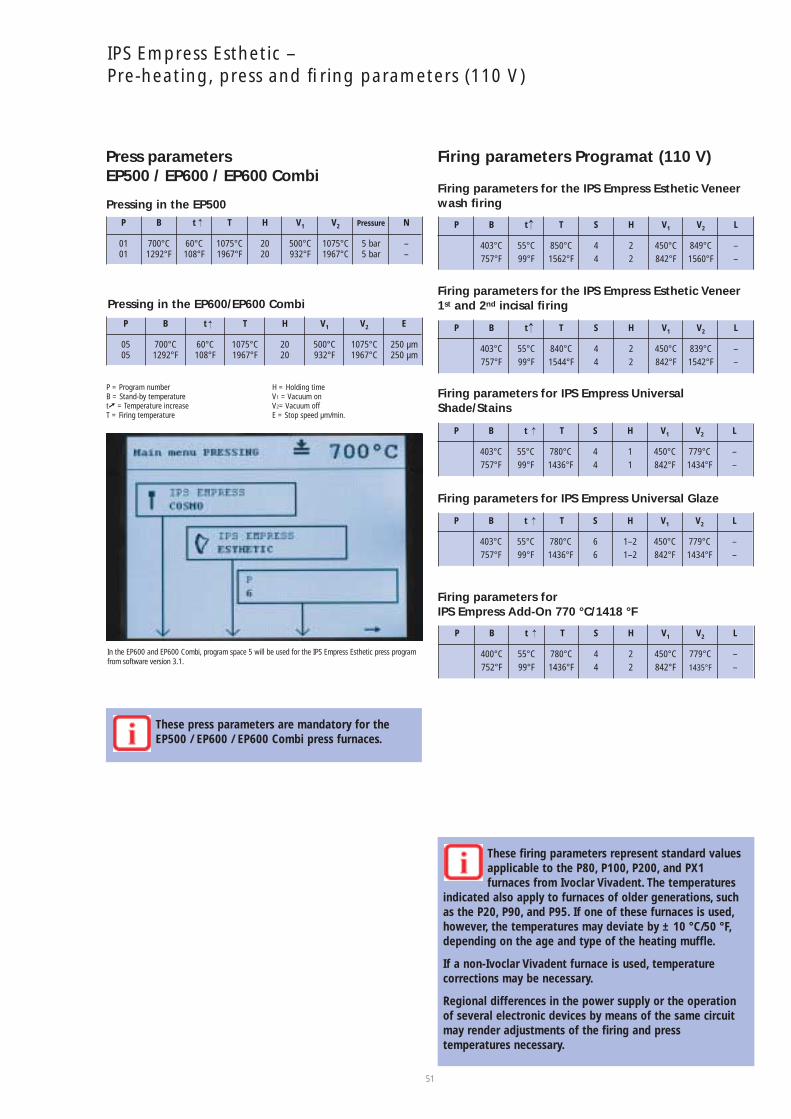
Firing parameters Programat (220 V)
Firing parameters for the IPS Empress Esthetic Veneerwash firing
Firing parameters for the IPS Empress Esthetic Veneer1st and 2nd incisal firing
Firing parameters for IPS Empress UniversalShade/Stains
Press parameters EP500 / EP600 / EP600 Combi
These firing parameters represent standard valuesapplicable to the P80, P100, P200, and PX1 furnaces from Ivoclar Vivadent. The temperatures
indicated also apply to furnaces of older generations, suchas the P20, P90, and P95. If one of these furnaces is used,however, the temperatures may deviate by ± 10 °C/50 °F,depending on the age and type of the heating muffle.
If a non-Ivoclar Vivadent furnace is used, temperature corrections may be necessary.
Regional differences in the power supply or the operationof several electronic devices by means of the same circuitmay render adjustments of the firing and press temperatures necessary.
These press parameters are mandatory for theEP500 / EP600 / EP600 Combi press furnaces.
IPS Empress Esthetic – Pre-heating, press and firing parameters (220 V)
In the EP600 and EP600 Combi, program space 5 will be used for the IPS Empress Esthetic press programfrom software version 3.1.
Firing parameters for IPS Empress Add-On 770 °C/1418 °F
50
Firing parameters for IPS Empress Universal Glaze
Pressing in the EP500 P
0101
B
700°C1292°F
t
60°C108°F
T
1075°C1967°F
H
2020
V1
500°C932°F
V2
1075°C1967°C
Pressure
5 bar5 bar
N
––
→
P
0505
B
700°C1292°F
t
60°C108°F
T
1075°C1967°F
H
2020
V1
500°C932°F
V2
1075°C1967°C
E
250 µm250 µm
→
Pressing in the EP600/EP600 Combi
P = Program numberB = Stand-by temperature t➚ = Temperature increaseT = Firing temperature
H = Holding timeV1 = Vacuum onV2= Vacuum off E = Stop speed µm/min.
P B
403°C757°F
t
60°C108°F
T
770°C1418°F
S
44
H
11
V1
450°C842°F
V2
769°C1416°F
L
––
→P B
403°C757°F
t
60°C108°F
T
770°C1418°F
S
66
H
1–21–2
V1
450°C842°F
V2
769°C1416°F
L
––
→
P B
400°C752°F
t
60°C108°F
T
770°C1418°F
S
44
H
22
V1
450°C842°F
V2
769°C1416°F
L
––
→
P B
403°C757°F
t
60°C108°F
T
840°C1544°F
S
44
H
22
V1
450°C842°F
V2
839°C1542°F
L
––
→
P B
403°C757°F
t
60°C108°F
T
830°C1526°F
S
44
H
22
V1
450°C842°F
V2
829°C1524°F
L
––
→
Firing parameters Programat (110 V)
Firing parameters for the IPS Empress Esthetic Veneerwash firing
Firing parameters for the IPS Empress Esthetic Veneer1st and 2nd incisal firing
Firing parameters for IPS Empress UniversalShade/Stains
51
Press parameters EP500 / EP600 / EP600 Combi
IPS Empress Esthetic – Pre-heating, press and firing parameters (110 V)
These press parameters are mandatory for theEP500 / EP600 / EP600 Combi press furnaces.
Firing parameters for IPS Empress Add-On 770 °C/1418 °F
In the EP600 and EP600 Combi, program space 5 will be used for the IPS Empress Esthetic press programfrom software version 3.1.
Firing parameters for IPS Empress Universal Glaze
Pressing in the EP500 P
0101
B
700°C1292°F
t
60°C108°F
T
1075°C1967°F
H
2020
V1
500°C932°F
V2
1075°C1967°C
Pressure
5 bar5 bar
N
––
→
P
0505
B
700°C1292°F
t
60°C108°F
T
1075°C1967°F
H
2020
V1
500°C932°F
V2
1075°C1967°C
E
250 µm250 µm
→
Pressing in the EP600/EP600 Combi
P = Program numberB = Stand-by temperature t➚ = Temperature increaseT = Firing temperature
H = Holding timeV1 = Vacuum onV2= Vacuum off E = Stop speed µm/min.
P B
403°C757°F
t
55°C99°F
T
780°C1436°F
S
44
H
11
V1
450°C842°F
V2
779°C1434°F
L
––
→P B
403°C757°F
t
55°C99°F
T
780°C1436°F
S
66
H
1–21–2
V1
450°C842°F
V2
779°C1434°F
L
––
→
P B
400°C752°F
t
55°C99°F
T
780°C1436°F
S
44
H
22
V1
450°C842°F
V2
779°C1435°F
L
––
→
P B
403°C757°F
t
55°C99°F
T
850°C1562°F
S
44
H
22
V1
450°C842°F
V2
849°C1560°F
L
––
→
P B
403°C757°F
t
55°C99°F
T
840°C1544°F
S
44
H
22
V1
450°C842°F
V2
839°C1542°F
L
––
→
These firing parameters represent standard valuesapplicable to the P80, P100, P200, and PX1 furnaces from Ivoclar Vivadent. The temperatures
indicated also apply to furnaces of older generations, suchas the P20, P90, and P95. If one of these furnaces is used,however, the temperatures may deviate by ± 10 °C/50 °F,depending on the age and type of the heating muffle.
If a non-Ivoclar Vivadent furnace is used, temperature corrections may be necessary.
Regional differences in the power supply or the operationof several electronic devices by means of the same circuitmay render adjustments of the firing and press temperatures necessary.
52
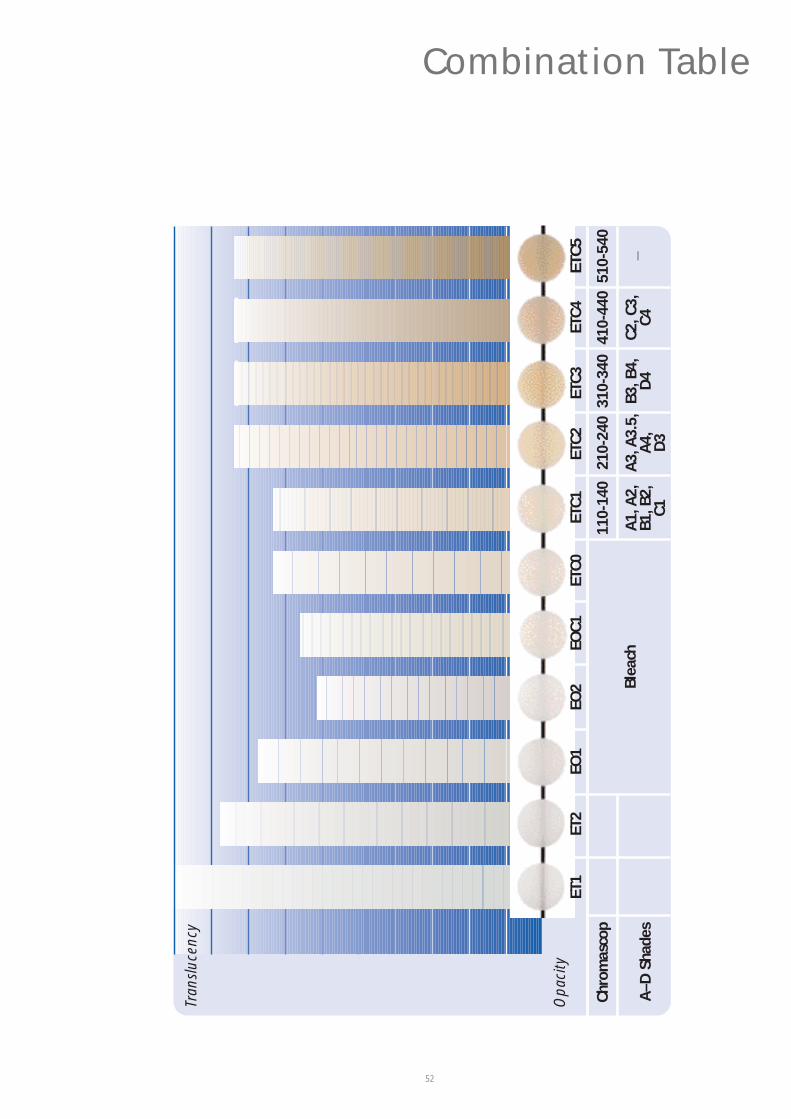
Combination Table
ET1
Tran
sluc
ency
Opa
city
ET2
EO1
EO2
EOC1
Chro
mas
cop
A–D
Sha
des
Blea
ch
110-
140
A1,
A2,
B1,B
2,C1
210-
240
A3,
A3.
5,A
4, D3
310-
340
B3,B
4,D
4
410-
440
C2,C
3,C4
ETC0
ETC1
ETC2
ETC3
ETC4
ETC
5
510-
540
_
53
Empress EstheticIPS
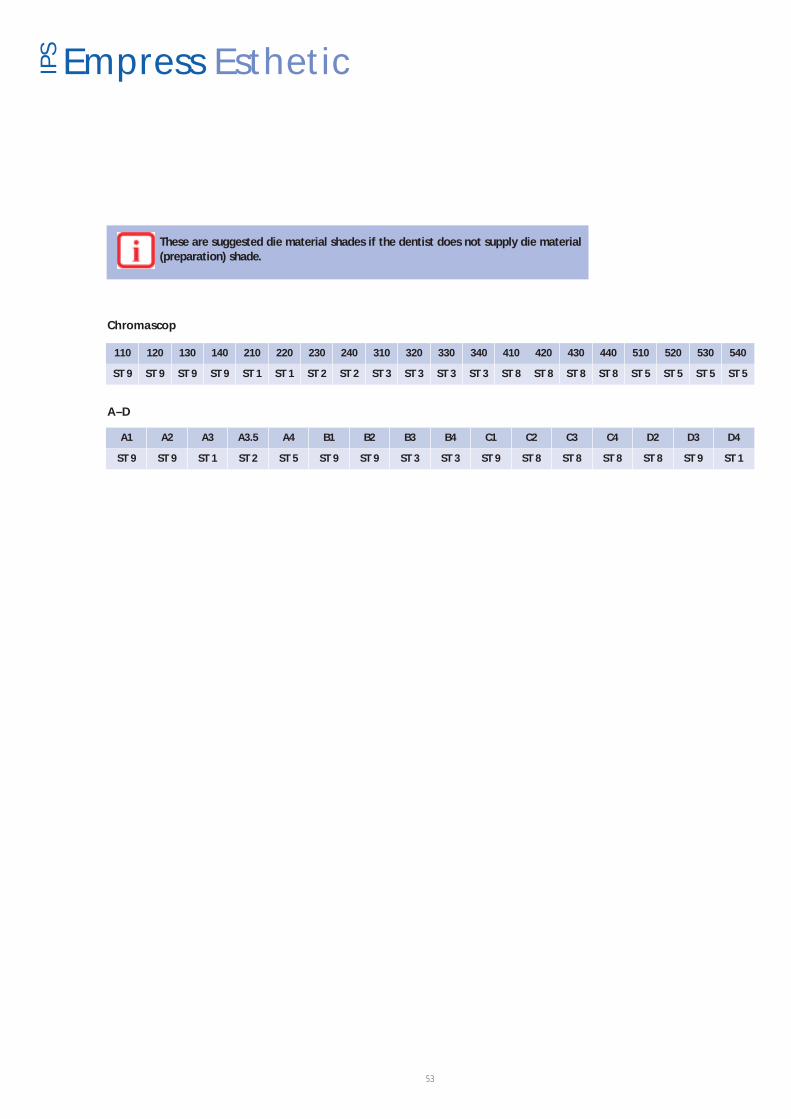
These are suggested die material shades if the dentist does not supply die material(preparation) shade.
110 120 130 140 210 220 230 240 310 320 330 340 410 420 430 440 510 520 530 540
ST 9 ST 9 ST 9 ST 9 ST 1 ST 1 ST 2 ST 2 ST 3 ST 3 ST 3 ST 3 ST 8 ST 8 ST 8 ST 8 ST 5 ST 5 ST 5 ST 5
A1 A2 A3 A3.5 A4 B1 B2 B3 B4 C1 C2 C3 C4 D2 D3 D4
ST 9 ST 9 ST 1 ST 2 ST 5 ST 9 ST 9 ST 3 ST 3 ST 9 ST 8 ST 8 ST 8 ST 8 ST 9 ST 1
Chromascop
A–D
54
Empress® EstheticIPS
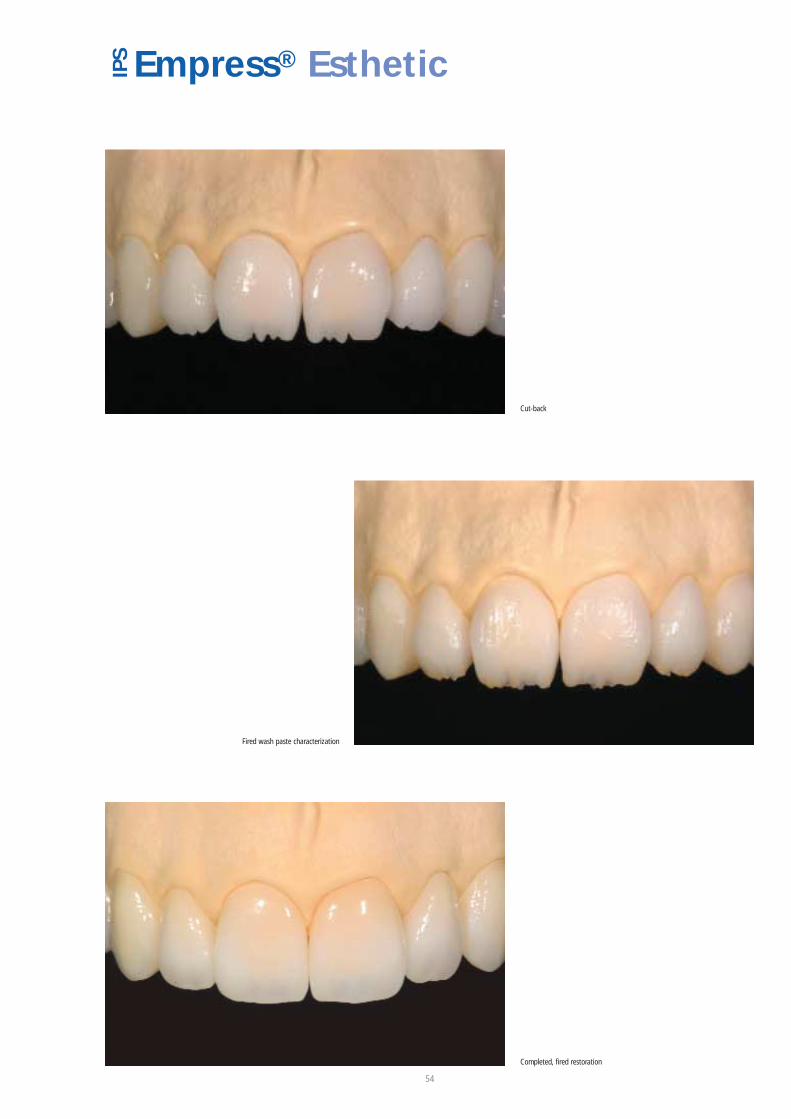
Cut-back
Fired wash paste characterization
Completed, fired restoration
55
Empress® EstheticIPS
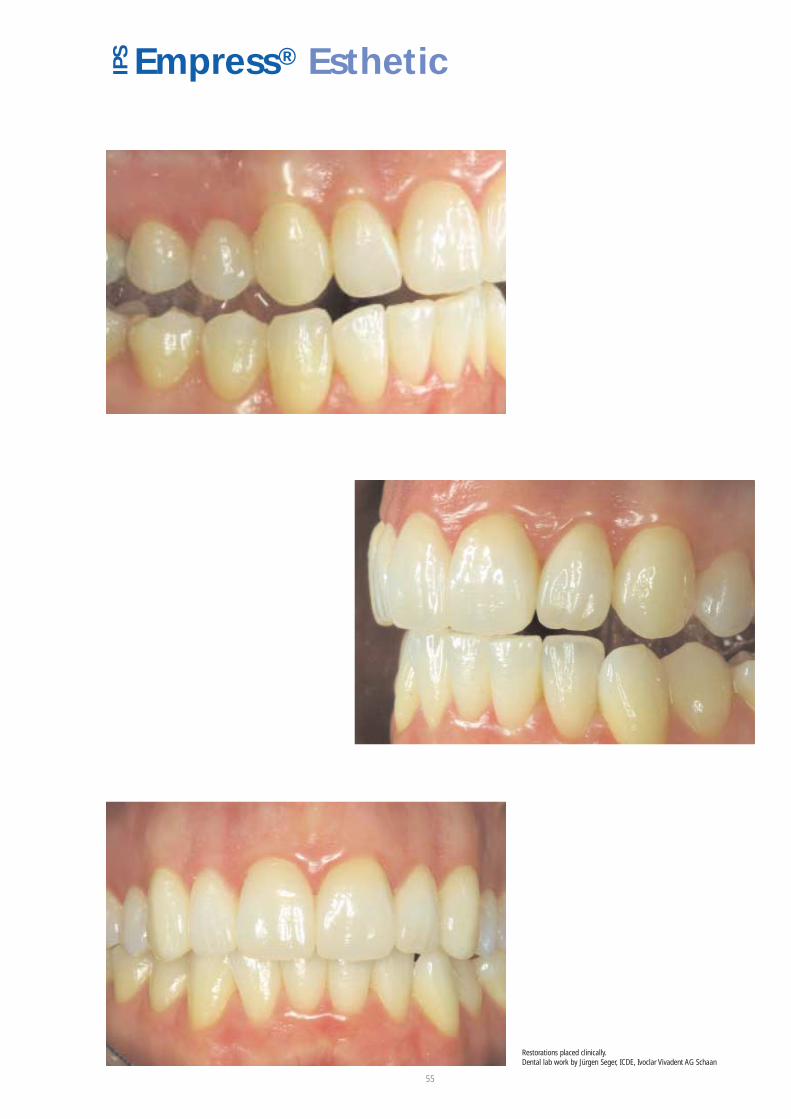
Restorations placed clinically.Dental lab work by Jürgen Seger, ICDE, Ivoclar Vivadent AG Schaan
Ivoclar Vivadent AGBendererstrasse 2FL-9494 SchaanLiechtensteinTel. +423 235 35 35Fax +423 235 33 60www.ivoclarvivadent.com
Ivoclar Vivadent Pty. Ltd.1 – 5 Overseas DriveP.O. Box 367Noble Park, Vic. 3174AustraliaTel. +61 3 979 595 99Fax +61 3 979 596 45
Ivoclar Vivadent Ltda.Rua Maestro João Gomes deAraújo 50; Salas 92/94Sao Paulo, CEP 02332-020Brasil Tel. +55 11 69 59 89 77 Fax +55 11 69 71 17 50
Ivoclar Vivadent Inc.2785 Skymark Avenue, Unit 1MississaugaOntario L4W 4Y3CanadaTel. +1 905 238 5700Fax +1 905 238 5711
Ivoclar Vivadent MarketingLtd.Calle 134 No. 13-83, Of. 520BogotáColombiaTel. +57 1 627 33 99Fax +57 1 633 16 63
Ivoclar Vivadent SASB.P. 118F-74410 Saint-JoriozFranceTel. +33 450 88 64 00Fax +33 450 68 91 52
Ivoclar Vivadent GmbH Dr. Adolf-Schneider-Str. 2D-73479 Ellwangen, JagstGermanyTel. +49 (0) 79 61 / 8 89-0Fax +49 (0) 79 61 / 63 26
Ivoclar Vivadent UK LimitedMeridian SouthLeicesterLE19 1WYGreat BritainTel. +44 116 265 40 55Fax +44 116 265 40 57
Ivoclar Vivadent s.r.l.Via dell’Industria 16I-39025 Naturno (BZ)ItalyTel. +39 0473 67 01 11Fax +39 0473 66 77 80
Ivoclar Vivadent S.A. de C.V.Av. Mazatlán No. 61, Piso 2Col. Condesa06170 México, D.F.MexicoTel. +52 (55) 55 53 00 38Fax +52 (55) 55 53 14 26
Ivoclar Vivadent Ltd12 Omega St, AlbanyPO Box 5243 Wellesley StAuckland, New ZealandTel. +64 9 914 9999Fax +64 9 914 9990
Ivoclar Vivadent Polska Sp.z.o.o.ul. Jana Pawla II 78PL-01-501 WarszawaPolandTel. +48 22 635 54 96Fax +48 22 635 54 69
Ivoclar Vivadent S.A.c/Emilio Muñoz, 15 Esquina c/AlbarracínE-28037 MadridSpainTel. + 34 91 375 78 20Fax + 34 91 375 78 38
Ivoclar Vivadent ABDalvägen 16S-169 56 SolnaSwedenTel. +46 8 514 93 930Fax +46 8 514 93 940
Ivoclar Vivadent, Inc.175 Pineview DriveAmherst, N.Y. 14228USATel. +1 800 533 6825Fax +1 716 691 2285
Ivoclar Vivadent – worldwide
Date information prepared: 04/2004
These materials have been developed solely for usein dentistry. Processing should be carried out strictlyaccording to the Instructions for Use. Liability cannotbe accepted for damages resulting from failure toobserve the Instructions or the stipulated are ofapplication. The user is responsible for testing thematerial for its suitability for any purpose not explicitly stated in the Instructions. Descriptions anddata constitute no warranty of attributes and arenot binding.
Printed in Liechtenstein © Ivoclar Vivadent AG, Schaan / Liechtensteinxxx/0404/eUSA/2/BVD
For dental use only.Caution: U.S. Federal Law restricts this device tosale by or on the order of a licensed dentist.


