67
Emulator Troubleshooting User Guide BH-Troubleshooting-UG-03 February 2009

Emulator Troubleshooting User Guide
BH-Troubleshooting-UG-03 February 2009
IMPORTANT INFORMATION © 2009 EWA Technologies, Inc. All rights reserved. Reproduction, adaptation, or translation without prior written permission is prohibited, except as allowed under the copyright laws. EWA Technologies Document: BH-Troubleshooting-UG-03
Warranty - this manual The information contained in this document is subject to change without notice. EWA makes no warranty of any kind with regard to this material, including, but not limited to, the implied warranties of merchantability and fitness for a particular purpose. EWA shall not be liable for errors contained herein or for incidental or consequential damages in connection with the furnishing, performance, or use of this material.
About This Manual This document represents the troubleshooting guide for Blackhawk™ products. Please visit the Blackhawk website from time to time as this document will be periodically updated. This guide contains some TIP paragraphs to help in diagnosis of a problem that may be preventing proper operation of a Blackhawk product. These paragraphs are shaded as in the following example. Please read each of these areas of text carefully.
This is an example of a paragraph with important TIP information.
Related Documents
• Texas Instruments Code Composer User's Guide (SPRU296 - Updated: 12/30/1998)
• Texas Instruments Code Composer Studio User's Guide (SPRU328B - Updated: 03/28/2000)
• To get the latest documentation from TI, click: Get the latest DSP manuals from TI.
• Additional TI Documentation which are referred with full links within this guide.
Trademarks BLACKHAWK is a trademark of EWA Technologies, Inc. All other marks are trademarks of their respective owners.
Emulator Troubleshooting Table of Contents
User Guide • iii
TABLE OF CONTENTS PREFACE ....................................................................................................................... 6
INTRODUCTION ............................................................................................................... 6 LIST OF EMULATORS ....................................................................................................... 7
STEP 1 - POWER ........................................................................................................... 8
STEP 2 - ENUMERATION ............................................................................................ 13
STEP 3 - BASIC SCAN ................................................................................................ 32
STEP 4 - LATEST DRIVERS AND UPDATES ............................................................. 37
STEP 5 – CCSETUP ..................................................................................................... 39
STEP 6 - RUNNING CCSTUDIO .................................................................................. 51
STEP 7 – WHERE DO I GO NEXT? ............................................................................. 56
ADDITIONAL RESOURCES ........................................................................................ 57 LAN EMULATOR UTILITIES ............................................................................................ 57
BHEthCfg.exe ........................................................................................................ 57 Lan560Diags .......................................................................................................... 57 NOTES ................................................................................................................... 57 BH560Eth.exe ........................................................................................................ 58
CODE COMPOSER STUDIO TIPS .................................................................................... 59 Installation .............................................................................................................. 59 Modifying CCStudio Imports .................................................................................. 60 CCStudio Connect Tips .......................................................................................... 60 Error Reference ...................................................................................................... 61
TARGET HARDWARE BASICS ......................................................................................... 62 DSK and EVMs ...................................................................................................... 62 Custom Boards ...................................................................................................... 62
JTAG CONNECTOR SIGNALS AND PIN-OUTS .................................................................. 64 CONTACTING BLACKHAWK SUPPORT ............................................................................. 66 SUBMITTING SUPPORT INFORMATION ............................................................................. 66 GENERAL CONTACT INFORMATION ................................................................................. 67
Table of Figures Emulator Troubleshooting
iv • User Guide
TABLE OF FIGURES Figure 1 USB-JTAG Power LED ................................................................................... 9 Figure 2 USB2000 Power LED ...................................................................................... 9 Figure 3 BH-USB-510 Power LED .............................................................................. 10 Figure 4 USB510L Power LED .................................................................................... 10 Figure 5 BH-USB-560bp Power LED .......................................................................... 11 Figure 6 BH-USB560m Power LEDs .......................................................................... 11 Figure 7 BH-LAN-560 Power LEDs ............................................................................. 12 Figure 8 BH-PCI-510 Device Manager Enumeration ................................................. 13 Figure 9 BH-PCI-560 Device Manager Enumeration ................................................. 14 Figure 10 BH-USB-1 Device Manager Enumeration ................................................. 14 Figure 11 USB 2.0 Device Manager Enumeration ..................................................... 14 Figure 12 BH-USB-2000 Device Manager Enumeration ........................................... 15 Figure 13 BH-USB-510 Device Manager Enumeration ............................................. 15 Figure 14 BH-USB-510L Device Manager Enumeration ........................................... 15 Figure 15 BH-USB-560 Device Manager Enumeration ............................................. 16 Figure 16 BH-USB-506bp Device Manager Enumeration ......................................... 16 Figure 17 BH-USB-560m Device Manager Enumeration .......................................... 16 Figure 18 BH-LAN-560 Device Manager Enumeration ............................................. 17 Figure 19 - Sample Texas Instruments Device Manager Entry ............................... 17 Figure 20 PCI510 Blackhawk control panel .............................................................. 18 Figure 21 PCI560 Blackhawk control panel .............................................................. 19 Figure 22 USB-JTAG Blackhawk control panel ........................................................ 20 Figure 23 USB2 Blackhawk control panel ................................................................. 21 Figure 24 USB2000 Blackhawk control panel ........................................................... 22 Figure 25 USB510 Blackhawk control panel ............................................................. 23 Figure 26 USB510L Blackhawk control panel ........................................................... 24 Figure 27 USB560 Blackhawk control panel ............................................................. 25 Figure 28 USB560bp Blackhawk control panel ........................................................ 26 Figure 29 USB560m Blackhawk control panel .......................................................... 27 Figure 30 LAN560 Blackhawk control panel ............................................................. 28 Figure 31 LAN 560 Configuration Utility - Status Tab .............................................. 30 Figure 32 LAN 560 Configuration Utility - Test Tab .................................................. 31 Figure 33 Processor Properties ................................................................................. 51 Figure 34 Single Processor Target ............................................................................ 52 Figure 35 Multiple Processor Target Figure 36 Multiple Core Target ................. 53 Figure 37 Multiple Unique Core Processors ............................................................. 54 Figure 38 - Obsolete LAN560 Diagnostic Utility ...................................................... 57 Figure 39 - LAN560 Ethernet Redirector ................................................................... 58
Emulator Troubleshooting Table of Contents
User Guide • v
LIST OF TABLES Table 1 Blackhawk Supported Emulators ................................................................... 7 Table 2 - CCS Error Table ........................................................................................... 61 Table 3 Standard 14 pin .............................................................................................. 64 Table 4 20 pin ARM multi-ice ...................................................................................... 64 Table 5 20 pin cTI (Compact TI) ................................................................................. 64 Table 6 60 pin XDS560 Trace ...................................................................................... 65
Preface Emulator Troubleshooting
6 • Introduction User Guide
Preface Introduction This guide provides information to quickly identify common emulator problems. This guide is designed to walk the user through a series of steps to help determine the issue, cause and possible solution. Using this guide can save you valuable time because it is designed to: (a) help resolve problem quickly by self diagnosis, and; (b) identify for Blackhawk support, what does and does not work properly to expedite diagnosis. If your product is not working properly after carefully following the instructions presented here, contact Blackhawk Support Team with the step that fails and appropriate error information.
Emulator Troubleshooting Preface
User Guide List of Emulators • 7
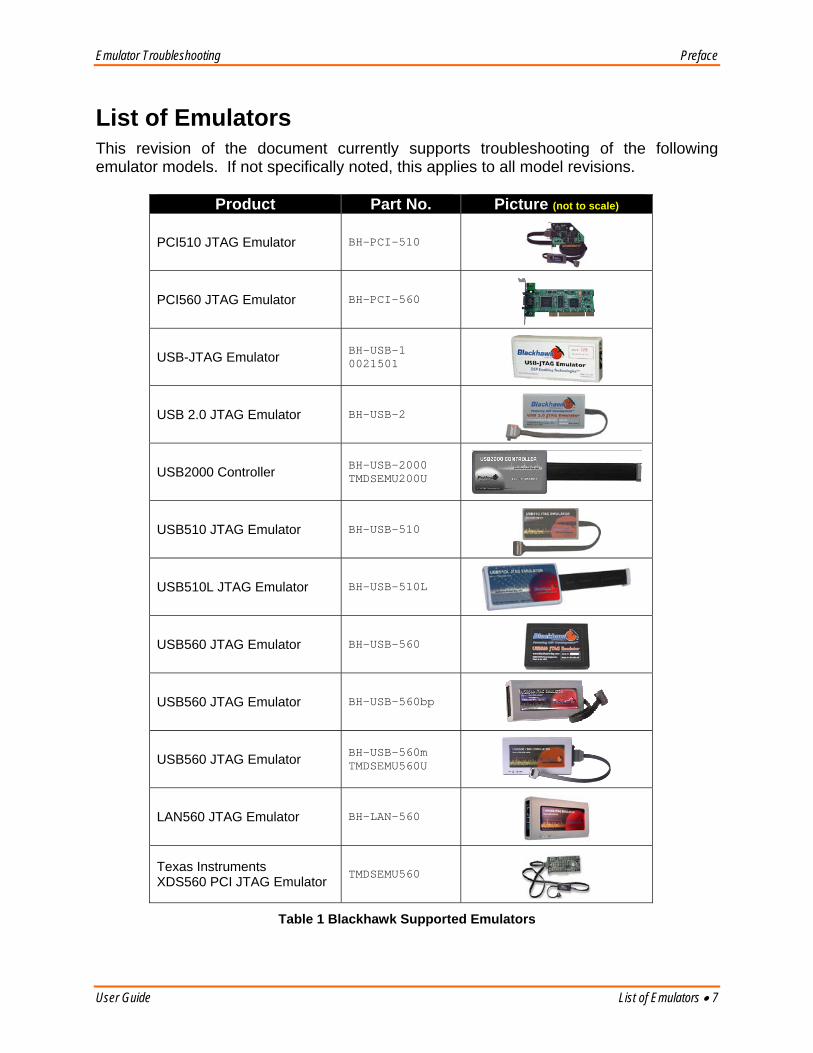
List of Emulators This revision of the document currently supports troubleshooting of the following emulator models. If not specifically noted, this applies to all model revisions.
Product Part No. Picture (not to scale)
PCI510 JTAG Emulator BH-PCI-510
PCI560 JTAG Emulator BH-PCI-560
USB-JTAG Emulator BH-USB-1 0021501
USB 2.0 JTAG Emulator BH-USB-2
USB2000 Controller BH-USB-2000 TMDSEMU200U
USB510 JTAG Emulator BH-USB-510
USB510L JTAG Emulator BH-USB-510L
USB560 JTAG Emulator BH-USB-560
USB560 JTAG Emulator BH-USB-560bp
USB560 JTAG Emulator BH-USB-560m TMDSEMU560U
LAN560 JTAG Emulator BH-LAN-560
Texas Instruments XDS560 PCI JTAG Emulator TMDSEMU560
Table 1 Blackhawk Supported Emulators
Step 1 - Power Emulator Troubleshooting
8 • List of Emulators User Guide
Step 1 - Power This step helps determine if your emulator is powered and you do not have to squander any more time try other troubleshooting steps. Please locate your emulator and/or host interface below to identify if your emulator is powered. THIS SECTION SHOULD LIST ALL THE MODELS AND PICTURES OF THE LOCATION WHERE THE LED IS PRESENT AND NOT BY HOST INTERFACE.
FOR THOSE WITHOUT A POWER INDICATOR, DO NOT USE A PICTURE AND ADD A COMMENT TO GO TO NEXT STEP.
PCI510 JTAG Emulator (BH‐PCI‐510)
The XDS510-class PCI cards do not have a power LED indicator and assume that if the card is properly installed and the PC is powered, the card is powered. Notes:
• If your PC is not powering up then follow steps to contact our support team to further assist you.
• A line with a “Communication Controller” will be shown in the BIOS POST screen under PCI Devices Listings … if your motherboard had properly powered the PCI card.
PASS/FAIL This is a PCI card and it is properly installed, go to the next step. If you believe the PCI card is not properly installed, shut off you computer, and verify that the card is firmly inserted into the motherboard. Otherwise report this information (step that failed) to Blackhawk support and be sure to include the unit’s model and serial number. There is no reason to continue with these procedures.
PCI560 JTAG Emulator (BH‐PCI‐560)
The XDS560-class PCI cards do not have a power LED indicator and assume that if the card is properly installed and the PC is powered, the card is powered. Notes:
• If your PC is not powering up then follow steps to contact our support team to further assist you.
• A line with a “Communication Controller” will be shown in the BIOS POST screen under PCI Devices Listings … if your motherboard had properly powered the PCI card.
PASS/FAIL This is a PCI card and it is properly installed, go to the next step.
If you believe the PCI card is not properly installed, shut off you computer, and verify that the card is firmly inserted into the motherboard. Otherwise report this information (step that failed) to Blackhawk support and be sure to include the unit’s model and serial number. There is no reason to continue with these procedures.
Emulator Troubleshooting Step 1 - Power
User Guide List of Emulators • 9
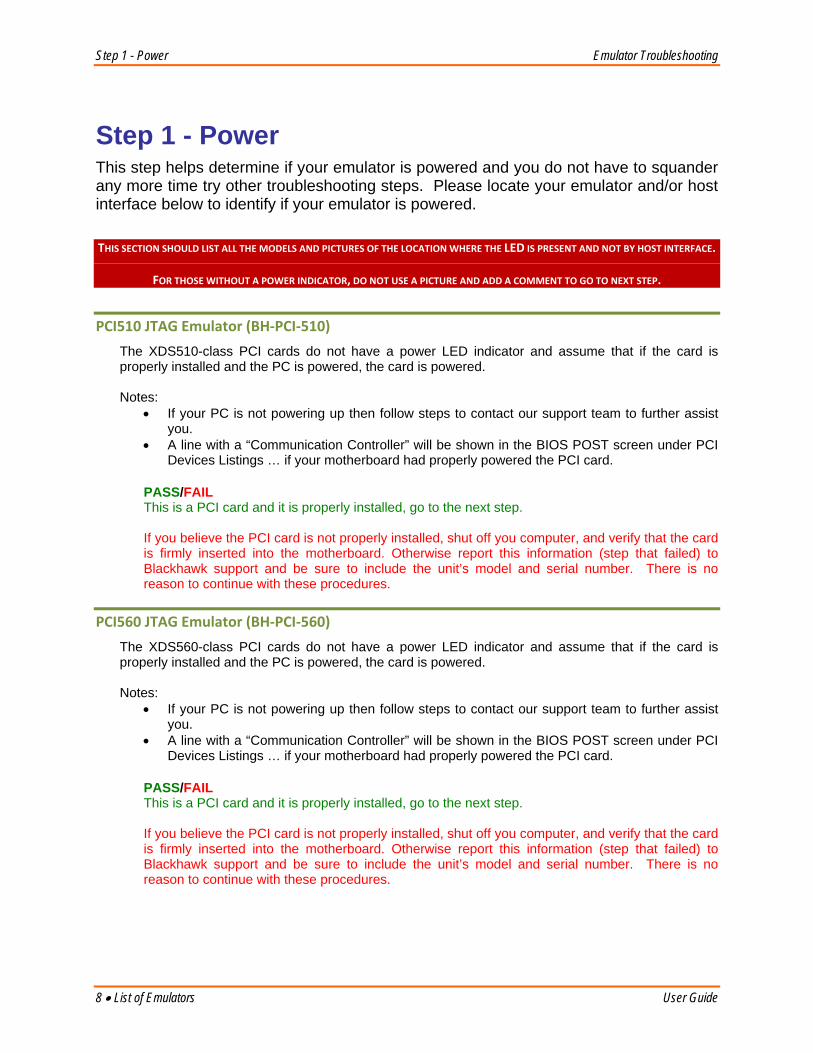
USB‐JTAG Emulator (BH‐USB‐1, 0021501)
This model has two LEDs on the USB end panel. When power is supplied from the USB cable, you will see the power led next to the USB connector turn on solid red.
Figure 1 USB-JTAG Power LED
PASS/FAIL If the power indicator is illuminated, go to the next step.
Verify that the USB cable is firmly inserted into the motherboard, or switch USB ports the cable is connected to. Otherwise report this information (step that failed) to Blackhawk support and be sure to include the unit’s model and serial number. There is no reason to continue with these procedures.
USB 2.0 JTAG Emulator (BH‐USB‐2)
This model does not have an LED. Continue to Step 2 - Enumeration.
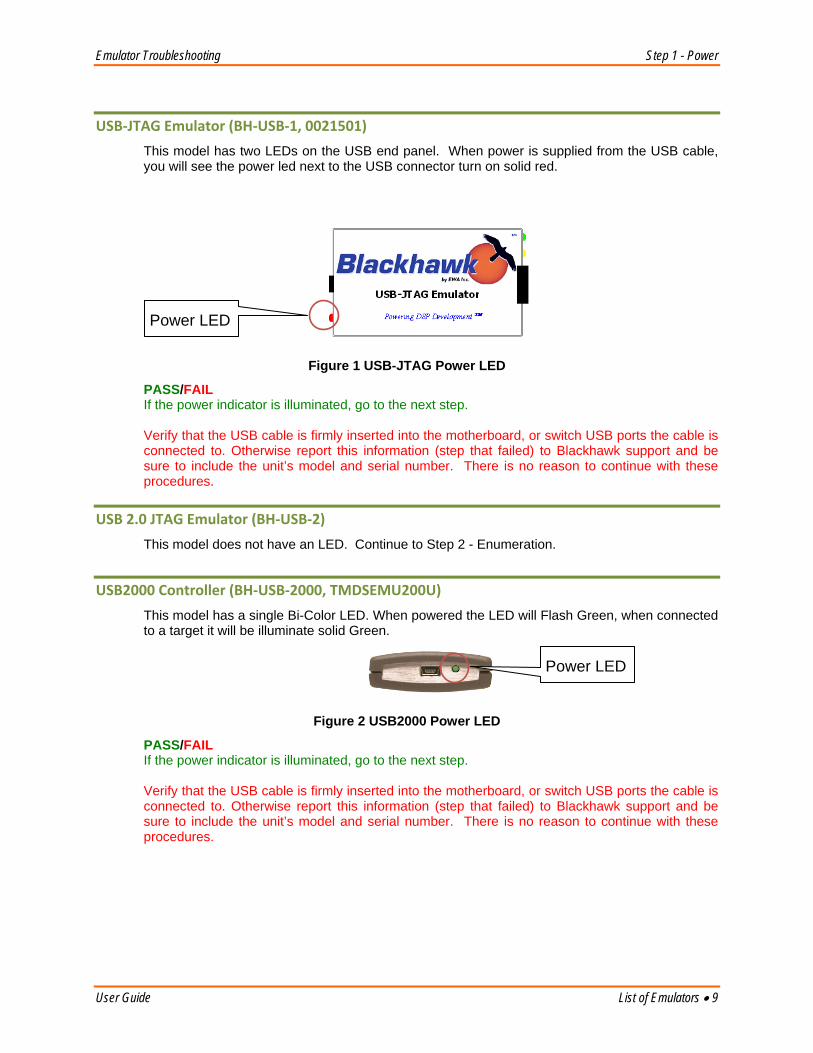
USB2000 Controller (BH‐USB‐2000, TMDSEMU200U)
This model has a single Bi-Color LED. When powered the LED will Flash Green, when connected to a target it will be illuminate solid Green.
Figure 2 USB2000 Power LED
PASS/FAIL If the power indicator is illuminated, go to the next step.
Verify that the USB cable is firmly inserted into the motherboard, or switch USB ports the cable is connected to. Otherwise report this information (step that failed) to Blackhawk support and be sure to include the unit’s model and serial number. There is no reason to continue with these procedures.
Power LED
Power LED
Step 1 - Power Emulator Troubleshooting
10 • List of Emulators User Guide
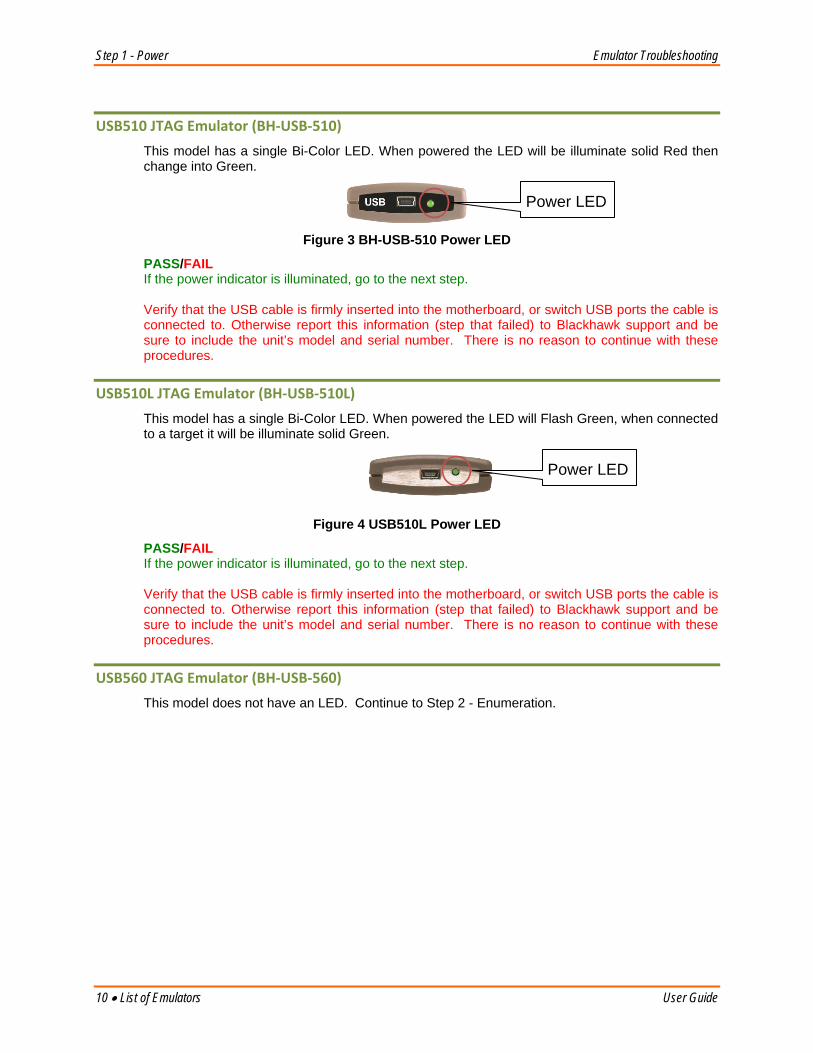
USB510 JTAG Emulator (BH‐USB‐510)
This model has a single Bi-Color LED. When powered the LED will be illuminate solid Red then change into Green.
Figure 3 BH-USB-510 Power LED
PASS/FAIL If the power indicator is illuminated, go to the next step.
Verify that the USB cable is firmly inserted into the motherboard, or switch USB ports the cable is connected to. Otherwise report this information (step that failed) to Blackhawk support and be sure to include the unit’s model and serial number. There is no reason to continue with these procedures.
USB510L JTAG Emulator (BH‐USB‐510L)
This model has a single Bi-Color LED. When powered the LED will Flash Green, when connected to a target it will be illuminate solid Green.
Figure 4 USB510L Power LED
PASS/FAIL If the power indicator is illuminated, go to the next step.
Verify that the USB cable is firmly inserted into the motherboard, or switch USB ports the cable is connected to. Otherwise report this information (step that failed) to Blackhawk support and be sure to include the unit’s model and serial number. There is no reason to continue with these procedures.
USB560 JTAG Emulator (BH‐USB‐560)
This model does not have an LED. Continue to Step 2 - Enumeration.
Power LED
Power LED
Emulator Troubleshooting Step 1 - Power
User Guide List of Emulators • 11
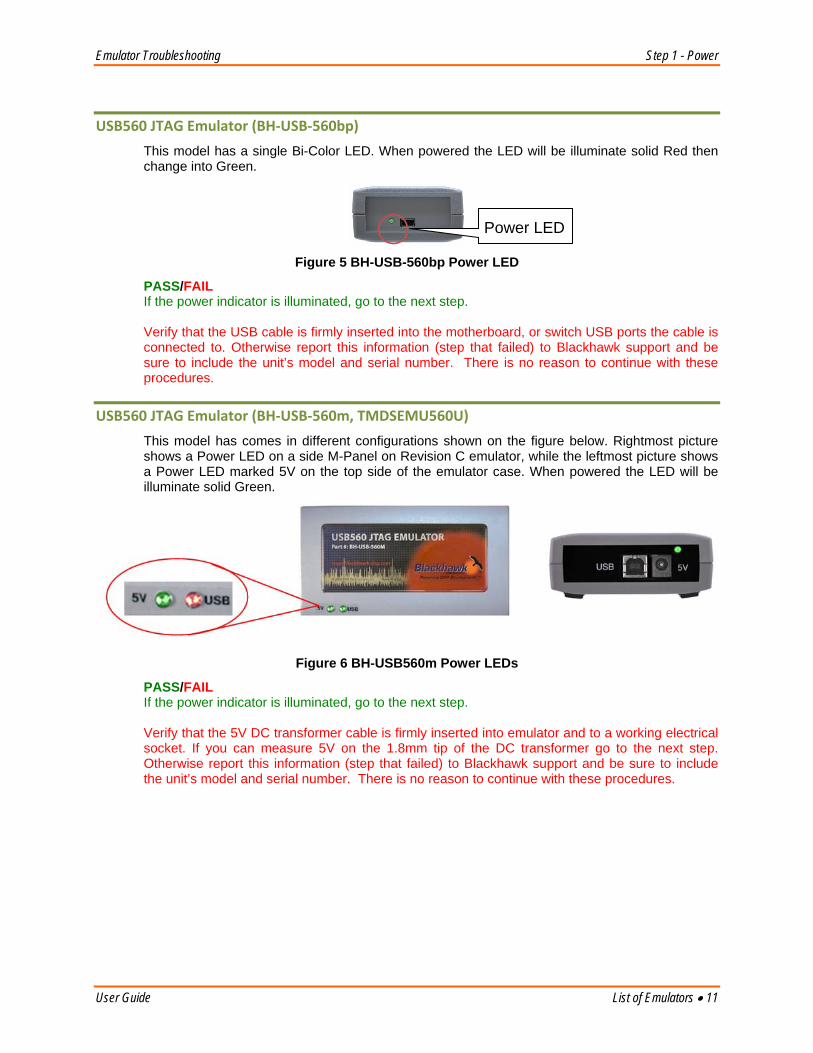
USB560 JTAG Emulator (BH‐USB‐560bp)
This model has a single Bi-Color LED. When powered the LED will be illuminate solid Red then change into Green.
Figure 5 BH-USB-560bp Power LED
PASS/FAIL If the power indicator is illuminated, go to the next step.
Verify that the USB cable is firmly inserted into the motherboard, or switch USB ports the cable is connected to. Otherwise report this information (step that failed) to Blackhawk support and be sure to include the unit’s model and serial number. There is no reason to continue with these procedures.
USB560 JTAG Emulator (BH‐USB‐560m, TMDSEMU560U)
This model has comes in different configurations shown on the figure below. Rightmost picture shows a Power LED on a side M-Panel on Revision C emulator, while the leftmost picture shows a Power LED marked 5V on the top side of the emulator case. When powered the LED will be illuminate solid Green.
Figure 6 BH-USB560m Power LEDs
PASS/FAIL If the power indicator is illuminated, go to the next step.
Verify that the 5V DC transformer cable is firmly inserted into emulator and to a working electrical socket. If you can measure 5V on the 1.8mm tip of the DC transformer go to the next step. Otherwise report this information (step that failed) to Blackhawk support and be sure to include the unit’s model and serial number. There is no reason to continue with these procedures.
Power LED
Step 1 - Power Emulator Troubleshooting
12 • List of Emulators User Guide
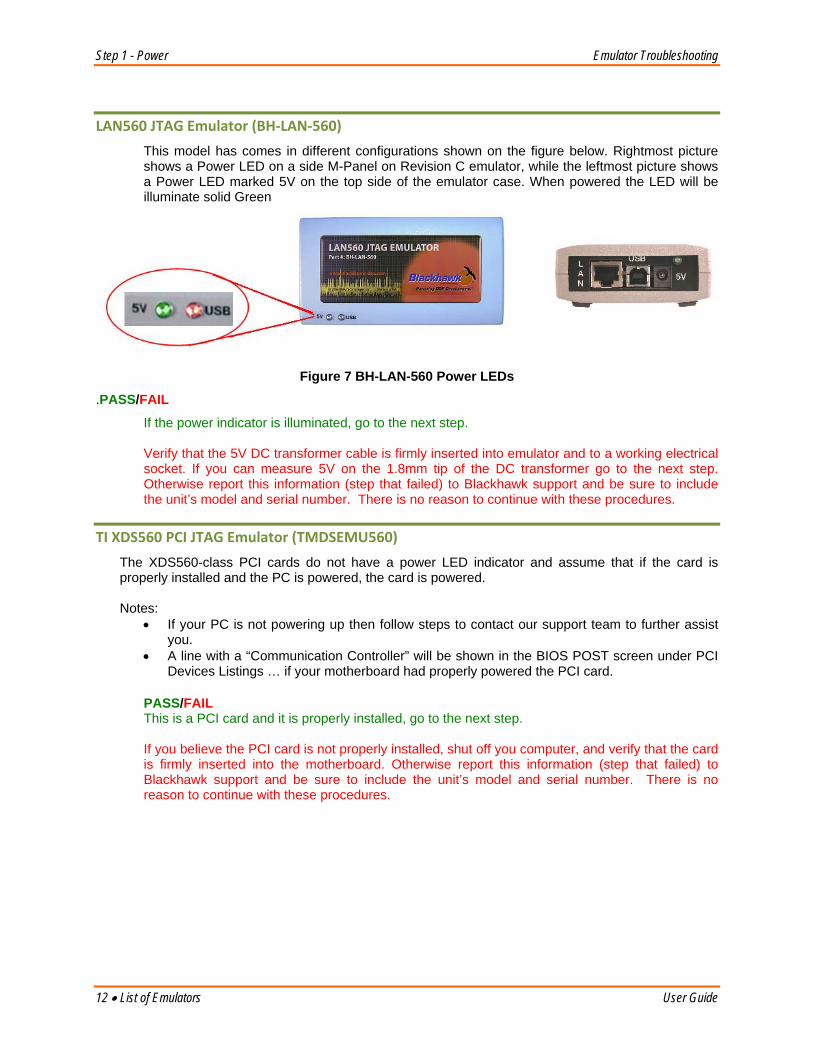
LAN560 JTAG Emulator (BH‐LAN‐560)
This model has comes in different configurations shown on the figure below. Rightmost picture shows a Power LED on a side M-Panel on Revision C emulator, while the leftmost picture shows a Power LED marked 5V on the top side of the emulator case. When powered the LED will be illuminate solid Green
Figure 7 BH-LAN-560 Power LEDs
.PASS/FAIL
If the power indicator is illuminated, go to the next step.
Verify that the 5V DC transformer cable is firmly inserted into emulator and to a working electrical socket. If you can measure 5V on the 1.8mm tip of the DC transformer go to the next step. Otherwise report this information (step that failed) to Blackhawk support and be sure to include the unit’s model and serial number. There is no reason to continue with these procedures.
TI XDS560 PCI JTAG Emulator (TMDSEMU560)
The XDS560-class PCI cards do not have a power LED indicator and assume that if the card is properly installed and the PC is powered, the card is powered. Notes:
• If your PC is not powering up then follow steps to contact our support team to further assist you.
• A line with a “Communication Controller” will be shown in the BIOS POST screen under PCI Devices Listings … if your motherboard had properly powered the PCI card.
PASS/FAIL This is a PCI card and it is properly installed, go to the next step.
If you believe the PCI card is not properly installed, shut off you computer, and verify that the card is firmly inserted into the motherboard. Otherwise report this information (step that failed) to Blackhawk support and be sure to include the unit’s model and serial number. There is no reason to continue with these procedures.
Emulator Troubleshooting Step 2 - Enumeration
User Guide List of Emulators • 13
Step 2 - Enumeration The following section will help you identify that the emulator has enumerated successfully. By enumerated, we mean that Windows can see that the emulator has been attached to the computer and has loaded the emulator’s device drivers successfully.
If you are using the Ethernet connection to an emulator, and not USB or PCI (plug-n-play interface), there are a couple of other steps necessary to identify that Windows has loaded the emulator’s device drivers correctly.
Please locate your emulator model below to determine if it has enumerated successfully.
A. Windows Device Manager 1.
The Windows Device Manager can be used to determine USB and PCI emulator enumeration and successful device driver installation. To view the device manager Go to Start Run… Devmgmt.msc
Below are sample images of each emulator’s enumeration in the device manager. The following is an example of a Blackhawk emulator (USB or PCI).
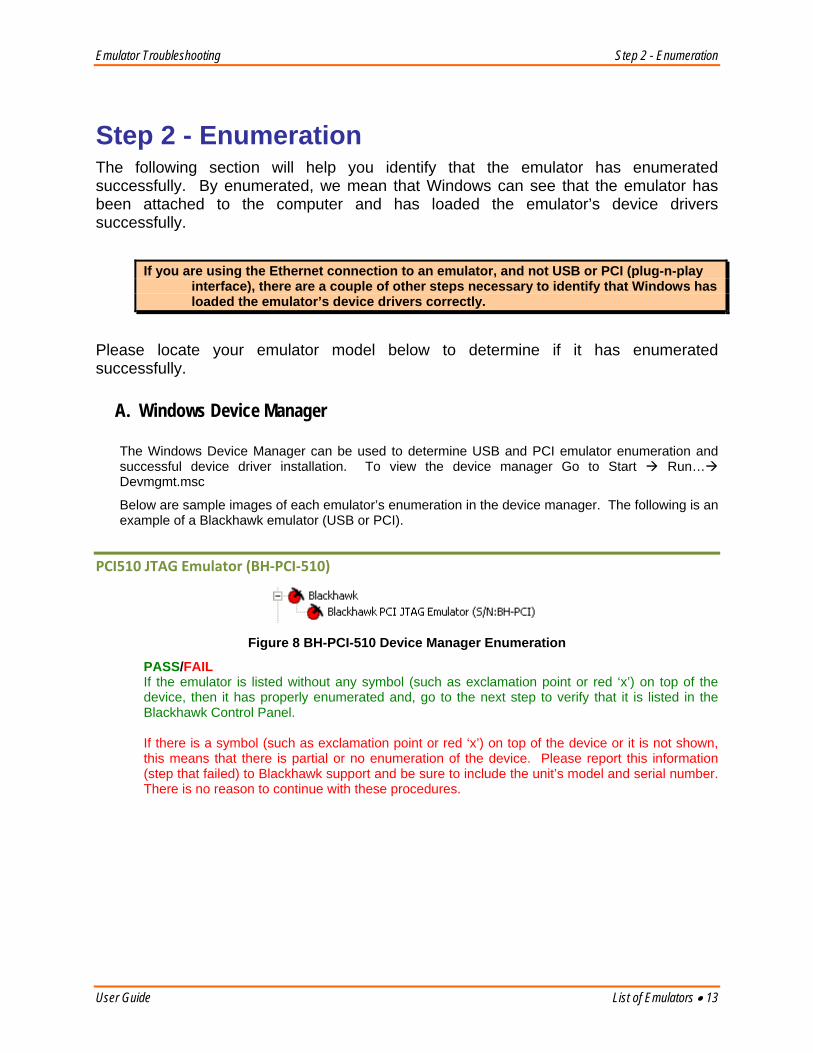
PCI510 JTAG Emulator (BH‐PCI‐510)
Figure 8 BH-PCI-510 Device Manager Enumeration
PASS/FAIL If the emulator is listed without any symbol (such as exclamation point or red ‘x’) on top of the device, then it has properly enumerated and, go to the next step to verify that it is listed in the Blackhawk Control Panel. If there is a symbol (such as exclamation point or red ‘x’) on top of the device or it is not shown, this means that there is partial or no enumeration of the device. Please report this information (step that failed) to Blackhawk support and be sure to include the unit’s model and serial number. There is no reason to continue with these procedures.
Step 2 - Enumeration Emulator Troubleshooting
14 • List of Emulators User Guide
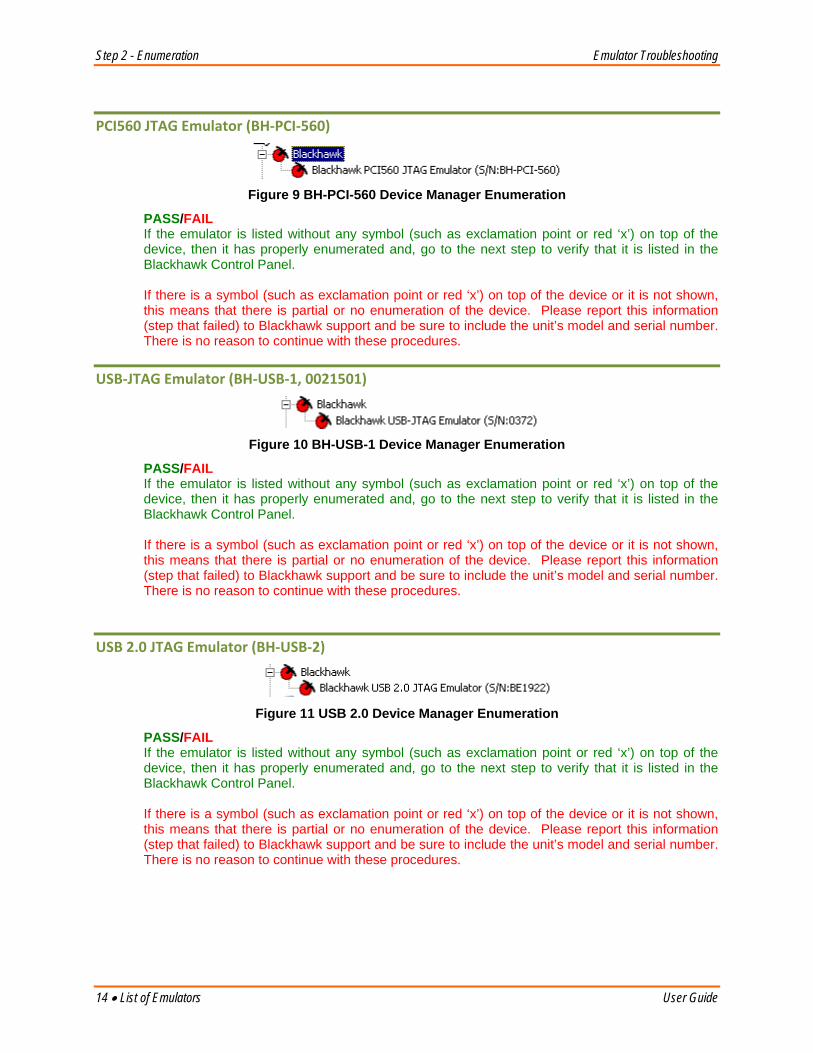
PCI560 JTAG Emulator (BH‐PCI‐560)
Figure 9 BH-PCI-560 Device Manager Enumeration
PASS/FAIL If the emulator is listed without any symbol (such as exclamation point or red ‘x’) on top of the device, then it has properly enumerated and, go to the next step to verify that it is listed in the Blackhawk Control Panel. If there is a symbol (such as exclamation point or red ‘x’) on top of the device or it is not shown, this means that there is partial or no enumeration of the device. Please report this information (step that failed) to Blackhawk support and be sure to include the unit’s model and serial number. There is no reason to continue with these procedures.
USB‐JTAG Emulator (BH‐USB‐1, 0021501)
Figure 10 BH-USB-1 Device Manager Enumeration
PASS/FAIL If the emulator is listed without any symbol (such as exclamation point or red ‘x’) on top of the device, then it has properly enumerated and, go to the next step to verify that it is listed in the Blackhawk Control Panel. If there is a symbol (such as exclamation point or red ‘x’) on top of the device or it is not shown, this means that there is partial or no enumeration of the device. Please report this information (step that failed) to Blackhawk support and be sure to include the unit’s model and serial number. There is no reason to continue with these procedures.
USB 2.0 JTAG Emulator (BH‐USB‐2)
Figure 11 USB 2.0 Device Manager Enumeration
PASS/FAIL If the emulator is listed without any symbol (such as exclamation point or red ‘x’) on top of the device, then it has properly enumerated and, go to the next step to verify that it is listed in the Blackhawk Control Panel. If there is a symbol (such as exclamation point or red ‘x’) on top of the device or it is not shown, this means that there is partial or no enumeration of the device. Please report this information (step that failed) to Blackhawk support and be sure to include the unit’s model and serial number. There is no reason to continue with these procedures.
Emulator Troubleshooting Step 2 - Enumeration
User Guide List of Emulators • 15
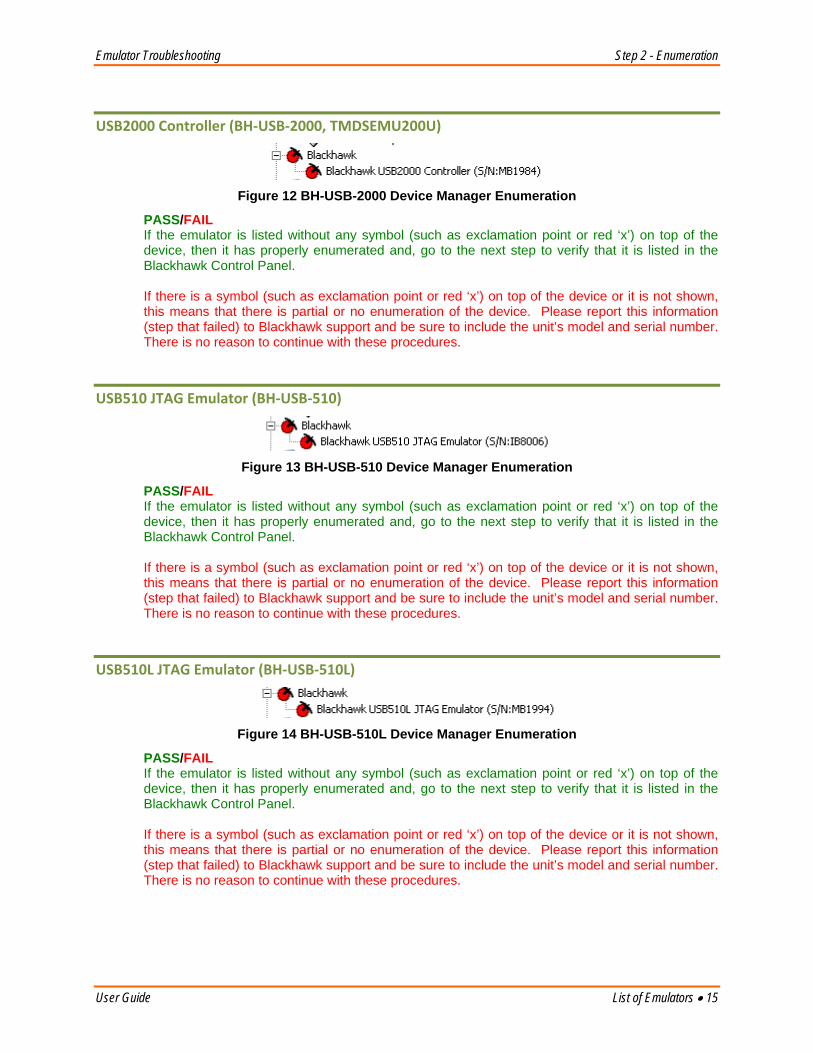
USB2000 Controller (BH‐USB‐2000, TMDSEMU200U)
Figure 12 BH-USB-2000 Device Manager Enumeration
PASS/FAIL If the emulator is listed without any symbol (such as exclamation point or red ‘x’) on top of the device, then it has properly enumerated and, go to the next step to verify that it is listed in the Blackhawk Control Panel. If there is a symbol (such as exclamation point or red ‘x’) on top of the device or it is not shown, this means that there is partial or no enumeration of the device. Please report this information (step that failed) to Blackhawk support and be sure to include the unit’s model and serial number. There is no reason to continue with these procedures.
USB510 JTAG Emulator (BH‐USB‐510)
Figure 13 BH-USB-510 Device Manager Enumeration
PASS/FAIL If the emulator is listed without any symbol (such as exclamation point or red ‘x’) on top of the device, then it has properly enumerated and, go to the next step to verify that it is listed in the Blackhawk Control Panel. If there is a symbol (such as exclamation point or red ‘x’) on top of the device or it is not shown, this means that there is partial or no enumeration of the device. Please report this information (step that failed) to Blackhawk support and be sure to include the unit’s model and serial number. There is no reason to continue with these procedures.
USB510L JTAG Emulator (BH‐USB‐510L)
Figure 14 BH-USB-510L Device Manager Enumeration
PASS/FAIL If the emulator is listed without any symbol (such as exclamation point or red ‘x’) on top of the device, then it has properly enumerated and, go to the next step to verify that it is listed in the Blackhawk Control Panel. If there is a symbol (such as exclamation point or red ‘x’) on top of the device or it is not shown, this means that there is partial or no enumeration of the device. Please report this information (step that failed) to Blackhawk support and be sure to include the unit’s model and serial number. There is no reason to continue with these procedures.
Step 2 - Enumeration Emulator Troubleshooting
16 • List of Emulators User Guide
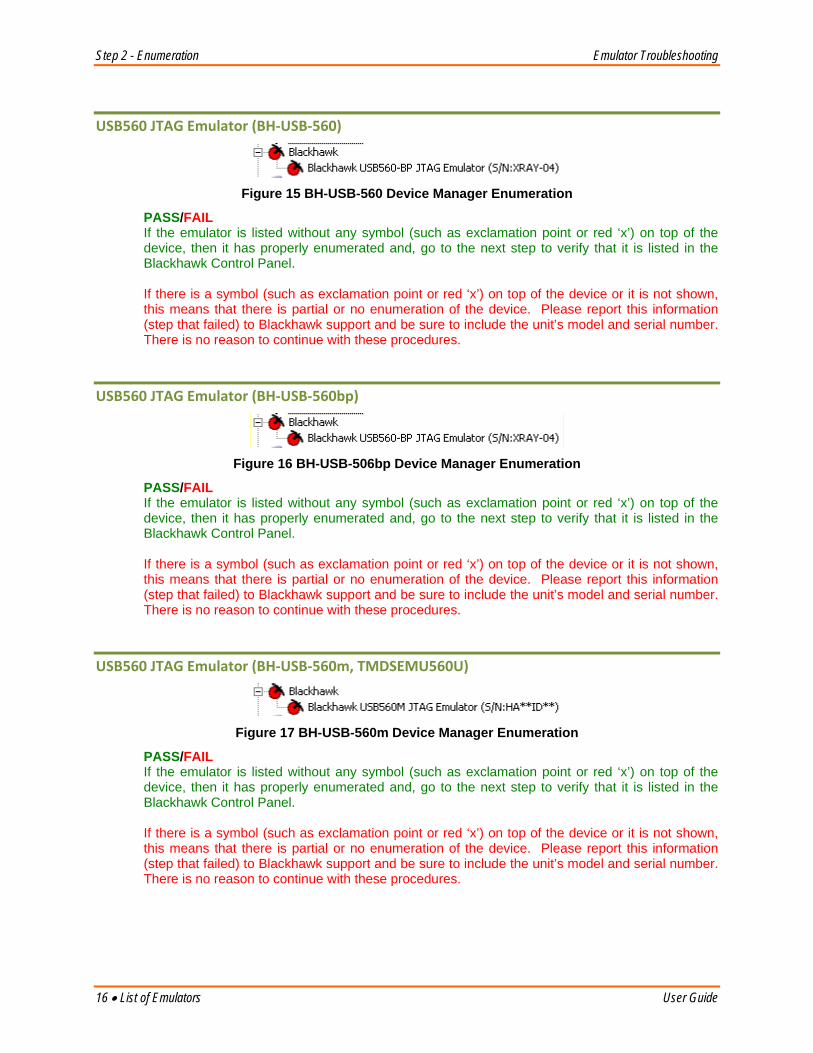
USB560 JTAG Emulator (BH‐USB‐560)
Figure 15 BH-USB-560 Device Manager Enumeration
PASS/FAIL If the emulator is listed without any symbol (such as exclamation point or red ‘x’) on top of the device, then it has properly enumerated and, go to the next step to verify that it is listed in the Blackhawk Control Panel. If there is a symbol (such as exclamation point or red ‘x’) on top of the device or it is not shown, this means that there is partial or no enumeration of the device. Please report this information (step that failed) to Blackhawk support and be sure to include the unit’s model and serial number. There is no reason to continue with these procedures.
USB560 JTAG Emulator (BH‐USB‐560bp)
Figure 16 BH-USB-506bp Device Manager Enumeration
PASS/FAIL If the emulator is listed without any symbol (such as exclamation point or red ‘x’) on top of the device, then it has properly enumerated and, go to the next step to verify that it is listed in the Blackhawk Control Panel. If there is a symbol (such as exclamation point or red ‘x’) on top of the device or it is not shown, this means that there is partial or no enumeration of the device. Please report this information (step that failed) to Blackhawk support and be sure to include the unit’s model and serial number. There is no reason to continue with these procedures.
USB560 JTAG Emulator (BH‐USB‐560m, TMDSEMU560U)
Figure 17 BH-USB-560m Device Manager Enumeration
PASS/FAIL If the emulator is listed without any symbol (such as exclamation point or red ‘x’) on top of the device, then it has properly enumerated and, go to the next step to verify that it is listed in the Blackhawk Control Panel. If there is a symbol (such as exclamation point or red ‘x’) on top of the device or it is not shown, this means that there is partial or no enumeration of the device. Please report this information (step that failed) to Blackhawk support and be sure to include the unit’s model and serial number. There is no reason to continue with these procedures.
Emulator Troubleshooting Step 2 - Enumeration
User Guide List of Emulators • 17
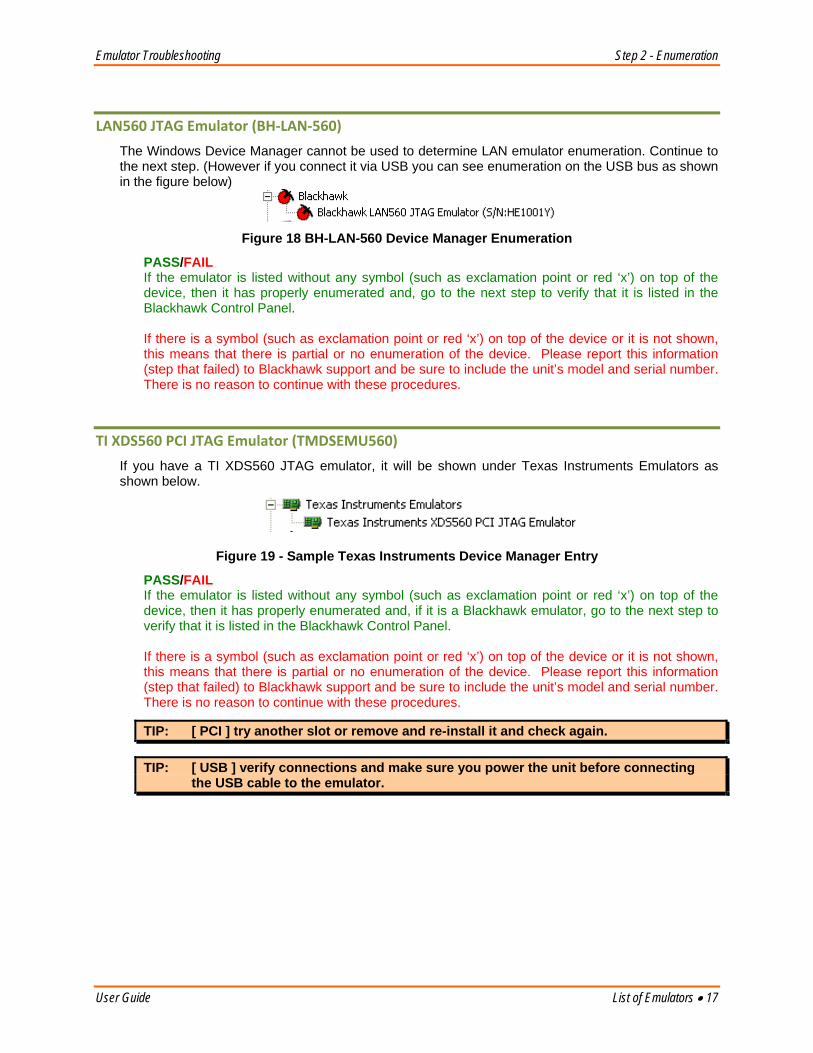
LAN560 JTAG Emulator (BH‐LAN‐560)
The Windows Device Manager cannot be used to determine LAN emulator enumeration. Continue to the next step. (However if you connect it via USB you can see enumeration on the USB bus as shown in the figure below)
Figure 18 BH-LAN-560 Device Manager Enumeration
PASS/FAIL If the emulator is listed without any symbol (such as exclamation point or red ‘x’) on top of the device, then it has properly enumerated and, go to the next step to verify that it is listed in the Blackhawk Control Panel. If there is a symbol (such as exclamation point or red ‘x’) on top of the device or it is not shown, this means that there is partial or no enumeration of the device. Please report this information (step that failed) to Blackhawk support and be sure to include the unit’s model and serial number. There is no reason to continue with these procedures.
TI XDS560 PCI JTAG Emulator (TMDSEMU560)
If you have a TI XDS560 JTAG emulator, it will be shown under Texas Instruments Emulators as shown below.
Figure 19 - Sample Texas Instruments Device Manager Entry
PASS/FAIL If the emulator is listed without any symbol (such as exclamation point or red ‘x’) on top of the device, then it has properly enumerated and, if it is a Blackhawk emulator, go to the next step to verify that it is listed in the Blackhawk Control Panel. If there is a symbol (such as exclamation point or red ‘x’) on top of the device or it is not shown, this means that there is partial or no enumeration of the device. Please report this information (step that failed) to Blackhawk support and be sure to include the unit’s model and serial number. There is no reason to continue with these procedures.
TIP: [ PCI ] try another slot or remove and re-install it and check again.
TIP: [ USB ] verify connections and make sure you power the unit before connecting the USB cable to the emulator.
Step 2 - Enumeration Emulator Troubleshooting
18 • List of Emulators User Guide
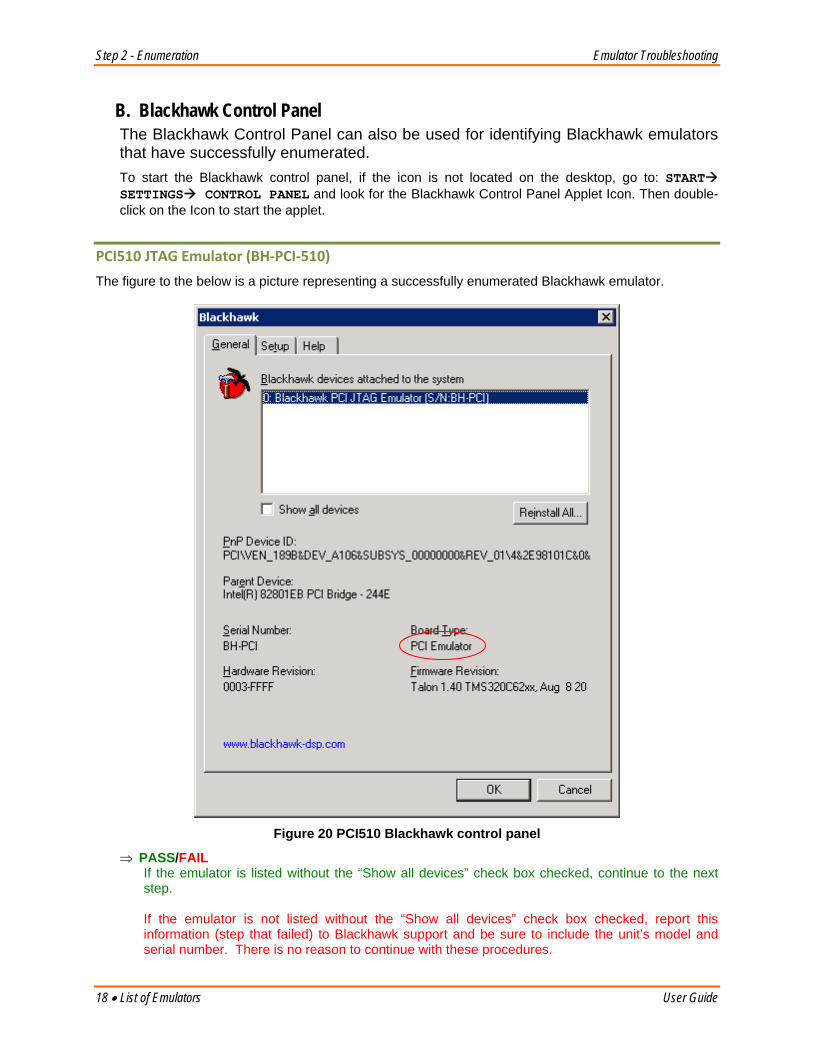
B. Blackhawk Control Panel The Blackhawk Control Panel can also be used for identifying Blackhawk emulators that have successfully enumerated. To start the Blackhawk control panel, if the icon is not located on the desktop, go to: START SETTINGS CONTROL PANEL and look for the Blackhawk Control Panel Applet Icon. Then double-click on the Icon to start the applet.
PCI510 JTAG Emulator (BH‐PCI‐510)
The figure to the below is a picture representing a successfully enumerated Blackhawk emulator.
Figure 20 PCI510 Blackhawk control panel
⇒ PASS/FAIL If the emulator is listed without the “Show all devices” check box checked, continue to the next step. If the emulator is not listed without the “Show all devices” check box checked, report this information (step that failed) to Blackhawk support and be sure to include the unit’s model and serial number. There is no reason to continue with these procedures.
Emulator Troubleshooting Step 2 - Enumeration
User Guide List of Emulators • 19
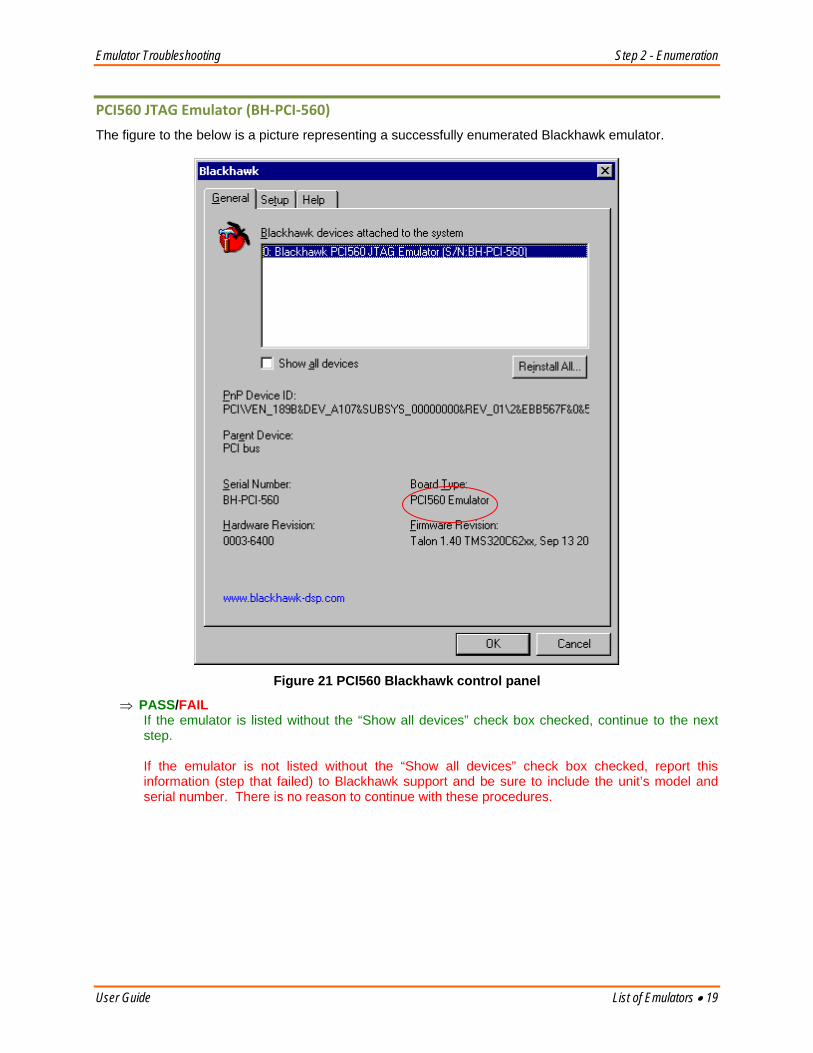
PCI560 JTAG Emulator (BH‐PCI‐560)
The figure to the below is a picture representing a successfully enumerated Blackhawk emulator.
Figure 21 PCI560 Blackhawk control panel
⇒ PASS/FAIL If the emulator is listed without the “Show all devices” check box checked, continue to the next step. If the emulator is not listed without the “Show all devices” check box checked, report this information (step that failed) to Blackhawk support and be sure to include the unit’s model and serial number. There is no reason to continue with these procedures.
Step 2 - Enumeration Emulator Troubleshooting
20 • List of Emulators User Guide
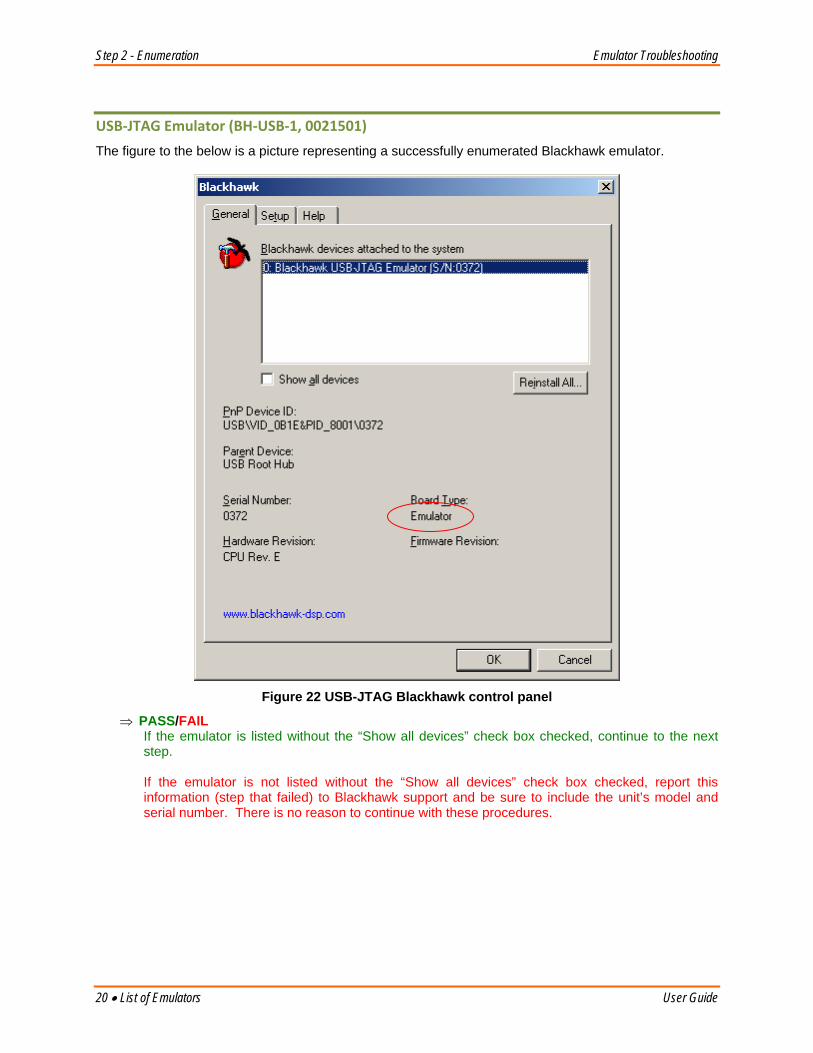
USB‐JTAG Emulator (BH‐USB‐1, 0021501)
The figure to the below is a picture representing a successfully enumerated Blackhawk emulator.
Figure 22 USB-JTAG Blackhawk control panel
⇒ PASS/FAIL If the emulator is listed without the “Show all devices” check box checked, continue to the next step. If the emulator is not listed without the “Show all devices” check box checked, report this information (step that failed) to Blackhawk support and be sure to include the unit’s model and serial number. There is no reason to continue with these procedures.
Emulator Troubleshooting Step 2 - Enumeration
User Guide List of Emulators • 21
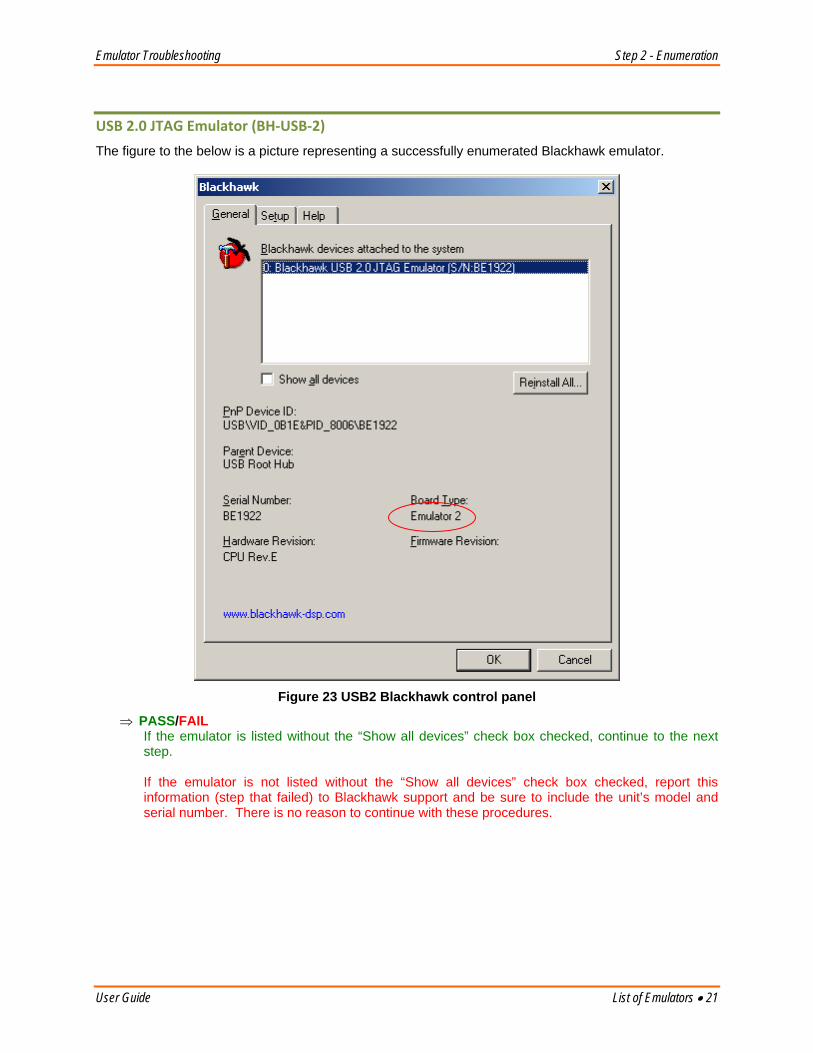
USB 2.0 JTAG Emulator (BH‐USB‐2)
The figure to the below is a picture representing a successfully enumerated Blackhawk emulator.
Figure 23 USB2 Blackhawk control panel
⇒ PASS/FAIL If the emulator is listed without the “Show all devices” check box checked, continue to the next step. If the emulator is not listed without the “Show all devices” check box checked, report this information (step that failed) to Blackhawk support and be sure to include the unit’s model and serial number. There is no reason to continue with these procedures.
Step 2 - Enumeration Emulator Troubleshooting
22 • List of Emulators User Guide
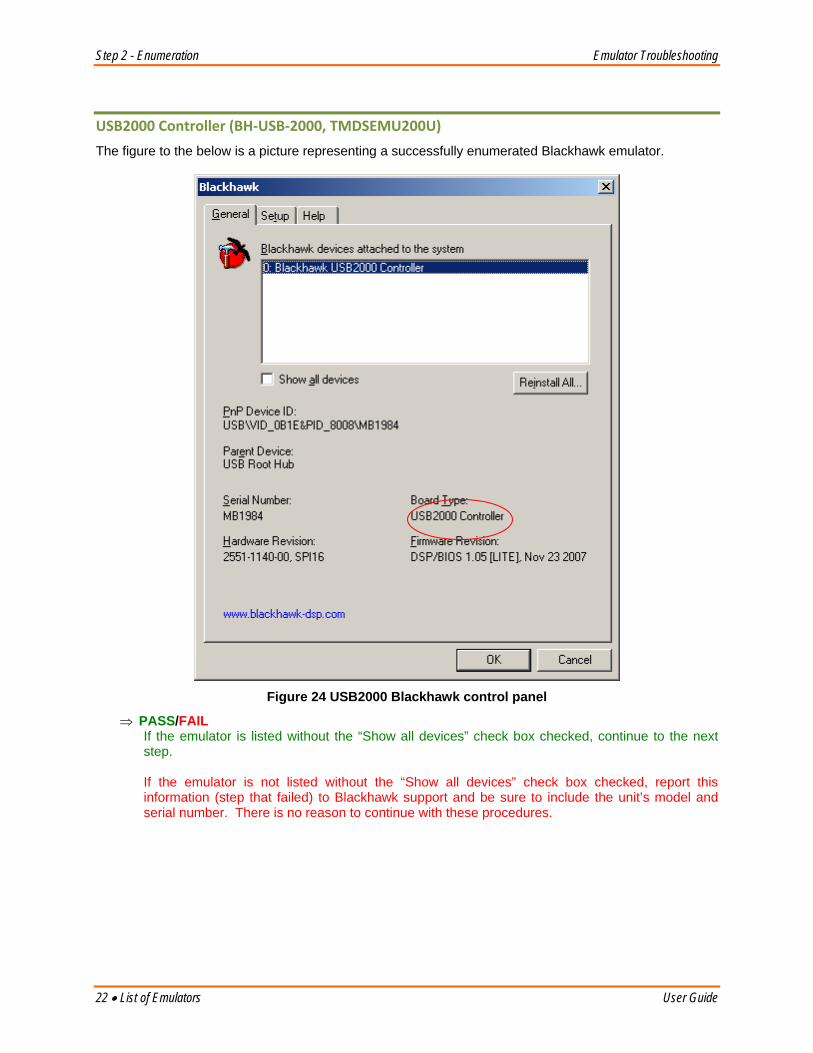
USB2000 Controller (BH‐USB‐2000, TMDSEMU200U)
The figure to the below is a picture representing a successfully enumerated Blackhawk emulator.
Figure 24 USB2000 Blackhawk control panel
⇒ PASS/FAIL If the emulator is listed without the “Show all devices” check box checked, continue to the next step. If the emulator is not listed without the “Show all devices” check box checked, report this information (step that failed) to Blackhawk support and be sure to include the unit’s model and serial number. There is no reason to continue with these procedures.

Emulator Troubleshooting Step 2 - Enumeration
User Guide List of Emulators • 23
USB510 JTAG Emulator (BH‐USB‐510)
The figure to the below is a picture representing a successfully enumerated Blackhawk emulator.
Figure 25 USB510 Blackhawk control panel
⇒ PASS/FAIL If the emulator is listed without the “Show all devices” check box checked, continue to the next step. If the emulator is not listed without the “Show all devices” check box checked, report this information (step that failed) to Blackhawk support and be sure to include the unit’s model and serial number. There is no reason to continue with these procedures.
Step 2 - Enumeration Emulator Troubleshooting
24 • List of Emulators User Guide
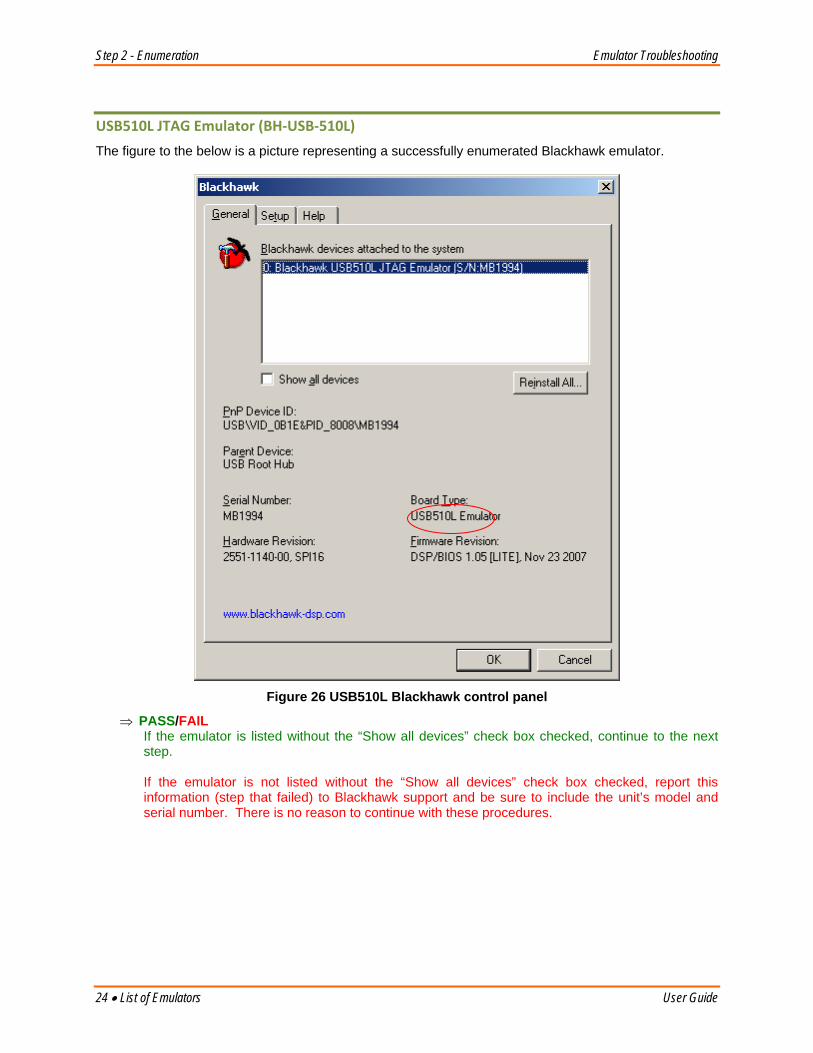
USB510L JTAG Emulator (BH‐USB‐510L)
The figure to the below is a picture representing a successfully enumerated Blackhawk emulator.
Figure 26 USB510L Blackhawk control panel
⇒ PASS/FAIL If the emulator is listed without the “Show all devices” check box checked, continue to the next step. If the emulator is not listed without the “Show all devices” check box checked, report this information (step that failed) to Blackhawk support and be sure to include the unit’s model and serial number. There is no reason to continue with these procedures.
Emulator Troubleshooting Step 2 - Enumeration
User Guide List of Emulators • 25
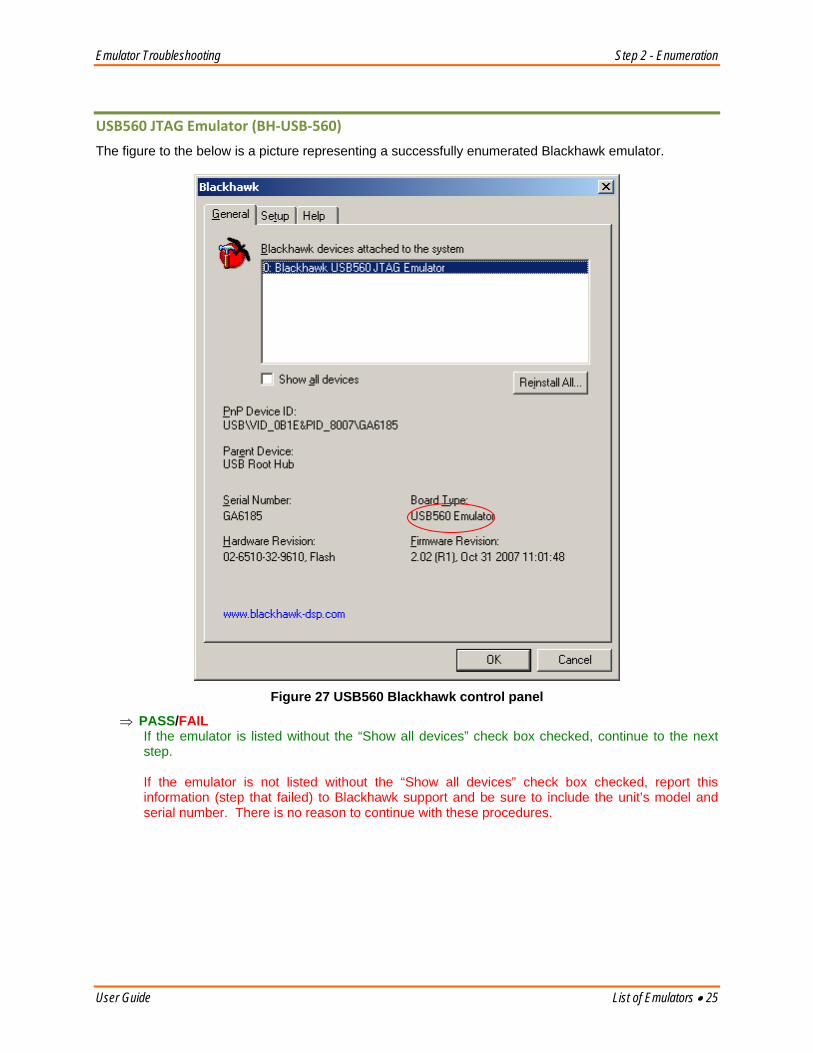
USB560 JTAG Emulator (BH‐USB‐560)
The figure to the below is a picture representing a successfully enumerated Blackhawk emulator.
Figure 27 USB560 Blackhawk control panel
⇒ PASS/FAIL If the emulator is listed without the “Show all devices” check box checked, continue to the next step. If the emulator is not listed without the “Show all devices” check box checked, report this information (step that failed) to Blackhawk support and be sure to include the unit’s model and serial number. There is no reason to continue with these procedures.

Step 2 - Enumeration Emulator Troubleshooting
26 • List of Emulators User Guide
USB560 JTAG Emulator (BH‐USB‐560bp)
The figure to the below is a picture representing a successfully enumerated Blackhawk emulator.
Figure 28 USB560bp Blackhawk control panel
⇒ PASS/FAIL If the emulator is listed without the “Show all devices” check box checked, continue to the next step. If the emulator is not listed without the “Show all devices” check box checked, report this information (step that failed) to Blackhawk support and be sure to include the unit’s model and serial number. There is no reason to continue with these procedures.
Emulator Troubleshooting Step 2 - Enumeration
User Guide List of Emulators • 27
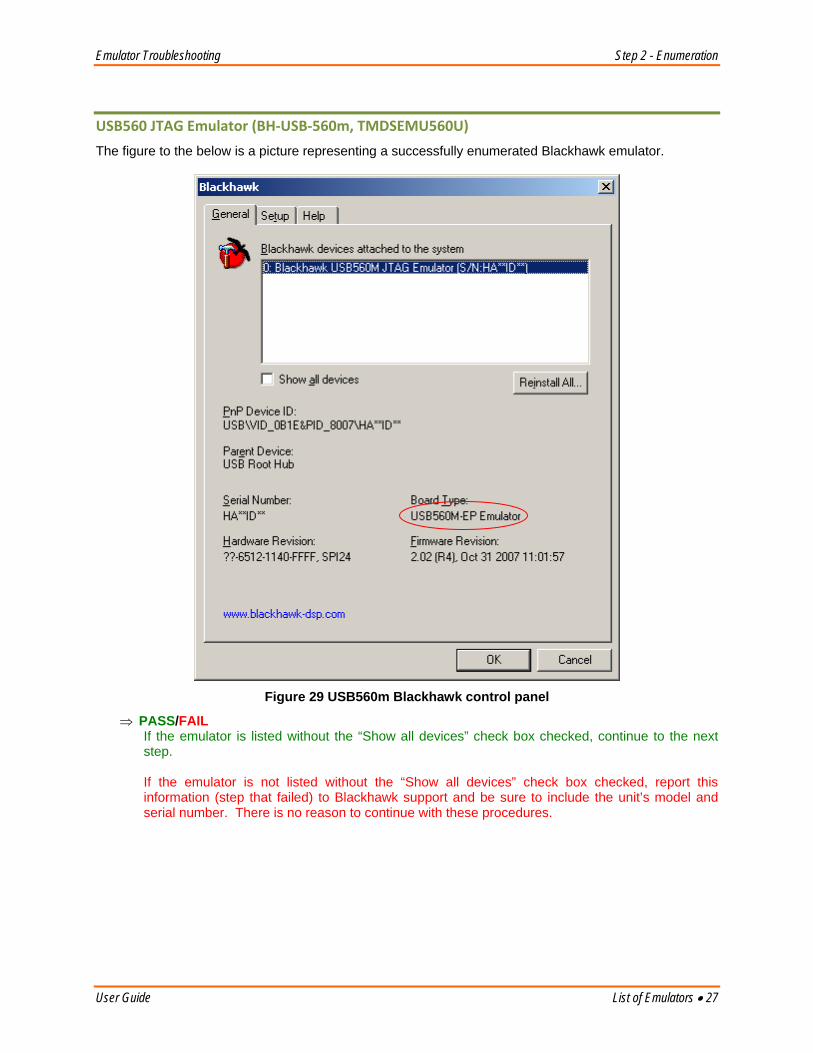
USB560 JTAG Emulator (BH‐USB‐560m, TMDSEMU560U)
The figure to the below is a picture representing a successfully enumerated Blackhawk emulator.
Figure 29 USB560m Blackhawk control panel
⇒ PASS/FAIL If the emulator is listed without the “Show all devices” check box checked, continue to the next step. If the emulator is not listed without the “Show all devices” check box checked, report this information (step that failed) to Blackhawk support and be sure to include the unit’s model and serial number. There is no reason to continue with these procedures.
Step 2 - Enumeration Emulator Troubleshooting
28 • List of Emulators User Guide
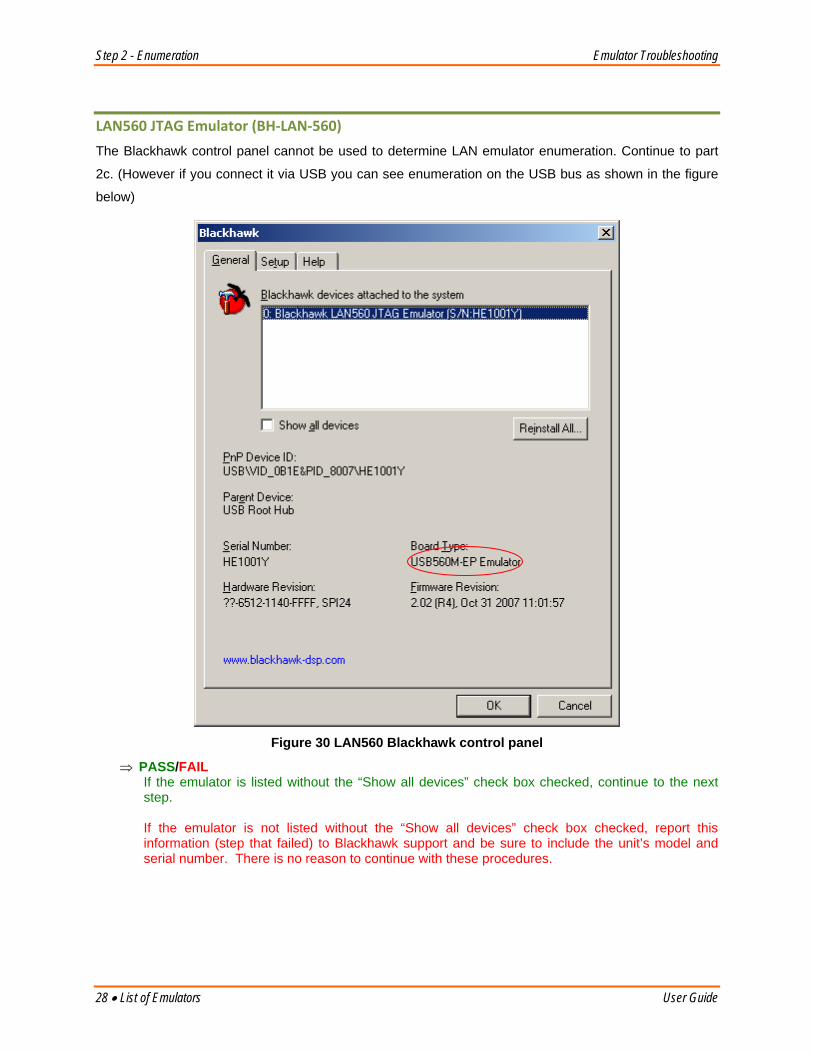
LAN560 JTAG Emulator (BH‐LAN‐560)
The Blackhawk control panel cannot be used to determine LAN emulator enumeration. Continue to part
2c. (However if you connect it via USB you can see enumeration on the USB bus as shown in the figure
below)
Figure 30 LAN560 Blackhawk control panel
⇒ PASS/FAIL If the emulator is listed without the “Show all devices” check box checked, continue to the next step. If the emulator is not listed without the “Show all devices” check box checked, report this information (step that failed) to Blackhawk support and be sure to include the unit’s model and serial number. There is no reason to continue with these procedures.
Emulator Troubleshooting Step 2 - Enumeration
User Guide List of Emulators • 29
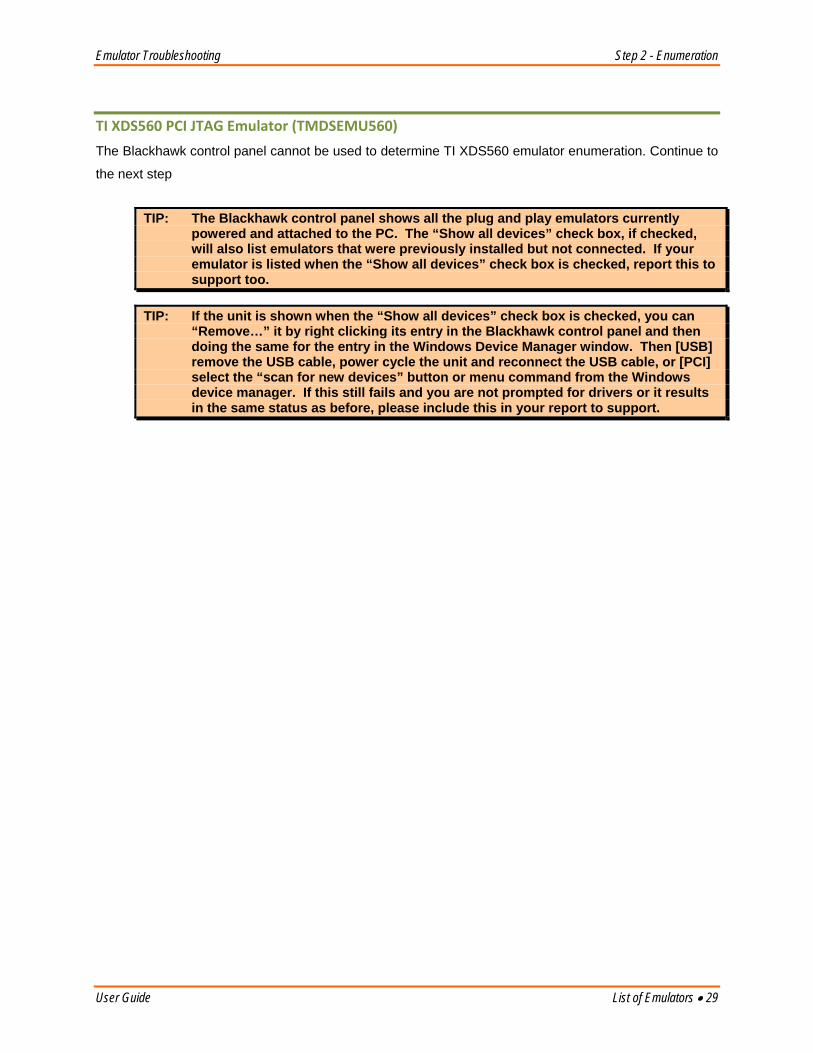
TI XDS560 PCI JTAG Emulator (TMDSEMU560)
The Blackhawk control panel cannot be used to determine TI XDS560 emulator enumeration. Continue to
the next step
TIP: The Blackhawk control panel shows all the plug and play emulators currently powered and attached to the PC. The “Show all devices” check box, if checked, will also list emulators that were previously installed but not connected. If your emulator is listed when the “Show all devices” check box is checked, report this to support too.
TIP: If the unit is shown when the “Show all devices” check box is checked, you can “Remove…” it by right clicking its entry in the Blackhawk control panel and then doing the same for the entry in the Windows Device Manager window. Then [USB] remove the USB cable, power cycle the unit and reconnect the USB cable, or [PCI] select the “scan for new devices” button or menu command from the Windows device manager. If this still fails and you are not prompted for drivers or it results in the same status as before, please include this in your report to support.
Step 2 - Enumeration Emulator Troubleshooting
30 • List of Emulators User Guide
C. BHETHCFG
LAN560 JTAG Emulator (BH‐LAN‐560)
Please use the LAN560 Configuration Utility to verify if the unit is operational.
If you have not configured your Blackhawk LAN560 emulator or setup the LAN560 network service
Please refer to your emulator documentations.
http://www.blackhawk-dsp.com/downloads/EMU_Docs.aspx#BH-LAN-560
The LAN 560 Configuration Utility is found under <CCS Install Dir>\Blackhawk\Utility\Lan560Diags
\bhethcfg.exe
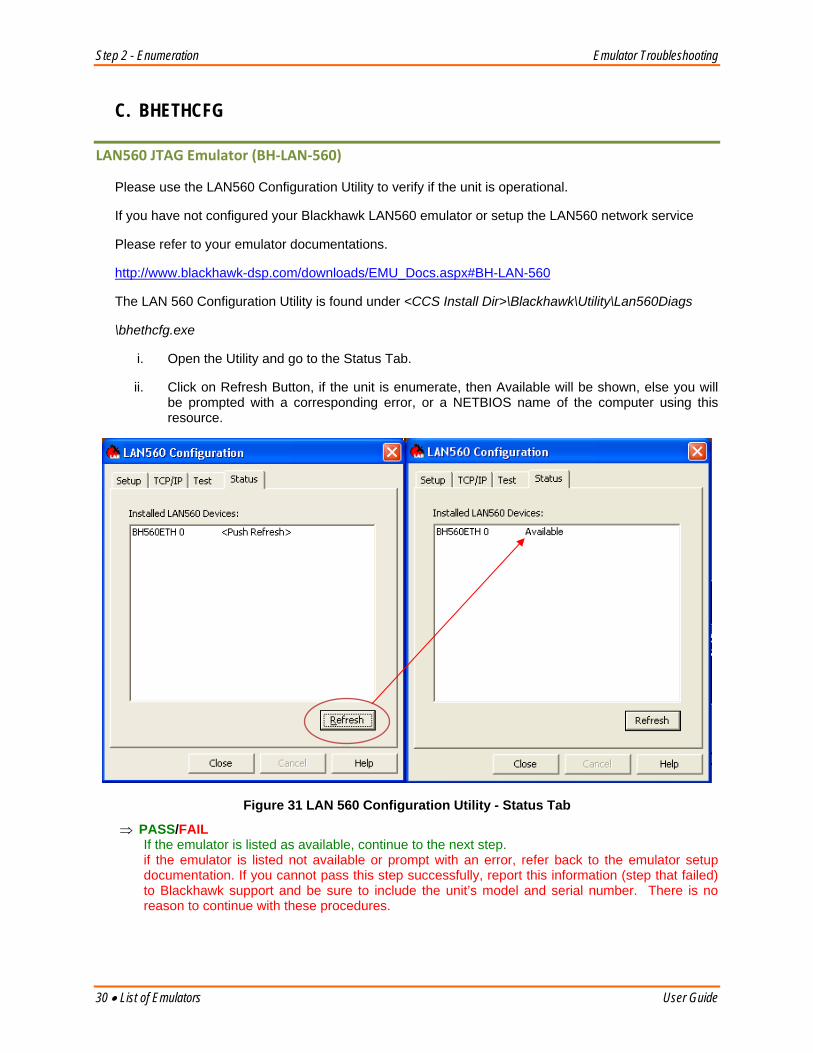
i. Open the Utility and go to the Status Tab.
ii. Click on Refresh Button, if the unit is enumerate, then Available will be shown, else you will be prompted with a corresponding error, or a NETBIOS name of the computer using this resource.
Figure 31 LAN 560 Configuration Utility - Status Tab
⇒ PASS/FAIL If the emulator is listed as available, continue to the next step. if the emulator is listed not available or prompt with an error, refer back to the emulator setup documentation. If you cannot pass this step successfully, report this information (step that failed) to Blackhawk support and be sure to include the unit’s model and serial number. There is no reason to continue with these procedures.
Emulator Troubleshooting Step 2 - Enumeration
User Guide List of Emulators • 31
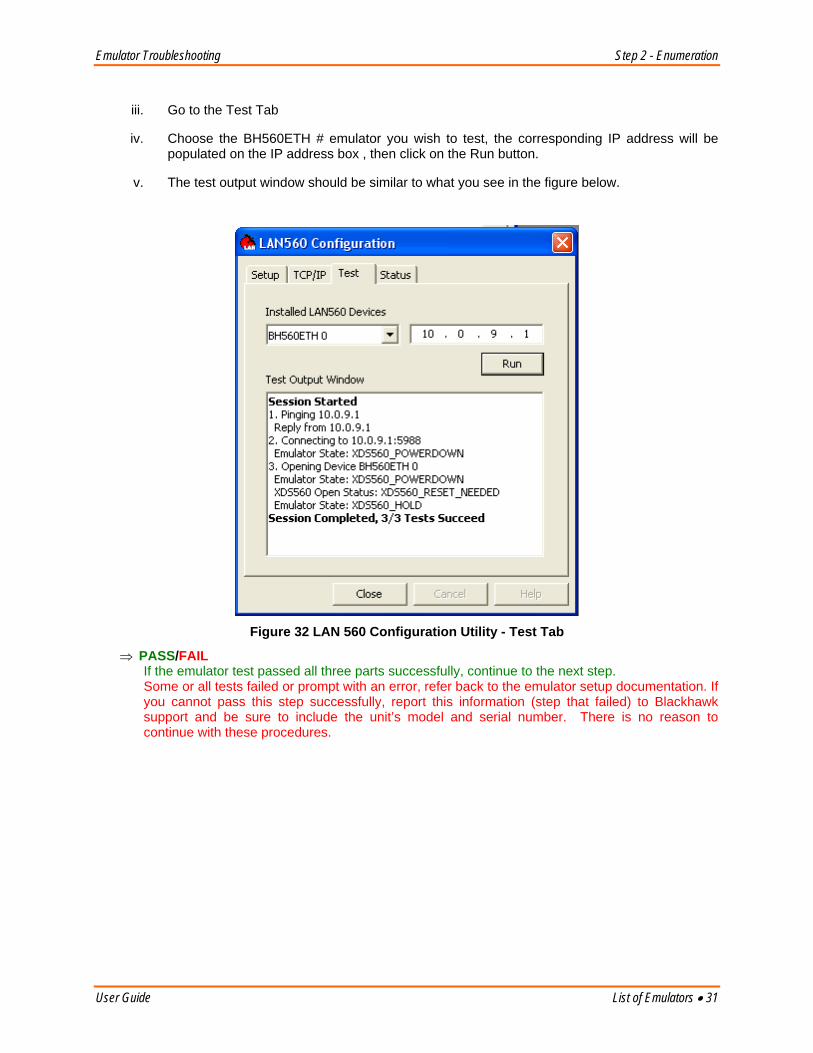
iii. Go to the Test Tab
iv. Choose the BH560ETH # emulator you wish to test, the corresponding IP address will be populated on the IP address box , then click on the Run button.
v. The test output window should be similar to what you see in the figure below.
2.
Figure 32 LAN 560 Configuration Utility - Test Tab
⇒ PASS/FAIL If the emulator test passed all three parts successfully, continue to the next step. Some or all tests failed or prompt with an error, refer back to the emulator setup documentation. If you cannot pass this step successfully, report this information (step that failed) to Blackhawk support and be sure to include the unit’s model and serial number. There is no reason to continue with these procedures.
Step 3 - Basic Scan Emulator Troubleshooting
32 • List of Emulators User Guide
Step 3 - Basic Scan At this point you have been able to determine that the emulator is powered and has enumerated with Windows correctly and you are ready to perform a basic scan. The basic scan is a standalone test and does not use CCSetup information or require that CCStudio is installed or running.
This test assumes that you have passed the pervious steps and have the emulator connected to your target board and the target board is powered.
The following section explains the confidence tests that can be executed to verify an emulator is operational and can communicate to the target board (i.e. scan data through the scan chain). This section does not utilize CCStudio and runs from the command line independently, so we can determine if there is a possible problem with the emulator or target board.
TIP: If Code Composer is running or is not responding, close all running processes (i.e cc_app, cc_setup) associated with Code Composer before proceeding. You can do this from the Windows task manager(usually invoked by CTRL+ALT+DEL).
TIP: The following tests the scan chain which includes the target. It is recommended that you connect the JTAG cable to the target board and reset the target prior to running these tests.
XDSPROBE
Blackhawk Emulators
Go to folder \CCStudio\blackhawk\utility\BHProbe.2\1 and run the corresponding BATCH file for your emulator model. Please refer to the table below and to the BHProbe documentation located in the same folder for more details.
The output log files are placed in the log subfolder (i.e. BHProbe.2\log).
1 \CCStudio\blackhawk\utility\BHProbe.1 on older driver installations
Emulator Troubleshooting Step 3 - Basic Scan
User Guide List of Emulators • 33
PCI510 JTAG Emulator (BH‐PCI‐510)
Run the following batch file for this emulator C:\CCStudio_v3.3\blackhawk\utility\BHProbe.2\BHprobe_PCI510.bat ⇒ PASS/FAIL
If the command results in no errors, continue to the next step. If you are not sure, email the output log file to Blackhawk support. If the command results in errors email the output log file (i.e. BHProbe_PCI510.log) to Blackhawk support and be sure to include the unit’s model and serial number. In most cases, depending on the error, there is no reason to continue with these procedures.
PCI560 JTAG Emulator (BH‐PCI‐560)
Run the following batch file for this emulator C:\CCStudio_v3.3\blackhawk\utility\BHProbe.2\BHprobe_PCI560.bat ⇒ PASS/FAIL
If the command results in no errors, continue to the next step. If you are not sure, email the output log file to Blackhawk support. If the command results in errors email the output log file (i.e. BHProbe_PCI560.log) to Blackhawk support and be sure to include the unit’s model and serial number. In most cases, depending on the error, there is no reason to continue with these procedures.
USB‐JTAG Emulator (BH‐USB‐1, 0021501)
Run the following batch file for this emulator C:\CCStudio_v3.3\blackhawk\utility\BHProbe.2\BHprobe_USB2.bat ⇒ PASS/FAIL
If the command results in no errors, continue to the next step. If you are not sure, email the output log file to Blackhawk support. If the command results in errors email the output log file (i.e. BHProbe_USB2.log) to Blackhawk support and be sure to include the unit’s model and serial number. In most cases, depending on the error, there is no reason to continue with these procedures.
USB 2.0 JTAG Emulator (BH‐USB‐2)
Run the following batch file for this emulator C:\CCStudio_v3.3\blackhawk\utility\BHProbe.2\BHprobe_USB2.bat ⇒ PASS/FAIL
If the command results in no errors, continue to the next step. If you are not sure, email the output log file to Blackhawk support. If the command results in errors email the output log file (i.e. BHProbe_USB2.log) to Blackhawk support and be sure to include the unit’s model and serial number. In most cases, depending on the error, there is no reason to continue with these procedures.
Step 3 - Basic Scan Emulator Troubleshooting
34 • List of Emulators User Guide
USB2000 Controller (BH‐USB‐2000, TMDSEMU200U)
Run the following batch file for this emulator C:\CCStudio_v3.3\blackhawk\utility\BHProbe.2\BHprobe_USB2000.bat ⇒ PASS/FAIL
If the command results in no errors, continue to the next step. If you are not sure, email the output log file to Blackhawk support. If the command results in errors email the output log file (i.e. BHProbe_USB2000.log) to Blackhawk support and be sure to include the unit’s model and serial number. In most cases, depending on the error, there is no reason to continue with these procedures.
USB510 JTAG Emulator (BH‐USB‐510)
Run the following batch file for this emulator C:\CCStudio_v3.3\blackhawk\utility\BHProbe.2\BHprobe_PCI510.bat ⇒ PASS/FAIL
If the command results in no errors, continue to the next step. If you are not sure, email the output log file to Blackhawk support. If the command results in errors email the output log file (i.e. BHProbe_PCI510m.log) to Blackhawk support and be sure to include the unit’s model and serial number. In most cases, depending on the error, there is no reason to continue with these procedures.
USB510L JTAG Emulator (BH‐USB‐510L)
Run the following batch file for this emulator C:\CCStudio_v3.3\blackhawk\utility\BHProbe.2\BHprobe_USB510L.bat ⇒ PASS/FAIL
If the command results in no errors, continue to the next step. If you are not sure, email the output log file to Blackhawk support. If the command results in errors email the output log file (i.e. BHProbe_USBI510L.log) to Blackhawk support and be sure to include the unit’s model and serial number. In most cases, depending on the error, there is no reason to continue with these procedures.
USB560 JTAG Emulator (BH‐USB‐560)
Run the following batch file for this emulator C:\CCStudio_v3.3\blackhawk\utility\BHProbe.2\BHprobe_USB560.bat ⇒ PASS/FAIL
If the command results in no errors, continue to the next step. If you are not sure, email the output log file to Blackhawk support. If the command results in errors email the output log file (i.e. BHProbe_USB560.log) to Blackhawk support and be sure to include the unit’s model and serial number. In most cases, depending on the error, there is no reason to continue with these procedures.
Emulator Troubleshooting Step 3 - Basic Scan
User Guide List of Emulators • 35
USB560 JTAG Emulator (BH‐USB‐560bp)
Run the following batch file for this emulator C:\CCStudio_v3.3\blackhawk\utility\BHProbe.2\BHprobe_USB560bp.bat ⇒ PASS/FAIL
If the command results in no errors, continue to the next step. If you are not sure, email the output log file to Blackhawk support. If the command results in errors email the output log file (i.e. BHProbe_USB560bp.log) to Blackhawk support and be sure to include the unit’s model and serial number. In most cases, depending on the error, there is no reason to continue with these procedures.
USB560 JTAG Emulator (BH‐USB‐560m, TMDSEMU560U)
Run the following batch file for this emulator C:\CCStudio_v3.3\blackhawk\utility\BHProbe.2\BHprobe_USB560m.bat ⇒ PASS/FAIL
If the command results in no errors, continue to the next step. If you are not sure, email the output log file to Blackhawk support. If the command results in errors email the output log file (i.e. BHProbe_USB560m.log) to Blackhawk support and be sure to include the unit’s model and serial number. In most cases, depending on the error, there is no reason to continue with these procedures.
LAN560 JTAG Emulator (BH‐LAN‐560)
Run the following batch file for this emulator C:\CCStudio_v3.3\blackhawk\utility\BHProbe.2\BHprobe_LAN560.bat ⇒ PASS/FAIL
If the command results in no errors, continue to the next step. If you are not sure, email the output log file to Blackhawk support. If the command results in errors email the output log file (i.e. BHProbe_LAN560.log) to Blackhawk support and be sure to include the unit’s model and serial number. In most cases, depending on the error, there is no reason to continue with these procedures.
Step 3 - Basic Scan Emulator Troubleshooting
36 • List of Emulators User Guide
TI XDS560 PCI JTAG Emulator (TMDSEMU560)
For this card you will need to open a Windows command prompt (START RUN cmd.exe) and change to folder, \CCStudio\cc\bin and run the command:
XDSPROBE -F xds560.out -v -i
You can redirect the output to a file if there are errors to send to support by using the (-o) option. The following outputs the results to the file, xds560-probe.log.
XDSPROBE -F xds560.out -v -i -o TIProbe_xds560.log
⇒ PASS/FAIL If the command results in no errors, continue to the next step. If you are not sure, email the output log file to Blackhawk support. If the command results in errors email the output log file (i.e. BHProbe_USB560m.log or TIProbe_XDS560.log) to Blackhawk support and be sure to include the unit’s model and serial number. In most cases, depending on the error, there is no reason to continue with these procedures.

Emulator Troubleshooting Step 4 - Latest Drivers and Updates
User Guide List of Emulators • 37
Step 4 - Latest Drivers and Updates If you are at this step, you have confirmed that the emulator is installed correctly (with respect to Windows and device drivers) and can communicate with the target board. Before continuing, now would be a good time to verify that you have:
• The latest CCStudio updates that supports your target board and device. You can use the CCStudio Update Advisor from the HELP menu to download v3.3 service release or you can click here. Depending on how new the board or device is, you may need a Chip Support Package. These all require a my.TI login. If you are using a CCStudio version earlier than v3.3, you may need to verify with TI that your target board or DSP device is supported. You can also contact us here at Blackhawk.
• The latest Blackhawk Drivers for your version of CCStudio. You can download the latest drivers for all CCStudio versions from Blackhawk here. These files are available for download from the Blackhawk web site and each emulation driver installer contains a version number. This version number also includes a relationship to the CCStudio version you are using. So it is easy to check our web site posting and compare it to a file you have on your system to see which is later. For example, a file names BHEMU-SetupCCS_v3.3.200.2.exe, uses the first two digits of the EXE to tell you that it is for CStudio v3.3. The second two numbers, 200.2, indicate the current version of the Blackhawk drivers for this CCStudio version. So, if you have files called, BHEMU-SetupCCS_v3.3.200.1.exe, or BHEMU-SetupCCS_v3.3.0.9.exe, they are older and you should download the newer files.
Please note that for CCStudio v3.3, you must also check the service release you are using. If you did not install you may not need or be able to install the latest version driver without updating CCStudio via the update advisor.
The information below describes where to download the files from the Blackhawk web site. USB/PCI/LAN Having the latest Drivers installed on a system, is key to resolving many issues when using Blackhawk JTAG Emulator with Code Composer Studio. The site is updated regularly to bring the most up-to-date drivers and imports to you.
a. Follow this link to our download section http://www.blackhawk-dsp.com/Downloads.aspx
b. You must be a registered user to download drivers from the Blackhawk website.
Two Download section exist
Step 4 - Latest Drivers and Updates Emulator Troubleshooting
38 • List of Emulators User Guide
a. USCIF Downloads - USCIF updates are to be applied only after the matching TI USCIF was
installed on the target system, failure to install TI USCIF updater prior to the 3rd party patch will
result in incomplete installation. All current Blackhawk Driver Release versions are prepacked
with the USCIF updates.
b. Driver Downloads by Emulator - Drivers versions are based on emulator class, and code
composer version to be applied to. Choose the one that applied to your current setup.
• Note - Code Composer Studio Version 3.3 SR2 and above driver release supports all
emulators in one unified driver.
• If you have multiple Code Composer installations and/or emulator, you may need to apply
more than one driver to satisfy all your setups you wish to be working on.
PASS/FAIL If the driver installation results in no errors, continue to the next step. If the driver installation results in errors email the error message to Blackhawk support and be sure to include the unit’s model and serial number.
Emulator Troubleshooting Step 5 – CCSetup
User Guide List of Emulators • 39
Step 5 – CCSetup Configuration of CCSetup seems to be the most popular place for mistakes when the emulator is installed and operating correctly. This section should help describe how to make sure you are using the correct setup for the DSP device or devices you have on your target board.
PCI510 JTAG Emulator (BH‐PCI‐510)
a. Importing a Pre-Defined Import or Factory Board
These instructions apply to CCStudio v2.2 - v3.3, but the import dialog varies slightly between versions. Please refer to the PCI510 Installation Guide if more information is needed.
Run CCStudio Setup, and if you are using v3.0 and earlier, start the “Import a Configuration File” dialog (menu option: File Import).
Find the platform pull down located at the top of the middle CCSetup window or in the center of the import dialog box and select “bh-pci510 emulator” from the list (this will list only the PCI510 imports).
You can narrow down the import options further by using the Family pull down (i.e. select C55x to list all TMS320C55x DSP imports).
When you find your target, or an import that closely matches it, highlight the entry and choose the option to “ADD” or “IMPORT” it to My System.
If this import does not completely match your target, you can customize the properties (right click with the mouse and choose properties) to add/change a GEL file, modify TCK rate, or add/remove/reorder devices, etc.
When finished, save the setup and start CCStudio. b. Using Create Board for CCStudio v3.1 and later
Run CCStudio Setup. Select the “Create Board” tab and drag the “BH PCI510 Emulator Connection” to My System
on the left. This will prompt you for a connection name. You can enter any string you want, but at a minimum, it typically includes the emulator name and target DSP or board name.
Now, highlight the new connection name you added under My System and add the available processor(s) from the middle window to match your hardware.
Save your setup and start CCS.
⇒ PASS/FAIL If this works, great, you can continue with your project. If CCStudio fails to start or connect, email the error output to Blackhawk support and be sure to include the unit’s model and serial number. Please include the BHDetect output with the other information listed within contact Support section.
Step 5 – CCSetup Emulator Troubleshooting
40 • List of Emulators User Guide
PCI560 JTAG Emulator (BH‐PCI‐560)
a. Importing a Pre-Defined Import or Factory Board
These instructions apply to CCStudio v2.2 - v3.3, but the import dialog varies slightly between versions. Please refer to the PCI560 Installation Guide if more information is needed.
Run CCStudio Setup, and if you are using v3.0 and earlier, start the “Import a Configuration File” dialog (menu option: File Import).
Find the platform pull down located at the top of the middle CCSetup window or in the center of the import dialog box and select “bh-pci560 emulator” from the list (this will list only the PCI560 imports).
You can narrow down the import options further by using the Family pull down (i.e. select C55x to list all TMS320C55x DSP imports).
When you find your target or an import that closely matches it, highlight the entry and choose the option to “ADD” or “IMPORT” it to My System.
If this import does not completely match your target, you can customize the properties (right click with the mouse and choose properties) to add/change a GEL file, modify TCK rate, or add/remove/reorder devices, etc.
When finished, save the setup and start CCStudio. b. Using Create Board for CCStudio v3.1 and later
Run CCStudio Setup. Select the “Create Board” tab and drag the “BH PCI560 Emulator Connection” to My System
on the left. This will prompt you for a connection name. You can enter any string you want, but at a minimum, it typically includes the emulator name and target DSP or board name.
Now, highlight the new connection name you added under My System and add the available processor(s) from the middle window to match your hardware.
Save your setup and start CCS.
YOU MAY ALSO CHOOSE THE BH PCI560 EMULATOR, 20‐PIN REV –D CABLE CONNECTION
c. Changing an XDS560 PCI import for CCStudio v2.2-v3.0
Run CCStudio Setup and import a setup for the TI XDS560 PCI card that matches your target (refer to section 4.7 above for importing).
Highlight the board you added under My System, right click with the mouse and choose properties.
Locate the Emulator Name field under board properties tab and change the name from “XDS560 0” to “PCI560 0”. If you need to change other properties (GEL, DSP, etc.), you can do that too.
Save CCSetup and start CCS. ⇒ PASS/FAIL
If this works, great, you can continue with your project. If CCStudio fails to start or connect, email the error output to Blackhawk support and be sure to include the unit’s model and serial number. Please include the BHDetect output with the other information listed within contact Support section.
Emulator Troubleshooting Step 5 – CCSetup
User Guide List of Emulators • 41
USB‐JTAG Emulator (BH‐USB‐1, 0021501)
THE BH‐USB 2.0 IMPORTS ARE USED FOR BOTH THE BH‐USB2 AND THE BH‐USB‐JTAG PRODUCTS
a. Importing a Pre-Defined Import or Factory Board
These instructions apply to CCStudio v2.2 - v3.3, but the import dialog varies slightly between versions. Please refer to the USB-1 Installation Guide if more information is needed.
Run CCStudio Setup, and if you are using v3.0 and earlier, start the “Import a Configuration File” dialog (menu option: File Import).
Find the platform pull down located at the top of the middle CCSetup window or in the center of the import dialog box and select “bh-usb2.0 emulator” from the list (this will list only the USB-2 imports).
You can narrow down the import options further by using the Family pull down (i.e. select C55x to list all TMS320C55x DSP imports).
When you find your target or an import that closely matches it, highlight the entry and choose the option to “ADD” or “IMPORT” it to My System.
If this import does not completely match your target, you can customize the properties (right click with the mouse and choose properties) to add/change a GEL file, modify TCK rate, or add/remove/reorder devices, etc.
When finished, save the setup and start CCStudio. b. Using Create Board for CCStudio v3.1 and later
Run CCStudio Setup. Select the “Create Board” tab and drag the “BH USB2.0 Emulator Connection” to My System
on the left. This will prompt you for a connection name. You can enter any string you want, but at a minimum, it typically includes the emulator name and target DSP or board name.
Now, highlight the new connection name you added under My System and add the available processor(s) from the middle window to match your hardware.
Save your setup and start CCS.
⇒ PASS/FAIL If this works, great, you can continue with your project. If CCStudio fails to start or connect, email the error output to Blackhawk support and be sure to include the unit’s model and serial number. Please include the BHDetect output with the other information listed within contact Support section.
Step 5 – CCSetup Emulator Troubleshooting
42 • List of Emulators User Guide
USB 2.0 JTAG Emulator (BH‐USB‐2)
a. Importing a Pre-Defined Import or Factory Board
These instructions apply to CCStudio v2.2 - v3.3, but the import dialog varies slightly between versions. Please refer to the USB2.0 Installation Guide if more information is needed.
Run CCStudio Setup, and if you are using v3.0 and earlier, start the “Import a Configuration File” dialog (menu option: File Import).
Find the platform pull down located at the top of the middle CCSetup window or in the center of the import dialog box and select “bh-usb2.0 emulator” from the list (this will list only the USB2.0 imports).
You can narrow down the import options further by using the Family pull down (i.e. select C55x to list all TMS320C55x DSP imports).
When you find your target, or an import that closely matches it, highlight the entry and choose the option to “ADD” or “IMPORT” it to My System.
If this import does not completely match your target, you can customize the properties (right click with the mouse and choose properties) to add/change a GEL file, modify TCK rate, or add/remove/reorder devices, etc.
When finished, save the setup and start CCStudio. b. Using Create Board for CCStudio v3.1 and later
Run CCStudio Setup. Select the “Create Board” tab and drag the “BH USB2.0 Emulator Connection” to My System
on the left. This will prompt you for a connection name. You can enter any string you want, but at a minimum, it typically includes the emulator name and target DSP or board name.
Now, highlight the new connection name you added under My System and add the available processor(s) from the middle window to match your hardware.
Save your setup and start CCS.
⇒ PASS/FAIL If this works, great, you can continue with your project. If CCStudio fails to start or connect, email the error output to Blackhawk support and be sure to include the unit’s model and serial number. Please include the BHDetect output with the other information listed within contact Support section.
Emulator Troubleshooting Step 5 – CCSetup
User Guide List of Emulators • 43
USB2000 Controller (BH‐USB‐2000, TMDSEMU200U)
a. Importing a Pre-Defined Import or Factory Board
These instructions apply to CCStudio v3.1 - v3.3, but the import dialog varies slightly between versions. Please refer to the USB2000 Installation Guide if more information is needed.
NOTE: THE BH‐USB2000 ONLY SUPPORTS CODE COMPOSER 3.1 AND CODE COMPOSER 3.3 SR2+
Run CCStudio Setup dialog. Find the platform pull down located at the top of the middle CCSetup window or in the center
of the import dialog box and select “bh-usb2000 controller” from the list (this will list only the USB2000 imports).
You can narrow down the import options further by using the Family pull down (i.e. select C55x to list all TMS320C55x DSP imports).
When you find your target or an import that closely matches it, highlight the entry and choose the option to “ADD” or “IMPORT” it to My System.
If this import does not completely match your target, you can customize the properties (right click with the mouse and choose properties) to add/change a GEL file, modify TCK rate, or add/remove/reorder devices, etc.
When finished, save the setup and start CCStudio. b. Using Create Board for CCStudio v3.1 and later
Run CCStudio Setup. Select the “Create Board” tab and drag the “BH USB2000 Controller Connection” to My
System on the left. This will prompt you for a connection name. You can enter any string you want, but at a minimum, it typically includes the emulator name and target DSP or board name.
Now, highlight the new connection name you added under My System and add the available processor(s) from the middle window to match your hardware.
Save your setup and start CCS.
⇒ PASS/FAIL If this works, great, you can continue with your project. If CCStudio fails to start or connect, email the error output to Blackhawk support and be sure to include the unit’s model and serial number. Please include the BHDetect output with the other information listed within contact Support section.
Step 5 – CCSetup Emulator Troubleshooting
44 • List of Emulators User Guide
USB510 JTAG Emulator (BH‐USB‐510)
a. Importing a Pre-Defined Import or Factory Board
These instructions apply to CCStudio v2.2 - v3.3, but the import dialog varies slightly between versions. Please refer to the USB510 Installation Guide if more information is needed.
Run CCStudio Setup, and if you are using v3.0 and earlier, start the “Import a Configuration File” dialog (menu option: File Import).
Find the platform pull down located at the top of the middle CCSetup window or in the center of the import dialog box and select “bh-usb510 emulator” from the list (this will list only the USB510 imports).
You can narrow down the import options further by using the Family pull down (i.e. select C55x to list all TMS320C55x DSP imports).
When you find your target, or an import that closely matches it, highlight the entry and choose the option to “ADD” or “IMPORT” it to My System.
If this import does not completely match your target, you can customize the properties (right click with the mouse and choose properties) to add/change a GEL file, modify TCK rate, or add/remove/reorder devices, etc.
When finished, save the setup and start CCStudio. b. Using Create Board for CCStudio v3.1 and later
Run CCStudio Setup. Select the “Create Board” tab and drag the “BH USB510 Emulator Connection” to My System
on the left. This will prompt you for a connection name. You can enter any string you want, but at a minimum, it typically includes the emulator name and target DSP or board name.
Now, highlight the new connection name you added under My System and add the available processor(s) from the middle window to match your hardware.
Save your setup and start CCS.
⇒ PASS/FAIL If this works, great, you can continue with your project. If CCStudio fails to start or connect, email the error output to Blackhawk support and be sure to include the unit’s model and serial number. Please include the BHDetect output with the other information listed within contact Support section.
Emulator Troubleshooting Step 5 – CCSetup
User Guide List of Emulators • 45
USB510L JTAG Emulator (BH‐USB‐510L)
a. Importing a Pre-Defined Import or Factory Board
These instructions apply to CCStudio v3.1 - v3.3, but the import dialog varies slightly between versions. Please refer to the USB510L Installation Guide if more information is needed.
NOTE: THE BH‐USB2000 ONLY SUPPORTS CODE COMPOSER 3.1 AND CODE COMPOSER 3.3 SR2+
Run CCStudio Setup dialog. Find the platform pull down located at the top of the middle CCSetup window or in the center
of the import dialog box and select “bh-usb510(L) controller” from the list (this will list only the USB510L imports).
You can narrow down the import options further by using the Family pull down (i.e. select C55x to list all TMS320C55x DSP imports).
When you find your target or an import that closely matches it, highlight the entry and choose the option to “ADD” or “IMPORT” it to My System.
If this import does not completely match your target, you can customize the properties (right click with the mouse and choose properties) to add/change a GEL file, modify TCK rate, or add/remove/reorder devices, etc.
When finished, save the setup and start CCStudio. b. Using Create Board for CCStudio v3.1 and later
Run CCStudio Setup. Select the “Create Board” tab and drag the “BH USB510L Emulator Connection” to My
System on the left. This will prompt you for a connection name. You can enter any string you want, but at a minimum, it typically includes the emulator name and target DSP or board name.
Now, highlight the new connection name you added under My System and add the available processor(s) from the middle window to match your hardware.
Save your setup and start CCS.
⇒ PASS/FAIL If this works, great, you can continue with your project. If CCStudio fails to start or connect, email the error output to Blackhawk support and be sure to include the unit’s model and serial number. Please include the BHDetect output with the other information listed within contact Support section.
Step 5 – CCSetup Emulator Troubleshooting
46 • List of Emulators User Guide
USB560 JTAG Emulator (BH‐USB‐560)
a. Importing a Pre-Defined Import or Factory Board
These instructions apply to CCStudio v2.2 - v3.3, but the import dialog varies slightly between versions. Please refer to the USB560 Installation Guide if more information is needed.
Run CCStudio Setup, and if you are using v3.0 and earlier, start the “Import a Configuration File” dialog (menu option: File Import).
Find the platform pull down located at the top of the middle CCSetup window or in the center of the import dialog box and select “bh-usb560 emulator” from the list (this will list only the USB560 imports).
You can narrow down the import options further by using the Family pull down (i.e. select C55x to list all TMS320C55x DSP imports).
When you find your target, or an import that closely matches it, highlight the entry and choose the option to “ADD” or “IMPORT” it to My System.
If this import does not completely match your target, you can customize the properties (right click with the mouse and choose properties) to add/change a GEL file, modify TCK rate, or add/remove/reorder devices, etc.
When finished, save the setup and start CCStudio. b. Using Create Board for CCStudio v3.1 and later
Run CCStudio Setup. Select the “Create Board” tab and drag the “BH USB560 Emulator Connection” to My System
on the left. This will prompt you for a connection name. You can enter any string you want, but at a minimum, it typically includes the emulator name and target DSP or board name.
Now, highlight the new connection name you added under My System and add the available processor(s) from the middle window to match your hardware.
Save your setup and start CCS. c. Changing an XDS560 PCI import for CCStudio v2.2-v3.0
Run CCStudio Setup and import a setup for the TI XDS560 PCI card that matches your target (refer to section 4.7 above for importing).
Highlight the board you added under My System, right click with the mouse and choose properties.
Locate the Emulator Name field under board properties tab and change the name from “XDS560 0” to “USB560 0”. If you need to change other properties (GEL, DSP, etc.), you can do that too.
Save CCSetup and start CCS. ⇒ PASS/FAIL
If this works, great, you can continue with your project. If CCStudio fails to start or connect, email the error output to Blackhawk support and be sure to include the unit’s model and serial number. Please include the BHDetect output with the other information listed within contact Support section.
Emulator Troubleshooting Step 5 – CCSetup
User Guide List of Emulators • 47
USB560 JTAG Emulator (BH‐USB‐560bp)
a. Importing a Pre-Defined Import or Factory Board
These instructions apply to CCStudio v2.2 - v3.3, but the import dialog varies slightly between versions. Please refer to the USB560bp Installation Guide if more information is needed.
Run CCStudio Setup, and if you are using v3.0 and earlier, start the “Import a Configuration File” dialog (menu option: File Import).
Find the platform pull down located at the top of the middle CCSetup window or in the center of the import dialog box and select “bh-usb560(bp) emulator” from the list (this will list only the USB560bp imports).
You can narrow down the import options further by using the Family pull down (i.e. select C55x to list all TMS320C55x DSP imports).
When you find your target, or an import that closely matches it, highlight the entry and choose the option to “ADD” or “IMPORT” it to My System.
If this import does not completely match your target, you can customize the properties (right click with the mouse and choose properties) to add/change a GEL file, modify TCK rate, or add/remove/reorder devices, etc.
When finished, save the setup and start CCStudio. b. Using Create Board for CCStudio v3.1 and later
Run CCStudio Setup. Select the “Create Board” tab and drag the “BH USB560-BP Emulator Connection” to My
System on the left. This will prompt you for a connection name. You can enter any string you want, but at a minimum, it typically includes the emulator name and target DSP or board name.
Now, highlight the new connection name you added under My System and add the available processor(s) from the middle window to match your hardware.
Save your setup and start CCS.
YOU MAY ALSO CHOOSE THE BH USB560‐BP EMULATOR, 20‐PIN REV –D CABLE CONNECTION
c. Changing an XDS560 PCI import for CCStudio v2.2-v3.0
Run CCStudio Setup and import a setup for the TI XDS560 PCI card that matches your target (refer to section 4.7 above for importing).
Highlight the board you added under My System, right click with the mouse and choose properties.
Locate the Emulator Name field under board properties tab and change the name from “XDS560 0” to “BH560UBP 0”. If you need to change other properties (GEL, DSP, etc.), you can do that too.
Save CCSetup and start CCS. ⇒ PASS/FAIL
If this works, great, you can continue with your project. If CCStudio fails to start or connect, email the error output to Blackhawk support and be sure to include the unit’s model and serial number. Please include the BHDetect output with the other information listed within contact Support section.
Step 5 – CCSetup Emulator Troubleshooting
48 • List of Emulators User Guide
USB560 JTAG Emulator (BH‐USB‐560m, TMDSEMU560U)
a. Importing a Pre-Defined Import or Factory Board
These instructions apply to CCStudio v2.2 - v3.3, but the import dialog varies slightly between versions. Please refer to the USB560m Installation Guide if more information is needed.
Run CCStudio Setup, and if you are using v3.0 and earlier, start the “Import a Configuration File” dialog (menu option: File Import).
Find the platform pull down located at the top of the middle CCSetup window or in the center of the import dialog box and select “bh-usb560(m) emulator” from the list (this will list only the USB560m imports).
You can narrow down the import options further by using the Family pull down (i.e. select C55x to list all TMS320C55x DSP imports).
When you find your target, or an import that closely matches it, highlight the entry and choose the option to “ADD” or “IMPORT” it to My System.
If this import does not completely match your target, you can customize the properties (right click with the mouse and choose properties) to add/change a GEL file, modify TCK rate, or add/remove/reorder devices, etc.
When finished, save the setup and start CCStudio. b. Using Create Board for CCStudio v3.1 and later
Run CCStudio Setup. Select the “Create Board” tab and drag the “BH USB560-M Emulator Connection” to My
System on the left. This will prompt you for a connection name. You can enter any string you want, but at a minimum, it typically includes the emulator name and target DSP or board name.
Now, highlight the new connection name you added under My System and add the available processor(s) from the middle window to match your hardware.
Save your setup and start CCS.
YOU MAY ALSO CHOOSE THE BH USB560‐M EMULATOR, 20‐PIN REV –D CABLE CONNECTION
c. Changing an XDS560 PCI import for CCStudio v2.2-v3.0
Run CCStudio Setup and import a setup for the TI XDS560 PCI card that matches your target (refer to section 4.7 above for importing).
Highlight the board you added under My System, right click with the mouse and choose properties.
Locate the Emulator Name field under board properties tab and change the name from “XDS560 0” to “USB560M 0”. If you need to change other properties (GEL, DSP, etc.), you can do that too.
Save CCSetup and start CCS. ⇒ PASS/FAIL
If this works, great, you can continue with your project. If CCStudio fails to start or connect, email the error output to Blackhawk support and be sure to include the unit’s model and serial number. Please include the BHDetect output with the other information listed within contact Support section.

Emulator Troubleshooting Step 5 – CCSetup
User Guide List of Emulators • 49
LAN560 JTAG Emulator (BH‐LAN‐560)
a. Importing a Pre-Defined Import or Factory Board
These instructions apply to CCStudio v2.2 - v3.3, but the import dialog varies slightly between versions. Please refer to the LAN560 Installation Guide if more information is needed.
Run CCStudio Setup, and if you are using v3.0 and earlier, start the “Import a Configuration File” dialog (menu option: File Import).
Find the platform pull down located at the top of the middle CCSetup window or in the center of the import dialog box and select “bh-lan560 emulator” from the list (this will list only the LAN560 imports).
You can narrow down the import options further by using the Family pull down (i.e. select C55x to list all TMS320C55x DSP imports).
When you find your target, or an import that closely matches it, highlight the entry and choose the option to “ADD” or “IMPORT” it to My System.
If this import does not completely match your target, you can customize the properties (right click with the mouse and choose properties) to add/change a GEL file, modify TCK rate, or add/remove/reorder devices, etc.
When finished, save the setup and start CCStudio. b. Using Create Board for CCStudio v3.1 and later
Run CCStudio Setup. Select the “Create Board” tab and drag the “BH LAN560 Emulator Connection” to My System
on the left. This will prompt you for a connection name. You can enter any string you want, but at a minimum, it typically includes the emulator name and target DSP or board name.
Now, highlight the new connection name you added under My System and add the available processor(s) from the middle window to match your hardware.
Save your setup and start CCS.
YOU MAY ALSO CHOOSE THE BH LAN560 EMULATOR, 20‐PIN REV –D CABLE CONNECTION
c. Changing an XDS560 PCI import for CCStudio v2.2-v3.0
Run CCStudio Setup and import a setup for the TI XDS560 PCI card that matches your target (refer to section 4.7 above for importing).
Highlight the board you added under My System, right click with the mouse and choose properties.
Locate the Emulator Name field under board properties tab and change the name from “XDS560 0” to “LAN560 0”. If you need to change other properties (GEL, DSP, etc.), you can do that too.
Save CCSetup and start CCS. ⇒ PASS/FAIL
If this works, great, you can continue with your project. If CCStudio fails to start or connect, email the error output to Blackhawk support and be sure to include the unit’s model and serial number. Please include the BHDetect output with the other information listed within contact Support section.
Step 5 – CCSetup Emulator Troubleshooting
50 • List of Emulators User Guide
TI XDS560 PCI JTAG Emulator (TMDSEMU560)
a. Importing a Pre-Defined Import or Factory Board
These instructions apply to CCStudio v2.2 - v3.3, but the import dialog varies slightly between versions. Please refer to the XDS560 Installation Guide if more information is needed.
Run CCStudio Setup, and if you are using v3.0 and earlier, start the “Import a Configuration File” dialog (menu option: File Import).
Find the platform pull down located at the top of the middle CCSetup window or in the center of the import dialog box and select “xds560 emulator” from the list (this will list only the XDS560 imports).
You can narrow down the import options further by using the Family pull down (i.e. select C55x to list all TMS320C55x DSP imports).
When you find your target or an import that closely matches it, highlight the entry and choose the option to “ADD” or “IMPORT” it to My System.
If this import does not completely match your target, you can customize the properties (right click with the mouse and choose properties) to add/change a GEL file, modify TCK rate, or add/remove/reorder devices, etc.
When finished, save the setup and start CCStudio. b. Using Create Board for CCStudio v3.1 and later
Run CCStudio Setup. Select the “Create Board” tab and drag the “TI XDS560 Emulator Connection” to My System
on the left. This will prompt you for a connection name. You can enter any string you want, but at a minimum, it typically includes the emulator name and target DSP or board name.
Now, highlight the new connection name you added under My System and add the available processor(s) from the middle window to match your hardware.
Save your setup and start CCS.
YOU MAY ALSO CHOOSE THE TI XDS560 EMULATOR, 20‐PIN REV –D CABLE CONNECTION
⇒ PASS/FAIL
If this works, great, you can continue with your project. If CCStudio fails to start or connect, email the error output to Blackhawk support and be sure to include the unit’s model and serial number. Please include the BHDetect output with the other information listed within contact Support section.

Emulator Troubleshooting Step 6 - Running CCStudio
User Guide List of Emulators • 51
Step 6 - Running CCStudio At this point you must have configured CCSetup and get a run-time error when starting CCStudio or trying to connect to the target board’s DSP device, devices, or particular CPU core. This section is separated into different areas based on the possible target board type, DSP, and manner in which you configured CCSetup. Please refer to this that may apply to your target board configuration.
CCSetup Used for a Standard DSK or EVM Board
a. Load Code Composer Studio Setup, import the setup that is most closely matching your
target DSK or EVM board.
b. If the DSK or EVM board were not used you can add to each processor a GEL that may be
required by some DSK’s. Right click on the processor, and choose properties.
Figure 33 Processor Properties
c. Now click on the to browse to the location of the GEL file corresponding to the processor
you are using.

Step 6 - Running CCStudio Emulator Troubleshooting
52 • List of Emulators User Guide
d. Choose File Save your new import.
e. Load Code Composer Studio
f. On Versions 3.0 and above Choose from the main menu Debug Reset Emulator, then
Debug Connect, else skip this step as older version use auto connect feature.
g. Once connected choose from the main menu File Load Program…
h. Step trough your program using single step or other
2. 3. PASS/FAIL
If this works, great, you can continue with your project. If CCStudio fails to connect or load your program, verify that the program is compiled for that target DSP, use TI tutorial or example out files. Email the error output to Blackhawk support and be sure to include the unit’s model and serial number. Please include the BHDetect output with the other information listed within contact Support section.
CCSetup for a Custom Target Board Using a Single Device
Figure 34 Single Processor Target
a. Load Code Composer Studio Setup, In Code Composer 3.1 and later Highlight My System
located on the left pane
b. Choose the Create Board Tab in the middle pane.
c. Drag the Connection correlated to the emulator you are using to the left pane.
d. This will prompt you for a connection name. You can enter any string you want, but at a
minimum, it typically includes the emulator name and target DSP or board name
e. Now drag the device you require from the available processor types from the middle pane
into the left pane.
f. If this import does not completely match your target, you can customize the properties (right
click with the mouse and choose properties) to add/change a GEL file, modify TCK rate, or
add/remove/reorder devices, etc.
g. Choose File Save your new import.
h. Load Code Composer Studio
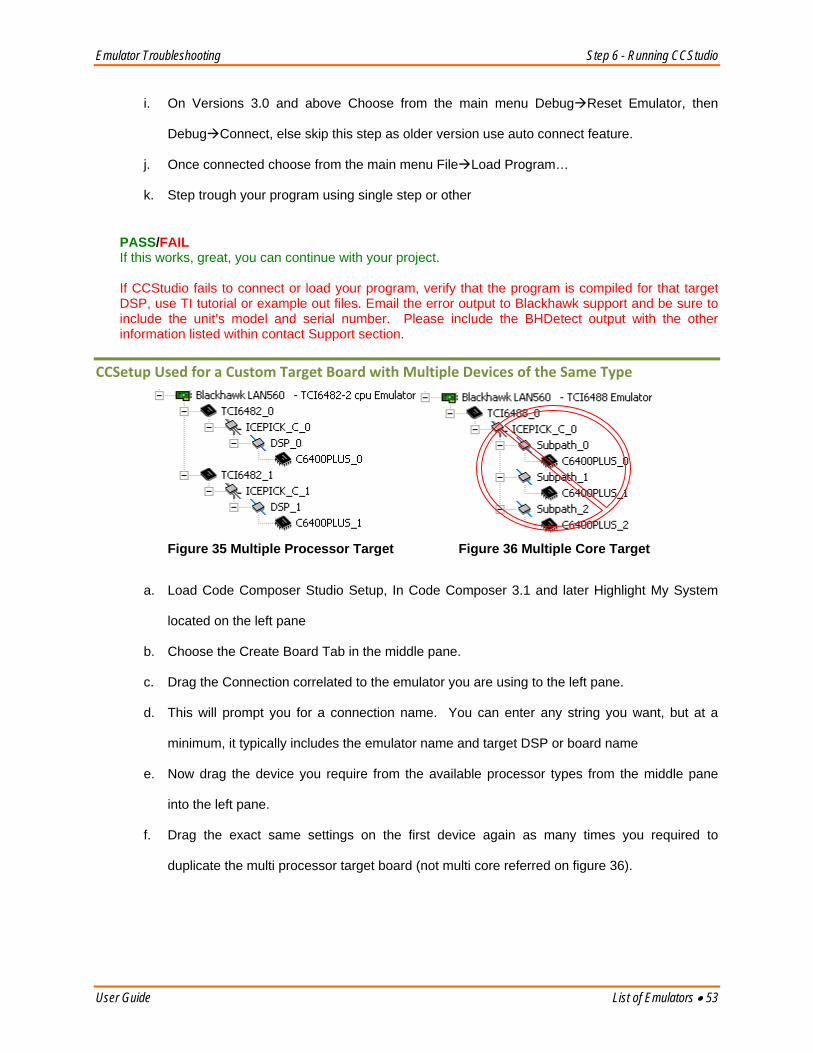
Emulator Troubleshooting Step 6 - Running CCStudio
User Guide List of Emulators • 53
i. On Versions 3.0 and above Choose from the main menu Debug Reset Emulator, then
Debug Connect, else skip this step as older version use auto connect feature.
j. Once connected choose from the main menu File Load Program…
k. Step trough your program using single step or other
4. 5. PASS/FAIL
If this works, great, you can continue with your project. If CCStudio fails to connect or load your program, verify that the program is compiled for that target DSP, use TI tutorial or example out files. Email the error output to Blackhawk support and be sure to include the unit’s model and serial number. Please include the BHDetect output with the other information listed within contact Support section.
CCSetup Used for a Custom Target Board with Multiple Devices of the Same Type
Figure 35 Multiple Processor Target Figure 36 Multiple Core Target
a. Load Code Composer Studio Setup, In Code Composer 3.1 and later Highlight My System
located on the left pane
b. Choose the Create Board Tab in the middle pane.
c. Drag the Connection correlated to the emulator you are using to the left pane.
d. This will prompt you for a connection name. You can enter any string you want, but at a
minimum, it typically includes the emulator name and target DSP or board name
e. Now drag the device you require from the available processor types from the middle pane
into the left pane.
f. Drag the exact same settings on the first device again as many times you required to
duplicate the multi processor target board (not multi core referred on figure 36).
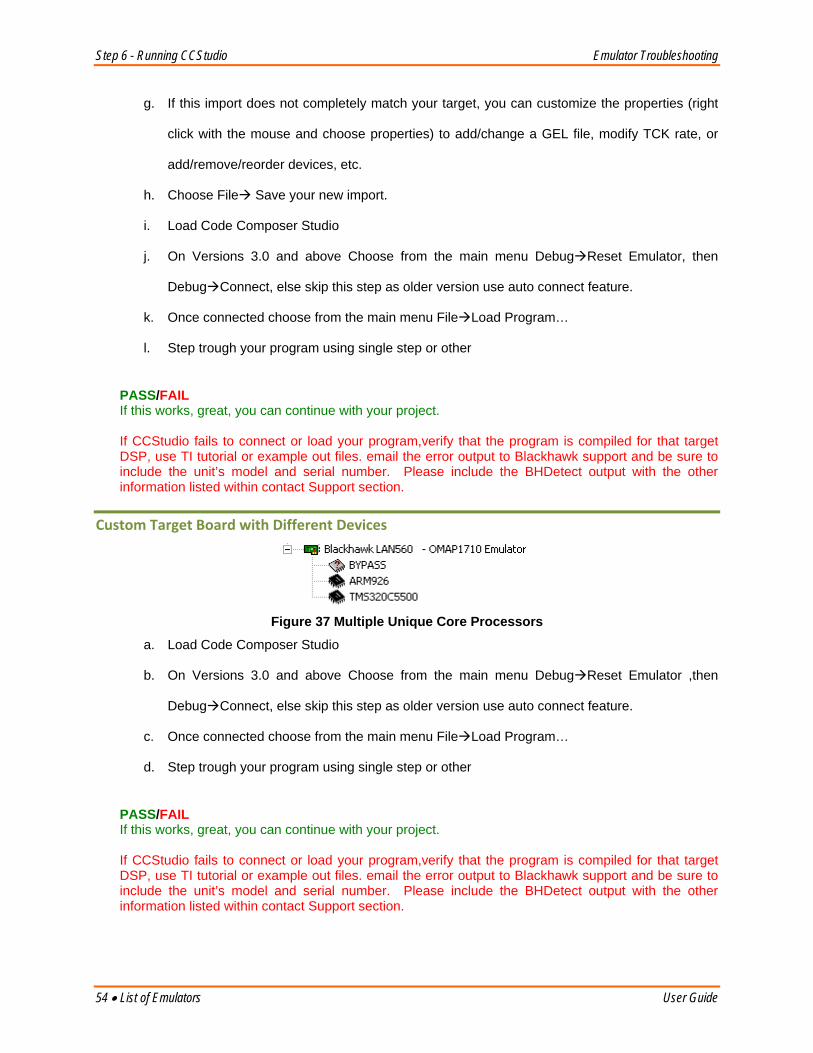
Step 6 - Running CCStudio Emulator Troubleshooting
54 • List of Emulators User Guide
g. If this import does not completely match your target, you can customize the properties (right
click with the mouse and choose properties) to add/change a GEL file, modify TCK rate, or
add/remove/reorder devices, etc.
h. Choose File Save your new import.
i. Load Code Composer Studio
j. On Versions 3.0 and above Choose from the main menu Debug Reset Emulator, then
Debug Connect, else skip this step as older version use auto connect feature.
k. Once connected choose from the main menu File Load Program…
l. Step trough your program using single step or other
6. 7. PASS/FAIL
If this works, great, you can continue with your project. If CCStudio fails to connect or load your program,verify that the program is compiled for that target DSP, use TI tutorial or example out files. email the error output to Blackhawk support and be sure to include the unit’s model and serial number. Please include the BHDetect output with the other information listed within contact Support section.
Custom Target Board with Different Devices
Figure 37 Multiple Unique Core Processors
a. Load Code Composer Studio
b. On Versions 3.0 and above Choose from the main menu Debug Reset Emulator ,then
Debug Connect, else skip this step as older version use auto connect feature.
c. Once connected choose from the main menu File Load Program…
d. Step trough your program using single step or other
8. 9. PASS/FAIL
If this works, great, you can continue with your project. If CCStudio fails to connect or load your program,verify that the program is compiled for that target DSP, use TI tutorial or example out files. email the error output to Blackhawk support and be sure to include the unit’s model and serial number. Please include the BHDetect output with the other information listed within contact Support section.
Emulator Troubleshooting Step 6 - Running CCStudio
User Guide List of Emulators • 55
CCSetup Used for a Board Not Listed Above
a. Contact Blackhawk support for any custom setup needed that is not listed above.
10. 11. FAIL
Email the error output to Blackhawk support and be sure to include the unit’s model and serial number. Please include the BHDetect output with the other information listed within contact Support section.
Step 7 – Where Do I Go Next? Emulator Troubleshooting
56 • List of Emulators User Guide
Step 7 – Where Do I Go Next? USB/PCI/LAN This document contains an Appendix that refers to common known errors and diagnostic utilities offered on our website. Before contacting support, please verify if your question is answered within the appendix of this document or on our FAQ page http://www.blackhawk-dsp.com/Faq.aspx .

Emulator Troubleshooting Additional Resources
User Guide LAN Emulator Utilities • 57
Additional Resources LAN Emulator Utilities
BHEthCfg.exe i. Available on all current driver installations, and on our website. ii. Use the utility to program IP address information into a LAN unit. iii. Create and start LAN service with a port for emulation on Code Composer. iv. Test connectivity to the LAN unit and JTAG communication to the board
connected to it. v. Check the status of a LAN unit on a network.
See Step 2 part c for details on using the utility
Lan560Diags This utility is no longer supported, please see current revision BHEthcfg.exe
Figure 38 - Obsolete LAN560 Diagnostic Utility
NOTES a. Test the unit and target using the USB side. b. Test LAN Drivers
I. Go to C:\<CCS install dir>\blackhawk\Drivers.1\LAN\bheth.inf and right click on it and choose “Install”.
II. Go to C:\ <CCS install dir>\blackhawk\Drivers.1\LAN\bhethcfg.exe and verify that you have created and started the LAN service.
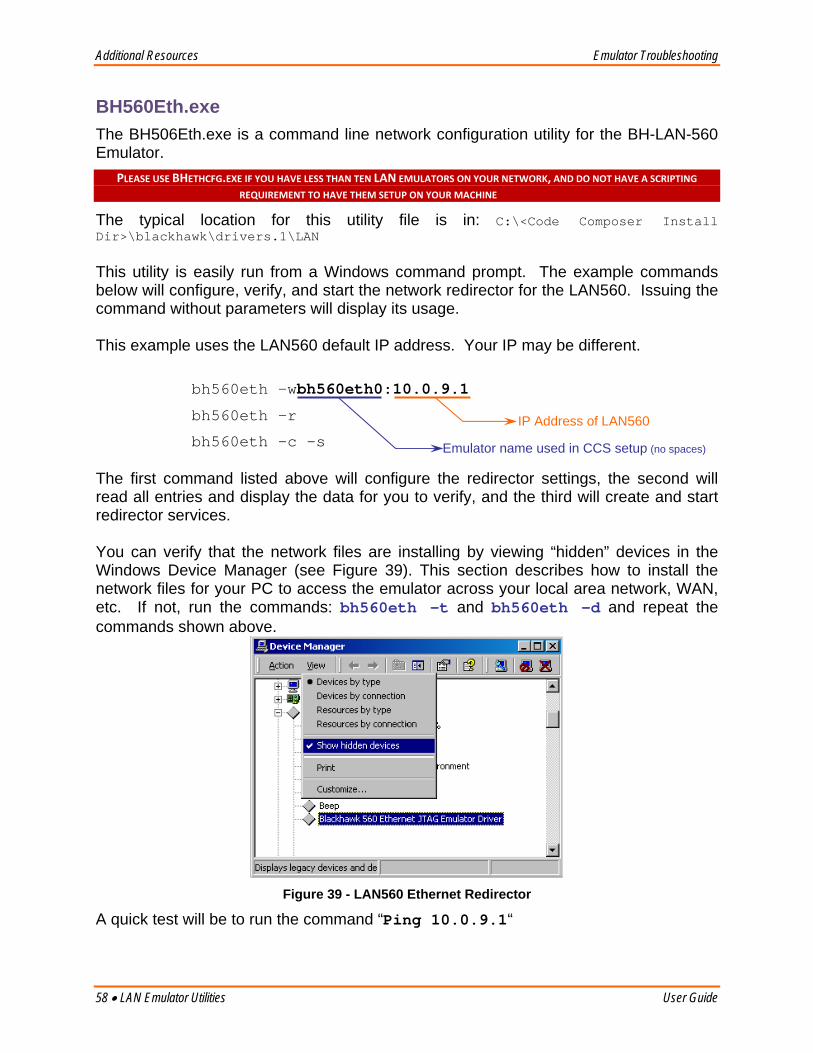
Additional Resources Emulator Troubleshooting
58 • LAN Emulator Utilities User Guide
BH560Eth.exe The BH506Eth.exe is a command line network configuration utility for the BH-LAN-560 Emulator.
PLEASE USE BHETHCFG.EXE IF YOU HAVE LESS THAN TEN LAN EMULATORS ON YOUR NETWORK, AND DO NOT HAVE A SCRIPTING REQUIREMENT TO HAVE THEM SETUP ON YOUR MACHINE
The typical location for this utility file is in: C:\<Code Composer Install Dir>\blackhawk\drivers.1\LAN This utility is easily run from a Windows command prompt. The example commands below will configure, verify, and start the network redirector for the LAN560. Issuing the command without parameters will display its usage. This example uses the LAN560 default IP address. Your IP may be different.
bh560eth –wbh560eth0:10.0.9.1
bh560eth –r
bh560eth –c –s The first command listed above will configure the redirector settings, the second will read all entries and display the data for you to verify, and the third will create and start redirector services. You can verify that the network files are installing by viewing “hidden” devices in the Windows Device Manager (see Figure 39). This section describes how to install the network files for your PC to access the emulator across your local area network, WAN, etc. If not, run the commands: bh560eth –t and bh560eth –d and repeat the commands shown above.
Figure 39 - LAN560 Ethernet Redirector
A quick test will be to run the command “Ping 10.0.9.1“
IP Address of LAN560
Emulator name used in CCS setup (no spaces)

Emulator Troubleshooting Additional Resources
User Guide Code Composer Studio Tips • 59
Code Composer Studio Tips
Installation The following section describes the common installation procedure for CCStudio. Code Composer Studio versions 3.3, 3.1, 2.21 are the recommended stable versions to use with our emulators, if possible upgrade to one of these versions. We support Windows 2000/XP/Vista 32-bit and 64-bit, no current support for Linux. If you need to work under another O/S environment, virtual implementation is possible, but is less likely to work.
Service packs and updates to its products are released by TI on a regular basis. Using our BHprobe tools it is possible that your emulator may communicate ok with your target, however when CCS may fail. This section will assist most users seeing errors that are coming from improper installation or setup.
CCS 3.3 a. Install Code Composer Studio from your CD. b. Recommended - Update Code Composer to the latest Service Pack Release from TI. Doing
this requires an active “my TI” account and to register your product with TI. You can access the web updates either from component manager by choosing Tools Web Update Now or from Code Composer IDE Dialog Help Update Advisor Check for Updates.
c. Install latest Blackhawk Drivers either from CD that came with the product or from our website. (For download rights you are required to register within the site using a valid email address. Please verify that blackhawk-dsp.com domain is a trusted domain in your email program setting when creating an account to omit any spam filters from deleting or blocking the registration confirmation email).
d. Install USCIF update if you had followed step b. *Note users installing a BH-USB2000 or BH-USB510L must follow step b above in order to continue with driver installation.
CCS 3.1 a. Install Code Composer Studio from your CD. b. Install latest Blackhawk Drivers either from CD that came with the product or from our
website. (All downloads require registration, and use a login. Please verify that blackhawk-dsp.com domain is a trusted domain in your email program setting when creating an account).
Note - USCIF update is bundled with current CCS 3.1 drivers and is required for USB560m Rev E and above JTAG Emulators, and for XDS560 Rev D cables. However, it is also located on the Installation CD and on the blackhawk-dsp.com website if you are not using the latest drivers. Note - USB2000 and USB510L come with a special driver and uscif update. Install the drivers on the last step only to avoid any TI updates which erase files installed by those drivers. Verify that Code Composer is not running in the background as it may result in a failed driver installation.

Additional Resources Emulator Troubleshooting
60 • Code Composer Studio Tips User Guide
CCS 2.21 c. Install Code Composer Studio from your CD. d. Install latest Blackhawk Drivers either from the CD that came with the product or from our
website. (All downloads require registration and use a login. Please verify that blackhawk-dsp.com domain is a trusted domain in your email program setting when creating an account).
Note - USCIF update is bundled with current CCS 2.2.1 Drivers and is required for USB560m Rev E and above JTAG Emulators, and for XDS560 Rev D cables. It is also located on the Installation CD that comes with those products. If you are unsure which driver version you currently hold please go to the blackhawk-dsp.com website downloads section.
Modifying CCStudio Imports a. Code Composer Studio Setup may require additional tweaks to work with
your hardware. I. Custom Configuration Files are preinstalled along with the Blackhawk
drivers, (config file is explained further in spra758a page 10, no support is given to custom files, and incorrect setup may complicate a simple problem).
II. Gel Files - Can either be required to be used in order to place target silicon in debug mode while connecting, or best removed when inhibiting it from connecting. By default if you are having issues connecting, remove the gel file being used or add one corresponding to your target if one is not used.
2.
CCStudio Connect Tips a. Always power down emulator and target board and reconnect cables, then
retest Code Composer. b. Lower JTAG TCLK Frequency on connection properties within Code
Composer setup.
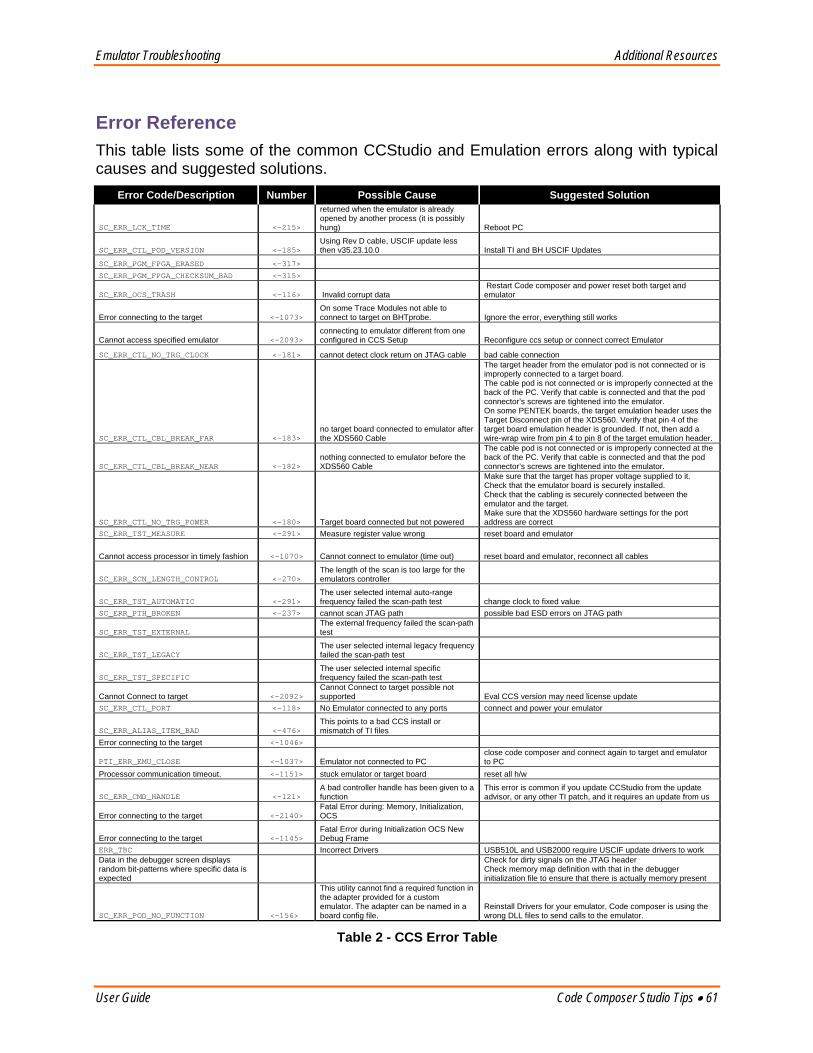
Emulator Troubleshooting Additional Resources
User Guide Code Composer Studio Tips • 61
Error Reference This table lists some of the common CCStudio and Emulation errors along with typical causes and suggested solutions.
Error Code/Description Number Possible Cause Suggested Solution
SC_ERR_LCK_TIME <-215>
returned when the emulator is already opened by another process (it is possibly hung) Reboot PC
SC_ERR_CTL_POD_VERSION <-185> Using Rev D cable, USCIF update less then v35.23.10.0 Install TI and BH USCIF Updates
SC_ERR_PGM_FPGA_ERASED <-317> SC_ERR_PGM_FPGA_CHECKSUM_BAD <-315>
SC_ERR_OCS_TRASH <-116> Invalid corrupt data Restart Code composer and power reset both target and emulator
Error connecting to the target <-1073> On some Trace Modules not able to connect to target on BHTprobe. Ignore the error, everything still works
Cannot access specified emulator <-2093> connecting to emulator different from one configured in CCS Setup Reconfigure ccs setup or connect correct Emulator
SC_ERR_CTL_NO_TRG_CLOCK <-181> cannot detect clock return on JTAG cable bad cable connection
SC_ERR_CTL_CBL_BREAK_FAR <-183> no target board connected to emulator after the XDS560 Cable
The target header from the emulator pod is not connected or is improperly connected to a target board. The cable pod is not connected or is improperly connected at the back of the PC. Verify that cable is connected and that the pod connector’s screws are tightened into the emulator. On some PENTEK boards, the target emulation header uses the Target Disconnect pin of the XDS560. Verify that pin 4 of the target board emulation header is grounded. If not, then add a wire-wrap wire from pin 4 to pin 8 of the target emulation header.
SC_ERR_CTL_CBL_BREAK_NEAR <-182> nothing connected to emulator before the XDS560 Cable
The cable pod is not connected or is improperly connected at the back of the PC. Verify that cable is connected and that the pod connector’s screws are tightened into the emulator.
SC_ERR_CTL_NO_TRG_POWER <-180> Target board connected but not powered
Make sure that the target has proper voltage supplied to it. Check that the emulator board is securely installed. Check that the cabling is securely connected between the emulator and the target. Make sure that the XDS560 hardware settings for the port address are correct
SC_ERR_TST_MEASURE <-291> Measure register value wrong reset board and emulator
Cannot access processor in timely fashion <-1070> Cannot connect to emulator (time out) reset board and emulator, reconnect all cables
SC_ERR_SCN_LENGTH_CONTROL <-270> The length of the scan is too large for the emulators controller
SC_ERR_TST_AUTOMATIC <-291> The user selected internal auto-range frequency failed the scan-path test change clock to fixed value
SC_ERR_PTH_BROKEN <-237> cannot scan JTAG path possible bad ESD errors on JTAG path
SC_ERR_TST_EXTERNAL The external frequency failed the scan-path test
SC_ERR_TST_LEGACY The user selected internal legacy frequency failed the scan-path test
SC_ERR_TST_SPECIFIC The user selected internal specific frequency failed the scan-path test
Cannot Connect to target <-2092> Cannot Connect to target possible not supported Eval CCS version may need license update
SC_ERR_CTL_PORT <-118> No Emulator connected to any ports connect and power your emulator
SC_ERR_ALIAS_ITEM_BAD <-476> This points to a bad CCS install or mismatch of TI files
Error connecting to the target <-1046>
PTI_ERR_EMU_CLOSE <-1037> Emulator not connected to PC close code composer and connect again to target and emulator to PC
Processor communication timeout. <-1151> stuck emulator or target board reset all h/w
SC_ERR_CMD_HANDLE <-121> A bad controller handle has been given to a function
This error is common if you update CCStudio from the update advisor, or any other TI patch, and it requires an update from us
Error connecting to the target <-2140> Fatal Error during: Memory, Initialization, OCS
Error connecting to the target <-1145> Fatal Error during Initialization OCS New Debug Frame
ERR_TBC Incorrect Drivers USB510L and USB2000 require USCIF update drivers to work Data in the debugger screen displays random bit-patterns where specific data is expected
Check for dirty signals on the JTAG header Check memory map definition with that in the debugger initialization file to ensure that there is actually memory present
SC_ERR_POD_NO_FUNCTION <-156>
This utility cannot find a required function in the adapter provided for a custom emulator. The adapter can be named in a board config file.
Reinstall Drivers for your emulator, Code composer is using the wrong DLL files to send calls to the emulator.
Table 2 - CCS Error Table
Additional Resources Emulator Troubleshooting
62 • Target Hardware Basics User Guide
Target Hardware Basics
DSK and EVMs a. Some DSK’s (Development Starter Kit) and EVM’s (Evaluation Modules) may
require hardware update to work properly using external emulation or Trace capability. Always check with your board manufacturer that your board’s revision is updated, or what are the current known issues with your board.
b. Known issues:
I. TMS320C6455 DSK- last stable Revision D; TCK return may intermit external JTAG emulation from connecting to the board using Code Composer. Can be solve using a custom configuration file that loops back the TCLK (spraak6.pdf)
II. TMS320C6482/ TMS3206416 refer to spraak6 for recommended hardware changes. Page 11-16
III. DM648 EVM - Revision B cannot connect to the board using Trace cable, resolve by updating the firmware.
Custom Boards 2. DFT (Design For Test)
Follow the TI guidelines for implementing JTAG into your custom board. The following technical documents are guidelines for board design for both JTAG and Trace. It is recommended on alpha board design to use some DFT guidelines within their designs such as adding optional jumpers or no-pop resistors that can assist in changing circuit layout to exclude logic for debugging board design errors that may arise. We cannot be held responsible for emulation issues due to bad board design; contact your TI rep for pre-developmental questions and hardware verification, if you are unsure on your JTAG implementation.
a. General 14-Pin Emulation
I. XDS560 Emulator Technical Reference (Rev. A) http://www.ti.com/litv/pdf/spru589a
II. TMS320C6000 DSP Designing for JTAG Emulation Reference Guide http://focus.ti.com/general/docs/techdocsabstract.tsp?abstractName=spru641
III. JTAG/MPSD Emulation Technical Reference http://focus.ti.com/lit/ug/spdu079a/spdu079a.pdf
Emulator Troubleshooting Additional Resources
User Guide Target Hardware Basics • 63
b. TCK Sensitivity
I. TMS320C6455/54 Digital Signal Processor Silicon Errata (Silicon Revs 2.0, 1.1) http://focus.ti.com/lit/er/sprz234h/sprz234h.pdf - page 20-21
c. Trace Related
I. 60-Pin Emulation Header Technical Reference (Rev. C) http://focus.ti.com/lit/ug/spru655c/spru655c.pdf
II. Common Trace Transmission Problems and Solutions http://www.ti.com/litv/pdf/spraak6
d. General
I. Emulation Fundamentals for TI's DSP Solutions http://focus.ti.com/general/docs/techdocsabstract.tsp?abstractName=spra439c
II. Testability Primer (Rev. D ) http://focus.ti.com/lit/an/ssya002d/ssya002d.pdf
III. Boundary-Scan Tutorial http://www.corelis.com/products/Boundary-Scan_Tutorial.htm
IV. Using xdsprobe with the XDS560 and XDS510 (Rev. A) http://focus.ti.com/lit/an/spra758a/spra758a.pdf
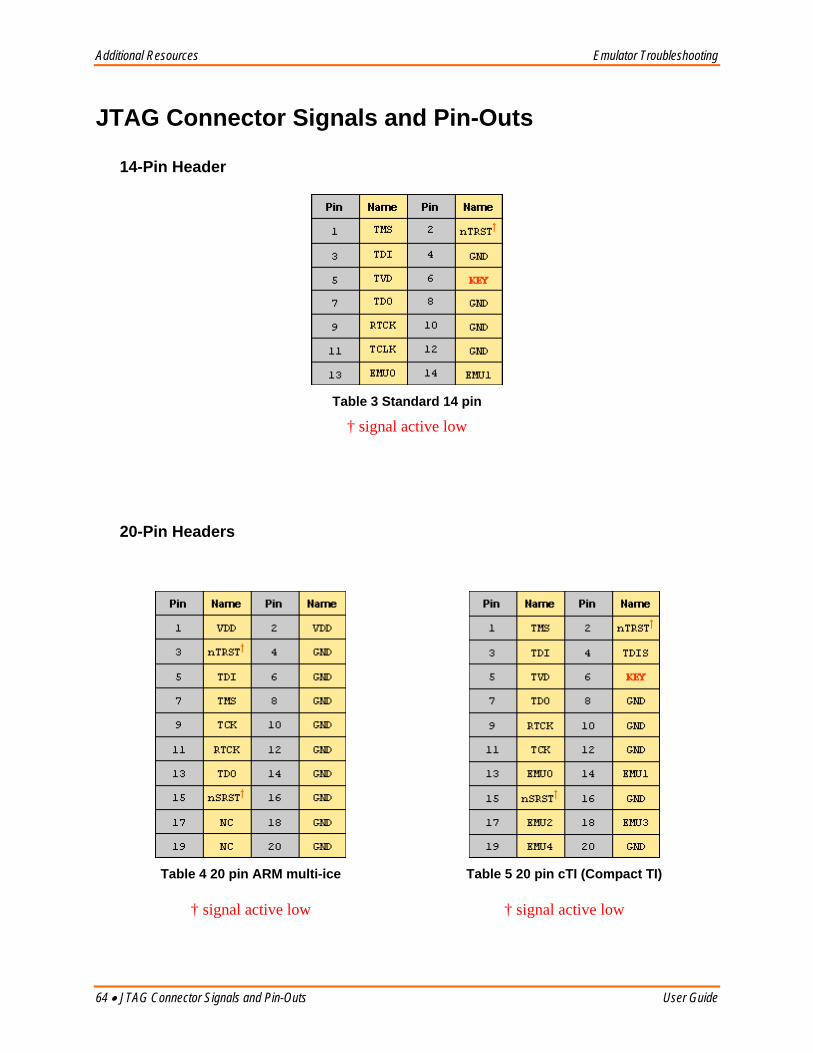
Additional Resources Emulator Troubleshooting
64 • JTAG Connector Signals and Pin-Outs User Guide
JTAG Connector Signals and Pin-Outs 3. 1. 14-Pin Header
Table 3 Standard 14 pin
† signal active low
20-Pin Headers
Table 4 20 pin ARM multi-ice
Table 5 20 pin cTI (Compact TI)
† signal active low † signal active low
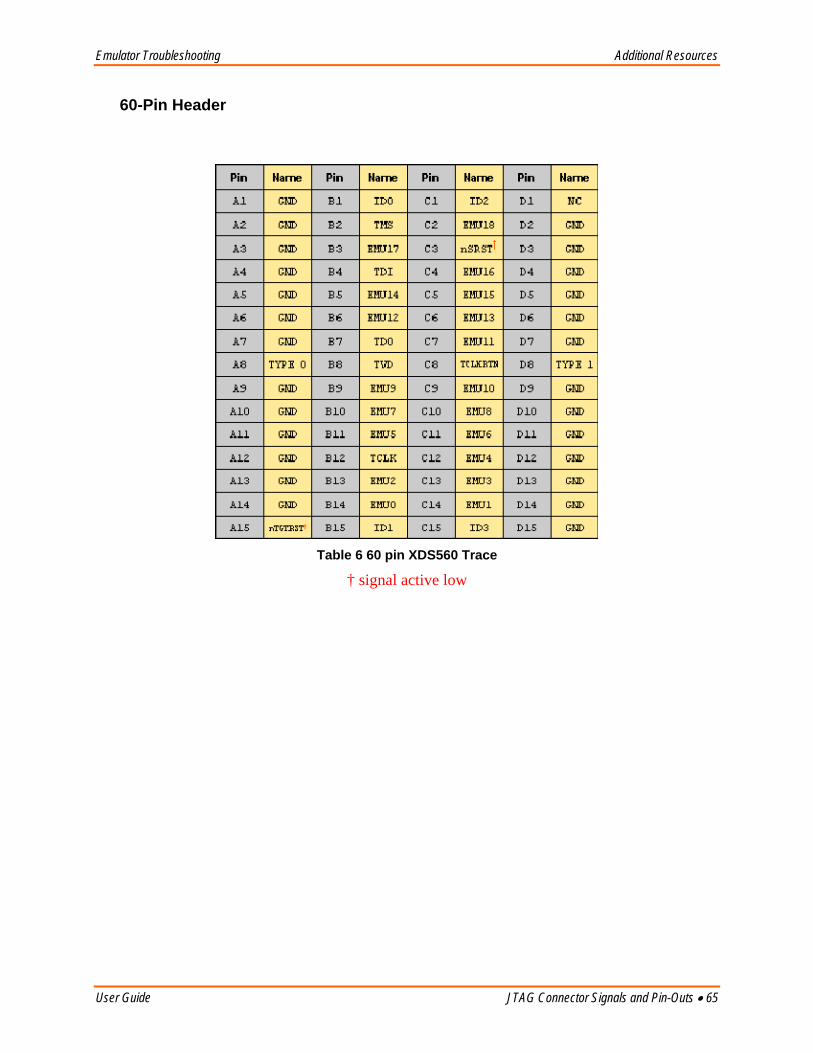
Emulator Troubleshooting Additional Resources
User Guide JTAG Connector Signals and Pin-Outs • 65
60-Pin Header
Table 6 60 pin XDS560 Trace
† signal active low
Additional Resources Emulator Troubleshooting
66 • Contacting Blackhawk Support User Guide
Contacting Blackhawk Support What to do next; What we need from you to help.
Submitting Support Information If you verify everything, but still fail to connect to your target board, please provide the following information to Blackhawk support to help resolve the problem by emailing to: [email protected].
BHDetect Output This is a new utility added this year to analyze your system and report detailed information to help check for installation errors (i.e. incompatible USCIF versions) and can be found in “\CCS\BLACKHAWK\UTILITY\BHDetect”. This utility does a READ-ONLY scan and is included as part of our drivers installations for CCStudio v2.0 and later. Output can be saved to a file and emailed to us for analysis.
Target DSP (TI part number of chip)
Hardware Board Type This would be the DSK or EVM name, such as C6713 DSK, or if your own design, indicate CUSTOM board.
CCStudio version If you have more than one installed, it is important to identify the version that has the problem.
CCStudio error(s) Copy the CCStudio error you receive. If it is a scrollable dialog box, make sure you select all the text content and copy it to a file or paste it into the email.
Emulator Model/Part Number and serial number

Emulator Troubleshooting Additional Resources
User Guide General Contact Information • 67
General Contact Information Support is provided for pre-sales information and registered products. Mailing Address
Blackhawk 123 Gaither Drive Mt. Laurel, New Jersey 08054-1701
Phone
(877) 983-4514 (856) 234-2629
FAX (856) 866-1100
World Wide Web
http://www.blackhawk-dsp.com
Corrections Please report any documentation errors by email to [email protected].


