TRF/EPM/3.0 !!" #$!! End User Training Manual for SAP PM – Plant Maintenance Process Name: Break down Maintenance Process No: TRF/EPM/3.0 Control Copy No: TRF/EPM/3.0/ %&’ % Doc Version Description Prepared by Date Reviewed by Approved by 00 Original Palani Dorai 18.12.2009
For each of the above processes, there are separate End User Training Manuals are available This document covers sl. No. 3. Of the above list, that is Unplanned / Breakdown Maintenance Process.
This End User Training manual on Unplanned / Breakdown Maintenance Process
consists of the following sequence of sub-processes
1. Creation of Notifications – transaction Code IW21 2. Changing the PM Notifications – Transaction Code IW22 3. Create Breakdown maintenance Order for Notification – Transaction code IW34 4. Changing the maintenance Order – Transaction Code IW32 5. PM Order Confirmation – Transaction code IW44 6. Change PM Notification – Transaction Code IW22 7. Change Order – Transaction Code IW32
Enter the Transaction code IW21 in the command field as shown in the screen below
Or go as per the navigation shown below and click IW21 – Create (General)
Project: MISSION SURE
�������������� � ����TRF/EPM3.0� !!"��#$!!
Page 4 of 48
Press <Enter> or click on the check mark icon in the top left side corner of the Screen, the following screen will appear
Project: MISSION SURE
�������������� � ����TRF/EPM3.0� !!"��#$!!
Page 5 of 48
In the above screen, click on the Notification Type field, a drop down icon appears at the end of the field, and click on this field to get the drop down list (see below screen)
And select and double click on the Notification Type “M2”, to get it populated on the screen.
Project: MISSION SURE
�������������� � ����TRF/EPM3.0� !!"��#$!!
Page 6 of 48
The notification is used, for external number assignment. Since system is configured for Internal Notification Number assignment, Do not enter any data in this field. The Reference – Notification field is used, when we like to create a Notification, by copying the details of an already created Notification. Do not enter any data in this field.
Click on the check mark icon, the following screen appears.
a) Key-in the description of Notification
b) Click on the Functional Loc field, a drop down icon button will appear at the end
of the field, and click this icon to get the following drop down menu (as shown below)
Key-in the description
Project: MISSION SURE
�������������� � ����TRF/EPM3.0� !!"��#$!!
Page 7 of 48
Click on the check mark button of the above pop up window, the following screen appears.
Select (click once) the required location and click on the check mark button, to populate the value in to the field. c) Similarly, get the drop down list for the equipment (as shown below) for the Equipment field Note: while searching for the Equipment No, select the “ Equipment by technical ID
number” tab in the followings earch window.
Project: MISSION SURE
�������������� � ����TRF/EPM3.0� !!"��#$!!
Page 8 of 48
Click on the check mark button of the above pop up window, the following screen appears.
Select (click once) the required equipment Number and click on the check mark button, to populate the value in to the field. d) get the drop down list for the Planner group field, as shown below
Project: MISSION SURE
�������������� � ����TRF/EPM3.0� !!"��#$!!
Page 9 of 48
In the above screen, select (click once on the line) the required group, and click on the check
mark button to populate the value on the field. e) Similarly get the drop down list and populate the value on to the Main WorkCtr. field. f) Similarly get the drop down list and populate the value of the Person respons. Field g) Similarly get the drop down list and populate the value of the Reported by field h) Also if required, enter textual matter in the Subject Long Text field After populating all the above values, the screen will look as shown below.
Project: MISSION SURE
�������������� � ����TRF/EPM3.0� !!"��#$!!
Page 10 of 48
Click the check mark button to save the record. (Note the change in the Subject long Text field)
Click the save button to save the record., the system returns back to the following screen
Project: MISSION SURE
�������������� � ����TRF/EPM3.0� !!"��#$!!
Page 11 of 48
With the following message at the status line
Note: Note Down the Notification Number for future reference
End of document on T-code IW21
Project: MISSION SURE
�������������� � ����TRF/EPM3.0� !!"��#$!!
Page 12 of 48
2. Changing the Pm Notification - Transaction code IW22
Enter the Transaction code IW22 in the command field as shown in the screen below
Or go as per the navigation shown below and click IW22 - Change
Project: MISSION SURE
�������������� � ����TRF/EPM3.0� !!"��#$!!
Page 13 of 48
Press <Enter> or click on the check mark icon in the top left side corner of the Screen, the following screen will appear Key-in the Notification number in the Notification field (refer screen below)
Project: MISSION SURE
�������������� � ����TRF/EPM3.0� !!"��#$!!
Page 14 of 48
Click the check mark button to get the next screen, as shown below
Project: MISSION SURE
�������������� � ����TRF/EPM3.0� !!"��#$!!
Page 15 of 48
Scroll down (as shown below) to enter the Cause details in the screen.
Click on the cause code field to get the drop down button, and then click on this
drop down button to get the following drop down list
Project: MISSION SURE
�������������� � ����TRF/EPM3.0� !!"��#$!!
Page 16 of 48
Expand the right side arrow button of the MECH cause; the screen will look as below
Select (click once on the line) the required line and press the choose push button. The value will get populated in to the cause Code field. Key-in the Cause text as required. The screen will look as below
Project: MISSION SURE
�������������� � ����TRF/EPM3.0� !!"��#$!!
Page 17 of 48
Click on the put in process button, And
Click the save button to save the record. The system returns back to the following screen
With the following message at the status line
End of documentation on T-code IW22
Project: MISSION SURE
�������������� � ����TRF/EPM3.0� !!"��#$!!
Page 18 of 48
3. Create Breakdown maintenance order for notification –
Transaction Code IW34
Procedural Steps
Purpose
Creating Breakdown maintenance order for notification
Transaction Code IW34
Navigation: SAP Easy Access > Logistics > Plant maintenance > Maintenance Processing > Order > Create (Special) > IW34 – Order the Notification
Procedure Enter the Transaction code IW34 in the command field as shown in the screen below
Or go as per the navigation shown below and click IW34 – Order for Notification
Project: MISSION SURE
�������������� � ����TRF/EPM3.0� !!"��#$!!
Page 19 of 48
Press <Enter> or click on the check mark icon in the top left side corner of the Screen, the following screen will appear Key-in the Notification number in the Notification field (refer screen below)
Project: MISSION SURE
�������������� � ����TRF/EPM3.0� !!"��#$!!
Page 20 of 48
Click on the drop down button of the Order type, the following drop down list appears
Project: MISSION SURE
�������������� � ����TRF/EPM3.0� !!"��#$!!
Page 21 of 48
Select (click once on the line) “PM02 – Breakdown Maintenance Order” (refer above
screen) , and click on the check mark button to get the value populated in the Order Type field. The screen will look as shown below.
Do not key-in any value in any of the other fields.
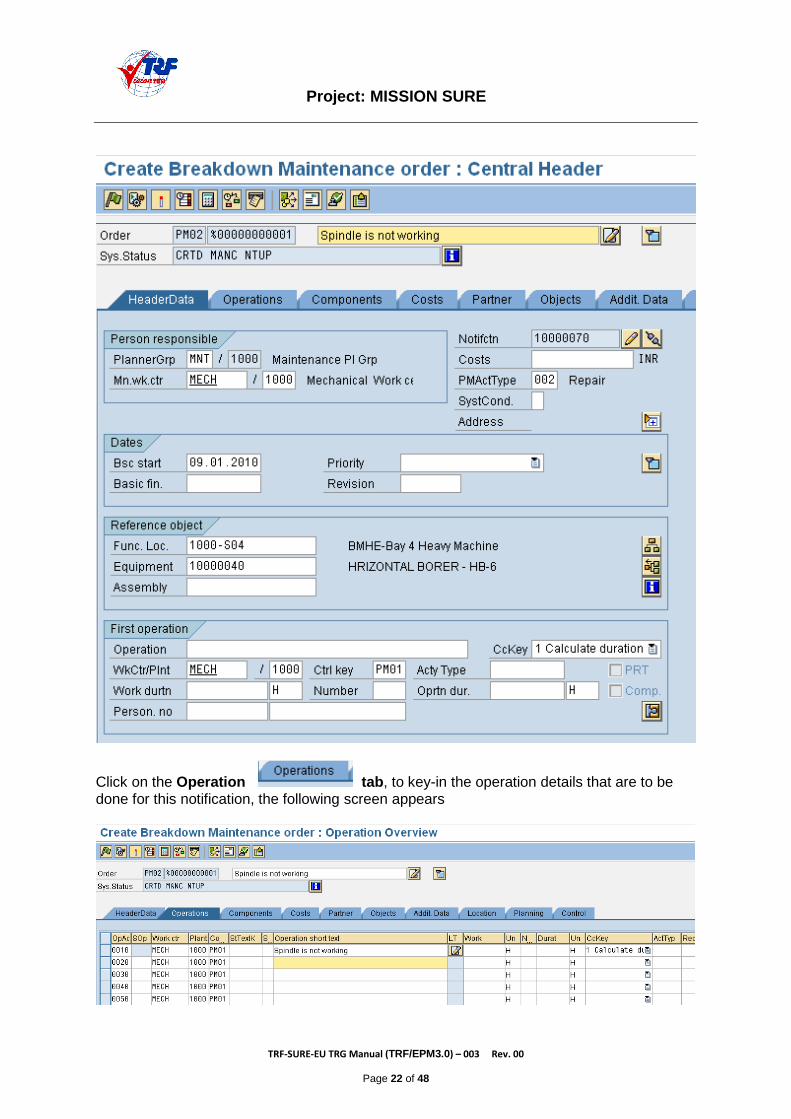
Click the check mark button, the following screen appears
Project: MISSION SURE
�������������� � ����TRF/EPM3.0� !!"��#$!!
Page 22 of 48
Click on the Operation tab, to key-in the operation details that are to be done for this notification, the following screen appears
Project: MISSION SURE
�������������� � ����TRF/EPM3.0� !!"��#$!!
Page 23 of 48
Add the operation “Check power supply (refer screen below)
Selecting Component - Stock items
Click on the Components tab to assign the components that are required for the operations, the following screen appears
Click on the drop down button of the components field, the following screen appears
Click on the drop down button of the material Type field, the following drop down list appears,
Project: MISSION SURE
�������������� � ����TRF/EPM3.0� !!"��#$!!
Page 24 of 48
Select the material type “ERSA” and click on the check mark button to get the value populated on the Material type field, as shown in screen below
Project: MISSION SURE
�������������� � ����TRF/EPM3.0� !!"��#$!!
Page 25 of 48
Click on the check mark button of the above window, to get the components drop down list, as shown in screen below
Scroll the list up and down and locate the required component, and select this component
and click on the check mark button of the above window, to get the value populated on the components field. (the screen will look as shown below)
Similarly locate and get the component required for the next operation. The screen will look as shown below, after populating the value in the field. Also key-in the values for the following fields (refer screen below) a) Quantity b) Unit c) Plant d) Operation No
Project: MISSION SURE
�������������� � ����TRF/EPM3.0� !!"��#$!!
Page 26 of 48
Click on the check mark button , the following screen appears, showing the description and procurement type for the components.
Select the above two line items of the components and Click on the material availability
(overall) button to check the availability of the material. The following message appears at the status line
Since the material is available, it is reserved for this notification, and no PR need to be raised to get the material. For procurement of external Services
Go to the Operations tab, change the control key to PM03 (Plant maintenance - external services), and key in the operation description as “External services”. (Refer screen below)
Project: MISSION SURE
�������������� � ����TRF/EPM3.0� !!"��#$!!
Page 27 of 48
And press the External push button at the bottom of the screen
The following screen appears
In the above screen, key-in the following details a) Short text b) Quantity c) UOM d) Gross Price
and then click on the check mark button, the system will populate the cost element value automatically (refer screen below)
Project: MISSION SURE
�������������� � ����TRF/EPM3.0� !!"��#$!!
Page 28 of 48
Click the save button to save the record. The system returns back to the following screen
With the following message at the status line
Note down this Order number to, which will be used while drawing the materials from the stores.
End of documentation on T-code IW34
Project: MISSION SURE
�������������� � ����TRF/EPM3.0� !!"��#$!!
Page 29 of 48
4. Change the Breakdown maintenance Order of a Notification –
Transaction Code IW32
Procedural Steps
Purpose
Change the Breakdown maintenance Order of a Notification
Transaction Code IW32
Navigation: SAP Easy Access > Logistics > Plant maintenance > Maintenance Processing > Order > IW32 – Change
Procedure Enter the Transaction code IW32 in the command field as shown in the screen below
Or go as per the navigation shown below and click IW32 - Change
Project: MISSION SURE
�������������� � ����TRF/EPM3.0� !!"��#$!!
Page 30 of 48
Press <Enter> or click on the check mark icon in the top left side corner of the Screen, the following screen will appear Key-in the Order Number in the Order field (refer screen below)
Project: MISSION SURE
�������������� � ����TRF/EPM3.0� !!"��#$!!
Page 31 of 48
click on the check mark button, the following screen appearsr
Project: MISSION SURE
�������������� � ����TRF/EPM3.0� !!"��#$!!
Page 32 of 48
Click on the release button, to release the order. The following screen appears.
In the above screen, key-in the Requisition Number and Tracking No. Once the values are keyed-in, the screen will look as shown below
Click on the check mark button, the following screen will appear
Project: MISSION SURE
�������������� � ����TRF/EPM3.0� !!"��#$!!
Page 33 of 48
With the following message at the status line.
Click the save button, the system will return back to the following screen
Project: MISSION SURE
�������������� � ����TRF/EPM3.0� !!"��#$!!
Page 34 of 48
With the following message at the status line
End of document on T=code IW32
Project: MISSION SURE
�������������� � ����TRF/EPM3.0� !!"��#$!!
Page 35 of 48
5. Order Confirmation – Transaction Code IW44
Procedural Steps
Purpose
Order Confirmation
Transaction Code IW44
Navigation: SAP Easy Access > Logistics > Plant maintenance > Maintenance Processing > Completion confirmation > Entry > Collective time confirmation. IW44 – Without Selection
Procedure Enter the Transaction code IW44 in the command field as shown in the screen below
Or go as per the navigation shown below and click IW44 – without Selection
Project: MISSION SURE
�������������� � ����TRF/EPM3.0� !!"��#$!!
Page 36 of 48
Press <Enter> or click on the check mark icon in the top left side corner of the Screen, the following screen will appear Key-in the Order Number in the Order field (refer screen below)
Project: MISSION SURE
�������������� � ����TRF/EPM3.0� !!"��#$!!
Page 37 of 48
Key-in the values for the following fields a) Order No b) Operation No
c) Check mark in the check boxes of F and N fields Note: F stands for Final confirmation and N stands for No remain Work Once all the values are keyed in fro all the three operations of the order, the screen will look as below
Click the check mark button, the screen automatically populating values in other required fields as shown below
Project: MISSION SURE
�������������� � ����TRF/EPM3.0� !!"��#$!!
Page 38 of 48
Click the save button, the system will return back to the following screen
With the following message at the status line
Return back to the SAP Easy Access Screen or Home Screen.
End of document of T-code IW44
Project: MISSION SURE
�������������� � ����TRF/EPM3.0� !!"��#$!!
Page 39 of 48
6. Completion of Notification – Transaction Code IW22
Enter the Transaction code IW22 in the command field as shown in the screen below
Or go as per the navigation shown below and click IW22 – without Selection
Project: MISSION SURE
�������������� � ����TRF/EPM3.0� !!"��#$!!
Page 40 of 48
Press <Enter> or click on the check mark icon in the top left side corner of the Screen, the following screen will appear Key-in the Notification Number in the Notification field (refer screen below)
Project: MISSION SURE
�������������� � ����TRF/EPM3.0� !!"��#$!!
Page 41 of 48
click on the check mark button, the following screen appears
Project: MISSION SURE
�������������� � ����TRF/EPM3.0� !!"��#$!!
Page 42 of 48
Update the Malfunction data. b) Key-in the malfunction end date and time
and click the check mark button, the screen will look as below
Click on the completion flag button, and then click on the save button, the following screen appears.
Project: MISSION SURE
�������������� � ����TRF/EPM3.0� !!"��#$!!
Page 43 of 48
With the following message at the status line
End of document of T-code IW22
Project: MISSION SURE
�������������� � ����TRF/EPM3.0� !!"��#$!!
Page 44 of 48
7. Change Order – Transaction Code IW32
Procedural Steps
Purpose
Change Order
Transaction Code IW32
Navigation: SAP Easy Access > Logistics > Plant maintenance > Maintenance Processing > Order > IW32 – Change
Procedure
Enter the Transaction code IW32 in the command field as shown in the screen below
Or go as per the navigation shown below and click IW32 – Change
Project: MISSION SURE
�������������� � ����TRF/EPM3.0� !!"��#$!!
Page 45 of 48
Press <Enter> or click on the check mark icon in the top left side corner of the Screen, the following screen will appear Key-in the Order Number in the Order field (refer screen below)
Project: MISSION SURE
�������������� � ����TRF/EPM3.0� !!"��#$!!
Page 46 of 48
Click on the check mark button, the following screen appears
Project: MISSION SURE
�������������� � ����TRF/EPM3.0� !!"��#$!!
Page 47 of 48
Click on the technical completion flag button, the following pop up window appears
Click on the check mark button of the above screen, the system will return back to the following screen
With the following message at the status line
End of document of T-code IW32
End of Training Manual on Breakdown Maintenance process, Document No: �������������� � ����TRF/EPM/3.0� !!"��#$!!