+ All Categories
Home > Documents > End Users Guide to Starfish onnect - Campbell University · End Users Guide to Starfish onnect ......

End Users Guide to Starfish onnect - Campbell University · End Users Guide to Starfish onnect ......

Date post: 03-May-2018
Category:
Upload: letu
View: 231 times
Download: 1 times
Share this document with a friend
41
© 2013, 2014 Starfish Retention Solutions, Inc. | Proprietary and Confidential Page 1 of 41 End User’s Guide to Starfish Connect Version 1.0 Purpose This document provides guidance on setting up your office hours in Starfish, making appointments with students, and documenting outcomes. It is intended for staff members who will manage a calendar in Starfish to make, edit, and document student meetings. Related Resources For the latest FAQ and tips for using these features, please visit the Reef by clicking the Support link to the right of your profile link on your Starfish Home page. Refer to the sections titled Manage your Starfish Account and Connect with Students If you have questions that are not answered by this document or what you find on the Reef, or if you have a more general question about how others in the Starfish community are using appointments, please post your question in the Ask the Community forum on the Reef Tenant admins can find additional guidance on configuring Connect features on the Implementation Resource corner on the Features and Workflow page, in the Services, Appointments, and Calendars section.
Transcript

© 2013, 2014 Starfish Retention Solutions, Inc. | Proprietary and Confidential Page 1 of 41

End User’s Guide to Starfish Connect Version 1.0

Purpose

This document provides guidance on setting up your office hours in Starfish, making appointments with

students, and documenting outcomes. It is intended for staff members who will manage a calendar in

Starfish to make, edit, and document student meetings.

Related Resources

For the latest FAQ and tips for using these features,

please visit the Reef by clicking the Support link to the

right of your profile link on your Starfish Home page.

Refer to the sections titled Manage your Starfish Account and Connect with Students

If you have questions that are not answered by this document or what you find on the Reef, or if you

have a more general question about how others in the Starfish community are using appointments,

please post your question in the Ask the Community forum on the Reef

Tenant admins can find additional guidance on configuring Connect features on the Implementation

Resource corner on the Features and Workflow page, in the Services, Appointments, and Calendars

section.

© 2013, 2014 Starfish Retention Solutions, Inc. | Proprietary and Confidential Page 2 of 41

Table of Contents

Purpose .............................................................................................................................................1

Related Resources..............................................................................................................................1

Important Definitions.........................................................................................................................4

How Starfish Communicates with your Online Calendar ......................................................................5 When the Starfish Calendar is updated .................................................................................................... 5 When an invitation is canceled or declined .............................................................................................. 5

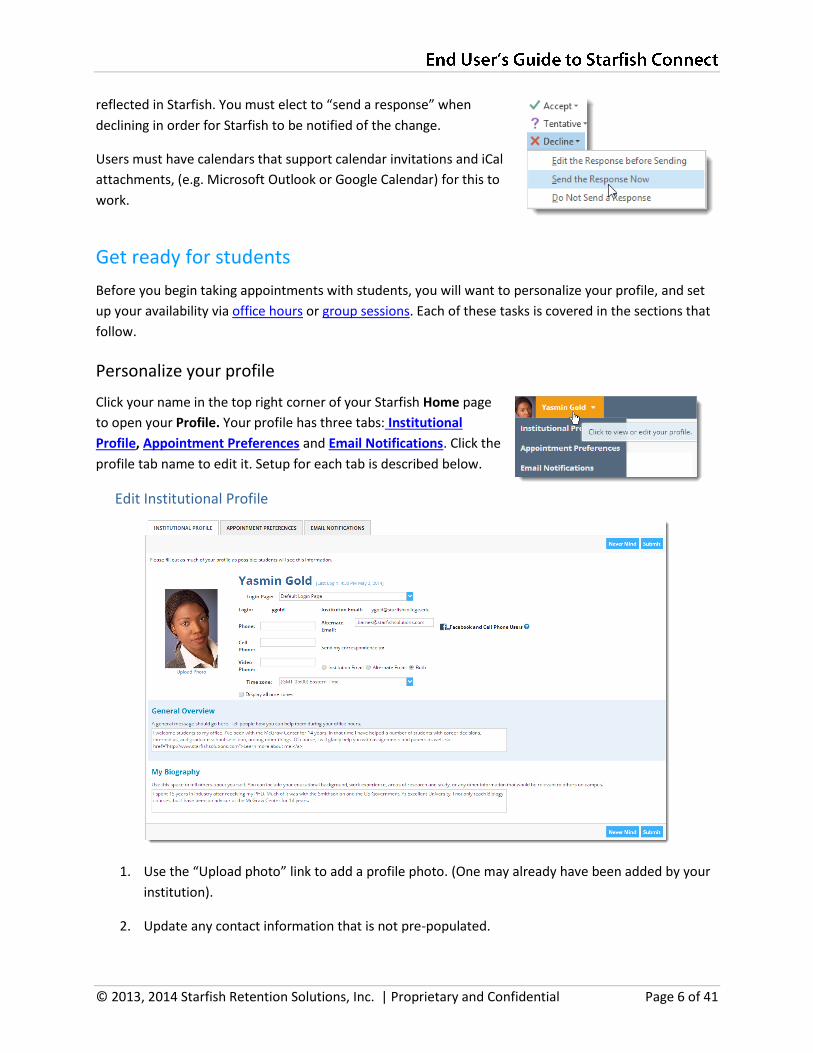
Get ready for students .......................................................................................................................6 Personalize your profile ............................................................................................................................ 6

Edit Institutional Profile ........................................................................................................................ 6

Edit Appointment Preferences.............................................................................................................. 7

Verify Basic preferences ................................................................................................................... 7

Add Locations .................................................................................................................................... 8

Add Calendar Managers .................................................................................................................... 9

Save Appointment Preferences ........................................................................................................ 9

Edit Email Notifications preferences ................................................................................................... 10

Verify Appointment Notification settings ....................................................................................... 10

Update Tracking Item Notifications ................................................................................................ 11

Save Email Notification preferences ............................................................................................... 11

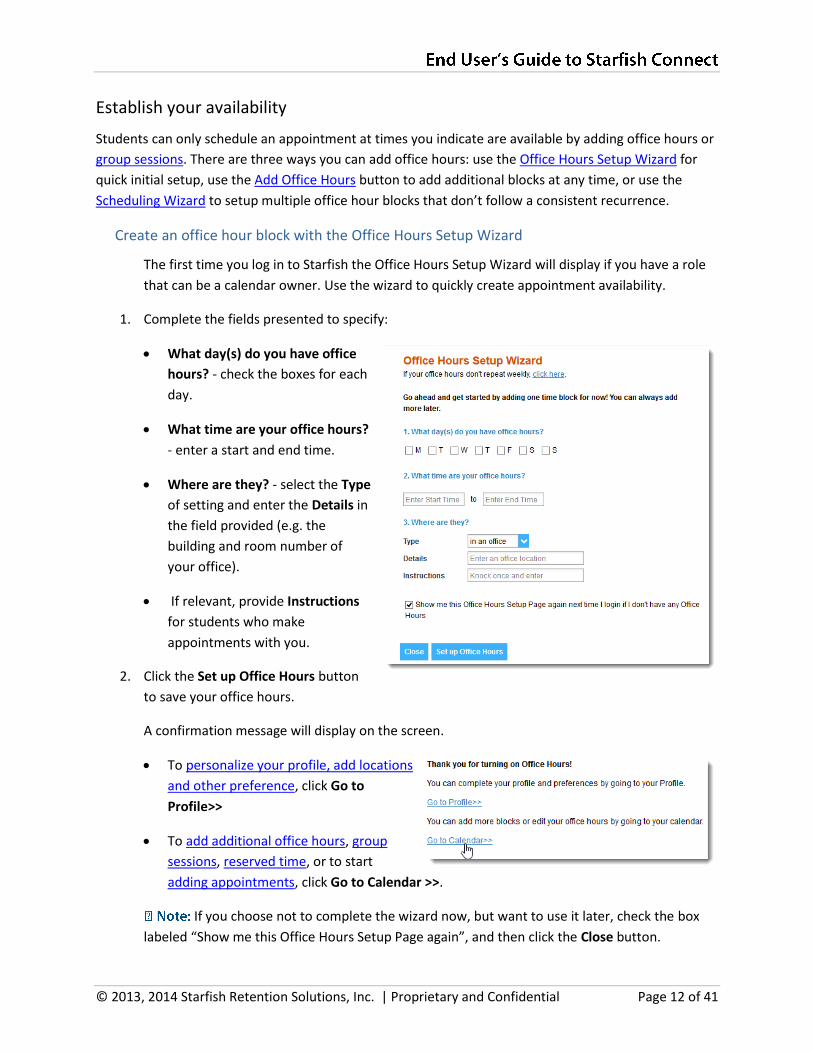
Establish your availability ........................................................................................................................ 12 Create an office hour block with the Office Hours Setup Wizard ....................................................... 12

Add Office Hours ................................................................................................................................. 13

Edit or Cancel office hours .................................................................................................................. 15

Edit office hours .............................................................................................................................. 15

Cancel a series of office hours ........................................................................................................ 15

Cancel a single occurrence of an office hour block ........................................................................ 16

Add less structured office hours (Scheduling Wizard) ........................................................................ 17

Add a Group Session ........................................................................................................................... 19

Edit or cancel a group session ............................................................................................................. 21

Edit a group session ........................................................................................................................ 21

Cancel a group session .................................................................................................................... 21

Cancel a single occurrence of a group session................................................................................ 22

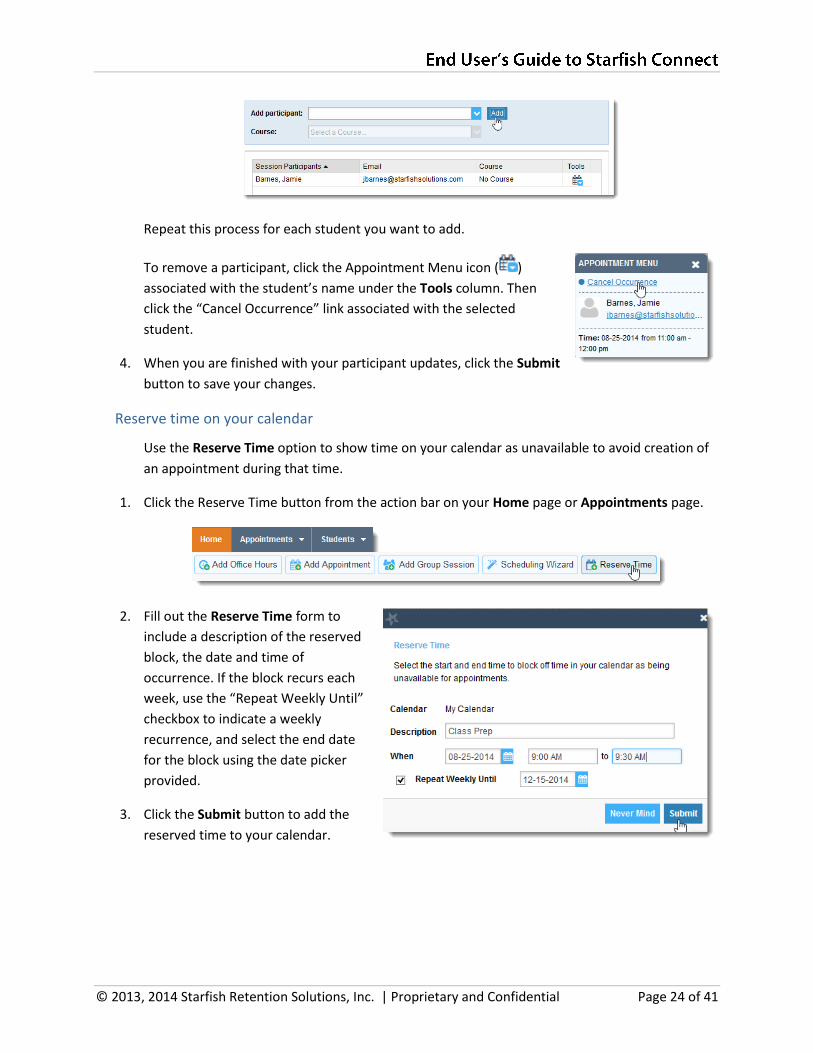
Manage group session participants ................................................................................................ 23

Reserve time on your calendar ........................................................................................................... 24

Make and manage Appointments ..................................................................................................... 25 Add, edit, or cancel appointments on your Starfish calendar ................................................................ 25

Add an appointment to the calendar.................................................................................................. 25

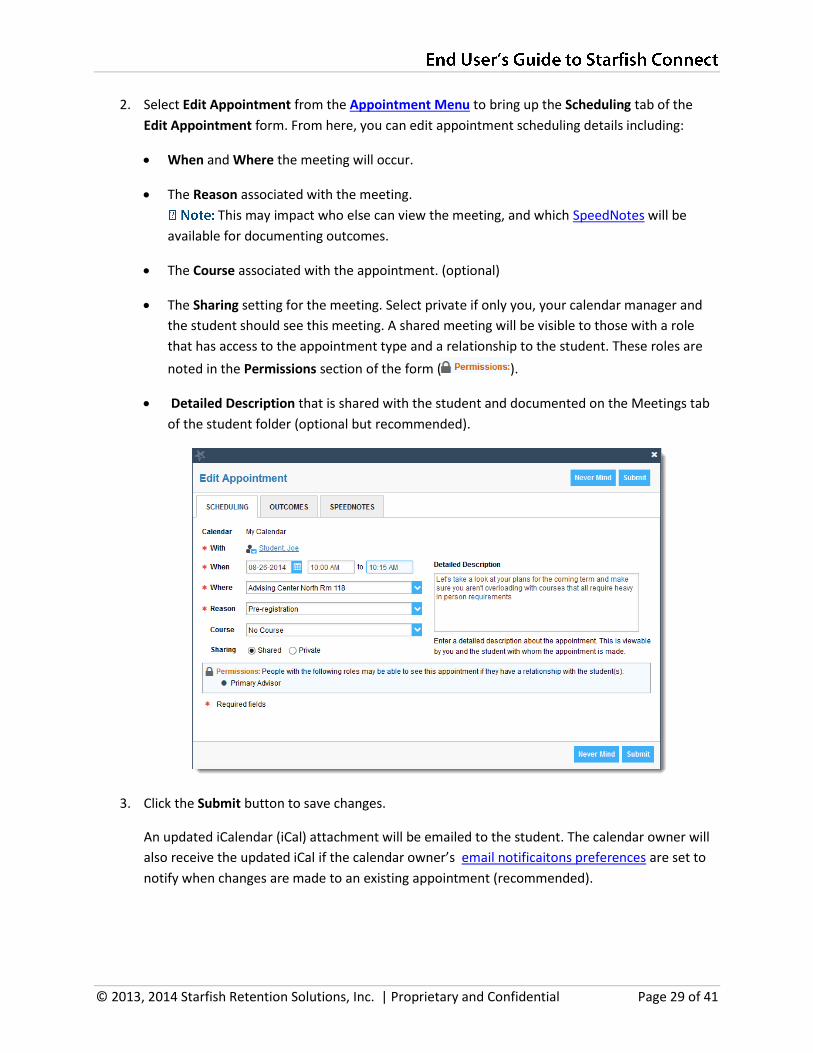
Modify scheduling details of an appointment .................................................................................... 28

Document outcomes from a meeting ................................................................................................. 30

Use SpeedNotes to document common outcomes ............................................................................ 31

Cancel an appointment ....................................................................................................................... 32

© 2013, 2014 Starfish Retention Solutions, Inc. | Proprietary and Confidential Page 3 of 41

Review appointment information and meeting outcomes .................................................................... 32 Review appointment and meeting information on the student folder .............................................. 32

Filter student lists based on meetings ................................................................................................ 34

Use calendar managers ........................................................................................................................... 35 Designate someone to manage your calendar ................................................................................... 35

Manage another’s calendar ................................................................................................................ 36

Calendar viewing options ................................................................................................................ 36

Make and update appointments for others ................................................................................... 37

External Calendar Integration ........................................................................................................... 38 Configure integration in your profile ...................................................................................................... 38

Set your profile to read busy times from Google ............................................................................... 39

Set your profile to read busy times from Exchange ............................................................................ 40

External calendar holds on your Starfish calendar ................................................................................. 40

Document Version History ............................................................................................................... 41

© 2013, 2014 Starfish Retention Solutions, Inc. | Proprietary and Confidential Page 4 of 41

Important Definitions

Appointment: A documented set of details shared between a student and a calendar owner (e.g.

advisor, instructor) about a planned meeting. Students may only schedule appointments in the

future at times the calendar owner designates as available. Calendar owners and calendar

managers, can schedule future appointments, and create appointments to document past meetings.

Appointment Type: Grouping of appointment reasons and activities (i.e., SpeedNotes) that a

common set of roles can add and/or view. Your Starfish administrator will create appointment types

and associated reasons and SpeedNotes that will be available to you based on your role. You may be

able to use appointment types to allow different groups of students to see different office hours on

your calendar.

Calendar attachment (iCal): Attachment to an emailed calendar invitation that allows a user to

accept or decline from his/her email client (e.g., Outlook, Google). iCal is the industry standard to

communicate meeting information between online calendaring software.

Calendar Manager: A Starfish user who can see and edit another user’s Starfish calendar. A calendar

owner can designate his/her own calendar managers by navigating to Profile > Appointment

Preferences. Or, a Starfish Admin can batch upload these relationships.

Calendar Owner: The Starfish user associated with a Starfish calendar. The calendar owner can add

office hours and make appointments with students on his or her calendar. Only users with staff roles

are calendar owners. Students do not own calendars in Starfish.

Group Session: Similar to Office Hours, but more than one student can sign up for this particular

block of time. The Calendar Owner decides how many students can sign up for each Group Session.

Meeting: A documented occurrence of a meeting between a student and a calendar owner (i.e.,

advisor, instructor) that includes details about the outcomes of the meeting. Calendar owners may

designate available times for walk-in meetings, or restrict availability to scheduled appointments

only. Students may only schedule appointments in the future at times the calendar owner

designates as available. Calendar owners and calendar managers, can schedule future

appointments, and create appointments to document past meetings.

Office Hours: Calendar owners can add blocks of time called “Office Hours” to their calendars to

indicate when they are available to meet with students. Appointments can be added outside the

blocks by calendar owners or calendar managers, but students can only self-schedule within the

block. Office Hours allow students to sign up for individual one-on-one slots within the time

parameters entered by the calendar owner.

Outcomes: Results of a meeting documented on the Outcomes tab of an Appointment in Starfish.

SpeedNotes: Activity codes that provide an easy way for staff to document common outcomes of an

appointment. Specific SpeedNotes are set up by the institution per Appointment Type.

© 2013, 2014 Starfish Retention Solutions, Inc. | Proprietary and Confidential Page 5 of 41

How Starfish Communicates with your Online Calendar

Starfish supports Two-Way Calendar Communication via email with most online calendars (e.g.,

Microsoft Outlook, Google, Entourage). As illustrated below in figure 1, when an appointment is

scheduled or updated in Starfish, a calendar invitation email (with iCal attachment) is sent to both

parties (the student and the calendar owner) and users can accept or decline in their email client.

Figure 1: Two-Way Calendar Communication

This two-way communication about Starfish appointments is automatically available and requires no

additional integration or installation.

Important Note: If your institution has integrated Starfish with Exchange or Google, you should update your profile to allow external appointments to be visible in Starfish. Details are provided in the External Calendar Integration section.

When the Starfish Calendar is updated

Starfish triggers an updated calendar invitation (iCal) to be sent to the calendar owner when a new or

updated block of time is available for student meetings (e.g. when office hours are added).

Both the student and the calendar owner will be sent an iCal when a student appointment is scheduled,

changed, or canceled.

Staff users can modify whether or not they receive these notifications in the Appointment Notifications

section of their Profiles. Starfish highly recommends receiving email notifications for all changes as

illustrated below.

When an invitation is canceled or declined

When you cancel or decline a Starfish invitation from within your external calendar (e.g., Microsoft

Outlook), the cancel/decline is sent to Starfish and is reflected on your Starfish calendar. Note: you

cannot modify Starfish appointments times in your external calendar. Only Accept, Cancel or Decline are

© 2013, 2014 Starfish Retention Solutions, Inc. | Proprietary and Confidential Page 6 of 41

reflected in Starfish. You must elect to “send a response” when

declining in order for Starfish to be notified of the change.

Users must have calendars that support calendar invitations and iCal

attachments, (e.g. Microsoft Outlook or Google Calendar) for this to

work.

Get ready for students

Before you begin taking appointments with students, you will want to personalize your profile, and set

up your availability via office hours or group sessions. Each of these tasks is covered in the sections that

follow.

Personalize your profile

Click your name in the top right corner of your Starfish Home page

to open your Profile. Your profile has three tabs: Institutional

Profile, Appointment Preferences and Email Notifications. Click the

profile tab name to edit it. Setup for each tab is described below.

Edit Institutional Profile

1. Use the “Upload photo” link to add a profile photo. (One may already have been added by your

institution).

2. Update any contact information that is not pre-populated.

© 2013, 2014 Starfish Retention Solutions, Inc. | Proprietary and Confidential Page 7 of 41

3. If configured by your institution, you can provide an alternate

email address in addition to your institutional email for

Starfish email notifications.

4. Write a description about yourself in the General Overview

and My Biography fields.

This is the information that students see when making an appointment with

you. A photo and personal information helps students put a face to a name and feel more

comfortable reaching out for help.

5. Click the Submit button at the top or bottom of the page to save your updates.

Edit Appointment Preferences

This tab defines defaults related to how students can interact with your office hours. Set your

preferences before you begin adding Office Hours.

Verify Basic preferences

1. Select a value for Minimum Appointment Length. Starfish recommends 15 minutes. This will be

used as the default when you set up new Office Hours. (Your institution settings for specific

appointment reasons may override your selection when a student makes an appointment).

© 2013, 2014 Starfish Retention Solutions, Inc. | Proprietary and Confidential Page 8 of 41

2. Select a radio button and specify the specific value to define your Scheduling Deadline. The

deadline is imposed based on the start time of any office hour blocks vs.an individual time slot.

If set to ‘None,’ a student may schedule an appointment with you right up to the time slot.

3. Check the box to “Allow drop-ins after deadline has passed” if you wish to include a note in

your calendar letting students know that they cannot schedule, but can walk in to your office

after the scheduling deadline has passed.

Add Locations

Add all possible meeting locations, including physical offices, phone numbers, chat services, or

anywhere else you might want to meet with students. When you build your calendar

availability/ add Office Hours, you will select which of these locations apply to each set of hours.

1. Click Add Location.

2. Select the type of location, enter a

descriptive name and enter any

relevant instructions.

Students will see this information

when scheduling an appointment for

office hours that have been

designated for this location.

3. Click the Save button.

Repeat this process to add any

additional meeting locations.

Use the edit icon ( ) to the right of any location in your list to make changes. Use the delete

icon ( ) to the right of any location to remove it.

© 2013, 2014 Starfish Retention Solutions, Inc. | Proprietary and Confidential Page 9 of 41

Add Calendar Managers

In the Calendar Managers section of the Appointment Preferences tab of your profile, you can

designate other users who can see and edit your Starfish calendar.

1. Click Add Calendar Manager.

2. Begin typing a user’s name. Search results will begin

to populate.

3. Select a user from the search results and click the

Submit button.

Repeat these steps to add more calendar managers.

You may return to this page of your Profile at any time to add or remove calendar managers.

Use the delete icon (circle with an x) to remove a calendar manager.

Important Note: Calendar Managers can also be assigned by Starfish Administrators. If you are unable to remove a calendar manager from this area, contact your Starfish Administrator.

Save Appointment Preferences

When you have made all desired edits to each of your Appointment Preferences profile

settings, click the Submit button at the bottom or top of the Appointment Preferences tab to

save your changes.

© 2013, 2014 Starfish Retention Solutions, Inc. | Proprietary and Confidential Page 10 of 41

Edit Email Notifications preferences

You can set preferences for email sent to you from Starfish for both Appointments and Tracking

Items (e.g. flags, to-dos and referrals).

Verify Appointment Notification settings

Specify if and when you wish to receive Planning Reminders, Appointment Alerts, and calendar

attachments. Institution defaults will be used if you don’t update these options. Each of these

are described below:

Planning Reminders: Receive optional email reminder(s) sent separately for each of the

day’s appointments, in one email, or not at all. Specify the date and time for reminders.

Appointment Alerts: Receive an optional email reminder sent a certain number of minutes

before the start of an appointment.

Calendar Attachments: Receive emails with calendar attachments for schedule

It his highly recommended to keep both calendar attachment options

checked (change to my appointments and change to my Office Hours/Group Sessions). This

ensures that your external calendar (e.g., Outlook, Google, Entourage) receives all of the

latest information from your Starfish calendar.

Read busy times from my external Google (or Exchange) calendar: If your institution has

enabled integration with Google or Exchange, busy times from your external Google or

Exchange calendar can be displayed in Starfish. Follow the “Click here” link for instructions

to complete your personalized setup.

See the External Calendar Integration section for more details.

© 2013, 2014 Starfish Retention Solutions, Inc. | Proprietary and Confidential Page 11 of 41

Update Tracking Item Notifications

Your Starfish administrator has determined which items you will be emailed. Items that may

trigger an email to you are listed in the Flag Rules table below your notification options.

You have the ability to customize how you receive those emails including whether you will

receive your notifications as a summary email of all recent activity or as individual email for each

item. As noted, items marked with the emergency notification icon ( ) will be sent when raised

regardless of your settings.

You can also use a combination of both options.

1. Select either the Daily or Weekly summary option to receive one email at the frequency

specified with all relevant activity since the previous summary. Specify the time of day (for daily)

or day of week and time of day (weekly).

2. Select the checkbox for each event for which you want an immediate individual email to be sent

to you. Events include when an item is raised (or created) when an item is cleared (or closed)

and when an item is assigned to you.

Combine a daily summary (typically first thing in the morning to ensure it is

inclusive of any system-raised flags that were processed overnight) with an immediate email

when an item is assigned to you.

Save Email Notification preferences

Click the Submit button in the top or bottom right of the Email Notifications page to submit any

changes you have made for appointment notifications or tracking item notifications.

© 2013, 2014 Starfish Retention Solutions, Inc. | Proprietary and Confidential Page 12 of 41

Establish your availability

Students can only schedule an appointment at times you indicate are available by adding office hours or

group sessions. There are three ways you can add office hours: use the Office Hours Setup Wizard for

quick initial setup, use the Add Office Hours button to add additional blocks at any time, or use the

Scheduling Wizard to setup multiple office hour blocks that don’t follow a consistent recurrence.

Create an office hour block with the Office Hours Setup Wizard

The first time you log in to Starfish the Office Hours Setup Wizard will display if you have a role

that can be a calendar owner. Use the wizard to quickly create appointment availability.

1. Complete the fields presented to specify:

What day(s) do you have office

hours? - check the boxes for each

day.

What time are your office hours?

- enter a start and end time.

Where are they? - select the Type

of setting and enter the Details in

the field provided (e.g. the

building and room number of

your office).

If relevant, provide Instructions

for students who make

appointments with you.

2. Click the Set up Office Hours button

to save your office hours.

A confirmation message will display on the screen.

To personalize your profile, add locations

and other preference, click Go to

Profile>>

To add additional office hours, group

sessions, reserved time, or to start

adding appointments, click Go to Calendar >>.

If you choose not to complete the wizard now, but want to use it later, check the box

labeled “Show me this Office Hours Setup Page again”, and then click the Close button.

© 2013, 2014 Starfish Retention Solutions, Inc. | Proprietary and Confidential Page 13 of 41

Add Office Hours

The Add Office Hours option is meant for setting up a recurring block of time on a regular

pattern such as weekly or daily at a certain time. If you want to set up a group of Office Hours

that are less structured, use the Scheduling Wizard.

1. Click the Add Office Hours button on your Starfish Home page or

Appointments page.

This opens the Add Office Hour form.

2. Enter a Title (name) for this block of time. Students will see this name when they view your

calendar. The title will also help your or others managing your calendar identify different types

of office hours.

3. Select What day(s)? and indicate any recurrence (e.g. Repeats every 1 week).

4. Use the What time? fields to enter the start and end time for the office hours.

Important Note: once this office hour block is saved, you will not be able to edit the days on which the office hours occur or the type of frequency (e.g. weekly) but you will be able to edit how often the block recurs (e.g. 1 week vs. 2 weeks) and the specific times available.

5. Select Where? meetings will be held using the checkbox(es) next to your location(s). If you

choose more than one location, the student will be able to choose his/her preferred location for

the meeting. To add additional locations options, go to the Appointments Preference page of

your profile.

© 2013, 2014 Starfish Retention Solutions, Inc. | Proprietary and Confidential Page 14 of 41

6. Select the Office Hour Type for meetings you will take during this block.

Select Scheduled And Walk-ins If you will be using the kiosk/waiting room features, and you

plan to take walk-ins between appointments.

Select Scheduled Appointments Only if you will not take any walk-ins.

Select Walk-ins Only to show the time as available to students, but disallow anyone from

making advance appointments

7. Select How long? meetings can be by selecting a minimum and maximum duration. If the

minimum and maximum are identical, the student will not be given a choice of duration. Note

that institution settings for specific appointment reasons, may override your settings.

8. If your role has permissions to add more than one Appointment Type, you will see checkboxes

that allow you to select which types apply to this block of time. Appointment Types dictate:

1) which students can schedule during this time (based on the role that connects you),

2) the appointment reasons shown to students,

3) which SpeedNotes will display, and

4) which roles can view the appointment and its notes.

An appointment type with the recurrence icon ( ) indicates an appointment that

recurs on the same date and time for the duration of the term.

9. Use the Instructions box to

enter instructions to

students scheduling with you

during this block of time.

Instructions are required for

blocks that allow Walk-ins.

10. Optionally, click the Start/End Date tab to set a time frame for a repeating office hour block. For

the End Date, you may choose: Never, End of Term, on a specified date, or after a specified

number of occurrences.

© 2013, 2014 Starfish Retention Solutions, Inc. | Proprietary and Confidential Page 15 of 41

11. Click the Submit button at the top or bottom of the Add Office Hours form to save your Office

Hour block.

Edit or Cancel office hours

You can edit or cancel office hours from the Agenda tab in the Appointments section of Starfish.

Edit office hours

1. Click the office hours menu icon ( ) next to an office hour title to open the Office Hours Menu.

2. Select Edit Office Hours to modify: the frequency of the office hour

block’s recurrence, the time of day, locations, office hour types,

minimum and maximum duration of appointments, appointment

types, instructions, or a start/end date of the series.

3. Click the Submit button on the Edit Appointment form to save your

changes.

Note: You cannot edit the days of the week or the nature of the

recurrence (e.g. weekly).

Cancel a series of office hours

1. Click the office hours menu icon ( ) next to an office hour title to open the Office Hours Menu.

2. Select Cancel Series to cancel all occurrences

of the office hour block. You will be

prompted to confirm the date from which to

cancel the series, and to add a message that

will be sent to anyone who had time

scheduled with you during the office hours

you are canceling.

© 2013, 2014 Starfish Retention Solutions, Inc. | Proprietary and Confidential Page 16 of 41

3. Click the Submit button on the Cancel Series Confirmation form to cancel the office hour block.

Cancel a single occurrence of an office hour block

You can cancel an individual occurrence of an office hour series from the Day tab of your

Appointments section of Starfish. Use the mini calendar on the left to select the desired day.

1. Click the edit icon associated with the block of hours for the selected

day ( ). Select Cancel Occurrence from the Office Hours Menu to

cancel office hours for the selected day.

Note: You cannot modify the time range for a single occurrence of

an office hour. Selecting Edit Office Hours will modify all occurrences

of this set of office hours. To reduce availability within an office hour

block on a specific day, add reserved time to cover the part of the

office hours you want to remove from availability.

2. You will be prompted to confirm the

cancellation and can add a note that

will be included in an email to those

whose appointments are canceled.

include an

explanation and provide guidance on

how to reschedule or connect to

other available resources.

3. Click the Submit button to cancel the

Office Hour occurrence.

© 2013, 2014 Starfish Retention Solutions, Inc. | Proprietary and Confidential Page 17 of 41

Add less structured office hours (Scheduling Wizard)

Students can only schedule an appointment at times you indicate are available by adding office

hours or group sessions. The Add Office Hours option is geared toward setting up a recurring

block of time on a regular pattern such as weekly or daily at a certain time. If you want to set up

a group of Office Hours that are less structured, use the Scheduling Wizard.

This feature is particularly useful for advising rush weeks, midterm course

meetings, or other scenarios where you need to hold several different office hour sessions for

students within a week or two.

1. Click the Scheduling Wizard button from your Starfish Home

page or Appointments page.

2. Complete the first page of the scheduling wizard by entering

the Title, location (Where?), duration (How long?), Appointment Types and Instructions that

should be applied to all of the office hour blocks that are to be created. (You will find additional

descriptions of these fields in the Add Office Hours section).

Any office hour block that does not share these details must be created separately.

3. Click the Next button

© 2013, 2014 Starfish Retention Solutions, Inc. | Proprietary and Confidential Page 18 of 41

4. The date and time page of the wizard is displayed using a Monday through Friday grid for the

current week. The date range is displayed in the top right corner of the grid.

5. Use the < > controls to the right of the date range to navigate to the week in which you want to

begin scheduling the office hours.

6. In the selected week, enter the start and end times for each block in the appropriate day

columns. You can schedule multiple office hour blocks on any day within the week.

If you need to schedule more than three blocks on any day, select the “Add Another Block” link

in the column for that day.

7. To add blocks to another week, use the < > controls to move to the next week. Don't click finish

until you've entered all of the blocks!

8. Click the Finish button to create all of the office hour blocks. A summary will be presented.

9. The summary will include a list of hours that could not be created due to conflicts between the

blocks you specified and existing calendar items. Make a note of failed blocks before clicking

Finish to exit the wizard.

© 2013, 2014 Starfish Retention Solutions, Inc. | Proprietary and Confidential Page 19 of 41

Add a Group Session

Group sessions allow you to create blocks of time in which a specified number of students can

meet with you as a group. The steps are similar to adding office hours but include selections that

are specific to group sessions.

1. Click the Add Group Session button

from the Home page or

Appointments page.

This opens the Add Group Session form

2. Enter a Title (name) for this group session. Students will see this name when they view your

calendar.

3. Select When? the group session will occur and select the recurrence (e.g. Repeats every 1

week).

4. Use the What time? fields to enter the start and end time for the group session.

Important Note: Once the group session is saved, you will not be able to edit the days on which the session occurs or the type of frequency (e.g. weekly) but you will be able to edit how often the block recurs (e.g. 1 week vs. 2 weeks) and the specific times.

5. Select Where? meetings will be held. To add additional locations options, go to the

Appointments Preference page of your profile. Only one location can be selected for a group

session.

© 2013, 2014 Starfish Retention Solutions, Inc. | Proprietary and Confidential Page 20 of 41

6. Select the reason associated with this group session. Reasons listed are those associated with

the Appointment Types your role has permission to add. If you don’t find the reason you

expected, contact your Starfish administrator.

7. Enter how many students (maximum) can sign up for the session.

8. If students should be able to see the names of other students who have signed up for the

session, check the box labeled “Allow students to see other students who have signed up”.

9. If this group session should be limited to students in the same course/ course section, check the

box labeled “Support supplemental instruction”. When this option is checked, participants will

be limited to the course/course section selected by the first student who signs up.

Important Note: The supplemental instruction option is most often used with Tutoring Service Calendars. The restriction may be either course or course section based (e.g. restricted to Biology 101 students, or to Biology 101, section 02 students). This depends on options your Starfish administrator set for the appointment type associated with your group session reason. Contact your Starfish Admin to learn more about this option.

10. Use the Instructions box for information that should be shared with students who sign up.

11. Click the Start/End Date tab to designate a time frame for the group session if it recurs (as set in

step 3 above). For the End Date, you may choose: Never, End of Term, on a specified date, or

after a specified number of occurrences.

12. Click the Submit button at the top or bottom of the form to save your Group Session.

© 2013, 2014 Starfish Retention Solutions, Inc. | Proprietary and Confidential Page 21 of 41

Edit or cancel a group session

Existing group sessions will display on your Agenda tab within the Appointments section of

Starfish.

Edit a group session

1. Click the group session menu icon ( ) to open the group session menu.

2. Select Edit Group Session. You can edit the frequency of recurrence,

time of day, location, reason, number of participants, visibility of

students, instructions and the series start/end date.

Note: You cannot edit the days or the nature of the recurrence (e.g.

weekly). Some changes are prevented after students have signed up.

3. Click the Submit button to save your Edit Group Session form.

Cancel a group session

1. Click the group session menu icon ( ) to

open the group session menu.

2. Select Cancel Series to cancel all occurrences

of the group session. You will be prompted to

confirm the date from which to cancel the

series, and can add a note that will be

included in an email to those whose sessions

are canceled.

3. Click the Submit button to cancel the group

session series.

© 2013, 2014 Starfish Retention Solutions, Inc. | Proprietary and Confidential Page 22 of 41

Cancel a single occurrence of a group session

You can cancel an individual occurrence of a group session series from the Day tab of the

Appointments section of Starfish.

Use the mini calendar on the left to select the desired day.

1. Click the edit icon associated with the group session for the selected

day ( ).

2. Select Cancel Occurrence from the Group Session menu to cancel

session for the selected day.

3. You will be prompted to confirm the cancellation, and can add a note

that will be included in an email to those whose session is canceled.

include an explanation and provide guidance on how

to reschedule for another session or connect to other available resources.

4. Click the Submit button to delete the

group session occurrence. .

© 2013, 2014 Starfish Retention Solutions, Inc. | Proprietary and Confidential Page 23 of 41

Manage group session participants

You can add or remove participants in an individual group session using the Group Session

Menu selected from the Day view of the group session.

1. Click the edit icon associated with the group session for the selected day

( ).

2. Select Manage Participants from the Group Session Menu.

3. Search for a student by typing his/her name into the Add participant

field, then click the Add button to add the student to the list of

participants.

© 2013, 2014 Starfish Retention Solutions, Inc. | Proprietary and Confidential Page 24 of 41

Repeat this process for each student you want to add.

To remove a participant, click the Appointment Menu icon ( )

associated with the student’s name under the Tools column. Then

click the “Cancel Occurrence” link associated with the selected

student.

4. When you are finished with your participant updates, click the Submit

button to save your changes.

Reserve time on your calendar

Use the Reserve Time option to show time on your calendar as unavailable to avoid creation of

an appointment during that time.

1. Click the Reserve Time button from the action bar on your Home page or Appointments page.

2. Fill out the Reserve Time form to

include a description of the reserved

block, the date and time of

occurrence. If the block recurs each

week, use the “Repeat Weekly Until”

checkbox to indicate a weekly

recurrence, and select the end date

for the block using the date picker

provided.

3. Click the Submit button to add the

reserved time to your calendar.

© 2013, 2014 Starfish Retention Solutions, Inc. | Proprietary and Confidential Page 25 of 41

Make and manage Appointments

Students may only schedule appointments with you during times you have designated as available,

either through your office hours or group sessions.

Calendar owners and their designated calendar managers can add appointments wherever they choose

with a few exceptions:

You cannot overlap a reserved time: If you use the Reserve Time feature to block time on

your calendar, you will not be able to add an appointment in the time occupied by the

reserved time without first removing the reserved time from your calendar.

You cannot overlap a group session: you cannot add an individual appointment that

overlaps with a group session previously added to on your calendar.

You cannot overlap an external hold: If your Starfish calendar is integrated with an external

calendar via Exchange or Google integration, you will find “External Holds” on your calendar.

These represent items that exist on your other calendar (Outlook or Google). You will not be

able to add appointments that conflict with external holds on your Starfish calendar.

Add, edit, or cancel appointments on your Starfish calendar

Add an appointment to the calendar

1. Initiate a new appointment using either of these options:

Click the Add Appointment button from your Home or Appointments page.

Click the sign up icon ( ) for an existing office hour slot using the Day or Week view of your

calendar on the Appointments page.

© 2013, 2014 Starfish Retention Solutions, Inc. | Proprietary and Confidential Page 26 of 41

This opens the Add Appointment form

2. Begin typing the name of the desired student into the With drop down list box. Starfish will find

matching students with whom you have a relationship. Select the desired student from the list.

If you start the appointment from an existing office hour block, the “appointment types” setting

in that block may further limit the students available in your list.

3. If you used the Add Appointment button rather than selecting an existing time slot, specify

when the meeting will take place (date, start time, end time).

4. Select the desired location from the options available in the When drop down list.

5. Select a Reason for the meeting. The reasons available are based on the student you selected

and the appointment types that you have access to in your role/ relationship with that student.

If you have selected a timeslot from a set of existing office hours, the reasons will be further

limited to those associated with the appointment types settings for the office hours.

Important Note: Each reason is tied to an appointment type. Each appointment type defines which roles may view or modify an appointment of this type, and what SpeedNotes will be available. Once you choose a reason, information about which other roles have permission to see the appointment

will be shown in the section labeled Permissions ( ).

6. If relevant to the meeting and permitted by your role, select a Course from the list presented.

7. Select a radio button for Sharing to either make the appointment Shared (roles listed in the

Permissions area for this student can see the appointment and its outcomes) or Private (only

the person with whom the appointment is made can see it).

© 2013, 2014 Starfish Retention Solutions, Inc. | Proprietary and Confidential Page 27 of 41

8. Type a Detailed Description for the meeting that will be visible/emailed to you and the student.

Best Practice: This is optional but recommended to set expectations for the meeting.

9. Click the Submit button to schedule the meeting.

The appointment will appear on the calendar owner’s calendar in the selected date and time.

The appointment is also available from the calendar owner’s Home page on the Appointments

and Recent Changes channel.

© 2013, 2014 Starfish Retention Solutions, Inc. | Proprietary and Confidential Page 28 of 41

The appointment will also appear on the Meetings tab of the student folder for anyone that has

permission to view the appointment. If you included a detailed description, it will be listed on

the Meetings tab.

Both the student and calendar owner will receive an email with an iCalendar attachment for any

future appointments. Appointments created to document prior meetings will not send an email.

If you do not receive an email, check your Email Notification settings.

Modify scheduling details of an appointment

1. Click the Appointment Menu icon ( ) associated with an

appointment to make updates. The appointment menu is available

from your calendar, the Appointments or Recent Changes channels

on your Home page, or from the student folder Meetings tab.

From this menu you can edit the scheduling details of an upcoming

appointment and add or edit outcome details. If configured on your

Starfish system, you may be able to use SpeedNotes to document

common outcomes.

You can also cancel an appointment from this menu.

© 2013, 2014 Starfish Retention Solutions, Inc. | Proprietary and Confidential Page 29 of 41

2. Select Edit Appointment from the Appointment Menu to bring up the Scheduling tab of the

Edit Appointment form. From here, you can edit appointment scheduling details including:

When and Where the meeting will occur.

The Reason associated with the meeting.

This may impact who else can view the meeting, and which SpeedNotes will be

available for documenting outcomes.

The Course associated with the appointment. (optional)

The Sharing setting for the meeting. Select private if only you, your calendar manager and

the student should see this meeting. A shared meeting will be visible to those with a role

that has access to the appointment type and a relationship to the student. These roles are

noted in the Permissions section of the form ( ).

Detailed Description that is shared with the student and documented on the Meetings tab

of the student folder (optional but recommended).

3. Click the Submit button to save changes.

An updated iCalendar (iCal) attachment will be emailed to the student. The calendar owner will

also receive the updated iCal if the calendar owner’s email notificaitons preferences are set to

notify when changes are made to an existing appointment (recommended).

© 2013, 2014 Starfish Retention Solutions, Inc. | Proprietary and Confidential Page 30 of 41

Document outcomes from a meeting

1. Click the Appointment Menu icon ( ) associated with an appointment.

2. Select Outcomes from the Appointment Menu to bring up the

Outcomes tab of the Edit Appointment form.

3. Capture the meeting’s actual start and end time next to the Date.

4. If the student is a no-show for a meeting, check the Attendance box labeled “Student missed

appointment”.

Depending on your institution’s settings, this may trigger an email to the student.

5. Add your notes into the Comments box.

Click the Email check box labeled “Send a copy of note to student” if your comments

should be shared with the student via email.

6. Click the Submit button to save your updates.

Your updates will be available in the student folder on the Meetings tab for this appointment.

© 2013, 2014 Starfish Retention Solutions, Inc. | Proprietary and Confidential Page 31 of 41

Use SpeedNotes to document common outcomes

SpeedNotes are preconfigured appointment activities that can be checked off to quickly capture

recurring meeting outcomes.

If SpeedNotes exist for any appointment types in your

Starfish system, the SpeedNotes tab is available

whenever the Edit Appointment form is open.

If the selected appointment type has no SpeedNotes

associated with it, the tab contents will be blank.

Important Note: The reason selected for your appointment on the Scheduling tab is connected to an appointment type, and that appointment type determines which SpeedNotes are displayed. If you don’t see the SpeedNotes you were expecting, you may need to select a different reason or check with your Starfish administrator.

1. Click the Appointment Menu icon ( ) associated with an appointment.

2. Select Outcomes or Edit Appointment from the Appointment Menu

to bring up the Edit Appointment form.

3. Click the SpeedNotes tab. Available options may be grouped into

categories. Within any category, items are listed alphabetically.

4. Check all boxes that are relevant to your meeting.

5. Click the Submit button to save your updates.

© 2013, 2014 Starfish Retention Solutions, Inc. | Proprietary and Confidential Page 32 of 41

Cancel an appointment

1. Click the appointment menu icon ( ) associated with an

appointment to bring up the Appointment Menu.

The appointment menu is available from your calendar, the

Appointments or Recent Changes channels on your Home page, or

from the student folder Meetings tab.

You can also edit an existing appointment from this menu.

2. Select Cancel Appointment from the Appointment Menu.

3. The Cancel Appointment form is displayed. Type a note explaining the reason for the

cancellation (optional but recommended).

include an explanation for the cancellation, and provide guidance on how to

reschedule or connect to other available resources.

4. Click the Submit button to cancel the appointment and send a cancellation email (and iCal

attachment) to the student.

The calendar owner will also receive the iCal for the cancellation if the calendar owner’s email

notifications preferences are set to notify when changes are made to an existing appointment

(recommended).

Review appointment information and meeting outcomes

Review appointment and meeting information on the student folder

You can open the student folder by clicking on the link associated with the student’s name

wherever it appears in Starfish.

© 2013, 2014 Starfish Retention Solutions, Inc. | Proprietary and Confidential Page 33 of 41

For example from the Appointment channel on your Home page.

Or from the appointment on your calendar

Click on the Meetings tab of the student folder to review information about upcoming and past

meetings for this student.

The Meetings tab of the student folder includes upcoming appointment information as well as

meeting notes captured in Starfish. It may also include historical meeting information from

external systems.

The information that is available to you on the Meetings tab is based on the role(s) that connect

you to your students and the appointment types those roles have permission to view.

The icons to the left of each meeting in the list provide additional information or available

actions related to the meeting:

© 2013, 2014 Starfish Retention Solutions, Inc. | Proprietary and Confidential Page 34 of 41

Click the expand icon to the left of any appointment listed to view additional details

about the meeting. For example the Description that was included when the

appointment was created, any Comments entered on the Outcomes tab and any

Activities that were checked off on the SpeedNotes tab.

Click on the appointment menu icon to update the appointment.

If the student was marked as a no show on the Outcomes tab, the missed

appointment icon will be displayed instead of the standard appointment menu icon.

If the appointment presents information from an external system, the historical

appointment icon () will displayed. This type of meeting cannot be edited. External

meeting will only exist if your institution has imported meeting outcomes from another

system (e.g. tutortrac).

Filter student lists based on meetings

Use the Meetings filter from the list of Additional Filters available on your My Students and

Tracking tabs to identify students that have or have not scheduled appointments.

1. Click on the My Students tab from within your Students area in Starfish. Then click the Add

Filters button.

2. Select Meetings from the filter options on the left and check the box to the left of the word

Students in the filter criteria area to make this filter active.

3. Select whether you want to filter to students “Who have had/ scheduled a meeting” or to those

“Who have not had/scheduled a meeting. Optionally, you can filter to a specific Appointment

Type/ Reason and a range of Dates.

© 2013, 2014 Starfish Retention Solutions, Inc. | Proprietary and Confidential Page 35 of 41

4. Click the Submit button activate your filter

Your student list will be displayed showing only those students who matched your Meetings

filter critiera.

Click the Clear Filters button ( ) to remove your filter, or click the Edit Filters button to modify

your filter criteria.

Canceled appointments will not be included in the filter results for students that have

had/scheduled an appointment, but scheduled appointments where the student was marked as

a no show will be included.

Use calendar managers

Designate someone to manage your calendar

Calendar Managers can see, add, and edit appointments on the calendar owner’s Starfish

calendar.

© 2013, 2014 Starfish Retention Solutions, Inc. | Proprietary and Confidential Page 36 of 41

You can designate other users to be your calendar manager through Appointment Preferences

in your profile.

Institutions can create calendar managers via SIS import or administrator upload. You must

contact your Starfish administrator to remove calendar managers created via these methods.

Manage another’s calendar

Calendar viewing options

If you are designated as a calendar manager for someone else, when

you reach your Starfish Calendar on the Appointments page, you will

find a list of calendars you have permission to manage under the

Calendars I Manage heading in the Calendar Manager section on the

left of the page, beneath the small monthly calendar.

You can filter the calendars displayed by appointment type and/or

by individual users’ calendars:

Use the Appointment Types filter to limit the view to calendar

owners who have office hours of the selected types.

Check /uncheck the boxes associated with each name under the

Calendars I Manage heading to limit which calendars are

displayed.

To make it easier to

distinguish among

calendars, each name

is displayed in its own

color. The color of the

name in the listing

matches the color

used to display

appointments on the

main calendar.

As a calendar

manager, you will

find a Schedule tab in

addition to the Agenda, Day, and Week tabs. If you are opening more than 3 calendars at the

same time, rely on the schedule view. If you manage a large number of calendars the “Select all”

calendars option will only be available in the schedule view.

© 2013, 2014 Starfish Retention Solutions, Inc. | Proprietary and Confidential Page 37 of 41

When you click the Schedule tab, Starfish may display a quick reference pop up that includes

these tips for using the schedule view:

Use the time scale option at the top of the schedule view to look at the combined schedules

in 15 minute, 30 minute or 1 hour increments.

Click on an individual’s name in the schedule view to jump to viewing that user’s calendar in

the day view.

Close the Quick Reference pop up using the “x “in the top right corner.

Make and update appointments for others

If you are a calendar manager for others, you

will have additional calendar selections when

adding an appointment to the calendar.

On the Add Appointment form, you will find a

drop down selector in the Calendar field

listing those individuals for whom you have

the calendar manager permission.

Select the desired staff member to add an appointment to his/her calendar. Options presented

in terms of students, locations and appointment types will be based on the selected user’s

role(s).

The same holds true if you add office hours, groups sessions, or reserved time.

If you elect to add appointments, office hours, group sessions or

reserved time from your Appointments page, individuals who are not

checked in the Calendars I Manage section will not be listed as

options in the drop down box for Calendar on the “Add” forms.

Important Note: Once the appointment, office hour block, group session or reserve time is created, you cannot modify the person whose calendar it belongs to (i.e. you cannot move it to another person’s calendar by selecting another calendar).

© 2013, 2014 Starfish Retention Solutions, Inc. | Proprietary and Confidential Page 38 of 41

External Calendar Integration

Integration with an external calendar allows free/busy information from a staff member’s external

calendar to be displayed on that staff members’ Starfish calendar.

This type of integration is available for Google or Exchange, and your institution must have configured

one of those options with Starfish in order for you to take advantage of it.

With Starfish’s adapter installed, Starfish will poll your external calendaring system for shared calendars,

and then display the free/busy information from those shared calendars on the corresponding Starfish

user’s calendar.

Figure 2: External Calendar Integration

In order for your external calendar’s information to be available to the Starfish adapter, you must set up

your Email Notification/ Appointment Notification preferences as described below.

Configure integration in your profile

Select the Email Notifications tab from your Profile menu.

If either Google or Exchange integration has been enabled on your

Starfish system, just above the Tracking Item Notifications heading

you will find a check box labeled:

“Read busy times from my external Google calendar” or “Read busy times from my external Exchange

calendar.

Check the box and then follow the “Click here” link for set up steps specific to your type of integration.

© 2013, 2014 Starfish Retention Solutions, Inc. | Proprietary and Confidential Page 39 of 41

Set your profile to read busy times from Google

After you check the “Ready busy times” box in the Appointment Notifications section of your

profile, you must paste your personalized Google Calendar private link into the text box

provided. You can use the “Click here” link to find these instructions:

To get your Google Calendar private link:

1. Open your Google Calendar and click

on the drop down menu icon to the

right of the calendar you want to

share.

2. Select the Calendar Settings option

3. Scroll down to the Private Address heading and click the ICAL button to get your private URL.

4. Copy the Private URL provided by Google and paste it into the Google Calendar private link field

in your profile’s Email Notifications > Appointment Notifications section.

5. Be sure to click the Submit button on your Profile > Email Notifications tab to save changes.

© 2013, 2014 Starfish Retention Solutions, Inc. | Proprietary and Confidential Page 40 of 41

Set your profile to read busy times from Exchange

After you check the “Ready busy times” box in the Appointment Notifications section of your

profile, you must share your Outlook (or Microsoft 365) calendar with the starfish email address

specified in the line labeled Important under the “Ready busy times” checkbox.

Follow the “Click here” link to find detailed instructions specific to your version of Outlook or

Microsoft 365. Generally speaking, you will share your calendar with the email address specified

and give it the ability to read “full details”.

External calendar holds on your Starfish calendar

If you have configured Google or Exchange integration as described in the previous section, information

from your external calendar will begin to appear on your Starfish calendar. Items from your external

calendar will appear as external holds on your Starfish calendar.

An external hold is distinguishable from a Starfish appointment on your Starfish calendar in two ways:

1. The title on the calendar does not include the hyperlink

to the student folder.

2. When you click on the appointment menu icon ( ) the

External Hold Menu is displayed rather than the Starfish

Appointment Menu.

As noted on the External Hold Menu, this

item is editable only in the external

calendar. You cannot edit or cancel this

meeting from within Starfish.

External holds will be respected when a calendar

owner or manager is adding an appointment or other

reserved time to the calendar.

Time will show as unavailable and appointments will

not be able to be added over external holds.

© 2013, 2014 Starfish Retention Solutions, Inc. | Proprietary and Confidential Page 41 of 41

Document Version History

Version Description of updates Date of update

2.0 Refined to include newest screens and additional options added in the summer of 2014.

9/10/14

2.01 Updated Student Folder image (meetings tab) with updated student folder layout

08/14/15


Recommended