12
Q U I C K S T A R T C4608M-B (12/12) Endura ® Advanced System Management Software WS5000 version 2.0 or later for use with WS5200 Models
Q U I C K S T A R T
C4608M-B (12/12)
Endura®
Advanced SystemManagement Software
WS5000 version 2.0 or later for use with WS5200 Models
About This Guide
Thank you for purchasing Pelco’s Endura® advanced system management software. This guide provides instructions on installing the software along with basic instructions on how to operate the software, monitor live video, and work with recorded video. For proper network configuration, follow the instructions in the Endura Network Design Guide, which is available at the Endura Partner Portal. For detailed instructions on programming and using the software, refer to the operation manual, which is available electronically on the software resource disc. You also can find complete instructions for operating the software in the online Help.
PREPARING THE COMPUTERBefore you install the software on your computer, you must verify that it meets the following conditions:• The computer must meet the minimum system requirements that are described on the specification
sheet, which is available at the Pelco Web site. The installation program will not continue unless the minimum system requirements are met.
• The computer must be connected to an Endura network as described in the Endura Network Design Guide.
• Close all other applications before you install the software.
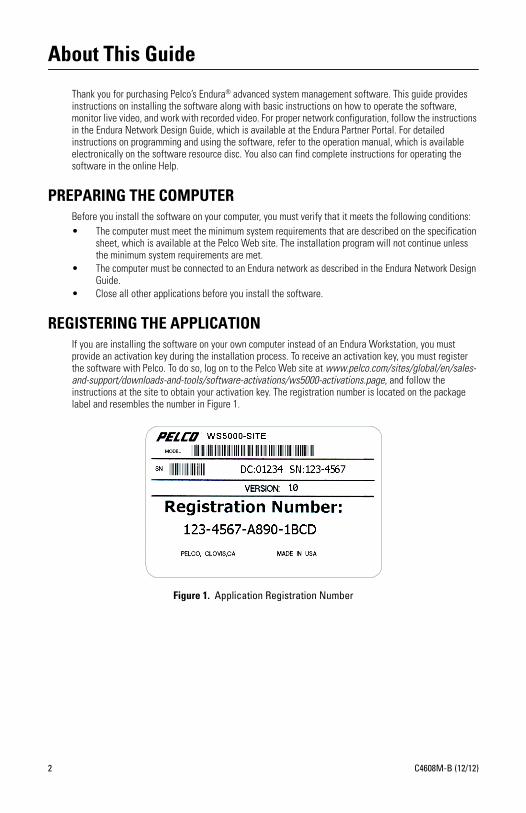
REGISTERING THE APPLICATIONIf you are installing the software on your own computer instead of an Endura Workstation, you must provide an activation key during the installation process. To receive an activation key, you must register the software with Pelco. To do so, log on to the Pelco Web site at www.pelco.com/sites/global/en/sales-and-support/downloads-and-tools/software-activations/ws5000-activations.page, and follow the instructions at the site to obtain your activation key. The registration number is located on the package label and resembles the number in Figure 1.
Figure 1. Application Registration Number
2 C4608M-B (12/12)

Installing the ApplicationIf you are running an older version of the software on an Endura Workstation, you must close the application before you install this version of the software. When you install a newer version of the software over an existing version, all previously exported video and snapshots are deleted from the computer. If necessary, copy any exported video and snapshots to backup media for future use.
1. Place the installation disc into the CD or DVD drive of your computer. The installation wizard appears automatically. If the installation wizard does not appear automatically, open Windows® Explorer, locate the installation program, and double-click it. The program prepares the installation files and displays the Welcome dialog box.
Figure 2. InstallShield Wizard
2. Follow the prompts on the screen to install the application.
3. When prompted, enter the unique activation key that you received from Pelco. If you do not have your unique activation key, visit the Pelco web site at www.pelco.com/sites/global/en/sales-and-support/downloads-and-tools/software-activations/ws5000-activations.page to register the application. You will receive a 25-digit activation key to enter on this screen. A valid activation key contains capital letters and numbers. Refer to Registering the Application on page 2 for detailed instructions.
Figure 3. Activation Key Screen
4. Continue through the remaining installation screens, and then click Finish to complete the installation.
5. Repeat this process for each additional computer for which you have purchased a license.
C4608M-B (12/12) 3
Logging On and Off
Before starting, ensure that the computer on which the software is installed is configured to work on an Endura network. For information on network requirements, consult the Endura Network Design Guide.
To start the application, double-click the Endura icon on the desktop. A login dialog box appears. If the SM5000 system manager is on line, enabling the authentication of users and devices, a small key icon appears in the lower-right corner.
Logging on loads your user profile, including your language preferences. When you start the software, a Login dialog box automatically appears. You cannot access the application if you do not have a valid user name and password.
To keep your system secure, be sure to change any default passwords. Record your new login information in a secure location.
To log on:
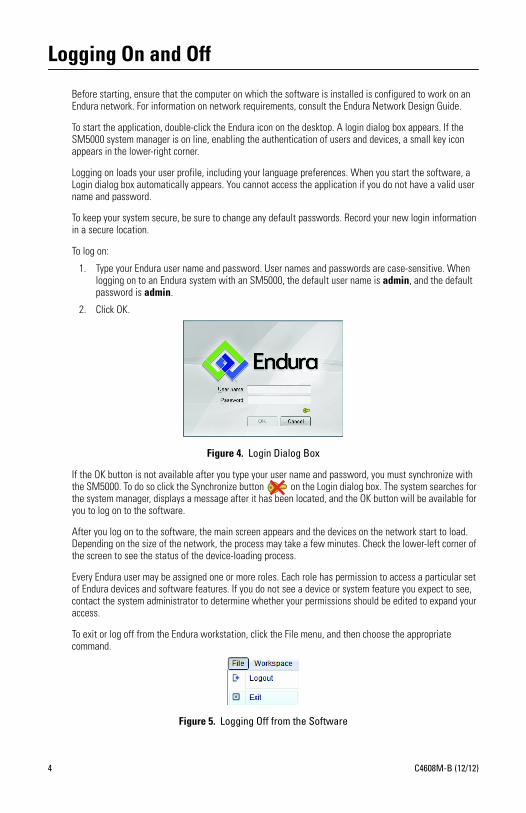
1. Type your Endura user name and password. User names and passwords are case-sensitive. When logging on to an Endura system with an SM5000, the default user name is admin, and the default password is admin.
2. Click OK.
Figure 4. Login Dialog Box
If the OK button is not available after you type your user name and password, you must synchronize with the SM5000. To do so click the Synchronize button on the Login dialog box. The system searches for the system manager, displays a message after it has been located, and the OK button will be available for you to log on to the software.
After you log on to the software, the main screen appears and the devices on the network start to load. Depending on the size of the network, the process may take a few minutes. Check the lower-left corner of the screen to see the status of the device-loading process.
Every Endura user may be assigned one or more roles. Each role has permission to access a particular set of Endura devices and software features. If you do not see a device or system feature you expect to see, contact the system administrator to determine whether your permissions should be edited to expand your access.
To exit or log off from the Endura workstation, click the File menu, and then choose the appropriate command.
Figure 5. Logging Off from the Software
4 C4608M-B (12/12)
Main Screen
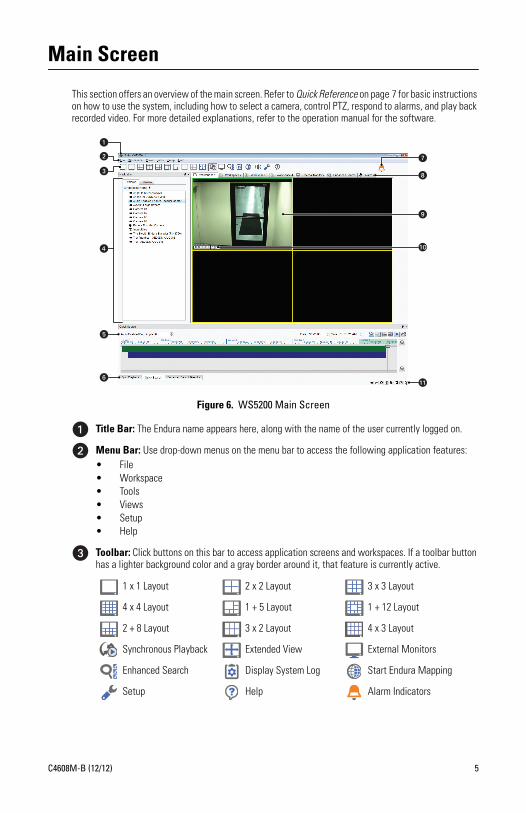
This section offers an overview of the main screen. Refer to Quick Reference on page 7 for basic instructions on how to use the system, including how to select a camera, control PTZ, respond to alarms, and play back recorded video. For more detailed explanations, refer to the operation manual for the software.
Figure 6. WS5200 Main Screen
Title Bar: The Endura name appears here, along with the name of the user currently logged on.
Menu Bar: Use drop-down menus on the menu bar to access the following application features:• File• Workspace• Tools• Views• Setup• Help
Toolbar: Click buttons on this bar to access application screens and workspaces. If a toolbar button has a lighter background color and a gray border around it, that feature is currently active.
1 x 1 Layout 2 x 2 Layout 3 x 3 Layout
4 x 4 Layout 1 + 5 Layout 1 + 12 Layout
2 + 8 Layout 3 x 2 Layout 4 x 3 Layout
Synchronous Playback Extended View External Monitors
Enhanced Search Display System Log Start Endura Mapping
Setup Help Alarm Indicators
C4608M-B (12/12) 5
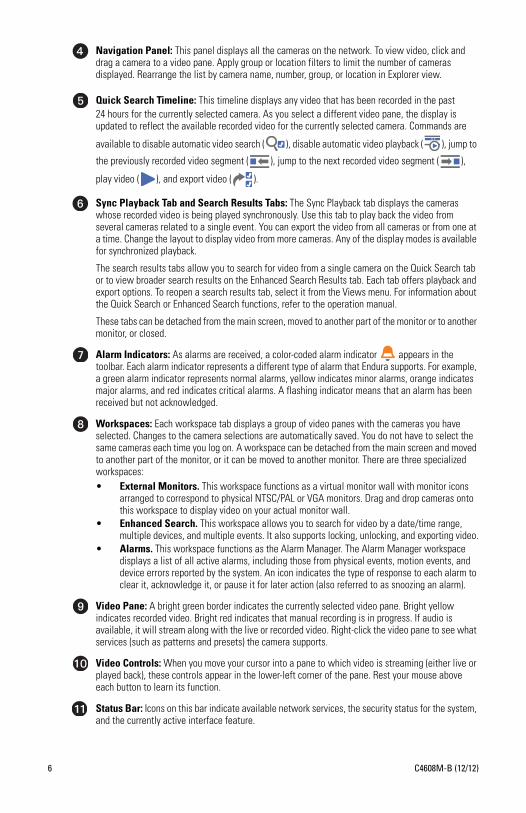
Navigation Panel: This panel displays all the cameras on the network. To view video, click and drag a camera to a video pane. Apply group or location filters to limit the number of cameras displayed. Rearrange the list by camera name, number, group, or location in Explorer view.
Quick Search Timeline: This timeline displays any video that has been recorded in the past 24 hours for the currently selected camera. As you select a different video pane, the display is updated to reflect the available recorded video for the currently selected camera. Commands are
available to disable automatic video search ( ), disable automatic video playback ( ), jump to
the previously recorded video segment ( ), jump to the next recorded video segment ( ),
play video ( ), and export video ( ).
Sync Playback Tab and Search Results Tabs: The Sync Playback tab displays the cameras whose recorded video is being played synchronously. Use this tab to play back the video from several cameras related to a single event. You can export the video from all cameras or from one at a time. Change the layout to display video from more cameras. Any of the display modes is available for synchronized playback.
The search results tabs allow you to search for video from a single camera on the Quick Search tab or to view broader search results on the Enhanced Search Results tab. Each tab offers playback and export options. To reopen a search results tab, select it from the Views menu. For information about the Quick Search or Enhanced Search functions, refer to the operation manual.
These tabs can be detached from the main screen, moved to another part of the monitor or to another monitor, or closed.
Alarm Indicators: As alarms are received, a color-coded alarm indicator appears in the toolbar. Each alarm indicator represents a different type of alarm that Endura supports. For example, a green alarm indicator represents normal alarms, yellow indicates minor alarms, orange indicates major alarms, and red indicates critical alarms. A flashing indicator means that an alarm has been received but not acknowledged.
Workspaces: Each workspace tab displays a group of video panes with the cameras you have selected. Changes to the camera selections are automatically saved. You do not have to select the same cameras each time you log on. A workspace can be detached from the main screen and moved to another part of the monitor, or it can be moved to another monitor. There are three specialized workspaces:• External Monitors. This workspace functions as a virtual monitor wall with monitor icons
arranged to correspond to physical NTSC/PAL or VGA monitors. Drag and drop cameras onto this workspace to display video on your actual monitor wall.
• Enhanced Search. This workspace allows you to search for video by a date/time range, multiple devices, and multiple events. It also supports locking, unlocking, and exporting video.
• Alarms. This workspace functions as the Alarm Manager. The Alarm Manager workspace displays a list of all active alarms, including those from physical events, motion events, and device errors reported by the system. An icon indicates the type of response to each alarm to clear it, acknowledge it, or pause it for later action (also referred to as snoozing an alarm).
Video Pane: A bright green border indicates the currently selected video pane. Bright yellow indicates recorded video. Bright red indicates that manual recording is in progress. If audio is available, it will stream along with the live or recorded video. Right-click the video pane to see what services (such as patterns and presets) the camera supports.
Video Controls: When you move your cursor into a pane to which video is streaming (either live or played back), these controls appear in the lower-left corner of the pane. Rest your mouse above each button to learn its function.
Status Bar: Icons on this bar indicate available network services, the security status for the system, and the currently active interface feature.
6 C4608M-B (12/12)

Quick ReferenceTable A. Software Features and Functions (1 of 4)
To do this: Take this action: On-screen button Shortcut
Get help with Endura
Click the Help button in the toolbar. Or, go to the Help menu, and then select Help.
F1
Log off or Exit Go to the File menu, and then select Logout or Exit.
Work with Cameras
Select a workspace (a set of cameras)
Click a workspace tab.
Select a camera for live view
Click a camera in the Navigation panel, and then drag the camera to a video pane. Or, right-click a video pane, and then select Select Camera by Number. Or, double-click a camera to view its video in the first available video pane.
Disconnect a camera
Right-click the video pane, and then select Disconnect from the shortcut menu.
Adjust PTZ Click in the video pane, and then drag the mouse to pan or tilt. Use the mouse’s scroll button to zoom in and out.
Arrow keys to pan or tilt; Page Up and Page Down to zoom
Adjust focus or iris
Right-click the video pane, and then select Iris and Focus from the context menu.
Use digital zoom
Click the Digital Zoom button in the video controls, and then use the mouse to adjust the zoom.
Page UpPage Down
Use Zone of Interest™ feature with certain IP cameras
Click the Zone of Interest mode button in the video controls.
Run pattern, preset, or scan
Right-click the video pane, and then select an option from the shortcut menus.
C4608M-B (12/12) 7
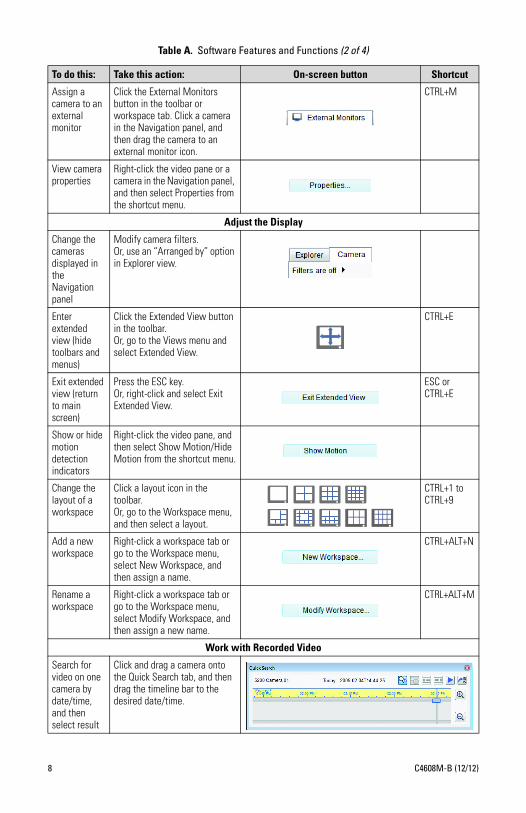
Assign a camera to an external monitor
Click the External Monitors button in the toolbar or workspace tab. Click a camera in the Navigation panel, and then drag the camera to an external monitor icon.
CTRL+M
View camera properties
Right-click the video pane or a camera in the Navigation panel, and then select Properties from the shortcut menu.
Adjust the Display
Change the cameras displayed in the Navigation panel
Modify camera filters.Or, use an “Arranged by” option in Explorer view.
Enter extended view (hide toolbars and menus)
Click the Extended View button in the toolbar.Or, go to the Views menu and select Extended View.
CTRL+E
Exit extended view (return to main screen)
Press the ESC key. Or, right-click and select Exit Extended View.
ESC or CTRL+E
Show or hide motion detection indicators
Right-click the video pane, and then select Show Motion/Hide Motion from the shortcut menu.
Change the layout of a workspace
Click a layout icon in the toolbar.Or, go to the Workspace menu, and then select a layout.
CTRL+1 to CTRL+9
Add a new workspace
Right-click a workspace tab or go to the Workspace menu, select New Workspace, and then assign a name.
CTRL+ALT+N
Rename a workspace
Right-click a workspace tab or go to the Workspace menu, select Modify Workspace, and then assign a new name.
CTRL+ALT+M
Work with Recorded Video
Search for video on one camera by date/time, and then select result
Click and drag a camera onto the Quick Search tab, and then drag the timeline bar to the desired date/time.
Table A. Software Features and Functions (2 of 4)
To do this: Take this action: On-screen button Shortcut
8 C4608M-B (12/12)
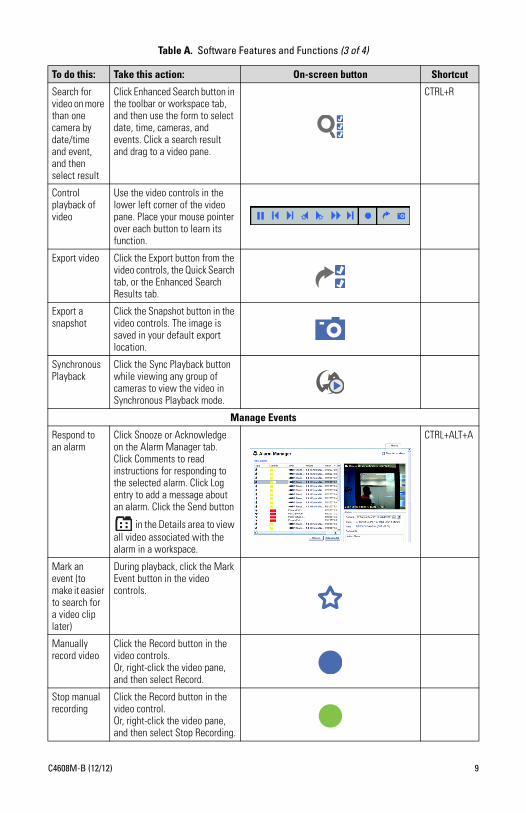
Search for video on more than one camera by date/time and event, and then select result
Click Enhanced Search button in the toolbar or workspace tab, and then use the form to select date, time, cameras, and events. Click a search result and drag to a video pane.
CTRL+R
Control playback of video
Use the video controls in the lower left corner of the video pane. Place your mouse pointer over each button to learn its function.
Export video Click the Export button from the video controls, the Quick Search tab, or the Enhanced Search Results tab.
Export a snapshot
Click the Snapshot button in the video controls. The image is saved in your default export location.
Synchronous Playback
Click the Sync Playback button while viewing any group of cameras to view the video in Synchronous Playback mode.
Manage Events
Respond to an alarm
Click Snooze or Acknowledge on the Alarm Manager tab. Click Comments to read instructions for responding to the selected alarm. Click Log entry to add a message about an alarm. Click the Send button
in the Details area to view all video associated with the alarm in a workspace.
CTRL+ALT+A
Mark an event (to make it easier to search for a video clip later)
During playback, click the Mark Event button in the video controls.
Manually record video
Click the Record button in the video controls. Or, right-click the video pane, and then select Record.
Stop manual recording
Click the Record button in the video control. Or, right-click the video pane, and then select Stop Recording.
Table A. Software Features and Functions (3 of 4)
To do this: Take this action: On-screen button Shortcut
C4608M-B (12/12) 9

Run a script Go to the Tools menu, and then select Execute Script.
CTRL+ALT+S
Activate a relay
Go to the Tools menu, and then select Activate Relay.
CTRL+ALT+R
Add manual entry to system log
Go to the Tools menu, and then select Add to System Log.
CTRL+A
Manage Endura System
View a log of all system events and device activity
Click the System Log button in the toolbar. Or, go to the Tools menu, and then select View System Log.
CTRL+L
Open the Setup screen
Click the Setup button. Or, go to the Setup menu, and then select Setup.
CTRL+SHIFT+S
Adjust network settings
Click the Setup button, and then click the System Configuration tab. Refer to Help for more details.
Configure a device
Click the Setup button, and then click the Devices tab. Refer to Help for more details.
Edit a user’s set of permissions
Click the Setup button, and then click the Roles tab. Refer to Help for more details.
Add a new user
Click the Setup button, and then click the Users tab. Refer to Help for more details.
Configure an external monitor wall
Click the Setup button, and then click the External Monitors tab. Refer to Help for more details.
Set up event groups
Open Setup and then click the Event Groups tab.
Set up a recording schedule
Click the Setup button, and then click the Recording Schedule tab. Refer to Help for more details.
Program a script (a macro or set of actions)
Click the Setup button, and then click the Scripts tab. Refer to Help for more details.
Update software on an Endura device
Click the Setup button, and then click the Update Software tab. Refer to Help for more details.
Table A. Software Features and Functions (4 of 4)
To do this: Take this action: On-screen button Shortcut
10 C4608M-B (12/12)

REVISION HISTORYManual # Date CommentsC4608M 3/09 Original version.C4608M-A 9/09 Updated to document features in Endura 2.1 software.C4608M-B 12/12 Updated the activation key Web address in the Registering the Application and Installing the
Application sections.
Pelco, the Pelco logo, and other trademarks associated with Pelco products referred to in this publication are trademarks of Pelco, Inc. or its affiliates.All other product names and services are the property of their respective companies. ONVIF and the ONVIF logo are trademarks of ONVIF Inc. Product specifications and availability are subject to change without notice. © Copyright 2012, Pelco, Inc. All rights reserved.
The materials used in the manufacture of this document and its components are compliant to the requirements of Directive 2002/95/EC.
C4608M-B (12/12) 11

Pelco by Schneider Electric 3500 Pelco Way Clovis, California 93612-5699 United StatesUSA & Canada Tel (800) 289-9100 Fax (800) 289-9150
International Tel +1 (559) 292-1981 Fax +1 (559) 348-1120www.pelco.com www.pelco.com/community


