18
C O N F I G U R A T I O N C5608M Endura / Lenel OnGuard Integration Guide
| Date post: | 26-Aug-2018 |
| Category: |
Documents |
| Upload: | nguyencong |
| View: | 216 times |
| Download: | 1 times |

C O N F I G U R A T I O N
C5608M
Endura / Lenel OnGuard Integration Guide

2 C5608M

Important Notices . . . . . . . . . . . . . . . . . . . . . . . . . . . . . . . . . . . . . . . . . . . . . . . . . . . . . . . . . . . . . . . . . . . . . . . . . . . . . . . . . . . . . . . . . . . . . . . . . . . . . 3LEGAL NOTICE . . . . . . . . . . . . . . . . . . . . . . . . . . . . . . . . . . . . . . . . . . . . . . . . . . . . . . . . . . . . . . . . . . . . . . . . . . . . . . . . . . . . . . . . . . . . . . . . . . . 3
Getting Started . . . . . . . . . . . . . . . . . . . . . . . . . . . . . . . . . . . . . . . . . . . . . . . . . . . . . . . . . . . . . . . . . . . . . . . . . . . . . . . . . . . . . . . . . . . . . . . . . . . . . . . 4General Requirements . . . . . . . . . . . . . . . . . . . . . . . . . . . . . . . . . . . . . . . . . . . . . . . . . . . . . . . . . . . . . . . . . . . . . . . . . . . . . . . . . . . . . . . . . . . . . 4
Hardware . . . . . . . . . . . . . . . . . . . . . . . . . . . . . . . . . . . . . . . . . . . . . . . . . . . . . . . . . . . . . . . . . . . . . . . . . . . . . . . . . . . . . . . . . . . . . . . . . . . 4Endura Components. . . . . . . . . . . . . . . . . . . . . . . . . . . . . . . . . . . . . . . . . . . . . . . . . . . . . . . . . . . . . . . . . . . . . . . . . . . . . . . . . . . . . . . . . . . 4Software . . . . . . . . . . . . . . . . . . . . . . . . . . . . . . . . . . . . . . . . . . . . . . . . . . . . . . . . . . . . . . . . . . . . . . . . . . . . . . . . . . . . . . . . . . . . . . . . . . . 4
Installation . . . . . . . . . . . . . . . . . . . . . . . . . . . . . . . . . . . . . . . . . . . . . . . . . . . . . . . . . . . . . . . . . . . . . . . . . . . . . . . . . . . . . . . . . . . . . . . . . . . . . . 4Initial Steps. . . . . . . . . . . . . . . . . . . . . . . . . . . . . . . . . . . . . . . . . . . . . . . . . . . . . . . . . . . . . . . . . . . . . . . . . . . . . . . . . . . . . . . . . . . . . . . . . . . . . . 5
Endura Video Server . . . . . . . . . . . . . . . . . . . . . . . . . . . . . . . . . . . . . . . . . . . . . . . . . . . . . . . . . . . . . . . . . . . . . . . . . . . . . . . . . . . . . . . . . . 5Endura Video Camera . . . . . . . . . . . . . . . . . . . . . . . . . . . . . . . . . . . . . . . . . . . . . . . . . . . . . . . . . . . . . . . . . . . . . . . . . . . . . . . . . . . . . . . . . 5
First Step. . . . . . . . . . . . . . . . . . . . . . . . . . . . . . . . . . . . . . . . . . . . . . . . . . . . . . . . . . . . . . . . . . . . . . . . . . . . . . . . . . . . . . . . . . . . . . . . . . . . . . . . 5
Endura Video Server . . . . . . . . . . . . . . . . . . . . . . . . . . . . . . . . . . . . . . . . . . . . . . . . . . . . . . . . . . . . . . . . . . . . . . . . . . . . . . . . . . . . . . . . . . . . . . . . . . . 6Overview . . . . . . . . . . . . . . . . . . . . . . . . . . . . . . . . . . . . . . . . . . . . . . . . . . . . . . . . . . . . . . . . . . . . . . . . . . . . . . . . . . . . . . . . . . . . . . . . . . . . . . . . 6
Essential Tasks . . . . . . . . . . . . . . . . . . . . . . . . . . . . . . . . . . . . . . . . . . . . . . . . . . . . . . . . . . . . . . . . . . . . . . . . . . . . . . . . . . . . . . . . . . . . . . 6Other Tasks . . . . . . . . . . . . . . . . . . . . . . . . . . . . . . . . . . . . . . . . . . . . . . . . . . . . . . . . . . . . . . . . . . . . . . . . . . . . . . . . . . . . . . . . . . . . . . . . . 6
Creating an Endura Video Server . . . . . . . . . . . . . . . . . . . . . . . . . . . . . . . . . . . . . . . . . . . . . . . . . . . . . . . . . . . . . . . . . . . . . . . . . . . . . . . . . . . . . 6Editing an Endura Video Server . . . . . . . . . . . . . . . . . . . . . . . . . . . . . . . . . . . . . . . . . . . . . . . . . . . . . . . . . . . . . . . . . . . . . . . . . . . . . . . . . . . . . . 7Deleting an Endura Video Server . . . . . . . . . . . . . . . . . . . . . . . . . . . . . . . . . . . . . . . . . . . . . . . . . . . . . . . . . . . . . . . . . . . . . . . . . . . . . . . . . . . . . 8
Endura Video Cameras. . . . . . . . . . . . . . . . . . . . . . . . . . . . . . . . . . . . . . . . . . . . . . . . . . . . . . . . . . . . . . . . . . . . . . . . . . . . . . . . . . . . . . . . . . . . . . . . . 10Overview . . . . . . . . . . . . . . . . . . . . . . . . . . . . . . . . . . . . . . . . . . . . . . . . . . . . . . . . . . . . . . . . . . . . . . . . . . . . . . . . . . . . . . . . . . . . . . . . . . . . . . . 10
Essential Tasks . . . . . . . . . . . . . . . . . . . . . . . . . . . . . . . . . . . . . . . . . . . . . . . . . . . . . . . . . . . . . . . . . . . . . . . . . . . . . . . . . . . . . . . . . . . . . 10Importing Cameras . . . . . . . . . . . . . . . . . . . . . . . . . . . . . . . . . . . . . . . . . . . . . . . . . . . . . . . . . . . . . . . . . . . . . . . . . . . . . . . . . . . . . . . . . . . . . . . 10Adding an Endura Video Camera . . . . . . . . . . . . . . . . . . . . . . . . . . . . . . . . . . . . . . . . . . . . . . . . . . . . . . . . . . . . . . . . . . . . . . . . . . . . . . . . . . . . 10Editing Endura Video Camera General Settings. . . . . . . . . . . . . . . . . . . . . . . . . . . . . . . . . . . . . . . . . . . . . . . . . . . . . . . . . . . . . . . . . . . . . . . . . 11Video View . . . . . . . . . . . . . . . . . . . . . . . . . . . . . . . . . . . . . . . . . . . . . . . . . . . . . . . . . . . . . . . . . . . . . . . . . . . . . . . . . . . . . . . . . . . . . . . . . . . . . 13Pan, Tilt, Zoom . . . . . . . . . . . . . . . . . . . . . . . . . . . . . . . . . . . . . . . . . . . . . . . . . . . . . . . . . . . . . . . . . . . . . . . . . . . . . . . . . . . . . . . . . . . . . . . . . . 13
Events. . . . . . . . . . . . . . . . . . . . . . . . . . . . . . . . . . . . . . . . . . . . . . . . . . . . . . . . . . . . . . . . . . . . . . . . . . . . . . . . . . . . . . . . . . . . . . . . . . . . . . . . . . . . . . 14
C5608M 1

2 C5608M

Important Notices
LEGAL NOTICESOME PELCO EQUIPMENT CONTAINS, AND THE SOFTWARE ENABLES, AUDIO/VISUAL AND RECORDING CAPABILITIES, THE IMPROPER USE OF WHICH MAY SUBJECT YOU TO CIVIL AND CRIMINAL PENALTIES. APPLICABLE LAWS REGARDING THE USE OF SUCH CAPABILITIES VARY BETWEEN JURISDICTIONS AND MAY REQUIRE, AMONG OTHER THINGS, EXPRESS WRITTEN CONSENT FROM RECORDED SUBJECTS. YOU ARE SOLELY RESPONSIBLE FOR INSURING STRICT COMPLIANCE WITH SUCH LAWS AND FOR STRICT ADHERENCE TO ANY/ALL RIGHTS OF PRIVACY AND PERSONALTY. USE OF THIS EQUIPMENT AND/OR SOFTWARE FOR ILLEGAL SURVEILLANCE OR MONITORING SHALL BE DEEMED UNAUTHORIZED USE IN VIOLATION OF THE END USER SOFTWARE AGREEMENT AND RESULT IN THE IMMEDIATE TERMINATION OF YOUR LICENSE RIGHTS THEREUNDER.
CxxxxM (xx/11) 3

Getting Started
GENERAL REQUIREMENTS
HARDWAREThe minimum hardware requirements for the client machine to use for completing the steps outlined in this document are the following:
• CPU: Intel 2.4 Core 2 Duo (or higher)
• Memory: 2 GB
• GPU: DirectX9 Compatible; must be a dedicated card and not a motherboard integrated chip
• HD: 1 GB
ENDURA COMPONENTSThe Endura System is comprised of powerful components that seamlessly work in concert to deliver state-of-the-art IP-based video management. The following are Endura 2.x compatible components that are compatible with the Endura/Lenel OnGuard integration:
• DVR5300: Endura Digital Video Recorder
• EE500: Endura Express Recorder
• NET5301R: Endura Single Channel Decoder
• NET53xxT: Endura 1, 8 & 16 Channel MPEG4 Encoders
• NET5402R-HD: Endura High Definition Decoder
• NET540xT: Endura 1, 2, & 4 Channel H.264 Encoders
• NSM5200: Endura Network Storage Manager
• NVR5100: Endura Network Video Recorder
• SM5000: Endura System Manager
• VCD5202: Endura Video Console Display
• WS5200: Endura Workstation
• UDI5000: Endura Universal Device Interface
SOFTWAREThe software requirements for completing the steps outlined in this document are the following:
• Lenel OnGuard
• Windows XP, Windows Vista [32 bit / 64 bit], Windows Server 2003 [32 bit / 64 bit], Windows Server 2008 [32 bit / 64 bit], WIndows 7 [32 bit / 64 bit]
• DirectX 9.0 c
• Visual Studio C++ RuntimeNOTE: This documentation’s main focus is on the integration of Pelco IP products with the Lenel OnGuard. This documentation is not a replacement for general Lenel documentation. It is highly recommended that you review the following documentation and become familiar with Lenel OnGuard concepts before proceeding with this documentationLenel documentation is available online on their website (http://www.lenel.com/).
NOTE: Improper use of audio/visual recording equipment may subject you to civil and criminal penalties. Applicable laws regarding the use of such capabilities vary between jurisdictions and may require, among other things, express written consent from the recorded subjects. You are solely responsible for insuring strict compliance with such laws and for strict adherence to any/all rights of privacy and personalty.
INSTALLATIONWARNING: Lenel OnGuard cannot be installed on any machine containing an existing Pelco SDK installation.
Once finished downloading the Endura Lenel Lenel OnGuard Integration installer, double click on the Endura Lenel Lenel OnGuard Integration installer to begin installation. Simply follow the onscreen prompts to complete installation.
4 CxxxxM (xx/11)

INITIAL STEPSWhile this documentation covers a wide variety of tasks, only the tasks listed below are essential to having a successful base integration between Lenel’s Lenel OnGuard and Pelco’s Endura system:
ENDURA VIDEO SERVER• Adding an Endura Video Server: This both connects your Endura Video Server to the Lenel OnGuard, as well as importing all Endura Video
Cameras associated with it into the Lenel OnGuard.
ENDURA VIDEO CAMERA• Accessing an Endura Video Camera’s View: This allows you to take control of a successfully connected Endura Video Camera, giving you
access to its stream and controls.
• Playback control for a Previously Recorded Stream: This entry details the steps needed to play back a very specific portion of recorded streams.
• Reconnecting the Camera: When you experience a loss of connection from a particular Endura Video Camera’s stream, this entry will demonstrate how to restore it.
• Recording a Stream: This entry shows how to record an Endura Video Camera’s current stream.
Figure 1. Digital Video menu item
FIRST STEPEndura related functionality is located within a subsection of the Lenel OnGuard application. To access Endura related functionality, begin by starting the Lenel OnGuard application. Once Lenel OnGuard is started, access the ‘Video’ menu and select the ‘Digital Video...’ menu item.
You should now have access to the portion of UI related to Pelco Endura.
CxxxxM (xx/11) 5
Endura Video Server
OVERVIEWBefore we dive into the details of actually adding an ‘Endura Video Server’, we should provide some background. An Endura Video Server is better known as the Endura System Manager (SM). The SM is the heart of Endura, and responsible for the following:
• Managing devices such as cameras, decoders, and NVRs, including administering rights and privileges
• Storing device information, like status
• Administering users, which includes permissions management
• Logs errors and alarms
• Security key management
ESSENTIAL TASKSThe following is a list of essential tasks related to using the Endura Video Server:
• Creating a new Endura Video Server
• Configuring Endura VIdeo Server General Settings
• Configuring Endura VIdeo Server Alarm Settings
OTHER TASKSThe following is a list of other tasks related to the Endura Video Server:
• Editing an Existing Endura Video Server
• Deleting an Endura Video Server
• Deleting Multiple Endura Video Servers
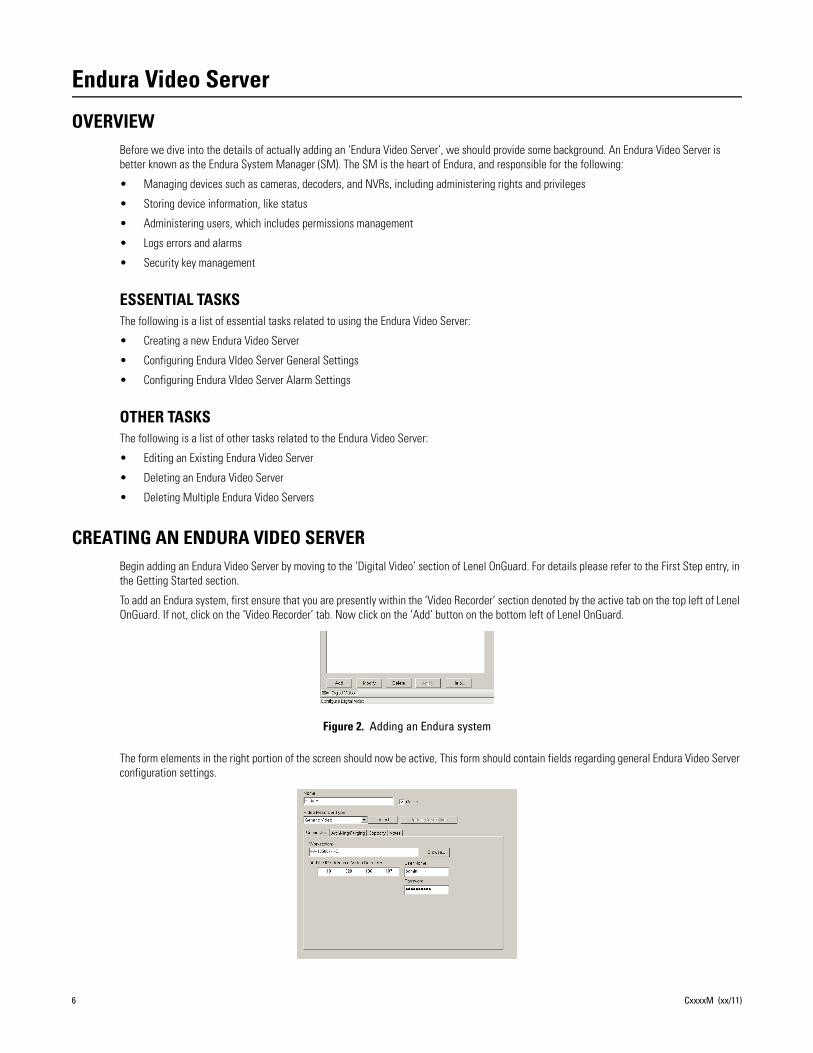
Figure 2. Adding an Endura system
CREATING AN ENDURA VIDEO SERVERBegin adding an Endura Video Server by moving to the ‘Digital Video’ section of Lenel OnGuard. For details please refer to the First Step entry, in the Getting Started section.
To add an Endura system, first ensure that you are presently within the ‘Video Recorder’ section denoted by the active tab on the top left of Lenel OnGuard. If not, click on the ‘Video Recorder’ tab. Now click on the ‘Add’ button on the bottom left of Lenel OnGuard.
The form elements in the right portion of the screen should now be active, This form should contain fields regarding general Endura Video Server configuration settings.
6 CxxxxM (xx/11)

Figure 6. Successful addition of the Endura Video Server
Figure 8. Click the Modify button to edit an Endura Video Server configuration
Figure 7. Select an Endura Video Server to edit
Figure 5. Click OK to verify and save new Endura settings
Figure 4. Endura Video Server notes
Figure 3. Endura Video Server configuration settings
The following is describe the fields in ‘General Settings’:
• Name: The Endura Video Server’s friendly name.
• Video Recorder Type: The type of video recorder, please select ‘Generic Video’.
• Workstation: This is the machine where the local machine resides. To select the proper machine, click on the ‘Browse’ button.
• IP Address of Video Recorder: This is the Endura Video Server’s network location.
• User Name: This is the desired username for as Endura Video Server authentication credentials.
• Password: This is the desired password for as Endura Video Server authentication credentials.
• Online: This checkbox determines whether or not the Endura Video Server is currently available.
As an option, you can enter any relevant notes concerning this particular Endura Video Server in the ‘Notes’ tab.
Once you have successfully entered the required Endura Video Server settings, click on the ‘Ok’ button (on the bottom left of Lenel OnGuard) to verify the validity of your setting values, to connect the Lenel OnGuard to your Endura Video Server, and to save your new Endura Video Server settings.
Assuming that the Endura Video Server has already been successfully added, you should now see it in the left portion of Lenel OnGuard’s Digital Video section.
EDITING AN ENDURA VIDEO SERVERTo edit an existing Endura VIdeo Server, just click on it to highlight it.
Now click on the ‘Modify’ button in the bottom left of the Lenel OnGuard application.
CxxxxM (xx/11) 7

Figure 10. Configruation notes for an Endura Video Server
Figure 9. Endura Video Server configuration settings
A dialog box displaying the Endura Video Server’s saved settings will appear. This dialog box should contain forms regarding general Endura Video Server configuration settings, as well as settings for alarms (i.e. events).
(It should be noted that only the ‘Connection’ and ‘Notes’ tabs are relevant for Endura Lenel Integration.)
The following is describe the fields in ‘General Settings’:
• Name: The Endura Video Server’s friendly name.
• Video Recorder Type: The type of video recorder, please select ‘Generic Video’.
• Workstation: This is the machine where the local machine resides. To select the proper machine, click on the ‘Browse’ button.
• IP Address of Video Recorder: This is the Endura Video Server’s network location.
• User Name: This is the desired username for as Endura Video Server authentication credentials.
• Password: This is the desired password for as Endura Video Server authentication credentials.
• Online: This checkbox determines whether or not the Endura Video Server is currently available.
As an option, you can enter any relevant notes concerning this particular Endura Video Server in the ‘Notes’ tab.
Once you have successfully entered the required Endura Video Server settings, click on the ‘Ok’ button (on the bottom left of Lenel OnGuard) to both verify the validity of your setting values, to connect the Lenel OnGuard to your Endura Video Server, and to save your new Endura Video Server settings.
Figure 11. Select an Endura Video Server to delete
DELETING AN ENDURA VIDEO SERVERTo delete an existing Endura Video Server, click on the desired Endura Video Server to delete.
8 CxxxxM (xx/11)

Figure 12. Click the Delete button to delete an Endura Video Server
Now click on the ‘Delete’ button in the bottom left of the Lenel OnGuard application and confirm the delete.
CxxxxM (xx/11) 9
Endura Video Cameras
OVERVIEWAn Endura Video Camera simply describes Pelco IP video products such as IP cameras, or encoders.
ESSENTIAL TASKS• Adding an Endura Video Camera: This can be done in one of two ways:
• Using the ‘Import Camera’ menu option, as described in the Importing Cameras entry below.
• Adding a single camera at a time, as described in the Adding an Endura Video Camera entry below.
• Editing Endura Video Camera General Settings
• Controlling an Endura Video Camera:
• Accessing an Endura Video Camera’s View
• Take a Snapshot of the Current Video Frame
• Playback control for a Previously Recorded Stream
• Reconnecting the Camera
Figure 15. Successful camera import
Figure 14. Select “Import from Recorder” to import cameras
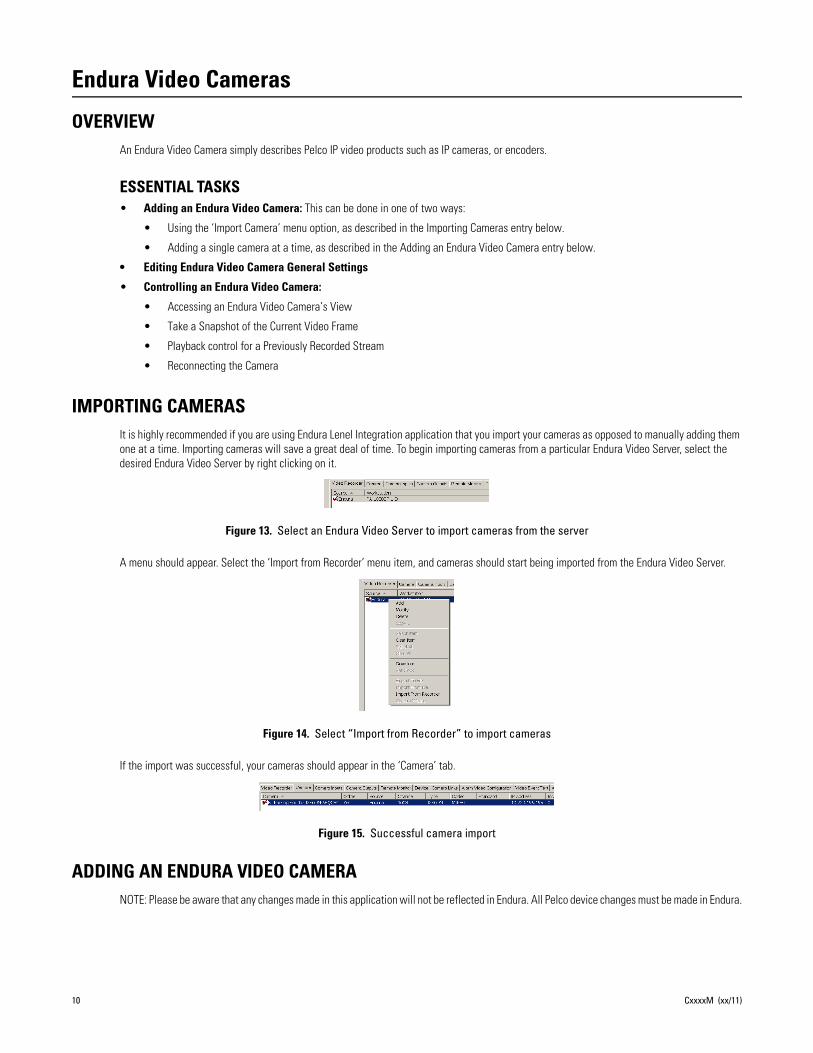
Figure 13. Select an Endura Video Server to import cameras from the server
IMPORTING CAMERASIt is highly recommended if you are using Endura Lenel Integration application that you import your cameras as opposed to manually adding them one at a time. Importing cameras will save a great deal of time. To begin importing cameras from a particular Endura Video Server, select the desired Endura Video Server by right clicking on it.
A menu should appear. Select the ‘Import from Recorder’ menu item, and cameras should start being imported from the Endura Video Server.
If the import was successful, your cameras should appear in the ‘Camera’ tab.
ADDING AN ENDURA VIDEO CAMERANOTE: Please be aware that any changes made in this application will not be reflected in Endura. All Pelco device changes must be made in Endura.
10 CxxxxM (xx/11)
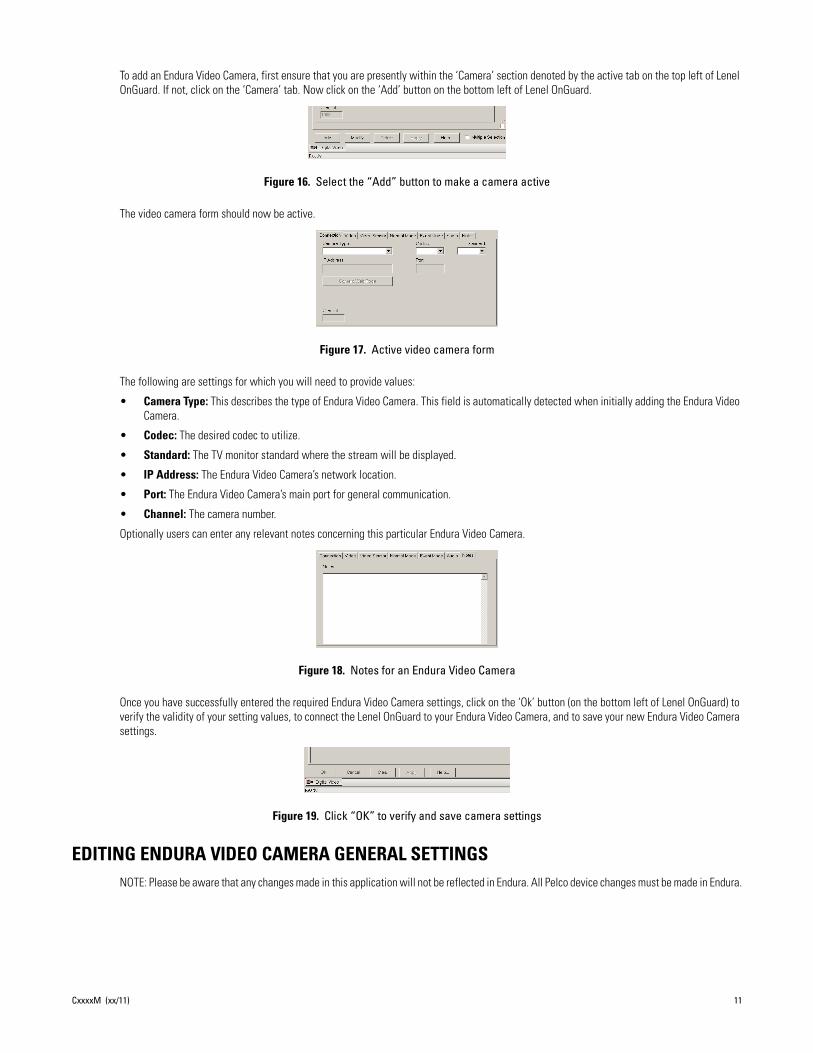
Figure 19. Click “OK” to verify and save camera settings
Figure 18. Notes for an Endura Video Camera
Figure 17. Active video camera form
Figure 16. Select the “Add” button to make a camera active
To add an Endura Video Camera, first ensure that you are presently within the ‘Camera’ section denoted by the active tab on the top left of Lenel OnGuard. If not, click on the ‘Camera’ tab. Now click on the ‘Add’ button on the bottom left of Lenel OnGuard.
The video camera form should now be active.
The following are settings for which you will need to provide values:
• Camera Type: This describes the type of Endura Video Camera. This field is automatically detected when initially adding the Endura Video Camera.
• Codec: The desired codec to utilize.
• Standard: The TV monitor standard where the stream will be displayed.
• IP Address: The Endura Video Camera’s network location.
• Port: The Endura Video Camera’s main port for general communication.
• Channel: The camera number.
Optionally users can enter any relevant notes concerning this particular Endura Video Camera.
Once you have successfully entered the required Endura Video Camera settings, click on the ‘Ok’ button (on the bottom left of Lenel OnGuard) to verify the validity of your setting values, to connect the Lenel OnGuard to your Endura Video Camera, and to save your new Endura Video Camera settings.
EDITING ENDURA VIDEO CAMERA GENERAL SETTINGSNOTE: Please be aware that any changes made in this application will not be reflected in Endura. All Pelco device changes must be made in Endura.
CxxxxM (xx/11) 11
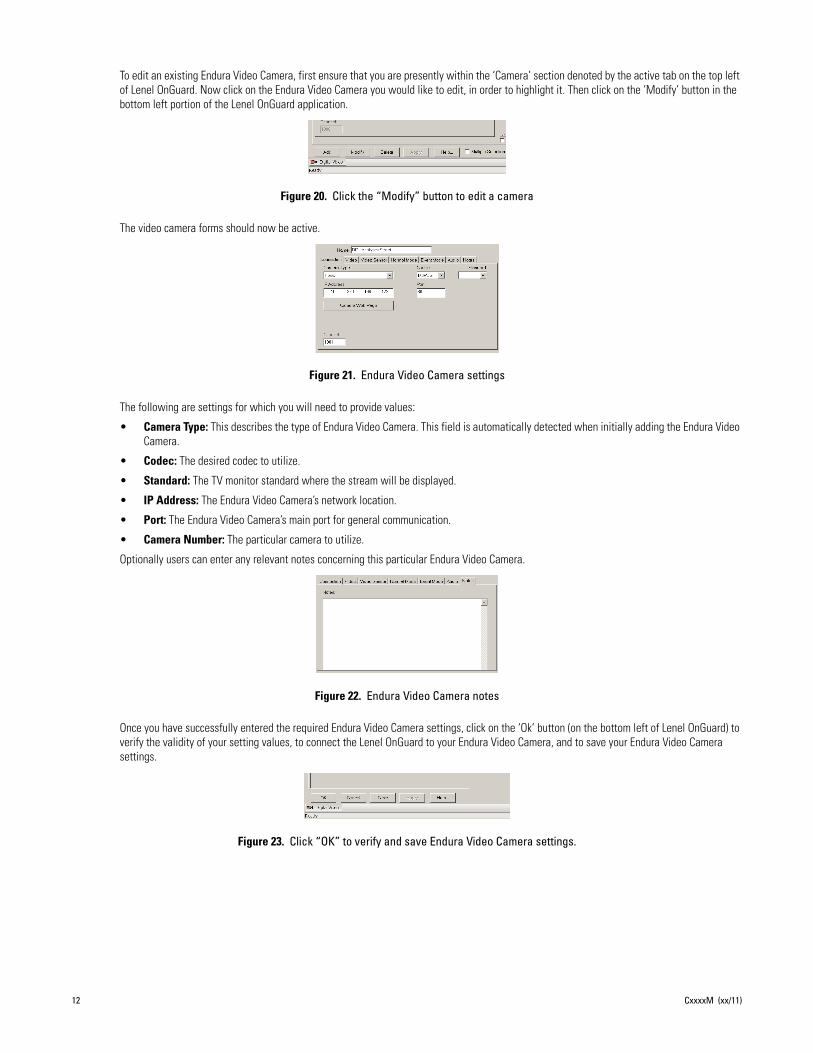
Figure 23. Click “OK” to verify and save Endura Video Camera settings.
Figure 22. Endura Video Camera notes
Figure 21. Endura Video Camera settings
Figure 20. Click the “Modify” button to edit a camera
To edit an existing Endura Video Camera, first ensure that you are presently within the ‘Camera’ section denoted by the active tab on the top left of Lenel OnGuard. Now click on the Endura Video Camera you would like to edit, in order to highlight it. Then click on the ‘Modify’ button in the bottom left portion of the Lenel OnGuard application.
The video camera forms should now be active.
The following are settings for which you will need to provide values:
• Camera Type: This describes the type of Endura Video Camera. This field is automatically detected when initially adding the Endura Video Camera.
• Codec: The desired codec to utilize.
• Standard: The TV monitor standard where the stream will be displayed.
• IP Address: The Endura Video Camera’s network location.
• Port: The Endura Video Camera’s main port for general communication.
• Camera Number: The particular camera to utilize.
Optionally users can enter any relevant notes concerning this particular Endura Video Camera.
Once you have successfully entered the required Endura Video Camera settings, click on the ‘Ok’ button (on the bottom left of Lenel OnGuard) to verify the validity of your setting values, to connect the Lenel OnGuard to your Endura Video Camera, and to save your Endura Video Camera settings.
12 CxxxxM (xx/11)

Figure 24. Video View display
Figure 26. Zoom, iris control, and focus controls
Figure 25. Activate PTZ functionality
VIDEO VIEWTo view a video simply click on the desired camera, and its video will be displayed on the right portion of the screen.
PAN, TILT, ZOOMTo activate PTZ functionality, click on the ‘Activate PTZ’ icon as shown in the below screenshot.
You should now be able to control panning and tilting by holding down the left mouse button, while the cursor is over the video view portion of the application, and by moving your mouse in the desired direction. Zoom, iris control, and focus controls can now be found above the ‘Camera Selection’ header; as shown in the screenshot below.
CxxxxM (xx/11) 13

Figure 27. Viewing triggered events
EventsTo view triggered events, simply access the ‘Alarm Monitoring’ portion of the application. You should now be able to see events as they are triggered in real time.
14 CxxxxM (xx/11)

PRODUCT WARRANTY AND RETURN INFORMATION
WARRANTYPelco will repair or replace, without charge, any merchandise proved defective in material or workmanship for a period of one year after the date of shipment.
Exceptions to this warranty are as noted below:• Five years:
– Fiber optic products– Unshielded Twisted Pair (UTP) transmission products– CC3701H-2, CC3701H-2X, CC3751H-2, CC3651H-2X, MC3651H-2, and
MC3651H-2X camera models• Three years:
– Pelco-designed fixed network cameras and network dome cameras with Sarix™ technology.
– Pelco-branded fixed camera models (CCC1390H Series, C10DN Series, C10CH Series, and IP3701H Series)
– EH1500 Series enclosures– Spectra® IV products (including Spectra IV IP)– Camclosure® Series (IS, ICS, IP) integrated camera systems– DX Series digital video recorders (except DX9000 Series which is covered
for a period of one year), DVR5100 Series digital video recorders, Digital Sentry® Series hardware products, DVX Series digital video recorders, and NVR300 Series network video recorders
– Endura® Series distributed network-based video products– Genex® Series products (multiplexers, server, and keyboard)– PMCL200/300/400 Series LCD monitors– PMCL5xx Series FHD monitors
• Two years:– Standard varifocal, fixed focal, and motorized zoom lenses– DF5/DF8 Series fixed dome products– Legacy® Series integrated positioning systems– Spectra III™, Spectra Mini, Spectra Mini IP, Esprit®, ExSite®, and PS20
scanners, including when used in continuous motion applications.– Esprit Ti and TI2500 Series thermal imaging products– Esprit and WW5700 Series window wiper (excluding wiper blades).– CM6700/CM6800/CM9700 Series matrix– Digital Light Processing (DLP®) displays (except lamp and color wheel). The
lamp and color wheel will be covered for a period of 90 days. The air filter is not covered under warranty.
– Intelli-M® eIDC controllers• One year:
– Video cassette recorders (VCRs), except video heads. Video heads will be covered for a period of six months.
• Six months:– All pan and tilts, scanners, or preset lenses used in continuous motion
applications (preset scan, tour, and auto scan modes).Pelco will warrant all replacement parts and repairs for 90 days from the date of Pelco shipment. All goods requiring warranty repair shall be sent freight prepaid to a Pelco designated location. Repairs made necessary by reason of misuse, alteration, normal wear, or accident are not covered under this warranty.
Pelco assumes no risk and shall be subject to no liability for damages or loss resulting from the specific use or application made of the Products. Pelco’s liability for any claim, whether based on breach of contract, negligence, infringement of any rights of any party or product liability, relating to the Products shall not exceed the price paid by the Dealer to Pelco for such Products. In no event will Pelco be liable for any special, incidental, or consequential damages (including loss of use, loss of profit, and claims of third parties) however caused, whether by the negligence of Pelco or otherwise.
The above warranty provides the Dealer with specific legal rights. The Dealer may also have additional rights, which are subject to variation from state to state.
If a warranty repair is required, the Dealer must contact Pelco at (800) 289-9100 or (559) 292-1981 to obtain a Repair Authorization number (RA), and provide the following information:
1. Model and serial number 2. Date of shipment, P.O. number, sales order number, or Pelco invoice number 3. Details of the defect or problem
If there is a dispute regarding the warranty of a product that does not fall under the warranty conditions stated above, please include a written explanation with the product when returned.
Method of return shipment shall be the same or equal to the method by which the item was received by Pelco.
RETURNSTo expedite parts returned for repair or credit, please call Pelco at (800) 289-9100 or (559) 292-1981 to obtain an authorization number (CA number if returned for credit, and RA number if returned for repair) and designated return location.
All merchandise returned for credit may be subject to a 20 percent restocking and refurbishing charge.
Goods returned for repair or credit should be clearly identified with the assigned CA or RA number and freight should be prepaid.
2-10-10
Pelco, the Pelco logo, and other trademarks associated with Pelco products referred to in this publication are trademarks of Pelco, Inc. or its affiliates. © Copyright 2011, Pelco, Inc. All other product names and services are the property of their respective companies. All rights reserved.Product specifications and availability are subject to change without notice.
REVISION HISTORY
Manual # Date CommentsC5608M A/11 Original version.

Pelco by Schneider Electric 3500 Pelco Way Clovis, California 93612-5699 United StatesUSA & Canada Tel (800) 289-9100 Fax (800) 289-9150
International Tel +1 (559) 292-1981 Fax +1 (559) 348-1120
www.pelco.com


