Automated Benchmarking Process Overview: (A high-level overview of the steps in the process covered in depth in this User Guide) Energy Data Portal Benchmarking User Guide For CenterPoint Energy Customers Prepare your ESPM property • Create your ESPM property Step 2: In Energy Data Portal (EDP) Register your EDP user and link all accounts • Register for EDP • Add all CenterPoint accounts that YOU pay for your building Step 3: In EDP Create property • Request whole-building data (if applicable) • Verify that the correct number of meters are present • If necessary, request required additional authorizations Step 4: In EDP Step 1 In ENERGY STAR Portfolio Manager® (ESPM) Send Data from EDP to ESPM • Complete Contact connection with CenterPoint Energy Web Services • Enable property sharing for Data Exchange • Link your EDP buildings with ESPM Building IDs • Confirm usage data transfer
Transcript
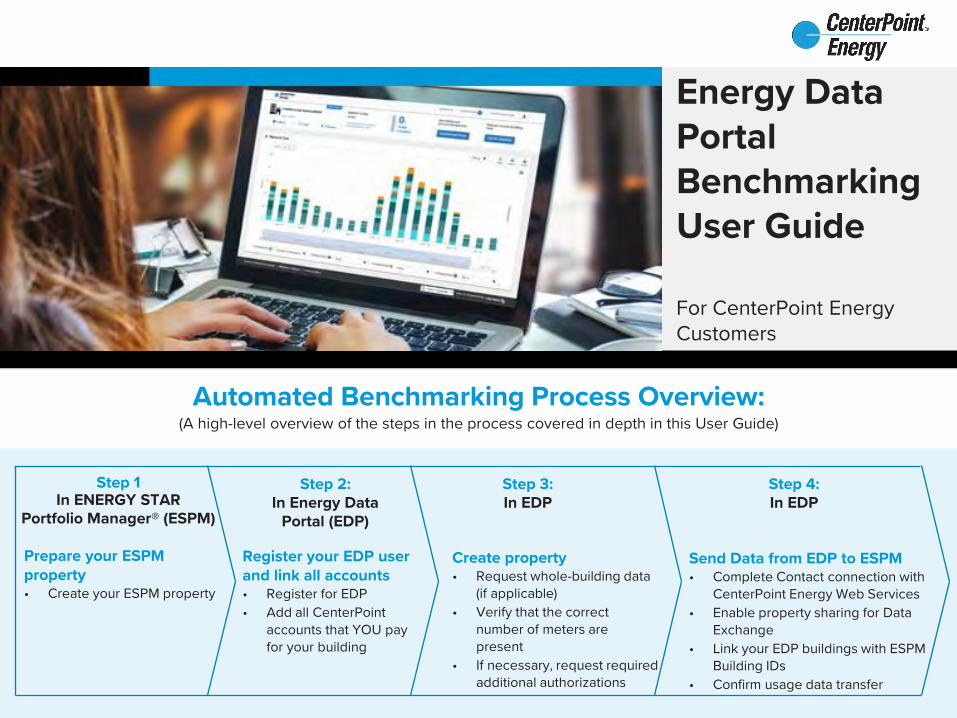
Automated Benchmarking Process Overview:(A high-level overview of the steps in the process covered in depth in this User Guide)
Energy Data PortalBenchmarkingUser Guide
For CenterPoint Energy Customers
Prepare your ESPM property• Create your ESPM property
Step 2:In Energy Data
Portal (EDP)
Register your EDP user and link all accounts• Register for EDP• Add all CenterPoint
accounts that YOU pay for your building
Step 3:In EDP
Create property• Request whole-building data
(if applicable)• Verify that the correct
number of meters are present
• If necessary, request required additional authorizations
Step 4:In EDP
Step 1In ENERGY STAR
Portfolio Manager® (ESPM)
Send Data from EDP to ESPM• Complete Contact connection with
CenterPoint Energy Web Services• Enable property sharing for Data
Exchange• Link your EDP buildings with ESPM
Building IDs• Confirm usage data transfer
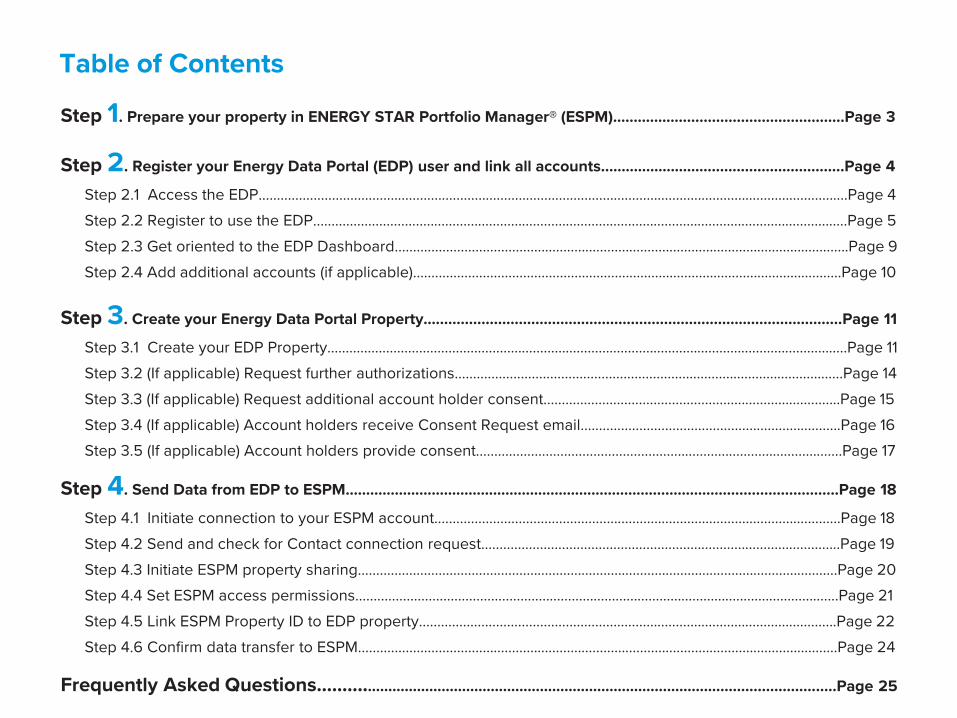
Table of Contents
Step 1. Prepare your property in ENERGY STAR Portfolio Manager® (ESPM)….…………........................................Page 3
Step 2. Register your Energy Data Portal (EDP) user and link all accounts..…………………….................................Page 4
Step 2.1 Access the EDP.......................……………………………………..………………............................................................................Page 4Step 2.2 Register to use the EDP……………………………………………………………………………...........................................................Page 5Step 2.3 Get oriented to the EDP Dashboard..……………………………………..………………............................................................Page 9Step 2.4 Add additional accounts (if applicable)..…………………………………………………..........................................................Page 10
Step 3. Create your Energy Data Portal Property…........................................................................….......................Page 11
Step 4. Send Data from EDP to ESPM…………………………………………………………………....………….............................Page 18
Step 4.1 Initiate connection to your ESPM account…………………………..……………….............................................................Page 18Step 4.2 Send and check for Contact connection request…………………………………...........................................................Page 19Step 4.3 Initiate ESPM property sharing..……………………………………..………………...................................................................Page 20Step 4.4 Set ESPM access permissions……………..…………………………………………………..........................................................Page 21Step 4.5 Link ESPM Property ID to EDP property..…………………………………..………..............................................................Page 22Step 4.6 Confirm data transfer to ESPM…………….…………………………………………………..........................................................Page 24
Step 2.2 Register to use the EDP• Use your commercial CenterPoint Energy bill and an email address to register for the EDP• Gather the CenterPoint Energy bills that you pay for the property
Helpful Hint – Pick any of your commercial bills, you can add more later.
DO NOT use individual apartment unit or residential accounts to register; use commercial or common/house meter accounts.
DO organize large building portfolios by matching accounts and meters to specific properties.
• Use the following from your bill to register to use the EDP
• See the following pages for guidance and special instructions on locating required information for the registration form fields:
• ACCOUNT NUMBER
• STREET NUMBER (from your Street Address)
• CUSTOMER NAME
Step 1Step 2• Register your EDP user
and link all accountsStep 3 Step 4
5
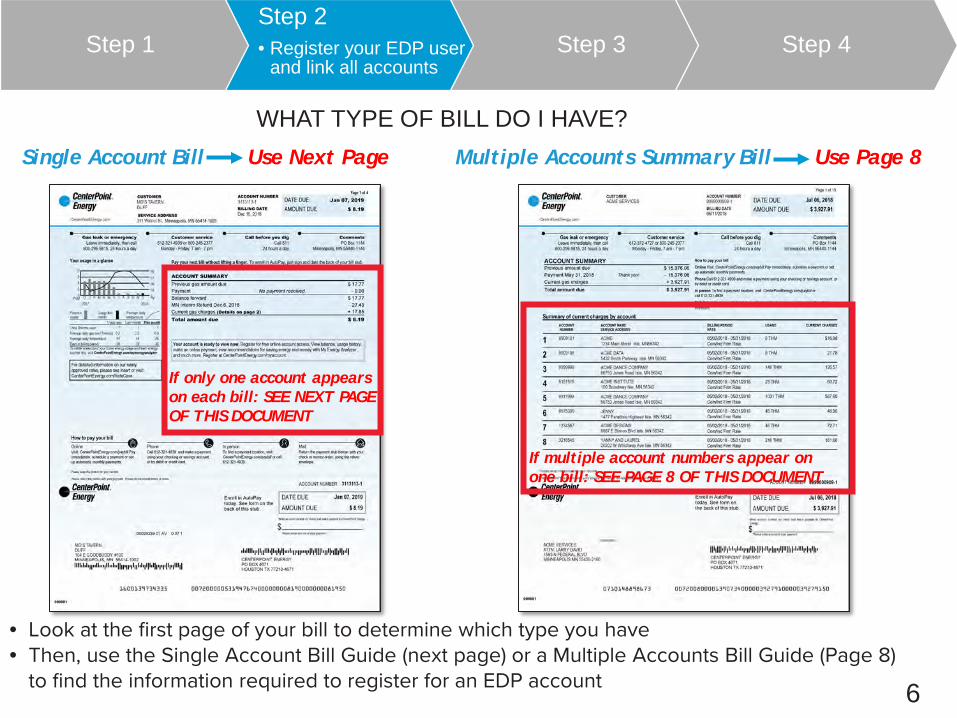
Single Account Bill Use Next Page Multiple Accounts Summary Bill Use Page 8
• Look at the first page of your bill to determine which type you have• Then, use the Single Account Bill Guide (next page) or a Multiple Accounts Bill Guide (Page 8)
to find the information required to register for an EDP account
Step 1Step 2• Register your EDP user
and link all accountsStep 3 Step 4
WHAT TYPE OF BILL DO I HAVE?
If only one account appears on each bill: SEE NEXT PAGE OF THIS DOCUMENT
If multiple account numbers appear on one bill: SEE PAGE 8 OF THIS DOCUMENT
6
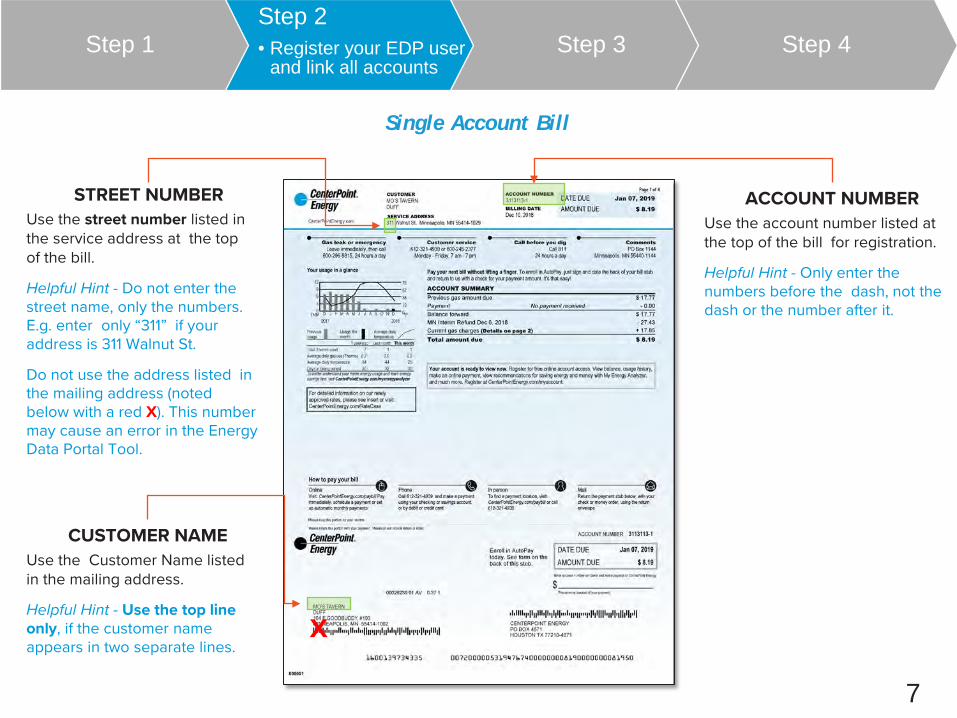
Single Account Bill
ACCOUNT NUMBERUse the account number listed at the top of the bill for registration.
Helpful Hint - Only enter the numbers before the dash, not the dash or the number after it.
STREET NUMBERUse the street number listed in the service address at the top of the bill.
Helpful Hint - Do not enter the street name, only the numbers. E.g. enter only “311” if your address is 311 Walnut St.
Do not use the address listed in the mailing address (noted below with a red X). This number may cause an error in the Energy Data Portal Tool.
CUSTOMER NAMEUse the Customer Name listed in the mailing address.
Helpful Hint - Use the top line only, if the customer name appears in two separate lines.
X
Step 1Step 2• Register your EDP user
and link all accountsStep 3 Step 4
7
Multiple Accounts Summary Bill
ACCOUNT NUMBERUse the listed account for the service location you would like to register. Helpful Hint- Do not use the account number listed at the top of the bill (noted at right with a red X). This number may cause an error in the Energy Data Portal Tool. STREET NUMBER
Use the street number from the service address affiliated with the account number selected from the list of accounts.
Helpful Hint – Do not enter the street name, only the numbers. E.g. enter only “1234” if your address is 1234 Main Street.
Do not use the street number/service address listed in the mailing address (noted at left with a red X). This number may cause an error in the Energy Data Portal Tool.
CUSTOMER NAMEIf you receive a bill with a single account, use the Customer Name listed in the mailing address.
Helpful Hint - Use the top line only, if the customer name appears in two separate lines.
X
X
Step 1Step 2• Register your EDP user
and link all accountsStep 3 Step 4
8
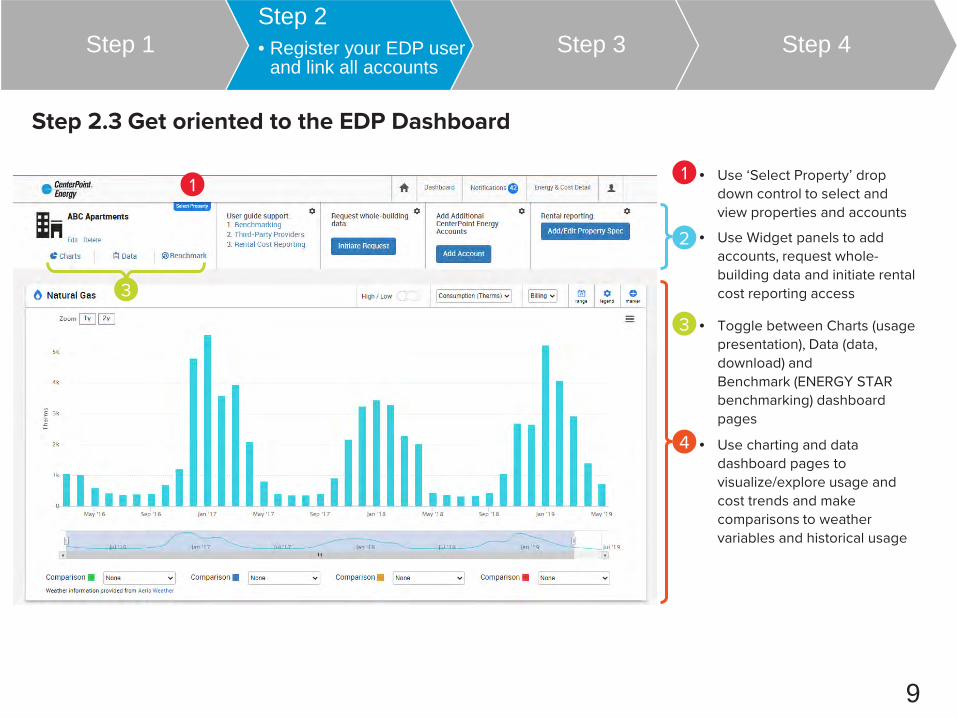
Step 2.3 Get oriented to the EDP Dashboard
1
4
2
3
1
3
• Use ‘Select Property’ drop down control to select and view properties and accounts
• Use Widget panels to add accounts, request whole-building data and initiate rental cost reporting access
• Toggle between Charts (usage presentation), Data (data, download) and Benchmark (ENERGY STAR benchmarking) dashboard pages
• Use charting and data dashboard pages to visualize/explore usage and cost trends and make comparisons to weather variables and historical usage
Step 1Step 2• Register your EDP user
and link all accountsStep 3 Step 4
9
10
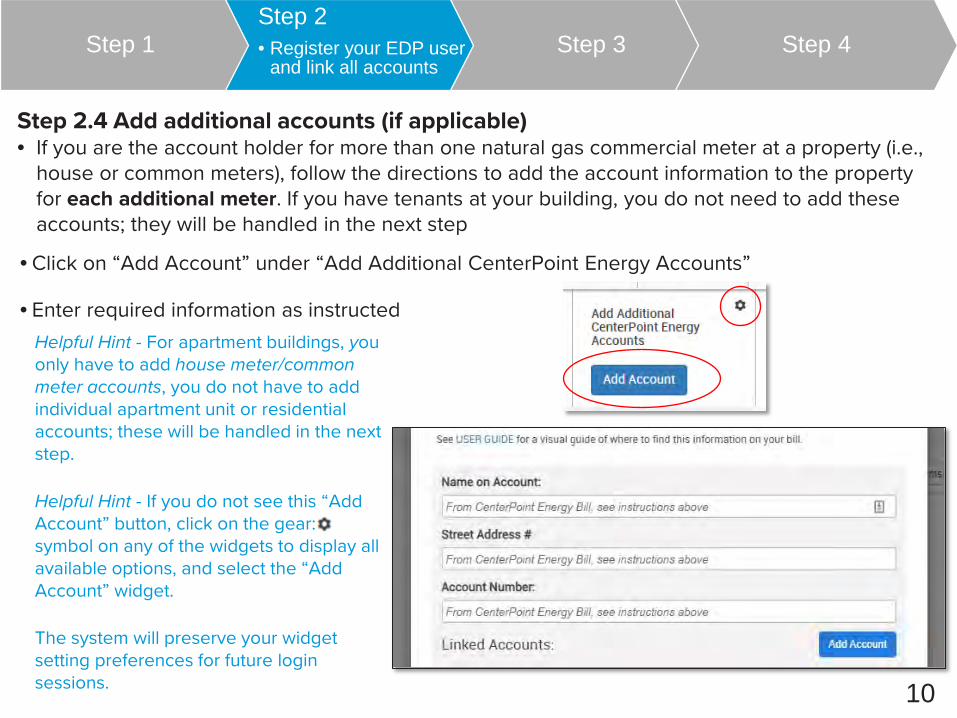
Step 2.4 Add additional accounts (if applicable)• If you are the account holder for more than one natural gas commercial meter at a property (i.e.,
house or common meters), follow the directions to add the account information to the property for each additional meter. If you have tenants at your building, you do not need to add these accounts; they will be handled in the next step
• Click on “Add Account” under “Add Additional CenterPoint Energy Accounts”
• Enter required information as instructedHelpful Hint - For apartment buildings, you only have to add house meter/common meter accounts, you do not have to add individual apartment unit or residential accounts; these will be handled in the next step.
Helpful Hint - If you do not see this “Add Account” button, click on the gear: symbol on any of the widgets to display all available options, and select the “Add Account” widget.
The system will preserve your widget setting preferences for future login sessions.
Step 1Step 2• Register your EDP user
and link all accountsStep 3 Step 4
Option 1 - SIMPLIFIED WHOLE - BUILDING BENCHMARKING (RECOMMENDED)
• Complete the whole-building data access form:• Assign a name in the “Building Name” field• Click for each relevant service address that
comprises the building, from the “Available/matching service locations” list
Helpful Hint - In some cases for buildings with multiple accounts/meters, there may be more than one service address associated with a single building – please refer to your CenterPoint Energy bills to confirm relevant service addresses.• Clicking will delete selected locations from the
target list• Confirm your relationship with the building and click
“Submit”
Helpful Hint - Whole-building data will transfer aggregated energy use data for all meters at the selected service address(es) – including any tenant meters.
• Click on the “Initiate Request” button from the “Request whole-building data” widget
11
Step 1 Step 2Step 3:• Create your EDP
PropertyStep 4
Step 3: Create your Energy Data Portal Property
Step 3.1 Create your EDP Property
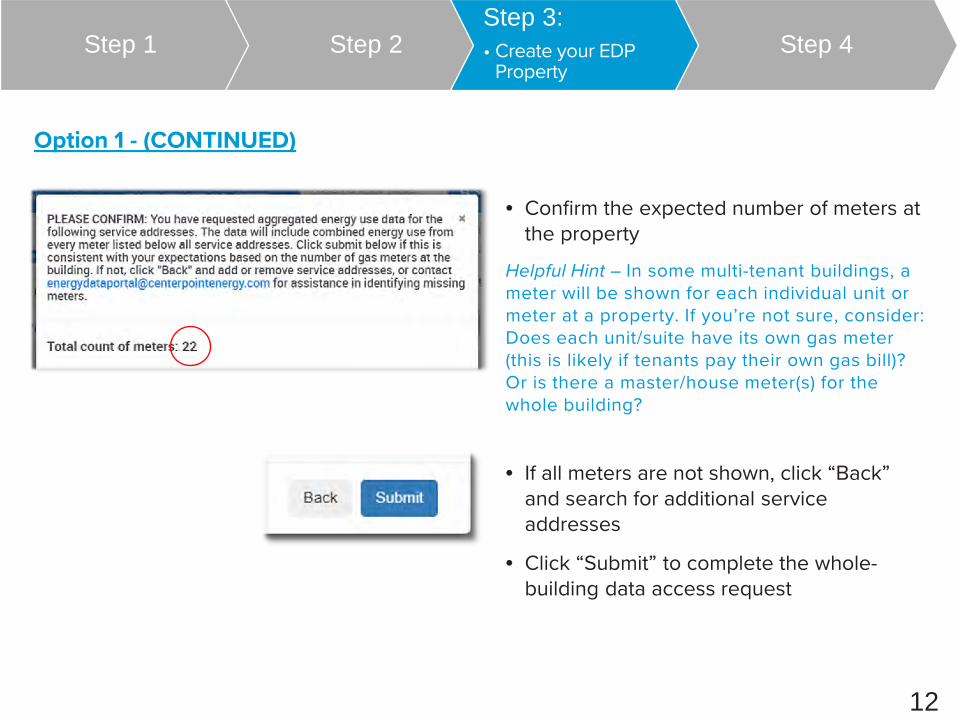
• Confirm the expected number of meters at the property
Helpful Hint – In some multi-tenant buildings, a meter will be shown for each individual unit or meter at a property. If you’re not sure, consider: Does each unit/suite have its own gas meter (this is likely if tenants pay their own gas bill)? Or is there a master/house meter(s) for the whole building?
• If all meters are not shown, click “Back” and search for additional service addresses
• Click “Submit” to complete the whole-building data access request
12
Step 1 Step 2Step 3:• Create your EDP
PropertyStep 4
Option 1 - (CONTINUED)
Option 2 - DETAILED METER LEVEL DATA
13
Step 1 Step 2Step 3:• Create your EDP
PropertyStep 4
Choose this option only if you wish to have detailed energy use for each of your building's meters, rather than aggregated totals for your building. This option should only be used if you pay all of the CenterPoint Energy Bill(s) for your building, and want to track energy use data individually for each meter
This option can require more on-going maintenance. This option can also be used to create customized grouping of accounts, such as a grouping of all accounts at a campus of buildings, or a grouping of all accounts to track total energy use
• Create New Meter Group• Determine which accounts are relevant to your
building or customized grouping of accounts, and note each account number/meter number
• Click on “Select Property”• Click on “Add New+”• Enter a name for the building or grouping of
accounts• Select applicable accounts• Click “Save” at the bottom of the account listings to
create the new meter group and return to dashboard access displaying multiple accounts and associated meters together
Step 3.2 (If applicable) Request further authorizations
• You will see the below message if further authorization is required. Follow the instructions on the screen to make applicable requests. If you do not see this message, skip to Step 4
The constraints described below are
referred to as theAggregation
Threshold Policy or the “4/50 Rule”
Evaluated for each calendar month’s
usage
14
• CenterPoint Energy is bound by regulatory policy to require additional authorizations prior to disclosure if either:
1) There are fewer than four customer/tenant accounts at the building service location, OR2) More than 50% of the service location usage is attributable to any one non-authenticated account
Step 1 Step 2Step 3:• Create your EDP
PropertyStep 4
Step 3.3 (If applicable) Request additional account holder consent to aggregate whole-building energy use data
• When required, consent is needed from current account holders (i.e., renters or tenants) at the service location
• Complete and send requests to all account holders required to provide access to aggregated whole building data
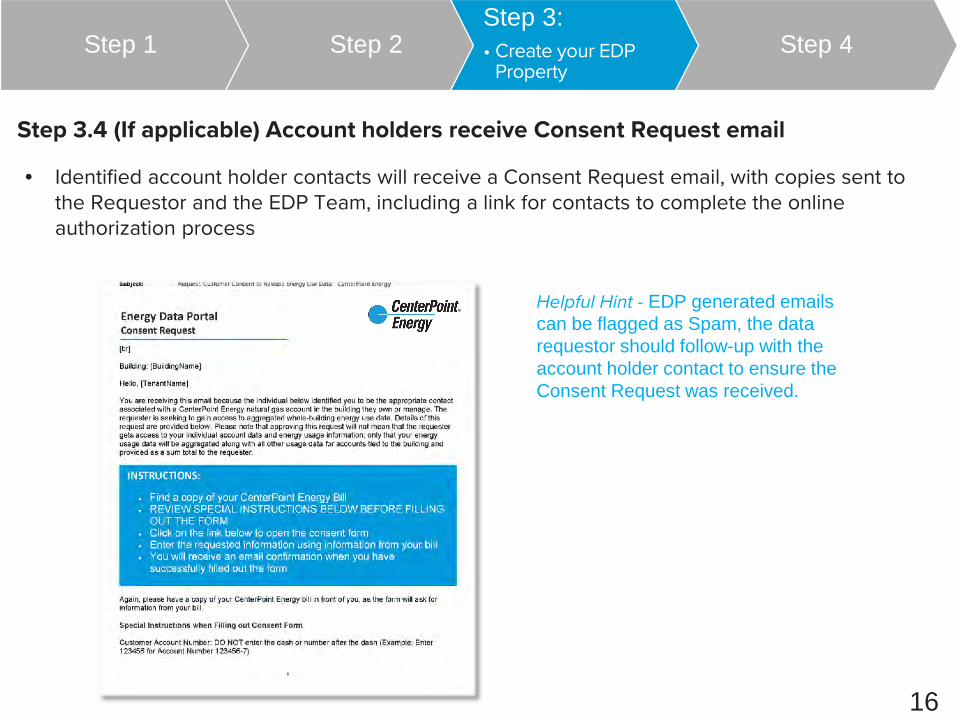
• Identified account holder contacts will receive a Consent Request email, with copies sent to the Requestor and the EDP Team, including a link for contacts to complete the online authorization process
Helpful Hint - EDP generated emails can be flagged as Spam, the data requestor should follow-up with the account holder contact to ensure the Consent Request was received.
16
Step 1 Step 2Step 3:• Create your EDP
PropertyStep 4
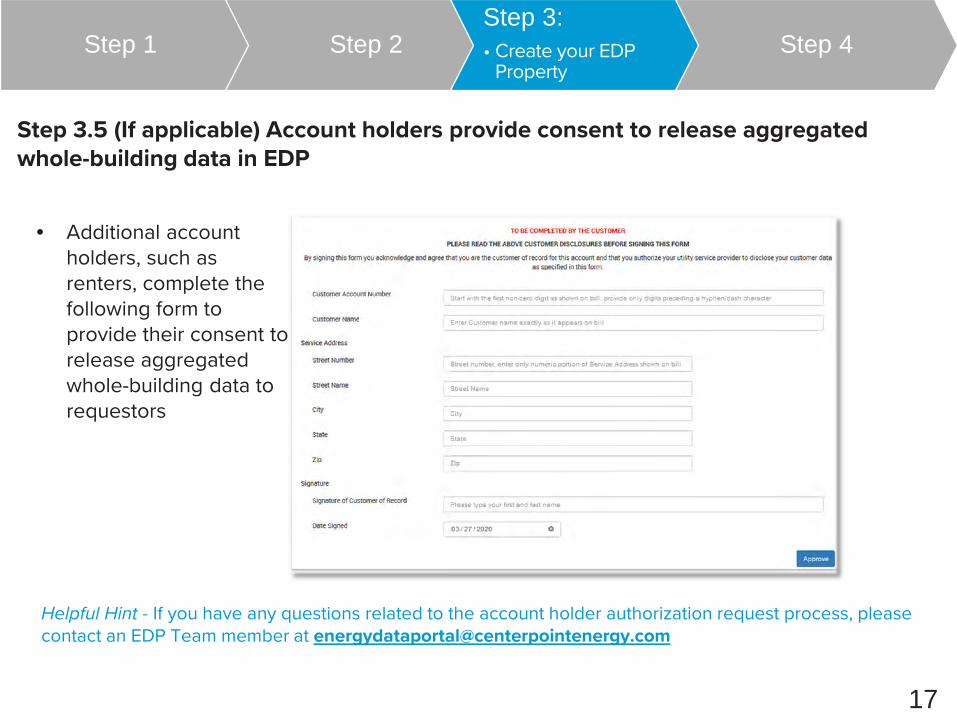
Step 3.5 (If applicable) Account holders provide consent to release aggregated whole-building data in EDP
• Additional account holders, such as renters, complete the following form to provide their consent to release aggregated whole-building data to requestors
Helpful Hint - If you have any questions related to the account holder authorization request process, please contact an EDP Team member at [email protected]
In order to transfer monthly billing data from the EDP you must first establish a connection between your Energy Star Portfolio Manager (ESPM) account and CenterPoint Energy’s web services account on ESPM. After the connection is in place you will be able to share your ESPM Property with the EDP and initiate automated data transfer
Step 4.1 Initiate connection to your ESPM account
• Select from the EDP dashboard
• Select the radio button to answer ‘Yes’
Step 4: Send Data from EDP to ESPM
Step 1 Step 2 Step 3Step 4:• Send Data from EDP
to ESPM
19
Step 4.2 Send and check for Contact connection request
• Click on the ‘Request Connection’ button to link to the EDP’s Contact page on the ENERGY STAR web site (opens as a new tab on your web browser)
• Click on the ‘Send Connection Request’ button
Helpful Hint - In the case that you are not currently logged on to the ESPM site, you may first be prompted to enter your username and password before you are transferred to the Contact connection page.
Step 1 Step 2 Step 3Step 4:• Send Data from EDP
to ESPM
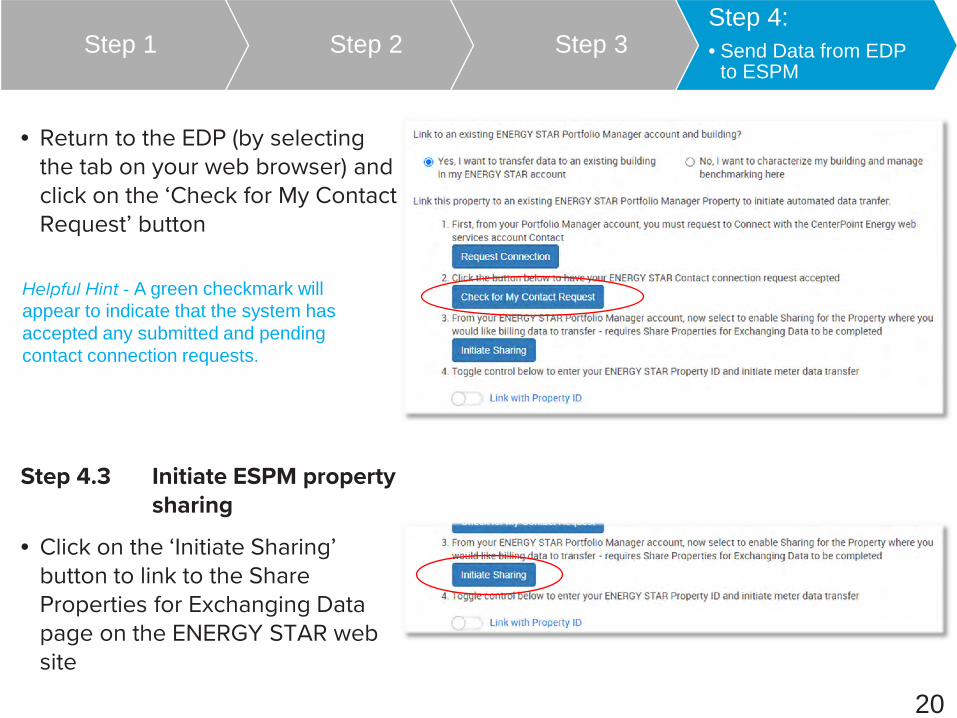
• Return to the EDP (by selecting the tab on your web browser) and click on the ‘Check for My Contact Request’ button
Step 4.3 Initiate ESPM property sharing
• Click on the ‘Initiate Sharing’ button to link to the Share Properties for Exchanging Data page on the ENERGY STAR web site
Helpful Hint - A green checkmark will appear to indicate that the system has accepted any submitted and pending contact connection requests.
20
Step 1 Step 2 Step 3Step 4:• Send Data from EDP
to ESPM
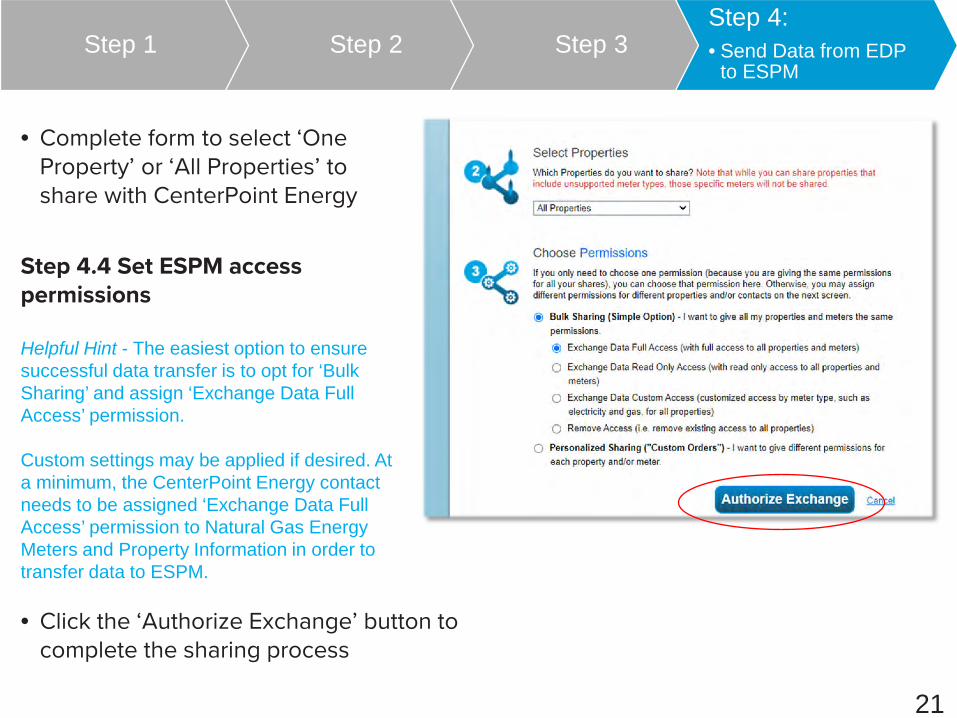
• Complete form to select ‘One Property’ or ‘All Properties’ to share with CenterPoint Energy
Step 4.4 Set ESPM access permissions
Helpful Hint - The easiest option to ensure successful data transfer is to opt for ‘Bulk Sharing’ and assign ‘Exchange Data Full Access’ permission.
Custom settings may be applied if desired. At a minimum, the CenterPoint Energy contact needs to be assigned ‘Exchange Data Full Access’ permission to Natural Gas Energy Meters and Property Information in order to transfer data to ESPM.
• Click the ‘Authorize Exchange’ button to complete the sharing process
21
Step 1 Step 2 Step 3Step 4:• Send Data from EDP
to ESPM
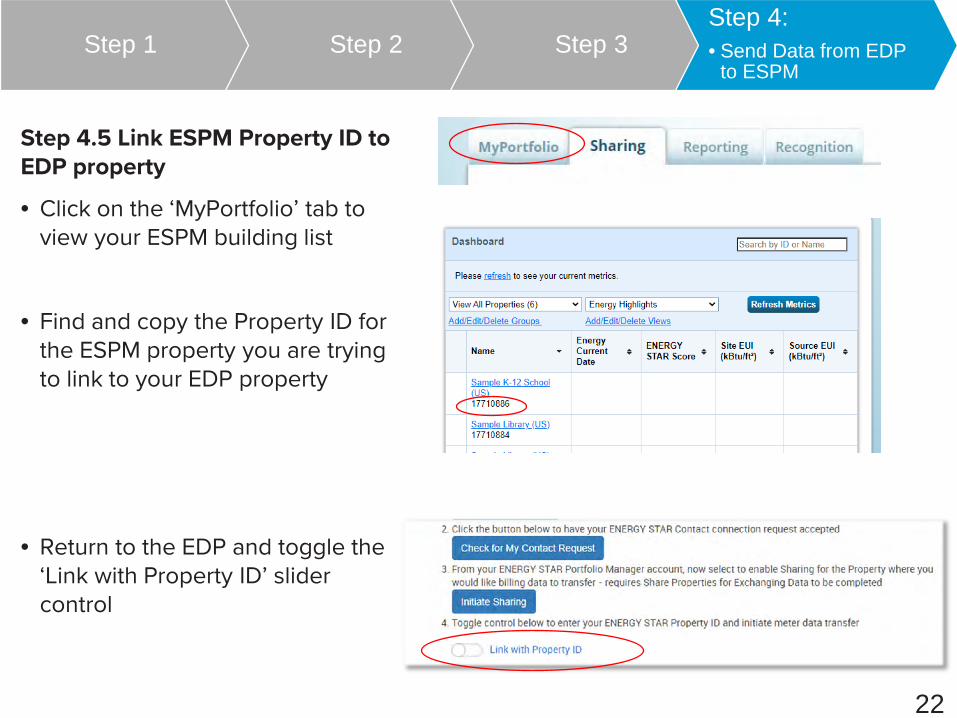
Step 4.5 Link ESPM Property ID to EDP property
• Click on the ‘MyPortfolio’ tab to view your ESPM building list
• Find and copy the Property ID for the ESPM property you are trying to link to your EDP property
• Return to the EDP and toggle the ‘Link with Property ID’ slider control
22
Step 1 Step 2 Step 3Step 4:• Send Data from EDP
to ESPM
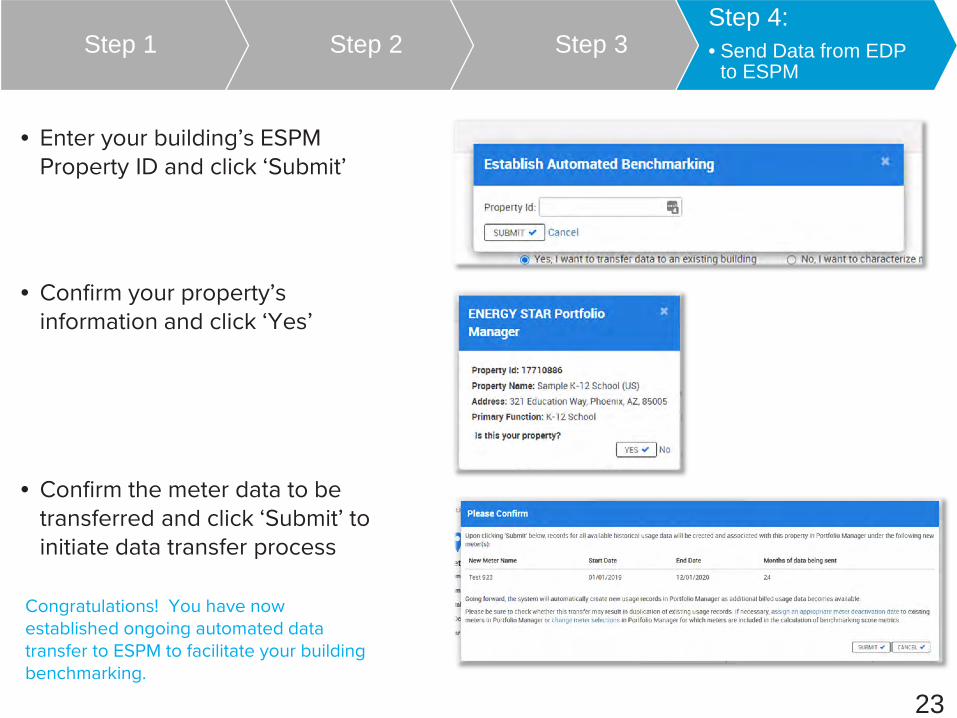
• Enter your building’s ESPM Property ID and click ‘Submit’
• Confirm your property’s information and click ‘Yes’
• Confirm the meter data to be transferred and click ‘Submit’ to initiate data transfer process
Congratulations! You have now established ongoing automated data transfer to ESPM to facilitate your building benchmarking.
23
Step 1 Step 2 Step 3Step 4:• Send Data from EDP
to ESPM
24
Step 4.6 Confirm data transfer to ESPM
• Return to your ESPM account and select your target property from the MyPortfolio dashboard
• Select the ‘Energy’ tab for your property to confirm that the new EDP meter is showing with recent bill information in the ‘Meters’ table
Helpful Hint - In the case that your CenterPoint Energy account billed natural gas usage had been previously entered manually on a separate ESPM natural gas meter, because the EDP will transfer a full history of billing data it may be necessary to use the ‘Change Meter Selections’ to only include the new EDP meter and avoid double entry of historical usage.
FREQUENTLY ASKED QUESTIONSProblem: I am trying to add an account but the Energy Data Portal keeps giving me an error message (e.g. “account number, street number or customer name does not match our records”).
Solution: • Check that you are using the correct information on your bills – see Pages 6-8 of user guide for a visual guide for
where to find the correct information.• Check that you are following the special instructions for account authentication – see Step 2.2 on Page 5 of this
User Guide.• Street Number: Make sure there is no space after the street number.
Problem: I do not see my building’s service address in the list.
Solution: You must first add all of your CenterPoint Energy accounts associated with the building – see Step 2.4 on Page 10 of this User Guide.
Problem: I am getting a “consent needed” message after I request whole building data, but I do not have any tenants in my building.
Solution:
• There is an additional account at the building that must be added to the Energy Data Portal before proceeding.
• Check that all accounts associated with the building have been added – see Step 2.4 on Page 10 of this User Guide. After adding the additional account, you may have to wait for up to 20 minutes before the data will display.
Problem: I am getting a “consent needed” message for my building. I have tenants, but no unit or suite numbers are shown in the consent needed list, so I can’t tell which unit the consent is needed from.
Solution: Contact [email protected] for assistance in identifying the correct unit.
25
FREQUENTLY ASKED QUESTIONS (CONTINUED)Problem: I have a mixed use property. My tenant pays their own CenterPoint bill, and are designated as a separate service address – how do I ensure that their energy use data is included in my aggregated data?
Solution: Contact [email protected] for assistance in adding your tenant’s additional service address.
Problem: Energy Data Portal does not recognize my ENERGY STAR Portfolio Manager® property.
Solution: Check that you have shared the ENERGY STAR Portfolio Manager® property with CenterPoint Energy. See Step 4.3 on Page 20 of this User Guide.
Problem: CenterPoint Energy has not accepted my PROPERTY SHARE request in ENERGY STAR Portfolio Manager®.
Solution: You do NOT need to wait for the property share request to be accepted; you can move on immediately to the next step and your share request will be accepted automatically when you establish automated benchmarking from the Energy Data Portal in Step 4.
Problem: After I click submit when sending my property’s energy use data to ESPM, the screen freezes. No meters were created in ESPM, or I see that a meter was created, but no usage data was transferred.
Solution: The transfer process was interrupted and you must correct it by following these steps: 1) In ESPM, delete any meters that have been created by the Energy Data Portal. 2) In Energy Data Portal, on the property tab, toggle the “Use Existing Account” slider back to the left. 3) Restart Step 4. After clicking “submit”, PLEASE BE PATIENT AS THE DATA TRANSFERS AND DO NOT REFRESH YOUR SCREEN,EVEN IF THE SCREEN APPEARS TO BE FROZEN. Depending on the size of your building, the transfer process make take up to 10 minutes.