26
June 15 1 ENTERING BLANKET REQUISITIONS

June 15 1
ENTERING BLANKET REQUISITIONS
June 15 2
Table of contents
• What is a blanket order?................................................3• Entering blanket order for monthly maintenance……….4• Entering blanket order for commodities
(i.e. food/UPS shipping)…………………………………………….15

June 15 3
What is a Blanket Purchase Order (BPO)?
A BPO is an order that is not line‐item specific. These orders set up a lump sum of money to a specific supplier that a department may use on a recurring basis to order services or consumable items for a specific period of time. They can also be used to make monthly maintenance payments to a supplier.
Restrictions: Cannot set up these orders with any SpearMart supplier or a non‐contract supplier if there is a contract for that commodity/service established.BPOs are not for ordering equipment.
Requirements: Procurement Services must approve BPOs on a case‐by‐case basis with a maximum term of one year. Requesters should obtain this approval prior to entering the requisition. Check the BPO procedures on the site at www.procurement.fsu.edu under How to Buy/Blanket Purchase Orders. Requester must have good description of the types of goods/services, beginning and ending dates and full names of those authorized to use the BPO in the Item Description. BPO cannot be used after the ending date listed in the order or when the receipts match the amount on the PO.

June 15 4
• Log into myFSU• Click the “FI” icon to
get into Financials• Go to Main
Menu>eProcurement>Requisition
Blanket Order for Monthly Maintenance

June 15 5
• You will land on the Requisition Settings page.
• Click the magnifying glass to the right of the “Supplier” field to look up your supplier.

June 15 6
• Enter a small string of letters in the supplier’s name. “Toshiba” was entered for this example.
• Click “Find” to search.• When the search list comes
up, click the “Supplier ID” to the left of the desired address for the supplier. For this example, this is the local supplier for this company.
June 15 7
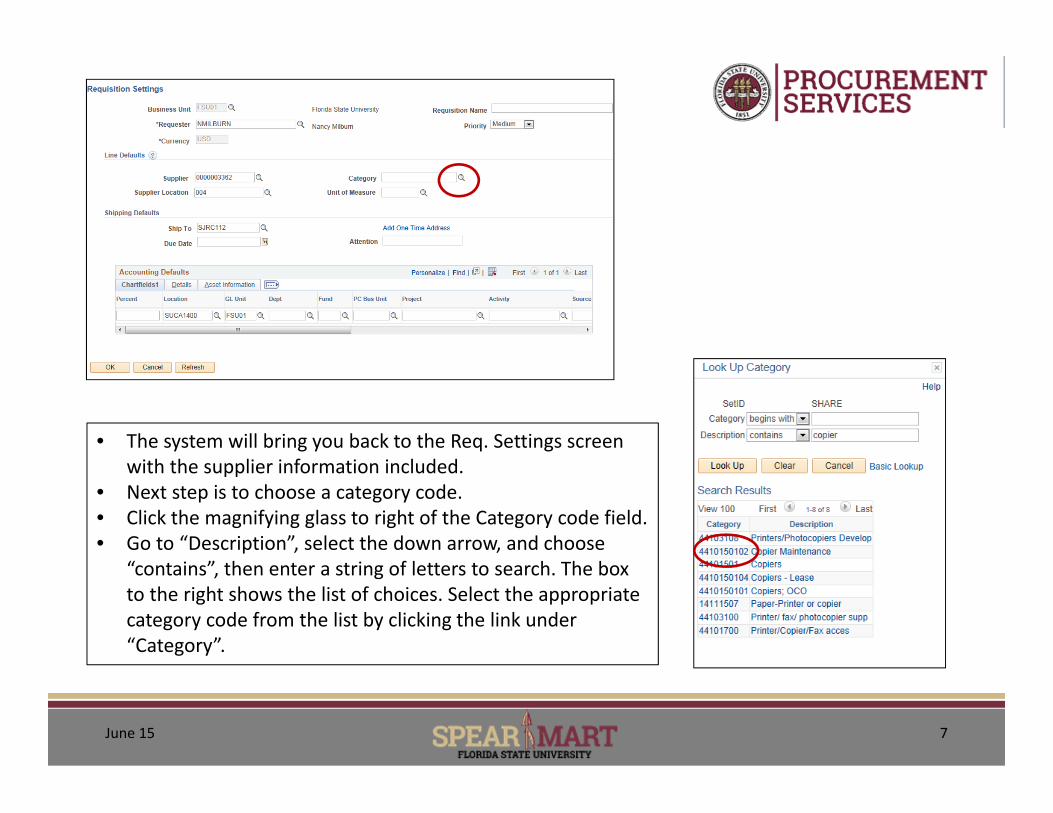
• The system will bring you back to the Req. Settings screen with the supplier information included.
• Next step is to choose a category code.• Click the magnifying glass to right of the Category code field. • Go to “Description”, select the down arrow, and choose
“contains”, then enter a string of letters to search. The box to the right shows the list of choices. Select the appropriate category code from the list by clicking the link under “Category”.
June 15 8
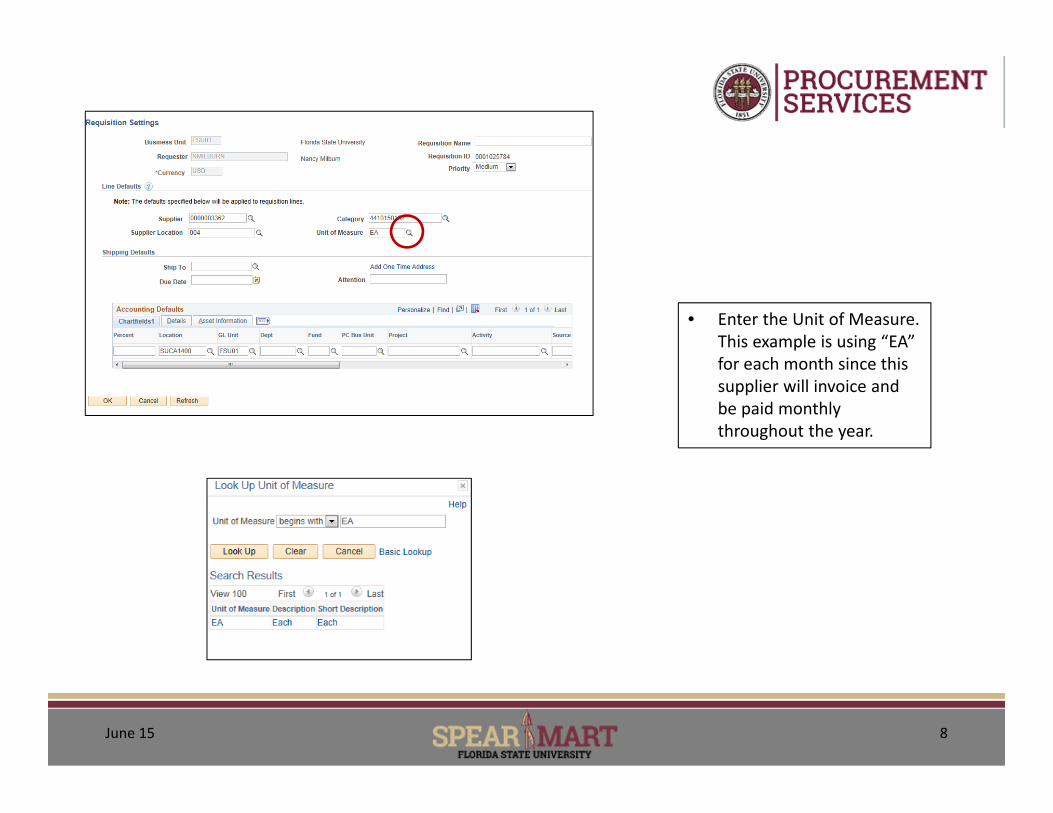
• Enter the Unit of Measure. This example is using “EA” for each month since this supplier will invoice and be paid monthly throughout the year.

June 15 9
• Click the magnifying glass to search for the appropriate Ship To code to enter. Click the down arrow next to the “Description” field, then enter a string of letters in the department name to search. Click the “Ship To Location” link to select.
• Then enter the Due Date. For a BPO that will last the entire fiscal year, use 6‐30‐2016 as the ending date. The Due Date is the last day the order will be effective/usable.

June 15 10
• Finally, enter the DeptID/Fund/Project combination and click “Ok”.

June 15 11
• You will land on this page.• Click on “Special Requests” to bring
up the template for a special requisition.
June 15 12
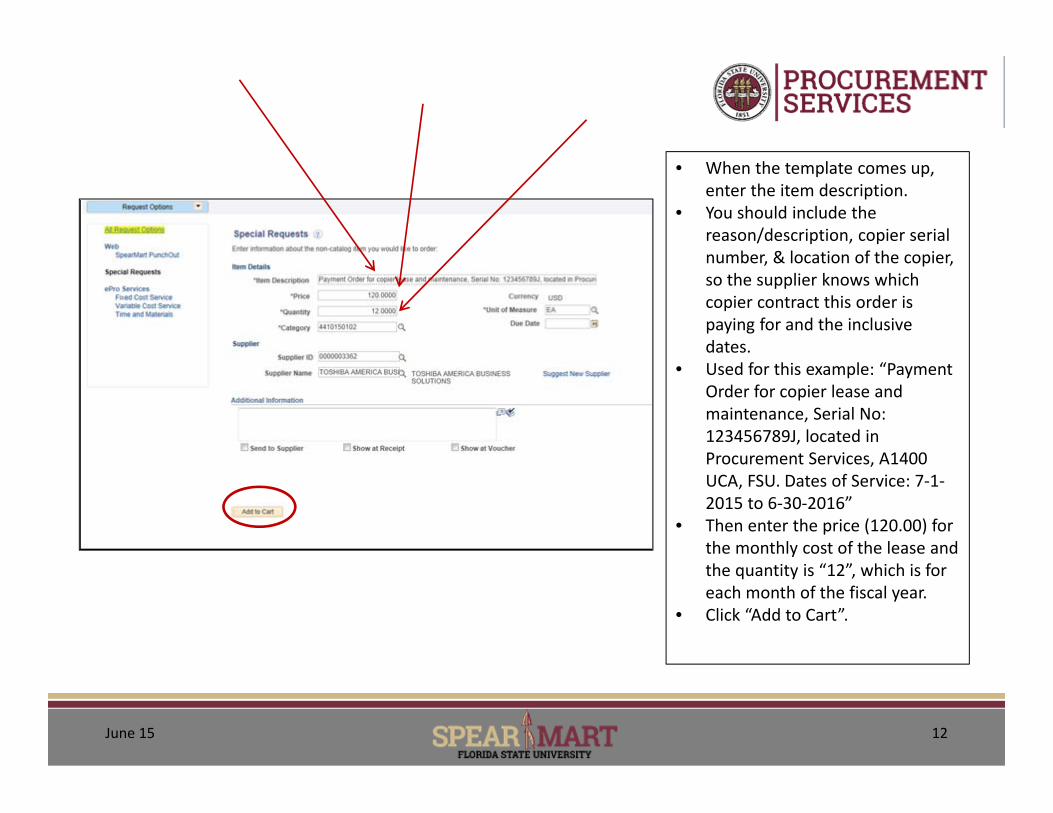
• When the template comes up, enter the item description.
• You should include the reason/description, copier serial number, & location of the copier, so the supplier knows which copier contract this order is paying for and the inclusive dates.
• Used for this example: “Payment Order for copier lease and maintenance, Serial No: 123456789J, located in Procurement Services, A1400 UCA, FSU. Dates of Service: 7‐1‐2015 to 6‐30‐2016”
• Then enter the price (120.00) for the monthly cost of the lease and the quantity is “12”, which is for each month of the fiscal year.
• Click “Add to Cart”.
June 15 13
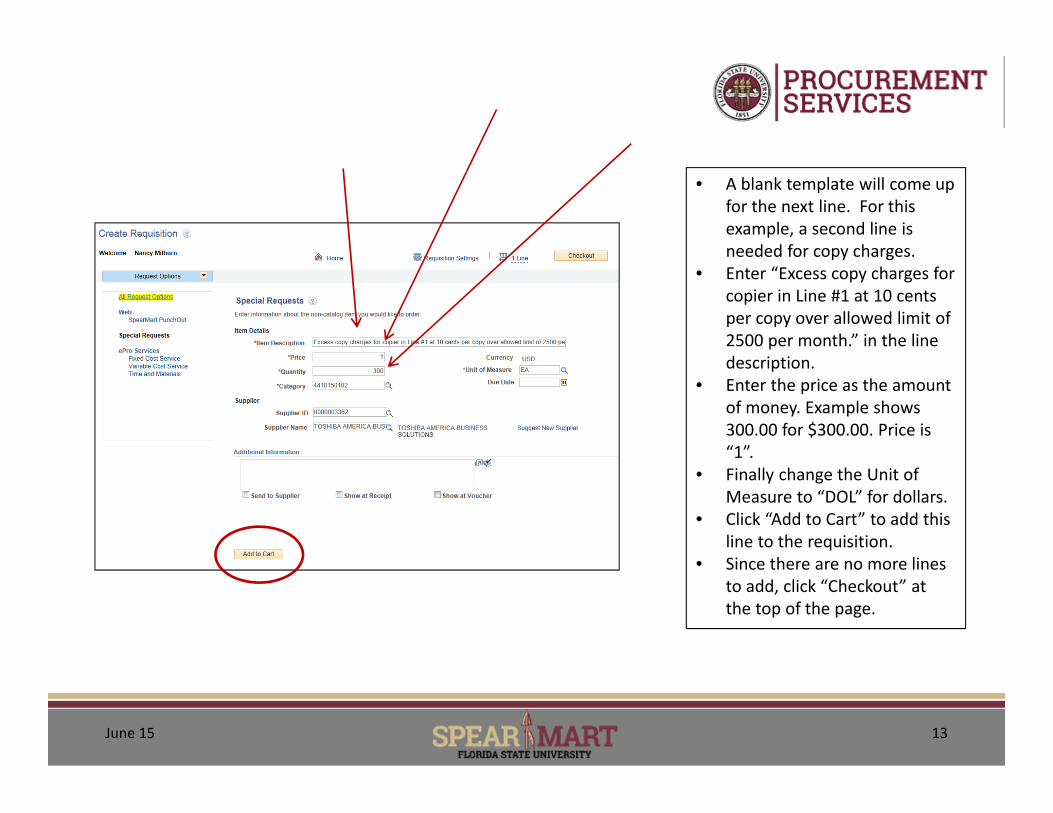
• A blank template will come up for the next line. For this example, a second line is needed for copy charges.
• Enter “Excess copy charges for copier in Line #1 at 10 cents per copy over allowed limit of 2500 per month.” in the line description.
• Enter the price as the amount of money. Example shows 300.00 for $300.00. Price is “1”.
• Finally change the Unit of Measure to “DOL” for dollars.
• Click “Add to Cart” to add this line to the requisition.
• Since there are no more lines to add, click “Checkout” at the top of the page.

June 15 14
• The last step is to review the order.
• Check your spelling, unit of measures, price, quantities, etc. to ensure everything is correct.
• Click “Save & Submit” to save and send the requisition to the approver.

June 15 15
• Once submitted, this is the confirmation page.
• Note the Requisition ID provided.
Congratulations! You completed this requisition!

June 15 16
• Log into myFSU• Click the “FI” icon to
get into Financials• Go to Main
Menu>eProcurement>Requisition
Blanket Order for Commodities
June 15 17
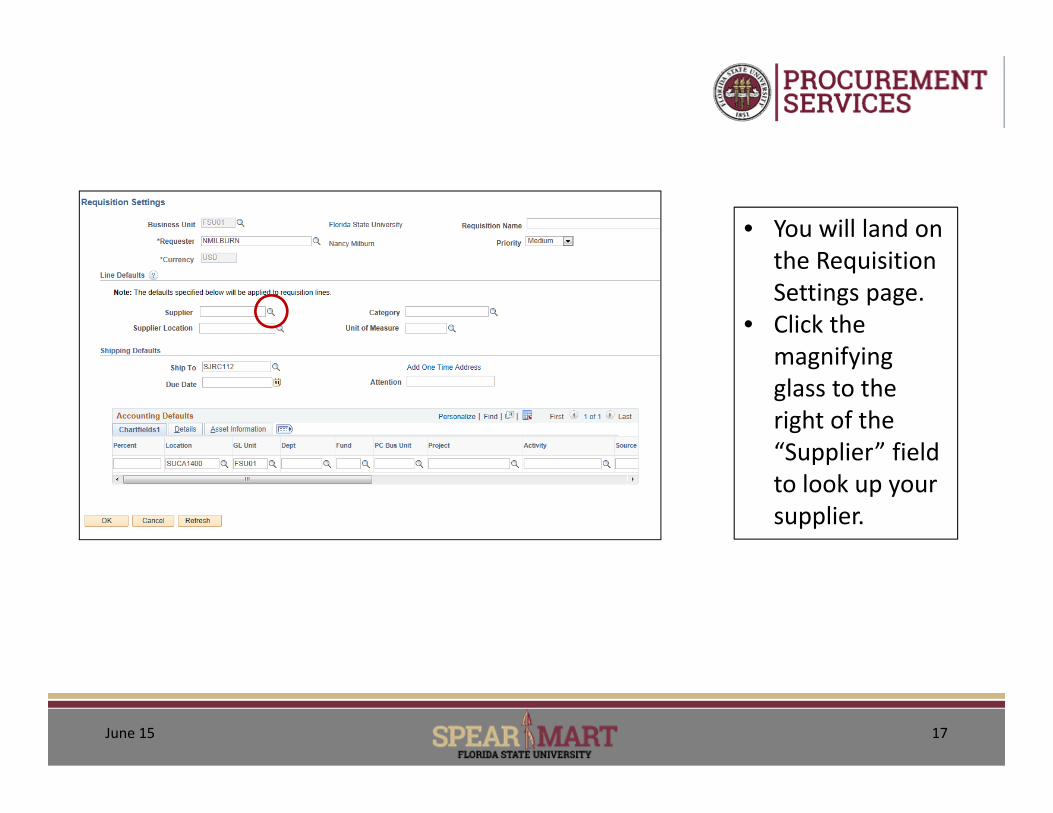
• You will land on the Requisition Settings page.
• Click the magnifying glass to the right of the “Supplier” field to look up your supplier.

June 15 18
• In the Supplier search, enter a portion of the Supplier name in the “Name” field. This example is for “Publix”.
• When the list comes up, select the appropriate Publix store by clicking on the “Supplier ID” for that line.
June 15 19
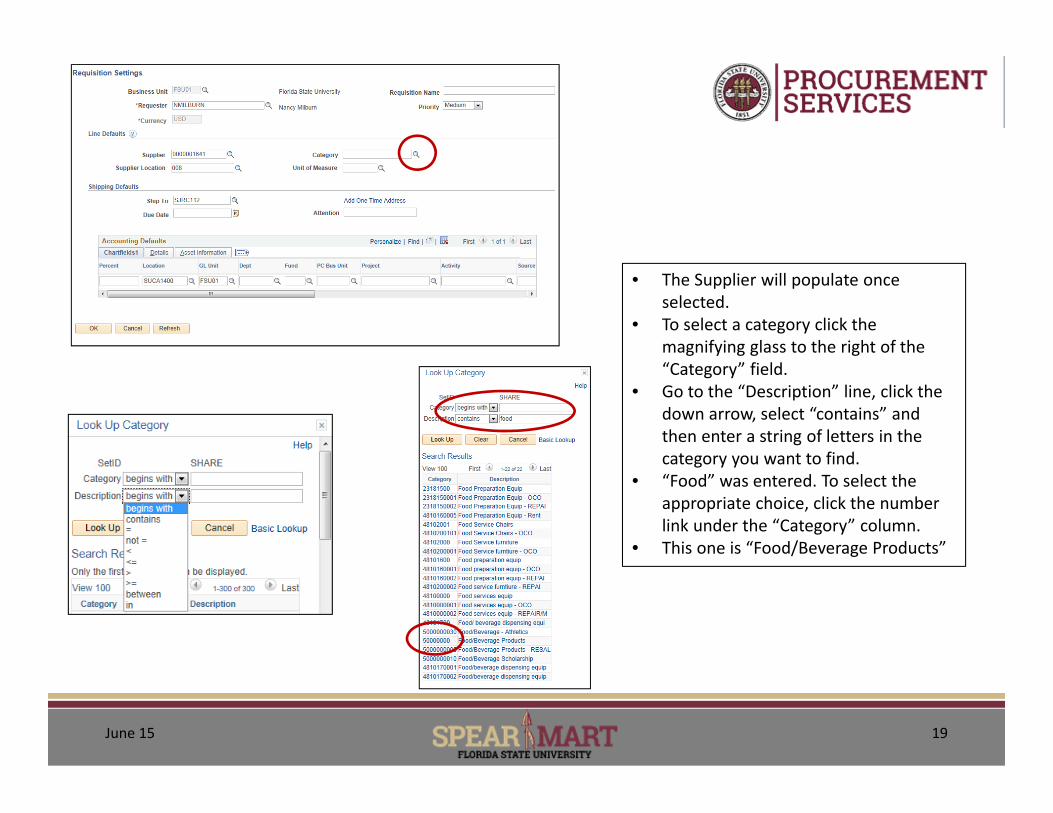
• The Supplier will populate once selected.
• To select a category click the magnifying glass to the right of the “Category” field.
• Go to the “Description” line, click the down arrow, select “contains” and then enter a string of letters in the category you want to find.
• “Food” was entered. To select the appropriate choice, click the number link under the “Category” column.
• This one is “Food/Beverage Products”

June 15 20
• The category populates once selected.
• Now enter “DOL” for the Unit of Measure.
• DOL is for dollars. This tells the supplier that you are setting up an order for a certain dollar amount.
• Click the magnifying glass to the right of the “Ship To” field to select the appropriate one. Enter a string of letters in the department name and select the appropriate Ship To in the list.

June 15 21
• Enter or select Due Date. To use the calendar, click the small calendar icon to the right of the field and then select the ending date for the blanket order.
• Since the date will be in the future, you may get the error message shown. Verify the date and click “Ok” to accept the date as written.
• This due date represents the last date the order can be used for purchases.

June 15 22
• Finally, enter a DeptID/Fund/Project that are to be used to pay for the purchases made on this blanket order.
• Since the example is to be for food items, a Student Government budget was used.
• Click “Ok” when completed.

June 15 23
• Click “Special Requests” to pull up the template for blanket orders.
• When the template comes up, enter the Item Details in the appropriate line.
• “Blanket Order for the purchase of various food and beverage items for Student Government Functions throughout summer. Dates: 7‐1‐2015 to 8‐28‐2015. Authorized signatures: Nancy Milburn and Marcia Feldman” was entered for this example.
June 15 24
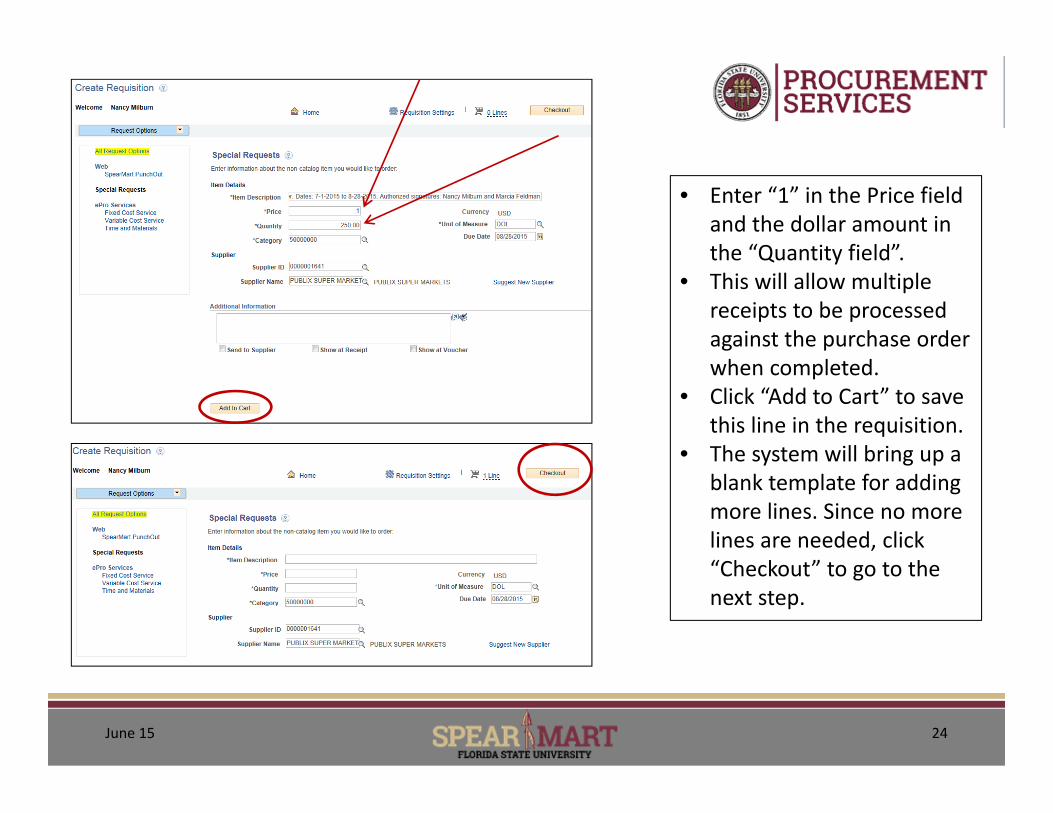
• Enter “1” in the Price field and the dollar amount in the “Quantity field”.
• This will allow multiple receipts to be processed against the purchase order when completed.
• Click “Add to Cart” to save this line in the requisition.
• The system will bring up a blank template for adding more lines. Since no more lines are needed, click “Checkout” to go to the next step.

June 15 25
• This is the step where all information is verified and if correct, then click “Save and Submit”.
• If changes are needed, click in the “Description field and make changes as needed, then “Save and Submit” when completed.

June 15 26
• The confirmation page will come up after submitting the order.
• Note the Requisition ID is provided.
• The approver(s) for the budget/project will receive an email to approve the requisition.Congratulations! You completed this requisition!


